

Page 1
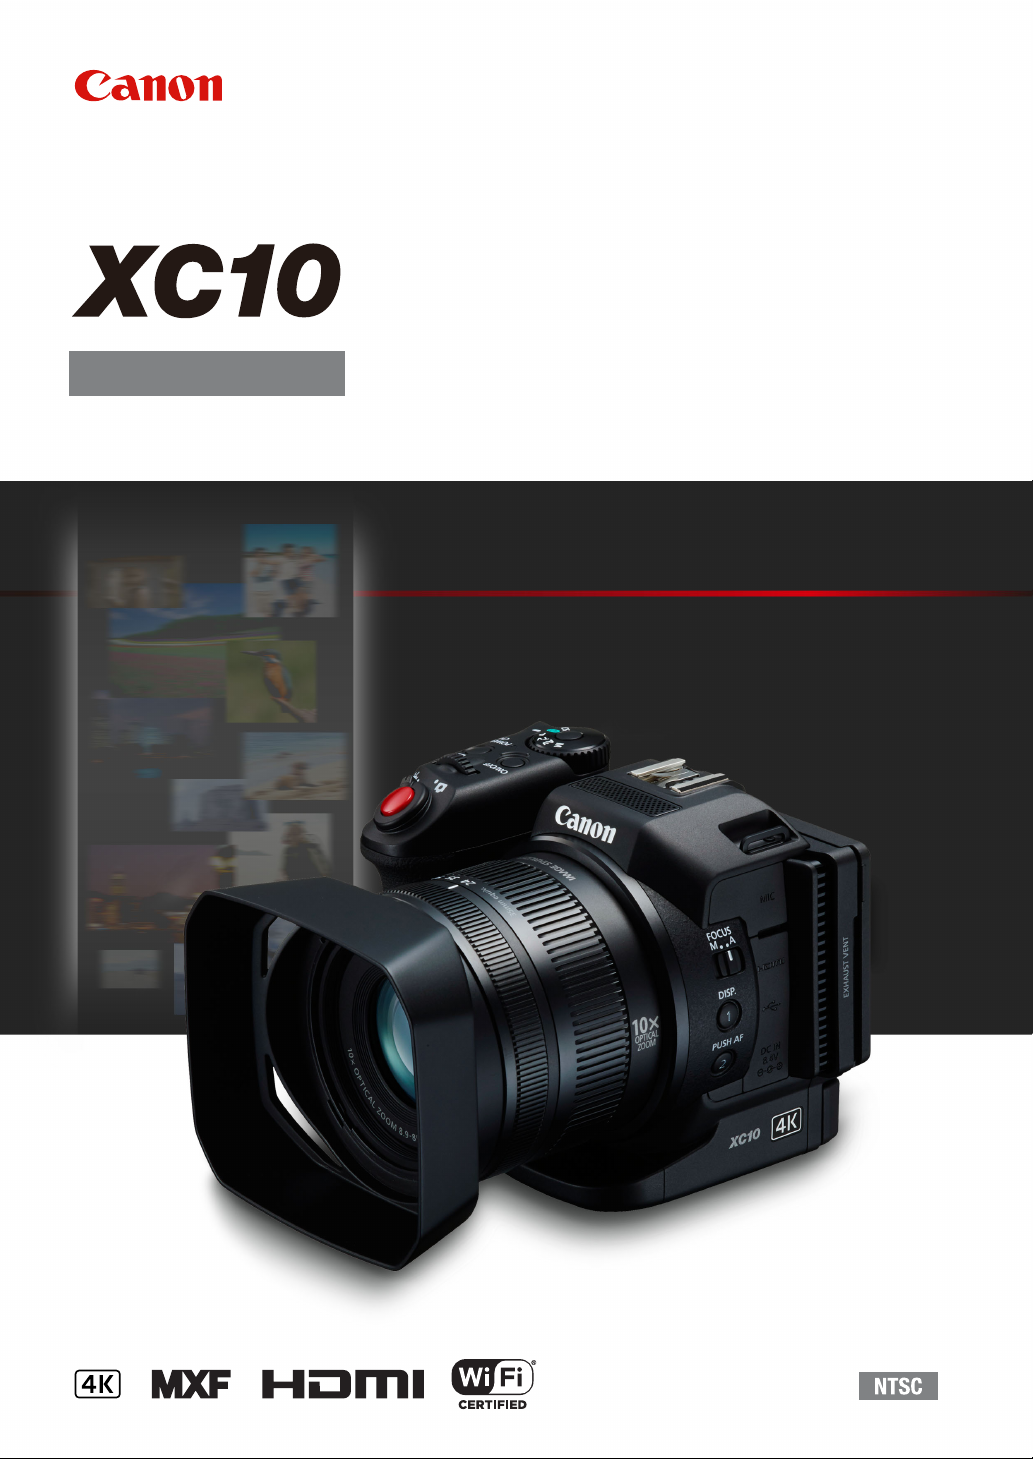
4K Camcorder
Instruction Manual
PUB. DIE-0469-000
Page 2
Important Usage Instructions
WARNING
2
TO REDUCE THE RISK OF FIRE OR ELECTRIC SHOCK, DO NOT EXPOSE THIS PRODUCT TO RAIN OR
MOISTURE.
To reduce the risk of fire or electric shock, do not expose this apparatus to dripping or splashing, and do not
place objects filled with liquids, such as vases, on the apparatus.
WARNING
TO REDUCE THE RISK OF ELECTRIC SHOCK AND TO REDUCE ANNOYING INTERFERENCE, USE THE
RECOMMENDED ACCESSORIES ONLY.
COPYRIGHT WARNING:
Unauthorized recording of copyrighted materials may infringe on the rights of copyright owners and be
contrary to copyright laws.
Table of Contents Index
Menus
Page 3
FCC NOTICE
4K Camcorder, XC10 Systems.
This device complies with Part 15 of the FCC Rules. Operation is subject to the following two conditions:
(1) This device may not cause harmful interference, and (2) this device must accept any interference
received, including interference that may cause undesired operation.
Note: This equipment has been tested and found to comply with the limits for class B digital device,
pursuant to Part 15 of the FCC Rules. These limits are designed to provide reasonable protection against
harmful interference in a residential installation. This equipment generates, uses and can radiate radio
frequency energy and, if not installed and used in accordance with the instructions, may cause harmful
interference to radio communications. However, there is no guarantee that interference will not occur in a
particular installation. If this equipment does cause harmful interference to radio or television reception,
which can be determined by turning the equipment off and on, the user is encouraged to try to correct the
interference by one or more of the following measures:
• Reorient or relocate the receiving antenna.
• Increase the separation between the equipment and receiver.
• Connect the equipment into an outlet on a circuit different from that to which the receiver is connected.
• Consult the dealer or an experienced radio/TV technician for help.
Use of shielded cable is required to comply with class B limits in Subpart B of Part 15 of FCC Rules.
Do not make any changes or modifications to the equipment unless otherwise specified in the manual.
If such changes or modifications should be made, you could be required to stop operation of the
equipment.
Model ID0052 (including WLAN Module Model RF400, FCC ID: AZD400)
This device complies with Industry Canada license-exempt RSS standard(s). Operation is subject to the
following two conditions: (1) this device may not cause interference, and (2) this device must accept any
interference, including interference that may cause undesired operation of the device.
This transmitter must not be co-located or operated in conjunction with any other antenna or transmitter.
The available scientific evidence does not show that any health problems are associated with using low
power wireless devices. There is no proof, however, that these low power wireless devices are absolutely
safe. Low power wireless devices emit low levels of radio frequency energy (RF) in the microwave range
while being used. Whereas high levels of RF can produce health effects (by heating tissue), exposure of lowlevel RF that does not produce heating effects causes no known adverse health effects. Many studies of
low-level RF exposures have not found any biological effects. Some studies have suggested that some
biological effects might occur, but such findings have not been confirmed by additional research. This model
has been tested and found to comply with FCC/IC radiation exposure limits set forth for an uncontrolled
equipment and meets the FCC radio frequency (RF) Exposure Guidelines and RSS-102 of the IC radio
frequency (RF) Exposure rules.
Compliance with FCC requirement 15.407(c) Data transmission is always initiated by software, which is the
passed down through the MAC, through the digital and analog baseband, and finally to the RF chip. Several
special packets are initiated by the MAC. These are the only ways the digital baseband portion will turn on
the RF transmitter, which it then turns off at the end of the packet. Therefore, the transmitter will be on only
while one of the aforementioned packets is being transmitted. In other words, this device automatically
discontinues transmission in case of either absence of information to transmit or operational failure.
3
Frequency Tolerance: 25 ppm
Canon U.S.A., Inc.
One Canon Park, Melville, NY 11747, USA
Tel No. 1-800-OK-CANON (1-800-652-2666)
The Mains plug is used as the disconnect device. The Mains plug shall remain readily operable to
disconnect the plug in case of an accident.
CA-570 identification plate is located on the bottom.
Table of Contents Index
Menus
Page 4
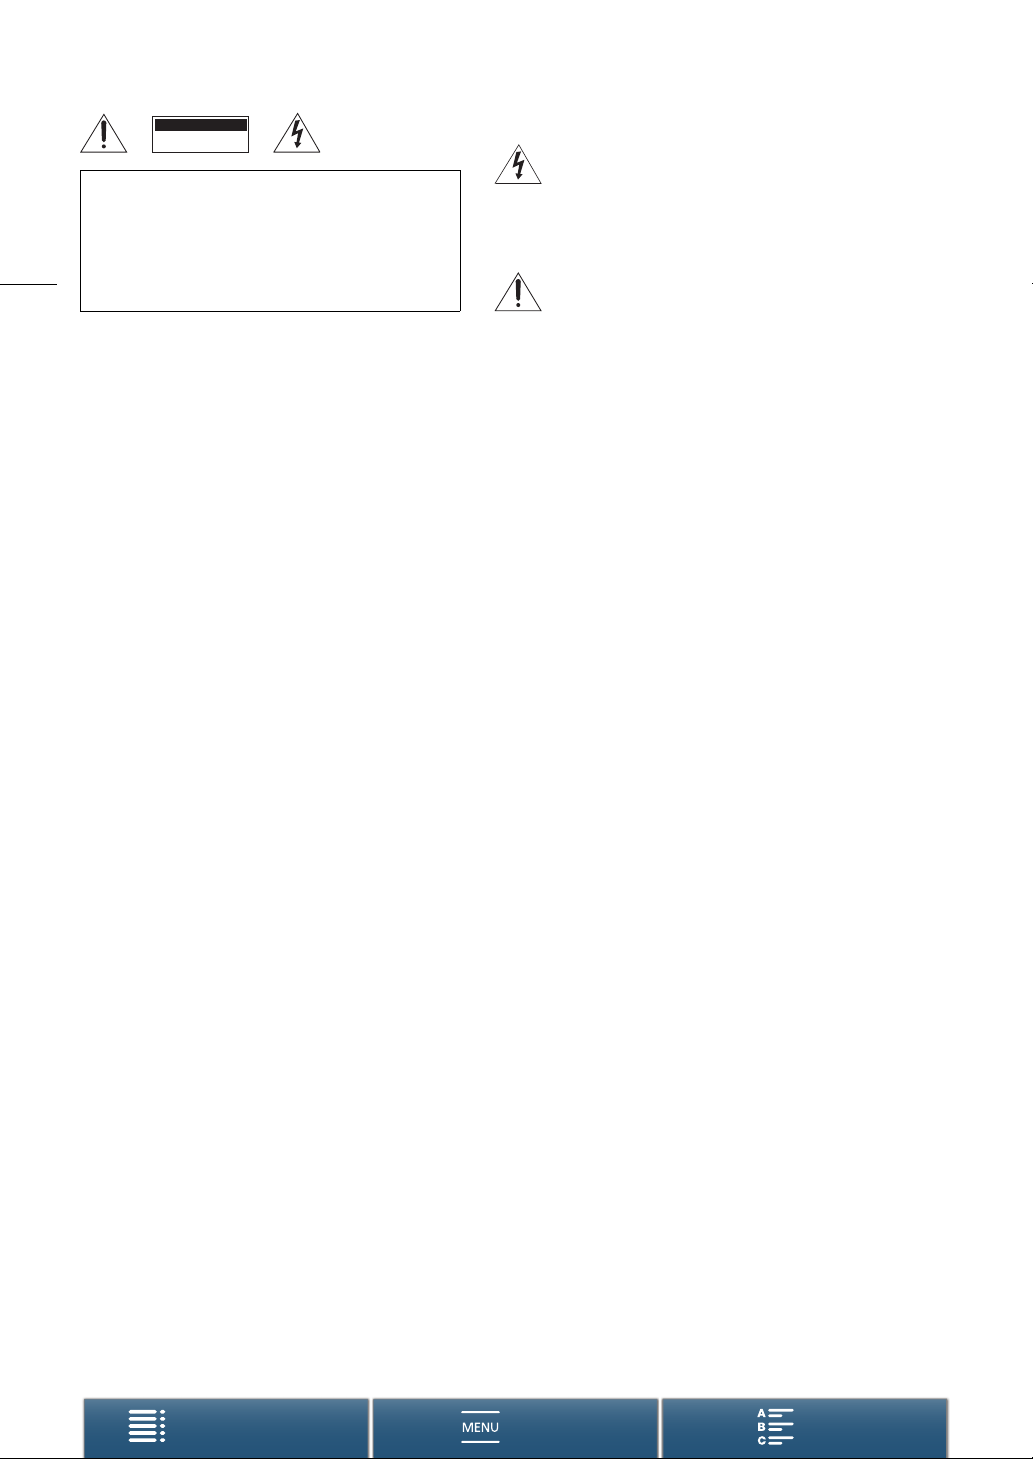
CAUTION
RISK OF ELECTRIC SHOCK
DO NOT OPEN
CAUTION:
TO REDUCE THE RISK OF ELECTRIC
SHOCK, DO NOT REMOVE COVER (OR
4
BACK). NO USER-SERVICEABLE
PARTS INSIDE. REFER SERVICING TO
QUALIFIED SERVICE PERSONNEL.
The lightning flash with arrowhead symbol, within an
equilateral triangle, is intended to alert the user to
the presence of uninsulated “dangerous voltage”
within the product’s enclosure, that may be of
sufficient magnitude to constitute a risk of electric
shock to persons.
The exclamation point, within an equilateral triangle,
is intended to alert the user to the presence of
important operating and maintenance (servicing)
instructions in the literature accompanying the
product.
Table of Contents Index
Menus
Page 5
Important Safety Instructions
In these safety instructions the word “apparatus”
refers to the Canon 4K Camcorder XC10 and all its
accessories.
1. Read these instructions.
2. Keep these instructions.
3. Heed all warnings.
4. Follow all instructions.
5. Do not use this apparatus near water.
6. Clean only with dry cloth.
7. Do not install near any heat sources such as
radiators, heat registers, stoves, or other
apparatus (including amplifiers) that produce
heat.
8. Do not defeat the safety purpose of the polarized
or grounding-type plug. A polarized plug has two
blades with one wider than the other.
A grounding type plug has two blades and a third
grounding prong. The wide blade or the third
CAN ICES-3(B)/NMB-3(B)
REGIONS OF USE
XC10 is in compliance (as of March 2015) with the radio signal regulations of the regions listed below. For details on
other regions where they can be used, make inquiries with the contacts listed on the back cover of this instruction
manual.
prong are provided for your safety. If the provided
plug does not fit into your outlet, consult an
electrician for replacement of the obsolete outlet.
9. Protect the power cord from being walked on or
pinched particularly at plugs, convenience
receptacles, and the point where they exit from
the apparatus.
10. Only use attachments/accessories specified by
the manufacturer.
11. Unplug this apparatus during lightning storms or
when unused for long periods of time.
12. Refer all servicing to qualified service personnel.
Servicing is required when the apparatus has
been damaged in any way, such as power-supply
cord or plug is damaged, liquid has been spilled
or objects have fallen into the apparatus, the
apparatus has been exposed to rain or moisture,
does not operate normally, or has been dropped.
5
REGIONS
Canada, Hong Kong S.A.R., South Korea, Taiwan, USA
Model
ID0052: XC10
Table of Contents Index
Menus
Page 6

6
Trademark Acknowledgements
• SD, SDHC and SDXC Logos are trademarks of SD-3C, LLC.
• Canon is an authorized licensee of the CFast 2.0™ trademark, which may be registered in various
jurisdictions.
• Microsoft and Windows are trademarks or registered trademarks of Microsoft Corporation in the United
States and/or other countries.
• Apple, App Store, Mac OS, Final Cut Pro are trademarks of Apple Inc., registered in the U.S. and other
countries.
• IOS is a trademark or registered trademark of Cisco in the U.S. and other countries and is used under license.
• Google, Android, Google Play, are trademarks of Google Inc.
• Wi-Fi is a registered trademark of the Wi-Fi Alliance.
• Wi-Fi Certified, WPA, WPA2, and the Wi-Fi Certified logo are trademarks of the Wi-Fi Alliance.
• WPS as used on the camcorder's settings, onscreen displays and in this manual signifies Wi-Fi Protected
Setup.
• The Wi-Fi Protected Setup Identifier Mark is a mark of the Wi-Fi Alliance.
• JavaScript is a trademark or registered trademark of Oracle Corporation, its affiliates or subsidiaries in the
United States and other countries.
• HDMI, the HDMI logo and High-Definition Multimedia Interface are trademarks or registered trademarks of
HDMI Licensing LLC in the United States and other countries.
• Other names and products not mentioned above may be trademarks or registered trademarks of their
respective companies.
• This device incorporates exFAT technology licensed from Microsoft.
• This product is licensed under AT&T patents for the MPEG-4 standard and may be used for encoding MPEG-4
compliant video and/or decoding MPEG-4 compliant video that was encoded only (1) for a personal and
noncommercial purpose or (2) by a video provider licensed under the AT&T patents to provide MPEG-4
compliant video. No license is granted or implied for any other use for MPEG-4 standard.
Table of Contents Index
Menus
Page 7

Highlights of the XC10
The Canon 4K Camcorder XC10 is a highly functional camcorder that is capable of producing outstanding
results when recording video at either 4K or HD quality, or taking photos of up to approx. 12 megapixels. The
XC10 continues Canon’s lineage of high-performance camcorders with robust features designed to help
articulate the discerning professional’s creative expression.
7
Exceptional Video and Photos
1.0-in. CMOS sensor and DIGIC DV 5 image
processor
The combination of the XC10’s CMOS sensor and
DIGIC DV 5 image processor allows your camcorder
to capture videos and photos with low levels of
noise, even in dimly-lit shooting situations. Owing to
the DIGIC DV 5 image processor, this camcorder
boasts remarkable image quality.
4K/HD recording and the XF-AVC video format
The camcorder records 4K video to a CFast card
using XF-AVC intra-frame compression while it
records HD video to an SD card using XF-AVC Long
GOP. You can record 4K video at a maximum of 305
Mbps. The impressive video quality you produce
with the XC10 will make it your “go-to” main camera
for a multitude of projects. You could even shoot
B-roll for projects that use Cinema EOS cameras.
* This indicates the compression method used for each
frame of video. Intra-frame is also suitable for grabbing
frames from video and for editing.
Excellent photo quality
You can take photos of up to approx. 12 megapixels
(effective pixel count). You will find that the superb
photo functionality provide by the XC10 will allow it to
be more versatile in your projects, such as taking
A
photos while you shoot video (
frame from 4K video playback (
even attach an optional EX-series Speedlite for EOS
cameras.
42) or grabbing a
A
109). You can
Operability and Adaptability
Intuitive design
The camcorder is designed for a single operator to
access necessary camera functions both efficiently
and intuitively. The lens features separate rings for
focus and zoom while the articulated touch-screen
LCD panel lets you record in low- and high-angle
shooting situations. You can use the shooting mode
dial to select a mode, from special scene mode to
auto to full manual, that best suits how much control
A
you want over shooting functions (
52).
Depending on your shooting style, you may even
want to attach the supplied viewfinder unit to the
camcorder (
controller (
Software to help manage recordings
The Canon XF Utility for XF-AVC software and
Camera Window software are available as free
downloads from Canon’s Web site. Canon XF Utility
for XF-AVC allows you to easily save, manage and
playback your video clips (A 116) while Camera
Window lets you transfer photos to your computer
(A 118). For the latest information on compatibility
with commercially available non-linear (NLE)
software, visit your local Canon Web site.
A
24) or use the supplied remote
A
38).
Versatile Artistic Expression
Creative recording modes
The camcorder offers a variety of recording modes
that you can use to control how your final video or
photo will come out. The slow and fast motion
recording mode (A 91) can go from slow motion at
x1/4 speed up to fast motion at x1200 speed. Prerecording mode (A 92), catches the 5 seconds of
video prior to the actual start of recording, which
helps ensure that you do not miss the action. You
can use interval recording mode (A 93) to take a
series of photos at a set interval.
Creating a professional look
You can add a professional feel to your shots by
using looks (A 66) to affect image-related settings,
such as sharpness and color depth. Use the preinstalled looks or customize them to your
preference.
Diverse audio options
The camcorder can record sound as 2-channel
linear PCM audio (16-bit/48 kHz). The camcorder’s
audio scenes (A 81) are a convenient way to let
the camcorder take care of audio options depending
on the shooting situation. For more control, you can
adjust functions such as the audio recording level
(A 82), audio equalizer (A 84) and audio
compressor (A 87).
Table of Contents Index
Menus
Page 8

Advanced Professional Features and
Flexibility
Wi-Fi network functions
When you use the Wi-Fi functions (A 120), you can
remotely record and play back using a connected
Wi-Fi device, such as your smartphone or tablet.
You can also use the media server function to view
8
photos on your camcorder’s SD card.
Time code and user bit output
The camcorder generates a time code and adds it
to your recordings. In addition, it can output that
time code and user bit from the HDMI OUT terminal
(A 78). This is useful for situations such as
referencing or shooting in a multi-camera setup.
Customization
The camcorder features 3 assignable buttons to
which you can assign often-used functions
(A 100). The main camera function menu can also
be customized so that you can quickly access and
adjust functions you find necessary (A 99).
Other Functions
•Assistance functions
Peaking and magnification (A 72) can be helpful
when you use manual focus, onscreen markers
(A 77) can be very useful to help you frame your
video, and zebra patterns (A 77) can give you a
reference point to avoid overexposures.
•ND filter
When activated, the built-in ND filter reduces the
amount of light by 3 stops, allowing you to better
capture your subject in the desired depth of field
(A 136).
• Push AF
While the camcorder is in manual focus mode,
you can use Push AF to switch the camcorder
temporarily to autofocus mode (A 74).
• HD playback from 4K video
When you play back a 4K clip, you can play back
an HD-sized area of your choosing (A 109).
• Image stabilization (IS)
In addition to the standard IS function, you can
use Dynamic IS, which compensates for
camcorder shake while walking and shooting, or
Powered IS, which is most effective when you are
stationary and zoom in on subjects far away
(A 76).
• Support for geotagging
You can use the optional GP-E2 GPS Receiver to
add GPS information to your recordings (A 89).
Table of Contents Index
Menus
Page 9

Tab l e of C o n ten t s
9
1. Introduction 12
About this Manual 12
Conventions Used in this Manual 12
Supplied Accessories 14
Names of Parts 15
Viewfinder unit 20
RC-6 Remote Controller 20
2. Preparations 21
Charging the Battery Pack 21
Preparing the Camcorder 24
Attaching the Lens Hood 24
Using the Viewfinder Unit 24
Using the LCD Panel 26
Adjusting the Grip 27
Attaching the Shoulder Strap 27
Using a Tripod 27
Basic Operation of the Camcorder 28
Switching Between Movies and Photos 28
Switching Between Recording and Playback 28
Using the Touch Screen 29
Date, Time and Language Settings 30
Setting the Date and Time 30
Changing the Language 31
Changing the Time Zone 31
Using the MENU Button and Joystick 31
Using the FUNC. Menu and Setup Menus 32
Preparing Recording Media 34
Inserting a CFast Card 34
Removing a CFast card 35
Inserting and Removing an SD Card 36
Initializing the Recording Media 36
Recovering Data on a Recording Media 37
Using the Remote Controller 38
Inserting the Battery 38
Activating the Remote Sensor 38
Using the Remote Controller to Operate the
Camcorder 38
3. Recording 40
Recording Video and Taking Photos 40
Preparing to Record 40
Basic Recording 41
Selecting the Photo Size 43
Shooting Continuous Photos (Drive Mode) 43
Remote Operation Using Browser Remote 44
Onscreen Icons and Displays 45
Using the Fan 50
Video Configuration: Resolution (4K/HD), Frame
Rate and Bit Rate 51
Selecting the Resolution (Recording in 4K or
HD) 51
Selecting the Frame Rate and Bit Rate 51
Shooting Modes 52
Setting the Shooting Modes 52
Manual Exposure (n)52
Aperture Priority AE (“)54
Shutter Priority AE (‚)55
Program AE (’)55
Auto (N)55
Special Scene (ƒ)55
Adjusting Shooting Mode Settings 57
Automatic Gain and ISO Limits 59
Exposure 61
Exposure Lock 61
Touch Exposure 61
AE Shift 62
Light Metering Mode 63
White Balance 64
Using Looks 66
Selecting a Pre-installed Look 66
Creating a User-defined Look 67
Zooming 68
Adjusting the Focus 69
Autofocus (AF) Mode 69
Manual Focus (MF) 71
Push AF 74
Detecting and Focusing On Faces (Face Detection
& Tracking) 74
Table of Contents Index
Menus
Page 10

Image Stabilizer 76
Onscreen Markers and Zebra Patterns 77
Displaying Onscreen Markers 77
Displaying Zebra Patterns 77
Setting the Time Code 78
Selecting the Time Code Mode 78
10
Selecting Drop or Non-Drop Frame 79
User Bit 80
Setting the User Bit 80
User Bit Output 80
Recording Audio 81
Using Commercially Available Microphones 81
Audio Scenes (Built-in Microphone) 81
Audio Recording Level 82
Wind Screen (Built-in Microphone) 83
Microphone Attenuator (Built-in Microphone) 84
Audio Equalizer (Built-in Microphone) 84
Microphone Directionality (Built-in
Microphone) 85
Microphone Attenuator (External Microphone) 85
Low Cut Filter (External Microphone) 86
Switching the Input 86
Audio Limiter 86
Audio Compressor 87
Monitoring the Audio with Headphones 87
Colors Bars/Audio Reference Signal 88
Recording Color Bars 88
Recording an Audio Reference Signal 88
Recording GPS Information (Geotagging) 89
Slow & Fast Motion Mode 91
Pre-recording Mode 92
Interval Recording Mode 93
Self Timer 94
Orientation Detection 95
Using an Optional Speedlite Flash 97
Attaching the Speedlite 97
Configuring an Attached Flash 97
4. Customization 99
Customizing the FUNC. Menu 99
Assignable Buttons 100
Using an Assignable Button 101
Saving and Loading Menu Settings 102
Saving Menu Settings to an SD Card 102
Loading Menu Settings from an SD Card 102
5. Playback 103
Playback 103
Playing Back Recordings 103
Changing the Index Screen 104
Onscreen Icons and Displays during
Playback 105
Playback Controls during Clip Playback 107
Playback Controls during Photo Playback 108
Adjusting the Volume 108
Displaying Clip Information 108
Playing an HD-sized Clip from a 4K Clip 109
Capturing Photos from 4K Clips (4K Frame Grab)
and HD Clips 109
Magnifying Photos during Playback 110
Deleting Recordings 111
Deleting Clips and Photos from the Index
Screen 111
Deleting a Clip During Playback Pause 111
Deleting a Photo during Playback 112
6. External Connections 113
Video Output Configuration 113
Recording Video Signal Configuration and Video
Output Configuration 113
Playback Video Configuration and Video Output
Configuration 114
Connecting to an External Monitor 115
Connection Diagram 115
Saving Clips to a Computer 116
Installation 116
Saving Photos to a Computer 118
Installation 118
Connecting the Camcorder to a Computer 118
7. Wi-Fi Functions 120
About the Wi-Fi Functions 120
Wireless Connections Using Wi-Fi 121
Wi-Fi Protected Setup (WPS) 121
Searching for Access Points 122
Manual Setup 124
Viewing and Changing Wi-Fi Settings 125
Browser Remote: Controlling the Camcorder from
a Network Device 127
Setting Up Browser Remote 127
Starting Browser Remote 127
Playback via Browser 131
Media Server 132
Table of Contents Index
Menus
Page 11

8. Additional Information 133
Menu Options 133
FUNC. Menu 133
Setup Menus 135
Troubleshooting 142
List of Messages 148
Handling Precautions 152
Maintenance/Others 155
Optional Accessories 156
Specifications 158
Reference Tables 161
Index 163
11
Table of Contents Index
Menus
Page 12
Introduction
1
12
About this Manual
Thank you for purchasing the Canon XC10. Please read this manual carefully before you use the camcorder and
retain it for future reference. Should the camcorder fail to operate correctly, refer to
Conventions Used in this Manual
• IMPORTANT: Precautions related to the camcorder’s operation.
• NOTES: Additional topics that complement the basic operating procedures.
• A: Reference page number.
• The following terms are used in this manual.
“Screen” refers to the LCD screen.
“SD card” refers to an SD, SDHC or SDXC memory card.
“Recording media” refers to CFast cards and SD cards.
• Photographs in the manual are simulated pictures taken with a still camera. Some screenshots have been
altered to make them easier to read.
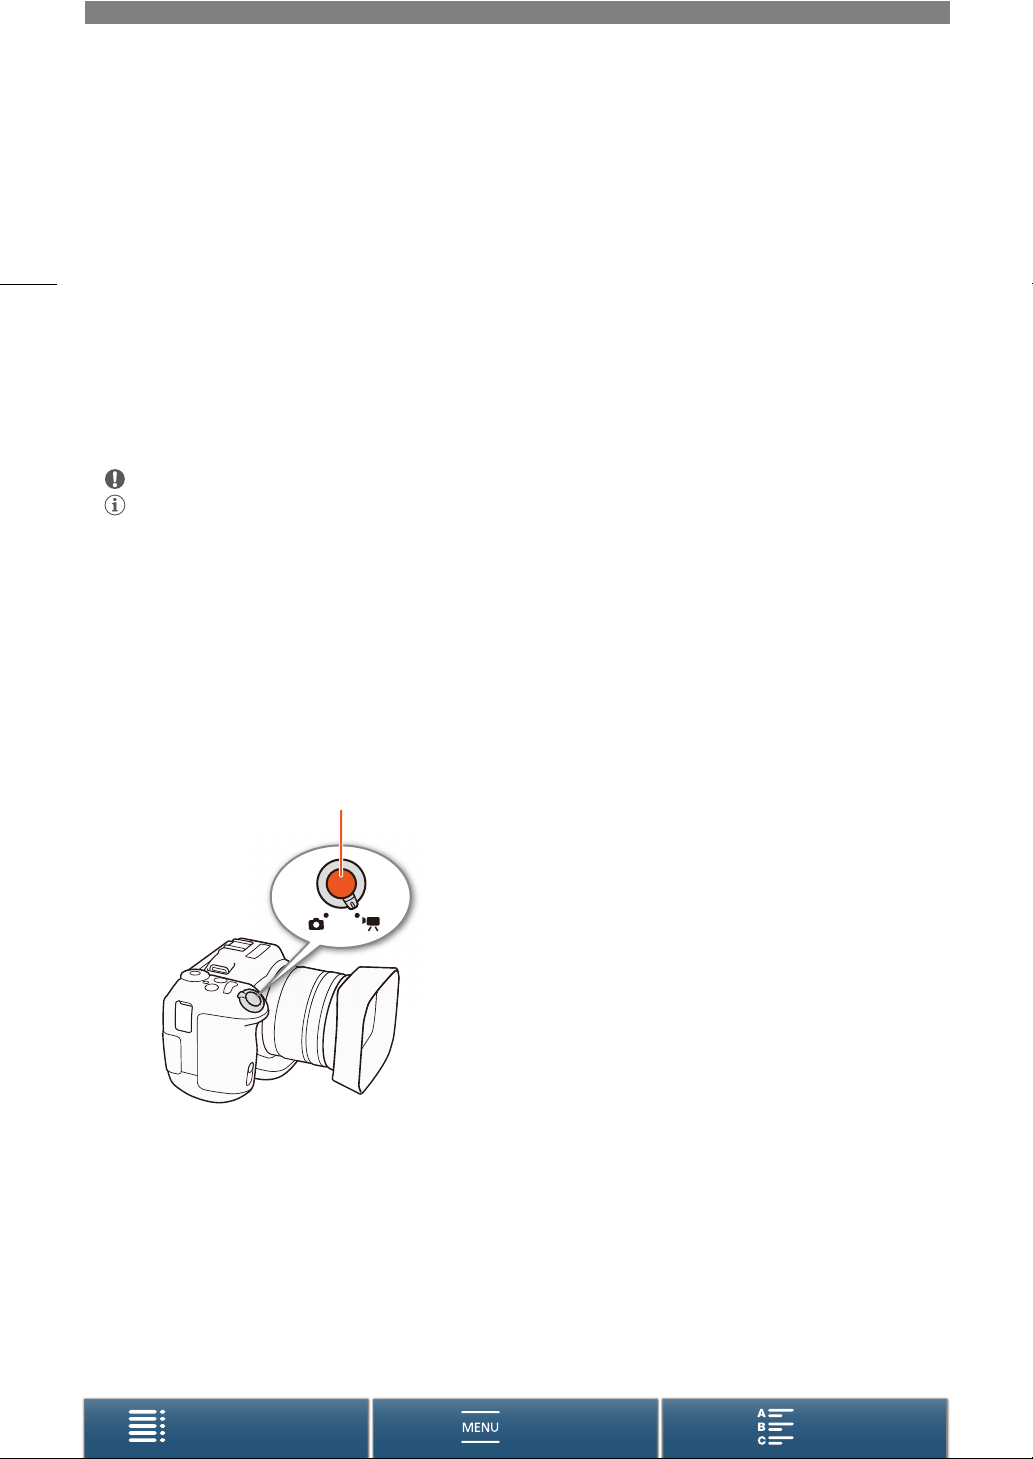
• This camcorder uses the same button to record video clips and take photos. In this manual, when you are
recording video clips, this button is referred to as the START/STOP button; when you are shooting photos, it is
referred to as the PHOTO button.
Troubleshooting
(A 142).
START/STOP (PHOTO) button
Table of Contents Index
Menus
Page 13
About this Manual
The arrow > is used to abbreviate menu
selections. For a detailed explanation on how
to use the menus, refer to
Button and Joystick
summary of all available menu options and
settings, refer to the appendix
(A 133).
Using the MENU
(A 31). For a concise
Menu Options
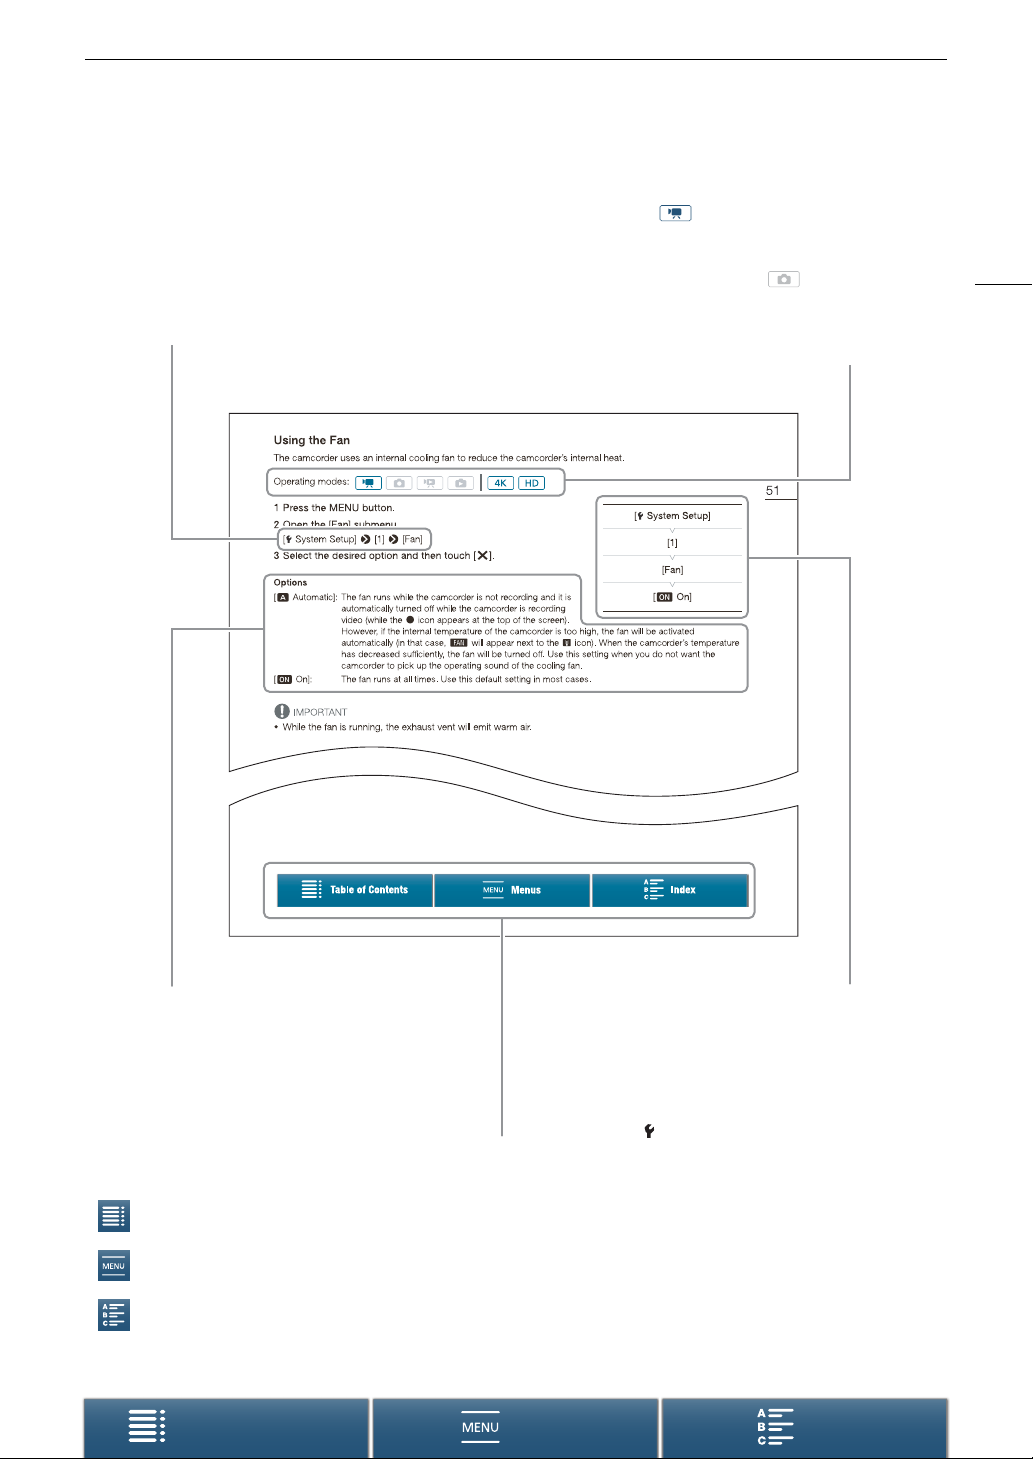
Operating modes and Format
A full icon (like ) indicates that the function
described can be used in the operating mode shown
or for recordings made in the movie format shown in
the icon; an empty icon (like ) indicates that the
function cannot be used. For details refer to
Operation of the Camcorder
the Resolution (Recording in 4K or HD)
(A 28) and
Basic
Selecting
(A 51).
13
When a procedure requires selecting an option,
the available options are listed within or after the
procedure. Brackets [ ] are used to refer to menu
options as they are displayed on screen.
The navigation bar at the bottom of the page offers buttons to
let you jump quickly to the information you want to find.
Takes you to the table of contents.
Takes you to the summary of menu options and settings.
Takes you to the alphabetical index.
Table of Contents Index
Menus
When a function requires the use of the
menu, the quick reference shows the
submenus and, when applicable, the
default setting for the menu item. The
example illustration indicates that you
can find the function by selecting the
[ System Setup] menu and then the
[Fan] menu item.
Page 14
Supplied Accessories
Supplied Accessories
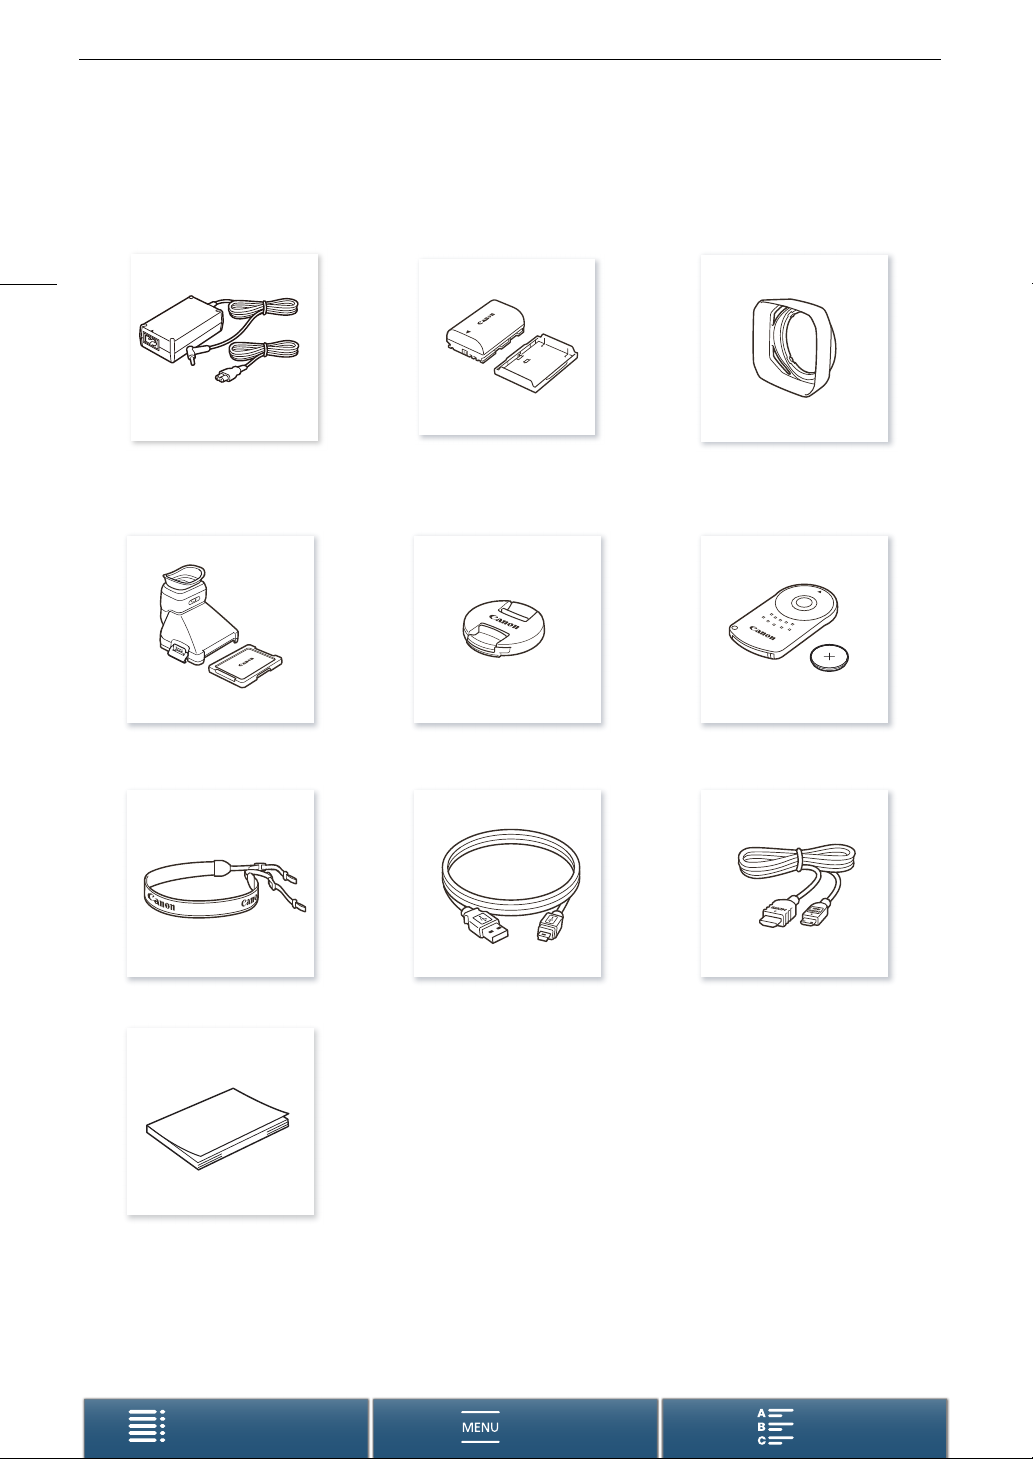
The following accessories are supplied with the camcorder.
14
CA-570 Compact Power Adapter
(incl. power cord)
Viewfinder Unit
(incl. viewfinder unit cover)
Shoulder Strap IFC-300PCU/S USB Cable HTC-100/S High Speed HDMI Cable
LP-E6N Battery Pack
(incl. protective cover)
Lens Cap RC-6 Remote Controller
(incl. CR2032 lithium button battery)
Lens Hood
Quick Guide
Table of Contents Index
Menus
Page 15
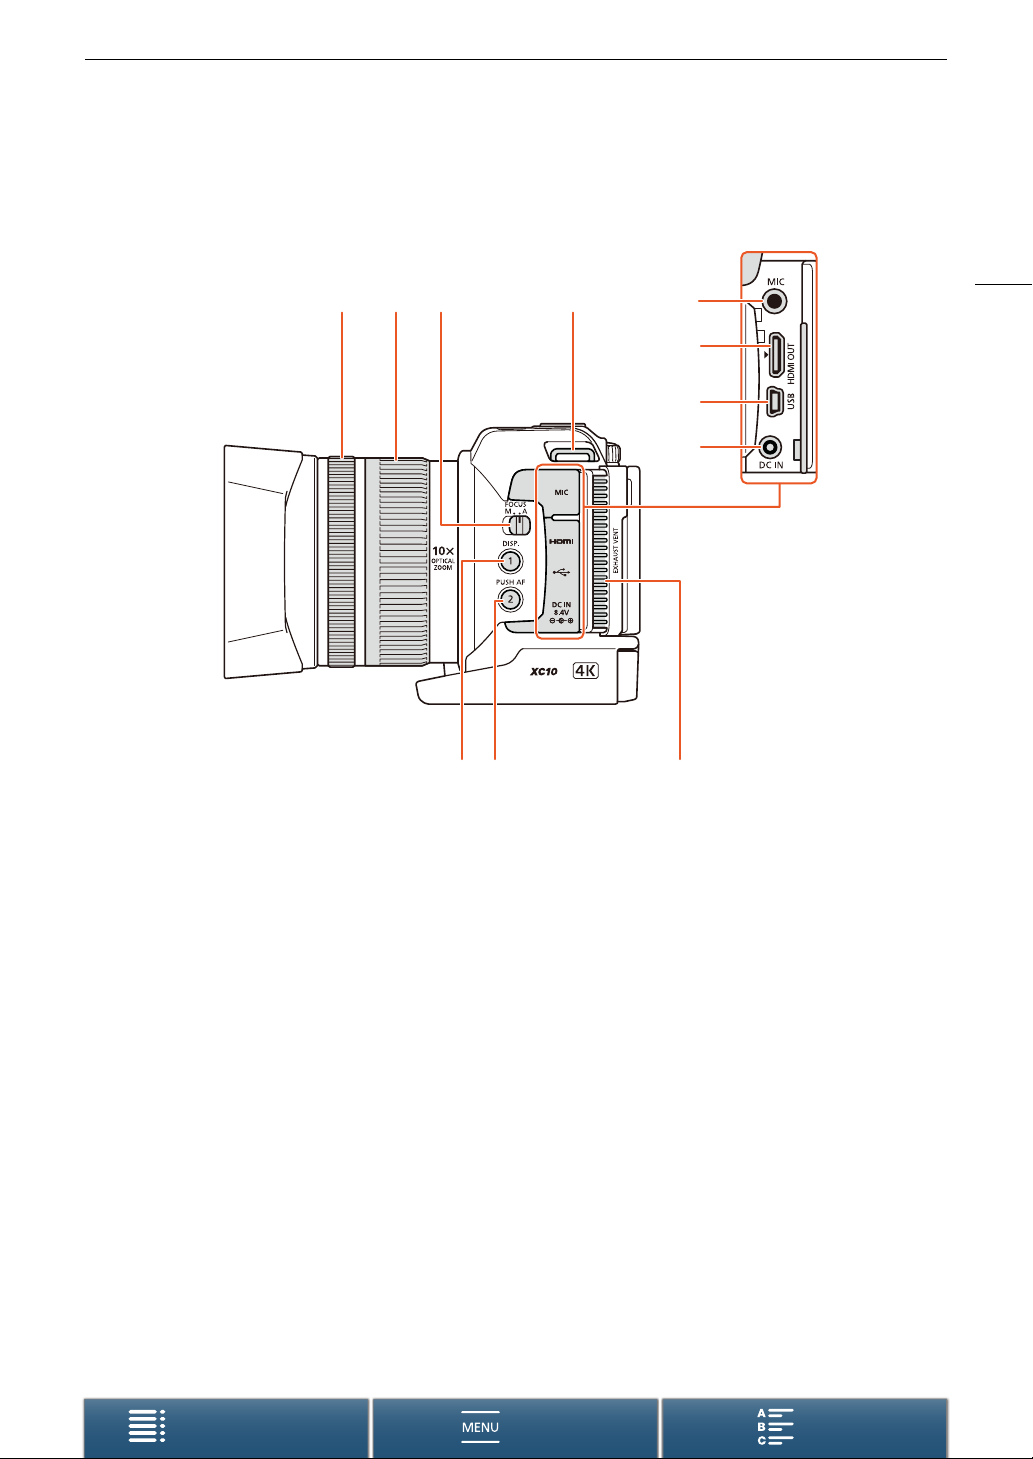
Names of Parts
3412
Names of Parts
15
5
6
7
8
1 Focus ring (A 69)
2Zoom ring (A 68)
3 FOCUS (focus mode) switch (A 69)
4 Shoulder strap mount (A 27)
5 MIC (microphone) terminal (A 81)
6HDMI OUT terminal (A 115)
7USB terminal (A 89, 118)
11910
8DC IN terminal (A 21)
9 DISP. (display) button (A 49)/
Assignable button 1 (A 100)
10 PUSH AF (momentary autofocus) button (A 74)/
Assignable button 2 (A 100)
11 Exhaust ventilation outlet (A 50)
Table of Contents Index
Menus
Page 16
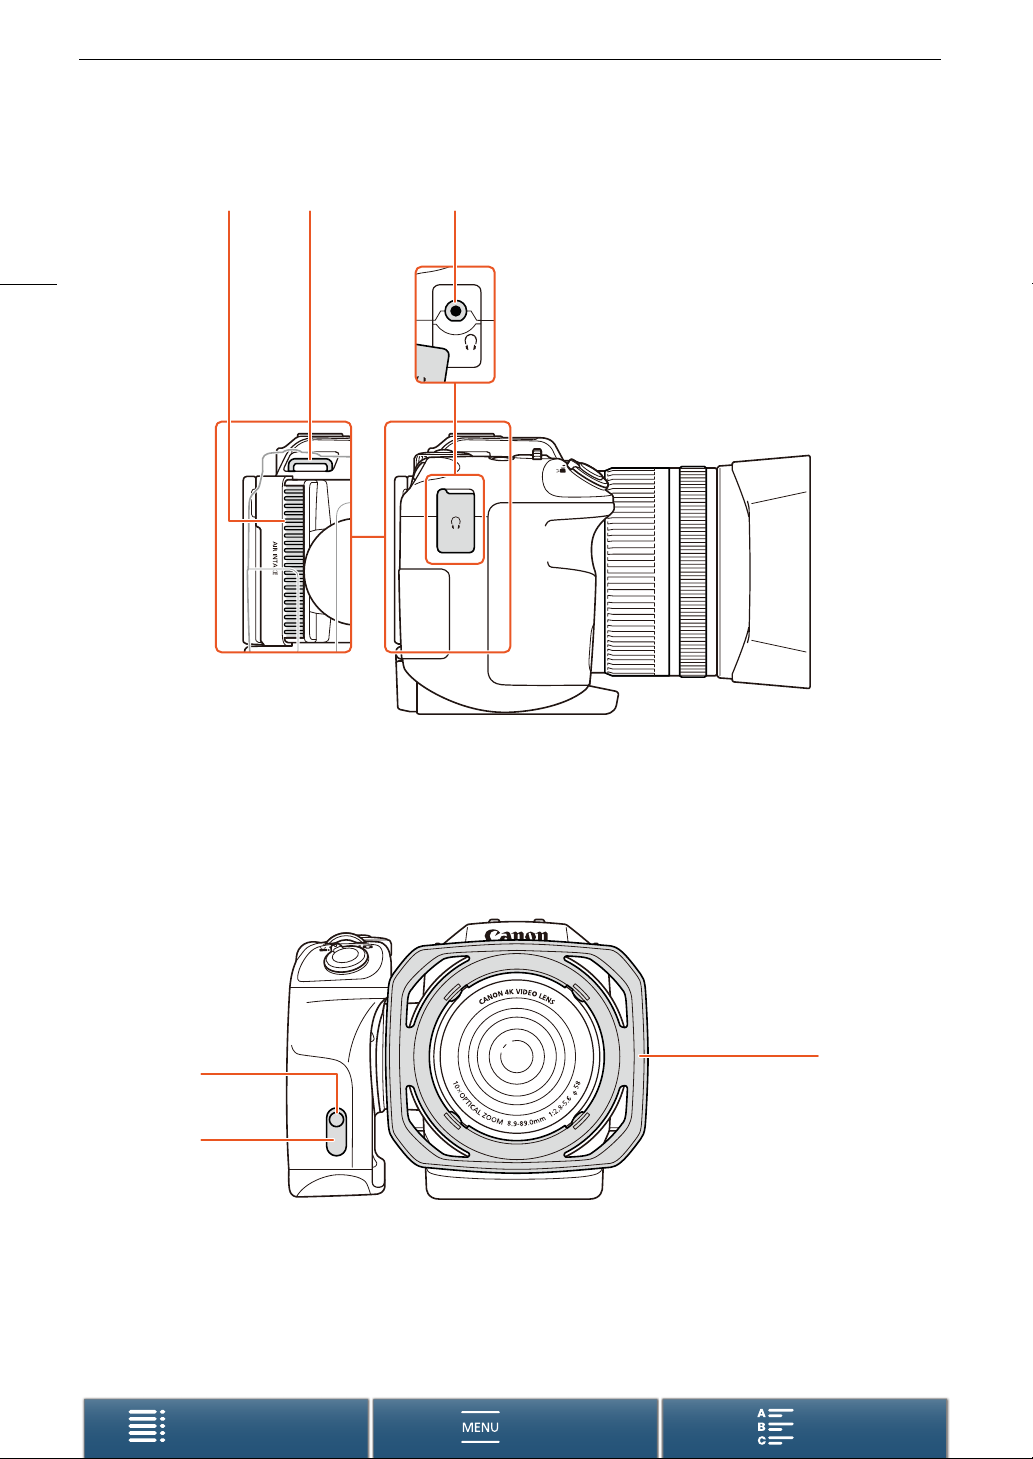
16
Names of Parts
12 3
1 Air intake vent (A 50)
2 Shoulder strap mount (A 27)
4
5
4 Tally lamp (A 41)
5 Remote sensor (A 38)
3 × (headphone) terminal (A 87)
6
6Lens hood (A 24)
Table of Contents Index
Menus
Page 17
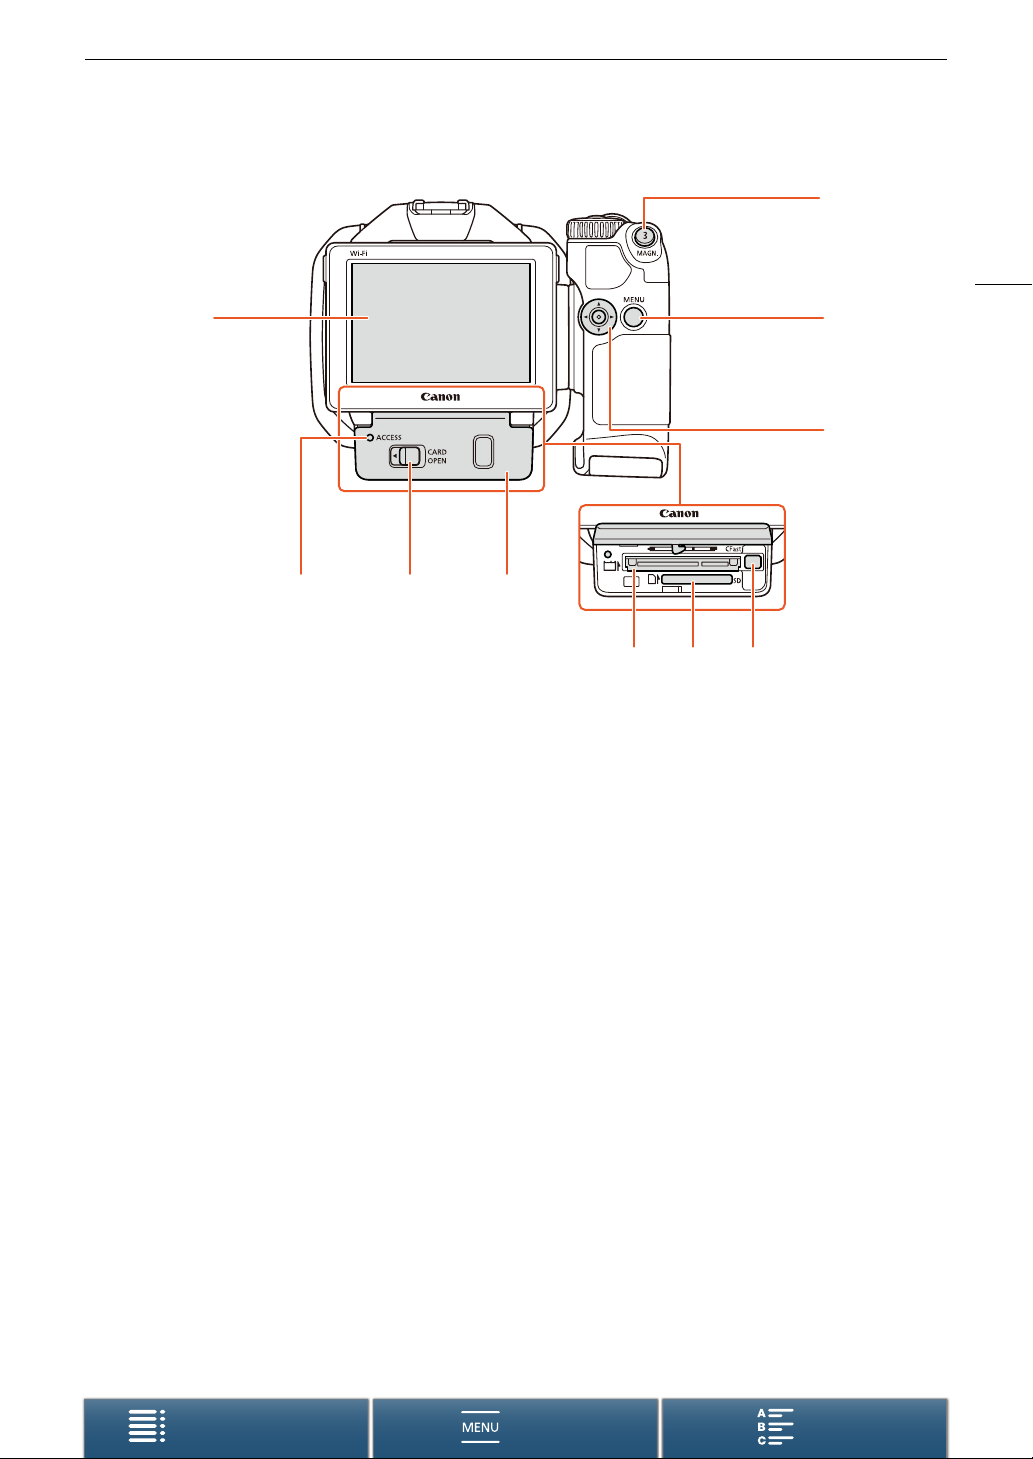
Names of Parts
2
17
1
567
1 LCD touch screen (A 26)
2 MAGN. (magnification) button (A 72)/
Assignable button 3 (A 100)
3 MENU button (A 31)
4Joystick (A 31)
5 ACCESS indicator (A 34)
3
4
8910
6 CARD OPEN (open recording media slot cover)
lever (A 34)
7 Recording media slot cover
8 CFast card slot (A 34)
9SD card slot (A 34)
10 CFast card release button (A 34)
Table of Contents Index
Menus
Page 18
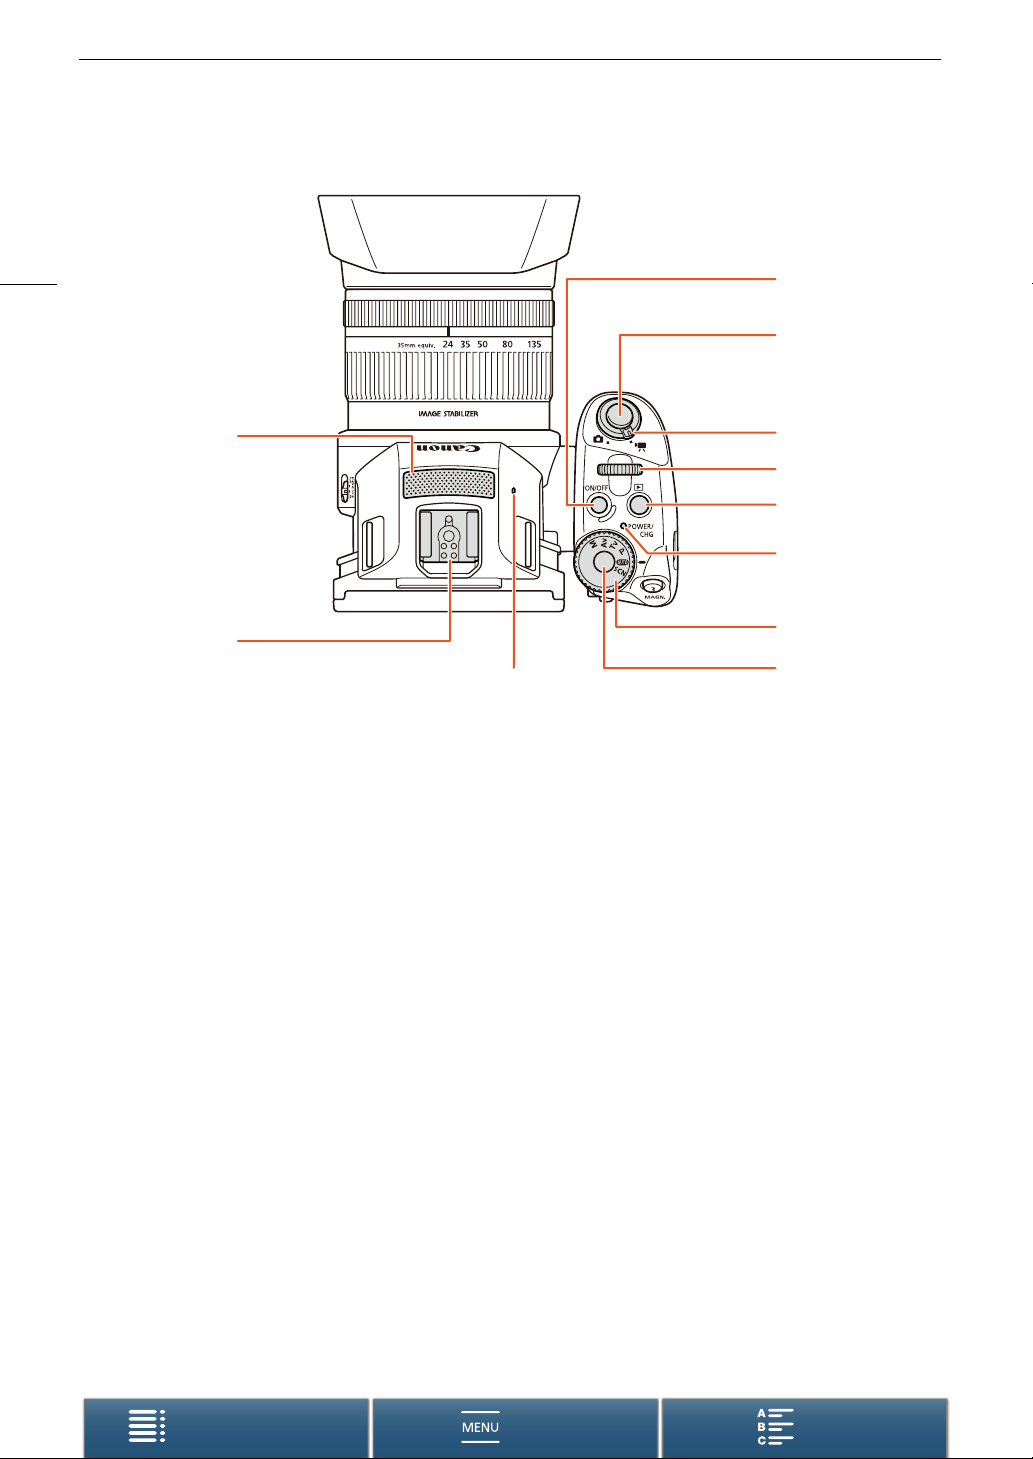
Names of Parts
18
1
2
1 Built-in microphone (A 81)
2 Accessory shoe (A 89, 97): For attaching the
optional GP-E2 GPS Receiver or optional EXseries Speedlite for EOS cameras.
3 ON/OFF button (A 30)
4START/STOP button (A 40)/PHOTO button
(A 40): When you are recording video clips, this
button is referred to in this manual as the START/
STOP button; when you are shooting photos, it is
referred to as the PHOTO button.
3
4
5
6
7
8
9
11
5 Movie/photo switch (A 28)
6 Control dial (A 52)
7 ^ (playback) button (A 103)
8 POWER/CHG (power/battery charging) indicator
(A 21)
9 Shooting mode dial (A 52)
10 Shooting mode dial button (A 52)
11 Built-in speaker (A 108)
10
Table of Contents Index
Menus
Page 19
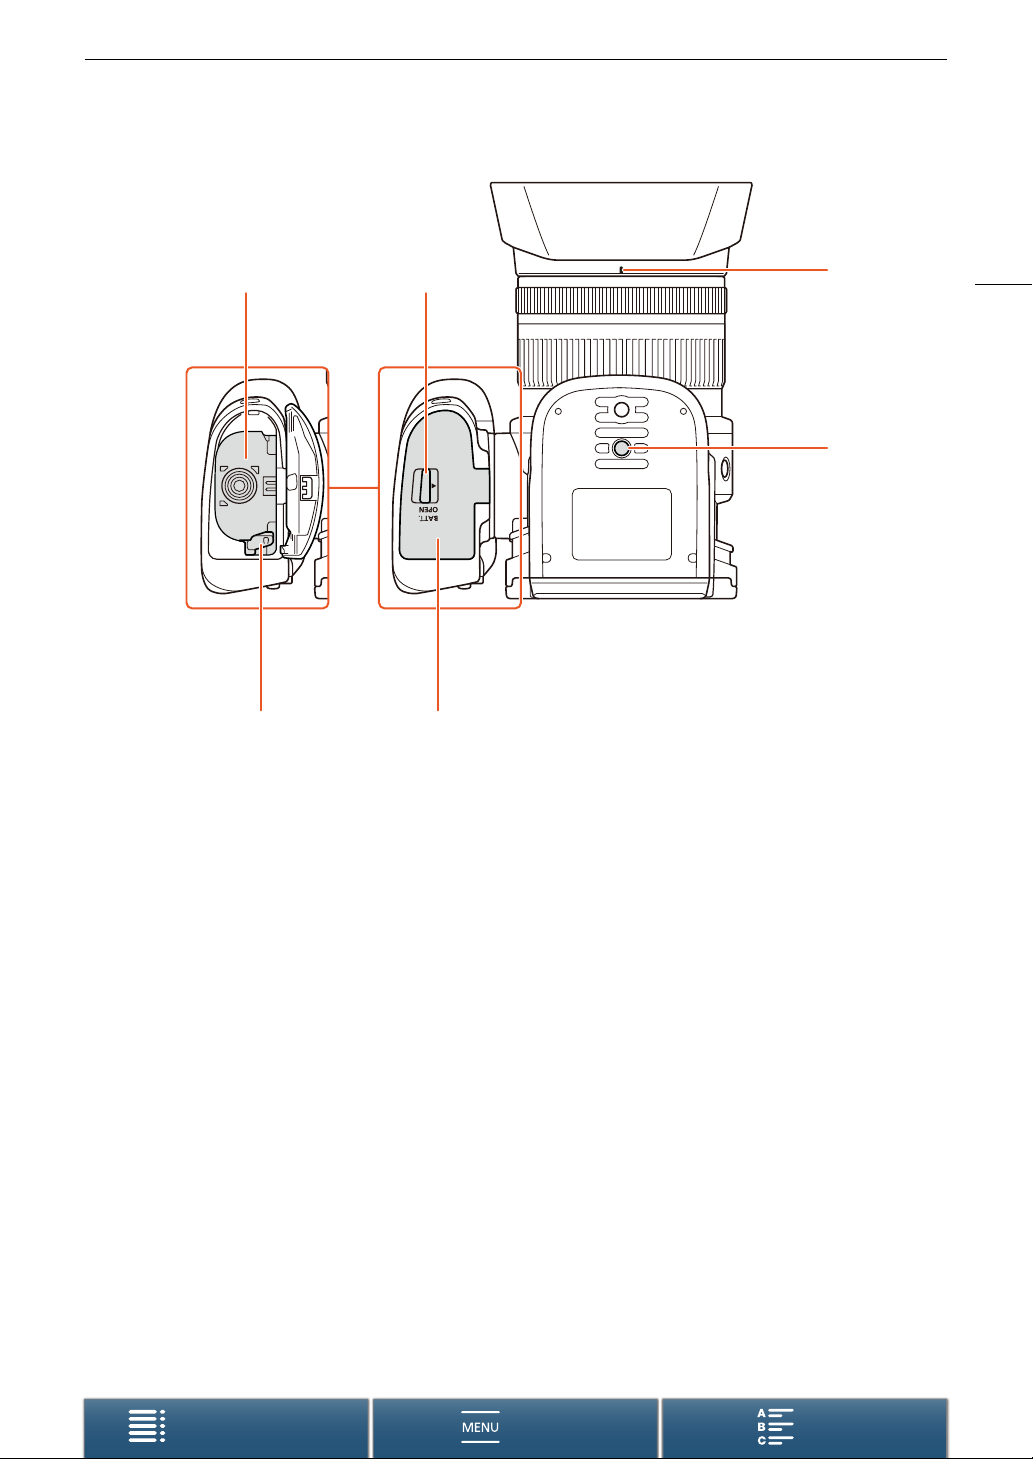
Names of Parts
1
3
24
1 Battery compartment
2 Battery release latch (A 21)
3 BATT. OPEN (open battery compartment) switch
(A 21)
4 Battery compartment cover (A 21)
5 Lens hood mount index (A 24)
6 Tripod socket (A 27)
5
19
6
Table of Contents Index
Menus
Page 20
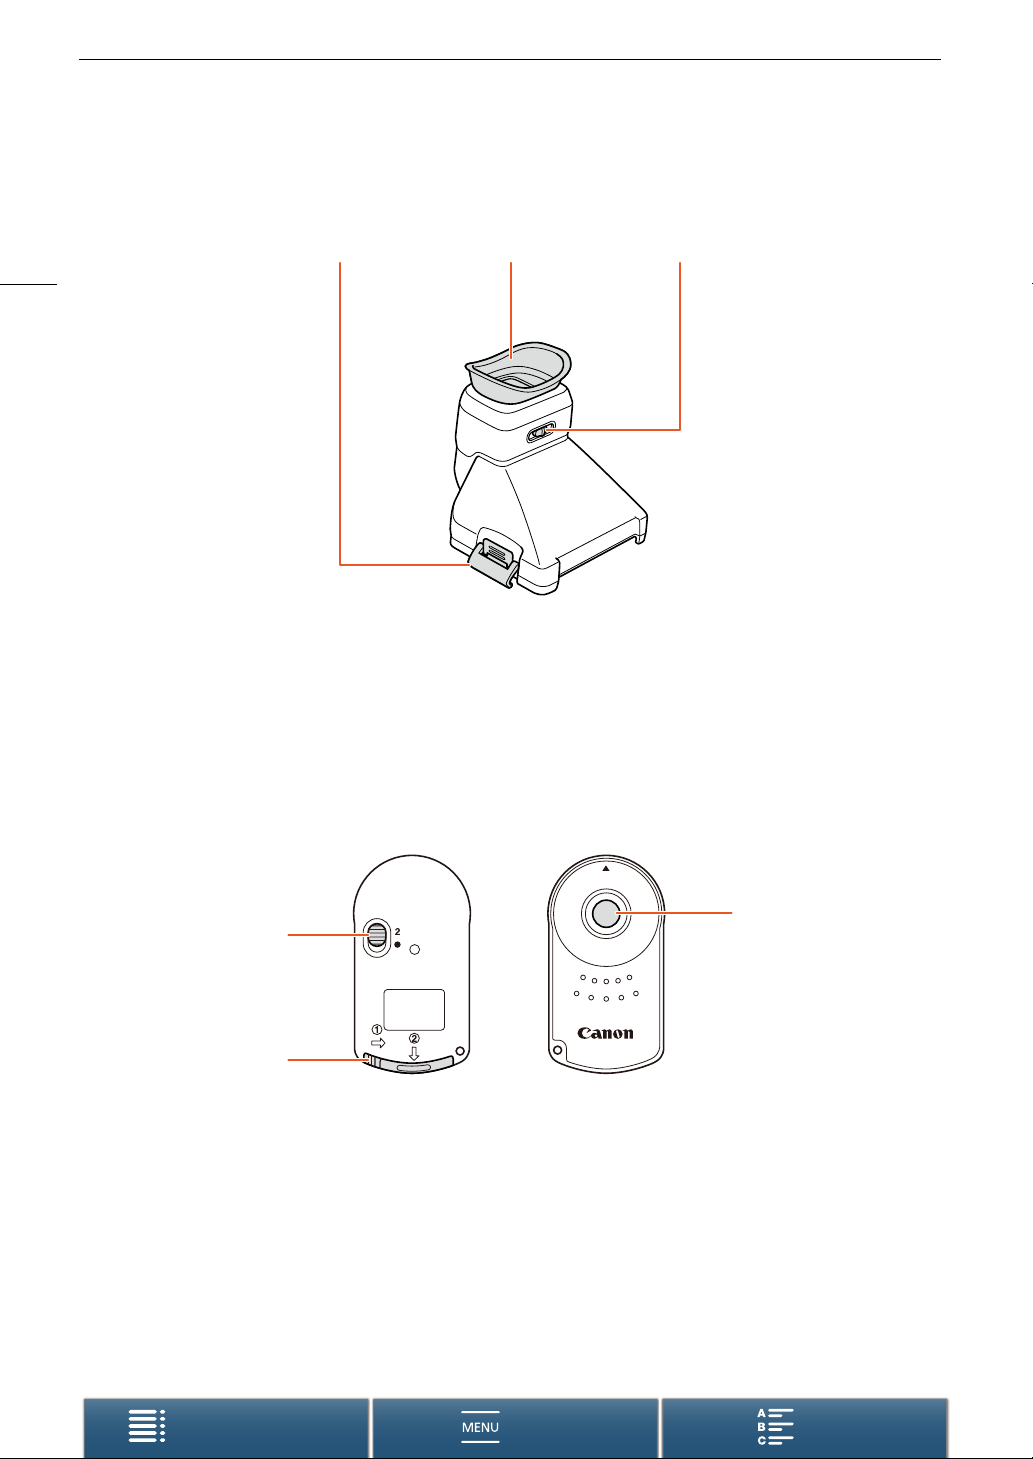
Names of Parts
Viewfinder unit
20
1 Viewfinder unit latch (A 24)
2Eye cup
RC-6 Remote Controller
123
3 Dioptric adjustment lever (A 25)
4
5
4 Delay switch (A 38)
5 Battery compartment cover
Table of Contents Index
6 Transmit button
Menus
6
Page 21
Preparations
2
Charging the Battery Pack
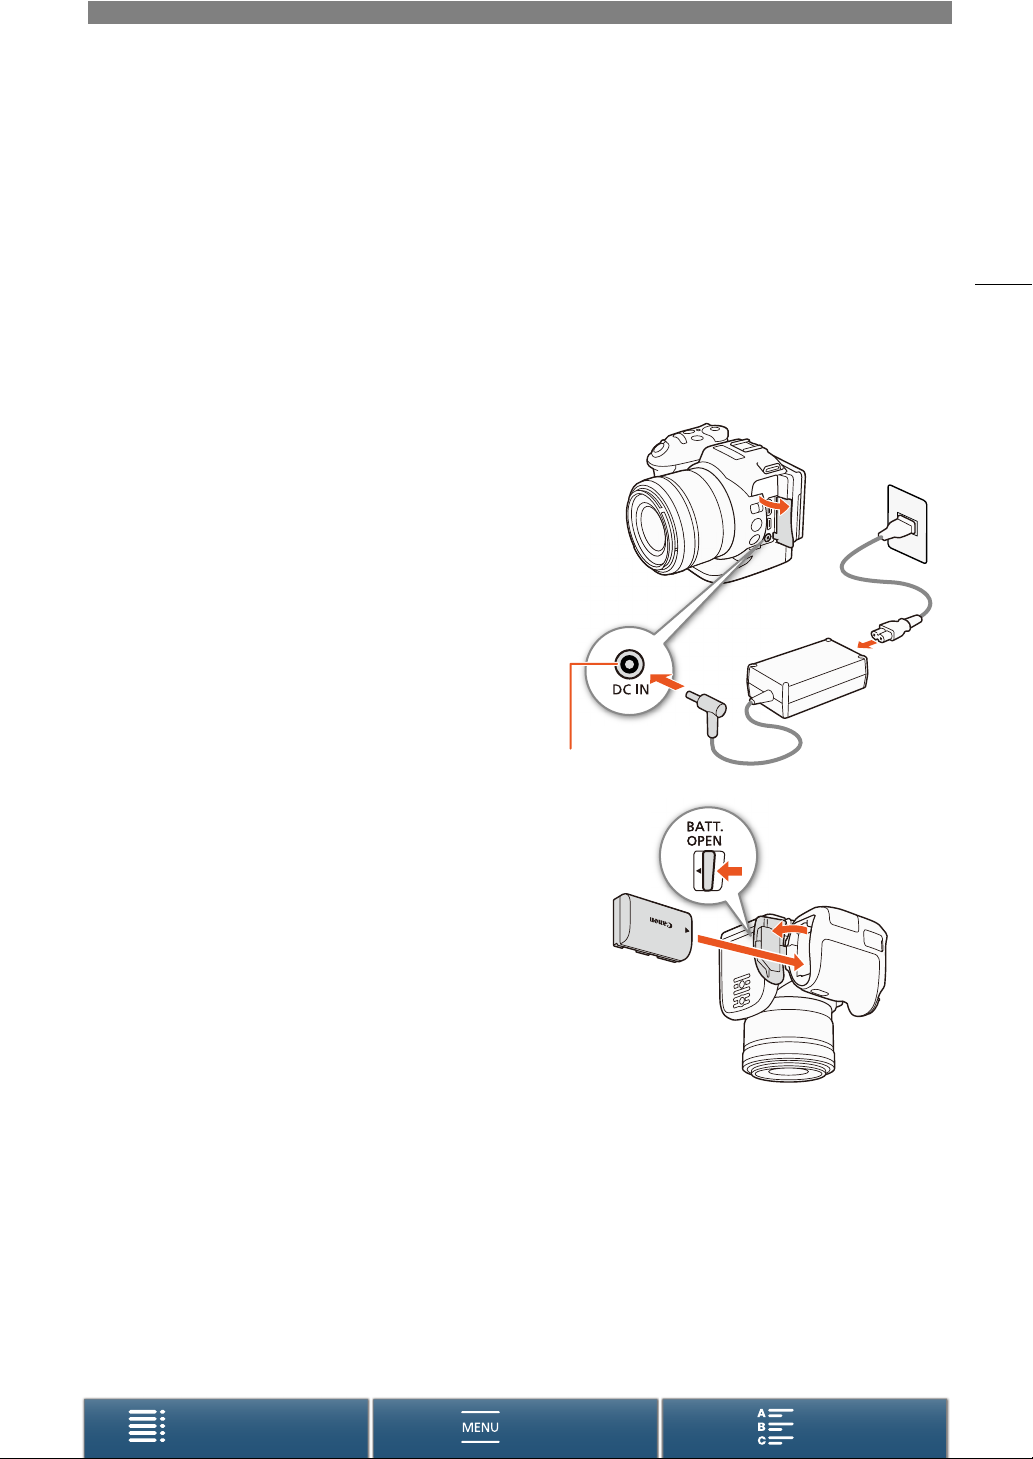
The camcorder can be powered with a battery pack or directly using the compact power adapter. The first time you use the
camcorder, charge the battery pack.
For approximate charging times and recording/playback times with a fully charged battery pack, refer to
Playback Times
1 Connect the power cord to the compact power adapter.
2 Plug the power cord into a power outlet.
3 Connect the compact power adapter to the camcorder’s
DC IN terminal.
(A 162).
Recording and
햳
햲
21
4 Slide the BATT. OPEN switch in the direction of the arrow
and open the battery compartment cover.
5 Insert the battery pack all the way into the compartment as
shown in the illustration.
• Push it all the way in until the battery release latch secures it in
place.
6 Close the battery compartment cover.
• Push the cover until you hear a click. Do not force the cover
closed if the battery pack is not correctly inserted.
햴
DC IN terminal
햲
햳
Table of Contents Index
Menus
Page 22
Charging the Battery Pack
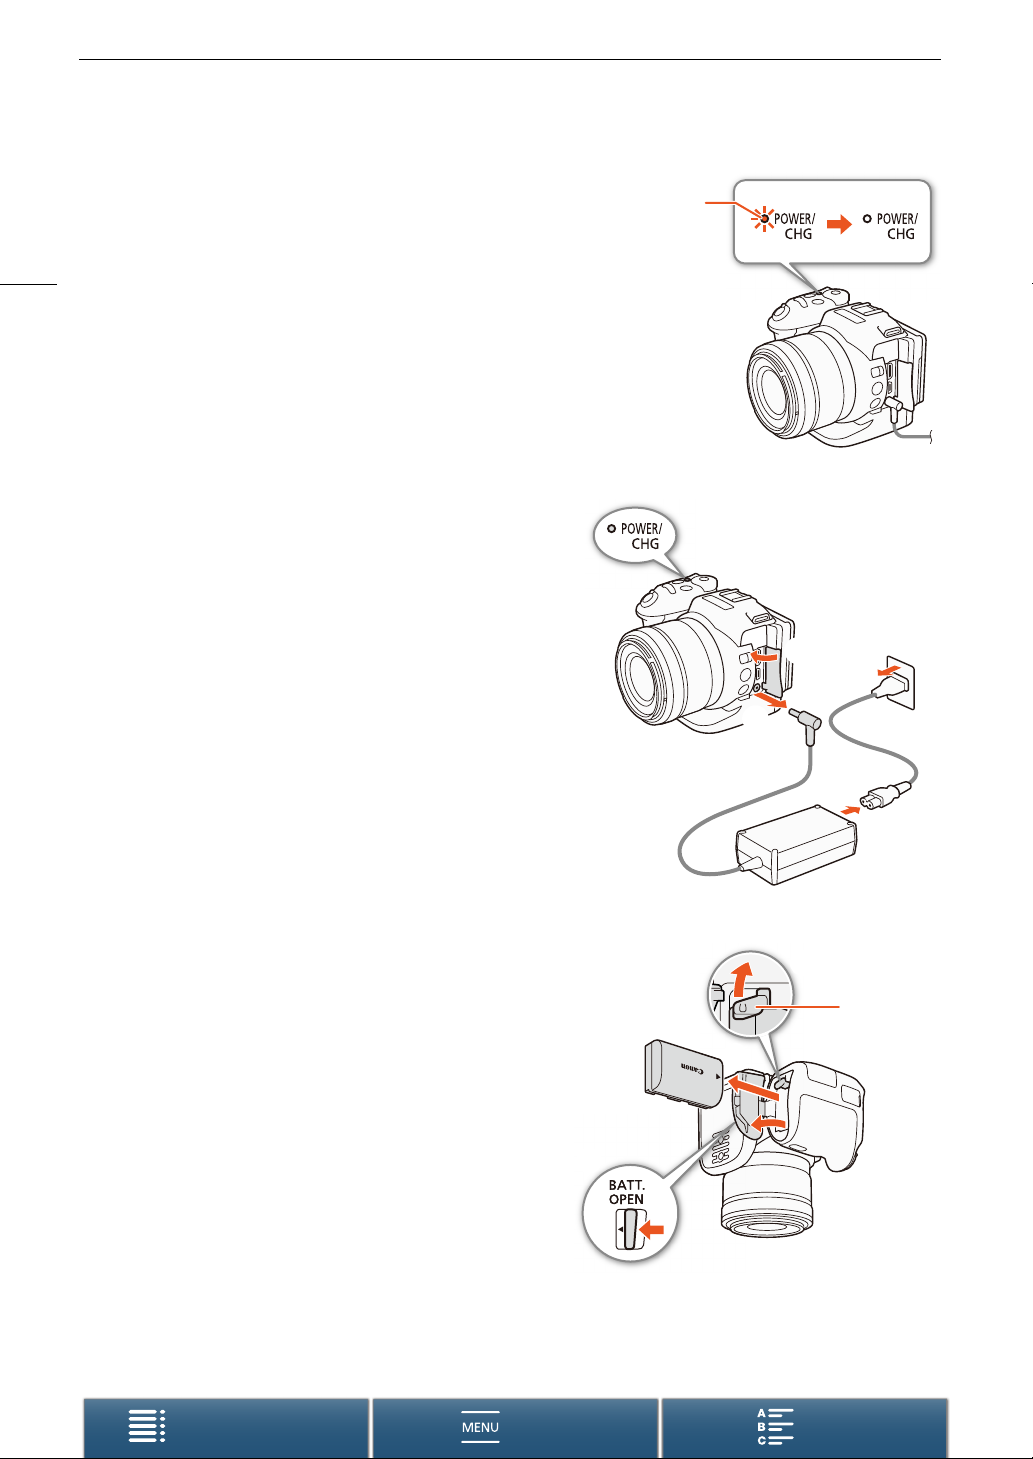
7 Charging will start when the camcorder is turned off.
• If the camcorder was on, the green POWER/CHG indicator will
go out when you turn off the camcorder. After a moment, the
POWER/CHG indicator will turn on in red (battery pack
22
charging). The red POWER/CHG indicator will go out when the
battery pack is fully charged.
• If the indicator flashes, refer to
8 Disconnect the compact power adapter in the order shown
in the illustration.
Troubleshooting
(A 142).
POWER/CHG
(battery pack charging)
indicator
햲
햳
햴
To remove the battery pack
Open the battery compartment cover and slide the battery
release latch in the direction of the arrow so the battery pack
springs out. Remove the battery pack and close the cover.
햵
햳
Battery
release latch
햴
햲
Table of Contents Index
Menus
Page 23
Charging the Battery Pack
IMPORTANT
• Turn off the camcorder before connecting or disconnecting the compact power adapter. After you turn off the
camcorder, important data is updated on the recording media. Be sure to wait until the green POWER/CHG
indicator goes out.
• Do not connect to the camcorder’s DC IN terminal or to the compact power adapter any electrical equipment
that is not expressly recommended for use with this camcorder.
• To prevent equipment breakdowns and excessive heating, do not connect the supplied compact power
adapter to voltage converters for overseas travels or special power sources such as those on aircraft and
ships, DC-AC inverters, etc.
NOTES
• We recommend charging the battery pack in temperatures between 10 °C and 30 °C (50 ºF and 86 ºF). If
either the ambient temperature or the battery pack’s temperature is outside the range of approx. 0 °C to 40 °C
(32 ºF to 104 ºF), charging may take longer than usual or charging may not start.
• The battery pack will be charged only when the camcorder is off.
• If the power supply was disconnected while charging a battery pack, make sure the POWER/CHG indicator
has gone out before restoring the power supply.
• If remaining battery time is an issue, you can power the camcorder using the compact power adapter so the
battery pack will not be consumed.
• Charged battery packs continue to discharge naturally. Therefore, charge them on the day of use, or the day
before, to ensure a full charge.
• We recommend that you prepare battery packs to last 2 to 3 times longer than you think you might need.
• USA and Canada only: The Lithium ion/polymer battery that powers the product is recyclable.
Please call 1-800-8-BATTERY for information on how to recycle this battery.
23
Table of Contents Index
Menus
Page 24
Preparing the Camcorder
Preparing the Camcorder
This section outlines the basic preparations of the camcorder, such as attaching the viewfinder unit and adjusting
the screen and grip.
24
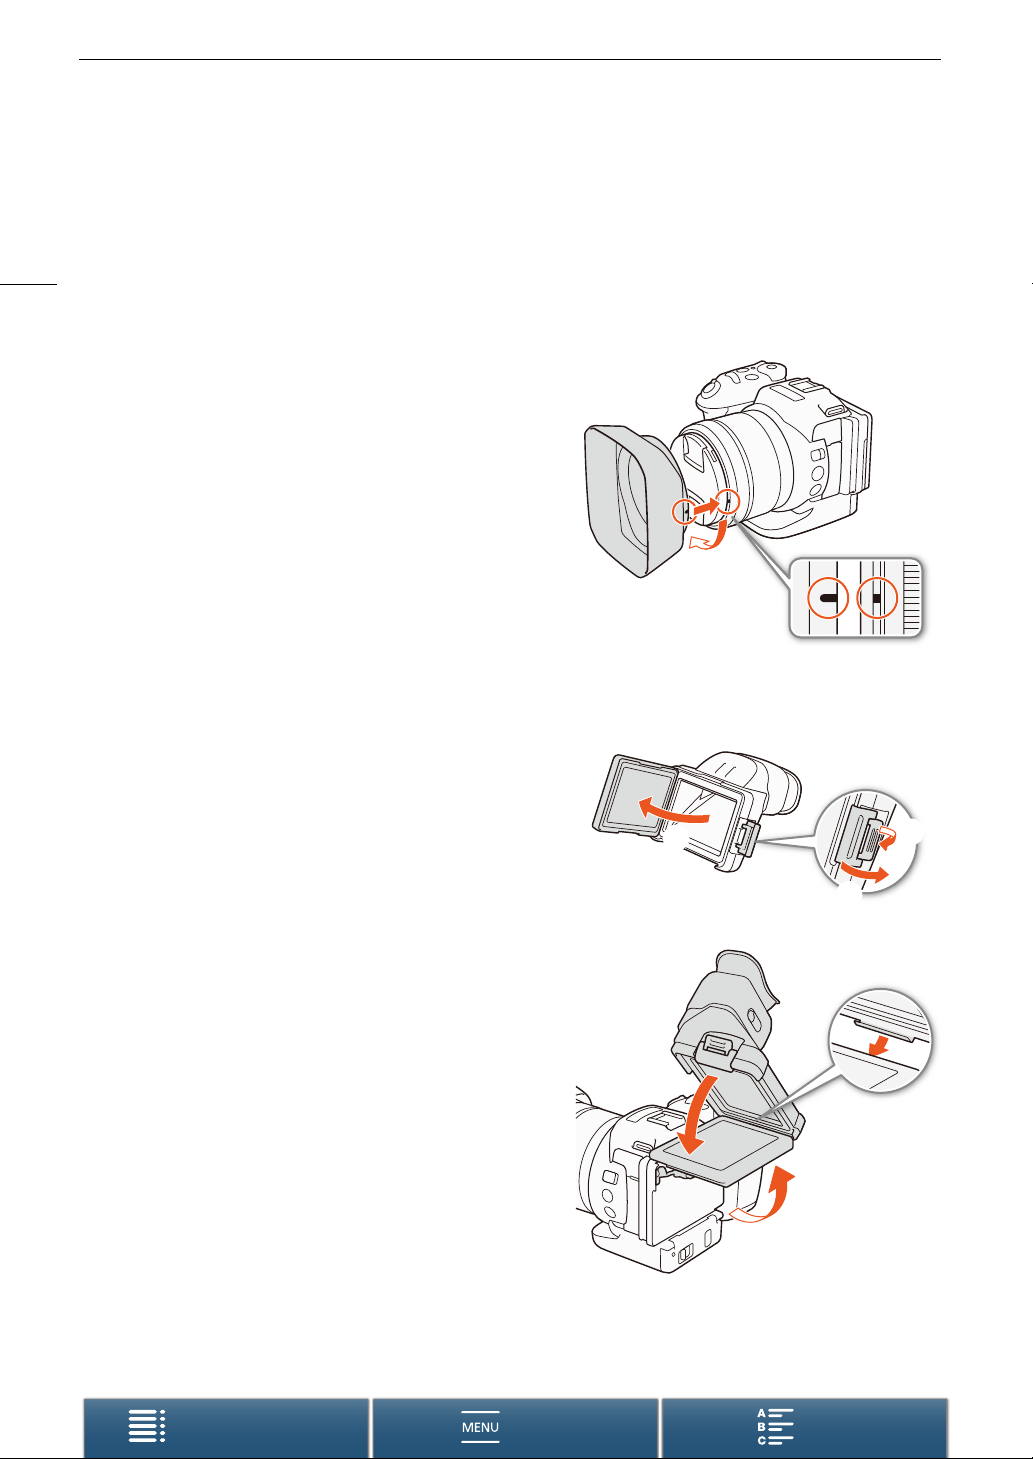
Attaching the Lens Hood
Attach the lens hood to protect the lens and reduce the amount of stray light that may hit the lens.
Place the lens hood on the front of the lens so that the
hood’s lens mount index covers the index on the lens
and turn it 90 degrees clockwise until it clicks
• Be careful not to deform the lens hood.
• Make sure that the lens hood is aligned with the thread.
(햳).
(햲)
Using the Viewfinder Unit
Attaching the Viewfinder Unit
1 Open the viewfinder unit latch and remove the
viewfinder unit cover.
2 Turn the LCD panel 90 degrees upward.
3 Hook the protrusion on the right side of the viewfinder
unit into the groove under the right side of the LCD
panel. Then, lower the viewfinder unit.
햴
햴
햳
햲
햲
햳
햳
Table of Contents Index
Menus
햲
Page 25
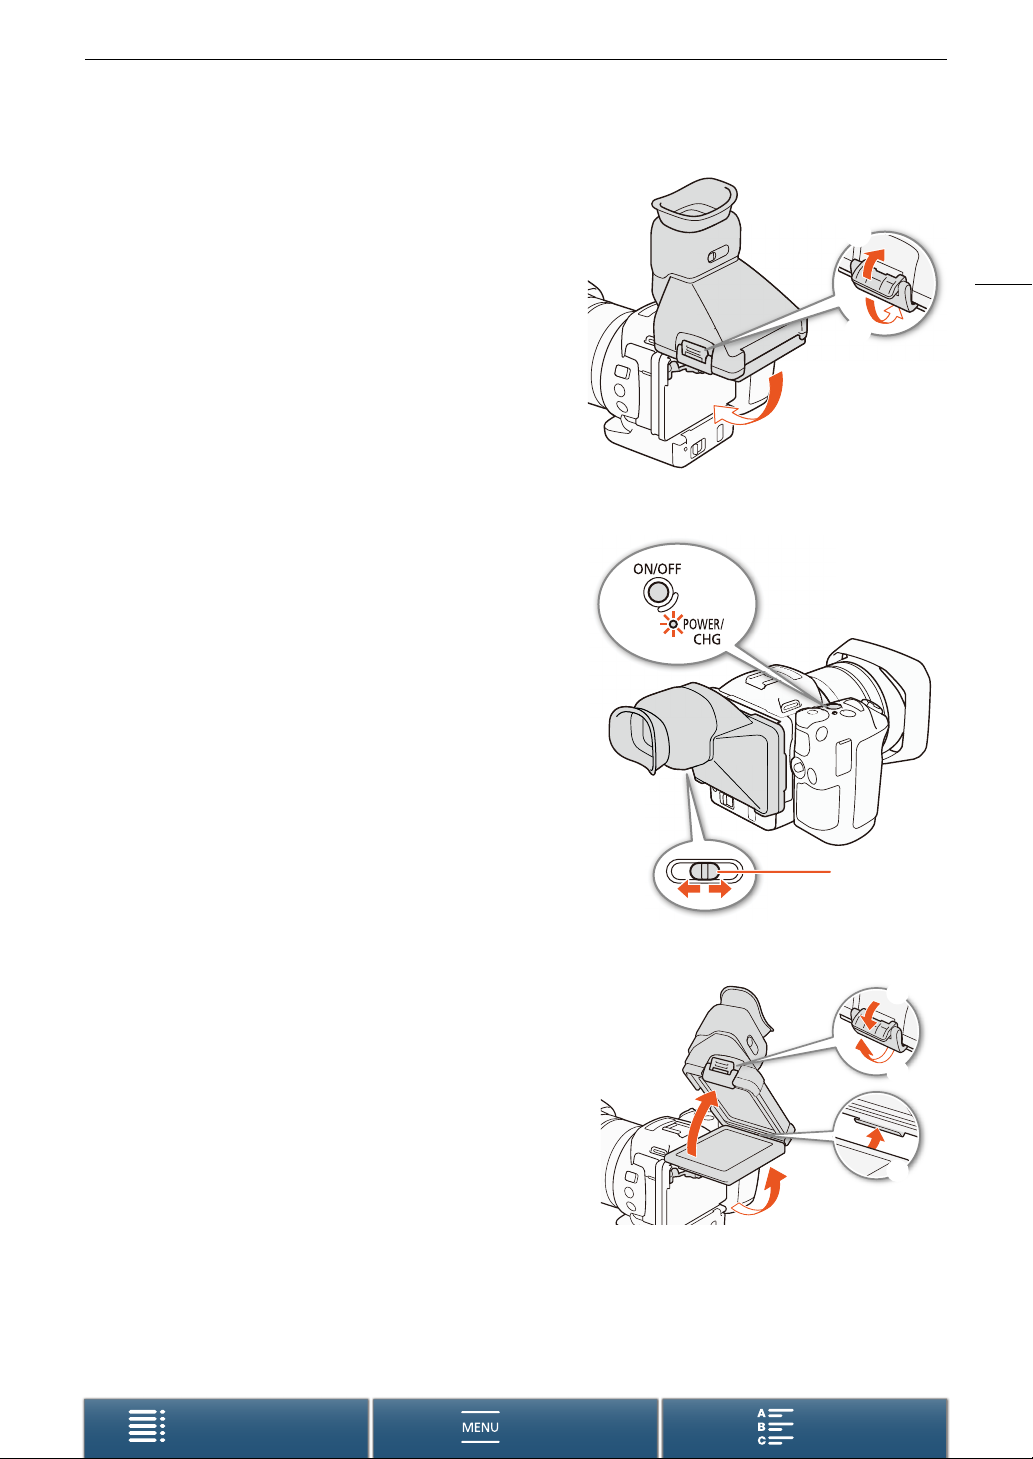
4 Hook the viewfinder unit latch under the left side of the
LCD panel and then fasten the latch. Then, return the
LCD panel to its original position.
Adjusting the Viewfinder Unit
1 Press the ON/OFF button to turn on the camcorder.
• The POWER/CHG indicator will illuminate.
• If necessary, perform the initial setup (A 30).
2 Adjust the dioptric adjustment lever until the viewfinder unit’s
image is sharp.
Preparing the Camcorder
햳
25
햲
햴
Removing the Viewfinder Unit
1 Turn the LCD panel 90 degrees upward.
2 Open the viewfinder unit latch and remove the viewfinder unit
from the camcorder.
• Make sure to open the latch all the way before removing
the unit.
3 Attach the viewfinder unit cover, hook the viewfinder unit
latch to the left side of the cover and then fasten the latch.
Table of Contents Index
Menus
Dioptric
adjustment lever
햳
햴
햵
햶
햲
Page 26
Preparing the Camcorder
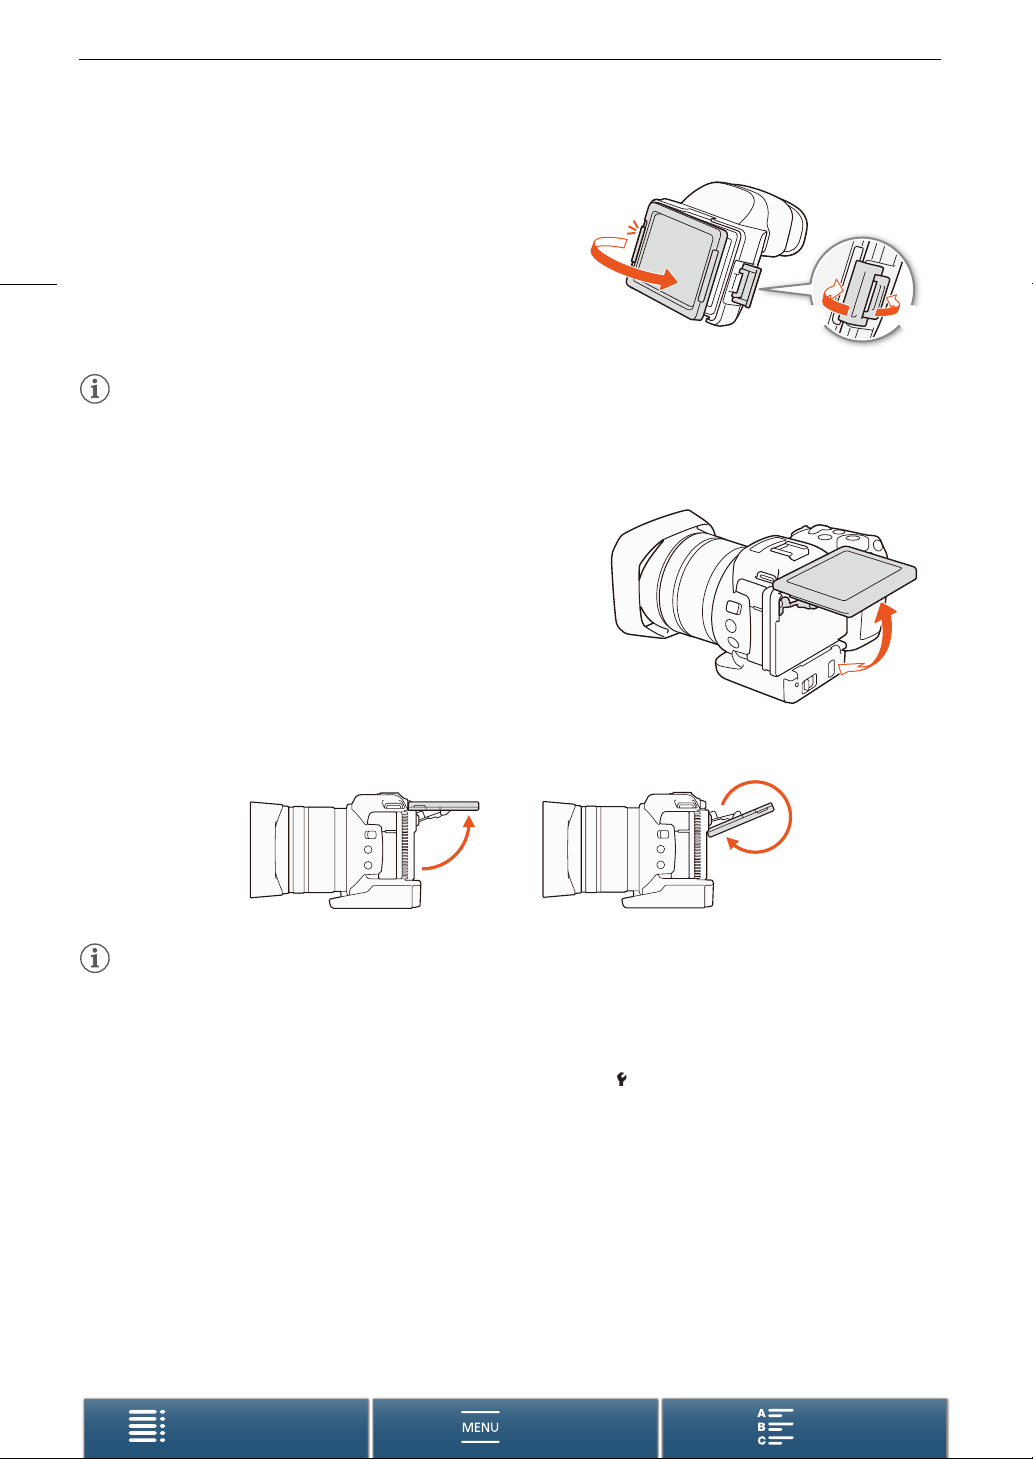
4 Attach the viewfinder unit cover.
26
햲
NOTES
• When you are not using the viewfinder unit, make sure to attach the viewfinder unit cap to the unit.
Using the LCD Panel
Pull out the LCD panel and adjust it to a comfortable
viewing angle.
• You can adjust the angle also for high- and low-angle shooting.
햳 햴
NOTES
• About the LCD screen: The screen is produced using extremely high-precision manufacturing techniques, with
more than 99.99% of the pixels operating to specification. Less than 0.01% of the pixels may occasionally
misfire or appear as black, red, blue or green dots. This has no effect on the recorded image and does not
constitute a malfunction.
• If the screen appears dim, you can adjust the brightness using the [ System Setup] > [1] >
[LCD Brightness] and [LCD Backlight] settings.
Table of Contents Index
Menus
Page 27
Adjusting the Grip
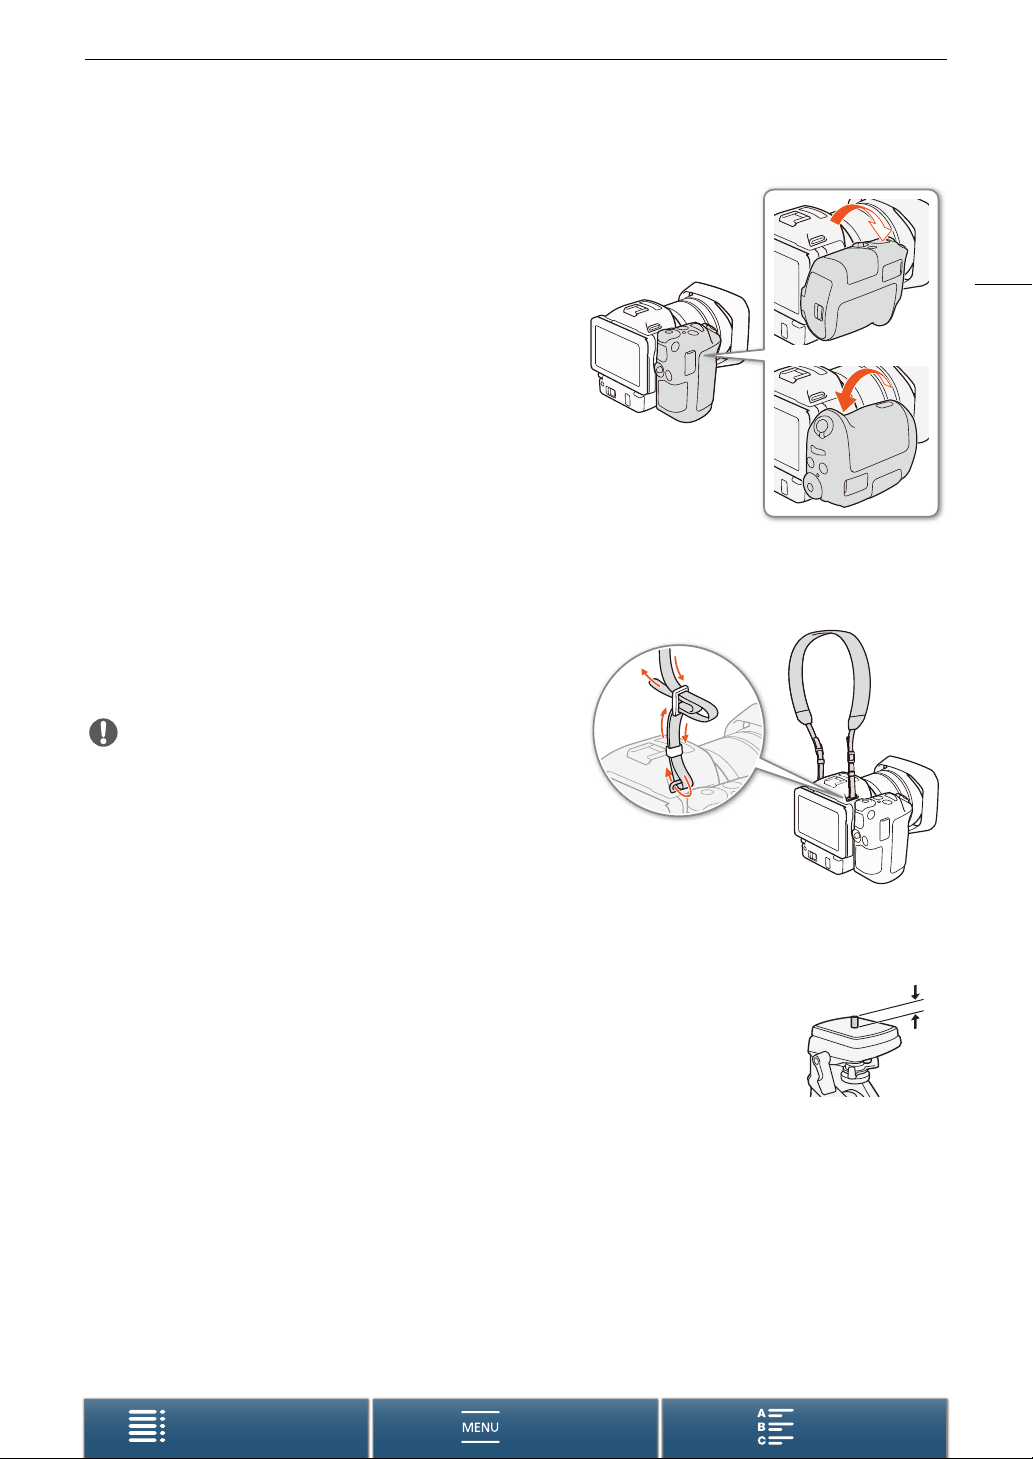
The grip can be rotated 90 degrees toward or away from the
lens to give you a convenient grip angle.
While firmly holding the camcorder, rotate the grip to the
desired position.
Attaching the Shoulder Strap
Pass the ends through the strap mounts and adjust the
length of the shoulder strap.
Preparing the Camcorder
27
IMPORTANT
• Be careful not to drop the camcorder when attaching or
adjusting the shoulder strap.
Using a Tripod
You can mount the camcorder on a tripod with a mounting screw of 6.5 mm (0.26 in.) or
smaller. Using tripods with longer mounting screws may cause damage to the
camcorder.
6.5 mm
Table of Contents Index
Menus
Page 28
Basic Operation of the Camcorder
Basic Operation of the Camcorder
Depending on how you plan to shoot, you may need to switch between shooting video clips and shooting
photos. Before you shoot, you can also select a shooting mode, which can give you the freedom of adjusting the
camcorder’s camera-related settings or allow you to entrust the settings to the camcorder to varying degrees,
28
depending on the mode. After you finish recording, you can check your recordings by switching the camcorder
to playback mode.
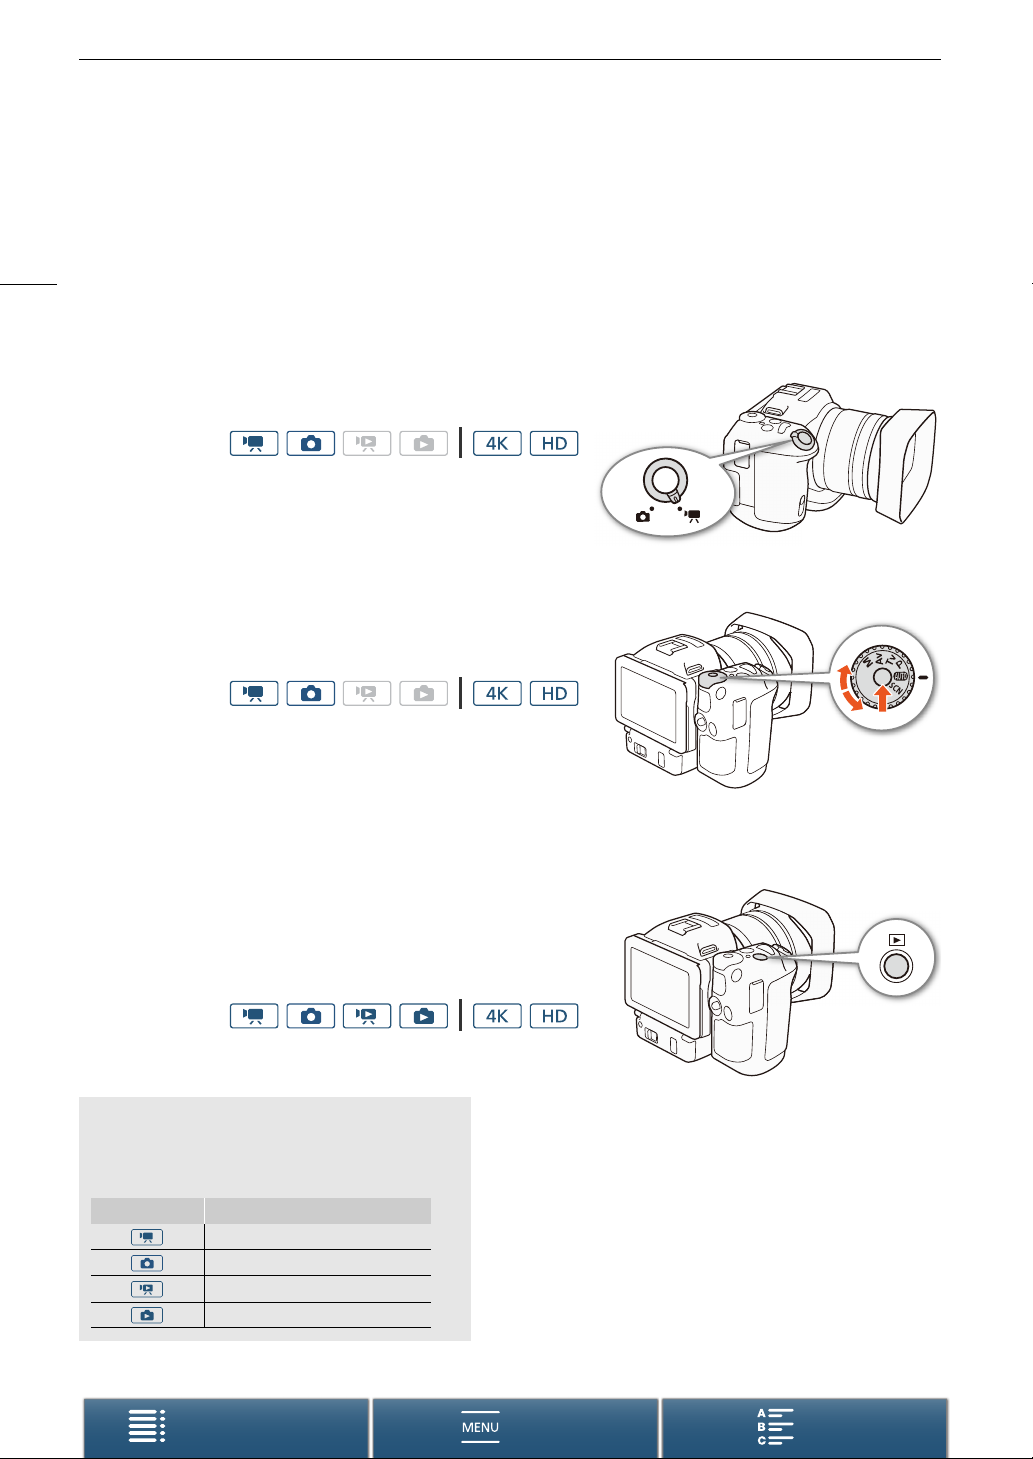
Switching Between Movies and Photos
Operating modes:
To shoot video clips, set the movie/photo switch to v; to
shoot photos, set it to {.
Setting the Shooting Mode
You can select a shooting mode to match your shooting style.
Operating modes:
While pressing down the shooting mode dial button, turn the
shooting mode dial to the desired mode.
• For details on the various shooting modes, refer to
(A 52).
Modes
Shooting
Switching Between Recording and Playback
With a single press of a button, the camcorder can easily switch
between recording mode and playback mode. For details on playing
back your recordings, refer to
Operating modes:
Hold the ^ button pressed down.
Operating Mode Icons Used in This Manual
This instruction manual uses icons to indicate
the recording and playback modes for video
clips and photos.
Icon Description
Video clip shooting mode.
Photo shooting mode.
Video clip playback mode
Photo playback mode.
Playback
(A 103).
Table of Contents Index
Menus
Page 29
Basic Operation of the Camcorder
Using the Touch Screen
The buttons and menu items that appear on the touch screen change dynamically depending on the operating
mode and the task you are performing. With the intuitive touch screen interface you have all the controls at your
fingertips.
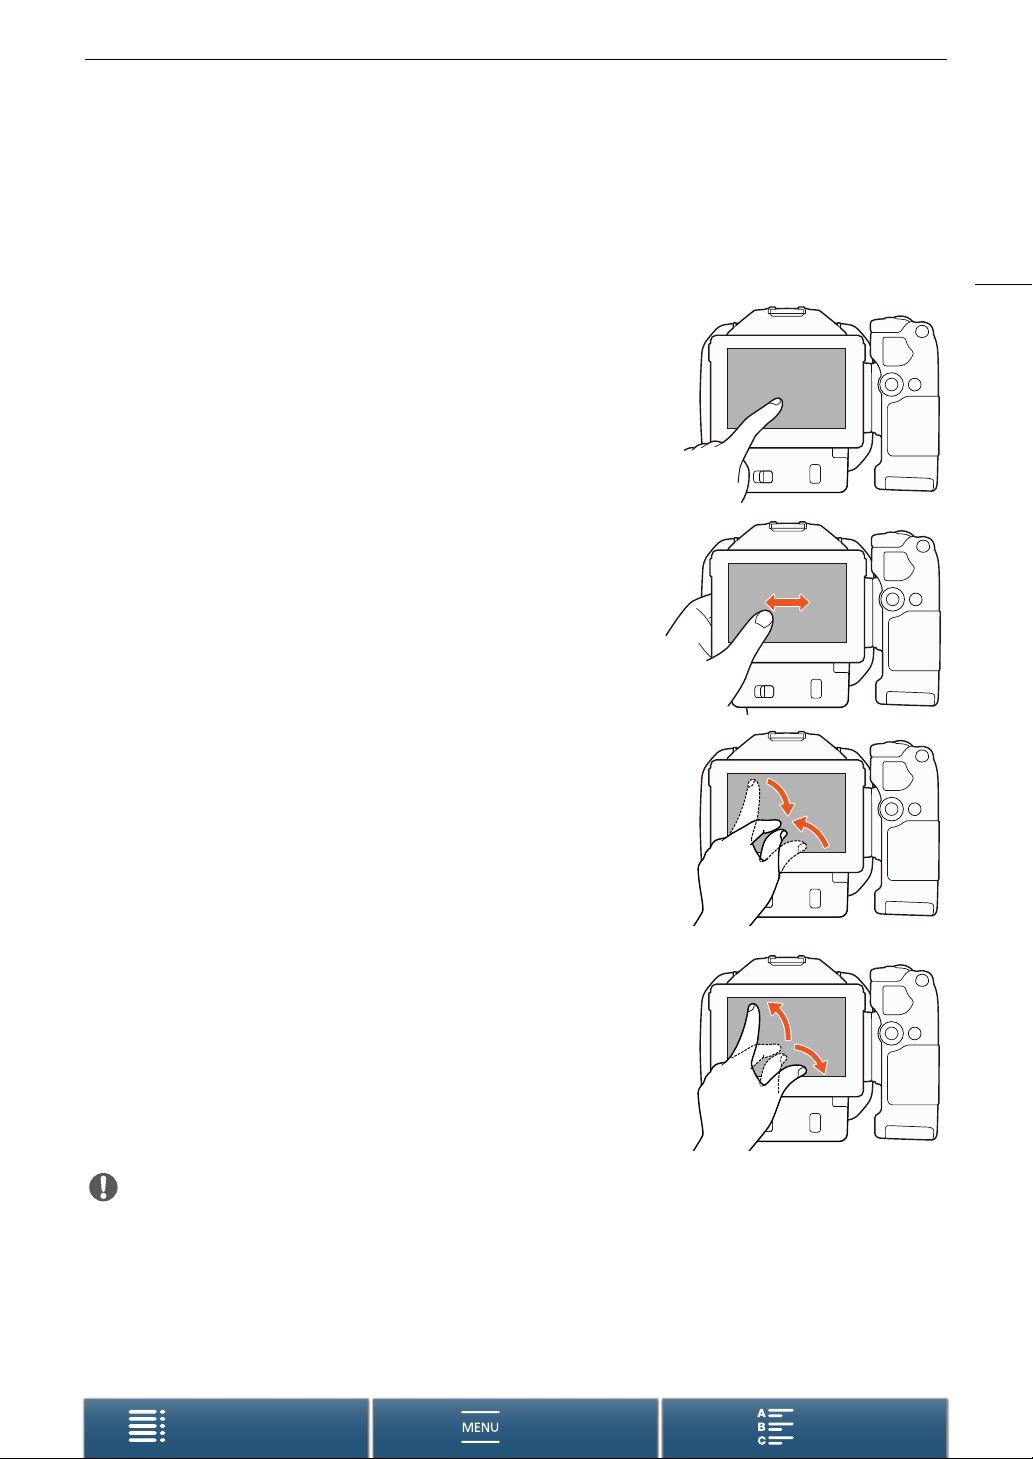
Tou c h
Press on an element displayed on the touch screen.
Used to start playing back a scene in an index screen, to select a setting
from the menus, etc.
Drag
Swipe your finger up and down or left and right across the screen. Used
to scroll menus, to browse through index screen pages or to adjust slider
controls like the volume.
On some screens, you can achieve the same effect by touching the
triangle control buttons.
29
Pinch
Pinch In
Place two fingers on the screen and bring them together.
Used when playing back clips and photos. Pinch your fingers in to return to
the index screen. Also used during photo playback to zoom out from a
photo that has been zoomed in.
Pinch Out
Place two fingers on the screen and move them apart.
Used on an index screen during playback. Pinch your fingers out to start
playing back the clip. Also used during photo playback to zoom in on the
photo.
IMPORTANT
• The camcorder features a capacitive touch screen. In the following cases, you may not be able to perform
touch operations correctly.
- Using your fingernails or hard-tipped objects, such as ballpoint pens.
- Operating the touch screen with wet or gloved hands.
- Applying excessive force or forcefully scratching the touch screen.
- Attaching commercially available screen protectors or adhesive film onto the touch screen’s surface.
Table of Contents Index
Menus
Page 30
Date, Time and Language Settings
Date, Time and Language Settings
Setting the Date and Time
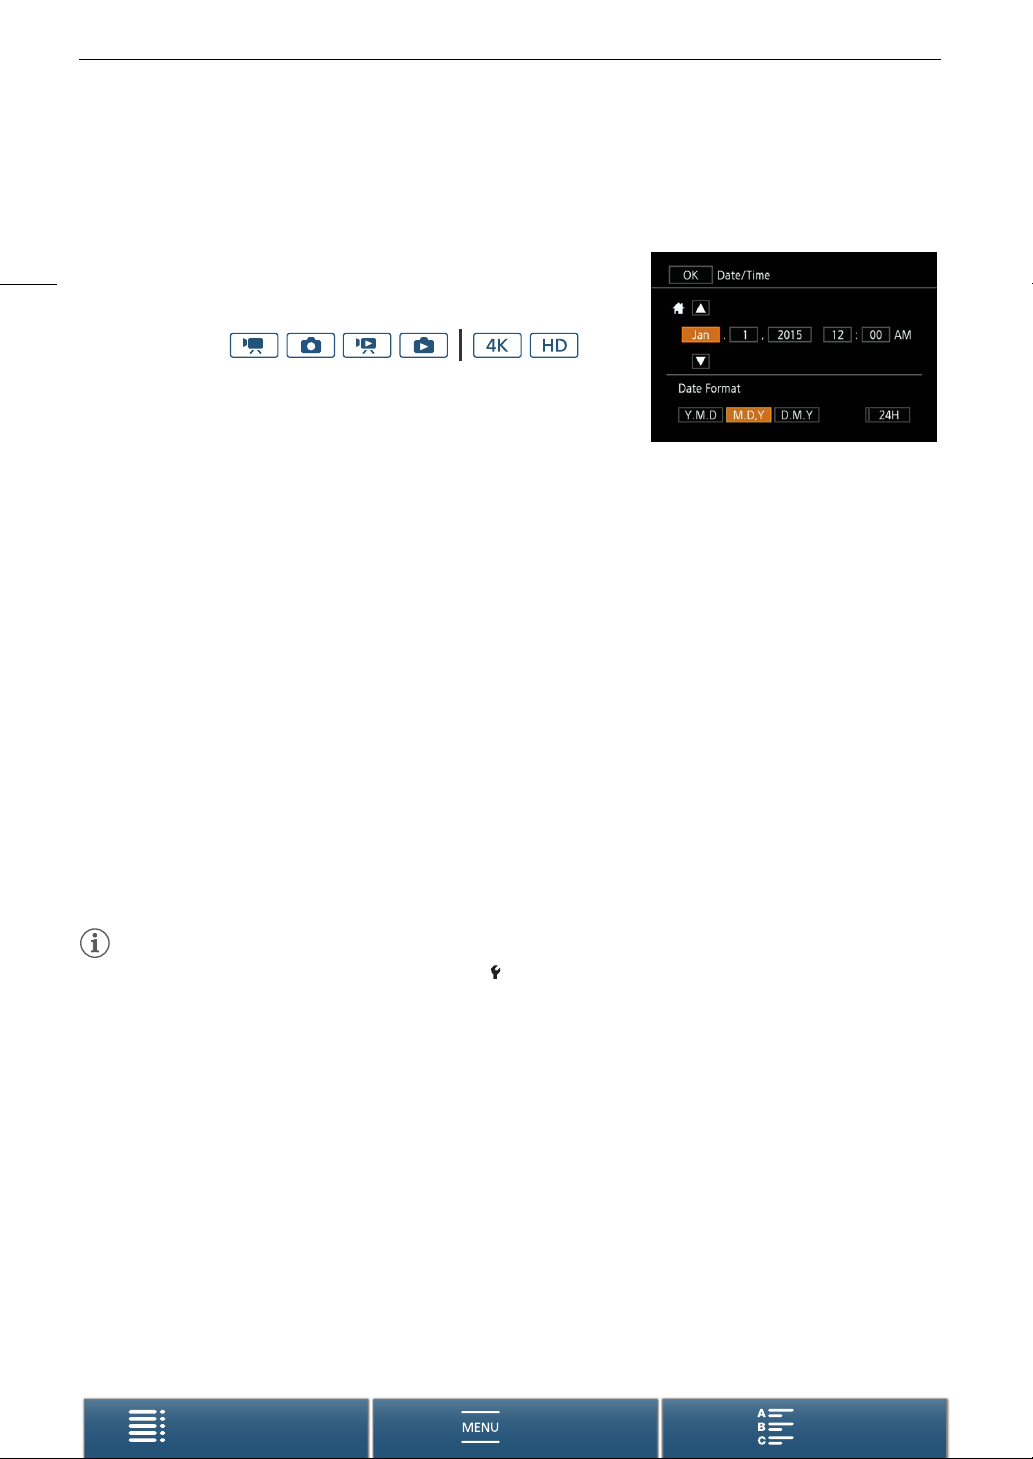
You will need to set the date and time of the camcorder before you can
30
start using it. When the camcorder’s clock is not set, the [Date/Time]
screen will appear automatically with the month selected.
Operating modes:
1 Press the ON/OFF button to turn on the camcorder.
• The POWER/CHG indicator will illuminate and the [Date/Time] screen
will appear.
2 Touch a field you want to change (year, month, day, hours or minutes).
• You can also push the joystick (Þ) to move between the fields and then press the joystick to make your
selection.
3Touch [Í] or [Î] to change the field as necessary.
• You can also push the joystick (Ý) to change the field.
4 Set the correct date and time by changing all the fields in the same way.
5 Touch [Y.M.D], [M.D,Y] or [D.M.Y] to select the date format you prefer.
• You can also push the joystick (Þ) to move between the fields and then press the joystick to make your
selection.
• In some screens, the date will be displayed in short form (numbers instead of month names or only the day
and month), but it will still follow the order you selected.
6 Touch [24H] to use 24-hour clock or leave it unselected to use 12-hour clock (AM/PM).
• You can also push the joystick (Þ) to move between the fields and then press the joystick to make your
selection.
7 Touch [OK] to start the clock and close the setup screen.
• You can also push the joystick (Þ) to move between the fields and then press the joystick to make your
selection.
NOTES
• You can adjust the date and time later on with the [ System Setup] > [1] > [Date/Time] setting.
• When you do not use the camcorder for about 3 months, the built-in rechargeable lithium battery may
discharge completely and the date and time setting may be lost. In such case, recharge the built-in lithium
battery (A 154) and set the time zone, date and time again.
• Using the optional GP-E2 GPS Receiver, you can have the camcorder adjust settings automatically according
to the UTC date/time information received from the GPS signal (A 89).
Table of Contents Index
Menus
Page 31
Date, Time and Language Settings
Changing the Language
The default language of the camcorder is English. You can set it to one of
27 languages.
Operating modes:
1 Press the MENU button.
2 Open the [Language ] screen.
[ System Setup] > [1] > [Language ]
3 Touch the desired language and then touch [OK].
4Touch [X] to close the menu.
NOTES
• Some buttons, such as [FUNC.] and [MENU], will appear in English regardless of the language selected.
[ System Setup]
[1]
[Language ]
[English]
Changing the Time Zone
Change the time zone to match your location. The default setting is New
York. In addition, the camcorder is able to retain the date and time of an
additional location. This is convenient when you travel so that you can set
the camcorder to match the time of your home location or that of your
travel destination.
[ System Setup]
[1]
[Time Zone/DST]
31
Operating modes:
1 Press the MENU button.
2 Open the [Time Zone/DST] screen.
[ System Setup] > [1] > [Time Zone/DST]
3Touch ["] to set the home time zone, or [#] to set the time zone of your destination when you are
traveling.
4Touch [Ï] or [Ð] to set the desired time zone. If necessary, touch [$] to adjust for daylight saving
time.
5Touch [X] to close the menu.
[New York]
Using the MENU Button and Joystick
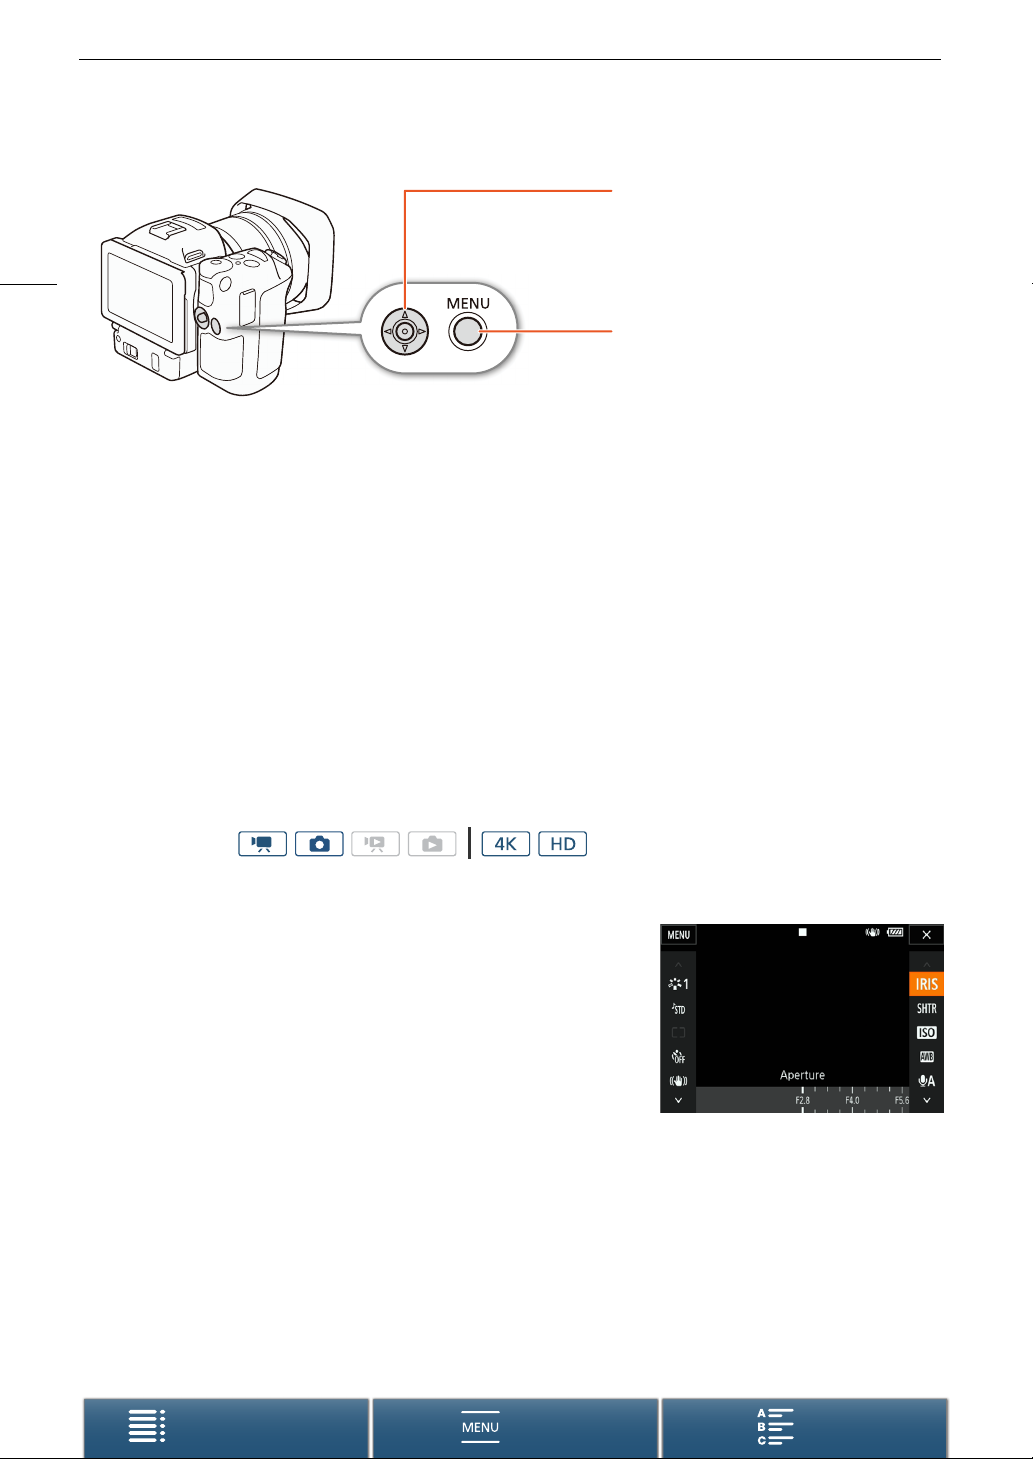
You can navigate some of the camcorder’s menus and screens using the MENU button and joystick instead of
using the touch panel. This is convenient, for example, when the viewfinder unit is attached to the camcorder
and you cannot touch the screen.
Table of Contents Index
Menus
Page 32
Date, Time and Language Settings
Joystick
When making a menu selection, push the joystick
(Ý/Þ) to move the orange selection frame in
the menu. Then, press the joystick itself to select
32
the menu item indicated by the orange selection
frame.
MENU button
Press the button to open the setup menus and then
press again to close the menu after adjusting
desired settings.
Using the FUNC. Menu and Setup Menus
The camcorder’s functions and settings can be adjusted using the FUNC. menu and setup menus. For details
about the available menu options and settings, refer to the appendix
navigating the menus is explained using mainly the touch panel controls but they can also be navigated using the
joystick and other buttons. The procedure below explains how to use both methods. If necessary, refer back to
this section for details on using the joystick.
FUNC. Menu
The FUNC. menu contains camera-related functions, such as shutter speed and aperture, used while shooting.
The icons of each function’s current setting appears on both sides of the menu. The left side contains functions
used prior to shooting while the right side contains functions that can be used while shooting. You can even
change what functions appear on the right side of the FUNC. menu (A 99).
Although you can access the various functions using the joystick, some functions will still require touch
operations.
Menu Options
(A 133). In this manual,
Operating modes:
To use the touch panel controls
1 Touch [FUNC.].
• The FUNC. menu appears. You can drag your finger up/down to see
more functions.
2 Touch the icon of the desired function.
• Menu items not available appear grayed out.
3 Adjust the function and then touch [X].
• Check the function’s description for details.
To use the joystick
1 Push the joystick (Ý/Þ) to select [FUNC.] and then press the joystick.
• The FUNC. menu appears.
2 Push the joystick (Ý/Þ) to select the icon of the desired function and then press the joystick.
• Menu items not available appear grayed out.
3 Adjust the function.
4 Push the joystick (Ý/Þ) to select [X] and then press the joystick.
• Check the function’s description for details.
Table of Contents Index
Menus
Page 33
Date, Time and Language Settings
NOTES
• An adjustment dial will appear when adjusting some functions. To use touch panel controls, drag your finger
left/right to move the adjustment dial to the desired setting. To use the joystick, first press the joystick itself so
that the position of the current setting is highlighted in orange and then push left/right to adjust the setting.
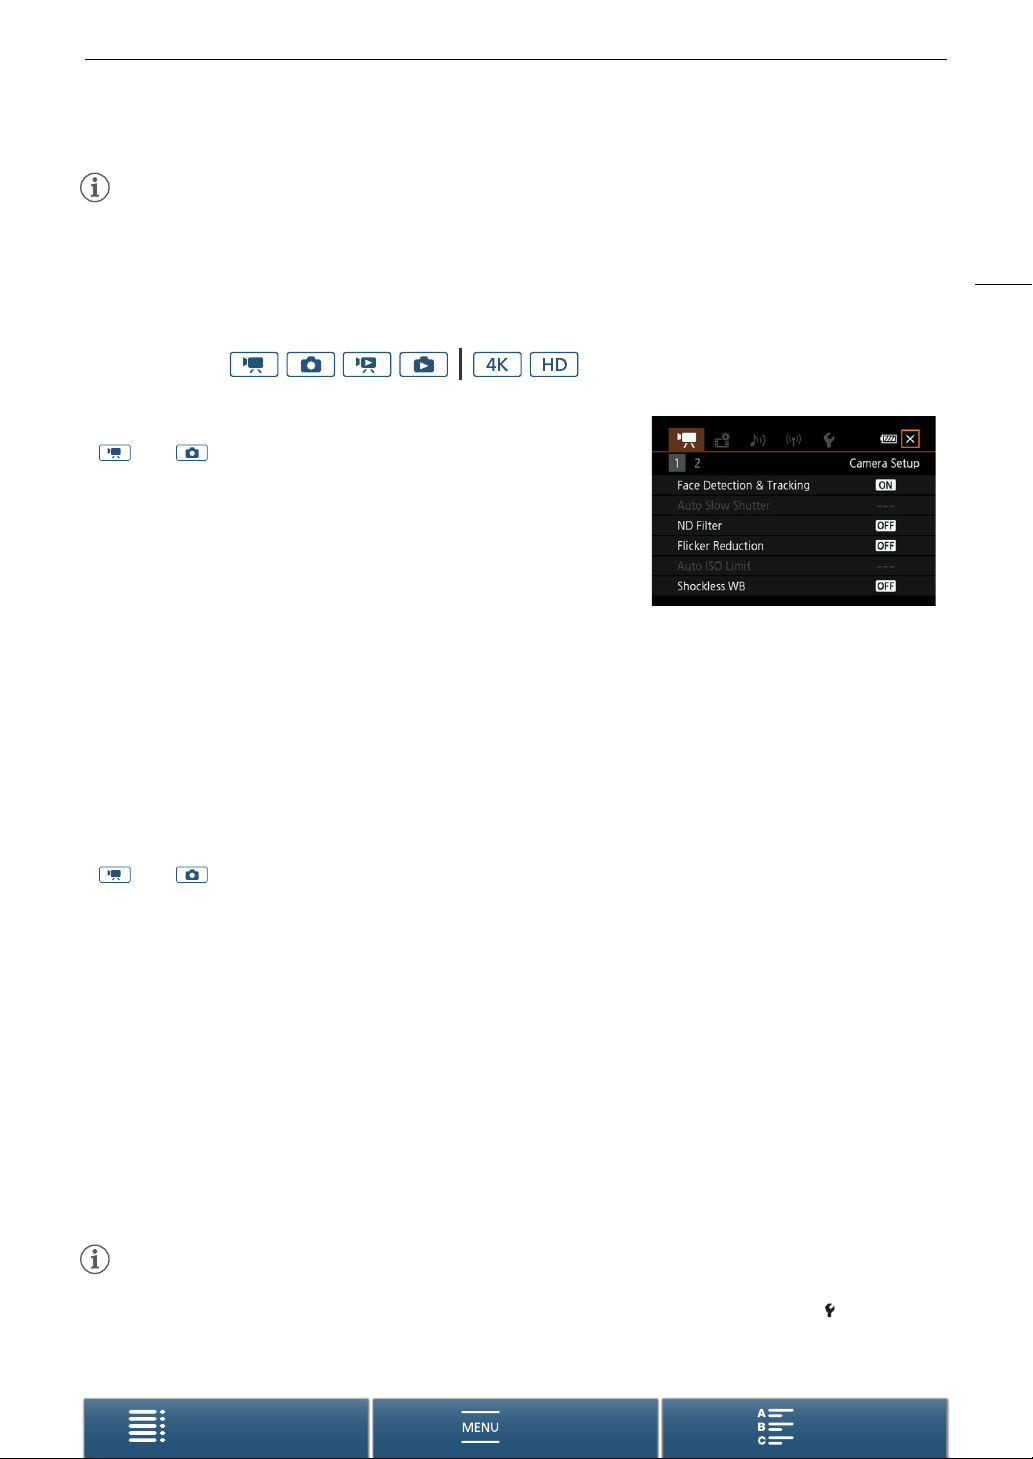
Setup Menus
Operating modes:
To use touch panel controls
1 and modes only: Touch [FUNC.].
2Touch [MENU].
• Alternatively, you can press the MENU button to open the setup
menus directly.
• The setup menus appear. Settings are divided into groups, which can
be accessed through the tabs at the top of the screen.
3 Touch the tab of the desired menu.
• Depending on the operating mode, some tabs may be divided into multiple “pages”. Touch the numbers
under the tab icons or drag your finger left/right to switch to other pages in the currently selected tab.
4 Touch the desired setting.
• Menu items not available appear grayed out.
5 Touch the desired option and then touch [X].
• You can touch [X] to close the menu at any time.
• You can touch [K] to return to the previous screen. If you changed a setting, it will be applied.
33
To use the joystick
1 and modes only: Push the joystick (Ý/Þ) to select [FUNC.] and then press the joystick.
2 Push the joystick (Ý/Þ) to select [MENU] and then press the joystick.
• Alternatively, you can press the MENU button to open the setup menus directly.
• The setup menus appear. Settings are divided into groups, which can be accessed through the tabs at the
top of the screen.
3 Push the joystick (Þ) to select the desired tab and page number.
• Depending on the operating mode, some tabs may be divided into multiple “pages”. Touch the numbers
under the tab icons or drag your finger left/right to switch to other pages in the currently selected tab.
4 Push the joystick (Ý) to move the selection bar to the desired setting and then press the joystick.
• Menu items not available appear grayed out.
5 Push the joystick (Ý/Þ) to select the desired option and then press the joystick.
6 Push the joystick (Ý/Þ) to select [X] and then press the joystick.
• You can press the MENU button to close the menu at any time.
• You can select [K] to return to the previous screen. If you changed a setting, it will be applied.
NOTES
• For brevity’s sake, references in the text to settings in the setup menus will include only the tab of the desired
menu and the setting name. For example, “You can adjust the date and time later on with the [ System
Setup] > [1] > [Date/Time] setting.”
• Depending on the operating mode, you may need to switch pages under the tab to access the function.
Table of Contents Index
Menus
Page 34
Preparing Recording Media
Preparing Recording Media
The camcorder records 4K clips to CFast cards, and HD clips and photos to . SD, / SDHC and 0
SDXC memory cards. Initialize recording media (A 36) when you use them with this camcorder for the first
time.
34
Compatible Recording Media
For the latest information about recording media tested for use with this camcorder, visit your local Canon Web
site.
CFast cards
CFast 2.0-compliant cards.
SD cards
As of March 2015, the recording function has been tested using memory cards made by Panasonic, Toshiba
and SanDisk. For details about SD cards tested for use with this camcorder, visit your local Canon Web site.
Memory card type: . SD card, / SDHC card, 0 SDXC card
SD Speed Class*:
*
SD Speed Class is a standard that indicates the minimum guaranteed data transfer of SD cards. To record HD clips with a bit
rate of 35 Mbps, we recommend using SD cards rated CLASS 6 or 10. To record HD clips with a bit rate of 50 Mbps, we
recommend using SD cards rated CLASS 10.
IMPORTANT
• After repeatedly recording, deleting and editing scenes (fragmented memory), it will take longer to write data
on recording media and recording may stop. Save your recordings and initialize the recording media with the
camcorder.
• About CFast and SDXC cards: You can use CFast cards and SDXC cards with this camcorder but such
recording media are initialized using the exFAT file system.
- When using exFAT-formatted recording media with other devices (digital recorders, card readers, etc.), make
sure that the external device is compatible with exFAT. For more information on compatibility, contact the
computer, operating system or memory card manufacturer.
- If you use exFAT-formatted recording media with a computer OS that is not exFAT-compatible, you may be
prompted to format the memory card. In such case, cancel the operation to prevent data loss.
NOTES
• Proper operation cannot be guaranteed for all recording media.
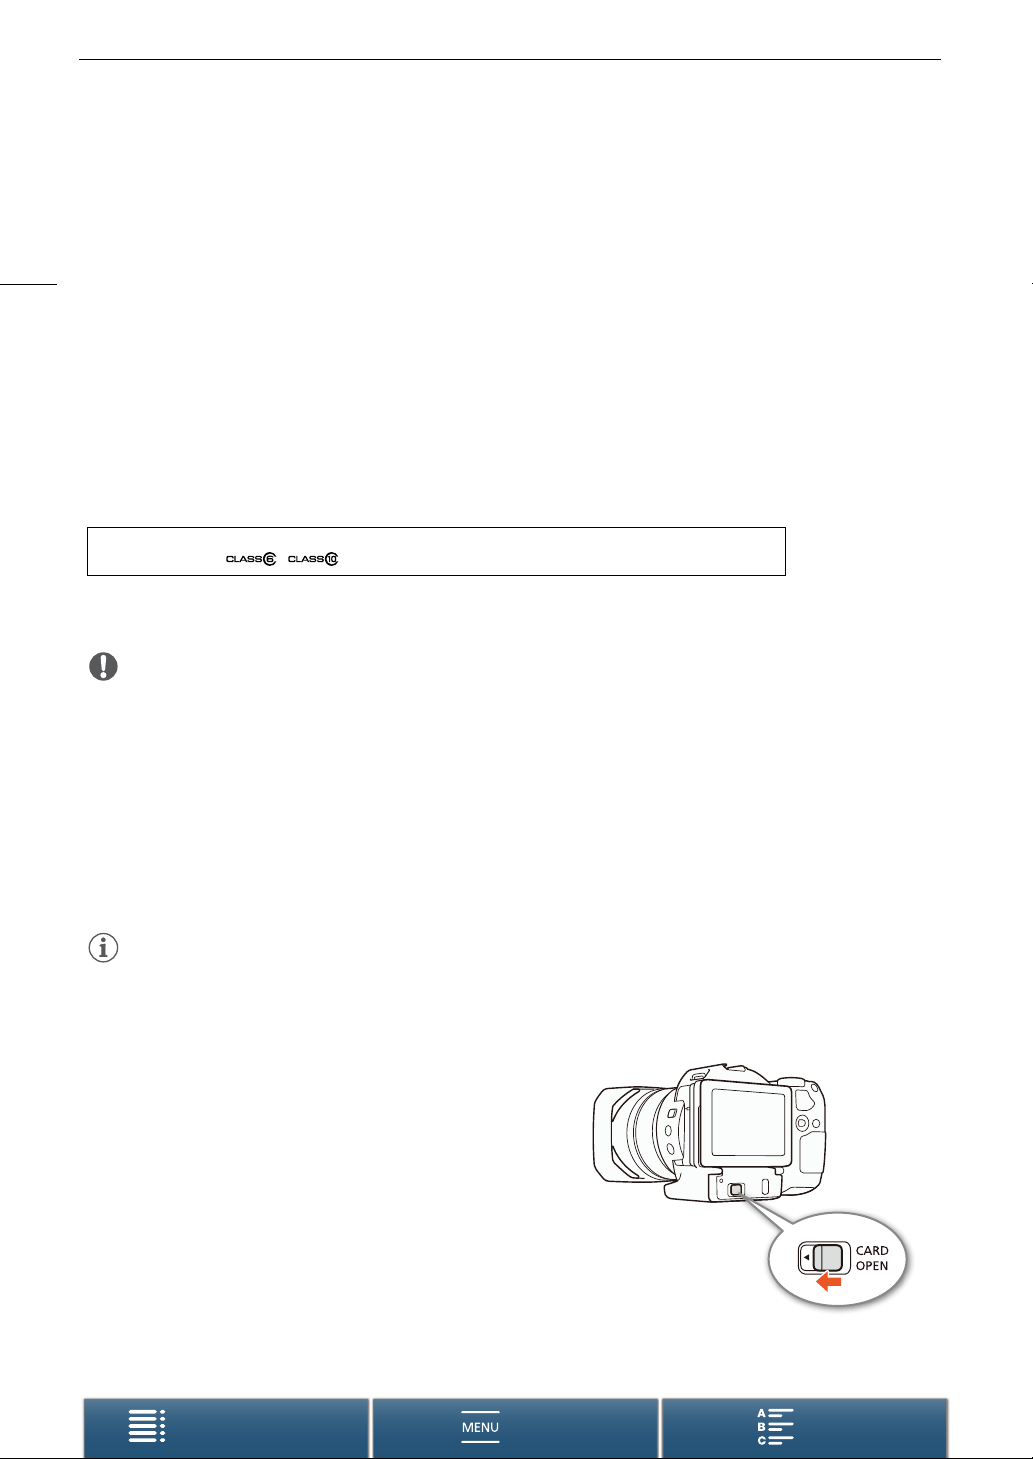
Inserting a CFast Card
1 Wait until the ACCESS indicator is off.
2 Slide the CARD OPEN switch in the direction of the
arrow and open the recording media slot cover.
Table of Contents Index
Menus
Page 35
Preparing Recording Media
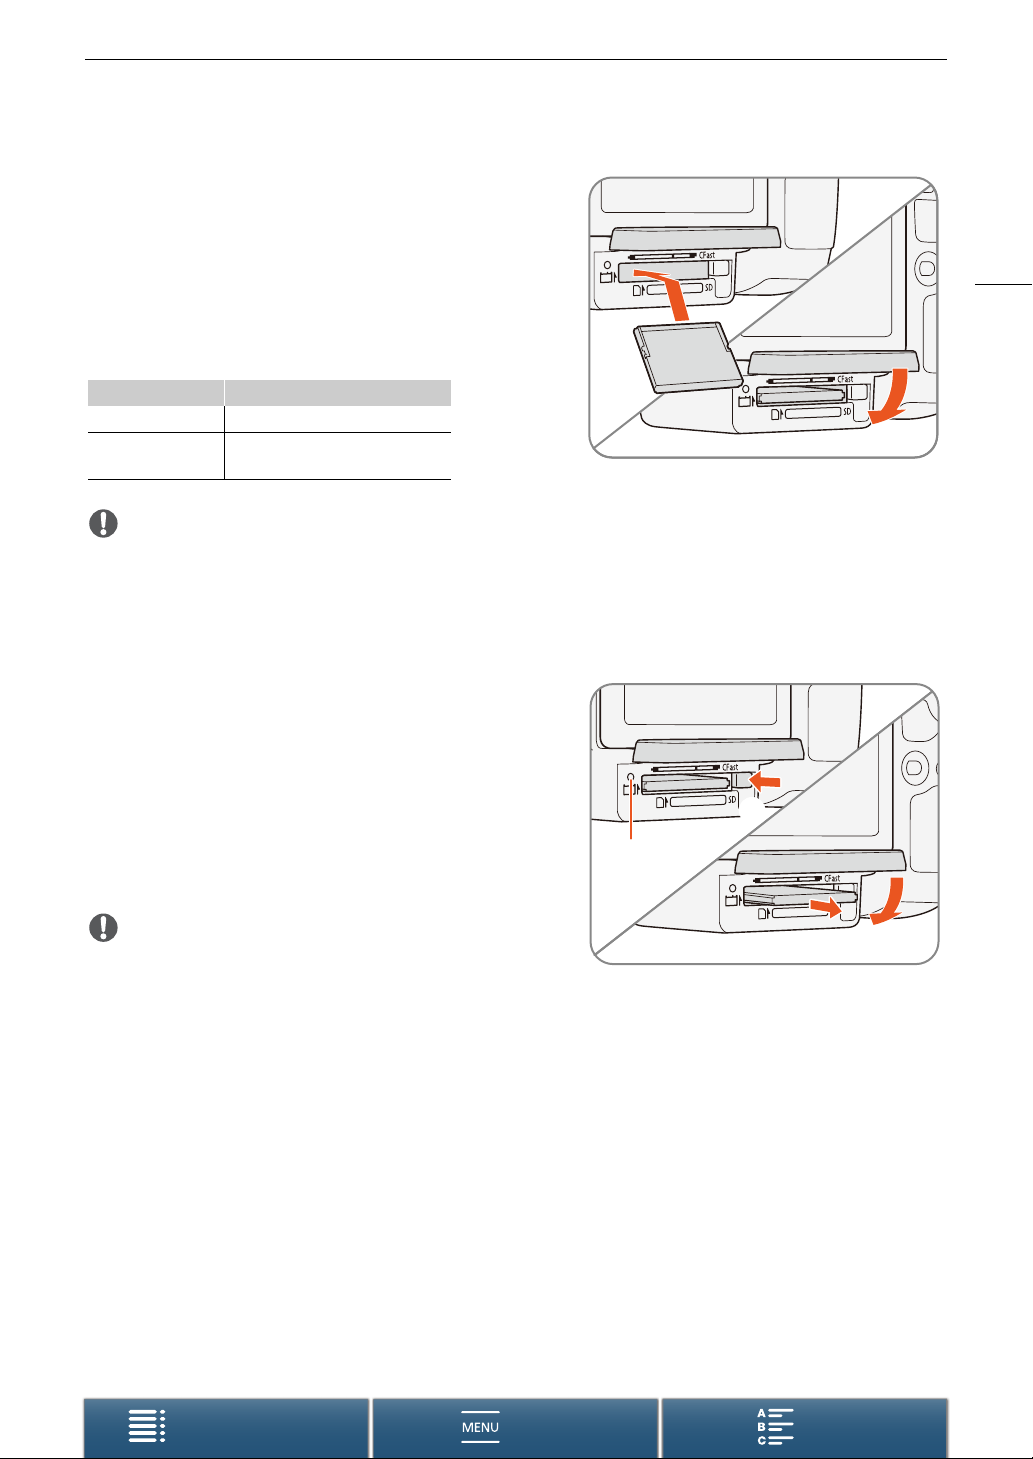
3 Insert the CFast card straight, with the label facing up,
all the way into the slot.
• Make sure the you insert the CFast card into the slot so
that the connectors in the card match the orientation
shown on the illustration to the left of the CFast card slot.
4 Close the recording media slot cover.
• Do not force the cover closed if the CFast card is not
correctly inserted.
ACCESS indicator Recording media status
On or flashing Accessing the recording media.
Off
IMPORTANT
• CFast cards have front and back sides that are not interchangeable. Inserting a CFast card facing the wrong
direction can cause a malfunction of the camcorder. Be sure to insert the CFast card as described in the
procedure above.
A recording media is not inserted or
it is not being accessed.
햴
햵
35
Removing a CFast card
1 Wait until the ACCESS indicator is off.
2 Slide the CARD OPEN switch in the direction of the
arrow and open the recording media slot cover.
3 Push in the CFast card release button to release the
CFast card.
4 Pull the CFast card all the way out and close the
recording media slot cover.
IMPORTANT
• Observe the following precautions while the ACCESS
indicator is on or flashing in red. Failure to do so may result in
permanent data loss.
- Do not disconnect the power source or turn off the camcorder.
- Do not open the recording media slot cover.
햴
ACCESS
indicator
햵
Table of Contents Index
Menus
Page 36
Preparing Recording Media
Inserting and Removing an SD Card
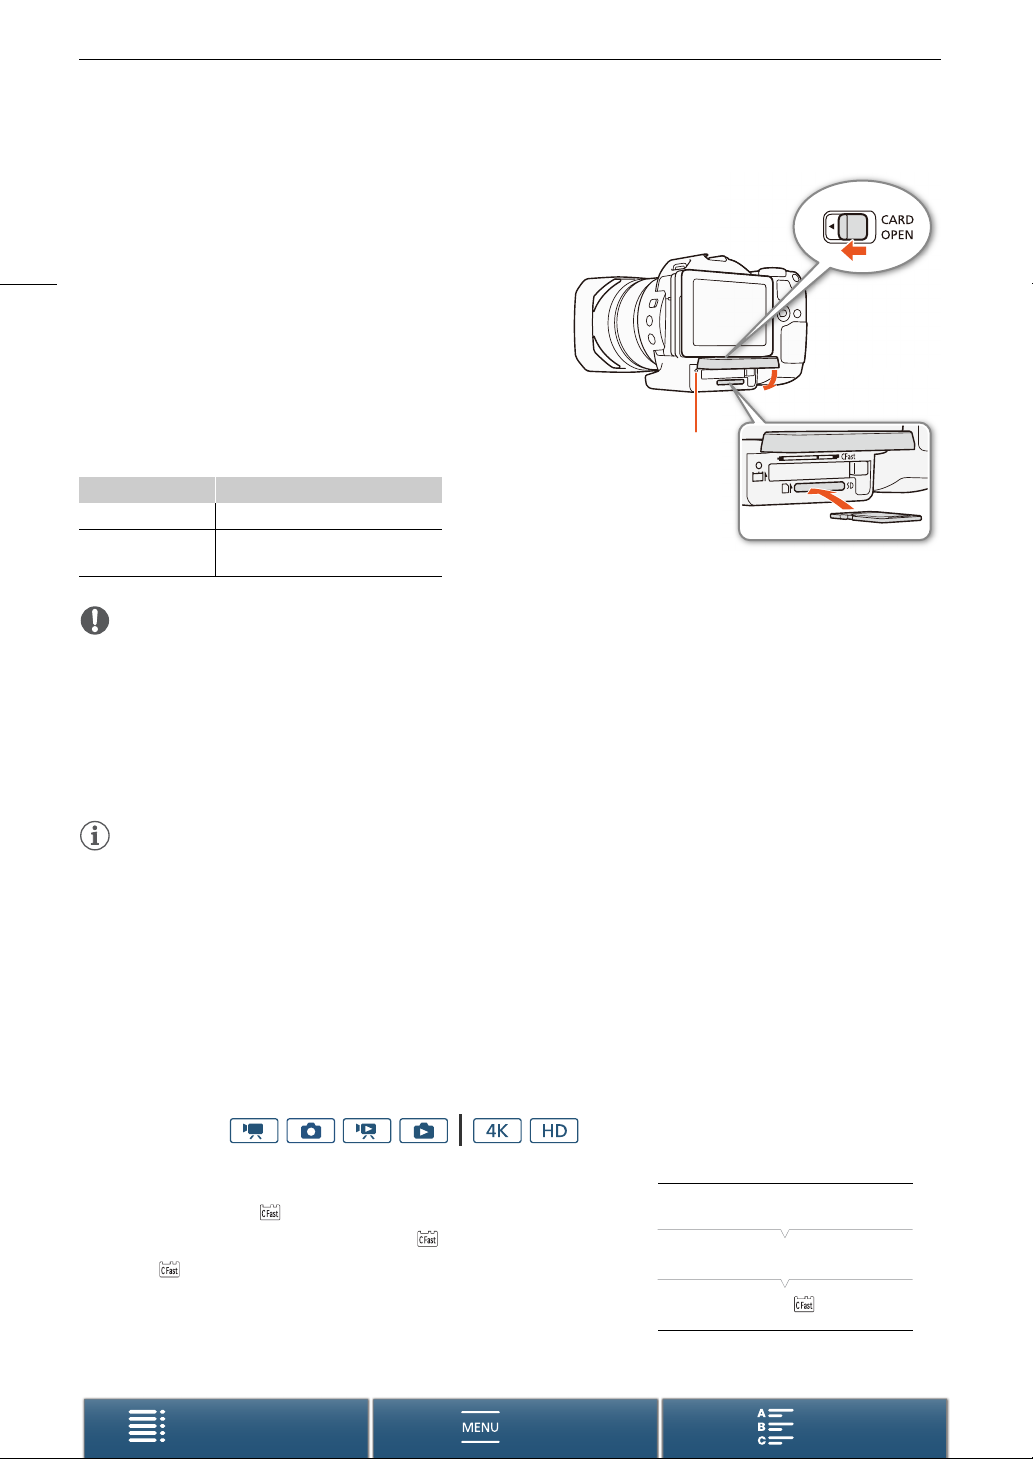
1 Make sure the ACCESS indicator is off.
2 Slide the CARD OPEN switch in the direction of the
36
arrow and open the recording media slot cover.
3 Insert the SD card, with the label facing up, all the way
into the SD card slot until it clicks.
• To remove the SD card, push the SD card once to release
it. When the SD card springs out, pull it all the way out.
4 Close the recording media slot cover.
• Do not force the cover closed if the SD card is not
correctly inserted.
ACCESS indicator Recording media status
On or flashing Accessing the recording media.
Off
IMPORTANT
• Observe the following precautions while the ACCESS indicator is on or flashing in red. Failure to do so may
result in permanent data loss.
- Do not disconnect the power source or turn off the camcorder.
- Do not open the recording media slot cover.
• SD cards have front and back sides that are not interchangeable. Inserting an SD card facing the wrong
direction can cause a malfunction of the camcorder. Be sure to insert the SD card as described in the
procedure above.
A recording media is not inserted or
it is not being accessed.
ACCESS indicator
햵
햴
햳
NOTES
• SD cards have a physical switch to prevent writing on the card so as to avoid the accidental erasure of the
card’s content. To write-protect the SD card, set the switch to the LOCK position.
Initializing the Recording Media
The first time you use any recording media with this camcorder, initialize it first. You can also initialize a recording
media to permanently delete all the data it contains.
When initializing an SD card, you can select quick initialization, which clears the file allocation table but does not
physically erase the stored data, or complete initialization, which deletes all data completely.
Operating modes:
1 Press the MENU button.
2 Open the [Initialize /8] submenu.
[3 Recording Setup] > [1] > [Initialize /8]
3 Touch [ Memory Card] or [8 Memory Card] and then touch
[Initialize].
• If you are initializing a CFast card, skip to step 5.
[3 Recording Setup]
[1]
[Initialize /8]
Table of Contents Index
Menus
Page 37
Preparing Recording Media
4 Touch [Complete Initialization] to delete all data completely.
5 Touch [Yes].
• If you are using the [Complete Initialization] option, you can touch [Cancel] to cancel the operation while it is
in progress. You can use the SD card but all data will be erased.
6 When the confirmation screen appears, touch [OK].
• The selected recording media is initialized and all the data it contains is erased.
IMPORTANT
• Initializing a recording media will permanently erase all data. Lost data cannot be recovered. Make sure you
save important recordings in advance.
• Depending on the SD card, the complete initialization may take up to a few minutes.
Recovering Data on a Recording Media
Some actions, such as suddenly turning off the camcorder or removing the recording media while data is being
recorded, can cause data errors on the recording media. In such case, you may be able to recover the data if a
message is displayed indicating that a clip needs recovering. You can recover the clips from a playback index
screen.
37
Operating modes:
1 Open the index screen with the clip you want to recover (A 103).
2 Select the clip to recover.
• The clip is indicated by a [?] in the thumbnail.
3 When the camcorder prompts you to recover the clip, touch [Yes].
4 After the clip has been recovered, touch [OK].
NOTES
• This procedure may delete clips shorter than 0.5 seconds in length. Additionally, up to 0.5 seconds may be
deleted from the end of the clips.
• In some cases, it may not be possible to recover the data. This is more likely when the file system is corrupted
or the recording media is physically damaged.
• Only clips recorded with this camcorder can be recovered.
Table of Contents Index
Menus
Page 38
Using the Remote Controller
Using the Remote Controller
The camcorder can be operated remotely. You can use the supplied remote controller as described in this
section. You can also use the camcorder’s network functions and wirelessly connect a compatible device to
control the camcorder. For details about wirelessly controlling the camcorder, refer to
38
Controlling the Camcorder from a Network Device
Operating modes:
(A 127).
Inserting the Battery
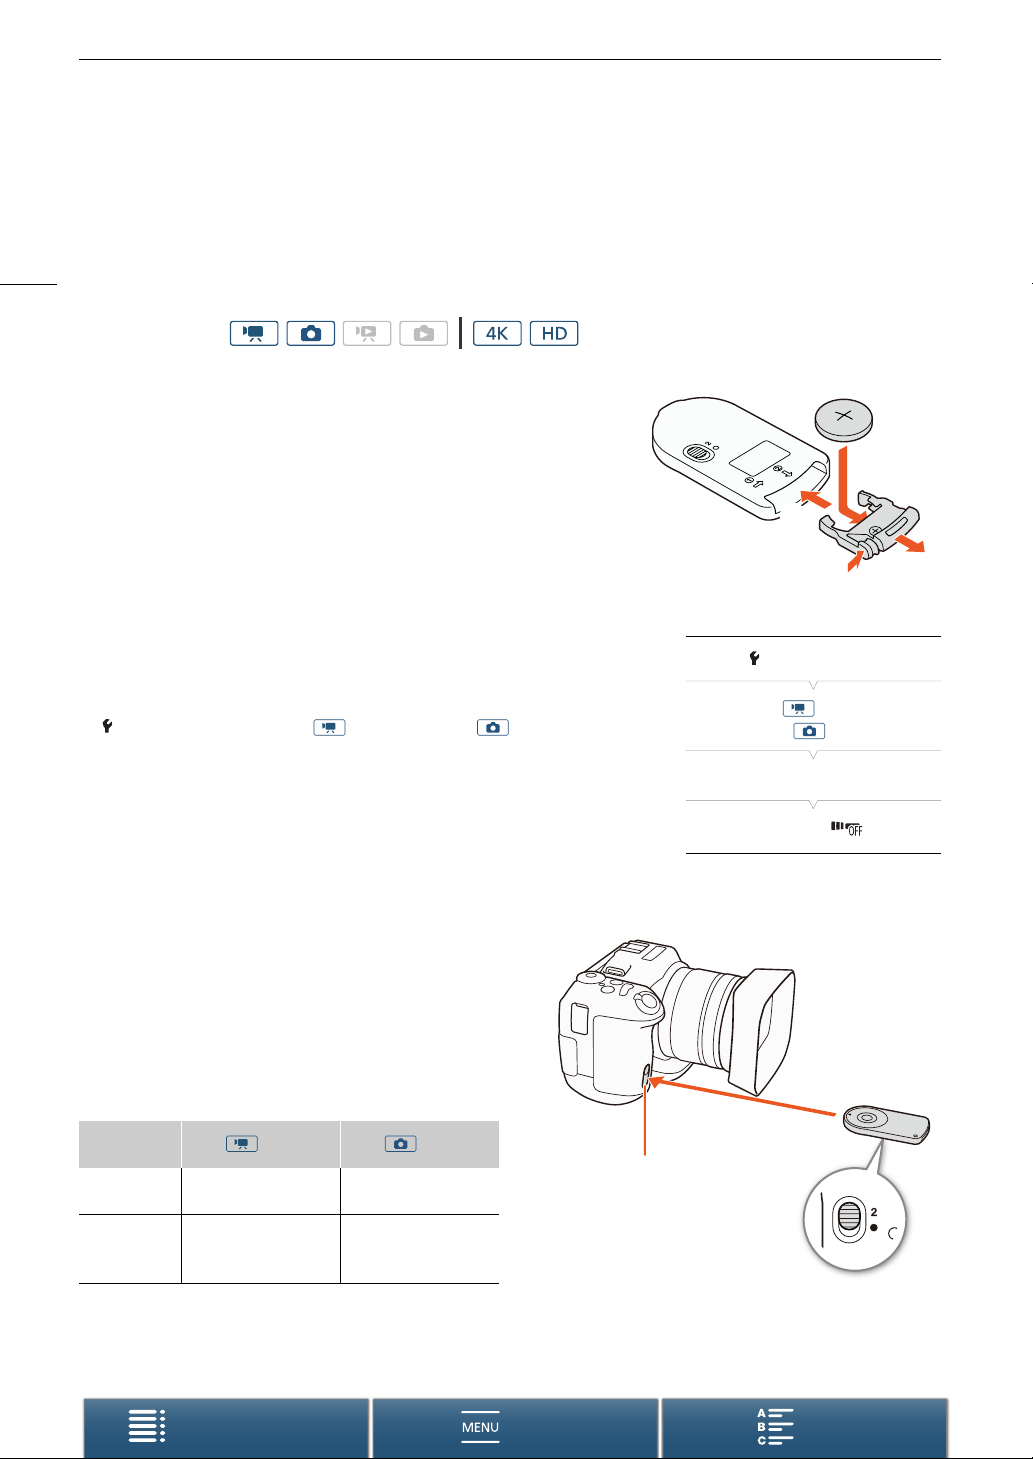
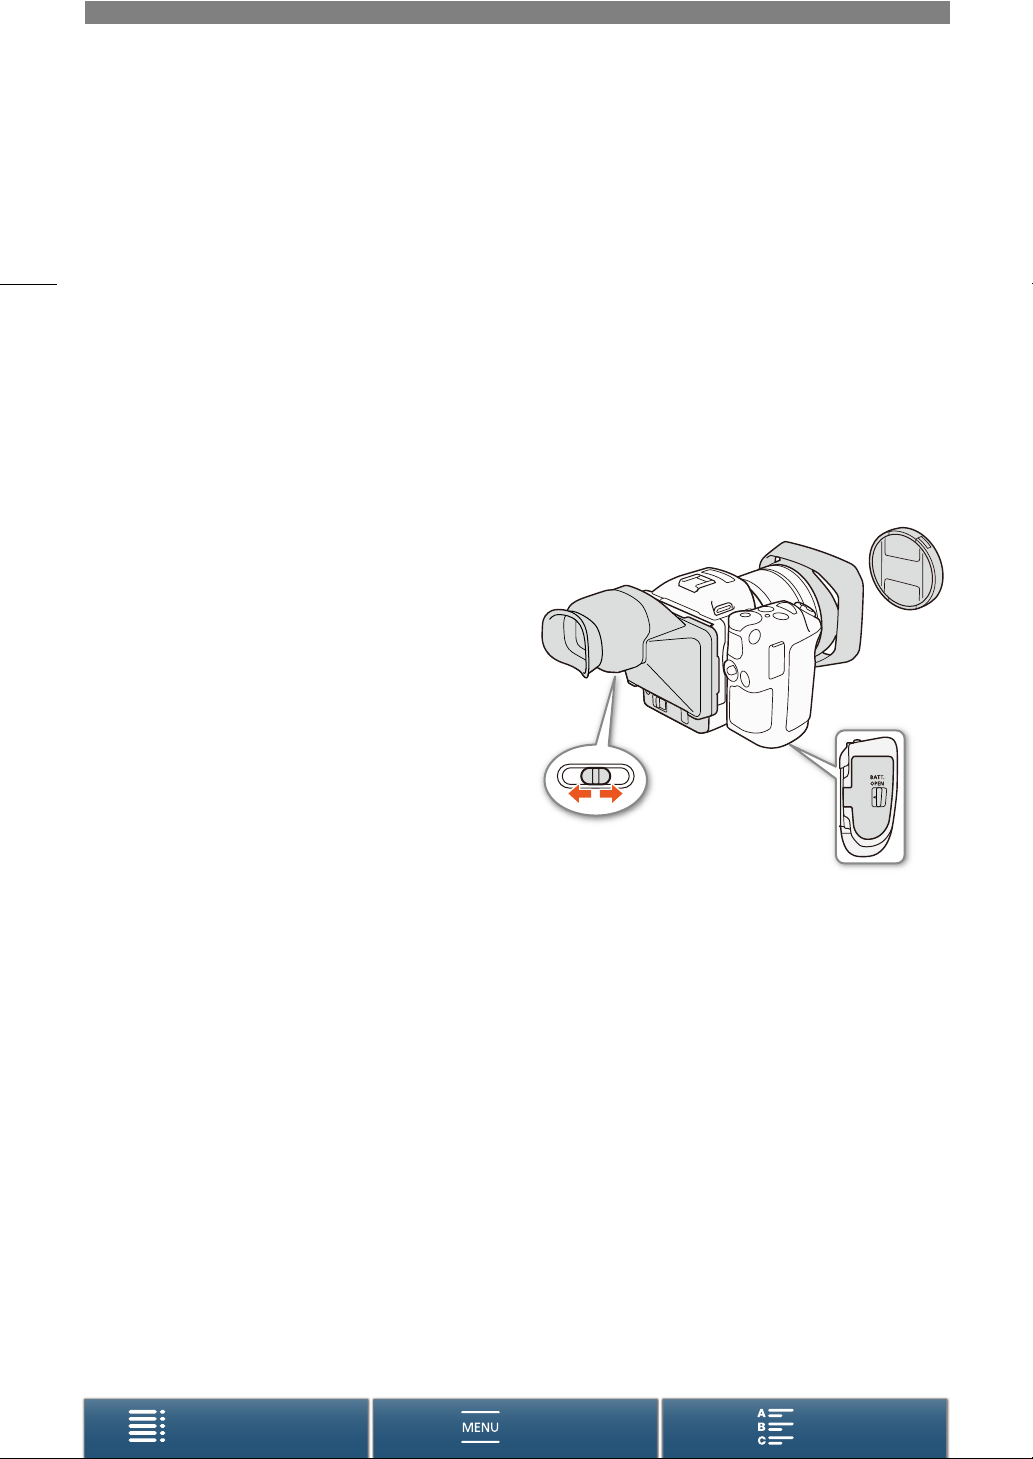
Insert the supplied lithium button battery into the remote controller before
use.
1 Press the tab in the direction of the arrow (햲) and pull out the battery
holder (햳).
2 Place the lithium button battery with the + side facing up (햴).
3 Insert the battery holder (햵).
Browser Remote:
햵
햲
햴
햳
Activating the Remote Sensor
1 Press the MENU button.
2 Open the [Wireless Remote Control] submenu.
[ System Setup] > [2] (in mode) or [1] (in mode) >
[Wireless Remote Control]
3 Select [i On] and then touch [X].
Using the Remote Controller to Operate the Camcorder
When using the remote controller, point it at the camcorder’s
remote sensor.
• The position of the delay switch on the remote controller
determines how the remote controller operates. Refer to
the following table.
Delay switch
position
2
‹
Starts and stops
recording a video clip.
Takes a photo, even
while recording video
clip.
mode mode
Takes a photo after a
2-second delay.
Takes a photo
immediately.
Remote sensor
[ System Setup]
[2] (in mode) or
[1] (in mode)
[Wireless Remote Control]
[j Off ]
Delay switch (bottom side
of remote controller)
Table of Contents Index
Menus
Page 39
Using the Remote Controller
NOTES
• The camcorder may not operate correctly when used under fluorescent or LED lights. Make sure to use the
camcorder away from such light sources as much as possible.
• The camcorder may not operate correctly when a remote controller for another device is pointed at the
camcorder and operated.
• When the camcorder cannot be operated with the supplied remote controller, or when it can only be operated
at very close range, replace the battery.
• The supplied remote controller may not operate correctly when the remote sensor is located under strong light
sources or direct sunlight.
• The camcorder may not operate correctly when a flash fires. If a flash is being used in the vicinity, deactivate
the remote sensor as described in the previous procedure.
39
Table of Contents Index
Menus
Page 40
Recording
3
40
Recording Video and Taking Photos
This section explains the recording basics. Before you begin recording clips*, make a test recording first to check
if the camcorder operates correctly. Record a 4K clip (on the CFast card) at 305 Mbps (frame rate of 29.97P or
23.98P) for approximately 5 minutes and an HD clip (on the SD card) at 50 Mbps (frame rate of 59.94P) for
approximately 15 minutes. Should the camcorder fail to operate correctly, refer to
For details on recording audio, refer to
* “Clip” refers to a single movie unit recorded with a single recording operation.
Preparing to Record
1 Remove the lens cap.
2 Attach the lens hood (
attach the viewfinder unit (
3 Attach a charged battery pack to the camcorder
(
A 21).
4 Insert recording media as necessary (
• Insert a CFast card to record 4K clips; insert an SD
card to record HD clips and photos.
5 Adjust the viewfinder unit, if necessary (A 25).
A 24) and, if necessary,
Recording Audio
A 24).
A 34, 36).
(A 81).
Tro ub le sh oot in g
(A 142).
Table of Contents Index
Menus
Page 41
Recording Video and Taking Photos
Basic Recording
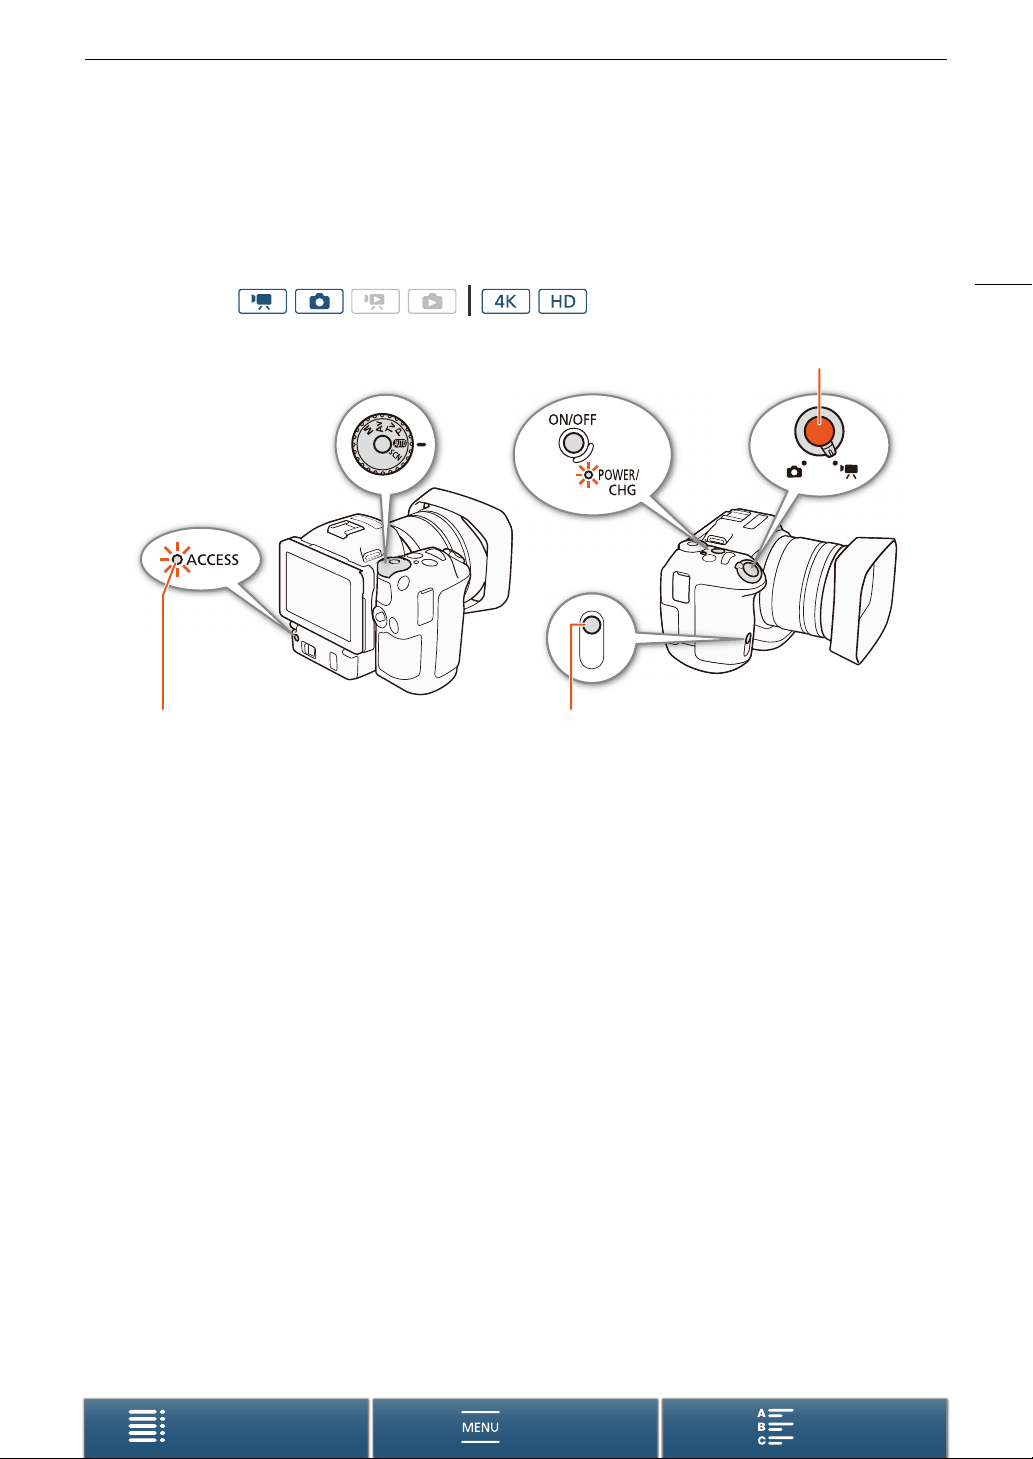
This camcorder uses the same button to record video clips and take photos. In this manual, when you are
recording video clips, this button is referred to as the START/STOP button; when you are shooting photos, it is
referred to as the PHOTO button.
Operating modes:
START/STOP (PHOTO) button
41
ACCESS indicator
1 Set the movie/photo switch to v to record clips or { to take photos.
2 Set the shooting mode dial to the desired shooting mode (A 52).
3 Press the ON/OFF button to turn on the camcorder.
• The POWER/CHG indicator will illuminate in green.
To shoot clips
4 Press the START/STOP button.
• Recording starts. The tally lamp illuminates and the Ñ icon at the top of the screen changes to Ü.
• The ACCESS indicator flashes in red intermittently as the camcorder records to the recording media.
• You can also take a photo while recording a clip (A 42).
5 Press the START/STOP button to stop the recording.
• The clip is recorded on the recording media and the camcorder enters record standby mode. The tally lamp
will also go out.
6 Press and hold the ON/OFF button until the POWER/CHG indicator goes out.
• Make sure the ACCESS indicator has also gone out.
Ta lly lam p
Table of Contents Index
Menus
Page 42
Recording Video and Taking Photos
To take photos
4 Press the PHOTO button halfway.
• When the FOCUS switch is set to A (autofocus): If the subject is not in focus, g will flash in yellow. Once
42
the focus is automatically adjusted, g will turn green and one or more AF (autofocus) frames will appear.
You can also change the autofocus method (A 69).
5 Press the PHOTO button fully.
• The ACCESS indicator flashes in red intermittently as the camcorder records to the recording media.
6 Press and hold the ON/OFF button until the POWER/CHG indicator goes out.
• Make sure the ACCESS indicator has also gone out.
IMPORTANT
• Observe the following precautions while the ACCESS indicator is on or flashing in red. Failure to do so may
result in permanent data loss.
- Do not open the recording media slot cover and do not remove the recording media.
- Do not disconnect the power source or turn off the camcorder.
• Be sure to save your recordings regularly (A 116, 118), especially after making important recordings. Canon
shall not be liable for any loss or corruption of data.
NOTES
• The built-in microphone may pick up operation noise from the camcorder while recording. Using a
commercially-available external microphone may reduce this noise.
• You can also press the transmit button on the supplied remote controller to record clips and take photos.
• You can select the length of time to review a photo after it is recorded (A 137).
Taking Photos During Mode
If you set an assignable button to [ Photo] (A 100), you can take a photo while recording a clip or while
the camcorder is in record standby mode. When you press the button, {æ8 will appear on the upper right of
the screen.
The size of the photo depends on whether the resolution is set to 4K or HD. When the resolution is set to 4K, the
photo size will be 3840x2160; when set to HD, 1920x1080.
NOTES
• You can even capture a photo in mode while a clip is being played back (A 109).
• You cannot take a photo while recording a clip when an external device is connected to the HDMI OUT
terminal or when [Slow & Fast Motion] is set to [x1/4] or [x1/2].
Table of Contents Index
Menus
Page 43
Recording Video and Taking Photos
Selecting the Photo Size
You can select the size of recorded photos.
Operating modes:
1 Press the MENU button.
2 Open the [Photo Aspect Ratio] submenu.
[3 Recording Setup] > [1] > [Photo Aspect Ratio]
3 Select the desired size and then touch [X].
[3 Recording Setup]
[1]
[Photo Aspect Ratio]
[ 4:3 4000x3000]
Shooting Continuous Photos (Drive Mode)
Using drive mode, you can take a burst of photos of your subject.
Operating modes:
1 Touch [FUNC.] and then touch [Drive Mode].
2 Select the desired option and then touch [X].
Options
[ Single Shot]:
[p Continuous]: Takes a burst of photos as long as you hold the PHOTO button pressed down. The same
[ AF Continuous]: Takes a burst of photos as long as you hold the PHOTO button down. The focus will be
Takes a single photo when you press the PHOTO button.
focus applied to the first photo will also be applied to the entire series. The camcorder will
shoot at a rate of approx. 3.8 shots/second.
adjusted throughout the series. Release your finger from the PHOTO button to stop shooting.
43
NOTES
• About the [ AF Continuous] option: Depending on the scene mode when the shooting mode is set to
ƒ, the zoom position and other camera settings, the interval between shots may not be the same or the
shooting speed may decrease.
Table of Contents Index
Menus
Page 44
Recording Video and Taking Photos
Remote Operation Using Browser Remote
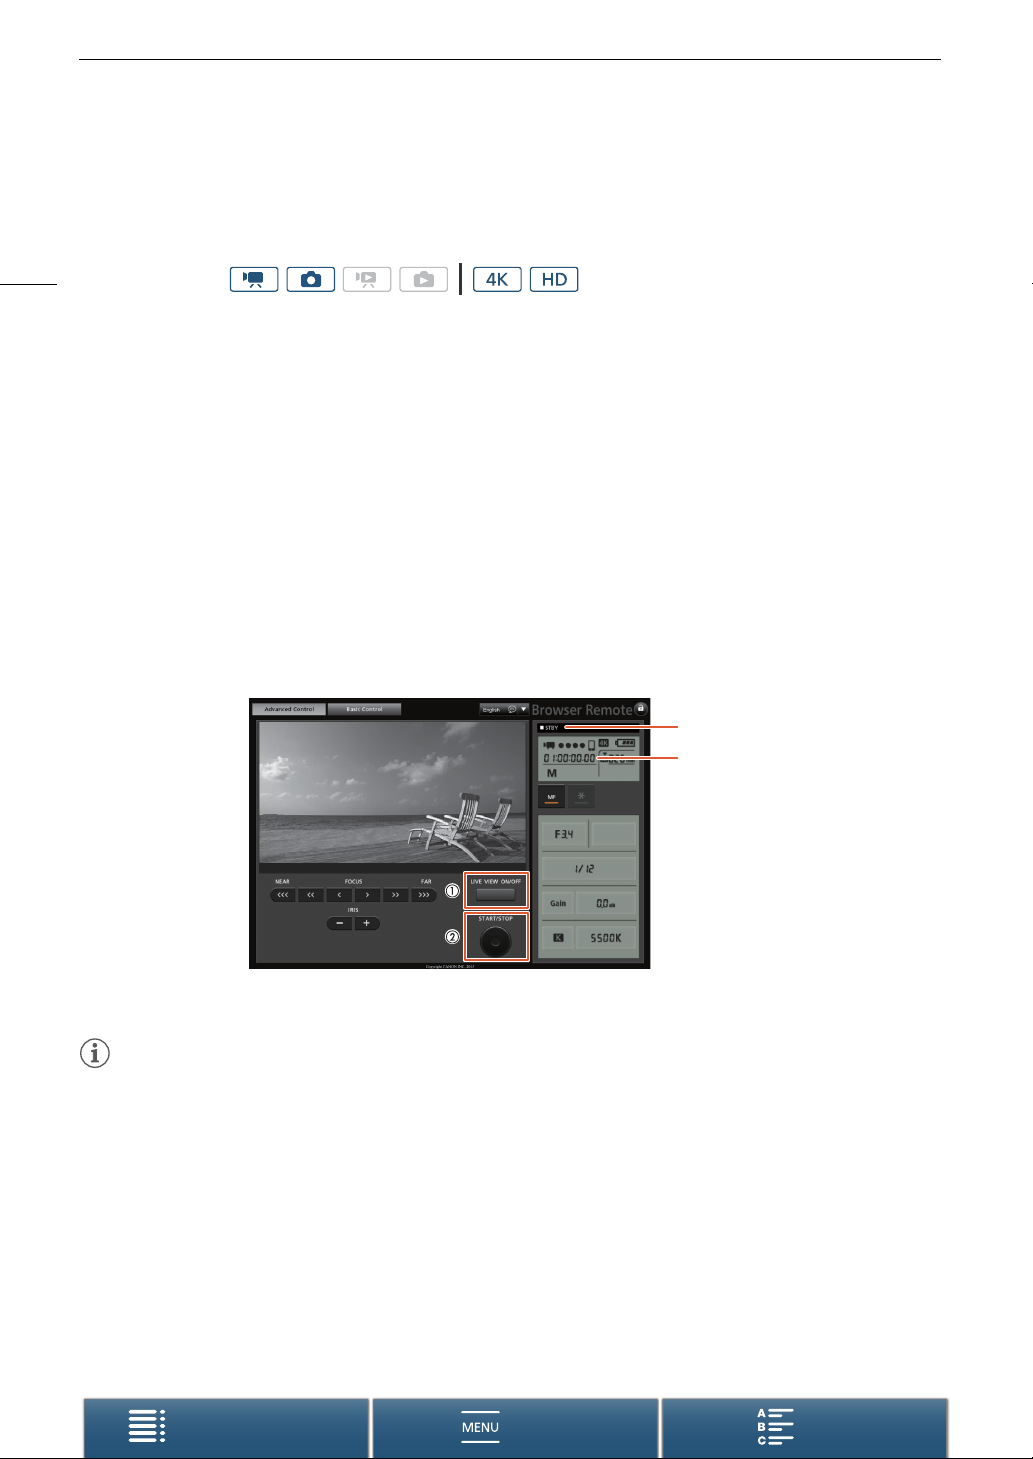
After completing the necessary preparations (A 127), you can start and stop recording from a connected
device using the Browser Remote application.
44
Operating modes:
1 Press [LIVE VIEW ON/OFF] to show the camcorder’s live view image on the Browser Remote screen.
• The position of the camcorder’s movie/photo switch will determine whether the Browser Remote screen
displays controls for recording clips or taking photos.
To shoot clips
2Press [START/STOP].
• The recording operation indicator changes to [ÜREC] and the center of the START/STOP button lights up
in red.
• The time code displayed on the Browser Remote screen is the same as on the camcorder.
• Press [START/STOP] again to stop the recording.
To take photos
2 Press [PHOTO].
Recording operation
Time code
Screenshot for recording clips
NOTES
• The Browser Remote application has a key lock function that is limited only to the controls on the application’s
screens (you will still be able to use the controls on the camcorder). Press [D] to lock the application’s
controls; press [C] to reactivate them.
Table of Contents Index
Menus
Page 45
Recording Video and Taking Photos
Onscreen Icons and Displays
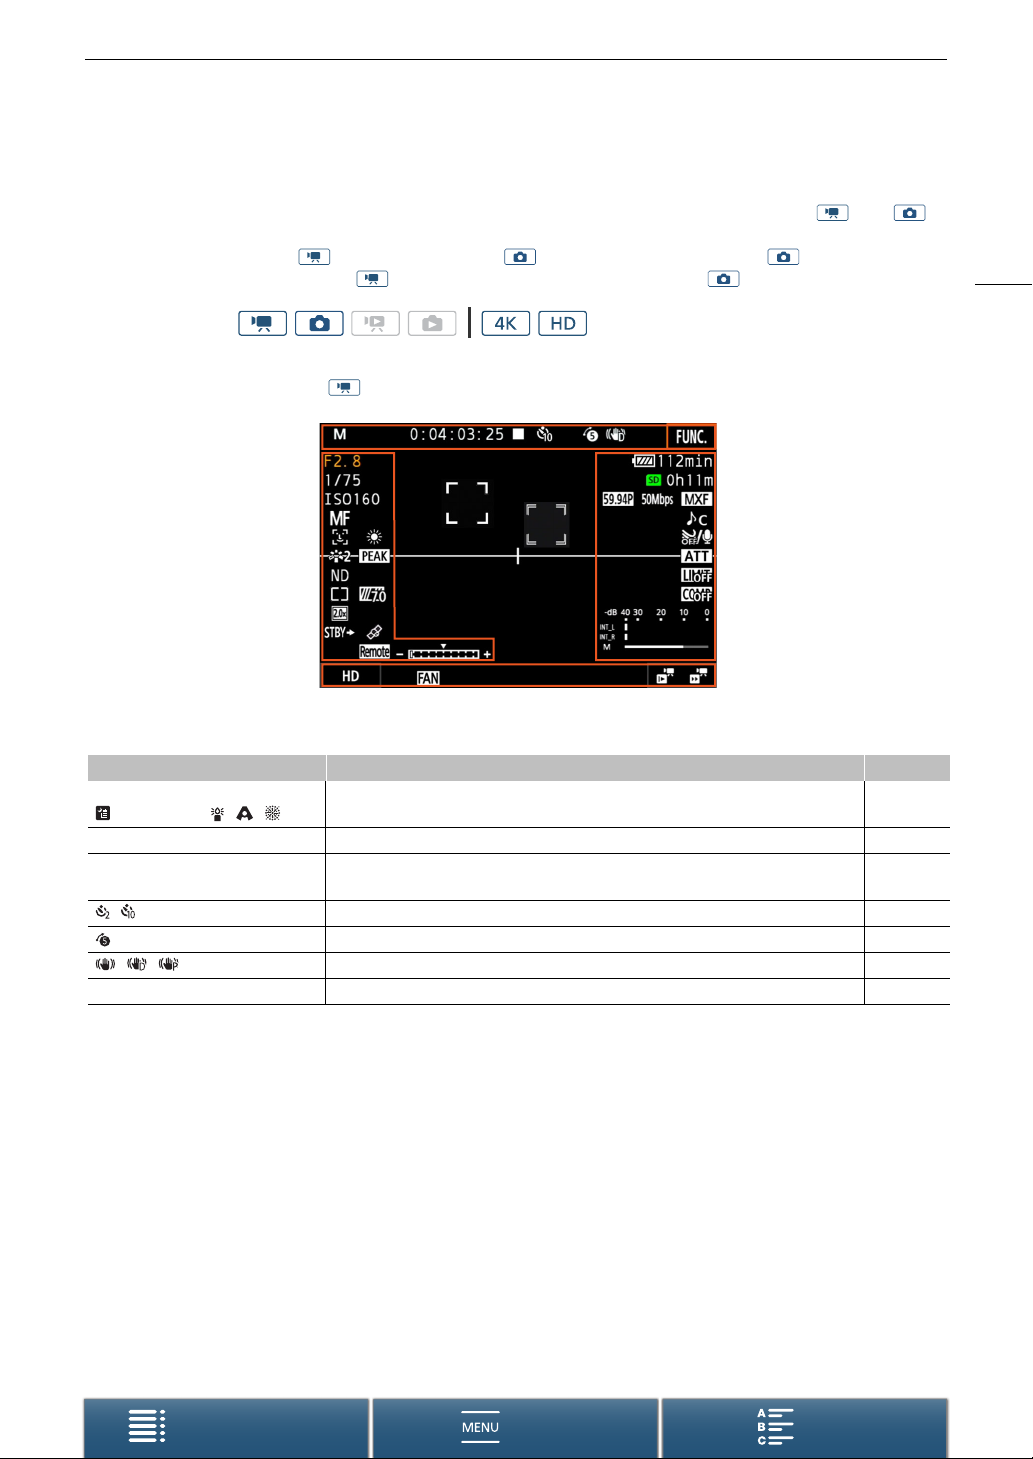
Refer to this section for an explanation of the various icons and screen displays that appear in and
modes. They may differ depending on the shooting mode and settings in the FUNC. menu and setup menus.
Some icons that appear in mode also appear in mode. If the camcorder is in mode and you do
not find an icon in these tables for mode, refer to
Operating modes:
Icons that appear during mode
Icons that appear during mode
(A 48).
45
Icons on the top of the screen
Icon/Display Description A
n, “, ‚, ’, N, H, û,
, K, L, ÿ, , ,
0:00:00.00, 0:00:00:00 Time code 78
Ü, Ñ Recording operation
, , 0, v Self timer 94
, , Image stabilizer 76
F Button to open the FUNC. menu. 32, 133
Shooting mode
Ü: recording, Ñ: record standby
Pre-recording mode 92
52
40
Table of Contents Index
Menus
Page 46
Recording Video and Taking Photos
Icons on the left side of the screen
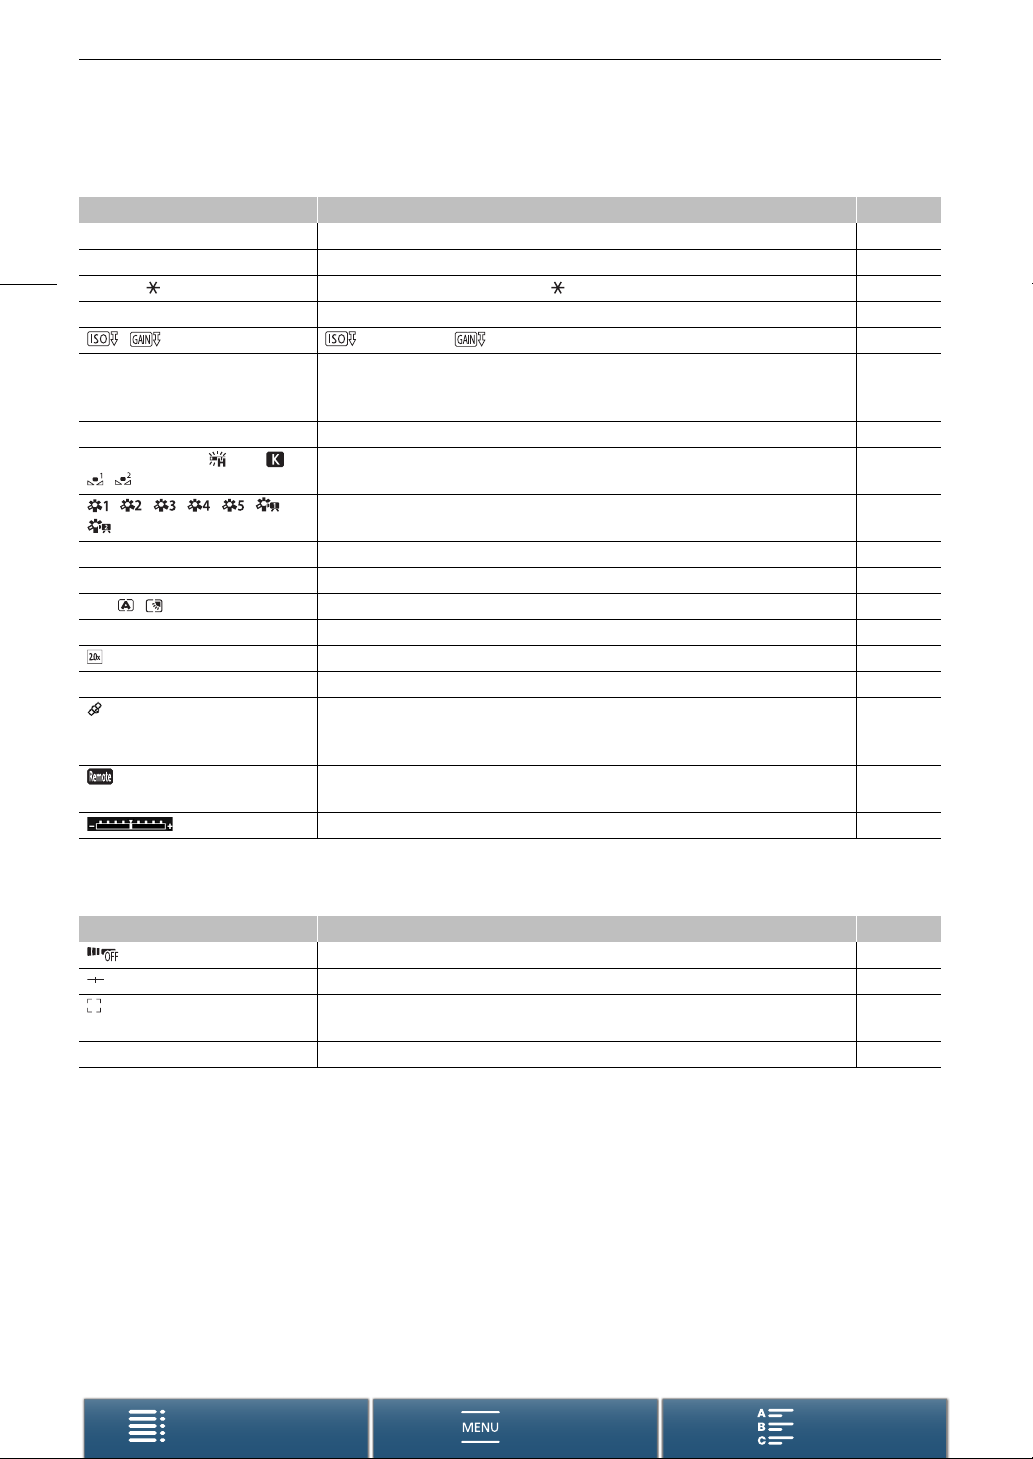
Icon/Display Description A
F0.0 Aperture value 52, 54
1/0000 Shutter speed 52, 55
46
y +0/0, y +0/0: exposure adjustment value, : exposure locked 61
ISO00000, 00dB ISO00000: ISO speed, 00dB: gain 52
, : auto ISO limit, : AGC limit 59
@, D 0.0ft Focus mode
• While focusing in manual focus mode, the estimated distance to the subject will be
displayed as well.
} Face detection and tracking 74
¼, ½, ¾, ¿, , É, , , White balance 64
, , , , , , Looks 66
O Peaking 72
ND ND filter 136
¬, , Light metering mode 63
z, { Zebra patterns 77
Digital tele-converter 68
STBYó, RECó HDMI recording command 140
GPS signal: continuously on - satellite signal acquired; flashing - satellite signal not
acquired.
• Displayed only when an optional GP-E2 GPS Receiver is connected to the camcorder.
Browser Remote: in white – preparations for connections completed; in yellow –
connecting to or disconnecting from the control device.
Exposure bar 54
69
89
127
Icons in the center of the screen
Icon/Display Description A
Remote sensor disabled 38
Onscreen markers 77
Face detection. When a face is detected, a white frame will appear around the main
subject’s face.
£ User-selected tracking frame 74
Table of Contents Index
Menus
74
Page 47
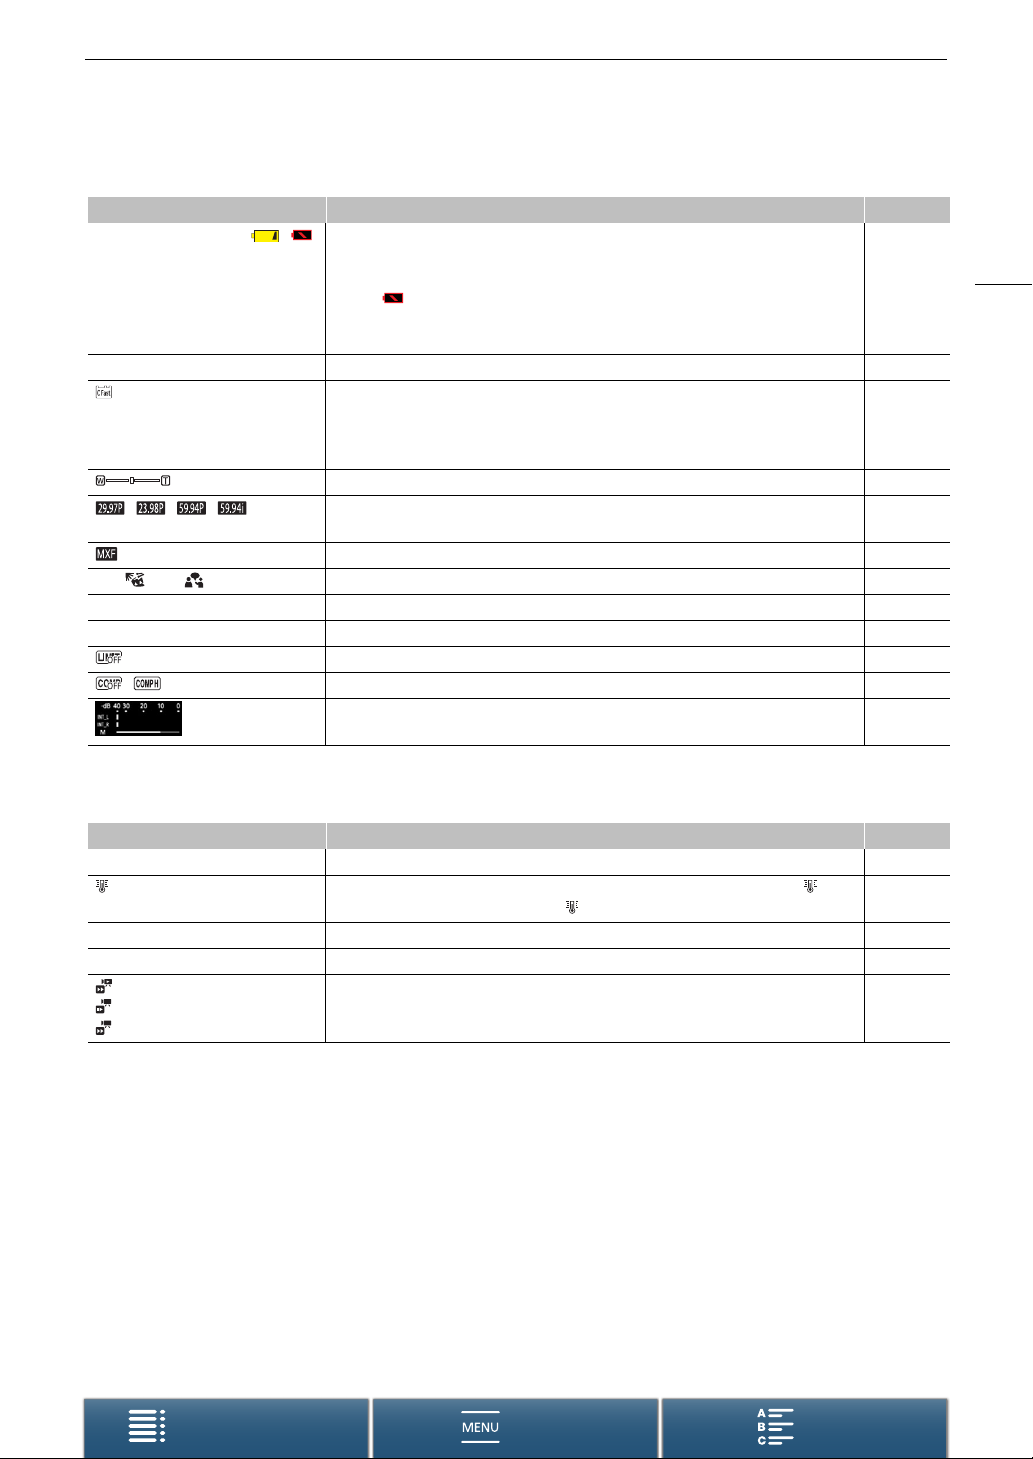
Recording Video and Taking Photos
Icons on the right side of the screen
Icon/Display Description A
è, é, ê, ë, ,
000 min
{Ð8 Recording a photo. If an SD card error occurs, 9 will appear instead. 42
0h00m, 8 0h00m Recording media status and available recording time estimate
, , ,
000 Mbps
’, , ‚, , “, ”, „ Audio scenes 81
ë, à Wind screen 83
å Built-in/external microphone attenuator 84, 85
, Audio compressor 87
Remaining battery charge
The icon shows an estimate of the remaining charge. The remaining recording time is
displayed, in minutes, next to the icon.
• When is displayed, replace the battery pack with a fully charged one.
• Depending on the conditions of use, the actual battery charge may not be indicated
accurately.
• The remaining available space is displayed, in minutes, next to the icon.
• When the icon appears in red followed by [END], there is no more available space and
recording will stop.
Zoom indicator 68
Frame rate
Bit rate
File format 51
Audio limiter 86
Audio recording level 82
–
47
–
51
Icons on the bottom of the screen
Icon/Display Description A
4K, HD Button to open the [4K/HD] submenu and currently selected recording resolution (4K/HD). 51
When the camcorder’s internal temperature has risen to a predetermined level, will
appear in yellow. If it continues to rise, will appear in red.
` Cooling fan operation 50
^ Magnification (focus assistance function) 72
Button to open the [Slow & Fast Motion] submenu.
x1/4, x1/2
x2, x4, x10, x20, x60, x120, x1200
Currently selected slow motion rate.
Currently selected fast motion rate.
144
91
Table of Contents Index
Menus
Page 48
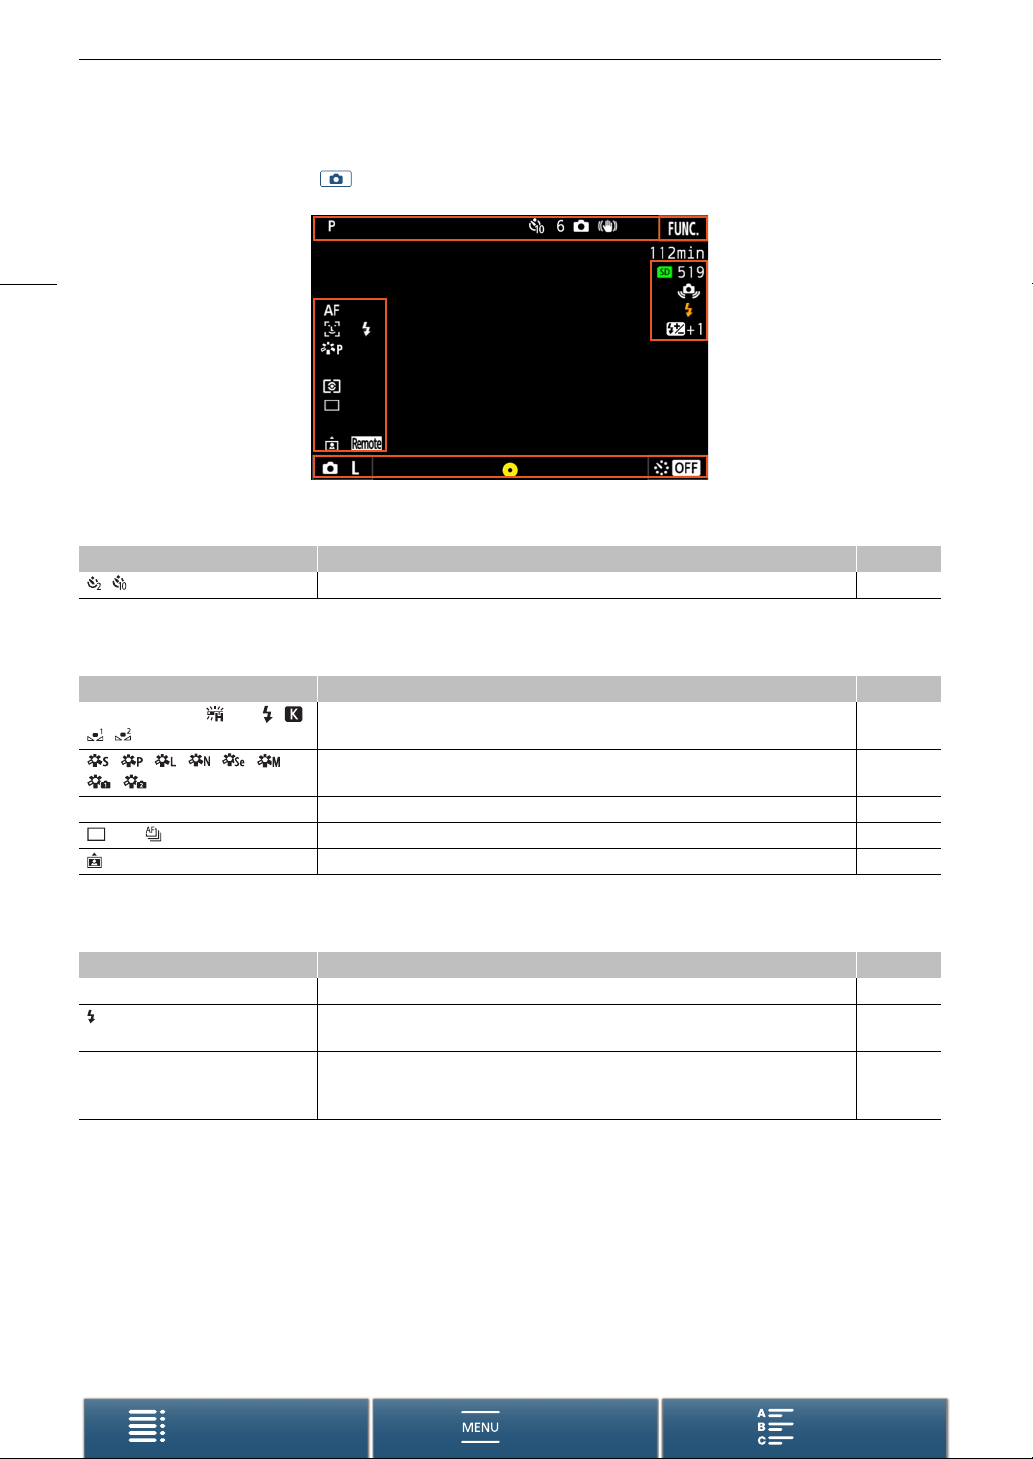
Recording Video and Taking Photos
Icons that appear during mode
48
Icons on the top of the screen
Icon/Display Description A
, , 0, { Self timer 94
Icons on the left side of the screen
Icon/Display Description A
¼, ½, ¾, ¿, , É, , , , White balance 64
, , , , , , , Looks 66
ª
, ¬, « Light metering mode 63
, p, Drive mode 43
Orientation detection 95
Icons on the right side of the screen
Icon/Display Description A
8000 Recording media and available number of photos. –
Optional Speedlite has been attached and turned on. When flash exposure compensation
has been set, the compensation level will also be displayed.
> Camcorder shake warning
• If this icon appears, we recommend stabilizing the camcorder, for example, by
mounting it on a tripod.
97
–
Table of Contents Index
Menus
Page 49
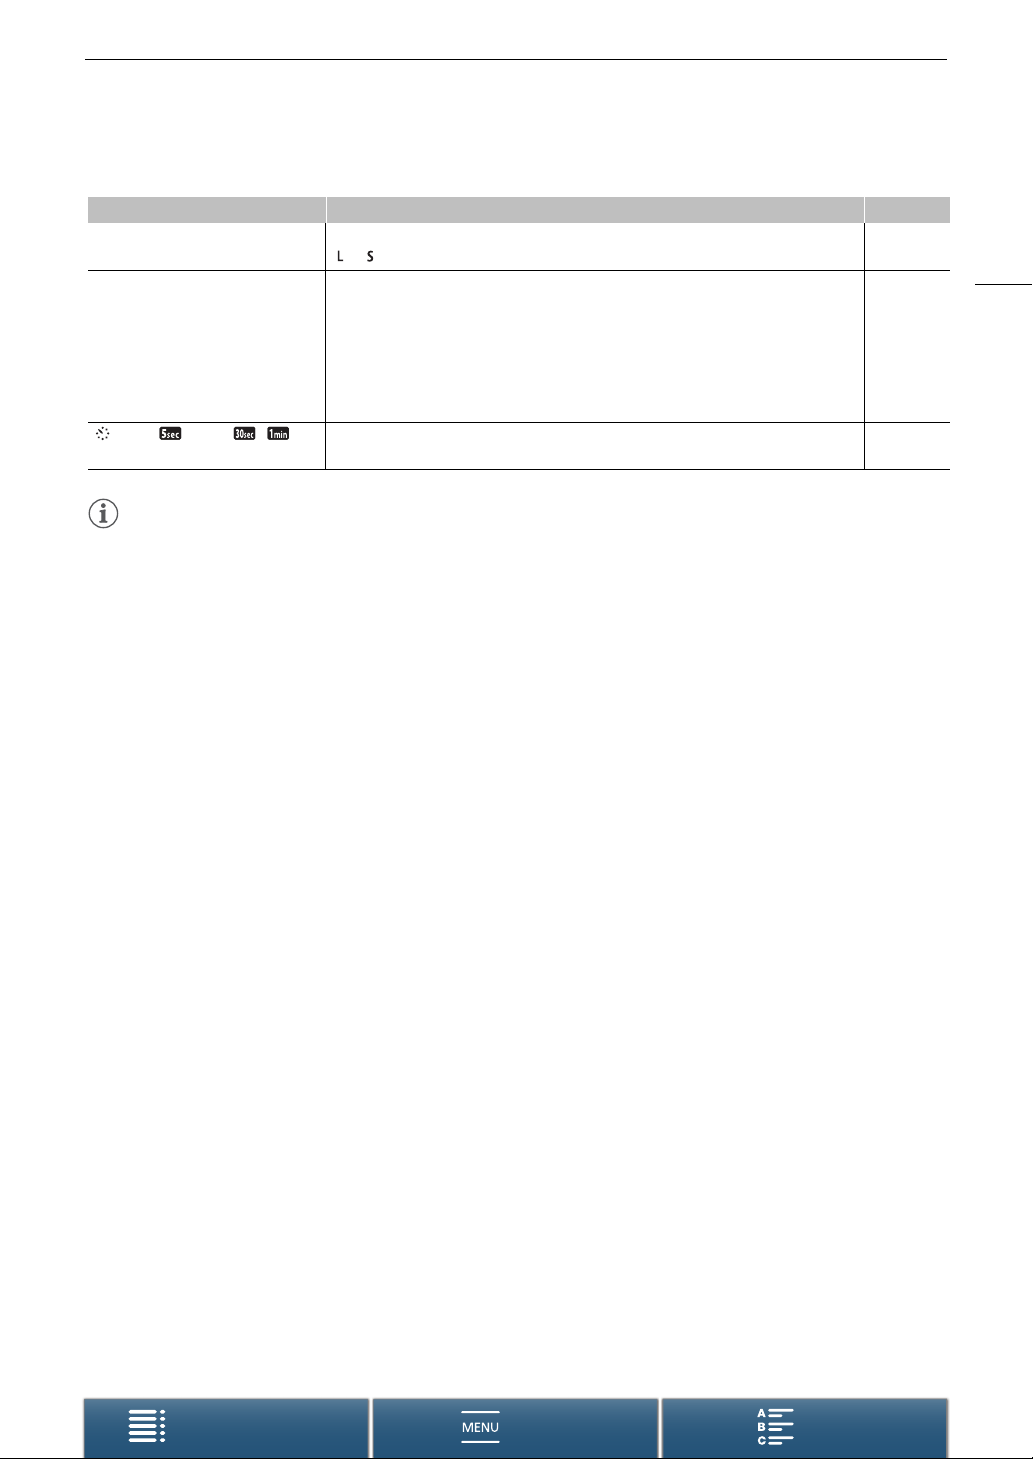
Recording Video and Taking Photos
Icons on the bottom of the screen
Icon/Display Description A
{L, {S Button to open the [Photo Aspect Ratio] submenu and currently selected photo size
( or ).
g Indicates whether the focus and/or exposure is locked while the PHOTO button is pressed
halfway.
• In green – focus and exposure are locked (during auto focus mode); exposure is locked
(manual focus mode).
• In yellow (flashing) – focus is not locked. If the zoom is operated while the icon is green
in autofocus mode, it will start flashing in yellow.
• In white (flashing) – the camcorder is attempting to focus on the subject.
, j, , G, , , @Button to open the [Interval Recording] submenu and currently selected interval length. 93
NOTES
• You can press the DISP. button to switch the onscreen displays in the following sequence.
Show all onscreen displays show only onscreen markers* and the recording operation display hide all
onscreen displays except the recording operation display.
* Only when an onscreen marker is selected (A 77).
43
–
49
Table of Contents Index
Menus
Page 50
Recording Video and Taking Photos
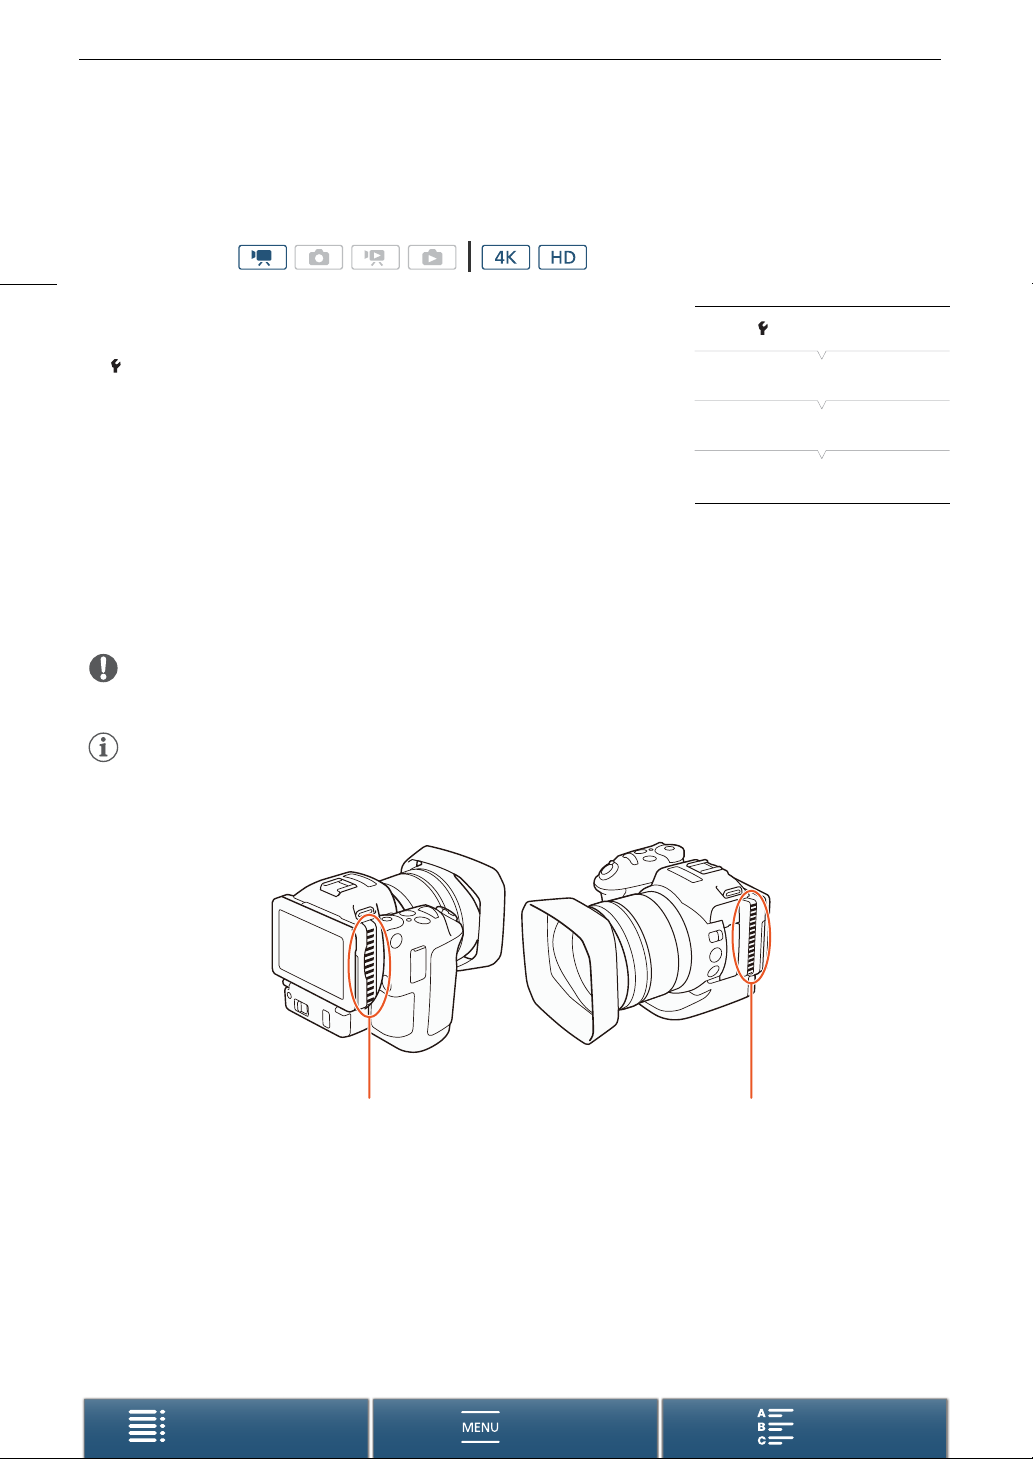
Using the Fan
The camcorder uses an internal cooling fan to reduce the camcorder’s internal heat.
Operating modes:
50
1 Press the MENU button.
2 Open the [Fan] submenu.
[ System Setup] > [1] > [Fan]
3 Select the desired option and then touch [X].
Options
[k Automatic]: The fan runs while the camcorder is not recording and it is
automatically turned off while the camcorder is recording
video (while the Ü icon appears at the top of the screen).
However, if the internal temperature of the camcorder is too high, the fan will be activated
automatically (in that case, ` will appear next to the b icon). When the camcorder’s temperature
has decreased sufficiently, the fan will be turned off. Use this setting when you do not want the
camcorder to pick up the operating sound of the cooling fan.
[i On]: The fan runs at all times. Use this default setting in most cases.
IMPORTANT
• While the fan is running, the exhaust vent will emit warm air.
NOTES
• Be careful not to cover with tape or otherwise obstruct the cooling fan’s air intake and exhaust vents (marked
as AIR INTAKE/EXHAUST VENT).
[ System Setup]
[1]
[Fan]
[i On]
Intake vent Exhaust vent
Table of Contents Index
Menus
Page 51
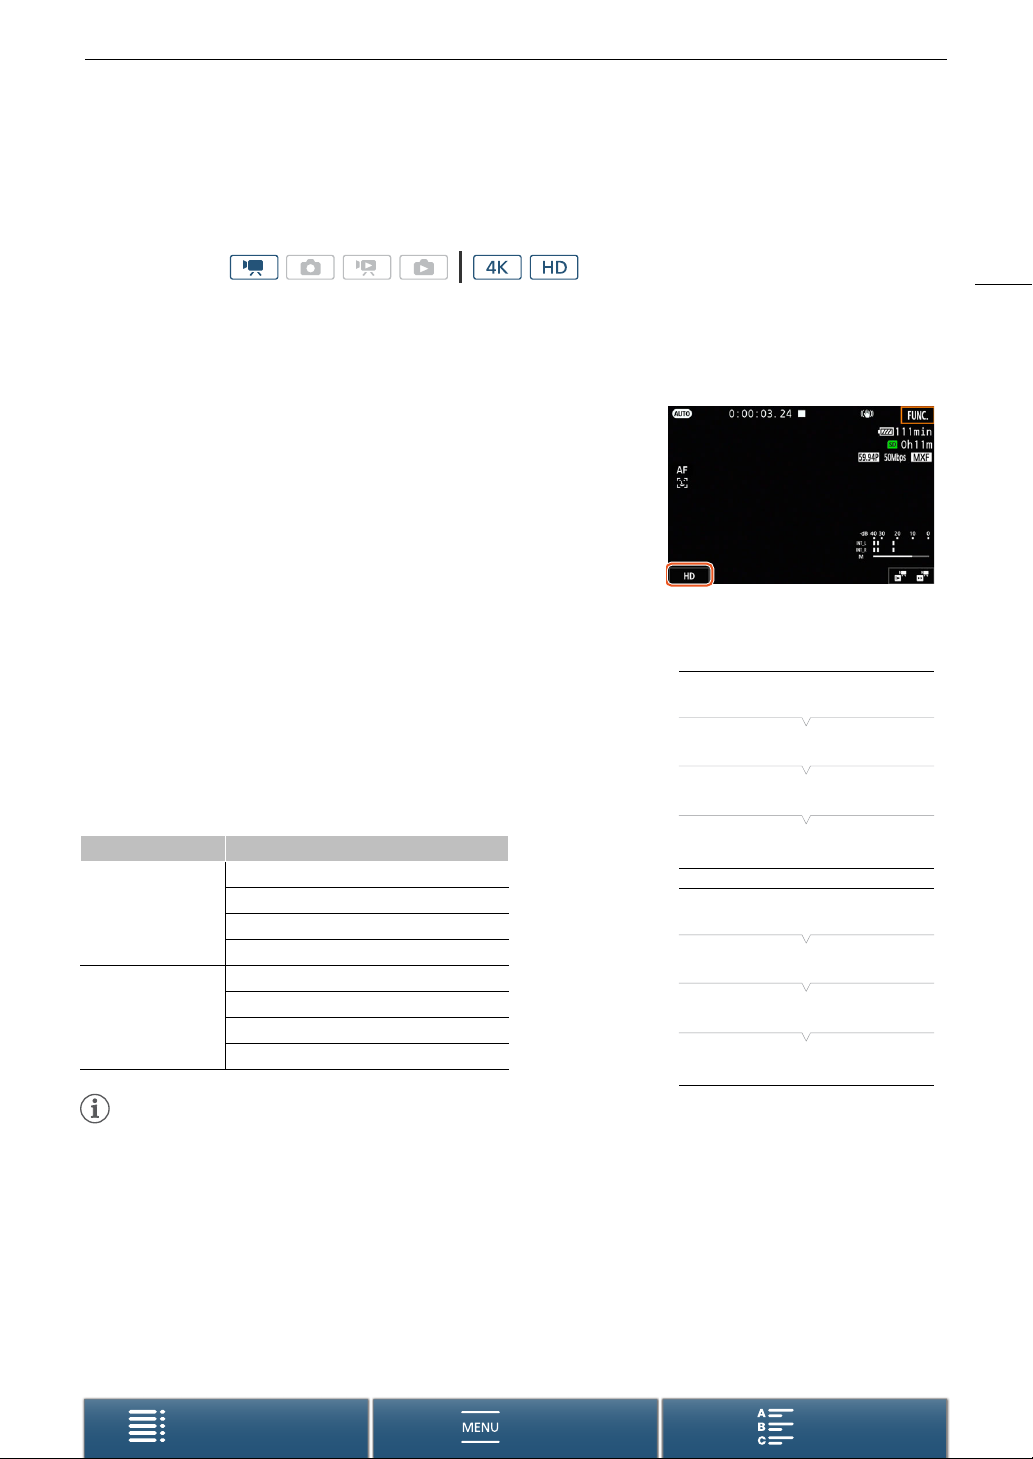
Video Configuration: Resolution (4K/HD), Frame Rate and Bit Rate
Video Configuration: Resolution (4K/HD), Frame Rate and Bit Rate
Before you record, select the resolution (4K or HD), frame rate and bit rate that best match your project’s needs.
Operating modes:
Selecting the Resolution (Recording in 4K or HD)
This camcorder allows you to record clips in 4K or HD. The resolution (frame size) of 4K clips is 3840x2160 while that
of HD clips is 1920x1080. Note that 4K clips are saved to the CFast card and HD clips are saved to the SD card.
1 Touch [4K] or [HD] on the bottom left of the screen.
• The icon will show the currently selected option.
• Alternatively, you can select [3 Recording Setup] > [1] >
[4K / HD].
2 Select the desired option and then touch [X].
Selecting the Frame Rate and Bit Rate
Follow the procedure below to select the frame rate and bit rate. Choose the combination of frame rate and bit
rate that best suits your needs.
1 Press the MENU button.
2 Open the [4K Recording] or [HD Recording] submenu.
[3 Recording Setup] > [1] > [4K Recording] or [HD Recording]
3 Select the desired option and then touch [X].
• Icons of the selected option will appear on the right side of the screen.
Available resolution, frame rate and bit rate settings
Resolution Frame rate / Bit rate
29.97P / 305 Mbps
4K
(3840x2160)
HD
(1920x1080)
29.97P / 205 Mbps
23.98P / 305 Mbps
23.98P / 205 Mbps
59.94P / 50 Mbps
59.94i / 35 Mbps
29.97P / 35 Mbps
23.98P / 35 Mbps
[3 Recording Setup]
[1]
[4K Recording]
[29.97P (305 Mbps)]
[3 Recording Setup]
[1]
[HD Recording]
[59.94P (50 Mbps)]
51
NOTES
• For details on the signal output from the HDMI OUT terminal, refer to
Table of Contents Index
Menus
Video Output Configuration
(A 113).
Page 52
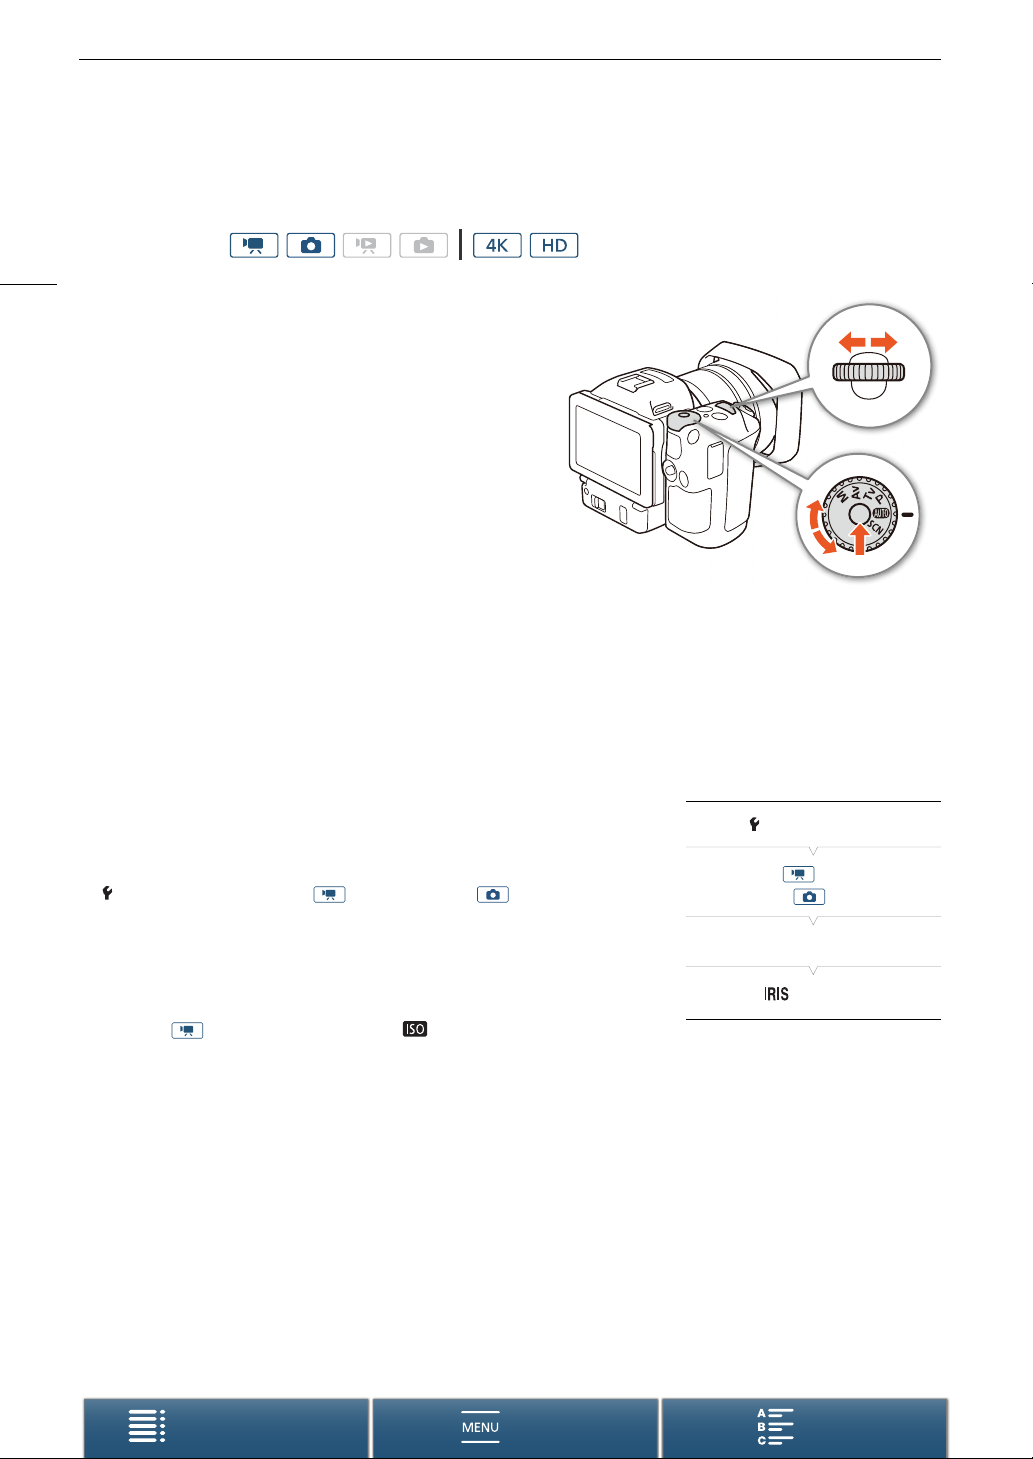
Shooting Modes
Shooting Modes
Operating modes:
52
Setting the Shooting Modes
This camcorder offers various shooting modes to help bring
your creative intent to life. After you select a mode, you can
adjust related settings, such as the shutter speed, using the
control dial. You can also use the FUNC. menu or Browser
Remote application.
1 While holding down the shooting mode dial button,
turn the dial to the desired shooting mode.
• The available shooting modes are explained in the
sections in the following few pages.
• Depending on the shooting mode, you may be able to
adjust the aperture, shutter speed, ISO speed or gain.
2 Turn the control dial to adjust the setting, if available.
Manual Exposure (n)
With this mode, you have full access to menus, settings and other functions. When shooting, you can use the
control dial to adjust the aperture, shutter speed or ISO speed/gain*. This mode gives you the most freedom
over shooting settings. First, assign the function that will be adjusted by the control dial.
* The gain can be adjusted only for clips, not photos.
1 Set the shooting mode dial to n.
2 Press the MENU button.
3 Open the [Control Dial] submenu.
[ System Setup] > [3] (in mode) or [2] (in mode) >
[Control Dial]
4 Select the desired function to assign to the control dial.
5Touch [X].
• The current value will be highlighted in orange.
• During mode, when you select [ ISO/Gain], you can select
whether to have control over the ISO speed or gain with the procedure below before touching [X].
6 Turn the control dial to select the desired value.
• You can also select the desired value using the FUNC. menu or Browser Remote application (A 57).
[ System Setup]
[3] (in mode) or
[2] (in mode)
[Control Dial]
[Aperture]
Table of Contents Index
Menus
Page 53
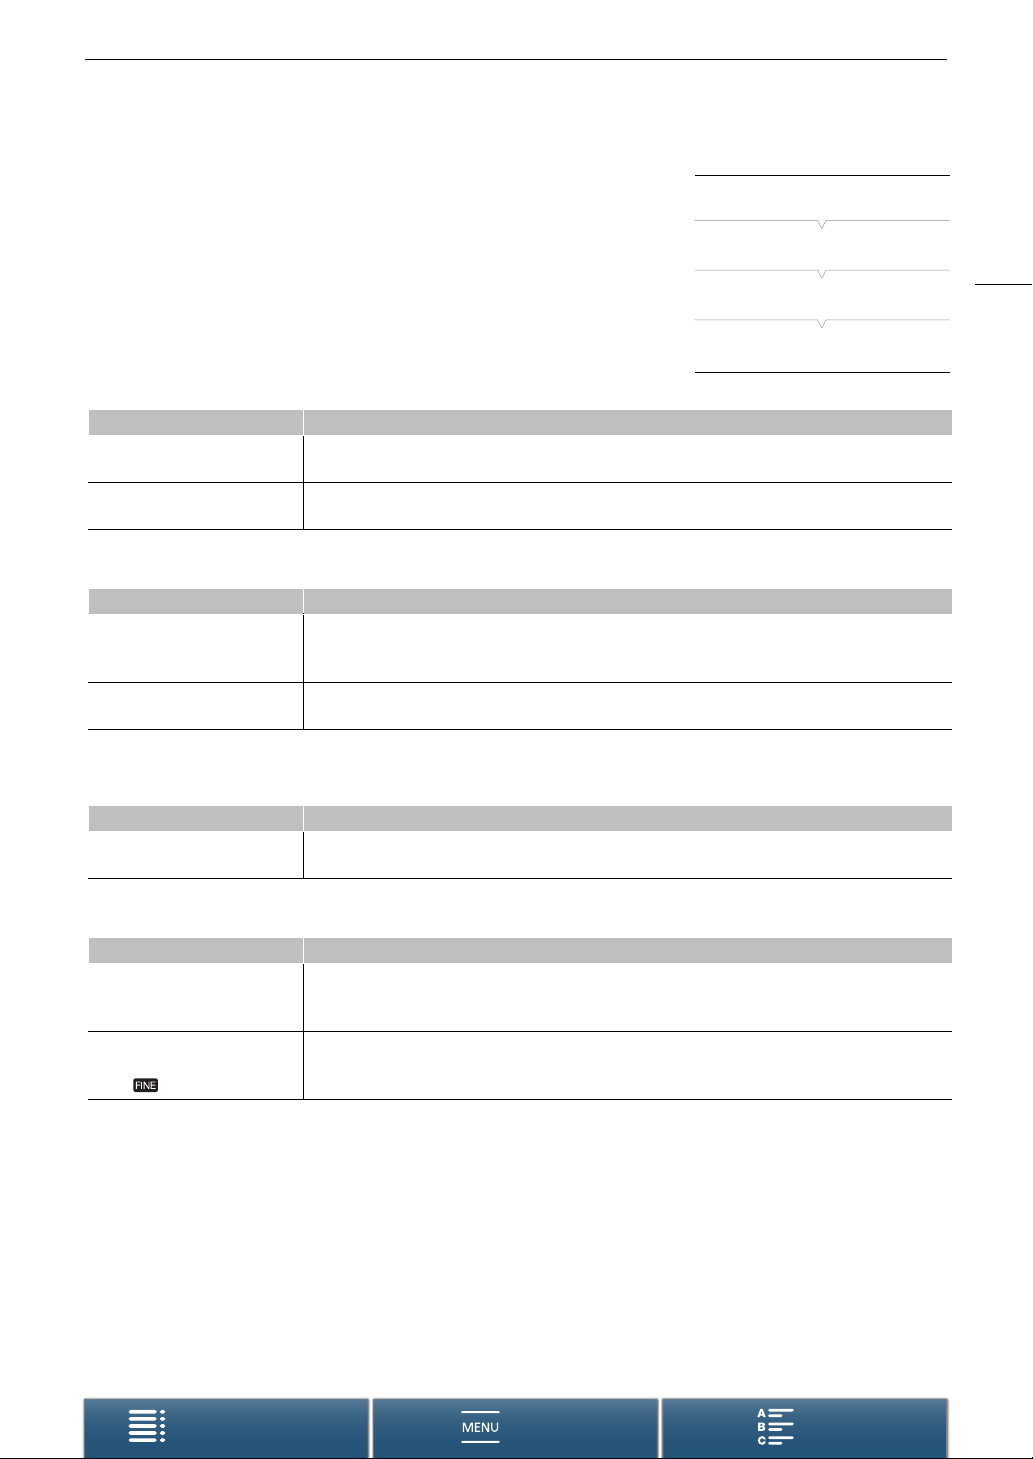
To select the ISO speed or gain
1Touch [K].
2 Open the [ISO/Gain] submenu.
[v Camera Setup] > [2] > [ISO/Gain]
3 Select the function to adjust.
Available aperture settings
Aperture
Clips
(1/4-stop increments)
Photos
(1/3-stop increments)
Available shutter speed settings
Clips
(1/4-stop increments)
Photos
(1/3-stop increments)
* These values represent 0.5 seconds, 0.4 seconds and 0.3 seconds, respectively.
F2.8, F3.2, F3.4, F3.7, F4.0, F4.4, F4.8, F5.2, F5.6, F6.2, F6.7, F7.3, F8.0, F8.7, F9.5, F10, F11
F2.8, F3.2, F3.5, F4.0, F4.5, F5.0, F5.6, F6.3, F7.1, F8.0, F9.0, F10, F11
Shutter speed
1/2, 1/3, 1/4, 1/5, 1/6, 1/8, 1/9, 1/10, 1/12, 1/15, 1/17, 1/20, 1/24, 1/30, 1/34, 1/40, 1/48, 1/60, 1/75,
1/90, 1/100, 1/120, 1/150, 1/180, 1/210, 1/250, 1/300, 1/360, 1/420, 1/500, 1/600, 1/720, 1/840, 1/1000,
1/1200, 1/1400, 1/1700, 1/2000
0”5*, 0”4*, 0”3*, 1/4, 1/5, 1/6, 1/8, 1/10, 1/13, 1/15, 1/20, 1/25, 1/30, 1/40, 1/50, 1/60, 1/80, 1/100,
1/125, 1/160, 1/200, 1/250, 1/320, 1/400, 1/500, 1/640, 1/800, 1/1000, 1/1250, 1/1600, 1/2000
Shooting Modes
[v Camera Setup]
[2]
53
[ISO/Gain]
[ISO]
Available ISO speed settings
Clips/Photos
(1/3-stop increments)
Available gain settings
Clips
(1.5-dB increments)
Clips
(0.5-dB increments when
[ Fine] is selected)
ISO speed
160, 200, 250, 320, 400, 500, 640, 800, 1000, 1250, 1600, 2000, 2500, 3200, 4000, 5000, 6400, 8000,
10000, 12800, 16000, 20000
Gain
0.0 dB, 1.5 dB, 3.0 dB, 4.5 dB, 6.0 dB, 7.5 dB, 9.0 dB, 10.5 dB, 12.0 dB, 13.5 dB, 15.0 dB, 16.5 dB,
18.0 dB, 19.5 dB, 21.0 dB, 22.5 dB, 24.0 dB, 25.5 dB, 27.0 dB, 28.5 dB, 30.0 dB, 31.5 dB, 33.0 dB,
34.5 dB, 36.0 dB, 37.5 dB, 39.0 dB, 40.5 dB, 42.0 dB
0.0 dB to 42.0 dB
Table of Contents Index
Menus
Page 54
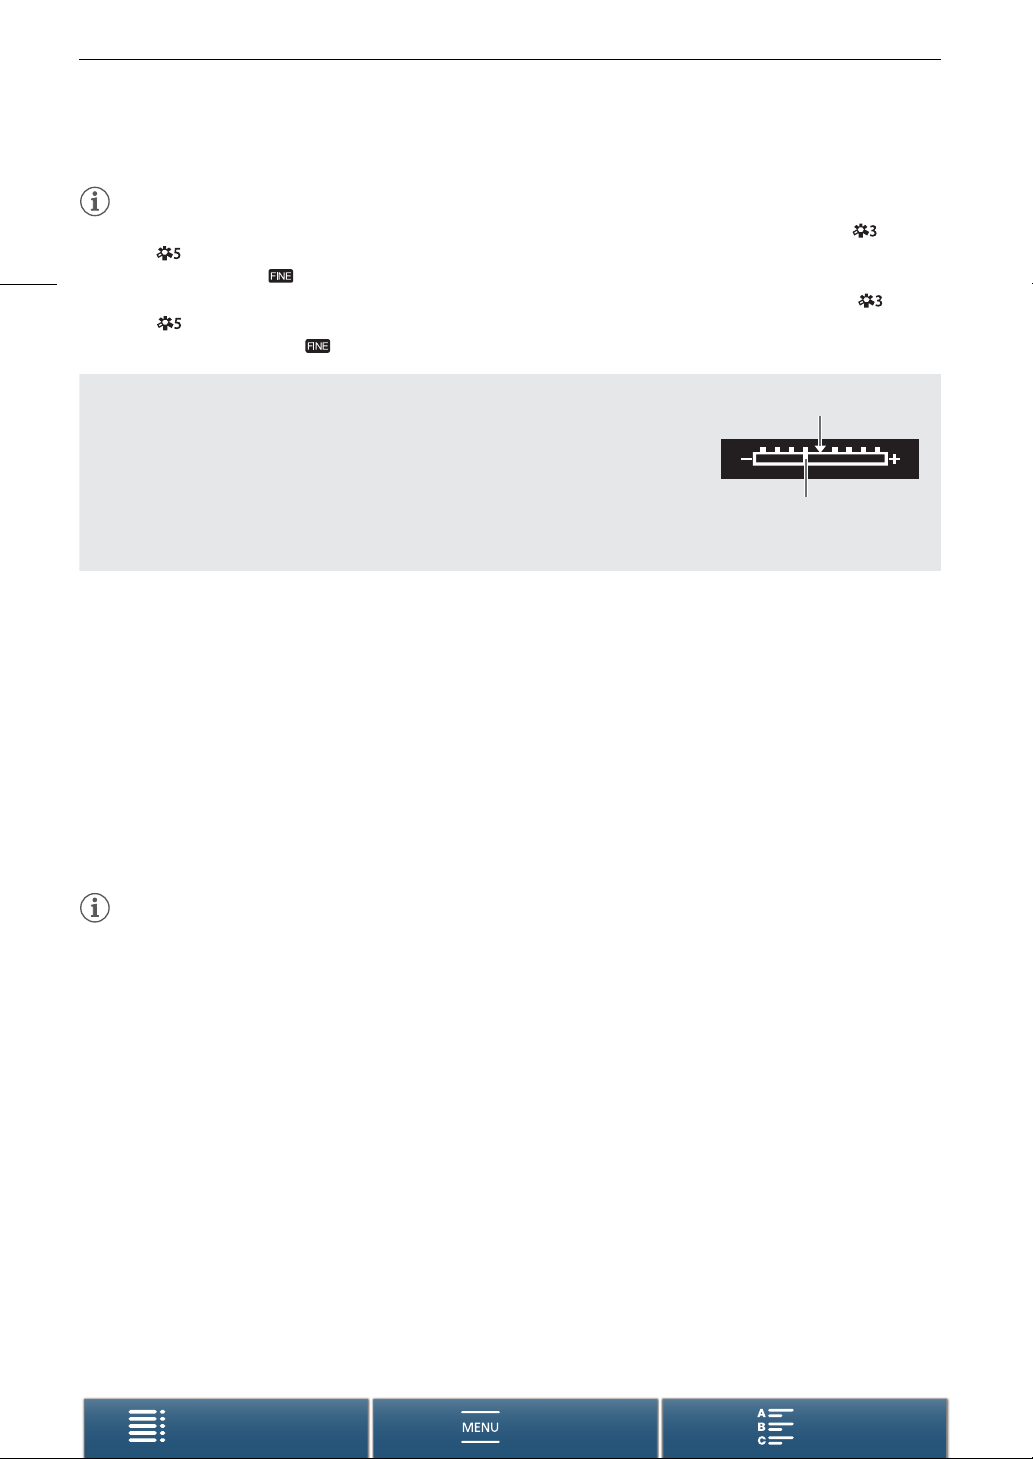
Shooting Modes
NOTES
• When the rate for slow & fast motion recording mode is set to [x1/4] (A 91), or the look is set to [ Wide
54
DR] or [ Canon Log] (A 66), the lowest available ISO speed is 500 and the lowest available gain setting is
9.0 dB (8.5 dB when [ Fine] is selected).
• While the rate for slow & fast motion recording mode is set to [x1/4] (A 91) and the look is set to [ Wide
DR] or [ Canon Log] (A 66), the lowest available ISO speed is 1250 and the lowest available gain setting
is 18.0 dB (17.0 dB when [ Fine] is selected).
The Exposure Bar
When the shooting mode is set to n, the exposure bar will appear, giving you
an indication of the current exposure. The Î on top of the exposure bar
indicates optimal exposure without any shift (AE±0) and the indicator inside the
exposure bar represents the current exposure.
When the difference between current and optimal exposure is larger than ±2 EV,
the indicator will flash at the edge of the exposure bar.
Optimal exposure AE±0
Current exposure
Aperture Priority AE (“)
In this mode, after you adjust the aperture value with the control dial, the camcorder automatically sets the
appropriate shutter speed to obtain the optimal exposure for the subject. Adjusting the aperture is useful in
changing the depth of field, which can allow you to blur the background and make the subject stand out more.
1 Set the shooting mode dial to “.
• The aperture value will highlighted in orange.
2 Turn the control dial to adjust the aperture value.
• You can also adjust the aperture value using the FUNC. menu or Browser Remote application (A 57).
• For available settings, refer to
NOTES
• Depending on the brightness of the subject, the camcorder will not be able to control the exposure and the
aperture value will flash. In such case, select a different aperture value.
Manual Exposure
(n) (A 53).
Table of Contents Index
Menus
Page 55
Shooting Modes
Shutter Priority AE (‚)
In this mode, after you adjust the shutter speed, the camcorder automatically sets the appropriate aperture to
obtain the optimal exposure for the subject. The shutter speed affects how moving objects are captured – you
can make fast-moving subjects, such as a waterfall, appear to be motionless or impart a sense of movement to
them.
1 Set the shooting mode dial to ‚.
• The shutter speed will highlighted in orange.
2 Turn the control dial to adjust the shutter speed.
• You can also adjust the shutter speed using the FUNC. menu or Browser Remote application (A 57).
• For available settings, refer to
NOTES
• Depending on the brightness of the subject, the camcorder will not be able to control the exposure and the
shutter speed value will flash. In such case, select a different shutter speed.
Manual Exposure
(n) (A 53).
Program AE (’)
The camcorder automatically sets the aperture, shutter speed, gain (for clips) and ISO speed to obtain the
optimal exposure for the subject.
Set the shooting mode dial to ’.
55
Auto (N)
Use this mode to let the camcorder select various settings. This is the perfect mode for those times when you do
not want to take the time to adjust settings.
Set the shooting mode dial to N.
Special Scene (ƒ)
You can select the special scene mode that best matches your shooting situation. Some shooting situations,
such as when the subject is lit with just a spotlight, can be tricky so you may find setting the appropriate special
scene mode to be convenient.
1 Set the shooting mode dial to ƒ.
2 Touch [FUNC.] and then touch ú [Scene].
3 Select the desired option and then touch [X].
Options
[ú Portrait]: The camcorder uses a large aperture, to achieve a sharp focus on the
subject while blurring the background.
Table of Contents Index
Menus
Page 56
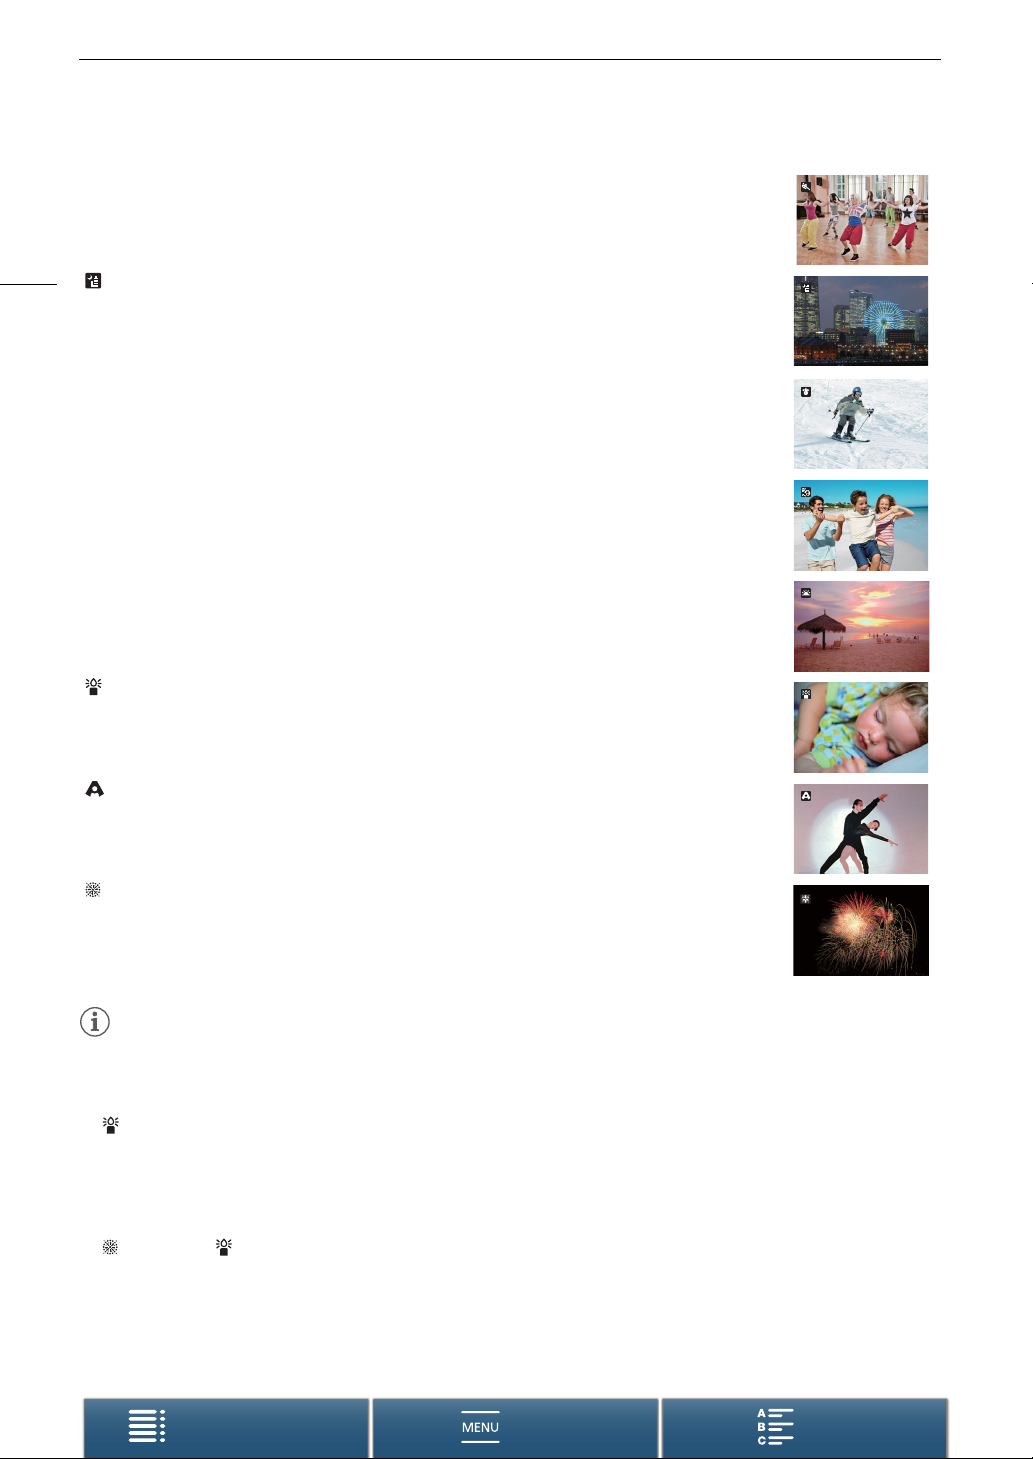
Shooting Modes
[û Sports]: To record sports scenes such as tennis or golf.
56
[ Night Scene]: To record nightscapes with lower noise.
[ý Snow]: To record in bright ski resorts without the subject being underexposed.
[L Beach]: To record on a sunny beach without the subject being underexposed.
[ÿ Sunset]: To record sunsets in vibrant colors.
[ Low Light]: To record in low-light situations.
[ Spotlight]: To record spotlit scenes.
[ Fireworks]: To record fireworks.
NOTES
•[ú Portrait]/[û Sports]/[ý Snow]/[L Beach]: The picture may not appear smooth during playback.
•[ý Snow]/[L Beach]: The subject may become overexposed on cloudy days or in shaded places. Check
the image on the screen.
• [ Low Light]:
- Moving subjects may leave a trailing afterimage.
- Picture quality may not be as good as in other modes.
- White points may appear on the screen.
- Autofocus may not work as well as in other modes. In such case, adjust the focus manually.
• [ Fireworks]/[ Low Light]: To avoid camcorder blur (blur due to the camcorder moving) we recommend
using a tripod.
Table of Contents Index
Menus
Page 57
Shooting Modes
Adjusting Shooting Mode Settings
You can adjust the settings related to the various shooting modes using the FUNC. menu or remotely using the
Browser Remote application.
Using the FUNC. Menu
To change the aperture value when the shooting mode is n or “
1 Touch [FUNC.] and then touch [Aperture].
• The aperture adjustment dial will appear at the bottom of the screen.
2 Drag your finger left/right along the dial to select the desired value.
• You can also press the joystick itself so that the position of the current value is highlighted in orange and
then push left/right to adjust the value.
3Touch [X].
• The selected aperture value will appear on the upper left of the screen.
To change the shutter speed when the shooting mode is n or ‚
1 Touch [FUNC.] and then touch [Shutter Speed].
• The shutter speed adjustment dial will appear at the bottom of the screen.
2 Drag your finger left/right along the dial to select the desired value.
• You can also press the joystick itself so that the position of the current value is highlighted in orange and
then push left/right to adjust the value.
3Touch [X].
• The selected shutter speed will appear on the upper left of the screen.
57
To change the ISO speed or gain when the shooting mode is n
1 Touch [FUNC.] and then touch [ISO] or [Gain].
• Note that during mode, you cannot adjust the gain.
• The ISO speed or gain adjustment dial will appear at the bottom of the screen.
• You can use the [v Camera Setup] > [2] > [ISO/Gain] setting to switch between ISO speed and gain.
2 Drag your finger left/right along the dial to select the desired value.
• You can also press the joystick itself so that the position of the current value is highlighted in orange and
then push left/right to adjust the value.
3Touch [X].
• The selected ISO speed or gain value will appear on the upper left of the screen.
Using the Browser Remote Application
After completing the necessary preparations (A 127), you can change the shutter speed, aperture, ISO speed
or gain from a connected device using the Browser Remote application.
Table of Contents Index
Menus
Page 58
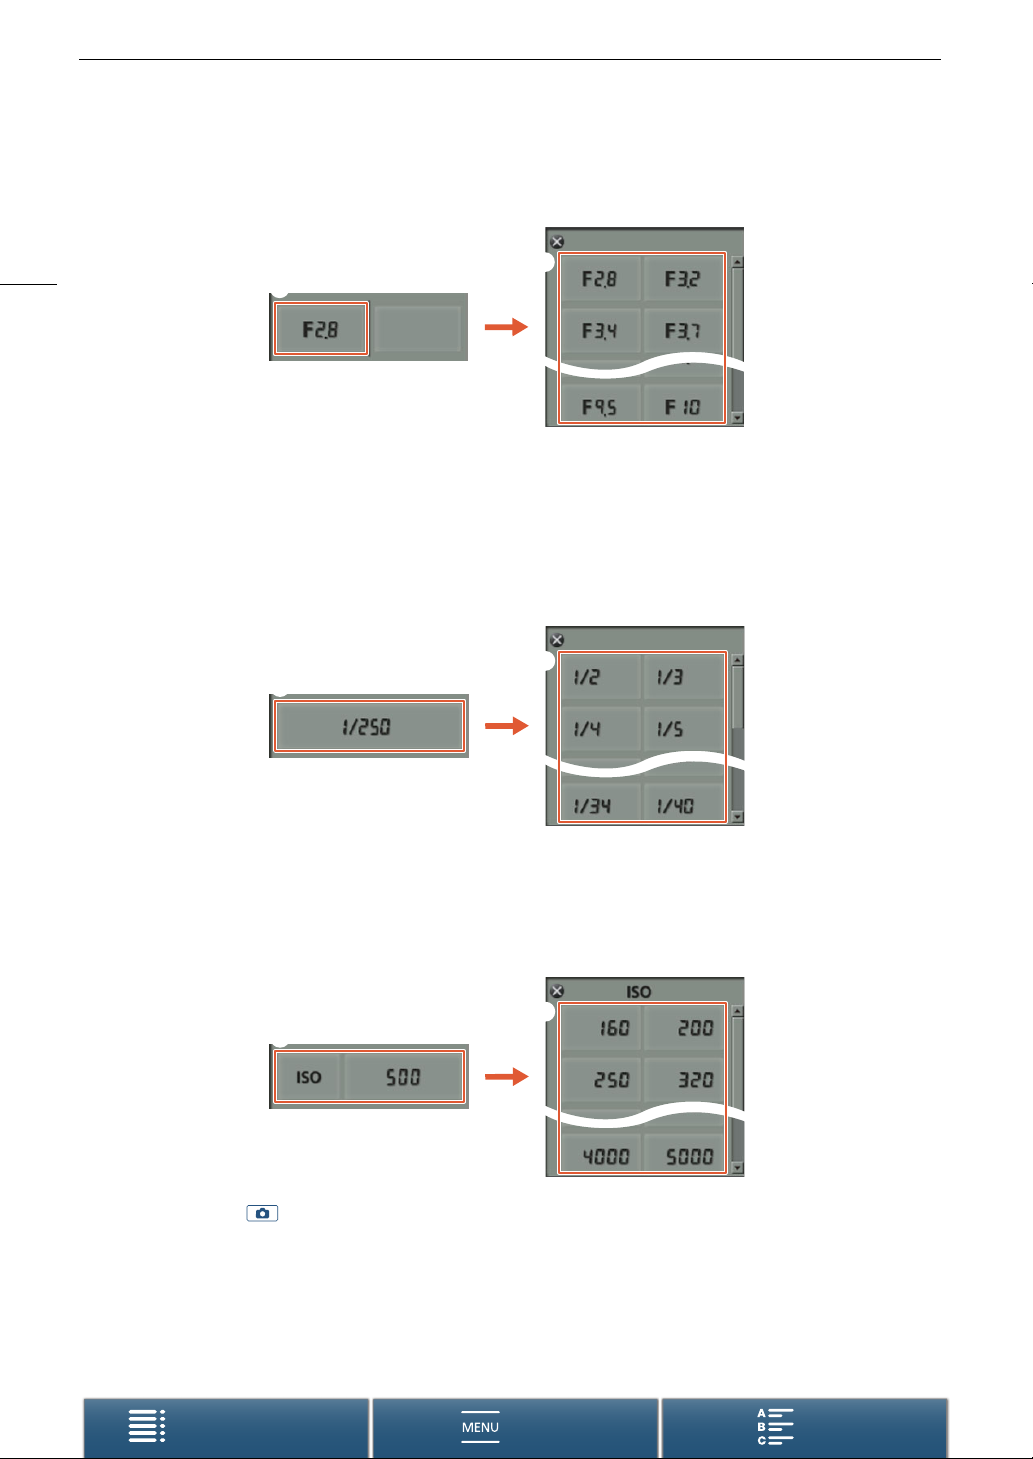
Shooting Modes
To change the aperture value when the shooting mode is n or “
1 Press the current aperture value on the Browser Remote screen.
58
햲
2 Select the desired aperture value from the list.
• The selected value will be displayed on the Browser Remote screen and applied on the camcorder.
• Alternatively, you can press [IRIS +] to open the aperture or [IRIS -] to close the aperture in 1/16-stop
increments.
To change the shutter speed when the shooting mode is n or
1 Press the current shutter speed value on the Browser Remote screen.
햲
햳
‚
햳
2 Select the desired shutter speed value from the list.
• The selected value will be displayed on the Browser Remote screen and applied on the camcorder.
To change the ISO speed or gain when the shooting mode is n
1 Press the current ISO speed or gain value on the Browser Remote screen.
햳
햲
• Note that during mode, you cannot adjust the gain.
• You can touch [ISO] and then the desired setting ([ISO] or [Gain]) to switch between the two.
2 Select the desired ISO speed or gain value from the list.
• The selected value will be displayed on the Browser Remote screen and applied on the camcorder.
Table of Contents Index
Menus
Page 59
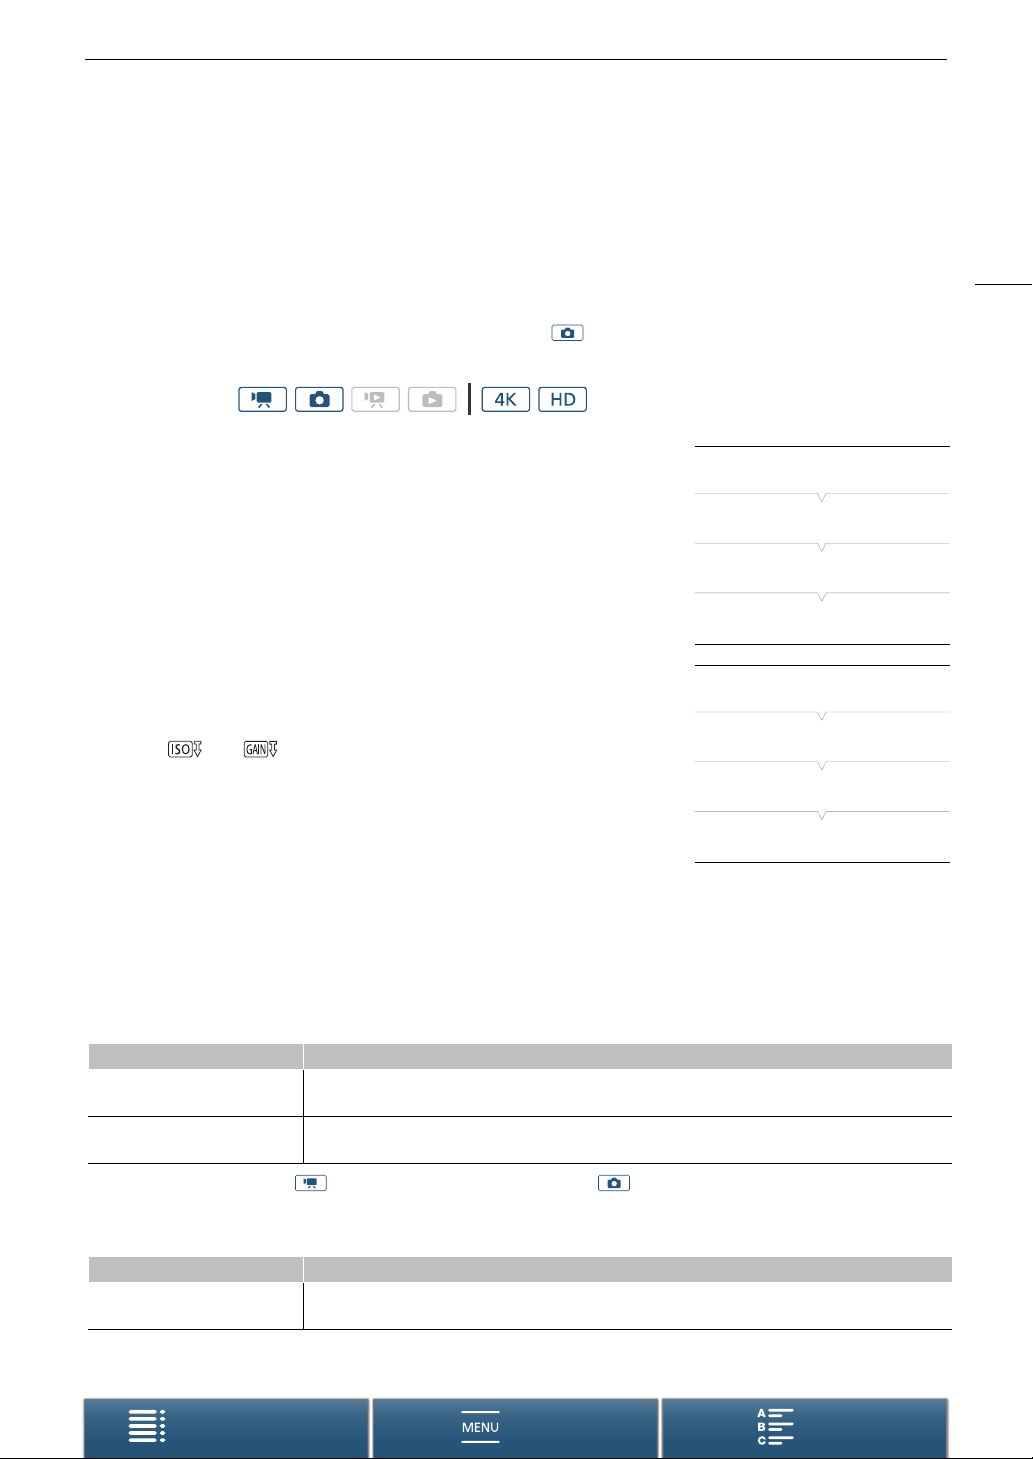
Automatic Gain and ISO Limits
Automatic Gain and ISO Limits
Depending on the brightness of the surroundings, the camcorder will automatically raise the gain or ISO speed
to try to get a brighter picture. Because doing so can lead to video noise, you can select a maximum limit for
how high levels are raised. These limits are referred to as the automatic gain control (AGC) limit and auto ISO
limit. Shooting with a smaller limit is useful as it results in a darker picture but less noise. This function is available
when the shooting mode is set to ’, ‚ or “.
Because only the ISO speed can be adjusted for photos, in mode, press the MENU button and start the
procedure below from step 4, selecting the options for ISO speed.
Operating modes:
59
1 Press the MENU button.
2 Open the [ISO/Gain] submenu.
[v Camera Setup] > [2] > [ISO/Gain]
[v Camera Setup]
[2]
3 Select the option that corresponds to the limit you want to set
and then touch [K].
[ISO/Gain]
[ISO]
4 Back in the setup menus, open the submenu to set the AGC limit
or auto ISO limit.
[v Camera Setup] > [1] > [AGC Limit] or [Auto ISO Limit]
5Touch [] or [].
• The AGC limit or auto ISO limit dial will appear at the bottom of the
screen.
•Touch [m] to remove the limit.
[v Camera Setup]
[1]
[AGC Limit] or [Auto ISO Limit]
[m]
6 Drag your finger left/right along the dial to select the desired
value.
• You can also push the joystick up/down until the position of the current value is highlighted in orange and
then push left/right to adjust the value.
7Touch [X].
• The selected icon will appear on the left side of the screen.
Available ISO limit settings
ISO speed
Clips
(1/3-stop increments)
Photos
(1/3-stop increments)
* When this value is selected in mode and the camcorder is switched to mode, the auto ISO limit will be set to
ISO2000.
160, 200, 250, 320, 400, 500, 640, 800, 1000, 1250, 1600, 2000, 2500*, 3200*, 4000*
160, 200, 250, 320, 400, 500, 640, 800, 1000, 1250, 1600, 2000
Available AGC limit settings
Gain
Clips
(1.5-dB increments)
Table of Contents Index
0.0 dB, 1.5 dB, 3.0 dB, 4.5 dB, 6.0 dB, 7.5 dB, 9.0 dB, 10.5 dB, 12.0 dB, 13.5 dB, 15.0 dB, 16.5 dB,
18.0 dB, 19.5 dB, 21.0 dB, 22.5 dB, 24.0 dB, 25.5 dB, 27.0 dB, 28.5 dB
Menus
Page 60
Automatic Gain and ISO Limits
NOTES
• When the rate for slow & fast motion recording mode is set to [x1/4] (A 91), or the look is set to [ Wide
DR] or [ Canon Log] (A 66), the lowest available ISO speed is 500 and the lowest available gain setting is
60
9.0 dB.
• While the rate for slow & fast motion recording mode is set to [x1/4] (A 91) and the look is set to [ Wide
DR] or [ Canon Log] (A 66), the lowest available ISO speed is 1250 and the lowest available gain setting
is 18.0 dB.
Table of Contents Index
Menus
Page 61
Exposure
Exposure
In some shooting modes, the camcorder will automatically adjust the exposure. In such cases, you can lock the
exposure or use a touch exposure function to automatically set the optimal exposure for the subject you select.
You can also use AE shift to darken or lighten the image that was set during automatic exposure. These
functions are not available when the shooting mode is set to N, n or ƒ*.
* Exposure lock and touch exposure are available in all scene modes except [ Fireworks].
Operating modes:
Exposure Lock
1 Touch [FUNC.] and then touch [Exposure Lock].
• The exposure adjustment screen will appear.
2Touch [n].
• An adjustment dial will appear on the bottom of the screen. The exposure is locked but you can adjust it
using the adjustment dial.
3 Drag your finger left/right along the dial to select the desired value.
• You can also push the joystick up/down until the position of the current value is highlighted in orange and
then push left/right to adjust the value.
• Depending on the exposure, some values may be grayed out, which will affect the adjustment range.
•Touch [n] again to return the camcorder to automatic exposure.
4Touch [X] to lock the exposure at the selected value.
• If the exposure was just locked, will appear on the left side of the screen. If the exposure was locked and
adjusted, y and the selected adjustment value will appear to the left of .
61
Using the Browser Remote Application
After completing the necessary preparations (A 127), you can manually change the exposure from a
connected device using the Browser Remote application.
1 Press [ ].
• The gray line in the button will turn orange and the camcorder will
change to manual exposure.
2 Press the exposure value button and then select the desired exposure
adjustment level.
• The selected value will be displayed on the Browser Remote screen and applied on the camcorder.
Tou c h E x p o s u r e
You can have the camcorder adjust the exposure simply by touching the screen. The camcorder will meter the
light at the point you touch and lock the exposure. Using the highlights setting, you can make sure that clouds or
other white objects in the area you touch are not overexposed.
1 Touch [FUNC.] and then touch [Exposure Lock].
• The exposure adjustment screen will appear.
2 Touch a subject that appears inside the frame.
•The I mark will flash and the exposure will be adjusted automatically so the area you touched will be
correctly exposed.
Table of Contents Index
Menus
Page 62
Exposure
• An adjustment dial will appear on the bottom of the screen. The exposure is locked but you can adjust it
using the adjustment dial.
3 Drag your finger left/right along the dial to select the desired value.
62
• You can also push the joystick up/down until the position of the current value is highlighted in orange and
then push left/right to adjust the value.
• When using only touch exposure, skip to step 6. To use the highlights setting, continue to step 4.
4 Touch [ ] and then touch [ Highlights].
• Touch [ Normal] to turn off the highlights setting.
5Touch [K] to return to the exposure adjustment screen.
6Touch [X] to lock the exposure at the selected value.
• If the exposure was just locked, will appear on the left side of the screen. If the exposure value was
locked and adjusted, in addition, y and the selected exposure value will appear to the left of .
AE Shift
When using AE shift, you can select from 17 AE shift levels for clips and 13 for photos.
1 Touch [FUNC.] and then touch y [AE Shift].
• An adjustment dial will appear on the bottom of the screen.
2 Drag your finger left/right to move the adjustment dial to the desired setting.
• You can also push the joystick itself so that the position of the current setting is highlighted in orange and
then push left/right to adjust the setting.
3Touch [X].
• y and the selected AE shift level will appear on the left side of the screen.
Available AE shift levels for clips
-2 -1 3/4 -1 1/2 -1 1/4 -1 - 3/4 - 1/2 - 1/4 ±0
+1/4 +1/2 +3/4 +1 +1 1/4 +1 1/2 +1 3/4 +2
Available AE shift levels for photos
-2 -1 2/3 -1 1/3 -1 - 2/3 - 1/3 ±0
+1/3 +2/3 +1 +1 1/3 +1 2/3 +2
NOTES
• AE shift is not available if exposure lock or touch exposure have been enabled.
Table of Contents Index
Menus
Page 63
Light Metering Mode
Light Metering Mode
The camcorder measures light in the scene in order to set the optimal exposure settings. Depending on the
scene, you may want to change the measurement method. This function is available when the shooting mode is
set to ’, ‚ or “.
Operating modes:
1 Touch [FUNC.] and then touch ¬ [Metering Mode] (in mode) or ª [Metering Mode] (in
mode).
2 Select the desired option and then touch [X].
Options (for clips)
[¬ Standard]: Averages the light metered from the entire screen, giving more weight to the subject in the center.
[ Spotlight]: Use this option when recording a scene in which only a certain part of the picture is lit, for example,
when the subject is lit by a spotlight.
[ Backlight]: Suitable when recording backlit scenes.
Options (for photos)
[ª Evaluative]: Appropriate for standard shooting conditions.
[¬ Center-weighted
Average]: The camcorder suitably exposes a subject at the center of the scene.
[« Spot]: The camcorder suitable exposes a subject at the center of the scene but within a narrower
area.
63
Table of Contents Index
Menus
Page 64
White Balance
White Balance
The white balance function helps you to accurately reproduce colors under different lighting conditions.
Operating modes:
64
1 Touch [FUNC.] and then touch [White Balance].
2 Select the desired option and then touch [X].
• When you select [È Color Temperature], [ Set 1] or [ Set 2], set the color temperature or a custom
white balance with the appropriate procedure below before touching [X].
To set the color temperature ([È Color Temperature])
1Touch [ ].
• The color temperature adjustment dial will appear on the bottom of the screen.
2 Drag your finger left/right along the dial to select the desired value.
• You can also push the joystick left/right to adjust the setting.
3Touch [K].
To set a custom white balance ([ Set 1] or [ Set 2])
1 Point the camcorder at a gray card or white object so it fills the whole screen.
2 Touch [ ] and then touch [Set WB].
• During the procedure, Å will flash quickly. When it stops flashing, the procedure is completed and the
setting will be applied on the camcorder.
3Touch [K].
Options
[ Automatic]: The camcorder automatically sets the white balance for natural looking colors.
[¼ Daylight]*: To record outdoors on a bright day.
[½ Shade]*: To record in shaded places.
[¾ Cloudy]*: To record on a cloudy day.
[¿ Fluorescent]*: To record under warm white, cool white or warm-white-type (3-wavelength) fluorescent
lighting.
[ Fluorescent H]*: To record under daylight or daylight-type (3-wavelength) fluorescent lighting.
[É Tungsten]*: To record under tungsten and tungsten-type (3-wavelength) fluorescent lighting.
[ Flash]*: To record when using an optional Speedlite. Available in mode only.
[È Color Temperature]*: Allows you to set the color temperature between 2,000 K and 15,000 K.
[ Set 1], [ Set 2]: Use the custom white balance settings to make white subjects appear white under colored
lighting.
* Indicates a preset white balance option.
NOTES
• When recording a clip, you can use the [v Camera Setup] > [1] > [Shockless WB] setting (A 136) to
make the transition look smoother when you change the white balance settings.
• When you select a custom white balance:
- Readjust the custom white balance if the light source or ND filter setting changes.
- Depending on the light source, Å may keep flashing. The result will still be better than with [ Automatic].
Table of Contents Index
Menus
Page 65
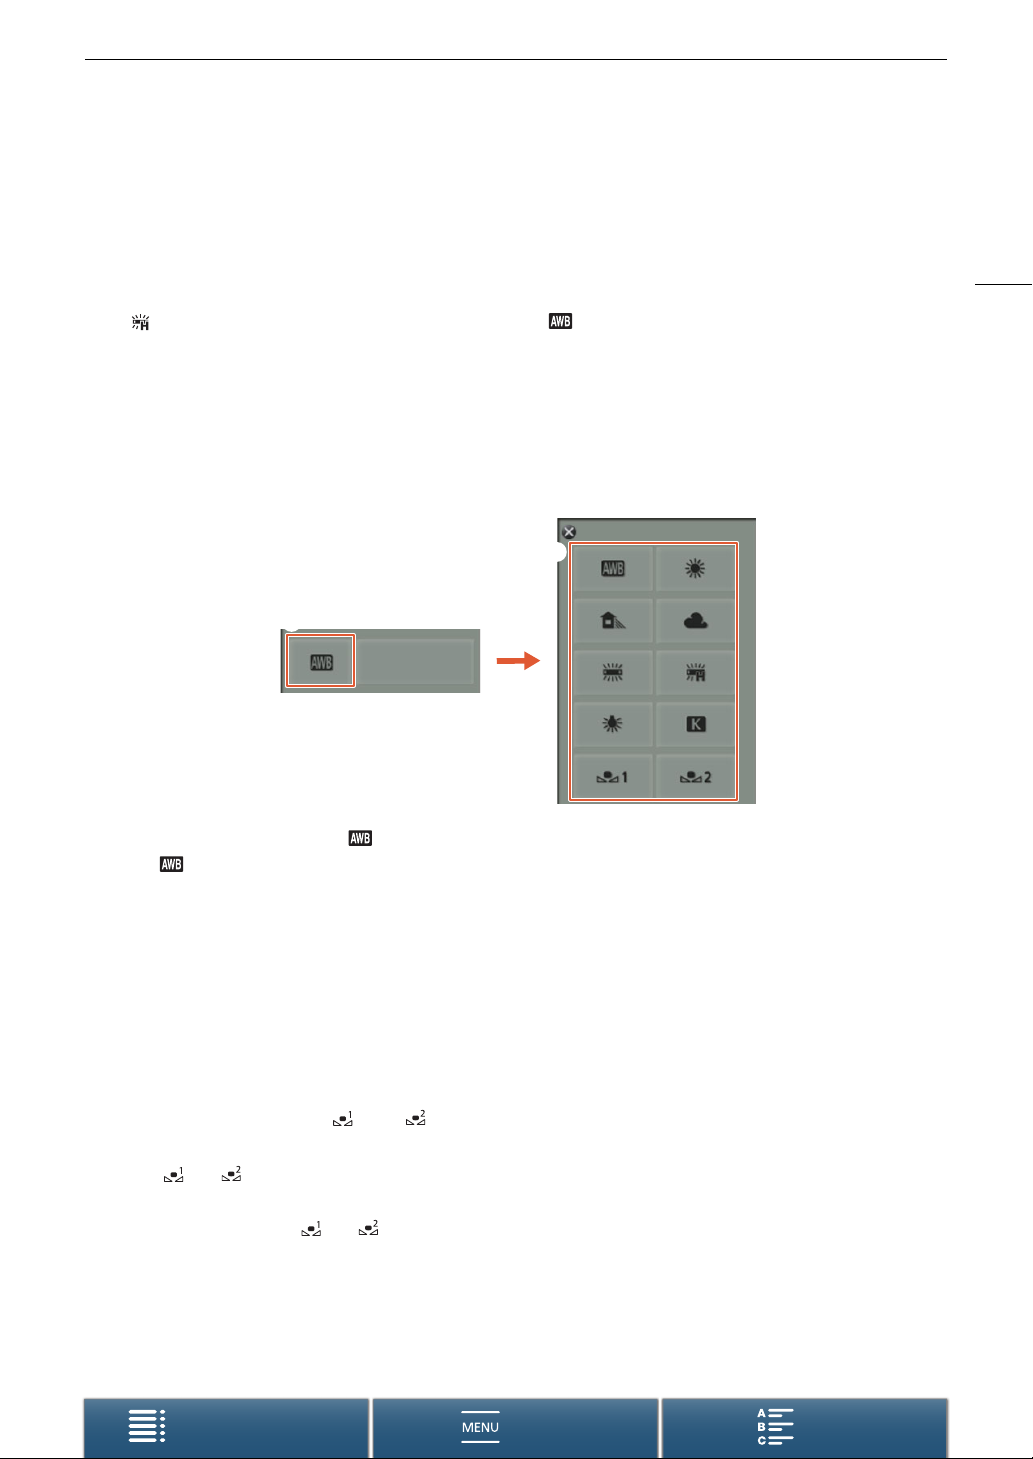
White Balance
• Using a custom white balance may provide better results in the following cases:
- Changing lighting conditions
-Close-ups
- Subjects in a single color (sky, sea or forest)
- Under mercury lamps, certain types of fluorescent lights and LED lights
• Depending on the type of fluorescent light, optimal color balance may not be obtained with [¿ Fluorescent]
or [ Fluorescent H]. If the color looks unnatural, select [ Automatic] or a custom white balance setting.
Remote Operation Using Browser Remote
After completing the necessary preparations (A 127), you can change the white balance option remotely from a
connected device using the Browser Remote application.
1 Press the white balance button on the Browser Remote screen.
햳
햲
65
To set automatic white balance ( )
2 Select .
• The selected option will be displayed on the Browser Remote screen and applied on the camcorder.
To set a preset white balance option
2 Select the desired option.
•If you selected [È], continue to the next step to set the color temperature. Otherwise, the selected option
will be displayed on the Browser Remote screen and applied to the camcorder; you do not need to perform
the rest of the procedure.
3 Press [5500K] and then selected the desired value from the list.
• The selected value will be displayed on the Browser Remote screen and applied on the camcorder.
To set custom white balance ([ ] and [ ])
2 Point the camcorder at a gray card or white object so it fills the whole screen.
3 Select [ ] or [ ].
4 Press [Å].
• During the procedure, [ ] or [ ] will flash quickly. When it stops flashing, the procedure is completed and
the setting will be applied on the camcorder.
Table of Contents Index
Menus
Page 66
Using Looks
Using Looks
The camcorder can shoot using looks—settings that affect the image-related characteristics of the picture.
The camcorder has several pre-installed looks available and you can even create your own user-defined look
based on one of the pre-installed looks. This function is not available when the shooting mode is set to N or
66
ƒ.
Operating modes:
Selecting a Pre-installed Look
For looks other than [ Canon Log], you can tweak the picture after selecting an option by adjusting the
sharpness, contrast and color depth.
1 Touch [FUNC.] and then touch [Looks] (in mode) or [Looks] (in mode).
2 Select the desired option and then touch [X].
• The selected icon will appear on the left side of the screen.
• For settings other than [ Canon Log], you can adjust the settings with the procedure below before
touching [X].
Options (for clips)
[ Standard]: Standard profile for general video shooting situations.
[ EOS Std.]: Reproduces the vivid, sharp and crisp picture that is found on EOS digital SLR cameras
using the standard picture style.
[ Wide DR]: Applies a gamma curve with a wide latitude and colors appropriate for the gamma curve.
[ Cinema EOS Std.]: Reproduces the picture found on Cinema EOS cameras.
[ Canon Log]: Creates a picture with wide dynamic range that is suitable for processing in post-
production.
[ v User Setting 1],
[ v User Setting 2]:
Allows you to create a customized look. Start with one of the pre-installed looks and
adjust the settings as necessary.
Options (for photos)
[ Standard]: Standard profile for general photo shooting situations.
[ Portrait]: Appropriate for taking photos of people, as this look brings out a sense of vitality in skin
tones.
[ Landscape]: Makes colors in the landscape appear more vivid.
[ Neutral]: The details of the subject are emphasized, which helps create an image that is suitable for
editing later.
[ Sepia]: Allows you to take a sepia-toned photo.
[ Monochrome]: Allows you to take a black & white photo.
[ { User Setting 1],
[ { User Setting 2]: Allows you to create a customized look. Start with one of the pre-installed looks and
adjust the settings as necessary.
Table of Contents Index
Menus
Page 67
Using Looks
Adjusting the Settings of a Pre-installed Look
1Touch [ ].
2 Adjust the desired setting by touching [-] or [+].
• [Sharpness]: 0 (low sharpness) to 7 (high sharpness)
[Contrast]
[Color Depth]2: -4 (shallower colors) to +4 (richer colors)
1 Not available for [ Wide DR].
2
Not available for [ Sepia] and [ Monochrome].
1
: -4 (low contrast) to +4 (high contrast)
Creating a User-defined Look
You can create your user-defined looks based on one of the pre-installed looks. The camcorder can store two
user-defined looks for clips and two for photos.
1 Touch [FUNC.] and then touch [Looks].
2 Select which user-defined setting icon to use.
•Select [ v User Setting 1] or [ v User Setting 2] for clips and [ { User Setting 1] or
[ { User Setting 2] for photos.
3 Touch and then touch [Standard].
4 Select the look that will be the basis of the user-defined look.
• The settings for [ Canon Log] cannot be adjusted.
5 Touch [Yes] and then touch [OK].
6 Adjust the settings as described in the previous section.
7Touch [X].
67
Table of Contents Index
Menus
Page 68
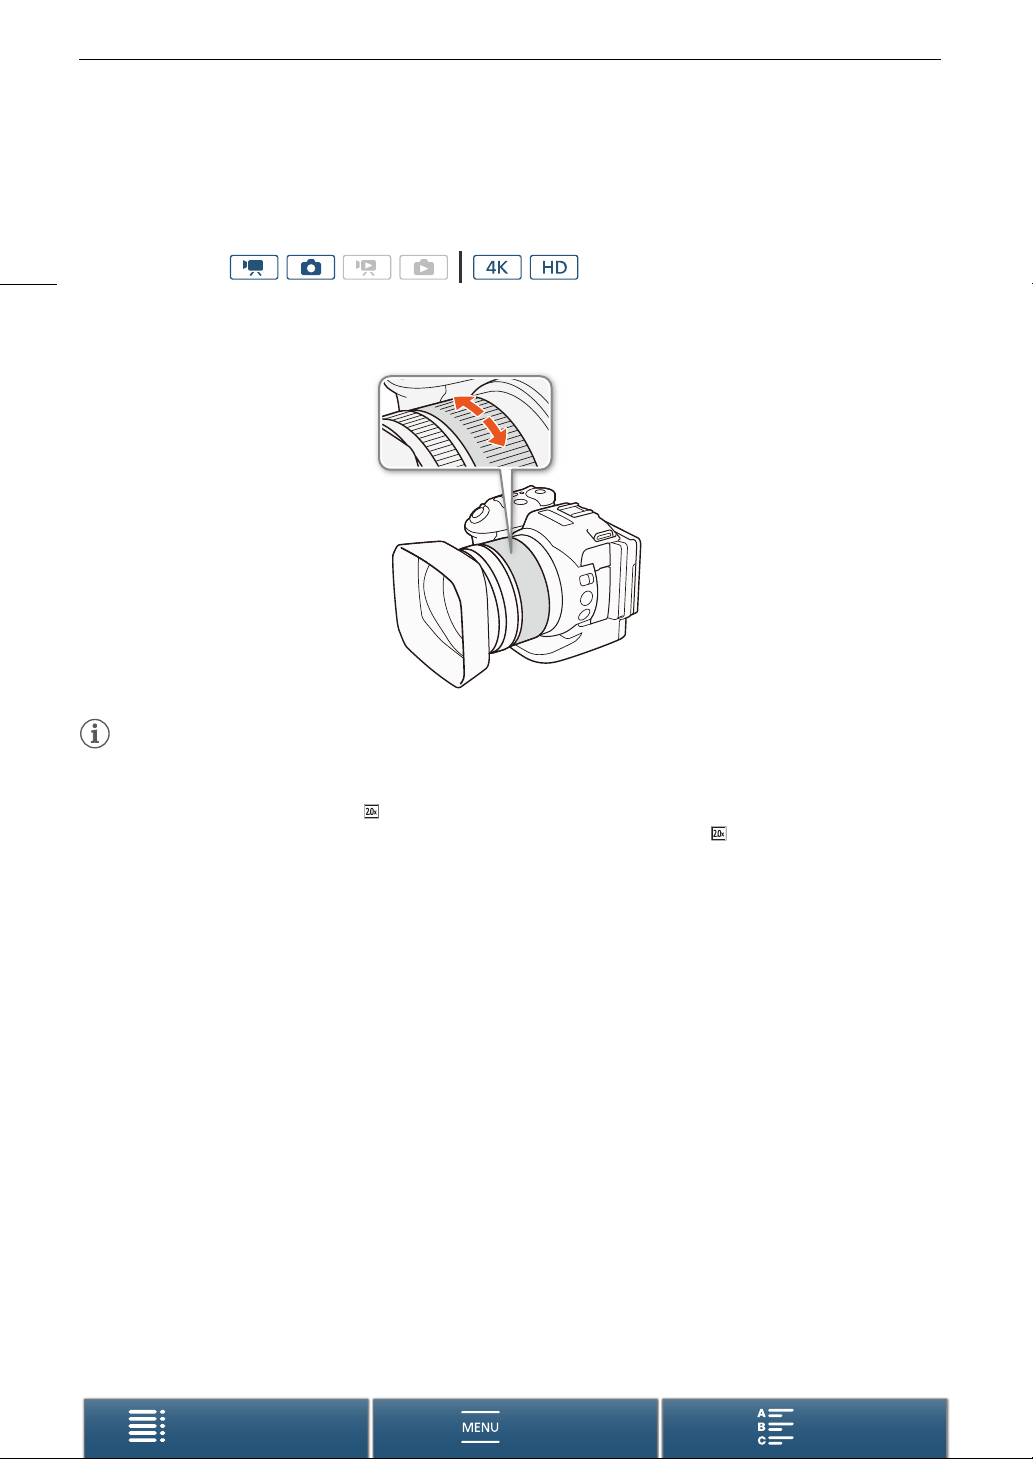
Zooming
Zooming
You can operate the zoom (10x optical zoom) using the zoom ring on the lens.
Operating modes:
68
Turn the zoom ring to zoom in and out.
NOTES
• If you turn the zoom ring too quickly, the camcorder may not be able to focus immediately. In such case, the
camcorder will focus after you finish turning the ring.
• If you set an assignable button to [ Digital Tele-conv.] (A 100), you can press the button to activate the
digital tele-converter. Alternatively, if you customize the FUNC. menu to include [ Digital Tele-conv.] (A 99),
you can activate the digital tele-converter from the FUNC. menu. The digital tele-converter allows you to
digitally increase the focal length of the camcorder by a factor of approx. 2. Note that the image is digitally
processed so the image will deteriorate throughout the zoom range.
Table of Contents Index
Menus
Page 69
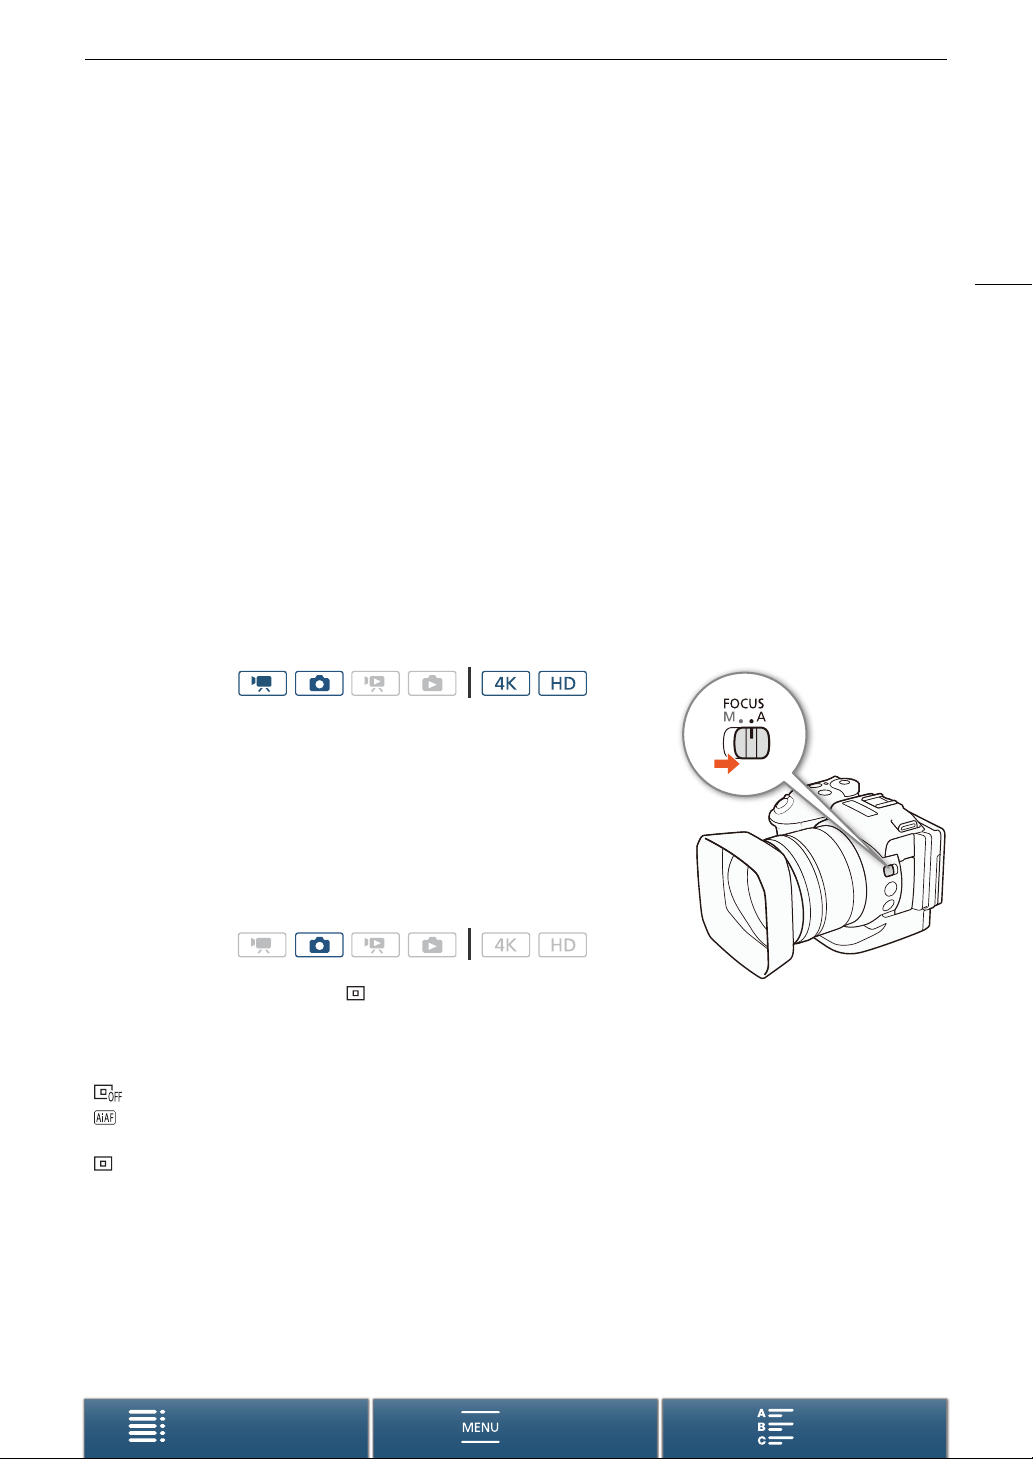
Adjusting the Focus
Adjusting the Focus
The camcorder offers 3 ways to focus. When you use manual focus, you can use the focus assistance functions,
peaking and magnification, to help you focus more accurately.
Autofocus (AF): The camcorder continuously adjusts the focus automatically. You can also use the focus ring
(with no physical stops).
Manual focus (MF): Adjust the focus manually using the focus ring, the FUNC. menu or remotely, using the
Browser Remote application.
Push AF: While using MF, you can have the camcorder switch temporarily to AF mode as long as you hold the
PUSH AF button pressed down.
Autofocus (AF) Mode
The camcorder uses the TTL autofocus system and continuously adjusts the focus on the subject in the center
of the screen. The focusing range is 8 cm (3.1 in.; at full wide-angle, measured from the front of the lens barrel) to
∞.
Even during autofocus mode, you can turn the focus ring to focus manually. When you stop turning the ring, the
camcorder returns to autofocus mode. This is useful in situations such as when focusing on a subject on the
other side of a window.
69
Operating modes:
Set the FOCUS switch to A.
• @ appears on the left side of the screen.
Using Focus Priority
You can select the autofocus method used by the camcorder when taking a
photo. This will also determine what AF frames are displayed when taking a
photo.
Operating modes:
1 Touch [FUNC.] and then touch [Focus Priority].
2 Select the desired option and then touch [X].
Options
[ Off]:
[ AiAF]: One or more AF frames out of the nine available frames are automatically selected and the focus is fixed
[ Center]:A single focusing frame appears in the center of the screen and the focus is automatically fixed on the
No AF frame will appear and the photo will be recorded immediately.
on them.
subject in the frame. While keeping the focus on the subject, you can recompose the shot.
Table of Contents Index
Menus
Page 70
Adjusting the Focus
Remote Operation Using Browser Remote
After completing the necessary preparations (A 127), you can change the focus mode remotely from a
connected device using the Browser Remote application. You can use the application to change the focus mode
regardless of the position of the camcorder’s FOCUS switch.
70
If the camcorder is set to manual focus mode, press [MF] on the
Browser Remote screen.
• The orange line in the button will turn gray and the camcorder will
change to autofocus mode.
• Press [MF] again to return the camcorder to manual focus mode.
NOTES
• When recording in bright surroundings, the camcorder closes down the aperture. This may cause the picture
to appear blurred and is more noticeable toward the wide-angle end of the zoom range. In such case, turn on
the ND filter (A 136).
• Autofocus takes longer to focus when the frame rate is set to 29.97P or 23.98P than when it is set to 59.94P
or 59.94i.
• When recording under dark conditions, the focusing range narrows and the picture may appear blurred.
• When drive mode (A 43) is set to [ AF Continuous], focus priority will automatically be set to [ Center]
and cannot be changed.
• When the shooting mode is set to ƒ and [ Fireworks] is selected, focus priority will automatically be set
to [ Off] and cannot be changed.
• When the shooting mode is set to N, focus priority will automatically be set to [ AiAF] and cannot be
changed.
• When you are using face detection & tracking with focus priority, the camcorder will focus on a face that has
been detected.
• When the shutter speed is slower than 1/8 in autofocus mode, the camcorder will not focus on the subject
even when you press the PHOTO button halfway. In such case, the AF frame and g icon will appear in yellow.
• Autofocus (including Push AF) may not work well on the following subjects or in the following cases. In such
case, focus manually.
- Reflective surfaces
- Subjects with low contrast or without vertical lines
- Fast moving subjects
- Through dirty or wet windows
-Night scenes
Table of Contents Index
Menus
Page 71
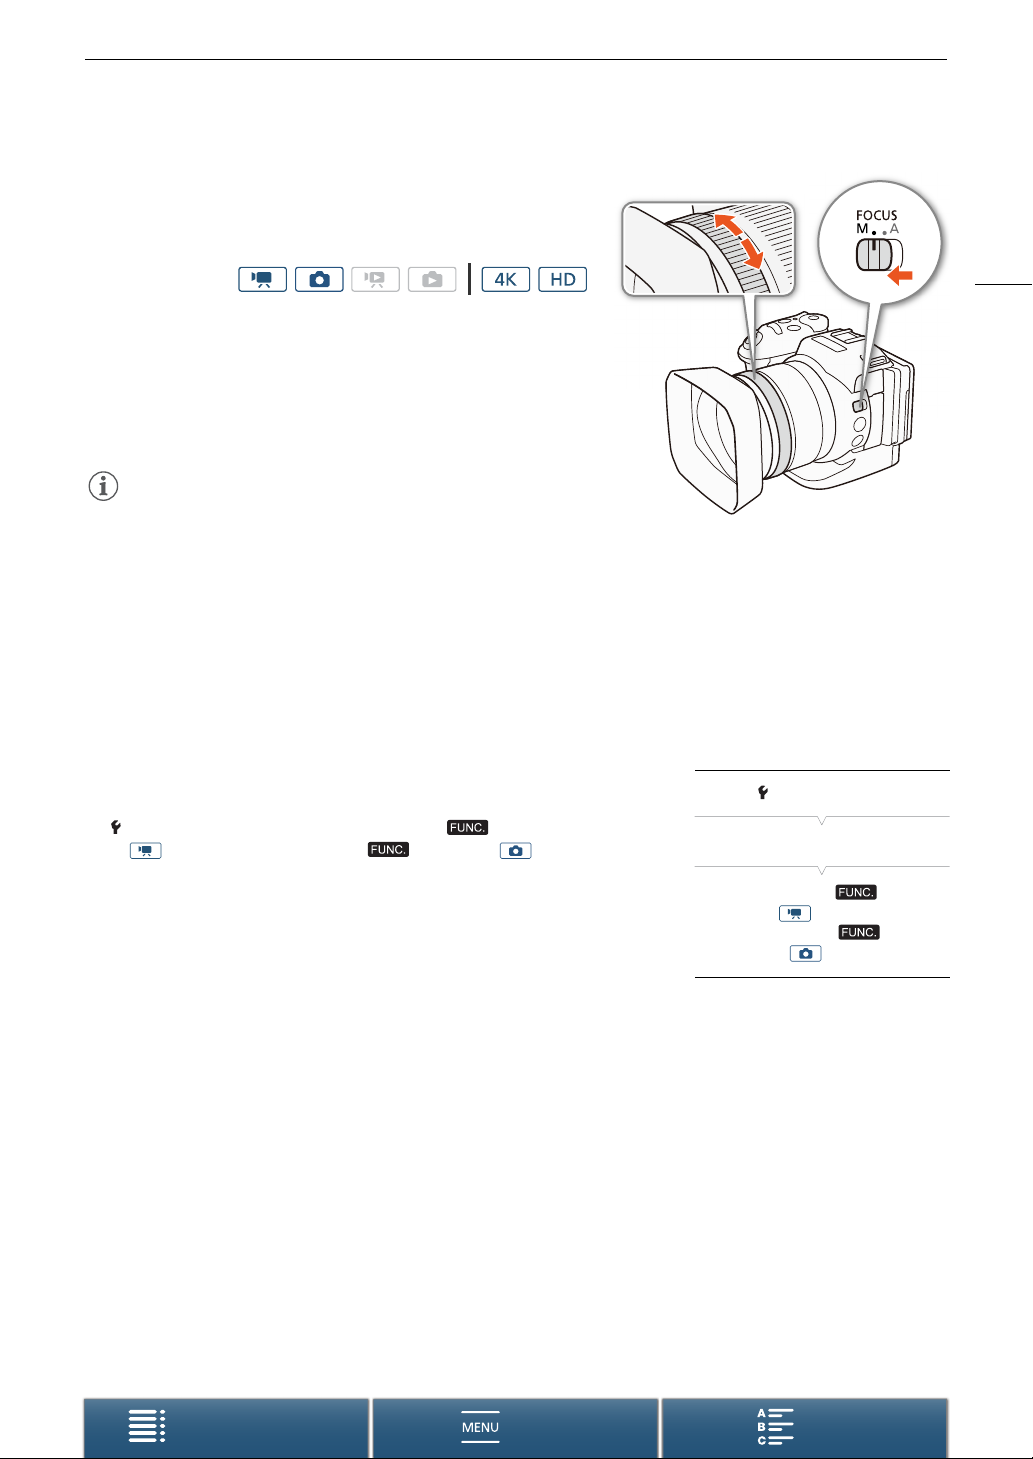
Adjusting the Focus
Manual Focus (MF)
You can adjust the focus using the focus ring on the lens or through
the FUNC. menu.
Operating modes:
Using the Focus Ring
1 Set the FOCUS switch to M.
• MF appears on the left side of the screen.
2 Turn the focus ring on the lens to adjust the focus.
• The focusing speed will depend on how fast you turn the ring.
NOTES
• You can change the direction of the adjustment and the sensitivity
of the response of the focus ring using the [Focus Ring Direction]
and [Focus Ring Response] settings (A 136).
Using the FUNC. Menu
You must first add [< Focus] to the right side of the FUNC. menu before adjusting the focus. If you have already
done so, start from the second procedure,
Adjusting the Focus
.
71
Preparation
1 Press the MENU button.
2 Open the [Customize F Menu] submenu.
[ System Setup] > [3] > [v Customize Menu]
(in mode) or [{ Customize Menu] (in mode)
3 From the right side of the screen, select the function to remove from the
right side of the FUNC. menu.
4 From the bottom of the screen, select [< Focus].
5Touch [X].
Adjusting the Focus
1 Touch [FUNC.] and then touch < [Focus].
2 Touch a subject that appears inside the white frame.
•The I mark will flash on the selected subject or area and the camcorder will automatically focus where the
mark is.
[ System Setup]
[3]
[v Customize Menu]
(in mode) or
[{ Customize Menu]
(in mode)
Table of Contents Index
Menus
Page 72
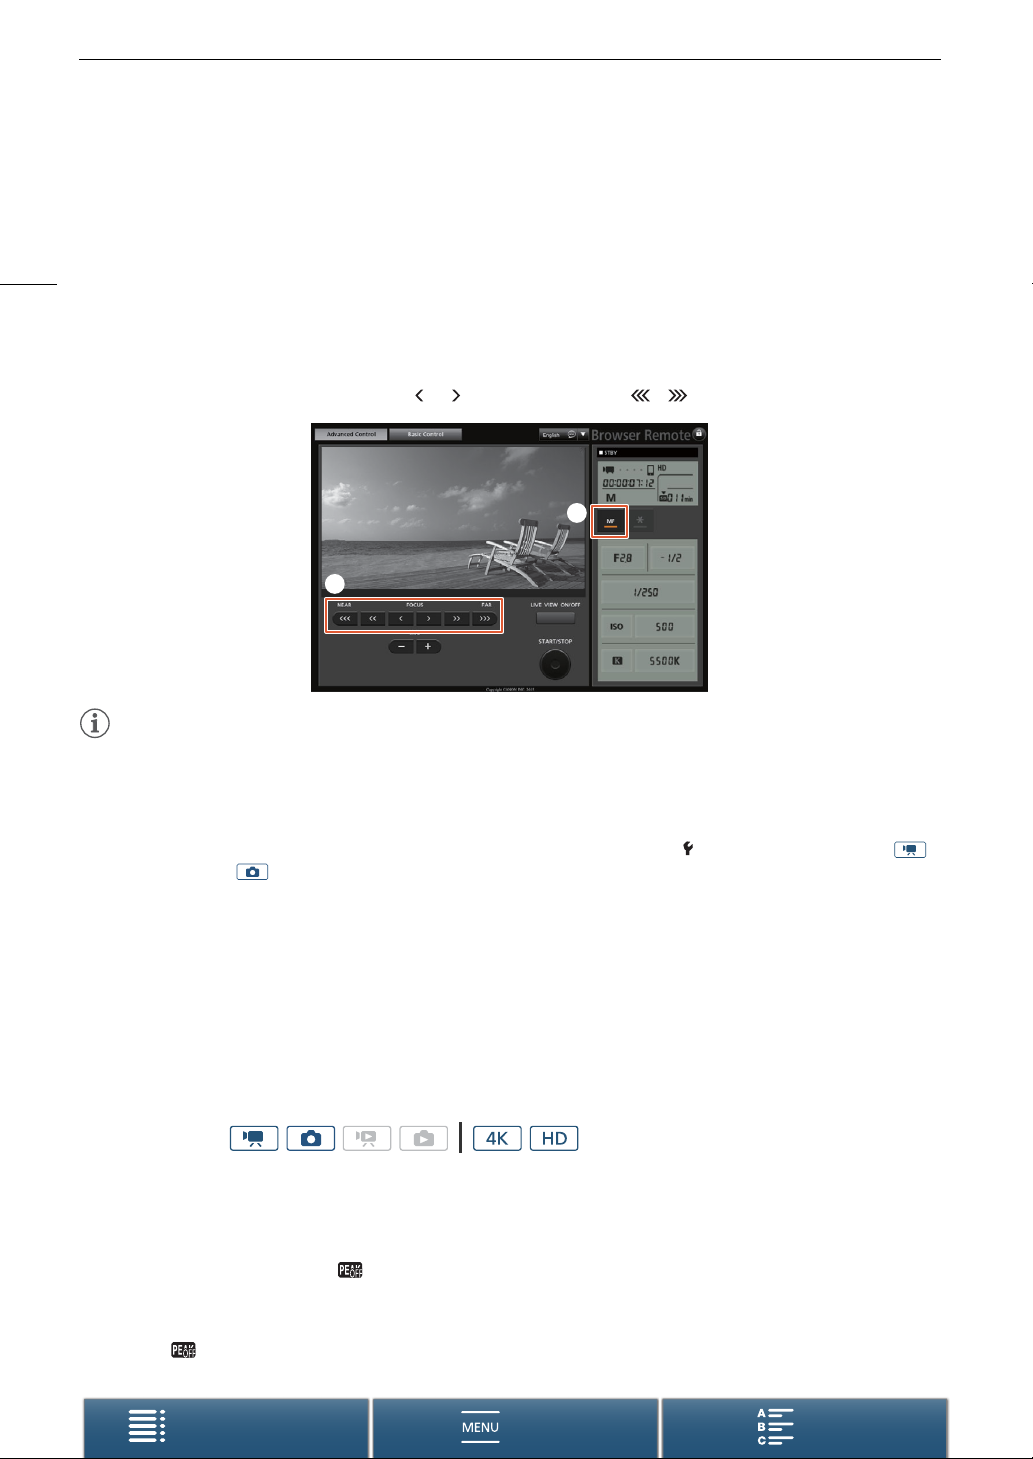
Adjusting the Focus
Remote Operation Using Browser Remote
After completing the necessary preparations (A 127), you can adjust the focus remotely from a connected
device using the Browser Remote application.
72
1 If the camcorder is set to AF mode, touch [MF] on the Browser Remote screen.
• The gray line in the button will turn orange and the camcorder will change to manual focus mode.
2 Press one of the [FOCUS] controls to adjust the focus as necessary.
• Press one of the controls on the [NEAR] side to focus closer or one of the controls on the [FAR] side to focus
farther away.
• There are three levels of adjustment - [ ]/[ ] is the smallest and [ ]/[ ] the largest.
햲
햳
NOTES
• Using the subject distance display on the screen:
- When you use the focus ring, the approximate subject distance is displayed for a few seconds.
- Use the subject distance display as an estimate.
-[∞] indicates infinity focus.
- You can change the units of distance between meters and feet using the [ System Setup] > [4] (in
mode) or [3] (in mode) > [Distance Units] setting.
• If you operate the zoom after focusing, the focus on the subject may be lost.
• If you focus manually and then leave the camcorder with the power turned on, the focus on the subject may
be lost after a while. This possible slight shift in focus is a result of the internal temperature rising in the
camcorder and lens. Check the focus before resuming shooting.
Using the Focus Assistance Functions
In order to focus more accurately, you can use two focus assistance functions – peaking, which creates a clearer
contrast by emphasizing the outlines of the subject, and magnification, which enlarges the image on the screen.
You can use both functions simultaneously for greater effect.
Operating modes:
Peaking
When peaking is activated, the edges of objects in focus will be highlighted in red, blue or yellow on the screen.
In addition, you can choose to switch the screen to black & white, further emphasizing the edges.
1 Touch [FUNC.] and then touch [Peaking].
2Touch [O].
• Peaking is activated and edges are highlighted.
• Touch [ ] to turn off the peaking effect.
Table of Contents Index
Menus
Page 73
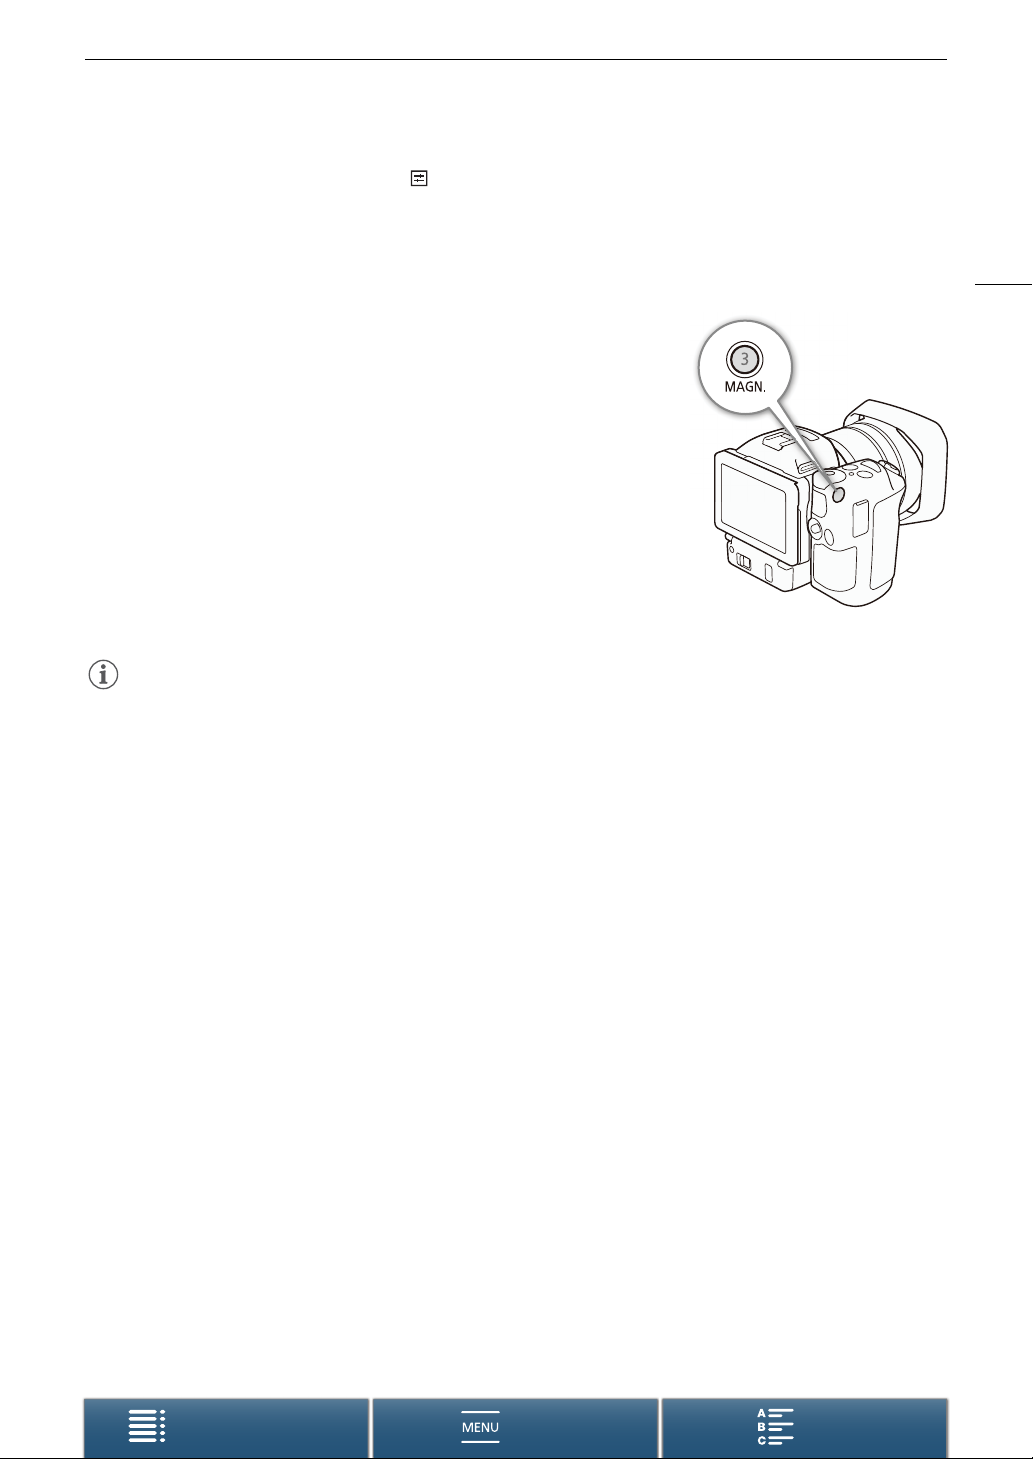
3 To change the peaking settings, touch [ ].
For the black & white setting: Touch [Off] or [On]
For the peaking color: Touch [Red], [Blue] or [Yellow]
4Touch [X].
Magnification
1 Press the MAGN. button.
• Alternatively, you can use the [FUNC.] > ^ [Magnification] > [OK]
setting.
• ^ will appear on the bottom right of the screen and the center of the
screen is magnified approximately 2 times*.
• A white frame representing the whole screen area is displayed on the
bottom right of the screen. The white rectangle within it represents the
approximate part of the image shown magnified.
2 If necessary, use the joystick (ÝÞ) or drag your finger across the
screen to move the white rectangle around and check other parts of the
image.
3 Press the MAGN. button again or touch [X] to cancel the magnification.
* The magnification that appears on the screen differs based on the video configuration.
Adjusting the Focus
73
NOTES
• Peaking/Magnification appears only on the camcorder screen. It will not appear on an external monitor
connected to the camcorder and will not affect your recordings.
• You cannot use magnification while color bars are displayed on the screen.
Table of Contents Index
Menus
Page 74
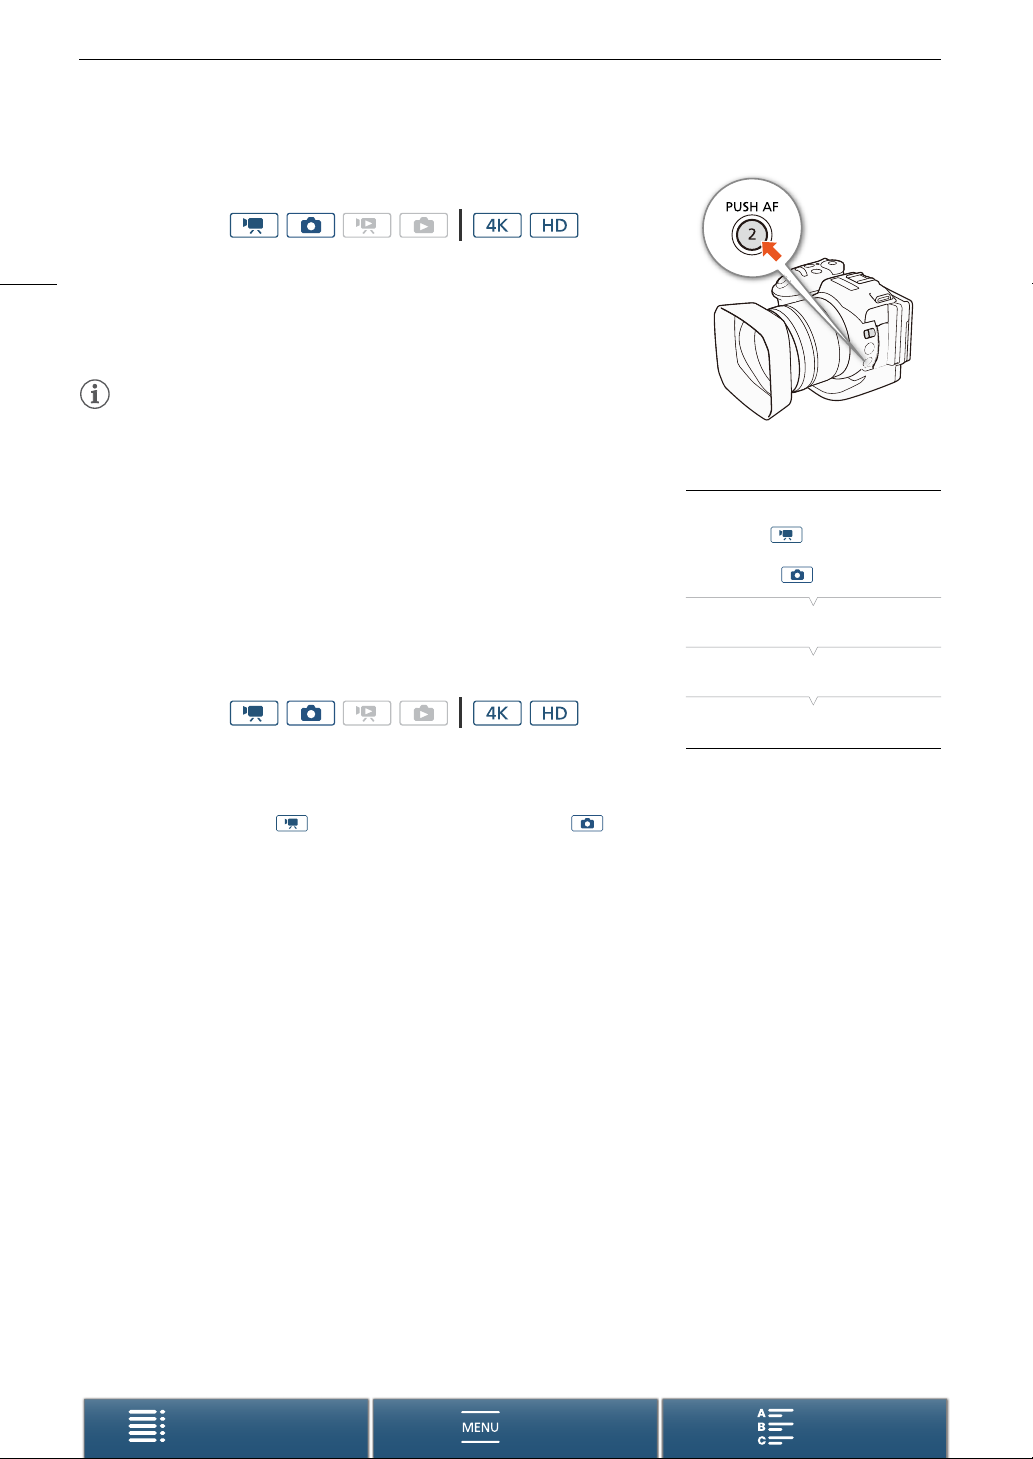
Adjusting the Focus
Push AF
Operating modes:
74
While using manual focus (A 71), press the PUSH AF button and
hold it pressed down.
• Autofocus is temporarily activated as long as you hold the PUSH AF
button pressed down.
NOTES
• All the NOTES for the autofocus section (A 70), apply also to Push AF.
Detecting and Focusing On Faces (Face Detection & Trac ki n g)
The camcorder can detect a person’s face during autofocus mode,
automatically focus on it, and even track it if the person moves. When there
are a number of people in the picture, one person (with the white face
detection frame) will be determined to be the main subject and the camcorder
will focus on that person’s face. You can also change the person selected as
main subject. You must use the touch screen to select the subject.
Operating modes:
1 Press the MENU button.
2 Open the [Face Detection & Tracking] submenu.
[v Camera Setup] (in mode) or [{ Camera Setup] (in mode) > [1] > [Face Detection &
Tracking ]
3 To uc h [i On }] and then touch [X].
•Touch [j Off] to turn face detection off.
4 Point the camcorder at the subject.
• If there is more than one person in the picture, the camcorder will automatically select one person it
determines is the main subject. The camcorder will indicate the main subject with a white face detection
frame and other faces with gray frames.
• If necessary, touch a different face on the touch screen to optimize the camcorder’s settings for that person.
A white double frame will appear around the subject and track it as it moves. Touch [Cancel £] to remove
the frame and cancel the tracking.
• Touching somewhere with a color or pattern unique to the subject will make it easier to track. However, if
there is another subject in the vicinity that shares similar characteristics to the selected subject, the
camcorder may start tracking the incorrect subject. Touch the screen again to select the desired subject.
[v Camera Setup]
(in mode) or
[{ Camera Setup]
(in mode)
[1]
[Face Detection & Tracking]
[i On }]
Table of Contents Index
Menus
Page 75
Adjusting the Focus
NOTES
• The camcorder may mistakenly detect the faces of non-human subjects. In such case, turn face detection off.
• When the shooting mode is set to N, face detection & tracking will automatically be set to [i On }]
and cannot be changed.
• In certain cases, faces may not be detected correctly. Typical examples include:
- Faces extremely small, large, dark or bright in relation to the overall picture.
- Faces that are turned to the side, upside-down, at a diagonal or partially hidden.
• Face detection cannot be used in the following cases:
- When the shutter speed used is slower than 1/30 (1/24 if the frame rate set in [
> [4K Recording] or [HD Recording] is 23.98P).
- When the shooting mode is set to ƒ and [ Night Scene], [ Low Light] or [ Fireworks] is selected.
- When [Slow & Fast Motion] is set to [x1/4].
- In mode, when drive mode is set to [ AF Continuous].
3 Recording Setup] > [1]
75
Table of Contents Index
Menus
Page 76
Image Stabilizer
Image Stabilizer
Use the image stabilizer to compensate for camcorder shake in order to achieve steadier shots. When taking
photos, you can turn image stabilization on and off. When recording clips, there are 3 methods of image
stabilization; select the method that best suits your needs.
76
Standard IS : Standard IS compensates for a lower degree of camcorder shake, such as when shooting while
remaining stationary, and is suitable for shooting natural-looking scenes.
Dynamic IS* : Dynamic IS compensates for a higher degree of camcorder shake, such as when shooting
while walking, and is more effective as the zoom approaches full wide angle.
* Not available when recording 4K clips, using slow & fast motion recording mode or taking photos.
Powered IS : Powered IS is most effective when you are stationary and zooming in on far subjects using high
zoom ratios (the more you approach the telephoto end). This mode is not suitable for tilting and panning shots.
To activate Standard IS or Dynamic IS
Operating modes:
1 Touch [FUNC.] and then touch [Image Stabilizer].
2 Select the desired option and then touch [X].
• In mode, select [i On] to turn on image stabilization.
• Select [ Off] to turn off image stabilization, for example, when recording with the camcorder mounted on
a tripod.
• The icon of the selected mode will appear on the upper right of the screen.
To activate Powered IS
Operating modes:
1 Touch [FUNC.] and then touch [Powered IS].
2 Select [ On] and then touch [X].
• The Powered IS icon will appear on the upper right of the screen.
• Select [ Off] to return image stabilization to its previous setting.
NOTES
• If you set an assignable button to [ Powered IS] (A 100), you can press the button to turn Powered IS on
or off.
• If the degree of camcorder shake is too high, the image stabilizer may not be able to compensate fully.
• When using Dynamic IS, the edges of the picture may be adversely affected (ghosting, artifacts and/or dark
areas may appear) when compensating for a high degree of camcorder shake.
• The angle of view when using Dynamic IS differs from the angle of view when using Standard IS or no image
stabilization.
Table of Contents Index
Menus
Page 77
Onscreen Markers and Zebra Patterns
Onscreen Markers and Zebra Patterns
Using onscreen markers allows you to make sure your subject is correctly framed. The zebra patterns help you
identify areas that are overexposed. The onscreen markers and zebra pattern will not affect your recordings.
Operating modes:
77
Displaying Onscreen Markers
You can display a grid or a horizontal line at the center of the screen. Use
the markers, which can be displayed in white or gray, to make sure your
subject is framed correctly.
1 Press the MENU button.
2 Open the [Onscreen Markers] submenu.
[v Camera Setup] (in mode) or [{ Camera Setup] (in
mode) > [2] (in mode) or [1] (in mode) > [Onscreen
Markers]
3 Select the desired option and then touch [X].
NOTES
• You can turn off most other onscreen displays, leaving only the onscreen markers (A 49).
[v Camera Setup]
(in mode) or
[{ Camera Setup]
(in mode)
[2] (in mode) or
[1] (in mode)
[Onscreen Markers]
[j Off]
Displaying Zebra Patterns
The camcorder has a zebra pattern feature that shows black and white diagonal stripes over areas that are
overexposed. The camcorder offers two levels of zebra pattern: With 100%, only areas that will lose detail in the
highlight areas will be identified, while 70% will identify also areas that are dangerously close to losing detail.
1 Touch [FUNC.] and then touch [Zebra].
2Touch [z 70%] or [{ 100%] and then touch [X].
• The zebra pattern will appear on the overexposed areas of the picture.
• Touch [ Off] to turn off the zebra pattern.
NOTES
• The zebra pattern will not be output to an external device connected to the HDMI OUT terminal.
Table of Contents Index
Menus
Page 78
Setting the Time Code
Setting the Time Code
In mode, the camcorder can generate a time code signal and embed it in clips. Additionally, you can
superimpose the time code on video output from the HDMI OUT terminal. When the frame rate set in
[3 Recording Setup] > [1] > [4K Recording] or [HD Recording] is not 23.98P, you can also select between a
78
drop frame and non-drop frame time code.
Operating modes:
Selecting the Time Code Mode
You can select the camcorder’s time code mode.
1 Press the MENU button.
2 Open the [Time Code Mode] submenu.
[3 Recording Setup] > [2] > [Time Code Mode]
3 Select the desired option and then touch [X].
Options
[ Preset]: The time code starts from an initial value you can select in advance. The default initial time code is
00:00:00.00. When you select this option, select the time code’s initial value and the time code
running mode by following the procedures below.
[ Regen.]:The camcorder will read the selected recording media and the time code will continue from the last
recorded time code on the recording media. The time code runs only while recording so clips
recorded consecutively on the same recording media will have continuous time codes.
Setting the Time Code Running Mode
If you set the time code mode to [
code’s running mode.
1 Press the MENU button.
2 Open the [Time Code Running Mode] submenu.
[3 Recording Setup] > [2] > [Time Code Running Mode]
3 Select the desired option and then touch [X].
Preset], you can set the time
[3 Recording Setup]
[2]
[Time Code Mode]
[ Preset]
[3 Recording Setup]
[2]
[Time Code Running Mode]
[ Rec Run]
Options
[ Rec Run]: The time code runs only while recording so clips recorded consecutively on the same recording
media will have continuous time codes.
[ Free Run]: The time code starts running the moment you touch [X] and keeps running regardless of the
camcorder’s operation.
Table of Contents Index
Menus
Page 79
Setting the Time Code
Setting the Time Code’s Initial Value
If you set the time code mode to [ Preset], you can set the initial
value of the time code.
1 Press the MENU button.
2 Open the [Initial Time Code] submenu.
[3 Recording Setup] > [2] > [Initial Time Code]
• The time code setting screen appears with an orange selection frame
indicating the hours.
3Touch [Í] or [Î] to set the hours and then touch the next field to set the minutes.
4 Change the rest of the fields (minutes, seconds, frame) in the same way.
• Touch [Cancel] to close the screen without setting the time code.
• Touch [Reset] to reset the time code. If the running mode is set to [ Free Run], the time code will start
running immediately after the time code is reset.
5 Touch [OK] and then touch [X].
• If the running mode is set to [ Free Run], the time code will start running from the selected time code
the moment you touch [OK].
[3 Recording Setup]
[2]
[Initial Time Code]
79
Selecting Drop or Non-Drop Frame
You can select between a drop frame (DF) or non-drop frame (NDF) time
code, depending on how you plan to use your recordings. When the
frame rate set in [3 Recording Setup] > [1] > [4K Recording] or [HD
Recording] is 23.98P, the time code is set to non-drop frame (NDF) and
cannot be changed.
1 Open the [DF/NDF] submenu.
[3 Recording Setup] > [2] > [DF/NDF]
2 Select [DF] or [NDF] and then touch [X].
• The time code display will differ depending on the setting. When you select [DF], the time code will appear
as [00:00:00.00]; when you select [NDF], it will appear as [00:00:00:00].
NOTES
• The frames value of the time code runs from 0 to 23 (frame rate set in [3 Recording Setup] > [1] > [4K
Recording] or [HD Recording] is 23.98P) or from 0 to 29 (all other frame rates).
• However, when the video output from the HDMI OUT terminal is 59.94i/59.94P, even when the frame rate set
in [3 Recording Setup] > [1] > [4K Recording] or [HD Recording] is 23.98P, the frames value of the time
code output from the terminal will be 0 to 29.
• When you are using slow & fast motion recording mode, you cannot select the [ Free Run] running mode.
Conversely, when you are using pre-recording mode, [ Free Run] is set automatically and cannot be
changed.
• When you mix drop frame and non-drop frame time codes, there might be a discontinuity in the time code at
the point where the recording starts.
• When you are using the [ Free Run] running mode, the time code will continue running as long as the
built-in rechargeable lithium battery is charged, even if you disconnect all other power sources. However, this
is less accurate than when the camcorder is on.
[3 Recording Setup]
[2]
[DF/NDF]
[DF]
Table of Contents Index
Menus
Page 80
User Bit
User Bit
The user bit display can be selected from the date or the time of recording, or an identification code consisting of
8 characters in the hexadecimal system. There are sixteen possible characters: the numbers 0 to 9 and the
letters A to F.
80
In addition to being recorded with clips, the user bit information can be output along with the video signal output
from the HDMI OUT terminal.
Operating modes:
Setting the User Bit
1 Press the MENU button.
2 Open the [User Bit Type] submenu.
[3 Recording Setup] > [2] > [User Bit Type]
3 Select the desired option.
• Select [ Setting] to set your own identification code, [ Time]
to use the time as user bit, or [ Date] to use the date as the user
bit.
• If you selected [ Time] or [ Date], touch [X]. You do not need
to perform the rest of the procedure. If you selected [ Setting], continue the procedure to set the
identification code.
4Touch [Í] or [Î] to set the first character and then touch the next field to set the next digit.
• Change the rest of the characters in the same way.
• Touch [Cancel] to close the screen without setting the user bit.
5 Touch [OK] and then touch [X].
[3 Recording Setup]
[2]
[User Bit Type]
[ Setting]
User Bit Output
The user bit is output from the HDMI OUT terminal in the selected type. When the frame rate set in
[3 Recording Setup] > [1] > [4K Recording] or [HD Recording] is 23.98P and [3 Recording Setup] > [1]
> [User Bit Output Mode] is set to [ Pulldown], the user bit will contain 2:3 pulldown data.
Table of Contents Index
Menus
Page 81
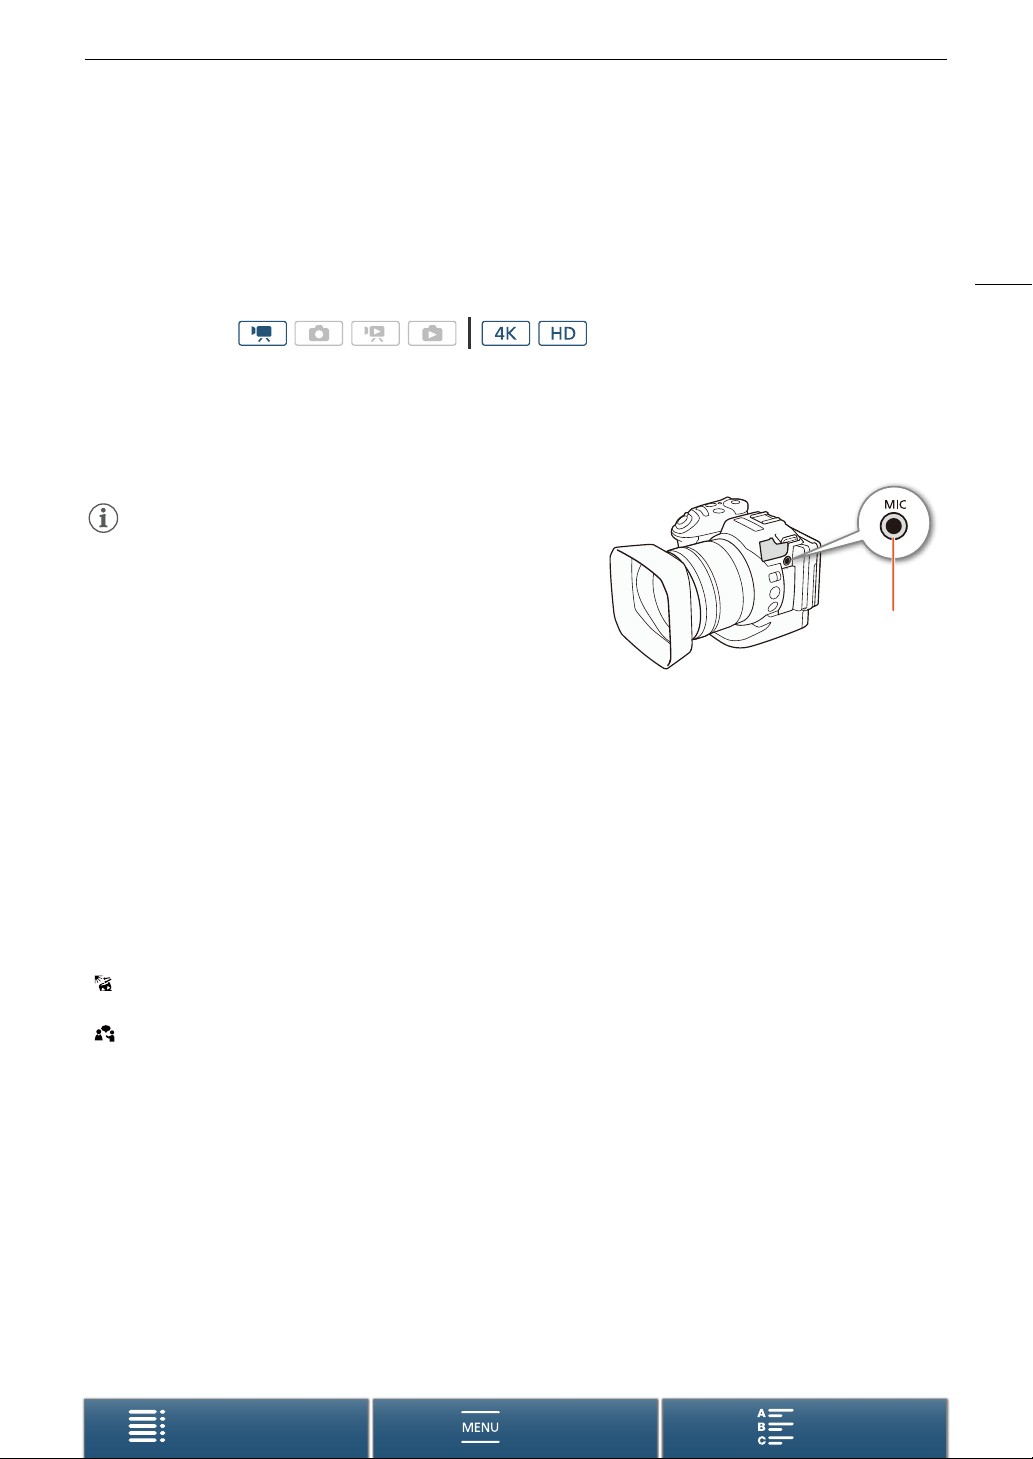
Recording Audio
Recording Audio
This camcorder features 2-channel linear PCM audio recording and playback with a sampling frequency of
48 kHz. You can record audio using the built-in stereo microphone or an external microphone connected to the
MIC terminal.
Audio is not recorded during slow & fast motion recording mode.
Operating modes:
Using Commercially Available Microphones
To the MIC terminal you can attach a commercially available condenser microphone with its own power supply
and a ∅ 3.5 mm stereo mini plug.
Connect the external microphone to the MIC terminal.
NOTES
• An external microphone may pick up noise while Wi-Fi functions
are in use. Keep a distance between the camcorder and
microphone.
MIC terminal
81
Audio Scenes (Built-in Microphone)
You can have the camcorder optimize the audio settings of the built-in microphone by selecting the audio scene
that matches your surroundings. This will greatly enhance the sense of “being there”.
1 Touch [FUNC.] and then touch ‘ [Audio Scene].
2 Select the desired option and then touch [X].
Options
[‘ Standard]: To record most general situations. The camcorder records with standard settings.
[’ Music]: To vibrantly record music performances and singing indoors.
[ Festival]: Optimized for recording music outdoors more naturally. Ideal for outdoor events with music.
[‚ Speech]: Best for recording human voices and dialog.
[ Meeting]: To record people talking while keeping each voice separate, allowing viewers to feel as if they
were there.
[“ Forest and Birds]: To record birds and scenes in forests. The camcorder clearly captures sound as it spreads.
[” Noise Suppression]: To record scenes while reducing noise from wind, passing vehicles and similar ambient sound.
Ideal for recording at the beach or in places with a lot of noise.
[„ Custom Setting]: Allows you to adjust the audio settings to your liking. You can adjust the following settings in
the [¡ Audio Setup] menu: [Built-in Mic Wind Screen], [Built-in Mic Att.], [Built-in Mic Freq.
Response], [Built-in Mic Directionality], [Audio Limiter] and [Audio Compressor].
Table of Contents Index
Menus
Page 82
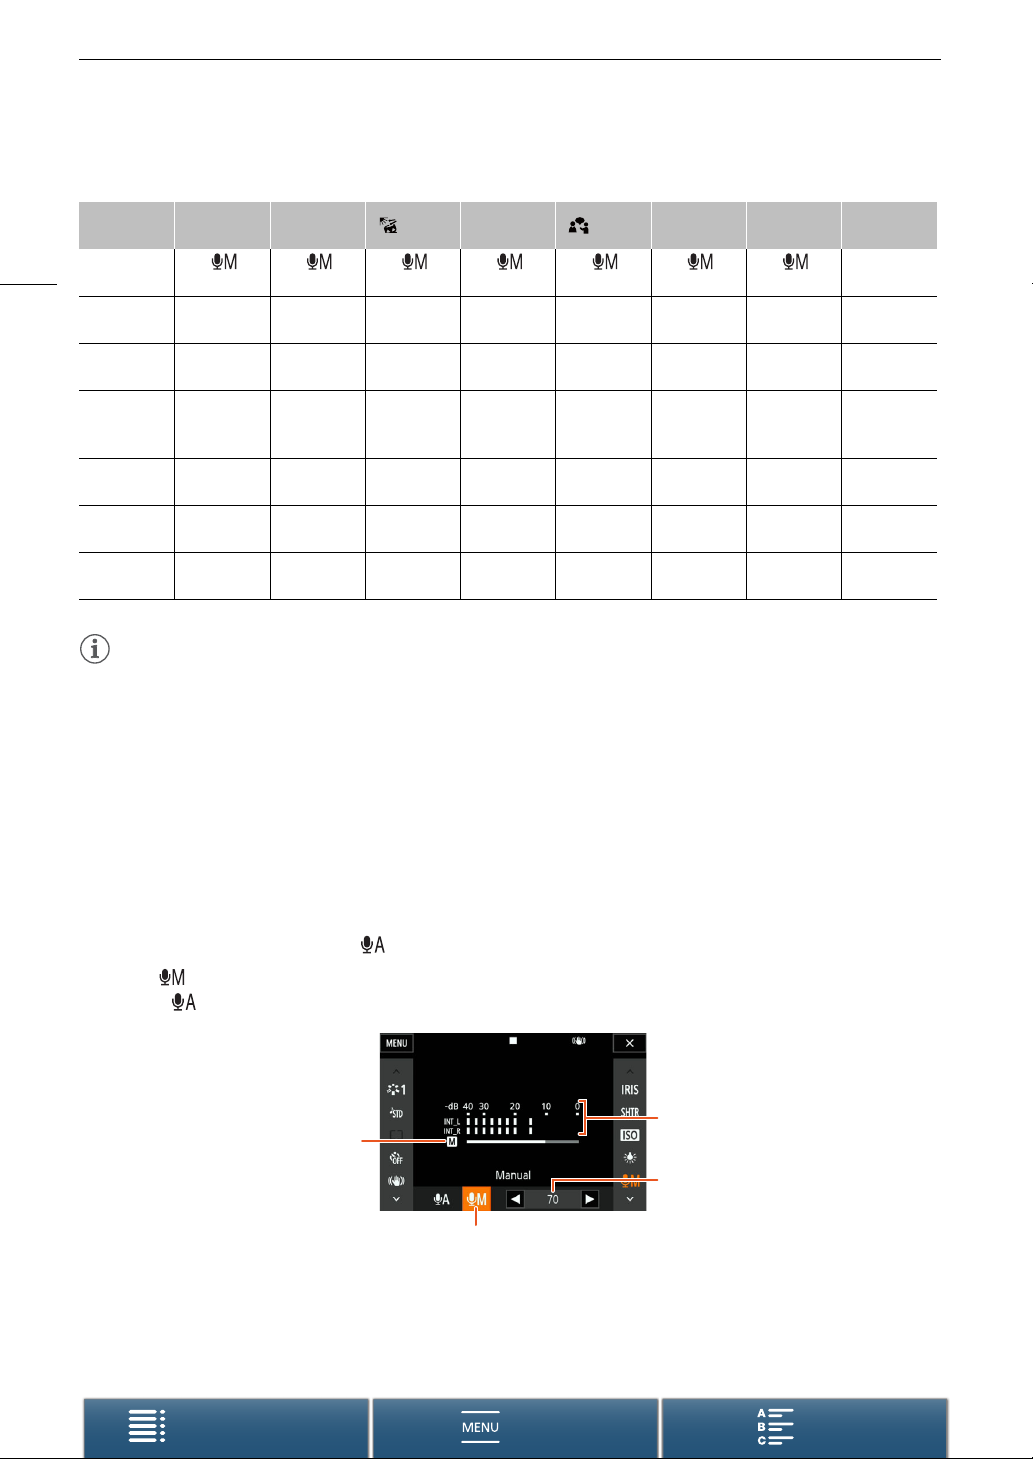
Recording Audio
Settings for each audio scene
82
[Mic level]
[Built-in Mic
Wind Screen]
[Built-in Mic
Att.]
[Built-in Mic
Freq.
Response]
[Built-in Mic
Directionality]
[Audio
Limiter]
[Audio
Compressor]
[‘ Standard]
[
Manual]: 70
[H Auto
(High)]
[k
Automatic]
[h
Normal]
[h
Normal]
[i On] [i On] [i On] [i On] [i On] [i On] [i On]
[L Low] [L Low] [L Low] [j Off] [H High] [L Low] [j Off]
[’ Music] [ Festival][‚ Speech]
[
Manual]: 70
[L Auto (Low) ë][L Auto (Low) ë][H Auto
[k
Automatic]
[ê Boost
HF+LF
Range]
[î Wide] [î Wide]
[
Manual]: 70
[k
Automatic]
[h
Normal]
[
Manual]: 86
(High)]
[k
Automatic]
[é Boost
MF Range]
[í
Monaural]
[ Meeting]
[
Manual]: 94
[H Auto
(High)]
[k
Automatic]
[é Boost
MF Range]
[î Wide] [î Wide]
[“ Forests
and Birds]
[
Manual]: 80
[H Auto
(High)]
[k
Automatic]
[è Low
Cut Filter]
[” Noise
Suppression]
[
Manual]: 70
[H Auto
(High)]
[k
Automatic]
[è Low
Cut Filter]
[í
Monaural]
NOTES
•[„ Custom Setting] is not available when the shooting mode is set to N. After setting [Audio Scene] to
‘
[„ Custom Setting], if the shooting mode is then set to N, this setting will change to [
Standard].
• To reproduce louder and quieter sounds in music more faithfully, we recommend that you first adjust the audio
recording level (refer to the following section). To reproduce the linearity of the music even more faithfully, we
recommend that you select the [„ Custom Setting] audio scene and adjust the audio settings to match those
of the [’ Music] audio scene except set [Audio Compressor] to [j Off].
[„ Custom
Setting]
Selected by
user (A 82)
Selected by
user (A 83)
Selected by
user (A 84)
Selected by
user (A 84)
Selected by
user (A 85)
Selected by
user (A 86)
Selected by
user (A 87)
Audio Recording Level
You can adjust the audio recording level of the built-in microphone or an external microphone connected to the
MIC terminal.
1 Touch [FUNC.] and then touch [Mic Level].
2 Touch [ ] to set the audio recording level to manual.
• Touch [ ] instead to return the camcorder to automatic audio recording level.
Audio level indicator
Audio level adjustment bar
Current audio recording level
Manual audio level adjustment
3Touch [Ï]/[Ð] to adjust the audio recording level as necessary and then touch [X].
• As a guideline, adjust the audio recording level so that the audio level meter will go to the right of the -10 dB
mark only occasionally.
Table of Contents Index
Menus
Page 83
Recording Audio
NOTES
• When the audio level meter reaches the red point (0 dB), the sound may be distorted.
• We recommend using headphones to check the sound level while adjusting the audio recording level or when
the microphone attenuator is activated.
83
Wind Screen (Built-in Microphone)
The camcorder automatically reduces the background sound of wind
when recording outdoors. You can select from two levels or turn off the
auto wind screen.
1Make sure ‘ [Audio Scene] is set to [„ Custom Setting]
(A 81).
2 Press the MENU button.
3 Open the [Built-in Mic Wind Screen] submenu.
[¡ Audio Setup] > [1] > [Built-in Mic Wind Screen]
4 Select the desired option and then touch [X].
Options
[H Auto (High)]: The camcorder will reduce a large amount of noise from the wind. Low-frequency sounds will also
be reduced.
[L Auto (Low) ]: The camcorder will reduce a small amount of noise from the wind. A small amount of low-
frequency sounds will also be reduced.
[j Off à]: The built-in microphone’s wind screen will be deactivated at all times.
NOTES
• Some low-frequency sounds will be suppressed along with the sound of wind. When recording in
surroundings unaffected by wind or if you want to record low-frequency sounds, we recommend setting
[Built-in Mic Wind Screen] to [j Off à].
[¡ Audio Setup]
[1]
[Built-in Mic Wind Screen]
[H Auto (High)]
Table of Contents Index
Menus
Page 84
Recording Audio
Microphone Attenuator (Built-in Microphone)
You can activate the microphone attenuator (20 dB) for the built-in
microphone to prevent audio from being distorted if the audio level is too
high.
84
1Make sure ‘ [Audio Scene] is set to [„ Custom Setting]
(A 81).
2 Press the MENU button.
3 Open the [Built-in Mic Att.] submenu.
[¡ Audio Setup] > [1] > [Built-in Mic Att.]
4 Select the desired option and then touch [X].
Options
[2 Automatic]: The camcorder will automatically activate the built-in microphone attenuator as necessary for optimal
audio recording levels so high audio levels will not be distorted.
[i On]: The built-in microphone attenuator will be activated at all times to reproduce more faithfully the sound
dynamics. When you select this option, å will appear on the screen.
[j Off]: The built-in microphone attenuator will be deactivated at all times. When you select this option,
will appear on the screen.
[¡ Audio Setup]
[1]
[Built-in Mic Att.]
[2 Automatic]
Audio Equalizer (Built-in Microphone)
You can use the audio equalizer to adjust sound levels by specifically
targeting one of the available frequency ranges.
1Make sure ‘ [Audio Scene] is set to [„ Custom Setting]
(A 81).
2 Press the MENU button.
3 Open the [Built-in Mic Freq. Response] submenu.
[¡ Audio Setup] > [1] > [Built-in Mic Freq. Response]
4 Select the desired option and then touch [X].
[¡ Audio Setup]
[1]
[Built-in Mic Freq. Response]
[
h Normal]
Options
[h Normal]: Appropriate for balanced sound under most normal recording conditions.
[ç Boost LF Range]: Accentuates the low-frequency range for more powerful sound.
[è Low Cut Filter]: Filters the low-frequency range to reduce the noise of blowing wind, a car’s engine and
similar ambient sounds.
[é Boost MF Range]: Best for recording human voices and dialog.
[ê Boost HF+LF Range]: Best, for example, for recording live music and clearly capture the special sound
characteristics of a variety of instruments.
Table of Contents Index
Menus
Page 85
Recording Audio
Microphone Directionality (Built-in Microphone)
You can change the directionality of the built-in microphone to have more
control over how sound is recorded.
1Make sure ‘ [Audio Scene] is set to [„ Custom Setting]
(A 81).
2 Press the MENU button.
3 Open the [Built-in Mic Directionality] submenu.
[¡ Audio Setup] > [1] > [Built-in Mic Directionality]
4 Select the desired option and then touch [X].
Options
[í Monaural]: Mono recording that emphasizes sound coming from the front of the camcorder/microphone.
[h Normal]: Standard stereo recording; a middle point between the [î Wide] and [í Monaural] settings in
reach.
[î Wide]: Stereo recording of ambient sound over a more extensive area that adds to the sense of presence
of clips.
[¡ Audio Setup]
[1]
[Built-in Mic Directionality]
[h Normal]
Microphone Attenuator (External Microphone)
You can activate the microphone attenuator (20 dB) for a microphone
connected to the MIC terminal to prevent audio from being distorted if the
audio level is too high.
1 Make sure the input of the MIC terminal is set to
[ß Microphone] (A 86).
2 Press the MENU button.
3 Open the [MIC Att.] submenu.
[¡ Audio Setup] > [2] > [MIC Att.]
4 Select the desired option and then touch [X].
[¡ Audio Setup]
[2]
[MIC Att.]
[2 Automatic]
85
Options
[2 Automatic]: The camcorder will automatically activate the microphone attenuator as necessary for optimal audio
recording levels so high audio levels will not be distorted.
[i On]: The microphone attenuator will be activated at all times to reproduce more faithfully the sound
dynamics. When you select this option, å will appear on the screen.
[j Off]: The microphone attenuator will be deactivated at all times. When you select this option, will
appear on the screen.
Table of Contents Index
Menus
Page 86
Recording Audio
Low Cut Filter (External Microphone)
When you are recording using a microphone connected to the MIC
terminal, you can activate the low cut filter to reduce the sound of blowing
wind, a car’s engine and similar ambient sounds.
86
1 Make sure the input of the MIC terminal is set to
[ß Microphone] (A 86).
2 Press the MENU button.
3 Open the [MIC Low Cut] submenu.
[¡ Audio Setup] > [2] > [MIC Low Cut]
4 Select the desired option and then touch [X].
Switching the Input
You can select the input signal used by the MIC terminal depending on
whether you are using an external microphone or an external audio
source, such as an audio player.
1 Press the MENU button.
2 Open the [MIC Terminal Input] submenu.
[¡ Audio Setup] > [2] > [MIC Terminal Input]
3Touch [Þ External Audio] or [ß Microphone] and then
touch [X].
[¡ Audio Setup]
[2]
[MIC Low Cut]
[j Off]
[¡ Audio Setup]
[2]
[MIC Terminal Input]
[ß Microphone]
Audio Limiter
The audio limiter will limit the amplitude of audio signals to prevent audio
distortions when sudden, loud sounds are picked up by the camcorder.
Start the procedure from step 1 for the built-in microphone and step 2 for
an external audio source.
1Make sure ‘ [Audio Scene] is set to [„ Custom Setting]
(A 81).
2 Make sure [Mic Level] is set to [ ] (A 82).
3 Press the MENU button.
4 Open the [Audio Limiter] submenu.
[¡ Audio Setup] > [2] > [Audio Limiter]
5Touch [i On] and then touch [X].
[¡ Audio Setup]
[2]
[Audio Limiter]
[i On]
Table of Contents Index
Menus
Page 87
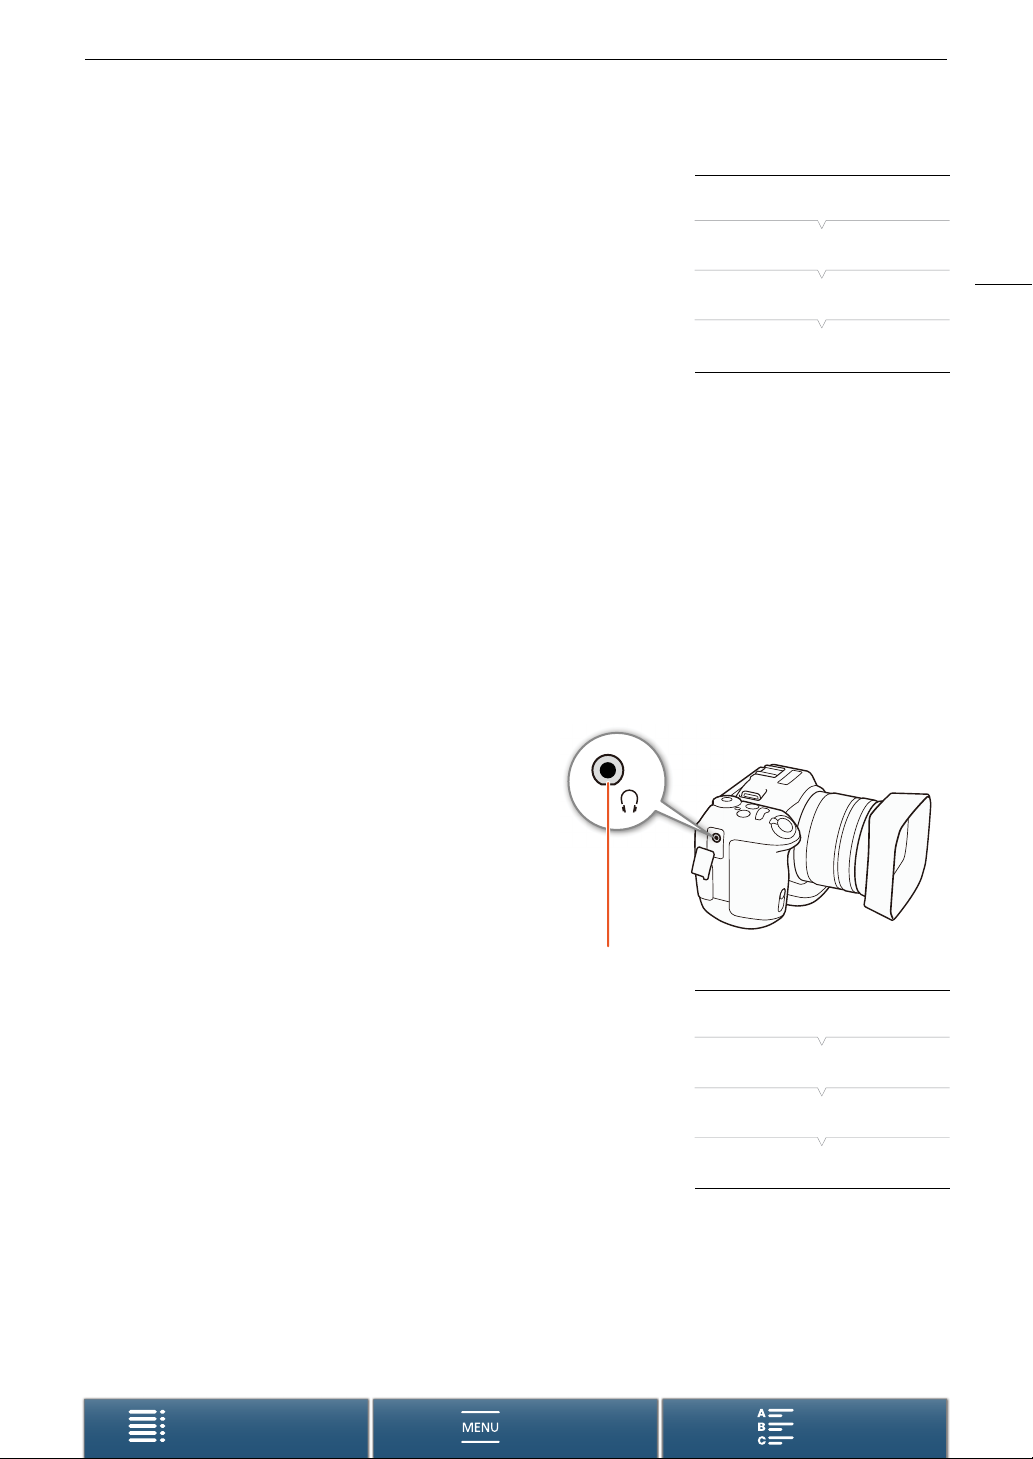
Recording Audio
Audio Compressor
The audio compressor will adjust the audio levels while maintaining the
strength of even louder sounds, which will make listening to the audio
easier. Start the procedure from step 1 for the built-in microphone and
step 2 for an external audio source.
1Make sure ‘ [Audio Scene] is set to [„ Custom Setting]
(A 81).
2 Press the MENU button.
3 Open the [Audio Compressor] submenu.
[¡ Audio Setup] > [2] > [Audio Compressor]
4 Select the desired option and then touch [X].
Options
[H High]: Flattens out audio levels more and is best when recording multiple people talking at varying levels, such
as during a meeting.
[L Low]: Keeps the difference between higher and lower audio levels clear and is best when recording situations
such as a musical performance. This setting is effective when the audio level meter goes all the way to the
right repeatedly.
[j Off]: To record scenes that are not mainly people talking or music performances.
[¡ Audio Setup]
[2]
[Audio Compressor]
[L Low]
Monitoring the Audio with Headphones
You can connect to the × (headphone) terminal any pair of
headphones with a ∅ 3.5 mm stereo mini plug to monitor
the recorded audio.
87
× (headphone) terminal
1 Press the MENU button.
2 Open the [Headphone Volume] submenu.
[¡ Audio Setup] > [1] > [Headphone Volume]
3Touch [Ô]/[Õ] to adjust the volume and then touch [X].
• Alternatively, you can drag your finger left/right to move the
adjustment bar to the desired setting.
Table of Contents Index
Menus
[¡ Audio Setup]
[1]
[Headphone Volume]
[8]
Page 88
Colors Bars/Audio Reference Signal
Colors Bars/Audio Reference Signal
You can have the camcorder generate and record color bars and a 1 kHz audio reference signal. The color bars
can be output from the HDMI OUT terminal while the audio reference signal can be output from the HDMI OUT
and × (headphone) terminals.
88
Operating modes:
Recording Color Bars
You can choose between SMPTE color bars and ARIB multi-format color
bars. For 4K clips, the color bars will be recorded in 4K (3840x2160) but
will be output from the HDMI OUT terminal in HD (1920x1080).
1 Press the MENU button.
2 Open the [Color Bars] submenu.
[3 Recording Setup] > [3] > [Color Bars]
3 Select the type of color bars and then touch [X].
• The selected color bars appear on the screen and will be recorded when you press the START/STOP
button.
• Select [j Off] to turn off the color bars.
• Turning the camcorder off or changing the operating mode to playback mode will deactivate the color bars.
[3 Recording Setup]
[3]
[Color Bars]
[j Off]
Recording an Audio Reference Signal
The camcorder can output a 1 kHz audio reference signal.
1 Press the MENU button.
2 Open the [1 kHz Tone] submenu.
[3 Recording Setup] > [3] > [1 kHz Tone]
3 Select the desired level and then touch [X].
• Available levels are -12 dB, -18 dB and -20 dB.
• Select [j Off] to turn off the signal.
• The signal is output at the selected level and will be recorded when you press the START/STOP button.
[3 Recording Setup]
[3]
[1 kHz Tone]
[j Off]
Table of Contents Index
Menus
Page 89
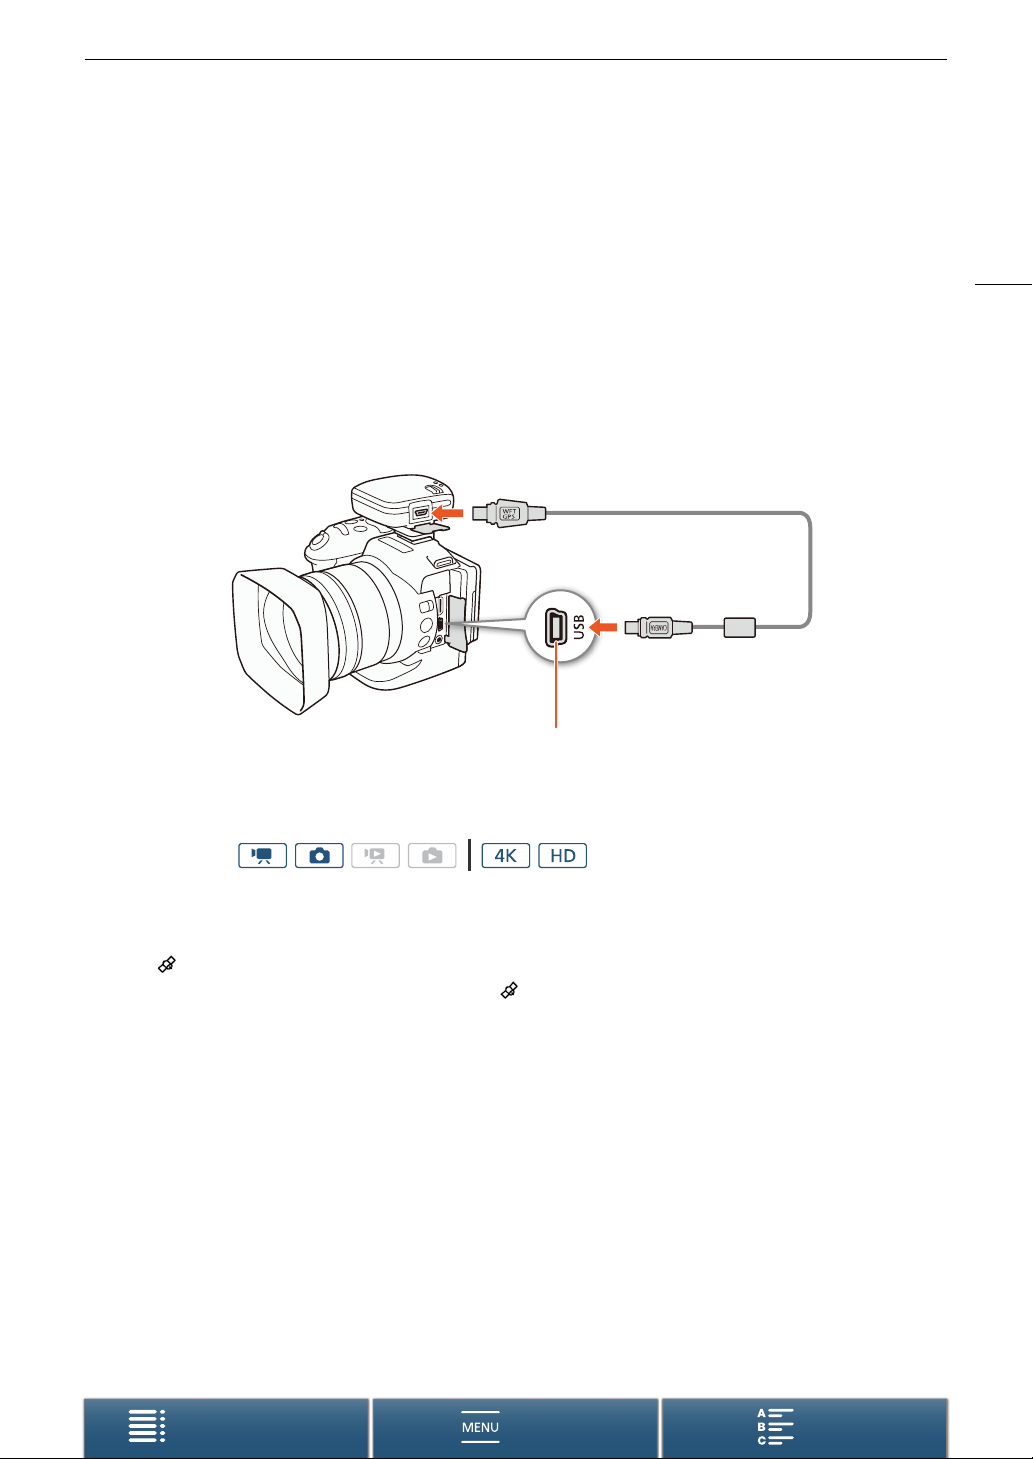
Recording GPS Information (Geotagging)
Recording GPS Information (Geotagging)
When the optional GP-E2 GPS Receiver is connected to the camcorder’s USB terminal, the camcorder will
automatically record the GPS information (time in the UTC standard*, longitude, latitude and altitude) to every
recording you make. The GPS information is recorded as part of the clip’s metadata and can be used to organize
and search recordings using Canon XF Utility for XF-AVC (A 116).
* The time in the UTC standard is recorded for photos only.
Connecting the GPS Receiver
Turn off the camcorder and the receiver. Connect the receiver to the camcorder’s USB terminal using the USB
cable*. For details about connecting and using the receiver, refer to the GP-E2 Instruction Manual.
* Supplied with the optional GP-E2 GPS Receiver.
89
USB terminal
Activating the GPS Receiver
Operating modes:
1 Turn off the camcorder and receiver, and then connect the receiver to the camcorder.
2 Turn on the camcorder and receiver.
• The icon appears on the right of the screen and will blink as the receiver tries to acquire satellite signals.
• When satellite signals are correctly acquired, the icon will stay continuously on. GPS functions will be
activated and clips and photos recorded thereafter will be geotagged.
Table of Contents Index
Menus
Page 90
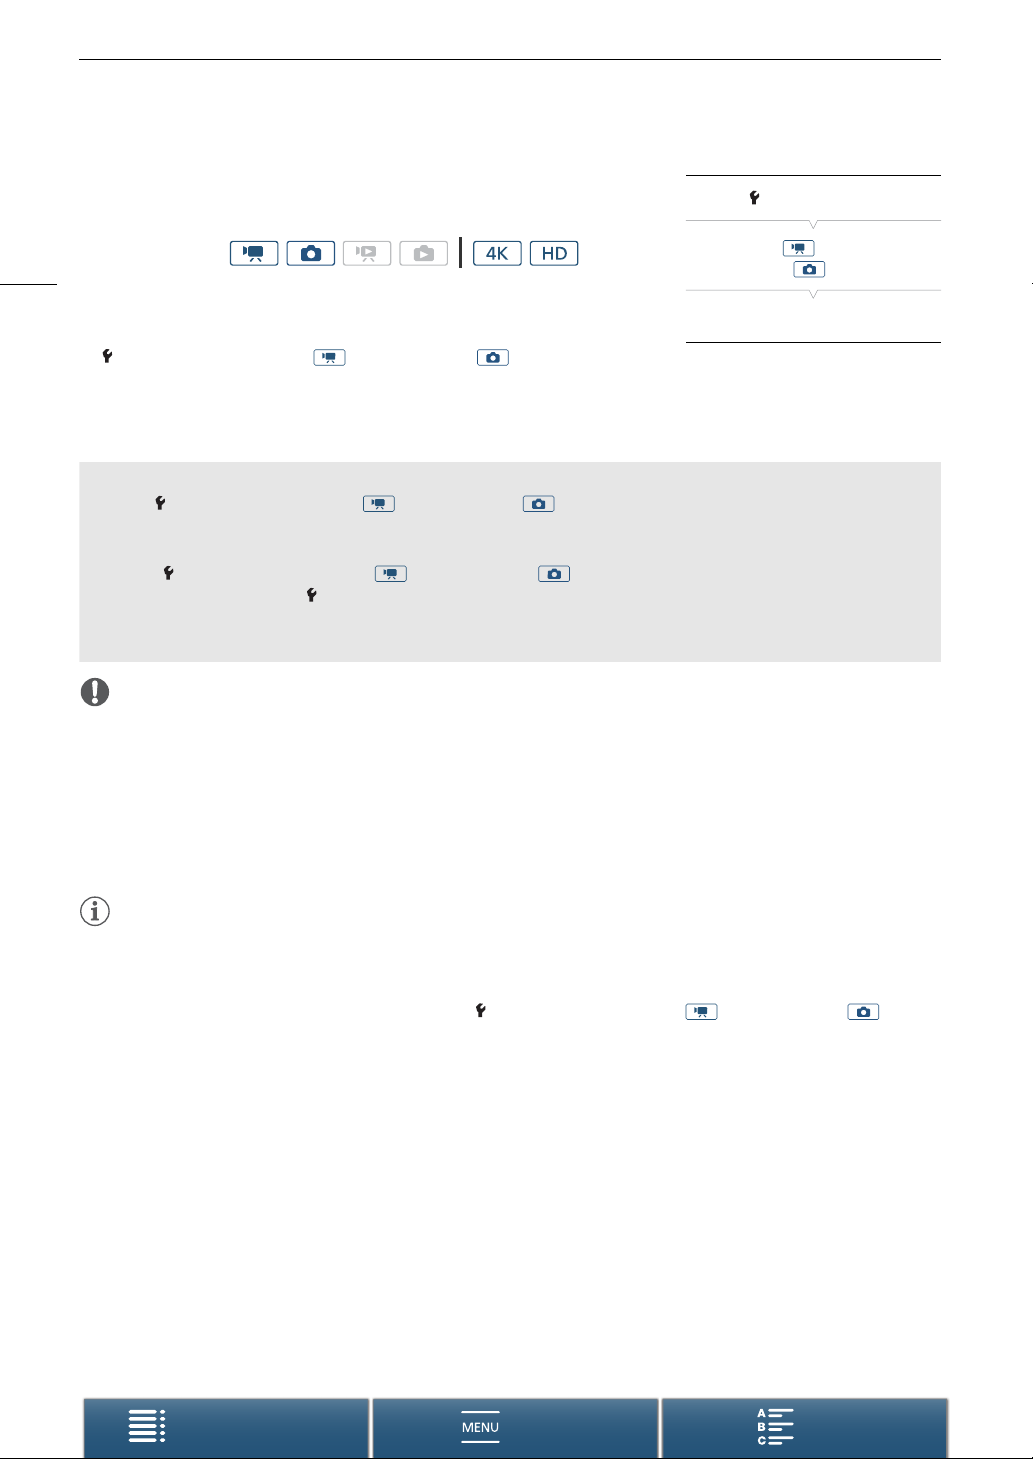
Recording GPS Information (Geotagging)
Displaying GPS Information
You can display GPS information for clips and photos.
[ System Setup]
Operating modes:
90
1 Press the MENU button.
2 Open the [GPS Information Display] submenu.
[ System Setup] > [4] (in mode) or [3] (in mode) >
[GPS Information Display]
3Touch [X].
• The GPS information will be displayed.
Adjusting the Date/Time Automatically According to GPS Position
Setting [ System Setup] > [4] (in mode) or [3] (in mode) > [GPS Auto Time Setting] to [i On],
you can have the camcorder automatically adjust its date and time settings according to the information
received from the GPS signal while an optional GP-E2 GPS Receiver is connected to the camcorder.
• When [ System Setup] > [4] (in mode) or [3] (in mode) > [GPS Auto Time Setting] is set to
[i On], settings in the [ System Setup] > [1] > [Date/Time] submenu will not be available.
• While the Browser Remote application is in use, the automatic adjustment of the date/time will be
deactivated.
IMPORTANT
• In certain countries/regions, the use of GPS may be restricted. Be sure to use the GPS receiver in accordance
with local laws and regulations of the country/region where the receiver is used. Be particularly careful when
traveling outside of your home country.
• Be careful about using the GPS receiver in places where the use of electronic devices is restricted.
• The GPS information recorded with clips and photos may contain data that can lead others to locate or
identify you. Be careful when sharing geotagged recordings with others or when uploading them to the Web.
• Do not leave the GPS receiver near strong electromagnetic fields such as near powerful magnets and motors.
[4] (in mode) or
[3] (in mode)
[GPS Information Display]
NOTES
• GPS signal reception may take some time after replacing the battery pack or when first turning on the
camcorder after a long period without use.
• The camcorder is not compatible with the GPS receiver’s digital compass and positioning interval functions.
Also, the [Set now] option is not available for the [ System Setup] > [4] (in mode) or [3] (in mode)
> [GPS Auto Time Setting] setting.
• GPS information will not be recorded with photos captured from a clip.
Table of Contents Index
Menus
Page 91
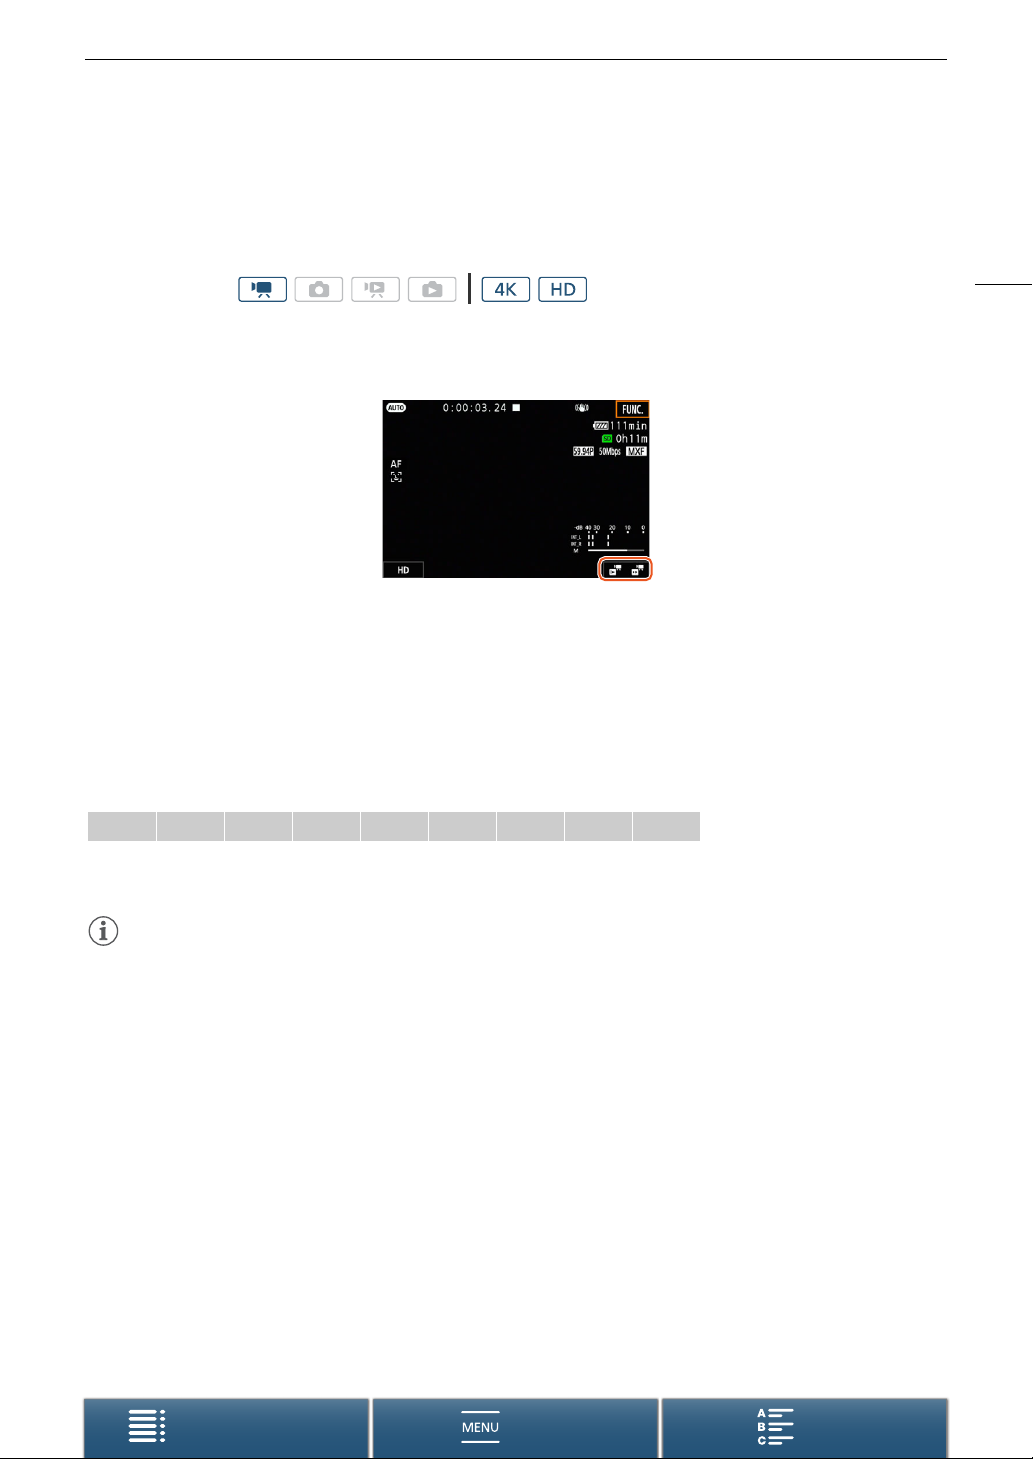
Slow & Fast Motion Mode
Slow & Fast Motion Mode
This mode allows you to change the shooting frame rate to achieve a slow motion or fast motion effect during
playback. Sound is not recorded in this special recording mode.
Operating modes:
1 Touch the slow & fast motion button at the bottom right of the screen.
• Alternatively, you can use the [3 Recording Setup] > [1] > [Slow & Fast Motion] setting.
2 Select the desired slow/fast motion rate and then touch [K] or [X].
• Select [OFF Normal Recording] to turn off slow & fast motion recording.
• The slow/fast motion rate appears in the slow & fast motion button.
3 Press the START/STOP button to begin recording.
• The tally lamp illuminates.
4 Press the START/STOP button again to stop recording.
91
Available slow/fast motion rates
1, 2
x1/4
1
Not available when recording 4K clips.
2
Clips recorded with this option will have a resolution of 1280x720 and a bit rate of 18 Mbps. Also, face detection & tracking will
not be available.
NOTES
• Slow & fast motion recording cannot be used together with pre-recording mode.
• The slow/fast motion rate cannot be changed while recording.
• Clips will have a frame rate of 29.97P.
• Slow & fast motion recording will be deactivated if you change the video configuration.
• During slow & fast motion recording mode, the time code’s running mode (A 78) can be set to [Rec Run] or
[Regen.] and the time code advances by the number of frames recorded. If the time code’s running mode is
set to [Free Run], the running mode will switch to [Rec Run] during slow & fast motion recording mode. When
slow & fast motion recording mode is deactivated, the running mode will return to its previous setting.
x1/2
1
x2 x4 x10 x20 x60 x120 x1200
Table of Contents Index
Menus
Page 92
Pre-recording Mode
Pre-recording Mode
When pre-recording mode is activated, the camcorder starts recording continuously into a temporary memory of
approximately 5 seconds so when you press the START/STOP button, the clip will contain also approximately
5 seconds of video and audio recorded before you pressed the button. Pre-recording is available only for HD
92
clips.
Operating modes:
1 Touch [FUNC.] and then touch [Pre REC].
2 Touch [ On] to turn on pre-recording mode and then touch [X].
• appears on the upper right of the screen.
• Touch [ Off] to turn off pre-recording mode.
3 Press the START/STOP button to begin recording.
• The tally lamp illuminates.
4 Press the START/STOP button again to stop recording.
• The camcorder records the clip, including approximately 5 seconds of video and audio recorded before the
START/STOP button was pressed.
• The tally lamp goes out.
NOTES
• During pre-recording mode, the time code will be recorded with the running mode (A 78) set to [Free Run],
regardless of the previous setting. When the time code is recorded, it will include the 5 seconds before the
START/STOP button was pressed. When pre-recording mode is deactivated, the running mode will return to
its previous setting.
• Pre-recording cannot be used together with slow & fast motion recording.
• Pre-recording will be deactivated if you change the video configuration.
Table of Contents Index
Menus
Page 93
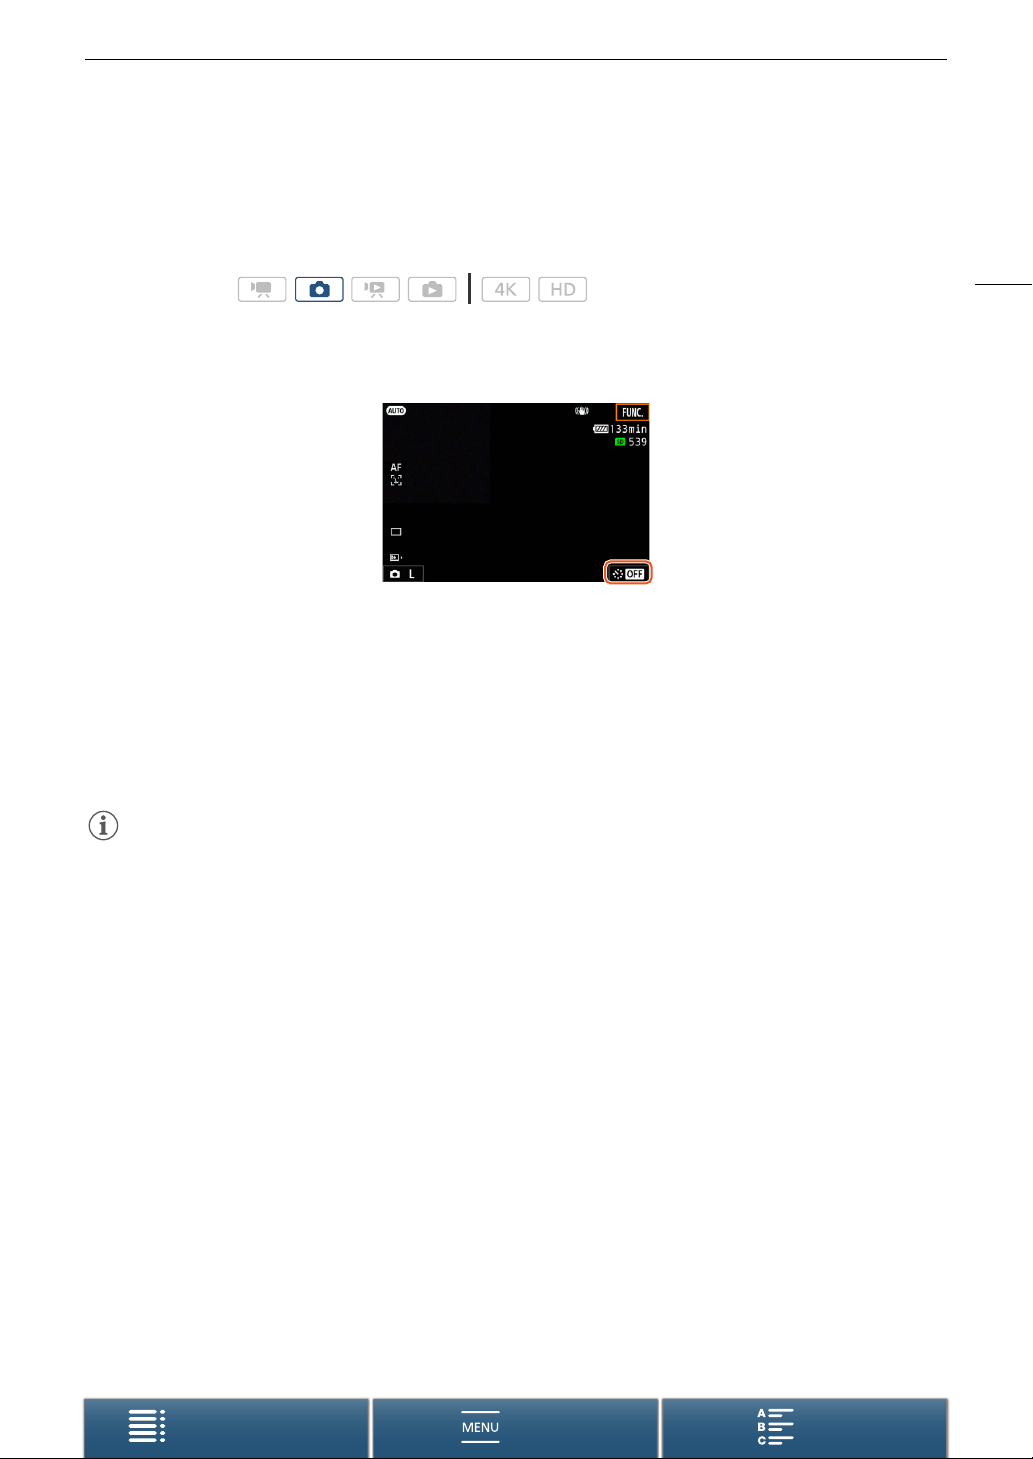
Interval Recording Mode
Interval Recording Mode
The camcorder will automatically record photos at a selected interval. This mode is suitable for recording
subjects with little movement, such as natural surroundings or plants. Set the interval in advance.
Operating modes:
1 Touch the interval recording button at the bottom right of the screen.
• Alternatively, you can use the [3 Recording Setup] > [1] > [Interval Recording] setting.
2 Select the desired interval and then touch [K] or [X].
• Available intervals are 5 seconds, 10 seconds, 30 seconds, 1 minute and 10 minutes.
•Select [j Off] to turn off interval recording.
3 Press the PHOTO button to begin recording.
• Photos are taken at the selected interval. The number of photos taken so far and the time remaining until the
next shot are displayed at the top of the screen.
4 Press the PHOTO button again to stop recording.
93
NOTES
• Interval recording cannot be used together with face detection & tracking, touch focus, exposure lock, touch
exposure or AE shift.
• The focus will be locked when interval recording starts. Autofocus will be deactivated while recording.
• Depending on the SD card, it may take some time to save the photos, thereby causing the actual interval
between shots to be longer than the selected one.
Table of Contents Index
Menus
Page 94
Self Timer
Self Timer
You can have the camcorder record after a 2-second or 10-second countdown.
Operating modes:
94
1 Touch [FUNC.] and then touch [Self Timer].
2 Select the desired countdown duration and then touch [X].
• The countdown icon ( or ) appears at the top of the screen.
3 Press the START/STOP button to start the countdown and record.
• You can press the START/STOP button again to cancel the countdown.
NOTES
• When using the supplied remote controller, the countdown duration will be determined by the [Self Timer]
setting, regardless of the position of the remote controller’s delay switch.
• Once the countdown has begun, any of the following actions will cancel the self timer.
- Turning off the camcorder.
- Pressing the ^ button or changing the shooting mode.
Table of Contents Index
Menus
Page 95
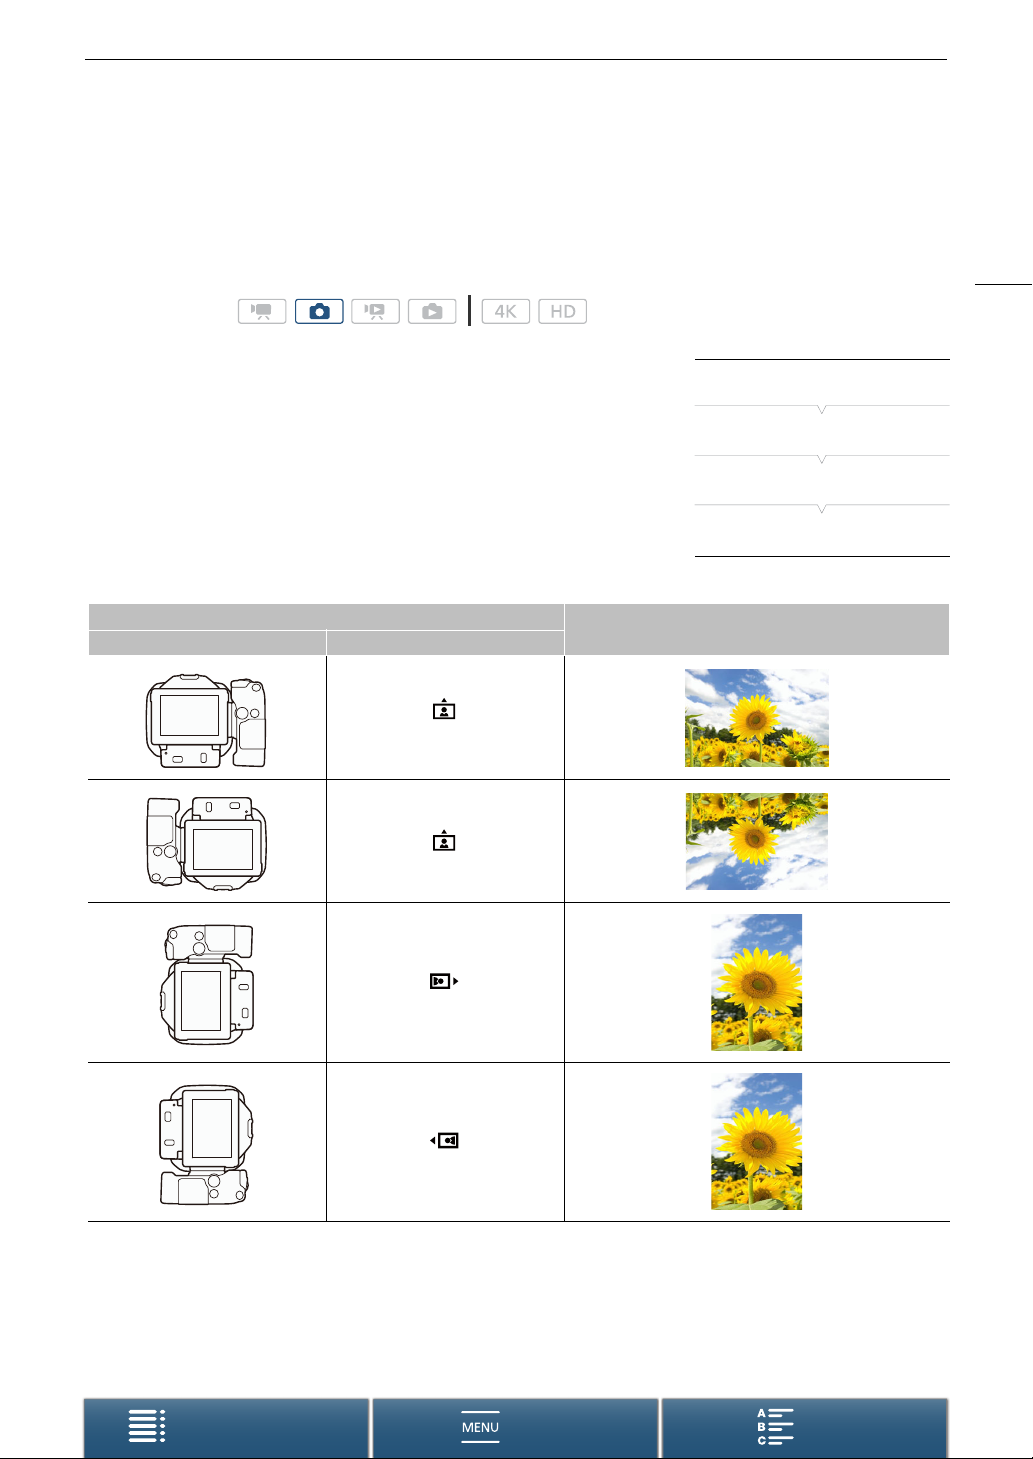
Orientation Detection
Orientation Detection
When orientation detection is turned on, the camcorder will detect if it is turned sideways or upside-down while
recording and add that information to the photo’s EXIF data. Furthermore, when you play back those photos, the
camcorder can automatically rotate them so that they are displayed in the correct orientation.
Operating modes:
95
1 Press the MENU button.
2 Open the [Detect Orientation] submenu.
[3 Recording Setup] > [1] > [Detect Orientation]
3Touch [i On] and then touch [X].
• The orientation icon (see the following table) appears on the bottom
left of the screen.
Examples of image rotation when [Detect Orientation] is set to [i On]
Recording
Camcorder’s orientation* Onscreen icon
[3 Recording Setup]
[1]
[Detect Orientation]
[i On]
Playback
* As seen from the back of the camcorder, with the lens pointing forward.
Table of Contents Index
Menus
Page 96
Orientation Detection
Correcting Orientation during Playback
You can have the camcorder display in the correct orientation photos that were recorded using orientation
detection.
96
Operating modes:
1 Press the MENU button.
2 Open the [Auto Rotate] submenu.
[^ Playback Setup] > [1] > [Auto Rotate]
3Touch [i On] and then touch [X].
• If you turn this function off, photos that were recorded with orientation
detection will not be displayed in the correct orientation.
[^ Playback Setup]
[1]
[Auto Rotate]
[i On]
Table of Contents Index
Menus
Page 97
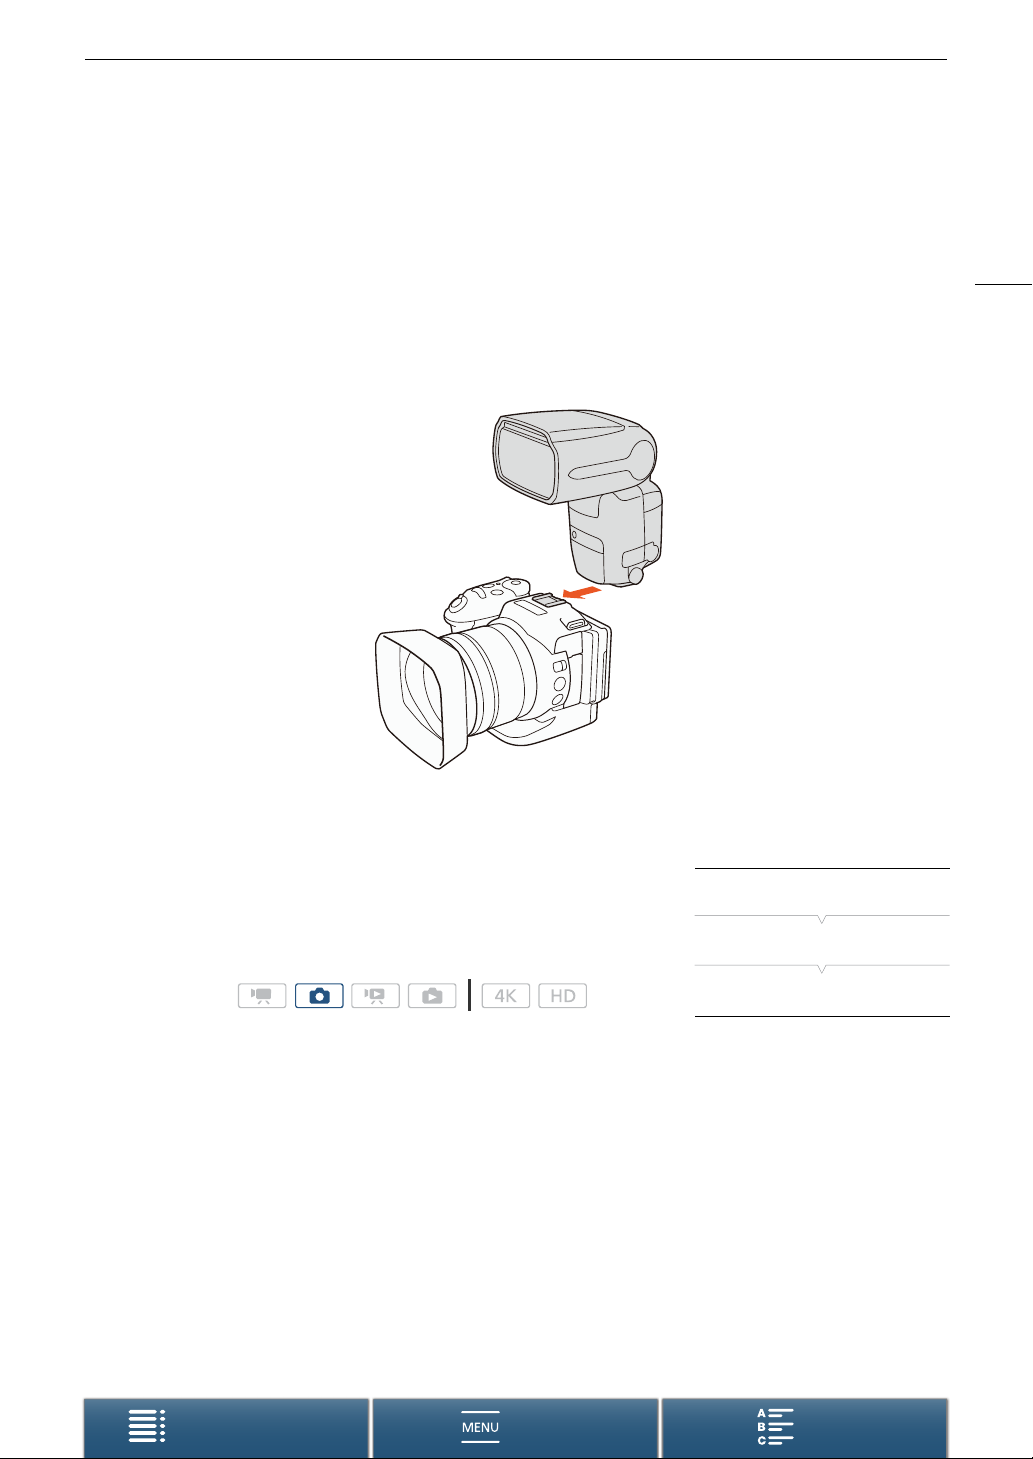
Using an Optional Speedlite Flash
Using an Optional Speedlite Flash
Using an optional EX-series Speedlite for EOS cameras (270EX II, 320EX, 430EX II, 580EX II, 600EX-RT), you
can enjoy flash photography with this camcorder. If you use the optional 320EX Speedlite, you can use its LED
light (video light) when recording clips.
For details about using a Speedlite, refer to its instruction manual.
Attaching the Speedlite
97
Configuring an Attached Flash
Depending on the Speedlite used, the following flash settings may be
available: flash mode, flash exposure compensation, flash output level,
high-speed sync. You can also reset the flash settings.
Operating modes:
1 Press the MENU button.
2 Open the [Flash] submenu.
[{ Camera Setup] > [2] > [Flash]
To set the flash mode
3 Touch [Flash Mode].
4 Select [k Automatic] or [n Manual] and then touch [K] to configure other flash settings or [X] to
close the menu.
Table of Contents Index
Menus
[{ Camera Setup]
[2]
[Flash]
Page 98
Using an Optional Speedlite Flash
To set the flash exposure compensation
3 Make sure [Flash Mode] is set to [k Automatic].
4 Touch [Flash Exp. Comp.].
98
5 Select the desired compensation level and then touch [K] to configure other flash settings or [X]
to close the menu.
• Available levels range from -3 to +3 stops, in 1/3-stop increments.
• You can also touch [-] and [+] to select the level.
To set the flash output level
3 Make sure [Flash Mode] is set to [n Manual].
4 Touch [Flash Output].
• An adjustment dial will appear.
5 Drag your finger left/right to move the adjustment dial to the desired setting.
• You can also push the joystick left/right to adjust the setting.
• Available levels range from 1/128 power* to 1/1 full power in 1/3-stop increments.
* 1/64 power for the 270EX II, 320EX and 430EX II Speedlites.
6Touch [K] to configure other flash settings or [X] to close the menu.
To set high-speed sync
3 Touch [High-speed Sync.].
4 Select [i On] and then touch [K] to configure other flash settings or [X] to close the menu.
•Touch [j Off] to turn off high-speed sync.
• When this function is set to [i On], the flash is available for all shutter speeds. When set to [j Off], it is
available for shutter speeds 1/250 and slower.
To reset the flash settings
3 Touch [Reset Flash Settings].
4 Touch [Yes].
5 When the confirmation screen appears, touch [OK] and then touch [X].
NOTES
• Depending on the Speedlite, some functions may not be available with this camcorder.
• When using a Speedlite that is not an EX-series Speedlite*, it may not fire at full power, fire correctly or fire at
all.
• Using a non-Canon flash (especially high-voltage models) or flash accessories can cause a malfunction of the
camcorder or cause the camcorder to not function normally.
• The following actions will reset the flash settings.
- Attaching or removing the Speedlite.
- While the Speedlite is attached to the camcorder, turning off the camcorder or Speedlite.
* EX-series Speedlites include the 270EX II, 320EX, 430EX II, 580EX II and 600EX-RT.
Table of Contents Index
Menus
Page 99
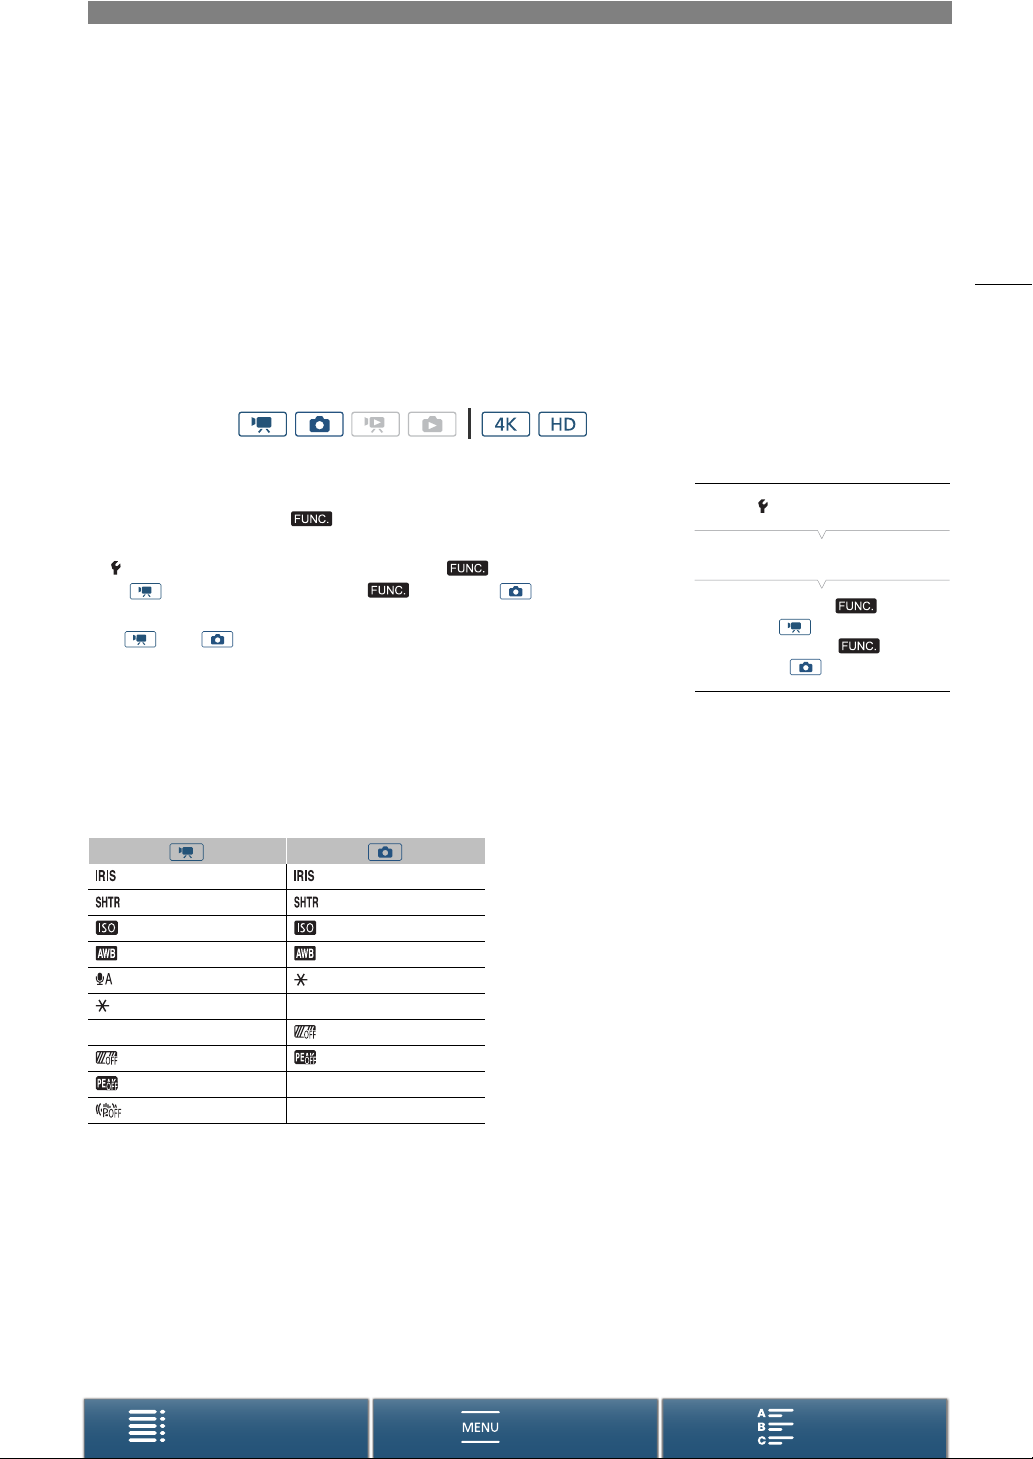
Customization
4
Customizing the FUNC. Menu
You can change what functions appear on the right side of the FUNC. menu appear, making frequently used
functions easier to access. By default, the following functions appear on the right side of the FUNC. menu. To
replace an icon, follow the procedure below.
Operating modes:
99
1 Press the MENU button.
2 Open the [Customize Menu] submenu for the current
recording mode.
[ System Setup] > [3] > [v Customize Menu]
(in mode) or [{ Customize Menu] (in mode)
• The right side of the FUNC. menu can be customized separately for
and modes.
3 From the right side of the screen, select the function to remove
from the right side of the FUNC. menu.
4 From the bottom of the screen, select the function to add to the
right side of the FUNC. menu.
5Touch [X].
Default functions by mode
[Aperture] [Aperture]
[Shutter Speed] [Shutter Speed]
[ISO] [ISO]
[White Balance] [White Balance]
[Mic Level] [Exposure Lock]
[Exposure Lock] y [AE Shift]
y [AE Shift] [Zebra]
[Zebra] [Peaking]
[Peaking] < [Focus]
[Powered IS] ^ [Magnification]
[ System Setup]
[3]
[v Customize Menu]
(in mode) or
[{ Customize Menu]
(in mode)
Table of Contents Index
Menus
Page 100
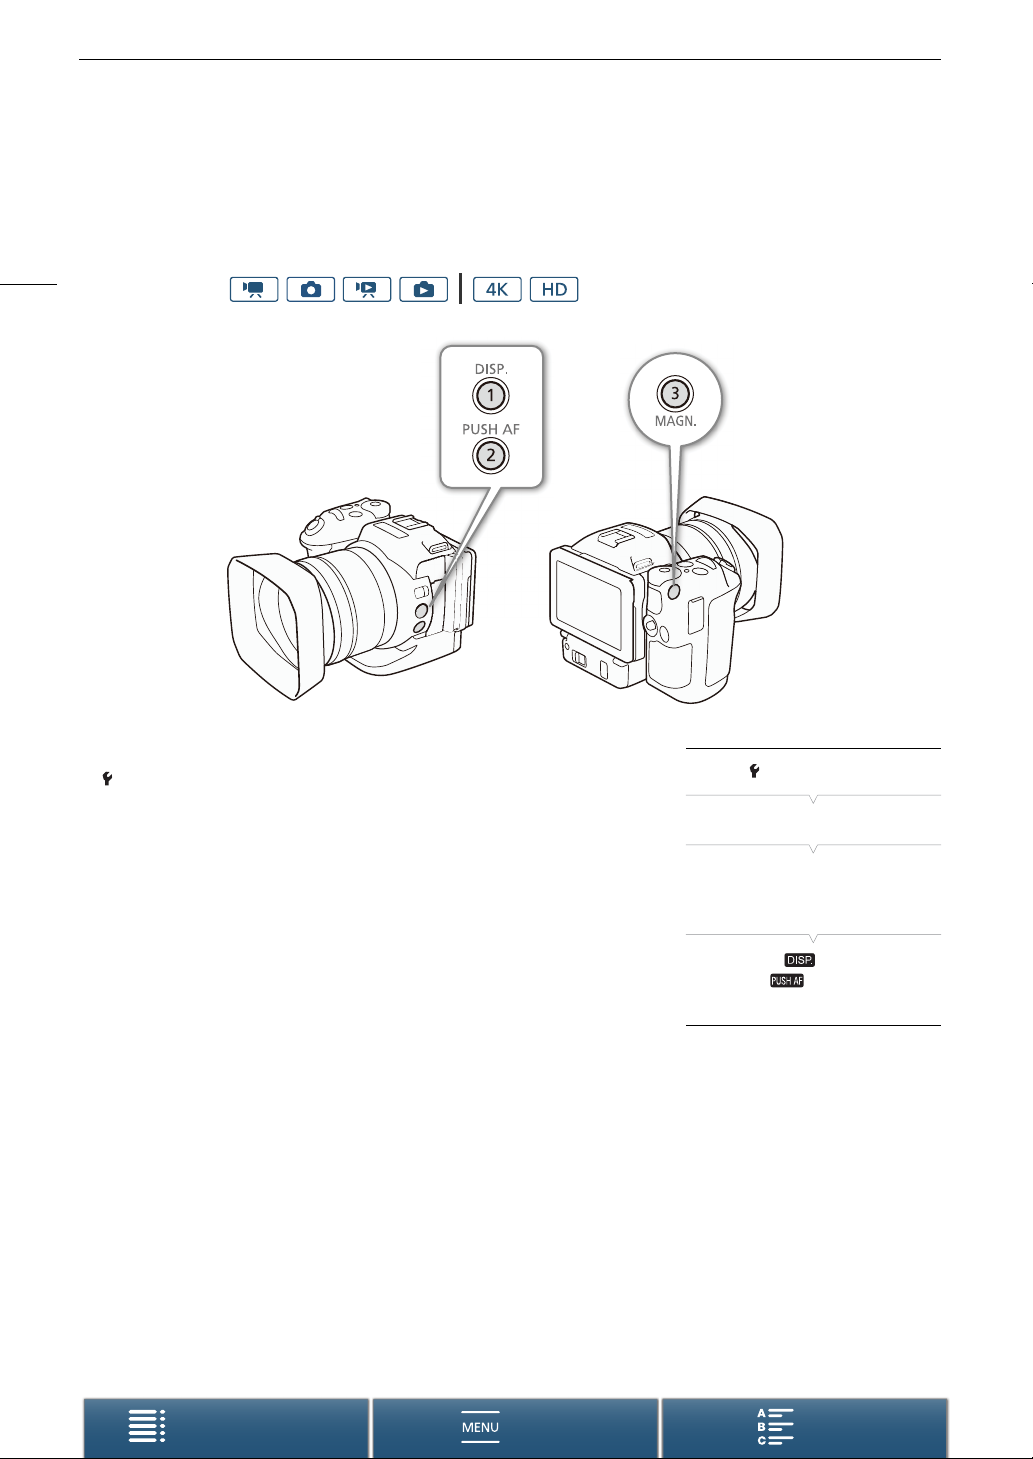
100
Assignable Buttons
Assignable Buttons
The camcorder conveniently features assignable buttons to which you can assign various functions. By
assigning often-used functions, you can quickly access them with a single press of a button.
Operating modes:
1 Open the submenu of the desired assignable button.
[ System Setup] > [2] > [Assign Button 1], [Assign Button 2] or
[Assign Button 3]
• A list of available functions appears.
• The quick reference shows the default settings for each assignable
button. The label on the button also indicates the button’s default
setting.
2 Select the desired function and then touch [X].
[ System Setup]
[2]
[Assign Button 1]
[Assign Button 2]
[Assign Button 3]
1: [ DISP.]
2: [ Push AF]
3: [^ Magnification]
Table of Contents Index
Menus
 Loading...