

Canon IP100, WebCAM IP200, WebCAM IP300, WebCAM IP100 User Manual

WebCAM
User Manual
Version 2.3
For models:
IP100, IP200, IP300

CONTENTS
Chapter 1: Introduction ________________________________________1
Section 1. Features ___________________________________________1
Section 2. WebCAM as a Remote Surveillance System _______________1
Section 3. Package Contents ___________________________________ 2
Chapter 2: Installation Procedure ________________________________ 4
Chapter 3: WebCAM, USB Camera and the Network _________________5
Section 1. Installation Procedure_________________________________5
Chapter 4: Using Utility to Setup IP & Update Firmware _________________7
Section 1. Installing Utility ______________________________________7
Section 2. Using Utility ________________________________________ 8
2.1 Setup Wizard_____________________________________________ 9
2.2 Launch WebCAM ________________________________________15
2.3 IP Configuration__________________________________________ 16
2.3.1 IP Address ____________________________________________17
2.3.2 Advanced _____________________________________________17
2.5 About __________________________________________________ 20
2.6 Refresh ________________________________________________ 20
Chapter 5: WebCAM Web Manager ______________________________21
Section 1. Introduction________________________________________ 21
Section 2. WebCAM Web Manager Interface ______________________22
2.1 Web-Camera Selection ____________________________________ 23
2.2 Information _____________________________________________24
2.2.1 System Status _________________________________________24
2.2.2 Current Connections ____________________________________ 25
2.2.3 Event Log _____________________________________________ 26
2.3 Basic Settings ___________________________________________ 26
2.3.1 Camera Settings________________________________________27
2.3.2 Network ______________________________________________28
2.3.3 Account Settings________________________________________30
2.4 Advanced Settings________________________________________ 32
2.4.1 Event Notification _______________________________________32
2.4.2 Motion Detection _______________________________________ 36
2.4.3 Image Recording _______________________________________39
2.4.4 E-mail / FTP ___________________________________________ 40
i

2.4.5 System Settings ________________________________________ 43
2.4.6 Image Server __________________________________________45
2.4.7 Language _____________________________________________ 46
2.4.8 About ________________________________________________47
2.5 Viewing images using PDA / Web enabled mobile phone __________ 48
Chapter 6: MultiMonitor _______________________________________50
Section 1. Installing MultiMonitor________________________________ 50
Section 2. Using MultiMonitor __________________________________50
2.1 Device _________________________________________________ 53
2.2 View___________________________________________________ 63
2.3 System ________________________________________________63
2.4 User___________________________________________________64
2.5 Help___________________________________________________65
2.6 Drag-and-Drop Feature ____________________________________ 66
Appendix A: Router Configuration ______________________________ 68
Appendix B: Methods to Update WebCAM Firmware _______________86
Appendix C: IP Address, Subnet and Gateway ____________________87
Appendix D: Glossary ________________________________________89
ii

Chapter 1: Introduction
Chapter 1: Introduction
Section 1. Features
WebCAM is a compact stand-alone web-server capable of remote video
surveillance. It can be accessed from anywhere in the world via a standard browser
by entering the IP, account and password. Each system can simultaneously support
any two combinations of USB PC cameras be it regular, infrared or pan-tilt. With its
built-in web-server, WebCAM can stream video images directly to the Internet without
have to go through a computer. WebCAM features a Windows-based software that
allows the user to archive streaming video directly into the hard-drive. The same
software also allows the user to monitor multiple cameras on one screen.
Features:
• Built-in Web Server
• 10/100Mbps Fast Ethernet Network Access
• Support Any Java-Enabled Web Browser
• LCD display shows the IP address, Subnet Mask and Gateway
• 32-Bit RISC CPU
• 1MB Flash Memory
• 8MB Dynamic Memory
• Support Up to 30 Remote Viewers for each camera
• Allow Up to 8 User Accounts and Passwords
• 5.3VDC 1A Maximum
• Operating Temperature: 0°C ~ 60°C
• Operating Humidity: 10% ~ 90%
• Dimensions: 48mm x 63mm x 21m
• Weight: 75g
• For Indoor Use. Protective housing required for outdoor use.
• Network Protocol: HTTP, TCP/IP, UDP, SMTP, PPPoE, Dynamic DNS, DNS
Client, SNTP, BOOTP, DHCP, FTP, SNMP
• Support All USB PC Camera with VIMICRO ZC0301 Plus processor built-in
• Resolution available: 640x480 (VGA), 352x288 (CIF), 320x240 (QVGA),
176x144 (QCIF), 160x120 (QQVGA).
• Frame Rate: Up to 15fps in 640x480, Up to 20fps in 320 x 240.
• Motion JPEG streaming video
• 2 USB Ports for PC Cameras
• USB 1.1 & 2.0 compliant
• Can combine with two different PC cameras
• Support Pan/Tilt and Infrared USB PC Camera
Section 2. WebCAM as a Remote Surveillance System
Once WebCAM is installed, the user can check any of the connected PC cameras
using a standard web browser. The user can monitor and control these cameras
simply by entering the IP address of the WebCAM into a Web Browser from
WebCAM user manual -1-
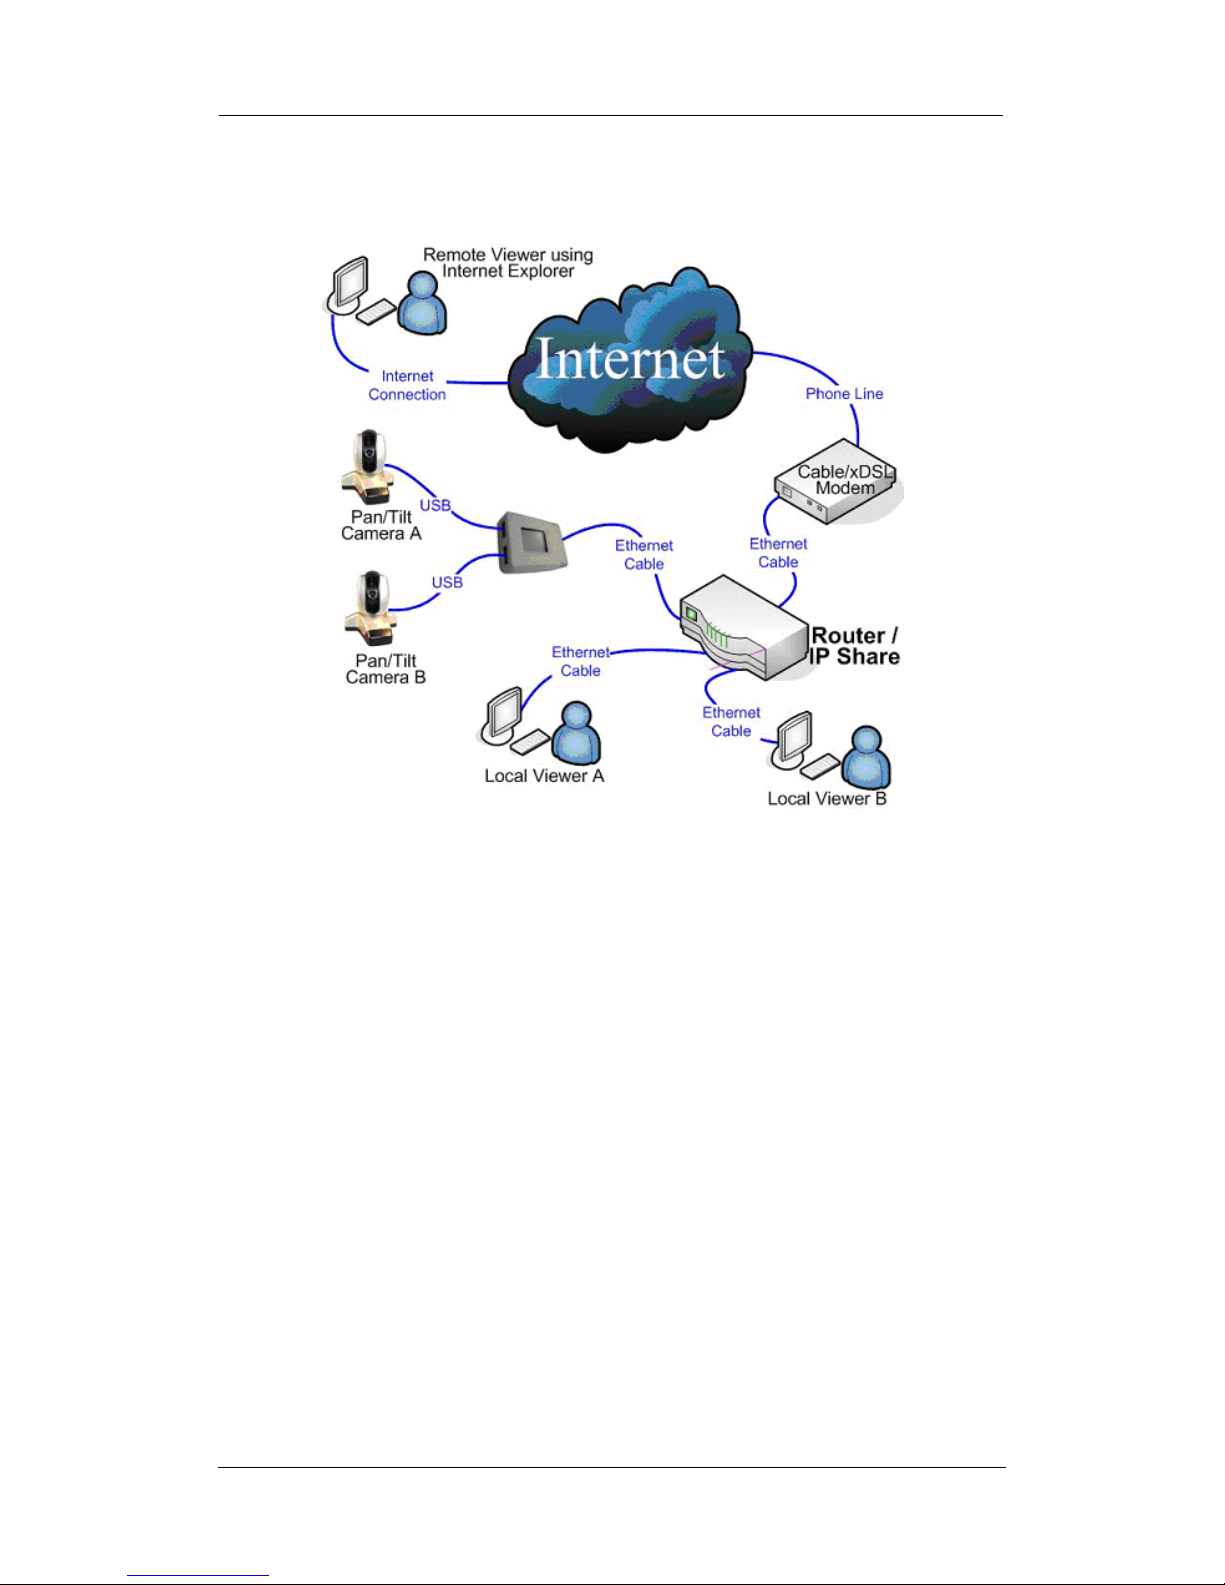
Chapter 1: Introduction
anywhere in the world. For instance, the user can be in Australia but is able to
monitor his factory production in China, and if he likes, check on his branch office
located in Singapore, all simultaneously.
Fig.1. WebCAM Network Diagram
Section 3. Package Contents
Your WebCAM package should contain the following items;
1. WebCAM,
2. Quick Installation Guide
3. WebCAM Utility CD, which contains;
a. Utility: to configure IP address, update the firmware, etc.
b. iMultiMonitor: Windows platform to monitor multiple WebCAM.
c. Time Server: Time adjustment utility.
d. Adobe Acrobat 5.0 Reader.
e. WebCAM user manual, and
f. Camera Windows Driver
4. 5.3V DC Adapter
5. USB Camera
WebCAM user manual -2-
Chapter 1: Introduction
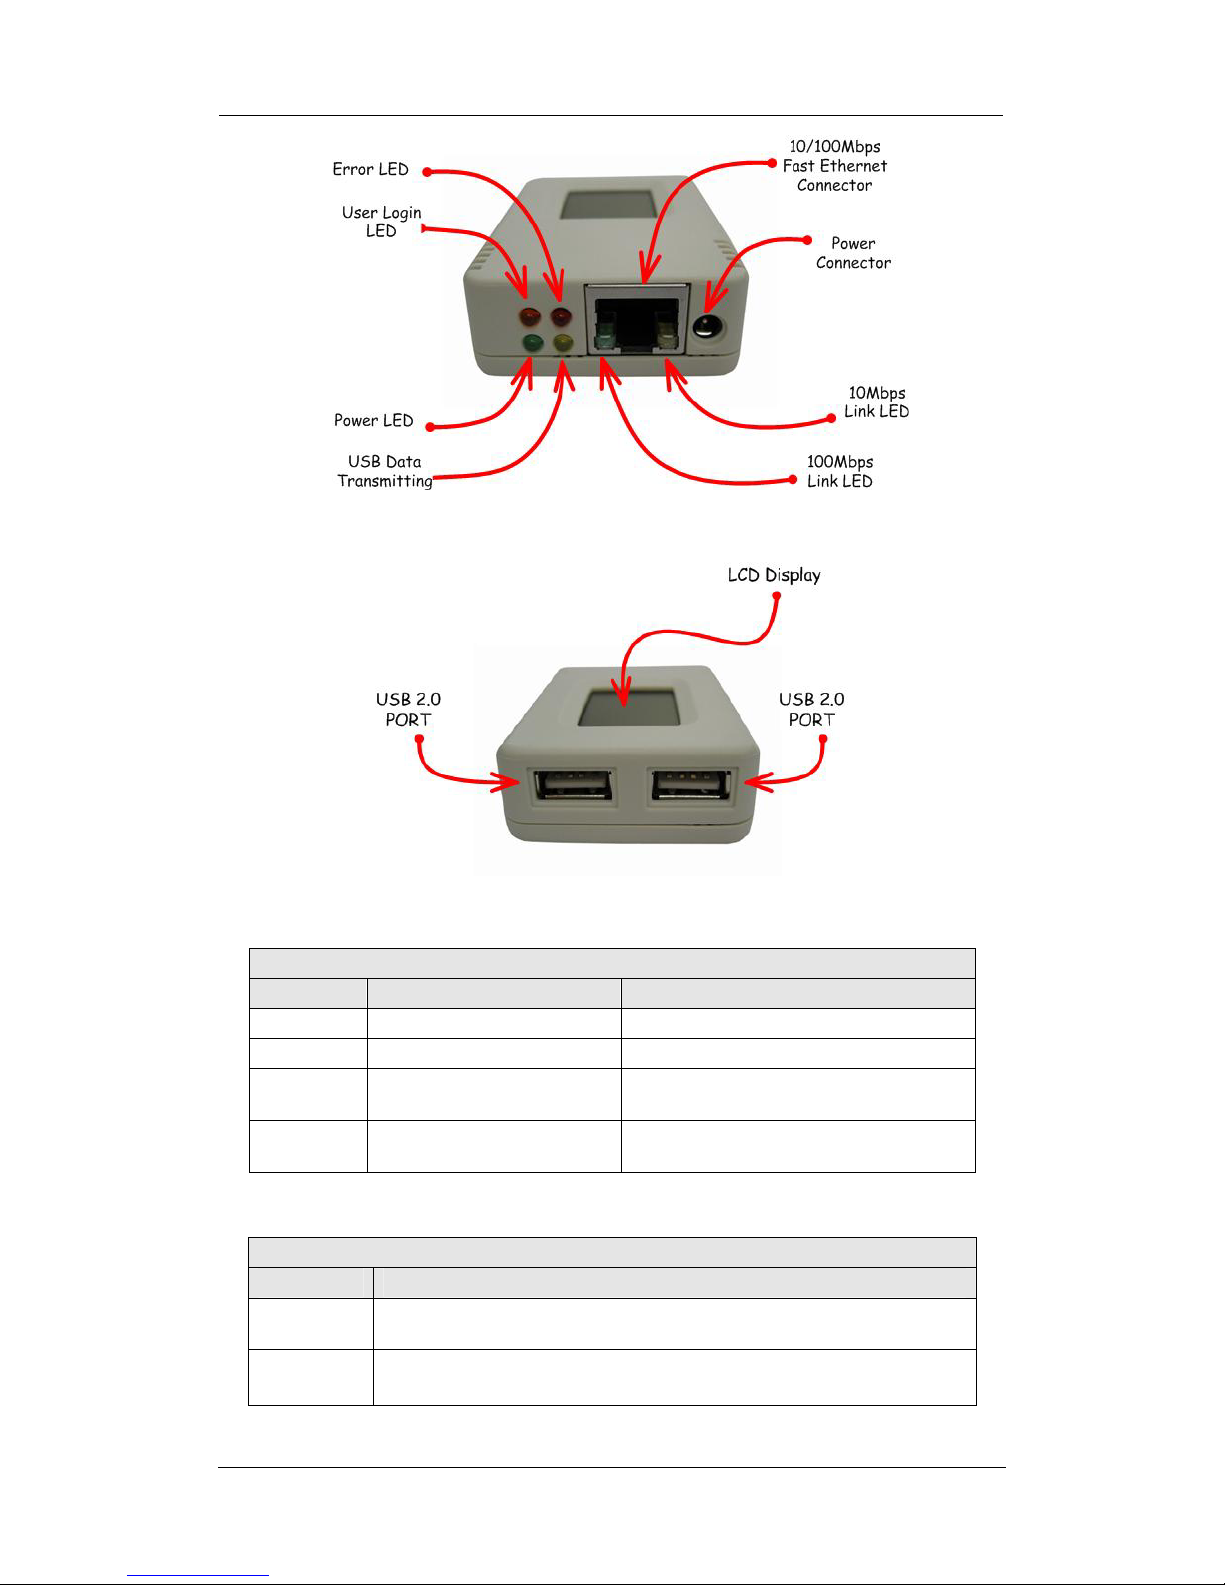
Fig.2. WebCAM Front View
Fig.3. WebCAM Back View
LED Status Indicators on WebCAM
Light color Signal definition Condition description
Green Power state On: Normal power
Red Error Condition On: Error condition occurred
Orange Logon state
Yellow
USB data activity
Fig.4. WebCAM Status LED Indicator
On: When there is user logon and
receive the image.
Flash when there is data
transmit/receive on the USB.
Light indicators on WebCAM LAN Port LED
Light color Condition description
Green
Yellow
On: Internet correspond speed is 100M
Flash: Data transmitting/receiving
On: Internet correspond speed is 10M
Flash: Data transmitting/receiving
Fig.5. WebCAM LAN LED Indicators
WebCAM user manual -3-

Chapter 2: Installation Procedure
Chapter 2: Installation Procedure
Before you start using WebCAM, you will need to set-up both the hardware and
software. The following is a flow chart on the installation procedure:
1
Connect WebCAM,
USB Camera and the Network cable
(Chapter 3)
2
Connect Network cable to ROUTER
/ HUB / xDSL modem
3
Install Utility (Chapter 4) and
MultiMonitor (Chapter 6)
4
Use Internet Explorer (>5.0) to
access WebCAM Web Manager
(Chapter 5).
5
WebCAM set-up completed
Fig.6. WebCAM installation flowchart
WebCAM user manual -4-

Chapter 3: WebCAM, USB Camera and the Network
Chapter 3: WebCAM, USB Camera and the Network
The following details the installation procedure for WebCAM.
Section 1. Installation Procedure
Step 1:
Connect the PC camera
into the USB port of
WebCAM.
Step 2:
Connect the WebCAM to
LAN by using the
Ethernet UTP port.
Step 3:
Connect DC power
adapter output into
WebCAM socket, and
plug the DC power input
into the wall socket
WebCAM user manual -5-
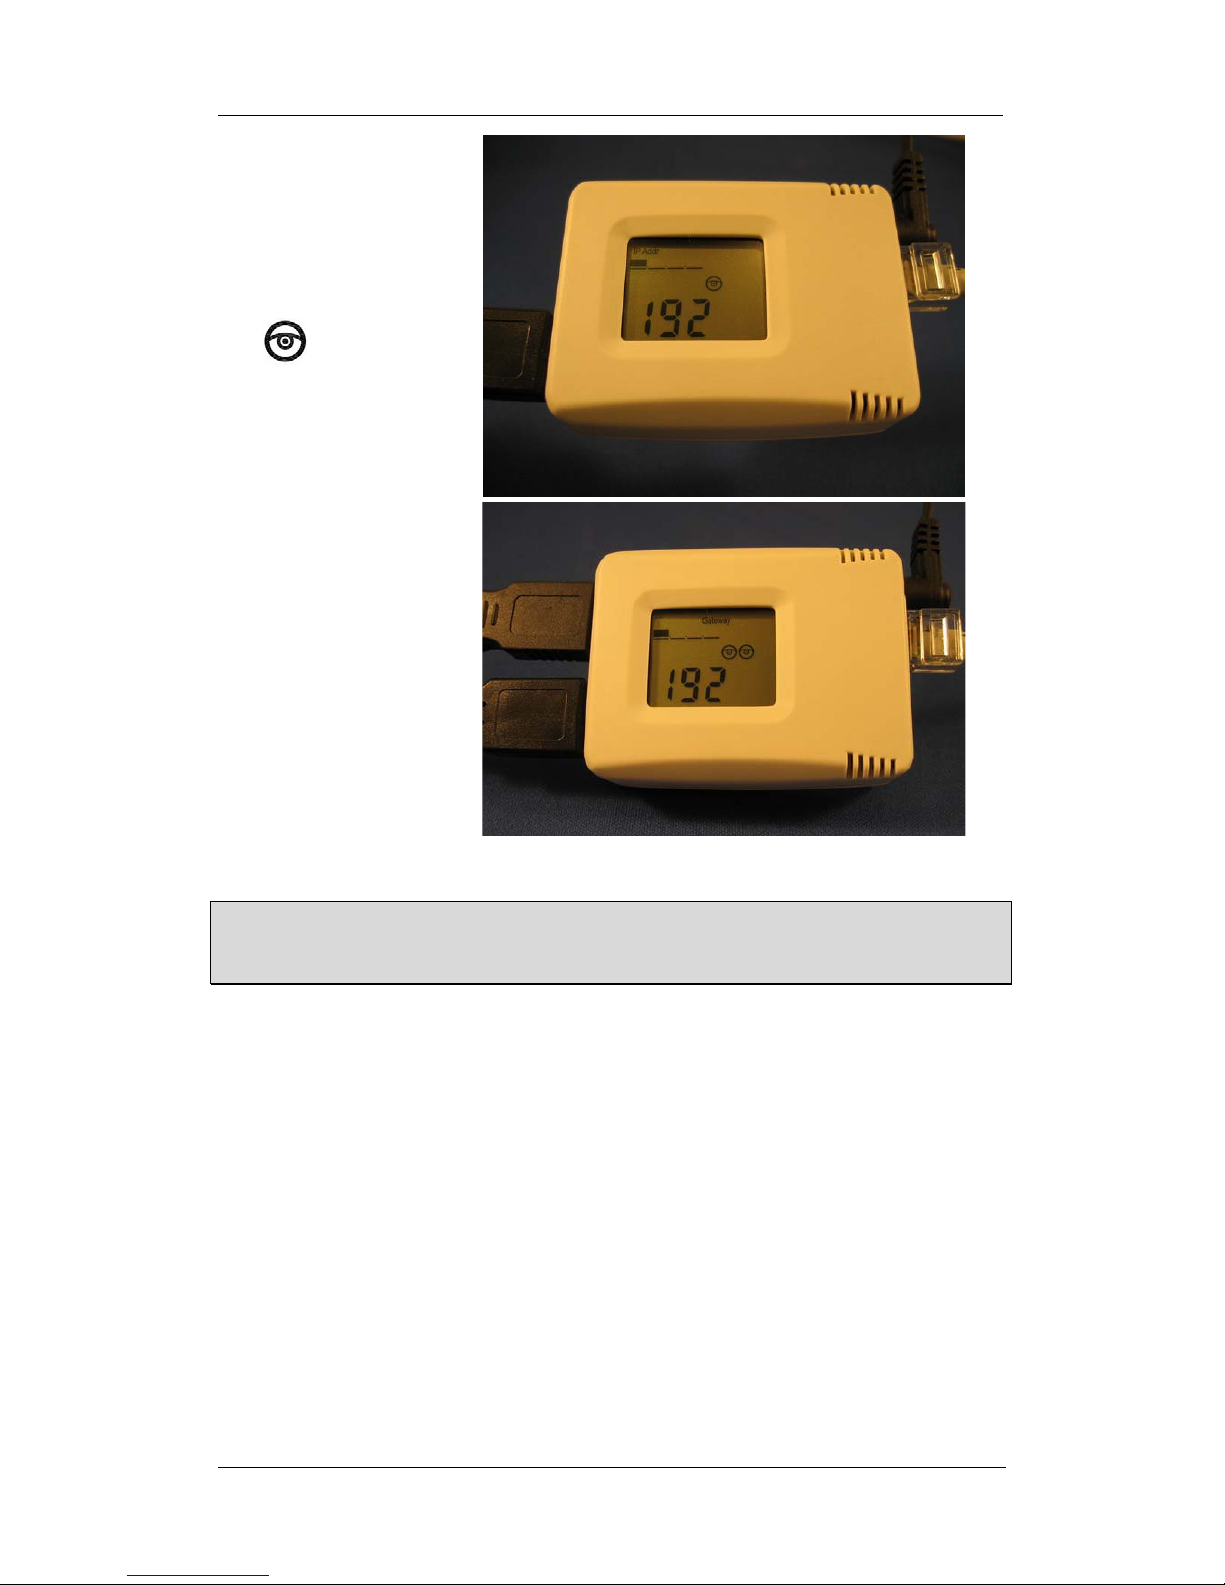
Step 4:
The LCD will display the
IP, Subnet Mask and
Gateway IP. Use a WEB
browser to login into the
WebCAM IP address.
Chapter 3: WebCAM, USB Camera and the Network
The
icon on the
LCD shows that a USB
camera is connected.
The LCD display shows
that two USB cameras
are attached to the
WebCAM.
Warning:
Please make sure the input Voltage and Frequency of the DC power adapter (DC
5.3V) is correct before plugging into the power outlet!
WebCAM user manual -6-

Chapter 4: Using Utility to Setup IP & Update Firmware
Chapter 4: Using Utility to Setup IP & Update Firmware
Section 1. Installing Utility
1. Insert the enclosed Utility CD into the CD-ROM drive. Utility CD setup will auto
run. The following menu will show up. Click on the buttons on the left to install
the programs you want.
" Utility - This is a program that helps the user perform quick installation. It will
detect the current configuration and take the user through the necessary
network setup.
a. Click the ‘Utility’ button to commence installation.
b. After the step by step installation is completed, the Utility group will
appear in Windows ’Start’ Æ Utility ‘Program Group’. Click this to
start the program.
Fig.7. Utility Group
" MultiMonitor - This is a windows based program designed to allow user to
control a large number of WebCAM websites located either in a LAN or on a
WAN.
" Read User’s Manual - Click to read WebCAM's User Manual. You will need
Adobe Acrobat Reader v5.0 or higher.
" Adobe Acrobat Reader v5.0 - This will install Acrobat Reader v5.0 on your
local hard drive.
" Sun Jave / ActiveX - Install Sun Java for viewing the video image by Java, or
install the OCX for viewing by ActiveX.
WebCAM user manual -7-
Chapter 4: Using Utility to Setup IP & Update Firmware
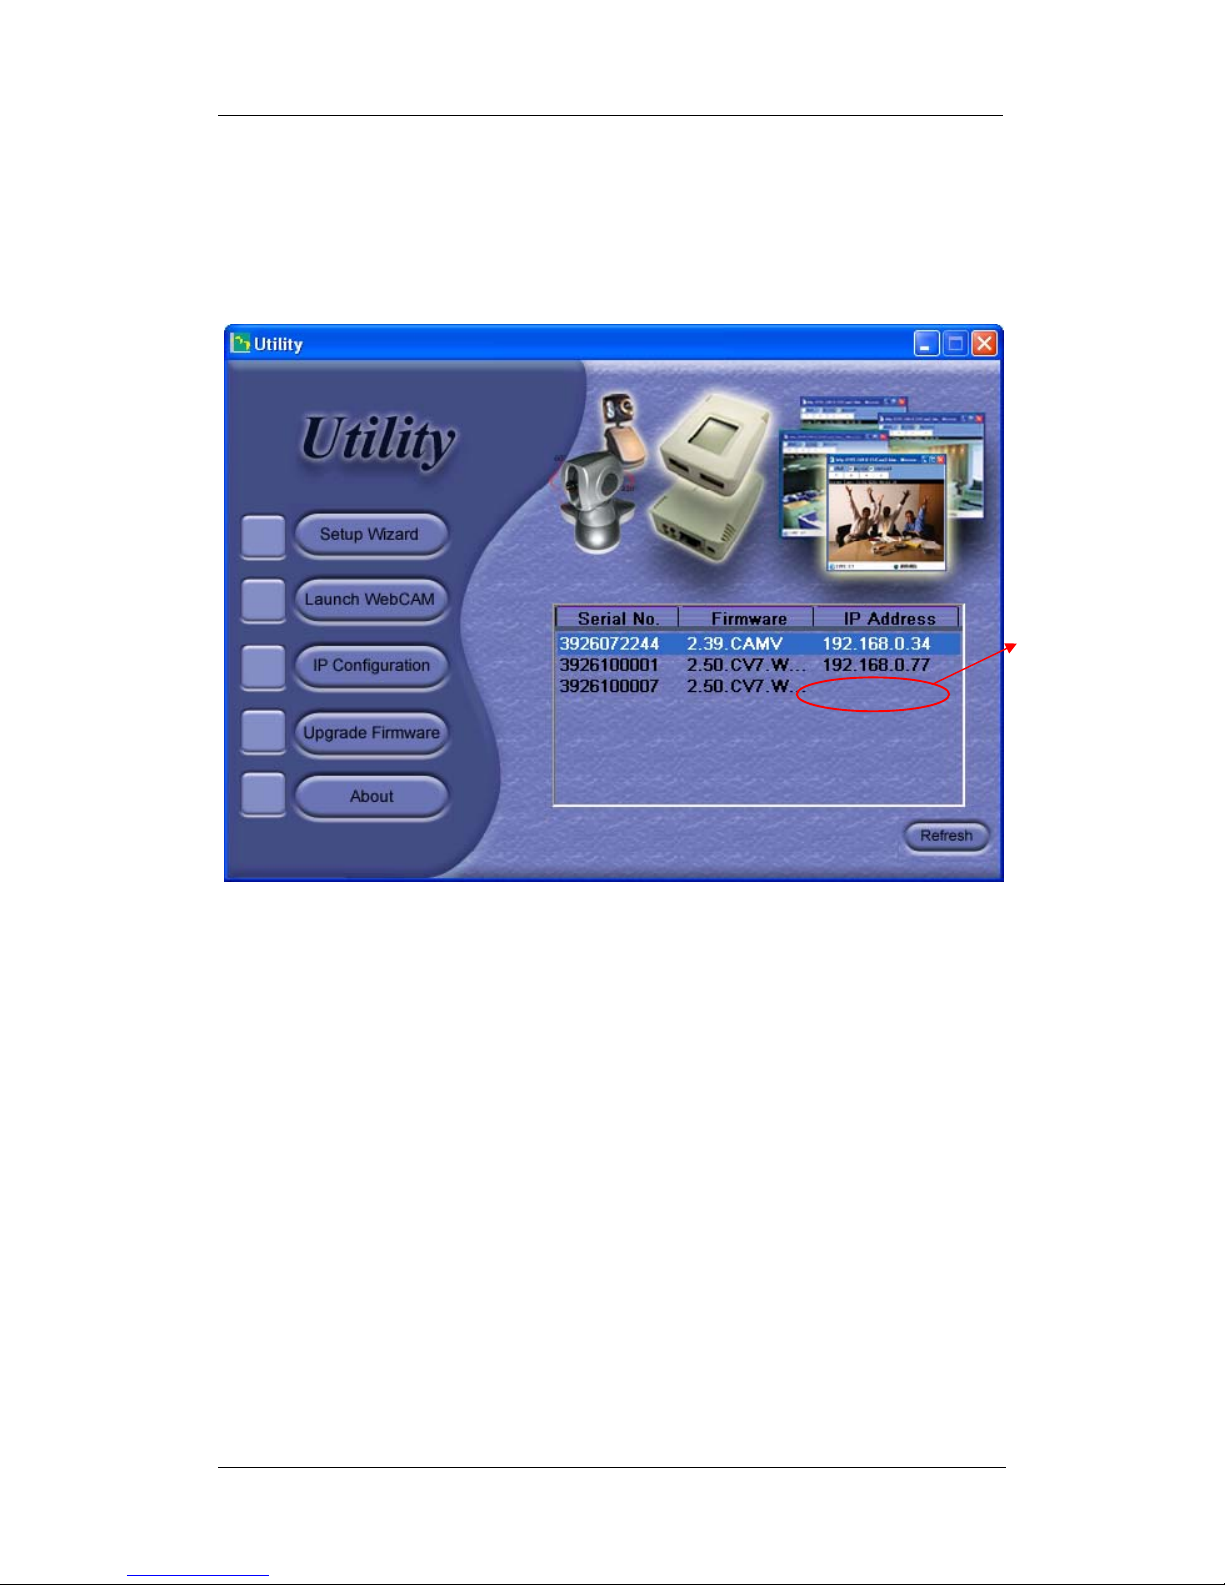
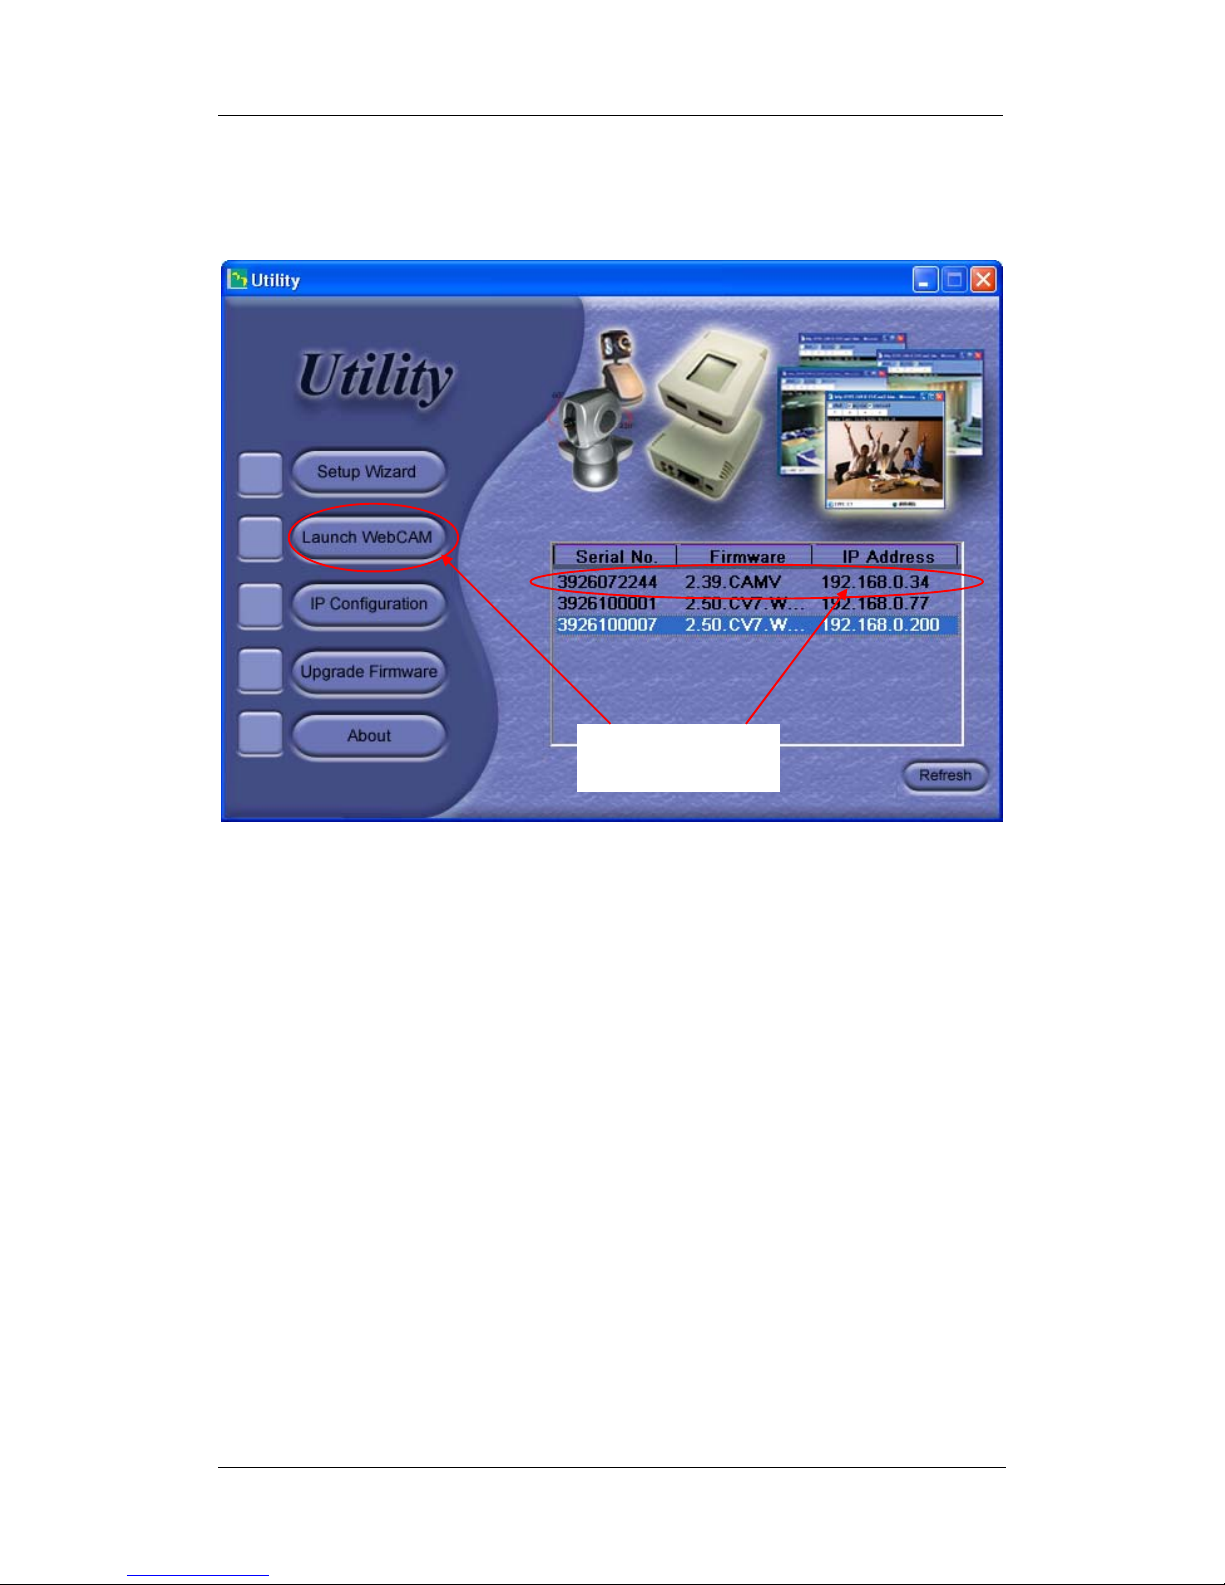
Section 2. Using Utility
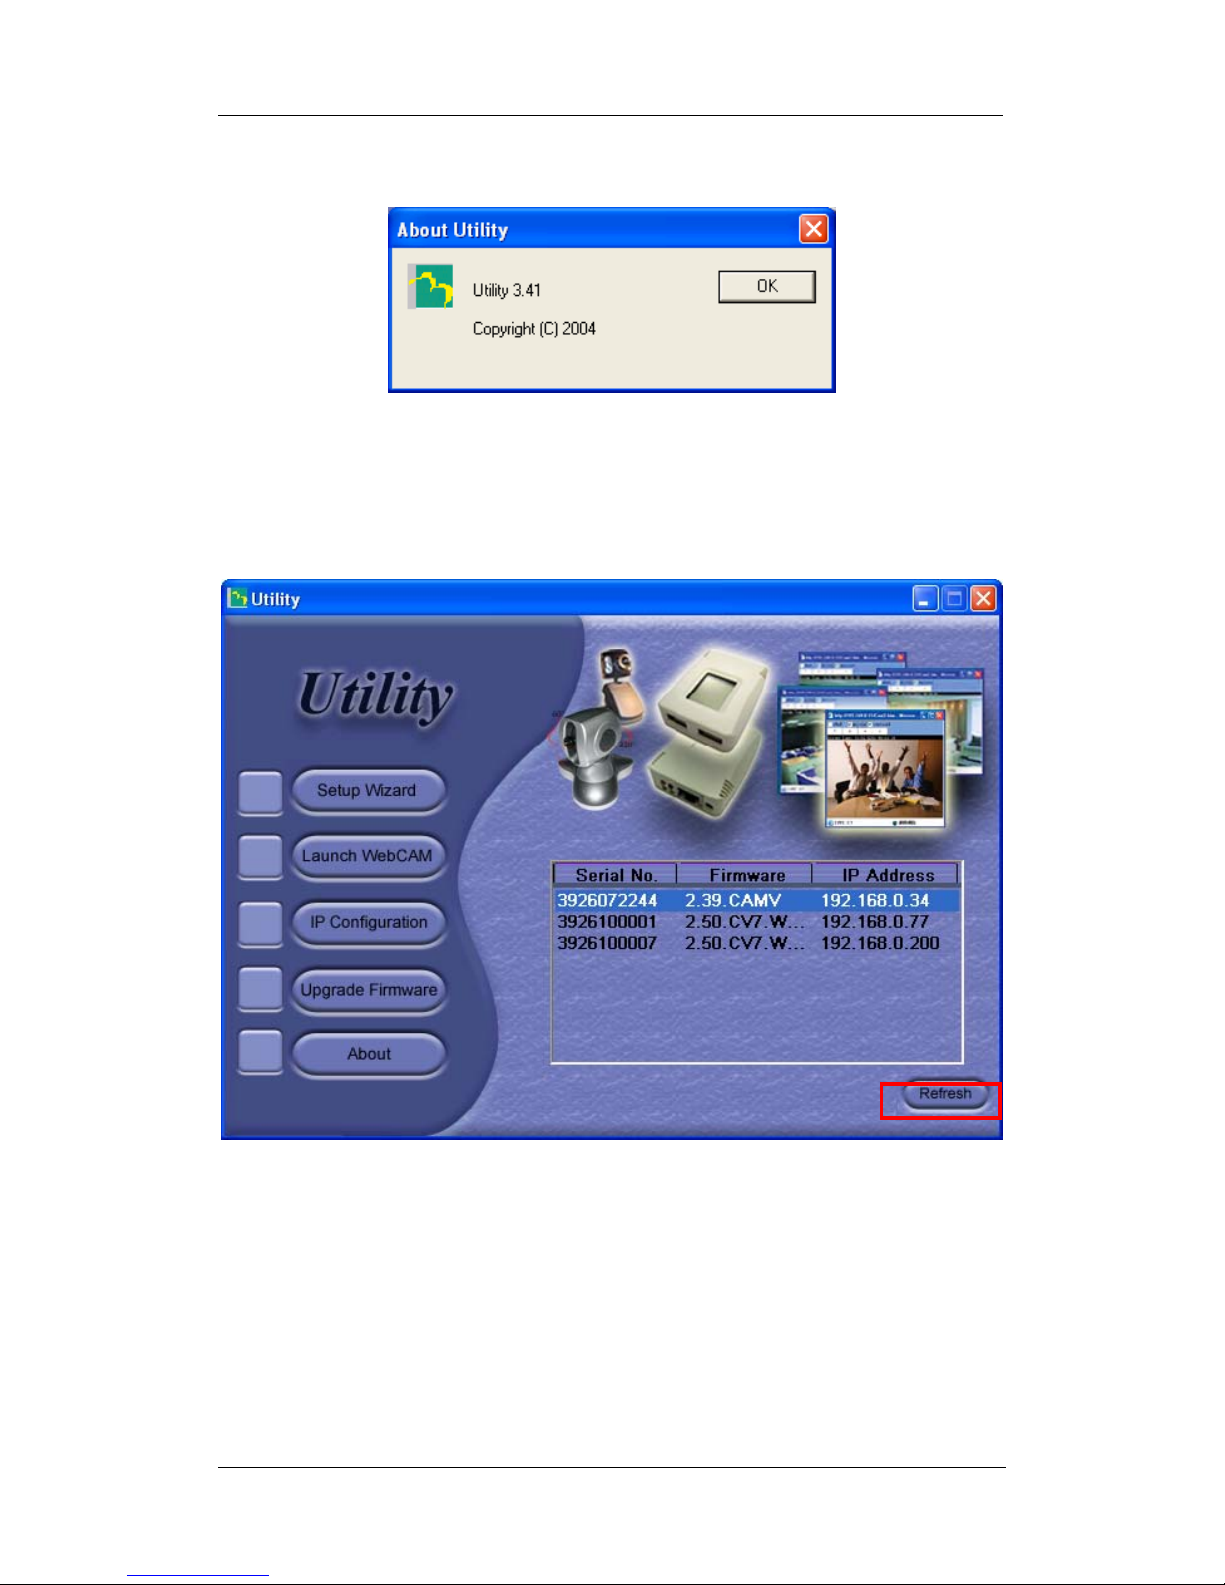
The Utility main menu is shown below. The selection menu is located on the left. The
Serial Number, current Firmware and IP Address of every connected to the LAN will
be displayed on the table to the right.
Devise
Password
enabled. IP
Address
hidden.
Fig.8. Utility Main Menu
For first time users, the Device Password will be enabled and the IP address hidden
until its setup and configuration has been completed.
WebCAM user manual -8-

Chapter 4: Using Utility to Setup IP & Update Firmware
2.1 Setup Wizard
Use “Setup Wizard” to take you through the basic configurations necessary to start
using WebCAM.
1. Click to highlight the WebCAM on the right that you want to configure.
2. Click on “Setup Wizard”.
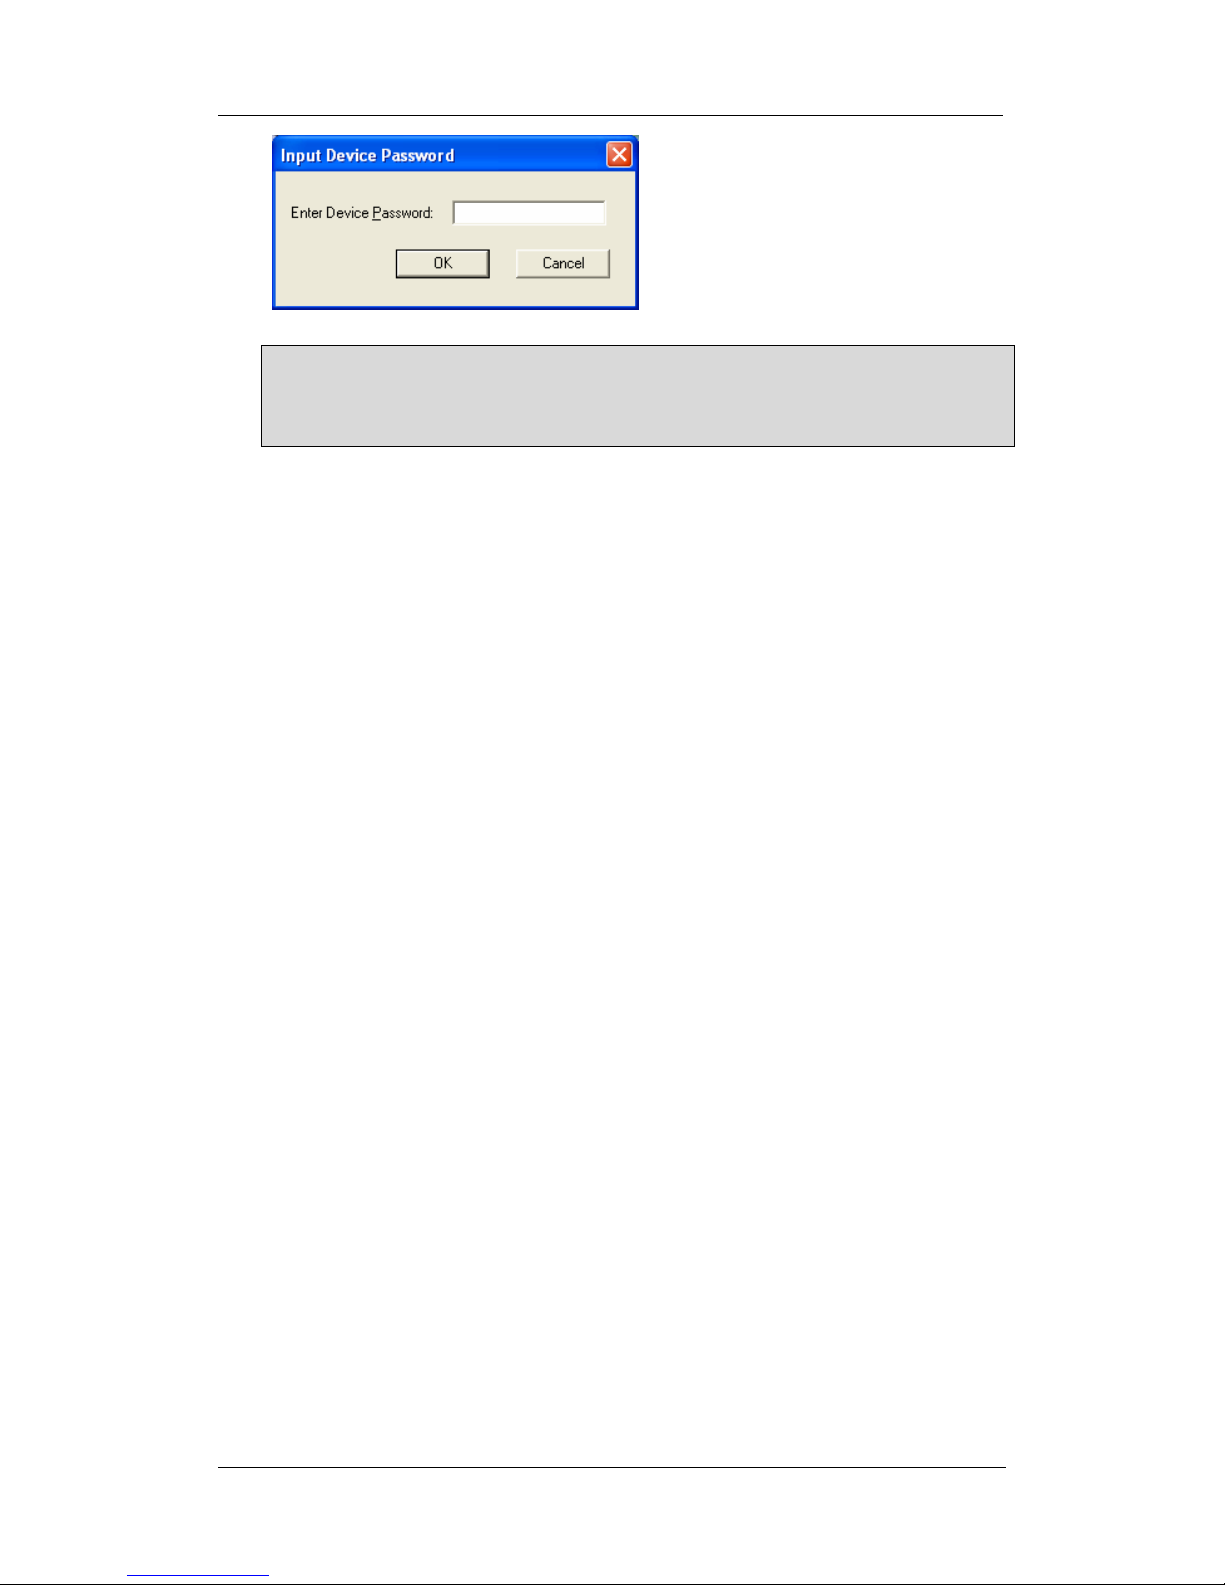
First, to begin Utility will request for the “Input Device Password” when you
click “Setup Wizard”.
User must enter the master password (as shown on WebCAM unit & freeware
CD) to enter “Setup Wizard”; or “Launch WebCAM”, or “IP Configuration”. You
may also delete the need for a device password once you enter “IP
Configuration” under “Advanced”.
WARNING:
Do not lose this password. If the password is lost, you can not access the
device to make changes. If you lose this password, you’ll have to contact
your reseller for the Master password.
Second, Utility will request for “Administrator authentication” after you have
passed the “Input Device Password”.
To enter, user must input “admin” [in small caps] for Account name and the
authentication key (as shown on freeware CD) for Password. Subsequently, the
user may change the Account name and Password in the “Setup Wizard”.
WebCAM user manual -9-
Chapter 4: Using Utility to Setup IP & Update Firmware
WARNING:
Do not lose your passwords (as attached on the WebCAM unit and freeware
CD). It is required every time you “reset” your WebCAM either thru “About”
section of the webpage, or via the manual reset button. If you lose these
passwords, you’ll have to contact your reseller for the master password.
3. Once you have entered the necessary information for “Input Device Password”
and “Administrator authentication”, “Setup Wizard” will initiate to take you through
the installation.
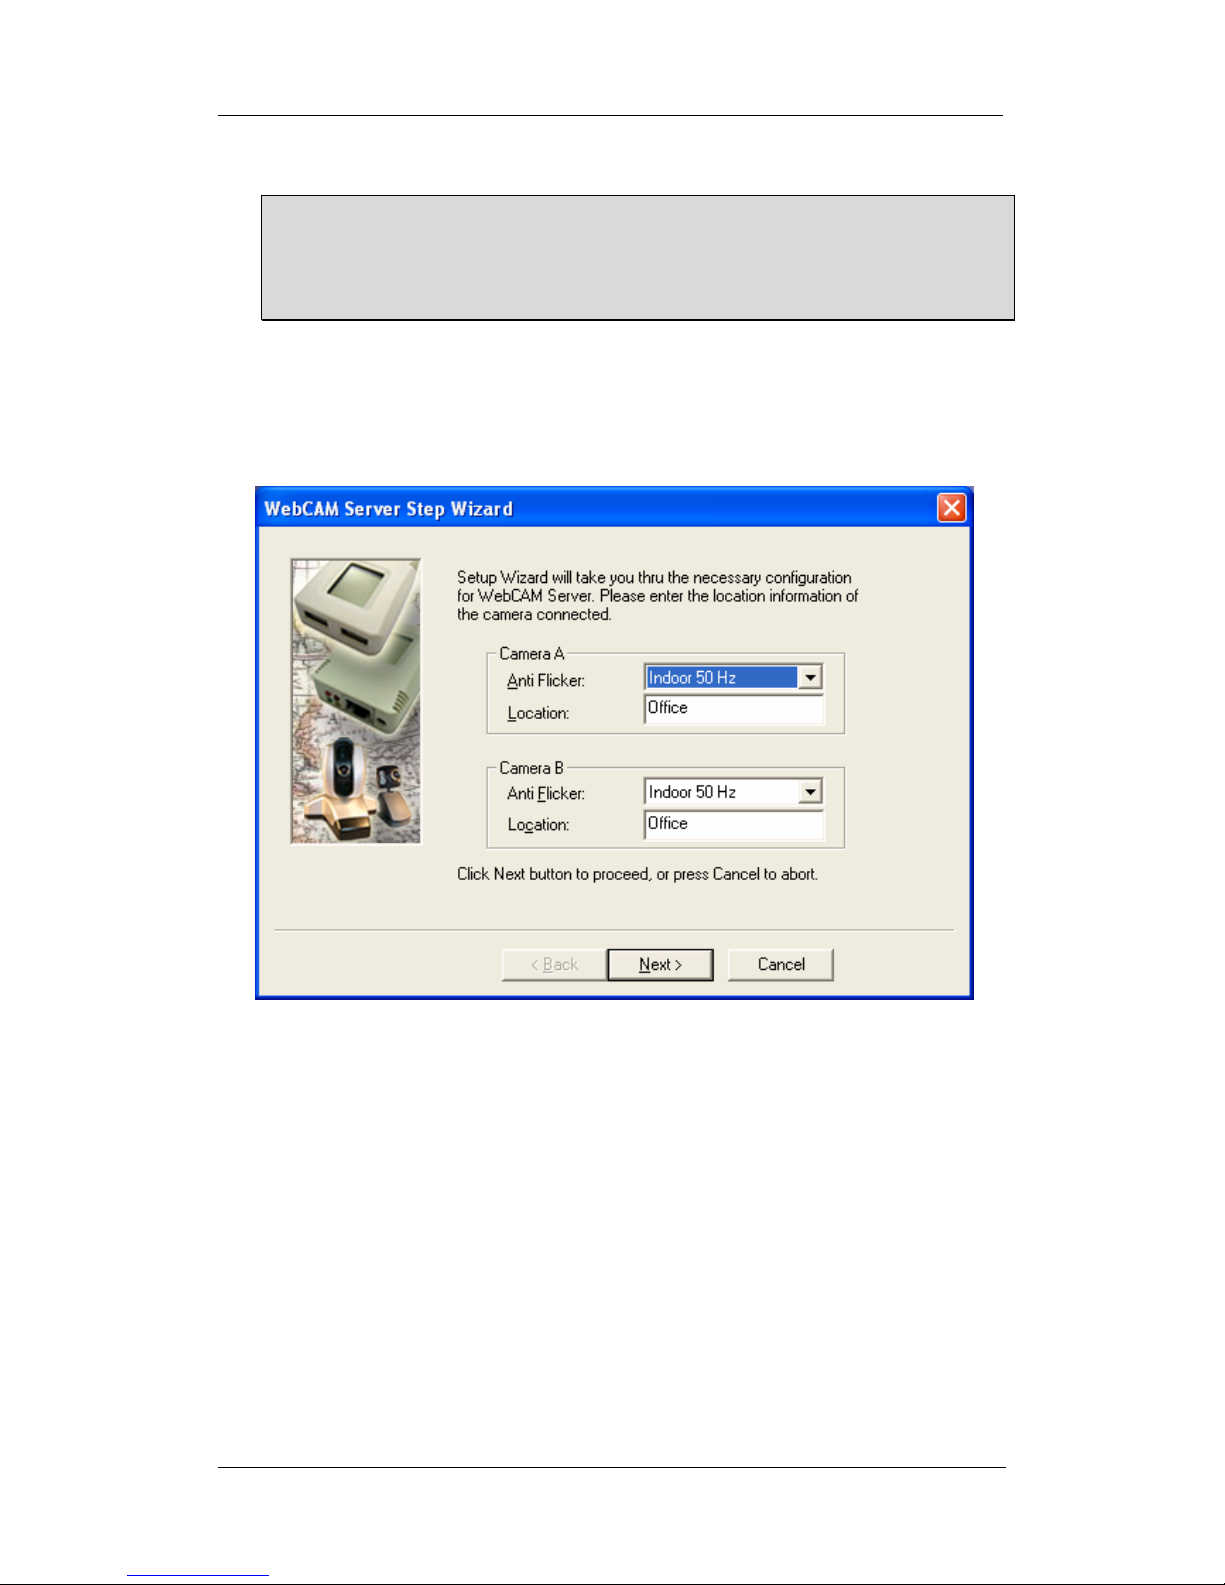
4. Enter the necessary camera configurations. Choose the appropriate frequency
(Indoor 60 Hz, Indoor 50 Hz or Outdoor) to prevent flickering on the video feed.
Enter a name for the camera in the “Location” box to easily identify it.
5. Click “Next >” to configure the Network Connection.
WebCAM user manual -10-
Chapter 4: Using Utility to Setup IP & Update Firmware
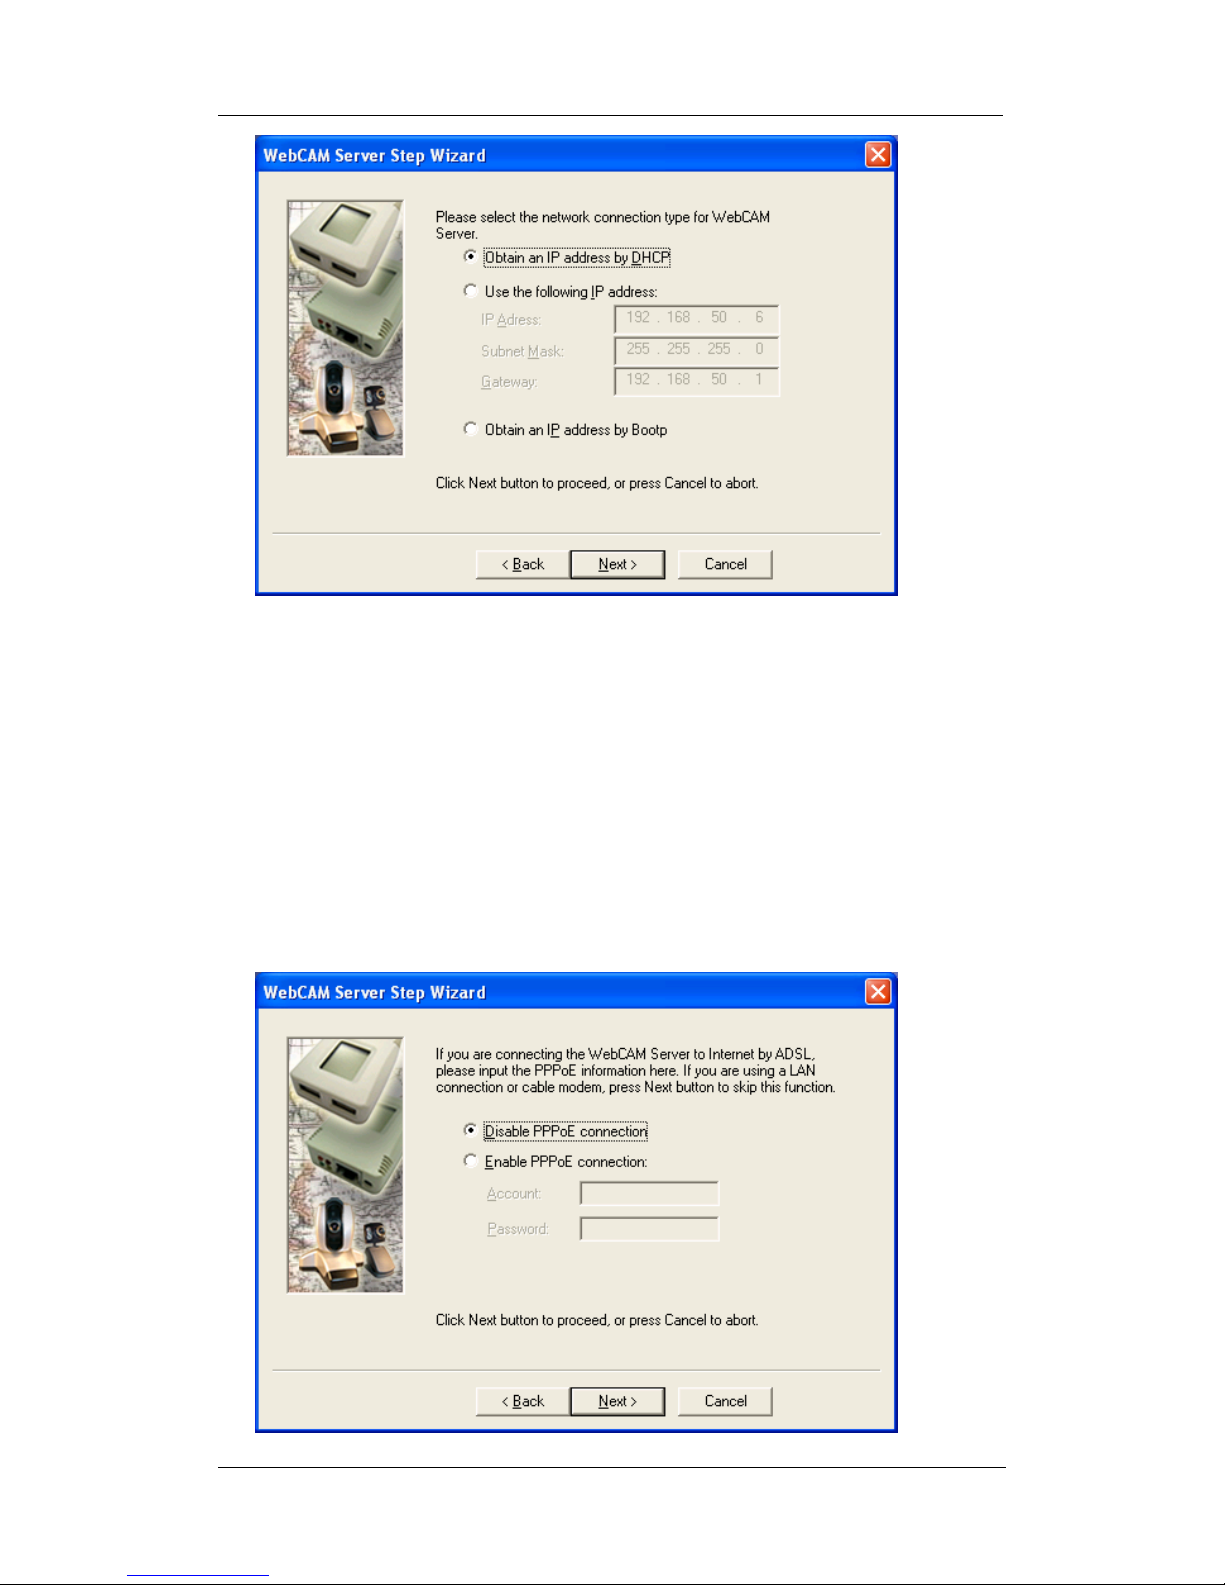
“Obtain an IP address by DHCP”
Choose this if you do not know your basic Network Configurations
“Use the following IP Address”
Enter an appropriate internal IP Address, Subnet Mask and Gateway for
WebCAM (Refer to Appendix C for an explanation of IP Addresses)
“Obtain an IP address by Bootp”
Allow WebCAM to obtain an IP address using Bootp protocol.
6. Click “Next >” to proceed to xDSL/Cable modem setup.
This section has to be configured to allow WebCAM to access the Internet
through an xDSL service provider.
WebCAM user manual -11-
Chapter 4: Using Utility to Setup IP & Update Firmware
Select “Enable PPPoE connection” and enter your account and password details
as provided by your internet service provider (“ISP”).
Otherwise, leave it at the default “Disable PPPoE connection”
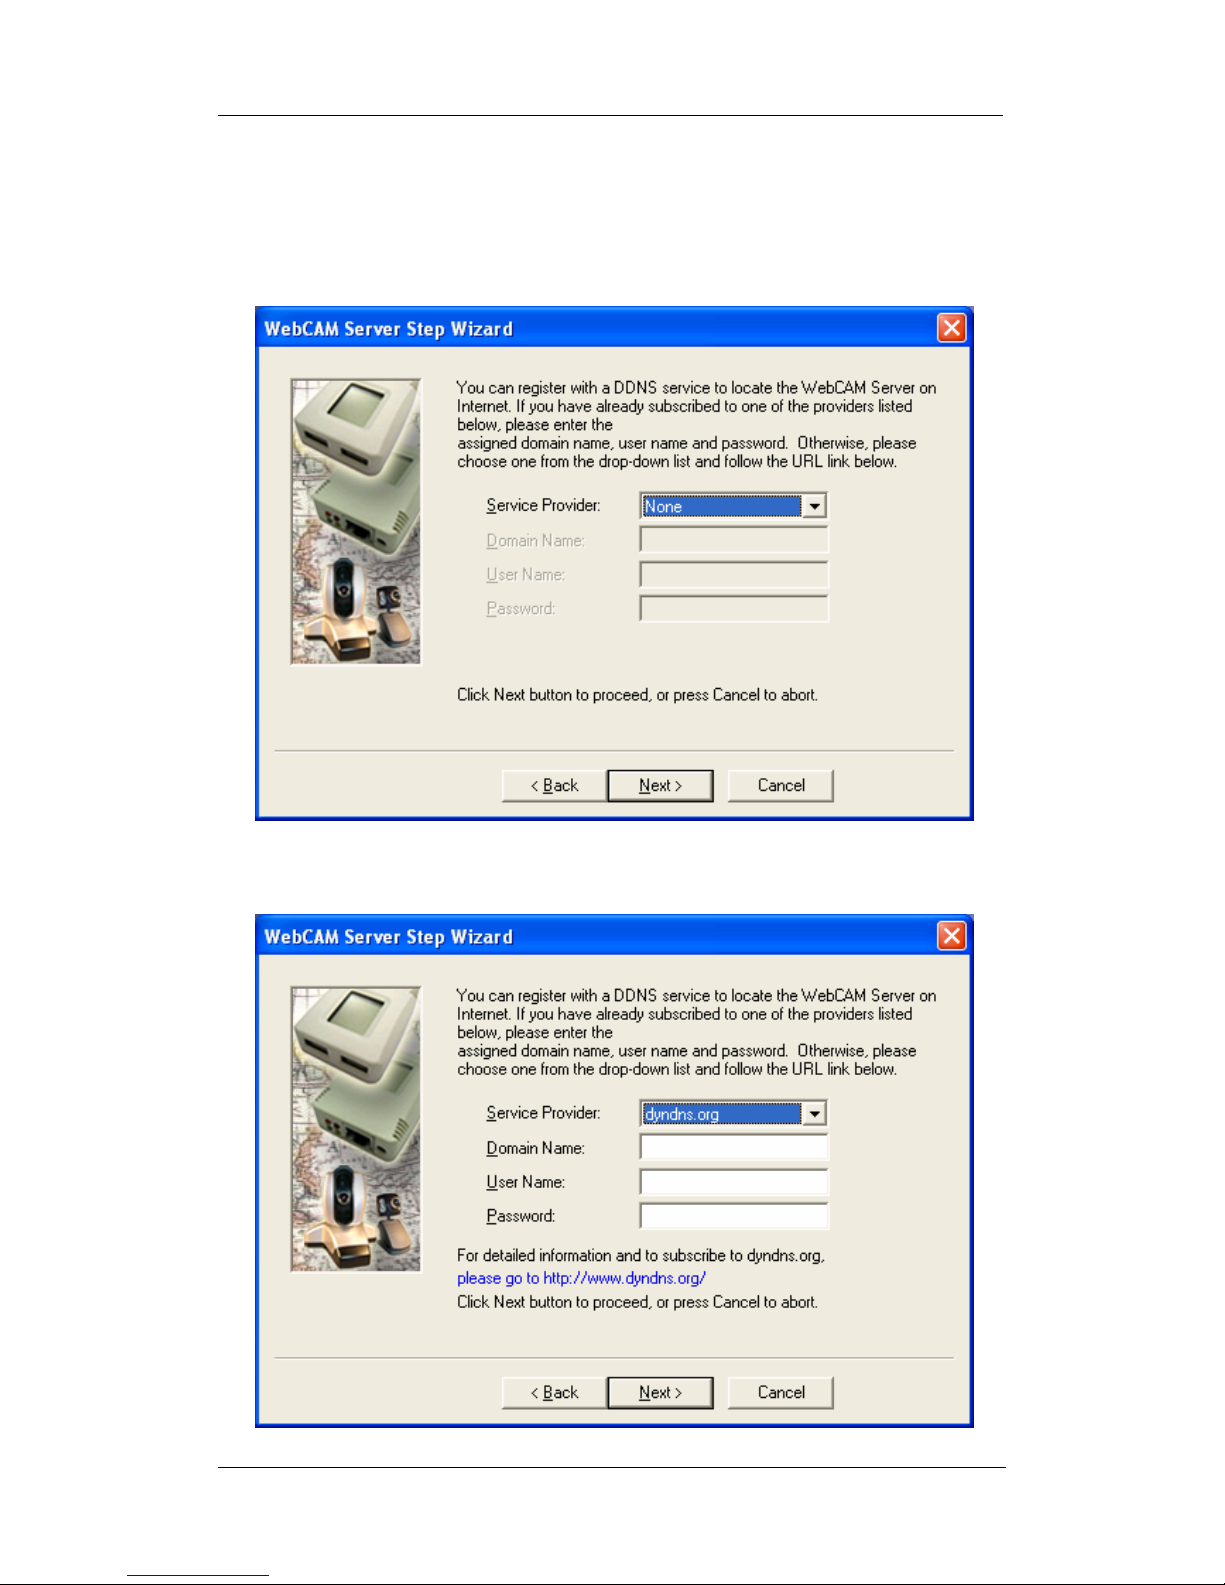
7. Click “Next >” to proceed with DDNS setup
You will need to setup this section if you are using a Dynamic IP
WebCAM user manual -12-

Chapter 4: Using Utility to Setup IP & Update Firmware
If you do not already have a Domain Name registered with your ISP, select from
one of the 4 Free DDNS service providers (zive.org, dhs.org, dyndns.org or
myddns.org). Follow the link to the respective free service providers to register
a Domain Name and obtain a User Name and Password. Enter these details in
the boxes provided
8. Click “Next >” to change your administrator account and password information.
9.
An administrator account is necessary to ensure privacy. The user may revert
to default settings, or if you do not set one, just delete the account and password
and click “Next”.
WARNING: Do not lose the administrator account and master password.
Once set, you will not be able to re-configure WebCAM after reset without the
administrator account and password. To reset the WebCAM account password,
you will need to re-install the firmware using Utility.
WebCAM user manual -13-
Chapter 4: Using Utility to Setup IP & Update Firmware
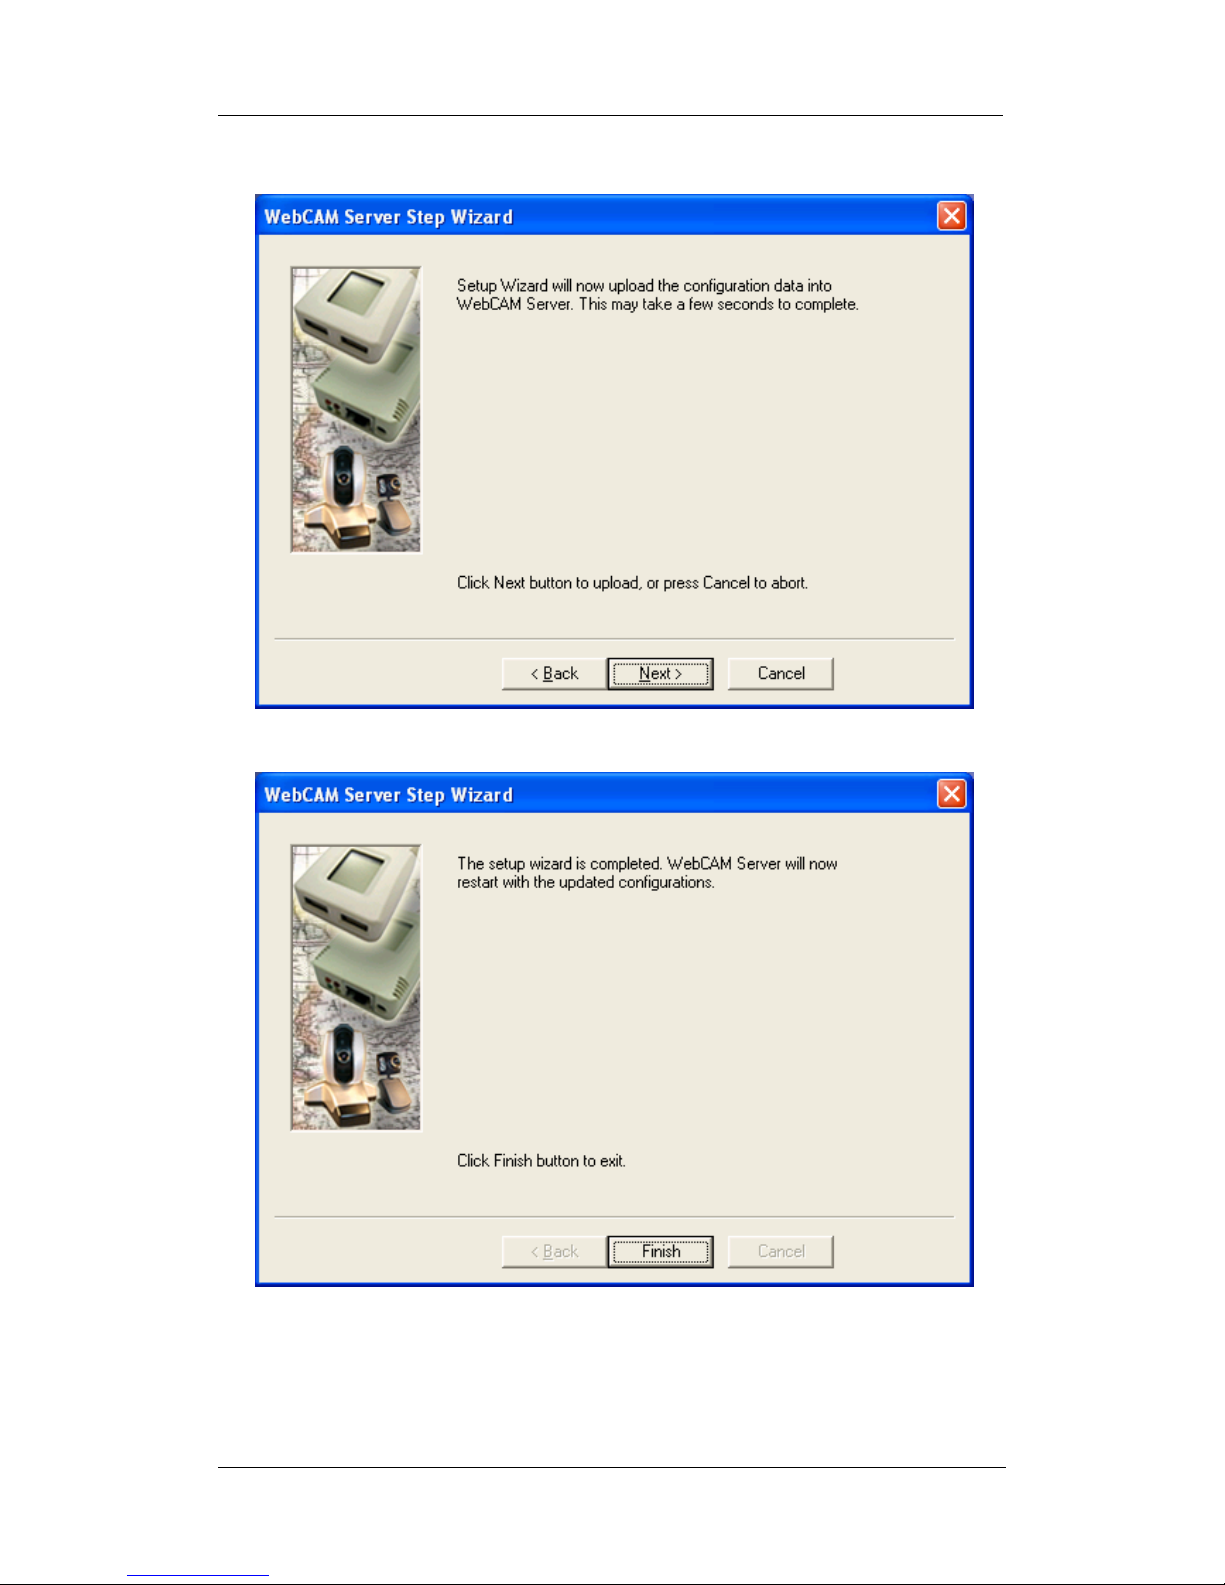
10. Click “Next >” to upload these configuration to WebCAM.
11. Click “Next >” to save and restart WebCAM with the new configurations.
WebCAM user manual -14-
Chapter 4: Using Utility to Setup IP & Update Firmware
2.2 Launch WebCAM
Once you have finished with the above Setup Wizard, either click “Launch WebCAM”
or double click on the WebCAM listed on the table to launch it.
Click either one to
Launch WebCAM.
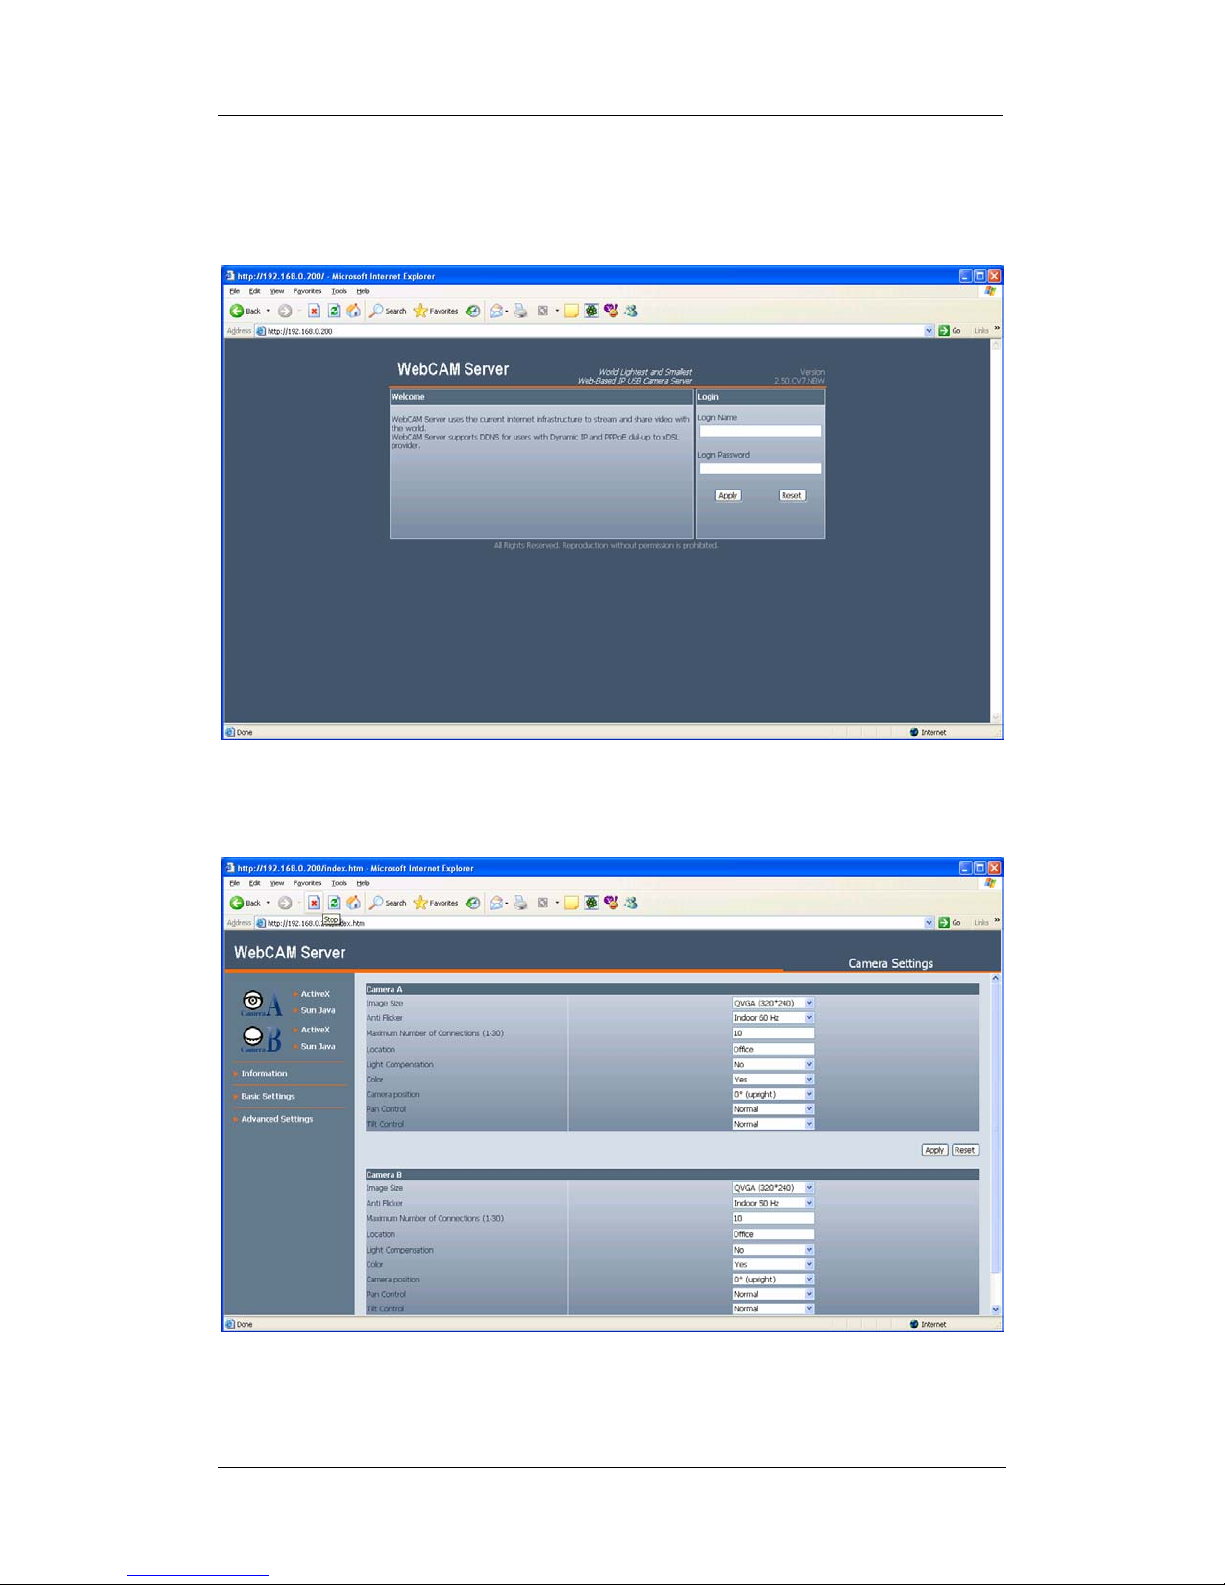
Once you have done the above, the WebCAM login screen will appear.
WebCAM user manual -15-
Chapter 4: Using Utility to Setup IP & Update Firmware
Key in the account name and password entered earlier (if you did not configure one,
then revert to the default name “admin” and key in the Master password, OR just
press ENTER or click on the “Apply” button, if the account name and password was
not set and have been deleted).
The WebCAM webpage will appear. Click ActiveX for Camera A to view the video
images.
2.3 IP Configuration
This section allows you to determine IP address configuration for WebCAM.
WebCAM user manual -16-
Chapter 4: Using Utility to Setup IP & Update Firmware
Select the WebCAM on the right display screen, and then click “IP Configuration”.
This will bring up the IP Address Configuration window. There are two tabs;
• IP Address
• Advanced (for port setting configuration)
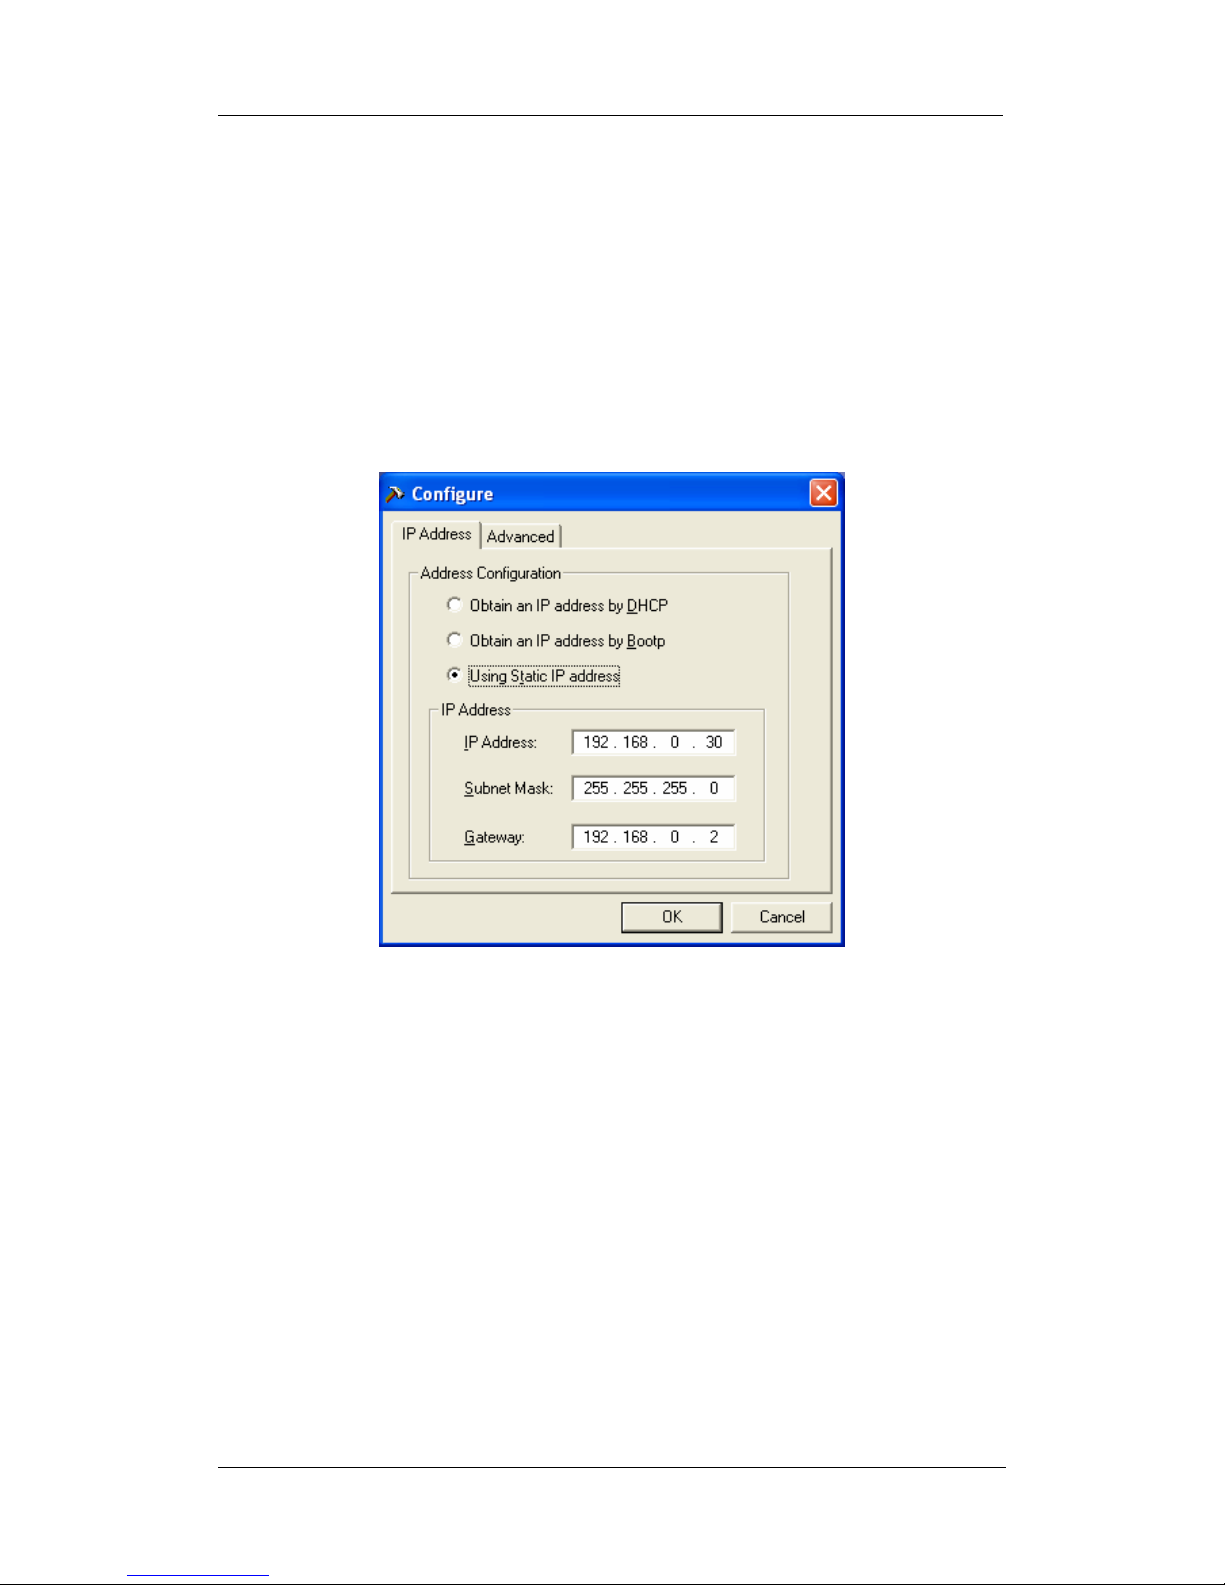
2.3.1 IP Address
Use this section to set the IP Address of WebCAM.
When using WebCAM for the first time, it is advisable to choose the “Using Static IP
Address” option. For this option, the user will have to enter an IP Address, Subnet
Mask and Gateway of their choice (refer to Appendix C for IP address explanation).
Fig.9. IP Configuration: Set an IP Address for WebCAM
Once the IP Address is set, you will be able to connect to WebCAM webpage by
entering this IP Address into a standard browser.
“Obtain an IP address by DHCP or BOOTP”
The IP address, Subnet Mask and Gateway is acquired directly and assigned
automatically by the system.
2.3.2 Advanced
This section sets security password against unauthorised access to devices through
Utility.
WebCAM user manual -17-
Chapter 4: Using Utility to Setup IP & Update Firmware
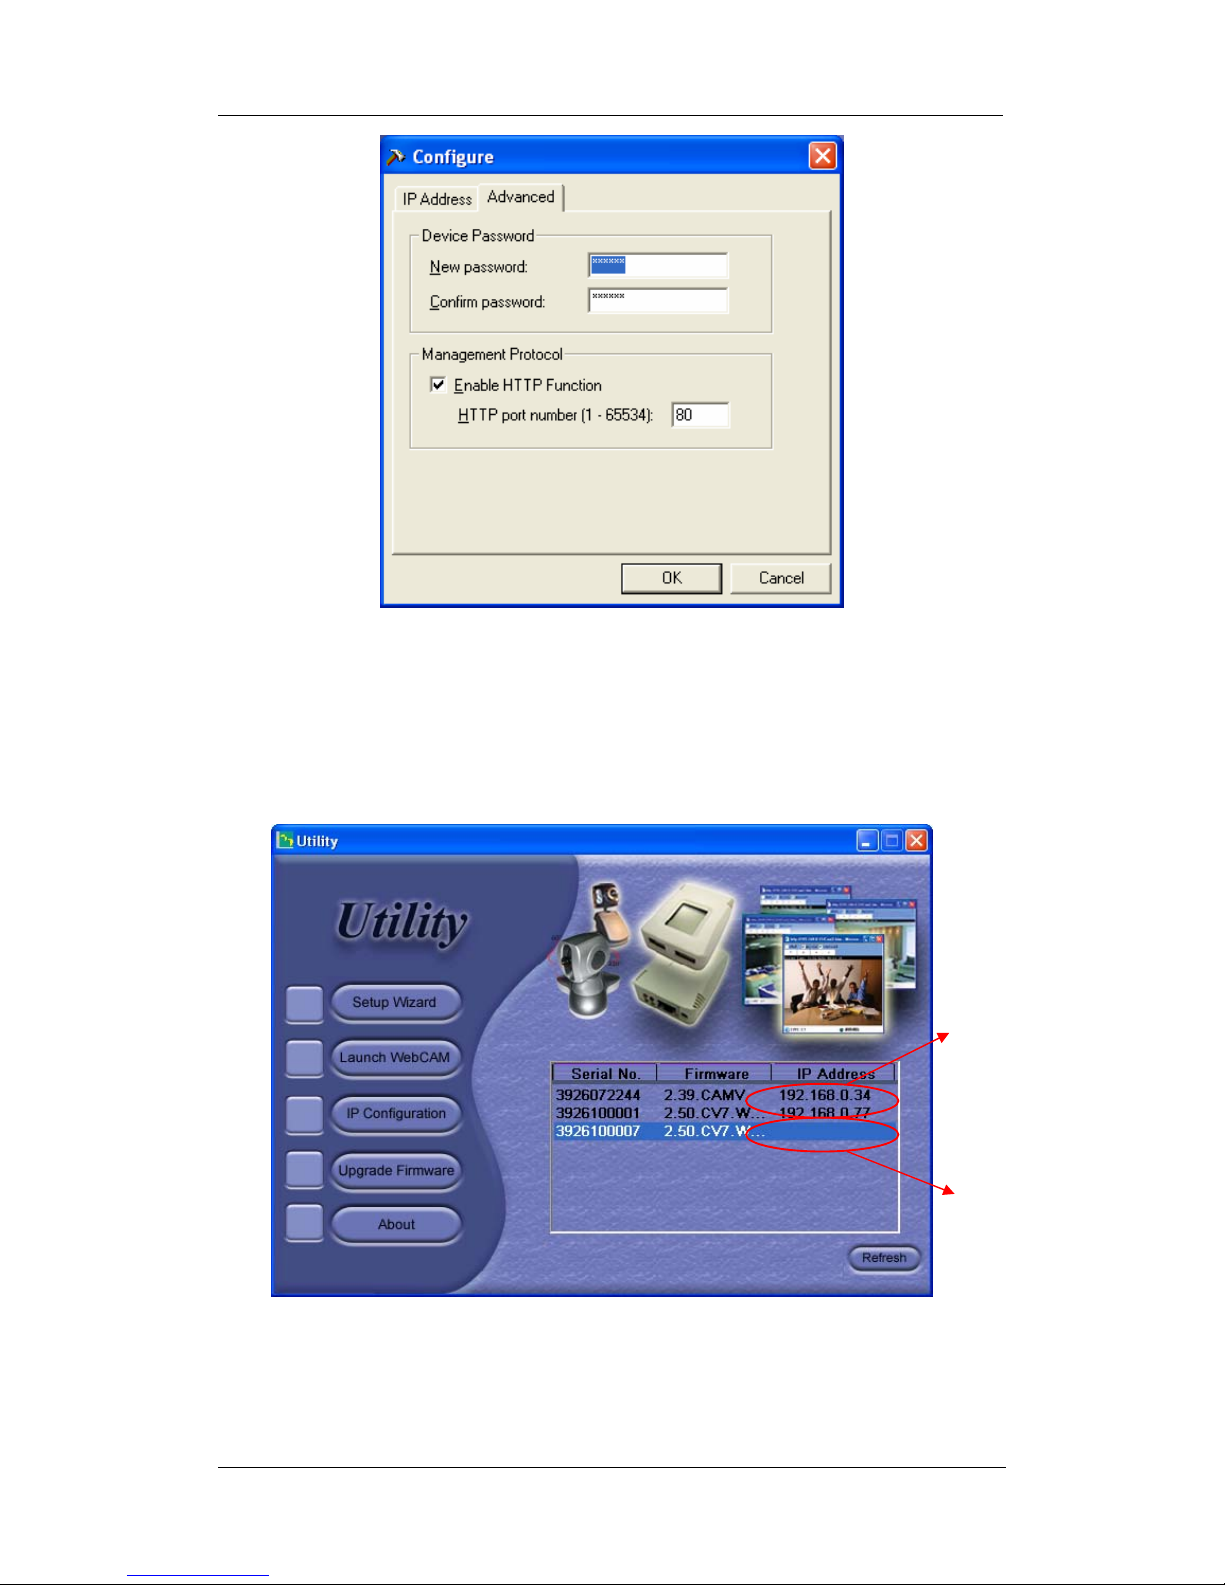
Fig.10. IP Configuration: WebCAM Advanced settings
i. Device Password
Use this to set an access password to the individual device. Once set, the
user must enter the password to access the device. In addition, the IP
Address will not be shown on the right display panel of Utility.
Utility will request for the “Input Device Password” when you click either “Setup
Wizard”, “Launch WebCAM” or “IP Configuration”
WebCAM user manual -18-
Devise
Password
not set.
Devise
Password
enabled. IP
Address
hidden.
Chapter 4: Using Utility to Setup IP & Update Firmware
WARNING:
Do not lose this master password. If the password is lost, you can not access
the device to make changes. If you lose this password, you’ll have to contact
your reseller for the master password.
To remove the password, you must first enter a valid “Input Device Password”,
go to “Device Password” and delete the entries, click “OK”.
ii. Management Protocol
The administrator can determine the parameter settings when providing access
via HTTP (web) to WebCAM. For security reasons, the administrator can
choose to use either an open or advanced port setting to control these access.
The default values are set to port number 80 for HTTP.
Once the HTTP port number is set to another port (other than 80), the full IP
Address must be entered in order to access the Website.
For example:
) If a value of 61 is set as the HTTP port number, then
http://192.168.0.177:61 must be entered as the web address in order to
access WebCAM website.
Uncheck to disable this function.
WebCAM user manual -19-
Chapter 4: Using Utility to Setup IP & Update Firmware
2.5 About
Click on this button to show software and version details.
Fig.11. About Utility
2.6 Refresh
Utility automatically searches for any WebCAMs connected to the LAN. However, the
user can do a manual search by clicking the “Refresh” icon located at the bottom
right of the menu.
WebCAM user manual -20-
Chapter 5: Web Manager
Chapter 5: WebCAM Web Manager
Section 1. Introduction
After you have setup the hardware and set an IP address for WebCAM, you will then
be able to go to WebCAM web site to monitor and control the PC cameras. All you
have to do is enter the new IP address into any web browser.
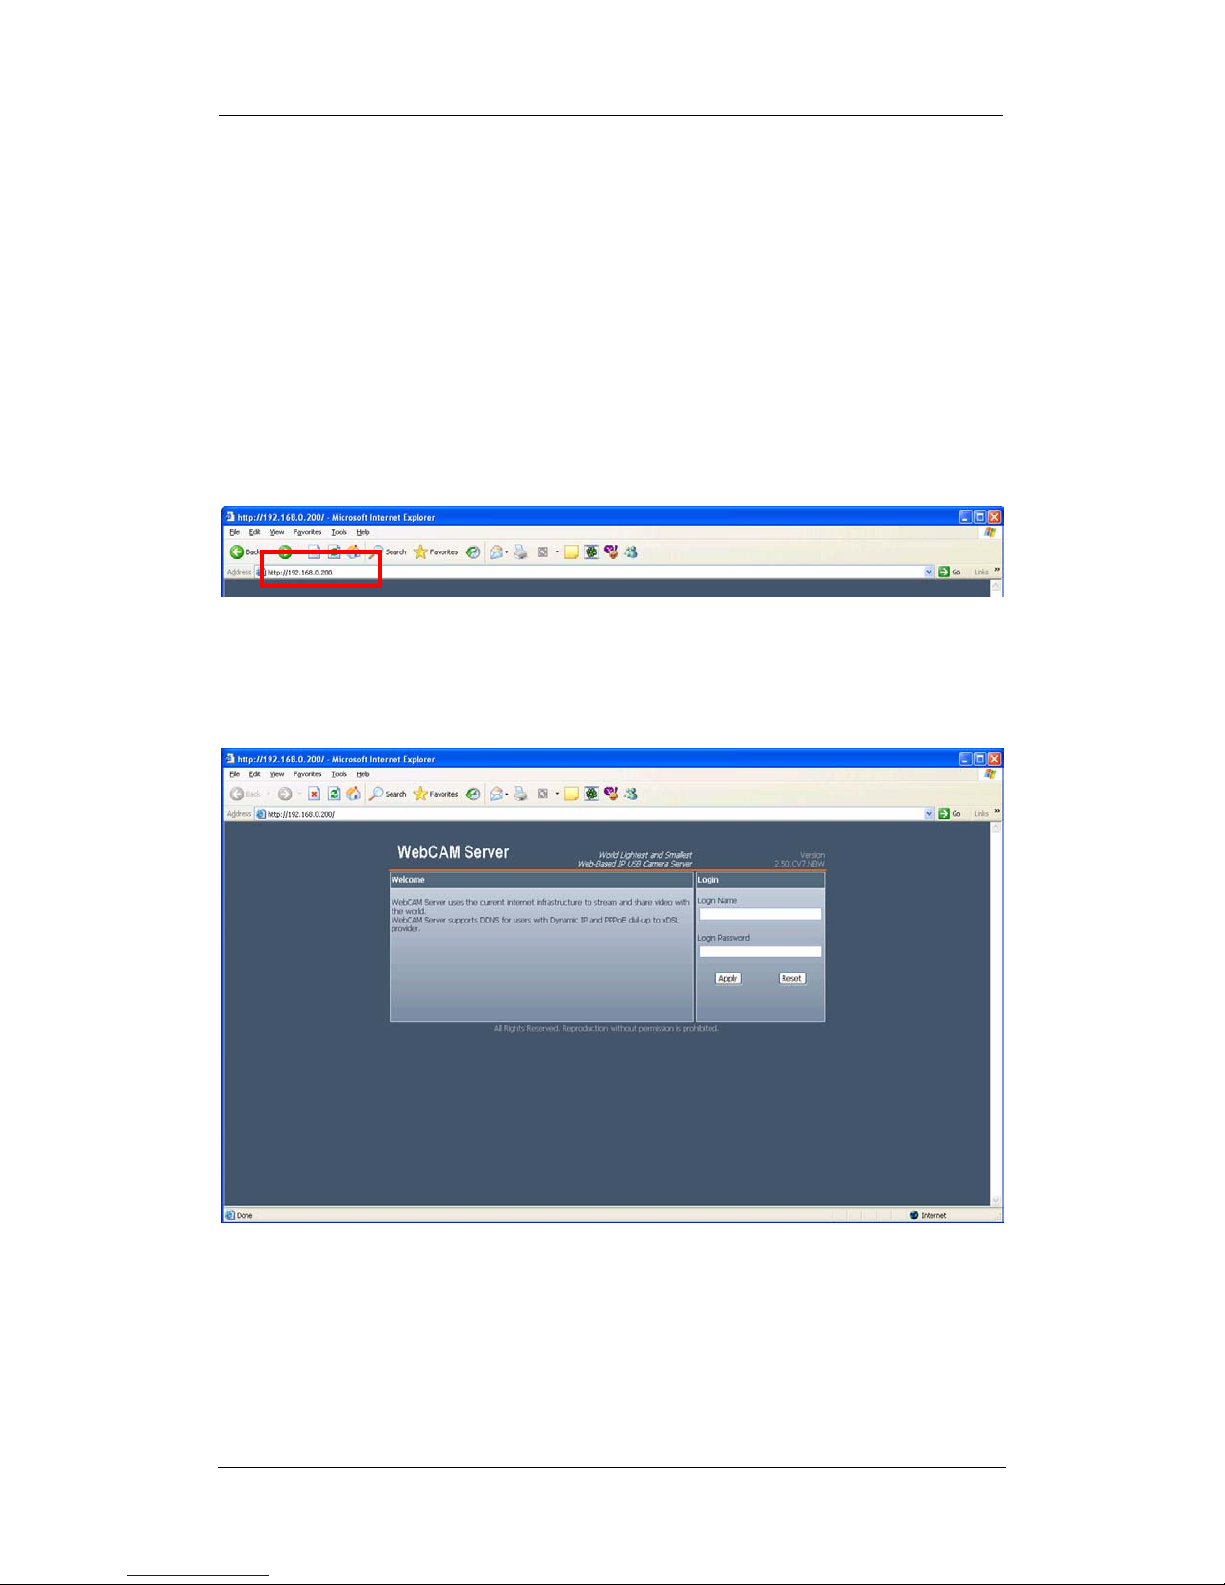
1. Start the Web Brower (Netscape or Internet Explore)
2. Enter the WebCAM IP Address that was set earlier using “Setup Wizard” (e.g.
192.168.0.30, if you do not remember, goto to WebCAM and look at the LCD
display) and press ENTER
Fig.12. Enter WebCAM IP address
3. A login screen will appear. For first time users and users resetting their
WebCAM (either via webpage or manual button), you will need to provide the
default User Login Name “admin” [in small caps] and Login Password (Master
password as shown on the freeware CD). Click “Apply” to enter.
WebCAM user manual -21-
Fig.13. WebCAM Login screen
Chapter 5: Web Manager
Section 2. WebCAM Web Manager Interface
The WebCAM webpage main menu is divided into two sections. The selection menu
on the left and display menu on the right. The selection menu consists of the
following options:
2.1 Web-Camera Selection
2.2 Information
2.3 Basic Settings
2.4 Advanced Settings
2.5 Viewing images using a PDA / Web Enabled Phone
Fig.14. WebCAM Main Menu
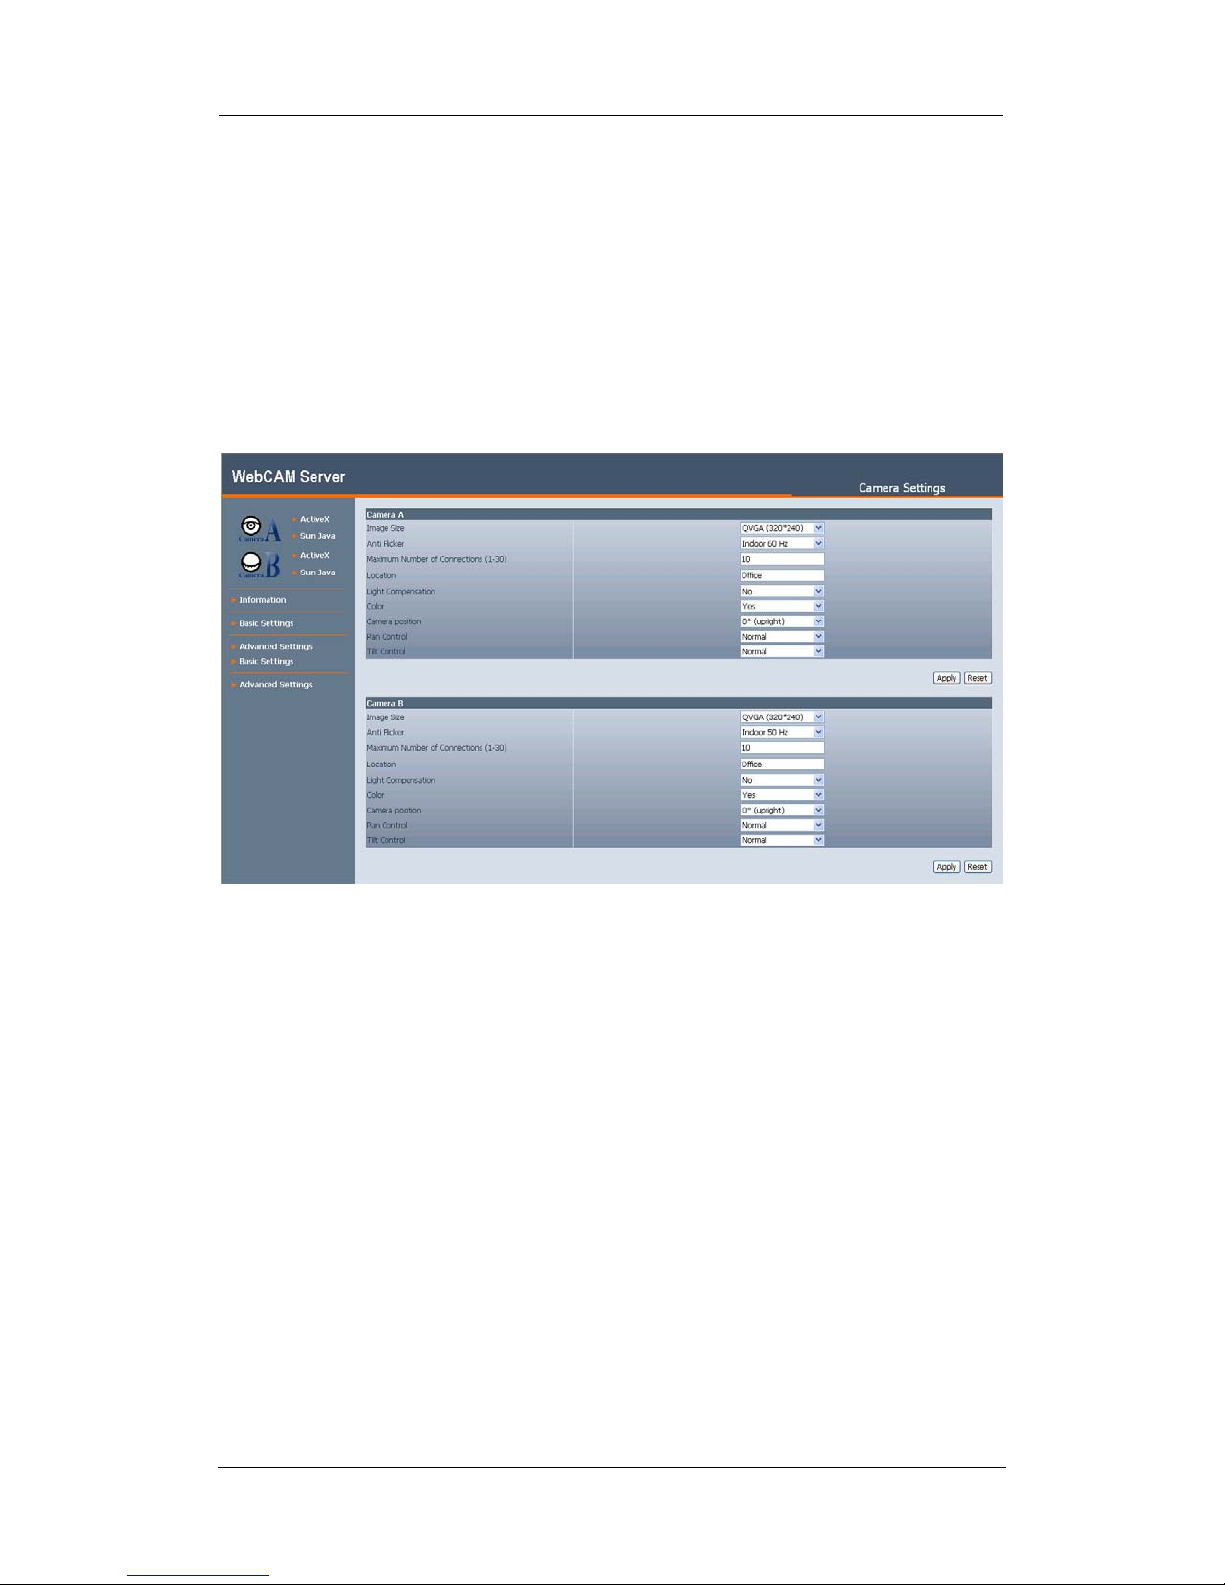
When using WebCAM for the first time, you must set the following to ensure that
WebCAM works smoothly;
a. Set the necessary parameters in the “Configuration” menu. In
particular, the “Anti Flicker” under “Camera Settings” should be set to
50Hz or 60Hz (change this to 60Hz or 50Hz / Outdoor if video output
continues to flicker).
b. That the USB PC camera lens is adjusted for best results.
By default the above Camera Settings page is displayed when you login.
WebCAM user manual -22-
2.1 Web-Camera Selection
Click on either “ActiveX” or “Sun Java” from Camera A
or B to view the camera images.
By default the first USB camera connected to WebCAM
will be denote as “Camera A”
Click “Camera B” to view camera B.
Note: ActiveX can only function on Windows platform
and a plug-in has to be installed on the client's
computer. If this is prohibited for safety reasons you
will have to use Sun Java to view the video feed. Sun
Java also allows users who are not using Windows
based Operating System to view the video feed.
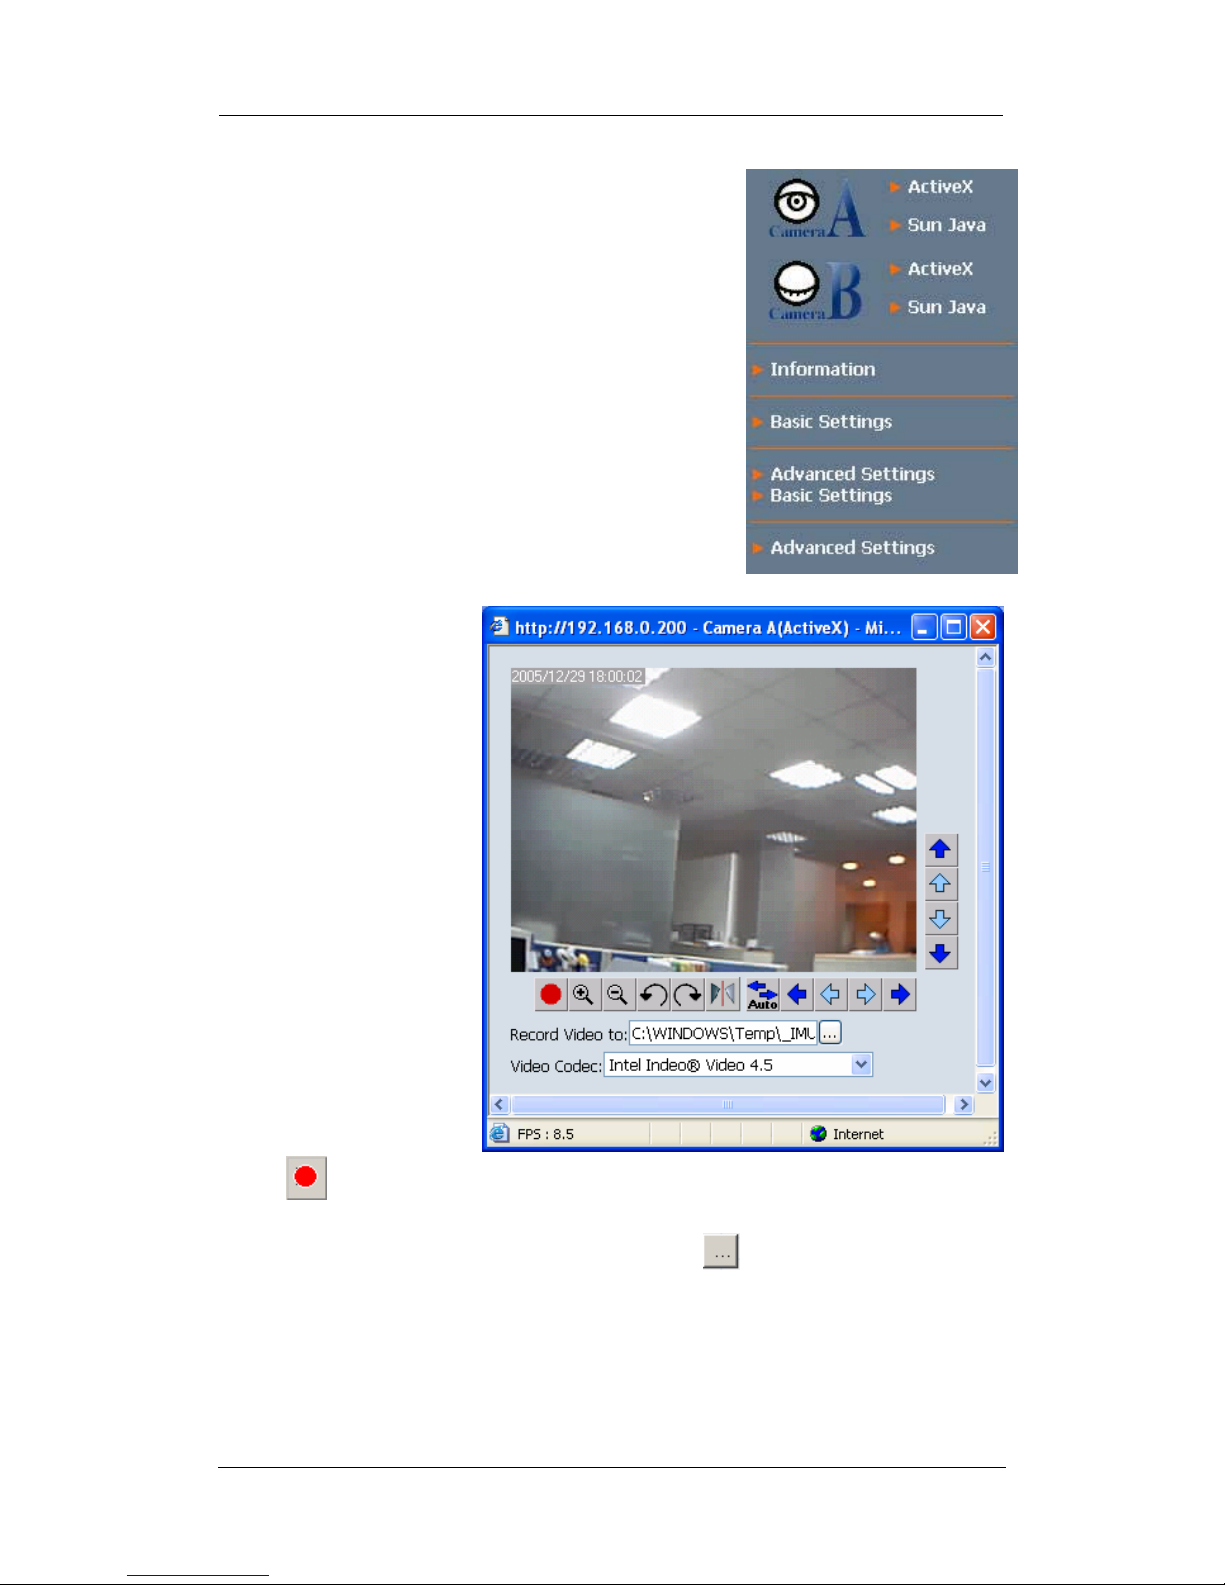
Once you click on
“Camera A” the following
image will appear.
Make sure to adjust the
USB camera lens for best
picture results.
Click on the controls
along the Window to
control the camera.
Note:
The pan and tilt controls
will only work with Pan Tilt
cameras.
Chapter 5: Web Manager
Click to record the current image to the selected directory, e.g.
C:\WINDOWS\Temp
To change the saved location and filename. Click
will pop up. Choose an alternate location and filename. Click the “Save” button to
confirm changes.
WebCAM user manual -23-
and the “Save As” window

Chapter 5: Web Manager
To change Video Codec, click
Note: The availability of Codec depends on weather the individual user has it
installed on the PC or not. Download and install Windows Media Player 10 to enable
MPEG4 codec.
Digital Zoom In, Digital Zoom Out
Rotate Left, Rotate Right
Flip the image vertically.
Auto Pan the camera
Pan Left by 5 deg / Pan Left by 1 deg.
Pan Right by 1 deg / Pan Right by 5 deg.
Tilt Up by 5 deg / Tilt Up by 1 deg.
Tilt Down by 1 deg / Tilt Down by 5 deg.
2.2 Information
The “Information” tab contains the following subsections;
2.2.1 System Status,
2.2.2 Current Connections and
2.2.3 Event Log.
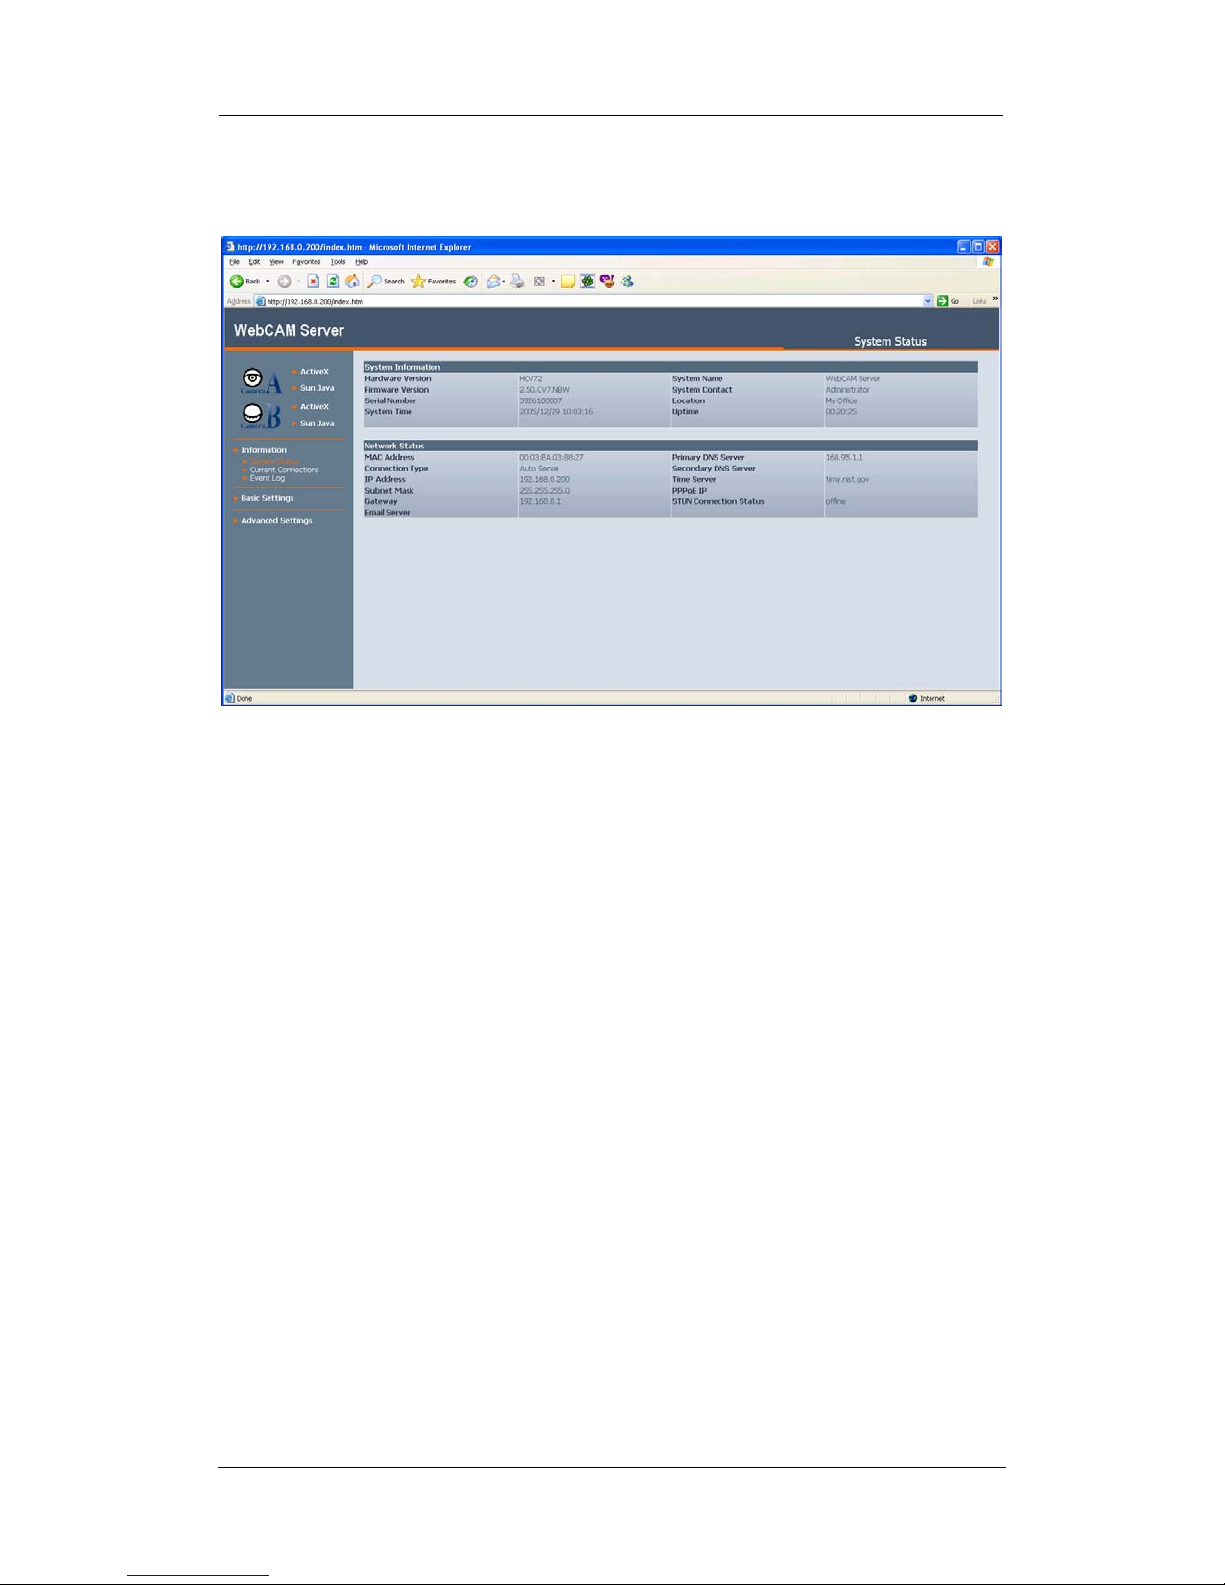
2.2.1 System Status
This section displays all the information relating to WebCAM.
i. System Information
WebCAM user manual -24-
Chapter 5: Web Manager
This section shows WebCAM System Information such as the Hardware and
Firmware Version, the serial number, current / local System Time, the system
name, contact, location and uptime. These values are either provided by
WebCAM or set by user.
Fig.15. WebCAM System Status
ii. System Information
This section shows WebCAM Network settings. The MAC Address is unique
to every WebCAM. All the other values are set by the user in Setup Wizard.
2.2.2 Current Connections
This section will show all the users currently viewing either Camera A or Camera B.
It also lists, the login time, and total bytes received. The user has an option to block
the IP or even disable the account of any errant viewer (The administrator privilege
will be required for this feature). A total of 10 connections can be displayed at the
same time.
Note: If you do not have Administrator’s privilege, the IP and Account details will be
hidden.
WebCAM user manual -25-
 Loading...