

Canon VL-3 Instructions Manual
このたびは、キヤノンビデオライトVL-3 をお買い上
げいただきまして、誠にありがとうございます。
この製品は、アドバンストアクセサリーシュー
を備えたビデオカメラ専用のビデオライトで
す。ビデオライトの電源は、ビデオカメラから供給
されます。ビデオライトを使うと、暗い室内で撮影
できます。本機では、周囲の明るさを検出して、自
動的に点灯させることができます。
ご使用になる前に、この使用説明書をお読みくださ
い。また、お読みになった後は、必ず保存してくだ
さい。
安全にご使用になるために
●ビデオライトに強い振動や衝撃を与えないでくだ
さい。ランプ切れや寿命を短くする原因となりま
す。
●水などがかかったり、濡れたりしないようにして
ください。
●分解、改造などをしないでください。
●ビデオライトを取り付けたときは、ライトを持っ
てビデオカメラを持ち運ばないでください。
●ビデオカメラのアクセサリーシューに、金属片な
どが入らないようにご注意ください。また、ビデ
オライトの底面に大きな力を加えないでください。
●ビデオライトを使用するときは、ビデオライトが
被写体に近づきすぎないようにしてください。
●使わないときは、ビデオライトの電源を切り、ビ
デオカメラの電源を取りはずしてください。
Thank you for purchasing the Canon Video Light VL-
3. This Video Light has been designed exclusively for
camcorders equipped with an advanced accessory
shoe
. It is powered by the camcorder’s power
supply. Attach the Video Light to a camcorder when
recording indark rooms. When on its automatic
setting, the Video Light turns on/off automatically
according to the brightness level of shooting
conditions.
Before using the Video Light, read these instructions
thoroughly and keep them in a safe place for future
reference.
To ensure safe use
• Keep cooling vents open and uncovered.
• Do not allow the Video Light to become wet.
• Do not look directly at the bulb while the Video
Light is on.
• Keep highly flammable substances such as alcohol
and benzine away from the Video Light.
• Do not store the camcorder with the Video Light
attached.
The Video Light could be powered on accidentally
and cause burning of the camcorder case, etc.
• Keep the Video Light safe from impact or vibration
when in use, to avoid halogen bulb burn-out or
shortening its lifespan.
• Do not disassemble or modify the Video Light.
• When carrying the camcorder with the Video Light
attached, be sure to support the camera body.
Never carry the camera holding the Video Light.
• Ensure that no foreign material such as metal
fragments, gets inside the camcorder’s accessory
shoe. Be careful not to deform the plug or the
bottom of the Video Light by using excessive force.
Caution:
• Do not touch the Video Light during and after use.
It becomes very hot.
Merci pour l’achat de la torche vidéo Canon VL-3. La
torche vidéo a été conçue exclusivement pour les
camescopes munis d’une griffe d’accessoires
. Elle est alimentée par la source d’alimentation du
camescope. Rattachez la torche vidéo à un
camescope pour la prise de vues dans des lieux
sombres. Lorsque le réglage automatique est
sélectionné, la torche vidéo s’allume et s’éteint
automatiquement en fonction de la luminosité
ambiante.
Avant d’utiliser la torche vidéo, veuillez lire
attentivement ces instructions et les conserver en lieu
sûr pour toute référence future.
Consignes de sécurité
• Laissez les orifices de ventilation ouverts et
découverts.
• Ne pas mouiller la torche vidéo.
• Ne pas regarder directement l’ampoule lorsque la
torche vidéo est éclairée.
• Ne pas poser de substances très inflammables,
comme l’alcool et la benzine, à proximité de la
torche vidéo.
• Ne pas ranger le camescope en laissant la torche
vidéo rattachée.
La torche vidéo pourrait être allumée
accidentellement et faire fondre le boîtier du
camescope ou causer d’autres brûlures.
• Ne pas soumettre la torche vidéo à des chocs ou
vibrations pendant son utilisation pour éviter de
griller l’ampoule et pour prolonger sa durée de vie.
• Ne pas démonter ni modifier la torche vidéo.
• Lorsque vous transportez le camescope avec la
torche vidéo, veillez à tenir le camescope. Ne
jamais saisir le camescope par la torche vidéo.
• Veillez à ne pas laisser de matières étrangères,
comme des morceaux de métal, pénétrer dans la
griffe d’accessoires du camescope. Veillez à ne
pas déformer la fiche ni le socle de la torche vidéo
en serrant trop fort.
ATTENTION :
• Ne touchez pas la torche vidéo pendant et après
son utilisation. Elle est extrêmement chaude.
Herzlichen Glückwunsch zum Kauf der Canon
Videoleuchte VL-3. Die Videoleuchte wurde
ausschließlich für Camcorder mit einem
fortschrittlichen Zubehörschuh
entwickelt. Sie
wird vom Camcorder aus mit Strom versorgt. Bringen
Sie die Videoleuchte an einem Camcorder an, wenn
in einem dunklen Raum gefilmt werden soll. In der
automatischen Einstellung schaltet die Videoleuchte
automatisch ein und aus, entsprechend den
vorhandenen Lichtverhältnissen.
Vor der Verwendung der Videoleuchte lesen Sie
diese Bedienungsanleitung gründlich durch und
bewahren sie an gut zugänglicher Stelle zum
Nachschlagen auf.
Beachten Sie bitte folgende
Anweisungen für den sicheren
Gebrauch
• Die Kühlschlitze dürfen nicht abgedeckt werden.
• Die Videoleuchte nicht naß werden lassen.
• Bei eingeschalteter Videoleuchte nicht direkt in die Birne
blicken.
• Leicht entflammbare Substanzen wie Alkohol und
Benzin von der Videoleuchte fernhalten.
• Den Camcorder nicht mit angebrachter Videoleuchte
lagern.
Die Videoleuchte könnte versehentlich eingeschaltet
werden und Verbrennungen des Camcordergehäuses
o.ä. verursachen.
• Die Videoleuchte darf beim Betrieb keinen
Erschütterungen oder Stößen ausgesetzt werden, um
ein Ausbrennen der Halogenlampe oder eine
Verkürzung ihrer Lebensdauer zu verhindern.
• Die Videoleuchte darf nicht auseinandermontiert werden.
Auch sind an ihr keine Umänderungsarbeiten zulässig.
• Beim Tragen der Kamera mit angebrachter Videoleuchte
immer das Kameragehäuse stützen. Niemals die
Kamera an der Videoleuchte tragen.
• Sicherstellen, daß keine Fremdkörper wie
Metallfragmente in das Innere des Zubehörschuhs des
Camcorders gelangen. Darauf achten, nicht den Stecker
oder die Unterseite der Videoleuchte durch
Gewaltanwendung zu verbiegen.
Vorsicht:
• Fassen Sie nicht die Videoleuchte während und
nach dem Gebrauch an. Sie kann sehr heiß
werden.
Gracias por haber adquirido la antorcha de vídeo
Canon VL-3. Esta antorcha de vídeo ha sido
diseñada exclusivamente para videocámaras
equipadas con una zapata para accesorio
avanzapada
. Se alimenta mediante la fuente
de alimentación de la videocámara. Fije la antorcha
de vídeo a una videocámara cuando grabe en una
sala obscura. Cuando esté en el ajuste automático, la
antorcha de vídeo se encenderá/apagará
automáticamente de acuerdo con el nivel de brillo de
las condiciones de grabación.
Antes de utilizar la antorcha de vídeo, lea
detenidamente estas instrucciones y guárdelas en un
lugar seguro para futura referencia.
Para asegurar un uso correcto
• No obstruya las ranuras de ventilación.
• No deje que la antorcha de vídeo se moje.
• No mire directamente la lámpara halógena
mientras la antorcha de vídeo esté encendida.
•Mantenga las sustancias muy inflamables tales
como alcohol y bencina alejadas de la antorcha de
vídeo.
• No guarde la videocámara con la antorcha de
vídeo fijada.
La antorcha de vídeo podría encenderse
accidentalmente y quemar la estuche de la
videocámara, etc.
• Proteja la antorcha de vídeo contra los golpes o las
vibraciones durante el uso, para evitar que se
estuche la lámpara halógena o se acorte su vida
de servicio.
•No intente desarmar ni hacer modificaciones a la
antorcha de vídeo.
• Cuando transporte la videocámara con la antorcha
de vídeo instalada, hágalo tomándola por su
cuerpo. No transporte nunca la videocámara
tomándola por la antorcha de vídeo.
• Asegúrese de que no haya materias extrañas
como fragmentos metálicos, en la zapata para
accesorio de la videocámara. Tenga cuidado de
no deformar el enchufe o la base de la antorcha de
vídeo empleando demasiada fuerza.
PRECAUTION:
• No toque la antorcha de vídeo durante y después
del empleo. Ésta estará muy caliente.
安全上のご注意
● ご使用の前に必ず「安全上のご注意」をよ
くお読みの上、正しくお使いください。
● 絵表示について
この使用説明書および製品への表示では、製品を
正しくお使いいただき、あなたや他の人々への危
害や財産への損害を未然に防止するために、いろ
いろな絵表示をしています。
その表示と意味は次のようになっています。
内容をよく理解してから本文をお読みください。
キヤノンビデオライト
Canon Video Light
Torche vidéo Canon
Canon-Videoleuchte
Antorcha de vídeo Canon
Faretto incorporato Canon
佳能摄像灯
VL-3
ビデオライトの放熱孔をふさがないでく
ださい。
火災の原因となることがあります。
ビデオライトの前面のガラスやランプが
高熱のときに水をかけないでください。
ガラスが破損して、けがをする恐れがあ
ります。
ビデオライトを点灯中、ランプを直接見
ないでください。
目を傷める恐れがあります。
ケースなどに収納するときには、電源ス
イッチを切り、ビデオカメラからはずし
てください。
誤って、スイッチが入り、点灯することによ
り、ケースなどが燃える恐れがあります。
禁止
禁止
禁止
一般注意
この表示を無視して、誤った取扱いをする
と、人が傷害を負う可能性が想定される内容
および物的損害のみの発生が想定される内容
です。必ずお守りください。
注意
この表示を無視して、誤った取扱いを
すると、火災、感電、破裂などによっ
て、人が死亡または重傷を負う可能性
が想定される内容です。必ずお守りく
ださい。
乳幼児の手の届かないところで、使用、保
管してください。
感電、やけどの原因となります。
ランプの点灯中や消灯直後は、ランプ周
辺は高温になっていますので、燃えやす
いものを置いたり、さわったりしないで
ください。
火災、やけどの原因となります。
警告
火災
感電
破裂
強制
接触禁止
この表示を無視して、誤った取り扱
いをすると、人が死亡または重傷を
負う可能性が想定される内容です。
必ずお守りください。
この表示を無視して、誤った取り扱
いをすると、人が傷害を負う可能性
が想定される内容および物的損害の
みの発生が想定される内容です。必
ずお守りください。
注意
警告
Instructions使用説明書
Mode d’emploi
Bedienungsanleitung Instrucciones 使用说明书Istruzioni
Grazie per aver acquistato il faretto incorporato
Canon VL-3, progettato esclusivamente per essere
utilizzato con videocamere dotate di advanced
accessory shoe
. Il faretto può essere
alimentato dalla videocamera. In caso di registrazioni
in condizioni di scarsa illuminazione, collegate il
faretto alla videocamera.
Se impostato, il faretto si attiva/disattiva
automaticamente in base al livello di illuminazione
delle condizioni di ripresa. Prima dell’utilizzo, leggete
le istruzioni e conservatele in un luogo sicuro per
riferimenti futuri.
Per un utilizzo sicuro
• Mantenete le ventole di raffreddamento aperte e
non copritele.
• Ponete attenzione affinché non si bagnino.
• Non guardate verso la lampada mentre il faretto è
acceso.
•Tenete le sostanze altamente infiammabili come
alcool e benzina lontano dal faretto.
• Non conservate la videocamera con il faretto
collegato. Il faretto potrebbe accendersi
accidentalmente ed incendiare la custodia della
videocamera, ecc.
• Per evitare che la lampada alogena si bruci o che
la sua durata si riduca, evitate di urtare o far
vibrare il faretto quando è in funzione.
• Non smontate né modificate il faretto.
• Durante il trasporto della videocamera con il faretto
collegato, è necessario sostenere il corpo della
videocamera. Non trasportate mai la videocamera
afferrandola per il faretto.
• Verificate che all’interno dell’accessory shoe della
videocamera non penetri alcun corpo estraneo,
quali, ad esempio, frammenti di metallo. Fate
attenzione a non esercitare forza eccessiva onde
evitare di deformare la spina o la parte inferiore del
faretto.
Attenzione:
• Evitate di toccare il faretto durante e dopo l’uso,
che è surriscaldato.
感谢您购买佳能摄像灯VL-3。本摄像灯是专为配有
“ ”先进附件插座的摄像机而设计,并由摄像机
供电。在黑暗的房间里摄像时,请安装本摄像灯。在
摄像灯为自动设定时,根据拍摄条件的亮度情况,摄
像灯会自动点亮或关闭。在使用摄像灯之前,请仔细
参阅本使用说明书,并将其妥善保管,以备日后参考
之用。
安全使用注意事项
• 保持排热孔开放,不要挡住。
• 不要弄湿摄像灯。
• 在摄像灯点亮时,不要直视摄像灯。
• 保持摄像灯远离易燃物质,譬如酒精、苯等。
• 保存摄像机时,拆下摄像灯。
因为摄像灯可能会因故供电,引起摄像机外壳燃烧
等。
• 在使用时应防止冲击和振动,以避免卤素灯烧坏,
或使用寿命缩短。
• 不要拆卸和改造摄像灯。
• 当拿起装有摄像灯的摄像机时,要注意握住摄像机
机体,绝对不要提着摄像灯来吊起摄像机。
• 请确认没有诸如金属碎片等异物进入附件插座内。
小心不要因用力过大而使插头或摄像灯底座变形。
警告∶
• 在摄像灯使用和刚使用完时,不要触摸。因为摄像
灯非常热。
DANGER
• Not to be handled by children.
•Emits intense heat and light.
• Use with caution to reduce the risk of fire or
injury.
• Keep a safe distance between the Video Light
and human or material subjects when using and
until cool.
• Turn the Video Light off and disconnect the
camcorder’s power source when not in use.
DANGER
• Ne laissez pas manipuler par des enfants.
• Emet une lumière et une chaleur intenses.
• Utilisez avec soin pour éviter tout risque
d’incendie ou de blessure.
• Conservez une distance suffisante entre la
torche vidéo et les sujets humains ou objets,
pendant et après utilisation jusqu’au
refroidissement complet.
• Eteignez la torche vidéo et débranchez la
source d’alimentation du camescope quand il
n’est pas utilisé.
GEFAHR
•Von Kindern fernhalten.
•Strahlt starke Hitze und intensives Licht ab.
•Vorsicht bei der Handhabung. Es besteht Brandund Verletzungsgefahr.
• Beim Gebrauch und während der Abkühlung
einen sicheren Abstand zwischen der
Videoleuchte und Personen oder Gegenständen
halten.
• Schalten Sie die Videoleuchte aus und trennen
die Stromversorgung den camcorder ab wenn
sie nicht benutzt wird.
PELIGRO!
•No deje la antorcha en manos de los niños.
• Emite calor y luz intensos.
• Utilícese con cuidado para evitar riesgos de
incendio o de lesiones.
• Durante el uso y hasta que se enfríe, mantenga
una distancia segura entre la antorcha de vídeo
y el cuerpo de las personas.
• Apague la antorcha de vídeo y desconecte la
fuente de alimentación de la videocámara
cuando no esté en uso.
PERICOLO
• Tenete lontano dalla portata dei bambini.
• Emette luce e calore intensi.
• Utilizzatelo con cautela, al fine di ridurre il rischio
di incendi o lesioni.
• Durante l’utilizzo e finché non si raffreddi,
mantenete una distanza di sicurezza dal faretto;
lo stesso discorso vale per gli oggetti.
• Quando non utilizzate il faretto, spegnetelo e
scollegate la spina della videocamera.
危险
• 不要让小孩触动。
• 发出炙热和强光。
• 小心使用,以减少火灾和受伤的危险。
• 使用摄像灯时,和在其冷却之前,摄像灯
须与人或物保持一定安全距离。
• 在摄像灯不使用时,中断摄像灯,从摄像
机电源连接拆下。
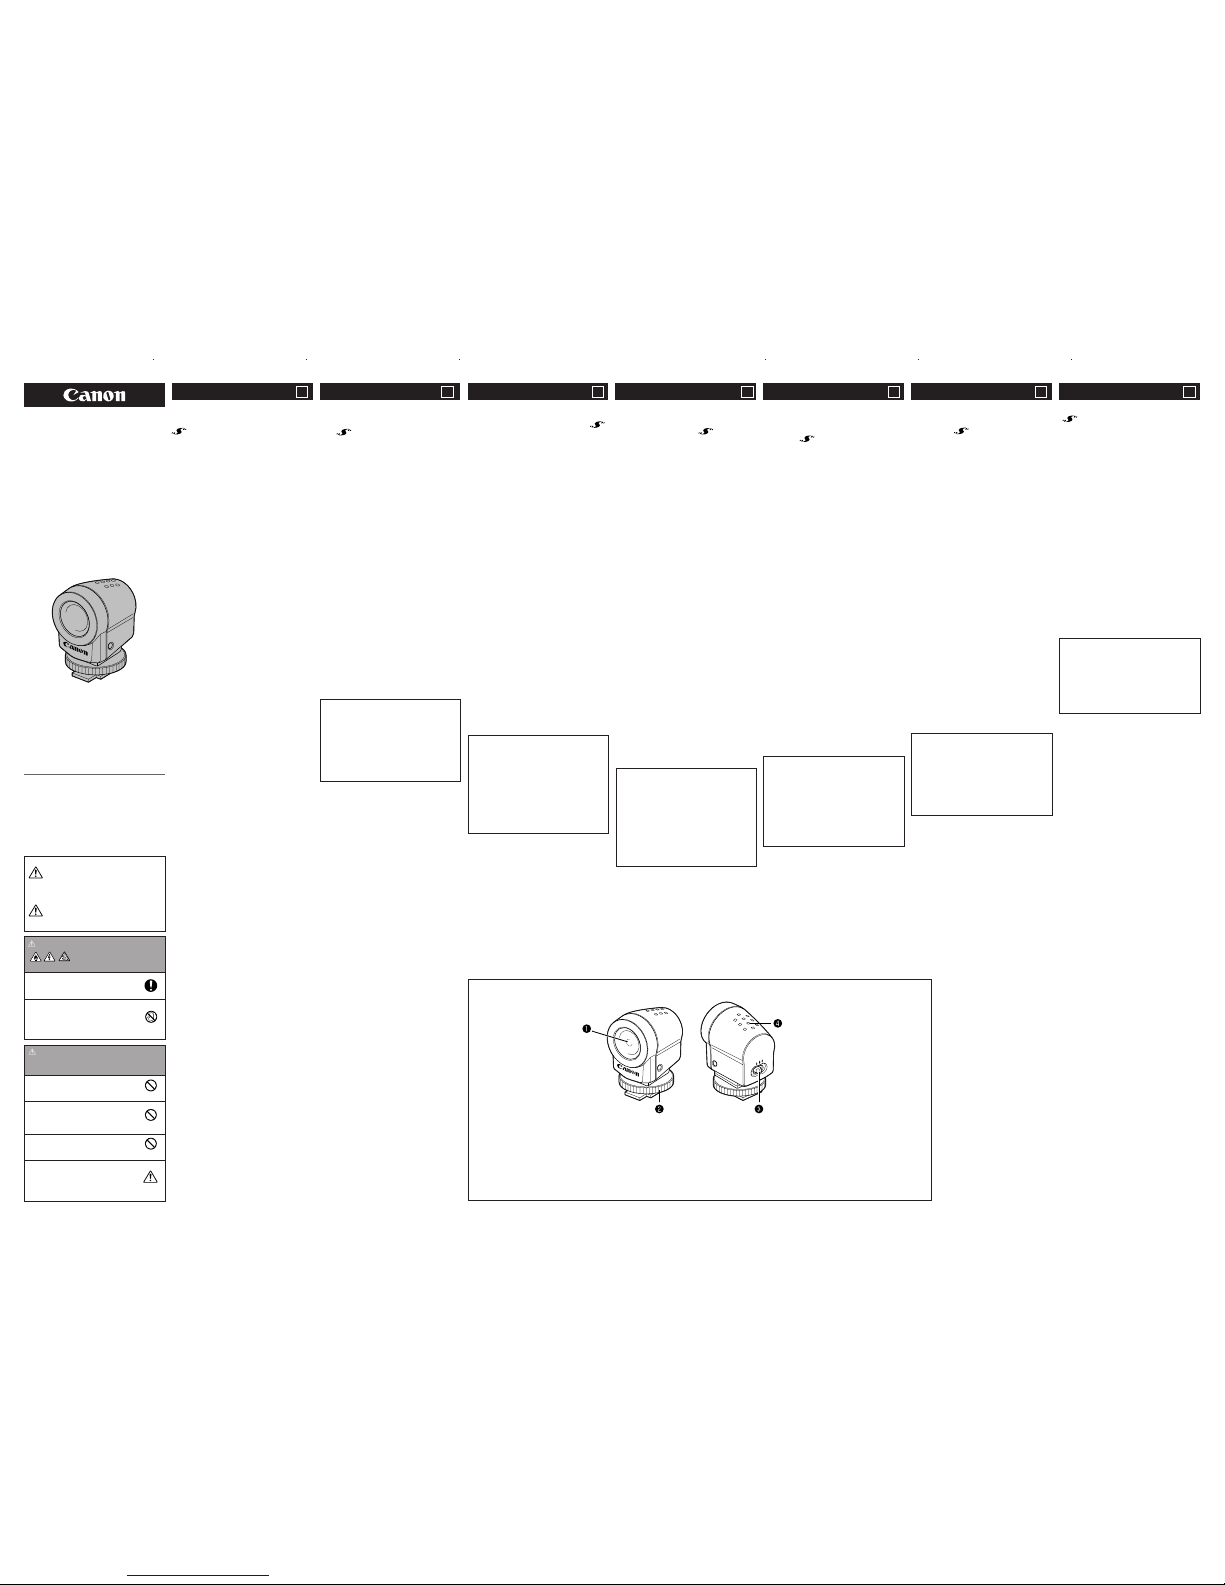
各部件名称
q 卤素灯
w 插座锁定钮
e 电源开关
r 排热孔
ON
OFF
AUTO
各部の名称
q ハロゲンランプ
w 締め付けねじ
e 電源スイッチ
r 放熱孔
Nomenclature
q Ampoule halogène
w Bague de
verrouillage lu socle
e Interrupteur
d’alimentation
r Orifices de ventilation
Bezeichnung der Teile
q Halogenbirne
w Schuhverriegelung
e Stromschalter
r Kühlschlitze
Nomenclature
q Halogen bulb
w Shoe lock
e Power switch
r Cooling vents
Nomenclatura
q Lámpara halógena
w Traba de la zapata
e Interruptor de encendidol
r Ranuras de ventilación
Nomenclatura
q Lampada alogena
w Shoe lock
e Alimentazione
r Ventole di raffreddamento
J E F
De
Es
I C
PRINTED IN JAPAN
IMPRIME AU JAPON
ビデオライトは、ビデオカメラにバッテリーパックやコンパク
トパワーアダプターなどの電源を取り付けて、撮影または撮影
一時停止中に使用できます。
ビデオカメラの使用説明書も、あわせてご覧ください。
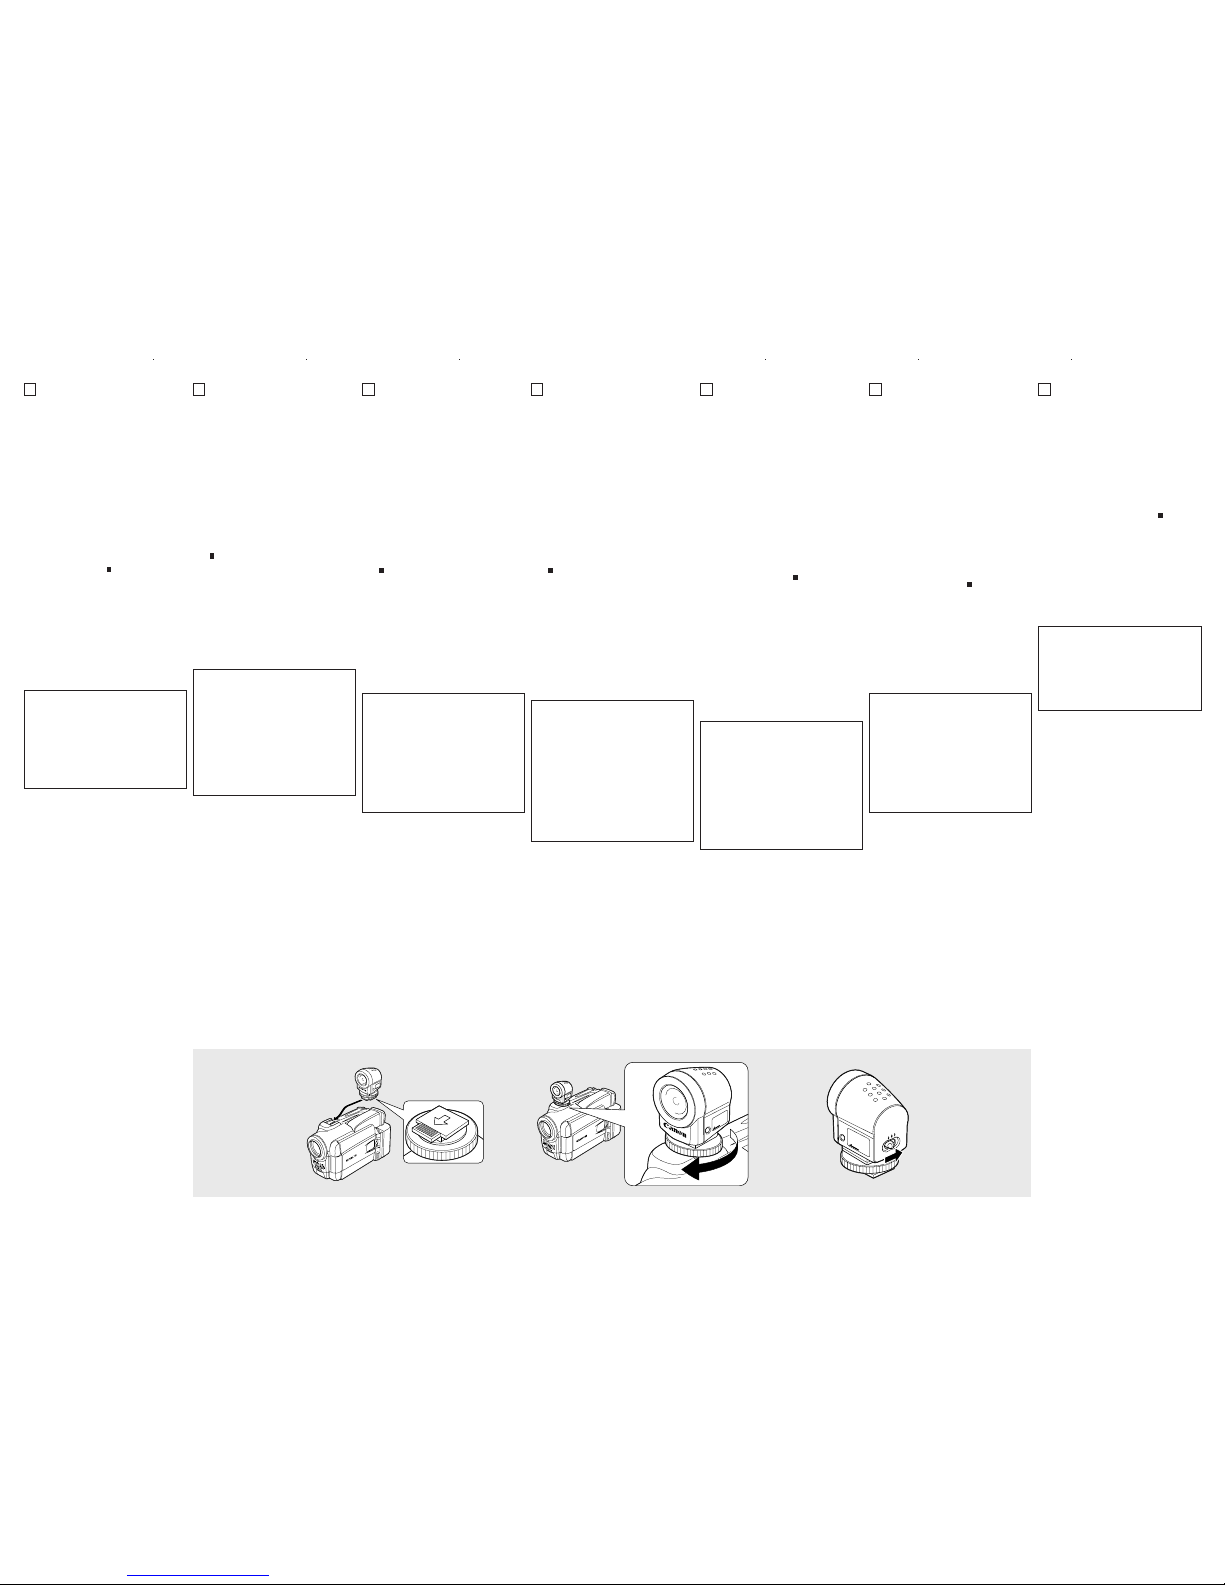
ビデオカメラに取り付ける
ビデオライトを取り付け/取りはずすときはビデオカメラの
電源を切ってください。
1 ビデオカメラのアクセサリーシューにビデオライトをまっ
すぐ差し込む(図1)
● ビデオライトの底面にある矢印の方向にカチッと音が
するまで、確実に差し込んでください。
2 締め付けねじを「LOCK」の矢印方向に回し、固定する
(図2)
● 締め付けねじを回しているときに、ビデオライトが抜
けないようにご注意ください。
3 ビデオカメラの電源を入れる
4 ビデオライトの電源スイッチを「OFF」以外にする(図
3)
・ 撮影または撮影一時停止中、液晶画面またはビュー
ファインダーの画面下に
C
(CONNECTION =接続)」
が出る。
・ ON: ビデオライトが点灯する。
・ AUTO: 暗くなると自動的に点灯し、明るくなると自
動的に消灯する。
使い終わったら
1ビデオカメラの電源を切る
2ビデオライトの電源を「OFF」にする
3ビデオライトの温度が十分に下がってから、締め付けねじ
を「LOCK」の矢印の逆方向に回す
4ビデオライトをまっすぐ引き抜く
●ケースなどに収納するときは、ビデオライトの温度が十分
に下がってから行ってください。
●ビデオライトを使って撮影するときは、被写体との距
離を1〜2m以内にすると効果的です。
●WIDE(広角)で撮影するときにビデオライトを使用
すると、画面周辺が暗くなります。
●ビデオライトを使用すると、バッテリーパックの連続
使用時間は短くなります。予備のバッテリーパックを
用意することをおすすめします。
●ビデオカメラのバッテリーパックが消耗すると、ビデ
オライトの明るさが変化します(故障ではありませ
ん)。
●ビデオライトの電源スイッチがオートのときに、鏡な
どの光を反射する被写体を撮影すると、ビデオライト
が点灯/消灯をくり返す場合があります。
●ランプの交換は、ビデオカメラ本体の取説の裏表紙に記載
されていますお近くのキヤノンサービスセンターにご相談
ください。
お手入れ
●ビデオライトのお手入れは、ライトの温度が十分に下がっ
てから行ってください。
●柔らかい布で乾拭きしてください。シンナー、ベンジン、
アルコール等の揮発性のものは使用しないでください。
●ビデオライトの底面の端子は、常にきれいにしておいてく
ださい。接触不良の原因となります。ビデオライトを取り
付ける前に、柔らかい布などで乾拭きしてください。
主な仕様
照射角度:約20度
照射方向:水平
色温度:約3,000° K
消費電力:約3.5W
使用ランプ:ハロゲンランプ7.2V3W
使用温度:0℃〜+40℃
外形寸法:約32× 52× 41mm(幅×高さ×奥行)
質量:約30g
仕様および外観は、予告なく変更することがありますが、ご了承くださ
い。
J
PUB . DIM-327ic
0100P2
The Video Light is powered by the camcorder’s battery
pack or Compact Power Adapter. Use the Video Light
when the camcorder is in record or record pause mode.
Refer to your camcorder instruction manual for more
information.
Attaching the Video Light
Turn the camcorder’s power off before attaching / removing
the Video Light.
1 Slide the Video Light straight onto the camcorder’s
accessory shoe (Fig. 1).
● Slide in the direction of the arrow on the bottom of
the Video Light until it clicks securely into place.
2 Tighten by turning the shoe lock in the direction of the
LOCK arrow (Fig. 2).
● Make sure that the light does not come
disconnected when turning the shoe lock.
3 Turn the camcorder’s power on.
4 Turn the Video Light’s power switch to AUTO or ON (Fig. 3).
•
C
(Connection) appears in the display when the
camcorder is in record or record pause mode.
• ON : The Video Light stays on.
• AUTO : The Video Light turns on/off automatically
according to the level of brightness of the
shooting conditions.
After use
1 Turn the camcorder’s power off.
2 Turn the Video Light’s power switch off.
3 When the Video Light has cooled off, turn the shoe lock in
the opposite direction from the LOCK arrow.
4 Slide and remove the Video Light.
● Store the Video Light only after it has cooled down.
● For best results, use the Video Light within 1 – 2 m
(3 ft 4 in – 6 ft 7 in) away from the subject.
● The Video Light illuminates the main subject of a
scene. When recording wide angle shots, the
corners of a scene may not be illuminated
completely.
● The camcorder’s continuous recording time
shortens when you use the Video Light. Have more
battery packs on hand than you think you will
need.
● When the camcorder’s battery pack is close to
power exhaustion, the Video Light’s illumination
becomes unsteady.
● Be careful of mirrors or other similarly reflective
objects that may cause the Video Light to turn
itself off / on (when in AUTO mode), effecting the
recording.
● For bulb replacement, see the back of your camcorder’s
instruction manual.
Care of Video Light
• Be sure the Video Light is cool before cleaning. Clean the
Video Light by dusting it lightly with a soft, dry cloth. Never
use thinner, benzene, alcohol or other volatile cleaners or
solvents.
• The Video Light will not work properly if the terminals are
dirty. Check them before use, and wipe them with a dry
cloth if necessary.
Specifications
Illumination angle: 20°
Illumination direction: Horizontal
Color temperature: 3,000°K
Power consumption: 3.5 W
Required Bulb: Halogen Bulb 7.2V 3W
Operating temperature range: 0°C – 40°C
(32°F – 104°F)
Dimensions(W × H × D): 32 × 52 × 41 mm
(11/4 × 2 × 15/8 in)
Weight: 30 g (1 oz)
Weight and dimensions are approximate. Errors and omissions
excepted.
Subject to change without notice.
E
La torche vidéo est alimentée par la batterie du
camescope ou l’adaptateur secteur compact. Utilisez la
torche vidéo pendant l’enregistrement ou la pause
d’enregistrement.
Reportez-vous au mode d’emploi du camescope pour de
plus amples informations.
Fixation de la torche vidéo
Mettez le camescope hors tension avant de fixer et d’enlever
la torche vidéo.
1 Insérez la torche vidéo tout droit dans la griffe
d’accessoires du camescope (figure 1).
● Poussez dans le sens de la flèche sur le socle de la
torche vidéo jusqu’à ce qu’elle s’encliquette.
2 Serrez en tournant la bague de verrouillage dans le sens
de la flèche LOCK (figure 2).
● Assurez-vous que la torche vidéo ne se déconnecte
pas lorsque vous tournez la bague de verrouillage.
3 Mettez le camescope sous tension.
4 Réglez l’interrupteur de la torche vidéo sur AUTO ou ON
(figure 3).
•
C
(connexion) apparaît dans l’afficheur lorsque le
camescope est en mode d’enregistrement ou de pause
d’enregistrement.
• ON : La torche vidéo reste allumée.
• AUTO : La torche vidéo s’allume et s’éteint
automatiquement en fonction du niveau de
luminosité ambiante.
Après utilisation
1 Mettez le camescope hors tension.
2 Eteignez la torche vidéo en mettant l’interrupteur sur arrêt.
3 Lorsque la torche vidéo a refroidi, tournez la bague de
verrouillage dans le sens opposé de la flèche LOCK.
4 Tirez sur la torche vidéo pour la retirer.
● Rangez la torche vidéo après l’avoir laissée refroidir.
● Pour des prises de vues optimales, utilisez la
torche vidéo à moins de 1 – 2 m du sujet.
● La torche vidéo éclaire le sujet principal d’une
scène. Lors des prises de vues à grand angle, les
angles de la scène ne seront peut-être pas
complètement éclairés.
● L’autonomie de la batterie est réduite lorsque vous
utilisez la torche vidéo. Prévoyez plusieurs
batteries d’alimentation pour le tournage.
● Lorsque la batterie du camescope est presque
vide, l’éclairage de la torche vidéo devient instable.
● Attention aux miroirs ou autres objets
réfléchissant la lumière car la torche risque de
s’allumer et de s’éteindre d’elle-même (en mode
AUTO), et cela aura un effet négatif sur
l’enregistrement.
● Pour le remplacement de l’ampoule, voir au dos du mode
d’emploi du camescope.
Entretien de la torche vidéo
• Veillez à éteindre la torche vidéo avant de la nettoyer.
Nettoyez-la avec un chiffon sec et doux. Ne jamais utiliser
de diluant, benzène, alcool ni aucun produit de nettoyage
ou solvant volatil.
•La torche vidéo ne fonctionnera pas correctement si les
bornes sont sales. Vérifiez-les avant d’utiliser la torche et
essuyez-les avec un chiffon sec, si nécessaire.
Fiche technique
Angle d’éclairement : 20°
Direction d’éclairement : Horizontale
Température de couleur : 3.000°K
Consommation : 3,5 W
Ampoule utilisée: Ampoule halogène 7.2 V 3 W
Température d’utilisation: De 0°C à 40°C
Dimensions(L × H × P) : 32 × 52 × 41 mm
Poids: 30 g
Le poids et les dimensions sont approximatifs. Sauf erreur et omission.
Sujet à changements sans préavis.
F
©CANON INC. 2002
DY8-9120-227-000
Die Videoleuchte wird über das Batteriepack des
Camcorders oder ein Kompakt-Netzteil mit Strom
versorgt. Verwenden Sie die Videoleuchte, wenn der
Camcorder auf Aufnahme oder Aufnahmepause gestellt
ist.
Einzelheiten siehe Bedienungsanleitung des Camcorders.
Anbringen der Videoleuchte
Vor dem Anbringen / Abnehmen der Videoleuchte den
Camcorder ausschalten.
1 Schieben Sie die Videoleuchte gerade auf den
Zubehörschuh des Camcorders (Fig. 1).
● Schieben Sie in Pfeilrichtung an der Unterseite der
Videoleuchte bis zum sicheren Einrasten.
2 Ziehen Sie durch Drehen der Schuh-Verriegelung in
Richtung des Pfeiles LOCK fest (Fig. 2).
● Stellen Sie sicher, daß die Leuchte nicht beim
Drehen der Schuh-Verriegelung abgetrennt wird.
3 Den Camcorder einschalten.
4 Stellen Sie den Stromschalter der Videoleuchte auf AUTO
oder ON (Fig. 3).
•
C
(Verbindung) erscheint im Display, wenn der
Camcorder auf Aufnahme oder Aufnahmepause gestellt
ist.
• ON : Die Videoleuchte leuchtet kontinuierlich.
• AUTO : Die Videoleuchte schaltet automatisch
entsprechend der Helligkeit ein/aus.
Nach der Verwendung
1 Den Camcorder ausschalten.
2 Schalten Sie die Videoleuchte das Gerät mit dem
Stromschalter aus.
3 Wenn die Videoleuchte abgekühlt ist, drehen Sie die
Schuhverriegelung in Gegenrichtung des Pfeils LOCK.
4 Schieben Sie Videoleuchte zum Entfernen.
● Legen Sie die Videoleuchte erst ab, wenn sie abgekühlt
ist.
● Für beste Ergebnisse verwenden Sie die
Videoleuchte in einem Bereich von 1 – 2 m
Entfernung zum Motiv.
● Die Videoleuchte beleuchtet das Hauptmotiv einer
Szene. Bei Weitwinkelaufnahmen kann es sein, daß
die Bildrandbereiche nicht vollständig
ausgeleuchtet werden.
● Die kontinuierliche Aufnahmedauer des
Camcorders nimmt ab, wenn Sie die Videoleuchte
verwenden. Halten Sie sicherheitshalber mehr
Batteriepacks bereit, als Sie normal benötigen
würden.
● Wenn das Batteriepack des Camcorders fast
erschöpft ist wird die Leuchtwirkung der
Videoleuchte ungleichmäßig.
● Auf Spiegel oder andere reflektierende Oberfläche
achten, die bewirken könnten, daß sich die
Videoleuchte ein- oder ausschaltet (im AUTOBetrieb) und damit die Aufnahme beeinträchtigt.
● Zum Austausch der Birne siehe Rückseite der CamcorderBedienungsanleitung.
Pflege der Videoleuchte
• Stellen Sie vor der Reinigung sicher, daß die Videoleuchte
abgekühlt ist.Reinigen Sie die Videoleuchte mit einem weichen,
trockenen Lappen. Verwenden Sie niemals Verdünner, Benzin,
Alkohol oder andere flüchtige Mittel.
• Die Videoleuchte arbeitet nicht einwandfrei wenn die
Anschlußklemmen verschmutzt sind. Prüfen Sie die
Anschlüsse vor dem Gebrauch der Lampe, und wischen Sie
sie gegebenenfalls mit einem trockenen Tuch ab.
Technische Daten
Beleuchtungswinkel: 20°
Beleuchtungsrichtung: Waagerecht
Farbtemperatur: 3.000°K
Stromverbrauch: 3,5 W
Verwendbare Birne: Halogenbirne HL 7,2 V 3 W
Umwelttemperatur: 0°C – 40°C
Abmessungen(B × H × T) : 32 × 52 × 41 mm
Gewicht: 30 g
Angaben für Gewicht und Abmessungen sind Annäherungswerte. Für
eventuelle Fehler und Auslassungen kann keine Gewähr übernommen
werden. Änderungen bleiben ohne vorherige Ankündigung vorbehalten.
De
La antorcha de vídeo se alimenta mediante la batería de la
videocámara o el adaptador de alimentación compacto.
Utilice la antorcha de vídeo cuando la videocámara esté
en el modo de grabación o en el de pausa de grabación.
Para más información, consulte el manual de
instrucciones de la videocámara.
Fijación de la antorcha de vídeo
Desconecte la alimentación de la videocámara antes de fijar/
quitar la antorcha de video.
1 Deslice la antorcha de vídeo derecho sobre la zapata para
accesorio de la videocámara (Fig. 1).
● Deslícela en el sentido de la flecha en la base de la
antorcha de vídeo hasta que chasquee
seguramente en su lugar.
2 Apriete girando la traba de la zapata en el sentido de la
flecha LOCK (Fig. 2).
● Asegúrese de que la antorcha no se desconecte al
girar la traba de la zapata.
3 Conecte la alimentación de la videocámara.
4 Ponga el interruptor de encendido de la antorcha de vídeo
en AUTO u ON (Fig. 3).
• En el visualizador aparecerá C (conexión) cuando la
videocámara esté en el modo de grabación o el de
grabación en pausa.
• ON : La antorcha de vídeo permanecerá encendida.
• AUTO : La antorcha de vídeo se encenderá/apagará
automáticamente de acuerdo al nivel de
iluminación de las condiciones de grabación.
Después del uso
1 Desconecte la alimentación de la videocámara.
2 Desconecte el interruptor de encendido de la antorcha de
vídeo.
3 Cuando la antorcha de vídeo se haya enfriado, gire la
traba de la zapata en el sentido opuesto al de la flecha
LOCK.
4 Deslice y quite la antorcha de vídeo.
● Guarde la antorcha de vídeo solamente después que
se haya enfriado.
● Para los mejores resultados, utilice la antorcha de
vídeo dentro de los 1 – 2 m hasta el motivo.
● La antorca de vídeo ilumina el motivo principal de
una escena. Cuando grabe tomas en gran angular,
es posible que las esquinas de una escena no se
iluminen completamente.
● El tiempo de grabación continua de la videocámara
se acortará cuando utilice la antorcha de vídeo.
Prepare más baterías de lo que calcule necesario.
● Cuando la batería de la videocámara esté cerca de
la expiración de su energía, la iluminación de la
antorcha de vídeo se volverá inestable.
● Tenga cuidado con los espejos u otros objetos
reflectivos similares que puedan hacer que la
antorcha de vídeo se encienda o apague
sola(cuando esté en el modo AUTO), afectando la
grabación.
● Para reemplazar la bombilla, consulte la parte posterior del
manual de instrucciones de su videocámara.
Cuidado de la antorcha de vídeo
• Antes de la limpieza, deje que se enfríe la antorcha de
vídeo. Limpie la antorcha de vídeo con un paño suave y
seco. No utilice nunca diluyentes, bencina, alcohol u otros
solventes o limpiadores volátiles.
• Esta antorcha de vídeo no funcionará correctamente su
hay suciedad en los terminales. Revíselos antes del uso y
de requerirse, límpielos con un paño seco.
Especificaciones
Ángulo de iluminación: 20°
Dirección de radiación: Horizontal
Temperatura de color: 3.000°K
Consumo eléctrico: 3,5 W
Bombilla: Bombilla halógena 7.2V 3W
Temperatura de funcionamiento: 0°C – 40°C
Dimensiones: 32 × 52 × 41 mm
Peso: 30 g
El peso y las dimensiones son aproximados. Se aceptan errores y
omisiones. Sujetos a cambio sin previo aviso.
Es
C
E’ possibile alimentare il faretto dal gruppo batteria o
dall’adattatore della videocamera. Utilizzate il faretto con
la videocamera in modalità di registrazione o di pausa
registrazione.
Per ulteriori informazioni, fate riferimento al manuale
d’istruzioni della videocamera.
Collegamento del faretto
Prima di montare/scollegare il faretto, spegnete la
videocamera.
1 Fate scorrere il microfono in direzione rettilinea
sull’accessory shoe della videocamera (Fig. 1).
● Fatelo scorrere in direzione della freccia sulla parte
inferiore del faretto finché scatti in posizione.
2 Serratelo ruotando il shoe lock in direzione della freccia
LOCK (Fig. 2).
● Durante la rotazione del shoe lock, verificate che il
faretto non si scolleghi.
3 Accendete la videocamera.
4 Ruotate l’interruttore del faretto incorporato su AUTO o
ON (Fig. 3).
• Quando la videocamera è in modalità di registrazione o
di pausa registrazione, sul display della videocamera
viene visualizzata l’indicazione
C
(Collegamento).
• ON : il faretto rimane acceso.
• AUTO : il faretto si accende/spegne automaticamente
in base al livello di illuminazione delle
condizioni di ripresa.
Dopo l’uso
1 Spegnete la videocamera.
2 Disattivate l’alimentazione del faretto.
3 Dopo il raffreddamento del faretto, ruotate il shoe lock in
direzione opposta alla freccia LOCK.
4 Fate scorrere il faretto fino ad avvenuta rimozione.
● Depositate il faretto solo quando si è raffreddato.
● Per risultati migliori, utilizzate il faretto ad una
distanza di 1 –2 m dal soggetto.
● Il faretto illumina il soggetto principale di una
scena. Durante la registrazione con riprese a
grandangolo, non è possibile illuminare
completamente gli angoli della scena.
● Utilizzando il faretto, il tempo di registrazione in
continuo della videocamera si riduce. Si consiglia
di procurarsi dei gruppi batteria di riserva.
● Quando il gruppo batteria della videocamera è sul
punto di esaurirsi, l’illuminazione del faretto inizia
ad indebolirsi.
● Tenetevi lontano da specchi o altri oggetti simili
che possano causare l’accensione/lo spegnimento
del faretto (in modalità AUTO), con conseguenze
sulla registrazione.
● Per la sostituzione della lampada, fate riferimento a quanto
riportato sul retro del manuale d’istruzione della
videocamera.
Manutenzione del faretto
• Prima di effettuarne la pulizia del faretto, verificate che si
sia raffreddato. Pulite il faretto spolverandolo con un panno
morbido ed asciutto. Evitate di utilizzare solvente, benzene,
alcool o altri tipi di sostanze volatili.
• Se i morsetti sono sporchi, il faretto non potrà funzionare in
modo adeguato. Controllateli prima dell’uso, quindi, se
necessario, puliteli con un panno asciutto.
Specifiche:
Angolo d’illuminazione: 20°
Direzione d’illuminazione: orizzontale
Temperatura colori: 3.000°K
Potenza assorbita 3,5 W
Tipo di lampada richiesta: Lampada alogena 7,2V 3W
Gamma temperature d’esercizio: 0°C – 40°C
Dimensioni (L × A × D): 32 × 52 × 41 mm
Peso: 30 g
I valori relativi al peso ed alle dimensioni sono approssimativi. Salvo
errori ed omissioni.
Soggetto a modifiche senza preavviso.
本摄像灯由摄像机电池或小型电源转接器供电。在摄像机处
于摄像或摄像暂停模式时,使用本摄像灯。
详细请参阅摄像机使用说明书。
安装摄像灯
在安装或拆下摄像灯之前,中断摄像机电源开关。
1 将摄像灯直线滑入摄像机附件插座。(图1)
●朝摄像灯底部箭头方向滑入,直至到位发出声响。
2 朝LOCK 箭头方向拧紧插座锁定钮。(图1)
●确认在拧紧插座锁定钮时,摄像灯连接着并松脱。
(图2)
3 接通摄像机的电源开关。
4 将摄像灯电源开关置于AUTO 或ON 位置。(图3)
• 在摄像机处于摄像或摄像暂停模式时,
C
(连接 )出现在
摄像机的显示屏上。
• ON∶ 摄像灯处于接通电源状态。
• AUTO∶ 根据拍摄条件的亮度,摄像灯自动点亮或关
闭。
使用之后
1 中断摄像机的电源开关。
2 中断摄像灯的电源开关。
3 在摄像灯冷却以后,朝LOCK箭头逆向转动插座锁定钮,
解除锁定。
4 滑动卸下摄像灯。
●只能在摄像灯冷却之后再进行保存。
●为了取得最佳效果,在离拍摄主体1~2 米处使用摄
像灯。
●摄像灯照明场景的主要拍摄对象。当进行广角拍摄时,
场景角落也许会没有被完全照射到。
●使用摄像灯时,摄像机的持续拍摄时间会缩短。请准备
超过预计需要的电池。
●当摄像机电池的电力接近耗尽时,摄像灯的照明变得不
稳定。
●请注意镜子或其他类似反射物体可能会引起摄像灯关闭
或点亮(在AUTO 模式时),影响摄像。
●更换灯泡时,请参阅摄像机使用说明书的背面。
摄像灯的维护保养
• 在清洁之前,请确认摄像灯已冷却。使用柔软和干燥的布,
轻轻擦拭沾在摄像灯上的灰尘。不得使用稀释液、苯、酒
精、或其他挥发性清洁剂或溶剂。
• 若端子附有污垢,摄像灯则不能有效的工作。在使用之前
进行检查,若有必要,用干燥的布擦拭干净。
规格∶
照明角度∶20度
照明方向∶水平
色温度∶3,000度 K
电力消耗∶3.5瓦特
要求灯泡∶卤素灯 7.2伏、3 瓦特
工作温度范围∶0~40摄氏
尺 寸(宽×高×厚)∶32×52×41毫米
重 量∶30克
重量和体积为近似值,可能出现误差和遗漏,若有变动,恕
不另行通知。
I
2
3
ON
OFF
AUTO
1
LOCK
LOCK
L
O
C
K
LOCK
 Loading...