

Canon Sure Shot 80 Tele, Sure Shot PRIMA BF TWIN Instructions Manual
{t
"T
Canoil
w#z/M
tr
H:Tf,'='.'J3|'
y;,'":,?;:H'"""
E
E
S''.T*'"TI?)5"
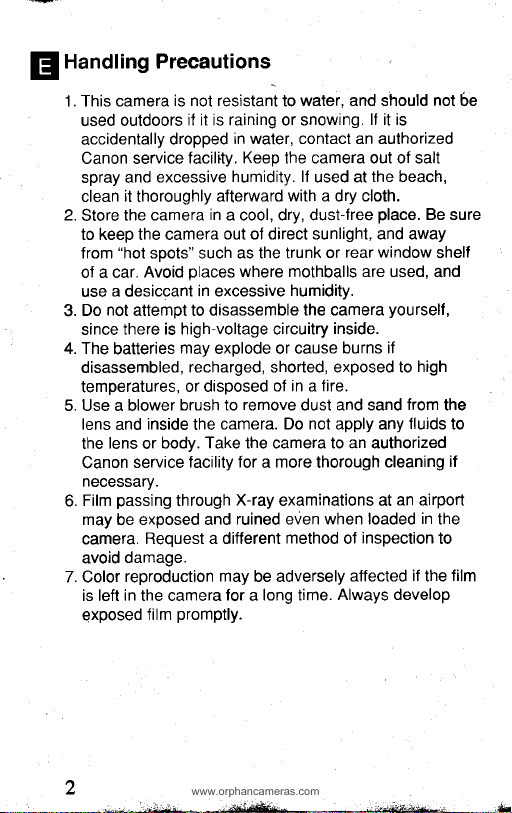
Handling Precautions
www.orphancameras.com
p
1. This camera
used outdoors
accidentally
Canon service
spray and
clean
2.
Store the
to keep the camera
from
of a car.
use a desiccant
not
Do
3.
since
4. The
batteries
disassembled,
temperatures,
5. Use a blower
lens and
lens
the
Canon
necessary.
Film
6.
may be exposed and
camera.
avoid
7. Color
is left in the camera
exposed
is not resistant
if it is raining or snowing.
dropped
facillty. Keep lhe camera out of salt
excessive
it
thoroughly afterward
camera
"hot
soots" such as the trunk
places
Avoid
attempt to disassemble
there is high-voltage circuitry
service
passing
damage.
reproduction
in excessive
may
recharged, shorted, exposed to
or disposed
brush to
inside
the
body. Take the camera to an authorized
or
facility for a more
through
Reouest a different
promptly.
film
water, and should not be
to
in water, contact an authorized
humidity. 11
in
a cool, dry, dust{ree
out of direct sunlight, and away
explode or cause
camera. Do not apply any
may
for a long time.
with a dry cloth.
where mothballs are used,
humidity.
the camera
of in a fire.
remove
dust and sand
X-ray
examinations at
ruined even when loaded
method
be adversely
lf it is
the
used at
place.
window
or rear
yourself,
inside.
burns if
thorough
cleaning
inspection
oJ
alfected
Always develop
beach,
an airport
Be sure
shell
and
high
from
fluids
in
the
to
if
the
the
to
if
film

you
Thank
purchasing
for
this Ganon
product.
Nous vous remercions d'avoir choisi un appareil Canon.
gracias por
Muchas
haber
adquirido este
producto
Canon.
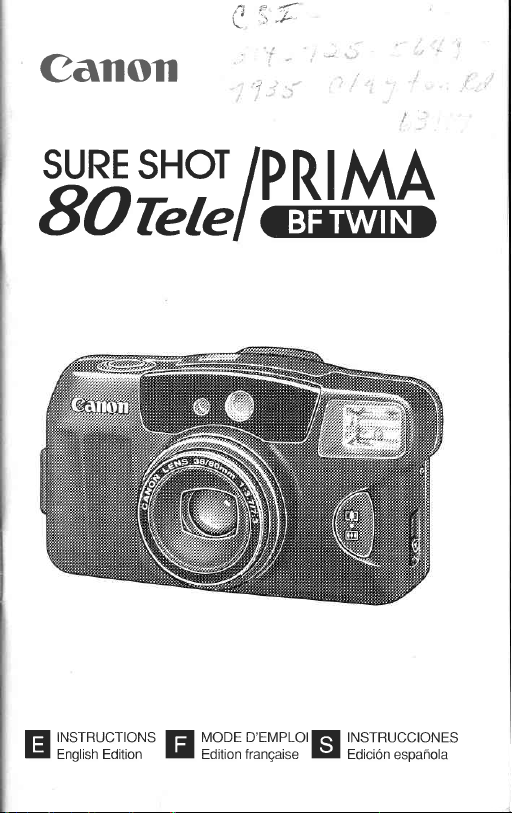
38mm B0mm
Please read
through these
thorough understanding before taking
.
Features
picture quality
nign
O
between telephoto
Avant d'utiliser votre appareil, veuillez lire attentivement ces
instructions
fonctions.
.
Caract6ristiques
C
Lea
familiarfzese
.
Caracteristicas
O
pour
vous familiariser
Objectif bifocal
commutable facilement entre la focale t6l6objectif
mm)
et
con atenci6n
el
oOletivo bifocal
cambia
angular
pour
la focale
las instrucciones
las
con
fdcilmente
(38mm).
instructions
bifocal
(80mm)
image
une
grand
angle
ooeraciones.
para
fotografias de alta calidad
entre telefoto
carefully
pictures.
lens
switches easily
wide-angle
and
parfaitement
haute
de
(38
mm).
de este
(80mm) y gran
for
a
(38mm).
avec toutes ses
qualitd
manual
(80
y
6
(Smart
Ainf
@
The
3-point
focused
of the
Large,
@
Fonction AiAF
@
La fonction
prendre
centr6 dans
Viseur large
@
Alnf
@
pictures
picture.
easy-to-see
des
(Smart
La funcion A|AF
imdgenes enfocadas
captar
desviado
grande
Visor
@
AF) function
(Smart
even
if
AF)
the
A|AF
viewfinder
(Smart
AF)
(Smart
AiAF d 3
photographies nettes,
I'image.
del centro
points
function
AF)
(Smart
de
y
f6cilmente
AF)
la imagen.
you
allows
is not
subject
vous
AF)
mOme si le sujet
puntos
de 3
cuando el
aun
visible
to take
in
the
permet
n'est
permite
le
sujeto est6
center
de
pas
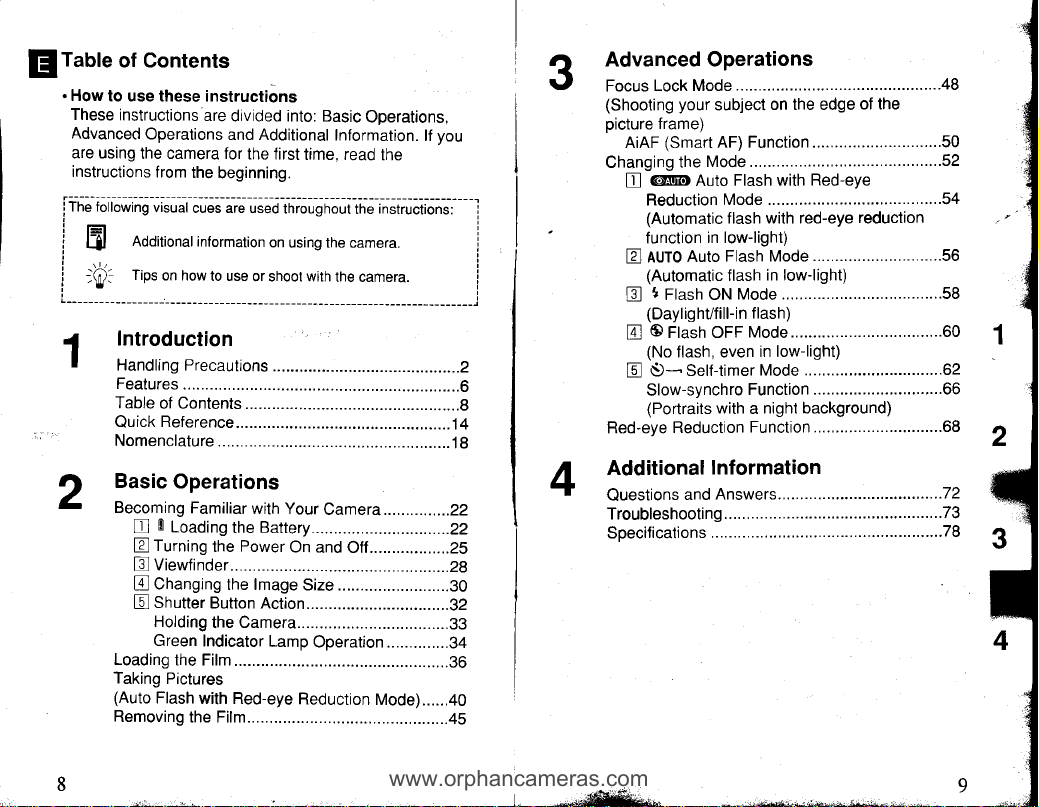
flTable
www.orphancameras.com
.
How
These
Advanced
are using
instructions
i;1il;il-iJ;r-;i,;;dG;r6r;;hiliti';i""ir.J;ii,;ft::
iffi
ir=|
llil
i
-x-
i
'w.
i
1
of Contents
to use these instructions
instructions
the camera for
Additional information
are
Operations
from
divided into: Basic
and Additional
the
beginning.
the first
on
using the camera.
Operations,
Information.
time, read
the
lf
you
Advanced Operations
3
Lock Mode..............
Focus
(Shooting
oicture
Changing
Red-eye
your
frame)
(Smart
AiAF
the
m Auto
tr
Reduction
(Automatic flash with red-eye
function
Auto
luro
E
(Automatic
t
Flash oN
E
(DaylighVfill-in f lash)
O
Flash OFF
@
(No
flash, even
Self-timer
$.-
tr
Slow-synch
(Portraits with a night background)
Reduction
........48
on the edge
subject
AF) Function .............................50
Mode
Flash with Red-eye
Mode ..............................
in low-light)
Flash Mode
in low-light)
flash
Mode
Mode..................................60
in low-light)
Mode ...............................62
ro Function
Function .............................68
of the
...................52
........54
reduction
.............................56
............58
.............................66
2
Additional
Questions
TroubleshootinS......
Soecifications
Information
Answers...
and
..
. ...................................73
..........72
.. .. ...................78
Quick
Reference
Utilisation
rdpida
Gu(a
rapide
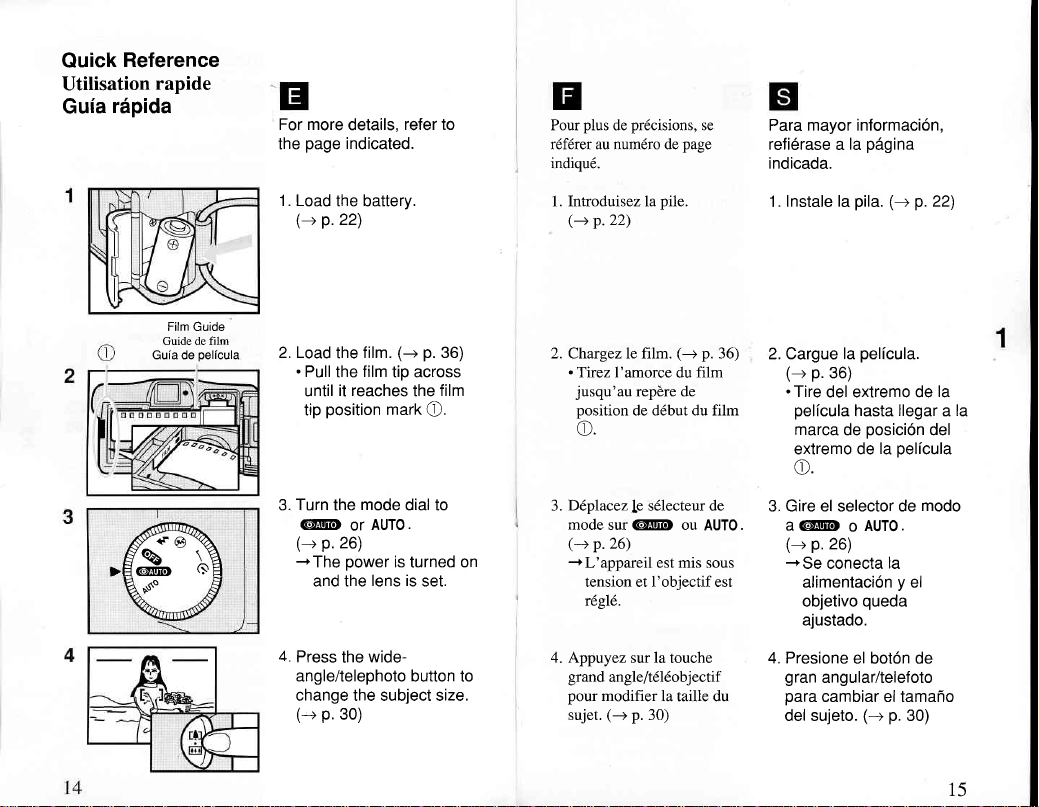
For more
page
the
refer to
details,
indicated.
plus
Pour
ftflrer au num6ro de
indiqu6.
pr6cisions,
de
page
se
Para mayor informaci6n,
refi6rase a la
p6gina
indicada.
Film Guide
Guide de film
pelicula
Gula de
c6-'& I
>E{@
aH
ss'
1. Load
the battery.
(-+ p.22)
p.36)
2.Load
the
.
Pull
the
until
position
tip
3. Turn the
GAIIO
p.
(-+
-rThe
and the
4.
Press
(-+
film.
film
tip across
it reaches
mark
mode
dial to
AUTO.
or
26)
power
is
lens is
wide-
the
the
turned
set.
angle/telephoto button to
change the subject size.
p.
(-+
30)
O.
film
on
1. Introduisezlaplle.
(-+
p.22)
2. Chargez le film.
.Tirez
I'amorce
jusqu'au
Dlplacezle
3.
mode sur
(-+
+L'appareil
4. Appuyez
grand
pour
sujet.
repdre de
position
de d6but du film
fr)
.g.
sdlecteur de
@IE
p.26)
tension et l'objectif est
16916.
est mis sous
sur la touche
angle/t6l6objectif
modifier
la taille du
(-->
p.
30)
(-+
du
ou
p.
film
AUTO.
1. lnstale
36)
2. Cargue la
(-+
.
Tire
pelicula
marca
extremo de
c.
3. Gire el selector de
A
GEUE o AUTO.
(-+
+Se
alimentaci6n y el
objetivo
ajustado.
4. Presione
gran
para
del sujeto.
pila.
p.22)
(-->
la
pelicula.
p.36)
del extremo de
llegar a la
hasta
posici6n
de
pelicula
la
modo
p.
26)
conecta
la
queda
el bot6n de
angular/telefoto
cambiar el tamafro
p.
(-+
30)
la
del
15
a,
www.orphancameras.com
%o
ffi
a
a
a
v
I6
tr
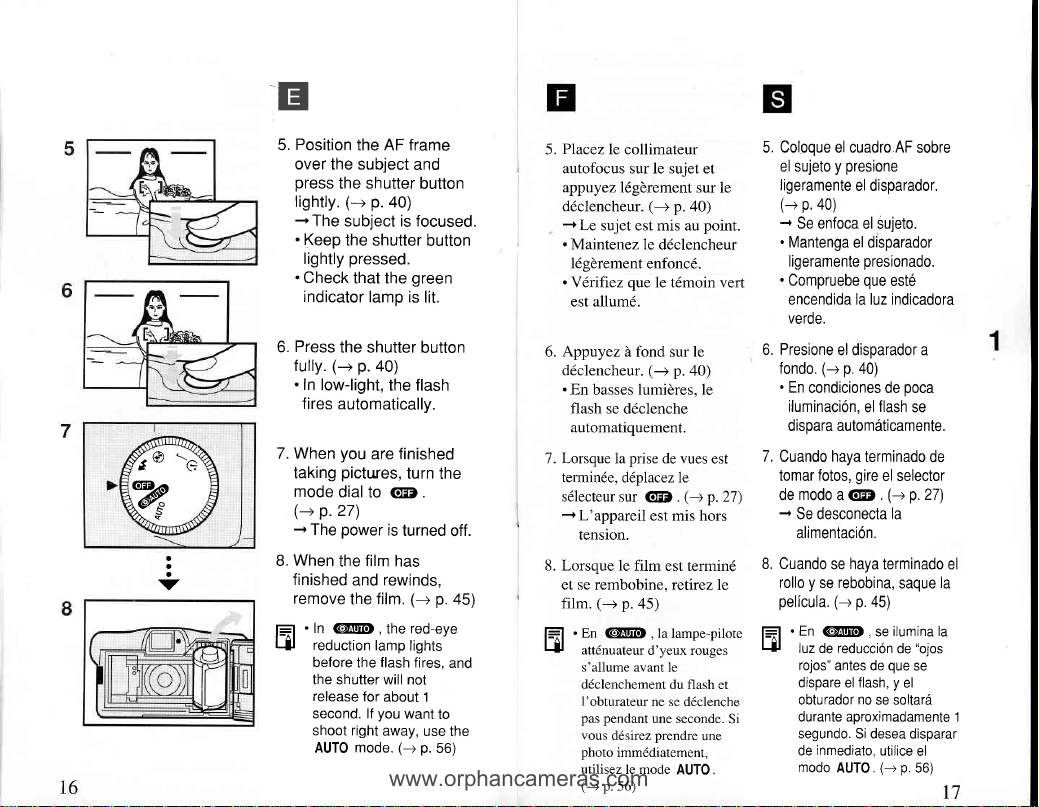
Position
5.
over the subject
press
lightly.
-rThe
.
.
Press
6.
fully.
.In
7. When
taking
mode
(-+
-r
When
B.
finished
remove
L=
ql
the AF frame
the shutter
(-+
subject is focused.
Keep
the shutter
pressed.
lightly
Check
that the
indicator
lamp
the shutter
p.
(-+
low-light,
fires
automatically.
you
pictures,
dial
to
p.27)
power
The
film
the
and
the
.
In
@!lo, the
reduction
before
the
the shutter will not
release
for
second. lf
shoot right
mode.
AUTO
p.
a0)
is lit.
40)
the flash
finished
are
turn
GB.
is
turned
has
rewinds,
(-+ p.
film.
red-eye
lamp
lights
flash
about 1
you
want
away,
(-+ p.
and
button
button
green
button
the
fires,
to
use the
56)
off.
45)
and
PIacez
5.
6. Appuyez d fond
7. Lorsque la
8. Lorsque le
lfl
l-tl
le collimateur
autofocus sur le sujet et
appuyez
l6gdrement sur le
d6clencheur.
+
Le
.
Maintenez
l6gdrement enfonc6.
.
Vdrifiez que
est allum6.
d6clencheur.
.
En basses lumidres, le
flash se d6clenche
automatrquement.
termin6e, d6placez le
s6lecteur sur @ .
+L'appareil
tenslon.
et se rembobine, retirez
film.
.
En
att6nuateur
s'allume avant le
d6clenchement
l'obturateur
pas pendant
vous
photo
utilisez le mode
(-+
(-+
sujet est mis au
le d6clencheur
le t6moin vert
(-+
prise
de
est mis hors
film est termin6
(+
p.45)
@IE.la
d'yeux rouges
ne se d6clenche
une seconde.
prendre
d6sirez
imm6diatement,
p.
56)
p.
40)
point.
le
sur
p.
40)
vues
est
(-+
p.27)
le
lampe-pilote
du flash et
Si
une
AUTO.
5. Colooue el cuadro AF
y presione
el sujeto
ligeramente
(-+
+
.
Mantenga
ligeramente
.
Compruebe
el disparador.
p.
a0)
Se enfoca
el disparador
el sujeto.
presionado.
que
est6
encendida la luz indicadora
ver0e.
6. Presione
el disoarador a
fondo.
.
En
40)
condiciones de
p.
(-+
iluminaci6n,
flash
el
poca
se
disoara automdticamente.
7.
haya
Cuando
tomar
de
-r
Se desconecta
fotos,
modo
a
gire
GD
terminado
el selector
p.27)
(-+
.
la
alimentaci6n.
8. Cuando
rollo
pelicula.
f-?
qJ
se
y
se rebobina,
(-+
.
En
@!lO
|uz
reducci6n
de
rojos"
antes de
dispare
el
obturador
haya
p.
a5)
.
se
flash,
no
se soltard
terminado el
saque
iiumina la
de
que
y
el
durante aproximadamente 1
segundo. Si desea
inmediato,
de
modo
AUTO.
disparar
utilice
(-+ p.
sobre
de
la
"ojos
se
el
56)
n
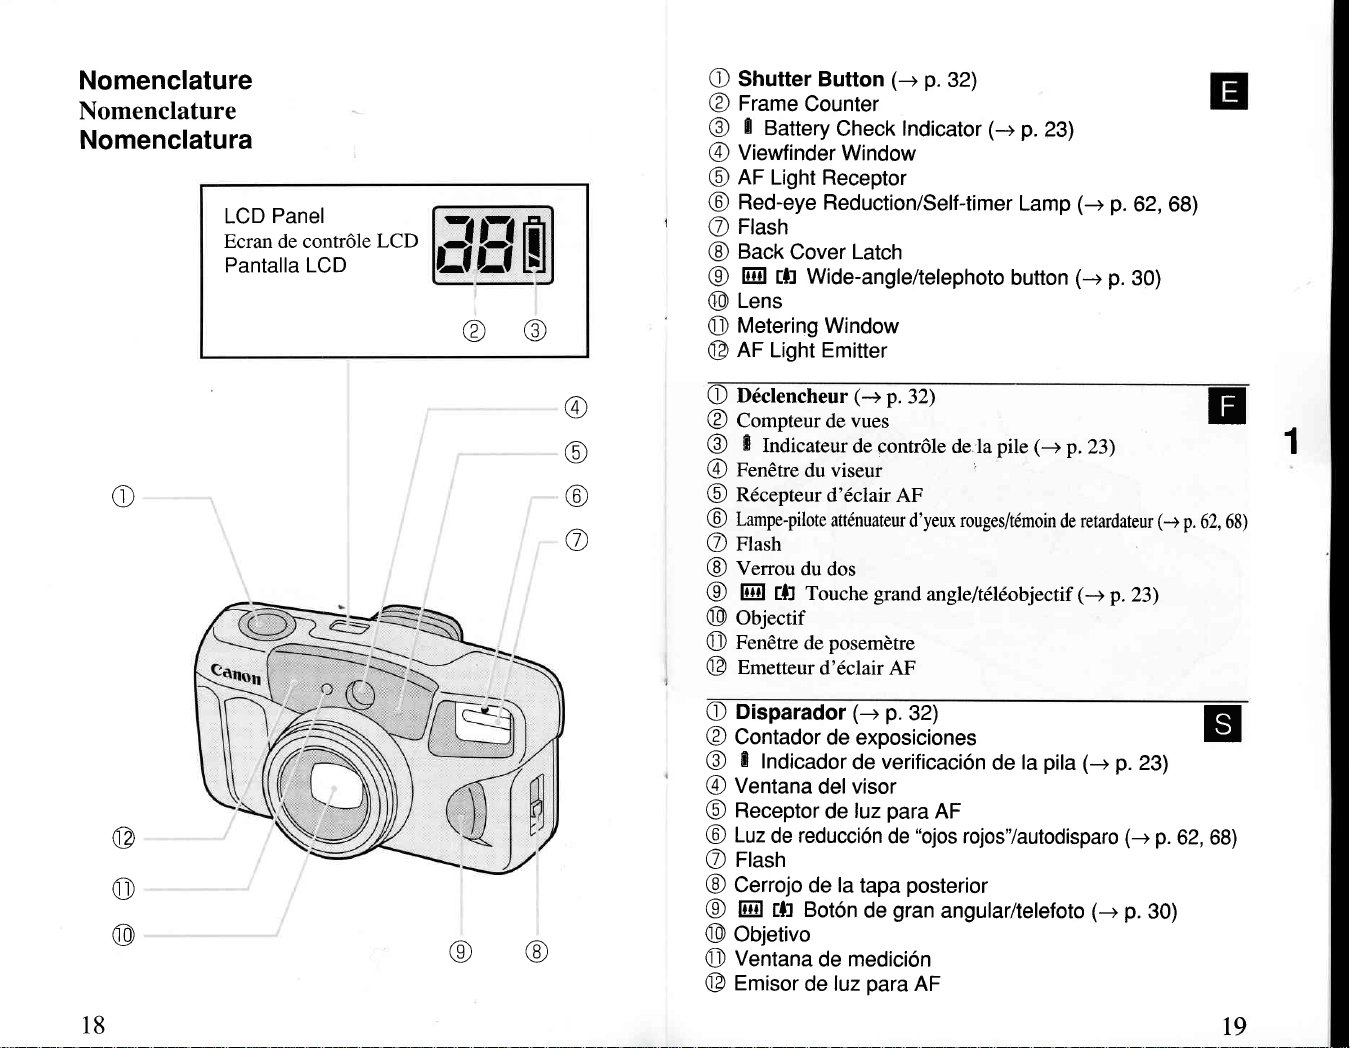
Nomenclature
Nomenclature
Nomenclatura
LCD
Ecran de contrOle
Pantalla LCD
Panel
LCD
L]ffH
/;\
t/l
\=,/
w,/
t@
,@
Shutter Button
\,
r
Frame
\5./
@
Viewfinder
@
/-A
AF
\p/
Red-eye
@
Counter
0
Battery
Light Receptor
Flash
Back
@
@
@
Cover Latch
Ein ff
Lens
Wide-angle/telephoto
Metering
6
AF
v
Light Emitter
p.
(+
32)
p.
Check
Indicator
(+
Window
Reduction/Self-timer
Lamp
button
Window
23)
(+
(-+
p.
62, 68)
p.
30)
o
@
@
@
ro)
\l/-/
(x)
\.:,/
@
f6)
\Y./
\9/
(7
D6ctencheur
C
Co-pteur
@
n
Indicateur
@
Fen€tre
@
Recepteur
@
Lampe-pilote
@
Hash
@
V"trou
@
Eiil
@
objectir
@
Fen0tre
O
E-"tt"ur
@
Disparador (+
O
Contador
@
E
@
Ventana
@
Receptor
@
Luz
@
Flastr
@
Cerrojo
@
Eiil
@
oojetivo
@
Ventana
O
Emisor
@
du
du dos
rfi Touche
de
Indicador
reducci6n
de
rfi Boton
de
(+
p.32)
vues
de
de contrdle
viseur
d'6clair
attenuateur
posembtre
d'6clair AF
AF
d'yeux rouges/tdmoin
grand
angleltlllobjectif
p.32)
de exposiciones
verificaci6n
de
visor
del
para
luz
de
la
de
medici6n
de
luz
tapa
de
para
AF
"ojos
de
posterior
gran
angular/telefoto
AF
de.la
de
la
pila
p.23)
retardateur
de
(+
p.23)
(-+ p.
(-+
pile
rojos'Tautodisparo (+
(-+ p.
(-r
23)
p.
30)
E
1
p.62,68)
E
62, 68)
18
I9

@
www.orphancameras.com
@
w
Viewfinder
@
p.
Green
@
lrrtooe
@
fitm
@
Strap
@
Strap
@
Strap
@
Battery
@
TripoO
@
6;\
:ro
@
vit"ut
@
t6moin vert
@
S6tecteur de mode
@
Fen6tre
@
A.rneau
@
6h^
\19 uoulTole
Attache de courroie
@
Co.r,r"rcle du logement de
@
filetage
@
':o
@
Indicator Lamp
(Main
Dial
Check
Window
Holder
Fixture
Cover
Socket
Film Rewind Button
(-+
p.3a)
de contr6le
courroie
de
pour
tr6pied
Touche de
rembobinage
(-+
Switch)
(-+ p.
(-+ p.
(Interrupteur
du film
pile
la
film
du
3a)
52)
a7)
principal)
(-->
p.
41)
(-+
p.
52)
20
llr:lndicadora
E
Selector de
@
Ventana
@
Soporte
@
Correa
@
Enganche
@
lapa
@
Rosca
@
:zo
@
Boton
verificacion de
de
la
de
de
pila
la
de
para
el
de
verde
modo
(+ p.
(lnterruptor
correa
la
correa
trfpode
rebobinado
3a)
principal)
pelfcula
la
pelfcula (-+ p.
la
de
(-+
a7)
p.
E
52)
2l
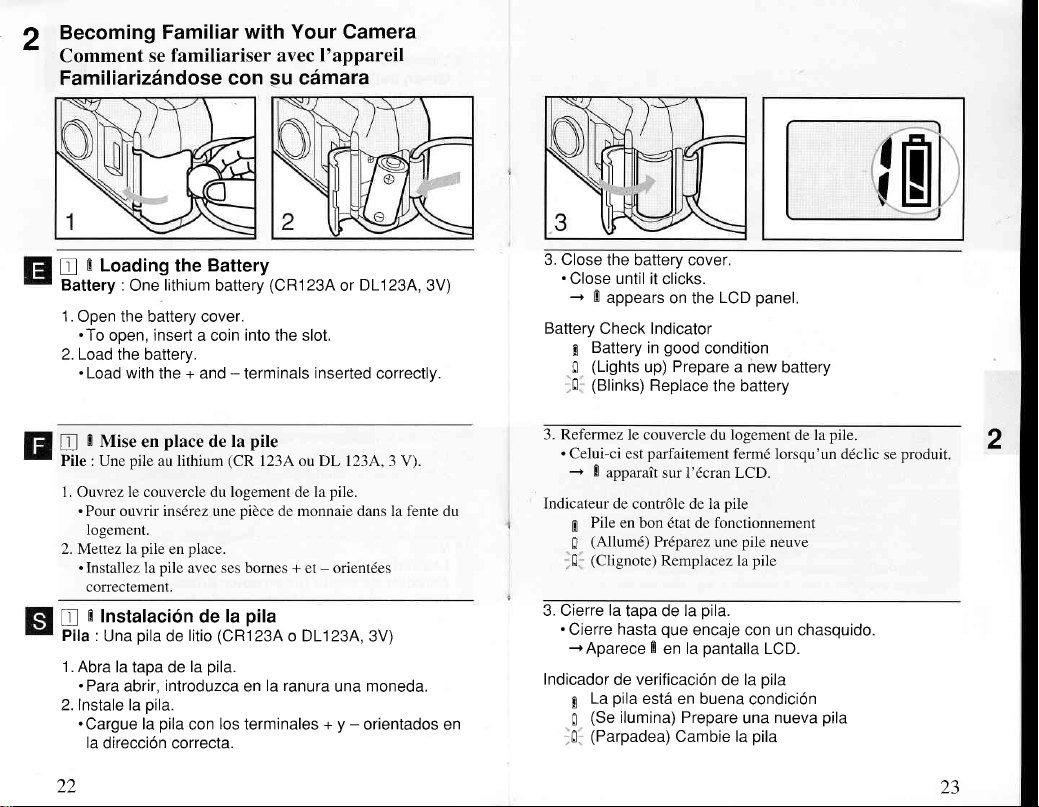
Becoming
2
Comment
se
Familiarizdndose
Familiar
with Your Camera
familiariser avec
con su c6mara
l'appareil
E
Loading the
I
Battery :
1.
2. Load
f
Pile : Une
1. Ouvrez le couvercle du logement de la
2. Metlez la
[
Pif a :
1.
2. Instale la
aa
One
Open the battery cover.
.To
open,
the battery.
.
Load with
0
Mise
en
pile
.
Pour ouvrir ins6rez une nidce de monnaie dans la fente du
logement.
.Installez
Abra la tapa de
.Para
pile
la
correctement.
0
Instalaci6n
pila
Una
abrir,
pila.
.Cargue
la
la
direcci6n correcta.
Battery
battery
into
(CR123A
the slot.
lithium
insert
a coin
the + and - terminals
place
au lithium
place.
en
pile
avec ses bornes + et - orient6es
litio
de
introduzca
pila
con
la
de
de
pila.
pile
la
(CR
123A ou DL 1234, 3 V).
pila
la
(CRl
234 o DL123A,
ranura
en la
los
terminales
DL123A,
or
inserted
pile.
3V)
moneda.
una
-
y
+
orientados en
correctlv.
3V)
3. Close
Battery
the battery cover.
.
Close until it
-r
E
appears
Check Indicator
g
Battery
(Lights
fi
fi (Blinks)
Refermez
3.
.
Celui-ci est
-r
B
apparait
Indicateur de
Pile en
6
(Allum6)
E
(Clignote)
F
3. Cierre
Indicador
la
.
hasta
Cierre
-rAparece
de
pila
La
g
(Se
0
(Parpadea)
fl
clicks.
panel.
LCD
on the
good
in
condition
Prepare
up)
Replace
le couvercle
parfaitement
sur l'6cran LCD.
contr6le de la
bon 6tat de fonctionnement
Prlparcz
Remplacez la
tapa de
que
B
en la
verificacion
esta en buena
ilumina) Prepare
a new
the battery
du logement de la
ferm6
pile
pile
une
pile
pila.
la
encaje con un chasquido.
pantalla
de
la
LCD.
pila
condici6n
una
Cambie la
pila
battery
pile.
lorsqu'un d6clic
neuve
pila
nueva
produit.
se
2
23
o*S*
www.orphancameras.com
o"'eF
oN Ks"
t
.
check the battery
Always
ffl
.
f-l
15'
ir
Il
F
24
carry a supply
Always
when traveling
be available.
.
When shooting
power
is reduced
display
indicator
while before turning
a
,i-.,,,+-
.
.
.
.
.
se munir
Toujours
particulier lors de
appropri6e
Lorsque
flash,
I'indicateur
cas,
Verifique siempre
las fotos.
Lleve siempre
especialmente
donde
Cuando
energia
indicador de
En
conectar
peut
vous
puissance de la
la
de
attendre un
le
sea
tome
de
caso, espere
este
la
prenez
contrOle de
diffcil conseguir
fotos continuamente
pila
la
verificaci6n de
alimentaci6n.
where the appropriate
continuously
may be
voyages vers
ne
instant avant
una
cuando
taking
before
batteries,
of spare
with
flash, the
the
temporarily
d'un stock
pas 6tre disponible.
des
el estado
provisi6n
se
and the battery
incorrect.
on the
photos
pile est momentan6ment
la
tenga
reduci16 temporalmente
un
In
this
power
again.
pile
rechange, en
de
de
des destinations
continuellement
pile peut 6tre incorrect'
de remettre
pila
la
de
pilas
de
de
que
viajar a
pila
la
apropiada.
con
pila pod16
la
momento antes
pictures.
especially
may not
battery
battery
check
wait for
case,
pile
la
or)
le
avec
r6duite et
sous tension.
antes de tomar
Dans ce
repuestos,
lugares
flash, la
el
y
el
incorrecto.
ser
volver a
de
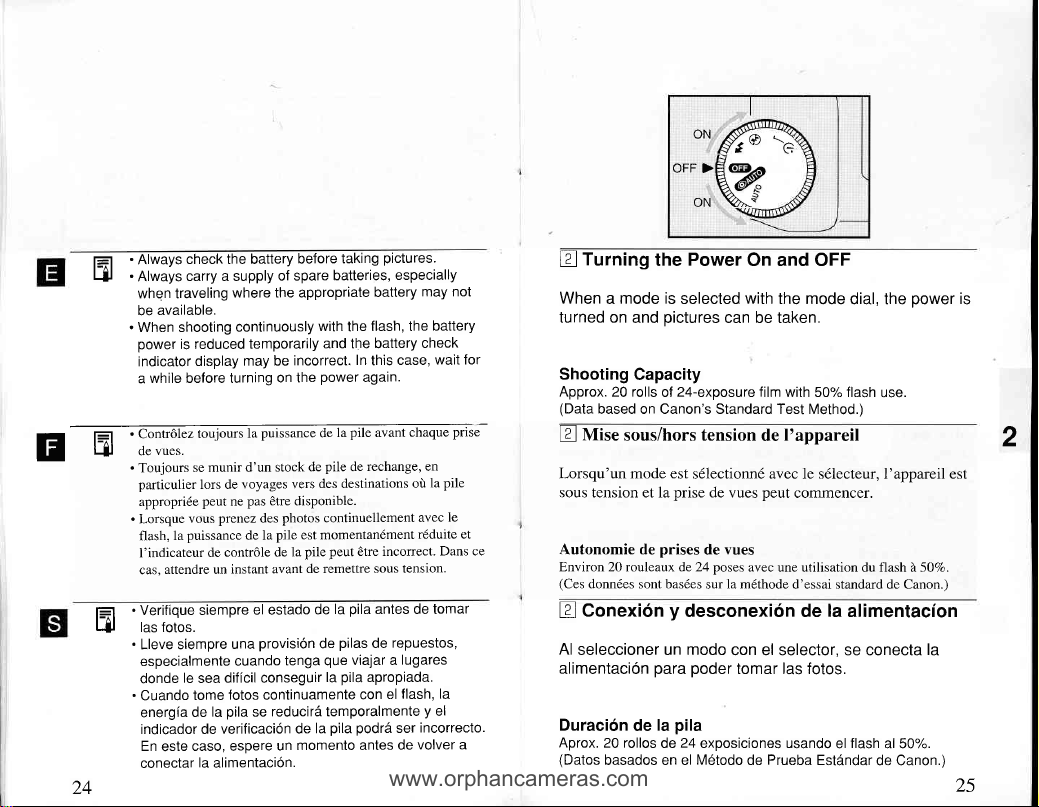
Power
E_lTurning
When a mode is
turned on
Shooting
Approx. 20 rolls
(Data
Mise
E
the
selected
and oictures can be taken.
Capacity
24-exposure film
of
based on Canon's Standard Test Method.)
sous/hors tension
Lorsqu'un mode est
sous tension et la
Autonomie de
Environ 20 rouleaux de 24 poses
(Ces
donn6es sont bas6es
Conexi6n
E
Al
seleccioner un modo
alimentaci6n
Duraci6n
Aprox. 20 rollos
(Datos
basados en el
prise
prises
y
desconexi6n de
para poder
pila
la
de
24
de
On and OFF
with
the mode
with 50% flash
I'appareil
de
s6lectionn6 avec le s6lecteur, I'appareil est
peut
de vues
de vues
avec une utilisation du flash d 507o.
la
sur
m6thode d'essai standard de
con el selector, se conecta
tomar las fotos.
exposiciones usando
M6todo
Prueba
de
dial, the
commencer.
la
alimentacfon
flash
el
Est6ndar
power
use.
Canon.)
la
al 50"k.
de Canon.)
is
2
25

'q
@D
.
"$"
tt't
€
@9'-
La
f
3L-]
@
'-I
Turning the
Turn
-r
The
l=l
ql
Mise sous tension
Toumez
-r
L'appareil est mis sous
H
ql
Power
mode dial to any
the
power.is
.
The lens first sets to the
.
lf
the
battery
.
Do
le
s6lecteur
.
L'objectif se
mm).
.
1'objectif n'est
Si
pile
la
.
N'appuyez
On
turned
lens is not
is loaded
not
oress on the
sur un des modes
rdgle tout d'abord en la
a 6t6 install6e correctement.
pas
sur
on.
set
correctly.
tension'
pas prdt pour
I'objectif.
Conexi6n
Gire el selector a cualquier
+
Se conecta
l=l
4f gran
la
alimentaci6n.
.
Primero
el objetivo
angular
.
Si el objetivo
instalada la
.
No
pila
oresione el obietivo.
(38mm).
no
se ajusta
correctamente.
26
(except
mode
wide-angle
@
).
position (38mm).
for shooting, check to see
lens.
modo
queda
(except6
la
(excepto
ajustado en
para
position grand
prise
de vues, v1rifiez
la
la
toma,
GB
@
posici6n
revise
).
).
if
the
angle
que
de
si est6
(38
Turning
protect
To
Turn
+
The lens retracts
Mise
Mettez
D lplacezle
-r
L'objectif
'
D"a"onexi6n
Para
c1mara.
Gire
-r
El
Power
the
the
the mode
hors
tension
I'appareil
s6lecteur
se r6tracte
proteger
el selector
objetivo
Off
lens,
be sure
to turn off
dial
to
GD
into
the camera.
hors tension pour prot6ger
de mode
el objetivo,
modo
de
se introduce
dans
I'appareil.
asegfrese
a
en
sur la
GB
la
cemara.
the camera.
I'objectif.
position
GE)
de desconectar
2
.
la
2i
 Loading...