

Page 1
Instructions
ENG
Page 2
Thank you for purchasing a Canon product.
Canon RF35mm F1.8 MACRO IS STM is
a macro lens for use with EOS R series
cameras.
z “IS” stands for Image Stabilizer.
z “STM” stands for Stepping Motor.
Camera Firmware
Please use the latest version of firmware with the
camera in use. For details on whether the firmware is
the latest version or not, and for details on updating the
firmware, please check the Canon website.
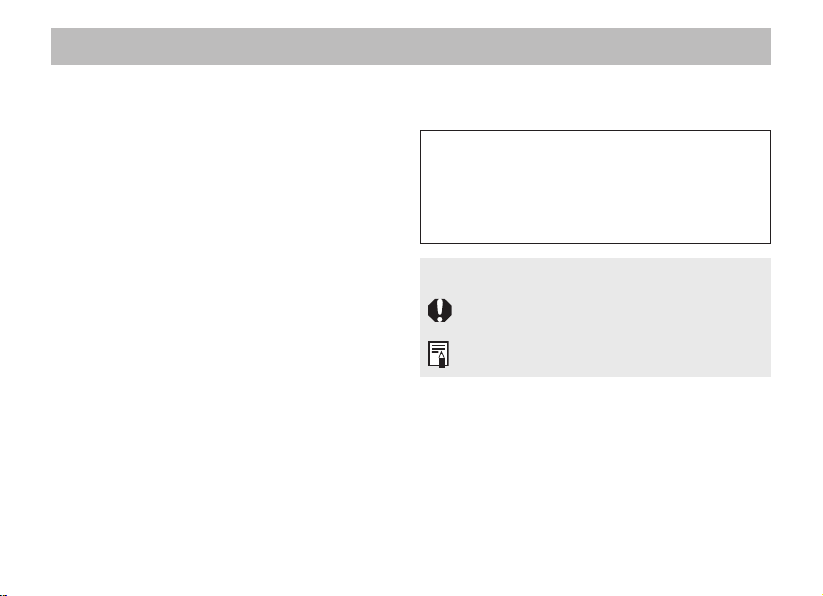
Conventions used in these instructions
Warning to prevent lens or camera malfunction
or damage.
Supplementary notes on using the lens and
taking pictures.
ENG-1
Page 3

Safety Precautions
Precautions to ensure that the camera is used
safely. Read these precautions thoroughly. Make
sure all details are observed in order to prevent
risks and injury to the user and other people.
Warning
Do not look directly at the sun or other strong
z
light sources through a lens. This may result in
loss of sight.
Do not leave a lens in the sun without the lens
z
cap attached. The lens may concentrate entering
sunlight and cause a malfunction or fire.
Caution
Do not leave the product in places exposed to
z
extremely high or low temperatures. The product
may cause burns or injury when touched.
Details pertaining to risks that may
result in death or serious injury.
Details pertaining to risks that may
result in injury.
Caution
Do not leave the product in excessive heat such as
z
in a car in direct sunlight. High temperatures can
cause the product to malfunction.
Details pertaining to risks that may result
in damage to property.
ENG-2
Page 4

General Precautions
Handling Precautions
If the lens is taken from a cold environment into a
z
warm one, condensation may develop on the lens
surface and internal parts. To prevent condensation
in this case, first put the lens into an airtight
plastic bag before taking it from a cold to warm
environment. Then take out the lens after it has
warmed gradually. Do the same when taking the
lens from a warm environment into a cold one.
Please also read any lens related handling
z
precautions listed in your camera’s instruction
manual.
Shooting Precautions
When the camera recovers from the auto power off
status to the standby status, the front end of the lens
moves in both AF/MF mode and an initial reset is
performed on the focus lens.
Do not shoot until the initial reset is completed.
z
Focus again after recovering from the auto power
z
off status.
To maintain the focus position in the standby status,
z
set [Auto power off] to [Disable] on the camera.
ENG-3
Page 5

This device complies with Part
Operation is subject to the following two conditions: (1) This
device may not cause harmful interference, and (2) this
device must accept any interference received, including
interference that may cause undesired operation.
Do not make any changes or modifications to the equipment
unless otherwise specified in the instructions. If such
changes or modifications should be made, you could be
required to stop operation of the equipment.
This equipment has been tested and found to comply with
the limits for a class B digital device, pursuant to part 15
of the FCC Rules. These limits are designed to provide
reasonable protection against harmful interference in a
residential installation. This equipment generates, uses and
can radiate radio frequency energy and, if not installed and
used in accordance with the instructions, may cause harmful
interference to radio communications.
However, there is no guarantee that interference will not
occur in a particular installation. If this equipment does
cause harmful interference to radio or television reception,
which can be determined by turning the equipment off and
on, the user is encouraged to try to correct the interference
by one or more of the following measures:
• Reorient or relocate the receiving antenna.
• Increase the separation between the equipment and
receiver.
• Connect the equipment into an outlet on a circuit different
from that to which the receiver is connected.
• Consult the dealer or an experienced radio/TV technician
for help.
15 of the FCC Rules.
CAN ICES-3 (B) / NMB-3 (B)
ENG-4
Page 6
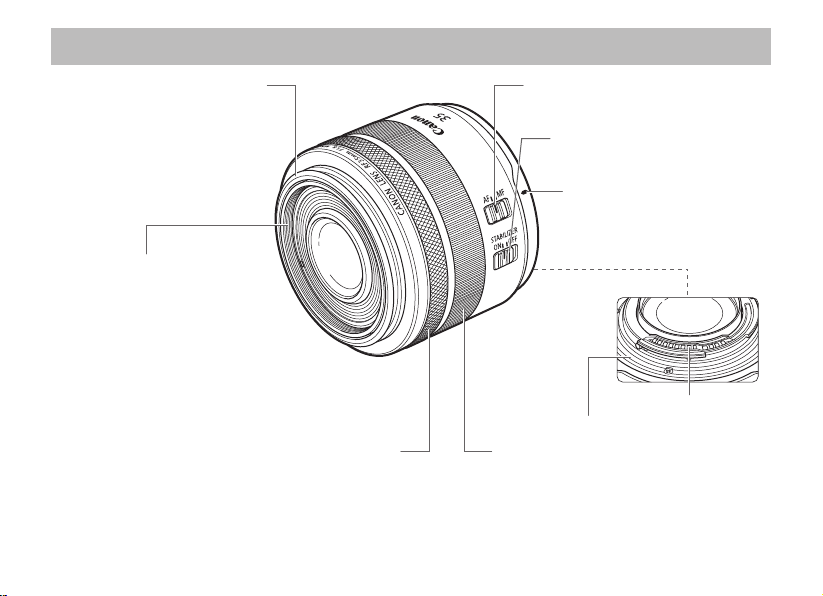
Nomenclature
Macro Ring Lite/
Macro Twin Lite
mount (→ 15)
Hood mount (→ 13)
Filter mounting thread (→ 13)
Control ring (→ 8)
z For detailed information, reference page numbers are provided in parentheses (→ **).
Focus mode switch (→ 7)
Image stabilizer switch (→ 9)
Lens mount index (→ 6)
Contacts (→ 6)
Lens mount (→ 6)
Focusing ring (→ 7)
ENG-5
Page 7

1.
Attaching and Detaching the Lens
Lens mount index
Lens release button Dust cap
Attaching the Lens
Align the lens mount indexes of the lens and
camera, and turn the lens clockwise until you
hear a click.
Detaching the Lens
Turn the lens counterclockwise while pressing
the camera’s lens release button. Detach the
lens once it has stopped turning.
Please refer to the camera's instructions for
details.
* When the lens storage is set to ON on the camera.
z Set the camera’s power switch to OFF when
attaching or detaching the lens.
z Attach the lens cap before detaching the lens
from the camera.
z When the power switch of the camera is set
to OFF, the focus lens pushed forward is
automatically stored.* Do not detach the lens
until the lens is completely stored.
z After detaching the lens, place the lens with the
rear end up and attach the dust cap to prevent
the lens surface and contacts from getting
scratched. Make sure the lens and dust cap
mount indexes are aligned when attaching the
dust cap.
z Contacts that are scratched, soiled, or have
fingerprints on them may result in faulty
connections or corrosion, which may lead to
malfunctions. If the contacts get soiled, clean
them with a soft cloth.
ENG-6
Page 8

2.
Setting the Focus Mode
Focus mode switch
Focusing ring
To shoot in autofocus (AF) mode, set the focus
mode switch to AF.
To use only manual focusing (MF), set the focus
mode switch to MF, and focus by turning the
focusing ring.
z Quickly turning the focusing ring may result in
delayed focus.
z Due to the structural characteristics, the focus
lens driving speed may vary according to the
variation in the air temperature and posture.
z Do not touch the operating part in the front of
the lens while the focus lens is operating. If
external pressure is applied to the moving part,
the lens initialization may be performed to return
the focus lens to the correct position for control
purposes.
z The lens’ focusing ring is electronic.
zWhen AF operation is set to [ONE SHOT],
manual focus is possible after autofocusing
has been completed by continuing to press the
shutter button halfway. (Full-time manual focus)
However, the camera settings need to be
changed.
ENG-7
Page 9

3.
Control Ring
The control ring can be assigned the functions
that are commonly used with cameras, such as
shutter speed and aperture settings.
Control ring
The click action of the control ring allows you to
have a sense of how much it is being turned.
Please refer to the camera's instructions for
details on how to use the control ring.
z There are cases in which the sound of control
ring operations may be recorded when shooting
movies.
z The clicking sensation of the control ring can
be removed by the Canon Service Center.
(chargeable)
ENG-8
Page 10

4.
Image Stabilizer
This function provides image stabilization
appropriate for shooting conditions (such as
shooting still subjects, panning shots, and closeup (macro) shooting).
Set the image stabilizer switch to ON when you
want to use the Image Stabilizer.
z Set the image stabilizer switch to OFF when
you are not going to use the Image Stabilizer.
z The shorter the focusing distance is, the less the
image stabilizer effect.
z The Image Stabilizer cannot compensate for a
blurred shot caused by a subject that moved.
z The Image Stabilizer may not be fully effective
if you shoot from a violently shaking vehicle or
other transportation.
z When using a tripod, it is recommended that you
set the image stabilizer switch to OFF.
z Even with a monopod, the Image Stabilizer will
be as effective as during hand-held shooting.
However, depending on the shooting conditions,
there are cases in which the Image Stabilizer
effect may be less effective.
z When shooting a still subject, it compensates for
camera shake in all directions.
z It compensates for vertical camera shake during
panning shots in a horizontal direction, and
compensates for horizontal camera shake during
panning shots in a vertical direction.
ENG-9
Page 11

Image Stabilizer
The Image Stabilizer for this lens is suited to hand-held shots in the following conditions.
z In semi-darkened areas such as indoors or
outdoors at night.
z In locations where a flash cannot be used,
such as art museums and theater stages.
z In situations where your footing is uncertain.
z In situations where fast shutter speed settings
cannot be used.
z Panning shots of
vehicles, trains, etc.
ENG-10
Page 12

5.
Hand-held Close-up (Macro) Shooting
This lens allows users to focus from infinity to a
magnification of 0.5x for close-up (macro) shooting.
Hold the camera steadily
Hold the camera steadily as shown in the illustration on the
right when taking hand-held close-ups (macro), and shoot
carefully to minimize camera shake and prevent focus blurring.
Taking photographs using servo AF
It is recommended that the camera AF operation is
set to [Servo AF] when taking close-up (macro) shots.
Refer to the camera’s instructions for further details.
z It is necessary to be careful with the following
during close-up (macro) shooting.
• Camera shake creates more impact than on
normal shots, and the effects of the image
stabilizing function are reduced.
Depth of field becomes extremely shallow when
•
taking close-up (macros) shots, and the focus may
blur if the camera is moved forward or backward.
z The minimum focusing distance (minimum
distance between the subject and the imaging
area) is 0.17 m/0.56 ft. The working distance
(distance between the front end of the lens and
the subject) is 70 mm/2.76 in.
Place both elbows on a steady surface such as a table.
Use your knee to
support the elbow of
the arm holding the
camera or lens.
Lean against a steady
object like a wall to support
your body and arm.
ENG-11
Page 13

6.
Exposure When Taking Close-up (Macro) Shots
Setting the Exposure
When taking photographs using TTL metering,
no exposure compensation is necessary because
the light coming through the lens is measured.
With TTL metering, photographing with AE (auto
exposure) is possible at all focusing distances.
Just select the desired picture-taking mode, then
check the shutter speed and aperture before
taking a picture.
Magnification and Effective f-number
The aperture displayed on the camera assumes
that the focus is set to infinity (∞). The actual
aperture (effective f-number) becomes darker
(effective f-number increases) at closer focusing
distances (magnification increases). This has
almost no influence on the exposure for normal
picture taking. However, for close-up (macro)
shooting, the change in the effective f-number is
more than negligible.
When deciding the exposure using a hand-held
exposure meter, apply the following exposure
factor.
Magnification 1:5 1:3 1:2
Focusing distance
(m/ft.)
Effective f/No. 2.1 2.2 2.4
Exposure factor
(stops)*
* Upper values: 1/3 stops. Lower values: 1/2 stops.
zConditions of the subject are very important
when deciding on the correct level of exposure
for close-up (macro) shooting.
It is therefore recommended that you change
the exposure level as much as possible during
shooting, or that you take pictures while
checking the images on the camera’s LCD
monitor.
zDuring close-up (macro) shooting, it is
recommended that you use either the aperturepriority AE (Av) mode or manual exposure (M)
mode, in which adjustment of the depth of field
and exposure is easier.
0.27/0.89 0.20/0.66 0.17/0.56
+1/3 +2/3 +1
+1/2 +1/2 +1
ENG-12
Page 14

7.
Hood (Sold separately)
8.
Filters (Sold separately)
The custom lens hood cuts out unwanted light
and protects the front of the lens from rain, snow,
and dust.
Screw the hood firmly and correctly onto the front
end of the lens.
z If the hood is not attached properly, vignetting
(darkening of the perimeter of the picture) may
occur.
zTurn OFF the power of the camera before
attaching or detaching the hood.
You can attach filters to the filter mounting thread
on the front end of the lens or on the front end of
the hood.
z Only one filter may be attached.
z If you need a polarizing filter, use the Canon
Circular Polarizing Filter PL-C B.
zTurn OFF the power of the camera before
attaching or detaching a filter.
ENG-13
Page 15

9.
Close-up Lenses (Sold separately)
Attaching a 250D/500D Close-up Lens enables
close-up photography. It provides the following
magnifications.
z250D: 0.14 to 0.62x
z500D: 0.07 to 0.56x
z MF mode is recommended for accurate
focusing.
ENG-14
Page 16

5.6
2.8
1.8
0.89
0.66
ISO100 ISO400
0.56
0.89
0.66
0.56
10.
Macro Flash (Sold separately)
The Macro Ring Lite MR-14EX II or Macro Twin
Lite MT-26EX-RT enables flash photography up
to 0.5x magnification in E-TTL II autoflash mode.
zWhen using a macro flash and filter at the same
time, attach the flash head to the lens while the
filter is attached to the thread for attaching the
filter in the front end of the lens.
zIf a filter is attached to the macro flash, the front
end of the lens and filter contact, which hinders
focusing. It also may damage the filter or causes
the lens to fail.
zFor how to use the MR-14EX II and MT-26EX-
RT, please refer to the lite's instructions.
■ When the MR-14EX II is in use
• Effective Flash Range (Reference)
↑
Aperture
Magnification
Focusing
distance
(m/ft.)
22
16
11
8
4
2
1:5 1:3 1:2
0.27/
0.20/
0.17/
22
16
11
8
5.6
4
2.8
2
1.8
1:5 1:3 1:2
0.27/
0.20/
0.17/
: Effective
flash range
(both sides
firing)
■ When the MT-26EX-RT is in use
The MT-26EX-RT’s flash range largely depends
on the flash head’s position.
zIn the event of over-exposure, use a diffuser
adapter, lower the ISO sensitivity setting, or
reduce the aperture size.
ENG-15
Page 17

Specifications
Focal Length/Aperture 35mm f/1.8
Lens Construction 9 groups, 11 elements
Minimum Aperture f/22
Angle of View Horizontal: 54°, Vertical: 38°, Diagonal: 63°
Min. Focusing Distance 0.17 m/0.56 ft.
Max. Magnification 0.5x
Field of View Approx. 72 x 48 mm/2.83 x 1.89 in. (at 0.17 m/0.56 ft.)
Filter Diameter 52mm
Max. Diameter and Length 74.4 x 62.8 mm/2.93 x 2.47 in.
Weight Approx. 305 g/10.76 oz.
Hood EW-52 (Sold separately)
Lens Cap E-52 II
Case LP1016 (Sold separately)
z The lens length is measured from the lens mount surface to the front end of the lens.
Add 23.9 mm/0.94 in. when including the lens cap and dust cap.
z The maximum diameter, length and weight listed are for the lens itself only.
z All data listed is measured according to Canon standards.
z Product specifications and appearance are subject to change without notice.
ENG-16
Page 18

CT1-D072-A 0818Ni © CANON INC. 2018
 Loading...