

Page 1

*L-IE-5173 *
Retinal imaging control software NM
(CR-1 Mark II)
Version 3.1
New Features Guide
Introduction
Before using this software, read the Operation Manual for Retinal imaging control software NM (CR-1 Mark II)
version 2.0 (hereinafter “Operation Manual”). Operating precautions are also included in the Operation
Manual.
This guide explains additional features that are not included in the Operation Manual. Please read this guide
along with the Operation Manual. Keep these documents so that you can use them in the future.
New Features
New features in version 3.1 are listed below.
• Deleting rows from the Patient History list (See page 2)
• Displaying the memory space required and available when saving the study log data (See page 2)
• Displaying the image in full-screen (See page 3)
• Changing the capture settings on the Study screen (See page 3)
• Pairing images for the stereo images (See page 4)
• Saving the displayed image in TIFF format (See page 6)
• Setting the person name separator conversion rules for DICOM (See page 7)
• Anonymizing patient information for transfer (See page 7)
• Setting the transfer syntax for DICOM (See page 8)
• Entering login user name in five name elements (See page 8)
Page 2
Software Requirements
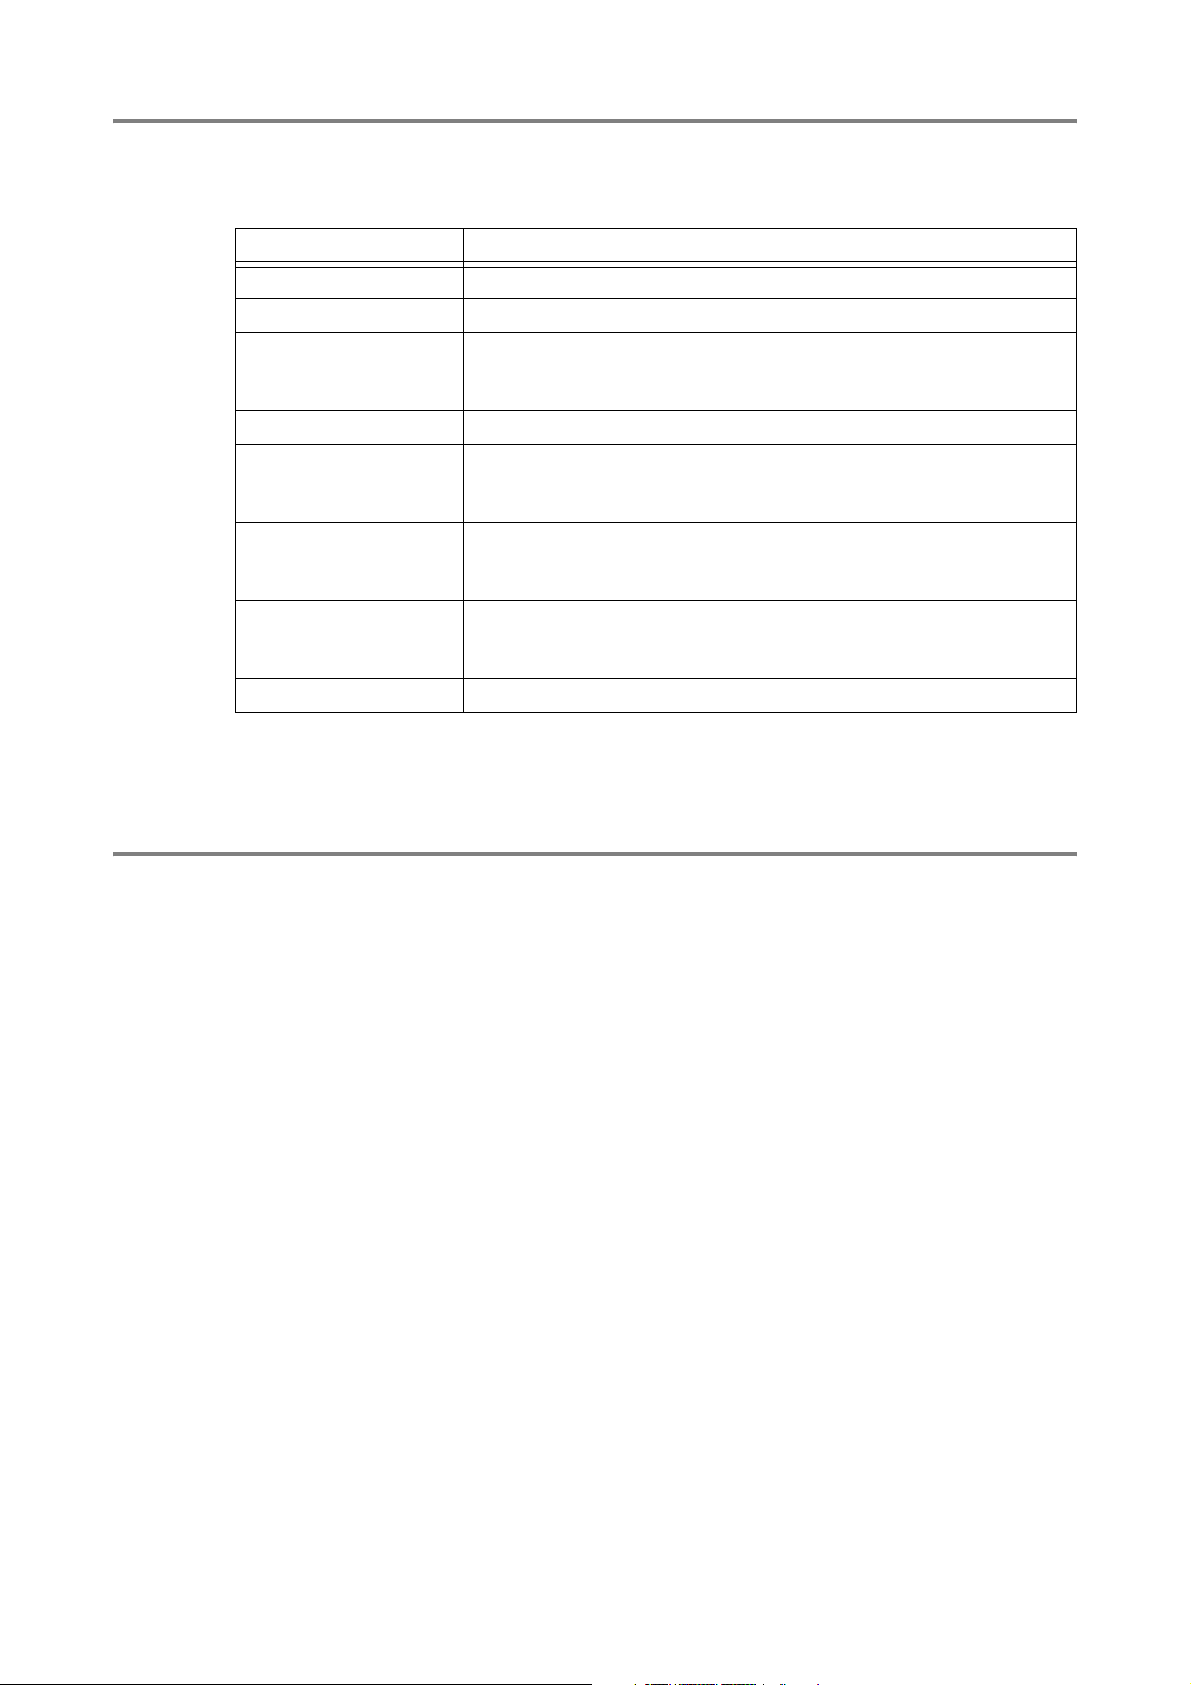
Version 3.1 runs in the following environment.
The updated specifications are shown in bold.
Hardware or Software Specifications
CPU Core 2 Duo 2.0 GHz or higher
RAM 2 GB or more
Screen resolution: XGA (1024 x 768 pixels) or higher
Display
Mouse Microsoft Mouse or compatible mouse
Interface
Operating system
Applications
WXGA (1280 x 800 pixels) or higher recommended
Screen colors: 24 bits or more
USB2.0, for communication with digital camera
USB1.1, for communication with retinal camera: emulating RS-232C
RS-232C (for magnetic card and barcode reader)
Microsoft Windows XP Professional SP2/SP3*
Microsoft Windows Vista Business SP1/SP2*
* This software does not support x64 (64-bit versions).
Microsoft .NET Framework Version 3.5
SQL Server 2005 Express Edition SP3
Canon Easy-PhotoPrint EX Version 2.0.0 or later, for printing images
Compatible EOS EOS 50D
Descriptions of New Functions
Deleting Rows from Patient History List
You can delete unnecessary rows from the Patient History list.
Click the row you want to delete to select it, and press the Delete key.
The row is deleted but the study information is retained.
See also sections 4.2.2 “Manual input” and 4.2.3 “Magnetic card/barcode input” in the Opera-
tion Manual.
Displaying Required and Available Memory in Destination to Save Study Log Data
When saving temporarily saved study log data, the required and available memory are displayed
on the Save screen.
2
Page 3
Displaying Image in Full-screen
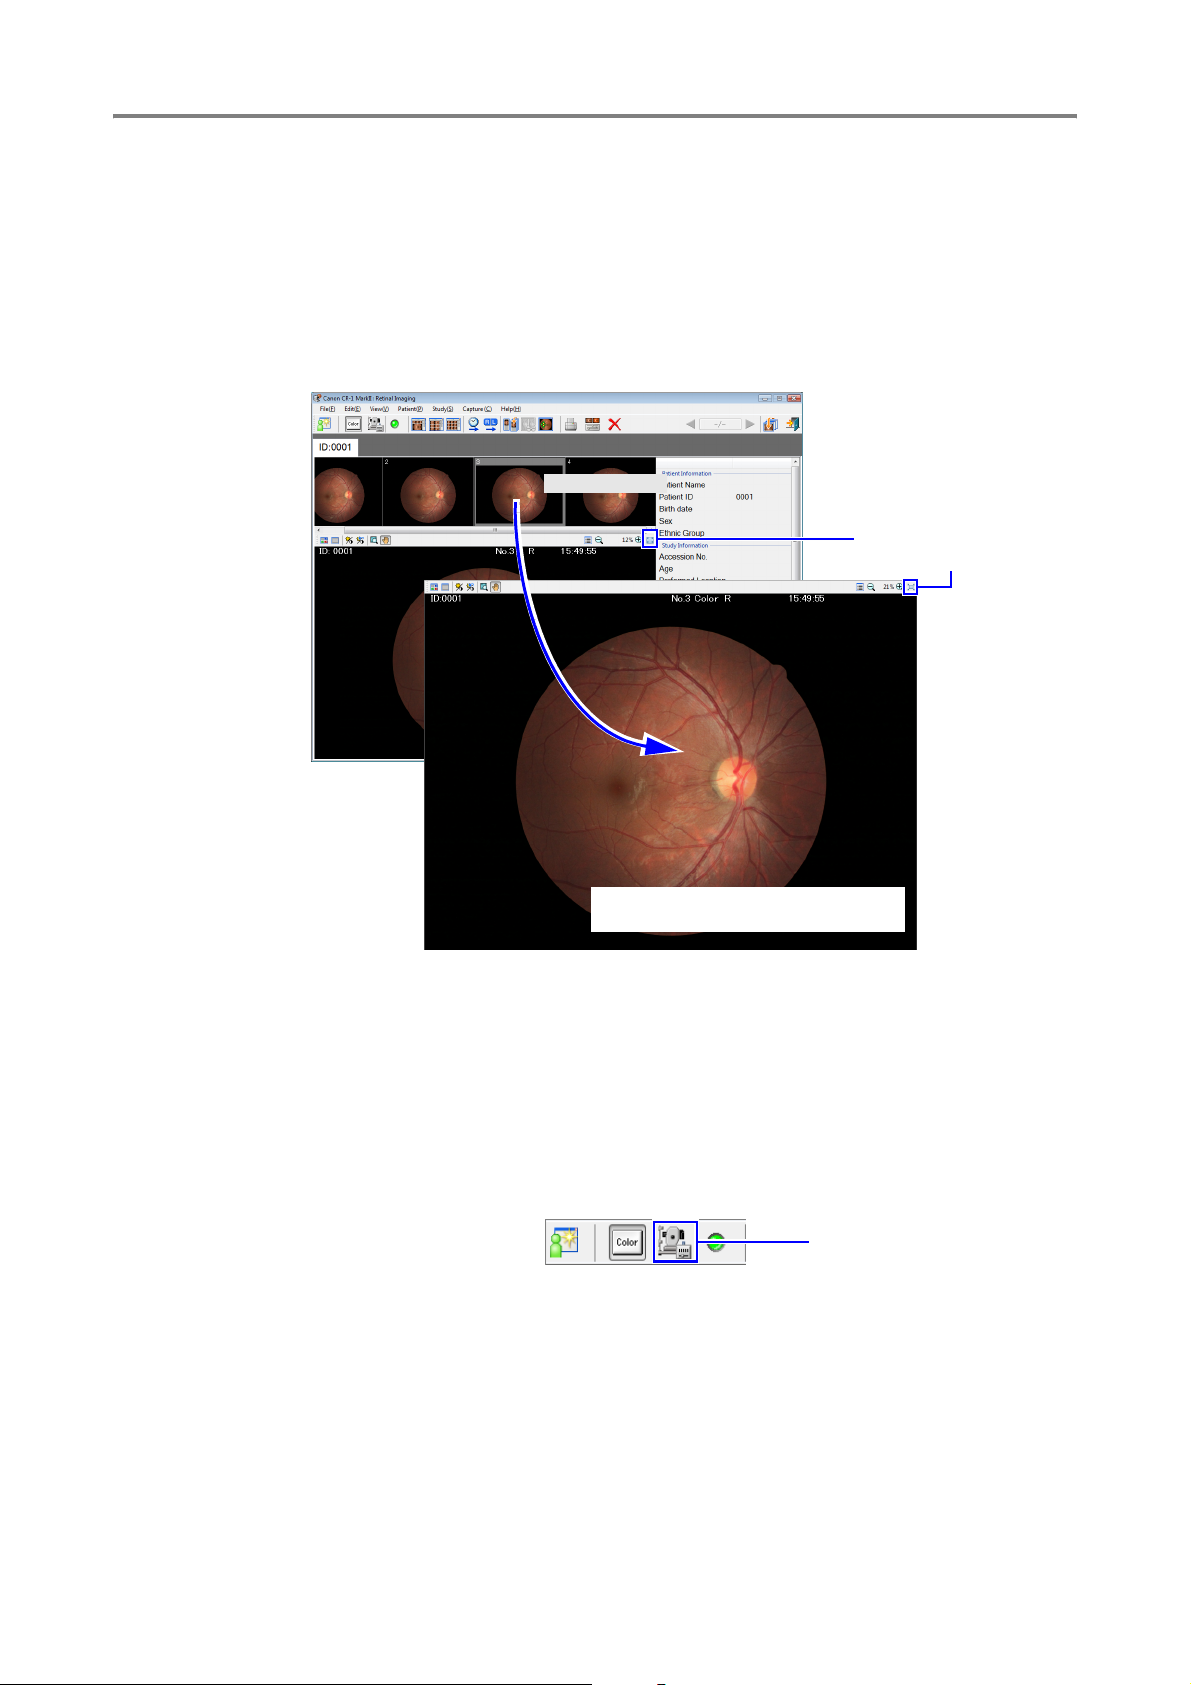
The Retinal imaging control software NM can display retinal images in full screen.
Click [Full Screen] or double-click the thumbnail that you want to display in full screen.
To return to the previous screen, click [Return] or press the ESC key.
See also section 6.1 “Main screen” in the Operation Manual.
Displaying Image in Full-screen
Double-click
Full Screen button
Return button
To change the displayed image, press
the left or right arrow key.
Changing Capture Settings During Examination
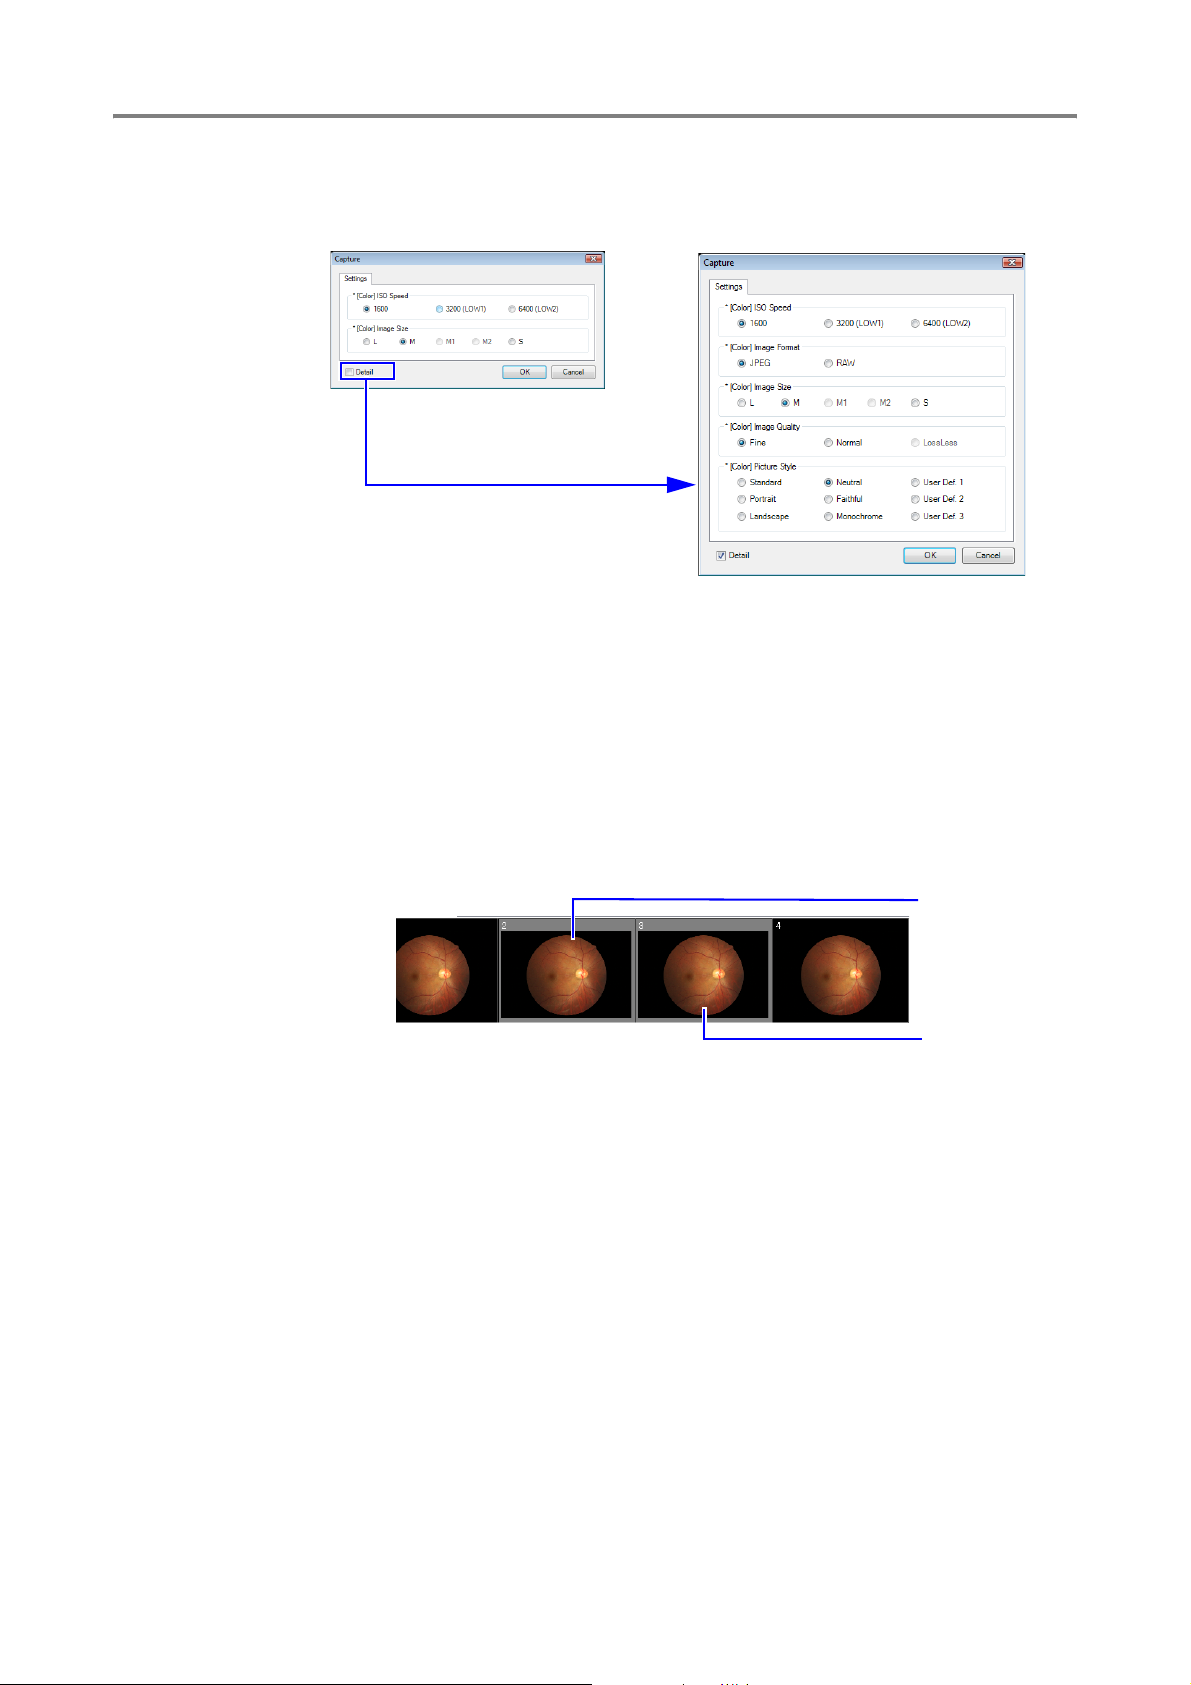
You can open the Capture screen with a click of a button when you are about to capture an
image. On the Capture screen, you can change the capture settings, for example, the image
format and size.
Click the [Capture Settings] button on the toolbar.
1
Capture Settings button
3
Page 4
Manipulating Images in Stereo Display
Change the settings.
2
You can display more settings, by selecting the Detail checkbox.
Click [OK] to close the Capture screen.
3
Manipulating Images in Stereo Display
You can record two captured images paired in a stereo image on the Stereo Display screen.
Pairing Images for Stereo Images
Click the thumbnail of the first image you want to pair as a stereo image.
1
Hold the Ctrl key and click the thumbnail of the second image.
2
Click [Stereo View]. The stereo image appears in the side-by-side alignment that the
3
thumbnails are displayed.
First selection
Second selection
4
Page 5
Manipulating Images in Stereo Display
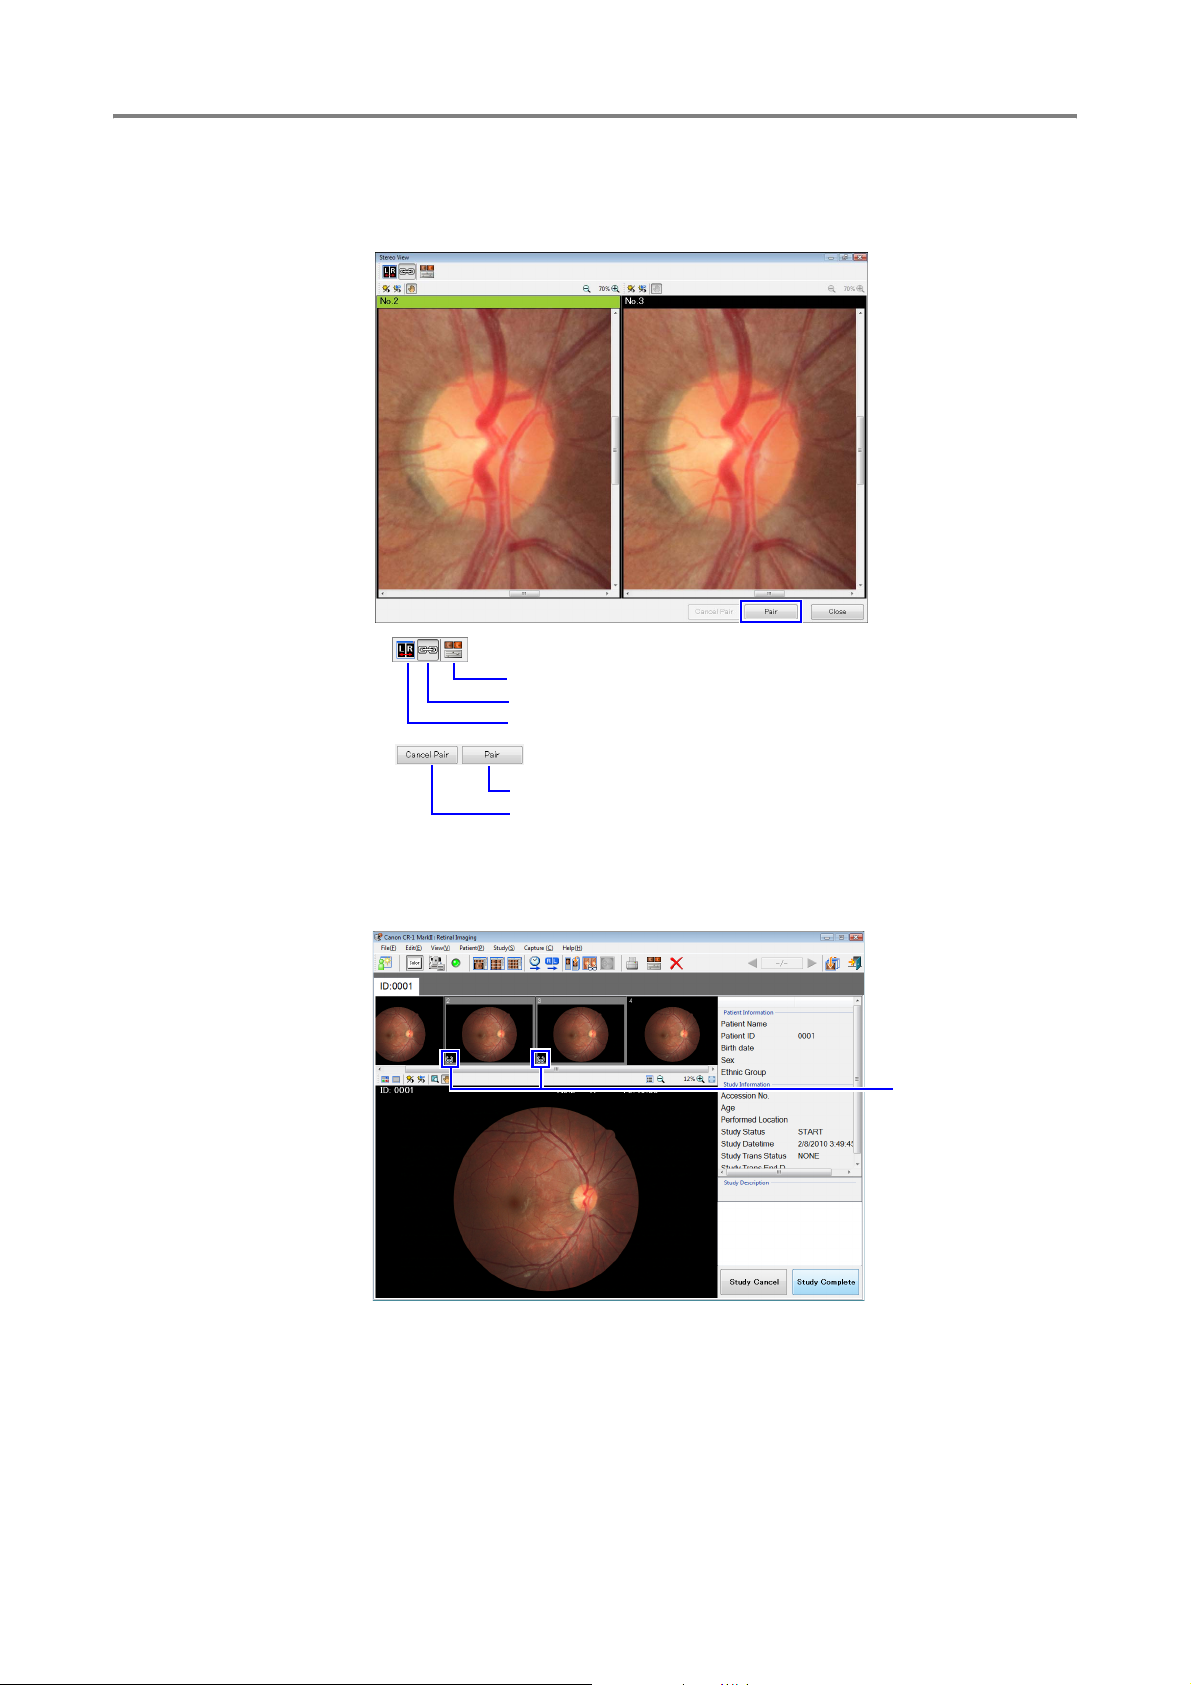
Click [Pair].
4
The images in the side-by-side alignment are recorded as a stereo image.
Adjust images
Apply the same effect to both images (zoom in, zoom out, or move)
Switch right and left images
Pair as stereo image. The stereo mark appears.
Unpair the images. The stereo mark disappears.
Click [Close]. The stereo mark is added to the thumbnails.
5
Stereo mark
5
Page 6
Saving Displayed Image in TIFF Format
Displaying Stereo Image
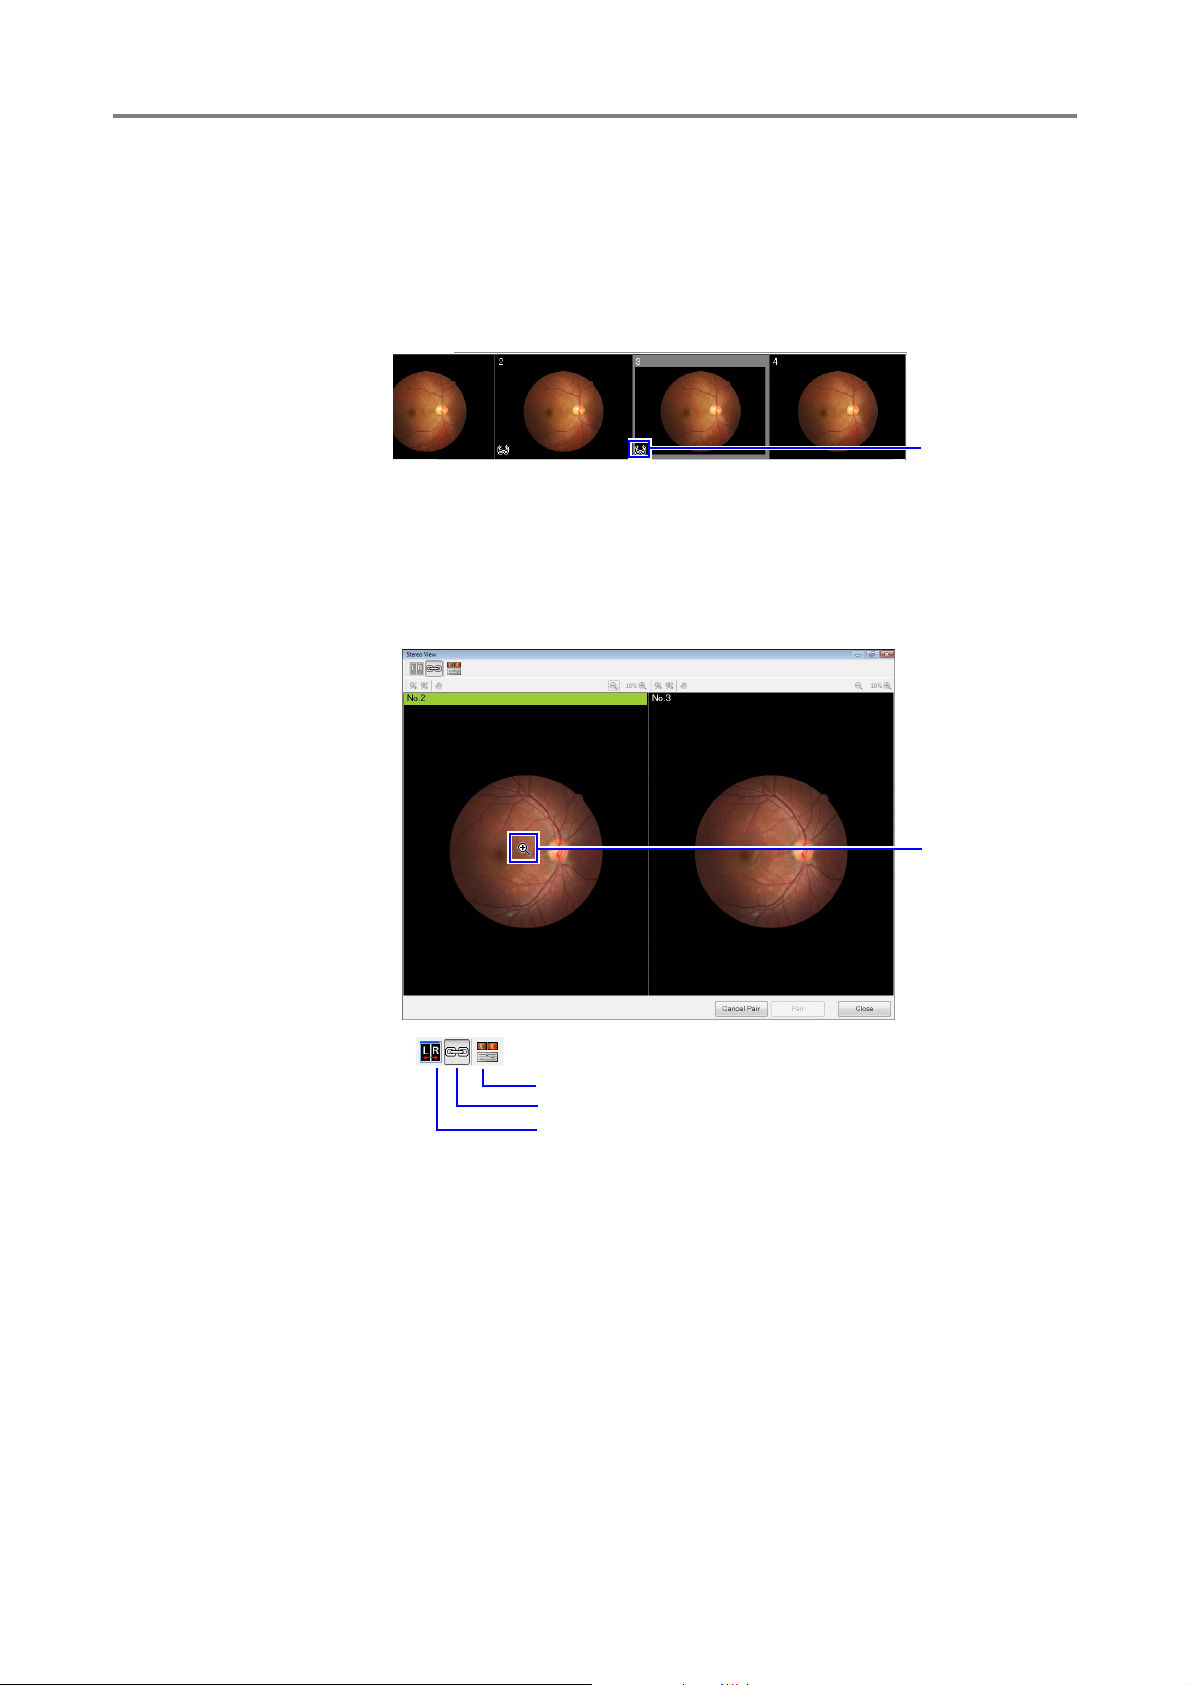
The stereo mark (glasses) appears on the thumbnails of images that are paired as stereo
images.
Click a thumbnail that has the stereo mark.
1
Click [Stereo View].
2
The Stereo View screen appears.
Initially, the Zoom In tool is selected for the mouse. To zoom in, zoom out, or to adjust the
image, click the image once.
Stereo mark
Adjust images
Apply the same effect to both images (zoom in, zoom out, or move)
Switch right and left images
Click [Close] to exit the Stereo View screen.
3
Saving Displayed Image in TIFF Format
You can save the image displayed on the main screen in TIFF format.
Select [File] > [Save As...] from the menu. Select Tiff files - Lossless or Tiff files - LZW from
the Save as type list box.
See also section 6.11 “Saving as JPEG Files” in the Operation Manual.
Zoom In tool
6
Page 7
Setting Personal Name Separator Conversion Rule in DICOM
Setting Personal Name Separator Conversion Rule in DICOM
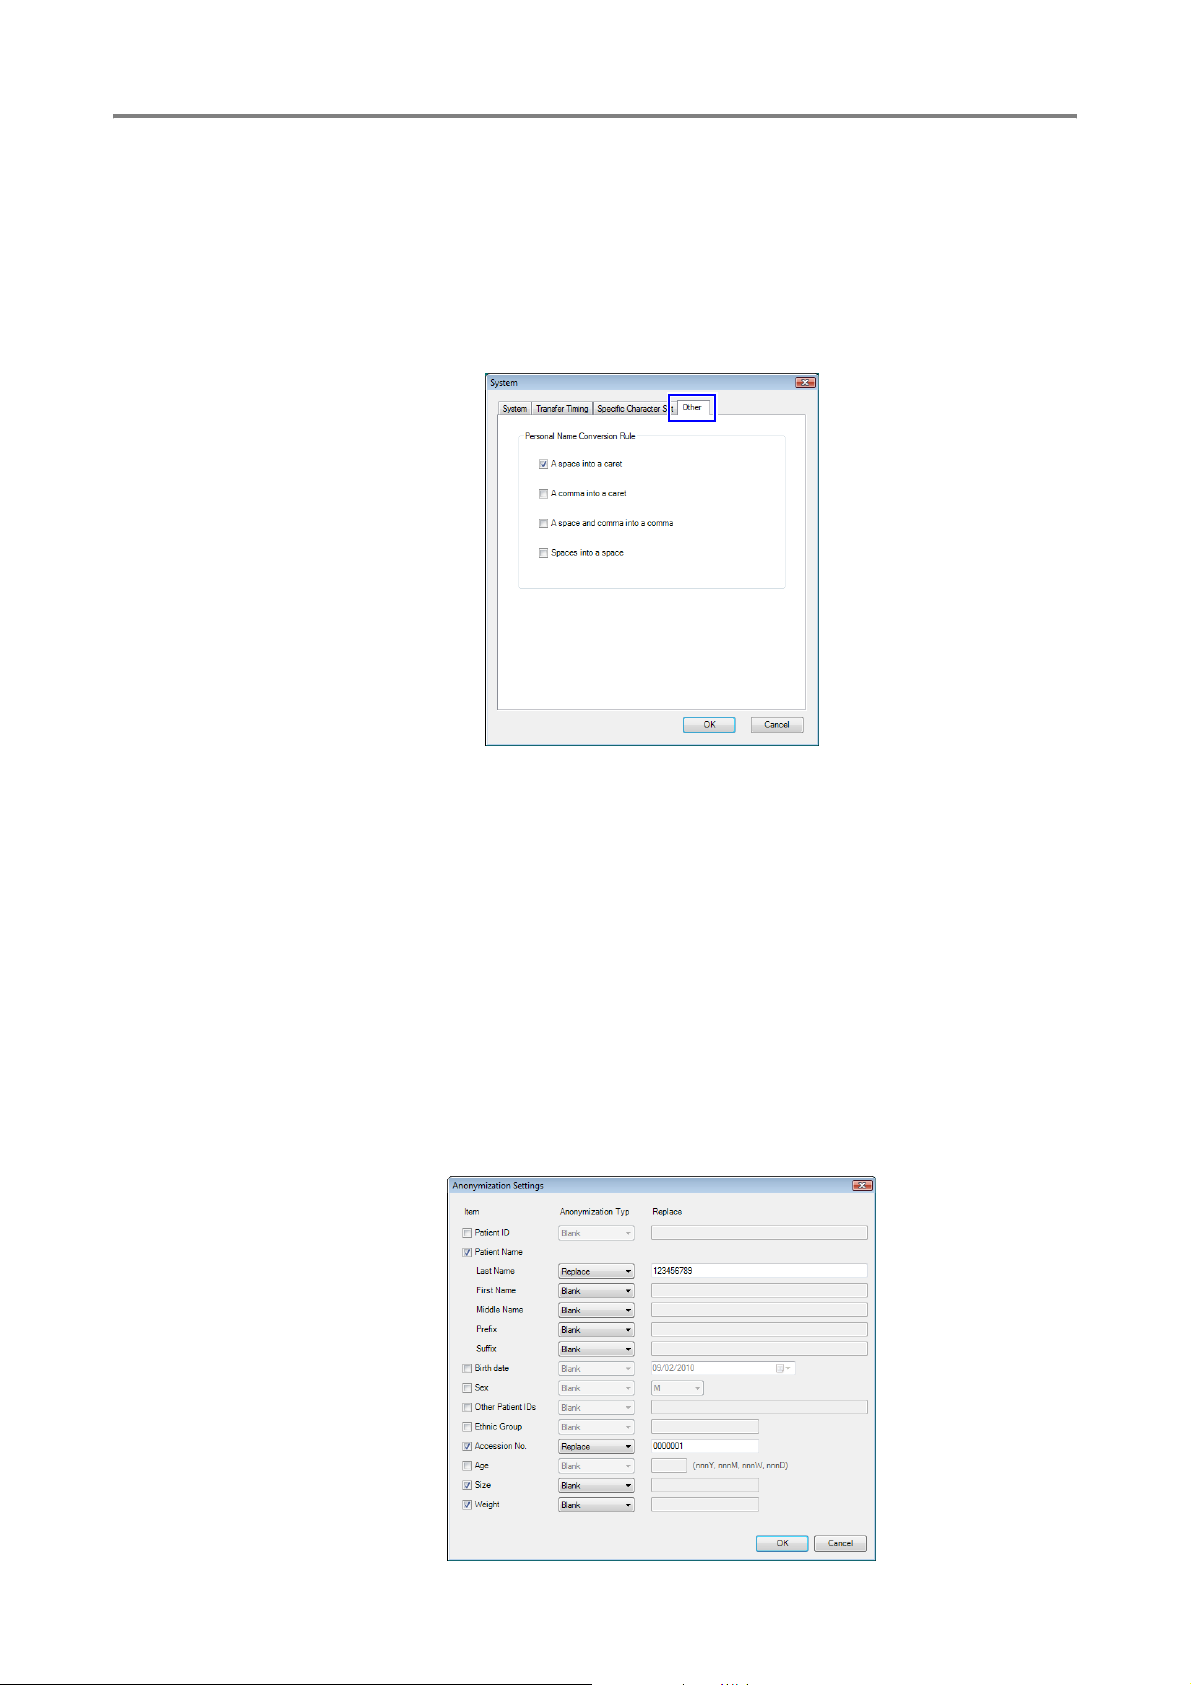
You can set the conversion rule for the separator between name elements in DICOM.
On the Other tab of the System screen, select a conversion rule option.
The setting is applied to screen displays and DICOM text string output.
See also section 7.2 “System” in the Operation Manual.
Anonymizing Patient Information
The Retinal imaging control software NM can anonymize pieces of patient information that are
appended to transferred images.
See also section 7.6 “Storage” in the Operation Manual.
Open the Create a New Storage screen or Change a Storage screen.
1
Select the Anonymize Patient Info. checkbox.
2
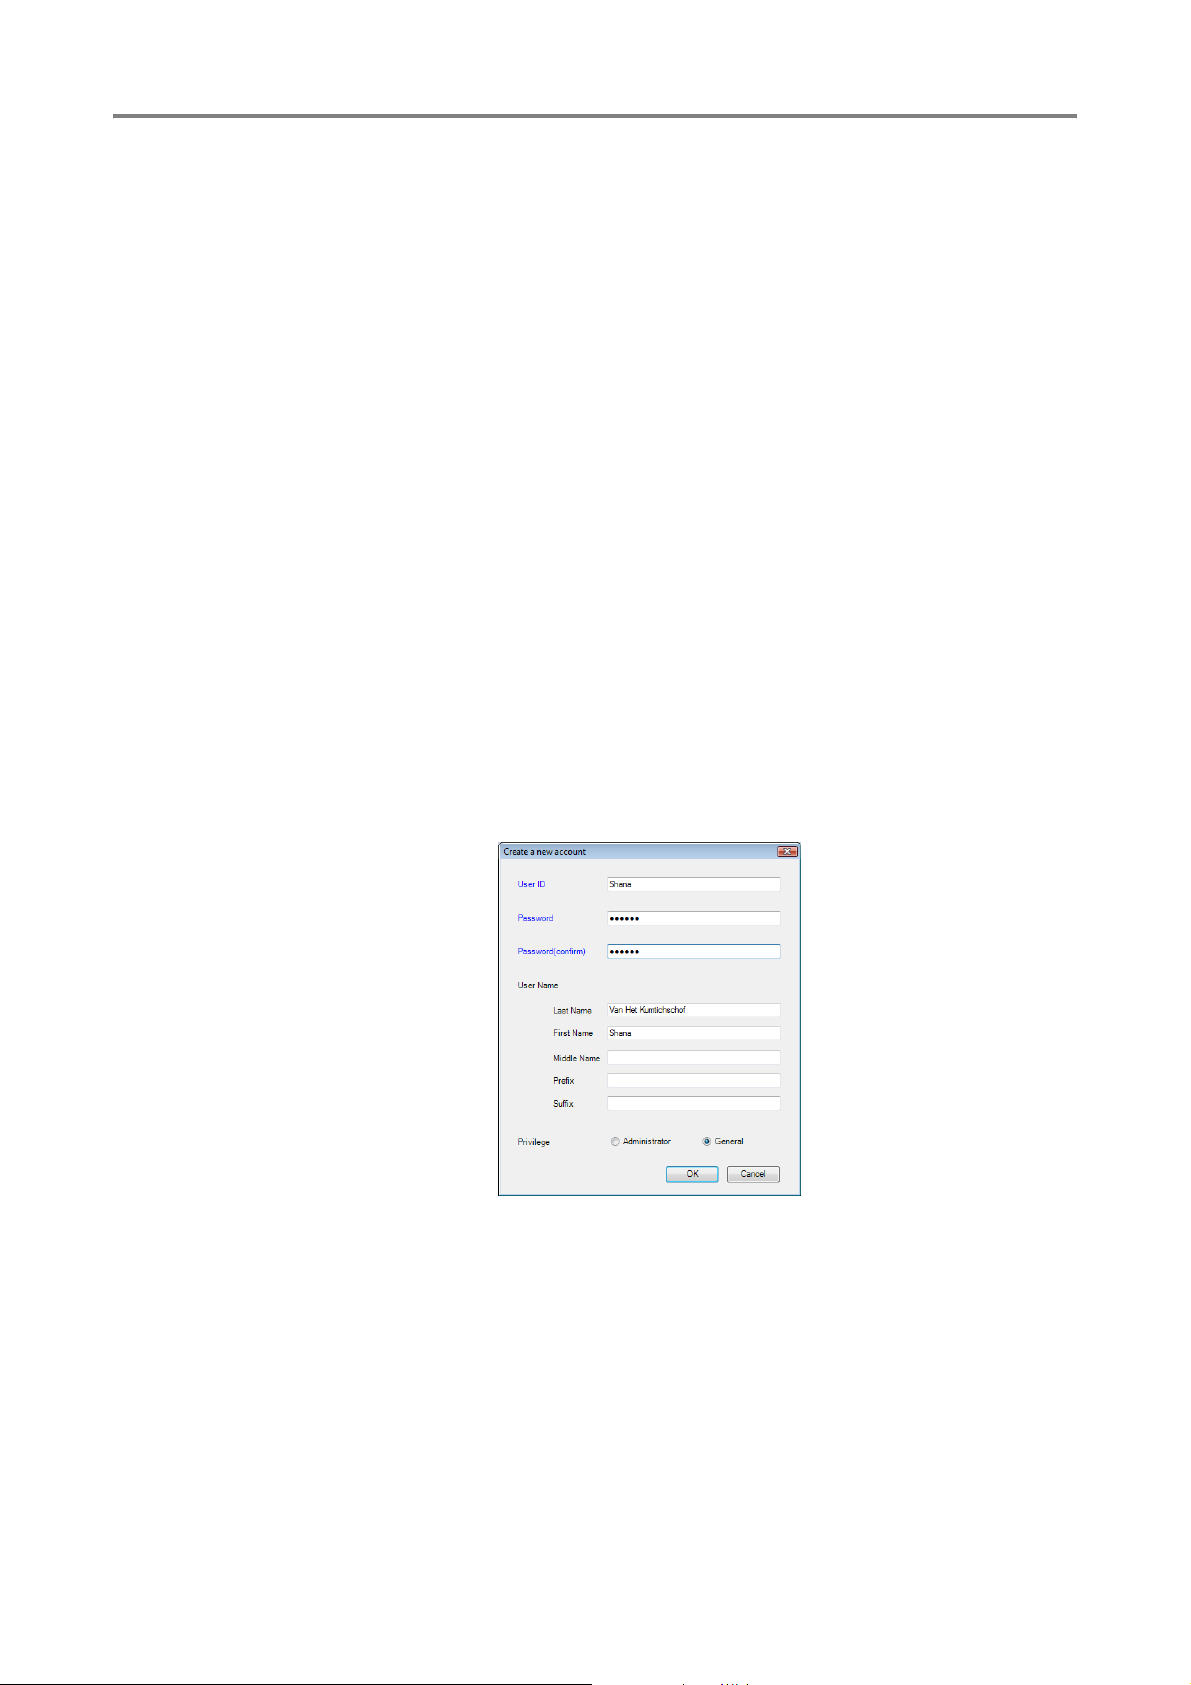
Click the [Anonymize Settings] button. The Anonymization Settings screen appears.
3
Select the items that you want to anonymize.
4
7
Page 8
Setting Transfer Syntax for DICOM
Select the Anonymization Type from the list box (Blank or Replace).
5
When Replace is selected for Anonymization Type, input a text string that replaces the
original value.
Click [OK]. The Anonymization Settings screen closes.
6
Setting Transfer Syntax for DICOM
You can specify a transfer syntax to export images in DICOM when the No Compression option
is selected for the Image Compression. You can select one from Implicit VR Little Endian,
Explicit VR Little Endian, and Explicit VR Big Endian.
See also section 7.6.2 “Advanced export settings” in the Operation Manual.
Entering Login User Name in Five Name Elements
With this software, you can divide the user name for logging in into five elements.
Enter the user name in the Create a new account or Change an account screen for the user
account. To display either of the screens, click [Create] or [Change] in the User Accounts
screen.
The user name is saved as the DICOM tag of the operator’s name.
See also section 7.8.1 “Registering users” in the Operation Manual.
PUB.L-IE-5173 Printed in Japan0310P0.001 © CANON INC. 2010
 Loading...