

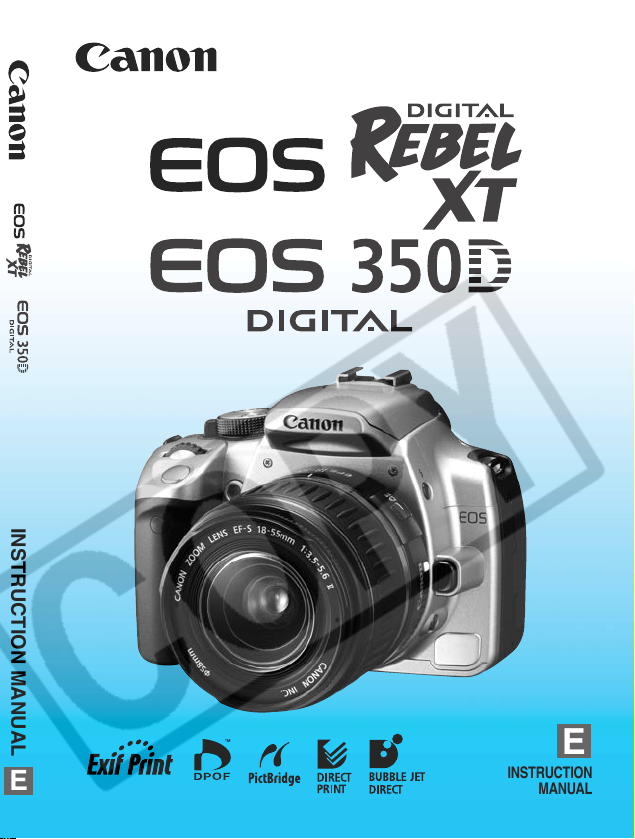
E
INSTRUCTION MANUAL
E
INSTRUCTION
MANUAL
Thank you for purchasing a Canon product.
The EOS DIGITAL REBEL XT/EOS 350D DIGITAL is a high-
performance, digital AF SLR camera enabling highly versatile and
speedy shooting. The camera has an 8-megapixel, high-resolution
CMOS sensor, and it is compatible with all Canon EF lenses (including
the EF-S lenses). The camera features quick shooting at anytime,
shooting modes for all types of photography from fully automatic
shooting to manual shooting, direct printing, and more.
Before using the camera, read this Instruction Manual to familiarize
yourself with the camera.
To prevent botched pictures and accidents, read the Safety Warnings
(p.6,7) and Handling Precautions (p.8,9).
Test the Camera Before Using
Before using the camera, take a few test shots and check that the images are
being properly recorded onto the memory card. If the camera or memory card is
faulty and the images cannot be recorded on the card or be read by a personal
computer, Canon cannot be held liable for any data loss.
Copyrights
Copyright laws in your country may prohibit the use of your recorded images of
people and certain subjects for anything but private enjoyment. Also be aware that
certain public performances, exhibitions, etc., may prohibit photography even for
private enjoyment.
¡ Canon and EOS are trademarks of Canon Inc.
¡ Adobe is a trademark of Adobe Systems Incorporated.
¡ ArcSoft, ArcSoftlogo, ArcSoft PhotoStudio are trademarks or registered trade-
marks of ArcSoft, Inc.
¡ CompactFlash is a trademark of SanDisk Corporation.
¡ Windows is a trademark or registered trademark of Microsoft Corporation in the
United States and other countries.
¡
Macintosh is a registered trademark of Apple Corporation in the United States
and other countries.
¡ All other corporate names and trademarks mentioned in this manual are the
property of their respective owners.
* This digital camera supports Design rule for Camera File System 2.0 and Exif
2.21 (also called “Exif Print”). Exif Print is a standard that enhances
compatibility between digital cameras and printers. By connecting to an Exif
Print-compliant printer, the shooting information is incorporated to optimize the
print output.
2
Item Check List
Check that all the following items have been included with your camera.
If anything is missing, contact your dealer.
¢ EOS DIGITAL REBEL XT/EOS 350D DIGITAL / Camera body (with eyecup,
body cap and lithium backup battery for the date and time)
¢ EF-S18-55mm f/3.5-5.6 II / Lens (with lens cap and dust cap) * Lens kit only.
¢ Battery Pack NB-2LH (with protective cover)
¢ Battery Charger CB-2LW/CB-2LWE *CB-2LW or CB-2LWE is included.
¢ Power cord for battery charger *For CB-2LWE.
¢ Interface Cable IFC-400PCU
¢ Video Cable VC-100
¢ Wide Strap EW-100DBll (with eyepiece cover)
¢ EOS DIGITAL Solution Disk (CD-ROM)
¢ ArcSoft PhotoStudio Disk (CD-ROM)
¢ Software Instruction Manual (CD-ROM, PDF)
¢ Pocket Guide
Quick start guide to shooting.
¢ EOS DIGITAL REBEL XT/EOS 350D DIGITAL INSTRUCTION
MANUAL
¢ Software Guide
Gives an overview of the bundled software and explains the software
installation procedure.
¢ Battery Pack NB-2LH Instructions
¢ Lens Instructions *Lens Kit only.
¢ Camera warranty card
¢ Lens warranty card *Lens Kit only.
* Be careful not to lose any of the above items.
* No CF card (for recording images) is included.Please purchase it separately.
CF cards made by Canon are recommended.
(this booklet)
3
Contents
Introduction
Item Check List.................................................................................................. 3
Handling Precautions ........................................................................................8
Quick Start Guide ............................................................................................10
Nomenclature ..................................................................................................12
Conventions Used in this Manual ....................................................................18
Getting Started 19
1
Recharging the Battery.................................................................................... 20
Installing and Removing the Battery................................................................22
Using a Household Power Outlet ....................................................................24
Mounting and Detaching a Lens...................................................................... 25
Installing and Removing the CF Card.............................................................. 26
Basic Operation ...............................................................................................28
Menu Operations .............................................................................................31
Setting the Language ......................................................................................36
Setting the Date and Time............................................................................... 37
Replacing the Date/Time Battery..................................................................... 38
Cleaning the CMOS sensor............................................................................. 39
Set the power-off time/Auto power off .............................................................41
CF Card Reminder ..........................................................................................41
Dioptric Adjustment .........................................................................................42
Holding the Camera......................................................................................... 42
Fully Automatic Shooting 43
2
Using Full Auto ................................................................................................44
Basic Zone Modes........................................................................................... 46
Self-timer Operation ........................................................................................48
Wireless Remote Control................................................................................. 49
Using the Eyepiece Cover ...............................................................................50
Silencing the Beeper .......................................................................................50
Image Settings 51
3
Setting the Image-recording Quality ................................................................52
Setting the ISO Speed..................................................................................... 55
Setting the White Balance ...............................................................................56
Custom White Balance ....................................................................................57
White Balance Correction................................................................................ 59
White Balance Auto Bracketing .......................................................................60
Setting the Color Space................................................................................... 62
Selecting the Processing Parameters .............................................................63
Setting the Processing Parameters .................................................................64
File Numbering Methods .................................................................................67
Checking Camera Settings.............................................................................. 68
Setting the AF, Metering, and Drive Modes 69
4
Selecting the AF Mode ....................................................................................70
4
Selecting the AF Point..................................................................................... 73
Using Focus Lock............................................................................................ 75
When Autofocus Fails (Manual Focusing)....................................................... 76
Selecting the Metering Mode........................................................................... 77
Selecting the Drive Mode ................................................................................78
Advanced Operations 79
5
Program AE..................................................................................................... 80
Shutter-Priority AE........................................................................................... 82
Aperture-Priority AE ........................................................................................ 84
Depth of Field Preview ....................................................................................85
Manual Exposure ............................................................................................ 86
Automatic Depth-of-Field AE........................................................................... 88
Setting Exposure Compensation..................................................................... 89
Auto Exposure Bracketing (AEB) ....................................................................90
AE Lock ........................................................................................................... 92
Bulb Exposures ...............................................................................................93
Mirror Lockup .................................................................................................. 94
Flash Photography 95
6
Using the Built-in Flash ................................................................................... 96
Using EOS-Dedicated, External Speedlites ..................................................101
Using Non-Canon Flash Units....................................................................... 102
LCD Panel Illumination.................................................................................. 102
Image Playback 103
7
Setting the Image Review Time .................................................................... 104
Auto Image Rotation...................................................................................... 105
Setting the LCD Brightness ........................................................................... 106
Image Playback............................................................................................. 107
Single image display, Index Display, Magnified View ........................107 - 110
Jump Display, Auto Play, Rotating an Image .....................................111 - 113
Displaying the Images on TV ........................................................................ 114
Protecting Images ......................................................................................... 115
Erasing Images ............................................................................................. 116
Formatting the CF Card................................................................................. 118
Direct Printing from the Camera 119
8
Preparing to Print .......................................................................................... 121
PictBridge / CP Direct / Bubble Jet Direct ............................................124 - 133
Easy Printing .................................................................................................136
DPOF: Digital Print Order Format 137
9
Customizing the Camera 145
10
Reference 151
11
Contents
1
2
3
4
5
6
7
8
9
10
11
5
Safety Warnings
Follow these safeguards and use the equipment properly to prevent injury, death,
and material damage.
Preventing Serious Injury or Death
• To prevent fire, excessive heat, chemical leakage, and explosions, follow the
safeguards below:
- Do not use any batteries, power sources, and accessories not specified in this
booklet. Do not use any home-made or modified batteries.
- Do not shor t-circuit, disassemble, or modify the battery pack or back-up battery. Do
not apply heat or apply solder to the battery pack or back-up battery. Do not expose
the battery pack or back-up battery to fire or water. And do not subject the battery
pack or back-up battery to strong physical shock.
- Do not install the batter y pack or back-up battery in reversed polarity (+ –). Do not
mix new and old or different types of batteries.
- Do not recharge the batter y pack outside the allowable ambient temperature range
of 0°C - 40°C (32°F - 104°F). Also, do not exceed the recharging time.
- Do not inser t any foreign metallic objects into the electrical contacts of the camera,
accessories, connecting cables, etc.
• Keep the back-up battery away from children. If a child swallows the battery, consult a
physician immediately. (Battery chemicals may harm the stomach and intestines.)
• When disposing of a battery pack or back-up battery, insulate the electrical contacts
with tape to prevent contact with other metallic objects or batteries. This is to prevent
fire or an explosion.
• If excessive heat, smoke, or fumes are emitted during battery pack recharging,
immediately unplug the battery charger from the power outlet to stop the recharging
and prevent a fire.
• If the battery pack or back-up battery leaks, changes color, deforms, or emits smoke
or fumes, remove it immediately. Be careful not to get burned in the process.
• Prevent any battery leakage from contacting your eyes, skin, and clothing. It can
cause blindness or skin problems. If the battery leakage contacts your eyes, skin, or
clothing, flush the affected area with lots of clean water without rubbing it. See a
physician immediately.
• During the recharging, keep the equipment away from the reach of children. The cord
can accidentally choke the child or give an electrical shock.
• Do not leave any cords near a heat source. It can deform the cord or melt the
insulation and cause a fire or electrical shock.
• Do not fire the flash at someone driving a car. It may cause an accident.
• Do not fire the flash near a person’s eyes. It may impair the person’s vision. When
using flash to photograph an infant, keep at least 1 meter away.
• Before storing the camera or accessory when not in use, remove the battery pack and
disconnect the power plug. This is to prevent electrical shock, heat generation, and
fire.
• Do not use the equipment where there is flammable gas. This is to prevent an
explosion or fire.
6
• If you drop the equipment and the casing breaks open to expose the internal par ts, do
not touch the internal parts due to the possibility of electr ical shock.
• Do not disassemble or modify the equipment. High-voltage internal parts can cause
electrical shock.
• Do not look at the sun or an extremely bright light source through the camera or lens.
Doing so may damage your vision.
• Keep the camera from the reach of small children. The neck strap can accidentally
choke the child.
• Do not store the equipment in dusty or humid places. This is to prevent fire and
electrical shock.
• Before using the camera inside an airplane or hospital, check if it is allowed.
Electromagnetic waves emitted by the camera may interfere with the plane’s
instruments or the hospital’s medical equipment.
• To prevent fire and electrical shock, follow the safeguards below:
- Always insert the power plug all the way in.
- Do not handle a power plug with wet hands.
- When unplugging a power plug, grasp and pull the plug instead of the cord.
- Do not scratch, cut, or excessively bend the cord or put a heavy object on the cord.
Also do not twist or tie the cords.
- Do not connect too many power plugs to the same power outlet.
- Do not use a cord whose insulation has been damaged.
• Occasionally unplug the power plug and use a dry cloth to clean off the dust around
the power outlet. If the surrounding is dusty, humid, or oily, the dust on the power outlet
may become moist and short-circuit the outlet to cause a fire.
Preventing Injury or Equipment Damage
• Do not leave equipment inside a car under the hot sun or near a heat source. The
equipment may become hot and cause skin burns.
• Do not carry the camera around while it is attached to a tripod. Doing so may cause
injury. Also make sure the tripod is sturdy enough to support the camera and lens.
• Do not leave a lens or lens-attached camera under the sun without the lens cap
attached. Otherwise, the lens may concentrate the sun’s rays and cause a fire.
• Do not cover or wrap the battery-recharging apparatus with a cloth. Doing so may trap
heat within and cause the casing to deform or catch fire.
• If you drop the camera in water or if water or metal fragments enter inside the camera,
promptly remove the battery pack and back-up battery. This is to prevent fire and
electrical shock.
• Do not use or leave the battery pack or back-up battery in a hot environment. Doing so
may cause battery leakage or a shorter battery life. The battery pack or back-up
battery can also become hot and cause skin burns.
• Do not use paint thinner, benzene, or other organic solvents to clean the equipment.
Doing so may cause fire or a health hazard.
If the product does not work properly or requires repair, contact
your dealer or your nearest Canon Service Center.
7
Handling Precautions
Camera Care
¡ This camera is a precision instrument. Do not drop it or subject it to physical
shock.
¡ The camera is not waterproof and cannot be used underwater. If you
accidentally drop the camera into water, promptly consult your nearest
Canon Service Center. Wipe off any water droplets with a dry cloth. If the
camera has been exposed to salty air, wipe with a well-wrung wet cloth.
¡ Never leave the camera near anything having a strong magnetic field such
as a magnet or electric motor. Also avoid using or leaving the camera near
anything emitting strong radio waves such as a large antenna. Strong
magnetic fields can cause camera misoperation or destroy image data.
¡ Do not leave the camera in excessive heat such as in a car in direct sunlight.
High temperatures can cause the camera to malfunction.
¡ The camera contains precision electronic circuitry. Never attempt to
disassemble the camera yourself.
¡ Use a blower to blow away dust on the lens, viewfinder, mirror, and focusing
screen. Do not use cleaners that contain organic solvents to clean the
camera body or lens.For stubborn dirt, take the camera to a Canon Service
Center.
¡ Do not touch the camera’s electrical contacts with your fingers. This is to
prevent the contacts from corroding. Corroded contacts can cause camera
misoperation.
¡ If the camera is suddenly brought in from the cold into a warm room,
condensation may form on the camera and internal parts. To prevent
condensation, first put the camera in a sealed plastic bag and let it adjust to
the warmer temperature before taking it out of the bag.
¡ If condensation forms on the camera, do not use the camera. This is to avoid
damaging the camera. If this occurs, remove the lens, CF card and battery
from the camera, then wait until the condensation has evaporated before
using the camera.
¡ If the camera will not be used for an extended period, remove the battery
and store the camera in a cool, dry, well-ventilated location. Even while the
camera is in storage, press the shutter button a few times once in a while to
check that the camera is still working.
¡ Avoid storing the camera where there are corrosive chemicals such as in a
darkroom or chemical lab.
¡ If the camera has not been used for an extended period, test all its functions
before using the camera. If you have not used the camera for some time or if
there is an important shoot coming up, have the camera checked by your
Canon dealer or check the camera yourself and make sure it is working
properly.
8
Handling Precautions
LCD Panel and LCD Monitor
¡ Although the LCD monitor is manufactured with very high precision
technology with over 99.99% active pixels, there might be a few dead pixels
among the remaining 0.01% or less pixels. Dead pixels displaying only black
or red, etc., are not a malfunction. They do not affect the images recorded.
¡ At low temperatures, the liquid-crystal display response may become slower.
And at high temperatures, the display may blacken. In either case, the
display will return to normal at room temperature.
CF Card
¡ The CF card is a precision device. Do not drop the memory card or subject it
to vibration. Doing so could damage the images recorded on them.
¡ Do not store or use a memory card near anything having a strong magnetic
field such as a TV set, speakers, or magnet. Also avoid places prone to
having static electricity. Otherwise, the images recorded on the CF card
might be lost.
¡ Do not leave memory cards in direct sunlight or near a heat source. Doing so
can warp the cards and make them unusable.
¡ Do not spill any liquid onto the CF card.
¡ Always store your CF cards in a case to protect the data stored on them.
¡ Non-Canon CF cards may not be able to record and playback images. Using
Canon CF cards is recommended.
¡ Do not bend the card or subject it to any excessive force or physical shock.
¡ Do not store CF cards in hot, dusty, or humid locations.
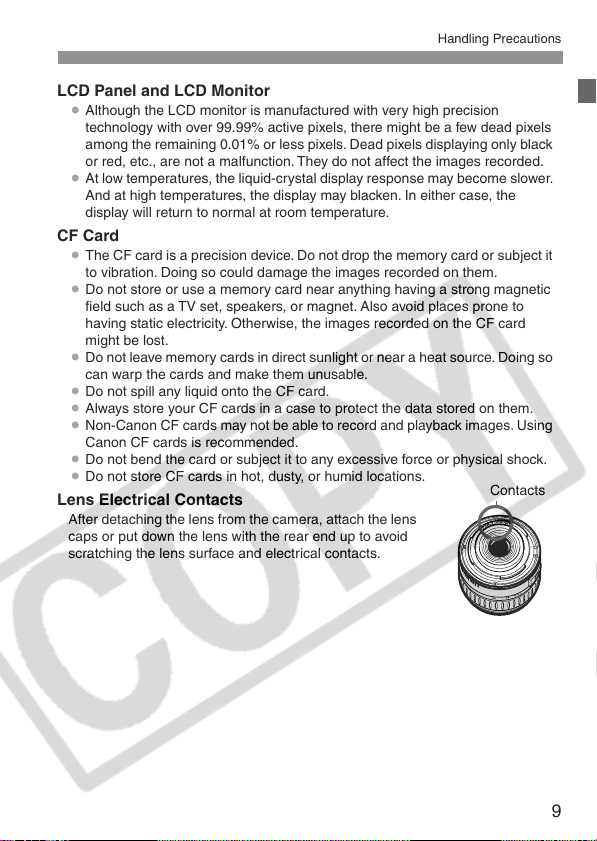
Lens Electrical Contacts
After detaching the lens from the camera, attach the lens
caps or put down the lens with the rear end up to avoid
scratching the lens surface and electrical contacts.
Contacts
9
Quick Start Guide
For EF-S lens
For EF lens
1
2
3
4
5
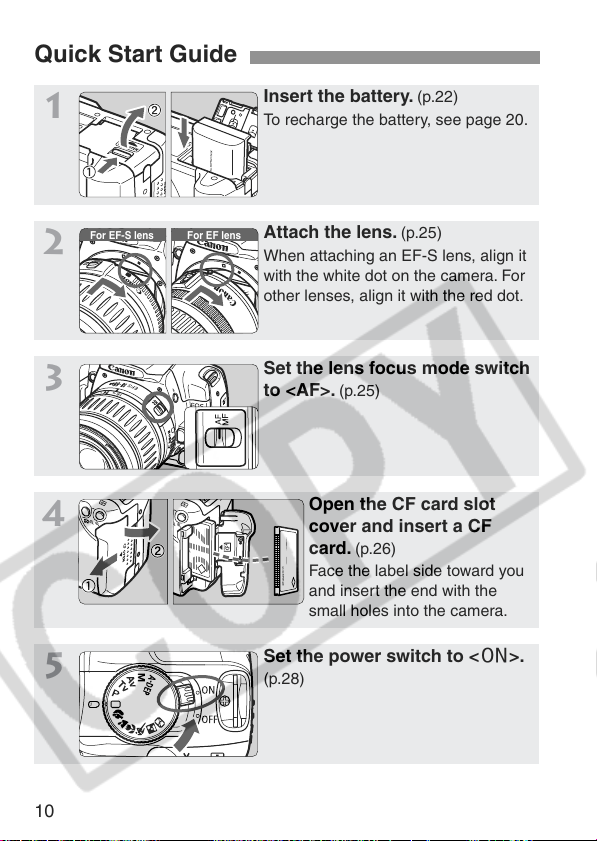
Insert the battery. (p.22)
To recharge the battery, see page 20.
Attach the lens. (p.25)
When attaching an EF-S lens, align it
with the white dot on the camera. For
other lenses, align it with the red dot.
Set the lens focus mode switch
to <AF>.
Set the power switch to <1>.
(p.28)
(p.25)
Open the CF card slot
cover and insert a CF
card.
(p.26)
Face the label side toward you
and insert the end with the
small holes into the camera.
10
Quick Start Guide
6
7
8
9
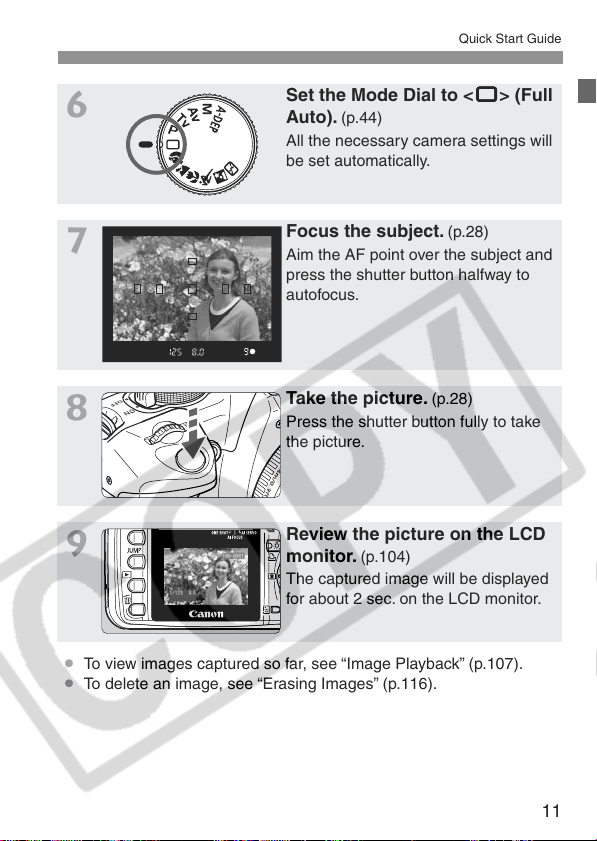
¡ To view images captured so far, see “Image Playback” (p.107).
¡ To delete an image, see “Erasing Images” (p.116).
Set the Mode Dial to <1111> (Full
Auto).
(p.44)
All the necessary camera settings will
be set automatically.
Focus the subject. (p.28)
Aim the AF point over the subject and
press the shutter button halfway to
autofocus.
Take the picture. (p.28)
Press the shutter button fully to take
the picture.
Review the picture on the LCD
monitor.
The captured image will be displayed
for about 2 sec. on the LCD monitor.
(p.104)
11
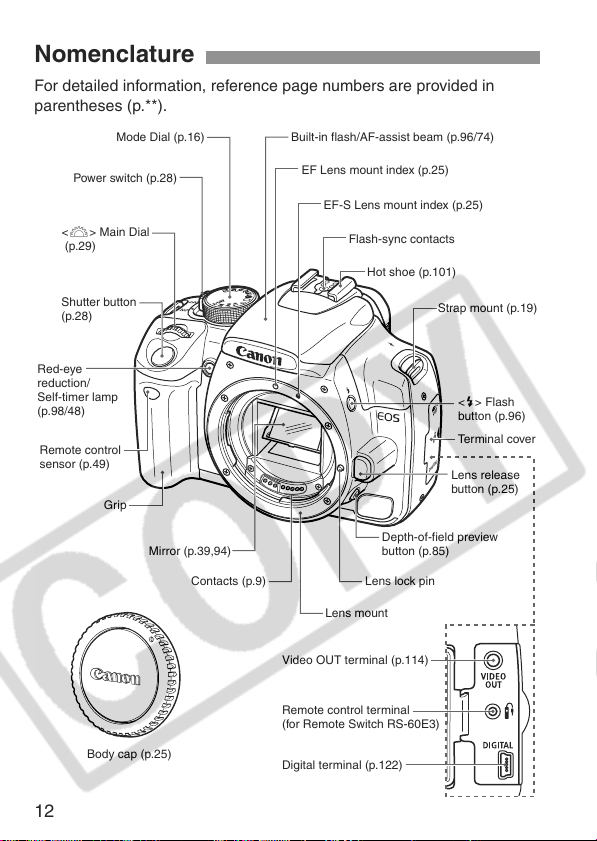
Nomenclature
For detailed information, reference page numbers are provided in
parentheses (p.**).
Built-in flash/AF-assist beam (p.96/74)
EF Lens mount index (p.25)
EF-S Lens mount index (p.25)
Flash-sync contacts
Hot shoe (p.101)
Strap mount (p.19)
<D> Flash
button (p.96)
Terminal cover
Lens release
button (p.25)
Depth-of-field preview
button (p.85)
Lens lock pin
Lens mount
Power switch (p.28)
<6> Main Dial
(p.29)
Shutter button
(p.28)
Red-eye
reduction/
Self-timer lamp
(p.98/48)
Remote control
sensor (p.49)
Mode Dial (p.16)
Grip
Mirror (p.39,94)
Contacts (p.9)
12
Body cap (p.25)
Video OUT terminal (p.114)
Remote control terminal
(for Remote Switch RS-60E3)
Digital terminal (p.122)
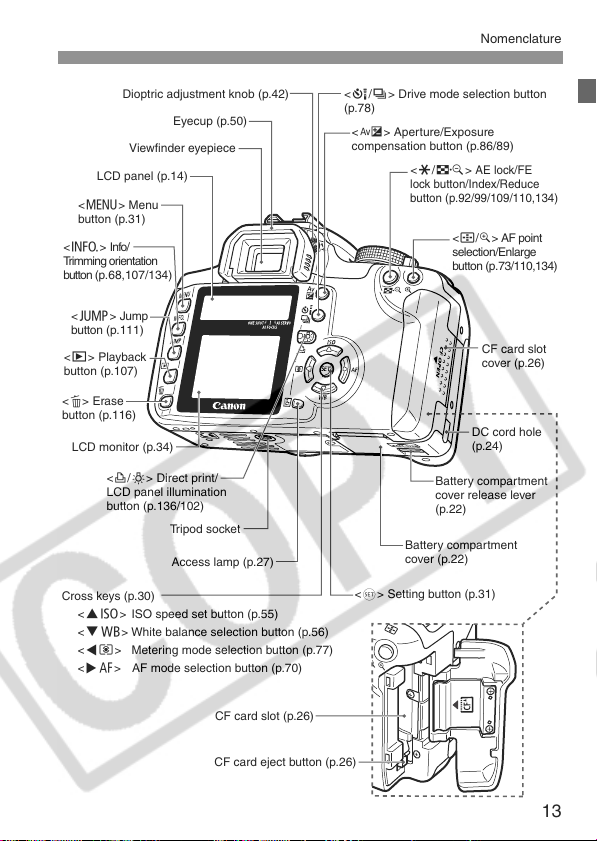
Nomenclature
Tripod socket
Access lamp (p.27)
Battery compartment
cover release lever
(p.22)
Battery compartment
cover (p.22)
<O> Aperture/Exposure
compensation button (p.86/89)
<Q/i> Drive mode selection button
(p.78)
Viewfinder eyepiece
Eyecup (p.50)
LCD panel (p.14)
Dioptric adjustment knob (p.42)
CF card slot
cover (p.26)
CF card slot (p.26)
CF card eject button (p.26)
LCD monitor (p.34)
<l/U> Direct print/
LCD panel illumination
button (p.136/102)
<S/u> AF point
selection/Enlarge
button (p.73/110,134)
<A/I>
AE lock/FE
lock button/Index/Reduce
button (p.92/99/109/110,134)
<M> Menu
button (p.31)
<B> Info/
Trimming orientation
button (p.68,107/134)
<C> Jump
button (p.111)
<x> Playback
button (p.107)
<L> Erase
button (p.116)
<0> Setting button (p.31)
DC cord hole
(p.24)
Cross keys (p.30)
<WZ> ISO speed set button (p.55)
<XB> White balance selection button (p.56)
<Yq> Metering mode selection button (p.77)
<ZE> AF mode selection button (p.70)
13
Nomenclature
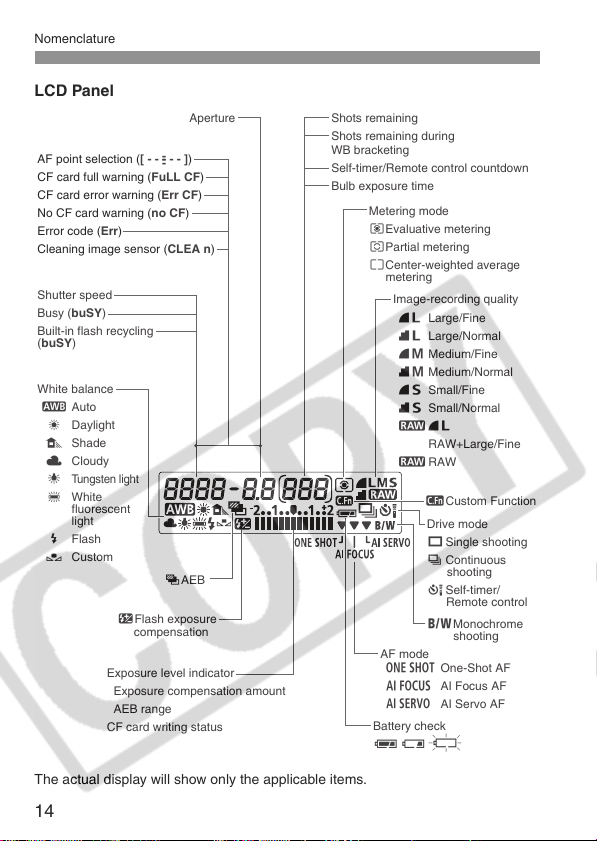
LCD Panel
Aperture
AF point selection ([ - - - - - ])
CF card full warning (FuLL CF)
CF card error warning (Err CF)
No CF card warning (no CF)
Error code (Err)
Cleaning image sensor (CLEA n)
Shutter speed
Busy (buSY)
Built-in flash recycling
(buSY)
White balance
Q Auto
W Daylight
E Shade
R Cloudy
Y
Tungsten light
U White
fluorescent
light
I Flash
O Custom
-
-
-
hAEB
yFlash exposure
compensation
Exposure level indicator
Exposure compensation amount
AEB range
CF card writing status
Shots remaining
Shots remaining during
WB bracketing
Self-timer/Remote control countdown
Bulb exposure time
Metering mode
qEvaluative metering
wPartial metering
eCenter-weighted average
metering
Image-recording quality
73 Large/Fine
83 Large/Normal
74 Medium/Fine
84 Medium/Normal
76 Small/Fine
86 Small/Normal
173
RAW+Large/Fine
1RAW
KCustom Function
Drive mode
u Single shooting
i Continuous
shooting
QSelf-timer/
Remote control
0Monochrome
shooting
AF mode
X One-Shot AF
9 AI Focus AF
Z AI Servo AF
Battery check
zx
n
The actual display will show only the applicable items.
14
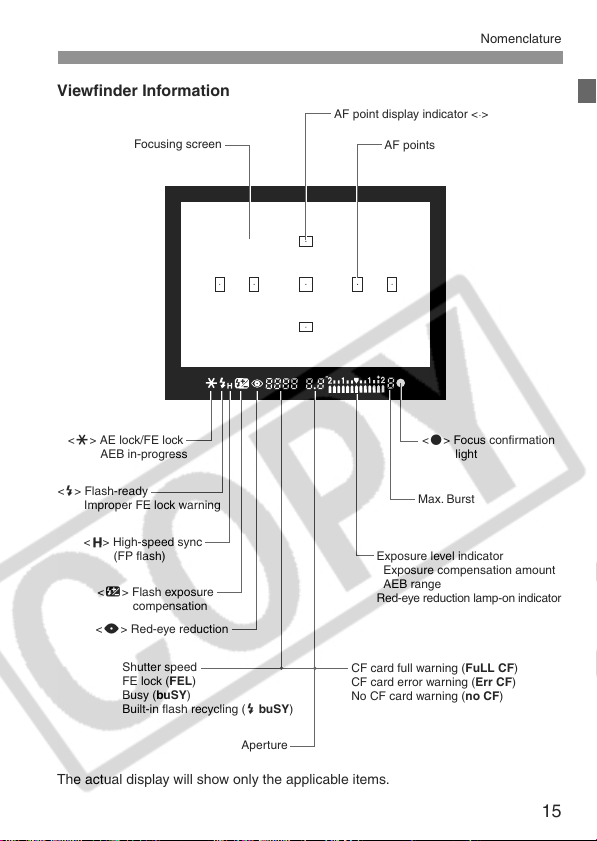
Viewfinder Information
AF point display indicator < >
AF points
Focusing screen
<A> AE lock/FE lock
AEB in-progress
<D> Flash-ready
Improper FE lock warning
Exposure level indicator
Exposure compensation amount
AEB range
Red-eye reduction lamp-on indicator
<o> Focus confirmation
light
Shutter speed
FE lock (FEL)
Busy (buSY)
Built-in flash recycling (D buSY)
Aperture
<y> Flash exposure
compensation
<L> Red-eye reduction
Max. Burst
CF card full warning (FuLL CF)
CF card error warning (Err CF)
No CF card warning (no CF)
<O> High-speed sync
(FP flash)
Nomenclature
The actual display will show only the applicable items.
15
Nomenclature
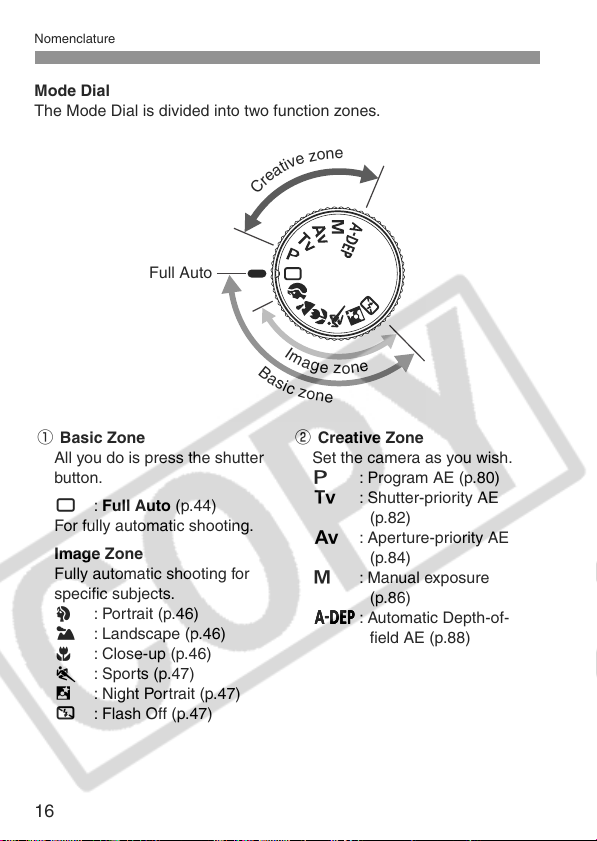
Mode Dial
The Mode Dial is divided into two function zones.
e
n
o
z
e
v
i
t
a
e
r
C
Full Auto
I
m
a
g
e
e
n
z
B
a
s
o
i
c
z
o
n
e
q Basic Zone
All you do is press the shutter
button.
1 : Full Auto (p.44)
For fully automatic shooting.
Image Zone
Fully automatic shooting for
specific subjects.
2 : Portrait (p.46)
3 : Landscape (p.46)
4 : Close-up (p.46)
5 : Sports (p.47)
6 : Night Portrait (p.47)
7 : Flash Off (p.47)
16
w Creative Zone
Set the camera as you wish.
d : Program AE (p.80)
s : Shutter-priority AE
(p.82)
f : Aperture-priority AE
(p.84)
a : Manual exposure
(p.86)
88
88
: Automatic Depth-of-
field AE (p.88)
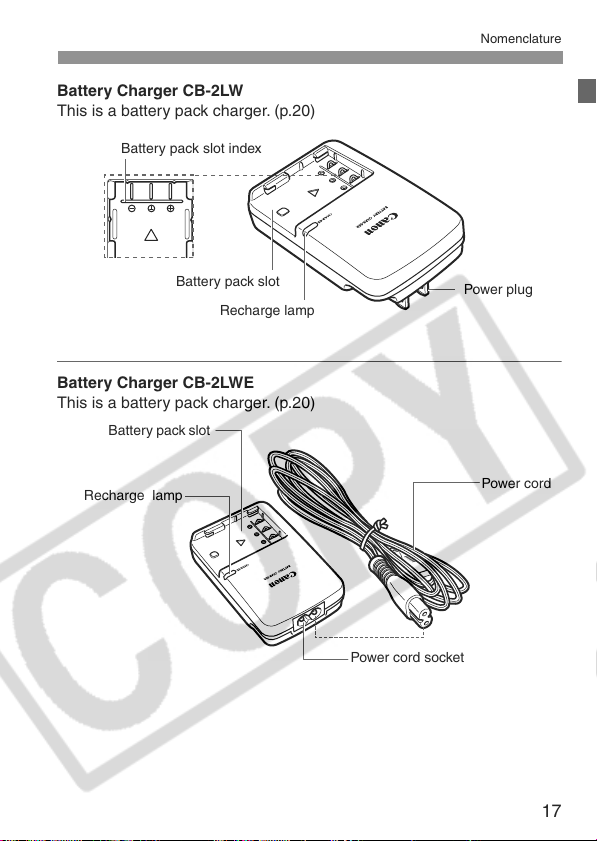
Battery Charger CB-2LW
Battery pack slot
Recharge lamp
Power plug
Battery pack slot index
Power cord
Power cord socket
Battery pack slot
Recharge lamp
This is a battery pack charger. (p.20)
Battery Charger CB-2LWE
This is a battery pack charger. (p.20)
Nomenclature
17
Conventions Used in this Manual
6
0
¡In this manual, the icons and markings indicating the camera’s
buttons, dials, and settings correspond to the icons and markings on
the camera.
¡For detailed information, reference page numbers are provided in
parentheses (p.**).
¡The asterisk M on the right of the page title indicates that the
respective feature is available only in Creative Zone modes (d, s,
f, a,
¡All operations explained in this Instruction Manual assume that the
power switch is already set to <1>.
¡The Canon EF-S18-55mm f/3.5-5.6 ll lens is used as the sample lens
in this Instruction Manual.
¡The procedures assume that the menu settings and Custom
Functions are set to the default settings.
¡
The
¡(0), (9) or (8) indicates that the respective function remains
active for 4 sec., 6 sec., or 16 sec. respectively after you let go of the
button.
¡This manual uses the following alert symbols:
:
:The Note symbol gives supplemental information.
¡The <6> icon indicates the Main Dial.
¡
The <S>, <V>, and <U> icons indicate the cross
keys. The <W>, <X>, <Y>, and <Z> icons indicate
the up, down, left, and right cross keys respectively.
¡In the text, the <0> icon indicates the SET button. It
is used for menu functions and Custom Functions.
88
88
).
3
icon indicates that the setting can be changed with the menu.
The Caution symbol indicates a warning to prevent shooting problems.
18
1
Getting Started
This chapter explains a few preliminary steps and basic
camera operations.
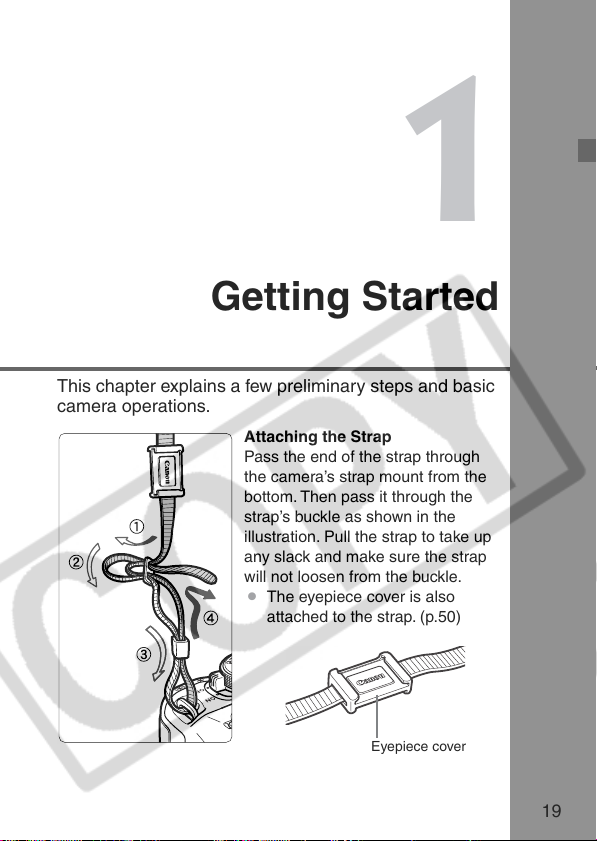
Attaching the Strap
Pass the end of the strap through
the camera’s strap mount from the
bottom. Then pass it through the
strap’s buckle as shown in the
illustration. Pull the strap to take up
any slack and make sure the strap
will not loosen from the buckle.
¡ The eyepiece cover is also
attached to the strap. (p.50)
Eyepiece cover
19
Recharging the Battery
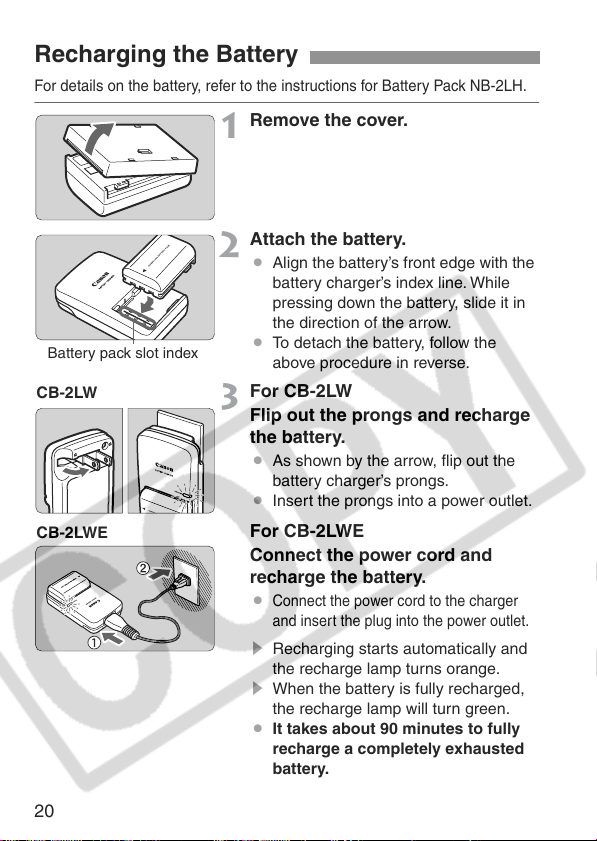
For details on the battery, refer to the instructions for Battery Pack NB-2LH.
Remove the cover.
1
Attach the battery.
2
¡ Align the battery’s front edge with the
battery charger’s index line. While
pressing down the battery, slide it in
the direction of the arrow.
Battery pack slot index
CB-2LW
CB-2LWE
¡ To detach the battery, follow the
above procedure in reverse.
For CB-2LW
3
Flip out the prongs and recharge
the battery.
¡ As shown by the arrow, flip out the
battery charger’s prongs.
¡ Insert the prongs into a power outlet.
For CB-2LWE
Connect the power cord and
recharge the battery.
¡
Connect the power cord to the charger
and insert the plug into the power outlet.
s Recharging starts automatically and
the recharge lamp turns orange.
s When the battery is fully recharged,
the recharge lamp will turn green.
¡ It takes about 90 minutes to fully
recharge a completely exhausted
battery.
20
Recharging the Battery
¡ Do not use the battery charger to recharge any battery other than
Battery Pack NB-2LH.
¡ To prevent the battery performance from degrading, avoid recharging the
battery pack for 24 consecutive hours or longer.
¡ If the battery is left in the camera for a prolonged period without the
camera being used, a low electrical current may be discharged
excessively and the battery’s service life may be affected. When not
using the camera, remove the battery and attach the protective cover to
prevent shorting. Before using the camera again, be sure to recharge the
battery.
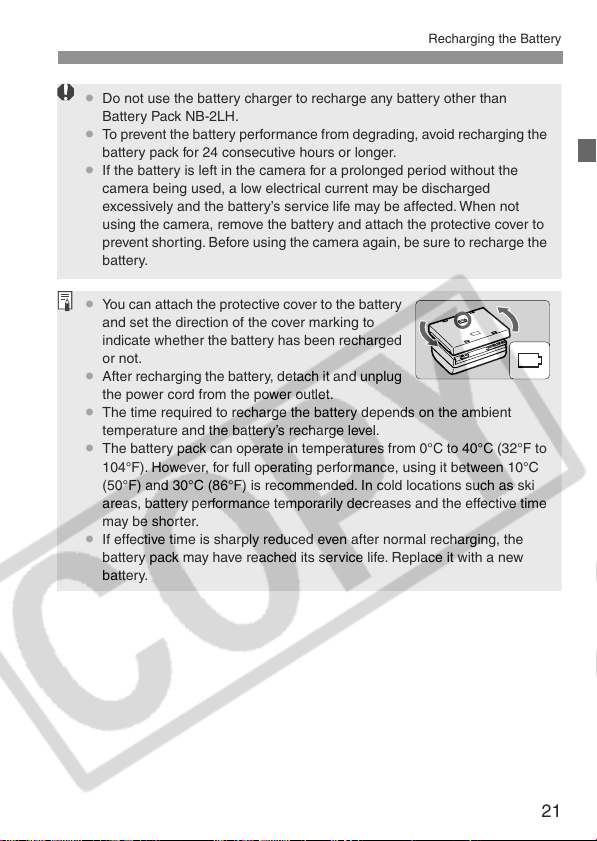
¡ You can attach the protective cover to the battery
and set the direction of the cover marking to
indicate whether the battery has been recharged
or not.
¡ After recharging the battery, detach it and unplug
the power cord from the power outlet.
¡ The time required to recharge the battery depends on the ambient
temperature and the battery’s recharge level.
¡ The battery pack can operate in temperatures from 0°C to 40°C (32°F to
104°F). However, for full operating performance, using it between 10°C
(50°F) and 30°C (86°F) is recommended. In cold locations such as ski
areas, battery performance temporarily decreases and the effective time
may be shorter.
¡ If effective time is sharply reduced even after normal recharging, the
battery pack may have reached its service life. Replace it with a new
battery.
21
Installing and Removing the Battery
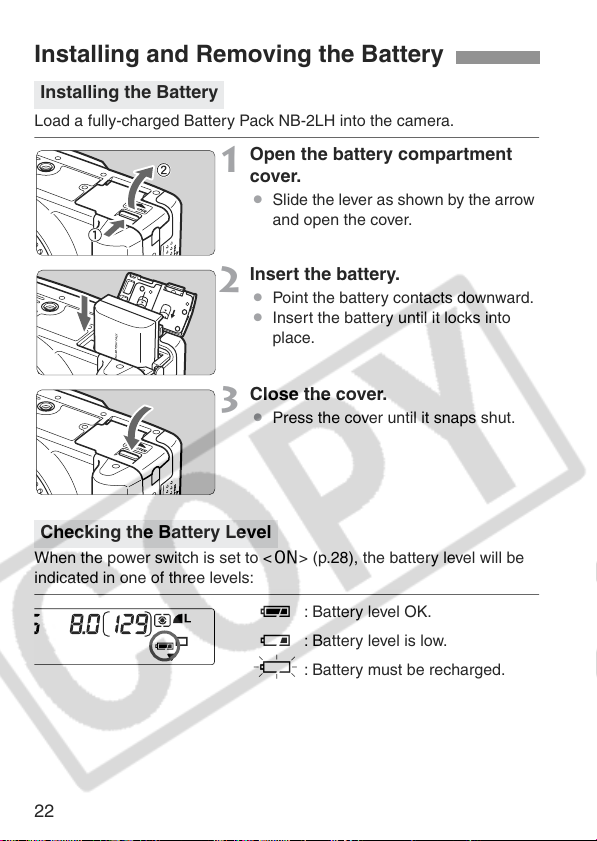
Installing the Battery
Load a fully-charged Battery Pack NB-2LH into the camera.
Open the battery compartment
1
cover.
¡ Slide the lever as shown by the arrow
and open the cover.
Insert the battery.
2
¡ Point the battery contacts downward.
¡ Insert the battery until it locks into
place.
Close the cover.
3
¡ Press the cover until it snaps shut.
Checking the Battery Level
When the power switch is set to <1> (p.28), the battery level will be
indicated in one of three levels:
z : Battery level OK.
x : Battery level is low.
n : Battery must be recharged.
22
Installing and Removing the Battery
¡ The actual number of shots may be fewer than indicated above
depending on the shooting conditions.
¡ The number of possible shots will decrease with more frequent use of
the LCD monitor.
¡ Pressing the shutter button halfway for long periods or operating only the
autofocus can also reduce the number of possible shots.
¡ The lens operation is powered by the camera’s battery. Using certain
lenses can reduce the number of possible shots.
Battery Life [Number of shots]
Temperature
At 20°C / 68°F Approx. 600 Approx. 400
At 0°C / 32°F Approx. 450 Approx. 350
¡ The figures above are based on a fully-charged NB-2LH and CIPA (Camera &
Imaging Products Association) testing criteria.
Shooting Conditions
No Flash 50% Flash Use
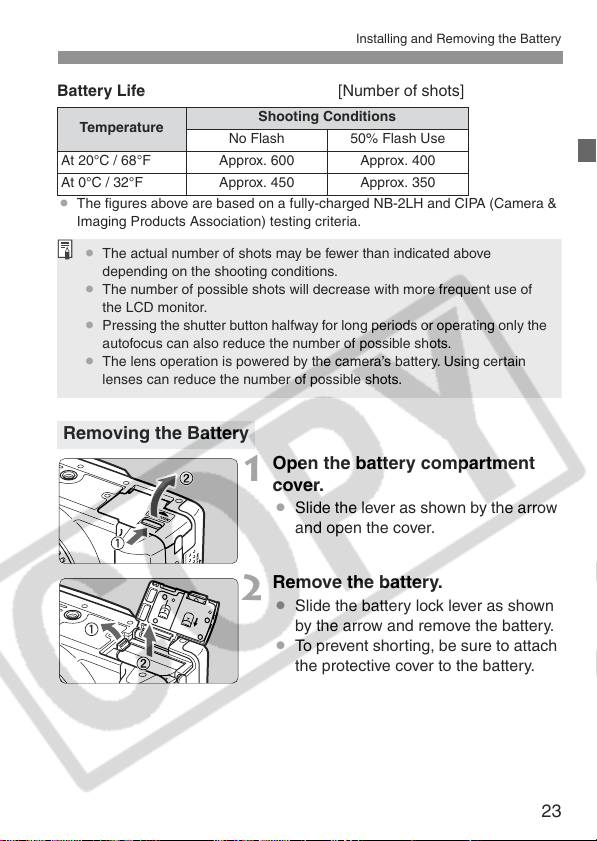
Removing the Battery
Open the battery compartment
1
cover.
¡ Slide the lever as shown by the arrow
and open the cover.
Remove the battery.
2
¡ Slide the battery lock lever as shown
by the arrow and remove the battery.
¡ To prevent shorting, be sure to attach
the protective cover to the battery.
23
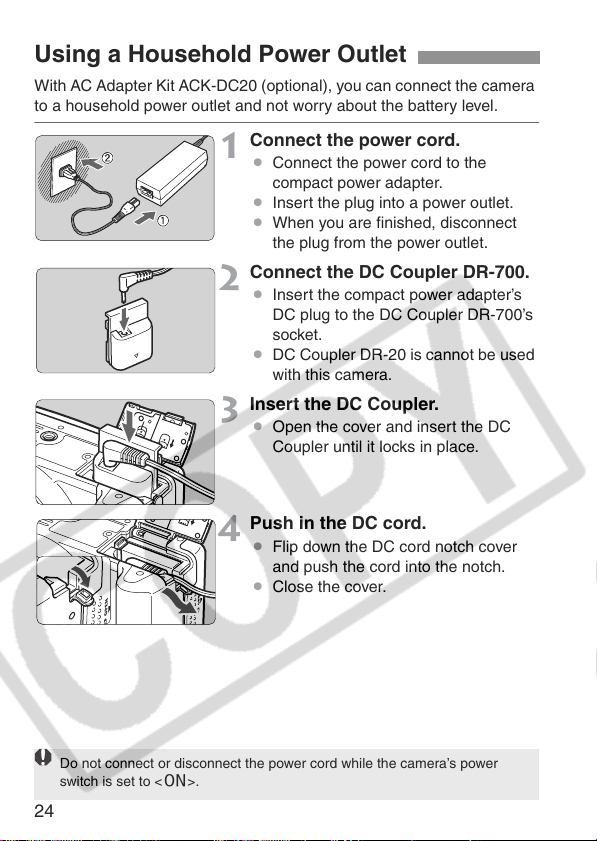
Using a Household Power Outlet
With AC Adapter Kit ACK-DC20 (optional), you can connect the camera
to a household power outlet and not worry about the battery level.
Connect the power cord.
1
¡ Connect the power cord to the
compact power adapter.
¡ Insert the plug into a power outlet.
¡ When you are finished, disconnect
the plug from the power outlet.
Connect the DC Coupler DR-700.
2
¡ Insert the compact power adapter’s
DC plug to the DC Coupler DR-700’s
socket.
¡ DC Coupler DR-20 is cannot be used
with this camera.
Insert the DC Coupler.
3
¡ Open the cover and insert the DC
Coupler until it locks in place.
Push in the DC cord.
4
¡ Flip down the DC cord notch cover
and push the cord into the notch.
¡ Close the cover.
Do not connect or disconnect the power cord while the camera’s power
switch is set to <
24
1>.
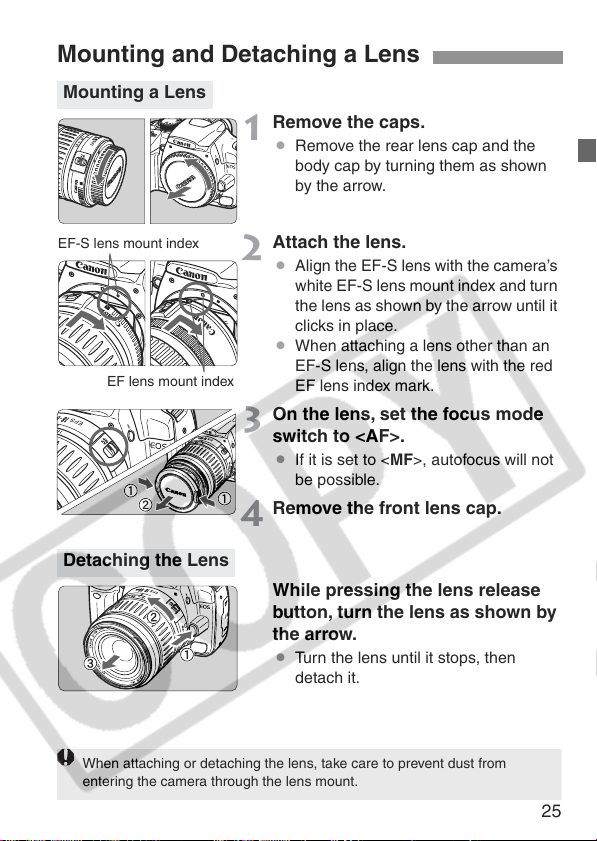
Mounting and Detaching a Lens
When attaching or detaching the lens, take care to prevent dust from
entering the camera through the lens mount.
Mounting a Lens
Remove the caps.
1
¡ Remove the rear lens cap and the
body cap by turning them as shown
by the arrow.
EF-S lens mount index
EF lens mount index
Detaching the Lens
Attach the lens.
2
¡ Align the EF-S lens with the camera’s
white EF-S lens mount index and turn
the lens as shown by the arrow until it
clicks in place.
¡
When attaching a lens other than an
EF-S lens, align the lens with the red
EF lens index mark.
On the lens, set the focus mode
3
switch to <AF>.
¡ If it is set to <MF>, autofocus will not
be possible.
Remove the front lens cap.
4
While pressing the lens release
button, turn the lens as shown by
the arrow.
¡ Turn the lens until it stops, then
detach it.
25
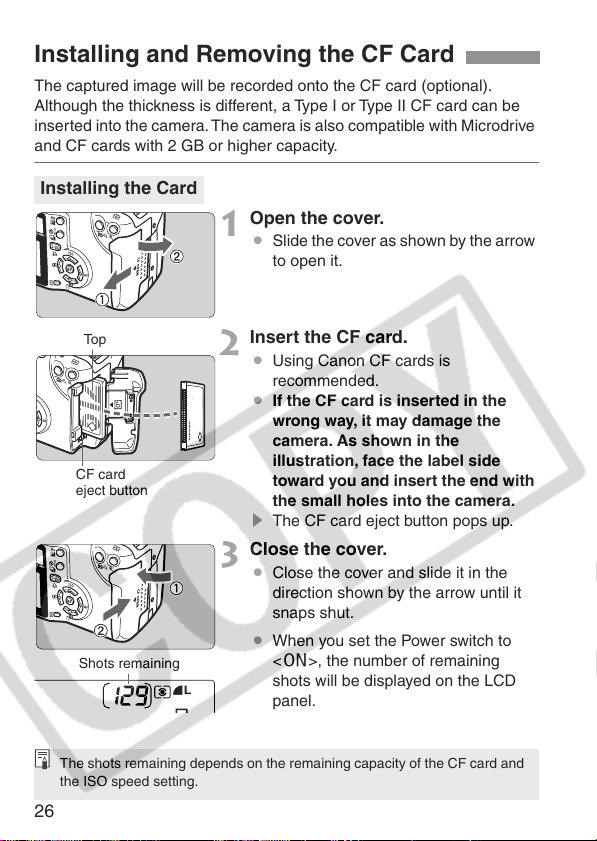
Installing and Removing the CF Card
The captured image will be recorded onto the CF card (optional).
Although the thickness is different, a Type I or Type II CF card can be
inserted into the camera. The camera is also compatible with Microdrive
and CF cards with 2 GB or higher capacity.
Installing the Card
Open the cover.
1
¡ Slide the cover as shown by the arrow
to open it.
To p
CF card
eject button
Shots remaining
The shots remaining depends on the remaining capacity of the CF card and
the ISO speed setting.
Insert the CF card.
2
¡ Using Canon CF cards is
recommended.
¡ If the CF card is inserted in the
wrong way, it may damage the
camera. As shown in the
illustration, face the label side
toward you and insert the end with
the small holes into the camera.
s The CF card eject button pops up.
Close the cover.
3
¡ Close the cover and slide it in the
direction shown by the arrow until it
snaps shut.
¡ When you set the Power switch to
<1>, the number of remaining
shots will be displayed on the LCD
panel.
26
Installing and Removing the CF Card
¡ A blinking access lamp indicates that data is being transferred or
read, written, or erased on the CF card. Never do the following while
the access lamp is lit or blinking. Such actions may destroy the
image data. It may also damage the CF card or camera.
• Shaking or banging the camera around.
• Opening the CF card slot cover.
• Removing the battery.
¡ If you use a CF card already containing recorded images, the images
recorded thereafter by the camera might be appended with a file number
that continues on from the images already recorded on the CF card.
If you want to start the file numbering from 0001, set [Auto reset] for the
file numbering (p.67), then use a newly formatted CF card.
¡ If “Err CF” (Error CF) is displayed on the LCD panel, see page 118.
¡
If you use a low-capacity CF card, it might not be able to record large images.
¡ Compared to CF cards, Microdrive cards are more vulnerable to
vibration and physical shock. If you use a Microdrive, be careful not to
subject the camera to vibration or physical shock especially while
recording or displaying images.
On the menu, if you set the [c Shoot w/o card] to [Off], it will prevent you
from shooting without a CF card. (p.41)
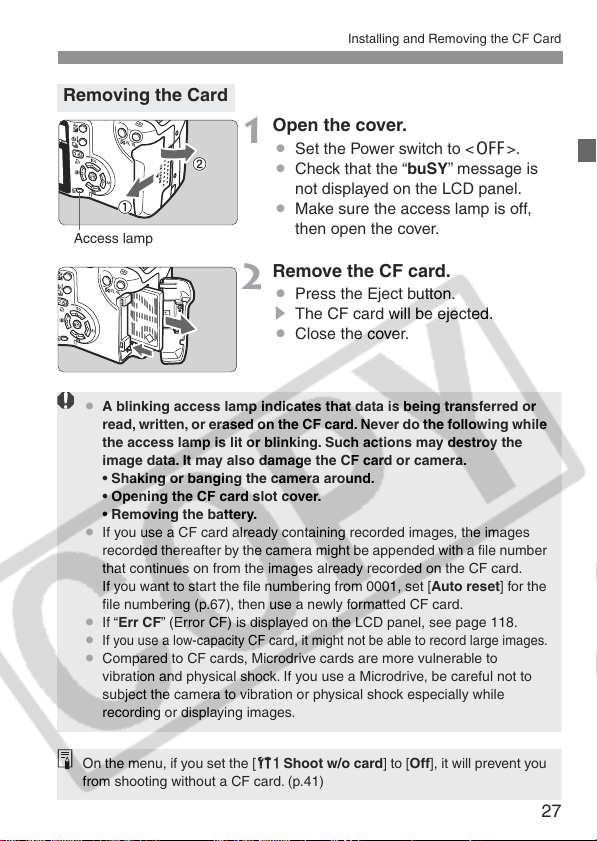
Removing the Card
Open the cover.
1
¡ Set the Power switch to <2>.
¡ Check that the “buSY” message is
not displayed on the LCD panel.
¡ Make sure the access lamp is off,
Access lamp
then open the cover.
Remove the CF card.
2
¡ Press the Eject button.
s The CF card will be ejected.
¡ Close the cover.
27
Basic Operation
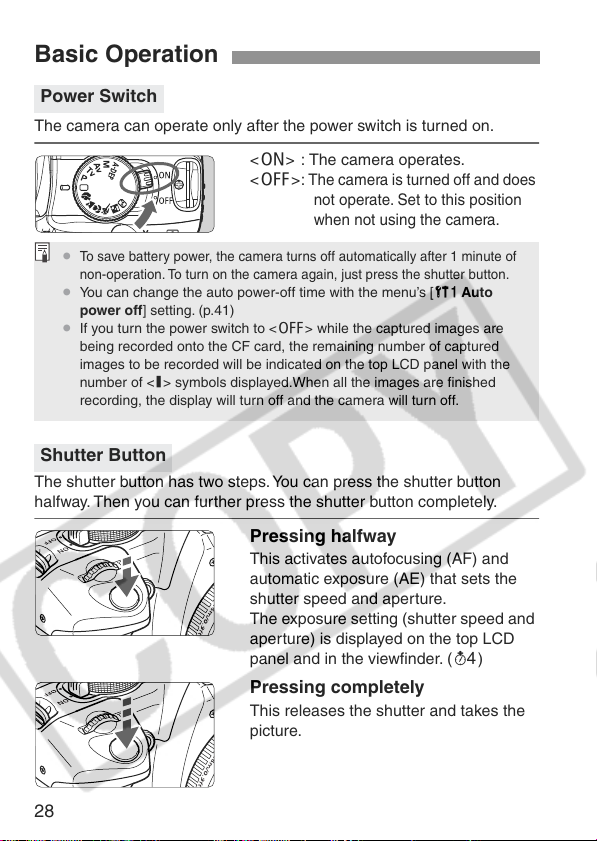
Power Switch
The camera can operate only after the power switch is turned on.
<1> : The camera operates.
The camera is turned off and does
<2>:
¡
To save battery power, the camera turns off automatically after 1 minute of
non-operation. To turn on the camera again, just press the shutter button.
¡ You can change the auto power-off time with the menu’s [c Auto
power off] setting. (p.41)
¡ If you turn the power switch to <2> while the captured images are
being recorded onto the CF card, the remaining number of captured
images to be recorded will be indicated on the top LCD panel with the
number of <N> symbols displayed.When all the images are finished
recording, the display will turn off and the camera will turn off.
Shutter Button
The shutter button has two steps. You can press the shutter button
halfway. Then you can further press the shutter button completely.
Pressing halfway
This activates autofocusing (AF) and
automatic exposure (AE) that sets the
shutter speed and aperture.
The exposure setting (shutter speed and
aperture) is displayed on the top LCD
panel and in the viewfinder. (0)
Pressing completely
This releases the shutter and takes the
picture.
not operate. Set to this position
when not using the camera.
28
Basic Operation
¡
If you press the shutter button halfway and (0) elapse, you must press it
halfway again and wait a moment before pressing it completely to take a
picture. If you press the shutter button completely without pressing it halfway
first or if you press the shutter button halfway and then press it completely
immediately, the camera will take a moment before it takes the picture.
¡ No matter what state the camera is in (image playback, menu operation,
image recording, etc.), you can return to shooting instantly just by
pressing the shutter button halfway (except during direct printing).
¡
Camera movement during the moment of exposure is called camera shake. To
prevent camera shake, note the advice below. Also see “Holding the Camera” (p.42).
• Hold the camera steady.
• Put your finger tip on the shutter button, hold the camera with your right
hand, then press the shutter button gently.
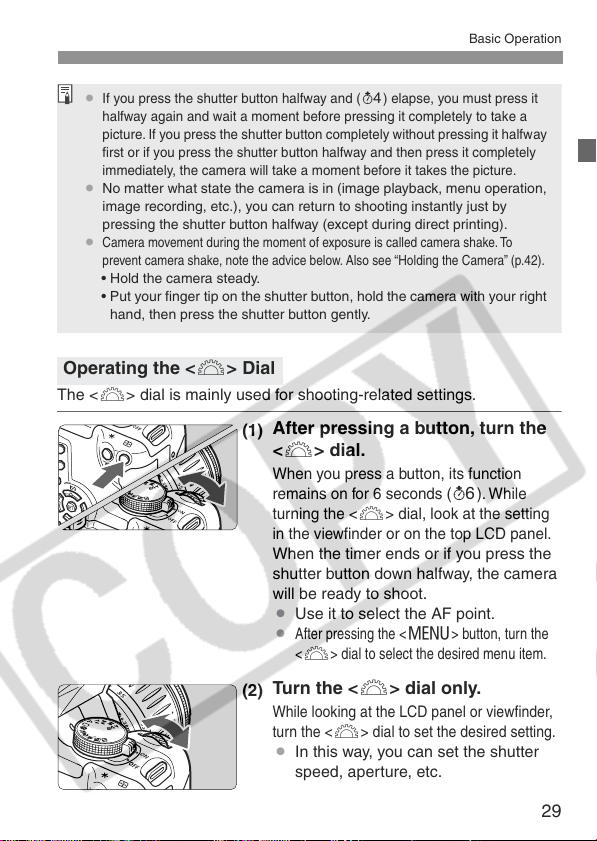
Operating the <6> Dial
The <6> dial is mainly used for shooting-related settings.
After pressing a button, turn the
(1)
<6> dial.
When you press a button, its function
remains on for 6 seconds (9). While
turning the <
in the viewfinder or on the top LCD panel.
When the timer ends or if you press the
shutter button down halfway, the camera
will be ready to shoot.
¡ Use it to select the AF point.
¡
After pressing the <
<
Turn the <6> dial only.
(2)
While looking at the LCD panel or viewfinder,
turn the <
¡ In this way, you can set the shutter
speed, aperture, etc.
6
> dial, look at the setting
M
> button, turn the
6
> dial to select the desired menu item.
6
> dial to set the desired setting.
29
Basic Operation
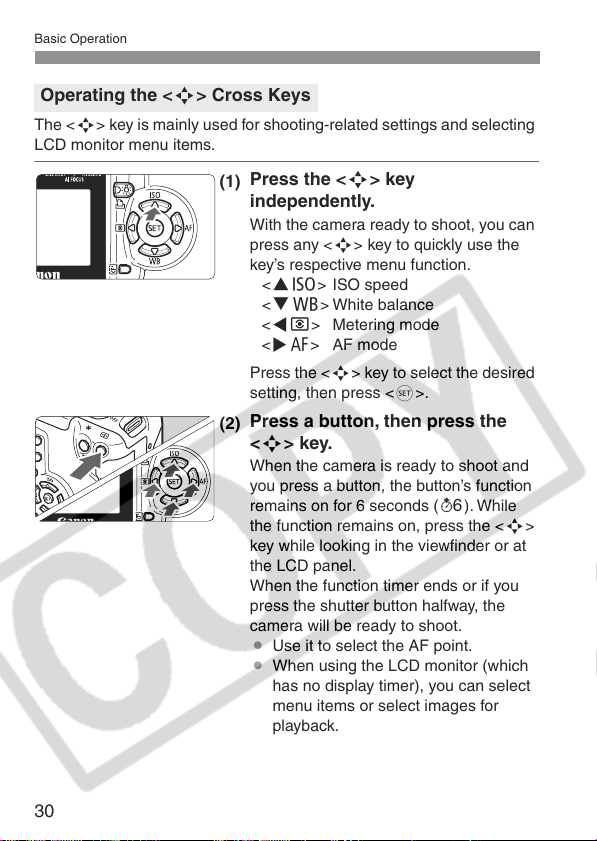
Operating the <S> Cross Keys
The <S> key is mainly used for shooting-related settings and selecting
LCD monitor menu items.
Press the <S> key
(1)
independently.
With the camera ready to shoot, you can
press any <S> key to quickly use the
key’s respective menu function.
<WZ> ISO speed
<XB> White balance
<YQ> Metering mode
<ZE> AF mode
Press the <S> key to select the desired
setting, then press <0>.
Press a button, then press the
(2)
<S> key.
When the camera is ready to shoot and
you press a button, the button’s function
remains on for 6 seconds (9). While
the function remains on, press the <S>
key while looking in the viewfinder or at
the LCD panel.
When the function timer ends or if you
press the shutter button halfway, the
camera will be ready to shoot.
¡ Use it to select the AF point.
¡ When using the LCD monitor (which
has no display timer), you can select
menu items or select images for
playback.
30
 Loading...