

Canon RebelT3i EOS 600D, EOS Rebel T3i, EOS 600D Instruction Manual
m
0
Canon
Z "

Introduction
The EOS REBEL T3i/EOS 600D is a high-performance, digital single-
lens reflex camera featuring a fine-detail CMOS sensor with approx.
18.0 effective megapixels, DIGIC 4, high-precision and high-speed 9-
point AF, approx. 3.7 fps continuous shooting, Live View shooting, and
Full High-Definition (Full HD) movie shooting.
The camera is highly responsive for shooting at anytime, provides many
functions fitted for advanced shooting, and offers many other features.
Refer to This Manual while Using the Camera to Further
Familiarize Yourself with the Camera
With a digital camera, you can immediately view the image you have
captured. While reading this manual, take a few test shots and see how
they come out. You can then better understand the camera.
To avoid botched pictures and accidents, first read the "Safety
Warnings" (p.297, 298) and "Handling Precautions" (p.14, 15).
Testing the Camera Before Use and Liability
After shooting, playback and check whether the images have been
properly recorded. If the camera or memory card is faulty and the
images cannot be recorded or downloaded to a computer, Canon
cannot be held liable for any loss or inconvenience caused.
Copyrights
Copyright laws in your country may prohibit the use of your recorded
images or copyrighted music and images with music in the memory
card for anything other than private enjoyment. Also be aware that
certain public performances, exhibitions, etc., may prohibit photography
even for private enjoyment.
This camera is compatible with SD memory cards, SDHC memory
,_"_" cards, and SDXC memory cards. This manual will refer to a!l these
_"4_- cards as just "card."
* The camera does not come with a card for recording images.
Please purchase it separately.

item Check List
Before starting, check that all the following items have been included
with your camera. If anything is missing, contact your dealer.
Battery Pack Battery Charger
Camera LP-E8 LC-E8/LC-E8E*
(with eyecup and body cap) (with protective cover)
Wide Strap interface cable Stereo AV Cable
EW-100DB Il! AVC-DC400ST
@
EOS DIGITAL Software Camera
Solution Disk instruction instruction Manual
(Software CD-ROM) Manual (this booklet)
(CD-ROM)
* Battery Charger LC-E8 or LC-E8E is provided. (The LC-E8E comes with a
power cord.)
® If you purchased a Lens Kit, check that the lens is included.
® Depending on the Lens Kit type, the lens instruction manual might also be
included.
® Be careful not to lose any of the above items.
Software instruction Manual
The software Instruction Manuals are included in the CD-ROM as
PDF files. See page 304 for instructions to look up manuals in the
Software Instruction Manual.

Conventions Used in this Manual
<AT> <4_>
<_-_>
_4, _6, _10, _16
icons in this Manual
<_ > indicates the Main Dial.
indicates the <_;_> cross keys.
indicates the setting button.
indicates that the respective function remains
active for 4 sec., 6 sec., 10 sec., or 16 sec.
respectively after you let go of the button.
* in this manual, the icons and markings indicatingthe camera's buttons, dials,
andsettings correspond to the icons andmarkings on the camera and onthe
LCD monitor.
(p.**)
?
indicates a function which can be changed by pressing the
<MENU> button and changing the setting.
if shown on the upper right of the page, it indicates that the
function is available only in the Creative Zone modes (p.22).
Reference page numbers for more information.
Tip or advice for better shooting.
Problem-solving advice.
Warning to prevent shooting problems.
Supplemental information.
Basic Assumptions
_ All operations explained in this manual assume that the power switch
has already been set to <ON> (p.32).
_ It is assumed that all the menu settings and Custom Functions are
set to the default.
_ For explanatory purposes, the instructions show the camera attached
with an EF-S18-55mm f/3.5-5.6 IS II lens.
4

Chapters
For first-time DSLR users,Chapters 1 and 2 explain the camera's
basic operations and shooting procedures.
fntroduction 2
: Getting Started 25 i
BasicShootingandimagePl.yback " !
Creative Shooting 73 i
4: AdvancedShooting 93I
Shooting with the LCD Monitor (Live View Shooting) 123I
ShootingMovies 1,1
Handy Features 165
8 WirelessFlashPhotography 189|
:i image Playback 201
10:1 Post-Processing images 229
11 Printing,mages 235I
c.stomi,ingtheCamera 2,9I
131Reference 2,9I
14_So.wareStartGuide 381i
Quick Reference Guide and Instruction Manual index 305M
5
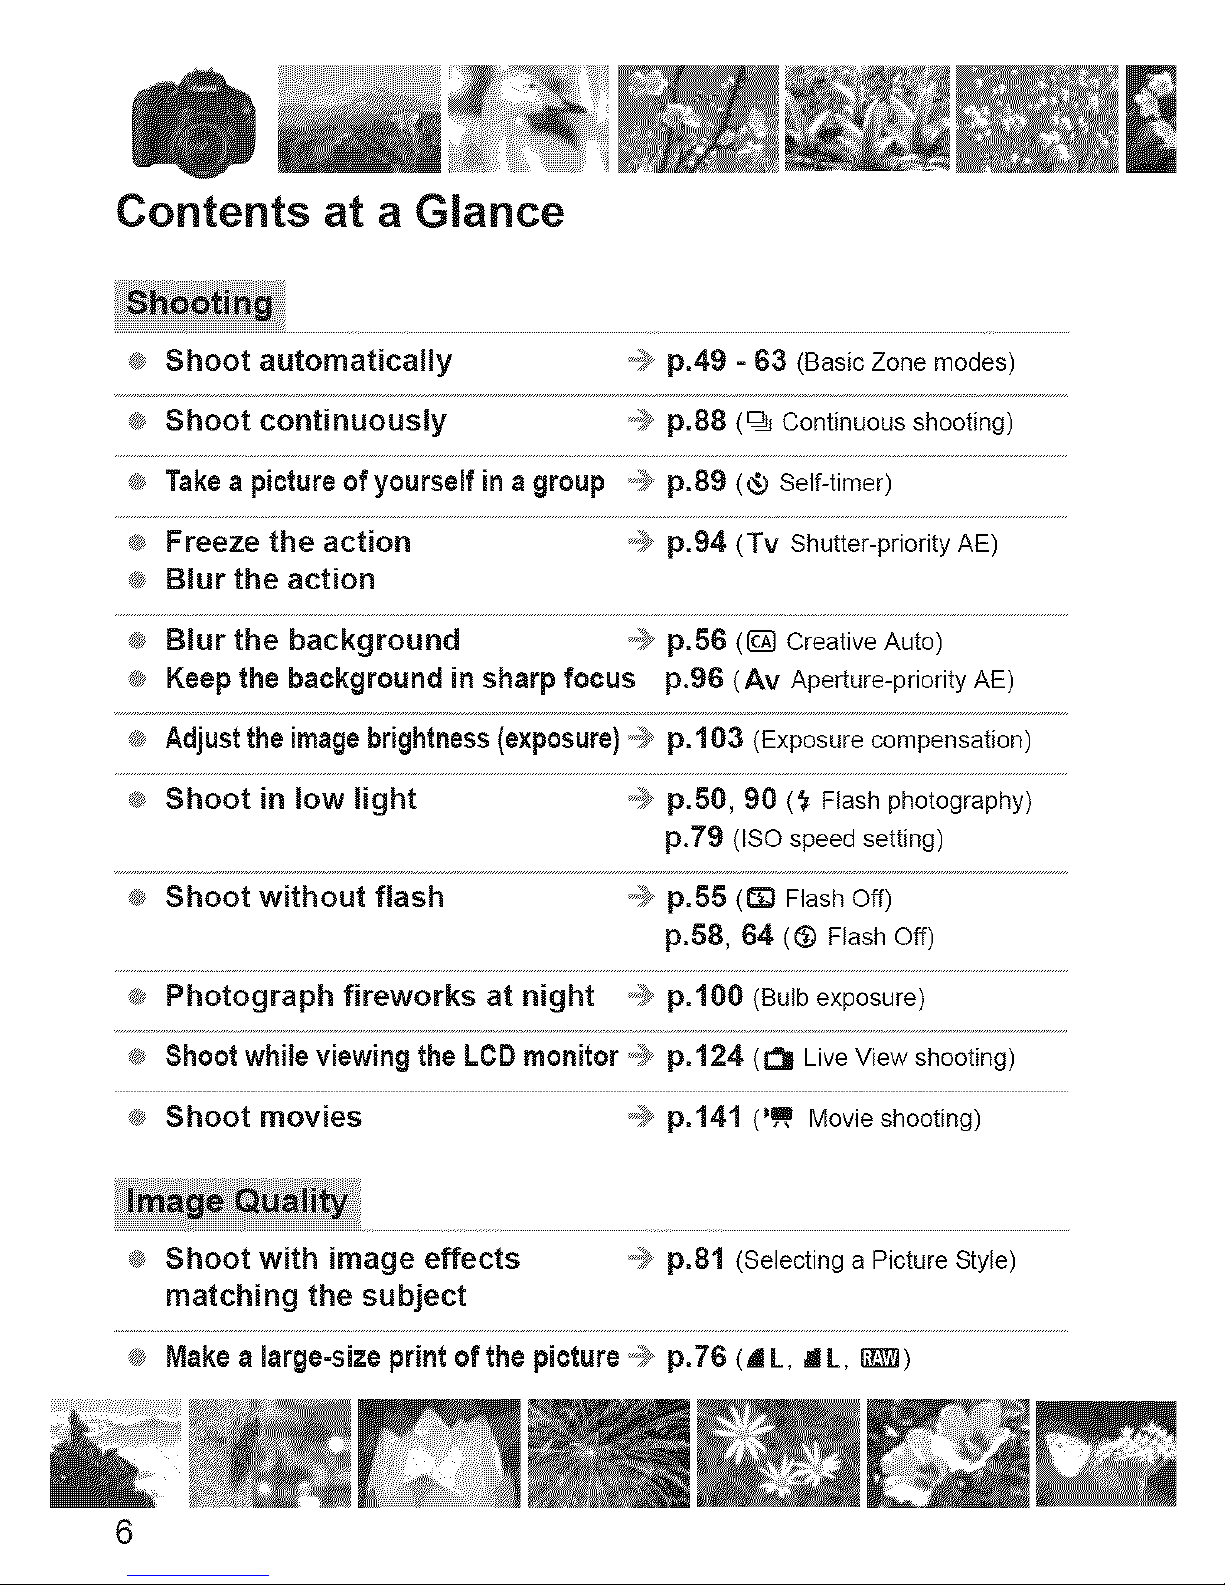
Contents at a Glance
® Shoot automatically ,,,,_p.49 - 63 (BasicZonemodes)
® Shoot continuously _-_p.88 (_ Continuousshooting)
® Takea pictureofyourself in agroup _,,_p.89 (e:oSelf-timer)
_ Freeze the action _ p.94 (Tv Shutter-priorityAE)
_ Blur the action
_ Blur the background _,-_p.56 (_ CreativeAuto)
® Keep the background in sharp focus p.96 (Av Aperture-priorityAE)
® Adjust the imagebrightness (exposure)o,;_p.103 (Exposurecompensation)
®_Shoot in low light _ p.50, 90 (_ Flashphotography)
p.79 (ISOspeedsetting)
_ Shoot without flash _ p.55 (D FlashOff)
p.58, 64 (® FlashOff)
® Shootwhile viewing the LCD monitor ,_ p.124 (r'_ LiveViewshooting)
_ Shoot movies _,_p.141 (_ Movieshooting)
_, Shoot with image effects _i_ p.81 (Selectinga PictureStyle)
matching the subject
_ Make a large-size print of the pioture ,,_ p.76 (L L, =lL, _)
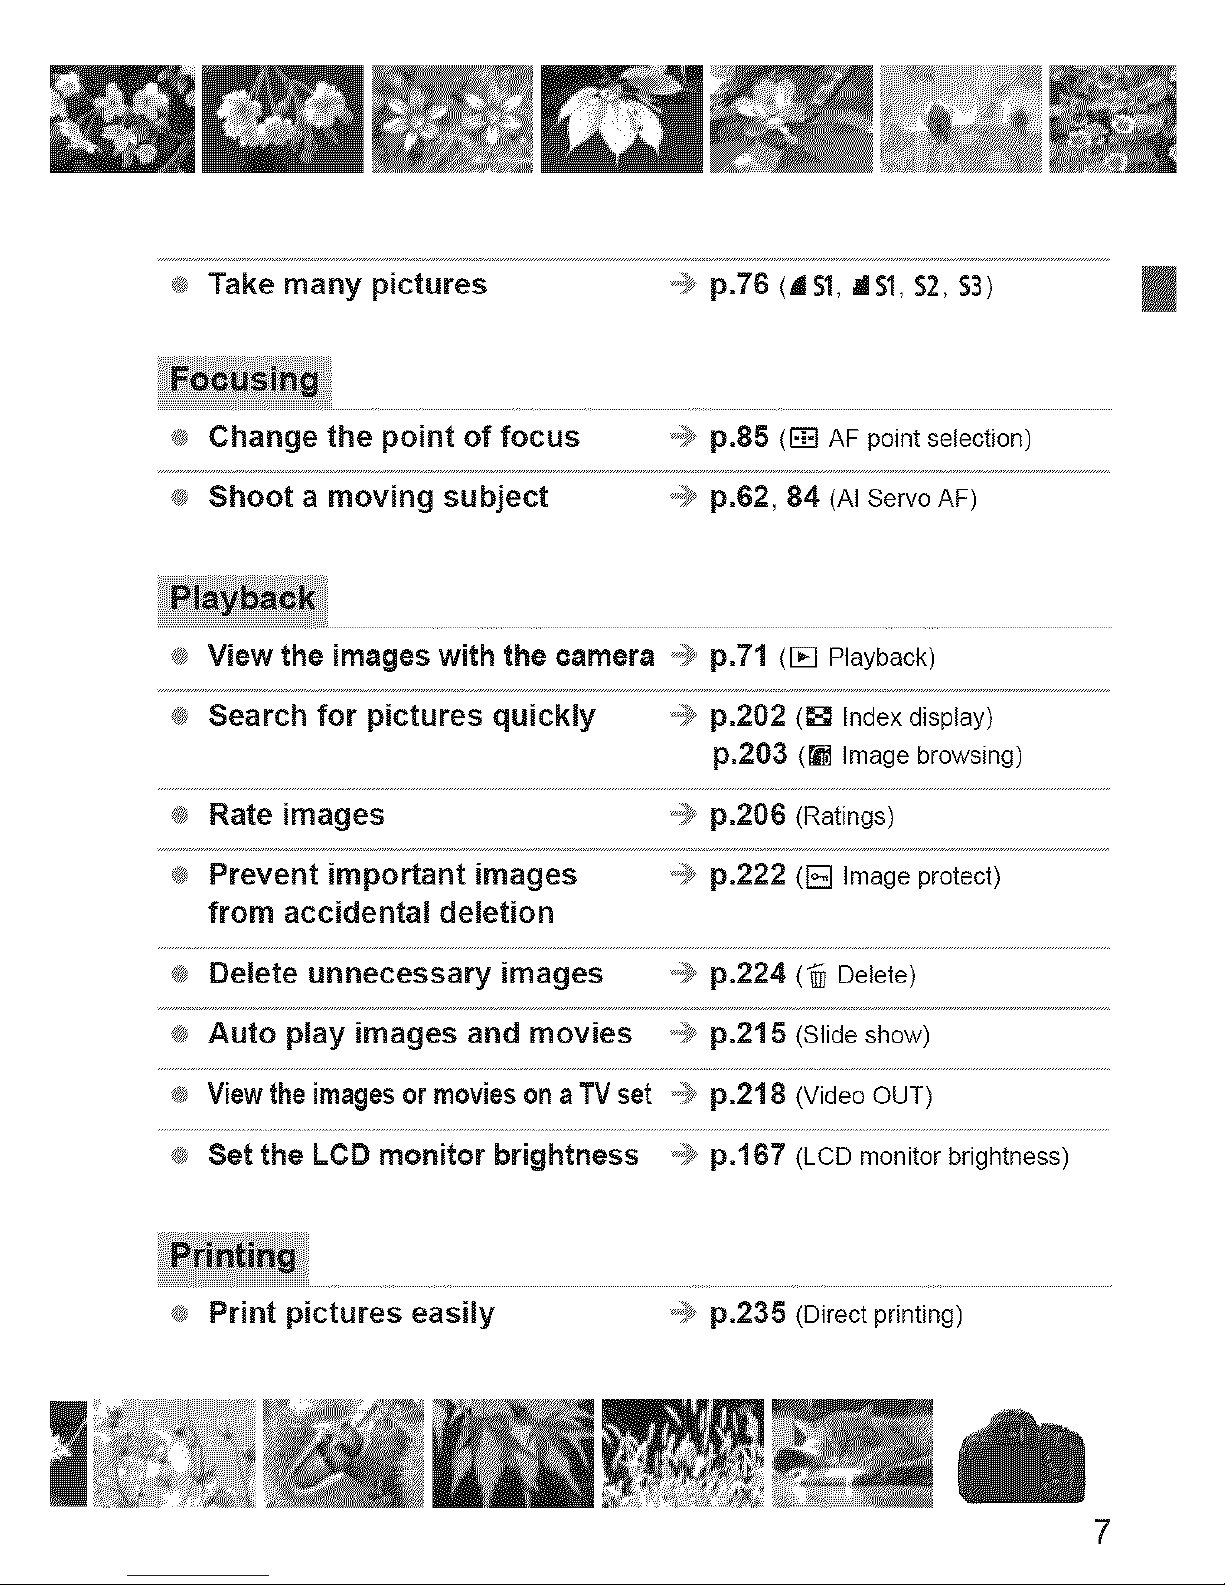
®_Take many pictures _,5p.76 (iS1, dS1, $2, S3) !
_ Change the point of focus _,5p.85 ([] AF pointselection)
_ Shoot a moving subject ',,,_p.62, 84 (AIServoAF)
_ View the images with the camera @ p.71 (1_1Playback)
_ Search for pictures quickly *,_p.202 ([] Indexdisplay)
p.203 ([] Imagebrowsing)
_ Rate images @ p.206 (Ratings)
_ Prevent important images _5 p.222 (B Imageprotect)
from accidental deletion
_ Delete unnecessary images @ p.224 (_ Delete)
_ Auto play images and movies @ p.215 (Slideshow)
_'_View theimagesormovies onaTV set _,_p.218 (VideoOUT)
_ Set the LeD monitor brightness @ p.167 (LCDmonitorbrightness)
_ Print pictures easily _'5 p.235 (Direct printing)
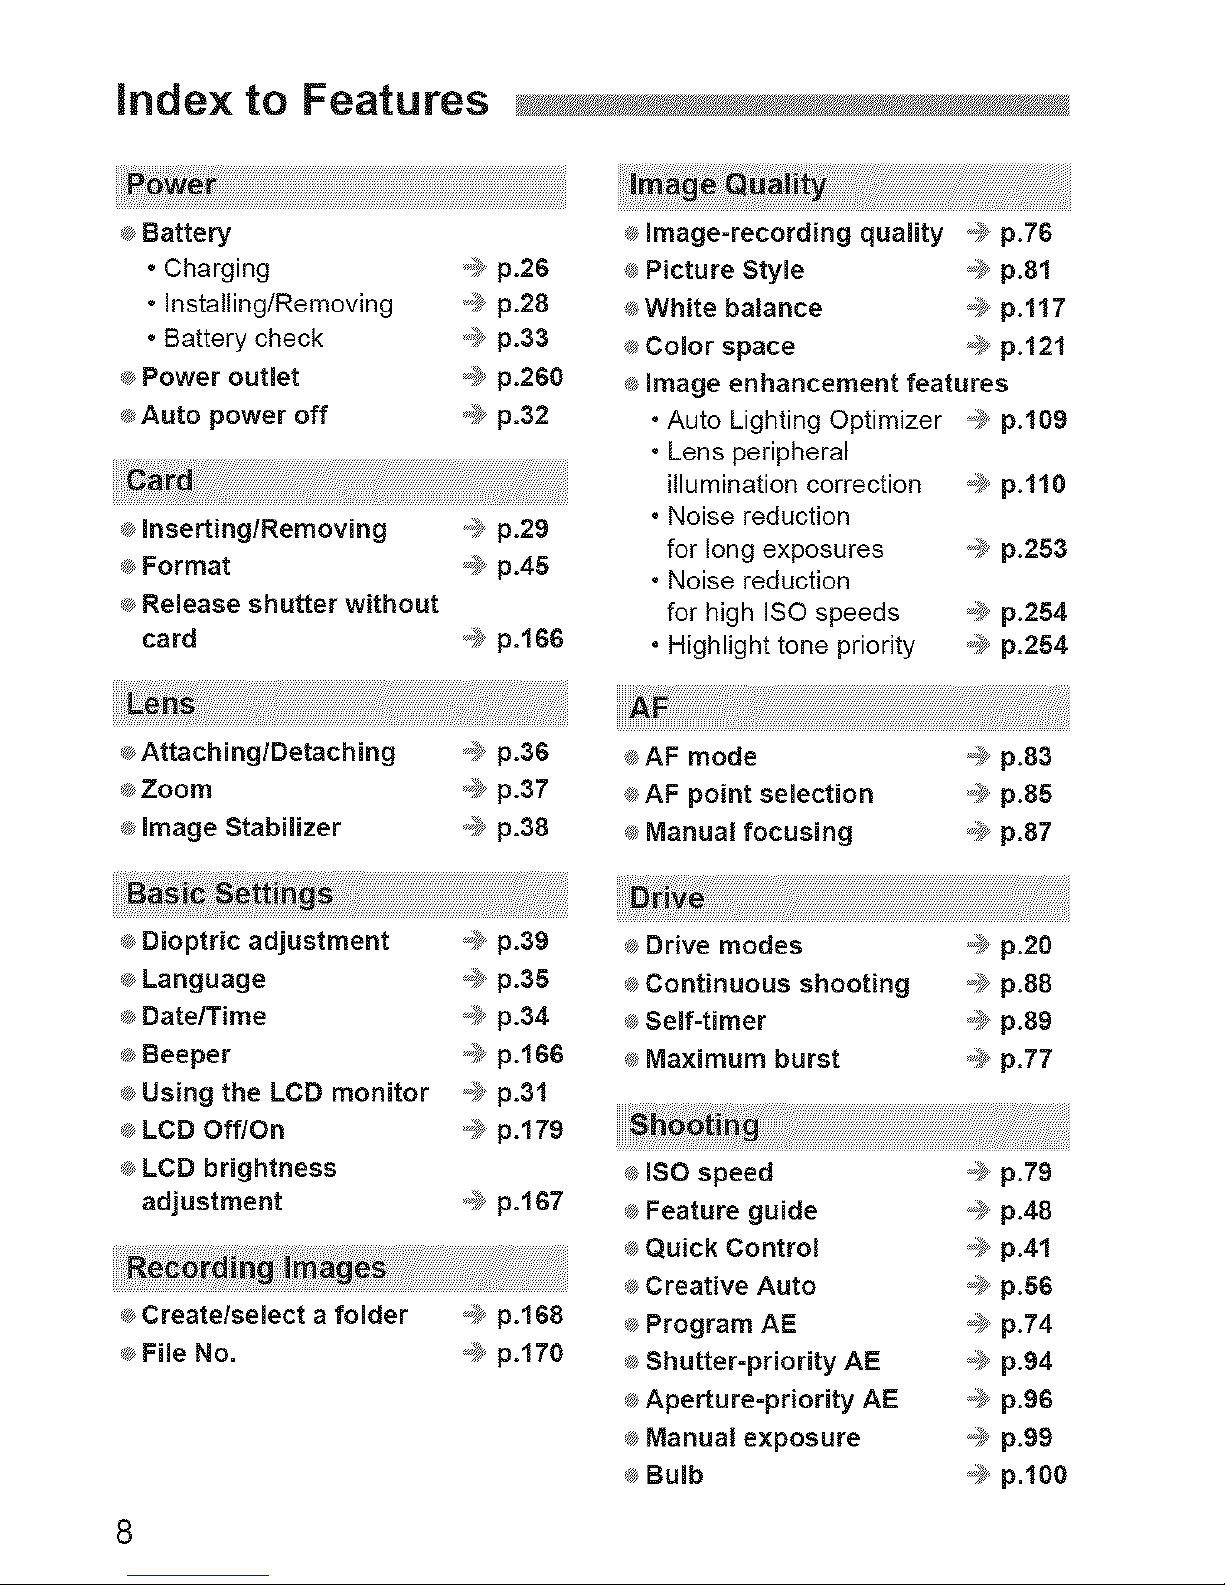
index to Features
® Battery ®image=recording quality _, p.76
• Charging ,_, p.26 _,Picture Style _ p.81
• Installing/Removing ,'_ p.28 ®White balance _ p.117
• Battery check ',,_p.33 ® Color space _ p.12f
® Power outlet _-_p.260 _; image enhancement features
_Auto power off ,_ p.32 • Auto Lighting Optimizer _ p.f09
• Lens peripheral
illumination correction _ p.ff0
® _nserting/Removing _,,_p.29 • Noise reduction
for long exposures _ p.253
® Format .;_ p.45 • Noise reduction
® Release shutter without for high ISO speeds _ p.254
card _#_p.16_ • Highlight tone priority ,,,i_p.254
®Attaching/Detaching .,_ p.36 _;AF mode _ p.83
®Zoom ,,,i_p.37 _AF point selection ,,_,p.85
_ image Stabilizer ,,,i_p.38 _ Manual focusing _ p.87
® Createlselect a folder _ p.168
®File No. _ p.170
_ ISO speed _÷
® Feature guide _
® Quick Control _
® Creative Auto _÷
® Program AE _
® Shutter-priority AE _
® Aperture-priority AE _
® Manual exposure _
®Bulb _
).79
).48
).4f
).56
).74
).94
).96
).99
).f00
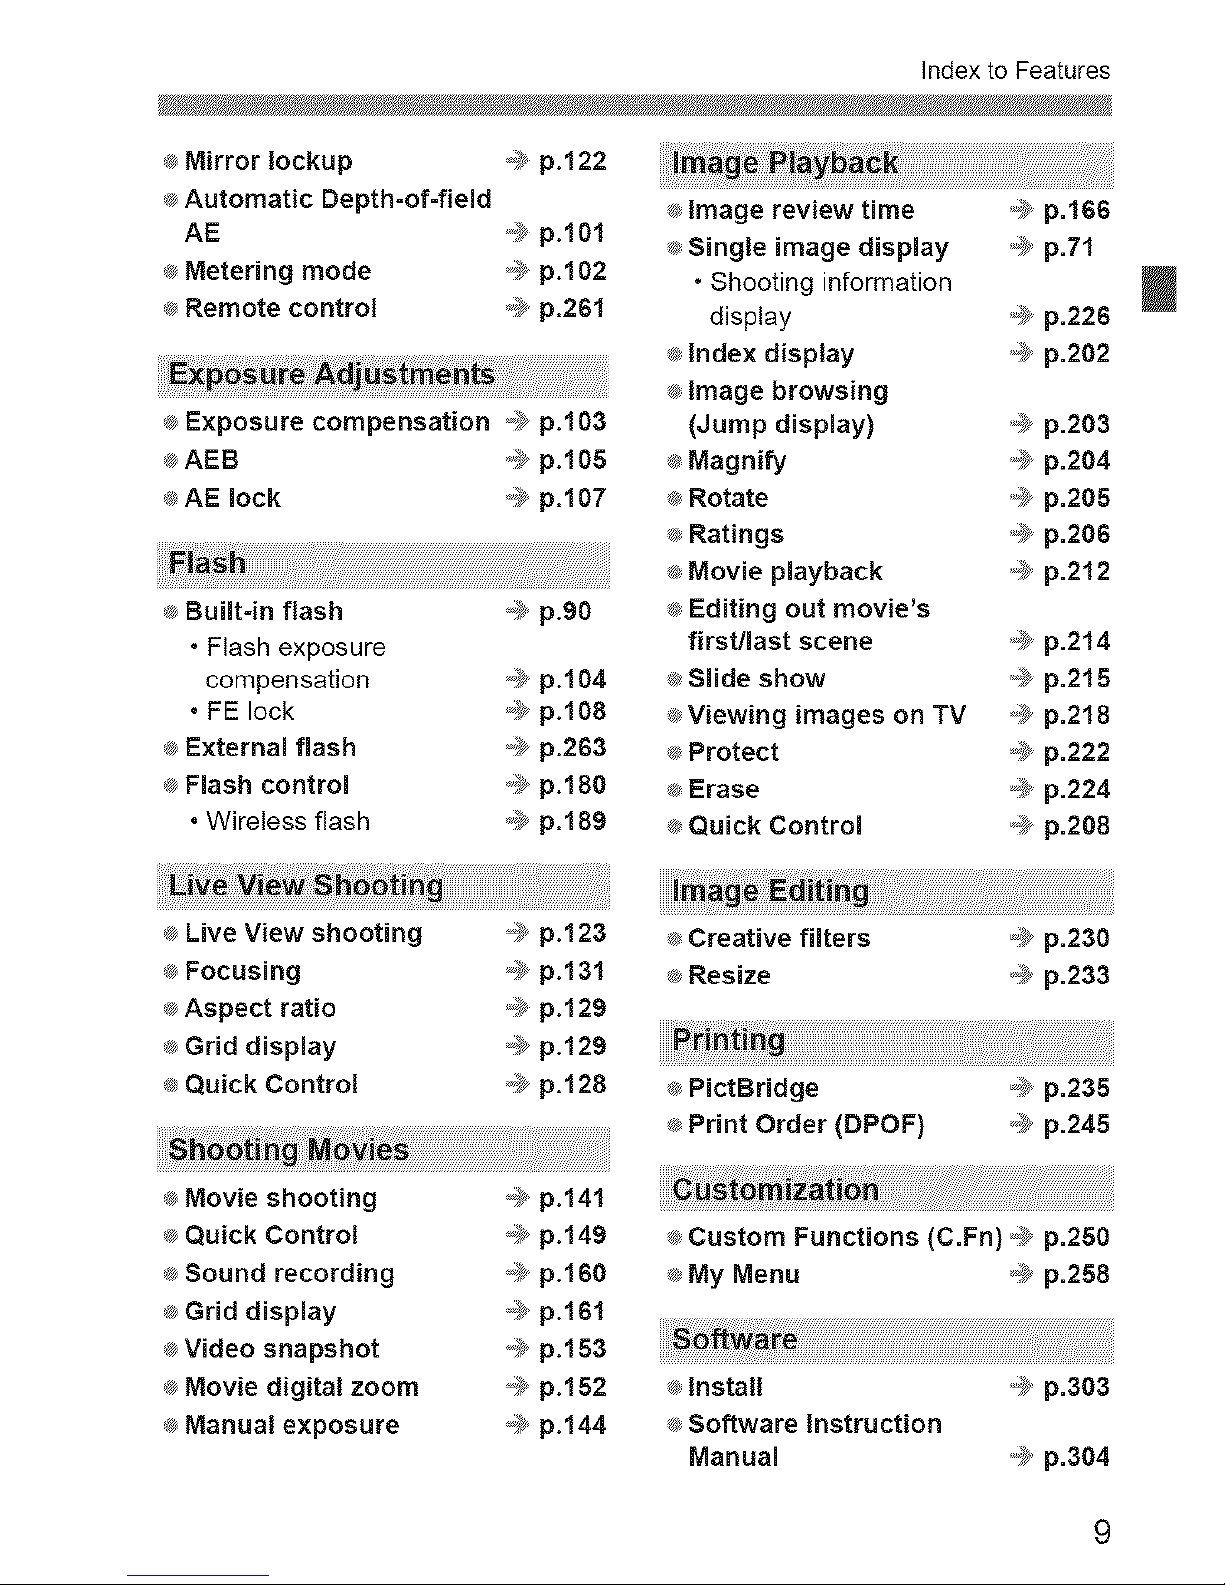
IndextoFeatures
®Mirror Iockup _ p.122
®Automatic Depth-of=fiemd
AE _# p.lOl
®Metering mode _ p.102
®Remote control ,,,_p.261
i ¸¸
®Exposure compensation _;_>p.103
®AEB ,,,i_p.105
®AE lock _,i_p.i07
®Built-in flash _ p.90
• Flash exposure
compensation _ p.104
• FE lock _ p.108
®Externam flash _ p.263
®Flash controm ,,,i_p.18O
. Wireless flash _,i_p.189
®image review time ,#_ p.166
®Single image display ,_ p.Ti
• Shooting information
display ,#_ p.226
®Index display _ p.202
®image browsing
(Jump dispmay) '_ p.203
_ Magnify ,_ p.204
®Rotate ,_ p.205
® Ratings ,#_ p.206
®Movie p_ayback _ p.212
® Editing out movie's
flrst/_ast scene ,#_ p.214
®SHde show ,,,_ p.215
®Viewing images on TV @ p.218
®Protect _ p.222
®Erase ,-i_'_p.224
Quick Contro_ _ p.208
® Live View shooting _b p.123
®Focusing *#_p.131
®Aspect ratio _ p.129
®Grid display _ p.129
_ Quick Contro_ _ p.128
®Movie shooting @ p.141
®Quick Control -_* p.149
®Sound recording -_÷p.160
®Grid display _ p.161
®Video snapshot _ p.153
®Movie digital zoom _ p.152
®Manual exposure _ p.144
®Creative filters ,_;_p.230
®Resize _@,p.233
®PictBridge _ p.235
®Print Order (DPOF) _ p.245
®Custom Functions (C.Fn) _,_ p.250
®My Menu _@,p.258
®install ,_ p.303
®Software instruction
Manual ,_ p.304
9
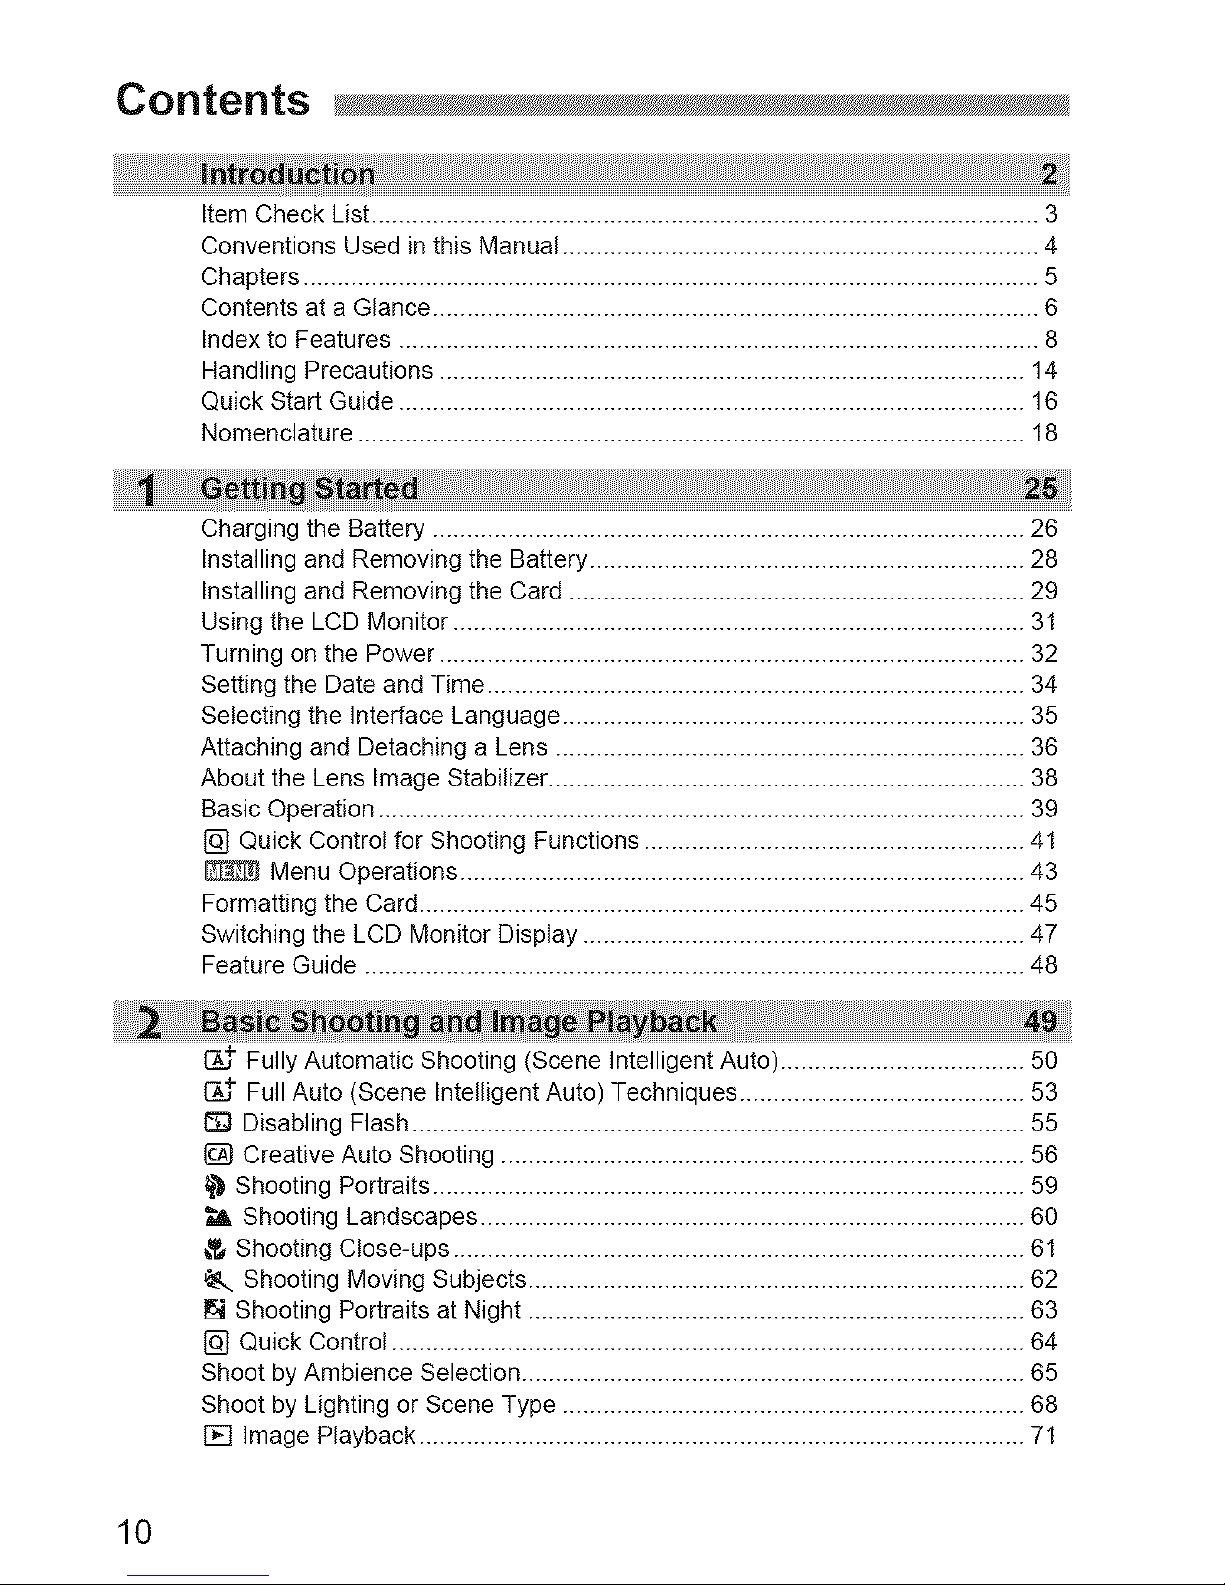
Contents
Item Check List .................................................................................................. 3
Conventions Used in this Manual ...................................................................... 4
Chapters ............................................................................................................ 5
Contents at a Glance ......................................................................................... 6
Index to Features .............................................................................................. 8
Handling Precautions ...................................................................................... 14
Quick Start Guide ............................................................................................ 16
Nomenclature .................................................................................................. 18
Charging the Battery ....................................................................................... 26
Installing and Removing the Battery ................................................................ 28
Installing and Removing the Card ................................................................... 29
Using the LCD Monitor .................................................................................... 31
Turning on the Power ...................................................................................... 32
Setting the Date and Time ............................................................................... 34
Selecting the Interface Language .................................................................... 35
Attaching and Detaching a Lens ..................................................................... 36
About the Lens Image Stabilizer ...................................................................... 38
Basic Operation ............................................................................................... 39
[] Quick Control for Shooting Functions ........................................................ 41
Menu Operations ................................................................................... 43
Formatting the Card......................................................................................... 45
Switching the LCD Monitor Display ................................................................. 47
Feature Guide ................................................................................................. 48
Fully Automatic Shooting (Scene Intelligent Auto) .................................... 50
Full Auto (Scene Intelligent Auto) Techniques .......................................... 53
1:_ Disabling Flash .......................................................................................... 55
[] Creative Auto Shooting ............................................................................. 56
_ Shooting Portraits ....................................................................................... 59
_, Shooting Landscapes ................................................................................ 60
_ Shooting Close-ups .................................................................................... 61
Shooting Moving Subjects ......................................................................... 62
Shooting Portraits at Night ......................................................................... 63
[] Quick Control ............................................................................................. 64
Shoot by Ambience Selection .......................................................................... 65
Shoot by Lighting or Scene Type .................................................................... 68
[] Image Playback ......................................................................................... 71
10
Contents
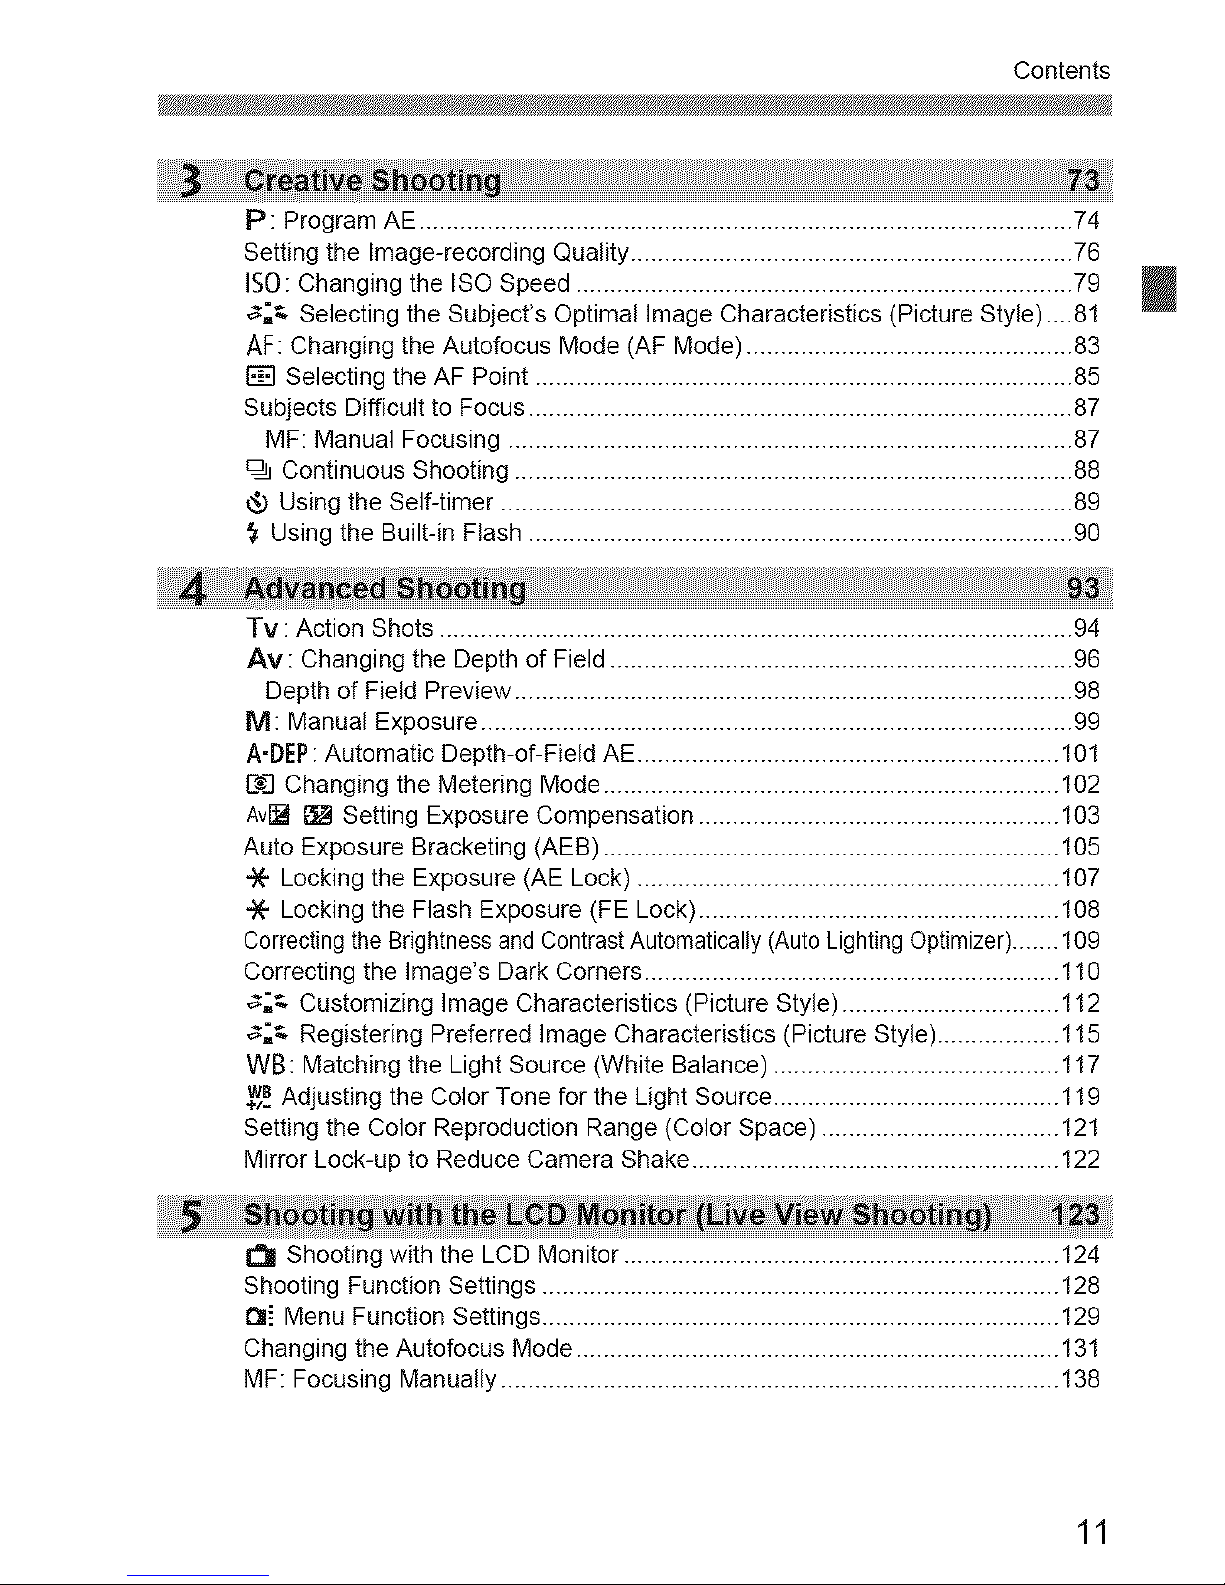
P: Program AE................................................................................................ 74
Setting the Image-recording Quality ................................................................. 76
IS0: Changing the ISO Speed ......................................................................... 79
_-_,=.Selecting the Subject's Optimal Image Characteristics (Picture Style)....81
AF: Changing the Autofocus Mode (AF Mode) ................................................ 83
[] Selecting the AF Point ............................................................................... 85
Subjects Difficult to Focus ................................................................................ 87
MF: Manual Focusing ................................................................................... 87
Continuous Shooting .................................................................................. 88
Using the Self-timer .................................................................................... 89
Using the Built-in Flash ................................................................................ 90
Tv : Action Shots ............................................................................................. 94
Av : Changing the Depth of Field .................................................................... 96
Depth of Field Preview .................................................................................. 98
M: Manual Exposure ....................................................................................... 99
A-DEP: Automatic Depth-of-Field AE.............................................................. 101
E_ Changing the Metering Mode ................................................................... 102
AvF__ Setting Exposure Compensation ..................................................... 103
Auto Exposure Bracketing (AEB) ................................................................... 105
-'X-Locking the Exposure (AE Lock) .............................................................. 107
-X- Locking the Flash Exposure (FE Lock) ..................................................... 108
Correctingthe Brightnessand ContrastAutomatically (AutoLightingOptimizer)....... 109
Correcting the Image's Dark Corners ............................................................. 110
_-[,=.Customizing Image Characteristics (Picture Style) ................................ 112
_-[,=.Registering Preferred Image Characteristics (Picture Style).................. 115
WB: Matching the Light Source (White Balance) .......................................... 117
wBAdjusting the Color Tone for the Light Source .......................................... 119
Setting the Color Reproduction Range (Color Space) ................................... 121
Mirror Lock-up to Reduce Camera Shake...................................................... 122
_1 Shooting with the LCD Monitor ................................................................ 124
Shooting Function Settings ............................................................................ 128
t_i Menu Function Settings ............................................................................ 129
Changing the Autofocus Mode ....................................................................... 131
MF: Focusing Manually .................................................................................. 138
11
Contents
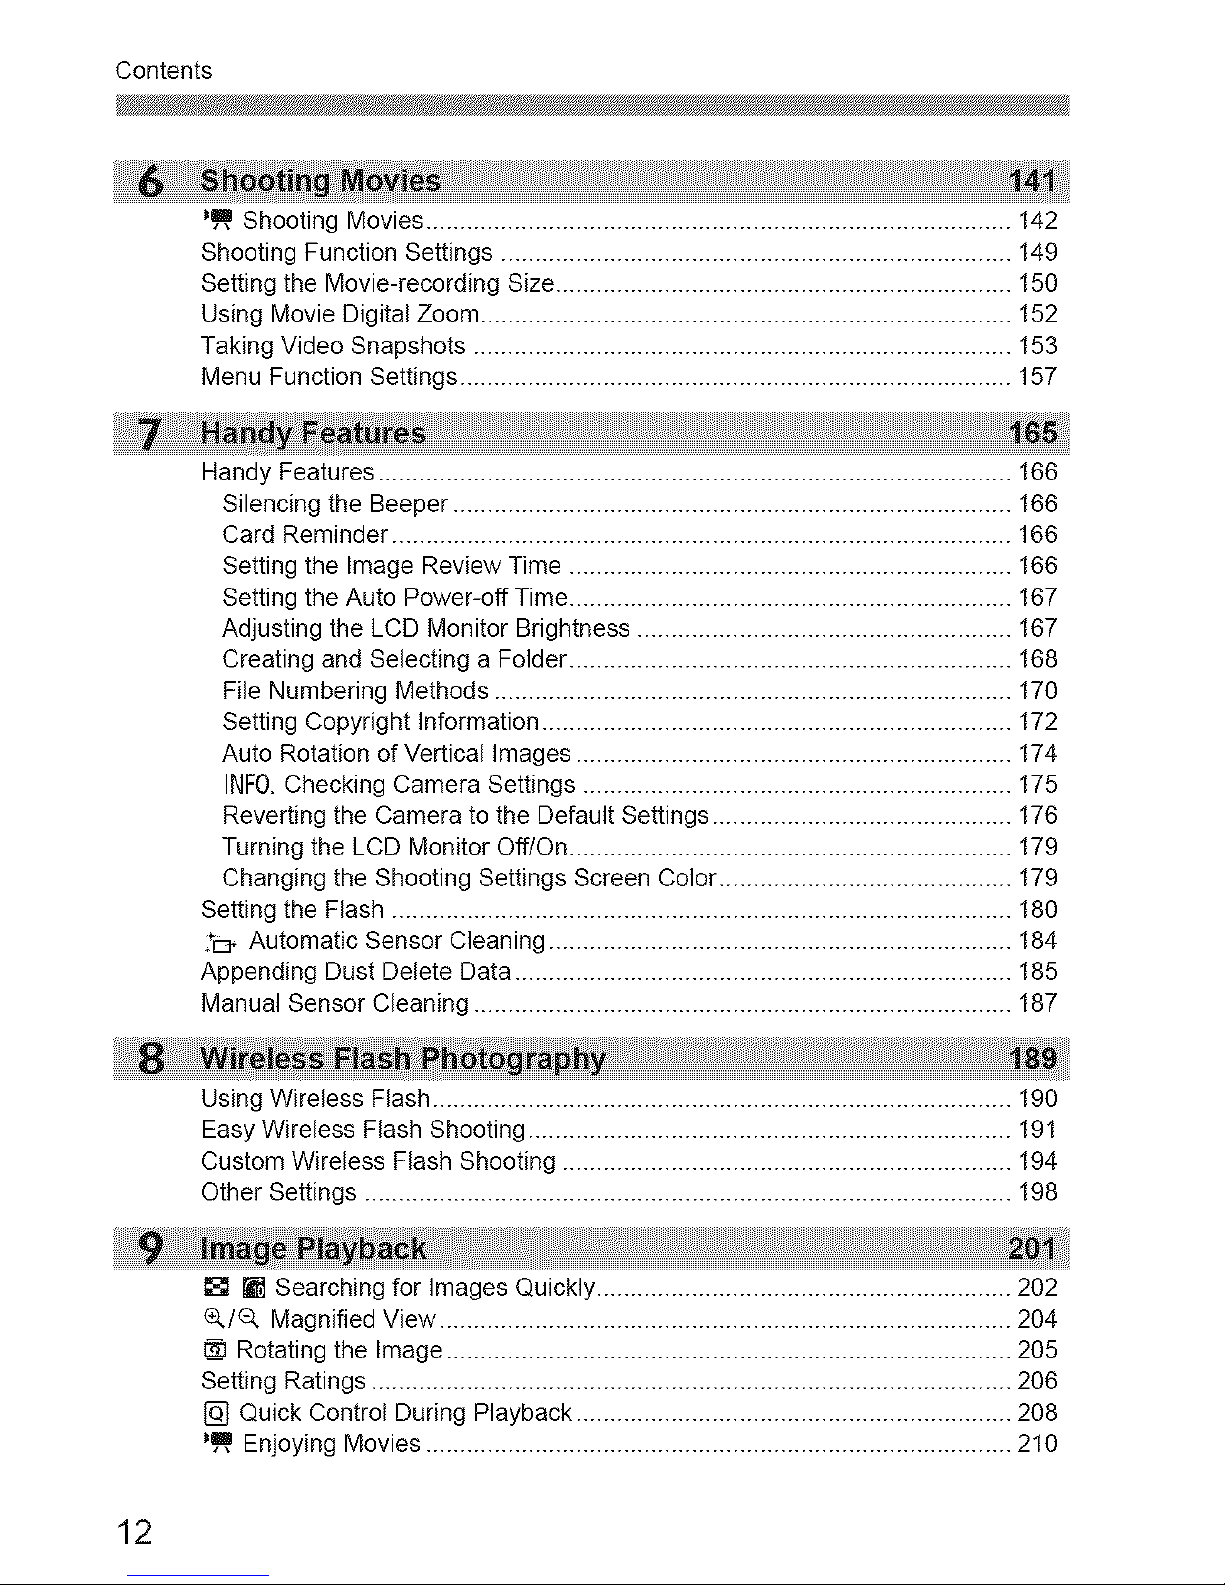
_ Shooting Movies ...................................................................................... 142
Shooting Function Settings ........................................................................... 149
Setting the Movie-recording Size................................................................... 150
Using Movie Digital Zoom .............................................................................. 152
Taking Video Snapshots ............................................................................... 153
Menu Function Settings ................................................................................. 157
Handy Features ............................................................................................. 166
Silencing the Beeper .................................................................................. 166
Card Reminder ........................................................................................... 166
Setting the Image Review Time ................................................................. 166
Setting the Auto Power-off Time ................................................................. 167
Adjusting the LCD Monitor Brightness ....................................................... 167
Creating and Selecting a Folder ................................................................. 168
File Numbering Methods ............................................................................ 170
Setting Copyright Information ..................................................................... 172
Auto Rotation of Vertical Images ................................................................ 174
INF0, Checking Camera Settings ............................................................... 175
Reverting the Camera to the Default Settings ............................................ 176
Turning the LCD Monitor Off/On ................................................................. 179
Changing the Shooting Settings Screen Color ........................................... 179
Setting the Flash ........................................................................................... 180
:*_ Automatic Sensor Cleaning .................................................................... 184
Appending Dust Delete Data ......................................................................... 185
Manual Sensor Cleaning ............................................................................... 187
Using Wireless Flash ..................................................................................... 190
Easy Wireless Flash Shooting ....................................................................... 191
Custom Wireless Flash Shooting .................................................................. 194
Other Settings ............................................................................................... 198
[] [] Searching for Images Quickly ............................................................. 202
¢,/% Magnified View .................................................................................... 204
__ Rotating the Image ................................................................................... 205
Setting Ratings .............................................................................................. 206
[] Quick Control During Playback ................................................................ 208
_ Enjoying Movies ...................................................................................... 210
12
Contents
_ Playing Movies ......................................................................................... 212
Editing a Movie's First and Last Scenes ................................................... 214
Slide Show (Auto Playback) ........................................................................... 215
Viewing the Images on TV ............................................................................. 218
[] Protecting Images .................................................................................... 222
Erasing Images ......................................................................................... 224
INF0. Shooting Information Display ................................................................ 226
Creative Filters ......................................................................................... 230
[] Resize ...................................................................................................... 233
Preparing to Print ........................................................................................... 236
f'd( Printing ...................................................................................................... 238
Trimming the Image .................................................................................... 243
_'_ Digital Print Order Format (DPOF) ........................................................... 245
_J_ Direct Printing with DPOF ........................................................................ 248
Setting Custom Functions .............................................................................. 250
Custom Function Settings .............................................................................. 252
Registering My Menu ..................................................................................... 258
Using a Household Power Outlet ................................................................... 260
Remote Control Shooting ............................................................................... 261
External SpeedIites ........................................................................................ 263
Using Eye-Fi Cards ........................................................................................ 265
Function Availability Table According to Shooting Modes ............................. 268
Menu Settings ................................................................................................ 270
System Map ................................................................................................... 276
Troubleshooting Guide ................................................................................... 278
Error Codes .................................................................................................... 287
Specifications ................................................................................................. 288
Safety Warnings ............................................................................................. 297
Software Start Guide ...................................................................................... 302
Quick Reference Guide .................................................................................. 306
Index .............................................................................................................. 318
13
Handling Precautions
Camera Care
_ This camera is a precision instrument. Do not drop it or subject it to physical
shock.
_ The camera is not waterproof and cannot be used underwater. If you
accidentally drop the camera into water, promptly consult your nearest
Canon Service Center. Wipe off any water droplets with a dry cloth. If the
camera has been exposed to salty air, wipe it with a well-wrung wet cloth.
_ Never leave the camera near anything having a strong magnetic field such
as a magnet or electric motor. Also avoid using or leaving the camera near
anything emitting strong radio waves such as a large antenna. Strong
magnetic fields can cause camera misoperation or destroy image data.
_ Do not leave the camera in excessive heat such as in a car in direct
sunlight. High temperatures can cause the camera to malfunction.
_ The camera contains precision electronic circuitry. Never attempt to
disassemble the camera yourself.
_ Use a blower to blow away dust on the lens, viewfinder, reflex mirror, and
focusing screen. Do not use cleaners that contain organic solvents to clean
the camera body or lens. For stubborn dirt, take the camera to the nearest
Canon Service Center.
_ Do not touch the camera's electrical contacts with your fingers. This is to
prevent the contacts from corroding. Corroded contacts can cause camera
misoperation.
_ If the camera is suddenly brought in from the cold into a warm room,
condensation may form on the camera and internal parts. To prevent
condensation, first put the camera in a sealed plastic bag and let it adjust to
the warmer temperature before taking it out of the bag.
_ If condensation forms on the camera, do not use the camera. This is to
avoid damaging the camera. If there is condensation, remove the lens, card
and battery from the camera, and wait until the condensation has
evaporated before using the camera.
_ If the camera will not be used for an extended period, remove the battery
and store the camera in a cool, dry, well-ventilated location. Even while the
camera is in storage, press the shutter button a few times once in a while to
check that the camera is still working.
_ Avoid storing the camera where there are corrosive chemicals such as a
darkroom or chemical lab.
_ If the camera has not been used for an extended period, test all its functions
before using it. If you have not used the camera for some time or if there is
an important shoot coming up, have the camera checked by your Canon
dealer or check the camera yourself and make sure it is working properly.
14
Handling Precautions
LCD Monitor
® Although the LCD monitor is manufactured with very high precision
technology with over 99.99% effective pixels, there might be a few dead
pixels among the remaining 0.01% or less pixels. Dead pixels displaying
only black or red, etc., are not a malfunction. They do not affect the images
recorded.
® If the LCD monitor is left on for a prolonged period, screen burn-in may
occur where you see remnants of what was displayed. However, this is only
temporary and will disappear when the camera is left unused for a few
days.
® In low or high temperatures, the LCD monitor display may seem slow or it
might look black. It will return to normal at room temperature.
Cards
To protect the card and its recorded data, note the following:
® Do not drop, bend, or wet the card. Do not subject it to excessive force,
physical shock, or vibration.
® Do not touch the card's electronic contacts with your fingers or anything
metallic.
® Do not store or use the card near anything having a strong magnetic field
such as a TV set, speakers, or magnet. Also avoid places prone to having
static electricity.
® Do not leave the card in direct sunlight or near a heat source.
® Store the card in a case.
® Do not store the card in hot, dusty, or humid locations.
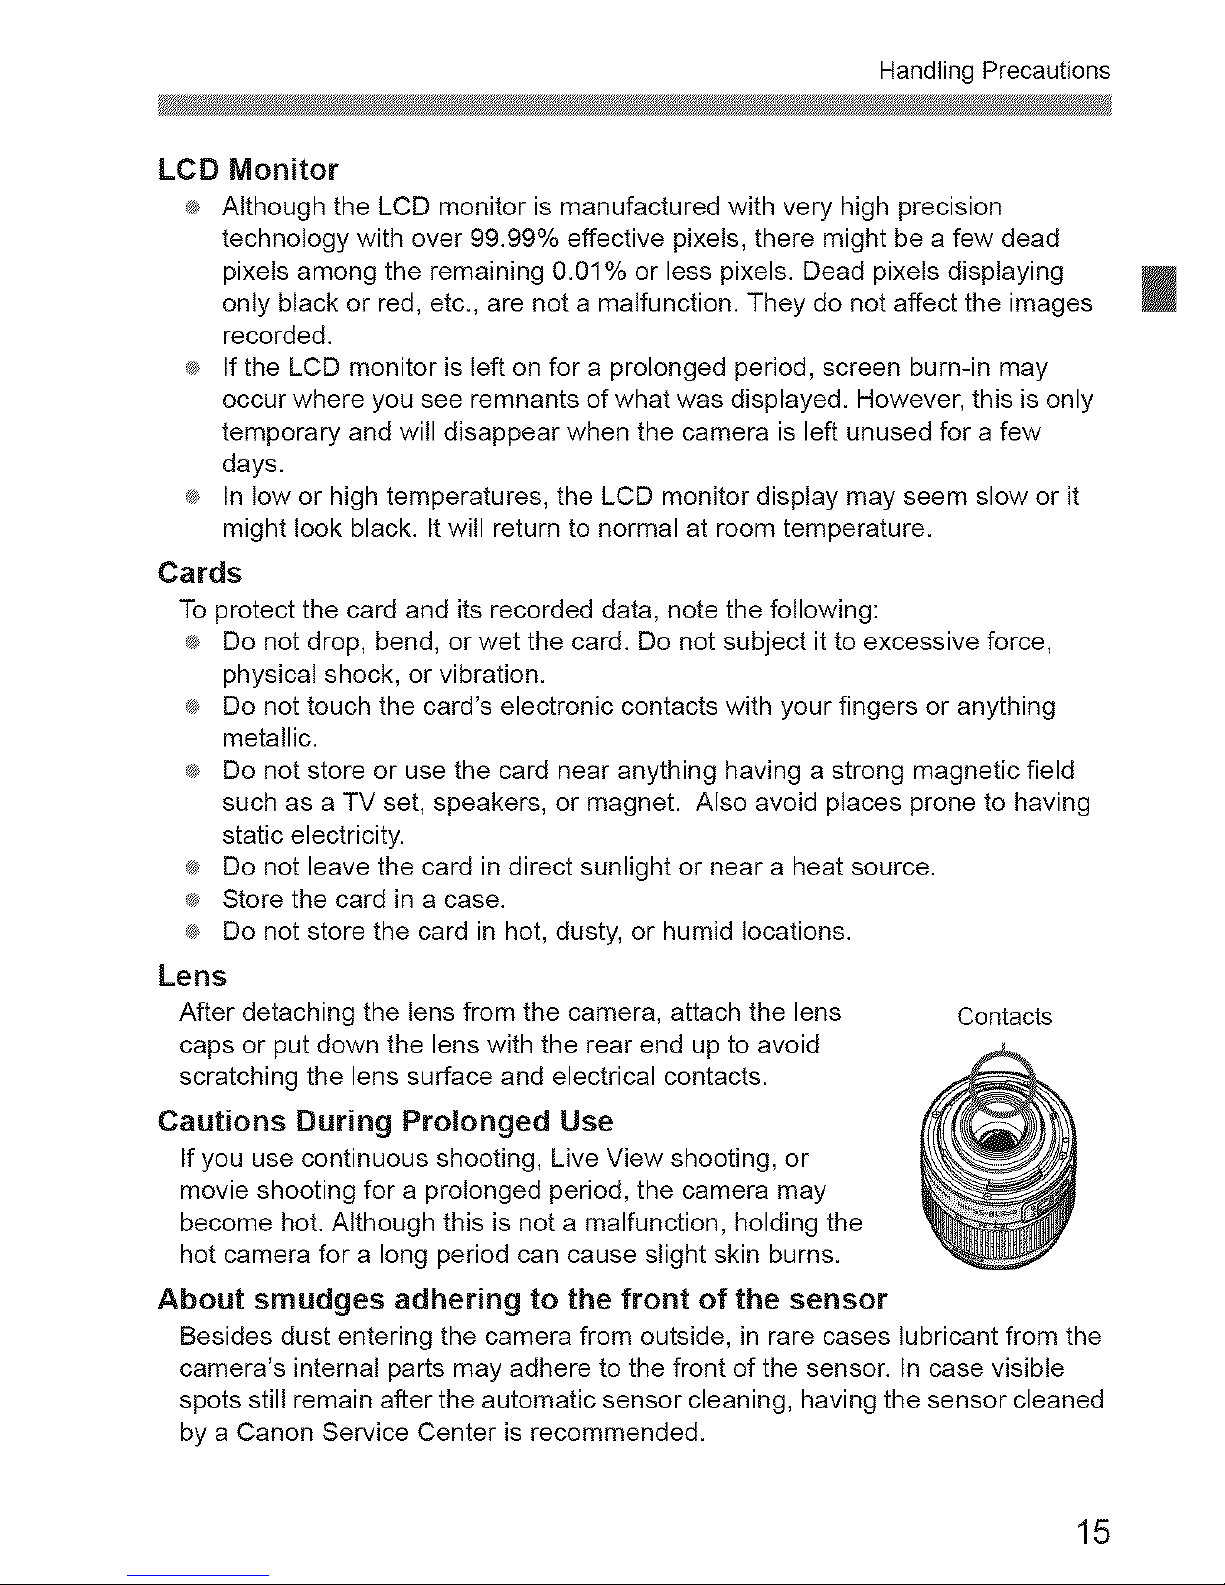
Lens
After detaching the lens from the camera, attach the lens Contacts
caps or put down the lens with the rear end up to avoid
scratching the lens surface and electrical contacts.
Cautions During Prolonged Use
If you use continuous shooting, Live View shooting, or
movie shooting for a prolonged period, the camera may
become hot. Although this is not a malfunction, holding the
hot camera for a long period can cause slight skin burns.
About smudges adhering to the front of the sensor
Besides dust entering the camera from outside, in rare cases lubricant from the
camera's internal parts may adhere to the front of the sensor. In case visible
spots still remain after the automatic sensor cleaning, having the sensor cleaned
by a Canon Service Center is recommended.
15
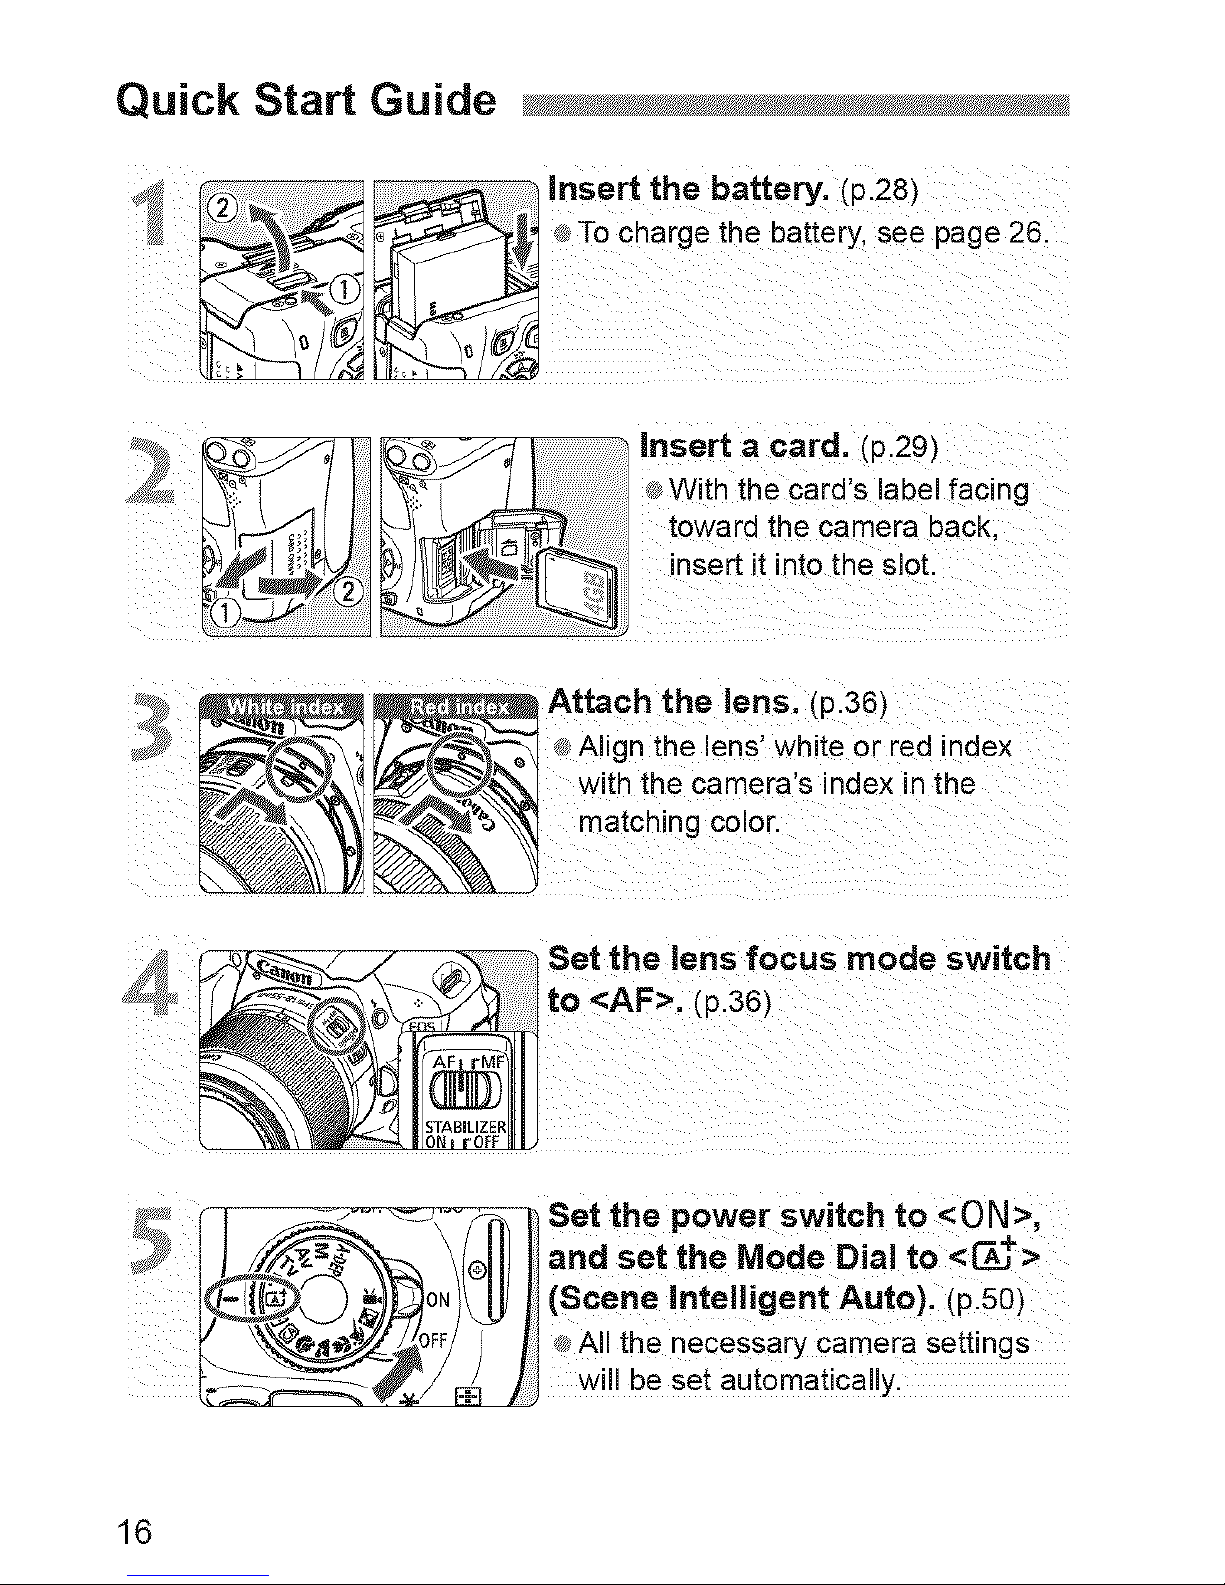
Quick Start Guide
insert the battery. (p.28)
To charge the battery, see page 26.
insert a card. (p.29)
With the card's label facing
toward the camera back,
insert it intothe sJot.
Attach the lens. (p.36)
_ Align the ions' white or red index
with the cameras index in the
matching color.
Set the lens focus mode switch
to <AF>. (p.36)
Set the power switch to <ON>,
and set the Mode Dial to <_____>
(Scene InteBigent Auto). (p.50)
Allthe necessarycamera settings
wJlUbe set automatically.
16
Quick Start Guide
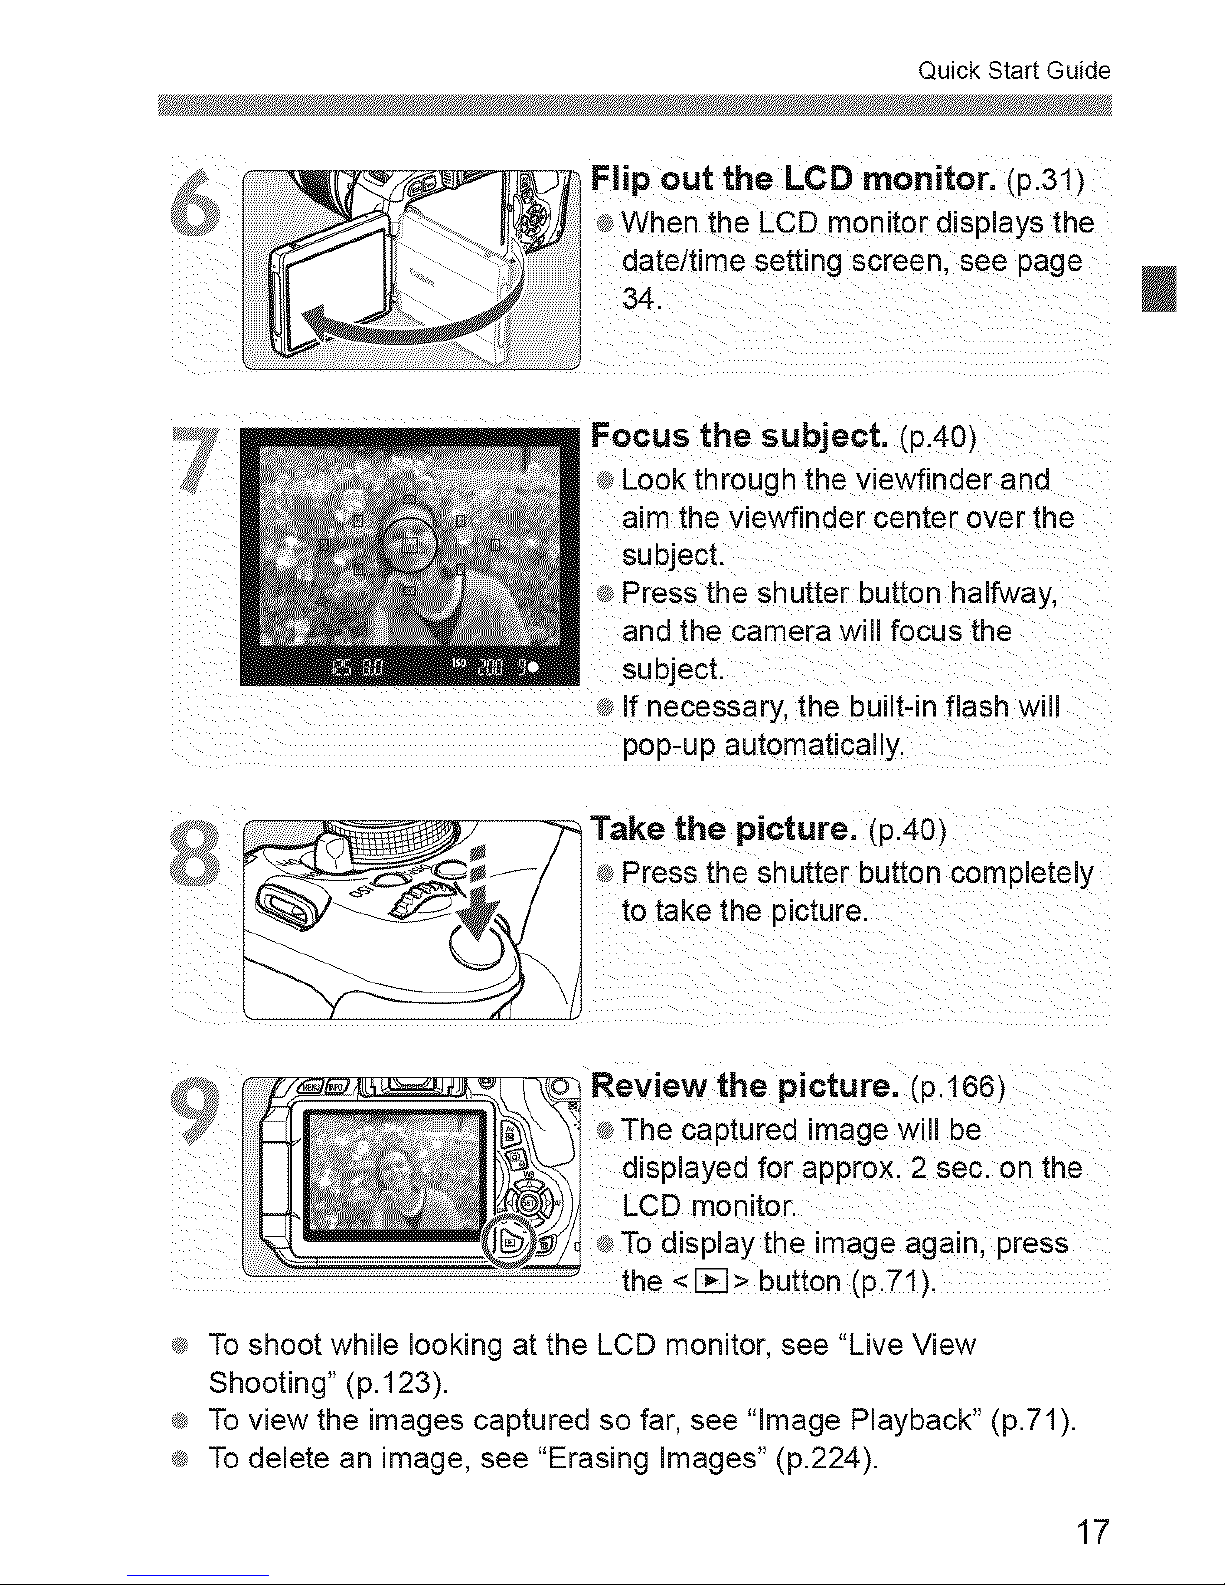
Flip out the LCD monitor. (p.31)
®When the LCD monitor displays the
date/time setting screen, see page
34
Focus the subject. (p.40)
Look through the viewfinder and
aim the viewfinder center over the
subject.
Press the shutter button halfway,
and the camera will focus the
subject.
If necessary, the built-in flash will
pop-up automatically.
,, _ Take the picture. (p.40)
Press the shutter button completely
to take the picture.
picture. (p.166)
_=captured image will be
displayed for approx. 2 sec. on the
LCD monitoE
®To display the image again, press
the <1_1> button (p.71).
® To shoot while looking at the LCD monitor, see "Live View
Shooting" (p.123).
® To view the images captured so far, see "image Playback" (p.71).
® To delete an image, see "Erasing images" (p.224).
17
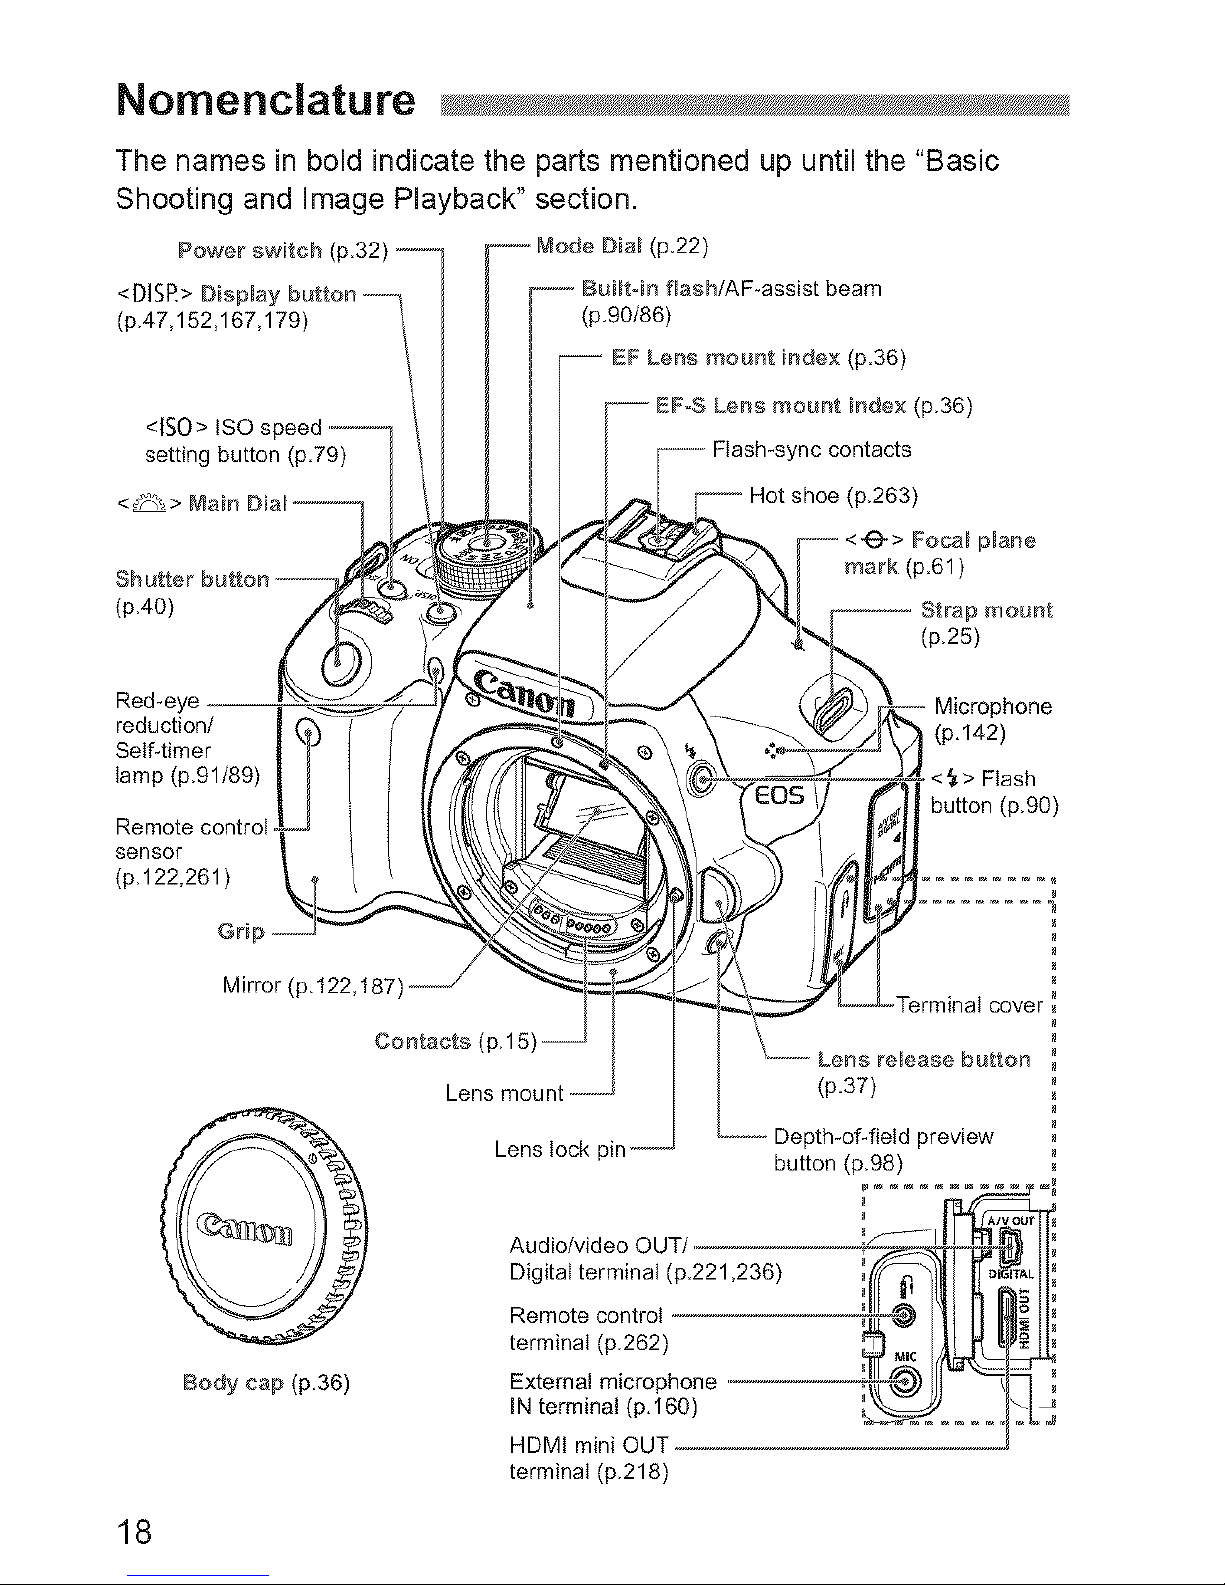
Nomenclature
The names in bold indicate the parts mentioned up until the "Basic
Shooting and Image Playback" section.
Dial (p.22)
Power switch
<DISR> Dis
(p,47,152,167,179)
<ISO> tSO
setting button (p79)
<_> _'_ain
(pA0)
Red-eye
reduction/
Self-timer "!"
tamp (p.91/89) J
Renmotr.... trot LI
(pM22,261)
Grip ._;
Mirror (p,122,187)
Body cap (p.36)
Contacts
Lens
EF Lens mount index (p36)
index (p.36)
no contacts
ot shoe (p.263)
<4_-> Foca_ plane
mark (p.61)
Strap mount
p.25)
. _i._r4°2P)h°n e
\i@_ "(EosJ_l__u_tt>o:'(psh0)
::,Z::v:
(p37)
_- Depth-of-field preview
Lens lock pin-- button (p.98)
!.................i
Audio/video OUT/
Digital terminal {p221,236) _,_1:_l,F°_41i
Retool .... trot.
term,na, p. 6
External microphone -- I
IN terminal (p.160) _,_ ........ H_Ls
HDMI mini OUT
terminal (p.218)
18
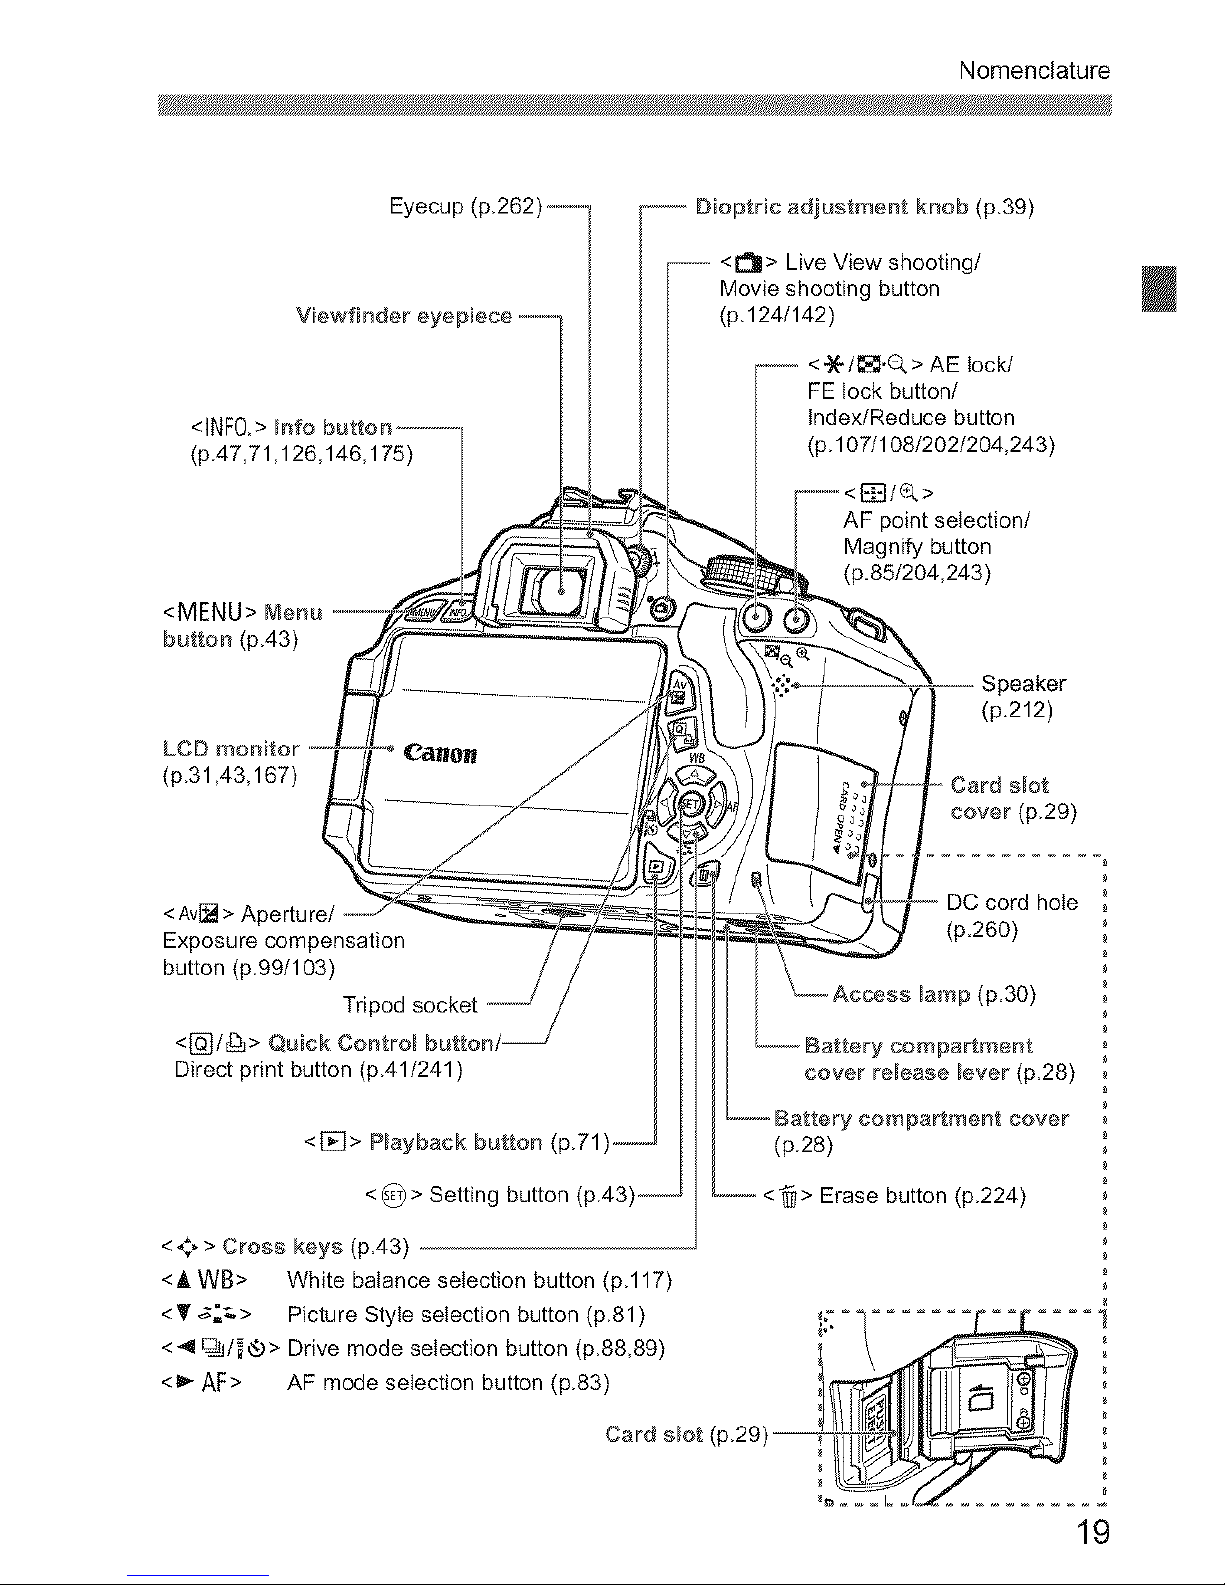
Nomenclature
Eyecup (p,262)
Viewfinder eyepiece
<INFO,>
(p,47,71,126,146,175)
-- Dioptric adjustment knob (p,39)
<_> Live View shooting/
Movie shooting button
(pj24/142)
-_-o <_/[].Q> AE lock/
FE lock button/
Index/Reduce button
(p, 107/108/202/204,243)
iI_>
AF point selection/
Magnify button
(p.85/204,243)
button (pA3)
Exposure compensation
button (p,99/103)
Tripod socket
<[]/_> Q_
Direct print button (pAl/241)
<[_> Playback button
< _ > Cross keys (pA3)
<A WE}> White balance selection button (pJ 17)
Speaker
(p.212)
Card slot
cover(p,29)
hole
(p.260)
p (p.30)
cover release lever(p.28)
cover
(p,28)
Erase button (p,224)
<_' $_,_,> Picture Style selection button (p,81) _;:...........
<41 _/_®> Drive mode selection button (p,88,89)
<)" AF> AF mode selection button (p,83) l_li /l
Card slot (p,29) ,o
19
Nomenclature
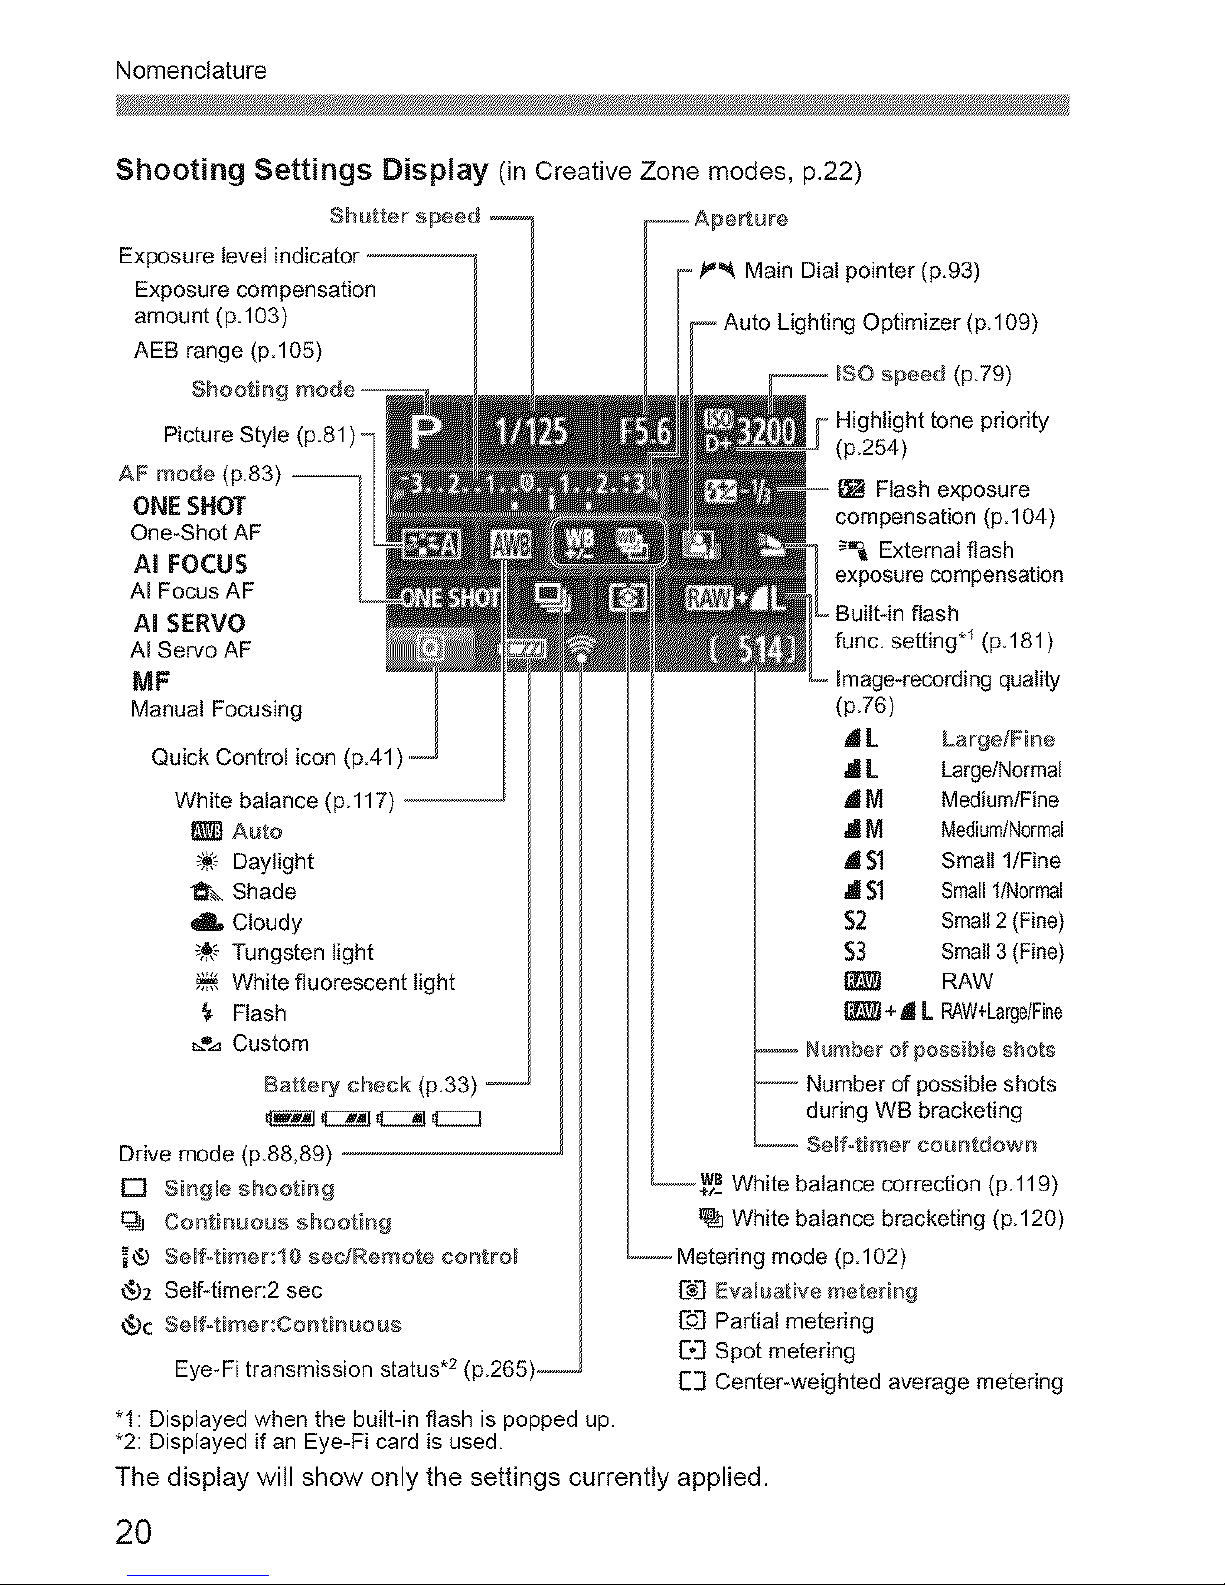
Shooting Settings Display (in Creative Zone modes, p.22)
Shutter speed --
Exposure level indicator.
Exposure compensation
amount (p 103)
AEB range (p 105)
Shootin_
Picture Style (p,81) -
AF triode (p,83) --
ONE SHOT
One-Shot AF
AI FOCUS
AI Focus AF
AI SERVO
AI Servo AF
MF
Manual Focusing
Quick Control icon
White balance
A_Jl]Auto
_: Daylight
_'_ Shade
Cloudy
;_ Tungsten light
White fluorescent light
_- Flash
_e_ Custom
Battery cheek (p,33) --
_ _E3_ CCC]
Drive mode (p.8&89)
[] Si_gle shoot_g
Contim__ous shoot_g
_® Sel#timer:!0 sedRemote eo_trol
_2 Self-timer:2 sec
_.)c Sel#timer:Continuous
Eye_Fi transmission status .2 (p.265).
"1 : Displayed when the built-in flash is popped up.
*2: Displayed if an Eye-Fi card is used.
Aperture
/,_'_ Main Dial pointer (p.93)
F Auto Lighting Optimizer (p. 109)
- HigNight tone priority
(p254)
- _ Flash exposure
compensation (p 104)
_ External flash
exposure compensation
- Builtqn flash
func, setting *_ (p 181 )
LargelFir_e
Large/Normal
Medium/Fine
Medium/Normal
d5"1 Small ltFine
,t $1 Small l/Normal
$2 Small 2 (Fine)
$3 Small 3 (Fine)
RAW
+L L RAW+Large/Fine
-- Number of possible sho_s
-- Number of possible shots
during WB bracketing
-- Se_fotimer countdown
........__BWhite balance correction (p 119)
White balance bracketing (p. 120)
-- Metering mode (p 102)
[8] EvaluaHve metering
[o] Partial metering
[.] Spot metering
[] Center-weighted average metering
The display will show only the settings currently applied.
20
Nomenclature
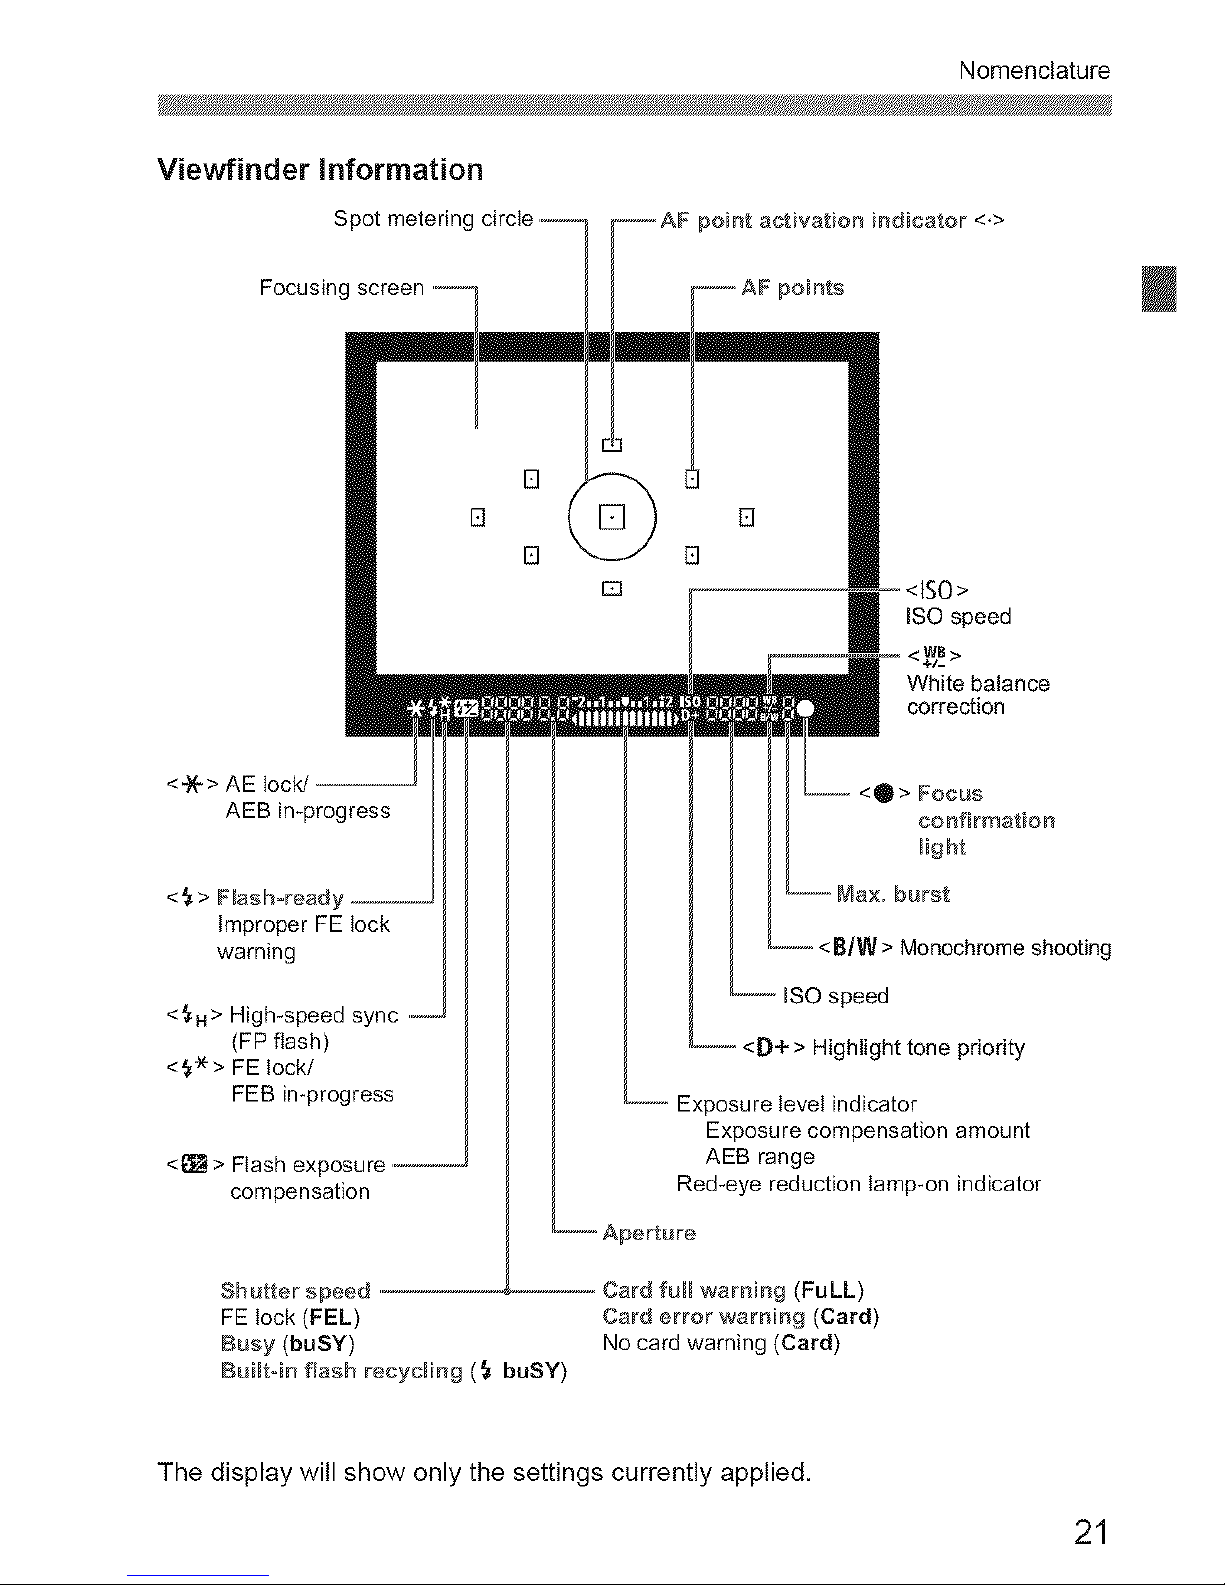
Viewfinder Information
FocusirlP°t metering circte --I !- AF p°int activation indicat°r <'>
<_
AEB improgress
< _ > F_ash_read
Improper FE lock
warning
<¢a > High-speed sync
(FP flash)
<_> FE lock/
FEB in-progress
<_>
compensation
[]
[]
[]
[]
<leO>
I ISO speed
<g_B>
White balance
correction
[> Eoc_J_e
confirmation
light
buret
<B/W> Monochromeshooting
leo speed
Highlight tone priority
Exposure compensation amount
AEB range
Red-eye reduction tamp_on indicator
Shutter speed
FE lock (FEL)
Busy (buSY)
Builtoin flash recycling (_ buSY)
Card full warning (FULL)
Card error warnin 9 (Card)
No card warning (Card)
The display will show only the settings currently applied.
21

Nomenclature
Mode Dial
The Mode Dial includes the Basic Zone modes Creative Zone modes,
and the Movie shooting mode.
Creative Zone
These modes give you more control for
shooting various subjects.
P : Program AE (p.74)
Tv : Shutter-priorityAE (p.94)
Av : Aperture-priorityAE (p.96)
M : Manual exposure (p.99)
AoDEP: Automatic depth-of-field AE
(p.101)
All you do is press the shutter button.
The camera sets everything to suit the
subject.
• Scene intelligent Auto (p.50)
[] : Flash Off(p.55)
: Creative Auto (p.56)
22
Image Zone
_t_ : Portrait (p.59)
_,A : Landscape (p.60)
: Close-up (p.61)
: Sports (p.62)
!_ : Night Portrait (p.63)
_: Movie shooting
(p.141)
Nomenclature
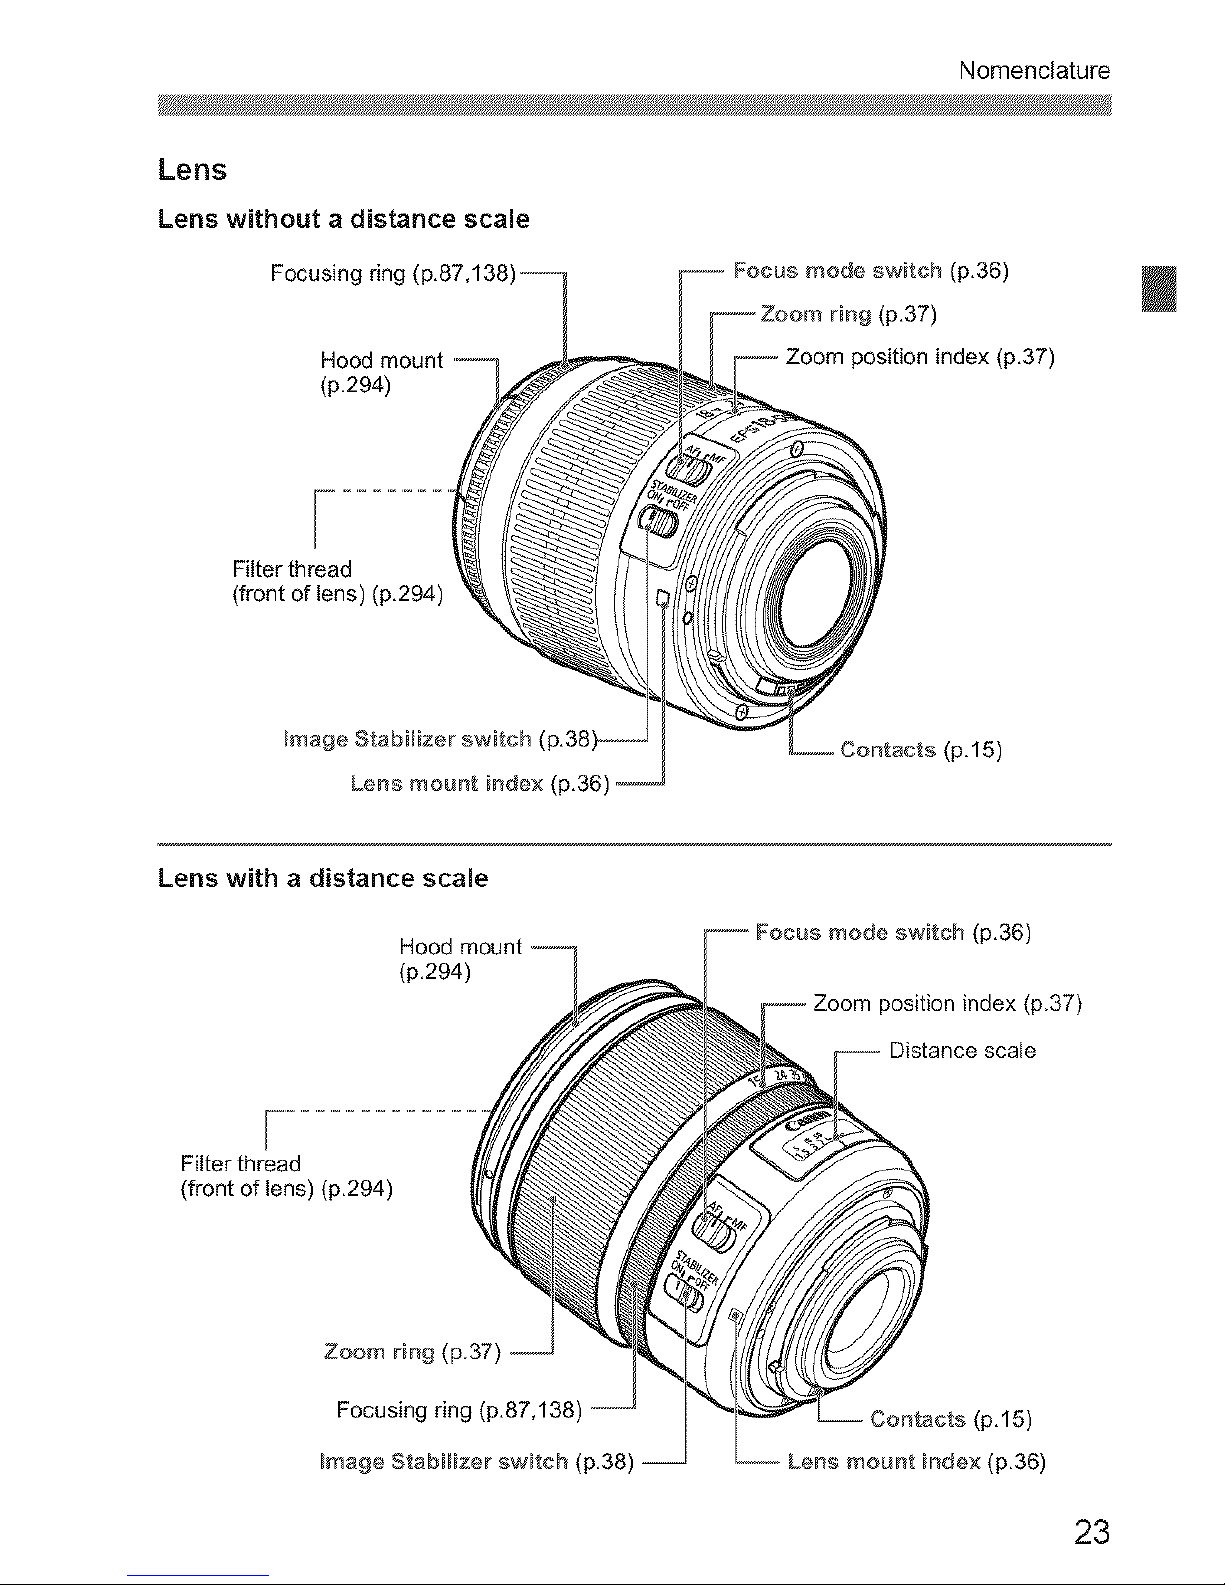
Lens
Lens without a distance scale
Focusing ring
(p,294)
Filterthread
(frontof lens) (p,294)
Image Stabilizer switch
Lens mount index (p,36)
Focus mode switch (p,36)
(p,37)
index (p,37)
Contacts (p,15)
Lens with a distance scats
Hood mount
(p,294)
Filter thread
(front of lens)(p,294)
Zoom tin# (p.37)
Focusing ring
Image Stabilizer switch (p,38) --
-- Focus mode switch (p,36)
position index (p.37)
Contacts (p,15)
(p,36)
23
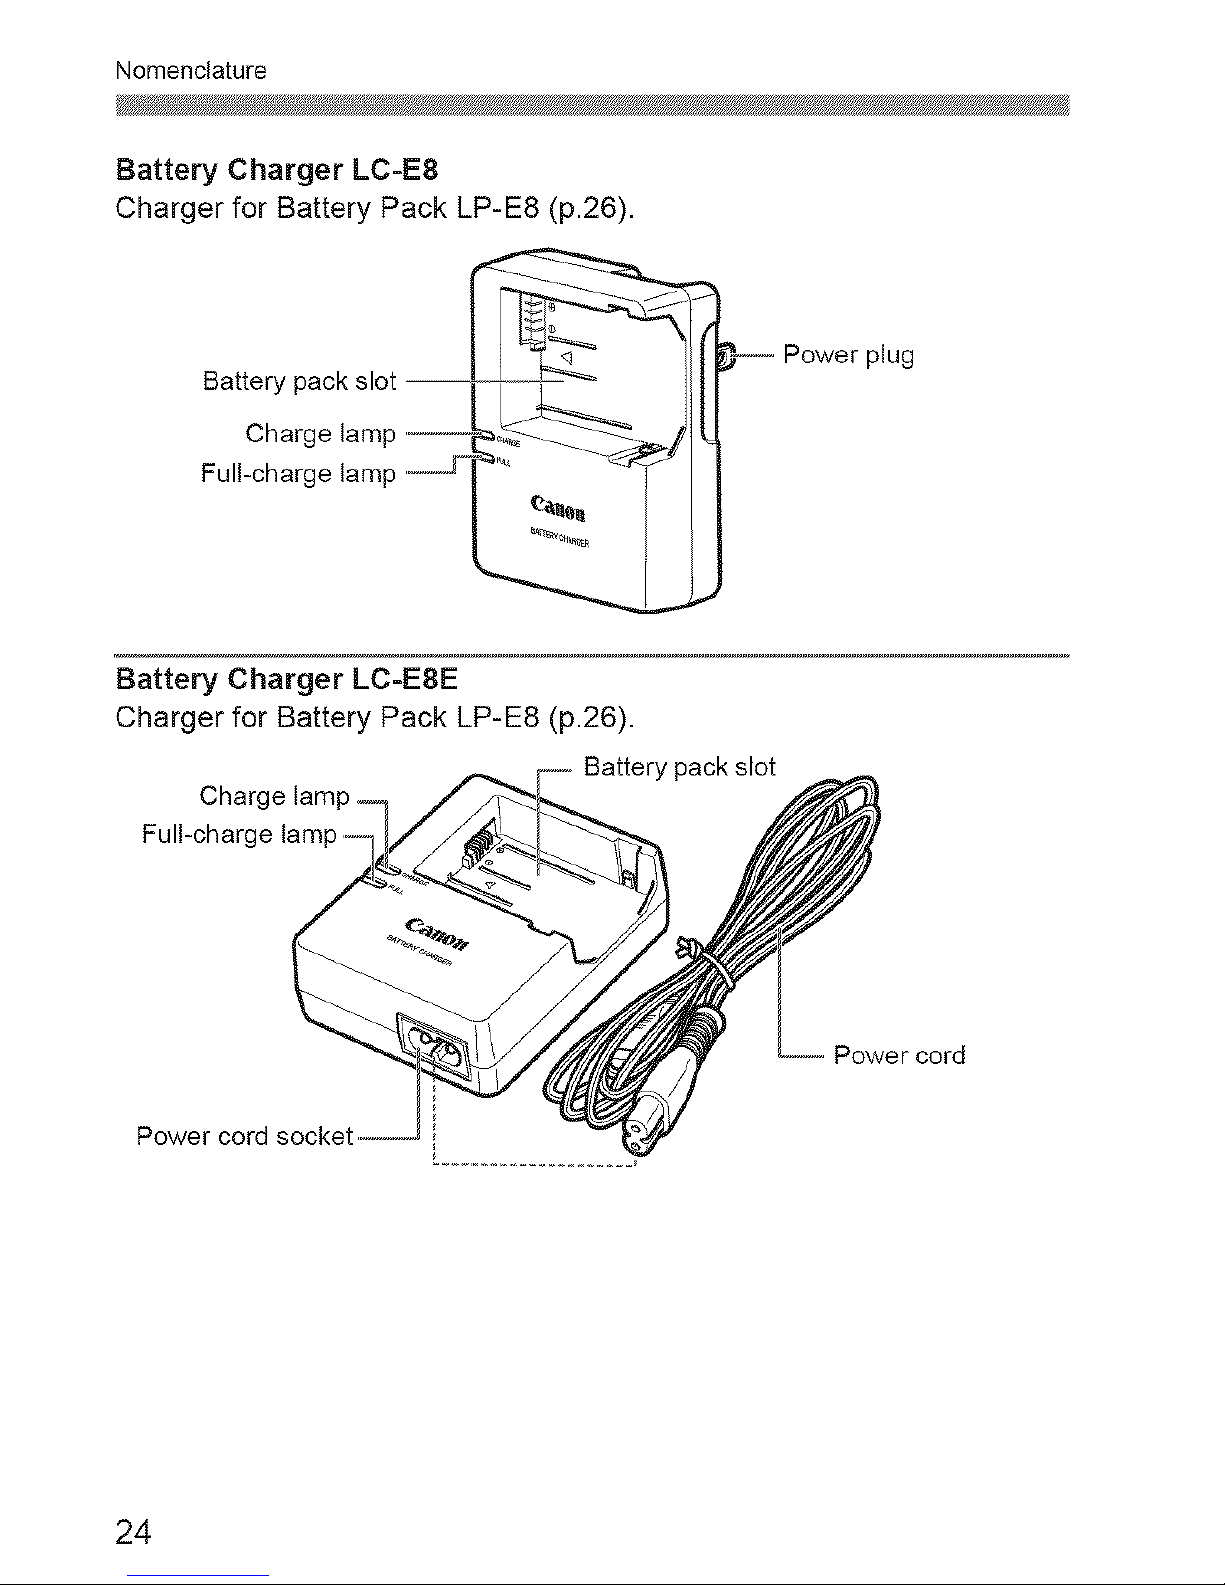
Nomenclature
Battery Charger LC-E8
Charger for Battery Pack LP-E8 (p.26).
Battery pack slot
i
Charge lamp
Full-charge lamp
Power plug
Battery Charger LC-ESE
Charger for Battery Pack LP-E8 (p.26).
Battery pack slot
Charge lamp --
Full-charge lamp-
Power cord
24

Getting Started
This chapter explains preparatory steps before you start
shooting and basic camera operations.
Attaching the Strap
Pass the end of the strap through
the camera's strap mount eyelet
from the bottom. Then pass it
through the strap's buckle as shown
in the illustration. Pull the strap to
take up any slack and make sure
the strap will not loosen from the
buckle.
®_The eyepiece cover is also
attached to the strap (p.262).
Eyepiececover

Charging the Battery
Remove the protective cover.
_ Detach the protective cover provided
with the battery.
Attach the battery.
_ As shown in the illustration, attach the
battery securely to the charger.
_ To detach the battery, follow the
above procedure in reverse.
LC-E8 Recharge the battery.
For LC=E8
_ As shown by the arrow, flip out the
battery charger's prongs and insert
the prongs into a power outlet.
For LO-ESE
LC-ESE _ Connect the power cord to the
charger and insert the plug into the
power outlet.
_y,,Recharging starts automatically and
the charge lamp turns orange.
_y,,When the battery is fully recharged,
the full-charge lamp will turn green.
®_it takes approx. 2 hours to fully recharge a completely exhausted
battery at 23°C / 73°F.The time required to recharge the battery
depends onthe ambient temperature and the battery's charge level.
_ For safety reasons, recharging in low temperatures (6°C - 10°C /
43°F - 50°F) will take a longer time (up to 4 hours).
26
Charging the Battery
_ Tips for Using the Battery and Charger
_ Upon purchase, the battery is not fully charged.
Recharge the battery before using.
®_Recharge the battery on the day before or on the day it is to be
used.
Even during storage, a charged battery will gradually drain and lose
its power.
®_After recharging the battery, detach it and unplug the charger
from the power outlet.
®_When not using the camera, remove the battery.
If the battery is left in the camera for a prolonged period, a small
amount of power current is released, resulting in excess discharge
and shorter battery life. Store the battery with the protective cover
(provided) attached. Storing the battery after it is fully charged can
lower the battery's performance.
®_The battery charger can also be used in foreign countries.
The battery charger is compatible with a 100 V AC to 240 V AC 50/
60 Hz power source. If necessary, attach a commercially-available
plug adapter for the respective country or region. Do not attach any
portable voltage transformer to the battery charger. Doing so can
damage the battery charger.
_ If the battery becomes exhausted quickly even after being fully
charged, the battery has reached the end of its service life.
Purchase a new battery.
I_ _ After disconnecting the charge;,s power plug, do not touch the prongs for
at least 3 Sec.
_,_Do not charge any battery other than a Battery Pack LP-E8,
The Battery Pack LP:E8 is dedicated to Canon products on!y. Using it
with an incompat!ble battery charger or product may result in malfunction
or accidents for which Canon cannot be held liable.
27
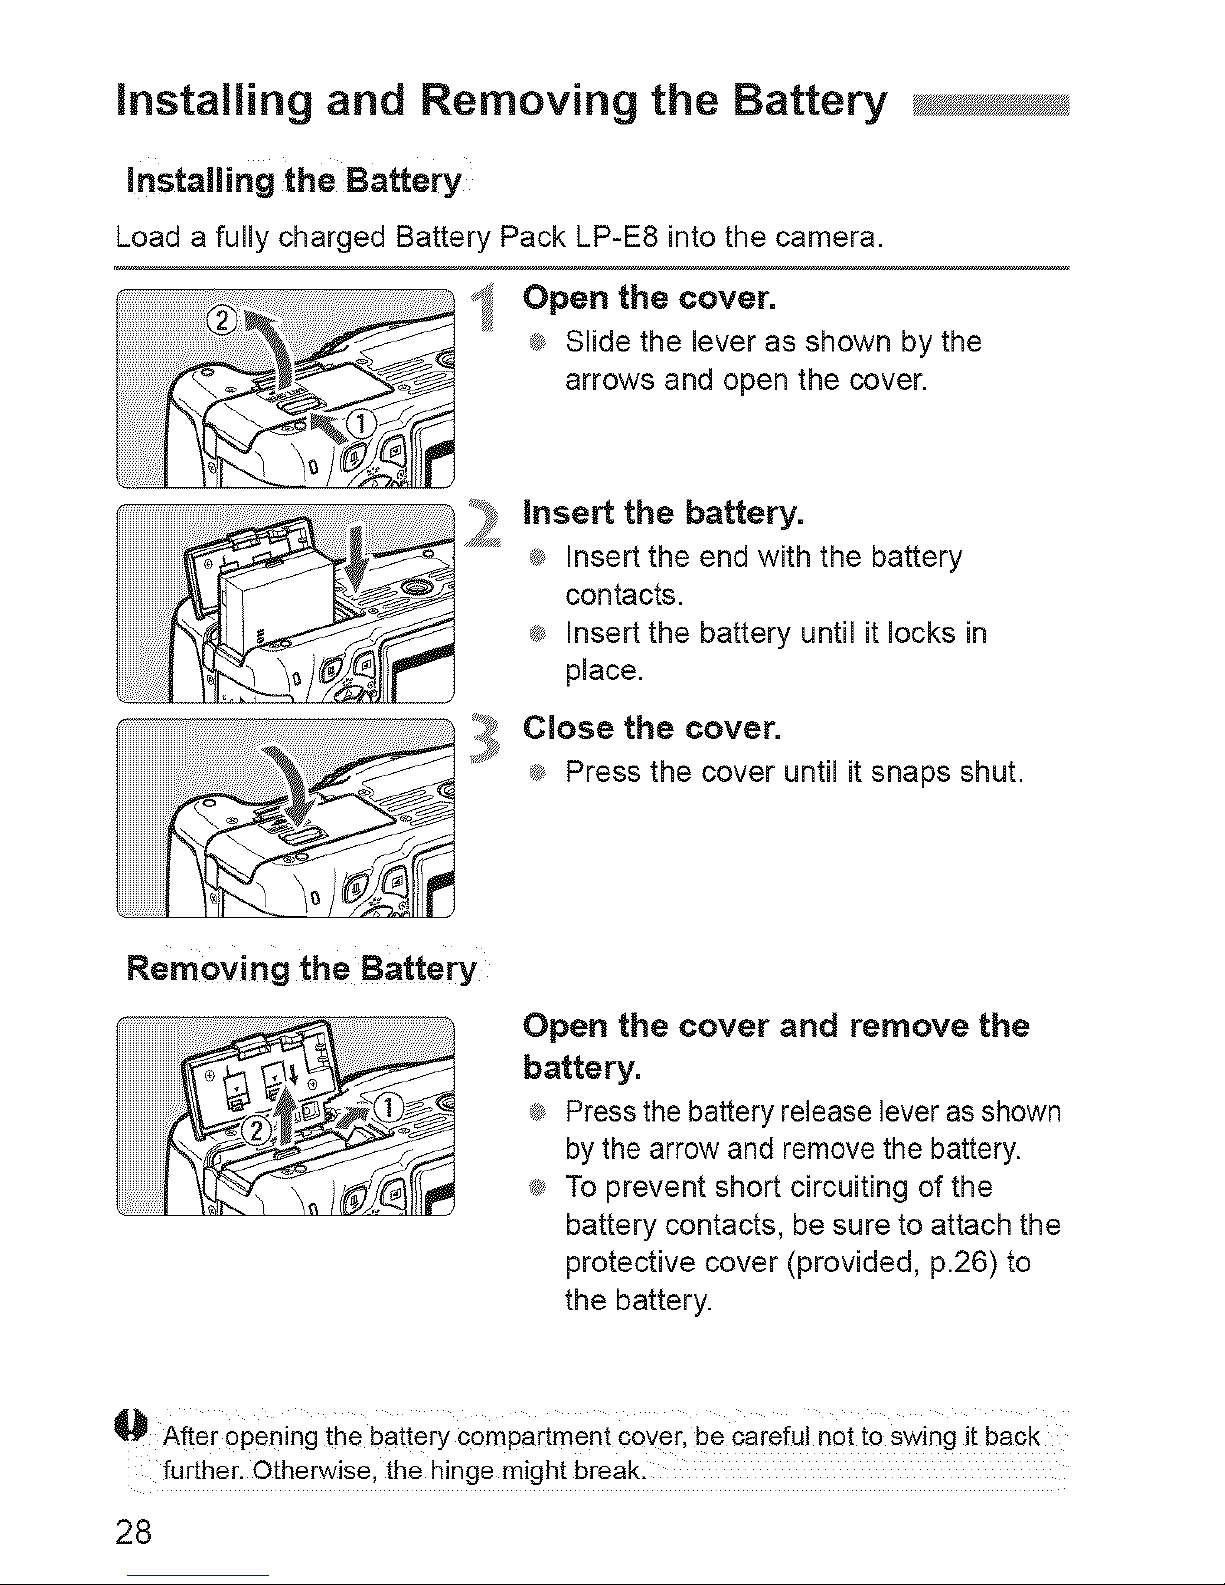
installing and Removing the Battery
Installing the Battery
Load a fully charged Battery Pack LP-E8 into the camera.
_ Open the cover.
® Slide the lever as shown by the
arrows and open the cover.
_ insert the battery.
® Insert the end with the battery
contacts.
® Insert the battery until it locks in
place.
,_l_ Close the cover.
® Press the cover until it snaps shut.
Removingthe Battery
Open the cover and remove the
battery.
® Press the battery release lever asshown
by the arrow and remove the battery.
® To prevent short circuiting of the
battery contacts, be sure to attach the
protective cover (provided, p.26) to
the battery.
U After opening the battery €0mpartmeni COver, be careful not to Swing it back
further. Otherwise, the hinge might break.
28
 Loading...