

Canon PRO90 IS User Manual
Flowchart and Reference Guides
This Guide
Shooting with the Camera
Software Starter Guide
Installing the Software
This Guide
Connecting the Camera to a Computer
Software Starter Guide
Downloading Images to a Computer
DIGITAL CAMERA
Camera User Guide
Camera User Guide
CDI-E010-000 0900CH21.3 © 2000 CANON INC. PRINTED IN JAPAN
Please start by reading the Precaution on the reverse side of this cover.
ENGLISH

Precaution
Camera Body Temperature
If your camera is used for prolonged periods, the camera body may become
warm. Please be aware of this and take care when operating the camera for an
extended period.
LCD Monitor
The LCD monitor is produced with extremely high-precision manufacturing
techniques. More than 99.99% of the pixels operate to specification. Less than
0.01% of the pixels may occasionally misfire or appear as red or black dots. This
has no effect on the recorded image and does not constitute a malfunction.
Please read the handling and safety precautions starting on page 4 before using the camera.
Disclaimer
• While every effort has been made to ensure that the information contained in this guide
is accurate and complete, no liability can be accepted for any errors or omissions.
• Canon Inc. reserves the right to change the specifications of the hardware and software
described herein at any time without prior notice.
• No part of this guide may be reproduced, transmitted, transcribed, stored in a retrieval
system, or translated into any language in any form, by any means, without the prior
written permission of Canon Inc.
• Canon Inc. makes no warranties for damages resulting from corrupted or lost data due
to a mistaken operation or malfunction of the camera, the software, the
CompactFlash™ cards (CF cards), personal computers, peripheral devices, or use of nonCanon CF cards.
Trademark Acknowledgements
• Canon and PowerShot are trademarks of Canon, Inc.
• CompactFlash is a trademark of SanDisk Corporation.
• iBook and iMac are trademarks of Apple Computer , Inc.
• Macintosh, PowerBook, Power Macintosh and QuickTime are trademarks of Apple
Computer, Inc., registered in the United States and other countries.
• Microsoft, Windows and Windows NT are either registered trademarks or trademarks of
Microsoft Corporation in the United States and/or other countries.
• Other names and products not mentioned above may be registered trademarks or
trademarks of their respective companies.
Copyright ©2000 Canon Inc. All rights reserved.
FCC Notice
(Digital Camera, Model PC1003)
This device complies with Part 15 of the FCC Rules. Operation is subject to the following two
conditions;
(1) this device may not cause harmful interference, and
(2) this device must accept any interference received, including interference that may cause
undesired operation.
Note: This equipment has been tested and found to comply with the limits for Class B digital
devices, pursuant to Part 15 of the FCC rules. These limits are designed to provide reasonable
protection against harmful interference in a residential installation. This equipment generates,
uses and can radiate radio frequency energy and, if not installed and used in accordance with
the instructions, may cause harmful interference to radio communications. However, there is no
guarantee that interference will not occur in a particular installation. If this equipment does
cause harmful interference to radio or television reception, which can be determined by turning
the equipment off and on, the user is encouraged to try to correct the interference by one or
more of the following measures:
•Reorient or relocate the receiving antenna.
• Increase the separation between the equipment and receiver.
• Connect the equipment into an outlet on a circuit different from that to which the receiver is
connected.
•Consult the dealer or an experienced radio/TV technician for help.
Use of shielded cable with the ferrite core provided with the Digital Camera is requir ed to
comply with Class B limits in Subpart B of Part 15 of the FCC rules.
Do not make any changes or modifications to the equipment unless otherwise specified in the
manual. If such changes or modifications should be made, you could be required to stop
operation of the equipment.
Canon U.S.A. Inc.
One Canon Plaza, Lake Success, NY 11042, U.S.A.
Tel No. (516) 328-5600
Canadian Radio Interference Regulations
THIS CLASS B DIGITAL APPARATUS MEETS ALL REQUIREMENTS OF THE CANADIAN INTERFERENCE CAUSING EQUIPMENT REGULATIONS.
Réglementation canadienne sur les interférences radio
CET APPAREIL NUMERIQUE DE LA CLASSE B RESPECTE TOUTES LES EXIGENCES DU
REGLEMENT SUR LE MA TERIEL BROUILLEUR DU CANADA.

Table of Contents
Read this First ............................................................................. 4
Quick Start .................................................................................. 8
Components Guide................................................................... 10
Front View ................................................................................... 10
Back View .................................................................................... 11
Controls....................................................................................... 12
Main Dial / Mode Dial ................................................................... 13
Display Panel ................................................................................ 15
Viewfinder / LCD Monitor ............................................................. 16
Preparing the Camera .............................................................. 19
Charging the Battery Pack............................................................. 19
Installing the Battery Pack ............................................................. 21
Using a Household Power Source .................................................. 23
Using a Charge Adapter / Car Battery Cable Kit (Optional) .............. 24
Installing a CF Card....................................................................... 27
Attaching the Strap ...................................................................... 29
Attaching the Lens Cap ................................................................ 29
Using the Semi-Hard Case (Optional) ............................................. 30
Basic Functions.......................................................................... 31
Turning the Power On / Off ........................................................... 31
Setting the Date / Time ................................................................. 32
Switching between Shooting and Replaying................................... 33
Using the LCD Monitor ................................................................. 34
Pressing the Shutter Button........................................................... 36
Using the Image Stabilizer Function ............................................... 37
Selecting Menus and Settings........................................................ 38
Shooting - Letting the Camera Select Settings......................... 40
Auto Mode.......................................................................... 40
Checking an Image Right after Shooting........................................ 42
Adjusting the Zoom (Focal Length) ................................................ 43
Using the Built-In Flash ......................................................... 44
Pan Focus Mode .................................................................. 46
Portrait Mode ...................................................................... 46
Landscape Mode ................................................................. 47
Night Scene Mode ............................................................... 47
Table of Contents 1

Black and White Mode......................................................... 48
Stitch Assist Mode................................................................ 49
Movie Mode ........................................................................ 52
Self-Timer ............................................................................ 53
Continuous Mode................................................................ 54
Digital Zoom ................................................................................ 55
Shooting - Selecting Particular Effects ..................................... 56
Changing the Resolution and Compression.................................... 56
Changing the File Format.............................................................. 58
Program AE ......................................................................... 59
Setting the Shutter Speed..................................................... 60
Setting the Aperture ............................................................ 62
Manually Setting the Shutter Speed and Aperture ................. 64
Adjusting the Exposure Compensation.................................. 65
Setting the White Balance .................................................... 66
Auto Exposure Bracketing (AEB Mode).................................. 69
Adjusting the Flash Output (Flash Exposure Compensation).... 70
Locking the Exposure Setting (AE Lock) ................................. 71
Locking the Flash Exposure Setting (FE Lock).......................... 72
Switching between Metering Modes..................................... 73
Shooting Problem Subjects for the Autofocus ................................ 74
Manually Setting Image Characteristics .......................................... 77
Resetting the File Number ............................................................. 78
Functions Available in Each Shooting Mode ................................... 79
Replaying.................................................................................. 80
Viewing Images Singly (Single Image Replay).................................. 80
Magnifying Images .............................................................. 81
Viewing Nine Images at a Time (Index View).......................... 82
Jumping between Images ................................................. 83
Viewing Movies ............................................................................ 84
Rotating Images in the Display ...................................................... 85
Automated Playback (Slide Show).................................................. 86
Protecting Images ......................................................................... 90
Erasing ...................................................................................... 91
Erasing Images Singly.................................................................... 91
Erasing All Images ........................................................................ 92
Formatting a CF Card ................................................................... 93
2 Table of Contents

Print Settings (DPOF Settings) .................................................. 94
Selecting Images for Printing ......................................................... 94
Setting the Print Style.................................................................... 97
Resetting the Print Settings ........................................................... 99
List of Menu Options.............................................................. 100
Rec. Menu ................................................................................. 100
Play Menu.................................................................................. 102
Set up Menu .............................................................................. 103
Shooting / Replaying with a TV Monitor................................ 105
Using the Wireless Controller................................................. 106
Installing the Battery ................................................................... 106
Shooting / Replaying................................................................... 107
Using an Externally Mounted Flash (Optional) ...................... 108
Using a Lens (Optional) / Lens Hood (Optional) ..................... 110
Attaching a Lens / Lens Hood ...................................................... 111
Downloading Images to a Computer..................................... 112
Downloading Directly from a CF Card.......................................... 112
Using the Supplied Interface Cables............................................. 115
Appendices ............................................................................. 121
Replacing the Button Battery....................................................... 121
Camera Care and Maintenance................................................... 123
Troubleshooting.......................................................................... 124
List of Error / Message Codes ...................................................... 126
List of Messages ......................................................................... 127
Specifications ............................................................................. 129
Index....................................................................................... 134
Canon Customer Support ....................................................... 137
Icon Conventions in the Text
This mark denotes topics about issues that may affect shooting.
This mark denotes additional topics that complement the basic operating
procedures.
This mark denotes tips about the camera and photography.
Table of Contents 3

Read this First
Please Read
Test Shots
Before you try to photograph important subjects, we highly recommend that you
shoot several trial images to confirm that the camera is operating and being
operated correctly. Please note that Canon Inc., its subsidiaries and affiliates, and its
distributors are not liable for any consequential damages arising from any
malfunction of a camera or accessory, including CompactFlash™ cards, that results in
the failure of an image to be recorded or to be recorded in a format that is
unreadable.
Warning Against Copyright Infringement
Please note that Canon digital cameras are intended for personal use and should
never be used in a manner that infringes upon or contravenes international or
domestic copyright laws and regulations. Please be advised that in certain cases the
copying of images from performances, exhibitions, or commercial properties by
means of a camera or other device may contravene copyright or other legal rights
even if the image was shot for personal use.
Warranty Limitations
This camera’s warranty is only effective in the country of sale. If a problem arises
while the camera is in use abroad, please convey it back to the country of sale before
proceeding with a warranty claim to a Canon Customer Support Help Desk.
Safety Precautions
• Before using the camera, please ensure that you read and understand the safety
precautions described below . Always ensure that the camera is operated correctly.
• The safety precautions noted on the following pages are intended to instruct you in
the safe and correct operation of the camera and its accessories to prevent injuries or
damage to yourself, other persons and equipment.
• In the next few pages, the term “equipment” refers primarily to the camera and its
power supply accessories.
4 Read This First

Warnings
• Do not aim the camera directly into the sun or at other intense light sources that could
injure your eyesight.
• Do not trigger the flash in close proximity to human or animal eyes. Exposure to the
intense light produced by the flash may injure eyesight. In particular, r emain at least
one meter (39 inches) away from infants when using the flash.
• Store this equipment out of the reach of children and infants. Accidental damage to
the camera or batteries by a child could result in serious injury. In addition, placement
of the strap around the child’s neck could r esult in asphyxiation.
• Be particularly careful to keep the button batteries used in the camera and wireless
controller out of the reach of children. Seek medical assistance immediately if a child
swallows a battery.
• Do not attempt to disassemble or alter any part of the equipment that is not expressly
described in this guide. Disassembly or alteration may result in high-voltage electrical
shock. Internal inspections, alterations and repairs should be conducted by qualified
service personnel authorized by your camera distributor or the closest Canon Customer
Support Help Desk.
• To avoid the risk of high-voltage electrical shock, do not touch the flash por tion of the
camera if it has been damaged. Similarly, never touch internal portions of the
equipment that become exposed as a result of damage. There is a risk of high-voltage
electrical shock. Please take the first opportunity to consult your camera distributor or
the closest Canon Customer Support Help Desk.
• Stop operating the equipment immediately if it emits smoke or noxious fumes.
Failure to do so may result in fire or electrical shock. Immediately turn the camera’s
power off, remove the camera battery and unplug the power cord fr om the electrical
outlet. Confirm that smoke or fume emissions have ceased. Please consult your
camera distributor or the closest Canon Customer Support Help Desk.
• Stop operating the equipment if it is dropped or the casing is damaged. Failure to do so
may result in fire or electrical shock. Immediately turn the camera’s power off, remove the
camera battery and unplug the power cord from the electrical outlet. Please consult your
camera distributor or the closest Canon Customer Support Help Desk.
• Do not allow the equipment to come into contact with, or become immersed in, water
or other liquids. Do not allow liquids to enter the interior. The camera has not been
waterproofed. If the exterior comes into contact with liquids or salt air, wipe it dry with
a soft, absorbent cloth. If water or other foreign substances enter the interior,
immediately turn the camera’s power off and remove the camera battery or unplug the
power cord from the electrical outlet. Continued use of the equipment may result in
fire or electrical shock. Please consult your camera distributor or the closest Canon
Customer Support Help Desk.
Read This First 5

• Do not use substances containing alcohol, benzene, thinners or other flammable
substances to clean or maintain the equipment. The use of these substances may lead
to fire.
• Do not cut, damage, alter or place heavy items on the power adapter cord. Any of these
actions may cause an electrical short circuit, which may lead to fire or electrical shock.
Replace a broken or damaged power adapter cord.
• Do not handle the power cord if your hands are wet. Handling it with wet hands may
lead to electrical shock. When unplugging the cord, ensure that you hold the solid
portion of the plug. Pulling on the flexible portion of the cord may damage or expose the
wire and insulation, creating the potential for fires or electrical shocks.
• Use of power sources not expressly recommended for this equipment may lead to
overheating, distortion of the equipment, fire, electrical shock or other hazards. Use
only the recommended power accessories.
• Always turn off the computer and unplug the camera from the DC plug before
attaching or detaching any interface cables (except for USB cables). The cables carry
high-voltage currents and there is a risk of electrical shock.
• Do not place the batteries near a heat source or expose them to direct flame or heat.
Neither should you immerse them in water . Such exposur e may damage the batteries and
lead to the leakage of corrosive liquids, fire, electrical shock, explosion or serious injury.
• Do not attempt to disassemble, alter or apply heat to the batteries. There is serious risk
of injury due to an explosion. Immediately flush with water any area of the body including the eyes and mouth, or clothing - that comes into contact with the inner
contents of a battery. If the eyes or mouth contact these substances, immediately flush
with water and seek medical assistance.
• Avoid dropping or subjecting the batteries to severe impacts that could damage the
casings. It could lead to leakage and injury.
• Do not short-circuit the battery terminals with metallic objects, such as key holders. It
could lead to overheating, burns and other injuries. Use the supplied terminal cover to
transport or store the battery pack.
• Before you discard a battery, cover the terminals with tape or other insulators to
prevent direct contact with other objects. Contact with the metallic components of
other materials in waste containers may lead to fire or explosions. Discard the batteries
in specialized waste facilities if available in your area.
• Use of batteries not expressly recommended for this equipment may cause explosions
or leaks, resulting in fire, injury and damage to the surroundings. Use only
recommended batteries and accessories.
• Disconnect the compact power adapter from both the camera and electrical outlet after
recharging and when the camera is not in use to avoid fires and other hazards. Continuous
use over a long period of time may cause the unit to overheat and distort, resulting in fire.
6 Read This First

• The camera terminal of the supplied compact power cord is designed for exclusive use
with your camera. Do not use it with other products or batteries. There is a risk of fire
and other hazards.
• Exercise due caution when screwing on the separately sold wide converter lens or
close-up lens. If they loosen, fall off and shatter, the glass shards may cause an injury.
Never aim the lenses at the sun or strong light sources. There is a risk of damage to
eyesight.
Cautions
• Avoid using, placing or storing the equipment in places subject to strong sunlight or
high temperatures, such as the dashboard or trunk (boot) of a car. Exposure to intense
sunlight and heat may cause the batteries to leak, overheat or explode, resulting in fire,
burns or other injuries. High temperatures may also cause deformation of the casing.
Ensure that there is good ventilation when using the compact power adapter to charge
the battery pack or power the camera.
• Do not store the equipment in humid or dusty areas. Storage in such areas could lead
to fire, electrical shock or other damage.
• Be careful not to bang the camera or subject it to strong impacts or shocks that could
lead to injury or damage the equipment when wearing or holding it by the strap.
• Be careful not to cover the flash with your fingers when shooting. In addition, do not
touch the surface of the flash after taking several pictures in rapid succession. Either
action could result in burns.
• If your camera is used for prolonged periods, the camera body may become warm.
Please take care when operating the camera for extended periods as your hands may
experience a burning sensation.
Preventing Malfunctions
Avoid Strong Magnetic Fields
Never place the camera in close proximity to electric motors or other equipment
generating strong electromagnetic fields. Exposure to str ong magnetic fields may cause
malfunctions or corrupt image data.
Avoid Condensation Related Problems
Moving the equipment rapidly between hot and cold temperatures may cause
condensation (water droplets) to form on its external and internal surfaces. Y ou can
avoid this by placing the equipment in an airtight, resealable plastic bag and letting it
adjust to temperature changes slowly before removing it fr om the bag.
If Condensation Forms Inside the Camera
Stop using the camera immediately if you detect condensation. Continued use may
damage the equipment. Remove the CF card and battery or Compact Power Adapter
CA-560 (if connected) from the camera and wait until the moisture evaporates
completely before resuming use.
Read This First 7
Quick Start
Terminals
Battery
Lock
Orange
Indicator
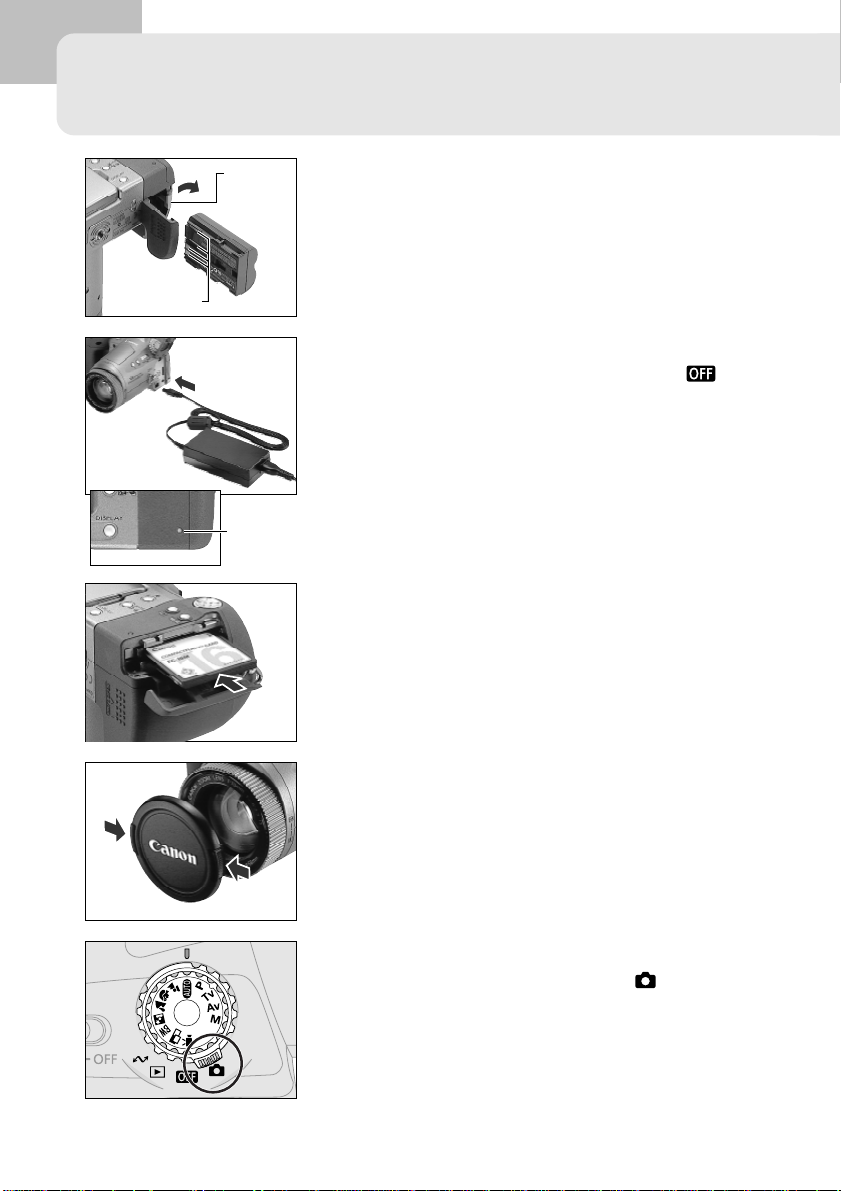
Install the battery.
1
Open the battery cover and insert the battery
pack while pressing the battery lock in the
direction of the arrow (p. 19).
Charge the battery.
2
Confirm that the main dial is turned to .
Charge the battery . The battery is charged
(approximately 90%) when the orange indicator
on the back panel stops flashing and changes to
a steady orange. After charging, detach the
compact power adapter’s DC plug from the
camera (p. 19).
Install the CF card.
3
Open the CF card slot and insert a CF card (p. 27).
8 Quick Start
Remove the lens cap.
4
Pinch it between your fingers to remove it.
Turn the power on.
5
Turn the main dial (lower dial) to (shooting)
(p. 31).
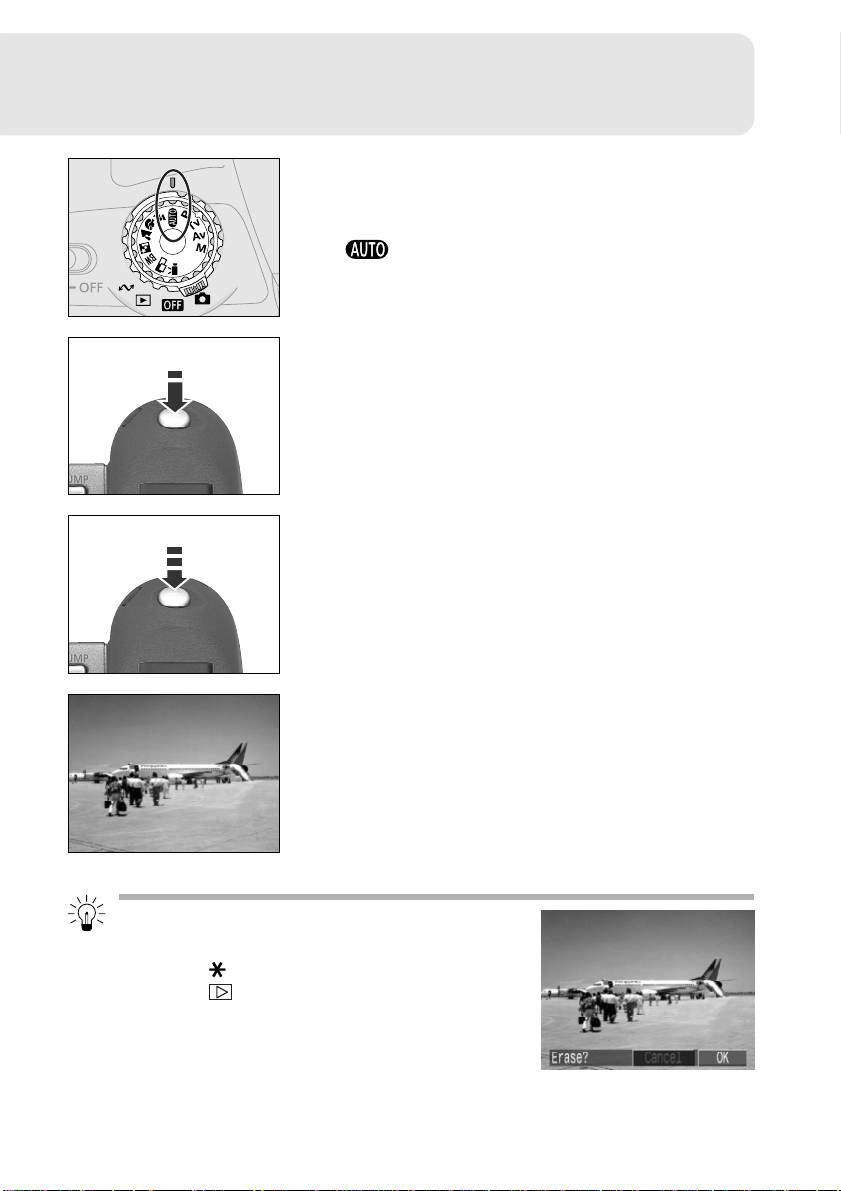
Turn the mode dial (upper dial) to the
6
desired shooting mode.
The easiest way to snap an image is to select the
mode (p. 40).
Compose the image and focus.
7
Aim the camera and lightly press the shutter
button halfway . Two beeps will sound when the
autofocus is set (p. 36).
Shoot.
8
Press the shutter button all the way. You will hear
the sound of the shutter close when the shot is
complete (p. 36).
View the recorded image.
9
The recorded image will display for approximately
2 seconds. Keep your finger on the shutter
button or press the Set button while the image is
displayed to continue to display the image after
the shutter button is released (p. 42).
T o Immediately Delete the Displayed
Image
1. Press the button while the image is displayed.
2. Press the
[OK].
3. Press the Set button.
arrow on the omni selector to select
Quick Start 9
Components Guide
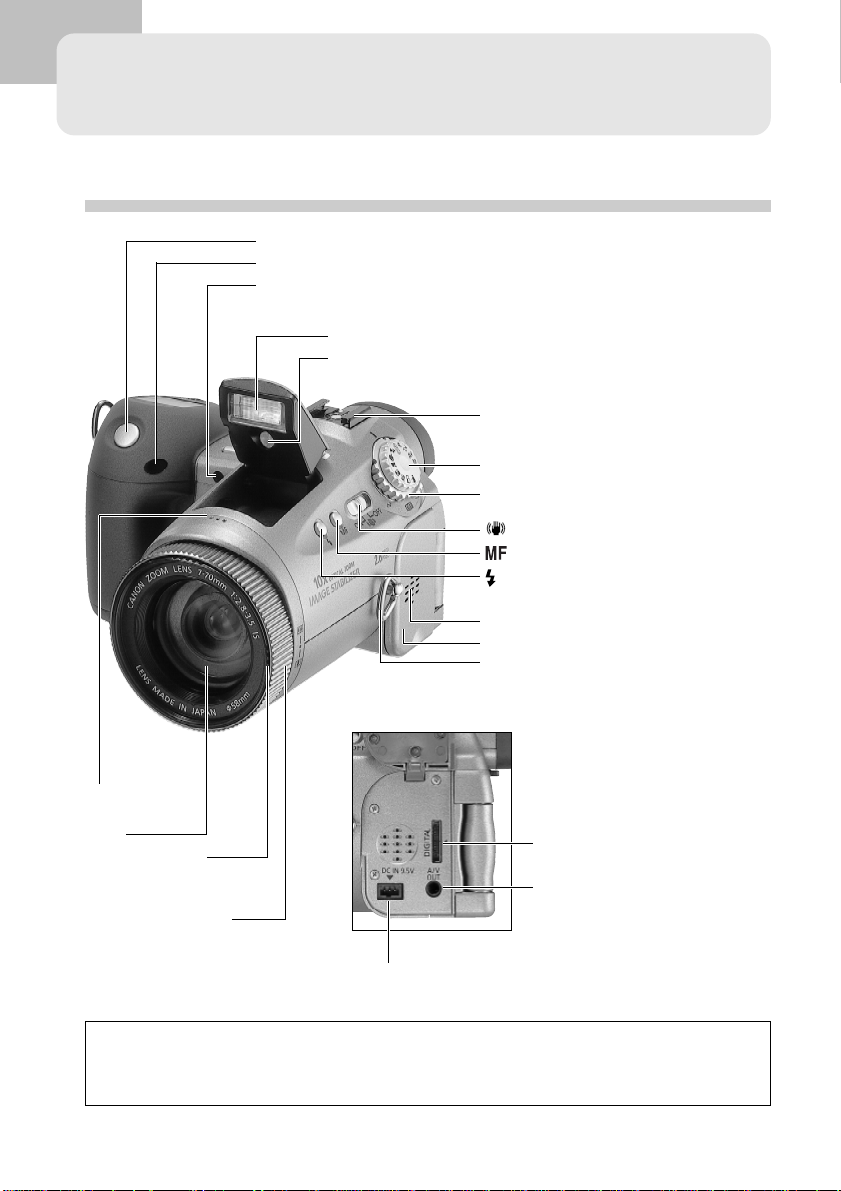
Front View
Shutter Button (p. 36)
Remote Sensor (p. 107)
Self-Timer Lamp (p. 53)
Built-In Flash (p. 44)
Red-Eye Reduction Lamp (p. 44)
Hot Shoe (p. 108)
Mode Dial (p. 13)
Main Dial (p. 13)
(Image Stabilizer) Switch (p. 37)
(Manual Focus) button (p. 74)
(Flash) Button (p. 44)
Speaker
Terminal Cover
Strap Eyelet (p. 29)
Microphone
Lens
Lens Accessory
Mounting Thread
(p. 111)
Zoom Ring (p. 43)
DC IN T erminal (p. 19)
* To connect the camera to the computer with the USB interface, attach the supplied
USB cable to the camera’ s Digital terminal. To connect to a serial port, the separately
sold serial cable (IFC-200PCS for Windows and IFC-200MC for Macintosh) is required.
DIGITAL (Digital) Terminal*
(pp. 118, 119)
A/V OUT (Audio/Video Out)
Terminal (p. 105)
10 Components Guide
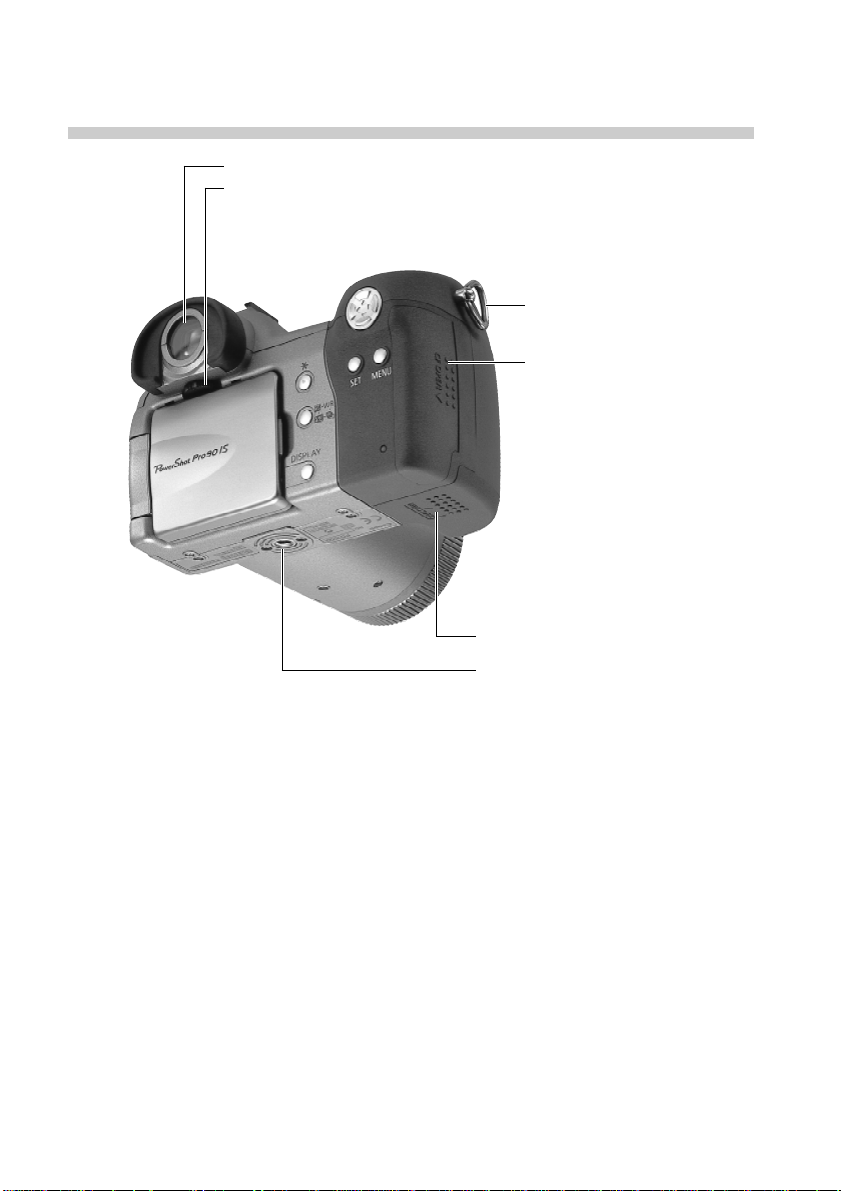
Back View
Viewfinder (pp. 16, 41)
Diopter Adjustment Dial (p. 41)
Strap Eyelet (p. 29)
CF Card Slot Cover (p. 27)
Battery Cover (p. 19)
Tripod Socket
Components Guide 11
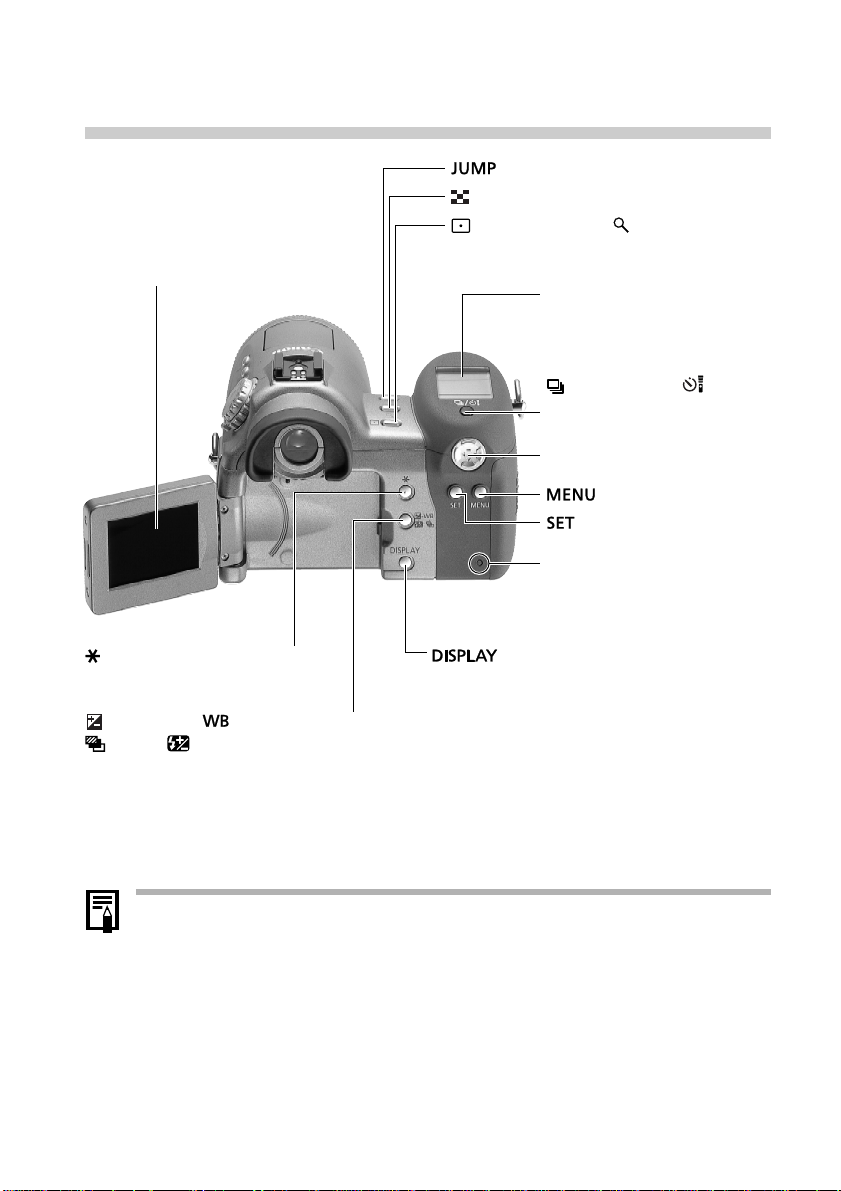
Controls
LCD Monitor (pp. 16, 34)
(Jump) Button (p. 83)
(Index) Button (p. 82)
(Spot Metering) / (Enlarge) Button
(pp. 73, 81)
Display Panel (p. 15)
(Continuous) / (SelfTimer / Wireless Controller)
Button (pp. 53, 54, 107)
Omni Selector
(Menu) Button
(Set) Button
Indicator
(AE Lock) / (FE Lock) Button
(pp. 71, 72)
(Exposure) / (White Balance) /
(AEB) / (Flash Exposure Compensation) Button
(pp. 65, 66, 69, 70)
(Display) Button (p. 16)
Indicators
The indicator shines or flashes under the following circumstances or when the
shutter button is pressed.
• Green: Battery charge complete (100%)*
• Flashing Green: Recording to CF card / Reading CF card / Erasing from CF card
• Orange: Battery charge adequate (approximately 90%)*
• Flashing Orange: Charging battery (the frequency of the flashes varies with the
charging state)*
*
Only appears when the compact power adapter is connected to the camera.
12 Components Guide
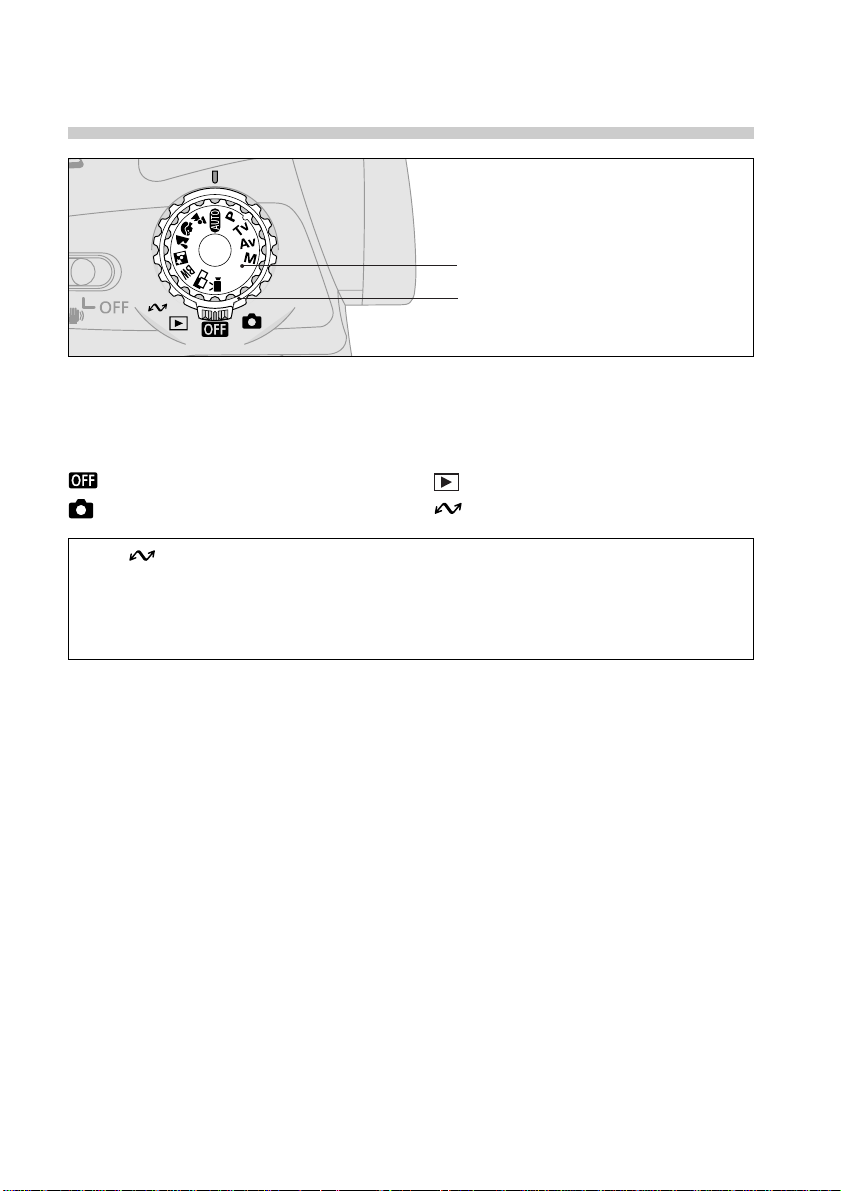
Main Dial / Mode Dial
Mode Dial (upper dial)
Main Dial (lower dial)
Main Dial
Use the main dial to switch between the power off, shooting, replaying and PC
connection modes.
: Off (p. 31)
: Shooting (p. 33)
• The (PC connection) mode is used to download and view images on a computer
when the camera is connected via the interface cable. Please read Using the Supplied
Interface Cables (p. 115) for connection instructions. The Software Starter Guide, a
separate manual, describes how to download and view the images.
• “PC” will show in the display panel when a connection to the computer is opened.
: Replaying (p. 33)
: PC Connection (pp. 118, 120)
Components Guide 13
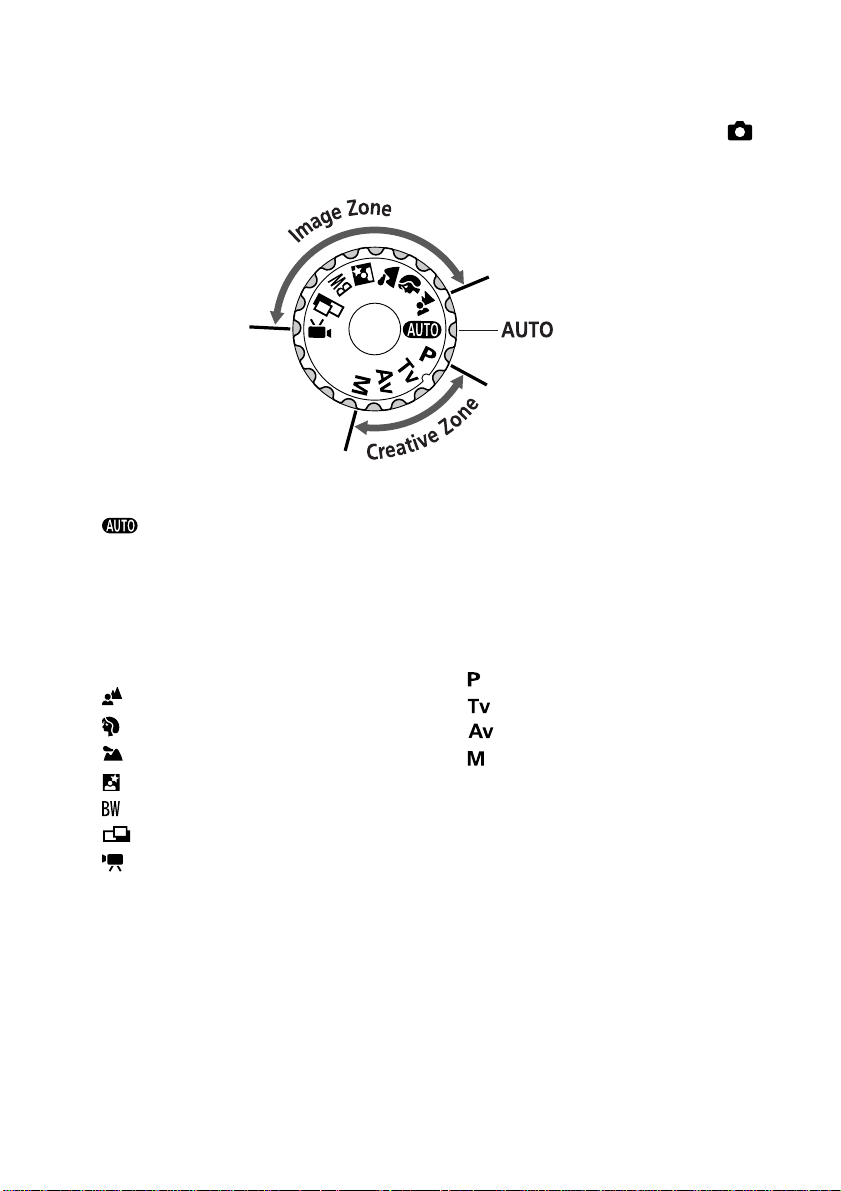
Mode Dial
The mode dial is for selecting a shooting mode (when the main dial is set to
(shooting).)
•
: Auto (p. 40)
The camera automatically selects all
settings.
• Image Zone
Select a mode to match your subject
type then let the camera select the
settings.
: Pan Focus (p. 46)
: Portrait (p. 46)
: Landscape (p. 47)
: Night Scene (p.47)
: Black and White (p. 48)
: Stitch Assist (p. 49)
: Movie (p. 52)
14 Components Guide
• Creative Zone
Set the exposure and/or aperture
settings for special effects.
: Program AE (p. 59)
:
Shutter Speed-Priority AE (p. 60)
: Aperture-Priority AE (p. 62)
: Manual Exposure (p. 64)

Display Panel
The display panel shows the camera settings, the remaining image capacity, movie
shooting time, battery charge and other information.
AE Lock / FE Lock
Shutter Speed / Movie Shooting Time
Aperture Setting
Compression
Resolution
File Format
Spot Metering
Single Shot / Continuous Mode
Flash On / Flash Off
Red-Eye Reduction
Flash Exposure Compensation
Self-Timer / Wireless Controller
Manual Focus
Battery Charge State
Remaining Image Capacity / Message Code / Error Code
White Balance Settings
AEB
Exposure Compensation Level / AEB Level /
Flash Exposure Compensation Level
pp. 71, 72
-
-
p. 56
p. 56
p. 58
p. 73
p. 54
p. 44
p. 44
p. 70
pp. 53, 107
p. 74
p. 22
p. 126
p. 66
p. 69
pp. 65, 69, 70
• The diagram above shows all the icons appearing at once. Normally, only the icons
applicable to the selected mode and camera state appear.
Components Guide 15
Viewfinder / LCD Monitor
The viewfinder or LCD monitor can be used to see and compose the actual image
as it will be recorded.
Switching between Displays
In shooting mode, the display can be switched between the viewfinder and the
LCD monitor .
• The LCD monitor turns on when it is opened.
• The LCD monitor turns off and the viewfinder turns on when the LCD monitor is
closed.
• Images can be replayed on the LCD monitor only.
• When the LCD monitor is difficult to see outdoors or in bright surroundings, adjust
the LCD Brightness setting in the Set up menu (p. 103) or use the viewfinder to
shoot.
• When the LCD monitor is folded back against the camera body (p. 35), pressing
(Index) button switches the display to the viewfinder. Pressing the
the
button a second time switches the display back to the LCD monitor.
Switching between Information Views
Pressing the Display button cycles the LCD monitor to the next mode each time the
button is pressed.
Shooting
The display mode switches between “no information” and “information view”
each time the Display button is pressed.
• The camera shake warning icon will appear at the center of the viewfinder or
LCD monitor in low light conditions while the camera is preparing to shoot. When
this icon appears, use the flash or fix the camera to a tripod to shoot.
• The display mode [on (no information); on (information view)] is memorized when
the camera is turned off. When the camera is turned on again it assumes the last
mode.
• The LCD monitor will display relevant information for about six seconds when the
power is turned on, or a shooting mode or menu setting is changed, even if the
display mode is set to “no information”.
• The LCD monitor cannot display any information when it is opened to the left and
tilted 180
16 Components Guide
o
toward the lens (so that it can be seen from in front of the camera) (p. 35).
Replaying
• Pressing the Display button switches the information view mode.
Single Replay: Simple Display ➞ Detailed Display ➞ No Display
Index View: Simple Display ➞ No Display
Information Displayed in the Viewfinder / LCD Monitor
The viewfinder and LCD monitor display information in the shooting or replaying
mode, such as the camera settings, remaining image capacity and shooting date/
time.
Shooting
Aperture Setting
MF (Manual Focus)
Indicator
Shutter Speed
Shooting Mode
Flash
Drive Mode
Spot Metering
...
...
(RED)
(Green)
(Yellow)
2x 4
x
• When the power is turned on, or a shooting mode or menu
setting is changed, the icons in the shaded boxes above display
for approximately 6 seconds even when the information view is
set to off.
• In addition to the above, the shutter speed, aperture setting and
MF indicator (when manual focus is selected) are displayed as in
the example to the left.
White Balance
Exposure Level
AEB Mode
Flash Exposure
Compensation
Flash Charging Complete
AE Lock / FE Lock
Focused
Metering Complete in
Manual Focus Mode
Image Stabilizer
Camera Shake Warning
Manual Focus
Digital Zoom Setting
p. 14
p. 44
pp. 53, 54
p. 73
p. 66
p. 65
p. 69
p. 70
p. 44
pp. 71, 72
p. 36
p. 36
p. 37
p. 16
p. 75
p. 55
Components Guide 17
Replaying
Image Number
and T otal
File Number
Shooting
Date / Time
In simple display mode, the following information
displays.
• File Number
• Image Number (Displayed Image / T otal)
• Shooting Date / Time
•
: Compression Setting
•
: Resolution Setting
•
: File Format
• : Movie
• Protection Status (
)
In the detailed display mode, the following
information also displays.
Shooting Mode
...
Aperture Setting
Shutter Speed
ISO Speed Setting
...
* In addition to the above, the ISO speed, shutter speed and
aperture setting are displayed as in the example to the left.
Exposure Compensation
White Balance
Spot Metering
Flash Exposure
Compensation
The following information may also appear with some image files.
Audio file is attached (wav file).
An audio file other than a wav file or a file with an unrecognized format is attached.
A JPEG file not supported by “Design rule for Camera File system” standards.
p. 14
p. 65
p. 66
p. 73
p. 70
18 Components Guide
Preparing the Camera
Charging the Battery Pack
Use the following procedures to charge the battery pack the first time and
subsequently when the low battery icon (
Turn the main dial to .
) and Lb ( ) message flash.
1
Slide the battery cover lock in the
2
direction of the arrow and lift to open
it.
Battery
Lock
T erminals
Connect to an
Electrical Outlet
.
.
.
Orange
Indicator
Press the battery lock in the direction of
3
the arrow while inserting the battery
pack, then close the battery cover.
• Insert the battery pack until it locks into place.
Attach the power cord to the compact
4
power adapter and plug it into an
electrical outlet.
Connect the DC plug of the compact
5
power adapter to the camera’s DC IN
terminal.
•
The indicator on the back panel will flash orange
while the battery pack is charging and change to
steady orange when it is approximately 90%
charged. If it is charged for approximately two
more hours, it will become fully charged and the
indicator will switch to green.
Preparing the Camera 19

• After charging the battery, remove it from the camera if the camera will not be
used.
• If the main dial is set to any position other than while charging, the battery
pack will stop charging and the household electrical current will power the
camera.
• This is a lithium ion battery pack so there is no need to completely use or
discharge it before recharging. It can be charged at any charge state.
• It takes approximately 100 minutes to bring a fully discharged battery pack to a
charge state of approximately 90% (adequate charge for use). It takes
approximately two more hours to charge it fully (based on standard Canon testing
criteria). Charge it within a temperature range of 5 to 40º C (41 to 104º F).
• Charging times will vary according to the surrounding humidity and battery pack
charge state.
Battery Pack Handling Precautions
• Keep the battery pack and camera terminals (
) clean at all times. Dirty
terminals may cause a poor contact between the battery pack and camera. Polish
the terminals with a tissue or a dry cloth before charging or using the battery pack.
• Do not cover the compact power adapter with anything, such as a tablecloth,
cushion or blanket, when it is charging. Heat will build up internally and possibly
lead to fire.
• Do not charge batteries other than Battery Pack BP-511 with the supplied
equipment. It could damage the camera.
• The battery pack continues to discharge a small amount when left in the camera
even with the power turned off. This shortens the battery life. Remove it from
the camera, attach the supplied terminal adapter and store it in a cool, dry place.
Charge it before use.
• Even charged battery packs continue to discharge naturally. You are advised to
charge the battery on the day of use, or one day before, to ensure a full charge.
Storing fully charged battery packs may shorten battery life and diminish
performance.
• The camera consumes the battery charge when the power is on even when a
function is not being used. To conserve the battery charge, be particularly
attentive in turning the power off.
• Although the battery pack’ s maximum operating range is 0 to 40º C (32 to 104º F),
the optimal range is 10 to 30º C (50 to 86º F). At cold temperatures, such as those
experienced on ski hills, performance will temporarily decline, reducing the usable
time before recharging.
• If the usable time of a battery pack diminishes substantially even when fully
charged, it should be replaced.
20 Preparing the Camera
Installing the Battery Pack
Install Battery Pack BP-511 (supplied) into the camera as follows. Use a household
power source to power the camera for extended periods (p. 23).
T urn the main dial to .
1
Slide the battery cover lock in the
2
direction of the arrow and lift to open
it.
Battery
Lock
Terminals
Press the battery lock in the direction of
3
the arrow while inserting the battery
pack, then close the battery cover.
• Insert the battery pack until it locks into place.
Close the battery cover.
4
To Remove the Battery Pack
Twist the battery lock in the direction of the
arrow and pull the battery pack out.
• Charge the battery pack before using it the first time (p. 19).
• The flashing green indicator signals that the CF card is being written to, read, or
erased. Never open the battery cover or remove the battery while it is flashing.
• Remove the battery pack when the camera is not in use.
Preparing the Camera 21

Battery Status Symbols
• The following icons indicate the battery status. These icons will not appear while
the camera is plugged into a household power source.
(Steady): Sufficient battery charge
(Flashing): Low battery
(Flashing): Replace or recharge battery
Battery Performance
Number of Images Shot
LCD Monitor On
Battery Pack BP-511 (fully charged)
• The data above will vary according to the shooting conditions and settings.
• Movie data is excluded.
• At low temperatures, the battery pack performance may diminish and the low battery icon appear very rapidly.
In these circumstances, the performance can be improved by warming the battery pack in a pocket before use.
<Test Conditions>
Shooting: Room temperature (23° C, 73° F), alternating maximum wide angle and maximum telephoto shots at
Replaying: Room temperature (23º C, 73º F), continuous playback at one image per 5 seconds. CF card used.
20-second intervals with flash fired once every four shots and camera power turned off and on every
eighth shot. CF card used.
Approx. 200 images
LCD Monitor Off
Approx. 200 images
Replay Time
Approx. 120 minutes
22 Preparing the Camera
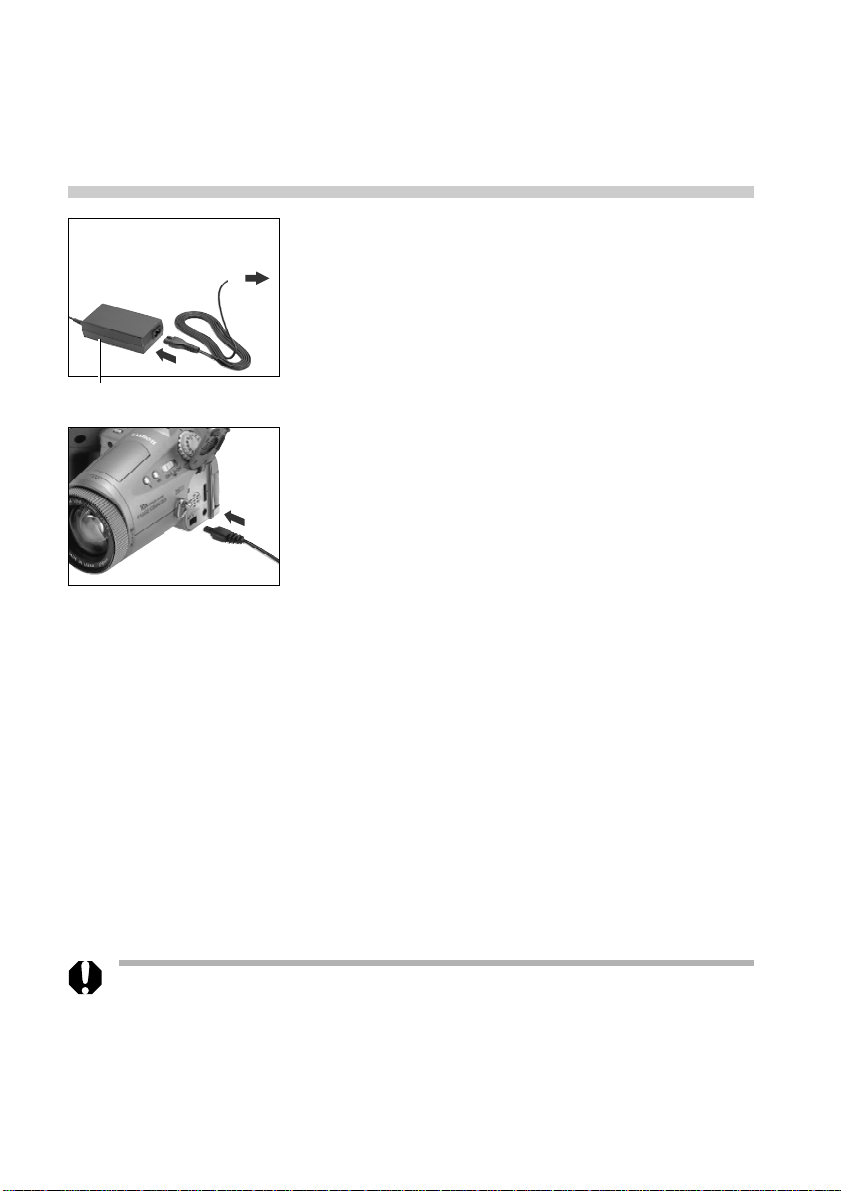
Using a Household Power Source
You are advised to use a household power source for long periods of use and for
connecting to a computer.
Connect to an
Electrical Outlet
Compact Power Adapter
CA-560
.
.
.
Attach the power cord to the compact
1
power adapter and plug it into an
electrical outlet.
Open the terminal cover and connect
2
the DC plug of the compact power
adapter to the camera’s DC IN terminal.
• Always disconnect and unplug the compact
power adapter after use.
• Always turn the camera’ s power off before connecting or disconnecting the
compact power adapter.
• Battery Pack BP-511 cannot be charged while the compact power adapter is being
used to run the camera (main dial is set to any position other than Off).
• Do not use Compact Power Adapter CA-560 to power to any device other than
one for which Battery Pack BP-511 is specified.
Preparing the Camera 23
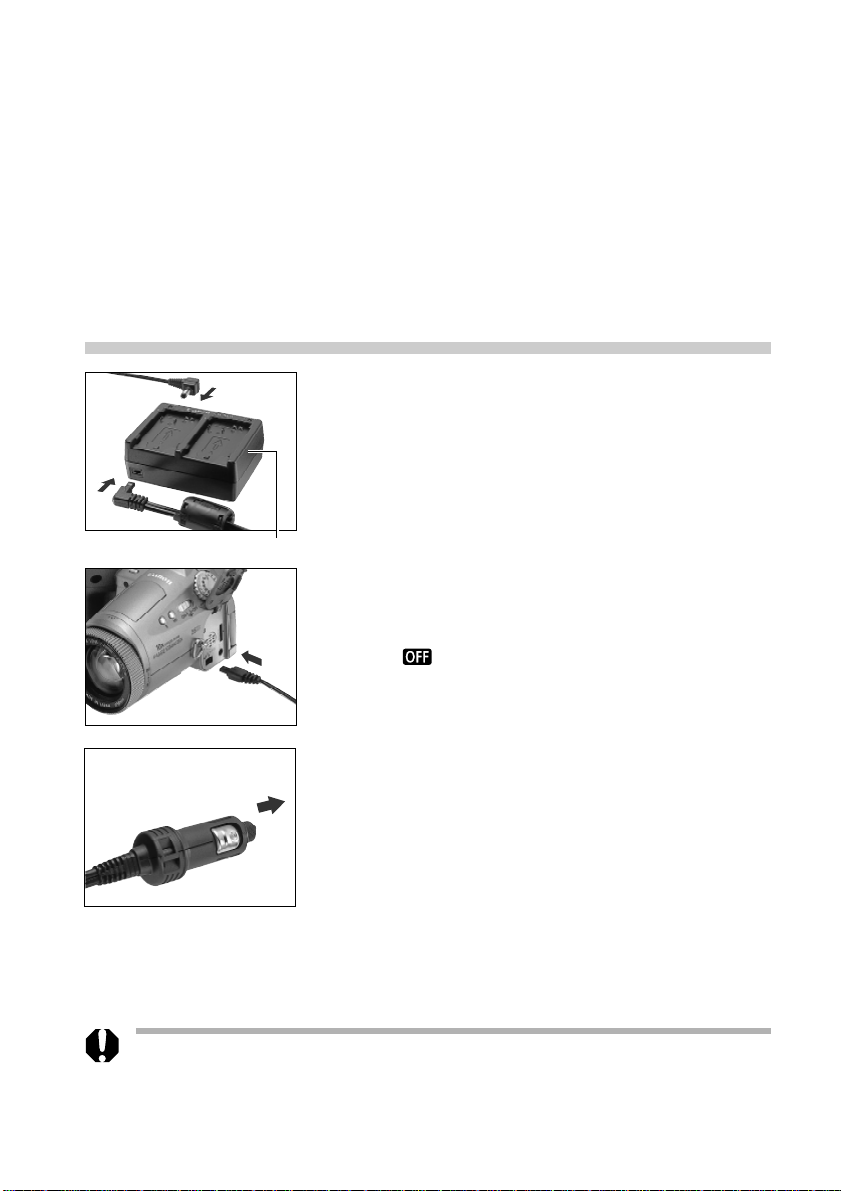
Using a Charge Adapter / Car Battery Cable Kit
(Optional)
Charge Adapter / Car Battery Cable Kit CR-560 (optional) can be used to charge
battery packs or to power the camera from a car’s cigarette lighter socket. You can
also charge a battery pack from a household power source without using the
camera by connecting Compact Power Adapter CA-560 (supplied with the camera)
to Charge Adapter / Car Battery Cable Kit CR-560.
Using a Car Cigarette Lighter Socket as a Power Source
Attach the DC cable and car battery
1
cable to the charge adapter.
Charge Adapter
Connect the DC cable to the camera’ s
2
DC IN terminal.
• Confirm that the camera’ s main dial is turned
.
to
T o a Car’s Cigarette
Lighter Socket
With the engine running, plug the car
3
battery cable into the car’ s cigarette
lighter socket.
• Be sure to have the engine running when you
unplug it too.
Turn the camera on.
4
• Always ensure that the car’s engine is running when you use Charge Adapter / Car
Battery Cable Kit CR-560. Use of the kit without the engine running may flatten
the car battery . Always unplug the kit before turning off the engine.
24 Preparing the Camera
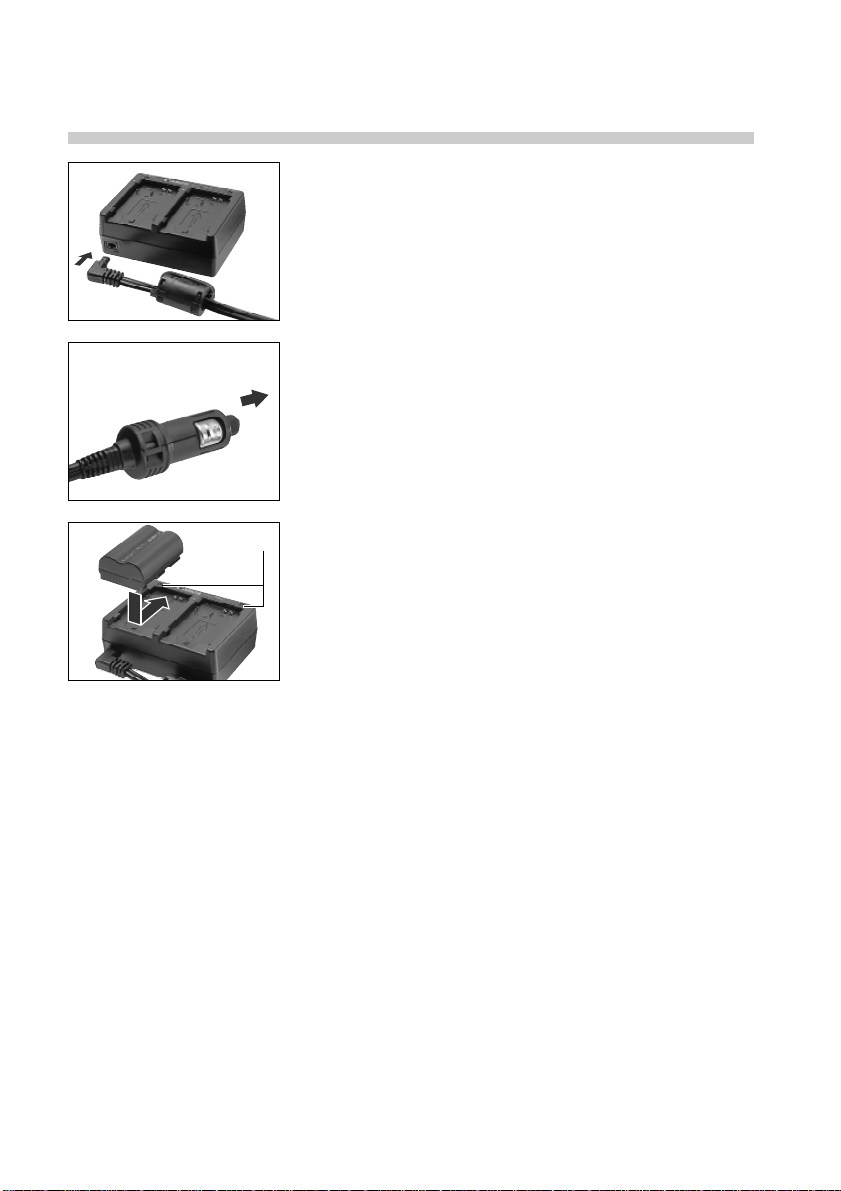
Charging the Battery Pack
Attach the car battery cable to the
1
charge adapter.
T o a Car’s Cigarette
Lighter Socket
Indicator
With the engine running, plug the car
2
battery cable into the cigarette lighter
socket.
Attach the battery pack.
3
• Align the battery pack with the ▲ mark on the
charge adapter and slide it in the direction of
the arrow.
• Up to two Battery Pack BP-511s can be placed
in the charge adapter simultaneously.
• Either slot, A or B, can be used to charge a
single battery pack. When two are placed in the
charge adapter , the first one to be installed will
start charging. The second battery pack will start
charging after the first has been fully charged.
• If two battery packs have been placed in the
charge adapter before it is plugged into the
cigarette lighter socket, the one placed in the A
side will charge first. (B side will start after A side
is fully charged.)
• The red light will flash while a battery pack is
charging and shine steadily when it is charged.
• It takes approximately 80 minutes to charge a
single battery pack.
After charging, remove the battery pack.
4
• Remove the battery pack by sliding it in the
opposite direction from which it was installed.
Preparing the Camera 25

With the engine running, unplug the
5
car battery cable from the socket.
• Whenever you turn the engine off, the battery
will stop charging, so be sure to unplug the
charge adapter from the cigarette lighter socket.
• Wait until the engine is running again to plug it
back into the cigarette lighter socket and
resume charging.
Charging with the Compact Power Adapter
Battery packs can also be charged in the charge adapter using a household power
source by attaching Compact Power Adapter CA-560 in place of the car battery
cable. This allows you to use the camera while your other battery packs are
charging.
Connect to an electrical outlet
...
Compact Power Adapter CA-560
26 Preparing the Camera
Installing a CF Card
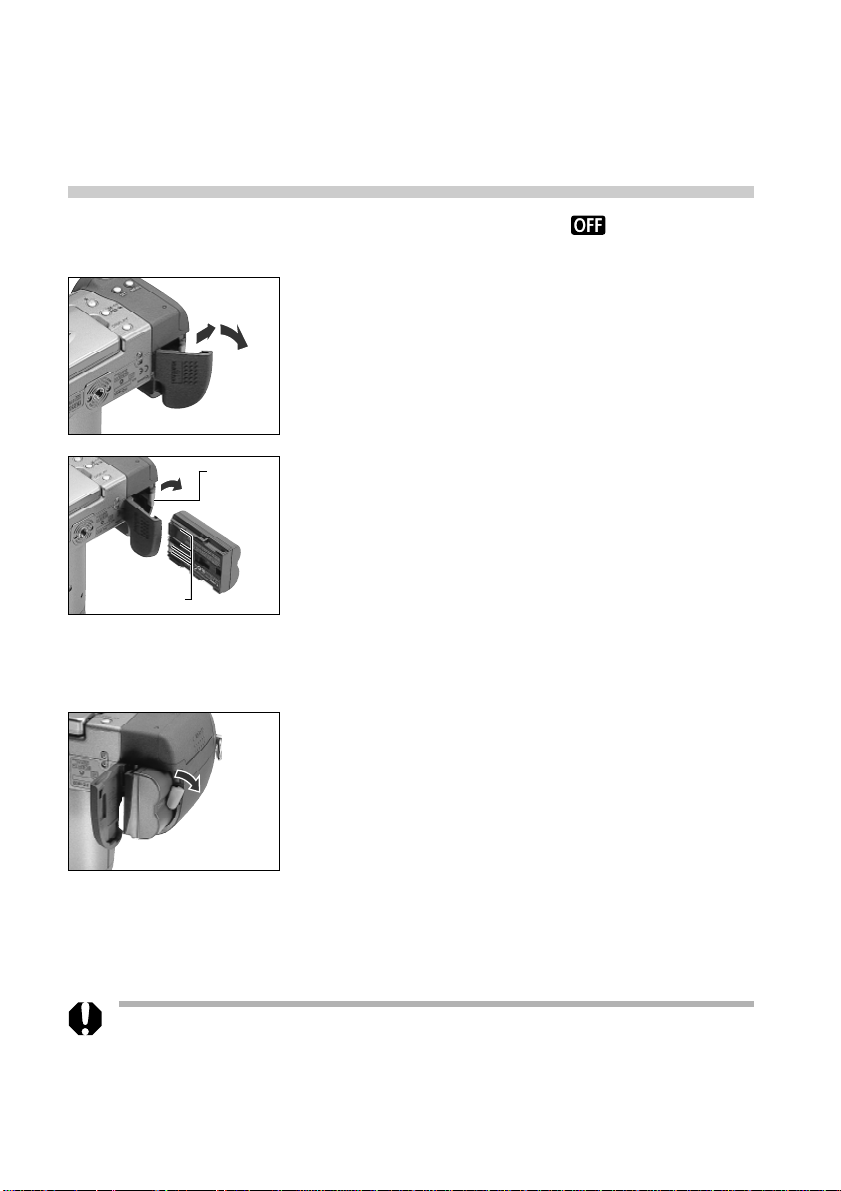
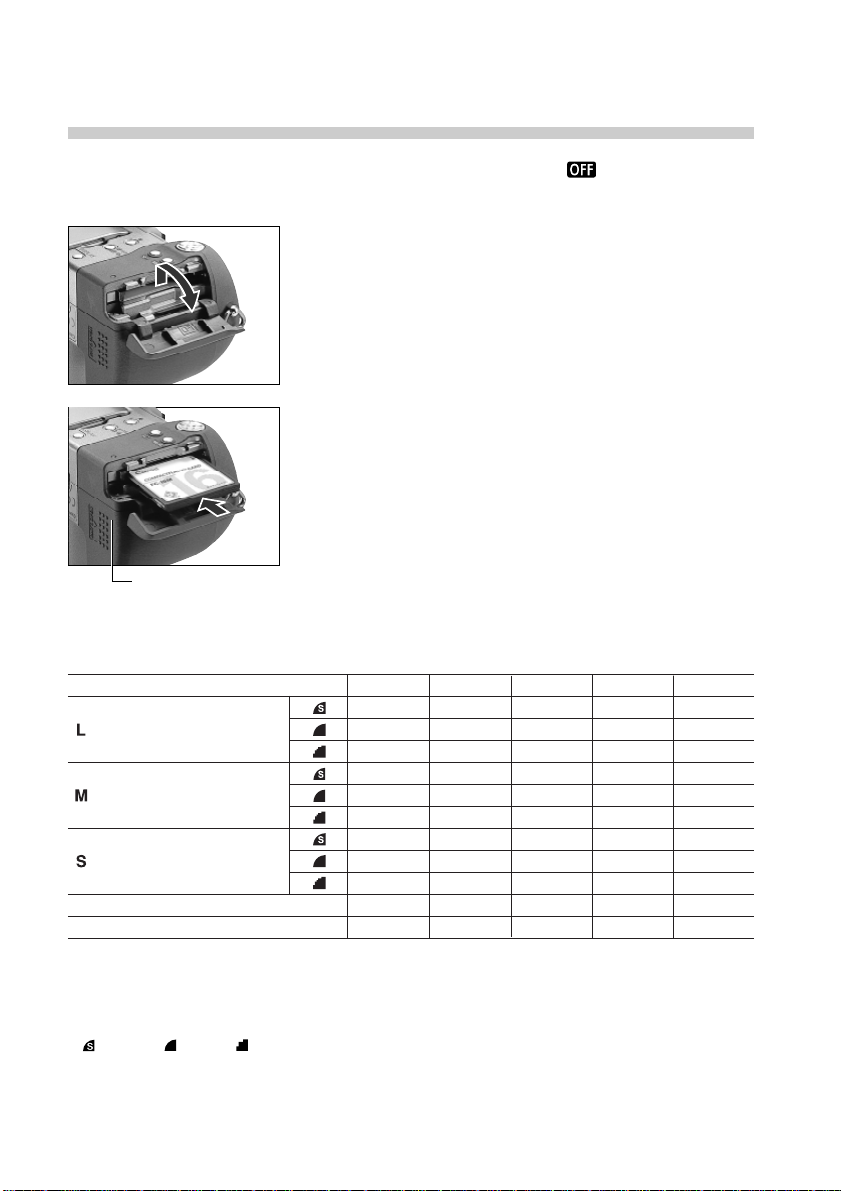
Turn the main dial to .
1
Slide the CF card slot cover in the
2
direction of the arrow and lift it open.
Insert the CF card with the label facing
3
up and the arrow pointing in.
• Push the card in until the CF card eject button
fully extends.
• To remove the CF card, push the CF card eject
button and pull the card out.
CF Card
Eject Button
CF Cards and Estimated Capacities (Recordable Images)
FC-8M
(Large) 1856 x 1392 pixels
17
12
(Medium) 1024 x 768 pixels
(Small) 640 x 480 pixels
RAW 1856 x 1392 pixels
Movie 320 x 240 pixels
* Figures over 1000 display as “999” since the display panel can only show up to three digits.
• For movies, time figures are displayed as if the movies were shot continuously. A movie file, however , has a
maximum length of approximately 30 seconds.
• These figures reflect standard shooting conditions established by Canon. Actual totals may vary according to the
subject, shooting conditions and shooting mode.
• Superfine, Fine and Normal indicate the relative compression ratio.
22
41
26
46
79
30 sec.
FC-16M
4
8
2
17
35
25
45
84
54
94
161
62 sec.
FC-32M
9
6
20
36
72
51
91
170
109
189
323
13
124 sec.
FC-64M
40
73
145
103
183
342
220
379
648
27
250 sec.
FC-128M
82
146
292
207
368
684
441
760
1298*
56
502 sec.
Preparing the Camera 27

• When the camera’s indicator flashes green, the camera is writing, reading, erasing
or transmitting an image to or from the card. Do not perform the following, for
image data may be lost or corrupted:
• Do not apply shocks or vibrations to the camera.
• Do not turn off the power or open the battery cover.
• Do not open the CF card slot cover or remove the CF card.
• Never open the CF card slot cover when the power is on.
• Please note that CF cards formatted in or edited with other manufacturer’s
cameras or application programs may not operate correctly in the camera.
CF Card Handling Precautions
• CF cards are high-precision electronic devices. Do not bend, force, or subject
them to shocks or vibration.
• Do not attempt to disassemble or alter a CF card.
• Moving a CF card rapidly between temperature extremes may cause condensation
to form in the card, leading to potential malfunctions. T o avoid condensation
formation, place the CF card in a sealed plastic bag before moving it into a
different temperature zone and allow it to adjust slowly to the new temperature. If
condensation forms on the CF card, put it aside until the water droplets have
evaporated completely .
• Place the CF card in the supplied case for storage.
• Do not use or store CF cards in the following types of location.
- Locations subject to dust or sand
- Locations subject to high humidity and high temperatures
Microdrives are a recording medium with a hard disk. Their merits are a large
capacity and a low price per megabyte of capacity. However, they are relatively
more susceptible to vibrations and shocks than CF cards, which use durable
flash memories. Please be careful, therefore, not to subject the camera to
vibrations or shocks when using a microdrive, especially while recording or
replaying.
28 Preparing the Camera
 Loading...