

Page 1

Introductory Information
479
Important
Caution
Note
7.9 inches (200 mm)
(600 mm)
7.9 inches
(200 mm)
7.9 inches (200 mm)
(600 mm)
(When not
using the stand)
(When using the stand)
3.9 inches (100 mm)
7.9 inches (200 mm)
(600 mm)
7.9 inches
(200 mm)
ENGLISH
Setup Guide
Read this manual before attempting to operate the printer.
Keep this manual in a handy location for future reference.
• Instructions in this Setup Guide show the PRO-4000 printer. Note that your printer may look different from these illustrations in some cases. However,
the basic operations are the same.
Introduction
Before Setting Up the Printer
Before setting up the printer, check the completed image of the printer you purchased and make sure you have enough space to install the printer.
It is recommended that you reserve space of the following dimensions to allow you to work around the printer.
• The printer stand and roll unit may be options depending on the model. Care is required because the required space may differ depending on whether or not the
options are used.
• The space required in front of the printer differs on how the basket supplied with the printer stand is used. This shows the installation space when used in the
position in the illustration.
PRO-2000
Installation space (W x D x H)
• When not using the stand
59.5 x 56.5 x 40.2 inches
(1510 x 1434 x 1020 mm)
• When using the stand
59.5 x 66.3 x 61.5 inches
(1510 x 1684 x 1560 mm)
PRO-4000S
Installation space (W x D x H)
78.5 x 66.3 x 61.5 inches
(1993 x 1684 x 1560 mm)
7.9 inches
(200 mm)
23.6 inches
(600 mm)
23.6 inches
(600 mm)
5.9 inches (150 mm)
3.9 inches
(100 mm)
(When not using
the stand)
7.9 inches
(200 mm)
(When using the
stand)
5.9 inches (150 mm)
PRO-4000
Installation space (W x D x H)
78.5 x 66.3 x 61.5 inches
(1993 x 1684 x 1560 mm)
PRO-6000S
Installation space (W x D x H)
94.5 x 66.3 x 61.5 inches
(2399 x 1684 x 1560 mm)
7.9 inches
(200 mm)
5.9 inches (150 mm)
3.9 inches (100 mm)
23.6 inches
5.9 inches (150 mm)
23.6 inches
Set up the printer using the following procedure.
Assemble the Stand
Install the Printer
Attach the Roll Unit
Attach the Basket
Turn On the Printer
Install the Ink Tanks
Install the Print Head
(P.3)
(P.3)
(P.4)
(P.4)
(P.4)
(P.6)
(P.8)
3.9 inches (100 mm)
Overview of Setup
* Refer to the separate manual
* Refer to the separate manual
* Refer to the separate manual
3.9 inches (100 mm)
23.6 inches
If an error message appears during setup or other problems occur,
refer to "Responding to Messages" on p.14.
• Some items are included with the printer but not described in
this manual.
Keep these items in a safe place after setup because they
are used invarious printing applications.
• For instructions on the included items not described in this
manual, refer to the Online Manual. ("How to Display the
Online Manuals" on p.14)
• A cable to connect the printer to a computer is not provided
with the printer.
• Windows is a trademark or registered trademark of Microsoft Corporation in the
U.S. and/or other countries.
Perform Print Head Adjustment and Select the Connection
Method on the PRO-2000
Select the Connection Method and Perform Print Head
Adjustment on the PRO-4000, PRO-4000S, and PRO-6000S
QT6-1322-V01 PRINTED IN XXXXXXXXXXXXXXXX © CANON INC. 2016
Load the Paper
Connect to the Printer
Store Accessories in the Pockets
How to Display the Online
Manuals
(P.9)
(P.10)
(P.11)
(P.12)
(P.13)
(P.14)
RMC (Regulatory Model Code): K10441
RMC (Regulatory Model Code): K10440
RMC (Regulatory Model Code): K10439
RMC (Regulatory Model Code): K10438
1
Page 2
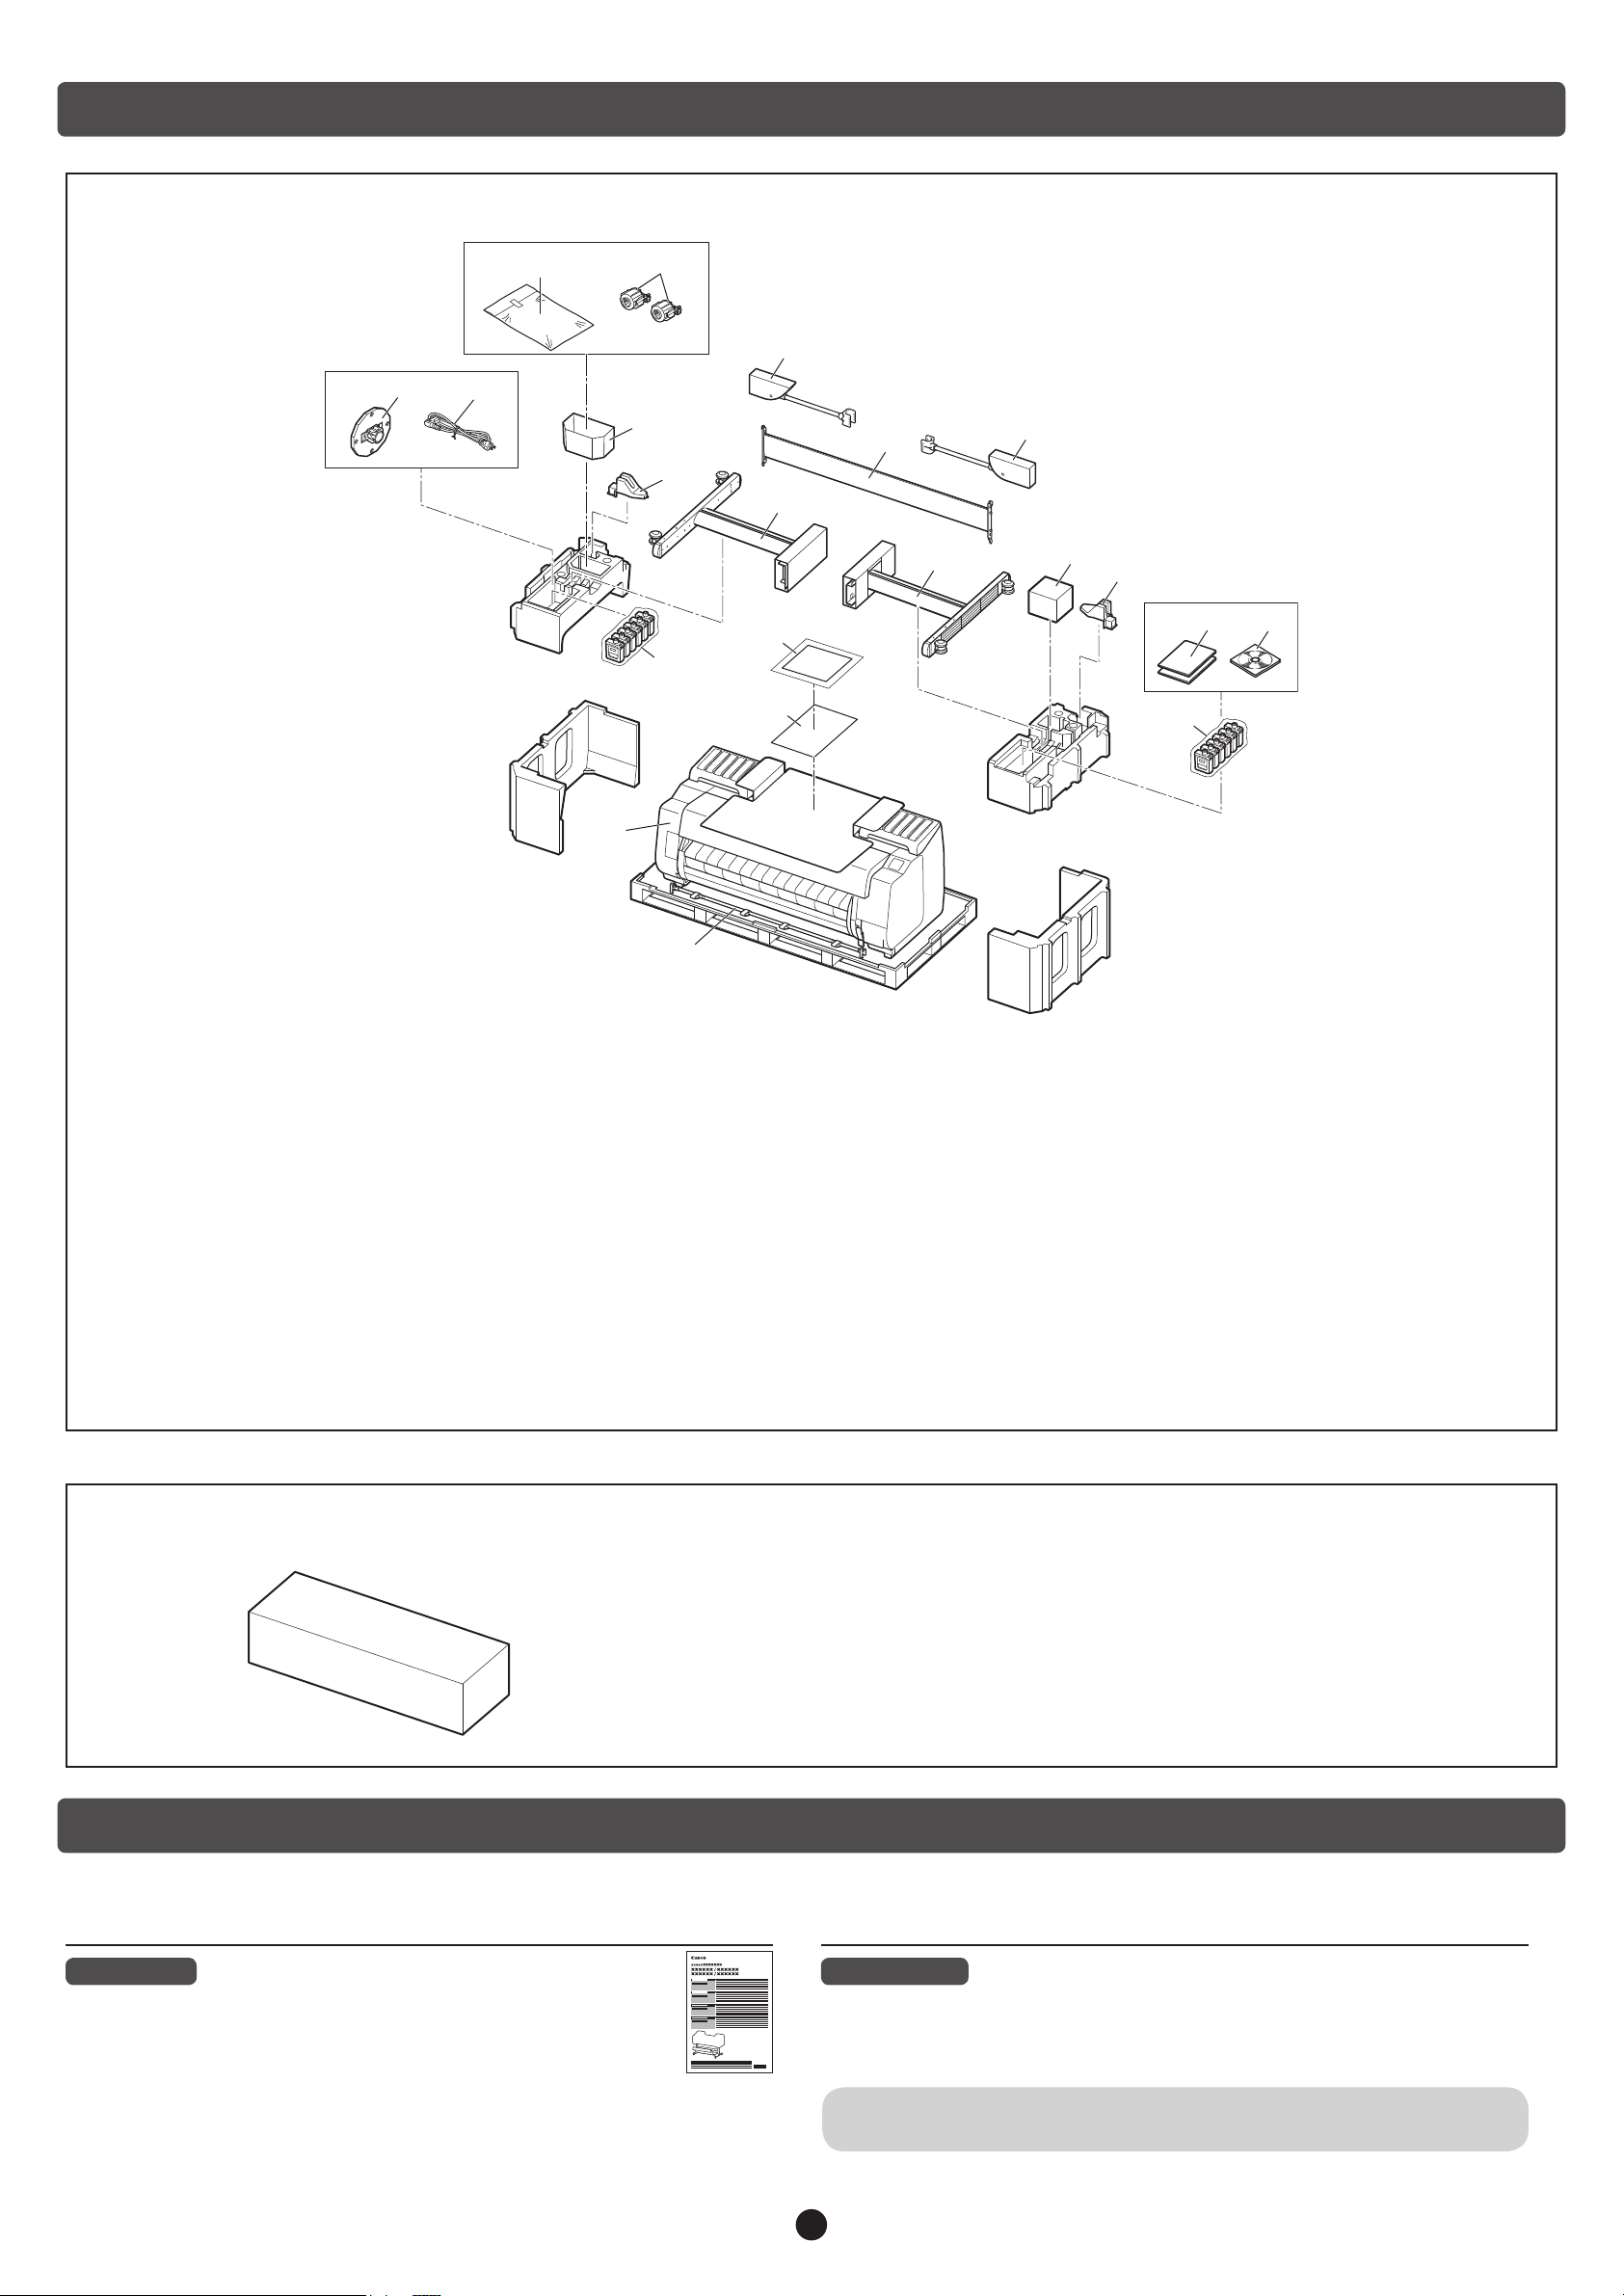
● Printer
Package Contents
O, P, Q, R, S N
M
V
U
A
T
L
M
H
K
J
I
H
G F
D
E
C
E
B
A. Printer
B. Basket rod / Basket cloth (*1)
C. Paper for adjustment
D. Setup Guide (this manual)
E. Starter ink tanks (x 2) (*2)
F. Set of CD-ROMs
G. Set of printer documentation
H. Rod holder (x 2) (*1)
*1 Only included with models where the stand is included as standard. Furthermore, it may be packaged in a separate box
depending on the region where you purchased the printer.
*2 The number and types of ink tanks differ between models.
For the PRO-2000 and PRO-4000 :
MBK, PBK, C, M, Y, PC, PM, R, CO, B, GY, PGY
For the PRO-4000S and PRO-6000S :
MBK, PBK, C, M, Y, PC, PM, GY
*3 The holder stopper is used when loading roll paper. For details, refer to the Online Manual.
I. Print head
J. Stand leg L (*1)
K. Stand leg R (*1)
L. Stand stay (*1)
M. Basket arm (x 2) (*1)
N. 3-inch paper core attachment (x 2)
O. M4 hex screw (x 9) (*1)
P. M8 hex screw (x 4) (*1)
Q. M4 Hex screw for basket arm (x 4) (*1)
R. M8 Allen wrench (*1)
S. M4 Allen wrench (*1)
T. Accessory pocket (*1)
U. Power cord
V. Holder stopper (*3)
● Roll Unit
On the PRO-6000S, this is included as standard.
On the PRO-2000, PRO-4000, and PRO-4000S, this is an option.
Refer to the "Roll Unit Setup Guide" for details on the products included in the boxes.
The Manuals Supplied with This Printer
After installing the printer as shown in this Setup Guide, refer to the manuals for instructions on operation and maintenance.
Printed Manuals
Quick Guide
The Quick Guide contains information related to warnings for using this
product safely and information related to replacing paper, ink tanks, and
the print head.
Electronic Manuals
Online Manual
This manual describes advanced usage of the printer such as paper saving tips,
how to print a poster and banner with the supplied software and print quality
adjusting method, in addition to the basic instructions for printing on roll paper or
cut sheet.
To view the electronic manuals, refer to "How to Display the Online Manuals"
(p.14).
2
Page 3
Caution
Assemble the Stand
• Models That Use a Stand
Assemble the stand on which you will install the printer.
-> Refer to "Assemble the Stand" to "Prepare to Install the Printer" in the Printer Stand Setup Guide (separate manual).
• Models That Do Not Use a Stand
Proceed to "Install the Printer".
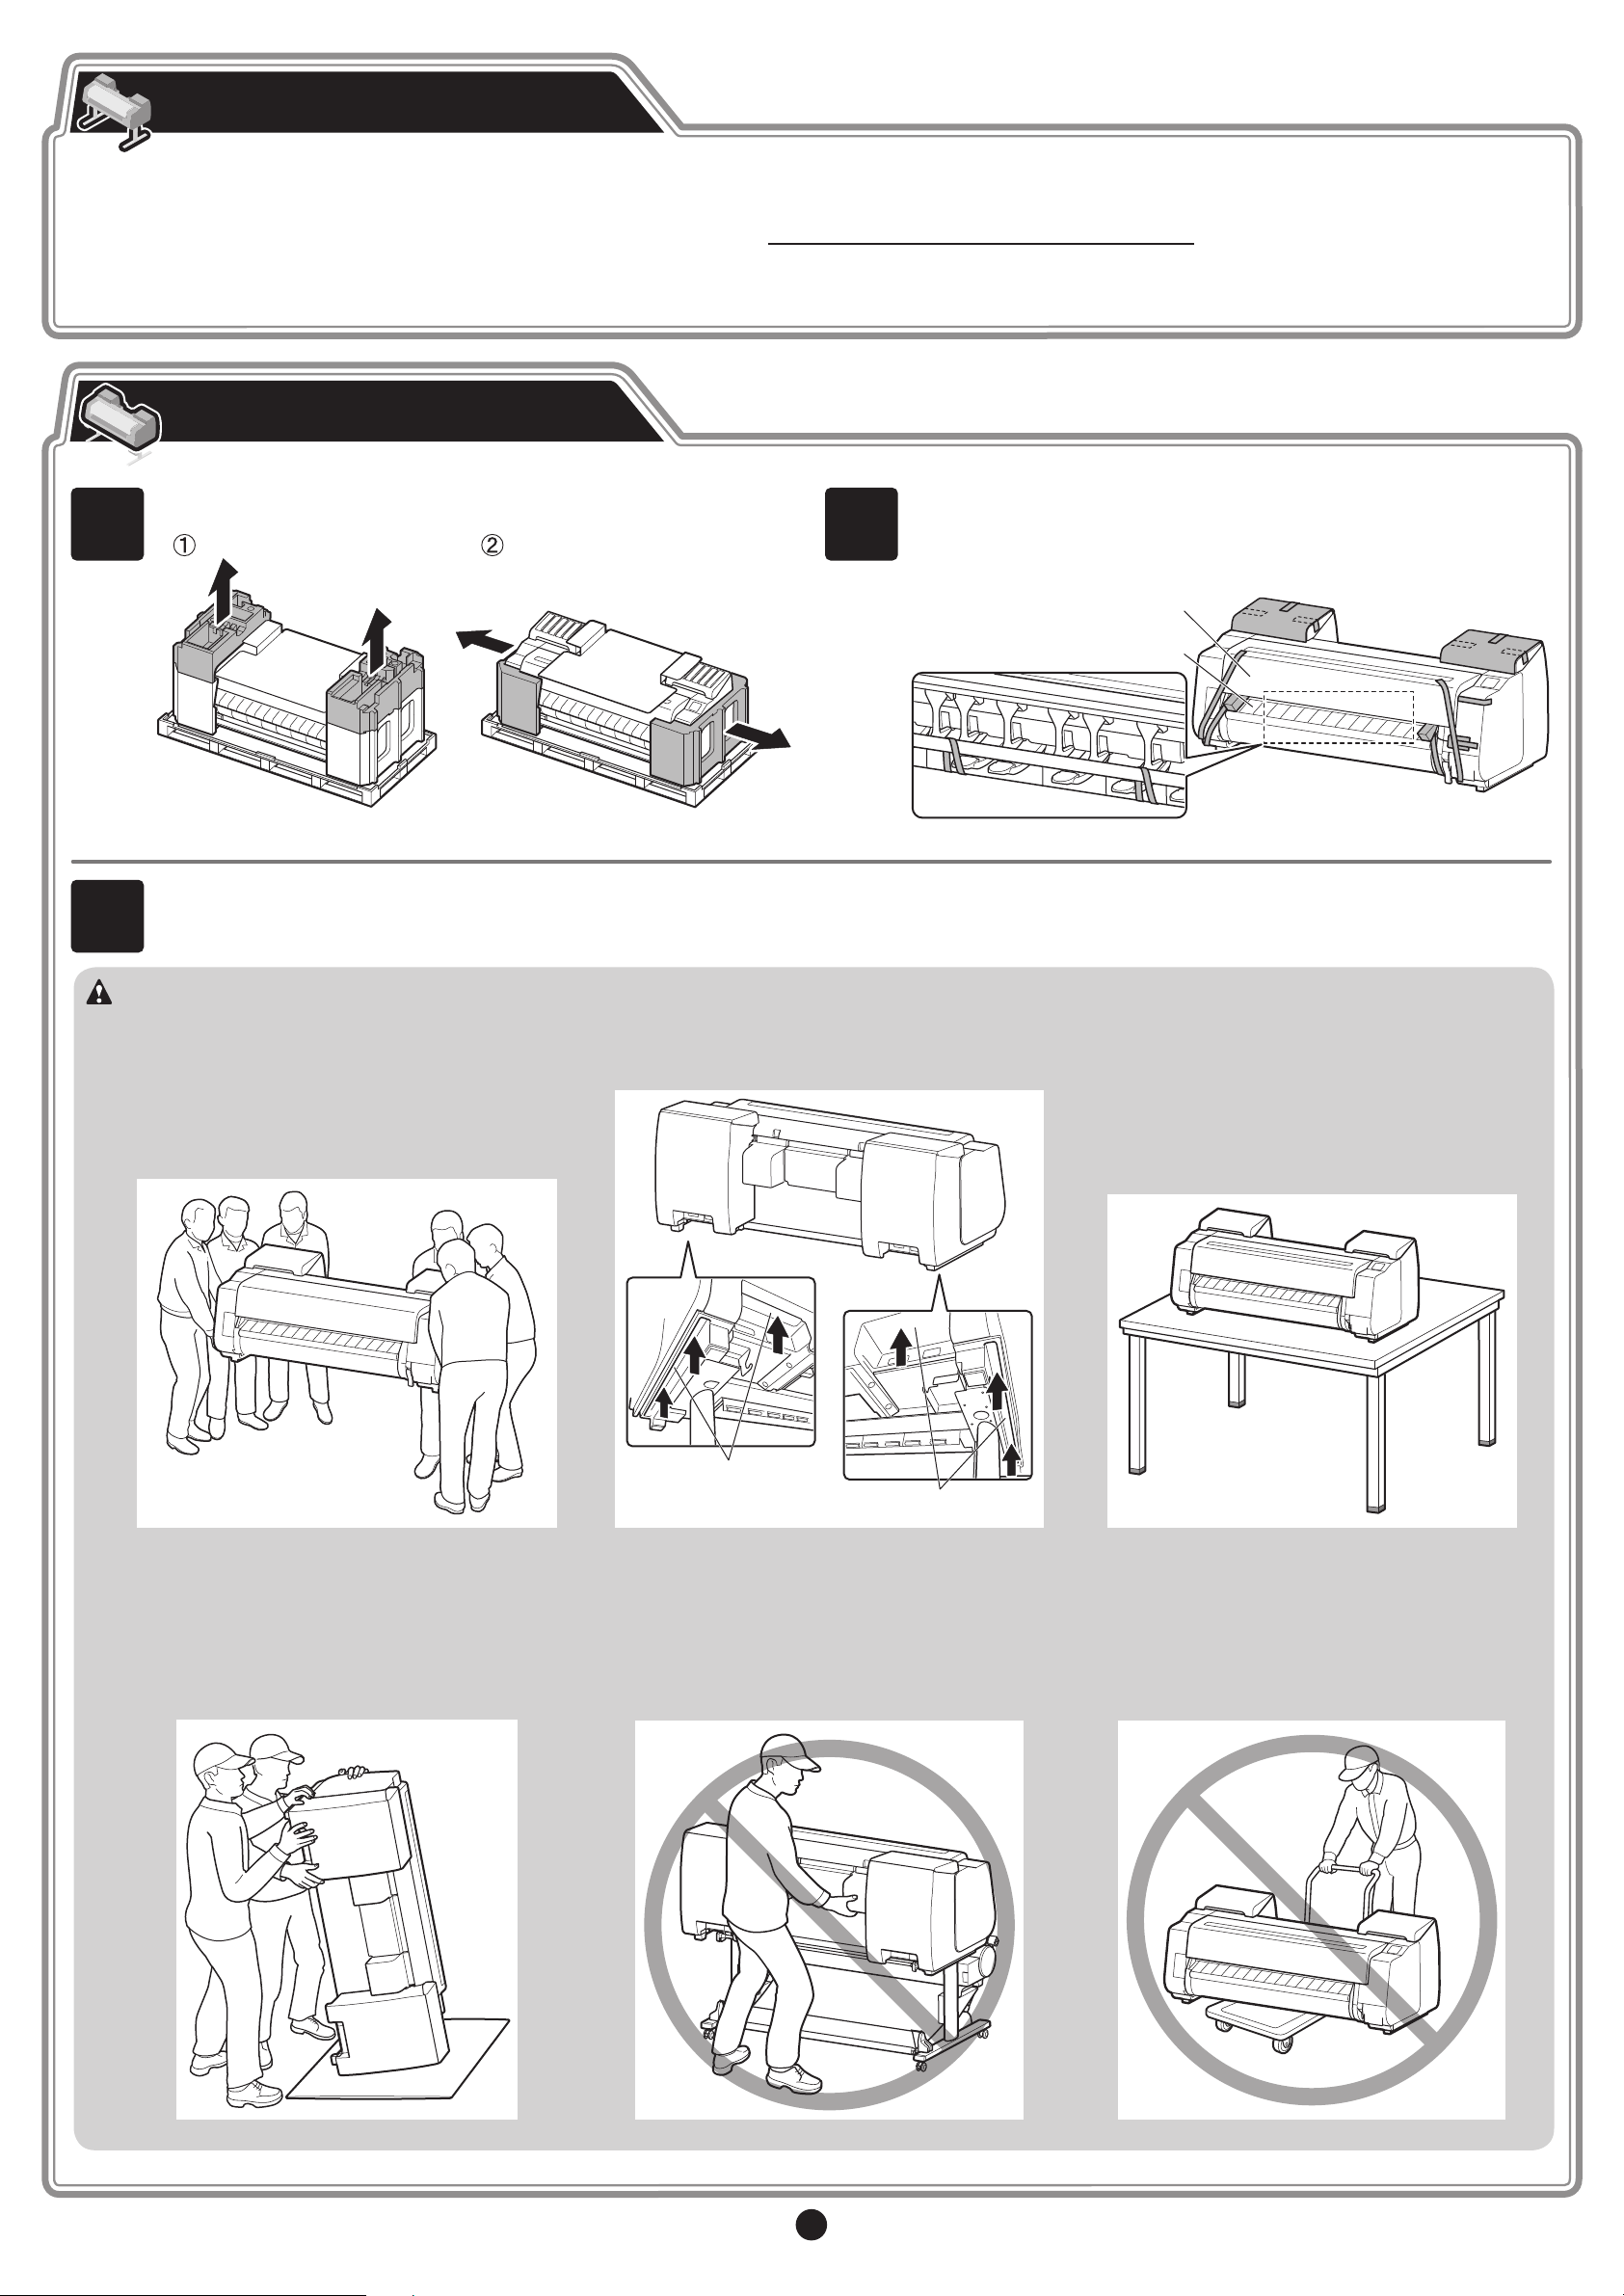
Install the Printer
Remove the packaging material.
1
With 3 people holding the carrying handles under the printer on both ends, lift the printer.
3
• The printer alone weighs differently depending on
the model. PRO-2000 is approx. 185 lb (84 kg),
PRO-4000 is approx. 231 lb (105 kg), PRO-4000S
is approx. 227 lb (103 kg), and PRO-6000S is
approx. 260 lb (118 kg). Moving the printer requires
at least 6 people, 3 on either side. Be careful to
avoid back strain and other injuries.
Remove all of the tape and other packaging material. Open the top
2
• When moving the printer, rmly grasp the carrying
handles (A) under each side. Holding the printer at
other positions is dangerous and cause injury and
damage if the printer is dropped.
cover (A) and output guide (B), and then remove the tape afxed to
the roll holder.
A
B
• When setting the printer down temporarily make
sure to put the printer on a at, stable place.
• When standing the printer up, make sure the side
with the control panel is up, and place cardboard
or other material underneath to prevent scratching.
Furthermore, make sure that the weight of the
printer is taken by the corner of the printer. If the
weight is taken by any other part of the printer, the
printer may become damaged.
A
A
• When standing up the printer or supporting the
printer, hold the metal parts of the printer. If
you hold a plastic part, the printer may become
damaged.
• The way to set the printer down or to carry with the
load only to the center of the printer, may cause
damage to the printer.
3
Page 4
4
Important
Note
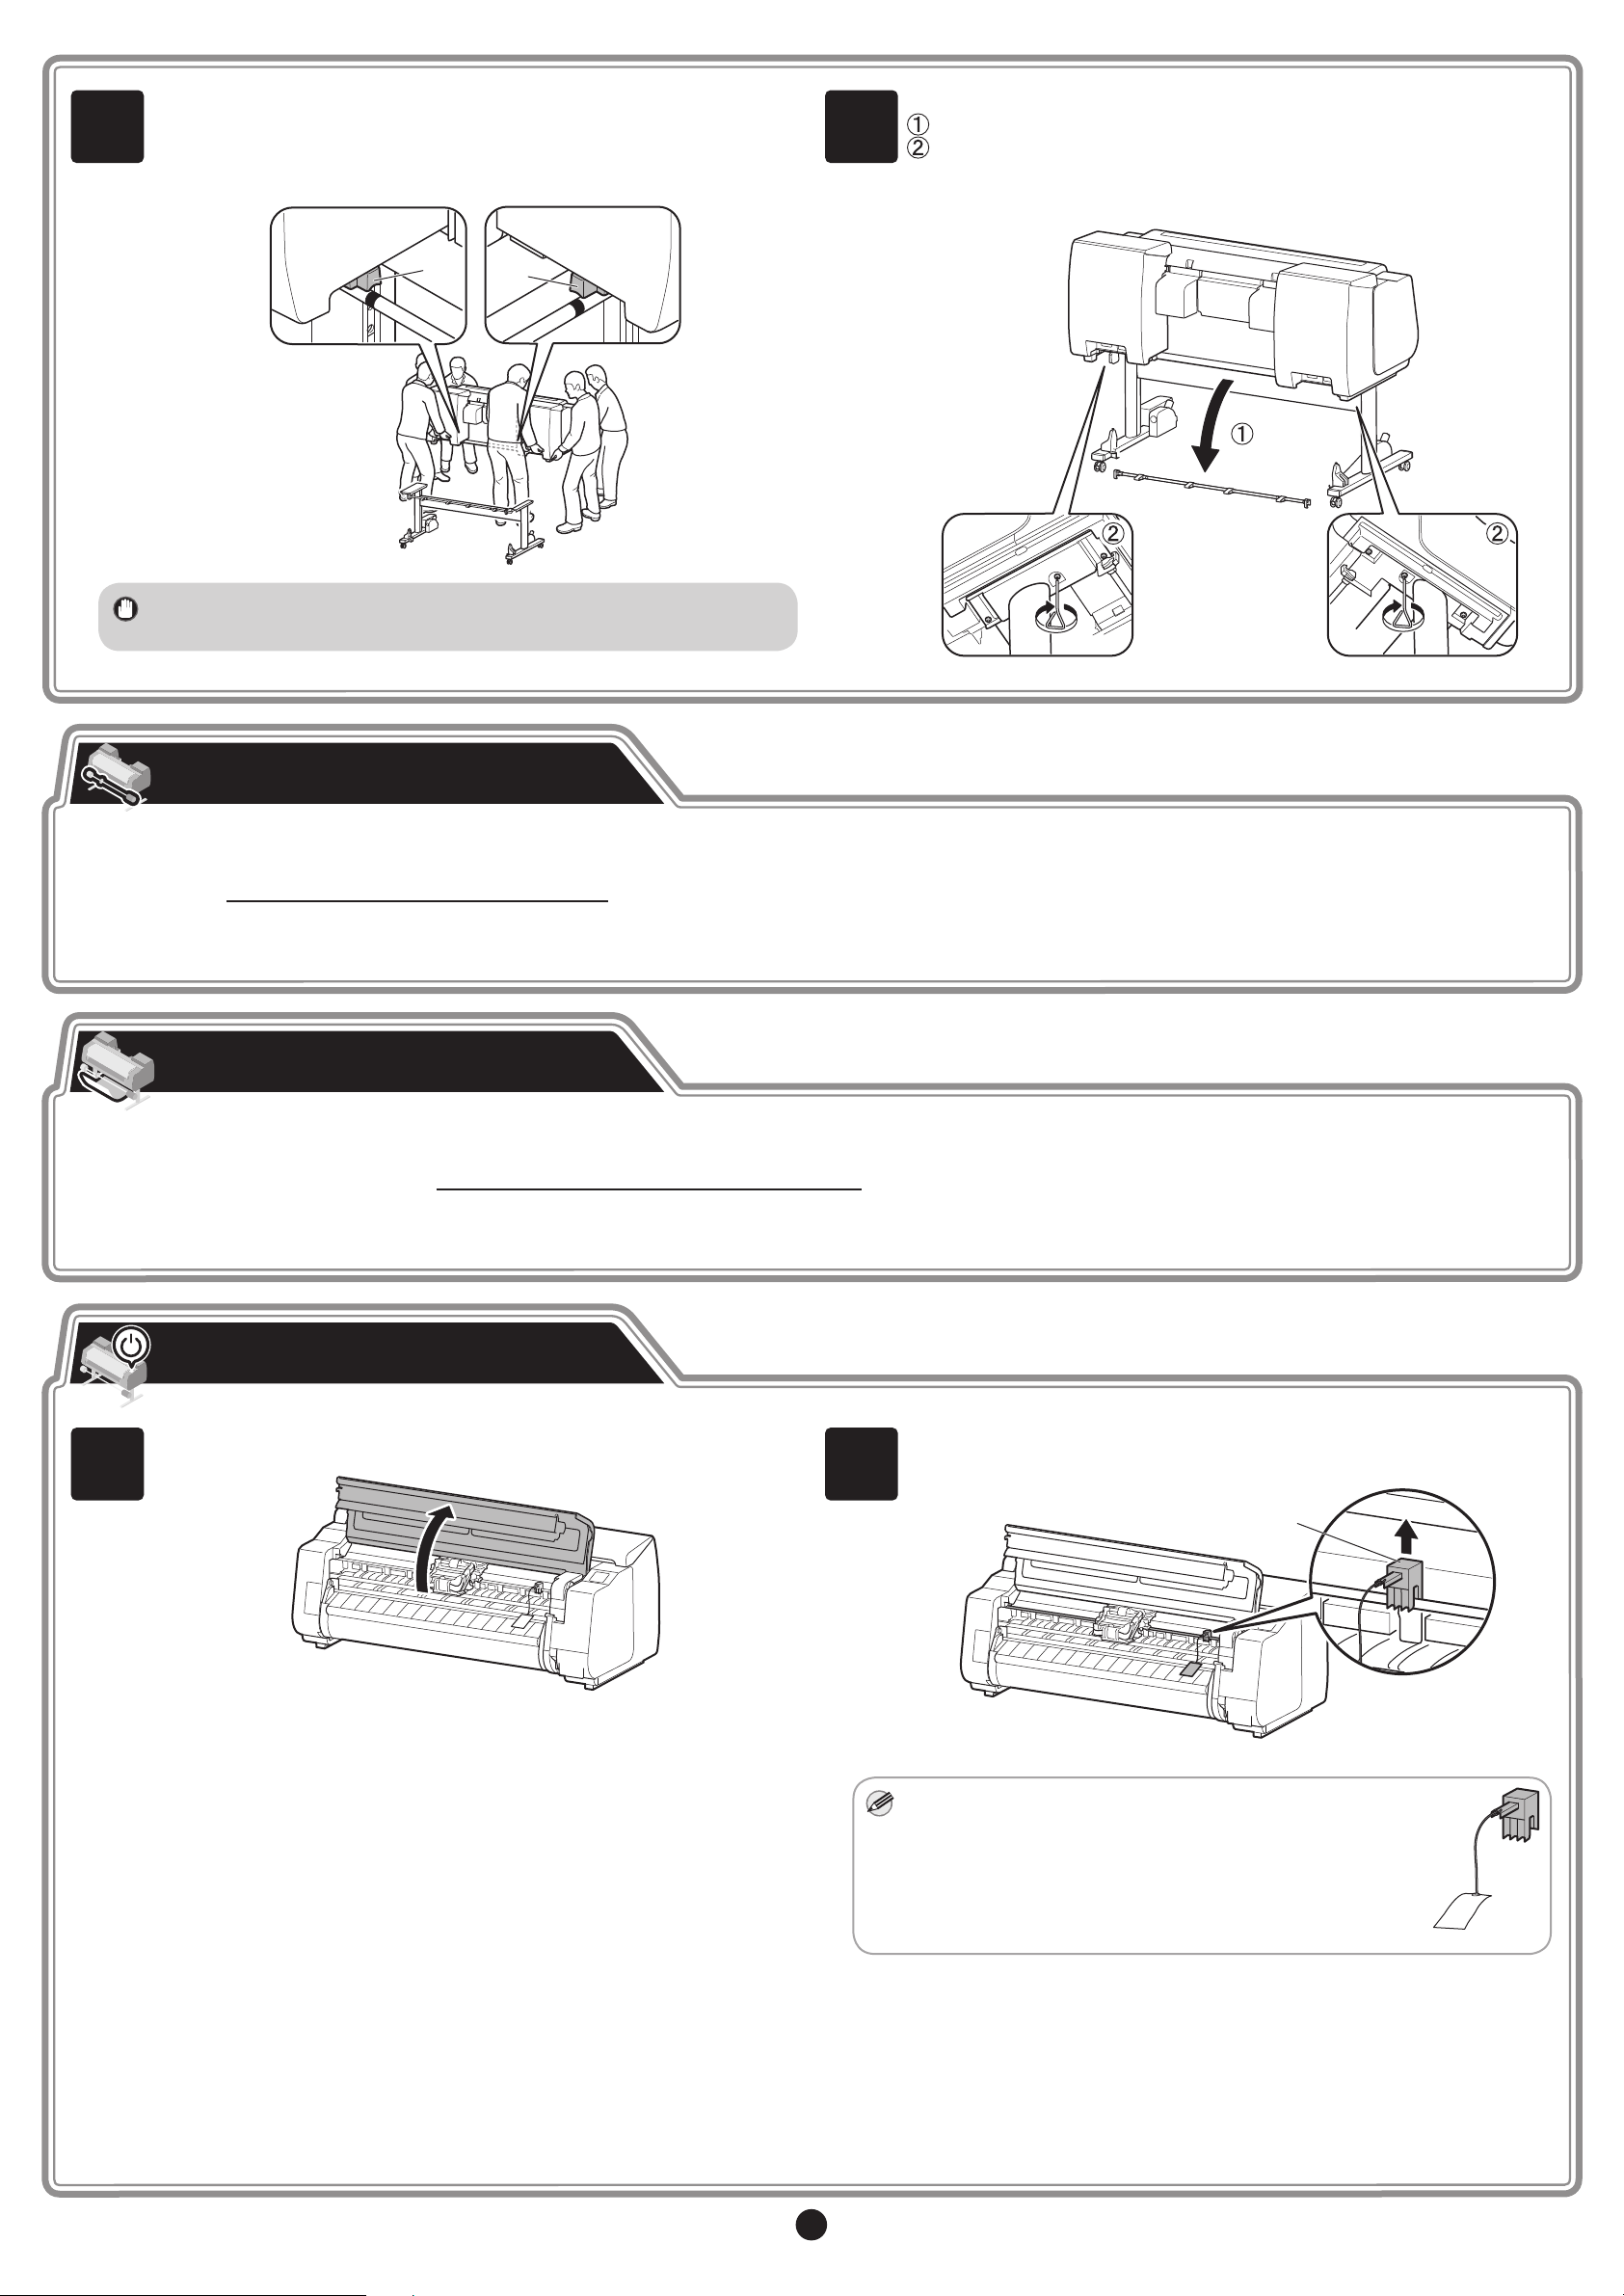
Place the printer on the stand such that the protrusion (A) for aligning
the position of the printer under the rear side of the printer is aligned
with the position of the black marker on the basket rod attached to
the supporting plate.
5
Afx the printer to the stand.
Remove the basket rod.
Use an M4 Allen wrench to securely afx by using three M4
hex screws each on the left and right from the bottom of the
supporting plate.
A
• If you are not using a stand, place the printer in the installation
location and proceed to "Turn On the Printer".
A
Attach the Roll Unit
• Models That Use the Roll Unit
Attach the roll unit to the stand.
-> Refer to the Roll Unit Setup Guide (separate manual).
• Models That Do Not Use the Roll Unit
Proceed to "Attach the Basket".
Attach the Basket
• Models That Use a Stand
Attach the basket to the stand.
-> Refer to "Attach the Basket" in the Printer Stand Setup Guide (separate manual).
• Models That Do Not Use a Stand
Proceed to "Turn On the Printer".
Turn On the Printer
1
Open the top cover.
Pull up and remove the belt stopper (A).
2
A
• Keep the belt stopper you removed for future use. You
will need them in case you move the printer to another
location.
• When you open the top cover, a cleaning brush is
stored on the right side. Take it out and use it when
cleaning inside the top cover.
4
Page 5
3
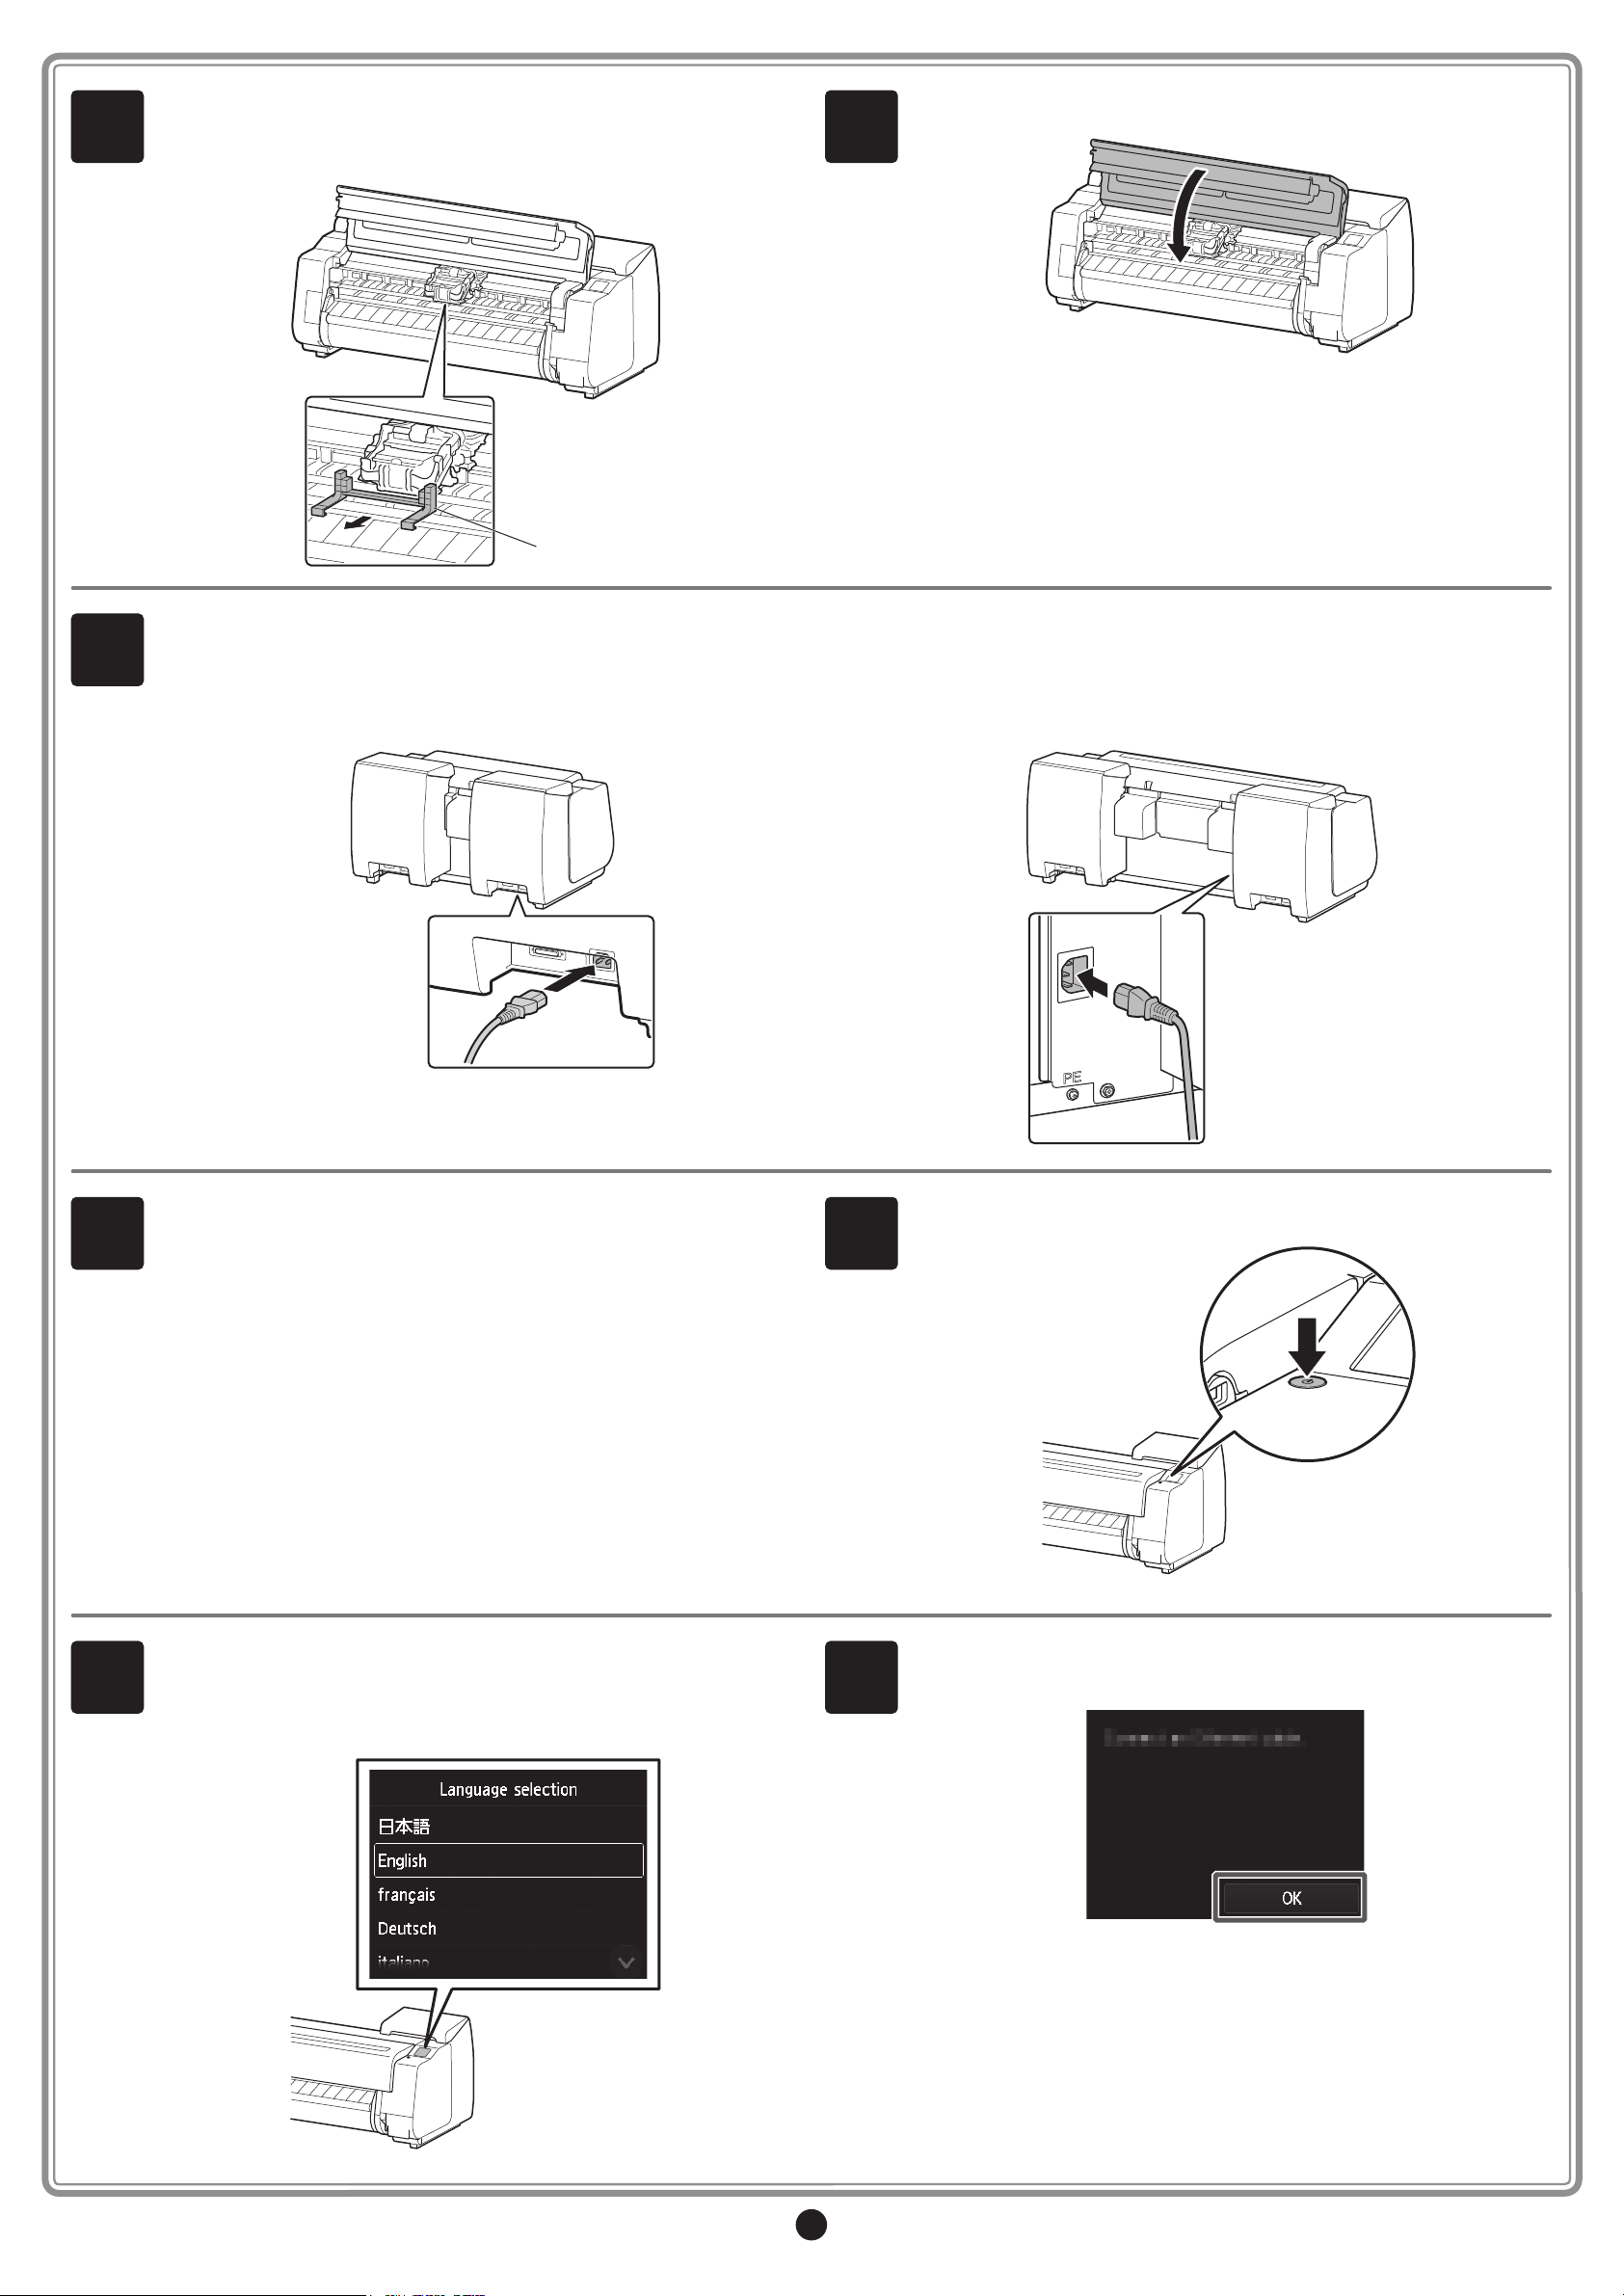
Peel off the tape afxed to the carriage, and then pull the protective
material (A) towards you and remove it. Remove the protective sheet
if there is one attached.
A
Plug the power cord into the power supply connector on the back of the printer.
4
Close the top cover.
5
PRO-2000
Plug the power cord into the outlet.
PRO-4000 / PRO-4000S / PRO-6000S
Turn on the printer.
6
8
When the language selection screen appears on the touch screen,
select and tap a language (lightly with your nger, and then move
your nger away). Then, if the screen for selecting a time zone
appears, select and tap your region.
7
9
When a message prompting you to start the setup appears on the
touch screen, tap OK.
5
Page 6
Important
Note
Important
Important
Install the Ink Tanks
Important
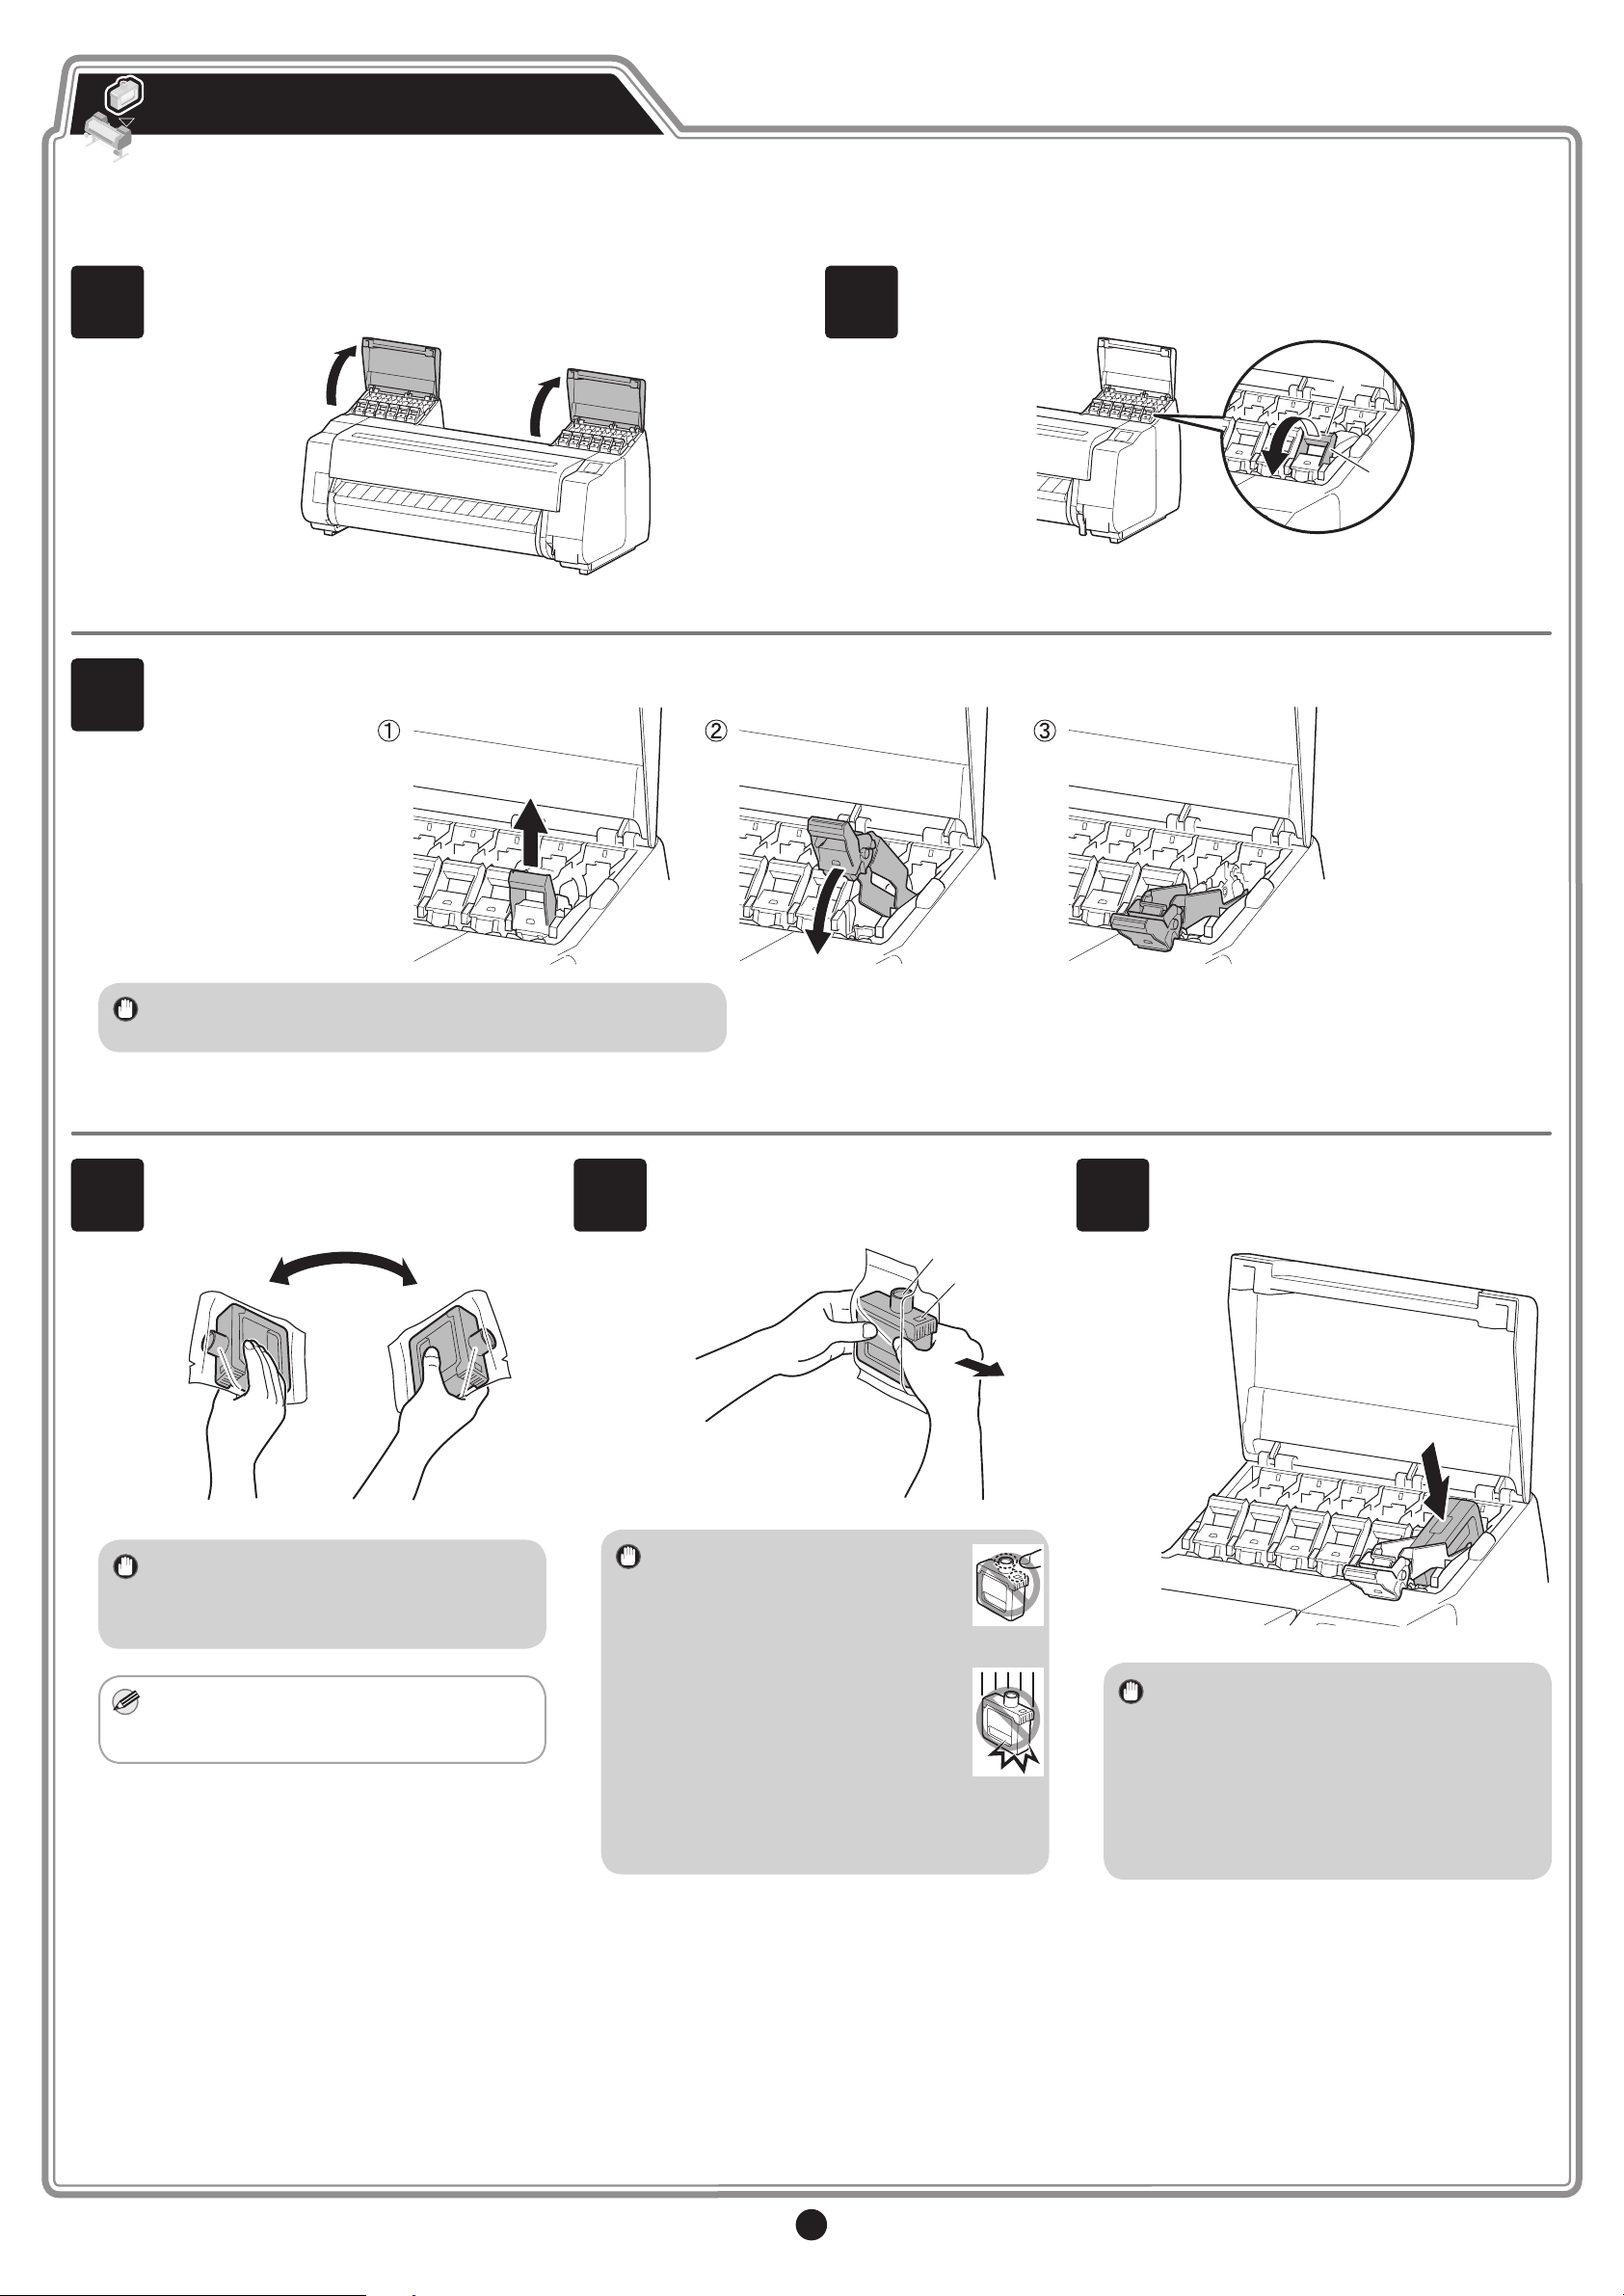
Install the ink tanks. The PRO-2000 and PRO-4000 use 12 ink tanks, and the PRO-4000S and PRO-6000S use 8 ink tanks.
1
3
Instructions on ink tank installation are shown on the screen. Open
the ink tank covers as instructed.
Lift up the ink tank lock lever until it stops, and then pull it towards you.
2
Pull out the handle part (A) of the ink tank lock lever for the color of
ink to install while pressing the button at position (B).
B
A
4
• Make sure the ink tank lock lever stays in the locked position.
Shake each ink tank gently 7 or 8 times
before opening its pouch.
• Failure to shake the ink tanks may result
in reduced print quality because ink
ingredients have settled on the bottom
of the tank.
5
Open the pouch and remove the ink tank.
• Never touch the ink holes (A)
or metal contacts (B). Touching
these parts may cause stains,
damage the ink tank, and
affect print quality.
A
B
6
Orient the ink tanks and mount them in
the holders with ink holes down and metal
contacts on the bottom.
• If the ink tank is cold, allow it to adjust to
room temperature before attaching it to
the printer.
• Avoid dropping the ink tank
after removing it from the
pouch. Otherwise, ink may
leak and cause stains.
• Do not remove ink tanks to shake them
after they have been mounted. Doing so
may cause ink to spill.
6
• An ink tank cannot be mounted in the
holder if it is not oriented correctly for the
color.
• Do not try to force an ink tank into the
holder if it does not go in normally.
Check the color indicated on the label
and the ink tank orientation, and then try
mounting the tank into the holder again.
Page 7
7
Important
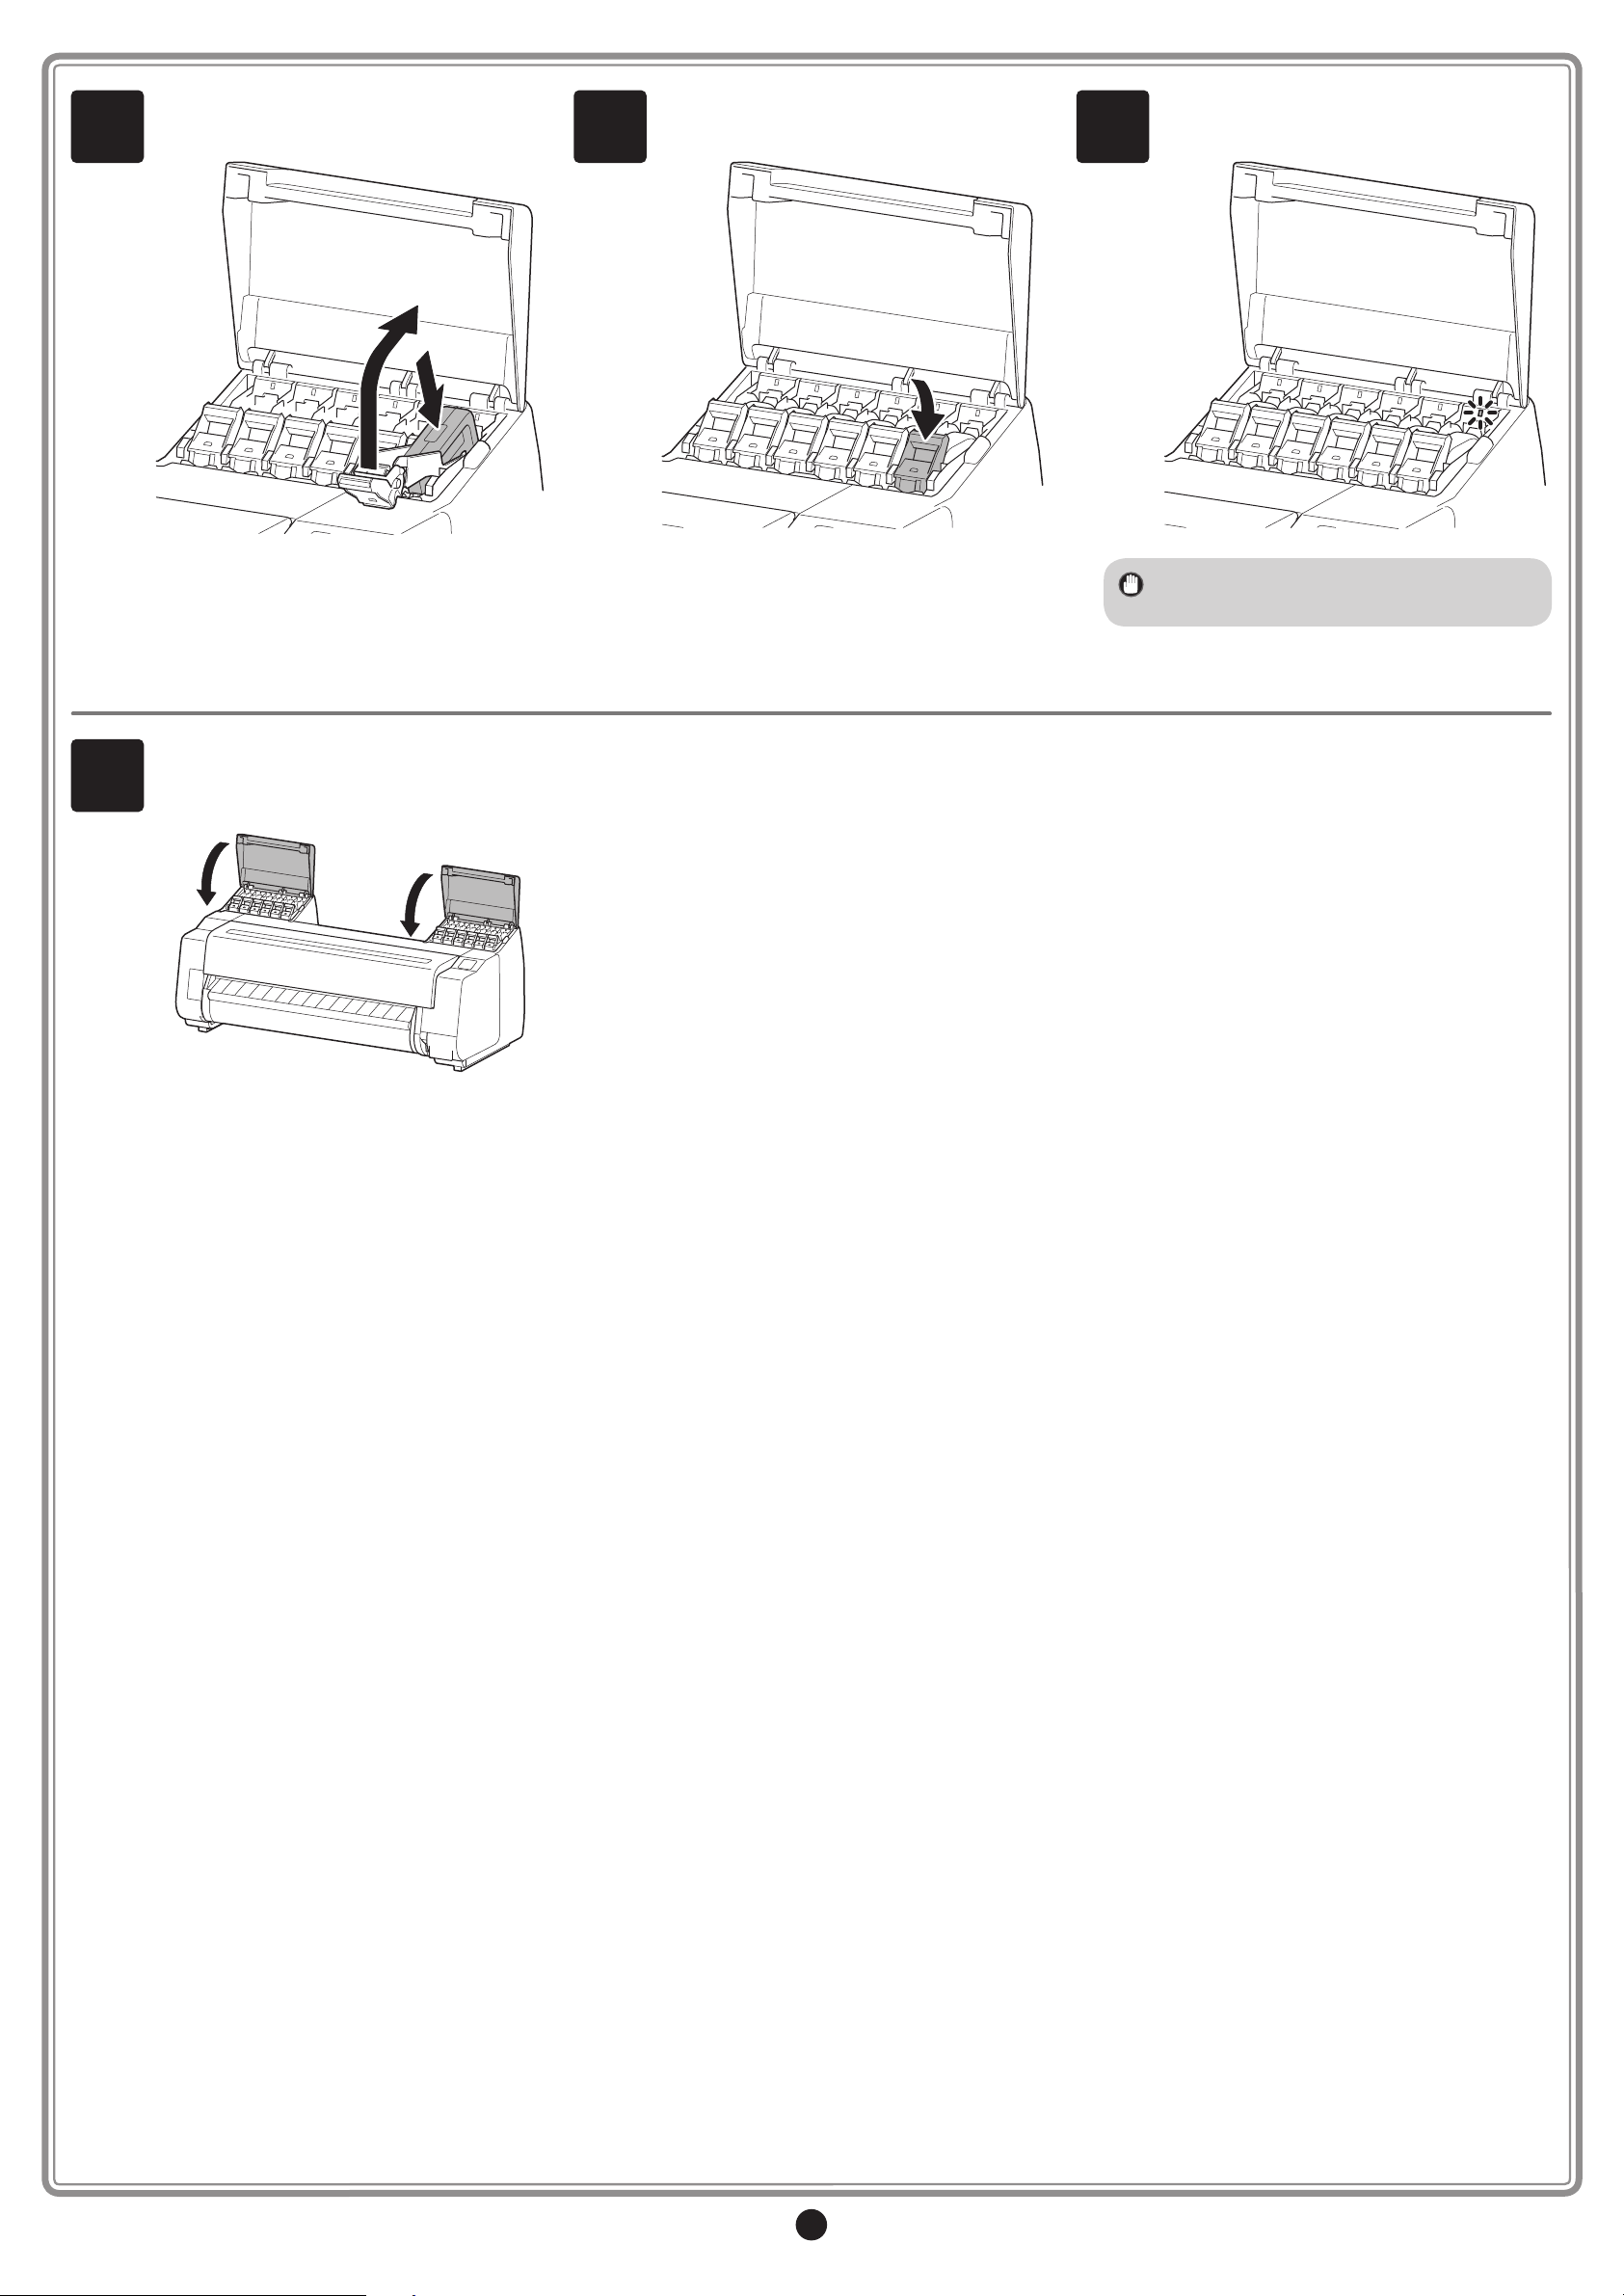
Lift up the ink tank lock lever once and
then push it down.
8
Firmly push down the handle part of the
ink tank lock lever all the way in.
Make sure the ink lamp lights red.
9
• If the ink lamp does not light, repeat
steps 2, 3, 7, and 8.
10
Repeat steps 2 to 9 to install each of the
ink tanks.
Close the ink tank covers.
7
Page 8
Important
Note
Install the Print Head
1
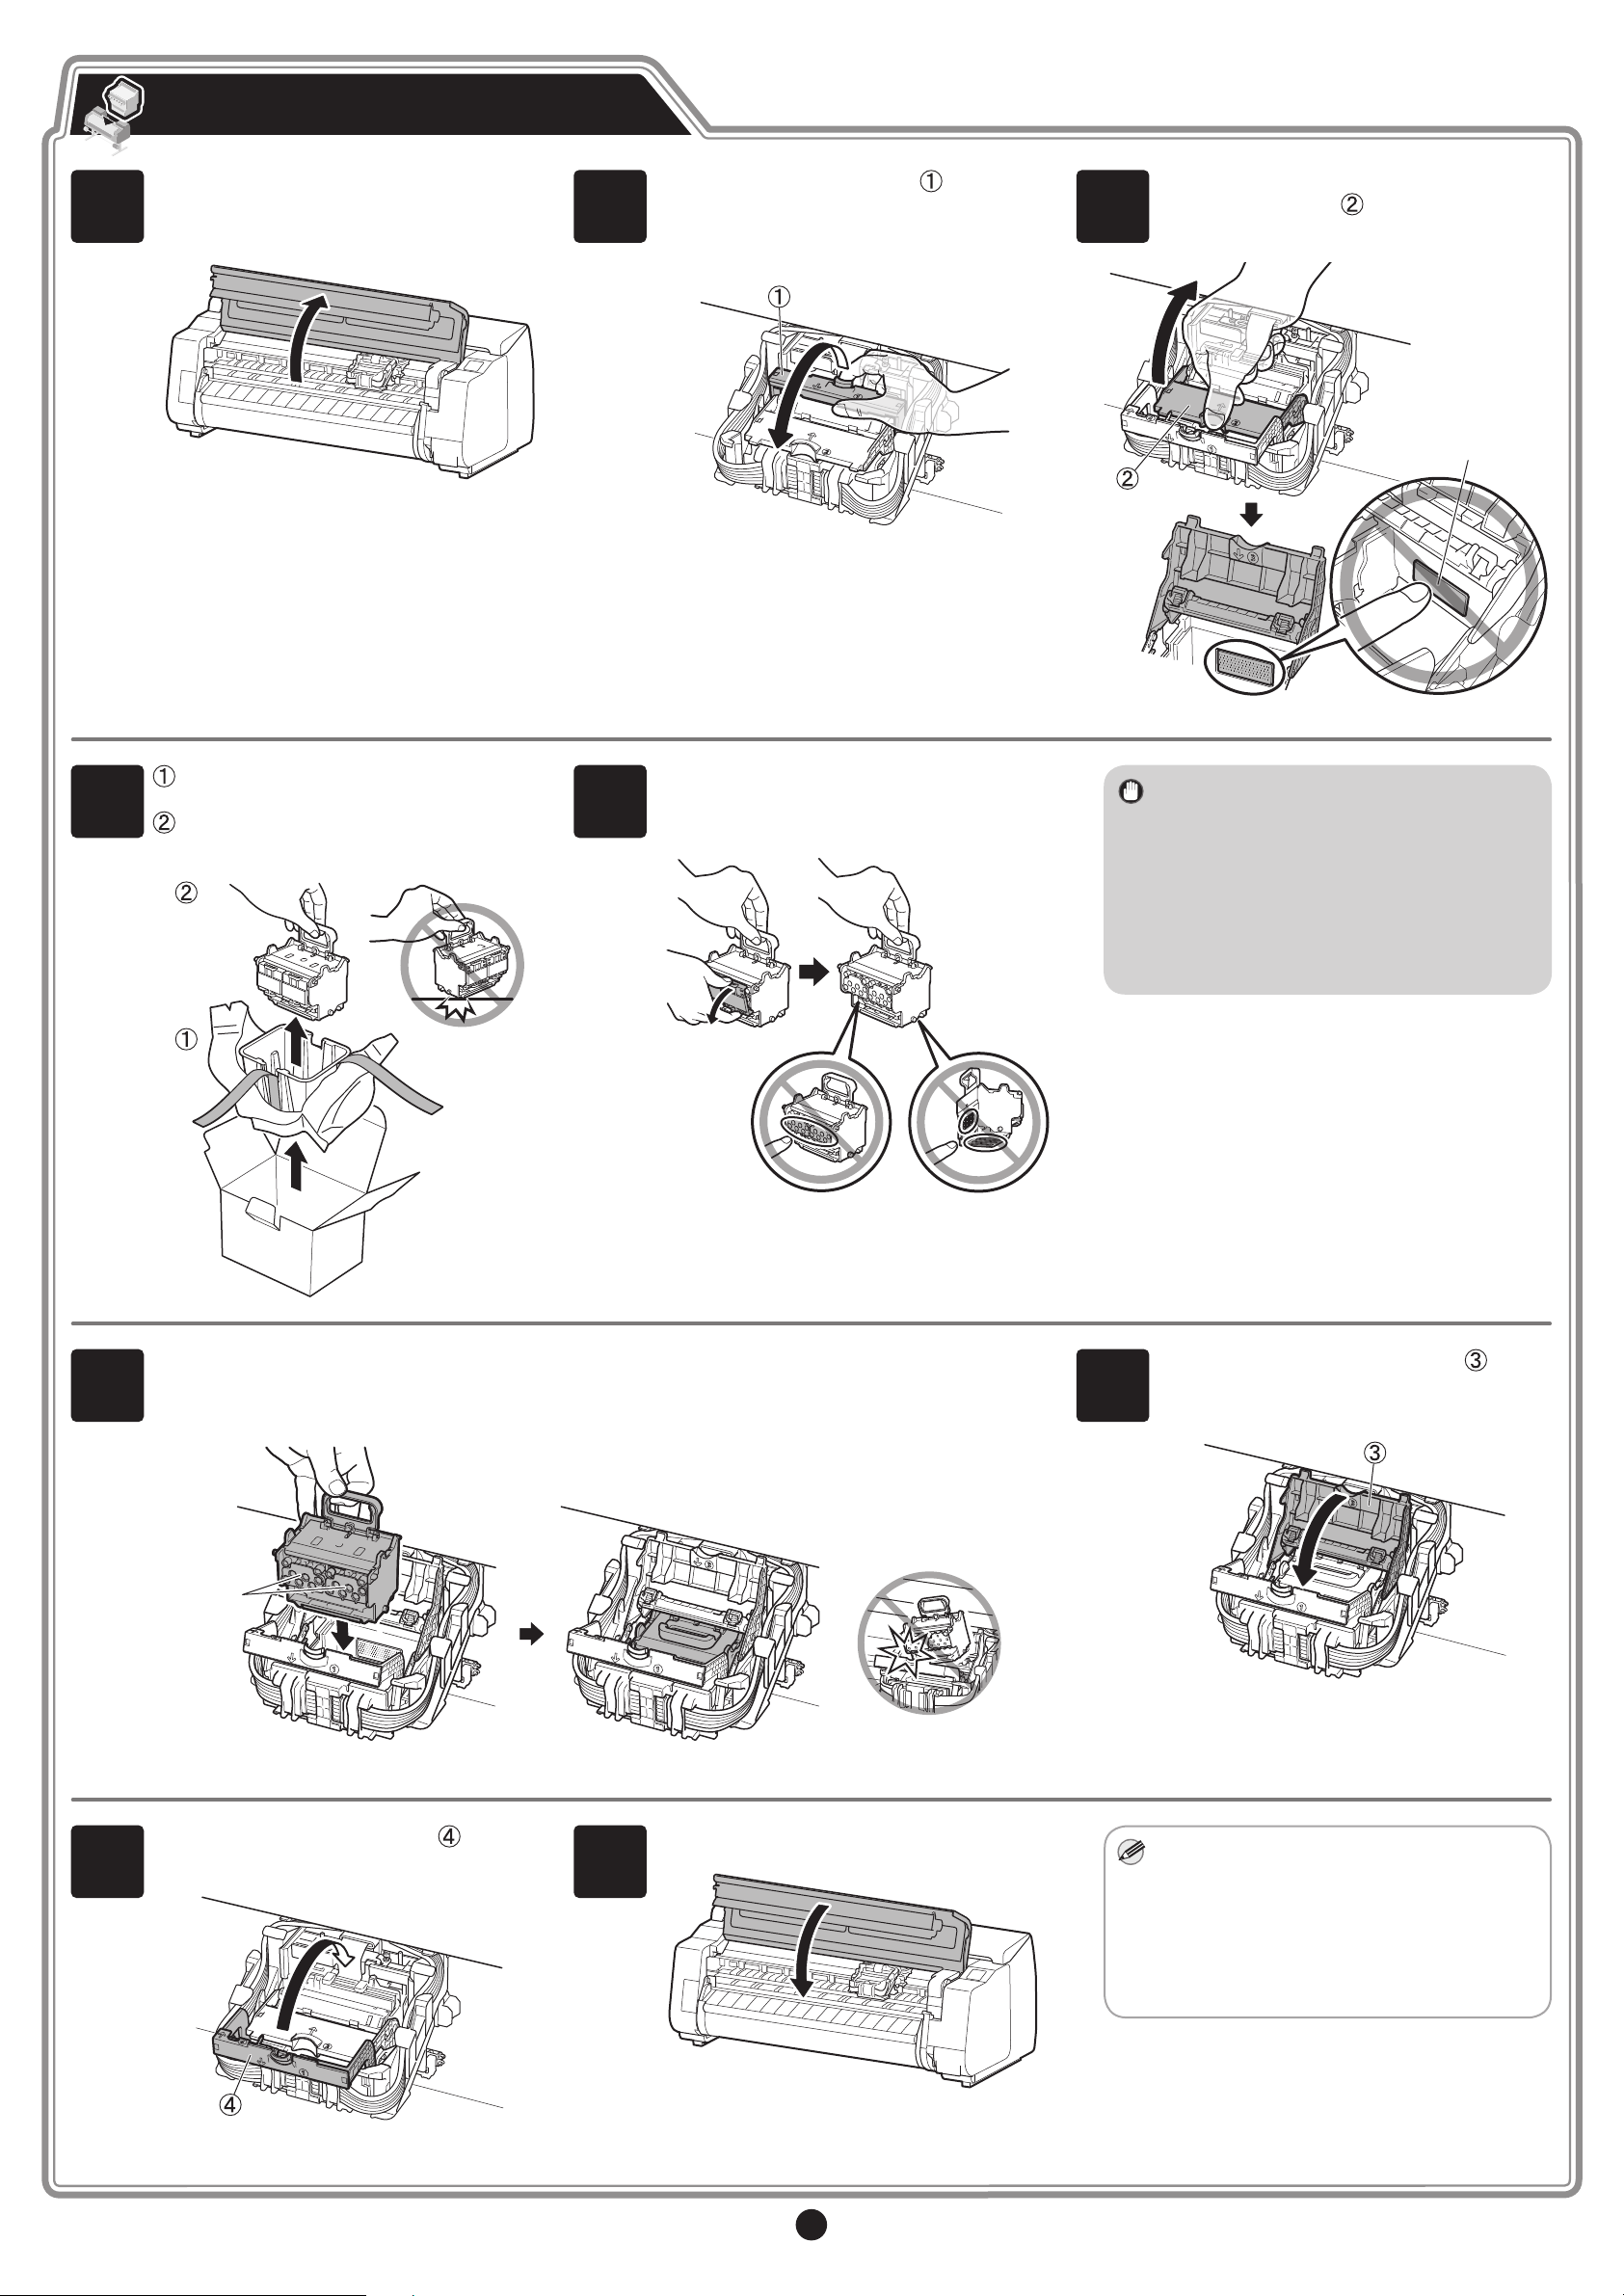
When the instruction to open the top
cover appears on the screen, open the
top cover.
Instructions are now shown on the screen
regarding print head installation.
2
Tilt the print head lock lever towards
you while pressing the button in the
middle. Remove the protective sheet if
there is one attached.
3
Grasp the grip in the center of the print
head locking cover
touch the contacts (A) on the carriage.
and open it. Do not
A
4
Remove the print head from the box
and bag, and peel off the xing tape.
Grasp the blue handle and remove the
print head.
5
Remove the orange protective caps (2
pieces).
• Do not touch any part other than the
handle or put down the unit.
• The print head contains ink, so be
careful not to spill it once the protective
caps are removed.
• Do not reattach the protective caps
after removing them. Dispose of them
according to local regulations.
6
8
Insert the print head into the carriage with the ink holes (A) on the upper side and facing
towards you as shown in the gure. Carefully push the print head rmly into the carriage,
ensuring that the part covered by the protective caps does not touch the carriage.
A
Push the print head lock lever all the
way in until it makes a click sound.
9
Close the top cover.
7
Pull the print head locking cover down
toward the front to lock the print head in
place.
• If the roll unit is installed, the roll unit
calibration starts automatically after the
print head is attached.
If the roll holder is mounted on the roll
unit at this time, calibration cannot be
executed. Do not mount the roll holder
on the roll unit until the setup has
nished.
8
Page 9
Important
Note
Load the Paper
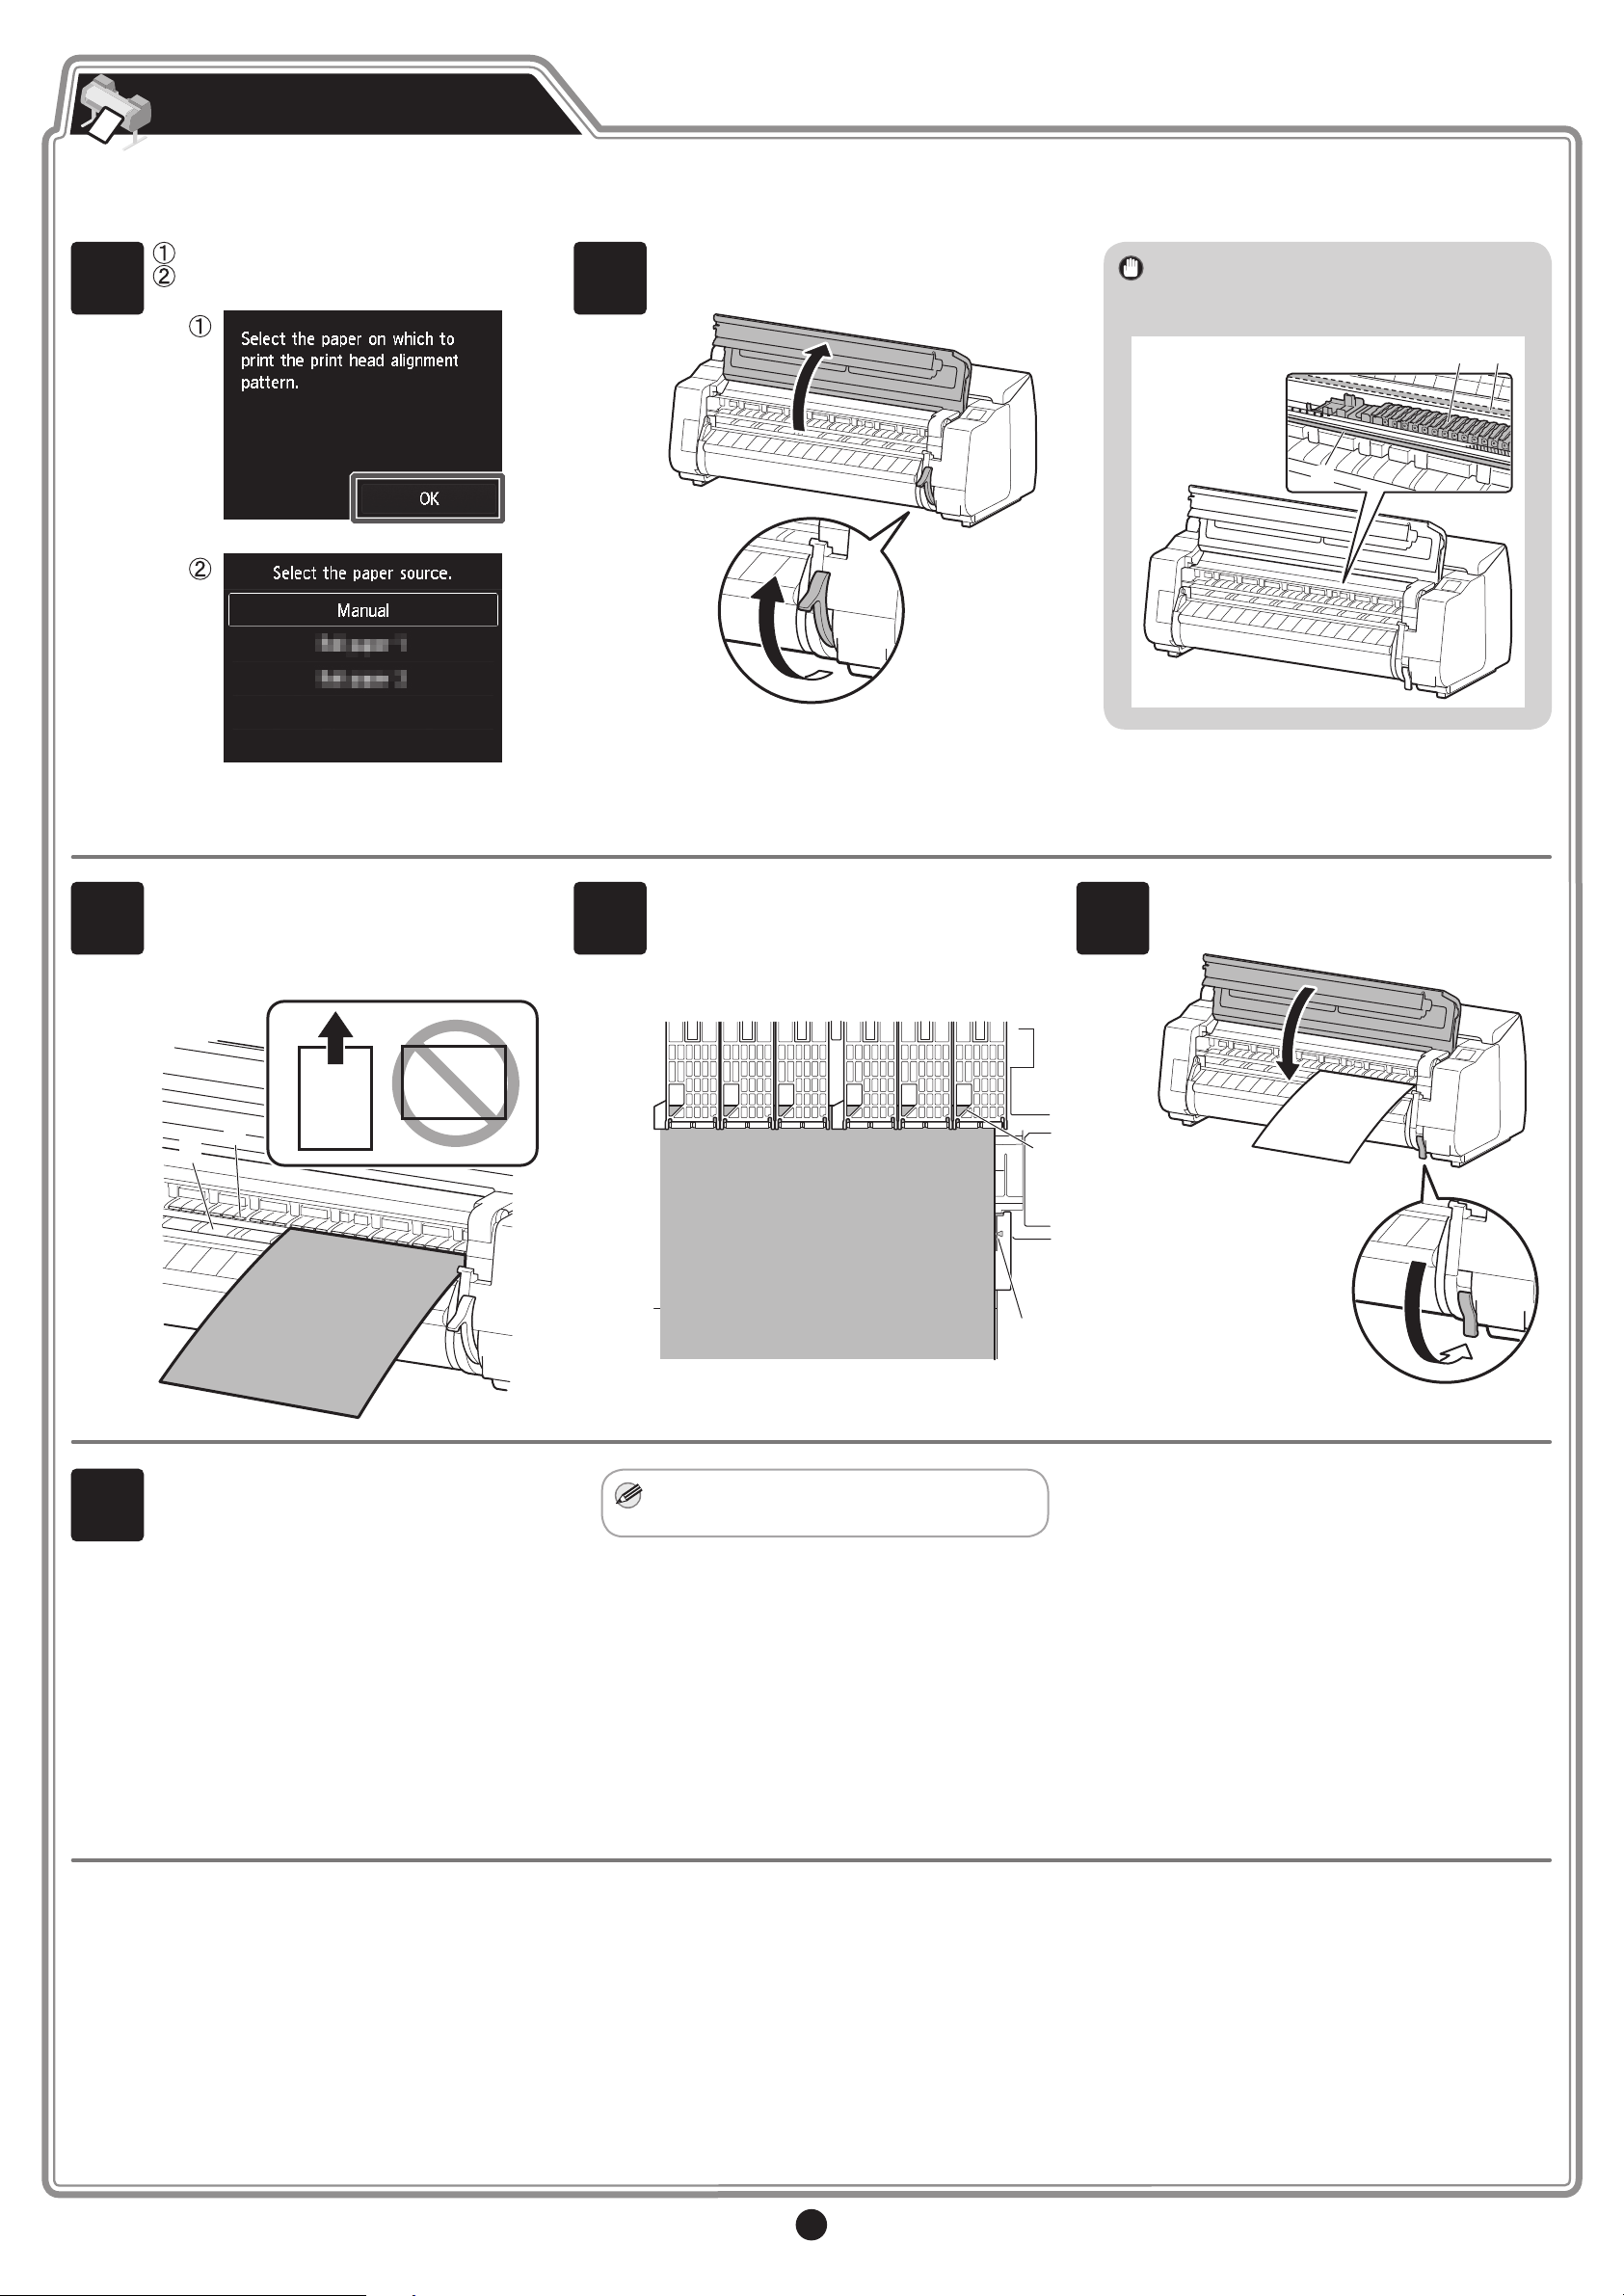
Load the paper for adjustment.
1
Tap OK.
Tap Manual.
2
Open the top cover and lift the release
lever.
• Do not touch the linear scale (A),
carriage shaft (B), or ink tube stabilizer
(C). Touching them may cause damage.
C
B
A
3
Insert the paper for adjustment between
the platen (A) and paper retainer (B) in
portrait orientation with the printed side of
the paper facing up.
B
A
4
Load the paper aligned with the paper
alignment lines (A) to ensure that the
paper is not crooked, and align the
leading edge of the paper with the front
side of the line (B).
A
B
5
Lower the release lever to lock the paper
and close the top cover.
6
The screen for selecting the paper type
appears. Tap the type of paper you
loaded.
In this case, tap Coated papers then HW
Coated HG.
The remainder of this procedure differs depending on the model you are using.
Check the name of the model you are using, and proceed to the following page.
• If The paper is loaded askew. appears,
repeat steps 2 to 5.
For the PRO-2000: Go to p.10
For the PRO-4000, PRO-4000S, and PRO-6000S: Go to p.11
9
Page 10
Important
Note
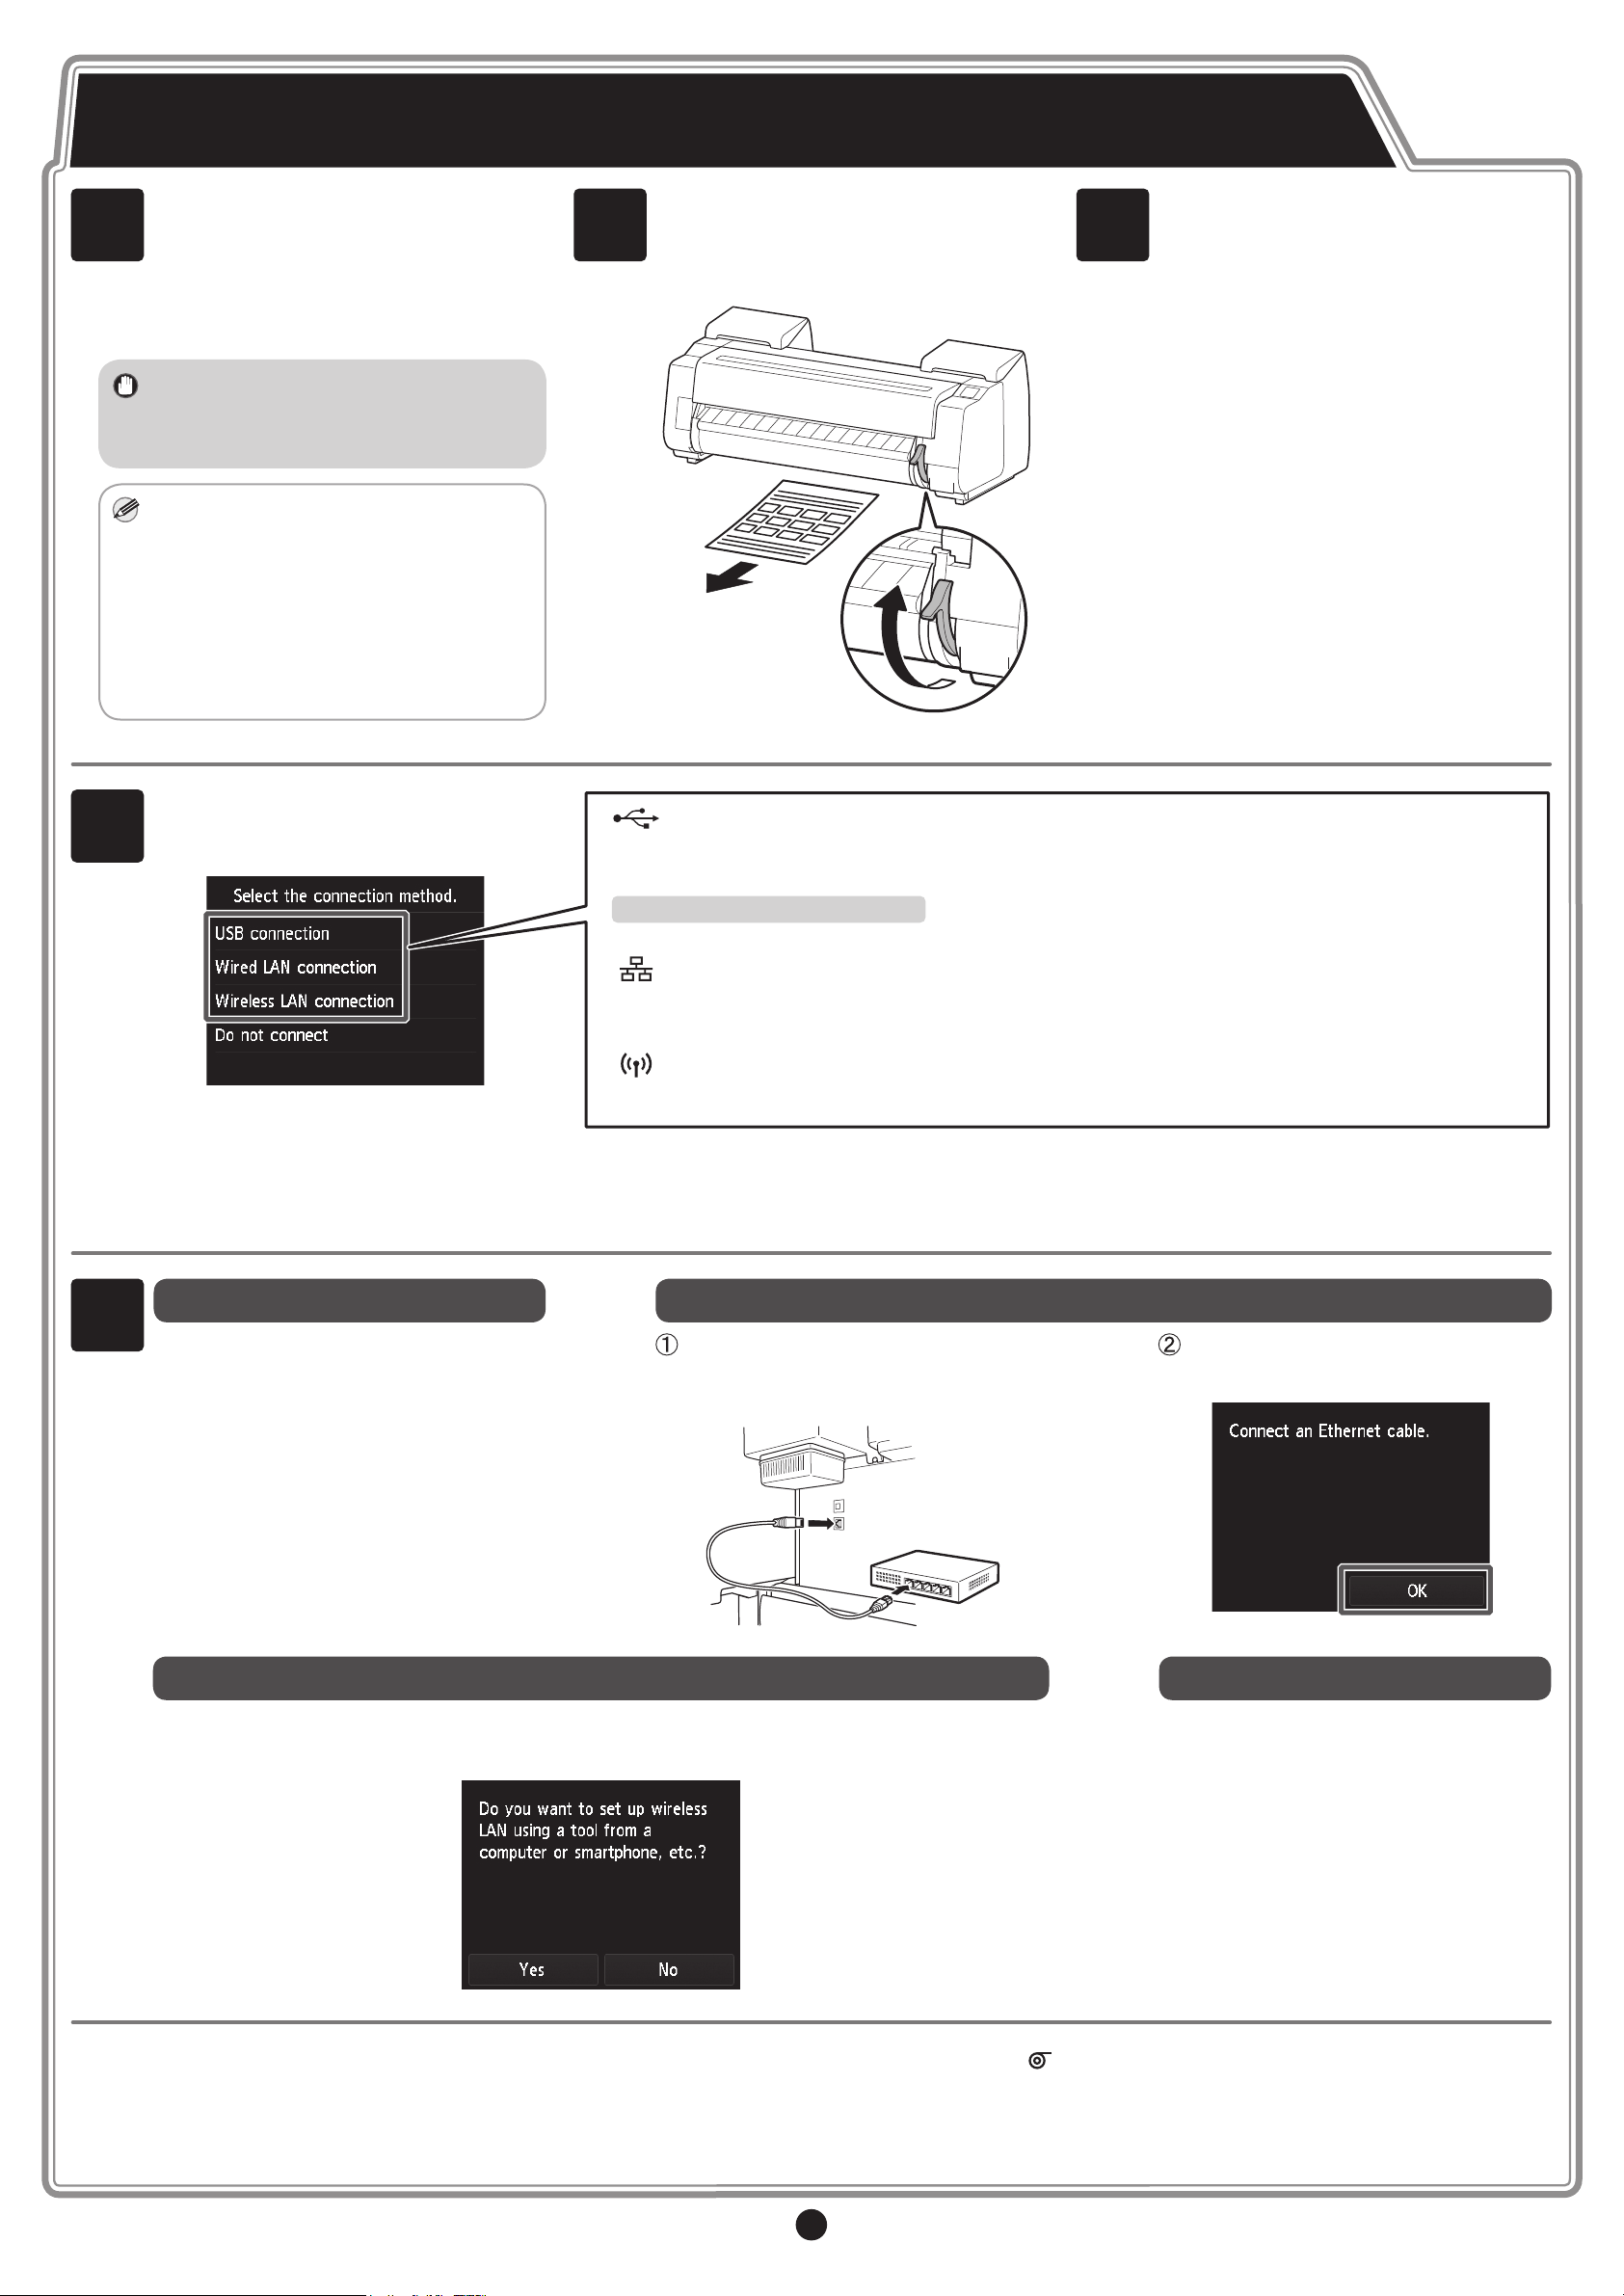
Perform Print Head Adjustment and Select the Connection Method on the PRO-2000
1
The paper starts feeding, and then the
printer automatically starts charging the
system with ink and adjusting the print
head. Charging the system with ink
and adjusting the print head for the rst
time takes about 50 minutes and uses 5
sheets of paper for adjustment.
• Do not open the covers of the printer
or turn the power off while the ink is
charging for the rst time and the print
head adjustment is executing.
• Charging the system with ink lls the
system from the ink tanks to the print
head. In addition, cleaning is performed
to keep the printer in optimal condition.
This may cause the remaining ink
indicator and maintenance cartridge
capacity indicator to drop some amount.
The starter ink tank is for rst-time
installation. It is recommended that you
purchase replacement ink tanks quickly.
2
Once a single sheet of the adjustment
pattern has nished printing, lift up the
release lever and remove the paper for
adjustment.
3
Load the next paper by referring to steps
2 to 5 on p.9. Print head adjustment uses
5 sheets of paper. Repeat steps 2 and 3
until the printing has nished.
4
5
Once the print head adjustment has
nished, the screen below appears.
Tap the connection method to use.
Check the message about the connection
method and tap Yes if there are no
problems.
If you selected USB connection
Proceed to "Connect to the Printer" on
p.12.
USB connection
This is the method for connecting the printer to a computer using a USB cable.
Only 1 printer can be connected.
Do not connect the USB cable yet.
Wired LAN connection
This is the method for connecting the printer to the network using a LAN cable.
Wireless LAN connection
This is the method for connecting the printer to the network without using a cable.
If you selected Wired LAN connection
Use the LAN cable to connect the
wired LAN connector on the back of
the printer to the hub port.
Tap OK, and then proceed to "Connect
to the Printer" on p.12.
If you selected Wireless LAN connection
To congure the wireless LAN settings using a computer, tap Yes, or to congure the wireless
LAN settings on the printer, tap No, and proceed to "Connect to the Printer" on p.12.
To load roll paper after setup, tap the paper settings display area from the home screen, then (roll paper icon), then Replace paper, and follow the
instructions on the screen.
For details, refer to the Online Manual that can be accessed by the procedure in "How to Display the Online Manuals" (p.14).
If you selected Do not connect
Setup has nished at this point.
However, the connection settings and
software installation will need to be
performed separately in order to use the
printer from a computer.
(Refer to "Connect to the Printer" on p.12)
10
Page 11
Important
Note
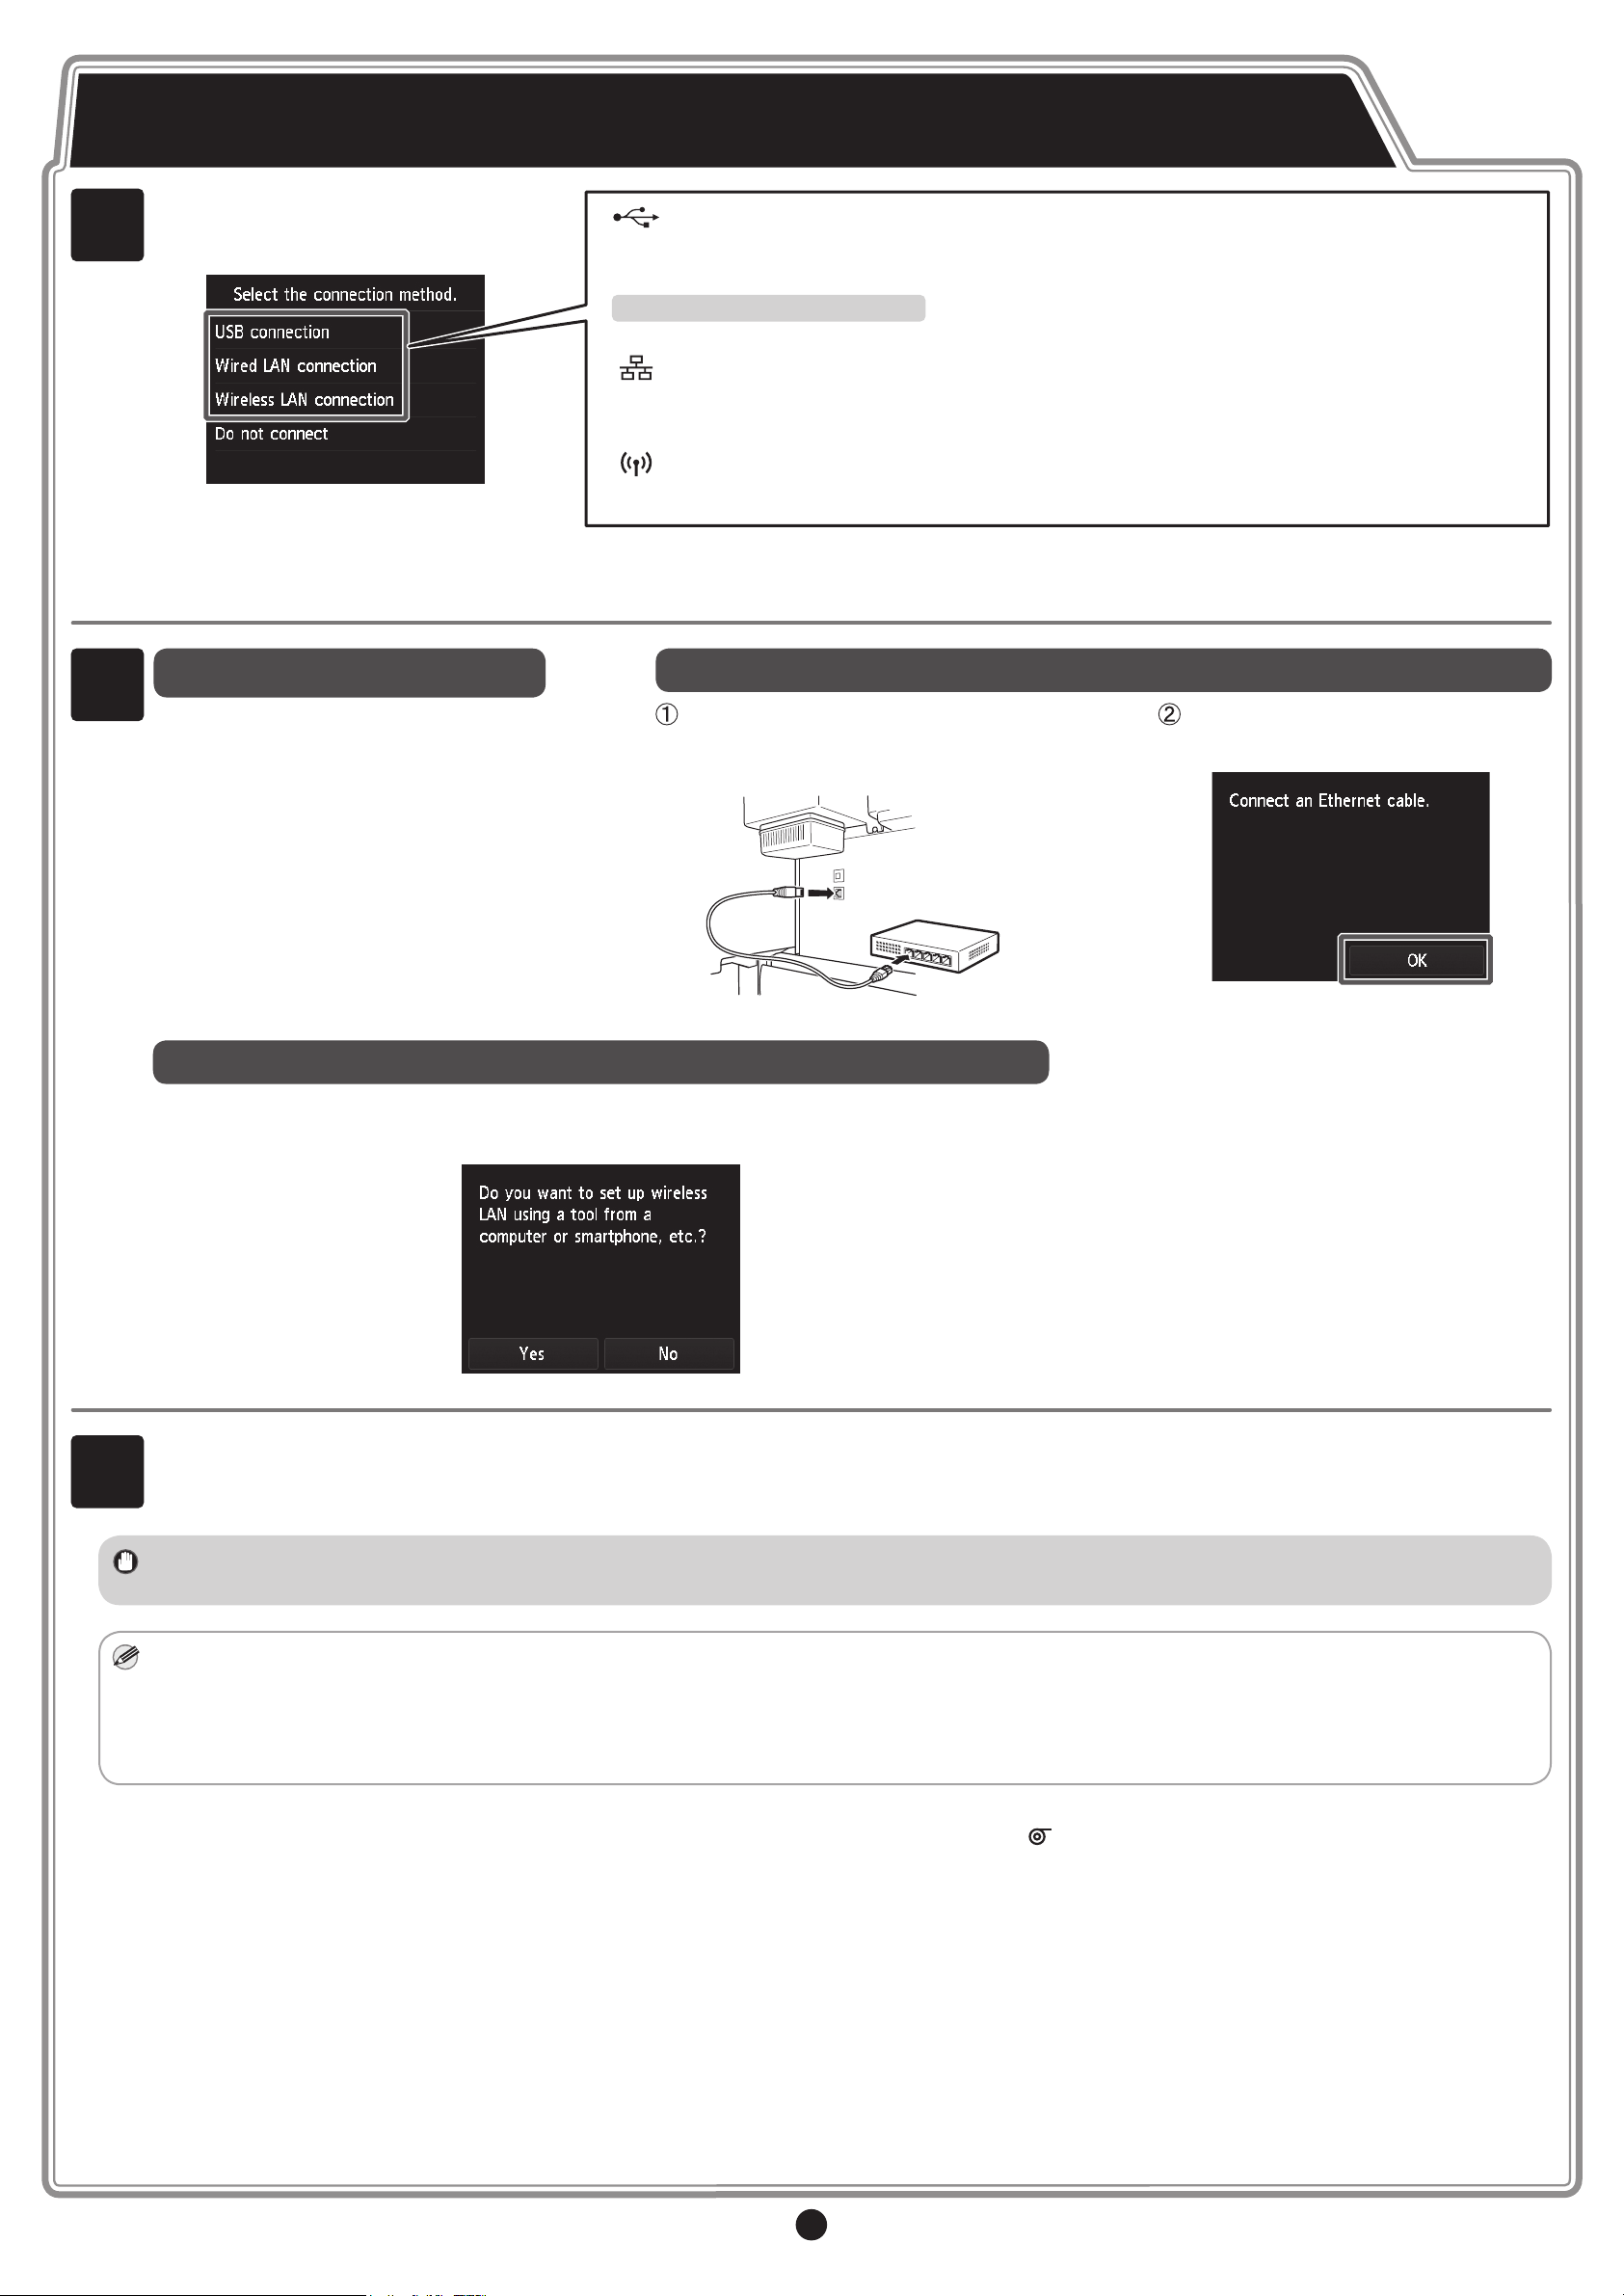
Select the Connection Method and Perform Print Head Adjustment on the PRO-4000, PRO-4000S, and PRO-6000S
1
2
When the screen for selecting the
connection method appears, tap the
connection method to use.
Check the message about the connection
method and tap Yes if there are no
problems.
If you selected USB connection or
Do not connect
Proceed to step 3.
USB connection
This is the method for connecting the printer to a computer using a USB cable.
Only 1 printer can be connected.
Do not connect the USB cable yet.
Wired LAN connection
This is the method for connecting the printer to the network using a LAN cable.
Wireless LAN connection
This is the method for connecting the printer to the network without using a cable.
If you selected Wired LAN connection
Use the LAN cable to connect the
wired LAN connector on the back of
the printer to the hub port.
Tap OK, and then proceed to step 3.
3
If you selected Wireless LAN connection
To congure the wireless LAN settings using a computer, tap Yes, or to congure the wireless
LAN settings on the printer, tap No, and proceed to step 3.
The paper starts feeding, and then the printer automatically starts charging the system with ink and adjusting the print head. Charging the system
with ink and adjusting the print head for the rst time takes about 55 minutes.
During this time, congure the printer and computer connection settings and install the software. (Refer to "Connect to the Printer" on p.12)
• Do not open the covers of the printer or turn the power off while the ink is charging for the rst time and the print head adjustment is executing.
• Charging the system with ink lls the system from the ink tanks to the print head. In addition, cleaning is performed to keep the printer in optimal condition. This
may cause the remaining ink indicator and maintenance cartridge capacity indicator to drop some amount. The starter ink tank is for rst-time installation. It is
recommended that you purchase replacement ink tanks quickly.
• If you selected Do not connect in step 1, setup is nished at this point. However, the connection settings and software installation will need to be performed
separately in order to use the printer from a computer. (Refer to "Connect to the Printer" on p.12)
To load roll paper after setup, tap the paper settings display area from the home screen, then (roll paper icon), then Replace paper, and follow the
instructions on the screen.
For details, refer to the Online Manual that can be accessed by the procedure in "How to Display the Online Manuals" (p.14).
11
Page 12
Note
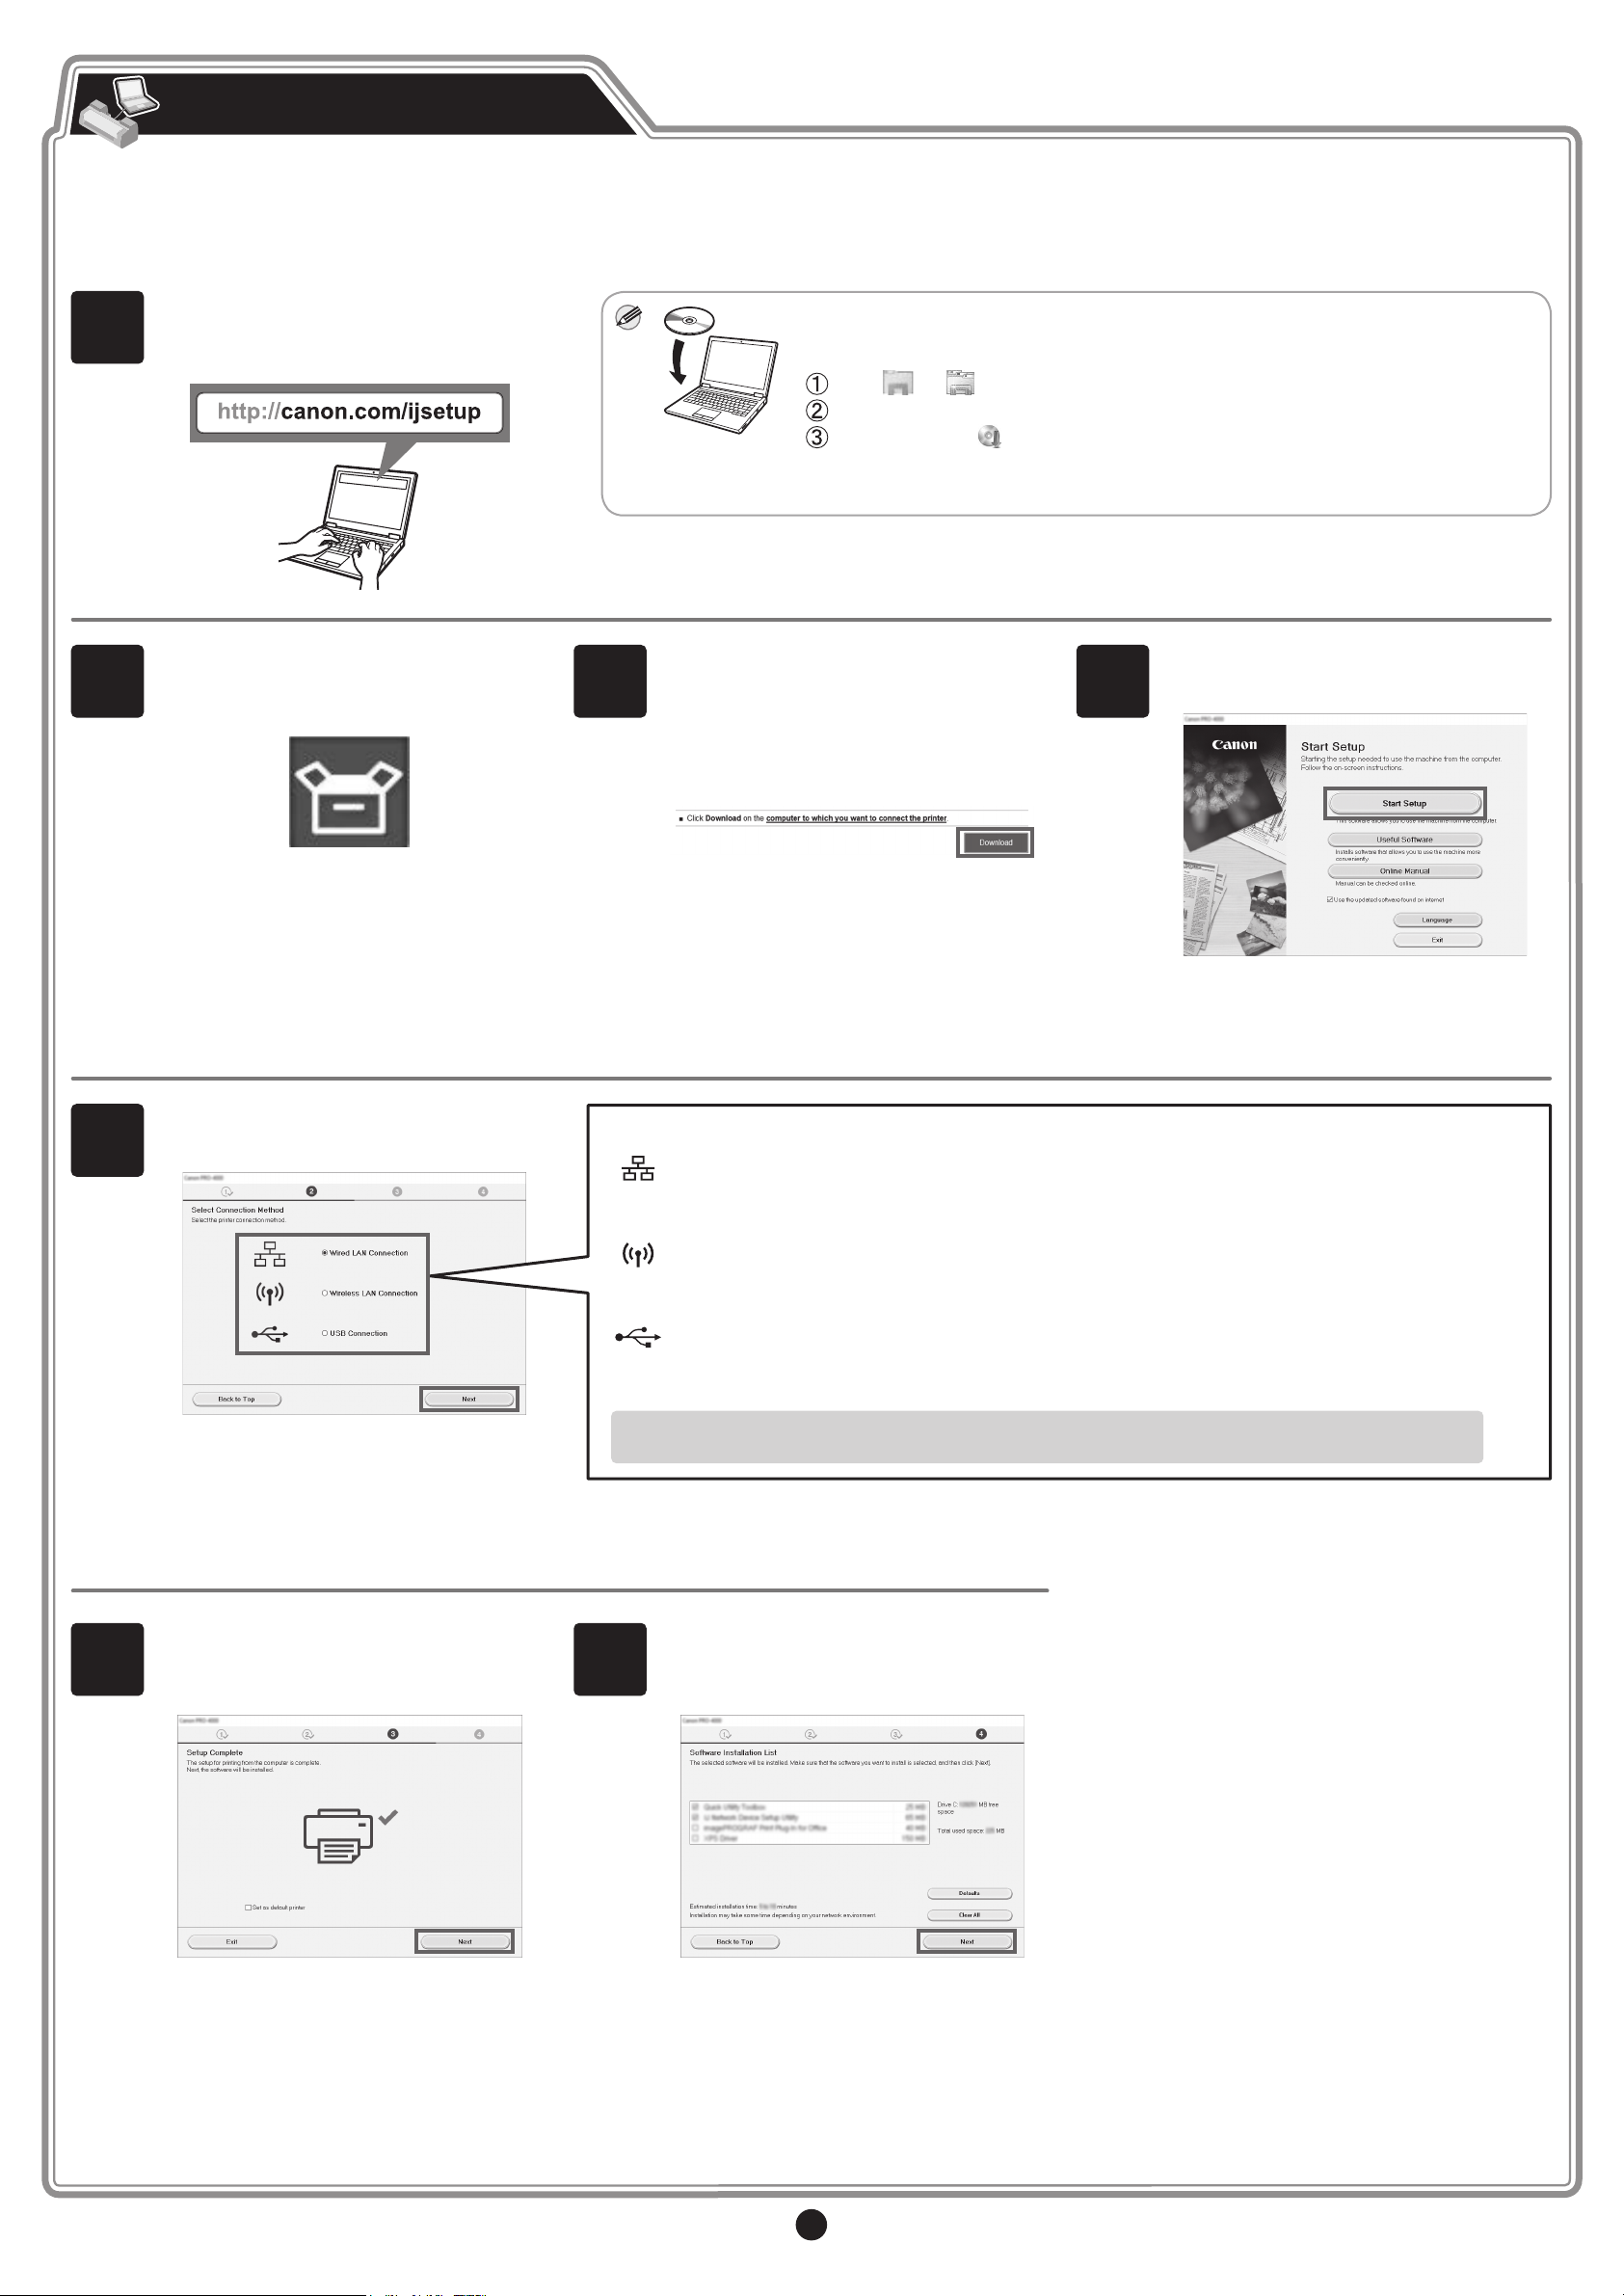
Connect to the Printer
The printer connection settings and software installation are performed using a computer.
However, if you selected Wireless LAN connection -> Yes -> No in steps 4 to 5 on p.10 or steps 1 to 2 on p.11, congure the wireless LAN settings only
using the printer. Proceed to "Congure Wireless LAN Settings on the Printer" on p.13.
1
2
Enter the following URL in the web
browser of your computer to access the
website.
Click Set Up.
Perform the remaining operations by
following the instructions on the screen.
3
• If you are using a Windows PC, you can also start this from the CD-ROM.
• When using Windows 10, Windows 8.1 or Windows 8, follow the procedure below
for start up the setup le after inserting the setup CD.
Click or File Explorer on the taskbar.
Select This PC or Computer on the left side of the opened window.
Double-click the CD-ROM icon on the right side of the window.
If the contents of the CD-ROM appear, double-click MSETUP4.EXE.
• If you have started from the CD-ROM, proceed to step 4.
Click Download to download the setup
les.
If a warning screen about downloading
appears, select Do not block, Allow, etc.
to proceed with the operation.
4
Run the le you downloaded and click
Start Setup.
5
Select the printer connection method and
click Next.
Congure the remaining settings by
following the instructions on the screen.
Congure the settings by following the
instructions on the screen.
Select the same method that you selected in step 4 on p.10 or step 1 on p.11.
Wired LAN connection
This is the method for connecting the printer to the network using a LAN cable.
Wireless LAN connection
This is the method for connecting the printer to the network without using a cable.
USB connection
This is the method for connecting the printer to a computer using a USB cable.
Only 1 printer can be connected.
For the USB cable connection, first select the connection method and then follow the instructions on
the screen.
6
When the following screen appears, you
can use the printer. Next, click Next to
proceed to installing the software.
7
When the following screen appears,
select the software to install and click
Next.
Congure the remaining settings by
following the instructions on the screen.
This completes the connection with the
computer.
12
Page 13
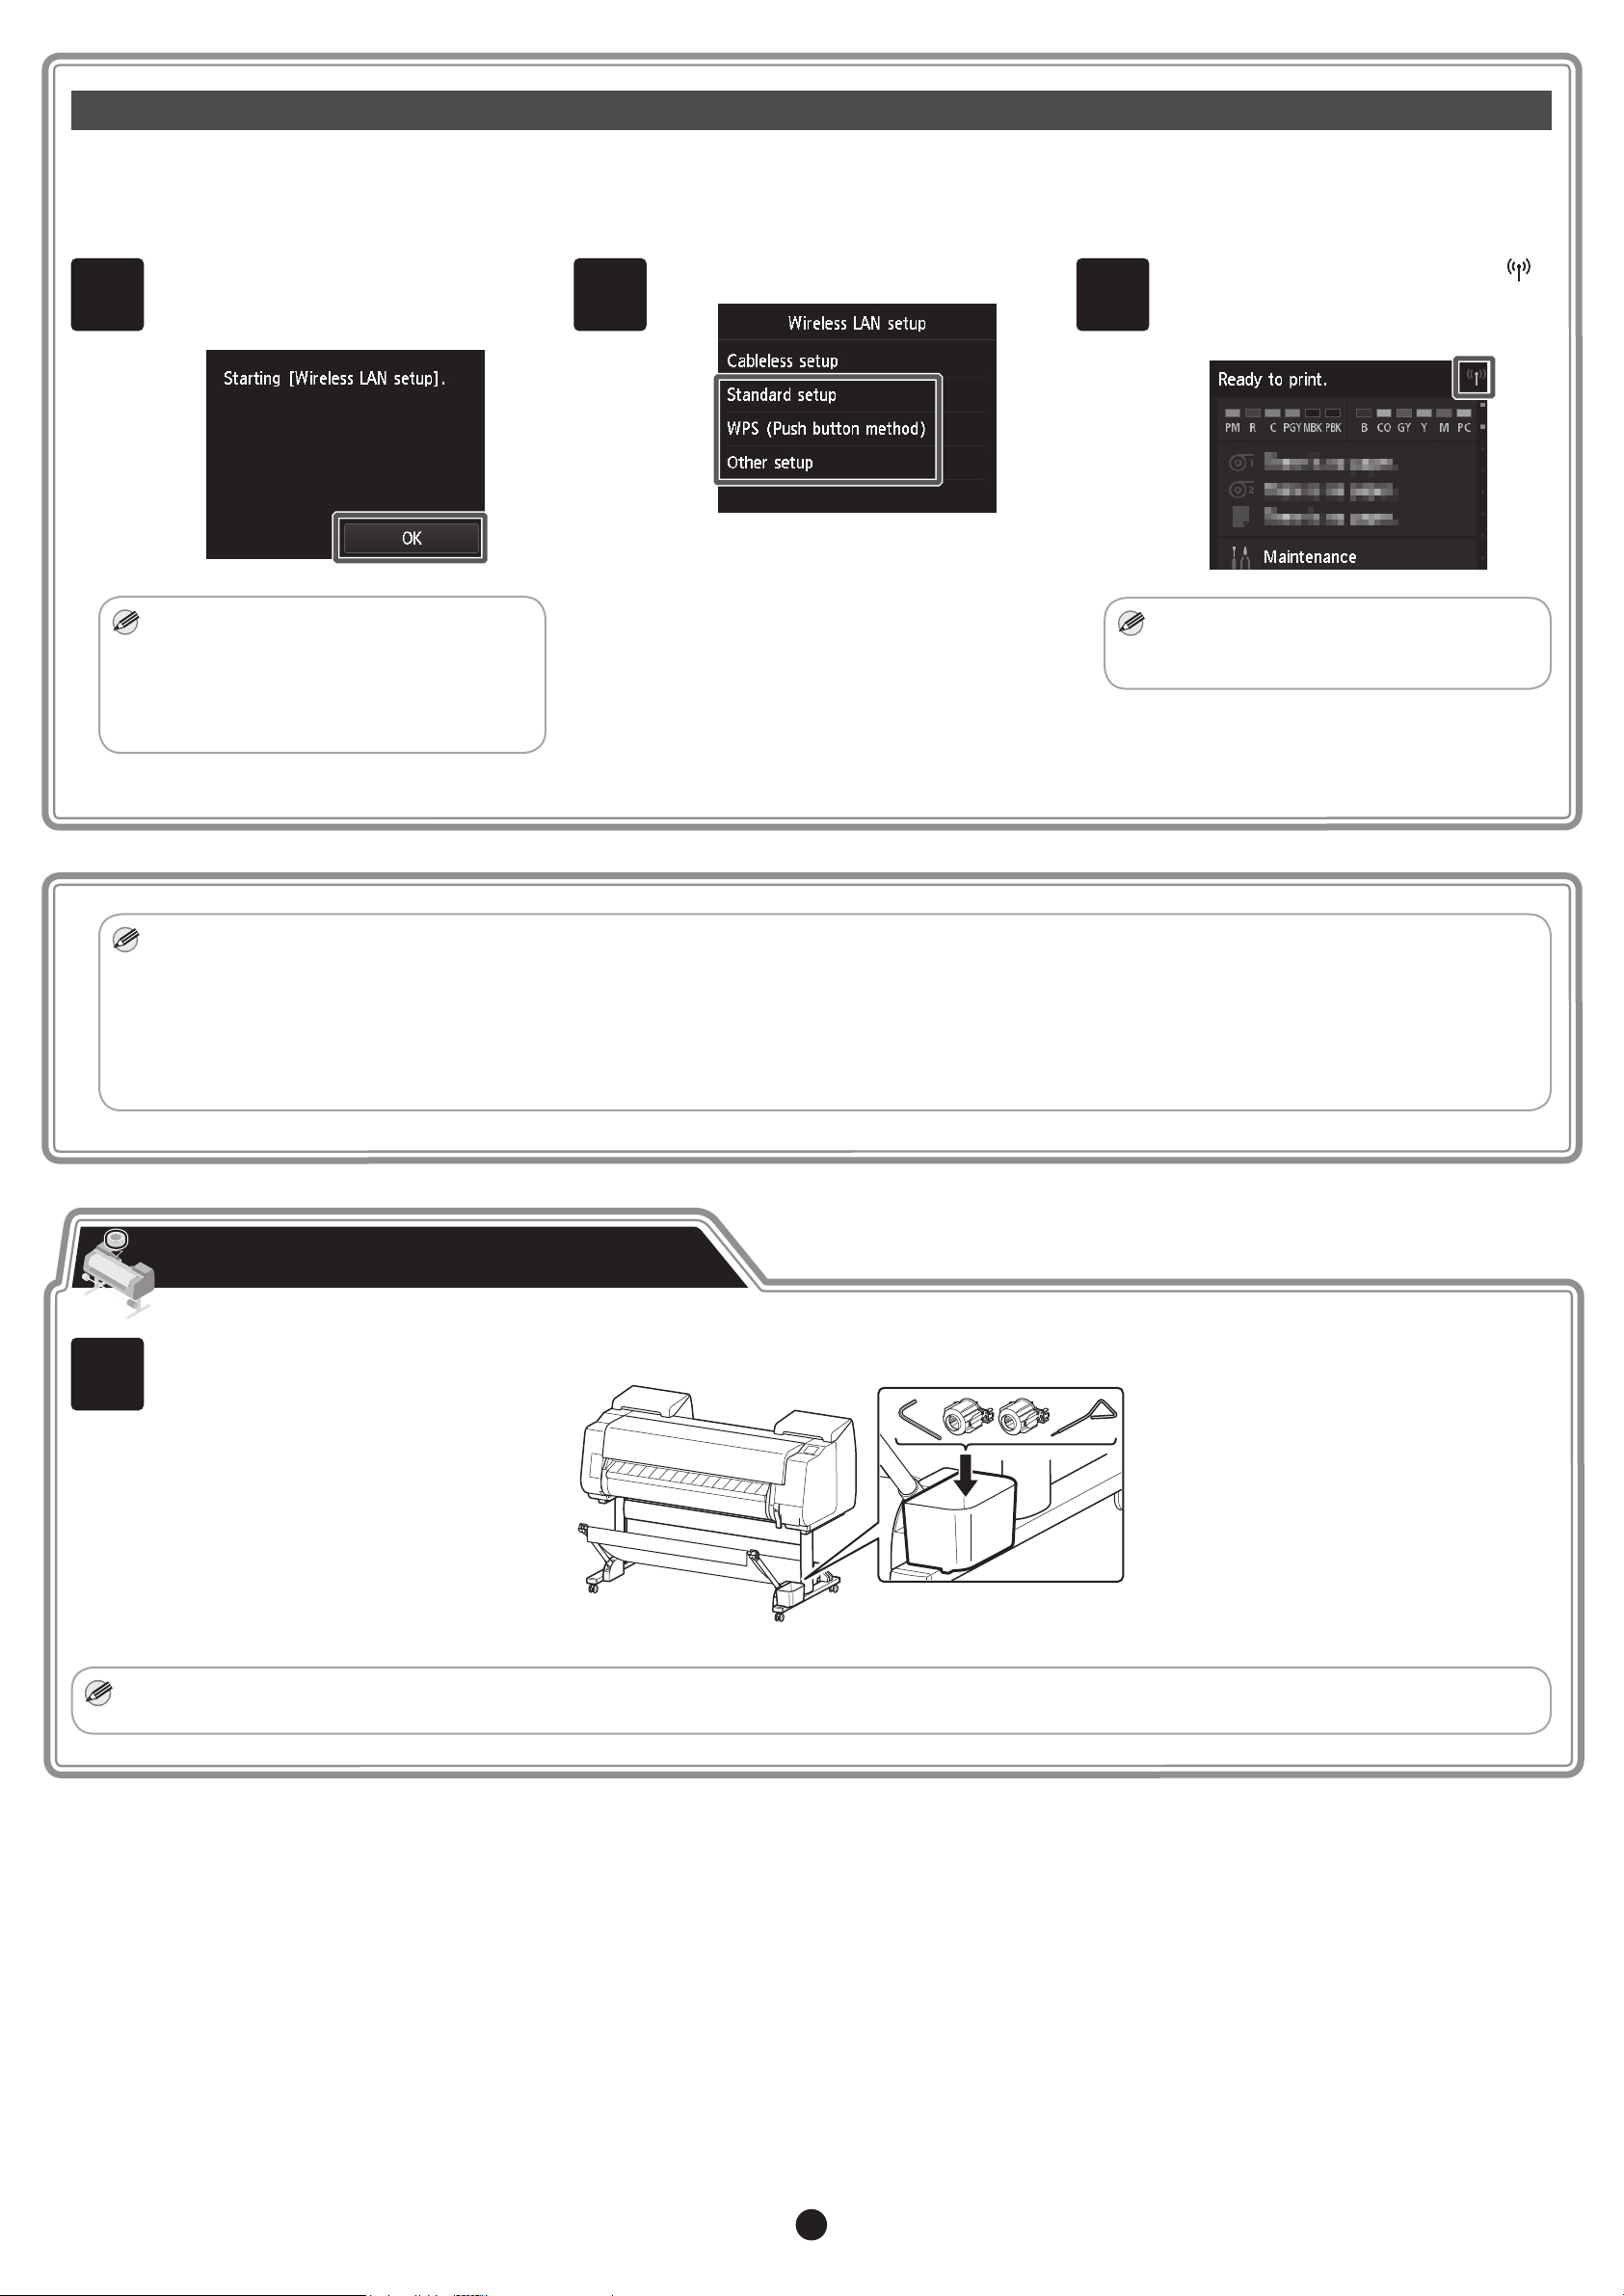
Congure Wireless LAN Settings on the Printer
Note
Note
Note
Note
If you selected Wireless LAN connection -> Yes -> No in steps 4 to 5 on p.10 or steps 1 to 2 on p.11, congure the wireless LAN settings using the printer
touch screen.
1
Once the print head adjustment has
nished, check that the following screen
appears and tap OK.
• If the following message appears, the
printer initial settings are not nished.
Wait until the above screen appears.
Checking the nozzle.
Filling the print head with ink...
Cleaning...
2
Select and tap the connection method.
Congure the wireless LAN settings by
following the instructions on the screen.
3
When the home screen appears and
appears, the wireless LAN settings are
complete.
• Before using the printer, the software
needs to be installed on the computer
that is connected to the printer.
1
• Once you have nished setting up the printer and software, it is recommended that you execute color calibration. You can compensate for variations in color
tone due to differences between printers and variations due to aging by executing color calibration. Color calibration is executed using paper for adjustment
that supports color calibration. For details on other supported paper, refer to "List of Paper Information" in the Online Manual.
To execute color calibration, select Maintenance from the home screen -> Color calibration -> Auto adjust. Executing color calibration takes about 10
minutes.
• If you are using color calibration, it is convenient to congure the function for notifying the execution time (Calibration guide setting). For details on this function,
refer to "Performing Color Calibration" in the Online Manual.
Store Accessories in the Pockets
Store accessories such as the 3-inch paper core attachment in the accessory pocket.
• When the setup is completed, refer to the various manuals to use the printer. Refer to "The Manuals Supplied with This Printer" on p.2.
13
Page 14
How to Display the Online Manuals
Online Manual that describes how to use the printer in detail is published on the Web. Access it using the following procedure as needed.
1
Enter the following URL in the web browser of a computer,
smartphone, etc.
Alternatively, you can also scan the following QR code and access
the website from the scan result.
Responding to Messages
2
Click or tap Read Online Manual.
Perform the remaining operations by following the instructions on the
screen to display the Online Manual.
Error messages may appear on the touch screen of the operation panel when setting up printer. If so, it may not indicate a problem with the printer, and the issue may be
easily resolved. Common messages and the causes are listed here with corrective actions. For details on other messages, refer to the Online Manual.
Message Cause Corrective Action
The ink tank is not installed.
Install the ink tank properly.
Print head cannot be recognized correctly.
Open the top cover and install the correct
print head.
The paper is loaded askew.
Lift the release lever and reload the paper.
Cannot detect the paper size.
Lif the release lever and reload the paper.
Hardware error ECxx-xxxx
(x represents a letter or number)
Printer error has occurred.
Turn the device off, wait a while, and then
turn it on again.
There is no ink tank loaded. Load or reload the ink tank.
The ink tank is not rmly installed all the way in.
The print head is not installed. Install the print head.
Electrical contact failure in the print head. Remove the print head, make sure that no debris becomes
The paper may not be aligned with the paper alignment
line.
The roll paper is fed even though cut sheet remains
selected as the paper source.
The belt stopper or the tape inside the top cover has not
been removed.
You may have encountered an error that cannot be
resolved.
(Refer to step 1 on p.6 to step 10 on p.7)
(Refer to steps 1-9 on p.8)
adhered to the contacts on the print head and the carriage, and
then reinstall the print head.
Reload the paper so that the edge of the paper is aligned with the
paper alignment line. (Refer to steps 2-6 on p.9)
Release the release lever and reload the paper. Tap the paper
settings display area from the home screen, then
icon), then Replace paper, and feed the roll paper again. For
details, refer to "Removing the Upper Roll from the Printer" and
"Loading the Upper Roll on the Printer" in the Online Manual.
Turn off the power, open the top cover, and remove the tape and
the belt stopper, then turn the power on.
Turn off the printer and wait at least 3 seconds before restoring the
power.
If the message appears again, write down the error code and
message, turn off the printer, and contact your Canon dealer for
assistance.
(roll paper
Error Ecxxx-xxxx
(x represents a letter or number)
Printer error has occurred.
See the manual and contact the service
center.
You may have encountered an error that cannot be
resolved.
Write down the error code and message, turn off the printer, and
contact your Canon dealer for assistance.
14
 Loading...