

Page 1
DIRECT CARD PRINTER
Operation Guide
Page 2

Page 3

Contents
Section 1: For your safety
a) Before installing ........................................................................................................................................... 2
b) Before turning power ON ......................................................................................................................... 4
c) Before using ................................................................................................................................................... 5
d) Before moving the equipment ................................................................................................................. 8
e) Other .................................................................................................................................................................. 9
f) Prohibited matters ......................................................................................................................................... 9
Section 2: Preparation
a) Package contents ............................................................................................................................................ 10
b) Consumables ................................................................................................................................................... 11
Ink Ribbons
Card
c) Parts to be replaced periodically ............................................................................................................. 12
Print Head
Input Roller
Fan Filter
d) Cleaning Card ................................................................................................................................................. 13
Cleaning Card
e) Name of the parts .......................................................................................................................................... 14
Section 3: Installation
a) Environment for installation ..................................................................................................................... 18
b) Space for installation ................................................................................................................................... 18
c) Preparation for installation ........................................................................................................................ 18
d) Connecting the Printer to Computer ...................................................................................................... 19
Setting Printer ID
Internet Connection Settings
Connecting Cable
e) Power ON ......................................................................................................................................................... 22
f) Settings after the Power ON ...................................................................................................................... 22
Page 4

Section 4: Operation Panel
a) Outline of the Operation Panel ................................................................................................................. 23
Appearance and composition
Function of each part
b) Operation of Normal Mode ....................................................................................................................... 24
Checking "Ready to Print" status
Recovering from the Error status
Change the Ink Ribbon
Clearing the Output Data
EXE key print
Stopping the continuous printing
c) Operation of User Mode ......................................................................................................................... 25
Switching to User Mode
Basic operation in the User Mode
d) Function of User Mode ............................................................................................................................... 26
Checking the number of cards used: Card Count
Total count of the printed frames: Total Count
Print adjustments: Image Set Up
ON/OFF of the error buzzer: Error Buzzer
Ribbon setting type: Printer Ribbon
Display Printer ID No: Printer ID Disp
Setting the System Environment: Printer Status
Interface Settings: Interface Setup
Device Version Information: ROM Version
Printer Settings Initialization: Setup Data Reset
e) Structure of User Mode .............................................................................................................................. 30
Section 5: How to Set Cards and Ribbon
a) Setting cards .................................................................................................................................................... 32
b) Setting the ink ribbon .................................................................................................................................. 34
Section 6: Cleaning
a) Input Roller ..................................................................................................................................................... 37
b) Cleaning of the card transport rollers in Flip Turn Block ............................................................ 38
c) Cleaning of the Print Rollers .................................................................................................................... 39
d) Cleaning of the Ribbon transport roller ............................................................................................... 40
e) Cleaning of the Supply Roller .................................................................................................................. 41
f) Cleaning of the Print Head ......................................................................................................................... 42
g) Cleaning of the card transport roller ..................................................................................................... 43
Page 5

Section 7: Periodical replacement of parts
a) Replacing Input Roller ................................................................................................................................ 43
b) Replacing Print Head ................................................................................................................................... 44
c) Replacing Fan Filter ..................................................................................................................................... 46
Section 8: Basic specification
Section 9: Configuration of the equipment
Section 10: Trouble and Countermeasure
a) Troubles displayed on the operation panel .......................................................................................... 49
Display of trouble on the LCD panel
Basic operation to release troubles
Trouble shooting
b) Releasing card jam ....................................................................................................................................... 53
Block Layout
Card Jam which cannot be released by Clear key
c) Troubles which are not displayed on the operation panel ............................................................. 56
Troubles relating to print image
Other troubles
Page 6
Danger
Warning
Caution
Section 1: For your safety
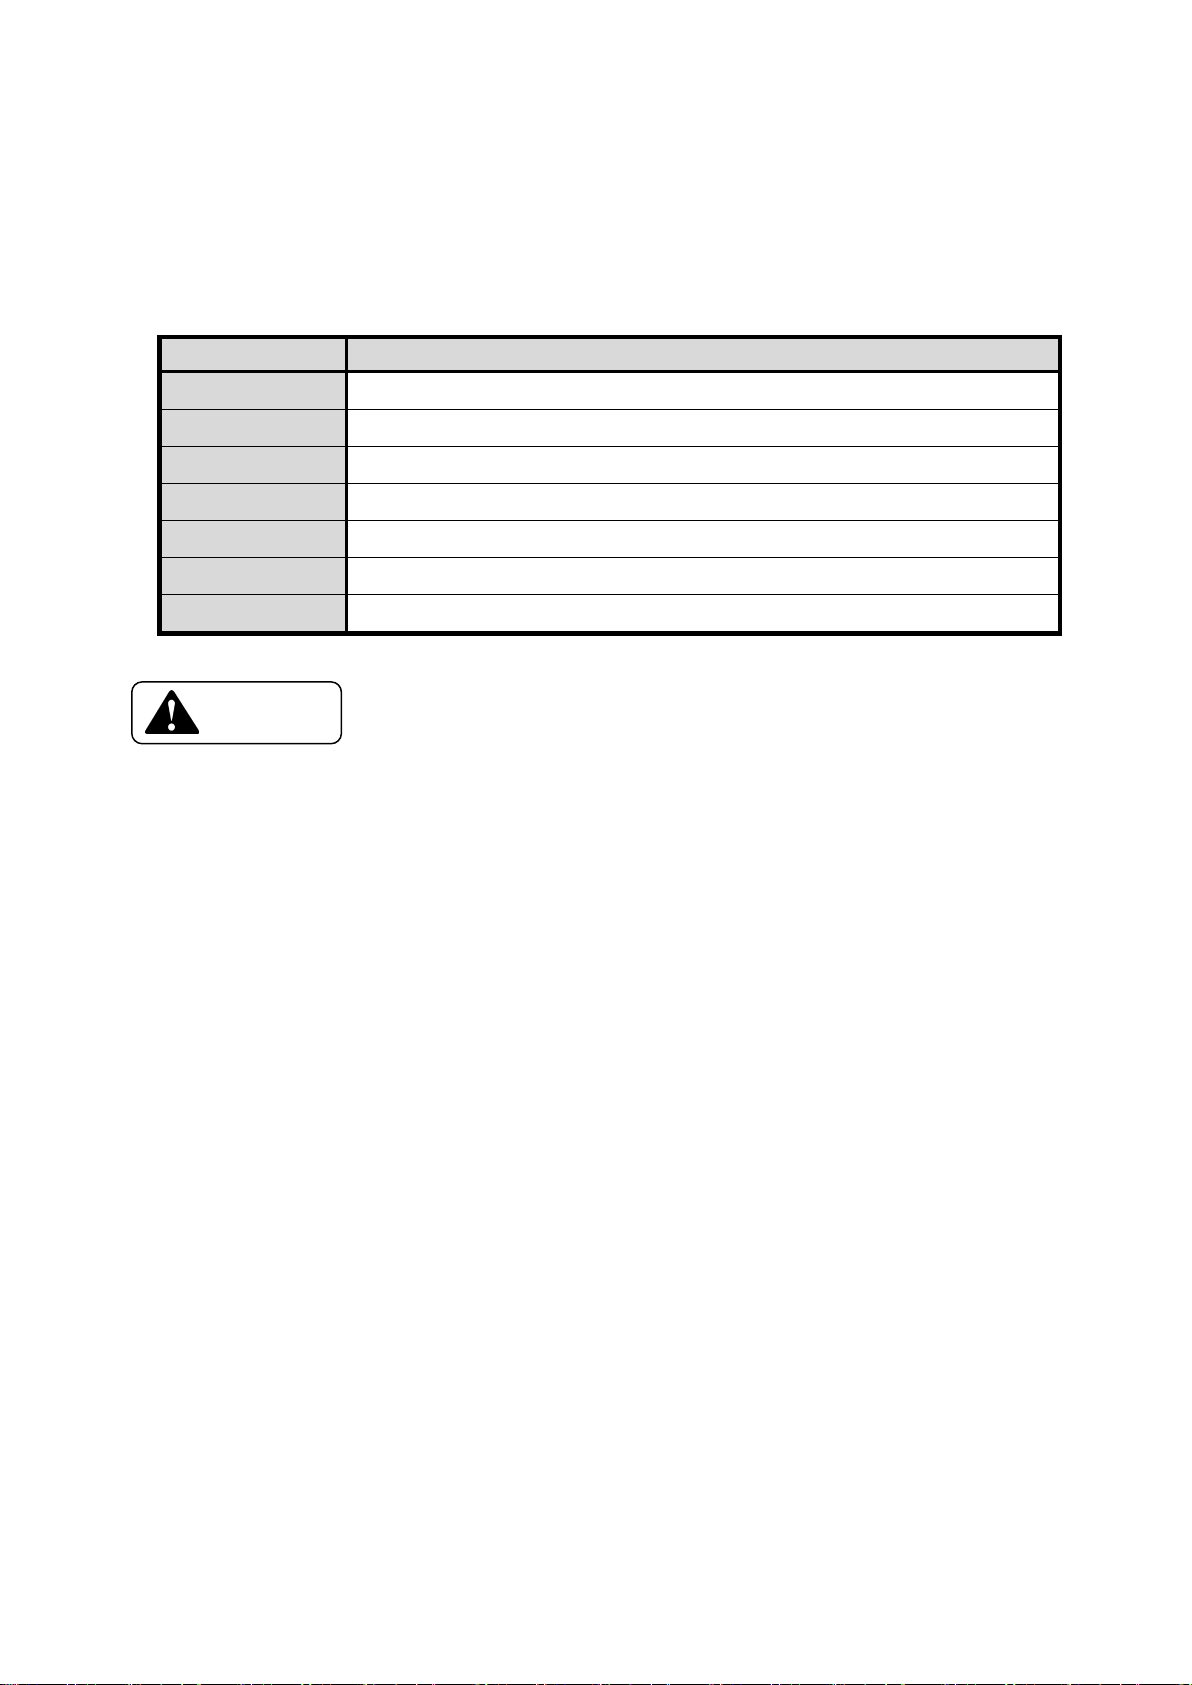
Several illustrations are used in this operation manual to ensure safe
operation. The following conventions are used to identify the result caused
by the use or operations not following such illustrations.
:This indicates that there is a danger of death or
serious injury.
:This indicates that there is possibility of death or
serious injury.
:This indicates that there is a possible cause of injury
and/or damages on properties.
This manual MUST be read fully before operating the printer.
a) Before installing 2 Page
b) Before turning the power on 4 Page
c) Before using
d) Before moving the equipment 8 Page
e) Other
f) Prohibited matters 9 Page
Meaning of the marks
△ means " Be careful "
5 Page
9 Page
○ means " Never do this "
● means " Must do this "
- 1 -
Page 7
Caution
1 - a) Before installing
About environment for installation
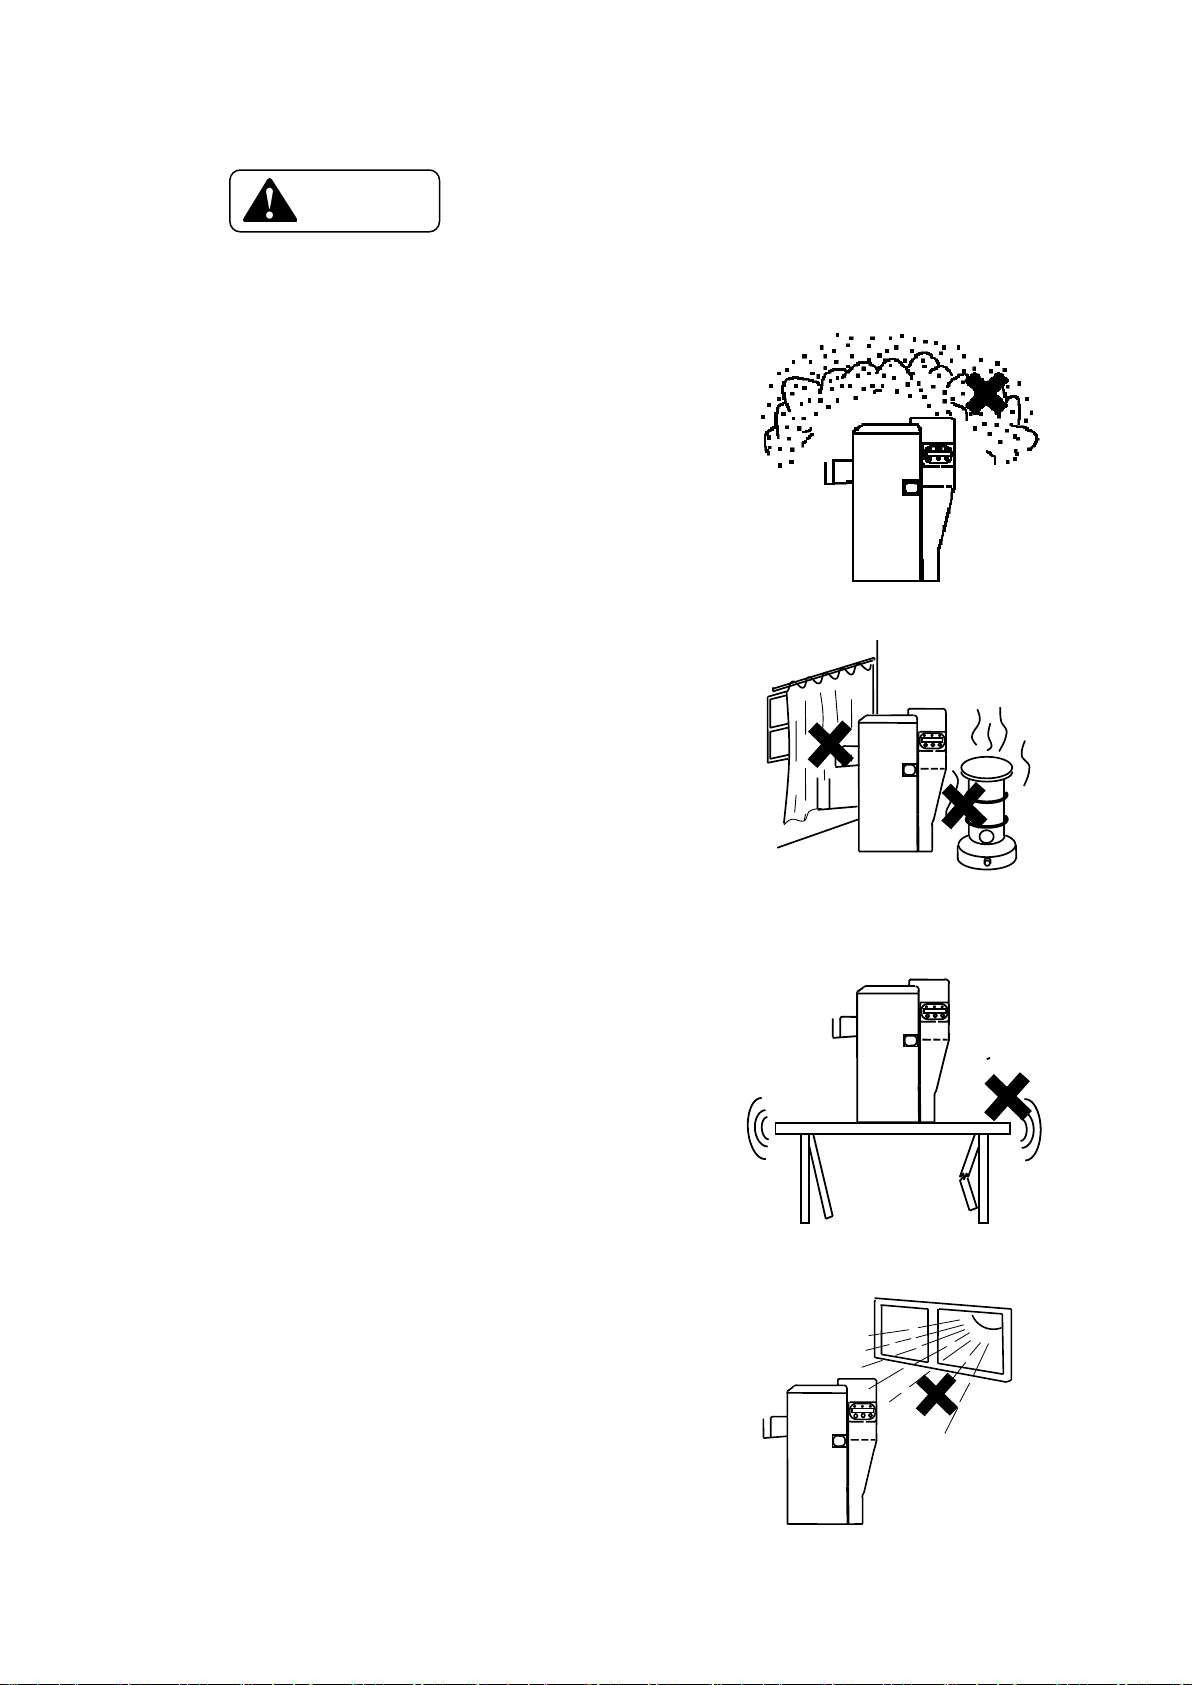
○ Do not install in humid and dusty room. It may
cause fire and/or electric shock.
○ Do not install the equipments near the
heat emitting apparatus such as stove
and heater or near the flammables such
as curtain. It may cause fire.
○ Do not place on shaky table or inclined
location. It may fall or drop and cause
injury to nearby persons.
○ Do not place where there is direct sunlight.
It may cause deformation of plastic housing
and discoloration of the prints.
- 2 -
Page 8
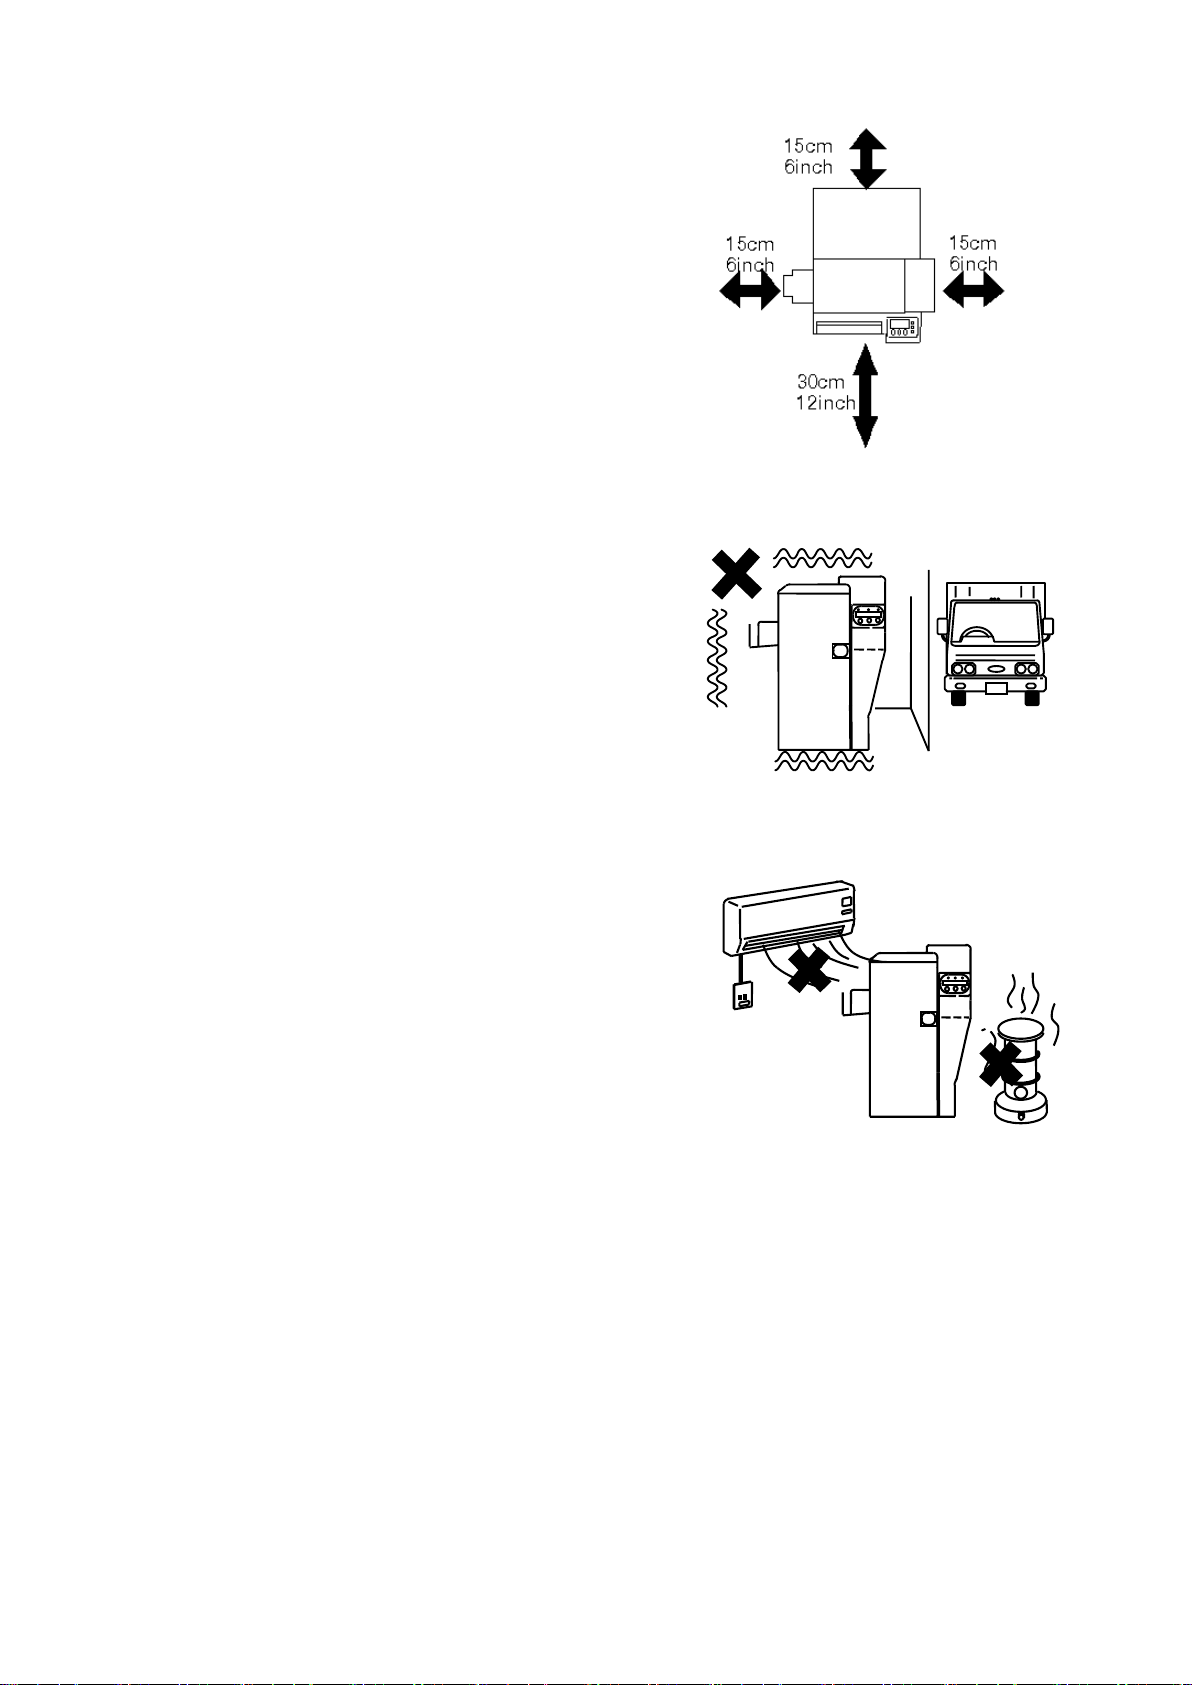
● Enough space must be provided around the
equipments. This is necessary for easy
operation as well as for ventilation.
If the ventilation opening is closed by
obstacle, heat cannot be dissipated and
it may cause a fire.
( Place with the clearance as shown in
the illustration. )
○ Do not place in the room with much
vibration. It may cause troubles on the
equipments.
○ Do not place in such place where the
temperature changes rapidly. If the
cold room is suddenly heated it may
cause condensation on the equipments
and damage the print quality or even
printing function itself.
- 3 -
Page 9
1 - b) Before turning the power ON
About power source
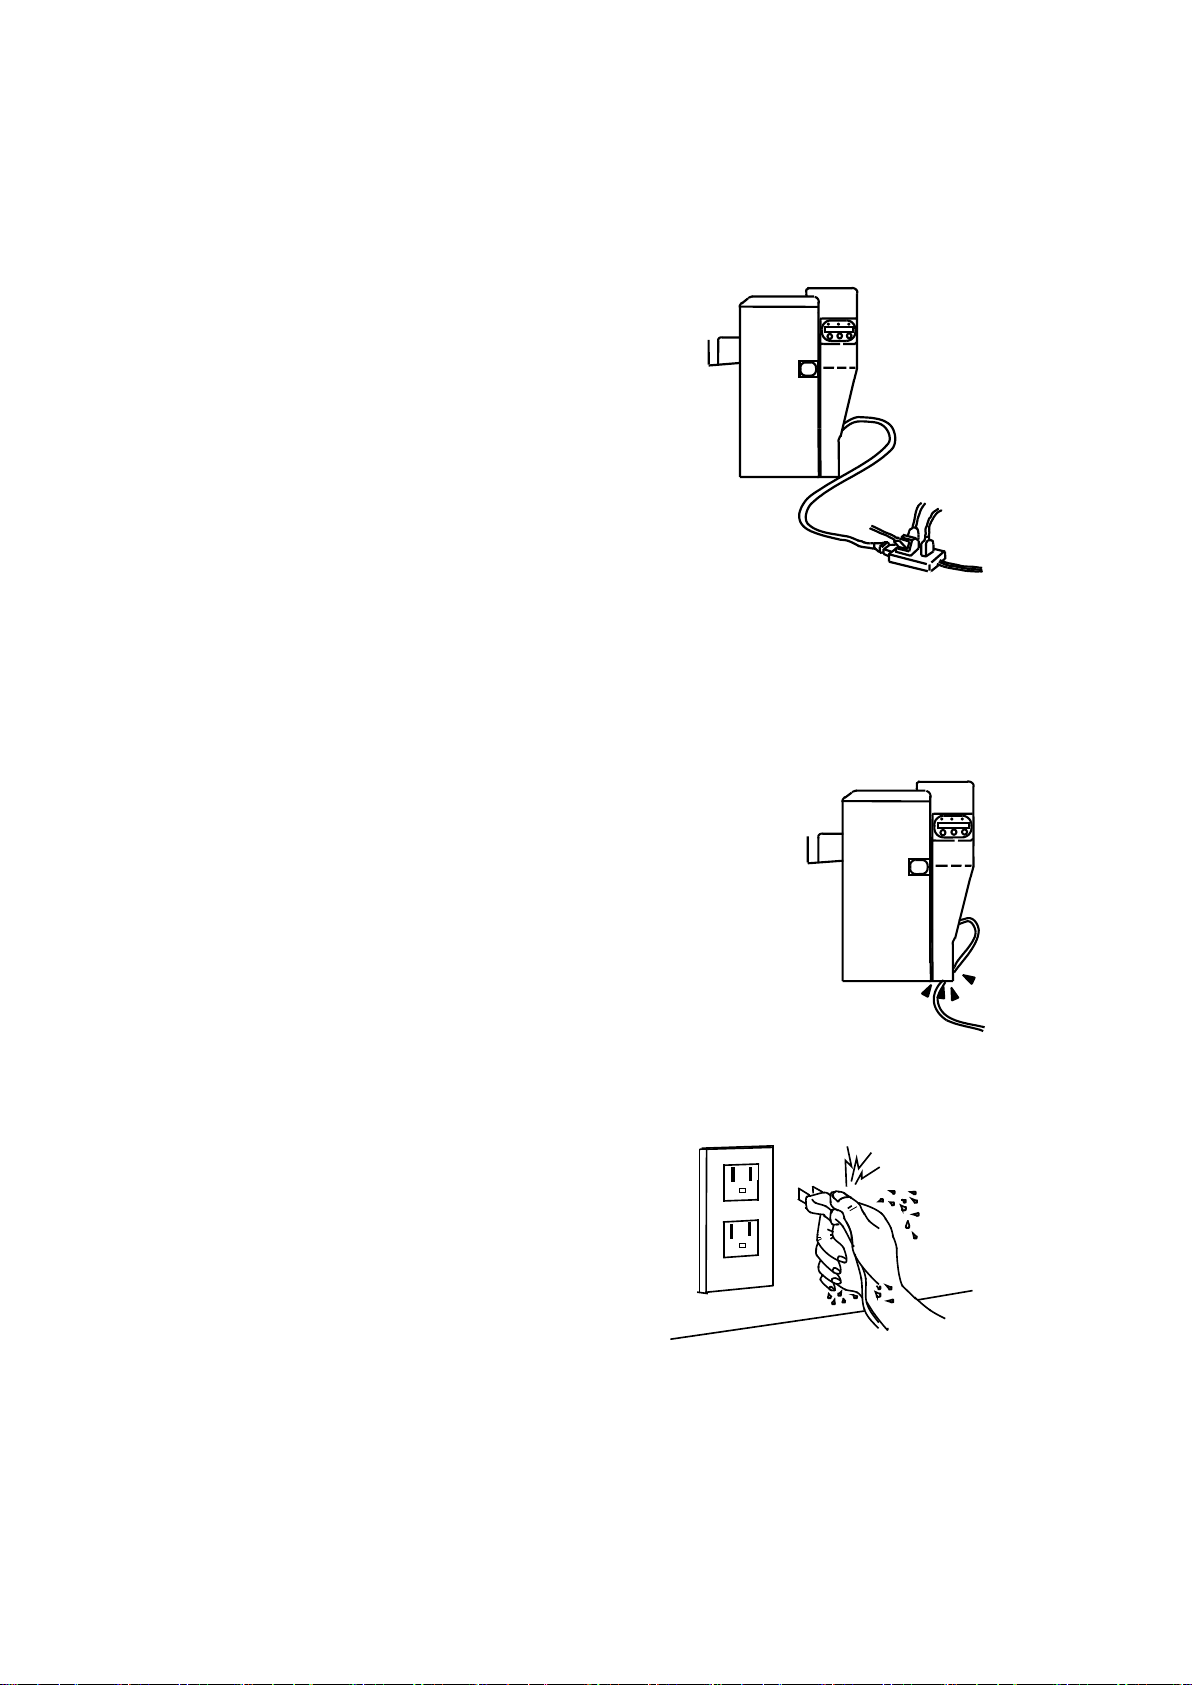
○ Do not use any other outlet than following.
Do not connect more than one equipment
onto one outlet. Otherwise, it may cause
a fire and/or electric shock. The specified
rating of this equipment is following.
100~240 VAC 2A
● Dust on the plug and electrical outlet must be removed. If used without
removing, a small amount of electricity runs continuously through the dust
by the effect of moisture etc. and may eventually cause a fire.
○ Be careful so that the power supply cord
is not damaged. If the cord is twisted,
pulled strongly or placed underneath a
heavy object, it may be damaged and become
a cause of fire.
○ Do not handle the plug with wet hand
because it may cause electric shock.
○ When you use an extension cord, do not use the cord which is rated at less
than 125V 10A. Excessive heat or smoke will be caused.
- 4 -
Page 10
Warning
1 - c) Before using
About handling the equipment
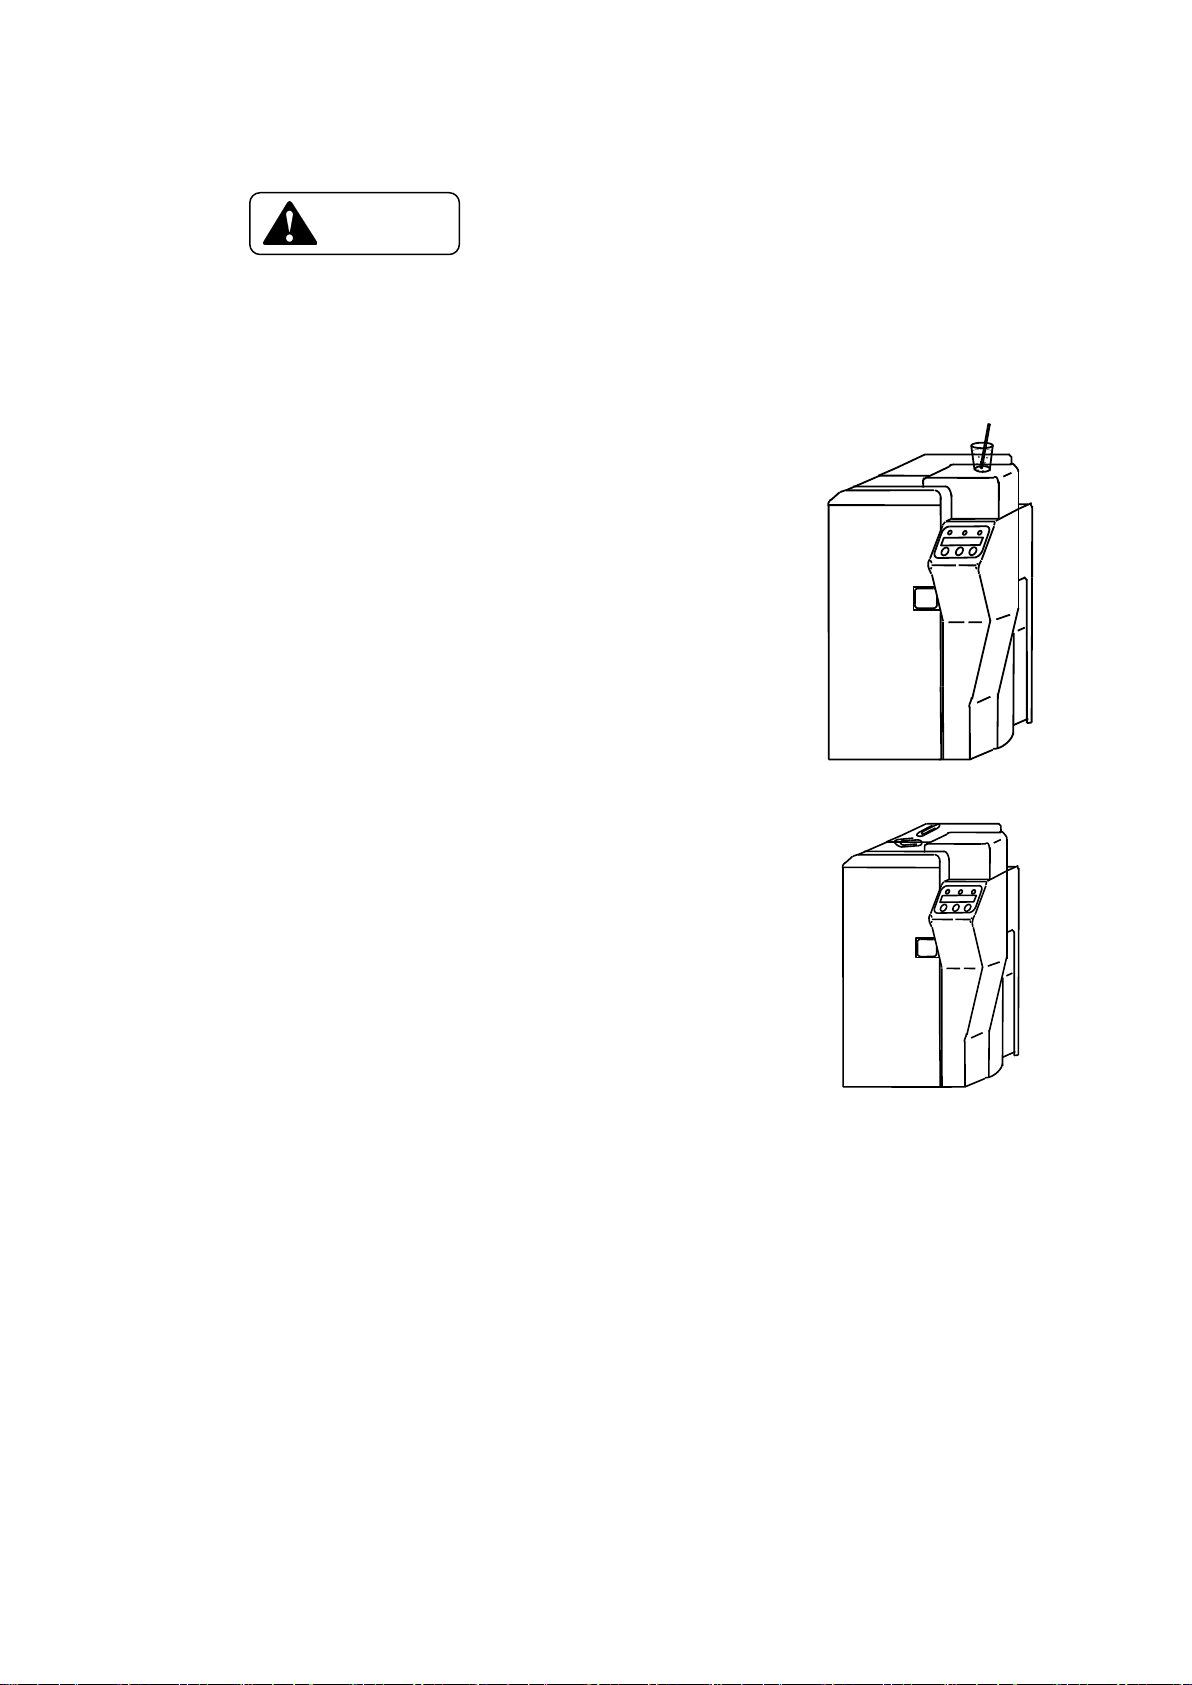
○ Do not put anything containing water such
as vase etc. on the equipment. If water is
spilled, it may cause fire or electric
shock.
○ Do not put any metal pieces such as paper
clips on the equipment. If they drop inside
the equipment, it may cause short circuit
and cause fire or electric shock.
● If, by any chance, metal pieces or water get inside the equipment, turn off
the main switch and plug off the power supply cord from the outlet.
Then, contact the dealer from whom you have purchased the equipment.
Using as it is may cause fire or electric shock.
○ Do not open the panel or cover which is fixed with screws, other than
directed by the manual. There is live part carrying high voltage and it is
dangerous of electric shock.
○ Do not modify the equipment. It may cause the danger of fire or electric shock.
- 5 -
Page 11
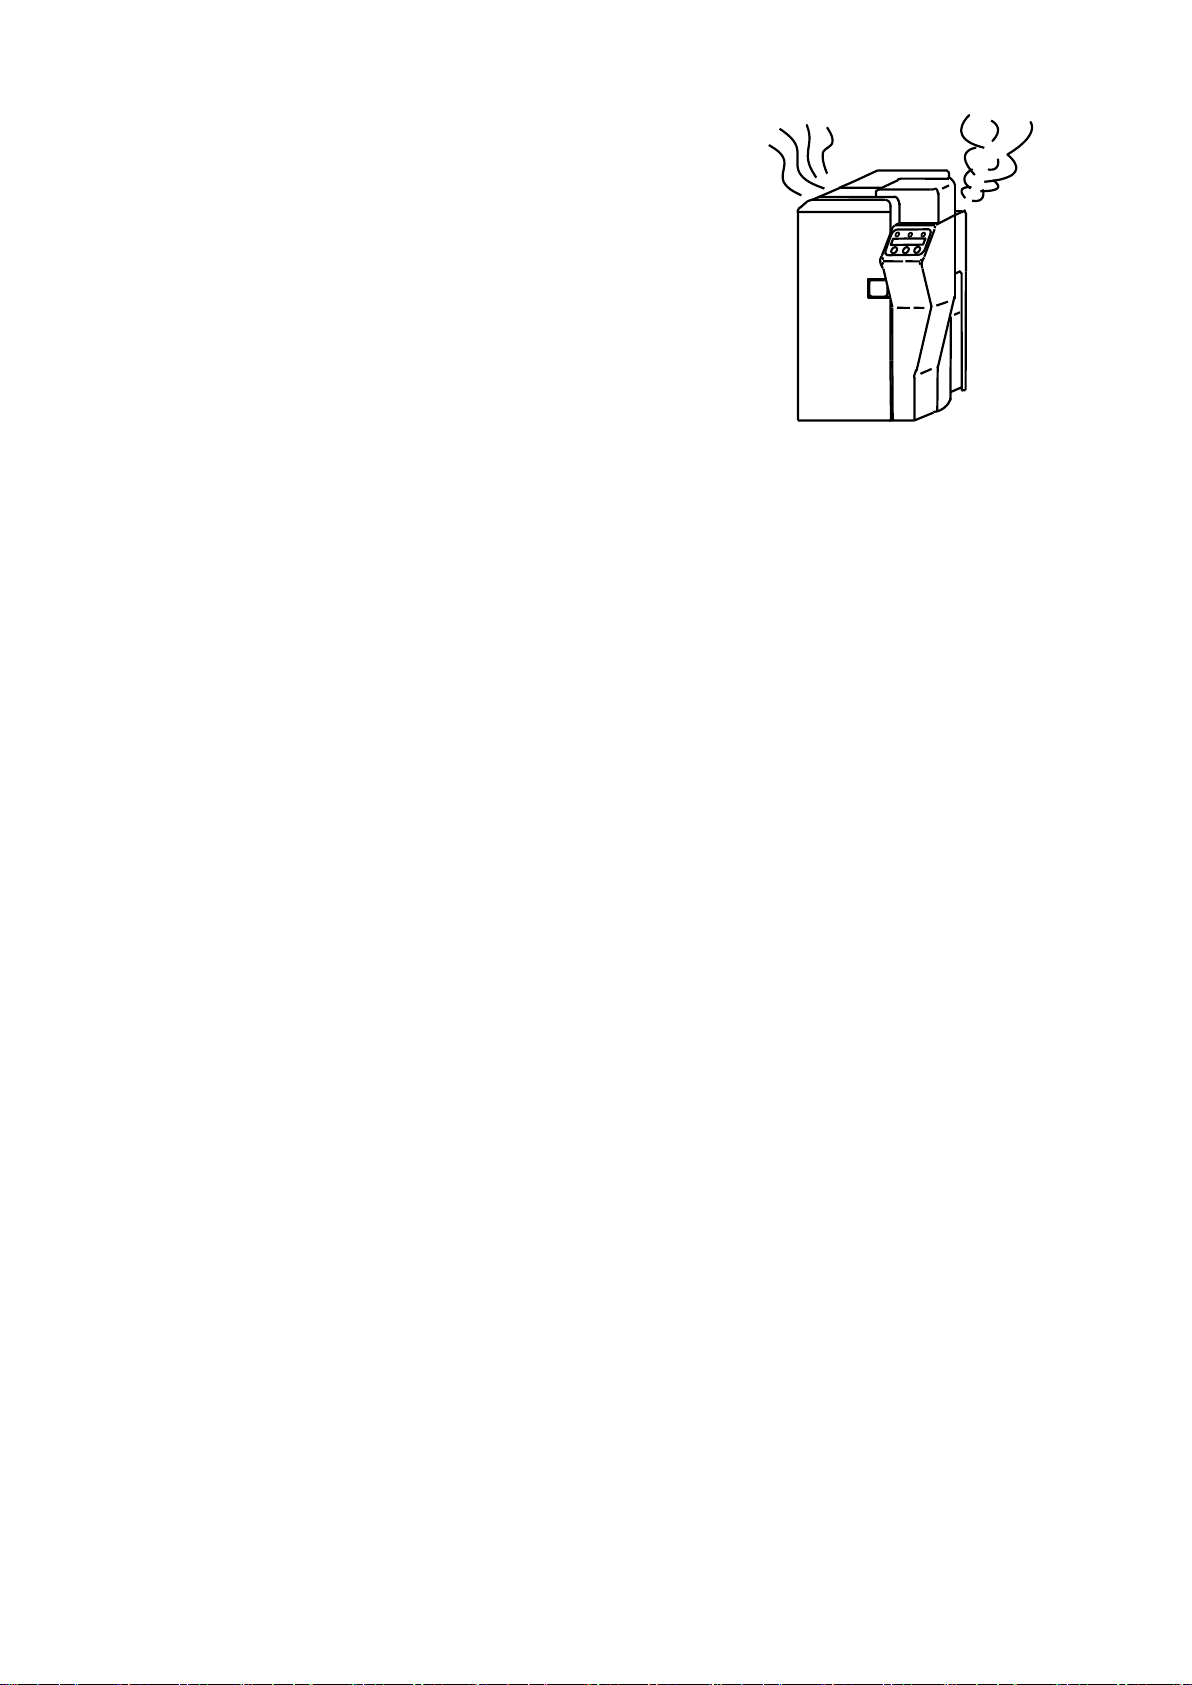
● If smoke or unusual smell is detected, stop
using. If it is used as it is, it may cause
fire or electric shock. Turn OFF the main
switch immediately, plug off the power cord
and contact the dealer from whom the
equipment was purchased.
● In case of thunder, for the purpose of safety, turn OFF the main switch and plug off
the power cord. This will prevent burning of the equipment, fire or electric shock.
● If the equipment will not be used for a long period, turn OFF the main switch and
plug off the power cord for safety. Deterioration of insulation may cause electric
shock or leakage and fire.
- 6 -
Page 12

Caution
About handling of the equipment
○ Do not put any heavy article on the equipment. It may damage the equipment
or cause the injury by dropping.
○ Do not use flammable sprays at near the equipment. It may catch fire and
cause fire accident.
○ When the front door is open, do not put anything on the door or lean on.
The door may be broken and will cause injury.
○ While the equipment is in operation, do not turn OFF the main switch, pull
off the plug of power cord or open the doors of the equipment.
It may cause card jamming or malfunction of the equipment.
○ Do not touch any part inside the equipment other than directed by this manual.
● Read this manual carefully before performing recovering operations for
card jamming or other malfunctions.
○ Do not attempt to operate in any other way than designated in this manual.
Such attempt may cause unexpected damage on the equipment.
● If electric leakage occurs frequently, please contact the dealer from whom
you have purchased the equipment.
○ Cooling fans are rotating continuously to prevent temperature rise inside
the equipment. This is not a defect. Do not put anything which may prevent
air flow near the ventilation opening of the equipment.
- 7 -
Page 13
Caution
1 - d) Before moving the equipment
About power source
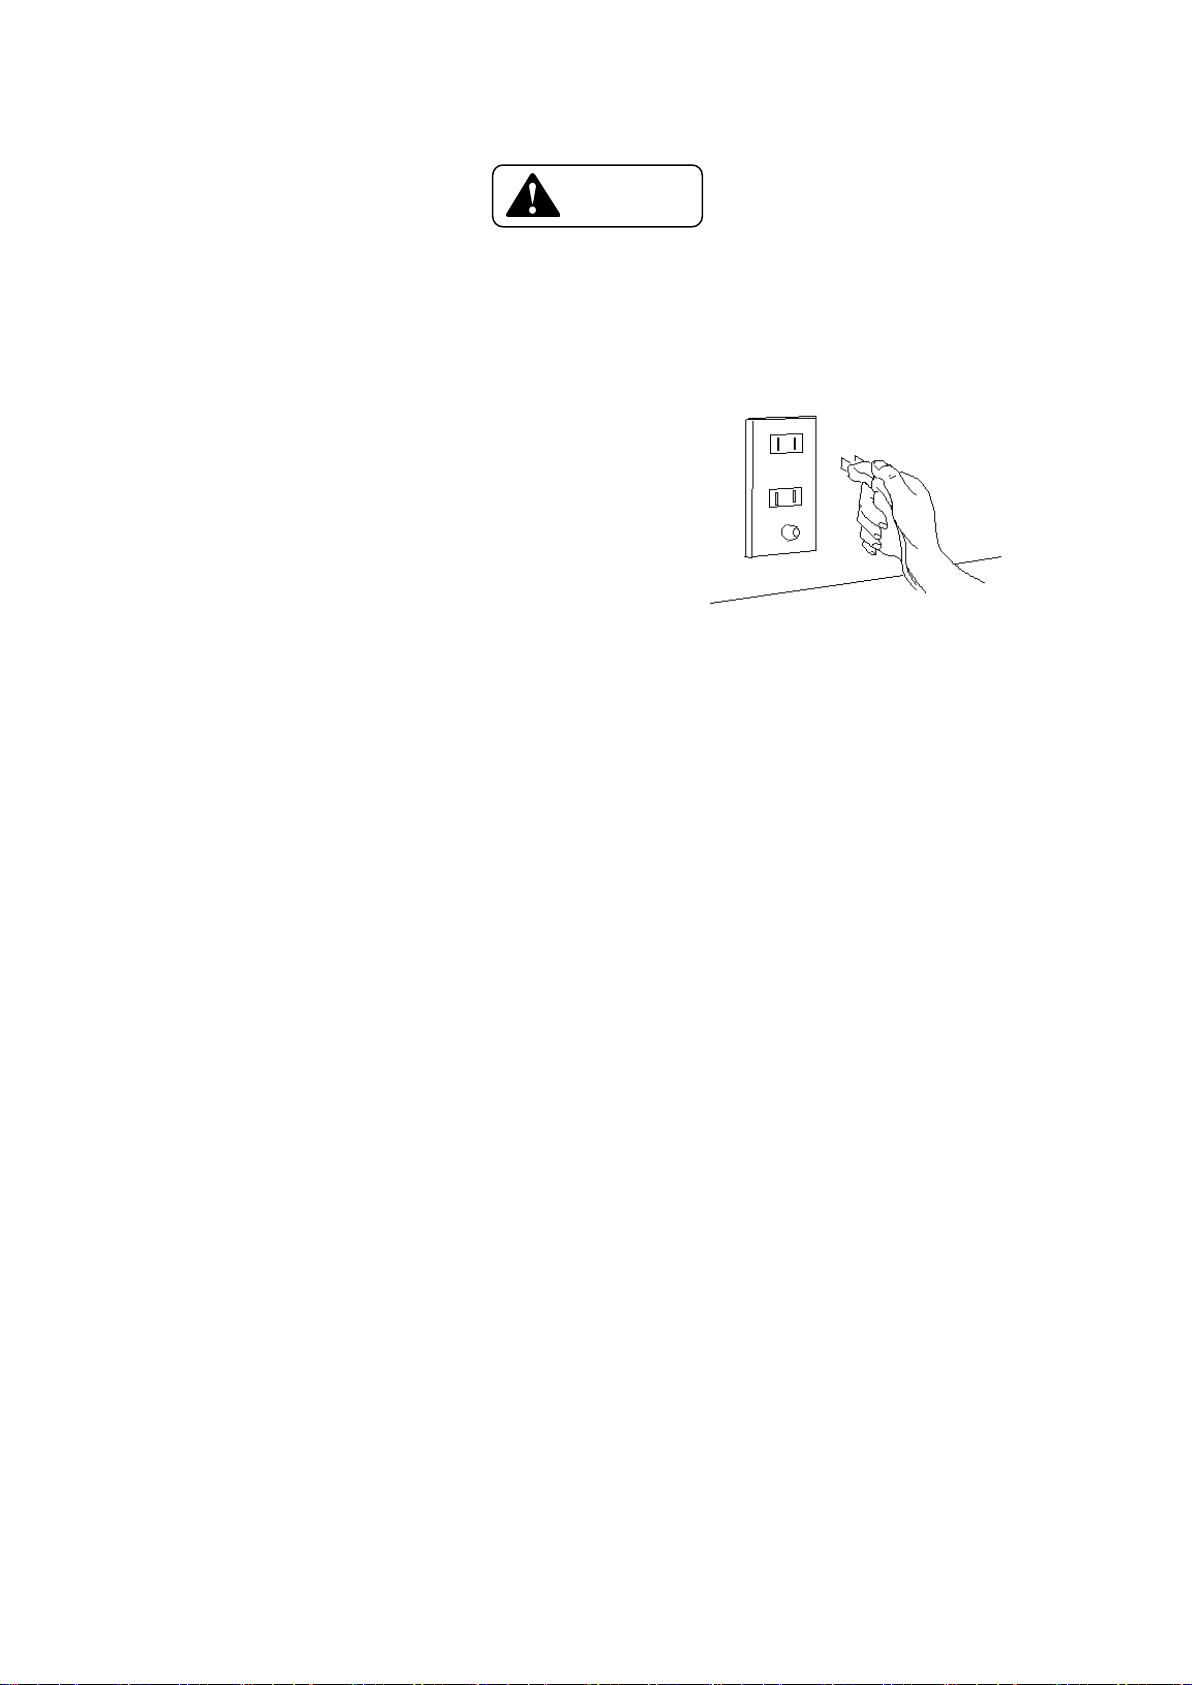
● Turn OFF the main switch and plug off the power supply cord from the outlet
before moving the equipment.
Otherwise, it may damage the power cord
and cause a fire.
● To pull off the plug of the power cord,
hold the body of the plug and pull off.
If the cord is held and pulled, the
core lines may be pulled out or broken
and cause fire or electric shock.
- 8 -
Page 14

1 - e) Other
If the equipment is installed and operated at near TV set or radio, it may
cause an interference such as noise or flicker. In such case, use the outlet
connected to separate power line and place the equipment as far as possible
from them.
1 - f) Prohibited matters
The law prohibits to use the portrait (photographs, paintings)of a person or use
the copyright products (illustrations, logos etc)without permission.
Do not use this equipment for the unauthorized use of the copyrighted products or
for other unlawful purpose.
- 9 -
Page 15
□
Section 2: Preparation
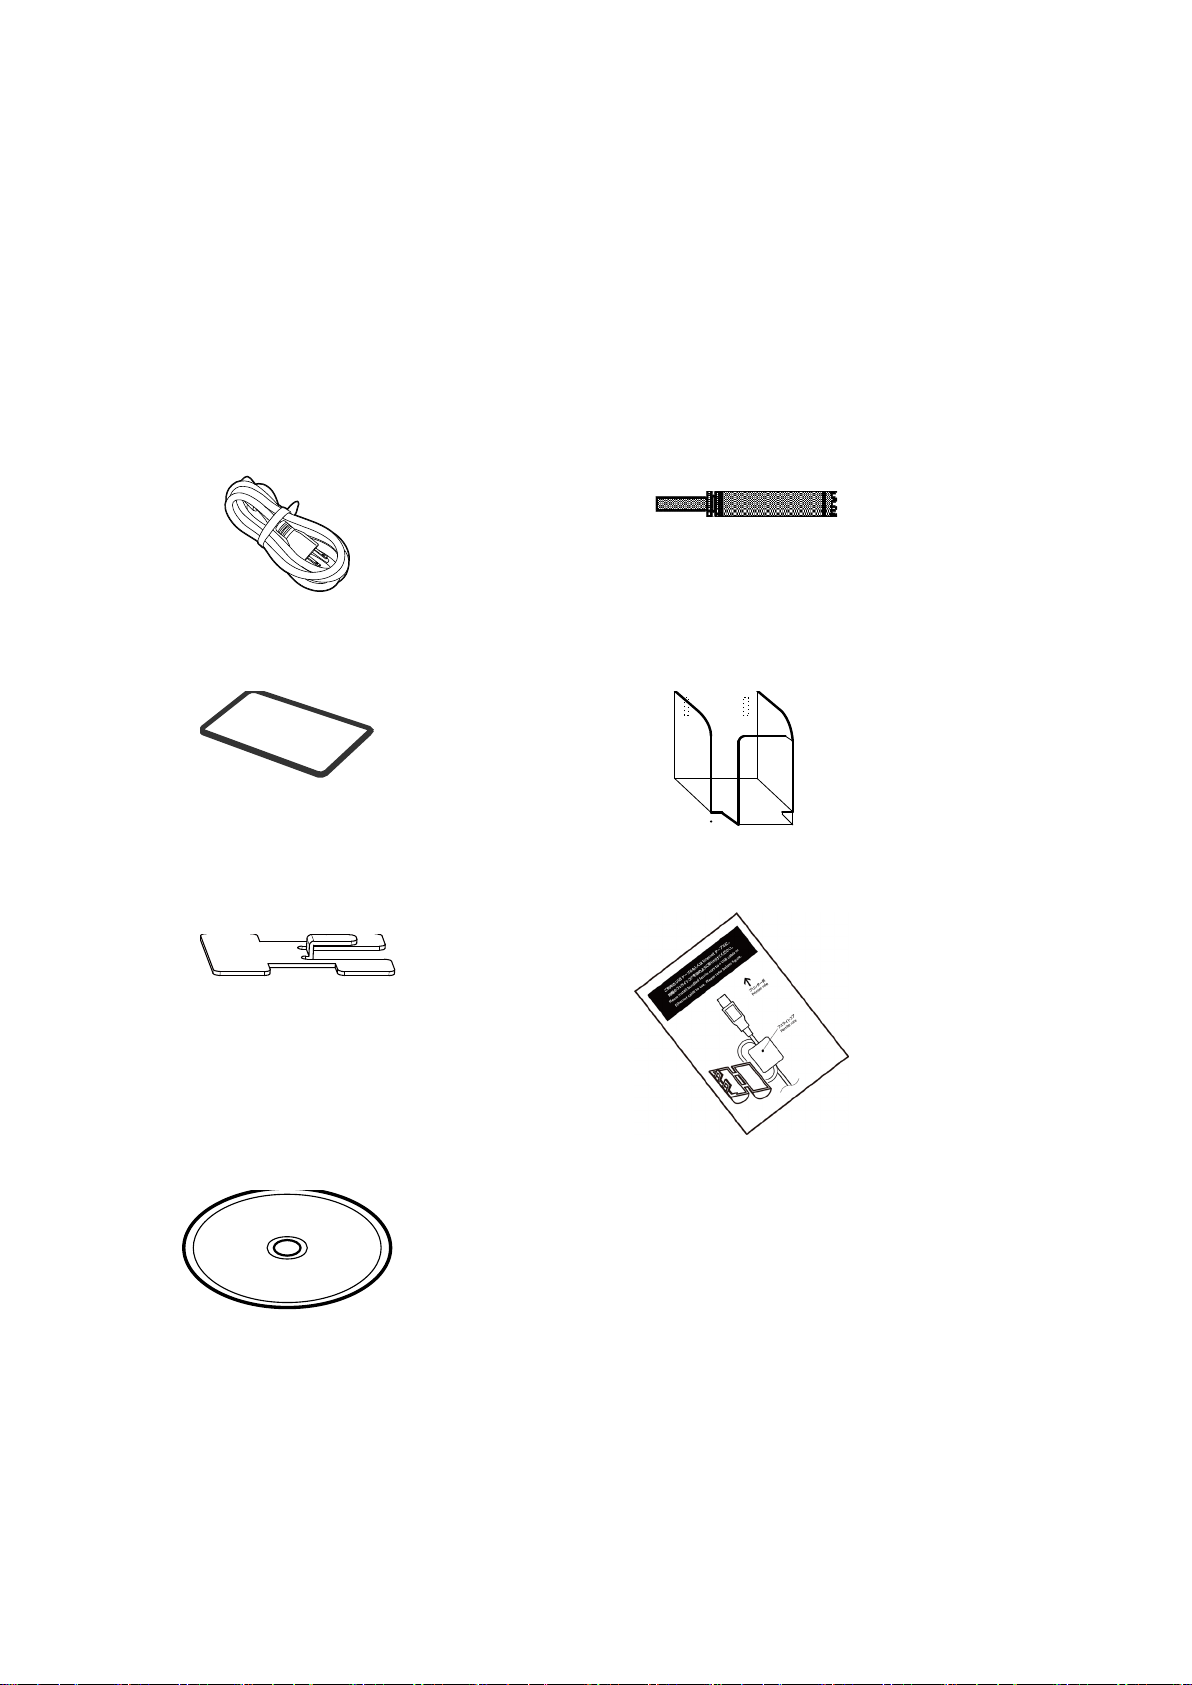
2 - a) Package contents
Following items are packed in the carton together with the printer.
If anything is missing, contact the dealer from whom you have purchased.
Power Supply Cord □ Empty Bobbin
□ Cleaning Card □ Stacker Box
□ Weight □ Ferrite core
□ Operation Manual CD
- 10 -
Page 16

(Per roll)
w/ resin black
+ Heat melting black + Overcoat
Resin black
KO
250
Heat melting black + Overcoat
Caution
2 - b) Consumables
Ink ribbons and cards must be prepared to use this printer.
Ink Ribbons
The following 2 kinds of ribbons are used for this printer.
Name Marking Number of frames Reference
Color 3BP 250 Dye sublimation type full color
w/ overcoat
□ Do not use other ink ribbons than designated by us.→ It may cause equipment trouble.
□ In the following case, printing of 250 frames may not be possible with one roll of ink ribbon.
Ink ribbon has been changed in the middle.
There has been errors in the middle.
Head lifting has been done in the middle.
Abnormal operation which is not allowed in this manual was done.
□ Ink ribbon must be stored in the cold and dark place and kept away from organic solvent or
diazo copying machine. Use as early as possible.
Maximum storage period is 6 months after delivery if they are kept in the environment
of 25
゚C (77゚F), 50% RH. After this period, quality of print may be affected.
Card
The recommended card by dealer must be used. If the other cards are used, normal
print quality may not be obtained and malfunction of the equipment may be caused.
- 11 -
Page 17

Caution
2 - c) Parts to be replaced periodically
Spare Print Head, Input Rollers and Fan Filter are available for periodic replacement
in order to ensure the print quality and long life of machine.
Print Head
The Print Head comes with the floppy disk which
contains the data for best print quality assured.
Because the Print Head is very sensitive to static
voltage, hold it by frames and be very careful
not to touch the contact pins with fingers.
Static may damage the circuits inside this part.
At the printing edge of the Print Head is very high
compound of heating element. So, never touch this
part with a hard object, fingers or stained materials.
Standard replacement cycle for the Head is 20,000 frames of printing with
the following standard printing condition.
Full color image portion : 25.4mm in length
(1inch)
Black characters : 38.1mm in length
(1.5inch)
Protective layer : On color image portion only.
Do not use the stained or dusty cards. Use the cards which are recommended by your dealer.
Otherwise, it may cause damage on the Print Head and printer.
- 12 -
Page 18
Caution
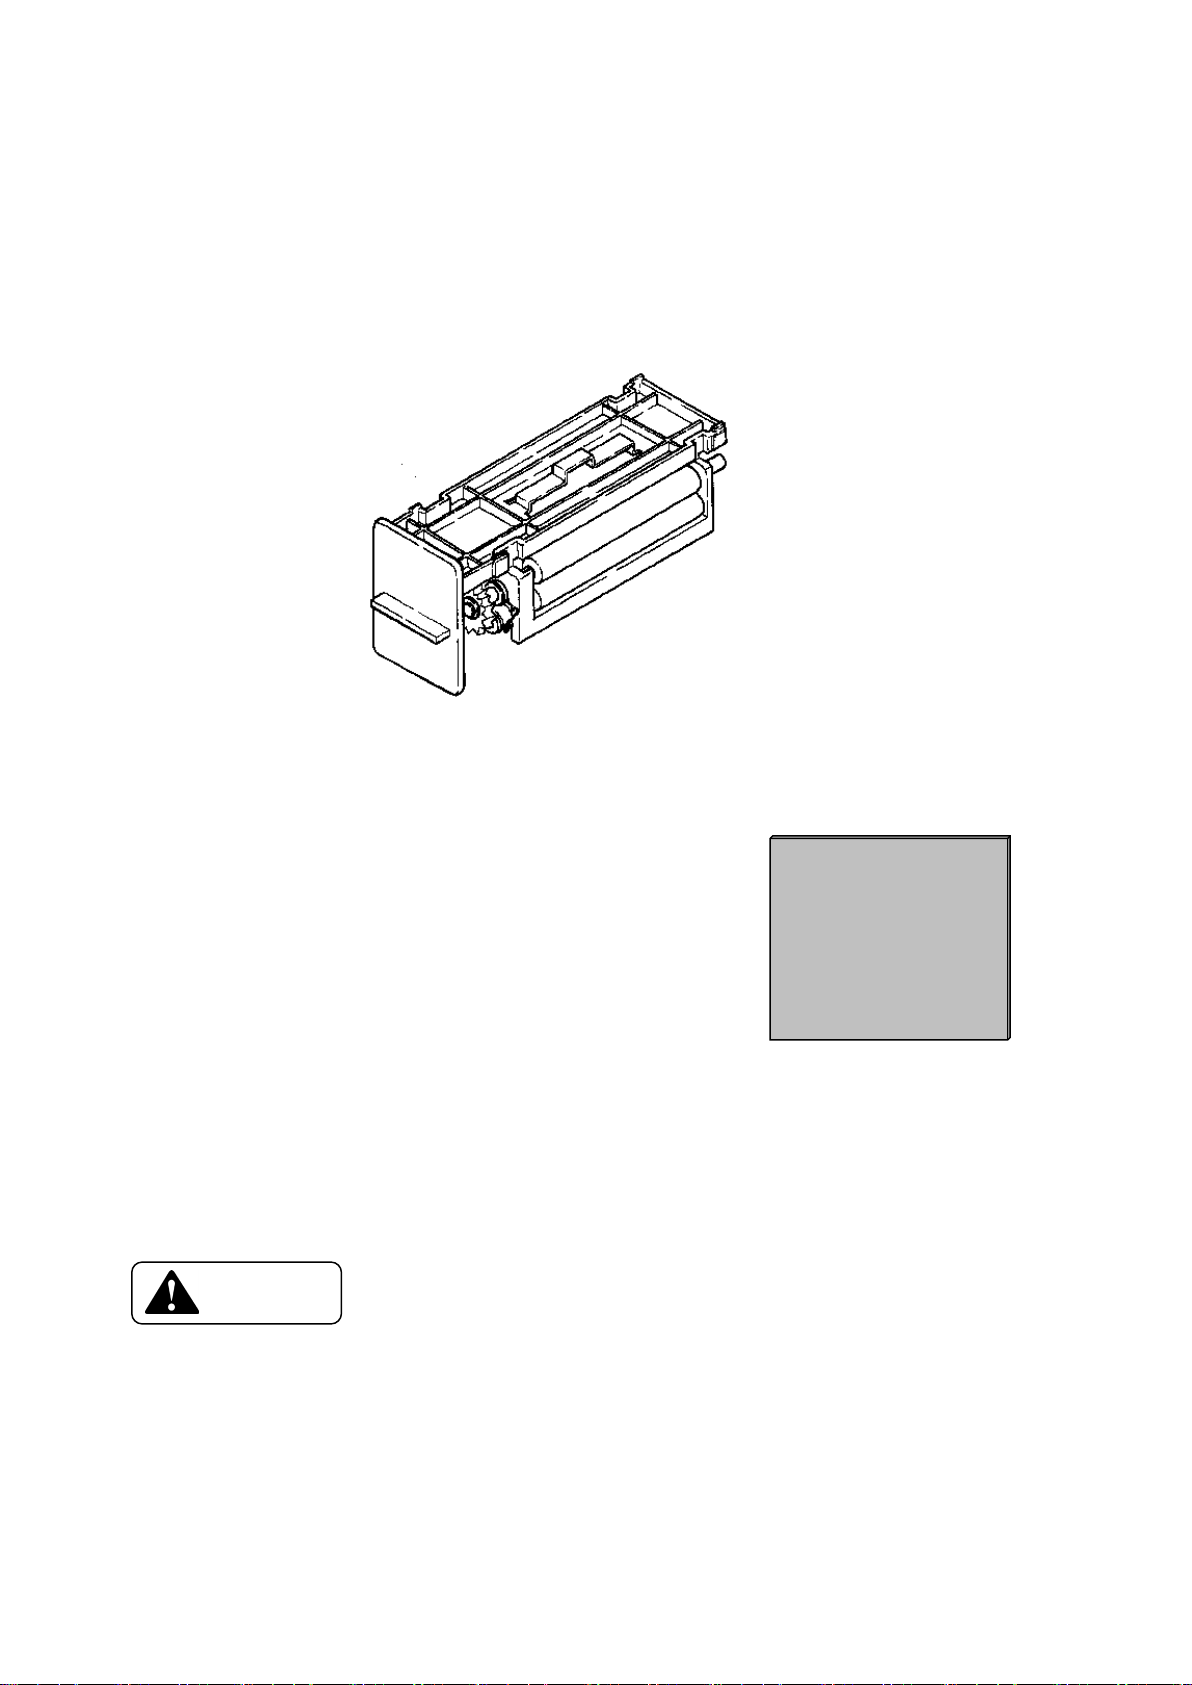
Input Roller
Periodic replacement cycle for the Input Roller is every 40,000 frames if the recommended cards
are used and cleaning is done every 2,000 frames.
To exchange the Roller, refer the item "Replacing Input Roller" at 7-a).
For cleaning the Rollers, refer the item "Input roller" at 6-a).
Fan Filter
Recommended Replacement period: every 6 months
Do not wash with water.
→ It may cause equipment trouble.
See page 46 for replacement
2 - d) Cleaning Card
Cleaning Card
Use to make cleaning of card transportation rollers.
See page 41 for the way to clean.
The cleaning card is designed as one time use.
- 13 -
Page 19
⑩
⑧
⑨
⑦
⑥
⑤
④
①
②
③
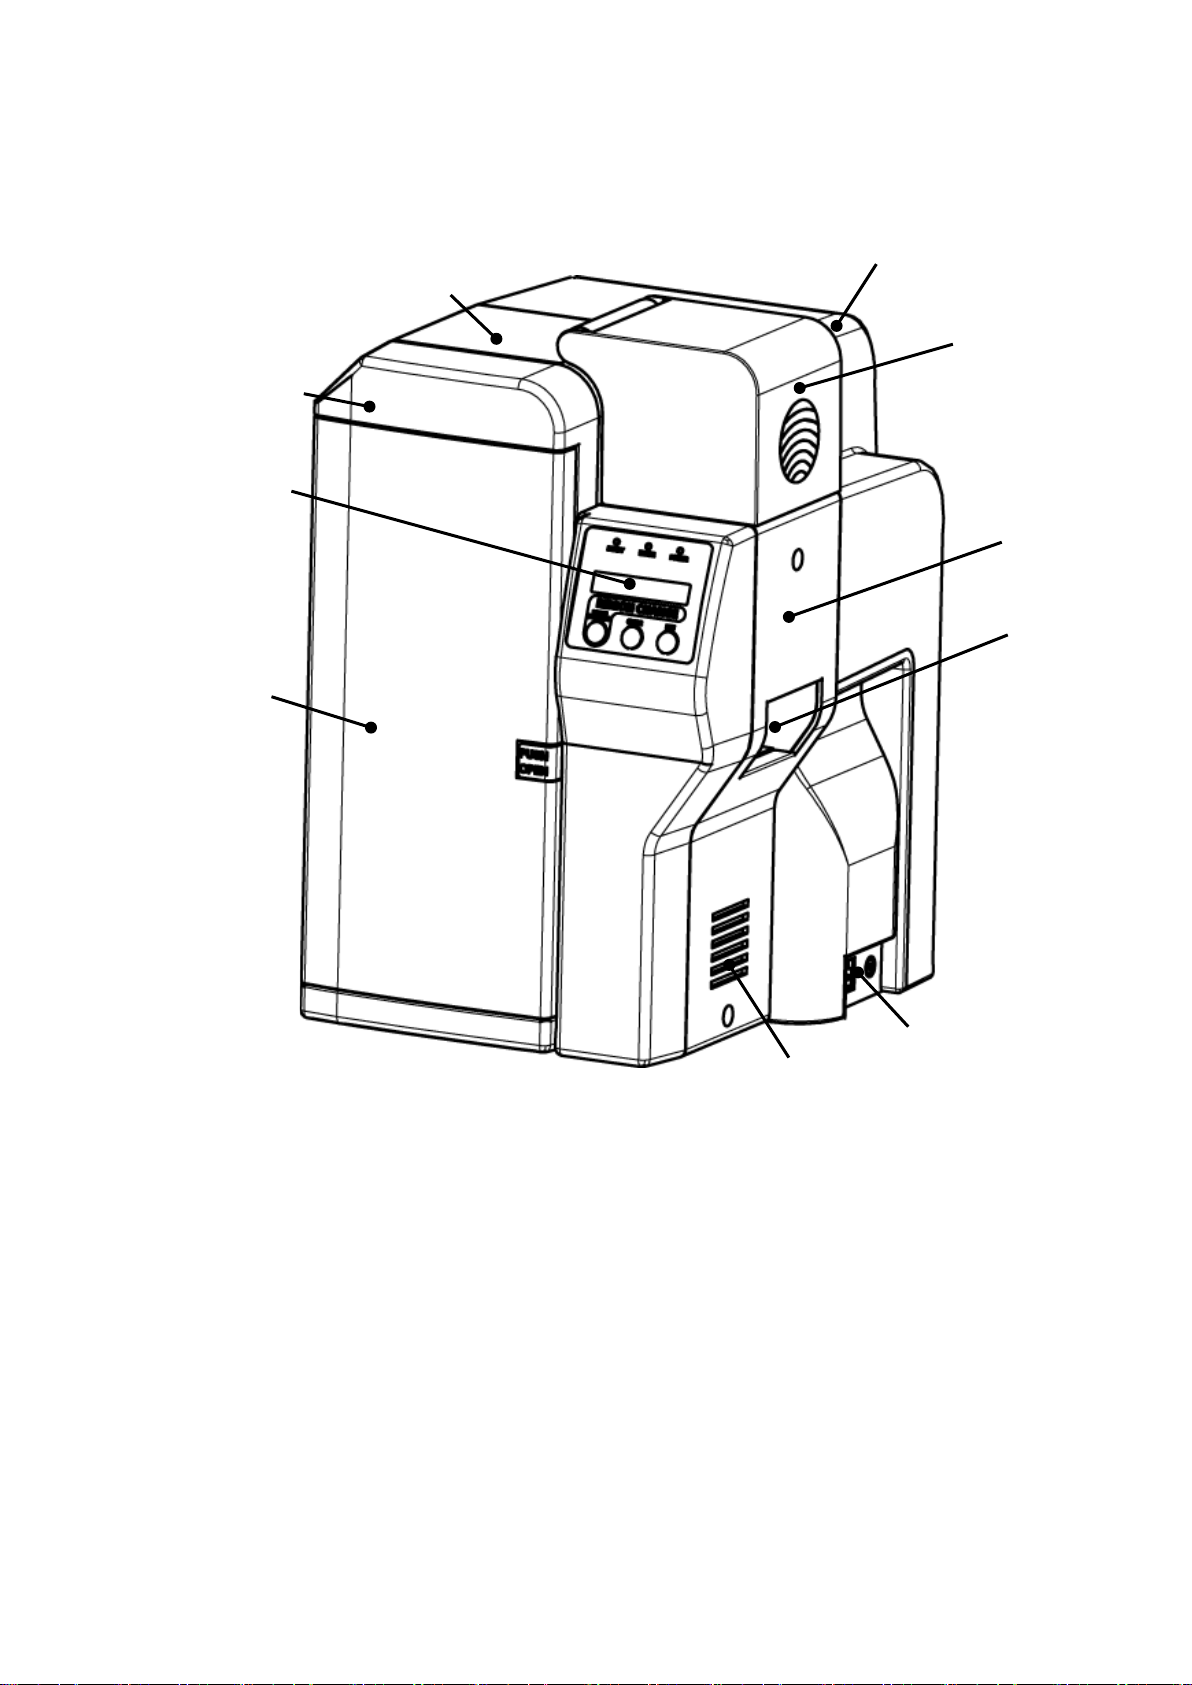
2 - e) Name of the parts
Front side of the printer
①Front Access Cover
②Top Cover
③Rear Cover
④Operation Panel
⑤Card Feeding Unit
⑥Power Switch
⑦Reject Card Exit
⑧Front Cover
⑨Right Cover
⑩Fan Filter
- 14 -
Page 20
⑦
⑥
⑤
②
③
④
①
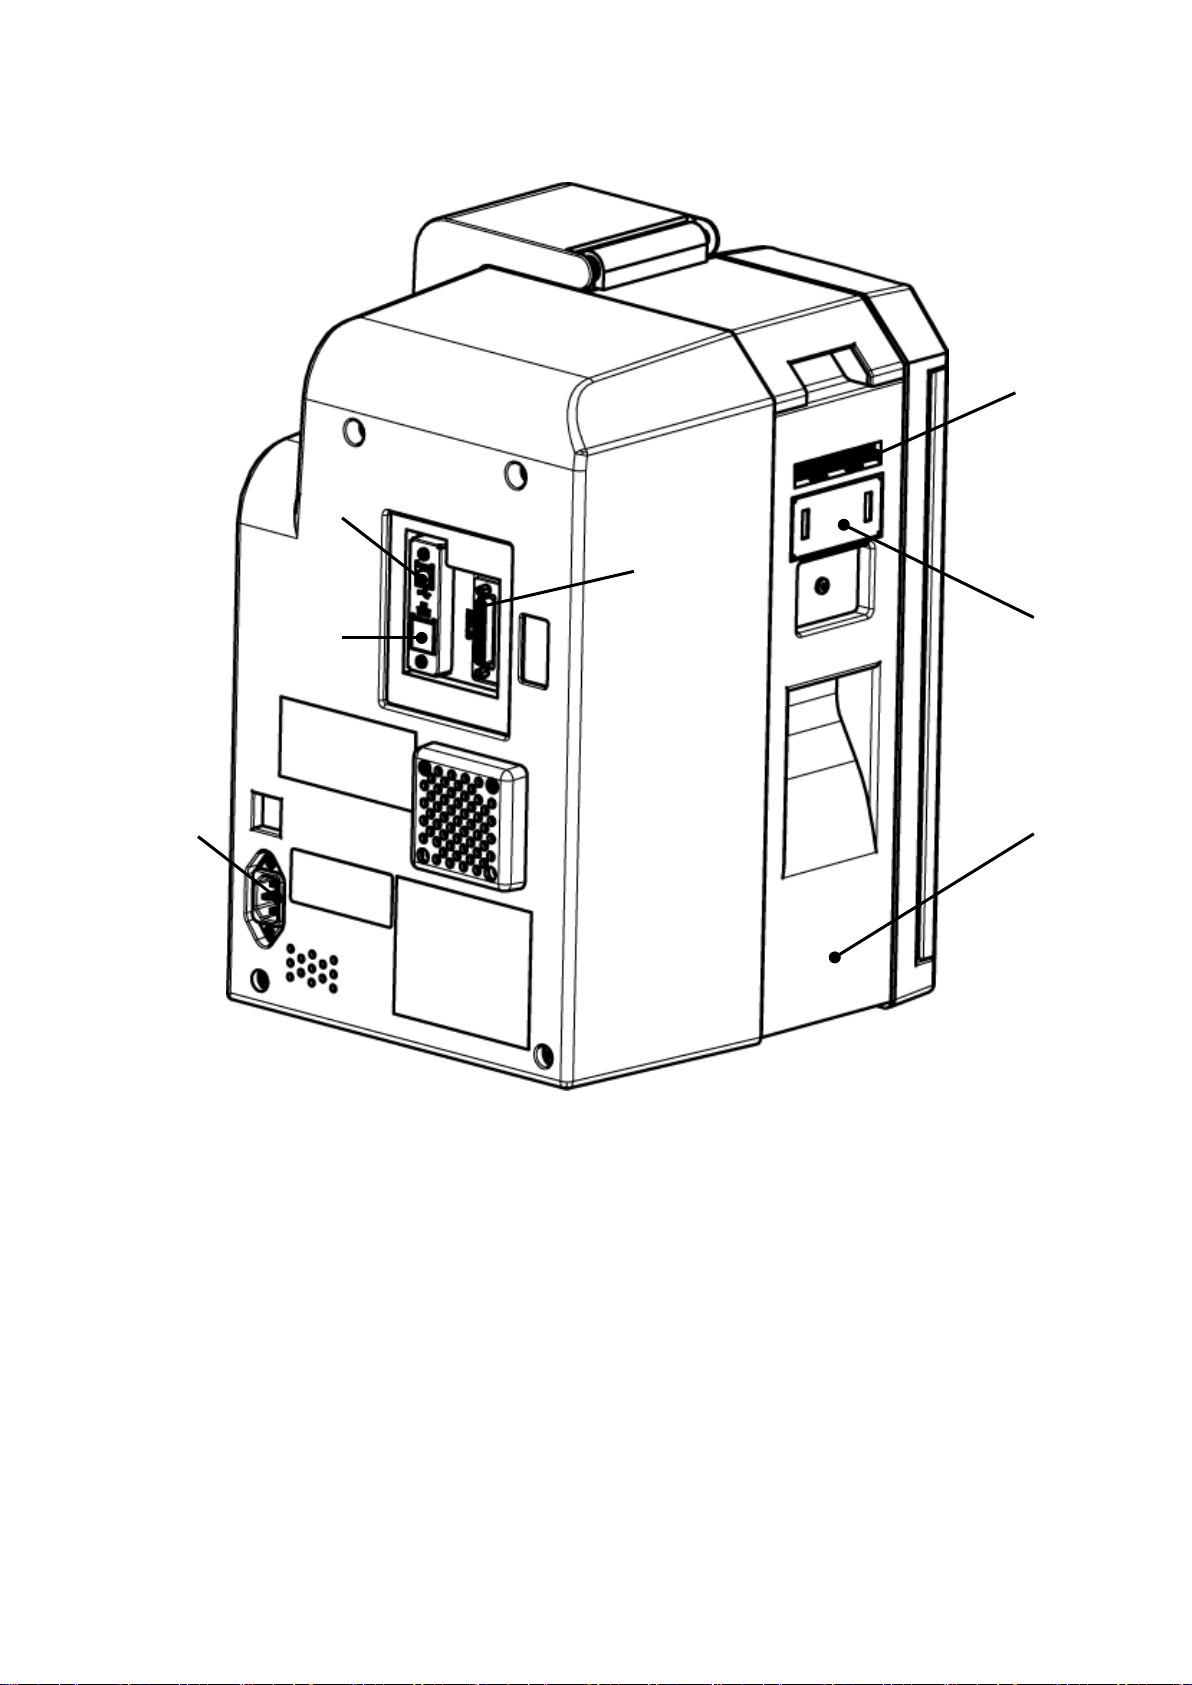
Rear side of the printer
①Power Cord Receptacle
②USB Connector
③Optional Unit Connector
④Ethernet Connector
⑤Left Cover
⑥Exit Box Mount
⑦Eject Card Exit
- 15 -
Page 21
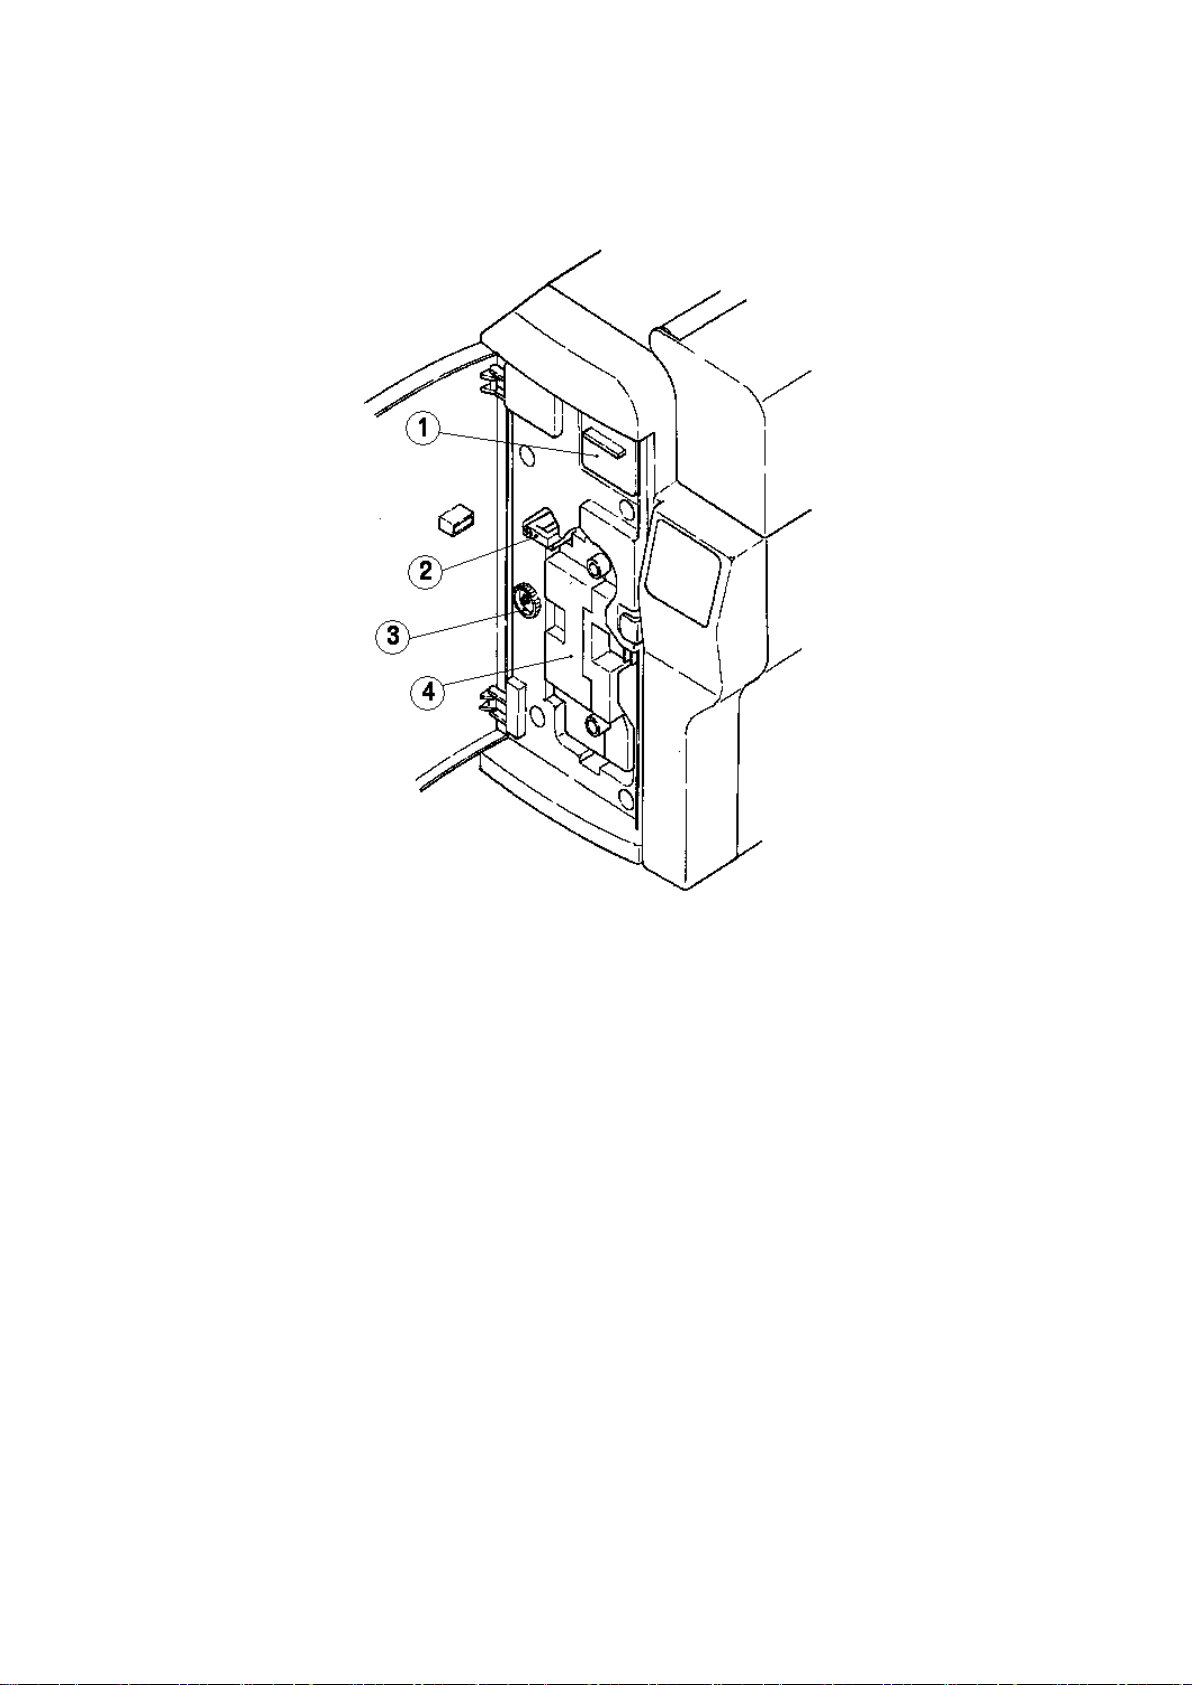
Front Access Panel
①Input Roller Module
②Ribbon Cartridge Holding Lever
③Manual Rotation Knob
④Ribbon Cartridge
- 16 -
Page 22

[ MEMO ]
- 17 -
Page 23
Caution
Caution
Section 3: Installation
□ First, please confirm that you have read the Cautions about installation.
3 - a) Environment for installation
The equipment can be used in the ambient temperature of 10~35゜C(50~95°F)
but to ensure the best performance, temperature range of 20~25゜C(68~77°F) is recommended.
Humidity should be 35 - 80% (RH) and without condensation.
□ This printer is very much sensitive to dust. Do not install it in dusty room.
→ If dust remains on the printing surface of the card, it will directly affect the printed image.
In the worst case, it will damage the Print Head and the Printer.
□ Do not place near the equipments which emit magnetic field.
→ It may destruct the magnetic encoding data if the Magnetic Encoder is being used.
In the worst case, it may cause equipment trouble.
3 - b) Space for installation
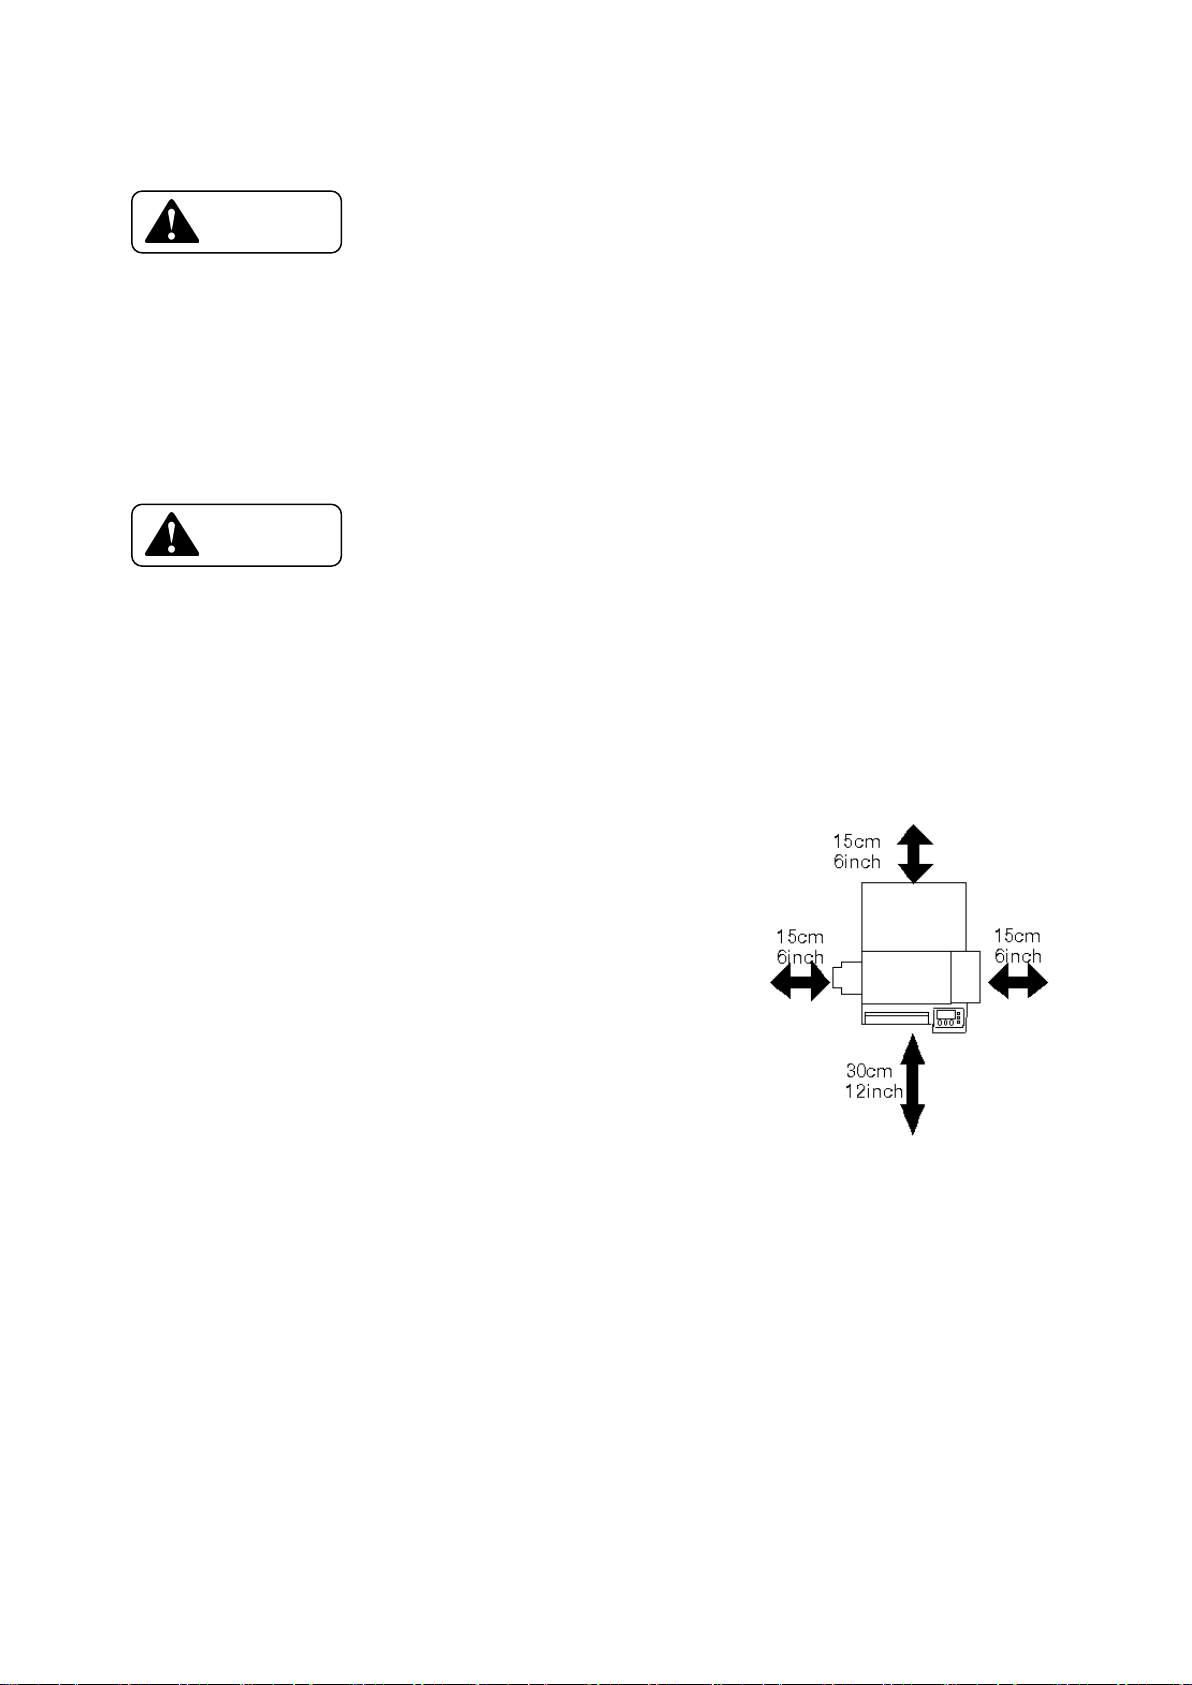
The space for the operation as shown in the illustration should
be provided.
◆ At least 20 cm(8inch)of clearance should be kept
for the Top Cover.
◆ Table to place the printer should be able to hold
Minimum 25Kg(55lbs)and have flat top and 4 rigid legs.
◆ It should not incline more than 1゜.
3 - c) Preparation for installation
Take out the printer from the shipping carton, confirm that all
contents are included as listed in section 2-a) and place it on the installing table.
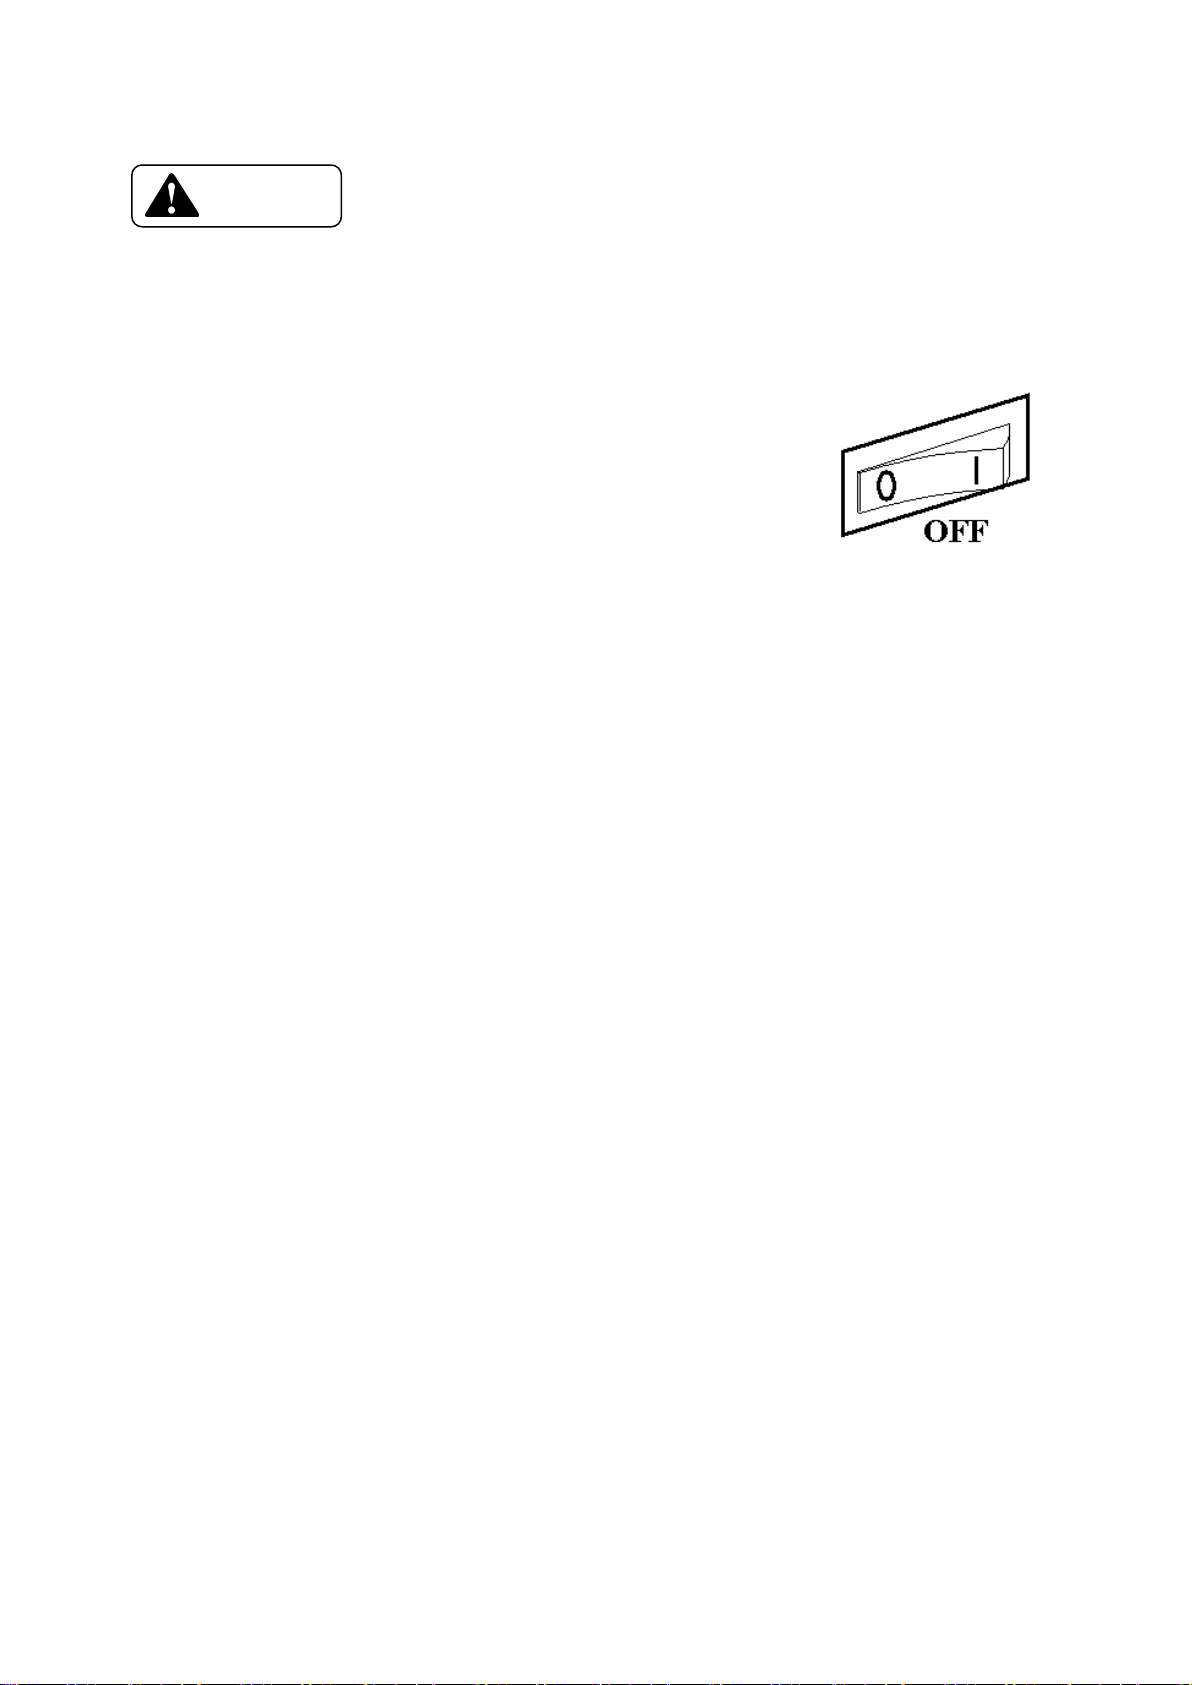
Make sure that the main switch is in OFF position before placing the printer on the table.
Before connecting the plug into the power outlet, make sure once again that the main switch is OFF.
- 18 -
Page 24
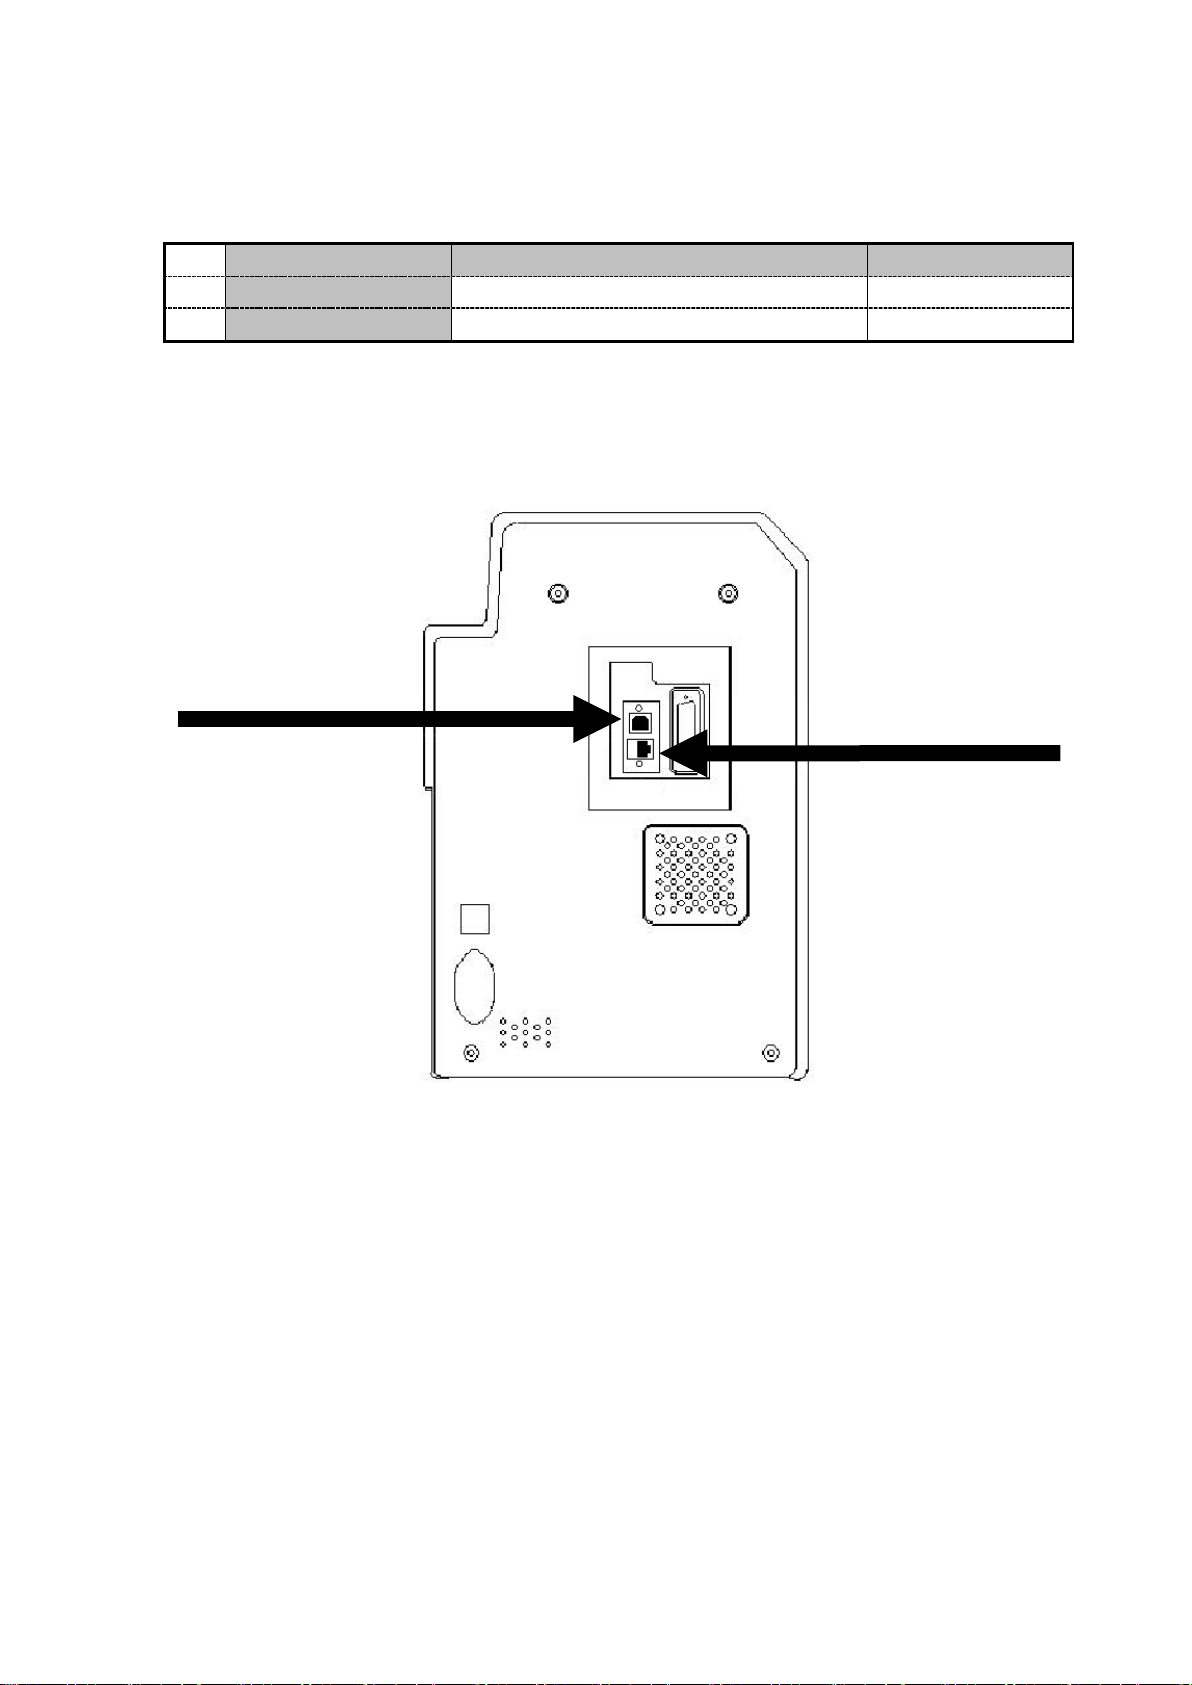
To Control a Printer
Ethernet 100BASE-TX (Operation guaranteed)
Not bundled
USB
Ethernet
USB
3 - d) Connecting the Printer to Computer
USB or LAN interface and RS-232C interface (for IC R/W)
No
①
②
Description Interface Cable
To Control a Printer
USB 2.0 Not bundled
①
②
Ethernet
- 19 -
Page 25
Caution
Setting Printer ID
There are 16 PRINTER #s. as a specification and each devices must be assigned with different ID
numbers. To set the ID numbers for this card printing system, follow the instruction of the
system.
The default of this Printer is "5".
□ The Printer ID No. shall not be the same as that for the other device.
→ The system will not operate normally.
Internet Connection Settings
Configure Internet connection settings to connect the printer to a network.
Configure these settings on the printer in User Mode or through the printer driver.
→ 4-d) Function of User Mode
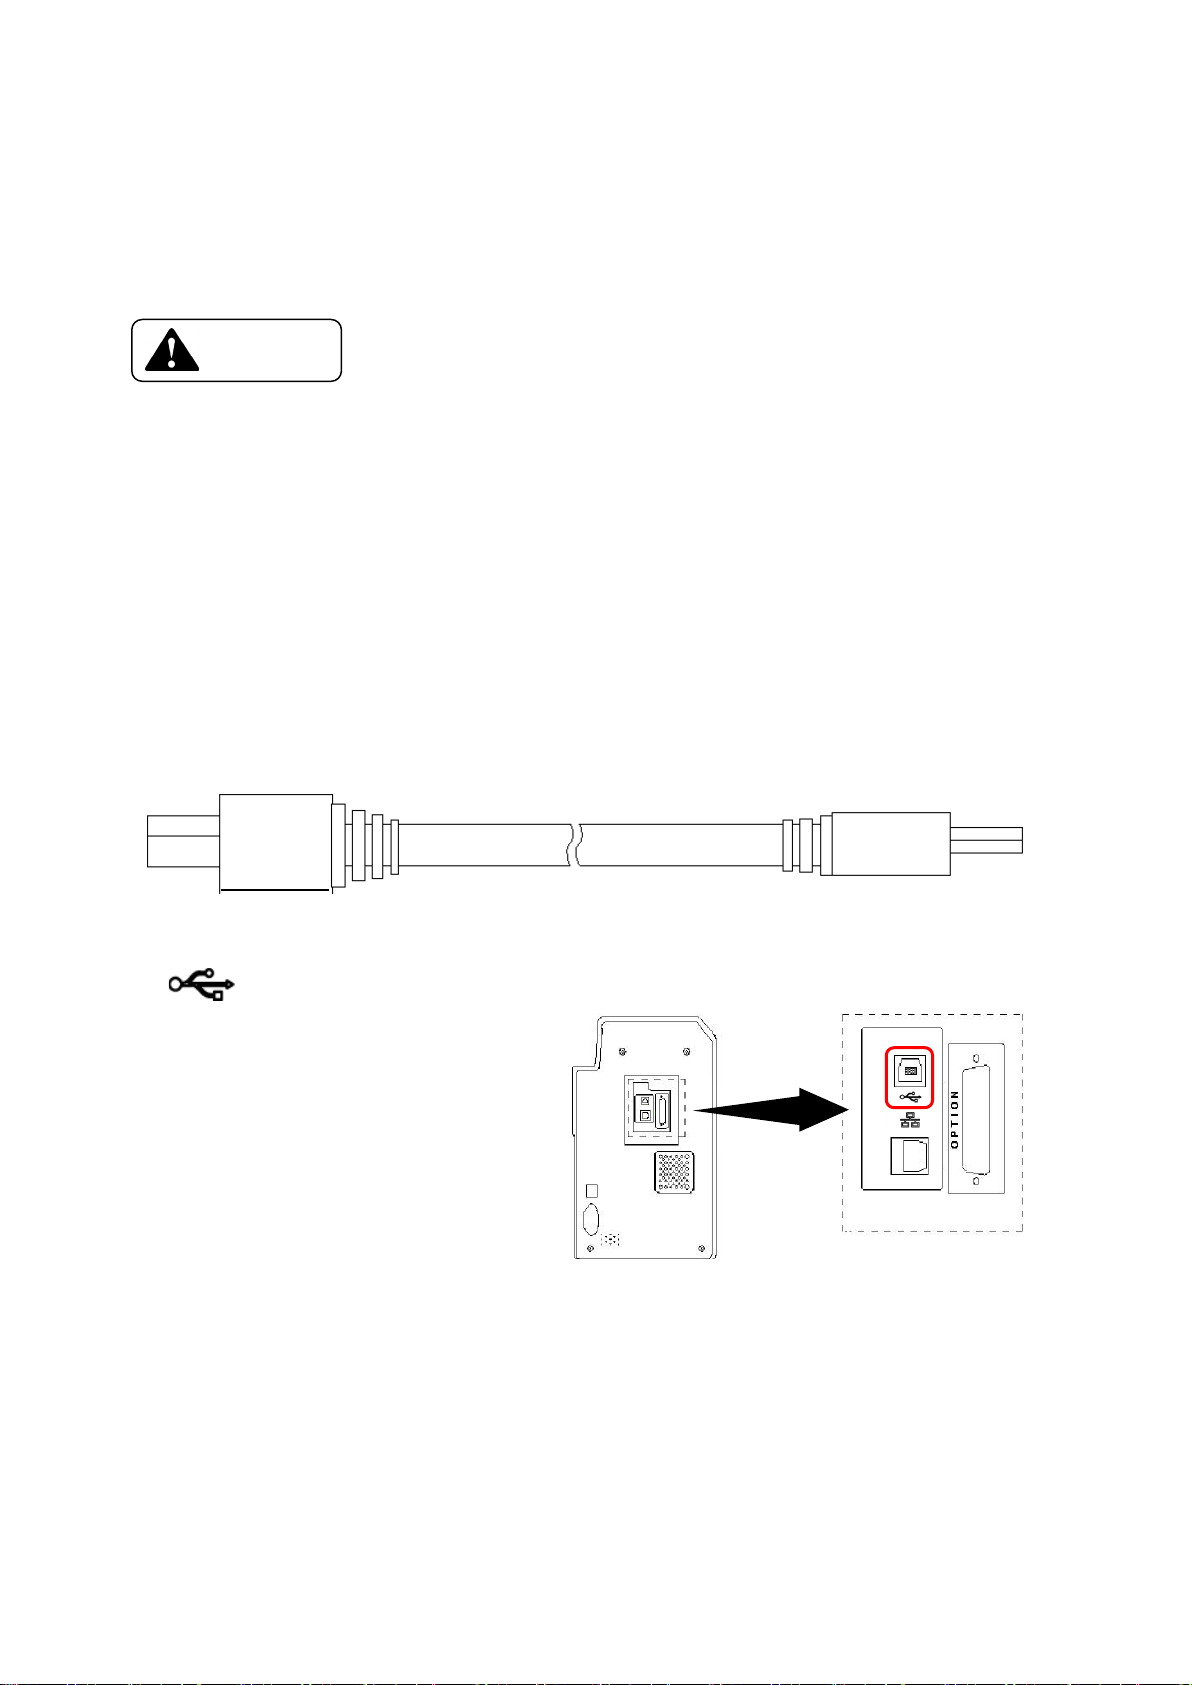
Connecting Cable
□ USB Cable
Shape of the connector on a printer side :B Type
Connect the B type side to the back of a Printer at the connector with displayed
as as shown on right
- 20 -
Page 26
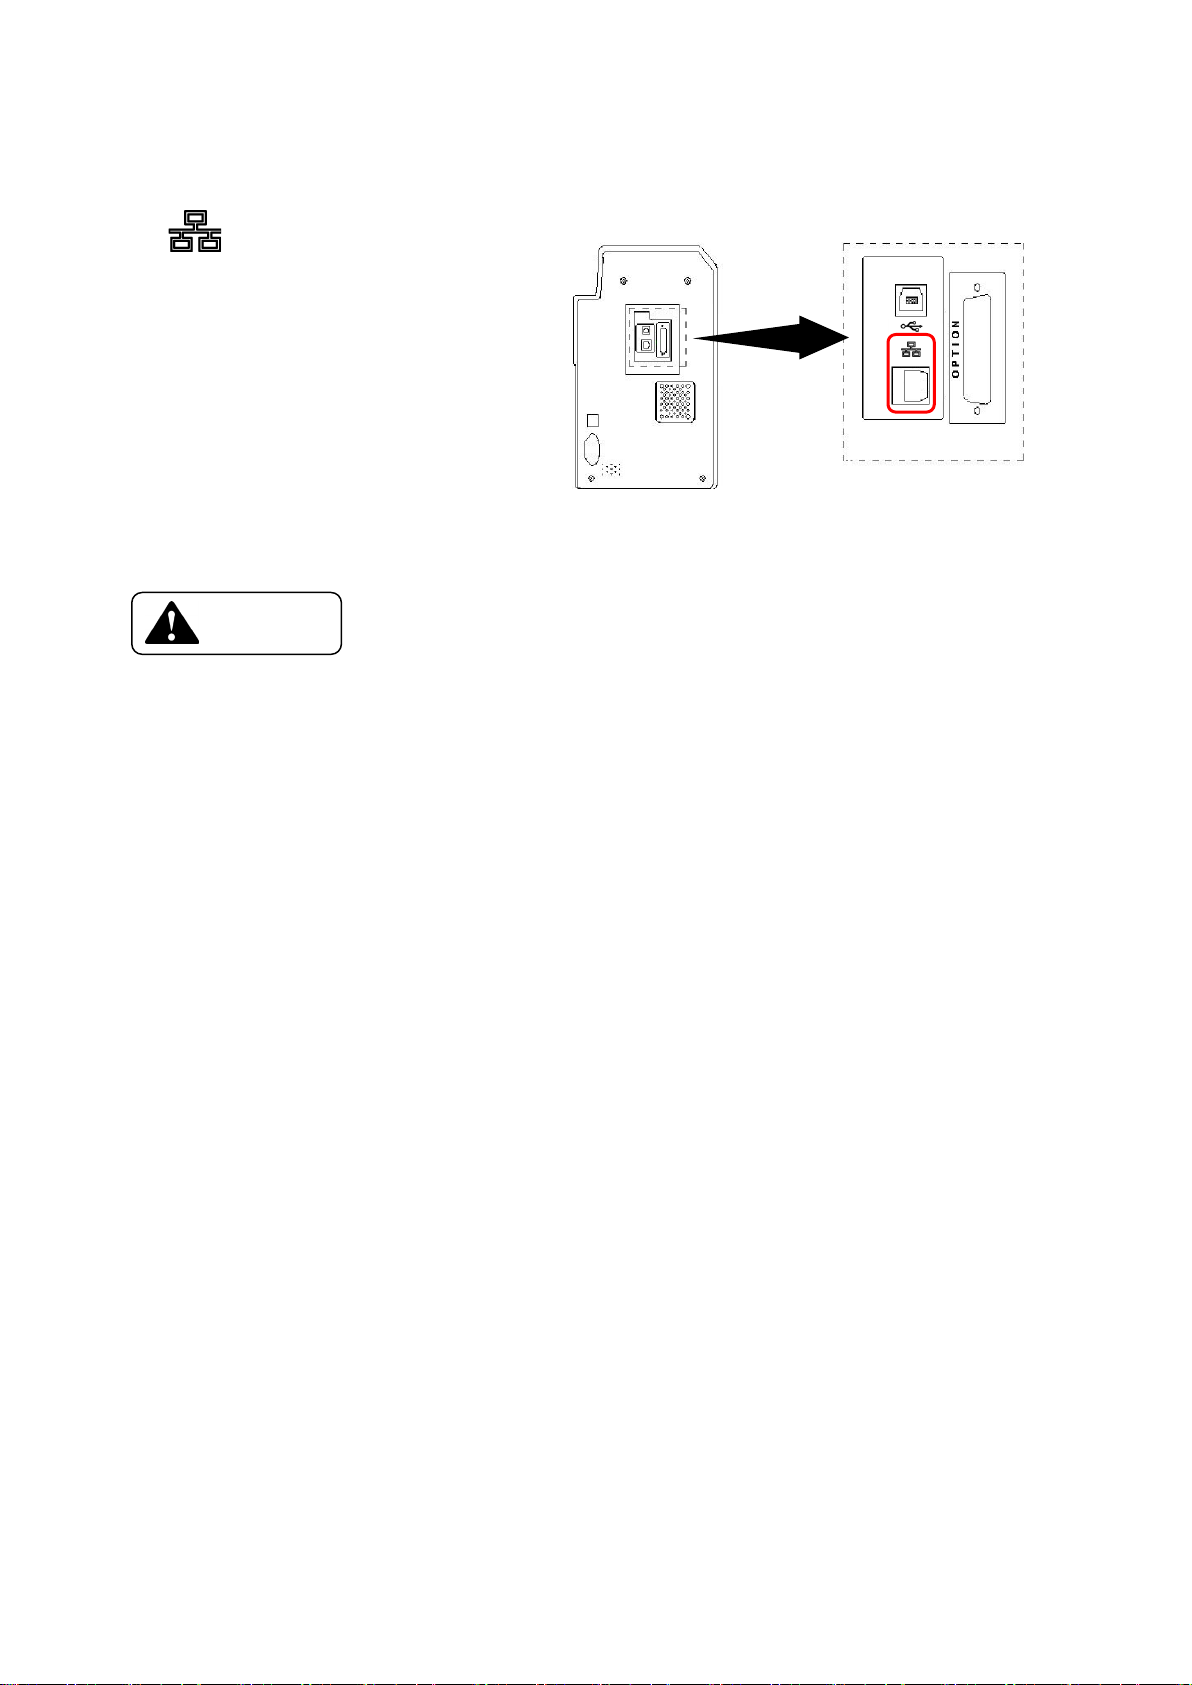
Warning
□ Ethernet Cable
Connect the Ethernet Cable to the back of a Printer at the connector with displayed
as as shown on right
□ Do not connect any device other than the specially designated device
PR-L151(Model Name : PR5302) which are presented by CANON FINETECH NISCA,
to the connector (Non LPS : Limited Power Source) for the options.(Refer to the
printer back view in the Section 2, Name of the parts)
→Connected device may be damaged.
→Circuit voltage rating: 24 Vdc, 5 Vdc
→Fire risk when none designated device is connected.
□ When connecting the cable, do not forget to turn OFF the power switch of the printer and
all other devices to be connected.
→It may cause a trouble to entire system and there is a possibility of big damage such as
losing the stored data.
- 21 -
Page 27
Caution
3 - e) Power ON
□ The electrical rating of power for this printer is alternate power
(AC100V-240V .50 Hz or 60Hz).
□ Earth must be securely connected for this printer.
□ The maximum power consumption of this printer is 120W. Avoid power failure
or voltage drop as much as possible.
□ When the power is turned OFF, wait for at least
3 sec. before turning ON again.
◆ Check that the power switch is "OFF" (◯) bef ore
connecting the power cord to the outlet.
3 - f) Settings after the Power ON
◆ Set the Card and Ink Ribbon.
→ 5-a) Setting the Cards
→ 5-b) Setting the ink ribbon
◆ Set the Operation Panel following the system instructions
→ 4-d) [Setting the system environment] in the paragraph of
[Function of User Mode]
- 22 -
Page 28
Item
Mode
Description
(Red)
(Blue)
Ribbon Change
Normal
Use this key when taking out the ribbon cassette before
when the message "Please wait ...Now Printing" is showing.
which is stored in the memory of the printer
User
Use to execute the displayed items or to change the set
Ready to Print
EXE Key
CLEAR Key
RIBBON CHANGE / MENU Key
LCD
POWER LED
ERROR LED
READY LED
Section 4: Operation Panel
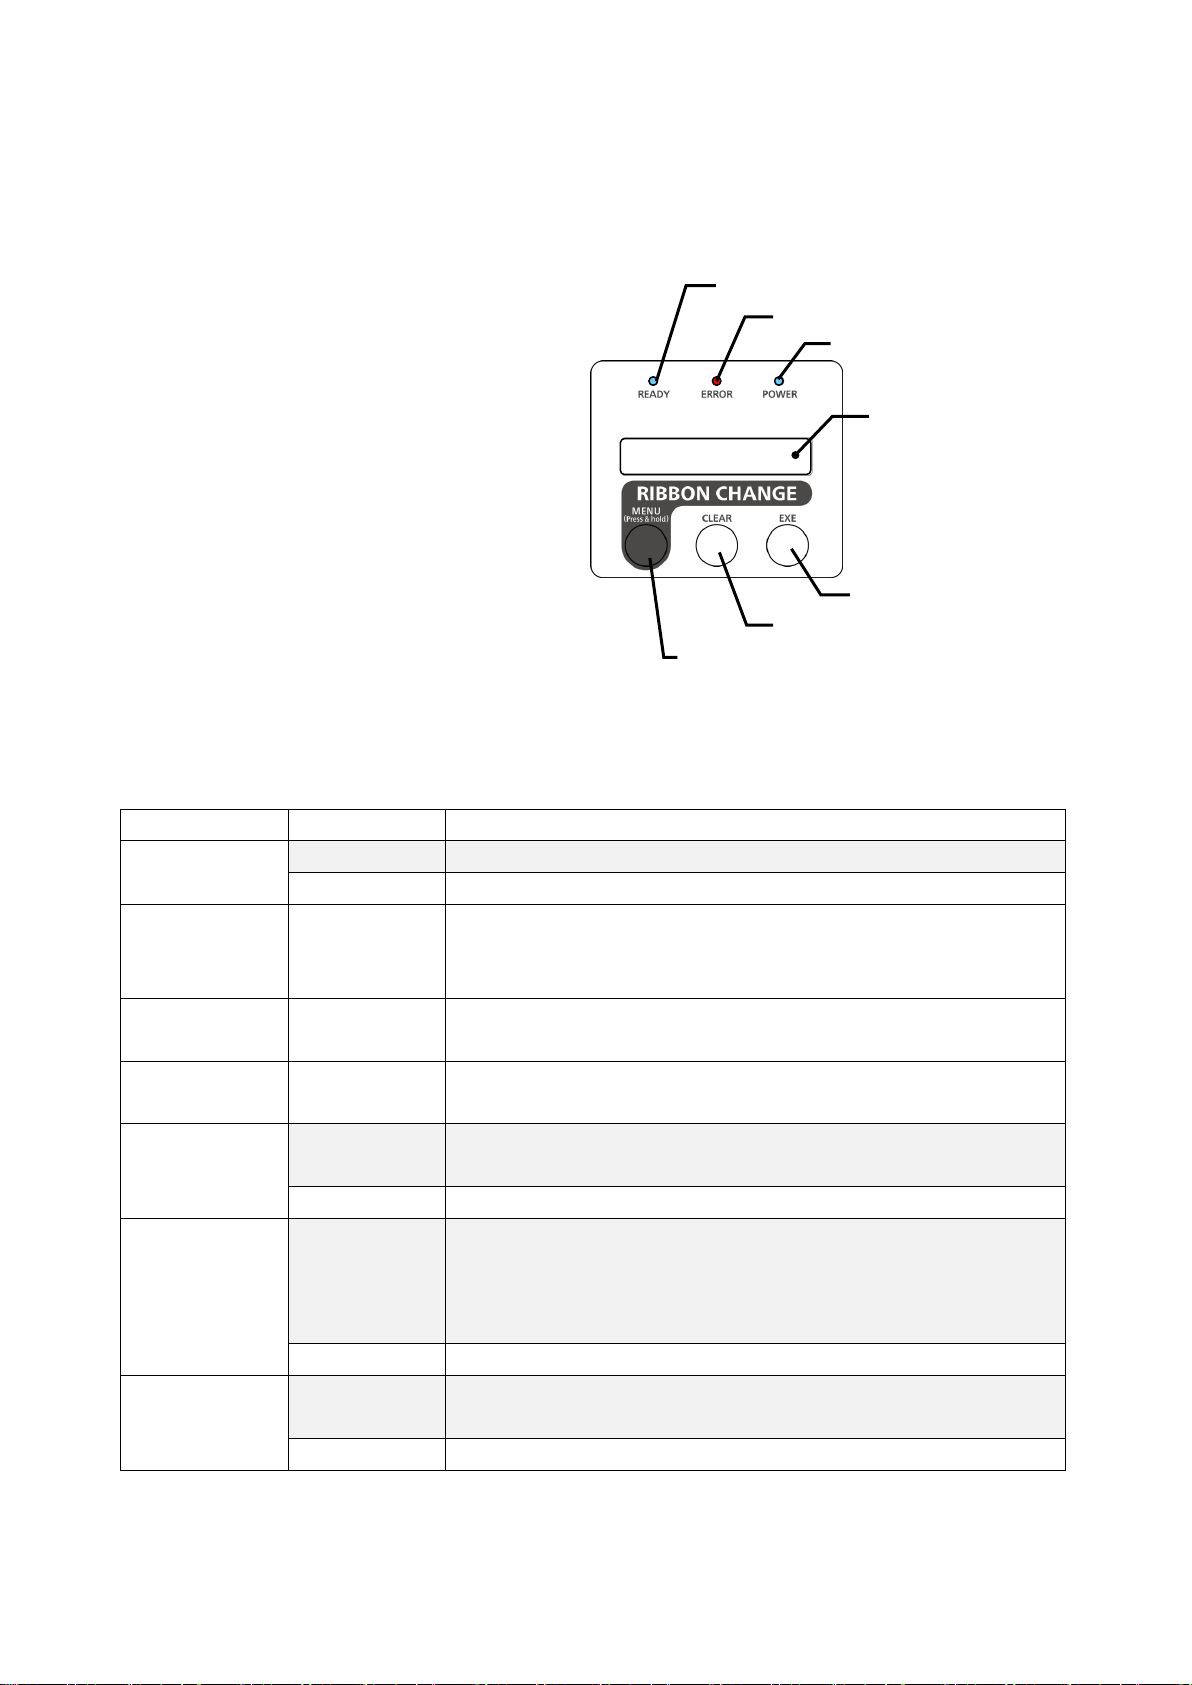
4 - a) Outline of the Operation Panel
Appearance and composition
Function of each part
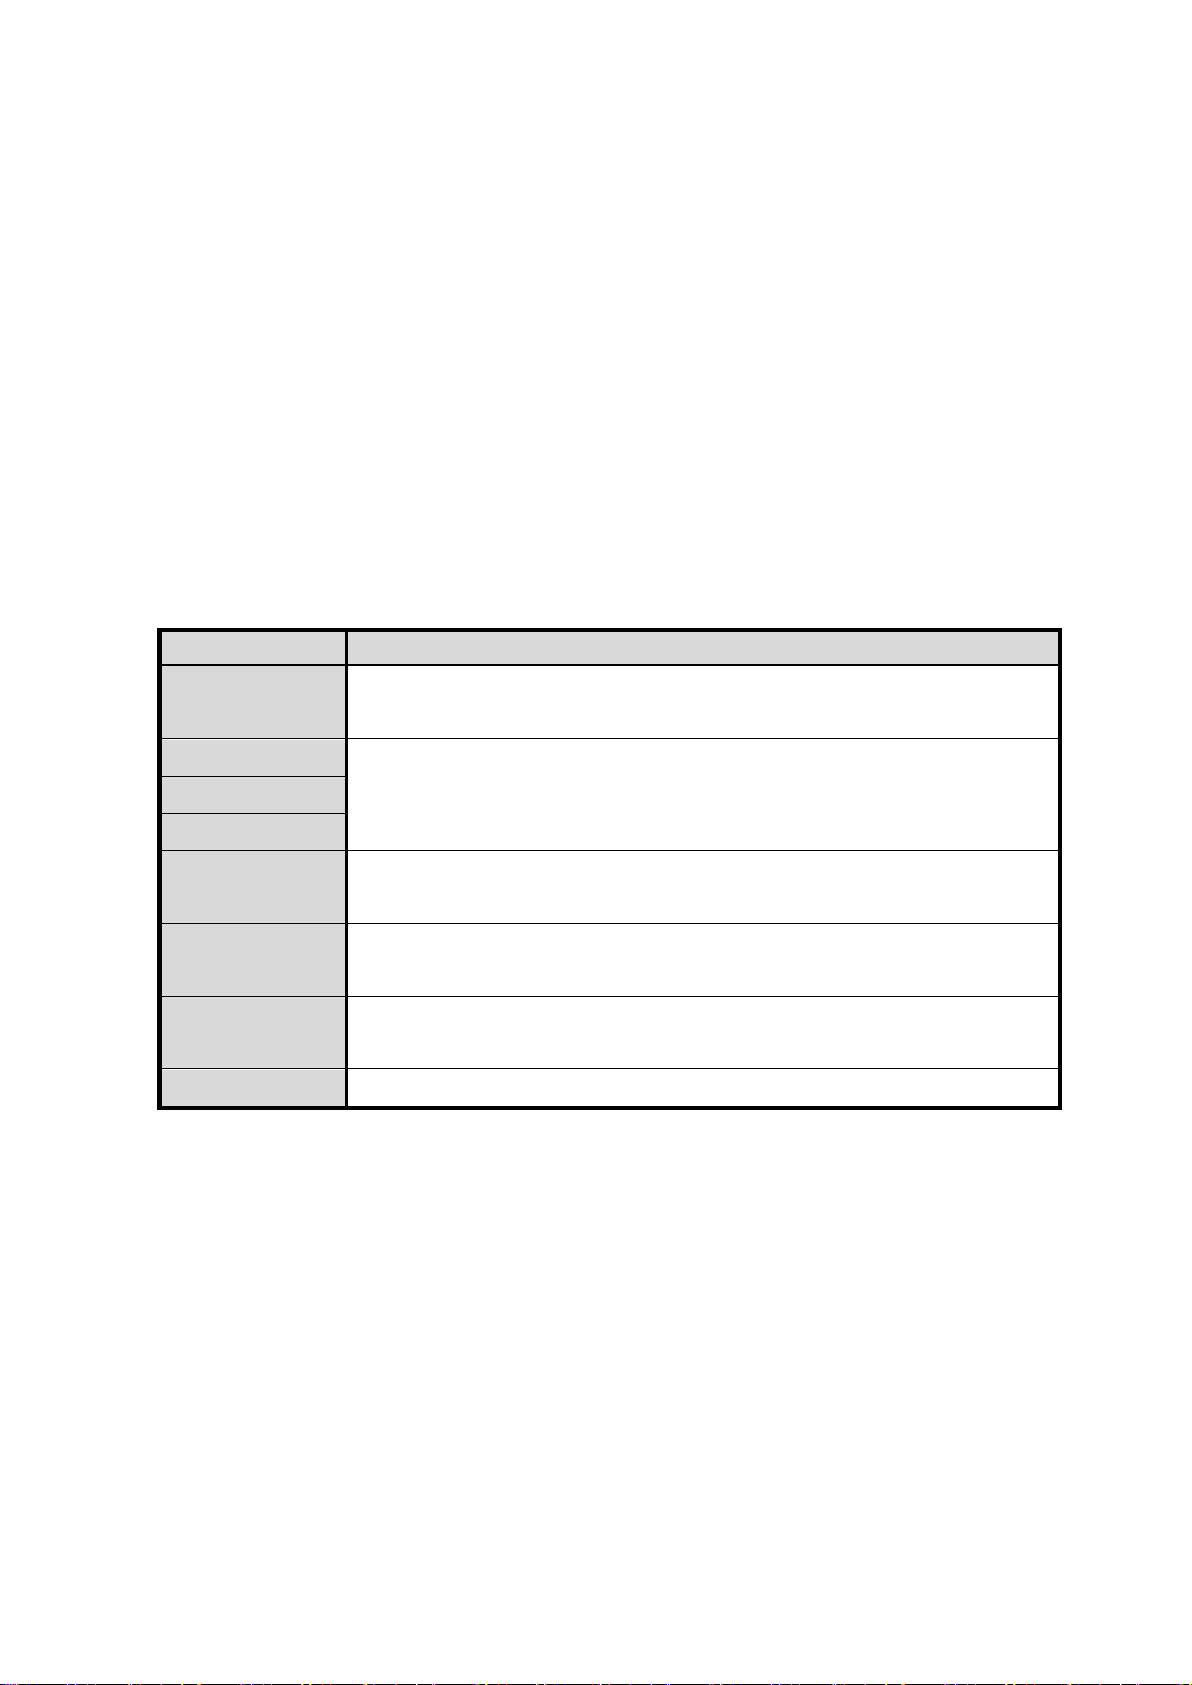
The functions of LCD and the three keys (Menu, Clear, Exe) are different for
Normal Mode ( after the power is turned ON and before entering the User Mode)
and for the User Mode. In the following table, the functions listed in the
[Normal] column is for Normal Mode and in the [User] column, for the User Mode.
LCD
READY LED
(Blue)
Error LED
Power LED
/Menu Key
Clear Key
Normal Shows the printer status.
User Shows the selected menu or set values.
The lamp shows the printer is ready. While it is lighted,
communication with the host computer is possible.
Flushes while communicating.
Indicates Error. This alarms that the printer is in error.
Power ON indicator. This shows the power is ON.
User Use this key for the menu selection at the User Mode.
Normal
the ribbon is finished. By pressing for 3 sec or longer, it moves to User Menu.
Use for clearing or resuming after releasing error.
By pressing for 3 sec., the printer is reset.
Depending on the system, it is used to stop continuous printing
User In some cases, it is used to change the set values.
EXE Key
Normal
Not used. Depending on the system, it may be used to print the data
- 23 -
Page 29

4 - b) Operation of Normal Mode
When the power is turned ON, the printer is in Normal Mode.
The Power LED (Blue) turns ON and the printer status is shown on the LCD panel.
Normal Mode is the mode for printing, and the printer status is shown on the LCD panel.
For example, when the printer is waiting to print, "Ready to Print" is shown.
If there is any problem to print, error message such as "Card Empty" or "Ribbon Empty" appears.
Thus, the mode for printing is called as Normal Mode, and is differentiated from the User Mode.
Checking "Ready to Print" status
When printing, check that the Ready LED (Blue) is ON. At such status, "Ready to Print" or "Ready
to Print/Removable Ribbon" is displayed on the LCD panel.
Recovering from the Error status
When the Error LED (Red) is lit, there is some error in the printer and it cannot operate normally.
In such case, the messages on the LCD panel must be followed.
Please refer to Paragraph 10, Countermeasure for Trouble.
After releasing the error, press Clear key to resume to "Ready to Print".
If "Cannot Recover/Please Reset" appears on the LCD, resolve the trouble and press Clear key for
about 3 second. Release the key after checking that the display has been changed to "Reset" so that
the printer is reset and returned to the status of after the power ON.
Change the Ink Ribbon
To pull out the Ribbon Cassette containing the ribbon in the middle of operation, for example, to
change the ribbon type or to check the amount of the
Remaining ribbon, press Menu/Ribbon Change key. The message on the LCD panel changes
from "Ready to Print" to "Ready to Print/Removable Ribbon" and the Ribbon Cassette can be pulled
out.
Clearing the Output Data
To erase the output data which is still in the memory of the printer, reset the printer.
Press and hold the Clear key for about 3 sec. to change the message on the LCD panel to "Reset".
Release the button after checking the above. The printer becomes to the status of immediately after the
power is turned ON.
EXE key print
This is the function to repeat printing the data stored in the printer memory by pressing the EXE
key. However, to effect this function, it is necessary to set the EXE Key Print to ON position
in the user mode. This function is invalid regardless of the setting in the user mode if the
system is designed so that the data is not stored in the printer memory to prevent double printing.
Stopping the continuous printing
While printing more than one card with a single data, press Clear key to interrupt the printing after
the current printing is completed.
]However, depending on the system design, this function may be invalid.
- 24 -
Page 30
Ready to Print
Normal Mode
Push MENU key
Normal Mode
Normal Mode
Parent MENU
Parent MENU
4 - c) Operation of User Mode
User Mode is used to set the printer setting for the user environment or to check the printer status.
Switching to User Mode
1.Press and hold the MENU key on the Operation
Panel as illustrated.
The message on the LCD display changes from
"Input Command" to "User Mode".
2.Release the key after checking that the "User Mode"
is shown. Then, selection of
"CLR:BACK EXE:GO" appears on the lower line.
3.Select "GO" with the EXE key.
Then, "User Mode/Push Menu Key" is displayed
on the screen. If "BACK" is selected with
Clear key, it returns to Normal Mode.
4.After checking that the "User Mode/Push MENU Key"
is shown, press MENU key as directed, to move to the User Menu.
Then, the first menu, "Card Count" is displayed.
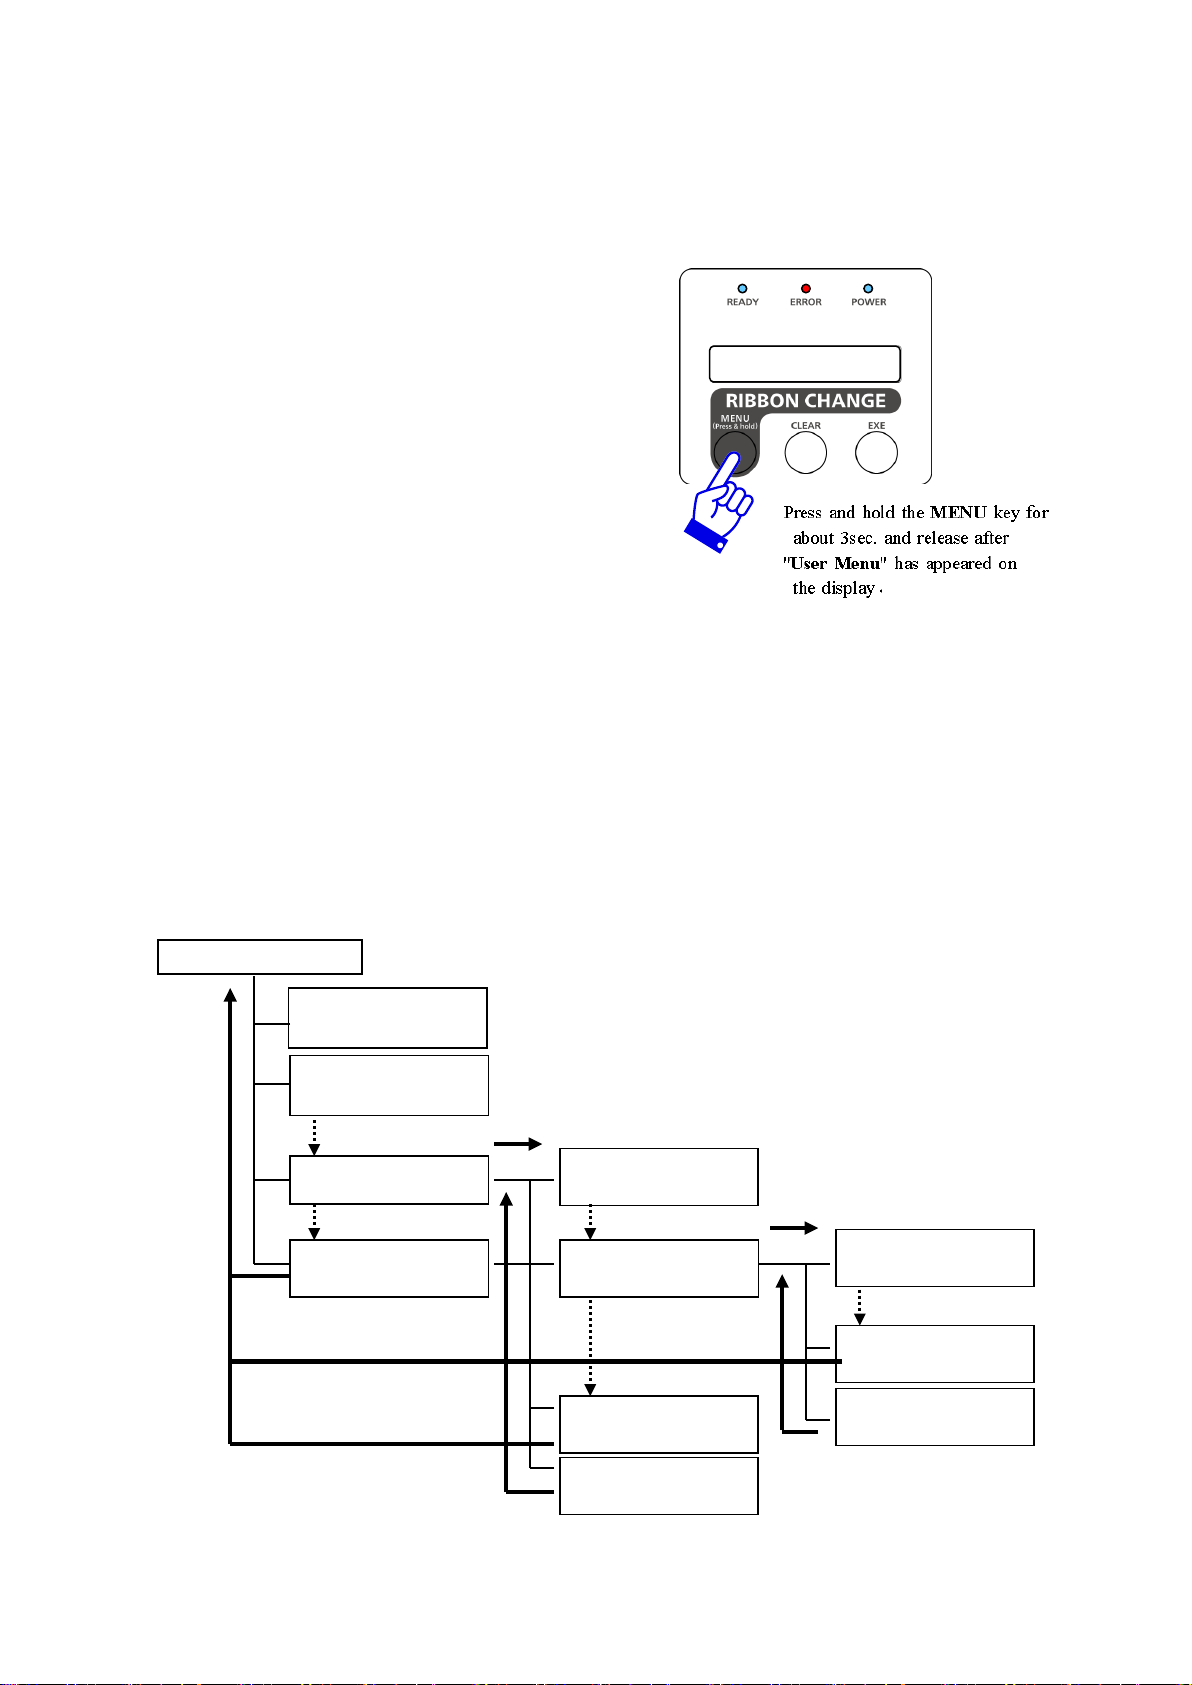
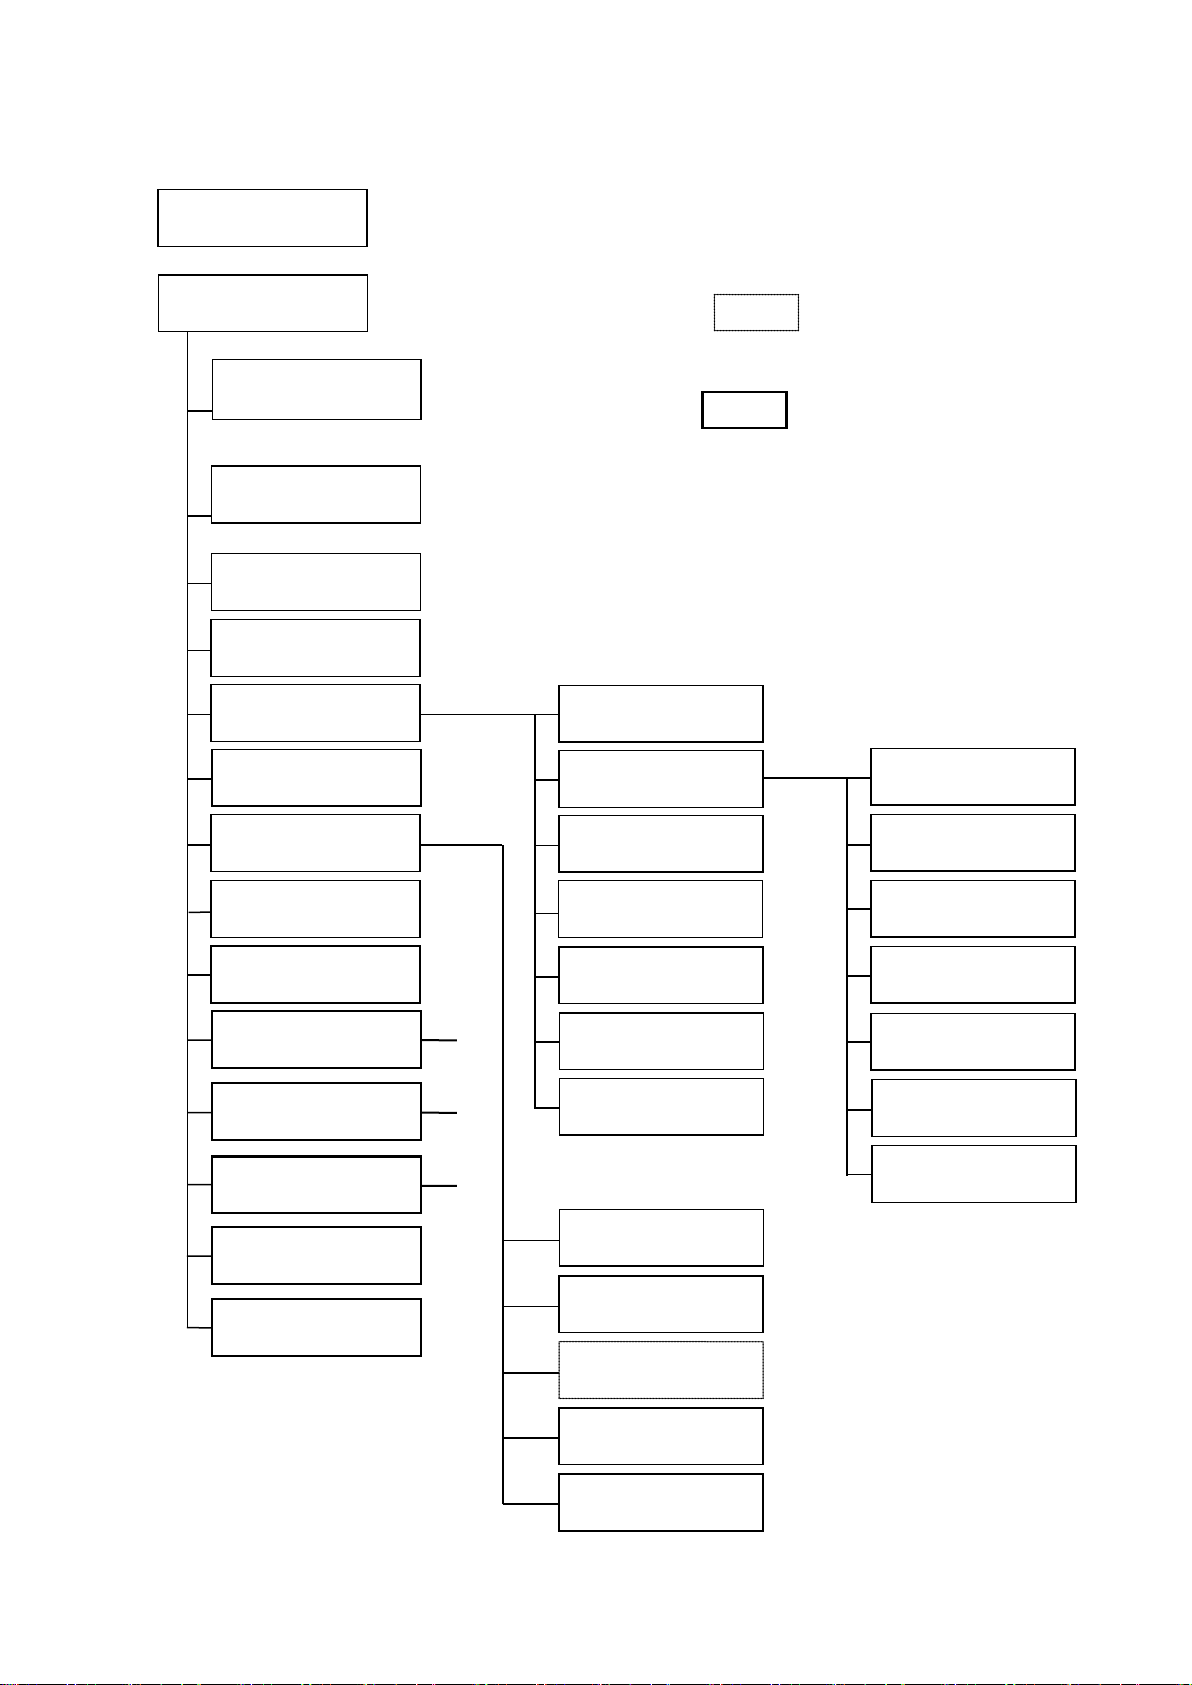
Basic Operation in the User Mode
As the User Menu has the following layer structure, select the desired item with the MENU key
and change the setting values using EXE key or Clear key.
By pressing EXE key at ".../EXE:sub Menu", it goes one layer below.
There are "Return to Normal Menu" or "Return to Parent Menu" selections at each layers. By pressing EXE
key at either of these selections, you can return to onelayer higher or to the Normal Menu.
Ready to Print
By keeping the MENU key pressed, the group
EXE
User Mode
Card Count
○○○○○○
MENU
EXE:sub menu
MENU
Return to
EXE
EXE
of menu circulates in the same layer.
Push MENU key
EXE
MENU
EXE:sub menu
MENU
Return to
Push MENU key
MENU
Return to
Return to
Return to
EXE
- 25 -
Page 31
Menu
Function
Black.
・Yellow
・Magenta
・Cyan
Increase values if thin lines blur. Decrease values if thicker lines smear.
High Speed (Prioritize speed) / High Quality(Prioritize quality)
This scenario can be avoided by turning the setting off.
Sharpness Adjust
Enhance the edges of images. EXE : Strong / CLEAR : Weak
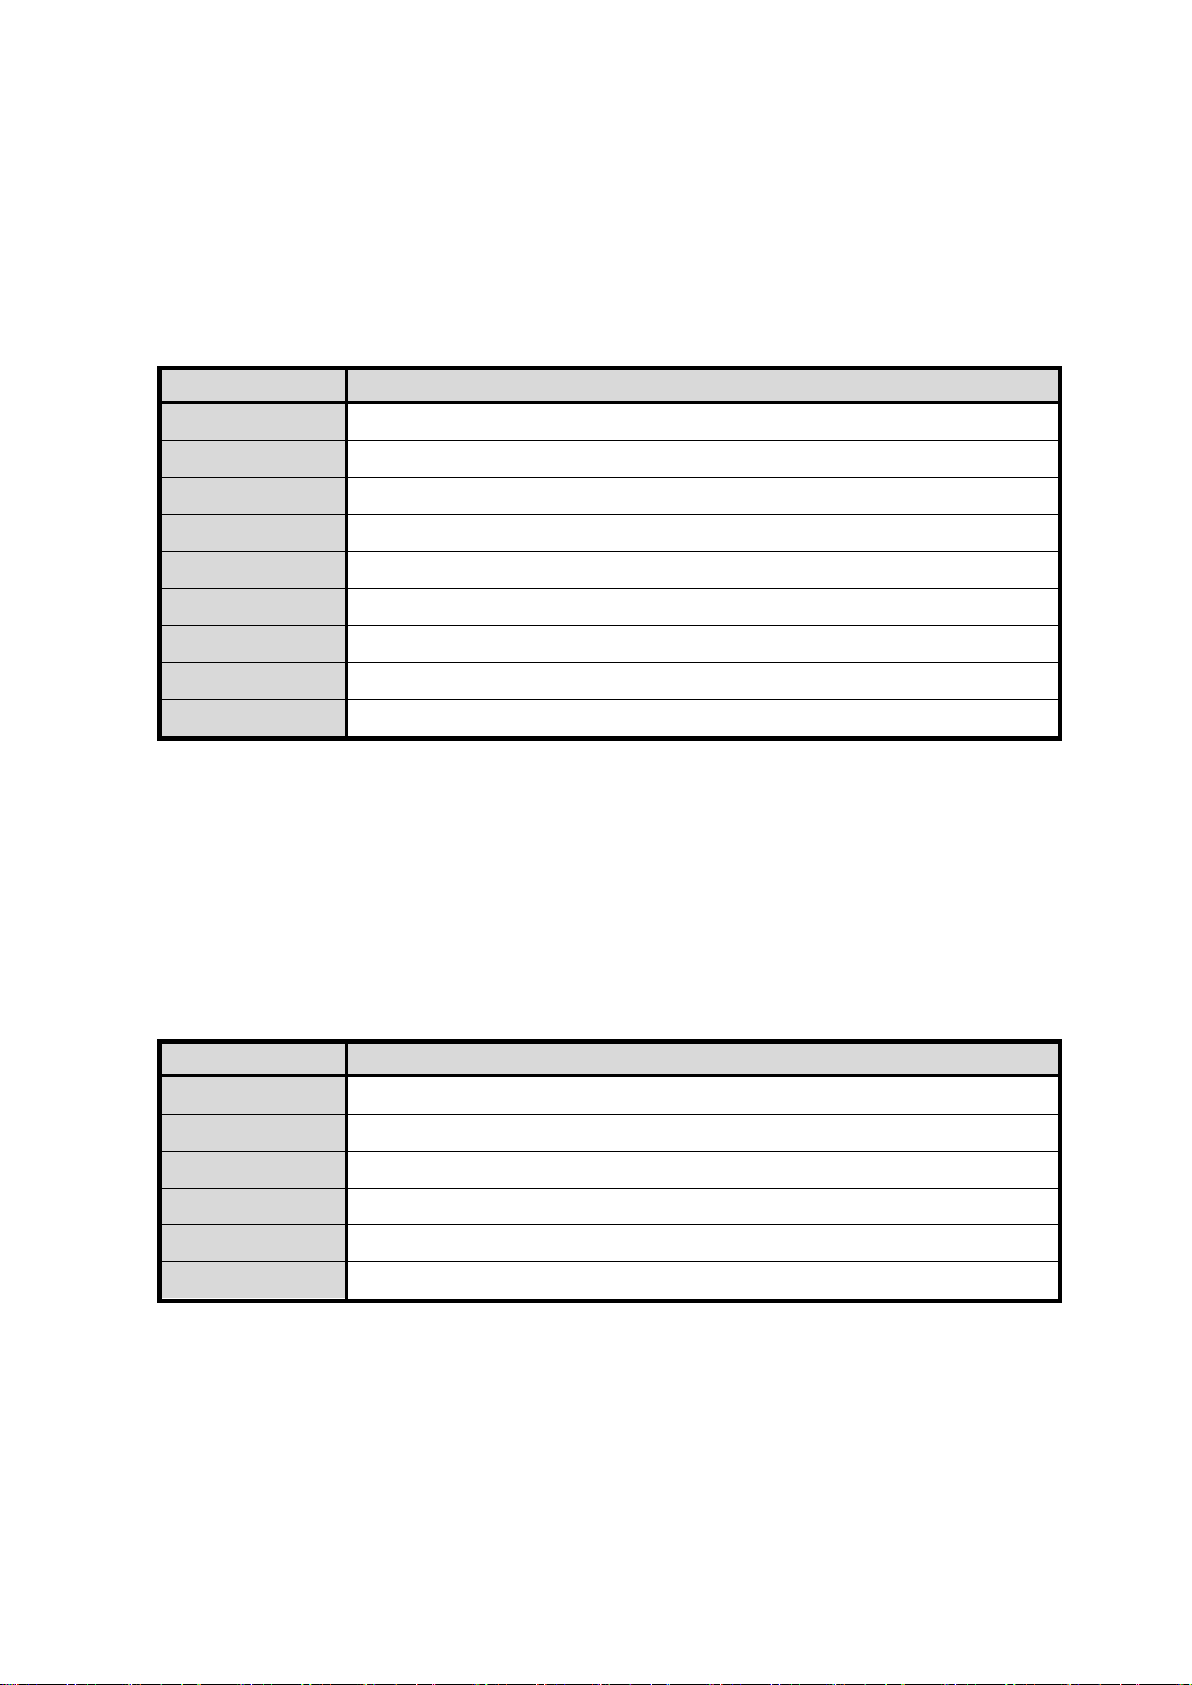
4 - d) Functions of User Mode
Checking the number of cards used: Card Count
Indicates the number of the cards taken-in from the card feeder. It returns to 0 by pressing Clear
key.
→ To be used for the control of card consumption.
Total count of the printed frames: Total Count
This is a maintenance counter for the accumulated number of the frames printed.
The value cannot be reset.
→ To be used to know approximate time of maintenance operations.
* For the both side printing, Total Count is 2 [frames] against the Card Count of 1[card].
Print adjustments: Image Set Up
Print adjustments can be made for printers.
* This parameter may not appear depending on your system.
Color Adjustment Configure print conditions for each ink color including Yellow, Magenta, Cyan, and
Adjust the hues of color for color images. (*1)
Increasing values produces richer colors. Decreasing values produce lighter colors.
・Black Adjust the thickness of black characters.
Color Print Mode Configure the color print speed.
Black Correction Printing in black over color prints may cause the black print to blur.
(*1) Cyan (C), Magenta (M), and Yellow (Y) used to print color images are
complimentary colors to the red(R), green (G), and blue (B) generally used.
Refer to the correlation numbers for CMY and RGB.
- 26 -
Page 32

C
B
G
Example) To increase red color:
Decrease the value of Cyan which
is in the complementary to red,
or increase the value of Y and M.
Correlation of RGB and CMY
If there is a customized setting, color tone of CANON FINETECH NISCA default setting and the
customized setting can be selected with Gamma0 Select menu. Please ask the dealer for the details.
M
R
Y
ON/OFF of the error buzzer: Error Buzzer
Select ON/OFF of the error alarm buzzer which sounds when the errors such as"Cover Open"
or "Card Empty" occur.
Ribbon setting type: Printer Ribbon
"YMCK01" for color printing and "K01" for black letters are used as the standard ribbons for this
printer. Setting of the operation panel is required corresponding to the label of the ink ribbon type
being used.
* Some system does not display this item for the purpose of prevention of the erroneous operation.
Display Printer ID No: Printer ID Disp
The current Printer ID appears. Use the Interface Setup menu to change Printer IDs.
- 27 -
Page 33
Parallel Print
Laminating or magnetic encoding and printing are executed simultaneously.
Encoder Type
Select Hi-Co or Low-Co. (Only Hi-Co magnetic encoder)
Encode Mode
Set the entry direction into the magnetic encoder (front or back).
Multi Card Print
Laminating, magnetic encoding and printing are executed simultaneously.
Caution
Setting the System Environment: Printer Status
This item must be set according to the Card printing system being used. So, follow the Card printing
system instructions for setting.
To enter this menu, in order to prevent operational error, follow the
instruction on the display and press Clear key and Exe key at the same time.
Others are same as the basic operation.
* This parameter may not appear depending on your system.
Menu Function
Card Eject Face To change the card surface side when the card is ejected.
Encode First When this is ON, magnetic encoding is done before printing.
IC-R/W Connect Configure IC R/W connection status.
□ Depending on the system, these functions may be invalid.
□ If the magnetic encoder is not connected, messages relating to Encode will not be displayed.
□ Encode Type displays, only when the optional encoder of ISO Hi-Co standard is connected.
This must be set according to the magnetic characteristics of the card being used.
→ If the magnetic characteristics of the card is different from the settings of this menu,
normal encoding will not result.
□ If the optional heat roller is not connected, Multi Card Print will not be displayed.
- 28 -
Page 34
Menu
Function
DHCP
Set the DHCP function ON/OFF.
Subnet Mask
Set the subnet mask. (*)
MAC Address
Displays the MAC address.
Timeout
Set the session timeout (seconds).
Base Program
Version of the base program used to replace the main program
Main Program
Version of the main program that prints cards
Head Number
Print Head serial number
Encoder Unit
Version of the magnetic encoder program (only when using connected options)
H.Roller Unit
Version of the Laminating program (only when using connected options)
Serial Number
Printer serial number
Interface Settings: Interface Setup
These parameters must be configured in accordance with the network environment to
which the printer is connected. Configure these settings per the guidance provided by
your network administrator.
To prevent unintended accidental operation, the CLEAR key and EXE key must be
pressed simultaneously in accordance with the display to enter this menu. Use basic
operation methods to continue configuring these settings.
*This parameter may not appear depending on your system.
Printer ID Set the individual Printer ID (0-15).
IP Address Set the IP address. (*)
Default Gateway Set the default gateway. (*)
IP Sec Set the IP sec function ON/OFF.
Password Reset Disable the printer driver password setting.
(*)To enable settings only when DHCP is turned off or change settings, press the CLEAR key and EXE key
simultaneously to change to the change settings menu.
Device Version Information: ROM Version
This printer is equipped with the function to download the main program from the PC
in order to support various card printing systems. The program has two parts; one is
the Base Program which controls the basic communications and the other is the Main
Program to control all functions. In addition to those two, it is possible to check and
confirm the version of the optional devices, if connected.
Menu Function
Printer Settings Initialization: Setup Data Reset
Resets any changed settings to the factory default values.
The following parameters are initialized.
Value [Card Count]
Settings [Error Buzzer]
Sub-menu settings within [Image Setup], [Ribbon Type], [Printer Status],
[Interface Setup]
- 29 -
Page 35
The items shown with □□ are to be set by the
Ready to Print
Removable Ribbon
User Mode
Push MENU Key
Removable Ribbon
Card Count
○○
Total Count
○○
EXE: sub menu
Error Buzzer
□□
EXE:sub menu
EXE:sub menu
Image Setup
Push MENU Key
EXE:submenu
Color Print Mode
□□
□□
□□
H.Roller Ribbon
□□
Mode (EXE)
Menu (EXE)
Push MENU Key
□□
□□
□□
Black
□□
Return to normal
Mode (EXE)
Return to Parent
Menu (EXE)
(High
Speed)
ID:□□
Ribbon Type
Push MENU Key
Printer Status
CLR+EXE: sub menu
Interface Setup
CLR+EXE: sub menu
Setup Data Reset
CLR+EXE:Reset
Return to normal
Mode (EXE)
Mode (EXE)
Menu (EXE)
□□
(ON)
(0)
(0)
(0)
(3BP)
EXE:sub menu
CLR:Back EXE:Go
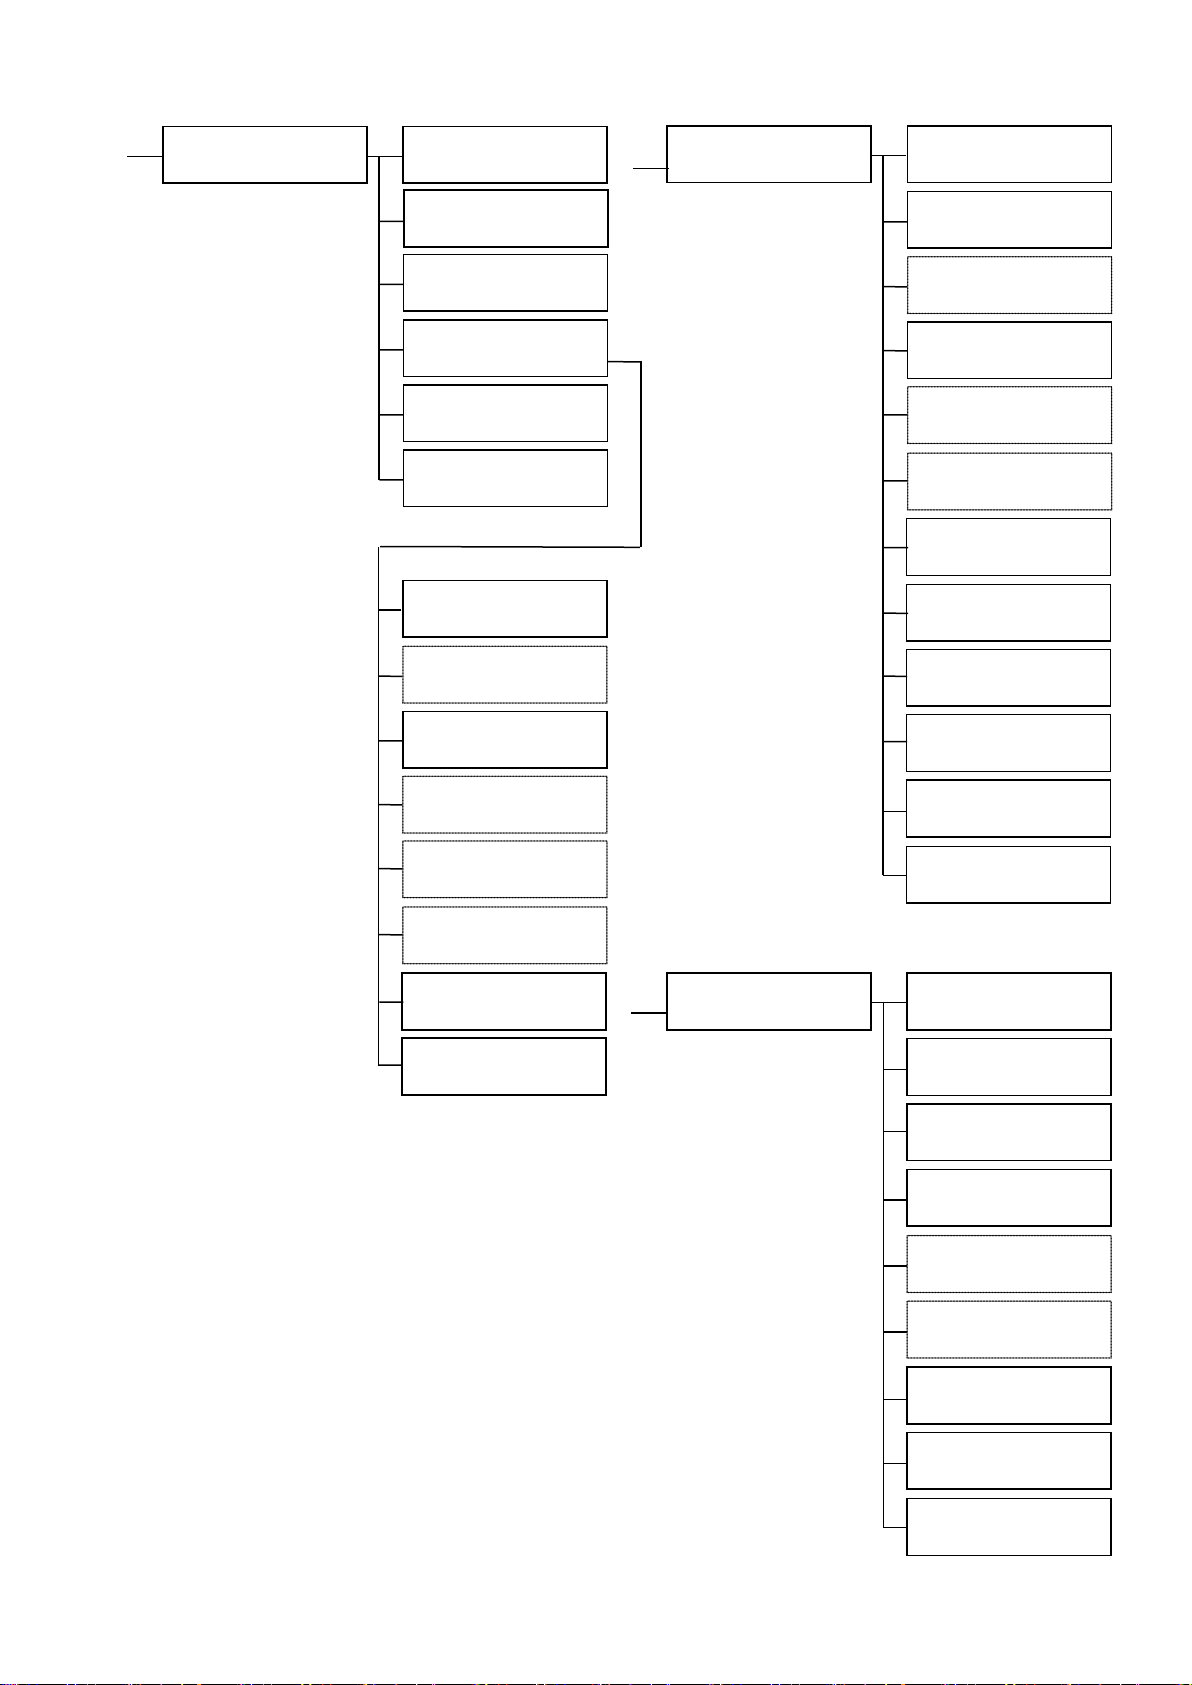
4 - e) Structure of User Mode
◆
User. Default settings is shown by the white letters
on the black background
User Mode
Ready to Print
Image Setup
Ribbon Type
Printer Cleaning
◆ The display surrounded with appears only
when the corresponding optional unit is connected
◆ Sub-menus as shown with are listed in the next page.
Color Adjustment
(ON)
Black Correction
Color Adjustment
Yellow
(0)
Magenta
Printer ID Disp
F/W Version
(5)
①
②
③
Sharpness Adjust
Return to normal
Return to Parent
Printer Ribbon
Return to normal
Return to Parent
Cyan
(0)
- 30 -
Page 36
Menu (EXE)
Interface Setup
CLR+EXE:submenu
Interface Setup
Push MENU Key
□□
IP Address
□□
□□
Default Gateway
□□
□□
Timeout
□□
Printer ID
□□
CLR+EXE:reset
Mode (EXE)
□□
CLR+EXE:submenu
Push MENU Key
□□
□□
Option Setup
EXE:submenu
Mode (EXE)
Return to Parent
Menu (EXE)
F/W Version
Push MENU Key
○○
Main Program
○○
Head Number
○○
Encoder Unit
H.Roller Unit
Serial Number
○○
Mode (EXE)
Menu (EXE)
F/W Version
EXE: sub menu
Push MENU Key
□□
Encode First
□□
□□
□□
Return to normal
Mode (EXE)
Menu (EXE)
(A(MG:Bk/IC:--))
(off)
□□
①
Printer Status
Printer Status
Parallel Print
Card Eject Face
Return to normal
Option Setup
Encoder Type
Encode Mode
IC-R/W Connect
②
(on)
DHCP
(Print Face Up)
Subnet Mask
MAC Address
IP Sec
(Lo-Co)
Password Reset
(off)
Return to normal
Return to Parent
Multi Card Print
Return to Parent
③
Base Program
Return to normal
Return to Parent
- 31 -
Page 37
Caution
Caution
Section 5: How to Set Cards and Ribbon
5 - a) Setting cards
□ Do not use the card other than designated by the dealer.
→ Otherwise, it may not produce the normal print quality and cause trouble on the equipment.
□ Double printing on the card which has been printed with this printer is not possible.
→ Double printing will cause trouble on the printer.
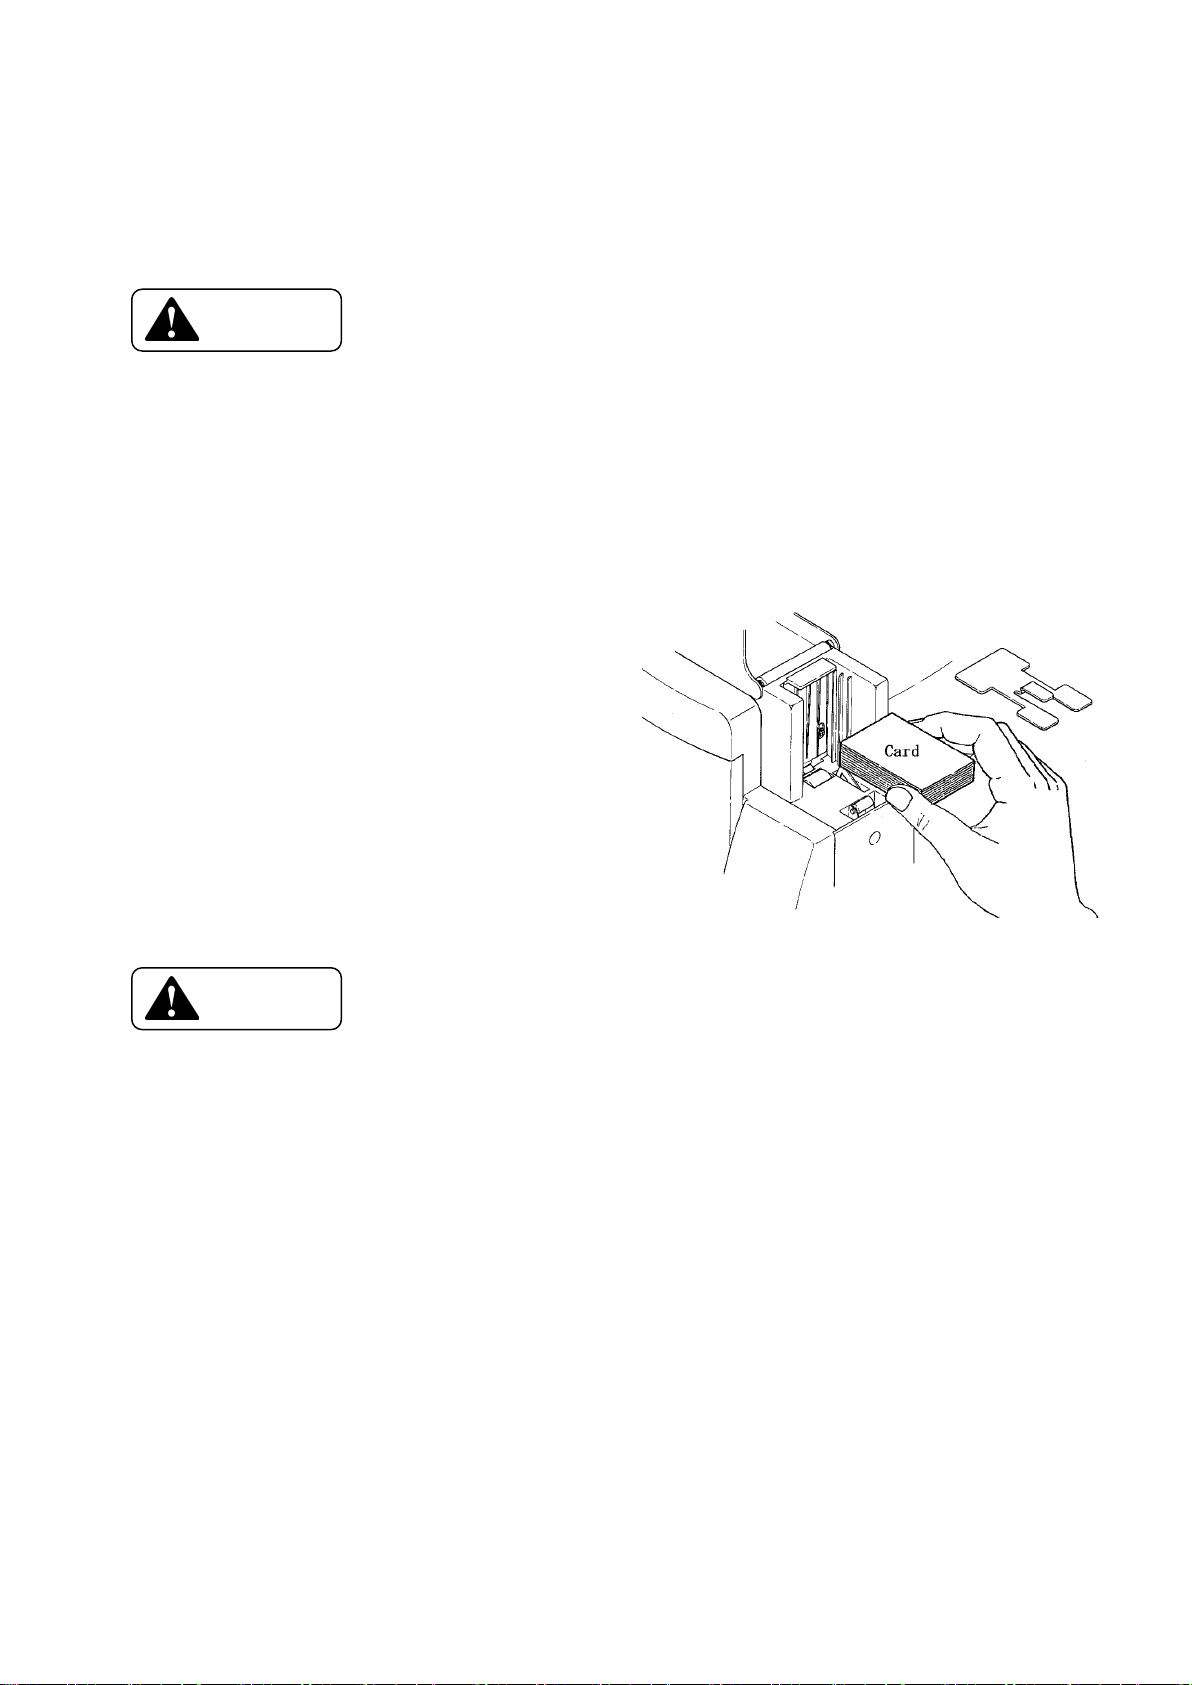
1. Open the cover of card supplying
box and remove the card weight.
2. Hold a stack of card as shown
in the fig. on the right side,
and set.
3. Push the cards in so that the
back edges of the cards
become even.
4. Place the card weight on top
of the card and close the cover.
Place the Weight on the Top
Hold the card(s) by the edge
□ When loading the cards with mag-stripe, be careful to the direction of
the card. Regarding the direction, read and follow the instruction manual.
→ If the direction is incorrect it becomes "Encoder Write Error".
→ If mag-stripes are on both sides, it may be erroneously encoded.
□ When printing on the pre-printed card, make sure that cards are loaded in the correct direction.
Read the operation manual of the systems which you are using.
→ If it is incorrect, the proper printing will not be made.
□ Do not use dusty or stained cards .
→ It may cause a damage on the Print Head.
□ Hold the cards by the edges only and do not touch the printing surface.
→ It may affect the print quality.
- 32 -
Page 38
Caution
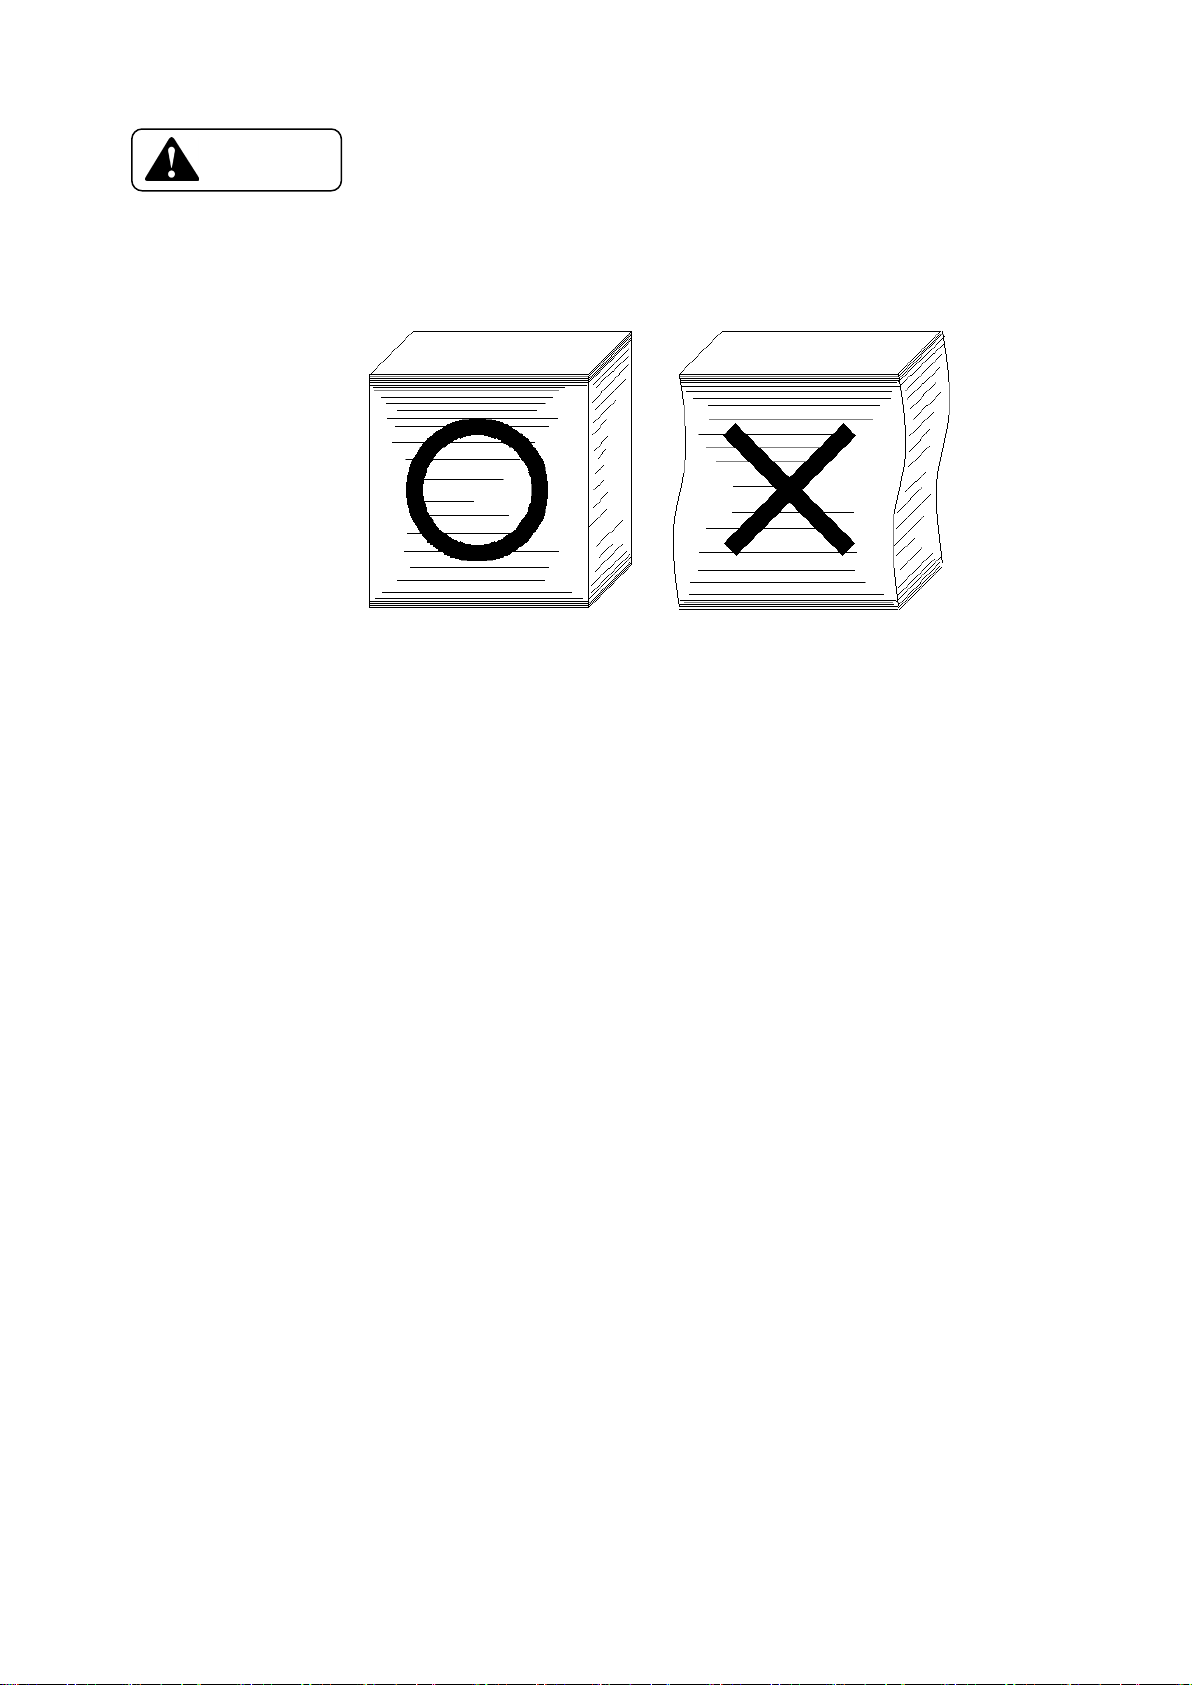
□ When loading the cards, stack the cards evenly as marked with ○ in the figure below.
If it is stacked unevenly as shown with the × mark in the figure below, it may cause
"Pick Up Error" or the stack may collapse.
- 33 -
Page 39
Caution
Ready to Print
5 - b) Setting the ink ribbon
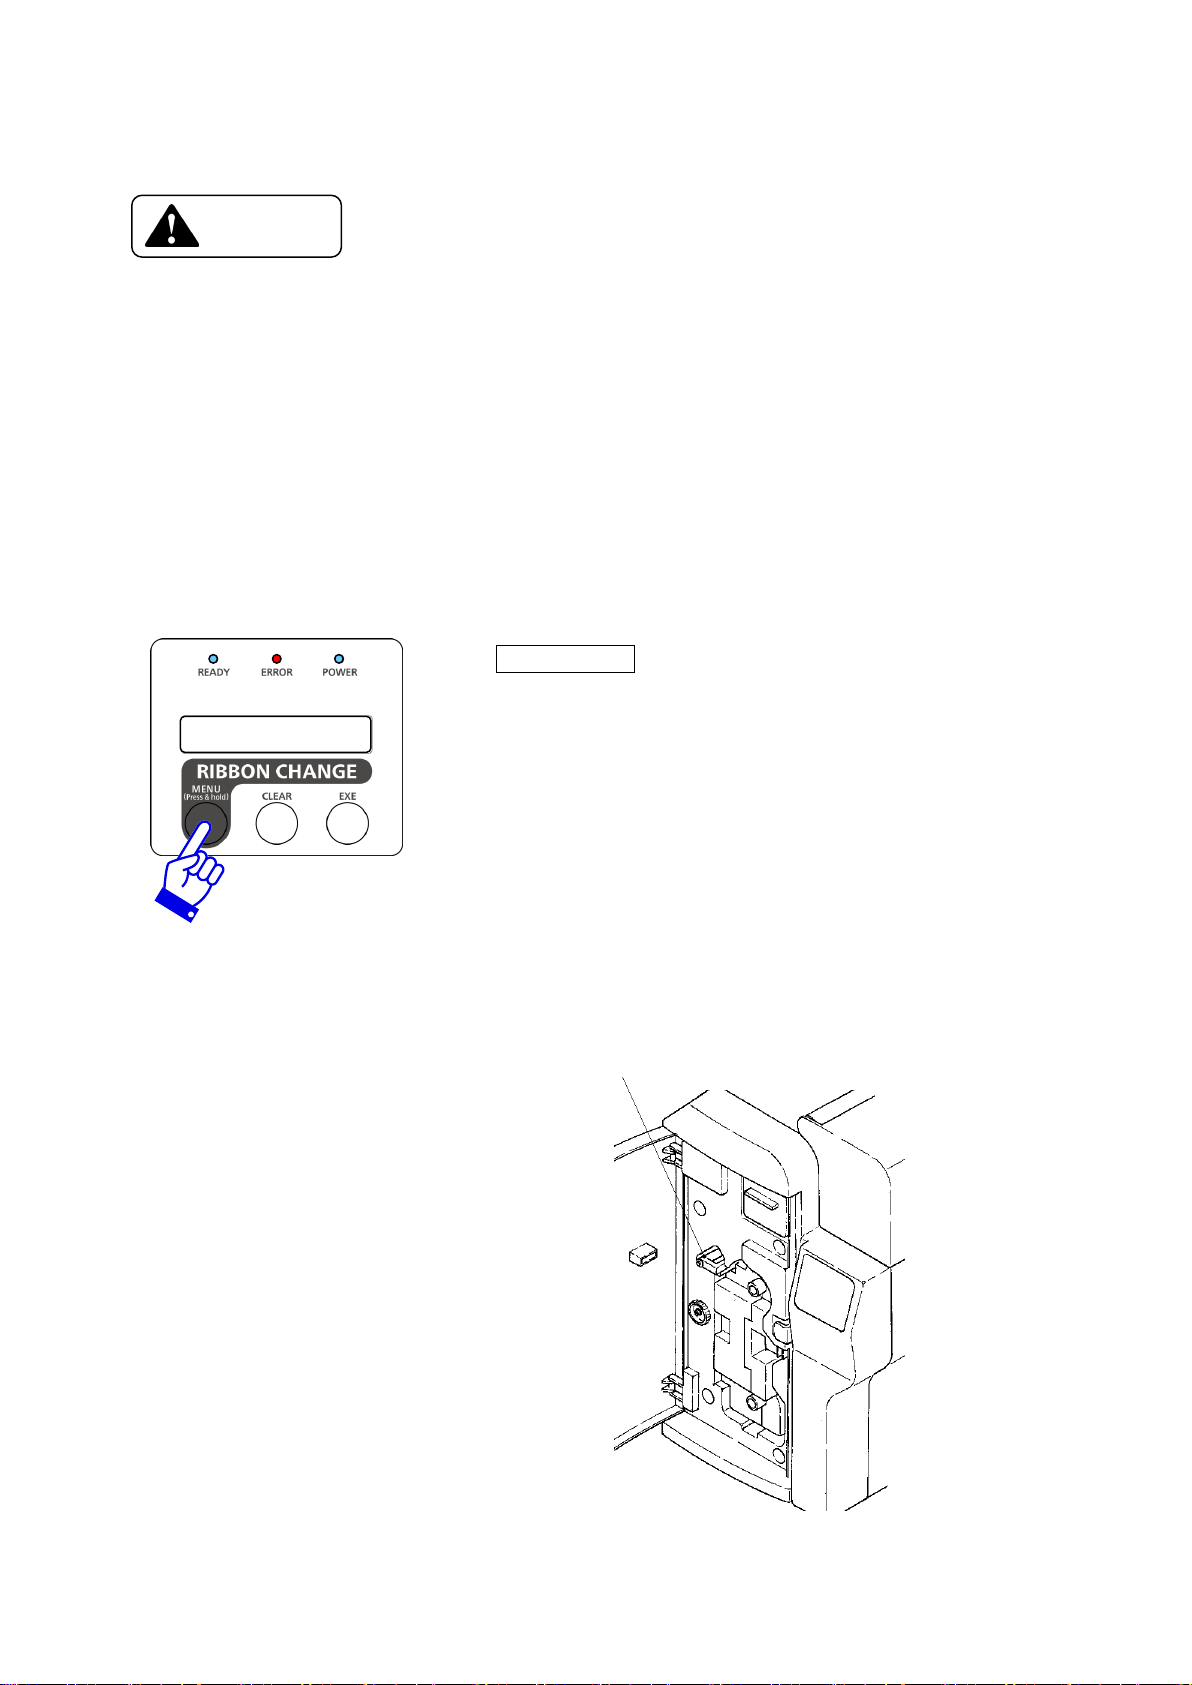
□ When taking out the ink ribbon cartridge before it becomes empty (while LCD panel displays other
than "Ribbon Empty"), press RIBBON CHANGE key and confirm that the head is lifted.
→ Cartridge cannot be removed with the head at the printing position. The ribbon may be wrinkled
or broken if the cartridge is removed forcibly.
Removing forcibly may cause damage on the printer.
□ Do not attempt to open the Top Cover and take out the Ribbon Cartridge without lifting the
Print Head by pressing RIBBON CHANGE key.
→ Normal print quality of the next printing will not be obtained.
□ Do not leave the ink ribbon cartridge off hand. When loading again, take up the frame which
has been exposed before inserting.
→ Dust on the ribbon or cartridge may cause a trouble on the print head.
Press Ribbon Change key about 1 sec.
Then make sure of the "Removable Ribbon" has appeared on
lower part of operation panel.
Cartridge Retaining Lever
Open the front cover of the printer.
Release the Cartridge Retaining Lever
and pull out the Ink Ribbon Cartridge.
- 34 -
Page 40
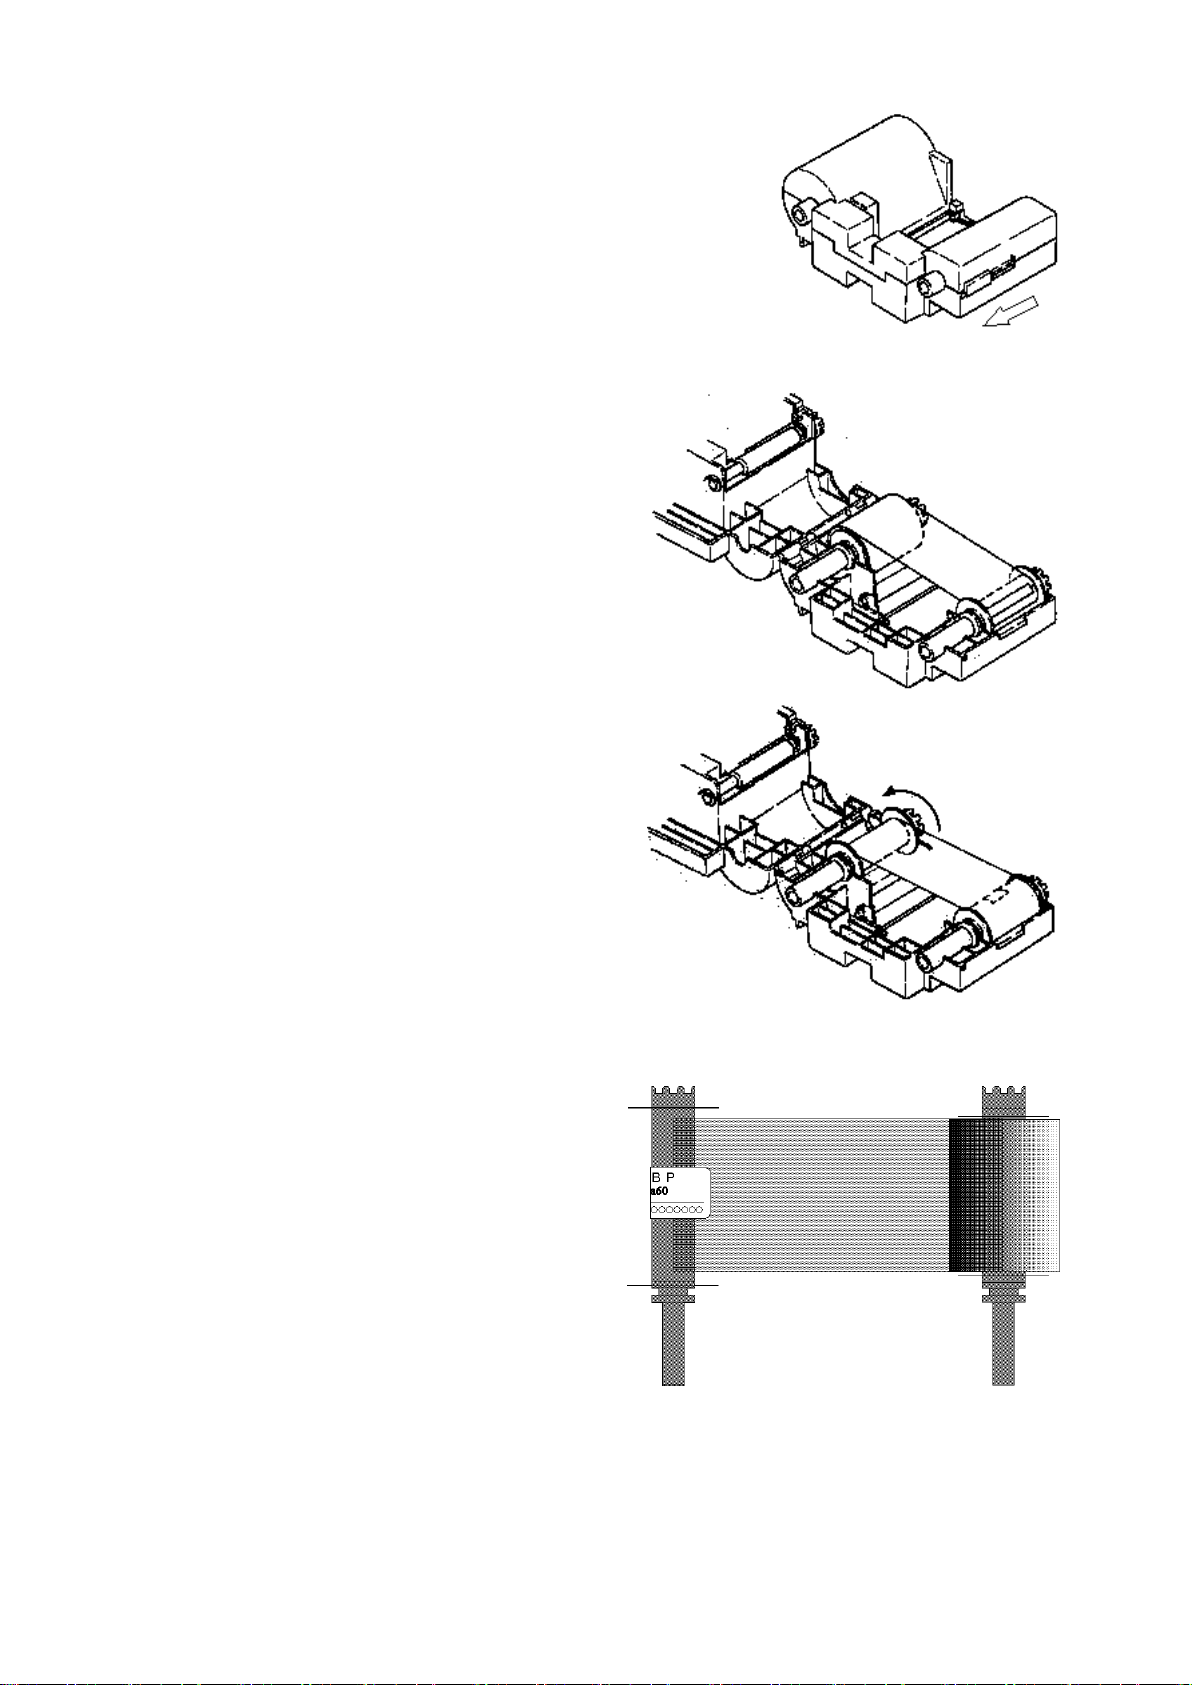
Release the lock of Ribbon Cartridge and
and open as illustrated.
Peel off the remaining ribbon from
the supply bobbin.
Dispose of the take up bobbin with
the full used ribbon.
Place the now empty supply bobbin
in the take up side of the cartridge
touse as take up bobbin.
Set new ribbon onto the supply side
of the cartridge.
Peel off the leading tape at the
beginning of new ribbon and put it
onto the empty bobbin.
Attach the center of ribbon to the
center of the bobbin as shown below.
Close and lock the cartridge, turn the take up bobbin shaft some(2-3) turns in
direction as shown by arrow in the figure and set the cartridge to the printer.
- 35 -
Page 41
Caution
cleaned
frames printed
Input Roller
Every 2000
frames
Soft cloth with no fur, Alcohol
Every 10000
Every 10000
frames
Print Roller
Every 10000
Cleaning brush, Alcohol
Roller on F/T Block
Every 10000
frames
Supply Roller
Every 10000
Soft cloth with no fur, Alcohol
Every 2000
Section 6: Cleaning
Clean the rollers and print head regularly to ensure a comfortable working environment.
Read the cautions in this manual carefully before the cleaning operation.
□ Turn OFF the main switch and pull out the plug of power cord before the cleaning operation.
→ Otherwise, an electrical shock or personal injury could result.
□ Do not use solvents other than alcohol for cleaning OA equipments.
→ Using the solvent other than alcohol may damage the parts and may cause trouble of the printer.
□ Do not clean the parts at near the fire.
→ Alcohol is flammable and may cause fire accident.
□ Take off all the cards on feeder block before cleaning
→ In case of the roller in the feeder block rotate linking with other rollers. It may cause a trouble.
□ After the cleaning operation, leave the machine for about 5 min before restarting.
→ Correct printing may not be obtained if printed before the alcohol is completely dried.
□ Do not touch the rollers with hand.
→ Fingerprint may affect the quality of the printed image.
Although the interval of cleaning varies depending on the condition of the card,
the following period is recommended assuming that the cards are properly stored and handled.
Parts to be
Ribbon Transportation
roller
Exit Roller
Transportation
Print Head
Number of the frames printed is indicated by the counter on the operation panel.
→ Refer to Section 4 "Operation of User Mode".
Number of
frames
frames
frames
frames
Cleaning tools and solvent
Soft cloth with no fur, Alcohol
Cotton swab, Alcohol
Cotton swab, Alcohol
Soft cloth with no fur, Alcohol
- 36 -
Page 42
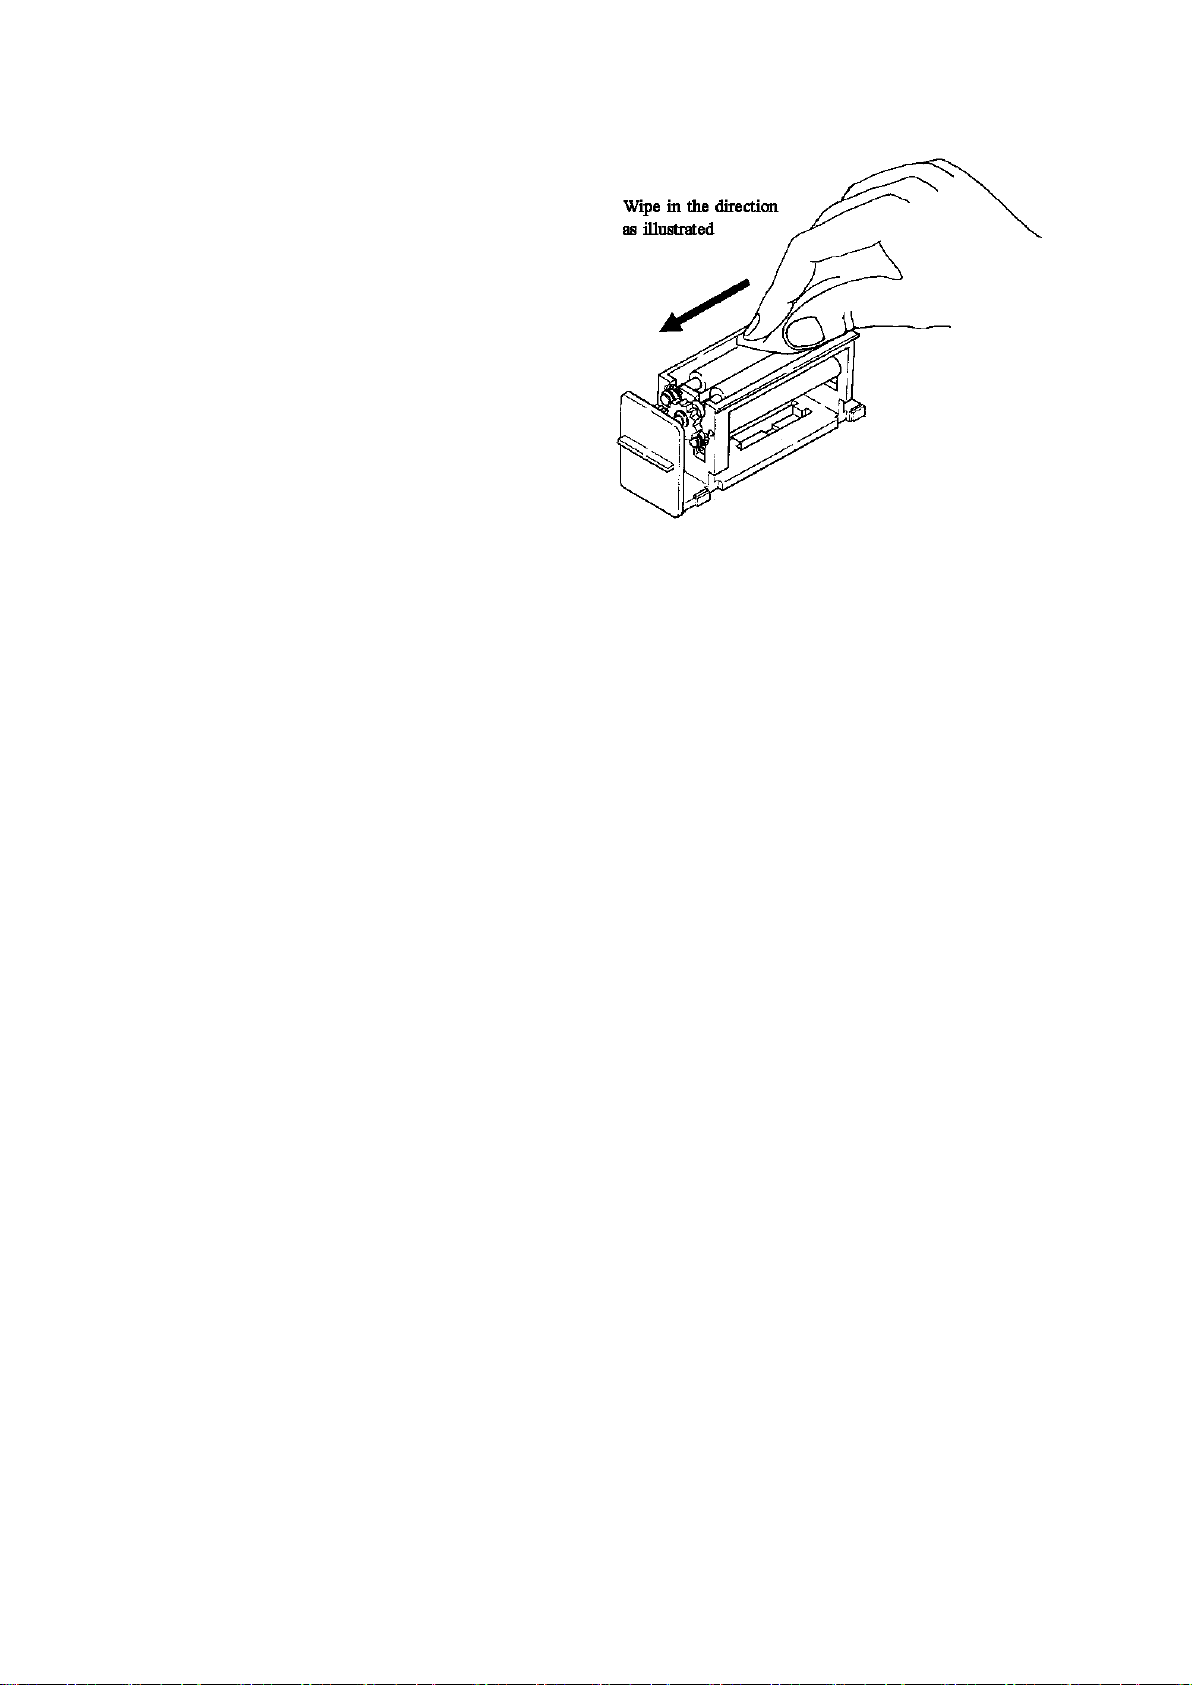
6 - a) Input Roller
Before starting this operation,
please read the general advice
which appears in the beginning
part of this section.
Remove the Input Roller module
as explained in Page 43 and
clean in the following procedure.
Wet and squeeze a piece of soft
cloth with alcohol for cleaning
OA equipment and wipe in the
direction as illustrated.
Rotate the roller slowly and
clean all surface. After cleaning,
wipe with a dry cloth and leave
about 1 minute to dry up before
reinstalling.
After wiping off, wait till it becomes completely dry before inserting it again.
- 37 -
Page 43
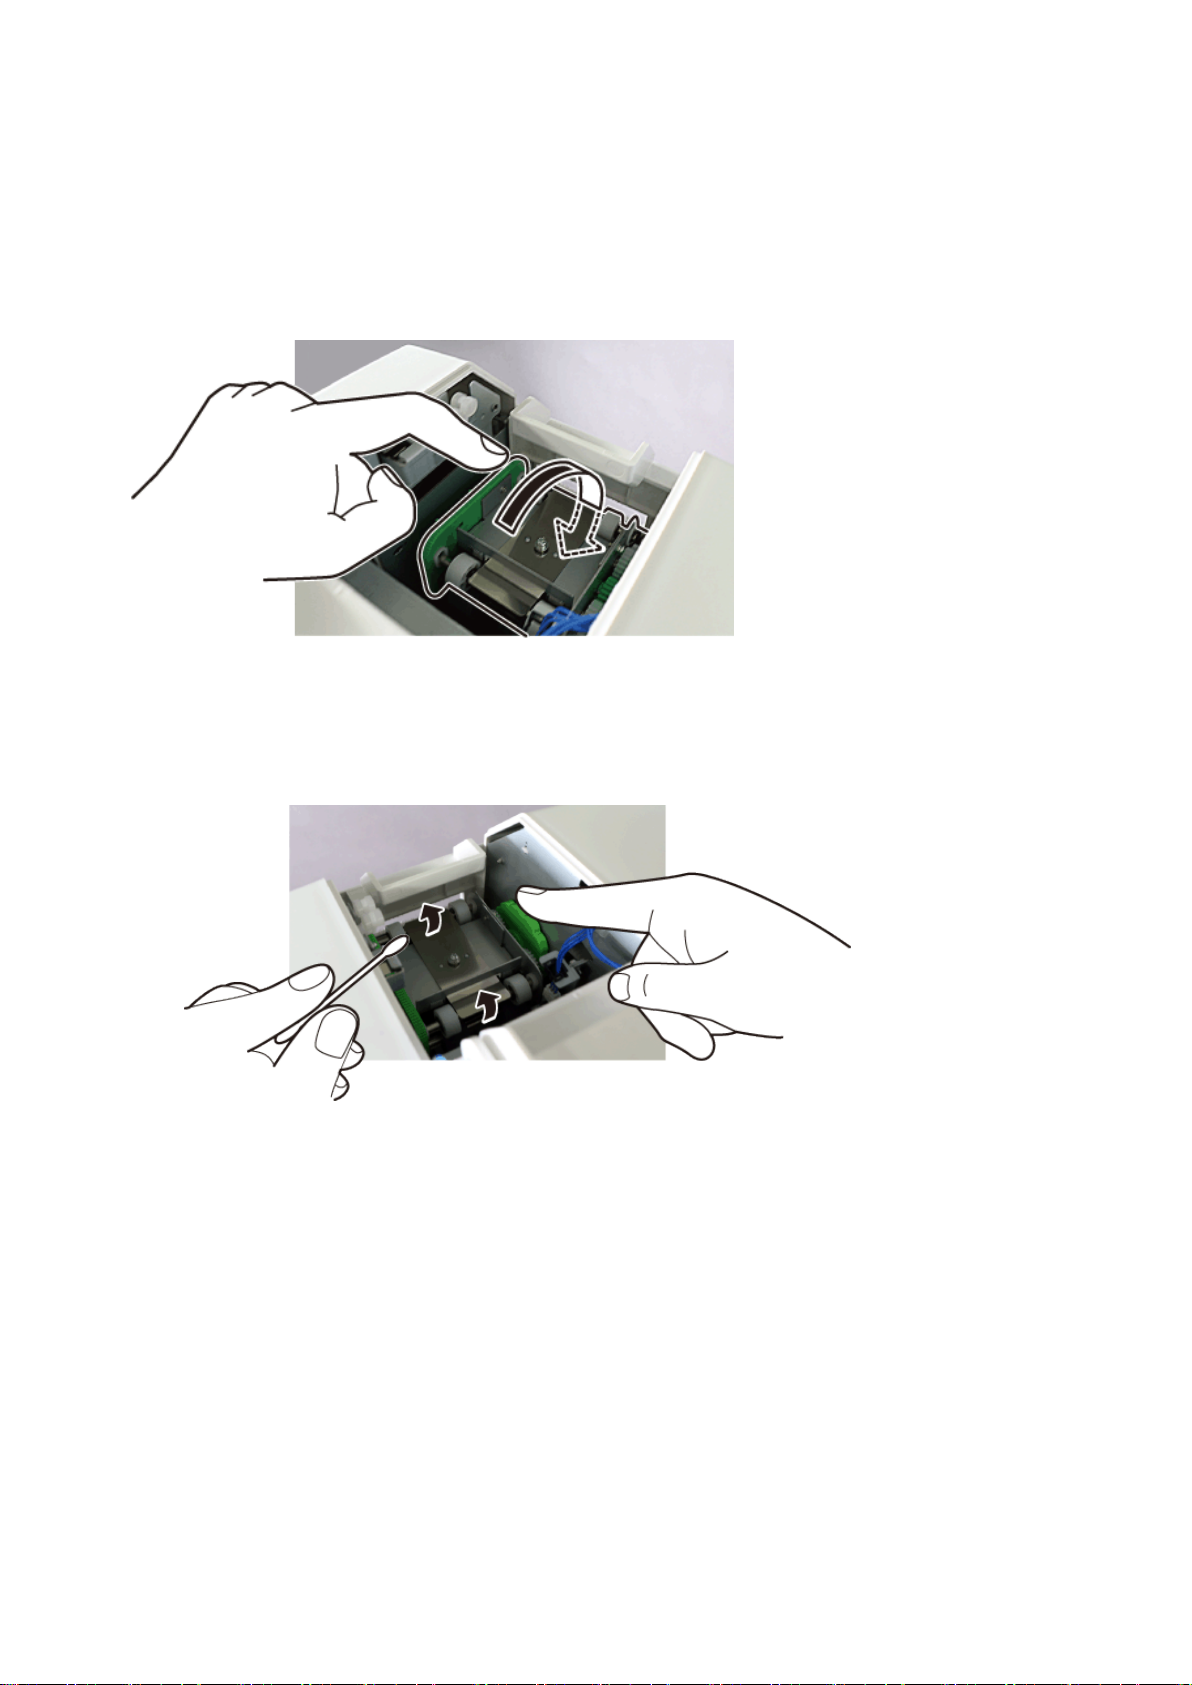
6 - b) Cleaning of the card transport rollers in Flip Turn Block
Before beginning this operation, please read the general advice which appears in the beginning
part of this section.
◆ Open the top cover, rotate the whole Flip Turn Module to the angle of easy to clean as using green
handle as shown in the figure.
◆ P
repare the cotton swab and put a few alcohol on it. Touch the cotton swab to the surface
of rubber rollers, then ro
cleaning is given for the all white mold rollers paired with rubber rollers as well.
tate the these rollers as using green disk as shown in figure. This
- 38 -
Page 44
Press
Ribbon Change
key first, then pull out the ribbon cartridge.
Caution
Caution
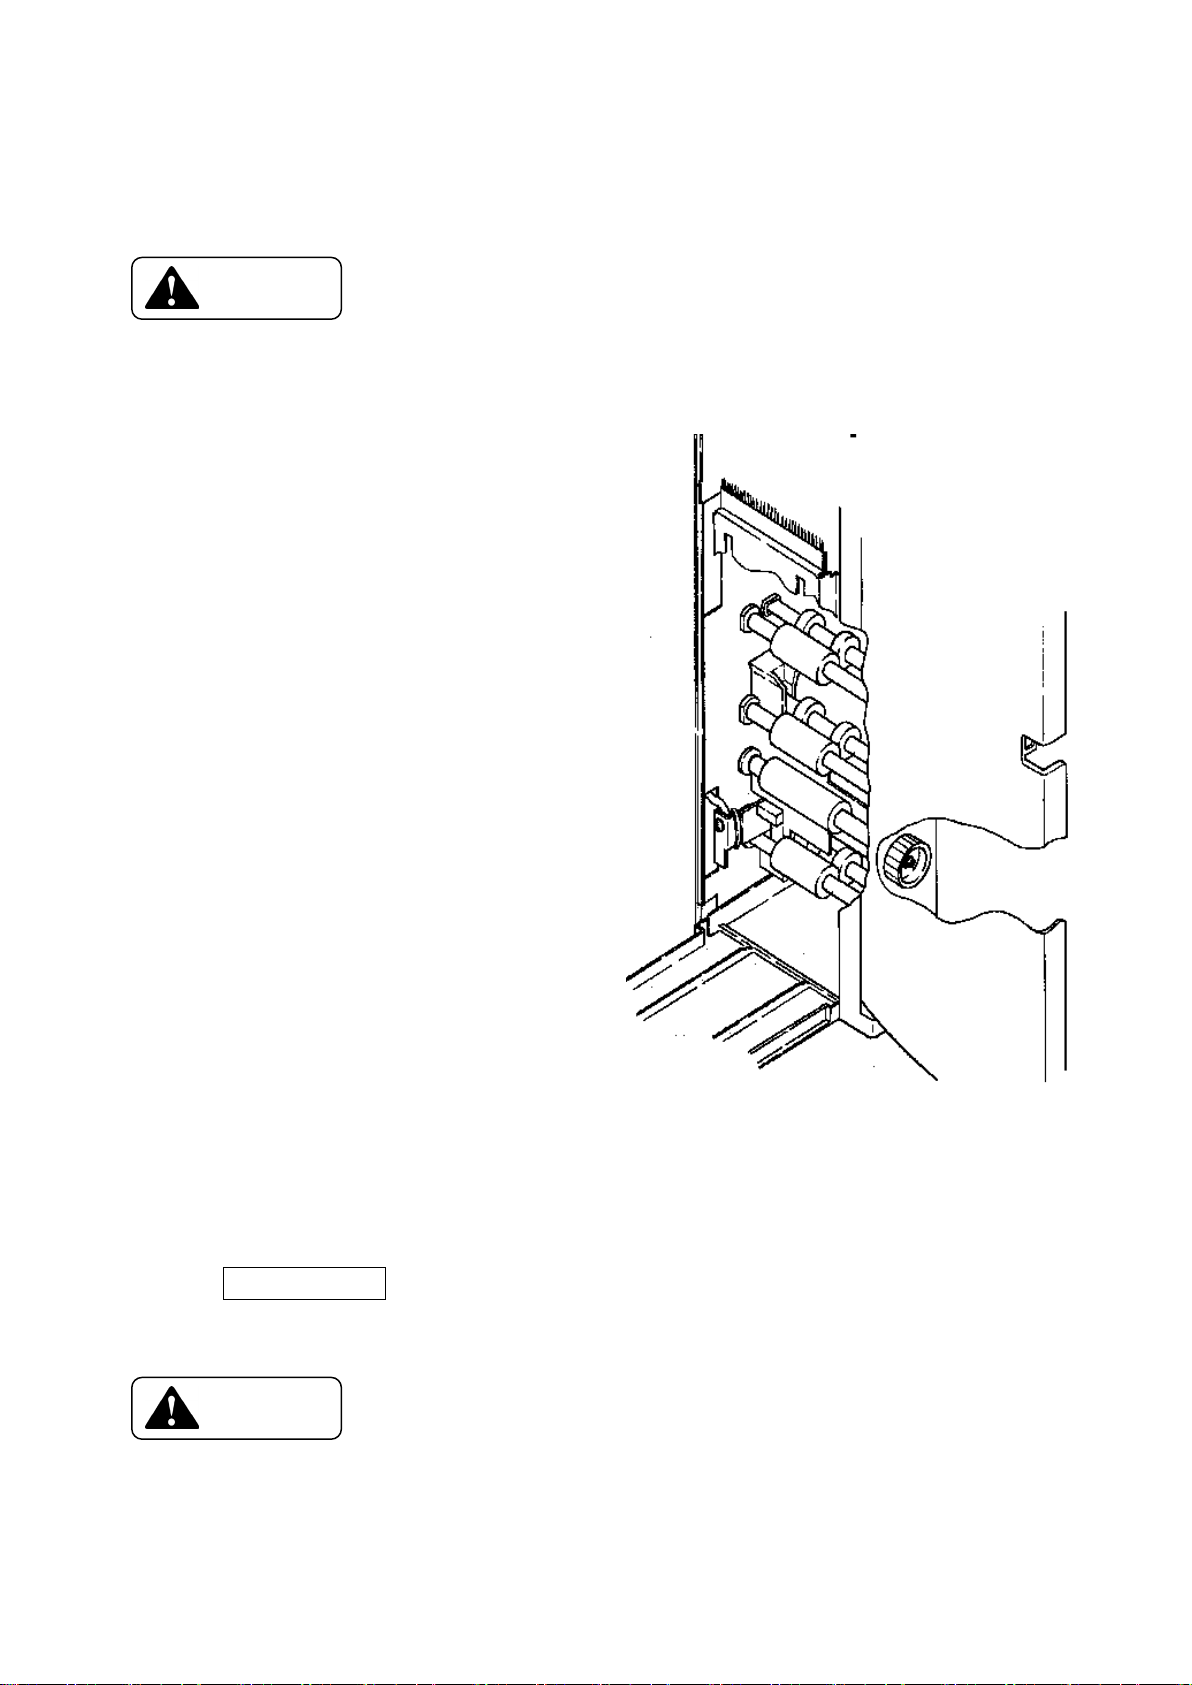
6 - c) Cleaning of the Print Rollers
Before starting this operation, please read the general advice which appears in
the beginning part of this section.
□ Turn OFF the main switch and pull out the plug of power cord before the cleaning operation.
→ Otherwise, an electrical shock or personal injury could result.
The figure on Right is shown that
the side cover on ejecting side is
opened.
To open the side cover, take off a
screw located under the stacker.
◆ Prepare cotton swab and put a
few alcohol, clean the whole
surface of all 4 pairs of
rubber rollers and white
mold rollers.
◆ To cl ean them easi l y, use the
green handle located on front
access area as shown in figure
on right.
This handle is used for
rotating those rollers manually.
6 - d) Cleaning of the Ribbon transport roller
Before beginning this operation, please read the general advice which appears in the beginning
part of this section.
◆
◆ Open the ribbon cartridge, take the ribbon out.
◆ Clean the white mold roller on the lower tray and black rubber roll er on the top cover.
After cleaning, put the ribbon back to the cartridge after waiting till the rollers are completely dry.
- 39 -
Page 45
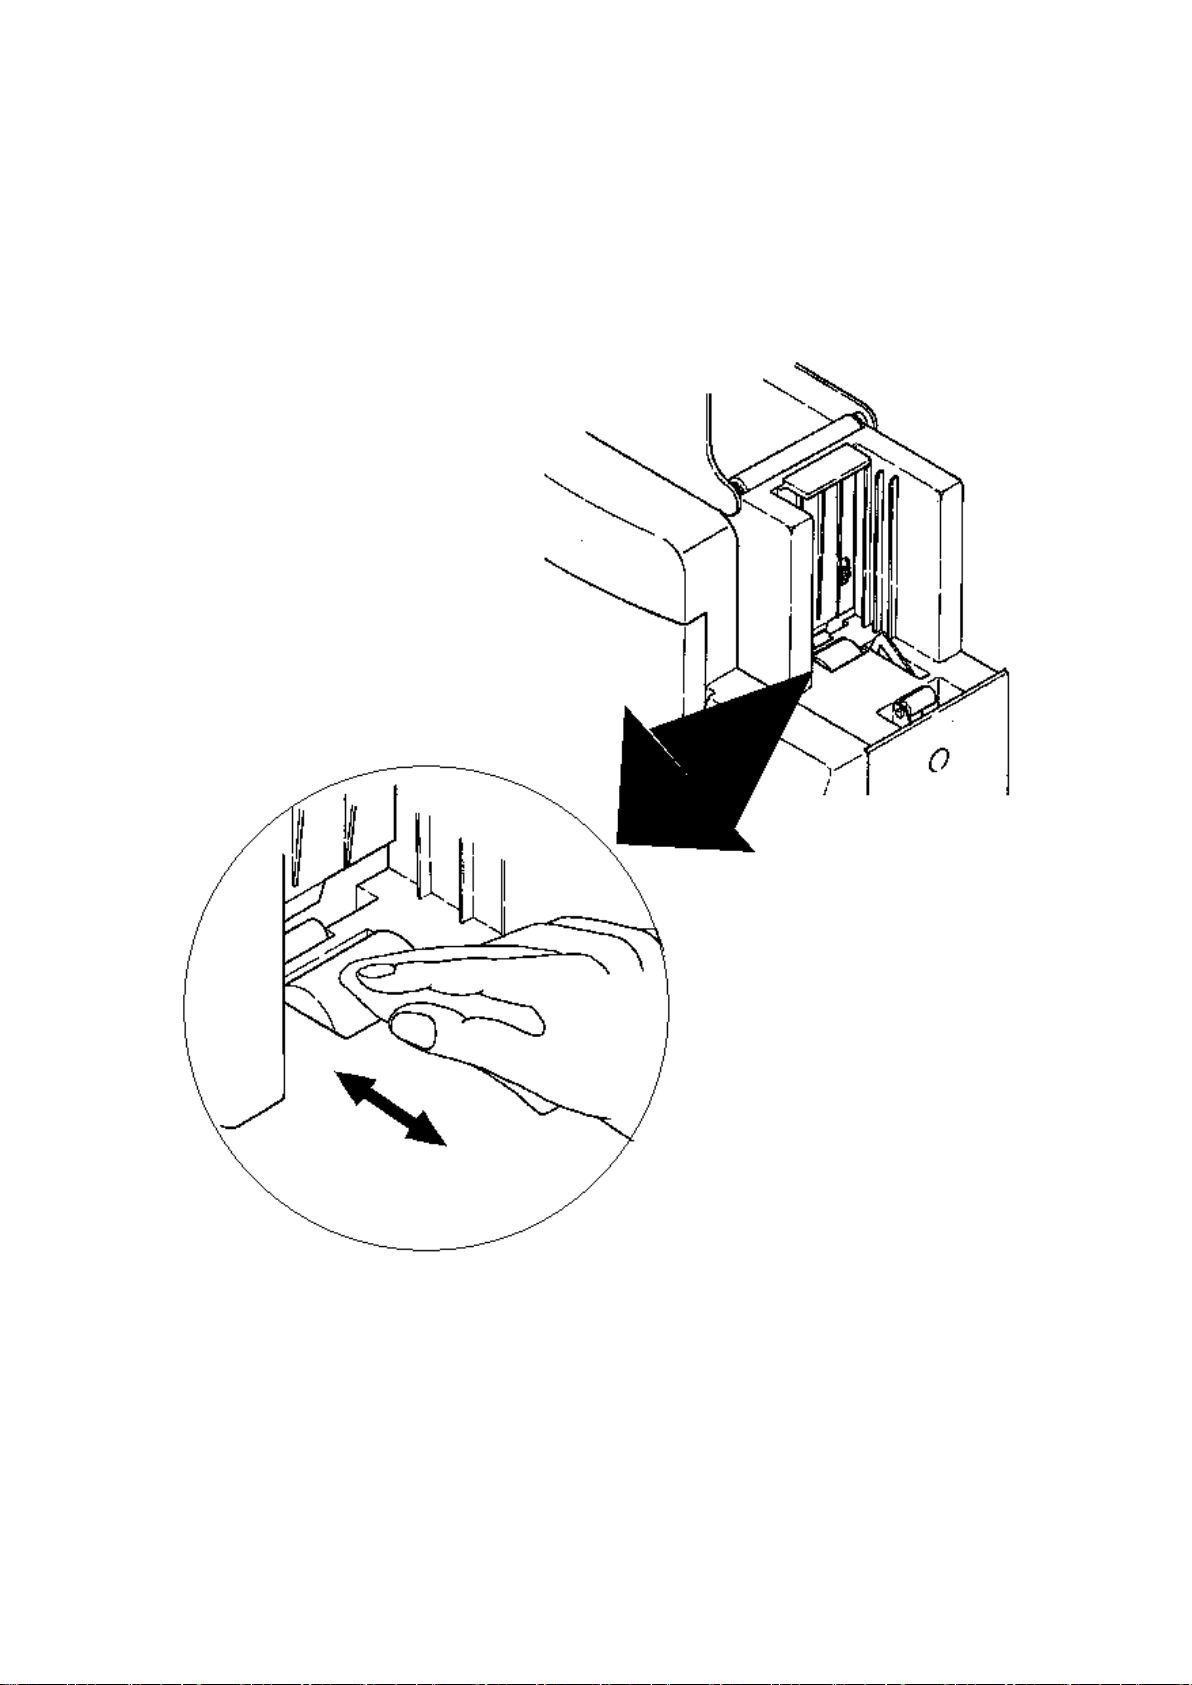
6 - e) Cleaning of the Supply Roller
Before starting this operation, please read the general advice which appears in
the beginning part of this section.
◆ Wet and squeeze the soft cloth with alcohol for OA equipments and wipe the
all surface of the roller in the direction as shown by arrow in the figure below.
- 40 -
Page 46
Caution
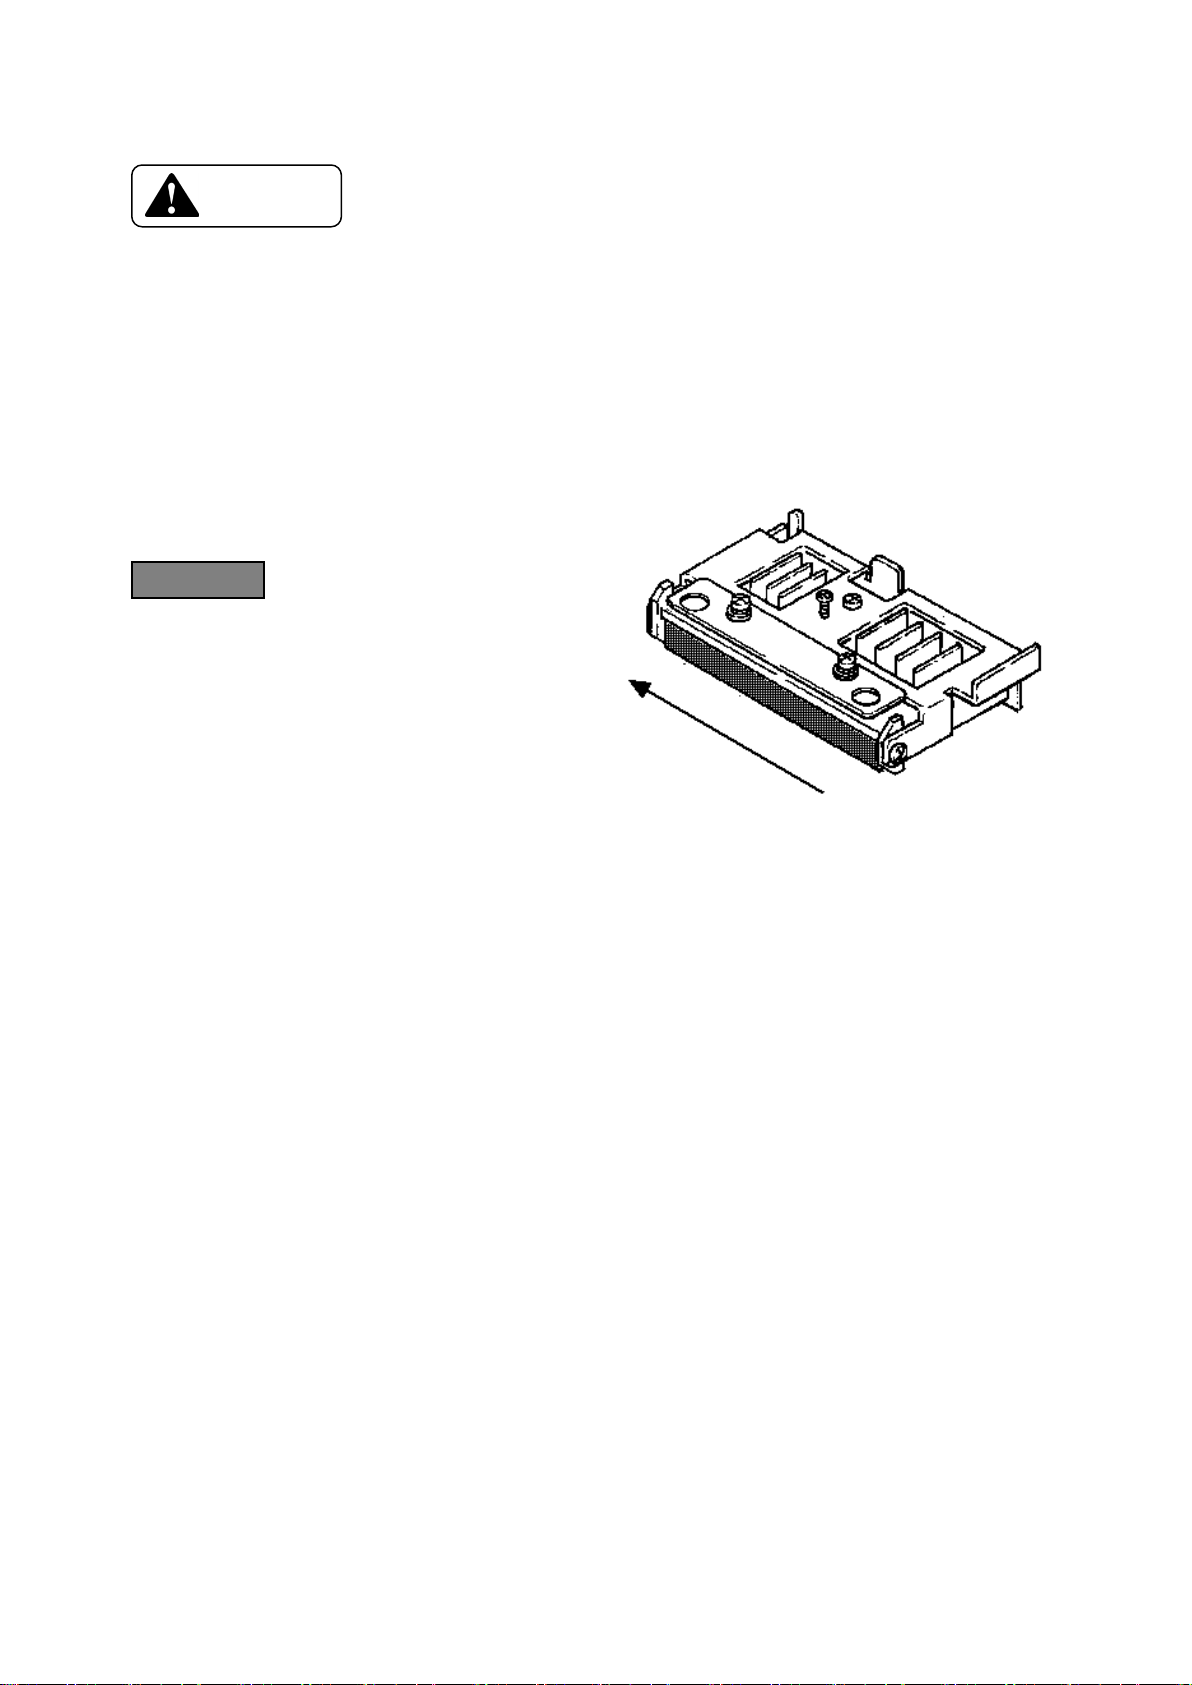
6 - f) Cleaning of the Print Head
□ The Print Head will be remaining hot when just after Printing.
Before starting this operation, make sure that the Print Head module has been cool.
□ Turn OFF the main switch and pull out the plug of power cord before the cleaning operation.
→ Otherwise, an electrical shock or personal injury could result.
□ Do not use solvents other than alcohol for cleaning OA equipments.
→ Using the solvent other than alcohol may damage the parts and may cause trouble of the printer.
The heating elements are shown with
in the figure on right.
◆ W et and squeeze the soft cl oth
with alcohol for OA equipments
and wipe the heating elements in
the direction as shown by an
arrow in the figure on right.
- 41 -
Page 47
The indication changes as shown on right
Set Cleaning Card
7
MENU key
Return to Normal Mode
9
Put the cards for print and push the CLEAR key.
Ready to Print
6 - g) Cleaning of the card transport roller
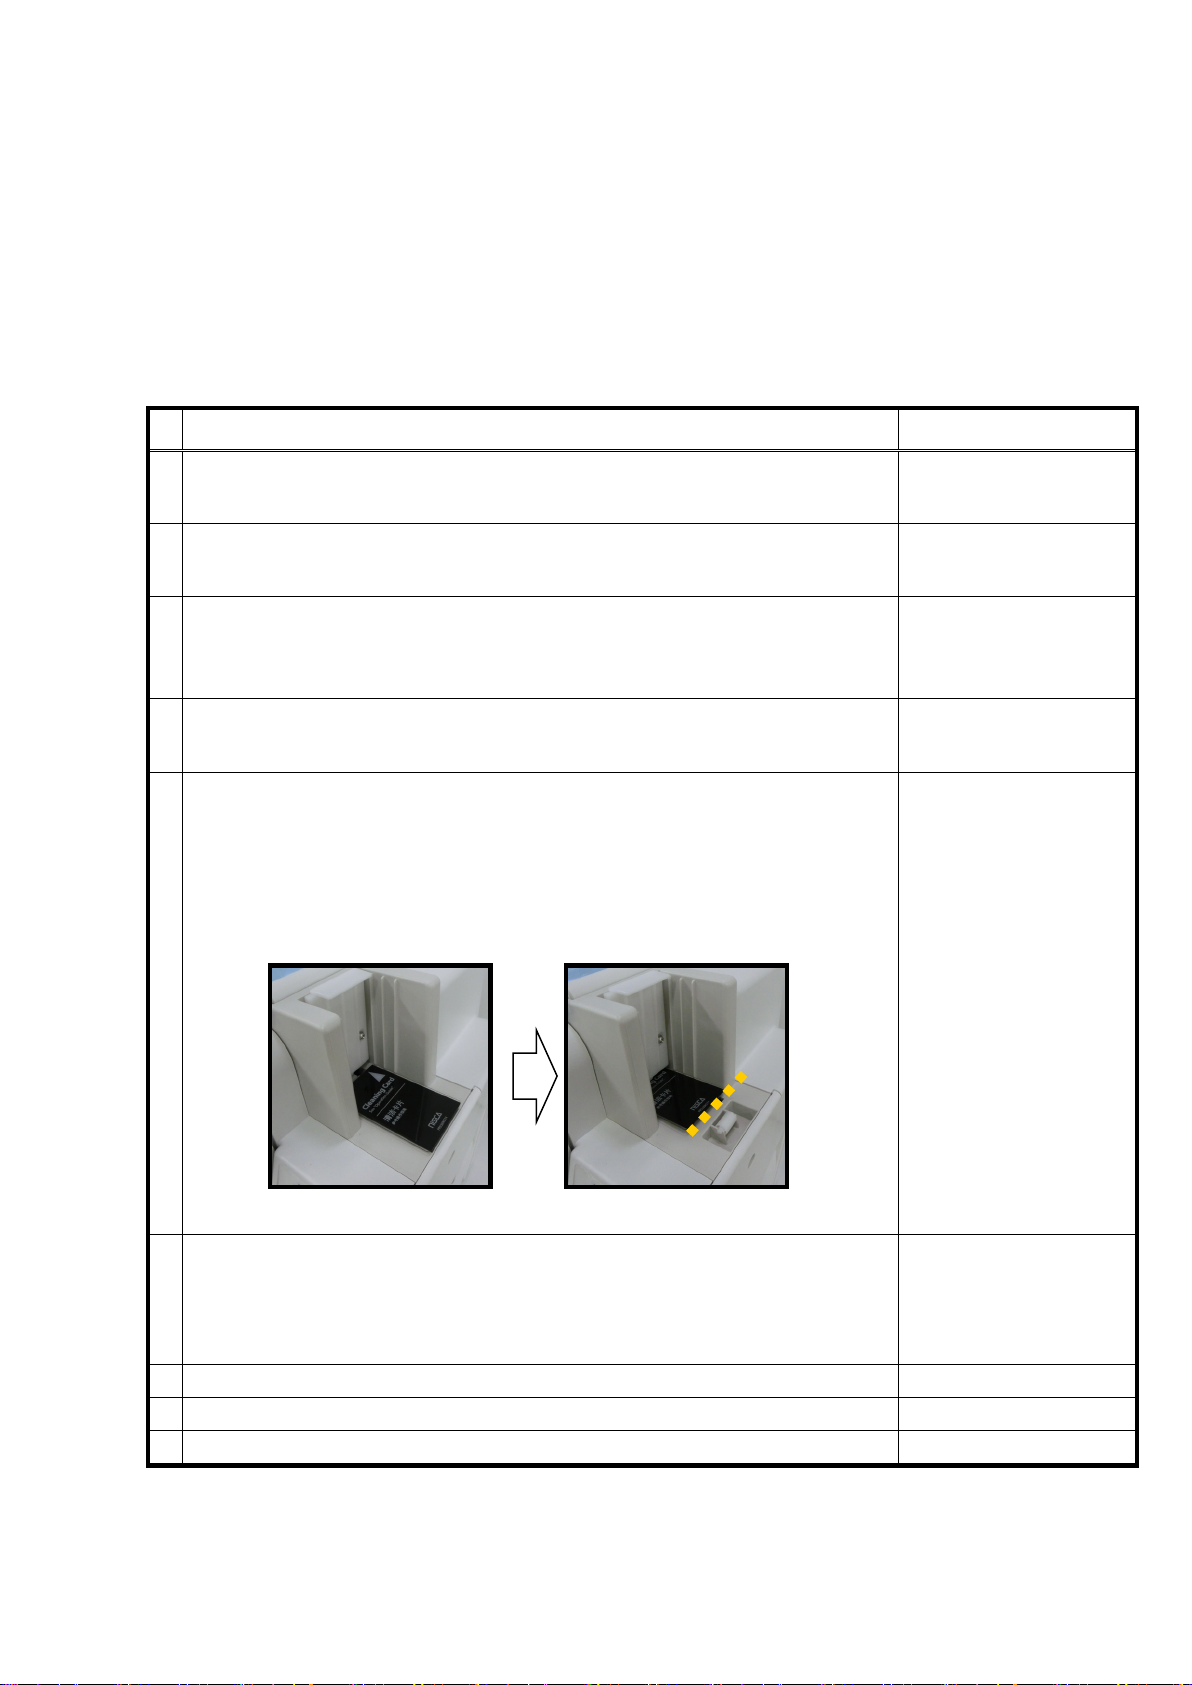
It is able to clean the card transportation roller automatically, by using a specific cleaning card, and carrying out a cleaning mode.
But clean the input roller separately.
Prepare a specific cleaning card, and turn the printer power on.
→ Please tear off protection sheet of the card back side.
The cleaning mode is set in the user mode of the printer.
According to the following procedures, please carry out the cleaning of the card transportation roller.
Button operation / Work contents Liquid crystal display
1 MENU key press and hold User Mode
CLR:Back EXE:Go
2 EXE key User Mode
PUSH MENU KEY
3 MENU key
Indication changes by pressing the MENU key.
Press it till the indication changes as shown on right..
4 EXE key
Remove a blank card for print from the card hopper.
5 EXE key
Put the cleaning card on card hopper with printed side up.
Note 1:It may cause trouble when the card set with printed side down
Note 2:Push the card into a printer till at the point the card stops.
The chart below shows rough distance of pushing the card.
Printer Cleaning
Remove Normal Card
Set Cleaning Card
6 EXE key
Carry out cleaning automatically.
A card is come out from a normal exit, when the cleaning has completed
8 EXE key Card Empty
Please Wait..
Now Cleaning
↓
- 42 -
Page 48
Replaced part
Period(frames)
Tools to be used
Fan Filter
Every 6 months
Philips Screw Driver
Caution
Section 7: Periodical replacement of parts
This printer offers a superb performance for long period with very high reliability.
But to maintain the performance, some parts need to be replaced periodically. This means the low
running cost.
Replacement can be easily done if the operator has basic knowledge or experience of handling
electronic machinery. Read the instruction and cautions in this manual carefully before performing
the required periodic replacement work.
Input Roller Every 40000 frames N/A
Print Head Every 20000 frames Philips Screw Driver, Loader Application
Number of the printed frames is displayed on the LCD panel
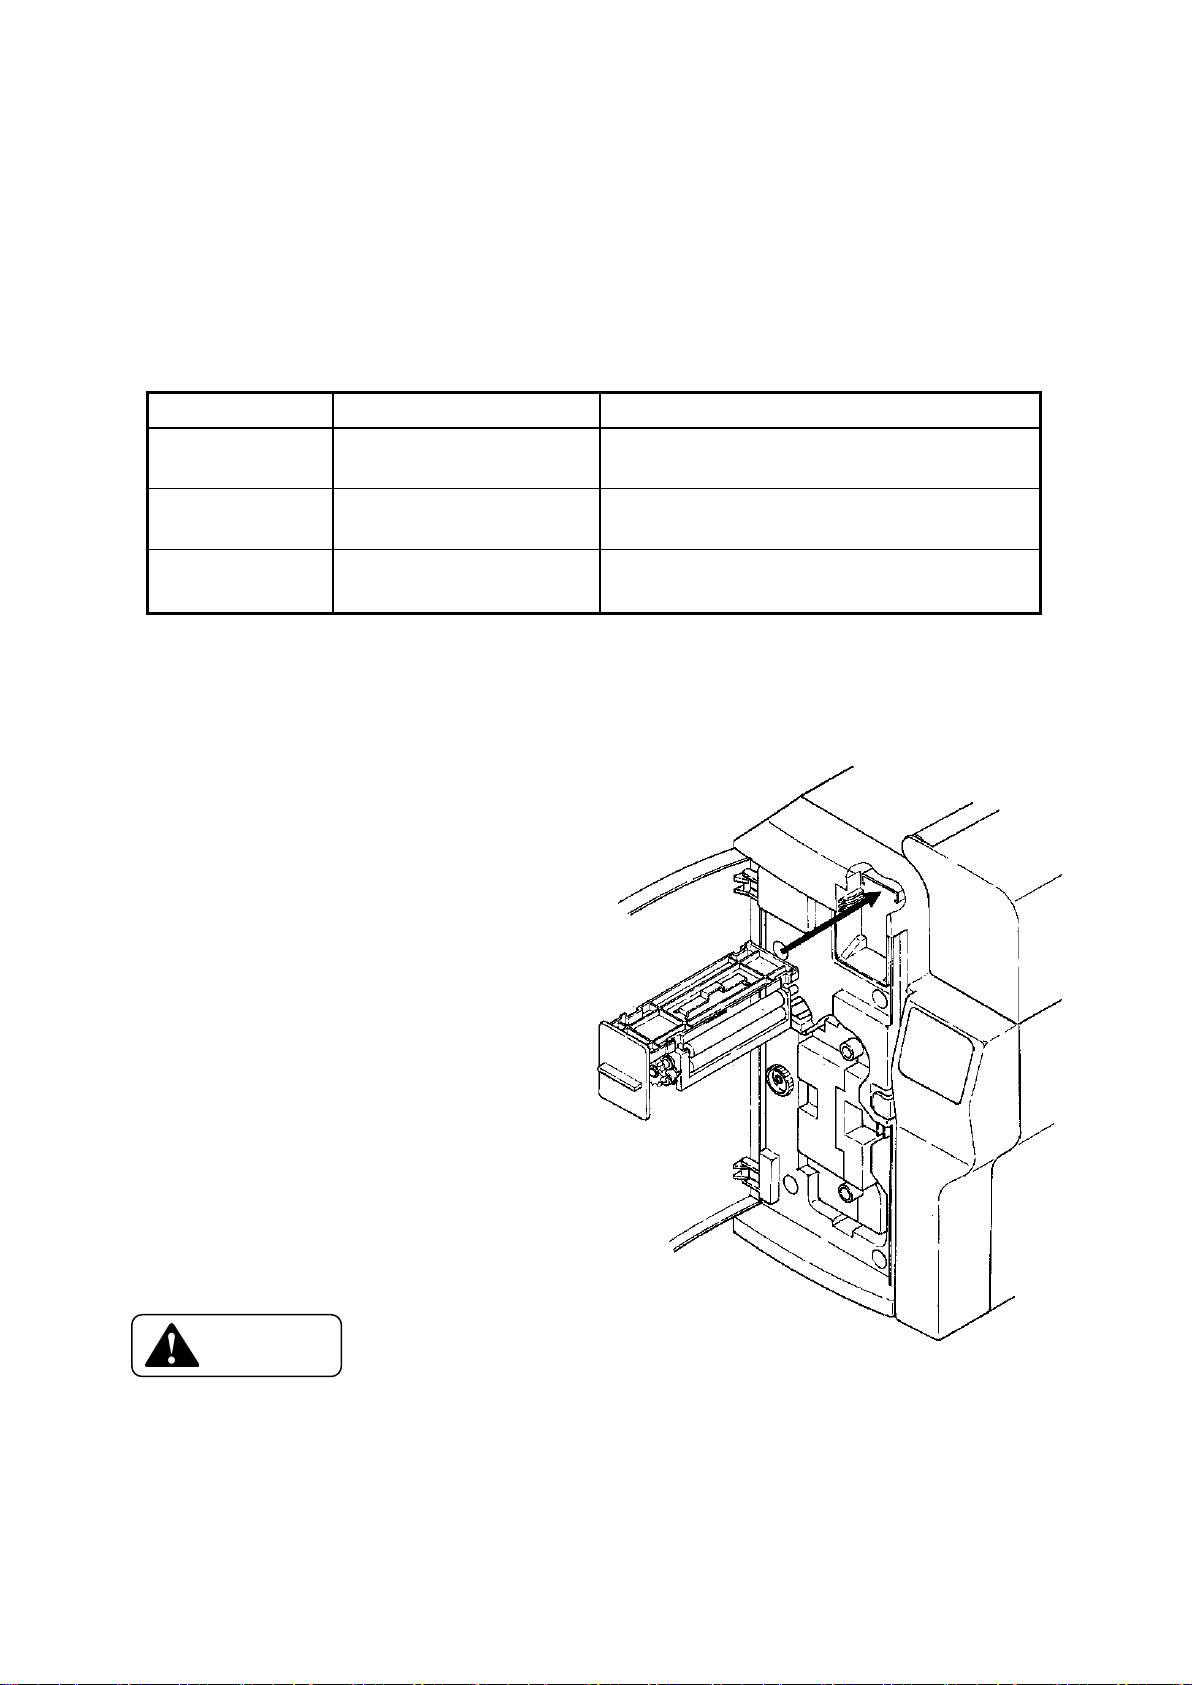
7 - a) Replacing Input Roller
* Hold the tab and pull slightly
till its frame can be hold.
* Hold frame and pull the whole
unit out.
* Before setting the new unit
the rollers on the new unit must
be clean.
* To put the new unit in.
Line it up the slide plate against
guide rail of the printer as shown
on right. and slide the unit in
till to reach it to the stopper.
□ Do not print without the input roller attached.
→ Card jam error will be occurred.
□ Do not pull the unit out with holding only its tab.
→ It may cause the unit fallen down when the moment of the unit comes off.
- 43 -
Page 49
Caution
Caution
7 - b) Replacing Print Head
The print head comes with a floppy disk which contains the data for assuring best print quality.
The data in floppy disk must be loaded to the printer when the print head replaced.
□ Turn OFF the main switch and pull out the plug of power cord before the replacement operation.
→ Otherwise, an electrical shock or personal injury could result.
□ Depending on a printer working, the print head has been hot. Before doing this operation, make
sure that the head is not hot.
→ It may cause to get burn.
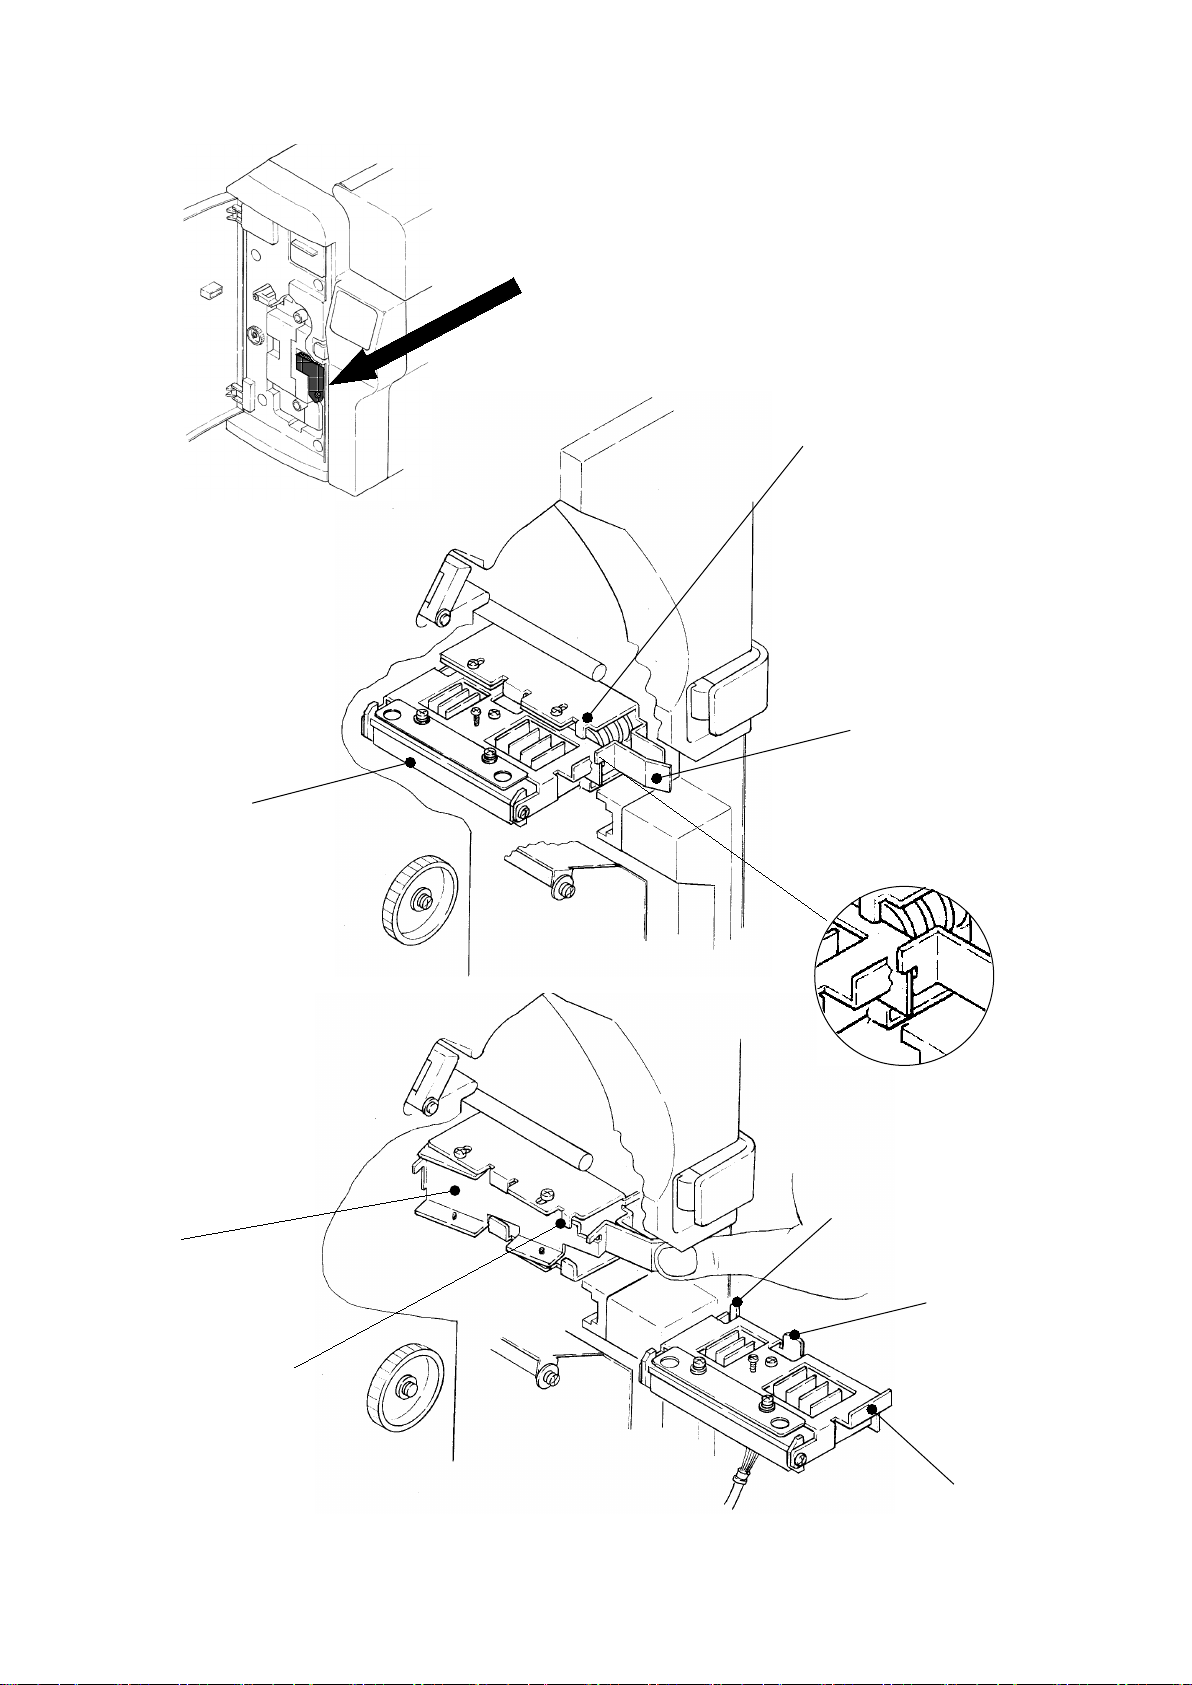
□ Do not touch the hard substance or your hands to the edge of the head as pointed with "J" in
the figure on next page.
→ It may cause the print head damaged and/or bad image printed.
Clean the edge by a soft cloth with alcohol when you accidentally touch there.
To replace a print head
The figures on next page : ① showing a print head fixed
② showing a print head removed
* Take the part off.
See the figure at the top of next page.
* To take the print head off.
Release the lever as pointed with "C" in fig.② Then hold the tab "H" of the
head module and pull it out.
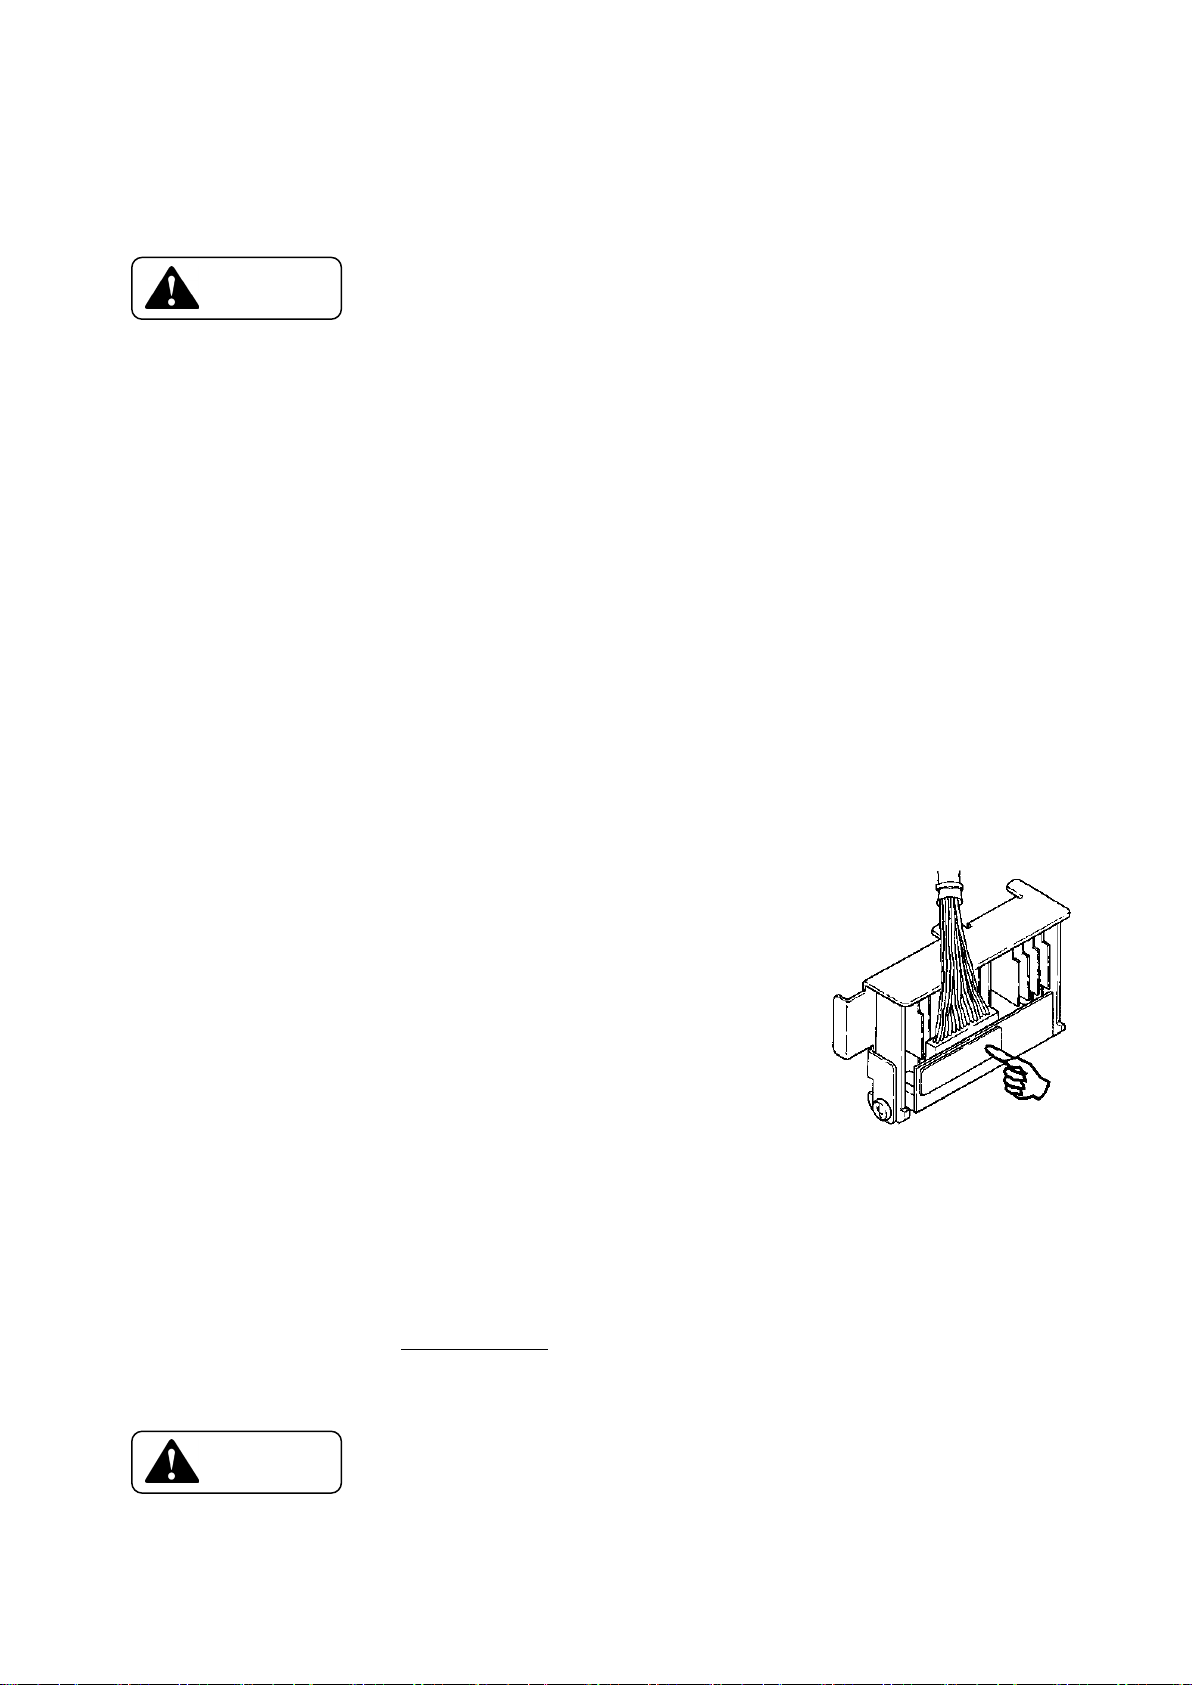
* Take the connector off and fixed it onto the new head
module.
* To put the head module into the printer.
Release the lever "C" and slide in the head module along
the surface as pointed with "D".
Point
The tabs "F" and "G" on head module must go inside of
the guide "A" when the head module slid.
* Get the lever "C" back to original position
* Make sure the head module is locked firmly by the lever "C" as shown with
circle "B".
To install the head data
First, you have to get the application for the download from CANON FINETECH NISCA homepage
through internet addressed at http://ftn.canon/ .
Please see the information attached application for the way of installation.
□ The data must be installed to the printer when a print head replaced.
→ It may cause the printer damaged.
- 44 -
Page 50
A
B
C
D
F
G
H
A
J
②
①
誤操作防止カ バ ー を 取 り 外します。
Take the wrong operation prevention cover off.
- 45 -
Page 51
Caution
7 - c) Replacing Fan Filter
□ Turn OFF the main switch and pull out the plug of power cord before the replacement operation.
→ Otherwise, an electrical shock or personal injury could result.
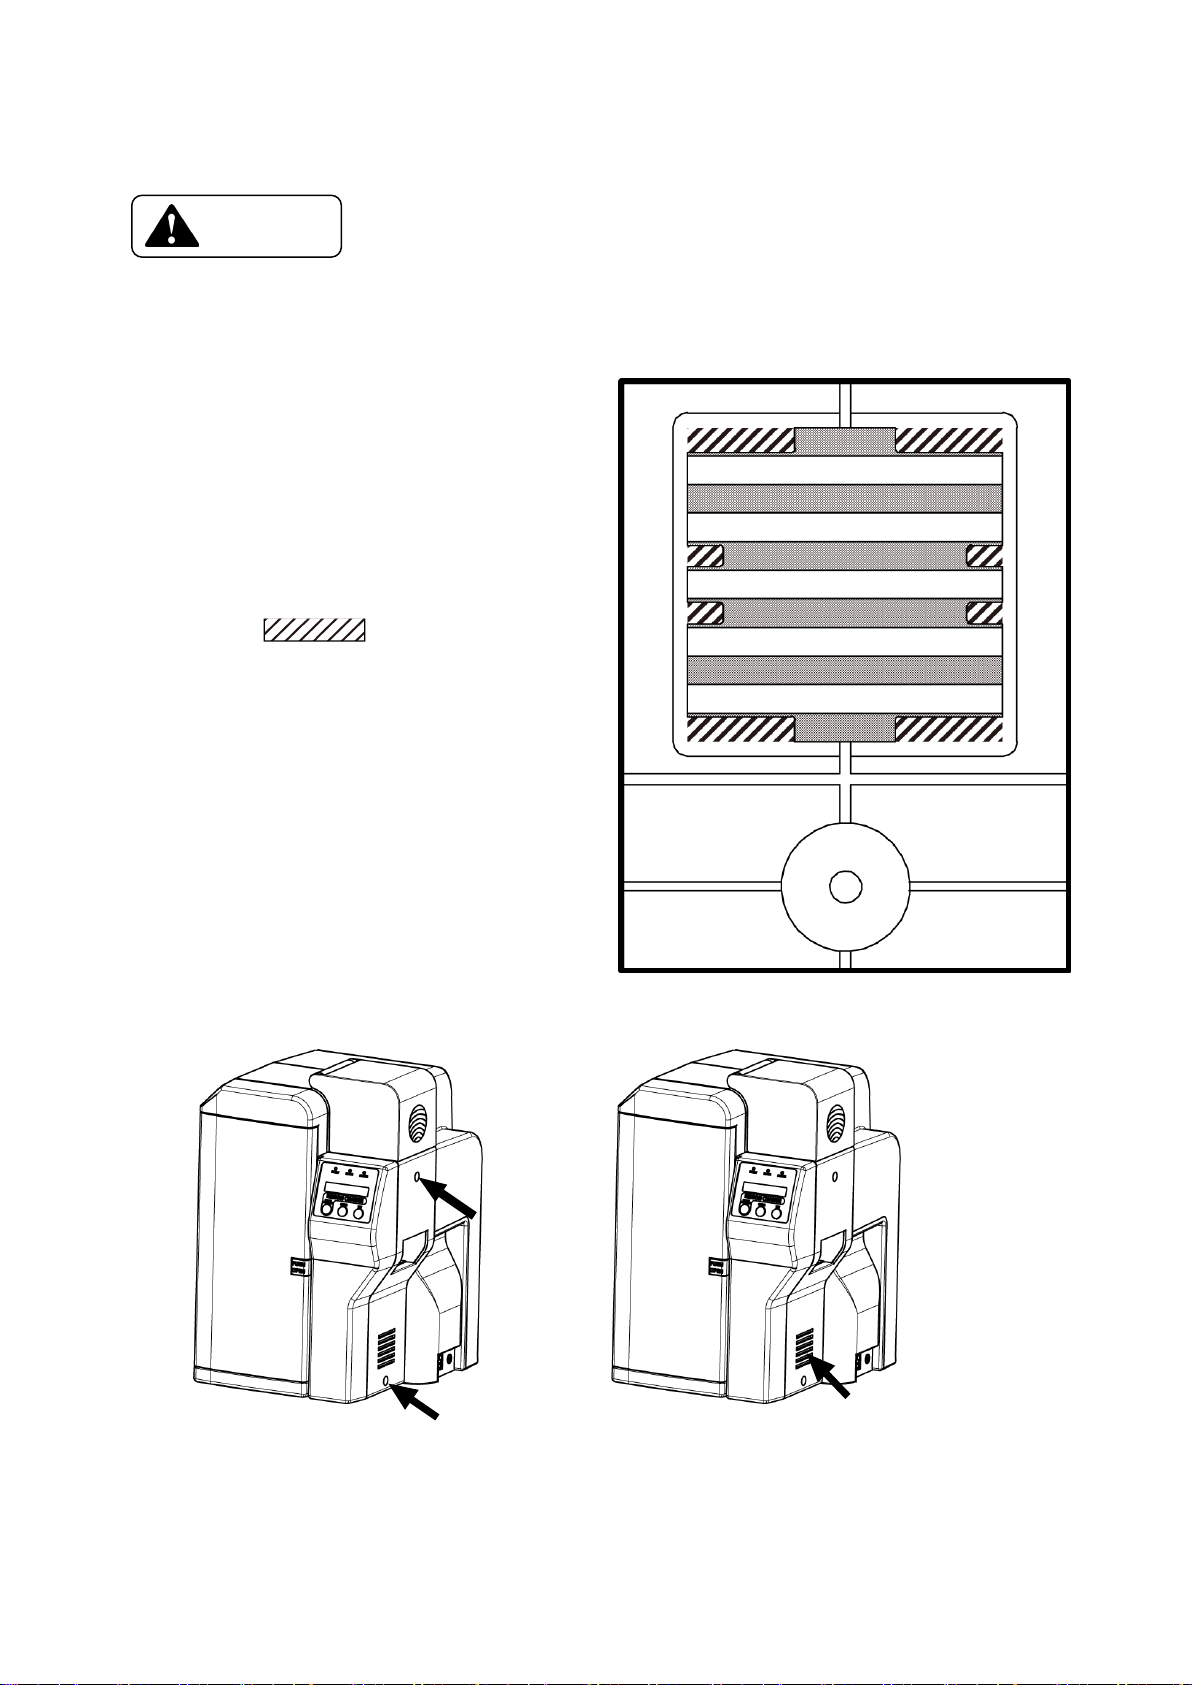
A figure on right shows a part of
back side of the right cover located
just below the card hopper.
Take off Fan Filter installed at
the fan intake duct behind the right cover.
Put Fan Filter into inside the rib,
shown as in the figure
on the right, to fix Fan Filter.
→ Please be careful that in case
Fan Filter is not firmly fixed,
foreign substance might be absorbed
from the gap, which can damage
print head or printer.
Right cover installation screw Filter section
Filter
X 2 Change the right cover from the disassembly inside.
- 46 -
Page 52
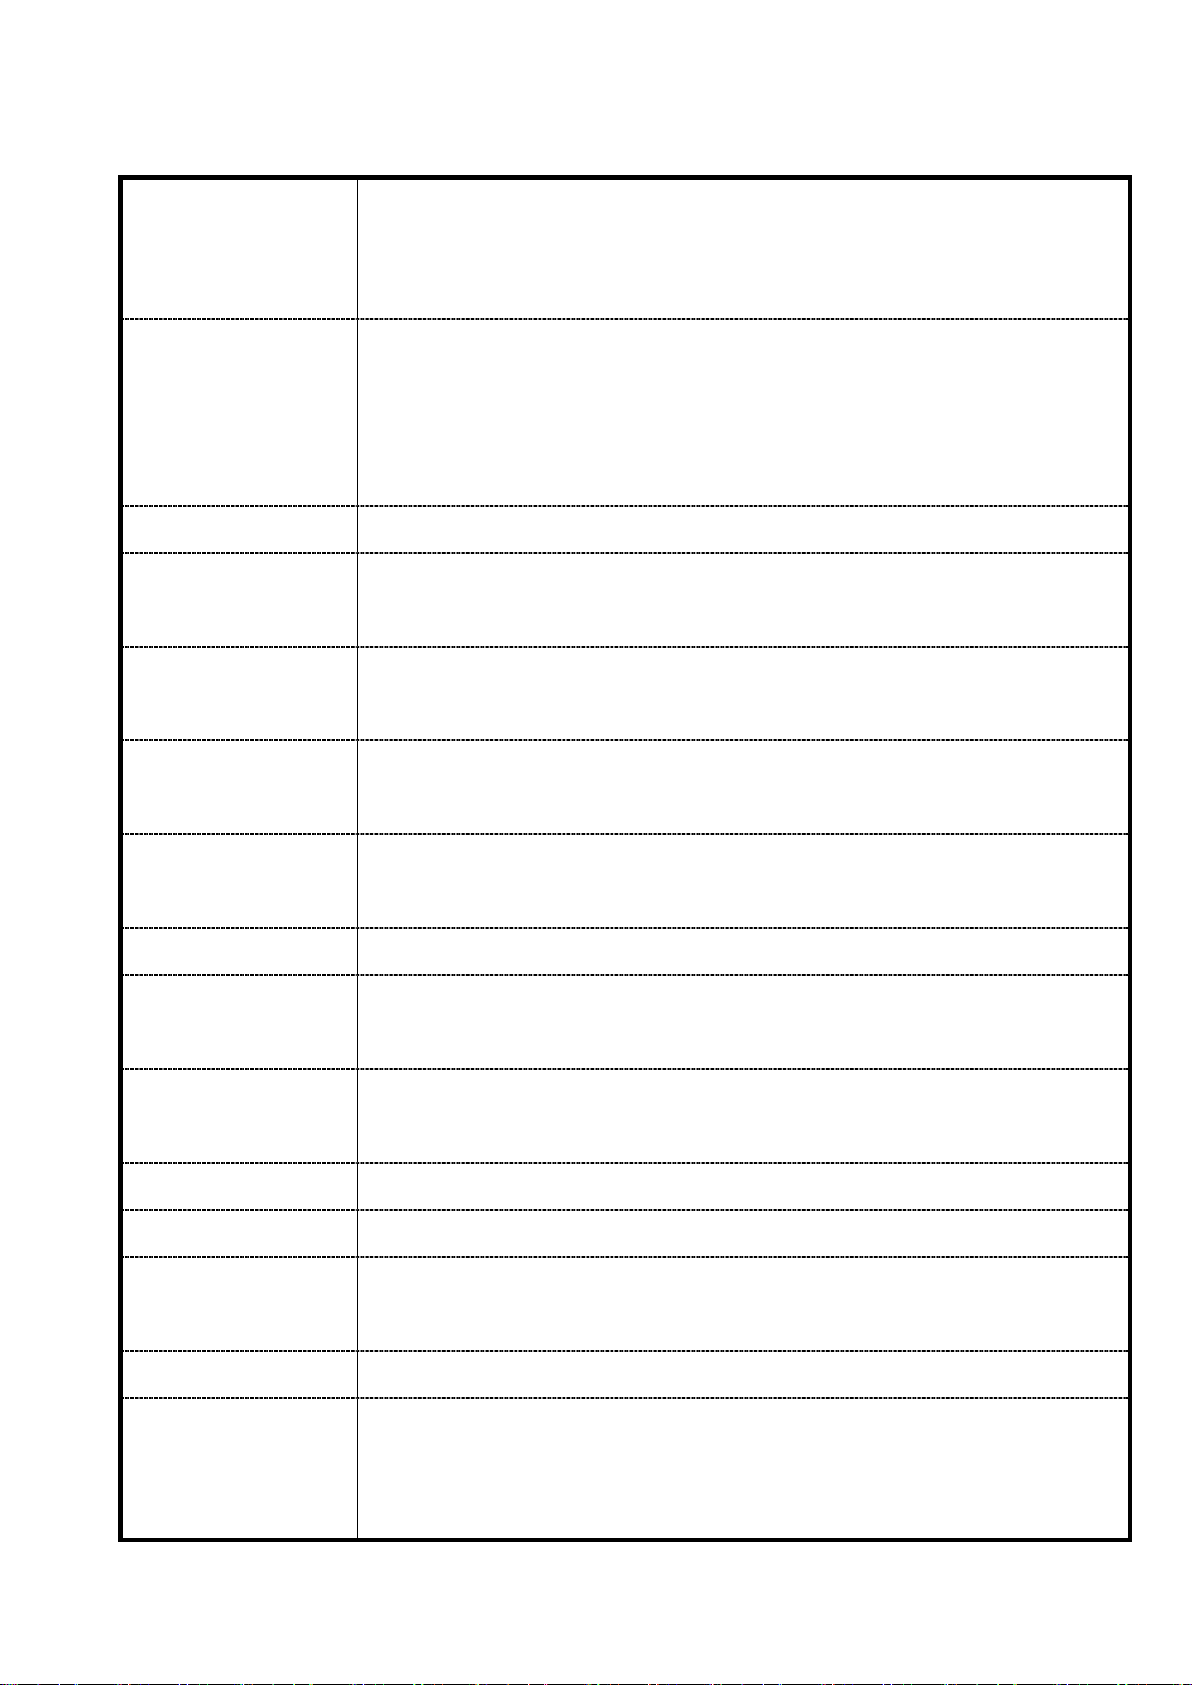
Section 8: Basic Specification
1 Printing Method
2 Printing Media
3 Printing Resolution 300 dpi (11.81 dots/mm)
4 Printing Grayscale
5 Printing Size Max. 85.5mm(card longitudinal direction)
6 Printing Speed 28 seconds / one side. (excluding communication time.) at whole area printing
Image Area : Dye Diffusion Thermal Transfer
Character Area : Molten Type Thermal Transfer
Protective Layer : Molten Type Thermal Transfer system
PVC Card (Conforms to ISO 7810 , JIS X6301 )or made of other materials
with receivable layer on the surface
Size : 54.5mm x 85.5mm
Thickness : 0.76 +- 10% mm
Input : 256 grayscale for each of colors R, G and B
Output : 256 grayscale control for each of colors Y, M and C
x 54.5mm(card transverse direction)
at the size as shown above.
7 Ink Ribbon Standard: 3BP 5 panels (250images)
: BK/OP 2 panels (250images)
8 Flip Turn Feature Standard
9 Supply method
and capacity
10 Interface USB2.0
11 Power supply
12 Power consumption 120W max.
13 Equipment
dimensions
14 Equipment weight 13kg : Main body
100 cards(at card thickness :0.76mm) ; supplied automatically
Ethernet 100BASE-TX (Operation guaranteed)
AC 100~240V 50/60Hz
421mm(H) × 270mm(W) × 331mm(D)
(excluding Stack Box)
15 Option
Encoder
Device code IC encoding Magnetic encoding specification
MD No ISO (Hi-Co, Lo-Co switchable)
- 47 -
Page 53
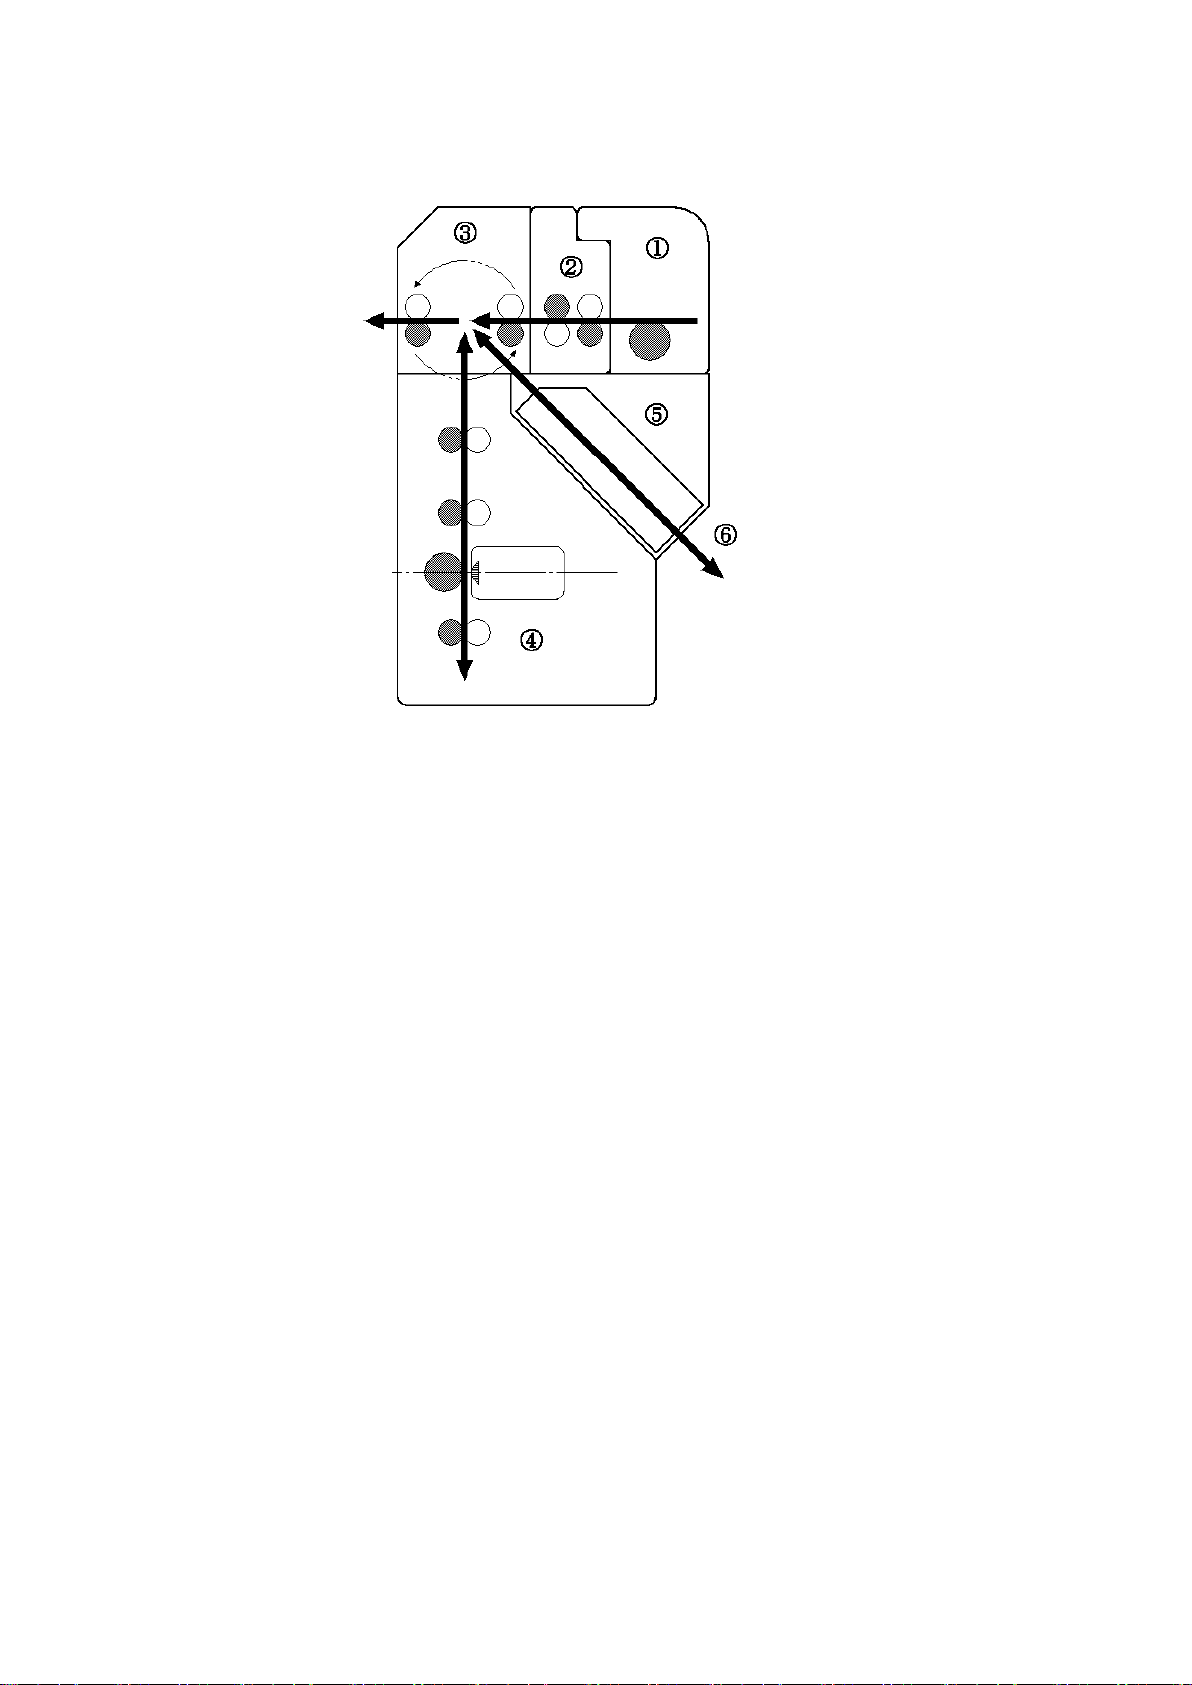
Section 9: Configuration of the equipment
① Card Supply Unit
Picks up a card from the bottom of the stack and feeds to the printer with the Supply Roller.
The slot is 1.5 times of the thickness of the card so that the double feeding will not occur.
② Cleaning Unit
Remove the impediments such as dusts on the surface of the card fed from Feeder Unit.
③ Flip Turn Unit
This unit serves to flip over the card and to switch the card path to printing unit, reject unit or to encode unit.
④ Printing Unit
The card moves through this unit five times to be printed 3 colors, black color and protective overlay coating.
Print Head is positioned Rectangular to the card transport line and pressed against the printing face of the card linked
with the movement of the card. The image is printed by controlling the heat of each cell of the Print Head.
⑤ Encoder (Option) Space
This is the space for attaching the Encoder Unit.
If the Magnetic Encoder is mounted, encoding, reading and verifying is done by the commands from the computer.
⑥ Card Rejection Unit
Because of an error in the printer etc, when the card is required to be rejected, such card is rejected through this
unit.
- 48 -
Page 54
Caution
Card JAM Encode
Card JAM Unknown
Card JAM Remove
Temperature out of
Encoder Write
Encoder Read
Ribbon Empty
Ribbon Type
Ribbon Wind up
Card Empty
Section 10: Trouble and Countermeasure
10 - a) Troubles displayed on the operation panel
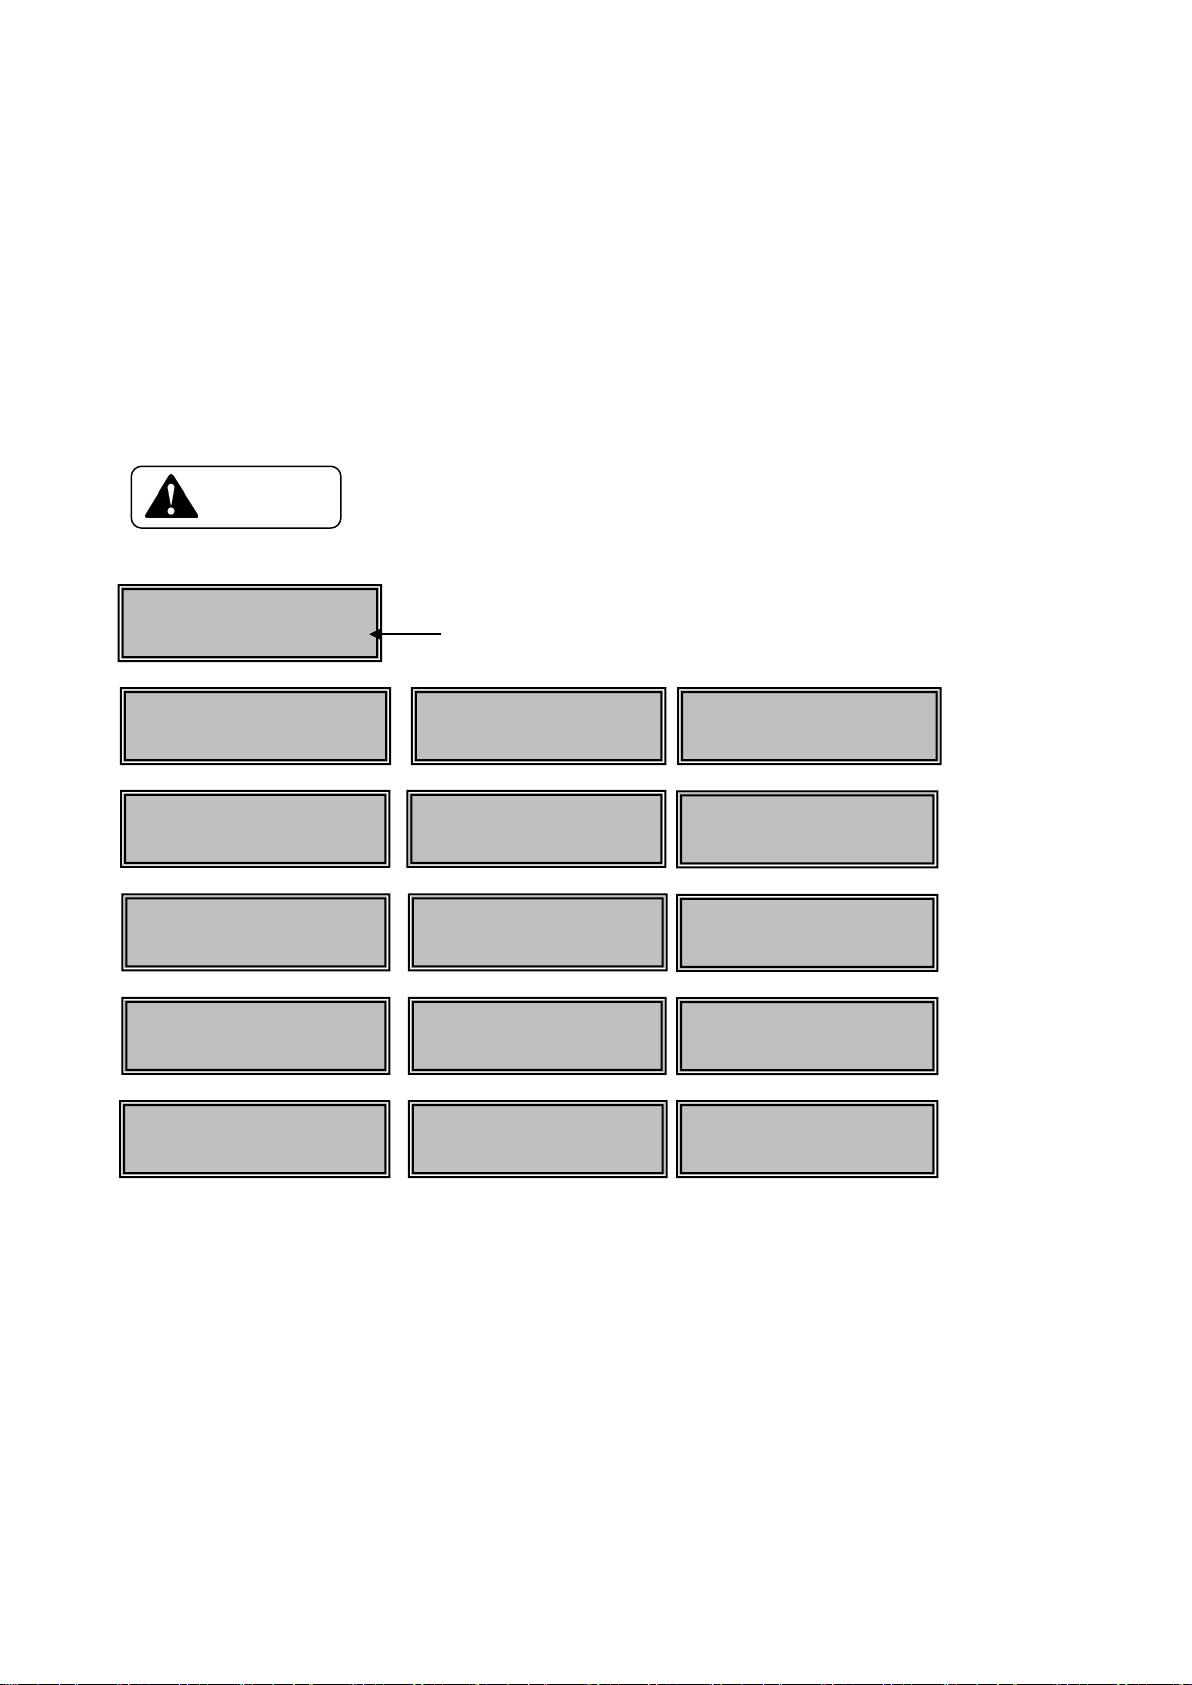
If a trouble occurs, the red lamp on the operation panel turns ON and the nature of the trouble is shown on the LCD panel.
In addition to the indication of ribbon empty and card empty, almost all kinds of troubles such as setting of the ribbon type,
position of card jam, etc., can be checked with the messages on the LCD panel
Display of trouble on the LCD panel
If messages which is not listed below appears or the trouble is not released, please contact the dealer.
□ When contacting the dealer, please inform the error message and the error code which is shown
on the lower right hand of the LCD panel.
○○-○○
Card JAM Feeder
Area ○ ○○-○○
Area ○ ○○-○○
Front Cover is Open
○○-○○
Error ○○-○○
○○-○○
Error Code + Additional Code
Card JAM F. Turn
Area ○ ○○-○○
○○-○○
Top Cover is Open
○○-○○
Error ○○-○○
Incorrect ○○-○○
Card JAM Print
Area ○ ○○-○○
the Card ○○-○○
Range ○○-○○
Check Ink Ribbon
○○-○○
Miss ○○-○○
Basic operation to release troubles
By pressing the Clear key after releasing the trouble, the printer returns to "Ready to Print".
When there are more than one errors simultaneously, such as "Cover Open" and "Card Empty", the error of higher
priority( "Cover Open" in this case) is displayed on the LCD panel. Close the cover and press Clear key. Then, the display
changes to "Card Empty". Load the cards and press Clear key to return to "Ready to Print". When the message "Cannot
Recover/Please Reset" is displayed, remove
the trouble and press and hold the Clear key for more than 3 second. Release the Clear key after checking the display has been
changed to "Reset". The printer is reset to the status of immediately after the power ON. Take out the ribbon cartridge and
watch the ink ribbon when "Ribbon…" appears on LCD. In this case, the ribbon cartridge can be taken out without Ribbon
Change key pressed.
"Please Check Ink Ribbon" will be appeared on LCD when Clear key pressed without taking out the ribbon cartridge.
- 49 -
Page 55
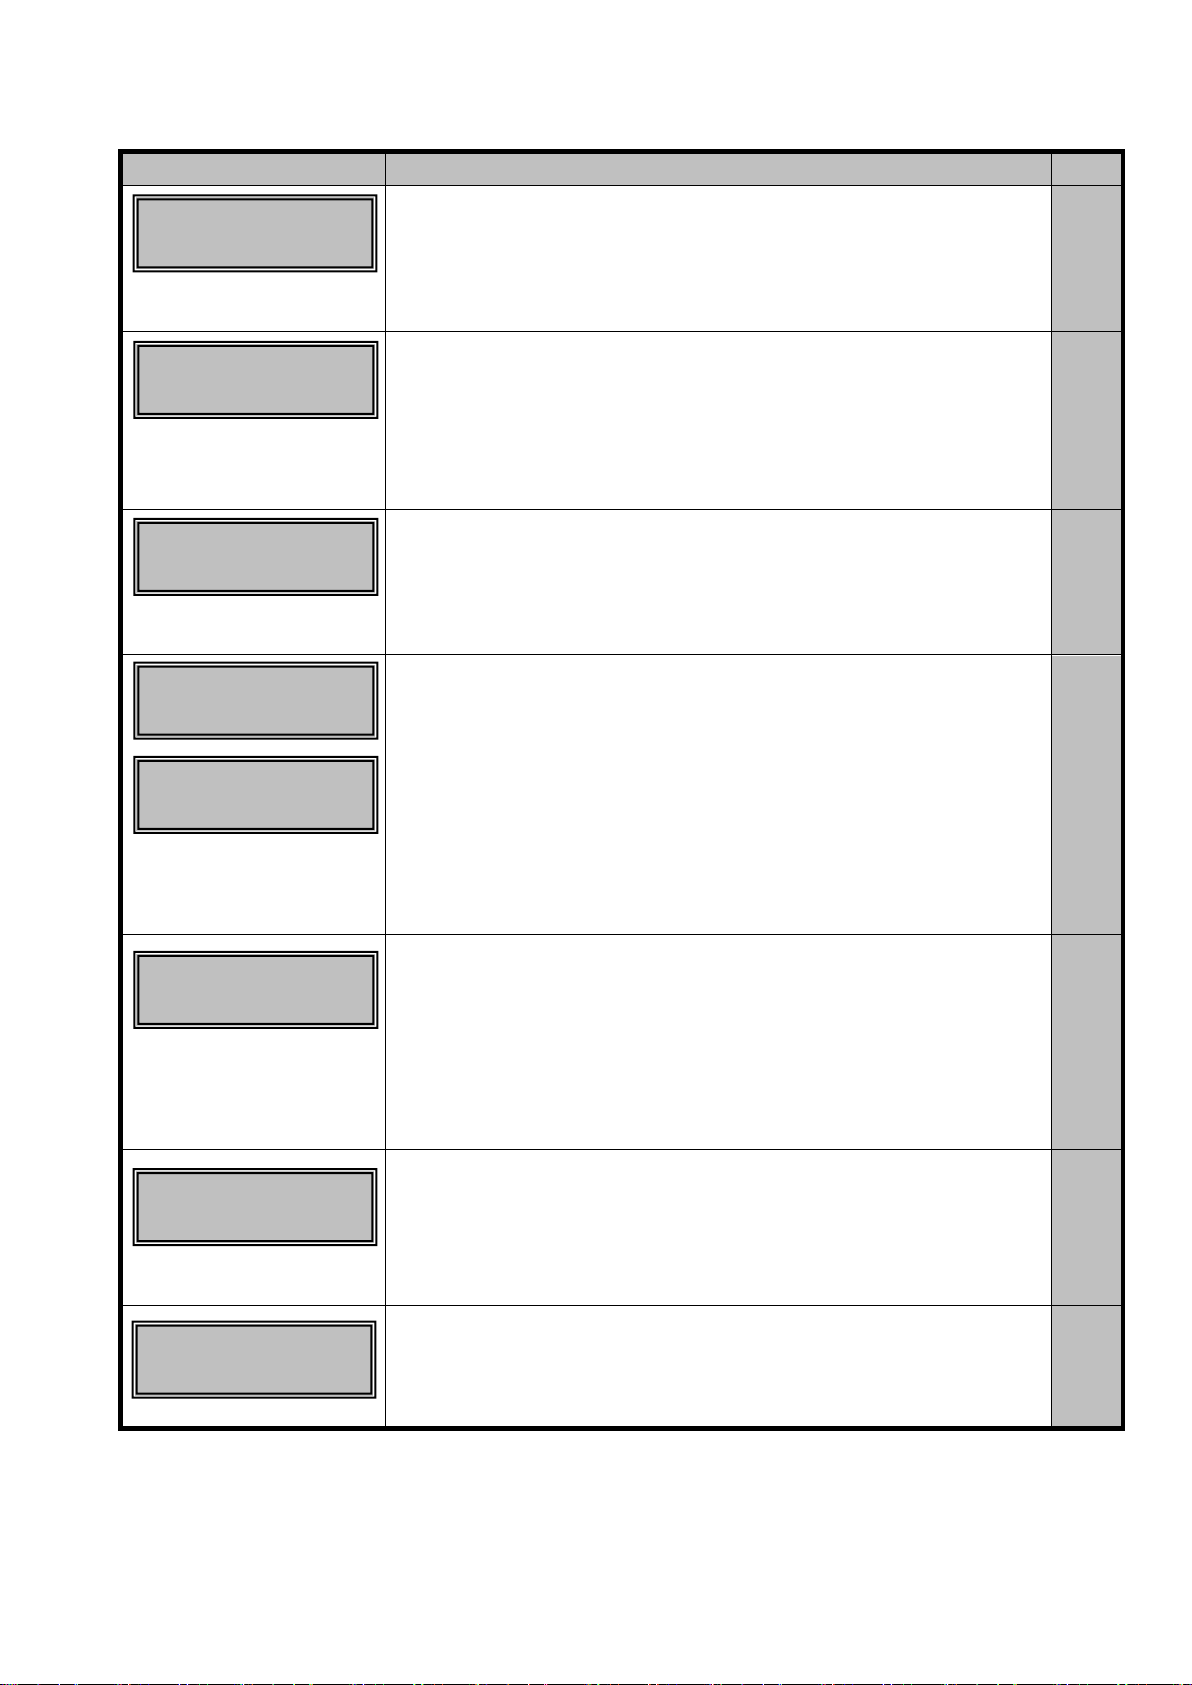
Message on LCD
Cause/ Countermeasure
Ref.
→ Check if the type of the card being used is correct.
-
The ink ribbon is finished
Trouble shooting
Card Empty
○○-○○
□ Card is empty
Front Cover is
Open
○○-○○
□ Front Access cover
is open
Top Cover is
Open
○○-○○
□ Top cover is open
Encode Write
Error ○○-○○
Encode Read
Error ○○-○○
□Some error occurred
during Mag. encoding
◆ Card is empty.
→ Supply cards.
◆ Front Cover is not closed correctly.
→ Close the cover positively.
◆ Top Cover is not closed correctly.
→ Close the cover positively.
◆ The card is set incorrectly (wrong side up, right side left)
→ Set the card correctly
◆ There is scratch or stain on the magnetic stripe.
→ Replace with other card.
◆ Mismatching of the magnetic characteristics
→ Check the setting of type on the encoder.
P.32
-
-
P.32
-
-
Temperature out
of Range ○○-○○
□ Temperature of the print
head or inside of the
equipment is out of range.
Check Ink Ribbon
○○-○○
Ribbon Empty
○○-○○
◆ Temperature around equipment is out of range.
→ Make sure of ambient temperature is in the range of what is mentioned in Section 3
◆ This message is shown when the Clear key is pressed without
taking out the ribbon cartridge when the ink ribbon related errors
→ Pull out the cartridge and check the ribbon, then release the error
and press the Clear key.
◆
→ Replace with the fresh ink ribbon.
P.18
P.34
P.34
- 50 -
Page 56
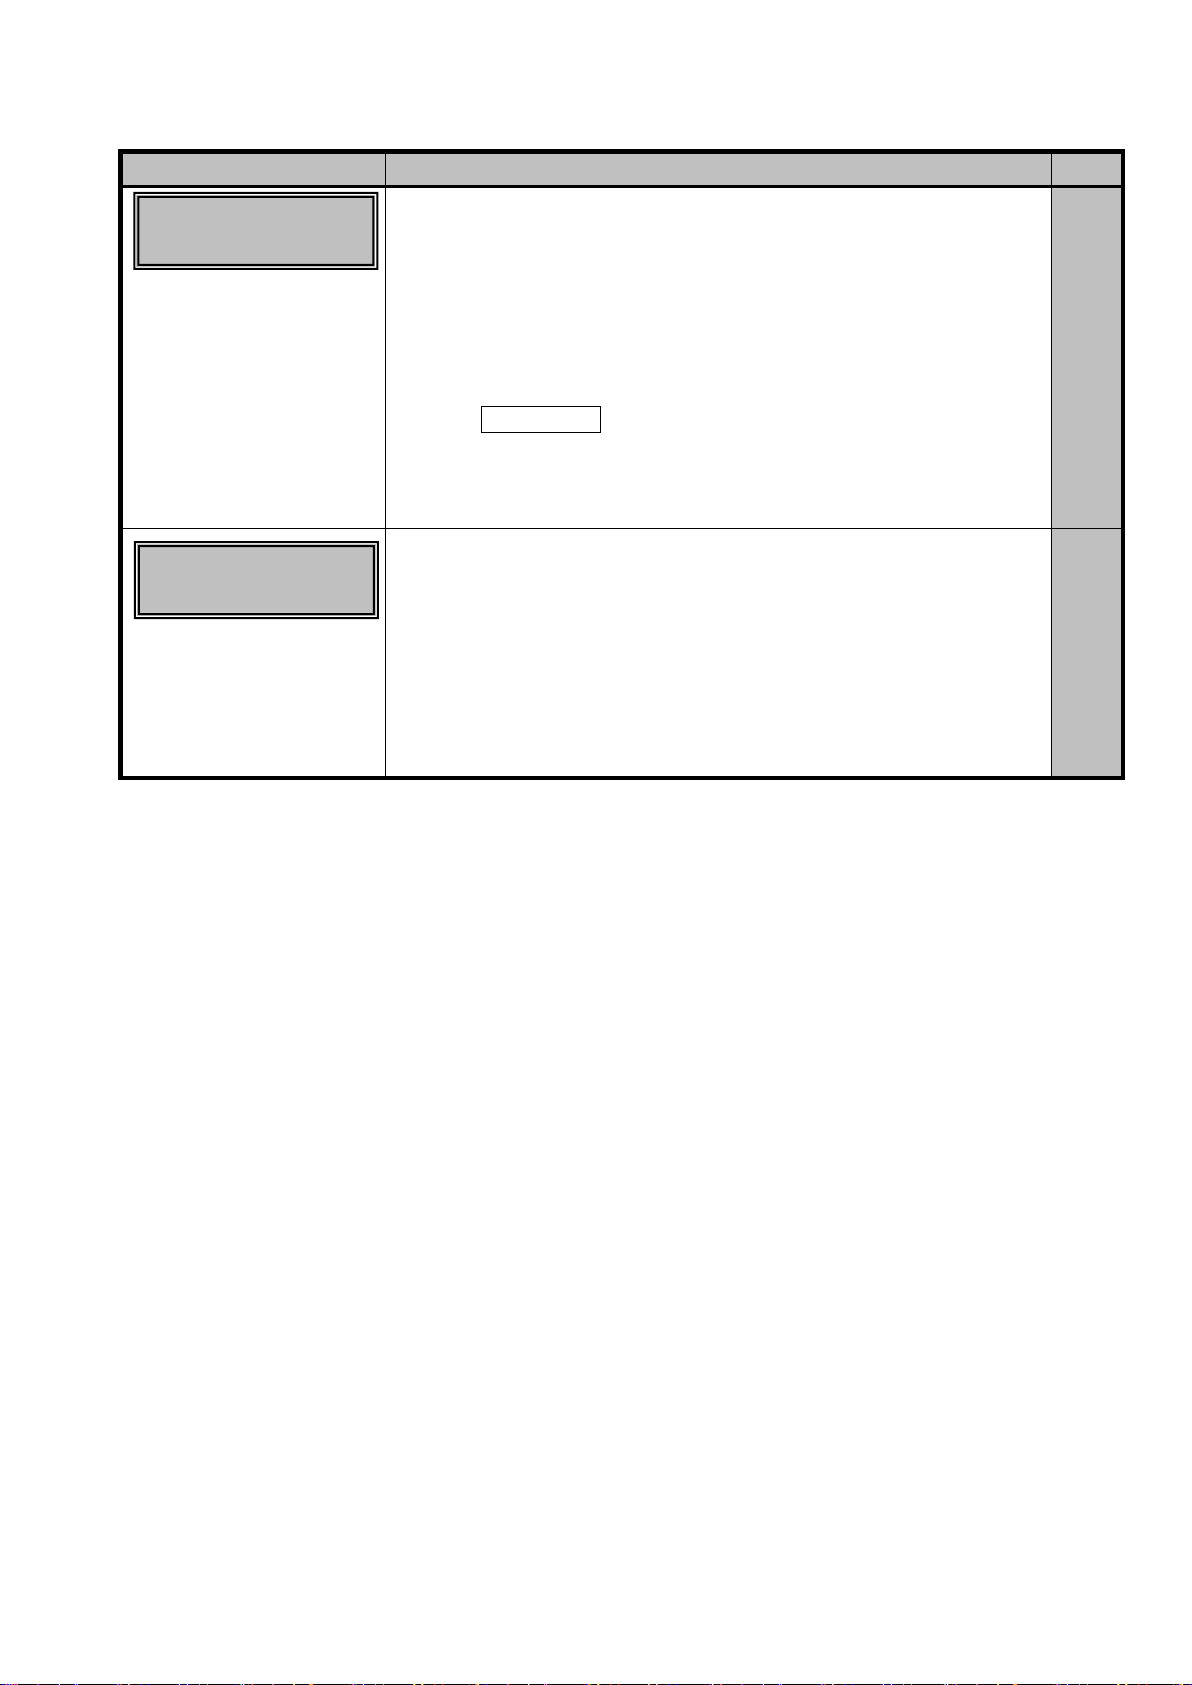
Message on LCD
Cause/ Countermeasure
Ref.
Check the ink ribbon.
Trouble shooting
Ribbon Type
Incorrect ○○-○○
Ribbon Wind up
Miss ○○-○○
◆ The ribbon typesetting of the printer and the ribbon type actually being used
do not correspond.
→ Pull out the ribbon cartridge and check the type of the ribbon in
the cartridge. If the type is correct, change the setting of the
operation panel to the correct one.
◆ The ribbon cartridge has been taken out without pressing the
MENU/ Ribbon Change key while the ink ribbon is not used up
To the end.
→ The printer becomes to error and normal printing is not possible.
◆The ribbon typesetting of the printer and the ribbon type actually being used
do not correspond.
The ribbon sticks to the card and card jam error will occur.
→Pull out the ribbon cartridge and peel off the ribbon from the card
and turn the take up bobbin shaft some(2-3) turns.
If the ribbon is broken, use Scotch tape etc. to patch up and roll up.
Check the type of the ribbon in the cartridge. If the type is correct,
change the setting of the operation panel to the correct one.
P.34
P.34
P.34
- 51 -
Page 57
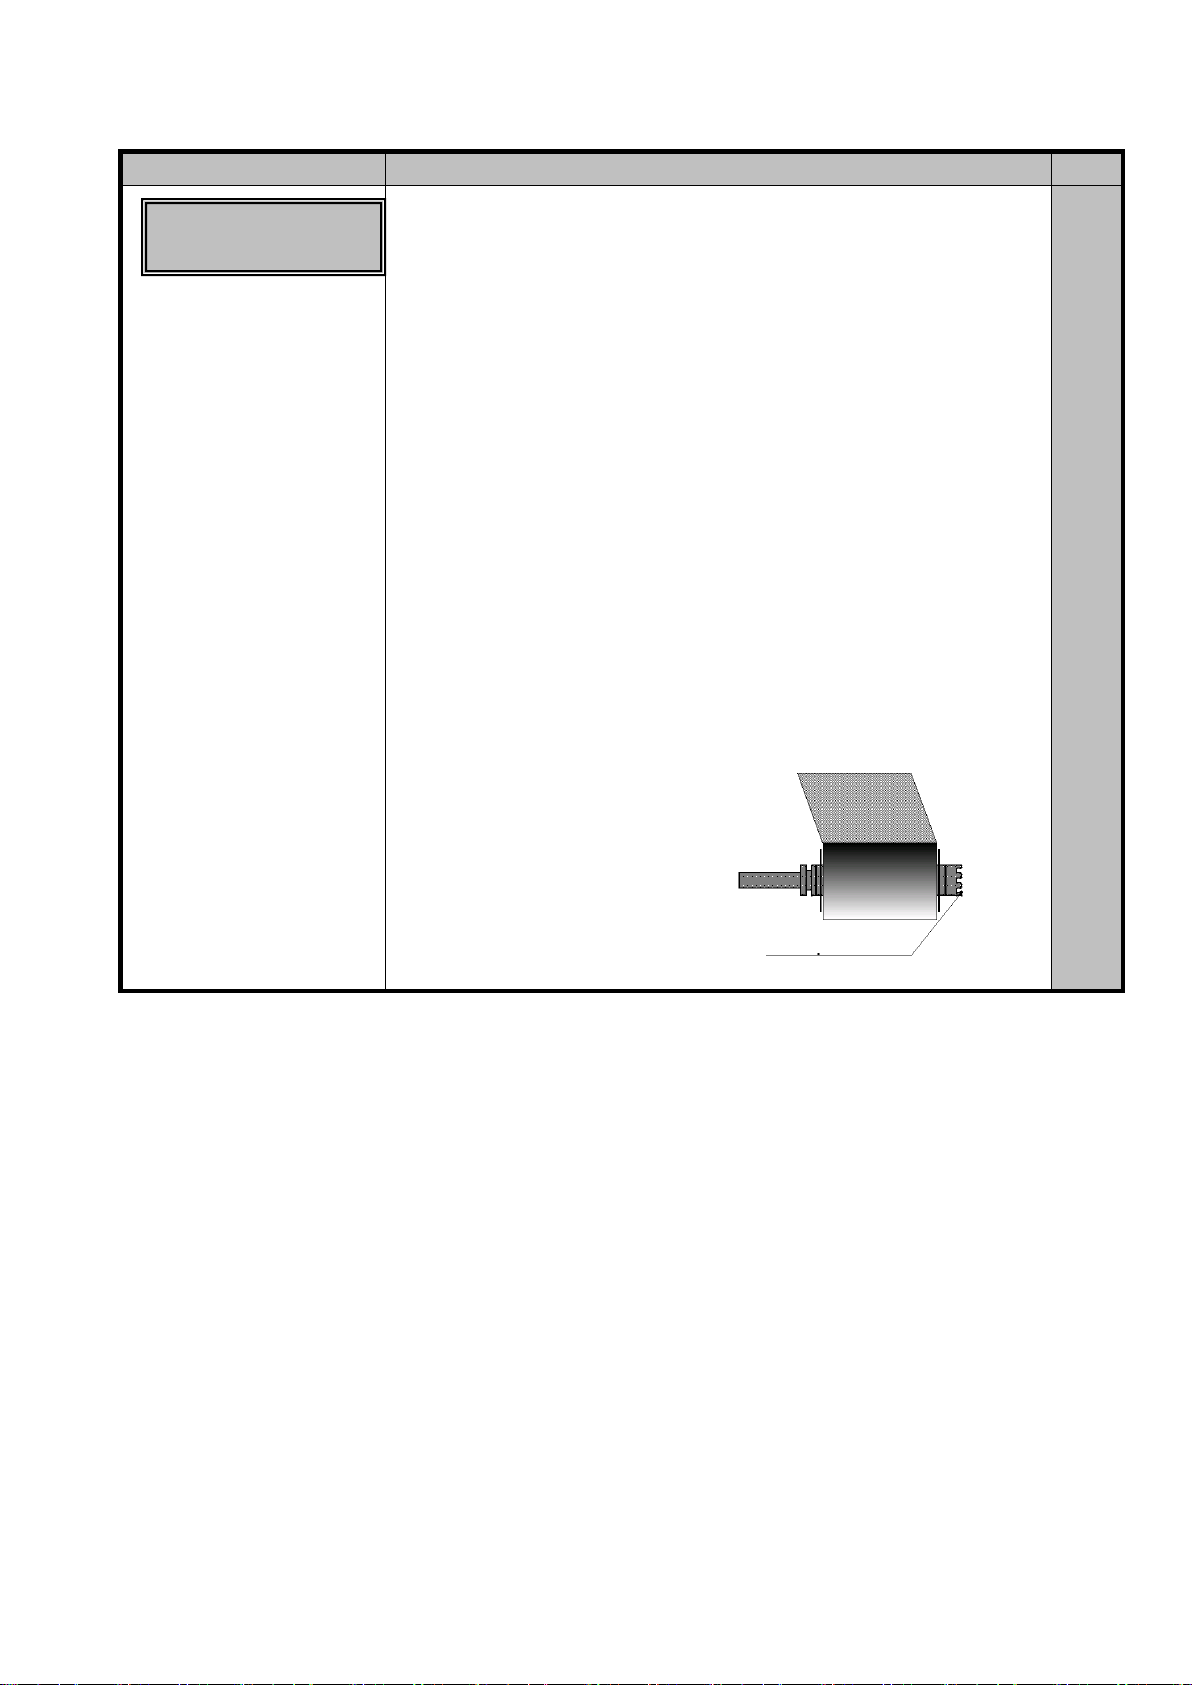
Message on LCD
Cause/ Countermeasure
Ref.
Check the engagement
Trouble shooting
Ribbon Wind up
Miss ○○-○○
◆ Ink ribbon is not set correctly.
→ Check whether the ink ribbon is correctly set in the cartridge.
◆ Ribbon transport roller is dirty
→ Clean the roller.
◆ Improper card is used.
If a card which is already printed with this printer is used,
the ribbon sticks to the card and card jam error will occur.
→ Peel off the ribbon from the card and roll up the ribbon2-3 turns.
If the ribbon is broken, use Scotch tape etc. to patch up and roll up.
It may require repairing depending of the condition.
◆ The engagement teeth of the bobbin is broken by dropping etc.
→ Replace with the normal bobbin.
If the take up bobbin is damaged, unwind the used ribbon or cut off the
wound up part of the ribbon, attach the end to the normal bobbin and
wind up to the next frame.
teeth of the bobbin.
P.34
P.36
P.34
P.34
- 52 -
Page 58
Area
Location
~
Caution
Card JAM Feeder
Card JAM Print
10 - b) Releasing card jam
Most of the card jam errors are caused by dirt and stain of the card transport rollers.
If the rollers are dirty, card jam error frequently occur. To prevent this, periodic roller cleaning as described in paragraph
6 is recommended.
□ Depending on the position of the card jam, you may have to put your hand in the printer. Please be careful when doing so and
be sure to turn OFF the power before beginning the work.
Usually, jammed card can be ejected automatically to the Card Eject Exit by pressing Clear key on the operation panel. If the card
cannot be ejected in this method, remove the jammed card manually. The location(Block) of card jam is shown on the LCD
panel.
The figures next to the "Card Jam Area" indicates the card jam location more closely.
Area ○ ○○-○○
Card JAM F.Turn
Area ○ ○○-○○
Area ○ ○○-○○
Card JAM Encode
Area ○ ○○-○○
01,02
02,04
03
08
04
05
08
09
Inside the Feeder Block
Between Feeder Block and Flip Turn Block
Within Flip Turn Block and eject
Between Flip Turn Block and Encoder
Between Flip Turn Block and Print block
With in Print Block
07
Between Flip Turn Block and Encoder
Within Encoder
- 53 -
Page 59
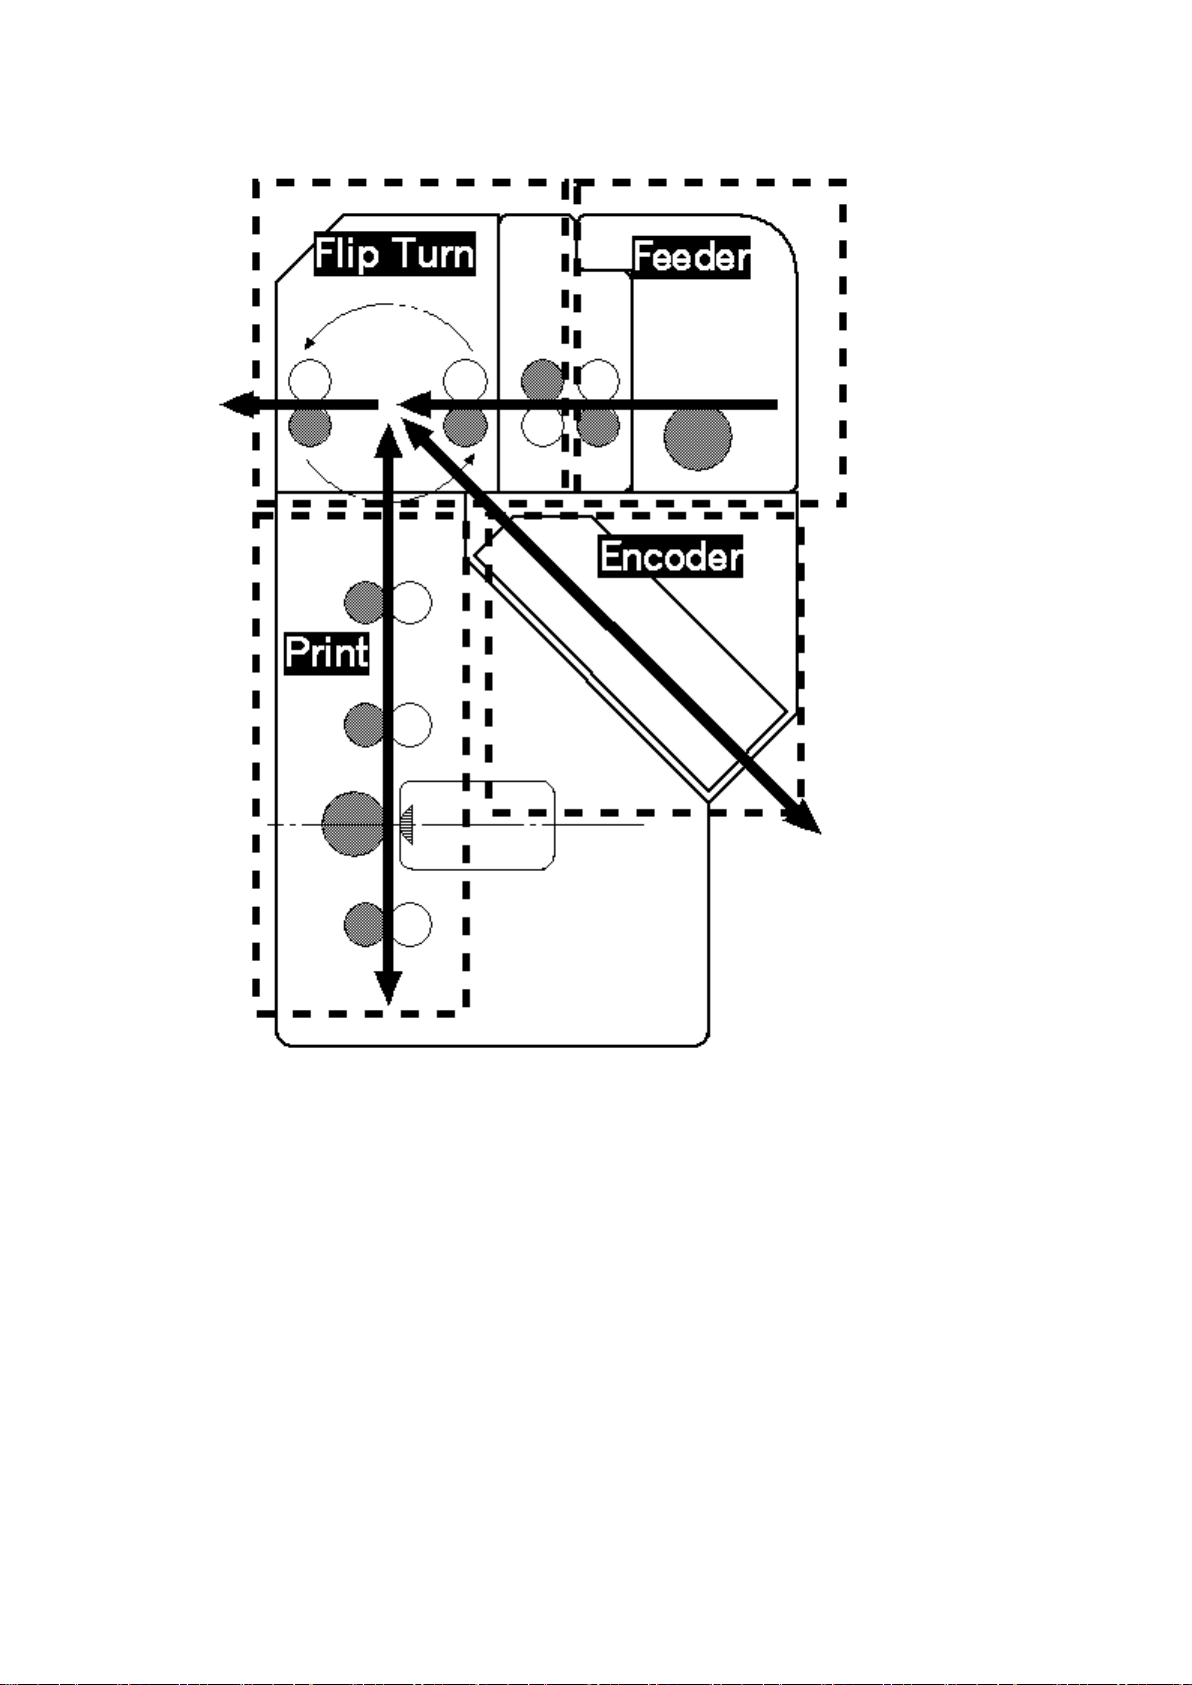
Block Layout
- 54 -
Page 60
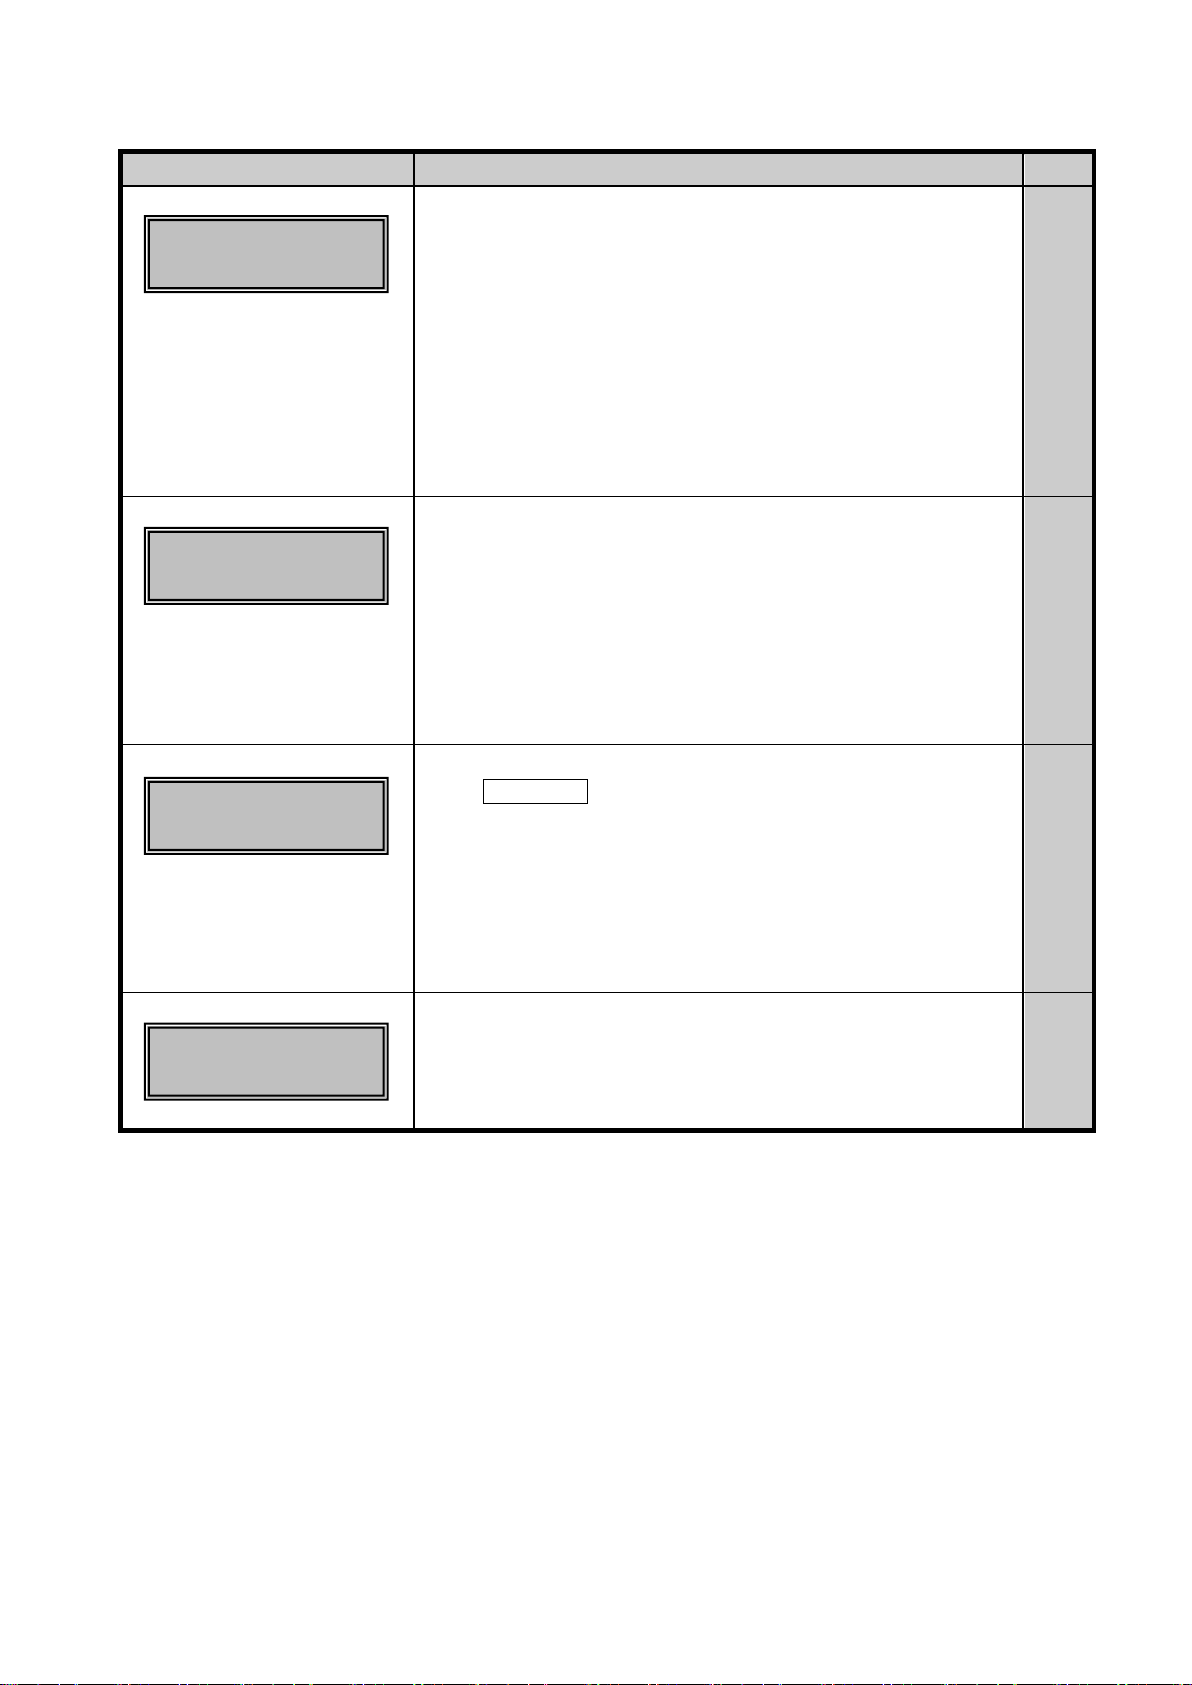
Ref.
Card JAM Encoder
Card Jam which cannot be released by Clear key
Message on LCD
Card JAM Feeder
Area ○ ○○-○○
Card Jam F.Turn
Area ○ ○○-○○
Card JAM Print
Area ○ ○○-○○
Area ○ ○○-○○
Cause/Countermeasure
◆ Card is not taken into the printer and remaining in the Feeder Block.
→ Remove all cards in the Feeder and set them again after separating
the edges of the cards. After setting, press Clear key to recover the
error. In case this error continues to occur. Then make a cleaning of
the Supply Roller.
In case this error continues to occur even after the above treatment,
please call your dealer. If it is caused by the cards, such as the face
condition, burr, bend, materials, etc., it is hard to judge visually.
Please use the specified cards by the dealer.
◆ A card is stuck in the Flip Turn Block
→ First, turn OFF the power.
Open the top cover and remove the card. If necessary, rotate the
green handle and / or green disk to transport in the flip turn unit
to move the card to the easy position to take out. Press Clear key
after the card is removed.
If this error repeats, clean the rollers in the Flip Turn Block.
◆ A card is stuck in the Print Block
→ Press Ribbon Change key and take out the ribbon cassette before
turning OFF the power.
Remove the stuck card in the same manner as Flip Turn Block.
If necessary, rotate the transport knob and output the card to the exit.
By rotating the transport knob, print rollers are rotated.
If this error repeats, clean the print rollers.
◆ A card is stuck in the Encoder Block
→ Please contact the dealer.
P.40
P.38
-
P.39
-
- 55 -
Page 61
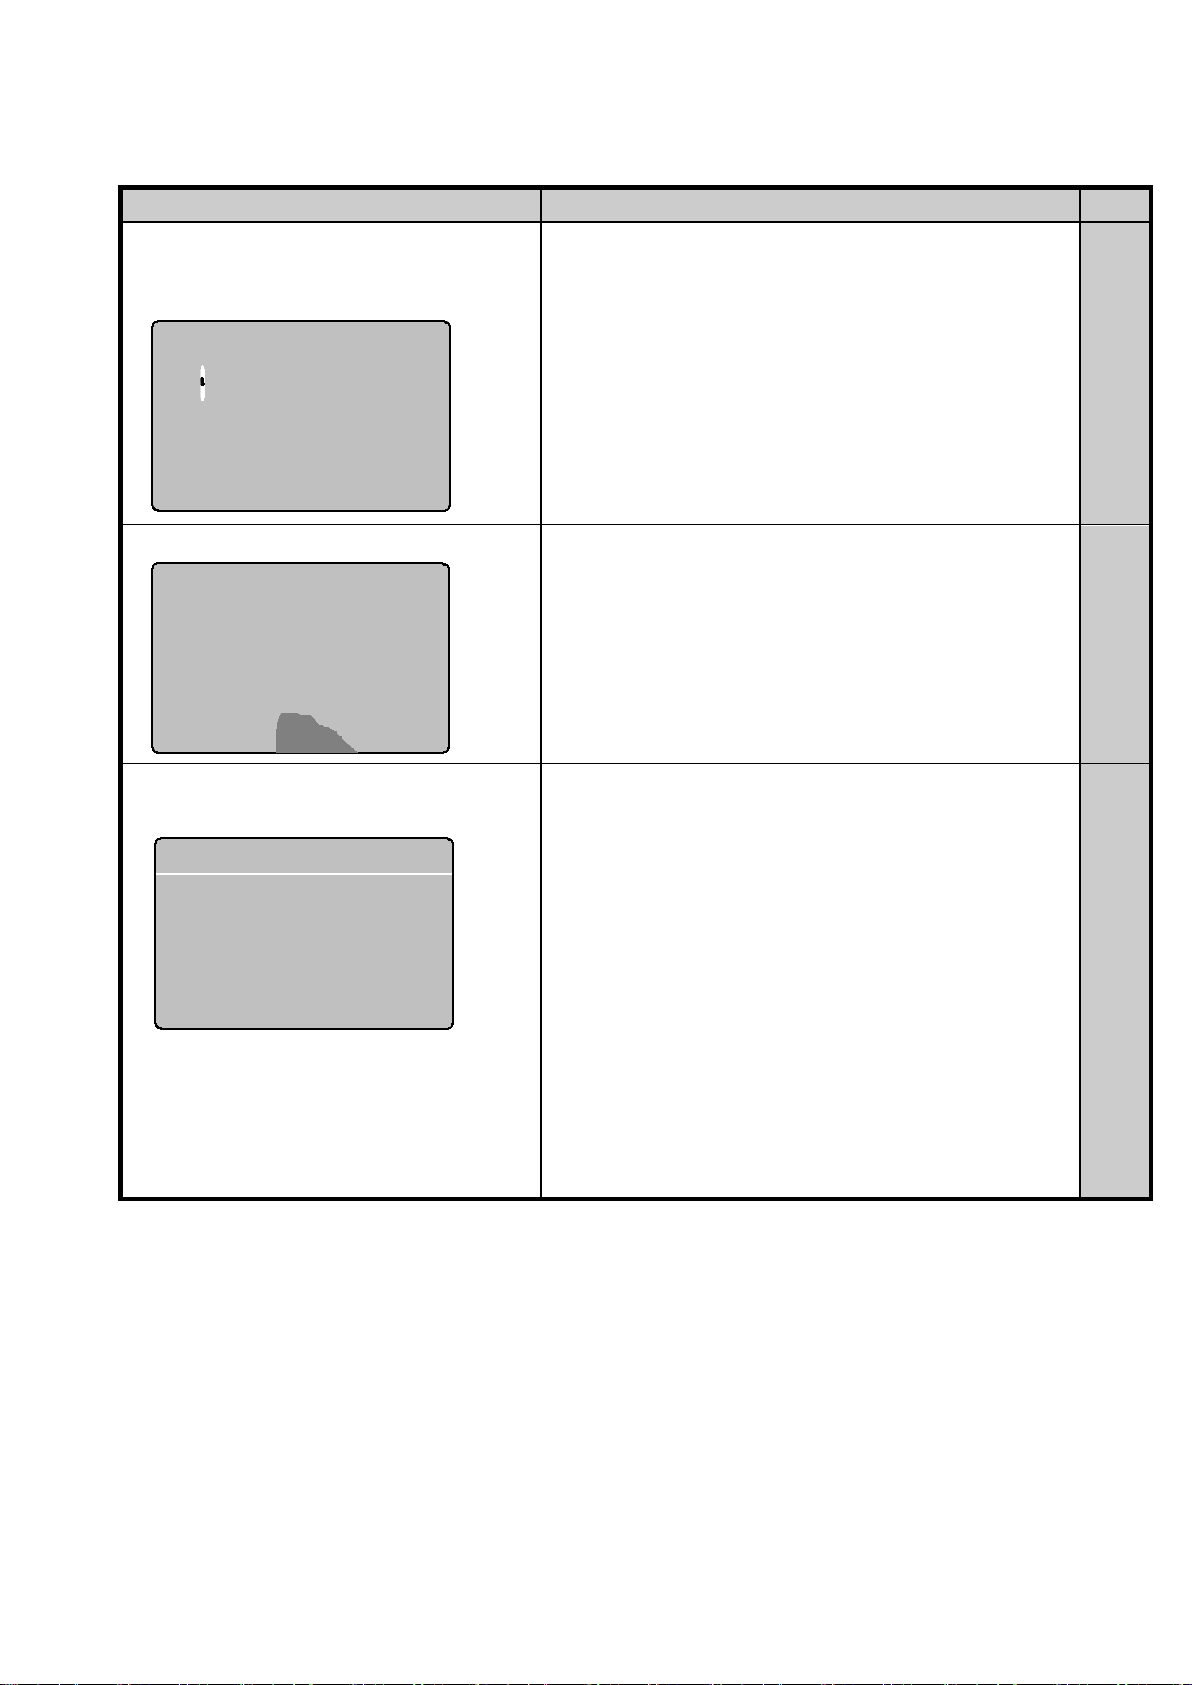
Ref.
10 - c) Troubles which are not displayed on the operation panel
Troubles relating to print image
Problem
◆ Color drop
Partial drop or discoloration
The dust may disappear after printing.
◆ Abnormal coloring of an amorphous area.
◆ A thin unprinted line along the card
transport direction appears.
Cause/Countermeasure
◆ If a dust is on the surface of the card when printing,
the part of the dust remains unprinted
→ Do not use the card having a dust on the face.
→ Do not use the printer in the dusty area.
→ Clean the rollers.
◆ Grease of the fingertip is transferred to a part of the
card causing abnormal printing.
→ Do not touch the printing surface of the card.
◆ A dust adheres on the print head.
→ Clean the print head.
◆ If the problem is not solved by head cleaning, a part of the heat
element of the head is damaged.
→ Replace with the new head.
The damage of the print head is caused by biting a solid particle
between the head and the card while printing. To avoid this, do not
use a dirty card or leave the ribbon cartridge in the dusty place
when taking out from the printer. If the cartridge is taken out, wind
up the frame that has been exposed on the window before re-setting
it to the printer.
P.32
P.18
P.36
P.32
P.41
P.44
- 56 -
Page 62
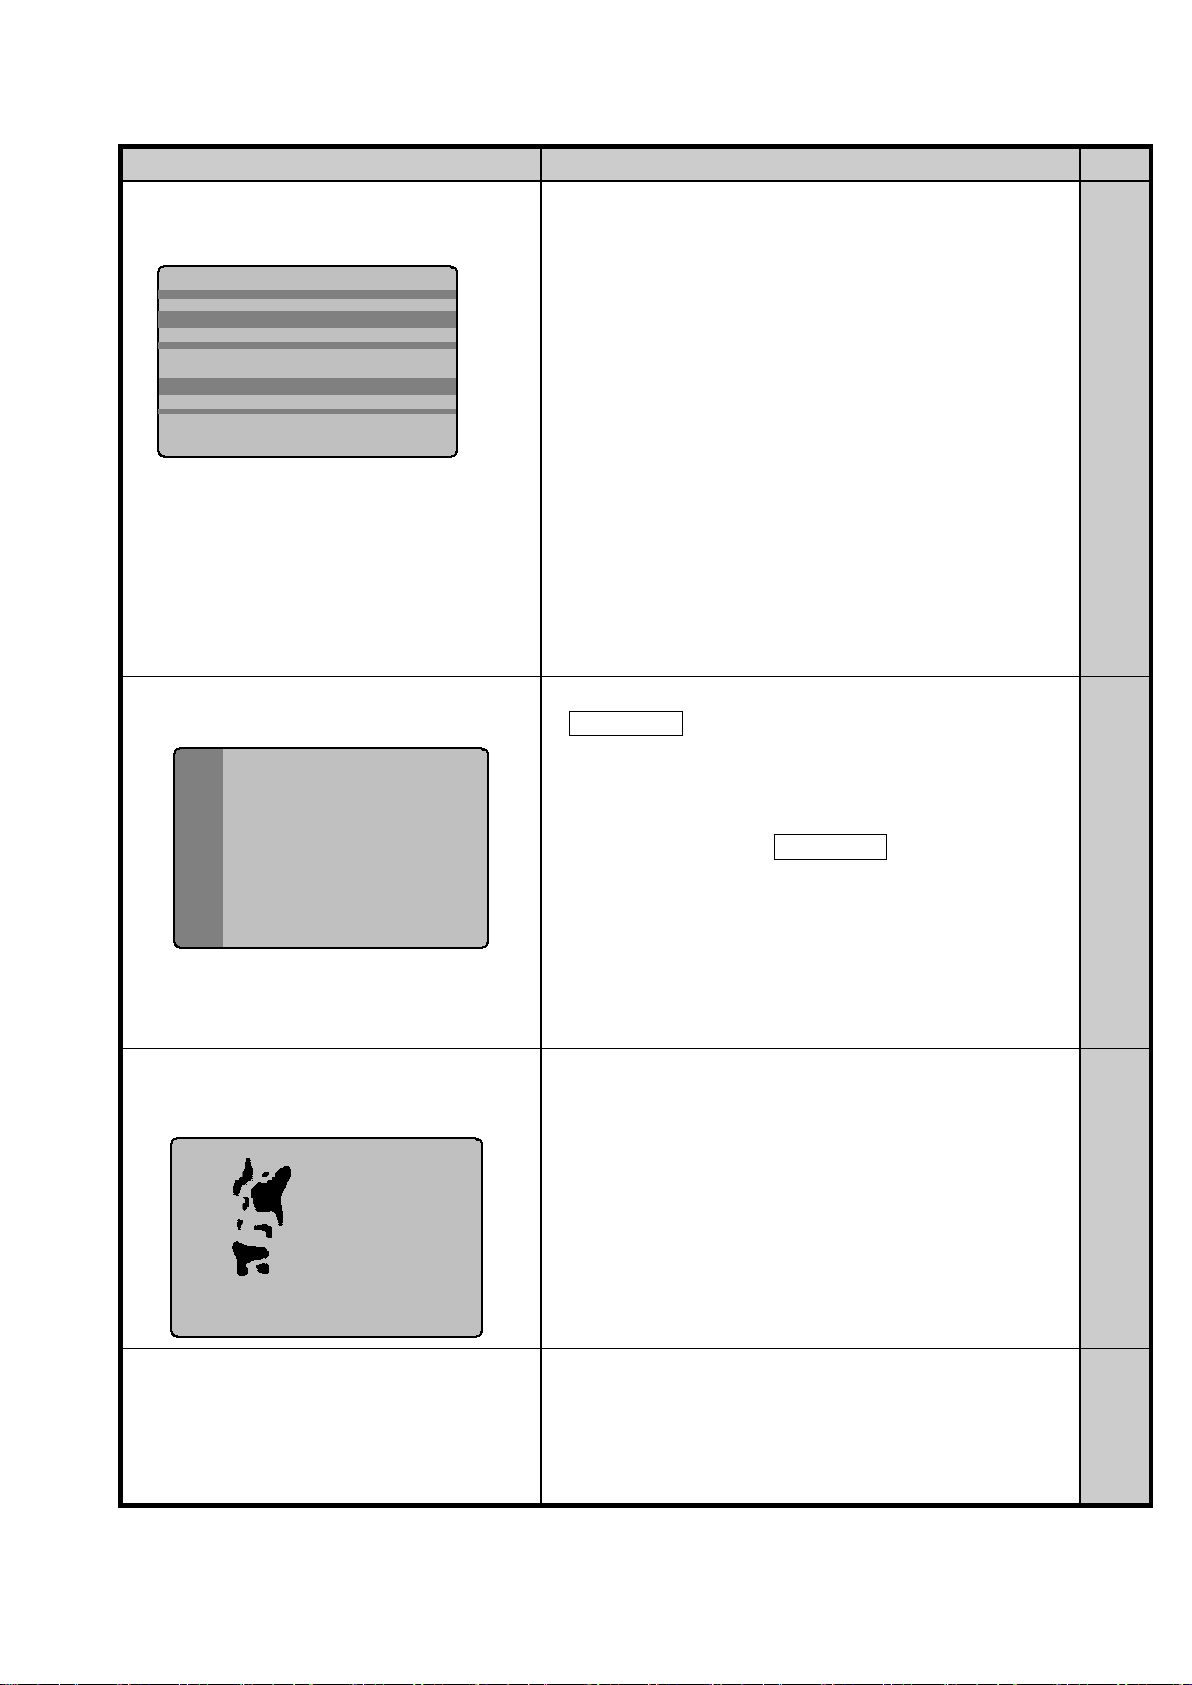
Ref.
Problem
◆ Random bands appears in the direction
of the card transportation.
◆ The color of the printed image suddenly
changes in the middle.
◆ Un supposed Dark area appears on the
Printed image.
◆ The print head is heavily stained.
→ Clean the print head.
◆ More than 20,000 frames are printed.
→ Replace with a new print head.
◆ When the print head is replaced, the data is not
installed at the same time.
→Install the data contained in CD-ROM of which
come with the head.
→ The print head for replacement comes with each
corresponding CD-ROM having the same serial
number as the head. Check and make sure that the
CD-ROM with the same number
is installed. as the print head
◆ If the ribbon cartridge is taken out without pressing
Ribbon Change key and re-set again, the first frame
is printed and output with this trouble.
→ When taking out the ribbon cartridge with remaining
ribbon, do not forget to press Ribbon Change key
before taking out.
The message "Ribbon Type incorrect" is shown on
the LCD display. This does not mean the machine
trouble but means incorrect operation.
◆ This problem is caused by a material of the card.
→ Please use the specified cards by the dealer
Cause/Countermeasure
P.41
P.44
P.44
P.34
P.32
◆ White card ( unprinted ) came out.
◆ If the color image data only is transmitted while the
KO ribbon only is set, the card is output without
printing.
→ Set YMCKO ribbon when printing the color image.
- 57 -
P.11
Page 63
Ref.
Other troubles
Problem
◆ Power does not turn ON.
◆ Data cannot be transmitted to
the printer.
◆ Cut of the ribbon.
.
Cause/Countermeasure
◆ Check the connection of the power cord.
→ Please call your dealer.
◆ Check that the Printer ID number is not conflicting
with other device(s).
◆ Turn OFF the power of the system and turn ON
again. Please be sure that the printer and the other
devices start before the computer.
◆ Check the connection of the cables
◆ Print roller is dirty
→ Clean the roller.
Refer to 6-c) Cleaning of the Print Rollers
-
P.20
-
P.19
P.39
- 58 -
Page 64

4Y5-8690-040 © CANON FINETECH NISCA INC. 2018
 Loading...