

Page 1
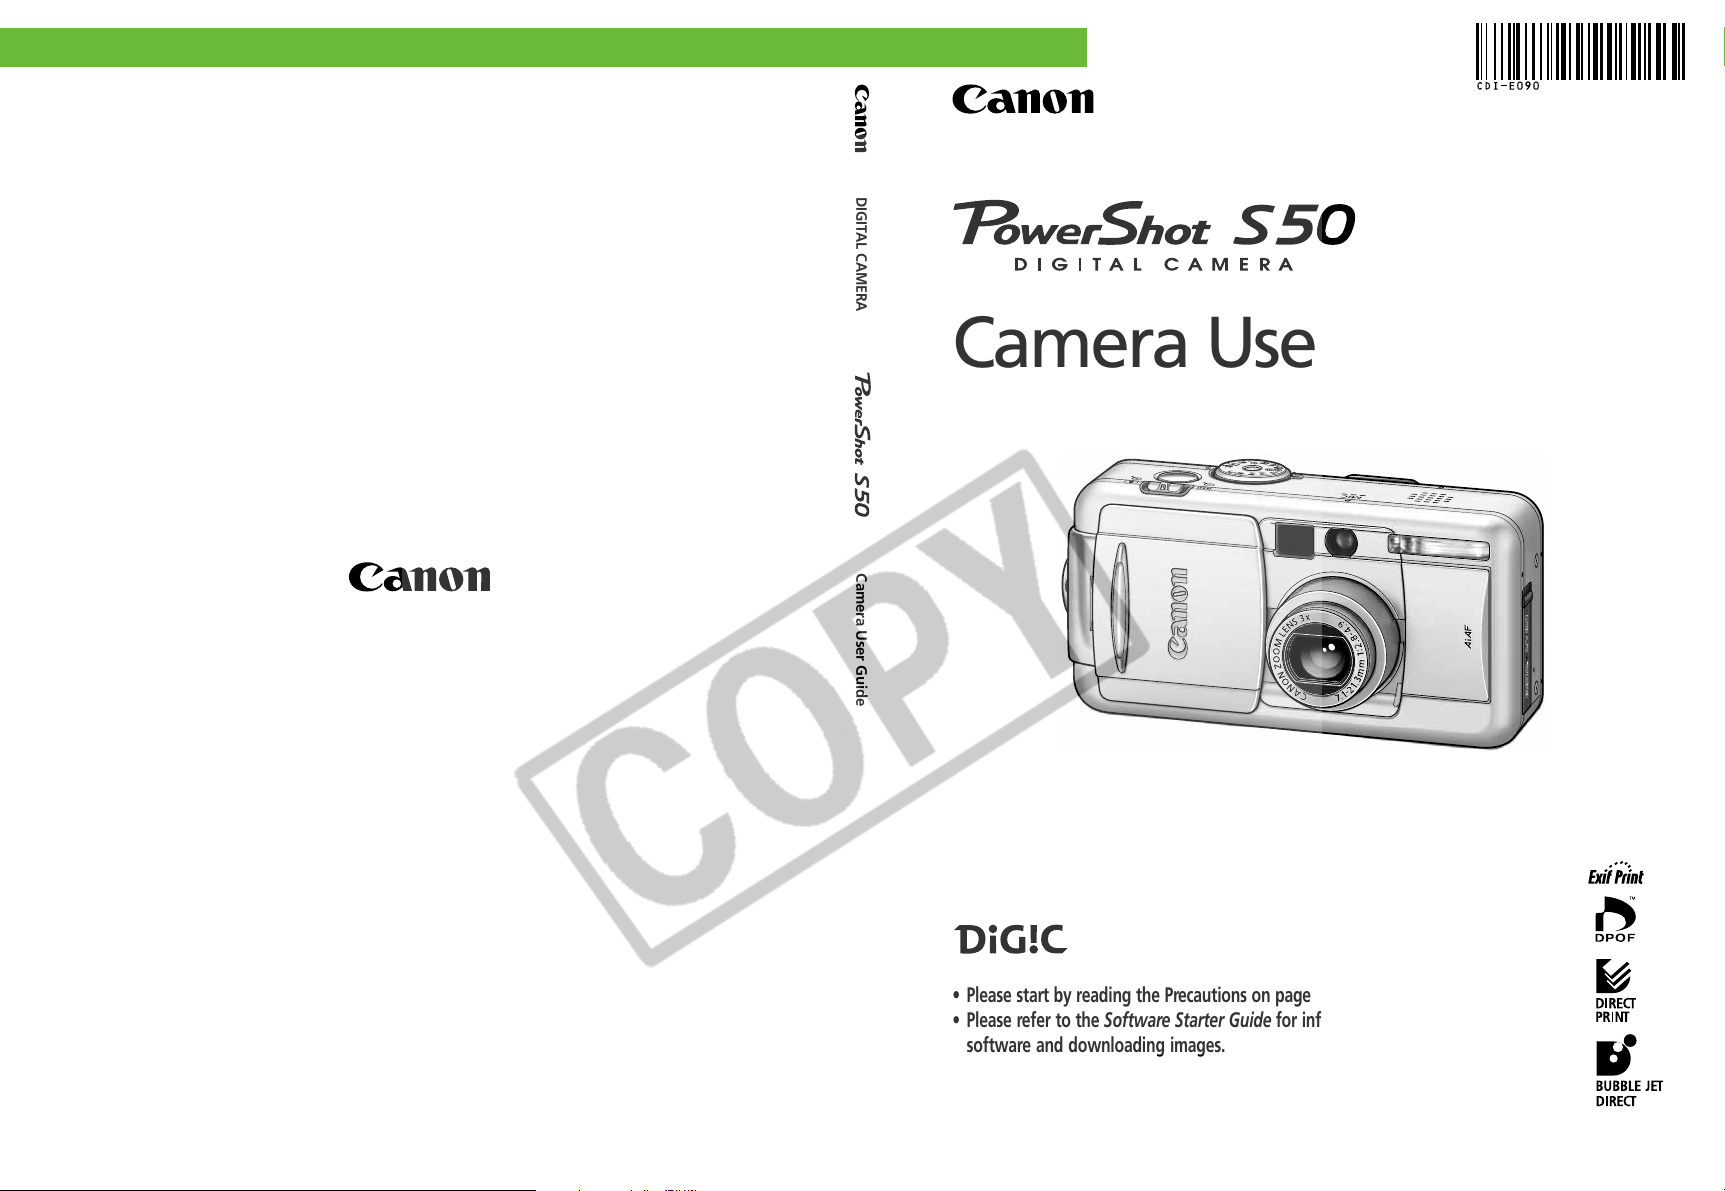
ENGLISH
DIGITAL CAMERA
Camera User Guide
Camera User Guide
CDI-E090-010 XXXXXXX © 2003 CANON INC. PRINTED IN JAPAN
• Please start by reading the Precautions on page 4 of this manual.
• Please refer to the Software Starter Guide for information on installing the
software and downloading images.
• Please also read the printer user guide included with your Canon printer.
Page 2
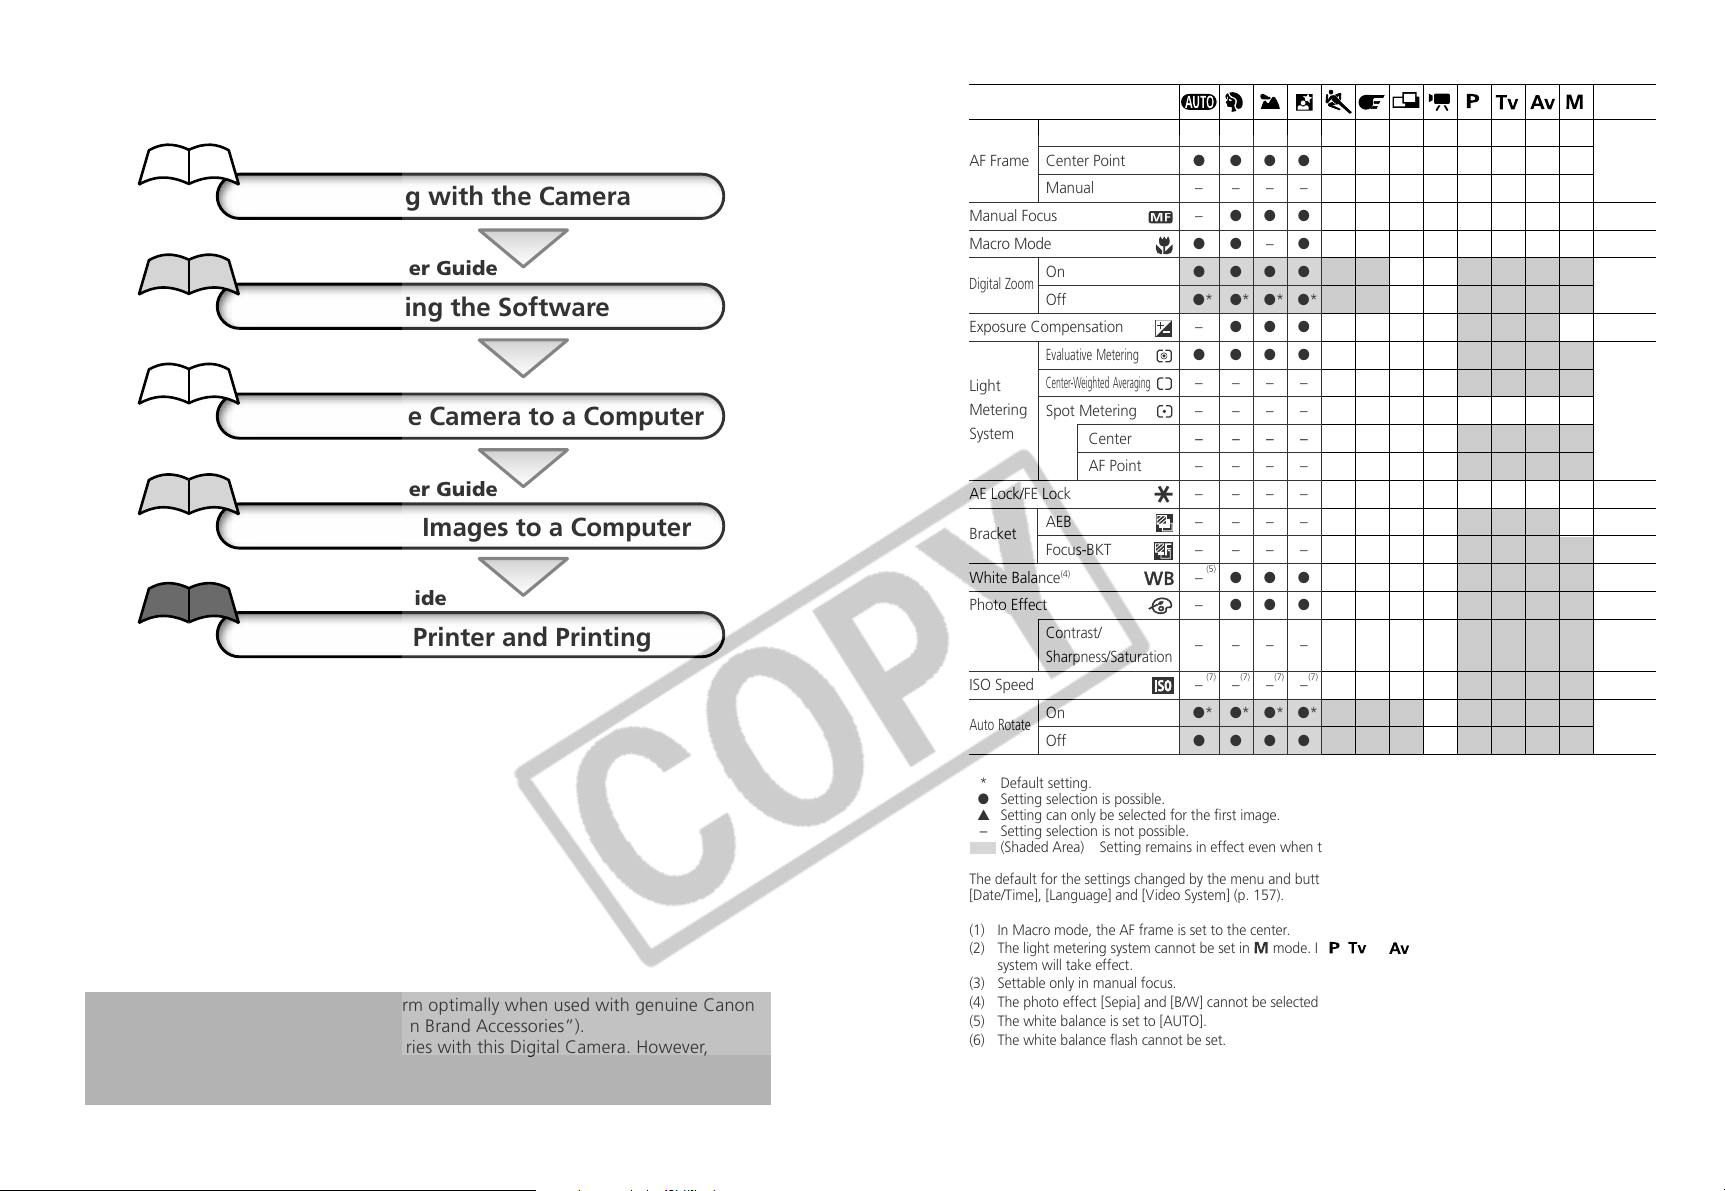
Flowchart and Reference Guides
This Guide
Shooting with the Camera
Software Starter Guide
Installing the Software
This Guide
Connecting the Camera to a Computer
Software Starter Guide
Downloading Images to a Computer
Printer User Guide
Using the Printer and Printing
Auto
AF Frame Center Point
Manual
Manual Focus
Macro Mode
Digital Zoom
Exposure Compensation
Light
Metering
System
AE Lock/FE Lock
Bracket
White Balance
Photo Effect
ISO Speed
Auto Rotate
On
Off
Evaluative Metering
Center-Weighted Averaging
Spot Metering
Center
AF Point
AEB
Focus-BKT
(4)
Contrast/
Sharpness/Saturation
On
Off
(1)*(1)
*
● ●●●●●●● ––––
● ●●●●● –– ●* ●* ●* ●*
– –––––––●●●●
– ●●●●●●●●●●●
●●– ●●●●●●●●●
● ●●●●● ––●●●●
●* ●* ●* ●* ●* ●*– – ●* ●* ●* ●*
– ●●●●●▲●●●● –
● ●●●●●●● ●* ●* ●* ●
– –––––––●●● ●
– –––––––●●● ●
– ––––––– ●* ●* ●* ●*
– –––––––●●●●
– –––––––●●● –
– –––––––●●● –
– –––––––●●●●
(5) (6)
– ●●●●●▲●●●●●
– ●●●●●▲●●●●●
– –––––––●●●●
(7) (7) (7) (7) (7) (7) (7) (7) (8)
– –––––––●●●●
●* ●* ●* ●* ●* ●* ▲*– ●* ●* ●* ●*
● ●●●●●▲– ●●●●
(1)*(1)*(1)*(1)*(1)
**
(3) (3) (3) (3)
Reference
Page
74
100
63
65
79
(2)
(2)
(2)
77
90/92
86
88
80
83
84
85
103
This digital camera is designed to perform optimally when used with genuine Canon
brand digital camera accessories (“Canon Brand Accessories”).
You may use non Canon Brand Accessories with this Digital Camera. However,
Canon makes no warranties concerning, and is not responsible for damages
resulting from, use of non Canon Brand Accessories.
* Default setting.
● Setting selection is possible.
▲ Setting can only be selected for the first image.
-
Setting selection is not possible.
(Shaded Area) Setting remains in effect even when the camera is turned off.
The default for the settings changed by the menu and button operations can be restored all at once except for
[Date/Time], [Language] and [Video System] (p. 157).
(1) In Macro mode, the AF frame is set to the center.
(2) The light metering system cannot be set in
system will take effect.
(3) Settable only in manual focus.
(4) The photo effect [Sepia] and [B/W] cannot be selected.
(5) The white balance is set to [AUTO].
(6) The white balance flash cannot be set.
(7) The ISO speed is automatically set by the camera.
(8) ISO [AUTO] cannot be selected.
mode. In , or mode, the last selected light metering
181
Page 3
Camera Body Temperature
If your camera is used for prolonged periods, the camera body may become warm. Please be aware
of this and take care when operating the camera for an extended period.
About the LCD Monitor
The LCD monitor is produced with extremely high-precision manufacturing techniques. More than
99.99% of the pixels operate to specification. Less than 0.01% of the pixels may occasionally misfire
or appear as red or black dots. This has no effect on the recorded image and does not constitute a
malfunction.
Video Format
Please set the camera’s video signal format to the one used in your region before using it with a TV
monitor (p. 154).
Language Setting
Please see page 23 to change the language setting.
Please read through the “Read This First” section (p. 4) before using your camera.
Charging the Date/Time Battery
• The camera has a built-in rechargeable lithium battery that maintains the date, time and other
camera settings. This battery recharges when the main battery pack is inserted into the camera.
When you first purchase the camera, place a charged battery pack in it or use the AC adapter
kit (sold separately) for at least 4 hours to charge the date/time battery. It will charge even when
the camera power is set to Off.
• If the Set Date/Time menu appears when the camera power is turned on, it means that the
date/time battery charge is depleted. Recharge it as described above.
Disclaimer
• While every effort has been made to ensure that the information contained in this guide is
accurate and complete, no liability can be accepted for any errors or omissions.
• Canon Inc. reserves the right to change the specifications of the hardware and software
described herein at any time without prior notice.
• No part of this guide may be reproduced, transmitted, transcribed, stored in a retrieval system,
or translated into any language in any form, by any means, without the prior written permission
of Canon Inc.
• Canon Inc. makes no warranties for damages resulting from corrupted or lost data due to a
mistaken operation or malfunction of the camera, the software, the CompactFlash™ cards (CF
cards), personal computers, peripheral devices, or use of non-Canon CF cards.
Trademark Acknowledgements
• Canon, PowerShot and Bubble Jet are trademarks of Canon, Inc.
• CompactFlash is a trademark of SanDisk Corporation.
• iBook and iMac are trademarks of Apple Computer, Inc.
• Macintosh, PowerBook, Power Macintosh and QuickT ime are trademarks of Apple Computer, Inc,
registered in the United States and other countries.
• Microsoft, Windows, and Windows NT are either registered trademarks or trademarks of Microsoft
Corporation in the United States and/or other countries.
• Other names and products not mentioned above may be registered trademarks or trademarks of
their respective companies.
Copyright ©2003 Canon Inc. All rights reserved.
(i)
Page 4
About this Camera User Guide
Symbols Used
: This mark denotes issues that may affect the camera’s operation.
: This mark denotes additional topics that complement the basic operating
procedures.
Question? Look Here First.
3 How do I navigate the menus?
Selecting Menus and Settings (p. 36)
3 What settings are available under each function?
and
Will my settings remain in effect even after I’ve turned the camera off?
Functions Available in Each Shooting Mode (p. 180)
3 How do I go about printing?
About Printing (p. 122)
3 What functions are available through the menus?
Rec. Menu (p. 148)
Replay Menu (p. 150)
Set up Menu (p. 151)
My Camera Menu (p. 155)
(ii)
Page 5
About the Thumb Index
A quick introduction intended for new users who want to
shoot first and learn more later. Tells you how to get the
camera running and how to begin shooting and playing
back images.
Quick Start
Introduces you to all of the camera components, and
explains how to load batteries and use the shutter button,
among other basic functions. Also explains how to set the
camera’s start-up image, start-up sound and shutter sound.
Describes shooting with the camera, from each shooting
mode to using the camera’s various shooting features.
Explains how to review recorded images or select replay
settings, how to protect images or erase them, and how
to edit movies.
Explains how to print and make print settings, and how to
select images for transferring to e-mail.
Explains how to transfer images to a computer. Also explains
how to use a TV set for shooting and reviewing images.
You must read this section before connecting your
camera to a computer.
Shows the Rec. and Replay menus, the Setup menu and
the My Camera menu at a glance and error messages.
Also explains how to use the Battery and Charger Kit.
Preparing the Camera,
Basic Functions
Shooting
Replaying, Erasing
Printing,
Transferring
Connecting
Appendix
(iii)
Page 6

Page 7
Table of Contents
: Functions and operations tables. These pages are shaded on the right edges
to make them easy to find.
Read This First ............................................................................. 4
Quick Start .................................................................................. 8
Components Guide ................................................................... 10
Front View ................................................................................... 10
Back / Bottom View ...................................................................... 11
Controls ....................................................................................... 12
Shooting Mode Dial ...................................................................... 13
Operating the Multicontroller ........................................................ 14
Preparing the Camera .............................................................. 15
Charging the Battery Pack ............................................................. 15
Installing the Battery Pack ............................................................. 17
Installing a CF Card ....................................................................... 19
Setting the Date / Time ................................................................. 21
Setting the Language .................................................................... 23
Basic Functions.......................................................................... 24
Turning the Power On / Off ........................................................... 24
Switching between Shooting and Replaying ................................... 26
Using the LCD Monitor ................................................................. 28
Using the Viewfinder to Shoot ...................................................... 32
Pressing the Shutter Button ........................................................... 33
Using the Zoom (Focal Length) ...................................................... 35
Selecting Menus and Settings ........................................................ 36
Customizing the Camera (My Camera Settings) ...................... 40
Changing My Camera Settings ...................................................... 40
Registering My Camera Settings .................................................... 42
Shooting - Letting the Camera Select Settings ......................... 45
Auto Mode .......................................................................... 45
Reviewing an Image Right after Shooting ....................................... 47
Changing the Resolution and Compression .................................... 49
Changing the File Format .............................................................. 52
Using the Flash .................................................................... 54
Portrait Mode ...................................................................... 56
Landscape Mode ................................................................. 56
Night Scene Mode ............................................................... 57
1
Page 8
Fast Shutter ......................................................................... 57
Slow Shutter ........................................................................ 58
Stitch Assist Mode ................................................................ 59
Movie Mode ........................................................................ 62
Macro Mode........................................................................ 63
Self-Timer ............................................................................ 64
Digital Zoom ................................................................................ 65
Continuous Shooting ........................................................... 66
Shooting - Selecting Particular Effects ..................................... 67
Program AE ......................................................................... 67
Setting the Shutter Speed ..................................................... 69
Setting the Aperture ............................................................ 71
Manually Setting the Shutter Speed and Aperture ................. 73
Selecting an AF frame .......................................................... 74
Switching Between Light Metering Modes ............................ 77
Adjusting the Exposure ......................................................... 79
Setting the White Balance .................................................... 80
Changing the Photo Effect .................................................. 83
Changing the ISO Speed ...................................................... 85
Auto Exposure Bracketing (AEB Mode) .................................. 86
Focus Bracketing (Focus-BKT Mode) ...................................... 88
Locking the Exposure Setting (AE Lock) ................................. 90
Locking the Flash Exposure Setting (FE Lock) .......................... 92
Switching between the Built-in Flash Adjustment Settings ...... 93
Switching the Timing at which the Flash Fires ................................. 95
Shooting Images at Set Intervals (Intervalometer) ............................ 96
Shooting Problem Subjects for the Autofocus ................................ 98
Saving Custom Settings ...................................................... 102
Setting the Auto Rotate Function ................................................ 103
Resetting the File Numbers .......................................................... 104
Replaying ................................................................................ 105
Displaying Images Individually ..................................................... 105
Magnifying Images ............................................................ 106
Viewing Images in Sets of Nine (Index Replay) ..................... 107
Jumping Between Images ............................................... 108
Viewing Movies .......................................................................... 109
Editing Movies ............................................................................ 110
Rotating Images in the Display .................................................... 112
Attaching Sound Annotations to Images ...................................... 113
2
Page 9

Automated Playback (Slide Show) ................................................ 114
Protecting Images ....................................................................... 118
Erasing .................................................................................... 119
Erasing Images Individually .......................................................... 119
Erasing All Images ...................................................................... 120
Formatting a CF Card ................................................................. 121
Printing ................................................................................... 122
About Printing ............................................................................ 122
Selecting from the Print Order Menu ........................................... 124
Connecting the Camera to a Printer ............................................ 126
Printing ...................................................................................... 129
Setting the Print Settings (Direct Print Function) ............................ 131
Print Settings (DPOF Print Settings) .............................................. 135
Printing with DPOF Print Settings ................................................. 140
Image Transfer Settings (DPOF Transfer Order) ..................... 142
Selecting Images for Transferring ................................................. 142
Viewing Images on a TV Set ................................................... 144
Downloading Images to a Computer ..................................... 145
Connecting the Camera to a Computer via the USB Cable ........... 145
Downloading Directly from a CF Card .......................................... 147
List of Menu Options and Messages ...................................... 148
Rec. Menu ................................................................................. 148
Replay Menu .............................................................................. 150
Set up Menu .............................................................................. 151
My Camera Menu ...................................................................... 155
Resetting the Settings to Default ................................................. 157
List of Messages ......................................................................... 158
Appendices ............................................................................. 162
Using an AC Adapter Kit (Optional) ............................................. 162
Using a Car Battery Charger (Optional) ........................................ 164
Using the Waterproof Case (Optional) ......................................... 165
Camera Care and Maintenance ................................................... 166
Troubleshooting.......................................................................... 167
Specifications .......................................................................... 170
Index ....................................................................................... 176
Functions Available in Each Shooting Mode .......................... 180
3
Page 10
Read This First
Please Read
Test Shots
Before you try to photograph important subjects, we highly recommend that you
shoot several trial images to confirm that the camera is operating and being
operated correctly. Please note that Canon Inc., its subsidiaries and affiliates, and its
distributors are not liable for any consequential damages arising from any
malfunction of a camera or accessory, including CompactFlash™ cards, that results in
the failure of an image to be recorded or to be recorded in a format that is machine
sensible.
Warning Against Copyright Infringement
Please note that Canon digital cameras are intended for personal use and should
never be used in a manner that infringes upon or contravenes international or
domestic copyright laws and regulations. Please be advised that in certain cases the
copying of images from performances, exhibitions, or commercial properties by
means of a camera or other device may contravene copyright or other legal rights
even if the image was shot for personal use.
Warranty Limitations
This camera’s warranty is only effective in the country of sale. If a problem arises
while the camera is in use abroad, please convey it back to the country of sale before
proceeding with a warranty claim to a Canon Customer Support Help Desk.
For Canon Customer Support contacts, please see the Canon Limited Warranty
supplied with your camera.
Safety Precautions
• Before using the camera, please ensure that you read and understand the safety
precautions described below. Always ensure that the camera is operated correctly.
• The safety precautions noted on the following pages are intended to instruct you in
the safe and correct operation of the camera and its accessories to prevent injuries or
damage to yourself, other persons and equipment.
• In the next few pages, the term “equipment” refers primarily to the camera, its
power supply accessories and an optional compact power adapter.
4
Page 11
Warnings
• Do not aim the camera directly into the sun or at other intense light sources
which could damage your eyesight.
• Do not trigger the flash in close proximity to human or animal eyes. Exposure
to the intense light produced by the flash may damage eyesight. In particular, remain
at least one meter (39 inches) away from infants when using the flash.
• Store this equipment out of the reach of children and infants. Accidental
damage to the camera or batteries by a child could result in serious injury. In addition,
placement of the strap around the child’s neck could result in asphyxiation.
• Do not attempt to disassemble or alter any part of the equipment that is not
expressly described in this guide. Disassembly or alteration may result in high-
voltage electrical shock. Internal inspections, alterations and repairs should be
conducted by qualified service personnel authorized by your camera distributor or a
Canon Customer Support Help Desk.
• To avoid the risk of high-voltage electrical shock, do not touch the flash
portion of the camera if it has been damaged. Similarly, never touch internal
portions of the equipment that become exposed as a result of damage. There is a risk
of high-voltage electrical shock. Please take the first opportunity to consult your
camera distributor or a Canon Customer Support Help Desk.
• Stop operating the equipment immediately if it emits smoke or noxious fumes.
Failure to do so may result in fire or electrical shock. Immediately turn the camera’s power
off, remove the camera battery and unplug the power cord from the power outlet.
Confirm that smoke or fume emissions have ceased. Please consult your camera distributor
or the closest Canon Customer Support Help Desk.
• Stop operating the equipment if it is dropped or the casing is damaged. Failure to
do so may result in fire or electrical shock. Immediately turn the camera’s power off,
remove the camera battery or unplug the power cord from the power outlet. Please
consult your camera distributor or the closest Canon Customer Support Help Desk.
• Do not allow the equipment to come into contact with, or become immersed
in, water or other liquids. Do not allow liquids to enter the interior. The camera has
not been waterproofed. If the exterior comes into contact with liquids or salt air, wipe it
dry with a soft, absorbent cloth. In the event that water or other foreign substances
enter the interior, immediately turn the camera’s power off and remove the camera
battery or unplug the power cord from the power outlet. Continued use of the
equipment may result in fire or electrical shock. Please consult your camera distributor
or the closest Canon Customer Support Help Desk.
• Do not use substances containing alcohol, benzene, thinners or other
flammable substances to clean or maintain the equipment. The use of these
substances may lead to fire.
5
Page 12
• Remove the power cord on a regular periodic basis and wipe away the dust
and dirt that collects on the plug, the exterior of the power outlet and the
surrounding area. In dusty, humid or greasy environments, the dust that collects
around the plug over long periods of time may become saturated with humidity and
short-circuit, leading to fire.
• Do not cut, damage, alter or place heavy items on the power adapter cord. Any of
these actions may cause an electrical short circuit, which may lead to fire or electrical shock.
• Do not handle the power cord if your hands are wet. Handling it with wet hands
may lead to electrical shock. When unplugging the cord, ensure that you hold the solid
portion of the plug. Pulling on the flexible portion of the cord may damage or expose the
wire and insulation, creating the potential for fires or electrical shocks.
• Use only the recommended power accessories. Use of power sources not
expressly recommended for this equipment may lead to overheating, distortion of the
equipment, fire, electrical shock or other hazards.
• Do not place the batteries near a heat source or expose them to direct flame or
heat. Neither should you immerse them in water. Such exposure may damage the batteries
and lead to the leakage of corrosive liquids, fire, electrical shock, explosion or serious injury.
• Do not attempt to disassemble, alter or apply heat to the batteries. There is
serious risk of injury due to an explosion. Immediately flush with water any area of the
body, including the eyes and mouth, or clothing, that comes into contact with the
inner contents of a battery. If the eyes or mouth contact these substances, immediately
flush with water and seek medical assistance.
• Avoid dropping or subjecting the batteries to severe impacts that could
damage the casings. It could lead to leakage and injury.
• Do not short-circuit the battery terminals with metallic objects, such as key
holders. It could lead to overheating, burns and other injuries. Use the supplied
terminal cover to transport or store the battery pack.
• Before you discard a battery, cover the terminals with tape or other insulators
to prevent direct contact with other objects. Contact with the metallic
components of other materials in waste containers may lead to fire or explosions.
Discard the batteries in specialized waste facilities if available in your area.
• Use NB-2L battery pack only. Use of other batteries may cause explosions or leaks,
resulting in fire, injury and damage to the surroundings.
• Use the designated battery charger to charge the NB-2L battery pack. Use of other
battery chargers may cause the unit to overheat and distort, resulting in fire or electrical shock.
• Disconnect the battery charger or the compact power adapter from both the
camera and power outlet after recharging and when the camera is not in use
to avoid fires and other hazards.
• The battery charger and the camera terminal of the optional compact power
adapter are designed for exclusive use with this camera. Do not use it with other
products. There is a risk of fire and other hazards.
6
Page 13
• Always keep the terminals of the battery charger clean. Do not place metal
objects on top of the terminals. There is a risk of fire and other hazards.
Cautions
• Avoid using, placing or storing the equipment in places subject to strong
sunlight or high temperatures, such as the dashboard or trunk (boot) of a car.
Exposure to intense sunlight and heat may cause the batteries to leak, overheat or
explode, resulting in fire, burns or other injuries. High temperatures may also cause
deformation of the casing. Ensure that there is good ventilation when using the
compact power adapter to charge the battery pack or power the camera.
• Do not store the equipment in humid or dusty areas. Storage in such areas could
lead to fire, electrical shock or other damage.
• Be careful not to bang the camera or subject it to strong impacts or shocks
that could lead to injury or damage the equipment when wearing or holding
it by the strap.
• Be careful not to cover the flash with your fingers when shooting. In addition,
do not touch the surface of the flash after taking several pictures in rapid succession.
Either action could result in burns.
• Do not operate the flash with dirt, dust or other items stuck to its lens. The
resulting heat build-up could damage the flash.
• If your camera is used for prolonged periods, the camera body may become
warm. Please take care when operating the camera for an extended period as your
hands may experience a burning sensation.
Preventing Malfunctions
■ Avoid Strong Magnetic Fields
Never place the camera in close proximity to electric motors or other equipment
generating strong electromagnetic fields. Exposure to strong magnetic fields may
cause malfunctions or corrupt image data.
■ Avoid Condensation Related Problems
Moving the equipment rapidly between hot and cold temperatures may cause
condensation (water droplets) to form on its external and internal surfaces. You can
avoid this by placing the equipment in an airtight, resealable plastic bag and letting it
adjust to temperature changes slowly before removing it from the bag.
■ If Condensation Forms Inside the Camera
Stop using the camera immediately if you detect condensation. Continued use may
damage the equipment. Remove the CF card, and battery or a household power
source, from the camera and wait until the moisture evaporates completely before
resuming use.
7
Page 14
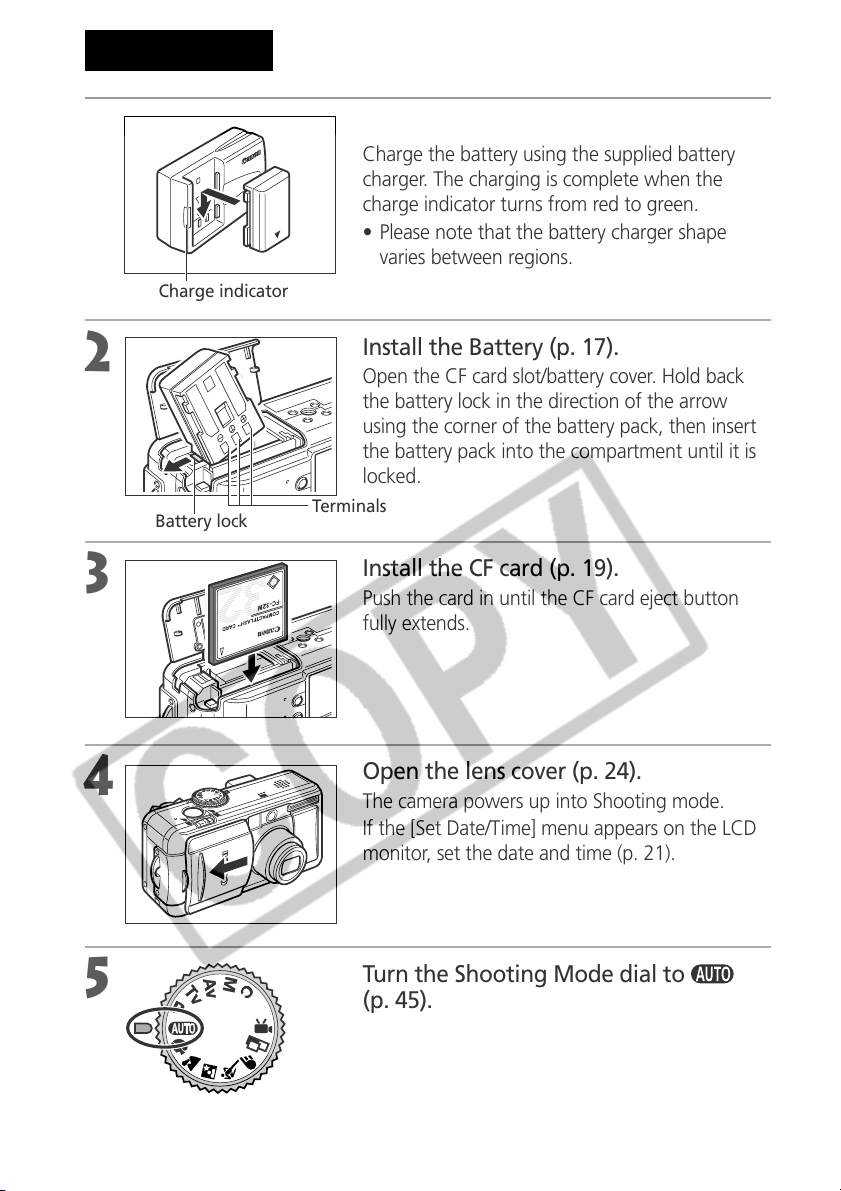
Quick Start
1
2
3
Charge indicator
Battery lock
Charge the Battery (p. 15).
Charge the battery using the supplied battery
charger. The charging is complete when the
charge indicator turns from red to green.
• Please note that the battery charger shape
varies between regions.
Install the Battery (p. 17).
Open the CF card slot/battery cover. Hold back
the battery lock in the direction of the arrow
using the corner of the battery pack, then insert
the battery pack into the compartment until it is
locked.
Terminals
Install the CF card (p. 19).
Push the card in until the CF card eject button
fully extends.
4
5
8
Open the lens cover (p. 24).
The camera powers up into Shooting mode.
If the [Set Date/Time] menu appears on the LCD
monitor, set the date and time (p. 21).
Turn the Shooting Mode dial to
(p. 45).
Page 15
6
Focus (p. 33).
Aim the camera and lightly press the shutter
button halfway. Two beeps will sound when the
autofocus is set.
Quick Start
7
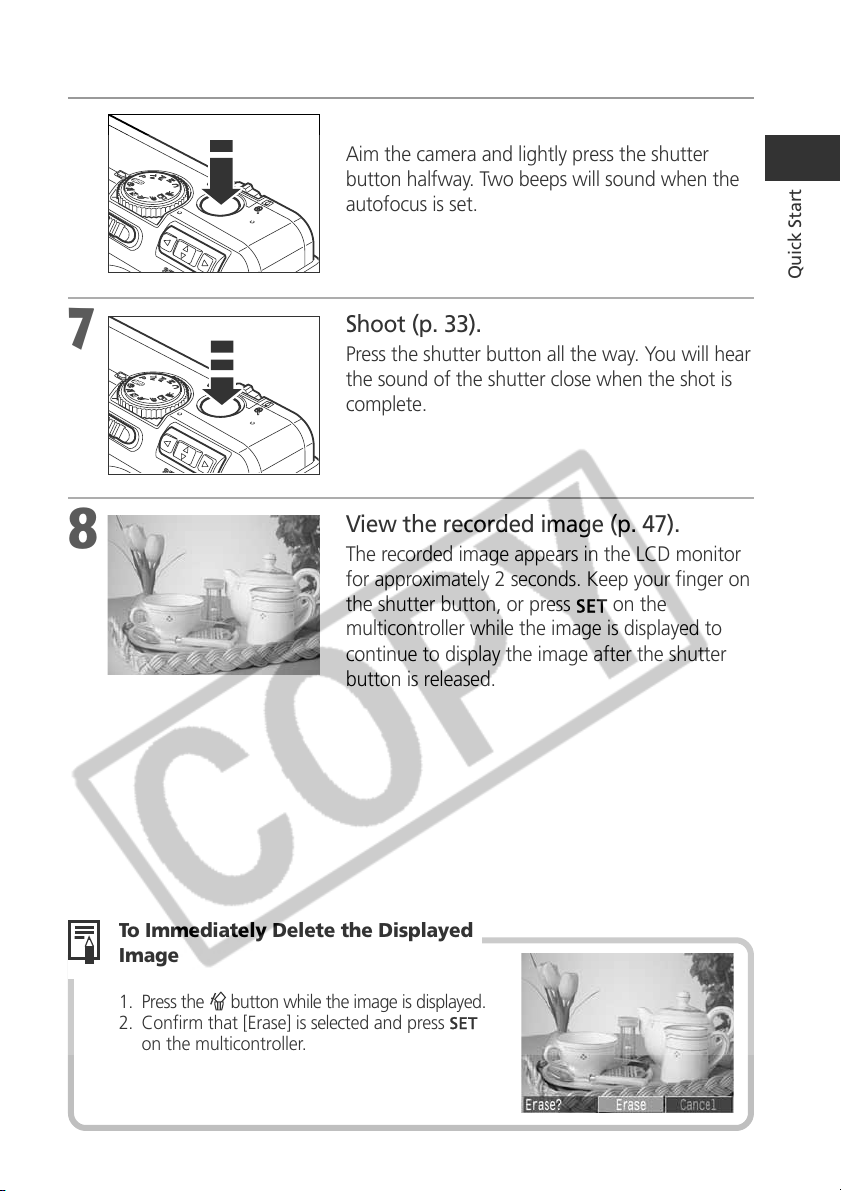
8
Shoot (p. 33).
Press the shutter button all the way. You will hear
the sound of the shutter close when the shot is
complete.
View the recorded image (p. 47).
The recorded image appears in the LCD monitor
for approximately 2 seconds. Keep your finger on
the shutter button, or press
multicontroller while the image is displayed to
continue to display the image after the shutter
button is released.
on the
To Immediately Delete the Displayed
Image
1. Press the button while the image is displayed.
2. Confirm that [Erase] is selected and press
on the multicontroller.
9
Page 16

Components Guide
Front View
Zoom Lever
Shooting:
(Telephoto)/
(Wide Angle) p. 35
Replaying:
(Zoom in)/
(Zoom out) p. 106
Shutter button
(p. 33)
Lens Cover
(p. 24)
Optical Viewfinder Window (p. 32)
Shooting Mode Dial (p. 13)
AF-assist Beam (p. 34)
Red-Eye Reduction Lamp (p. 54)
Self-Timer Lamp (p. 64)
Microphone (p. 113)
Flash (p. 54)
Speaker
(Audio/Video
Out) Terminal
(p. 144)
Lens
Terminal Cover
* To connect the camera to a computer or printer, use one of the following cables.
• Computer: USB Interface Cable IFC-300PCU (supplied with this camera)
• Direct Print Compatible Printer (CP series, optional): Direct Interface Cable DIF-100
(supplied with Direct Print compatible printers)
• Bubble Jet Printer with the direct print function (optional): Please refer to the
Bubble Jet Printer user guide.
Please refer to your System Map to find out which direct print function compatible
printer can be used with this camera.
Terminal*
(p. 126, 127)
10
Page 17
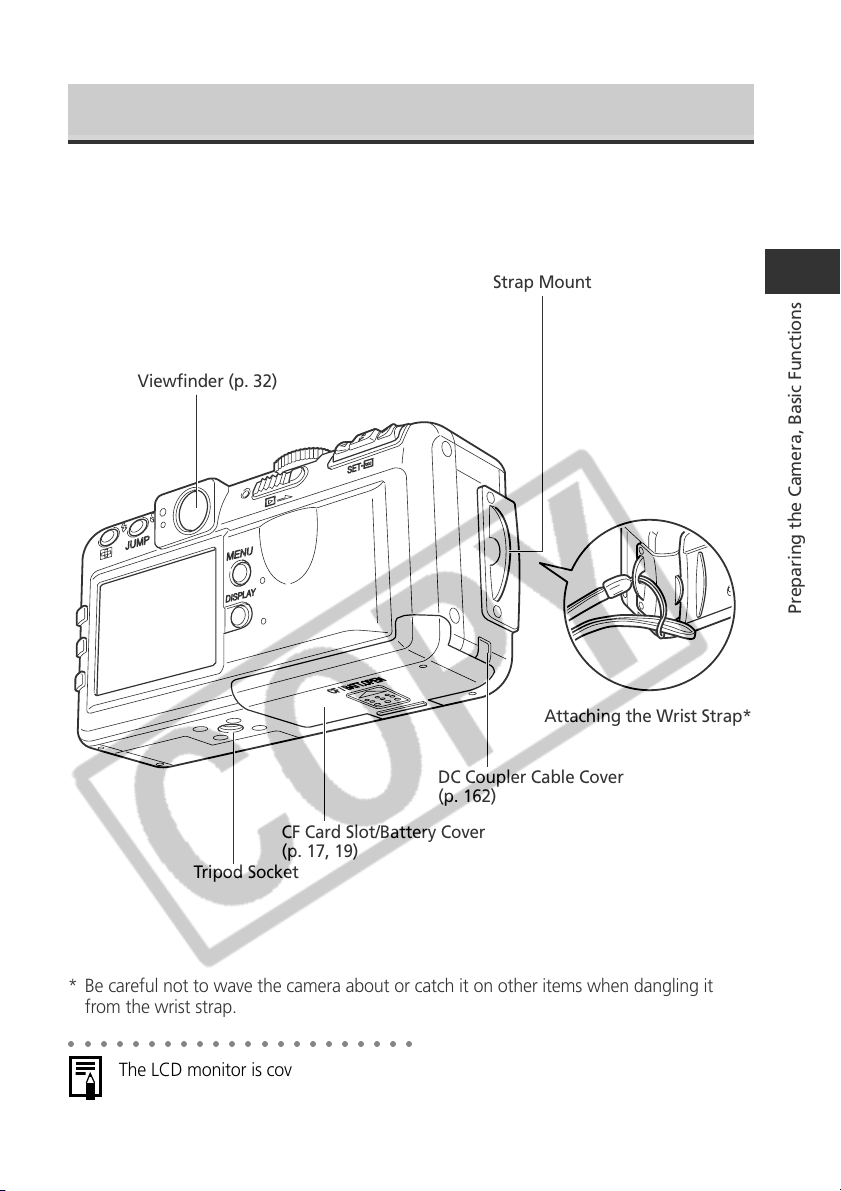
Back / Bottom View
Viewfinder (p. 32)
Strap Mount
Preparing the Camera, Basic Functions
Attaching the Wrist Strap*
DC Coupler Cable Cover
(p. 162)
CF Card Slot/Battery Cover
(p. 17, 19)
Tripod Socket
* Be careful not to wave the camera about or catch it on other items when dangling it
from the wrist strap.
○○○○○○○○○○○○○○○○○○○○○○
The LCD monitor is covered with a thin plastic film for protection against scratches
during shipment. Remove it before using the camera.
11
Page 18
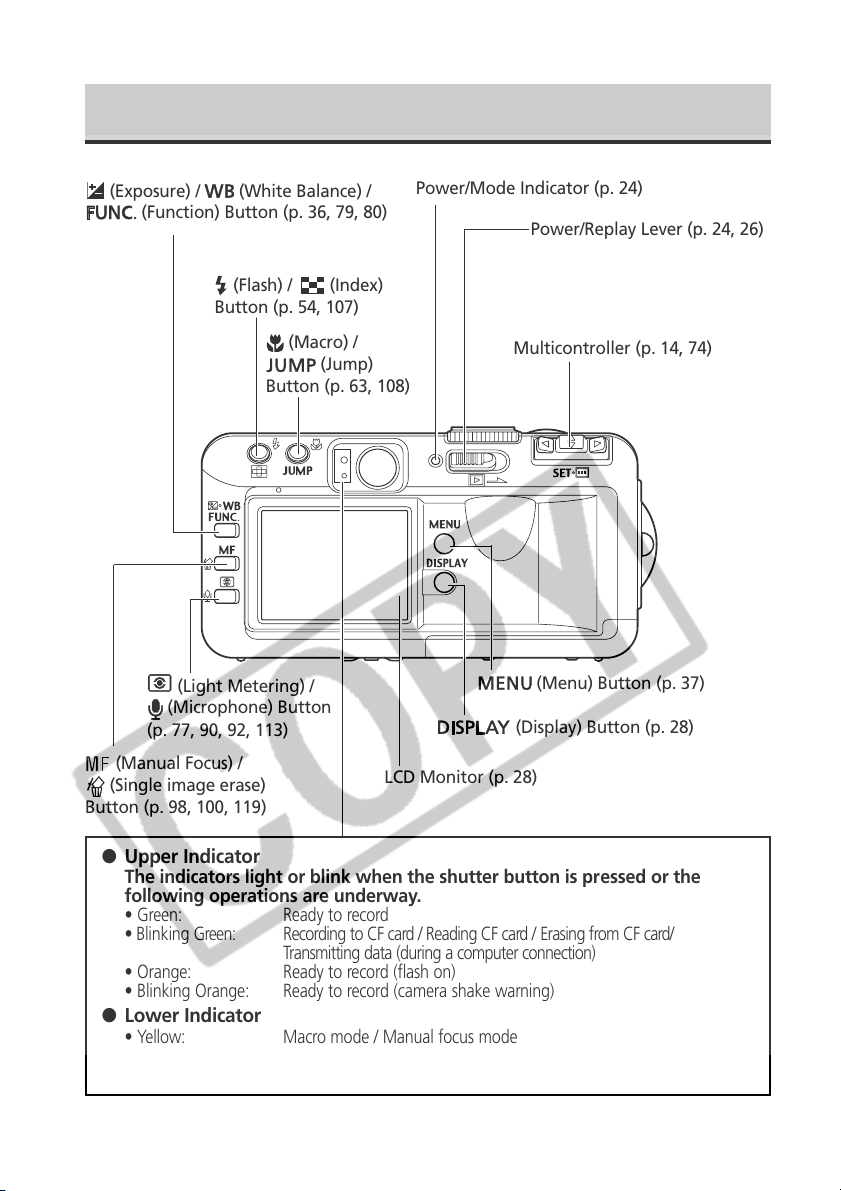
Controls
(Exposure) /
(Function) Button (p. 36, 79, 80)
(Light Metering) /
(Microphone) Button
(p. 77, 90, 92, 113)
(Manual Focus) /
(Single image erase)
Button (p. 98, 100, 119)
(White Balance) /
(Flash) / (Index)
Button (p. 54, 107)
Button (p. 63, 108)
(Macro) /
(Jump)
Power/Mode Indicator (p. 24)
Power/Replay Lever (p. 24, 26)
Multicontroller (p. 14, 74)
(Menu) Button (p. 37)
(Display) Button (p. 28)
LCD Monitor (p. 28)
● Upper Indicator
The indicators light or blink when the shutter button is pressed or the
following operations are underway.
• Green: Ready to record
• Blinking Green: Recording to CF card / Reading CF card / Erasing from CF card/
Transmitting data (during a computer connection)
• Orange: Ready to record (flash on)
• Blinking Orange: Ready to record (camera shake warning)
● Lower Indicator
• Yellow: Macro mode / Manual focus mode
• Blinking Yellow: Focusing difficulty (although you can press the shutter button, try using
focus lock or adjusting the focus manually, p. 100)
12
Page 19
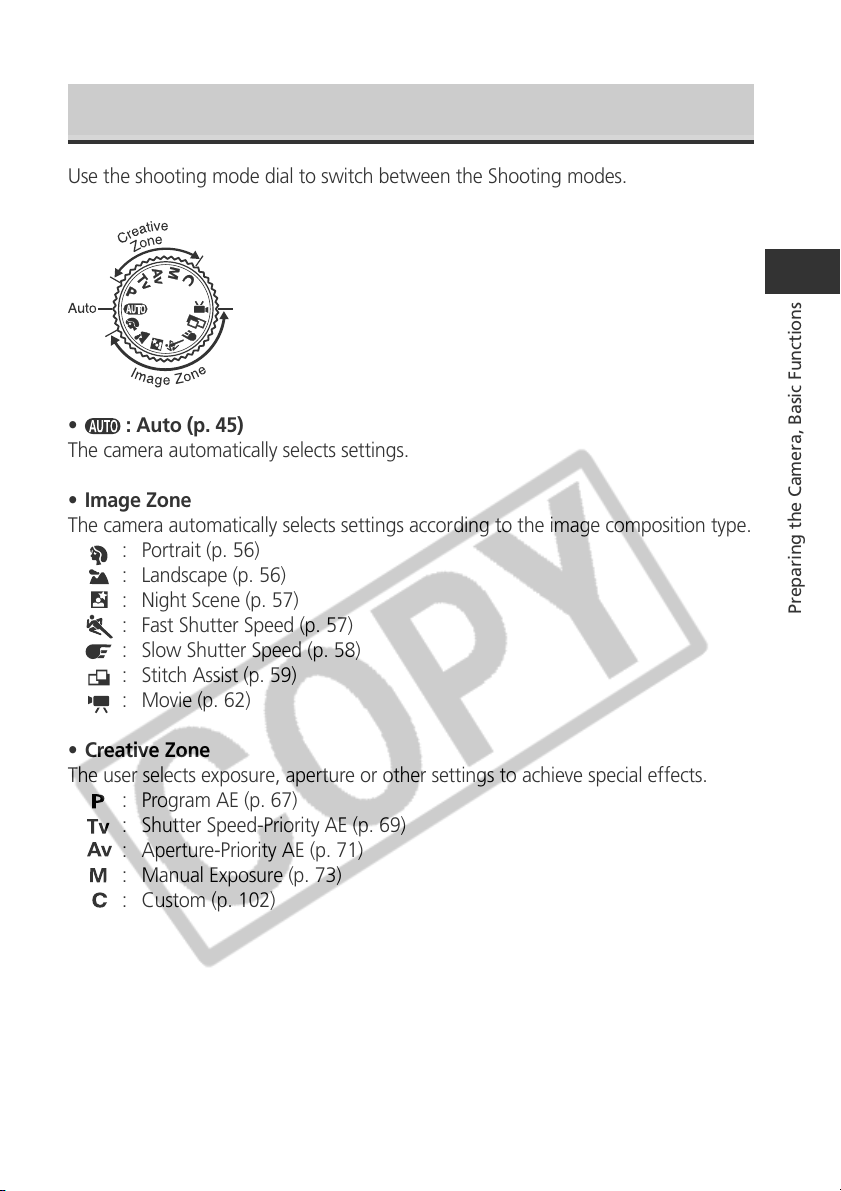
Shooting Mode Dial
Use the shooting mode dial to switch between the Shooting modes.
• : Auto (p. 45)
The camera automatically selects settings.
• Image Zone
The camera automatically selects settings according to the image composition type.
: Portrait (p. 56)
: Landscape (p. 56)
: Night Scene (p. 57)
: Fast Shutter Speed (p. 57)
: Slow Shutter Speed (p. 58)
: Stitch Assist (p. 59)
: Movie (p. 62)
Preparing the Camera, Basic Functions
• Creative Zone
The user selects exposure, aperture or other settings to achieve special effects.
: Program AE (p. 67)
: Shutter Speed-Priority AE (p. 69)
: Aperture-Priority AE (p. 71)
: Manual Exposure (p. 73)
: Custom (p. 102)
13
Page 20
Operating the Multicontroller
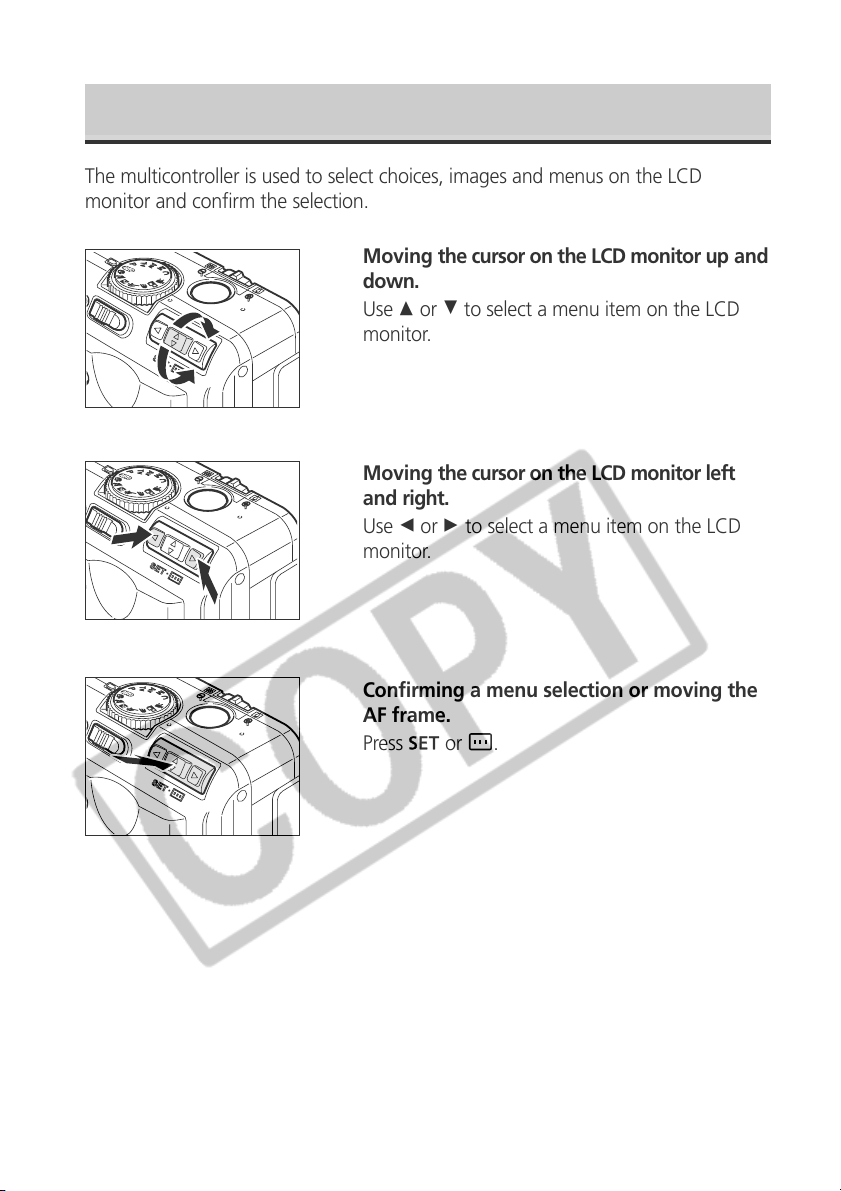
The multicontroller is used to select choices, images and menus on the LCD
monitor and confirm the selection.
Moving the cursor on the LCD monitor up and
down.
Use C or D to select a menu item on the LCD
monitor.
Moving the cursor on the LCD monitor left
and right.
Use B or A to select a menu item on the LCD
monitor.
Confirming a menu selection or moving the
AF frame.
Press
or .
14
Page 21
Preparing the Camera
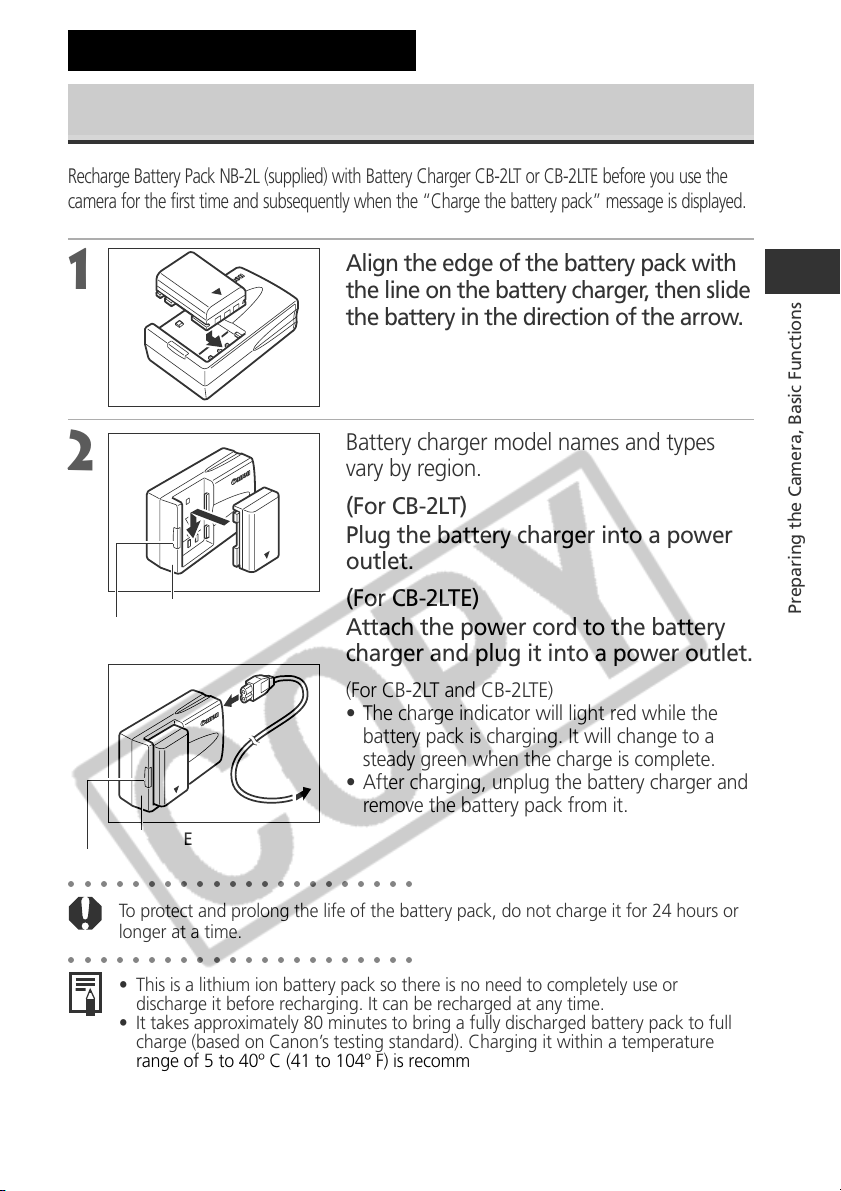
Charging the Battery Pack
Recharge Battery Pack NB-2L (supplied) with Battery Charger CB-2LT or CB-2LTE before you use the
camera for the first time and subsequently when the “Charge the battery pack” message is displayed.
1
the line on the battery charger, then slide
the battery in the direction of the arrow.
Battery charger model names and types
Align the edge of the battery pack with
2
vary by region.
(For CB-2LT)
Plug the battery charger into a power
outlet.
CB-2LT
Charge Indicator
(For CB-2LTE)
Attach the power cord to the battery
charger and plug it into a power outlet.
(For CB-2LT and CB-2LTE)
• The charge indicator will light red while the
battery pack is charging. It will change to a
steady green when the charge is complete.
• After charging, unplug the battery charger and
remove the battery pack from it.
Charge Indicator
CB-2LTE
○○○○○○○○○○○○○○○○○○○○○○
To protect and prolong the life of the battery pack, do not charge it for 24 hours or
longer at a time.
○○○○○○○○○○○○○○○○○○○○○○
• This is a lithium ion battery pack so there is no need to completely use or
discharge it before recharging. It can be recharged at any time.
• It takes approximately 80 minutes to bring a fully discharged battery pack to full
charge (based on Canon’s testing standard). Charging it within a temperature
range of 5 to 40º C (41 to 104º F) is recommended.
• Charging times will vary according to the surrounding humidity and battery pack
charge state.
• You may hear a noise during charging. This is not a malfunction.
Preparing the Camera, Basic Functions
15
Page 22
Charging the Battery Pack (continued)
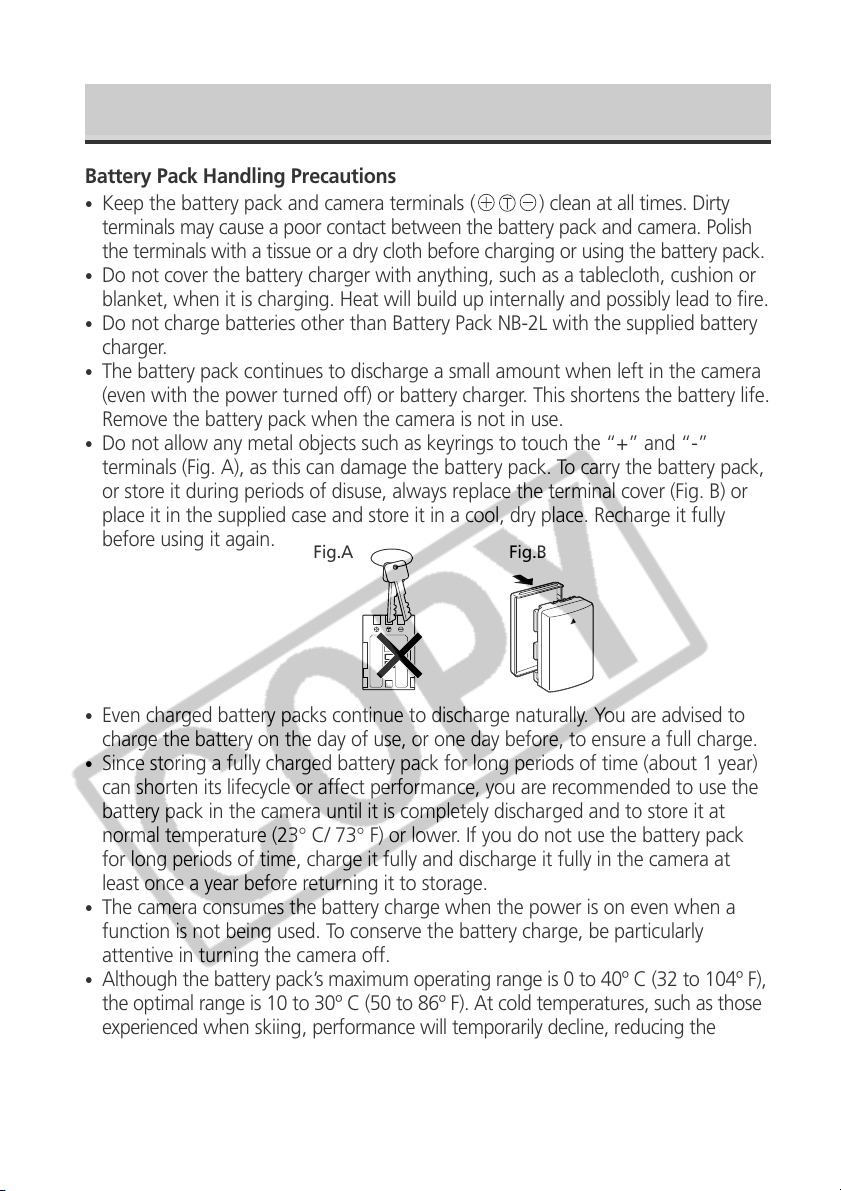
Battery Pack Handling Precautions
•
Keep the battery pack and camera terminals ( ) clean at all times. Dirty
terminals may cause a poor contact between the battery pack and camera. Polish
the terminals with a tissue or a dry cloth before charging or using the battery pack.
•
Do not cover the battery charger with anything, such as a tablecloth, cushion or
blanket, when it is charging. Heat will build up internally and possibly lead to fire.
•
Do not charge batteries other than Battery Pack NB-2L with the supplied battery
charger.
•
The battery pack continues to discharge a small amount when left in the camera
(even with the power turned off) or battery charger. This shortens the battery life.
Remove the battery pack when the camera is not in use.
•
Do not allow any metal objects such as keyrings to touch the “+” and “-”
terminals (Fig. A), as this can damage the battery pack. To carry the battery pack,
or store it during periods of disuse, always replace the terminal cover (Fig. B) or
place it in the supplied case and store it in a cool, dry place. Recharge it fully
before using it again.
Fig.A Fig.B
•
Even charged battery packs continue to discharge naturally. You are advised to
charge the battery on the day of use, or one day before, to ensure a full charge.
•
Since storing a fully charged battery pack for long periods of time (about 1 year)
can shorten its lifecycle or affect performance, you are recommended to use the
battery pack in the camera until it is completely discharged and to store it at
normal temperature (23° C/ 73° F) or lower. If you do not use the battery pack
for long periods of time, charge it fully and discharge it fully in the camera at
least once a year before returning it to storage.
•
The camera consumes the battery charge when the power is on even when a
function is not being used. To conserve the battery charge, be particularly
attentive in turning the camera off.
•
Although the battery pack’s maximum operating range is 0 to 40º C (32 to 104º F),
the optimal range is 10 to 30º C (50 to 86º F). At cold temperatures, such as those
experienced when skiing, performance will temporarily decline, reducing the
usable time before recharging.
•
If the usable time of a battery pack diminishes substantially even when fully
charged, it should be replaced.
16
Page 23

Installing the Battery Pack
Install Battery Pack NB-2L (supplied) into the camera as follows. We recommend
that you use the AC Adapter Kit ACK700 (optional) to power the camera for
extended periods (p. 162).
Turn off the camera (p. 24).
1
Check that the power/mode indicator is not lit.
2
3
4
2
1
Battery lock
Slide the CF card slot/battery cover in
the direction of the arrow to open the
cover.
Hold back the battery lock in the
direction of the arrow with the corner
of the battery pack, then insert the
battery pack into the compartment
until it is locked.
To remove the battery pack, release the battery
lock.
Close the CF card slot/battery cover
then slide it to the original position
until it clicks.
Preparing the Camera, Basic Functions
○○○○○○○○○○○○○○○○○○○○○○
• Charge the battery pack before using it the first time (p. 15).
• When the upper indicator on the left side of the viewfinder is blinking green, the
CF card is being written to, read, erased or transmitted to. Therefore, never turn
off the camera or open the CF card slot/battery cover while this indicator is
blinking green.
• Remove the battery pack when the camera is not in use.
17
Page 24

Installing the Battery Pack (continued)
Battery Low Status
The following icon and/or message appears when the battery becomes low.
Battery pack charge is low. Recharge it as soon as possible before it is
required for an extended period.
When the LCD monitor is off, this icon will display when you press the
, , ,
, or
button.
Change
the battery pack
Battery charge is insufficient to operate the camera. Replace the battery
pack immediately.
○○○○○○○○○○○○○○○○○○○○○○
See Battery Performance (p. 172).
18
Page 25
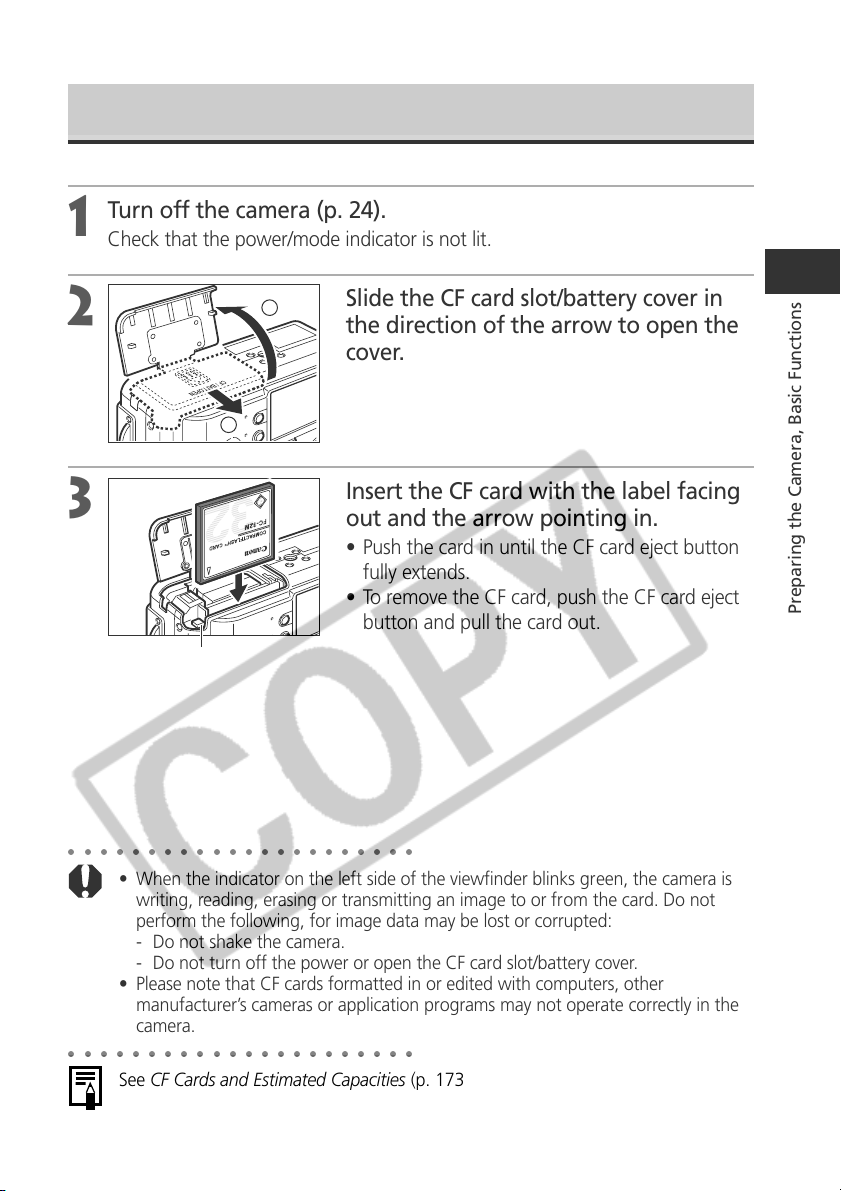
Installing a CF Card
Turn off the camera (p. 24).
1
Check that the power/mode indicator is not lit.
2
2
Slide the CF card slot/battery cover in
the direction of the arrow to open the
cover.
1
Insert the CF card with the label facing
3
CF card Eject Button
○○○○○○○○○○○○○○○○○○○○○○
• When the indicator on the left side of the viewfinder blinks green, the camera is
writing, reading, erasing or transmitting an image to or from the card. Do not
perform the following, for image data may be lost or corrupted:
- Do not shake the camera.
- Do not turn off the power or open the CF card slot/battery cover.
• Please note that CF cards formatted in or edited with computers, other
manufacturer’s cameras or application programs may not operate correctly in the
camera.
○○○○○○○○○○○○○○○○○○○○○○
See CF Cards and Estimated Capacities (p. 173).
out and the arrow pointing in.
• Push the card in until the CF card eject button
fully extends.
• To remove the CF card, push the CF card eject
button and pull the card out.
Preparing the Camera, Basic Functions
19
Page 26
Installing a CF Card (continued)
CF Card Handling Precautions
•
CF cards are high-precision electronic devices. Do not bend, force, or subject
them to shocks or vibration.
•
Do not attempt to disassemble or alter a CF card.
•
Moving a CF card rapidly between temperature extremes may cause condensation
to form in the card, leading to potential malfunctions. To avoid condensation
formation, place the CF card in a sealed plastic bag before moving it into a
different temperature zone and allow it to adjust slowly to the new temperature. If
condensation forms on the CF card, put it aside until the water droplets have
evaporated completely.
•
Place the CF card in the supplied case for storage.
•
Do not use or store CF cards in the following types of locations.
• Locations subject to dust or sand
• Locations subject to high humidity and high temperatures
Microdrives are a recording medium with a hard disk. Their merits are a large
capacity and a low price per megabyte of capacity. However, they can be more
susceptible to vibrations and shocks than CF cards, which use durable flash
memories. Please be careful, therefore, not to subject the camera to vibrations
or shocks when using a microdrive, especially while recording or replaying.
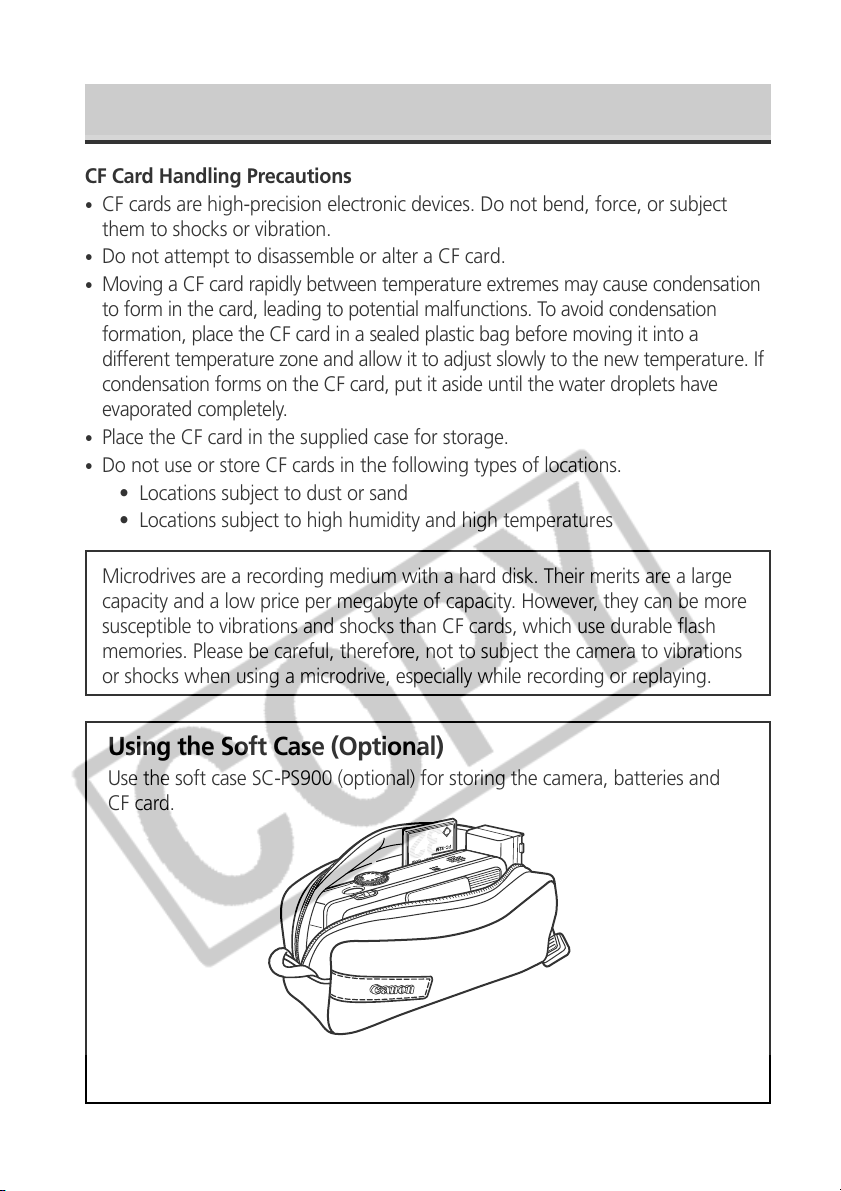
Using the Soft Case (Optional)
Use the soft case SC-PS900 (optional) for storing the camera, batteries and
CF card.
• Soft case appearance may differ in some regions.
20
Page 27
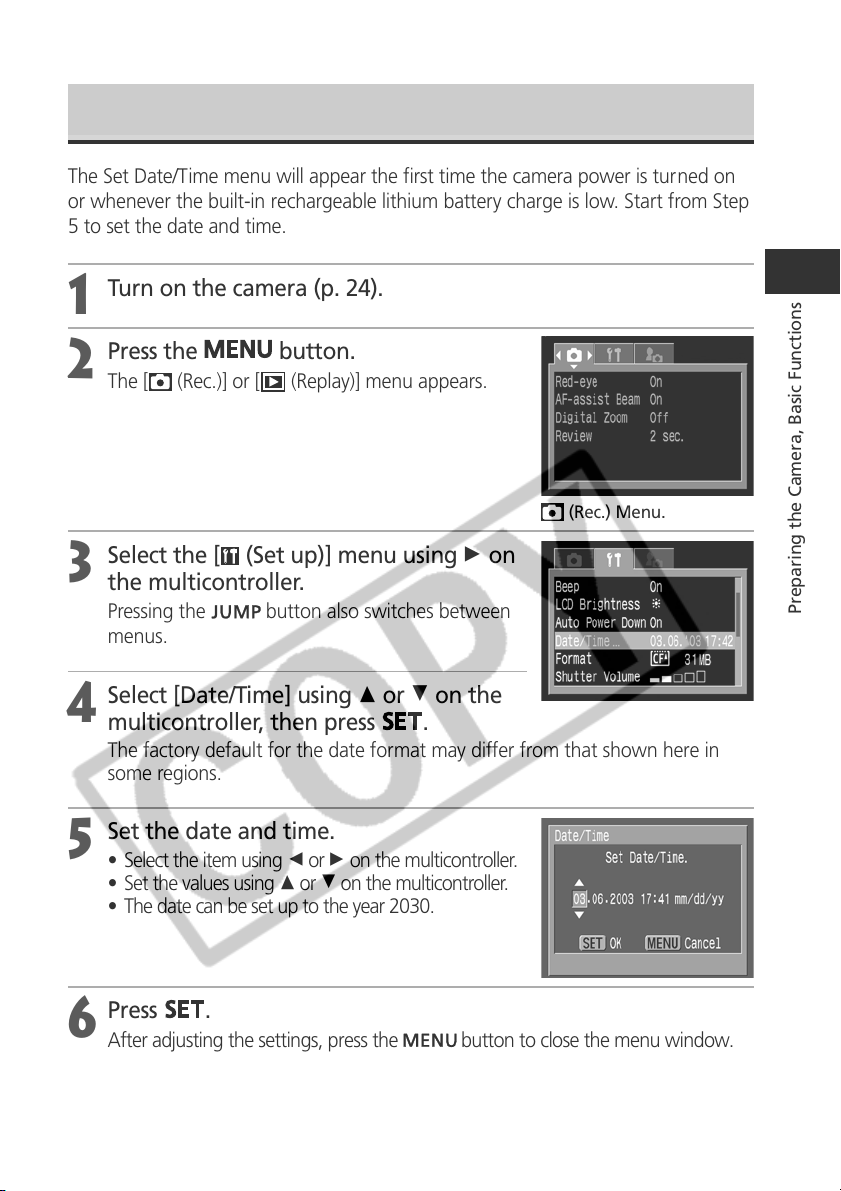
Setting the Date / Time
The Set Date/Time menu will appear the first time the camera power is turned on
or whenever the built-in rechargeable lithium battery charge is low. Start from Step
5 to set the date and time.
Turn on the camera (p. 24).
1
Press the
2
The [ (Rec.)] or [ (Replay)] menu appears.
Select the [ (Set up)] menu using A on
3
the multicontroller.
Pressing the
menus.
Select [Date/Time] using C or D on the
4
multicontroller, then press
The factory default for the date format may differ from that shown here in
some regions.
Set the date and time.
5
• Select the item using B or A on the multicontroller.
• Set the values using C or D on the multicontroller.
• The date can be set up to the year 2030.
button.
(Rec.) Menu.
button also switches between
.
Preparing the Camera, Basic Functions
Press
6
After adjusting the settings, press the
.
button to close the menu window.
21
Page 28

Setting the Date / Time (continued)
○○○○○○○○○○○○○○○○○○○○○○
• You may need to reset the date and time if the battery pack is removed for about
three weeks.
• The Date/Time cannot be inserted in the actual image even if the Date/Time have
been set.
○○○○○○○○○○○○○○○○○○○○○○
• Charging the Date/Time Battery
• The camera has a built-in rechargeable lithium battery that maintains the
date, time and other camera settings. This battery recharges when the main
battery pack is inserted into the camera. When you first purchase the camera,
place a charged battery pack in it or use the AC Adapter Kit ACK700 (sold
separately) for at least 4 hours to charge the date/time battery. It will charge
even when the camera power is set to Off.
• If the Set Date/Time menu appears when the camera power is turned on, it
means that the date/time battery charge is depleted. Recharge it as described
above.
• For printing images with the date on them, refer to page 131.
22
Page 29
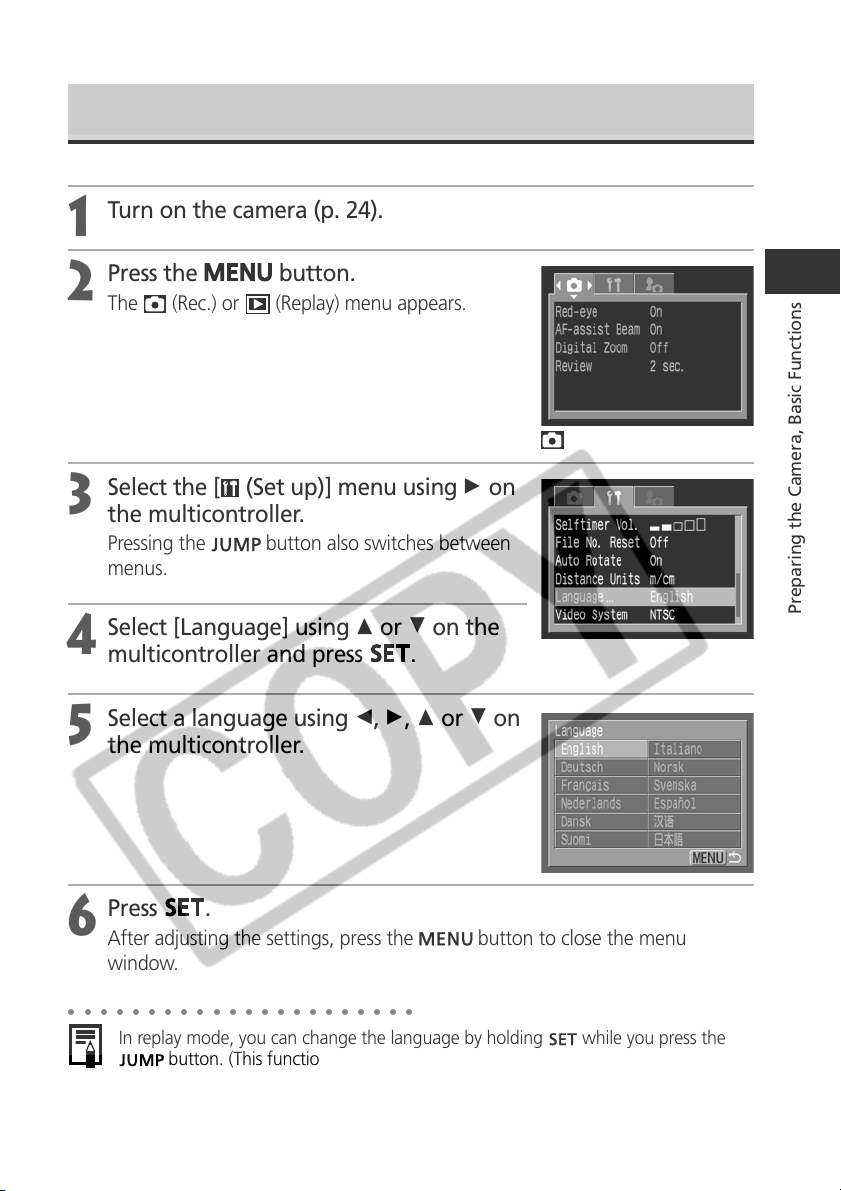
Setting the Language
Turn on the camera (p. 24).
1
Press the
2
The (Rec.) or (Replay) menu appears.
Select the [ (Set up)] menu using A on
3
the multicontroller.
Pressing the
menus.
Select [Language] using C or D on the
4
multicontroller and press
Select a language using B, A, C or D on
5
the multicontroller.
button.
button also switches between
.
(Rec.) Menu.
Preparing the Camera, Basic Functions
Press
6
After adjusting the settings, press the
window.
○○○○○○○○○○○○○○○○○○○○○○
In replay mode, you can change the language by holding while you press the
compatible printer (CP series) or the direct print function compatible Bubble Jet
Printer (optional) is connected to the camera or while replaying movies.)
.
button to close the menu
button. (This function cannot be used while an optional direct print function
23
Page 30

Basic Functions
Turning the Power On / Off
The power/mode indicator remains lit while the power of the camera is on. The
power/mode indicator indicates the state of the camera as follows.
Orange: Shooting mode
Green: Replaying mode/Printer connection mode*
Yellow: Computer connection mode*
Off: The power of the camera is off.
* For printer connection mode, see Connecting the Camera to a
Printer (p. 126).
For computer connection mode, see the Software Starter Guide
Power/Mode Indicator
Turning On/Off the Camera in Shooting Mode
supplied with the camera.
1
Open the lens cover.
• The camera powers up in Shooting mode.
• The power/mode indicator lights orange.
Close the lens cover.
The power goes off.
Turning On/Off the Camera in Replaying Mode
1
Slide the power/replay lever to the
right and hold its position until an
image appears on the LCD monitor,
then release it.
• The camera powers up in Replaying mode.
• The power/mode indicator lights green.
Slide the power/replay lever to the
right again.
The power goes off.
24
Page 31

○○○○○○○○○○○○○○○○○○○○○○
• You will hear a start-up sound and see the start-up image when the power comes
on. (To change the startup sound and image, see below and pages 40 and 156.)
• The start-up image does not appear when the LCD monitor is off or the
terminal is connected to a TV.
Turning on the camera without the start-up sound and image
Press and hold the
button, then turn on the power.
Power-saving Function
The camera is equipped with a power-saving function. If [Auto Power Down] is set to
[On], the power goes off according to the following conditions.
Shooting Mode: Powers down approximately three minutes after the last
time a camera control is accessed. The LCD monitor will shut
off approximately three minutes after the last time a camera
control is accessed even if the power-saving function is
turned off.
Replaying Mode: Powers down approximately five minutes after the last time
a camera control is accessed.
Printer Connection Mode:
Powers down approximately five minutes after the last time
a camera control is accessed on the camera or something is
printed on the printer.
• The following are the ways to restore the power.
– If the power-saving function is activated while the camera is in Shooting mode,
press the shutter button halfway.
– If the power-saving function is activated while the camera is in Replaying mode,
slide the power/replay lever to the right again.
• Please note that the camera continues to consume a minimal amount of power
even when the power-saving function shuts it down.
•
The power-saving function is disabled while a slide show plays on the camera or during
a computer connection (p. 114).
• You can turn off the power-saving function in the [ (Set up)] menu (p. 151).
Preparing the Camera, Basic Functions
25
Page 32

Switching between Shooting and Replaying
You can quickly switch between Shooting mode and Replaying mode. This is
convenient when you wish to shoot again after checking or deleting an image
immediately after it is shot.
2 Shooting Mode
Slide the power/replay lever to the right (p. 24).
1
• The camera switches to Replaying mode. In this case, the lens does not
retract.
• To return to Shooting mode, slide the power/replay lever to the right again
or press the shutter button halfway.
2 Replaying Mode (With the Lens Cover Closed)
Open the lens cover (p. 24).
1
The camera switches to Shooting mode.
26
Page 33

○○○○○○○○○○○○○○○○○○○○○○
Relationship of the Three States (Power Off/Shooting Mode/Replaying
Mode) of the Camera
Replaying Mode
Power Off
Replaying Mode
: Sliding the Power/Replay lever to the right
: Opening/Closing the lens cover
: Pressing the shutter button halfway
Shooting Mode
Preparing the Camera, Basic Functions
27
Page 34

Using the LCD Monitor
The LCD monitor can be used to confirm an image during shooting, to replay
recorded images or to adjust menu settings. Pressing the
the LCD monitor display mode.
2 Shooting Mode
Pressing the
button cycles the LCD monitor to the next mode each time
the button is pressed.
On (No Information) ➝ On (Information View) ➝ Off
○○○○○○○○○○○○○○○○○○○○○○
• The on/off setting of the LCD monitor display mode is memorized when the
camera is turned off. When the camera is turned on again it assumes the last
mode. However, when the LCD monitor is turned on and the “Change the Battery
Pack” message appears, the LCD monitor may not automatically turn on the next
time the camera is started.
• When the LCD monitor is set to On (No Information) or Off, shooting information
appears for approximately 6 seconds when you take any of the following actions.
• The power is turned on.
• The
• The focus is set with the manual focus.
• The aperture value and the shutter speed have been set with the
• The Shooting mode is changed.
• Setting the mode dial to
whether it is set to on or off.
○○○○○○○○○○○○○○○○○○○○○○
The camera shake warning icon will appear on the LCD monitor in low light
conditions while the camera is preparing to shoot. When this icon appears, set the
flash to On or Auto, or fix the camera to a tripod to shoot.
, or button is pressed.
multicontroller’s CDBA buttons.
or turns on the LCD monitor regardless of
button switches
2 Replaying Mode
•
The LCD monitor turns on when you turn on the camera in Replaying mode.
•
Pressing the
button cycles the information view mode each time the
button is pressed.
Single Replay (p. 105): Simple Display ➞ Detailed Display ➞ No Display
Index Replay (p. 107): Simple Display
No Display
28
Page 35

Information Displayed on the LCD Monitor
The LCD monitor displays information in Shooting or Replaying mode, such as the
camera settings, remaining image capacity and shooting date / time.
2 Shooting Mode
MF (Manual Focus) Indicator
Aperture
Value
Shutter Speed
Spot AE Point
Frame
Recordable
Images or
Recordable
Movie Time
(sec.)
AF Frame
The following displays in information view.
•••
L M1 M2 S
3.8x 4.9x 6.1x 7.6x 9.3x 12x
Exposure Compensation
White Balance (WB)
Drive Mode p. 64, 66
ISO Speed p. 85
Photo Effects p. 83
Bracket p. 86, 88
Flash Exposure Compensation /
Flash Output
Compression Settings p. 49
Resolution Settings p. 49
File Format p. 52
Digital Zoom Setting* p. 65
Low Battery p. 18
Flash p. 54
Red-eye Reduction p. 54
Macro Mode p. 63
Light Metering Mode p. 77
Auto Rotate p. 103
p. 79
p. 80
p. 93
Preparing the Camera, Basic Functions
Shooting Mode p. 13
Camera Shake Warning
AE Lock/FE Lock p. 90, 92
Manual Focus p.
(Red)
• The icons in the shaded boxes above appear even when the
information view is turned off.
• In addition to the above, the message, shutter speed, AF frame ,
Spot Light Metering Frame, aperture value and MF indicator
(when manual focus is selected) are shown as in the example to
the upper left.
* Zoom powers reflect the combined optical and digital zoom
effects. These figures appear when the digital zoom is activated.
Movie Recording Mode
p.28
100, 101
p.62
29
Page 36

Using the LCD Monitor (continued)
2 Replaying Mode
File Number
In simple display mode, the following information
appears.
L M1 M2 S
Image Number
and Total
(Display Image/
Total)
Shooting
Date / Time
In detailed display mode, the following
information also appears.
Compression Settings p. 49
Resolution Settings (still image)
File Format p. 52
Sound annotation (wave file)
Movie p. 109
Protection Status p. 118
ISO Speed p. 85
Photo Effects p. 83
Shooting Mode p. 13
p. 49
p. 113
Resolution Settings (Movie)
Aperture Value
Shutter Speed
Movie Length
Histogram
••• •••
••• •••
• In addition to the above, the ISO speed, shutter speed, aperture
setting, movie length, histogram and overexposure warning
appear.
Exposure level p. 79
Flash Exposure Compensation
White Balance p. 80
Light Metering Mode p. 77
Macro Mode p. 63
Manual Focus p.
The following information may also appear with some image files.
An audio file other than a wave file, or a file with an unrecognized format, is attached.
JPEG file with format not conforming to Design rule for Camera File System Standards.
File with unrecognized format.
○○○○○○○○○○○○○○○○○○○○○○
Please note that image information recorded by this camera may not display
correctly on other cameras and image information recorded by other cameras may
not display correctly on this camera.
30
p. 49
p. 93
100, 101
Page 37

○○○○○○○○○○○○○○○○○○○○○○
About the Histogram
The histogram is a graph that allows you to judge the brightness of the recorded
image. The greater the bias toward the left in the graph, the darker the image. The
greater the bias toward to the right, the brighter the image. If the image is dark,
adjust the exposure compensation to a positive number. Similarly, adjust the
exposure compensation to a negative number if the image is bright (p. 79).
Histogram Examples
Dark Image Balanced Image Bright Image
Overexposure Warning
In detailed display mode, overexposed portions of the image blink.
Preparing the Camera, Basic Functions
31
Page 38

Using the Viewfinder to Shoot
Setting the LCD monitor to Off (p.28) and using the optical viewfinder can help
conserve power while shooting.
• The viewfinder has a field of vision of
approximately 82% of the actual shooting
image.
Shows the center of
the image
○○○○○○○○○○○○○○○○○○○○○○
Image Seen in Viewfinder vs. Recorded Image
Please note that the actual image may differ from the image seen in the optical
viewfinder due to the physical separation between the viewfinder and lens. This is
called the parallax phenomenon and is more noticeable the closer the subject is to
the lens. In some cases, portions of images shot up close that appear in the
viewfinder will not appear in the recorded image. Please use the LCD monitor to
shoot images up close.
Shooting with an Off-Center AF Frame Selected
You should always use the LCD monitor to compose images when you have selected
an off-center AF frame. When setting the AF frame to the desired position to shoot
an image, please use the LCD monitor (See Selecting an AF Frame, p. 74).
32
Page 39

Pressing the Shutter Button
The shutter button features a two-stage action.
● Pressing Halfway
Pressing halfway automatically sets the exposure,
focus and white balance.
• The indicators light or blink as follows.
Upper indicator
•
Green: Metering complete (two beeps
sound)
•
Orange: Flash will fire
•
Blinking Orange: Camera shake warning /
Insufficient exposure
Lower indicator
Indicators
AF Frame
•
Yellow: Macro mode/Manual focus mode
•
Blinking Yellow: Focusing difficulty* (single
beep sounds)
* Use the focus lock, or focus manually, to shoot when the
indicator blinks yellow (p. 98).
• The AF frame appears as follows when the LCD
monitor is on.
•
Green: Metering complete
•
Yellow: Focusing difficulty*
* The AF frame will not appear on the LCD monitor when it is
set to Auto Selection.
Preparing the Camera, Basic Functions
● Pressing Fully
Pressing fully releases the shutter.
• The upper indicator blinks green while the
image is recording onto the CF card.
• You will hear the shutter sound when the shot
is complete. Do not move the camera until you
hear this sound.
33
Page 40

Pressing the Shutter Button (continued)
○○○○○○○○○○○○○○○○○○○○○○
• If the orange or yellow indicator blinks while you press halfway, you can still press
fully to take the shot.
• Images are first saved into the camera’s internal memory before being recorded
onto the CF card, allowing the next images to be taken immediately as long as
sufficient space is available in the internal memory.
• The beep and shutter sound can be set On / Off in the Set up menu (p. 151).
• When the shutter sound is set to Off, but the beep is set to On, one beep will
sound when the shutter button is fully pressed.
• There is no shutter sound in movie mode.
• Shots cannot be taken while the flash is charging.
AF-assist Beam
• The AF-assist beam will sometimes emit when the shutter button is pressed
halfway to assist focusing in certain conditions, i.e. dark conditions.
• The AF-assist beam can be turned off (p. 149).
If animals are your subject, turn off the beam when shooting in the dark to avoid
startling them. However, please keep in mind the following facts.
- Turning the AF-assist beam off may make it more difficult for the camera to
focus.
- The red-eye reduction lamp may emit when you press the shutter button
halfway even if the AF-assist beam is turned off.
In order to prevent any lamp from emitting before the flash fires, set both the red-
eye reduction function and the AF-assist beam to [Off] in the Shooting menu.
34
Page 41

Using the Zoom (Focal Length)
The zoom can be adjusted from 35 to 105 mm (equivalent to 35 mm film format).
Telephoto / Wide Angle
• Slide the zoom lever toward to zoom in
(telephoto).
• Slide the zoom lever toward
(wide angle).
Digital Zoom
An image already zoomed with the optical zoom
lens can be further zoomed up digitally to an
approximate factor of 12 for shooting (p. 65).
to zoom out
Preparing the Camera, Basic Functions
○○○○○○○○○○○○○○○○○○○○○○
The digital zoom cannot be used with certain Shooting modes (p.180).
○○○○○○○○○○○○○○○○○○○○○○
The more the image is zoomed digitally, the coarser its image quality becomes.
35
Page 42

Selecting Menus and Settings
Menus are used to adjust shooting, replaying, date / time and electronic sound
settings. Menus can be displayed by either pressing the
the
procedures.
button. Watch the LCD monitor while performing the following
/ /
button or
Selecting Settings by Pressing the
Press the / /
1
• Icons of the selectable settings appear on the left
side of the LCD monitor.
• The current settings icons appear.
Select a menu item using C or D on the
2
multicontroller.
Select setting contents using B or A on
3
the multicontroller.
Some menu items can only be selected after
pressing
again to confirm the setting.
Press the / /
4
• The menu closes.
• Images can be shot immediately with the selected settings after Step 3 by
pressing the shutter button.
and displaying the next menu. Press
button.
button.
Button (Only in Shooting Mode)
36
Page 43

Selecting Settings by Pressing the
Button
Press the
1
In Shooting mode, the [ (Rec.)] menu appears. In Replaying mode, the [
(Replay)] menu appears.
Switch between menu tabs using B or A
2
on the multicontroller.
• The menu switches as follows:
[
(Rec.)] or [ (Replay)] [ (Set up)]
[ (My Camera)]
• Pressing the
switches between the menu tabs.
Select a menu item using C or D on the
3
multicontroller.
Select setting contents using B or A on
4
the multicontroller.
Press for items followed by an ellipsis (...) then
select a setting. Press
setting.
button.
button or the zoom lever also
again to confirm the
Preparing the Camera, Basic Functions
Press the
5
• The menu closes.
• In Shooting mode, the menu can be closed by pressing the shutter button
halfway. (In Replaying mode, the menu closes when the shutter button is
pressed halfway and the camera switches to Shooting mode if the lens cover
is open.)
button.
37
Page 44

Selecting Menus and Settings (continued)
Menu Settings and Factory Defaults
This chart shows the options for each menu and the default settings.
Menu Items Selectable with the
Menu Item Available Settings
Exposure Compensation -2 ~ ±0* ~ +2 79
White Balance 80
Drive Mode 64, 66
ISO Speed AUTO / 50 / 100 / 200 / 400 85
Photo Effect 83
Bracket 86, 88
Flash Exposure/Flash Output -2 to +2 1 3 (FULL) 93
Resolution, File Format, Compression
Menu Items Selectable with the
Menu Item Available Settings
Flash Sync 1st-curtain*, 2nd-curtain 95
Slow Synchro On/Off* 55
Flash Adjust Auto*/ Manual 93
Red-eye On*/ Off 54
Spot AE Point Center* / AF Point 77
Rec.
Menu
(Red)
Replay
Menu
(Blue)
MF-Point Zoom On*/ Off 100
AF-assist Beam On*/ Off 149
Digital Zoom On / Off* 65
Review Off / 2* to 10 sec. 47
Intervalometer
Save Settings... Saves customized settings 102
Protect Turns image protection on and off 118
Rotate Rotates the image in the display 112
Erase all Erases all images on the CF card 120
Slide Show Replays selected images in a slide show 114
Print Order Sets the print settings 135
Transfer Order Sets the transfer settings 142
Button
Reference
Page
*
/ / / / / / / /
*
/ / / /
*
/ / / / / /
*
/ /
(Still picture) L*/ M1 / M2 / S / RAW
(Movie)
*/
(Compression) / */
49, 52
Button
Reference
Page
Automatically shoots images at a set time interval
96
38
Page 45

Set up
Menu
(Yellow)
My
Camera
Menu
(Purple)
Menu Item Available Settings
Reference
Page
Beep On* / Off 151
LCD Brightness * / 151
Auto Power Down On* / Off 151
Date/Time Sets the date and time 21
Format Formats the CF card 121
Shutter Volume Off / 1 / 2* / 3 / 4 / 5 152
Playback Vol. Off / 1 / 2* / 3 / 4 / 5 152
Start-up Vol. Off / 1 / 2* / 3 / 4 / 5 152
Operation Vol. Off / 1 / 2* / 3 / 4 / 5 153
Selftimer Vol. Off / 1 / 2* / 3 / 4 / 5 153
File No. Reset On / Off* 104
Auto Rotate On* / Off 103
Distance Units m/cm* / ft/in 153
Language English* / Deutsch / Français / Nederlands /
Dansk / Suomi / Italiano / Norsk / Svenska / 23
Español / Chinese / Japanese
Video System NTSC / PAL 154
*
Theme
Start-up Image
Start-up Sound
Operation Sound
Selftimer Sound
Shutter Sound
1
/
/
1
/
1
/
1
/
1
/
1
/
/
*
/
/
*
/
/
*
/
/
*
/
/
*
/
/
40, 155
40, 155
40, 155
40, 155
40, 156
40, 156
Preparing the Camera, Basic Functions
* Default values. Default video system settings var y between regions.
• Some menu items are not available in certain Shooting modes (p. 180).
• You can apply a desired image and sound to
My Camera Settings (p. 42) or the Software Starter Guide.
• The default of the settings changed by the menu and button operations except for [Date/ Time], [Language] and
[Video System] can be restored all at once (p. 157).
and in the My Camera menu. For details, see Registering
39
Page 46

Customizing the Camera (My Camera Settings)
My Camera allows you to customize the start-up image and start-up, shutter,
operation and self-timer sounds. Each menu item has three choices.
e.g. Start-up image
1
][][]
[
As default settings, My Camera setting [ ] has a science fiction theme and My
Camera setting [
] has an animal theme.
Changing My Camera Settings
Turn on the camera (p. 24).
1
Press the
2
The [ (Rec.)] or [ (Replay)] menu appears.
Select the [ (My Camera)] menu using
3
A on the multicontroller.
Pressing the
the menu tabs.
Select a menu item using C or D on the
4
multicontroller.
40
button.
button also switches between
Page 47

Select setting content using B or A on
5
the multicontroller.
Press the
6
• Pressing the
effect.
• In Shooting mode, the menu can be closed by pressing the shutter button
halfway. (In Replaying mode, the menu closes when the shutter button is
pressed halfway and the camera switches to Shooting mode if the lens cover
is open.)
button.
button closes the menu and makes the settings take
Preparing the Camera, Basic Functions
○○○○○○○○○○○○○○○○○○○○○○
• If you select [Theme] in Step 4, you can select a consistent theme for each of the
My Camera Settings.
• If [Beep] in the [
sound item such as [Start-up Sound], [Operation Sound], [Selftimer Sound] and
[Shutter Sound] in the [
(Set up)] menu is set to [On], the beep sounds even if each
(My Camera)] menu is set to [
(Off)] (p. 151).
41
Page 48

Registering My Camera Settings
Images recorded onto the CF card and newly recorded sounds can be added as My
Camera settings to the and menu items. You can also use the supplied
software to upload your computer’s images and sounds to the camera.
The following menu items can be saved to the camera.
• Start-up Image • Start-up Sound
• Operation Sound • Selftimer Sound
• Shutter Sound
Registering CF Card Images and Sounds
Turn on the camera (p. 24).
1
Slide the power/replay lever.
2
The camera switches to Replaying mode.
Press the
3
The [ (Replay)] menu appears.
Select the [ (My Camera)] menu using
4
A on the multicontroller.
Pressing the
the menu tabs.
Select the menu item you wish to register using C or D on the
5
multicontroller.
42
button.
button also switches between
Page 49

Select or using B or A on the
6
multicontroller.
appears.
Press the
7
An image appears.
[Start-up Image] → Step 8a, 9a
[Start-up Sound], [Shutter Sound], [Selftimer
Sound] → Step 8b, 9b
Select the image you wish to
8a
register using B or A or on the
multicontroller.
Press
button.
.
9a
Select (Record) using B or A on
8b
the multicontroller and press
• Recording starts.
• Recording stops when the set amount of
time has passed.
Start-up Sound: 1 second, Operation Sound:
0.3 second, Selftimer Sound: 2 seconds,
Shutter Sound: 0.3 second.
Preparing the Camera, Basic Functions
.
9b
10
Select [ (Register)] using B or A
or on the multicontroller.
Select [OK] using B or A or on the
multicontroller and press
.
43
Page 50

Registering My Camera Settings (continued)
○○○○○○○○○○○○○○○○○○○○○○
• Sounds recorded with the movie (p.62) and sound annotation (p.113) functions
cannot be added as My Camera settings.
• When you register new My Camera settings, the previously registered settings are
erased.
File Format of My Camera Settings
My Camera settings should conform to the below file formats. However, CF card
images shot with this camera can be registered as My Camera settings regardless
of the below formats.
● Start-up Image
•
Recording image format JPEG (Base line JPEG)
•
Sampling rate 4:2:0 or 4:2:2
•
Image size 320 x 240 pixels
•
File capacity 20 KB or less
● Start-up Sound, Operation Sound, Selftimer Sound and Shutter Sound
•
Recording format WAVE (monaural)
•
Quantization bit 8 bit
•
Sampling frequency 11.025 kHz and 8.000 kHz
•
Recording time
11.025 kHz 8.000 kHz
Start-up Sound 1.0 sec. or less 1.3 sec. or less
Operation Sound 0.3 sec. or less 0.4 sec. or less
Selftimer Sound 2.0 sec. or less 2.0 sec. or less
Shutter Sound 0.3 sec. or less 0.4 sec. or less
Any file format other than those described above cannot be used with this camera.
An example of this function is to record “Say cheese” as a self-timer sound so the
camera will replay this sound 2 seconds before the photo is taken. You could also
record cheerful music to bring out the natural smiles of your subjects, or so they
can strike a pose fitting the music. In these ways you can customize your camera by
creating and adding new My Camera settings.
See the supplied Software Starter Guide for more information on creating and
adding to the My Camera Settings files.
44
Page 51

Shooting - Letting the Camera Select Settings
See Functions Available in Each Shooting Mode (p. 180) at the end of this
manual to find out which settings can be changed in which Shooting modes.
Auto Mode
In this mode, all you have to do is press the shutter button and let the camera do
everything else.
Check that the camera is in Shooting mode (p. 24).
1
2
Turn the shooting mode dial to .
Aim the camera at the subject.
3
Use the zoom lever to achieve the desired composition
4
(relative subject size in the viewfinder).
Press the shutter button halfway (p. 33).
5
• Two beeps will sound when the camera has
finished metering, and the indicator beside the
viewfinder will light green or orange. If the LCD
monitor is on, the AF frame will light green.
• The shutter speed and aperture value are
automatically determined and show on the LCD
monitor if it is on.
• The yellow indicator will blink and the beep will sound one time if the
subject is difficult to focus on. The AF frame will also appear yellow. ( When
the AF frame is set to Auto selection it will not appear)
AF Frame
Shooting - Letting the Camera Select Settings
Press the shutter button all the way (p. 33).
6
• You will hear the sound of the shutter when the shutter activates.
• The picture appears for two seconds on the LCD monitor, if it is on.
45
Page 52

Auto Mode (continued)
○○○○○○○○○○○○○○○○○○○○○○
• Functions Available in Each Shooting Mode (p. 180)
• You can change the length of time images show on the LCD monitor after
shooting, or set it so they do not show at all (p. 48).
46
Page 53

Reviewing an Image Right after Shooting
Reviewing the Image
After a photo is taken, the image displays on the LCD monitor for two seconds. (To
change this setting, see page 48.) There are two ways to display the image for
longer.
2Keeping the Shutter Button Pressed
The image continues to appear on the LCD monitor as long as you keep the
shutter button fully depressed.
2Pressing
If you press
display even after the shutter button is released.
Press the shutter button halfway again to stop displaying it and shoot an image.
○○○○○○○○○○○○○○○○○○○○○○
You can perform the following while images are displayed.
– Erasing Images Individually (p. 9, 119)
– Displaying Images in detailed display mode (p. 28)
– Magnifying Images (p. 106)
– Changing the Recording Format (p. 52)
– Attaching Sound Annotations (p. 113)
Changing the Recording Format Right after Shooting
while the image is displayed
while the image is displayed on the LCD monitor, it will continue to
By following the below instructions, you can save images shot in the JPEG format
in the RAW format (p. 52) right after shooting if the camera is set to
or *. You can easily process images saved in the RAW format using a computer
to edit the resolution, photo effect and white balance without any loss of quality.
* The JPEG format image will not be saved.
Right after shooting, press the / /
1
the image is displayed on the LCD monitor.
button while
, , , ,
Select [OK] using B or A on the
2
multicontroller and press
• The image is recorded in the RAW format.
• When you press the shutter button halfway, the
camera returns to the shooting screen.
.
47
Shooting - Letting the Camera Select Settings
Page 54

Reviewing an Image Right after Shooting (continued)
○○○○○○○○○○○○○○○○○○○○○○
The above operations cannot be performed if the image was shot with the digital
zoom or when
is already selected as the recording format.
Changing the Image Display Duration
The length of time images are displayed after a photo has been taken can be
changed anywhere from 2 seconds to 10 seconds or turned off.
In the [ (Rec.)] menu, select [Review].
1
See Selecting Menus and Settings (p. 36).
Select a Review setting and press the
2
• With the [Off] option, the image will not
• With the [2 sec.] to [10 sec.] options, the image
• You can continue to display the image as long as
• Another picture can be taken even while the last is displayed.
button.
automatically display.
will appear for the time selected even if the
shutter button is released.
the shutter button is fully held pressed regardless
of the Review setting.
48
Page 55

Changing the Resolution and Compression
You can change the resolution and compression (excluding movies) settings to suit
the purpose of the image you are about to shoot. To record the CCD output
without compression, select the RAW file format (p. 52).
Resolution Purpose
L (Large) 2592 x 1944 pixels High
M1 (Medium 1) 1600 x 1200 pixels
M2 (Medium 2) 1024 x 768 pixels
S (Small) 640 x 480 pixels Low
*Paper sizes vary according to region.
Compression Purpose
Superfine High Quality
Fine
Normal Normal
• Movies can be shot with the following resolution.
Resolution
320 x 240 pixels
160 x 120 pixels
• Print A4 size* 210 x 297 mm (8.3 x 11.7 in.) or larger prints
• Print letter size* 216 x 279 mm (8.5 x 11 in.) or larger prints
• Print postcard size 148 x 100 mm (6 x 4 in.) prints
• Print L size 119 x 89 mm (4.7 x 3.5 in.) prints
Print card size 86 x 54 mm (3.4 x 2.1 in.) prints
• Send images as e-mail attachments
• Shoot more images
Shoot higher quality images
Shoot normal quality images
Shoot more images
Turn the shooting mode dial to the desired Shooting mode.
1
Press the
/ /
button.
2
Select L* (2592 x 1944) using C or D on
3
the multicontroller.
* The current setting is displayed.
Shooting - Letting the Camera Select Settings
49
Page 56

Changing the Resolution and Compression (continued)
Select the resolution you wish to set
4
using B or A on the multicontroller.
Press
.
5
Select the compression you wish to set
6
using B or A on the multicontroller.
You can shoot the image right after selecting
settings by pressing the shutter button. This
screen will appear again, once the image is shot.
Press the / /
button.
7
Excluding
Number of recordable images
(Only displayed when the resolution,
compression or file format is selected)
Shoot the image.
8
50
Page 57

○○○○○○○○○○○○○○○○○○○○○○
• Some settings are not available with certain Shooting modes. Please refer to
Functions Available in Each Shooting Mode (p. 180)
• Size of an image file (approximate) (p.173)
• Types of CF cards and resolution (p. 173)
• The resolution and compression settings are affected by the Shooting mode
selection as follows (only the resolution in
Initial Shooting
Mode
Next Shooting Mode
mode).
Resolution and Compression after Change
Settings change to those of the next mode
Settings do not change
Settings change to those of the next mode
Settings do not change
Settings change to those of the next mode
51
Shooting - Letting the Camera Select Settings
Page 58

Changing the File Format
The recording file format can be switched to the RAW format before shooting the
image.
With the standard JPEG file format, the camera processes images after capturing
them to produce optimal results. The JPEG format compresses images so that more
can be stored on a single CF card. However, the compression is irreversible,
meaning that the original image data cannot be recovered after processing. In
contrast, the RAW format records the image data as captured by the camera’s CCD
without further processing. RAW images are compressed, but the compression is
reversible** so that a high-quality image can be obtained from the decompressed
file without any loss of image quality. In addition, although a RAW file is larger than
an equivalent JPEG file, it is still only approximately one-quarter the size* of an
uncompressed RGB TIFF format file, making it relatively compact.
With standard uncompressed file formats, such as RGB TIFF, images are processed
in the camera and require further processing by retouching software to adjust the
image parameters, which reduces image quality. With the RAW format, however,
the original data can be used in special software** to adjust the image parameters
(white balance, contrast, sharpness and saturation) making it possible to maintain
the image quality while making changes. The resolution (2592 x 1944) and
compression settings cannot be adjusted for these images.
* As measured by Canon’s testing standard.
** The bundled software can be used to open or adjust the parameters of images recorded in the RAW file
format. Please consult the Software Starter Guide for details.
Turn the shooting mode dial to , , , or .
1
Press the / /
button.
2
Select L* (2592 x 1944) using C or D on
3
the multicontroller.
* The current setting is displayed.
52
Page 59

Select RAW using B or A on the multicontroller.
4
You can shoot the image right after selecting settings by pressing the shutter
button. The previous screen will appear again, once the image is shot.
Press the / /
5
Shoot the image.
6
button.
Shooting - Letting the Camera Select Settings
○○○○○○○○○○○○○○○○○○○○○○
Images shot in the JPEG format can also be changed to the RAW format while they
are displayed right after shooting (p. 47).
53
Page 60

Using the Flash
Use the flash according to the guidelines below.
Red-eye reduction, Auto
Auto The flash fires automatically as required by the lighting level.
Red-eye reduction, Flash on
Flash on The flash always fires.
Flash off The flash does not fire.
Press the button to switch between
1
flash modes.
• The selected flash mode appears on the LCD
monitor.
• You can switch between settings by pressing the
button.
When the red-eye reduction function is on
The flash fires automatically as required by the lighting level, and the
red-eye reduction lamp fires each time the main flash fires
The red-eye reduction lamp and the flash always fire.
When the red-eye reduction function is off
Shoot the image.
2
• The flash will fire if the indicator beside the viewfinder lights orange when
the shutter button is pressed halfway. (In
• Shooting procedures are the same as for the
, the flash does not fire.)
mode (p. 45).
Setting the Red-eye Reduction Function
The red-eye reduction lamp fires when the flash is used in dark areas. This prevents
light from reflecting back from the eyes and making them appear red.
54
Page 61

In the [ (Rec.)] menu, set [Red-eye] to
1
[On].
appears on the LCD monitor.
○○○○○○○○○○○○○○○○○○○○○○
When shooting with the red-eye reduction function, the subjects must look right at
the red-eye reduction lamp for this mode to be effective. Try asking them to look
directly at the lamp. Even better results can be obtained by shooting with the lens set
to a wide angle, increasing the lighting in indoor settings or approaching closer to
the subject.
Setting the Slow Synchro
You can shoot images using the flash with a slow shutter speed. This helps avoid
dark backgrounds when shooting night scenes or with indoors lighting conditions.
In the [ (Rec.)] menu, set [Slow Synchro] to [On].
1
○○○○○○○○○○○○○○○○○○○○○○
When shooting with a high ISO sensitivity and using the built-in flash, there is more
of a chance of overexposure the closer you are to the subject.
○○○○○○○○○○○○○○○○○○○○○○
• Some settings are not available with certain Shooting modes. Please refer to
Functions Available in Each Shooting Mode (p. 180)
• The flash fires twice. A pre-flash will fire and will be followed by the main flash.
The pre-flash is used by the camera to obtain the subject’s exposure data so that
the main flash can be set to the optimal intensity for the shot.
• The fastest shutter speed for flash synchronization is 1/250 second. The camera
automatically resets the shutter speed to 1/250 second if a faster speed is selected.
• The flash fires with automatic adjustments when [Flash Adjust] is set to [Auto] in
the [
(Rec.)] menu. When shooting in mode, or with [Flash Adjust] set to
[Manual], the flash fires with the manually set adjustments.
• Shots cannot be taken while the flash is charging.
• The flash may take up to approximately 10 seconds to charge in some cases.
Actual times will vary according to usage and the battery charge.
• The [
• The flash setting is saved when the camera is tur ned off in the
• When shooting with [Slow Synchro] set to [On], we recommend the use of a
(Flash)] (flash exposure) and the [Flash Output] can be changed (p. 93).
, , , and
Shooting modes.
tripod to prevent camera shake.
Shooting - Letting the Camera Select Settings
55
Page 62

Portrait Mode
Use this mode when you want the subject to appear sharp
and the background to blur.
1
○○○○○○○○○○○○○○○○○○○○○○
• Functions Available in Each Shooting Mode (p. 180)
• To best achieve the effect of the background gradually fading, compose the image
so that the upper half of the subject’s body fills most of the viewfinder or LCD
monitor.
• The background gets increasingly indistinct the more you adjust the focal length
toward telephoto.
mode dial to .
Shooting procedures are the
same as for the
(p. 45).
Mode
Landscape Mode
Use this mode to shoot expansive landscape scenes.
Turn the shooting
1
Turn the shooting mode
dial to .
Shooting procedures are the
same as for the
45).
Mode (p.
○○○○○○○○○○○○○○○○○○○○○○
• Functions Available in Each Shooting Mode (p. 180)
• Since a slow shutter speed is often selected in
(camera shake warning) icon appears on the LCD monitor.
the
56
mode, use a tripod to shoot if
Page 63

Night Scene Mode
Use this mode to capture human subjects against the backdrop of an evening sky or
night scene. The people are illuminated with light from the flash while the backdrop
is captured at a slow shutter speed so that both appear correctly exposed.
1
○○○○○○○○○○○○○○○○○○○○○○
Always use a tripod to prevent camera shake in this mode.
○○○○○○○○○○○○○○○○○○○○○○
• Functions Available in Each Shooting Mode (p. 180)
• Warn people to stay still for a few seconds after the flash fires because of the slow
shutter speed.
• Using the
mode.
• With the
Shooting procedures are the same as for the mode
(p. 45).
mode in daylight will produce an effect similar to that of the
mode, the slow synchro function automatically turns on.
Fast Shutter
Use this mode to shoot fast moving objects.
Turn the shooting mode dial to .
1
Turn the shooting mode
dial to
Shooting procedures are the
same as for the
45).
.
mode (p.
Shooting - Letting the Camera Select Settings
○○○○○○○○○○○○○○○○○○○○○○
• Functions Available in Each Shooting Mode (p. 180)
• Noise in the recorded image may increase if you shoot dark subjects.
57
Page 64

Slow Shutter
Use this mode to shoot moving objects to make them
appear blurred such as river rapids.
1
○○○○○○○○○○○○○○○○○○○○○○
• Functions Available in Each Shooting Mode (p. 180)
• Always use a tripod to prevent camera shake in this mode.
mode dial to .
Shooting procedures are the
same as for the
45).
mode (p.
Turn the shooting
58
Page 65

Stitch Assist Mode
Use this mode to shoot a series of overlapping frames for merging (stitching) into a
large panoramic image using a computer.
Horizontal Vertical
2 x 2
○○○○○○○○○○○○○○○○○○○○○○
Please use the bundled PhotoStitch program to merge the images on a computer.
Framing a Subject
PhotoStitch detects the overlapping portions of adjoining images and merges
them. When composing shots, try to include a distinctive item (landmark, etc.) in
the overlapping portions.
59
Shooting - Letting the Camera Select Settings
Page 66

Stitch Assist Mode (continued)
○○○○○○○○○○○○○○○○○○○○○○
• Compose each frame so that it overlaps 30 to 50% of the adjoining image. Try to
keep the vertical misalignment to within 10% of the image height.
• Do not include moving items in the overlap.
• Do not try to stitch images that include both distant and close subjects. Objects
may appear warped or doubled up.
• Make the brightness in each image consistent. The final image will appear
unnatural if the difference in brightness is too great.
• For good results, pan (swivel) the camera to take successive shots.
• To shoot close-ups, slide the camera over the subject, keeping it parallel as you
move.
Shooting
Images can be shot in the following 5 sequences in Stitch Assist mode.
Horizontally, left to right
Horizontally, right to left
Vertically, bottom to top
Vertically, top to bottom
Clockwise starting at the top left
1
The LCD monitor will turn on.
Select the shooting sequence using B or
Turn the shooting mode dial to .
2
A on the multicontroller and press
You can also press the shutter button directly to
shoot without pressing .
.
Shoot the first image.
3
The exposure and white balance settings are set and locked with the first
image.
60
Page 67

Compose and shoot the second image so
4
that it overlaps the first.
• Minor discrepancies in the overlap can be corrected
with the software.
• An image can be retaken. Press B or A on the
multicontroller to return to that frame.
Sequence
Sequence
Use the same procedures to shoot the remaining frames.
5
A maximum of 26 images can be recorded either horizontally or vertically.
Press
after the last shot.
6
○○○○○○○○○○○○○○○○○○○○○○
• A custom white balance setting (p. 80) cannot be set in mode. To use a
custom white balance setting, first set it in another Shooting mode.
• The settings in place for the first image are locked in and cannot be changed for
subsequent shots.
• A TV cannot be used as the monitor for shooting in this mode.
○○○○○○○○○○○○○○○○○○○○○○
Functions Available in Each Shooting Mode (p. 180)
Shooting - Letting the Camera Select Settings
61
Page 68

Movie Mode
Use this mode to shoot movie frames. The resolution can be set to either [
240 (default setting))] or [
(160 × 120)] (p. 49).
Turn the shooting mode dial to .
1
The LCD monitor turns on and displays the maximum
recording time (in seconds).
Press the shutter button all the way.
2
• Shooting and sound recording starts simultaneously.
• During the shooting a red circle appears in the upper right of the LCD monitor.
Press the shutter button all the way to stop recording the movie.
3
The maximum length of individual movie clips (approximately 15 frames/
second) is about 3 minutes* at the
setting. The clip will end automatically after this time elapses or when the CF
card becomes full.
* The data reflects Canon’s testing standard. The actual figures will vary according to the shooting objects
and conditions.
setting and about 3 minutes* at the
(320 ×
○○○○○○○○○○○○○○○○○○○○○○
• Be careful not to touch the microphone while shooting.
• The AE, AF, white balance and zoom settings are set and locked to the settings of
the first frame.
• If the indicator on the left side of the viewfinder blinks green after a shot, this
indicates that the movie is being written to the CF card. You cannot shoot again
until it stops blinking.
○○○○○○○○○○○○○○○○○○○○○○
• Functions Available in Each Shooting Mode (p. 180)
• Sound is recorded monaurally.
• There is no shutter sound in movie mode.
• QuickTime 3.0 or higher is required to replay movie files (AVI / Motion JPEG) on a
computer. (QuickTime (for Windows) is bundled on the supplied Digital Camera
Solution Disk. On the Macintosh platform, QuickTime 3.0 or later is generally
bundled with Mac OS 8.5 or later operating system.)
62
Page 69

Macro Mode
Use the macro mode to shoot close-ups of subjects in the range of 10 to 50 cm
(3.9 in. to 1.6 ft.) at wide angle end and 30 to 50 cm (1.0 ft. to 1.6 ft.) at
telephoto end.
Press the
button to turn the LCD monitor on.
1
Press the button.
2
• The icon appears on the LCD monitor.
• Press the
mode.
Shoot the image.
3
• The indicator beside the viewfinder will light yellow when the shutter button
is pressed halfway.
• Shooting procedures are the same as for the
button again to cancel the macro
Mode (p. 45).
Shooting - Letting the Camera Select Settings
○○○○○○○○○○○○○○○○○○○○○○
• Some settings are not available with certain Shooting modes. Please refer to
Functions Available in Each Shooting Mode (p. 180).
• Always use the LCD monitor to compose images in macro mode. Shooting with
the viewfinder is possible, though, the parallax phenomenon may cause images
composed with the optical viewfinder to be off-center (p. 32).
• When the lens is zoomed out to the wide angle end, the recordable area is 110 ×
80 mm (4.33 in. × 3.15 in.) at the closest focal distance, and at telephoto end, it is
113 × 83 mm (4.45 in. × 3.27 in.).
• The exposure may not be optimal when the flash is used in macro mode.
63
Page 70

Self-Timer
You can take pictures with the self-timer in any Shooting mode.
Press the / /
button.
1
Select * (Drive mode) using C or D on
2
the multicontroller.
* The current setting is displayed.
Select or
3
multicontroller and press the / /
button.
When is selected, the shutter release will be
delayed for 10 seconds, and when
the shutter release will be delayed for 2 seconds,
after you press the shutter button.
Shoot the image.
4
• When is selected, the self-timer lamp starts blinking when the shutter
button is pressed all the way. The self-timer sounds and the blinking gets
faster two seconds before the shutter activates.
• When
shutter activates in two seconds.
• Shooting procedures are the same as for the
using B or A on the
is selected,
is selected, the self-timer lamp blinks fast from the beginning. The
mode (p. 45).
○○○○○○○○○○○○○○○○○○○○○○
• Some settings are not available with certain Shooting modes. Please refer to
Functions Available in Each Shooting Mode (p. 180)
• You can change the self-timer sound by changing the setting in [Selftimer Sound]
in the [
64
(My Camera)] menu (p. 156).
Page 71

Digital Zoom
With the combined optical and digital zoom functions, images can be
zoomed as follows.
3.8 times, 4.9 times, 6.1 times, 7.6 times, 9.3 times and 12 times
Press the
button to turn the LCD monitor on.
1
Turn the shooting mode dial to any Shooting mode except for
2
3
or .
In the [ (Rec.)] menu, select [Digital
Zoom].
See Selecting Menus and Settings (p. 36).
Select [On] and press the
button.
4
Slide the zoom lever toward and hold
5
it.
• The lens will zoom to the maximum optical
telephoto setting and stop. Release the lever and
slide it toward
image digitally.
• Slide the lever toward
Shoot the image.
6
Shooting procedures are the same as for the
mode (p. 45).
again to further zoom the
to zoom back out.
The combined
magnifications of the
optical zoom and digital
zoom are displayed.
Shooting - Letting the Camera Select Settings
○○○○○○○○○○○○○○○○○○○○○○
The digital zoom cannot be used when the LCD monitor is off or with the RAW file
format.
○○○○○○○○○○○○○○○○○○○○○○
• Some settings are not available with certain Shooting modes. Please refer to
Functions Available in Each Shooting Mode (p. 180)
• Images become coarser the more they are digitally zoomed.
65
Page 72

Continuous Shooting
Use this mode to shoot successive frames while the shutter button is fully pressed.
Standard
Continuous Shooting
High Speed
Continuous Shooting
Use this mode to view the images as you shoot continuously. The
shutter interval is longer in this mode than in mode.
Use this mode to shoot continuously with a short shutter interval.
You cannot check images while shooting continuously.
Press the / /
button.
1
Select * (Drive mode) using C or D on
2
the multicontroller.
* The current setting is displayed.
Select or and press the
3
Press the shutter button halfway to lock the focus.
button.
/ /
4
Press the shutter button all the way to shoot.
5
• Shooting will stop when the shutter button is released.
• The shooting speed is as follows.*
When
When
* Large/Fine, LCD monitor off mode. (These figures reflect Canon’s testing standard. The actual figures
will vary according to the shooting conditions and settings.)
is selected: Approx. 1.5 frames per second
is selected: Approx. 2.0 frames per second
○○○○○○○○○○○○○○○○○○○○○○
• Some settings are not available with certain Shooting modes. Please refer to
Functions Available in Each Shooting Mode (p. 180)
• The interval between frames may lengthen somewhat when the internal memory
becomes full.
• The flash can be used, but the interval between images will lengthen to
accommodate the flash recharge time.
66
Page 73

Shooting - Selecting Particular Effects
Camera settings such as shutter speed and aperture can be freely changed for
shooting.
See Functions Available in Each Shooting Mode (p. 180) at the end of this
manual to find out which settings can be changed in which Shooting modes.
○○○○○○○○○○○○○○○○○○○○○○
Please see Mode (p. 45) for shooting procedures once you have changed a
setting.
Program AE
Use the program AE mode to have the camera automatically set the shutter speed
and aperture value to match the brightness of the scene.
1
Turn the shooting mode dial to .
Shoot the image.
2
• The shutter speed and aperture value will be set
automatically. They appear on the LCD monitor if it
is on.
• The correct exposure has been set if the shutter
speed and aperture value show in white.
Shooting - Selecting Particular Effects
67
Page 74

Program AE (continued)
○○○○○○○○○○○○○○○○○○○○○○
• Functions Available in Each Shooting Mode (p. 180)
• If a correct exposure cannot be obtained, the shutter speed and aperture value
show in red on the LCD monitor. Use the following methods to obtain the correct
exposure and make them show in white.
- Use the flash.
- Change the ISO speed setting.
- Change the light metering mode.
Differences and Similarities between the and Modes.
• Both modes automatically select the shutter speed and aper ture value.
• The following settings can be adjusted in
•
Exposure Compensation
•
ISO Speed
•
Flash Exposure Compensation
•
Flash (Flash on, Slow Synchro, 2nd-curtain flash)•Photo Effects
•
Continuous Shooting
•
Light Metering Mode
•
AF frame (manual selection)
•
FE Lock
mode, but not in mode.
•
White Balance
•
Bracket
•
File Format Settings
•
Manual Focus
•
AE Lock
• For the correlation between aperture value and shutter speed, see page 70.
68
Page 75

Setting the Shutter Speed
When you set the shutter speed in the shutter speed-priority AE mode, the camera
automatically selects an aperture value to match the brightness. Faster shutter
speeds allow you to catch an instantaneous image of a moving subject while
slower speeds create a flowing effect and allow you to shoot without a flash in
dark areas.
1
Select a speed using B or A on the
2
multicontroller.
Shoot the image.
3
The correct exposure has been set if the shutter
speed and aperture value show in white.
○○○○○○○○○○○○○○○○○○○○○○
• If the aperture value shows in red, the image is under exposed (insufficient light) or
overexposed (too much light). Adjust the shutter speed using B or A on the
multicontroller until the aperture value display turns to white.
• The nature of CCD image sensors is such that noise in the recorded image
increases at slow shutter speeds. This camera, however, applies special processing
to images shot at shutter speeds slower than 1.3 seconds to eliminate the noise,
thereby producing high-quality images. Nevertheless, a certain amount of
processing time may be required before the next image can be shot.
Turn the shooting mode dial to .
The shutter speed appears on the LCD monitor if it is on.
Shooting - Selecting Particular Effects
69
Page 76

Setting the Shutter Speed (continued)
○○○○○○○○○○○○○○○○○○○○○○
• Functions Available in Each Shooting Mode (p. 180)
• Please note that camera shake becomes a factor at low shutter speeds. If the
camera shake warning
appears in the center of the LCD monitor, secure the
camera to a tripod before shooting.
• The aperture value and shutter speed change according to the zoom state as
follows.
Wide Angle
Aperture
F 2.8 - 3.5 to 1/1000
Shutter Speed (seconds)
F 4.0 - 8.0 to 1/1500
Telephoto
F 4.9 - 6.3 to 1/1000
F 7.1 - 8.0 to 1/1500
• The fastest shutter speed for flash synchronization is 1/250 second. The camera
automatically resets the shutter speed to 1/250 second if a faster speed is selected
(p. 55).
Shutter Speed Display
The numbers in the table below indicate the shutter speed in seconds. For slower
speeds, quote marks indicate the decimal place, so that 0"3 indicates 0.3 second
and 2" indicates 2 seconds.
1/1500 1/1250 1/1000 1/800 1/640 1/500 1/400 1/320
1/250 1/200 1/160 1/125 1/100 1/80 1/60 1/50 1/40
1/30 1/25 1/20 1/15 1/13 1/10 1/8 1/6 1/5 1/4
0"3 0"4 0"5 0"6 0"8 1" 1"3 1"6 2" 2"5 3"2 4"
5" 6" 8" 10" 13" 15"
70
Page 77

Setting the Aperture
When you set the aperture in the aperture-priority AE mode, the camera
automatically selects a shutter speed to match the brightness. Selecting a lower
aperture value (opening the aperture) allows you to fade the background and
create a beautiful portrait. A higher aperture value (closing it) brings the entire
range from foreground to background into focus. The larger the aperture value,
the greater the range of the image brought into clear focus.
1
Select a value using B or A on the
2
multicontroller.
Shoot the image.
3
The correct exposure has been set if the shutter
speed and aperture value show in white.
Turn the shooting mode dial to .
The aperture value appears on the LCD monitor if it is on.
Shooting - Selecting Particular Effects
71
Page 78

Setting the Aperture (continued)
○○○○○○○○○○○○○○○○○○○○○○
• If the shutter speed shows in red on the LCD monitor, the image is under exposed
(insufficient light) or overexposed (too much light). Adjust the aperture value using
B or A on the multicontroller until the shutter speed display turns white.
• Some aperture values may not be available with certain zoom positions.
○○○○○○○○○○○○○○○○○○○○○○
• Functions Available in Each Shooting Mode (p. 180)
• Please note that camera shake becomes a factor at low shutter speeds. If the
camera shake warning
appears in the LCD monitor, secure the camera to a
tripod before shooting.
• In this mode, the shutter speed with synchronized flash is 1/60 second to 1/250
second. The aperture value setting may therefore be changed automatically to
match the synchronized flash speed even if its value was set previously.
Aperture Value Display
The larger the aperture value, the smaller the lens aperture.
F2.8 F3.2 F3.5 F4.0 F4.5 F5.0 F5.6 F6.3 F7.1 F8.0
• For the correlation between aperture value and shutter speed, see page 70.
72
Page 79

Manually Setting the Shutter Speed and Aperture
You can manually set the shutter speed and aperture to achieve a particular effect.
This is convenient for shooting fireworks and other images where it is difficult to
set the correct exposure automatically.
1
Select a shutter speed using B or A on
2
the multicontroller.
Select an aperture value using C or D on
3
the multicontroller.
Shoot the image.
4
When you press the shutter button halfway, a number indicating the
difference between the standard exposure* and the selected exposure
appears on the LCD monitor. If the difference is more than ±2 steps, “-2” or
“+2” appears in red.
* The standard exposure is calculated by the AE function according to the selected metering mode.
Turn the shooting mode dial to .
The shutter speed and aperture value appears on the LCD
monitor if it is on.
Shooting - Selecting Particular Effects
○○○○○○○○○○○○○○○○○○○○○○
• Functions Available in Each Shooting Mode (p. 180)
• If you wish to change the exposure, adjust the shutter speed using B or A on the
multicontroller, or adjust the aperture using C or D on the multicontroller.
• The LCD monitor's brightness matches the selected shutter speed and aper ture
value. When you select a fast shutter speed or shoot a subject in a dark place and
set the flash to
monitor will always light up.
• For the correlation between aperture value and shutter speed, see page 70.
(Red-Eye Reduction, Flash On) or (Flash On) the LCD
73
Page 80

Selecting an AF Frame
The AF frame indicates the area of the composition on which the camera focuses.
You can set the AF frame in the following way.
When the Shooting Mode dial is set to , , , , or
You can set the AF frame to Auto Selection (AiAF) or to center-point. When Auto
Selection (AiAF) is selected, the camera automatically selects an AF frame from 9
points to focus according to the shooting conditions. With the digital zoom, the
center-point AF-frame is always selected.
Press .
1
The AF frame appears in green on the LCD monitor.
Select the auto selection or center-point AF frame using CDB
2
or A on the multicontroller.
e.g. Auto Selection e.g. Center-point
Press .
3
You can immediately shoot the image using the selected AF frame by pressing
the shutter button instead of pressing
Shoot the image.
.
4
74
Page 81

When the Shooting Mode dial is set to , , or
You can set the focusing frame manually to the desired position (Manual Selection).
This is convenient for focusing accurately on your chosen subject to obtain the
composition you desire. The AF frame is fixed to center-point when an image is
shot using the viewfinder with the LCD monitor off or when using the digital
zoom, even if you previously set the AF frame to the position you desire.
Press .
1
The AF frame appears in green on the LCD monitor.
Move the focusing frame to the position
2
you wish to set using CDB or A on the
multicontroller.
Press .
3
You can immediately shoot the image using the selected AF frame by pressing
the shutter button instead of pressing
.
Shoot the image.
4
Shooting - Selecting Particular Effects
75
Page 82

Selecting an AF Frame (continued)
○○○○○○○○○○○○○○○○○○○○○○
• Some settings are not available with certain Shooting modes. Please refer to
Functions Available in Each Shooting Mode (p. 180)
• Turn the LCD monitor on to set the AF frame to the position you desire before
shooting.
• The AF frame is locked to center-point when using the digital zoom.
• When the Spot AE Point is selected as the light metering mode, you can use the
selected AF frame as the Spot AE Point (p. 77).
• When the AF frame is set to manual selection, it will move to the center if you
continuously press
.
• For an explanation of the AF frame colors, please refer to page 33.
• If the Shooting mode is changed, the AF frame may also change depending on
the Shooting mode. See the table below.
Initial Shooting Mode Next Shooting Mode
PTvAvM
PTvAvM
PTvAvM
PTvAvM
If you switch to
mode, the AF frame will change to the setting previously
AF frames after
change
Auto Selection
No change
Auto Selection
Center-Point
saved with the [Save Settings] function. When switching to any other
Shooting mode, the AF frame settings will change to the settings of the
mode you switched to.
Regarding the AF Frame
AiAF* has a wide range of measuring for accurate focusing. AiAF focuses on the
object even if it is not exactly in the center of the frame.
* “Ai” stands for “Artificial intelligence” and “AF” stands for “Auto Focus.”
76
Page 83

Switching between Light Metering Modes
Evaluative metering is the default light metering mode. This can be switched to
another metering mode.
Appropriate for standard shooting conditions, including backlight
scenes. The camera divides images into several zones for light
Evaluative
Light Metering
Center-Weighted
Averaging
Spot AE Point
Center
AF Point
metering. The camera evaluates the complex lighting conditions,
such as the position of the subject, the brightness, the background,
the direct light, and the backlighting, and adjusts the settings to the
correct exposure for the main subject.
Averages the exposure from the entire image, but places more
weight on the subject at the center. Use this mode when the subject
is backlit or surrounded by bright light.
Meters the area within the spot AE point frame at the center of the
LCD monitor.
Meters the spot AF point corresponding to the selected AF frame.
Press the
button to turn on the LCD monitor.
1
Press the button to select the
2
metering mode.
• Each press of the
metering mode as follows.
(Evaluative Light (Center-Weighted
Metering) Averaging)
• The icon of the currently selected light metering
mode appears on the LCD monitor.
If you have selected
If you have selected
Weighted Averaging), go to step 5.
button changes the
(Spot AE Point)
(Spot AE Point), go to step 3.
(Evaluative Light Metering) or (Center-
Shooting - Selecting Particular Effects
77
Page 84

Switching between Light Metering Modes (continued)
In the [ (Rec.)] menu, select [Spot AE
3
Point].
See Selecting Menus and Settings (p. 36).
Select the [Center] or [AF Point] option,
4
then press the
When [Spot AE Point] is set to [Center], the spot
AE point frame appears at the center of the LCD
monitor, and when [Spot AE Point] is set to [AF
Point], it appears inside the selected AF frame.
Shoot the image.
button.
e.g. Center
5
Spot AE Point Frame
○○○○○○○○○○○○○○○○○○○○○○
Some settings are not available with certain Shooting modes. Please refer to
Functions Available in Each Shooting Mode (p. 180)
78
Page 85

Adjusting the Exposure
Adjust the exposure compensation setting to avoid making the subject too dark
when it is backlit or shot against a bright background.
Press the / /
button.
1
Select * (+/- (Exp.)) using C or D on
2
the multicontroller.
* The current setting is displayed.
Select a setting using B or A on the
3
multicontroller.
• The settings can be adjusted in 1/3 steps in the
range of -2EV to +2EV.
• You can shoot the image right after selecting
settings by pressing the shutter button. This
screen will appear again, once the image is shot.
Press the / /
4
To cancel the exposure compensation, return the setting to using B or A on
the multicontroller.
button.
Shooting - Selecting Particular Effects
Shoot the image.
5
○○○○○○○○○○○○○○○○○○○○○○
Some settings are not available with certain Shooting modes. Please refer to
Functions Available in Each Shooting Mode (p. 180)
79
Page 86

Setting the White Balance
When the white balance mode is set to match the light source, the camera
reproduces colors more accurately.
Auto Settings are automatically set by the camera
Daylight For recording outdoors on a bright day
Cloudy For recording under overcast, shady or twilight skies
Tungsten For recording under tungsten and bulb-type 3-wavelength fluorescent lighting
Fluorescent For recording under warm-white, cool-white or warm-white (3-wavelength) fluorescent lighting
Fluorescent H
Flash For flash photography
Custom1 For setting a custom value with a white sheet of paper, etc., to obtain the optimal white balance
Custom2
For recording under daylight fluorescent, or daylight fluorescent-type 3-wavelength fluorescent lighting
for the conditions. There are two custom values: custom1 and custom2.
Press the
/ /
button.
1
Select * (Auto) using C or D on the
2
multicontroller.
* The current setting is displayed.
Select the desired setting using B or A
3
on the multicontroller.
• Please see the next page regarding the
custom setting.
• You can shoot the image right after selecting settings by pressing the shutter
button. This screen will appear again, once the image in shot.
Press the / /
button.
4
Shoot the image.
5
○○○○○○○○○○○○○○○○○○○○○○
The white balance cannot be adjusted when the photo effect is set to
(B/W).
(Sepia) or
80
Page 87

Setting a Custom White Balance
You can set a custom white balance to obtain the optimal setting for the shooting
conditions by having the camera evaluate a subject such as a white piece of paper
or cloth, or a photo-quality gray card. You can set two types of settings.
Press the / /
button.
1
Select * (Auto) using C or D on the
2
multicontroller.
* The current setting is displayed.
Select (Custom1) or (Custom2)
3
using B or A on the multicontroller.
Aim the camera at the white paper or
4
cloth, or gray card and press
• Aim the camera so that the white paper or cloth,
or gray card, completely fills the frame on the
LCD monitor screen or the entire viewfinder
before pressing
camera reads the white balance data.
• You can shoot the image right after selecting settings by pressing the shutter
button. This screen will appear again, once the image is shot.
. When you press
.
, the
Shooting - Selecting Particular Effects
Press the
5
Shoot the image.
6
/ /
button.
81
Page 88

Setting the White Balance (continued)
○○○○○○○○○○○○○○○○○○○○○○
• Some settings are not available with certain Shooting modes. Please refer to
Functions Available in Each Shooting Mode (p. 180)
• To set and use a custom white balance setting, it is advisable to select the
Shooting mode and set the exposure compensation and flash exposure
compensation to zero (±0). The correct white balance may not be obtained when
the exposure is incorrect (image is completely black or white).
• It is also advisable to use the LCD monitor to compose the shot and to further
zoom in.
• Since the white balance data cannot be read in
balance in another Shooting mode first before selecting
mode, preset the white
mode.
• Set the flash on or off when setting a custom white balance.
The white balance may not be accurate if the setting conditions and shooting
conditions are not the same.
If the flash fires when setting a custom white balance with the flash set to
or , ensure that you also use the flash when you go to shoot.
82
Page 89

Changing the Photo Effect
You can shoot with different photo effects.
Photo Effect Off Records with no effect.
Vivid Emphasizes the contrast and color saturation to record in bold color.
Neutral Tones down the contrast and color saturation to record neutral hues.
Low Sharpening Records subjects with softened outlines.
Sepia Records in sepia tones.
B/W Records in black and white.
Custom Effect You can freely set the contrast, sharpness and color saturation.
Press the / /
button.
1
Select * (Effect Off) using C or D on
2
the multicontroller.
* The current setting is displayed.
Select the desired setting using B or A
3
on the multicontroller.
When is selected
A screen allowing you to set the contrast,
sharpness and color saturation appears when you
press
In this screen, select the item you wish to set using
the CD buttons and set it using the BA buttons.
.
Shooting - Selecting Particular Effects
83
Page 90

Changing the Photo Effect (continued)
Contrast
• Select from - (Weak), 0 (Neutral) and + (Strong).
• This function allows you to adjust the degree of
brightness.
Sharpness
• Select from - (Weak), 0 (Neutral) and + (Strong).
• This function allows you to adjust how sharply
outlines are defined.
Saturation
• Select from - (Weak), 0 (Neutral) and + (Strong).
• This function allows you to adjust the color
depth.
• You can shoot the image right after selecting settings by pressing the shutter
button. This screen will appear again, once the image is shot.
Press the
/ /
button.
4
Shoot the image.
5
○○○○○○○○○○○○○○○○○○○○○○
The white balance cannot be set when
○○○○○○○○○○○○○○○○○○○○○○
Some settings are not available with certain Shooting modes. Please refer to
Functions Available in Each Shooting Mode (p. 180)
84
(sepia) or
(B/W) mode is selected.
Page 91

Changing the ISO Speed
Raise the ISO speed when shooting in dark places or when you want to shoot with
a faster shutter speed. You can choose from the following speeds: Auto, 50, 100,
200 and 400.
Press the
/ /
button.
1
Select * (ISO Speed) using C or D on
2
the multicontroller.
* The current setting is displayed.
Select the desired setting using B or A
3
on the multicontroller.
You can shoot the image right after selecting
settings by pressing the shutter button. This
screen will appear again, once the image is shot.
Press the / /
button.
4
Shoot the image.
5
Shooting - Selecting Particular Effects
○○○○○○○○○○○○○○○○○○○○○○
• Higher ISO speeds increase the image noise. To take clean images, use as low an
ISO speed as possible.
• Although the AUTO setting selects the optimal speed, it will automatically raise
the speed when the shooting conditions limits are reached. It will also raise the
speed when the light from the flash is insufficient to illuminate the subject matter.
○○○○○○○○○○○○○○○○○○○○○○
Some settings are not available with certain Shooting modes. Please refer to
Functions Available in Each Shooting Mode (p. 180)
85
Page 92

Auto Exposure Bracketing (AEB Mode)
In this mode, the camera automatically changes the exposure within a set range to take
three shots after you press the shutter button once. You can adjust AEB settings in 1/3EV
steps within the range of -2EV to +2EV of the standard exposure setting. AEB settings can
be combined with exposure compensation settings (p. 79) to extend the adjustment
range. The images are shot in the following order: Standard exposure,
underexposure and overexposure.
Press the / /
button.
1
Select * (BKT-Off) using C or D on the
2
multicontroller.
* The current setting is displayed.
Select (AEB
3
multicontroller and press
Expand or contract the range using B or
4
A on the multicontroller.
• Use A to expand the range and B to contract it.
• You can shoot the image right after selecting
settings by pressing the shutter button. This
screen will appear again, once the image is shot.
) using B or A on the
.
Press the / /
5
Select (BKT-Off) in Step 3 to cancel the AEB mode.
86
button.
Page 93

Shoot the image.
6
○○○○○○○○○○○○○○○○○○○○○○
The AEB mode cannot be used for flash photography. If the flash fires, only one
image gets recorded.
○○○○○○○○○○○○○○○○○○○○○○
Some settings are not available with certain Shooting modes. Please refer to
Functions Available in Each Shooting Mode (p. 180)
Shooting - Selecting Particular Effects
87
Page 94

Focus Bracketing (Focus-BKT Mode)
You can shoot three images while the focus changes automatically when shooting
with the manual focus. Three ranges -small, medium or large- can be selected.
Images are shot with the focus position changing in the following order: current
position, backwards and forward.
Press the
/ /
button.
1
Select * (BKT-Off) using C or D on the
2
multicontroller.
* The current setting is displayed.
Select (Focus-BKT) using B or A on
3
the multicontroller and press
Select a range using B or A on the
4
multicontroller.
You can shoot the image right after selecting
settings by pressing the shutter button. This
screen will appear again, once the image is shot.
.
Press the / /
5
The selected setting is saved.
Shoot the image in manual focus (p. 100).
button.
6
88
Page 95

○○○○○○○○○○○○○○○○○○○○○○
The Focus-BKT mode is not available when shooting with the flash on. The camera
will revert to shooting only one image when the flash is on.
○○○○○○○○○○○○○○○○○○○○○○
Some settings are not available with certain Shooting modes. Please refer to
Functions Available in Each Shooting Mode (p. 180)
89
Shooting - Selecting Particular Effects
Page 96

Locking the Exposure Setting (AE Lock)
You can set the exposure and focus separately. This is effective when the contrast is
too strong between the subject and background or when a subject is backlit.
Press the
button to turn on the LCD monitor.
1
Focus the AF frame or the spot metering frame on the subject
2
on which you wish to lock the exposure setting and press the
shutter button halfway.
• Selecting an AF frame (p. 74)
• Switching Between Light Metering Modes (p. 77)
While pressing the shutter button
3
halfway, press the button.
• The exposure setting locks (AE Lock) and the
icon appears on the LCD monitor.
• Using any button, lever or switch other than B,
A, C or D on the multicontroller cancels the AE
lock.
Recompose the image and shoot.
AE Lock Icon
4
90
Page 97

○○○○○○○○○○○○○○○○○○○○○○
The AE lock function cannot be used when the LCD monitor is off.
○○○○○○○○○○○○○○○○○○○○○○
• Some settings are not available with certain Shooting modes. Please refer to
Functions Available in Each Shooting Mode (p. 180).
• The automatically selected combinations of shutter speeds and aper ture values can
be freely changed without altering the exposure with the following procedures.
1 Turn the mode dial to
2 Press the
, or .
button to turn on the LCD monitor.
3 Focus on the subject on which you wish to lock the exposure.
Press the shutter button halfway.
4 Press the
The exposure setting will lock and the
button.
icon will appear in the display panel
and LCD monitor.
5 Press B or A on the multicontroller until the desired shutter speed or aperture
value is reached.
6 Recompose the image and shoot.
The setting will cancel after the shot is taken.
91
Shooting - Selecting Particular Effects
Page 98

Locking the Flash Exposure Setting (FE Lock)
You can obtain the correct exposure regardless of the location of your subject in
the composition.
Press the
button to turn on the LCD monitor.
1
Press the (Flash) button and set the flash to fire (p. 54).
2
Focus the AF frame or the spot metering frame on the subject
3
on which you wish to lock the flash exposure setting and press
the shutter button halfway.
While pressing the shutter button halfway, press the button.
4
• The flash exposure compensation setting locks (FE lock) and the
appears on the LCD monitor.
• The flash will fire a pre-flash and lock the flash exposure to the required
intensity to illuminate the subject. (Each time you press the
flash exposure locks at the required intensity for that composition).
• Using any button, lever or switch other than B, A, C or D on the
multicontroller cancels the FE lock.
Recompose the image and shoot.
icon
button, the
5
○○○○○○○○○○○○○○○○○○○○○○
• Some settings are not available with certain Shooting modes. Please refer to
Functions Available in Each Shooting Mode (p. 180).
• The FE lock function is not available when [Flash Adjust] is set to [Manual].
92
Page 99

Switching between the Built-in
Flash Adjustment Settings
The flash fires with automatic flash adjustments (except in the mode), but it is
possible to set it so that it fires without any adjustments.
Select [Flash Adjust] from the [ (Rec.)] menu.
1
See Selecting Menus and Settings (p. 36).
Select [Auto] or [Manual] and press the
button.
2
Compensating the Flash Adjustment (+/- (Flash))
The flash adjustment can be changed when [Flash Adjust] is set to [Auto]. The
settings can be adjusted in 1/3-stop increments in the range of –2EV to +2EV. You
can enjoy flash photography with exposure adjustments with the combined use of
the camera’s exposure compensation function.
Press the
/ /
button.
1
Select (+/- (Flash)) using C or D on
2
the multicontroller.
Adjust the compensation using B or A
3
on the multicontroller.
You can shoot the image right after selecting
settings by pressing the shutter button. This
screen will appear again, once the image is shot.
Press the
/ /
button.
e.g. Flash Adjustment Settings
4
Shooting - Selecting Particular Effects
Shoot the image.
5
93
Page 100

Switching between the Built-in Flash Adjustment Settings (continued)
Compensating the Flash Output.
In mode or when [Flash Adjust] is set to [Manual], the flash output can be
controlled in three steps, starting from FULL, when shooting. This setting is also
active with slave flash photography where multiple flashes are fired at the subject
from different positions because the pre-flash does not fire.
Press the / /
button.
1
Select (Flash Output) using C or D on
2
the multicontroller.
Adjust the compensation using B or A
3
on the multicontroller.
You can shoot the image right after selecting
settings by pressing the shutter button. This
screen will appear again, once the image is shot.
Press the
/ /
button.
4
Shoot the image.
5
e.g. Flash Output
○○○○○○○○○○○○○○○○○○○○○○
Some settings are not available with certain Shooting modes. Please refer to
Functions Available in Each Shooting Mode (p. 180).
94
 Loading...