

Canon PIXM MX300 Series User Manual

User's Guide
MP-1722-V1.00
FAQs
How to Use This Manual
Safety Precautions
Legal Limitations on Use of Your Product and Use of Images
Before Using the Machine
Main Components
Handling the Original Document
Loading Printing Paper
Loading Paper
Loading Envelopes
Loading Small-Sized Paper
Printing Media
General Information
Compatible Media Types
Copying
Making Copies
Changing the Copy Settings
Using Useful Copy Functions
Printing from Your Computer
Printing with Windows
Printing with Macintosh
1

Scanning Images
About Scanning Images
Scanning Methods
Faxing
Preparing the Machine for Fax
Registering Sender Information
Registering the Destination
Sending Faxes
Using Other Useful Sending Functions
Receiving Faxes
Using Other Useful Receiving Functions
Document Stored in Memory
Summary of Reports and Lists
Routine Maintenance
When Printing Becomes Faint or Colors Are Incorrect
Printing the Nozzle Check Pattern
Examining the Nozzle Check Pattern
Print Head Cleaning
Print Head Deep Cleaning
Aligning Print Head on the Machine
Aligning Print Head on the Computer
Replacing a FINE Cartridge
Keeping the Best Printing Results
Cleaning Your Machine
Changing the Machine Settings
FAX SETTINGS
DEVICE SETTINGS
Troubleshooting
An Error Message Is Displayed on the LCD
LCD Cannot Be Seen At All
An Unintended Language Is Displayed on the LCD
Cannot Install the MP Drivers
Cannot Connect to Computer Properly
Print Results Not Satisfactory
The Print Result Not Satisfactory When Copying
2

Machine Does Not Start or Stops During Print Jobs
Paper Does Not Feed Properly
Paper Jams
Error Message Appears on the Computer Screen
Windows-specific Problems
Error Message Appears on a PictBridge Compliant Device
Scanning Problems
Problems Receiving Faxes
Problems Sending Faxes
Telephone Problems
If You Cannot Resolve the Problem
Appendix
Included Items
Printing Area
Uninstalling the On-Screen Manuals
Transporting the Machine
Opening the Printer Properties Dialog Box (Windows)
Opening the Page Setup and Print Dialog Box (Macintosh)
Opening the Printer Setup Utility (Print Center) (Macintosh)
Opening the Canon IJ Printer Utility (Macintosh)
3
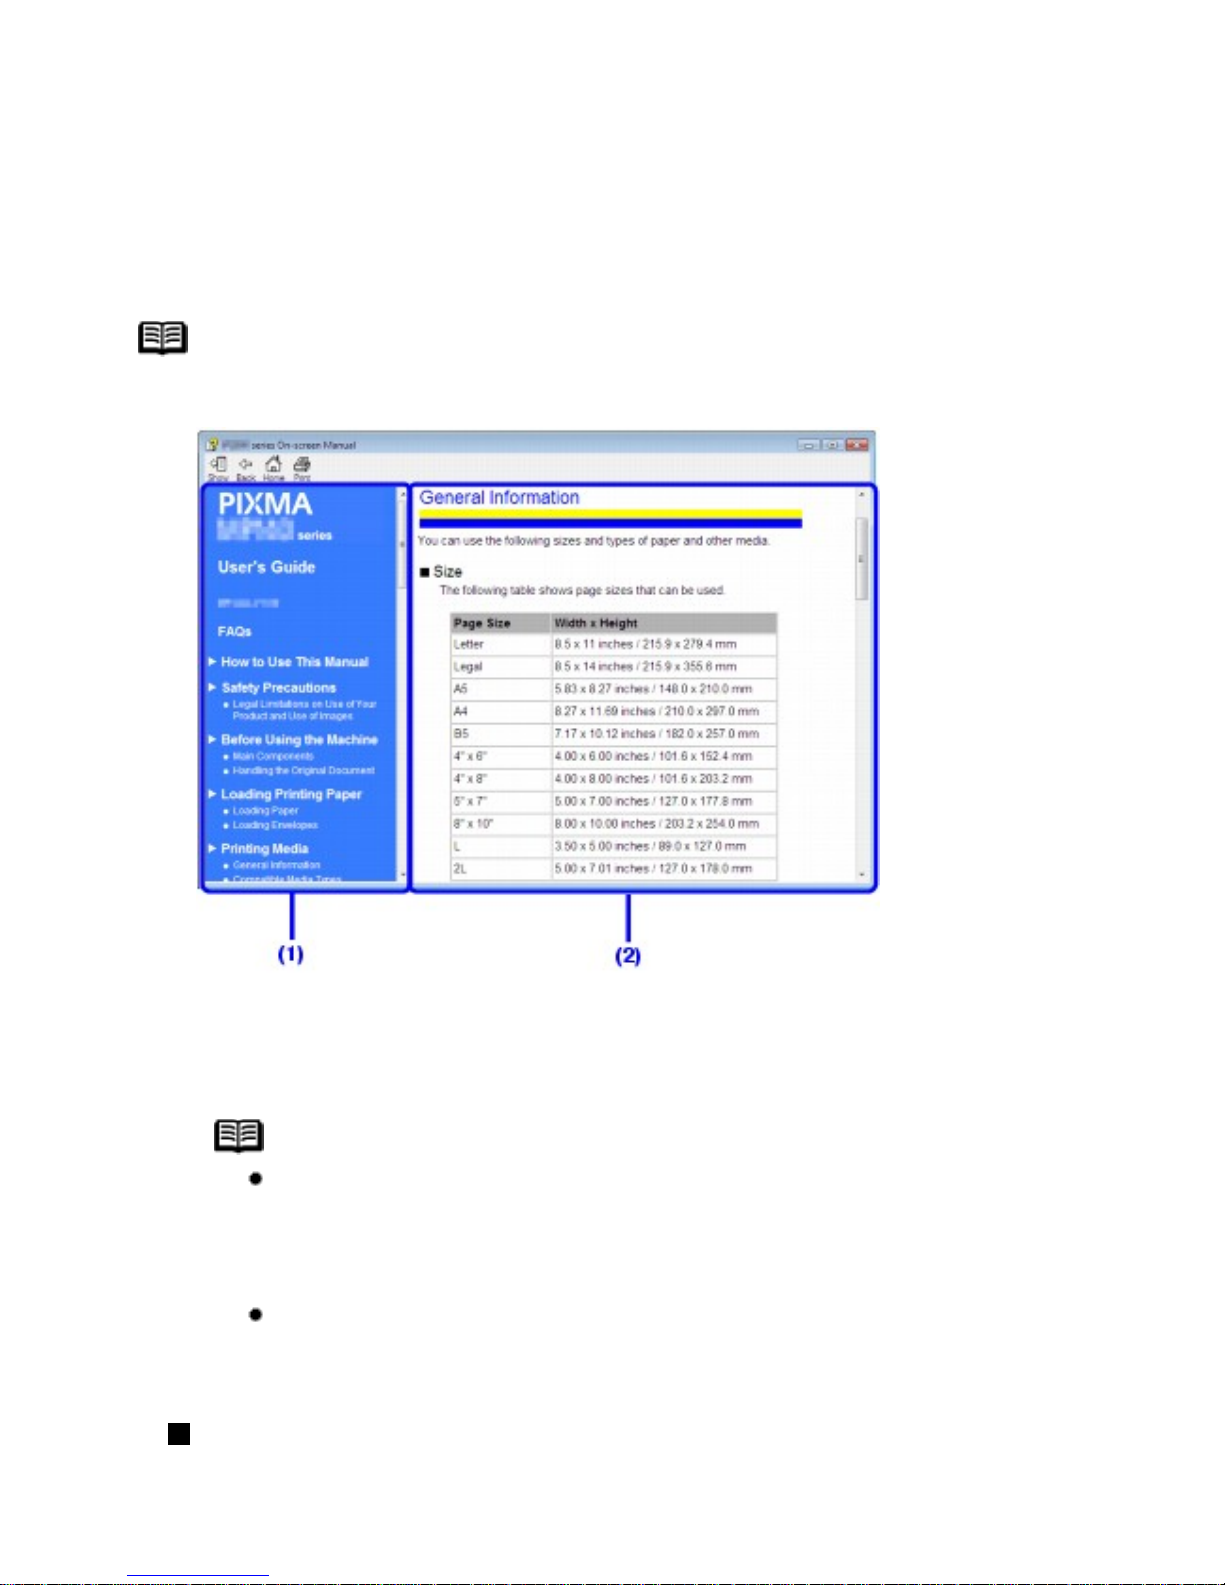
How to Use This Manual
The screen of this on-screen manual consists of two parts: the Menu frame (on the left) and the
Content frame (on the right).
Note
The example screenshots in this section are in English.
(1) Menu frame
(2) Content frame
Note
Operations explained in this manual are specific to computers
running Windows Vista™ operating system Ultimate Edition (hereafter
referred to as "Windows Vista") or Mac® OS X v.10.4.x operating
systems. Operation may vary depending on your operating system.
The example above is the screen in Windows®. The appearance of
the screen in Macintosh® differs slightly.
Navigating from the Menu
Click a title on the Menu frame. The corresponding topic will appear on the Content frame.
4
Navigating in the Content Frame
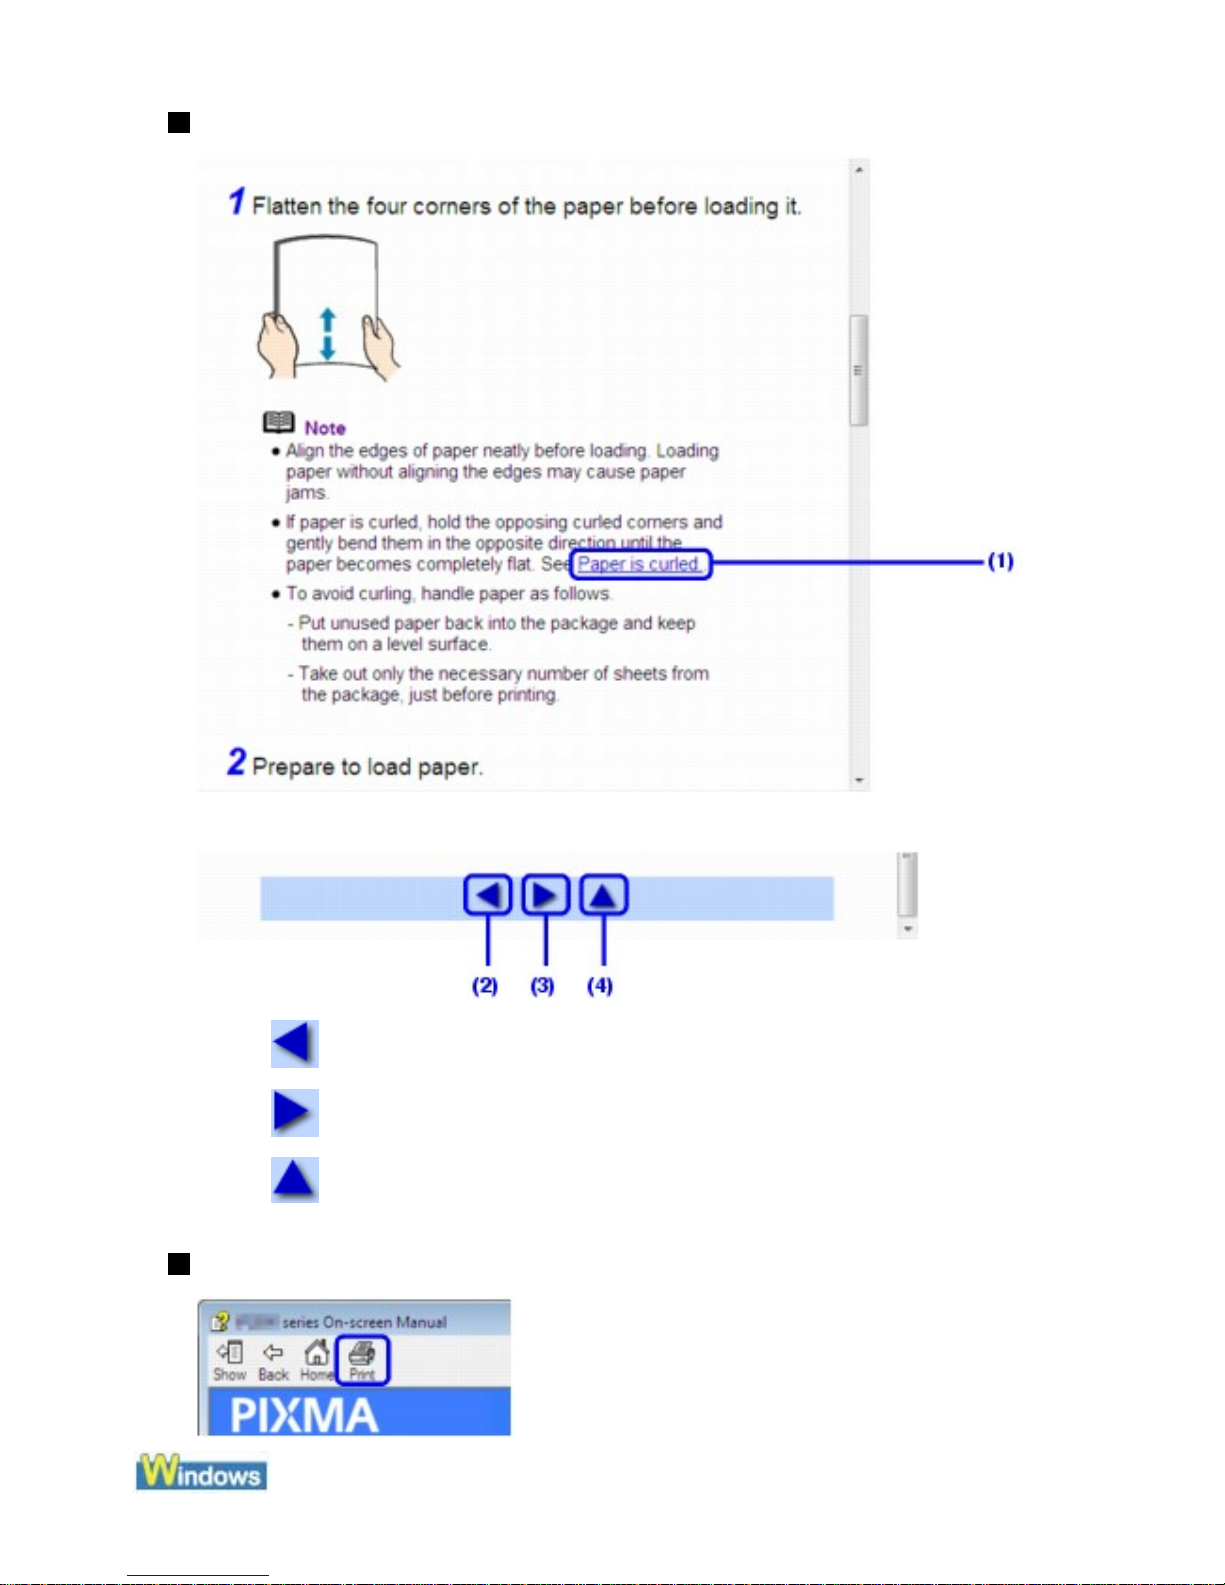
(1) Click a character string with a blue underline to jump to the associated page.
(2) : Click to jump to the previous page.
(3)
: Click to jump to the next page.
(4)
: Click to jump to the beginning of this page.
Printing This Manual
5

To print a topic, click on a blank area of the Content frame to make sure it is active, then click
the Print button.
Note
Clicking the Print button without making the Content frame active may
print the Menu frame instead.
To print a topic, click on a blank area of the Content frame to make sure it is active, then select
Print on the File menu, and click the Print button.
Note
Clicking the Print button without making the Content frame active can
print the Menu frame instead.
Searching Topics by Keywords
You can search for a topic by entering keywords.
Click the Show button. In the search screen, enter a keyword and click the List Topics
button.
Select a topic to read from the list of search results, then click the Display button. The page is
displayed.
Note
This searches all the on-screen manuals installed on your computer.
Enter keywords in the (search field), then press the Return key.
Double-click the topic to read from the list of search results to display the page.
6
Note
You can click
to specify the search scope.
Search XXXX:
Searches in the on-screen manual currently opened.
* Where "XXXX" is your machine's name and on-screen manual's title.
Search all help:
Searches all the online help installed on your computer.
Symbols Used in This Manual
Warning
Instructions that, if ignored, could result in death or serious personal injury
caused by incorrect operation of the equipment. These must be observed
for safe operation.
Caution
Instructions that, if ignored, could result in personal injury or material
damage caused by incorrect operation of the equipment. These must be
observed for safe operation.
Important
Instructions that must be observed for safe operation.
Note
Instructions as notes for operation or additional explanations.
Indicates operations in Windows.
Indicates operations in Macintosh.
7

Trademarks
"Microsoft" is a registered trademark of Microsoft Corporation.
"Windows" is a trademark of Microsoft Corporation, registered in the U.S. and other
countries.
"Windows Vista" is a trademark of Microsoft Corporation.
"Macintosh" and "Mac" are trademarks of Apple Inc., registered in the U.S. and other
countries.
8

Safety Precautions
Please read the safety warnings and cautions provided in this manual to ensure that you use the
machine safely. Do not attempt to use the machine in any way not described in this manual.
Warning
This product emits low level magnetic flux. If you use a cardiac pacemaker and feel
abnormalities, please move away from this product and consult your doctor.
You may cause an electric shock, fire, or damage the machine if you ignore any of
these safety precautions.
Choosing a
location
Do not place the machine close to flammable
solvents such as alcohol or thinners.
Power supply Never attempt to plug in or unplug the
machine from the power supply when your
hands are wet.
Always push the plug all the way into the
power outlet.
Never damage,
modify, stretch or
excessively bend
or twist the power
cord. Do not place
heavy objects on
the power cord.
Never plug the
machine into a
power socket that
is shared with
other equipment
(extension lead/
cord, 2- or 3-way adapter, etc.).
Never use the machine if the power cord is
bundled or knotted.
9
If you detect smoke, unusual smells or strange
noises around the machine, immediately
unplug the machine at the power supply and
call for service.
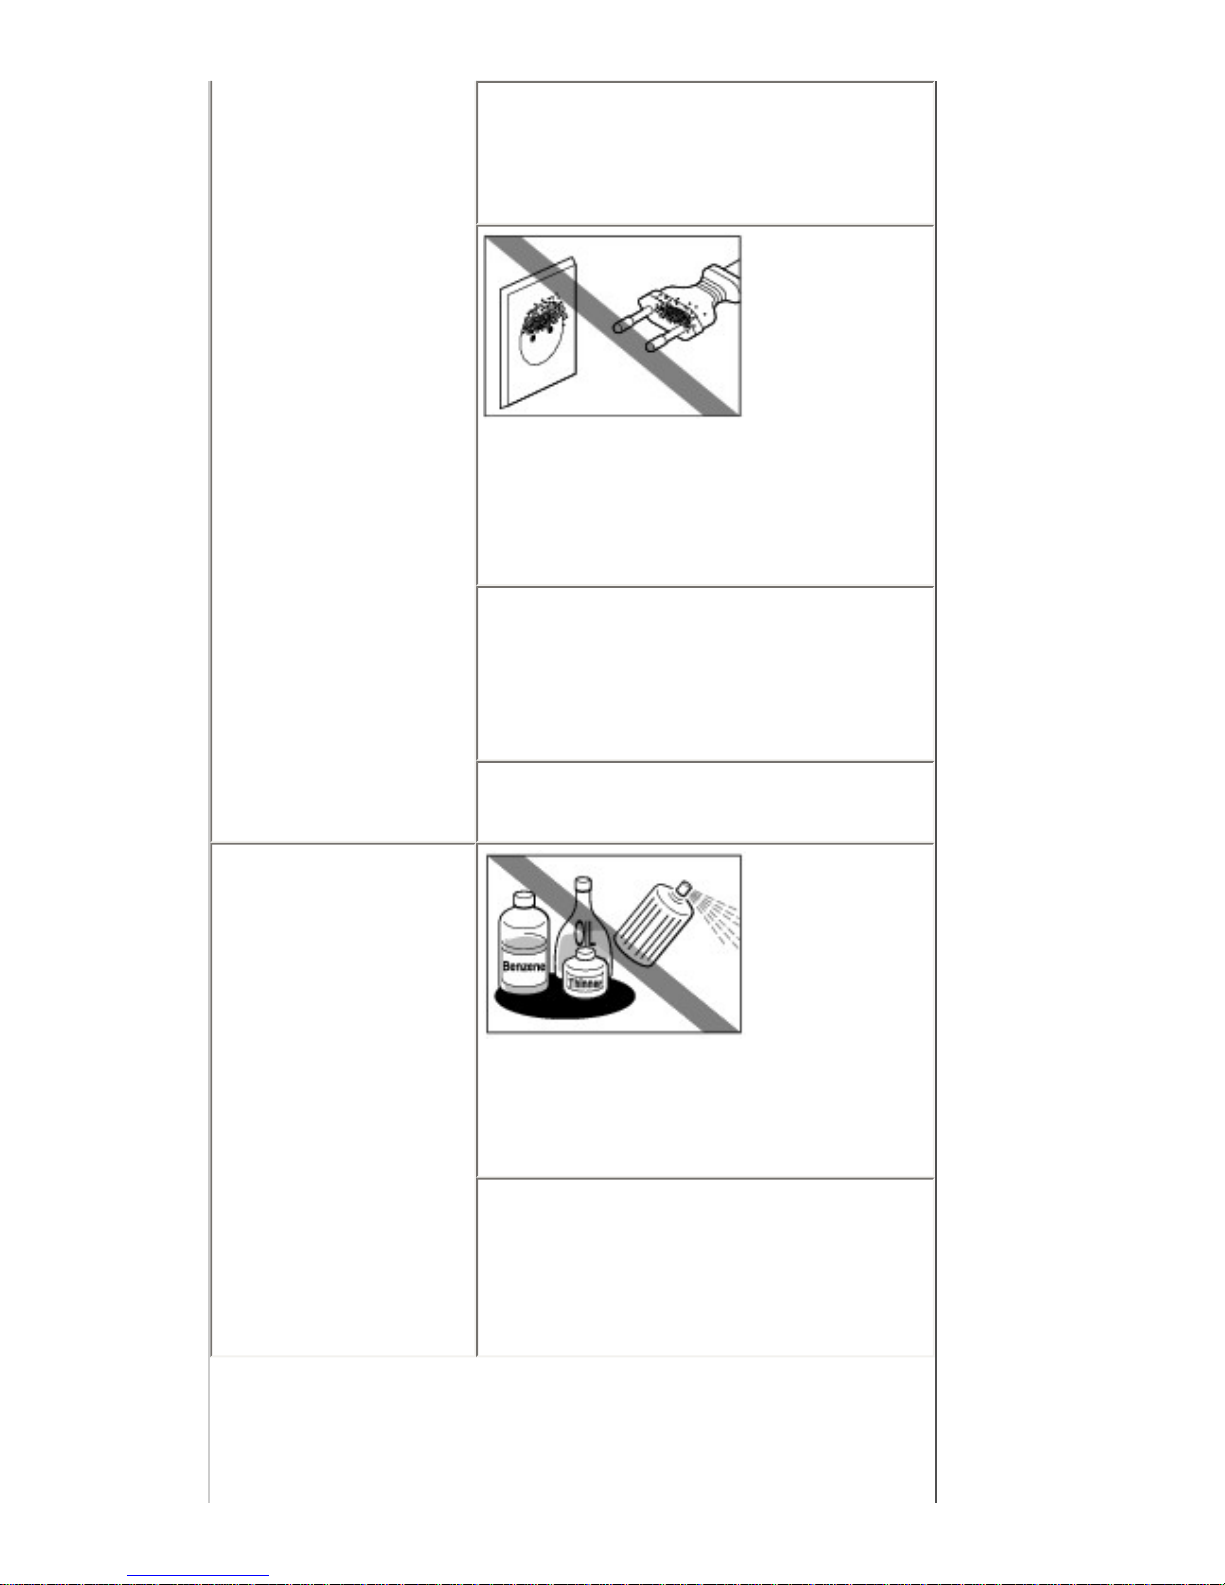
Periodically,
unplug the
machine and use
a dry cloth to wipe
off any dust or dirt
collected on the
plug and the power outlet. If the machine is
placed at a location exposed to a lot of dust,
smoke, or high humidity, the dust collected on
the plug absorbs moisture and may cause
insulation failure and fire.
If you hear thunder, disconnect the power
supply of the machine and refrain from using
it. Leaving the machine plugged in may cause
fire, electric shock, or damage to the machine,
depending on the thunder storm.
Use the power cable included with the
machine.
Cleaning the
machine
Use a damp cloth
to clean the
machine. Never
use flammable
solvents such as
alcohol, benzene
or thinners.
If flammable solvents come in contact with
electrical components inside the machine, it
could cause a fire or electric shock.
Always unplug the machine from the power
outlet before cleaning the machine.
If you accidentally switch the machine on
while cleaning it, you could injure yourself or
damage the machine.
10

Maintaining the
machine
Do not attempt to disassemble or modify the
machine. There are no user serviceable parts
inside the machine.
The machine contains high-voltage
components. Never attempt any maintenance
procedure not described in this guide.
Working around
the machine
Do not use highly flammable sprays near the
machine.
This could cause a fire or electric shock if the
spray comes into contact with electrical
components inside the machine.
Caution
You may cause injury or damage the machine if you ignore any of these safety
precautions.
Choosing a
location
Do not install the machine in a location that is
unstable or subject to excessive vibration.
Do not install the machine in locations that are
very humid or dusty, in direct sunlight,
outdoors, or close to a heating source.
To avoid the risk of fire or electric shocks,
install the machine in a location with an
ambient temperature range of 5°C to 35°C (41°
F to 95°F) and humidity of 10% to 90%
(condensation free).
Do not place the machine on a thick rug or
carpet.
Do not place the machine with its back
attached to the wall.
Power supply
Ensure that the
area around the
power outlet is
kept clear at all
times so you can
easily unplug the
power cord if necessary.
11
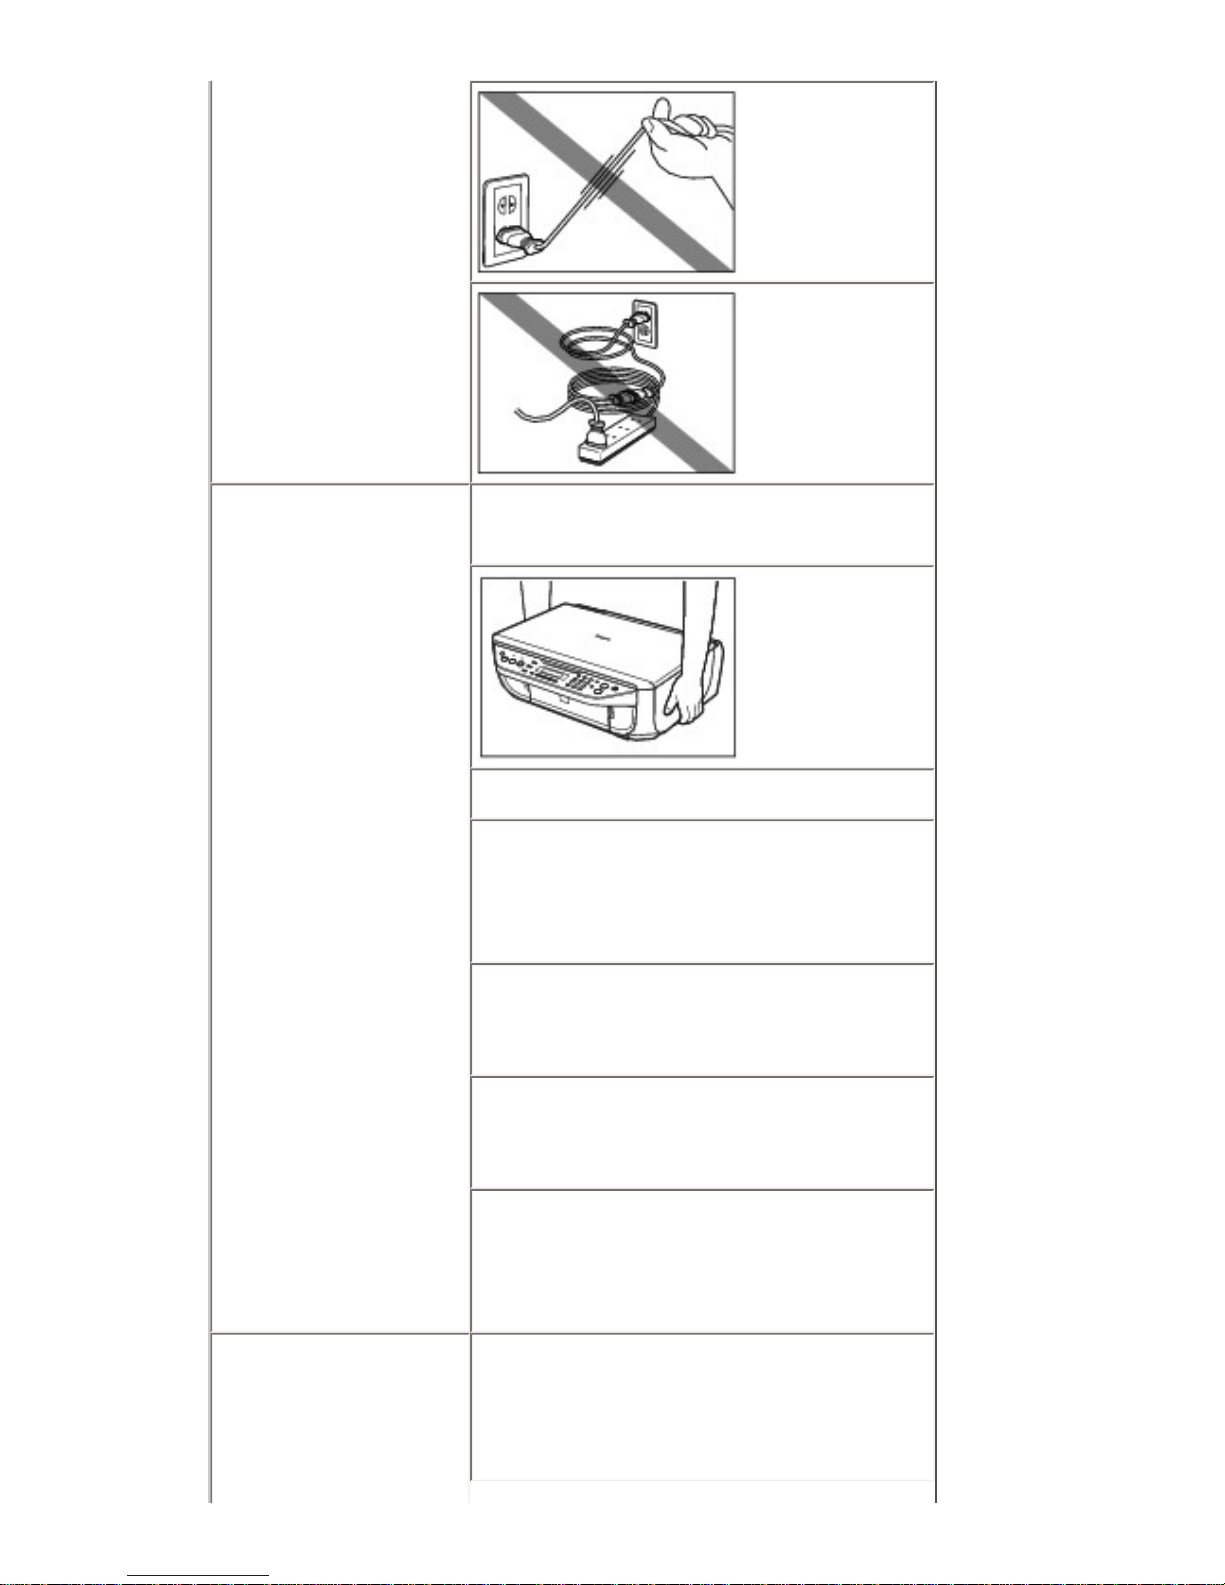
Never remove the
plug by pulling on
the cord.
Do not use an
extension lead/
cord.
Working around
the machine
Never put your hands or fingers in the machine
while it is printing.
When moving the
machine, carry the
machine at both
ends.
Do not place any object on the machine.
Do not place metal objects (paper clips,
staples, etc.) or containers of flammable
solvents (alcohol, thinners, etc.) on top of the
machine.
If any foreign object (metal or liquid) fall into
the machine, unplug the power cord and call
for service.
Do not transport or store the machine on a
slant, vertically or upside-down, as the ink may
leak and damage the machine.
When loading a thick book on the Platen
Glass, do not press hard on the Document
Cover. The Platen Glass may break and cause
injury.
FINE Cartridges
(Ink Cartridges)
For safety reasons, store FINE Cartridges (Ink
Cartridges) out of the reach of small children.
If a child ingests any ink, consult a doctor
immediately.
12
Do not shake FINE Cartridges (Ink Cartridges).
Ink may spill out and stain clothing or the
surrounding area.
Never touch the
electrical contacts
or Print Head
Nozzles on a
FINE Cartridge
(Ink Cartridge)
after printing. The
metal parts may be very hot and could cause
burns.
Do not throw FINE Cartridges (Ink Cartridges)
into fire.
13

Legal Limitations on Use of Your Product and Use of
Images
It may be unlawful to make copies of, scan, print, or use reproductions of the following documents.
The list provided is non-exhaustive. When in doubt, check with a legal representative in your
jurisdiction.
Paper money
Money orders
Certificates of deposit
Postage stamps (canceled or
uncanceled)
Identifying badges or
insignias
Selective service or draft
papers
Checks or drafts issued by
governmental agencies
Motor vehicle licenses and
certificates of title
Traveler's checks
Food stamps
Passports
Immigration papers
Internal revenue stamps
(canceled or uncanceled)
Bonds or other certificates of
indebtedness
Stock certificates
Copyrighted works/works of art
without permission of copyright
owner
14
Before Using the Machine
Main Components
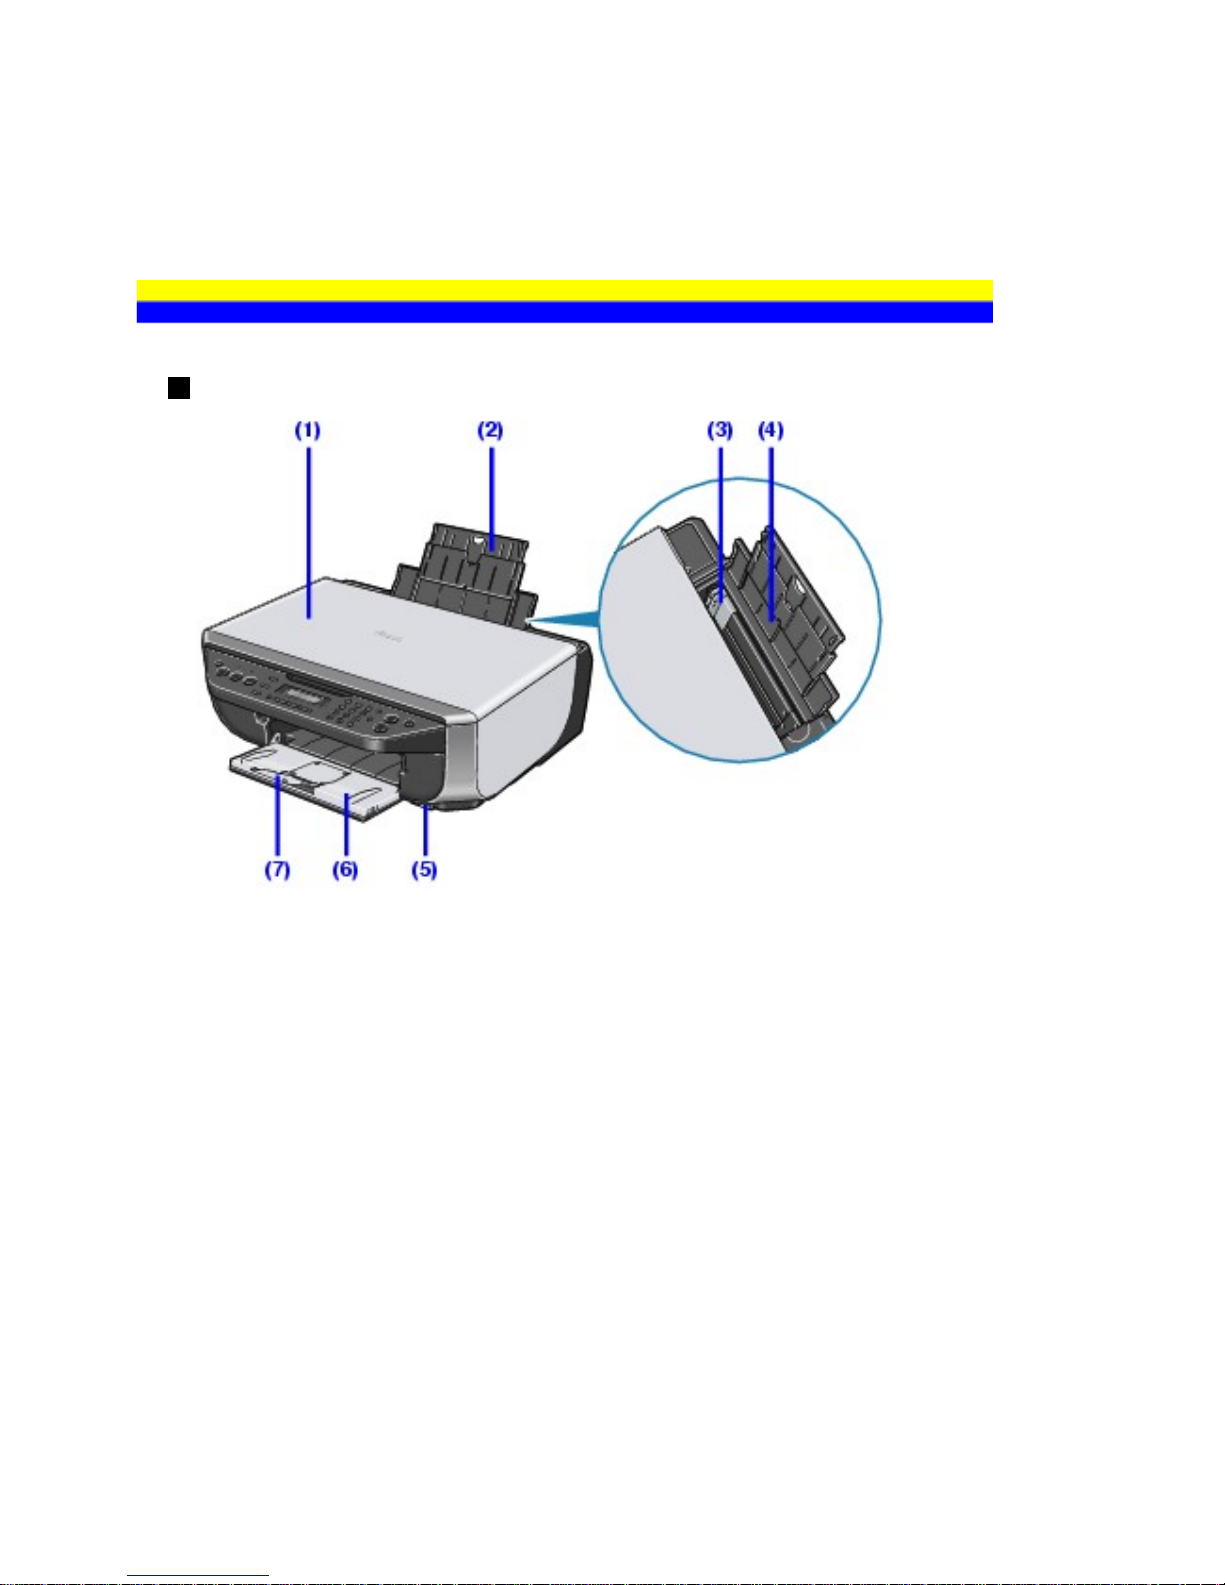
Front View
(1) Document Cover
Open when loading an original document on the Platen Glass.
(2) Paper Support
Pull out fully to support paper loaded on the tray.
(3) Paper Guide
Slide against the left side of the paper stack to support paper so that it feeds properly.
(4) Rear Tray
Load paper here before printing. Paper feeds automatically, one sheet at a time.
(5) Direct Print Port
Connect your PictBridge compliant device, such as a digital camera, here to print directly
from it. Refer to "Printing Photographs Directly from a Compliant Device" in the Quick
Start Guide.
(6) Paper Output Tray
Supports the printout. Open it when printing, copying, or faxing.
15
(7) Output Tray Extension
Supports output printouts.
(8) Platen Glass
Load original documents to copy, scan, or fax here.
(9) Operation Panel
Changes the settings and operates the machine. See
Operation Panel Name.
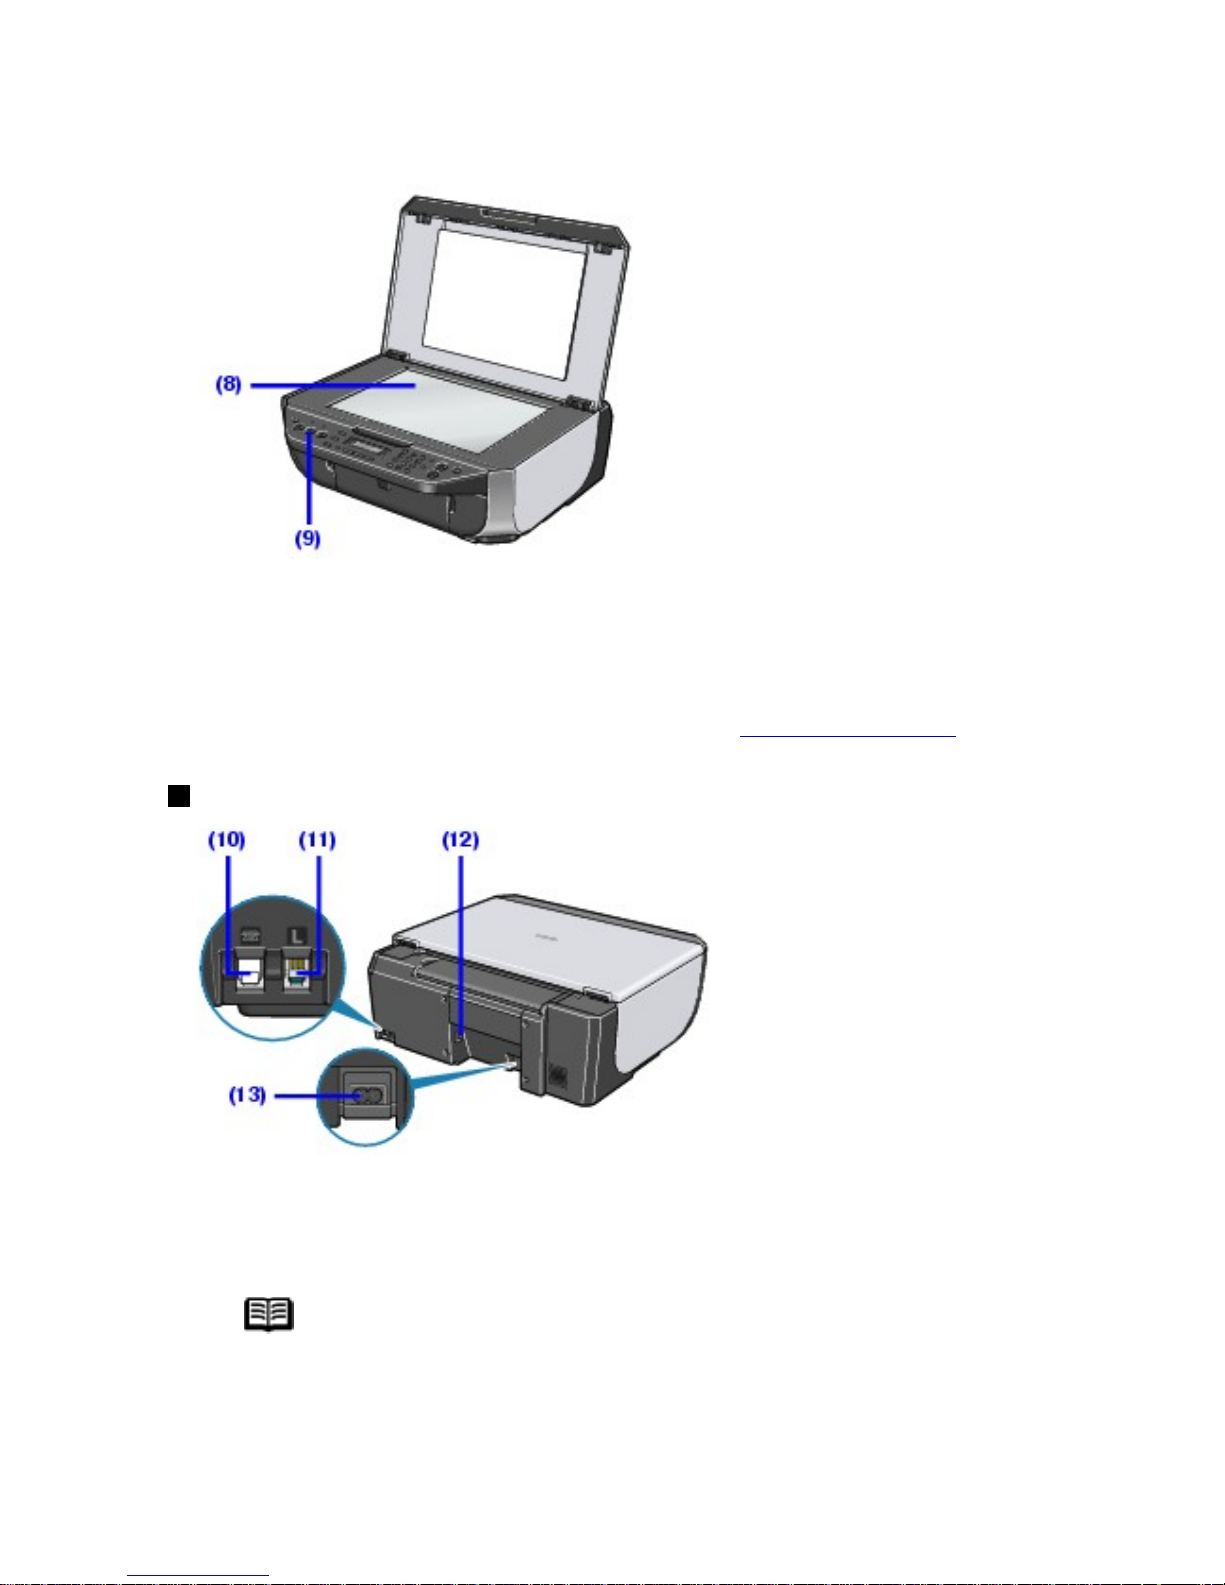
Rear View
(10) External Device Jack
Connect the external device.
Note
Remove the Telephone connector cap to connect the external device.
(11) Telephone Line Jack
Connect the telephone line.
16
(12) USB Port
Plug in the USB cable connecting the machine to a computer here.
Important
While the machine is printing from or scanning images to the computer,
or the computer is in the sleep mode or standby mode, do not
disconnect or connect the USB cable.
(13) Power Cord Connector
Plug in the supplied power cord here.
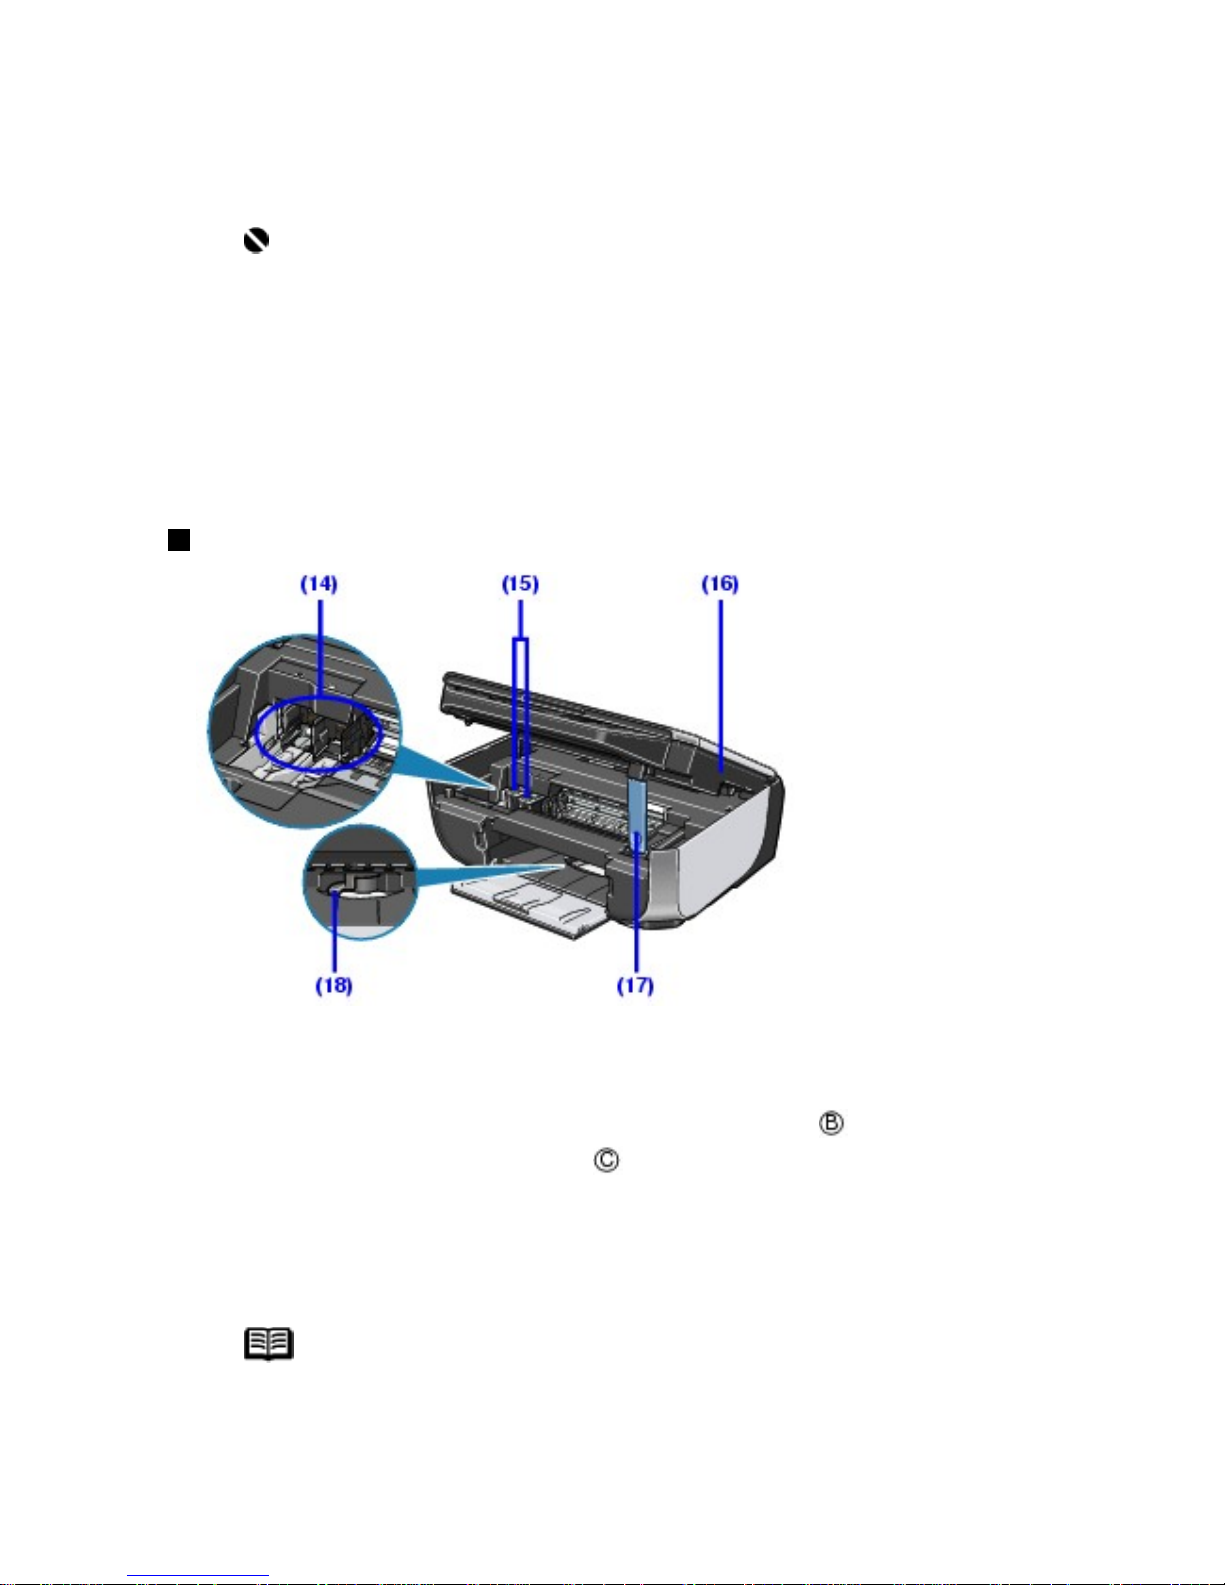
Inside
(14) FINE Cartridge Holder
Install the FINE Cartridges here.
The Black FINE Cartridge should be installed into the left slot (
) and the Color FINE
Cartridge should be into the right slot (
).
(15) FINE Cartridges (Ink Cartridges)
A replaceable cartridge that is Print Head and ink tank integrated.
Note
For information on how to install the FINE Cartridges, refer to your setup
sheet.
17
(16) Scanning Unit (Printer Cover)
Scans original documents. Open it when replacing the FINE Cartridges or removing
jammed paper remaining inside the machine.
(17) Scanning Unit Support
Holds the Scanning Unit (Printer Cover) being open.
(18) Paper Thickness Lever
Switches the clearance between the Print Head and the loaded paper to match the media
type.
Note
The position of the Paper Thickness Lever
Set to the right when printing on envelopes or T-shirt transfers.
Set to the left when printing on paper other than envelopes or T-
shirt transfers.
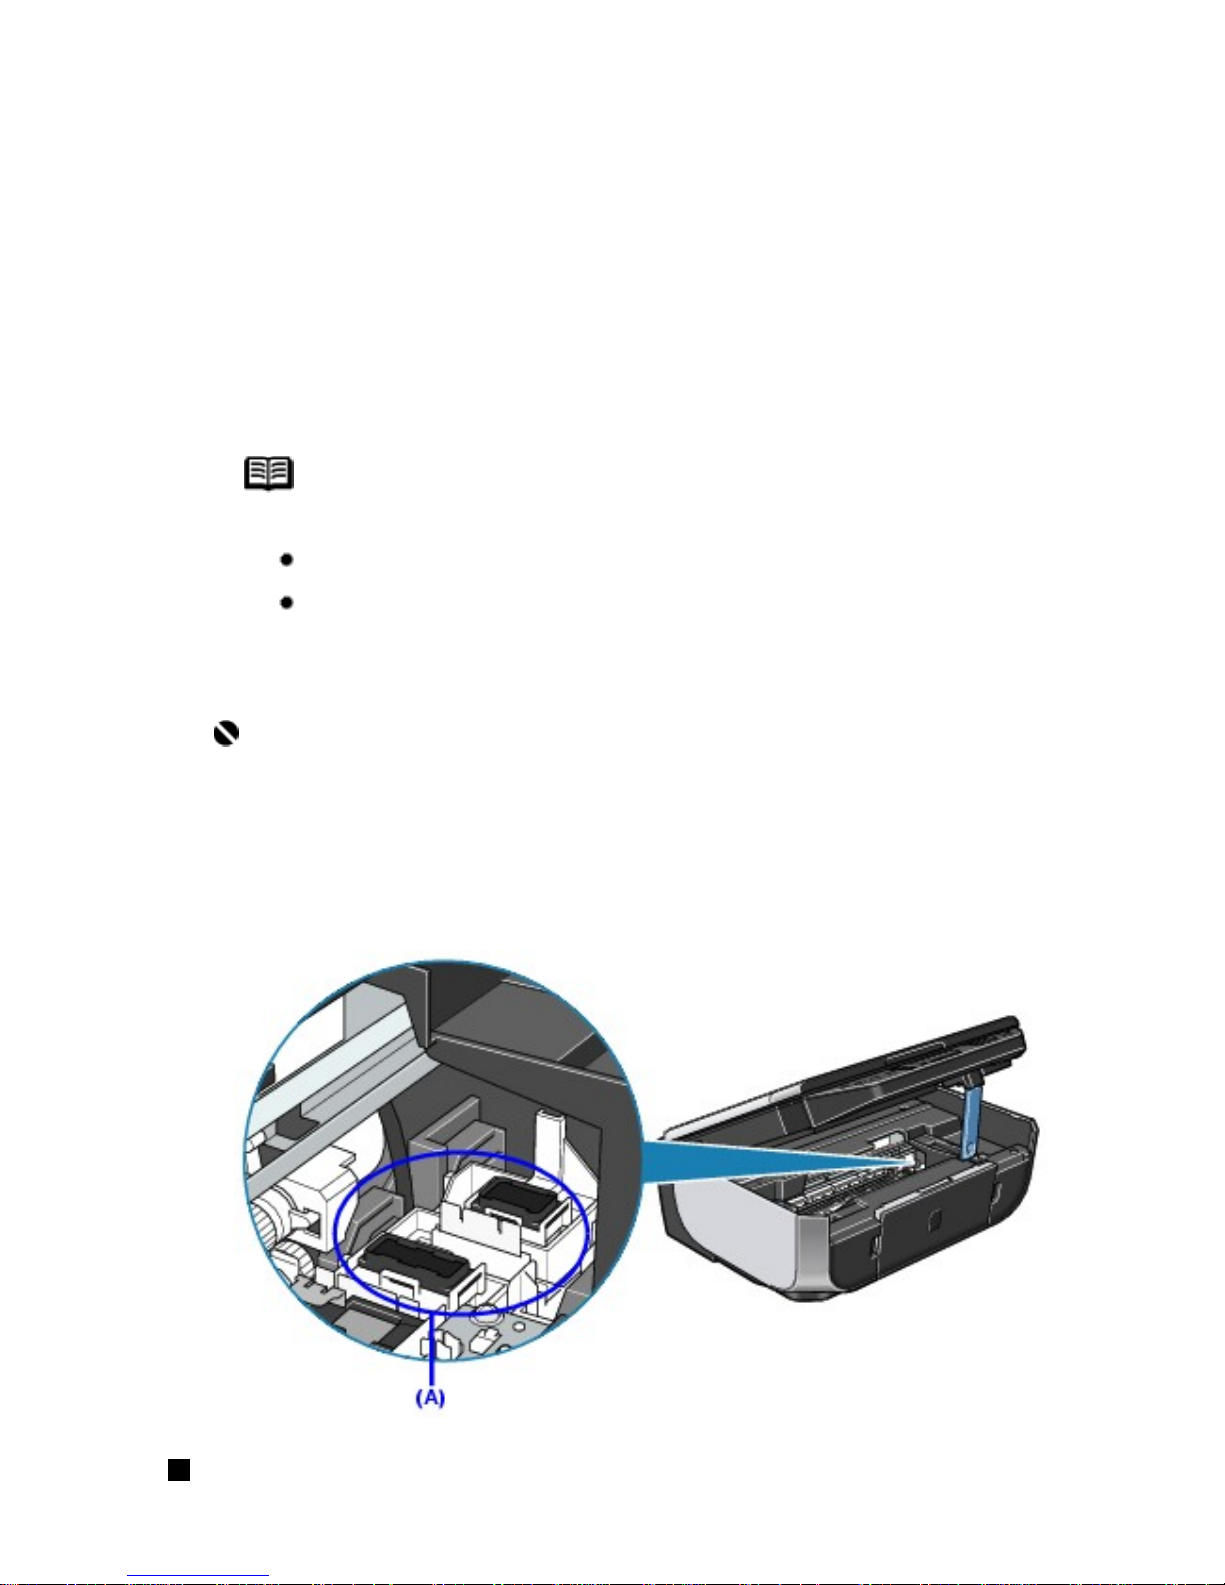
Important
This part (A) indicated in the below illustration may be covered by
splattered ink. It does not affect the performance of the machine.
Do not touch this part (A). The machine may not print out properly if you
touch it.
Operation Panel Name
18
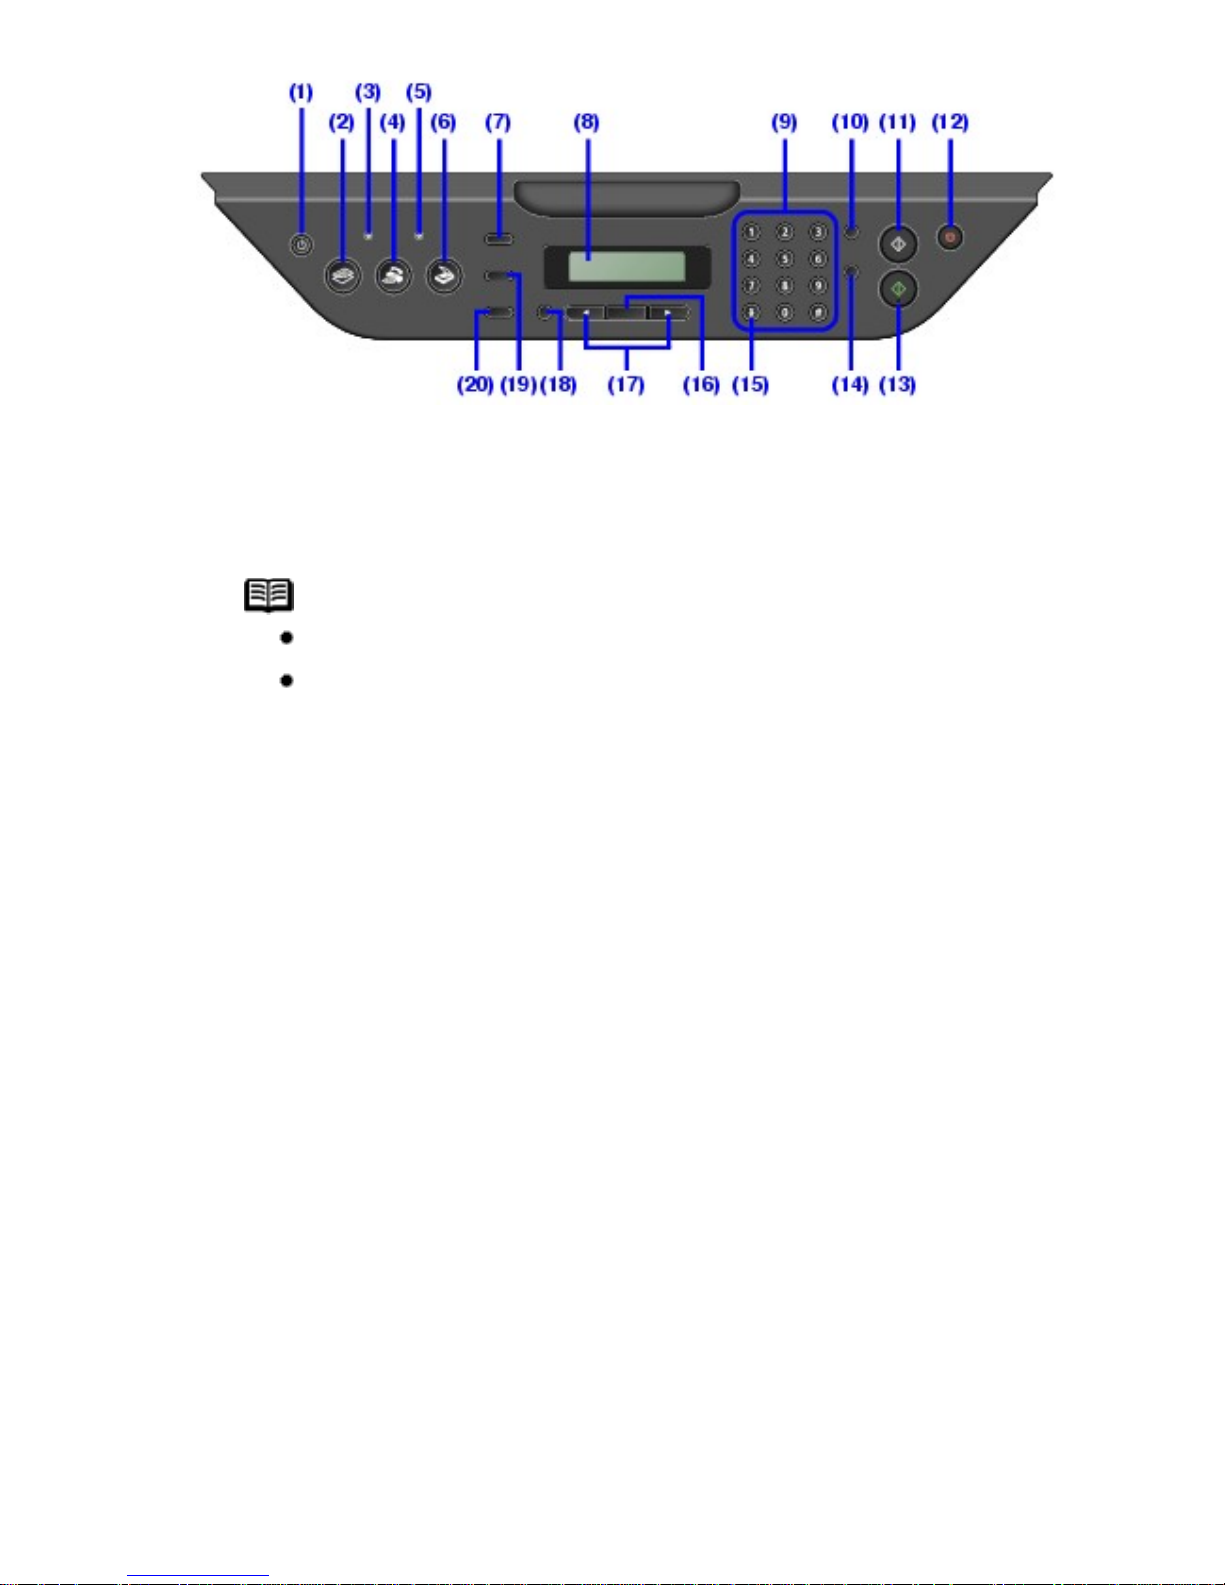
(1) ON/OFF button / Power lamp
Turns the machine on and off. Lights or flashes green to indicate the power status. Before
turning on the machine, make sure the Document Cover is closed.
Note
The machine cannot receive faxes when the power is turned off.
The power cannot be turned off while the machine is sending or
receiving a fax, or when there are unsent faxes stored in the
machine's memory.
(2) COPY button
Switches the machine to copy mode.
(3) In Use/Memory lamp
Flashes when the telephone line is in use. Lights when there are documents stored in the
machine's memory.
(4) FAX button
Switches the machine to fax mode.
(5) Alarm lamp
Lights or flashes orange when an error, such as paper-out or ink-out, occurs.
(6) SCAN button
Switches the machine to scan mode. In scan mode, the machine scans a document to
your computer according to the settings selected. To use this button, the machine must be
connected to a computer. For details, refer to the Scanning Guide on-screen manual.
(7) Menu button
Accesses the menus and settings to customize operation of your machine.
(8) LCD (Liquid Crystal Display)
19

Displays messages, menu selections, and the operational status.
(9) Numeric buttons
Enter numerical values such as the number of copies, as well as fax/telephone numbers
and characters.
(10) Redial/Pause button
Redials the last number called using the Numeric buttons. Also enters pauses between or
after numbers when dialing or registering numbers.
(11) Black button
Starts black & white copying, scanning, or faxing.
(12) Stop/Reset button
Cancels operations such as copying, scanning, or faxing, or a print job in progress.
(13) Color button
Starts color copying, scanning, or faxing.
(14) Coded Dial button
Press this button and a two-digit code to dial a pre-registered fax/telephone number.
(15) Tone button
Switches temporarily to tone dialing. Also changes the mode when entering characters.
(16) OK button
Finalizes your selection for the menu or setting item.
Dismisses the error message and resumes the machine's normal operation after resolving
a printing error or removing jammed paper.
(17)
(-) and (+) buttons
Scroll through menu selections, and increase or decrease the number of copies.
For the fax settings,
cancels the entered character, and enters a space between
characters.
(18) Back button
Returns the LCD to the previous screen.
(19) Settings button
Configures the page size, media type, and image correction settings.
(20) FAX Quality button
Sets the scan contrast and resolution of the fax you are sending.
20

21
Handling the Original Document
This section describes how to load the original document on the Platen Glass.
Original Document Requirements
The original documents you load on the Platen Glass for copying, scanning, or faxing must meet
these requirements:
Document type
Paper documents
Photographs
Books
Size (W x L)
Max. 8.5 x 11.7 inches / 216 x 297 mm
Thickness
Max. 0.39 inches / 10 mm
Loading Original Documents
Load originals to copy, scan, or fax on the Platen Glass.
Note
Make sure any glue, ink, correction fluid, or the like on the original
document is completely dry before loading it on the Platen Glass.
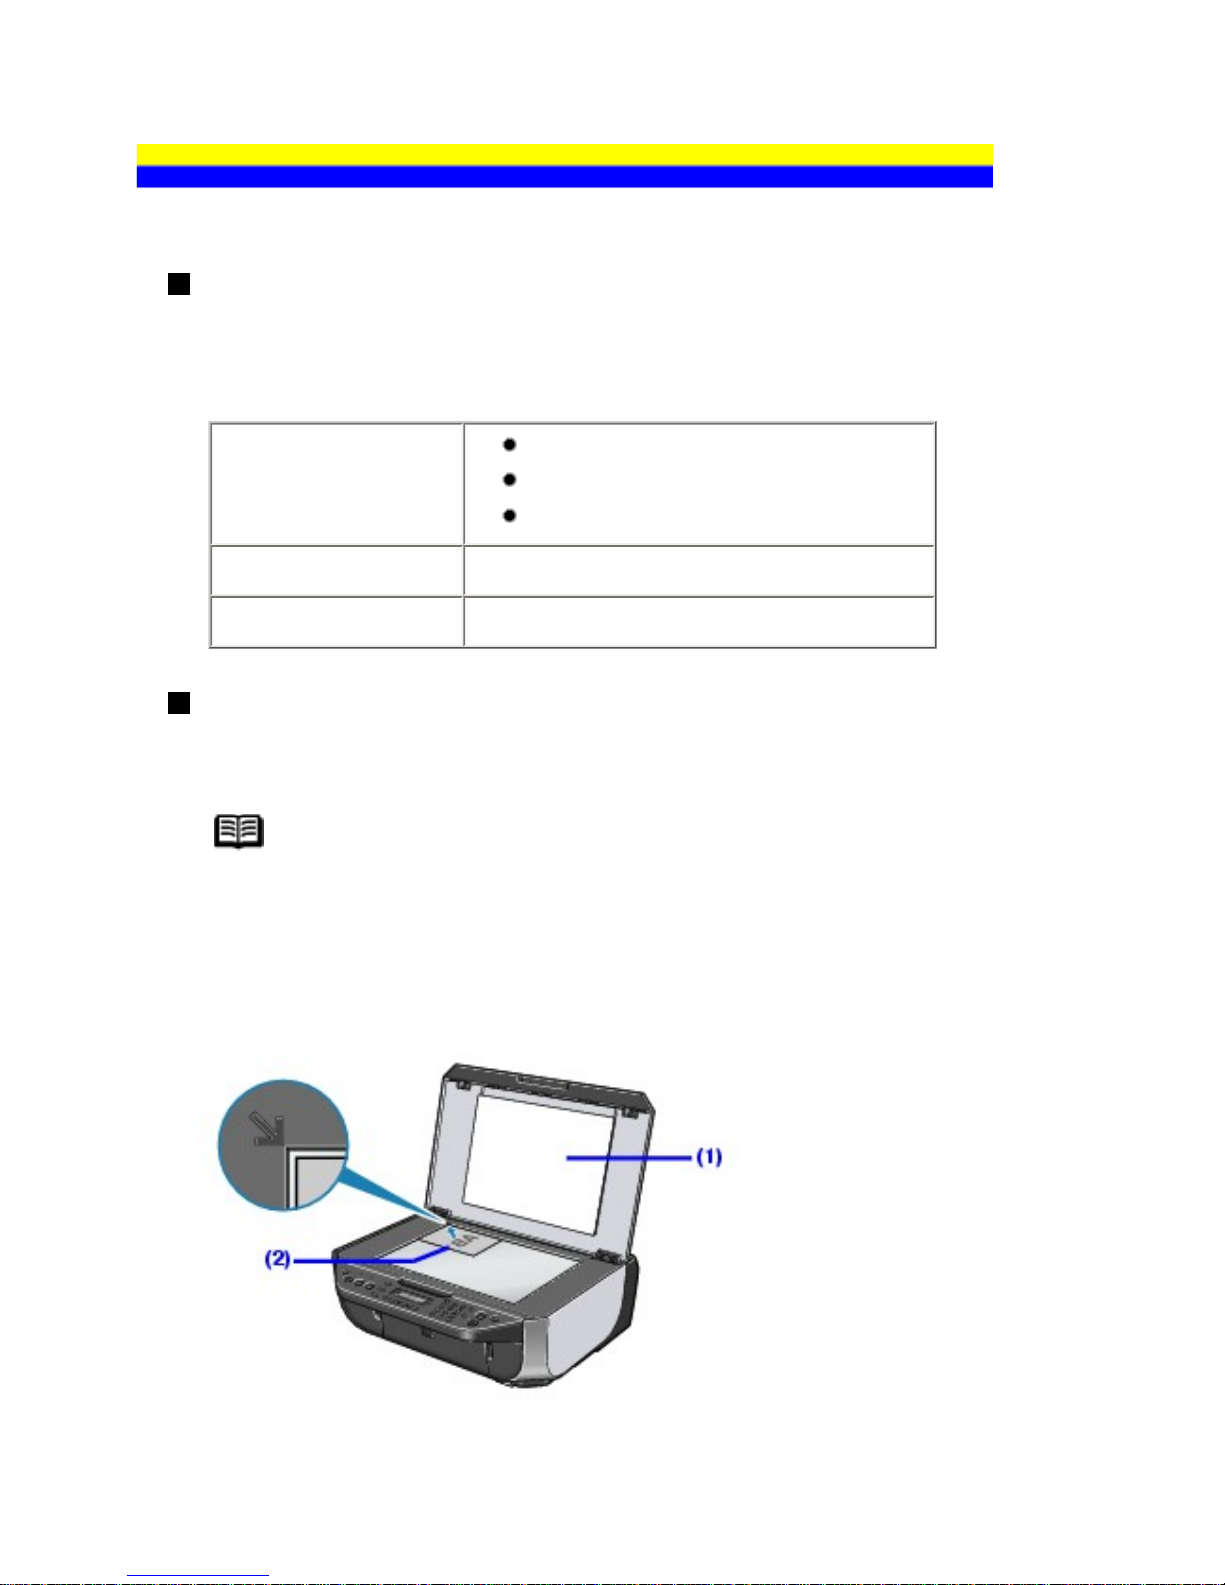
1 Load the original document on the Platen Glass.
(1) Lift the Document Cover.
(2) Load the original with the side to be copied, scanned, or faxed facing down on the
22
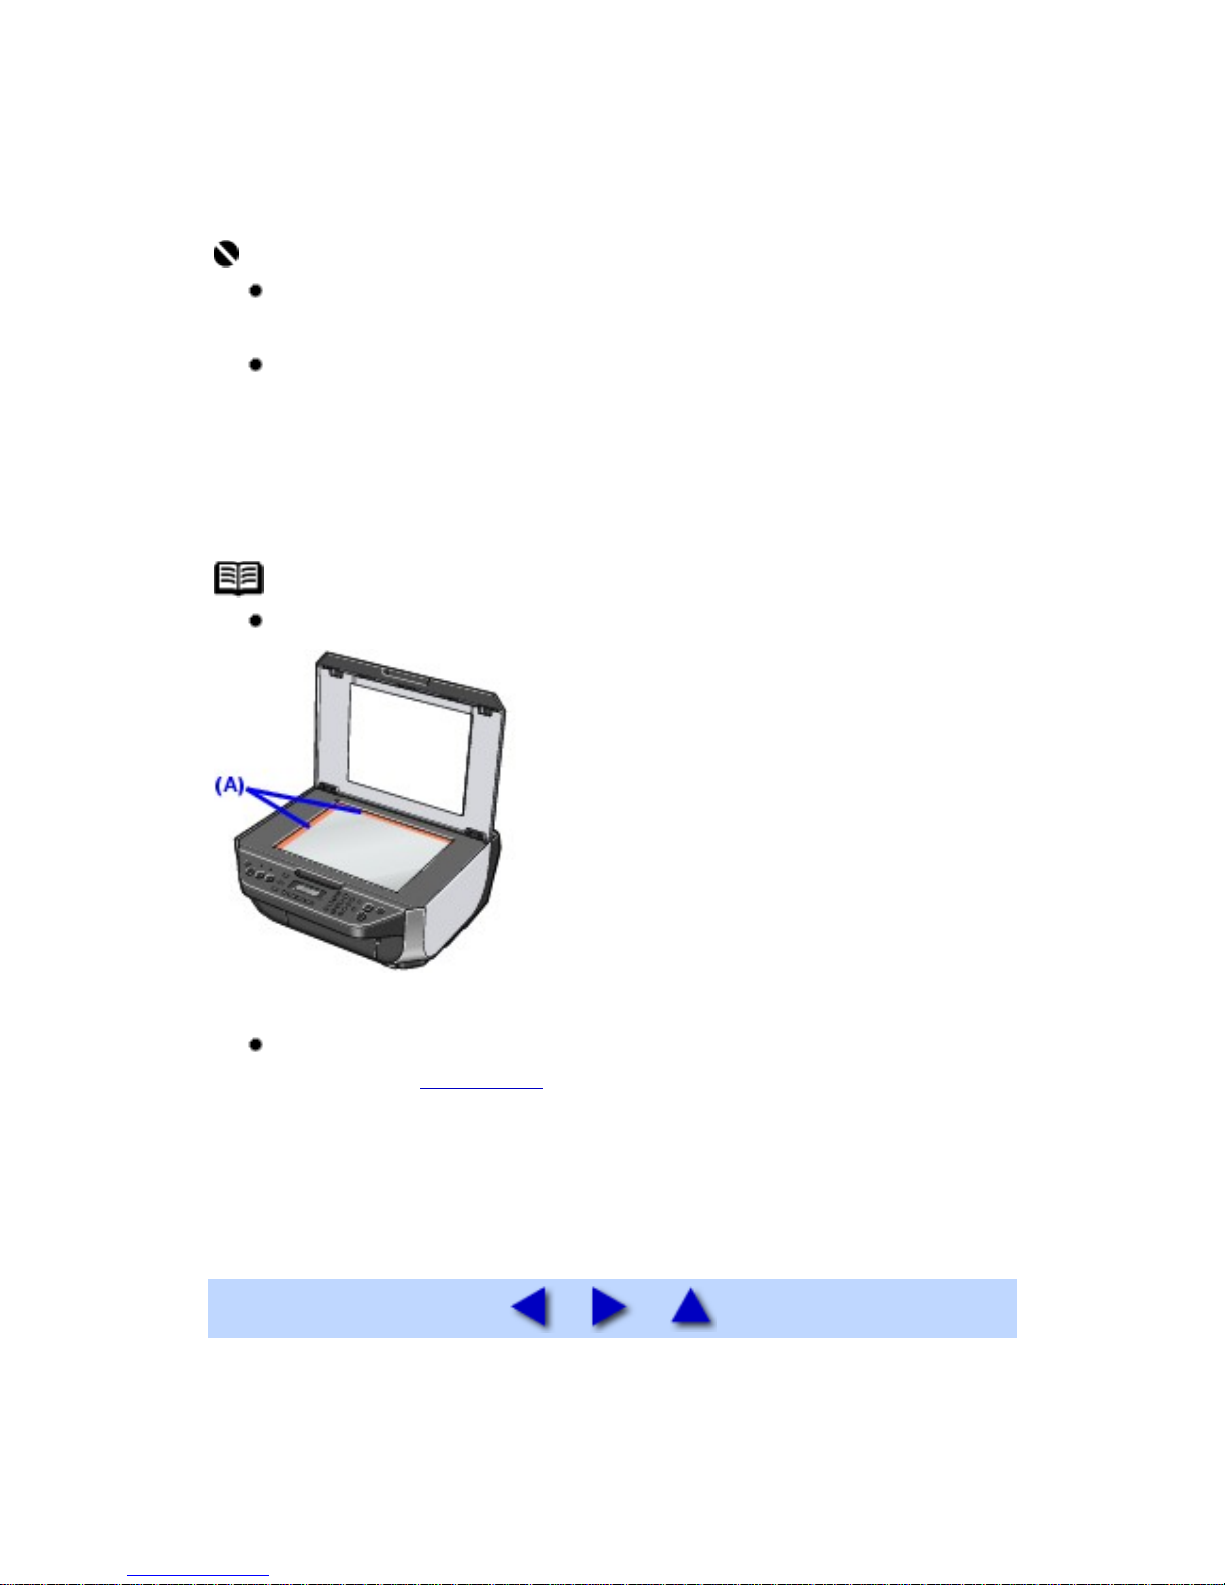
Platen Glass.
Place the original in landscape orientation and align the upper corner of it with the
alignment mark as shown in the figure above.
Important
Do not place any objects weighing more than 4.4 lb / 2.2 kg on the
Platen Glass.
Do not press or put weight on the original with pressure exceeding
4.4 lb / 2.2 kg.
Doing so may cause the scanner to malfunction or the Platen Glass to
break.
Note
The machine cannot scan the area in red in the figure below.
(A) 0.04 inches / 1 mm
When copying, the area you can scan depends on the printable area
of the media. See Printing Area.
2 Gently close the Document Cover.
23
Loading Printing Paper
Loading Paper
Important
Load A4, Letter, or Legal-sized plain paper when receiving faxes.
If you cut plain paper to 4" x 6" / 101.6 x 152.4 mm, 5" x 7" / 127.0 x 177.8 mm, or
2.13" x 3.39" / 54.0 x 86.0 mm (credit card-size) for a trial print, it can cause paper
jams.
You cannot print on postcards affixed with photos or stickers.
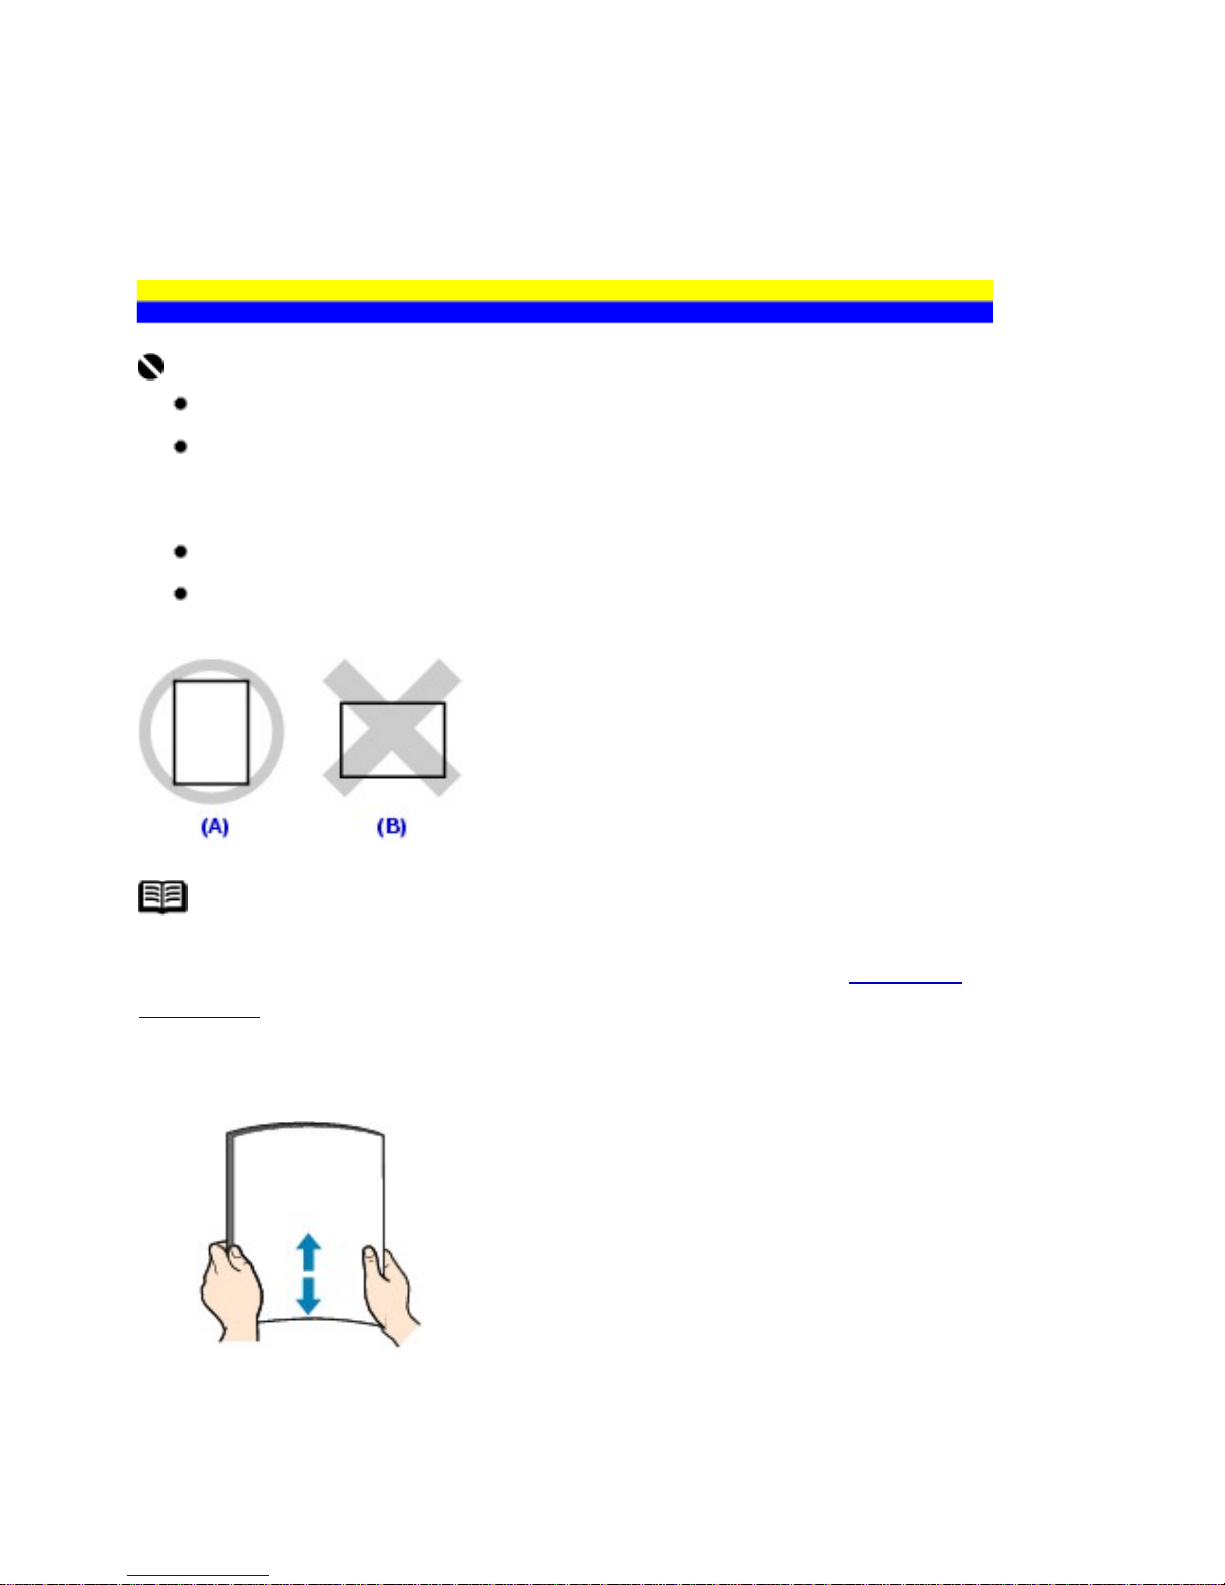
Always load paper in portrait orientation (A). Loading paper in landscape
orientation (B) can cause the paper to be jammed.
Note
We recommend using genuine Canon photo media when printing photographs. For details
on the specialty media Canon provides for use with its various printers, see
Compatible
Media Types.
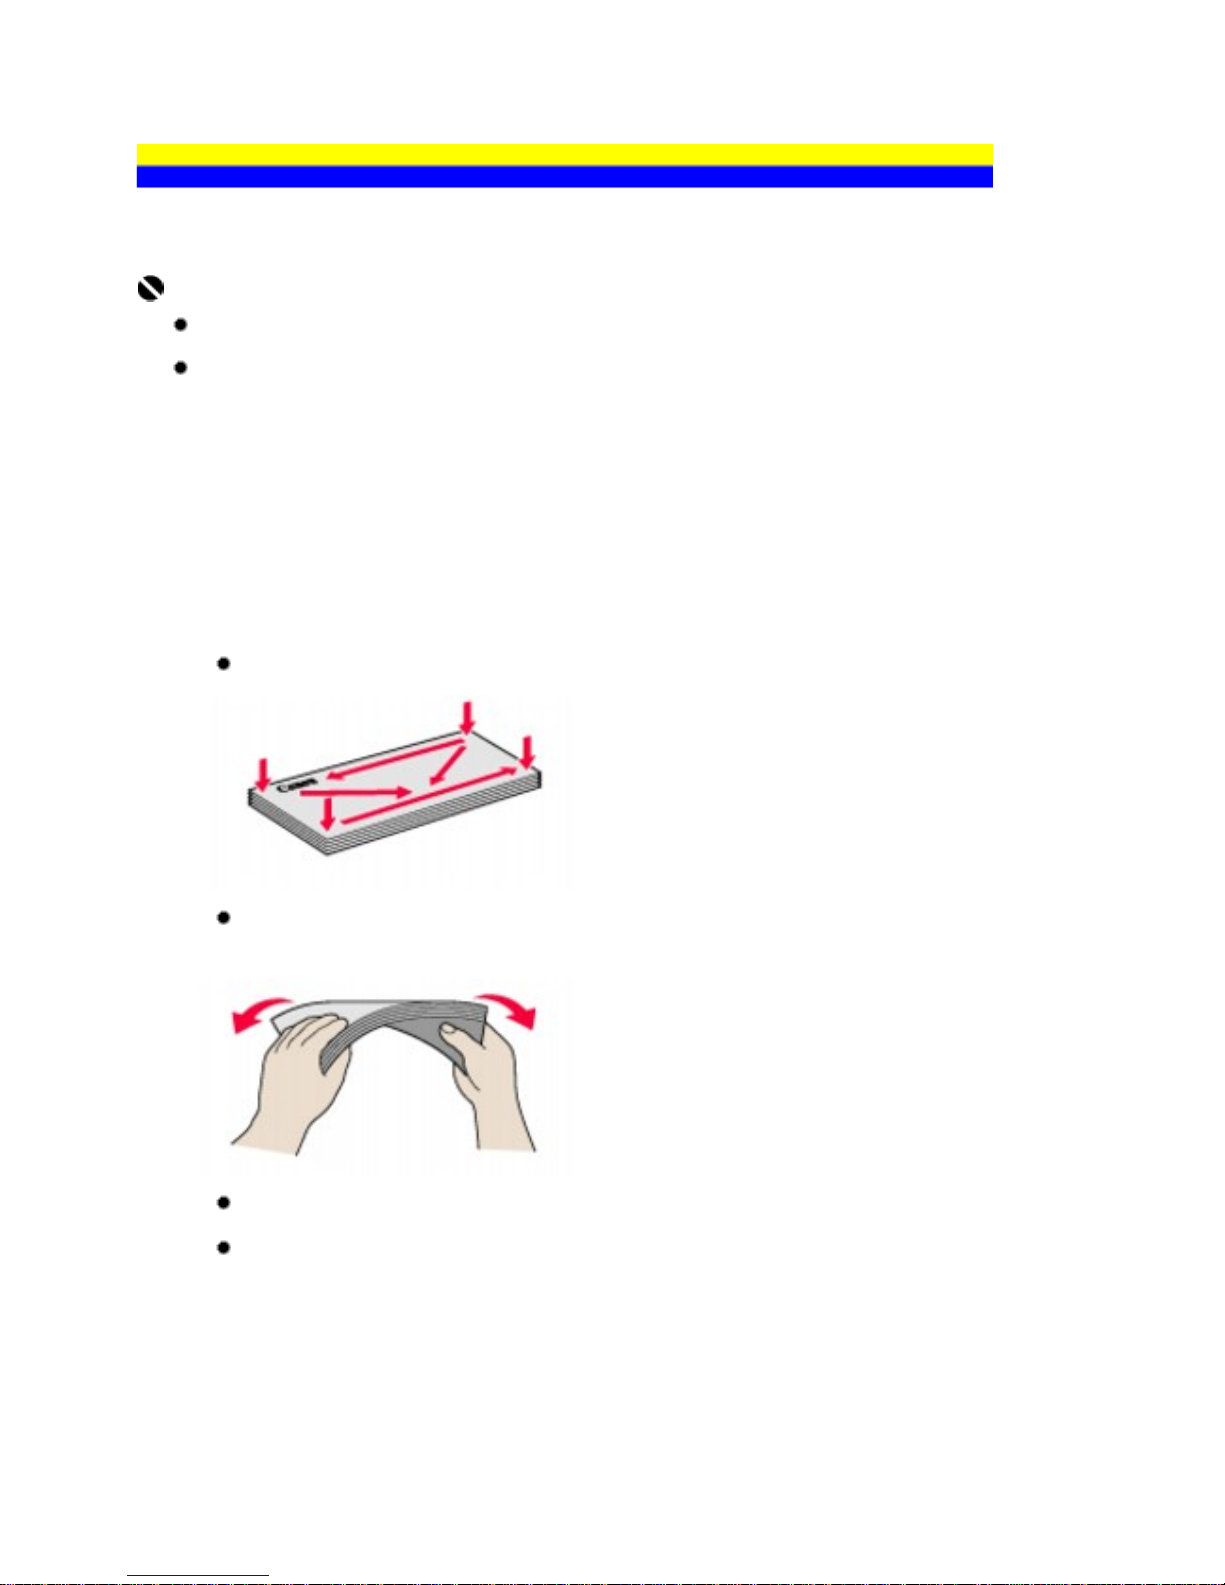
1 Flatten the four corners of the paper before loading it.
24
Note
Align the edges of paper neatly before loading. Loading paper without
aligning the edges may cause paper jams.
If paper is curled, hold the opposing curled corners and gently bend
them in the opposite direction until the paper becomes completely flat.
See Paper is curled..
To avoid curling, handle paper as follows.
- Put unused paper back into the package and keep them on a level
surface.
- Take out only the necessary number of sheets from the package,
just before printing.
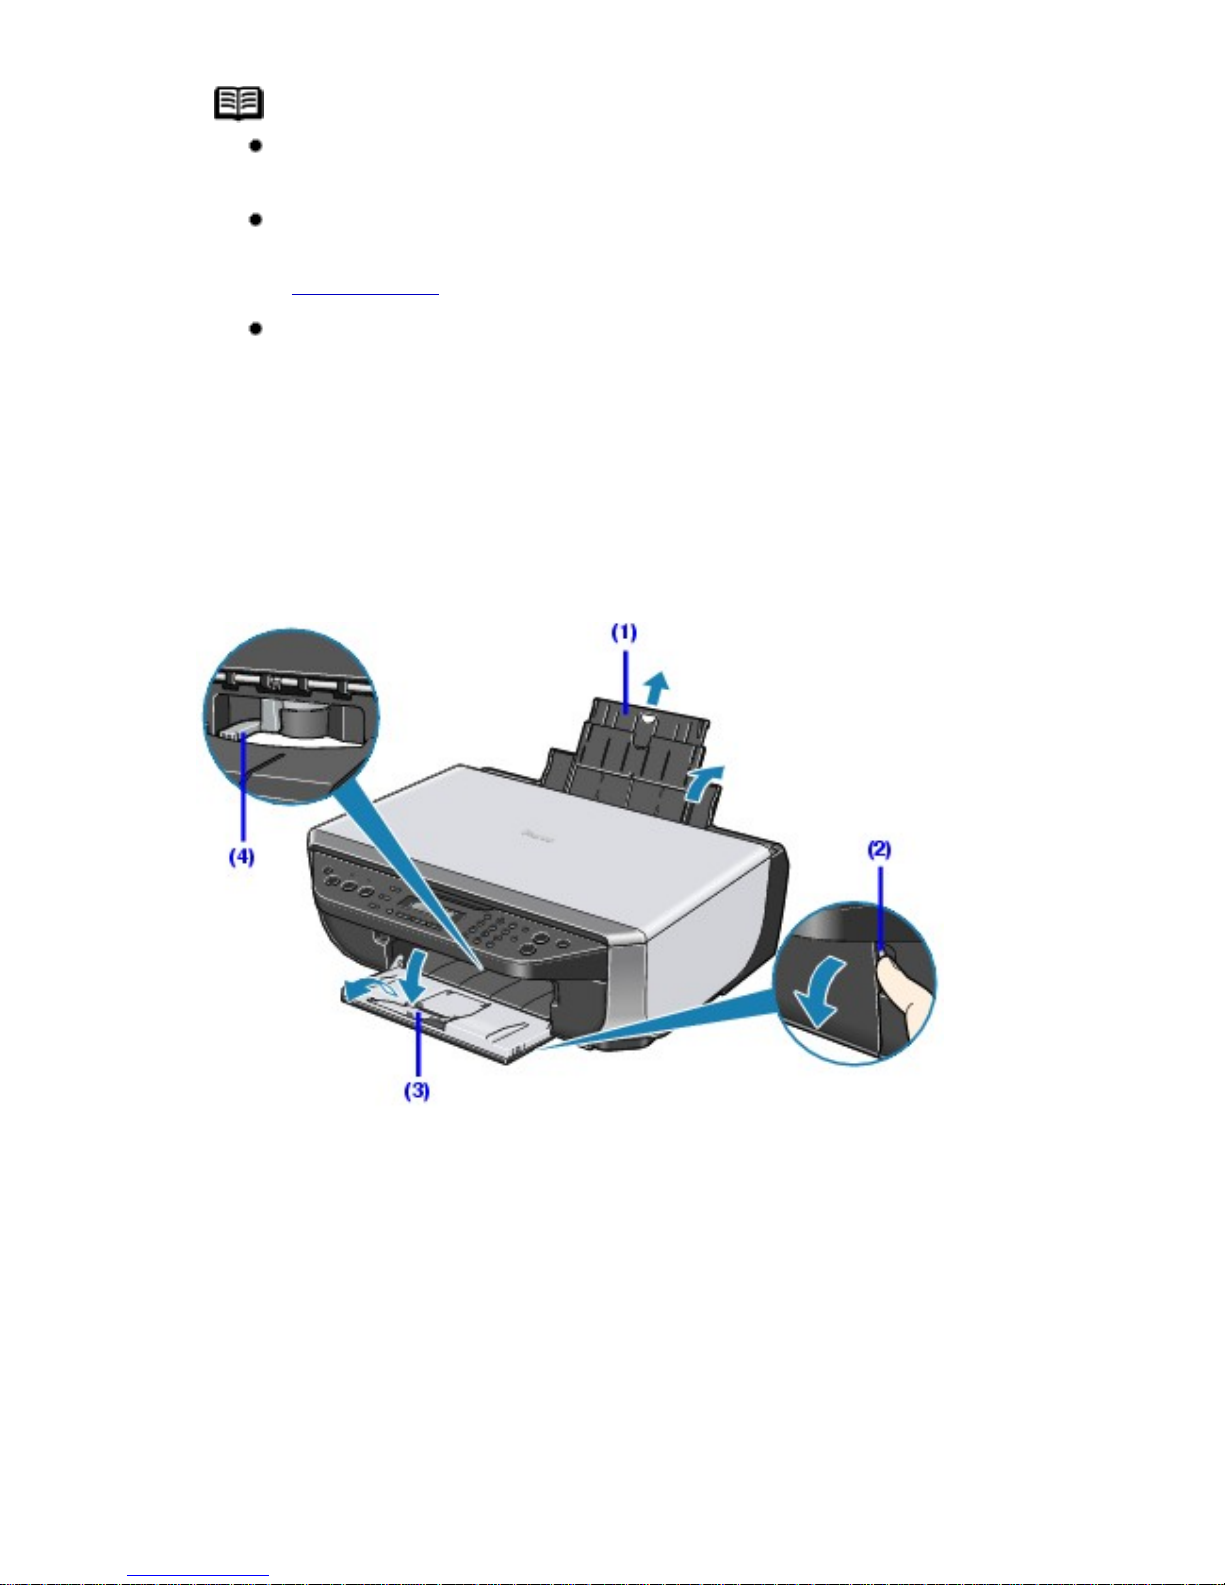
2 Prepare to load paper.
(1) Open the Rear Tray and pull out the Paper Support.
Put your finger in the rounded indent of the Paper Support and pull it out until it stops.
(2) Open the Paper Output Tray.
Put your finger in the rounded indent beside the Paper Output Tray and open it gently.
(3) Open the Output Tray Extension.
Open up and set the Output Tray Extension completely by pressing down the hollow on its
front side.
(4) Adjust the position of the Paper Thickness Lever.
Set it to the right when printing on envelopes or T-shirt transfers, and left when printing on
25
any other type of paper. See Compatible Media Types.
Note
If the corners or edges of the paper are smudged, try to print with the
Paper Thickness Lever set to the right. It may improve print quality.
Reset the Paper Thickness Lever to the left when you finish printing.
See
The position of the Paper Thickness Lever.
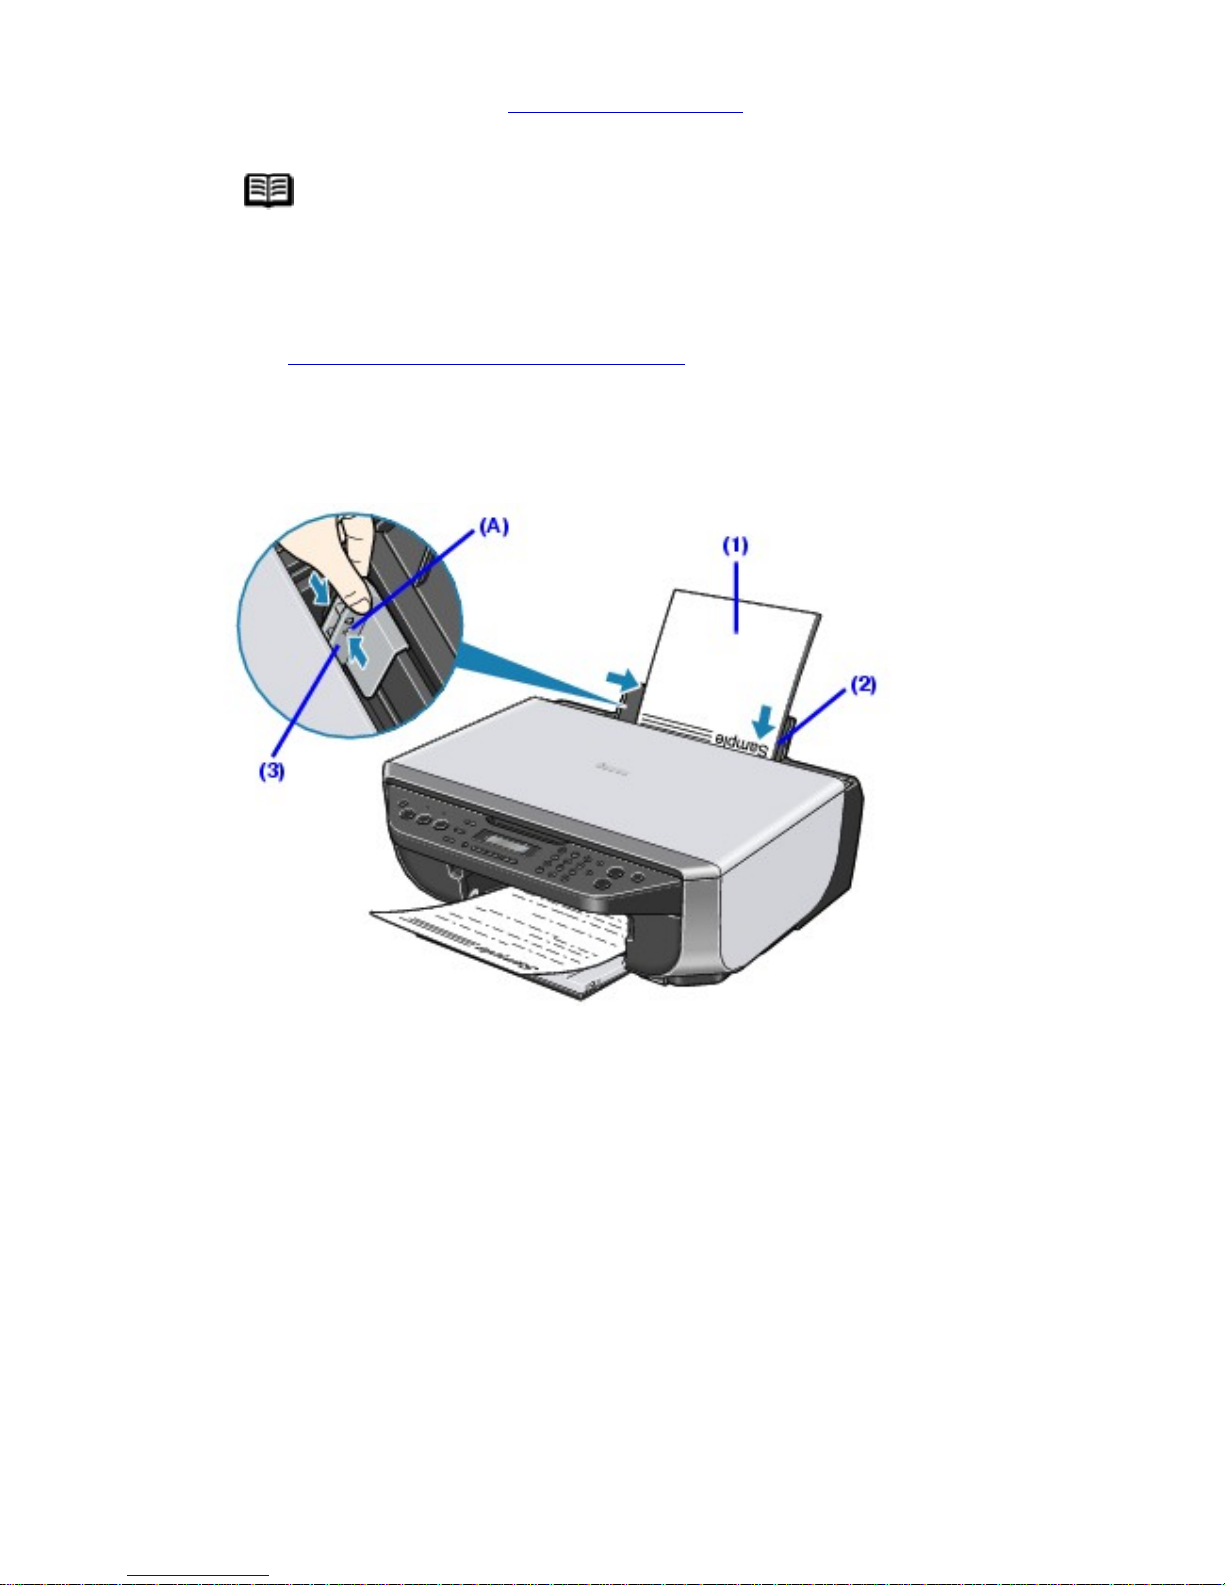
3 Load the paper.
* Do not load higher than the Load Limit Mark (A).
(1) Load the paper in the Rear Tray with the print side facing UP.
(2) Align the paper stack against the right side of the Rear Tray.
(3) Pinch the Paper Guide and slide it against the left side of the paper stack.
4 Specify the page size and media type settings according to the loaded
paper.
26

Note
When performing copy direct printing without using a computer,
select the size and type of the loaded paper using the Operation Panel.
For details on settings, see
Changing the Copy Settings or Changing
the Print Settings.
When using the machine connected to a computer, select the size
and type of the loaded paper in Page Size (or Paper Size) and
Media Type in the printer driver.
For details on printer driver settings, see
Printing with Windows or
Printing with Macintosh.
27
Loading Envelopes
Use either European DL or US Comm. Env. #10-sized envelope.
Important
You need to print from the computer to print on envelopes.
Do not use the following envelopes:
- Envelopes with a double flap (or sticker flaps)
- Envelopes with an embossed or treated surface
- Envelopes with pressure seals
- Envelopes whose gummed flaps are already moistened and adhesive
1 Prepare the envelopes.
Press down on all four corners and edges of the envelopes to flatten them.
If the envelopes are curled, hold the opposite corners and gently twist them in the
opposite direction.
If the flap of an envelope is curled, flatten it.
If the leading edge of an envelope is puffed up or curled, use a pen to press the envelope
flat and sharpen the crease.
Press the envelope flat, working from the middle to the edge.
28
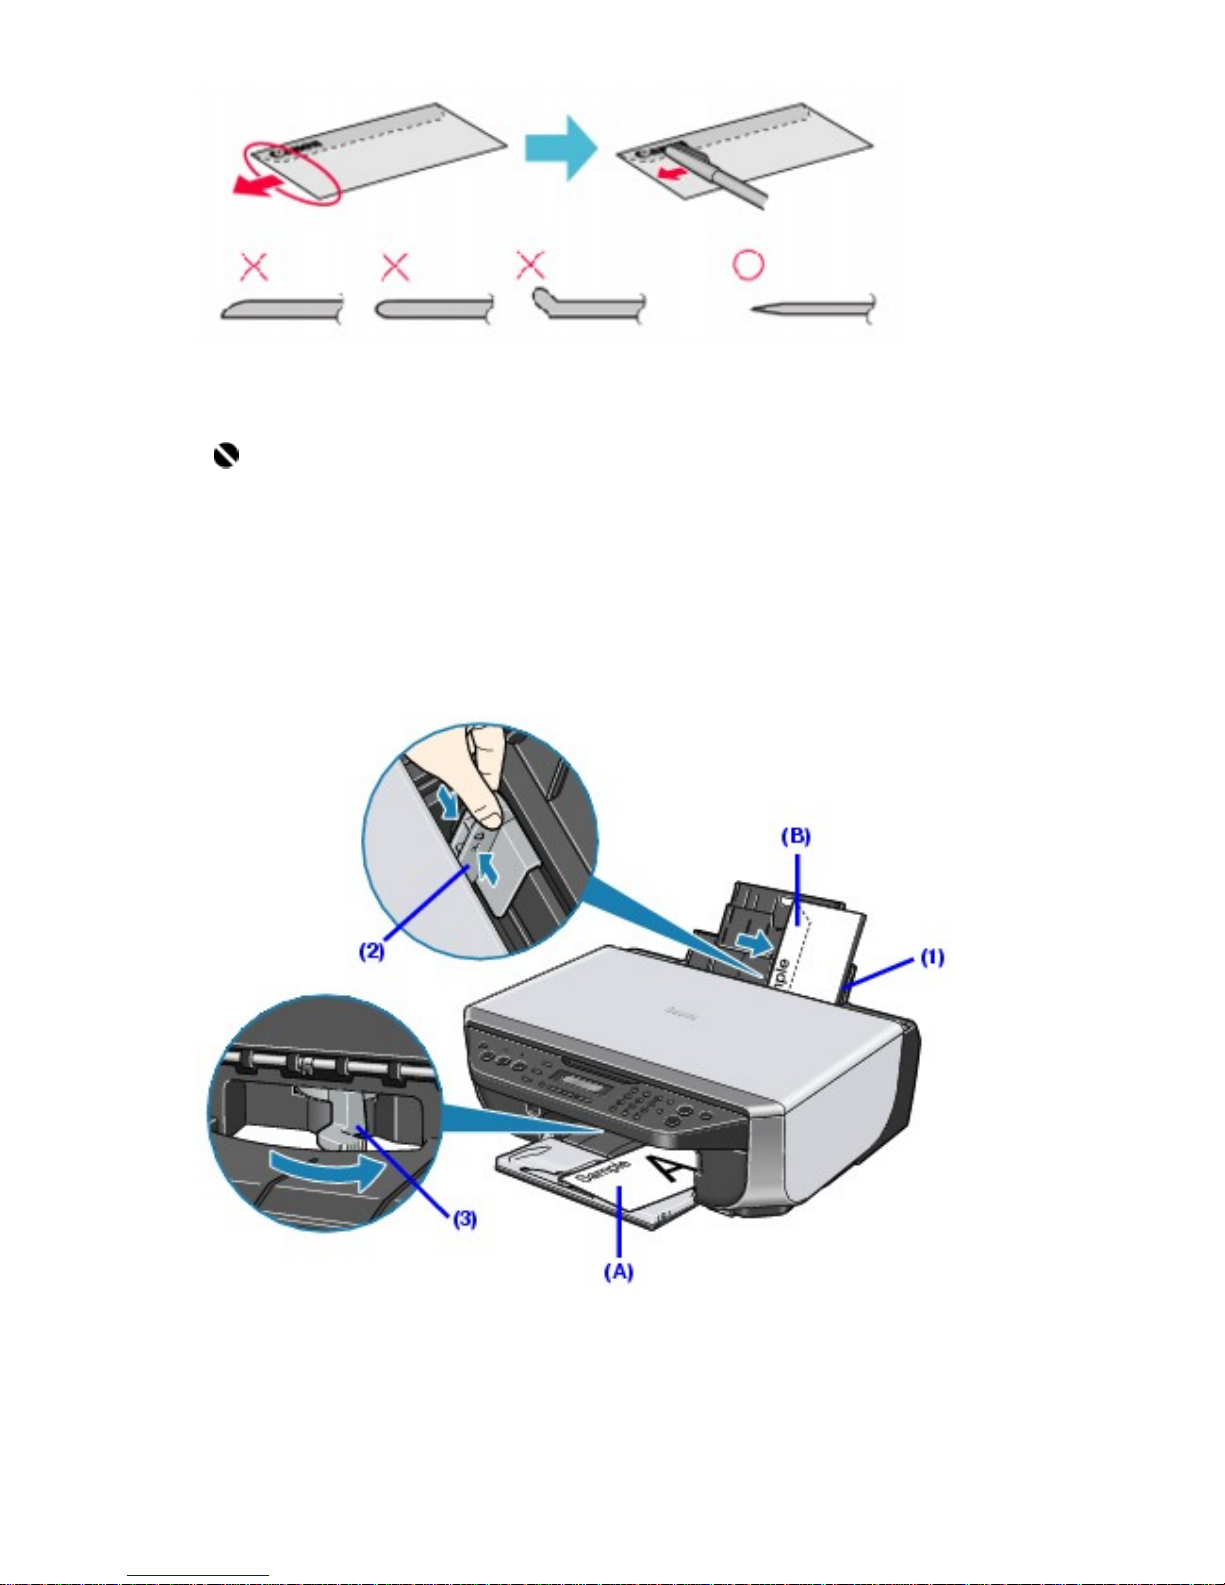
* The above illustrations show a side view of the leading edge of the envelope.
Important
The envelopes may jam in the machine if they are not flat or the edges are
not aligned.
Make sure that no curl or puff exceeds 0.1 inches / 3 mm.
2 Load the envelopes.
(A) Printing orientation
(B) Make sure the flaps are folded.
(1) Load the envelope against the right side of the Rear Tray.
Load with the address side facing UP and the rear flaps DOWN on the left.
29

Up to 10 envelopes can be loaded at once.
(2) Pinch the Paper Guide and slide it against the left side of the envelope.
(3) Set the Paper Thickness Lever to the right.
Note
Reset the Paper Thickness Lever to the left when you finish printing.
See
The position of the Paper Thickness Lever.
3 Specify the settings in the printer driver.
(1) Select Envelope in Media Type.
(2) Select the size for envelopes.
In Windows, select DL Env. or Comm. Env. #10 in Page Size.
In Macintosh, select DL Envelope or #10 Envelope in Paper Size.
(3) Select Landscape in Orientation.
Important
Be sure to set the printer driver setting properly. If you do not, the address
will be printed in the wrong direction.
Note
For details on printer driver settings, see
Printing with Windows or Printing
with Macintosh.
30
 Loading...