

Canon PIXMA TS8250 Getting Started Guide [fr]

Getting Started
Démarrage
Inbetriebnahme
Aan de Slag-gids
Guida Rapida
Para Começar
Guía de inicio
Ξεκινώντας
Uppstartsguide
Komme i gang
Før du begynder
Aloitusopas
Read Safety and Important Information
(addendum) rst.
Commencez par lire Sécurité et informations
importantes (addendum).
Lesen Sie Sicherheitsinformationen und wichtige
Hinweise (Anhang) zuerst.
Lees eerst Veiligheidsinformatie en belangrijke
informatie (addendum).
Leggere innanzitutto Informazioni importanti
esulla sicurezza (addendum).
Leia Informações Importantes e Sobre Segurança
(adendo) primeiro.
Lea primero Información de seguridad
einformación importante (apéndice).
Διαβάστε πρώτα τις Πληροφορίες για την ασφάλεια
και σημαντικές πληροφορίες (συμπλήρωμα).
Läs Information om säkerhet och annan viktig
information (bilaga) först.
Les Sikkerhetsinformasjon og viktig informasjon
(tillegg) først.
Læs Sikkerhedsoplysninger og vigtige
oplysninger (tillæg) først.
Lue Turvallisuus ja tärkeitä tietoja
(lisähuomautus) ensin.
Installing the Printer ...................................................................................................................page 1
Installation de l'imprimante .................................................................................................. page 1
Installation des Druckers ..........................................................................................................Seite 1
De printer installeren.............................................................................................................pagina 1
Installazione della stampante .......................................................................................... pagina 1
Instalando a impressora ...................................................................................................... página 1
Instalación de la impresora ............................................................................................... página 1
Εγκατάσταση του εκτυπωτή ..............................................................................................σελίδα 1
Installera skrivaren..........................................................................................................................sida 1
Installere skriveren .........................................................................................................................side 1
Installation af printeren ...............................................................................................................side 1
Tulostimen asennus ......................................................................................................................sivu 1
Connecting with Computer and Smartphone/Tablet .........................................page 4
Connexion avec un ordinateur et un smartphone ou une tablette ............ page 4
Herstellen einer Verbindung mit einem Computer und Smartphone/Tablet
........Seite 4
Verbinden met een computer en smartphone/tablet .................................... pagina 4
Connessione con computer e smartphone/tablet ............................................ pagina 4
Conectando a um computador e smartphone/tablet .................................... página 4
Conexión con el ordenador y con el teléfono inteligente o la tableta ..........página 4
Σύνδεση με υπολογιστή και Smartphone/Tablet .................................................σελίδα 4
Ansluta med dator och smarttelefon/surfplatta .........................................................sida 4
Koble til datamaskin og smarttelefon/nettbrett .........................................................side 4
Tilslutning med computer og smartphone/tablet ....................................................side 4
Yhdistäminen tietokoneeseen ja älypuhelimeen/tablet-tietokoneeseen .............sivu 4
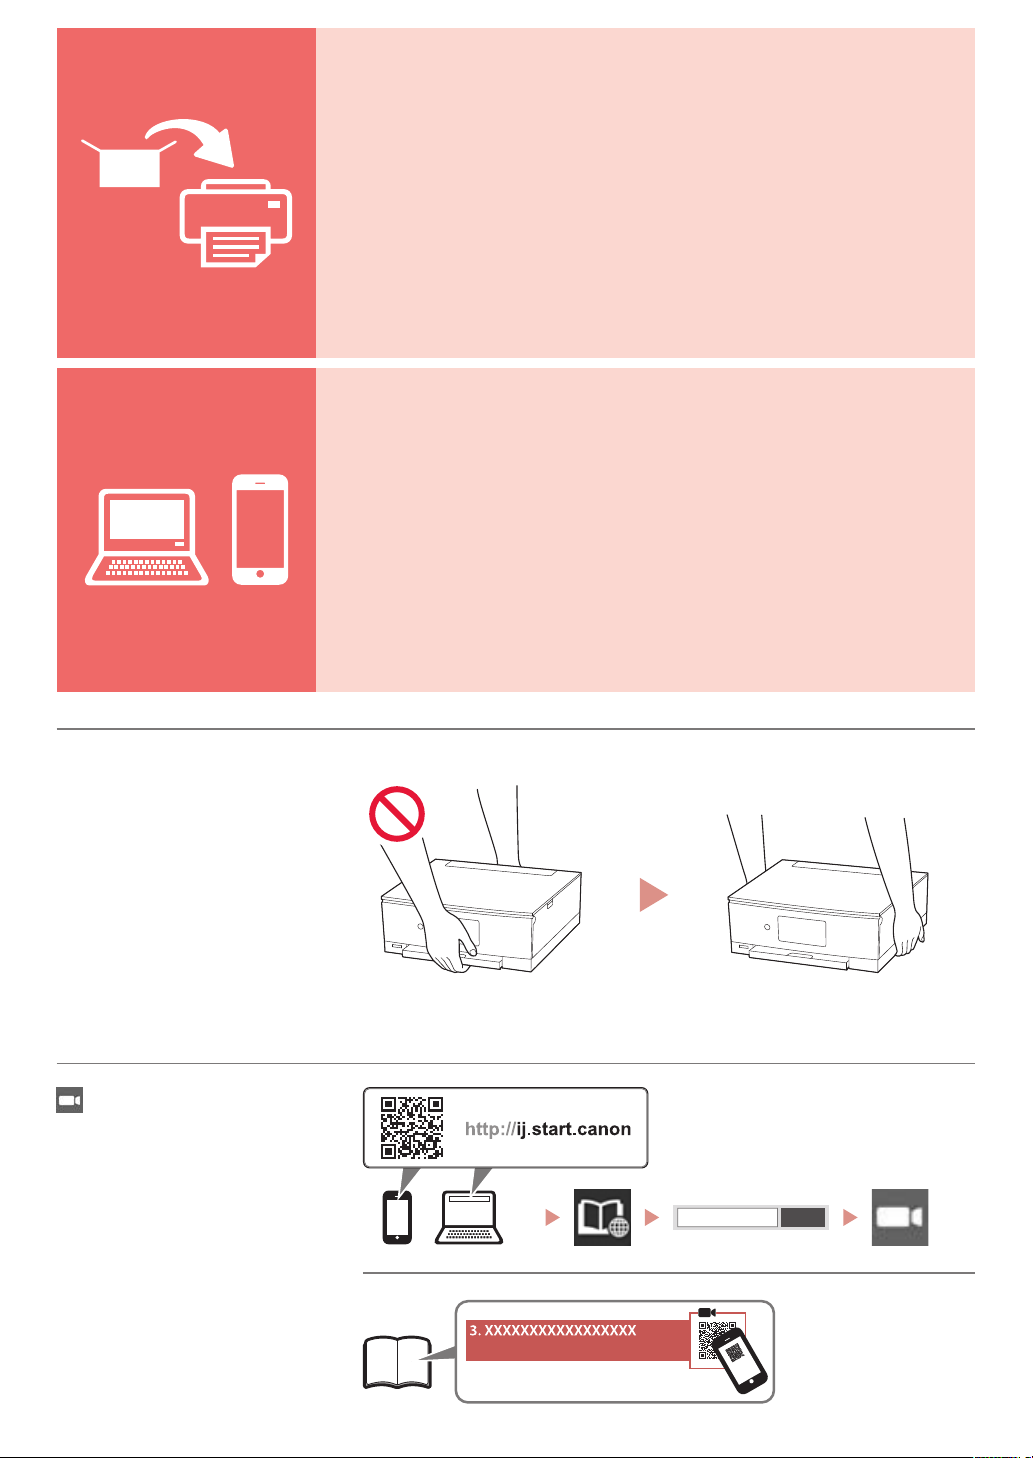
How to Hold Printer
Manipulation de l'imprimante
Halten des Druckers
De printer vasthouden
Come sospendere la stampante
Como segurar a impressora
Cómo sujetar la impresora
Πώς να κρατάτε τον εκτυπωτή
Hur du håller skrivaren
Hvordan holde skriveren
Sådan holder du printeren
Tulostimen pitäminen
Instructional Videos
Instructions vidéo
Anleitungsvideos
Instructievideo’s
Video informativi
Vídeos instrucionais
Vídeos instructivos
Εκπαιδευτικό βίντεο
Instruktionslmer
Instruksjonsvideoer
Instruktionsvideoer
Ohjevideot
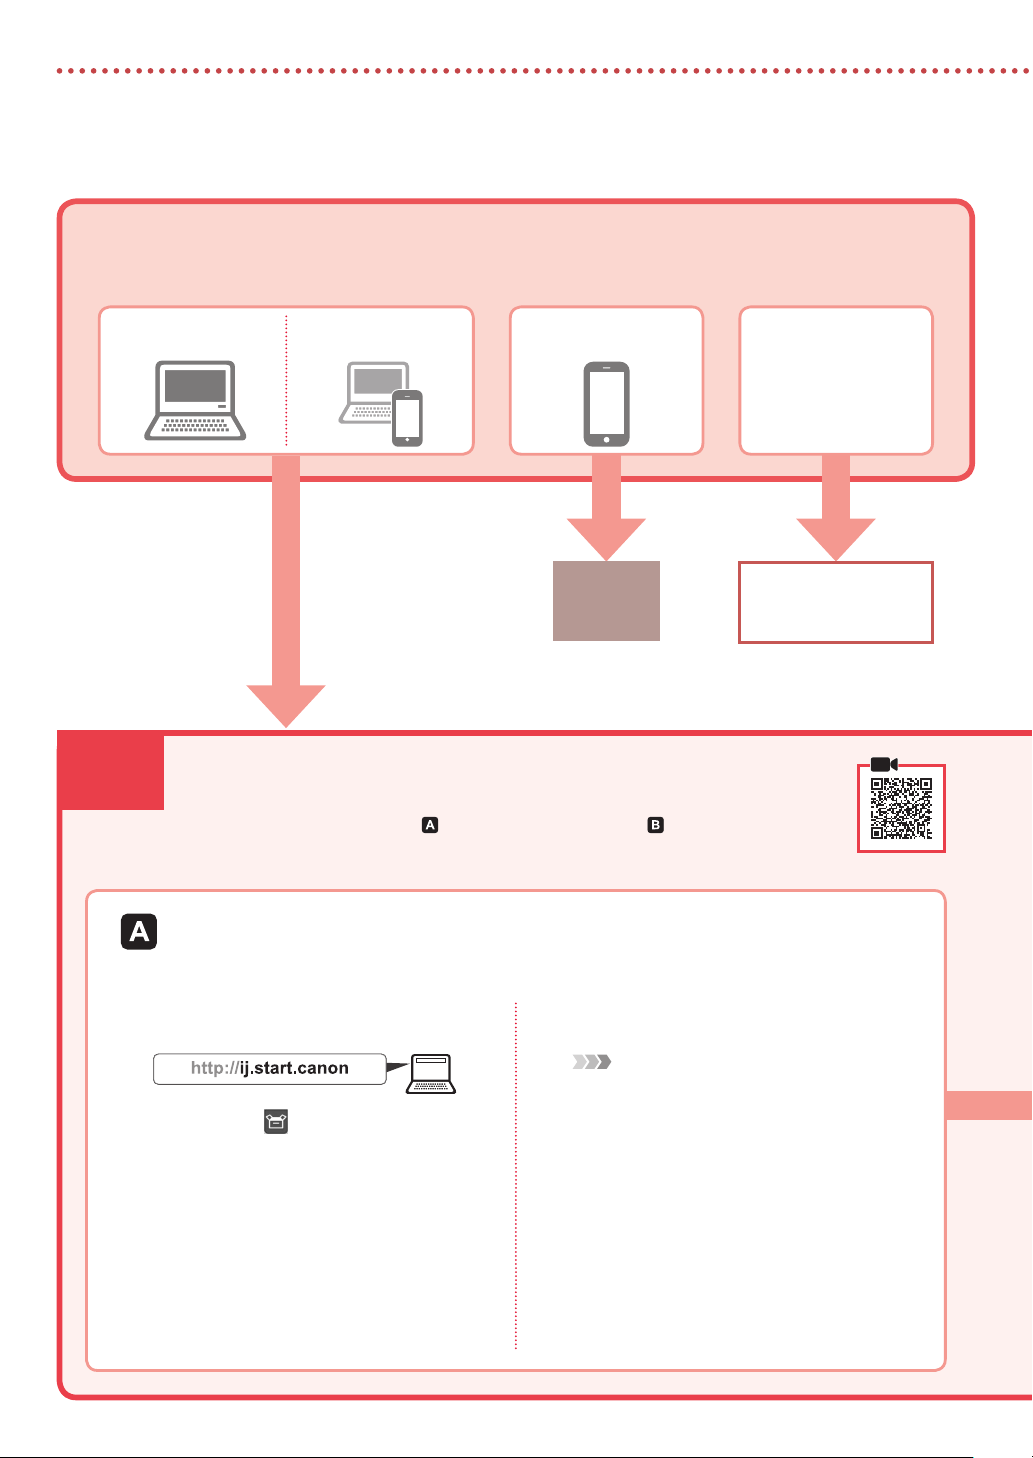
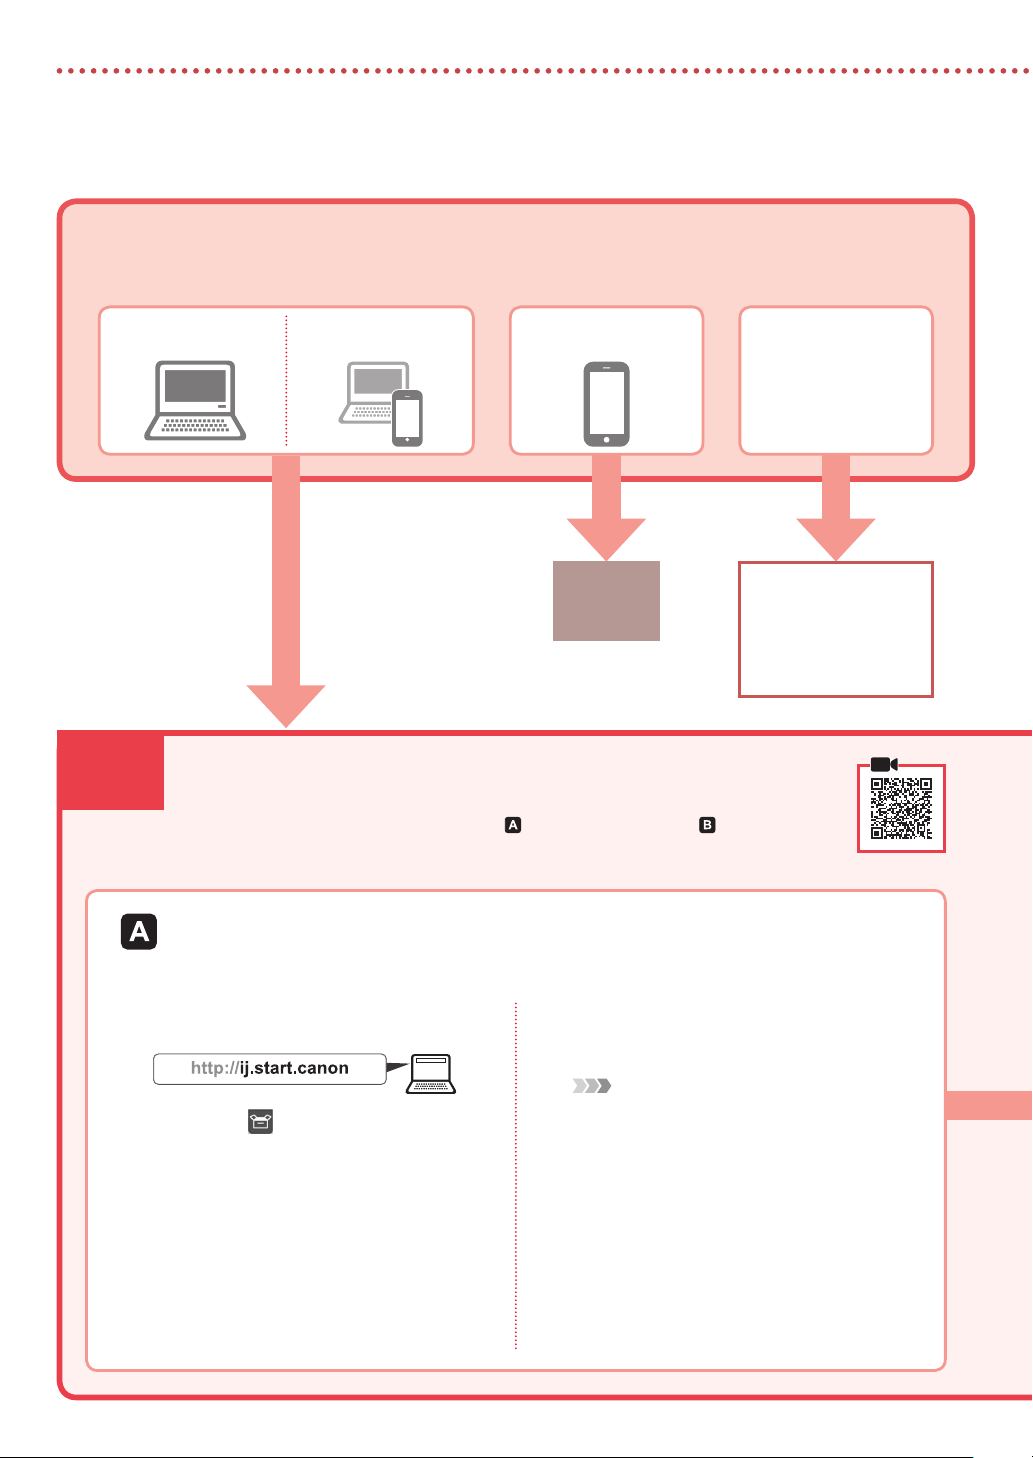
Go
Setting up the printer
Web Setup
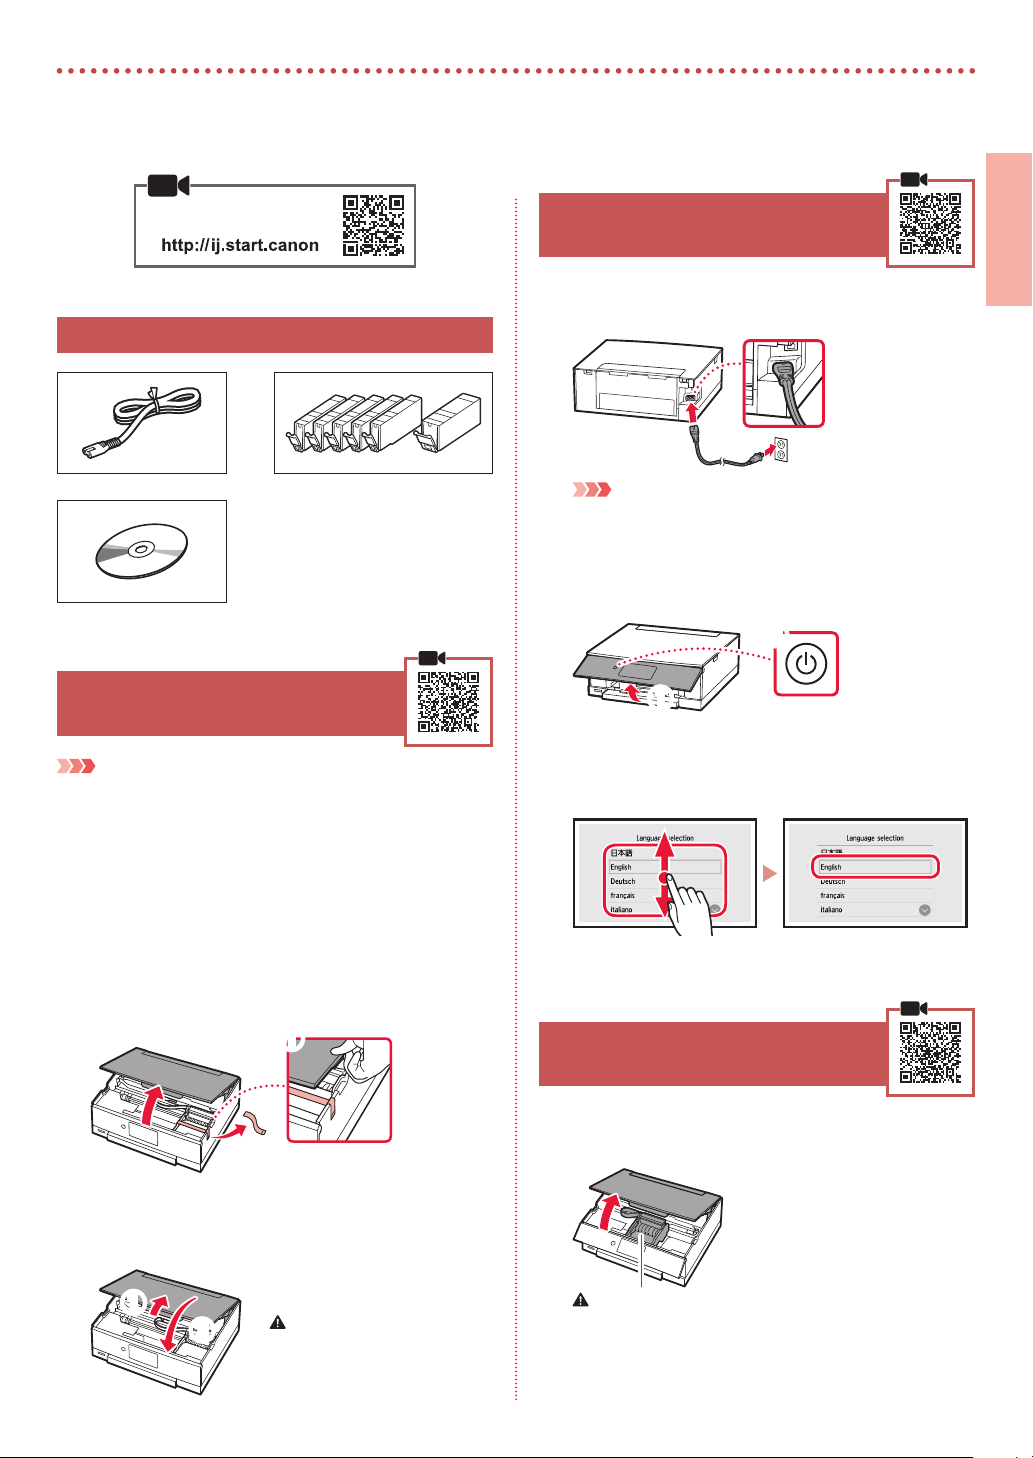
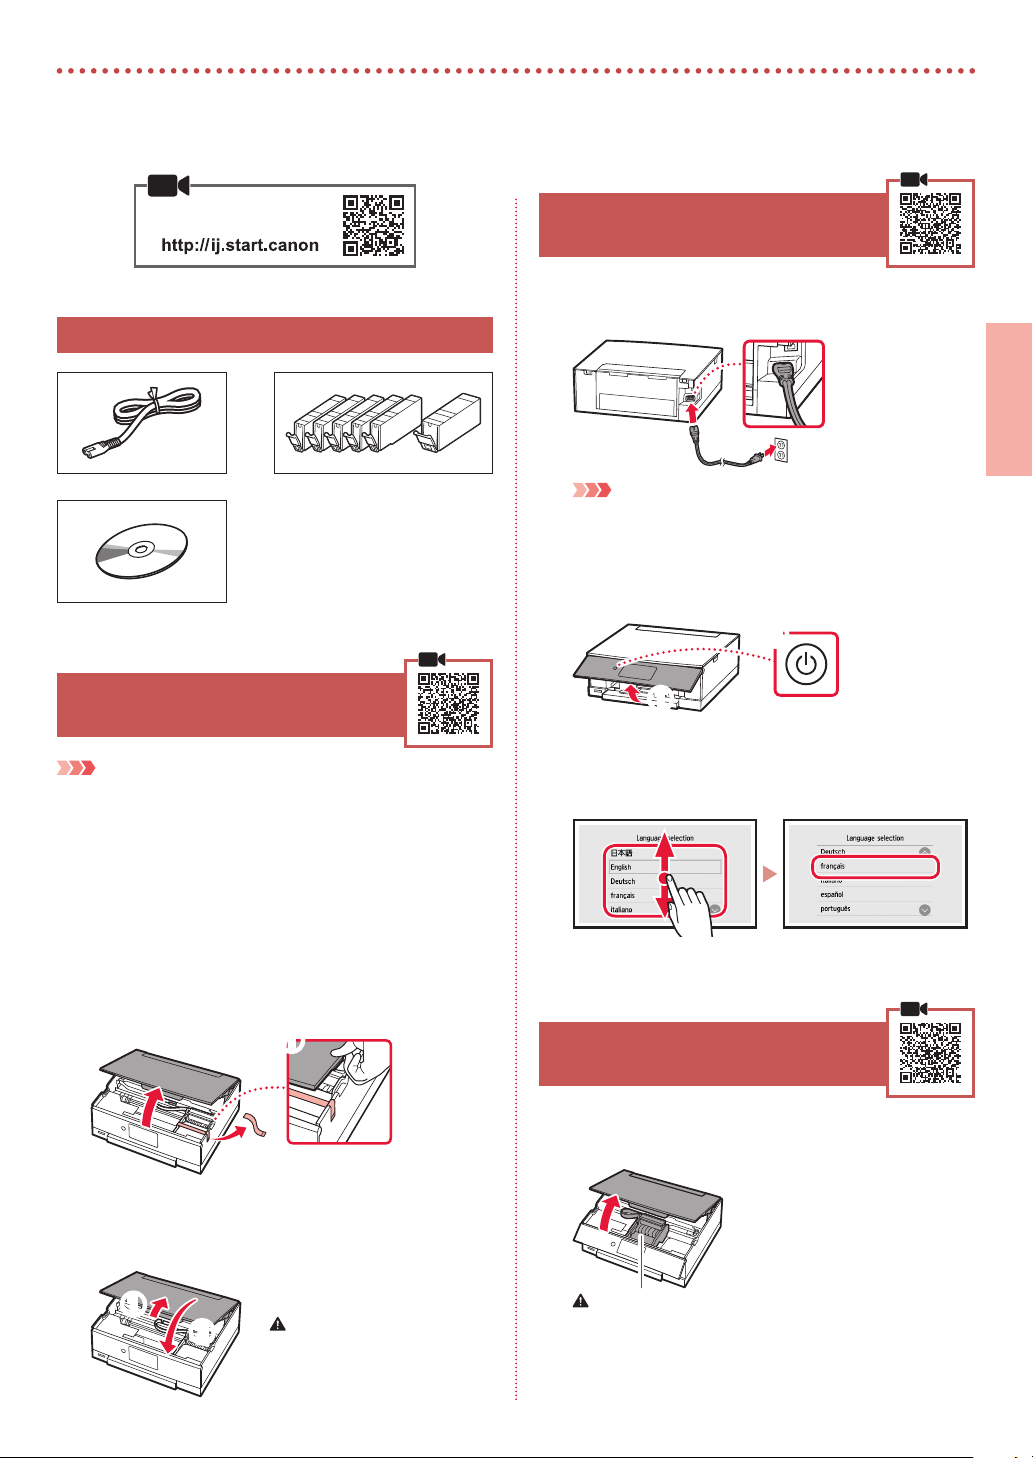
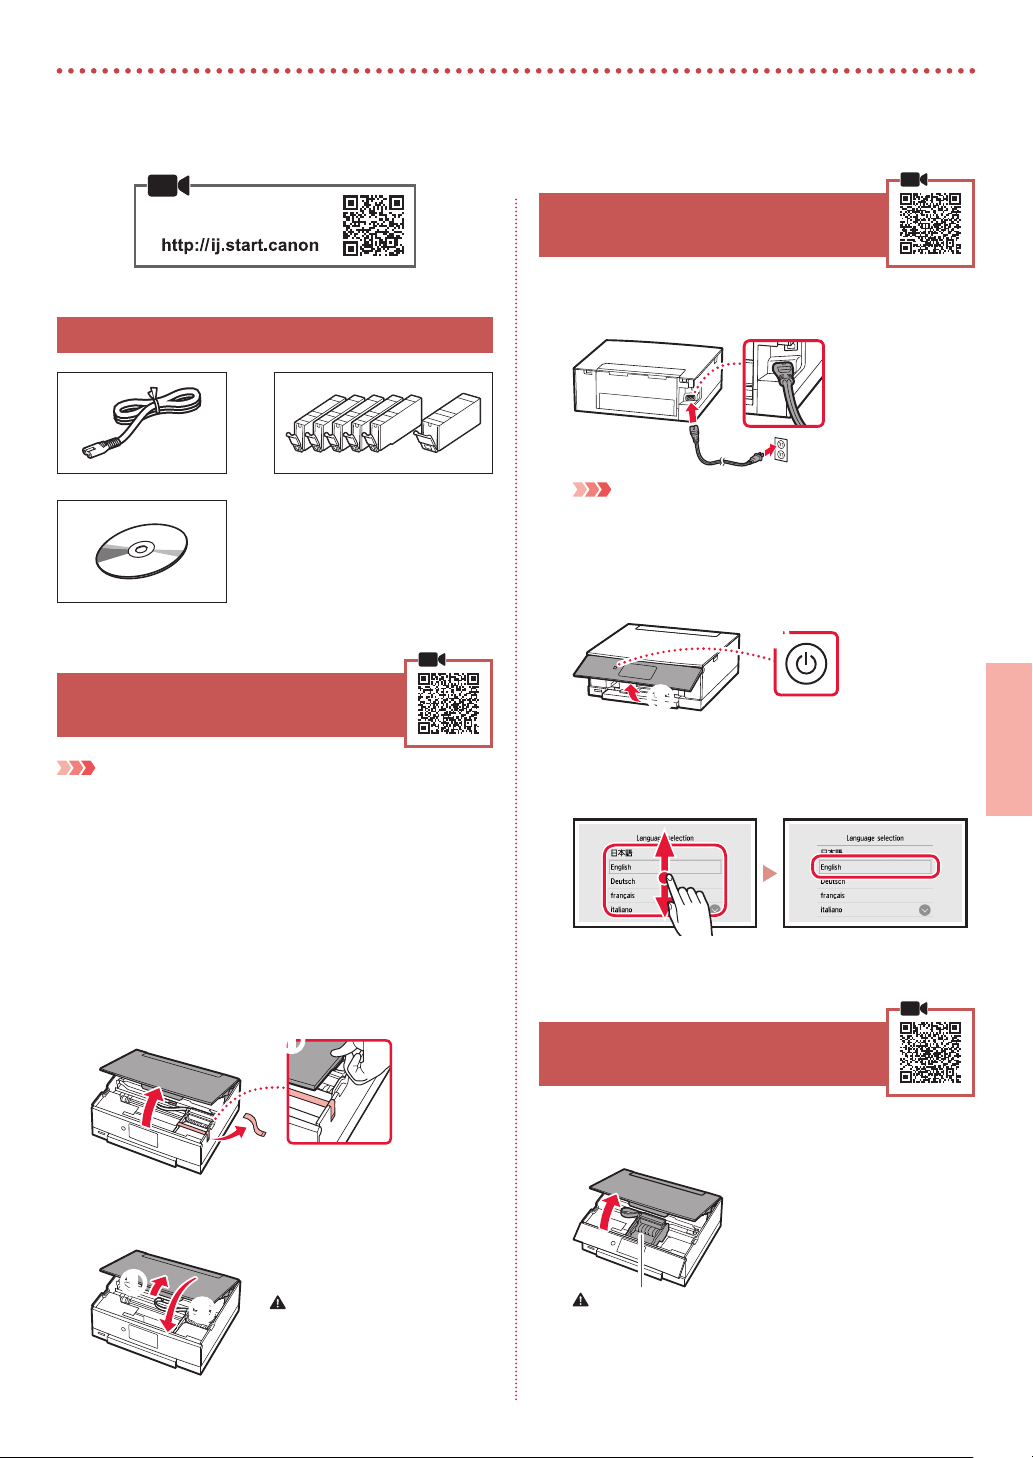
1. Box Contents
Power cord
•
Setup CD-ROM
•
2. Removing Packing Materials
Important
When printing starts, the operation panel opens and the paper
output tray comes out automatically. Do not put things in front of
the printer.
Ink tanks for setup
•
Safety and Important Information
•
Getting Started (this manual)
•
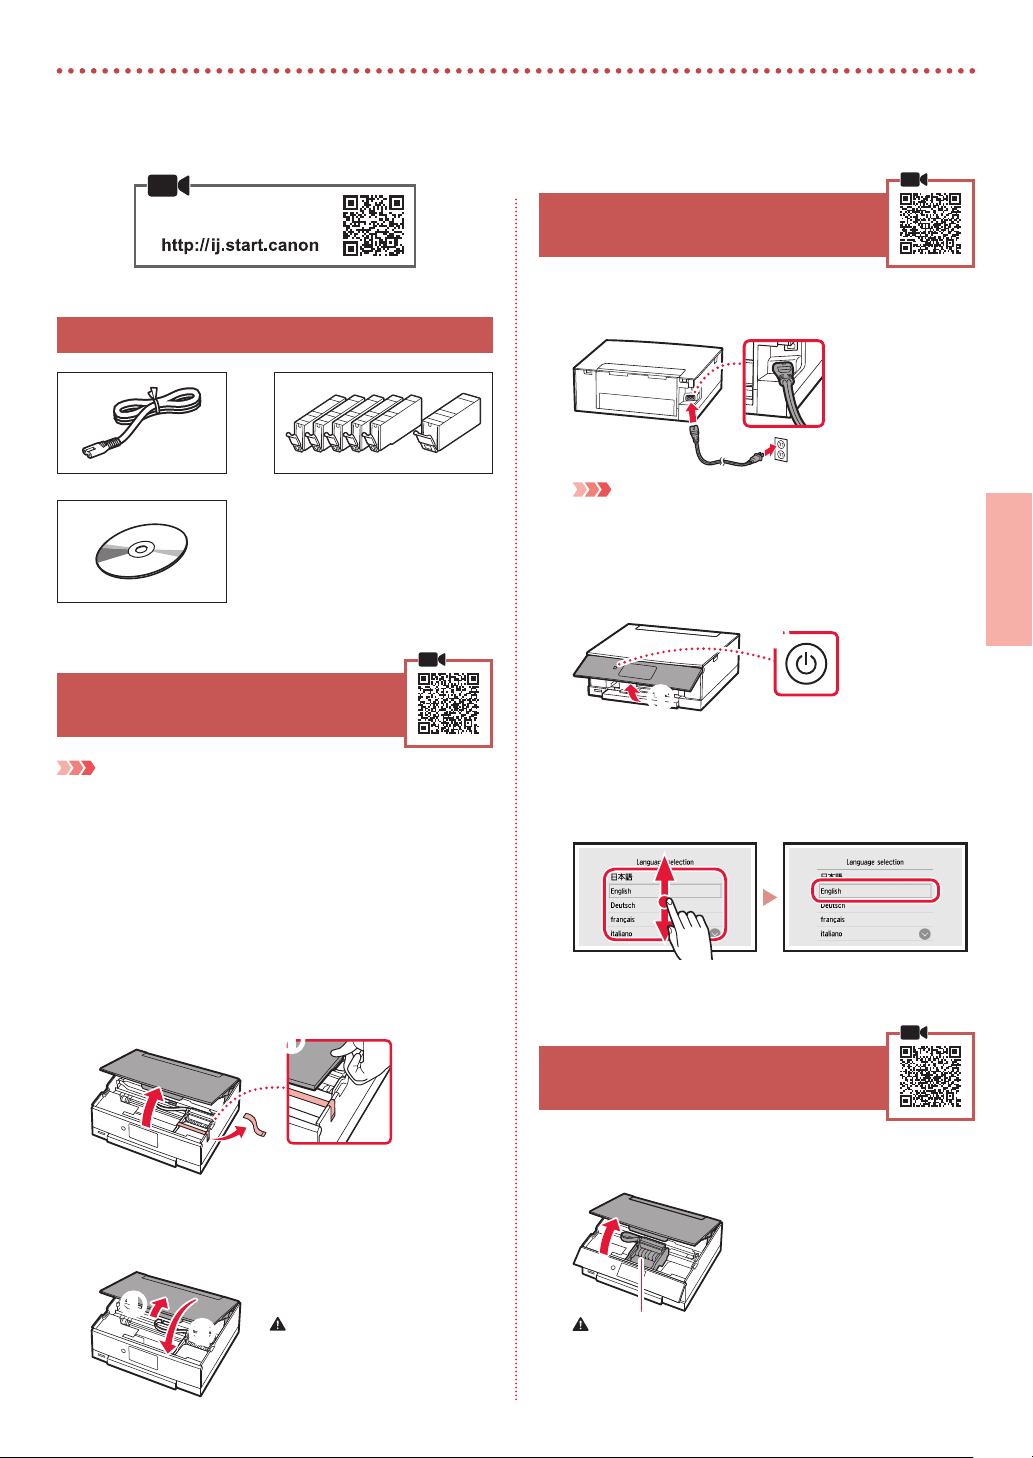
3. Turning on the Printer
Connect the power cord.
1
Back
Important
At this time, do not connect any other cables.
Open the operation panel and press the ON
2
button.
b
a
Scroll and tap to select your language, and then
3
tap OK.
ENGLISH
Remove and dispose of the packing materials
1
from the device.
Operating the printer while the orange tape and
•
protective lm are still on it causes malfunctions. Be
sure to remove them.
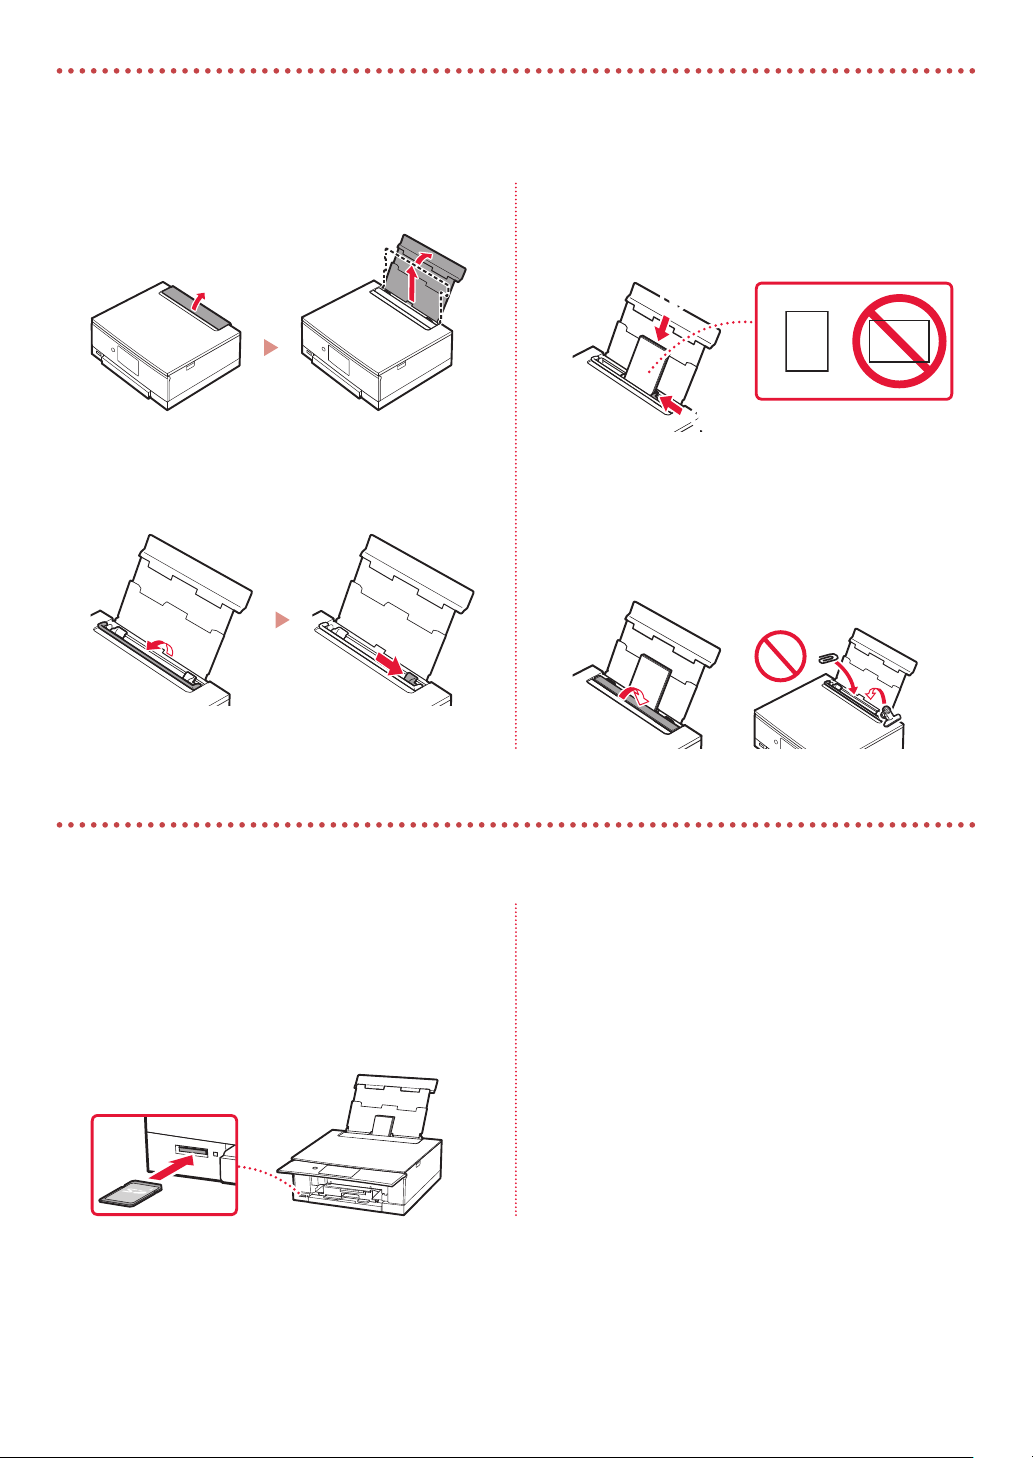
Open the scanning unit / cover and remove the
2
orange tape.
a
b
Close the scanning unit / cover.
3
Lift up the scanning unit / cover briey, and then
•
close it.
a
b
Caution
Watch your ngers.
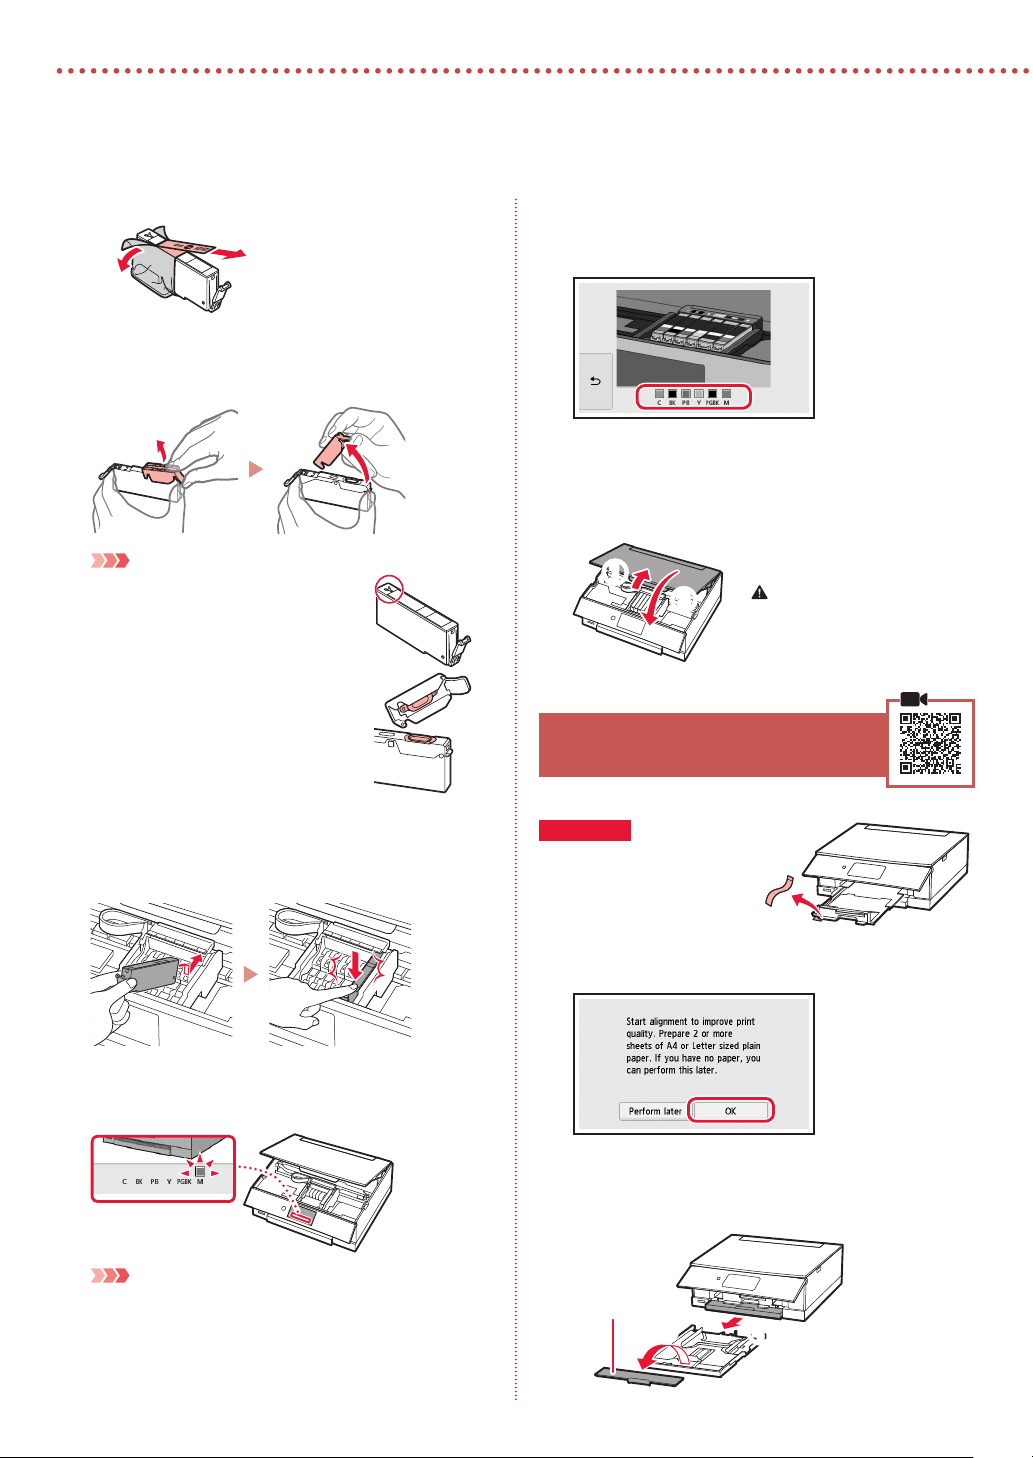
4. Installing the Ink Tanks
Open the scanning unit / cover.
1
Caution
Do not touch the print head holder until it stops moving.
1

Setting up the printer
Remove the tape and lm on the ink tanks.
2
b
Check that no tape is left over.
•
Slowly remove the orange cap.
3
Important
Do not push both sides of the ink tank
•
with the Y-shape air hole blocked.
Do not touch the red areas shown in the
•
gure.
a
Repeat steps 2 through 5 to install all the ink
6
tanks.
Make sure that all the colors appear.
•
Close the scanning unit / cover.
7
When you close the scanning unit / cover, the
•
internal operations start.
a
b
Caution
Watch your ngers.
5. Loading Paper
Install the ink tanks.
4
Insert the ink tank into the print head and press it
•
from above until it clicks.
Make sure that the color of the ink tank you
5
installed appears on the screen.
Important
If the color is not displayed on the screen even though you
have installed the ink tank, the color of the ink tank may be
wrong or you may have installed an ink tank, such as one
with a dierent model number, that is not supported by this
printer. Either install an ink tank for the correct color or use the
provided ink tank for setup.
2
Check!
If there is any orange tape, remove
it.
Tap OK.
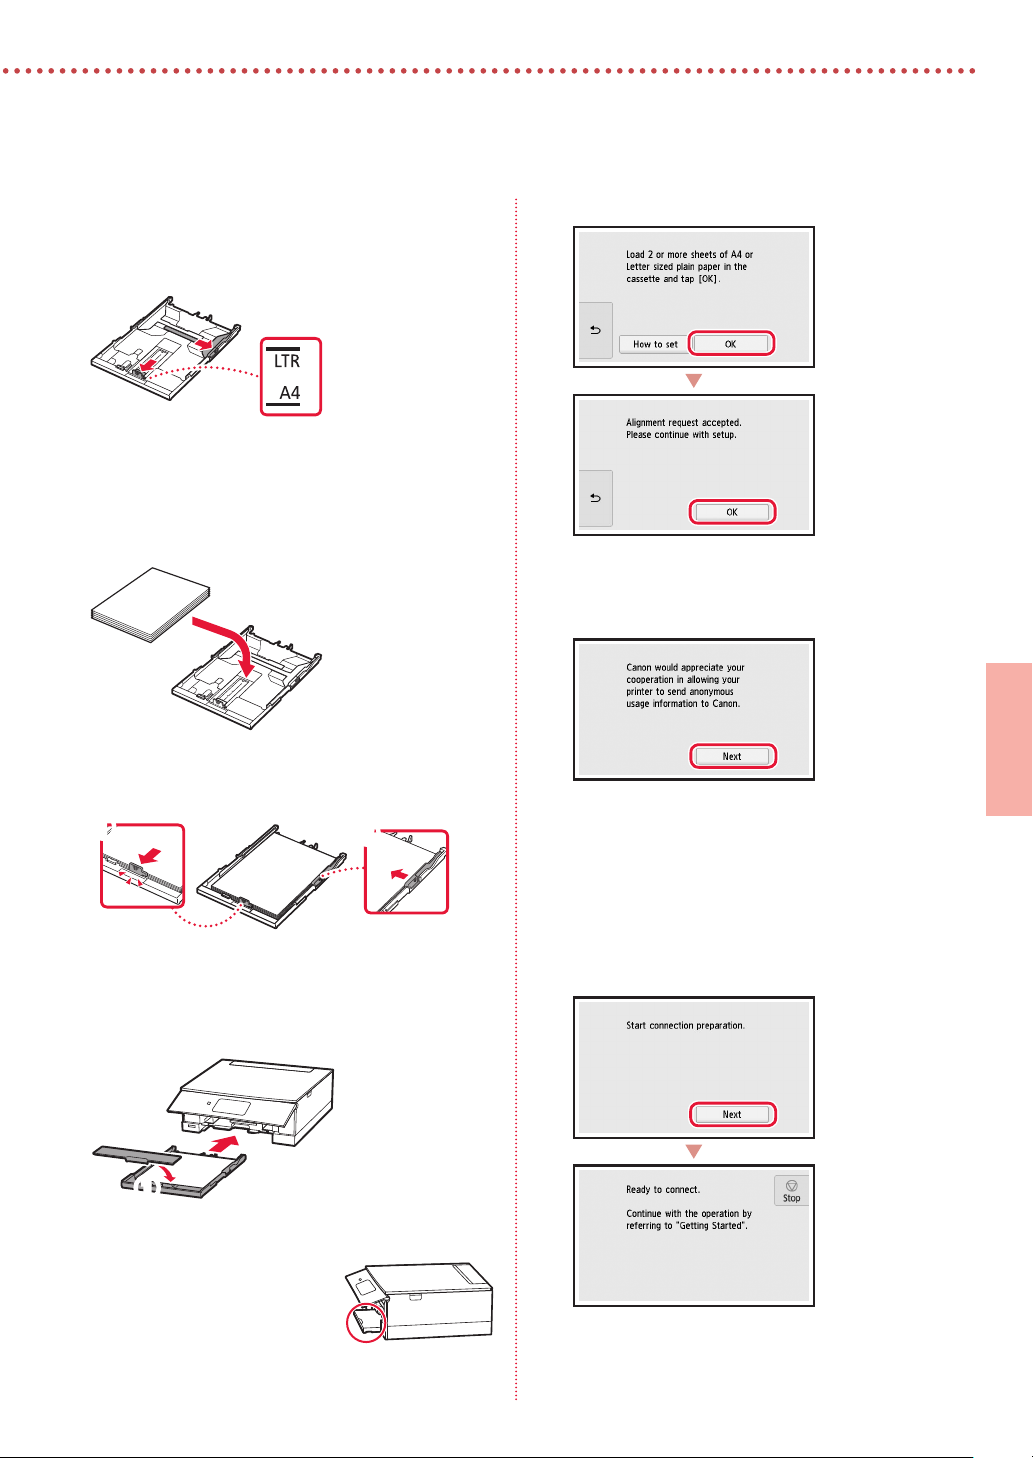
1
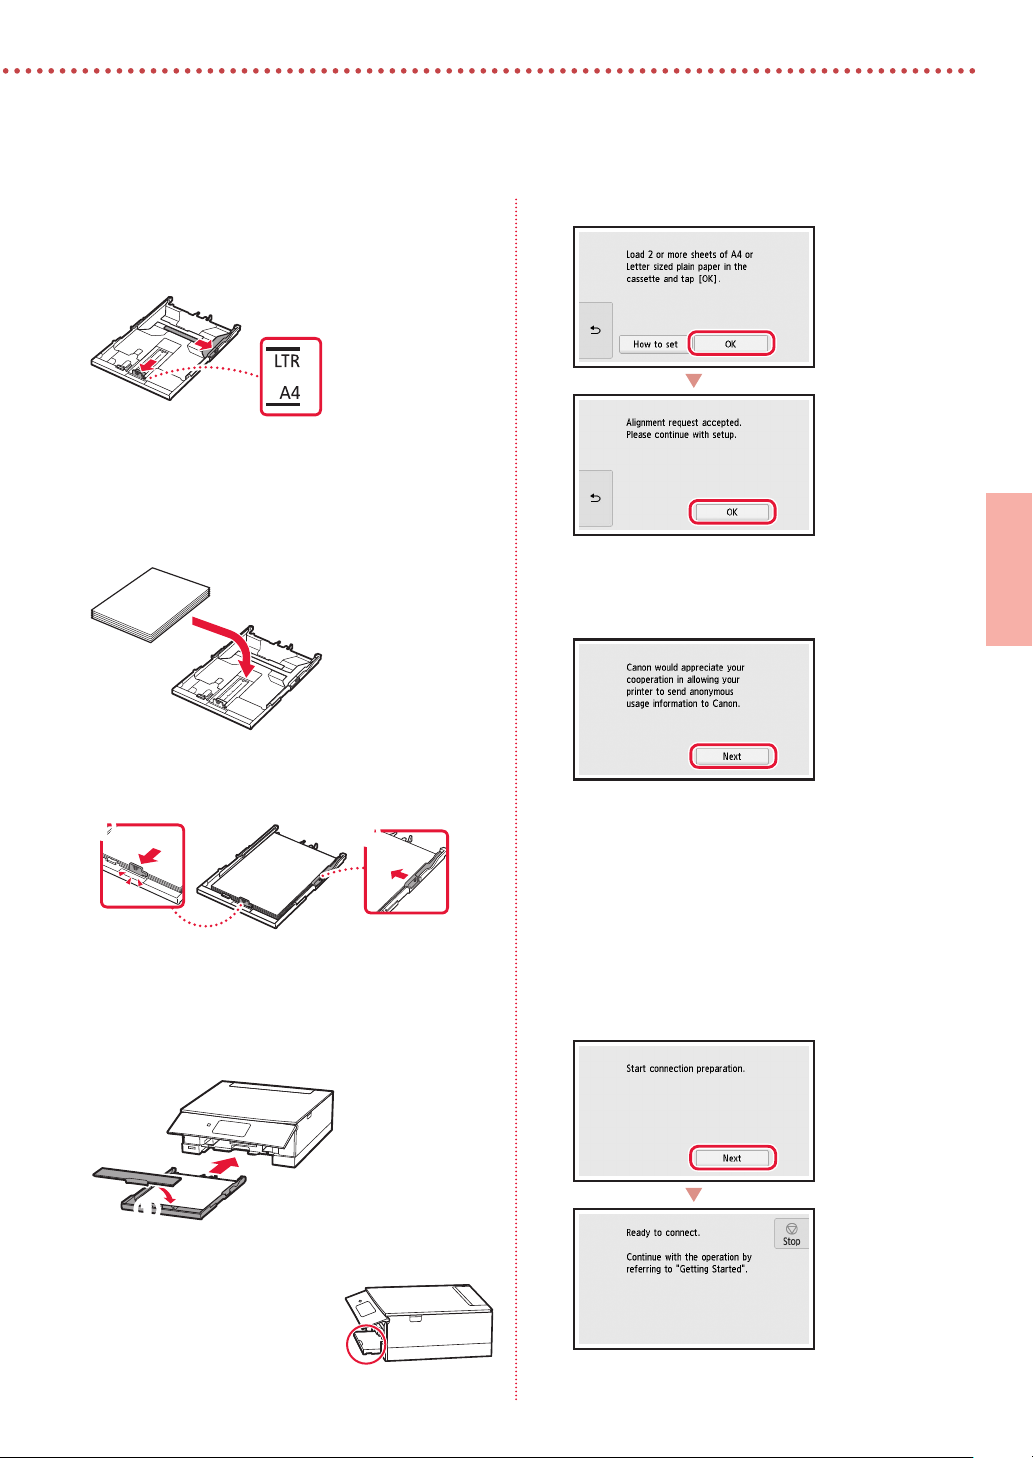
Pull the cassette out of the device and remove
2
the cassette cover.
Cassette cover
b
a
Slide apart the paper guides.
3
Slide the right paper guide to the right edge. Align
•
the front paper guide with the LTR or A4 mark.
Load paper.
4
Load plain LTR or A4 size paper with the print side
•
facing down.
Place the paper against the front paper guide, and
•
align the right paper guide to the width of the paper.
6
7
Tap OK.
ENGLISH
Tap Next.
a
Load the cassette.
5
Attach the cassette cover and put the cassette back
•
in.
b
a
Look at it from the side to conrm it looks like the
•
diagram.
b
Next, follow the onscreen instructions to continue
•
operations. During these operations, you will need
to make selections related to sending information.
Read "Sending Information To Canon" in Safety and
Important Information.
Tap Next.
8
3
Setting up the printer
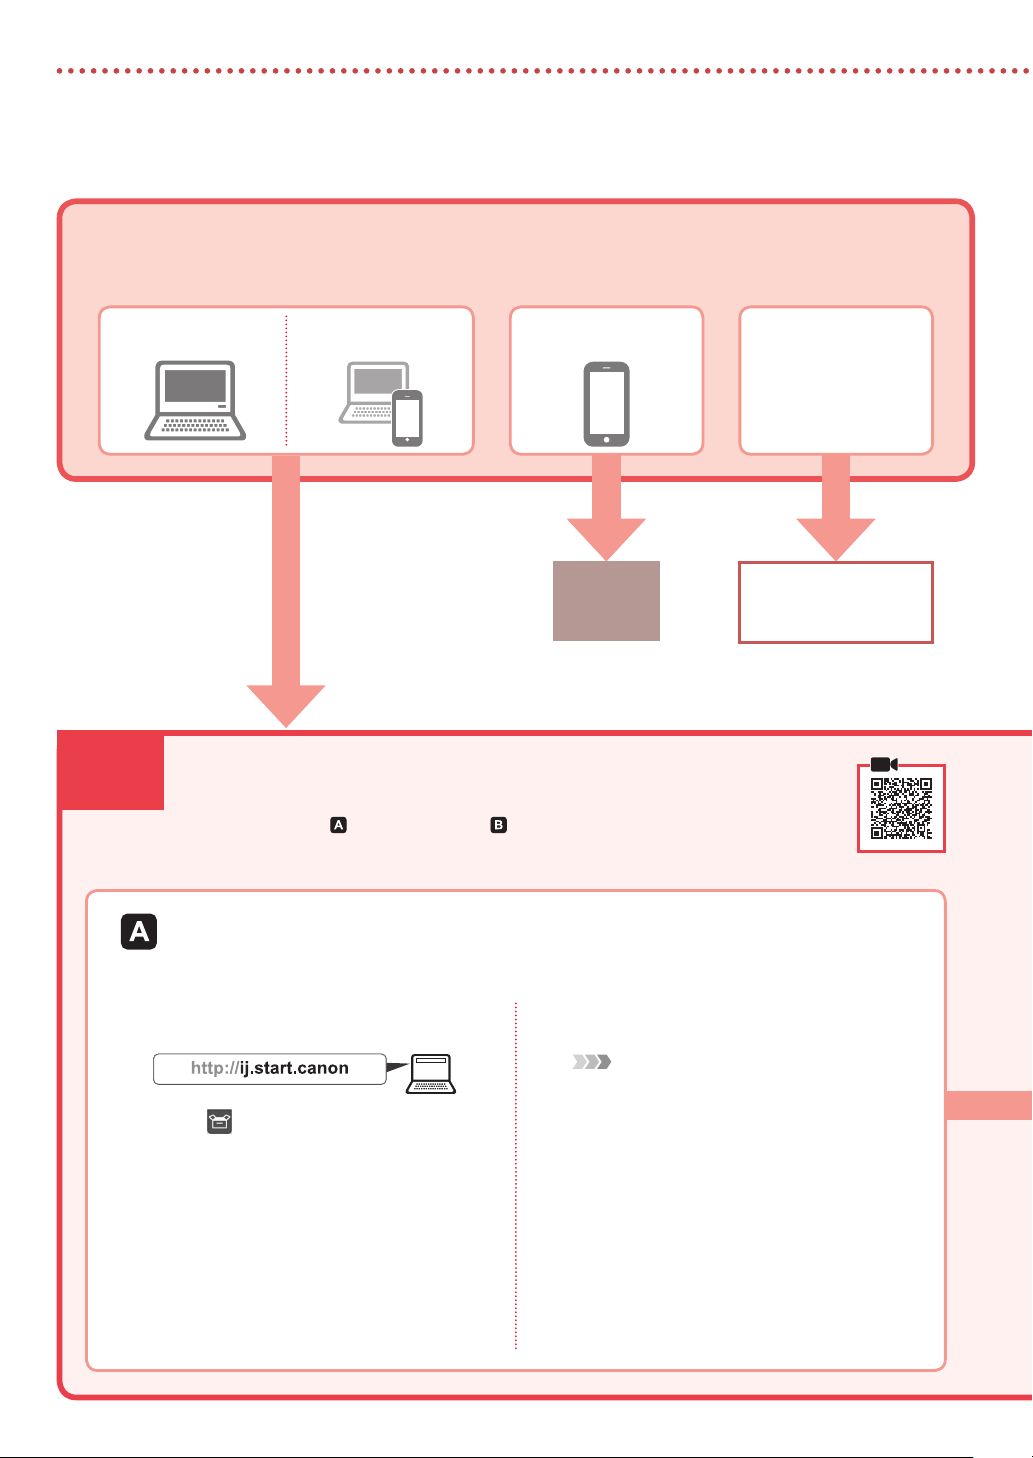
What device are you connecting?
Select a device and follow the relevant section.
6-a
Computer Computer and
smartphone
Connecting to a Computer
If you are using multiple computers, perform these steps on each computer. There are
two methods, " Online Setup" and " Using the Setup CD-ROM (Windows Only)
Provided".
Smartphone
6-b
page 6
No device
Tap the Stop button,
and then select Do not
connect > Yes, in this
order.
Online Setup
Access the Canon website from a
1
computer.
Select Set Up.
2
Enter your printer's model name and
3
click Go.
Click Start.
4
Click If you have already prepared
5
your printer, go to Connect.
Note
When you are using a computer with Windows
(except for Windows 10 S) or macOS, proceed to
the next step. When you are using a computer with
another OS, continue the setup by following the onscreen instructions.
Click Download.
6
The setup le is downloaded to your
•
computer.
Run the downloaded le.
7
Proceed to step 9 on page 5.
8
4
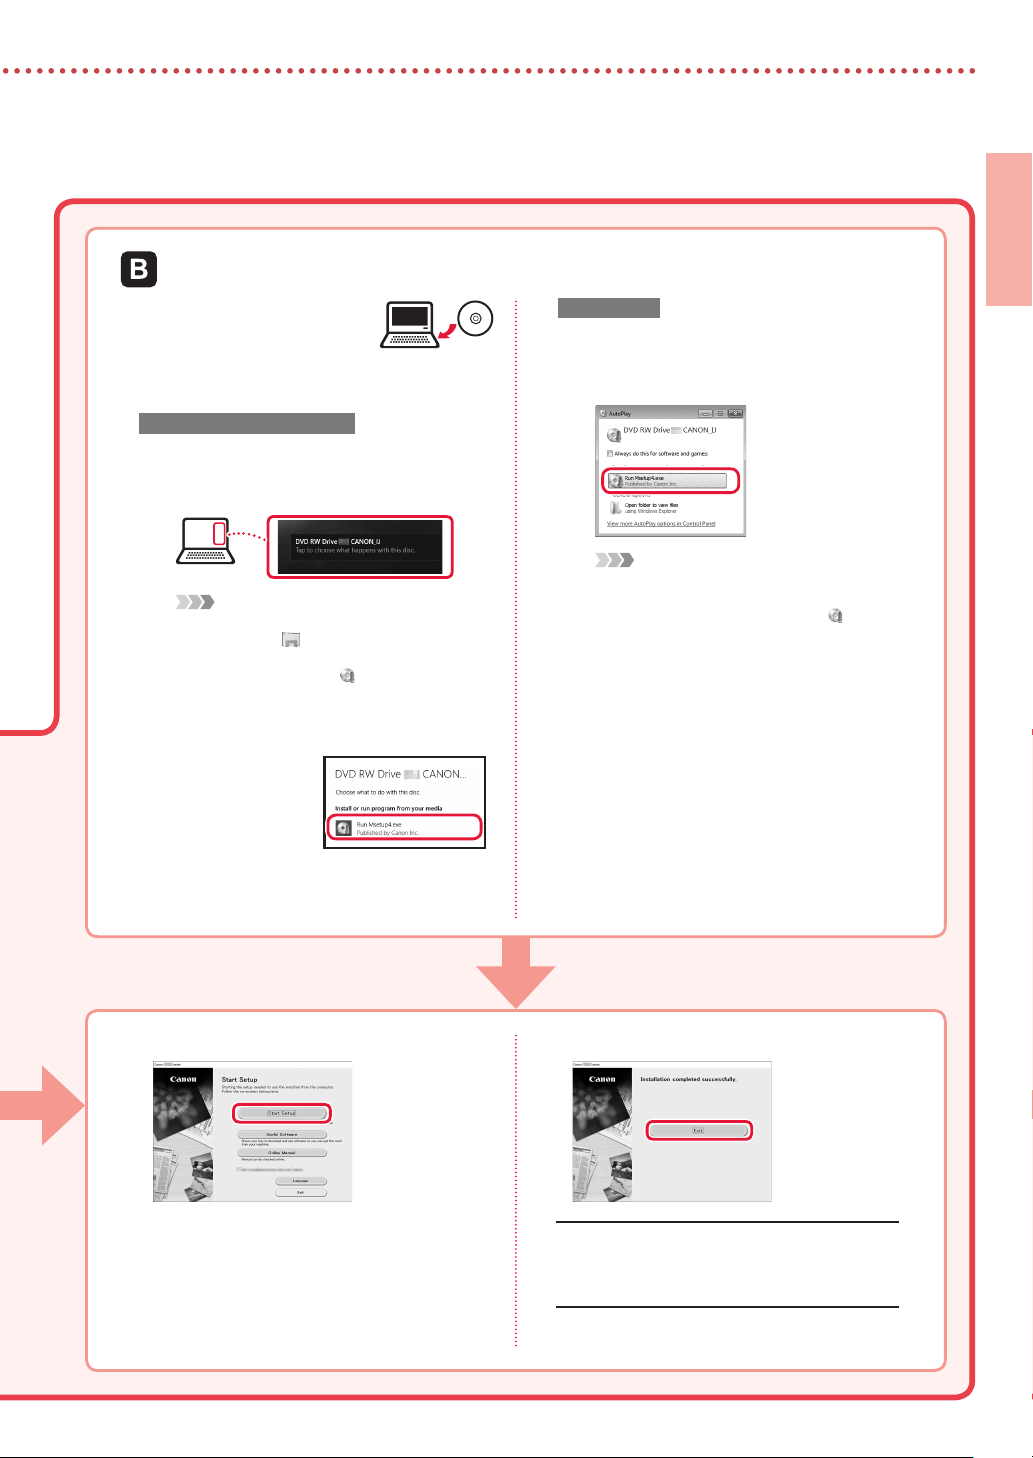
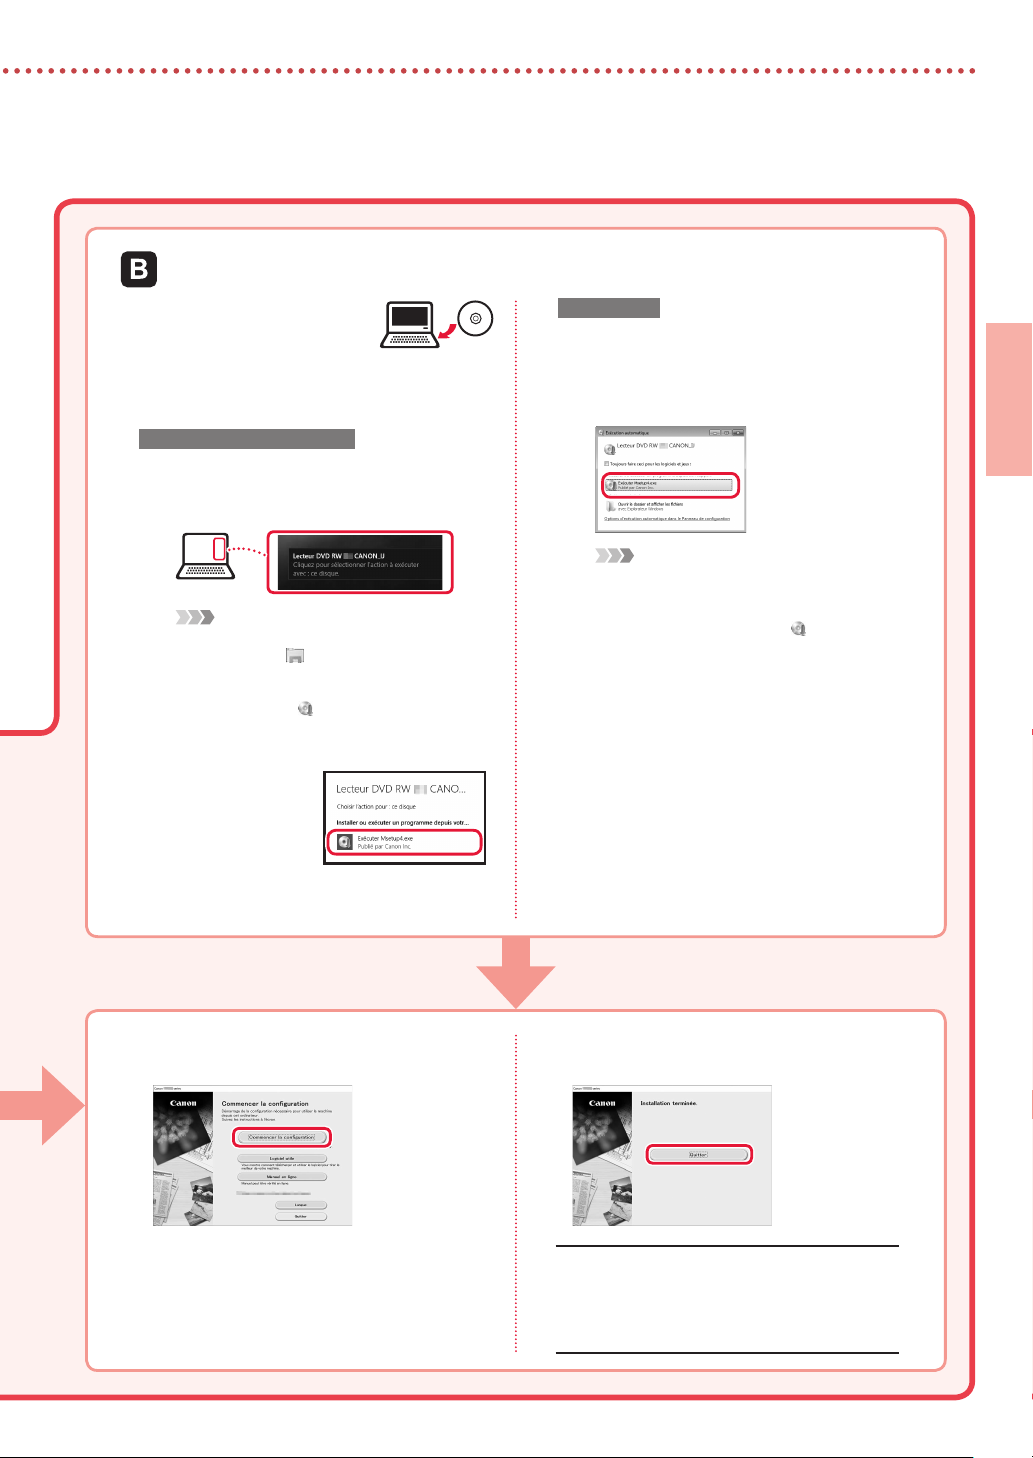
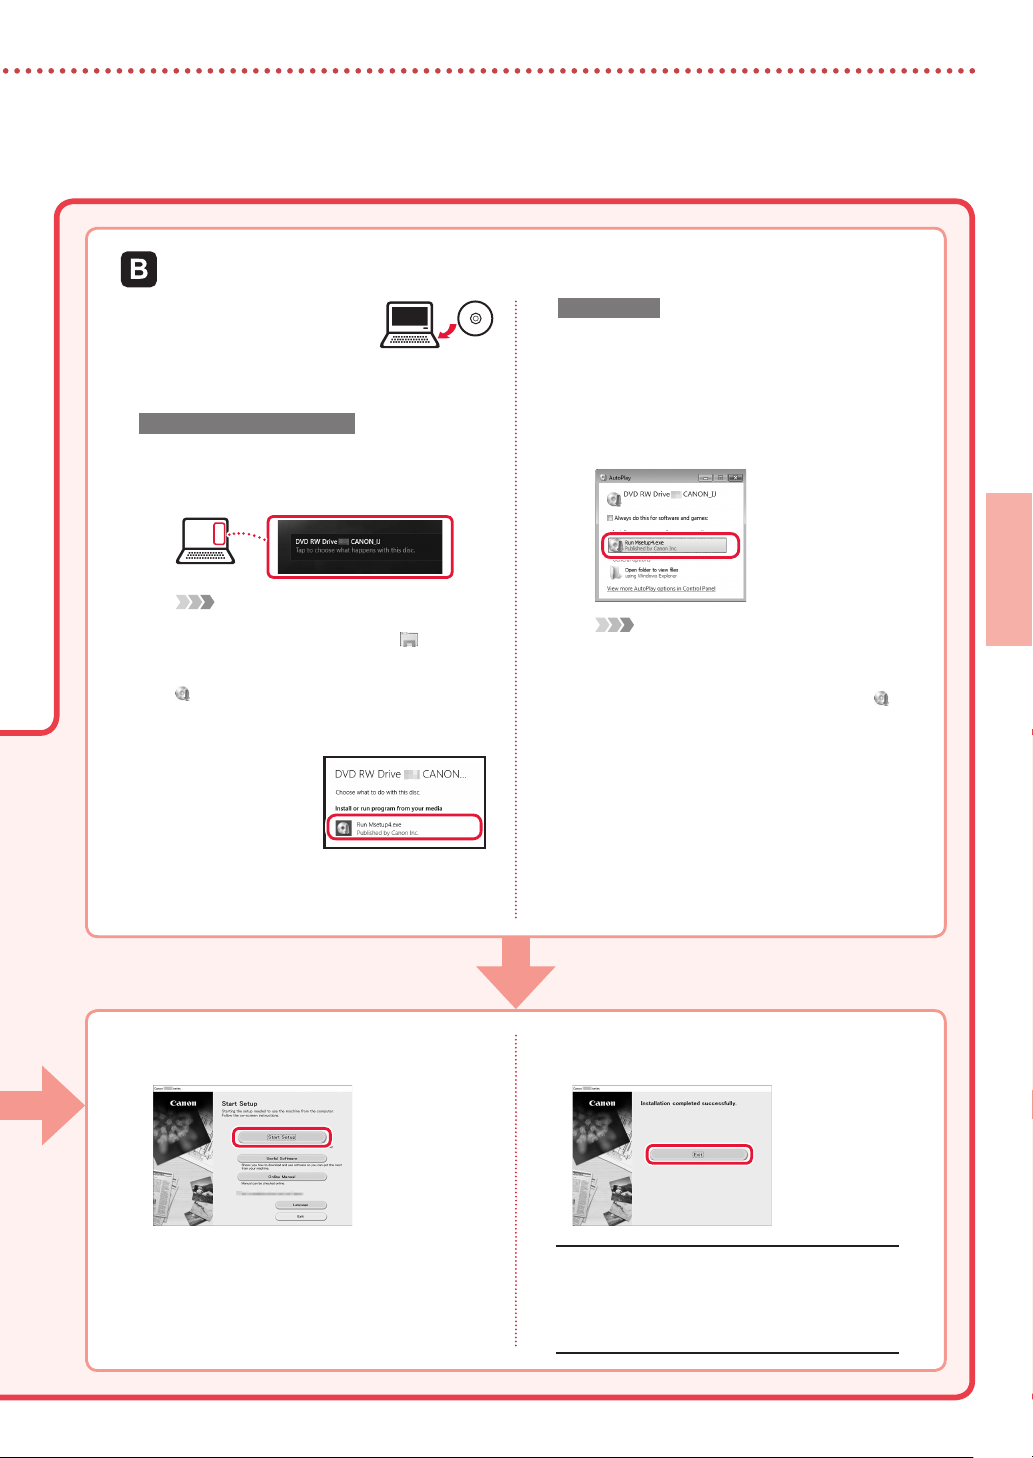
Using the Setup CD-ROM (Windows Only) Provided
ENGLISH
Insert the Setup CD-ROM
1
into your computer.
Follow the instructions for your version
2
of Windows.
Windows 10/Windows 8.1
aClick on the following message when it
appears on the right-hand side of your
computer screen.
Note
If the message does not appear (or is no longer
visible), click the
taskbar. On the left-hand side of the window, click
This PC. Double click the CD icon that is
displayed on the right-hand side (when the
content of the CD is displayed, and then double
click Msetup4.exe). Proceed to c.
bClick Run
Msetup4.exe.
cIf the User Account Control dialog box
appears, click Yes.
File Explorer icon in the
Windows 7
aClick Run Msetup4.exe.
When the AutoPlay screen appears, click
•
Run Msetup4.exe.
Note
If the AutoPlay screen does not appear, in the
Start menu, click Computer. On the right-hand
side of the window, double click the
(when the content of the CD is displayed, double
click Msetup4.exe).
bIf the User Account Control dialog box
appears, click Continue.
Proceed to step 9 below.
3
CD icon
Click Start Setup.
9
Follow the on-screen instructions.
10
These operations may take some time.
•
When the following screen appears, click Exit.
11
Your printer is now connected to your computer.
To connect a smartphone as well, see
Connecting to a Smartphone" on page 6.
"6-b.
5
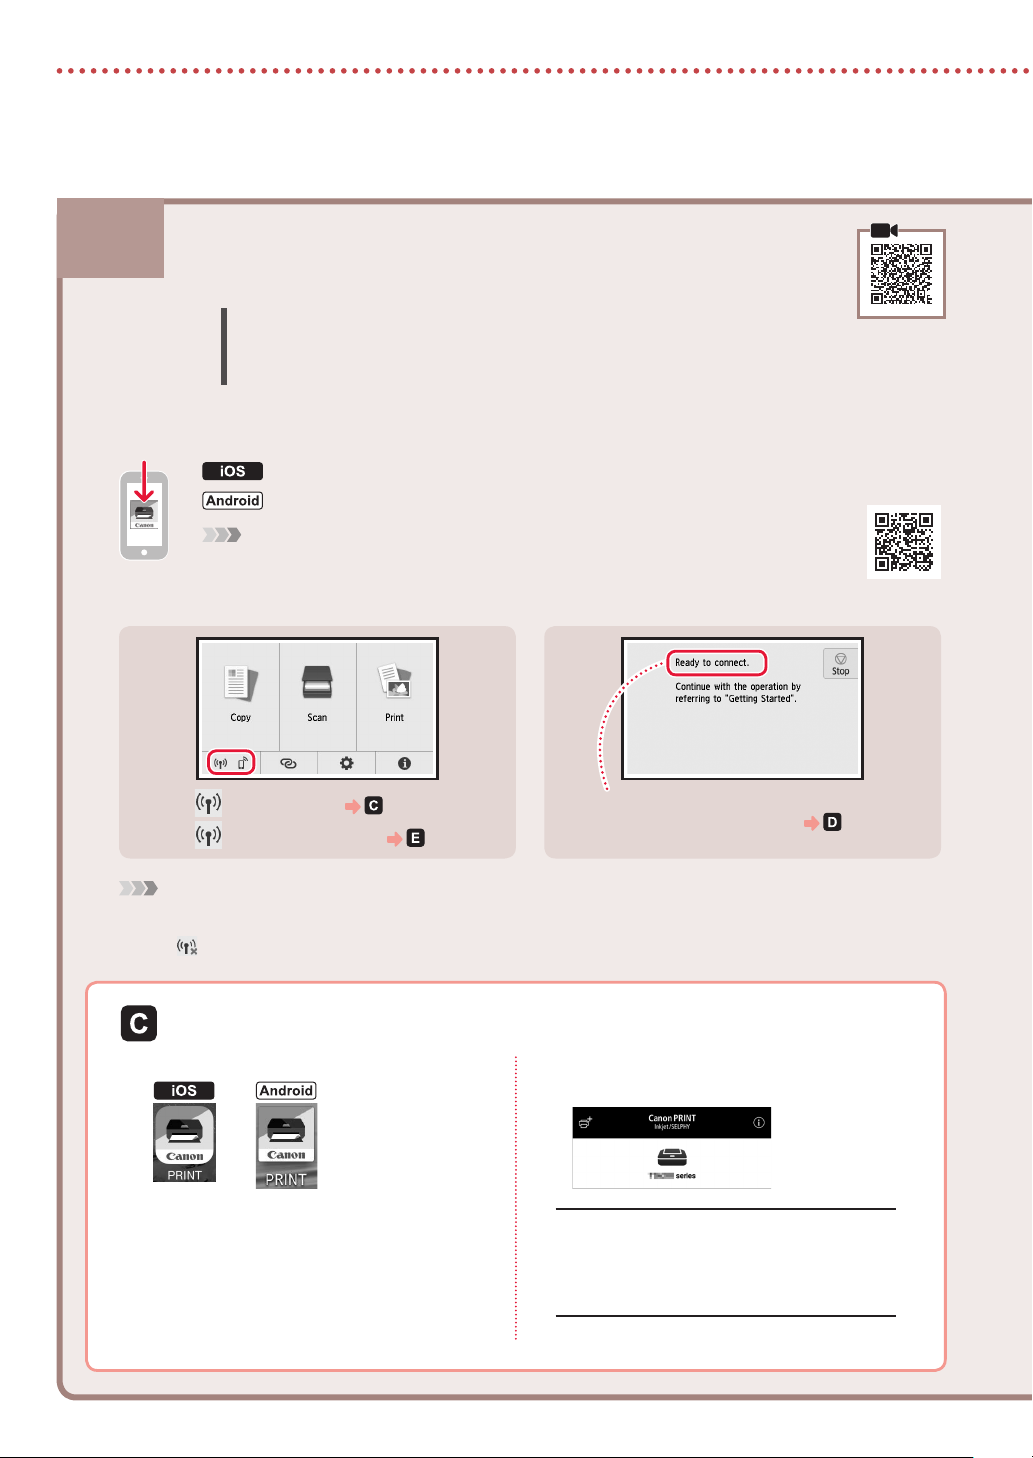
Setting up the printer
6-b
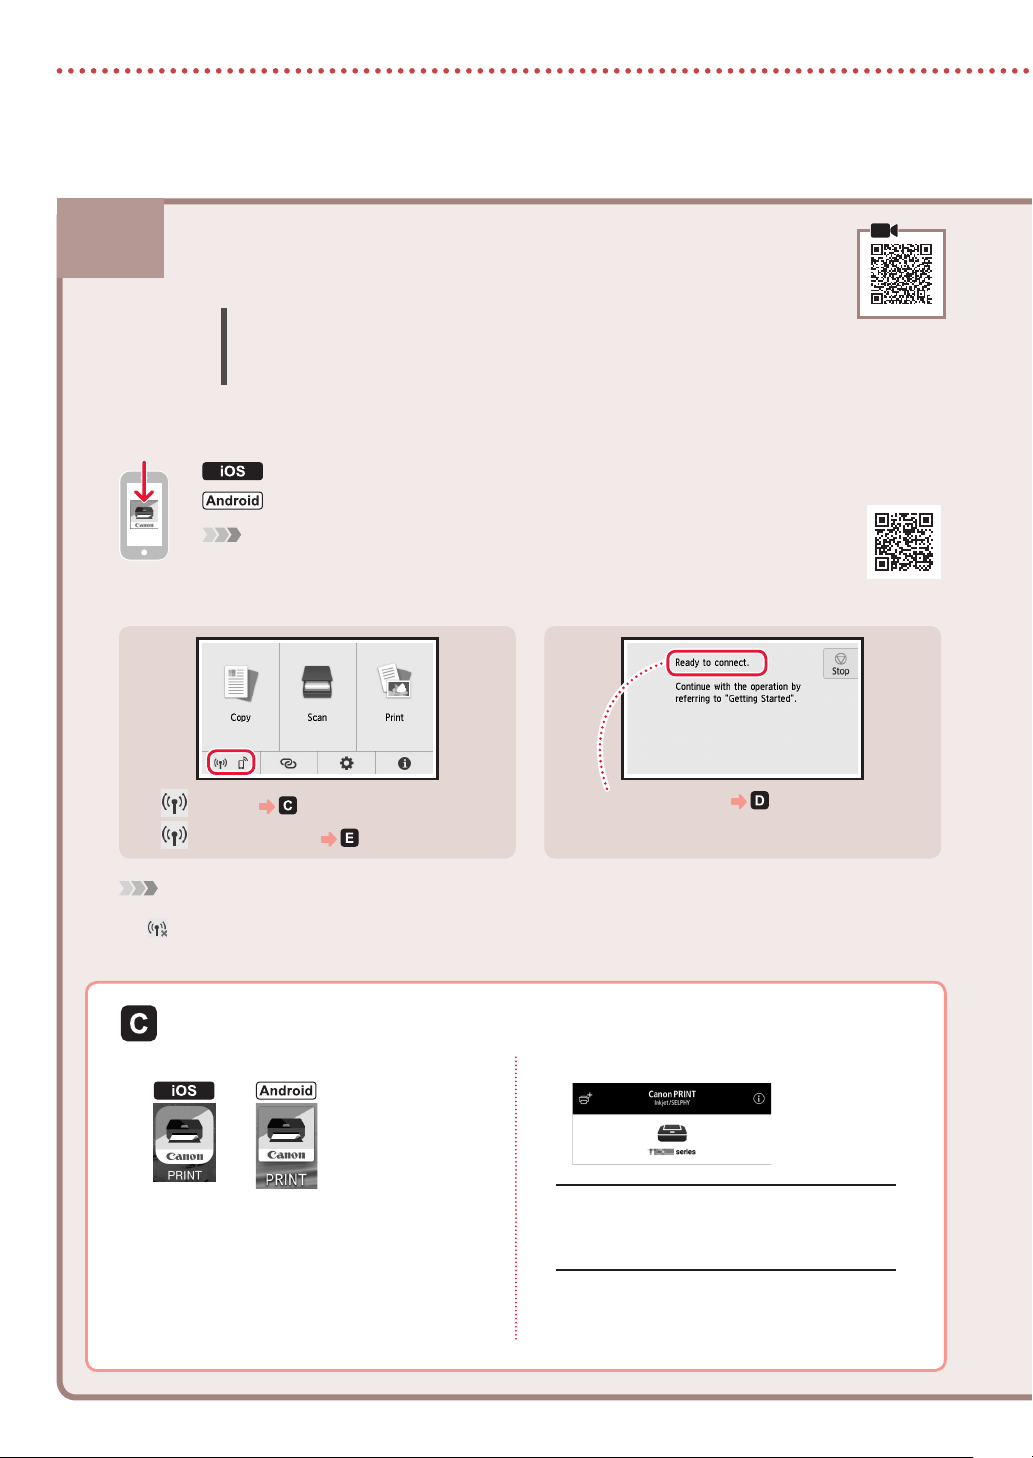
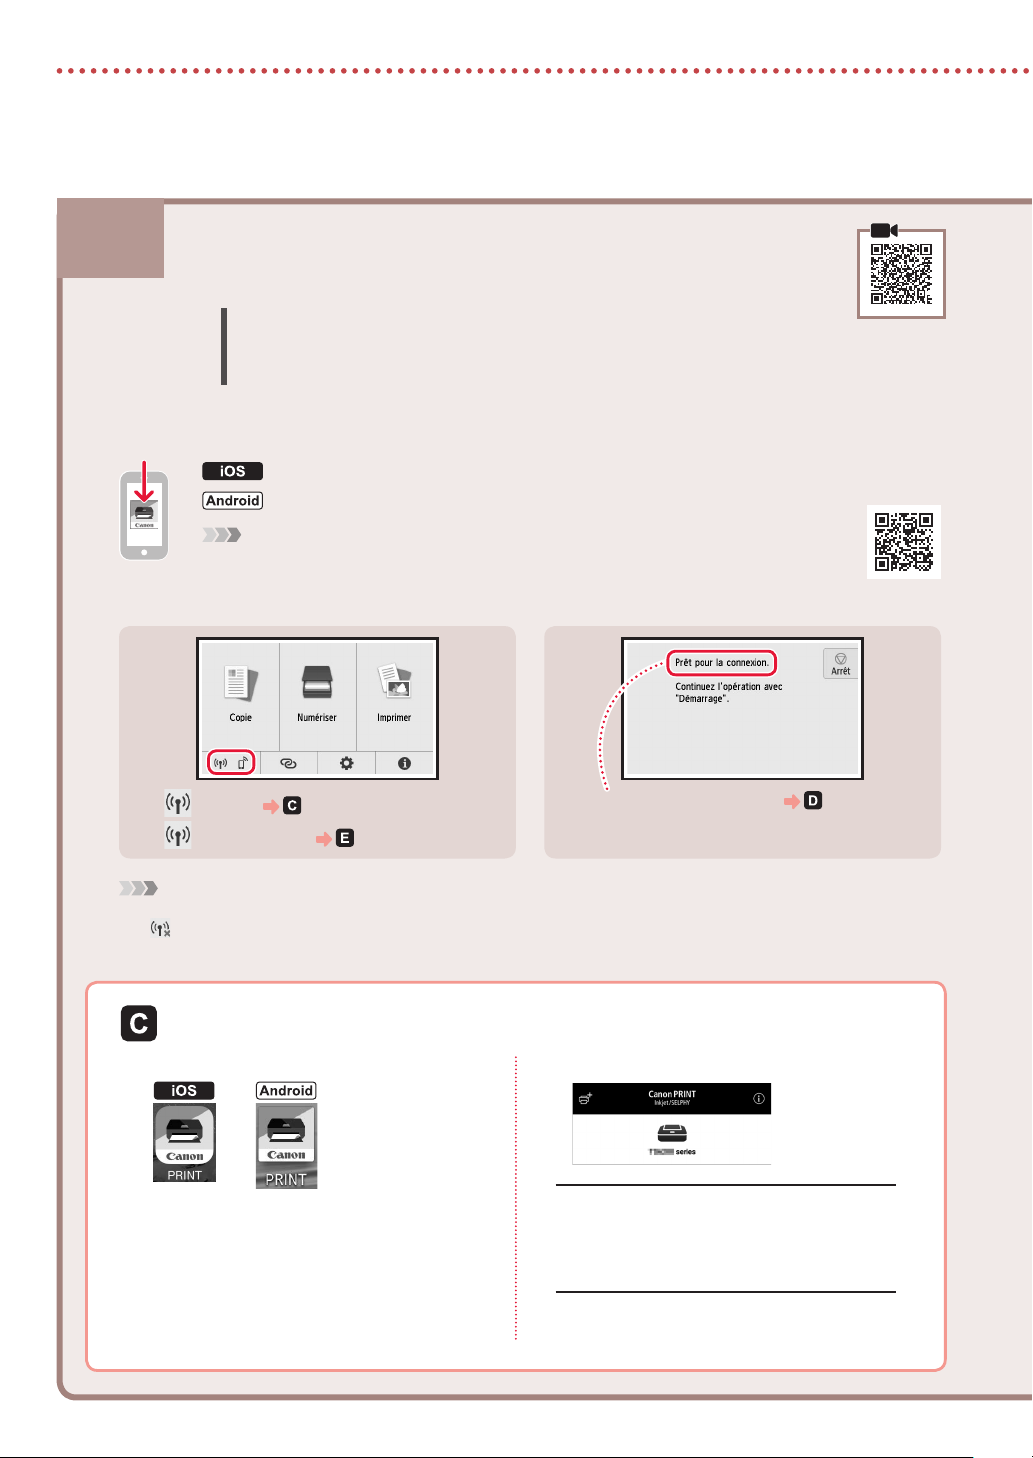
Install the "Canon PRINT Inkjet/SELPHY" app on your smartphone.
1
Check the printer's screen as you proceed through the steps.
2
If appears,
•
If does not appear,
•
Connecting to a Smartphone
If you are using multiple smartphones, perform these steps on each smartphone.
Prepare the following before starting.
a Enable the Wi-Fi setting on your smartphone*.
b Connect your smartphone to the wireless router* (if you have a wireless router).
* See your smartphone and wireless router manuals regarding these procedures for more details.
Search for "Canon PRINT" in the App Store.
Search for "Canon PRINT" in Google Play.
Note
You can also access the Canon website by scanning the QR code shown on the right to
download the app.
"Ready to connect."
•
Note
The printer's screen turns o when the printer is idle for 10 minutes. Tap the touch screen to turn on the screen.
•
If appears, The printer cannot communicate by Wi-Fi connection. For details, see "Frequently Asked Questions" at
•
"http://ij.start.canon".
Open the installed app.
3
Follow the on-screen instructions to add
4
your printer.
Check that the following screen appears.
5
Your printer is now connected to your
smartphone. To print photos, see "Loading
Photo Paper" on page 8.
6
Procedures vary for iOS and Android. Follow the instructions for your operating system.
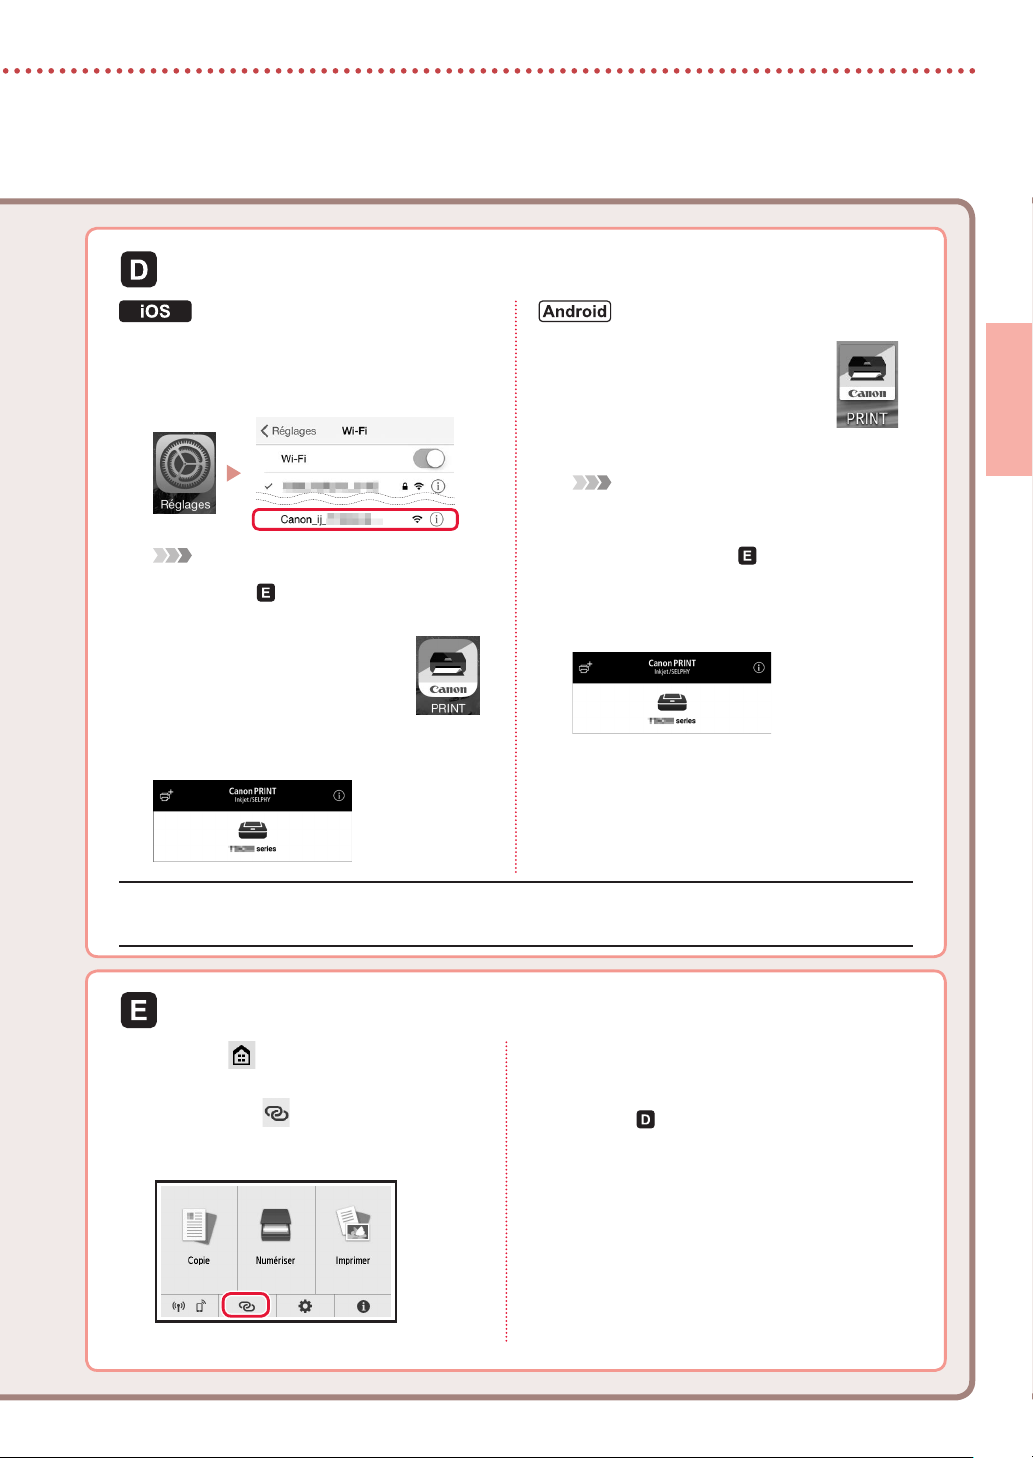
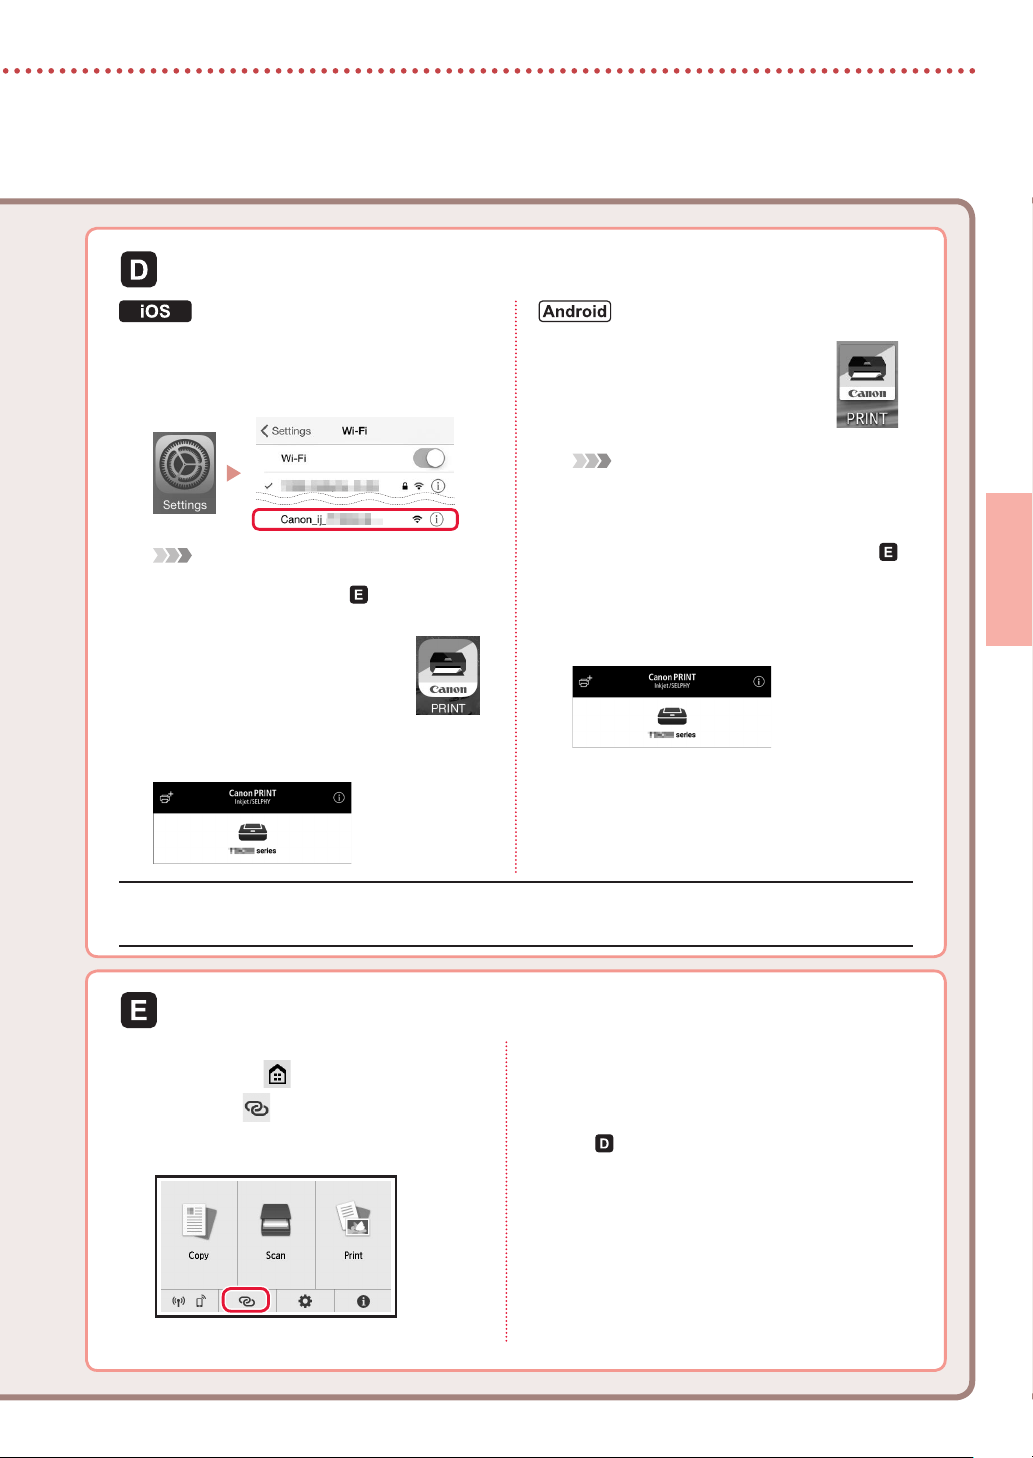
ENGLISH
Tap Settings on your smartphone's
3
home screen, and tap Canon_ij_XXXX
in the Wi-Fi settings.
Note
If Canon_ij_XXXX does not appear, follow the
procedure in
XXXX again.
Open the installed app.
4
The printer is registered with the
•
most appropriate connection
method for the environment
you are using.
Check that the following screen appears.
5
Your printer is now connected to your smartphone. To print photos, see "Loading Photo Paper" on page 8.
, and then search for Canon_ij_
Open the installed app.
3
The printer is registered with the
•
most appropriate connection
method for the environment
you are using.
Note
If a message saying "No printer has been added.
Perform printer setup?" does not readily appear
after starting the application, follow the procedure in
, and then return to smartphone operations.
Check that the following screen appears.
4
Tap on the printer's touch screen.
3
Press and hold the on the HOME
4
screen for about 3 seconds.
When "Follow the instructions on
5
the computer or smartphone, etc.
to perform the operation." appears,
proceed to .
7

Loading Photo Paper
Photo paper can only be loaded in the rear tray.
Open the rear tray cover and extend the paper
1
support.
Open the feed slot cover and slide the right-
2
hand side paper guide to the far right.
Load several sheets of photo paper with the
3
print side facing up and slide the side paper
guide against the edge of the paper stack.
a
b
Close the feed slot cover.
4
Follow the on-screen instructions to set information
•
for the loaded paper.
Printing Photos Saved on a Memory Card
Turn on the printer.
1
Load several sheets of photo paper.
2
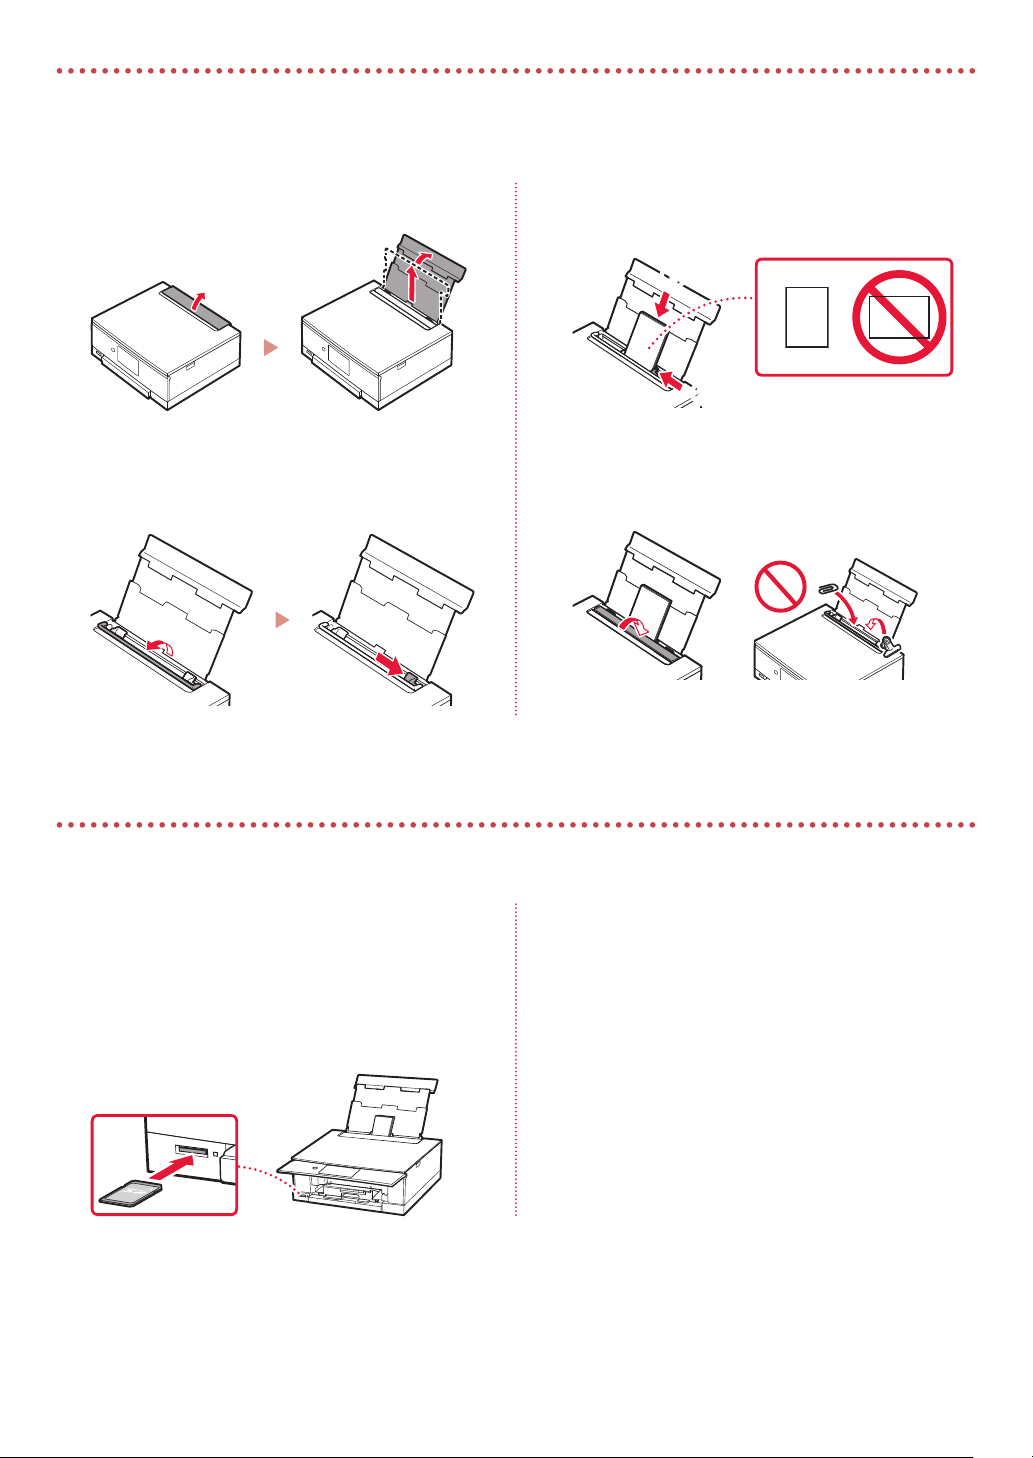
Insert the memory card into the card slot.
3
8
4
5
Flick right and left through the photos and
select one.
Tap the Color button to start printing.
Conguration de l'imprimante
Conguration Web
1. Contenu de la boîte
Cordon d'alimentation
•
CD-ROM d'installation
•
2. Retrait des matériaux
d'emballage
Important
Lorsque l'impression démarre, le panneau de contrôle s'ouvre et le
bac de sortie papier sort automatiquement. Ne placez aucun objet
devant l'imprimante.
C
artouches d'encre pour la conguration
•
Sécurité et informations importantes
•
Démarrage (ce manuel)
•
3. Mise sous tension de
l'imprimante
Branchez le cordon d'alimentation.
1
Arrière
Important
À ce stade, ne branchez aucun autre câble.
Ouvrez le panneau de contrôle et appuyez sur le
2
bouton MARCHE (ON).
b
a
Faites glisser et touchez pour sélectionner votre
3
langue, puis touchez OK.
FRANÇAIS
Retirez et jetez les matériaux d'emballage du
1
périphérique.
Faire fonctionner l'imprimante lorsque la bande
•
orange et le lm protecteur sont encore en place peut
entraîner des dysfonctionnements. Veillez à les retirer.
Ouvrez l'unité de numérisation / capot et retirez
2
la bande orange.
a
b
Fermez l'unité de numérisation / capot.
3
Soulevez brièvement l'unité de numérisation / capot,
•
puis fermez-la.
a
b
Attention
Surveillez vos doigts.
4. Installation des cartouches
d'encre
Ouvrez l'unité de numérisation / capot.
1
Attention
Évitez tout contact avec le support de tête d'impression
tant que celui-ci n'est pas arrêté.
1

Conguration de l'imprimante
Retirez la bande et le lm sur les cartouches d'encre.
2
b
Vériez qu'il ne reste aucune bande.
•
Retirez doucement le capuchon orange.
3
Important
Ne poussez pas sur les deux côtés de
•
la cartouche d'encre alors que le trou
d'aération en forme de Y est bloqué.
Ne touchez pas les zones rouges
•
présentées dans la gure.
a
Répétez les étapes2 à5 pour installer toutes les
6
cartouches d'encre.
Assurez-vous que toutes les couleurs s'achent.
•
Fermez l'unité de numérisation / capot.
7
Lorsque vous fermez l'unité de numérisation / capot,
•
les opérations internes commencent.
a
b
Attention
Surveillez vos doigts.
5. Chargement du papier
Installez les cartouches d'encre.
4
I
nsérez la cartouche d'encre dans le support de tête d'impression
•
et appuyez dessus jusqu'à ce qu'un clic se produise.
Vériez que la couleur de la cartouche d'encre
5
que vous avez installée s'ache à l'écran.
Important
Si la couleur ne s'ache pas à l'écran alors que vous avez installé la
cartouche d'encre, la couleur de la cartouche d'encre est peut-être
fausse, ou vous avez peut-être installé une cartouche d'encre non prise
en charge par l'imprimante, par exemple une cartouche avec un numéro
de modèle diérent. Installez une cartouche d'encre de la bonne couleur
ou utilisez la cartouche d'encre fournie pour la conguration.
2
Vériez!
Retirez la totalité de la bande
orange.
Touchez OK.
1
Tirez la cassette hors du périphérique et retirez
2
le couvercle de la cassette.
Couvercle de la cassette
b
a

Faites glisser séparément les guides papier.
3
Faites glisser le guide papier droit vers le bord droit.
•
Alignez le guide papier avant sur la marque LTR ou A4.
Chargez du papier.
4
Chargez du papier ordinaire au format LTR ou A4 face
•
à imprimer vers le bas.
Placez le papier contre le guide papier avant et
•
alignez le guide papier droit sur la largeur du papier.
Touchez OK.
6
Touchez Suivant.
7
FRANÇAIS
a
Chargez la cassette.
5
Attachez le couvercle de la cassette et remettez la
•
cassette en place.
b
a
Observez-la depuis le côté pour conrmer qu'elle se
•
présente comme dans le diagramme.
b
Ensuite, suivez les instructions à l'écran pour
•
poursuivre les opérations. Au cours de ces opérations,
vous devrez procéder à des sélections relatives à
l'envoi d'informations. Lisez «Envoi d'informations
à Canon» dans Sécurité et informations
importantes.
Touchez Suivant.
8
3
Conguration de l'imprimante
Quel périphérique connectez-vous?
Sélectionnez un périphérique et reportez-vous à la section appropriée.
6-a
Ordinateur Ordinateur et
smartphone
Connexion à un ordinateur
Si vous utilisez plusieurs ordinateurs, eectuez ces étapes sur chaque ordinateur. Deux
méthodes sont possibles: « Conguration en ligne» et « Utilisation du CD-ROM
d'installation (Windows uniquement) fourni».
Smartphone
6-b
page 6
Aucun périphérique
Touchez le bouton Arrêt
(Stop), puis sélectionnez
Ne pas connecter > Oui,
dans cet ordre.
Conguration en ligne
Accès au site Web Canon à partir d'un
1
ordinateur.
Sélectionnez Conguration.
2
Entrez le nom de modèle de votre
3
imprimante et cliquez sur Accéder.
Cliquez sur Démarrer.
4
Cliquez sur Si vous avez déjà préparé
5
votre imprimante, allez à Connecter.
Remarque
Lorsque vous utilisez un ordinateur équipé de
Windows (à l'exception de Windows 10 S) ou de
macOS, passez à l'étape suivante. Lorsque vous
utilisez un ordinateur équipé d'un autre système
d'exploitation, poursuivez la conguration en
fonction des instructions qui s'achent à l'écran.
Cliquez sur Télécharger.
6
Le chier de conguration est téléchargé
•
survotre ordinateur.
Exécutez le chier téléchargé.
7
Passez à l'étape9, page 5.
8
4
Utilisation du CD-ROM d'installation (Windows uniquement) fourni
Insérez le CD-ROM
1
d'installation dans
l'ordinateur.
Suivez les instructions correspondant
2
àvotre version de Windows.
Windows 10/Windows 8.1
aCliquez sur le message suivant lorsqu'il
apparaît sur la droite de l'écran de
l'ordinateur.
Remarque
Si le message n'apparaît pas (ou n'est plus visible),
cliquez sur l'icône
la barre des tâches. Dans la partie gauche de la
fenêtre, cliquez sur Ce PC. Double-cliquez sur l'icône
représentant un CD q
droite (lorsque le contenu du CD s'ache, doublecliquez sur Msetup4.exe). Passez à l'étape
bCliquez sur
Exécuter
Msetup4.exe.
cSi la boîte de dialogue Contrôle de compte
d'utilisateur apparaît, cliquez sur Oui.
Explorateur de chiers dans
ui apparaît dans la partie
c.
Windows 7
aCliquez sur Exécuter Msetup4.exe.
Lorsque l'écran Lecture automatique
•
apparaît, cliquez sur Exécuter
Msetup4.exe.
Remarque
Si l'écran Lecture automatique n'apparaît pas,
cliquez sur Ordinateur dans le menu Démarrer.
Dans la partie droite de la fenêtre, double-cliquez
sur l'icône représentant un CD
contenu du CD s'ache, double-cliquez sur
Msetup4.exe).
bSi la boîte de dialogue Contrôle de
compte d'utilisateur apparaît, cliquez
surContinuer.
Passez à l'étape9 ci-dessous.
3
FRANÇAIS
(lorsque le
Cliquez sur Commencer la
9
conguration.
Suivez les instructions à l'écran.
10
Ces opérations peuvent prendre du temps.
•
Lorsque l'écran suivant s'ache, cliquez
11
sur Quitter.
Votre imprimante est désormais connectée
à votre ordinateur. Pour connecter aussi un
smartphone, reportez-vous à la section
Connexion à un smartphone»à la page 6.
«6-b.
5
Conguration de l'imprimante
6-b
Installez l'application «Canon PRINT Inkjet/SELPHY» sur votre smartphone.
1
Vériez l'écran de l'imprimante à mesure que vous eectuez ces étapes.
2
Si s'ache,
•
Si ne s'ache pas,
•
Connexion à un smartphone
Si vous utilisez plusieurs smartphones, eectuez ces étapes sur chaque smartphone.
Préparez les éléments suivants avant de démarrer.
a Activez le paramètre Wi-Fi sur votre smartphone*.
b Connectez votre smartphone au routeur sans l* (si vous disposez d'un routeur sans l).
* Pour plus de détails sur ces procédures, reportez-vous aux manuels de votre smartphone et de votre
routeur sans l.
Recherchez «Canon PRINT» dans l'App Store.
Recherchez «Canon PRINT» dans Google Play.
Remarque
Vous pouvez également accéder au site Web Canon en numérisant le code QR sur la droite
pour télécharger l'application.
« Prêt pour la connexion. »
•
Remarque
L'écran de l'imprimante s'éteint si celle-ci est inactive pendant 10minutes. Touchez l'écran tactile pour activer l'écran.
•
Si apparaît, l'imprimante ne peut pas communiquer via une connexion Wi-Fi. Pour plus de détails, reportez-vous à la
•
section «Foire aux questions» sur «http://ij.start.canon».
Ouvrez l'application installée.
3
Suivez les instructions à l'écran pour
4
ajouter votre imprimante.
Assurez-vous que l'écran suivant s'ache.
5
Votre imprimante est désormais connectée à
votre smartphone. Pour imprimer des photos,
reportez-vous à la section «Chargement de
papier photoȈ la page 8.
6
Les procédures varient pour iOS et Android. Suivez les instructions correspondant à votre système d'exploitation.
Touchez Réglages sur l'écran
3
d'accueil du smartphone, puis touchez
Canon_ij_XXXX dans les réglages Wi-Fi.
Remarque
Si Canon_ij_XXXX n'apparaît pas, suivez
la procédure de
Canon_ij_XXXX de nouveau.
Ouvrez l'application installée.
4
L'imprimante est enregistrée avec
•
la méthode de connexion la plus
appropriée à l'environnement
que vous utilisez.
Assurez-vous que l'écran suivant s'ache.
5
Votre imprimante est désormais connectée à votre smartphone. Pour imprimer des photos, reportez-vous à la
section «Chargement de papier photo»à la page 8.
, puis recherchez
Ouvrez l'application installée.
3
L'imprimante est enregistrée
•
avec la méthode de
connexion la plus appropriée
à l'environnement que vous
utilisez.
Remarque
Si le message «Aucune imprimante n'a été
ajoutée. Congurer l'imprimante ?» ne s'ache
pas après le démarrage de l'application, suivez
la procédure décrite dans
opérations sur le smartphone.
Assurez-vous que l'écran suivant
4
s'ache.
, puis revenez aux
FRANÇAIS
Touchez sur l'écran tactile de
3
l'imprimante.
Appuyez sur à partir de l'écran
4
ACCUEIL et maintenez-le enfoncé
pendant environ 3secondes.
Lorsque « Suivez les instructions
5
surl’ordinateur, le smartphone, etc.
pour eectuer l’opération. » s’ache,
passez à .
7
Chargement de papier photo
Le papier photo peut être chargé uniquement dans le réceptacle arrière.
Ouvrez le couvercle du réceptacle arrière et
1
déployez le support papier.
Ouvrez le couvercle de la fente d'alimentation et
2
faites glisser le guide papier droit vers l'extrême
droite.
Chargez plusieurs feuilles de papier photo face
3
à imprimer vers le haut et faites glisser le guide
papier latéral contre le bord de la pile de papier.
a
b
Fermez le couvercle de la fente d'alimentation.
4
Suivez les instructions à l'écran pour dénir les
•
informations sur le papier chargé.
Impression de photos enregistrées sur une carte mémoire
Mettez l'imprimante sous tension.
1
Chargez plusieurs feuilles de papier photo.
2
Insérez la carte mémoire dans l'emplacement
3
decarte.
8
Faites déler les photos vers la droite ou vers la
4
gauche et sélectionnez-en une.
Touchez le bouton Couleur (Color) pour lancer
5
l'impression.
Einrichten des Druckers
Web-Einrichtung
1. Inhalt der Box
Netzkabel
•
Installations-CD-ROM
•
2. Entfernen des
Verpackungsmaterials
Wichtig
Wenn der Druckvorgang beginnt, wird das Bedienfeld geönet
und das Papierausgabefach fährt automatisch aus. Legen Sie keine
Gegenstände vor dem Drucker ab.
Tintenbehälter für die Einrichtung
•
Sicherheitsinformationen und
•
wichtige Hinweise
Inbetriebnahme (dieses Handbuch)
•
3. Einschalten des Druckers
Schließen Sie das Netzkabel an.
1
Rückseite
Wichtig
Schließen Sie zum jetzigen Zeitpunkt keine weiteren Kabel an.
Önen Sie das Bedienfeld und drücken Sie auf
2
die Taste EIN (ON).
b
a
Um eine Sprache auszuwählen, scrollen Sie zu
3
der gewünschten Sprache, tippen Sie darauf
und tippen Sie dann auf OK.
DEUTSCH
Entfernen Sie das Verpackungsmaterial vom
1
Gerät und entsorgen Sie es.
W
ird der Drucker bedient, wenn sich das orangefarbene
•
Klebeband und die Schutzfolie noch daran benden, kommt es
zu Fehlfunktionen. Stellen Sie sicher, dass Sie beides entfernen.
Önen Sie das Scan-Modul/die Abdeckung und
2
entfernen Sie das orangefarbene Klebeband.
a
b
Schließen Sie Scan-Modul/Abdeckung.
3
Heben Sie das Scan-Modul/die Abdeckung kurz an
•
und schließen Sie es/sie dann.
a
b
Vorsicht
Passen Sie auf Ihre Finger auf.
4. Installation der
Tintenbehälter
Önen Sie das Scan-Modul/die Abdeckung.
1
Vorsicht
Berühren Sie den Druckkopfhalter nicht, solange er sich
bewegt.
1
Einrichten des Druckers
E
ntfernen Sie das Klebeband und die Folie auf den Tintenbehältern.
2
b
Ü
berprüfen Sie, ob das gesamte Klebeband entfernt wurde.
•
Nehmen Sie die orangefarbene Kappe langsam ab.
3
a
Wiederholen Sie die Schritte 2 bis 5, um alle
6
Tintenbehälter einzusetzen.
Stellen Sie sicher, dass alle Farben angezeigt werden.
•
Schließen Sie Scan-Modul/Abdeckung.
7
Wenn Sie das Scan-Modul/die Abdeckung schließen,
•
werden die internen Vorgänge gestartet.
Wichtig
Üben Sie keinen Druck auf die Seiten
•
desTintenbehälters aus, wenn das
Y-förmige Loch blockiert ist.
Berühren Sie nicht die in der Abbildung
•
rot dargestellten Bereiche.
Setzen Sie die Tintenbehälter ein.
4
Setzen Sie den Tintenbehälter in den Druckkopf ein
•
und drücken Sie ihn von oben, bis er einrastet.
S
tellen Sie sicher, dass die Farbe des eingesetzten
5
Tintenbehälters auf dem Bildschirm angezeigt wird.
a
b
5. Einlegen von Papier
Überprüfen!
Wenn orangefarbenes Klebeband
zu nden ist, entfernen Sie dieses.
Tippen Sie auf OK.
1
Vorsicht
Passen Sie auf Ihre Finger auf.
Wichtig
Wenn die Farbe nicht auf dem Bildschirm angezeigt wird, obwohl Sie den
Tintenbehälter eingesetzt haben, ist die Farbe des Tintenbehälters möglicherweise
falsch oder Sie haben beispielsweise einen Tintenbehälter mit einer anderen
Modellnummer eingesetzt, der von diesem Drucker nicht unterstützt wird. Setzen
Sie entweder einen Tintenbehälter der richtigen Farbe ein oder verwenden Sie
den im Lieferumfang enthaltenen Tintenbehälter für die Einrichtung.
2
Ziehen Sie die Kassette aus dem Gerät und
2
entfernen Sie die Kassettenabdeckung.
Kassettenabdeckung
b
a
Schieben Sie die Papierführungen auseinander.
3
Schieben Sie die rechte Papierführung an die rechte
•
Kante. Richten Sie die vordere Papierführung an der
Markierung für LTR oder A4 aus.
Legen Sie Papier ein.
4
Legen Sie Normalpapier des Formats LTR oder A4 mit
•
der bedruckbaren Seite nach unten ein.
Schieben Sie das Papier gegen die vordere
•
Papierführung und richten Sie die rechte
Papierführung an der Breite des Papiers aus.
a
b
Tippen Sie auf OK.
6
Tippen Sie auf Weiter (Next).
7
Befolgen Sie anschließend die Anweisungen auf
•
dem Bildschirm, um den Vorgang fortzusetzen.
Während dieses Vorgangs müssen Sie Auswahlen im
Zusammenhang mit dem Senden von Informationen
treen. Lesen Sie „Information an Canon senden”
unter Sicherheitsinformationen und wichtige
Hinweise.
DEUTSCH
Legen Sie die Kassette ein.
5
Bringen Sie die Kassettenabdeckung an und setzen
•
Sie die Kassette wieder ein.
b
a
Sehen Sie es sich von der Seite an und stellen Sie
•
sicher, dass es der Abbildung entspricht.
Tippen Sie auf Weiter (Next).
8
3
Einrichten des Druckers
Mit welchem Gerät stellen Sie eine Verbindung her?
Wählen Sie ein Gerät aus und befolgen Sie die Anweisungen im entsprechenden Abschnitt.
6-a
Computer Computer und
Smartphone
Herstellen einer Verbindung mit einem Computer
Wenn Sie mehrere Computer verwenden, führen Sie diese Schritte auf jedem
Computer aus. Es gibt zwei Methoden, „ Onlineeinrichtung” und „ Verwenden der
bereitgestellten Installations-CD-ROM (nur Windows)”.
Smartphone
6-b
Seite 6
Kein Gerät
Tippen Sie auf die
Schaltäche Stopp
(Stop) und wählen Sie
dann Nicht verbinden
(Do not connect)
> Ja (Yes) in dieser
Reihenfolge aus.
Onlineeinrichtung
Greifen Sie von einem Computer aus
1
aufdie Canon-Website zu.
Wählen Sie Einrichten aus.
2
Geben Sie den Modellnamen Ihres
3
Druckers ein und klicken Sie auf Los.
Klicken Sie auf Start.
4
Klicken Sie auf Wenn Sie Ihren Drucker
5
bereits vorbereitet haben, wechseln
Sie zu Verbindung herstellen.
Hinweis
Wenn Sie einen Computer mit Windows (ausgenommen
Windows 10 S) oder macOS verwenden, fahren Sie mit dem
nächsten Schritt fort. Wenn Sie einen Computer mit einem
anderen Betriebssystem verwenden, fahren Sie mit der Einrichtung
fort, indem Sie die Anweisungen auf dem Bildschirm befolgen.
Klicken Sie auf Herunterladen.
6
Sie Setup-Datei wird auf Ihren Computer
•
heruntergeladen.
Führen Sie die heruntergeladene Datei aus.
7
Fahren Sie mit Schritt 9 auf Seite 5 fort.
8
4
Verwenden der bereitgestellten Installations-CD-ROM (nur Windows)
L
egen Sie die Installations-CD-ROM
1
in Ihren Computer ein.
Befolgen Sie die Anweisungen für
2
IhreWindows-Version.
Windows 10/Windows 8.1
aKlicken Sie auf die folgende Nachricht, wenn
sie rechts auf Ihrem Computerbildschirm
angezeigt wird.
Hinweis
Wenn die Nachricht nicht (oder nicht mehr) angezeigt wird,
klicken Sie in der Taskleiste auf das Symbol
Explorer (File Explorer). Klicken Sie links im geöneten
Fenster auf Dieser PC (This PC). Doppelklicken Sie auf das
CD-Symbol, das auf der rechten Seite angezeigt wird
(wenn der Inhalt der CD angezeigt wird, dann doppelklicken
Sie auf Msetup4.exe). Fahren Sie bei
bKlicken Sie auf
Msetup4.exe
ausführen
(Run Msetup4.exe)
cW
enn das Dialogfeld
Benutzerkontensteuerung (User Account
Control) angezeigt wird, klicken Sie auf Ja (Yes).
.
c fort.
Datei-
Windows 7
aKlicken Sie auf Msetup4.exe ausführen
(Run Msetup4.exe).
Wenn der Bildschirm Automatische
•
Wiedergabe (AutoPlay)angezeigt wird,
klicken Sie auf Msetup4.exe ausführen
(Run Msetup4.exe).
DEUTSCH
Hinweis
Wenn der Bildschirm Automatische
Wiedergabe (AutoPlay) nicht angezeigt wird,
klicken Sie im Startmenü auf Computer.
Doppelklicken Sie rechts im Fenster auf das
CD-Symbol (wenn der Inhalt der CD angezeigt
wird, doppelklicken Sie auf Msetup4.exe).
bWenn das Dialogfeld
Benutzerkontensteuerung
(User Account Control) angezeigt wird,
klicken Sie auf Weiter (Continue).
Fahren Sie bei Schritt 9 unten fort.
3
Klicken Sie auf Setup starten
9
(Start Setup).
Befolgen Sie die Anweisungen auf
10
demBildschirm.
Diese Verfahren können einige Zeit dauern.
•
Wenn der folgende Bildschirm angezeigt
11
wird, klicken Sie auf Beenden (Exit).
Ihr Drucker ist jetzt mit Ihrem Computer verbunden.
Um auch eine Verbindung mit einem Smartphone
herzustellen, lesen Sie
Verbindung mit einem Smartphone” auf Seite 6.
„6-b. Herstellen einer
5
Einrichten des Druckers
6-b
Installieren Sie die App „Canon PRINT Inkjet/SELPHY” auf Ihrem Smartphone.
1
Überprüfen Sie den Bildschirm des Druckers, während Sie die einzelnen Schritte befolgen.
2
Wenn angezeigt wird,
•
Wenn nicht angezeigt wird,
•
Herstellen einer Verbindung mit einem Smartphone
Wenn Sie mehrere Smartphones verwenden, führen Sie diese Schritte auf jedem Smartphone aus.
Bereiten Sie Folgendes vor, bevor Sie beginnen.
a Aktivieren Sie die Wi-Fi-Einstellung auf Ihrem Smartphone*.
b S
tellen Sie eine Verbindung zwischen Ihrem Smartphone und dem Wireless Router her* (wenn Sie über einen Wireless Router verfügen).
* Weitere Informationen zu diesen Verfahren nden Sie in den Handbüchern zu Ihrem Smartphone und dem
Wireless Router.
Suchen Sie „Canon PRINT” im App Store.
Suchen Sie „Canon PRINT” in Google Play.
Hinweis
Sie können die Canon-Website auch aufrufen und die App herunterladen, indem Sie den
QR-Code auf der rechten Seite scannen.
„Die Verbindung kann nun hergestellt
•
werden. (Ready to connect.)”
Hinweis
Wenn der Drucker 10 Minuten lang inaktiv ist, schaltet sich der Druckerbildschirm aus. Tippen Sie auf den Touchscreen, um
•
den Bildschirm einzuschalten.
Wenn angezeigt wird, ist eine Kommunikation des Druckers über eine Wi-Fi-Verbindung nicht möglich. Weitere
•
Informationen nden Sie unter „Häug gestellte Fragen” unter „http://ij.start.canon”.
Önen Sie die installierte App.
3
Befolgen Sie die Anweisungen auf
4
dem Bildschirm, um Ihren Drucker
hinzuzufügen.
Überprüfen Sie, ob der folgende
5
Bildschirm angezeigt wird.
Ihr Drucker ist jetzt mit Ihrem Smartphone
verbunden. Informationen zum Drucken
von Fotos nden Sie unter „Einlegen von
Fotopapier” auf Seite 8.
6
Die Verfahren unterscheiden sich auf iOS und Android. Befolgen Sie die Anweisungen für Ihr Betriebssystem.
Ti
ppen Sie auf dem Startbildschirm Ihres Smartphones
3
auf Einstellungen (Settings) und anschließend in den
Wi-Fi-Einstellungen auf Canon_ij_XXXX.
Hinweis
Wenn Canon_ij_XXXX nicht angezeigt wird,
befolgen Sie die Schritte unter
anschließend erneut Canon_ij_XXXX.
Önen Sie die installierte App.
4
D
er Drucker wird mit der für die verwendete
•
Umgebung am besten geeigneten
Verbindungsmethode registriert.
Überprüfen Sie, ob der folgende
5
Bildschirmangezeigt wird.
Ihr Drucker ist jetzt mit Ihrem Smartphone verbunden. Informationen zum Drucken von Fotos nden Sie unter
„Einlegen von Fotopapier” auf Seite 8.
und suchen Sie
Önen Sie die installierte App.
3
Der Drucker wird mit der für
•
die verwendete Umgebung
am besten geeigneten
Verbindungsmethode registriert.
Hinweis
Wird die Meldung „Es wurde kein Drucker
hinzugefügt. Druckereinrichtung ausführen?
(No printer has been added. Perform printer
setup?)” nach dem Starten der Anwendung nicht
sofort angezeigt, befolgen Sie die Schritte unter
und kehren Sie dann zu den Smartphone-Verfahren
zurück.
Überprüfen Sie, ob der folgende
4
Bildschirm angezeigt wird.
DEUTSCH
Tippen Sie auf dem Touchscreen des
3
Druckers auf
Halten Sie auf dem HOME-
4
Bildschirm ungefähr 3 Sekunden lang
gedrückt.
.
Wenn „Den Anleitungen auf dem
5
Computer oder Smartphone
usw. folgen, um den Vorgang
durchzuführen.” erscheint, fahren Sie
mit fort.
7
Einlegen von Fotopapier
Fotopapier kann nur in das hintere Fach eingelegt werden.
Önen Sie die Abdeckung des hinteren Fachs
1
und ziehen Sie die Papierstütze heraus.
Önen Sie die Abdeckung für den
2
Einzugsschacht und schieben Sie die rechte
Papierführung ganz nach rechts.
Legen Sie mehrere Blätter Fotopapier mit der
3
bedruckbaren Seite nach oben ein und schieben
Sie die seitliche Papierführung gegen die Kante
des Papierstapels.
a
b
Schließen Sie die Abdeckung für den
4
Einzugsschacht.
Befolgen Sie die Anweisungen auf dem Bildschirm,
•
um Informationen für das eingelegte Papier
festzulegen.
Ausdrucken von auf einer Speicherkarte gespeicherten Fotos
Schalten Sie den Drucker ein.
1
Legen Sie mehrere Blätter Fotopapier ein.
2
Setzen Sie die Speicherkarte in den
3
Kartensteckplatz ein.
8
Wischen Sie nach rechts und links, um die Fotos
4
zu durchsuchen, und wählen Sie eins aus.
Tippen Sie auf die Schaltäche Farbe (Color),
5
um den Druckvorgang zu starten.
De printer instellen
Webinstallatie
1. Inhoud van de doos
Netsnoer
•
Installatie-cd-rom
•
2. Verpakkingsmateriaal
verwijderen
Belangrijk
Het bedieningspaneel wordt geopend en de papieruitvoerlade
komt automatisch naar voren wanneer het afdrukken wordt gestart.
Leg geen dingen voor de printer.
Inkttanks voor installatie
•
Veiligheidsinformatie en belangrijke
•
informatie
Aan de Slag-gids (deze handleiding)
•
3. De printer inschakelen
Sluit het netsnoer aan.
1
Achterkant
Belangrijk
Sluit op dit moment nog geen andere kabels aan.
Open het bedieningspaneel en druk op de knop
2
AAN (ON).
b
a
Blader en tik om uw taal te selecteren en tik
3
daarna op OK.
NEDERLANDS
Verwijder het verpakkingsmateriaal van het
1
apparaat en gooi dit weg.
Als u de printer gebruikt terwijl de oranje tape en de
•
beschermende folie nog aanwezig zijn, leidt dit tot
defecten. Let erop dat u ze verwijdert.
Open de scaneenheid / klep en verwijder de
2
oranje tape.
a
b
Sluit de scaneenheid / klep.
3
Til de scaneenheid / klep kort omhoog en sluit deze.
•
a
b
Let op
Kijk uit met uw vingers.
4. De inkttanks installeren
Open de scaneenheid / klep.
1
Let op
Raak de printkophouder niet aan totdat deze stopt met
bewegen.
1

De printer instellen
Verwijder de tape en de folie van de inkttanks.
2
b
Controleer of er geen tape is achtergebleven.
•
Verwijder langzaam het oranje kapje.
3
Belangrijk
Duw niet op beide zijden van de
•
inkttankwaarbij u de Y-vormige
luchtopening blokkeert.
Raak de aangegeven rode gebieden in
•
deafbeelding niet aan.
a
Herhaal de stappen 2 tot en met 5 om alle
6
inkttanks te plaatsen.
Controleer of alle kleuren worden weergegeven.
•
Sluit de scaneenheid / klep.
7
Wanneer u de scaneenheid / klep sluit, starten de
•
interne bewerkingen.
a
b
Let op
Kijk uit met uw vingers.
5. Papier plaatsen
Installeer de inkttanks.
4
Plaats de inkttank in de printkop en druk erop vanaf
•
de bovenkant totdat hij klikt.
Controleer of de kleur van de geplaatste
5
inkttank op het scherm wordt weergegeven.
Belangrijk
Als de kleur niet op het scherm wordt weergegeven, ook al
hebt u de inkttank geplaatst, dan is de kleur van de inkttank
mogelijk onjuist of hebt u mogelijk een inkttank met een ander
modelnummer geïnstalleerd die niet wordt ondersteund door
deze printer. Plaats een inkttank voor de juiste kleur of gebruik
de bijgeleverde inkttank voor de installatie.
2
Controleer!
Als er oranje tape is
achtergebleven, verwijdert u deze.
Tik op OK.
1
Trek de cassette uit het apparaat en verwijder
2
de cassetteklep.
Cassetteklep
b
a
Schuif de papiergeleiders uit elkaar.
3
Schuif de rechterpapiergeleider naar de rechterrand.
•
Lijn de voorste papiergeleider uit met de markering
LTR of A4.
Plaats papier.
4
Plaats normaal papier van LTR- of A4-formaat met de
•
afdrukzijde omlaag.
Plaats het papier tegen de voorste papiergeleider en
•
lijn de rechterpapiergeleider uit met de breedte van
het papier.
a
b
Tik op OK.
6
Tik op Volgende (Next).
7
Volg daarna de instructies op het scherm om
•
door te gaan. Hierbij moet u selecties maken
die betrekking hebben op het verzenden van
informatie. Lees "Gegevens verzenden naar Canon" in
Veiligheidsinformatie en belangrijke informatie.
NEDERLANDS
Plaats de cassette.
5
Bevestig de cassetteklep en plaats de cassette terug.
•
b
a
Kijk vanaf de zijkant om te controleren of het eruitziet
•
zoals in de afbeelding.
Tik op Volgende (Next).
8
3

De printer instellen
Met welk apparaat maakt u verbinding?
Selecteer een apparaat en lees de desbetreende sectie.
6-a
Computer Computer en
smartphone
Verbinden met een computer
Als u meerdere computers gebruikt, voert u deze stappen uit op elke computer. Erzijn
twee methoden, " Online installatie" en " De meegeleverde installatie-cd-rom
gebruiken (alleen Windows)".
Smartphone
6-b
pagina 6
Geen apparaat
Tik op de knop Stoppen
(Stop) en selecteer Niet
verbinden (Do not
connect) > Ja (Yes) in
deze volgorde.
Online installatie
Ga naar de Canon-website op een
1
computer.
Selecteer Installatie.
2
Voer de modelnaam van de printer in en
3
klik op Ga.
Klik op Start.
4
Klik op Als u uw printer al hebt
5
voorbereid, gaat u naar Verbinden.
Opmerking
Als u een computer gebruikt met Windows (behalve
Windows 10 S) of macOS, gaat u verder naar de
volgende stap. Als u een computer gebruikt met
een ander besturingssysteem, gaat u verder met de
installatie door de instructies op het scherm uit te
voeren.
Klik op Downloaden.
6
Het installatiebestand wordt gedownload
•
naar uw computer.
Voer het gedownloade bestand uit.
7
Ga verder naar stap 9 op pagina 5.
8
4
 Loading...