

Page 1

MultiPASS L90
User’s Manual
fcv
Page 2

Although this equipment can use either loop disconnect or DTMF signalling,
only the performance of the DTMF signalling is subject to regulatory
requirements for correct operation. It is therefore strongly recommended that
the equipment is set to use DTMF signalling for access to public or private
emergency services. DTMF signalling also provides faster call set up.
Trademarks
Canon is a registered trademark of Canon, Inc.
Copyright
Copyright E 1997 by Canon, Inc. All rights reserved. No part of this publication
may be reproduced, transmitted, transcribed, stored in a retrieval system, or
translated into any language or computer language in any form or by any means,
electronic, mechanical, magnetic, optical, chemical, manual, or otherwise, without
the prior written permission of Canon, Inc.
ii Preface
As an E
NERGYSTAR
Partner, Canon has determined that
MultiPASS L90 meets the E
energy efficiency.
NERGYSTAR
guidelines for
Page 3
Safety Information
Use of controls, adjustments or performance of procedures other than those
specified in this user’s guide may result in hazardous radiation exposure.
This label is attached to the laser scanner unit inside the MultiPASS L90 and is
not in a user access area.
ATTENTION
VORSICHT
ATTENZIONE
PRECAUCION
VARO!
VARNING!
ADVARSEL!
ADVARSEL
DANGER
CAUTION
- RAYONNEMENT LASER INVISIBLE EN CAS D’OUVERTURE.
EXPOSITION DANGEREUSE AU FAISCEAU.
-
UNSICHTBARE LASERSTRAHLUNG, WENN ABDECKUNG GEÖFNET.
NICHT DEM STRAHL AUSSETZEN.
- RADIAZIONE LASER INVISIBLE IN CASO DI APERTURA.
EVITARE L’ESPOSIZIONE AL FASCIO.
- RADIACION LASER INVISIBLE CUANDO SE ABRE.
EVITAR EXPONERSE AL RAYO.
- AAVATTAESSA OLET ALTTIINA NÄKYMÄTTÖMÄLLE
LASERSÄTEILYLLE. ÄLÄ KATSO SÄTEESEEN.
- OSYNLIG LASERSTRÅLNING NÄR DENNA DEL ÄR ÖPPNAD.
BETRAKTA EJ STRÅLEN.
- USYNLIG LASER STRÅLING, NÅR DENNE ER ÅBEN.
UNDGÅ BESTRÅLING.
- USYNLIG LASERSTRÅLING, NÅR DEKSEL ÅPNES.
UNNGÅ EKSPONERING FOR STRÅLEN.
- Invisible laser radiation when open.
AVOID DIRECT EXPOSURE TO BEAM.
- INVISIBLE LASER RADIATION WHEN OPEN.
AVOID EXPOSURE TO BEAM.
RS5-8169
iiiPreface
Page 4

This CE Marking shows compliance of this equipment with Directive 73/23/EEC and Directive 89/336/EEC (as amended by
Directive 92/31/EEC), both as amended by Directive 93/68/EEC.
L’estampille CE indique que ce matériel est conforme aux dispositions de la Directive 73/23/CEE et de la Directive 89/336/
CEE (modifiée par la Directive 92/31/CEE), toutes deux modifiées par la Directive 93/68/CEE.
Diese CE-Markierung weist darauf hin, daß dieses Gerät mit Richtlinie 73/23/EWG und der durch Richtlinie 92/31/EWG
geänderten Richtlinie 89/336/EWG übereinstimmt, die beide durch Richtlinie 93/68/EWG geändert wurden.
Denne CE-mærkning indikerer, at dette udstyr følger Direktiv 73/23/EU og Direktiv 89/336/EU (som udvidet med Direktiv 92/
31/EU), begge som udvidet med Direktiv 93/68/EU.
CE Märkningen visar att denna utrustning följer direktiven 73/23/EEC och 89/336/EEC (komplement till 92/31/EEC) båda
som komplement till direktiv 93/68/EEC.
CE merkintä osoittaa tämän tuotteen yhteensopivuuden direktiivien 73/23/EEC ja 89/336/EEC (täydennetty direktiivillä 92/
31/EEC) kanssa, joita on täydennetty direktiivillä 93/68/EEC.
Dette CE merket viser at utstyret er i samsvar med EU direktivene 73/23 og 89/336 (med korreksjon av EU direktiv 92/31),
begge med korreksjon av EU direktiv 93/68.
Deze CE markering toont aan dat het produkt in overeenstemming is met de richtlijnen 73/23/EEC en 89/336/EEC (zoals
geammendeerd door richtlijn 92/31/EEC), welke beide zijn geammendeerd door de richtlijn 93/68/CEE.
Questo contrassegno CE indica che l’apparecchio è conforme alle Direttive CEE 73/23 e 89/336 (successivamente
modificata con la Direttiva 92/31), entrambe modificate con la Direttiva 93/68.
Este símbolo CE indica que el equipo cumple con las Directivas 73/23/EEC y 89/336/EEC (según la enmienda a la Directiva
92/31/EEC), ambas según la enmienda de la Directiva 93/68/EEC.
Esta marca CEE indica que este equipamento está de acordo com as Directivas 73/23/EEC e 89/336/EEC (conforme
amenda da directiva 92/31/EEC), ambas amendas da directiva 93/68/EEC.
Auth´ h CE sh´ mansh dhlw´ nei thn sumvwnı´a thŒ Suskeuh´ Œ me thn Odhgı´a 73/23/EEC kai thn Odhgı´a 89/336/EEC
(o´ pwŒ tropopoih´ chkan apo´ thn Odhgı´a 92/31/EEC), o´ pwŒ amvo´ tereŒ e´qoun tropopoihceı´ apo´ thn Odhgı´a 93/68/
EEC.
Oznaka CE prikazuje, da oprema ustreza predpisu 73/23/EEC, in kot to predpisuje predpis 93/68/EEC.
A CE jelzés tanúsítja, hogy a berendezés megfelel az EEC 92/31 és 93/68 elo˝írásokkal módosított EEC 73/23 és 89/336
követelményrendszernek.
Oznaczenie CE jest potwierdzeniem zgodnos´ci niniejszego urza˛dzenia z wymaganiami Dyrektywy 73/23/EEC oraz
Dyrektywy 89/336/EEC (zgodnie ze zmianami Dyrektywy 92/31/EEC), obie uzupełnione przez Dyrektywe˛ 93/68/EEC.
Znacˇka CE indikuje, zˇe toto zarˇízení odpovídá Smeˇrnici 73/23/EEC a Smeˇrnici 89/336/EEC (doplneˇné Smeˇrnicí 92/31/
EEC), které byly dále doplneˇny Smeˇrnicí 93/68/EEC.
Käesolev CE-markeering näitab, et antud seade vastab Euroopa Liidu Direktiividele 73/23/EEC ja 89/336/EEC (koos
muudatustega vastavalt Direktiivile 92/31/EEC) ning vo˜ttes arvesse, et mo˜lemaid direktiive on muudetud vastavalt
Direktiivile 93/68/EEC.
CE marœ†jums nor¬da, ka sˇ¢ iek¬rta atbilst pras¢b¬m, kas iek©autas EK direkt¢v¬s 73/23 un 89/336 (ar EK direkt¢v¬ 92/31
paredz†taj¬m izmai߬m), kur¬s veikti labojumi saska߬ ar EK direkt¢vu 93/68.
Zˇenklas CE rei£kia, kad £is ¢renginys atitinka direktyvas 73/23/EEC ir 89/336/EEC (atlikus pataisas direktyva 92/31/EEC),
kuriose buvo atliktos pataisos direktyva 93/68/EEC.
Markirovka SE ukazyvaet na to, ˆto dannoe oborudovanie sootvetstvuet Direktive 73/23/EEC i Direktive 89/
336/EEC (s izmeneniqmi v sootvetstvii s Direktivoj 92/31/EEC) s izmeneniqmi, predpisyvaemymi Direktivoj
93/68/EEC.
iv Preface
Fax III
Page 5

Contents
Chapter 1 Introduction ............................................................................................................... 1-1
Features of the Canon MultiPASS L90 .................................................................... 1-2
Plain Paper Fax Features ................................................................................ 1-3
Copier Features ............................................................................................... 1-3
Telephone Features ......................................................................................... 1-4
Printer Features ............................................................................................... 1-4
PC Fax Features ............................................................................................... 1-4
Scanner Features ............................................................................................. 1-4
How to Use Your Documentation ............................................................................ 1-5
Type Conventions ............................................................................................ 1-6
Customer Support ....................................................................................................... 1-7
Important Safety Instructions ................................................................................... 1-8
Chapter 2 Getting Started .......................................................................................................... 2-1
Setting Up Your MultiPASS L90 .............................................................................. 2-2
Choosing a Location for Your MultiPASS L90 ........................................... 2-2
Dimensions ............................................................................................ 2-3
Unpacking Your MultiPASS L90 .............................................................................. 2-4
Do You Have Everything? ............................................................................. 2-4
Removing Shipping Materials ........................................................................ 2-6
Replaceable Parts ............................................................................................ 2-7
Assembling Your MultiPASS L90 ............................................................................ 2-8
Controls, Components, and Connections ................................................................ 2-9
From the Front ................................................................................................. 2-9
From the Back ............................................................................................... 2-10
The Handset (Option) .................................................................................. 2-10
The Operation Panel ..................................................................................... 2-11
Making Connections ..................................................................................... 2-15
Connecting the Telephone Line ....................................................... 2-15
Connecting a Telephone or Optional Handset .............................. 2-15
Connecting an Extension Phone or Answering Machine ............. 2-16
Connecting the Parallel Cable .......................................................... 2-17
Powering Up ................................................................................................... 2-18
The Toner Cartridge ................................................................................................. 2-20
Handling and Storing Cartridges ................................................................. 2-20
Installing/Replacing the Toner Cartridge ................................................... 2-21
Loading Recording Paper ........................................................................................ 2-25
vContents
Page 6

Chapter 3 Registering Information in the MultiPASS L90 ................................................. 3-1
Registering Information in the MultiPASS L90 ..................................................... 3-2
Guidelines for Registering Information ................................................................... 3-3
Entering Numbers, Letters, and Symbols .................................................... 3-3
Editing Your Entry .............................................................................. 3-5
Using the One-Touch Speed Dial/Special Function Buttons ......... 3-6
Using the Menu System ...................................................................... 3-6
Personalising Your MultiPASS L90 .......................................................................... 3-8
Identifying Your Documents .......................................................................... 3-8
Entering the Date and Time .......................................................................... 3-9
Registering Your Fax Number and Name .................................................. 3-10
Setting the Telephone Line Type ................................................................. 3-12
Speed Dialling ........................................................................................................... 3-13
One-Touch Speed Dialling ........................................................................... 3-13
Storing Numbers for One-Touch Speed Dialling ........................... 3-13
Changing a Number/Name Stored under a One-Touch Speed
Dialling Button ................................................................................... 3-16
Using One-Touch Speed Dialling .................................................... 3-18
Coded Speed Dialling ................................................................................... 3-19
Storing Numbers for Coded Speed Dialling ................................... 3-19
Changing a Number/Name Stored under a Coded Speed
Dialling Code ...................................................................................... 3-21
Using Coded Speed Dialling ............................................................ 3-23
Group Dialling ............................................................................................... 3-24
Creating Groups for Group Dialling ............................................... 3-24
Using Group Dialling ........................................................................ 3-27
Adjusting the Transmission Settings ....................................................................... 3-28
Setting the Transmission Time ..................................................................... 3-28
Setting the Transmission Type ..................................................................... 3-30
Sending with a Subaddress and Password ...................................... 3-30
Changing the Long Distance Setting .......................................................... 3-32
Setting the Transmission Speed ................................................................... 3-33
vi Contents
Page 7

Chapter 4 Sending Faxes .......................................................................................................... 4-1
Document Requirements ........................................................................................... 4-2
Scanning Area ...................................................................................... 4-3
Preparing to Send a Fax ............................................................................................. 4-4
Preparing the Document ................................................................................ 4-4
Loading the Document ................................................................................... 4-4
Two Ways to Send a Fax ............................................................................................ 4-6
Memory Sending .............................................................................................. 4-6
Manual Sending via the Handset or
(HOOK) Button ......................... 4-7
Adding Pages During Transmission ......................................................................... 4-8
Cancelling a Transmission .......................................................................................... 4-8
Messages Displayed During Sending ....................................................................... 4-9
Messages During Memory Sending .............................................................. 4-9
Redialling ................................................................................................................... 4-10
Manual Redial ................................................................................................ 4-10
Auto Redial (in Memory Sending) ............................................................. 4-10
Cancelling Auto Redialling .......................................................................... 4-11
Setting Up Redialling .................................................................................... 4-11
Maximising Image Quality ....................................................................................... 4-14
Resolution ...................................................................................................... 4-14
Auto Halftone ................................................................................................ 4-14
Scanning Contrast .......................................................................................... 4-15
Chapter 5 Receiving Faxes ....................................................................................................... 5-1
Different Ways to Receive a Fax .............................................................................. 5-2
How to Set the Receiving Mode ................................................................... 5-3
Automatic Receiving Options ........................................................................ 5-4
Setting Up Fax/Telephone Auto-Switch Receiving ......................... 5-5
What Happens When FAX/TEL AUTO SW is Selected ............... 5-6
Manual Receiving .......................................................................................... 5-10
Using the MultiPASS L90 with an Answering Machine .......................... 5-11
Adjusting the MultiPASS L90 for Different Types of
Answering Machines .......................................................................... 5-11
Using an Answering Machine .......................................................... 5-12
Recording the Outgoing Message .................................................... 5-12
Receiving Documents in Memory ............................................................... 5-13
Printing a Fax from Memory ........................................................................ 5-14
Messages Displayed While Receiving a Fax .............................................. 5-15
How to Cancel an Incoming Fax ................................................................. 5-16
viiContents
Page 8

Chapter 6 Special Features ....................................................................................................... 6-1
Sending to More Than One Location ...................................................................... 6-3
Sending a Fax at a Delayed Time ............................................................................. 6-5
Special Dialling ........................................................................................................... 6-7
Dialling Through a Switchboard ................................................................... 6-7
Registering the Access Type and the Outside Line Number ......... 6-7
Long Distance Dialling ................................................................................. 6-10
How to Enter Pauses ......................................................................... 6-10
Confirming a Dial Tone ................................................................................ 6-11
Using Memory ........................................................................................................... 6-12
Deleting a Stored Fax from Memory .......................................................... 6-12
Resending a Document that Encountered an Error Signal ..................... 6-13
Printing a List of the Documents in Memory ............................................ 6-14
Printing a Stored Fax ..................................................................................... 6-15
Sending a Stored Fax to Another Destination .......................................... 6-16
Receiving a PC Fax Document in Memory ............................................... 6-18
If a Power Cut Occurs ................................................................................... 6-19
During a Power Failure ..................................................................... 6-19
Memory Backup Function ................................................................ 6-19
Making Copies ........................................................................................................... 6-20
Polling To Receive Faxes ......................................................................................... 6-22
Polling a Fax Machine ................................................................................... 6-22
Using Tone Dialling on a Pulse Line ...................................................................... 6-23
Restricting Use of the MultiPASS L90 .................................................................. 6-24
Chapter 7 Manual Feed of Paper/Envelopes/etc… ............................................................. 7-1
Selecting the Media Type ........................................................................................... 7-2
Selecting Paper and Other Media ............................................................................. 7-3
Plain Paper ....................................................................................................... 7-3
Plain White Paper ................................................................................ 7-3
Coloured Paper .................................................................................... 7-3
Heavy/Thick Paper .............................................................................. 7-3
Envelopes ......................................................................................................... 7-5
Transparencies .................................................................................................. 7-7
Labels ................................................................................................................ 7-7
Selecting Paper Delivery ............................................................................................ 7-8
Paper Delivery Selector ................................................................................ 7-10
Manually Feeding Paper/Envelopes/etc… ............................................................. 7-11
viii Contents
Page 9

Chapter 8 Activity Reports ........................................................................................................ 8-1
Printing Transaction Reports ..................................................................................... 8-2
Activity Management Report ........................................................................ 8-2
Transmission (TX) Report ............................................................................. 8-4
Reception (RX) Report .................................................................................. 8-6
Memory Clear Report ..................................................................................... 8-7
Printing Information Registered in the MultiPASS L90 ....................................... 8-8
Printing a List of User’s Data ........................................................................ 8-8
Printing a List of Registered Telephone Numbers ...................................... 8-9
One-Touch Speed Dial List 1 ............................................................. 8-9
Coded Speed Dial List 1 ..................................................................... 8-9
Group Dial List .................................................................................. 8-10
Printing a Detailed List of One-Touch Speed Dialling Numbers ........... 8-11
One-Touch Speed Dial List 2 ........................................................... 8-11
Printing a Detailed List of Coded Speed Dialling Numbers ................... 8-12
Coded Speed Dial List 2 ................................................................... 8-12
Chapter 9 Maintenance .............................................................................................................. 9-1
Maintaining the MultiPASS L90 ............................................................................... 9-2
Cleaning the MultiPASS L90 ......................................................................... 9-2
Cleaning the Outer Casing .................................................................. 9-2
Cleaning the Inside of the MultiPASS L90 ....................................... 9-3
Cleaning the Scanner Components .................................................... 9-4
Chapter 10 Frequently Asked Questions .............................................................................. 10-1
Questions and Answers ............................................................................................ 10-2
Did Your Document or Recording Paper Misfeed or Jam? .................... 10-2
Document Feed Jams and Misfeeds ................................................ 10-2
Recording Paper Jams ....................................................................... 10-3
Can not Send Documents Correctly? ......................................................... 10-9
Does the document not feed properly? .......................................... 10-9
Can not send a fax? ............................................................................ 10-9
Are the faxes you send spotted or dirty? ........................................ 10-9
Can not send using error correction mode (ECM)? ................... 10-10
Do errors frequently occur during sending? ................................ 10-10
Can not Receive Documents Correctly? .................................................. 10-10
Does the recording paper jam frequently? ................................... 10-10
Does the unit not switch automatically between phone and
fax transmissions? ............................................................................ 10-10
Will the unit not receive faxes automatically? ............................. 10-10
Will the unit not receive faxes manually? (Optional handset
or extension phone connected to the unit) ................................... 10-11
Will the unit not receive using ECM? ........................................... 10-11
Do errors frequently occur during receiving? .............................. 10-11
ixContents
Page 10

Can not Print Correctly? ............................................................................ 10-12
Nothing prints ................................................................................... 10-12
Vertical White Streaks ..................................................................... 10-13
Miscellaneous Questions ............................................................................ 10-14
Does the telephone not work? ....................................................... 10-14
Does the phone disconnect while you are talking? ..................... 10-14
Does nothing appear in the display? ............................................. 10-14
Can not make copies? ...................................................................... 10-14
Can not poll other units? ................................................................ 10-14
Can not insert the paper cassette? ................................................. 10-14
Can not remove the toner cartridge? ............................................ 10-14
Display Messages and Meanings ........................................................................... 10-15
Other Error Messages ................................................................................. 10-18
Appendix A The Menu System .................................................................................................... A-1
The Menu System ...................................................................................................... A-2
To Access SPEED DIAL SETUP: .............................................................. A-2
To Access USER SETTINGS: ..................................................................... A-2
USER SETTINGS .............................................................................. A-3
To Access REPORT SETTINGS: ............................................................... A-4
REPORT SETTINGS ........................................................................ A-5
To Access SEND (TX) SETUP: .................................................................. A-6
SEND (TX) SETUP ........................................................................... A-7
To Access RECEIVE (RX) SETUP: .......................................................... A-8
RECEIVE (RX) SETUP .................................................................. A-8
To Access FAX PRINTER SETUP: ......................................................... A-10
FAX PRINTER SETUP .................................................................. A-11
To Access SYSTEM SETTINGS: .............................................................. A-12
SYSTEM SETTINGS ...................................................................... A-13
Appendix B Specifications ........................................................................................................... B-1
MultiPASS L90 Specifications .................................................................................. B-2
Appendix C Options ....................................................................................................................... C-1
Handset ....................................................................................................................... C-2
Package Contents ........................................................................................... C-2
Attaching the Handset to the MultiPASS L90 ........................................... C-2
Memory Board ........................................................................................................... C-5
Installing the Memory Board ........................................................................ C-6
Glossary ...................................................................................................................................... G-1
Index ........................................................................................................................................ I-1
x Contents
Page 11

Chapter 1
Introduction
This chapter introduces you to your MultiPASS L90. It also explains how to get
the most from the documents that come with the unit, and gives important safety
instructions.
Features of the Canon MultiPASS L90 .................................................................... 1-2
Plain Paper Fax Features ................................................................................ 1-3
Copier Features ............................................................................................... 1-3
Telephone Features ......................................................................................... 1-4
Printer Features ............................................................................................... 1-4
PC Fax Features ............................................................................................... 1-4
Scanner Features ............................................................................................ 1-4
How to Use Your Documentation ............................................................................ 1-5
Type Conventions ............................................................................................ 1-6
Customer Support ....................................................................................................... 1-7
Important Safety Instructions ................................................................................... 1-8
1-1Chapter 1 Introduction
Page 12
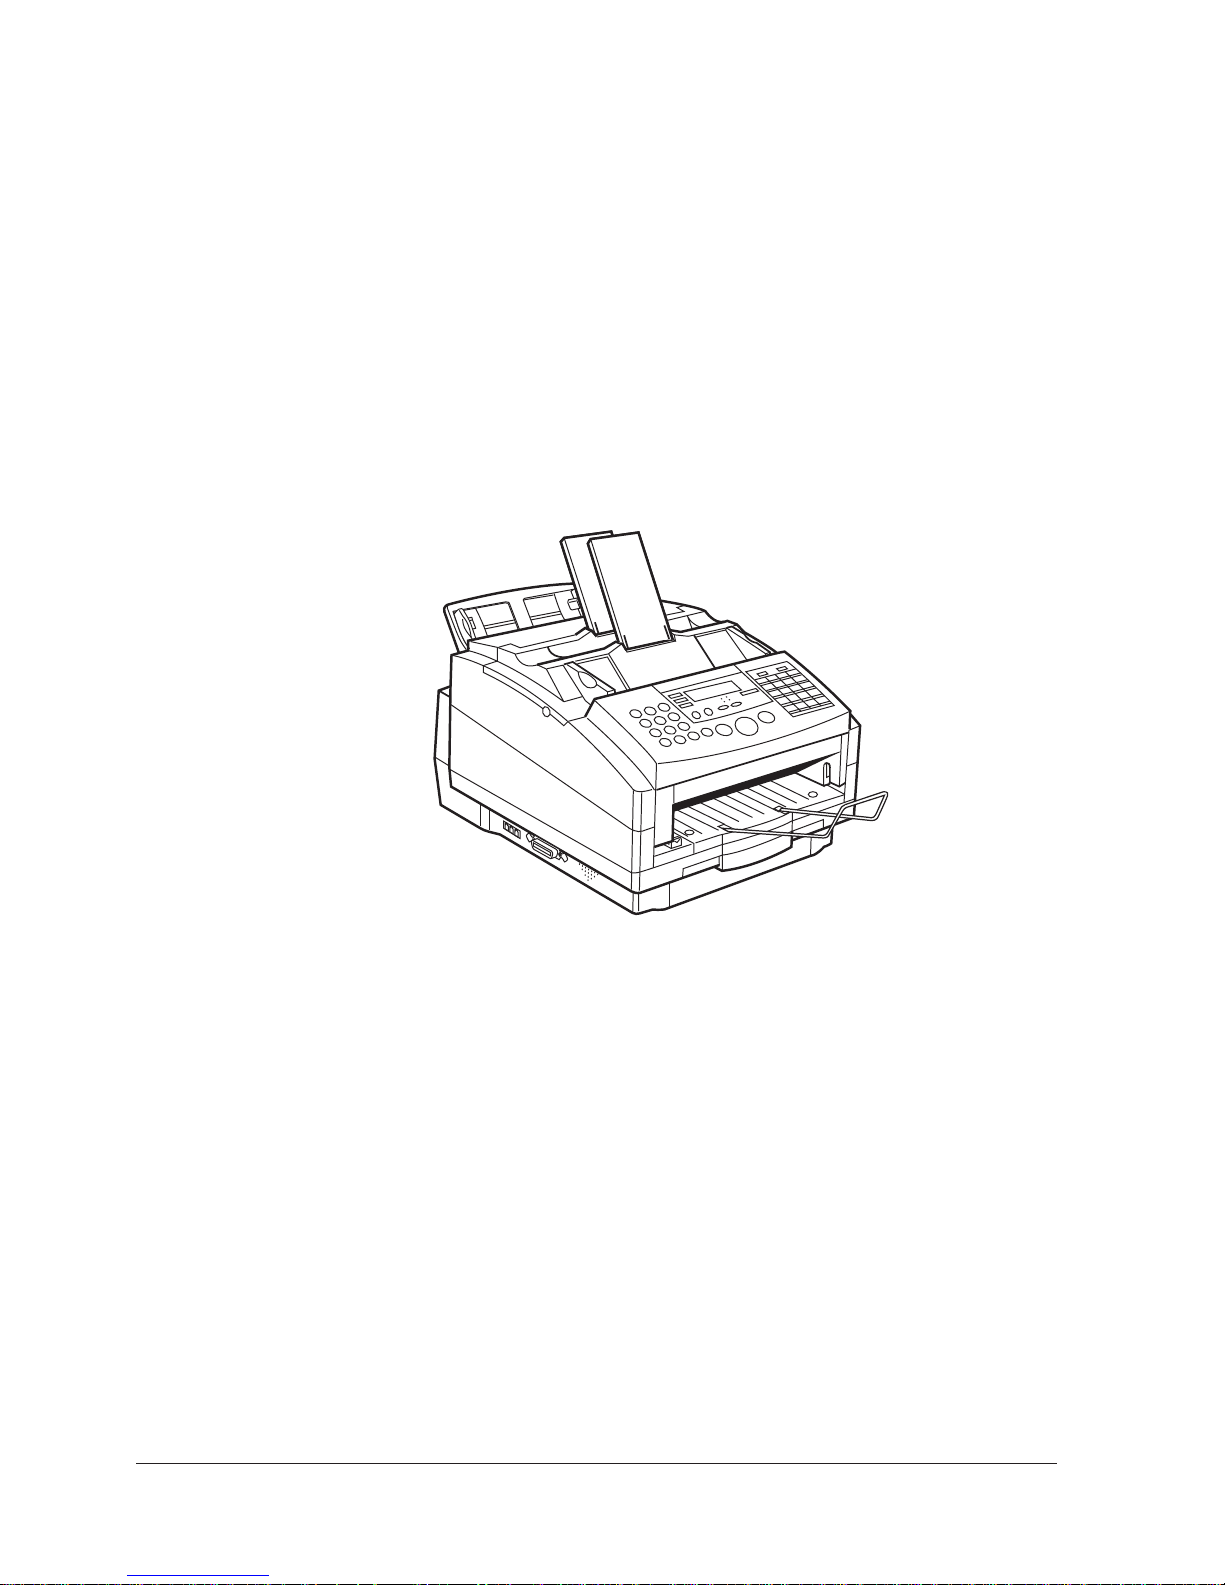
Features of the Canon MultiPASS L90
Thank you for purchasing the new Canon MultiPASS L90 Laser Multifunction
System. The MultiPASS L90 will help you work more efficiently and expand your
work capacity. To gain the most benefit from all the new features, be sure to refer
to the manuals included with your unit when you are not sure how to perform a
task.
Your MultiPASS L90 combines these six functions, critical to your home or small
office:
J Plain paper fax
J Scanner
J PC fax
The MultiPASS L90 is equipped with a standard bi-directional parallel port that
enables it to transfer data to and from your computer. This makes it possible for
you to send scanned documents and received faxes from your MultiPASS L90 to
your computer, and to send data to be printed and/or faxed from your computer
to the MultiPASS L90.
Your MultiPASS L90 includes the MultiPASS
software. This exclusive Canon software package allows your PC to manage your
MultiPASS L90’s printing, faxing, scanning, and telephone activities.
J Copier
J Printer
J Telephone (option)
TM
Desktop Manager for WindowsH
The MultiPASS L90 supports the TWAIN scanning standard, which allows you to
scan images from any graphics or OCR application that also supports the
TWAIN standard.
1-2 Chapter 1Introduction
Page 13

The MultiPASS L90 includes the following features:
J Excellent print quality
Quiet, clean laser technology offers 600 × 600 dpi resolution for text and
graphics.
J Convenient paper handling
The paper cassette holds up to 250 sheets of plain A4, letter, or legal paper,
and the automatic document feeder (ADF) can hold up to 30 A4-size or
letter-size pages, or 20 legal-size pages.
In addition to the paper cassette, the manual feed tray allows you to manually
feed other media, such as envelopes, transparencies, thick and thin paper, etc.
J Simple maintenance
When the toner runs out, simply replace the toner cartridge.
Plain Paper Fax Features
J Automatic fax/telephone switching allows you to receive fax messages and
normal phone calls on a single line.
J A transmission speed of approximately six seconds per page*
J A fax memory that can store approximately 42 received pages, or 138 received
pages with the optional 2 MB memory board installed**
J An Error Correction Mode (ECM) that reduces transmission errors
J Sophisticated networking features such as memory broadcasting, polling
reception, restricted receiving and delayed transmission
J Automatic dialling methods, including one-touch speed dialling, coded speed
dialling and group dialling
Copier Features
J 400 × 400 dpi resolution with Resolution-Enhancement
J A variety of print media can be used for copying
J Up to 99 copies
J Auto-halftone with 256-level greyscale
* Based on Canon FAX Standard Chart No.1, standard mode
Resolution: Standard, Auto Halftone OFF
Transmission speed: 14400 bps, ECM-MMR
** Based on Canon FAX Standard Chart No.1, standard mode
1-3Chapter 1 Introduction
Page 14

Telephone Features
J Automatic dialling methods, including one-touch speed dialling and coded
speed dialling
J Connection for an answering machine or extension telephone
J On-hook dialling
J Optional handset available
J Point-and-click telephone dialler
Printer Features
J 600 × 600 dpi with Resolution-Enhancement laser beam printing for high
resolution text and graphics
PC Fax Features
J Ability to set and download user settings including speed dial numbers
directly from PC to MultiPASS L90
J Fax address book
J Fax viewer
J Fax distribution lists
J Custom cover sheets
J ECM receiving
J Annotations and highlight supported
Scanner Features
J High precision 256-level greyscale scanning
J TWAIN compliant
J Enhanced 400 × 400 dpi resolution
1-4 Chapter 1Introduction
Page 15

How to Use Your Documentation
The MultiPASS L90 includes the following documentation to help you use the
unit more effectively. Be sure to do the following before you begin setting it up:
J Read this chapter to learn about the MultiPASS L90 features, and guidelines
for operating your new equipment safely.
J Carefully follow the instructions in Chapter 2, “Getting Started,” to set up
your MultiPASS L90 properly.
J Use the rest of this manual to master basic operating procedures (such as
registering information, making copies, sending and receiving faxes, and using
the telephone features), and to learn more about its special features (such as
sending to more than one location, and receiving documents in memory).
Keep it handy so you can refer to it when you have a problem or need
particular information about the MultiPASS L90.
J If you need help getting your MultiPASS L90 to operate properly, see Chapter
10, “Frequently Asked Questions.” For the unit’s technical specifications, see
Appendix B.
TM
J Use your MultiPASS
out how to use your MultiPASS L90 to print, scan, and fax from the Windows
environment, as well as how to print from non-Windows applications. Refer to
the MultiPASS
need information about printing, scanning, or faxing from the PC.
TM
Desktop Manager for Windows User’s Guide to find
Desktop Manager for Windows User’s Guide whenever you
If you still have questions about how to use your MultiPASS L90, feel free to
contact your authorised Canon Facsimile Dealer’s sales or service representative.
They will be glad to answer your questions.
1-5Chapter 1 Introduction
Page 16

Type Conventions
This manual uses the following type conventions to emphasise information:
Cautions alert you to operations that could cause damage to your hardware or
software, or cause injury to yourself.
Notes provide advice or suggestions regarding the use of the MultiPASS L90.
In addition, this guide uses bold capital letters to show the names of buttons and
switches on the unit, such as: SET, FUNCTION, or STOP. Text that appears in
the unit’s display, or the names of lamps, are also shown using capital letters, such
as: RECEPTION OK.
1-6 Chapter 1Introduction
Page 17

Customer Support
Your Canon MultiPASS L90 is designed with the latest technology to provide
trouble-free operation.
If you have a problem with your unit, try first to solve it by referring to the
information in Chapter 10, “Frequently Asked Questions.” If you still can not
solve the problem, contact a Canon Authorised Service Facility.
If you think your MultiPASS L90 needs service, only a Canon Authorised Service
Facility will do warranty service.
You must have your sales receipt for warranty service.
1-7Chapter 1 Introduction
Page 18

Important Safety Instructions
Read these safety instructions thoroughly before using your MultiPASS L90, and
refer to them later if you have any questions.
Except as explained in this manual, do not attempt to service your MultiPASS
L90 yourself. Never attempt to disassemble the unit: exposed power points inside
the unit can cause electrical shock if you touch them. Takeosed power points
inside the unit can cause electrical shock if you touch them. Take your MultiPASS
L90 to your local authorised Canon Facsimile Service Dealer for all service.
J Follow all warnings and instructions marked on the unit.
J Use the MultiPASS L90 only on level, solid, stable surfaces.
J The back and bottom of the unit’s cabinet include slots and openings for
ventilation. To help keep it from overheating (which can cause malfunction),
do not block or cover these openings. Do not place the unit on a bed, sofa,
rug, or other similar soft surface, or near a radiator or heat source. Also, do
not place the unit in a cupboard, on shelves, or in a similar structure unless
properly ventilated.
J Operate the unit only from the type of power source indicated on the unit’s
label. If you are not sure of the type of power available, consult your dealer or
local power company.
J Make sure that the total amperage used by all products plugged into the wall
outlet does not exceed the ampere rating of the outlet’s circuit breaker.
J Do not allow anything to rest on the power cord, and do not locate the unit
where the cord will be walked on. Make sure the power cord is not knotted or
kinked.
J Do not use the unit near water or other liquids. If you spill liquid on or into
the unit, unplug it immediately and call a Canon Authorised Service Facility.
J Do not allow small objects (such as pins, paper clips, or staples) to fall into the
unit. If something does fall into it, unplug the unit immediately and call a
Canon Authorised Service Facility.
1-8 Chapter 1Introduction
Page 19
J Keep your unit away from direct sunlight as this can cause damage to it. If you
have to place it near a window, install heavy curtains or blinds.
J Avoid a location subject to extreme temperature fluctuation. Use in a room
that is within a temperature range of 10!C and 32.5!C.
J Do not insert objects into the openings on the unit’s cabinet, as they could
touch dangerous voltage points or short out parts, possibly resulting in fire or
electric shock.
J After you unplug the unit, wait at least five seconds before you turn it back
on.
J Never unplug the unit during printing. This can cause the printing unit to jam.
J Always unplug the unit during thunderstorms.
J Always unplug the unit before moving or cleaning it.
J Before you transport your unit, remove its toner cartridge. When you reinstall
the unit in its new location, replace the toner cartridge.
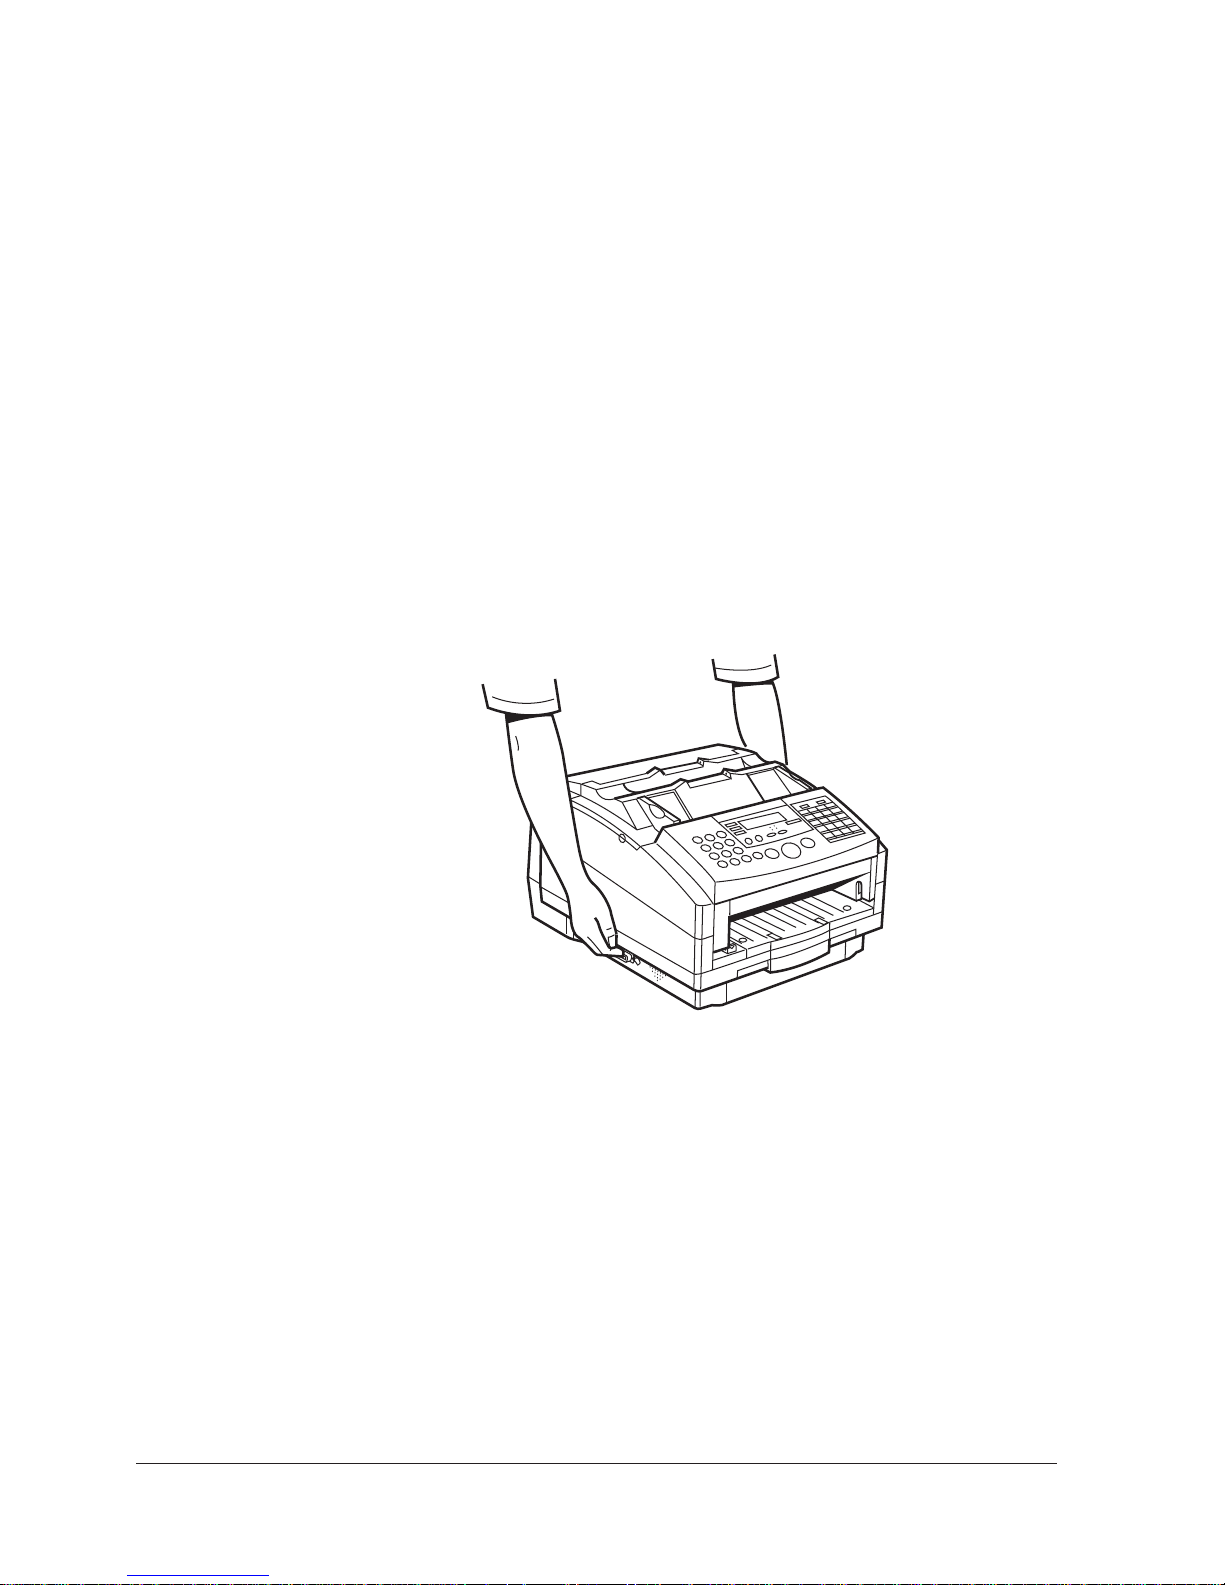
J Never lift the unit by its paper cassette–always hold it by the sides.
1-9Chapter 1 Introduction
Page 20

Unplug the unit from the wall outlet and refer servicing to a Canon Authorised
Service Facility under the following conditions:
J When its power cord or plug is damaged or frayed.
J If liquid has been spilled on or into the unit.
J If you notice smoke or unusual noises or odors coming from it.
J If it does not operate normally when you have followed the operating
instructions. Adjust only those controls that are covered by the operating
instructions in this manual. Improper adjustment of other controls may result
in damage and may require extensive work by a qualified technician to restore
the product to normal operation.
J If it has been dropped or the cabinet has been damaged.
J If it begins performing poorly.
1-10 Chapter 1Introduction
Page 21

Chapter 2
Getting Started
This chapter tells you how to unpack your Canon MultiPASS L90 and get it
ready to send, receive, and print documents.
Setting Up Your MultiPASS L90 .............................................................................. 2-2
Choosing a Location for Your MultiPASS L90 ........................................... 2-2
Dimensions ............................................................................................ 2-3
Unpacking Your MultiPASS L90 .............................................................................. 2-4
Do You Have Everything? ............................................................................. 2-4
Removing Shipping Materials ........................................................................ 2-6
Replaceable Parts ............................................................................................ 2-7
Assembling Your MultiPASS L90 ............................................................................ 2-8
Controls, Components, and Connections ................................................................ 2-9
From the Front ................................................................................................. 2-9
From the Back ............................................................................................... 2-10
The Handset (Option) .................................................................................. 2-10
The Operation Panel ..................................................................................... 2-11
Making Connections ..................................................................................... 2-15
Connecting the Telephone Line ....................................................... 2-15
Connecting a Telephone or Optional Handset .............................. 2-15
Connecting an Extension Phone or Answering Machine ............. 2-16
Connecting the Parallel Cable .......................................................... 2-17
Powering Up ................................................................................................... 2-18
The Toner Cartridge ................................................................................................. 2-20
Handling and Storing Cartridges ................................................................. 2-20
Installing/Replacing the Toner Cartridge ................................................... 2-21
Loading Recording Paper ........................................................................................ 2-25
2-1Chapter 2 Getting Started
Page 22

Setting Up Your MultiPASS L90
Choosing a Location for Your MultiPASS L90
Before unpacking your MultiPASS L90, be sure to follow these guidelines to
choose the best location for your unit.
J Choose a cool, dry, clean area:
I Make sure the area is free from dust.
I Make sure the area’s temperature is within 10!C and 32.5!C.
I Make sure the area’s relative humidity is within 20%-80%.
I Avoid direct sunlight. If you have to place the unit near a window, install
heavy curtains or blinds.
J Place the unit near a standard 220-240 V AC power outlet and a telephone
line jack.
J Do not plug the unit into a circuit that is also used by appliances such as air
conditioners, electric typewriters, or copiers. Such appliances generate
electrical noise that can interfere with faxing documents.
J Make sure the MultiPASS L90 is near your computer and easily accessible.
J Set the unit on a flat, sturdy, stable surface.
J Do not set up the unit near a television, radio, or heavy equipment that can
generate strong electromagnetic fields.
J Do not use or store the unit outdoors.
2-2 Chapter 2Getting Started
Page 23
Dimensions
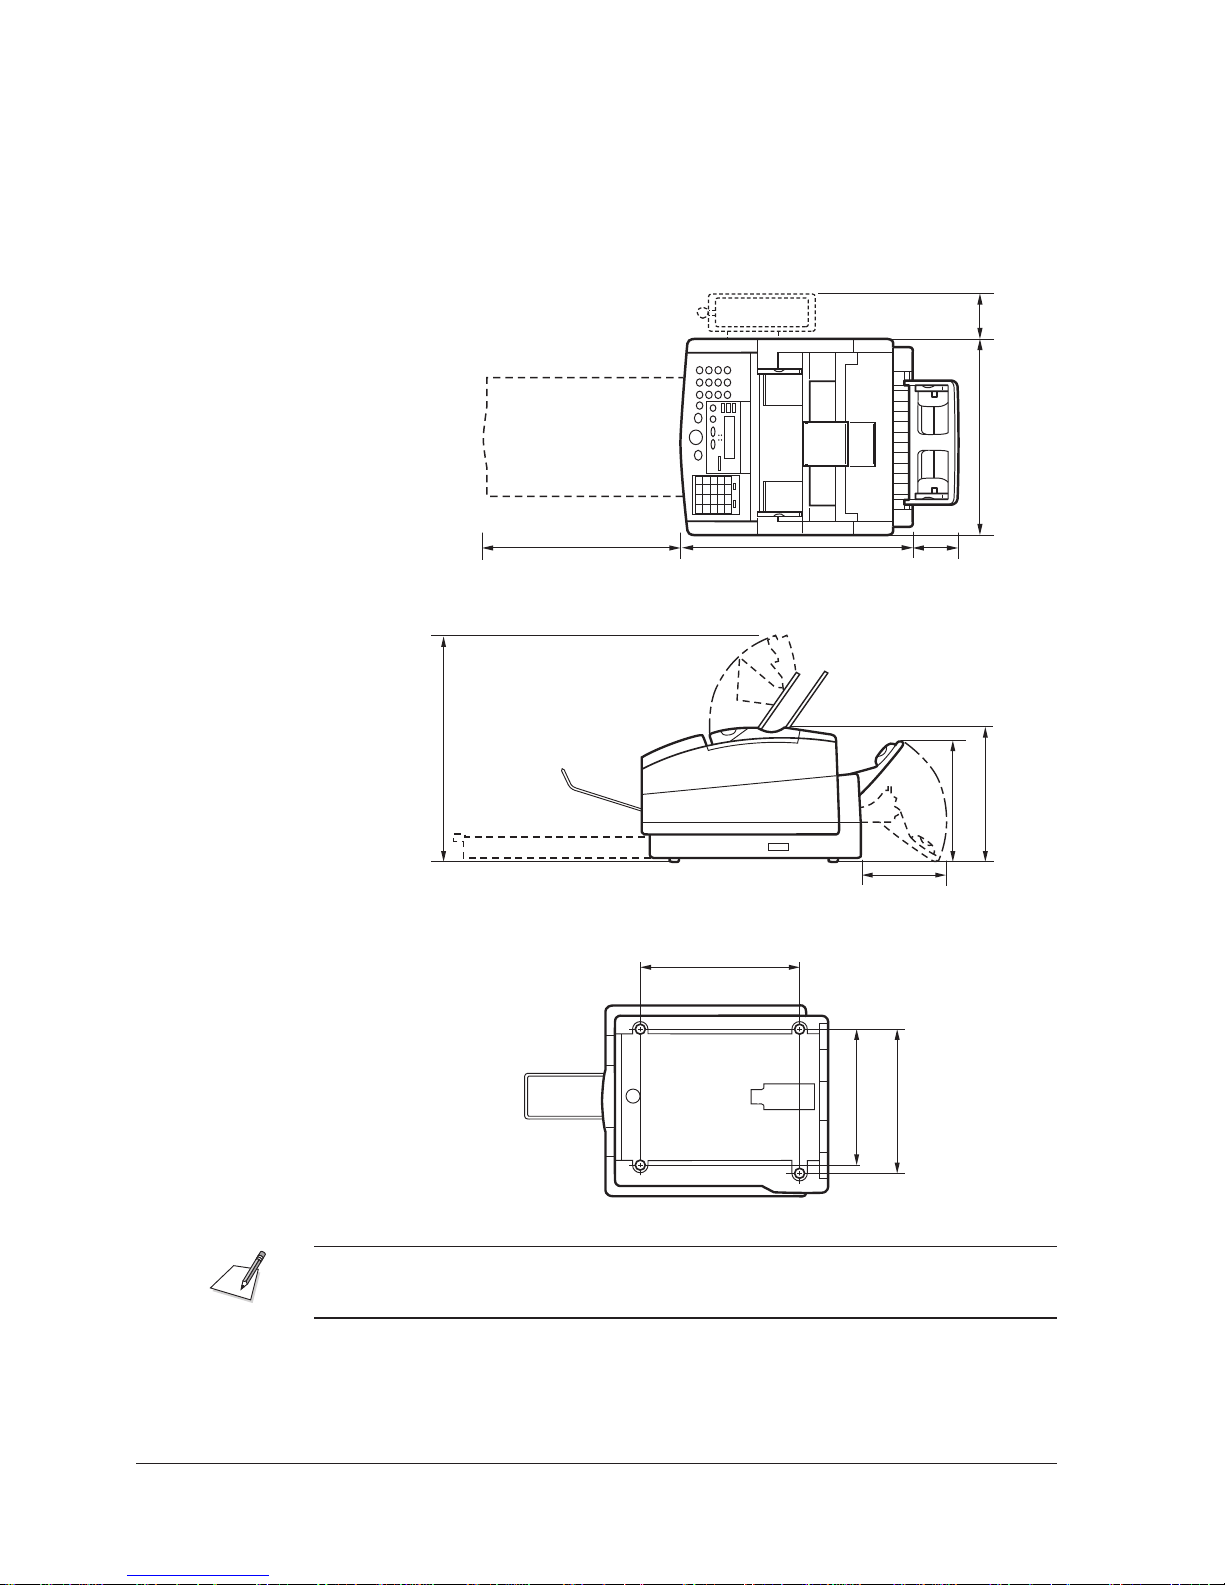
Make sure there is enough room around the unit to allow adequate ventilation,
and to allow paper to flow freely into and out of the unit. It requires this much
space:
Top view
383 mm 81.5 mm
423 mm 445 mm 91 mm
Side view
435.2 mm
269 mm
260 mm
185 mm
Bottom view
315 mm
265 mm
282.5 mm
If you need assistance installing your MultiPASS L90, contact your local Canon
authorised service representative.
2-3Chapter 2 Getting Started
Page 24
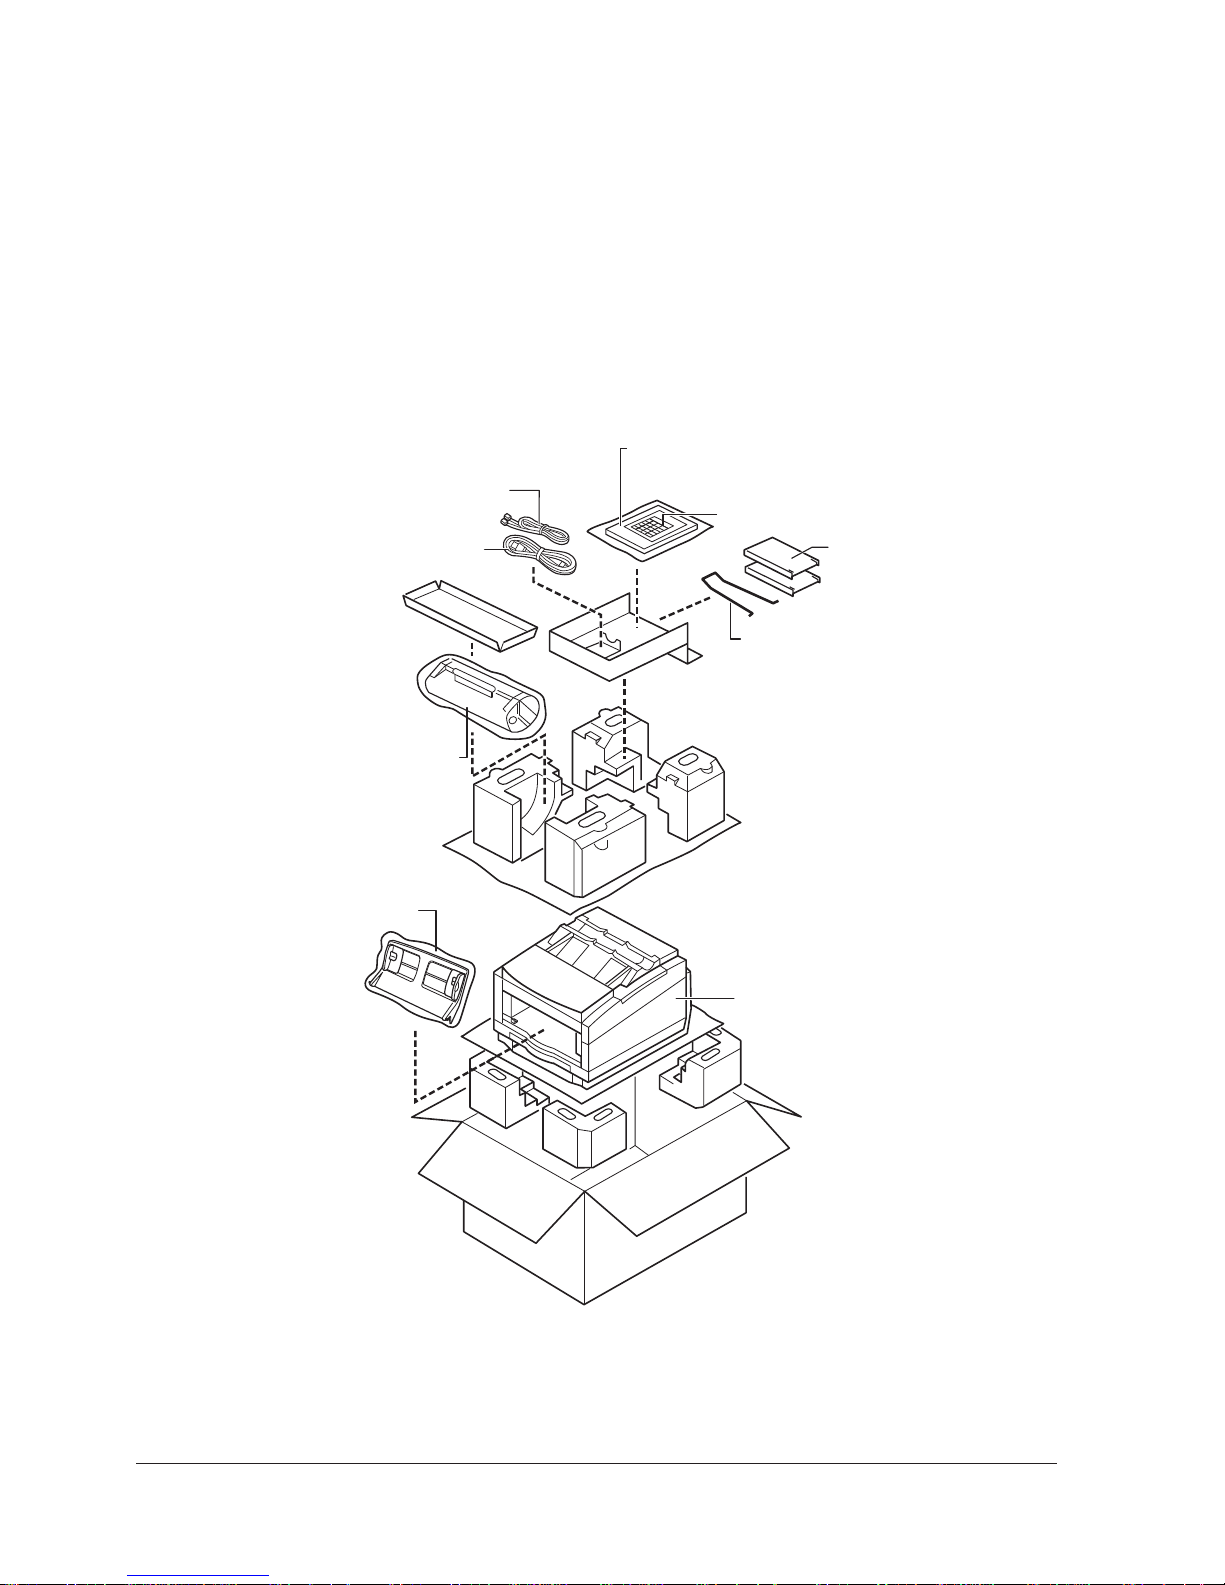
Unpacking Your MultiPASS L90
Do You Have Everything?
As you unpack the MultiPASS L90, save the carton and packing material in case
you want to move or ship the unit in the future.
1. Carefully remove all items from the box. You should have someone help by
holding the box while you lift the unit and its protective packaging out of the
carton.
User’s Guide, Desktop Manager for WindowsH Software
User’s Guide and Floppy Disks
Telephone Line
One-Touch Faceplate
Power Cord
Document Supports for Scanned
Documents
2 Sub Trays (same size):
Document Support for ADF
and Output Tray
FX3 Toner Cartridge
Manual Feed Tray
Main MultiPASSL90 Unit with Paper
Cassette
2-4 Chapter 2Getting Started
Page 25

2. Make sure you have the following items:
Main MultiPASSL90 Unit
with Paper Cassette
Document Support for
Scanned Documents
MultiPASS L90
MultiPASSL90 User’s Guide
(this book)
Desktop Manager for WindowsH
Software User’s Guide
Manual Feed Tray 2 Sub Trays (same size)
I Output Tray
I Document Support for
ADF
SET
MEMORY
REFERENCE
04
POLLING
FUNCTION
DELAYED
03
08
TRANSMISSION
DATA
REGISTRATION
01
D.T.
02
07
12
06
11
CLEAR
05
SPACE
10
REPORT
15
09
14
TONE / +
CLEAR
13
18
17
FX3 Toner Cartridge One-Touch Faceplate
Power Cord Telephone Line
Printer Driver
Floppy Disk
Desktop Manager for WindowsH
Software Floppy Disks
16
20
19
If anything is missing, notify your Canon dealer immediately.
J In addition to the items shipped with your MultiPASS L90, you will need to
purchase a IEEE 1284 bi-directional parallel interface cable.
J For reliable data communication between your computer and the MultiPASS
L90, it is recommended that you use a cable no longer than 2 metres long.
2-5Chapter 2 Getting Started
Page 26
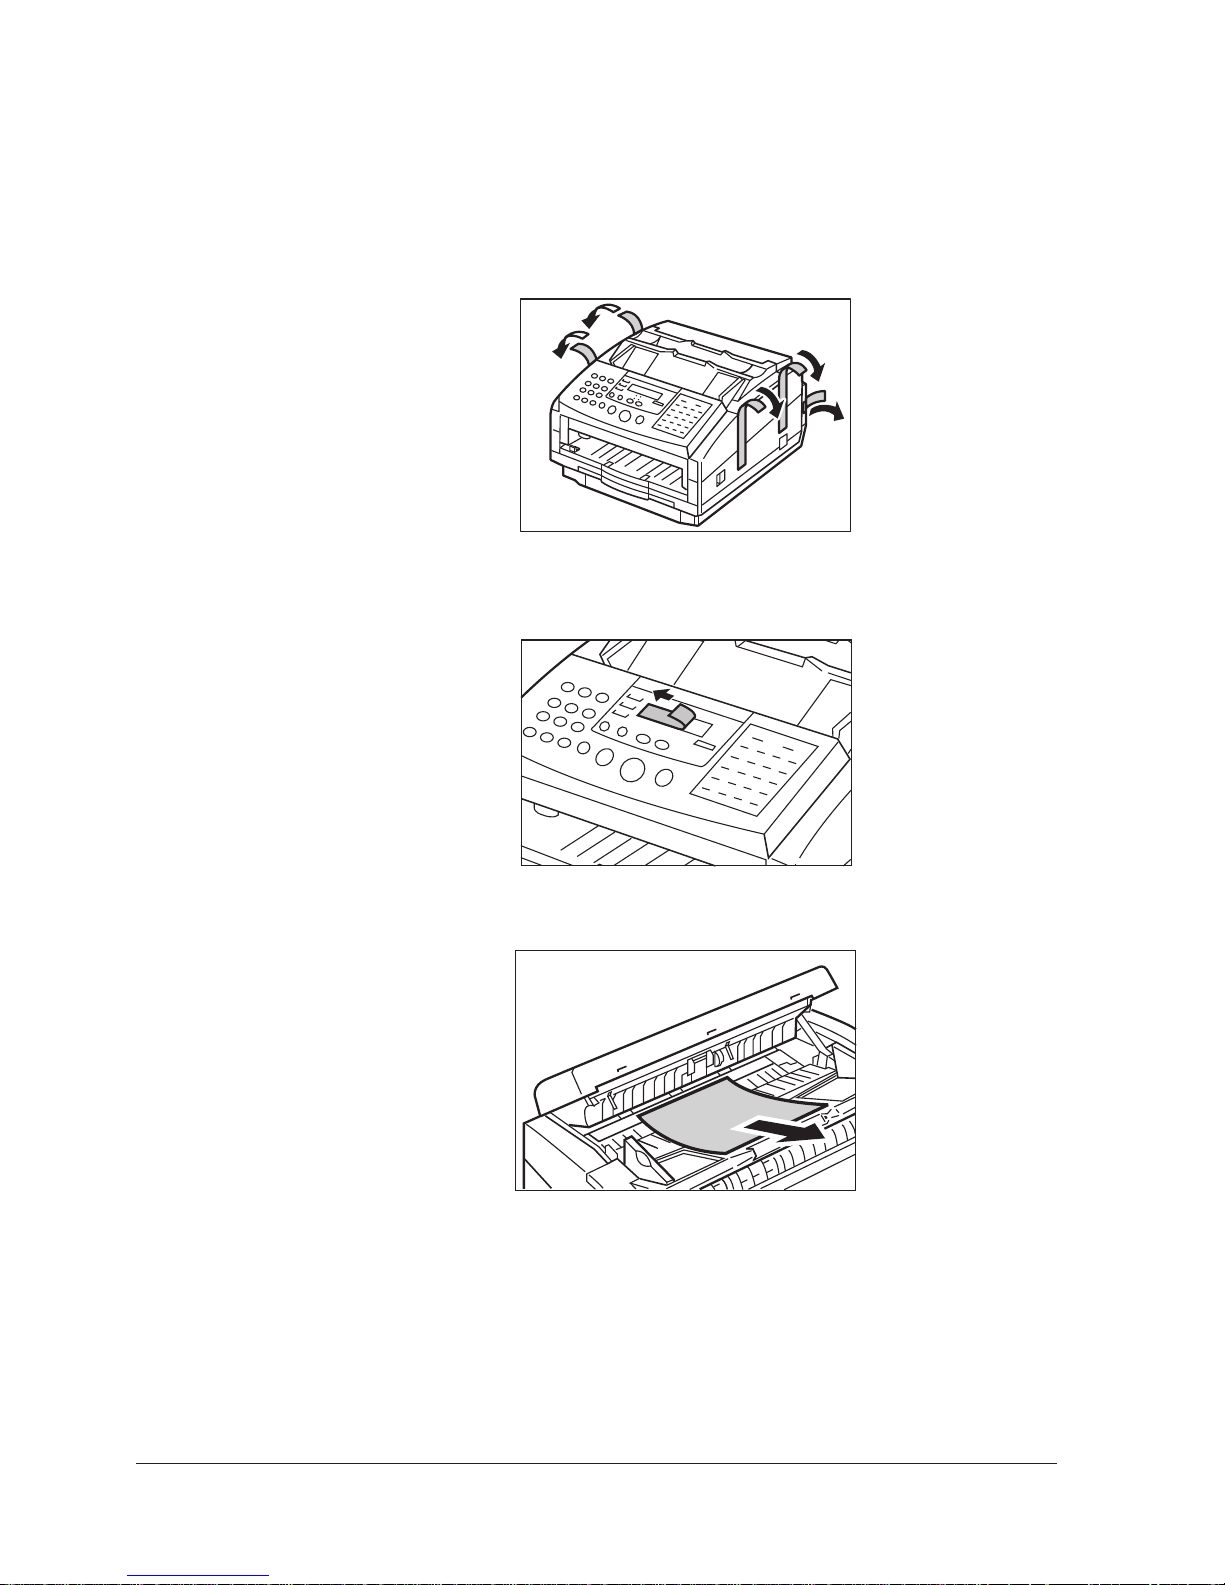
Removing Shipping Materials
Before setting up your MultiPASS L90, be sure to remove all shipping materials
as described below:
1. Remove the shipping tapes from the printer cover and rear cover.
2. The LCD is covered with a protective clear plastic sheet. Please peel off this
protective sheet.
3. Remove the soft styrofoam sheet from inside the operation panel.
2-6 Chapter 2Getting Started
Page 27
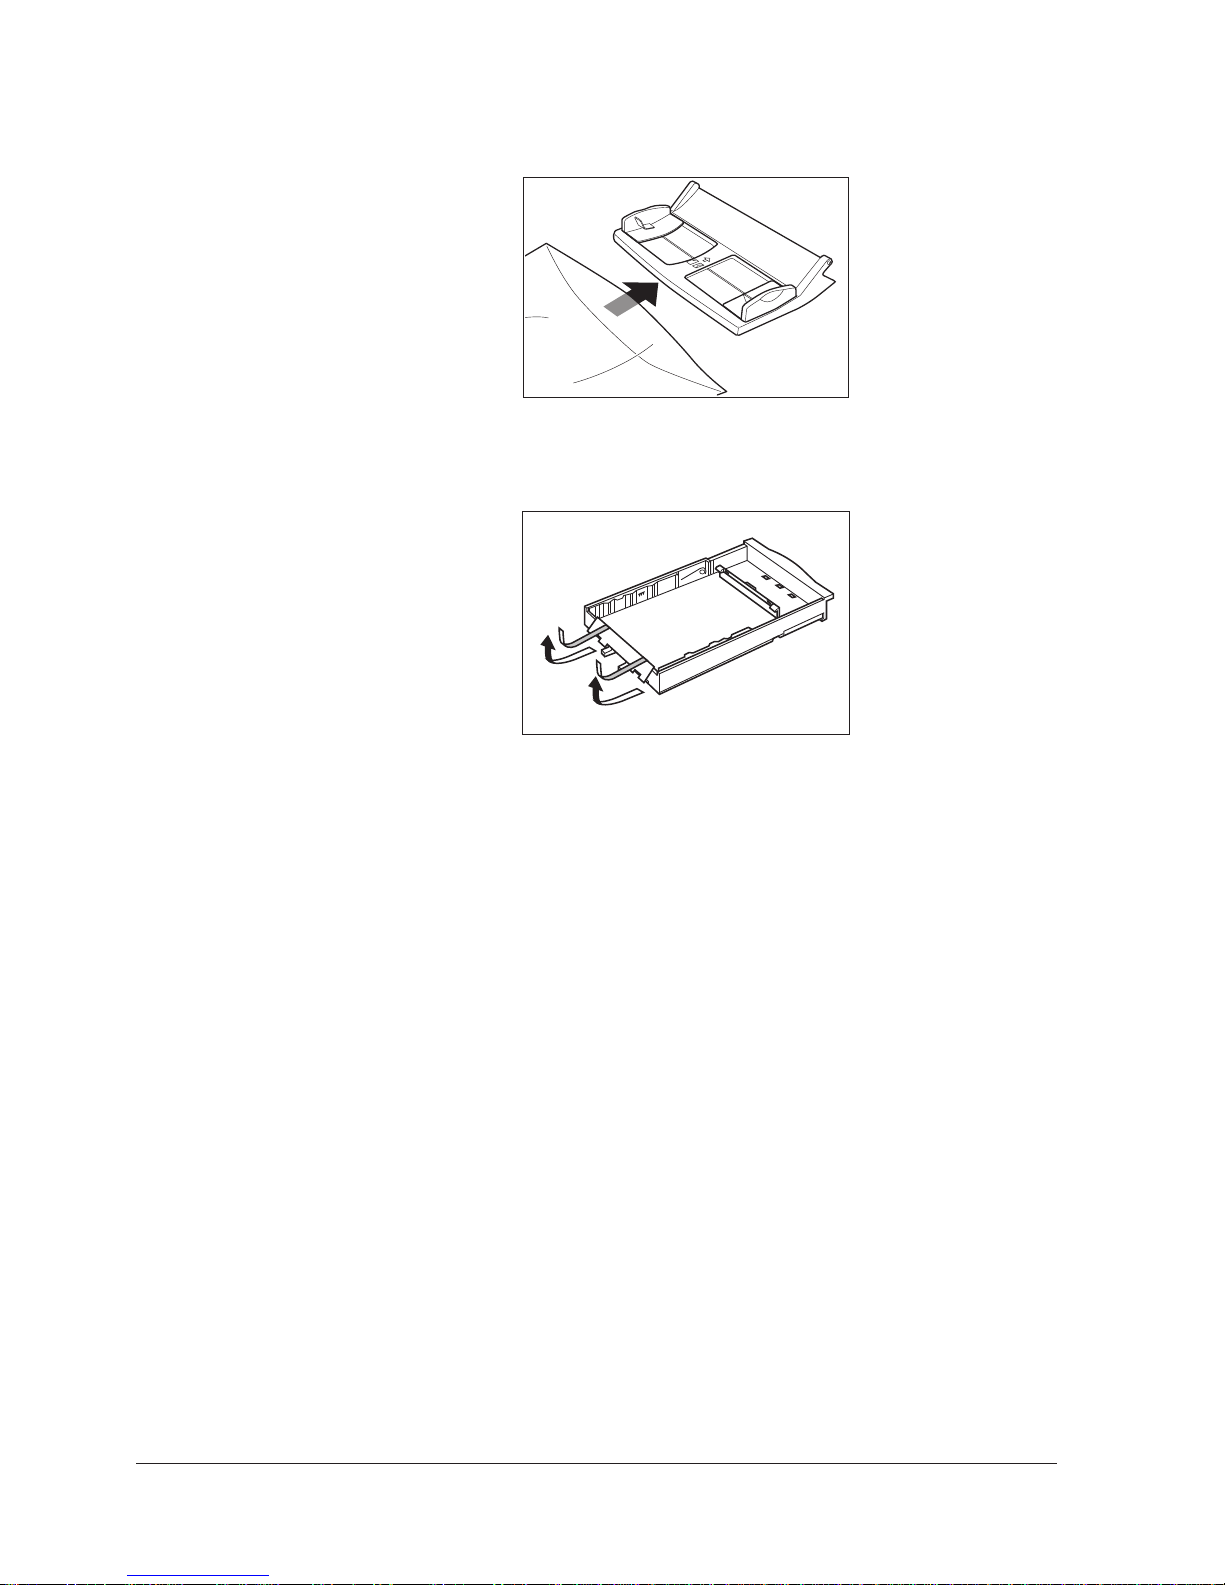
4. Take out the manual feed tray from the protective bag.
5. Remove the shipping tapes and cardboard protector from inside the paper
cassette.
Replaceable Parts
The only component of the MultiPASS L90 that should need regular service or
replacement is the FX3 toner cartridge.
2-7Chapter 2 Getting Started
Page 28
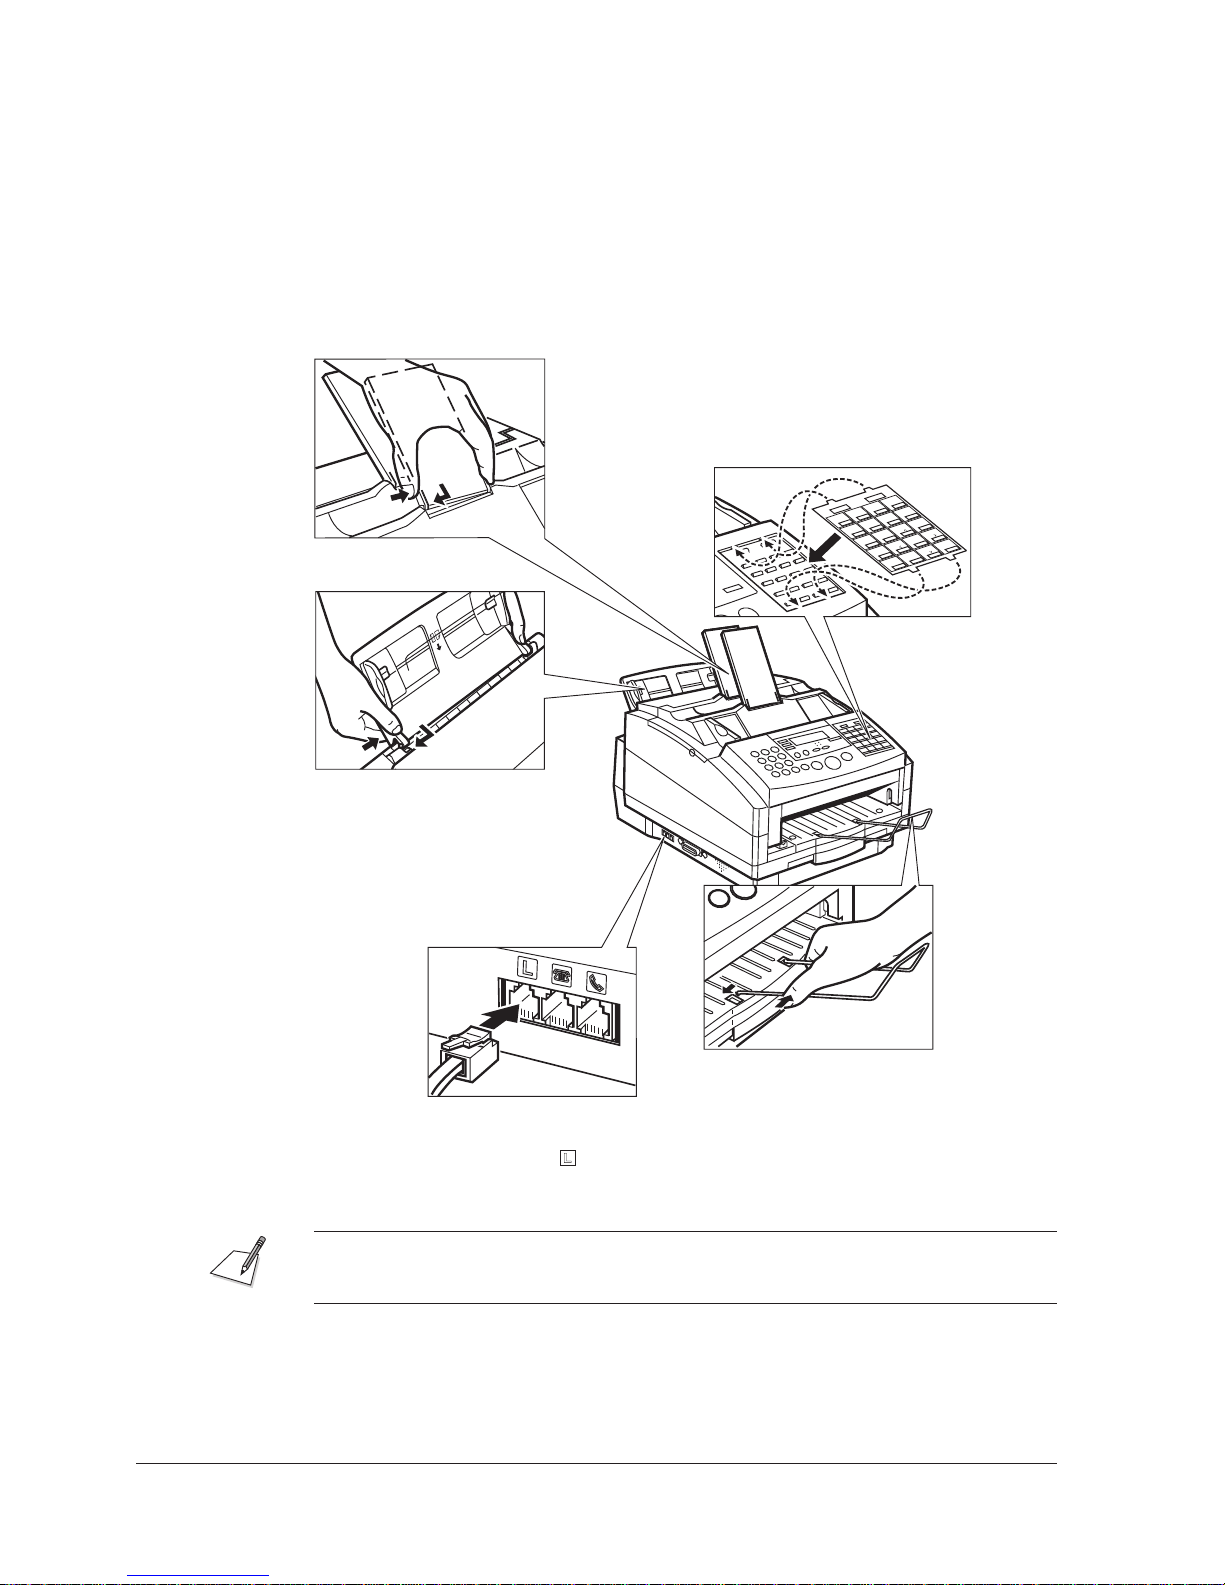
Assembling Your MultiPASS L90
Attach the following parts to your unit as explained below.
Output Tray and Document Support for ADF
Insert one tab first into the slot. Make sure that the
output tray and document support for ADF rest back.
One-touch Faceplate
Fit the tabs on the one-touch faceplate into
the slots on the unit.
FUNCTION
SET
MEMORY
REFERENCE
04
POLLING
DELAYED
03
TRANSMISSION
DATA
REGISTRATION
01
08
02
07
12
06
11
05
REPORT
09
16
10
SPACE
15
FILE PRINT
+
13
20
14
19
CLEAR
18
17
Manual Feed Tray
Hold the tray with both hands and
insert one tab first into the slot, then
the other tab into the other slot. Make
sure the tray rests back.
Document Support for Scanned Documents
Insert the ends of the document support into
Telephone Line
Connect the telephone line to the
input jack marked
. (Qp. 2-15)
the slots on the unit. (Remove this support
when using face-up delivery. (Qp.7-9)
See Appendix C “Options” for attaching the optional handset.
2-8 Chapter 2Getting Started
Page 29
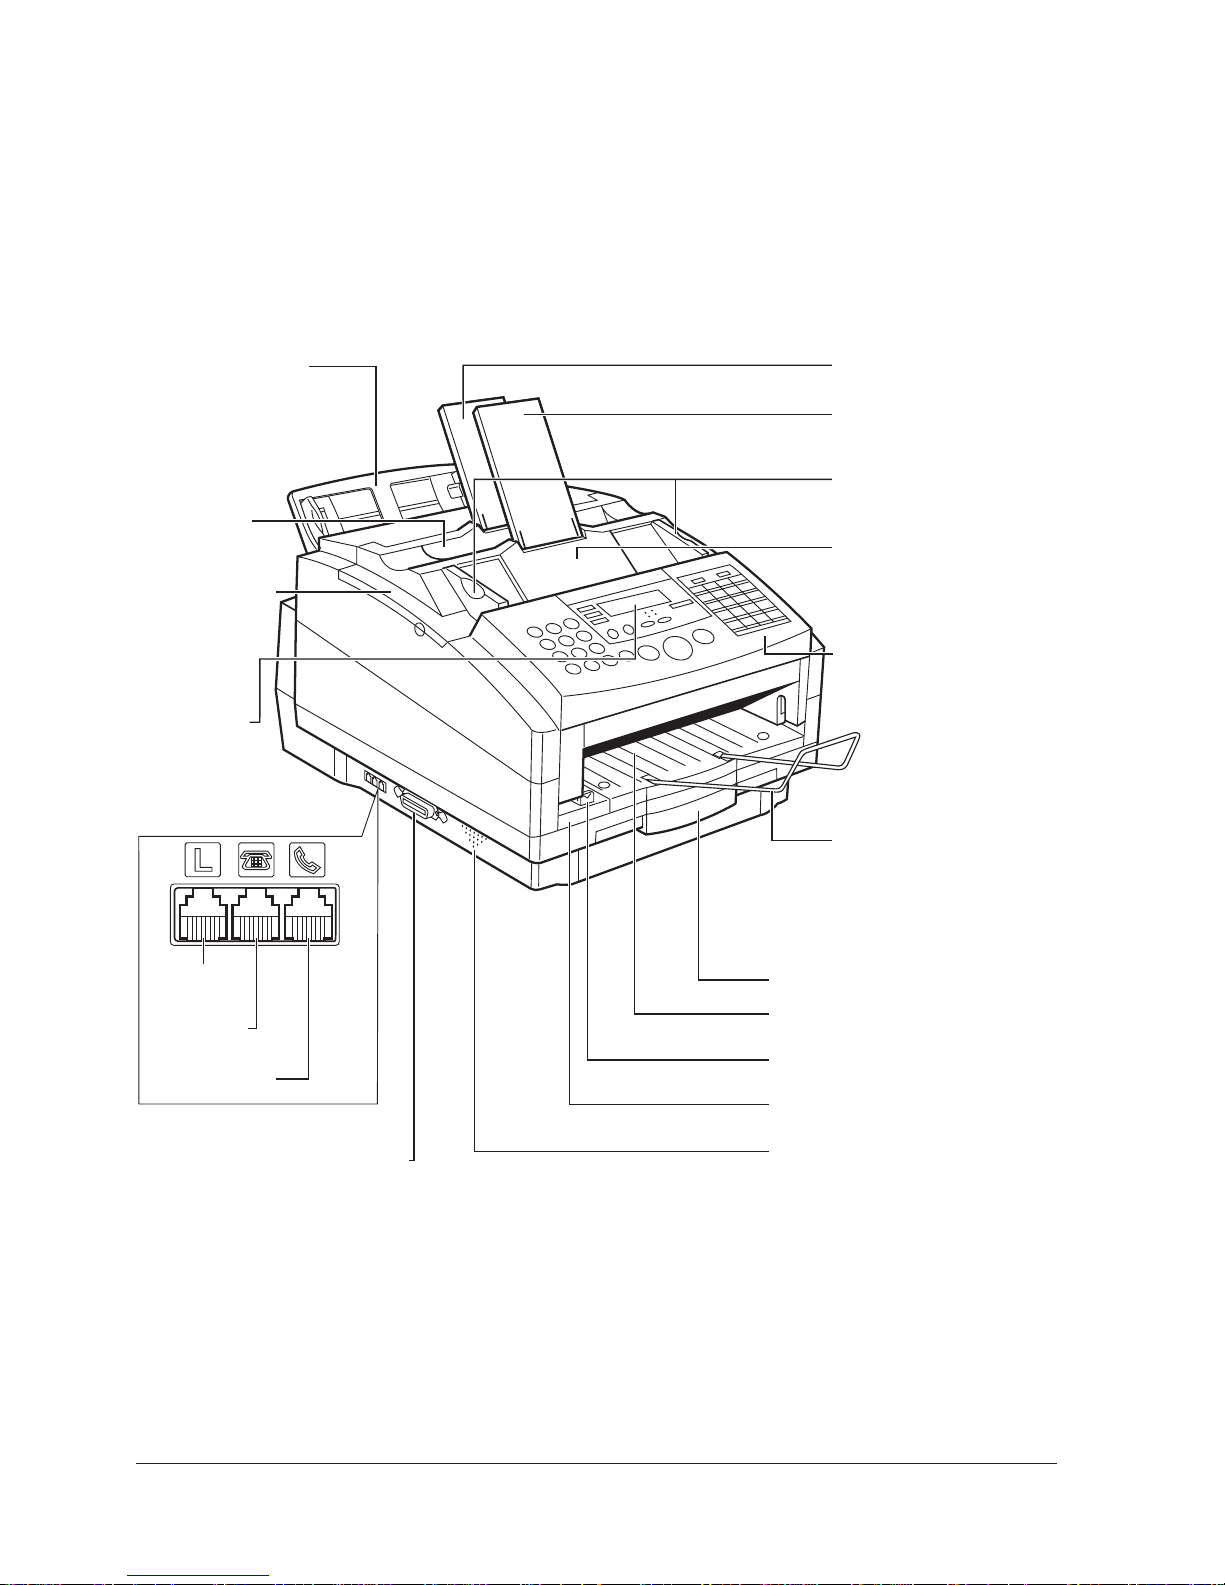
Controls, Components, and Connections
Now that you’ve assembled your MultiPASS L90, use the diagrams on the
following pages to become familiar with its components and functions.
From the Front
Manual Feed Tray
Face-Down
Delivery Slot
Printer Cover
LCD Display
Displays
Messages and
Menu Selections
Input Jacks
Output Tray
Document Support for ADF
Paper Guides
Adjust to the Width of the
Document
Automatic Document
Feeder (ADF)
Holds Document pages to be
scanned
Operation Panel
Use the Operation Panel
Buttons to operate the Unit
Document Support for
Scanned Documents
Holds Document pages after
they are scanned
Telephone
Line Jack
Extension
Phone Jack
Handset Jack
Bi-directional Parallel Port
Paper Cassette
Face-up Delivery Slot
Paper Delivery Slot
Inner Cover
Speaker
2-9Chapter 2 Getting Started
Page 30
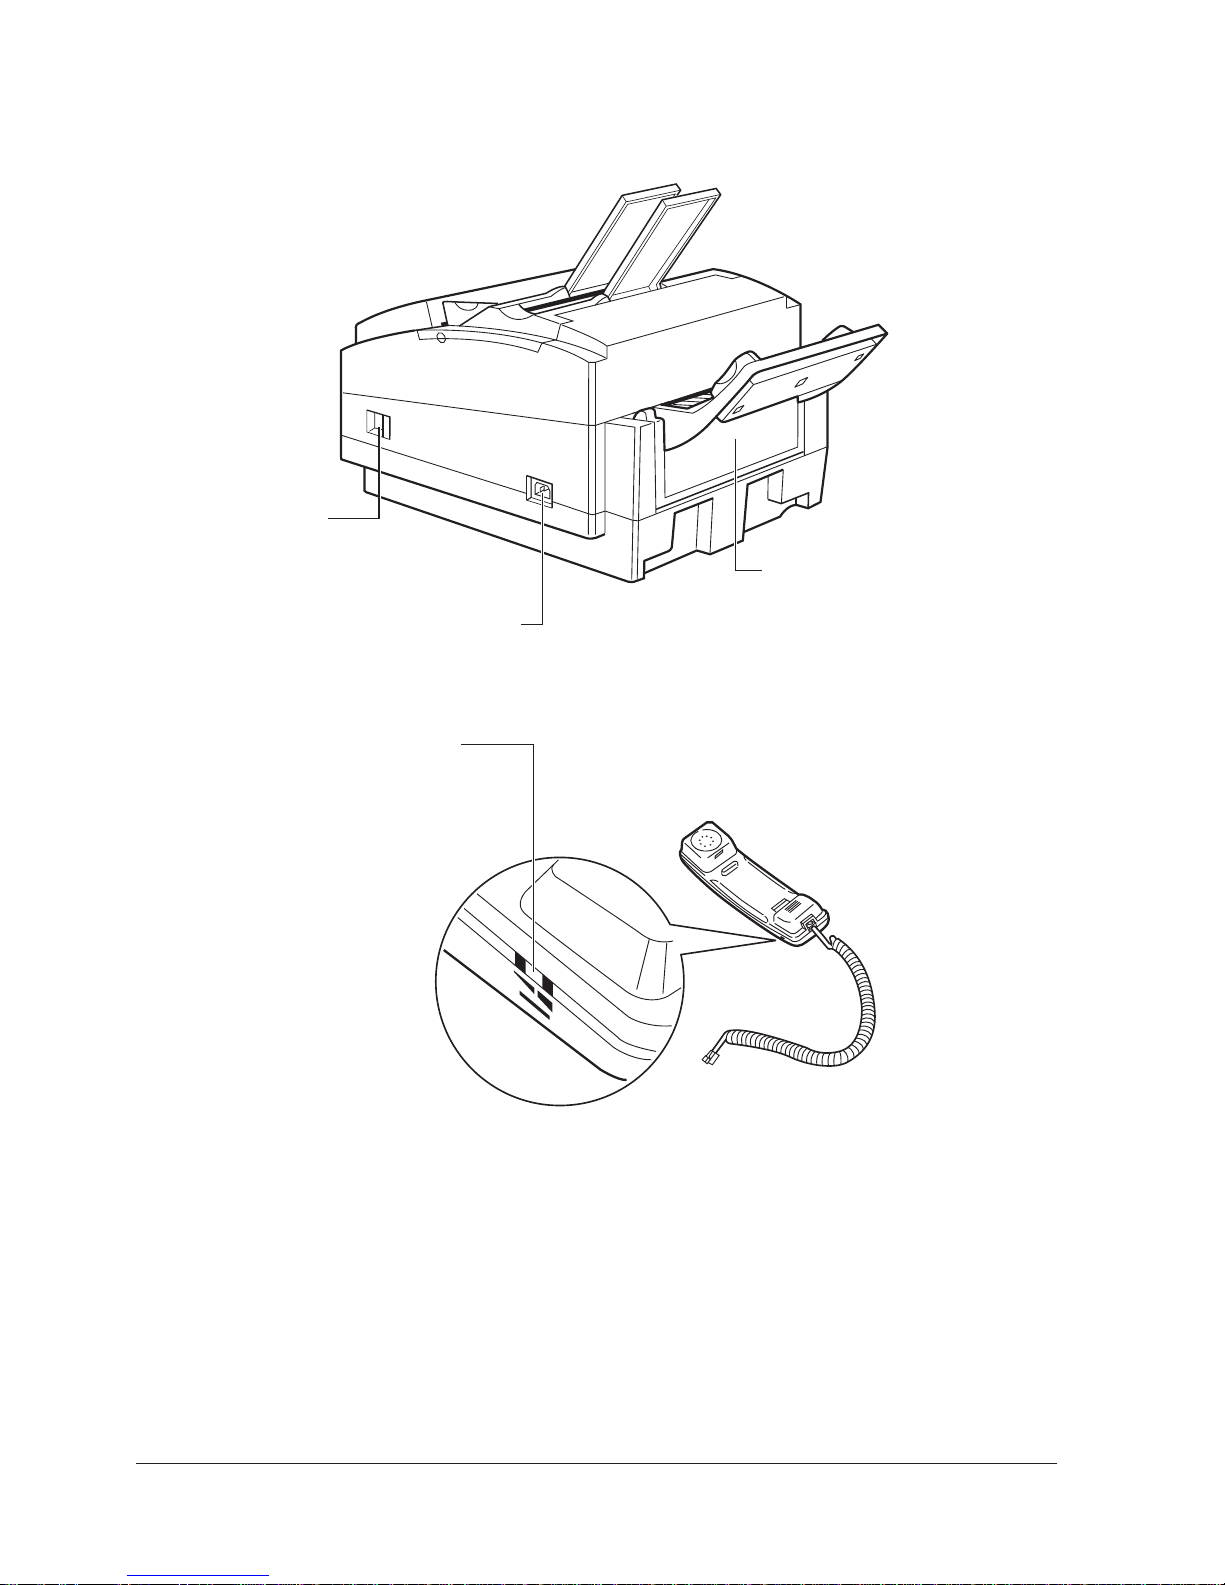
From the Back
Front Cover Release
Latch
Opens the Front Part of
the Unit to remove
recording Paper Jams
Power Connector
The Handset (Option)
Ringer Volume Switch
Adjusts the Volume of the Ringer.
There are three Settings: High, Low,
and Off. Use a pen or other pointed
object to adjust the Switch
Rear Cover
Open to remove Paper when a recording
Paper Jam occurs
2-10 Chapter 2Getting Started
Page 31
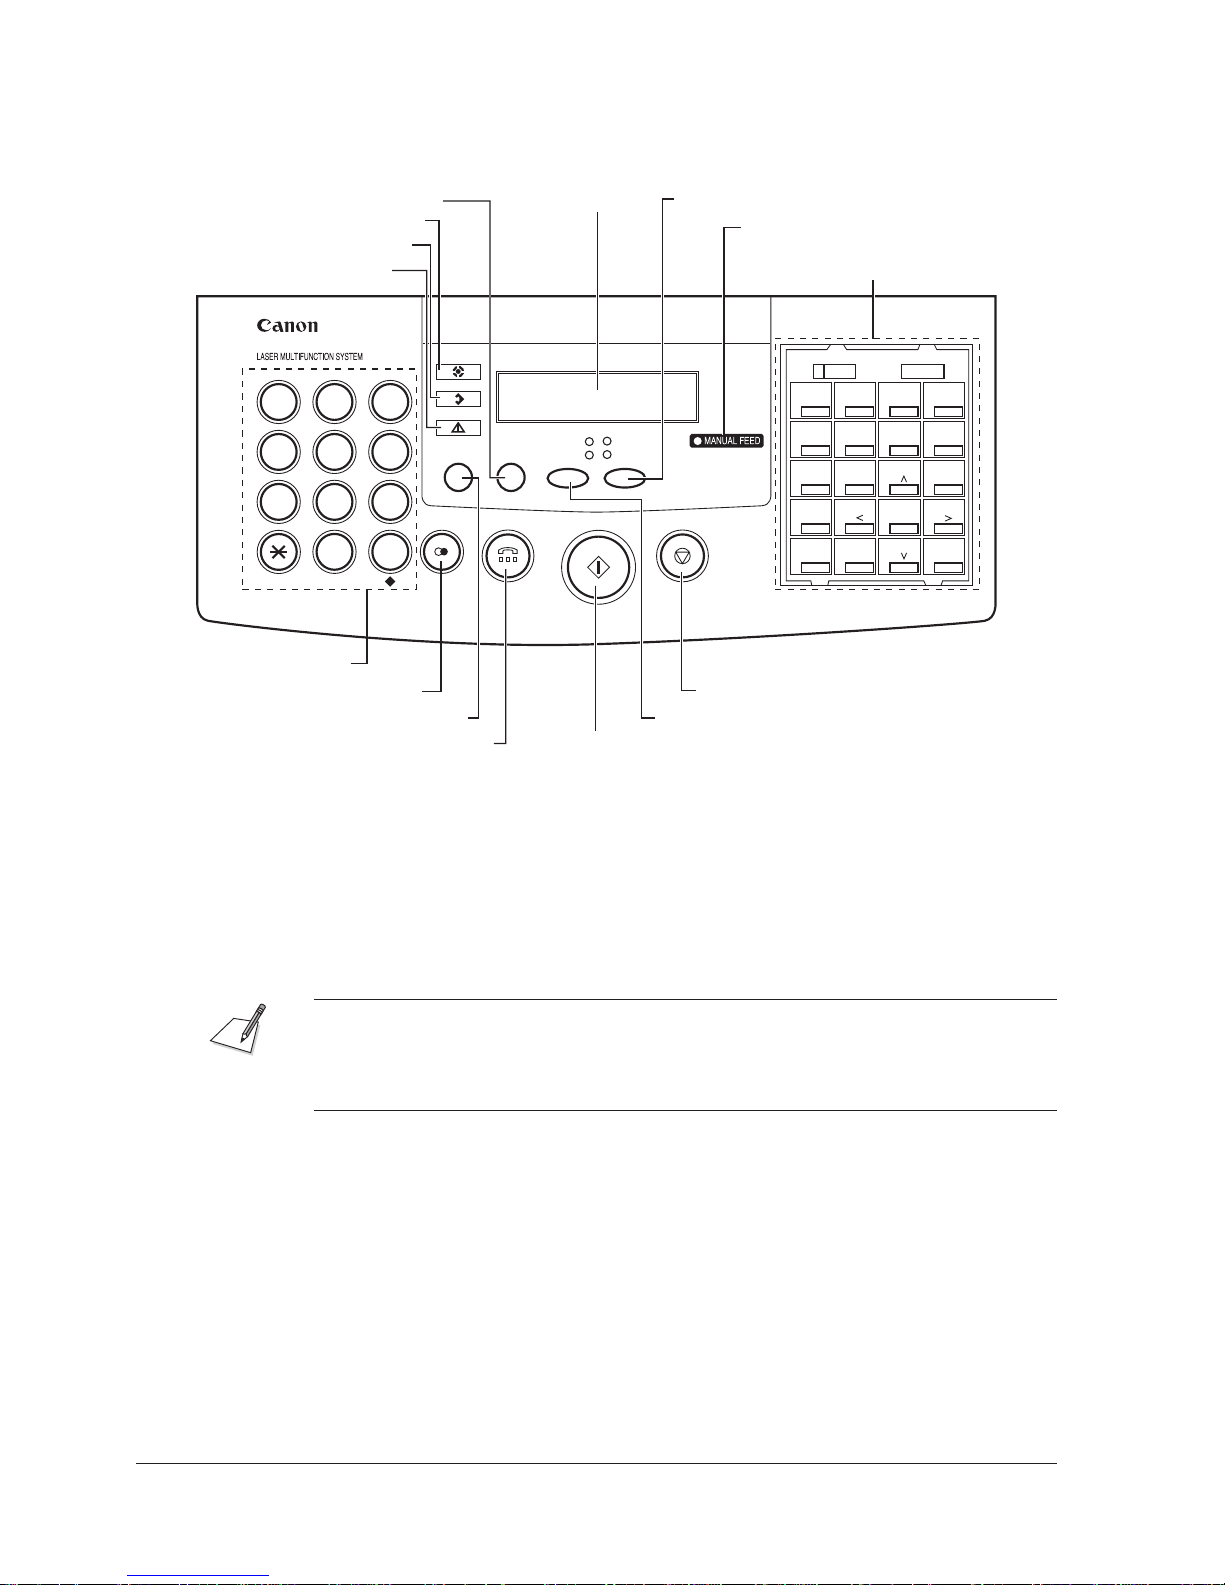
The Operation Panel
MultiPASS L90
ABC DEF
1 2 3
JKL MNO GHI
4 5 6
TUV WXYZ PQRS
7 8 9
0
I
A
B
#
D
C
CODED DIAL R
J
IN USE
MEMORY
ALARM
K
L
ANS HOOK UP
MANUAL
E
M
FINE
STANDARD
N
F
O
G
FUNCTION
DATA
REGISTRATION
01 02 03 04
05 06 07 08
REPORT
09 10 11 12
TONE / +
13 14 15 16
17 18 19 20
DELAYED
TRANSMISSION
PAUSE
CLEAR
H
SET
MEMORY
POLLING
REFERENCE
D.T.
SPACE
a ALARM lamp
Flashes when there is a paper jam, when the unit is out of paper or toner,
when there is no cartridge installed, when the loaded paper size is incorrect,
or when the printer cover or front cover is open.
b MEMORY lamp
Flashes when data is being transmitted between your computer and the
MultiPASS L90. Lights when there are documents in memory.
J When the MEMORY lamp is lit, do not unplug the unit. Doing so will erase
all data in memory.
J When the MEMORY lamp is flashing, do not unplug the unit or turn your
computer off. Doing so can cause a malfunction or damage the unit.
c IN USE lamp
Lights when the telephone line is being used.
2-11Chapter 2 Getting Started
Page 32

d R button
Press to dial an outside telephone number when the unit is connected through
a switchboard (PBX).
e LCD display
Displays messages and prompts during operation. Displays selections, text,
and names when registering information.
f FINE/STANDARD button
Use to set resolution for the type of document you want to send.
g MANUAL FEED lamp
Flashes to alert you to add paper or other media to the manual feed tray.
Lights when there is print media in the manual feed tray.
h One-touch speed dial/Special Function buttons
Use these buttons for one-touch speed dialling and to perform special
operations.
i Numeric buttons
Use the numeric buttons to enter phone numbers when dialling. These
buttons also enter text, numbers, and symbols when registering names and
numbers.
j
(REDIAL) button
Press to dial the previous number dialled with the numeric buttons.
k CODED DIAL button
Press this button and then press a 2-digit number code under which you have
previously registered a facsimile or telephone number for coded speed
dialling.
l
(HOOK) button
Press to dial with the numeric buttons when using manual sending.
(START/COPY) button
m
Press to start sending, receiving, copying, and other operations.
n ANS HOOK UP/MANUAL button
When both lamps are off, the fax is set for automatic receiving. Press and light
ANS HOOK UP when an answering machine is connected. Press and light
MANUAL for manual document receiving.
(STOP) button
o
Press to cancel sending, receiving, or registering data, or to cancel any other
operation.
2-12 Chapter 2Getting Started
Page 33
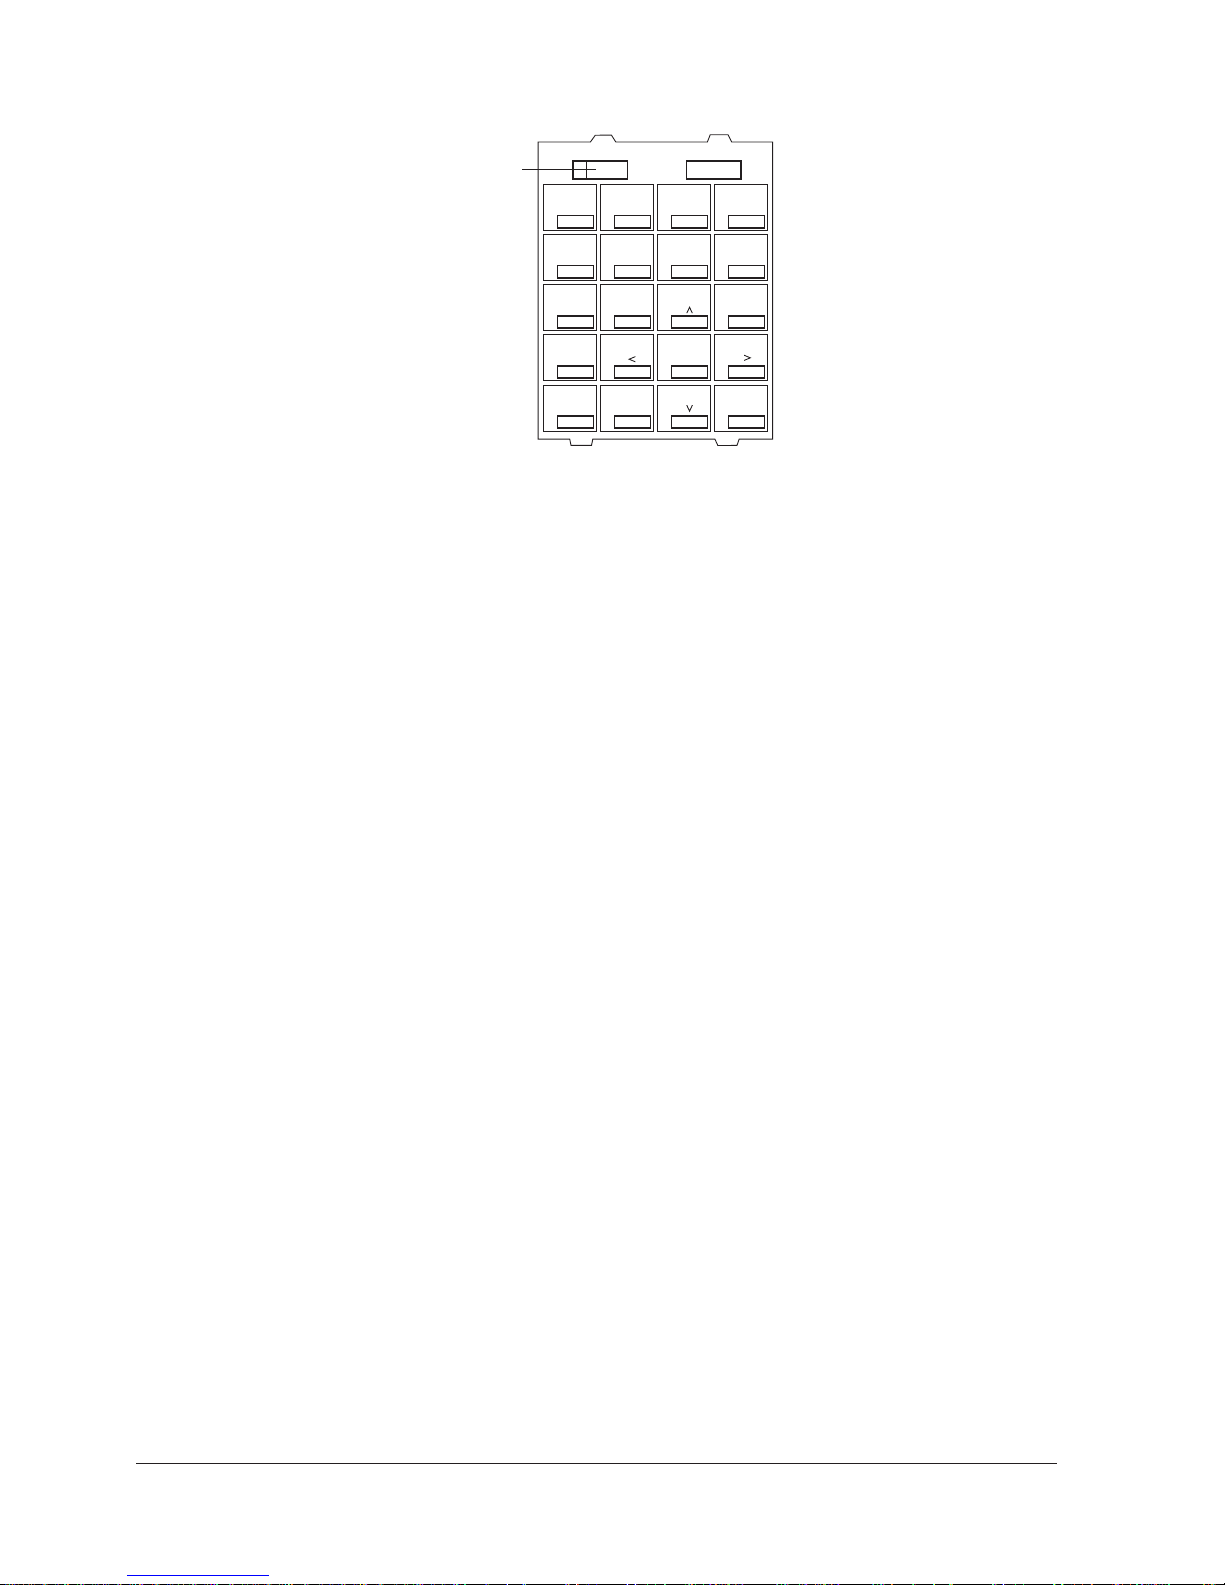
Function Lamp
FUNCTION
DATA
REGISTRATION
01 02 03 04
05
DELAYED
TRANSMISSION
06 07 08
SET
POLLING
MEMORY
REFERENCE
SPACE
D.T.
16
REPORT
09 10 11 12
TONE / +
13
17 18 19 20
PAUSE
14
15
CLEAR
J FUNCTION button
Use to select special functions such as Data Registration and Polling. The
FUNCTION lamp must be lit to select these functions.
J SET button
Use to accept special function settings and activities.
The following buttons perform special operations when the FUNCTION lamp is
on:
J DATA REGISTRATION button 01
Press to start data registration for facsimile numbers, names, and other
important settings for sending, receiving and printing.
J DELAYED TRANSMISSION button 02
Press to start registering a time for delayed sending.
J POLLING button 03
Use for polling receiving.
J MEMORY REFERENCE button 04
Use to delete or resend documents stored in memory, or to print a document
or a list of documents in memory or memory TX.
J REPORT button 09
Use to print activity reports.
J PAUSE button 10
Press to enter pauses between digits when dialling or registering facsimile
numbers.
2-13Chapter 2 Getting Started
Page 34

J Search buttons (h, i) 11 and 19
Use to scroll through selections during data registration.
J D.T. button 12
Press to confirm the dial tone when dialling a telephone number.
J TONE/+ button 13
Press to use tone dialling, even if your unit is set for pulse dialling. Press also
to enter a + in your facsimile number.
J Cursor buttons (k, j) 14 and 16
Use to move the cursor during data registration.
J SPACE button 15
Press to enter a space between numbers or letters when you register facsimile
numbers and names.
J CLEAR button 18
Press during data registration to clear a number or name.
2-14 Chapter 2Getting Started
Page 35
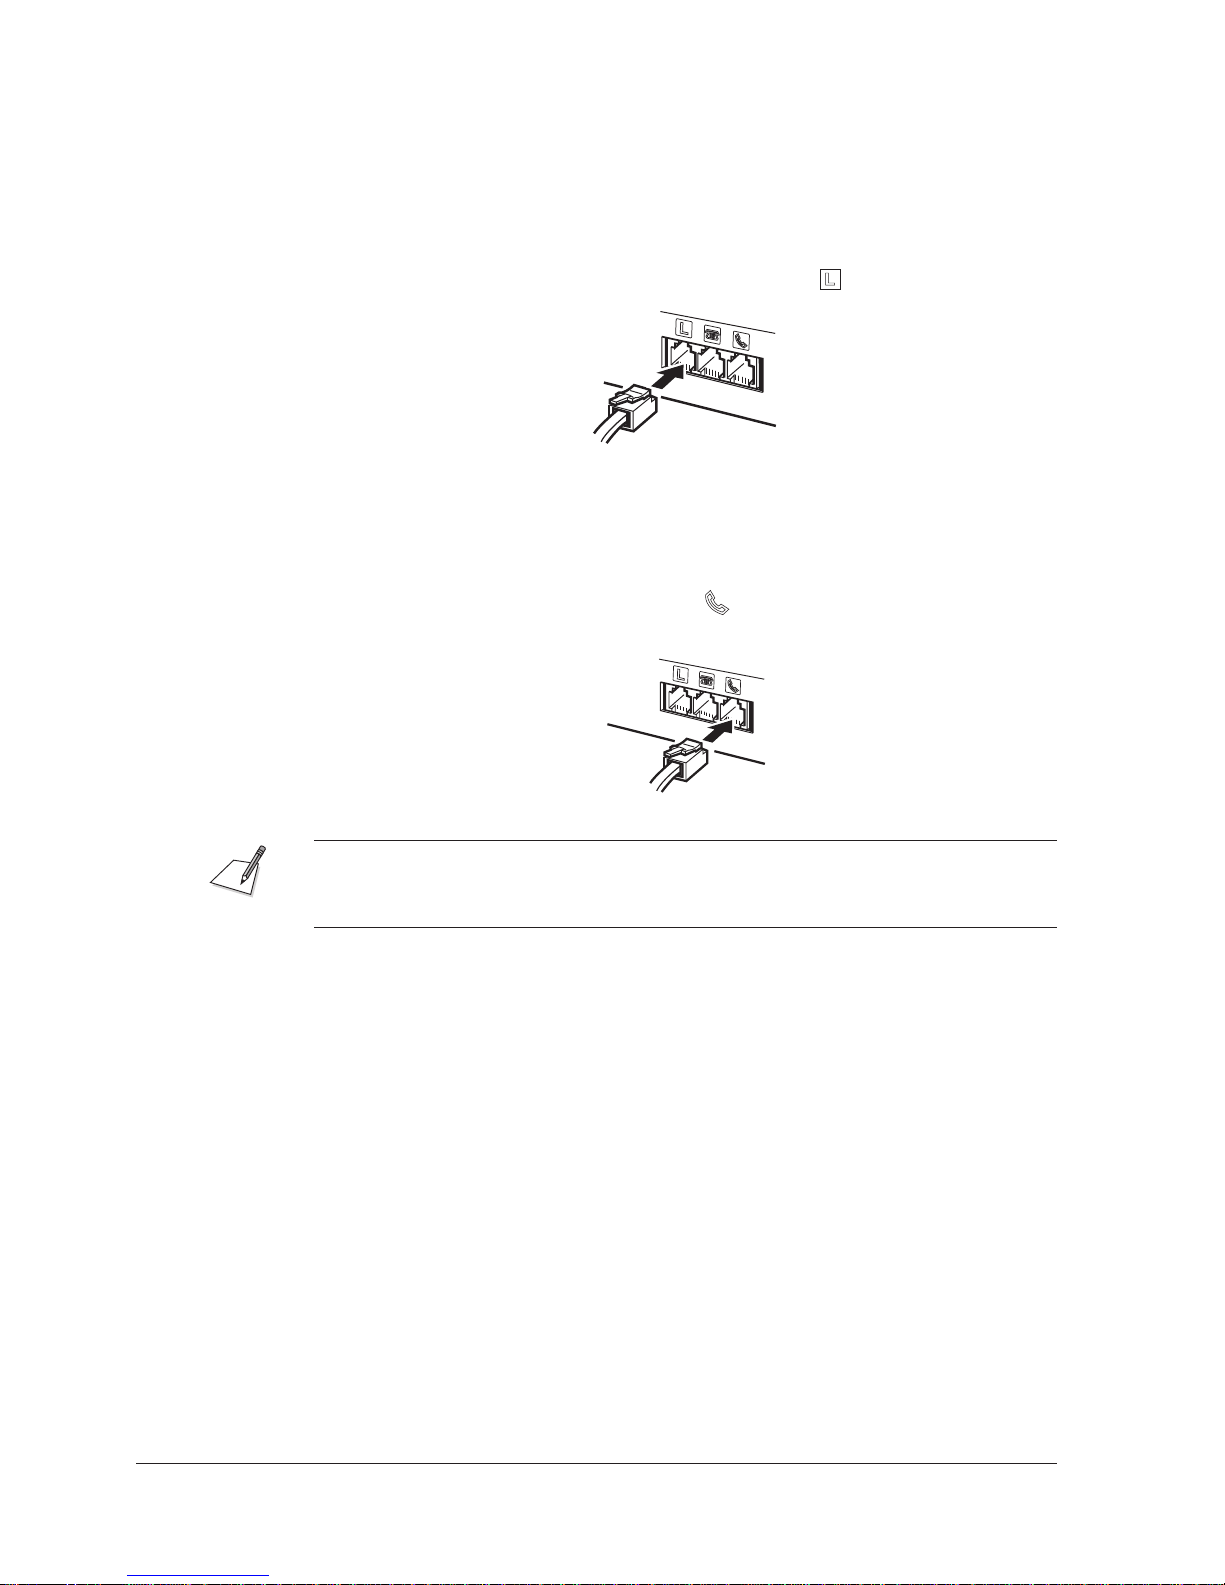
Making Connections
Use the following instructions to connect phone lines to your unit.
Connecting the Telephone Line
1. Connect the telephone line to the unit jack marked .
2. Connect the other end of the telephone line to your telephone jack.
Connecting a Telephone or Optional Handset
1. If you wish to connect a telephone or optional handset to the unit, connect
the end of the cord to the jack marked
on how to install the optional handset.)
. (See Appendix C for instructions
If the connector does not fit the jack or does not seat properly, contact your local
Canon authorised service representative or telephone company to have the
correct connector installed.
2-15Chapter 2 Getting Started
Page 36

Connecting an Extension Phone or Answering Machine
1. To connect an extension phone or answering machine to the unit, connect the
end of the extension cord to the jack marked
J You only need to use the extension/answering machine jack (the middle one)
when you are using a single phone line for both voice and fax
communications. The extension telephone does not ring for incoming calls.
J If the connector does not fit the jack or does not seat properly, contact your
local Canon authorised service representative or telephone company to have
the correct connector installed.
.
2-16 Chapter 2Getting Started
Page 37
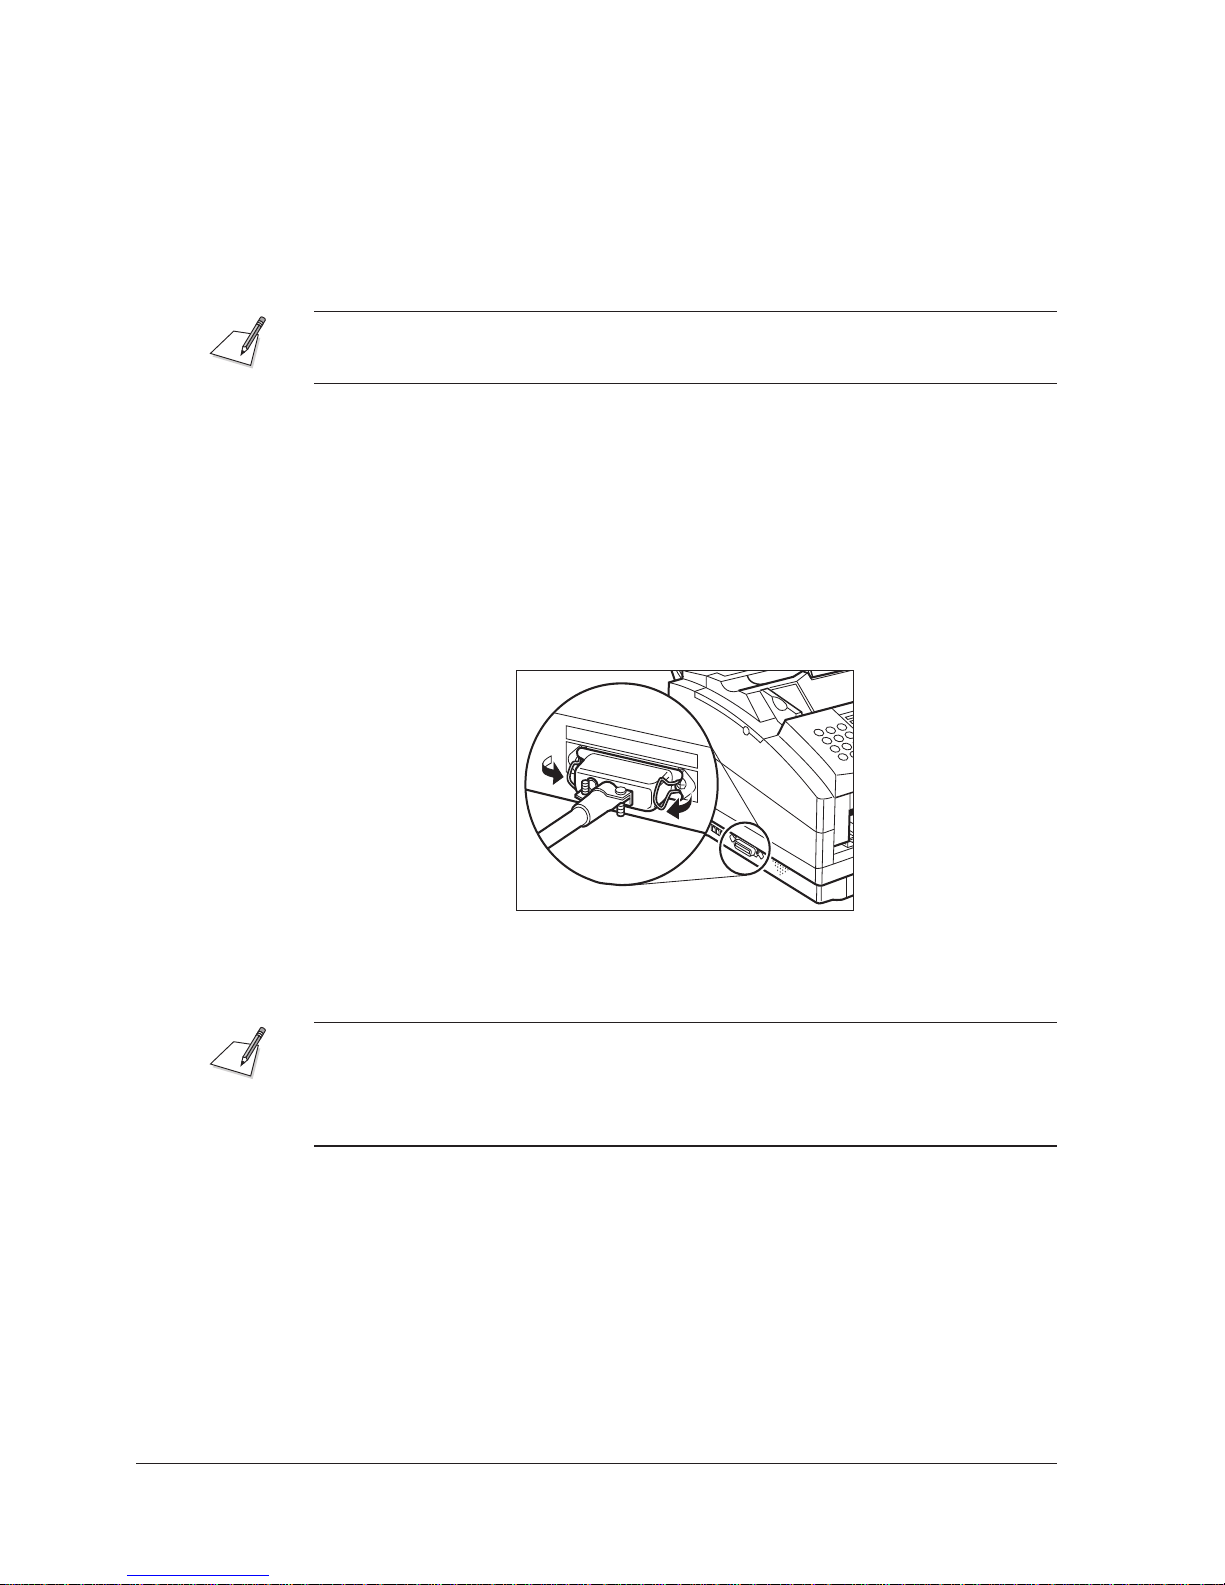
Connecting the Parallel Cable
Your MultiPASS L90 has an 8-bit, bi-directional, parallel interface port which
allows you to use it with IBM PCs and compatible computers. You need to
purchase a bi-directional parallel interface cable from your dealer. We
recommend a IEEE 1284 compliant cable.
For reliable communications between your computer and the MultiPASS L90, it
is recommended that you use a cable no more than 2 metres long.
Connect the MultiPASS L90 to your computer as follows:
1. Make sure the computer is turned off and the MultiPASS L90 unplugged.
2. Connect the parallel cable to your MultiPASS L90.
J Align the cable connector with the interface port so that the shapes match.
J Gently press the cable connector into the port.
J Secure the cable connector by snapping the two wire clips (on either sides
of the port) into the cable connector.
3. Connect the other end of the parallel cable to the parallel interface port on
your computer.
J When the MEMORY lamp flashes, printing data is being transmitted from
your computer to the MultiPASS L90 through the parallel cable.
J Do not disconnect the parallel cable when the MultiPASS L90 is plugged in.
Doing so can cause a malfunction or damage your unit.
2-17Chapter 2 Getting Started
Page 38
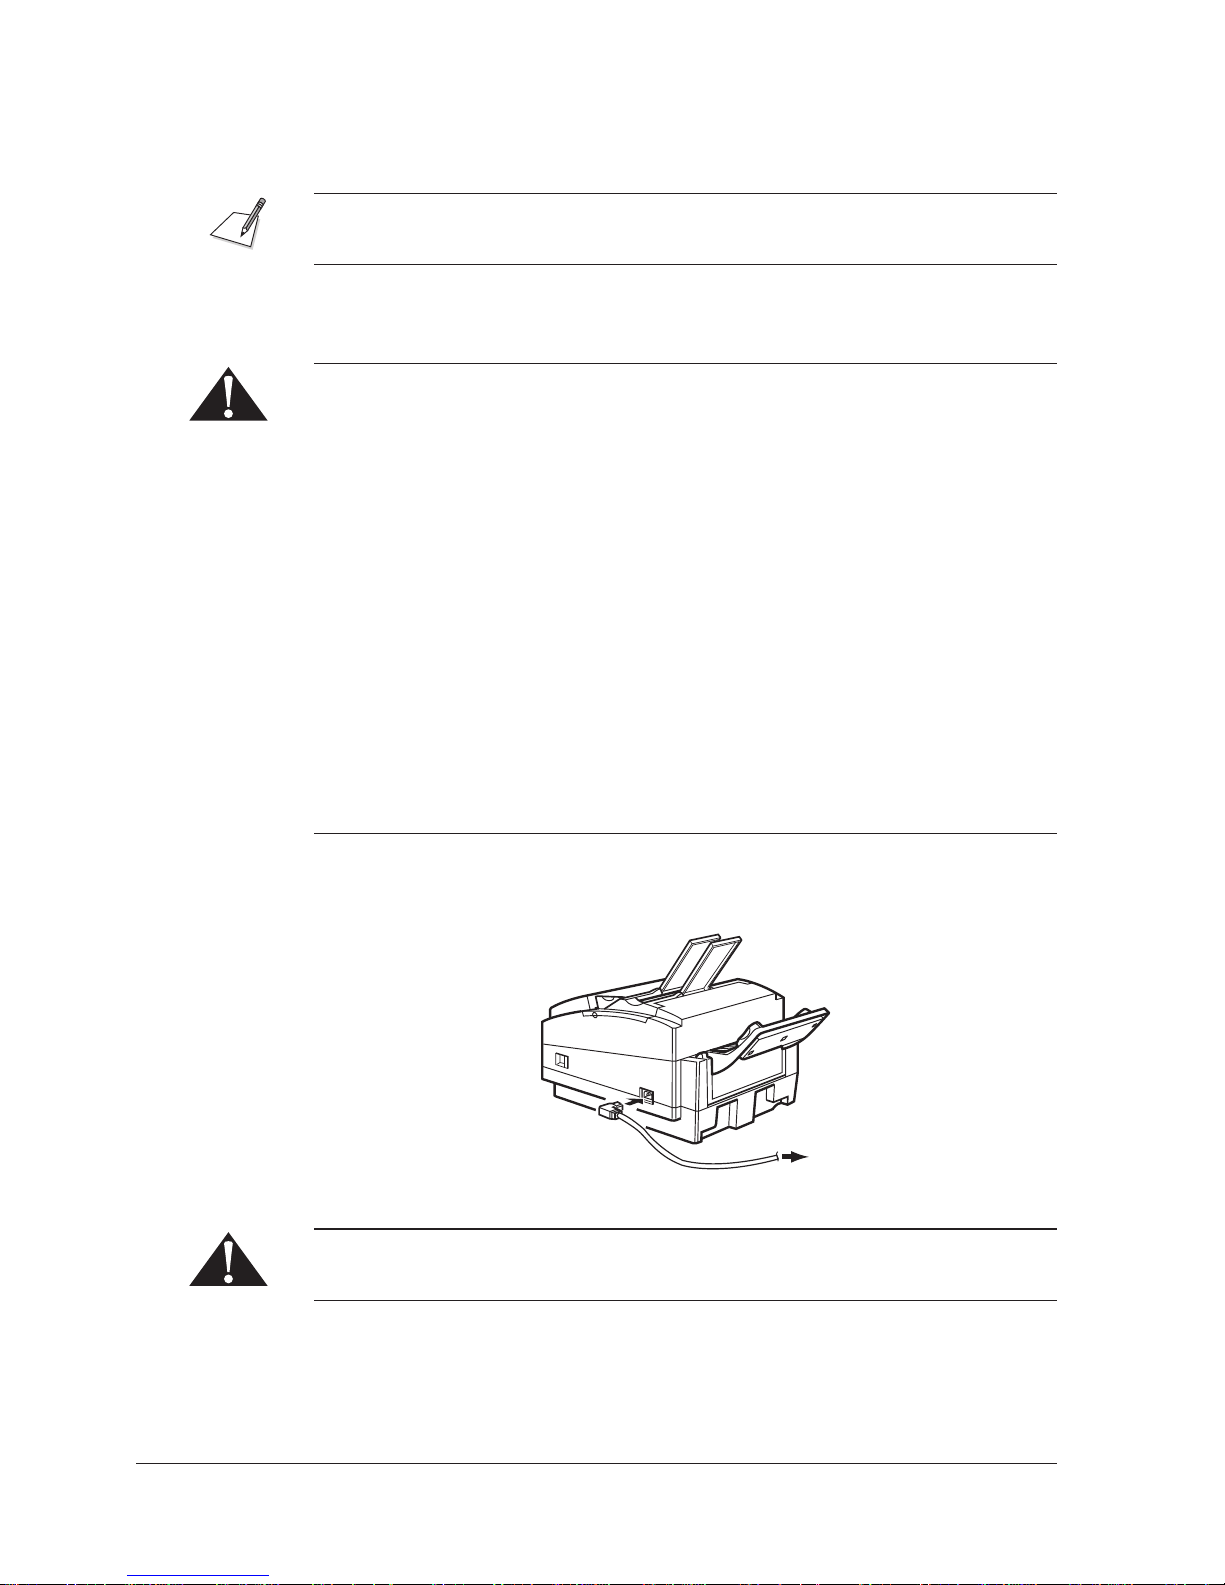
Powering Up
If you are planning on increasing your unit’s memory, see Appendix C before you
power up.
Once you finish setting up your unit, you are ready to power it up.
Follow these guidelines when connecting your MultiPASS L90 to a power source:
J The unit is intended for domestic use only and requires 200-240 V AC. Do not
J Use only the power cord that came with the MultiPASS L90. Using a longer
J Unplug the unit by pulling on the plug itself, not on the cord.
J Do not plug the unit into a power outlet shared with an appliance that
J Make sure nothing is laying on the power cord, and that the cord is located
J Do not overload the electrical outlet. Make sure that the total amperage used
use it outside the country where you purchased it.
cord or extension cord can cause the unit to malfunction.
generates electrical noise, such as an air conditioner, computer, electric
typewriter, or copier.
where it can not be walked on or tripped over.
by all products plugged into the wall outlet does not exceed the ampere rating
of the outlet’s circuit breaker.
J Do not plug the unit into an uninterruptable power supply (UPS).
To connect the power cord, plug the cord into the power receptacle on the
MultiPASS L90, and then into a 200-240 V AC outlet.
200-240 V AC
Power Outlet
Before plugging in the unit, make sure there are no documents in the automatic
document feeder (ADF).
2-18 Chapter 2Getting Started
Page 39
J The MultiPASS L90 has no power switch, so its power is on as soon as you
plug it in. Once powered up, though, the unit still needs to warm up before
you can use it.
J Depending on the number of pages accumulated in the MultiPASS L90
memory, it can take up to four minutes for the unit to warm up.
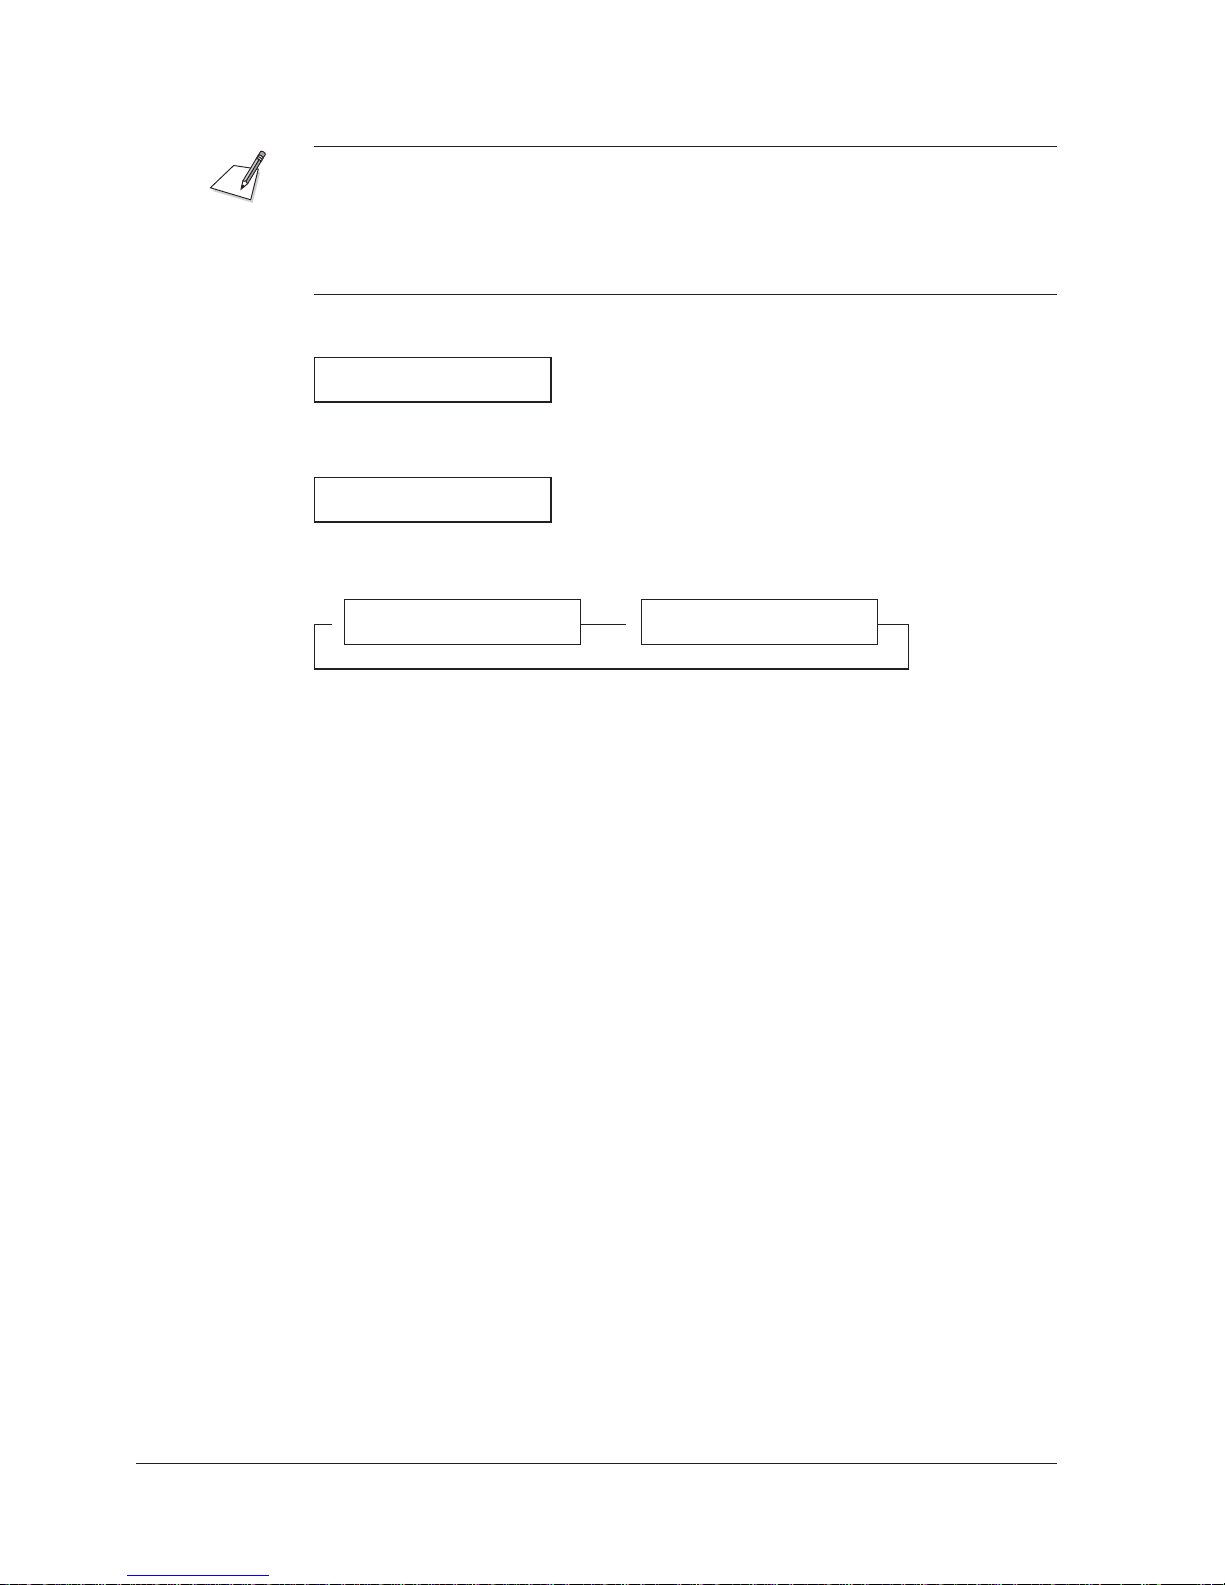
While the unit is warming up, the following message appears in the LCD display:
PLEASE WAIT
The unit is warmed up and ready for use when the date appears in the LCD
display:
22/07 ’97 TUE 12:34
When connecting the unit for the first time, the date display alternates with the
following message:
22/07 ’97 TUE 12:34 INSTALL CARTRIDGE
P P
See “The Toner Cartridge” on the following pages for details on installing the
toner cartridge.
If face-up delivery is selected, the LCD will display FACE UP PRINT OUT
alternately with the other displays. See page 7-8 for details on selecting paper
delivery.
2-19Chapter 2 Getting Started
Page 40
The Toner Cartridge
HDD
Handling and Storing Cartridges
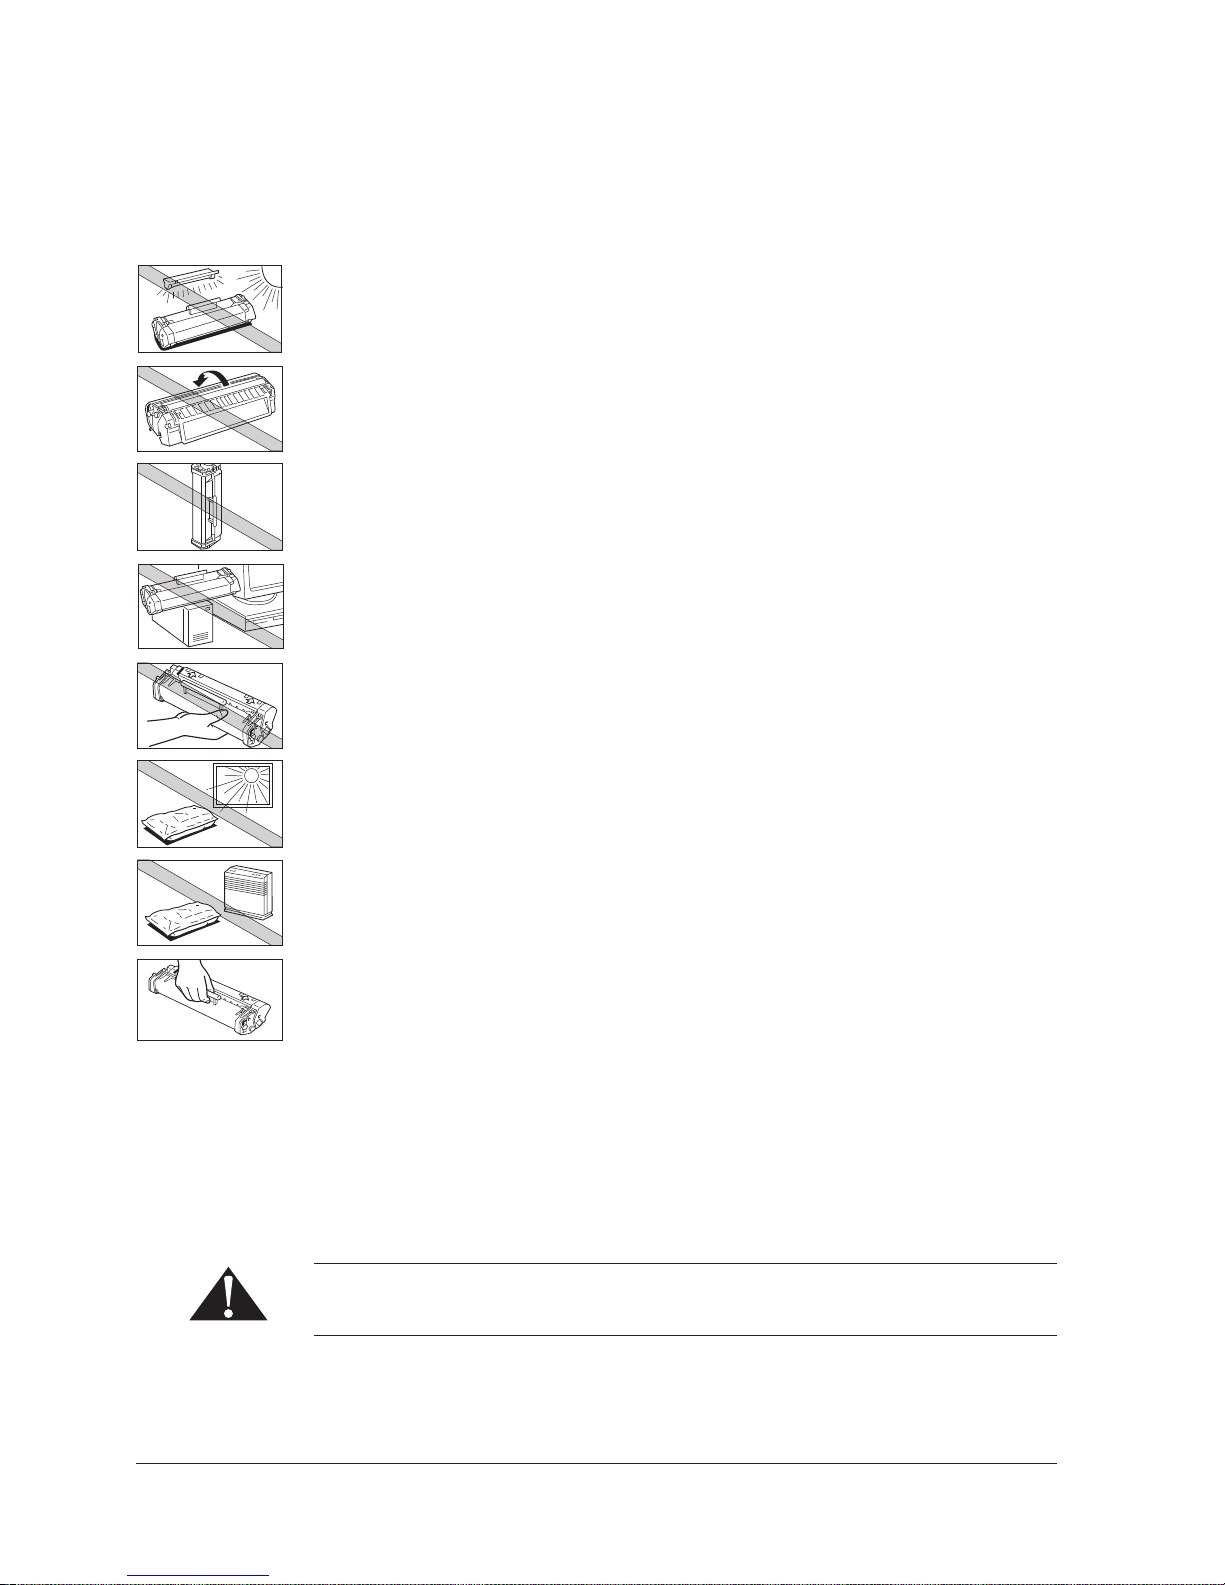
J Do not expose the cartridge to direct sunlight or bright light for longer than
five minutes.
J Do not open the drum protective shutter on the cartridge. If the drum surface
is exposed to light and damaged, print quality may deteriorate.
J Do not stand the cartridge on end, and do not turn it upside down. If toner
becomes caked in the cartridge, it may prove impossible to free it even by
shaking the cartridge.
J Keep the cartridge away from computer screens, disk drives, and floppy disks.
The magnet inside the cartridge may harm these items.
J Never touch the drum protective shutter. When holding the cartridge avoid
touching the drum protective shutter with your hands.
J Do not store the cartridge in direct sunlight.
J Avoid locations subject to high temperature, high humidity, or rapid changes
in temperature. Store the cartridge between 0!C and 35!C.
J Hold the cartridge as shown so that your hand is not touching the drum
protective shutter.
J Store the cartridge in its protective bag. Do not open the bag until you are
ready to install the cartridge in the unit.
J Save the protective bag. You may need to repack and transport the cartridge
at a later date.
J Do not store the cartridge in salty air or where there are corrosive gases such
as from aerosol sprays.
DO NOT PLACE THE CARTRIDGE IN FIRE. TONER POWDER IS
FLAMMABLE.
2-20 Chapter 2Getting Started
Page 41
Installing/Replacing the Toner Cartridge
The MultiPASS L90 uses a Canon FX3 toner cartridge. The procedure below
explains how to install the cartridge for the first time, and how to replace it when
the toner runs out.
When the message REPLACE CARTRIDGE appears, the toner in the cartridge
may simply be unevenly distributed. Before replacing the cartridge, follow the
instructions on page 10-13 to evenly distribute the toner. If after doing this the
message remains displayed or the print quality is low, replace the cartridge as
described below.
Canon makes numerous cartridges. The FX3 toner cartridge has been designed
specially for the MultiPASS L90 and is the only one Canon recommends that you
use.
1. Remove any documents or printed pages from the unit.
2. Make sure the MultiPASS L90 is plugged in.
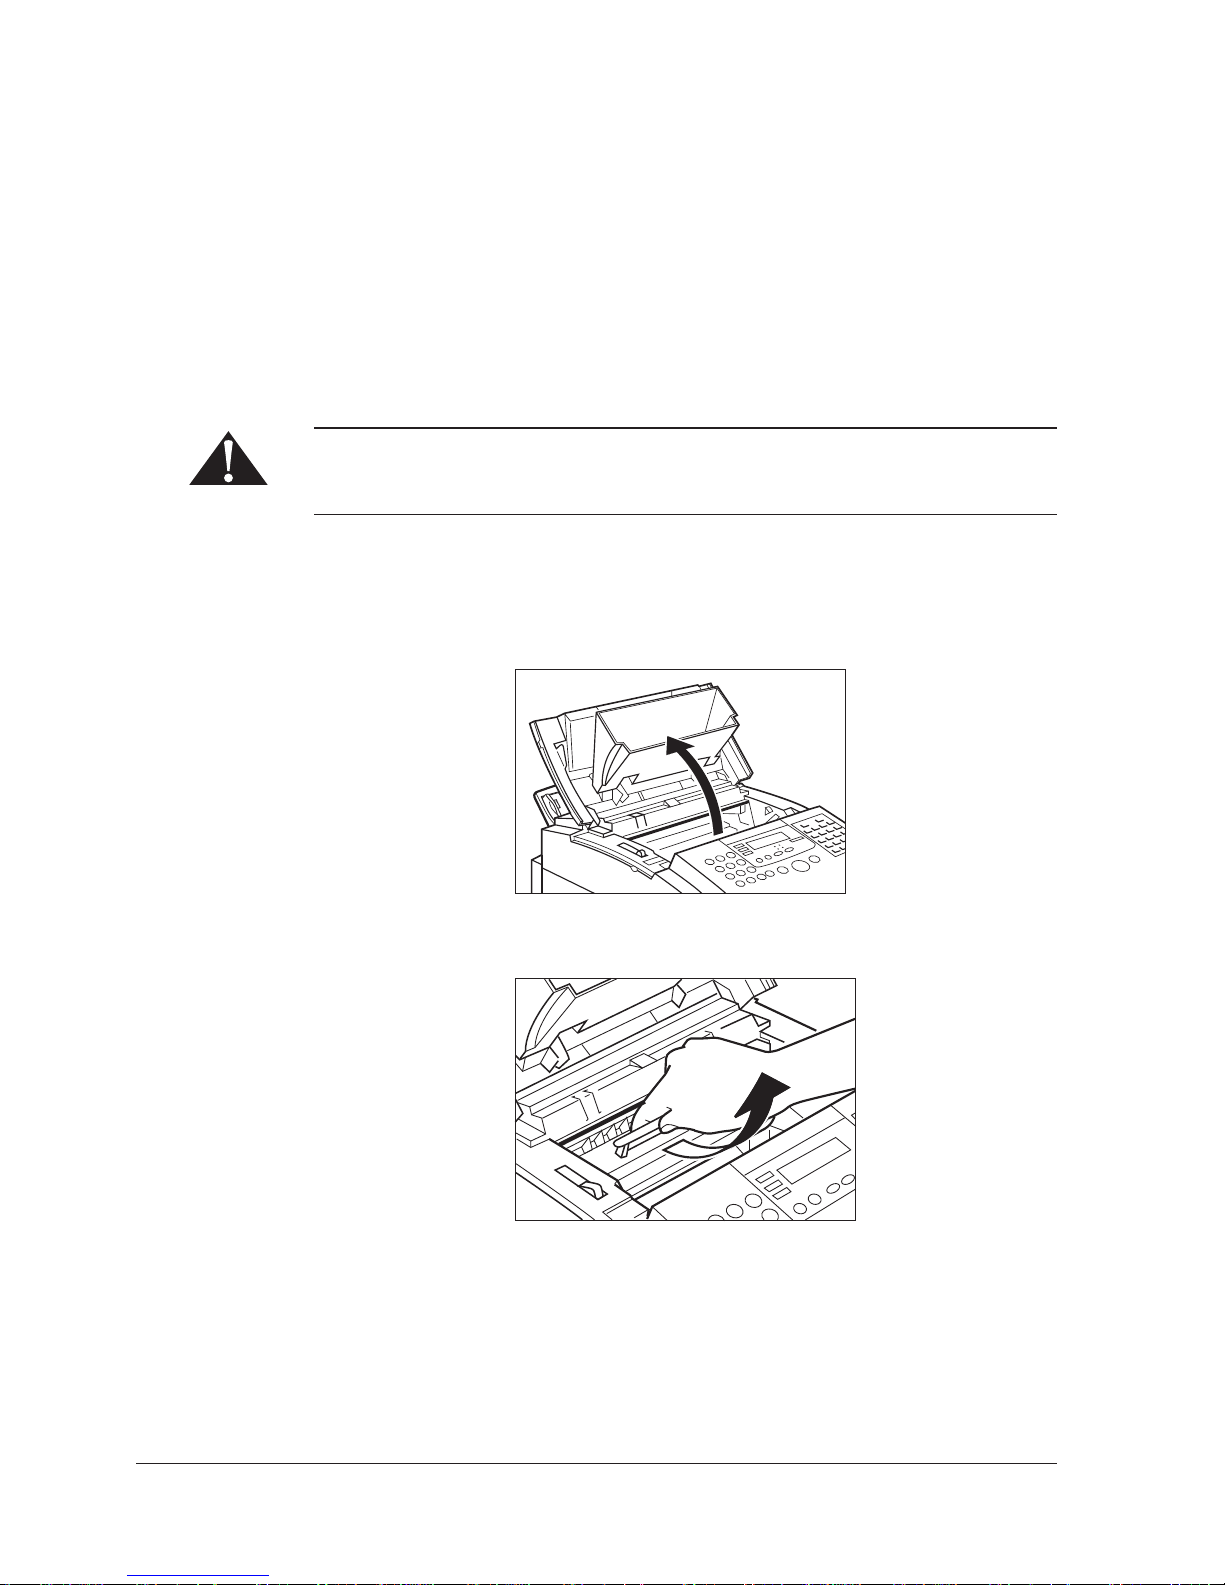
3. Open the printer cover by grasping it at both sides and lifting it up.
4. If replacing a used cartridge, remove the old one as shown.
2-21Chapter 2 Getting Started
Page 42
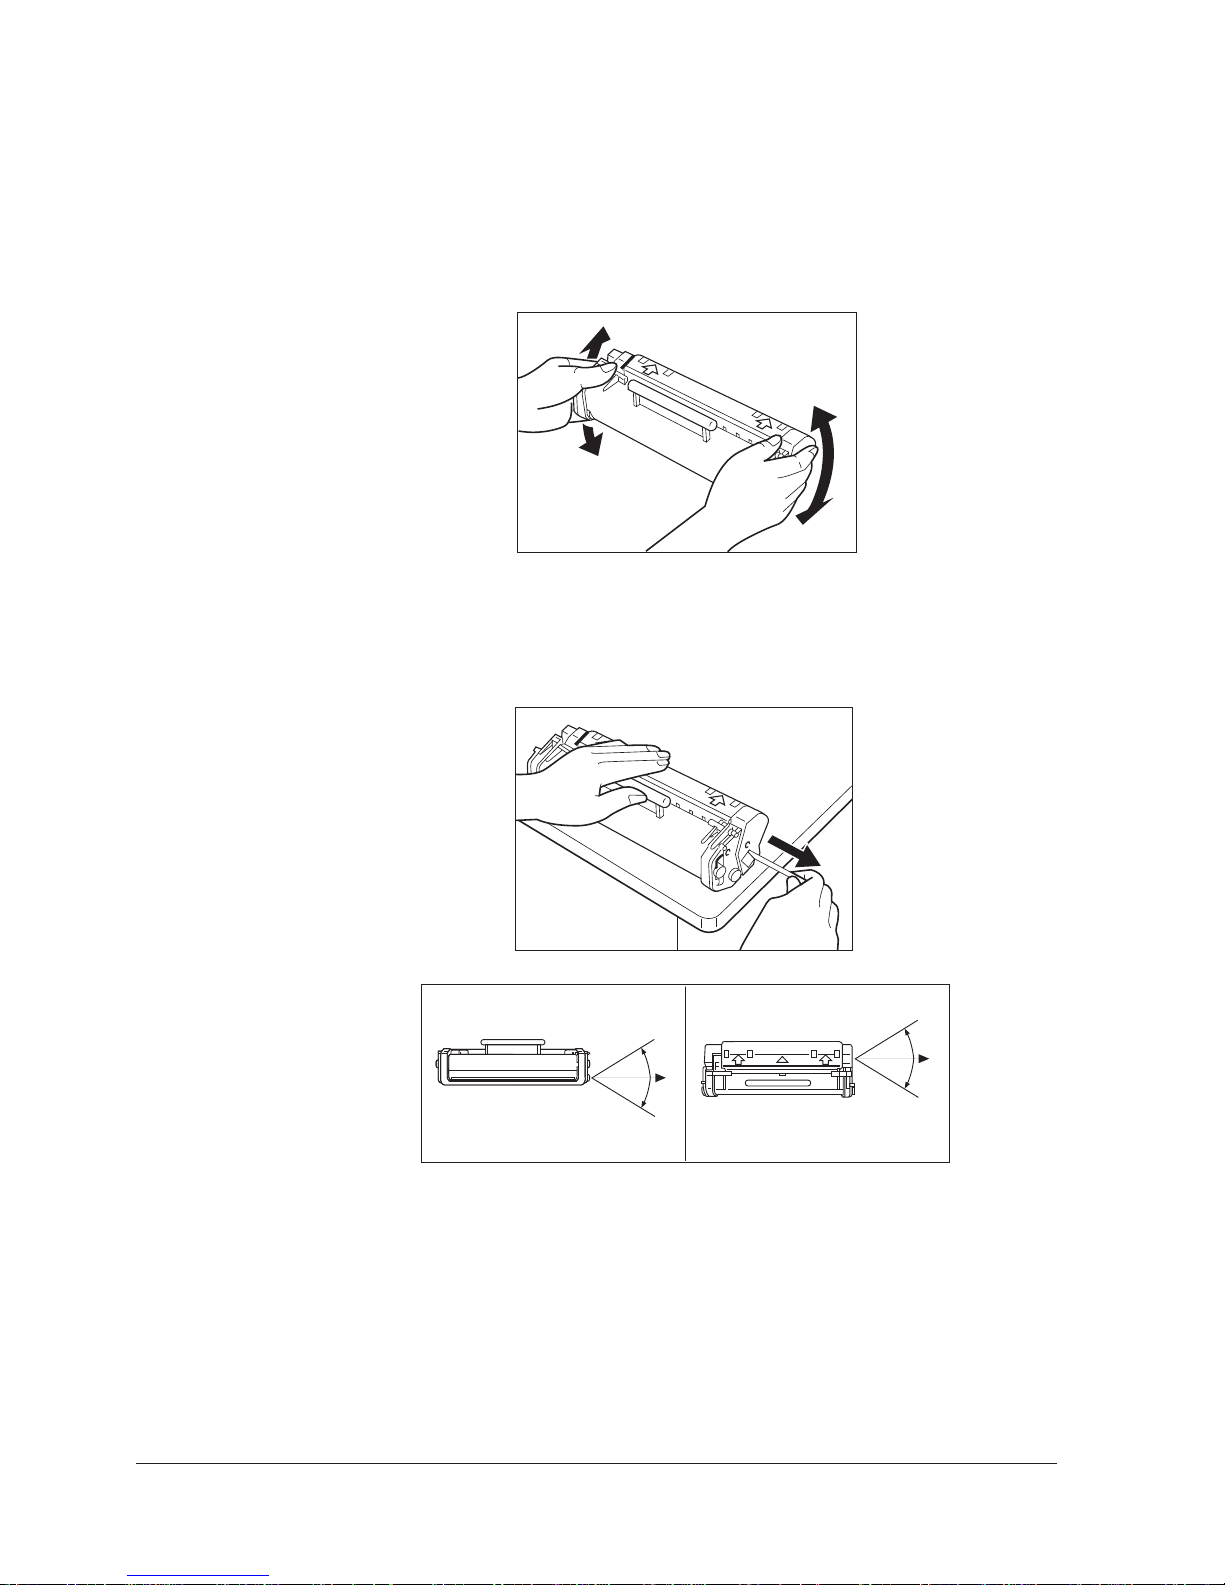
5. Remove a new toner cartridge from its protective bag.
J Save the protective bag. You may need to repack and transport it in the
future.
6. Gently rock the cartridge from side to side five or six times.
J This evenly distributes the toner inside.
7. Place the cartridge on a flat, clean surface, and steady it with one hand. Then
remove the seal by gently pulling on the plastic tab with your other hand.
J Use a firm, even pull to remove the plastic seal. To avoid breaking the
seal, do not jerk on it unevenly.
2-22 Chapter 2Getting Started
Side View Top View
Pull in this direction Pull in this direction
Page 43
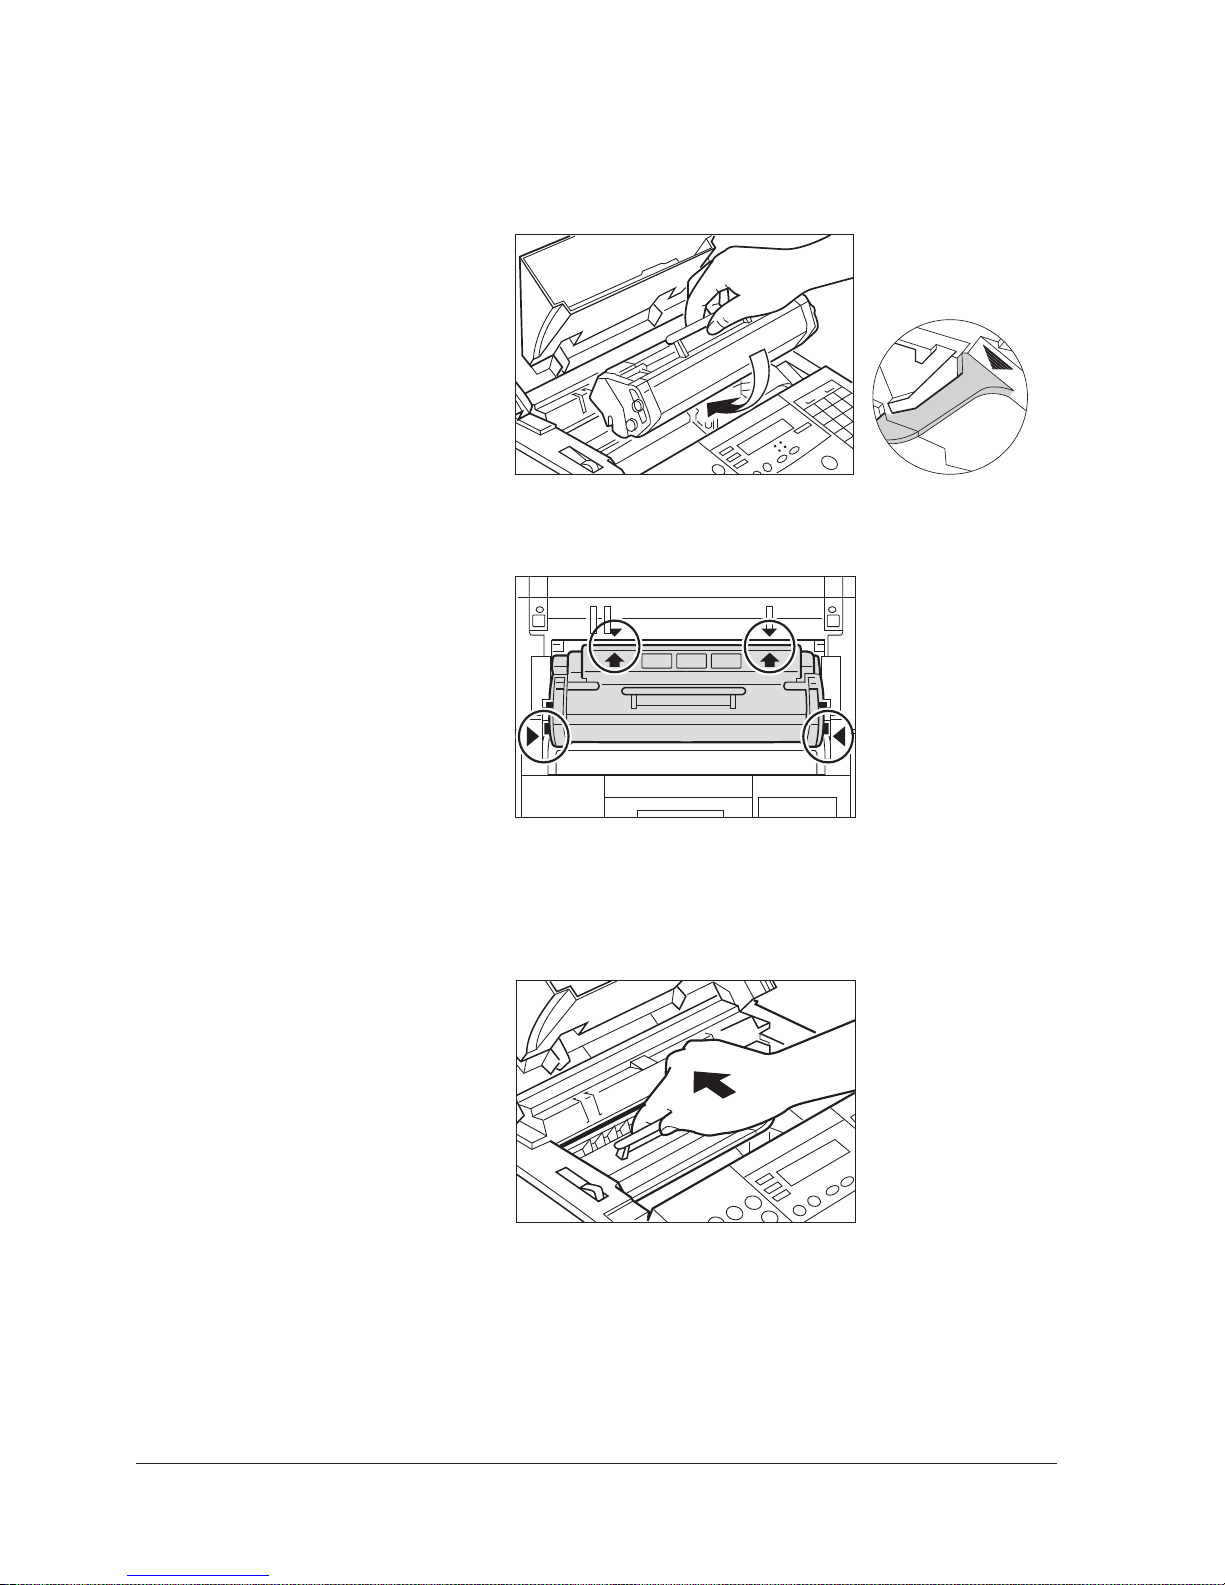
8. Hold the cartridge by its handle and insert as follows:
J Make sure the round large tabs on the sides of the cartridge are aligned
with the arrow marks (P, O) on the unit.
J Align the arrow marks on the cartridge (A) with the arrow marks on the
inside of the unit (N).
9. Gently slide the cartridge down and back and push firmly until it clicks into
position.
J Make sure the cartridge is set all the way into the unit. Otherwise it won’t
operate properly.
2-23Chapter 2 Getting Started
Page 44
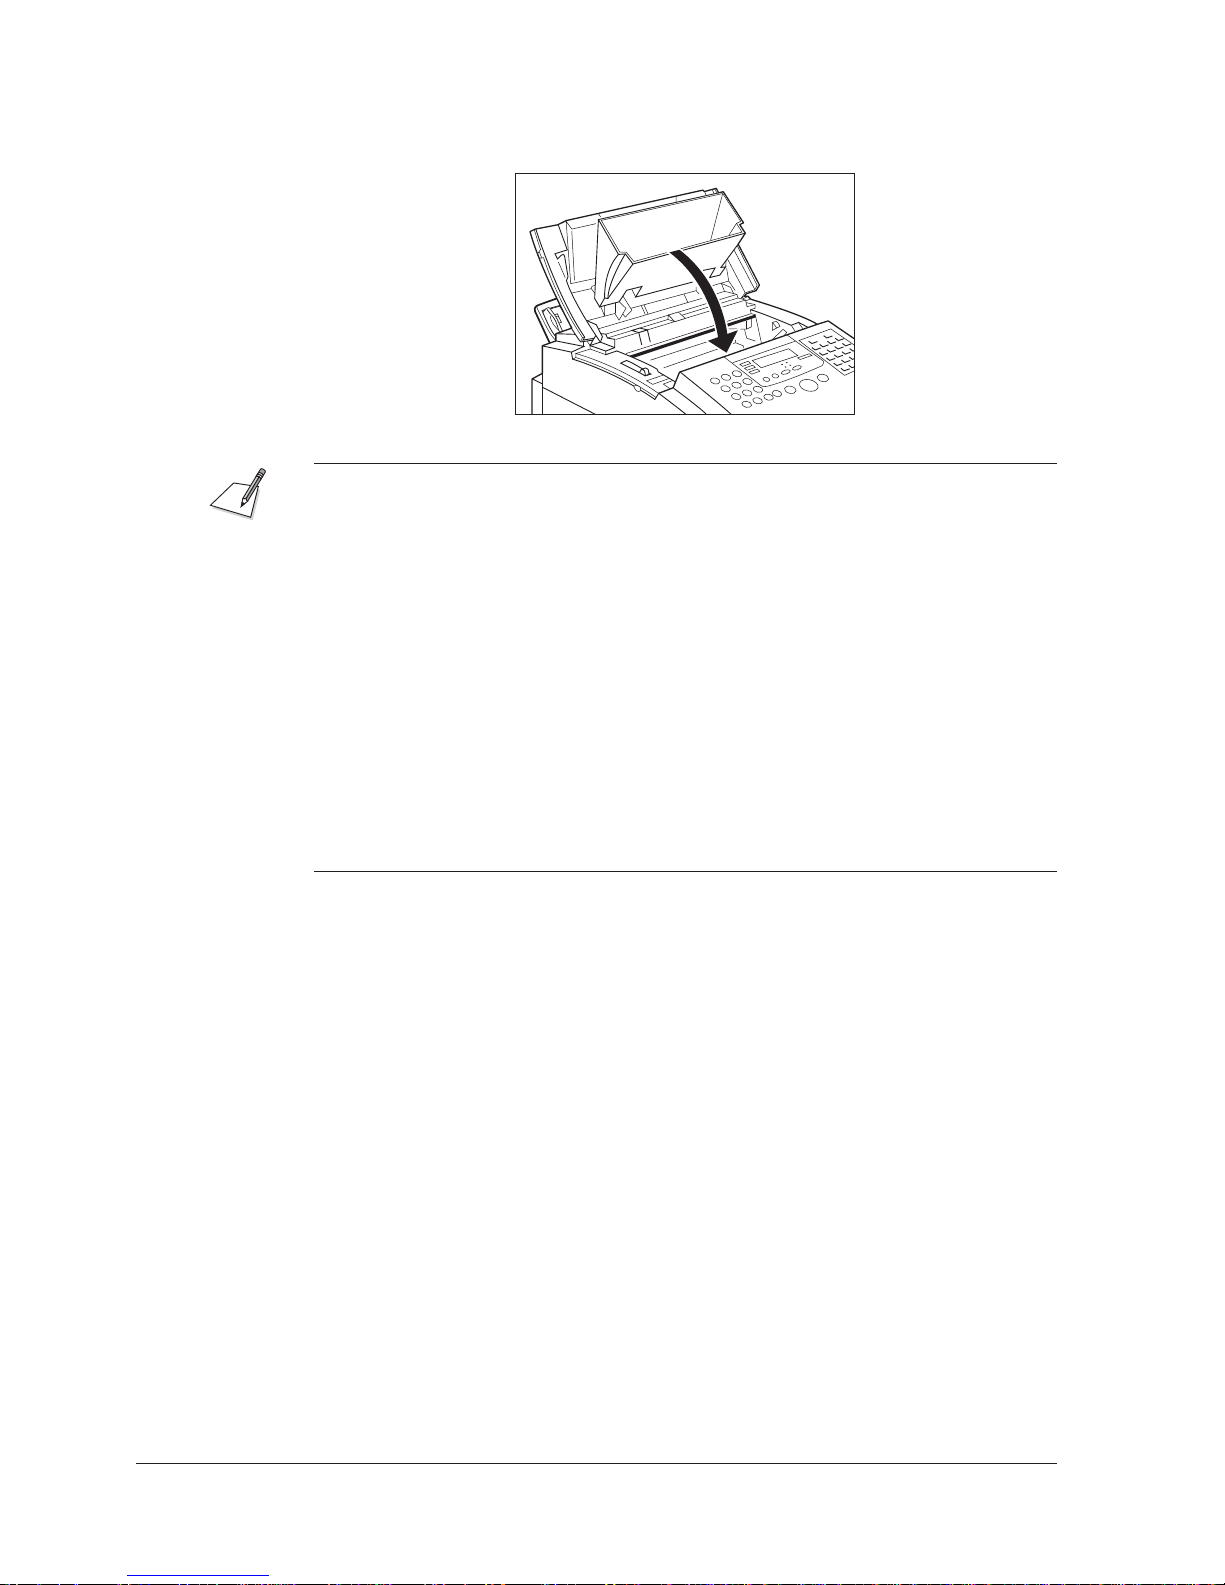
10. Gently close the printer cover.
J Never leave the printer cover open. Exposure to light can damage the drum
surface.
J If you see CHECK PRT/FRNT COVRS in the display even after closing the
printer cover, the cartridge may not be installed properly. Try installing the
cartridge again.
J If you see REPLACE CARTRIDGE in the display, the cartridge may not be
installed properly even if the printer cover closes completely. Try installing the
cartridge again.
J After you have replaced the cartridge, make a copy of a document to check if
the unit is printing properly. See page 6-20, “Making Copies” for details on
making a copy.
J If you are setting up for the first time, go on to the next section “Loading
Recording Paper” before making a copy of a document to check if the unit is
printing properly.
2-24 Chapter 2Getting Started
Page 45

Loading Recording Paper
When the message SUPPLY REC. PAPER appears in the display, you need to
add paper to the paper cassette. Here are a few tips you should follow when you
load paper into the paper cassette.
J Use A4-size paper.
2
J Use standard 60-90 g/m
J Do not use wrinkled or curled paper.
J Let the paper run out before you refill the cassette. Avoid mixing new paper
with paper remaining in the paper cassette.
J Stack the paper so the top and bottom edges and sides are straight and even
before placing it in the paper cassette.
J To keep the paper from curling, do not open paper packs until you are ready
to use the paper. Store unused paper from opened packs in a cool, dry
location in the original packaging.
J The paper cassette supplied with your unit holds up to 250 sheets of standard
weight paper or a stack of 2.75 cm high.
J In addition to feeding paper from the paper cassette, you can also manually
feed other types of paper, envelopes, labels, and transparencies. For details,
see Chapter 7, “Manual Feed of Paper/Envelopes/etc…”.
weight paper.
Do not load paper in the cassette when the unit is printing.
2-25Chapter 2 Getting Started
Page 46
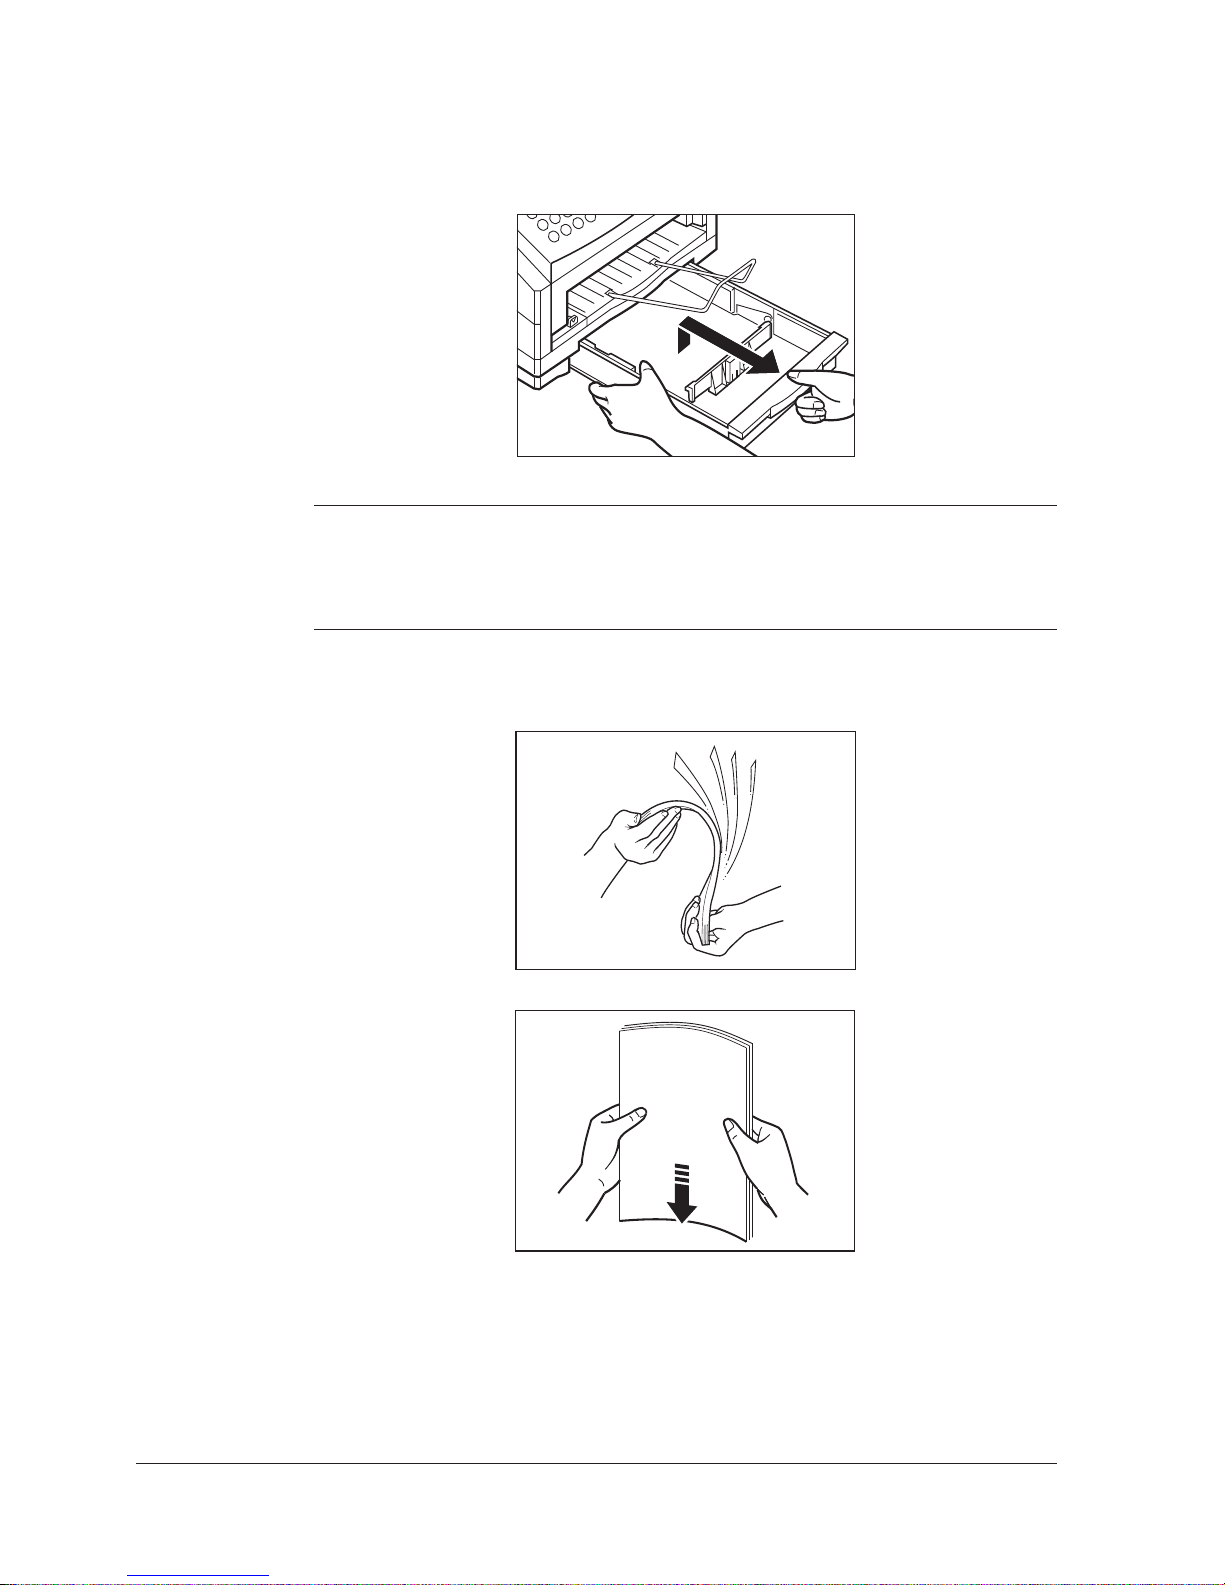
Follow these steps to load paper in the paper cassette:
1. Lift the paper cassette slightly and pull it out.
J Remove the paper cassette being careful not to drop it as you pull it out.
J Filling the paper cassette without removing it completely from the unit may
cause the paper to misfeed. Be sure to remove the paper cassette completely
before loading paper.
2. Before loading the paper, fan it and then stack it so that the leading edge and
sides of the paper are even.
2-26 Chapter 2Getting Started
Page 47
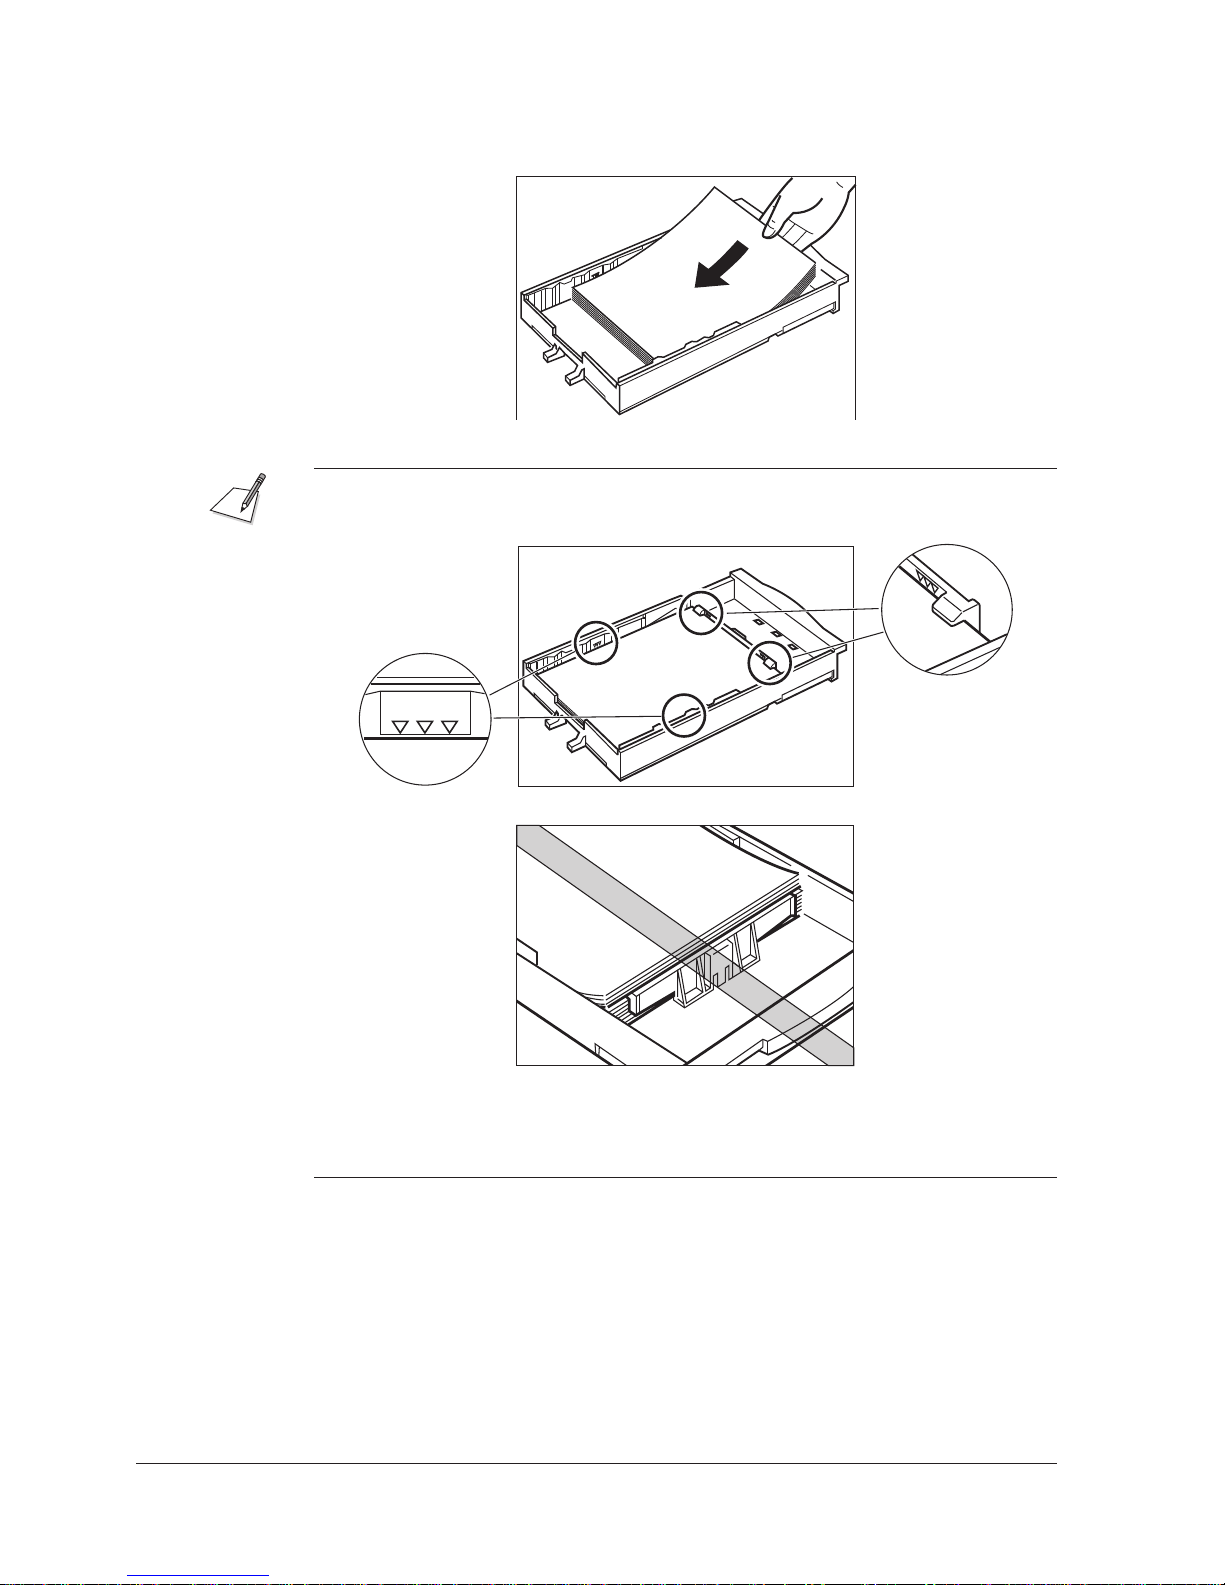
3. Load the stack of paper into the paper cassette.
J Make sure the paper stack is not higher than the limit marks (NNN) on the
sides of the cassette, and is under the tabs on the paper selector.
J Check all corners and edges of the paper stack to be sure they are flat and
even.
J The cassette can hold about 250 sheets of standard paper.
2-27Chapter 2 Getting Started
Page 48
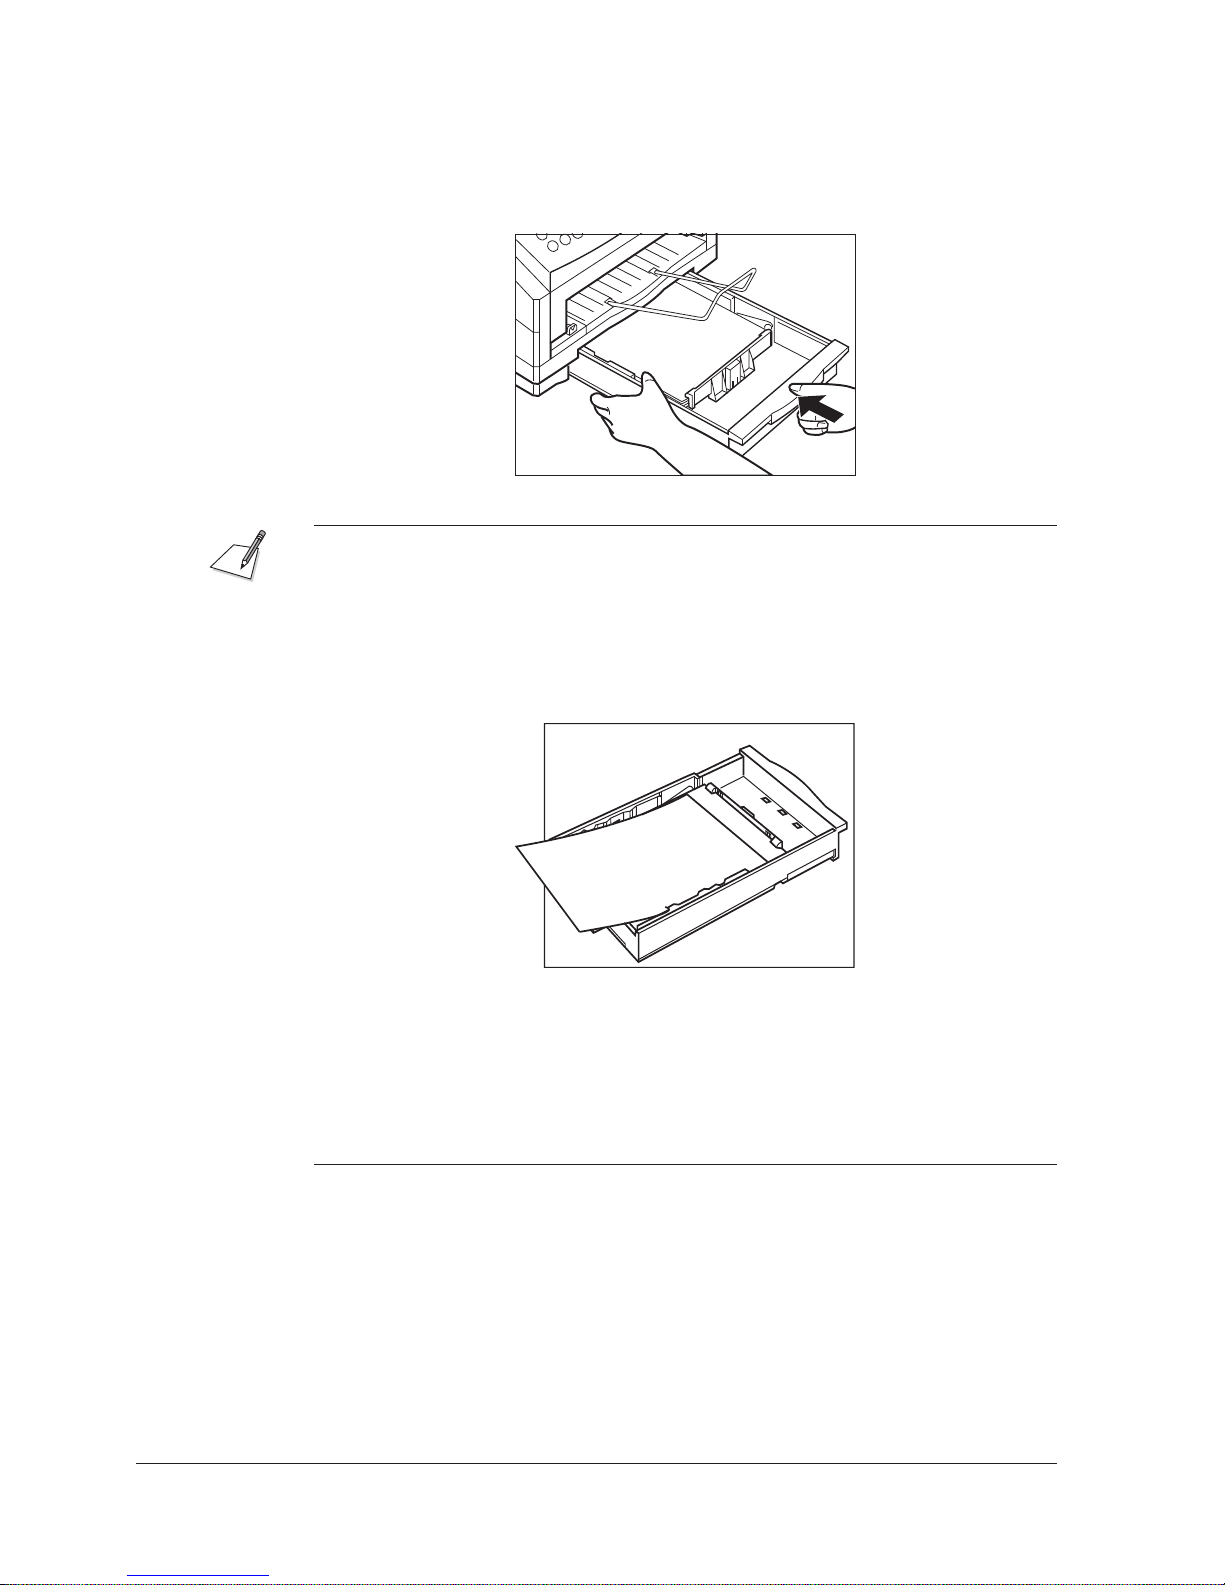
4. Gently insert the paper cassette into the unit until it clicks into position.
J If the paper cassette is not installed correctly, the paper may misfeed and/
or cause paper jams.
J If you have difficulty inserting the paper cassette, disconnect then connect the
power cord. When the PLEASE WAIT message is no longer displayed, try
inserting the paper cassette again.
J If you pull out the paper cassette with paper remaining in the cassette, be sure
to check the following before reinserting the cassette:
I Make sure no paper is out of the cassette.
I Make sure there is no paper inside the unit.
J If you wish to use letter or legal size paper, please contact a Canon
Authorised Service Facility.
J If the paper cassette jams when you try inserting it in the unit, remove it from
the unit and open the printer cover. Then close it and try reinserting the paper
cassette.
2-28 Chapter 2Getting Started
Page 49

Chapter 3
Registering Information in the
MultiPASS L90
This chapter tells you how to enter information in the MultiPASS L90 and
describes the speed dialling features.
Registering Information in the MultiPASS L90 ..................................................... 3-2
Guidelines for Registering Information ................................................................... 3-3
Entering Numbers, Letters, and Symbols .................................................... 3-3
Editing Your Entry .............................................................................. 3-5
Using the One-Touch Speed Dial/Special Function Buttons ......... 3-6
Using the Menu System ...................................................................... 3-6
Personalising Your MultiPASS L90 .......................................................................... 3-8
Identifying Your Documents .......................................................................... 3-8
Entering the Date and Time .......................................................................... 3-9
Registering Your Fax Number and Name .................................................. 3-10
Setting the Telephone Line Type ................................................................. 3-12
Speed Dialling ........................................................................................................... 3-13
One-Touch Speed Dialling ........................................................................... 3-13
Storing Numbers for One-Touch Speed Dialling ........................... 3-13
Changing a Number/Name Stored under a One-Touch Speed
Dialling Button ................................................................................... 3-16
Using One-Touch Speed Dialling .................................................... 3-18
Coded Speed Dialling ................................................................................... 3-19
Storing Numbers for Coded Speed Dialling ................................... 3-19
Changing a Number/Name Stored under a Coded Speed
Dialling Code ...................................................................................... 3-21
Using Coded Speed Dialling ............................................................ 3-23
Group Dialling ............................................................................................... 3-24
Creating Groups for Group Dialling ............................................... 3-24
Using Group Dialling ........................................................................ 3-27
Adjusting the Transmission Settings ....................................................................... 3-28
Setting the Transmission Time ..................................................................... 3-28
Setting the Transmission Type ..................................................................... 3-30
Changing the Long Distance Setting .......................................................... 3-32
Setting the Transmission Speed ................................................................... 3-33
Sending with a Subaddress and Password ...................................... 3-30
3-1Chapter 3 Registering Information in the MultiPASS L90
Page 50

Registering Information in the MultiPASS L90
There are two methods by which you can register information in the
MultiPASS L90.
Method 1
In Method 1 all settings are entered through the operation panel of the unit itself.
This user’s guide covers Method 1.
Method 2
In Method 2 most settings are entered via the Setup menu of the MultiPASS
Desktop Manager software installed in your PC. The Setup dialog, invoked by
the user selecting an item from the Setup menu, gives the user the means to view,
verify and change various system parameters relating to the software and the
hardware, including the Transmit Terminal Identification (TTI) information and
speed dial numbers. Once the settings are entered and saved, they are
downloaded to the MultiPASS L90 unit and will remain in effect until the next
change is downloaded. This method is covered in the MultiPASS Desktop
Manager for Windows User’s Guide.
It should be noted that any change the user may make from the operation panel
of the unit itself will not be reflected in the Setup dialog (software). So if you add
an entry to the Speed Dial list, or change the number of rings before pickup, and
do this from the operation panel of the unit, these changes will be overwritten the
next time you save changes made from within the Setup dialog (software).
3-2 Chapter 3Registering Information in the MultiPASS L90
Page 51
Guidelines for Registering Information
Follow these guidelines when you enter information into the MultiPASS L90:
J If you pause and do not make an entry for more than 60 seconds, the
MultiPASS L90 returns to standby mode. You will then have to start entering
the information all over again.
J If you make a mistake while making an entry, you can press CLEAR and
repeat the entry, or press
Entering Numbers, Letters, and Symbols
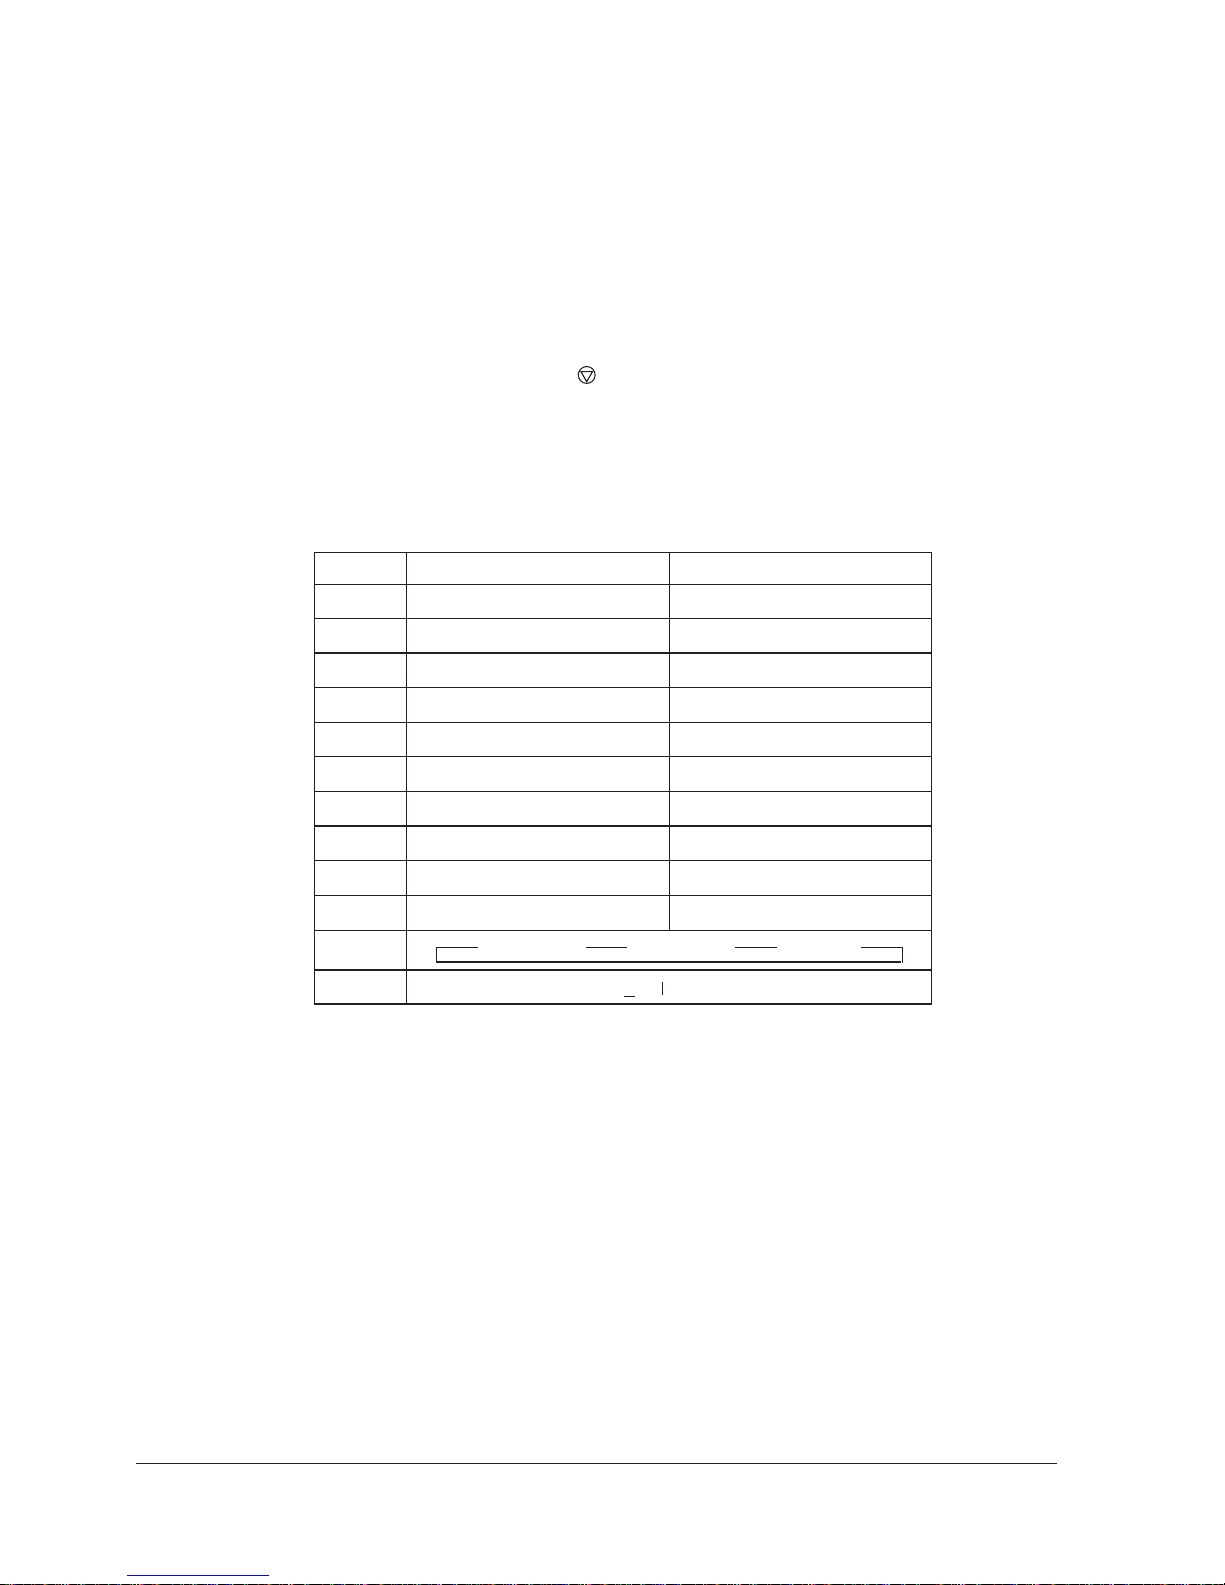
Each numeric button has a number and a group of uppercase and lowercase
letters assigned to it. Use the chart below to determine which number to press for
each character.
Button Uppercase Lowercase
1
(STOP) and start again.
*
2
3
4
5
6
7
8
9
0
#
ABCÅÄÁÀA˜ÂÆÇ
DEFРЛЙИК
GHIÏÍÌÎ
JKL
MNON˜ØÖÓÒO˜Ô
PQRS Þ
TUVÜÚÙÛ
´
WXYZY
P Uppercase PLowercase P Number
–.*#!“,;: ˆ` =/ ’?$6%&+()[]IJ‹›
abcåäáàa˜âæç
defрлйик
ghiïíìî
jkl
mnon˜øöóòo˜ô
pqrs þ
tuvüúùû
wxyzy´
3-3Chapter 3 Registering Information in the MultiPASS L90
Page 52
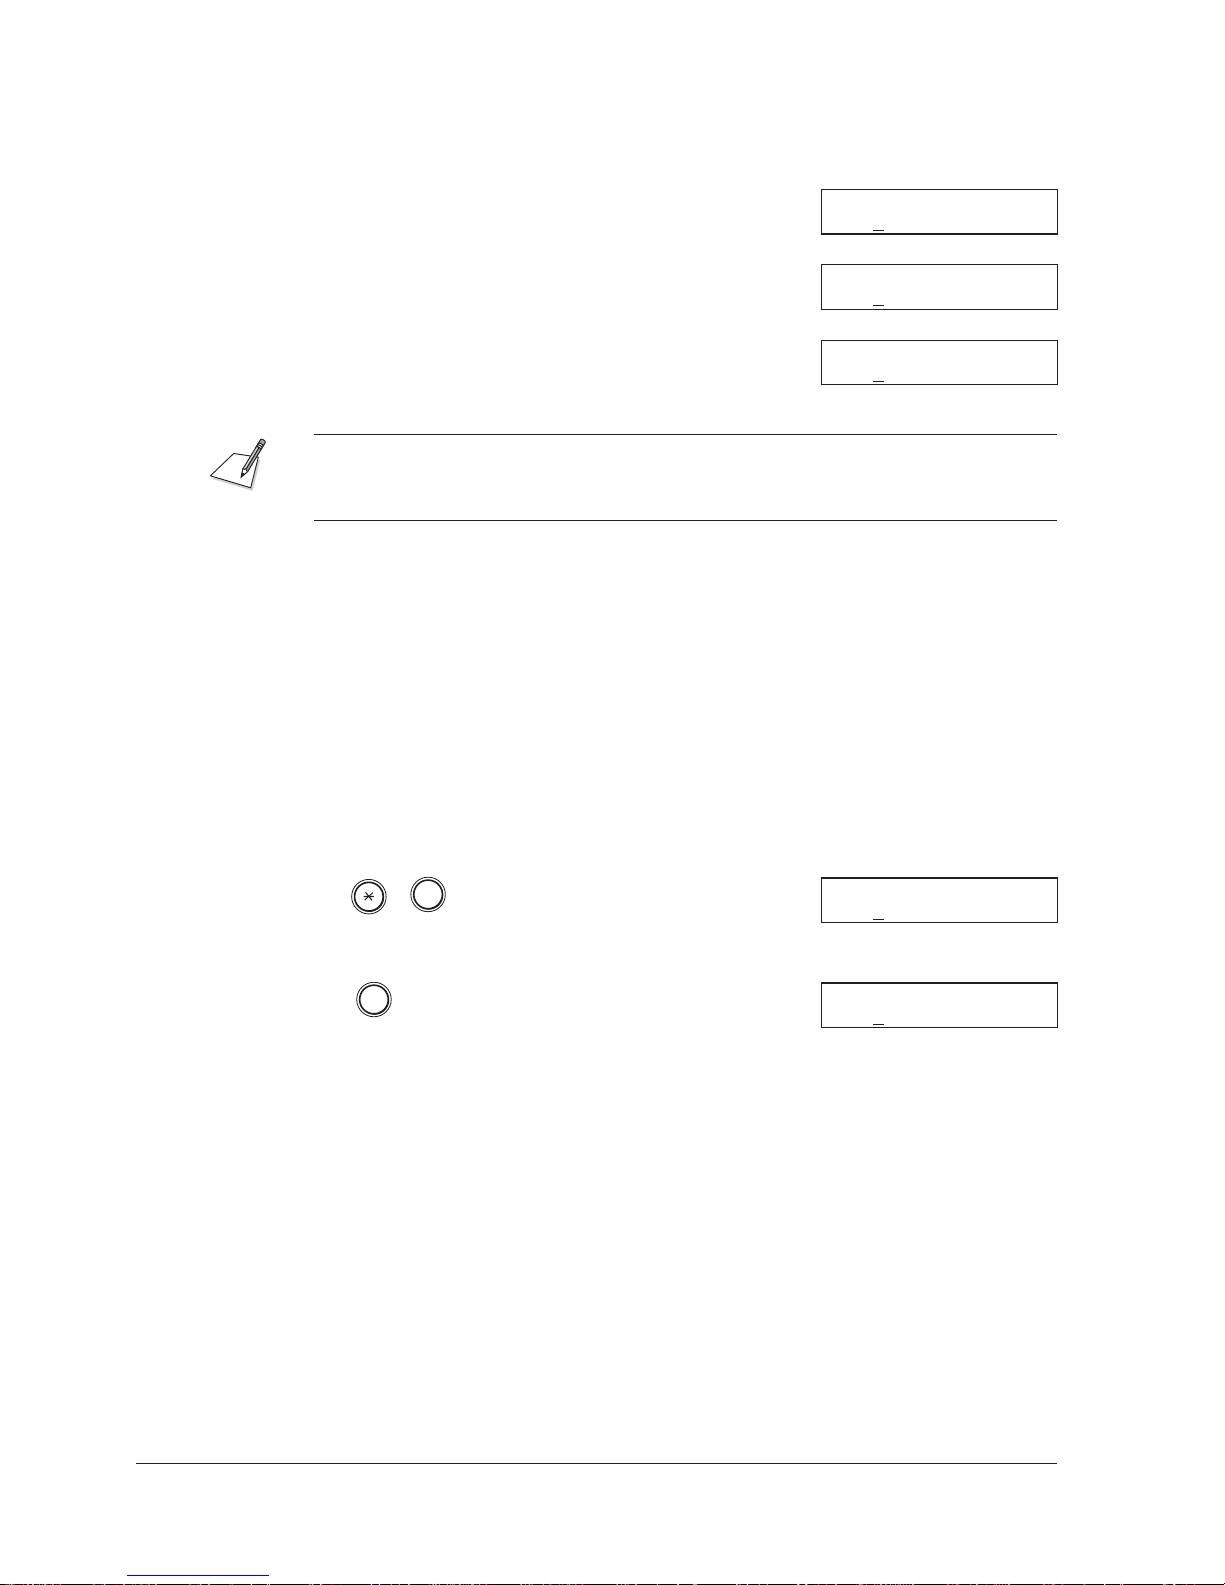
To change between number mode, uppercase letter mode, and lowercase letter
mode, press the
When you are in number mode, “1” appears in the
button. The mode changes every time you press.
*
UNIT NAME :1
upper right corner of the display:
When you are in uppercase letter mode, “A”
UNIT NAME :A
appears in the upper right corner of the display:
When you are in lowercase letter mode, “a” appears
UNIT NAME :a
in the upper right corner of the display:
To enter a symbol, make sure you are in letter mode, then press # repeatedly
until the symbol you want appears. Press any other button or j to enter the
symbol and move the cursor.
Here is the general method of entering letters:
1. Make sure the unit is in uppercase and lowercase letter mode (press
if not).
*
2. Press the button that contains the letter you want.
J If you want to enter a space, press SPACE (Special Function button).
3. Press the button repeatedly as needed until the letter you want appears in the
display. Then press any other button to enter the letter.
For example, you would enter a lowercase letter k like this:
1. Press the
button until an “a” appears in the upper right corner, then press
*
the 5 button. The letter j appears in the display.
JKL
5
UNIT NAME :a
j
2. Press the 5 button once. The letter k appears in the display.
JKL
5
j Q k
3-4 Chapter 3Registering Information in the MultiPASS L90
UNIT NAME :a
k
Page 53
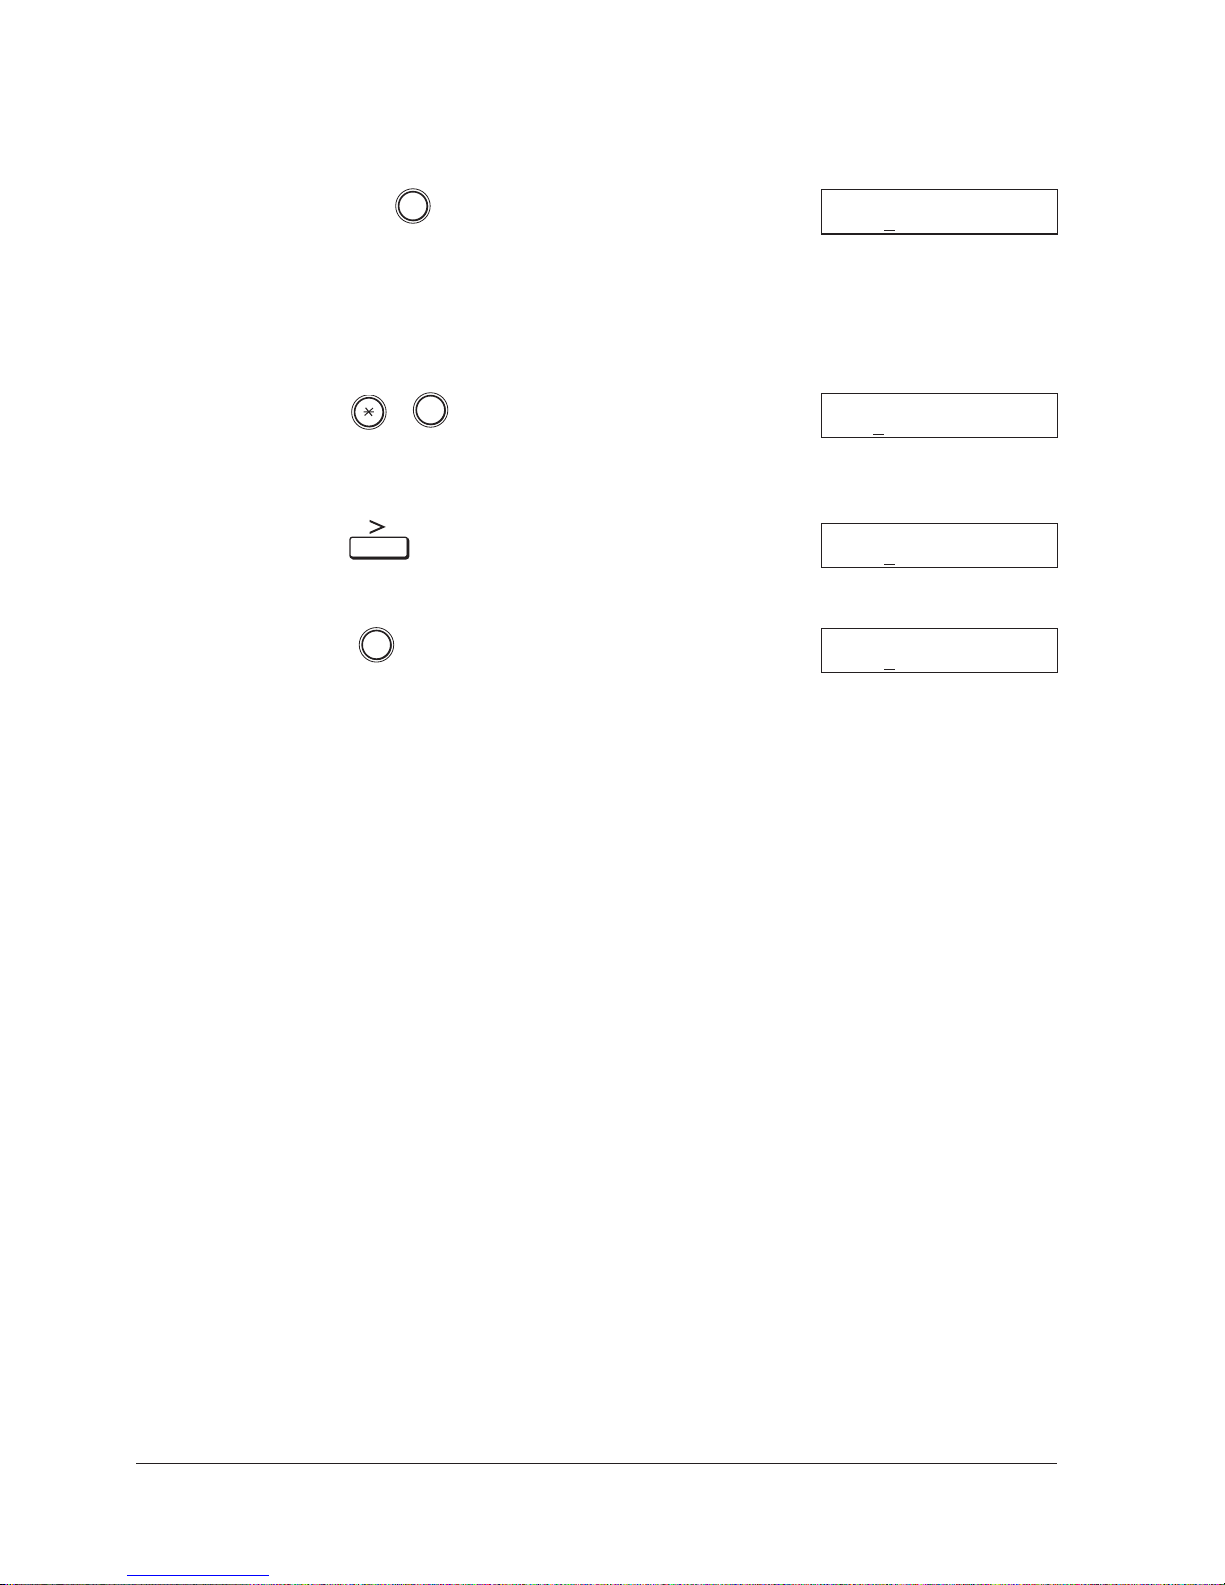
3. To enter the k, press the button of the next letter you want to enter, or press
the right cursor j (Special Function button).
Ex:
ABC
2
UNIT NAME :a
a
k
To enter two letters from the same group, you have to use the right cursor button
(j). For example, you would enter AA like this:
1. Press the
button until an “A” appears in the upper right corner, then press
*
2 for the first A.
ABC
2
UNIT NAME :A
A
2. Press the right cursor j (Special Function button) to enter the A and move
the cursor one space to the right.
UNIT NAME :A
A
3. Press 2 for the second A.
ABC
2
UNIT NAME :A
A
A
Editing Your Entry
You can also correct characters you’ve already entered, as follows:
1. Use the cursor buttons (k, j) to move the cursor to the character you want
to change.
2. Enter the correct character or a space.
J If you want to erase the entire entry and start over, press CLEAR (Special
Function button).
3-5Chapter 3 Registering Information in the MultiPASS L90
Page 54
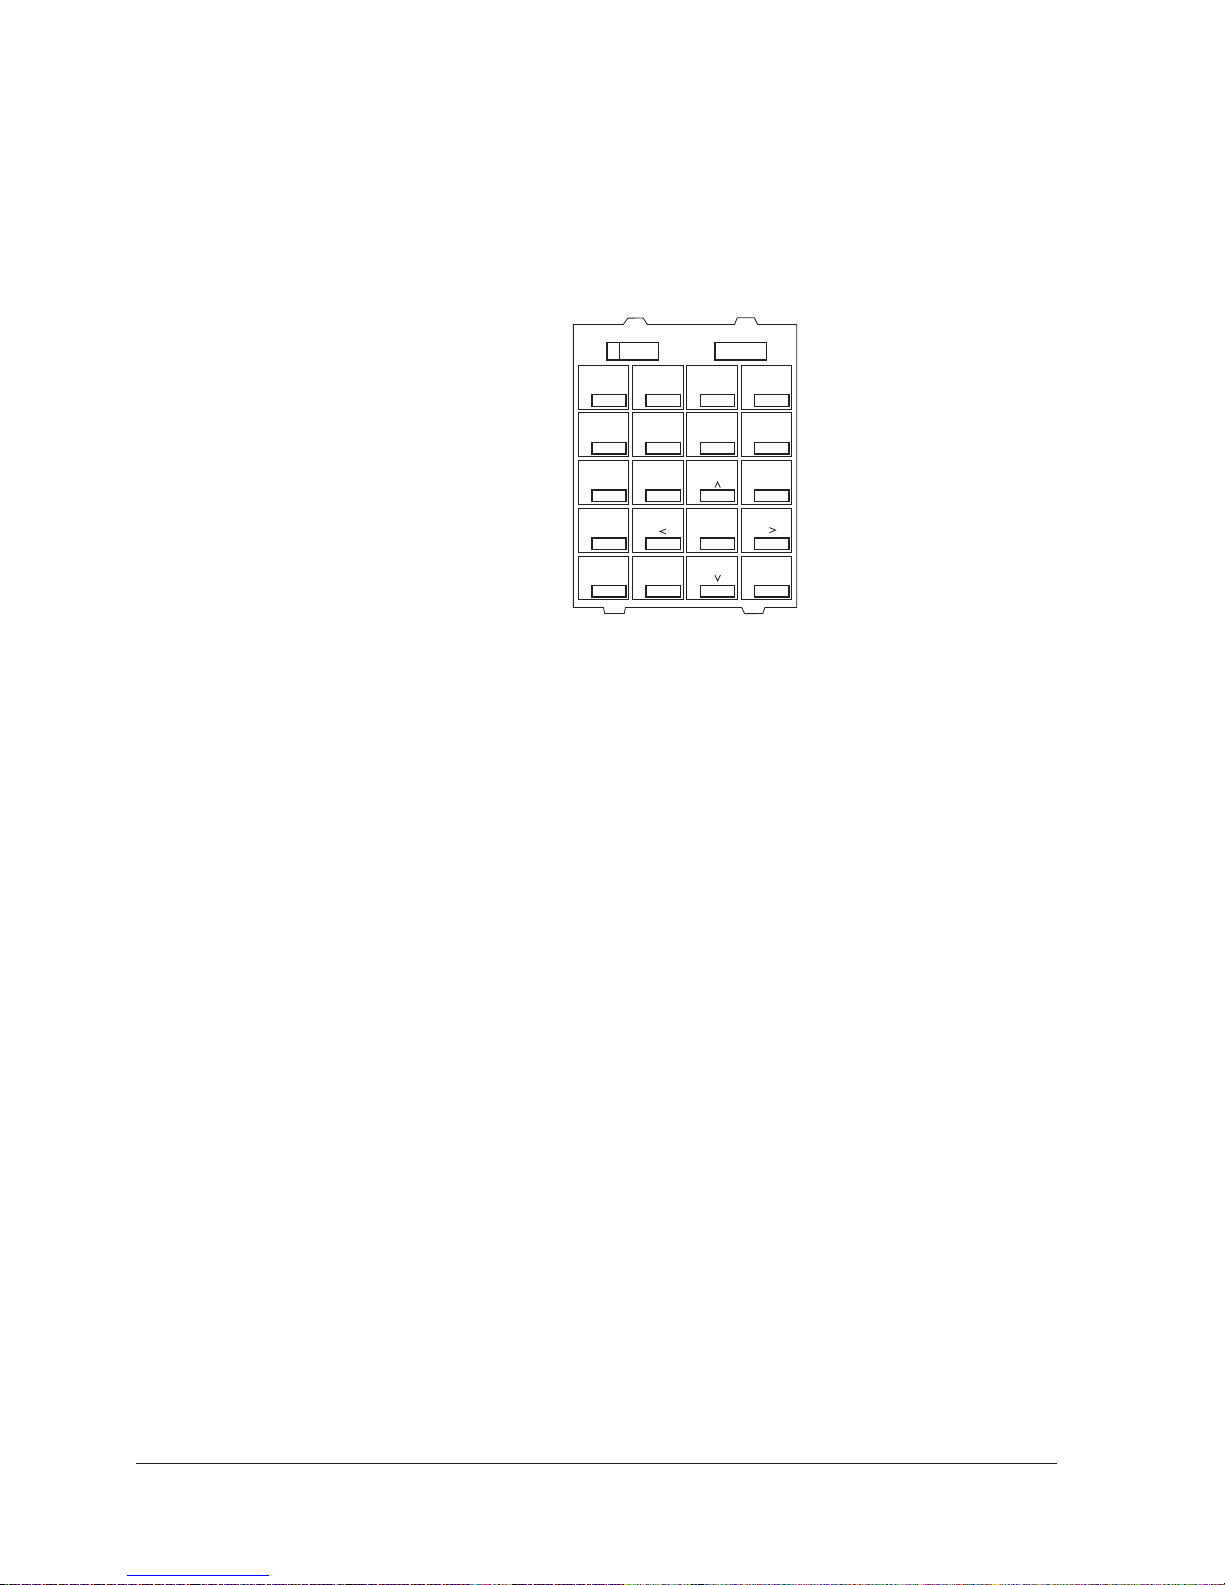
Using the One-Touch Speed Dial/Special Function
Buttons
The one-touch speed dial/Special Function buttons allow you to use speed
dialling and special functions such as delayed fax transmissions, printing reports,
and polling. The FUNCTION button switches the buttons’ functions between
one-touch speed dialling and Special Functions.
FUNCTION
DATA
REGISTRATION
01 02 03 04
05
09 10 11 12
TONE / +
13
17 18 19 20
DELAYED
TRANSMISSION
06 07 08
PAUSE
REPORT
14
CLEAR
15
POLLING
SPACE
SET
MEMORY
REFERENCE
16
D.T.
Using the Menu System
The MultiPASS L90 includes a menu system that you use to select fax, telephone,
and printer operations, and to enter user information. The system includes these
seven items:
J SPEED DIAL SETUP
Lets you register numbers for one-touch speed dialling, coded speed dialling
and group dialling.
J USER SETTINGS
Lets you enter the information that prints on the faxes you send, to set
scanning contrast, and to enter other basic data. Enter these settings when you
plug your unit in for the first time; you will rarely need to change them
thereafter.
J REPORT SETTINGS
Lets you set the fax to print a report every time you send or receive a fax, and
also contains options for printing summary reports.
3-6 Chapter 3Registering Information in the MultiPASS L90
Page 55

J SEND (TX) SETUP
Contains items that let you customise how your unit sends documents.
J RECEIVE (RX) SETUP
Allows you to customise how your unit receives documents.
J FAX PRINTER SETUP
Lets you customise how your unit prints documents.
J SYSTEM SETTINGS
Allows you to set the date format, transmission and receive speed, etc.
For details, see Appendix A, “The Menu System.”
You’ll use the Special Function buttons to display and select items from the menu
system, as follows:
1.
FUNCTION
DATA
REGISTRATION
DATA REGISTRATION
1.SPEED DIAL SETUP
2. Use the search buttons to change the menu display.
J Press ito display the next item in the menu. (The list will wrap from the
last item in the list back to the first.)
J Press h to display the previous item in the menu. (The list will wrap from
the first item in the list back to the last.)
3. Press SET to select an item from the menu, or press STOP to cancel the
menu selection and return to standby mode.
SET
or
22/07 ’97 TUE 17:20
3-7Chapter 3 Registering Information in the MultiPASS L90
Page 56
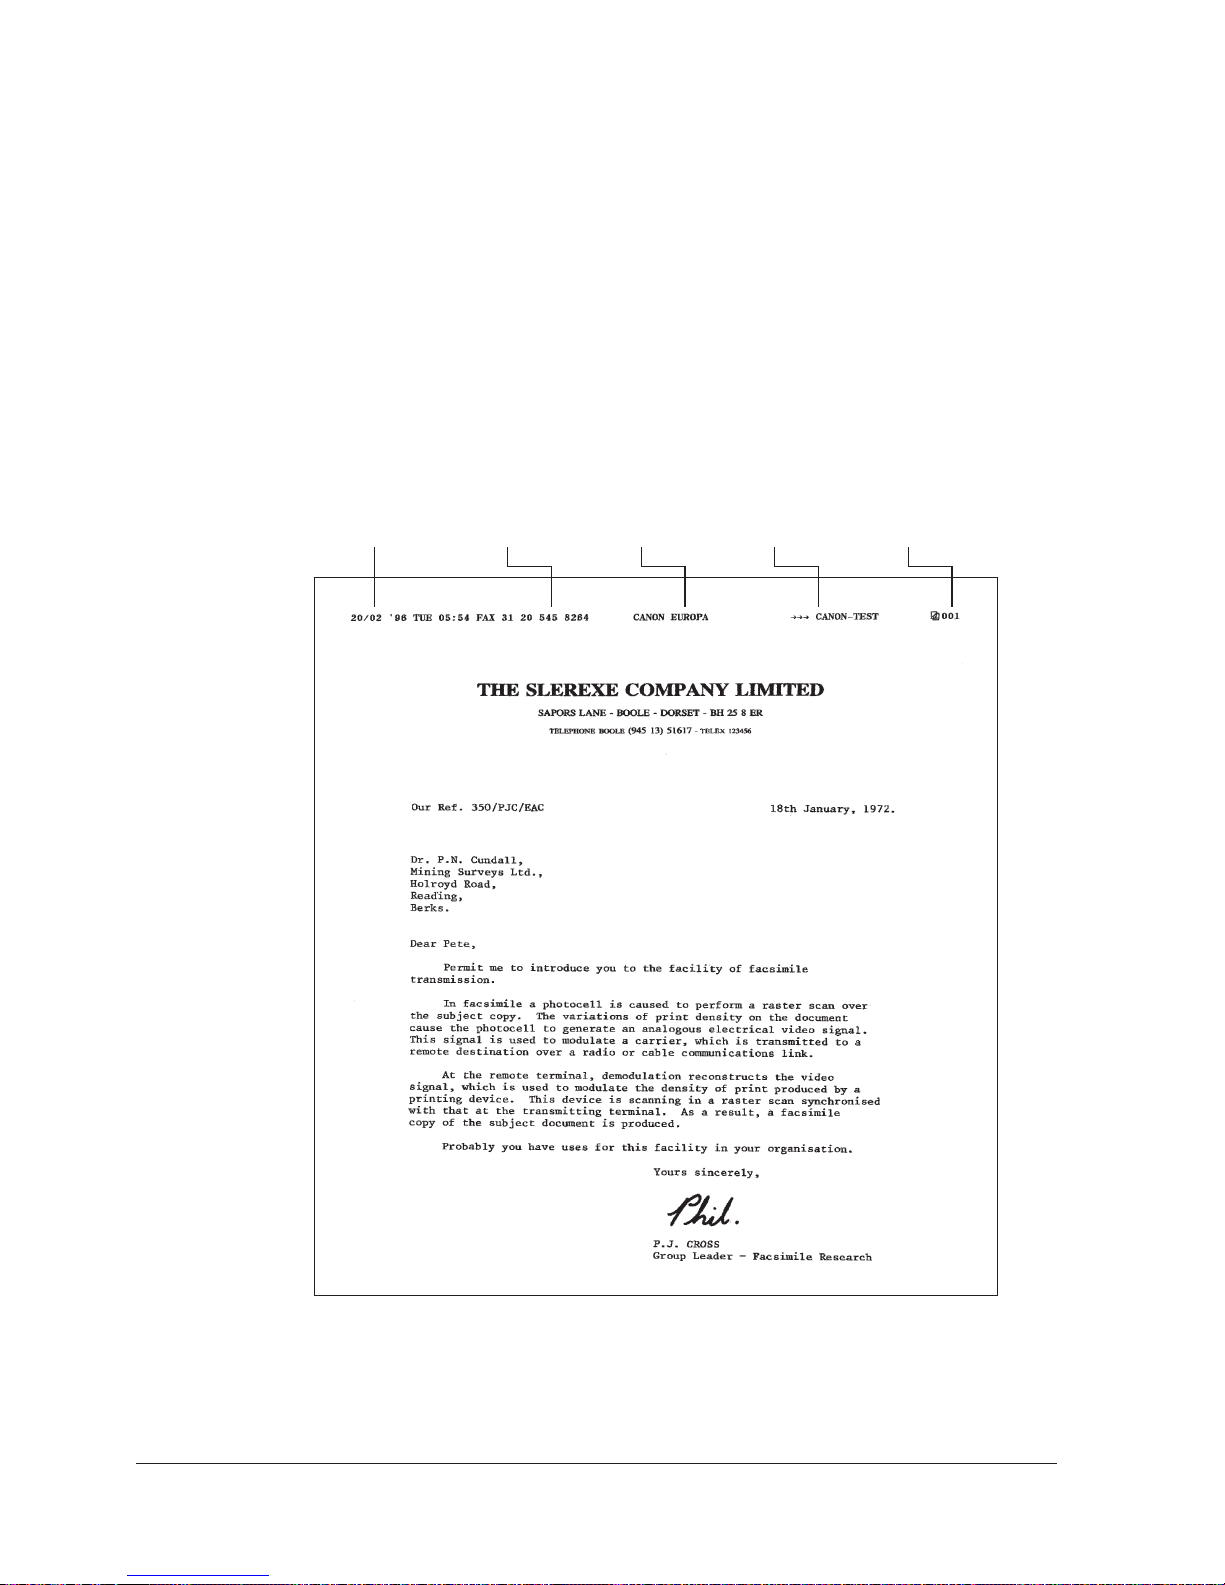
Personalising Your MultiPASS L90
Identifying Your Documents
When sending documents, you can have your fax number, your name, and the
current date and time printed out by the receiving fax. This information is called
your TTI (Transmit Terminal Identification) and appears at the top of the faxed
document in small type.
By identifying the documents you send, the receiving party can recognize your
fax messages at a glance. Here is a sample document with the identifying
information:
The date and
time you sent
the document
Your Fax/
Telephone
number
Your name or
company name
The name of the
party who is
receiving the
document
The page
number
The top line also includes the name of the receiving party when you send the
document using one-touch speed dialling, coded speed dialling, or group dialling
(if you registered it).
3-8 Chapter 3Registering Information in the MultiPASS L90
Page 57
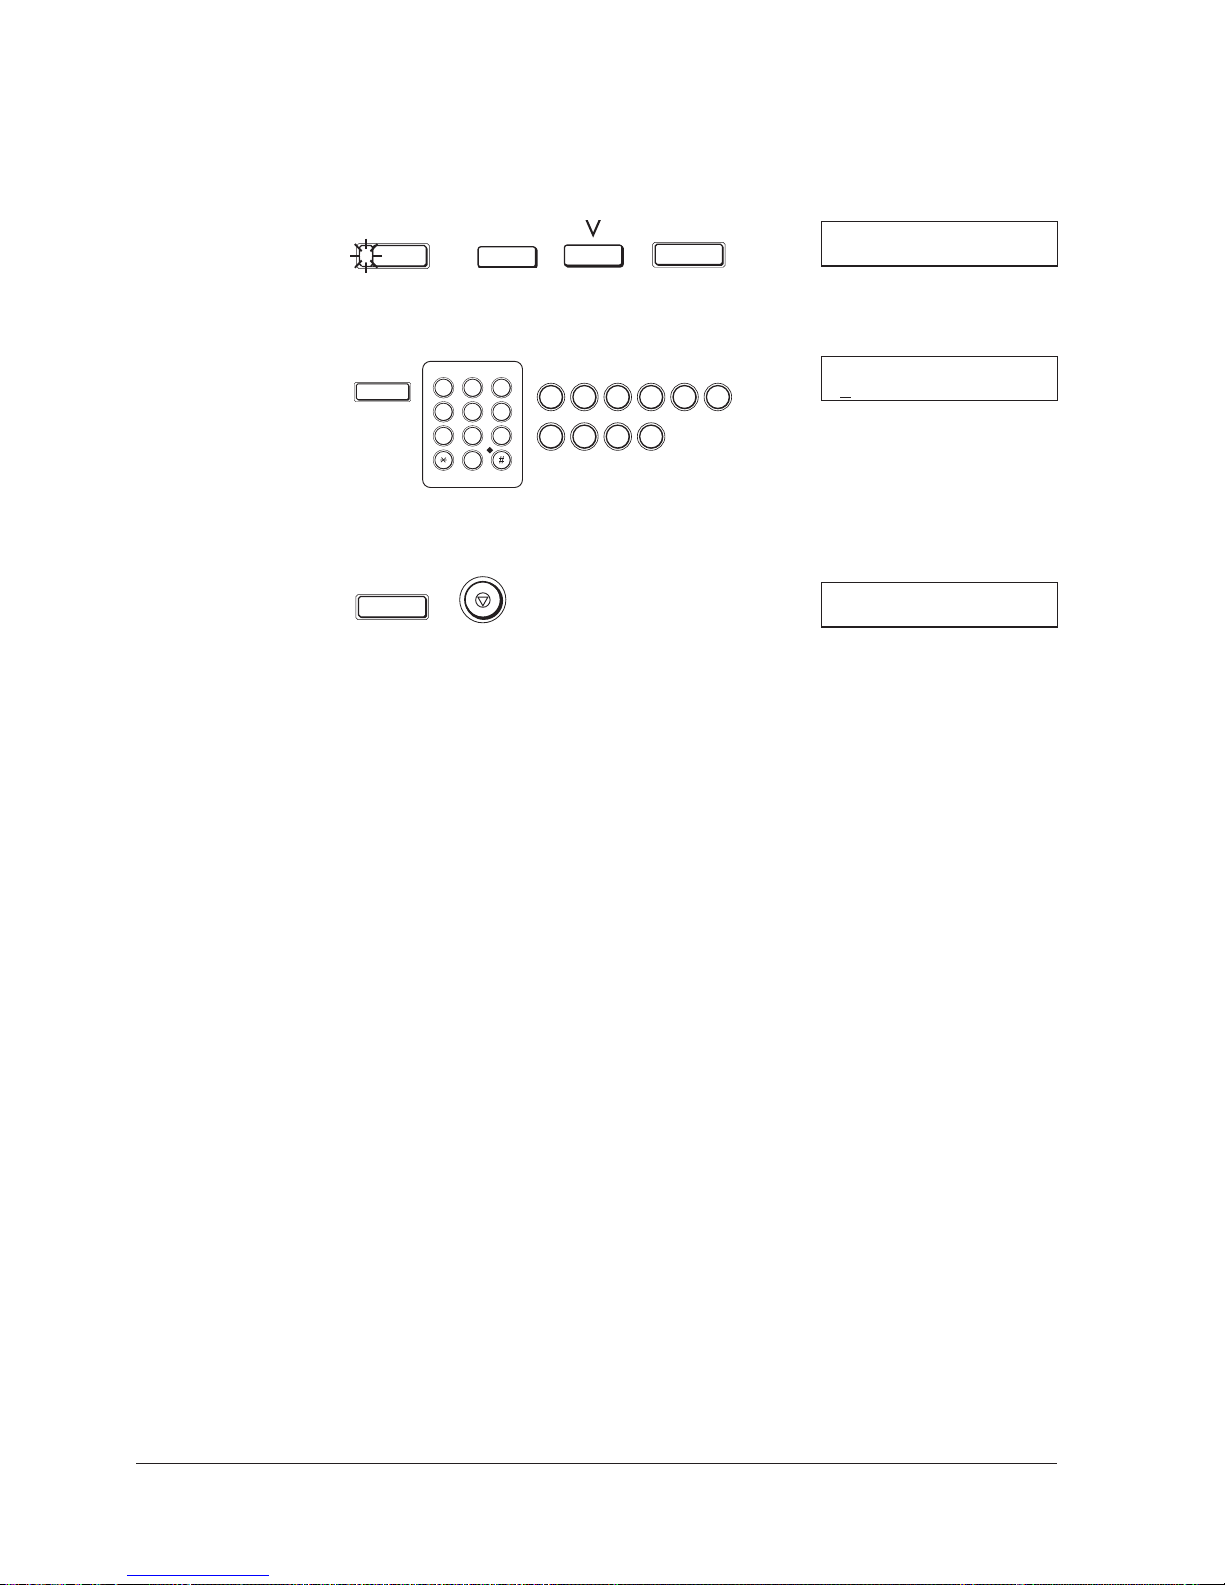
Entering the Date and Time
Use the following procedure to enter the date and time:
1.
FUNCTION
2. Press SET and use the numeric buttons to enter the correct date and time.
Use the 24-hour system for the time (5:20 p.m. would be 17:20, for example).
DATA
REGISTRATION
SET
USER SETTINGS
1.DATE & TIME
SET
ABC DEF
1
2
GHI JKL MNO
4
5
PQRS TUV WXYZ
7
8
0
3
6
9
Ex:
2 2 0
7
1
2 0
7
7
9
DATE & TIME
22/07 ’97 17:20
3. Press SET to save the date and time, then press STOP to return to standby
mode.
SET
22/07 ’97 TUE 17:20
3-9Chapter 3 Registering Information in the MultiPASS L90
Page 58
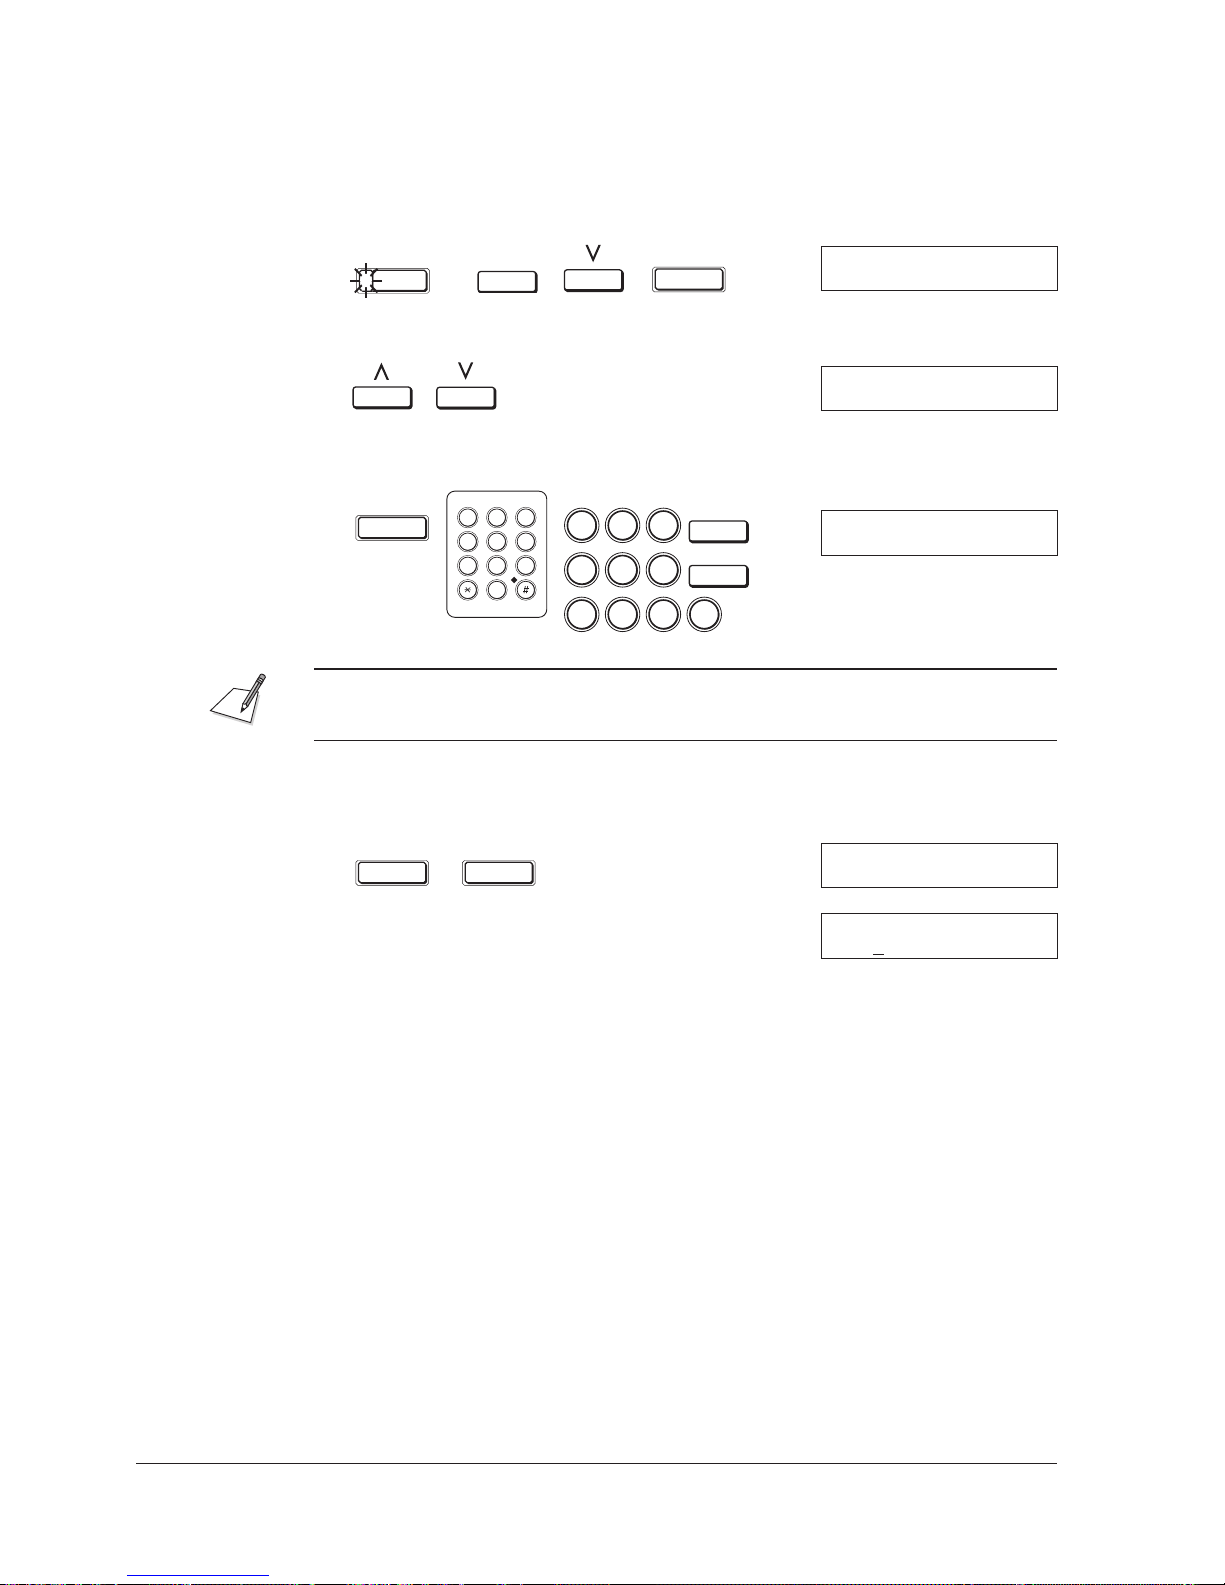
Registering Your Fax Number and Name
SPACE
SPACE
2
Use the following procedure to enter your fax number and name included on
every fax you send:
1.
FUNCTION
2. Use the search buttons to display 2.UNIT TELEPHONE #.
3. Press SET and enter your fax number–up to 20 digits–using the numeric
buttons.
SET
You can use the TONE/+ button to enter a plus sign before the fax number.
DATA
REGISTRATION
ABC DEF
1
2
GHI JKL MNO
PQRS TUV WXYZ
3
4
5
6
7
8
9
0
Ex:
5
0 3
5 5 5
1 2 1
SET
USER SETTINGS
1. DATE & TIME
USER SETTINGS
2.UNIT TELEPHONE #
UNIT TELEPHONE #
TEL= 503 555 1212
4. Press SET to save the fax number, then press SET again to display UNIT
NAME.
SET SET
USER SETTINGS
3.UNIT NAME
UNIT NAME :A
3-10 Chapter 3Registering Information in the MultiPASS L90
Page 59
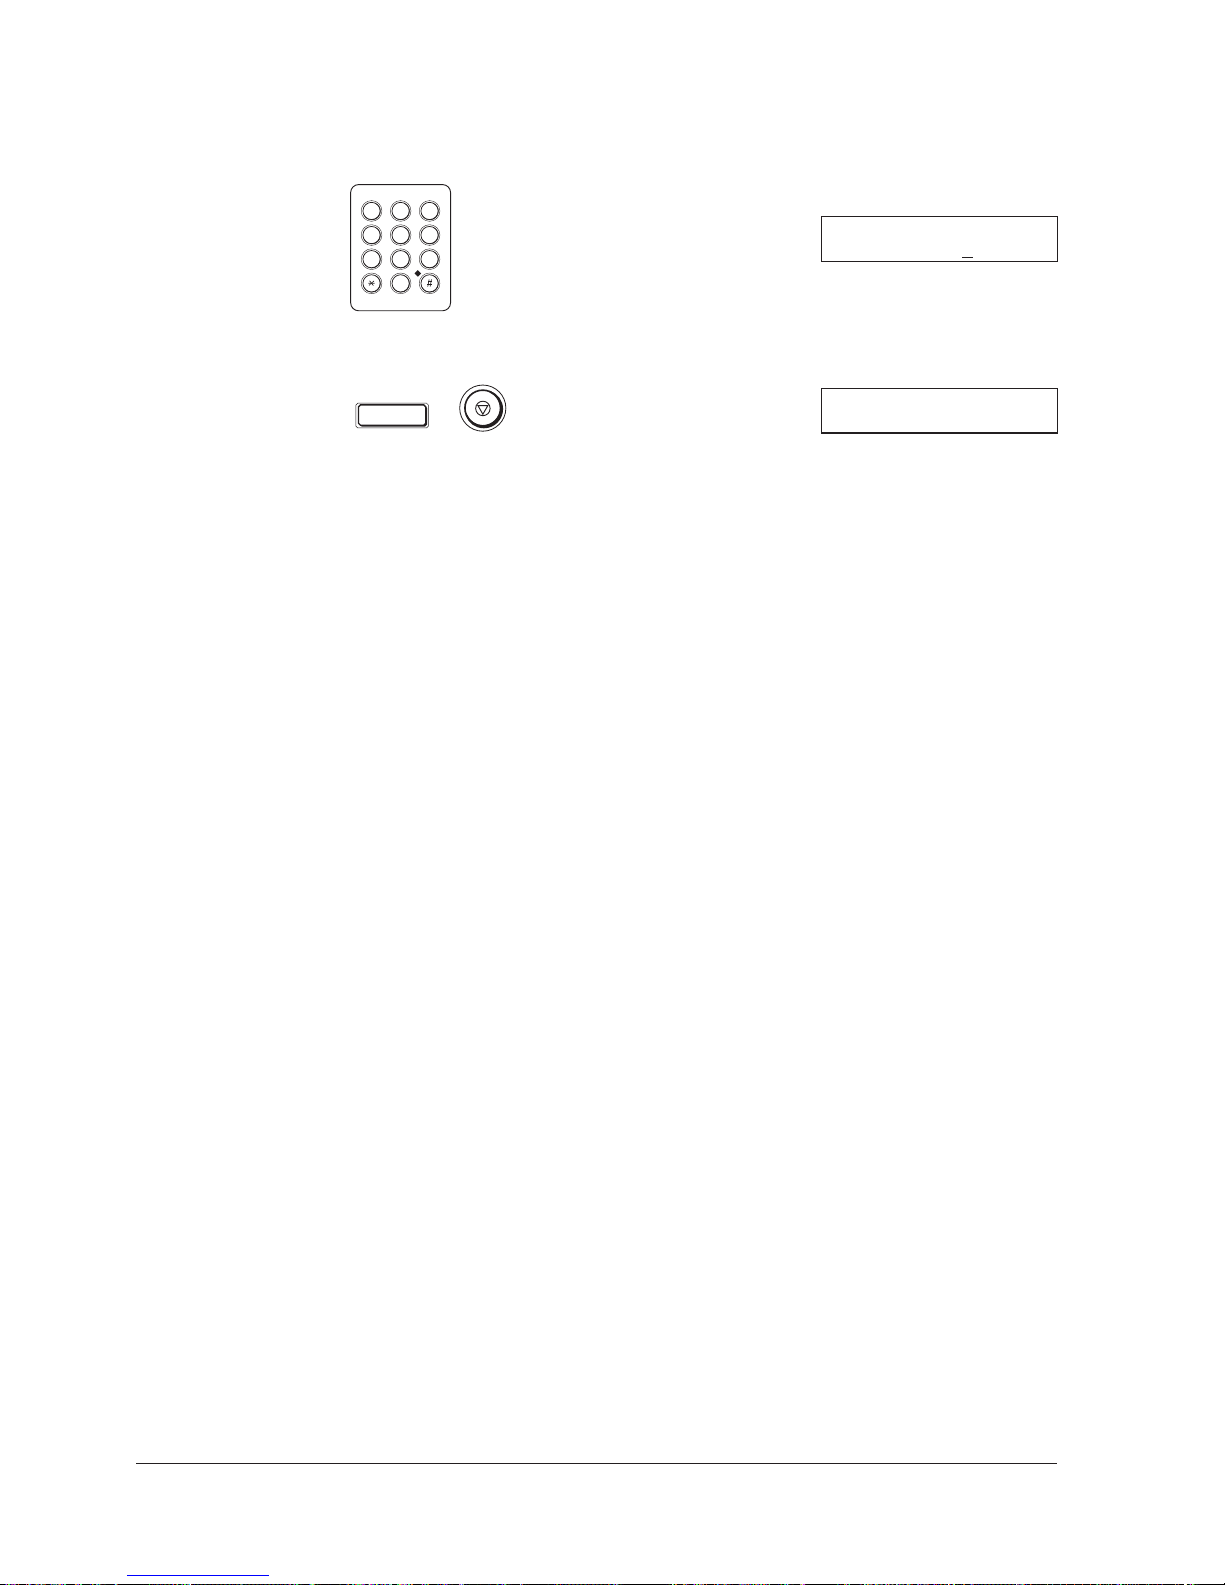
5. Enter your name or your company name–up to 24 characters–using the
numeric buttons. (Qp. 3-3)
3
6
9
Ex:
CANON INC
UNIT NAME :A
CANON IN
C
ABC DEF
1
2
GHI JKL MNO
4
5
PQRS TUV WXYZ
7
8
0
6. Press SET to save the name, then press STOP to return to standby mode.
SET
22/07 ’97 TUE 17:20
3-11Chapter 3 Registering Information in the MultiPASS L90
Page 60
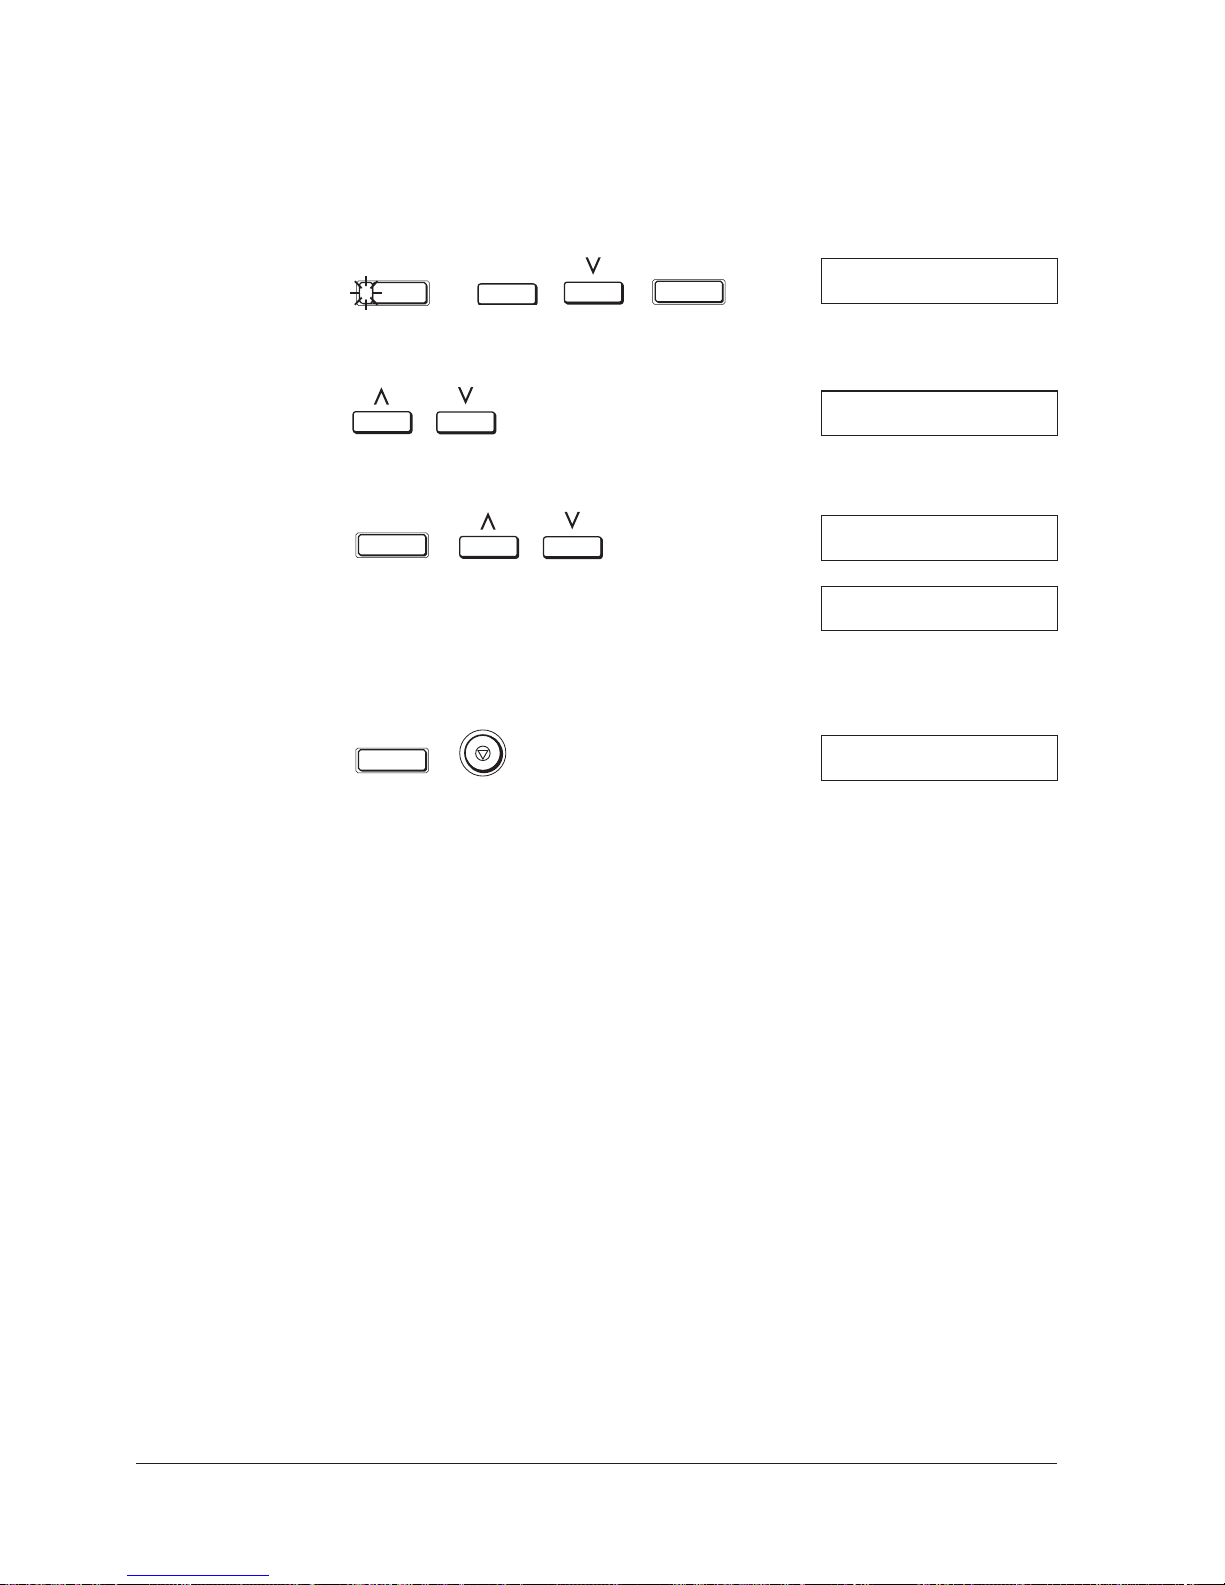
Setting the Telephone Line Type
Use this procedure if you need to change the factory-set telephone line setting.
If you are unsure which setting to use, consult your local telephone company.
1.
FUNCTION
2. Use the search buttons to display 10.TEL LINE TYPE.
3. Press SET, then use the search buttons to select rotary pulse or touch tone.
DATA
REGISTRATION
SET
USER SETTINGS
1.DATE & TIME
USER SETTINGS
10.TEL LINE TYPE
SET
TEL LINE TYPE
ROTARY PULSE
TEL LINE TYPE
TOUCH TONE
4. Press SET to save your selection, then press STOP to return to standby
mode.
SET
22/07 ’97 TUE 17:20
3-12 Chapter 3Registering Information in the MultiPASS L90
Page 61
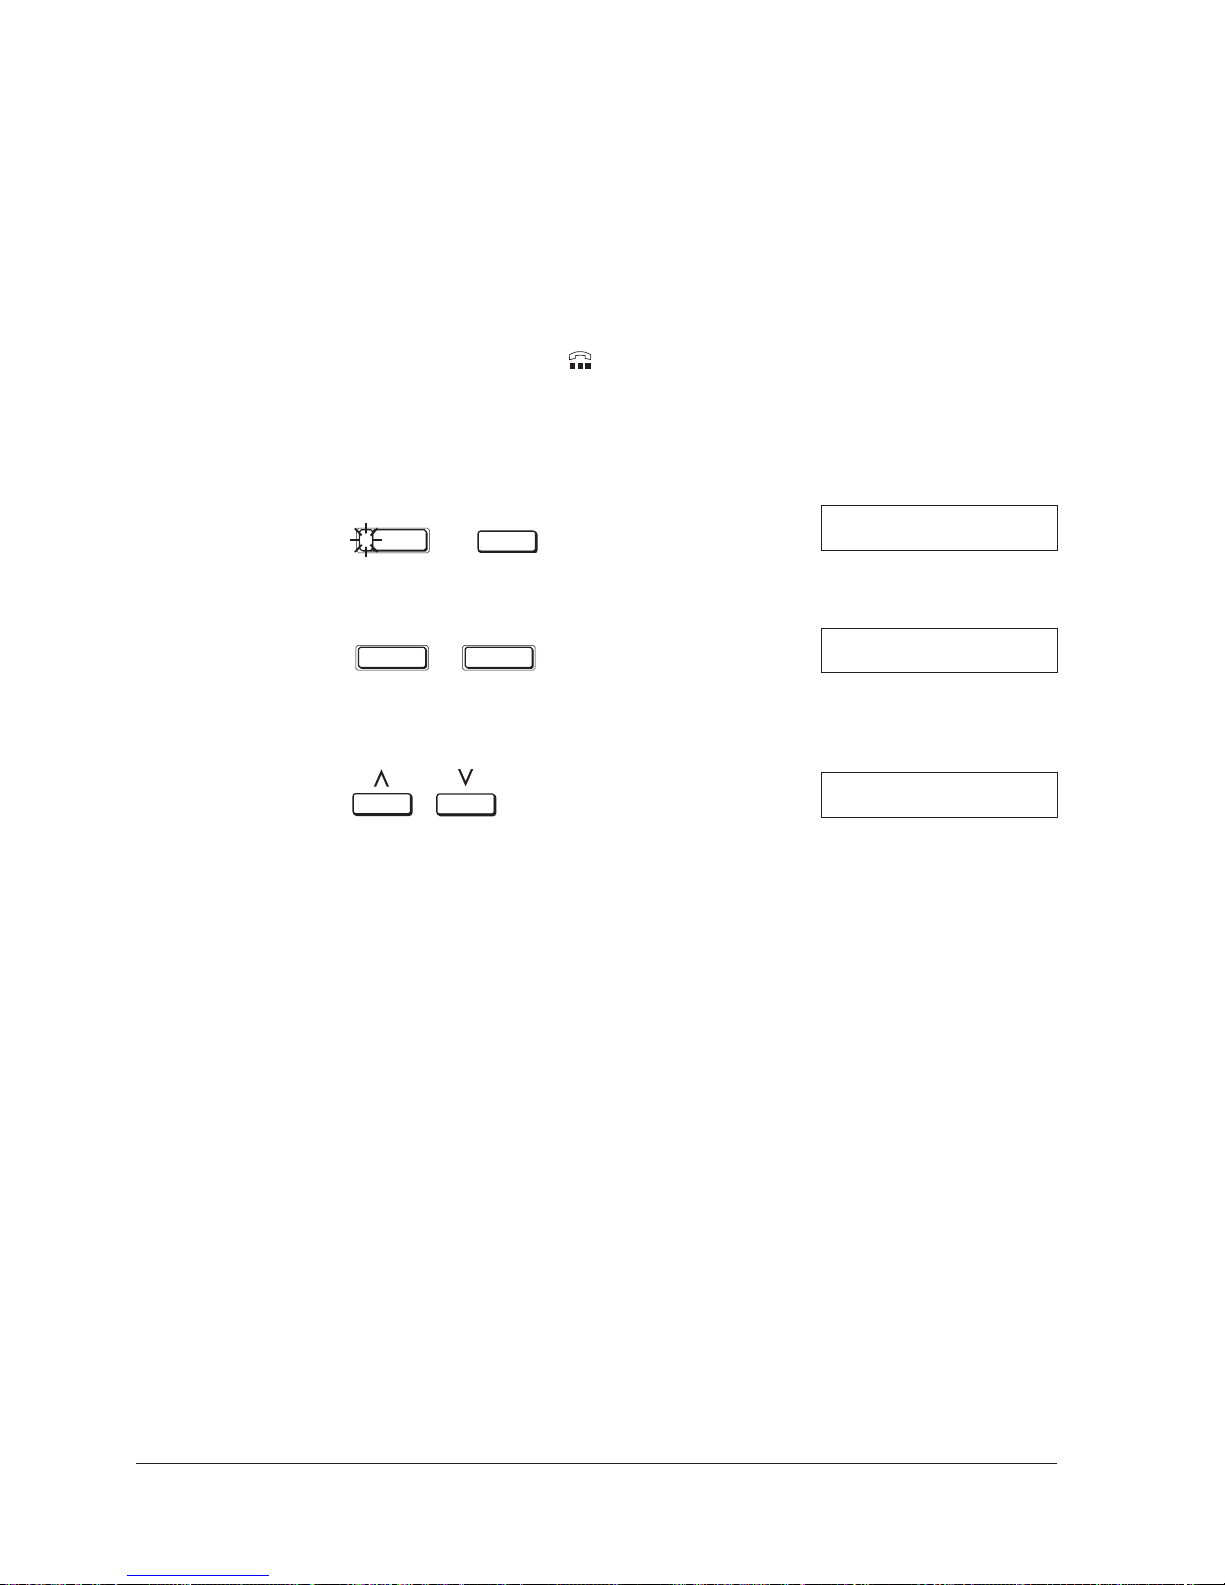
Speed Dialling
Your MultiPASS L90 can store up to 120 phone numbers: up to 20 of your most
frequently used numbers can be stored for one-touch speed dialling, and an
additional 100 numbers can be stored for coded speed dialling.
When using speed dialling, all documents are stored in memory before
transmission. If you wish to send documents directly, see page 4-6 for Manual
Sending via the Handset or
One-Touch Speed Dialling
Storing Numbers for One-Touch Speed Dialling
(HOOK) button.
1.
FUNCTION
2. Press SET twice.
SET SET
3. Use the search buttons to select a one-touch speed dialling button between 01
and 20.
J You can also do this by pressing FUNCTION, then the one-touch speed
dialling button, then FUNCTION again.
J If a number is already stored at the button you select, that number
appears.
J If the button you select is registered for group dialling, GROUP DIAL
appears.
DATA
REGISTRATION
DATA REGISTRATION
1.SPEED DIAL SETUP
1-TOUCH SPD DIAL
01=
1-TOUCH SPD DIAL
07=
3-13Chapter 3 Registering Information in the MultiPASS L90
Page 62
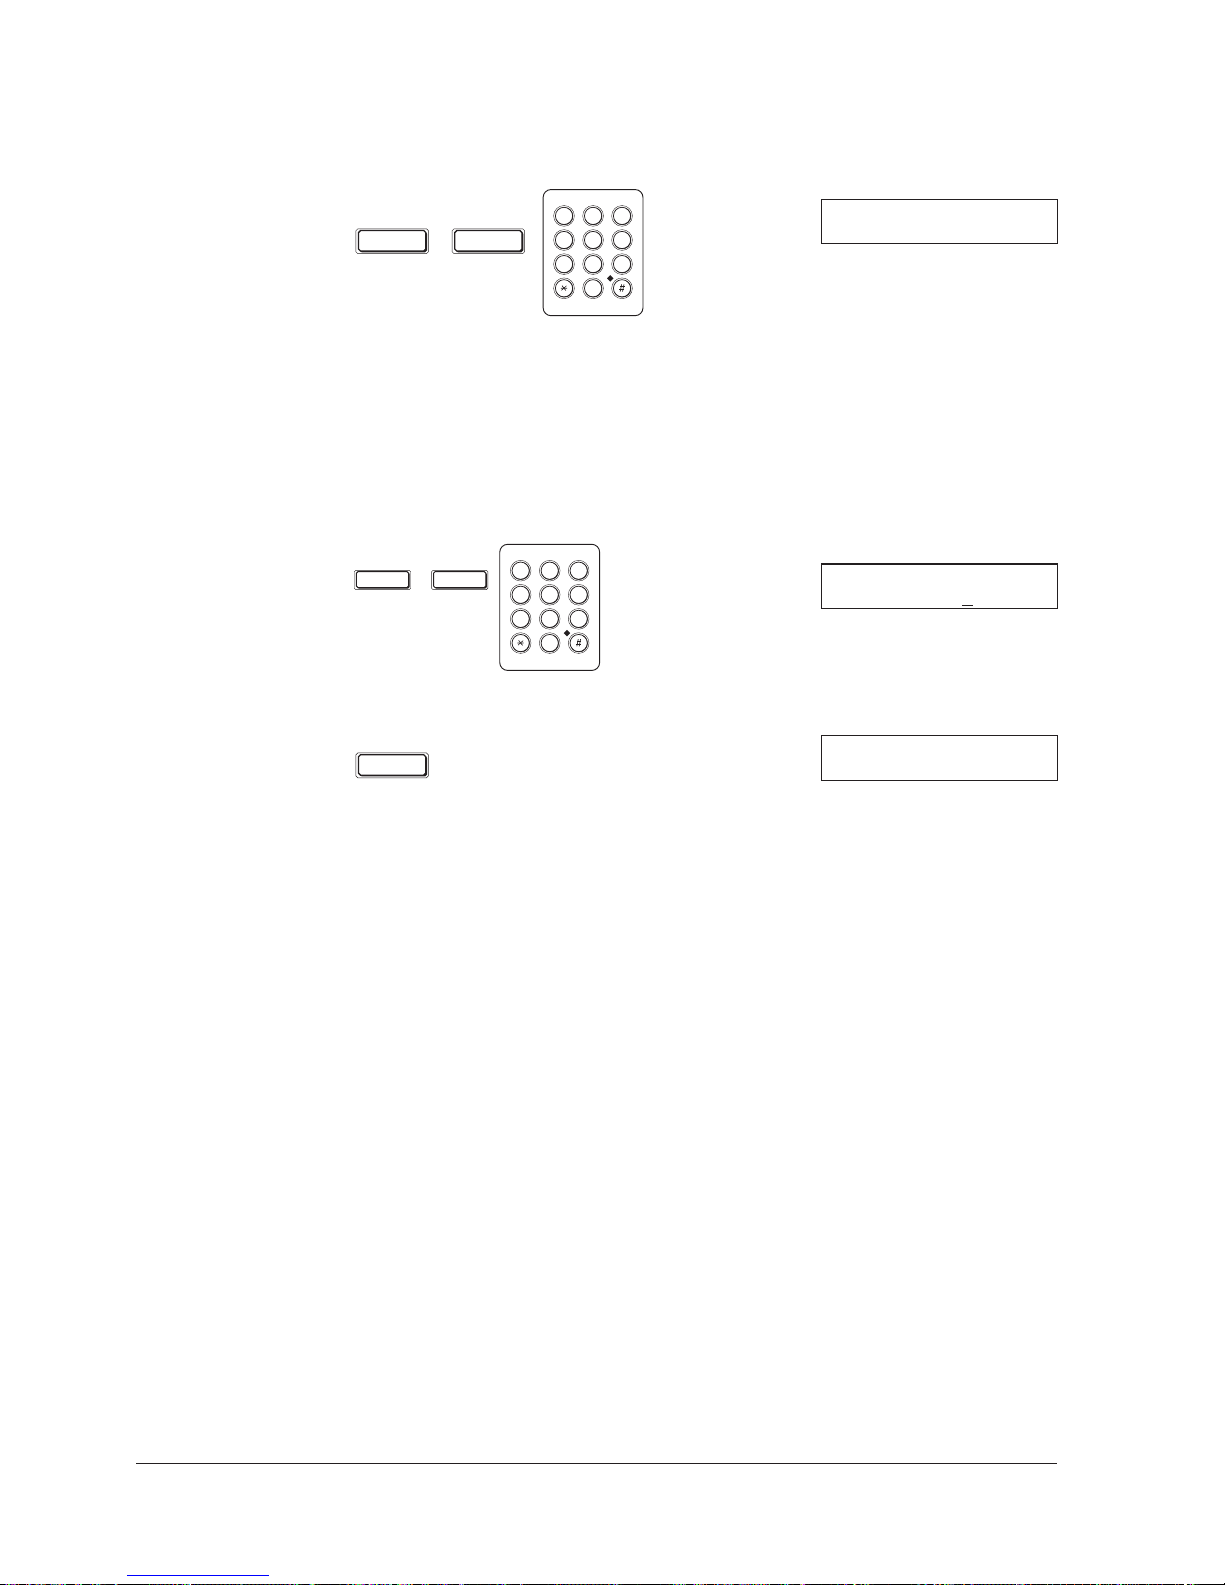
4. Press SET twice. Use the numeric buttons to enter the fax number you want
to store.
SET SET
ABC DEF
1
2
GHI JKL MNO
4
5
PQRS TUV WXYZ
7
8
0
3
6
9
TELEPHONE NUMBER
TEL=
J Press SPACE to enter spaces between numbers. (Spaces are optional and
are ignored during dialling. They are used to enhance clarity on lists and
reports.)
J If you want to clear a number or a mistaken entry, press CLEAR.
J To enter a pause in the number, press PAUSE one or more times.
5. Press SET twice, then use the numeric buttons to store the name that goes
with the number. (See page 3-3 for details on entering letters.)
SET SET
ABC DEF
1
2
GHI JKL MNO
4
5
PQRS TUV WXYZ
7
8
0
Ex:
3
CANON INC
6
9
NAME :A
CANON IN
C
6. Press SET.
SET
1-TOUCH SPD DIAL
3.OPTIONAL SETTING
3-14 Chapter 3Registering Information in the MultiPASS L90
Page 63
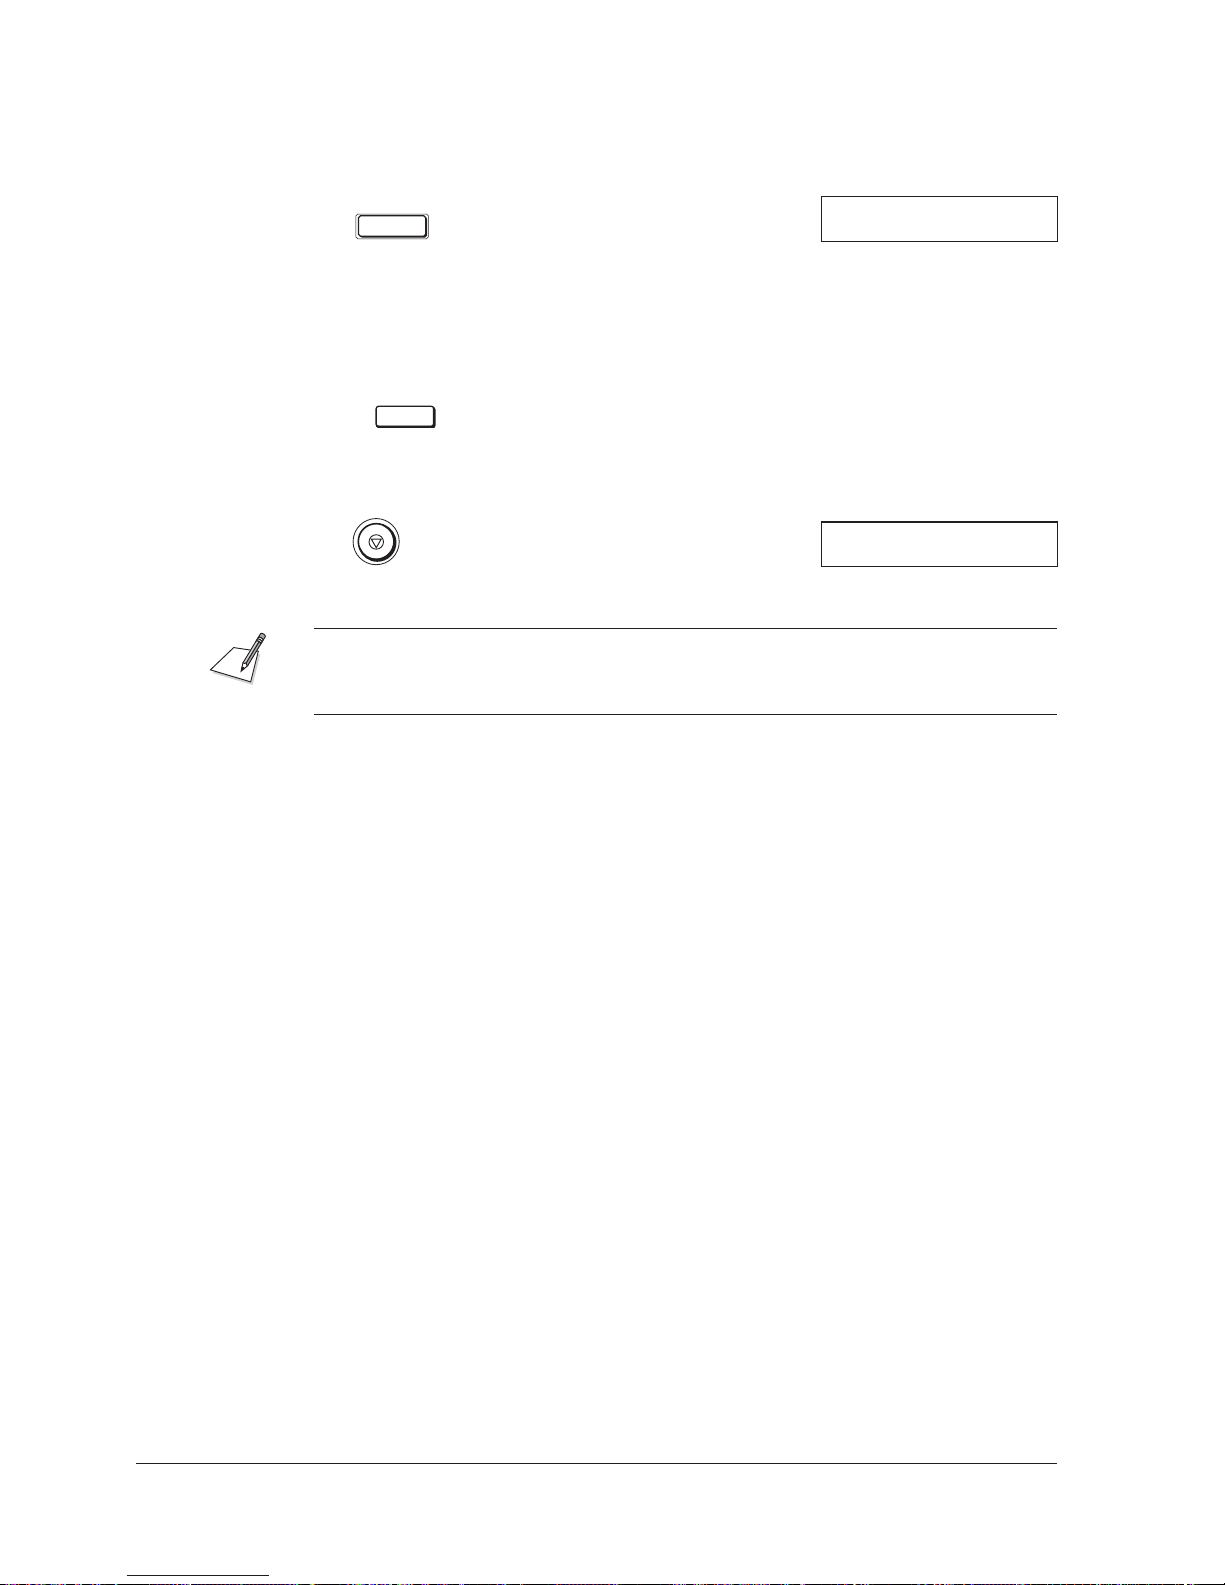
7. To adjust the transmission settings, press SET and follow the instructions on
page 3-28.
SET
OPTIONAL SETTING
OFF
- or -
To continue registering more numbers and names for one-touch speed
dialling, press DATA REGISTRATION.
DATA
REGISTRATION
8. When you are finished registering numbers and names, press STOP to return
to standby mode.
22/07 ’97 TUE 12:34
You may want to print a list of the numbers and names you store under the onetouch speed dial buttons, and post the list near the unit. See “Printing a List of
Registered Telephone Numbers” on page 8-9.
3-15Chapter 3 Registering Information in the MultiPASS L90
Page 64
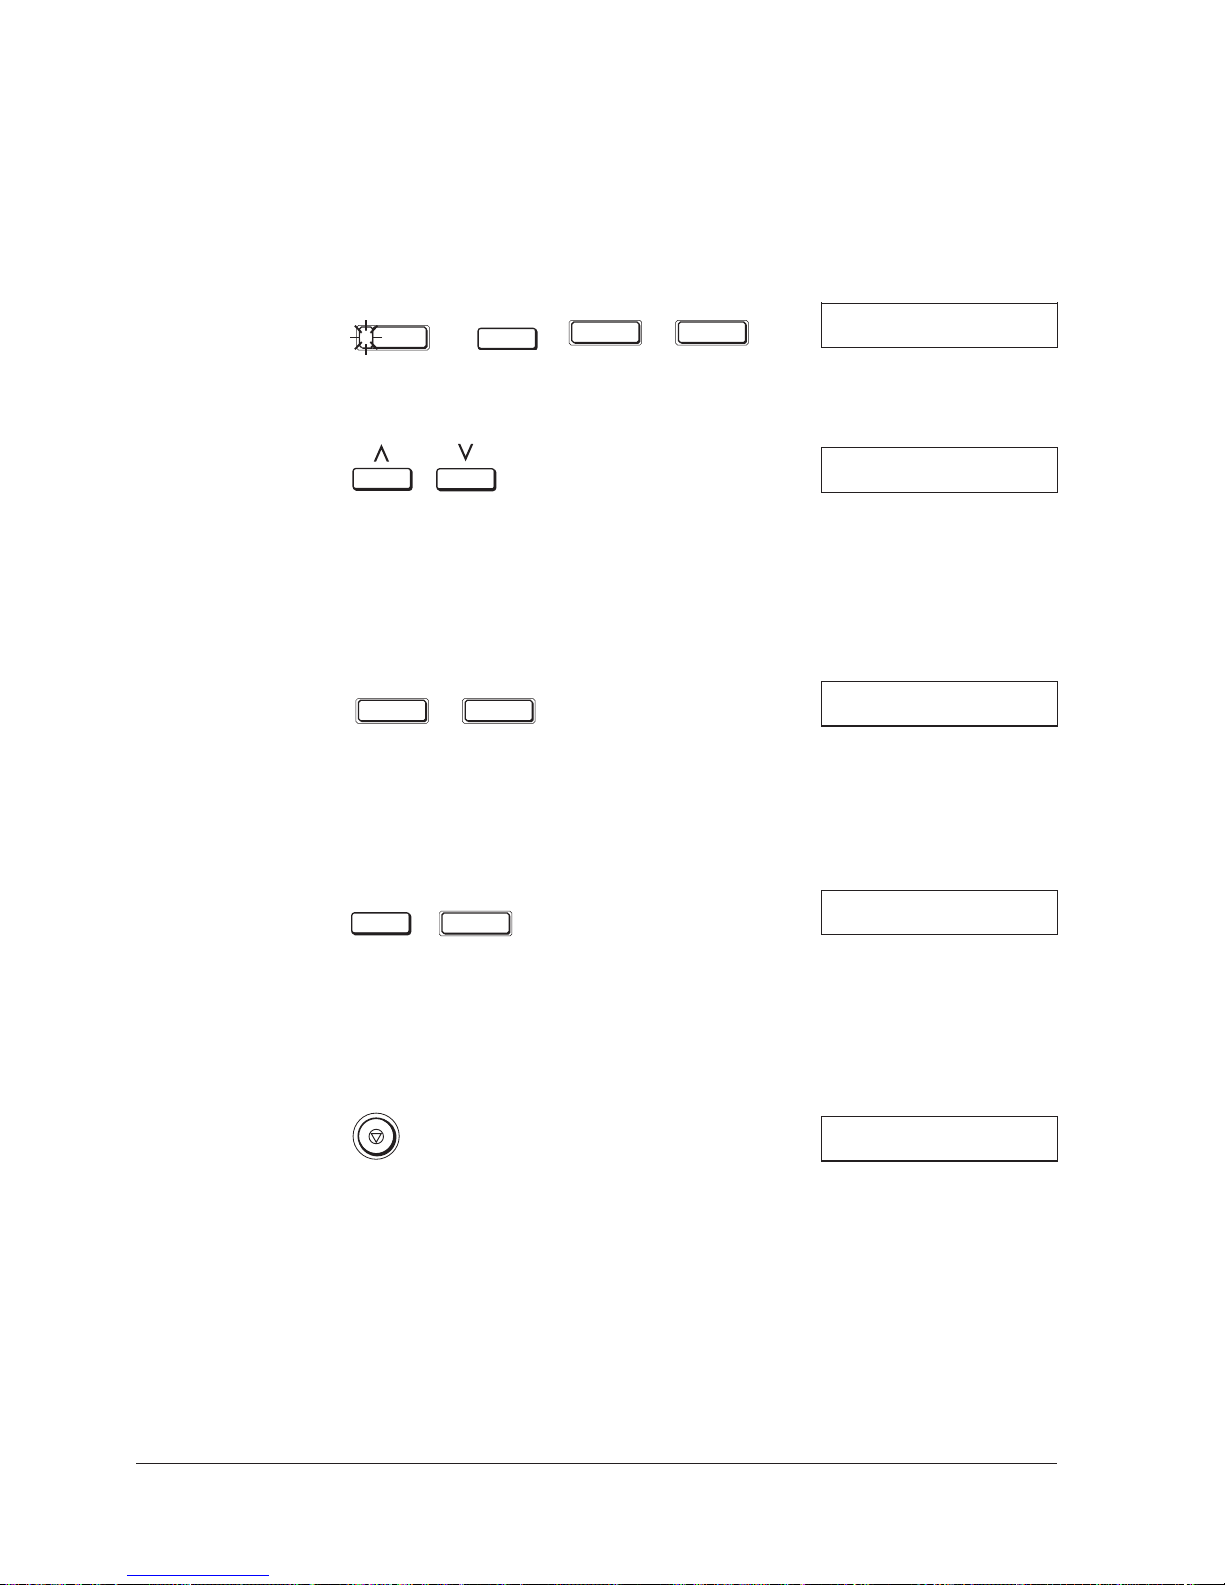
Changing a Number/Name Stored under a One-Touch
Speed Dialling Button
Follow these steps if you want to change the number and/or name registered
under a one-touch speed dialling button, or if you want to delete all information
stored in a button.
1.
FUNCTION
DATA
REGISTRATION
SET SET
1-TOUCH SPD DIAL
01= 907 795 1111
2. Use the search buttons to select the one-touch speed dialling button you want
to change or delete (between 01 and 20).
1-TOUCH SPD DIAL
02= 20 5458545
J You can also do this by pressing FUNCTION, then the one-touch speed
dialling button, then FUNCTION again.
J If the button you select is registered for group dialling, GROUP DIAL
appears.
3. Press SET twice.
SET SET
TELEPHONE NUMBER
TEL= 20 5458545
J The registered number is displayed.
To delete a number:
4. Press CLEAR, then SET.
CLEAR
SET
1-TOUCH SPD DIAL
2.NAME
J When you delete a number, the name registered for that number is also
deleted.
J To delete additional numbers, repeat steps 2 to 5.
5. When you are finished deleting numbers, press STOP to return to standby
mode.
22/07 ’97 TUE 12:34
3-16 Chapter 3Registering Information in the MultiPASS L90
Page 65
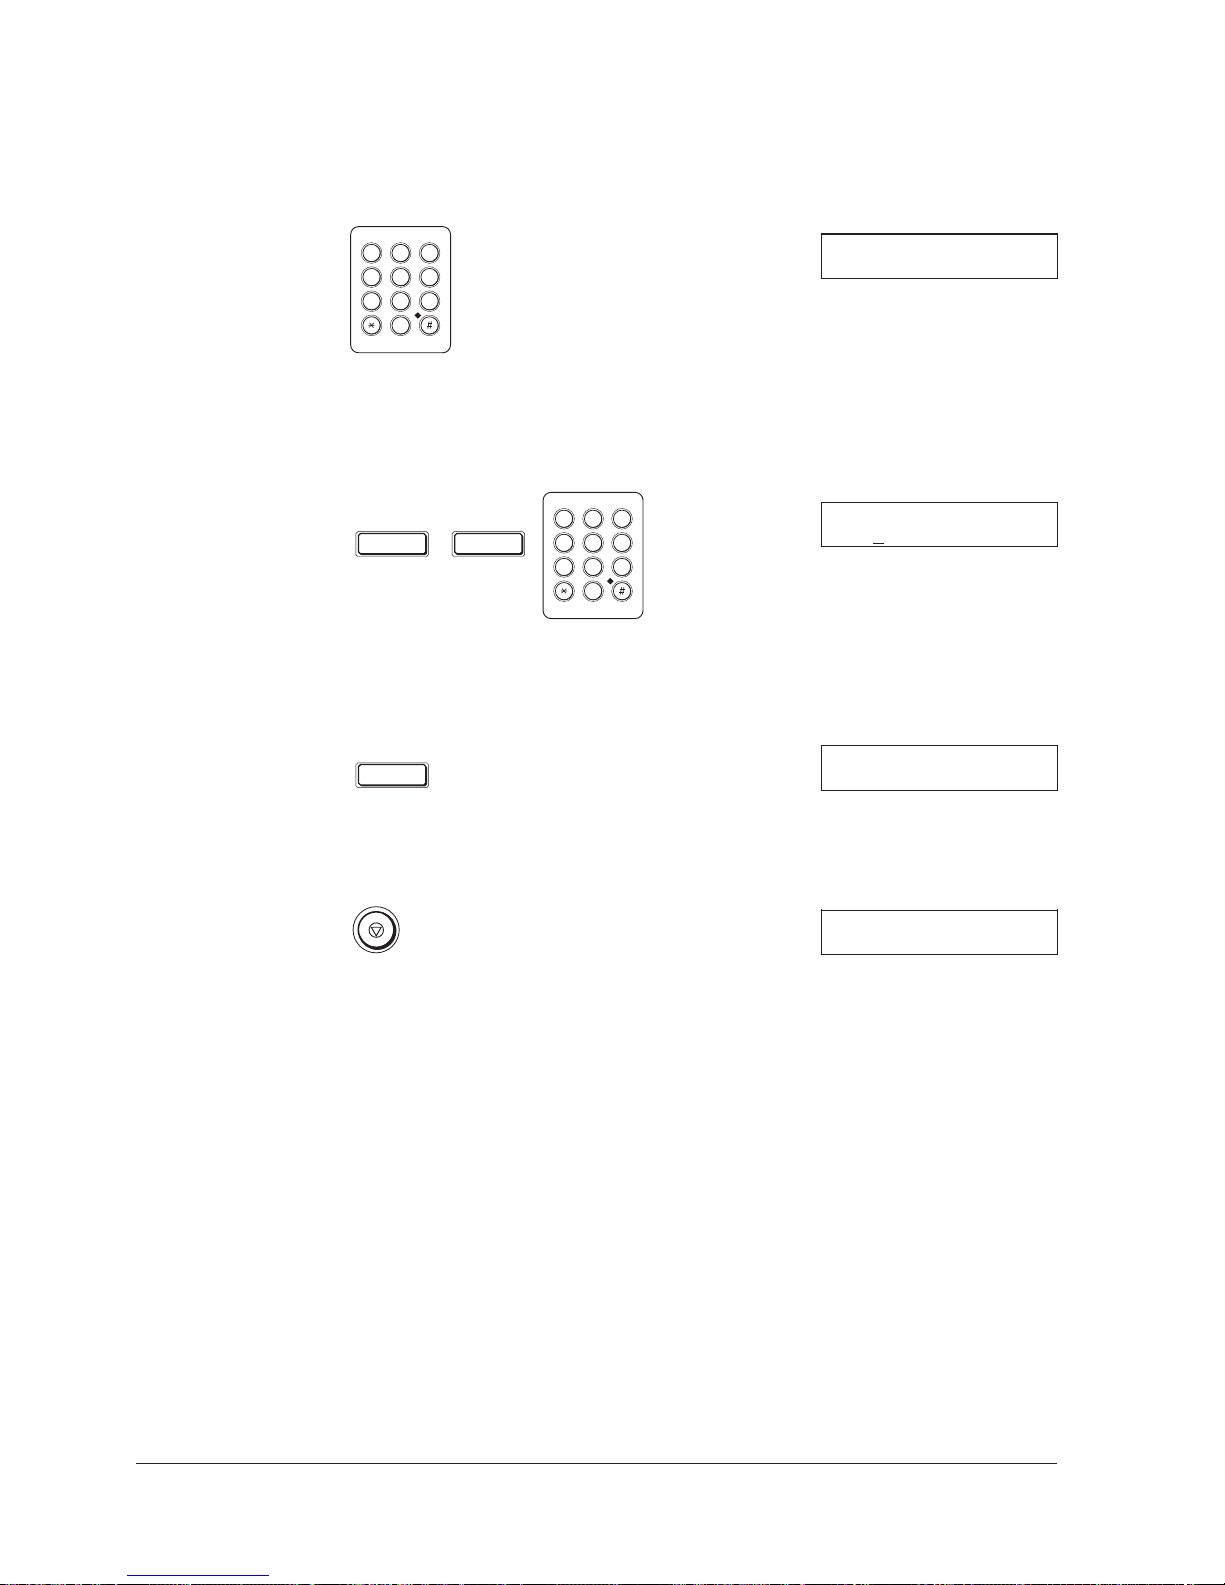
To change the number and/or name:
4. To change the number, use the numeric buttons to enter the new number
over the previous number.
ABC DEF
1
2
GHI JKL MNO
4
5
PQRS TUV WXYZ
7
8
0
3
6
9
TELEPHONE NUMBER
TEL= 20 5458545
J If you only want to change the name, ignore this step and go to step 5.
5. Press SET twice to display the registered name. To change the name, use the
numeric buttons to enter the new name over the previous name. (See page
3-3 for details on entering letters).
SET SET
ABC DEF
1
2
GHI JKL MNO
4
5
PQRS TUV WXYZ
7
8
0
3
6
9
NAME :A
Canon Europa
J If you want to keep the same name, do not enter a new name and go to
step 7.
6. Press SET.
SET
1-TOUCH SPD DIAL
03= 81 773 3173
J To change additional numbers repeat steps 2 to 6.
7. When you are finished changing numbers and/or names, press STOP to
return to standby mode.
22/07 ’97 TUE 12:34
3-17Chapter 3 Registering Information in the MultiPASS L90
Page 66

Using One-Touch Speed Dialling
1. Place the document face down on the unit, and gently insert it into the
automatic document feeder (ADF) until it stops.
2. Press the desired one-touch speed dialling button.
Here are some important points about one-touch speed dialling:
J If you make a mistake, or want to cancel the dialling, press
J You can select up to 20 one-touch speed dial buttons and also include
coded speed dial codes (00-99). The fax will automatically be sent in
numerical order to the coded speed dial numbers first, then to the onetouch speed dial numbers.
J After you press a one-touch speed dialling button, the unit will start
scanning in five seconds, even if you don’t press
seconds if you press more than one one-touch speed dialling button). So if
you want to send to multiple destinations, be sure to press the second onetouch speed dialling button within five seconds after pressing the first, and
press any subsequent buttons within ten seconds.
J If you don’t first place the document into the automatic document feeder
(ADF), the LCD will display SET DOCUMENT.
J If no number is stored under the button you press, the LCD will display
NO TEL #.
When using one-touch speed dialling, make sure the FUNCTION lamp is off.
(START/COPY) (ten
(STOP).
3-18 Chapter 3Registering Information in the MultiPASS L90
Page 67
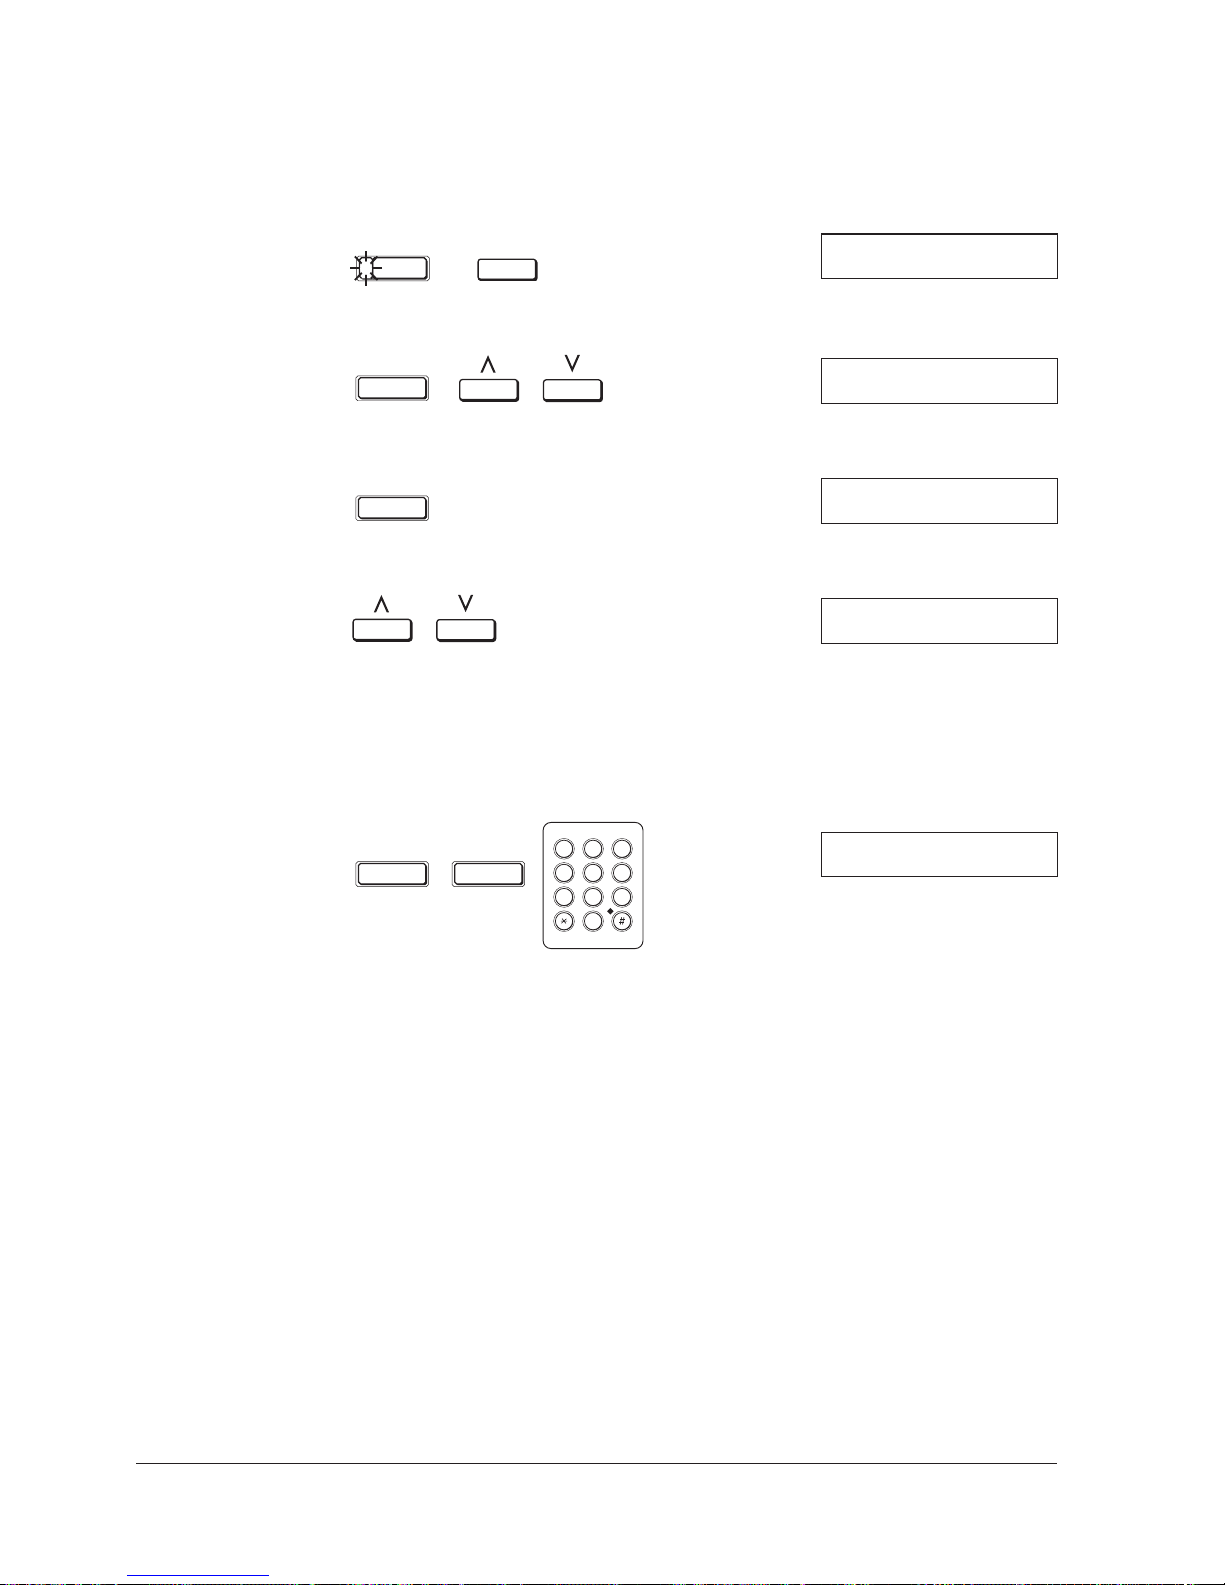
Coded Speed Dialling
Storing Numbers for Coded Speed Dialling
1.
FUNCTION
DATA
REGISTRATION
DATA REGISTRATION
1.SPEED DIAL SETUP
2. Press SET. Use the search buttons to display 2. CODED SPD DIAL.
SET
SPEED DIAL SETUP
2.CODED SPD DIAL
3. Press SET.
SET
CODED SPD DIAL
00=
*
4. Use the search buttons to select a two-digit code (00–99) in the display.
CODED SPD DIAL
07=
*
J If a number is already stored at the code you select, that number appears.
J If the code you select is registered for group dialling, GROUP DIAL
appears.
5. Press SET twice, then use the numeric buttons to enter the fax number you
want to store.
SET SET
ABC DEF
1
2
GHI JKL MNO
4
5
PQRS TUV WXYZ
7
8
0
3
6
9
TELEPHONE NUMBER
TEL=
J Press SPACE to enter spaces between numbers. (Spaces are optional and
are ignored during dialling.)
J If you want to clear a number or a mistaken entry, press CLEAR.
J To enter a pause in the number, press PAUSE one or more times.
3-19Chapter 3 Registering Information in the MultiPASS L90
Page 68
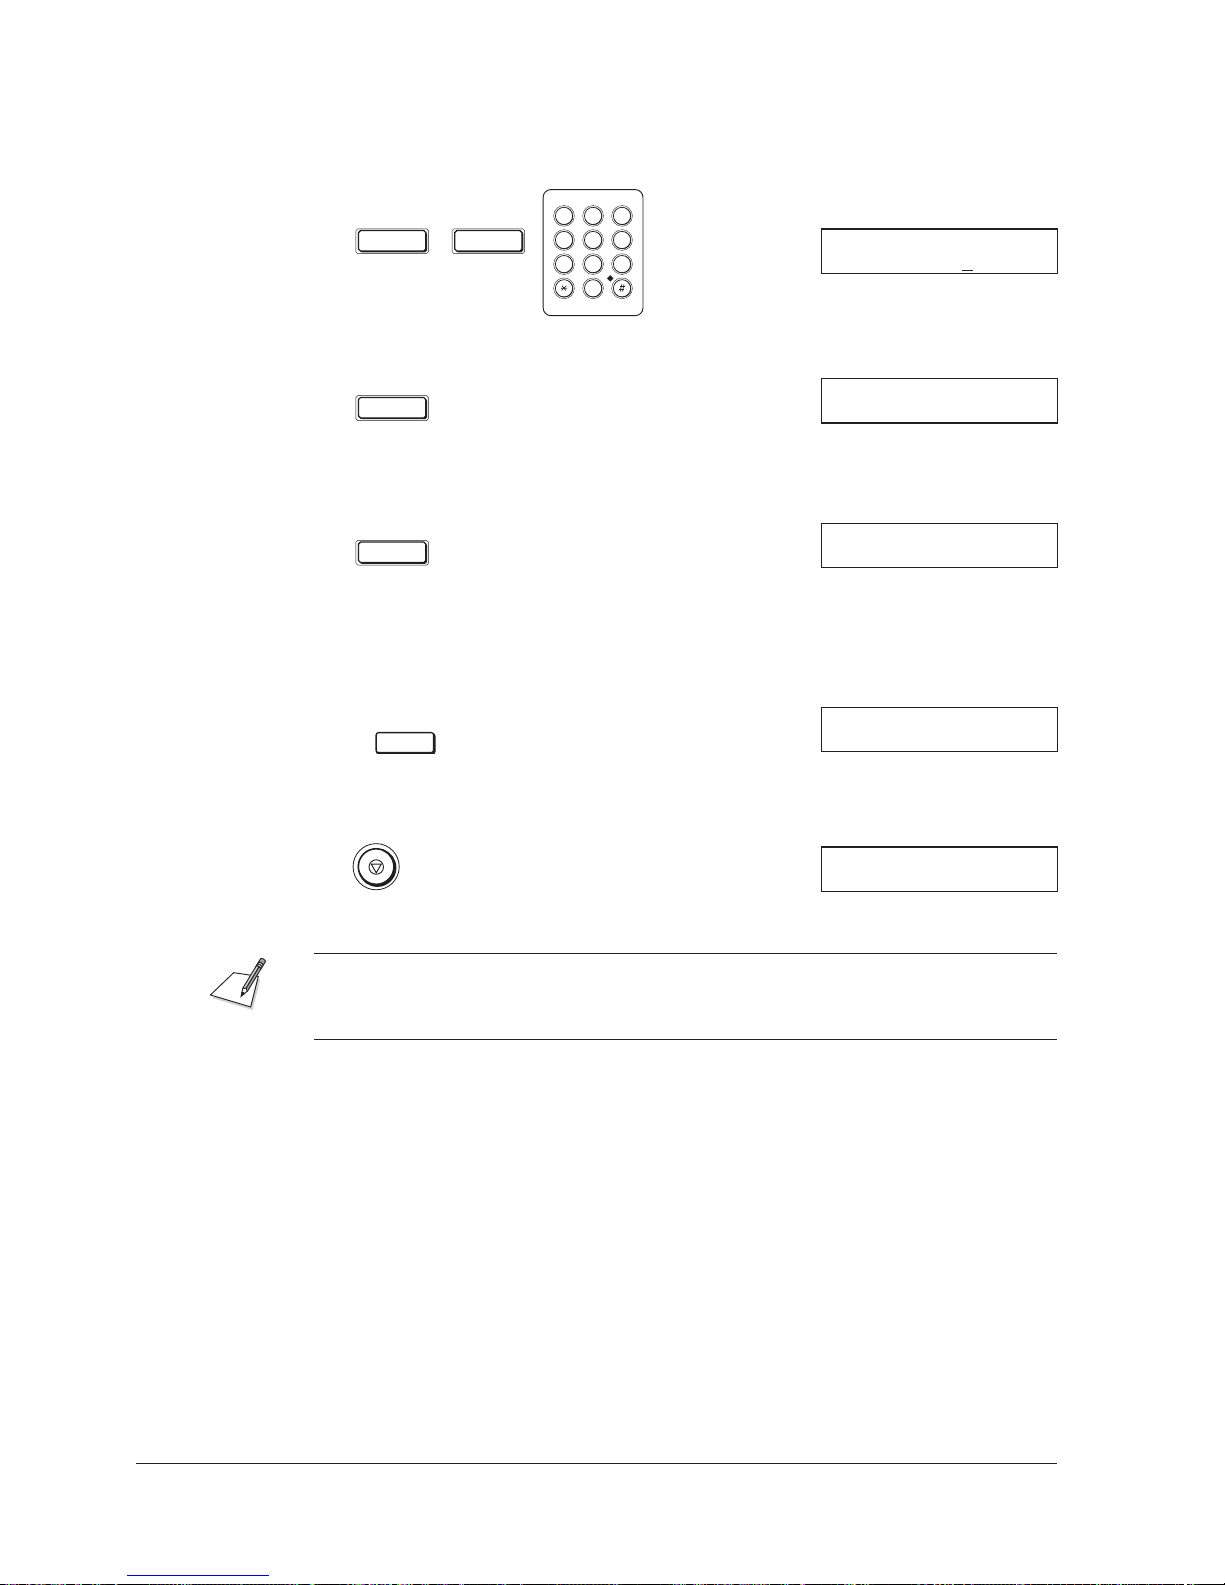
6. Press SET twice, then use the numeric buttons to store the name that goes
with the number. (See page 3-3 for details on entering letters.)
ABC DEF
1
2
SET SET
GHI JKL MNO
4
PQRS TUV WXYZ
7
3
5
8
0
Ex:
6
CANON INC
9
NAME :A
CANON IN
C
7. Press SET.
SET
CODED SPD DIAL
3.OPTIONAL SETTING
8. To adjust the transmission setting, press SET and follow the instruction on
page 3-28.
SET
OPTIONAL SETTING
OFF
- or -
To continue registering more numbers and names for coded speed dialling,
press DATA REGISTRATION.
DATA
REGISTRATION
CODED SPD DIAL
08=
*
9. When you are finished registering numbers and names, press STOP to return
to standby mode.
22/07 ’97 TUE 12:34
You may want to print a list of the numbers and names you store under the
coded speed dial codes, and post the list near the unit. See “Printing a List of
Registered Telephone Numbers” on page 8-9.
3-20 Chapter 3Registering Information in the MultiPASS L90
Page 69
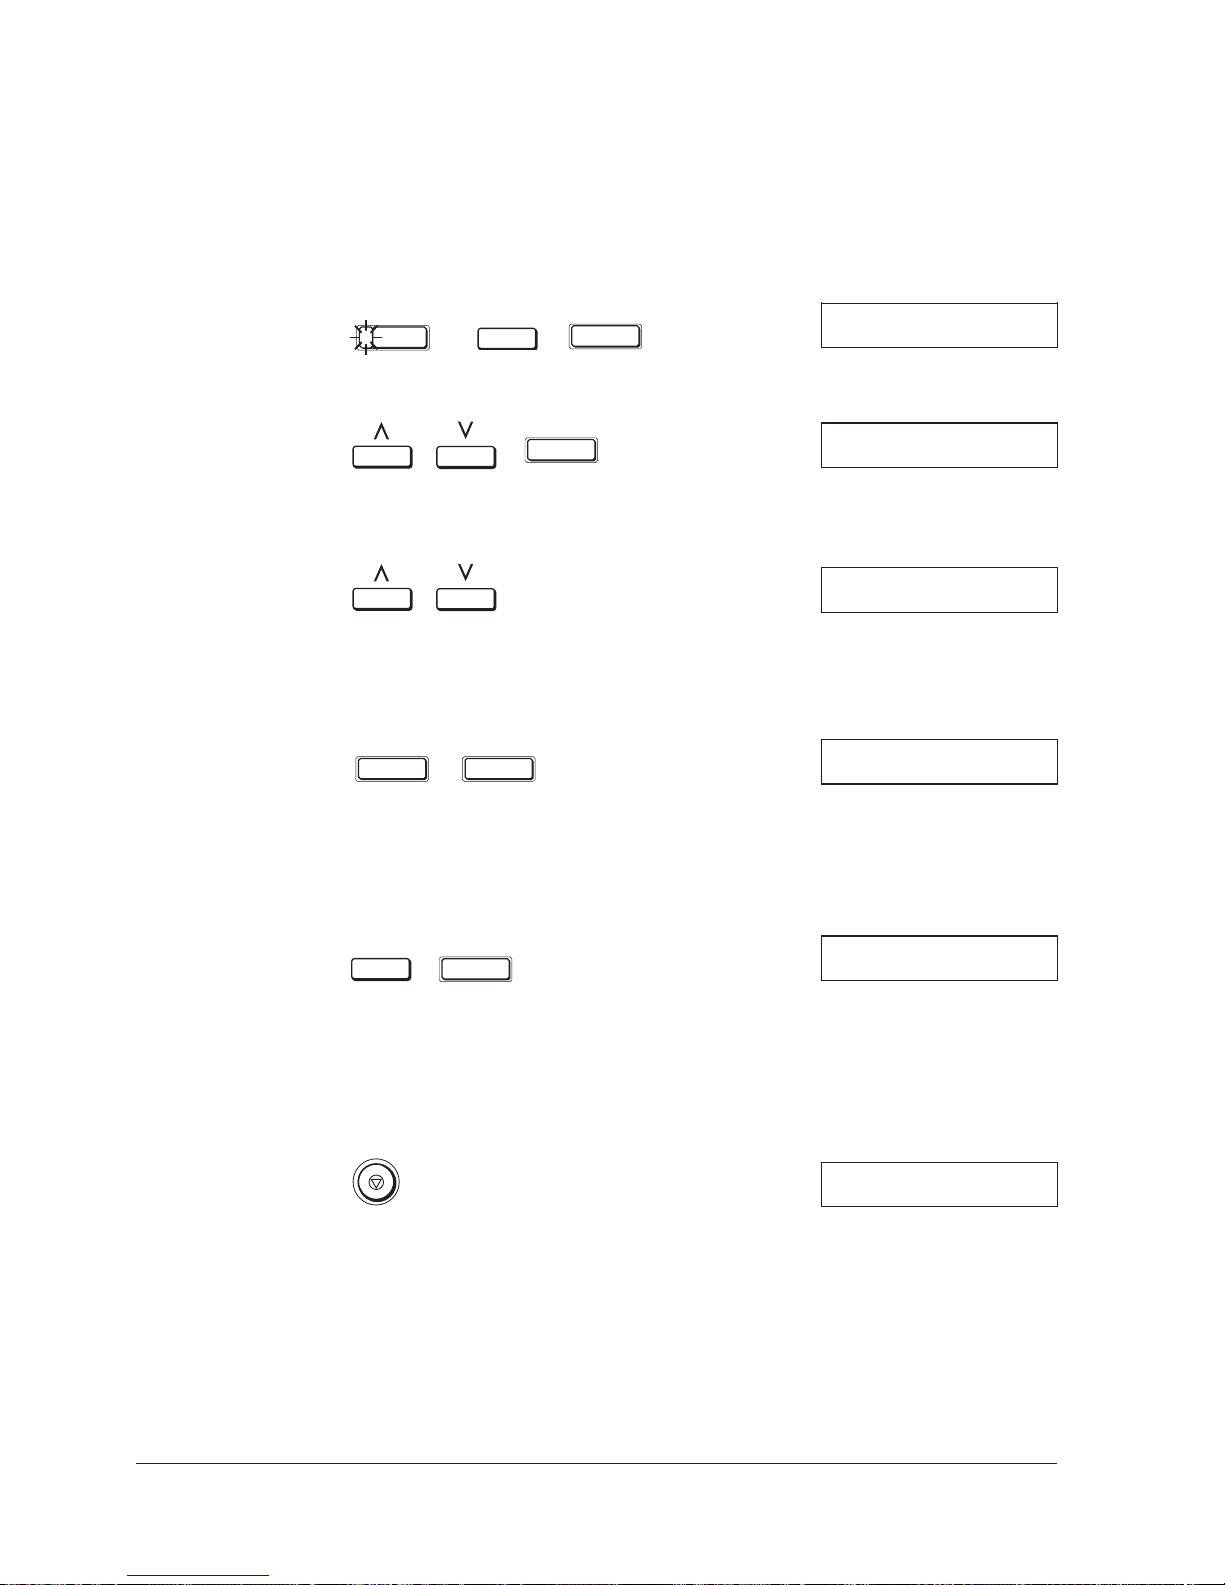
Changing a Number/Name Stored under a Coded Speed
Dialling Code
Follow these steps if you want to change the number and/or name registered
under a coded speed dialling code, or if you want to delete all information stored
in a code.
1.
FUNCTION
DATA
REGISTRATION
SET
SPEED DIAL SETUP
1.1-TOUCH SPD DIAL
2. Use the search buttons to display 2. CODED SPD DIAL, then press SET.
SET
CODED SPD DIAL
00
*
3. Use the search buttons to select the two-digit code (00–99) you want to
change.
CODED SPD DIAL
30= 1 432 2060
*
J If the code you select is registered for group dialling, GROUP DIAL
appears.
4. Press SET twice.
SET SET
TELEPHONE NUMBER
TEL= 1 432 2060
J The registered number is displayed.
To delete a number:
5. Press CLEAR, then SET.
CLEAR
SET
CODED SPD DIAL
2.NAME
J When you delete a number, the name registered for that number is also
deleted.
J To delete additional numbers, repeat steps 2 to 5.
6. When you are finished deleting numbers, press STOP to return to standby
mode.
22/07 ’97 TUE 12:34
3-21Chapter 3 Registering Information in the MultiPASS L90
Page 70
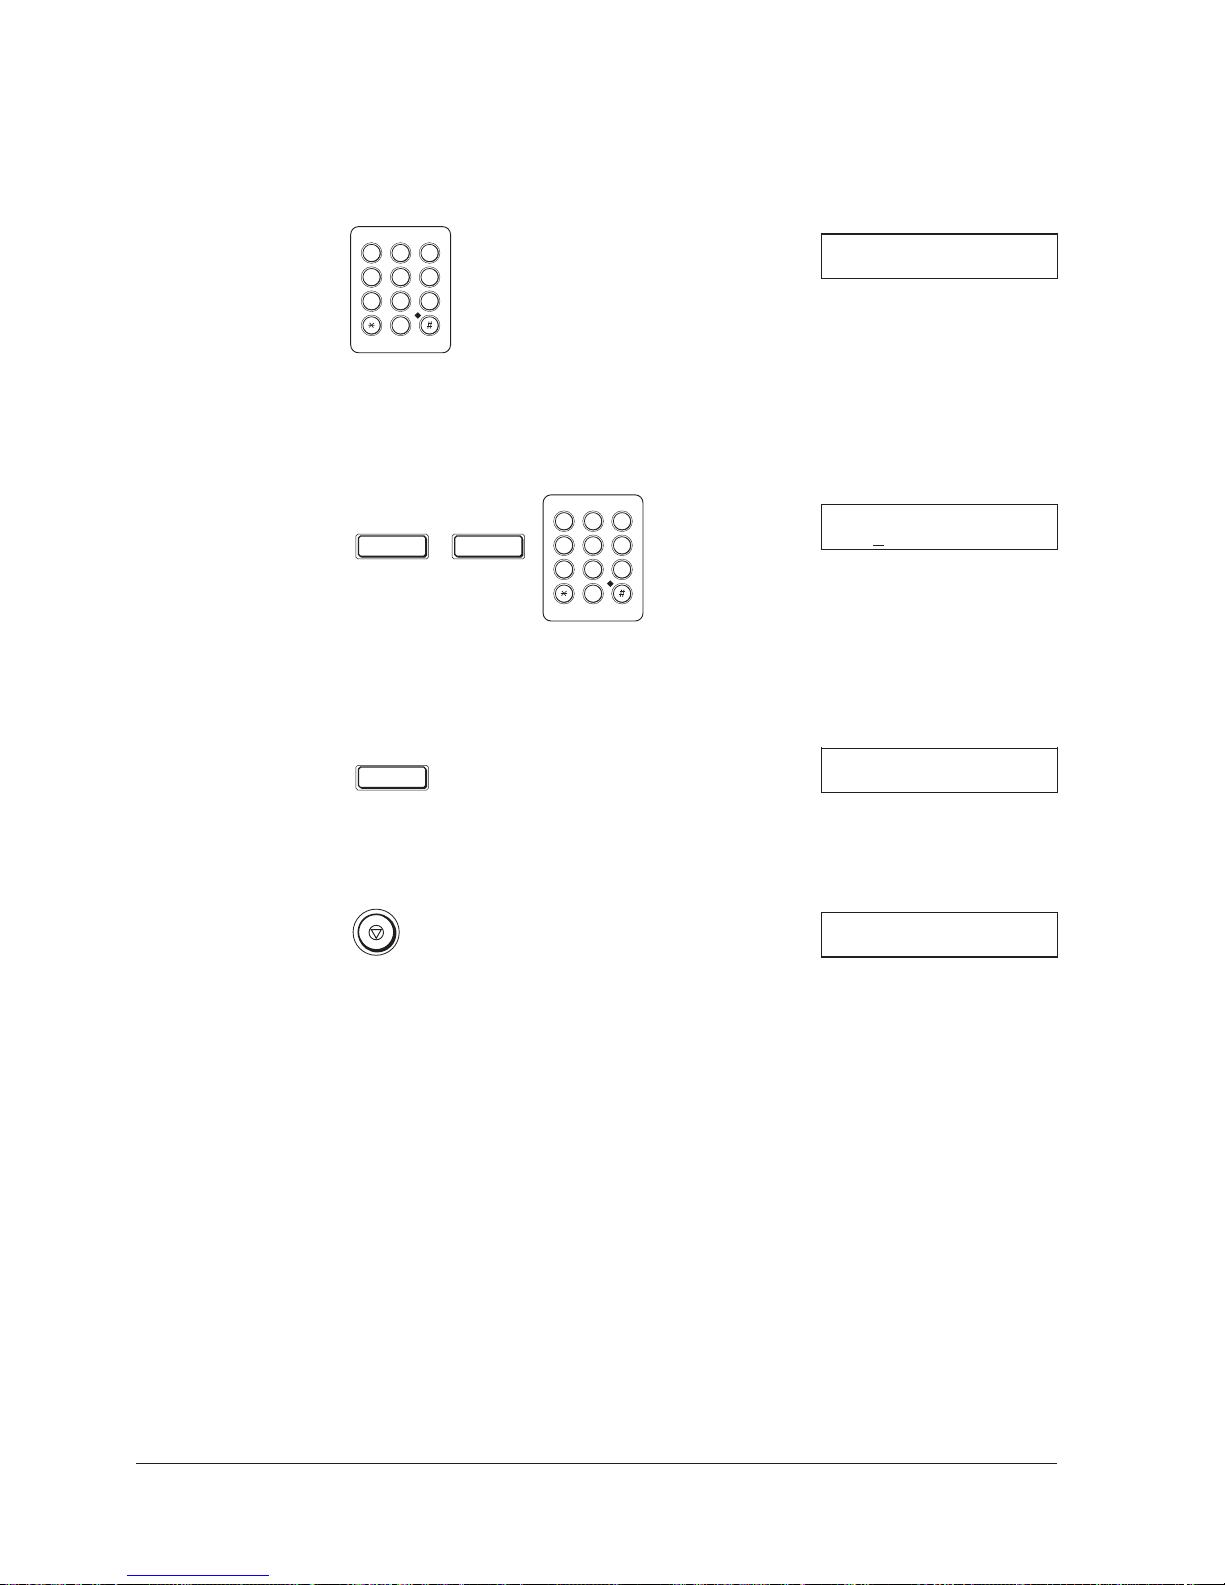
To change the number and/or name:
5. To change the number, use the numeric buttons to enter the new number
over the previous number.
ABC DEF
1
2
GHI JKL MNO
4
5
PQRS TUV WXYZ
7
8
0
3
6
9
TELEPHONE NUMBER
TEL= 1 432 2060
J If you only want to change the name, ignore this step and go to step 6.
6. Press SET twice to display the registered name. To change the name, use the
numeric buttons to enter the new name over the previous name. (See page
3-3 for details on entering letters).
SET SET
ABC DEF
1
2
GHI JKL MNO
4
5
PQRS TUV WXYZ
7
8
0
3
6
9
NAME :A
Canon OPTICS
J If you want to keep the same name, do not enter a new name and go to
step 8.
7. Press SET.
SET
CODED SPD DIAL
31=
*
J To change additional numbers repeat steps 3 to 7.
8. When you are finished changing numbers and names, press STOP to return to
standby mode.
22/07 ’97 TUE 12:34
3-22 Chapter 3Registering Information in the MultiPASS L90
Page 71

Using Coded Speed Dialling
1. Place the document face down on the unit, and gently insert it into the
automatic document feeder (ADF) until it stops.
2. Press CODED DIAL and use the numeric buttons to enter the desired twodigit code (00–99). (You can enter several codes in a row by pressing
CODED DIAL between each code.) Then press START/COPY.
Ex:
CODED DIAL
3
CODED DIAL
7
1
4
Here are some important points about coded speed dialling:
J If you make a mistake, or want to cancel the dialling, press
(STOP).
J You can enter multiple coded speed dial codes and also include one-touch
speed dial buttons (01-20). The fax will automatically be sent in numerical
order to the coded speed dial numbers first, then to the one-touch speed
dial numbers.
J Once you enter a two-digit code, the unit will start scanning in five
seconds, even if you don’t press
(START/COPY) (ten seconds if you
enter multiple codes). So if you want to send to multiple destinations, be
sure to enter the second coded speed dialling code within five seconds
after entering the first, and subsequent codes within ten seconds.
J If you don’t first place the document into the automatic document feeder
(ADF), the LCD will display SET DOCUMENT.
J If no number is stored under the code you press, the LCD will display NO
TEL #.
3-23Chapter 3 Registering Information in the MultiPASS L90
Page 72
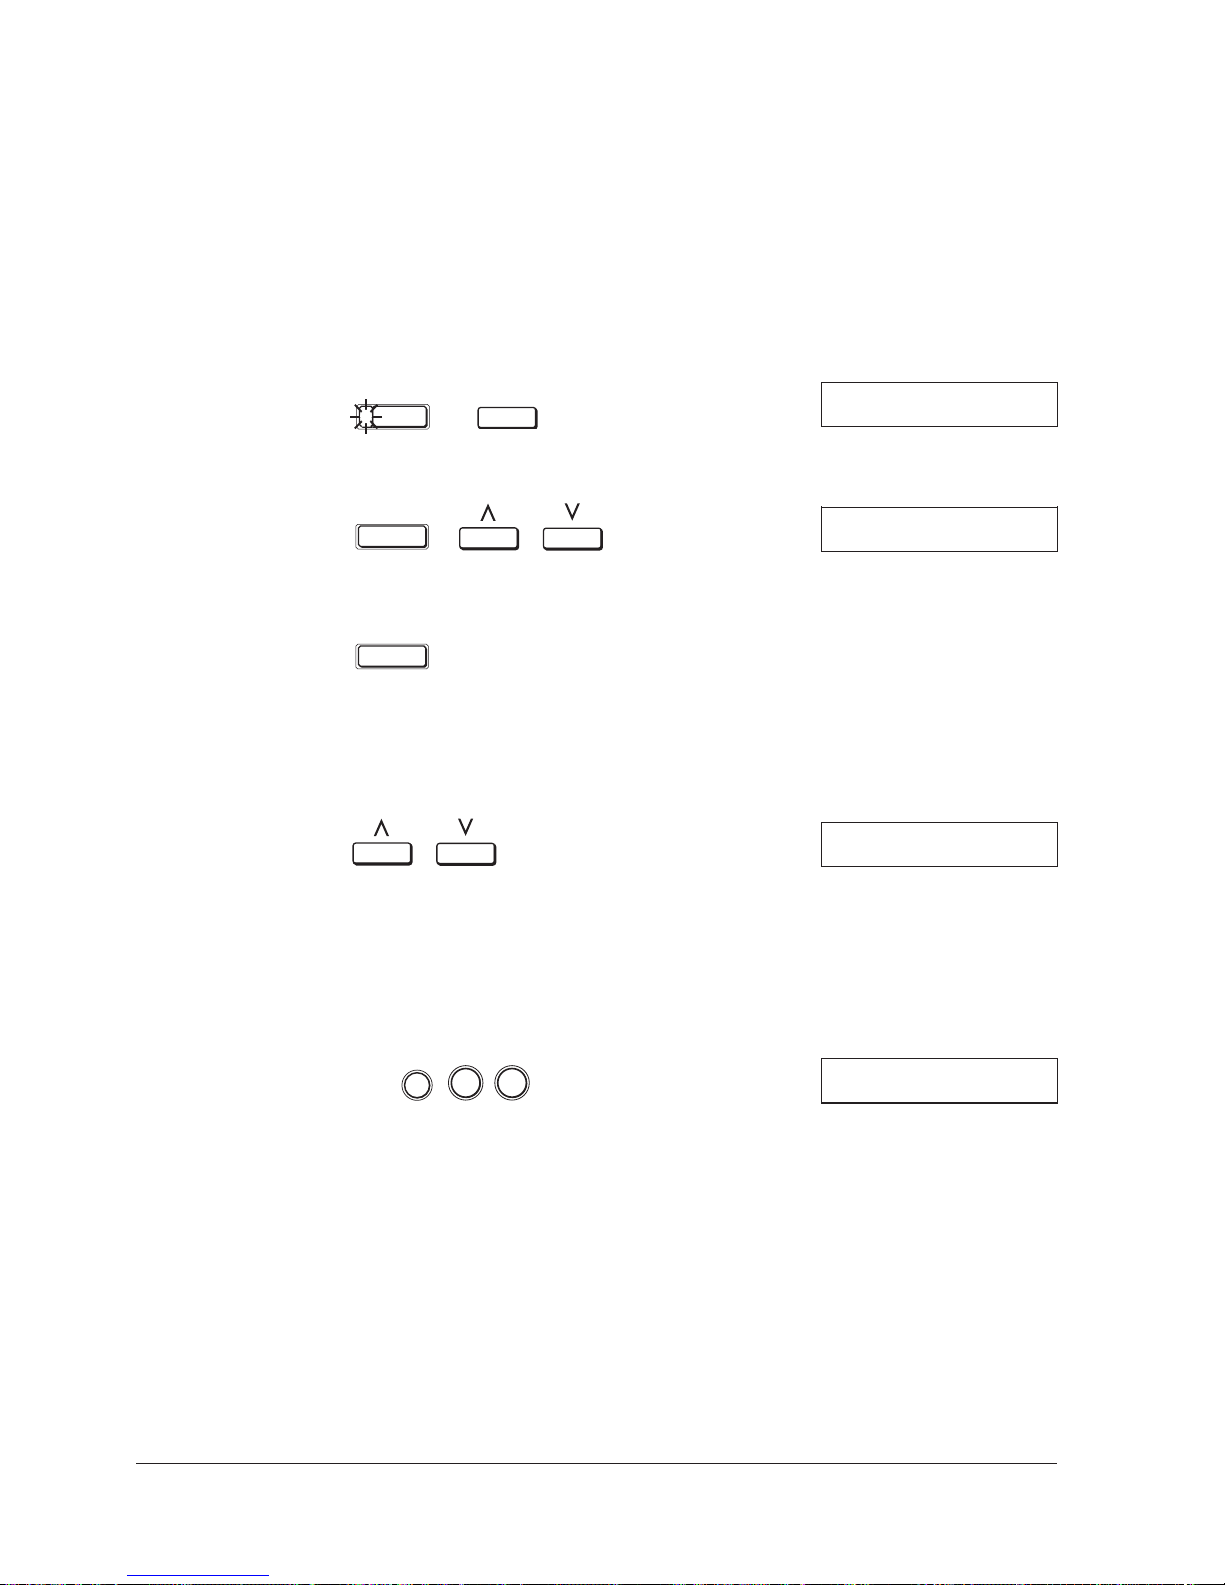
Group Dialling
Creating Groups for Group Dialling
Group dialling lets you send a fax to a group of destinations. The numbers you
use in groups must already be stored in one-touch speed dialling buttons or
coded speed dialling codes. Each group is stored under a one-touch speed dialling
button or a coded speed dialling code.
Create groups for group dialling as follows:
1.
FUNCTION
DATA
REGISTRATION
DATA REGISTRATION
1.SPEED DIAL SETUP
2. Press SET, then use the search buttons to display 3. GROUP DIAL.
SET
SPEED DIAL SETUP
3.GROUP DIAL
3. Press SET.
SET
4. To store a group under a one-touch speed dialling button:
Use the search buttons to select an unused one-touch speed dial button code
(01 to 20). If a group or number is already stored in the button you select,
1–TOUCH SPD DIAL or GROUP DIAL is displayed.
GROUP DIAL
01=
- or -
To store a group under a coded speed dialling code:
Press CODED DIAL, then enter an unused two-digit code (00 to 99). If a
group or number is already stored in the code you select, CODED SPD
DIAL or GROUP DIAL is displayed.
CODED DIAL
Ex:
7
0
3-24 Chapter 3Registering Information in the MultiPASS L90
GROUP DIAL
07=
*
Page 73
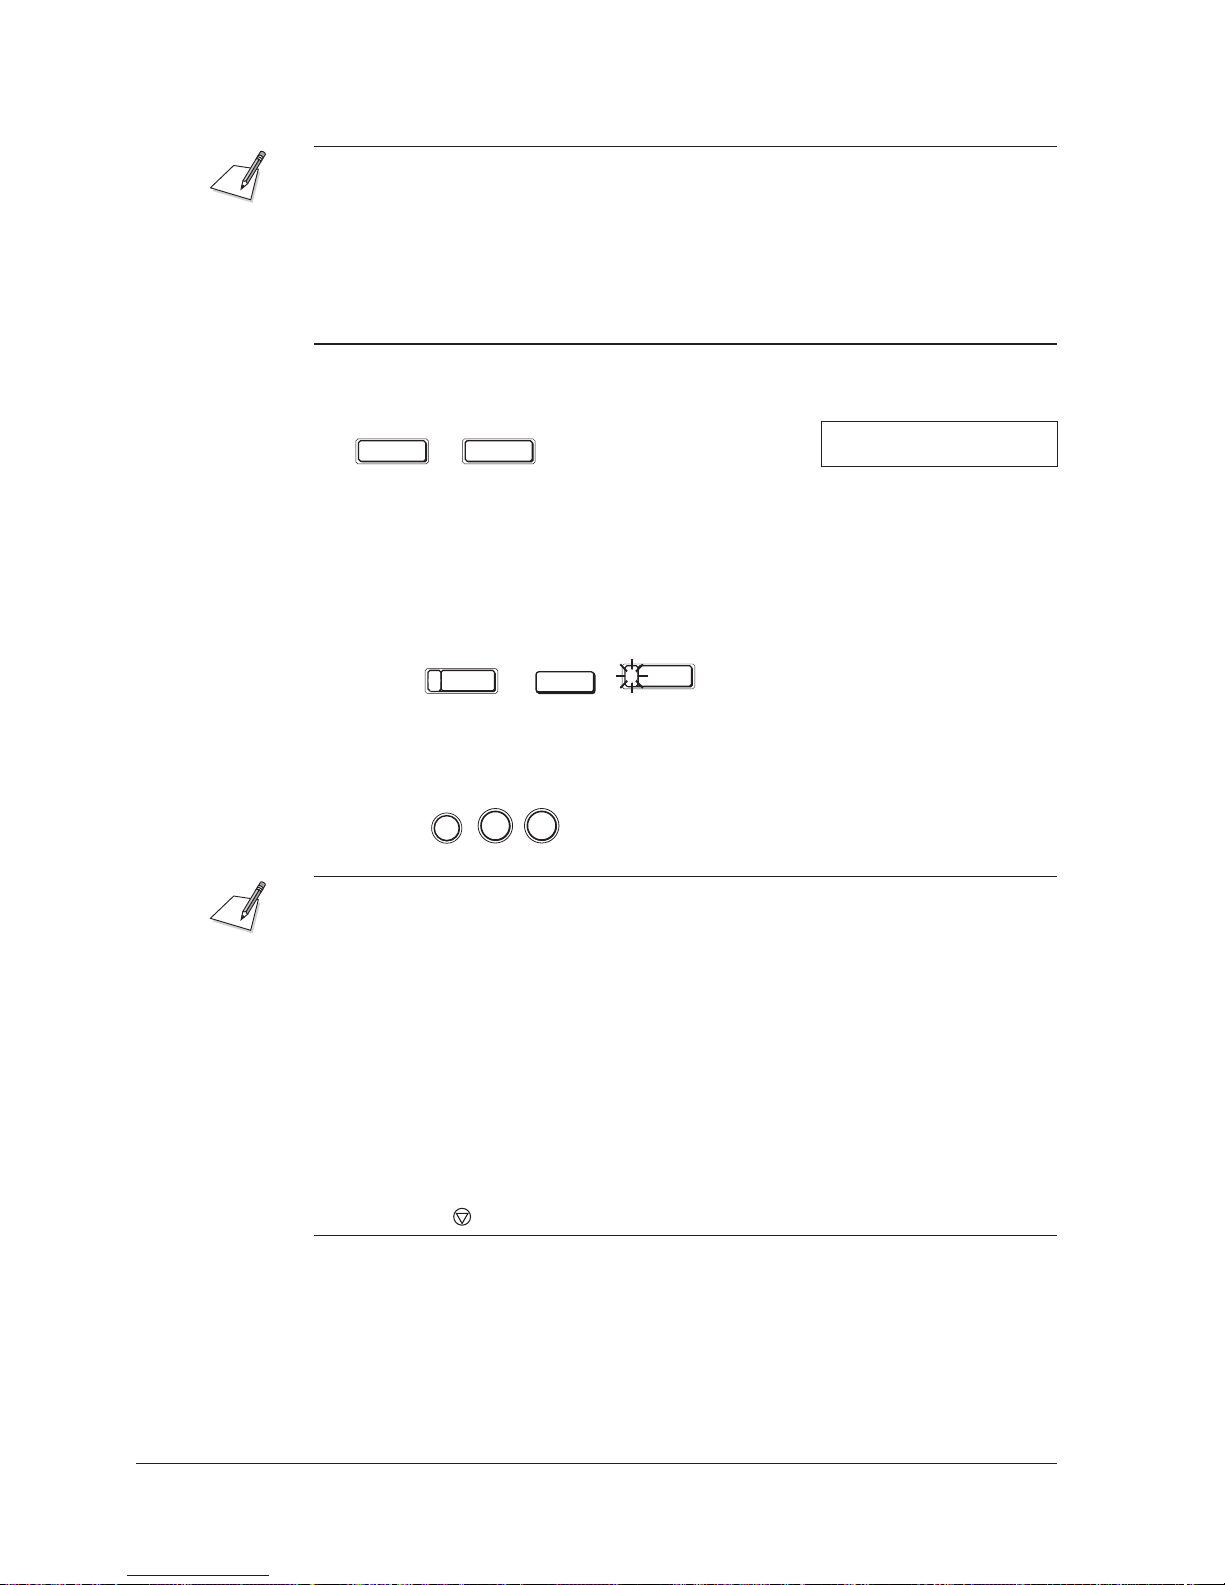
J Each one-touch speed dial button or coded speed dial code can store either a
name and number for speed dialling or a group. Be careful not to override
speed dial names and numbers when creating and storing groups.
J If you wish to register a group under a one-touch speed dialling button or
coded speed dialling code already registered for speed dialling, or if you want
to re-enter a group, you must delete the previous information first. (Qp. 3-16,
3-21)
5. Press SET twice.
SET SET
TEL=
6. Enter the speed dial numbers you want to store in the group.
J If you want to enter a number that is already stored in a one-touch speed
dialling button, press FUNCTION (the FUNCTION lamp goes off), press
the desired one-touch speed dial button(s), and press FUNCTION again
(the FUNCTION lamp goes on).
FUNCTION
Ex:
FUNCTION
06
J If you want to enter a number that is already stored in a coded speed
dialling code, press CODED DIAL, then enter the two-digit code for the
number. (Press CODED DIAL between each entry.)
CODED DIAL
Ex:
7
0
J You can add new numbers to a group already registered for group dial.
J If you want to clear a mistaken entry, press CLEAR.
J Use the search buttons (h, i) to scroll through the list of speed dial numbers
registered in the group.
If you wish to delete a number in the list, display that number using the search
buttons, then press CLEAR.
J You can not register numbers in the group that have not been registered for
speed dialling.
J If all numbers in a group are deleted, group dialling is cancelled.
J You can cancel registering or correcting numbers and return to standby mode
by pressing
(STOP) anytime before pressing SET in Step 7.
3-25Chapter 3 Registering Information in the MultiPASS L90
Page 74
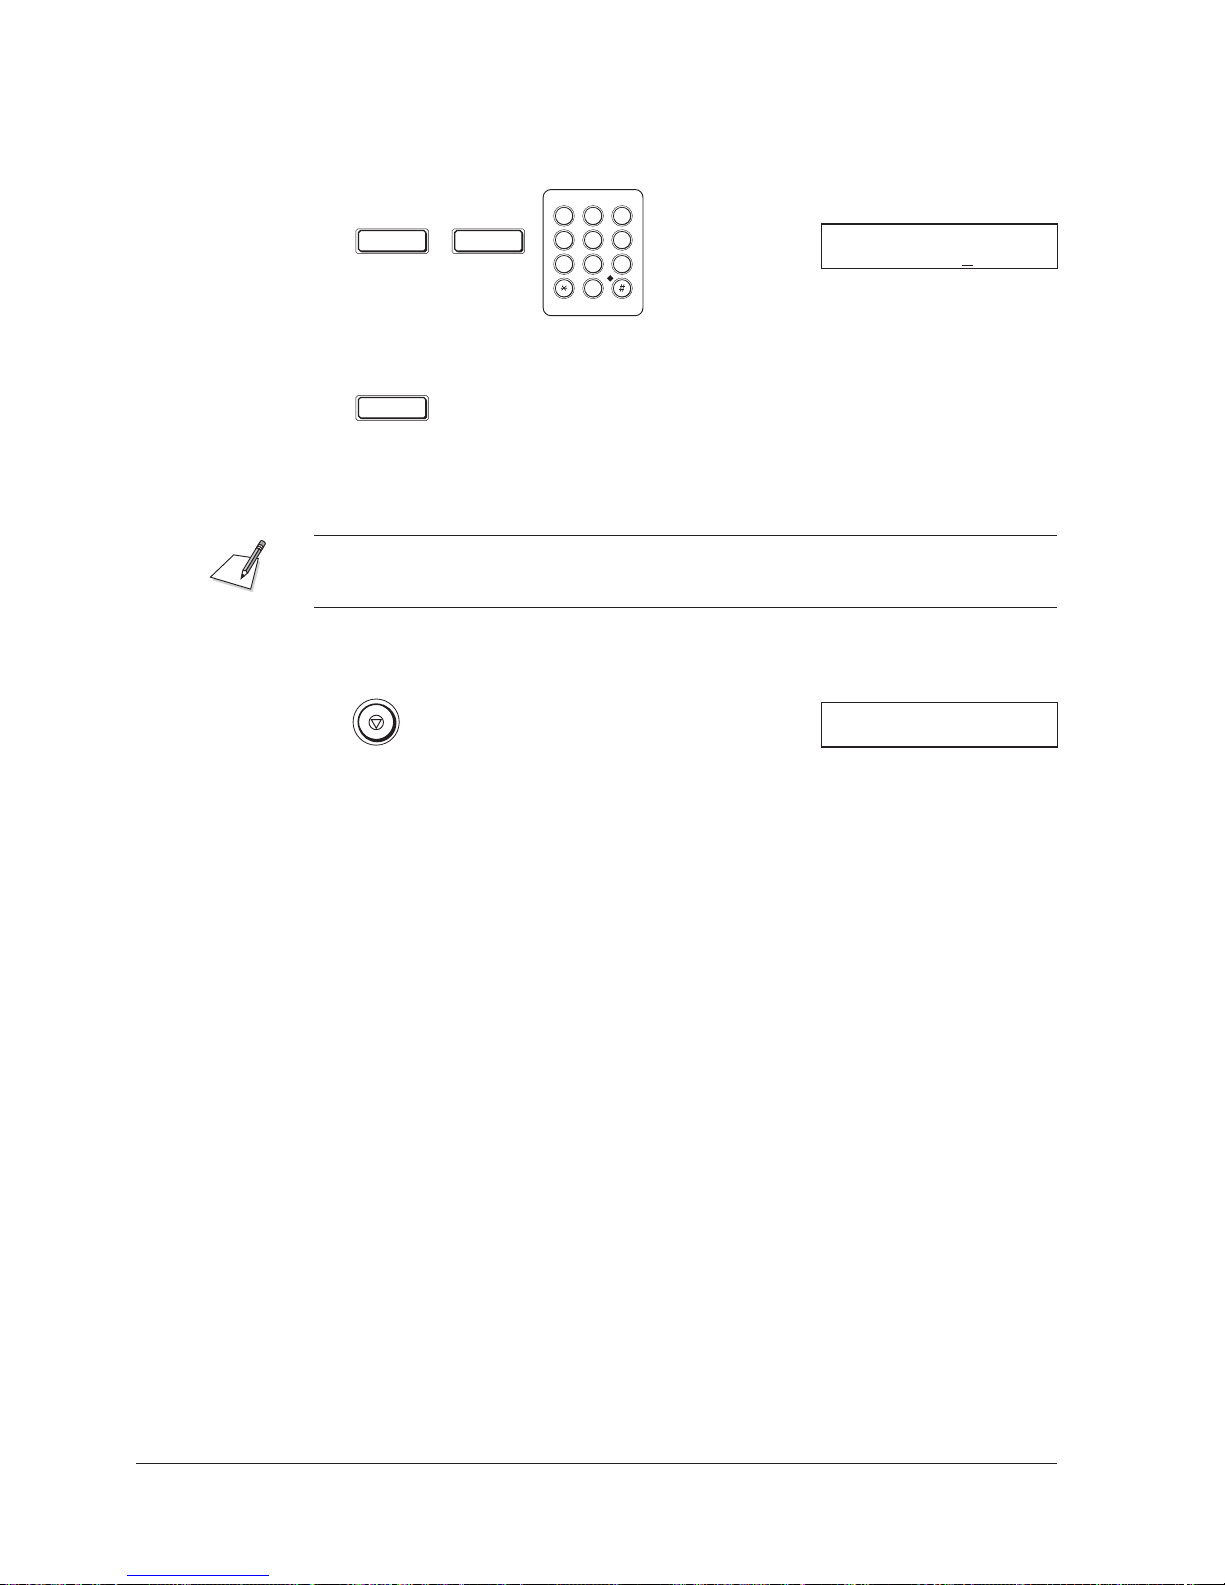
7. Press SET twice, then use the numeric buttons to enter a name for the group.
(See page 3-3 for details on entering letters.)
ABC DEF
1
2
3
SET SET
GHI JKL MNO
4
5
PQRS TUV WXYZ
7
8
0
Ex.
CANON INC NAME :A
6
9
CANON IN
C
8. Press SET.
SET
J To enter additional groups, repeat the above procedure starting with
step 4.
If a one-touch speed dialling number or coded speed dialling code is changed, it
will also be changed if registered for group dialling.
9. When you are finished entering groups, press STOP to return to standby
mode.
22/07 ’97 TUE 12:34
3-26 Chapter 3Registering Information in the MultiPASS L90
Page 75

Using Group Dialling
1. Place the document face down on the unit, and gently insert it into the
automatic document feeder (ADF) until it stops.
2. Press the desired one-touch speed dialling button(s) or enter the coded speed
dialling code(s), then press START/COPY.
Here are some important points about group dialling:
J If you make a mistake, or want to cancel the dialling, press
J You can select several groups in a row. The fax will automatically be sent
in numerical order to the groups stored under coded speed dial codes first,
then to those stored under one-touch speed dial numbers. You can also
include numbers stored for one-touch or coded speed dialling.
J Once you select a group, the unit will start scanning in five seconds, even if
you don’t press
codes). So if you want to send to multiple destinations, be sure to press
the second group dialling, coded dialling, or one-touch speed dialling
button within five seconds after pressing the first, and press any
subsequent buttons within ten seconds.
J If you don’t place the document into the automatic document feeder
(ADF), the LCD will display SET DOCUMENT.
J The unit can detect if a number is registered more than once (one-touch
speed dialling button no. 10, for example), and sends the document once
only to that number.
J The TX TYPE set in one-touch speed dialling buttons or coded speed
dialling codes remain effective when registered in a group.
J The TX TYPE feature can not be set in group dialling.
(START/COPY) (ten seconds if you enter multiple
(STOP).
3-27Chapter 3 Registering Information in the MultiPASS L90
Page 76
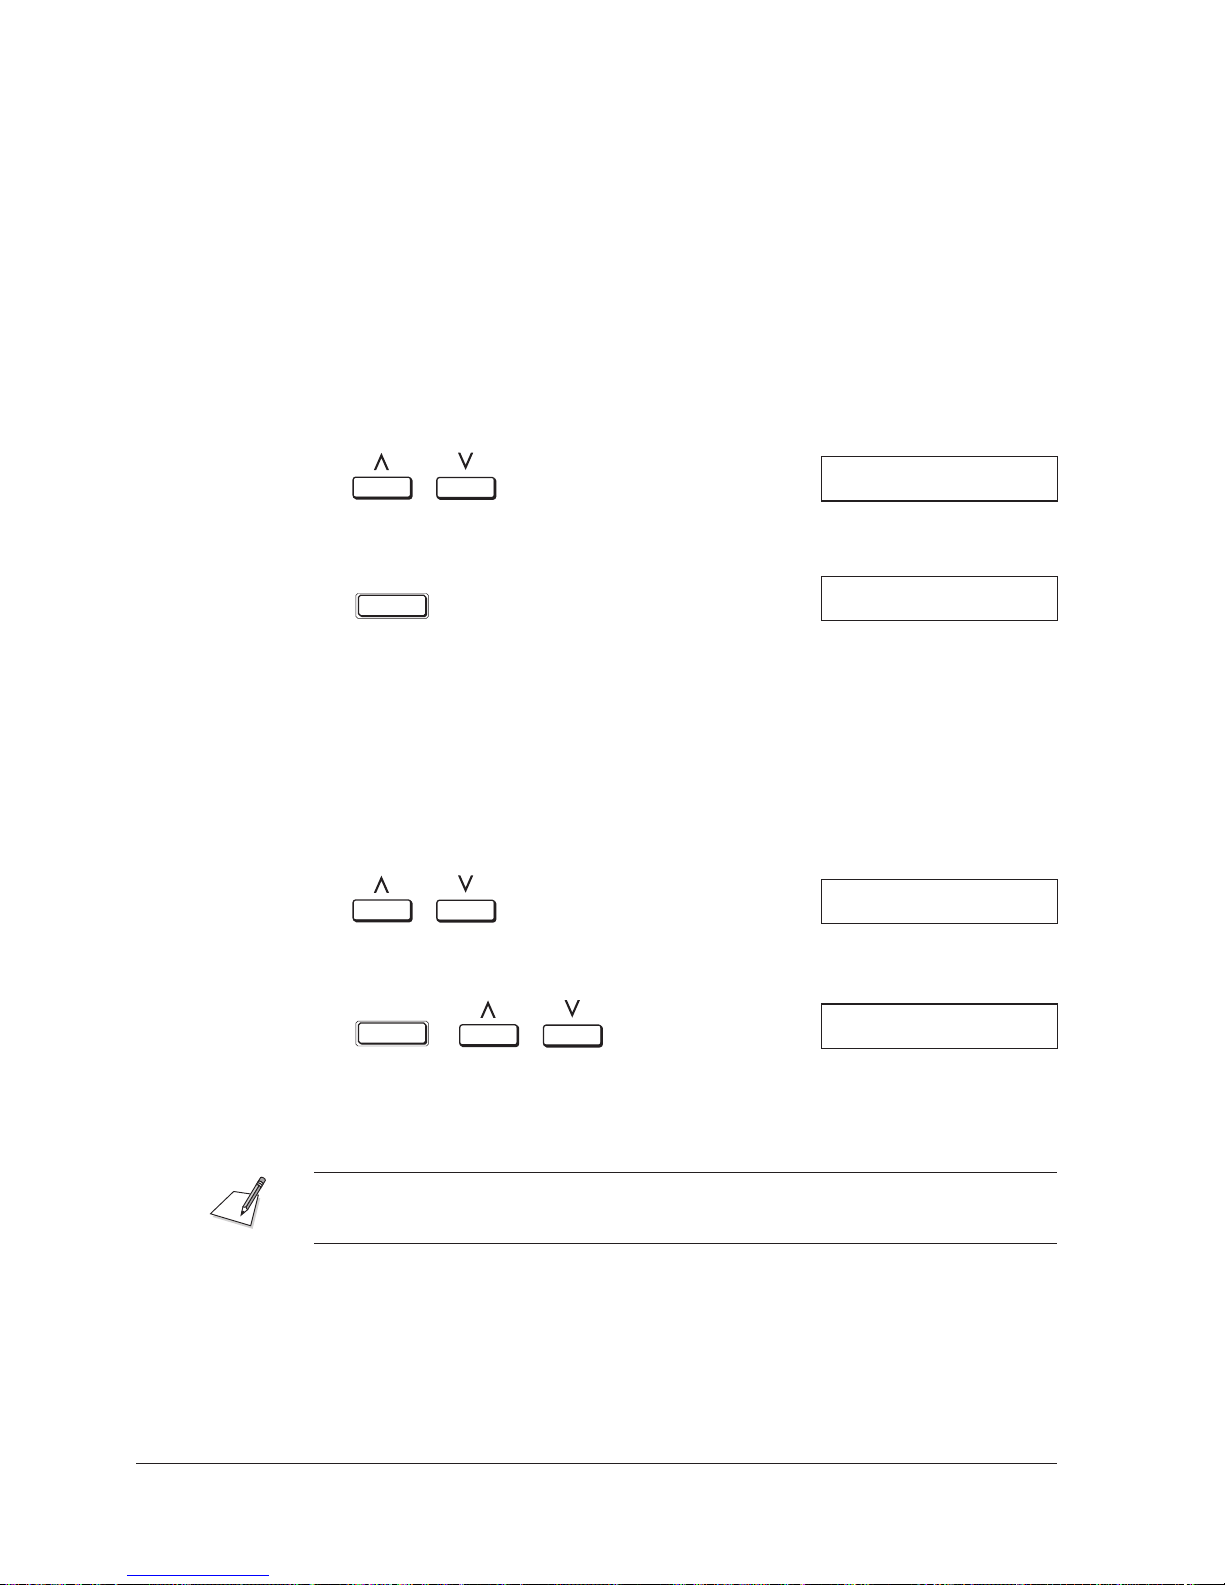
Adjusting the Transmission Settings
When you register a number for one-touch speed dialling or coded speed dialling,
you can also set the transmission time, transmission type, long distance setting,
and the transmission speed.
Before you can set any of the transmission settings, you need to turn the
OPTIONAL SETTING on. Follow the procedure below after completing step 7
on page 3-15 (one-touch speed dialling) or step 8 on page 3-20 (coded speed
dialling).
1. Use the search buttons to display ON.
2. Press SET.
SET
Setting the Transmission Time
Use this procedure to set the transmission time for a one-touch speed dialling
button or a coded speed dialling code.
Make sure the OPTIONAL SETTING is on (see above) before following the
procedure below.
1. Use the search buttons to display 1.SET TIME.
2. Press SET, then use the search buttons to select a line.
SET
Ex: Setting 2
OPTIONAL SETTING
ON
OPTIONAL SETTING
1.SET TIME
OPTIONAL SETTING
1.SET TIME
SET TIME
2: :
J You can set 1 to 5 settings for the transmission time. The procedure is the
same for all settings.
To clear a time setting, press CLEAR. If you clear all settings, the document will
not be sent at a set time.
3-28 Chapter 3Registering Information in the MultiPASS L90
Page 77
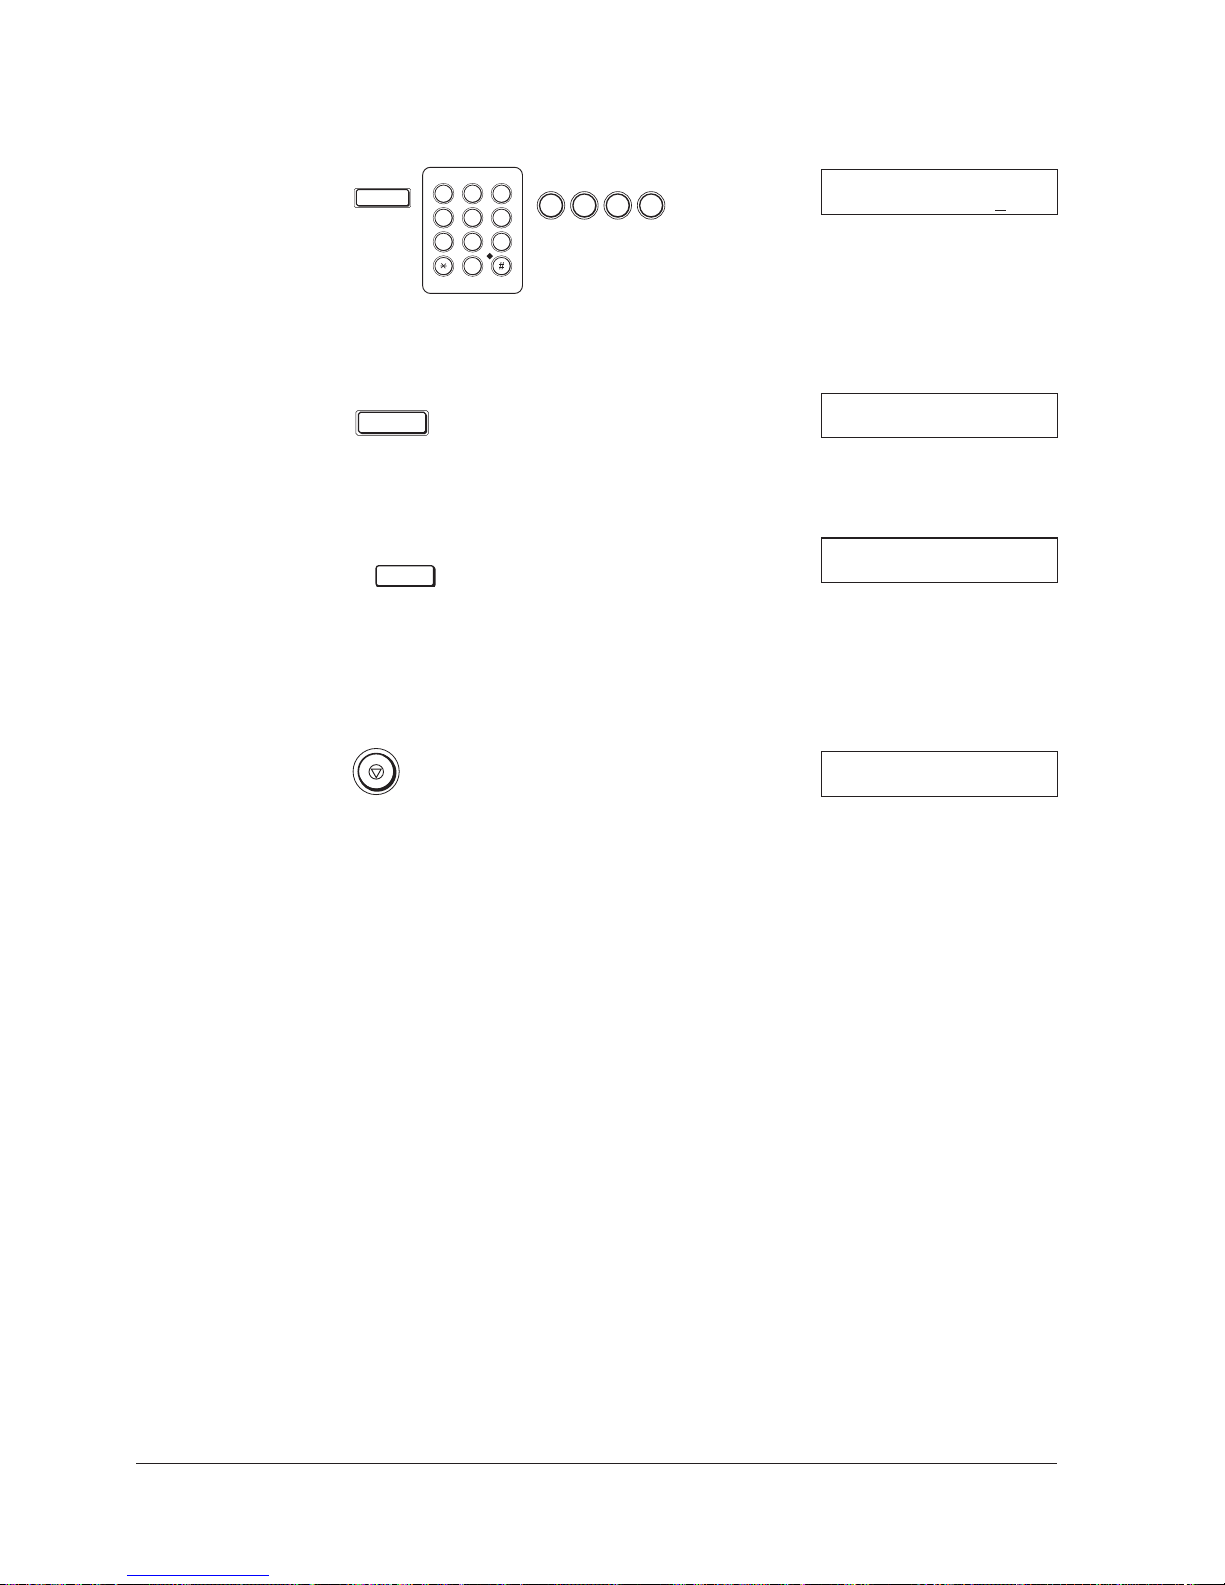
3. Press SET, then use the numeric buttons to enter the starting time.
SET
ABC DEF
1
2
GHI JKL MNO
4
5
PQRS TUV WXYZ
7
8
0
3
6
9
Ex:
0 2 1
SET TIME
5
2:
J Use the 24-hour system to set the time.
4. Press SET.
SET
SET TIME
3: :
5. To continue registering other features for the same number press DATA
REGISTRATION.
DATA
REGISTRATION
OPTIONAL SETTING
2.TX TYPE
J You do not need to press DATA REGISTRATION if the last time setting
you set was 5.
- or If you are finished, press STOP to return to standby mode.
02:15
22/07 ’97 TUE 17:20
3-29Chapter 3 Registering Information in the MultiPASS L90
Page 78
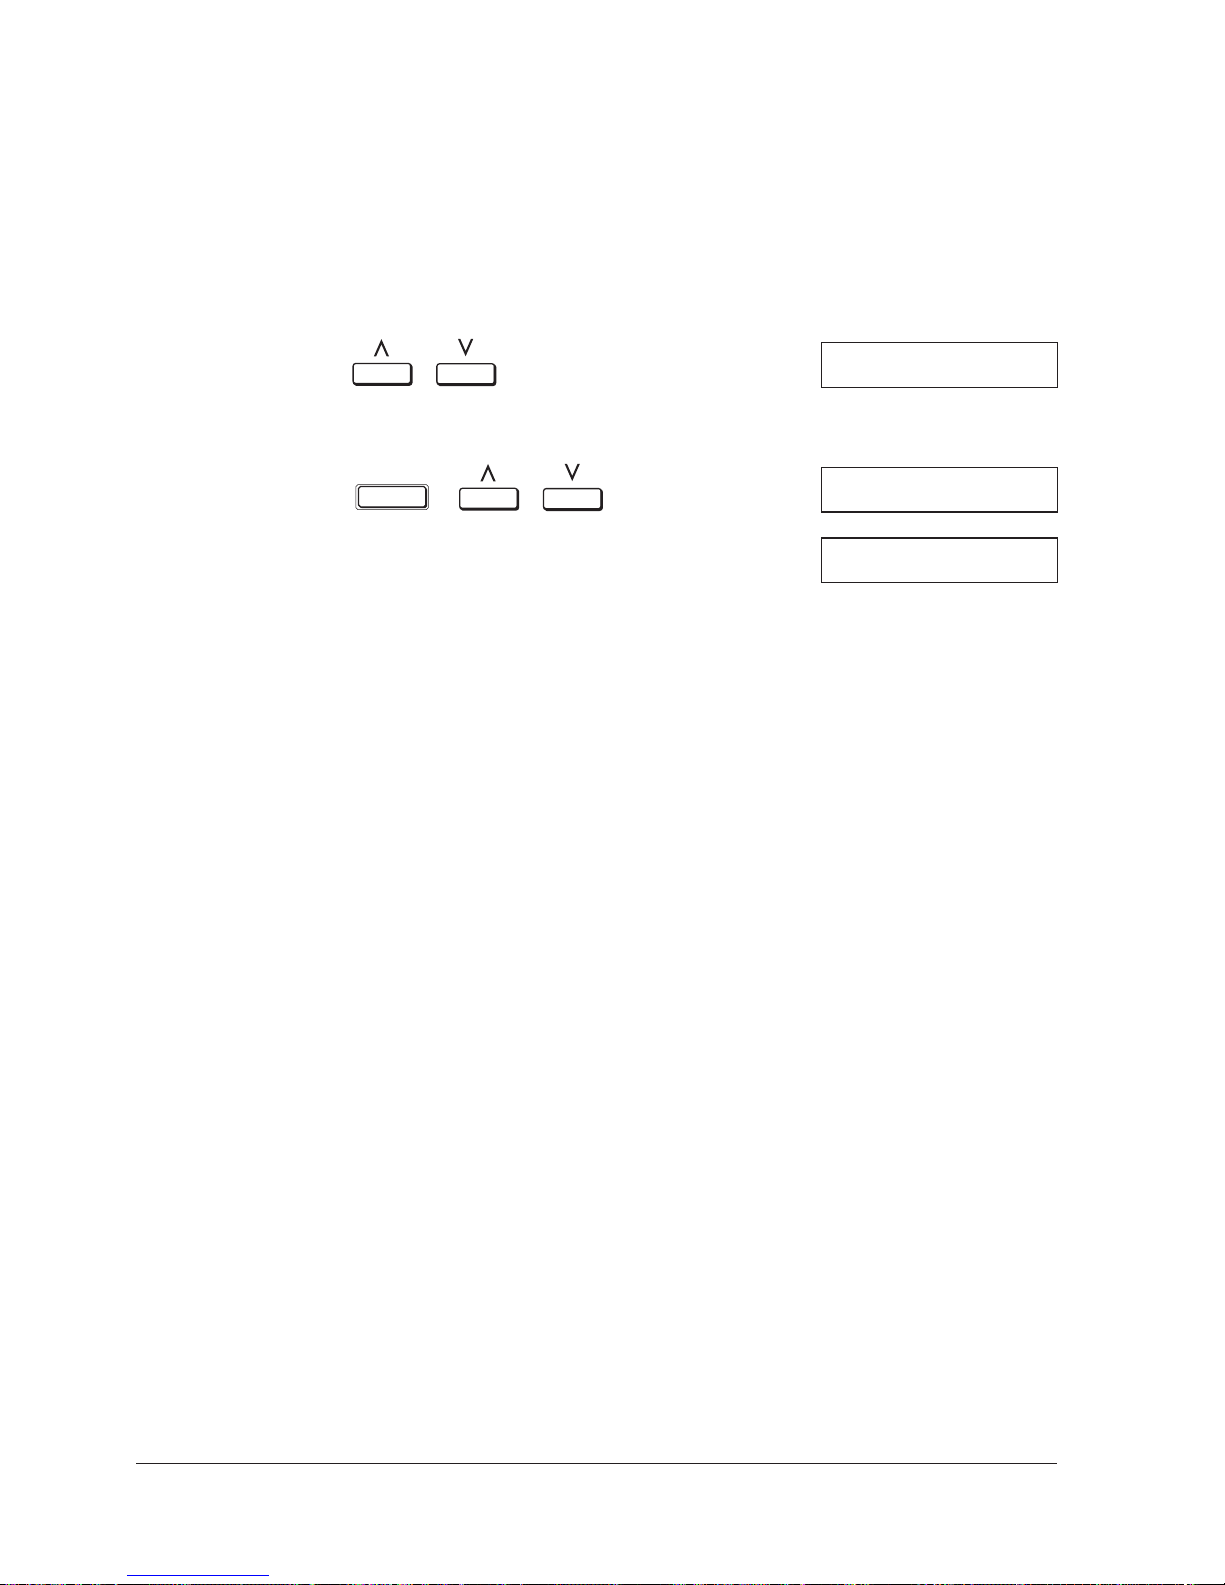
Setting the Transmission Type
Use the expanded transmission feature to set up sending with subaddress and
password for a one-touch speed dialling button or a coded speed dialling code.
Make sure the OPTIONAL SETTING is on (Qp. 3-28) before following the
procedure below.
1. Use the search buttons to display 2.TX TYPE.
2. Press SET, then use the search buttons to display the setting you want to use.
OPTIONAL SETTING
2.TX TYPE
SET
TX TYPE
REGULAR TX
TX TYPE
PSWD/SUBADDRESS
J Use the REGULAR TX setting to turn off a subaddress/password setting
if one has been set up.
Sending with a Subaddress and Password
With the PASSWORD/SUBADDRESS feature, you can send documents with a
registered subaddress or password based on the ITU-T standard so that
documents transmitted without the corresponding subaddress or password will
not be received. To send a document with the PASSWORD/SUBADDRESS
feature, it is necessary that the subaddress or the password of the document you
wish to send is identical to the subaddress or password of the other fax to which
the document is to be transmitted to.
When sending a document using this feature, it is necessary for the receiving
party’s fax machine to have the same function for receiving. If using a Canon fax
machine, the “Memory Box” feature is suitable for this.
The PASSWORD/SUBADDRESS feature may differ depending on the receiving
fax machine’s settings. When using this feature, check with the other party on
how they are using the PASSWORD, SUBADDRESS, and “Memory Box”
features before sending a document.
3-30 Chapter 3Registering Information in the MultiPASS L90
Page 79
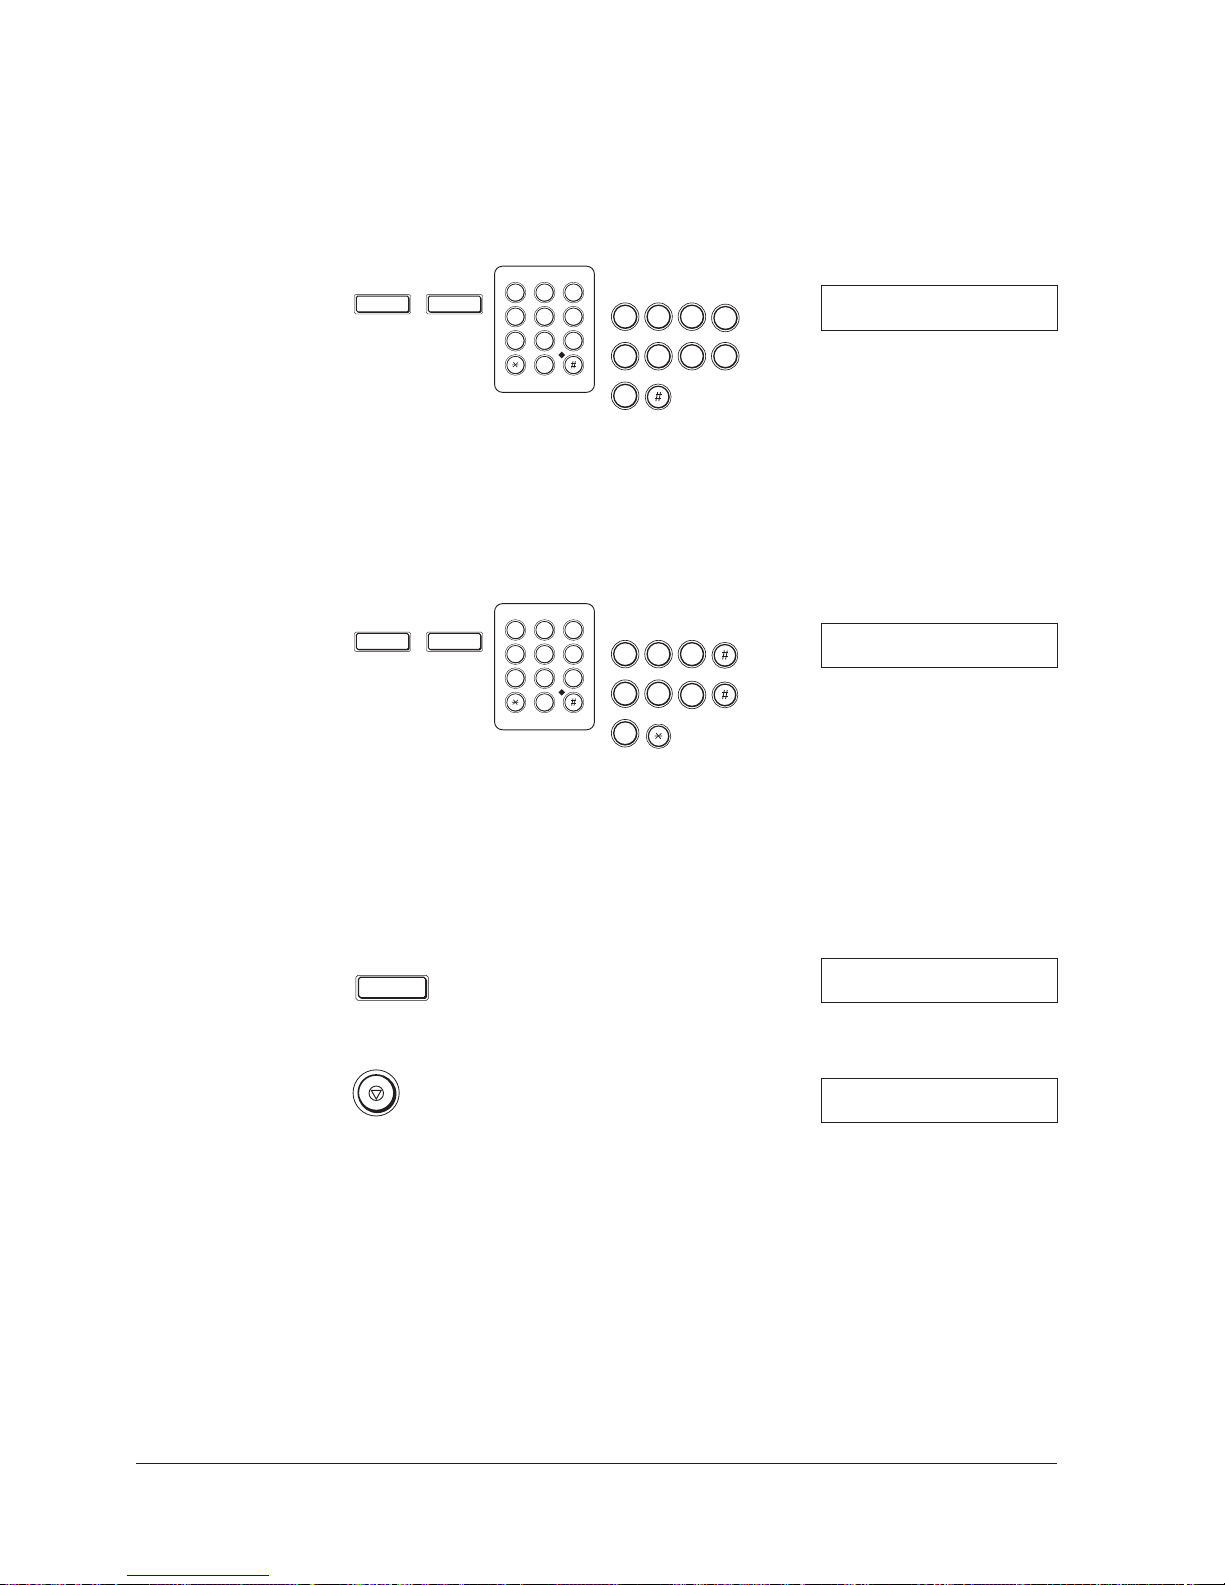
Follow this procedure to set the subaddress and the password for a one-touch
speed dialling button or a coded speed dialling code. To set the subaddress and
password, display PSWD/SUBADDRESS.
3. Press SET twice, then use the numeric buttons to enter the subaddress.
SET SET
ABC DEF
1
2
GHI JKL MNO
4
5
PQRS TUV WXYZ
7
8
0
3
6
9
Ex:
1 2 3
5
6
9
4
7
8
123456789#
SUBADDRESS
J You can enter numbers, an asterisk (*), a sharp (#), or spaces up to 20
digits.
J If you wish not to register a subaddress, press SET.
J If you make a mistake and want to enter again, press CLEAR.
4. Press SET twice, then use the numeric buttons to enter a TX password.
SET SET
ABC DEF
1
2
GHI JKL MNO
4
5
PQRS TUV WXYZ
7
8
0
Ex:
3
6
9 8
9
6
3
7
5
4
PASSWORD
987#654#3
J You can enter numbers, an asterisk (*), a sharp (#), or spaces up to 20
digits.
J If you wish not to register a password, press SET.
*
J If you make a mistake and want to enter again, press CLEAR.
5. Press SET.
SET
OPTIONAL SETTING
3.LONG DISTANCE
6. If you are finished, press STOP to return to standby mode.
22/07 ’97 TUE 17:20
3-31Chapter 3 Registering Information in the MultiPASS L90
Page 80
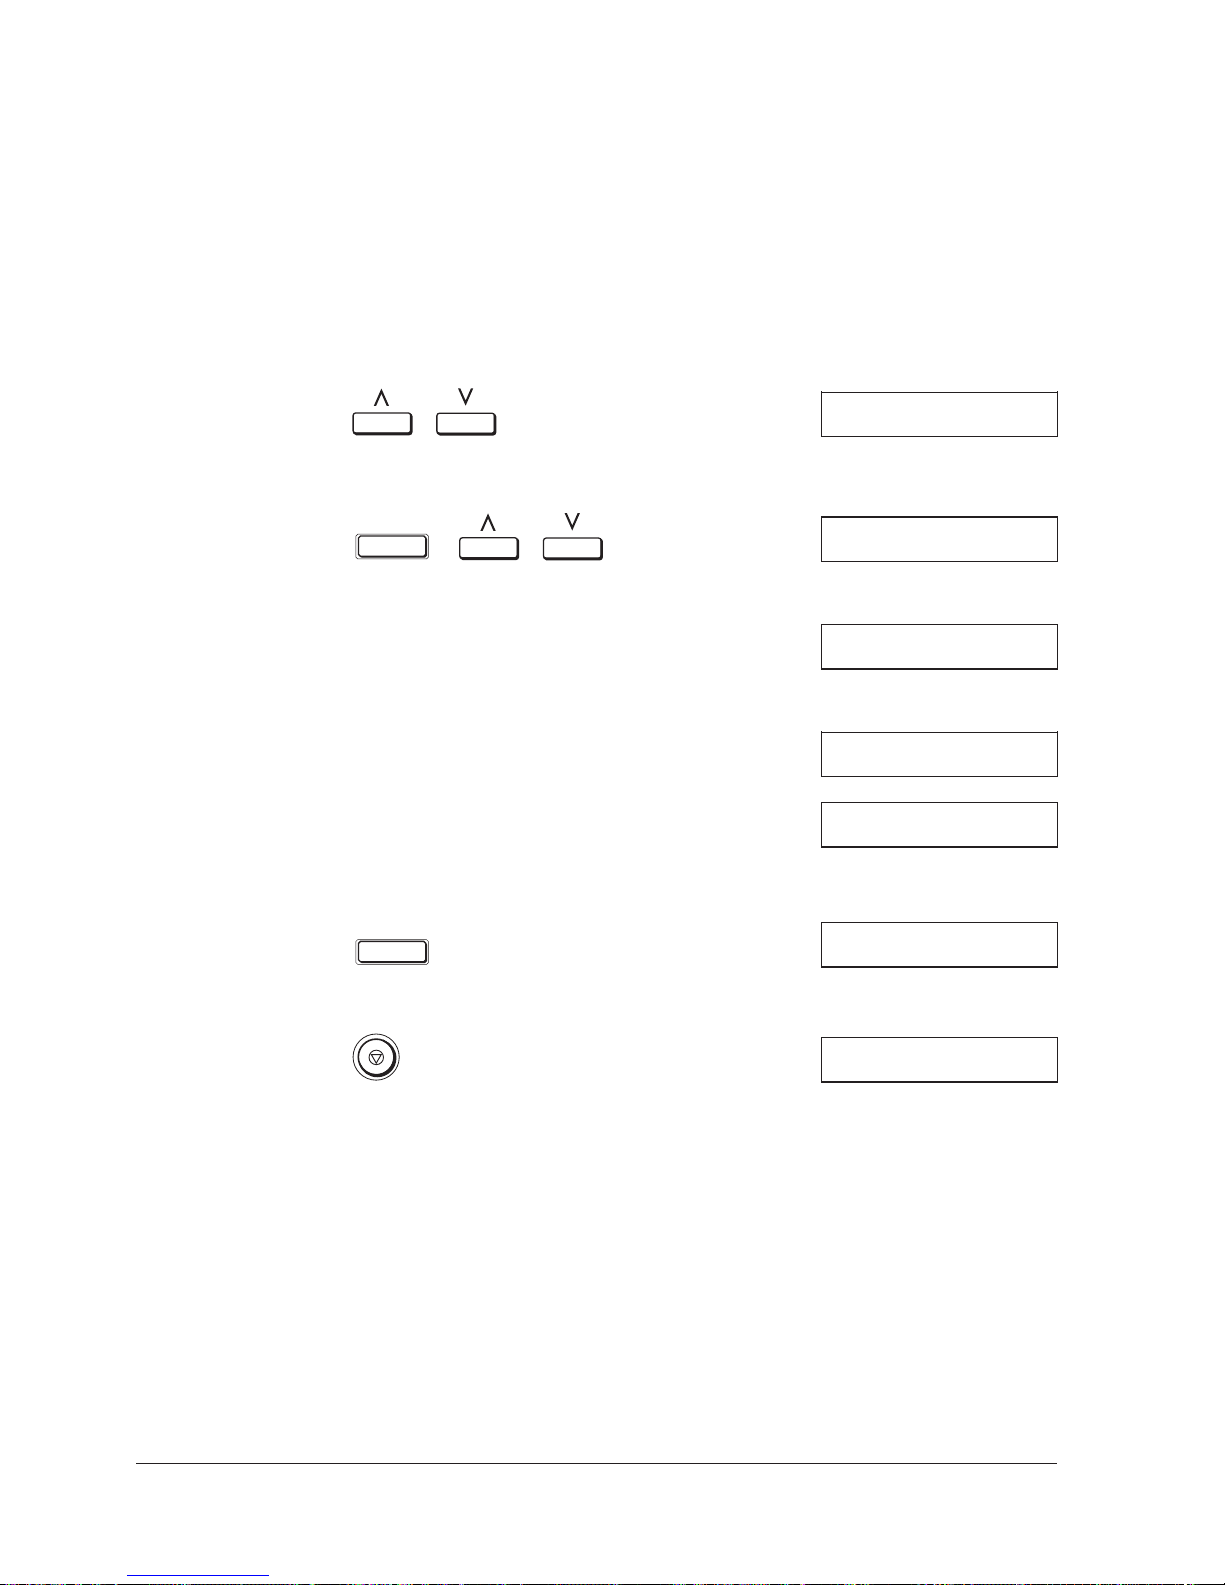
Changing the Long Distance Setting
Use this procedure to change the long distance setting for a one-touch speed
dialling button or a coded speed dialling code. Change this setting if you are
getting transmission errors when you send documents long distance (international
transmissions, etc.).
Make sure the OPTIONAL SETTING is on (Qp. 3-28) before following the
procedure below.
1. Use the search buttons to display 3.LONG DISTANCE.
2. Press SET, then use the search buttons to change the setting.
OPTIONAL SETTING
3.LONG DISTANCE
SET
LONG DISTANCE
Select long distance (1), then try to send your document.
LONG DISTANCE
If the setting (1) does not solve the problem, try setting (2) or (3).
LONG DISTANCE
LONG DISTANCE
3. Press SET.
SET
OPTIONAL SETTING
4.TX SPEED
4. If you are finished, press STOP to return to standby mode.
22/07 ’97 TUE 17:20
DOMESTIC
LONG DISTANCE(1)
LONG DISTANCE(2)
LONG DISTANCE(3)
3-32 Chapter 3Registering Information in the MultiPASS L90
Page 81
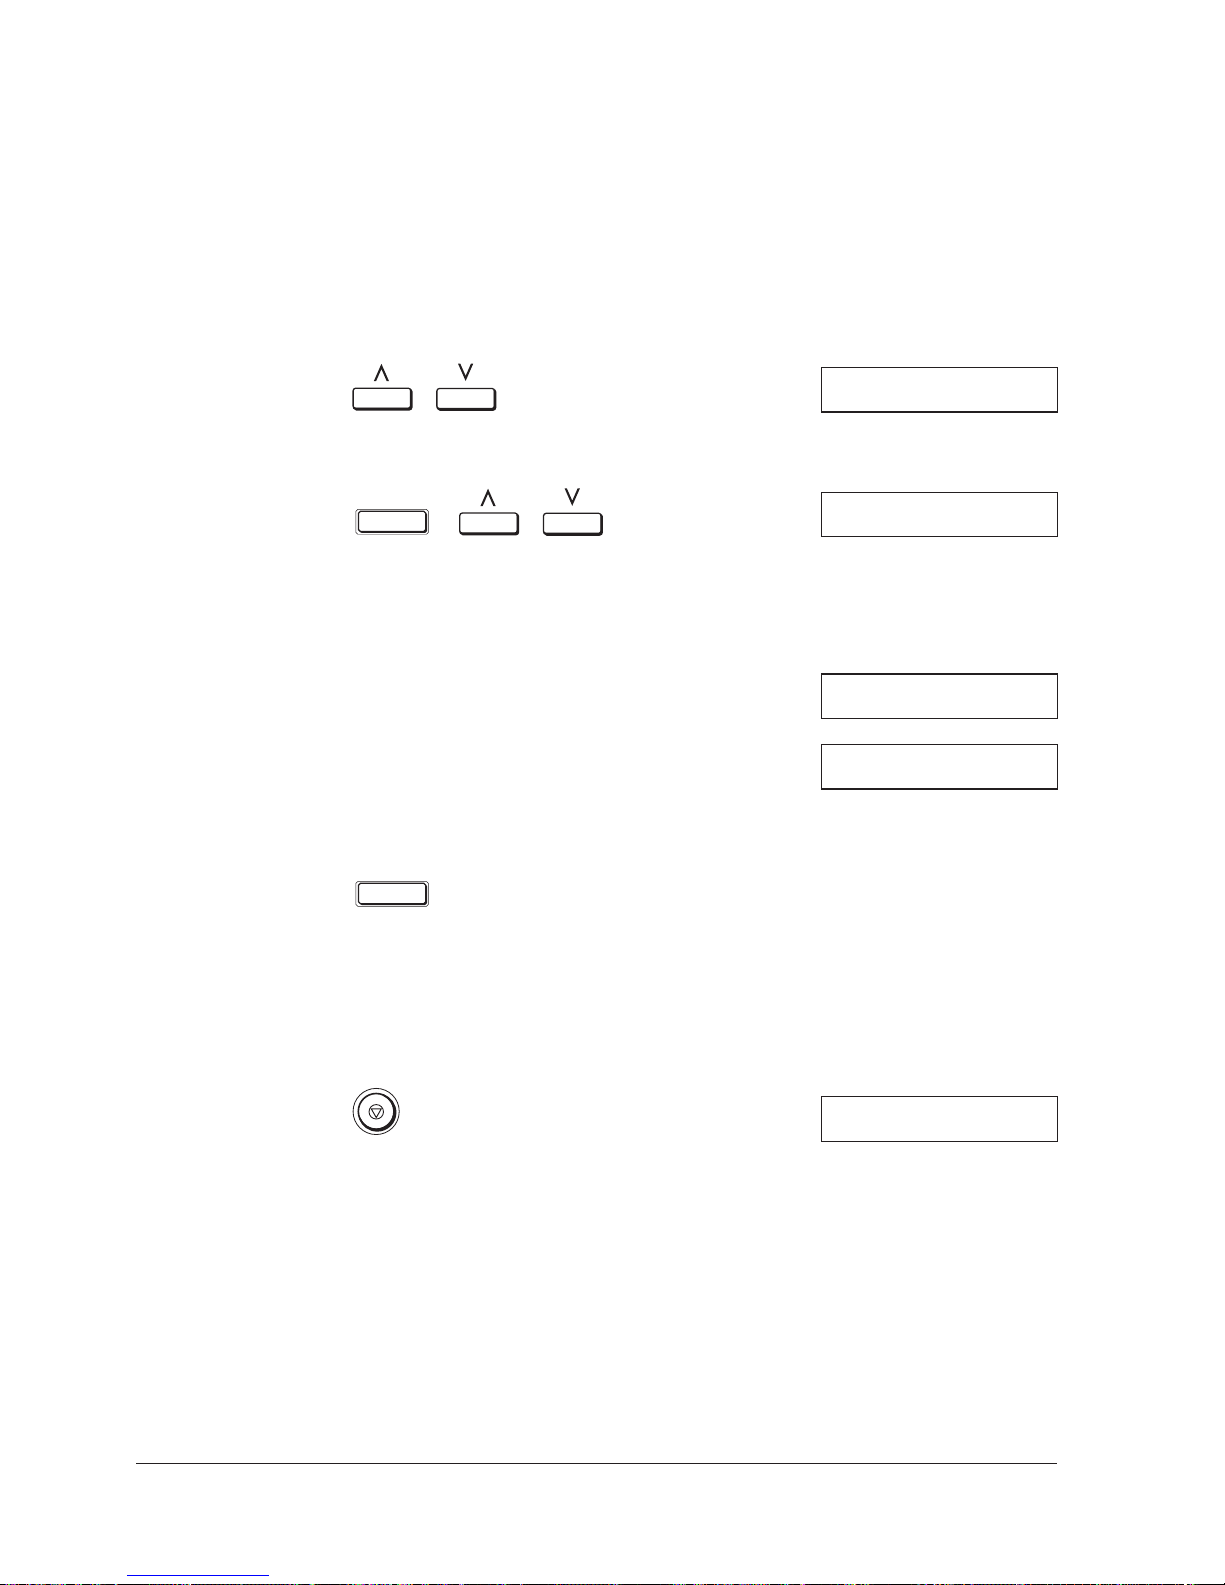
Setting the Transmission Speed
Use this procedure to change the transmission speed for a one-touch speed
dialling button or a coded speed dialling code. Change the speed when it takes a
long time for your document transmissions to begin.
Make sure the OPTIONAL SETTING is on (Qp. 3-28) before following the
procedure below.
1. Use the search buttons to display 4.TX SPEED.
2. Press SET, then use the search buttons to change the speed setting.
OPTIONAL SETTING
4.TX SPEED
SET
TX SPEED
14400bps
J If it takes a long time for your document transmissions to begin, this may
mean that the telephone lines in your area are in poor condition. If you
experience this problem, change the transmission speed from 14400 bps to
9600 bps or 4800 bps.
TX SPEED
TX SPEED
9600bps
4800bps
3. Press SET.
SET
4. To continue registering other speed dial numbers and names, continue with
the procedure from step 3 on page 3-13 (one-touch speed dialling) or from
step 4 on page 3-19 (coded speed dialling).
- or If you are finished, press STOP to return to standby mode.
22/07 ’97 TUE 17:20
3-33Chapter 3 Registering Information in the MultiPASS L90
Page 82

3-34 Chapter 3Registering Information in the MultiPASS L90
Page 83

Chapter 4
Sending Faxes
Now that you have installed and set up your Canon MultiPASS L90, you are
ready to begin sending faxes.
This section describes the types of documents you can fax, two ways of sending
faxes, and how to improve the appearance of your faxes.
Document Requirements ........................................................................................... 4-2
Scanning Area .................................................................................................. 4-3
Preparing to Send a Fax ............................................................................................. 4-4
Preparing the Document ................................................................................ 4-4
Loading the Document ................................................................................... 4-4
Two Ways to Send a Fax ............................................................................................ 4-6
Memory Sending .............................................................................................. 4-6
Manual Sending via the Handset or
Adding Pages During Transmission ......................................................................... 4-8
Cancelling a Transmission .......................................................................................... 4-8
Messages Displayed During Sending ....................................................................... 4-9
Messages During Memory Sending .............................................................. 4-9
(HOOK) button .......................... 4-7
Redialling ................................................................................................................... 4-10
Manual Redial ................................................................................................ 4-10
Auto Redial (in Memory Sending) ............................................................. 4-10
Cancelling Auto Redialling .......................................................................... 4-11
Setting Up Redialling .................................................................................... 4-11
Maximising Image Quality ....................................................................................... 4-14
Resolution ...................................................................................................... 4-14
Auto Halftone ................................................................................................ 4-14
Scanning Contrast .......................................................................................... 4-15
4-1Chapter 4 Sending Faxes
Page 84
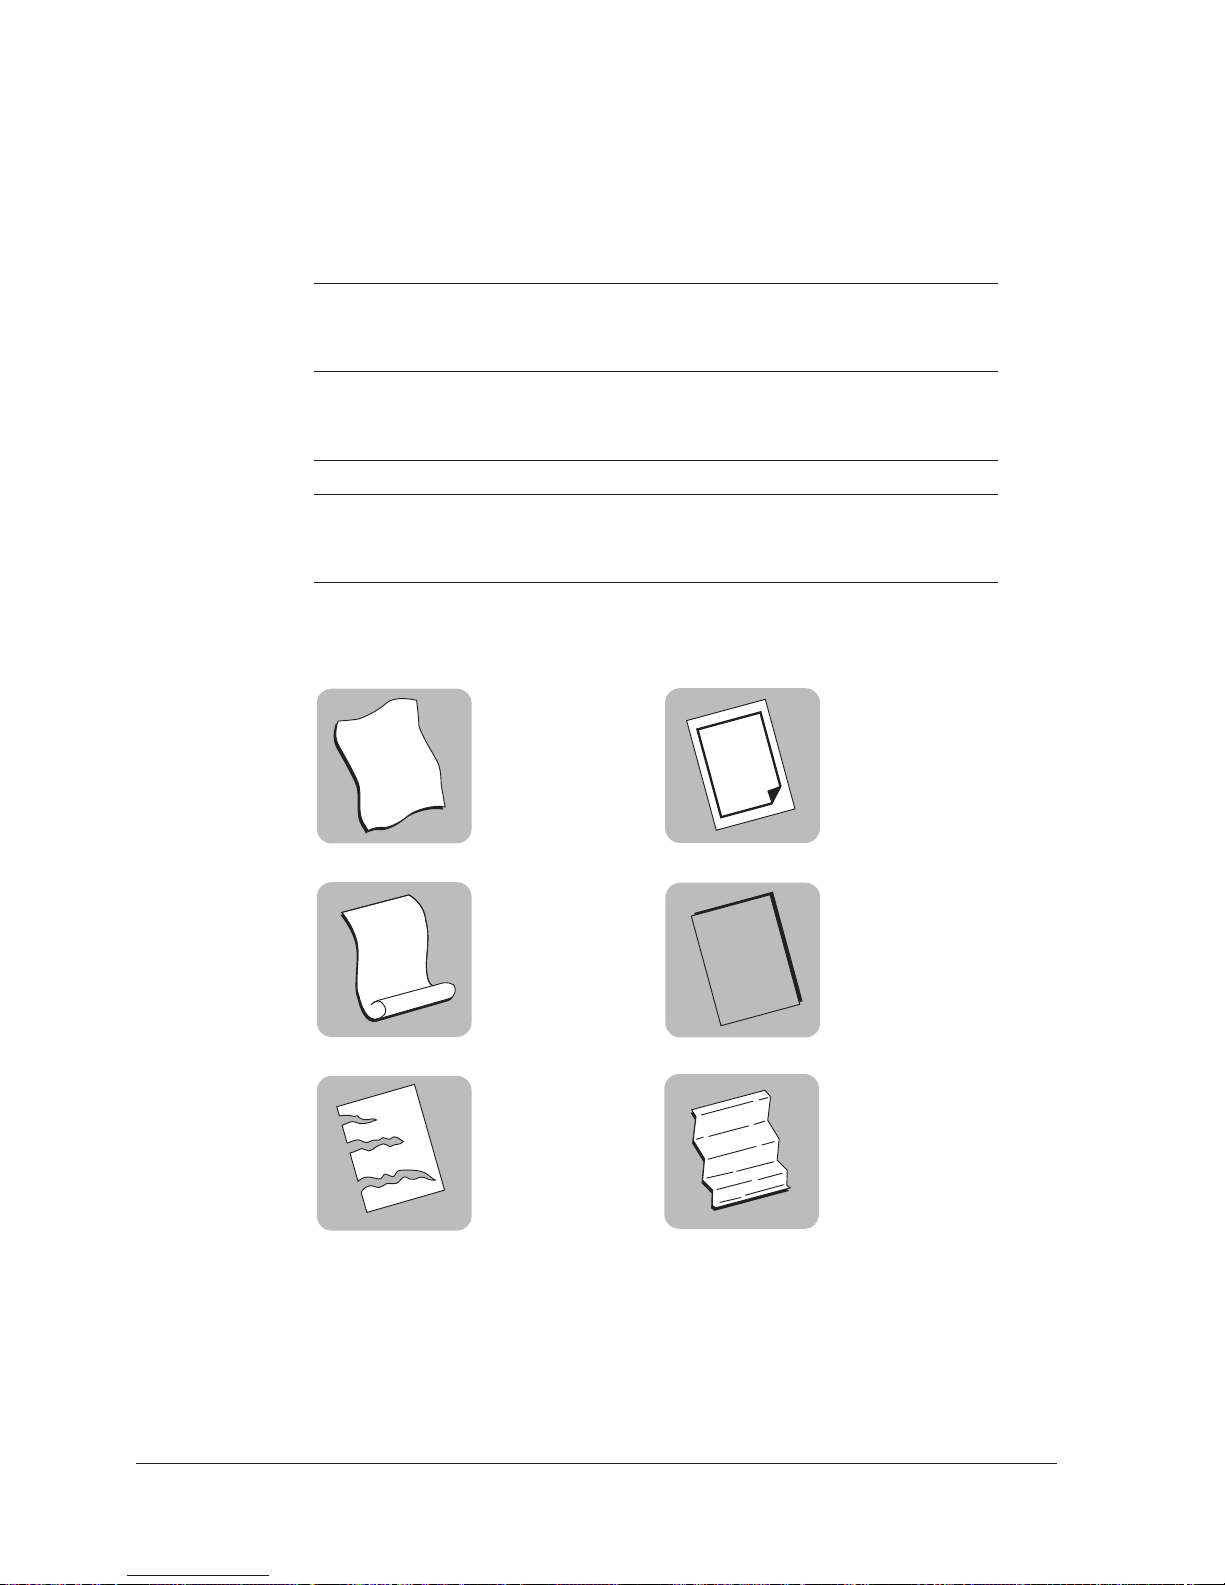
Document Requirements
Before sending a fax, make sure your document meets the MultiPASS L90’s
paper size, weight, and thickness requirements listed below.
Weight
One-page document 34.7 – 240 g/m
Multipage document 50 – 90 g/m
Width
Paper 146.5 – 259 mm
Scanning 208 mm
Length 103.5 – 366 mm
Thickness
One-page document 0.06 – 0.3 mm
Multipage document 0.07 – 0.13 mm
To prevent paper jams in the automatic document feeder (ADF), be sure not to
use any of the following with the unit:
2
2
Wrinkled or creased
paper
Curled paper Coated paper
Torn paper Onion skin or very thin
Carbon or carbonback paper
paper
4-2 Chapter 4Sending Faxes
Page 85

Scanning Area
Make sure your document’s text and graphics do not extend all the way to the
edge of the page. The white area in the illustration below shows the area the
MultiPASS L90 can scan on an A4- size page.
Max. 4 mm
Max. 3 mm Max. 3 mm
Max. 4 mm
4-3Chapter 4 Sending Faxes
Page 86
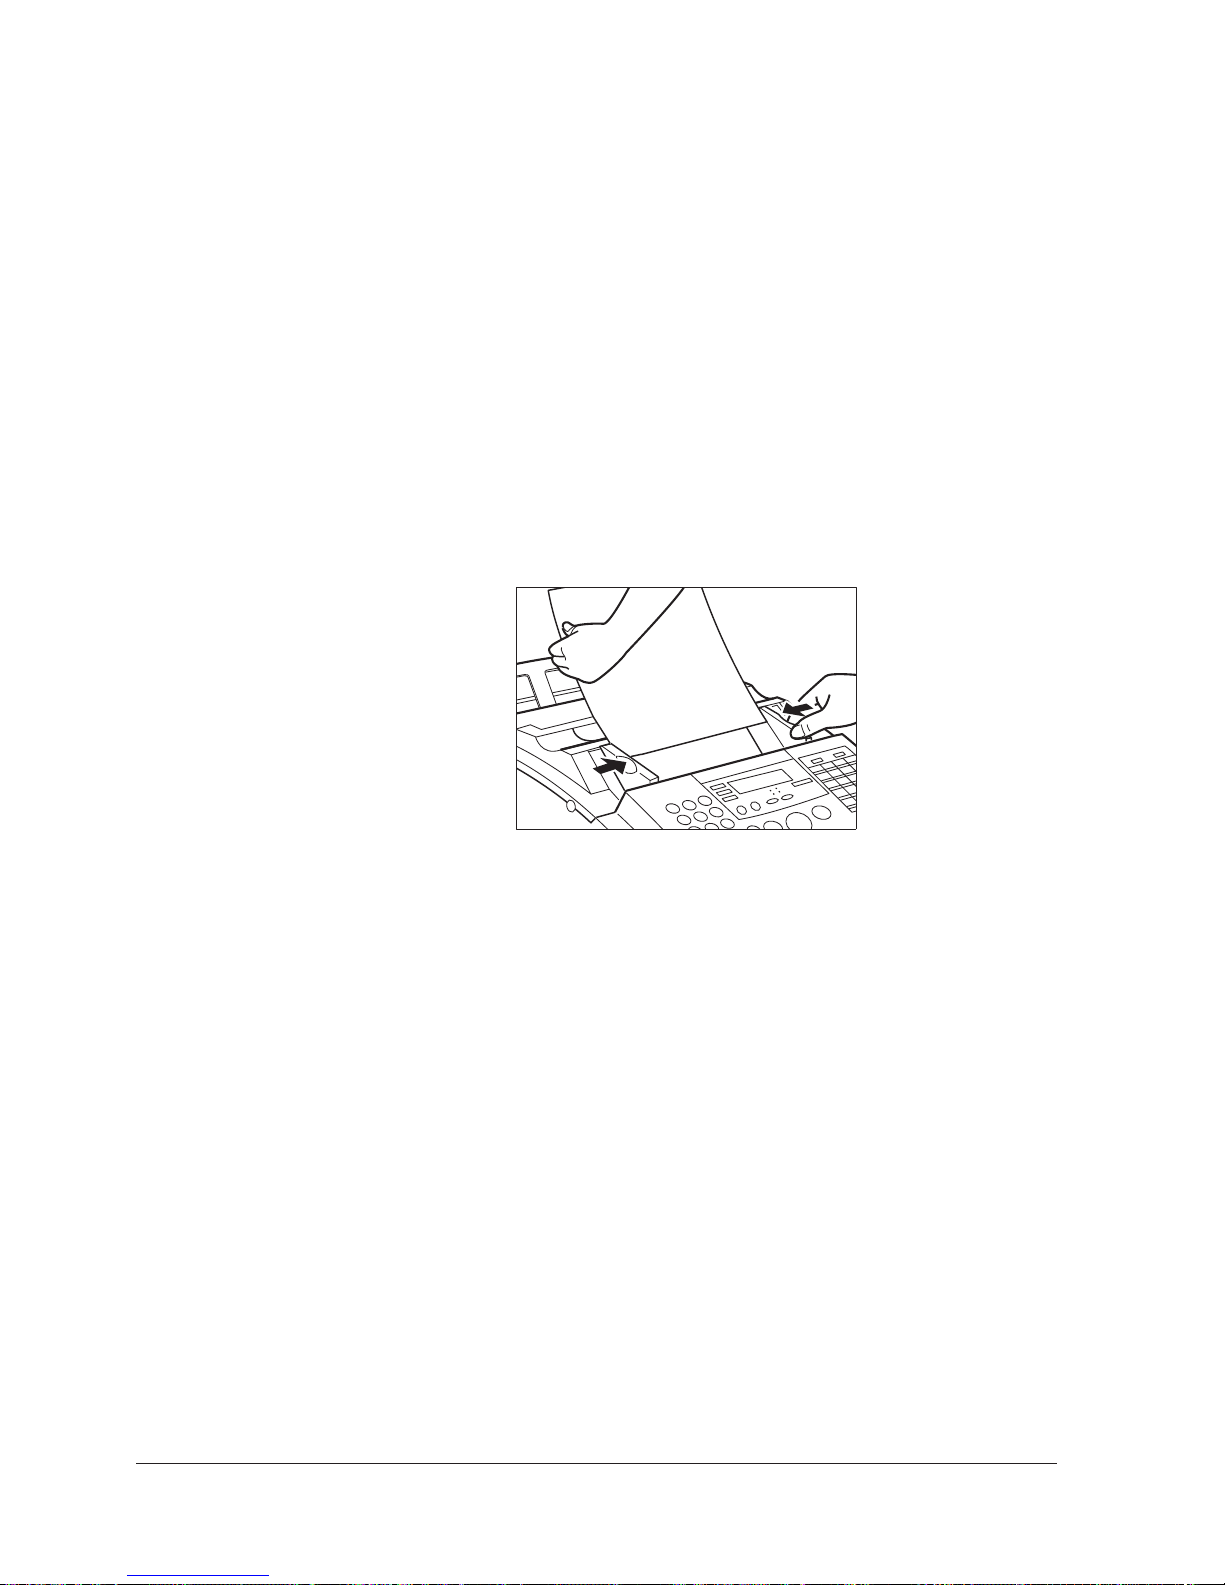
Preparing to Send a Fax
Preparing the Document
J Remove all paper clips, staples, tape, etc. from the document.
J Let any wet ink, correction fluid, or paste dry completely.
J Make sure all pages are the same size and type.
Loading the Document
The MultiPASS L90 can hold up to 30 A4-size, letter-size or 20 legal-size pages at
a time. If your document is longer than this, you can add more pages to the
automatic document feeder (ADF) while the fax is being sent (see “Adding Pages
During Transmission” later in this chapter).
1. Slide the paper guides to fit the width of the document.
4-4 Chapter 4Sending Faxes
Page 87
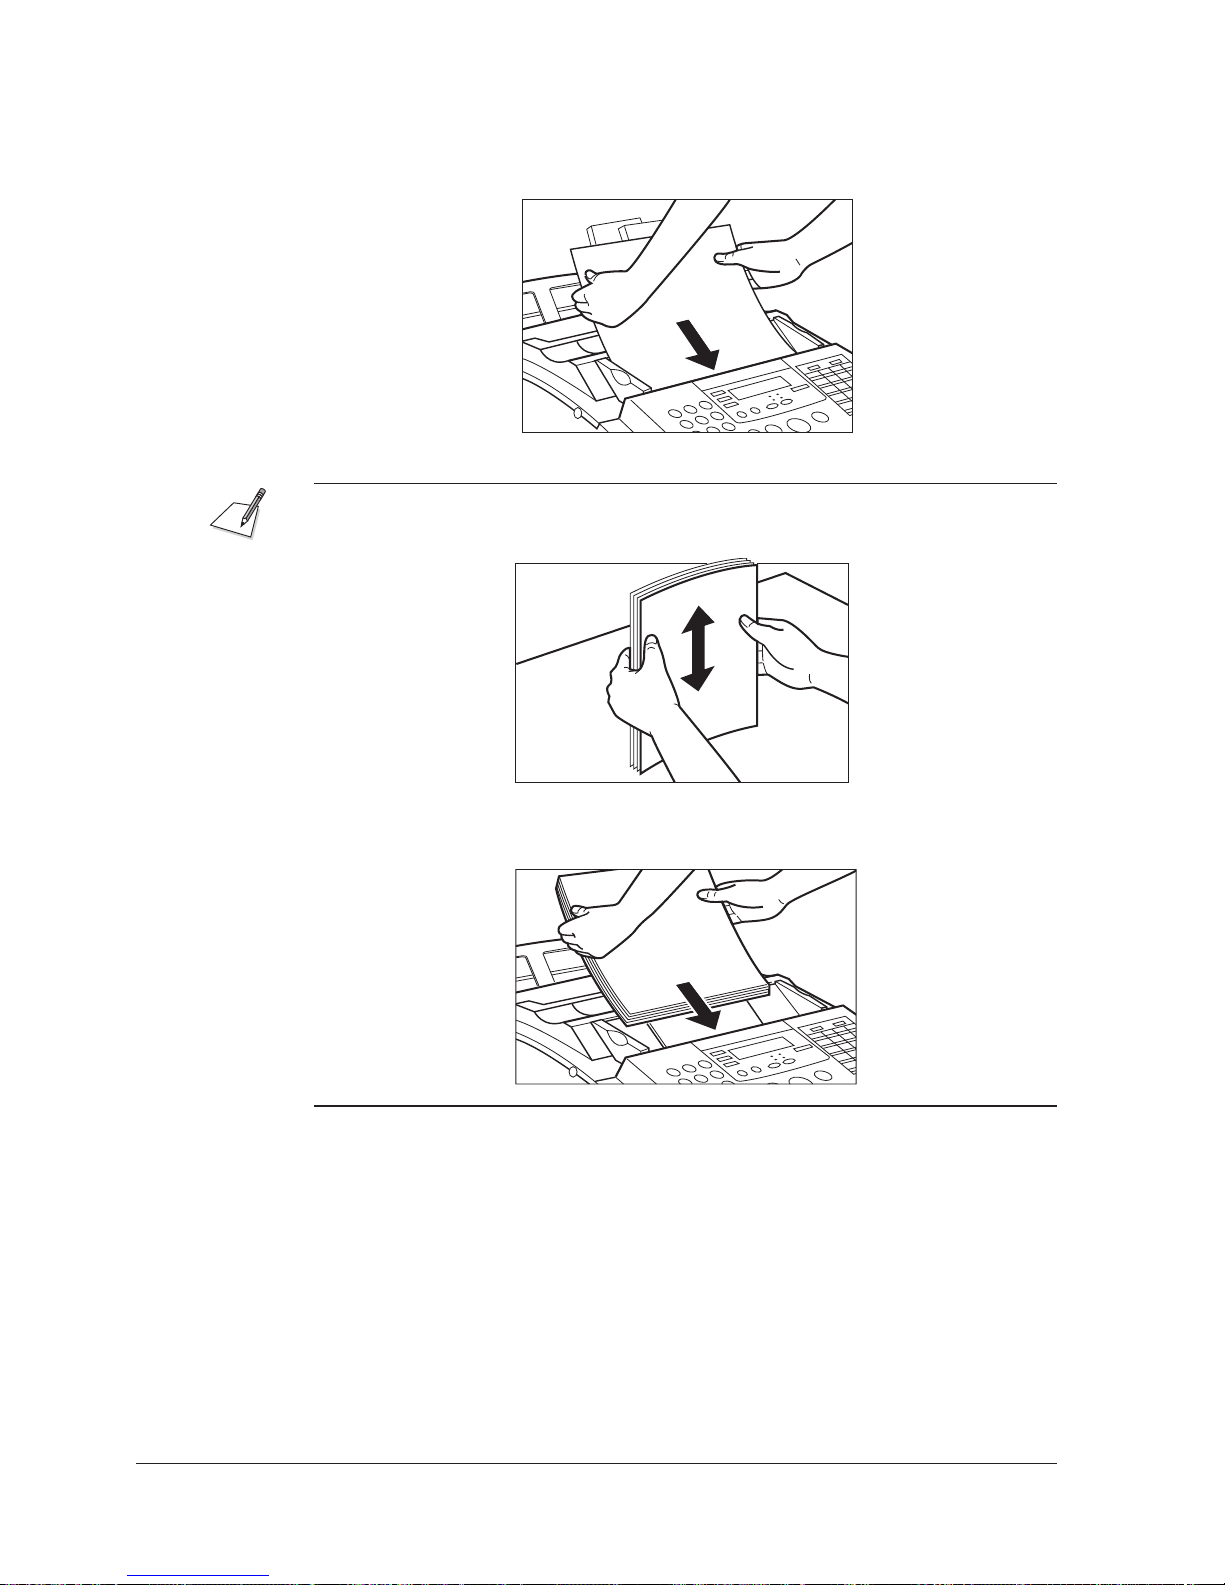
2. Place the document face down on the unit, and gently insert the document
into the automatic document feeder (ADF) until it stops.
J If you are experiencing difficulty feeding multipage documents, remove the
stack and tap it on a flat surface to even the edges.
Then insert it into the automatic document feeder (ADF) until it stops.
You are now ready to send the fax as described on the following pages.
4-5Chapter 4 Sending Faxes
Page 88
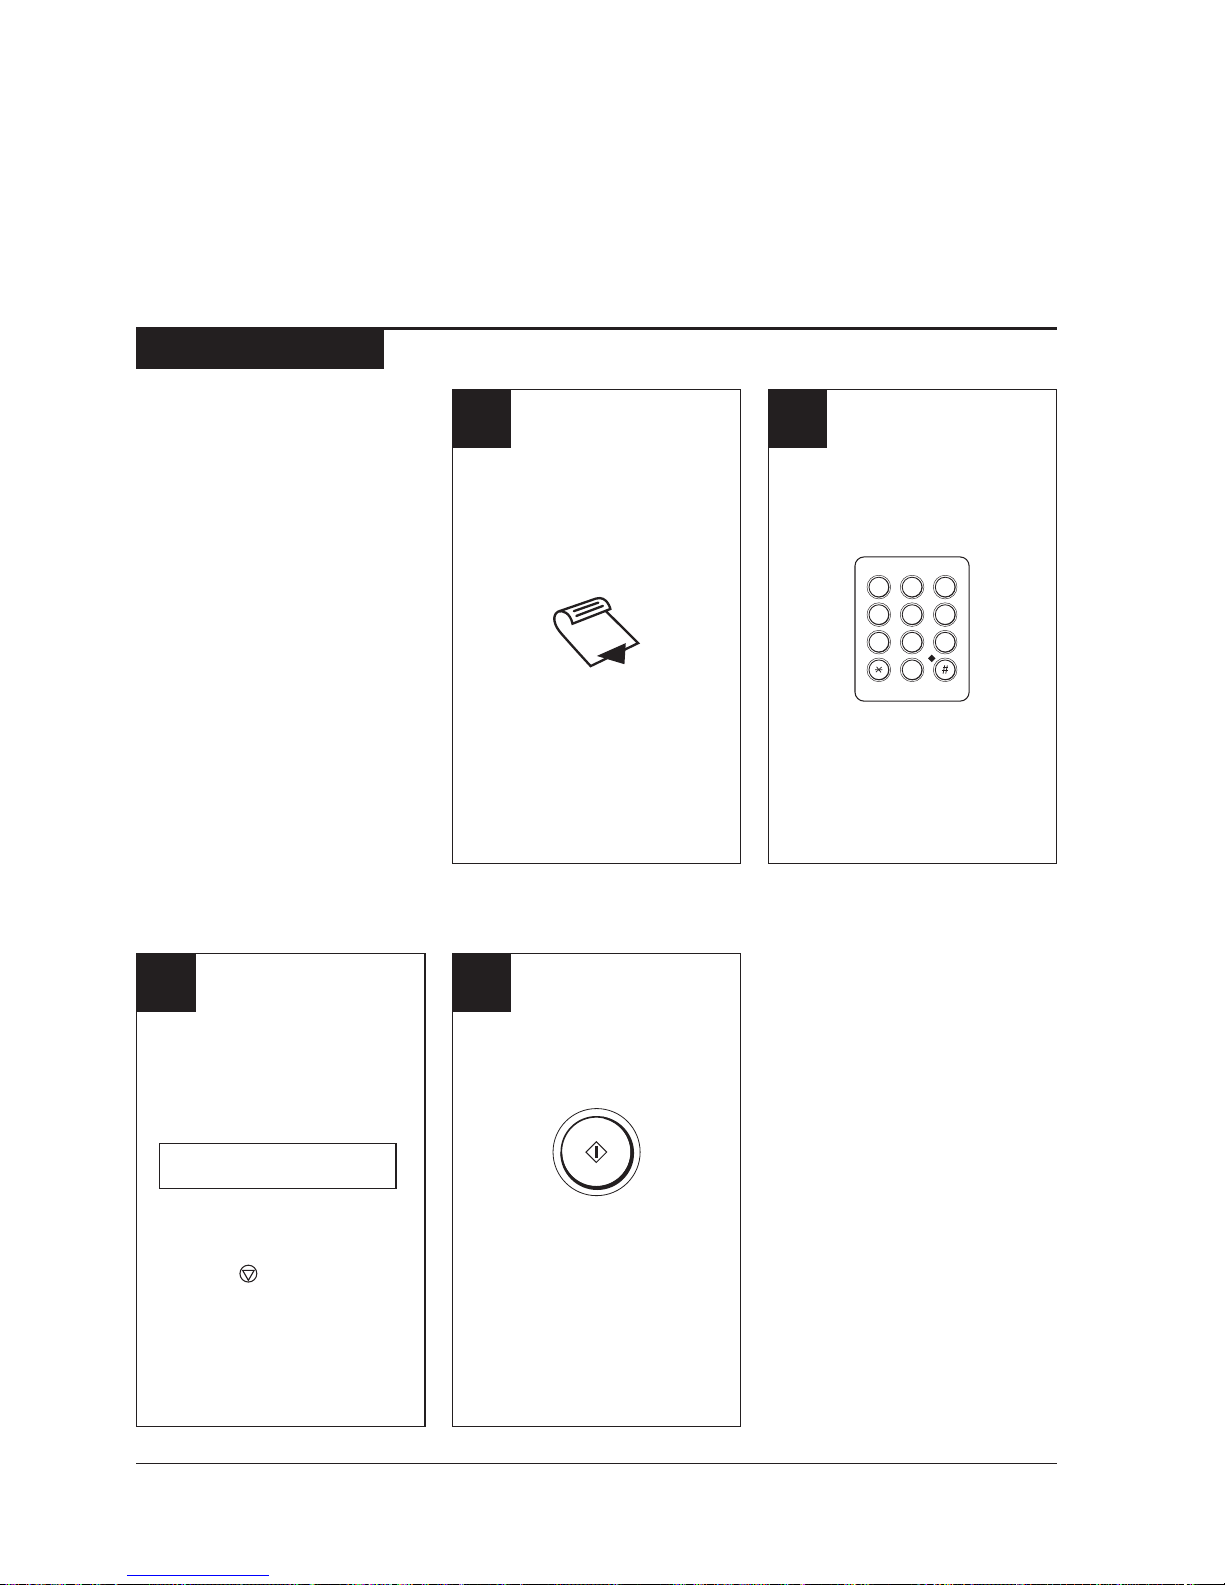
Two Ways to Send a Fax
The MultiPASS L90 provides two ways of sending faxes: Memory Sending and
Manual Sending via the Handset or (HOOK) Button.
Memory Sending
Memory Sending scans your
document into the unit’s
memory. As soon as it starts
scanning, if the telephone line
is free, the unit will call the
other party and will start to
transmit the information even
as the remaining pages are
being scanned.
Memory Sending allows you to
load faxes into memory while
the unit performs other tasks,
such as transmitting a fax. It
also lets you send to numbers
that are often busy (it
automatically redials), or to
send to more than one fax
number.
1
Load the document into
the automatic document
feeder (ADF) until it
stops.
J Load as described on
pages 4-4 and 4-5.
2
Use the numeric buttons to
dial the fax number you’re
sending to.
ABC DEF
1
2
GHI JKL MNO
4
PQRS TUV WXYZ
7
J You can also use one-
touch or coded speed
dialling to enter the
number.
3
5
6
8
9
0
3
Check the display to make
sure the number is correct.
TEL= 1 503 555 1212
J If you make a mistake,
press
start again from step 2.
4-6 Chapter 4Sending Faxes
(STOP) and
4
Press START/COPY to
send the fax.
As the document is scanned
into memory, a transaction
number appears in the display:
this number identifies the
document and can be used to
delete it from memory (see
“Deleting a Stored Fax from
Memory” in Chapter 6 for
details).
Page 89
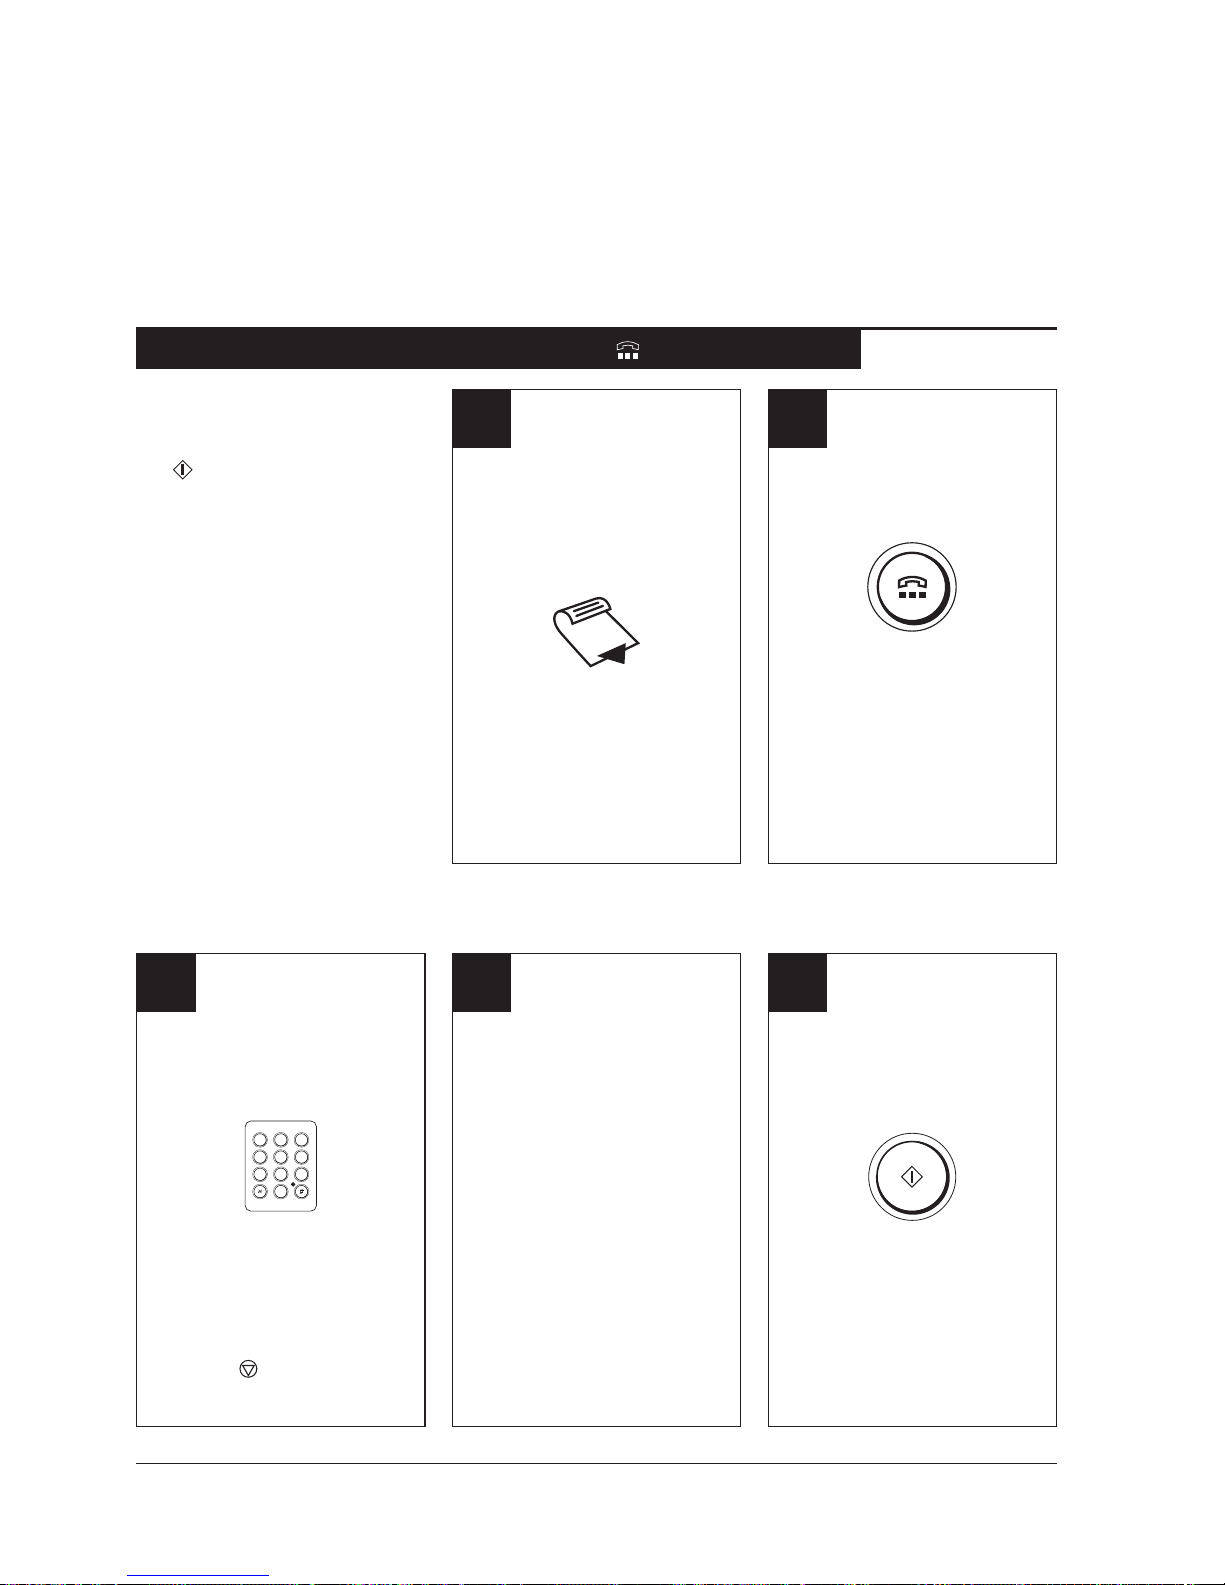
You can also send faxes directly from your PC. PC Faxing is covered in detail in
the MultiPASS Desktop Manager for Windows User’s Guide.
Manual Sending via the Handset or (HOOK) Button
When using Manual Sending,
the number is dialled and the
fax is sent immediately when
the
(START/COPY) button
is pressed. It can also let you
talk to the other party before
sending the document. This is
useful when the other party
uses one phone line for both
voice and fax transactions.
1
Load the document into
the automatic document
feeder (ADF) until it
stops.
2
Press HOOK to activate
the speaker.
3
Use the numeric buttons to
dial the fax number you’re
sending to.
ABC DEF
1
2
3
GHI JKL MNO
4
5
6
PQRS TUV WXYZ
7
8
9
0
J You can also use one-
touch or coded speed
dialling to enter the
number.
J If you make a mistake,
press
start again from step 2.
(STOP) and
J Load as described on
pages 4-4 and 4-5.
4
When you hear the other
party answer, pick up the
handset and tell them to
get ready to receive a fax
by pressing the start button
on their fax machine.
J You will hear fax tones
over the handset when
they do this. If you hear
fax tones immediately
on connection, go to
step 5.
J You will hear the dial
tone, and the IN USE
lamp lights up.
5
Press START/COPY to
send the fax. Then hang
up.
4-7Chapter 4 Sending Faxes
Page 90
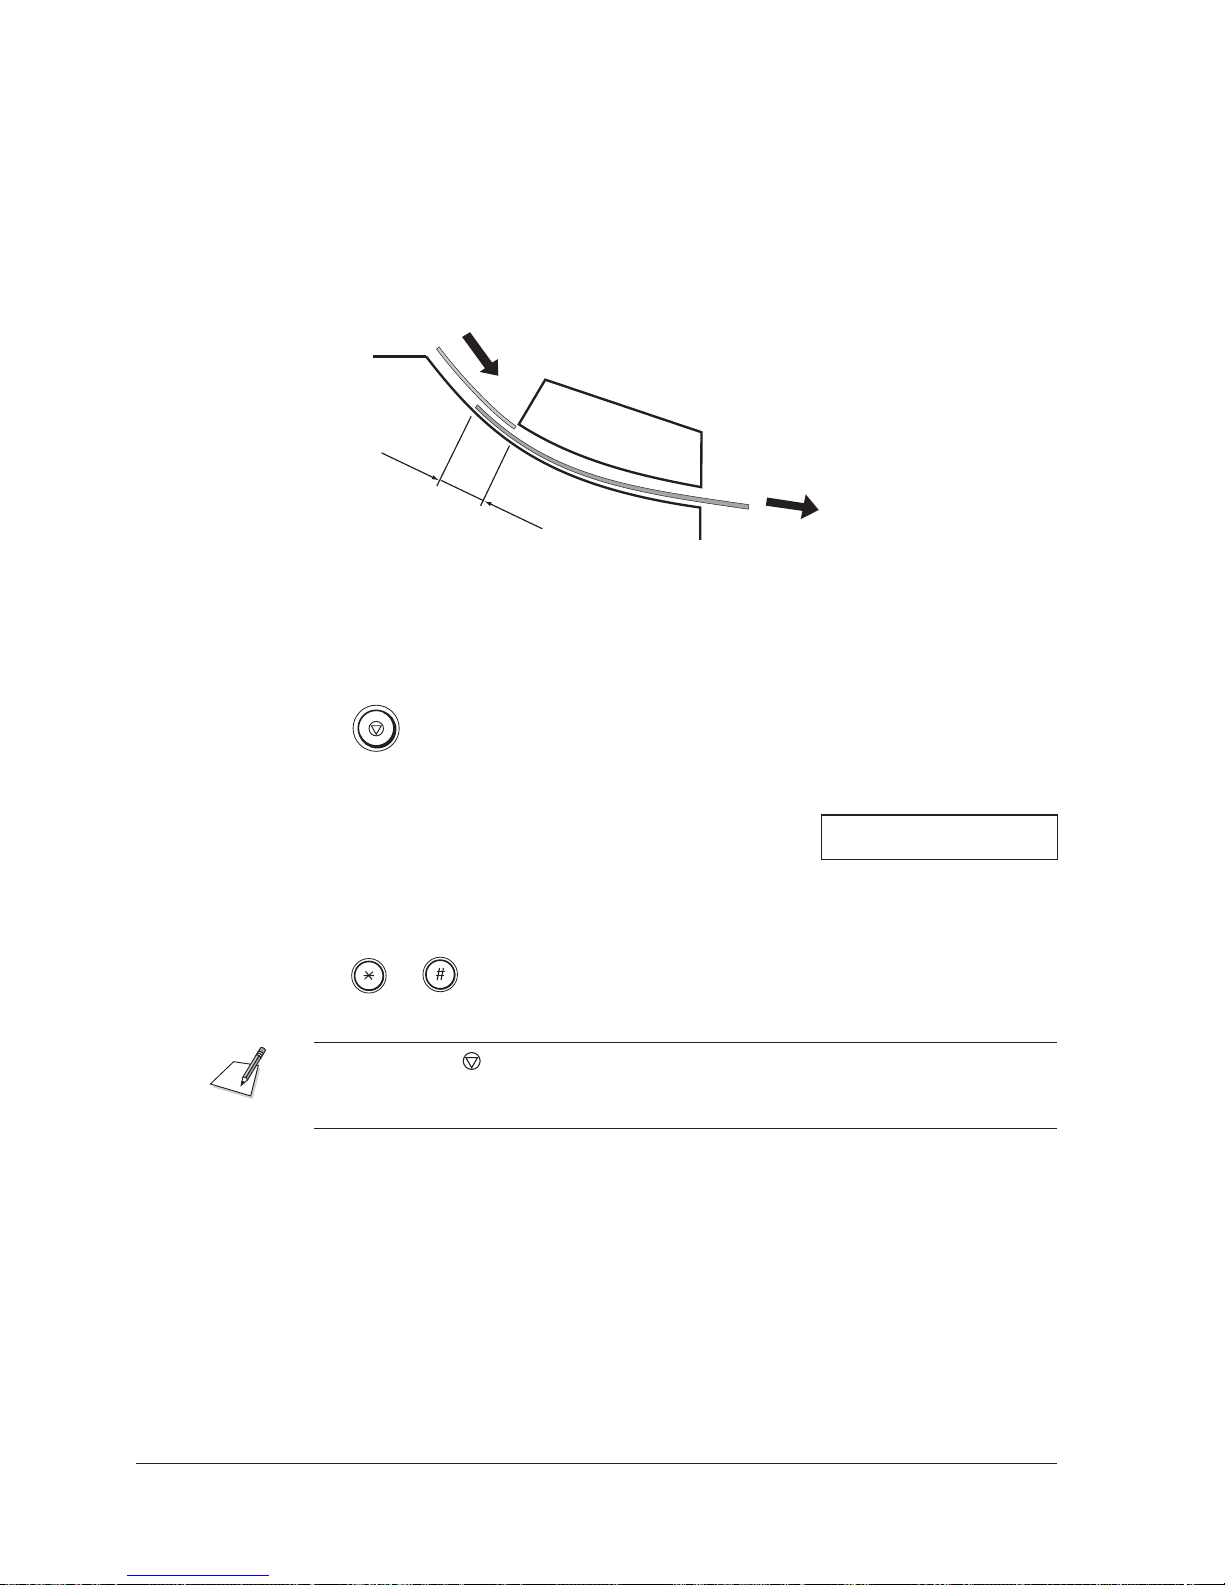
Adding Pages During Transmission
Wait until the last page starts to feed into the unit. When all but about 2.5 cm of
the last page is scanned, place the new page on top of the last page and gently
feed it in.
2,5 cm
Cancelling a Transmission
1. Press STOP.
J If you’re using memory sending, the message shown below appears. Go to
step 2.
CANCEL DURING TX/RX?
YES=(
J If you’re using manual sending, the transmission is cancelled immediately.
2. Press
If you press the (STOP) button while the unit is waiting to redial, the display
will be deleted, but the transmission will not be cancelled. Follow the procedure
on page 6-12, “Deleting a Stored Fax from Memory” to cancel the transmission.
to cancel the transmission, or press # to complete the transmission.
*
or
) NO=(#)
*
4-8 Chapter 4Sending Faxes
Page 91

Messages Displayed During Sending
When the unit sends a document, the following messages are displayed. These
messages allow you to see the progress of the transmission and know when it has
been completed.
Messages During Memory Sending
This message is displayed when the unit is scanning the document to be sent:
Transaction No.
TRANSMIT 0040
SCANNING DOC. P.001
Page No.
During transmission, the following are displayed alternately:
J Condition (CALLING, TRANSMIT, etc.)
J Dialled number
J Other party’s name
J Transmission mode (G3)
J ECM TX (in ECM)
J TX/RX no.
J Page no.
When the document has been transmitted, the following are displayed for about
ten seconds before the unit returns to standby mode:
J Transmission result (TRANSMITTING OK or an error message)
J TX/RX no.
The unit will print a transmission report (TX Report) if it has been set to do so.
(Qp. 8-4, A-5)
4-9Chapter 4 Sending Faxes
Page 92

Redialling
Manual Redial
To redial the last number dialled with the numeric buttons, press the
(REDIAL) button.
To cancel manual redialling, simply press the
Auto Redial (in Memory Sending)
If the line is busy or there is no answer, the unit waits two minutes and then dials
the same number.
When the unit is waiting to redial, the following messages are displayed:
22/07 ’97 TUE 12:34
P P
AUTO REDIAL
These messages are displayed once the unit has redialled the number and is
calling:
22/07 ’97 TUE 12:34
P P
CALLING
Auto redialling occurs even if the unit’s memory becomes full when the
document is being scanned. In this case, the following messages are displayed:
(STOP) button.
Transaction No.
22/07 ’97 TUE 12:34
TX/RX NO. 0040
Telephone No.
22/07 ’97 TUE 12:34
5035551212
If after two attempts the line is still busy or there is no answer, the unit stops
redialling, sending stops, and an activity report is printed to remind you that the
transmission was not completed.
4-10 Chapter 4Sending Faxes
MEMORY FULL
P P
PLEASE WAIT
Transaction No.
AUTO REDIAL 0040
SCANNING DOC. P.007
Page No.
Page 93
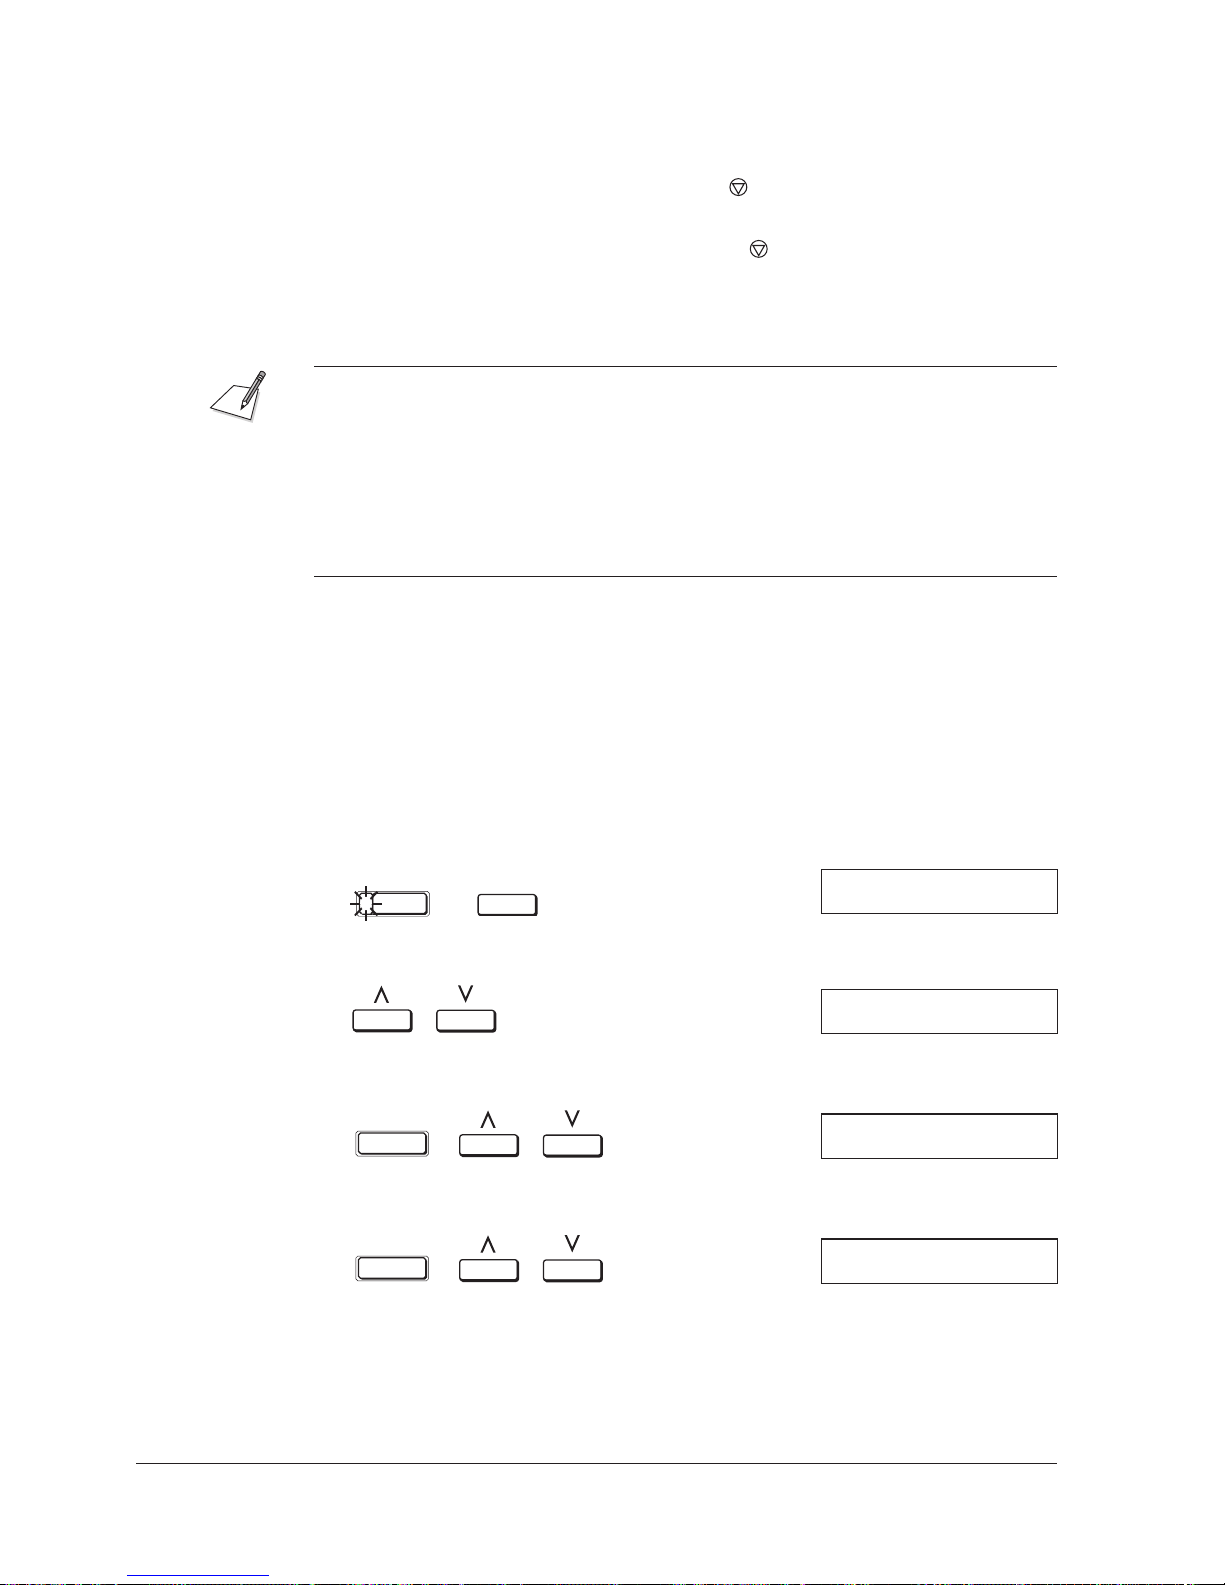
Cancelling Auto Redialling
Auto redialling can not be cancelled with the (STOP) button while the unit is
waiting to redial. To cancel, do one of the following:
J Wait until dialling begins and then press the (STOP) button.
J Delete the document from memory. See page 6-12, “Deleting a Stored Fax
from Memory” for details.
The factory default settings for the auto redial feature are:
J Redials two times
J Waits two minutes before redialling
J If an error occurs during transmission, the MultiPASS L90 resends the first
page of the document and the error page.
You can change these settings by following the procedure below.
Setting Up Redialling
You can set up the following for automatic redialling:
J The number of times the unit attempts redialling
J The time interval between redialling attempts
J How the unit handles redialling when a transmission error occurs
Follow the procedure below to adjust these settings.
1.
FUNCTION
DATA
REGISTRATION
DATA REGISTRATION
1.SPEED DIAL SETUP
2. Use the search buttons to display 4.SEND (TX) SETUP.
DATA REGISTRATION
4.SEND(TX) SETUP
3. Press SET, then use the search buttons to display 3.AUTO REDIAL.
SET
SEND(TX) SETUP
3.AUTO REDIAL
4. Press SET, then use the search buttons to display ON.
SET
AUTO REDIAL
ON
4-11Chapter 4 Sending Faxes
Page 94
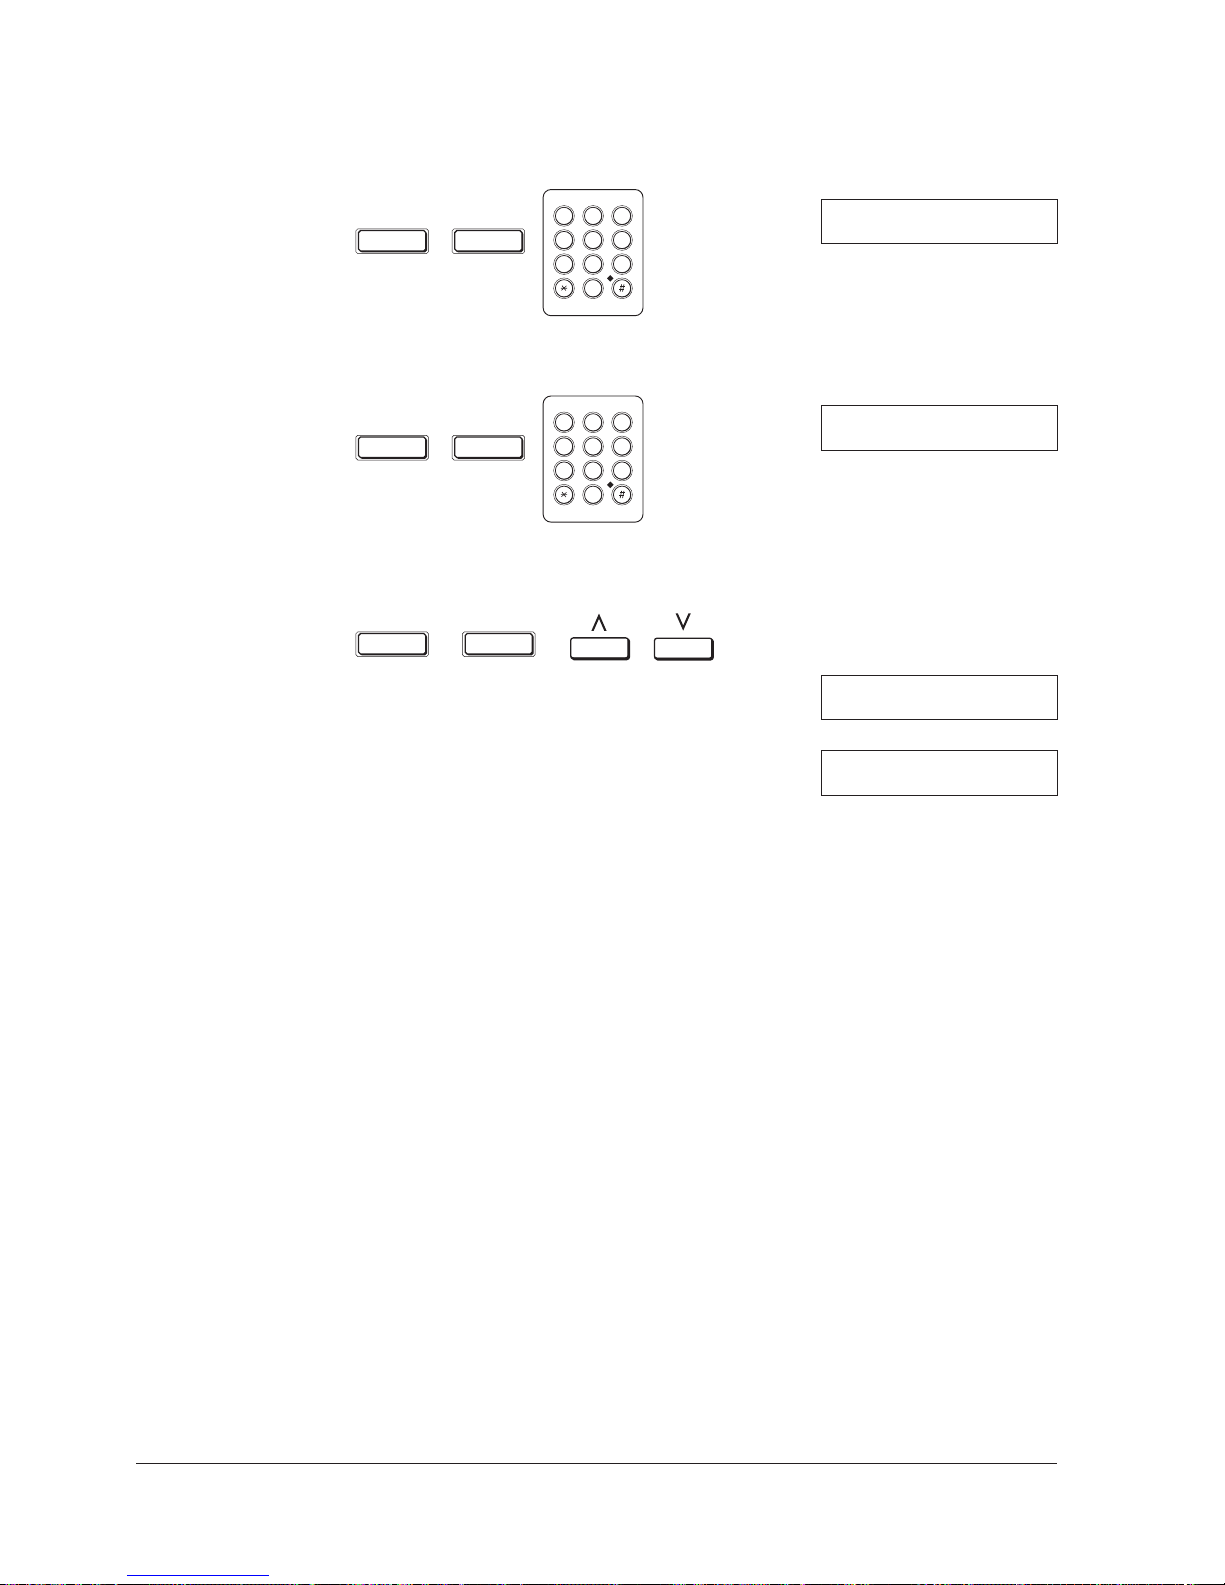
5. Press SET twice, then use the numeric buttons to enter the number of times
you want the unit to redial (1 to 15 times).
SET SET
ABC DEF
1
2
GHI JKL MNO
4
5
PQRS TUV WXYZ
7
8
0
3
6
9
REDIAL TIMES
02TIMES
6. Press SET twice, then use the numeric buttons to enter the time interval
during rediallings (02 to 99 minutes).
SET SET
ABC DEF
1
2
GHI JKL MNO
4
5
PQRS TUV WXYZ
7
8
0
3
6
9
REDIAL INTERVAL
02MIN.
7. Press SET twice, then use the search buttons to select whether or not the unit
redials when a transmission error occurs.
SET SET
Select ON to redial when a transmission
error occurs.
Select OFF to cancel redialling when a
transmission error occurs.
TX ERROR RESEND
ON
TX ERROR RESEND
OFF
4-12 Chapter 4Sending Faxes
Page 95
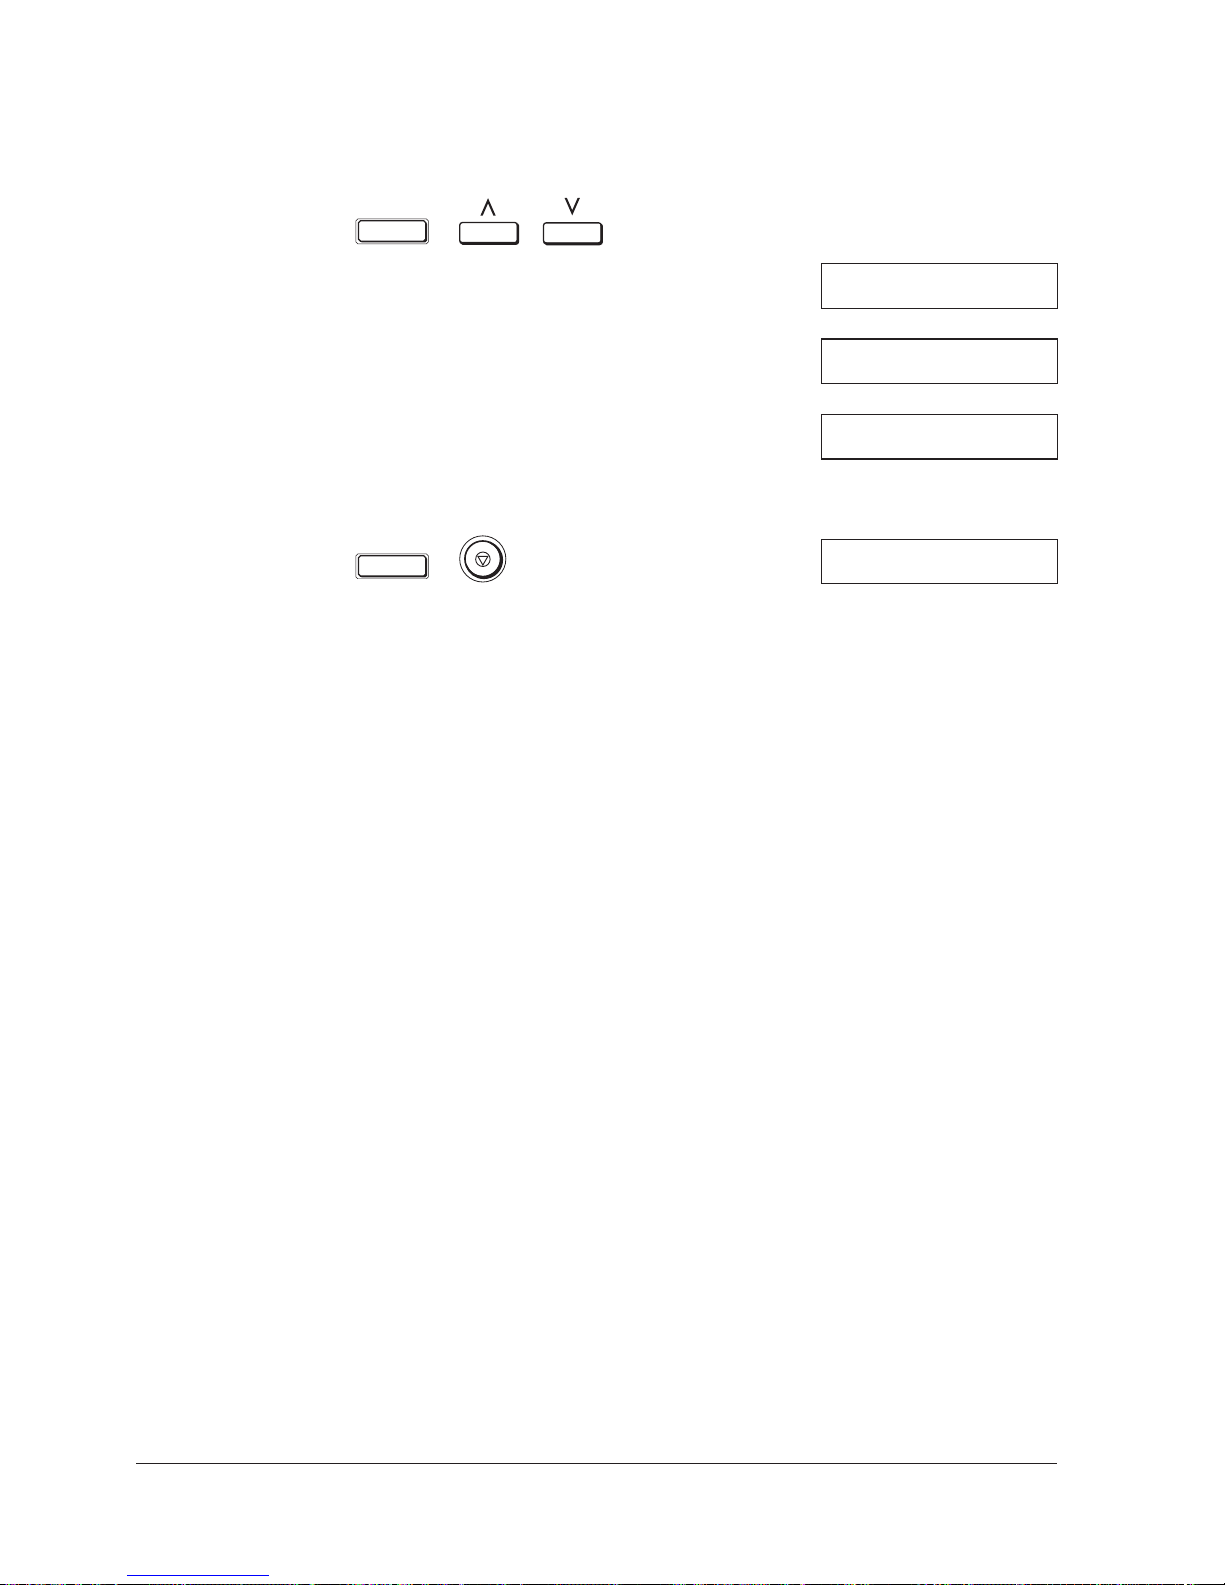
8. Press SET, then if you selected ON in step 7, use the search buttons to select
which pages are sent when an error occurs.
SET
Resends the first page of the document and
the page where the error occurred.
Resends only the page where the error
RESEND TX FROM
ERROR & 1ST PG
RESEND TX FROM
occurred.
Resends all the document pages. RESEND TX FROM
9. Press SET to save your selection, then STOP to return to standby.
SET
22/07 ’97 TUE 17:20
ERROR PAGE
ALL PAGES
4-13Chapter 4 Sending Faxes
Page 96

Maximising Image Quality
Canon’s Ultra High Quality (UHQ) and auto-halftone imaging technology allows
you to send and receive faxes that have print quality very close to that of the
originals.
Resolution
The MultiPASS L90 has two resolutions:
J STANDARD
This is the best setting for normal printed or typewritten text. It allows the fastest
document transmission. To use it, press the FINE/STANDARD button until the
STANDARD lamp lights.
J FINE
Fine provides twice the resolution of Standard, and is a good setting for
documents with small text. To use it, press the FINE/STANDARD button until
the FINE lamp lights.
When making copies, the unit automatically adjusts to FINE.
Auto Halftone
This setting tells the MultiPASS L90 whether the document includes halftone
images, or is composed only of black text on a white background.
When Auto Halftone is ON the unit automatically adjusts to accurately
reproduce documents that contain halftone images (such as photographs) or
documents with a dark background (newspaper, for example). Set to OFF when
you send faxes containing only black text on a white background.
To change the Auto Halftone setting:
1.
FUNCTION
DATA
REGISTRATION
SET
USER SETTINGS
1.DATE & TIME
4-14 Chapter 4Sending Faxes
Page 97
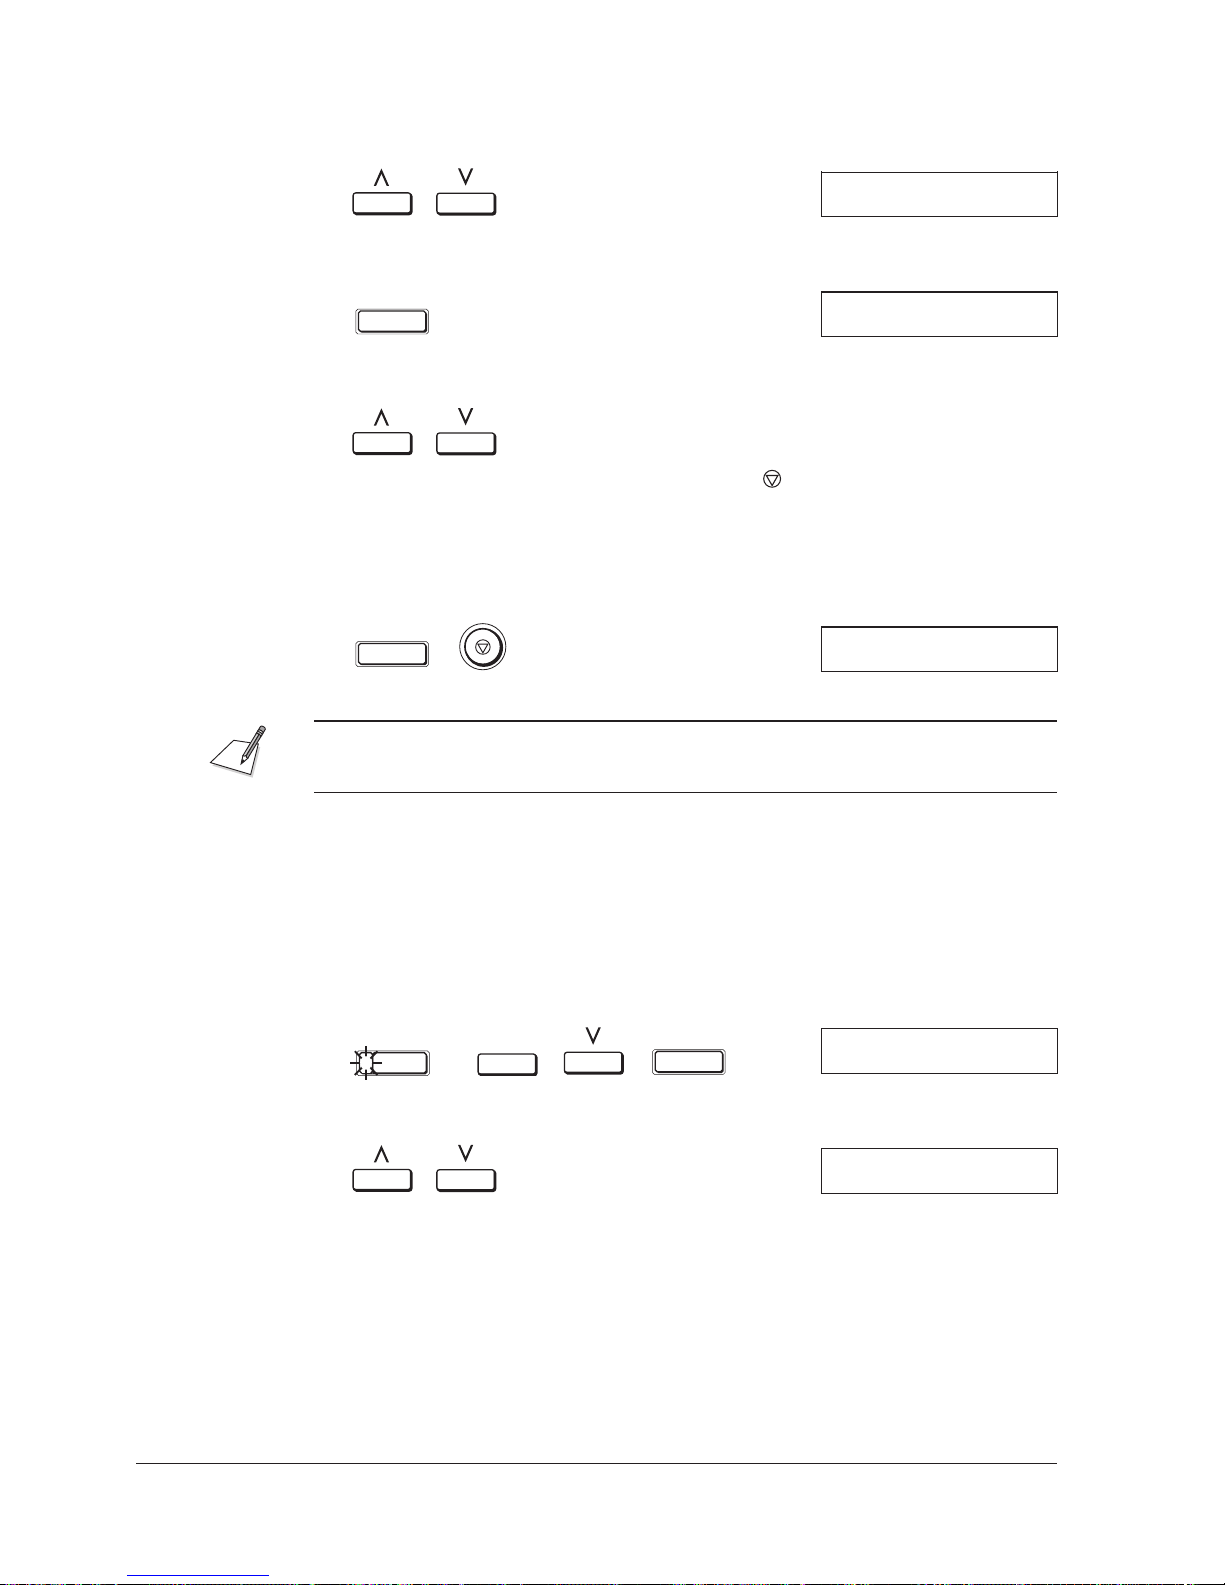
2. Use the search buttons to display 5.AUTO HALFTONE.
USER SETTINGS
5.AUTO HALFTONE
3. Press SET to display the current Auto Halftone setting.
SET
4. Use the search buttons to display the setting you want.
J You can cancel the procedure by pressing (STOP) any time before
pressing SET in step 5. This returns the unit to standby mode without
saving the changes.
5. Press SET to save your selection, then press STOP to return to standby
mode.
SET
When making copies, the unit automatically adjusts to Auto Halftone ON.
Scanning Contrast
AUTO HALFTONE
ON
22/07 ’97 TUE 17:20
The MultiPASS L90 can send documents using any of three contrast settings:
Dark, Standard, and Light. STANDARD is the default, and is fine for most
documents. If the print on your document is very light, use DARKER; if the
print is dark, use LIGHTER.
To change the Scanning Contrast setting:
1.
FUNCTION
DATA
REGISTRATION
SET
USER SETTINGS
1.DATE & TIME
2. Use the search buttons to display 6.SCANNING CONTRAST.
USER SETTINGS
6.SCANNING CONTRAST
4-15Chapter 4 Sending Faxes
Page 98

3. Press SET to display the current scanning contrast setting.
SET
SCANNING CONTRAST
STANDARD
4. Use the search buttons to display the scanning contrast you want.
J You can cancel and return to standby mode by pressing (STOP) any
time before pressing SET in step 5.
5. Press SET to save your selection, then press STOP to return to standby
mode.
SET
22/07 ’97 TUE 17:20
4-16 Chapter 4Sending Faxes
Page 99

Chapter 5
Receiving Faxes
This chapter describes how to set up the Canon MultiPASS L90 to receive faxes
in a way that best suits your needs.
Different Ways to Receive a Fax .............................................................................. 5-2
How to Set the Receiving Mode ................................................................... 5-3
Automatic Receiving Options ........................................................................ 5-4
Setting Up Fax/Telephone Auto-Switch Receiving ......................... 5-5
What Happens When FAX/TEL AUTO SW is Selected ............... 5-6
Manual Receiving .......................................................................................... 5-10
Using the MultiPASS L90 with an Answering Machine .......................... 5-11
Adjusting the MultiPASS L90 for Different Types of
Answering Machines .......................................................................... 5-11
Using an Answering Machine .......................................................... 5-12
Recording the Outgoing Message .................................................... 5-12
Receiving Documents in Memory ............................................................... 5-13
Printing a Fax from Memory ........................................................................ 5-14
Messages Displayed While Receiving a Fax .............................................. 5-15
How to Cancel an Incoming Fax ................................................................. 5-16
5-1Chapter 5 Receiving Faxes
Page 100

Different Ways to Receive a Fax
The MultiPASS L90 can receive documents by any of three methods, each of
which can be further customised to suit your needs.
J Automatic receiving
Use automatic receiving when you want your unit to automatically receive
faxes without any intervention from you. In this mode, the unit automatically
receives calls from fax machines, and can ring or not (as you select) if it
receives a telephone call.
J Manual receiving
For manual receiving, you need to have the optional handset installed or an
extension telephone connected.
Use manual receiving when you want to answer every call yourself. In this
mode the unit rings for every incoming call, whether from a fax machine or a
telephone. You can also use extension telephones with this mode.
J Answering machine receiving
Use this mode if you have a combined fax/phone line with an answering
machine, and want to leave it unattended. When your answering machine is
set to answer, this mode receives faxes automatically, and routes telephone
calls to the answering machine.
J PC Fax Receiving
To receive faxed documents directly into your PC, please refer to the
MultiPASS Desktop Manager for Windows User’s Guide.
5-2 Chapter 5Receiving Faxes
 Loading...