

Page 1
Page 2

Copyright
This manual is copyrighted by Canon Computer Systems, Inc. (CCSI)
with all rights reserved. Under the copyright laws, this manual may not be
reproduced in any form, in whole or part, without prior written consent of
CCSI.
©1997 Canon Computer Systems, Inc.
Disclaimer
Canon Computer Systems, Inc. has reviewed this manual thoroughly in
order to make it an easy to use guide for your Canon MultiPASS L6000
system. All statements, technical information, and recommendations in
this manual and in any guides or related documents are believed reliable,
but the accuracy and completeness thereof are not guaranteed or
warranted, and they are not intended to be, nor should they be understood
to be, representations or warranties concerning the products described.
Your MultiPASS L6000 and the software media included with your system
have been sold to you subject to the limited warranties set forth in the
warranty and license agreement enclosed with the respective product. All
software is licensed AS IS, as described in the license agreement enclosed
with the software media. Further, CCSI reserves the right to make changes
in the specifications of the products described in this manual at any time
without notice and without obligation to notify any person of such
changes.
Trademarks
Canon is a registered trademark and MultiPASS, ScanGear, and UHQ are
trademarks of Canon Inc.
Other brand and product names may be trademarks or registered
trademarks of their respective companies.
As an E
MultiPASS L6000 meets the E
ii
NERGY STAR® Partner, Canon U.S.A., Inc. has determined that the
NERGY STAR guidelines for energy efficiency.
Page 3

USERS IN U.S.A.
PRE-INSTALLATION REQUIREMENTS FOR CANON
FACSIMILE EQUIPMENT
A. Location
Supply a suitable table, cabinet, or desk. See Appendix A for the unit’s
dimensions and weight.
B. Order Information
1. Only a single line, touch-tone or rotary telephone set is to be used.
2. Order an RJ11-C modular jack (USOC code), which should be installed
by the phone company. If the RJ11-C jack is not present, installation
cannot occur.
3. Order a normal business line from your telephone company’s business
representative. The line should be a regular voice grade line or equivalent.
Use one line per unit.
DDD (DIRECT DISTANCE DIAL) LINE
or
IDDD (INTERNATIONAL DIRECT DISTANCE DIAL) LINE IF
YOU COMMUNICATE OVERSEAS
Canon recommends an individual line following industry standards [e.g., the 2500
N
(touch-tone) or 500 (rotary/pulse dial) telephones]. A dedicated extension off a
PBX unit without “Call Waiting” can be used with your MultiPASS L6000. Key
telephone systems are not recommended because they send non-standard signals to
individual telephones for ringing and special codes, which may cause a fax error.
C. Power Requirements
This equipment should be connected to a standard 120 volt AC, three-wire
grounded outlet only. Do not connect this unit to an outlet or power line
shared with other appliances that cause “electrical noise.” Air conditioners,
electric typewriters, copiers, and machines of this sort generate noise which
often interferes with communications equipment and the sending and
receiving of documents.
CONNECTION OF THE EQUIPMENT
This equipment complies with Part 68 of the FCC rules. On the rear panel of this
equipment is a label that contains, among other information, the FCC
Registration Number and Ringer Equivalence Number (REN) for this equipment.
If requested, this information must be given to the telephone company. This
equipment may not be used on coin service provided by the telephone company.
Connection to party lines is subject to state tariffs.
iii
Page 4

N
IN CASE OF EQUIPMENT MALFUNCTION
Should any malfunction occur which cannot be corrected by the procedures
described in this User’s Manual, disconnect the equipment from the telephone line
or unplug the power cord. The telephone line should not be reconnected or the
power cord plugged in until the problem is completely resolved. Users should
contact Canon Authorized Service Facilities for servicing of equipment.
Information regarding Authorized Service Facility locations can be obtained by
calling the Canon Computer Systems Customer Care Center. (See page 1-2 for
details.)
RIGHTS OF THE TELEPHONE COMPANY
Should the equipment cause harm to the telephone network, the telephone
company may temporarily disconnect service. The telephone company also retains
the right to make changes in facilities and services which may affect the operation
of this equipment. When such changes are necessary, the telephone company is
required to give adequate prior notice to the user.
WARNING
Do not make any changes or modifications to the equipment unless otherwise
specified in the manual. If such changes or modifications should be made, you
could be required to stop operation of the equipment.
This equipment has been tested and found to comply with the limits for a Class B
digital device, pursuant to Part 15 of the FCC Rules. These limits are designed to
provide reasonable protection against harmful interference in a residential
installation. This equipment generates, uses and can radiate radio frequency energy
and, if not installed, and used in accordance with the instructions, may cause
harmful interference to radio communications.
However, there is no guarantee that interference will not occur in a particular
installation. If this equipment does cause harmful interference to radio or
television reception, which can be determined by turning the equipment off and
on, the user is encouraged to try to correct the interference by one of the
following measures:
● Reorient or relocate the receiving antenna.
● Increase the separation between the equipment and receiver.
● Connect the equipment into an outlet on a circuit different from that to
which the receiver is connected.
● Consult the dealer or an experienced radio/TV technician for help.
The Telephone Consumer Protection Act of 1991 makes it unlawful for any
person to use a computer or other electronic device to send any message via a
telephone fax machine unless such message clearly contains in a margin at the top
or bottom of each transmitted page or on the first page of the transmission, the
date and time it is sent and an identification of the business or other entity, or
other individual sending the message and the telephone number of the sending
machine or such business, other entity, or individual.
To automatically enter this information into your MultiPASS L6000, follow the
instructions in your Quick Start Guide.
iv
Page 5

USERS IN CANADA
PRE-INSTALLATION REQUIREMENTS FOR CANON
FACSIMILE EQUIPMENT
A. Location
Supply a suitable table, cabinet, or desk. See Appendix A for the unit’s
dimensions and weight.
B. Order Information
1. Provide only a single-line to touch-tone or rotary telephone set
terminated with a standard 4-pin modular phone plug. (Touch-tone is
recommended if available in your area.)
2. Order an RJ11-C modular jack (USOC code), which should be installed
by the phone company. If the RJ11-C jack is not present, installation
cannot occur.
3. Order a normal business line from your telephone company’s business
representative. The line should be a regular voice grade line or equivalent.
Use one line per unit.
DDD (DIRECT DISTANCE DIAL) LINE
or
IDDD (INTERNATIONAL DIRECT DISTANCE DIAL) LINE IF
YOU COMMUNICATE OVERSEAS
N
Canon recommends an individual line following industry standards [e.g., the 2500
(touch-tone) or 500 (rotary/pulse dial) telephones]. A dedicated extension off a
PBX unit without “Camp On” signals is also permissible with your MultiPASS
L6000. Key telephone systems are not recommended because they send nonstandard signals to individual telephones for ringing and special codes, which may
cause a fax error.
C. Power Requirements
The power outlet should be a three-prong grounded receptacle (Single or
Duplex). It should be independent from copiers, heaters, air conditioners, or
any electric equipment that is thermostatically controlled. The rated value is
120 volts and 15 amperes. The RJ11-C modular jack should be relatively
close to the power outlet to facilitate installation.
NOTICE
The Industry Canada label identifies certified equipment. This certification means
that the equipment meets telecommunications network protective, operational and
safety requirements as prescribed in the appropriate Terminal Equipment
Technical Requirements document(s). The Department does not guarantee the
equipment will operate to the user’s satisfaction.
v
Page 6

Before installing this equipment, users should ensure that it is permissible to be
connected to the facilities of the local telecommunications company. The
equipment must also be installed using an acceptable method of connection. The
customer should be aware that compliance with the above conditions may not
prevent degradation of service in some situations.
Repairs to certified equipment should be coordinated by a representative
designated by the supplier. Any repairs or alterations made by the user to this
equipment, or equipment malfunctions, may give the telecommunications
company cause to request the user to disconnect the equipment.
Users should ensure for their own protection that the electrical ground
connections of the power utility, telephone lines and internal metallic water pipe
system, if present, are connected together. This precaution may be particularly
important in rural areas.
CAUTION
Users should not attempt to make such connections themselves, but should
contact the appropriate electric inspection authority, or electrician, as appropriate.
The Ringer Equivalence Number (REN) assigned to each terminal device provides
an indication of the maximum number of terminals allowed to be connected to a
telephone interface. The termination on an interface may consist of any
combination of devices subject only to the requirement that the sum of the Ringer
Equivalence Numbers of all the devices does not exceed 5.
CANON CANADA INC.
1-800-263-1121
24 HOURS A DAY, SEVEN DAYS A WEEK
Safety Information
Laser Safety
The MultiPASS L6000 complies with 21 CFR Chapter 1 Subchapter J as a
Class 1 laser product under the U.S. Department of Health and Human
Services (DHHS) Radiation Performance Standard according to the
Radiation Control for Health and Safety Act of 1968. This means that the
MultiPASS L6000 does not produce hazardous laser radiation.
Because radiation emitted inside the MultiPASS L6000 is completely
confined within protective housings, and external covers, the laser beam
cannot escape from the machine during any phase of user operation.
vi
Page 7
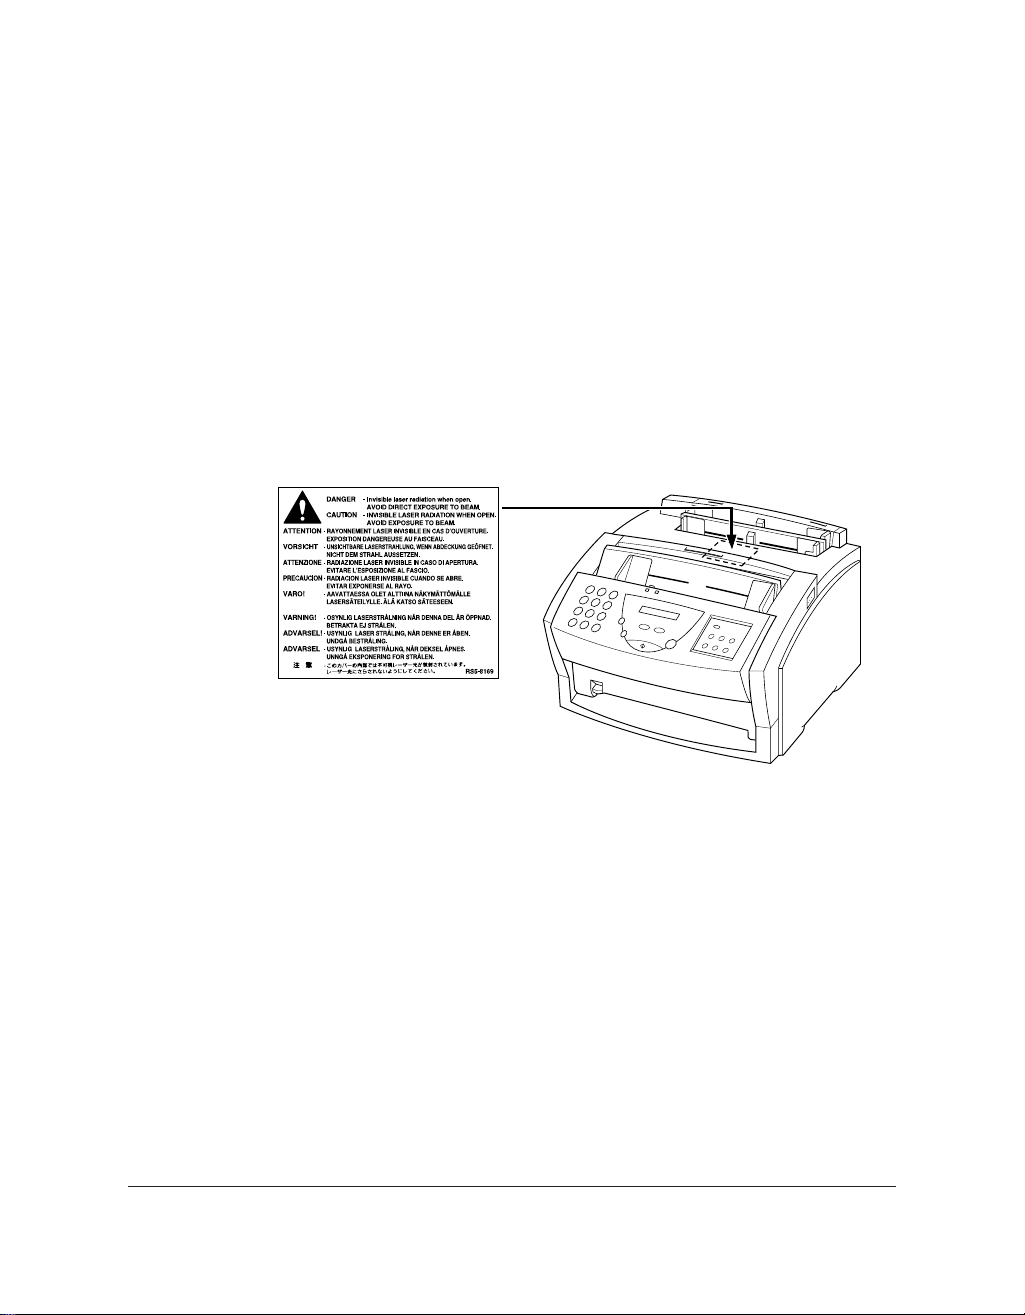
CDRH Regulations
The Center for Devices and Radiological Health (CDRH) of the U.S.
Food and Drug Administration implemented regulations for laser products
on August 2, 1976. These regulations apply to laser products manufactured
from August 1, 1976. Compliance is mandatory for products marketed in
the United States.
Use of controls, adjustments or performance of procedures other than
those specified in this User’s Manual may result in hazardous radiation
exposure.
This label is attached to the laser scanner unit inside the MultiPASS and is
not in an area that you can access.
Using Your Documentation
The following documentation is supplied with the MultiPASS™ L6000 to
help you use your new Canon multi-talented laser printer.
Quick Start Guide
This booklet describes how you unpack, set up, and start using your
MultiPASS L6000. It includes how to install the software that comes with
the MultiPASS, including the MultiPASS Printer Driver, MultiPASS
Desktop Manager for Windows®95, and ScanGear™ for MultiPASS. The
software enables you to use all the features of the MultiPASS L6000—laser
printing, copying, scanning, and PC faxing.
vii
Page 8

N
C
UserÕs Manual
This manual offers detailed information on how to operate your
MultiPASS L6000. It includes how to use the MultiPASS as a printer, how
to send and receive faxes, and how to copy and scan documents. It also
includes maintenance, troubleshooting, and specifications.
Conventions
This User’s Manual uses the following conventions to alert you to
information that will help you operate the MultiPASS L6000 correctly and
safely:
Notes provide advice or suggestions regarding the use of the MultiPASS.
Cautions alert you to operations that could cause damage to your hardware
or software, or cause injury to yourself.
Distinctive typefaces identify the buttons you press, the lights on the
operator panel, and any commands you enter at your computer.
viii
❍ The buttons you press appear in this typeface:
❍ The names of lights you see appear in this typeface: ALARM.
❍ What you see in the LCD display appears in this typeface:
PLEASE WAIT.
❍ When you type something on your computer, it appears in this
typeface: DIR/P.
START/COPY.
Page 9

Contents
1 Introduction
Supplies and Accessories.................................................................................... 1-2
Toner Cartridges ........................................................................................ 1-2
Customer Care Center ..................................................................................... 1-2
Servicing the MultiPASS L6000 ................................................................ 1-3
Important Safety Instructions........................................................................... 1-3
Main Components of the MultiPASS L6000 ................................................... 1-5
Front View ................................................................................................ 1-5
Back View .................................................................................................. 1-6
Inside the MultiPASS ................................................................................ 1-6
Using the Operator Panel ................................................................................ 1-7
Loading Paper in the Multi-purpose Tray ........................................................ 1-9
Preparing Documents for Faxing, Copying, or Scanning ................................. 1-11
Loading the Document .............................................................................. 1-12
Adding Pages to the Document ................................................................. 1-14
Setting the Document Feed Lever .............................................................. 1-14
Identifying Your Documents............................................................................. 1-15
2 Printing With the MultiPASS L6000
Paper Handling ................................................................................................ 2-1
Paper Guidelines ........................................................................................ 2-2
Installing a Printer Driver ................................................................................ 2-2
Printing a Document ....................................................................................... 2-3
Printer Setup Within Windows ........................................................................ 2-4
Opening the Printer Properties Dialog Box in Windows 95 ...................... 2-4
Using the Printer Driver in Windows 95 ................................................... 2-4
Using the Windows Tabs ........................................................................... 2-5
Specifying Your Printing Options .............................................................. 2-7
The Paper Path ................................................................................................ 2-8
Selecting Paper Delivery ................................................................................... 2-9
Facedown Delivery .................................................................................... 2-9
Faceup Delivery ......................................................................................... 2-10
Loading Paper in the Multi-purpose Tray ........................................................ 2-11
Loading Envelopes in the Multi-purpose Tray .................................................. 2-11
Loading Paper Manually .................................................................................. 2-14
ix
Page 10

3 Using the MultiPASS Desktop Manager
Starting the MultiPASS Desktop Manager ....................................................... 3-2
Exploring the MultiPASS Desktop Manager Window ..................................... 3-3
Closing the Desktop Manager ................................................................... 3-5
Using the Desktop Manager Folders ................................................................ 3-5
System-defined Folders .............................................................................. 3-5
User-defined Folders .................................................................................. 3-7
Viewing Documents in the Desktop Manager ................................................. 3-7
Document View ........................................................................................ 3-8
List View ................................................................................................... 3-9
Setting Up the Address Book ........................................................................... 3-10
Working With Address Book Entries ......................................................... 3-11
Importing an Address Book ....................................................................... 3-15
Exporting the Address Book ...................................................................... 3-17
Setting Up Your Speed Dial Assignments ......................................................... 3-18
Assigning an Individual Recipient to a Speed Dial Code ........................... 3-19
Defining a Group Speed Dial Code ........................................................... 3-20
Using the Fax Log ............................................................................................ 3-21
Displaying the Fax Log .............................................................................. 3-21
4 Sending Faxes With the MultiPASS L6000
Sending a Document ....................................................................................... 4-2
Regular Dialing ......................................................................................... 4-2
Automatic Dialing ..................................................................................... 4-4
Sending a Document Using Group Dialing ............................................... 4-6
Redialing ................................................................................................... 4-7
Resending a Fax After an Error .................................................................. 4-8
Manual Sending ........................................................................................ 4-9
Messages Displayed During Sending ......................................................... 4-10
Cancel Sending .......................................................................................... 4-10
Sending a Document to More Than One Location
(Sequential Broadcasting) ........................................................................... 4-11
Transmitting the Document ...................................................................... 4-11
Adjusting the Quality of Your Faxes ................................................................. 4-13
Setting the Resolution ............................................................................... 4-13
Setting the Contrast ................................................................................... 4-15
Sending PC Faxes ............................................................................................ 4-16
Sending a PC Fax From a Windows Application ....................................... 4-16
Creating a Fax Memo in the MultiPASS Desktop Manager ............................. 4-20
Designing a Fax Cover Page ............................................................................. 4-20
Preparing the Cover Page Background ....................................................... 4-21
Opening the Cover Page Designer ............................................................. 4-22
Using the Cover Page Designer .................................................................. 4-23
Creating a New Cover Page ....................................................................... 4-24
Editing an Existing Cover Page .................................................................. 4-27
Deleting a Cover Page ............................................................................... 4-28
Printing a Fax Cover Page .......................................................................... 4-29
x
Page 11

5 Receiving Faxes
Receiving Documents ...................................................................................... 5-2
Receiving Documents Automatically—Fax Only Mode ............................. 5-2
Receiving Both Documents and Telephone Calls Automatically—
FaxTel Mode .......................................................................................... 5-2
Receiving Documents Manually—Manual Mode ...................................... 5-3
Using an Answering Machine—Ans. Machine Mode ................................ 5-4
Printing Documents Received in Memor y ....................................................... 5-5
Receiving While Copying, Printing, or Registering .......................................... 5-6
Receiving Faxes to the MultiPASS Desktop Manager ....................................... 5-7
Receiving a Fax Into the In Box ................................................................. 5-7
Printing a Received Fax When Your Computer Is Off ............................... 5-8
Using the Distinctive Ring Pattern Detection (DRPD) Feature ....................... 5-9
Types of Ring Patterns ............................................................................... 5-9
How DRPD Responds to Calls ................................................................. 5-10
Communicating Using the Distinctive Ring Pattern Detection
(DRPD) Feature .................................................................................... 5-10
6 Copying and Scanning With the MultiPASS L6000
Setting the Document Feed Lever .................................................................... 6-1
Copying Documents Using the Operator Panel ............................................... 6-2
Scanning With the MultiPASS L6000 ............................................................. 6-4
Scanning From a Windows Application ..................................................... 6-9
7 Working With Documents in the Desktop Manager
Managing Your Documents in the Desktop Manager ...................................... 7-1
Selecting Documents in the Desktop Manager .......................................... 7-2
Printing a Document in the Desktop Manager .......................................... 7-2
Working With Jobs in the Out Box Folder ................................................ 7-3
Creating a Folder ....................................................................................... 7-7
Moving a Document ................................................................................. 7-7
Renaming a Document or Folder .............................................................. 7-8
Deleting a Document or Folder ................................................................. 7-8
Emptying the Trash Folder ........................................................................ 7-9
Importing a Document .............................................................................. 7-9
Exporting a Document .............................................................................. 7-10
Attaching a Document to Electronic Mail (E-mail) ................................... 7-10
Manipulating a Document in Document View ............................................... 7-11
Arranging the Documents in Document View .......................................... 7-11
Scrolling Through a Multi-page Document ............................................... 7-11
Removing a Page from a Document .......................................................... 7-12
Splitting a Document ................................................................................ 7-12
Merging a Document ................................................................................ 7-13
xi
Page 12

Annotating a Document .................................................................................. 7-14
Features of the Document Viewer Window ............................................... 7-16
Adjusting Your View of the Document ...................................................... 7-18
Adding Annotations to Your Document .................................................... 7-20
Revising Your Annotations ......................................................................... 7-25
Saving All or Part of a Base Page of Your Document ................................. 7-27
Removing an Annotation ........................................................................... 7-28
Exporting the Document ........................................................................... 7-28
Adjusting the Document Viewer Default Options ..................................... 7-29
8 Setup and Other Utilities in the Desktop Manager
Setting Up MultiPASS L6000 Options in the Desktop Manager ..................... 8-2
Setting Up Preferences ............................................................................... 8-3
Setting Up Send Fax Options .................................................................... 8-4
Setting Up Receive Fax Options ................................................................ 8-7
Setting Up Speed Dial Assignments ........................................................... 8-11
Making a Phone Call From the Desktop Manager ........................................... 8-12
Using the Status Monitor ................................................................................. 8-14
Opening the Status Monitor ...................................................................... 8-14
Using the Minimized Status Monitor ........................................................ 8-14
Using the Status Monitor Window ............................................................ 8-15
Status Messages .......................................................................................... 8-16
Closing the MultiPASS Background ................................................................ 8-17
Removing MultiPASS Background From StartUp ..................................... 8-18
Restarting the MultiPASS Background ...................................................... 8-19
Adding MultiPASS Background to StartUp ............................................... 8-19
Disconnecting the MultiPASS ......................................................................... 8-20
Using MultiPASS Diagnostics .......................................................................... 8-20
Uninstalling the Desktop Manager .................................................................. 8-21
9 Maintaining the MultiPASS L6000
MultiPASS L6000 Guidelines .......................................................................... 9-1
Routine Maintenance ....................................................................................... 9-2
Cleaning Inside the MultiPASS ....................................................................... 9-3
Cleaning the Scanner Components................................................................... 9-6
Toner Cartridge Guidelines .............................................................................. 9-8
FX-3 Toner Cartridge Warranty ................................................................. 9-10
Replacing the Toner Cartridge ......................................................................... 9-11
Preparing the Toner Cartridge ................................................................... 9-11
Inserting the Cartridge .............................................................................. 9-13
Transporting the MultiPASS ............................................................................ 9-15
xii
Page 13

10 Troubleshooting
Paper Jams ....................................................................................................... 10-3
Jams in the Automatic Document Feeder (ADF) ....................................... 10-3
Jams in the Output Slots ........................................................................... 10-5
Jams Inside the Unit .................................................................................. 10-6
After Clearing a Paper Jam ........................................................................10-10
LCD Messages ................................................................................................. 10-11
Printing Problems ............................................................................................ 10-15
Print Quality Problems.....................................................................................10-18
Paper Feeding Problems....................................................................................10-18
Faxing Problems ...............................................................................................10-20
Telephone Problems .........................................................................................10-24
Copying Problems ...........................................................................................10-24
General Problems .............................................................................................10-25
Technical Notes ...............................................................................................10-26
Using Other Bi-directional Devices ...........................................................10-26
MultiPASS Hardware Cannot Initialize .....................................................10-26
Using Switch Boxes ..........................................................................................10-27
If the Power Goes Out .....................................................................................10-27
Memory Clear Report ...............................................................................10-27
Appendix A Specifications
Laser Printer .................................................................................................... A-1
Toner Cartridge ............................................................................................... A-3
Facsimile .......................................................................................................... A-3
Copier .............................................................................................................. A-5
Scanner ............................................................................................................ A-5
MultiPASS Desktop Manager for Windows ..................................................... A-7
General Specifications ...................................................................................... A-8
Receiving Faxes and Phone Calls Automatically—FaxTel Mode ....................... A-10
Appendix B Using the MultiPASS L6000 as a Stand-alone Fax
LCD Menu System .......................................................................................... B-1
Entering Information in the MultiPASS .......................................................... B-2
Entering Your User Information ................................................................ B-2
Glossary .................................................................................................................. G-1
Index ....................................................................................................................... I-1
xiii
Page 14

xiv
Page 15
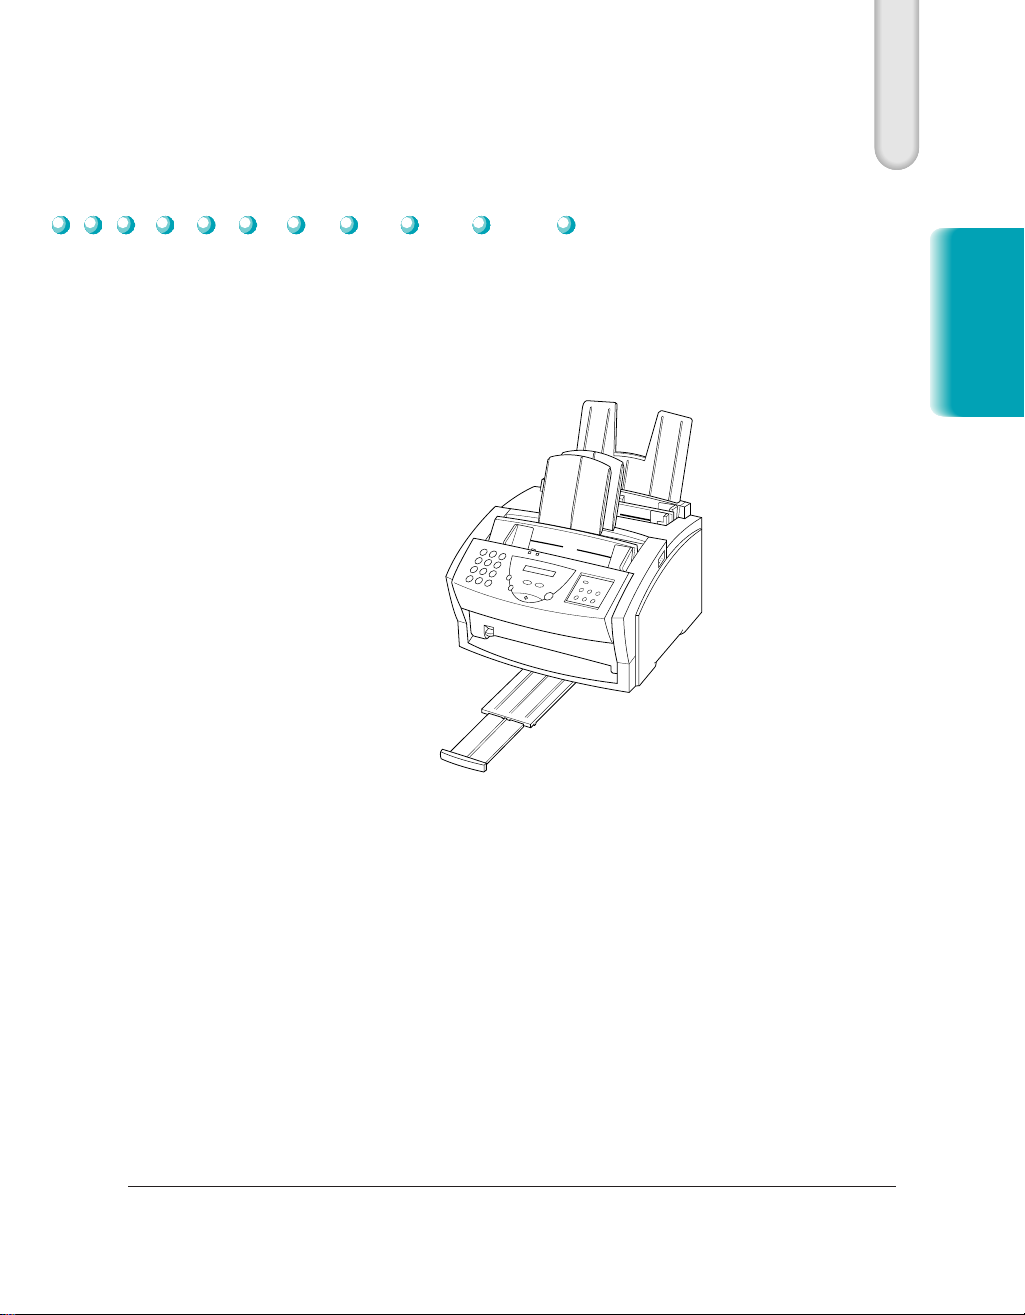
Introduction
Thank you for purchasing the Canon MultiPASS™ L6000—the multitalented laser printer for your home office and the whole family. We
are sure that your MultiPASS L6000 will provide all you need in one
machine: laser printer, plain paper fax, PC fax, copier, and scanner.
1
Introduction
This chapter introduces you to the MultiPASS L6000. It includes:
❍ Supplies and accessories
❍ Customer Care Center
❍ Important safety instructions
❍ Examining the main components of the unit
❍ Using the operator panel
❍ Loading paper in the multi-purpose tray
❍ Preparing documents for faxing, copying, or scanning
❍ Identifying your documents
Chapter 1 Introduction 1-1
Page 16

Supplies and Accessories
Canon has an extensive dealer network equipped to offer you supplies
as you need them. To find a dealer near you, call the Canon Referral
Service at 1-800-848-4123.
If supplies are not available from your local dealer, you can order directly
from Canon by calling 1-800-385-2155.
Toner Cartridges
Your MultiPASS L6000 comes with one FX-3 Toner Cartridge.
For optimum printing results, Canon recommends that you use only the
N
Canon FX-3 Toner Cartridge with your MultiPASS L6000.
Customer Care Center
Canon Computer Systems, Inc. offers a full range of customer technical
support options including*:
❍
24-hour, 7-day-a-week, toll-free automated support for troubleshooting
issues on most current products (1-800-423-2366)
❍ Speak to a technician free of service charge (currently Monday through
Friday, 8:00 A.M. to 10:00 P.M. EST and Saturday,
12:00 P.M. to 6:00 P.M. EST, excluding holidays) for products
still under warranty** (1-757-413-2848)
❍ Speak to a technician (currently $24.99) during holidays and
days/hours not listed above regarding urgent product questions or for
products no longer under warranty (1-800-423-2366)
❍ E-mail support via the Canon Computer Systems, Inc. Web site
(www.ccsi.canon.com)
❍ 24-hour, toll-free Fax Retrieval System (1-800-526-4345)
❍ 24-hour Bulletin Board Service (1-757-420-2000)
*Support program specifics subject to change without notice.
**Refer to individual product information for warranty details.
1-2 Introduction Chapter 1
Page 17

Canon Canada
Customer support for Canadian residents is available 24 hours a day (seven
days a week) at 1-800-263-1121.
In other countries, please contact your Canon dealer.
Servicing the MultiPASS L6000
The Canon MultiPASS L6000 is designed with the latest technology
to provide trouble-free operation. The warranty card that comes with your
system describes Canon’s limited warranty, which includes the
InstantExchange warranty program. Be sure to read the warranty
information to find out about the different service options available
to you.
Save the warranty and keep your sales receipt for proof of purchase. In the
event that your MultiPASS needs servicing, you will need your proof of
purchase to obtain warranty service.
Be sure to register your new product. This will help Canon give you better
support and warranty service. You can register electronically during
installation; see your Quick Start Guide for details. You can also fill out the
Registration card and fax it or mail it in. See the Registration card for
details.
If you seem to have a problem, try to solve it by referring to the
troubleshooting information in Chapter 10. If you cannot solve the
problem, contact the Canon Computer Systems Customer Care Center
(see previous page for details).
Important Safety Instructions
Read these safety instructions and refer to them later if you have any
questions.
Introduction
Except as explained in this manual, do not attempt to service the
C
Chapter 1 Introduction 1-3
MultiPASS L6000 yourself. Opening and removing interior covers may
expose you to dangerous voltage points or other risks. Refer all servicing to
a Canon Authorized Service Facility (ASF). Call the Customer Care Center
for details.
❍ Follow all warnings and instructions marked on the MultiPASS and
inside the front cover.
Page 18

❍ Place the MultiPASS on a sturdy level surface. Do not place it on an
unstable cart, stand, or table. If the unit falls, it could be seriously
damaged.
❍ Do not use the MultiPASS near water. If you spill liquid on or into
the unit, unplug it immediately and call the Customer Care Center.
Slots and openings in the unit and on the back or bottom are provided
❍
for ventilation. To ensure reliable operation of the MultiPASS and to
protect it from overheating, do not block or cover these openings. Do
not block the openings by placing the unit on a bed, sofa, rug, or other
similar surface. Do not place the unit near a radiator, nor in a closet or
built-in cabinet unless proper ventilation is provided.
❍ Operate the MultiPASS only from the type of power source indicated
on the unit’s label. If you are unsure of the type of power available,
consult your dealer or local power company.
❍ Do not allow anything to rest on the power cord, and do not locate
the MultiPASS where the cord will be walked on. Make sure the power
cord is not knotted or kinked.
❍ Do not push metal objects of any kind into the slots or openings on
the cabinet. This could result in a risk of fire or electric shock.
❍ Do not allow small objects (such as pins, paper clips, or staples) to fall
into the MultiPASS. If something does fall into it that you cannot
remove, unplug the unit immediately and call the Customer Care
Center.
❍ Unplug this product from the wall outlet and call the Customer Care
Center if any of the following conditions exist:
The power cord or plug is damaged or frayed.
•
Liquid is spilled into the unit, or if the unit is exposed to rain
•
or water.
Smoke, unusual noises, or odors come from the unit.
•
The unit has been dropped or the cabinet has been damaged.
•
The unit does not operate normally when you have followed the
•
operating instructions. Adjust only those controls that are covered
by the operating instructions in the Quick Start Guide and this
User’s Manual. Improper adjustment of other controls may result
in damage and may require extensive work by a qualified
technician to restore the product to normal operation.
1-4 Introduction Chapter 1
Page 19
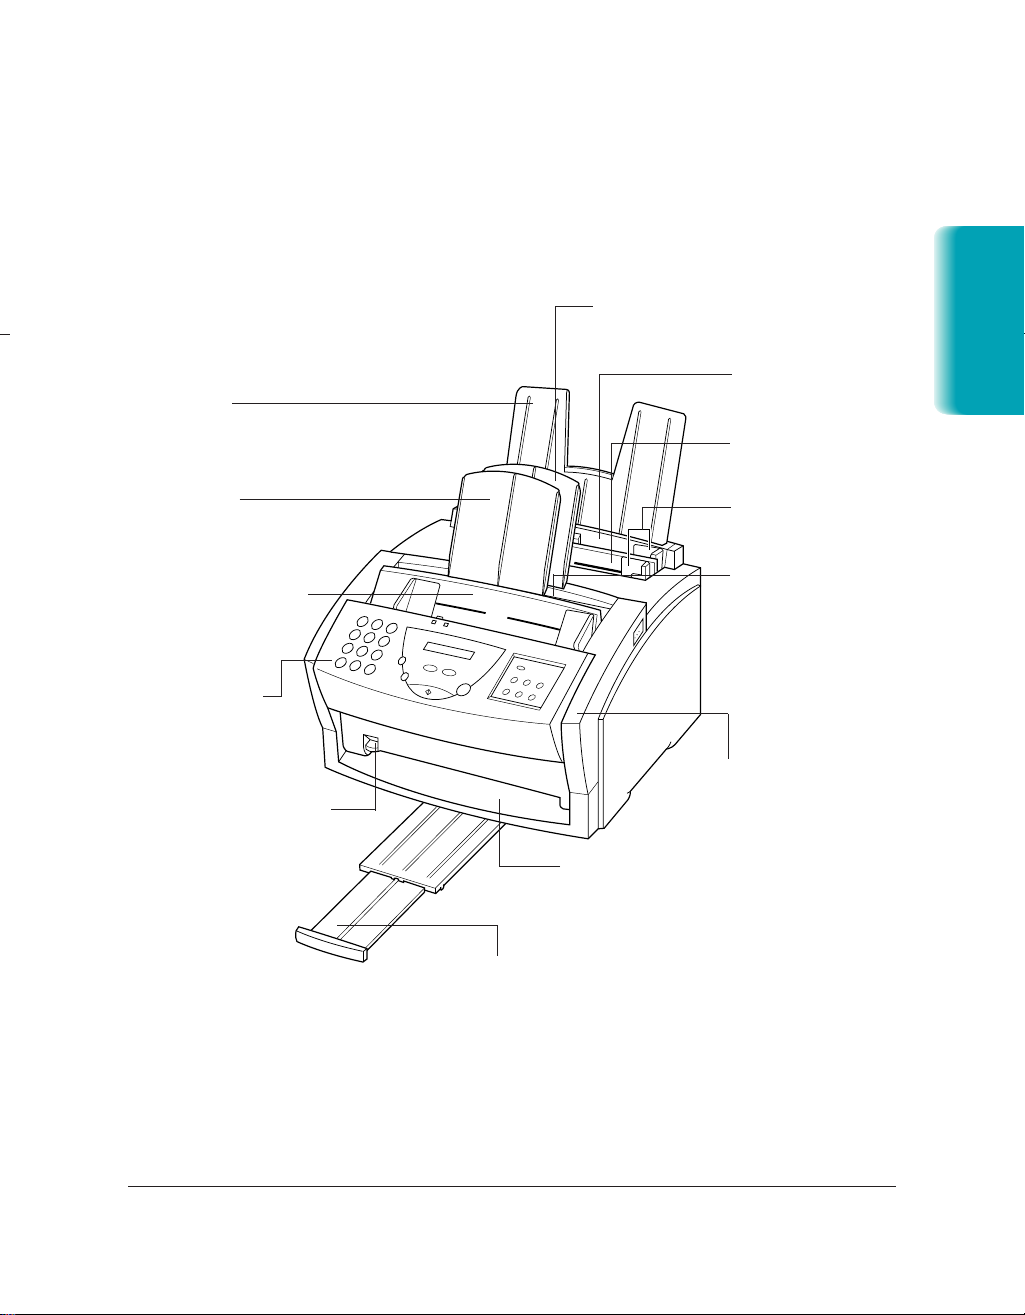
Main Components of the MultiPASS L6000
Before using the MultiPASS L6000, it’s a good idea to familiarize yourself
with the components and understand their functions.
Front View
PAPER REST
SUPPORTS PAPER
STACKED IN THE
MULTI-PURPOSE TRAY
SUPPORT TRAY
HOLDS DOCUMENTS
AS THEY FEED INTO ADF
AUTOMATIC DOCUMENT
FEEDER (ADF)
HOLDS DOCUMENTS
TO BE SCANNED (UP
TO 20 SHEETS)
OPERATOR PANEL
USE TO CONTROL
THE MultiPASS L6000
PAPER DELIVERY SELECTOR
DETERMINES WHETHER
PAPER EXITS FACEUP OR
FACEDOWN
SUPPORT TRAY
HOLDS PRINTED DOCUMENTS AS
THEY EXIT IN FACEDOWN POSITION
MULTI-PURPOSE TRAY
HOLDS 100 SHEETS
OF PLAIN PAPER
MANUAL FEED SLOT
HOLDS INDIVIDUAL
SHEETS OR ENVELOPES
PAPER GUIDES
ADJUST TO WIDTH
OF PAPER
FACEDOWN DELIVERY
SLOT—PAPER EXITS IN
FACEDOWN POSITION
IN COLLATED SEQUENCE
FRONT COVER
FACEUP DELIVERY SLOT
PAPER EXITS IN FACEUP POSITION
IN NON-COLLATED SEQUENCE
Introduction
OUTPUT TRAYAND EXTENSION
HOLDS PRINTED DOCUMENTS AS
THEY EXIT THE MultiPASS L6000
IN FACEUP POSITION
Chapter 1 Introduction 1-5
Page 20
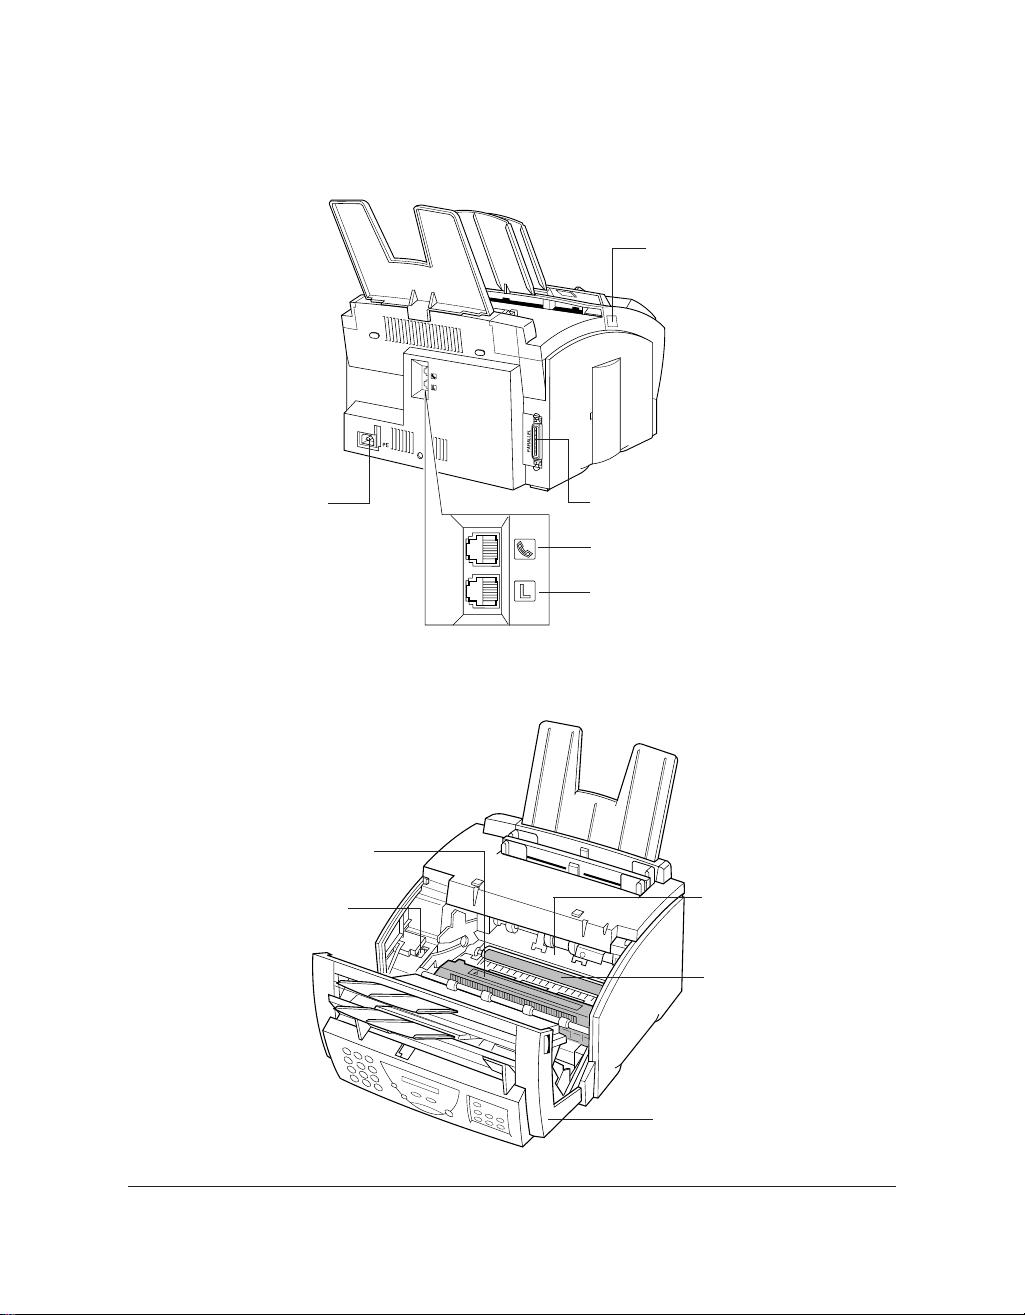
Back View
RELEASE LATCH
POWER
CONNECTOR
Inside the MultiPASS
FIXING ASSEMBLY
PAPER RELEASE LEVER
BI-DIRECTIONAL
PARALLELPORT
TELEPHONE/ ANSWERING
MACHINE JACK
TELEPHONE LINE JACK
FX-3 TONER CARTRIDGE
COMPARTMENT
TRANSFER CHARGING
ROLLER
FRONT COVER
1-6 Introduction Chapter 1
Page 21
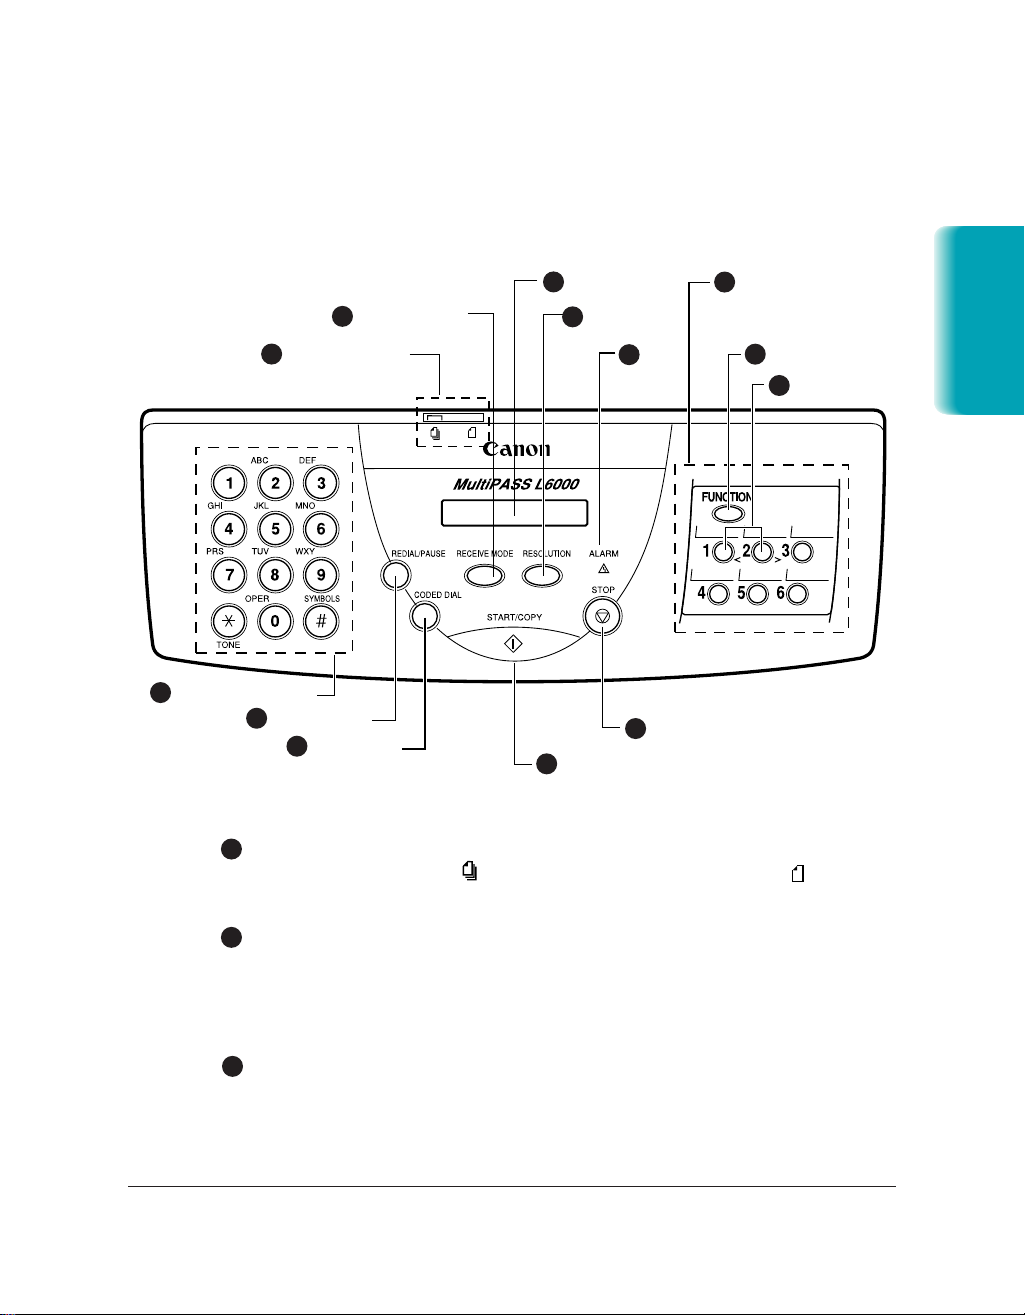
Using the Operator Panel
This section presents a brief description of the operator panel on the
MultiPASS L6000.
13
NUMERIC BUTTONS
12
1
Document feed lever
Set this lever to the left ( ) for automatic feed or to the right ( ) for
manual document feed.
2
1
DOCUMENT FEED
LEVER
REDIAL/PAUSE
11
CODED DIAL
RECEIVE MODE
LCD DISPLAY
3
4
START/COPY
10
RESOLUTION
5
ALARM
9
STOP
6
ONE-TOUCH SPEED
DIAL/FUNCTION
BUTTONS
FUNCTION
7
ARROW BUTTONS
8
Introduction
2
RECEIVE MODE button
Press to change the Receive Mode: Manual mode, FaxOnly mode, Answer
Machine mode, or FaxTel mode. The Receive Mode set during installation
overrides this setting every time the MultiPASS Background is turned on.
LCD display
3
Displays messages and prompts during operation. Displays selections, text,
numbers, and names when registering information.
RESOLUTION button
Chapter 1 Introduction 1-7
Page 22

4
Press to select the Resolution the MultiPASS will use for the document
you are faxing or copying.
ALARM light
5
Flashes when an error occurs, when the MultiPASS is out of paper or ink,
or when received faxes are stored in memory.
One-touch Speed Dial/Function buttons
6
Use for one-touch speed dialing, entering user information, and printing
documents stored in memory.
FUNCTION button
7
Use to register user settings or to print faxes stored in the MultiPASS
L6000’s memor y.
Arrow buttons
8
Use to scroll through menu selections, or to move the cursor when
registering data.
STOP button
9
Press to cancel sending, receiving, or any other operation.
START/COPY button
10
Press to begin sending, receiving, copying, or other operations, or to select
functions when registering information.
CODED DIAL button
11
Press this button (followed by a two-digit code) to dial a number that you
have registered for coded speed dialing.
REDIAL/PAUSE button
12
Press to redial the last number that was dialed using the number buttons,
or to enter pauses between digits when dialing fax numbers.
Numeric buttons
13
Use these buttons to enter numbers and names when entering information,
and to dial fax/telephone numbers that are not registered for automatic
dialing.
1-8 Introduction Chapter 1
Page 23
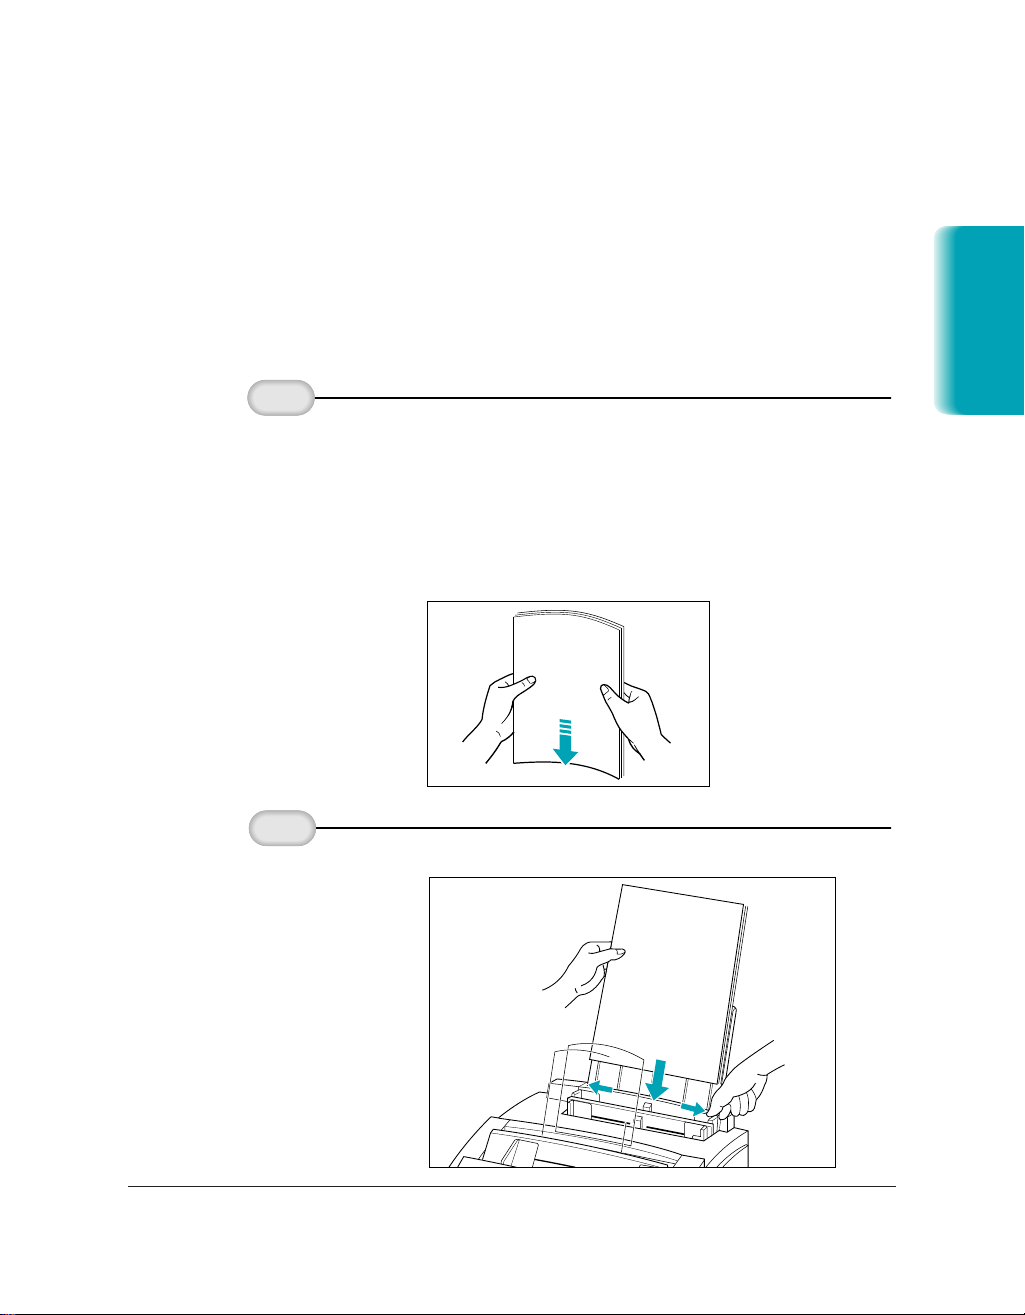
Loading Paper in the Multi-purpose Tray
2
1
The paper you load in the multi-purpose tray is used for printing
documents or for incoming faxes. You can use any plain paper (such
as copier paper).
When the message LOAD PAPER appears in the LCD display, you need to
add paper to the multi-purpose tray. This tray holds approximately 100
sheets of plain paper.
Introduction
Fan the paper.
Open the paper
guides to the
approximate width
of the
stack of paper.
❍ For best results, fan the paper before loading it.
❍ Always fan a stack of paper along the edge that will feed
into the MultiPASS first.
❍ Stack the paper so the leading edge and sides are even.
Chapter 1 Introduction 1-9
Page 24
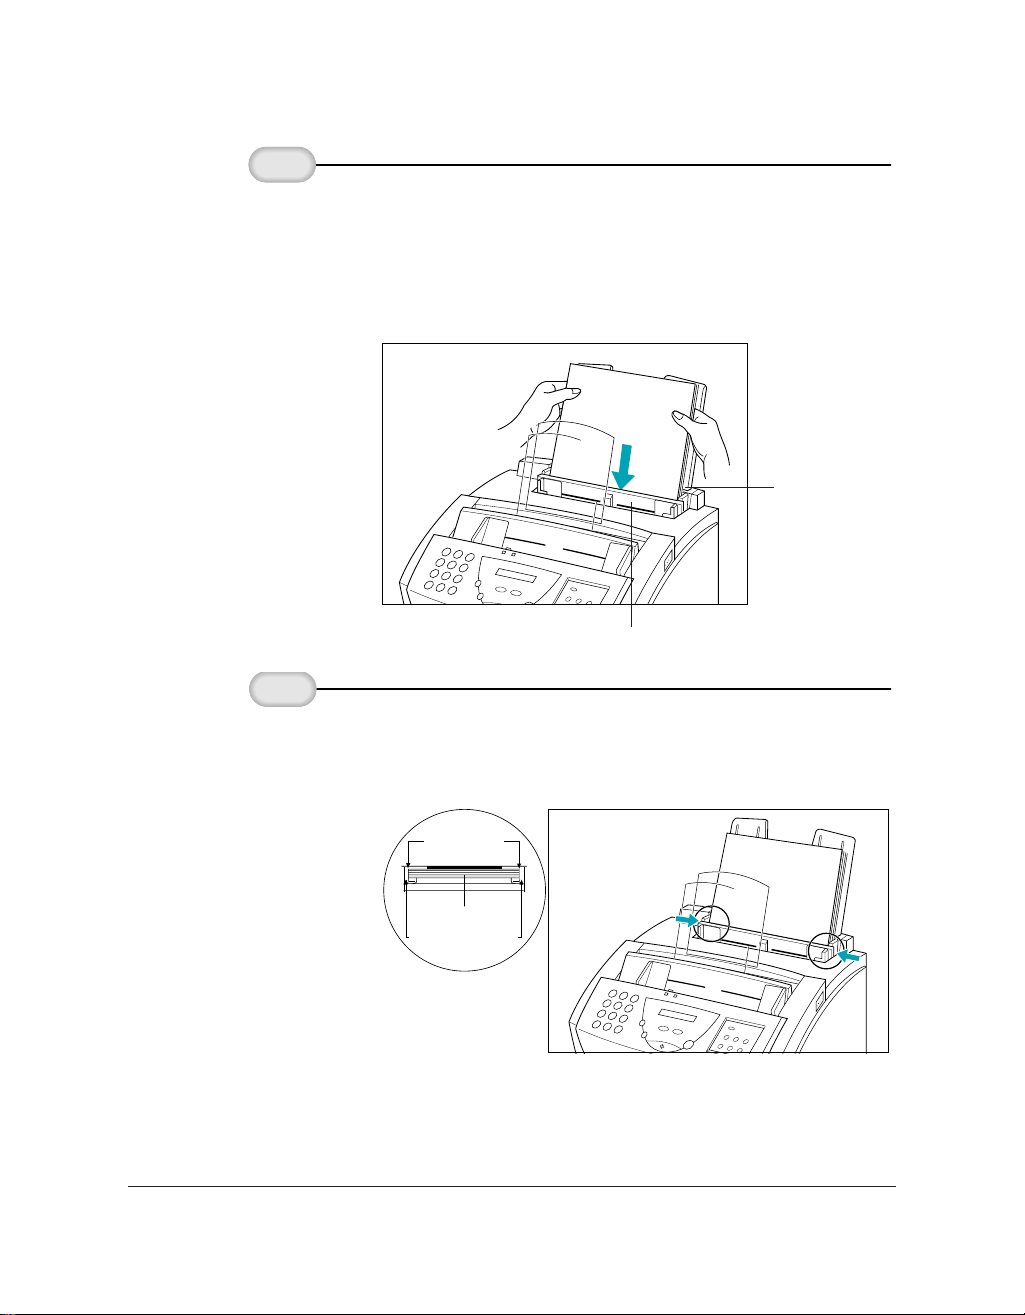
4
Insert the stack
3
of paper.
❍ Insert the paper with the print side facing you and top edge
first into the multi-purpose tray. (The multi-purpose tray is
behind the manual feed slot.)
❍ Insert the stack until it stops, but do not force it in.
MULTI-PURPOSE
TRAY
MANUAL FEED SLOT
Adjust the
paper guides
❍ Make sure there is no space between the paper guides and
the stack of paper.
to the width
of the paper.
NO SPACE
PAPER
PAPER GUIDES
TOP VIEW
Your MultiPASS L6000 is now ready to print.
1-10 Introduction Chapter 1
Page 25
Preparing Documents for Faxing,
Copying, or Scanning
You can use the MultiPASS L6000 to fax, copy, or scan documents that are
printed on standard letter, legal, or A4 size paper. Follow these guidelines
to prepare your documents.
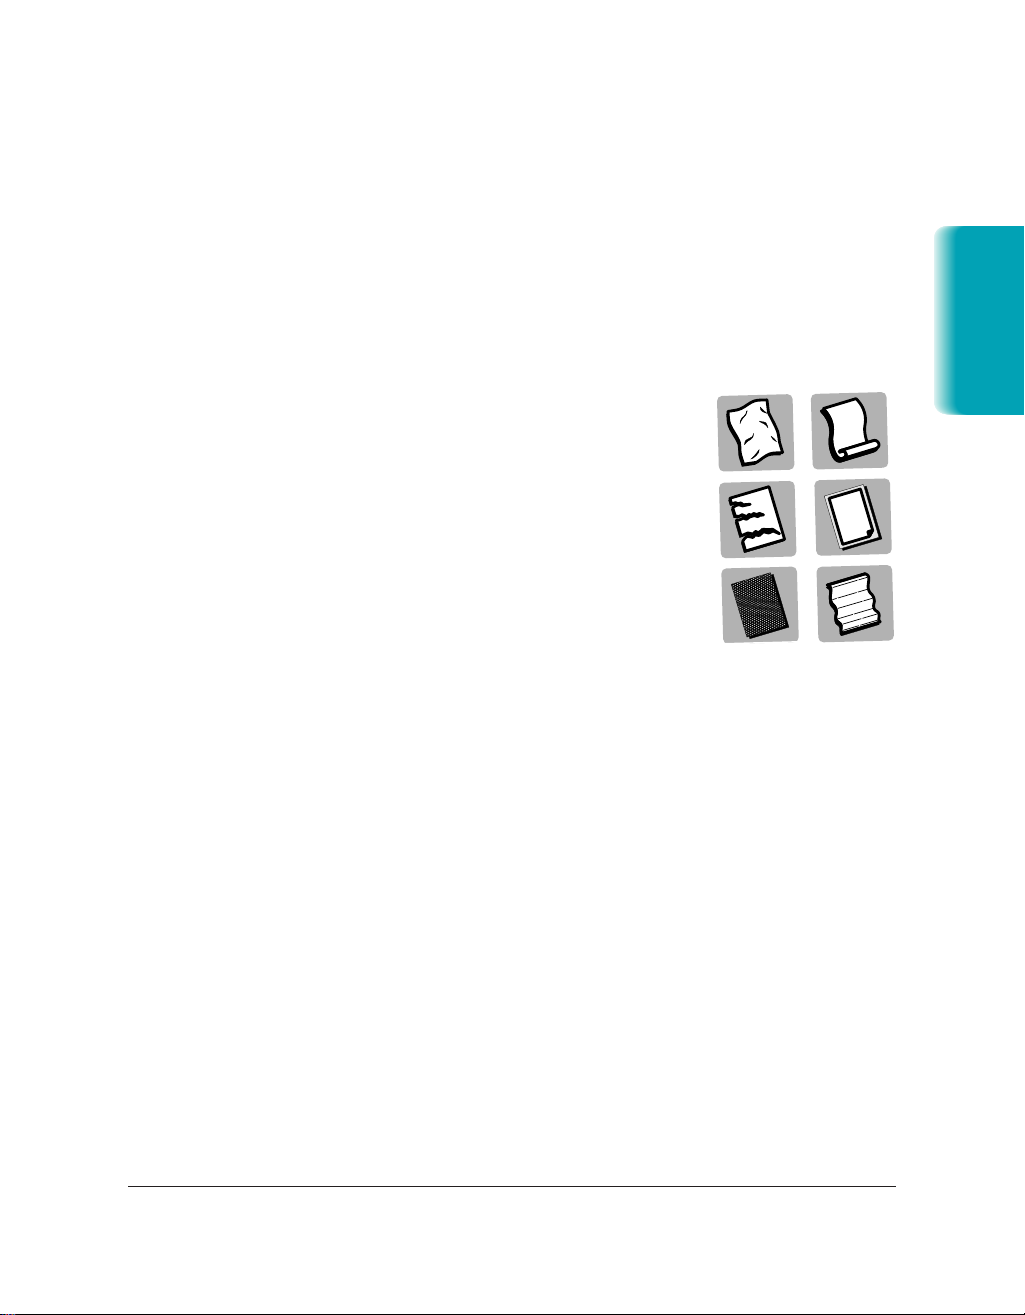
❍ Do not attempt to feed the following types of documents into the
MultiPASS:
wrinkled or creased paper
•
curled or rolled paper
•
torn paper
•
carbon-paper or carbon-backed paper
•
coated paper
•
onion skin or thin paper
•
❍ Remove all staples, paper clips, and the like before feeding the
document.
❍ Make sure any glue, ink, or correction fluid on the paper is completely
dry before feeding the document.
Introduction
❍ Make a photocopy of any document that will not feed into the
MultiPASS. You can then feed the copy.
❍ Do not feed documents with pages that are different sizes or of
different thicknesses.
Chapter 1 Introduction 1-11
Page 26
Loading the Document
2
1
You can load up to 20 letter or A4 size sheets and up to 10 legal size sheets
at a time into the Automatic Document Feeder (ADF).
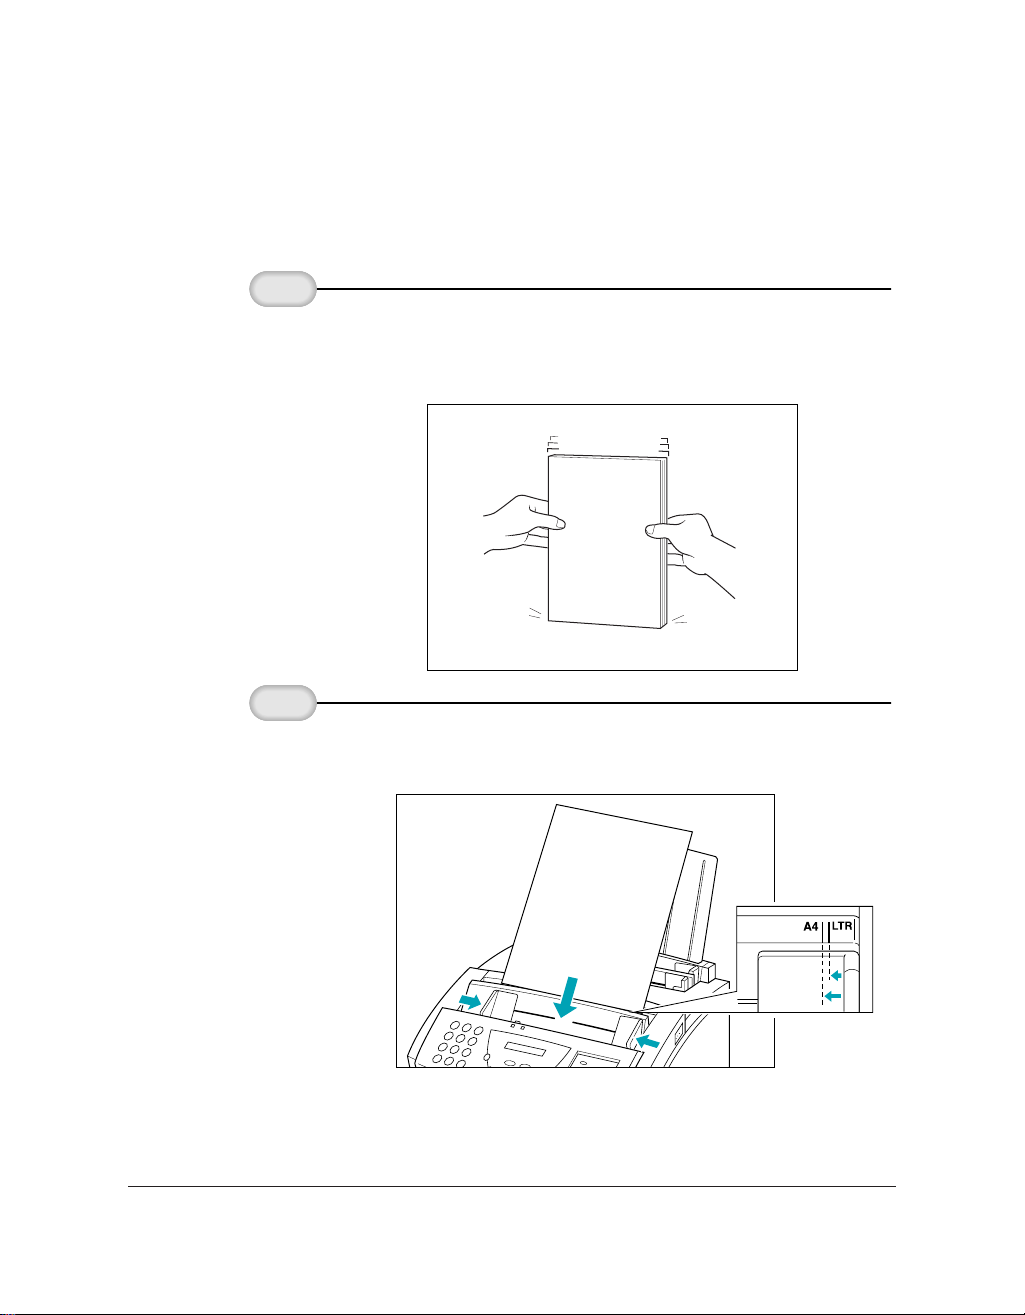
Stack your
documents.
Adjust the
document
guides.
❍ For a multiple-page document, fan the sheets and tap the
document on a flat surface to even the stack.
❍ Adjust the document guides to the width of the document.
1-12 Introduction Chapter 1
Page 27
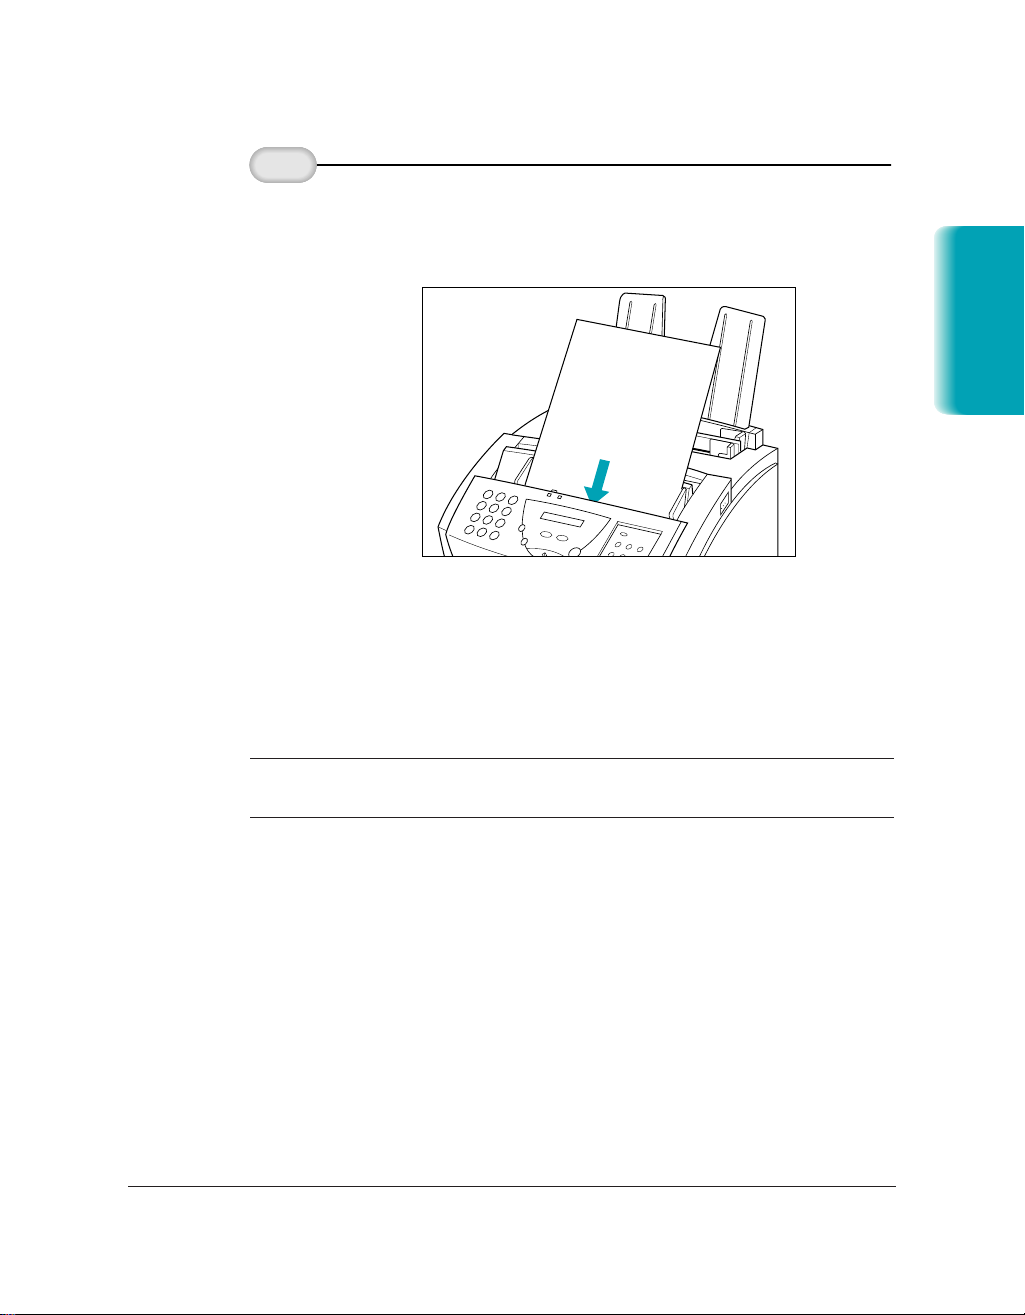
Feed the document.
3
The document is now ready for scanning. The MultiPASS automatically
feeds the pages one by one from the bottom of the stack.
If you have problems feeding a multiple-page document, remove the
document and re-stack it tapping the edges on a flat surface. If problems
persist, feed one page at a time.
Wait until your document has been scanned completely before inserting a
N
new document.
❍ Gently insert the document facedown (letterhead first) into
the ADF until it stops.
Introduction
Chapter 1 Introduction 1-13
Page 28
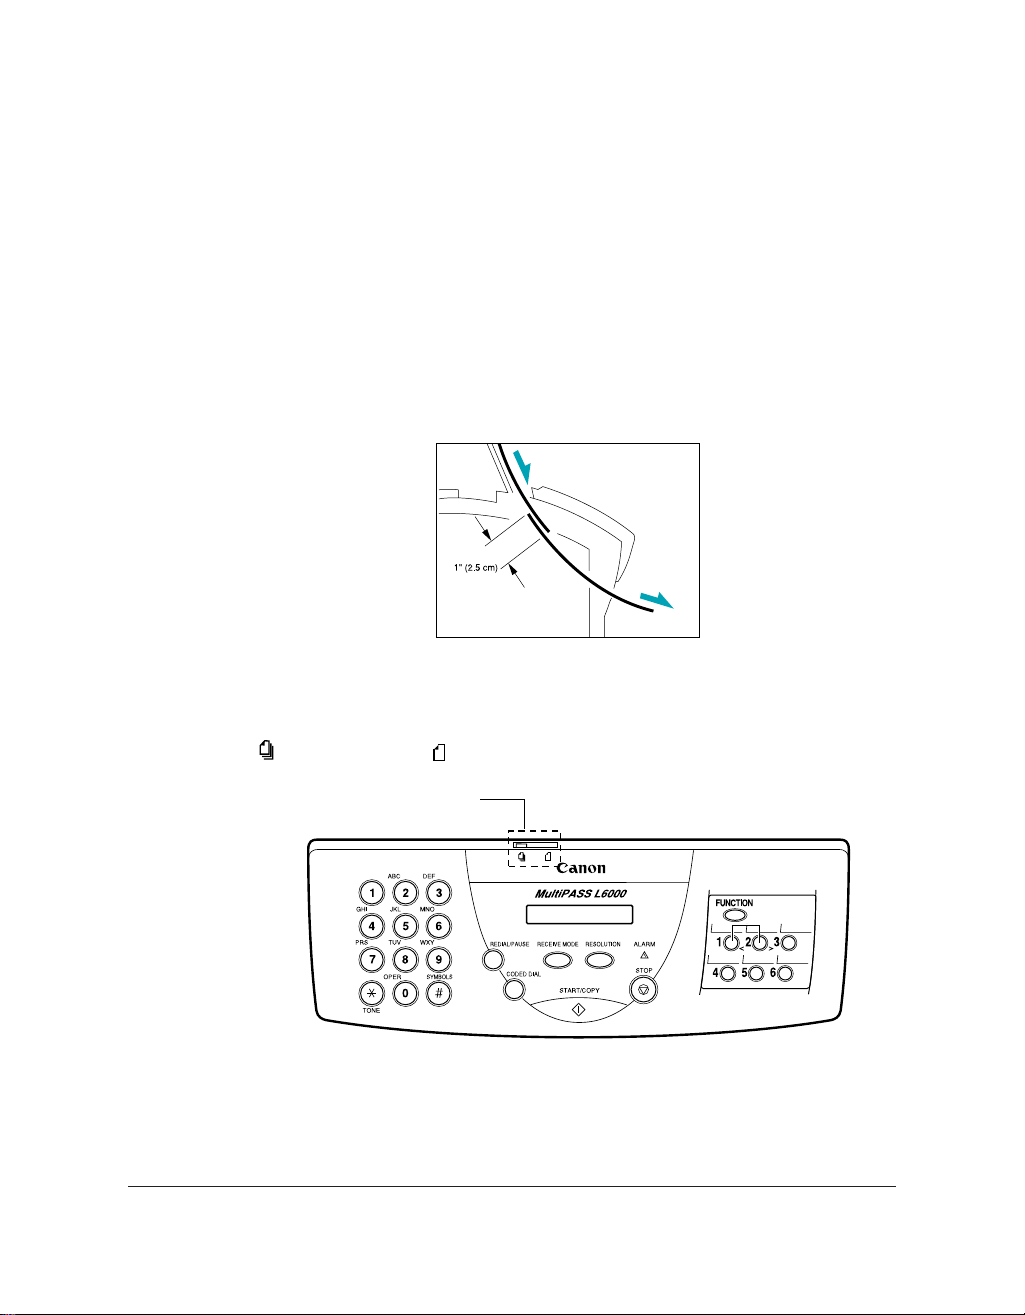
Adding Pages to the Document
If you want to add pages while the MultiPASS is sending a document, wait
until the last page is feeding into the MultiPASS and then insert the new
sheets. Insert the first new page so it overlaps the last page by about one
inch (2.5 cm).
❍ Always wait until the last page is being fed into the MultiPASS before
you add new pages.
❍ Insert the new page so that it overlaps the last page by about an inch
(2.5 cm).
Setting the Document Feed Lever
You use the document feed lever on the ADF to select multiple documents
( ) or single sheets ( ).
DOCUMENT FEED LEVER
1-14 Introduction Chapter 1
Page 29
Always set the document feed lever to single sheets and manually feed the
12/01/95 10:12 FAX 321 456 7777 CANON U.S.A.
→→→
CANON USA FAX 01/01
THE SLEREXE COMPANY LIMITED
SAPORS LANE - BOOLE - DORSET - BH 25 8 ER
Our Ref. 350/PJC/EAC
TELEPHONE DOOLE ( 945 13 ) 51617 TELEX 123456
.
following types of documents:
❍ Thick paper
❍ Thin paper
❍ Small documents (postcards, business cards)
❍ Documents with uneven surfaces
❍ Photographs
❍ Special types of paper
Identifying Your Documents
When sending a document, the following information is printed out
by the receiving fax: your fax number, your name, and the current date
and time. This information is called your TTI (Transmit Terminal
Identification) and appears at the top of the faxed document in
small type.
In the United States, you are required by FCC regulations to include this
N
information every time you send a fax.
By identifying the documents you send, the receiving party will recognize
your fax messages at a glance. The illustration below shows a sample
document with the identifying information.
02/06/98 10:10 FAX 800 526-4345 CANON FAX BACK JOHN DOE
Introduction
001
THE DATE AND
TIME YOU SENT
THE DOCUMENT
Chapter 1 Introduction 1-15
YOUR FAX/
TELEPHONE
NUMBER
YOUR NAME OR
COMPANY NAME
THE NAME OF THE
PARTYWHO IS
RECEIVING THE
DOCUMENT
THE PAGE NUMBER
Page 30

N
The top line includes the name of the receiving party if you send the
document using one-touch speed dialing, coded speed dialing, or group
dialing and you registered the party’s name. It also includes the page
number.
You entered your fax header information during the MultiPASS
installation procedure. If you followed the installation procedure, this
information will be printed on the top of your outgoing faxes. If you did
not install the MultiPASS Desktop Manager, see Appendix B, Using the
MultiPASS L6000 as a Stand-alone Fax, for details on how to enter this
information.
1-16 Introduction Chapter 1
Page 31

Printing With the
This chapter describes how to use the MultiPASS L6000 to print your
documents. Once you have installed the MultiPASS Desktop Manager, you
can use the MultiPASS for all your printing needs.
This chapter describes:
❍ Paper handling
❍ Installing a printer driver
❍ Printing a document
❍ Printer setup within Windows
❍ The paper path
❍ Selecting paper delivery
❍ Loading paper in the multi-purpose tray
❍ Loading envelopes in the multi-purpose tray
❍ Loading paper manually
2
Printing
Paper Handling
Your MultiPASS produces letter quality print on most plain bond papers,
including cotton bond and photocopying papers; it does not require special
laser papers. However, the print quality varies with different paper types.
Be sure to test a type of paper before you purchase a large quantity.
The MultiPASS suppor ts paper sizes of letter, legal, and A4 in portrait
orientation. You can use regular copier paper, cotton bond papers, and
typical letterhead. Always use paper without curls, folds, staples, or
damaged edges.
You can manually feed a single transparency or a single sheet of labels.
Make sure any transparencies or labels you use are designed specifically for
laser printing.
Paper Guidelines
Chapter 2 Printing With the MultiPASS L6000 2-1
Page 32

When selecting or loading paper, please remember the following:
❍ Attempting to print on damp, curled, wrinkled, or torn paper can
cause paper jams and poor print quality.
❍ Use cut-sheet paper only. You cannot use multipart paper.
❍ Highly textured or extremely smooth or shiny paper does not
print well.
❍ The laser printing process uses high temperatures to fuse toner to the
paper. Use paper that will not melt, vaporize, discolor, or emit
dangerous fumes at temperatures near 338°F (170°C). For example, do
not use vellum paper in a laser printer. Make sure any letterhead or
colored paper you use can withstand high temperatures.
❍ Make sure the paper is free of dust, lint, and oil stains.
❍ To keep the paper from curling, do not open paper packs until you are
ready to use the paper. Store unused paper from opened packs in a
cool, dry location in the original packaging.
❍ Your MultiPASS is factory-set to use letter-size paper. Whenever you
change the size of the paper loaded in the MultiPASS, you must also
set the MultiPASS Printer Driver to the new size.
❍ Do not use thicker paper than meets the specifications for this printer.
See Appendix A for details.
❍ Do not print on both sides of the paper. This may cause several sheets
to feed at one time.
Installing a Printer Driver
Before you can use any type of printer with your computer, you must
install a printer driver. The printer driver tells the computer what kind of a
printer you are using. The printer driver also controls the various settings,
such as print quality and paper type. You define these settings within the
printer driver, and the printer driver then communicates the settings to
both the computer and the printer.
You must install the MultiPASS Printer Driver and the MultiPASS
Desktop Manager for Windows 95 before you can use the MultiPASS
L6000 as a printer for your computer. See your Quick Start Guide for
details on how to install this software.
2-2 Printing With the MultiPASS L6000 Chapter 2
Page 33

Printing a Document
3
2
1
This procedure describes the general steps required for printing from
various Windows applications. The exact steps for printing a document
may vary depending on the application program you are using. Refer
to your software application’s documentation for the exact printing
procedure.
Start your
application.
Make sure the
Canon MultiPASS
L6000 Printer is
selected as your
default printer.
❍ Start the program you use to create documents, and open
the document you want to print.
❍ From the File menu, choose Print Setup.
❍ Click on the Properties or Setup button if you want to
make any adjustments as appropriate for printing your
document. (See Printer Setup Within Windows on the
following page for details.)
❍ Select OK to close the Print Setup dialog box.
Printing
Choose Print
from the
File menu.
Chapter 2 Printing With the MultiPASS L6000 2-3
❍ After making any necessary changes to the printing
parameters, select OK to start the print job.
Page 34

Printer Setup Within Windows
You can use the MultiPASS with all your Windows 95 applications.
Be sure to set the MultiPASS L6000 as the default printer for all your
Windows operations.
Most of your printing operations are controlled by your software
application. The following sections describe how you set certain options
directly from the printer driver; you only need this information if your
application does not control printing.
Opening the Printer Properties Dialog Box
in Windows 95
You can open the Properties dialog box in one of the following ways:
❍ From within any Windows application, you can select the Print or
Print Setup command.
❍ From the Printers folder, you can select the printer and then select the
Properties command from the File menu.
❍ From the Printers folder, you can select the printer, click the right
mouse button, and then select Properties from the drop down list.
Using the Printer Driver in Windows 95
The printing options are displayed on these Windows 95 tabs: General,
Details, Paper, Graphics, and Setting. See Using the Windows Tabs section
(page 2-5) for details.
For detailed information on any of the printing options, you can use the
N
2-4 Printing With the MultiPASS L6000 Chapter 2
Windows 95 on-line Help in the following ways:
❍ Use the right mouse button to click an item on the screen; then
click the What’s This? command.
❍ Click ? and then click an item.
❍ Press F1.
Page 35

Using the Windows Tabs
The MultiPASS Printer Driver for Windows has several tabs from which
you can select your printing options and learn about your printer driver as
well as your MultiPASS L6000.
❍ General
This tab allows you to add comments regarding the printer driver and
print a test page or a separator page. (You see this tab when
you open the Properties dialog box from the Printers folder, not
from within a Windows application.)
ADD COMMENTS
HERE
❍ Details
This tab allows you to specify printer port settings, spool settings, and
time-out settings. (You see this tab when you open the Properties
dialog box from the Printers folder, not from within a Windows
application.)
Printing
PRINT A
SEPARATOR
PAGE
PRINT A TEST PAGE
DEFINE THE
PRINTER’S PORT
SPECIFY THE
PRINTER DRIVER
SPECIFY TIMEOUT
SETTINGS
SPECIFY SPOOL
SETTINGS
SPECIFY PORT
SETTINGS
Chapter 2 Printing With the MultiPASS L6000 2-5
Page 36

❍ Paper
This tab allows you to specify page orientation, paper size, and type of
print media.
SPECIFY PAGE
ORIENTATION
SPECIFY SIZE
OF PAPER
SPECIFY TYPE
SPECIFY
PAPER FEED
METHOD
OF PAPER
❍ Graphics
This tab allows you to specify print quality and print model.
SPECIFY PRINT
QUALITY:
• 300 DPI (DEFAULT)—
DRAFT MODE
• 600 DPI—HIGHER
QUALITY PRINT BUT
SLOWER PRINT
SPEED
SELECT A PRINT MODEL:
• AUTOMATIC—PRINTER
SELECTS SETTINGS
FOR HIGHEST QUALITY
• GRAPHICS AND TEXT—
FOR PRINTING
DOCUMENTS THAT
CONTAIN SOLID
GRAPHICS AND TEXT
• PHOTO—FOR PRINTING
SCANNED PHOTOGRAPHS
OR BITMAPPED IMAGES
• CUSTOM—ALLOWS YOU
TO SPECIFY HALFTONING
AND INTENSITY IN THE
CUSTOM SETTING
DIALOG BOX
2-6 Printing With the MultiPASS L6000 Chapter 2
Page 37

❍ Setting
This tab allows you to turn on or off the Setup Analyzer and the Toner
Saving feature. It also allows you to save up to four custom print
settings.
ENABLE OR
DISABLE SETUP
ANALYZER
Be sure to use the Windows 95 Help features to find out more about the
options on these screens.
Specifying Your Printing Options
Be sure to use your on-line help to find out about the settings available for
each printing option.
❍ To move between the Windows tabs, click on any of the tabs.
❍ To select the settings and exit, click the OK button.
❍ To cancel your setting selections on a tab, click the Cancel button.
ENABLE OR
DISABLE TONER
SAVING FEATURE
SAVE YOUR
CUSTOM PRINT
SETTINGS
Printing
❍ To save your settings without exiting, click the Apply button.
❍ To access the Help file, click on the Help button.
❍ When you move the mouse cursor over one of the printing options, a
help message appears at the bottom of the tab.
Chapter 2 Printing With the MultiPASS L6000 2-7
Page 38

The Paper Path
Understanding how paper feeds through the MultiPASS will help you to
determine how to load paper and handle paper jams.
The page travels first to the FX-3 Toner Cartridge. Here a laser beam
“draws” the print image on the drum, then the drum applies toner to the
page. The page then travels to the fixing assembly where the toner is fused
to the page. The page then exits the unit from the front or top.
AUTOMATIC DOCUMENTFEEDER
FACEDOWN DELIVERY
FACEUP DELIVERY
RECORDING
PAPER—MULTIPURPOSE TRAY
MANUAL FEED
SLOT
TONER
CARTRIDGE
When you are printing, follow these guidelines:
❍ Always set the paper delivery selector before starting to print.
❍ Do not change the paper delivery selector while a document is
printing. This may cause a paper jam to occur.
❍ Make sure there is enough room for the paper to exit from the
faceup delivery slot.
❍ Do not pull the paper as it comes out of the unit.
❍ When using faceup delivery, be sure to remove each sheet of paper
from the output tray.
2-8 Printing With the MultiPASS L6000 Chapter 2
Page 39

Selecting Paper Delivery
Received faxes, copies, and printed documents can be delivered through
the faceup or facedown delivery slot. Choose paper delivery according to
the job the MultiPASS is performing and the type of print media you are
using.
PAPER DELIVERY
SELECTOR
FACEDOWN DELIVERY
Printing
FACEUP DELIVERY
Facedown Delivery
Use facedown delivery for most jobs and when using plain paper only (17
to 24 lbs or 64 to 90 g/m2). Printed pages are stacked in the order printed
in the facedown delivery slot. This slot holds up to 50 sheets of plain paper
(20 lb or 75 g/m2).
Chapter 2 Printing With the MultiPASS L6000 2-9
Page 40

❍ Make sure the paper delivery selector is set up to the mark.
FACEDOWN DELIVERY
Faceup Deliver y
Use faceup delivery when printing on media other than plain paper, such
as transparencies, labels, thick paper (up to 28 lb or 105 g/m2), or
envelopes. With faceup delivery, the sheet or envelope travels straight
through the unit without bending, and thus prevents curling.
❍ Make sure the paper delivery selector is set down to the mark.
FACEUP DELIVERY
❍ Make sure the paper output tray is extended.
❍ Be sure to remove each sheet as it exits the faceup delivery slot.
2-10 Printing With the MultiPASS L6000 Chapter 2
Page 41

Loading Paper in the Multi-purpose Tray
2
1
You can stack up to approximately 100 sheets of plain paper (20 lb
or 75 g/m2) in the multi-purpose tray. The multi-purpose tray holds letter,
legal, and A4 size paper, provided that its weight is 24 lb
(90 g/m2) or less.
To load the paper, follow the steps starting on page 1-9.
Loading Envelopes in the Multi-purpose Tray
Prepare the
envelopes.
Insert the stack
of envelopes
in the multipurpose tray.
❍ Arrange the stack of envelopes (up to 7) on a firm surface
and press down firmly on the edges to make the folds crisp.
Printing
❍ Press around the envelopes to remove any curls and expel
air from inside the envelopes.
❍ Press firmly on the area that corresponds to the edges of the
flap.
FLAP
PRESS DOWN FIRMLY ON
THE EDGES OF THE FLAP
❍ Make sure the print side is facing you.
❍ Open the paper guides to the approximate width of the
stack of envelopes.
Chapter 2 Printing With the MultiPASS L6000 2-11
Page 42

4
Insert the stack
3
until it stops, but
do not force it.
Adjust the
paper guides to the
stack of envelopes.
MULTIPURPOSE
TRAY
MANUAL FEED
SLOT
2-12 Printing With the MultiPASS L6000 Chapter 2
Page 43

Move the paper
5
delivery selector
down to the mark.
❍ Be sure to use faceup delivery when printing on envelopes.
FACEUP DELIVERY
N
Your MultiPASS is now ready to print.
You can change the orientation of the envelopes through your application
software. Check the orientation before printing.
Printing
Chapter 2 Printing With the MultiPASS L6000 2-13
Page 44

Loading Paper Manually
2
1
You can load paper manually, one sheet at a time, using the manual feed
slot. You can load plain paper (17 to 28 lb or 64 to 105 g/m2),
transparencies, labels, envelopes, and other special papers.
Open the
paper guides.
Insert one sheet
into the manual
feed slot.
❍ Adjust the paper guide to the approximate width of the
sheet of paper.
❍ Make sure the print side is facing you and the top edge goes
into the slot first.
❍ Insert the sheet until it stops, but do not force it in.
2-14 Printing With the MultiPASS L6000 Chapter 2
Page 45

4
Adjust the paper
3
guides to the sheet
of paper.
❍ Make sure there is no space between the paper guides and
the sheet.
Move the paper
delivery selector
down to the
mark.
Your MultiPASS is now ready to print.
N
❍ Be sure to use faceup delivery when printing on media
other than plain paper.
Printing
FACEUP DELIVERY
❍ If you insert a sheet into the manual feed slot when there is
paper stacked in the multi-purpose tray, the unit will feed
the sheet from the manual feed slot.
❍ Insert a sheet in the manual feed slot only when the
previous sheet has come out from the delivery slot. If you
insert a single sheet before the previous one has exited, a
paper jam may occur.
❍ If you have difficulty feeding a type of paper in the manual
feed slot, try feeding it through the multi-purpose tray—
one sheet at a time.
Chapter 2 Printing With the MultiPASS L6000 2-15
Page 46

2-16 Printing With the MultiPASS L6000 Chapter 2
Page 47

Using the MultiPASS
The MultiPASS Desktop Manager is a full-featured Windows application
that enables you to use your MultiPASS L6000 from your computer. The
MultiPASS Desktop Manager coordinates the printing, PC faxing, and
scanning functions of the MultiPASS L6000. Its features include:
❍Printing, PC faxing, and scanning control functions
❍Manipulating and editing the faxed or scanned documents
❍An Address Book where you store the names and fax numbers for
individuals and groups to whom you repeatedly send faxes
❍Folders that hold your faxes and scanned documents
This chapter describes:
❍Starting the MultiPASSDesktop Manager
❍Exploring the MultiPASS Desktop Manager window
3
❍Using the Desktop Manager folders
❍Viewing documents in the Desktop Manager
❍Setting up the Address Book
❍Setting up speed dialing
❍Using the Fax Log
Your MultiPASSL6000 is designed to be used with the MultiPASS
N
Chapter 3 Using the MultiPASS Desktop Manager 3-1
Desktop Manager. To use all the outstanding features of the MultiPASS
requires use of the Desktop Manager. To use the unit as a stand-alone
fax machine, see Appendix B.
MultiPASS
Desktop Manager
Page 48

Starting the MultiPASS Desktop Manager
When you start Windows or open the Desktop Manager, the MultiPASS
Background is automatically started as well. The MultiPASS Background
enables and monitors the communication between the Desktop Manager
and the MultiPASS L6000.
When you exit the Desktop Manager, you close only the Desktop Manager
window. Any documents you have set up to PC fax or print remain active.
If open, the MultiPASS Status Monitor, which tracks the progress of your
active jobs, also remains open and active.
After it is installed, the MultiPASS Desktop Manager is an option on the
Canon MultiPASS L6000 menu.
❍ Click the Start button and point to Programs.
❍ Point to Canon MultiPASS L6000 and then click MultiPASS Desktop
Manager.
3-2 Using the MultiPASS Desktop Manager Chapter 3
Page 49

Exploring the MultiPASS Desktop
Manager Window
When you start the MultiPASS Desktop Manager, you see a screen similar
to this:
MENU BAR
TOOLBAR
FOLDERS LIST
COMMAND BAR
STATUS LINE
Menu Bar
The menu bar contains commands that enable you to perform the various
Desktop Manager tasks. Some of the commands can also be accessed by
their corresponding icons on the toolbar or command bar.
Toolbar
The toolbar provides quick access to certain Desktop Manager tasks. When
a task is unavailable, the toolbar button appears dimmed.
WORK
AREA
MultiPASS
Desktop Manager
FAX MEMO
SCAN
SETUP
ADDRESS
BOOK
FAX LOG
LIST
VIEW
DOCUMENT
VIEW
REMOVE
TOP
PAGE MERGE
SPLIT
DELETE
STOP
CONTENTSSENSITIVE
HELP
HELP
CONTENTS
Pause the mouse over a button to see a description of the button. These are
called ToolTips.
Chapter 3 Using the MultiPASS Desktop Manager 3-3
Page 50

Folders List
The folders list contains folders that store your fax and scan documents.
The list contains both system-defined folders, provided automatically when
you install the software, and user-defined folders.
System-defined folders include In Box, Out Box, Scan, Sent Fax, and
Trash. User-defined folders are folders you can create yourself.
Work Area
The work area appears to the right of the folders list and displays one of
the documents within the open folder. The documents are displayed either
as a graphic thumbnail of each document or as a list of the documents.
You can adjust the width of the work area using the mouse pointer to
move the border between the work area and folders list.
Command Bar
The command bar contains command icons, which enable you to perform
a variety of tasks.
PHONE—
DISPLAYS IF
“TELEPHONE
ATTACHED
TO UNIT” IS
ENABLED
(SEE PAGE
8-3)
EXPORT—SAVES
THE SELECTED ITEM
PRINT—PRINTS
THE SELECTED
DOCUMENT
VIEW—DISPLAYS
THE SELECTED ITEM
E-MAIL
FAX—SENDS APC
FAX TO A NUMBER
YOU SELECT
You can use the command icons as follows:
❍ Drag a document to the command icon
For example, you can drag a document to the Print command icon to
start printing the document. The command icon signals its acceptance
of the item by lighting up.
If a document is dragged to a command icon that cannot perform the
task, the mouse pointer displays as a no-entry icon (a red circle with a
diagonal bar drawn through it).
❍ Click a document and then click the command icon
This method activates the command for the selected document, as
though the item had been dragged to the command icon.
3-4 Using the MultiPASS Desktop Manager Chapter 3
Page 51

Status Line
The status line displays information about the selected folder or document,
such as the name of the folder or document and its creation date. You
cannot edit this information.
If the Address Book is open, the status line displays information about the
selected Address Book entry.
Closing the Desktop Manager
When you exit the Desktop Manager, you close only the Desktop Manager
window. Any documents you have set up to PC fax or print remain active.
If open, the MultiPASS Status Monitor, which tracks the progress of your
active jobs, also remains open and active.
To close the Desktop Manager, click Exit from the File menu.
The MultiPASS Background will remain open.
N
Using the Desktop Manager Folders
The Desktop Manager stores and organizes your fax and scan documents
in folders. Only one folder can be open at a time. When you open another
folder, the current folder automatically closes.
System-defined Folders
When you install the Desktop Manager, these system-defined folders are
automatically available: In Box, Out Box, Scan, Sent Fax, and Trash.
❍ With the exception of the Trash folder, only the Desktop Manager can
place documents in the system-defined folders, based on faxes sent or
received, or images scanned. You can only rename, copy, move, or
remove documents from the folders.
❍ Including the Trash folder, the system-defined folders cannot be
deleted or renamed.
Chapter 3 Using the MultiPASS Desktop Manager 3-5
MultiPASS
Desktop Manager
Page 52

A document remains in a system-defined folder until you move it to a
user-defined folder, or delete it.
In Box
The In Box folder stores all incoming faxes received by the Desktop
Manager. Each received fax displays a system-assigned name—fax nnnn,
where nnnn is a number of up to four digits which is unique within the
Desktop Manager. You can later change the name to something more
descriptive.
Out Box
The Out Box folder is a chronological list of jobs you want to process. The
jobs consist of faxes to be sent, or fax or scan documents to be printed
from the Desktop Manager. A job in the Out Box folder is a copy of the
original document, not the original document itself.
The list of jobs in the Out Box folder is sorted by order of action, with the
next document to be printed or faxed at the head of the list. The job
currently being processed—the active job—displays in a separate row at
the top of the list, above the column titles.
You can select a job in the list to review information about that job in the
Status Bar, including the original document from which the job came and
a reason if the job failed.
Each job in the Out Box folder displays a system-assigned name: fax nnnn
for a fax job, and print nnnn for a print job, where nnnn is a number of
up to four digits which is unique within the Desktop Manager. You cannot
rename a job in the Out Box folder.
Scan
The Scan folder stores all images you scan with the MultiPASS from the
Desktop Manager. Each document displays a system-assigned name: scan
nnnn, where nnnn is a number of up to four digits which is unique within
the Desktop Manager. You can later change the name to something more
descriptive.
Sent Fax
The Sent Fax folder contains all documents that have been successfully sent
as faxes. If the fax had not been marked for deletion after sending, the sent
fax is automatically moved from the Out Box folder (where
the fax job is processed) to the Sent Faxes folder. By having sent faxes
moved to their own folder, you can better track your completed fax
communications and reserve the Out Box folder for jobs to be processed.
3-6 Using the MultiPASS Desktop Manager Chapter 3
Page 53

Trash
The Trash folder holds any documents that you want to delete. Once you
drag a document from another folder to the Trash folder, you can hold the
document until you are ready to delete it.
If you select a document and press the
N
document to the Delete icon, the document is deleted immediately.
It is not stored in the Trash folder.
User-defined Folders
You can create up to 255 folders for your own use. These folders are listed
immediately following the system-defined folders.
When you install the Desktop Manager software, you are automatically
provided an initial user-defined folder named My Folder. You can use this
folder immediately for storing documents moved from the system-defined
folders.
If you create additional folders that cause the folder list to grow beyond
the visible list area, a vertical scroll bar displays. The scroll bar scrolls the
entire list of system- and user-defined folders as a single entity.
Delete
key, or if you drag a
MultiPASS
Desktop Manager
Viewing Documents in the Desktop Manager
When you open a folder, you can view the documents contained within
the folder. With the exception of the Out Box folder, you can choose to
display the documents in Document View or in List View.
Chapter 3 Using the MultiPASS Desktop Manager 3-7
Page 54

When you first open the Desktop Manager, the documents are displayed
in Document View. However, you can change to List View at any time.
If the number of documents within a folder exceeds the available work
area, horizontal and/or vertical scroll bars appear. You can then scroll the
work area to view your documents.
To open a folder, simply click the desired folder in the folders list.
Document View
Document View presents each individual document as a thumbnail of the
document. Each document thumbnail displays the document name at the
top. For multiple page documents, the thumbnail also displays the page
count and scroll arrows at the bottom, and a scroll box at the right side.
The scroll arrows and scroll box enable you to page through a multi-page
document, displaying each page in turn or moving you to a particular page
in the document.
SCROLL BOX
SCROLL ARROWS
AND PAGE
NUMBER
Document View enables you to work with an individual document at the
page level: scrolling through the pages, removing a page, splitting a
document, or merging two or more documents into a single document.
You can rearrange the document thumbnails within the work area as
needed.
Document View is available only for the In Box, Scan, Sent Fax, and Trash
folders, and any user-defined folders you create. You cannot use Document
View for the Out Box folder.
❍ To view documents in a folder as thumbnails, make sure the folder is
open. Then click Document View on the View menu or the toolbar.
3-8 Using the MultiPASS Desktop Manager Chapter 3
Page 55

List View
List View presents the documents within the open folder as a list. Each
document on the list displays an icon representing the document type,
along with other pertinent information about the document (such as the
name, page count, disk storage size, and date and time of creation).
The icon designates the document type as fax, scan, or modified. A
modified document is a document where the fax cover page has been
removed from a fax, or a multipage document that has been split into
multiple documents.
List View is available for all folders, both system- and user-defined. When
you display documents using List View, the documents cannot be
manipulated at the page level (as in Document View), such as splitting a
document or merging two or more documents.
❍ To view the documents in a folder as a list, make sure the folder is
open. Then click List View on the View menu or the toolbar.
Sorting the Documents in the List
Documents in the Out Box folder are listed by a combination of the date
and time they were submitted for processing, any future scheduling time,
and processing status. Documents in the other system-defined folders are
listed in order of date and time. You cannot change the displayed order of
the list in a system-defined folder.
However, you can change the order of the listed documents in the userdefined folders. Typically, documents in user-defined folders are sorted
alphabetically by name. You can sort the documents based on criteria
corresponding to the column labels displayed at the top of the list (such as
type, name, number of pages, size, and date). Sorting by page, size, or date
and time displays the documents with the largest document or most
current document last. The list continues to display in the order you chose
each time you open the folder.
Chapter 3 Using the MultiPASS Desktop Manager 3-9
MultiPASS
Desktop Manager
Page 56

To change the order of the list, click the title of the appropriate column at
the top of the list.
Setting Up the Address Book
You set up the Address Book to create an easily accessible list of names and
fax and/or phone numbers for your business and personal contacts. You
use the entries in the Address Book to:
❍ Send a PC fax
❍ Assign one-touch speed dialing
❍ Assign coded speed dialing
❍ Assign group dialing
To display the Address Book, select Tools from the Desktop Manager
menu bar.
3-10 Using the MultiPASS Desktop Manager Chapter 3
Page 57

Now click Address Book. The MultiPASS Desktop Manager displays the
Address Book window:
ADDRESS
BOOK
ENTRIES
STATUS LINE
COMMAND
BUTTONS
❍ Address Book Entries
Address Book entries are listed by row. The columns indicate the
Address Book entry type (individual or group), name and address
information, and phone and fax numbers. Address Book entries can be
sorted based on a chosen column of information.
❍ Status Line
The status line displays additional information about the selected
Address Book entry, based on whether the selected entry is an
individual entry or group entry.
❍ Command Buttons
You use the command buttons to perform various tasks in working
with your Address Book.
MultiPASS
Desktop Manager
Working With Address Book Entries
When open, the Address Book displays a list of the address entries you
currently have set up, along with the corresponding information for each
entry. The Address Book contains two types of entries:
❍ Individual
An individual entry enables you to identify each individual to whom
you repeatedly send faxes. When you send a fax, you can then specify
the recipient for your fax from the entries listed in the Address Book.
Chapter 3 Using the MultiPASS Desktop Manager 3-11
Page 58

❍ Group
A group entry identifies the two or more individual Address Book
entries to whom you repeatedly send the same fax. For example, you
can set up a group to include those individuals involved in a particular
business project. When you specify the group entry as the fax recipient
on your fax, the fax is sent to each individual in the group.
Sorting the Address Book
The Address Book is sorted alphabetically by last name. You can change
the order of the list based on the column titles for the list. For example,
you can sort the list based on the fax number.
To change the order of the Address Book entries, click the appropriate
column title.
CLICK HERE TO SORT BY
COMPANY NAME
Adding and Editing an Individual Entry
When setting up an individual Address Book entry, you must specify the
contact’s first and last names, and fax number. Optionally, if you want the
information available for a fax cover page, you can provide the contact’s
phone number, title, company, address, and any comments.
3-12 Using the MultiPASS Desktop Manager Chapter 3
Page 59

To add an individual entry, click the New Individual button on the
toolbar. To edit an individual, select the Address Book entry and click the
Edit button.
Enter the appropriate information.
❍ You must type at least a First Name or Last Name and a Phone or Fax
number before you can click Add.
❍ You can enter 20 characters in the First and Last Name text boxes,
40 characters in the Company Name text boxes, and 32 characters
in the Phone and Fax Number text boxes.
❍ You can use the following:
Characters Activity
0 to 9 * # + Dialing digits
, p Pause (2 seconds)
P Last pause (10 seconds, at end of number only)
- ( ) Space Display-only characters; space cannot be used at the
beginning of a number
❍ Be sure to include all numbers that need to be dialed, for example, 1-
714-555-2222.
❍ If you entered an Outside Line Prefix number (such as 9) in the
Phone/Fax Setup dialog box, do not enter it here.
If adding a new entry, click Add. If editing an entry, click Replace.
Chapter 3 Using the MultiPASS Desktop Manager 3-13
MultiPASS
Desktop Manager
Page 60

N
Adding and Editing a Group Address
A group address contains addresses previously set up in the Address Book,
either individual addresses or other group addresses.
The New Fax Group dialog box displays two lists—a list of all Address
Book entries previously set up, and the list of addresses included in the
group. You select addresses from the Address Book to include in the group.
You’ll want to add addresses to a group when you will be PC faxing to this
group. If you will be sending plain paper faxes, you’ll want to set up the
group in the speed dial list. See page 3-20 for details.
You cannot assign a group address to a speed dial code.
To add a group entry, click the New Group button on the toolbar. To edit
a group, select the entry in the Address Book and click the Edit button.
❍ Enter or edit the name you want assigned to this group.
❍ In the Address Book list box, click the individual entry you want to
add to the group and click Add.
❍ To remove an entry from the group, click the entry in the group list
box and click Remove.
❍ In the Comments box, you can enter a note for this group entry.
3-14 Using the MultiPASS Desktop Manager Chapter 3
Page 61

❍ If adding a new group, click Create.
❍ If editing a group, click Replace.
Using a Group Address
When you specify a group address when sending a fax, the individual
addresses for the contained group are listed. If you specify more than one
group address for a fax, and each group contains the same individual
address, the duplicate address is removed. Separate fax jobs are created for
each recipient in the group.
Importing an Address Book
You may have an address book in another program that you want to use in
the MultiPASS Desktop Manager. You can import your address book and
use it in the Desktop Manager.
You can import addresses from any ASCII text file containing
information that is separated by a comma or tab.
❍ If the fields in the text file are separated by commas, the text file
extension must be .CSV.
❍ If the fields in the text file are separated by tabs, the text file extension
must be .TXT.
You must save your text file as a comma- or tab-separated text file before
you import it into the MultiPASS Desktop Manager. For more
information about saving your text file, see your application’s
documentation. If you attempt to import information from an improperly
formatted text file, the system alerts you to a problem with importing.
MultiPASS
Desktop Manager
When you import the text file, you assign the appropriate field names to
each column of information. For example, the column containing the
contact’s name must be titled as the name.
Chapter 3 Using the MultiPASS Desktop Manager 3-15
Page 62

3
2
To import addresses
1
from a text file,
click on the Import
button.
In the Import
Address Book
dialog box,
specify the location
and filename to
import. Then
click OK.
❍ You see this screen:
❍ In the Assign Field Names dialog box, the address
information is listed in columns, with a column title that
identifies the type of information within the column. The
button above the column titles enables you to reassign the
column titles where necessary.
Assign the
appropriate name
to each column
as the title.
3-16 Using the MultiPASS Desktop Manager Chapter 3
❍ To remove a field name from the column heading, drag the
column heading text off the dialog box.
❍ To assign the correct name, drag the titled button to the
column title.
Page 63

1
Click Import.
4
❍ When the appropriate names appear at the top of each
column, click Import.
Exporting the Address Book
You can export the Address Book from the MultiPASS Desktop Manager
to an ASCII text file. The address information can be separated by either
commas or tabs.
❍ If you choose to have the address information separated by commas,
the text file extension is .CSV.
❍ If you choose to have the address information in the text file separated
by tabs, the text file extension is .TXT.
To export the
Address Book, click
on the Export
button.
Chapter 3 Using the MultiPASS Desktop Manager 3-17
❍ You see this screen:
❍ In the Assign Field Names dialog box, the address
information is listed in columns, with a column title that
identifies the type of information within the column. You
can reassign the column titles where necessary.
MultiPASS
Desktop Manager
Page 64

3
Assign the
2
appropriate name
to each column
as the title.
❍ To remove a field name from the column heading, drag the
column heading text off the dialog box.
❍ To assign the correct name, drag the titled button to the
column title.
Click Export.
❍ When the appropriate names appear at the top of each
column, click Export.
❍ In the Export Address Book dialog box, select the file type
(.CSV or .TXT), location, and filename for saving the file.
Then click OK.
Setting Up Your Speed Dial Assignments
To set up speed dialing, you use the fax recipients set up in your Address
Book, and assign the desired individual recipients to speed dial codes. If
you have not set up the recipient in the Address Book, you can add the
recipient while creating speed dial assignments. You can also set up a group
speed dial by assigning two or more individual speed dial assignments to a
single speed dial assignment.
You cannot assign a group address from the Address Book to a speed dial
N
3-18 Using the MultiPASS Desktop Manager Chapter 3
code.
Page 65

To set up your speed dialing assignments, select Setup from the Desktop
Manager menu bar, and then click on the Speed Dial tab.
Assigning an Individual Recipient to a Speed Dial Code
To assign a fax recipient to a speed dial code:
❍In the Address Book list box, select the recipient that you want to
assign to a speed dial code.
❍Select the speed dial code to which you want to assign the Address
Book, and click Add.
To remove a recipient from a speed dial code:
MultiPASS
Desktop Manager
❍In the speed dial list box, select dial assignment, and then click
Remove.
To print the speed dial assignment list:
❍Click the Print List button.
To add a recipient to the Address Book:
❍Click New.
❍In the New Individual Entry dialog box, complete the appropriate
information for the recipient and then click Add.
Chapter 3 Using the MultiPASS Desktop Manager 3-19
Page 66

Defining a Group Speed Dial Code
You’ll want to assign multiple recipients to a speed dial code when you will
be sending plain paper faxes to this group. If you will be PC faxing, you
can set up the group in your Address Book. See page 3-14 for details.
To assign two or more recipients to a speed dial code:
❍ On the Speed Dial tab, make sure the desired recipients for your group
are set up as individual speed dial assignments.
❍ Select the speed dial code to which you want to assign the group of
recipients, and click Group Dial.
❍ In the Group Dial dialog box, enter a name for the group assignment
in the Group Name box.
3-20 Using the MultiPASS Desktop Manager Chapter 3
Page 67

❍In the Speed Dial list box, select the first recipient and click Add.
Repeat this procedure until the desired recipients are included in the
Member(s) list box.
❍To remove a member from the group, select the member in the
Member(s) list box and click Remove.
❍When all the desired members are listed in the Member(s) list box,
click OK to save your group.
❍To close the dialog box without saving your group, click Cancel.
❍To complete the operation, click OK to close the Setup Options dialog
box.
Using the Fax Log
The Fax Log contains a list of the fax activity (PC faxes sent from and
received to the Desktop Manager) for the last two months. Each fax is
listed with historical information, such as transmission status, date and
time the fax was sent or received, the recipient of the fax, and the number
of pages. You can use the Fax Log for a variety of reasons, such as
reviewing the error status of a PC fax that failed.
While reviewing the Fax Log, you can print the log.
Displaying the Fax Log
In the Desktop Manager, click Fax Log on the Tools menu.
Chapter 3 Using the MultiPASS Desktop Manager 3-21
MultiPASS
Desktop Manager
Page 68

You can also click on the Fax Log icon on the toolbar.
❍ In the Fax Log dialog box, click a specific fax document to review
additional information in the Details and Log Note boxes.
❍ Click the Print button to print the Fax Log.
3-22 Using the MultiPASS Desktop Manager Chapter 3
Page 69

Sending Faxes With the
You can use the MultiPASS L6000 to send paper faxes or PC faxes.
PC faxing is the ability to send a fax from an application without first
printing the document. Using the MultiPASS L6000 and the MultiPASS
Desktop Manager, you can PC fax documents from any Windows
application that supports printing.
Before sending faxes, you may want to set up the numbers you plan to use
for automatic dialing methods such as one-touch speed dialing.
To do this, you first set up your Address Book; then you assign speeddialing numbers. See Setting Up the Address Book on page 3-10.
This chapter describes:
❍ Sending a document
❍ Sending a document to more than one location
❍ Adjusting the quality of your faxes
❍ Sending PC faxes
4
❍ Creating a fax memo in the MultiPASS Desktop Manager
❍ Designing a fax cover page
Because the MultiPASS is a multitasking device, you can send a fax and
N
Chapter 4 Sending Faxes With the MultiPASS L6000 4-1
print a document at the same time.
Sending Faxes
Page 70

Sending a Document
1
The MultiPASS star ts sending a document while it is being scanned into
memory. When scanning a multipage document, the unit calls the other
party as the first page is being scanned. Once connection is made, the
MultiPASS begins to transmit the information while the remaining pages
are being scanned. This is called Memor y Sending.
Regular Dialing
Feed the document.
❍ Place the document facedown in the Automatic Document
Feeder (ADF). See page 1-12.
❍ The LCD display shows how much of the unit’s memory is
in use, then displays the current resolution, and then the
message
❍ Change the resolution if necessary. See page 4-13.
DOCUMENT READY
MEMORY USED 0%
STANDARD
DOCUMENT READY
.
4-2 Sending Faxes With the MultiPASS L6000 Chapter 4
Page 71

3
Dial the other
2
party’s fax number.
❍ Use the numeric buttons to dial the number.
ABC3DEF
1 2
JKLGHI
MNO
4 5
7 8
TONE
6
TUVPRS
WXY
9
SYMBOLS
OPER
0
TEL= 555 7899
Press
START/COPY.
❍ To enter a pause, press
A pause within a number (p) is two seconds. (You can
•
REDIAL/PAUSE.
enter more than one.)
A pause at the end of a number (P) is ten seconds.
•
START/COPY
The MultiPASS begins scanning the
document, and dials the number.
TX
❍ After a few seconds, the display shows the number of pages
it has scanned followed by the transaction number for the
fax. This is a unique number the MultiPASS assigns to the
document and uses to identify the document in transaction
reports.
SCANNING P.001
Sending Faxes
TX/RX NO. 0001
The LCD continues to show these displays in order while
the fax is being sent.
Chapter 4 Sending Faxes With the MultiPASS L6000 4-3
Page 72

❍ When the document has been sent successfully, the display
1
shows this message.
TRANSMITTING OK
The MultiPASS automatically redials if the receiving fax does
not answer, if the line is busy, or if a transmission error occurs.
You can specify the number of times it redials using the
Automatic Retries option in the Send Fax dialog box of the
MultiPASS Desktop Manager (see page 8-4). If all redial
attempts fail, the MultiPASS beeps intermittently for a few
seconds. If this happens, check the fax number and try sending
the fax again.
Automatic Dialing
You can send a document using one-touch speed dialing, coded speed
dialing, or group dialing. You must register the one-touch speed dialing
numbers, the coded speed-dialing numbers, and the group dialing
numbers using the MultiPASS Desktop Manager before you can send
documents using these automatic dialing methods. See Setting Up Your
Speed Dial Assignments on page 3-18.
Load the
document.
ALARM
If the
LCD display, and then press
light is flashing, correct the error described in the
STOP
. You may need to open the
operator panel to remove the document from the ADF (see
page 10-3).
❍ Place the document facedown in the ADF.
DOCUMENT READY
4-4 Sending Faxes With the MultiPASS L6000 Chapter 4
Page 73

3
A
Use automatic
2
dialing.
❍ Press the one-touch speed dialing button (1 through 6)
assigned to the number you wish to fax to; the name you
assigned to that button is displayed.
CANON FAX BACK
OR
Press
START/COPY.
❍ Press
CODED DIAL
and enter the appropriate two-digit
coded speed dialing code.
CODED DI
CCSI/MKT
❍ If a number is not registered for the button or codes, the
LCD displays
NO TEL #
message. Make sure you pressed the
correct button or entered the correct code and that the
number you want to dial is entered correctly.
❍ If you make a mistake, press
one-touch speed dialing button or press
STOP
. Then press the correct
CODED DIAL
and
re-enter the code.
START/COPY
❍ If you do not press
DIALING
START/COPY
within five seconds, the
MultiPASS star ts sending your document automatically.
Sending Faxes
❍ If the
ALARM
and press
light is flashing for any reason, correct the error
STOP
. You may need to open the operator panel to
remove the document from the ADF (see page 10-3).
Chapter 4 Sending Faxes With the MultiPASS L6000 4-5
Page 74

Sending a Document Using Group Dialing
3
2
1
If you frequently send plain paper faxes to the same group of people, you
can use the MultiPASS Desktop Manager to assign a “group” of numbers
to a speed dial code. See page 3-20.
Feed the document.
Choose the
group you wish
to send to.
Press
START/COPY.
❍ Place the document facedown in the ADF.
DOCUMENT READY
❍ Press the one-touch speed dialing button or press
DIAL
and the code under which you registered the group.
TEL=CANON GROUP 1
START/COPY
SCANNING P.001
CODED
❍ The MultiPASS starts scanning your document into
memory five seconds after you select the group to which
you will send the fax, even if you do not press
START/COPY
(ten seconds if you are sending to more than one group).
❍ After scanning the document into memory, the MultiPASS
automatically dials each number in the group.
4-6 Sending Faxes With the MultiPASS L6000 Chapter 4
Page 75

Redialing
❍ If there is no group registered under the one-touch speed
dialing button or the two-digit code, the LCD displays the
NO TEL #
message. Make sure you entered the correct
number and that the group has been registered correctly to
a speed dial code. See page 3-20.
STOP
❍ If you make a mistake when dialing, press
. You can
try again.
Manual
To start dialing again, just press the REDIAL/PAUSE button. The
MultiPASS redials the previous number you dialed with the numeric
buttons. Make sure the document is in the ADF.
Automatic
The MultiPASS automatically redials if the first attempt at sending fails
(for example, if the line is busy). The unit redials twice, and the time
between redials is two minutes. (These are the default settings.) The LCD
displays AUTO REDIAL and the transaction number while the MultiPASS is
redialing.
AUTO REDIAL
TX/RX NO. XXXX
If the MultiPASS fails to make a connection after the last redial, it beeps.
The LCD displays
BUSY/NO SIGNAL; try sending again later.
BUSY/NO SIGNAL
You can change the number of redials and the time between redials. The
redialing options are set in the Send Fax dialog box of the MultiPASS
Desktop Manager; see page 8-4.
Chapter 4 Sending Faxes With the MultiPASS L6000 4-7
Sending Faxes
Page 76

STOP
To Cancel Automatic Redialing
To cancel automatic redialing, press the
cannot cancel redialing while the LCD displays
waiting to redial). In this case, wait until dialing begins and then press
STOP
to cancel redialing. The MultiPASS asks you to confirm:
CANCEL? *YES #NO
STOP
button. However, you
AUTO REDIAL
(the unit is
To cancel the redialing, press
LCD displays:
TX/RX CANCELLED
TX/RX NO. XXXX
The unit then prints an error report:
PRINTING REPORT
Resending a Fax After an Error
If you get an error while sending a fax from memory, the MultiPASS can
resend it to the same destination without having to rescan it. To do this,
the On Error Resend option must be set in the Advanced: Send Fax dialog
box of the MultiPASS Desktop Manager. See page 8-5 for details.
You can also set how much of the fax is sent again:
❍ The pages following the page on which the error occurred (ERROR
PAGES)
❍ The first page of the document and the pages following that on which
the error occurred (ERROR & FIRST PAGES)
. The MultiPASS L6000 beeps and the
*
❍ The entire document (ALL PAGES)
The fax is erased from memory after it is successfully sent or after the
N
4-8 Sending Faxes With the MultiPASS L6000 Chapter 4
resending fails.
Page 77

Manual Sending
START/COPY
3
2
1
If you would like to speak with the other party before sending a fax to
them, you may do so; this is called manual sending. To use manual
sending, you must have a telephone connected to the MultiPASS.
Feed the document.
Pick up the
telephone and
dial the other
party’s fax
number.
Converse with the
other party.
❍ Place the document facedown in the ADF.
DOCUMENT READY
ABC3DEF
1 2
JKLGHI
MNO
4 5
7 8
TONE
6
TUVPRS
WXY
9
SYMBOLS
OPER
0
TEL= 4567899
❍ You can use regular dialing or any of the automatic dialing
methods.
❍ If a person answers, you can converse normally. When you
are ready to send the fax, ask them to press the start button
on their fax machine. Then press
START/COPY
on your
unit and hang up the telephone.
Faxing starts.
❍ Be sure to press
START/COPY
before you hang up, or you
will disconnect the call.
Chapter 4 Sending Faxes With the MultiPASS L6000 4-9
Sending Faxes
Page 78

Messages Displayed During Sending
2
1
When sending a document, the MultiPASS displays the following messages
as the call progresses.
TRANSMIT
TX/RX NO. XXXX
When it is finished sending the document, the MultiPASS beeps once; the
LCD displays:
TRANSMITTING OK
Cancel Sending
To stop sending before a fax is complete, follow these steps:
Press STOP.
❍ If you are sending manually, the transmission is cancelled
immediately.
❍ If you are sending from memory, the LCD displays:
STOP
CANCEL? *YES #NO
Press
*
❍ Press
to cancel or press # to continue the transmission.
*
or #.
TX/RX CANCELLED
Transmission continues.
If you press
STOP while the document is being scanned, you may need to
open the operator panel to remove the document (see page 10-3).
4-10 Sending Faxes With the MultiPASS L6000 Chapter 4
Page 79

Sending a Document to More Than One
1
Location (Sequential Broadcasting)
Sequential broadcasting sends one document to more than one location.
You can send to a total of 57 destinations as follows:
One-touch speed dialing = up to 6 destinations
Coded speed dialing = up to 50 destinations
Regular dialing (numeric
buttons dialing) = 1 destination only
You can enter the one-touch and coded speed dialing numbers in any
order. You simply press the one-touch speed dialing button, or press
CODED DIAL followed by the two-digit code.
You can also include one destination using regular dialing. This must be
the last number you enter because you must press START/COPY after
entering the number.
If you often send to the same group of destinations, use group dialing (see
N
Transmitting the Document
page 4-6).
Feed the document.
Chapter 4 Sending Faxes With the MultiPASS L6000 4-11
❍ Place the document facedown in the ADF.
DOCUMENT READY
Sending Faxes
Page 80

3
Dial the other
2
party’s number.
TEL= 4567899
❍ Simply enter the numbers one after the other: press the
desired one-touch speed dialing button or press
DIAL
followed by the two-digit code.
CODED
❍ If you are sending to group dialing destinations, use the
one-touch speed dialing buttons and the
CODED DIAL
button (along with the two-digit codes) to enter the groups.
❍ You must press the second speed dialing number within five
seconds of pressing the first one. Each subsequent speed
dialing number must be entered within ten seconds of the
preceding one.
❍ You can enter only one number directly from the numeric
keypad using regular dialing. This must be the last number
you enter.
Press
START/COPY.
START/COPY
TX
❍ The MultiPASS scans the entire document into memory
and begins sending.
4-12 Sending Faxes With the MultiPASS L6000 Chapter 4
Page 81

❍
The MultiPASS begins the operation approximately
seconds after you press the last button (five seconds if you
press only one button) even if you do not press
START/COPY
❍
The MultiPASS dials the destinations in numerical order
starting with the coded dial numbers, then the one-touch
numbers, and finally the regular-dial number (regardless of
the order in which you entered the numbers).
.
ten
STOP
N
❍ To cancel a transmission, press
transmission. All subsequent transmissions in the sequence
are cancelled. (You may need to open the operator panel to
remove the document; see page 10-3.)
If the memory becomes full while scanning your document, the LCD
displays
to remove the document; see page 10-3.) You can split the document into
two or three different jobs, or you can try sending the document to one
location at a time.
MEMORY FULL
. (You may need to open the operator panel
Adjusting the Quality of Your Faxes
Canon’s Ultra High Quality (UHQ™) imaging technology enables you to
send faxes that have a print quality very close to that of the original
document. The MultiPASS also allows you to adjust the resolution and
contrast it uses in sending faxes to best suit your particular document.
Setting the Resolution
Resolution is a measure of the fineness or clarity of a printout and is
usually expressed in horizontal and vertical dots per inch (dpi). Low
resolutions may cause text and graphics to have a jagged appearance, while
higher resolutions provide smoother curves and lines, crisp text and
graphics, and a better match to traditional typeface designs.
during the dialing or
Sending Faxes
Chapter 4 Sending Faxes With the MultiPASS L6000 4-13
Page 82

The MultiPASS has three resolution settings:
❍ STANDARD
Standard resolution (203 × 98 dpi) is adequate for most text
documents.
❍ FINE
Fine resolution (203 × 196 dpi) is suited for documents with fine
print (smaller than the print in this sentence).
❍ PHOTO
Photo resolution (203 × 196 dpi with halftones) is for documents that
contain photographs. With this setting, areas of the document that
contain photos are automatically scanned with 64 levels of gray, rather
than just two (black and white)—which it uses otherwise. This gives a
much better reproduction of the photos, though transmission time is
longer.
You use the
documents.
RESOLUTION button to set the resolution for faxing
RESOLUTION
BUTTON
4-14 Sending Faxes With the MultiPASS L6000 Chapter 4
Page 83

2
Press the
1
RESOLUTION
button.
❍ The LCD shows the current resolution.
STANDARD
Press the
❍ Press
RESOLUTION
button again.
❍ After about five seconds, the LCD returns to Standby
Setting the Contrast
Contrast is the difference in brightness between the lightest and darkest
parts of a printed document. You can adjust the contrast the MultiPASS
uses for sending faxes (Darker, Standard, or Lighter) through the
Advanced: Send Fax dialog box in the MultiPASS Desktop Manager. (See
page 8-5 for details.) Standard is the default, and is adequate for most
documents. To darken a light original, choose Darker; to lighten a dark
original, use Lighter.
RESOLUTION
once or twice more to display the
resolution you want (STANDARD, FINE, or PHOTO).
STANDARD
FINE
PHOTO
mode.
12/11/97 FaxTel
Sending Faxes
Chapter 4 Sending Faxes With the MultiPASS L6000 4-15
Page 84

Sending PC Faxes
2
1
You can create and send a PC fax from any Windows application that
supports printing or you can create a fax in the MultiPASS Desktop
Manager. You can PC fax the document immediately, send it at a specific
time, or hold it in the Out Box to be sent at a future time.
Sending a PC Fax From a Windows Application
Create a PC
fax document.
Open the Print
window in the
application.
Open the Windows application.
❍
Create and save the document.
❍
It varies between Windows applications but is generally
❍
found in one of two ways:
From the File menu, choose Print Setup.
•
OR
•
From the File Menu, choose Print. In the Print Dialog
•
box, click Print Setup.
Select and set up the Canon MultiPASS L6000 Fax as the
❍
current printer.
❍ Click OK.
4-16 Sending Faxes With the MultiPASS L6000 Chapter 4
Page 85

❍ The Send Fax dialog box appears:
3
Complete the
information in
the dialog box.
❍ Choose individuals or fax groups from the Address Book
list on the left by clicking a name and clicking the Add
button.
To remove a name from the Recipients list, click the
•
name and click the Remove button.
To add a new entry to the Address Book, click New.
•
❍ For a single, one-time recipient, enter the appropriate
information in the Last Name, First Name, Company,
Prefix, and Fax Number boxes.
❍ To attach a coversheet, enter the name of the coversheet
from the drop-down list or click None.
❍ To revise the name and phone number indicating from
whom the fax is being sent, enter the changes in the From
and Phone boxes.
❍ To add comments or notes for the fax on the cover page,
enter the text in the Memo box.
❍ To have the fax deleted after you send it, click Delete after
Sending.
Sending Faxes
Chapter 4 Sending Faxes With the MultiPASS L6000 4-17
Page 86

❍ To send the fax with any annotations that were added to
4
the document using the
Document Viewer
❍ To add a reference comment for the fax log, enter the text
in the Log Note box.
MultiPASS Desktop Manager
, click Include Annotation.
To send the
PC fax, click
Send Now,
Send Later,
or Hold.
❍ Send Now
Sends the document right now.
❍ Send Later
Saves the document in the Out Box.
❍ Hold
Places the document in the Out Box until you select it and
specify a time for it to be sent. The MultiPASS Background
must be open for the PC fax to be sent at the specified
time.
❍ Cancel
Closes the dialog box without sending the fax and cancels
the specified options.
Defining Send Fax Options
Attaching a Cover Page
You can attach a cover page to your fax. The MultiPASS Desktop Manager
contains a library of predefined fax cover pages, designed with different
styles and suggested uses. In addition, you can design your own cover page,
thereby adding it to the library. The available cover pages are listed
alphabetically by name in the Coversheet drop-down list box.
Previewing the Cover Page
To check the appearance of the cover page you have chosen, click Previe w.
The cover page displays, including the recipients and other fax information
you have specified; you cannot edit the cover page during Preview.
4-18 Sending Faxes With the MultiPASS L6000 Chapter 4
Page 87

Identifying the Fax Sender
You can enter your name and phone number in the From and Phone
boxes. After sending the first PC fax, this information is automatically
displayed the next time you send a PC fax. You can change the fax sender
information as needed.
Entering a Memo
You enter a memo to be included on the fax cover page. The memo
appears on the cover page if the cover page is designed to include it. The
font, style, and size of the memo text is determined by the particular
design of the cover page you select.
Deleting the Fax After Sending
If you select the Delete After Sending option, the fax is automatically
deleted from the Out Box folder after it is successfully transmitted. This
option enables you to more easily clear your system of unneeded
documents, thereby freeing disk space.
If the option is not selected, the sent fax is moved from the Out Box folder
to the Sent Fax folder after successful transmission.
Including Annotations
Using the editing capabilities within the MultiPASS Desktop Manager
(described in Chapter 7, Working With Documents in the Desktop
Manager), you may have modified your document—for example, by
adding text annotations, stamps, or highlighting. In this case, you can
choose to include the modifications by clicking the Include Annotation
option.
If the option is not selected, the original version of the document is faxed,
without any annotations.
Entering a Fax Log Comment
The Fax Log maintains a history of each fax sent. By providing a log note,
you can include descriptive text on the fax log that has particular meaning
to you. The log note may be an account number for billing purposes, or a
personal note about the particular document, recipient, or fax
transmission.
Chapter 4 Sending Faxes With the MultiPASS L6000 4-19
Sending Faxes
Page 88

Creating a Fax Memo in the MultiPASS
Desktop Manager
You can create and send a Fax Memo that consists of a coversheet with a
message you type. This allows you to quickly send a memo without using
another Windows application.
Simply choose Fax Memo from the File menu. The Send Fax dialog box
appears:
Specify this information exactly like you do for a regular PC fax.
See page 4-17.
Designing a Fax Cover Page
In addition to the set of predefined fax cover pages that are installed with
your system, you can design your own fax cover page. You can
edit any existing cover page—one installed with your system or created by
you.
When you create a new cover page, you use a previously designed
background as your base page, and then place the fax information fields on
the page. The fax information fields, or variable fields, provide areas where
you place recipient and sender information for a specific fax. You can
specify the size, font, and style of the text displayed in each field.
4-20 Sending Faxes With the MultiPASS L6000 Chapter 4
Page 89

Preparing the Cover Page Background
2
1
The cover page background provides the permanent information and any
graphics you want included on your cover page. You then position the
variable fields in the appropriate locations on the background. For
example, for your background, you may want to include heading text that
provides your company name and address information, labels for the
variables fields (such as To: and From:), and one or more graphics that may
represent your company logo or your signature. The background you plan
to use with the Cover Page Designer must be
black and white, and must be saved in a TIFF file format.
The following instructions provide the recommended procedure for
preparing a cover page background. Using the recommended procedures,
you process a document (created by a word processing application) as a
held fax. Once the document is in the Desktop Manager, you export the
document to save it in a TIFF file format. The TIFF file can then be used
as the background for a new cover page.
Create and
print your
background.
Specify and
hold the fax.
Chapter 4 Sending Faxes With the MultiPASS L6000 4-21
❍ In a word processing application (such as Word for
Windows), create a full-page, black-and-white document
that includes the desired features of your background:
heading text, field labels, and any graphics or pictures.
❍ When you have completed the document, print the
document using the Canon MultiPASS L6000 Fax driver.
To do so, click the Print command. In the Print dialog box,
select Canon MultiPASS L6000 Fax as the printer, and
click the command to print (usually OK or Print).
❍ Select None as the cover page to attach. Then click Hold.
❍ Once the fax document is placed on hold, open the Out
Box Folder in the Desktop Manager.
Sending Faxes
Page 90

Open and
3
save the document.
Once you have exported the document in a TIFF file format, you can use
the TIFF file as the background of your new cover page.
Another way to prepare the cover page background is to use a graphics
application (such as Paint or Photoshop) to prepare the cover page
background. The background graphic you prepare must be a black-andwhite image, 1728 pixels wide, saved in a TIFF file format.
❍ Locate the held fax document and open it in the Document
Viewer.
Double-click the document, select the document and
•
click Open Document on the File menu, or drag the
document to the Open Document button on the
toolbar.
❍ With the document open in the Document Viewer, export
the document in a TIFF file format.
On the File menu, click Export. In the Export dialog
•
box, specify the drive, directory, filename, and file type
for saving the document. Click OK.
Opening the Cover Page Designer
You open the Cover Page Designer from either the Windows desktop or
the MultiPASS Desktop Manager.
❍ From the Windows desktop:
Click Start, then click Programs. On the Programs menu, click
•
Canon MultiPASS L6000, then click Cover Page Designer.
❍ From the MultiPASS Desktop Manager:
On the Tools menu, click Cover Page Designer.
•
4-22 Sending Faxes With the MultiPASS L6000 Chapter 4
Page 91

Using the Cover Page Designer
The Cover Page Designer window consists of the following components.
MENU BAR
TOOLBAR
VARIABLES BIN
LAYOUTAREA
Menu Bar
The menu bar contains commands that enable you to create, edit, and
print your fax cover page. Some commands can also be accessed by
their corresponding buttons on the toolbar.
Toolbar
The toolbar provides you quick access to commands needed to create,
edit, and print a fax cover page.
NEW
COVER SAVE
OPEN
PRINT
BOLD
ITALIC
UNDERLINE
ALIGN
RIGHT
ALIGN
LEFT
ALIGN
BOTTOM
ALIGN
TOP
In addition to the buttons, the toolbar also provides you with dropdown list boxes that enable you to select a font and font size for the
text of a variable field.
Chapter 4 Sending Faxes With the MultiPASS L6000 4-23
Sending Faxes
Page 92

Variables Bin
2
1
The variables bin contains the fields of information you want to
include on the cover page for your fax. When you use the cover page
for sending a fax with the Desktop Manager, these fields are
automatically filled in with the appropriate information for that
specific fax transmission.
Layout Area
The layout area allows you to visually create and edit the features of
your cover page. The size of the layout area corresponds to the size of a
standard fax page. You use the horizontal and vertical scroll bars to
view different portions of the cover page.
Creating a New Cover Page
Have your
background
template ready.
Add variable
fields.
❍ Prepare or have available a black-and-white background, in
TIFF file format, to use as the template of your new cover
page. (See page 4-21 for details.)
❍ With the Cover Page Designer open, click New Cover on
the File menu or toolbar.
❍ In the displayed dialog box, specify the drive, directory, and
name of the TIFF file for your cover page background.
❍ In the layout area, where the black-and-white background is
now displayed, insert the variable fields you want to include
with the fax. (See page 4-25 for details.)
❍ Position the fields in the desired locations on your
background.
❍ Optionally, adjust the appearance of each field as necessary.
(See page 4-25 for details.)
4-24 Sending Faxes With the MultiPASS L6000 Chapter 4
Page 93

Save your
3
cover page.
❍ When you have completed the cover page design, click Save
on the File menu or toolbar.
❍ In the Save Cover Page Template dialog box, enter the
name of your cover page and click OK.
Inserting Variable Fields
You insert variable fields that are filled in with actual data when you attach
the cover page to a particular fax you are sending. You can choose any or
all of the available fields, and place each at the desired location in the
layout area. A field is placed on top of any cover page background. Each
field displays sample text to illustrate the current font, font size, and text
attributes used.
Only the variable fields that display in the variables bin or on the Insert
menu are available for you to use on your cover page. You cannot add or
delete a field to or from the existing set. You cannot use a single field more
than once on a cover page.
To insert a field:
❍ Drag a field from the variables bin to the desired location in the layout
area.
❍ On the Insert menu, click the field you want to insert. Then position
the cursor at the desired location in the layout area and click to place
the field.
Adjusting the Appearance of the Fields
Once you have placed the desired variable fields into the layout area, you
can adjust the appearance of any field. You can resize, move, or delete a
field. When you delete a field, the field is removed from the layout area
and returned to the variables bin.
Additionally, you can set the text attributes for a field and align two or
more fields on the right, left, top, or bottom. Text attribute changes are
reflected in the sample text shown in the field.
Chapter 4 Sending Faxes With the MultiPASS L6000 4-25
Sending Faxes
Page 94

❍ To select a field in the layout area:
To select a single field, click the field.
•
To select more than one field, hold down the Ctrl key and click
•
the desired fields.
To select all fields, on the Edit menu, click Select All.
•
❍ To move a field, drag the selected field to a new location.
❍ To delete a field, select the field and click Delete on the Edit menu or
press the Delete key.
Resizing a Field
With the exception of the Memo field, most of the variable fields consist
of a single line of text. If the variable information to be placed in the field
is longer than the field size, the text does not automatically wrap onto a
next line. The text is truncated to fit the length of the field. For this
reason, you may want to resize a field to ensure the full line of text is
visible on the cover page for the fax.
Because the Memo field typically contains multiple lines of information,
this variable field does provide automatic text wrapping. However, make
sure the size of the Memo field is large enough to accommodate the length
of memo text that you may enter in the Send Fax dialog box. If the Memo
field is not large enough, not all the lines of a memo text may be visible
when the fax cover page is sent.
To resize the field, click the field and drag any sizing handle.
Changing the text attributes
Once you have placed fields in the layout area, you can change the font
and font size for the text to be displayed in the field. You can also choose a
text style (bold, italic, underline). If you have multiple fields to which you
want to assign the same attributes, you can select the fields together and
make the change to all the selected fields. You can change the text
attributes assigned to predefined cover pages installed with the Desktop
Manager.
You choose the desired font and font size from drop-down list boxes on the
toolbar. The sample text in the variable field reflects the font and font size
you choose.
4-26 Sending Faxes With the MultiPASS L6000 Chapter 4
Page 95

To change the text attributes, select the field you want to change in the
layout area. Now choose the appropriate text attributes:
❍ Select the font and font size from the drop-down list boxes on the
toolbar.
❍ Click Bold, Italic, and/or Underline on the toolbar.
Aligning fields
When placing the variable fields in the layout area, you can align two or
more selected fields, based on the position of the first field you select. The
first field selected in the set of fields to be aligned is the anchor for the
alignment.
Fields that are placed in a column can be aligned on the right or left
border of the first field you select. Fields that are placed in a row (one next
to the other) can be aligned on the top or bottom border of the first field
you select.
For example, if you want to align a column of fields on the right, the right
border of the first field selected is used as the anchor. The other selected
fields are lined up with the right border of the first field selected.
To align fields:
❍ Select the two or more fields you want to align on the right or left, or
on the top or bottom.
❍ Click Align Left, Align Right, Align Top, or Align Bottom on the
toolbar.
Editing an Existing Cover Page
You can edit any existing cover page to change the variable fields placed on
it. You can add, move, or remove fields, or adjust the existing fields.
To edit an existing cover page:
❍ With the Cover Page Designer open, click Open on the File menu or
toolbar.
❍ In the Open Cover Page Template dialog box, specify the name of the
cover page you want to edit, and click OK.
Chapter 4 Sending Faxes With the MultiPASS L6000 4-27
Sending Faxes
Page 96

❍ In the layout area, make the appropriate changes.
❍ Save your changes.
To save the changes under the same name:
❍ Click Save on the File menu or toolbar.
To save the changes under a different name:
❍ On the File menu, click Save As. In the Save Cover Page Template
dialog box, specify the name of the cover page, and click OK. (This
retains the opened cover page under its original name.)
To rename the originally opened cover page:
❍ On the File menu, click Rename. In the Rename dialog box, specify
the new name and click OK.
Deleting a Cover Page
You can delete a cover page that you no longer need. You do not need to
open the cover page to delete it.
❍ With the Cover Page Designer open, on the File menu, click Delete.
❍ In the Delete Cover Page Template dialog box, click the name of the
cover page you want to delete. Then click OK.
4-28 Sending Faxes With the MultiPASS L6000 Chapter 4
Page 97

Printing a Fax Cover Page
2
1
You can print a cover page to produce a hard copy for review or to use
when sending a fax directly from the MultiPASS. The hard copy includes
the name of the cover page and the date last modified, printed at the
uppermost edge of the page.
With the Cover
Page Designer
open, on the
File menu, click
Print Setup.
Preview before
printing.
❍ In the Print Setup dialog box, specify your print options
and click OK.
❍ With the cover page open, on the File menu, click Print
Preview.
❍ To print the cover page, click Print.
❍ To enlarge or reduce the view size, click Zoom In or Zoom
Out.
❍ To close the preview window, click Close.
Sending Faxes
❍ Because a cover page is not typically more than one page,
Chapter 4 Sending Faxes With the MultiPASS L6000 4-29
Page 98

you will not use the remaining commands.
3
Print the
cover page.
❍ With the cover page open, click Print on the File menu or
toolbar.
❍ Complete the Print dialog box and click OK.
4-30 Sending Faxes With the MultiPASS L6000 Chapter 4
Page 99

Receiving Faxes
The MultiPASS L6000 has four Receive Modes:
❍ Fax Only Mode
❍ FaxTel Mode
❍ Manual Mode
❍ Answer Machine Mode
You set the Receive Mode during the MultiPASS installation procedure.
(See your Quick Start Guide for details.)
You can change the Receive Mode and the Receive Fax options through the
MultiPASS Desktop Manager. See page 8-7 for details.
This chapter describes:
❍ Receiving documents
5
❍ Printing documents received in memory
❍ Receiving while copying, printing, or registering
❍ Receiving faxes to the MultiPASS Desktop Manager
❍ Using the Distinctive Ring Pattern Detection (DRPD) feature
Chapter 5 Receiving Faxes 5-1
Receiving Faxes
Page 100

Receiving Documents
During reception of a fax:
❍If the unit runs out of paper or if the toner cartridge runs out of toner,
the MultiPASS receives the remainder of the document in memory.
❍To stop receiving before the document is complete, press STOP.
❍If the ALARMlight is flashing for any reason, correct the error and
then press STOP. If necessary, see Chapter 10, Troubleshooting.
❍If an error occurs, the MultiPASS beeps intermittently for a few
seconds. If this happens, contact the other party and have them resend
the document.
Receiving Documents Automatically Fax Only Mode
When you set up the MultiPASS for a dedicated fax line, the unit
automatically receives the document whenever a call comes over the fax
line. If a voice call comes in, the caller will hear the fax tone.
Receiving Both Documents and Telephone Calls
Automatically FaxTel Mode
In FaxTel Mode, the MultiPASS monitors all incoming calls over the
telephone line. When the MultiPASS receives an incoming call, it checks
to see if the call is from another fax machine trying to send a document or
from someone wanting to talk to you. You must have a telephone
connected to the MultiPASS to use this mode.
How FaxTel Mode Works
In FaxTel Mode, the MultiPASS does not ring when it receives
a call from another fax machine that is trying to send a document.
This is so that you are not disturbed when your MultiPASS is
communicating with another fax machine. The unit automatically receives
the document.
If the call is from a person, the MultiPASS rings to alert you to pick up the
phone. You must pick up the telephone connected to the MultiPASS.
5-2 Receiving Faxes Chapter 5
 Loading...