

Page 1

i
Your machine includes the following documentation. This documentation has been designed so that you can
easily use your machine to suit your particular needs.
Setting up the MultiPASS ...................................
Setting up paper ..............................................
Installing the MultiPASS Suite .............................
Document and paper handling .............................
Making copies ................................................
Maintenance ..................................................
Troubleshooting feed and copy issues ....................
Sending and receiving faxes ...............................
Speed dialing .................................................
Troubleshooting fax issues .................................
Controlling the MultiPASS from
your PC.........................................................
Documentation is included on the CD-ROM in PDF form.
• The machine shown in this guide is the F50 model.
Copyright
Copyright © 2001 by Canon, Inc. All rights reserved. No part of this publication may be reproduced, transmitted,
transcribed, stored in a retrieval system, or translated into any language or computer language in any form or by
any means, electronic, mechanical, magnetic, optical, chemical, manual, or otherwise, without the prior written
permission of Canon, Inc.
Trademarks
Canon and BJ are registered trademarks. BCI, Bubble Jet, and MultiPASS are trademarks of Canon Inc.
All other product and brand names are registered trademarks, trademarks or service marks of their respective
owners.
As an ENERGY STAR
®
Partner, Canon U.S.A., Inc. has determined that this product
meets the ENERGY STAR®guidelines for energy efficiency.
NOTE
Using Your Documentation
Quick Start Guide
MultiPASS
Reference Guide
MultiPASS
Fax Guide
MultiPASS Suite for
Windows®Software
User’s Guide
F50 model only
Page 2

Contents
ii
Chapter 1: Introduction
Customer Support .............................................1-1
Important Safety Instructions ...........................1-1
Main Components of the Machine ...................1-4
Operation Panel ................................................1-5
Standby Display ................................................1-6
Chapter 2: Document Handling
Document Requirements .................................2-1
Scanned Area of a Document .......................2-2
Setting Up Documents ......................................2-3
Placing a Document on the Platen Glass......2-3
Loading Documents into the ADF
(F50 Model Only) ...........................................2-4
Chapter 3: Paper Handling
Print Media Requirements.................................3-1
Paper Types and Sizes ..................................3-1
Paper Guidelines ...........................................3-3
Printable Areas ..............................................3-4
Loading Paper ..................................................3-5
Loading Envelopes............................................3-5
Using Canon Specialty Print Media .................3-7
Specialty Print Media Guidelines...................3-7
Printing on Banner Paper .............................3-8
Chapter 4: Making Copies
Documents You Can Copy ...............................4-1
Copying Documents .........................................4-1
Making Multiple Copies..................................4-2
Setting Paper Size and Paper Type...............4-2
Setting Enlarging/Reducing ...........................4-3
Setting the Image Quality ..............................4-4
Adjusting the Copy Exposure ........................4-4
Special Features ...............................................4-5
Repeating an Image over the Paper..............4-5
Creating a Mirror Image.................................4-7
Shrinking an Image to Fit onto the Paper......4-8
Chapter 5: Maintenance
Periodic Cleaning ..............................................5-1
Cleaning the Exterior .....................................5-1
Cleaning the Scanning Area..........................5-1
Cleaning Inside the Machine .........................5-2
Cleaning the Roller ........................................5-3
Cleaning Inside the ADF (F50 Model Only)...5-3
Ink Tanks ...........................................................5-4
Guidelines ......................................................5-4
When to Replace an Ink Tank..........................5-5
Replacing an Ink Tank....................................5-6
Testing and Cleaning the Printhead ..................5-7
Printing the Nozzle Check Pattern.................5-8
Cleaning the Printhead ..................................5-8
Chapter 6: Troubleshooting
Clearing Jams ...................................................6-1
Jams in the Multi-Purpose Tray......................6-1
Jams in the ADF (F50 Model Only) ...............6-2
LCD Messages .................................................6-4
Paper Feeding Problems...................................6-6
Copying Problems ............................................6-7
Print Quality Problems .....................................6-8
Printing Problems .............................................6-9
General Problems ...........................................6-11
If You Cannot Solve the Problem ...................6-11
Chapter 7: Summary of Settings
Understanding the Menu System .....................7-1
Accessing the Menus ....................................7-1
Menus in Copy Mode ....................................7-2
Appendix: Specifications
General Specifications .................................A-1
Copier ............................................................A-1
Ink Tanks........................................................A-1
Printer ............................................................A-2
Scanner .........................................................A-2
Index ................................................................I-1
Page 3

iii
Please read the list below of symbols, terms, and abbreviations used in this guide.
• Indicates a warning concerning operations that may lead to death or injury to persons if not
performed correctly. In order to use the machine safely, always pay attention to these warnings.
• Indicates a caution concerning operations that may lead to injury to persons or damage to
property if not performed correctly. In order to use the machine safely, always pay attention to
these cautions.
• Indicates operational warnings and restrictions. Be certain to read these items to operate the machine
correctly, and to avoid damage to the machine.
• Indicates notes for operation or additional explanations. Reading these is highly recommended.
(→ p. n-nn) A number preceded by an arrow and enclosed in parentheses references a page number
in this guide which contains more information on the topic of the previous sentence.
→ Quick Start Guide Refer to the Quick Start Guide for details on the topic of the previous sentence.
→ Fax Guide* Refer to the MultiPASS Fax Guide for details on the topic of the previous sentence.
→ MultiPASS Refer to the MultiPASS Suite for Windows
®
Software User’s Guide for details on the
Suite User’s Guide topic of the previous sentence.
machine The word “machine” is the general term used to represent the MultiPASS F50/F30.
default A setting that remains in effect unless you change it.
document or fax* The original sheet(s) of paper you copy, send or receive with the machine.
menu A list of settings from which you select an item to set up or change. A menu has a title
which appears in the LCD.
Available menus and the display differ depending on the machine type (F50 or F30) and
the current mode (Copy, Fax*, or Scan Mode). This guide shows the display of the F50
model in Copy Mode as an example.
In addition, this guide uses distinctive typefaces to identify buttons and information in the LCD:
• The buttons you press appear in this typeface: Stop/Reset.
• Information in the LCD appears in this typeface: PRINTER SETTINGS.
* F50 model only
NOTE
IMPORTANT
CAUTION
WARNING
Type Conventions Used in This Guide
Page 4
1-1
Your machine is designed with the latest technology to provide trouble-free operation. If you encounter a problem
with the machine’s operation, try to solve it by using the information in Chapter 6. If you cannot solve the
problem or if you think your machine needs servicing, contact the Canon Customer Care Center. (1-800-423-
2366)
Read these safety instructions thoroughly before using your machine, and keep them handy in case you need to
refer to them later.
• This product emits low level magnetic flux. If you use a cardiac pacemaker and feel
abnormalities, please move away from this product and consult your doctor.
• Do not disassemble or modify. There are high-temperature and high-voltage components inside
the machine which may result in a fire or electrical shock.
• Follow all warnings and instructions marked on the machine.
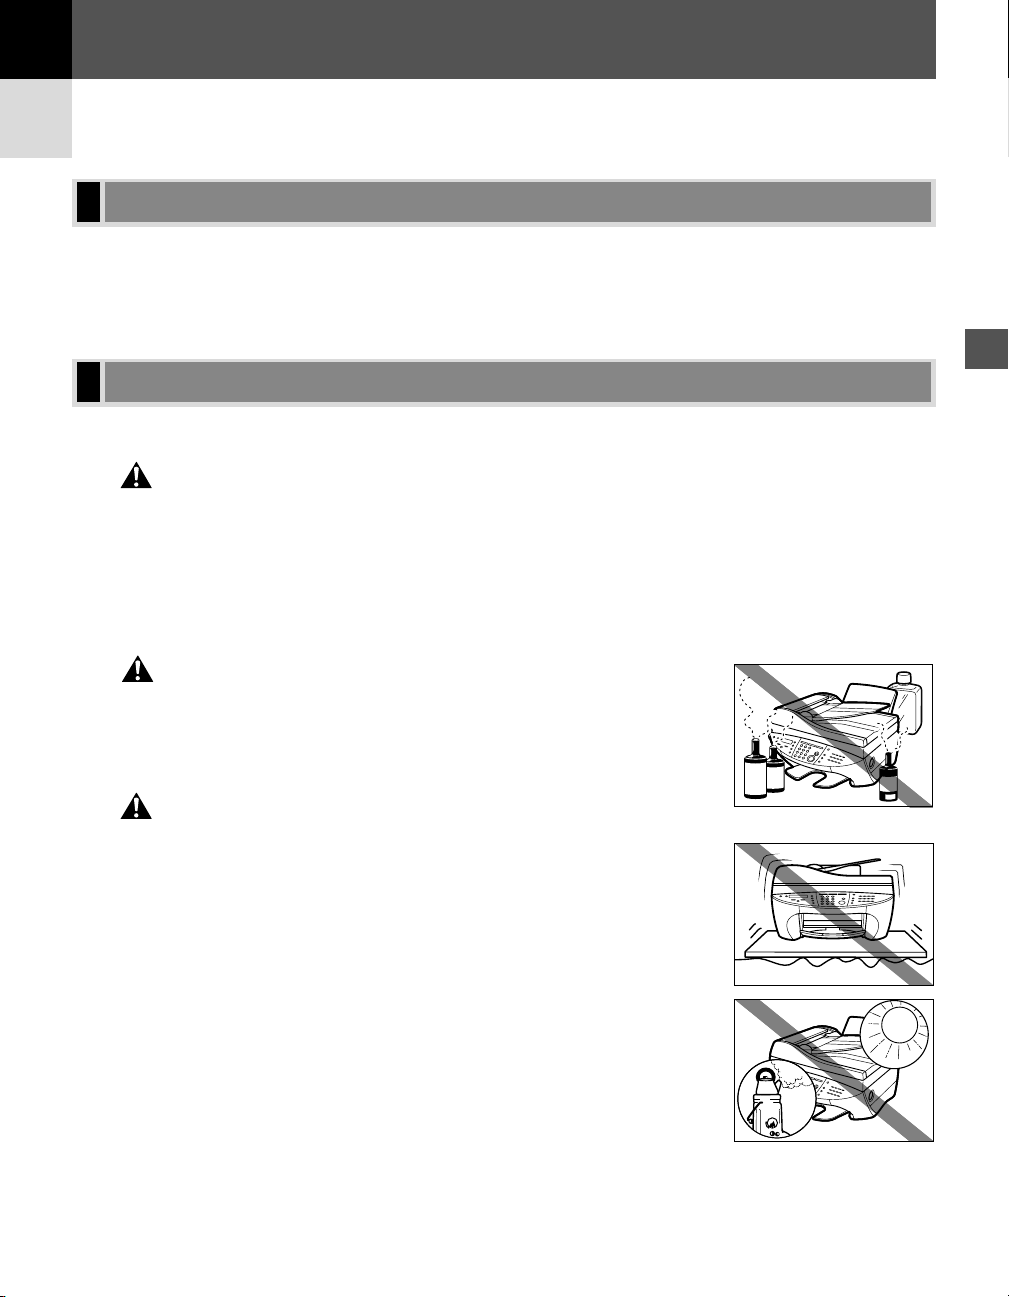
■ Location
• Do not place the machine near alcohol, paint thinner or other
inflammable substances. If inflammable substances come into
contact with electrical parts inside the machine, it may result in a
fire or electrical shock.
• Do not block or cover the ventilation port or any openings on the
machine with objects, as this may result in a fire.
• Place the machine on a flat, stable, vibration-free surface that is
strong enough to support its weight (approx. 27.3 lb./12.4 kg [F50
model] / 22 lb./10 kg [F30 model]).
• Make sure the area is free from dust.
• Make sure the location is not affected by extreme temperature changes, and
always stays between 50° and 90.5°F (10° and 32.5°C).
• Make sure the relative humidity of the area is between 20% and 85%.
• Keep the machine away from direct sunlight.
• Do not use or store the machine outdoors.
• Do not install the machine near devices that contain magnets or generate
magnetic fields, such as speakers.
• Make sure the machine is approximately 4 inches (10 cm) away from walls
and other equipment for proper ventilation.
CAUTION
WARNING
CAUTION
Important Safety Instructions
Customer Support
Introduction
1
Introduction
Chapter 1
Page 5
1-2
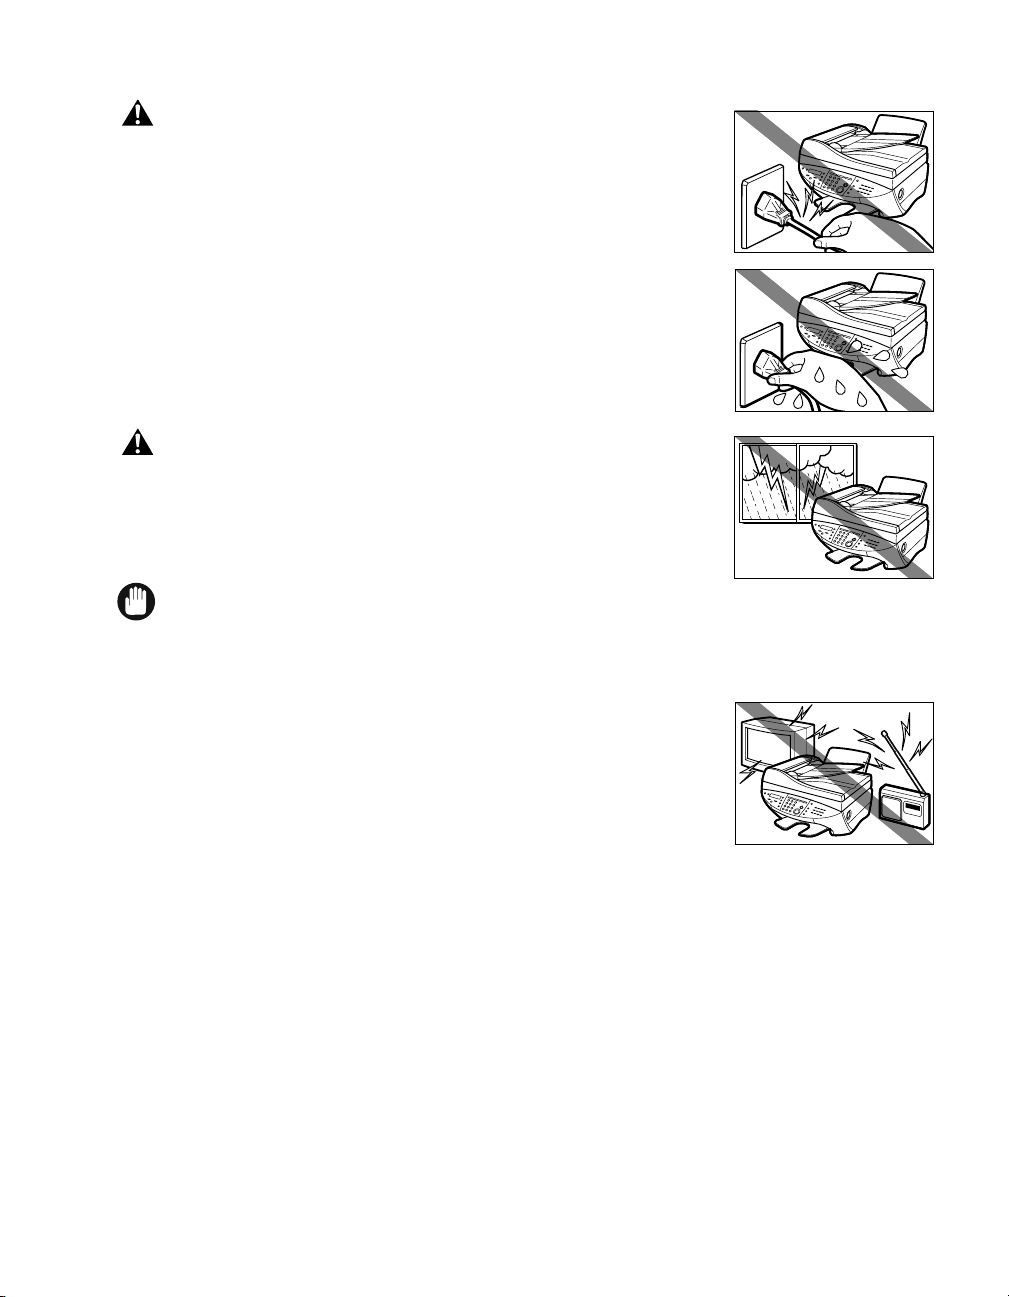
■ Power Supply
• Do not damage or modify the power cord and power plug. Also do
not place heavy objects on the power cord, pull on it, or extensively
bend it. These actions may cause electrical damage and result in a
fire or electrical shock.
• Do not insert or unplug the power plug with wet hands, as this may
result in electrical shock.
• During electrical storms, turn off the power and disconnect the
power cord from the power outlet. (Please note that any documents
stored in the machine’s memory will be deleted when you turn off
the power.)
• If dust accumulates around the plug of the power cord when it is
connected to a power outlet, unplug the machine and wipe the plug with
a clean, dry cloth.
• For using the F50 model, do not plug the machine into the same circuit
with appliances such as an air conditioner, television, or copier. These
devices generate an electrical noise, and this may interfere with your
machine’s ability.
• Whenever you turn off the power and unplug the machine, wait at least
five seconds before you plug it in again.
• Plug the machine into a standard 120V AC/60Hz, three-prong grounded outlet. Operate the machine only
from the type of power source indicated on the machine’s label. If you are not sure of the type of power
available, consult your local power company.
• Use only the power cord that came with the machine.
• Turn off the power and unplug the machine in the following conditions:
- When the power cord or plug is damaged or frayed.
- If liquid has spilled into the machine.
- If the machine has been exposed to rain or water.
- If the machine does not operate normally when you have followed the instructions in the guides included
with your machine. Adjust only those controls that are covered by the instructions in the guides since
improper adjustment of other controls may result in damage and will often require extensive work by a
qualified technician to restore the product to normal operation.
- If the machine has been dropped or damaged.
- If the machine exhibits a distinct change in performance, indicating a need for servicing.
IMPORTANT
CAUTION
WARNING
Page 6
1-3
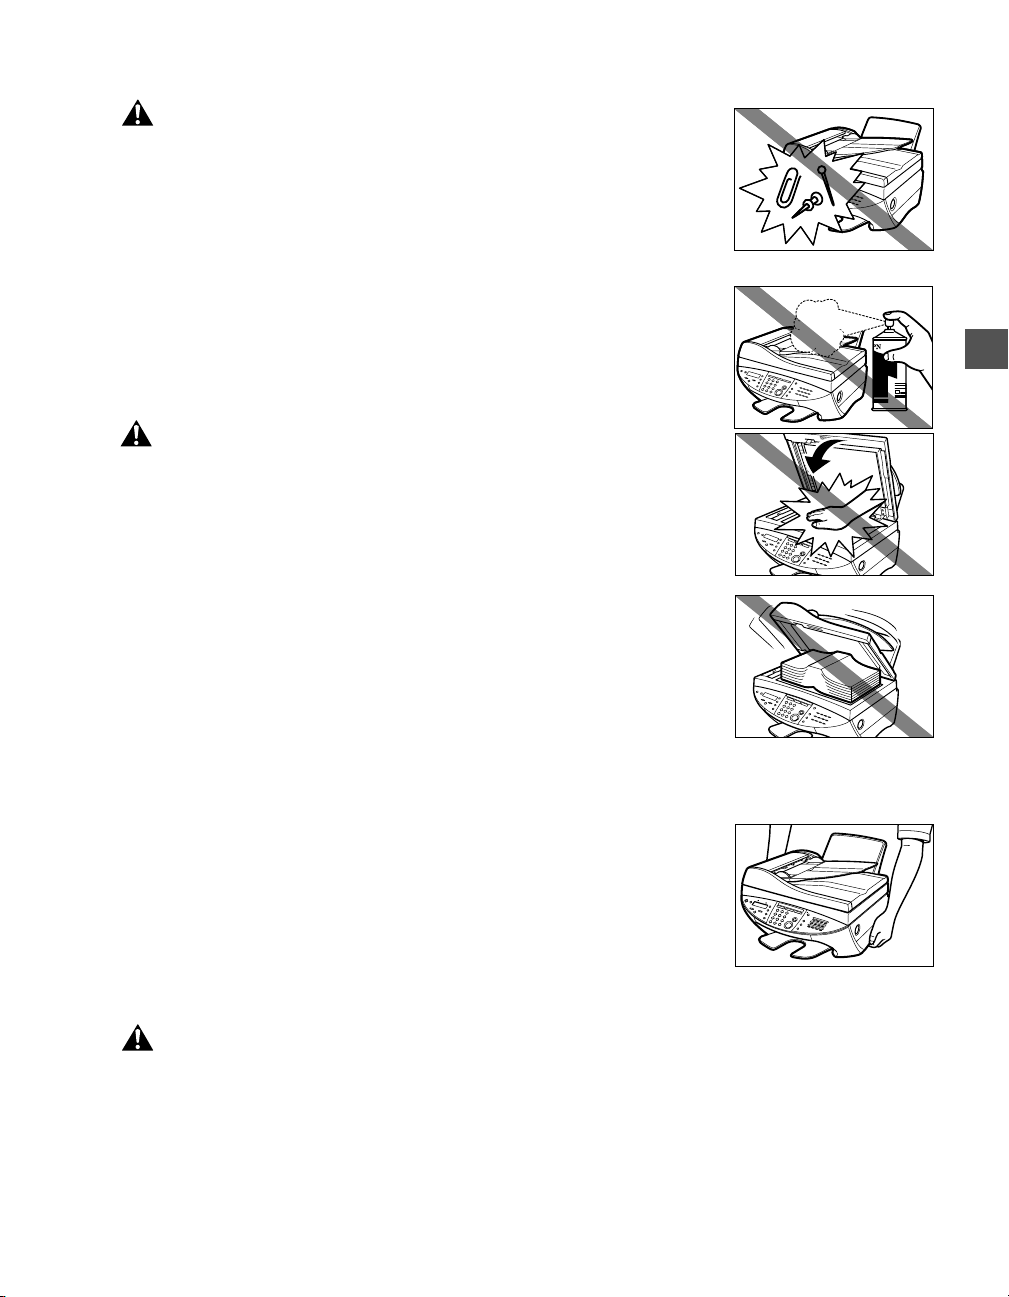
■ Handling
• Do not drop paper clips, staples, or other metal objects inside the
machine. Also do not spill water, liquid or inflammable substances
inside the machine. If these items come into contact with high-voltage
parts inside the machine, it may result in a fire or electrical shock. If
these items are dropped or spilled in the machine, turn off the power
and unplug the power cord immediately with dry hands. Then,
contact the Canon Customer Care Center.
• Do not use any highly flammable spray near the machine. If gas
from a spray comes into contact with the electrical components
inside the machine, it will result in a fire.
• Close the ADF, the platen glass cover, or the scanning unit gently to
avoid catching your hand. Failing to do so may result in personal
injury.
• Do not press down hard on the ADF or the platen glass cover when
using the platen glass to scan thick books. This may damage the platen
glass and/or result in personal injury.
• Do not fix your eyes on the luminous source while making copies and
scanning, as this may result in personal injury.
• Do not subject the machine to strong physical shock or vibration.
• Turn off the power and unplug the machine before moving it.
• Do not lift the machine by any of its attachments.
• If the machine exhibits a distinct change in performance, this indicates a need
for servicing.
■ Maintenance
• Do not service the machine yourself except as specifically described in this guide. If further
servicing is required, contact the Canon Customer Care Center.
• Keep the machine clean. Dust accumulation may prevent the machine from operating properly.
WARNING
CAUTION
WARNING
Introduction
1
Page 7
1-4
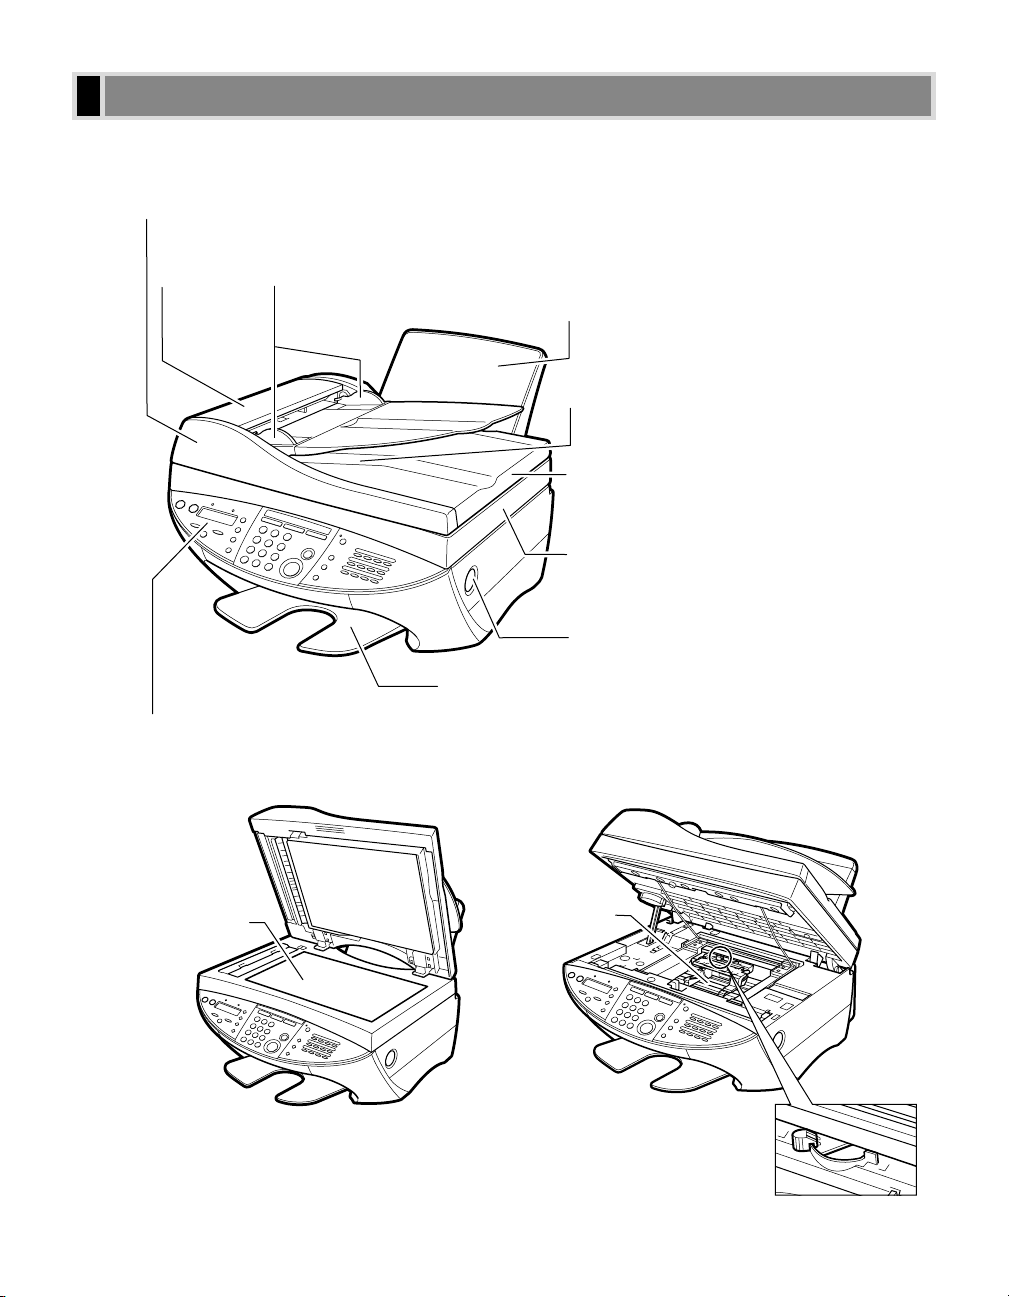
This section describes the main components of the machine.
Front View
Inside View
* F50 model only
PLATEN GLASS
OPEN BUTTON
Push to lift up the scanning unit.
OUTPUT TRAY
Holds printed pages as they exit the machine.
OPERATION PANEL
Controls the machine.
ADF (AUTOMATIC DOCUMENT FEEDER)*
Holds documents for copying, scanning and sending faxes and
feeds them automatically into the machine.
MULTI-PURPOSE TRAY and TRAY COVER
Holds plain paper and other print media.
DOCUMENT OUTPUT SLOT
Documents come out here.
PLATEN GLASS COVER
Open to place a document on the platen glass.
SCANNING UNIT
Lift up to install the Printhead (Cartridge) and
Ink Tanks.
DOCUMENT GUIDES
Adjust to the width of the document.
FEEDER
COVER
Main Components of the Machine
HOLDER
PAPER THICKNESS LEVER
Adjusts the gap between the
printhead and the surface of the
printing paper. Set the paper
thickness lever to the left when
loading paper other than
envelopes, Banner Paper, and
T-Shirt Transfers.
Page 8
1-5
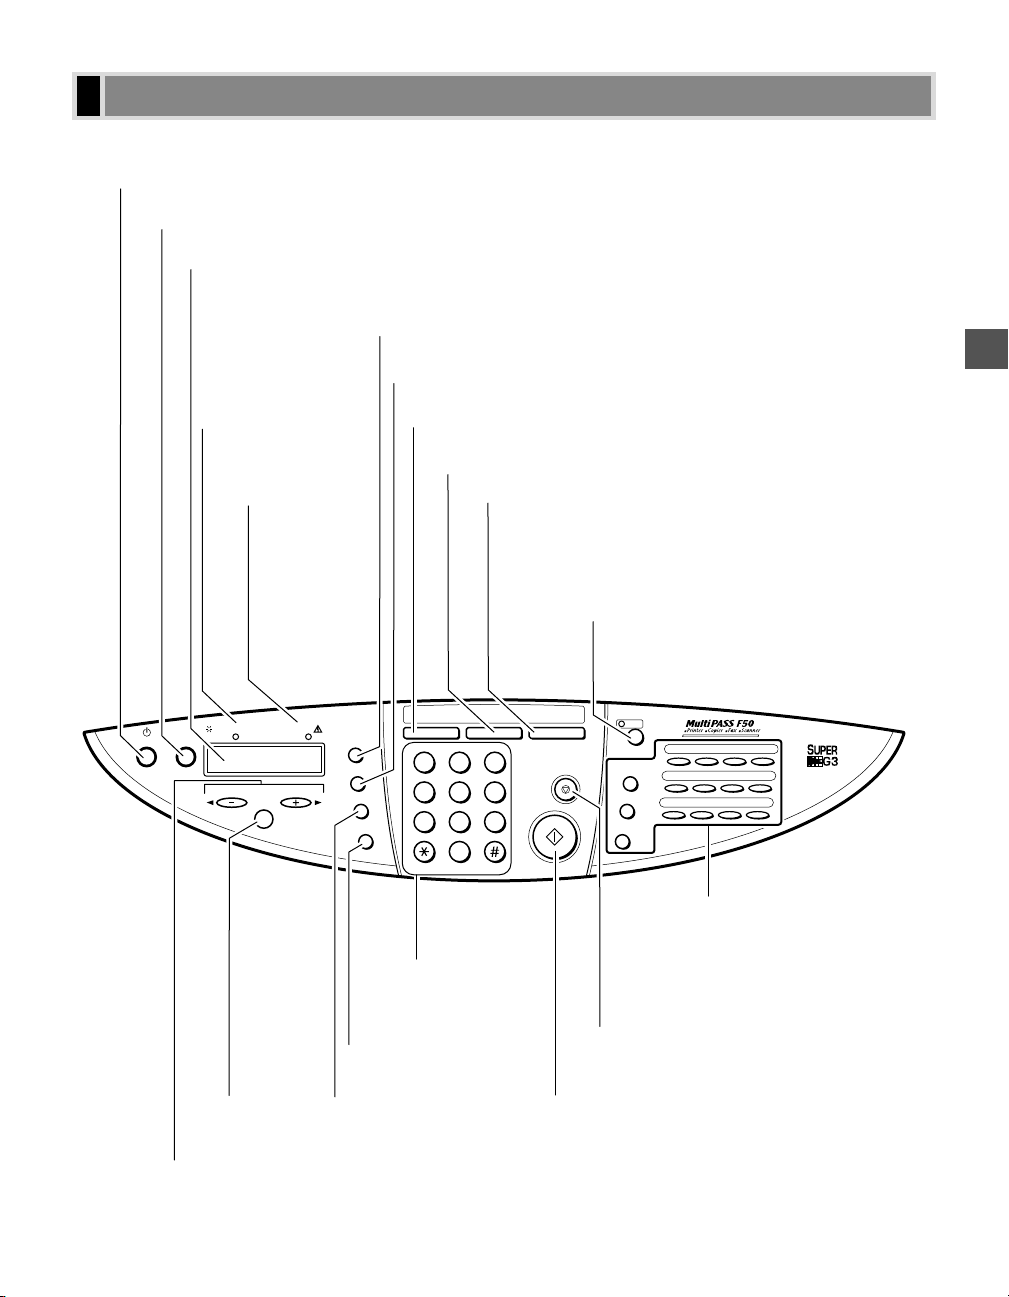
This section describes buttons used when making copies and scanning.
• The operation panel shown below is the example for the F50 model.
* F50 model only
ABC
Copy Fax Scan
DEF
Color
/B&W
Coded Dial
Hook
Enlarge/
Reduce
Redial/Pause
Paper Select
Stop/Reset
Start
Exposure
Image Quality
123
JKL MNO
456
TUV
GHI
PRS WXY
789
OPER
Tone
SYMBOLS
0
ON/OFF
Menu
Set
In Use/ Memory Alarm
Resume
01 02 03 04
05 06 07 08
09 10 11 12
Color/B&W Button
Sets the machine for color or black
& white copying. For color copying,
press this button to turn on its light.
Resume Button
Resumes printing after an error is corrected. Also ejects a jammed document from the ADF.
*
LCD
Displays messages and prompts during operation.
Also displays selections, text and numbers when setting information.
Set Button
Selects and
confirms the
settings.
Enlarge/Reduce Button
Sets an enlargement or reduction of the document.
Paper Select Button
Selects paper size and paper type.
Exposure Button
Adjusts the copy exposure.
Image Quality Button
Selects the resolution
setting the machine uses
to copy.
Copy Button
Switches standby display to Copy Mode.
Scan Button
Switches standby display to Scan Mode. When the machine
is connected to your PC, pressing this button starts scanning
and sends the scanned data to your PC. In Scan Mode,
pressing Start starts scanning. For details of scanning,
→ MultiPASS Suite User’s Guide.
Numeric Buttons
Enters copy
quantity and other
numerical values.
Stop/Reset Button
Cancels copying and other operations,
and returns the machine to standby mode.
Start Button
Starts copying and scanning.
t(-), s(+)(Menu) Buttons
Scroll through the selection so you can see other selections. s(+)(Menu) button also has a
function to show the menu that customizes the way your machine operates.
ON/OFF Button
Turns the machine on/off.
In Use/Memory Light
*
Lights during copying
and scanning.
Fax Button, → Fax Guide
*
Alarm Light
Flashes when
an error occurs,
or when the
machine is out
of paper or ink.
→ Fax Guide
*
Operation Panel
Introduction
1
Page 9
1-6
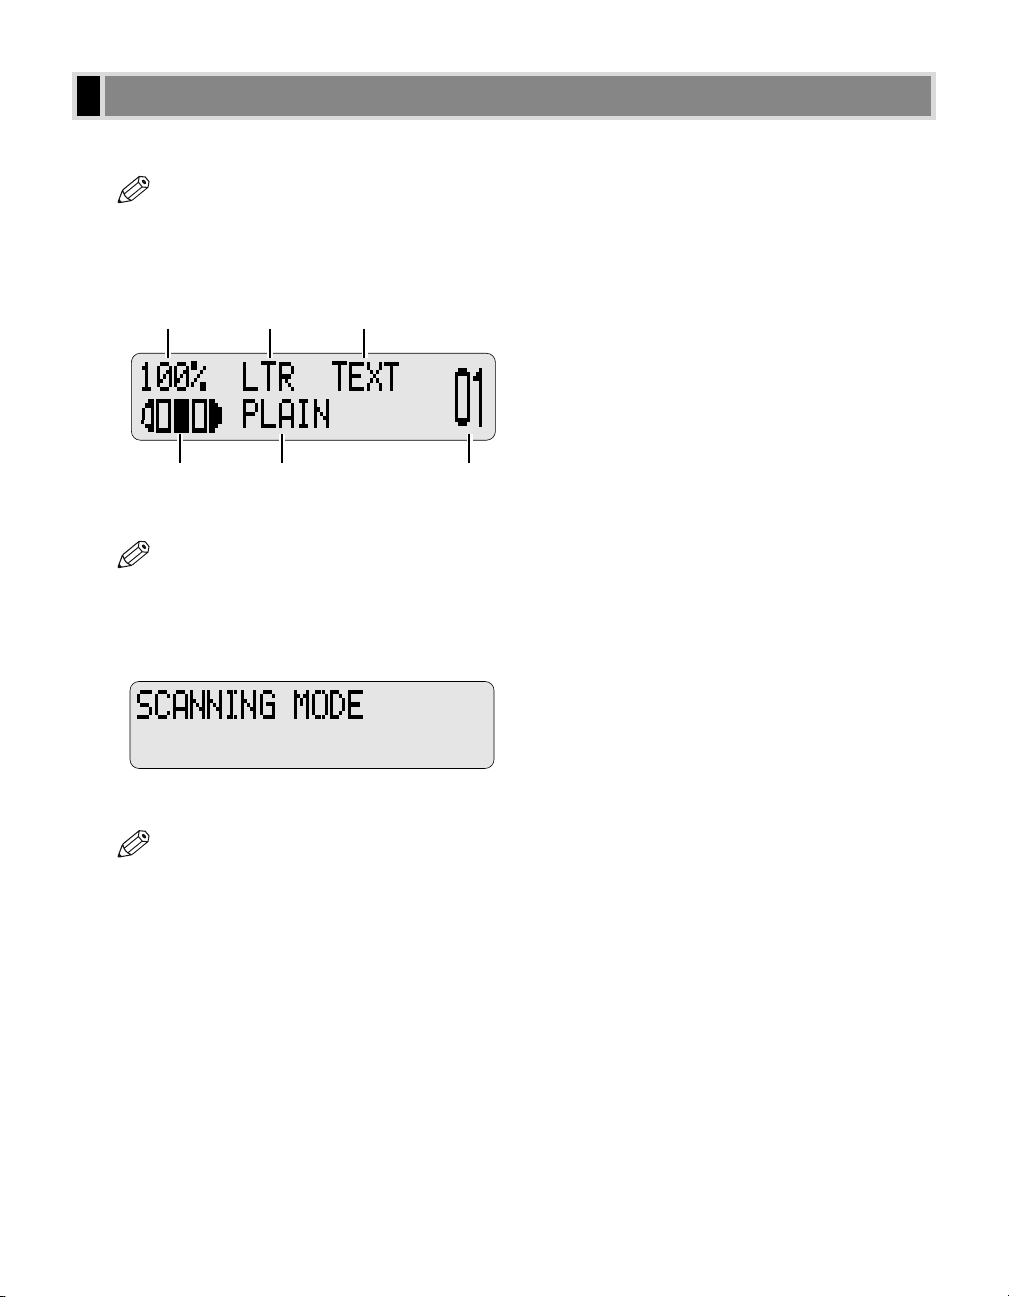
The standby display differs depending on which mode is selected. The standby display in Copy Mode and Scan
Mode are as follows:
• The standby display in Fax Mode is, → Fax Guide.
■ Copy Mode
• When the machine is turned on, the Copy Mode standby display appears.
■ Scan Mode
• When you start scanning by using your PC, the machine switches automatically to this mode if
necessary.
NOTE
NOTE
Copy Ratio
Exposure Paper Type Copy Quantity
Paper Size Image Quality
NOTE
Standby Display
Page 10

2-1
The documents you place on the platen glass or load into the ADF must meet the requirements shown in the table
below.
* 20 lb. (75 g/m
2
) paper
**14 in. (356 mm) for the F30 model
11 in. (279 mm) for sending faxes
Document Requirements
Document Handling
2
Document Handling
Chapter 2
Type of document
Size (W × L)
Quantity
Thickness
Weight
Platen Glass
- Thick paper
- Documents with uneven surfaces
- Photographs
- Small documents
(e.g. business cards, postcards)
- Special types of paper
- Book
Max. 8.5 × 11.7 in. **
(Max. 216 × 297 mm)
–––
Max. 0.79 in. (20 mm)
–––
ADF (F50 model only)
Multipage documents of the same
thickness and weight.
Max. 8.5 × 39 in.
(Max. 216 × 1 m)
Min. 4.13 × 5.83 in.
(Min. 105 × 148 mm)
Max. 30 letter-, legal- or A4 size sheets*
1 sheet for sizes other than these.
0.002 to 0.005 in.
(0.06 to 0.13 mm)
13 to 24 lb. (50 to 90 g/m2)
Page 11
2-2
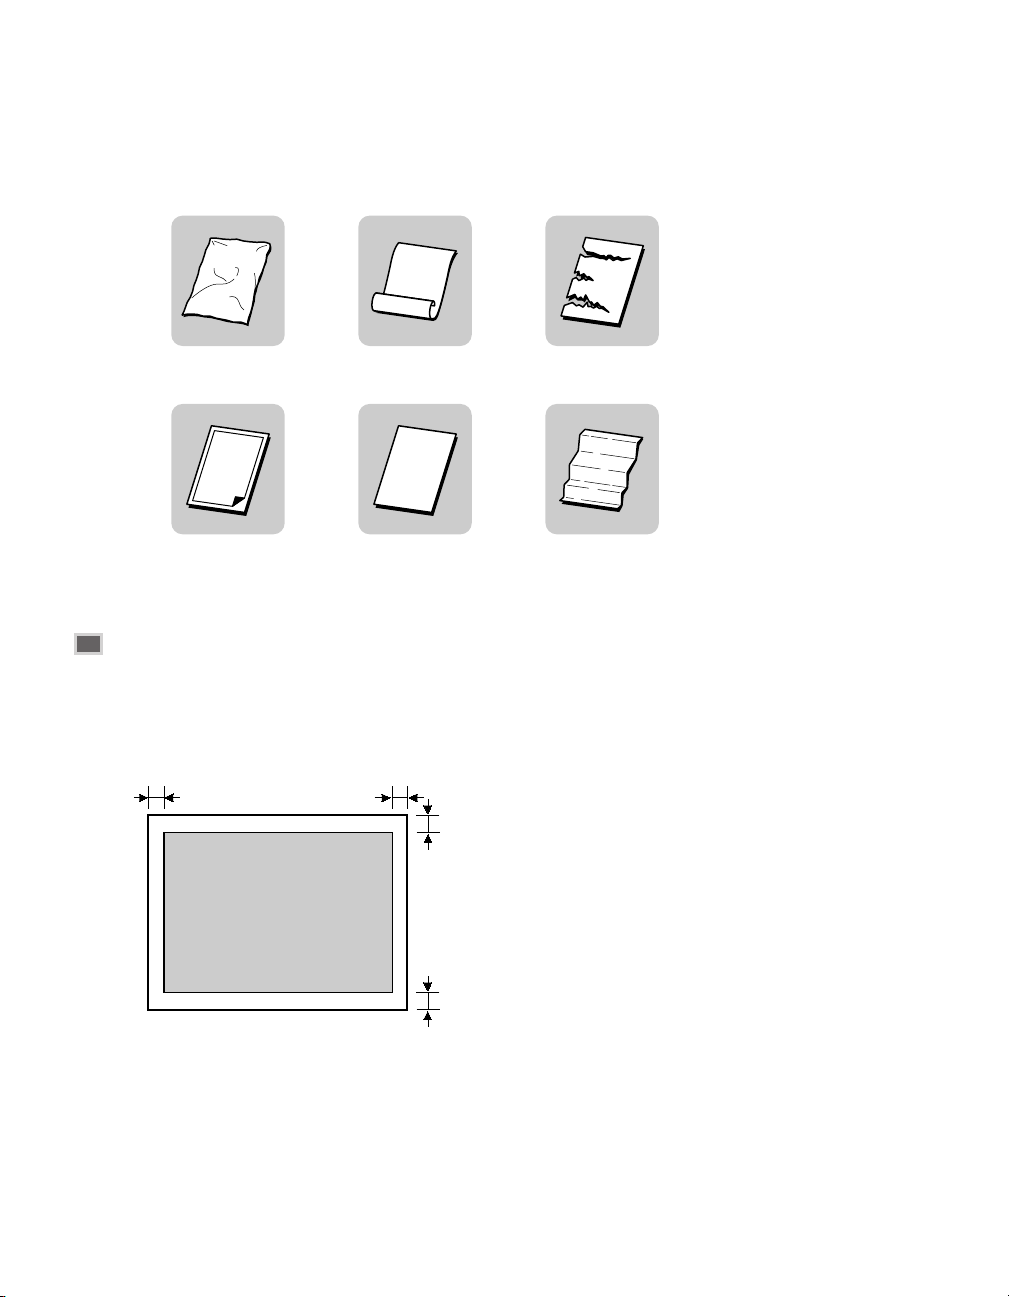
Problem Documents
• Make sure any glue, ink, or correction fluid on the document is completely dry before placing it on the platen
glass or loading it into the ADF.
• Remove all fasteners (staples, paper clips, etc.) before loading the document into the ADF.
• To prevent document jams in the ADF, do not use any of the following:
Scanned Area of a Document
The shaded area in the illustration below shows the scanned area of a document. Make sure your document’s text
and graphics are within this area.
* When using legal-size documents with the F50 model, load them into the ADF.
** F50 model only
*** When using legal-size documents with the F30 model, the bottom margin is MAX. 0.32 in. (MAX 8.0 mm)
Wrinkled or creased paper Curled or rolled paper Torn paper
Carbon paper or carbon-
backed paper
Coated paper Onion skin or thin paper
MAX. 0.18"
(MAX. 4.5 mm)
MAX. 0.16"
(MAX. 4.0 mm)
Letter/Legal*/A4
MAX. 0.16" (MAX. 4.0 mm)
***
COLOR FAX: MAX. 0.24"
**
(MAX. 6.0 mm)
MAX. 0.18"
(MAX. 4.5 mm)
Page 12
Document Handling
2
2-3
For scanning, place your documents on the platen glass or load them into the ADF. Where you set up your
documents depends on the size and type of documents you have, and the machine you are using. (→ p. 2-1)
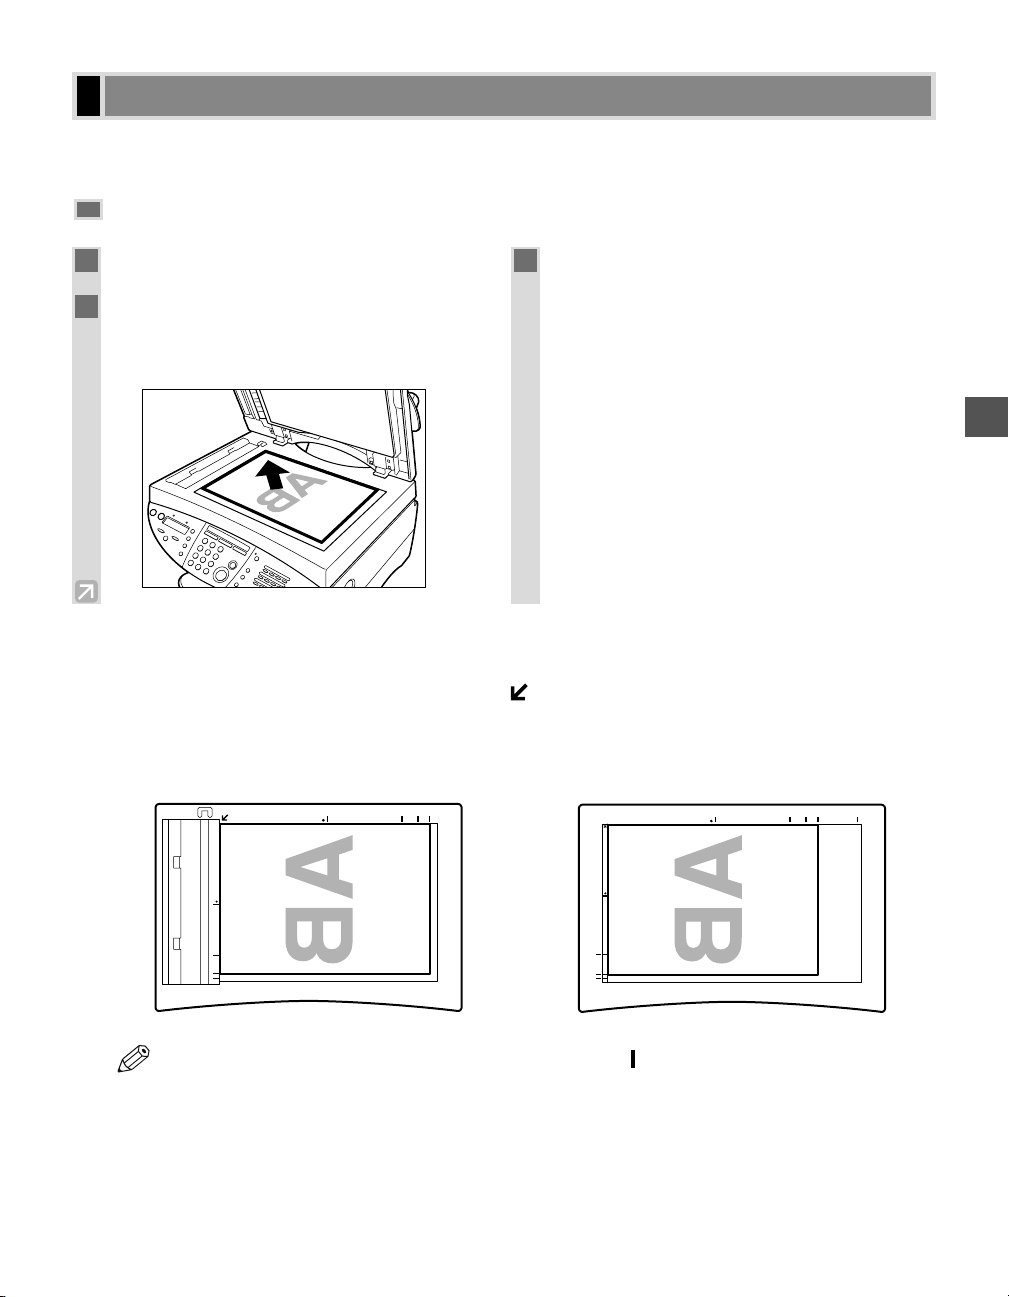
Placing a Document on the Platen Glass
Positioning Documents
Align the upper left corner of your document with the mark at the upper left corner of the guide plate.
Use the guide plate on the upper side and left side of the platen glass to position a document.
■ F50 Model ■ F30 Model
• If your document is 4"× 6" size, align the document with the marks.
NOTE
Setting Up Documents
1
Open the ADF or the platen glass cover.
2
Place your document face down on the
platen glass. Align the document with the
appropriate paper size marks.
3
Gently lower the ADF or the platen glass
cover.
The document is now ready for scanning.
B5 LTR A4
B5
LTR
A4
LGL
LTR
A4
B5
B5 LTR A4 LGL
Page 13
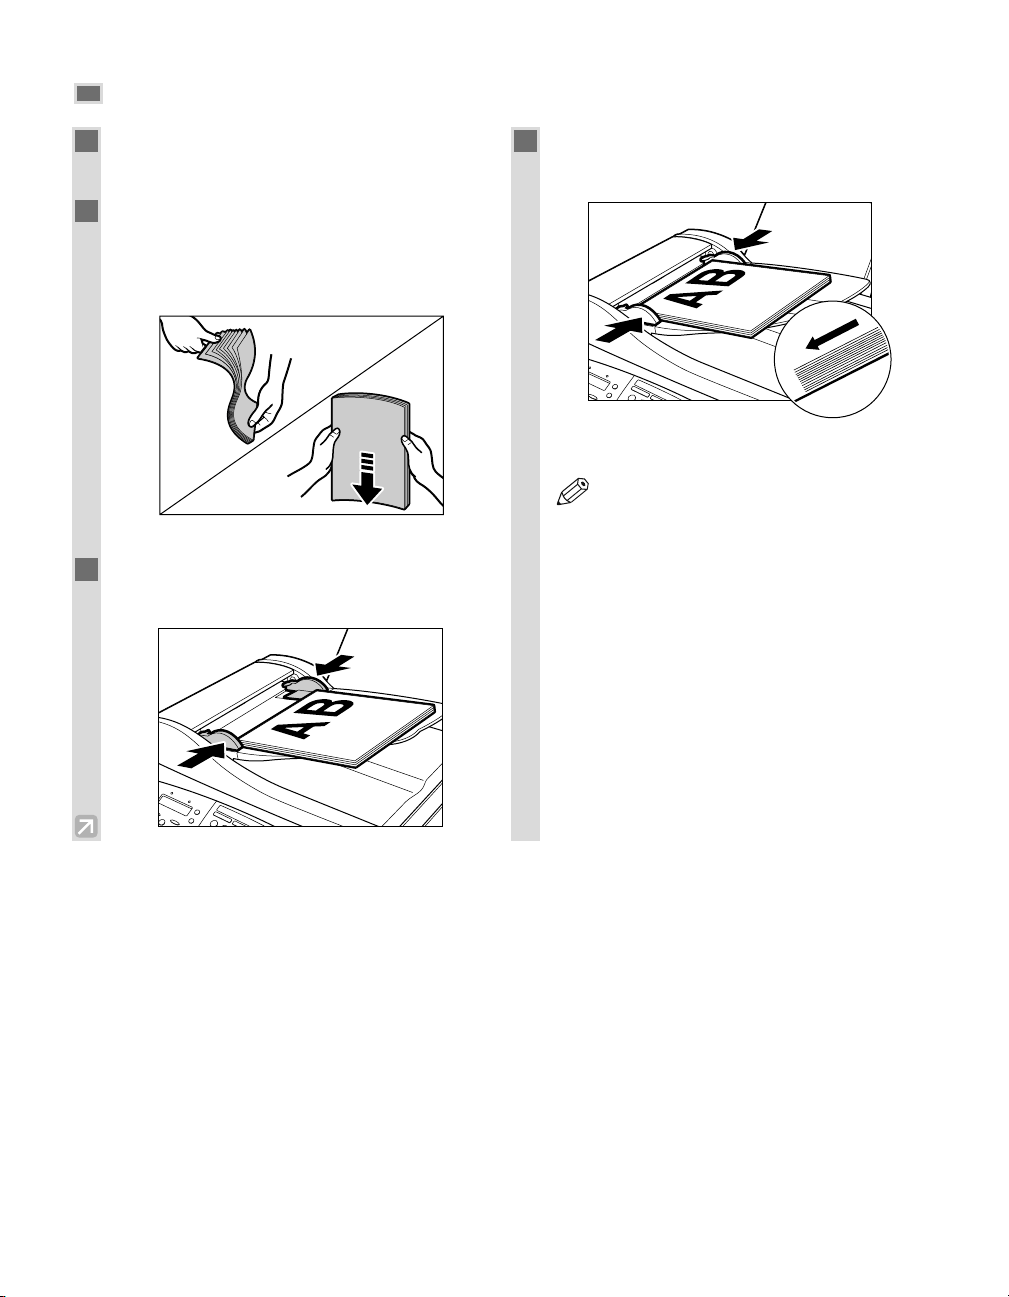
Loading Documents into the ADF (F50 Model Only)
2-4
1
Make sure there is no document on the
platen glass.
2
Fan the edge that will feed into the
machine first then, tap the edge of
multipage documents on a flat surface to
even the stack.
3
Adjust the document guides to the width of
the document.
4
Gently insert the top of the document, face
up, into the ADF until you hear a beep.
The document is now ready for scanning.
• For a multipage document, the pages are
fed one by one from the top of the stack.
• Wait until all pages of your document have
been scanned before starting a new job.
NOTE
Page 14

3-1
Paper Types and Sizes
This section describes the different print media you can use with your machine. To achieve the best possible
printing performance of your machine, be sure to select the correct print media.
Print Media Requirements
Paper Handling
3
Paper Handling
Chapter 3
Print Media
Plain paper
Envelopes
Glossy Photo
Paper
Banner Paper
High Resolution
Paper
Bubble Jet Paper
Transparencies
High Gloss
Photo Film
Glossy Photo
Cards
Size
Letter
(8.5 × 11 in. / 215.9 × 279.4 mm)
Legal
(8.5 × 14 in. / 215.9 × 355.6 mm)
A4
(8.27 × 11.69 in. / 210 × 297 mm)
U.S. Commercial No. 10
(9.5 × 4.1 in. / 241.3 × 104.1 mm)
European DL
(8.66 × 4.33 in. / 220 × 110 mm)
Letter and A4
8.5 × 11 in.
(215.9 × 279.4 mm)
Max. length: 66 in. (1676 mm)
Letter and A4
Letter and A4
Letter and A4
Letter and A4
Weight
17 - 28 lb.
(64 - 105 g/m2)
17 - 28 lb.
(64 - 105 g/m2)
17 - 28 lb.
(64 - 105 g/m2)
Quantity
Approx. 100 sheets*
(Max. 0.4 in. (10 mm) stack)
Approx. 100 sheets*
(Max. 0.4 in. (10 mm) stack)
Approx. 100 sheets*
(Max. 0.4 in. (10 mm) stack)
10 envelopes
10 sheets
2 to 6 sheets (joined)
Approx. 80 sheets
(Max. 0.4 in. (10 mm) stack)
Approx. 100 sheets
(Max. 0.4 in. (10 mm) stack)
30 sheets
1 sheet
20 cards
* 20 lb. (75g/m2) paper
Page 15

3-2
• Be sure to test print media before purchasing large quantities.
• For Canon print media, be sure to purchase the recommended print media types.
• Set the paper thickness lever to the left when loading paper other than envelopes, Banner Paper, and TShirt Transfers. (→ p. 1-4)
Description of print media
■ Plain Paper
The machine supports letter-, legal-, and A4-size paper in portrait orientation. You can use regular copier
paper, cotton bond paper, or typical letterhead. Your machine does not require special ink jet paper. Always
use paper without curls, folds, staples, or damaged edges. Look at the label on the package to see if the paper
has a preferred side for printing.
■ Envelopes
The machine can print on U.S. Commercial No. 10 and European DL envelopes. You may be able to load
other sizes, but Canon cannot guarantee consistent performance on these.
Do not use the following types of envelopes since they may cause problems:
• Envelopes with windows, holes, perforations, cutouts, and double flaps.
• Envelopes made with special coated paper or deeply embossed paper.
• Envelopes with peel-off sealing strips.
• Envelopes with letters enclosed.
■ Glossy Photo Paper GP-301
A high gloss, thick paper that produces the look and feel of a photograph.
■ Banner Paper BP-101
Specifically designed for printing one continuous sheet in a banner format. The connected sheets are divided
by perforations and you can print from two to six sheets at a time.
■ High Resolution Paper HR-101/HR-101N
Designed to produce near-photographic quality print output with sharp and vivid graphics.
■ Bubble Jet Paper LC-301
Developed for high quality printing with minimal or no smearing when in contact with water or damp
surfaces. This specially coated paper produces bright and vivid colors and stands up to normal office
highlighters.
■ Transparencies CF-102
Produce excellent contrast, sharpness, and color, creating crisp and professional overhead presentations.
Do not use normal transparencies in the machine as they do not absorb ink and may cause ink to run.
■ High Gloss Photo Film HG-201
A bright white finish film that lends striking visual power to charts, graphs, and photographic images. It
creates a sharper and more vivid color output than is possible with coated paper.
■ Glossy Photo Cards FM-101
Made from the same stock as Glossy Photo Paper, these cards allow you to print images over the entire area of
the card. Print the image so that it extends beyond the perforations and then trim off the unwanted white
margins.
NOTE
Print Media
Photo Paper Pro
T-Shirt Transfers
Size
4" × 6" and Letter
Letter
Weight Quantity
20 sheets (4" × 6")
1 sheet (Letter)
1 sheet
Page 16

3-3
■ Photo Paper Pro PR-101/ PC-101S
Photo Paper Pro PR-101 is thick paper with a treated surface that enhances gloss and provides superior color
reproduction. It is ideal for printing high quality photographs.
Photo Paper Pro PC-101S is made of the same material as Photo Paper Pro PR-101, this photo-size paper is
intended for printing images that cover the entire surface of the card, without a white border. To take full
advantage of PC-101S, make the images slightly larger than the area indicated by the perforations. This paper
is ideal for printing high quality photographs.
■ T-Shirt Transfers TR-201
This paper is used to produce iron-on transfers.
Paper Guidelines
• Store all print media wrapped and on a flat surface until ready to use. Keep opened packs in their original
packaging, in a cool, dry location.
• Store paper at 64.4° - 75.2°F (18° - 24°C), 40% - 60% relative humidity.
• To avoid paper jams and poor print quality, do not print on damp, curled, wrinkled, or torn paper.
• Use cut-sheet paper only, not paper that comes on a roll.
• Do not use paper thicker than can be used for the machine (→ p. 3-1). Thick paper can cause damage to the
printhead.
• Do not load paper beyond the paper limit mark (|t) or beyond the tabs on the multi-purpose tray. Doing so
may cause problems. Also, make sure there are no gaps on either side of the paper stack.
• If the print media has a print side, set it in the multi-purpose tray with the print side facing upwards.
• The capacity of the output tray is 50 sheets of paper. To prevent paper jams, remove paper from the output tray
before the count reaches 50.
• Let the paper run out before refilling the multi-purpose tray. Avoid mixing new stock with paper already
loaded.
• Do not leave paper stacked in the multi-purpose tray for long periods of time since it may bend or curl and
cause problems.
• Certain environmental conditions, such as extreme temperatures or humidity, can cause some print media to
misfeed in the multi-purpose tray. If you have trouble, feed one sheet at a time.
• Depending on the density of the printed pages, the ink may need time to dry. Within two or three seconds, the
ink becomes smudge resistant. After drying for several minutes, the ink becomes water-resistant.
• If your printed page contains a large amount of graphics, the ink on the page may be damp due to the print
density. Leave the page in the output tray for 30 to 60 seconds to allow the ink to dry. Then remove the page
carefully without touching any surfaces.
• Printing dense graphics on light paper stock may cause the paper to curl. Try using heavier stock.
• If paper curls after printing, remove it immediately; otherwise paper jams may occur.
• The platen (a roller inside the machine) may become inked if you print data beyond the width of the page. If
this happens, clean inside the machine. (→ p. 5-2)
Paper Handling
3
Page 17
3-4
Printable Areas
Please note that the term “printing area” represents both the recommended area for optimum print quality and the
entire area where the machine can technically print.
Printing area (light shade) : Canon recommends that you print within this area.
Printable area (dark shade) : The area in which it is possible to print. However, printing in this area can
adversely affect the print quality or the paper feed precision.
■ Paper
■ Envelope
0.13" (3.4 mm) 0.13" (3.4 mm)
1.04" (26.5 mm)
0.12" (3 mm)
0.13" (3.4 mm) 0.13" (3.4 mm)
1.04" (26.5 mm)
0.12" (3 mm)
FEED
DIRECTION
FEED
DIRECTION
EUROPEAN DL
U.S.
COMMERCIAL
NO. 10
0.12" (3 mm)
0.20" (5 mm)
1.10" (28 mm)
1.10" (28 mm)
1.10" (28 mm)
1.04" (26.5 mm)
1.04" (26.5 mm)
0.25" (6.3 mm)
0.20" (5 mm)
1.04" (26.5 mm)
0.25" (6.4 mm)
0.12" (3 mm)
0.13" (3.4 mm)0.13" (3.4 mm)
0.12" (3 mm)
0.20" (5 mm)
0.25" (6.3 mm)0.25" (6.4 mm)
FEED
DIRECTION
FEED
DIRECTION
FEED
DIRECTION
LEGAL
A4
LETTER
Page 18

3-5
Refer to the Quick Start Guide to load plain paper in the multi-purpose tray.
Loading Envelopes
Loading Paper
Paper Handling
3
1
Push the Open button and lift up the
scanning unit.
2
Move the paper thickness lever to the right
and close the scanning unit.
3
Arrange the stack of envelopes on a firm,
clean surface, and press down firmly on the
edges to make the folds crisp.
• Press all the way around the envelopes to remove
any curls and expel air from inside the envelopes.
Also, press firmly on the area that corresponds to
the edges of the back flap.
4
Remove any curling from the envelopes by
holding the edges diagonally and bending
them gently.
Page 19

3-6
5
Run a pen or other rounded object along
the back flaps to flatten them.
• The flaps should not bulge more than 0.2 inch
(5 mm).
6
Insert the stack of envelopes into the multipurpose tray ➀, and align the right edge of
the stack with the right side of the multipurpose tray. Pinch the paper guide, then
slide it snugly against the left edge of the
stack ➁.
• Insert the envelopes with the print side up (flaps
should not be visible).
• Feed the left side of the envelope (return address
portion) into the multi-purpose tray first.
• Make sure the stack does not exceed the paper
limit mark (|t).
7
Place the tray cover on the multi-purpose
tray.
The machine is now ready to print.
1
2
PAPER LIMIT MARK
PAPER GUIDE
FLAP
Page 20

3-7
Specialty Print Media Guidelines
• Be sure to read all instructions that come with your Canon specialty print media, as these provide
important information on how to achieve the highest print quality.
Follow these guidelines:
• When feeding Transparencies, remove each sheet after it is delivered, being careful not to touch any surfaces.
Do not allow film sheets to stack up in the output tray.
• Let the printed sheets of film or paper dry completely before storing them.
Drying time:
- Canon High Gloss Photo Film HG-201, Canon Glossy Photo Paper GP-301, and Canon Glossy Photo Cards
FM-101: 2 minutes
- Canon Transparencies CF-102: 15 minutes
• When your printed sheets of film have dried completely, cover the printed sides with a sheet of plain (not
coated) paper before storing. This is recommended even if you place the sheets in a clear file or plastic holder.
• When loading Transparencies, insert one sheet of plain paper as the last sheet in the stack.
• Do not leave film in the multi-purpose tray for long periods of time. Dust and dirt may accumulate on the film
resulting in spotty printing.
• To avoid smudging caused by fingerprints, use a pair of thin cloth gloves while loading and handling film.
• To avoid fading, do not expose printed film to prolonged sunlight.
• Store all print media flat. Do not remove them from their protective packaging until you are ready to use them.
• Store unused film at temperatures between 59° and 86°F (15° and 30°C). The relative humidity should be
between 10% and 70%.
NOTE
Using Canon Specialty Print Media
Paper Handling
3
Page 21

3-8
Printing on Banner Paper
Banner Paper is a continuous sheet of paper with perforations at equal distances along its length, where it can be
cut to the length required. For best results, use Canon Banner Paper. You can print banners from two to six sheets
in length.
• Always leave an extra sheet at the end of the banner—just in case the type runs over.
The shaded portion of the illustration below shows the maximum recommended printing area of Banner Paper.
• To prevent ink from running over the edges of the sheet, print within the margins shown above.
• Printing on Banner Paper may require considerable amounts of ink, so use new Ink Tanks if necessary.
• For best print results on Banner Paper, use light design patterns.
NOTE
11" (279 mm)
0.20" (5 mm)1.10" (28 mm)
2 SHEETS MIN.
APPROX. 66"/1676 mm (6 SHEETS MAX.)
0.25"
(6.3 mm)
0.25"
(6.4 mm)
8.5"
(216 mm)
NOTE
1
Place the machine near the edge of a table
so that the paper can flow over the edge as
it exits the machine.
2
Push the Open button and lift up the
scanning unit.
3
Move the paper thickness lever to the right
and close the scanning unit.
Page 22

3-9
Paper Handling
3
4
Cut the Banner Paper along one of the
perforations to the length required.
5
Remove the tray cover and the multipurpose tray.
6
Place the Banner Paper behind the machine
on a flat surface. Then insert the first sheet
and press gently down on the sheet ➀.
Pinch the paper guide, then slide it snugly
against the left edge of the stack ➁.
• Press gently down on the sheet until paper feeding
starts.
• Make sure the sheets behind the machine are
aligned with the direction in which the paper is
fed.
The machine is now ready to print.
7
Set your PC to print on the Banner Paper.
• Allow the paper to flow over the edge of the table
as it exits the machine.
2
1
Page 23

4-1
For information on the types of documents you can copy, their requirements, and details on setting up documents,
→ Chapter 2.
One of the machine’s convenient features is its ability to make high-quality black & white and color copies.
Copying Documents
Documents You Can Copy
Making Copies
4
Making Copies
Chapter 4
1
Press Copy to set Copy Mode.
Ex:
2
Prepare the document and place it on the
platen glass or load it into the ADF. (→ pp.
2-3, 2-4)
3
To make a black & white copy, make sure
the Color/B&W light is off.
To make a color copy, press Color/B&W
to turn on its light.
4
Set copy features if you wish. You can set
the features below.
• Copy quantity (→ p. 4-2)
• Paper size and paper type (→ p. 4-2)
• Enlarging/reducing (→ p. 4-3)
• Image quality (→ p. 4-4)
• Exposure (→ p. 4-4)
• Please note that you cannot change settings
during copying.
5
Press Start to begin copying.
When the machine finishes copying, it beeps.
• To stop copying, press Stop/Reset. For the F50
model, you may need to remove the other
documents from the ADF, and then press
Resume. The jammed document in the ADF will
be ejected automatically.
• If the paper in the multi-purpose tray runs out
during copying, the LCD displays LOAD PAPER
PRESS RESUME KEY. Load paper in the multipurpose tray and then press Resume.
• To copy multiple pages with a lot of
graphics requires a lot of memory. So if
you are copying such documents, separate
the pages into smaller stacks or make the
desired number of copies one at a time.
• For the F50 model, you will be unable to
make multiple copies if MEMORY FULL
appears in the LCD. Print or delete any
documents stored in memory (→ Fax
Guide) to free up space in the machine’s
memory, then start again.
• During copying, you cannot start copying
another job.
• After the machine finishes copying, the
setting will remain. However, if you press
Stop/Reset or if no button is pressed for
one minute, the machine will reset to the
default setting excluding the paper size and
paper type settings.
NOTE
COPYING
100% LTR TEXT
PLAIN
01 01
NOTE
Page 24

4-2
Making Multiple Copies
You can make multiple copies.
Setting Paper Size and Paper Type
You can make copies onto various types of paper. You must set the size and type of paper using the following
procedure.
1
Press Paper Select.
Ex:
2
Use F or E to select paper size.
Ex:
• You can select from the following:
- LTR
- LGL
-A4
3
Press Set.
Ex:
4
Use F or E to select paper type.
Ex:
• You can select from the following:
- PLAIN
For color copying on plain paper.
- GLOSSY
For copying color photos onto Glossy Photo
Paper.
- H.RES.
For color copying onto High Resolution Paper.
- TRANS.
For copying onto Transparencies.
- PHOTO
For copying onto Photo Paper Pro. It is suitable
for copying color photos.
• You can only select the B&W DRAFT and
COLOR FAST image quality settings when
using PLAIN paper. (→ p. 4-4)
5
Press Set.
Ex:
100% LGL TEXT
GLOSSY
SIZE : LGL
TYPE : < GLOSSY >
SIZE : LGL
TYPE : < PLAIN >
SIZE : < LGL >
TYPE : PLAIN
SIZE : < LTR >
TYPE : PLAIN
1
Use the numeric buttons to enter the
number of copies you want.
Ex:
• You can make up to 99 copies.
• During copying, the LCD displays the
remaining number of copies to be made.
Ex:
COPYING
100% LTR TEXT
PLAIN
05
05
01
NOTE
NOTE
Page 25

Making Copies
4
4-3
Setting Enlarging/Reducing
You can enlarge or reduce the copy size using preset copy ratios or using custom copy ratios.
■ Enlarging/Reducing using preset copy ratios
■ Enlarging/Reducing using custom copy ratios
1
Press Enlarge/Reduce.
Ex:
2
Use F or E to select the copy ratio.
Ex:
• You can select from the following:
- 25% MIN.
- 78% LGL → LTR
- 95% A4 → LTR
- 100%
- 212% 4” × 6” → LTR
- 400% MAX.
3
Press Set.
Ex:
78% LTR TEXT
PLAIN
PRESET RATIO
- 78% LGL→LTR +
PRESET RATIO
- 100% +
1
Press Enlarge/Reduce twice.
Ex:
Ex:
2
Use the numeric buttons to enter the copy
ratio.
Ex:
• You can enter the copy ratio from 25% to 400%,
selectable in 1% increment.
• You can also use F or E to set the copy ratio. To
increase the copy ratio, press E. To decrease the
copy ratio, press F.
3
Press Set.
Ex:
80% LTR TEXT
PLAIN
ZOOM 25-400%
- 80% +
ZOOM 25-400%
- 100% +
PRESET RATIO
- 100% +
01
01
Page 26

Setting the Image Quality
To set the image quality, select the resolution the machine uses to copy. Resolution is a measure of the fineness or
clarity of a printout. Low resolutions may cause text and graphics to have a jagged appearance, while higher
resolutions provide smoother curves and lines, crisp text and graphics, and a better match to traditional typeface
designs.
Adjusting the Copy Exposure
You can select the copy exposure the machine uses one of from nine levels. Select according to how light or dark
your document is.
4-4
1
Press Image Quality.
Ex:
(black & white mode)
Ex:
(color mode)
2
Use F or E to select the image quality.
• In black & white mode, you can select from the
following:
- B&W TEXT
Suitable for most text-only documents.
- B&W PHOTO
Suitable for documents that contain images such
as photos. With this setting, areas of the
document that contain photos are automatically
scanned with 64 levels of gray, rather than just
two (black & white).
- B&W DRAFT*
Suitable for high-speed copying at a lower
resolution.
• In color mode, you can select from the following:
- COLOR NORMAL
Suitable for normal color copying.
- COLOR FINE
Suitable for fine color copying.
- COLOR FAST*
Suitable for high-speed color copying at a lower
resolution.
* These settings are available when you select
PLAIN in the paper type setting. (→ p. 4-2)
3
Press Set.
Ex:
(black & white mode)
Ex:
(color mode)
• When using COLOR FAST, if the color of
the output is different from that expected,
please select COLOR NORMAL or COLOR
FINE and copy again.
NOTE
100% LTR FINE
PLAIN
100% LTR PHOTO
PLAIN
IMAGE QUALITY
COLOR NORMAL
IMAGE QUALITY
B&W TEXT
1
Press Exposure.
Ex:
2
Use F or E to adjust the copy exposure.
For a lighter copy exposure, press F. For a
darker copy exposure, press E.
Ex:
3
Press Set.
Ex:
• When setting the exposure to be lighter, the
LCD displays the left bar in reverse. When
setting the exposure to be darker, the LCD
displays the right bar in reverse.
NOTE
100% LTR TEXT
PLAIN
DENSITY
-LT DK+
DENSITY
-LT DK+
01
01
01
Page 27

4-5
Making Copies
4
The machine has the following SPECIAL COPY features. These features allow you to create special copies
easily by selecting from menus.
– IMAGE REPEAT: Repeating an image over the paper
– MIRROR IMAGE: Creating a mirror image
– ENTIRE IMAGE: Shrinking an image to fit onto the paper
These features are only available in Copy Mode.
• Please note that you cannot set the SPECIAL COPY features during copying.
• After the machine finishes copying, the current setting will remain. However, if you press Stop/Reset
or if no button is pressed for one minute, the machine will reset to the default setting.
Repeating an Image over the Paper
Use IMAGE REPEAT to print multiple copies of an image on a single sheet. You can select the number of times
you want to repeat the original image.
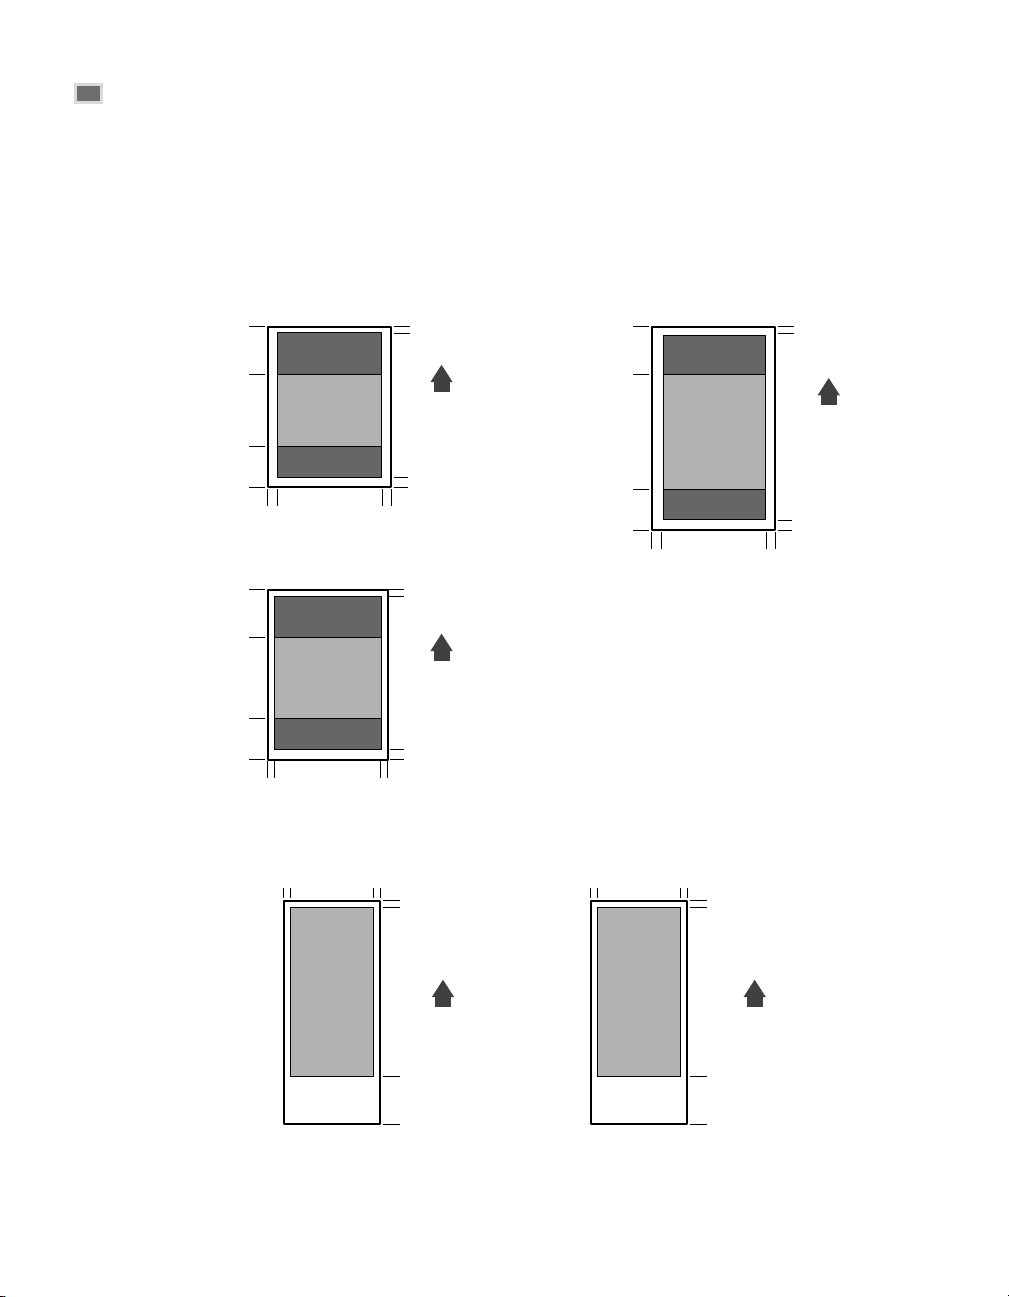
■ Scanned Area of a Document
The scanned area of a document differs between documents placed on the platen glass and documents loaded into
the ADF.
• The examples below show the scanned areas when copying a document on the same size of paper repeated 2 ×
2 times.
The scanned area of a document depends on the paper size to be printed on and the number of times which it is repeated.
• The examples below show the scanned areas when copying a document placed on the platen glass onto the
same size of paper.
• The scanned area of a document also depends on the enlargement/reduction ratio.
NOTE
AB
AB
2X2
SCANNED AREA
3X3
SCANNED AREA
AB
AB
Platen Glass (face down) ADF (face up)
SCANNED AREA SCANNED AREA
Special Features
NOTE
Page 28

4-6
1
Press Copy to set Copy Mode.
2
Prepare the document and place it on the
platen glass or load it into the ADF. (→ pp.
2-3, 2-4)
3
To make a black & white copy, make sure
the Color/B&W light is off.
To make a color copy, press Color/B&W
to turn on its light.
4
Set copy features if you wish. You can set
the features below.
• Copy quantity (→ p. 4-2)
• Paper size and paper type (→ p. 4-2)
• Enlarging/reducing (→ p. 4-3)
• Image quality (→ p. 4-4)
• Exposure (→ p. 4-4)
• Please note that you cannot change settings
during copying.
5
Press Menu.
6
Press Set twice.
7
Use F or E to select the number of
vertical repetitions.
Ex:
• You can select from 1, 2, 3, 4.
8
Press Set.
Ex:
9
Use F or E to select the number of
horizontal repetitions.
Ex:
• You can select from 1, 2, 3, 4.
10
Press Set.
Ex:
11
Press Start to begin copying.
When the machine finishes copying, it beeps.
100% LTR TEXT
REPEAT 3× 3
VERTICAL 3
HORIZONTAL < 3 >
VERTICAL 3
HORIZONTAL < 2 >
VERTICAL < 3 >
HORIZONTAL 2
VERTICAL < 2 >
HORIZONTAL 2
SPECIAL COPY
1.IMAGE REPEAT
MENU
1.SPECIAL COPY
01
NOTE
Page 29

4-7
Creating a Mirror Image
Use MIRROR IMAGE to print a mirror image of the original.
Making Copies
4
1
Press Copy to set Copy Mode.
2
Prepare the document and place it on the
platen glass or load it into the ADF. (→ pp.
2-3, 2-4)
3
To make a black & white copy, make sure
the Color/B&W light is off.
To make a color copy, press Color/B&W
to turn on its light.
4
Set copy features if you wish. You can set
the features below.
• Copy quantity (→ p. 4-2)
• Paper size and paper type (→ p. 4-2)
• Enlarging/reducing (→ p. 4-3)
• Image quality (→ p. 4-4)
• Exposure (→ p. 4-4)
• Please note that you cannot change settings
during copying.
5
Press Menu.
6
Press Set.
7
Use F or E to select MIRROR IMAGE.
8
Press Set.
Ex:
9
Press Start to begin copying.
When the machine finishes copying, it beeps.
100% LTR TEXT
MIRROR IMAGE
SPECIAL COPY
2.MIRROR IMAGE
SPECIAL COPY
1.IMAGE REPEAT
MENU
1.SPECIAL COPY
01
NOTE
Page 30

4-8
Shrinking an Image to Fit onto the Paper
To copy an original document with an image occupying the entire page onto a page of the same size as the
original, use ENTIRE IMAGE to fit the original image into the required paper size.
• When using legal-size documents with the F30 model, the lowermost section of the document may not
be copied.
NOTE
1
Press Copy to set Copy Mode.
2
Prepare the document and place it on the
platen glass or load it into the ADF. (→ pp.
2-3, 2-4)
3
To make a black & white copy, make sure
the Color/B&W light is off.
To make a color copy, press Color/B&W
to turn on its light.
4
Set copy features if you wish. You can set
the features below.
• Copy quantity (→ p. 4-2)
• Paper size and paper type (→ p. 4-2)
• Image quality (→ p. 4-4)
• Exposure (→ p. 4-4)
• Please note that you cannot change settings
during copying.
5
Press Menu.
6
Press Set.
7
Use F or E to select ENTIRE IMAGE.
8
Press Set.
Ex:
• When enlarging/reducing is set in
conjunction with ENTIRE IMAGE, only
copy ratios less than 101% can be used.
9
Press Start to begin copying.
When the machine finishes copying, it beeps.
NOTE
90% LTR TEXT
ENTIRE IMAGE
SPECIAL COPY
3.ENTIRE IMAGE
SPECIAL COPY
1.IMAGE REPEAT
MENU
1.SPECIAL COPY
01
NOTE
Page 31

5-1
Your machine requires little periodic maintenance. This section describes the necessary cleaning procedures for
your machine.
Turn off the power and disconnect the power cord before cleaning the machine. When you are finished, reconnect
the power cord and turn on the power again.
• Be sure to turn off the power and disconnect the power cord before cleaning the machine.
• For the F50 model, print any documents stored in memory before disconnecting the power cord, since
documents in memory are erased when the power is disconnected. (→ Fax Guide)
• Do not use tissue paper, paper towels, or similar materials for cleaning; they can stick to the
components or generate static charges.
Use a soft cloth to avoid scratching the components.
• Never use volatile liquids such as thinners, benzene, acetone, or any other chemical cleaner to clean the
interior of the machine; these can damage the machine’s components.
Cleaning the Exterior
Wipe the machine’s exterior (shaded area) with a clean, soft, lint-free cloth moistened with water or diluted
dishwashing detergent solution.
(F50 model) (F30 model)
Cleaning the Scanning Area
Wipe the scanning area (shaded area) with a clean, soft, lint-free cloth moistened with water, then wipe with a
clean, soft, dry, lint-free cloth.
(F50 model) (F30 model)
PLATEN GLASS
PLATEN GLASS
TRANSPARENT SHEET
Periodic Cleaning
Maintenance
5
Maintenance
Chapter 5
CAUTION
Page 32

5-2
Cleaning Inside the Machine
To prevent ink spots and paper dust from accumulating inside the machine and affecting print quality, clean
the unit’s print area periodically.
1
Turn off the power and disconnect the
power cord from the machine.
2
Push the Open button and lift up the
scanning unit.
• Do not touch the components shown or
any metal parts since this may adversely
affect operation of the machine and/or
affect print quality.
3
Use a clean, soft, dry, lint-free cloth to
remove any ink or paper debris from the
machine’s interior (shaded area), especially
around the platen and pinch roller.
• Be careful not to touch the Printhead (Cartridge)
or its holder.
4
When you are finished, close the scanning
unit.
• Be sure to close the scanning unit until it locks
into place, or the machine will not function
properly.
5
Reconnect the power cord and turn on the
power.
PLATEN
PINCH ROLLER
CAUTION
ROUND SHAFT
TRANSPARENT FILM
RIBBON CABLE
Page 33

5-3
Cleaning the Roller
Clean the roller when envelopes do not feed correctly.
For best results, first clean the rollers three times without setting any paper. Then, set three sheets of letter- or A4size paper and perform roller cleaning a further three times.
Cleaning Inside the ADF (F50 Model Only)
Maintenance
5
1
Turn off the power and disconnect the
power cord from the machine.
2
Open the feeder cover.
3
Use a clean, soft, dry, lint-free cloth to
wipe up paper dust from the shaded area.
• If the scanner components are dirty, the
documents you send or copy will also be
dirty.
4
When you are finished, close the feeder
cover by pressing it down.
• Be sure to close the feeder cover until it locks into
place, or the machine will not function properly.
5
Reconnect the power cord and turn on the
power.
NOTE
1
Press Menu.
2
Use F or E to select PRINTER
SETTINGS.
Ex:
3
Press Set twice.
4
Use F or E to select ROLLER
CLEANING.
5
Press Set.
• The machine cleans the roller.
CLEANING
4.ROLLER CLEANING
CLEANING
1.NOZZLE CHECK
PRINTER SETTINGS
1.CLEANING
MENU
7.PRINTER SETTINGS
Page 34

5-4
• For optimum printing results and to avoid printing problems, Canon recommends that you only use the
Canon Ink Tanks described in this guide.
There are four Ink Tanks: Black, cyan, magenta, and yellow.
Guidelines
• Store Ink Tanks at room temperature.
• Use Ink Tanks within a year after purchase. Once opened, use Ink Tanks within six months.
• Do not remove Ink Tanks from the machine unnecessarily, or the ink in them may harden.
• Do not leave empty Ink Tanks in a Printhead (Cartridge). Remove them immediately when they run out of ink,
and replace them with new ones. Do not leave a Printhead (Cartridge) with any of its Ink Tanks missing as the
ink in the Printhead (Cartridge) will dry and adversely affect print quality.
• Replace the Ink Tank with a new one. Replacing the Ink Tank with a used one causes trouble with the
printhead. It will also make it difficult to determine the correct time to change the Ink Tanks.
• The ink in the Ink Tanks is difficult to clean up if spilled. Follow these precautions when handling:
- Carefully remove Ink Tanks from packaging.
- Do not attempt to disassemble or refill Ink Tanks.
- Do not shake or drop Ink Tanks, or tip the printhead downwards.
• The ink in the Ink Tanks is soluble. Do not touch printed paper with wet hands, or spill any liquid onto it. It
may cause an ink spread.
• Keep Printhead (Cartridge) and Ink Tanks out of the reach of children. If a child inadvertently
ingests ink, consult a physician immediately.
CAUTION
Ink Tank
BCI-3eBK
BCI-3eC
Ink Tank
BCI-3eM
Ink Tank
BCI-3eY
Ink Tank
Ink Tanks
NOTE
Ink T
BCI-3eBK
a
nk
Ink T
BCI-3eC
ank
I
n
k
B
T
C
a
n
I
-3
k
e
M
In
k
BCI-3eY
T
a
n
k
YELLOW INK TANK (BCI-3eY)
MAGENTA INK TANK (BCI-3eM)
CYAN INK TANK (BCI-3eC)
BLACK INK TANK (BCI-3eBK)
Page 35

5-5
Maintenance
5
When to Replace an Ink Tank
How frequently you need to replace an Ink Tank depends on how you use your machine. If you print a lot of
graphics, halftones, or grayscales, you will need to replace them more often than if you print mainly text.
In general, you will need to replace an Ink Tank in the following situations:
• If you have been using an Ink Tank for over six months.
• If your output is blank.
• If your printouts appear to be missing a color.
• If one of the messages below appears in the LCD:
C INK EMPTY (Cyan Ink Tank is empty.)
M INK EMPTY (Magenta Ink Tank is empty.)
Y INK EMPTY (Yellow Ink Tank is empty.)
K INK EMPTY (Black Ink Tank is empty.)
If more than one Ink Tank is empty, several letters may appear (e.g. C Y INK EMPTY).
When one or more of the above messages appear in the LCD, replace the Ink Tank(s) as described later in this
chapter. If no message appears, refer to the flow chart to determine the problem. (→ p. 5-7)
Page 36

5-6
Replacing an Ink Tank
This section describes how to replace an Ink Tank in an installed Printhead (Cartridge). Before replacing an Ink
Tank, be sure to read the section When to Replace an Ink Tank. (→ p. 5-5)
• Do not replace Ink Tanks while the machine is printing or performing another operation.
IMPORTANT
1
Make sure the power is turned on.
2
Push the Open button and lift up the
scanning unit.
• The holder automatically moves to the center of
the machine.
• Do not try to manually move or stop the
holder since this may damage the
machine.
• Do not touch any metal parts since this
may adversely affect operation of the
machine and/or affect print quality.
3
Press on the tab to release the empty Ink
Tank, then remove it from its slot.
• Do not remove the Printhead (Cartridge)
from the machine.
• Do not remove several Ink Tanks
together. Remove and replace each one
individually to ensure that they are
inserted in the correct slot. Inserting
them in the wrong slot will cause colors
to print incorrectly.
• Discard the old Ink Tank immediately according to
the local laws and regulations for disposal of
consumables. You may want to place it in a bag to
keep any residual ink from spilling.
• Spilled ink can stain any surface; protect yourself
and your work area.
4
To install the new Ink Tank, → Quick Start
Guide.
CAUTION
CAUTION
Page 37

5-7
The printhead contains nozzles through which ink is propelled onto the paper. To maintain the best possible print
quality, these nozzles need to be cleaned from time to time. Your machine is equipped with a printhead cleaning
function that does this.
■ Flow Chart of Printhead Maintenance
• If the pattern does not improve even after performing HEAD REFRESHING, turn off the power and
perform HEAD REFRESHING again after 24 hours. If the pattern still does not improve, the Printhead
(Cartridge) may be damaged. Contact the Canon Customer Care Center to have the Printhead
(Cartridge) replaced.
NOTE
3 Perform deep printhead
cleaning. (HEAD REFRESHING
setting) (→ p. 5-8)
2 Perform normal printhead
cleaning (HEAD CLEANING
setting). (→ p. 5-8)
You can perform normal
printhead cleaning up to
three times.
2 Align the printhead.
(→ Quick Start Guide)
1 Print the nozzle check pattern (→ p. 5-8), and check the following;
• If the nozzle check pattern is printed clearly.
• If the printhead position is aligned.
The printhead is misaligned.
The pattern is broken, missing,
or a specific color is not printed.
The pattern is not improved.
Testing and Cleaning the Printhead
Maintenance
5
Page 38

5-8
Printing the Nozzle Check Pattern
Print the nozzle check pattern to test the printhead installed in the machine. This test shows if each printhead
nozzle is operating properly.
Cleaning the Printhead
If the printed nozzle check pattern is broken, missing, or a specific color is not printed, clean the printhead.
• Cleaning the printhead consumes a small amount of ink. Cleaning too often reduces the amount of ink
in the Ink Tanks.
NOTE
1
Press Menu.
2
Use F or E to select PRINTER
SETTINGS.
Ex:
3
Press Set twice.
4
Use F or E to select HEAD CLEANING
(normal printhead cleaning) or HEAD
REFRESHING (deep printhead cleaning).
Ex:
5
Press Set.
• The machine cleans the printhead which takes
about 30 to 50 seconds.
CLEANING
2.HEAD CLEANING
CLEANING
1.NOZZLE CHECK
PRINTER SETTINGS
1.CLEANING
MENU
7.PRINTER SETTINGS
1
Press Menu.
2
Use F or E to select PRINTER
SETTINGS.
Ex:
3
Press Set three times.
• The machine prints the nozzle check pattern.
CLEANING
1.NOZZLE CHECK
PRINTER SETTINGS
1.CLEANING
MENU
7.PRINTER SETTINGS
Nozzle Check Pattern
If the pattern is broken, missing, or a specific color is not
printed, → Cleaning the Printhead, below.
Printhead Position
If the pattern is not uniform, → Quick Start Guide.
If lateral lines are visible, → Quick Start Guide.
Page 39

6
6-1
Jams in the Multi-Purpose Tray
If print media jams in the multi-purpose tray, the LCD displays CLEAR PAPER JAM.
• For the F50 model, if the paper jam occurred while a fax was being received into the machine’s
memory, that fax will be printed automatically when the jam is cleared and you press Resume.
■ Removing the Jammed Paper from the Paper Output
NOTE
Clearing Jams
Troubleshooting
Troubleshooting
Chapter 6
1
Gently pull any jammed paper out of the
paper output.
• If you cannot see any jammed paper in the paper
output, remove it from the inside of the scanning
unit. (→ p. 6-2)
2
Press Resume to start the operation again.
• If you are printing from a Windows®application,
follow the instructions displayed by the software
on your PC.
Page 40

6-2
■ Removing the Jammed Paper from the Scanning Unit
Jams in the ADF (F50 Model Only)
When a document is jammed or misfed in the ADF, the LCD displays DOC.TOO LONG.
• You do not need to turn off the power when you remove the jammed documents from the ADF.
NOTE
1
Turn off the power.
2
Push the Open button and lift up the
scanning unit.
3
Gently gather the jammed paper to the
center of the opening, and then remove it.
• Be careful not to touch the components
inside the machine.
4
Close the scanning unit and turn on the
power.
5
Press Resume to start the operation again.
• If you are printing from a Windows®application,
follow the instructions displayed by the software
on your PC.
CAUTION
1
Press Stop/Reset.
2
If a multipage document is loaded, remove
all document except for jammed page(s)
from the ADF.
3
Open the feeder cover.
Page 41

6
6-3
• When a paper jam occurs by pressing Stop/Reset during copying or sending, remove the other
documents from the ADF, and then press Resume. The jammed document in the ADF will be ejected
automatically.
NOTE
Troubleshooting
4
Raise the paper release lever and slide the
paper under the roller toward the left of the
machine.
5
Pull out the jammed document from the
ADF.
6
Lower the paper release lever and then
close the feeder cover.
PAPER RELEASE LEVER
Page 42

6-4
The following messages are displayed in the LCD when the machine is performing a function or encounters an error.
This section describes the general messages and ones related to copy functions. For the messages related to fax
functions, → Fax Guide.
LCD Messages
Message (Error Code)
C INK EMPTY
CARTRIDGE
JAMMED
CHECK PAPER
SIZE
CHECK PRINTER
CLEAR ADF
(F50 model only)
CLEAR PAPER JAM
COVER OPEN
K INK EMPTY
Cause
The Cyan Ink Tank in the Printhead
(Cartridge) is empty.
The holder cannot move. This is normally
due to a paper jam.
The size of the paper in the multi-purpose
tray and that specified in the PAPER
SIZE setting are different.
There may be an obstruction that is not
allowing the holder mechanism to move.
The Printhead (Cartridge) may be
defective.
The waste ink tank (which holds the ink
used for printhead cleaning) may be full.
There is a paper jam in the ADF.
There is a paper jam.
You opened the scanning unit during an
operation.
The Black Ink Tank in the Printhead
(Cartridge) is empty.
Action
Replace the Ink Tank. (→ p. 5-6)
Clear the paper jam or whatever is
obstructing the holder and then press
Resume. Do not attempt to move the
holder manually.
Load the correct paper size or change the
PAPER SIZE setting. (→ p. 4-2)
Check for any obstruction (paper clip,
small object, etc.). Check also for a paper
jam and clear the jam if necessary (→ pp.
6-1, 6-2). Then press Resume and start
again.
Press Resume. Reinstall the Printhead
(Cartridge) (→ Quick Start Guide) and
start again.
In either case, if the error does not clear,
try turning off the power. Wait several
minutes, then turn on again.
Contact the Canon Customer Care Center
to have the waste ink tank replaced
immediately.
Remove the document you are trying to
copy or send from the ADF and press
Resume (→ p. 6-2). Then start again.
Clear the paper jam (→ pp. 6-1, 6-2) and
reload paper in the multi-purpose tray.
Then press Resume.
Close the scanning unit.
Replace the Ink Tank. (→ p. 5-6)
Page 43

6
6-5
Troubleshooting
Message (Error Code)
LOAD PAPER
(PRESS RESUME
KEY)
M INK EMPTY
MEMORY FULL
(#037)
(F50 model only)
WAIT COOLING
WRONG CARTRIDGE
Y INK EMPTY
Cause
The multi-purpose tray is empty.
The Magenta Ink Tank in the Printhead
(Cartridge) is empty.
The machine’s memory is full because it
has received too many documents, or a
very long or detailed document.
The machine’s memory is full because
you tried to send or copy too many pages
at once, or a very long or detailed
document.
During printing, the printhead may have
become too hot.
The Printhead (Cartridge) isn’t installed
correctly.
The Yellow Ink Tank in the Printhead
(Cartridge) is empty.
Action
Load paper in the multi-purpose tray (→
Quick Start Guide). Make sure the stack
is below the paper limit mark (|t).
Then press Resume.
Replace the Ink Tank. (→ p. 5-6)
Print any documents stored in memory
(→ Fax Guide). Then start again.
Divide the document and send or copy
each part separately. To free up space in
the machine’s memory, print or delete
any documents in memory you no longer
need. (→ Fax Guide)
Allow the machine to cool down. The
machine will resume printing when it has
cooled down.
Retry to install the Printhead (Cartridge).
Replace the Ink Tank. (→ p. 5-6)
Page 44

6-6
❚ Paper does not feed correctly.
The multi-purpose tray may contain too many sheets.
• Make sure the paper stack in the multi-purpose tray does not exceed the paper limit mark (|t). (→ Quick Start
Guide)
Paper may not be loaded correctly.
• Make sure the paper stack is loaded properly in the multi-purpose tray, and that the paper guide is adjusted
correctly. (→ Quick Start Guide)
❚ Paper feeds skewed. (Printing is skewed.)
Paper may not be loaded correctly.
• Make sure the paper stack is loaded properly in the multi-purpose tray, and that the paper guide is adjusted
correctly. (→ Quick Start Guide)
• Make sure the right edge of the paper stack is aligned with the right side of the multi-purpose tray and the
paper guide is aligned with the left edge of the stack. (→ Quick Start Guide)
• Make sure the paper exit path is clear.
❚ Multiple sheets feed into the machine at the same time.
Paper may not be loaded correctly.
• Make sure the paper stack is loaded properly in the multi-purpose tray, and that the paper guide is adjusted
correctly. (→ Quick Start Guide)
Sheets of paper may be sticking together.
• Be sure to fan the paper stack before loading it in the multi-purpose tray. This keeps the sheets of paper from
sticking together. (→ Quick Start Guide)
The multi-purpose tray may contain too many sheets.
• Make sure the paper stack in the multi-purpose tray does not exceed the paper limit mark (|t). (→ Quick Start
Guide)
• Do not exceed the maximum loading capacity of the multi-purpose tray. (→ p. 3-1)
• Do not force the paper stack into the multi-purpose tray.
Different types of paper may be loaded in the multi-purpose tray.
• Load only one type of paper.
• Make sure you load paper that meets the paper requirements for the machine. (→ Chapter 3)
❚ Transparencies do not feed correctly.
The Transparencies may not be loaded correctly.
• Make sure they are loaded properly (→ Quick Start Guide). Do not load more than 30 Transparencies in the
multi-purpose tray.
❚ Repeated paper jams occur.
The paper you are using may be causing the jams.
• Be sure to fan the paper stack before loading it in the multi-purpose tray. This keeps the sheets of paper from
sticking together. (→ Quick Start Guide)
• Check that the paper you are using and your printing environment are within the specifications of the machine.
(→ Chapter 3)
Paper Feeding Problems
Page 45

6
6-7
Troubleshooting
❚ Envelopes do not feed correctly.
Envelopes may not be loaded correctly.
• Make sure the envelopes are loaded properly (→ p. 3-5). Do not load more than 10 envelopes in the multipurpose tray.
• Perform roller cleaning. (→ p. 5-3)
The envelopes you are using may not meet the requirements for the machine.
• Envelopes must be U.S. Commercial No. 10 or European DL envelopes. (→ p. 3-1)
• For additional troubleshooting, → MultiPASS Suite User’s Guide.
❚ The machine will not make a copy.
One or more Ink Tanks in the installed Printhead (Cartridge) may be empty.
• Check for an error message in the LCD (→ p. 6-4) and replace if necessary. (→ p. 5-6)
The document may not have been loaded correctly.
• Remove the document, stack it if necessary, and place it on the platen glass or load it into the ADF correctly.
(→ p. 2-3)
• Make sure the feeder cover is closed.
The Printhead (Cartridge) or Ink Tanks may not be installed properly.
• Make sure the Printhead (Cartridge) and Ink Tanks are installed properly. (→ Quick Start Guide)
• Be sure to remove the orange protective cap from the Printhead (Cartridge) before you install it. (→ Quick
Start Guide)
The machine may not be operating properly.
• Print the nozzle check pattern. (→ p. 5-8)
❚ MEMORY FULL appears in the LCD when making multiple copies. (F50 model only)
The document you are copying may have too much graphics.
• If multiple pages are being copied, separate the pages into smaller stacks. If not, make the desired number of
copies one at a time as needed.
The machine’s memory is full.
• Print or delete any documents stored in memory (→ Fax Guide) to free up space in the machine’s memory,
then start again.
• For additional troubleshooting, → Print Quality Problems.
NOTE
Copying Problems
NOTE
Page 46

6-8
❚ The print quality is not what you expect; print is not clear, is splashed, has missing
dots or white streaks.
The print media you are using may not be supported by the machine.
• Make sure you are using the recommended print media. (→ p. 3-1)
You may be printing on the wrong side of the paper.
• Some papers have a “right” side for printing. If the print quality is not as clear as you would like it to be, try
turning the paper over and printing on the other side.
The nozzles on the printhead may be clogged.
• Refer to the flow chart (→ p. 5-7) and clean the printhead if necessary. (→ p. 5-8)
The Printhead (Cartridge) or Ink Tanks may not be installed properly.
• Make sure the Printhead (Cartridge) and Ink Tanks are installed properly. (→ Quick Start Guide)
• Be sure to remove the orange protective cap from the Printhead (Cartridge) before you install it. (→ Quick
Start Guide)
One or more Ink Tanks in the installed Printhead (Cartridge) may be empty.
• Check for an error message in the LCD (→ p. 6-4) and replace if necessary. (→ p. 5-6)
You may not have aligned the printhead after installing a new Printhead (Cartridge).
• Align the printhead. (→ Quick Start Guide)
❚ The printout contains blurred or smudged ink.
The print media you are using may not be supported by the machine.
• Make sure you are using the recommended print media. (→ p. 3-1)
You may be printing on the wrong side of the paper.
• Some papers have a “right” side for printing. If the print quality is not as clear as you would like it to be, try
turning the paper over and printing on the other side.
❚ The print side is rubbed and stained.
The paper thickness lever is not set correctly.
• When you print images that contain large quantities of ink, the paper may curl and rub. Move the paper
thickness lever to the right.
❚ The machine prints only in black. (You are printing from an application that supports
color printing but your output is black ink only.)
The Printhead (Cartridge) or Ink Tanks may not be installed properly.
• Make sure the Printhead (Cartridge) and Ink Tanks are installed properly. (→ Quick Start Guide)
• Be sure to remove the orange protective cap from the Printhead (Cartridge) before you install it. (→ Quick
Start Guide)
The printhead may need cleaning.
• Refer to the flow chart (→ p. 5-7) and clean the printhead if necessary. (→ p. 5-8)
❚ Colors are missing.
The printhead may need cleaning.
• Refer to the flow chart (→ p. 5-7) and clean the printhead if necessary. (→ p. 5-8)
Print Quality Problems
Page 47

6
6-9
Troubleshooting
❚ Colors in a line are uneven or different from previous lines.
The print settings may not be the best for the images you are printing.
• Experiment with different settings and paper types.
❚ Hue changes.
The nozzles on the printhead may be clogged.
• Refer to the flow chart (→ p. 5-7) and clean the printhead if necessary. (→ p. 5-8)
One or more Ink Tanks in the installed Printhead (Cartridge) may be empty.
• Check for an error message in the LCD (→ p. 6-4) and replace if necessary. (→ p. 5-6)
• For additional troubleshooting, → MultiPASS Suite User’s Guide.
❚ The Alarm light comes on and the machine beeps while printing.
The machine may have a paper jam.
• Clear the paper jam. (→ p. 6-1)
• If the machine has no paper jam, turn off and unplug the machine and wait five seconds, then plug and turn on
the machine again. If the problem is fixed, the Alarm light will turn off, the holder will move to its home
position on the right side of the machine, and the LCD will return to standby mode. If the Alarm light remains
lit, contact the Canon Customer Care Center.
❚ The Printhead (Cartridge) moves, but ink does not appear.
The Printhead (Cartridge) or Ink Tanks may not be installed properly.
• Make sure the Printhead (Cartridge) and Ink Tanks are installed properly. (→ Quick Start Guide)
• Be sure to remove the orange protective cap from the Printhead (Cartridge) before you install it. (→ Quick
Start Guide)
The nozzles on the printhead may be clogged.
• Refer to the flow chart (→ p. 5-7) and clean the printhead if necessary. (→ p. 5-8)
One or more Ink Tanks in the installed Printhead (Cartridge) may be empty.
• Check for an error message in the LCD (→ p. 6-4) and replace if necessary. (→ p. 5-6)
❚ The printed output is not what you expected.
The printer cable may not be securely connected to the machine and PC.
• Check the printer cable connection. (→ Quick Start Guide)
The printer cable may not be the correct type.
• Make sure you have the correct printer cable type. (→ Quick Start Guide)
The printer cable may be too long.
• Make sure you have the correct length cable. (→ Quick Start Guide)
Printing Problems
NOTE
Page 48

6-10
❚ Printout does not match paper size.
Paper may not be loaded and aligned correctly in the multi-purpose tray.
• Make sure the paper is loaded and aligned correctly. (→ Quick Start Guide)
• If the printhead prints on the platen, clean the ink off the platen by launching Notepad and setting the
application to print 2 or 3 blank sheets of paper.
❚ The machine suspends printing after each line.
The printhead may have become too hot. If this happens, the machine may be slowing its printing speed at
the end of each line to protect the printhead.
• Stop your print operation and wait several minutes to allow the machine to cool. Then start your operation
again.
❚ The printout curls.
Your page may include a large amount of ink.
• Leave the page in the output tray for 30 to 60 seconds to allow the ink to dry. Then remove the page carefully
without touching any surfaces.
• The paper you are using may be too thin. Printing dense graphics on light paper stock may cause the paper to
curl. Try using heavier stock.
• For additional troubleshooting, refer to Print Quality Problems (→ p. 6-8) and the MultiPASS Suite
User’s Guide.
NOTE
NOTE
Page 49

6
6-11
Troubleshooting
❚ The machine has no power.
The power cord may not be plugged in securely.
• Check that the power cord is plugged securely into the machine and into the wall outlet, and the power is
turned on (→ Quick Start Guide). If the machine is plugged into a power strip, make sure the power strip is
plugged in and turned on.
The power cord may not be supplying power.
• Check the power cord by substituting with another, or by using a voltmeter to test it for continuity.
❚ The machine will not print reports.
The Black Ink Tank of the installed Printhead (Cartridge) may be empty.
• Check for an error message in the LCD (→ p. 6-4), and replace if necessary. (→ p. 5-6)
❚ Nothing appears in the LCD.
The power cord may not be plugged in securely.
• Check that the power cord is plugged securely into the machine and into the wall outlet, and the power is
turned on (→ Quick Start Guide). If the machine is plugged into a power strip, make sure the power strip is
plugged in and turned on. If the LCD remains blank, turn off the power and unplug the machine, wait five
seconds, then plug it in again.
If you have a problem with your machine and you cannot solve it by referring to the information in this chapter,
contact the Canon Customer Care Center.
Canon’s support personnel are trained in the technical support of Canon’s products and should be able to help you
with your problem.
• If the machine makes strange noises, emits smoke or strange smells, turn off the power, unplug it
immediately, and then contact the Canon Customer Care Center. Do not attempt to disassemble
or repair the machine yourself.
• Attempting to repair the machine yourself may void the limited warranty.
If you need to contact Canon directly, make sure you have the following information:
• Product name
MultiPASS F50/F30
• Serial number
The serial number is on the label located at
the back of the machine.
• MultiPASS Suite version number
→ MultiPASS Suite User’s Guide
• Place of purchase
• Nature of problem
• Steps you have taken to solve the problem and the results
IMPORTANT
CAUTION
If You Cannot Solve the Problem
General Problems
Page 50

7-1
The machine menu system allows you to customize the way your machine operates. It consists of various menus,
each containing settings that control different functions of your machine.
Available menus and the LCD display differ depending on the machine type (F50 or F30 model) and the current
mode (Copy, Fax, or Scan Mode). This section explains the procedure to access the menus related to all modes in
common, and menus related only to the Copy and Scan Modes.
Press Copy or Scan to select each mode.
• For the menus related only to the Fax mode, → Fax Guide.
Accessing the Menus
The following illustrates the menu items in hierarchical order.
• The LCD displays shown below are the menus from the F50 model in the Copy Mode.
NOTE
Understanding the Menu System
7
Summary of Settings
Summary of Settings
Chapter 7
To select the desired menu, complete the
procedure as shown on the left.
1.Press Menu to display the menus.
2.Press FFor EEto select the menu you
want to make a change.
3.Press Set.
4.Use FFor EEto select the sub menu
you want to make a change.
5.Press Set.
• Details for sub menus, → p. 7-2.
• Press Stop/Reset to exit from menu
system.
NOTE
For details on these menus, → following pages.
For details on these menus, → Fax Guide.
1. SPECIAL COPY
2. RECEIVE MODE
3.
MEMORY REFERENCE
4. REPORTS/LISTS
5.
TEL REGISTRATION
6. FAX SETTINGS
7.
PRINTER SETTINGS
8.
SYSTEM SETTINGS
2. MIRROR IMAGE
1. IMAGE REPEAT
3. ENTIRE IMAGE
Set
Set
Set
2. AUDIBLE TONES
1.
DISPLAY LANGUAGE
2.
ALIGN PRINT HEAD
1. CLEANING
3.
BOTTOM MARGIN
Menu
Menu
Menu
Menu
Menu
Menu
Menu
Menu
Menu
NOTE
Page 51

7-2
Menus in Copy Mode
• Default settings are shown in bold type.
SPECIAL COPY*
* This menu is available only in the Copy Mode.
PRINTER SETTINGS
NOTE
Name
1.IMAGE REPEAT
VERTICAL
HORIZONTAL
2.MIRROR IMAGE
3.ENTIRE IMAGE
Description
Prints multiple copies of an image on a single
sheet. (→ p. 4-5)
Selects the number of vertical repetitions.
Selects the number of horizontal repetitions.
Prints a mirror image of the original. (→ p. 4-7)
Prints the original image to fit the selected paper
size. (→ p. 4-8)
Setting
—
1/2/3/4
1/2/3/4
—
—
Name
1.CLEANING
1.NOZZLE CHECK
2.HEAD CLEANING
3.HEAD REFRESHING
4.ROLLER CLEANING
2.ALIGN PRINT HEAD
VERT LINE PATTRN
CHANGE V VALUE
LAT LINE PATTERN
CHANGE L VALUE
3.BOTTOM MARGIN
Description
Selects a cleaning function.
Prints the nozzle check pattern to see if the print
head nozzles are operating properly. (→ p. 5-8)
Performs normal printhead cleaning. (→ p. 5-8)
Performs deep printhead cleaning. (→ p. 5-8)
Performs roller cleaning. (→ p. 5-3)
Aligns the vertical and lateral print position of
the printhead. (→ Quick Start Guide)
Prints the vertical line pattern.
Selects the pattern you want to use, for A to F.
Prints the lateral line pattern.
Selects the pattern you want to use, for G and H.
Selects the length of the bottom margin for color
copying and color reception.
Setting
—
—
—
—
—
—
A, B, C:
-3 to +7 (0)
D, E, F:
-5 to +5 (0)
—
-3 to +3 (0)
NORMAL (5 mm)
LONG (27 mm)
Page 52

7-3
SYSTEM SETTINGS
7
Summary of Settings
Name
1.DISPLAY LANGUAGE
2.AUDIBLE TONES
1.KEYPAD VOLUME
2.ALARM VOLUME
Description
Selects the language of the LCD messages.
Sets the volume of the machine’s sounds.
Selects the keypad touch beep volume.
Selects the alarm volume.
Setting
ENGLISH
FRENCH
SPANISH
—
0 (off) /1/2/3
0 (off) /1/2/3
Page 53

A-1
General Specifications
Power Source
120 V/60 Hz
Power Consumption
• Maximum: Approx. 39.6 W
• Standby: Approx. 5.8 W
Weight
• F50 Model
27.3 lb./12.4 kg (With components attached)
• F30 Model
22.0 lb./10 kg (With components attached)
Dimensions
* 9.0 in. (228 mm) for the F30 model
Environmental Conditions
• Temperature: 50º – 90.5ºF (10º – 32.5ºC)
• Humidity: 20% – 85%
Applicable Standards
• Electrical Safety: UL, C-UL
• Radiation: FCC Part 15 Class B IC
• Other: FCC Part 68 IC, Energy Star compliant
ADF
→ p. 2-1
Multi-Purpose Tray Capacity
→ p. 3-1
Printable Areas
→ p. 3-4
Scanned Area
→ p. 2-2
Copier
Density Adjustment
9 levels
Reduction/Enlargement
25% – 400%
Copy Speed
• Black & White:
Letter size: Approx. 17 pages/minute
• Color:
COLOR FAST mode, letter size: Approx. 10
pages/minute
No. of Copies
Maximum 99 copies
Ink Tanks
Ink Tanks
Ink Colors: Black (BCI-3eBK), cyan (BCI-3eC),
magenta (BCI-3eM), yellow (BCI-3eY)
22.3 in. (566 mm)
12.8 in.
(326 mm)
11.9 in.
(301 mm*)
20.6 in. (523 mm)
23.0 in. (584 mm)
17.3 in.
(440 mm)
A
Specifications
Specifications
Appendix:
Page 54

A-2
Capacity:
Black (BCI-3eBK) approx. 695*
1
, approx. 1250*
2
Cyan (BCI-3eC) approx. 460*
2
Magenta (BCI-3eM) approx. 395*
2
Yellow (BCI-3eY) approx. 300*
2
*11500 characters per page, normal text, at standard and
plain paper mode with Windows 95/Windows 98/
Windows Me.
*2Based on printing the ISO JIS-SCID No.5 pattern at
standard and plain paper mode with Windows 95/
Windows 98/Windows Me.
Print Head
Black: 320 nozzles (600 dpi)
Cyan, Magenta, Yellow: 256 nozzles (1200 dpi)
Printer
Printing Method
Bubble Jet ink on-demand
Paper Handling
Automatic feed
Print Media Size and Weight
→ p. 3-1
Recommended Print Media
→ p. 3-2
Print Speed*
• Color Printing, fast: 12 pages/minute
• Black Printing, fast: 17 pages/minute
* Based on Canon standard pattern.
Maximum Print Width
8 in. (203.2 mm)
Resolution
2400 (horizontal) × 1200 (vertical) dpi
Scanner
Scanning Image Processing
• Halftones: 256 levels of gray
• Color: 16,777,216 colors
Resolution
600 × 1200 dpi optical
9600 dpi enhanced
Effective Scanning Width
8.4 in. (214 mm) × 14 in. (355.6 mm)*
* 11.7 in. (297.2 mm) for the platen glass
Compatibility
TWAIN
Scanning Speed*
• B&W Text/Grayscale (30 – 150 dpi):
5 seconds/page
• B&W Text/Grayscale (151 – 300 dpi):
5 seconds/page
• B&W Text/Grayscale (301 – 600 dpi):
5 seconds/page
• Color (30 – 150 dpi): 15 seconds/page
• Color (151 – 300 dpi): 15 seconds/page
• Color (301 – 600 dpi): 15 seconds/page
* Letter size
Page 55

I-1
I
Index
Index
F (–) button............................................................1-5
E (+) (Menu) button ..............................................1-5
A
ADF (Automatic Document Feeder) ......................1-4
capacity................................................................2-1
jams in .................................................................6-2
loading documents into .......................................2-4
Alarm light ..............................................................1-5
ALARM VOLUME setting ....................................7-3
ALIGN PRINT HEAD setting................................7-2
Area
printable .......................................................3-4, 3-8
scanned document ...............................................2-2
AUDIBLE TONES setting......................................7-3
B
Banner Paper ...........................................................3-2
printing ................................................................3-8
Black & white copying ...........................................4-1
Black Ink Tank ........................................................5-4
BOTTOM MARGIN setting...................................7-2
Bubble Jet Paper .....................................................3-2
C
C INK EMPTY message.........................................6-4
Canon specialty print media (See Specialty print
media)
Cartridge
holder...................................................................1-4
maintenance.........................................................5-7
CARTRIDGE JAMMED message .........................6-4
CHECK PAPER SIZE message..............................6-4
CHECK PRINTER message...................................6-4
Cleaning ..................................................................5-1
inside the ADF.....................................................5-3
inside the machine...............................................5-2
machine’s exterior ...............................................5-1
periodic................................................................5-1
printhead ......................................................5-7, 5-8
roller ....................................................................5-3
scanning area .......................................................5-1
CLEANING setting.................................................7-2
CLEAR ADF message ............................................6-4
CLEAR PAPER JAM message...............................6-4
Color copying..........................................................4-1
Color/B&W button..................................................1-5
Components.............................................................1-4
Convention, type .......................................................iii
Copy button.............................................................1-5
Copy Mode..............................................................1-6
Copying ...................................................................4-1
adjusting the copy exposure................................4-4
copy ratio.............................................................4-3
document requirements .......................................2-1
ENTIRE IMAGE.................................................4-8
IMAGE REPEAT ................................................4-5
MIRROR IMAGE ...............................................4-7
paper requirements ..............................................3-1
problems ..............................................................6-7
setting enlarging/reducing ...................................4-3
setting image quality ...........................................4-4
setting paper size .................................................4-2
setting paper type ................................................4-2
COVER OPEN message .........................................6-4
Customer support ....................................................1-1
Cyan Ink Tank .........................................................5-4
Page 56

I-2
D
DISPLAY LANGUAGE setting .............................7-3
Document
guides...................................................................1-4
jam .......................................................................6-2
positioning ...........................................................2-3
problem................................................................2-2
quantity................................................................2-1
requirements ........................................................2-1
scanned area ........................................................2-2
setting ..................................................................2-3
size.......................................................................2-1
thickness ..............................................................2-1
type ......................................................................2-1
weight ..................................................................2-1
Document feed
ADF .....................................................................2-4
platen glass ..........................................................2-3
Documentation, using..................................................i
E
Enlarge setting.........................................................4-3
Enlarge/Reduce button............................................1-5
ENTIRE IMAGE setting .................................4-8, 7-2
Envelopes.........................................................3-1, 3-2
loading .................................................................3-5
printable area .......................................................3-4
Exposure button ......................................................1-5
Exposure, setting.....................................................4-4
F
Feeder Cover ...........................................................1-4
Feeding, paper problems.........................................6-6
Film (See individual film names)
G
Glossy
Photo Cards .........................................................3-2
Photo Paper .........................................................3-2
Guide
document .............................................................1-4
paper ....................................................................3-6
H
Handling, safety instructions ..................................1-3
HEAD CLEANING setting ....................................7-2
HEAD REFRESHING setting ................................7-2
High Gloss Photo Film ...........................................3-2
High Resolution Paper ............................................3-2
I
Image Quality button ..............................................1-5
Image Quality, setting.............................................4-4
IMAGE REPEAT setting .........................4-5, 4-6, 7-2
In Use/Memory light...............................................1-5
Ink Tank (See also individual Ink Tank names)
guidelines.............................................................5-4
replacing ..............................................................5-6
types.....................................................................5-4
when to replace ...................................................5-5
J
Jams.........................................................................6-1
clearing ................................................................6-1
in ADF .................................................................6-2
in multi-purpose tray ...........................................6-1
K
K INK EMPTY message.........................................6-5
KEYPAD VOLUME setting ...................................7-3
L
LCD .................................................................1-5, 6-4
LOAD PAPER (PRESS RESUME KEY)
message ...................................................................6-5
Loading
documents............................................................2-4
envelopes .............................................................3-5
paper ....................................................................3-5
Location, safety instructions ...................................1-1
Page 57

I-3
M
M INK EMPTY message........................................6-5
Magenta Ink Tank ...................................................5-4
Maintenance
printhead..............................................................5-7
safety instructions................................................1-3
MEMORY FULL message......................................6-5
Menu button ............................................................1-5
Menu system, understanding ..................................7-1
Menus (See also individual menu names)
accessing..............................................................7-1
Messages, LCD
(See also individual message names) .....................6-4
MIRROR IMAGE setting................................4-7, 7-2
Multi-purpose tray...................................................1-4
capacity................................................................3-1
jams in .................................................................6-1
loading paper .......................................................3-5
MultiPASS Suite User’s Guide .................................iii
Multiple copying .....................................................4-2
N
Nozzle check pattern
printing ................................................................5-8
when to print .......................................................5-7
NOZZLE CHECK setting.......................................7-2
Numeric buttons......................................................1-5
O
ON/OFF button .......................................................1-5
Open Button ............................................................1-4
Operation panel .......................................................1-4
Output tray ..............................................................1-4
P
Paper (See also individual paper names)
feeding problems .................................................6-6
guide ....................................................................3-6
guidelines .....................................................3-3, 3-7
jam .......................................................................6-1
loading .................................................................3-5
printable area .......................................................3-4
requirements ........................................................3-1
Paper Select button .................................................1-5
Paper size, setting....................................................4-2
Paper thickness lever...............................................1-4
Paper type, setting...................................................4-2
Photo film................................................................3-2
Photo Paper Pro.......................................................3-3
Plain paper...............................................................3-2
Platen glass..............................................................1-4
cover ....................................................................1-4
Positioning document..............................................2-3
Power supply, safety instructions............................1-2
Print media (See also individual print media names)
description ...........................................................3-2
quantity................................................................3-1
requirements ........................................................3-1
size.......................................................................3-1
specialty ....................................................3-7 to 3-9
type ......................................................................3-1
weight ..................................................................3-1
Print quality problems.............................................6-8
Printer Settings menu ......................................7-1, 7-2
Printhead
cleaning ........................................................5-7, 5-8
testing...........................................................5-7, 5-8
Printing
area of banner paper............................................3-8
area of envelopes.................................................3-4
area of paper........................................................3-4
banner paper ........................................................3-8
nozzle check pattern............................................5-8
problems ..............................................................6-9
Problems
cannot solve.......................................................6-11
copying ................................................................6-7
document .............................................................2-2
general ...............................................................6-11
paper feeding .......................................................6-6
print quality .........................................................6-8
printing ................................................................6-9
I
Index
Page 58

I-4
Q
Quality
print problems .....................................................6-8
setting ..................................................................4-4
Quantity
document .............................................................2-1
print media...........................................................3-1
R
Reduce setting .........................................................4-3
Replacing Ink Tank .................................................5-6
Resolution, setting...................................................4-4
Resume button.........................................................1-5
ROLLER CLEANING............................................5-3
S
Safety instructions
handling ...............................................................1-3
location ................................................................1-1
maintenance.........................................................1-3
power supply .......................................................1-2
Scan button..............................................................1-5
Scan Mode...............................................................1-6
Scanned area ....................................................2-2, 4-5
Scanning
document requirements .......................................2-2
unit.......................................................................1-4
Set button ................................................................1-5
Size
document .............................................................2-1
print media...........................................................3-1
Software
MultiPASS Suite User’s Guide .............................iii
Specialty print media (See also individual
print media names) .......................................3-7 to 3-9
guidelines.............................................................3-7
Specifications .........................................................A-1
Standby display .......................................................1-6
Copy Mode..........................................................1-6
Scan Mode...........................................................1-6
Start button..............................................................1-5
Stop/Reset button ....................................................1-5
System Settings menu .............................................7-3
T
T-shirt Transfers ......................................................3-3
Testing
printhead..............................................................5-7
Thickness
document .............................................................2-1
Transparencies.........................................................3-2
Tray
cover ....................................................................1-4
multi-purpose.......................................................1-4
output...................................................................1-4
Troubleshooting ......................................................6-1
Type conventions, this guide.....................................iii
V
VERTICAL & HORIZONTAL setting...................4-6
Volume
ALARM VOLUME setting.................................7-3
KEYPAD VOLUME setting ...............................7-3
W
WAIT COOLING message .....................................6-5
Weight
document .............................................................2-1
machine...............................................................A-1
print media...........................................................3-1
WRONG CARTRIDGE message ...........................6-5
Y
Y INK EMPTY message.........................................6-5
Yellow Ink Tank ......................................................5-4
 Loading...