

Page 1
m
TM
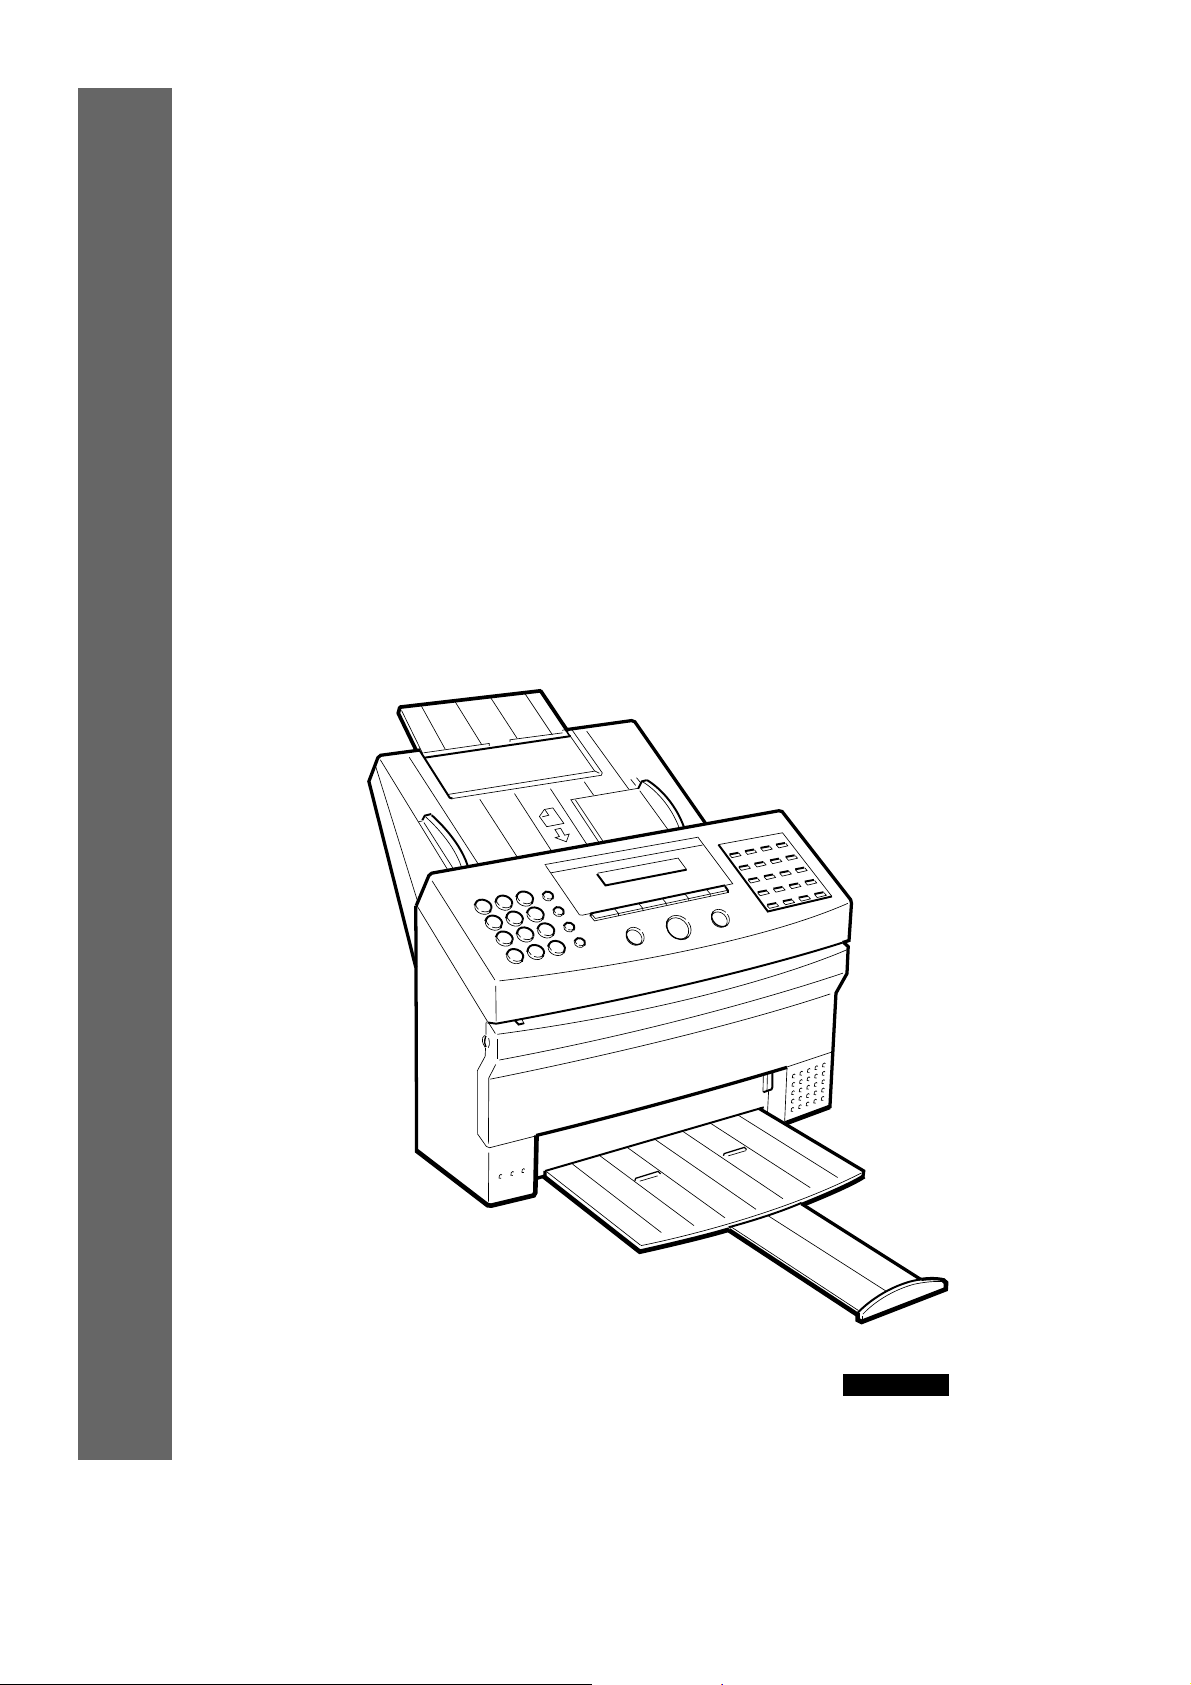
MultiPASS
Quick Reference Guide
Refer also to the MultiPASSTM10 Desktop Manager for Windows
User’s Guide if the MultiPASS10 is used with an IBM PC or
compatible computer.
10
FACSIMILES
ENGLISH
Canon MultiPASS10 QRG ENGLISH
aaaaaaaaaaaaaaaaaaaaaaaaaaaa
Page 2
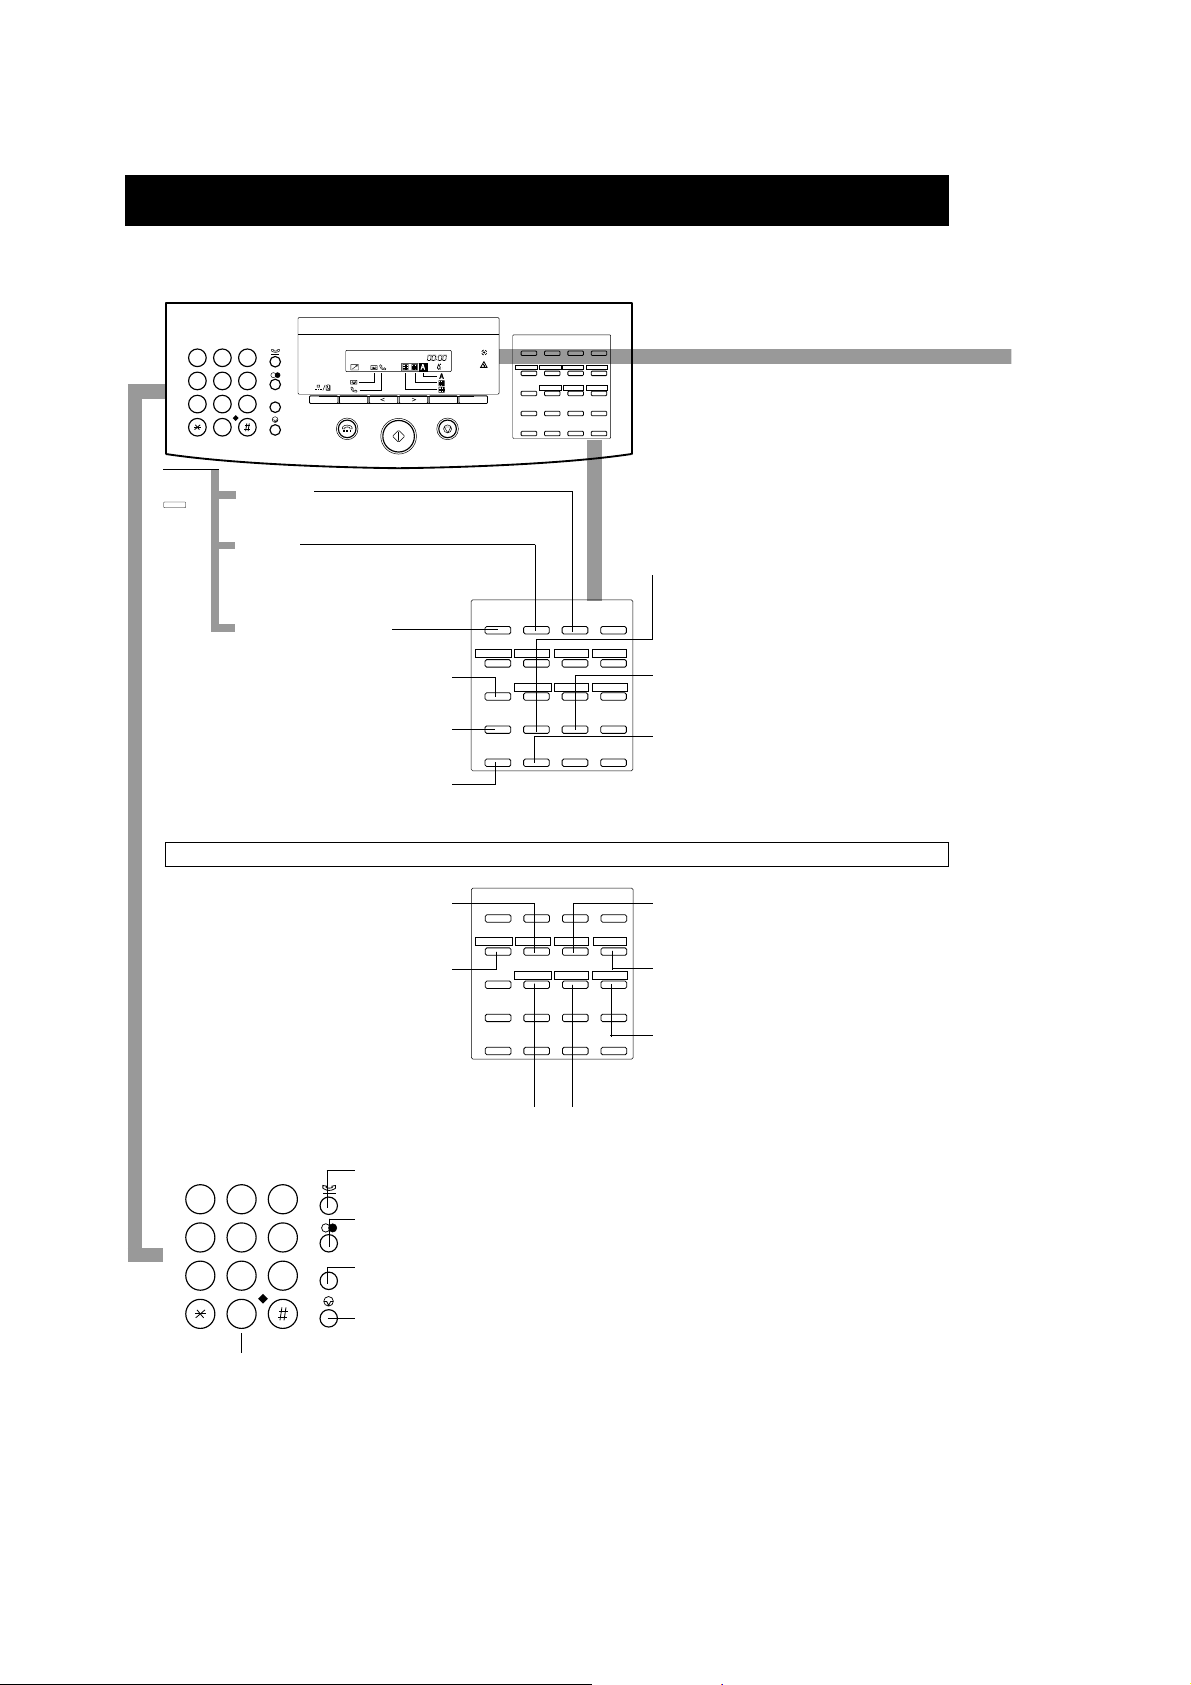
FAX CONTROLS – THE OPERATION PANEL
TRANSMISSION
MODE
REPORT
CLEANING
02 03 04
01
PRINTER ON LINE LF FF
05
06 07 08
FILE PRINT
ENVELOPE
2/3 1/2
10
09
11
TONE
D.T.
+
13
14 15 16
SPACE CLEAR
18
17
19
PRINT MODE
12
20
1
GHI
4
PQRS TUV
7
ABC
2
JKL MNO
5
WXYZ
89
0
DEF
3
6
R
F
Press
F
and
Press to print documents that are stored in memory
CLEANING
Press to clean the BJ cartridge print head.
REPORT
Press to select a transaction report, a list of registered
numbers or a list of settings to print out.
TRANSMISSION MODE
Press to select a transmission
mode.
FILE PRINT
for uploading to your computer.
Press to enter a + in a fax number.
Press to enter a space between numbers or letters
when you register fax numbers and names.
SPACE
TRANSMISSION
MODE
02 03 04
01
PRINTER ON LINE LF FF
05
06 07 08
FILE PRINT
ENVELOPE
10
09
+
13
SPACE CLEAR
17
14 15 16
18
+
REPORT
TONE
CLEANING
11
19
2/3 1/2
D.T.
PRINT MODE
12
20
TONE
Press to temporarily set your fax to send a tone
signal when using pulse dialling.
D.T.
Press to confirm the dialling tone when registering
information.
CLEAR
Press to clear a number or name quickly so you
can re-enter it.
These buttons are effective only in “Printer Mode”. See MultiPASSTMDesktop Manager for Windows User’s Guide.
Press to connect between your fax and your computer.
Press to switch to ”Printer Mode” to print from a non-
Windows application.
ON LINE
PRINTER
TRANSMISSION
MODE
REPORT
CLEANING
02 03 04
01
PRINTER ON LINE LF FF
05
06 07 08
FILE PRINT
ENVELOPE
2/3 1/2
10
09
13
SPACE CLEAR
17
TONE
+
14 15 16
18
11
D.T.
19
PRINT MODE
12
20
LF
Press to feed paper one line at a time.
FF
Press to feed a new sheet of paper to the starting
print position.
PRINT MODE
Press to select between HQ mode (High Quality
printing) and HS mode (High Speed printing).
2
Press to print an envelope from a non-Windows
ABC
DEF
2
1
GHI
4
PQRS TUV
7
JKL MNO
3
5
6
WXYZ
89
0
Numeric buttons
Use the numeric buttons to enter phone numbers when dialling. These buttons can also be used to enter text, numbers, and symbols
when registering names.
HOLD
Press to put a call on hold.
REDIAL
Press to dial the last number dialled with the numeric buttons.
R
R
Press to access an outside line.
PAUSE
Press to enter pauses between digits when dialling or registering fax numbers.
ENVELOPE
application
2/3 1/2
Press to reduce the output to two-thirds or onehalf of its full size.
Canon MultiPASS10 QRG ENGLISH
aaaaaaaaaaaaaaaaaaaaaaaaaaaa
Page 3
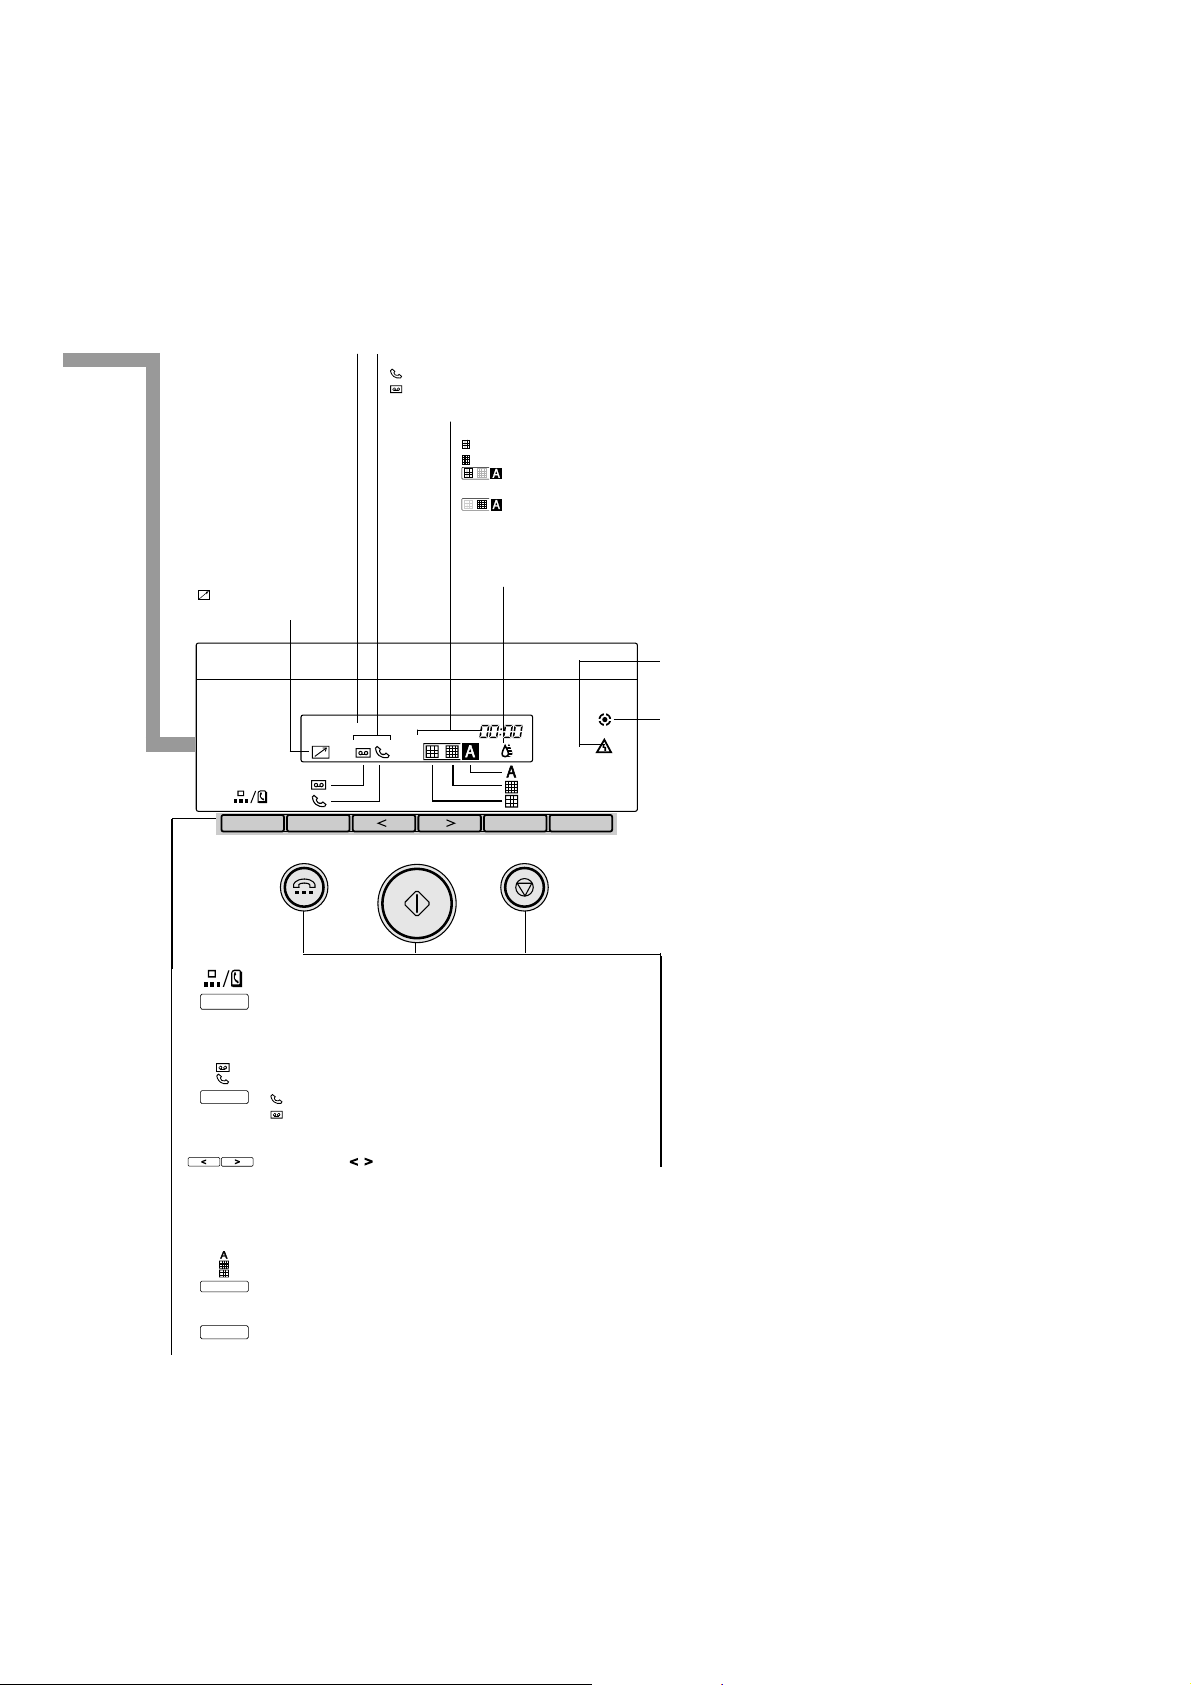
Displays messages and prompts
during operation. Displays
selectable functions, numbers,
and names when registering
LCD Display
information.
ANS HOOK UP/MANUAL indicator
indicates that manual answering mode is selected.
indicates that answering machine mode is selected.
[no icon] indicates that automatic receiving mode is selected.
Resolution indicator
indicates that STANDARD resolution mode is selected.
indicates that FINE resolution mode is selected.
indicates that STANDARD AUTO HALFTONE resolution
mode is selected.
indicates that FINE AUTO HALFTONE resolution mode is
selected.
PC Interface indicator
indicates the computer
is accessing the fax.
CODED DIAL/DIRECTORY
Press this button once (followed by a two-digit code) to dial a fax/
telephone number registered for Coded Speed Dialling.
Press twice to search for fax/telephone numbers by the name under
which they are registered.
ANS HOOK UP/MANUAL
Three modes are available:
to receive calls manually,
to pass calls to an answering machine,
[no icon] to answer calls as fax calls automatically.
Arrow buttons ( )
Use to scroll through menus and lists that appear on the LCD and to
change settings. These buttons also move the cursor in some naming
operations and adjust the volume of the monitor speaker.
INKSAVER indicator
Lights when the FAX PRINTER inksaver mode has been selected.
ALARM lamp
Flashes when an error occurs.
IN USE lamp
Lights when the fax is using the telephone line.
F
ON HOOK
Press to engage or disengage the
telephone line (hands-free
dialling).
START/COPY
Press to start sending, receiving
and copying. This key is also used
for data entry operations.
STOP
Press to cancel sending, receiving,
copying and data entry operations.
AUTO HALFTONE/FINE/STANDARD
Use to set the resolution for the type of document you want to send.
F
FUNCTION
Press to start data registration of fax numbers, names, and other
important settings for sending and receiving.
Canon MultiPASS10 QRG ENGLISH
3
aaaaaaaaaaaaaaaaaaaaaaaaaaaa
Page 4
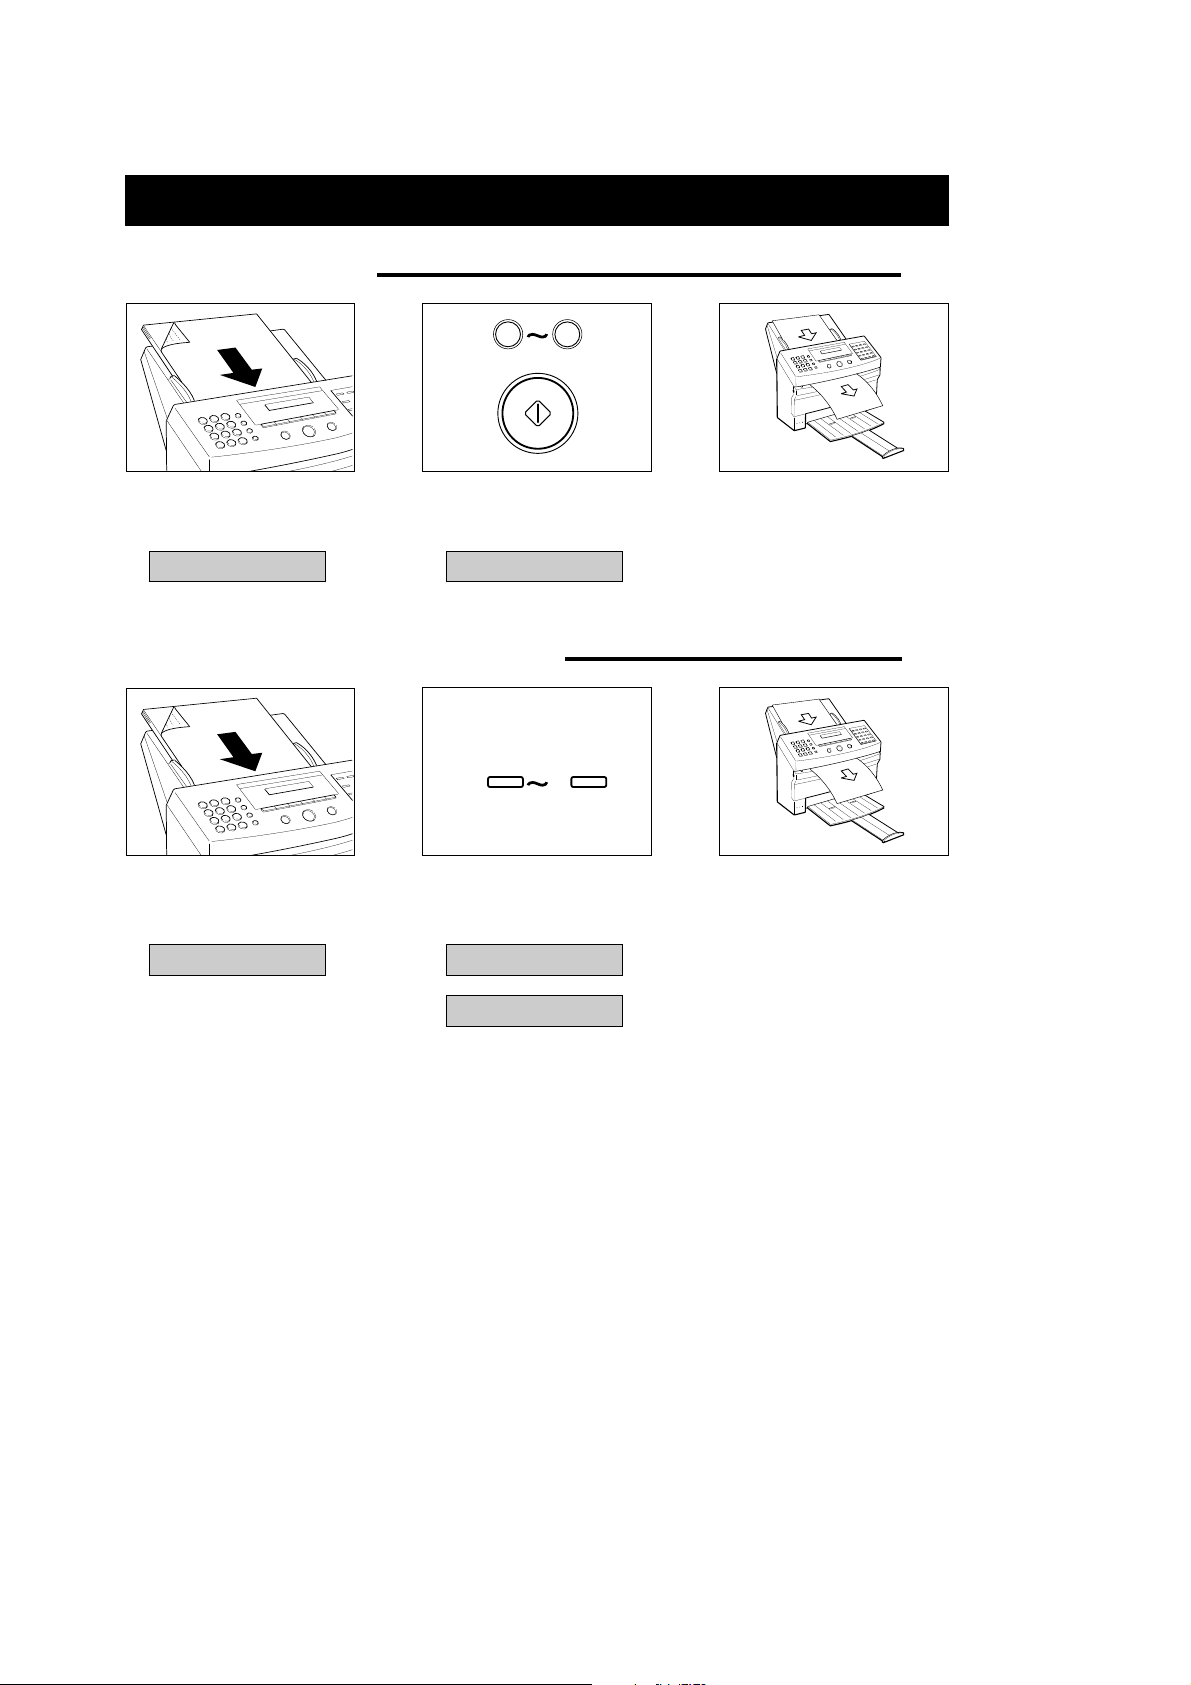
DIRECT SENDING
1 Regular Dialling
1 Feed the document face-
down into the Automatic
Document Feeder (ADF).
DOCUMENT READY
a
.......................................................................
b
2 Dial the other party’s fax
099
number.
Press [START/COPY].
TEL= 3456 7890
3 The fax begins sending the
document.
(54)
2 Using One-touch Speed Dialling (55)
01
20
1 Feed the document face-
down into the Automatic
Document Feeder (ADF).
DOCUMENT READY
4
The numbers in parentheses indicate the page in the MultiPASSTM10 INSTRUCTION BOOK on which you can find further details.
2 Press the One-touch Speed
dialling button assigned to
the number to which you
wish to fax.
CANON USA
D
12345678999
3 The fax begins sending the
document.
Canon MultiPASS10 QRG ENGLISH
aaaaaaaaaaaaaaaaaaaaaaaaaaaa
Page 5
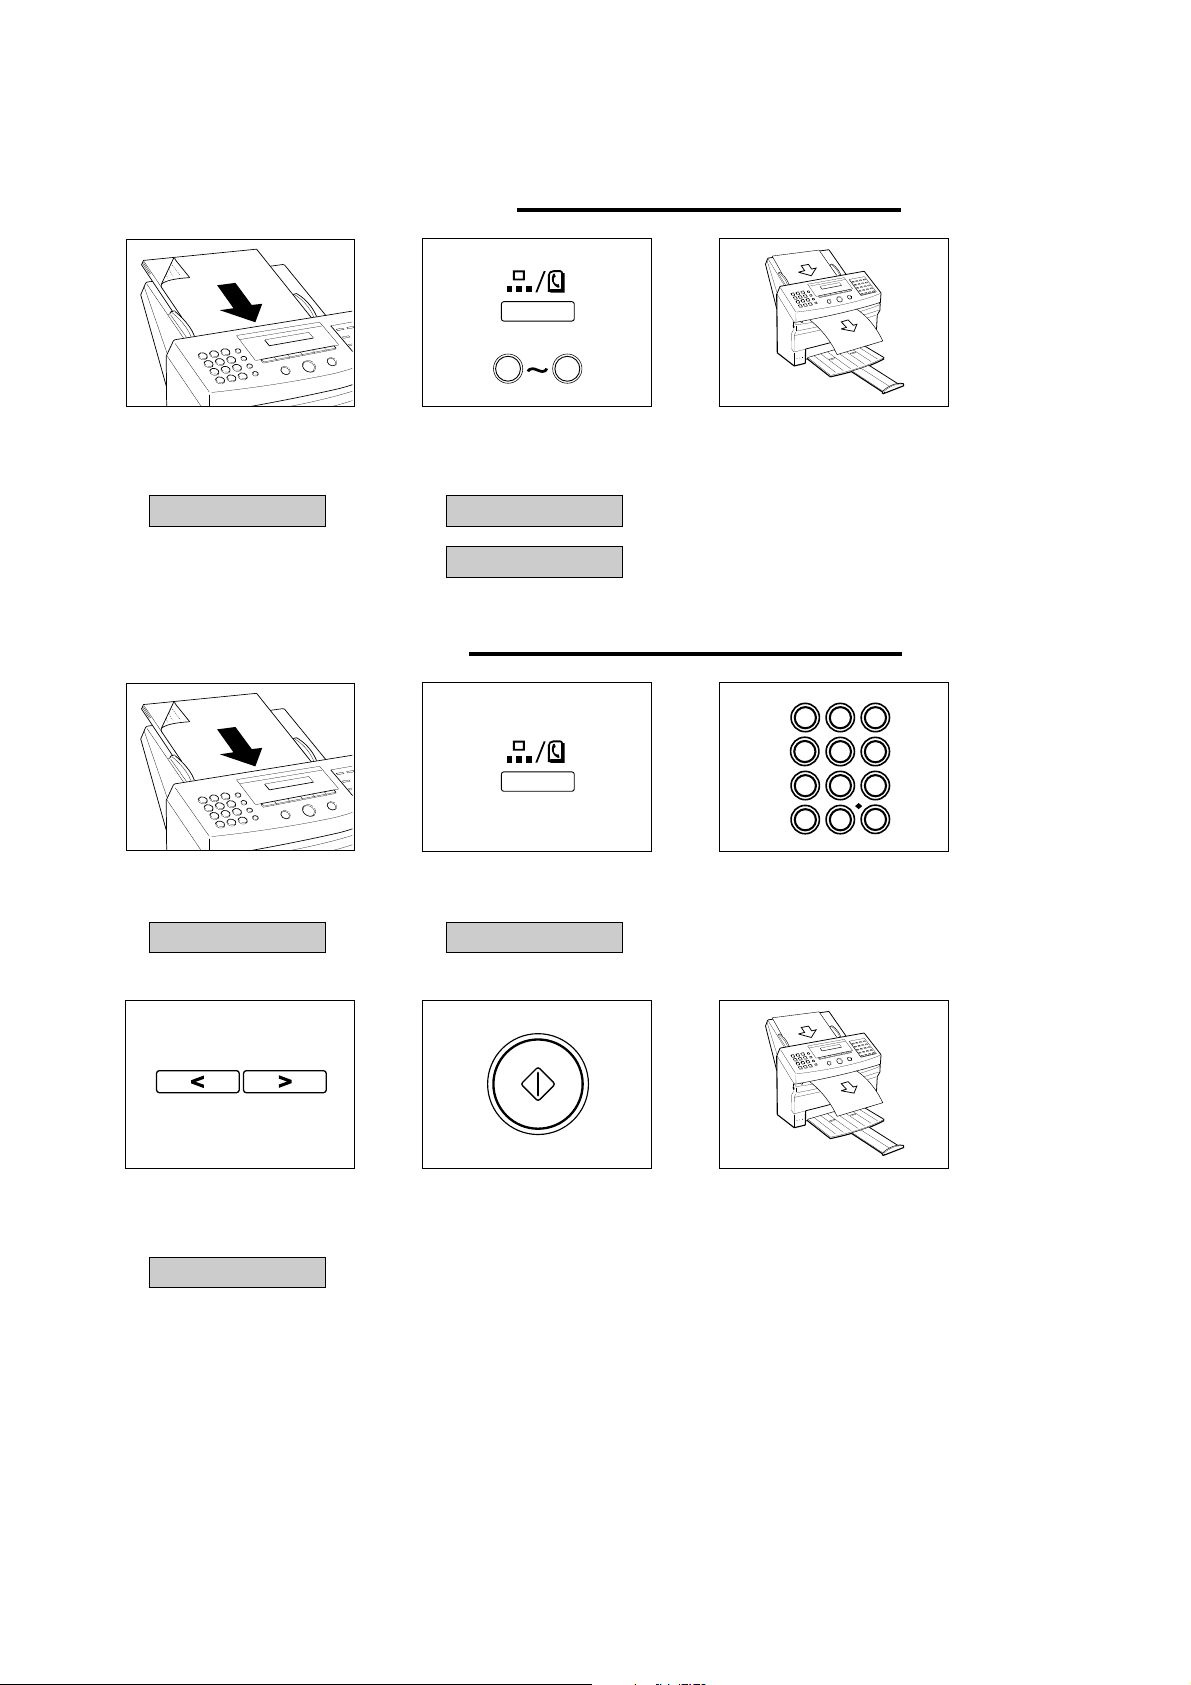
3 Using Coded Speed Dialling (55)
a
.......................................................................
b
099
1 Feed the document face-
down into the Automatic
Document Feeder (ADF).
DOCUMENT READY
2 Press [CODED DIAL/
DIRECTORY] and enter the
appropriate two-digit Coded
Speed Dialling code.
CANON USA
D
3 The fax begins sending the
document.
12345678999
4 Using Directory Dialling (56)
ABC DEF
1
23
JKL MNO
GHI
1 Feed the document face-
down into the Automatic
Document Feeder (ADF).
DOCUMENT READY
2 Press [CODED DIAL/
DIRECTORY] twice.
SEARCH TEL DIR.
4
PRS
789
x–
3 Look up the number
alphabetically.
TUV WXY
0
65
#
4 Press the arrow buttons until
the name whose number you
want to dial appears on the
display.
5 When you find the name you
are looking for, press
[START/COPY].
6 The fax begins sending the
document.
CANON USA
The numbers in parentheses indicate the page in the MultiPASSTM10 INSTRUCTION BOOK on which you can find further details.
Canon MultiPASS10 QRG ENGLISH
5
aaaaaaaaaaaaaaaaaaaaaaaaaaaa
Page 6

With Memory Sending, the fax quickly scans the document Into memory. Then, after it
MEMORY SENDING
dials the receiving party, it sends the document from memory. This means you do not
have to wait for the fax to finish sending before you can retrieve your original
document.
1 Regular Dialling (54&57)
TRANSMISSION
a
F
.......................................................................
b
MODE
01
1 Feed the document face-
down into the Automatic
Document Feeder (ADF).
DOCUMENT READY
a
.......................................................................
b
099
2 Press [FUNCTION].
SELECT MENU
D
TEL REGISTRATION
3 Press [TRANSMISSION
MODE].
Press [START/COPY].
MEMORY TX
TEL=
5 The fax scans the document
into memory and begins
sending.
TX/RX NO. XXXX
D
MEMORY INPUT P01
4 Dial the other party’s fax
number.
Press [START/COPY].
TEL= 9876543333
2 Using One-touch Speed Dialling (55&57)
TRANSMISSION
a
F
.......................................................................
b
MODE
01
1 Feed the document face-
down into the Automatic
Document Feeder (ADF).
DOCUMENT READY
6
The numbers in parentheses indicate the page in the MultiPASSTM10 INSTRUCTION BOOK on which you can find further details.
Canon MultiPASS10 QRG ENGLISH
2 Press [FUNCTION].
SELECT MENU
D
TEL REGISTRATION
3 Press [TRANSMISSION
MODE].
Press [START/COPY].
MEMORY TX
TEL=
aaaaaaaaaaaaaaaaaaaaaaaaaaaa
Page 7

01
20
4 Press the One-touch Speed
dialling button assigned to
the number to which you
wish to fax.
CANON USA
D
12345678999
5 The fax scans the document
into memory and begins
sending.
TX/RX NO. XXXX
D
MEMORY INPUT P01
3 Using Coded Speed Dialling (55&57)
TRANSMISSION
MODE
01
1 Feed the document face-
down into the Automatic
Document Feeder (ADF).
DOCUMENT READY
F
2 Press [FUNCTION].
SELECT MENU
D
TEL REGISTRATION
a
.......................................................................
b
3 Press [TRANSMISSION
MODE].
Press [START/COPY].
MEMORY TX
TEL=
a
.......................................................................
b
4 Press [CODED DIAL/
The numbers in parentheses indicate the page in the MultiPASSTM10 INSTRUCTION BOOK on which you can find further details.
099
DIRECTORY] and enter the
appropriate two-digit Coded
Speed Dialling code.
CANON USA
D
12345678999
5 The fax scans the document
into memory and begins
sending.
TX/RX NO. XXXX
D
MEMORY INPUT P01
Canon MultiPASS10 QRG ENGLISH
7
aaaaaaaaaaaaaaaaaaaaaaaaaaaa
Page 8

4 Using Directory Dialling (56&57)
TRANSMISSION
a
F
.......................................................................
b
MODE
01
1 Feed the document face-
down into the Automatic
Document Feeder (ADF).
DOCUMENT READY
4 Press [CODED DIAL/
DIRECTORY] twice.
SEARCH TEL DIR.
2 Press [FUNCTION].
SELECT MENU
D
TEL REGISTRATION
ABC DEF
1
23
JKL MNO
GHI
4
TUV WXY
PRS
789
x–
0
5 Look up the number
alphabetically.
3 Press [TRANSMISSION
MODE].
Press [START/COPY].
MEMORY TX
TEL=
65
#
6 Press the arrow buttons until
the name whose number you
want to dial appears on the
display.
CANON USA
7 When you find the name you
are looking for, press
[START/COPY].
8
The numbers in parentheses indicate the page in the MultiPASSTM10 INSTRUCTION BOOK on which you can find further details.
Canon MultiPASS10 QRG ENGLISH
8 The fax scans the document
into memory and begins
sending.
TX/RX NO. XXXX
D
MEMORY INPUT P01
aaaaaaaaaaaaaaaaaaaaaaaaaaaa
Page 9

5 Sending to More than One Location (55&64)
a
1 Feed the document face-
down into the Automatic
Document Feeder (ADF).
DOCUMENT READY
3 The fax scans the document
into memory and begins
sending approximately 10
seconds after you press the
last button.
01
2a Press the appropriate One-
touch Speed dialling buttons.
Simply dial the numbers one
after the other.
20
CANON USA
D
12345678999
OR
.......................................................................
b
2b Press [CODED DIAL/
099
DIRECTORY] and enter the
appropriate two-digit Coded
Speed Dialling codes. Make
sure you press [CODED
DIAL/DIRECTORY] before
you enter each code.
CANON USA
D
12345678999
TX/RX NO. XXXX
D
MEMORY INPUT P01
The numbers in parentheses indicate the page in the MultiPASSTM10 INSTRUCTION BOOK on which you can find further details.
Canon MultiPASS10 QRG ENGLISH
9
aaaaaaaaaaaaaaaaaaaaaaaaaaaa
Page 10

REDIALLING
1 Automatic Redialling
When a facsimile number is busy, does not answer, or an error occurs while sending, your fax waits for a short time and
then automatically redials the same number.
The fax displays REDIALLING while it is in the redialling process.
(58)
REDIALING
2 Manual Redialling (58)
1 Press [REDIAL].
The number of the last party you
called is redialled.
RECEIVING DOCUMENTS
The fax is set up at the factory for receiving documents and telephone calls over one phone line (AUTO FAX/TEL switchover).
If the incoming call is from another fax, your fax will quietly receive the document without ringing. If the call is from a person,
your fax will ring to alert you to pick up the telephone and answer the call.
You can change this receiving mode to Automatic receiving or Manual receiving, as described in the Installation Guide.
1 Receiving Documents in the Memory (70)
When the fax receives documents in memory, you see one of the following messages and you must perform one of the
following actions:
CHANGE CARTRIDGE
PUT IN CARTRIDGE
CHECK REC PAPER
REC. PAPER JAM
CHK. FRONT COVER
The fax will automatically print out the contents of memory when you remedy the cause of the problem.
10
The numbers in parentheses indicate the page in the MultiPASSTM10 INSTRUCTION BOOK on which you can find further details.
Cause: You ran out of ink or the BJ cartridge is not set properly.
Action: Install a new BJ cartridge.
Cause: There is no BJ cartridge.
Action: Install a BJ cartridge.
Cause: You ran out of recording paper.
Action: Load paper into the paper tray, then press [STOP].
Cause: A paper jam occurs.
Action: Clear the jam, then press [STOP].
Cause: The front cover is open.
Action: Close the front cover.
Canon MultiPASS10 QRG ENGLISH
aaaaaaaaaaaaaaaaaaaaaaaaaaaa
Page 11

2 Printing a Received Fax when your Computer is Off
T
You can set the MultiPASS 10 to store received faxes in memory until you print them. You can also set the MultiP ASS10
to print incoming faxes as it receives them.
You can set the MultiPASS 10 to automatically print incoming faxes when your computer is off. This recommended
setting allows you to leave the computer off for an extended period of time and still be assured of receiving your faxes.
When a document is in memory, you see a message displayed in the LCD display area of the MultiPASS 10. The
message alternately flashes the date and words RECEIVED IN FILE.
To move received faxes to the MultiPASS Desktop Manager:
1 Turn the computer on.
2 Start Windows.
3 Double-click the MultiPASS Desktop Manager icon.
To print faxes without the computer, follow these steps:
F
FILE PRIN
09
1 Press [FUNCTION].
SELECT MENU
D
TEL REGISTRATION
2 Press [FILE PRINT]. 3 The fax begins printing.
THE BUBBLE-JET INK CARTRIDGE
1 Replacing the BJ cartridge
Replace the BJ cartridge when you see the message CHANGE CARTRIDGE displayed.
When the faxes are done
printing, they are erased from
memory and you can not
upload them to the MultiPASS
Desktop Manager.
(103)
1 Open the front cover of the
fax.
The numbers in parentheses indicate the page in the MultiPASSTM10 INSTRUCTION BOOK on which you can find further details.
2 Raise the green cartridge
release lever up.
3 Remove the cartridge.
Dispose of the BJ cartridge
properly.
You may want to place it in a
plastic bag to keep from spilling
any residual ink.
Canon MultiPASS10 QRG ENGLISH
11
aaaaaaaaaaaaaaaaaaaaaaaaaaaa
Page 12

4 Remove the print head cap
G
from the new BJ cartridge.
5 Pull off the protective orange
tape.
6 Insert the BJ cartridge. Align
the slot in the cartridge with
the yellow post in the fax.
The yellow post (BJ cartridge
guide) should be visible
through the slot. The BJ
cartridge tilts slightly to the left
in the loaded position.
7 Lower the cartridge release
lever down until you hear a
click to lock the cartridge in
place.
Make sure the arm on the
cartridge release lever aligns
with the marking on the BJ
cartridge.
If the lever movement is not
smooth, release the cartridge
and reload it.
8 Close the front cover of the
fax.
2 Cleaning the Print Head (102)
If you notice some degradation in the print quality, try cleaning the print head.
F
1 Press [FUNCTION].
SELECT MENU
D
TEL REGISTRATION
2 Press [CLEANING].
CLEANIN
03
HEAD CLEANING
12
The numbers in parentheses indicate the page in the MultiPASSTM10 INSTRUCTION BOOK on which you can find further details.
Canon MultiPASS10 QRG ENGLISH
aaaaaaaaaaaaaaaaaaaaaaaaaaaa
Page 13

LOADING PAPER
Running out of recording paper may cause memory reception. Load paper into the paper tray and press [STOP] to begin
printing the stored document(s).
1 Loading Paper (7)
1 Remove the paper tray cover. 2 Fan a small stack of up to
100 sheets (up to 10 mm
thick). Tap the edge of the
stack on a flat surface to
even the stack.
A4
LTR
A4
LTR
4 Holding the stack of paper,
squeeze and slide the paper
guide until it touches the left
edge of the stack of paper.
Make sure the stack of paper
5 Complete inserting the stack
of paper into the paper tray
until it stops.
Do not force the paper down
into the fax.
does not exceed the paper limit
mark on the right side of the
feeder.
3 Line up the right edge of the
stack of paper against the
right edge of the paper tray
and insert it halfway into the
paper tray.
6 Replace the paper tray cover.
7 Press [STOP].
The numbers in parentheses indicate the page in the MultiPASSTM10 INSTRUCTION BOOK on which you can find further details.
Canon MultiPASS10 QRG ENGLISH
13
aaaaaaaaaaaaaaaaaaaaaaaaaaaa
Page 14

CLEARING DOCUMENT AND PAPER JAMS
1 Clearing Document Jams
If a document jams or stops halfway while it is being sent, remove it in the following way.
1 Press [STOP]. 2 Grip the operation panel with
the right hand while holding
down the fax with the left
hand as shown and gently
pull the panel toward you
until it opens.
4 Gently push the operation
panel shut until it clicks.
(98)
3 While holding the operation
panel open, pull the sheet
out from the top or bottom.
2 Clearing Paper Jams (99)
If paper jams when receiving or copying documents, follow this procedure to clear the jam.
1 Remove the paper tray cover. 2 Remove the recording paper. 3 Open the front cover.
14
The numbers in parentheses indicate the page in the MultiPASSTM10 INSTRUCTION BOOK on which you can find further details.
Canon MultiPASS10 QRG ENGLISH
aaaaaaaaaaaaaaaaaaaaaaaaaaaa
Page 15

4 Pull the sheet out slowly. 5 Close the front cover. 6 Load the paper, then replace
7 Press [STOP].
the paper tray cover.
MAKING COPIES
1 Making Copies
1 Feed the document face-
down into the Automatic
Document Feeder (ADF).
DOCUMENT READY
2 Press [START/COPY].
COPY PAGE 01
a
.......................................................................
b
3 Enter the number of copies
099
(up to 99) using the numeric
buttons.
Press [START/COPY].
COPY P03
(49)
!!!!!!!!!!!!!!!!!
Your MultiPASS 10 switches to the Energy Save Standby (ESS) mode if you do not use the machine for 5 minutes. In this
mode, the lower power consumption (approx. 0,9W) saves you expenses and contributes to the environmental protection. The
date is no longer indicated in the LCD display area of the operation panel; only the time is displayed, as illustrated below. In the
ESS mode the IN USE lamp does not light, even if you pick up the telephone. When the MultiPASS10 is used in combination
with an IBM PC or compatible computer, first press the [START/COPY] button on the fax operation panel.
12.00
The numbers in parentheses indicate the page in the MultiPASSTM10 INSTRUCTION BOOK on which you can find further details.
Canon MultiPASS10 QRG ENGLISH
15
aaaaaaaaaaaaaaaaaaaaaaaaaaaaaaaaaaaaaaaaaaaaaaaaaaaaaaaaaaaaaaaaaaaaa
a
Page 16

Canon Inc.
30-2, Shimomaruko 3-chome,
Ohta-ku, Tokyo 146, Japan
Europe, Africa and Middle East
Canon Europa N.V.
P.O. Box 2262,
1180 EG Amstelveen, Netherlands
ZZK-HM10A710
Specifications subject to change without notice.
ZZK-HM10A710-0396
f Canon Europa N.V. 1995
Printed in The Netherlands
Canon MultiPASS10 QRG ENGLISH
PRINTED ON
CHLORINE FREE PAPER
8375AX4
aaaaaaaaaaaaaaaaaaaaaaaaaaaa
 Loading...