

Page 1

ENGLISHESPAÑOL
Solución de problemas de conguración de red
Network Setup Troubleshooting
Page 2
1
ENGLISH
Network Setup Troubleshooting
This manual mainly describes problems you may encounter when setting up a network, and the possible
causes and solutions.
Find a description related to your problem and follow the solution.
If you cannot nd a description for your problem or if you encounter a problem after setup, refer to the on-
screen manual: Basic Guide/Advanced Guide.
Names of functions, etc. may differ from this manual depending on your access point or application
software.
•
The following symbols are used in this manual.
Description for Windows users.
Description for Macintosh users.
Instructions as notes for operation or additional explanations.
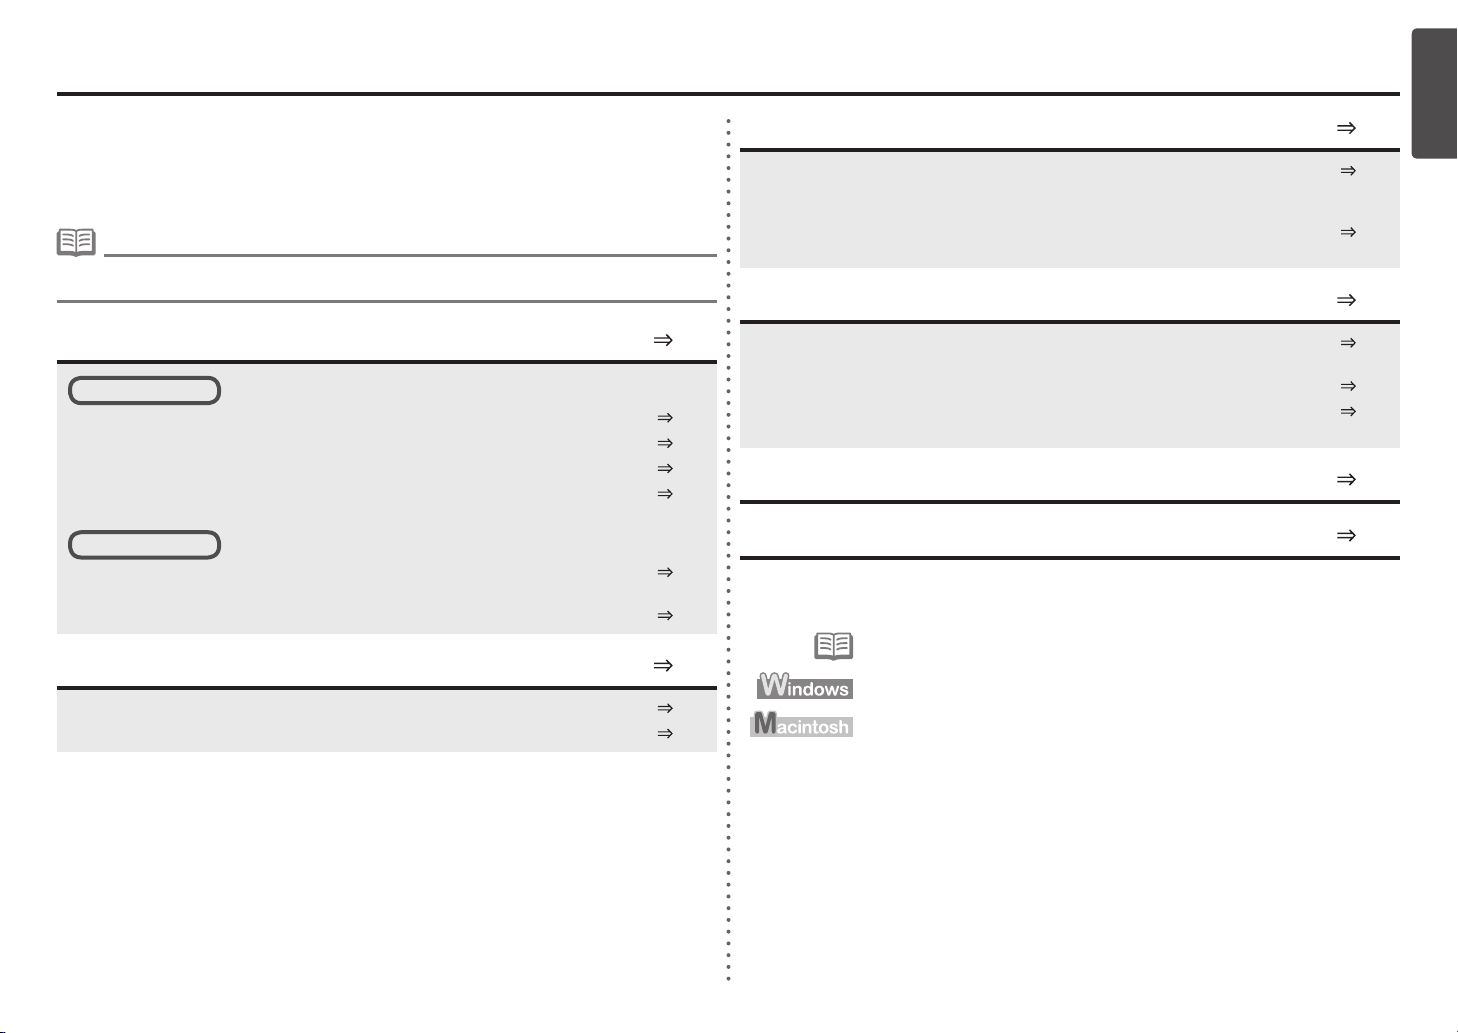
Other Troubleshooting Tips
The Target Access Point is Not Displayed (Detected)
P.2
P.2
Failed to connect to the access point. is Displayed P.3
Forgotten or Do Not Know the Access Point Name/Network Name (SSID), Security
Protocol (encryption standard), and Network Key
The Machine is Not Displayed (Detected)
Cannot connect. Multiple access points are enabled. is Displayed
Connection failed. is Displayed
Access point was not detected is Displayed
P.5
P.5
P.4
The Machine is Not Detected after the Network Environment is Changed
P.7
P.7
Connection Checklist
P.12
Multiple access points with the same name exist. is Displayed
P.4
P.5
P.5
P.6
Check Printer Settings dialog box is displayed
Problems during Network Setup
Problems during Software Installation
Reference Information
Specifying the Machine's IP Address (IPv4 only) P.10
P.8
Restoring the Machine's Default LAN Settings to Perform Setup Again P.11
WPS Settings
Easy Settings
P.7
Entering the Access Point's Wireless LAN Settings Directly on the Machine
P.8
Specications P.14
Page 3
2
A
Problems during Network Setup
Check
The Target Access Point is Not Displayed (Detected)
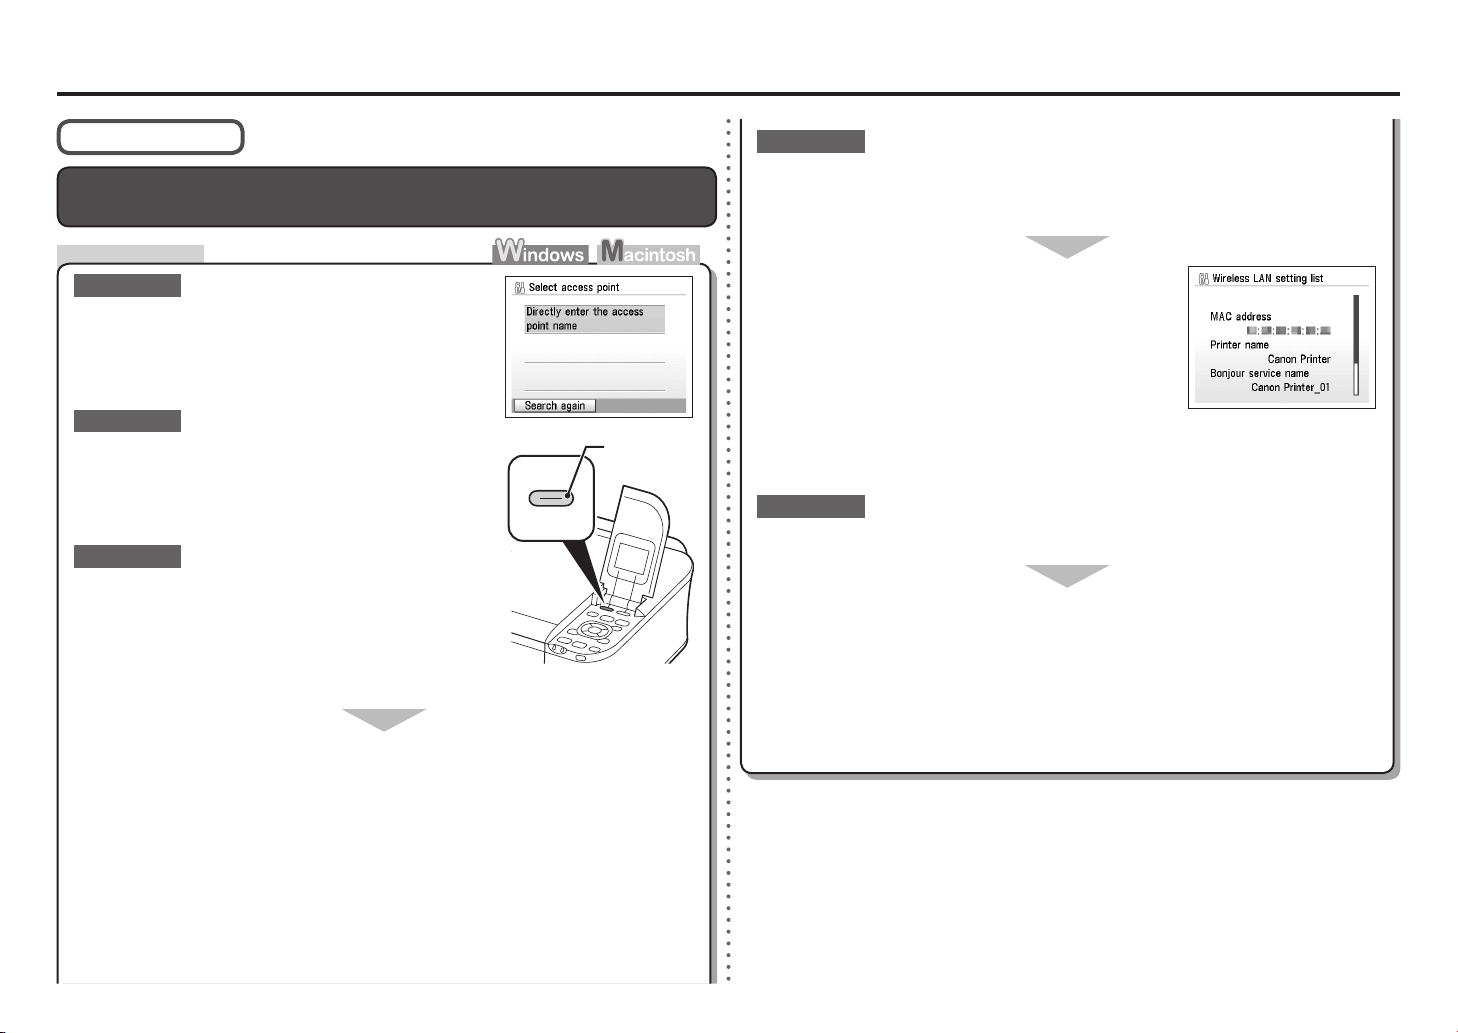
Make sure that you follow Check 1, 2, 5 and 6 of
"Connection Checklist" on page 12, then press the left
FUNCTION button (A) on the machine to search for the
access point again.
Unplug the access point from the power outlet and plug it
in, wait for a while, then press the left FUNCTION button (A)
on the machine to search for the access point again.
Is SSID broadcast (connection via "ANY" SSID, etc.)
disabled or is the stealth mode enabled on the access
point?
For details on how to check the settings of the access point,
refer to the manual supplied with the access point or contact its
manufacturer.
•
Enable SSID broadcast (connection via "ANY" SSID, etc.) or disable the stealth mode,
then press the left FUNCTION button (A) on the machine to search for the access point
again.
For details on how to change the settings of the access point, refer to the manual supplied with
the access point or contact its manufacturer.
•
To establish a connection without changing the access point settings, refer to "Entering
the Access Point's Wireless LAN Settings Directly on the Machine" on page 8.
Check 3
Check 2
Check 1
Easy Settings
Is the MAC address ltering enabled on the access point?
Set the access point to accept the MAC address of the
machine.
Check 4
For details on how to change the settings of the access point,
refer to the manual supplied with the access point or contact its
manufacturer.
•
To check the MAC address of the machine, press the HOME
button, then using the Easy-Scroll Wheel and OK button,
select Settings > Device settings > LAN settings > Conrm
LAN settings > Wireless LAN setting list, then check MAC
address.
•
For details on how to check the settings of the access point, refer to the manual supplied with the
access point or contact its manufacturer.
•
Is "WPA/WPA2 Enterprise" set as a security protocol (encryption standard) on the
access point?
Check 5
"WPA/WPA2 Enterprise" is not supported on the machine.
Change the security protocol (encryption standard) for the access point, then congure
settings again.
For details on how to change the security protocol (encryption standard) for the access point,
refer to the manual supplied with the access point or contact its manufacturer.
•
For the procedure to congure settings of the machine, refer to "Wireless Setup" on page 22 in
the printed manual: Getting Started.
•
Page 4
3
ENGLISH
SSID•
An identier to identify the specic access point.
An access point's periodic transmission of a signal revealing its SSID.
Stealth mode•
A function to hide SSID in wireless connection.
SSID broadcast•
Glossary
A function to block access from unauthorized wireless devices by saving the MAC addresses of specic
wireless devices (computers, printers, etc.) to the access point beforehand.
MAC address ltering•
A unique number assigned to each network device.
MAC address•
Check
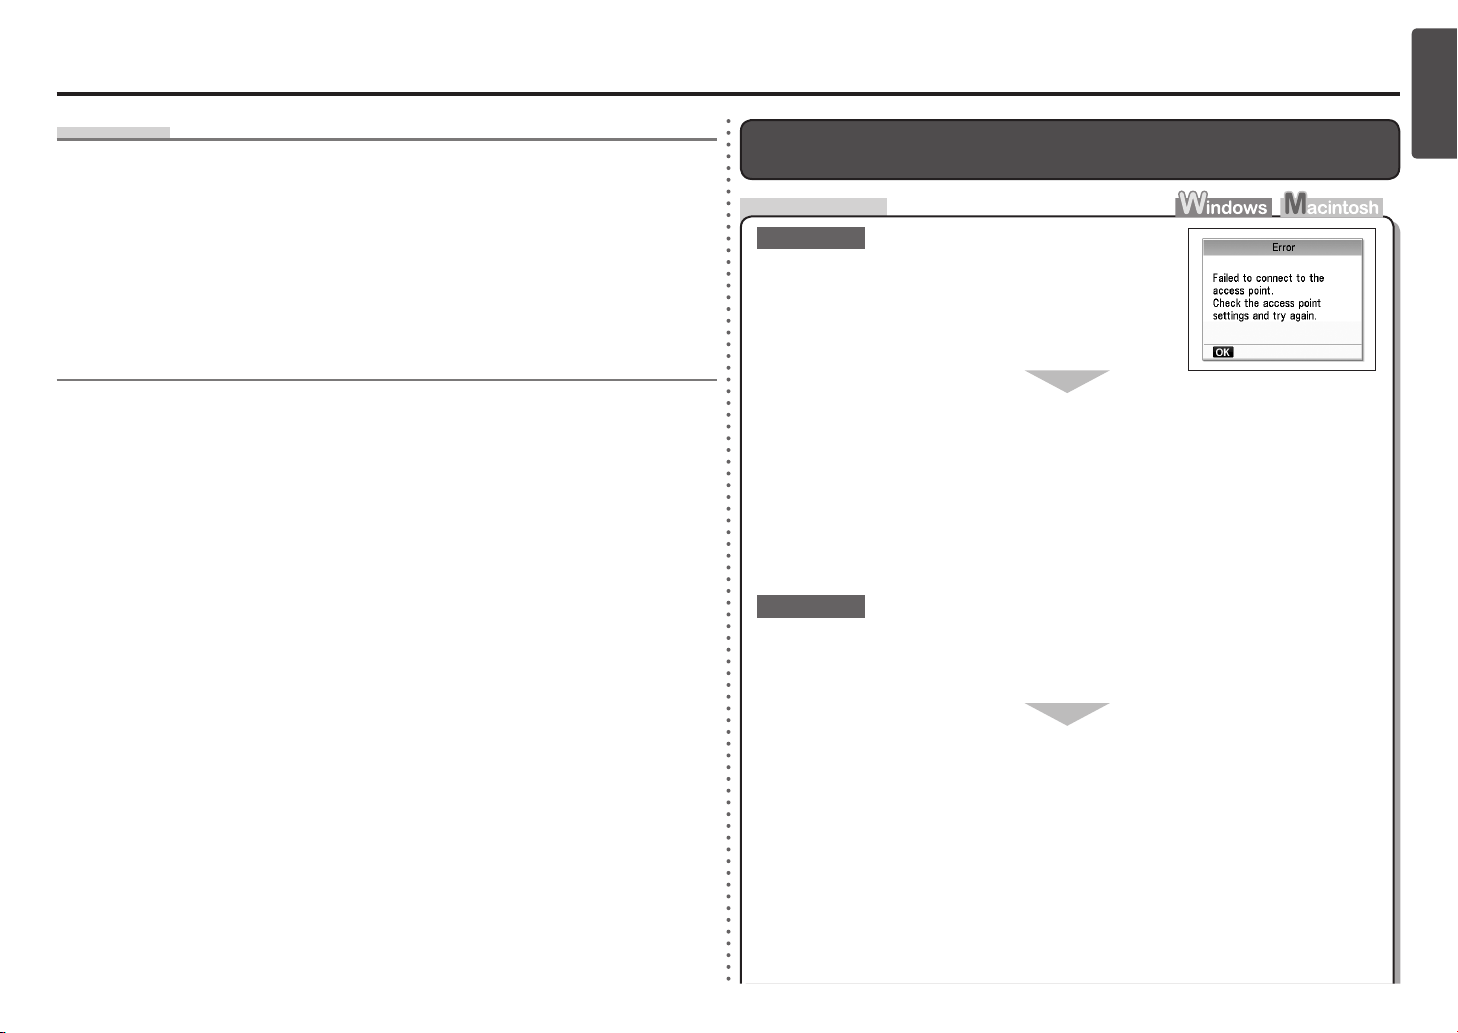
Failed to connect to the access point. is Displayed
Check 1
Is WEP key number 2, 3 or 4 of the access point in use?
For details on how to check the WEP key number of the access
point, refer to the manual supplied with the access point or
contact its manufacturer.
•
Set to use WEP key number 1 of the access point, or select a WEP key number by
entering wireless connection settings of the machine directly.
For details on how to change the WEP key number of the access point, refer to the manual
supplied with the access point or contact its manufacturer.
•
For details on how to select a WEP key number by entering wireless connection settings of the
machine directly, refer to "Entering the Access Point's Wireless LAN Settings Directly on the
Machine" on page 8.
•
Check 2
Make sure that the DHCP function of the access point is active.
For details on how to check the settings of the access point, refer to the manual supplied with the
access point or contact its manufacturer.
•
Enable the DHCP function of the access point, then congure settings again.
For details on how to change the settings of the access point, refer to the manual supplied with
the access point or contact its manufacturer.
•
Page 5

4
Check
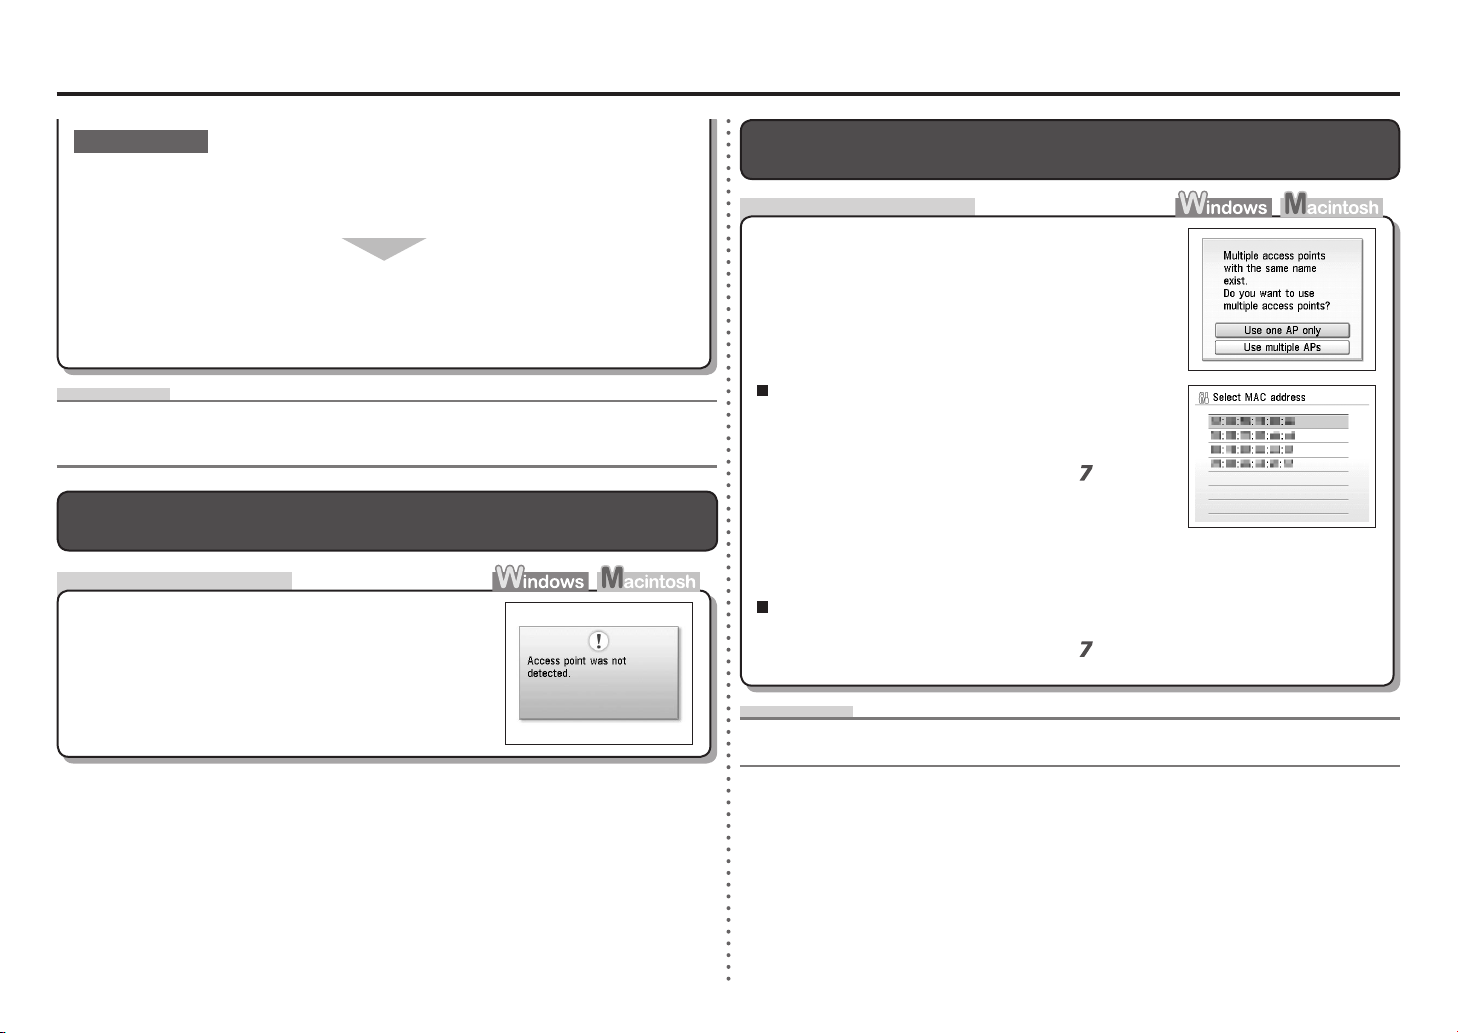
Multiple access points with the same name exist. is Displayed
The message appears when multiple access points with
the same name are found.
Select Use multiple APs.
When you have only one access point
For details on how to check the MAC address of the access point, refer to the manual supplied
with the access point or contact its manufacturer.
•
Select Use one AP only, then select the MAC address
of the target access point.
When using multiple access points
Glossary
A unique number assigned to each network device.
MAC address•
For subsequent operations, go to step in "Entering the Access Point's Wireless LAN Settings
Directly on the Machine" on page 8.
•
For subsequent operations, go to step in "Entering
the Access Point's Wireless LAN Settings Directly on the
Machine" on page 8.
•
Check
Access point was not detected is Displayed
The message appears when no access point is found.
Refer to "The Target Access Point is Not Displayed
(Detected)" on page 2.
Glossary
DHCP function•
A function that automatically assigns required information (IP address, etc.) to computers connected to
the Internet.
Are you using an access point that automatically creates WEP keys?
Check the WEP key (hexadecimal) created automatically on the access point, then
enter it on the machine.
For details on how to check the WEP key of the access point, refer to the manual supplied with
the access point or contact its manufacturer.
•
Check 3
For details on the access point, refer to the manual supplied with the access point or contact its
manufacturer.
•
Page 6
5
ENGLISH
A A
Action
Check
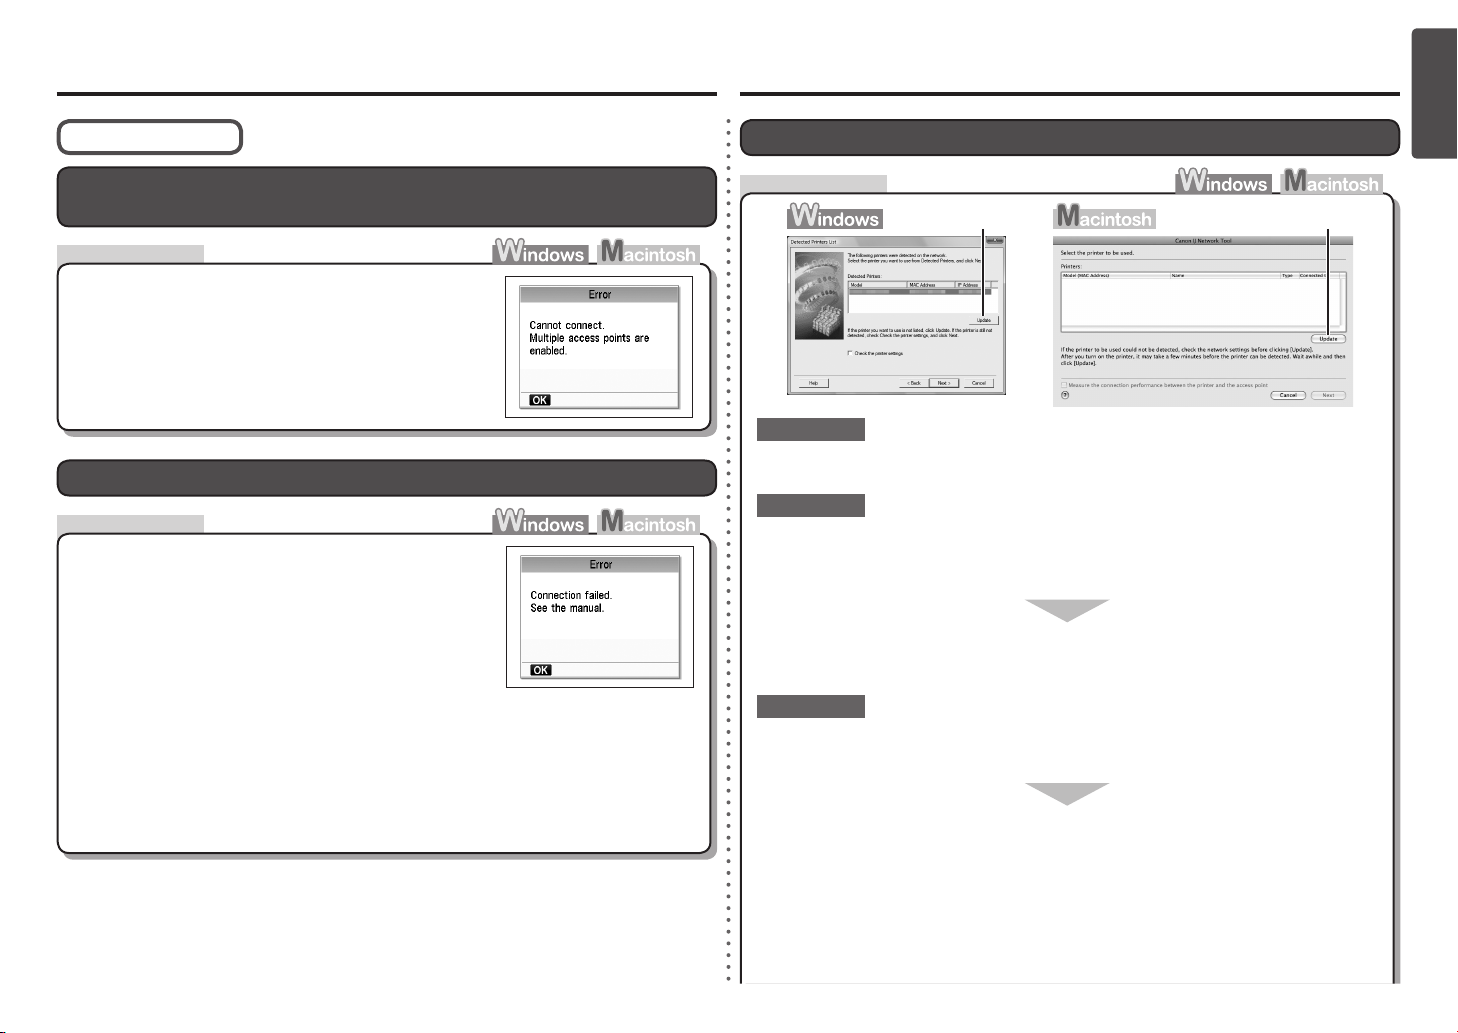
Cannot connect. Multiple access points are enabled. is Displayed
The message appears when multiple access points are
detected.
Check the access point settings, then congure WPS
settings again.
For details on how to check the settings of the access point,
refer to the manual supplied with the access point or contact its
manufacturer.
•
The message appears when an error occurs.
Connection failed. is Displayed
Wait for a while, then congure the settings again.
For the procedure to congure WPS settings of the machine,
refer to "Wireless Setup Using WPS (Wi-Fi Protected Setup)" on
page 27 in the printed manual: Getting Started.
•
When using an access point that does not support WPS, congure settings manually. For the
procedure to congure settings of the machine manually, refer to "Wireless Setup" on page 22 in
the printed manual: Getting Started.
•
WPS Settings
Check
The Machine is Not Displayed (Detected)
Is the machine connected to a network?
For details on how to check if the machine is connected to a network, refer to "Conrm
Connection Status" on page 30 in the printed manual: Getting Started.
•
Make sure that you follow "Connection Checklist" on page 12, then click Update (A).
Check 2
Check 1
If the machine is not connected to a network, perform setup again by following the
procedures in "Wireless Setup" on page 22 and onward in the printed manual: Getting
Started.
Check 3
Problems during Software Installation
Is the IP ltering feature enabled on the access point?
Set the access point to accept the IP address of the machine.
For details on how to check the settings of the access point, refer to the manual supplied with the
access point or contact its manufacturer.
•
For details on how to change the settings of the access point, refer to the manual supplied with
the access point or contact its manufacturer.
•
To check the IP address of the machine, press the HOME button, then using the Easy-Scroll
Wheel and OK button, select Settings > Device settings > LAN settings > Conrm LAN
settings > Wireless LAN setting list, then check IP address.
•
Page 7
6
A
Check
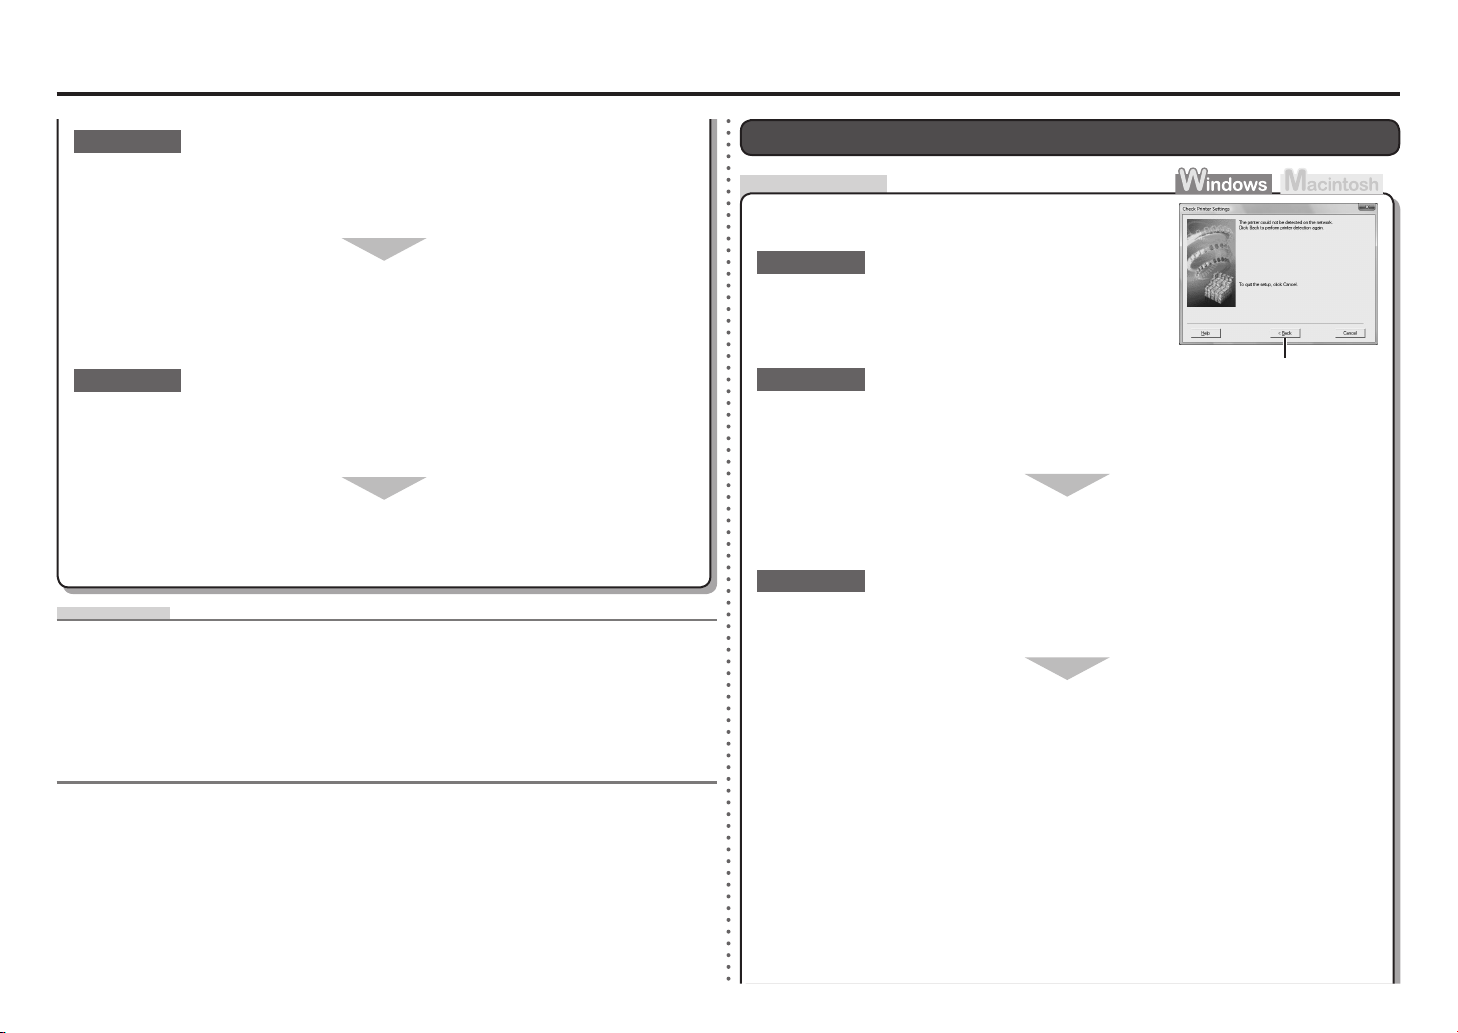
Check Printer Settings dialog box is displayed
The message appears when the machine cannot be
detected.
Is the machine connected to a network?
For details on how to check if the machine is connected to a network, refer to "Conrm
Connection Status" on page 30 in the printed manual: Getting Started.
•
Make sure that you follow "Connection Checklist" on
page 12, then click Back (A).
Check 1
Check 2
Proceed with the setup.
If the machine is not connected to a network, perform setup again by following the
procedures in "Wireless Setup" on page 22 and onward in the printed manual: Getting
Started.
Is the IP ltering feature enabled on the access point?
Check 3
For details on how to check the settings of the access point, refer to the manual supplied with the
access point or contact its manufacturer.
•
Set the access point to accept the IP address of the machine.
For details on how to change the settings of the access point, refer to the manual supplied with
the access point or contact its manufacturer.
•
To check the IP address of the machine, press the HOME button, then using the Easy-Scroll
Wheel and OK button, select Settings > Device settings > LAN settings > Conrm LAN
settings > Wireless LAN setting list, then check IP address.
•
Is the privacy separator feature enabled on the access point?
Disable the privacy separator feature.
Check 5
Check 4
For details on how to change the settings of the access point, refer to the manual supplied with
the access point or contact its manufacturer.
•
For details on how to check the settings of the access point, refer to the manual supplied with the
access point or contact its manufacturer.
•
When obtaining an IP address automatically, make sure that the DHCP function of the
access point is active.
For details on how to check the settings of the access point, refer to the manual supplied with the
access point or contact its manufacturer.
•
Enable the DHCP function of the access point, then click Update (A).
For details on how to change the settings of the access point, refer to the manual supplied with
the access point or contact its manufacturer.
•
Glossary
A function to control trafc to/from specic IP addresses.
IP address ltering•
A function to prevent communication between multiple wireless devices connected to an access point.
Privacy separator feature•
DHCP function•
A function that automatically assigns required information (IP address, etc.) to computers connected to
the Internet.
Page 8
7
ENGLISH
Is the privacy separator feature enabled on the access point?
Disable the privacy separator feature.
Check 5
Check 4
For details on how to change the settings of the access point, refer to the manual supplied with
the access point or contact its manufacturer.
•
For details on how to check the settings of the access point, refer to the manual supplied with the
access point or contact its manufacturer.
•
When obtaining an IP address automatically, make sure that the DHCP function of the
access point is active.
For details on how to check the settings of the access point, refer to the manual supplied with the
access point or contact its manufacturer.
•
Enable the DHCP function of the access point, then click Back (A).
For details on how to change the settings of the access point, refer to the manual supplied with
the access point or contact its manufacturer.
•
Glossary
A function to control trafc to/from specic IP addresses.
IP address ltering•
A function to prevent communication between multiple wireless devices connected to an access point.
Privacy separator feature•
DHCP function•
A function that automatically assigns required information (IP address, etc.) to computers connected to
the Internet.
Check
Check
Other Troubleshooting Tips
The Machine is Not Detected after the Network Environment is
Changed
IP address•
A numerical identication assigned to each computer or network device connected to a network.
Glossary
Wait until the IP address is assigned to the computer. You may need to restart your
computer.
Search for the machine again after conrming a valid IP address is assigned to the computer.•
Forgotten or Do Not Know the Access Point Name/Network Name
(SSID), Security Protocol (encryption standard), and Network Key
Check the access point settings.
For details on how to check the settings of the access point, refer to the manual supplied with the
access point or contact its manufacturer.
•
Page 9
8
5
6
7
1
2
3
4
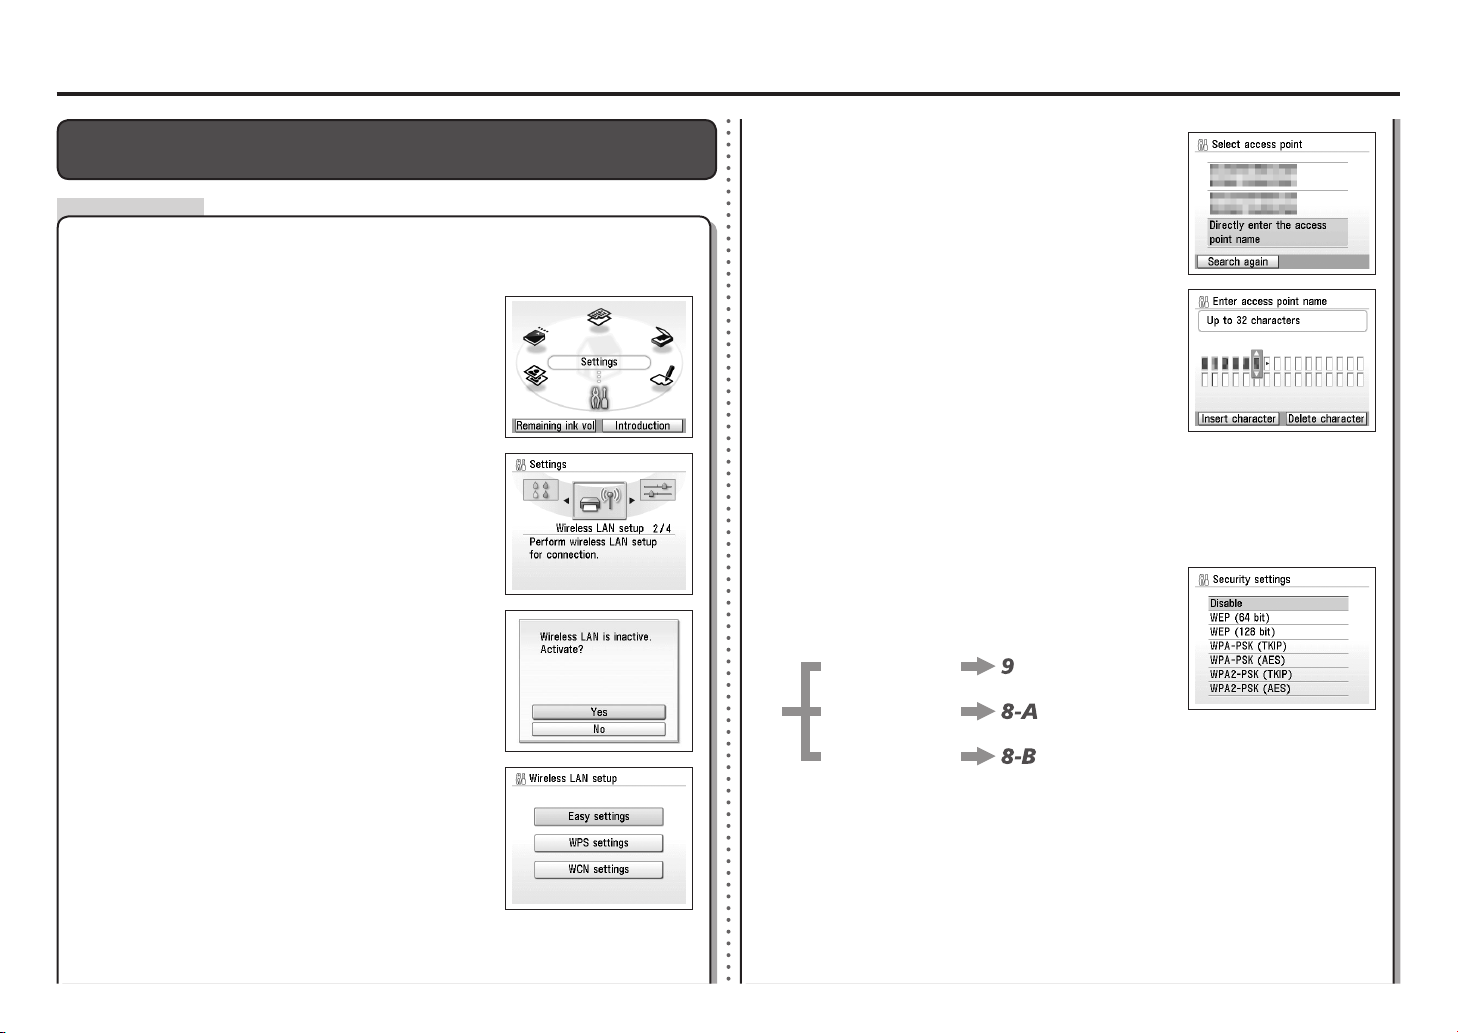
Select Directly enter the access point name, then
press the OK button.
If you are living in an apartment, nearby access points in use
may be detected.
•
Enter the access point name/network name (SSID)
using the Easy-Scroll Wheel, then press the OK button.
For details on how to check the access point name/network name (SSID), refer to the manual
supplied with the access point or contact its manufacturer.
•
Enter the same access point name/network name (SSID) as
that of the access point on the machine.
•
Enter upper and lower case letters of the alphabet correctly. Letters are case sensitive.•
Go to either of the following steps according to the selected
security protocol.
•
Disable
WEP
WPA/WPA2
Select a security protocol for the access point, then
press the OK button.
When WEP 40 bit is selected in AirPort Utility (AirPort Admin Utility), select WEP (64 bit).•
When WEP (Transitional Security Network) is selected in AirPort Utility, select WEP (128
bit) or WPA2-PSK (AES).
•
Use the Easy-Scroll Wheel to select the character. Use the ]
button to move the cursor to the right.
Action
Reference Information
Select Easy settings, then press the OK button.
Select Yes, then press the OK button.
Select Wireless LAN setup, then press the OK button.
Use the Easy-Scroll Wheel to select Settings, then
press the OK button.
Enter the access point name/network name (SSID) and security setting (WEP, WPA,
etc.) on the machine directly.
Follow the procedure below.
When wireless connection is enabled, the Wi-Fi lamp lights
blue.
•
Entering the Access Point's Wireless LAN Settings Directly on the
Machine
Page 10

9
ENGLISH
8-A 8-B
9
4
3
1
2
3
1
2
WEP
Make sure that the network key is correct, then
press the OK button.
Enter the network key, then press the OK
button.
Enter upper and lower case letters of the alphabet
correctly when the key input format is characters.
Letters are case sensitive.
Letters are not case sensitive if the format is
hexadecimal.
•
Select the network key format.
Select Characters when the network key is 5 or 13
characters.
Select Hexadecimal when it is 10 or 26 characters
(digits).
•
Select the WEP key number you want to use,
then press the OK button.
Make sure that the network key is correct, then
press the OK button.
Select the network key format.
Select Characters when the network key is
between 8 and 63 characters.
Select Hexadecimal when it is 64 characters
(digits).
•
Enter the network key, then press the OK
button.
Enter upper and lower case letters of the alphabet
correctly when the key input format is characters.
Letters are case sensitive.
Letters are not case sensitive if the format is
hexadecimal.
•
When the completion screen appears, press the OK
button.
The Settings screen returns.
When using AirPort, select WEP key 1 in the
screen. Selecting other key numbers will disable the
connection between the machine and AirPort.
•
WPA/WPA2
WPA/WPA2
Disable
Disable
Page 11

10
5
6
7
8
1
2
3
4
Select IPv4, then press the OK button.
Select IPv4/IPv6 settings, then press the OK button.
Follow the on-screen instructions to proceed with settings.•
Select Yes, then press the OK button.
Select Manual setup, then press the OK button.
Action
Specifying the Machine's IP Address (IPv4 only)
Select Other settings, then press the OK button.
Select LAN settings, then press the OK button.
Select Device settings, then press the OK button.
Use the Easy-Scroll Wheel to select Settings, then
press the OK button.
The machine's IP Address can be specied by the following procedure.
Page 12

11
ENGLISH
1
2
3
4
5
6
Action
<Default State>
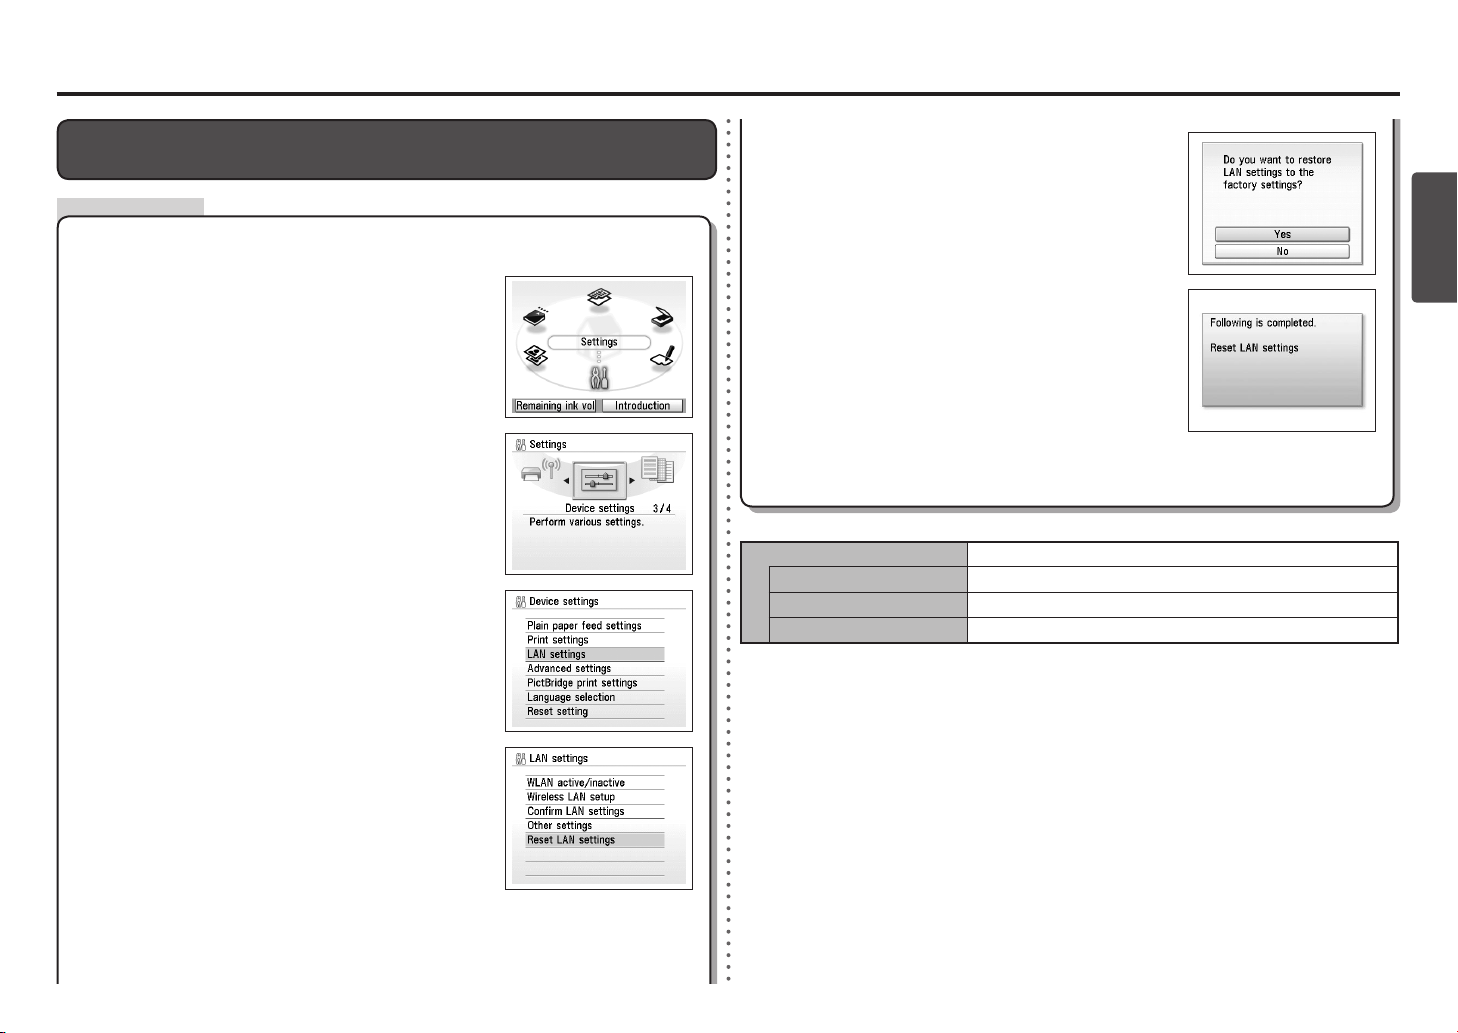
Select Reset LAN settings, then press the OK button.
Select LAN settings, then press the OK button.
Select Device settings, then press the OK button.
Use the Easy-Scroll Wheel to select Settings, then
press the OK button.
Make sure that the screen shown to the right appears.
After a while, the LAN settings screen returns.•
Select Yes, then press the OK button.
The LAN setting of the machine is now restored to the default state.
Restoring the Machine's Default LAN Settings to Perform Setup Again
Follow the procedure below to restore LAN settings of the machine to the default state.
Perform setup again by following the procedures in "Wireless Setup" on page 22 and onward in
the printed manual: Getting Started.
•
Wireless connection Inactive
SSID BJNPSETUP
Data encryption Inactive
TCP/IP setting Obtain an IP address automatically
Page 13

12
A
Check
Connection Checklist
Before connecting the machine, are the computer and network device (router, access point, etc.) congured and can the computer connect to the network?
Congure the computer and network device.
Are the machine and network device (router, access point, etc.) turned on?
Is the rewall function of your security software active?
A message may appear on the computer monitor warning that Canon software is attempting to access the network.
If the warning message appears, set the security software to always allow access.
Is the Wi-Fi lamp (A) lit blue?
After enabling wireless LAN, perform setup again by following the procedures in "Wireless Setup" on page 22 and onward in the printed manual: Getting
Started.
•
Turn on each device.
If the machine is already turned on, turn it off, then turn it back on.
Check 4
Check 3
Check 2
Check 1
Check 5
For the procedures, refer to the manuals supplied with the computer and network device, or contact their manufacturers.•
Are the access point and machine installed in an open space where wireless communications are possible? Also, is there a microwave oven, refrigerator, etc. nearby?
Install them in an open space with as few obstacles as possible.
To prevent radio interference, leave some space between the installation location and a microwave oven, refrigerator, etc.
Press the HOME button, then using the Easy-Scroll Wheel and OK button, select Settings > Device settings > LAN settings > WLAN
active/inactive > Wireless LAN active to enable wireless LAN.
Page 14
13
ENGLISH
Is the access point operating in IEEE802.11b or IEEE802.11g (2.4 GHz)?
For details on how to check the operating mode of the access point, refer to the manual supplied with the access point or contact its manufacturer.•
Check 6
Set the access point to operate in IEEE802.11b or IEEE802.11g (2.4 GHz).
For details on how to change the operating mode of the access point, refer to the manual supplied with the access point or contact its manufacturer.•
Firewall•
A security measure to protect computers connected to the Internet and corporate networks against unauthorized external access.
Glossary
Page 15

14
Specications
Minimum System Requirements
Conform to the operating system's requirements when higher than those given here.
Operating System
Processor
RAM
Windows Vista, Vista SP1
1 GHz processor
512 MB
Windows XP SP2, SP3
300 MHz processor
128 MB
Windows 2000 Professional
SP4
300 MHz processor
128 MB
Mac OS X v.10.5
Intel processor, PowerPC G5,
PowerPC G4
(867 MHz or faster)
512 MB
Mac OS X v.10.4
Intel processor, PowerPC G5,
PowerPC G4, PowerPC G3
256 MB
Mac OS X v.10.3.9
PowerPC G5, PowerPC G4,
PowerPC G3
128 MB
Browser Internet Explorer 6 or later Safari
Hard Disk Space 750 MB
Note: For bundled software
installation.
800 MB
Note: For bundled software
installation.
CD-ROM Drive Required
Display XGA 1024 x 768
Windows: Operation can only be guaranteed on a PC with Windows Vista, XP or
2000 pre-installed.
To upgrade from Windows XP to Windows Vista, rst uninstall software bundled with
the Canon inkjet printer.
Some functions may not be available with Windows Media Center.
Macintosh: Hard Disk must be formatted as Mac OS Extended (Journaled) or Mac
OS Extended.
Internet Explorer 7 or later is required to install Easy-WebPrint EX.
•
•
•
•
•
General Specications
Printing
resolution (dpi)
9600* (horizontal) x 2400 (vertical)
* Ink droplets can be placed with a pitch of 1/9600 inch at
minimum.
Interface USB Port:
Hi-Speed USB*1
Direct Print Port:
PictBridge
Bluetooth v2.0 (Option)*2 *3 *4
USB ash drive
LAN Port:
Wireless LAN: IEEE802.11b/IEEE802.11g*5
*1 A computer that complies with Hi-Speed USB standard
is required. Since the Hi-Speed USB interface is fully
upwardly compatible with USB 1.1, it can be used at
USB 1.1.
*2 Maximum speed: 1.44 Mbps
*3 JPEG/PNG only
*4 Bluetooth connection is for printing only.
*5 Setup possible through WPS (Wi-Fi Protected Setup)
settings, WCN (Windows Connect Now) settings or Easy
settings.
Print width 8 inches/203.2 mm
(for Borderless Printing: 8.5 inches/216 mm)
Operating
environment
Temperature: 5 to 35°C (41 to 95°F)
Humidity: 10 to 90% RH (no condensation)
Storage
environment
Temperature: 0 to 40°C (32 to 104°F)
Humidity: 5 to 95% RH (no condensation)
Power supply AC 100-240 V, 50/60 Hz
Power
consumption
Printing (Copy): Approx. 14 W
Standby (minimum): Approx. 1.3 W*
OFF: Approx. 0.5 W*
* USB connection to PC
External
dimensions
Approx. 17.9 (W) x 14.5 (D) x 6.3 (H) inches
Approx. 453 (W) x 368 (D) x 160 (H) mm
* With the Paper Support and Paper Output Tray retracted.
Weight Approx. 8.1 kg (Approx. 17.8 lb)
* With the Print Head and ink tanks installed.
Print Head/Ink Total 2,368 nozzles (PgBK 320 nozzles, Y/DyeBK each 256
nozzles, C/M each 768 nozzles)
Additional System Requirements for the On-Screen Manuals
Browser: Easy Guide Viewer
Note: Internet Explorer 6 or later must
be installed. The on-screen manual may
not be displayed properly depending on
your operating system or Internet Explorer
version. We recommend that you keep
your system up to date with Windows
Update.
Browser: Easy Guide Viewer
Note: The on-screen manual may not be
displayed properly depending on your
operating system or Safari version. We
recommend that you keep your system up
to date.
Specications are subject to change without notice.
About Consumables
Consumables (ink tanks / FINE Cartridges) are available for
5 years after production has stopped.
Copy Specications
Multiple copy Max 99 pages
Intensity adjustment 9 positions, Auto intensity (AE copy)
Reduction/
Enlargement
25% - 400% (1% unit)
Scan Specications
Scanner driver TWAIN/WIA (Windows Vista and Windows XP only)
Maximum scanning
size
A4/Letter, 8.5'' x 11.7''/216 x 297 mm
Scanning resolution Optical resolution (horizontal x vertical) max:
2400 dpi x 4800 dpi
Interpolated resolution max: 19200 dpi x 19200 dpi
Gradation (Input/
Output)
Gray: 16 bit/8 bit
Color: 48 bit/24 bit (RGB each 16 bit/8 bit)
Network Specications
Communication
protocol
TCP/IP
Wireless LAN Supported Standards: IEEE802.11g/IEEE802.11b
Transfer speed:
IEEE802.11g: 6/9/12/18/24/36/48/54 Mbps
IEEE802.11b: 1/2/5.5/11 Mbps
Frequency bandwidth*1: 2.412-2.462 GHz or
2.412 GHz-2.472 GHz
Channel*1: 1-11 or 1-13
Communication distance: Indoors 50 m*2
Security: Encryption by WPA-PSK, WPA2-PSK, or
WEP (64/128 bits), and access control by
passwords
*1 Frequency bandwidth and available channels
differ depending on country or region.
*2 Effective range varies depending on the
installation environment and location.
Page 16

1
ESPAÑOL
Solución de problemas de conguración de red
En este manual se describen principalmente los problemas que pueden aparecer al congurar una red y
las posibles causas y soluciones.
Localice la descripción que se ajuste al problema y siga las instrucciones de la solución.
Si no puede localizar una descripción que coincida con el problema o si éste surge después de la
conguración, consulte el manual en pantalla: Guía básica/Guía avanzada.
Los nombres de las funciones y demás pormenores pueden diferir de los de este manual en función del
software de aplicación o del punto de acceso.
•
En el manual se utilizan los símbolos siguientes.
Descripción para los usuarios de Windows.
Descripción para los usuarios de Macintosh.
Instrucciones en forma de notas de funcionamiento o explicaciones adicionales.
Otros consejos para la solución de problemas
El punto de acceso de destino no aparece (no se detecta)
P. 2
Aparece Error al conectar con el punto de acceso. (Failed to connect to the access
point.)
Se ha olvidado o se desconoce el nombre del punto de acceso/nombre de red (SSID), el
protocolo de seguridad (estándar de cifrado) y la clave de red
El equipo no se detecta después de modicar el entorno de red
P. 7
Lista de comprobación de las conexiones
P. 12
Problemas durante la conguración de red
Información de referencia
Especicación de la dirección IP del equipo (sólo IPv4)
P. 8
Restauración de la conguración de LAN predeterminada del equipo para volver a
congurar
P. 10
P. 11
El equipo no aparece (no se detecta)
Aparece No se puede establecer la conexión. Se han activado varios puntos de
acceso. (Cannot connect. Multiple access points are enabled.)
Aparece Error de conexión. (Connection failed.)
Aparece Punto de acceso no detectado. (Access point was not detected)
Aparece Existen varios puntos de acceso con el mismo nombre. (Multiple access
points with the same name exist.)
P. 5
P. 2
P. 3
P. 5
P. 5
P. 4
P. 4
P. 5
P. 6
Aparece el cuadro de diálogo Comprobar la conguración de impresora (Check
Printer Settings)
Problemas durante la instalación del software
Conguración WPS
Conguración fácil
Introducción de la conguración de LAN inalámbrica del punto de acceso directamente en
el equipo
P. 7
P. 7
P. 8
Especicaciones P. 14
Page 17

2
A
Problemas durante la conguración de red
Comprobaciones
El punto de acceso de destino no aparece (no se detecta)
Asegúrese de seguir las comprobaciones 1, 2, 5 y 6 de la
"Lista de comprobación de las conexiones" de la página 12
y, a continuación, pulse el botón FUNCIÓN (FUNCTION)
izquierdo (A) del equipo para volver a buscar el punto de
acceso.
Desconecte el punto de acceso de la toma de corriente y
vuelva a enchufarlo, espere un momento y, a continuación,
pulse el botón FUNCIÓN (FUNCTION) izquierdo (A) del
equipo para volver a buscar el punto de acceso.
¿Está desactivada la transmisión SSID (conexión mediante
SSID "ANY", etc.) o está habilitado el modo silencioso en
el punto de acceso?
Para obtener información sobre cómo comprobar la conguración
del punto de acceso, consulte el manual suministrado con éste o
póngase en contacto con el fabricante.
•
Active la transmisión SSID (conexión mediante SSID "ANY", etc.) o deshabilite el modo
silencioso y, a continuación, pulse el botón FUNCIÓN (FUNCTION) izquierdo (A) del
equipo para volver a buscar el punto de acceso.
Para obtener información sobre cómo cambiar la conguración del punto de acceso, consulte el
manual suministrado con éste o póngase en contacto con el fabricante.
•
Para establecer una conexión sin modicar la conguración del punto de acceso,
consulte "Introducción de la conguración de LAN inalámbrica del punto de acceso
directamente en el equipo" en la página 8.
Comprobación 3
Comprobación 2
Comprobación 1
Conguración fácil
¿Está activado el ltrado de direcciones MAC en el punto de acceso?
Congure el punto de acceso para que admita la dirección
MAC del equipo.
Comprobación 4
Para obtener información sobre cómo cambiar la conguración
del punto de acceso, consulte el manual suministrado con éste o
póngase en contacto con el fabricante.
•
Para comprobar la dirección MAC del equipo, pulse el botón
INICIO (HOME) y, a continuación, mediante la rueda de
fácil navegación y el botón OK, seleccione Conguración
(Settings) > Conguración dispositivo (Device settings) >
Conguración de LAN (LAN settings) > Conrmar conf. LAN
(Conrm LAN settings) > Lista cong. LAN inal. (Wireless
LAN setting list) y marque después Dirección MAC (MAC
address).
•
Para obtener información sobre cómo comprobar la conguración del punto de acceso, consulte
el manual suministrado con éste o póngase en contacto con el fabricante.
•
¿En el punto de acceso está establecido "WPA/WPA2 Empresa" como protocolo de
seguridad (estándar de codicación)?
Comprobación 5
El equipo no admite "WPA/WPA2 Empresa".
Cambie el protocolo de seguridad (estándar de codicación) del punto de acceso y
vuelva a establecer la conguración.
Para obtener información sobre cómo cambiar el protocolo de seguridad (estándar de
codicación) del punto de acceso, consulte el manual suministrado con éste o póngase en
contacto con su fabricante.
•
Para conocer el procedimiento para establecer la conguración del equipo, consulte
"Conguración inalámbrica" en la página 22 del manual impreso: Guía de inicio.
•
Page 18

3
ESPAÑOL
SSID•
Identicador de un punto de acceso especíco.
Transmisión periódica que realiza un punto de acceso de una señal que revela su SSID.
Modo silencioso•
Función para ocultar el SSID en una conexión inalámbrica.
Transmisión SSID•
Glosario
Función para bloquear el acceso de dispositivos inalámbricos no autorizados que consiste en guardar
de antemano en el punto de acceso las direcciones MAC de los dispositivos inalámbricos concretos
(ordenadores, impresoras, etc.).
Filtrado de direcciones MAC•
Número único asignado a cada dispositivo de red.
Dirección MAC•
Comprobaciones
Aparece Error al conectar con el punto de acceso. (Failed to
connect to the access point.)
Comprobación 1
¿Se está utilizando el número de clave WEP 2, 3 o 4 del
punto de acceso?
Para obtener información sobre cómo comprobar el número de
clave WEP del punto de acceso, consulte el manual suministrado
con éste o póngase en contacto con el fabricante.
•
Establezca el uso del número de clave WEP 1 del punto de acceso o seleccione
un número de clave WEP introduciendo directamente la conguración de conexión
inalámbrica del equipo.
Para obtener información sobre cómo modicar el número de clave WEP del punto de acceso,
consulte el manual suministrado con éste o póngase en contacto con el fabricante.
•
Para obtener información sobre cómo seleccionar un número de clave WEP introduciendo
directamente la conguración de conexión inalámbrica del equipo, consulte "Introducción de la
conguración de LAN inalámbrica del punto de acceso directamente en el equipo" en la página 8.
•
Comprobación 2
Compruebe que la función DHCP del punto de acceso está activada.
Para obtener información sobre cómo comprobar la conguración del punto de acceso, consulte
el manual suministrado con éste o póngase en contacto con el fabricante.
•
Active la función DHCP del punto de acceso y, a continuación, vuelva a establecer la
conguración.
Para obtener información sobre cómo cambiar la conguración del punto de acceso, consulte el
manual suministrado con éste o póngase en contacto con el fabricante.
•
Page 19
4
Comprobaciones
Aparece Existen varios puntos de acceso con el mismo nombre.
(Multiple access points with the same name exist.)
Este mensaje aparece cuando se localizan varios puntos
de acceso con el mismo nombre.
Seleccione Utilizar varios PA (Use multiple APs).
Si sólo se dispone de un punto de acceso
Para obtener información sobre cómo consultar la dirección MAC del punto de acceso,
consulte el manual suministrado con éste o póngase en contacto con el fabricante.
•
Seleccione Utilizar solo un PA (Use one AP only) y, a
continuación, elija la dirección MAC del punto de acceso
objetivo.
Si se utilizan varios puntos de acceso
Glosario
Número único asignado a cada dispositivo de red.
Dirección MAC•
Para las operaciones siguientes, vaya al paso de "Introducción de la conguración de LAN
inalámbrica del punto de acceso directamente en el equipo" en la página 8.
•
Para las operaciones siguientes, vaya al paso de
"Introducción de la conguración de LAN inalámbrica del
punto de acceso directamente en el equipo" en la página 8.
•
Comprobaciones
Aparece Punto de acceso no detectado. (Access point was not
detected)
Este mensaje aparece cuando no se localiza ningún punto
de acceso.
Consulte "El punto de acceso de destino no aparece (no
se detecta)" en la página 2.
Glosario
Función DHCP•
Función que asigna automáticamente la información necesaria (dirección IP, etc.) a los ordenadores
conectados a Internet.
¿Utiliza un punto de acceso que crea claves WEP automáticamente?
Consulte la clave WEP (hexadecimal) creada automáticamente en el punto de acceso y,
a continuación, introdúzcala en el equipo.
Para obtener información sobre cómo consultar la clave WEP del punto de acceso, consulte el
manual suministrado con éste o póngase en contacto con el fabricante.
•
Comprobación 3
Para obtener información sobre el punto de acceso, consulte el manual suministrado con éste o
póngase en contacto con el fabricante.
•
Page 20

5
ESPAÑOL
A A
Acción
Comprobaciones
Aparece No se puede establecer la conexión. Se han activado
varios puntos de acceso. (Cannot connect. Multiple access points
are enabled.)
Este mensaje aparece cuando se detectan varios puntos
de acceso.
Compruebe la conguración del punto de acceso y, a
continuación, vuelva a establecer la conguración WPS.
Para obtener información sobre cómo comprobar la conguración
del punto de acceso, consulte el manual suministrado con éste o
póngase en contacto con el fabricante.
•
Este mensaje aparece cuando se produce un error.
Aparece Error de conexión. (Connection failed.)
Espere un momento y vuelva a establecer la conguración.
Para conocer el procedimiento para establecer la conguración
WPS del equipo, consulte "Conguración inalámbrica mediante
WPS (Wi-Fi Protected Setup)" en la página 27 del manual
impreso: Guía de inicio.
•
Cuando utilice un punto de acceso que no admita WPS, establezca la conguración
manualmente. Para conocer el procedimiento para establecer la conguración del equipo
manualmente, consulte "Conguración inalámbrica" en la página 22 del manual impreso: Guía
de inicio.
•
Conguración WPS
Comprobaciones
El equipo no aparece (no se detecta)
¿El equipo está conectado a una red?
Para obtener información sobre cómo comprobar si el equipo está conectado a una red, consulte
"Comprobación del estado de conexión" en la página 30 del manual impreso: Guía de inicio.
•
Cerciórese de haber seguido el apartado "Lista de comprobación de las conexiones" de
la página 12 y, a continuación, haga clic en Actualizar (Update) (A).
Comprobación 2
Comprobación 1
Si el equipo no está conectado a una red, vuelva a establecer la conguración
siguiendo el procedimiento descrito en "Conguración inalámbrica" en la página 22 del
manual impreso: Guía de inicio.
Comprobación 3
Problemas durante la instalación del software
¿Está activada la función de ltrado de IP en el punto de acceso?
Congure el punto de acceso para que admita la dirección IP del equipo.
Para obtener información sobre cómo comprobar la conguración del punto de acceso, consulte
el manual suministrado con éste o póngase en contacto con el fabricante.
•
Para obtener información sobre cómo cambiar la conguración del punto de acceso, consulte el
manual suministrado con éste o póngase en contacto con el fabricante.
•
Para comprobar la dirección IP del equipo, pulse el botón INICIO (HOME) y, a continuación,
mediante la rueda de fácil navegación y el botón OK, seleccione Conguración (Settings)
> Conguración dispositivo (Device settings) > Conguración de LAN (LAN settings) >
Conrmar conf. LAN (Conrm LAN settings) > Lista cong. LAN inal. (Wireless LAN setting
list) y marque después Dirección IP (IP address).
•
Page 21

6
A
Comprobaciones
Aparece el cuadro de diálogo Comprobar la conguración de
impresora (Check Printer Settings)
Este mensaje aparece cuando no se puede detectar el
equipo.
¿El equipo está conectado a una red?
Para obtener información sobre cómo comprobar si el equipo está conectado a una red, consulte
"Comprobación del estado de conexión" en la página 30 del manual impreso: Guía de inicio.
•
Cerciórese de haber seguido el apartado "Lista de
comprobación de las conexiones" de la página 12 y, a
continuación, haga clic en Atrás (Back) (A).
Comprobación 1
Comprobación 2
Prosiga con la instalación.
Si el equipo no está conectado a una red, vuelva a establecer la conguración
siguiendo el procedimiento descrito en "Conguración inalámbrica" en la página 22 del
manual impreso: Guía de inicio.
¿Está activada la función de ltrado de IP en el punto de acceso?
Comprobación 3
Para obtener información sobre cómo comprobar la conguración del punto de acceso, consulte
el manual suministrado con éste o póngase en contacto con el fabricante.
•
Congure el punto de acceso para que admita la dirección IP del equipo.
Para obtener información sobre cómo cambiar la conguración del punto de acceso, consulte el
manual suministrado con éste o póngase en contacto con el fabricante.
•
Para comprobar la dirección IP del equipo, pulse el botón INICIO (HOME) y, a continuación,
mediante la rueda de fácil navegación y el botón OK, seleccione Conguración (Settings)
> Conguración dispositivo (Device settings) > Conguración de LAN (LAN settings) >
Conrmar conf. LAN (Conrm LAN settings) > Lista cong. LAN inal. (Wireless LAN setting
list) y marque después Dirección IP (IP address).
•
¿Está activada la función de separador de privacidad en el punto de acceso?
Desactive la función de separador de privacidad.
Comprobación 5
Comprobación 4
Para obtener información sobre cómo cambiar la conguración del punto de acceso, consulte el
manual suministrado con éste o póngase en contacto con el fabricante.
•
Para obtener información sobre cómo comprobar la conguración del punto de acceso, consulte
el manual suministrado con éste o póngase en contacto con el fabricante.
•
Cuando obtenga la dirección IP automáticamente, asegúrese de que la función DHCP
del punto de acceso está activada.
Para obtener información sobre cómo comprobar la conguración del punto de acceso, consulte
el manual suministrado con éste o póngase en contacto con el fabricante.
•
Active la función DHCP del punto de acceso y, a continuación, haga clic en Actualizar
(Update) (A).
Para obtener información sobre cómo cambiar la conguración del punto de acceso, consulte el
manual suministrado con éste o póngase en contacto con el fabricante.
•
Glosario
Función para controlar el tráco hacia y desde direcciones IP especícas.
Filtrado de direcciones IP•
Función para evitar la comunicación entre varios dispositivos inalámbricos conectados a un punto de
acceso.
Función de separador de privacidad•
Función DHCP•
Función que asigna automáticamente la información necesaria (dirección IP, etc.) a los ordenadores
conectados a Internet.
Page 22

7
ESPAÑOL
¿Está activada la función de separador de privacidad en el punto de acceso?
Desactive la función de separador de privacidad.
Comprobación 5
Comprobación 4
Para obtener información sobre cómo cambiar la conguración del punto de acceso, consulte el
manual suministrado con éste o póngase en contacto con el fabricante.
•
Para obtener información sobre cómo comprobar la conguración del punto de acceso, consulte
el manual suministrado con éste o póngase en contacto con el fabricante.
•
Cuando obtenga la dirección IP automáticamente, asegúrese de que la función DHCP
del punto de acceso está activada.
Para obtener información sobre cómo comprobar la conguración del punto de acceso, consulte
el manual suministrado con éste o póngase en contacto con el fabricante.
•
Active la función DHCP del punto de acceso y, a continuación, haga clic en Atrás (Back)
(A).
Para obtener información sobre cómo cambiar la conguración del punto de acceso, consulte el
manual suministrado con éste o póngase en contacto con el fabricante.
•
Glosario
Función para controlar el tráco hacia y desde direcciones IP especícas.
Filtrado de direcciones IP•
Función para evitar la comunicación entre varios dispositivos inalámbricos conectados a un punto de
acceso.
Función de separador de privacidad•
Función DHCP•
Función que asigna automáticamente la información necesaria (dirección IP, etc.) a los ordenadores
conectados a Internet.
Comprobaciones
Comprobaciones
Otros consejos para la solución de problemas
El equipo no se detecta después de modicar el entorno de red
Dirección IP•
Identicación numérica asignada a cada ordenador o dispositivo de red conectado a una red.
Glosario
Espere hasta que se asigne una dirección IP al ordenador. Quizás necesite reiniciarlo.
Vuelva a buscar el equipo después de conrmar que el ordenador tiene asignada una dirección
IP válida.
•
Se ha olvidado o se desconoce el nombre del punto de acceso/nombre
de red (SSID), el protocolo de seguridad (estándar de cifrado) y la
clave de red
Compruebe la conguración del punto de acceso.
Para obtener información sobre cómo comprobar la conguración del punto de acceso, consulte
el manual suministrado con éste o póngase en contacto con el fabricante.
•
Page 23

8
5
6
7
1
2
3
4
Seleccione Introducir directamente nombre punto
acceso (Directly enter the access point name) y, a
continuación, pulse el botón OK.
Si se encuentra en un piso, es posible que se detecten
puntos de acceso cercanos que estén en uso.
•
Introduzca el nombre del punto de acceso/nombre de
red (SSID) mediante la rueda de fácil navegación y, a
continuación, pulse el botón OK.
Para obtener información sobre cómo consultar el nombre del punto de acceso/nombre
de red (SSID), consulte el manual suministrado con éste o póngase en contacto con el
fabricante.
•
Introduzca en el equipo el mismo nombre de punto de
acceso/nombre de red (SSID) que el que tenga el punto de
acceso.
•
Introduzca correctamente las letras en mayúsculas y minúsculas. Con las letras, se distingue
entre mayúsculas y minúsculas.
•
En función del protocolo de seguridad seleccionado, vaya al
paso correspondiente de los que se indican a continuación.
•
Desactivado
WEP
WPA/WPA2
Seleccione un protocolo de seguridad para el punto de
acceso y, a continuación, pulse el botón OK.
Cuando esté seleccionado WEP de 40 bits (WEP 40 bit) en Utilidad AirPort (Utilidad
Administración AirPort), elija WEP (64 bits) (WEP (64 bit)).
•
Cuando esté seleccionado WEP (red seguridad de transición) (WEP (Transitional
Security Network)) en Utilidad AirPort, elija WEP (128 bits) (WEP (128 bit)) o WPA2-PSK
(AES).
•
Utilice la rueda de fácil navegación para seleccionar el carácter.
Utilice el botón ] para mover el cursor a la derecha.
Acción
Información de referencia
Seleccione Conguración fácil (Easy settings) y, a
continuación, pulse el botón OK.
Seleccione Sí (Yes) y, a continuación, pulse el botón
OK.
Seleccione Cong. LAN inalámbrica (Wireless LAN
setup) y, a continuación, pulse el botón OK.
Use la rueda de fácil navegación para seleccionar
Conguración (Settings) y, a continuación, pulse el
botón OK.
Introduzca el nombre del punto de acceso/nombre de red (SSID) y la conguración de
seguridad (WEP, WPA, etc.) en el equipo directamente.
Siga el procedimiento que se indica a continuación.
Cuando se habilita la conexión inalámbrica, la lámpara de
Wi-Fi se enciende en azul.
•
Introducción de la conguración de LAN inalámbrica del punto de
acceso directamente en el equipo
Page 24

9
ESPAÑOL
8-A 8-B
9
4
3
1
2
3
1
2
WEP
Asegúrese de que la clave de red es correcta y,
a continuación, pulse el botón OK.
Introduzca la clave de red y, a continuación,
pulse el botón OK.
Cuando el formato de entrada de clave sea
caracteres, introduzca correctamente las letras
mayúsculas y minúsculas. Con las letras, se
distingue entre mayúsculas y minúsculas.
Si el formato es hexadecimal, no hay distinción
entre mayúsculas y minúsculas.
•
Seleccione el formato de clave de red.
Cuando la clave de red sea de 5 o 13 caracteres,
elija Caracteres (Characters).
Cuando sea de 10 o 26 caracteres (dígitos),
seleccione Hexadecimal.
•
Seleccione el número de clave WEP que desee
utilizar y, a continuación, pulse el botón OK.
Asegúrese de que la clave de red es correcta y,
a continuación, pulse el botón OK.
Seleccione el formato de clave de red.
Cuando la clave de red sea de entre 8 y 63
caracteres, elija Caracteres (Characters).
Cuando sea de 64 caracteres (dígitos), seleccione
Hexadecimal.
•
Introduzca la clave de red y, a continuación,
pulse el botón OK.
Cuando el formato de entrada de clave sea
caracteres, introduzca correctamente las letras
mayúsculas y minúsculas. Con las letras, se
distingue entre mayúsculas y minúsculas.
Si el formato es hexadecimal, no hay distinción
entre mayúsculas y minúsculas.
•
Cuando aparezca la pantalla de conclusión, pulse el
botón OK.
Volverá a la pantalla Conguración (Settings).
Cuando utilice AirPort, elija Clave WEP 1 (WEP key
1) en la pantalla. La selección de otros números de
clave deshabilitará la conexión entre el equipo y
AirPort.
•
WPA/WPA2
WPA/WPA2
Desactivado
Desactivado
Page 25

10
5
6
7
8
1
2
3
4
Seleccione IPv4 y, a continuación, pulse el botón OK.
Seleccione Conguración IPv4/IPv6 (IPv4/IPv6
settings) y, a continuación, pulse el botón OK.
Siga las instrucciones en pantalla para establecer la
conguración.
•
Seleccione Sí (Yes) y, a continuación, pulse el botón
OK.
Seleccione Cong. manual (Manual setup) y, a
continuación, pulse el botón OK.
Acción
Especicación de la dirección IP del equipo (sólo IPv4)
Seleccione Otras conguraciones (Other settings) y,
a continuación, pulse el botón OK.
Seleccione Conguración de LAN (LAN settings) y, a
continuación, pulse el botón OK.
Seleccione Conguración dispositivo (Device
settings) y, a continuación, pulse el botón OK.
Use la rueda de fácil navegación para seleccionar
Conguración (Settings) y, a continuación, pulse el
botón OK.
La dirección IP del equipo se puede especicar mediante el procedimiento siguiente.
Page 26
11
ESPAÑOL
1
2
3
4
5
6
Acción
<Estado predeterminado>
Seleccione Rest. ajustes de LAN (Reset LAN
settings) y, a continuación, pulse el botón OK.
Seleccione Conguración de LAN (LAN settings) y, a
continuación, pulse el botón OK.
Seleccione Conguración dispositivo (Device
settings) y, a continuación, pulse el botón OK.
Use la rueda de fácil navegación para seleccionar
Conguración (Settings) y, a continuación, pulse el
botón OK.
Cerciórese de que aparece la pantalla de la derecha.
Al cabo de un rato, volverá a aparecer la pantalla
Conguración de LAN (LAN settings).
•
Seleccione Sí (Yes) y, a continuación, pulse el botón
OK.
La conguración de LAN del equipo se habrá restablecido al estado predeterminado.
Restauración de la conguración de LAN predeterminada del equipo
para volver a congurar
Siga el procedimiento que se indica a continuación para restaurar la conguración de
LAN del equipo al estado predeterminado.
Vuelva a establecer la conguración siguiendo el procedimiento descrito en "Conguración
inalámbrica", páginas 22 y siguientes, del manual impreso: Guía de inicio.
•
Conexión inalámbrica Inactiva
SSID BJNPSETUP
Codicación de datos Inactiva
Conguración TCP/IP Obtener una dirección IP automáticamente
Page 27

12
A
Comprobaciones
Lista de comprobación de las conexiones
Antes de conectar el equipo, ¿se han congurado el ordenador y el dispositivo de red (router, punto de acceso, etc.) y el ordenador se puede conectar a la red?
Congure el ordenador y el dispositivo de red.
¿Se han encendido el equipo y el dispositivo de red (router, punto de acceso, etc.)?
¿Está activada la función de rewall del software de seguridad?
En la pantalla del ordenador puede aparecer un mensaje advirtiendo de que el software de Canon está intentando acceder a la red.
Si aparece el mensaje de advertencia, establezca en el software de seguridad que permita el acceso siempre.
¿Está iluminada en azul la lámpara de Wi-Fi (A)?
Después de activar la LAN inalámbrica, vuelva a establecer la conguración siguiendo el procedimiento descrito en "Conguración inalámbrica", páginas 22 y
siguientes, del manual impreso: Guía de inicio.
•
Encienda cada dispositivo.
Si el equipo ya se ha encendido, apáguelo y vuelva a encenderlo.
Comprobación 4
Comprobación 3
Comprobación 2
Comprobación 1
Comprobación 5
Para obtener información sobre el procedimiento, consulte los manuales proporcionados con el ordenador y el dispositivo de red o póngase en contacto con el fabricante.•
¿El punto de acceso y el equipo están instalados en un espacio abierto en el que es posible la comunicación inalámbrica? Además, ¿hay algún horno microondas, nevera, etc.,
cerca?
Instálelos en un espacio abierto con la menor cantidad obstáculos posible.
Para evitar interferencias de radio, deje algún espacio entre la ubicación de la instalación y cualquier horno microondas, nevera, etc.
Pulse el botón INICIO (HOME) y, a continuación, mediante la rueda de fácil navegación y el botón OK, seleccione Conguración (Settings)
> Conguración dispositivo (Device settings) > Conguración de LAN (LAN settings) > WLAN activa/inactiva (WLAN active/inactive)
> LAN inalám. activa (Wireless LAN active) para habilitar la LAN inalámbrica.
Page 28
13
ESPAÑOL
¿El punto de acceso funciona con IEEE802.11b o IEEE802.11g (2,4 GHz)?
Para obtener información sobre cómo comprobar el modo de funcionamiento del punto de acceso, consulte el manual suministrado con éste o póngase en contacto con el fabricante.•
Comprobación 6
Establezca que el punto de acceso funcione con IEEE802.11b o IEEE802.11g (2,4 GHz).
Para obtener información sobre cómo modicar el modo de funcionamiento del punto de acceso, consulte el manual suministrado con éste o póngase en contacto con el fabricante.•
Firewall•
Medida de seguridad para proteger del acceso externo no autorizado a los ordenadores conectados a Internet y a las redes corporativas.
Glosario
Page 29

14
Especicaciones
Requisitos mínimos del sistema
Se cumplen los requisitos del sistema operativo cuando son mayores que los
mencionados aquí.
Sistema operativo
Procesador
RAM
Windows Vista, Vista SP1
Procesador de 1 GHz
512 MB
Windows XP SP2, SP3
Procesador de 300 MHz
128 MB
Windows 2000 Professional
SP4
Procesador de 300 MHz
128 MB
Mac OS X v.10.5
Procesador Intel, PowerPC G5,
PowerPC G4
(867 MHz o más rápido)
512 MB
Mac OS X v.10.4
Procesador Intel, PowerPC G5,
PowerPC G4, PowerPC G3
256 MB
Mac OS X v.10.3.9
PowerPC G5, PowerPC G4,
PowerPC G3
128 MB
Navegador Internet Explorer 6 o posterior Safari
Espacio en
el disco duro
750 MB
Nota: para la instalación del
software incluido.
800 MB
Nota: para la instalación del
software incluido.
Unidad de
CD-ROM
Necesaria
Pantalla XGA 1024 x 768
Windows: el funcionamiento sólo se puede garantizar en un PC con Windows Vista,
XP o 2000 preinstalado.
Para actualizarse de Windows XP a Windows Vista, desinstale primero el software
incluido con la impresora de inyección de tinta Canon.
Puede que algunas funciones no estén disponibles con Windows Media Center.
Macintosh: el disco duro debe estar formateado como Mac OS Plus (con registro) o
Mac OS Plus.
Para instalar Easy-WebPrint EX, es necesario Internet Explorer 7 o posterior.
•
•
•
•
•
Especicaciones generales
Resolución
de impresión
(ppp)
9600* (horizontal) x 2400 (vertical)
* Las gotas de tinta se pueden administrar con una precisión
de 1/9600 pulgadas como mínimo.
Interfaz Puerto USB:
Hi-Speed USB*1
Puerto de impresión directa:
PictBridge
Bluetooth v2.0 (opcional)*2 *3 *4
Unidad ash USB
Puerto LAN:
LAN inalámbrica: IEEE802.11b/IEEE802.11g*5
*1 Se necesita un ordenador que cumpla con el estándar
Hi-Speed USB. Dado que la interfaz Hi-Speed USB es
totalmente compatible con USB 1.1, se puede utilizar
también con USB 1.1.
*2 Velocidad máxima: 1,44 Mbps
*3 Sólo JPEG/PNG
*4 La conexión Bluetooth sólo admite la impresión.
*5 Se puede congurar mediante conguración WPS (Wi-
Fi Protected Setup), WCN (Windows Connect Now) o
Conguración fácil.
Ancho de
impresión
8 pulgadas/203,2 mm
(para la impresión sin bordes: 8,5 pulgadas/216 mm)
Entorno de
funcionamiento
Temperatura: 5 a 35 °C (41 a 95 °F)
Humedad: 10 a 90% de HR (sin condensación)
Entorno de
almacenamiento
Temperatura: 0 a 40 °C (32 a 104 °F)
Humedad: 5 a 95% de HR (sin condensación)
Fuente de
alimentación
100-240 V CA, 50/60 Hz
Consumo
eléctrico
Imprimiendo (copia): 14 W aprox.
En espera (mínimo): 1,3 W aprox.*
Apagada: 0,5 W aprox.*
* Conexión USB al ordenador
Dimensiones
externas
17,9 (An) x 14,5 (Pr) x 6,3 (Al) pulgadas aprox.
453 (An) x 368 (Pr) x 160 (Al) mm aprox.
* Con el soporte de papel y la bandeja de salida del papel
recogidos.
Peso 8,1 kg aprox. (17,8 lb aprox.)
* Con el cabezal de impresión y los depósitos de tinta
instalados.
Cabezal de
impresión/tinta
2368 inyectores en total (PgBK 320 inyectores, Y/DyeBK 256
inyectores cada uno, C/M 768 inyectores cada uno)
Requisitos adicionales del sistema para los manuales en
pantalla
Navegador: Easy Guide Viewer
Nota: debe estar instalado Internet
Explorer 6 o posterior. Según el sistema
operativo o la versión de Internet Explorer,
es posible que el manual en pantalla no se
muestre de forma correcta. Se recomienda
mantener el sistema actualizado con
Windows Update.
Navegador: Easy Guide Viewer
Nota: según el sistema operativo o la
versión de Safari, es posible que el manual
en pantalla no se muestre de forma
correcta. Se recomienda mantener el
sistema actualizado.
Especicaciones sujetas a cambios sin previo aviso.
Acerca de los consumibles
Los consumibles (depósitos de tinta/Cartuchos FINE) estarán
disponibles durante los 5 años siguientes a la nalización de la
fabricación del producto.
Especicaciones de copia
Número de copias 99 páginas como máximo
Ajuste de intensidad 9 posiciones, intensidad automática (copia AE)
Reducción/ampliación 25 - 400% (en pasos de 1%)
Especicaciones de escáner
Controlador de escáner TWAIN/WIA (sólo en Windows Vista y Windows XP)
Tamaño máximo de
escaneado
A4/Carta 8,5'' x 11,7''/216 x 297 mm
Resolución de
escaneado
Resolución óptica (horizontal x vertical) máx.:
2400 x 4800 ppp
Resolución interpolada máx.: 19 200 x 19 200 ppp
Gradación (entrada/
salida)
Gris: 16 bits/8 bits
Color: 48 bits/24 bits (RGB: 16 bits/8 bits cada uno)
Especicaciones de red
Protocolo de
comunicación
TCP/IP
LAN inalámbrica Estándares compatibles: IEEE802.11g/IEEE802.11b
Velocidad de transferencia:
IEEE802.11g: 6/9/12/18/24/36/48/54 Mbps
IEEE802.11b: 1/2/5.5/11 Mbps
Ancho de banda de frecuencia*1:
2,412-2,462 GHz o
2,412 GHz-2,472 GHz
Canal*1: 1-11 o 1-13
Distancia de comunicación: interiores 50 m*2
Seguridad: codicación mediante WPA-PSK,
WPA2-PSK o WEP (64/128 bits), y
control de acceso por contraseña
*1 El ancho de banda de frecuencias puede variar
según el país o región.
*2 El alcance efectivo varía con la ubicación y el
entorno de instalación.
Page 30

QT5-2628-V01 XXXXXXXX ©CANON INC.2009 PRINTED IN THAILAND
 Loading...