

Page 1

iB4000 series
Online Manual
Read Me First
Useful Functions Available on the Machine
Overview of the Printer
Printing
Troubleshooting
English
Page 2

Contents
Read Me First. . . . . . . . . . . . . . . . . . . . . . . . . . . . . . . . . . . . . . . . . . . . . . . . . . . 12
Symbols Used in This Document. . . . . . . . . . . . . . . . . . . . . . . . . . . . . . . . . . . . 13
Trademarks and Licenses. . . . . . . . . . . . . . . . . . . . . . . . . . . . . . . . . . . . . . . . . . 14
Search Tips. . . . . . . . . . . . . . . . . . . . . . . . . . . . . . . . . . . . . . . . . . . . . . . . . . . . . 18
Notes on Operation Explanations. . . . . . . . . . . . . . . . . . . . . . . . . . . . . . . . . . . . 20
Useful Functions Available on the Machine. . . . . . . . . . . . . . . . . . . . . . . . . . . . . 21
Connect Wirelessly with Ease in "Access Point Mode". . . . . . . . . . . . . . . . . . . . . . . . . . . 22
Download a Variety of Content Materials. . . . . . . . . . . . . . . . . . . . . . . . . . . . . . . . . . . . . . 23
Print Items with Easy-PhotoPrint+ (Web Application). . . . . . . . . . . . . . . . . . . . . . . . . . . . . 24
Use the Printer More Conveniently with Quick Toolbox. . . . . . . . . . . . . . . . . . . . . . . . . . . 25
Connection Methods Available on the Printer. . . . . . . . . . . . . . . . . . . . . . . . . . . . . . . . . . . 26
Connection without Using an Access Point (Windows XP). . . . . . . . . . . . . . . . . . . . . . . . . . . . . . . . . . . 28
Restrictions. . . . . . . . . . . . . . . . . . . . . . . . . . . . . . . . . . . . . . . . . . . . . . . . . . . . . . . . . . . . . . . . . . . . . . . 31
Notice for Web Service Printing. . . . . . . . . . . . . . . . . . . . . . . . . . . . . . . . . . . . . . . . . . . . . 33
Use MAXIFY Cloud Link. . . . . . . . . . . . . . . . . . . . . . . . . . . . . . . . . . . . . . . . . . . . . . . . . . . 35
Using MAXIFY Cloud Link from Your Smartphone, Tablet, or Computer. . . . . . . . . . . . . . . . . . . . . . . . 36
Before Using Canon Inkjet Cloud Printing Center. . . . . . . . . . . . . . . . . . . . . . . . . . . . . . . . . . . . . . 37
Requirements for Canon Inkjet Cloud Printing Center operation. . . . . . . . . . . . . . . . . . . . . . . 38
Preparations Before Using Canon Inkjet Cloud Printing Center. . . . . . . . . . . . . . . . . . . . . . . . . . . 40
Printing Your Printer registration ID. . . . . . . . . . . . . . . . . . . . . . . . . . . . . . . . . . . . . . . . . . . . . 47
Canon Inkjet Cloud Printing Center window. . . . . . . . . . . . . . . . . . . . . . . . . . . . . . . . . . . . . . 48
Using Canon Inkjet Cloud Printing Center. . . . . . . . . . . . . . . . . . . . . . . . . . . . . . . . . . . . . . . . . . . . 65
Adding a Printer. . . . . . . . . . . . . . . . . . . . . . . . . . . . . . . . . . . . . . . . . . . . . . . . . . . . . . . . . . . . . . . . 69
Adding a MAXIFY Cloud Link User. . . . . . . . . . . . . . . . . . . . . . . . . . . . . . . . . . . . . . . . . . . . . . . . . 71
Troubleshooting Canon Inkjet Cloud Printing Center. . . . . . . . . . . . . . . . . . . . . . . . . . . . . . . . . . . 76
What is a Security code?. . . . . . . . . . . . . . . . . . . . . . . . . . . . . . . . . . . . . . . . . . . . . . . . . . . . . . . . . . . . . 78
Printing with Google Cloud Print. . . . . . . . . . . . . . . . . . . . . . . . . . . . . . . . . . . . . . . . . . . . . 79
Preparations for Printing with Google Cloud Print. . . . . . . . . . . . . . . . . . . . . . . . . . . . . . . . . . . . . . . . . . 80
Printing from Computer or Smartphone with Google Cloud Print. . . . . . . . . . . . . . . . . . . . . . . . . . . . . . 84
Printing from AirPrint Compliant Device. . . . . . . . . . . . . . . . . . . . . . . . . . . . . . . . . . . . . . . 86
Checking Printer Information. . . . . . . . . . . . . . . . . . . . . . . . . . . . . . . . . . . . . . . . . . . . . . . 91
How to Use Print from E-mail. . . . . . . . . . . . . . . . . . . . . . . . . . . . . . . . . . . . . . . . . . . . . . . 94
Page 3

Preparing to Use Print from E-mail. . . . . . . . . . . . . . . . . . . . . . . . . . . . . . . . . . . . . . . . . . . . . . . . . . . . . 98
Timezone List. . . . . . . . . . . . . . . . . . . . . . . . . . . . . . . . . . . . . . . . . . . . . . . . . . . . . . . . . . . . . . . . . . . . . 101
Print Easily from a Smartphone or Tablet with MAXIFY Printing Solutions. . . . . . . . . . . 102
Printing with Windows RT. . . . . . . . . . . . . . . . . . . . . . . . . . . . . . . . . . . . . . . . . . . . . . . . . 103
Overview of the Printer. . . . . . . . . . . . . . . . . . . . . . . . . . . . . . . . . . . . . . . . . . . 104
Safety Guide. . . . . . . . . . . . . . . . . . . . . . . . . . . . . . . . . . . . . . . . . . . . . . . . . . . . . . . . . . . 105
Safety Precautions. . . . . . . . . . . . . . . . . . . . . . . . . . . . . . . . . . . . . . . . . . . . . . . . . . . . . . . . . . . . . . . . . 106
Regulatory and Safety Information. . . . . . . . . . . . . . . . . . . . . . . . . . . . . . . . . . . . . . . . . . . . . . . . . . . . 107
Main Components and Basic Operations. . . . . . . . . . . . . . . . . . . . . . . . . . . . . . . . . . . . . 111
Main Components. . . . . . . . . . . . . . . . . . . . . . . . . . . . . . . . . . . . . . . . . . . . . . . . . . . . . . . . . . . . . . . . . 112
Front View. . . . . . . . . . . . . . . . . . . . . . . . . . . . . . . . . . . . . . . . . . . . . . . . . . . . . . . . . . . . . . . . . . . 113
Rear View. . . . . . . . . . . . . . . . . . . . . . . . . . . . . . . . . . . . . . . . . . . . . . . . . . . . . . . . . . . . . . . . . . . 114
Inside View. . . . . . . . . . . . . . . . . . . . . . . . . . . . . . . . . . . . . . . . . . . . . . . . . . . . . . . . . . . . . . . . . . 115
Operation Panel. . . . . . . . . . . . . . . . . . . . . . . . . . . . . . . . . . . . . . . . . . . . . . . . . . . . . . . . . . . . . . . 116
About the Power Supply of the Printer. . . . . . . . . . . . . . . . . . . . . . . . . . . . . . . . . . . . . . . . . . . . . . . . . . 117
Confirming that the Power Is On. . . . . . . . . . . . . . . . . . . . . . . . . . . . . . . . . . . . . . . . . . . . . . . . . . 118
Turning the Printer On and Off. . . . . . . . . . . . . . . . . . . . . . . . . . . . . . . . . . . . . . . . . . . . . . . . . . . 119
Notice for the Power Plug/Power Cord. . . . . . . . . . . . . . . . . . . . . . . . . . . . . . . . . . . . . . . . . . . . . 121
Notice for Unplugging the Power Cord. . . . . . . . . . . . . . . . . . . . . . . . . . . . . . . . . . . . . . . . . . . . . 122
LCD and Operation Panel. . . . . . . . . . . . . . . . . . . . . . . . . . . . . . . . . . . . . . . . . . . . . . . . . . . . . . . . . . . 123
Loading Paper. . . . . . . . . . . . . . . . . . . . . . . . . . . . . . . . . . . . . . . . . . . . . . . . . . . . . . . . . 125
Loading Paper. . . . . . . . . . . . . . . . . . . . . . . . . . . . . . . . . . . . . . . . . . . . . . . . . . . . . . . . . . . . . . . . . . . . 126
Paper Sources to Load Paper. . . . . . . . . . . . . . . . . . . . . . . . . . . . . . . . . . . . . . . . . . . . . . . . . . . . 127
Loading Plain Paper / Photo Paper. . . . . . . . . . . . . . . . . . . . . . . . . . . . . . . . . . . . . . . . . . . . . . . . 129
Loading Envelopes. . . . . . . . . . . . . . . . . . . . . . . . . . . . . . . . . . . . . . . . . . . . . . . . . . . . . . . . . . . . 134
Media Types You Can Use. . . . . . . . . . . . . . . . . . . . . . . . . . . . . . . . . . . . . . . . . . . . . . . . . . . . . . 139
Paper Load Limit. . . . . . . . . . . . . . . . . . . . . . . . . . . . . . . . . . . . . . . . . . . . . . . . . . . . . . . . . . 141
Media Types You Cannot Use. . . . . . . . . . . . . . . . . . . . . . . . . . . . . . . . . . . . . . . . . . . . . . . . . . . . 143
Printing Area. . . . . . . . . . . . . . . . . . . . . . . . . . . . . . . . . . . . . . . . . . . . . . . . . . . . . . . . . . . . . . . . . 144
Printing Area. . . . . . . . . . . . . . . . . . . . . . . . . . . . . . . . . . . . . . . . . . . . . . . . . . . . . . . . . . . . . 145
Other Sizes than Letter, Legal, Envelopes. . . . . . . . . . . . . . . . . . . . . . . . . . . . . . . . . . . . . . 146
Letter, Legal. . . . . . . . . . . . . . . . . . . . . . . . . . . . . . . . . . . . . . . . . . . . . . . . . . . . . . . . . . . . . . 147
Envelopes. . . . . . . . . . . . . . . . . . . . . . . . . . . . . . . . . . . . . . . . . . . . . . . . . . . . . . . . . . . . . . . 148
Replacing an Ink Tank. . . . . . . . . . . . . . . . . . . . . . . . . . . . . . . . . . . . . . . . . . . . . . . . . . . 149
Replacing an Ink Tank. . . . . . . . . . . . . . . . . . . . . . . . . . . . . . . . . . . . . . . . . . . . . . . . . . . . . . . . . . . . . . 150
Page 4

Checking the Ink Status. . . . . . . . . . . . . . . . . . . . . . . . . . . . . . . . . . . . . . . . . . . . . . . . . . . . . . . . . . . . . 155
Checking the Ink Status with the LCD on the Printer. . . . . . . . . . . . . . . . . . . . . . . . . . . . . . . . . . . 156
Maintenance. . . . . . . . . . . . . . . . . . . . . . . . . . . . . . . . . . . . . . . . . . . . . . . . . . . . . . . . . . . 157
When Printing Becomes Faint or Colors Are Incorrect. . . . . . . . . . . . . . . . . . . . . . . . . . . . . . . . . . . . . 158
Maintenance Procedure. . . . . . . . . . . . . . . . . . . . . . . . . . . . . . . . . . . . . . . . . . . . . . . . . . . . . . . . . 159
Printing the Nozzle Check Pattern. . . . . . . . . . . . . . . . . . . . . . . . . . . . . . . . . . . . . . . . . . . . . . . . . 161
Examining the Nozzle Check Pattern. . . . . . . . . . . . . . . . . . . . . . . . . . . . . . . . . . . . . . . . . . . . . . 162
Cleaning the Print Head. . . . . . . . . . . . . . . . . . . . . . . . . . . . . . . . . . . . . . . . . . . . . . . . . . . . . . . . . 163
Cleaning the Print Head Deeply. . . . . . . . . . . . . . . . . . . . . . . . . . . . . . . . . . . . . . . . . . . . . . . . . . 164
Aligning the Print Head. . . . . . . . . . . . . . . . . . . . . . . . . . . . . . . . . . . . . . . . . . . . . . . . . . . . . . . . . 165
Performing Maintenance from a Computer. . . . . . . . . . . . . . . . . . . . . . . . . . . . . . . . . . . . . . . . . . . . . . 167
Cleaning the Print Heads from Your Computer. . . . . . . . . . . . . . . . . . . . . . . . . . . . . . . . . . . . . . . 168
Use Your Computer to Print a Nozzle Check Pattern. . . . . . . . . . . . . . . . . . . . . . . . . . . . . . . . . . 170
Aligning the Print Head. . . . . . . . . . . . . . . . . . . . . . . . . . . . . . . . . . . . . . . . . . . . . . . . . . . . . . . . . 171
Aligning the Print Head Position from Your Computer. . . . . . . . . . . . . . . . . . . . . . . . . . . . . . . . . . 172
Aligning the Print Head Position Manually from Your Computer. . . . . . . . . . . . . . . . . . . . . . . . . . 174
Cleaning the Printer. . . . . . . . . . . . . . . . . . . . . . . . . . . . . . . . . . . . . . . . . . . . . . . . . . . . . . . . . . . . . . . . 177
Cleaning the Exterior of the Printer. . . . . . . . . . . . . . . . . . . . . . . . . . . . . . . . . . . . . . . . . . . . . . . . 178
Cleaning the Paper Feed Roller. . . . . . . . . . . . . . . . . . . . . . . . . . . . . . . . . . . . . . . . . . . . . . . . . . 179
Cleaning the Inside of the Printer (Bottom Plate Cleaning). . . . . . . . . . . . . . . . . . . . . . . . . . . . . . 181
Cleaning the Pad in the Cassette. . . . . . . . . . . . . . . . . . . . . . . . . . . . . . . . . . . . . . . . . . . . . . . . . 183
Changing the Printer Settings. . . . . . . . . . . . . . . . . . . . . . . . . . . . . . . . . . . . . . . . . . . . . . 184
Changing Printer Settings from Your Computer. . . . . . . . . . . . . . . . . . . . . . . . . . . . . . . . . . . . . . . . . . 185
Checking the Ink Status from Your Computer. . . . . . . . . . . . . . . . . . . . . . . . . . . . . . . . . . . . . . . . 186
Registering a Changed Printing Profile. . . . . . . . . . . . . . . . . . . . . . . . . . . . . . . . . . . . . . . . . . . . . 187
Managing the Printer Power. . . . . . . . . . . . . . . . . . . . . . . . . . . . . . . . . . . . . . . . . . . . . . . . . . . . . 189
Reducing the Printer Noise. . . . . . . . . . . . . . . . . . . . . . . . . . . . . . . . . . . . . . . . . . . . . . . . . . . . . . 191
Changing the Printer Operation Mode. . . . . . . . . . . . . . . . . . . . . . . . . . . . . . . . . . . . . . . . . . . . . . 193
Changing the Machine Settings on the LCD. . . . . . . . . . . . . . . . . . . . . . . . . . . . . . . . . . . . . . . . . . . . . 195
Changing the Printer Settings on the LCD. . . . . . . . . . . . . . . . . . . . . . . . . . . . . . . . . . . . . . . . . . . 196
Output settings. . . . . . . . . . . . . . . . . . . . . . . . . . . . . . . . . . . . . . . . . . . . . . . . . . . . . . . . . . . . . . . . 198
LAN settings. . . . . . . . . . . . . . . . . . . . . . . . . . . . . . . . . . . . . . . . . . . . . . . . . . . . . . . . . . . . . . . . . 199
Dev. user settings. . . . . . . . . . . . . . . . . . . . . . . . . . . . . . . . . . . . . . . . . . . . . . . . . . . . . . . . . . . . . 201
Firmware update. . . . . . . . . . . . . . . . . . . . . . . . . . . . . . . . . . . . . . . . . . . . . . . . . . . . . . . . . . . . . . 202
Cassette settings. . . . . . . . . . . . . . . . . . . . . . . . . . . . . . . . . . . . . . . . . . . . . . . . . . . . . . . . . . . . . . 203
Reset setting. . . . . . . . . . . . . . . . . . . . . . . . . . . . . . . . . . . . . . . . . . . . . . . . . . . . . . . . . . . . . . . . . 204
About Quiet setting. . . . . . . . . . . . . . . . . . . . . . . . . . . . . . . . . . . . . . . . . . . . . . . . . . . . . . . . . . . . 205
Page 5

Turning on/off the Printer Automatically. . . . . . . . . . . . . . . . . . . . . . . . . . . . . . . . . . . . . . . . . . . . . 206
Using the Printer with the Access Point Mode. . . . . . . . . . . . . . . . . . . . . . . . . . . . . . . . . . . . . . . . 207
Information about Network Connection. . . . . . . . . . . . . . . . . . . . . . . . . . . . . . . . . . . . . . 210
Useful Information about Network Connection. . . . . . . . . . . . . . . . . . . . . . . . . . . . . . . . . . . . . . . . . . . 211
Default Values Set at Factory (Network). . . . . . . . . . . . . . . . . . . . . . . . . . . . . . . . . . . . . . . . . . . . 212
Connecting the Printer to the Computer Using a USB Cable. . . . . . . . . . . . . . . . . . . . . . . . . . . . 213
When Detecting the Printers Have the Same Name. . . . . . . . . . . . . . . . . . . . . . . . . . . . . . . . . . . 214
Connecting to Other Computer with LAN/Changing the Connection Method from USB to LAN. . 215
Printing Out Network Setting Information. . . . . . . . . . . . . . . . . . . . . . . . . . . . . . . . . . . . . . . . . . . 216
About Network Communication. . . . . . . . . . . . . . . . . . . . . . . . . . . . . . . . . . . . . . . . . . . . 219
Changing and Confirming Network Settings. . . . . . . . . . . . . . . . . . . . . . . . . . . . . . . . . . . . . . . . . . . . . 220
IJ Network Tool. . . . . . . . . . . . . . . . . . . . . . . . . . . . . . . . . . . . . . . . . . . . . . . . . . . . . . . . . . . . . . . 221
Canon IJ Network Tool Screen. . . . . . . . . . . . . . . . . . . . . . . . . . . . . . . . . . . . . . . . . . . . . . . . . . . 222
Canon IJ Network Tool Menus. . . . . . . . . . . . . . . . . . . . . . . . . . . . . . . . . . . . . . . . . . . . . . . . . . . 224
Changing the Settings in the Wireless LAN Sheet. . . . . . . . . . . . . . . . . . . . . . . . . . . . . . . . . . . . 226
Changing the WEP Detailed Settings. . . . . . . . . . . . . . . . . . . . . . . . . . . . . . . . . . . . . . . . . . . . . . 230
Changing the WPA/WPA2 Detailed Settings. . . . . . . . . . . . . . . . . . . . . . . . . . . . . . . . . . . . . . . . . 232
Changing the Settings in the Wired LAN Sheet. . . . . . . . . . . . . . . . . . . . . . . . . . . . . . . . . . . . . . . 234
Changing the Settings in the Admin Password Sheet. . . . . . . . . . . . . . . . . . . . . . . . . . . . . . . . . . 235
Monitoring Wireless Network Status. . . . . . . . . . . . . . . . . . . . . . . . . . . . . . . . . . . . . . . . . . . . . . . 237
Initializing the Network Settings of the Machine. . . . . . . . . . . . . . . . . . . . . . . . . . . . . . . . . . . . . . 239
Viewing the Modified Settings. . . . . . . . . . . . . . . . . . . . . . . . . . . . . . . . . . . . . . . . . . . . . . . . . . . . 240
Appendix for Network Communication. . . . . . . . . . . . . . . . . . . . . . . . . . . . . . . . . . . . . . . . . . . . . . . . . . 241
Using the Card Slot over a Network. . . . . . . . . . . . . . . . . . . . . . . . . . . . . . . . . . . . . . . . . . . . . . . 242
About Technical Terms. . . . . . . . . . . . . . . . . . . . . . . . . . . . . . . . . . . . . . . . . . . . . . . . . . . . . . . . . 244
Restrictions. . . . . . . . . . . . . . . . . . . . . . . . . . . . . . . . . . . . . . . . . . . . . . . . . . . . . . . . . . . . . . . . . . 251
Tips for Ensuring Optimal Printing Quality. . . . . . . . . . . . . . . . . . . . . . . . . . . . . . . . . . . . 252
Useful Information about Ink. . . . . . . . . . . . . . . . . . . . . . . . . . . . . . . . . . . . . . . . . . . . . . . . . . . . . . . . . 253
Key Points to Successful Printing. . . . . . . . . . . . . . . . . . . . . . . . . . . . . . . . . . . . . . . . . . . . . . . . . . . . . 254
Be Sure to Check Paper Settings before Printing. . . . . . . . . . . . . . . . . . . . . . . . . . . . . . . . . . . . . . . . . 255
Be Sure to Set Cassette Paper Information after Loading Paper. . . . . . . . . . . . . . . . . . . . . . . . . . . . . 256
Canceling a Print Job. . . . . . . . . . . . . . . . . . . . . . . . . . . . . . . . . . . . . . . . . . . . . . . . . . . . . . . . . . . . . . . 257
Key to Enjoying Consistent Printing Quality. . . . . . . . . . . . . . . . . . . . . . . . . . . . . . . . . . . . . . . . . . . . . . 258
Precautions for Safe Transport of the Printer. . . . . . . . . . . . . . . . . . . . . . . . . . . . . . . . . . . . . . . . . . . . 259
Legal Limitations on Use of Your Product and Use of Images. . . . . . . . . . . . . . . . . . . . . 261
Specifications. . . . . . . . . . . . . . . . . . . . . . . . . . . . . . . . . . . . . . . . . . . . . . . . . . . . . . . . . . 262
Administrator Password. . . . . . . . . . . . . . . . . . . . . . . . . . . . . . . . . . . . . . . . . . . 265
Page 6

Printing. . . . . . . . . . . . . . . . . . . . . . . . . . . . . . . . . . . . . . . . . . . . . . . . . . . . . . . 266
Printing from a Computer. . . . . . . . . . . . . . . . . . . . . . . . . . . . . . . . . . . . . . . . . . . . . . . . . 267
Printing with Application Software that You are Using (Printer Driver). . . . . . . . . . . . . . . . . . . . . . . . . 268
Printing with Easy Setup. . . . . . . . . . . . . . . . . . . . . . . . . . . . . . . . . . . . . . . . . . . . . . . . . . . . . . . . 269
Paper Settings on the Printer Driver and the Printer (Media Type). . . . . . . . . . . . . . . . . . . . 274
Paper Settings on the Printer Driver and the Printer (Paper Size). . . . . . . . . . . . . . . . . . . . 275
Various Printing Methods. . . . . . . . . . . . . . . . . . . . . . . . . . . . . . . . . . . . . . . . . . . . . . . . . . . . . . . . 276
Setting the Number of Copies and Printing Order. . . . . . . . . . . . . . . . . . . . . . . . . . . . . . . . . 277
Setting the Stapling Margin. . . . . . . . . . . . . . . . . . . . . . . . . . . . . . . . . . . . . . . . . . . . . . . . . . 279
Scaling the Printing to Fit the Paper Size. . . . . . . . . . . . . . . . . . . . . . . . . . . . . . . . . . . . . . . 280
Scaled Printing. . . . . . . . . . . . . . . . . . . . . . . . . . . . . . . . . . . . . . . . . . . . . . . . . . . . . . . . . . . . 282
Page Layout Printing. . . . . . . . . . . . . . . . . . . . . . . . . . . . . . . . . . . . . . . . . . . . . . . . . . . . . . . 283
Duplex Printing. . . . . . . . . . . . . . . . . . . . . . . . . . . . . . . . . . . . . . . . . . . . . . . . . . . . . . . . . . . 285
Printing on Postcards. . . . . . . . . . . . . . . . . . . . . . . . . . . . . . . . . . . . . . . . . . . . . . . . . . . . . . . 287
Switching the Paper Source to Match the Purpose. . . . . . . . . . . . . . . . . . . . . . . . . . . . . . . . 288
Displaying the Print Results before Printing. . . . . . . . . . . . . . . . . . . . . . . . . . . . . . . . . . . . . 290
Setting Paper Dimensions (Custom Size). . . . . . . . . . . . . . . . . . . . . . . . . . . . . . . . . . . . . . . 291
Changing the Print Quality and Correcting Image Data. . . . . . . . . . . . . . . . . . . . . . . . . . . . . . . . . 293
Printing a Color Document in Monochrome. . . . . . . . . . . . . . . . . . . . . . . . . . . . . . . . . . . . . . 294
Specifying Color Correction. . . . . . . . . . . . . . . . . . . . . . . . . . . . . . . . . . . . . . . . . . . . . . . . . . 295
Optimal Photo Printing of Image Data. . . . . . . . . . . . . . . . . . . . . . . . . . . . . . . . . . . . . . . . . . 297
Adjusting Colors with the Printer Driver. . . . . . . . . . . . . . . . . . . . . . . . . . . . . . . . . . . . . . . . . 298
Printing with ICC Profiles (Specifying an ICC Profile from the Application Software). . . . . . 299
Printing with ICC Profiles (Specifying an ICC Profile from the Printer Driver). . . . . . . . . . . . 301
Adjusting Color Balance. . . . . . . . . . . . . . . . . . . . . . . . . . . . . . . . . . . . . . . . . . . . . . . . . . . . 302
Adjusting Brightness. . . . . . . . . . . . . . . . . . . . . . . . . . . . . . . . . . . . . . . . . . . . . . . . . . . . . . . 304
Adjusting Intensity. . . . . . . . . . . . . . . . . . . . . . . . . . . . . . . . . . . . . . . . . . . . . . . . . . . . . . . . . 306
Adjusting Contrast. . . . . . . . . . . . . . . . . . . . . . . . . . . . . . . . . . . . . . . . . . . . . . . . . . . . . . . . . 308
Overview of the Printer Driver. . . . . . . . . . . . . . . . . . . . . . . . . . . . . . . . . . . . . . . . . . . . . . . . . . . . 310
Canon IJ Printer Driver. . . . . . . . . . . . . . . . . . . . . . . . . . . . . . . . . . . . . . . . . . . . . . . . . . . . . 311
How to Open the Printer Driver Setup Window. . . . . . . . . . . . . . . . . . . . . . . . . . . . . . . . . . . 312
Page Setup Dialog. . . . . . . . . . . . . . . . . . . . . . . . . . . . . . . . . . . . . . . . . . . . . . . . . . . . . . . . . 313
Print Dialog. . . . . . . . . . . . . . . . . . . . . . . . . . . . . . . . . . . . . . . . . . . . . . . . . . . . . . . . . . . . . . 314
Quality & Media. . . . . . . . . . . . . . . . . . . . . . . . . . . . . . . . . . . . . . . . . . . . . . . . . . . . . . . . . . . 316
Color Options. . . . . . . . . . . . . . . . . . . . . . . . . . . . . . . . . . . . . . . . . . . . . . . . . . . . . . . . . . . . . 318
Margin. . . . . . . . . . . . . . . . . . . . . . . . . . . . . . . . . . . . . . . . . . . . . . . . . . . . . . . . . . . . . . . . . . 320
Canon IJ Printer Utility. . . . . . . . . . . . . . . . . . . . . . . . . . . . . . . . . . . . . . . . . . . . . . . . . . . . . . 321
Opening the Canon IJ Printer Utility. . . . . . . . . . . . . . . . . . . . . . . . . . . . . . . . . . . . . . . . . . . 323
Page 7

Maintenance of this Printer. . . . . . . . . . . . . . . . . . . . . . . . . . . . . . . . . . . . . . . . . . . . . . . . . . 324
Display the Printing Status Screen. . . . . . . . . . . . . . . . . . . . . . . . . . . . . . . . . . . . . . . . . . . . 325
Deleting the Undesired Print Job. . . . . . . . . . . . . . . . . . . . . . . . . . . . . . . . . . . . . . . . . . . . . . 327
Instructions for Use (Printer Driver). . . . . . . . . . . . . . . . . . . . . . . . . . . . . . . . . . . . . . . . . . . . 328
Updating the Printer Driver. . . . . . . . . . . . . . . . . . . . . . . . . . . . . . . . . . . . . . . . . . . . . . . . . . . . . . 329
Obtaining the Latest Printer Driver. . . . . . . . . . . . . . . . . . . . . . . . . . . . . . . . . . . . . . . . . . . . 330
Delete the Unnecessary Canon IJ Printer from the Printer List. . . . . . . . . . . . . . . . . . . . . . . 331
Before Installing the Printer Driver. . . . . . . . . . . . . . . . . . . . . . . . . . . . . . . . . . . . . . . . . . . . . 332
Installing the Printer Driver. . . . . . . . . . . . . . . . . . . . . . . . . . . . . . . . . . . . . . . . . . . . . . . . . . 333
Paper setting for Printing. . . . . . . . . . . . . . . . . . . . . . . . . . . . . . . . . . . . . . . . . . . . . . . . . 334
Troubleshooting. . . . . . . . . . . . . . . . . . . . . . . . . . . . . . . . . . . . . . . . . . . . . . . . . 336
Problems with Network Communication. . . . . . . . . . . . . . . . . . . . . . . . . . . . . . . . . . . . . . 337
Problems with the Printer While Using with Network. . . . . . . . . . . . . . . . . . . . . . . . . . . . . . . . . . . . . . . 338
The Printer Stopped Working Suddenly. . . . . . . . . . . . . . . . . . . . . . . . . . . . . . . . . . . . . . . . . . . . 339
Printing Speed Is Slow. . . . . . . . . . . . . . . . . . . . . . . . . . . . . . . . . . . . . . . . . . . . . . . . . . . . . . . . . . 342
Cannot Use the Printer on Replacing an Access Point or Changing Its settings. . . . . . . . . . . . . . 343
Cannot Detect a Printer on a Network. . . . . . . . . . . . . . . . . . . . . . . . . . . . . . . . . . . . . . . . . . . . . . . . . . 345
Cannot Detect the Printer When Setting up Network Communication. . . . . . . . . . . . . . . . . . . . . 346
Cannot Detect the Printer during Wireless LAN Setup: Check 1. . . . . . . . . . . . . . . . . . . . . . 347
Cannot Detect the Printer during Wireless LAN Setup: Check 2. . . . . . . . . . . . . . . . . . . . . . 348
Cannot Detect the Printer during Wireless LAN Setup: Check 3. . . . . . . . . . . . . . . . . . . . . . 349
Cannot Detect the Printer during Wireless LAN Setup: Check 4. . . . . . . . . . . . . . . . . . . . . . 350
Cannot Detect the Printer during Wireless LAN Setup: Check 5. . . . . . . . . . . . . . . . . . . . . . 351
Cannot Detect the Printer during Wired LAN Setup: Check 1. . . . . . . . . . . . . . . . . . . . . . . . 352
Cannot Detect the Printer during Wired LAN Setup: Check 2. . . . . . . . . . . . . . . . . . . . . . . . 353
Cannot Detect the Printer during Wired LAN Setup: Check 3. . . . . . . . . . . . . . . . . . . . . . . . 354
The Printer Cannot Be Detected in the Wireless LAN. . . . . . . . . . . . . . . . . . . . . . . . . . . . . . . . . . 355
The Printer Cannot Be Detected in the Wired LAN. . . . . . . . . . . . . . . . . . . . . . . . . . . . . . . . . . . . 357
Other Problems with Network. . . . . . . . . . . . . . . . . . . . . . . . . . . . . . . . . . . . . . . . . . . . . . . . . . . . . . . . 358
Forgot an Access Point Name, SSID, or a Network Key. . . . . . . . . . . . . . . . . . . . . . . . . . . . . . . . 359
The Message Is Displayed on the Computer Screen During Setup. . . . . . . . . . . . . . . . . . . . . . . 361
The Administrator Password Set to the Printer Was Forgotten. . . . . . . . . . . . . . . . . . . . . . . . . . . 363
Checking Information about the Network. . . . . . . . . . . . . . . . . . . . . . . . . . . . . . . . . . . . . . . . . . . . 364
How to Restore the Printer's Network Settings to Factory Default. . . . . . . . . . . . . . . . . . . . . . . . 366
Problems with Printing. . . . . . . . . . . . . . . . . . . . . . . . . . . . . . . . . . . . . . . . . . . . . . . . . . . 367
Printing Does Not Start. . . . . . . . . . . . . . . . . . . . . . . . . . . . . . . . . . . . . . . . . . . . . . . . . . . . . . . . . . . . . 368
Page 8

Paper Jams. . . . . . . . . . . . . . . . . . . . . . . . . . . . . . . . . . . . . . . . . . . . . . . . . . . . . . . . . . . . . . . . . . . . . . 370
Paper Does Not Feed Properly/"No Paper" Error Occurs. . . . . . . . . . . . . . . . . . . . . . . . . . . . . . . . . . . 371
Cannot Print Properly with Automatic Duplex Printing. . . . . . . . . . . . . . . . . . . . . . . . . . . . . . . . . . . . . . 373
Printing Stops Before It Is Completed. . . . . . . . . . . . . . . . . . . . . . . . . . . . . . . . . . . . . . . . . . . . . . . . . . 374
Problems with Printing Quality. . . . . . . . . . . . . . . . . . . . . . . . . . . . . . . . . . . . . . . . . . . . . 375
Print Results Not Satisfactory. . . . . . . . . . . . . . . . . . . . . . . . . . . . . . . . . . . . . . . . . . . . . . . . . . . . . . . . 376
Cannot Print to End of Job. . . . . . . . . . . . . . . . . . . . . . . . . . . . . . . . . . . . . . . . . . . . . . . . . . . . . . . 377
No Printing Results/Printing Is Blurred/Colors Are Wrong/White Streaks. . . . . . . . . . . . . . . . . . . 378
Lines Are Misaligned. . . . . . . . . . . . . . . . . . . . . . . . . . . . . . . . . . . . . . . . . . . . . . . . . . . . . . . . . . . 380
Printed Paper Curls or Has Ink Blots. . . . . . . . . . . . . . . . . . . . . . . . . . . . . . . . . . . . . . . . . . . . . . . 381
Paper Is Smudged/Printed Surface Is Scratched. . . . . . . . . . . . . . . . . . . . . . . . . . . . . . . . . . . . . 382
Back of the Paper Is Smudged. . . . . . . . . . . . . . . . . . . . . . . . . . . . . . . . . . . . . . . . . . . . . . . . . . . 385
Colors Are Uneven or Streaked. . . . . . . . . . . . . . . . . . . . . . . . . . . . . . . . . . . . . . . . . . . . . . . . . . . 386
Ink Is Not Ejected. . . . . . . . . . . . . . . . . . . . . . . . . . . . . . . . . . . . . . . . . . . . . . . . . . . . . . . . . . . . . . . . . . 388
Problems with the Printer. . . . . . . . . . . . . . . . . . . . . . . . . . . . . . . . . . . . . . . . . . . . . . . . . 389
The Printer Cannot Be Powered On. . . . . . . . . . . . . . . . . . . . . . . . . . . . . . . . . . . . . . . . . . . . . . . . . . . 390
The Printer Turns Off Unintentionally. . . . . . . . . . . . . . . . . . . . . . . . . . . . . . . . . . . . . . . . . . . . . . . . . . . 391
Cannot Connect to Computer with a USB Cable Properly. . . . . . . . . . . . . . . . . . . . . . . . . . . . . . . . . . . 392
Cannot Communicate with the Printer with USB Connection. . . . . . . . . . . . . . . . . . . . . . . . . . . . . . . . 393
LCD Cannot Be Seen At All. . . . . . . . . . . . . . . . . . . . . . . . . . . . . . . . . . . . . . . . . . . . . . . . . . . . . . . . . . 394
An Unintended Language Is Displayed on the LCD. . . . . . . . . . . . . . . . . . . . . . . . . . . . . . . . . . . . . . . 395
Print Head Holder Does Not Move to the Position for Replacing. . . . . . . . . . . . . . . . . . . . . . . . . . . . . . 396
Problems with Installation/Downloading. . . . . . . . . . . . . . . . . . . . . . . . . . . . . . . . . . . . . . 397
Cannot Install the Printer Driver. . . . . . . . . . . . . . . . . . . . . . . . . . . . . . . . . . . . . . . . . . . . . . . . . . . . . . . 398
Uninstalling IJ Network Tool. . . . . . . . . . . . . . . . . . . . . . . . . . . . . . . . . . . . . . . . . . . . . . . . . . . . . . . . . 399
About Errors/Messages Displayed. . . . . . . . . . . . . . . . . . . . . . . . . . . . . . . . . . . . . . . . . . 400
If an Error Occurs. . . . . . . . . . . . . . . . . . . . . . . . . . . . . . . . . . . . . . . . . . . . . . . . . . . . . . . . . . . . . . . . . . 401
A Message Is Displayed. . . . . . . . . . . . . . . . . . . . . . . . . . . . . . . . . . . . . . . . . . . . . . . . . . . . . . . . . . . . 402
If You Cannot Resolve the Problem. . . . . . . . . . . . . . . . . . . . . . . . . . . . . . . . . . . . . . . . . 405
Support Code List. . . . . . . . . . . . . . . . . . . . . . . . . . . . . . . . . . . . . . . . . . . . . . . 406
Support Code List (When Paper Is Jammed). . . . . . . . . . . . . . . . . . . . . . . . . . . . . . . . . . 408
1300. . . . . . . . . . . . . . . . . . . . . . . . . . . . . . . . . . . . . . . . . . . . . . . . . . . . . . . . . . . . . . . . . . . . . . . . . . . . 409
1303. . . . . . . . . . . . . . . . . . . . . . . . . . . . . . . . . . . . . . . . . . . . . . . . . . . . . . . . . . . . . . . . . . . . . . . . . . . . 412
1313. . . . . . . . . . . . . . . . . . . . . . . . . . . . . . . . . . . . . . . . . . . . . . . . . . . . . . . . . . . . . . . . . . . . . . . . . . . . 414
1314. . . . . . . . . . . . . . . . . . . . . . . . . . . . . . . . . . . . . . . . . . . . . . . . . . . . . . . . . . . . . . . . . . . . . . . . . . . . 417
In Other Cases. . . . . . . . . . . . . . . . . . . . . . . . . . . . . . . . . . . . . . . . . . . . . . . . . . . . . . . . . . . . . . . . . . . . 419
Page 9

1007. . . . . . . . . . . . . . . . . . . . . . . . . . . . . . . . . . . . . . . . . . . . . . . . . . . . . . . . . . . . . . . . . 420
1008. . . . . . . . . . . . . . . . . . . . . . . . . . . . . . . . . . . . . . . . . . . . . . . . . . . . . . . . . . . . . . . . . 421
1200. . . . . . . . . . . . . . . . . . . . . . . . . . . . . . . . . . . . . . . . . . . . . . . . . . . . . . . . . . . . . . . . . 422
1310. . . . . . . . . . . . . . . . . . . . . . . . . . . . . . . . . . . . . . . . . . . . . . . . . . . . . . . . . . . . . . . . . 423
1575. . . . . . . . . . . . . . . . . . . . . . . . . . . . . . . . . . . . . . . . . . . . . . . . . . . . . . . . . . . . . . . . . 424
1600. . . . . . . . . . . . . . . . . . . . . . . . . . . . . . . . . . . . . . . . . . . . . . . . . . . . . . . . . . . . . . . . . 425
1660. . . . . . . . . . . . . . . . . . . . . . . . . . . . . . . . . . . . . . . . . . . . . . . . . . . . . . . . . . . . . . . . . 426
1688. . . . . . . . . . . . . . . . . . . . . . . . . . . . . . . . . . . . . . . . . . . . . . . . . . . . . . . . . . . . . . . . . 427
1700. . . . . . . . . . . . . . . . . . . . . . . . . . . . . . . . . . . . . . . . . . . . . . . . . . . . . . . . . . . . . . . . . 428
1701. . . . . . . . . . . . . . . . . . . . . . . . . . . . . . . . . . . . . . . . . . . . . . . . . . . . . . . . . . . . . . . . . 429
1754. . . . . . . . . . . . . . . . . . . . . . . . . . . . . . . . . . . . . . . . . . . . . . . . . . . . . . . . . . . . . . . . . 430
1755. . . . . . . . . . . . . . . . . . . . . . . . . . . . . . . . . . . . . . . . . . . . . . . . . . . . . . . . . . . . . . . . . 431
1872. . . . . . . . . . . . . . . . . . . . . . . . . . . . . . . . . . . . . . . . . . . . . . . . . . . . . . . . . . . . . . . . . 432
1873. . . . . . . . . . . . . . . . . . . . . . . . . . . . . . . . . . . . . . . . . . . . . . . . . . . . . . . . . . . . . . . . . 433
1874. . . . . . . . . . . . . . . . . . . . . . . . . . . . . . . . . . . . . . . . . . . . . . . . . . . . . . . . . . . . . . . . . 434
1890. . . . . . . . . . . . . . . . . . . . . . . . . . . . . . . . . . . . . . . . . . . . . . . . . . . . . . . . . . . . . . . . . 435
2111. . . . . . . . . . . . . . . . . . . . . . . . . . . . . . . . . . . . . . . . . . . . . . . . . . . . . . . . . . . . . . . . . 436
2112. . . . . . . . . . . . . . . . . . . . . . . . . . . . . . . . . . . . . . . . . . . . . . . . . . . . . . . . . . . . . . . . . 438
2113. . . . . . . . . . . . . . . . . . . . . . . . . . . . . . . . . . . . . . . . . . . . . . . . . . . . . . . . . . . . . . . . . 440
2121. . . . . . . . . . . . . . . . . . . . . . . . . . . . . . . . . . . . . . . . . . . . . . . . . . . . . . . . . . . . . . . . . 442
2122. . . . . . . . . . . . . . . . . . . . . . . . . . . . . . . . . . . . . . . . . . . . . . . . . . . . . . . . . . . . . . . . . 443
2500. . . . . . . . . . . . . . . . . . . . . . . . . . . . . . . . . . . . . . . . . . . . . . . . . . . . . . . . . . . . . . . . . 444
4100. . . . . . . . . . . . . . . . . . . . . . . . . . . . . . . . . . . . . . . . . . . . . . . . . . . . . . . . . . . . . . . . . 445
4103. . . . . . . . . . . . . . . . . . . . . . . . . . . . . . . . . . . . . . . . . . . . . . . . . . . . . . . . . . . . . . . . . 446
4104. . . . . . . . . . . . . . . . . . . . . . . . . . . . . . . . . . . . . . . . . . . . . . . . . . . . . . . . . . . . . . . . . 447
5100. . . . . . . . . . . . . . . . . . . . . . . . . . . . . . . . . . . . . . . . . . . . . . . . . . . . . . . . . . . . . . . . . 448
5102. . . . . . . . . . . . . . . . . . . . . . . . . . . . . . . . . . . . . . . . . . . . . . . . . . . . . . . . . . . . . . . . . 449
5103. . . . . . . . . . . . . . . . . . . . . . . . . . . . . . . . . . . . . . . . . . . . . . . . . . . . . . . . . . . . . . . . . 450
5104. . . . . . . . . . . . . . . . . . . . . . . . . . . . . . . . . . . . . . . . . . . . . . . . . . . . . . . . . . . . . . . . . 451
5105. . . . . . . . . . . . . . . . . . . . . . . . . . . . . . . . . . . . . . . . . . . . . . . . . . . . . . . . . . . . . . . . . 452
5200. . . . . . . . . . . . . . . . . . . . . . . . . . . . . . . . . . . . . . . . . . . . . . . . . . . . . . . . . . . . . . . . . 453
5203. . . . . . . . . . . . . . . . . . . . . . . . . . . . . . . . . . . . . . . . . . . . . . . . . . . . . . . . . . . . . . . . . 454
5204. . . . . . . . . . . . . . . . . . . . . . . . . . . . . . . . . . . . . . . . . . . . . . . . . . . . . . . . . . . . . . . . . 455
5205. . . . . . . . . . . . . . . . . . . . . . . . . . . . . . . . . . . . . . . . . . . . . . . . . . . . . . . . . . . . . . . . . 456
Page 10

5206. . . . . . . . . . . . . . . . . . . . . . . . . . . . . . . . . . . . . . . . . . . . . . . . . . . . . . . . . . . . . . . . . 457
5207. . . . . . . . . . . . . . . . . . . . . . . . . . . . . . . . . . . . . . . . . . . . . . . . . . . . . . . . . . . . . . . . . 458
5208. . . . . . . . . . . . . . . . . . . . . . . . . . . . . . . . . . . . . . . . . . . . . . . . . . . . . . . . . . . . . . . . . 459
5209. . . . . . . . . . . . . . . . . . . . . . . . . . . . . . . . . . . . . . . . . . . . . . . . . . . . . . . . . . . . . . . . . 460
5400. . . . . . . . . . . . . . . . . . . . . . . . . . . . . . . . . . . . . . . . . . . . . . . . . . . . . . . . . . . . . . . . . 461
5500. . . . . . . . . . . . . . . . . . . . . . . . . . . . . . . . . . . . . . . . . . . . . . . . . . . . . . . . . . . . . . . . . 462
5501. . . . . . . . . . . . . . . . . . . . . . . . . . . . . . . . . . . . . . . . . . . . . . . . . . . . . . . . . . . . . . . . . 463
5B00. . . . . . . . . . . . . . . . . . . . . . . . . . . . . . . . . . . . . . . . . . . . . . . . . . . . . . . . . . . . . . . . . 464
5B01. . . . . . . . . . . . . . . . . . . . . . . . . . . . . . . . . . . . . . . . . . . . . . . . . . . . . . . . . . . . . . . . . 465
5C01. . . . . . . . . . . . . . . . . . . . . . . . . . . . . . . . . . . . . . . . . . . . . . . . . . . . . . . . . . . . . . . . . 466
6000. . . . . . . . . . . . . . . . . . . . . . . . . . . . . . . . . . . . . . . . . . . . . . . . . . . . . . . . . . . . . . . . . 467
6500. . . . . . . . . . . . . . . . . . . . . . . . . . . . . . . . . . . . . . . . . . . . . . . . . . . . . . . . . . . . . . . . . 468
6502. . . . . . . . . . . . . . . . . . . . . . . . . . . . . . . . . . . . . . . . . . . . . . . . . . . . . . . . . . . . . . . . . 469
6800. . . . . . . . . . . . . . . . . . . . . . . . . . . . . . . . . . . . . . . . . . . . . . . . . . . . . . . . . . . . . . . . . 470
6801. . . . . . . . . . . . . . . . . . . . . . . . . . . . . . . . . . . . . . . . . . . . . . . . . . . . . . . . . . . . . . . . . 471
6900. . . . . . . . . . . . . . . . . . . . . . . . . . . . . . . . . . . . . . . . . . . . . . . . . . . . . . . . . . . . . . . . . 472
6901. . . . . . . . . . . . . . . . . . . . . . . . . . . . . . . . . . . . . . . . . . . . . . . . . . . . . . . . . . . . . . . . . 473
6902. . . . . . . . . . . . . . . . . . . . . . . . . . . . . . . . . . . . . . . . . . . . . . . . . . . . . . . . . . . . . . . . . 474
6910. . . . . . . . . . . . . . . . . . . . . . . . . . . . . . . . . . . . . . . . . . . . . . . . . . . . . . . . . . . . . . . . . 475
6911. . . . . . . . . . . . . . . . . . . . . . . . . . . . . . . . . . . . . . . . . . . . . . . . . . . . . . . . . . . . . . . . . 476
6920. . . . . . . . . . . . . . . . . . . . . . . . . . . . . . . . . . . . . . . . . . . . . . . . . . . . . . . . . . . . . . . . . 477
6921. . . . . . . . . . . . . . . . . . . . . . . . . . . . . . . . . . . . . . . . . . . . . . . . . . . . . . . . . . . . . . . . . 478
6930. . . . . . . . . . . . . . . . . . . . . . . . . . . . . . . . . . . . . . . . . . . . . . . . . . . . . . . . . . . . . . . . . 479
6931. . . . . . . . . . . . . . . . . . . . . . . . . . . . . . . . . . . . . . . . . . . . . . . . . . . . . . . . . . . . . . . . . 480
6932. . . . . . . . . . . . . . . . . . . . . . . . . . . . . . . . . . . . . . . . . . . . . . . . . . . . . . . . . . . . . . . . . 481
6933. . . . . . . . . . . . . . . . . . . . . . . . . . . . . . . . . . . . . . . . . . . . . . . . . . . . . . . . . . . . . . . . . 482
6940. . . . . . . . . . . . . . . . . . . . . . . . . . . . . . . . . . . . . . . . . . . . . . . . . . . . . . . . . . . . . . . . . 483
6941. . . . . . . . . . . . . . . . . . . . . . . . . . . . . . . . . . . . . . . . . . . . . . . . . . . . . . . . . . . . . . . . . 484
6942. . . . . . . . . . . . . . . . . . . . . . . . . . . . . . . . . . . . . . . . . . . . . . . . . . . . . . . . . . . . . . . . . 485
6943. . . . . . . . . . . . . . . . . . . . . . . . . . . . . . . . . . . . . . . . . . . . . . . . . . . . . . . . . . . . . . . . . 486
6944. . . . . . . . . . . . . . . . . . . . . . . . . . . . . . . . . . . . . . . . . . . . . . . . . . . . . . . . . . . . . . . . . 487
6945. . . . . . . . . . . . . . . . . . . . . . . . . . . . . . . . . . . . . . . . . . . . . . . . . . . . . . . . . . . . . . . . . 488
6946. . . . . . . . . . . . . . . . . . . . . . . . . . . . . . . . . . . . . . . . . . . . . . . . . . . . . . . . . . . . . . . . . 489
7100. . . . . . . . . . . . . . . . . . . . . . . . . . . . . . . . . . . . . . . . . . . . . . . . . . . . . . . . . . . . . . . . . 490
Page 11

7200. . . . . . . . . . . . . . . . . . . . . . . . . . . . . . . . . . . . . . . . . . . . . . . . . . . . . . . . . . . . . . . . . 491
7201. . . . . . . . . . . . . . . . . . . . . . . . . . . . . . . . . . . . . . . . . . . . . . . . . . . . . . . . . . . . . . . . . 492
7202. . . . . . . . . . . . . . . . . . . . . . . . . . . . . . . . . . . . . . . . . . . . . . . . . . . . . . . . . . . . . . . . . 493
7203. . . . . . . . . . . . . . . . . . . . . . . . . . . . . . . . . . . . . . . . . . . . . . . . . . . . . . . . . . . . . . . . . 494
7204. . . . . . . . . . . . . . . . . . . . . . . . . . . . . . . . . . . . . . . . . . . . . . . . . . . . . . . . . . . . . . . . . 495
7205. . . . . . . . . . . . . . . . . . . . . . . . . . . . . . . . . . . . . . . . . . . . . . . . . . . . . . . . . . . . . . . . . 496
7300. . . . . . . . . . . . . . . . . . . . . . . . . . . . . . . . . . . . . . . . . . . . . . . . . . . . . . . . . . . . . . . . . 497
B202. . . . . . . . . . . . . . . . . . . . . . . . . . . . . . . . . . . . . . . . . . . . . . . . . . . . . . . . . . . . . . . . . 498
B203. . . . . . . . . . . . . . . . . . . . . . . . . . . . . . . . . . . . . . . . . . . . . . . . . . . . . . . . . . . . . . . . . 499
B204. . . . . . . . . . . . . . . . . . . . . . . . . . . . . . . . . . . . . . . . . . . . . . . . . . . . . . . . . . . . . . . . . 500
B502. . . . . . . . . . . . . . . . . . . . . . . . . . . . . . . . . . . . . . . . . . . . . . . . . . . . . . . . . . . . . . . . . 501
B503. . . . . . . . . . . . . . . . . . . . . . . . . . . . . . . . . . . . . . . . . . . . . . . . . . . . . . . . . . . . . . . . . 502
B504. . . . . . . . . . . . . . . . . . . . . . . . . . . . . . . . . . . . . . . . . . . . . . . . . . . . . . . . . . . . . . . . . 503
C000. . . . . . . . . . . . . . . . . . . . . . . . . . . . . . . . . . . . . . . . . . . . . . . . . . . . . . . . . . . . . . . . . 504
Page 12

Read Me First
Notes on Online Manual Usage
How to Print
Notes on Online Manual Usage
• Reproduction, diversion or copying of any text, photo or image published in the Online Manual
(hereinafter referred to as "this guide"), in whole or in part, is prohibited.
• In principle, Canon shall change or delete the contents of this guide without prior notice to customers.
In addition, Canon may suspend or stop the disclosure of this guide due to unavoidable reasons.
Canon shall not be liable for any damage suffered by customers as a result of changes in or deletion
of information in this guide, or suspension/stoppage of disclosure of this guide.
• Although the contents of this guide have been prepared with utmost care, please contact the service
center if you find any incorrect or missing information.
• In principle, the descriptions in this guide are based on the product at the time of its initial sale.
• This guide does not disclose the manuals of all the products sold by Canon. See the manual supplied
with the product when using a product that is not described in this guide.
How to Print
Use the print function of your Web browser to print this guide.
To print background colors and images, follow the steps below to display the Print dialog options, then
select the Print backgrounds checkbox.
1. Click Print... from the File menu.
2. Click Show Details or (Down Arrow).
3. Select Safari from the pop-up menu.
12
Page 13

Symbols Used in This Document
Warning
Instructions that, if ignored, could result in death or serious personal injury caused by incorrect
operation of the equipment. These must be observed for safe operation.
Caution
Instructions that, if ignored, could result in personal injury or material damage caused by incorrect
operation of the equipment. These must be observed for safe operation.
Important
Instructions including important information. To avoid damage and injury or improper use of the
product, be sure to read these indications.
Note
Instructions including notes for operation and additional explanations.
Basic
Instructions explaining basic operations of your product.
Note
• Icons may vary depending on your product.
13
Page 14

Trademarks and Licenses
• Microsoft is a registered trademark of Microsoft Corporation.
• Windows is a trademark or registered trademark of Microsoft Corporation in the U.S. and/or other
countries.
• Windows Vista is a trademark or registered trademark of Microsoft Corporation in the U.S. and/or other
countries.
• Internet Explorer is a trademark or registered trademark of Microsoft Corporation in the U.S. and/or
other countries.
• Mac, Mac OS, AirPort, Safari, Bonjour, iPad, iPhone and iPod touch are trademarks of Apple Inc.,
registered in the U.S. and other countries. AirPrint and the AirPrint logo are trademarks of Apple Inc.
• IOS is a trademark or registered trademark of Cisco in the U.S. and other countries and is used under
license.
• Google Cloud Print, Google Chrome, Android, Google Play and Picasa are either registered trademarks
or trademarks of Google Inc.
• Adobe, Photoshop, Photoshop Elements, Lightroom, Adobe RGB and Adobe RGB (1998) are either
registered trademarks or trademarks of Adobe Systems Incorporated in the United States and/or other
countries.
• Photo Rag is a trademark of Hahnemühle FineArt GmbH.
• Bluetooth is a trademark of Bluetooth SIG, Inc., U.S.A. and licensed to Canon Inc.
Note
• The formal name of Windows Vista is Microsoft Windows Vista operating system.
Copyright (c) 2003-2004, Apple Computer, Inc. All rights reserved.
Redistribution and use in source and binary forms, with or without modification, are permitted provided
that the following conditions are met:
1. Redistributions of source code must retain the above copyright notice, this list of conditions and the
following disclaimer.
2. Redistributions in binary form must reproduce the above copyright notice, this list of conditions and
the following disclaimer in the documentation and/or other materials provided with the distribution.
3. Neither the name of Apple Computer, Inc. ("Apple") nor the names of its contributors may be used to
endorse or promote products derived from this software without specific prior written permission.
THIS SOFTWARE IS PROVIDED BY APPLE AND ITS CONTRIBUTORS "AS IS" AND ANY EXPRESS
OR IMPLIED WARRANTIES, INCLUDING, BUT NOT LIMITED TO, THE IMPLIED WARRANTIES OF
MERCHANTABILITY AND FITNESS FOR A PARTICULAR PURPOSE ARE DISCLAIMED. IN NO
EVENT SHALL APPLE OR ITS CONTRIBUTORS BE LIABLE FOR ANY DIRECT, INDIRECT,
INCIDENTAL, SPECIAL, EXEMPLARY, OR CONSEQUENTIAL DAMAGES (INCLUDING, BUT NOT
LIMITED TO, PROCUREMENT OF SUBSTITUTE GOODS OR SERVICES; LOSS OF USE, DATA, OR
PROFITS; OR BUSINESS INTERRUPTION) HOWEVER CAUSED AND ON ANY THEORY OF
LIABILITY, WHETHER IN CONTRACT, STRICT LIABILITY, OR TORT INCLUDING NEGLIGENCE OR
OTHERWISE) ARISING IN ANY WAY OUT OF THE USE OF THIS SOFTWARE, EVEN IF ADVISED OF
THE POSSIBILITY OF SUCH DAMAGE.
Apache License
Version 2.0, January 2004
http://www.apache.org/licenses/
TERMS AND CONDITIONS FOR USE, REPRODUCTION, AND DISTRIBUTION
14
Page 15

1. Definitions.
"License" shall mean the terms and conditions for use, reproduction, and distribution as defined by
Sections 1 through 9 of this document.
"Licensor" shall mean the copyright owner or entity authorized by the copyright owner that is granting
the License.
"Legal Entity" shall mean the union of the acting entity and all other entities that control, are controlled
by, or are under common control with that entity. For the purposes of this definition, "control" means
(i) the power, direct or indirect, to cause the direction or management of such entity, whether by
contract or otherwise, or (ii) ownership of fifty percent (50%) or more of the outstanding shares, or (iii)
beneficial ownership of such entity.
"You" (or "Your") shall mean an individual or Legal Entity exercising permissions granted by this
License.
"Source" form shall mean the preferred form for making modifications, including but not limited to
software source code, documentation source, and configuration files.
"Object" form shall mean any form resulting from mechanical transformation or translation of a Source
form, including but not limited to compiled object code, generated documentation, and conversions to
other media types.
"Work" shall mean the work of authorship, whether in Source or Object form, made available under
the License, as indicated by a copyright notice that is included in or attached to the work (an example
is provided in the Appendix below).
"Derivative Works" shall mean any work, whether in Source or Object form, that is based on (or
derived from) the Work and for which the editorial revisions, annotations, elaborations, or other
modifications represent, as a whole, an original work of authorship. For the purposes of this License,
Derivative Works shall not include works that remain separable from, or merely link (or bind by name)
to the interfaces of, the Work and Derivative Works thereof.
"Contribution" shall mean any work of authorship, including the original version of the Work and any
modifications or additions to that Work or Derivative Works thereof, that is intentionally submitted to
Licensor for inclusion in the Work by the copyright owner or by an individual or Legal Entity
authorized to submit on behalf of the copyright owner. For the purposes of this definition, "submitted"
means any form of electronic, verbal, or written communication sent to the Licensor or its
representatives, including but not limited to communication on electronic mailing lists, source code
control systems, and issue tracking systems that are managed by, or on behalf of, the Licensor for
the purpose of discussing and improving the Work, but excluding communication that is
conspicuously marked or otherwise designated in writing by the copyright owner as "Not a
Contribution."
"Contributor" shall mean Licensor and any individual or Legal Entity on behalf of whom a Contribution
has been received by Licensor and subsequently incorporated within the Work.
2. Grant of Copyright License. Subject to the terms and conditions of this License, each Contributor
hereby grants to You a perpetual, worldwide, non-exclusive, no-charge, royalty-free, irrevocable
copyright license to reproduce, prepare Derivative Works of, publicly display, publicly perform,
sublicense, and distribute the Work and such Derivative Works in Source or Object form.
3. Grant of Patent License. Subject to the terms and conditions of this License, each Contributor hereby
grants to You a perpetual, worldwide, non-exclusive, no-charge, royalty-free, irrevocable (except as
stated in this section) patent license to make, have made, use, offer to sell, sell, import, and
otherwise transfer the Work, where such license applies only to those patent claims licensable by
such Contributor that are necessarily infringed by their Contribution(s) alone or by combination of
15
Page 16

their Contribution(s) with the Work to which such Contribution(s) was submitted. If You institute patent
litigation against any entity (including a cross-claim or counterclaim in a lawsuit) alleging that the
Work or a Contribution incorporated within the Work constitutes direct or contributory patent
infringement, then any patent licenses granted to You under this License for that Work shall terminate
as of the date such litigation is filed.
4. Redistribution. You may reproduce and distribute copies of the Work or Derivative Works thereof in
any medium, with or without modifications, and in Source or Object form, provided that You meet the
following conditions:
1. You must give any other recipients of the Work or Derivative Works a copy of this License; and
2. You must cause any modified files to carry prominent notices stating that You changed the files;
and
3. You must retain, in the Source form of any Derivative Works that You distribute, all copyright,
patent, trademark, and attribution notices from the Source form of the Work, excluding those
notices that do not pertain to any part of the Derivative Works; and
4. If the Work includes a "NOTICE" text file as part of its distribution, then any Derivative Works that
You distribute must include a readable copy of the attribution notices contained within such
NOTICE file, excluding those notices that do not pertain to any part of the Derivative Works, in at
least one of the following places: within a NOTICE text file distributed as part of the Derivative
Works; within the Source form or documentation, if provided along with the Derivative Works; or,
within a display generated by the Derivative Works, if and wherever such third-party notices
normally appear. The contents of the NOTICE file are for informational purposes only and do not
modify the License. You may add Your own attribution notices within Derivative Works that You
distribute, alongside or as an addendum to the NOTICE text from the Work, provided that such
additional attribution notices cannot be construed as modifying the License.
You may add Your own copyright statement to Your modifications and may provide additional or
different license terms and conditions for use, reproduction, or distribution of Your modifications,
or for any such Derivative Works as a whole, provided Your use, reproduction, and distribution of
the Work otherwise complies with the conditions stated in this License.
5. Submission of Contributions. Unless You explicitly state otherwise, any Contribution intentionally
submitted for inclusion in the Work by You to the Licensor shall be under the terms and conditions of
this License, without any additional terms or conditions. Notwithstanding the above, nothing herein
shall supersede or modify the terms of any separate license agreement you may have executed with
Licensor regarding such Contributions.
6. Trademarks. This License does not grant permission to use the trade names, trademarks, service
marks, or product names of the Licensor, except as required for reasonable and customary use in
describing the origin of the Work and reproducing the content of the NOTICE file.
7. Disclaimer of Warranty. Unless required by applicable law or agreed to in writing, Licensor provides
the Work (and each Contributor provides its Contributions) on an "AS IS" BASIS, WITHOUT
WARRANTIES OR CONDITIONS OF ANY KIND, either express or implied, including, without
limitation, any warranties or conditions of TITLE, NON-INFRINGEMENT, MERCHANTABILITY, or
FITNESS FOR A PARTICULAR PURPOSE. You are solely responsible for determining the
appropriateness of using or redistributing the Work and assume any risks associated with Your
exercise of permissions under this License.
8. Limitation of Liability. In no event and under no legal theory, whether in tort (including negligence),
contract, or otherwise, unless required by applicable law (such as deliberate and grossly negligent
acts) or agreed to in writing, shall any Contributor be liable to You for damages, including any direct,
indirect, special, incidental, or consequential damages of any character arising as a result of this
License or out of the use or inability to use the Work (including but not limited to damages for loss of
16
Page 17

goodwill, work stoppage, computer failure or malfunction, or any and all other commercial damages
or losses), even if such Contributor has been advised of the possibility of such damages.
9. Accepting Warranty or Additional Liability. While redistributing the Work or Derivative Works thereof,
You may choose to offer, and charge a fee for, acceptance of support, warranty, indemnity, or other
liability obligations and/or rights consistent with this License. However, in accepting such obligations,
You may act only on Your own behalf and on Your sole responsibility, not on behalf of any other
Contributor, and only if You agree to indemnify, defend, and hold each Contributor harmless for any
liability incurred by, or claims asserted against, such Contributor by reason of your accepting any
such warranty or additional liability.
END OF TERMS AND CONDITIONS
17
Page 18

Enter keywords in the search window and click (Search).
You can search for target pages in this guide.
Search Tips
You can search for target pages by entering keywords in the search window.
Note
• The displayed screen may vary.
• When searching from this page or the "Home" page without entering your product's model name or your
application's name, all products supported by this guide will be considered for the search.
If you want to narrow down the search results, add your product's model name or your application's
name to the keywords.
• Searching for Functions
Enter your product's model name and a keyword for the function you want to learn about
Example: When you want to learn how to load paper
Enter "(your product's model name) load paper" in the search window and perform a search
• Troubleshooting Errors
Enter your product's model name and a support code
Example: When the following error screen appears
Enter "(your product's model name) 1000" in the search window and perform a search
18
Page 19

Note
• The displayed screen varies depending on your product.
• Searching for Application Functions
Enter your application's name and a keyword for the function you want to learn about
Example: When you want to learn how to print collages with My Image Garden
Enter "My Image Garden collage" in the search window and perform a search
• Searching for Reference Pages
Enter your model name and a reference page title*
* You can find reference pages more easily by entering the function name as well.
Example: When you want to browse the page referred to by the following sentence on a scanning
procedure page
Refer to "Color Settings Tab" for your model from Home of the Online Manual for details.
Enter "(your product's model name) scan Color Settings Tab" in the search window and perform a
search
19
Page 20

Notes on Operation Explanations
In this guide, most of the operations are described based on the windows displayed when OS X Mavericks
v10.9 is used.
20
Page 21

Useful Functions Available on the Machine
Connect Wirelessly with Ease in "Access Point Mode"
Download a Variety of Content Materials
Print Items with Easy-PhotoPrint+ (Web Application)
Use the Printer More Conveniently with Quick Toolbox
Connection Methods Available on the Printer
Notice for Web Service Printing
Use MAXIFY Cloud Link
Printing with Google Cloud Print
Printing from AirPrint Compliant Device
Checking Printer Information
How to Use Print from E-mail
Print Easily from a Smartphone or Tablet with MAXIFY Printing Solutions
Printing with Windows RT
21
Page 22

Connect Wirelessly with Ease in "Access Point Mode"
The printer supports "access point mode" in which you can connect to the printer wirelessly from a computer
or smartphone even in an environment without an access point or wireless LAN router.
Switch to "access point mode" with simple steps to enjoy printing wirelessly.
When you use the printer with the access point mode, be sure to specify the access point name of the
printer and the security setting in advance.
Using the Printer with the Access Point Mode
22
Page 23

Download a Variety of Content Materials
CREATIVE PARK
A "printing materials site" where you can download all the printing materials for free.
Various types of content such as seasonal cards and paper crafts that can be made by assembling paper
parts are provided.
CREATIVE PARK PREMIUM
A service where customers using models that support PREMIUM Contents can download exclusive
printing materials.
PREMIUM Contents can be downloaded easily via Easy-PhotoPrint+. Downloaded PREMIUM Contents
can be printed directly with Easy-PhotoPrint+.
To download PREMIUM Contents, make sure that genuine Canon ink tanks/ink cartridges are installed for
all colors on a supported printer.
Note
• The designs of PREMIUM Contents provided in this page are subject to change without prior notice.
23
Page 24

Print Items with Easy-PhotoPrint+ (Web Application)
You can easily create and print personalized items such as calendars and collages, anytime and anywhere,
by simply accessing Easy-PhotoPrint+ on the web from a computer or tablet.
By using Easy-PhotoPrint+, you can create items in the latest environment without going through the trouble
of installation.
Moreover, you can use various photos for your item through integration with social networks such as
Facebook, or with online storage, web albums, etc.
Refer to "Easy-PhotoPrint+ Guide" for details.
24
Page 25

Use the Printer More Conveniently with Quick Toolbox
Quick Toolbox is a shortcut menu that lets you access the functions you want to use with one click. After
installing utilities compatible with Quick Toolbox, they will be added to this menu. The Quick Toolbox
provides a convenient way to quickly launch added utilities for making printer settings and doing other
management tasks.
Refer to "Quick Toolbox Guide" for details.
25
Page 26
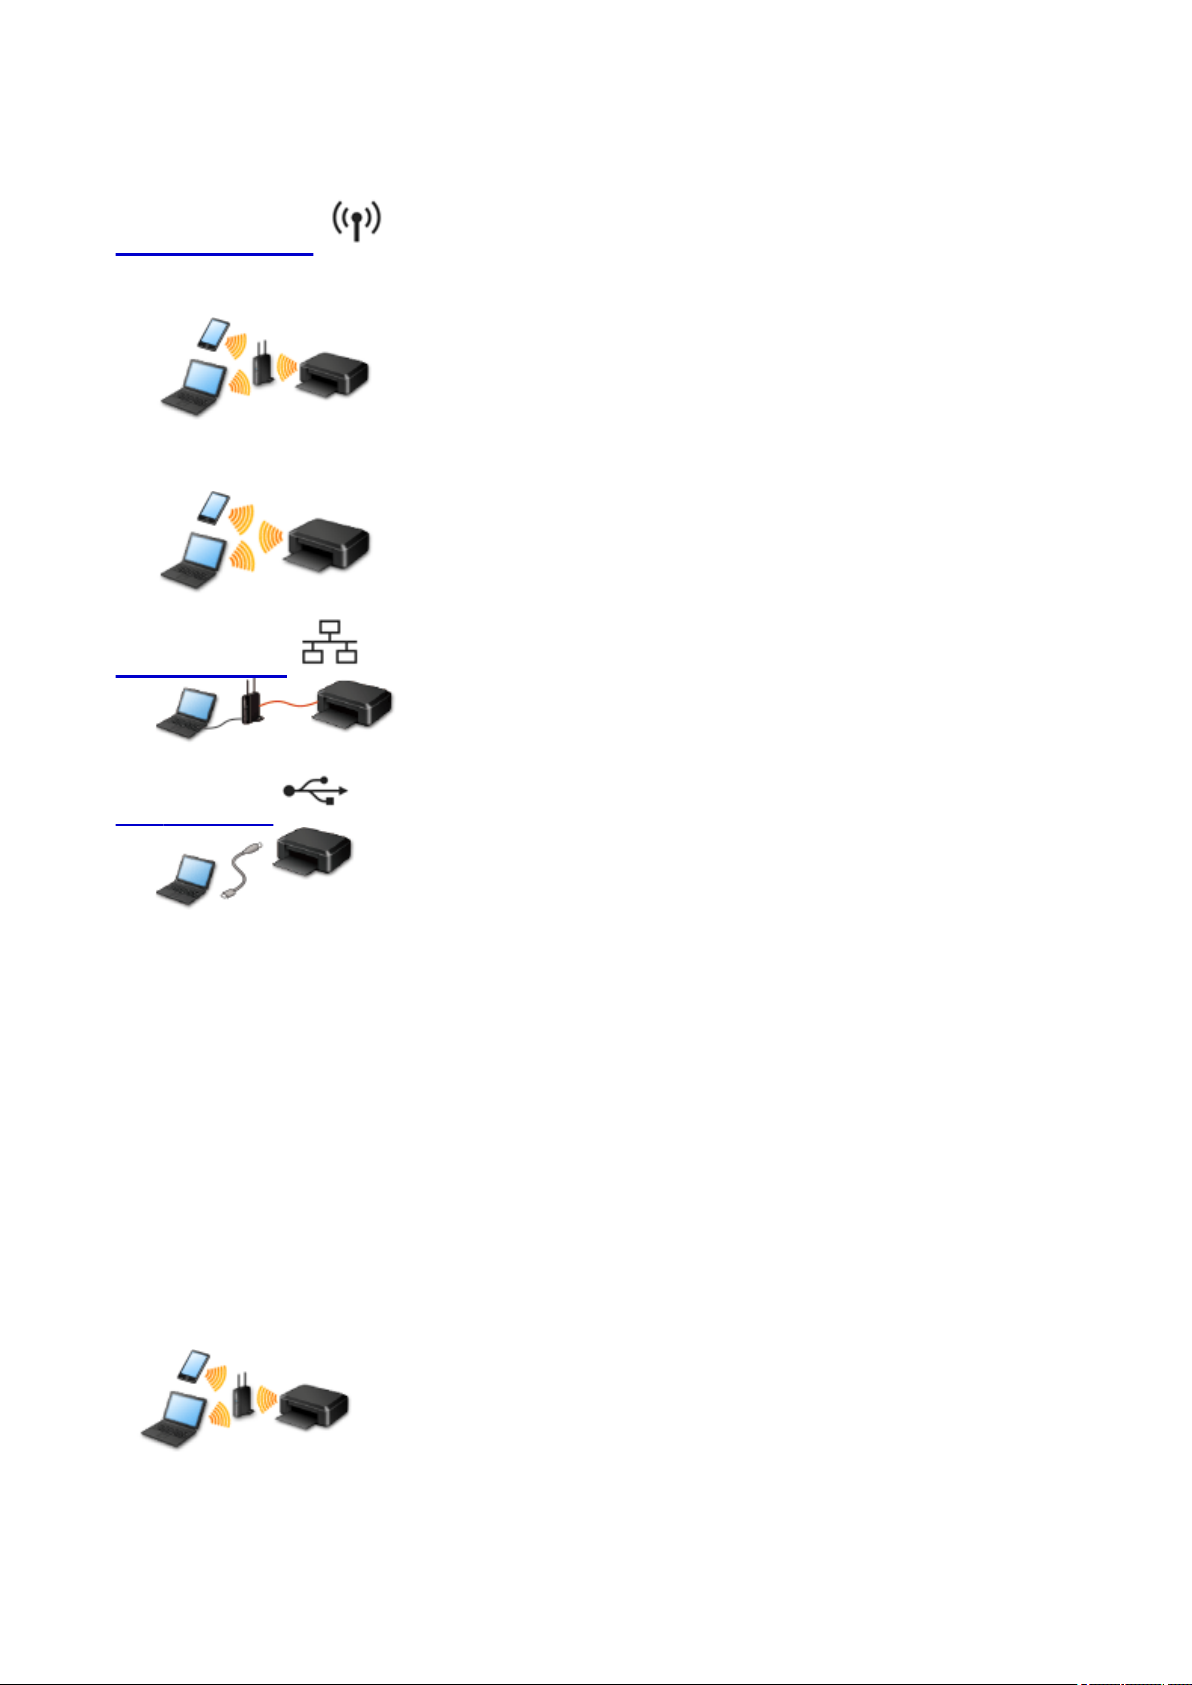
Connection Methods Available on the Printer
The following connection methods are available on the printer.
Wireless Connection
With an access point
Without an access point
Wired Connection
USB Connection
Wireless Connection
There are two methods for connecting the printer to your device (such as a smartphone). One method is
to connect using an access point, and the other method is to connect without using an access point.
The two connection methods cannot be used at the same time.
If you have an access point (or wireless network router), it is recommended that you use the method
described in Connection Using an Access Point.
When connecting another device while a device is already connected to the printer, connect it using the
same connection method as the connected device.
If you connect using a different connection method, the connection to the device in use will be disabled.
Connection Using an Access Point
Connect the printer and a device using an access point.
•
Connection methods vary depending on the access point type.
•
You can change network settings such as the SSID and security protocol on the printer.
•
26
Page 27

• When the connection between a device and an access point is completed and (Wi-Fi icon) is
displayed in the device's screen, you can connect the device to the printer using the access point.
Connection without Using an Access Point
• Connect the printer and a device without using an access point. Connect a device and the printer
directly using the printer's access point mode function.
• When establishing a connection in access point mode, Internet connection may become unavailable.
In that case, web services for the printer cannot be used.
• If you connect a device connected to the Internet via an access point to the printer that is in access
point mode, the connection between the device and access point will be disabled. In that case, the
connection of the device may switch to a mobile data connection automatically depending on your
device. Transmission fees for connecting to the Internet using a mobile data connection apply.
• In access point mode, you can connect up to five devices at the same time. If you try to connect a
sixth device while five devices are already connected, an error will appear.
If an error appears, disconnect a device that does not use the printer, then configure settings again.
• Network settings such as the SSID and security protocol can be changed on the printer.
When Using Windows XP:
Connection without Using an Access Point (Windows XP)
Restrictions
(Appears in a new window)
Wired Connection
Connect the printer and a hub or router with an Ethernet cable. Prepare an Ethernet cable.
USB Connection
Connect the printer and a computer with a USB cable. Prepare a USB cable.
27
Page 28

Connection without Using an Access Point (Windows XP)
Restrictions
(Appears in a new window)
Make sure that the screen below is displayed.
1.
If another screen is displayed, press the Setup button (A) on the printer.
2.
Press the Setup button.
3.
Use the or button (B) to select Device settings, then press the OK button.
4.
Select LAN settings, then press the OK button.
5. Select Change LAN, then press the OK button.
6. Select AP mode active, then press the OK button.
28
Page 29

7. Select SSID, then press the OK button.
Check SSID information in the printer screen, then press the Back (C).
8.
You will use the SSID information in the subsequent steps.
9.
Select Security protocol, then press the OK button.
10.
Check the Password (network key), then press the Back button.
You will use the Password (network key) in the subsequent steps.
11. Select Start setup, then press the OK button.
12. Right-click the Wireless Network Connection icon in the notification area of the taskbar
on the computer, then select View Available Wireless Networks.
29
Page 30
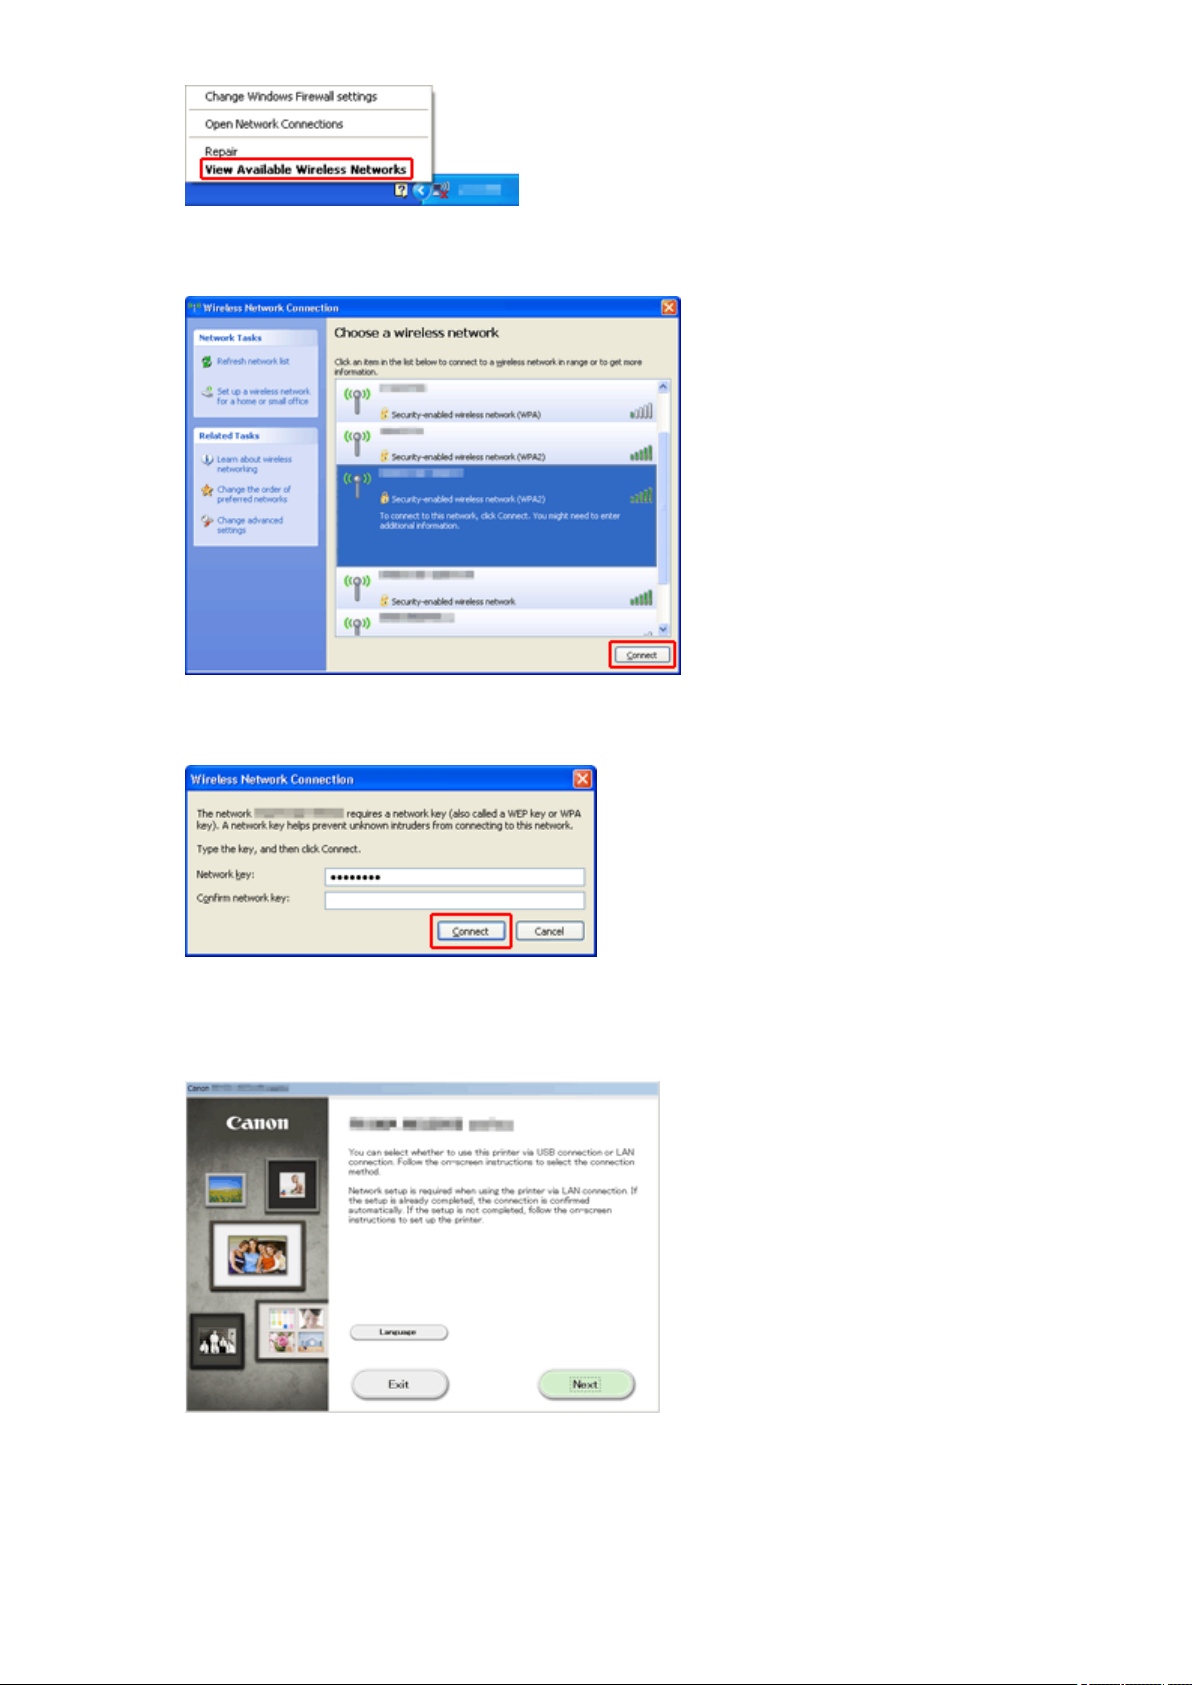
13. Select the network name (SSID) you want to use, then click Connect.
14.
Enter the Password (Network key), then click Connect.
15.
When connection is complete, click Back until the screen below appears.
Proceed with the setup.
30
Page 31

Restrictions
When connecting another device while a device (such as a smartphone) is already connected to the
printer, connect it using the same connection method as the connected device.
If you connect using a different connection method, the connection to the device in use will be disabled.
Connection Using a Wired Network cannot be performed on printers that do not support a wired
connection.
Connection Using an Access Point
• Make sure that a device and an access point (or wireless network router) are connected. For details
on how to check the settings, refer to the manual supplied with the access point or contact its
manufacturer.
As for a device already connected to the printer without using an access point, reconnect it via an
access point.
• The configuration, router functions, setup procedures and security settings of the network device vary
depending on your system environment. For details, refer to the manual of your network device or
contact its manufacturer.
• Check if your device supports IEEE802.11n (2.4 GHz), IEEE802.11g or IEEE802.11b.
• If your device is set to the "IEEE802.11n only" mode, WEP or TKIP cannot be used as a security
protocol. Change the security protocol for your device to something other than WEP and TKIP or
change the setting to something other than "IEEE802.11n only."
The connection between your device and the access point will be temporarily disabled while changing
the setting. Do not operate the screen of this guide until the setup is complete.
• For office use, consult your network administrator.
• Take added care when connecting to a network that is not protected with security measures, as there
is a risk of disclosing data such as your personal information to a third party.
Connection without Using an Access Point
Important
• If you connect a device connected to the Internet via an access point to the printer that is in access
point mode, the connection between the device and access point will be disabled. In that case, the
connection of the device may switch to a mobile data connection automatically depending on your
device. When you connect to the Internet using a mobile data connection, charges may apply
depending on your contract.
• When you connect a device and the printer in access point mode, the connection information will
be saved to Wi-Fi settings. The device may be connected to the printer automatically even after
disconnecting it or connecting it to another access point.
• You cannot connect to an access point and the printer that is in access point mode at the same
time. If you have an access point, it is recommended that you use the access point to connect to
the printer.
• To prevent automatic connection to the printer that is in access point mode, change the
connection mode after using the printer, or set not to connect automatically in the Wi-Fi settings
of the device.
For details on how to change the settings of a device, refer to the manual supplied with the
device or contact its manufacturer.
31
Page 32

• When connecting a device and the printer in access point mode, Internet connection may become
unavailable. In that case, web services for the printer cannot be used.
• In access point mode, you can connect up to five devices at the same time. If you try to connect a
sixth device while five devices are already connected, an error will appear.
If an error appears, disconnect a device that does not use the printer, then configure settings again.
• Devices connected to the printer in access point mode cannot communicate with each other.
• Firmware updates for the printer are not available while using the access point mode.
• When a device has been connected to the printer without using an access point and you want to set it
up again using the same connection method, disconnect it first. Disable the connection between the
device and printer in the Wi-Fi setting screen.
Connection Using a Wired Network
• This printer cannot be used over wireless and wired connections at the same time.
• When using a router, connect the printer and a device to the LAN side (same network segment).
32
Page 33

Notice for Web Service Printing
When Using Web Service
• Canon does not guarantee the continuity and reliability of the web services provided, the availability of
site access, or permission to download the materials.
• Canon may at any time update, change, or delete the information provided through the web service,
or may suspend or discontinue the service without prior notice. Canon shall not be held responsible
for any damages resulting from such actions.
• In no event shall Canon be liable for any damages whatsoever resulting from the use of the web
services.
• User registration is necessary before using the photo sharing site.
When you use the photo sharing site, observe the conditions of use of the site and use the service
within your own responsibility.
• All or part of the web service may not be available depending on the country or region you live in.
• Depending on your network environment, some functions on web service are not available. Even if
they are available, it may take a while to print or display the contents, or communication may be
interrupted while operation is in progress.
• When you use web service, your machine's name, information of your region or country, your selected
language, and what kind of service you use (e.g. photo sharing site) are sent to and saved in our
server. Canon is unable to identify specific customers using this information.
• Your login name and password for the photo sharing site are saved in the machine's memory (not
encrypted).
If you hand over the machine to anyone or dispose of it, delete your login name and password from
the machine's memory in advance.
• The account information will be sent to Canon Inc. server (located in Japan), then forwarded to the
service provider's server.
• Canon handles your account information as follows:
◦ Your account information will be used in personal identification process of the selected service.
◦ Canon will not provide your account information to any third party without your consent, except for
sending to the service provider or providing based on laws and regulations.
◦ After the conclusion of non-disclosure agreement, Canon may deposit your account information to
the contractor to achieve the purpose of use.
◦ Canon endeavors to secure the safety of your account information.
◦ It is at your option to enter and send your account information. However, the service that requires
to enter your account information is not available unless you enter and send it.
◦ Your account information does not remain in Canon Inc. server. At the latest, it will be deleted
when you have disconnected your printer from LAN.
◦ For details, contact a Canon-authorized sales representative in the country or region you live in.
To Those Living in Mainland China
• PIXMA/MAXIFY Cloud Link, Easy-PhotoPrint+, and some functions of PIXMA/MAXIFY Printing
Solutions, which are included with this machine, are provided by Canon Inc.
However, as the server is installed outside of mainland China, some of these services may not be
available yet.
33
Page 34

Copyrights and Rights of Publicity
When printing from the photo sharing site:
• Observe the conditions of use of the photo sharing site when you use photos on the site.
• It is unlawful to reproduce or edit the copyrighted work of another person without permission from the
copyright holder, except for personal use, use within the home, or other use within the limited scope
as defined by the copyright. Additionally, reproducing or editing photographs of people may infringe
on Rights of Publicity.
When printing downloaded template forms:
1. The copyright of each material (photos, illustrations, logos, or documents: hereinafter referred to as
"the materials") provided on the web template printing service belongs to their respective owners.
Issues pertaining to Rights of Publicity may arise regarding the use of any of people or characters
displayed on the web template printing service.
Except as otherwise permitted (please see "2" below), copying, modifying or distributing all or a
portion of any of the materials contained on the web template printing service without prior consent of
the respective rights (Rights of Publicity and Copyright) holder is strictly prohibited.
2. All of the materials provided on the web template printing service can be freely used for personal and
non-commercial purposes.
34
Page 35

Use MAXIFY Cloud Link
By using MAXIFY Cloud Link, you can connect your printer to a cloud service, such as CANON iMAGE
GATEWAY, Evernote, or Twitter, and use the following functions without using a computer:
• Print images from a photo-sharing service
• Print documents from a data management service
• Use Twitter to report the printer status, such as no paper or low ink levels.
In addition, you can use various functions by adding and registering apps that are linked with various cloud
services.
Using MAXIFY Cloud Link from Your Smartphone, Tablet, or Computer
Important
• In certain countries, MAXIFY Cloud Link may not be available or the available apps may be different.
• Some apps require that you have an account before you use those apps. For such apps, please set up
an account beforehand.
• To find out which models support MAXIFY Cloud Link check the Canon homepage.
• The screen display may change without prior notice.
35
Page 36

Using MAXIFY Cloud Link from Your Smartphone, Tablet, or
Computer
Before Using Canon Inkjet Cloud Printing Center
Preparations Before Using Canon Inkjet Cloud Printing Center
Using Canon Inkjet Cloud Printing Center
Adding a Printer
Adding a MAXIFY Cloud Link User
Troubleshooting Canon Inkjet Cloud Printing Center
36
Page 37

Before Using Canon Inkjet Cloud Printing Center
Canon Inkjet Cloud Printing Center is a service that links with the cloud function of the printer and allows you
to perform operations such as registering and managing apps from your smartphone or tablet device, and
checking the print status, print error, and ink status of the printer. You can also print app photos and
documents from your smartphone or tablet.
First, check the following content:
• Precautions
If you plan to use the web service to print documents, be sure to check these precautions beforehand.
• Printer specification
Check that Canon Inkjet Cloud Printing Center supports the printer.
• Network environment
The printer must be connected to a LAN and to the Internet.
Important
• The user will bear the cost of Internet access.
• Operating requirements
For computers, smartphones, and tablet devices, see "Requirements for Canon Inkjet Cloud Printing
Center operation".
Important
• This service may not be available in certain countries or regions. Also even if the service is available,
there are apps that cannot be used in certain regions.
Preparations Before Using Canon Inkjet Cloud Printing Center
37
Page 38

Requirements for Canon Inkjet Cloud Printing Center operation
Computer
CPU x86 or x64 1.6 GHz or higher
RAM 2 GB or higher
Monitor display
Windows XP SP3 or later
Windows Vista SP1 or later
Windows 7
Windows 8
Windows 8.1
Resolution 1024 x 768 pixels or higher
Number of display colors 24 bits (true-color) or higher
OS Browser
Internet Explorer 8*
Mozilla Firefox
Google Chrome
Internet Explorer 8*, 9
Mozilla Firefox
Google Chrome
Internet Explorer 8*, 9, 10, 11
Mozilla Firefox
Google Chrome
Internet Explorer 10
Mozilla Firefox
Google Chrome
Internet Explorer 11
Mozilla Firefox
Google Chrome
Mac OS X v10.6-OS X Mavericks v10.9 Safari 5.1, 6, 7
* When you use Internet Explorer 8, the web pages may not display correctly. Canon recommends that
you upgrade to Internet Explorer 9 or later, or use another browser.
Smartphone or tablet
OS Browser Resolution
iOS 5.1 or later
OS standard browser
Android 2.3.3 or later 480 x 800 (HVGA) or higher
*Android3.x is not supported.
Important
• On the browser you are using, enable JavaScript and cookies.
• If you use the zoom function or change the font size on your browser, the web pages may not display
correctly.
• If you use the translation function of Google Chrome, the web pages may not display correctly.
• If you use a proxy server outside of your country, the service may not be able to determine the correct
region.
320 x 480 (HVGA) or higher
38
Page 39

• In an in-house network environment, the 5222 port must be released. For confirmation instructions,
contact the network administrator.
39
Page 40

Preparations Before Using Canon Inkjet Cloud Printing Center
To use the Canon Inkjet Cloud Printing Center, you need to follow the steps described below and register
the user information.
Print registration information from the printer
1.
On the printer operation panel, select the Setup button, and then select Web
service setup -> Connection setup -> IJCloudPrintingCtr -> Register w/ service
2.
In the registration confirmation window, Select Yes
3.
In the print settings, select the display language
4.
Follow the instructions displayed in the window, and print the URL of the authentication
site and the Printer registration ID
Set A4 size or Letter size plain paper and select OK.
The authentication URL and Printer registration ID are printed.
Note
•
You will use this printed page in the next step.
40
Page 41

Important
• The operation to complete the registration should be done within 60 minutes.
Access the URL on the printed page, and then enter the e-mail address and
other necessary information
Important
• Do not use the Back button of the web browser while an operation is processing. The screen may not
transition properly.
1.
Use the web browser on your PC, smartphone, tablet, or other devices to access the
authentication URL
41
Page 42

2. On the Login screen, select Create new account
3.
Enter the E-mail address and Printer registration ID of the printer's owner, and then
select OK
The registration page URL is sent to the e-mail address entered.
Important
•
There are character restrictions for the e-mail address, as shown below.
•
You can use up to 255 alphanumeric characters consisting of single-byte characters and
symbols (!$'*/^_{}|~.-@).
•
Multibyte characters cannot be used.
You will get an error if the e-mail address you enter contains a character that cannot be
used.
•
If you registered a different e-mail address by mistake, you can cancel the registration by
selecting the Setup button on the printer operation panel, and then selecting Web service
setup -> Connection setup -> IJCloudPrintingCtr -> Delete from service.
42
Page 43

• You may not be able to receive the notification if you are using a spam filter. If you have a
setting to receive only the e-mails from certain domains, be sure to change the setting to allow
receiving e-mails from "noreply@mail.cs.c-ij.com".
There will be no error display even if you could not receive the e-mail because of the spam filter
setting or if you entered an incorrect e-mail address.
Access the URL in the e-mail, register the information, and complete the
user registration
1.
When an e-mail with the subject "Information on Canon Inkjet Cloud Printing Center" is
sent to the e-mail address that you entered, select the URL
In the License agreement and Privacy statement windows of Canon Inkjet Cloud
2.
Printing Center, read the statements, and select Agree if you agree
43
Page 44

3.
In the user information entry screen, enter your Password, and select Next
Enter your password for logging in to the Canon Inkjet Cloud Printing Center.
Important
•
There are character restrictions for the Password, as shown below.
•
The password needs to be between 8 and 32 characters long, using single-byte
alphanumeric characters and symbols (!"#$%&'()*+,-./:;<=>?@[\]^_`{|}~). (Alphabets are
case-sensitive)
4.
Enter the User name
Enter the name that identifies the user.
44
Page 45

Important
• The User name entry field has the following character restrictions:
• The user name needs to be between 1 and 20 characters long, using single-byte
alphanumeric characters and symbols (!"#$%&'()*+,-./:;<=>?@[\]^_`{|}~). (Alphabets are
case-sensitive)
5.
Specify the Time zone setting, and select Next
Select your region on the list. If you cannot find your region on the list, select the one closest to your
region.
Apply daylight saving time
This appears only when there is a daylight saving time in the Time zone that you selected.
Select whether or not to apply the daylight saving time.
6. Enter the Security code and select Done
45
Page 46

A Security code identifies the user when multiple other users are sharing the same printer.
Important
• The Security code entry field has the following character restrictions:
• Single-byte numbers
The registration is complete. A registration completion message is displayed.
When you select the OK button in the message, the login screen is displayed.
Enter the registered e-mail address and password, and log in to the Canon Inkjet Cloud Printing Center.
Using Canon Inkjet Cloud Printing Center
46
Page 47

Printing Your Printer registration ID
To add a printer by using Canon Inkjet Cloud Printing Center, you will need a Printer registration ID.
From the operation panel of this printer, print the URL of the authentication site and your Printer
registration ID. The procedure is as follows:
Check that the printer is connected to the Internet
1.
Important
To use this function, you must connect this printer to the Internet.
•
2.
On the printer operation panel, select the Setup button, and then select Web
service setup -> Connection setup -> IJCloudPrintingCtr -> Register w/ service
3.
In the registration confirmation window, Select Yes
4.
In the print settings, select the display language
5.
Follow the instructions displayed in the window, and print the URL of the authentication site
and your Printer registration ID
When you set A4 size or Letter size plain paper and select OK, the authentication site URL and your
Printer registration ID are printed.
Important
The operation to complete the registration should be done within 60 minutes.
•
47
Page 48

Canon Inkjet Cloud Printing Center window
This section describes the Canon Inkjet Cloud Printing Center screens that are displayed on your
smartphone, tablet device, or computer.
Description of the Login screen
Description of the Main screen
Description of the Login screen
This section provides the description of the Login screen of Canon Inkjet Cloud Printing Center.
Important
• You have 5 tries to enter your password. If you fail, you will not be able to log in for about the next
hour.
• You remain logged in for an hour after the last access.
Language
Select the language you will be using.
E-mail address
Enter the e-mail address that you entered in the user registration.
Important
• The e-mail address is case-sensitive. Make sure the case is correct.
Password
Enter the password that you entered in the user registration.
Keep login info
When you select the check box, the login screen is skipped for 14 days since the last day that the
service screen was accessed.
Reset password from here
Select this if you forgot the password.
Reset your password by following the instructions on the screen.
48
Page 49

Create new account
A new registration will be added to the Canon Inkjet Cloud Printing Center.
For a new registration, you need the Printer registration ID.
System requirements
This displays the system requirements for the Canon Inkjet Cloud Printing Center.
Help/legal notices (smartphone and tablet devices only)
The description of the Canon Inkjet Cloud Printing Center screen and various reminders are
displayed.
Software license info
The licensing information of Canon Inkjet Cloud Printing Center is displayed.
About this service
This displays the descriptions of this service.
Description of the Main screen
When you log in to the Canon Inkjet Cloud Printing Center, the Main screen appears.
Important
• With this service, the functions available to Standard user of the printer are different from those
available to the printer Administrator.
Standard user can only use the functions marked by an asterisk (*).
You can use areas shown below to start*, add, and manage apps.
If you are using a smartphone or a tablet, you can also print photos and documents.
If you are using a smartphone or tablet
If you are using a PC
49
Page 50

If you are using a smartphone or tablet
(1) Left context menu
(2) Printer name area
(3) Right context menu
(4) Display area
(5) Menu area
(1) Left context menu
When you select , the Mng. printer screen of the Manage users screen appears.
For general users, the Select printer screen appears.
Mng. printer screen (Select printer screen)
50
Page 51

From the Mng. printer screen (Select printer screen), you can check*and update* printer information
registered to the Canon Inkjet Cloud Printing Center, change printer names, delete printers, add
printers, and copy apps.
• Check the printer information*
The registered printer name is displayed.
indicates the currently selected printer.
indicates that an error occurred on the printer.
• Display update date/time of the printer information*
This displays the date and time the printer information was last updated.
refreshes the information.
• Multiuser mode
If multiple users are using the printer, select the Multiuser mode check box.
• Copy apps
Select this to copy apps added in the selected printer to another printer.
When you select , the screen shown below appears.
Set the Destination printer and the Source printer. Then select OK.
51
Page 52

• Change the printer name
When you select , a screen to change the printer name appears.
Follow the instructions on the screen to change the name.
Note
• The printer name entry has the following character limitation:
• Up to 128 characters
• Delete printers
When you select , the printer is deleted from the Canon Inkjet Cloud Printing Center.
When transferring the ownership of the printer, select Clear the information saved on the printer.
• Add printers
Select this to add printers to be used in the Canon Inkjet Cloud Printing Center.
You need a Printer registration ID to add a printer.
Note
• Up to 16 printers are guaranteed to operate for each e-mail address.
Manage users screen
From the Manage users screen, you can check user information registered to the Canon Inkjet Cloud
Printing Center, delete users, add users, and change the Administrator and Standard user settings.
52
Page 53

• User deletion
Select the check box of the user to be deleted, and select Delete.
However, you cannot delete yourself. To delete yourself, cancel your membership from the user
information screen.
• Adding a user
Select Add user. The user registration screen appears.
• Changing Administrator and Standard user settings
You can change the privileges of the Administrator and Standard users.
(2) Printer name area
The registered name of the printer selected is displayed.
The Administrator can change the printer name.
(3) Right context menu
When you select , the context menu appears.
The information displayed depends on the menu currently selected in the menu area.
The symbol indicates that there is a new unread notice.
• Sort
This displays the screen to sort registered apps.
You can use the buttons to change the display order of apps. When you finish sorting,
press the Done button to confirm the order.
53
Page 54

• Latest notices*
This displays the latest notices. The symbol indicates that there is a new unread notice.
• User information*
This displays the User information screen.
You can change the registered e-mail address, password, language, time zone, and other settings.
• Help/legal notices*
The description of the Canon Inkjet Cloud Printing Center screen and various reminders are
displayed.
• Log out*
This opens the Log out screen of the Canon Inkjet Cloud Printing Center.
(4) Display area
The display changes based on the menu you select.
54
Page 55

(5) Menu area
The following 4 menu buttons are displayed:
• Apps*
This displays the list of registered apps in the Display area.
• Config
This displays the Register apps screen in the Display area.
The display can be toggled between Registered and Search apps.
The Registered screen lists registered apps.
You can check the information of these apps or deregister them.
55
Page 56

On the Search apps screen, the apps that you can register by using the Canon Inkjet Cloud
Printing Center are displayed by category.
◦ When you select , the details of the app are displayed.
When you select / , you can choose to register or unregister the app.
Note
• Description of displayed icons
: Cannot be used because it is not yet released, not available in your region, or does
not support your model.
: Can be used with genuine Canon ink.
56
Page 57

• Properties*
This screen displays the status of the printer that is currently selected.
You can check how much ink is remaining or details about an error that occurred. You can also
access the ink purchasing site and the Online Manual.
Important
• The Properties displayed may differ from the actual status at the display time, depending on
the printer status.
• Manage jobs*
This screen displays the print status and the print history.
You can check the print status by looking at Status list, and the print history by looking at History.
You can also cancel print jobs and delete history information.
To cancel or delete a job, select that job and then select Cancel or Delete.
If you are using a PC
(1) Mng. printer (Select printer) button
(2) Manage users button
(3) Printer name area
(4) Menu area
(5) Notices area
(6) Information area
(7) Global navigation area
57
Page 58

(8) Display area
(1) Mng. printer (Select printer) button
When you select the Mng. printer (Select printer) button, the Mng. printer (Select printer) screen
appears.
From the Mng. printer screen (Select printer screen), you can check*and update* printer information
registered to the Canon Inkjet Cloud Printing Center, change printer names, delete printers, add
printers, and copy apps.
• Check the printer information*
The registered printer name is displayed.
indicates the currently selected printer.
indicates that an error occurred on the printer.
• Display update date/time of the printer information*
This displays the date and time the printer information was last updated.
refreshes the information.
58
Page 59

• Multiuser mode
If multiple users are using the printer, select the Multiuser mode check box.
• Change the printer name
When you select , a screen to change the printer name appears.
Follow the instructions on the screen to change the name.
Note
• The printer name entry has the following character limitation:
• Up to 128 characters
• Delete printers
When you select , the printer is deleted from the Canon Inkjet Cloud Printing Center.
When transferring the ownership of the printer, select Clear the information saved on the printer.
• Add printers
Select this to add printers to be used in the Canon Inkjet Cloud Printing Center.
You need a Printer registration ID to add a printer.
Note
• Up to 16 printers are guaranteed to operate for each e-mail address.
• Copy apps
Select this to copy apps added in the selected printer to another printer.
When you select , the screen shown below appears.
Set the Destination printer and the Source printer. Then select OK.
59
Page 60

(2) Manage users button
When you select the Manage users button, the Manage users screen appears.
From the Manage users screen, you can check user information registered to the Canon Inkjet Cloud
Printing Center, delete users, add users, and change the Administrator and Standard user settings.
• User deletion
Select the check box of the user to be deleted, and select Delete.
However, you cannot delete yourself. To delete yourself, cancel your membership from the user
information screen.
• Adding a user
Select Add user. The user registration screen appears.
• Changing Administrator and Standard user settings
You can change the privileges of the Administrator and Standard users.
(3) Printer name area
The registered name of the printer selected is displayed.
The Administrator can use the Mng. printer functions to change the printer name.
(4) Menu area
The following 4 menu buttons are displayed:
• Sort (Apps)
This displays the list of registered apps in the Display area.
Drag the app to change the order.
60
Page 61

When you finish sorting, press the Set sort order button and confirm the order.
• Config
This displays the Register apps screen in the Display area.
The display can be toggled between Registered and Search apps.
The Registered screen lists registered apps.
You can check the information of these apps or deregister them.
On the Search apps screen, the apps that you can register by using the Canon Inkjet Cloud
Printing Center are displayed by category.
61
Page 62

◦ When you select , the details of the app are displayed.
When you select / , you can choose to register or unregister the app.
Note
• Description of displayed icons
: Cannot be used because it is not yet released, not available in your region, or does
not support your model.
: Can be used with genuine Canon ink.
• Properties*
This screen displays the status of the printer that is currently selected.
You can check how much ink is remaining or details about an error that occurred. You can also
access the ink purchasing site and the Online Manual.
Important
• The Properties displayed may differ from the actual status at the display time, depending on
the printer status.
• Manage jobs*
This screen displays the print status and the print history.
You can check the print status by looking at Status list, and the print history by looking at History.
You can also cancel print jobs and delete history information.
To cancel or delete a job, select that job and then select Cancel or Delete.
62
Page 63

(5) Notices area
This displays the latest notice. Nothing is displayed in this area if there is no notice.
When you select Notice list, you can display up to 40 items.
(6) Information area
This display other information, including the privacy statement and other companies' licensing
information.
(7) Global navigation area
The User information*, Instructions*, and Log out* buttons are displayed.
Press the User information to change the settings.
(8) Display area
The display changes based on the menu you select.
63
Page 64

64
Page 65

Using Canon Inkjet Cloud Printing Center
When the user registration is completed, you can log in to the Canon Inkjet Cloud Printing Center and use
the service.
1. From your PC, smartphone, or tablet, access the service login URL (http://cs.c-ij.com/)
On the Login screen, enter the E-mail address and Password, and then select Log in
2.
Important
The e-mail address and password are case-sensitive. Make sure the case is correct.
•
E-mail address
Enter the e-mail address that you entered in the user registration.
Password
Enter the password that you entered in the user registration.
Keep login info
When you select the check box, the login screen is skipped for 14 days since the last day that the
service screen was accessed.
Important
• If you fail to log in five straight times, you will not be able to login again for an hour.
• You remain logged in for an hour after the last access.
• The service may not function properly if you log in from multiple devices at the same time.
After logging in, you can use useful services such as adding/managing apps that work in conjunction with
this product's cloud functionality and checking the ink status.
For screen descriptions and operation instructions, see "Canon Inkjet Cloud Printing Center window".
Printing procedure
This section introduces the photo printing procedure by using CANON iMAGE GATEWAY as an example.
65
Page 66

Important
• The available functions differ depending on the app.
• The printing procedure differs depending on the app.
• You need to get the account and register photo and other data beforehand.
• The following file formats can be printed: jpg, jpeg, pdf, docx, doc, xlsx, xls, pptx, ppt, and rtf.
The file formats that can be printed differ depending on the app.
• Before you print, check that printer is on and is connected to the network. Then start.
• This is available if you are using a smartphone or tablet.
Note
• You can use CANON iMAGE GATEWAY to print jpg and jpeg file formats.
1.
On the Main screen, select the app to be used
2.
Enter the information according to the instructions on the authentication screen, and then
select Log in
In the displayed album list, select the album of your choice
3.
66
Page 67

4.
In the displayed image list, select the image that you want to print, and then select Next
5. Make the necessary print settings, and then select Print
67
Page 68

6.
A print job completion message appears, and printing starts
To end the printing, select Apps and return to the Apps list screen.
To continue printing, select Continue and repeat the procedure from step 3.
Important
• If a print job is not printed within 24 hours after the print job is issued, the print job will expire and
cannot be printed.
• With premium apps that limit the number of print jobs, print jobs that expire and cannot be printed are
also included in the print count.
Adding a Printer
68
Page 69

Adding a Printer
With one account, you can use the Canon Inkjet Cloud Printing Center services on multiple printers.
The procedure for adding a printer is as follows:
1. Print the registration information from the printer to be added
From the browser on your smartphone, tablet, or computer, access the authentication site
2.
URL
3.
Select Add printer
4. When the confirmation message is displayed, select OK
5. Enter your Printer registration ID, and select OK
69
Page 70

Note
• When you access the service from Remote UI, the Printer registration ID is entered
automatically.
Printer addition is completed.
Adding a MAXIFY Cloud Link User
70
Page 71

Adding a MAXIFY Cloud Link User
Several people can use one printer.
This section describes the user addition procedure and the user privileges.
Adding a user
On the service screen, select Manage users
1.
2.
Select Add user
Note
•
When you select Add user, the service first checks whether the maximum number of users has
been reached. If new users can be added, the user registration screen appears.
•
The maximum number of users that can be added for 1 printer is 20.
71
Page 72

3. Enter the e-mail address of the user to be added, and then select OK
The URL for completing the registration is then sent to the entered e-mail address.
4. Access the URL reported in the e-mail
5. Read the terms displayed in the License agreement and Privacy statement screens. If
you agree to the terms, select Agree.
In the user information entry screen, enter your Password, and select Next
6.
72
Page 73

Enter your password for logging in to the Canon Inkjet Cloud Printing Center.
Important
• There are character restrictions for the password, as shown below.
• The password needs to be between 8 and 32 characters long, using single-byte
alphanumeric characters and symbols (!"#$%&'()*+,-./:;<=>?@[\]^_`{|}~). (Alphabets are
case-sensitive)
7.
Enter the User Name
Enter the name that identifies the user.
Important
•
The User Name entry field has the following character restrictions:
73
Page 74

• The user name needs to be between 1 and 20 characters long, using single-byte
alphanumeric characters and symbols (!"#$%&'()*+,-./:;<=>?@[\]^_`{|}~). (Alphabets are
case-sensitive)
8. Set Time zone and select Next
Select your region on the list. If you cannot find your region on the list, select the one closest to your
region.
Apply daylight saving time
This appears only when there is a daylight saving time in the time zone that you selected.
Select whether or not to apply the daylight saving time.
9.
Enter the Security code and select Done
Enter the code for authenticating the user.
74
Page 75

Important
• The Security code entry field has the following character restrictions:
•
Single-byte numbers
The main registration is complete, and a registration completion e-mail is sent.
Note
• A cookie for the selected user is added to the printer, and the login status of each user is recovered.
Cookies for up to 8 users can be registered to 1 printer.
Printer user privileges
If several users are using the cloud service for 1 printer, each user is categorized as the Administrator or
a Standard user.
Note
• The user who is registered first becomes the Administrator. The administrator can change the
privileges of users from the Manage users screen.
An Administrator can change printer information, add and delete apps, manage users, and perform
various other operations.
A Standard user can check printer information and start apps.
For information about the functions that each user can use, refer to the "Canon Inkjet Cloud Printing
Center window".
If you are using MAXIFY Cloud Link from the printer, select Multiuser mode in the Mng. printer screen to
set the printer to Multiuser mode. Each user can then start an app and print documents.
Troubleshooting Canon Inkjet Cloud Printing Center
75
Page 76

Troubleshooting Canon Inkjet Cloud Printing Center
If an app cannot be installed
If the registered app is not in the Apps list
If the information is not updated when you press the Update button
If you do not receive the registration e-mail
If you cannot print
Printing starts on its own even if you do not do anything
If you are unable to log in correctly even after entering the correct password in iOS or Mac
If an app cannot be installed
Check the country or region where the printer was purchased.
If the printer is taken outside the country or region where it was purchased, apps cannot be installed.
If the registered app is not in the Apps list
Check the display language of Canon Inkjet Cloud Printing Center.
If the display language is switched to a language that does not support an app, the app will not be
displayed in the apps list but will continue to be registered.
If you switch back to the target language of the app, it will be displayed in the apps list and you will be
able to start, register, or unregister the app.
If the information is not updated when you press the Update button
Because the Properties screen requires network connection with this product, the information may not be
reflected immediately. Please wait awhile, and then try updating the information again.
If the information is still not updated, then check that the product is connected to the Internet.
If you do not receive the registration e-mail
You may have entered a different e-mail address during the user registration of Canon Inkjet Cloud
Printing Center.
On the printer operation panel, select the Setup button, and then select Web service setup ->
Connection setup -> IJCloudPrintingCtr -> Delete from service to delete the service registration.
After resetting the printer, repeat the user registration of Canon Inkjet Cloud Printing Center from the
beginning.
If you cannot print
Check the following if you cannot print.
• Check that the printer is connected to the Internet.
• Check that the printer is connected to a LAN and the LAN environment is connected to the Internet.
• Check that no error message is displayed on the printer's LCD monitor.
• If printing does not start even after you wait awhile, go to the printer operation panel, select
Setup, and run Web service inquiry. If printing does not start, run the inquiry several times.
76
Page 77

If the problem is not resolved, use the printer driver from your computer to perform the print job and check
whether the data can be printed normally on the printer.
If you still cannot print, see the troubleshooting page for your model on the Home of the Online Manual.
Note
• With a wireless LAN connection, after the printer is turned on, it may take several minutes before
communication is possible. Check that your printer is connected to the wireless network, and wait a
while before you start printing.
• If the printer is not turned on or is not connected to the Internet, and consequently a print job is not
processed within 24 hours after it was submitted, the print job is automatically canceled. If this
happens, check the printer power and the Internet connection, and then re-submit the print job.
Printing starts on its own even if you do not do anything
A third party may be able to illegally use the Canon Inkjet Cloud Printing Center services.
On the printer operation panel, select the Setup button, and then select Web service setup ->
Connection setup -> IJCloudPrintingCtr -> Delete from service to delete the service registration.
After resetting the printer, repeat the user registration of Canon Inkjet Cloud Printing Center from the
beginning.
If you are unable to log in correctly even after entering the correct
password in iOS or Mac
If you are using iOS or Mac, and the password contains the ¥ symbol, enter a backslash instead. For
instructions on entering a backslash, see the OS help.
77
Page 78

What is a Security code?
A Security code identifies the user when multiple other users are sharing the same printer.
Important
• If you do not set a Security code, another user may use your account.
• This code is valid only when you use MAXIFY Cloud Link from the printer operation panel. You cannot
use this code when you access the Canon Inkjet Cloud Printing Center from your smartphone, tablet, or
computer.
78
Page 79

Printing with Google Cloud Print
The printer is compatible with Google Cloud Print™ (Google Cloud Print is a service provided by Google
Inc.).
By using Google Cloud Print, you can print from anywhere with applications or services supporting Google
Cloud Print.
1.
Preparations for Printing with Google Cloud Print
2.
Printing from Computer or Smartphone with Google Cloud Print
Important
• LAN connection with the printer and Internet connection are required to register the printer and to print
with Google Cloud Print. Internet connection fees apply.
• This function may not be available depending on the country or region you live in.
79
Page 80

Preparations for Printing with Google Cloud Print
To print with Google Cloud Print, you need to get Google account and register the printer with Google Cloud
Print in advance.
Getting Google Account
If you already have Google account, register the printer.
Registering the Printer with Google Cloud Print
Getting Google Account
First, get your Google account in order to register the printer with Google Cloud Print.
Access to Google Cloud Print with the web browser on the computer or the mobile device, then register
the required information.
* The screen above may change without prior notice.
Registering the Printer with Google Cloud Print
Register the printer with Google Cloud Print.
If the firmware version is Ver. 2.010 or later, registration is possible from Google Chrome on your
computer, smartphone, or tablet device.
Registration Using Google Chrome
For earlier versions, register the information from the printer.
Registration from the Printer
Important
• For instructions on checking the firmware version and updating the firmware, refer to "Firmware
Update".
• After you update the firmware, you must re-register the printer even if it was already registered.
80
Page 81

• When you register a printer, the printer must be connected to the LAN and the LAN environment
must be connected to the Internet. Note that the customer is responsible for all Internet connection
fees.
• When the printer owner changes, delete the printer registration from Google Cloud Print.
Registration Using Google Chrome
Start the Google Chrome browser on your computer, smartphone, or tablet device.
1.
Then from (Chrome menu), select Sign in to Chrome..., and log in to your Google
account
2.
From (Chrome menu), select Settings
3.
Click Show advanced settings... to display the information. Then for Google Cloud
Print, select Manage
4.
Select Add printers for the printer to be added
5.
When the confirmation message for registering the printer appears, select OK
Printer registration is complete.
Registration from the Printer
The authentication procedure using the web browser on the computer or the mobile device is required
in the process of registering. Because the authentication URL is printed from printer when the
authentication process is performed, prepare A4 or Letter-sized plain paper.
1.
Make sure that the printer is turned on
2.
From the operation panel, select the Setup button.
3. Select Web service setup -> Connection setup -> GoogleCloudPrint -> Register w/
service
Note
•
If you have already registered the printer with Google Cloud Print, the confirmation message
to re-register the printer is displayed.
4. When the confirmation screen to register the printer is displayed, select Yes
5. Select a display language on the print setting screen of Google Cloud Print
The confirmation message to print the authentication URL is displayed.
6.
Load A4 or Letter-sized plain paper, then select OK
81
Page 82

The authentication URL is printed.
7. Ensure that the authentication URL is printed, select Yes
8. Perform the authentication process using the web browser on the computer or the
mobile device
Access to the URL using the web browser on the computer or the mobile device and perform the
authentication process following the on-screen instructions.
Note
Perform the authentication process with your Google account which you have gotten in
•
advance.
When the message that the registration is complete is displayed on the LCD of the
9.
printer, select OK
When authentication process is complete properly, the registration items are displayed. When
authentication process is complete,
When authentication process is not complete properly and the error message is displayed, select
OK. When the confirmation message to print the authentication URL is displayed, print the
authentication URL, then perform the authentication process on the computer again.
you can print the data with Google Cloud Print.
Deleting the Printer from Google Cloud Print
To change the printer owner or to re-register the printer, first delete the printer from Google Cloud Print by
using the respective procedure.
Deletion from Google Chrome
Deletion from the Printer
Deletion from Google Chrome
1.
Start the Google Chrome browser on your computer, smartphone, or tablet device.
Then from (Chrome menu), select Sign in to Chrome..., and log in to your Google
account
2. From (Chrome menu), select Settings
3.
Click Show advanced settings... to display the information. Then for Google Cloud
Print, select Manage
4. Select Delete for the printer to be deleted
5. When the confirmation message for deleting the printer appears, select OK
82
Page 83

Deletion from the Printer
1. Make sure that the printer is turned on
2. From the operation panel, select the Setup button.
Select Web service setup -> Connection setup -> GoogleCloudPrint -> Delete from
3.
service
When the confirmation screen to delete the printer is displayed, select Yes
4.
83
Page 84

Printing from Computer or Smartphone with Google Cloud Print
When you send print data with Google Cloud Print, the printer receives the print data and prints it
automatically if the printer is turned on.
When printing from a smartphone, tablet, computer, or other external device by using Google Cloud Print,
load paper into the printer in advance.
Sending the Print Data with Google Cloud Print
1.
Make sure that the printer is turned on
Note
If you want to send the print data from an outside location, turn on the printer in advance.
•
2.
Send print data from your smartphone, tablet, or computer
The figure below is an example of when printing from the web browser corresponding with Google
Cloud Print. The screen differs depending on the applications or services supporting Google Cloud
Print.
When the preparation for printing with Google Cloud Print is complete and when the printer is turned
on, the printer receives the print data and prints it automatically.
Note
• If the firmware version is Ver. 2.010 or later, you can select which printer to use.
For the printing method, you can also select using the local network or using the cloud.
• Depending on the communication status, it may take a while to print the print data or the printer may
not receive the print data.
• While printing with Google Cloud Print, the printing may be canceled depending on the printer's
status, such as when the printer is being operated or an error has occurred. To resume printing,
check the printer's status, then print with Google Cloud Print again.
• For print settings:
• If you select the media type other than plain paper or if you select the paper size other than A4/
Letter/B5/A5-size, the print data is printed in single-sided even when you select the duplex print
setting. (* The paper size differs depending on the model of your printer. For information about
84
Page 85

the supported paper sizes, go to the Online Manual home page, and refer to the "Cannot Print
Properly with Automatic Duplex Printing" for your model.)
• If you select plain paper as media type or if you select B5/A5-size as paper size, the print data is
printed with border even when you select the borderless print setting.
• The print results may differ from the print image depending on the print data.
• Depending on the device sending the print data, you may not select the print settings when
sending the print data with Google Cloud Print.
When you want to print from Google Cloud Print immediately
When the printer cannot receive the print data, or you want to start printing immediately, you can check
whether there is a print job on the Google Cloud Print and start printing manually.
Follow the steps below.
Important
• Depending on your printer model, this function may not be available.
1.
Make sure that the printer is turned on
2.
From the operation panel, select the Setup button.
3.
Select Web service inquiry
Note
• If you have not registered the printer with Google Cloud Print, Web service inquiry is not
displayed.
Register the printer with Google Cloud Print.
4.
Select GoogleCloudPrint
5.
Press the OK button
Connect to the server. If print data is available, print that data.
85
Page 86

Printing from AirPrint Compliant Device
This document explains how to use AirPrint to print wirelessly from your iPad, iPhone and iPod touch to a
Canon printer.
AirPrint enables you to print photos, email, Web pages and documents from your Apple device directly to
your printer without installing a driver.
Checking Your Environment
First, check your environment.
• AirPrint Operation Environment
To use AirPrint, you will need one of the following Apple devices running the latest version of iOS:
◦ iPad (all models)
◦ iPhone (3GS or later)
◦ iPod touch (3rd generation or later)
• Network Environment
The Apple device (iPad, iPhone, or iPod touch) and this printer must be connected to the same Wi-Fi
network or connected in AP mode.
Note
• If your iPad, iPhone or iPod touch is running the latest version of iOS, you do not need to download
and install any drivers or additional software.
Printing with AirPrint
1. Check that this printer is turned on and the Apple device and this printer is connected to
the LAN or connected in AP mode.
2.
From the app of your Apple device, tap the operation icon to display the menu options.
86
Page 87

3.
From the menu options, tap Print.
4. From Printer Options, select the model that you are using.
Important
•
Because some app does not support AirPrint, Printer Options may not be displayed. If an app
does not let you use printer options, you cannot print from that app.
Note
•
The Printer Options differ depending on the app and model you are using.
87
Page 88

5. When printing a file type that has multiple pages, such as a PDF file, click Range and
then click All Pages or select the range of pages to be printed.
6. For 1 Copy, click + or - to set the number of required copies.
7. For Duplex Printing, click On to enable duplex printing or click Off to disable the
function.
8.
Tap the Print.
When you execute printing, the printer prints according to the specified settings.
Paper Size
With AirPrint, the paper size is selected automatically according to the app being used on the Apple
device and the region in which AirPrint is used.
When Apple's photo app is used, the default paper size is L size in Japan, and 4"x6" or KG in other
countries and regions.
When documents are printed from Apple's Safari app, the default paper size is letter size in the U.S.
region, and A4 in Japan and Europe.
Important
• Your app may support different paper sizes.
Checking the Print Status
During printing, a Print Center icon is displayed in the list of recently used apps, and you can use it to
check the print progress.
Press the Home button on the Apple device twice to set the Multitasking mode. Then swipe to the right to
display the Print Center icon and a Print Summary.
88
Page 89

Deleting a Print Job
To delete a print job with AirPrint, use one of the following two methods:
• From the printer: If your printer has a LCD monitor, use the operation panel to cancel the print job.
If you printer does not have a LCD monitor, press the Stop button on the printer to cancel the print
job.
• From an Apple device: Press the Home button on the Apple device twice to set the Multitasking
mode, and then swipe to the right. Tap the Print Center icon to display a Print Summary. Tap the
print job to be canceled, and then tap Cancel Printing.
AirPrint Troubleshooting
If the document does not print, check the following:
1. Check that the printer power is on. If the printer power is on, turn it off and then back on
again, and check whether the issue is resolved.
2. Check that the printer is connected by LAN to the same network subnet as the device on
which iOS is installed.
3. Check that the printer has enough paper and ink.
4. If your printer has a LCD monitor, check that no error message is displayed on the LCD
monitor.
If the problem persists, use the printer driver on your computer to execute printing and check whether
the document can be printed normally on the printer.
If the document cannot be printed, refer to the Online Manual for your model.
89
Page 90

Note
• After you turn on the printer, it may take few minutes before the printer can communicate through a
wireless LAN connection. Confirm that the printer is connected to the wireless LAN, and then try
printing.
• If Bonjour on the printer is disabled, AirPrint cannot be used. Check the LAN settings on the printer,
and enable Bonjour.
Note
• The windows used in the explanations may differ from those displayed by your Apple product or app.
90
Page 91

Checking Printer Information
You can use your smartphone, tablet, or computer to check the Printer status and execute utility functions
from apps such as Canon Inkjet Print Utility and MAXIFY Printing Solutions.
You can also use the convenient web services presented by Canon.
Selecting Printer Information in an Apps Screen
1.
Note
You can also enter IPv4 address directly in the web browser to display printer information.
•
Load one sheet of A4 size or Letter size plain paper
1.
On the printer operation panel, select the Setup button, and then select Device
2.
settings -> LAN settings -> Print LAN details
IP address printing starts.
From your computer, smartphone, or tablet device, open the Web browser, and enter the
3.
following URL:
http:// <Printer IP address>
For <Printer IP address>, enter the IP address that you checked in the previous procedure.
2.
Entering Username and Administrator's Password
From the authentication screen, enter the Username and Password.
Username: ADMIN
Password: See "About the Administrator Password."
Note
• The Username display may differ depending on your browser.
3.
Displaying Printer Information
The top screen for printer information is displayed.
91
Page 92

Printer status
This function displays printer information such as the remaining ink amount, the status, and detailed
error information.
You can also connect to the ink purchase site or support page, and use Web Services.
Utilities
This function allows you to set and execute the printer utility functions such as cleaning.
AirPrint settings
This function allows you to specify the Apple AirPrint settings, such as position information.
Google Cloud Print setup
This function allows you to register this printer to Google Cloud Print or delete the printer.
Print from E-mail setup
Allows you to register printers, check print addresses, and delete registered printers.
IJ Cloud Printing Center setup
Allows you to register to IJ Cloud Printing Center or to delete a registration.
Security
Allows you to set the Administrator's password and Operation restrictions for the machine.
Important
•
For the initial Password, see "About the Administrator Password."
For Security reasons, we recommend that you change the Password to an individual
password.
•
The following character restrictions apply to the password that you enter:
•
Set the password by using 0 to 32 characters.
•
The allowed characters are single-byte alphanumeric characters.
Records of use
Displays a record of your printer usage, such as the number of pages printed.
Firmware update
This function allows you to update the firmware and check version information.
92
Page 93

Manual (Online)
This function displays the Online Manual.
93
Page 94

How to Use Print from E-mail
By using Print from E-mail, you can easily print a photo or document saved on your smartphone, tablet, or
computer just by attaching it to an e-mail.
You can print simply from outside like a travel destination. Also, your family or friends can print by
registering beforehand.
You can use Print from E-mail on any Canon printer that supports the service.
Checking Your Environment
First, check your environment.
• Network environment
This product needs to be connected to a LAN with an Internet connection.
Important
• The user will bear the cost of Internet access.
• This function may not be available in some countries/regions.
• Depending on your printer model, this function may not be available.
Preparing to use Print from E-mail
To use Print from E-mail, you need to register the printer by entering information about the printer's
owner.
1. Print the printer registration page's URL and the PIN code
2. Access the URL and enter the owner's e-mail address and other required information
3. Check if an e-mail has been sent to the e-mail address you entered
94
Page 95

4. Access the URL provided in the e-mail and complete the printer registration process
Note
• The e-mail address that appears on the screen when you have finished registering is the e-mail
address that will be used just for the Print from E-mail function.
For details about the registration procedure, see here
Printing from Your Smartphone, Tablet, or Computer
Prepare a file that you want to print
1.
The file format, number of files, and file size that this printing function supports are provided below.
Supported File Formats
Adobe PDF files
•
JPEG files
•
.doc/.docx/.xls/.xlsx/.ppt/.pptx files
•
Important
Only files that are attached to e-mail can be printed. E-mail messages cannot be printed.
•
• Adobe PDF files and .doc/.docx/.xls/.xlsx/.ppt/.pptx files that are encrypted, passwordprotected, or set to print disabled cannot be printed.
• Files that are attached as compressed files cannot be printed.
• Files other than Adobe PDF files, JPEG files and .doc/.docx/.xls/.xlsx/.ppt/.pptx files cannot be
printed.
Supported Number of Files and File Sizes
• Up to 10 attachment files can be printed.
• The maximum size of an e-mail with attachment files is 10 MB.
Note
The size of an e-mail is determined based on the size of the entire transmission file, including
•
the e-mail message and the header. Therefore sometimes an attachment file cannot be printed
even if the size of the attachment file is less than 10 MB.
•
If the size of an attached JPEG file is less than 10 KB, the file cannot be printed.
2.
Attach the file that you want to print from your smartphone, tablet, or computer to the email and send it to the e-mail address for printing
To check the print address, on the printer operation panel, select the
select Web service setup -> Connection setup -> Print from E-mail setup -> Register w/ service.
Setup button, and then
Important
• You will not be able to use the service during periods when the service is undergoing
maintenance.
95
Page 96

Use the Service With More Than One Person
To allow multiple users to use this function, register users (other than the printer's owner) as members.
1. The printer's owner uses his/her smartphone, tablet, or computer to access the service's
login URL (https://pr.mp.c-ij.com/po) and logs in
Select the printer name that you want to add the member. Click Member Settings ->
2.
Add to enter the member's e-mail address, and click Add
A URL of the member registration page is sent to the e-mail address of the newly registered member.
Registered member accesses to the URL that is included in the e-mail, and complete the
3.
registration
You can use this service from registered e-mail address.
Note
• You can register up to 500 members.
Print from E-mail Troubleshooting
The Document Does Not Print
If You Cannot Register to the Service or Delete the Service
If You Cannot Print after the Printer Is Repaired
The Document Does Not Print
If the document does not print, check the following:
• Check that the printer power is on.
If the printer power is on, turn it off and then back on again, and check whether the issue is resolved.
• Check that the printer is connected to the network.
• Check that the printer is connected to a LAN and the LAN has an Internet connection.
• Look at the printer LCD monitor and check that no error message is displayed.
If the problem persists, use the printer driver on your computer to execute printing and check whether
the document can be printed normally on the printer.
If the document cannot be printed, refer to the Online Manual for your printer.
• Check that the file attached to the e-mail is an Adobe PDF file, a JPEG file, or
a .doc/.docx/.xls/.xlsx/.ppt/.pptx file.
• Check whether the e-mail address of the send destination is correct.
To check the print address, on the printer operation panel, select the Setup button, and then
select Web service setup -> Connection setup -> Print from E-mail setup -> Register w/ service.
• Check that the user's e-mail address for using this service is registered.
If you want to check the error details, the printer owner have to access the login URL (https://pr.mp.cij.com/po).
• In the Print Status screen, click Go to Print History Screen and check the history of jobs that were
sent. You can check the error details.
96
Page 97

If you want to check the error details, the printer owner have to access the login URL (https://pr.mp.cij.com/po).
Note
• For a wireless LAN connection, after the printer is turned on, it may take a few minutes before
communication becomes possible. Confirm that your printer is connected to the wireless LAN, and
then try printing.
If You Cannot Register to the Service or Delete the Service
If You Cannot Register to the Service
• If the printer operation panel display the message "Failed to register with "Print from E-mail".",
the registration to Print from E-mail may not have been completed in time. Select OK to release
the error, and start over again from the beginning.
• Check that the firmware version of the printer has been updated.
If You Do Not Receive the URL to Complete the Registration by E-mail
• An incorrect e-mail address may have been entered. Wait about 30 minutes, and operate the printer
operation panel to print the printer registration URL and PIN code. Then re-register from the
beginning.
If You Cannot Delete the Service
• If the printer operation panel display the message "Failed to connect to "Print from E-mail". Only
the information on the printer was deleted." is displayed, it could be that the registration
information on the service could not be deleted even though the Print from E-mail information
stored on this printer was deleted.
Select OK to release the error, and then access the service's login URL (https://pr.mp.c-ij.com/po)
to delete the registration information.
• If the Print from E-mail information stored on this printer could not be deleted even though the
registration information on the service was deleted, on the printer operation panel, select the
Setup button, and then select Web service setup -> Connection setup -> Print from E-mail
setup -> Delete from service, and delete the registration information.
If You Cannot Print after the Printer Is Repaired
Re-registering the printer and the printer owner
• When the printer is repaired, all of the registered information is deleted and Print from E-mail can no
longer be used.
If you want to use this service again, you must re-register the printer and the printer owner.
For information about the re-registration procedure, see "Preparing to Use Print from E-mail".
Even if users other than the owner were registered as members, repeat the registration starting from
here.
97
Page 98

Preparing to Use Print from E-mail
To use this service to print a photo or document, you need to follow the procedure provided below and
register the printer.
Print the Printer Registration Page's URL and the PIN Code
First, print the printer registration page's URL and the PIN code.
Check that there is sufficient amount of ink in the printer, and then print using the printer's operation panel.
1.
Check that the printer is connected to the network
Important
This product needs to be connected to a LAN with an Internet connection.
•
2.
On the printer operation panel, select the Setup button, and then select Web
service setup -> Connection setup -> Print from E-mail setup -> Register w/ service.
3.
Follow the instructions on the screen and print the printer registration URL and PIN code
Important
• Do not turn off the power on the printer until the registration process is completed.
Access the printed URL and log in within 25 minutes.
If you canceled the registration before it is completed, repeat the procedure from printing the
•
registration information.
Access the Printed URL and Enter the Owner's E-mail Address and Other
Required Information
Next, enter the owner's e-mail address and other required information.
1.
Access the printed URL by using the browser on your smartphone, tablet, or computer,
and select Log In
2. In the use agreement window, select Agree
Important
•
If you do not select Agree in the use agreement window, you will not able to register as the
printer owner.
3. Enter the printer owner's e-mail address, and select Next
Important
•
An e-mail is sent with the required information for completing the registration to the e-mail
address entered for the printer's owner.
98
Page 99

• If domain-specific reception is set, change the setting so that mail can be received from
"info@mp.c-ij.com"
Note
• The e-mail address of the printer owner cannot be changed once the printer owner is
registered.
To change the e-mail address, delete the registration of the registered printer, and re-register
the printer owner by using the new e-mail address. In this case, all previously registered
information will be deleted.
The notification is sent automatically to the registered e-mail address when the printing or
•
service maintenance starts.
4.
In the Printer Owner Registration window, enter the information shown below, and click
Next
User Name
Enter any name.
The name that you enter is displayed at login.
Important
• The maximum number of characters that can be entered is 30.
Language
Select the language that you are using.
The language that you select is used in notification e-mails such as print start notices.
Time Zone
Refer to this section, and select the standard time of the city that is nearest to the region where you
live.
Date/Time Display Format
Select the format of your choice.
The format that you select is applied to the date/time information in the screens and notification emails of this service.
Daylight Saving Time
This setting is combined with the Time Zone setting, and applied to the date/time information in the
screens and notification e-mails of this service.
When you select ON, 1 hour is added to the Time Zone setting when the date/time information is
displayed.
5. In the Printer Registration window, enter the Printer Name, and select Confirm
Enter any name that will allow you to identify the printer.
Important
•
The maximum number of characters that can be entered is 30.
99
Page 100

6. In the Confirm Owner Registration window, check the registration information, and
select Register
A temporary password will be displayed.
Important
• The temporary password that appears is not included in the notification e-mail. Be sure to write
down the temporary password before closing the screen.
Check if an E-mail Has Been Sent to the E-mail Address You Entered
A URL is notified to complete the registration to the e-mail address that for the registered printer's owner.
Access the URL in the E-mail and Complete the Printer Registration
1.
Access the URL provided in the e-mail
Important
• You have to complete the registration within 30 minutes.
2.
Enter the registered e-mail address of the printer's owner, the temporary password, and
select Log In
3.
Set a password of your choice, and select Register
When the password setting process is completed, the printer's e-mail address and the service's URL
are displayed, and the printer's registration process is completed.
Important
• When you enter the password, the following character restrictions apply.
• Set a password that has 8 or more characters.
• The characters that you can use are single-byte uppercase letters, single-byte lowercase
letters, and single-byte numbers.
•
In the password, combine all of the different types of characters that can be used.
•
The displayed printer's e-mail address and the URL of the login page are not sent. Be sure to
write down the printer's e-mail address and the URL of the login page before closing the screen.
100
 Loading...