

Page 1
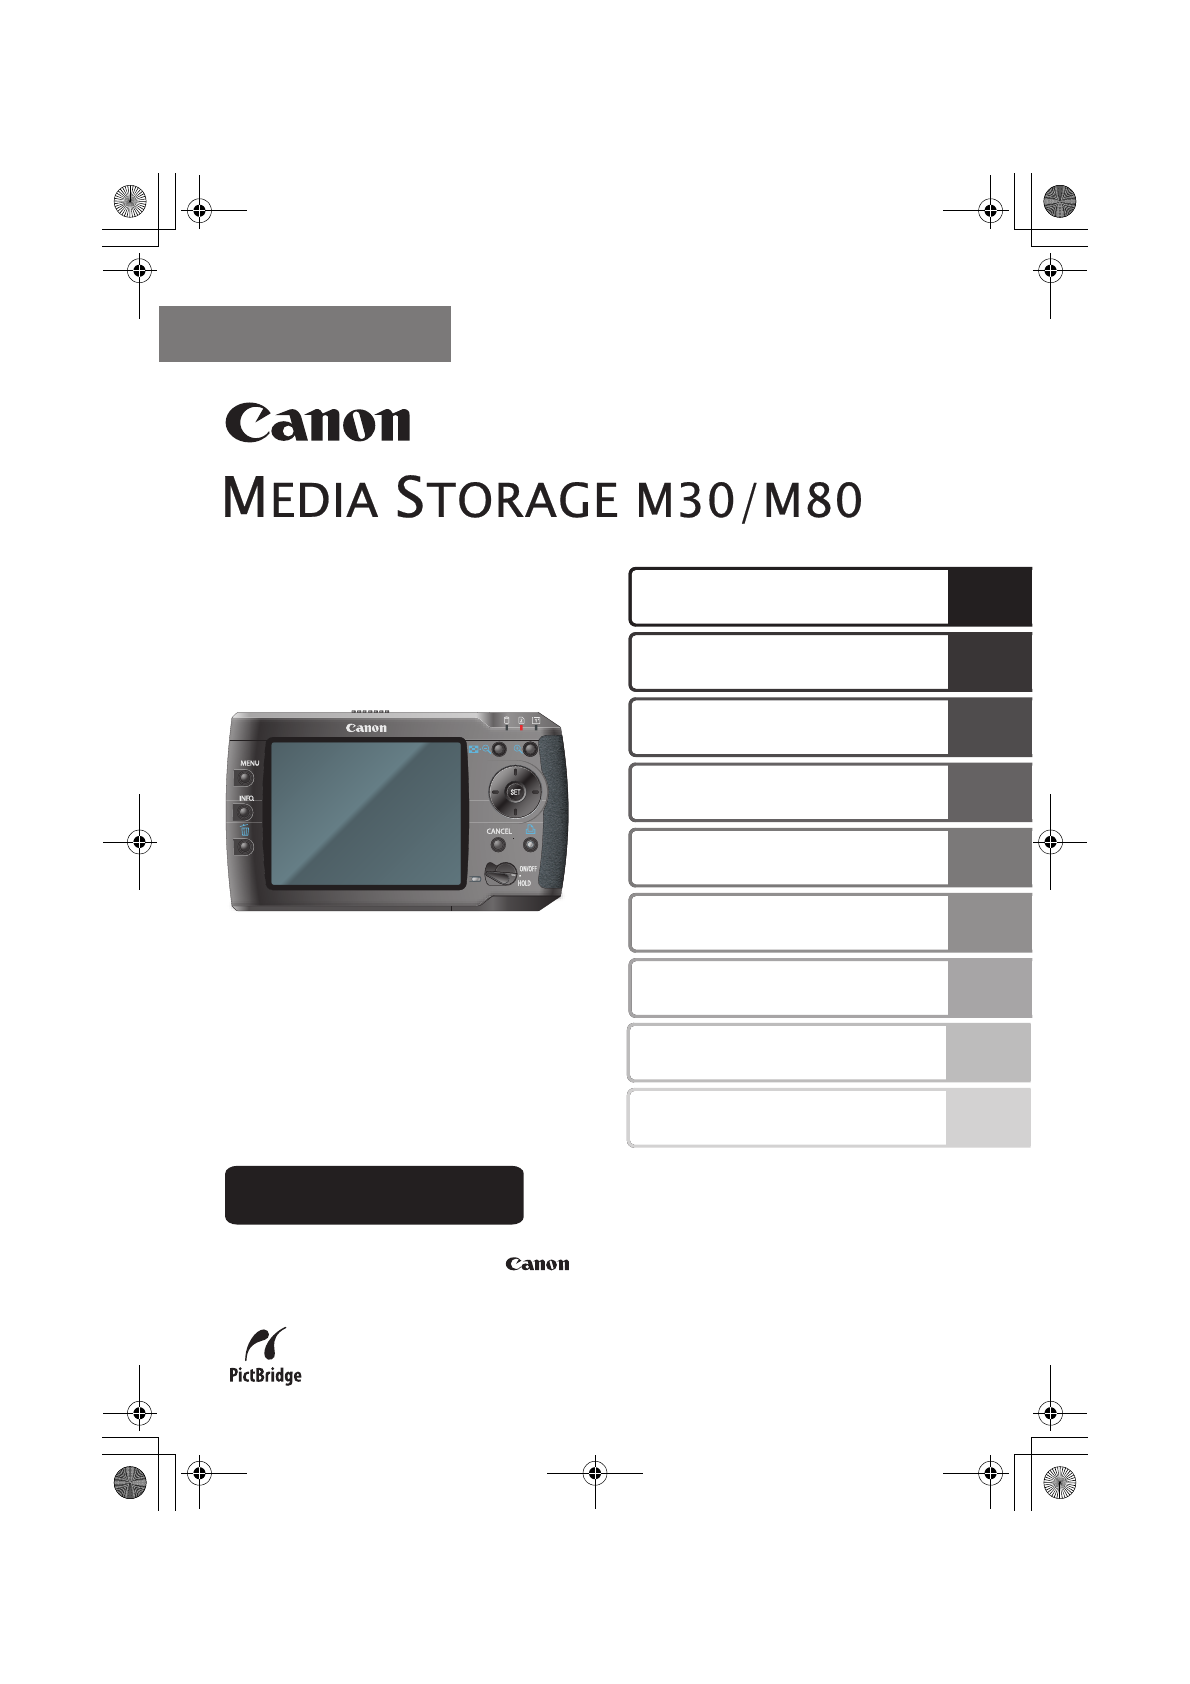
User Guide
ENGLISH
E-IE-373
Advanced
Thank you for purchasing our MEDIA STORAGE.
Read this guide carefully and use the MEDIA STORAGE M30/M80 correctly.
Preparation for Use
Backing up Files
Playing Back Images
Listening to Music
Watching a Movie
Configuring Various Settings
Organizing and Managing Files
Printing Images
Appendix
cover.fm Page 1 Monday, February 26, 2007 2:26 PM
Page 2
1
● Safety Precautions●
● Before using this product, please carefully read the instructions in
this guide to learn how to use it correctly.
● After you read this guide, keep it handy for reference.
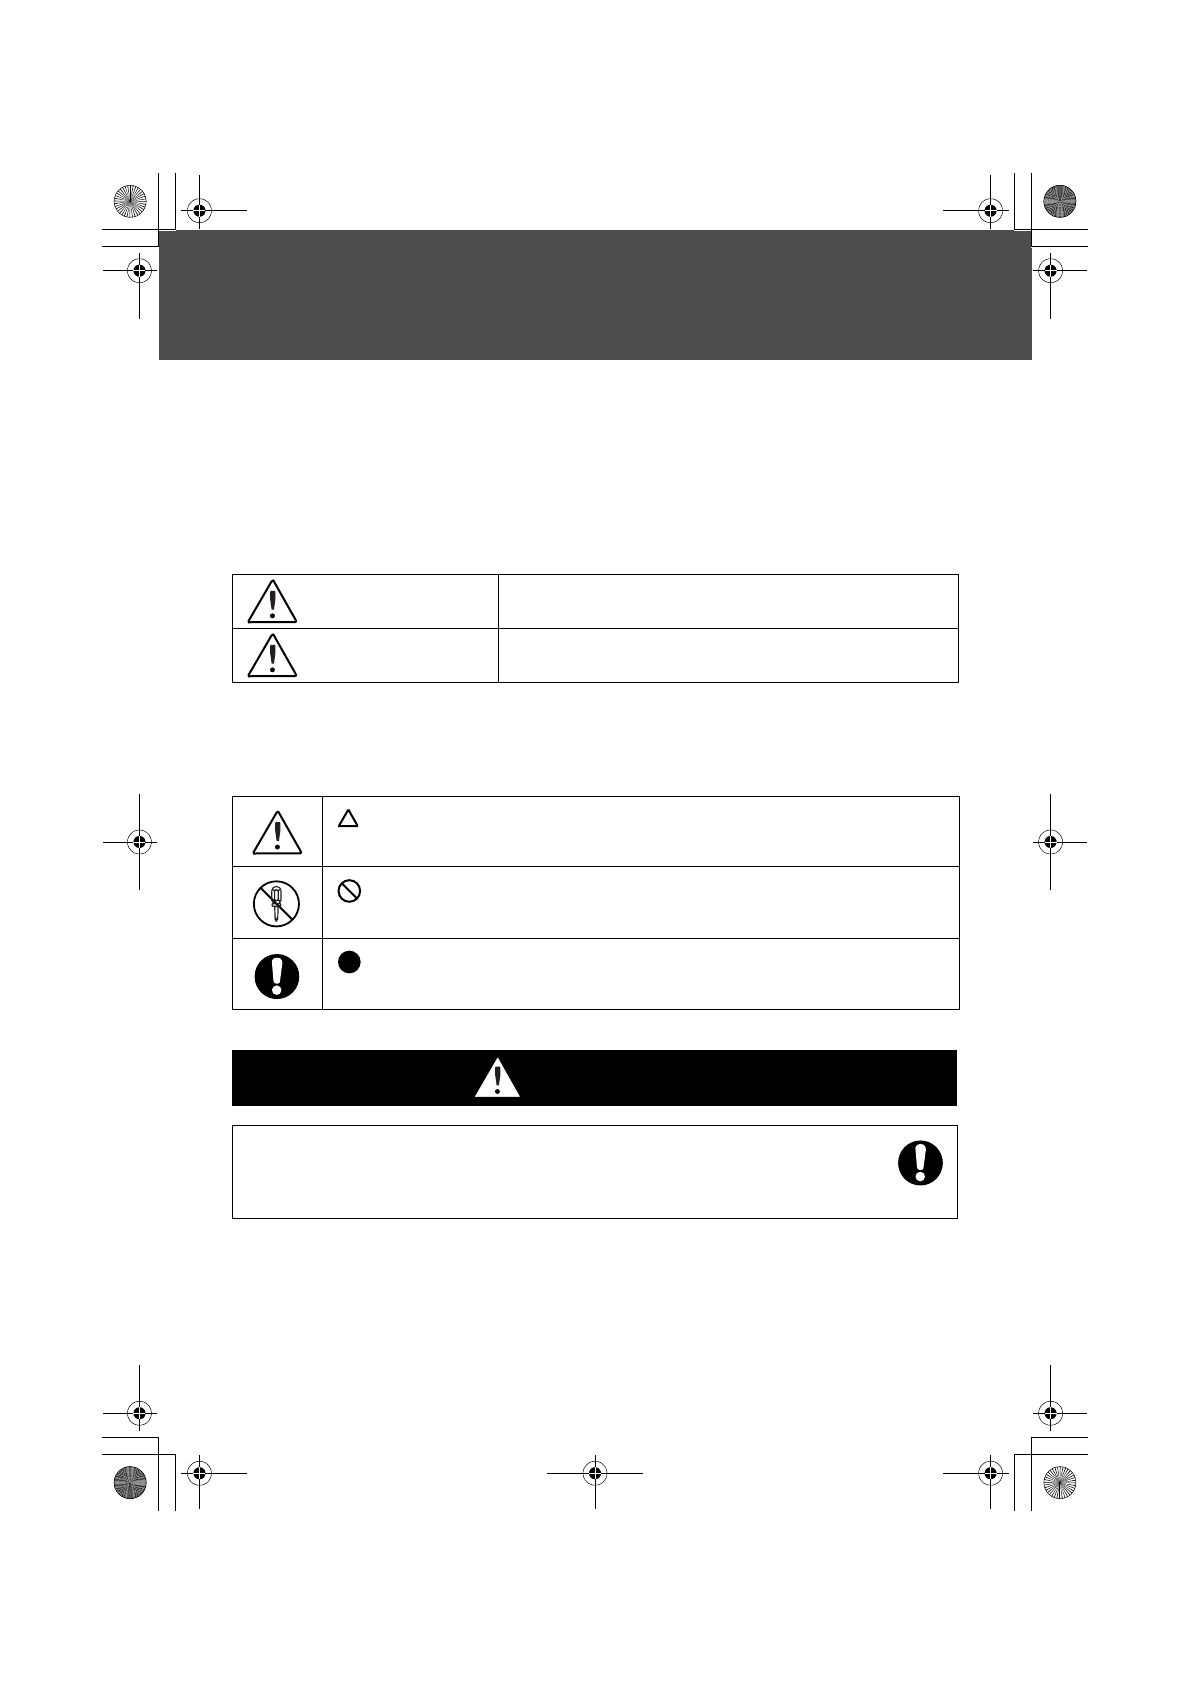
■ This guide uses the following symbols to classify and explain the dangers
and problems that may result from improper use of the product.
■ This guide uses the following symbols to categorize instructions to be
observed.
Warnings
Indicates that death or serious injury may result if you fail
to observe the warning.
Caution
Indicates that injury or property damage may result if you
fail to observe the caution.
is used to indicate that improper handling may cause accidents. The figure in
the symbol indicates that this is a caution.
is used to indicate prohibited activities. The figure in the symbol represents
prohibited activities. (Example on the left: "Disassembling prohibited")
is used to indicate instructions that must be observed. The figure in the
symbol indicates that this is an instruction.
Warnings
● Store this equipment out of the reach of children and infants.
Strap: There may be danger of suffocation if it accidentally winds around the
neck.
Media StorageM30_M80.book Page 1 Wednesday, December 20, 2006 2:34 PM
Page 3
2
●
Do not disassemble or alter the MEDIA STORAGE M30/M80.
● Stop operating the MEDIA STORAGE M30/M80 immediately if it
begins emitting smoke or noxious-fumes.
● Prevent water from penetrating into the MEDIA STORAGE M30/
M80 and do not allow it to get wet. Wipe the MEDIA STORAGE
M30/M80 with a soft, absorbent cloth if it gets wet or after it is
used in salty air.
●
Pull the power plug out of the outlet or remove the battery pack if
you drop the MEDIA STORAGE M30/M80 or damage the exterior.
● Do not touch the metal parts of the MEDIA STORAGE M30/M80 or
the power plug, if you hear thunder.
● Do not insert metal objects or combustible materials into the
MEDIA STORAGE M30/M80.
● Do not touch the internal parts.
Doing so may cause fire or electric shock.
Should this happen, turn off the MEDIA STORAGE M30/M80 power and be sure to remove
the battery, or pull the compact adapter out of the outlet, and then contact the shop from
which you purchased the MEDIA STORAGE M30/M80, or a Canon service center.
● Do not use flammable liquids such as alcohol, benzene, or thinner
to clean the MEDIA STORAGE M30/M80.
● Do not place heavy objects on the power cord. Also, do not
scratch, damage, or modify it.
● Use only the power supply specified for use with the MEDIA
STORAGE M30/M80.
● On a regular basis, pull the power plug out of the outlet and
wipe off any dust and dirt with a dry cloth.
● Do not handle the power cord if your hands are wet.
Doing so may cause fire or electric shock.
● Do not subject the MEDIA STORAGE M30/M80 to severe impact or
vibration.
Do not throw the MEDIA STORAGE M30/M80 at anything.Doing so may cause
damage and result in fire, burns, or injury. In particular, if the LCD screen, which is made
of glass, is subjected to a severe impact, the screen may break and cause an injury.
pre_1.fm Page 2 Monday, February 26, 2007 2:37 PM
Page 4
3
● Do not operate the MEDIA STORAGE M30/M80 while you are
driving a car or any other vehicle.
Doing so may cause traffic accidents.
● Do not listen to music at a very loud volume for long periods.
Doing so may exert a harmful influence on your hearing.
●
Do not put the battery close to fire. Do not throw the battery into
fire.
● Keep the battery away from water or seawater.
● Use only recommended batteries and accessories.
Otherwise, the battery you use may burst or leak and result in fire, injury, or soil the
surroundings. Should battery electrolyte leak and get onto your clothes, skin, eyes, or
mouth, wash it off immediately.
● Remove the compact power adapter from both the MEDIA
STORAGE M30/M80 and the outlet after completion of charging
and when not in use.
● Do not charge the battery while a table cloth, carpet, bedding,
cushion, or other objects are placed over it.
Charging the battery for a long period may cause it to heat up and become
deformed, and may result in fire.
● Use only the battery charger specified for the battery when you
charge the battery.
Otherwise, the batteries could heat up and become deformed, and this may
result in fire or electric shock.
● Insulate the battery by putting tape on the contact or by other
means when you discard the battery.
Touching other metal objects when it is discarded may cause it to ignite or burst.
● Do not use power voltages other than that specified.
Doing so may result in fire or electric shock.
Media StorageM30_M80.book Page 3 Wednesday, December 20, 2006 2:34 PM
Page 5
4
Caution
●
When you are carrying the MEDIA STORAGE M30/M80 by the wrist
strap, be careful not to let the strap become hooked on anything,
and avoid subjecting the MEDIA STORAGE M30/M80 to severe
impact or vibration.
Failing to do so may cause injury or result in the MEDIA STORAGE M30/M80
malfunctioning.
● This product emits low level magnetic flux
.
If you use a cardiac pacemaker and feel abnormalities, please be away from
this product and consult your doctor.
●
Do not store the MEDIA STORAGE M30/M80 in a dusty environment.
● Do not put metal pins or dust on the power plug and charging
terminals.
Doing so may result in fire, electric shock, or cause a malfunction.
● Do not use or store the MEDIA STORAGE M30/M80 in an
environment subject to direct sunlight, or a hot environment such
as the trunk or dashboard of a car.
● Do not use the MEDIA STORAGE M30/M80 in a way that exceeds
the rating of the outlet or wiring accessories. Also, do not use the
MEDIA STORAGE M30/M80 if the power cord or power plug are
damaged, or the plug is not fully inserted into the outlet.
● When not in use, remove the battery and store it in the
designated place.
If you leave the battery in the MEDIA STORAGE M30/M80, the battery power
will drain.
● When using the MEDIA STORAGE M30/M80 in an airplane, follow
the airline's instructions.
Electromagnetic waves emitted from the MEDIA STORAGE M30/M80 may affect
instruments on the airplane.
Media StorageM30_M80.book Page 4 Wednesday, December 20, 2006 2:34 PM
Page 6
5
● Precautions for Use●
■
About Environment for Using and Storing the MEDIA STORAGE M30/M80
• When using or storing the MEDIA STORAGE M30/M80, avoid high-humidity, high-
temperature environments, vibratory motions, direct sunlight, dust, sand, and rain.
• Do not use the MEDIA STORAGE M30/M80 in an environment where strong magnetic fields
are being generated. Doing so may distort screen images and add noise.
■ When Using the MEDIA STORAGE M30/M80
• Do not wrap the MEDIA STORAGE M30/M80 with a cloth or blanket when in use. Doing so
may cause malfunction or serious accidents.
• Do not step or stand on, or place heavy objects on the MEDIA STORAGE M30/M80. In
particular, families with children should be careful about this.
• Do not subject the MEDIA STORAGE M30/M80 to severe impacts or vibration while it is in
operation. Doing so may cause errors, data destruction, or data loss.
■ To Prevent Condensation
• Moving the MEDIA STORAGE M30/M80 suddenly from a cold to a hot environment may cause
condensation (water drops) to form on the inside or outside of the MEDIA STORAGE M30/M80.
Using the MEDIA STORAGE M30/M80 when it still has condensation may result in malfunctions.
When you move the MEDIA STORAGE M30/M80 from a cold to a hot environment, seal it as
tightly as possible and let it adapt to the temperature of the location before taking it out.
• If the MEDIA STORAGE M30/M80 has condensation, leave it at room temperature until the
water drops evaporate naturally.
■ About LCD Monitor
• Although the color LCD monitors are manufactured using highly accurate technology, some
pixels may be dead or may be left on the screen. This is not a defect. Those pixels are not
recorded in image files.
• Because of the characteristic of LCDs, the display response may be slower in low
temperatures, or the display may becomes black in high temperature, but these conditions
revert back to normal in ordinary temperatures.
• To clean the LCD monitor, first make sure that the power is off, then lightly wipe the stain off using a
soft, dry cloth. If the monitor is very dirty, soak a cloth in mild detergent diluted in water, wring the
water out of it, and wipe the monitor with the cloth. Then wipe the moisture off fully with a dry cloth.
• If you use a disposable cloth, follow the cautionary statements for the cloth.
■ About AC Adapter
• Use only the AC adapter specified for use with the MEDIA STORAGE M30/M80. Using other
AC adapters may cause the MEDIA STORAGE M30/M80 to malfunction.
• Other metal objects should not touch the contacts of the AC adapter. There may be a risk of
short-circuit.
Media StorageM30_M80.book Page 5 Wednesday, December 20, 2006 2:34 PM
Page 7
6
■ About Personal Computer and Peripherals
• When using your personal computer or printer, carefully read the documents for the product
and follow the handling instructions.
■ Cautions Regarding Hard Disk and Significance of Data Backup
• As the MEDIA STORAGE M30/M80 is a precision piece of electronic equipment, do not place
it close to any devices that generate strong magnetic fields. Electromagnetic waves may
cause a malfunction or destruction of data. The hard disk is vulnerable to shock caused by
banging and dropping, therefore, data should be backed up frequently to another medium
(see "Backing up Files in a Computer" on page 65).
• Because we do not provide backup or restoration services, it is your responsibility to backup
your data.
• Note that we are not responsible for data corruption or data loss for any reason, even if it
happens within the warranty period of the MEDIA STORAGE M30/M80. Please be forewarned.
■ When You Want to Completely Erase Data from the Hard Disk
• Even after data erasure, the data in the hard disk will not be completely erased. This is due to
the characteristics of the hard disk. If you are going to discard or transfer the MEDIA STORAGE
M30/M80 and do not want others to see your personal data, we recommend that you obtain
equipment that erases data from the hard disk completely and use it to erase your data.
■ About Memory Cards: Precaution for Handling
• Do not remove the memory card or turn off the power while the access lamp is flashing.
• Do not use a memory card in an environment where strong magnetic fields are generated.
• Do not leave memory cards in high-temperature or high humidity environments.
• Do not disassemble.
• Avoid moisture, bending, dropping, or strong impact.
• Moving a memory card between environments that have large differences in temperature
may result in the formation of condensation on the inside or surface of the card. If the
MEDIA STORAGE M30/M80 contains condensation, leave it at room temperature until the
water drops evaporate naturally.
• Do not put foreign substances such as dust or water onto the terminals on the back of the
card, or do not touch them with your hands.
• To protect the terminals, put the card in the case when you store or carry it.
• The top, back, front, and rear of the memory card should be differentiated. Do not attempt
to insert the card in the wrong orientation. Doing so may result in the card being damaged.
• Do not peel the label off. Do not put a different seal on. If you want to identify your memory
cards according to their application, put seals on the case.
• Recorded data may be damaged or lost due to malfunction of the memory card or static
electricity. Please be forewarned that we cannot provide compensation for any lost records.
Media StorageM30_M80.book Page 6 Wednesday, December 20, 2006 2:34 PM
Page 8
7
■ About Copyright
• Using things that are photographed or printed for anything other than private use without
permission from the right holder is prohibited under copyright laws.
■ About Trademarks
• Canon is a trademark of Canon Inc.
• " " logo is a trademark.
• MultiMediaCard is a trademark of Infineon Technologies AG.
• Compact Flash is a trademark of SanDisk Corporation.
• Windows is a registered trademark or trademark of Microsoft Corporation in the US and/or
other countries.
• Macintosh is a trademark of Apple Computer, Inc., registered in the US and other countries.
• DCF is a collective mark of Japan Electronics and Information Technology Industries
Association and a registered trademark in Japan.
• Other corporate names and product names in this document are registered trademarks or
trademarks of their respective companies.
This product uses software based on the GNU General Public License (GPL), GNU Lesser
General Public License (LGPL), The MIT License, The FreeType Project License, and others.
For each of the licenses, see GPL.txt, LGPL.txt, COPYING.txt, and others in the LICENSE
folder on the built-in HDD. If you need the source code for a program based on GPL or
LGPL, please contact the place of purchase or your nearest Canon Sales Company.
Use of this product in any manner that complies with the MPEG-4 Visual Standard is
prohibited, except for use by a consumer engaging in personal and non-commercial
activities.
This product is licensed under AT&T patents for the MPEG-4 standard and may be used
for encoding MPEG-4 compliant video and/or decoding MPEG-4 compliant video that was
encoded only (1) for a personal and non-commercial purpose or (2) by a video provider
licensed under the AT&T patents to provide MPEG-4 compliant video.
No license is granted or implied for any other use for MPEG-4 standard.
pre_1.fm Page 7 Monday, February 12, 2007 5:11 PM
Page 9

8
● Table of Contents●
Safety Precautions 1
Precautions for Use 5
Table of Contents 8
Introduction 11
Main Features ........................................................................................................................... 11
Bundled Items ........................................................................................................................... 12
Part Names and Functions 13
Preparation for Use 14
Charging the Battery ................................................................................................................ 14
Installing/Removing the Battery .............................................................................................. 15
Using a Household Power Supply ............................................................................................ 16
Turning on the Power .............................................................................................................. 17
How to Use the Hold Switch.................................................................................................... 17
Inserting a Memory Card.......................................................................................................... 18
Removing the Memory Card .................................................................................................... 18
Connecting to a Computer....................................................................................................... 19
Connecting to a Computer...................................................................................................... 19
Disconnecting from the Computer........................................................................................... 20
Before Operation 21
Home Screen ............................................................................................................................. 21
Specifying the option/Determine Operation .......................................................................... 22
Description of the Basic Screen................................................................................................ 23
Backing up Files 24
Backing up Images from a Memory Card to the HDD............................................................ 24
One-Touch Backup .................................................................................................................. 24
Backing up Images by Selecting a Memory Card on the Home Screen...................................... 24
[If You Want to Download Images from a Computer] .............................................................. 27
Playing Back Images 28
If You Select the HDD.............................................................................................................. 28
If You Select a Card................................................................................................................. 29
Switching the Pages (12 Images Per Page).............................................................................. 30
Zooming in on an Image (Zooming Function) ........................................................................ 30
Rotating an Image .................................................................................................................... 31
Viewing a Slide Show ............................................................................................................... 32
Viewing Images on TV.............................................................................................................. 34
Media StorageM30_M80.book Page 8 Wednesday, December 20, 2006 2:34 PM
Page 10
9
Listening to Music 35
Preparing to Playback Music Files on the MEDIA STORAGE M30/M80
(Downloading Music Files from a Computer) ......................................................................... 35
Playing Back Music Files ........................................................................................................... 36
If You Want to Repeat the Music ............................................................................................ 38
Making a Play List ..................................................................................................................... 38
Watching a Movie 39
Preparing to Play Back Movie Files on the MEDIA STORAGE M30/M80
(Downloading Movie Files from a Computer) ........................................................................ 39
Playing back Movie Files........................................................................................................... 40
Making a Play List ..................................................................................................................... 41
Displaying File Information...................................................................................................... 42
Displaying Still Image Information............................................................................................ 42
Displaying Music File Information............................................................................................. 43
Displaying Movie File Information ............................................................................................ 43
Configuring Various Settings 44
Display ....................................................................................................................................... 45
LCD Brightness Adjustment ..................................................................................................... 45
LCD Power OFF Time Setting ................................................................................................... 45
TV signal Switching ................................................................................................................. 45
Erase data in Image cache........................................................................................................ 46
System........................................................................................................................................ 46
Backup ....................................................................................................................................... 47
File Deletion in Backup ............................................................................................................ 47
Verification in Backup&Copy.................................................................................................... 47
Playback..................................................................................................................................... 48
Language................................................................................................................................... 48
Date/Time.................................................................................................................................. 48
Date ........................................................................................................................................ 48
Time........................................................................................................................................ 49
Date format............................................................................................................................. 49
HDD check ................................................................................................................................. 49
HDD free area ......................................................................................................................... 49
Tools ....................................................................................................................................... 50
1) File-System checker.............................................................................................................. 50
2) Format HDD ........................................................................................................................ 50
PIN setting................................................................................................................................. 50
Switching USB connection........................................................................................................51
Screen output switch ................................................................................................................ 51
Firmware Version...................................................................................................................... 51
Media StorageM30_M80.book Page 9 Wednesday, December 20, 2006 2:34 PM
Page 11
10
Organizing and Managing Files 52
Protecting Files.......................................................................................................................... 52
Copying or Moving Files........................................................................................................... 53
Arranging files .......................................................................................................................... 55
Displaying files by specifying their date.................................................................................. 56
Searching for an album ............................................................................................................ 57
Erasing Files............................................................................................................................... 58
If You Select < > (Erase button) to Erase .............................................................................. 58
If You Select <MENU> to Erase................................................................................................ 58
Using the Bookmark Function ................................................................................................. 61
Changing an Album Name....................................................................................................... 62
Setting an Image for the Album Cover ................................................................................... 63
Switching the Display Mode .................................................................................................... 64
Refreshing Images .................................................................................................................... 64
Backing up Files in a Computer ............................................................................................... 65
Using as a Card Reader............................................................................................................ 66
Printing Images 67
Preparing to Print ..................................................................................................................... 67
Printing Images ......................................................................................................................... 68
If You Print Files Using < > (Easy print button)..................................................................... 68
If You Print Files Using <MENU> .............................................................................................. 68
Information on the Screen during Printing ............................................................................ 73
Appendix 74
Details about Supported File Formats ..................................................................................... 74
About the Folder Structure in the Viewer .............................................................................. 76
[About Files in the Memory Card that is the Backup Source] .................................................... 76
Image Types that can be Displayed ......................................................................................... 77
Troubleshooting ....................................................................................................................... 78
How to Reset the MEDIA STORAGE M30/M80......................................................................... 79
MEDIA STORAGE M30/M80 Product Specifications ................................................................ 80
pre_1.fm Page 10 Thursday, February 8, 2007 9:14 AM
Page 12

11
● Introduction●
Main Features
• Photo Storage Feature
Instantly backs up images you took with the digital camera at the site.
The large storage capacity of the 30GB/80GB hard disk allows you to shoot without
worrying about the remaining capacity of the memory card.
• Photo Viewer Feature
Displays vivid images with the wide viewing angle, high-definition screen. It also displays
shooting information and histograms.
• Slide Show Feature
Allows you to view images as a slide show. You can also set up various effects and
Background Music (BGM).
• Sound Player Feature
Allows you to play back the music data with the formats: MP3, WAVE. You can make your
original play lists that contain your favorite tracks.
• Movie Player Feature
Allows you to play back movies in various formats: Motion JPEG, MPEG1, MPEG2, MPEG4
(ISO compatible). You can make your original play lists that contain your favorite movies.
• Direct Print Feature
Allows you to directly connect the MEDIA STORAGE M30/M80 to a printer (PictBridge-
compatible printer) to print images.
•TV Output Feature
Allows you to connect the MEDIA STORAGE M30/M80 to the TV set to view the images on
the TV screen.
Media StorageM30_M80.book Page 11 Wednesday, December 20, 2006 2:34 PM
Page 13
12
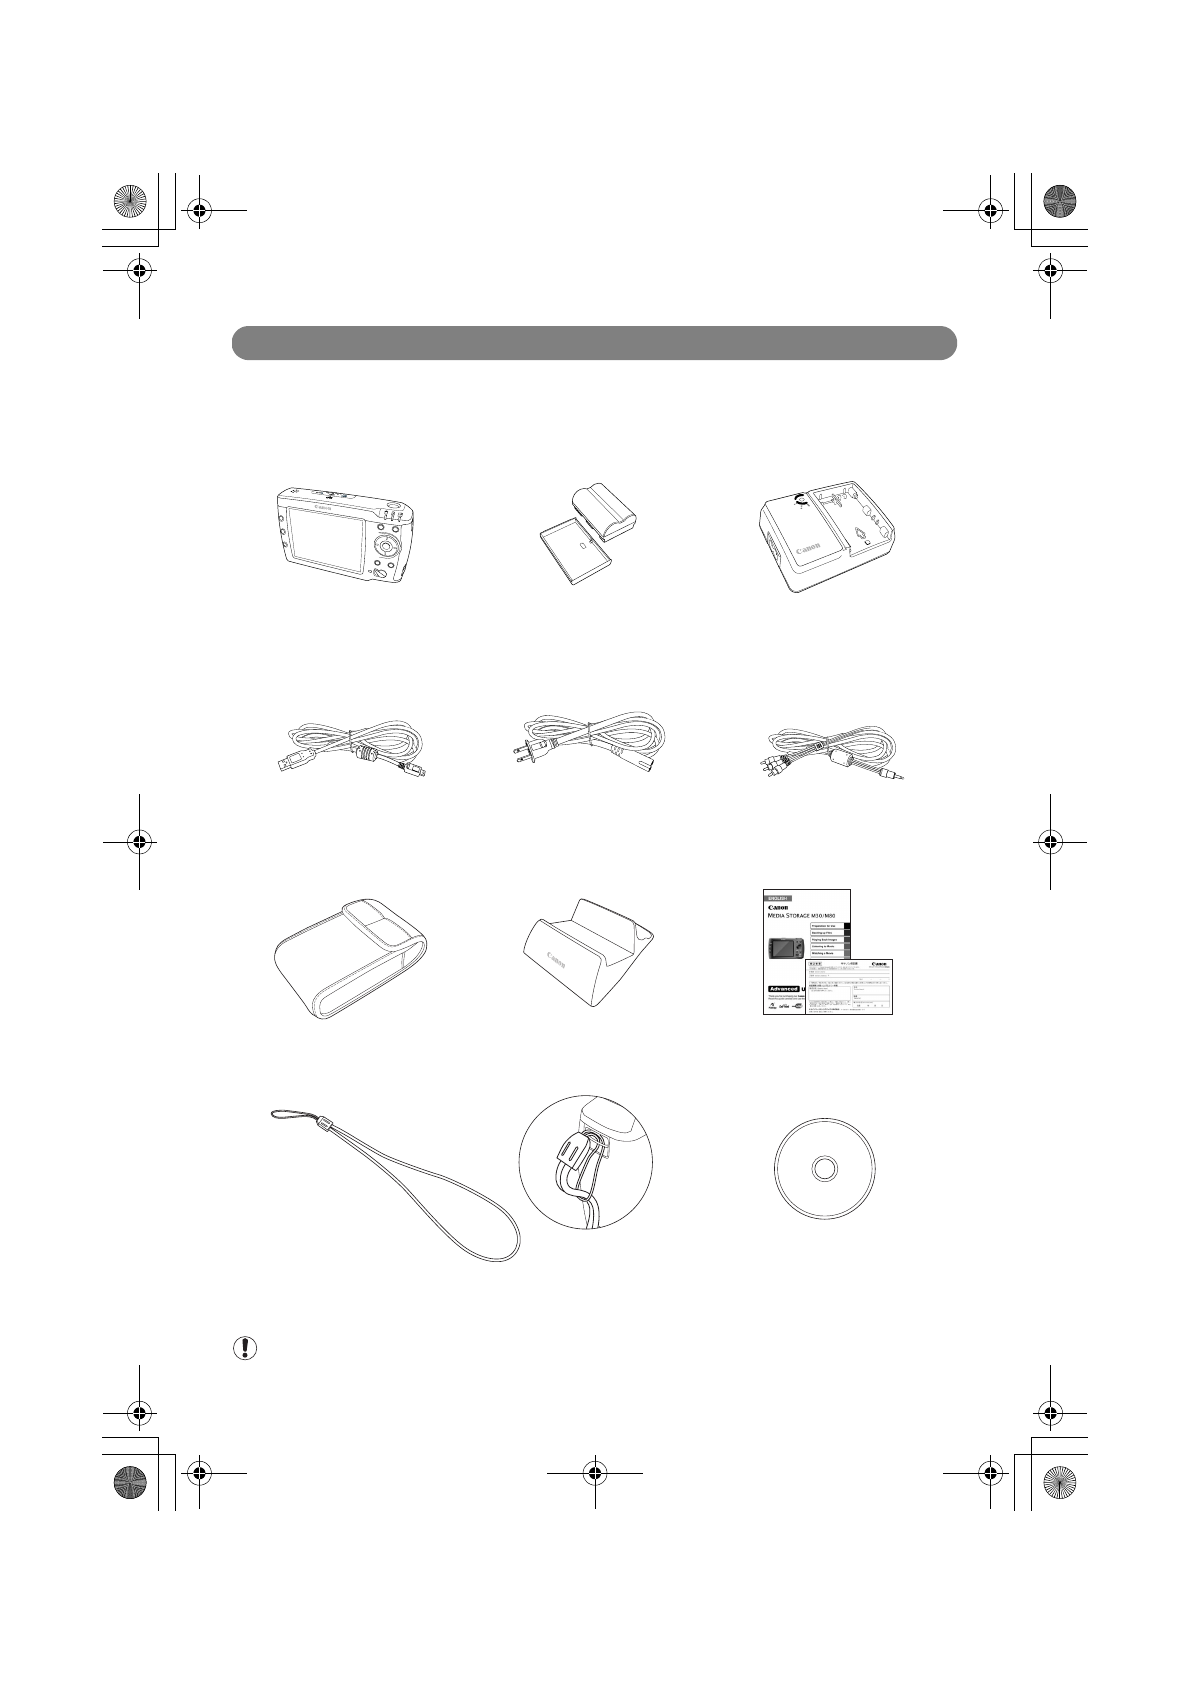
Bundled Items
The following products are in the package. Should any of these
not be in your package, please contact the shop from which you
purchased the MEDIA STORAGE M30/M80.
Note
Please be careful not to lose these items.
MEDIA STORAGE
M30/M80 body
Lithium-ion battery
(Model number: BP-511A)
Battery charger
(Model number: CB-5L)
USB cable
(For connection to
a computer and printer)
Power cord
for connection to the
battery charger
Video cable
Pouch case
Stand
(only for M80)
Manual
Warranty
Strap Manual CD
* Use the supplied strap only.
pre_2.fm Page 12 Thursday, December 21, 2006 2:00 PM
Page 14

13
● Part Names and Functions●
< > button
A/V output terminal
Digital terminal DC Input terminal
<>
Info/Trimming frame
vertical-horizontal switching/
Screen output switching button
Terminal cover
<BACKUP> Backup button
< > Erase button
<>
Cancel button
Power lamp
Battery cover
SD card slot
CF card slot
CF card eject
button
Speaker
<>
Menu
button
LCD monitor
CF card access lamp
SD card access lamp
HDD access lamp
<>
Index/zoom-out button
< > Zoom-in button
< > Setting button
<Direction> key
<>
Easy print button
Power button
Strap anchor points
Media StorageM30_M80.book Page 13 Wednesday, December 20, 2006 2:34 PM
Page 15
14
Preparation for Use
● Preparation for Use●
This section describes preparations that should be carried out
before you start using the MEDIA STORAGE M30/M80.
Charging the Battery
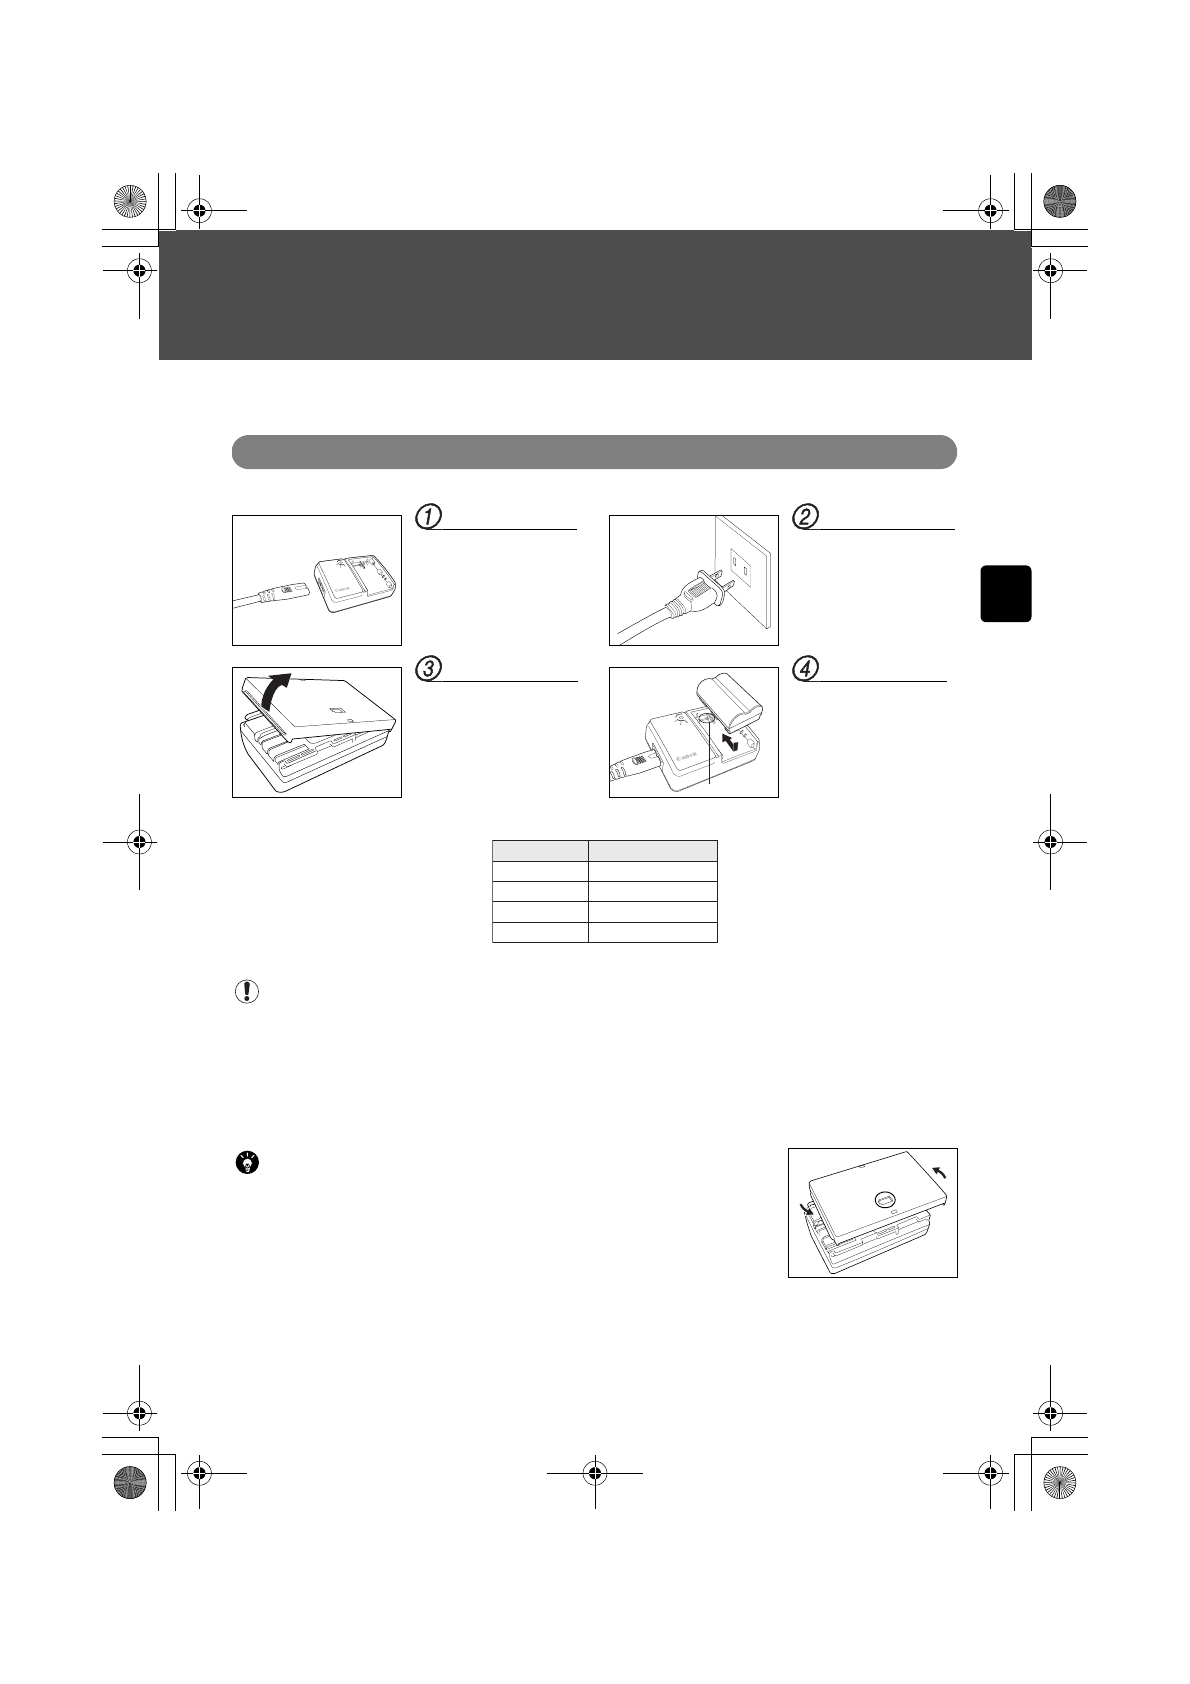
Insert the battery into the supplied battery charger to charge the battery.
Insert the power cord
Insert the power cord into
the battery charger.
Remove the protection cover
Whenever you remove the
battery from the MEDIA
STORAGE M30/M80, be
sure to put the cover on it
to avoid it short-circuiting.
Insert the power plug
Insert the power plug into
the outlet.
Attach
the battery
Align the top of the battery to
the <-> mark on the battery
charger and slide the battery
to set it while pressing the
battery onto the charger.
Reverse these steps to remove
the battery.
● Charging starts
automatically and the red
lamp will start flashing.
● It takes about 100
minutes for the empty
battery (BP-511A) to be
fully charged.
• Use only the BP-511A for the battery used with the MEDIA STORAGE M30/M80.
• Leaving the battery in the MEDIA STORAGE M30/M80 for a long period of time will cause it to discharge as a
slight amount of current continues to flow out and the battery life will be reduced. When not in use, remove the
battery from the MEDIA STORAGE M30/M80 and put the protection cover on it to avoid it short-circuiting before
you store the battery. Make sure to charge the battery every time before you use the MEDIA STORAGE M30/M80.
• Storing the battery after fully charging it may cause a reduction in battery life or degradation of battery performance.
• The battery pack BP-511A is designed for Canon products only. We do not take any responsibility for
malfunction or accidents caused by using the battery pack with a battery charger or any other product
other than Canon products.
• To fully charge the battery, continue charging for one hour after the red lamp lights up.
• The battery pack discharges little by little after charging even if you do not use it. We
recommend that you charge the battery either on the day or the day before you use it.
• The protection cover for the battery has a window so that you can determine
if the charging is completed by changing the orientation of the cover.
• When charging is complete, remove the battery and pull the plug out of the outlet.
• Time required for charging depends on ambient temperature and the amount
of power left in the battery.
• Although the battery can be used in ambient temperatures between 0 - 40 °C, we
recommend using it in temperatures of 10 - 30 °C for the battery to exert full performance. In a low temperature environment
such as a ski resort, the performance of the battery may decline temporarily and the amount of time it can be used may decrease.
• If the usable time of the battery decreases significantly even after you charge it as specified, this indicates
that the battery has reached the end of its life. Please purchase a new battery.
Charge state
0
~50%
50
~75%
75
~90%
90% or more
Red lamp
Blinks once/sec.
Blinks twice/sec.
Blinks thee times/sec.
Light on
The numbers and points printed on the
battery charger represent the following
table.
<-<-> mark
pre_3.fm Page 14 Friday, February 2, 2007 1:27 PM
Page 16
15
Installing/Removing the Battery
How to install the battery
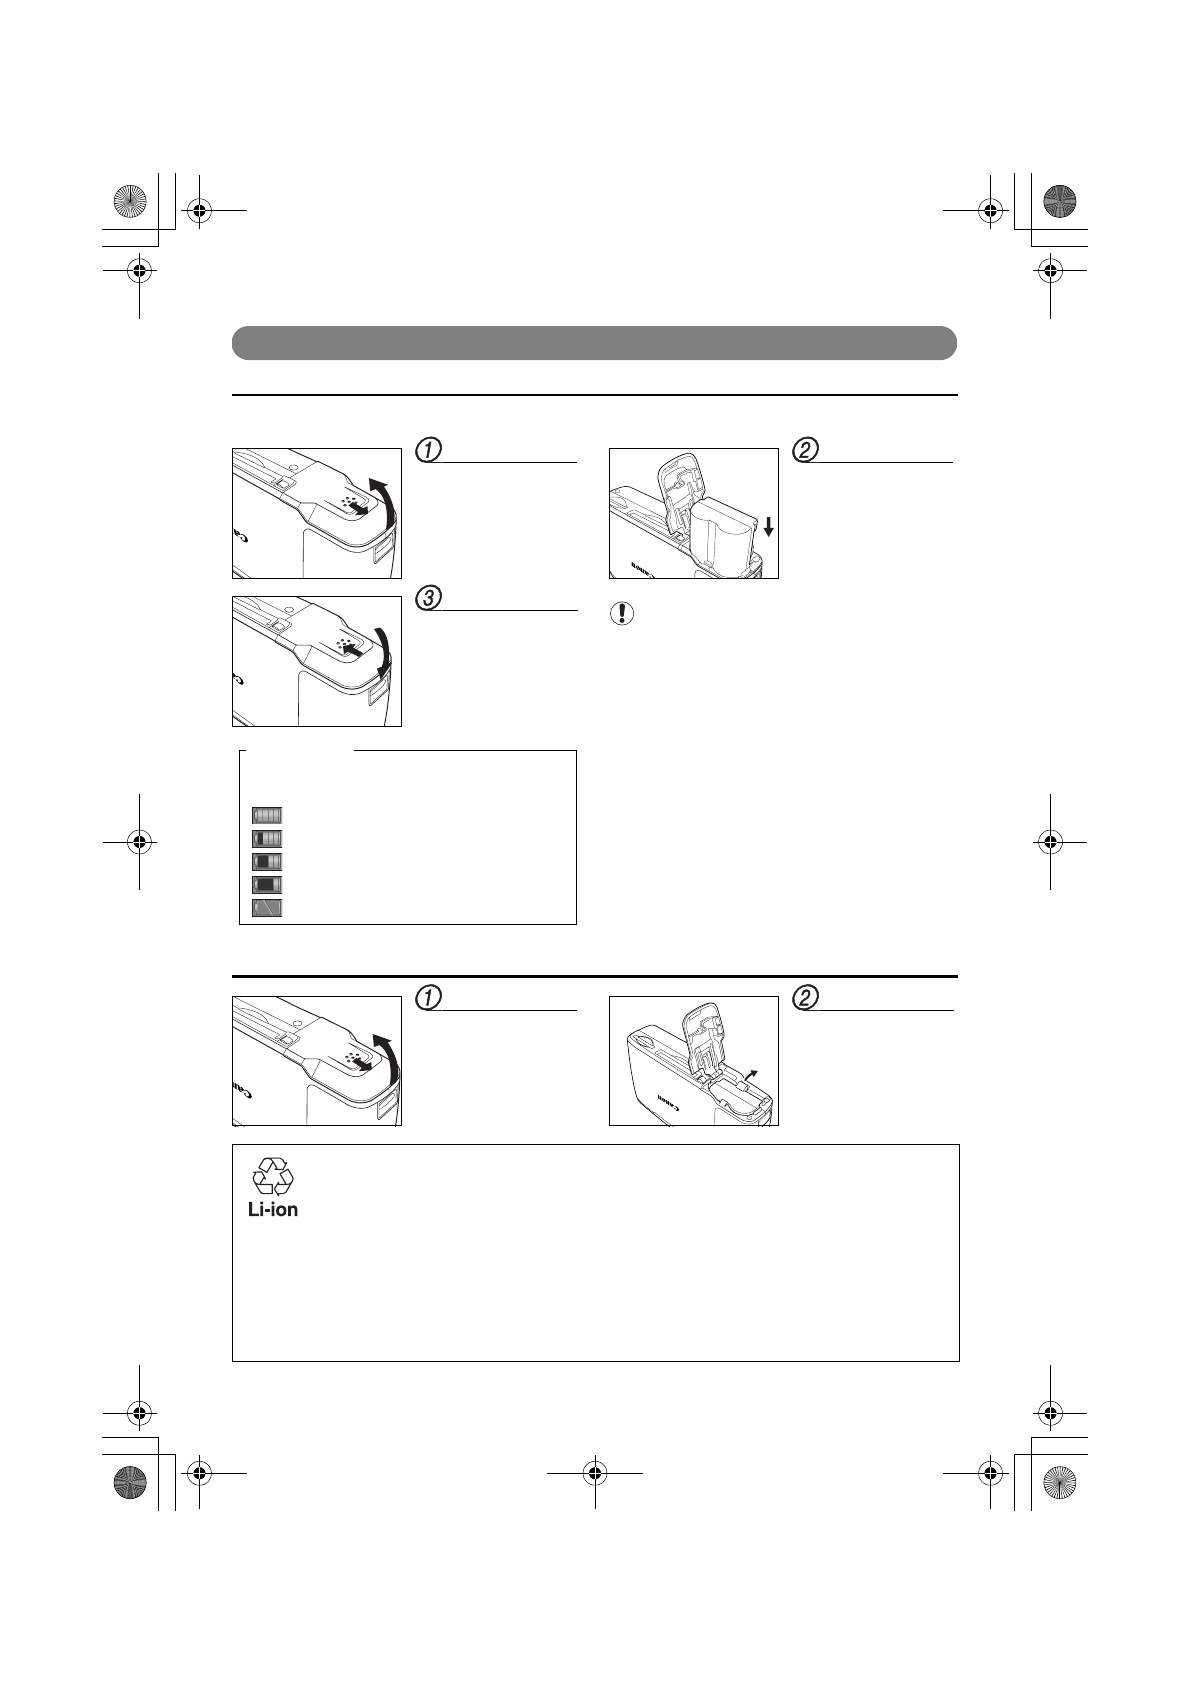
Install the charged battery pack BP-511A into the MEDIA STORAGE M30/M80.
Open battery cover
Slide the lever in the
direction of the arrows
indicating how to open
battery cover.
Close battery cover
Press battery cover until
you hear a click.
Install the battery
Install the battery with the
contact facing downwards.
Insert it firmly until it locks
into place.
Note
Use only the BP-511A.
How to remove the battery
Open battery cover
Slide the direction of the
arrows indicating how to
open battery cover.
Remove the battery
Slide the battery lock lever
in the direction of the
indicating arrow to
unlock and remove the
battery.
[Battery check]
You can check the remaining power of the battery
on the upper right of the LCD. There are five levels:
: Full battery.
:
3/4 battery.
:
1/2 battery.
: The battery will soon be empty.
: Please charge the battery.
• This product uses a lithium-ion battery.
• The battery is a valuable, recyclable resource.
• See the following Canon home page for information about the recovery and recycling of the battery.
Canon support page: http://cweb.canon.jp/ecology/recycle5.html
• After replacement, put a tape over the terminals of the old battery to insulate them.
Otherwise, it may emit smoke or ignite due to it short circuiting.
• If you have any questions about recycling cooperative stores, please contact:
- The store from which you purchased the product or lithium ion battery
-
Japan Portable Rechargeable Battery Recycling Center (JBRC), URL: http://www.jbrc.net/hp/contents/index.html
Precautions for recycling: Do not disassemble the battery.
pre_3.fm Page 15 Friday, January 5, 2007 8:47 AM
Page 17
16
Preparation for Use
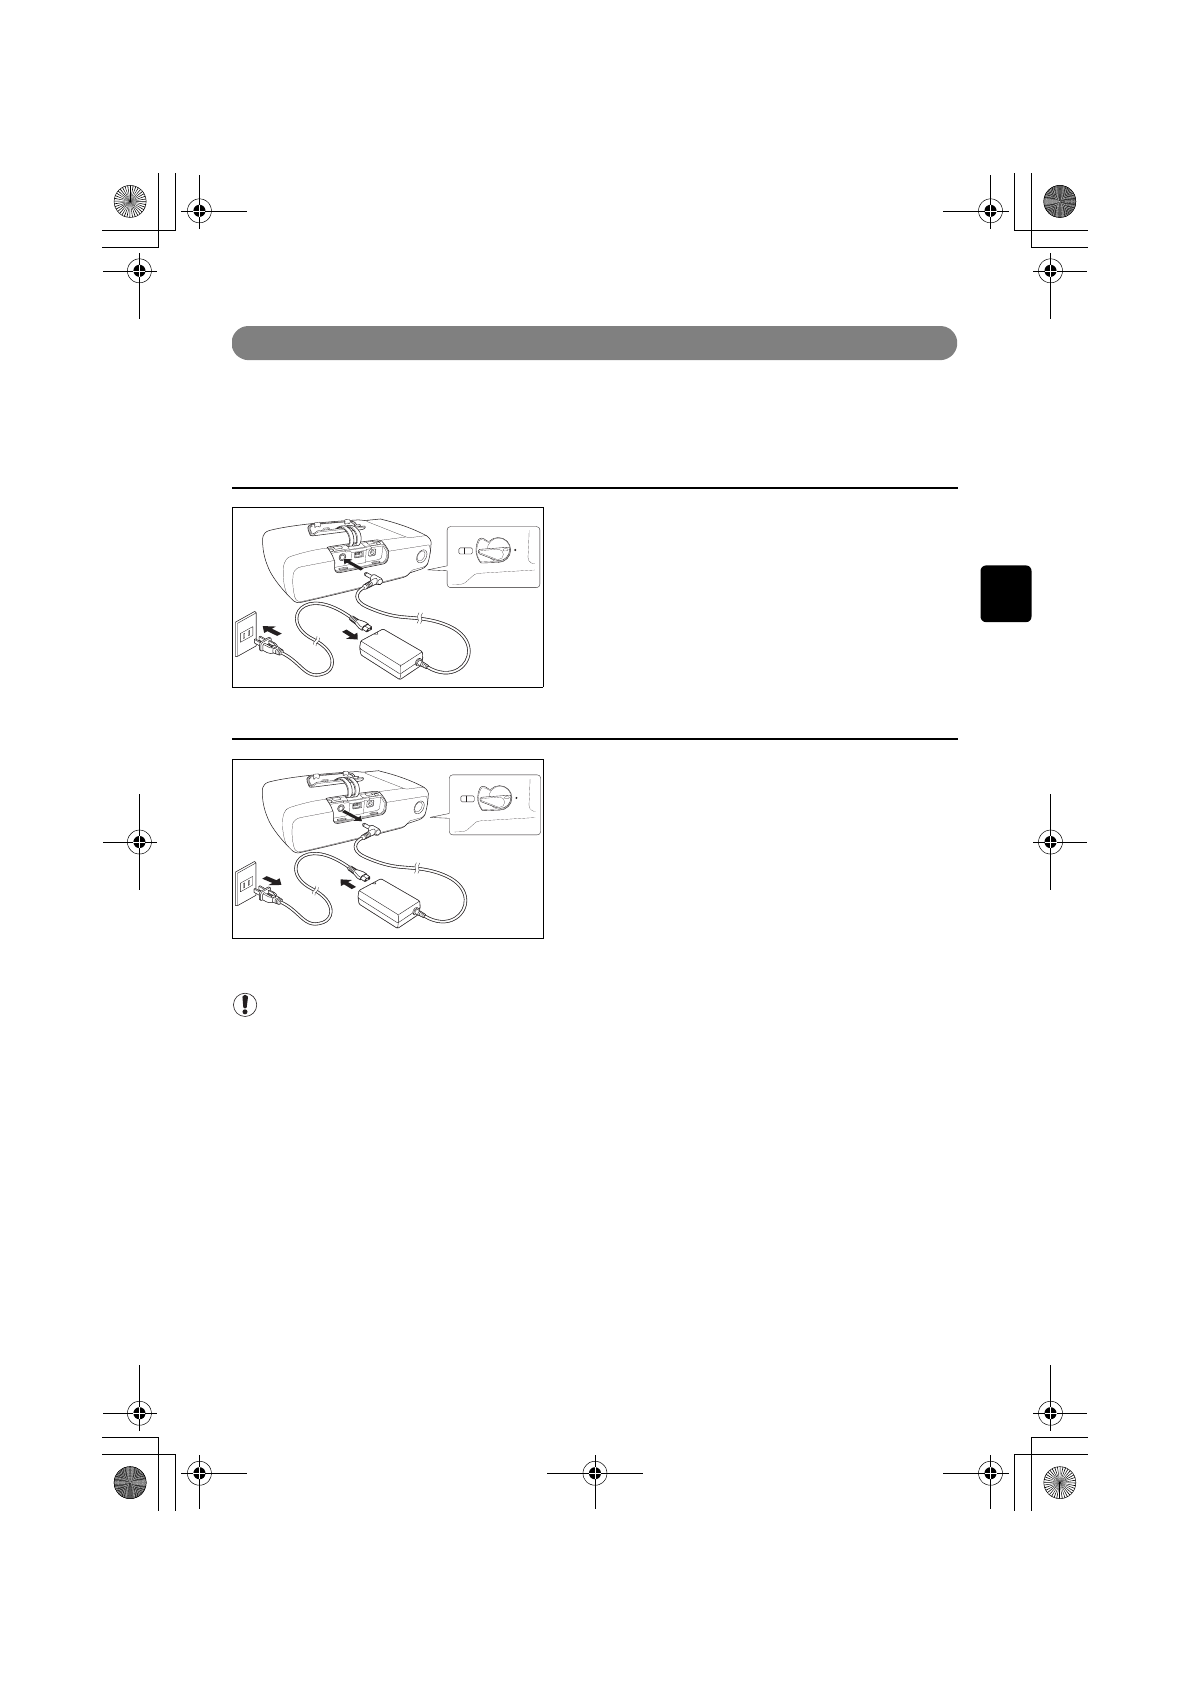
Using a Household Power Supply
Compact power adapter CA-570 (option)
Use the adapter when you need to use a household power supply for the MEDIA STORAGE M30/M80.
(Input voltage range is AC100 to 240V for global use)
How to install the compact power adapter
1Turn off the MEDIA STORAGE M30/M80 power
2Insert the power cord into the compact power adapter
3Insert the power plug into the outlet
4Connect the compact power adapter to the DC IN
terminal
How to remove the compact power adapter
1Turn off the MEDIA STORAGE M30/M80 power
2Disconnect the compact power adapter from the
MEDIA STORAGE M30/M80
3Pull the power plug out of the outlet
4Pull the power cord out of the compact adapter
Note
• Be sure you turn off the MEDIA STORAGE M30/M80 power when you install/remove the compact power adapter.
• When using the compact power adapter near a TV set, you may see noise on the TV screen. Maintain a distance
between the compact power adapter and the TV set or an antenna cable.
• Never connect any product other than a specified one to the DC IN terminal. Also, do not connect the compact power
adapter to any product other than a specified one.
• You may hear some noise while using the compact adapter. This is not because of a defect.
• If no battery is installed in the MEDIA STORAGE, it does not operate even when the compact power adapter is
connected. Make sure to install a charged battery in the MEDIA STORAGE.
ON/OFF
HOLD
1
4
2
3
ON/OFF
HOLD
1
2
4
3
pre_3.fm Page 16 Friday, February 2, 2007 8:51 AM
Page 18
17
Turning on the Power
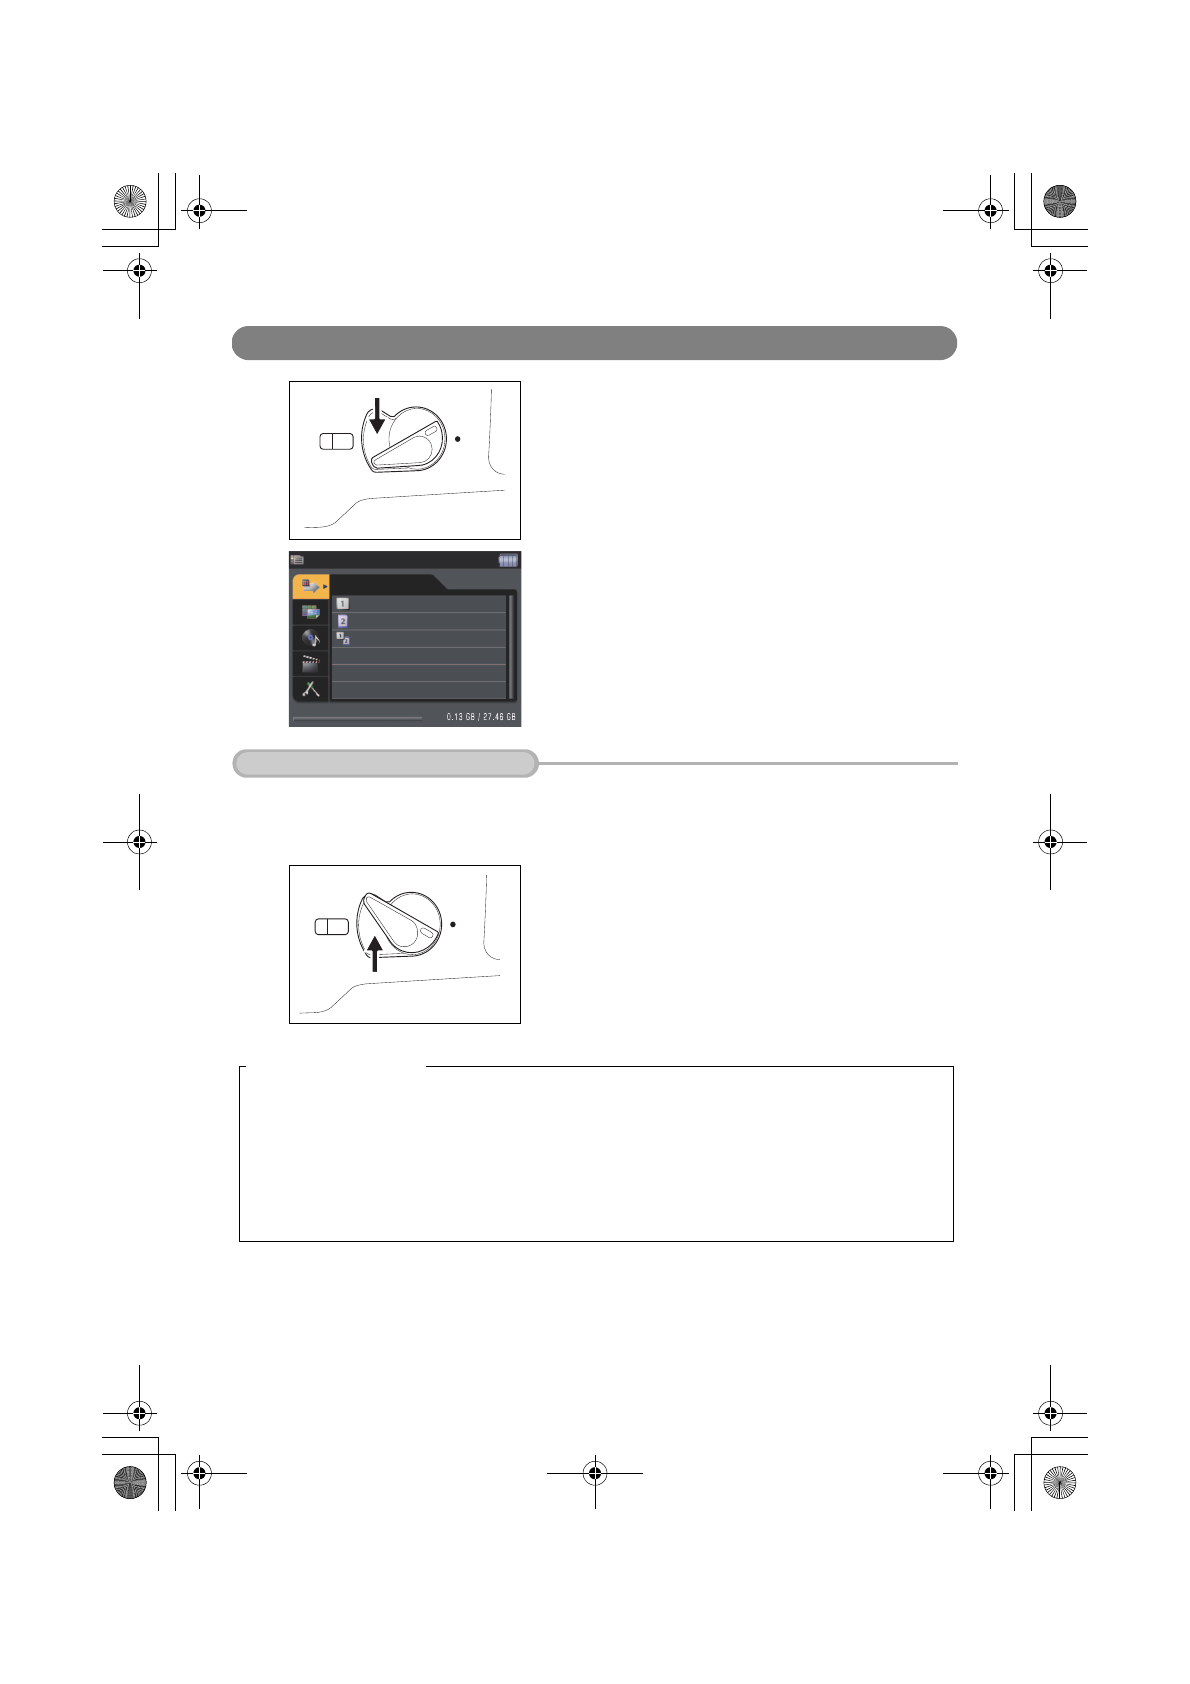
1Move the power switch down to turn on the power. The green
power lamp lights up.
●Holding the power switch down again for more than one
second turns the power off. (The switch returns to its original
position.)
2When you turn the power on, the Home screen appears.
●If you have set a PIN, the PIN input screen appears.
Once you set the switch to the HOLD position, the system stays in the current state and does not accept operation
of any other button. This function prevents operational errors as the system does not perform any actions even if a
button is pressed by accident (HOLD function).
Push the switch up.
ON/OFF
HOLD
Home
Backup
Card 1
Card 2
Card 1&2
How to Use the Hold Switch
ON/OFF
HOLD
[Power saving function]
The MEDIA STORAGE M30/M80 is equipped with a power saving function. The LCD monitor may become
dark or the power may be turned off automatically if no operation is performed for a certain amount of time.
* The power lamp stays on even when the LCD monitor is switched off. To bring it back into operation, press
any button other than the power switch.
See "[LCD Power OFF] Time Setting" on page 45 and "[Auto Power OFF] Time Setting" on page 46 for off
time settings for the LCD and power supply.
Media StorageM30_M80.book Page 17 Wednesday, December 20, 2006 2:34 PM
Page 19
18
Preparation for Use
Inserting a Memory Card
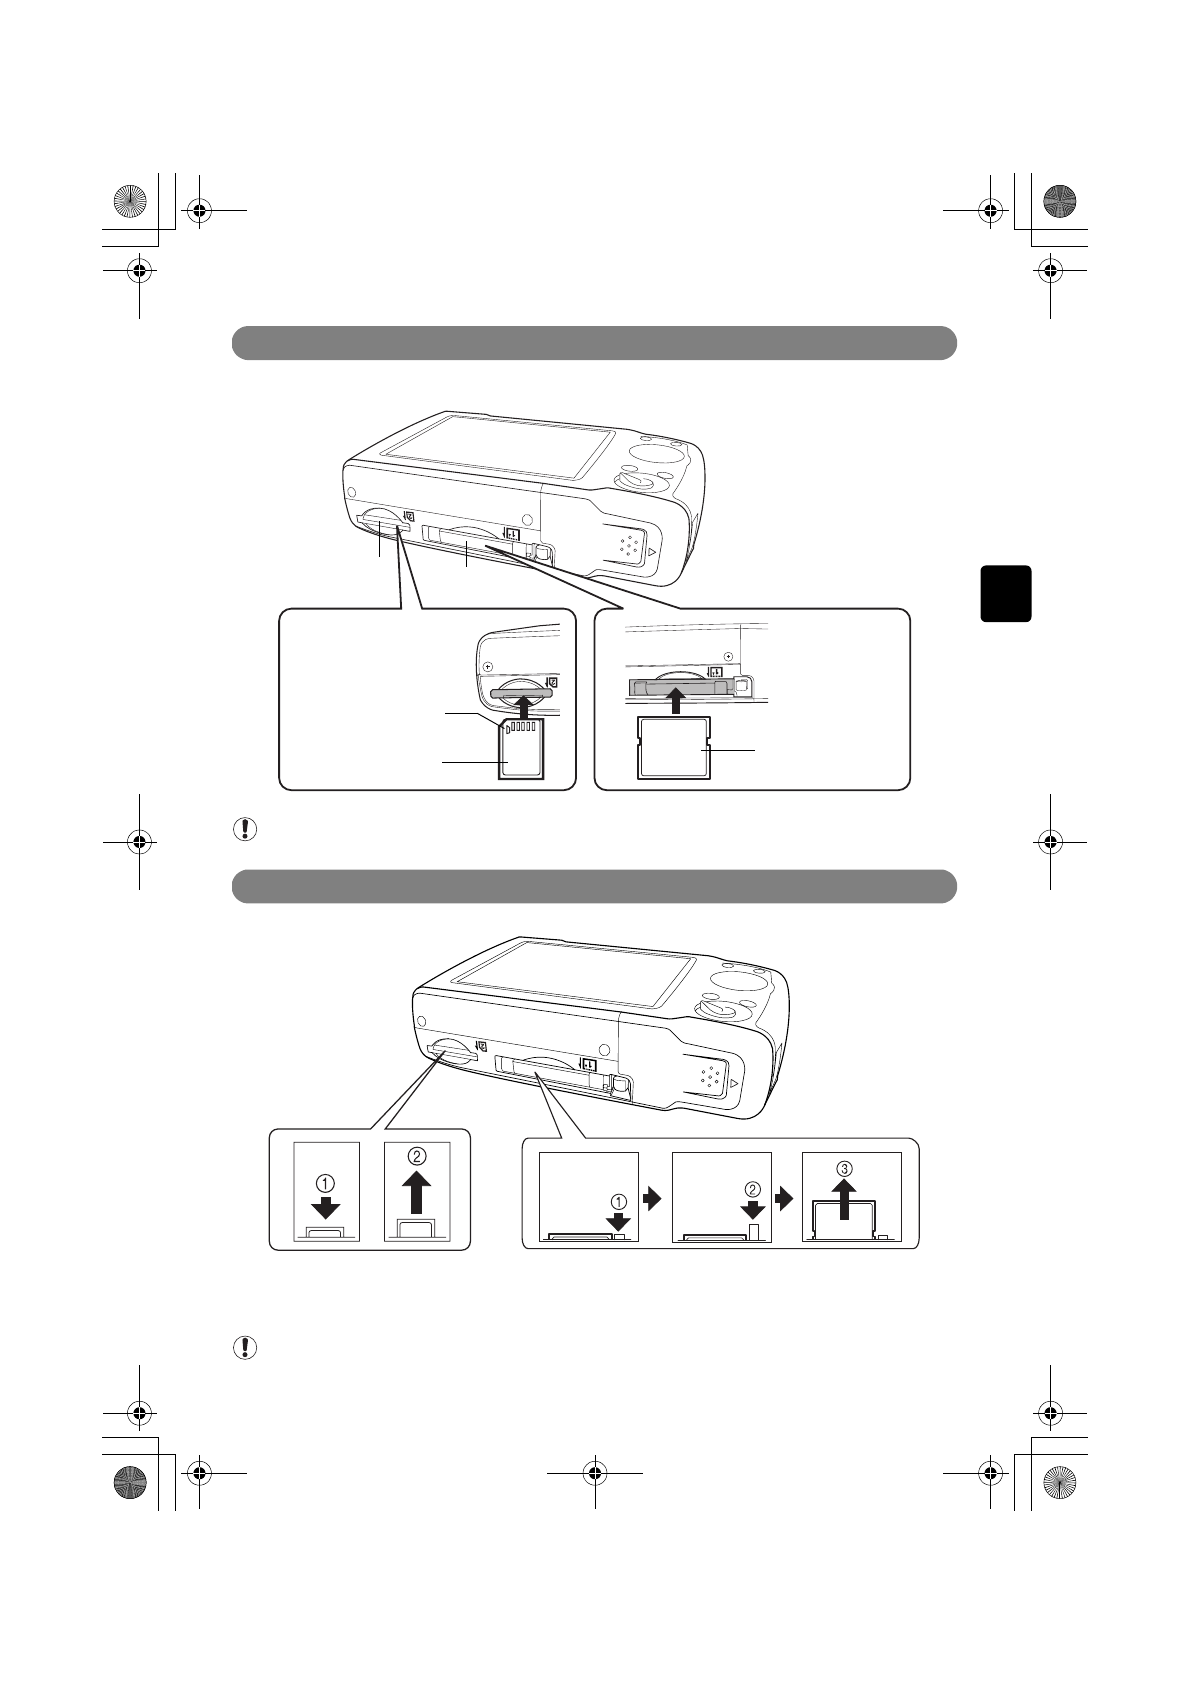
Insert a memory card in the right orientation completely into the card slot on the bottom of the MEDIA STORAGE M30/
M80. When a card is inserted correctly, the access lamp lights up (you can use a CF card and a SD memory card together).
SD memory card slot CF card slot
Note
• Be sure that the CF card eject button is fully pressed, and insert a CF card into the card slot.
Removing the Memory Card
Press the button to remove the memory card while the green access lamp of the MEDIA STORAGE M30/M80 is not flashing.
Note
• Do not press the CF card eject button when you are holding the CF card.
CF card/Microdrive
SD memory card
MultiMediaCard
CompactFlash (CF) card
Microdrive
SD memory card/
MultiMediaCard
Terminal
Backside
■
For
SD
memory card slot
1
Push the SD card with your finger until the
memory card clicks and then release it.
2
Pull the card out.
■ For CF card slot
1 Press the CF card eject button.
2
The button pops up. Press it again.
3 Pull the card out.
Media StorageM30_M80.book Page 18 Wednesday, December 20, 2006 2:34 PM
Page 20
19
Connecting to a Computer
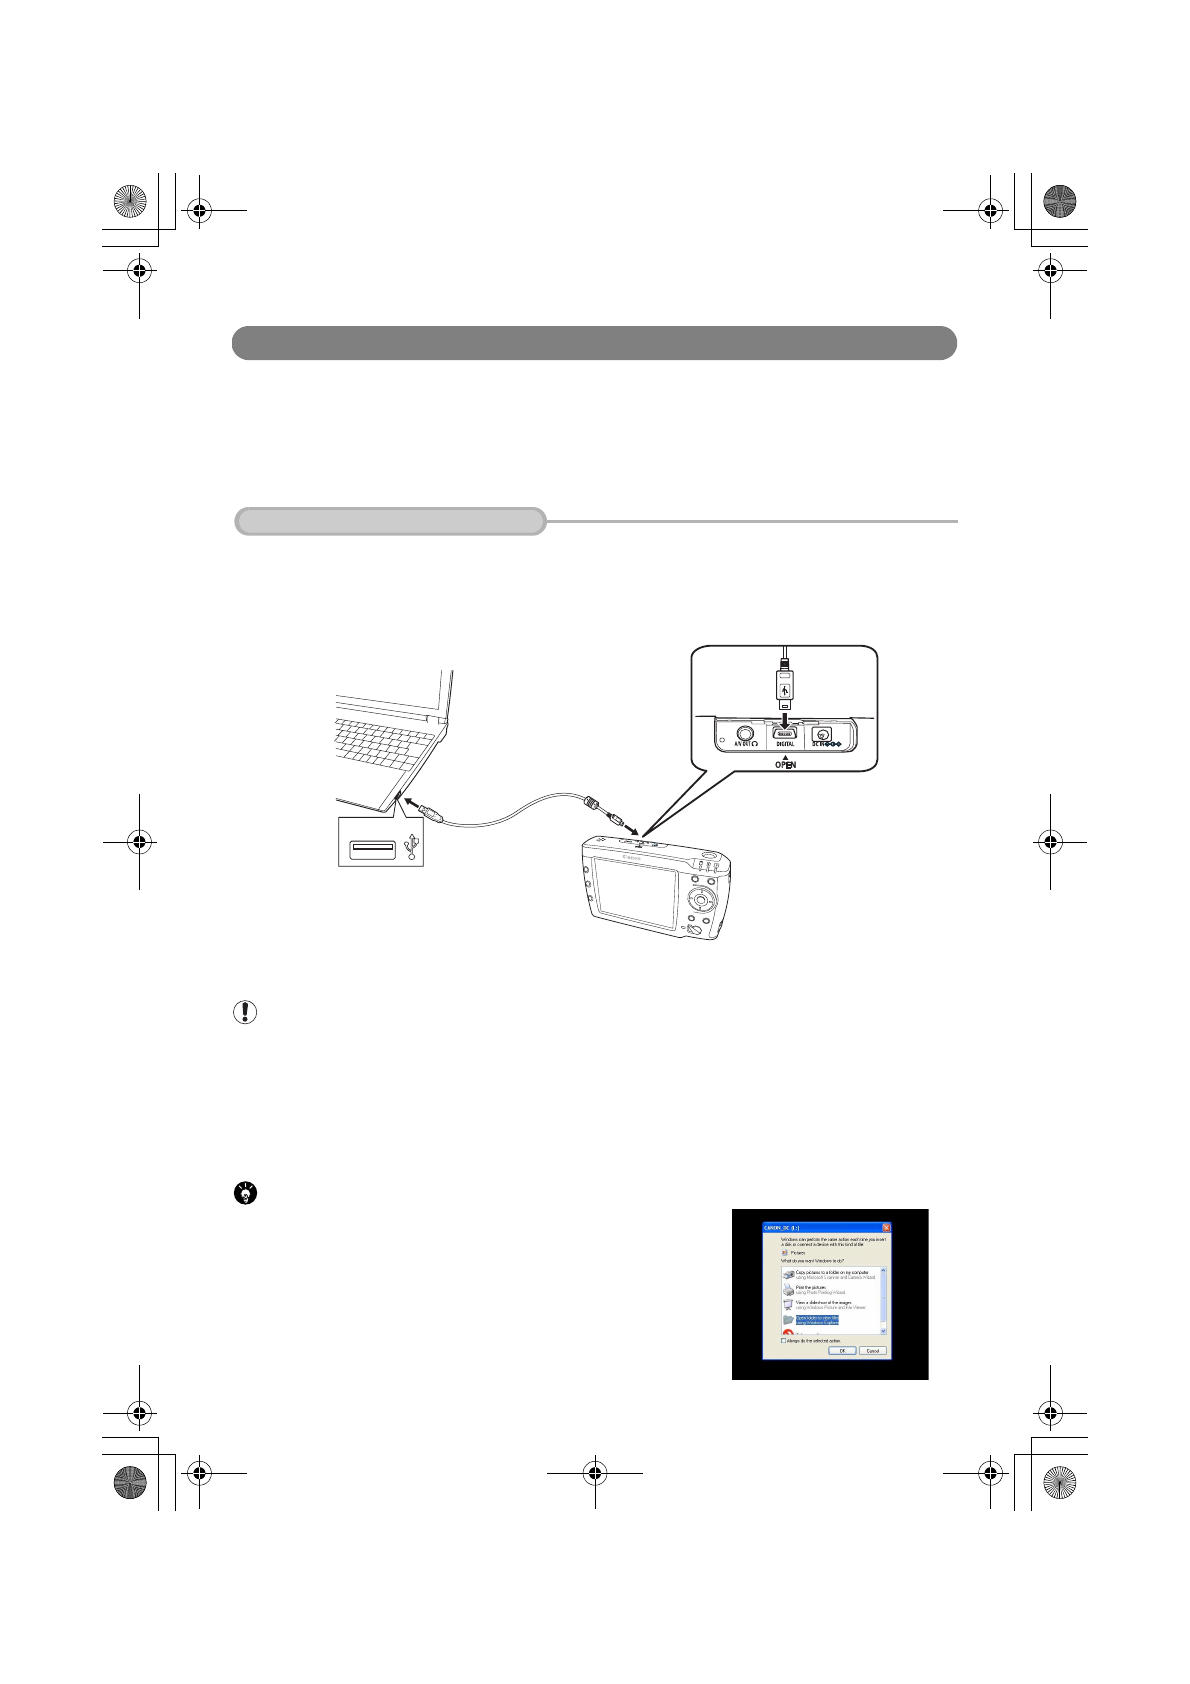
Connect the MEDIA STORAGE M30/M80 and a computer using the supplied USB cable.
■ Supported OS
The MEDIA STORAGE M30/M80 supports the following operating systems.
• Windows XP (Home Edition/Professional), Windows 2000 (SP4)
• Mac OS X 10.2
- 10.4
1 In the [Setup] section in the Home screen, set the USB cable destination to [Storage mode].
(See "Switching USB Destinations" on page 51)
2 Connect the computer's USB port and to the MEDIA STORAGE M30/M80's DIGITAL terminal using the
supplied USB cable.
3 When the connection is established, you will see the message "The unit is connected to the USB host
device.Please make sure that battery in the unit is charged enough."
Note
• When you connect the MEDIA STORAGE M30/M80 to a computer, make sure that the battery is appropriately charged.
Running out of battery power may cause the HDD to crash. Be careful to monitor the remaining battery power.
• Stop all other operations before you connect the MEDIA STORAGE M30/M80 to a computer.
• You do not have to turn off the power supply to the MEDIA STORAGE M30/M80 or the computer when you connect
them using the USB cable.
• Make sure that the orientation of the USB cable connector is correct before you insert it.
• Use the supplied USB cable only.
Point
For Windows XP, when the MEDIA STORAGE M30/M80 is connected, a
selection screen for an action that Windows performs may appear. In that
case, select [Open folder to view files] to see the data in the MEDIA
STORAGE M30/M80.
Connecting to a Computer
USB Port
USB cable
pre_3.fm Page 19 Thursday, December 21, 2006 9:43 AM
Page 21
20
Preparation for Use
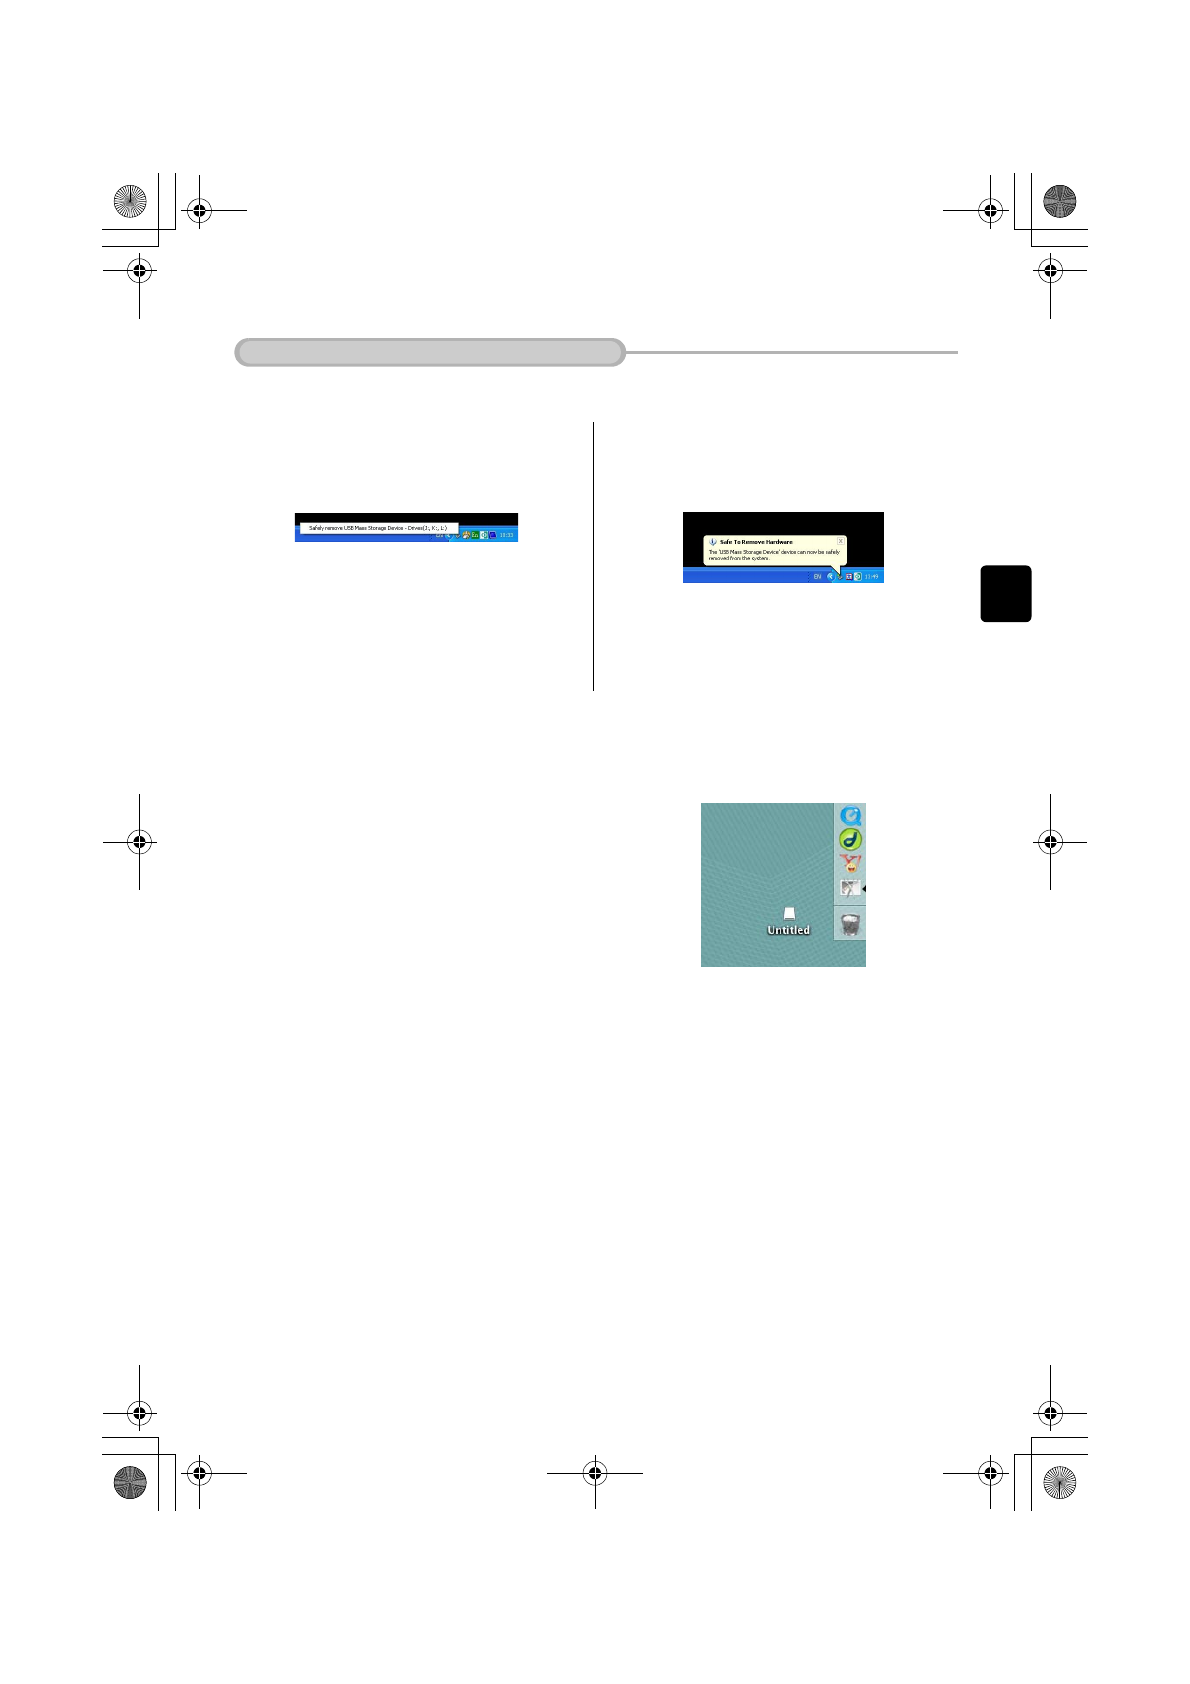
To disconnect the MEDIA STORAGE M30/M80 from the computer, take the following steps:
■ For Windows
1 Click [Unplug or eject hardware] on the bottom
right of the computer screen.
2 Click the pop-up menu, make sure that the
message below is displayed, and then remove the
USB cable.
■ For Macintosh
Move the icon of the MEDIA STORAGE M30/M80 on the computer screen to the [Trash Box]. Then
remove the USB cable.
Disconnecting from the Computer
Media StorageM30_M80.book Page 20 Wednesday, December 20, 2006 2:34 PM
Page 22
21
● Before Operation●
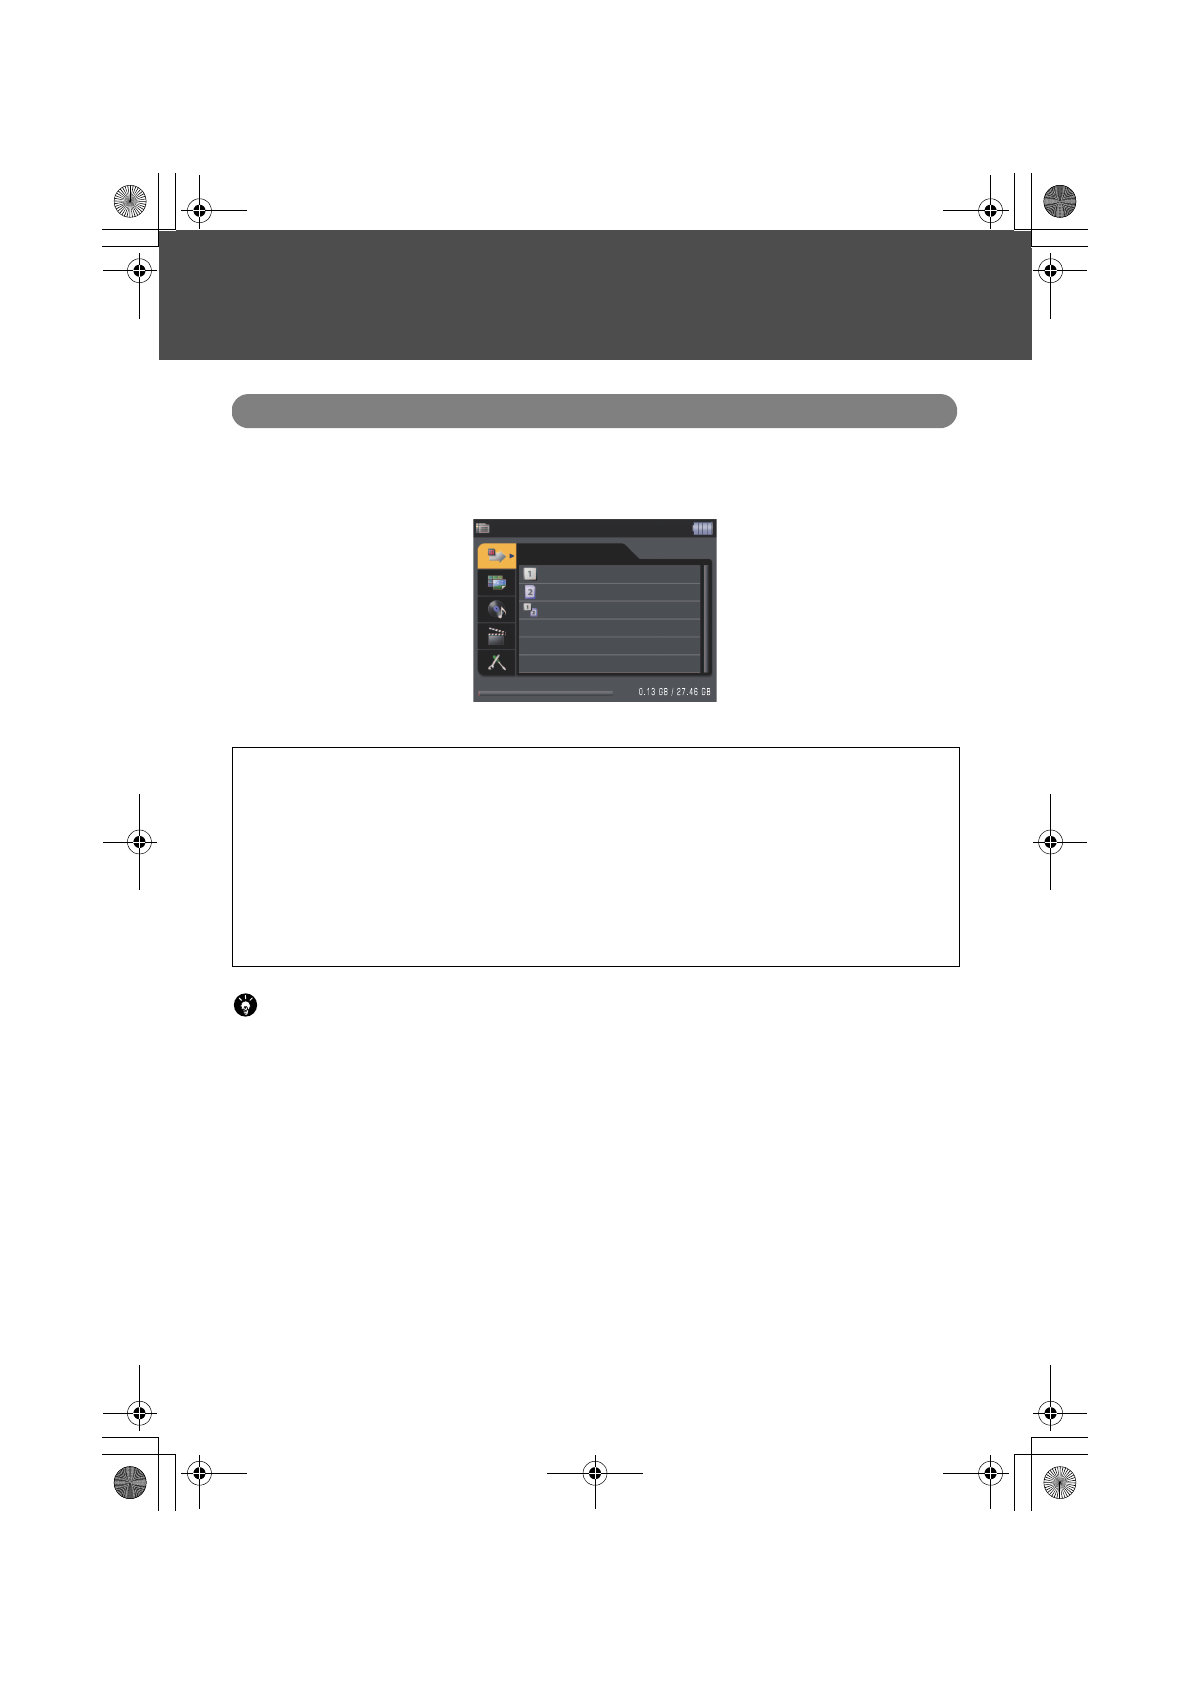
Home Screen
When you turn on the power, the Home screen appears.
The Home screen has the five basic functions.
Point
If you have set a PIN, the PIN input screen appears when you turn on the power (see "PIN setting" on page 50).
1 Backup
Backs up files in a memory card to the HDD (see "Backing up" on page 24).
2 Playback
Plays back images stored in the HDD or a memory card (see "Playing Back Images" on page 28).
3 Sound player
Plays back music data (see "Listening to Music" on page 35).
4 Movie player
Plays back movie data (see "Watching a Movie" on page 39).
5 Setup
Sets the brightness of the LCD, Date/Time, etc. (see "Configuring Various Settings" on page 44).
Home
Backup
Card 1
Card 2
Card 1&2
Media StorageM30_M80.book Page 21 Wednesday, December 20, 2006 2:34 PM
Page 23
22
Preparation for Use
Specifying the option/Determine Operation
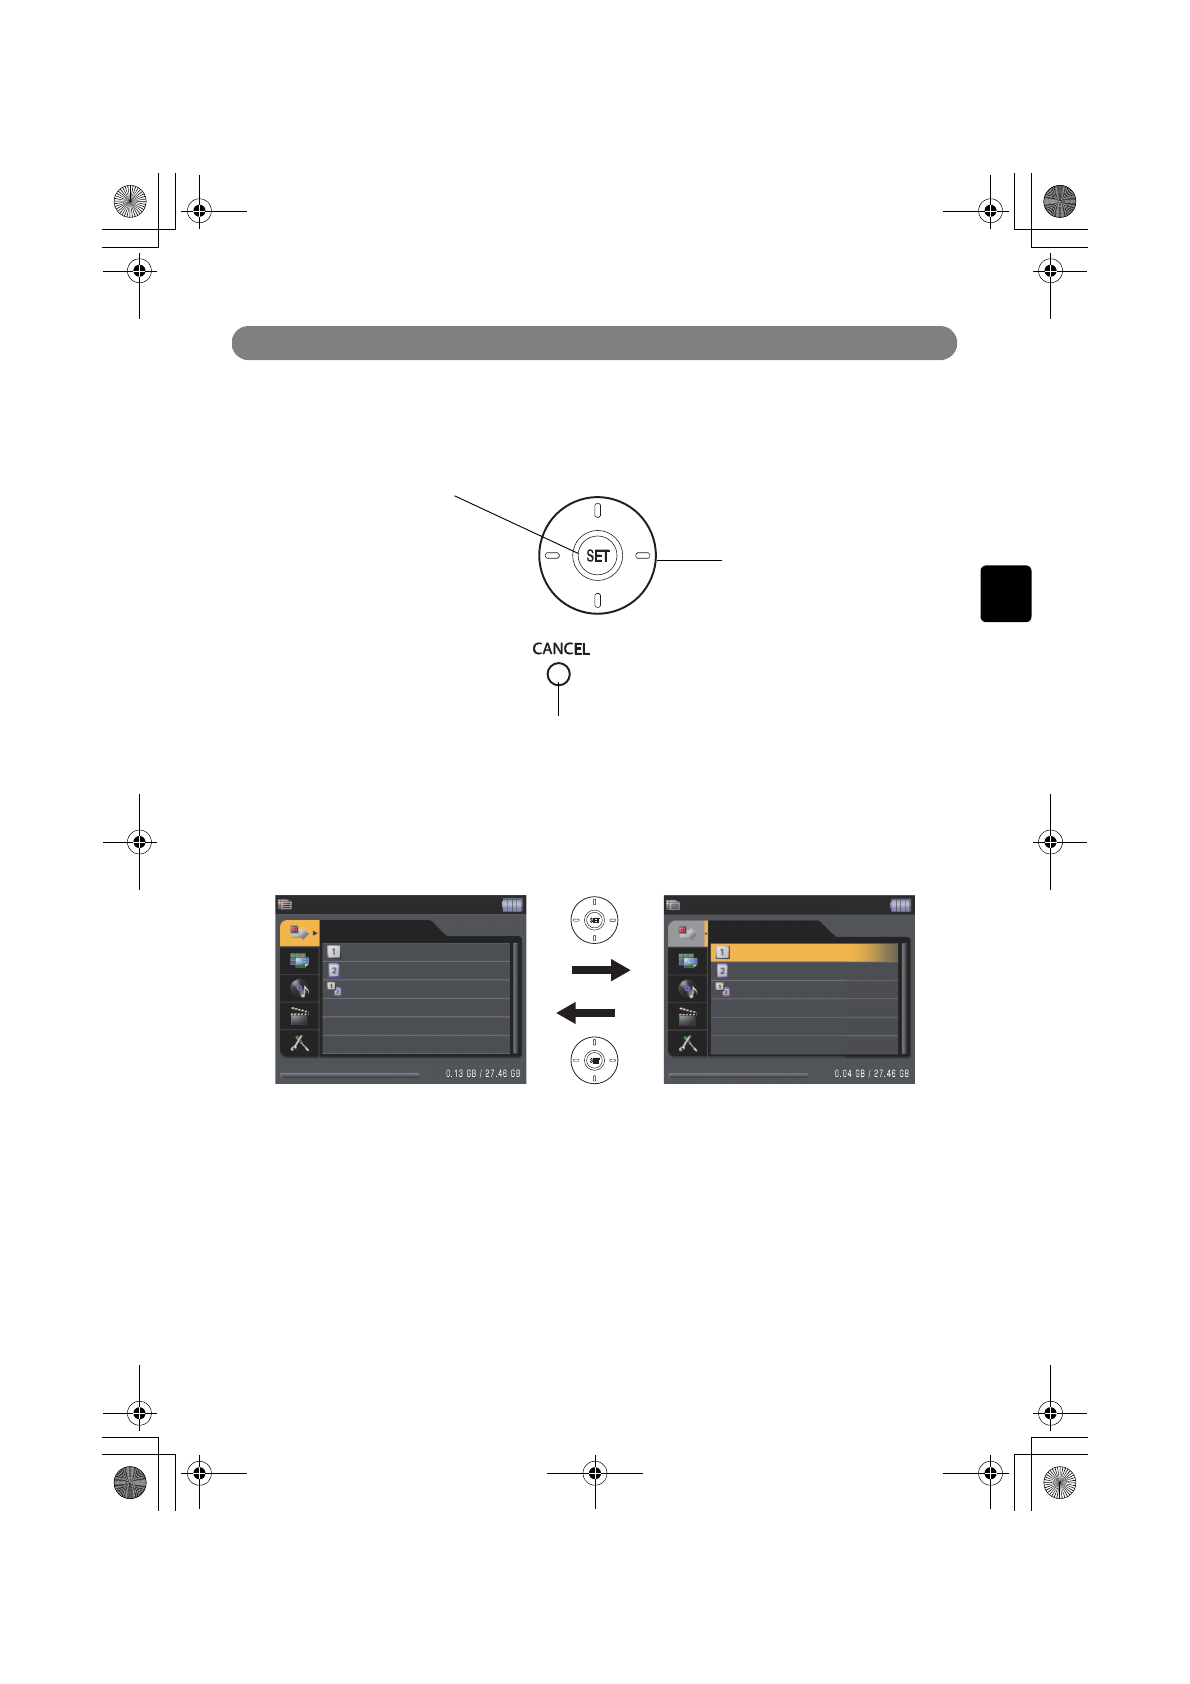
Use <Direction>, <SET> or <CANCEL> to select
and determine the option.
* In this document, buttons and keys are enclosed by < >.
<SET> button
Use this to determine the operation.
<CANCEL> button
Use this to go back to the previous screen.
<Direction> key
Use Up arrow, Down arrow,
Left arrow or right arrow to
specify the option.
Home
Backup
Card 1
Card 2
Card 1&2
Backup
Card 1
Card 2
Card 1&2
Home
Select <SET> or <Direction>
to choose the option
<CANCEL> returns you
back to the Home screen
pre_3.fm Page 22 Thursday, December 21, 2006 9:48 AM
Page 24
23
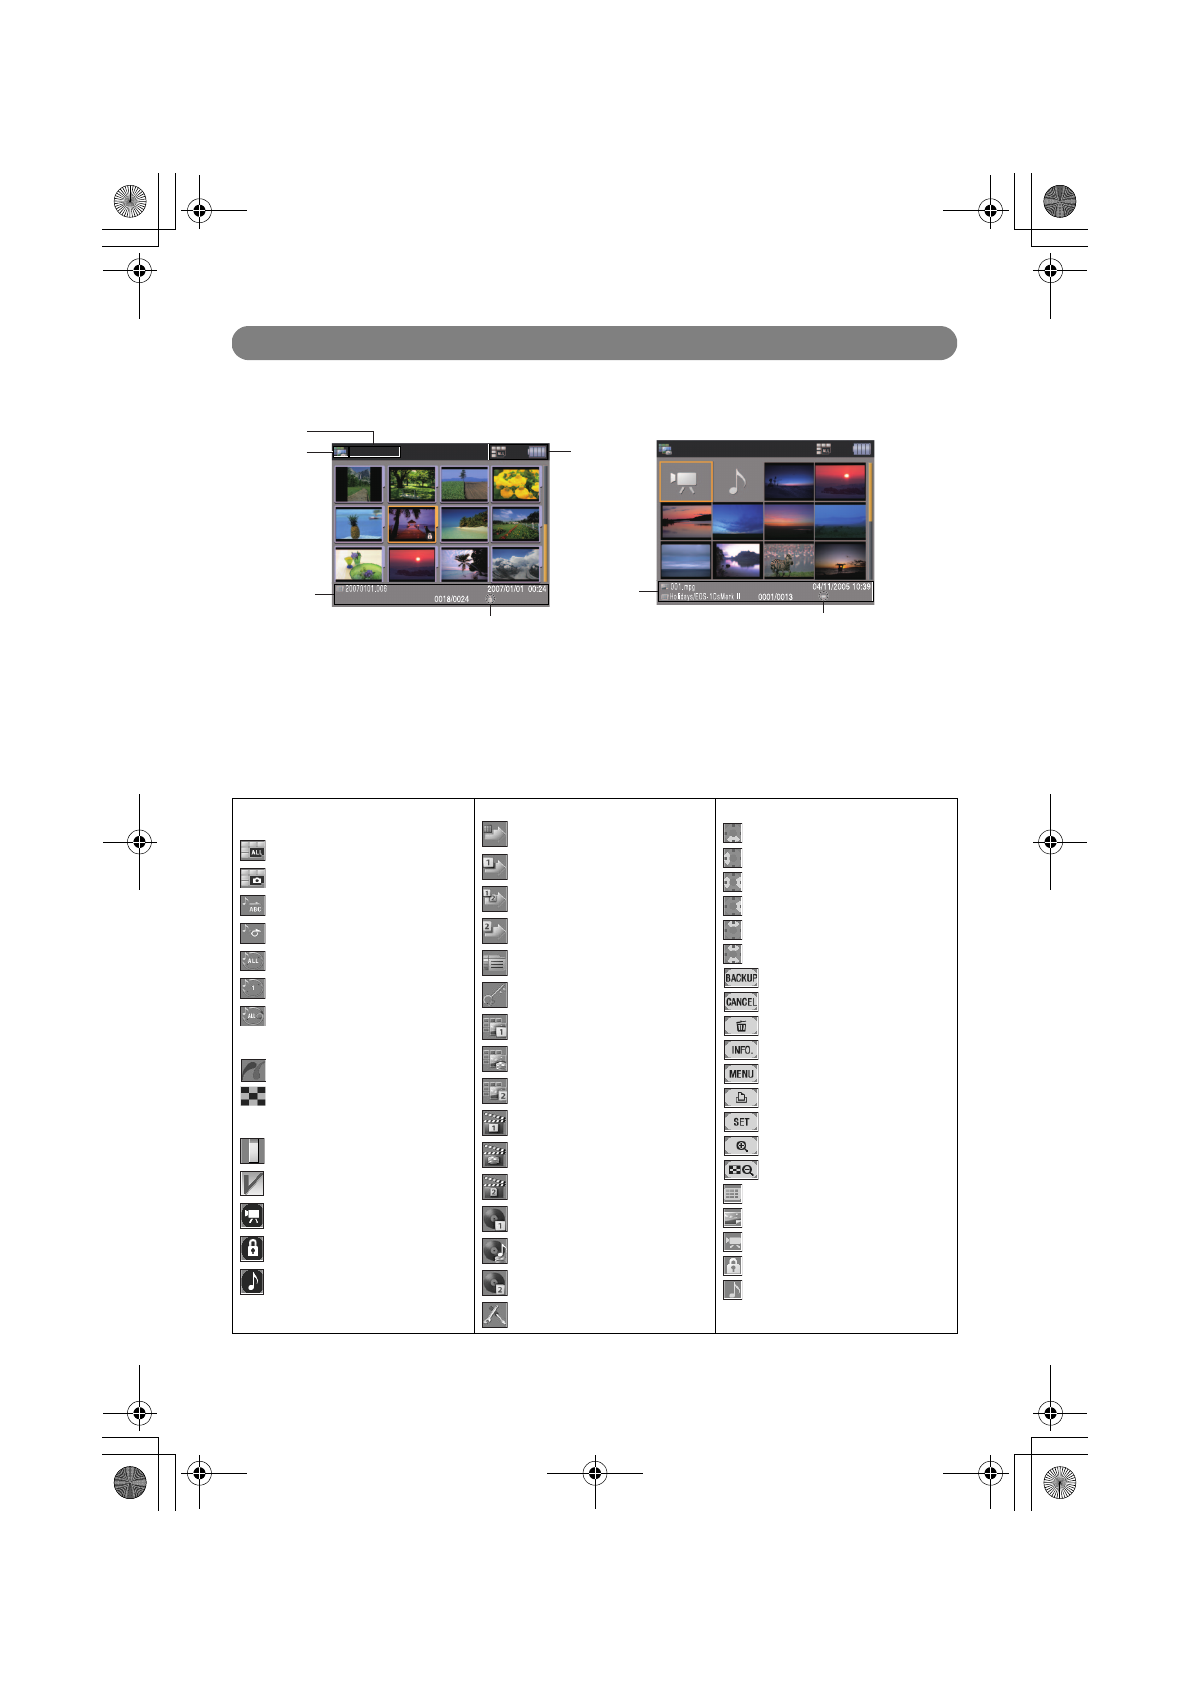
Description of the Basic Screen
The basic screen contains the following:
1 Medium icon: Displays an icon for a memory card or the HDD that are currently used to play back. In the various
setting screens, dedicated icons are displayed.
2 Function/screen name: Displays the screen name for the function that is now running.
3 Various icons: Displays icons for the view modes, remaining battery power, etc.
4 Information display area: Displays the album name, created date, etc.
5 Icon: Displays the protection icon, if protected.
6 Information display area: Displays the file name, shooting date, album name, etc.
7 Icon: Displays an icon for movies or music files.
Image index
Album index
1
2
4
5
3
6
7
<List of albums> <List of images> <Single view mode>
■ Display mode
(Playback/sound player function)
Display-all mode
Camera mode
Playback in the order based on the file names
Shuffle playback
Repeat all files
Repeat just one file
Playback all + shuffle
■ Printer
PictBridge
Index printing specified
■ Icons displayed on thumbnails
Bookmark
Checkmark
Movie file
Protection
Sound file/still image + sound
■ Function/Medium display
Backup
(General)
Backup
(From CF c ard)
Backup
(From CF card and SD card)
Backup
(From SD c ard)
Home screen
Authentication screen
Playback
(From CF c ard)
Playback
(From HDD)
Playback
(From SD c ard)
Movie player
(From CF c ard)
Movie player
(From HDD)
Movie player
(From SD c ard)
Sound player
(From CF c ard)
Sound player
(From HDD)
Sound player
(From SD c ard)
System settings
■ Instructional/Informational icons
Down arrow key
Left arrow key
Left/right arrow key
Right arrow key
Up arrow key
Up/down arrow key
BACKUP button
CANCEL button
Erase button
Info button
MENU button
Print button
Set button
Zoom-in button
Zoom-out/index button
Album name/file path
File name/DCF file number
Movie file
Protection
Sound file/still image + sound
pre_3.fm Page 23 Thursday, December 21, 2006 9:48 AM
Page 25
24
Backing up Files
● Backing up Files●
■ Supported memory cards
The MEDIA STORAGE M30/M80 supports the following memory cards.
• CompactFlash (CF) card
(TYPE I, II) (Up to 8GB)
• Microdrive
• SD/SDHC memory card
• MultiMediaCard
Backing up Images from a Memory Card to the HDD
Back up files in a memory card to the MEDIA STORAGE M30/M80 built-in HDD.
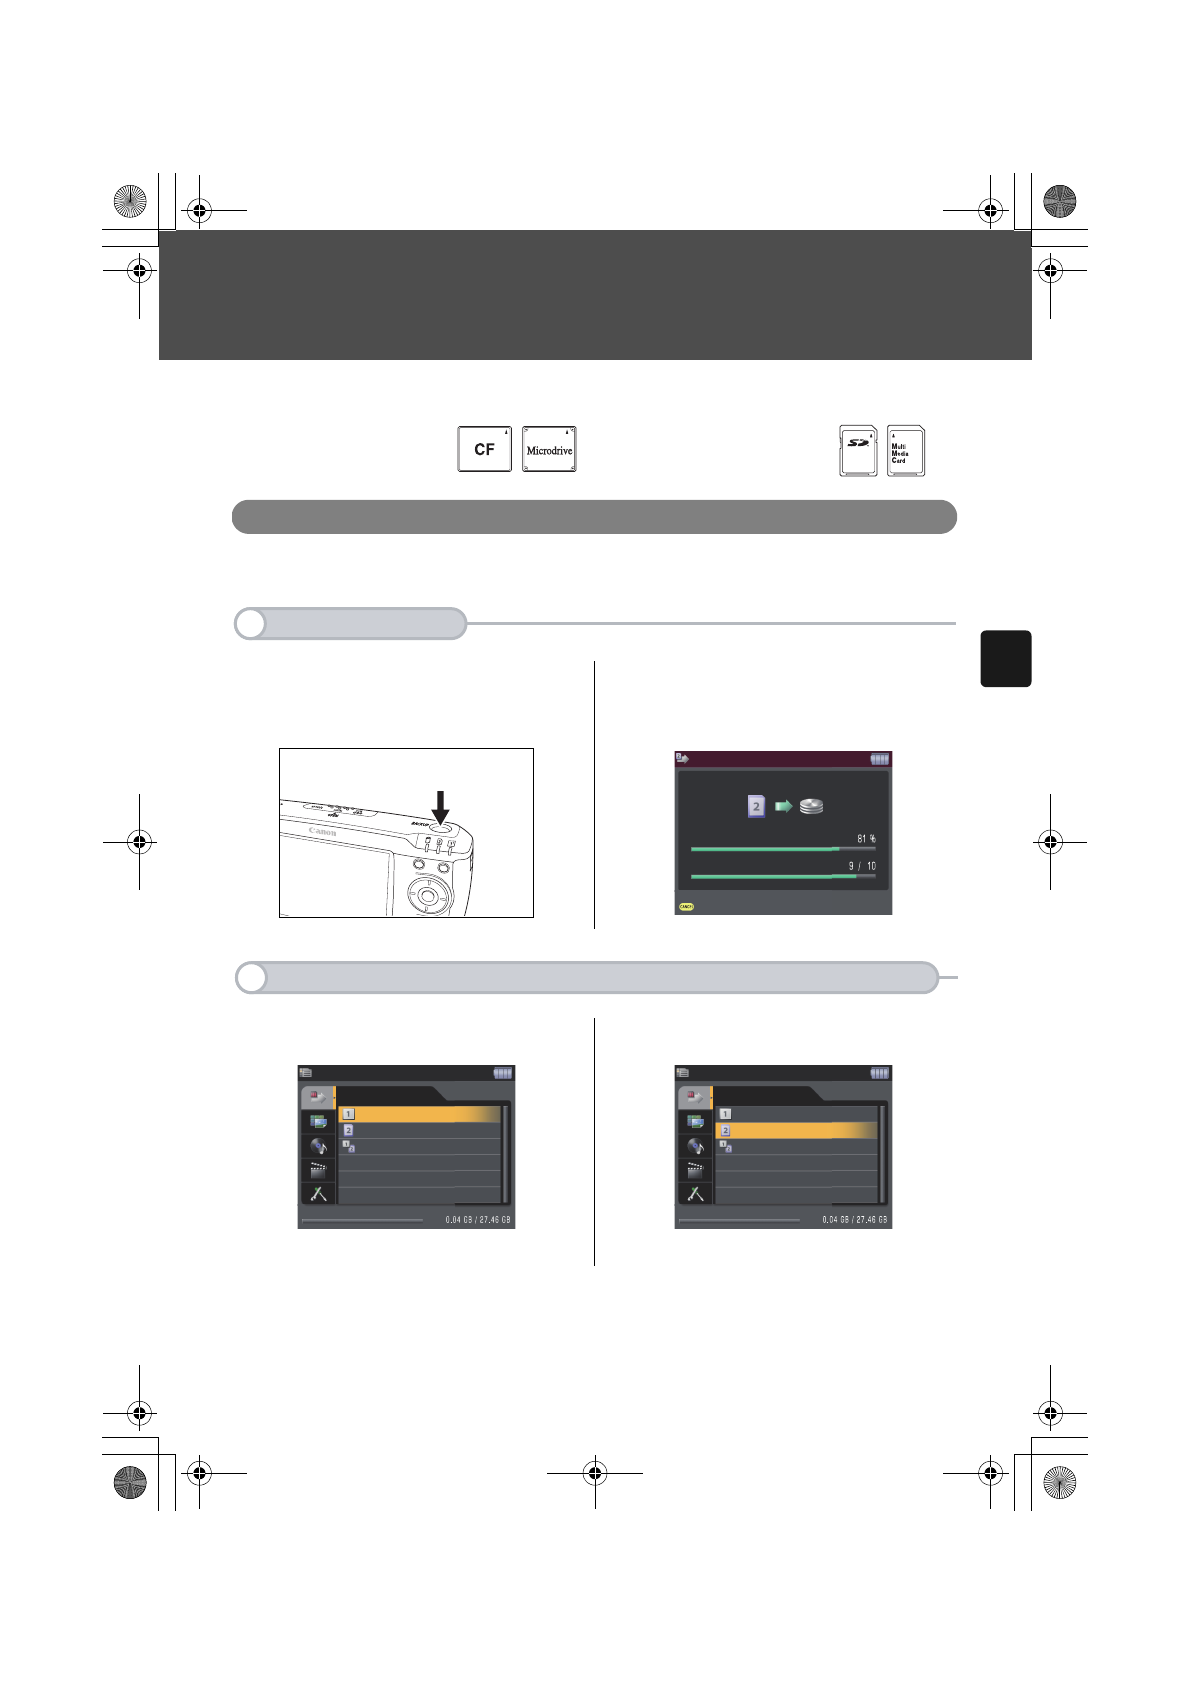
1 Press <BACKUP> for 2 seconds when the
memory card that contains the files you want to
back up is inserted into the MEDIA STORAGE M30/
M80.
2 Backup will begin and the progress of the
backup will be displayed on the screen. When
completed, a message "Backup was completed
successfully" will be displayed.
1 Choose [Backup] on the Home screen and press
<SET>.
2 Select the card that contains the files you want
to back up and press <SET>.
1
One-Touch Backup
Press for 2 seconds
Backup-ALL
Current file
Progress
Now backing up data from Card 2.
Cancel backup
2
Backing up Images by Selecting a Memory Card on the Home Screen
Backup
Card 1
Card 2
Card 1&2
Home
Home
Backup
Card 1
Card 2
Card 1&2
base_1.fm Page 24 Friday, February 2, 2007 8:52 AM
Page 26
25
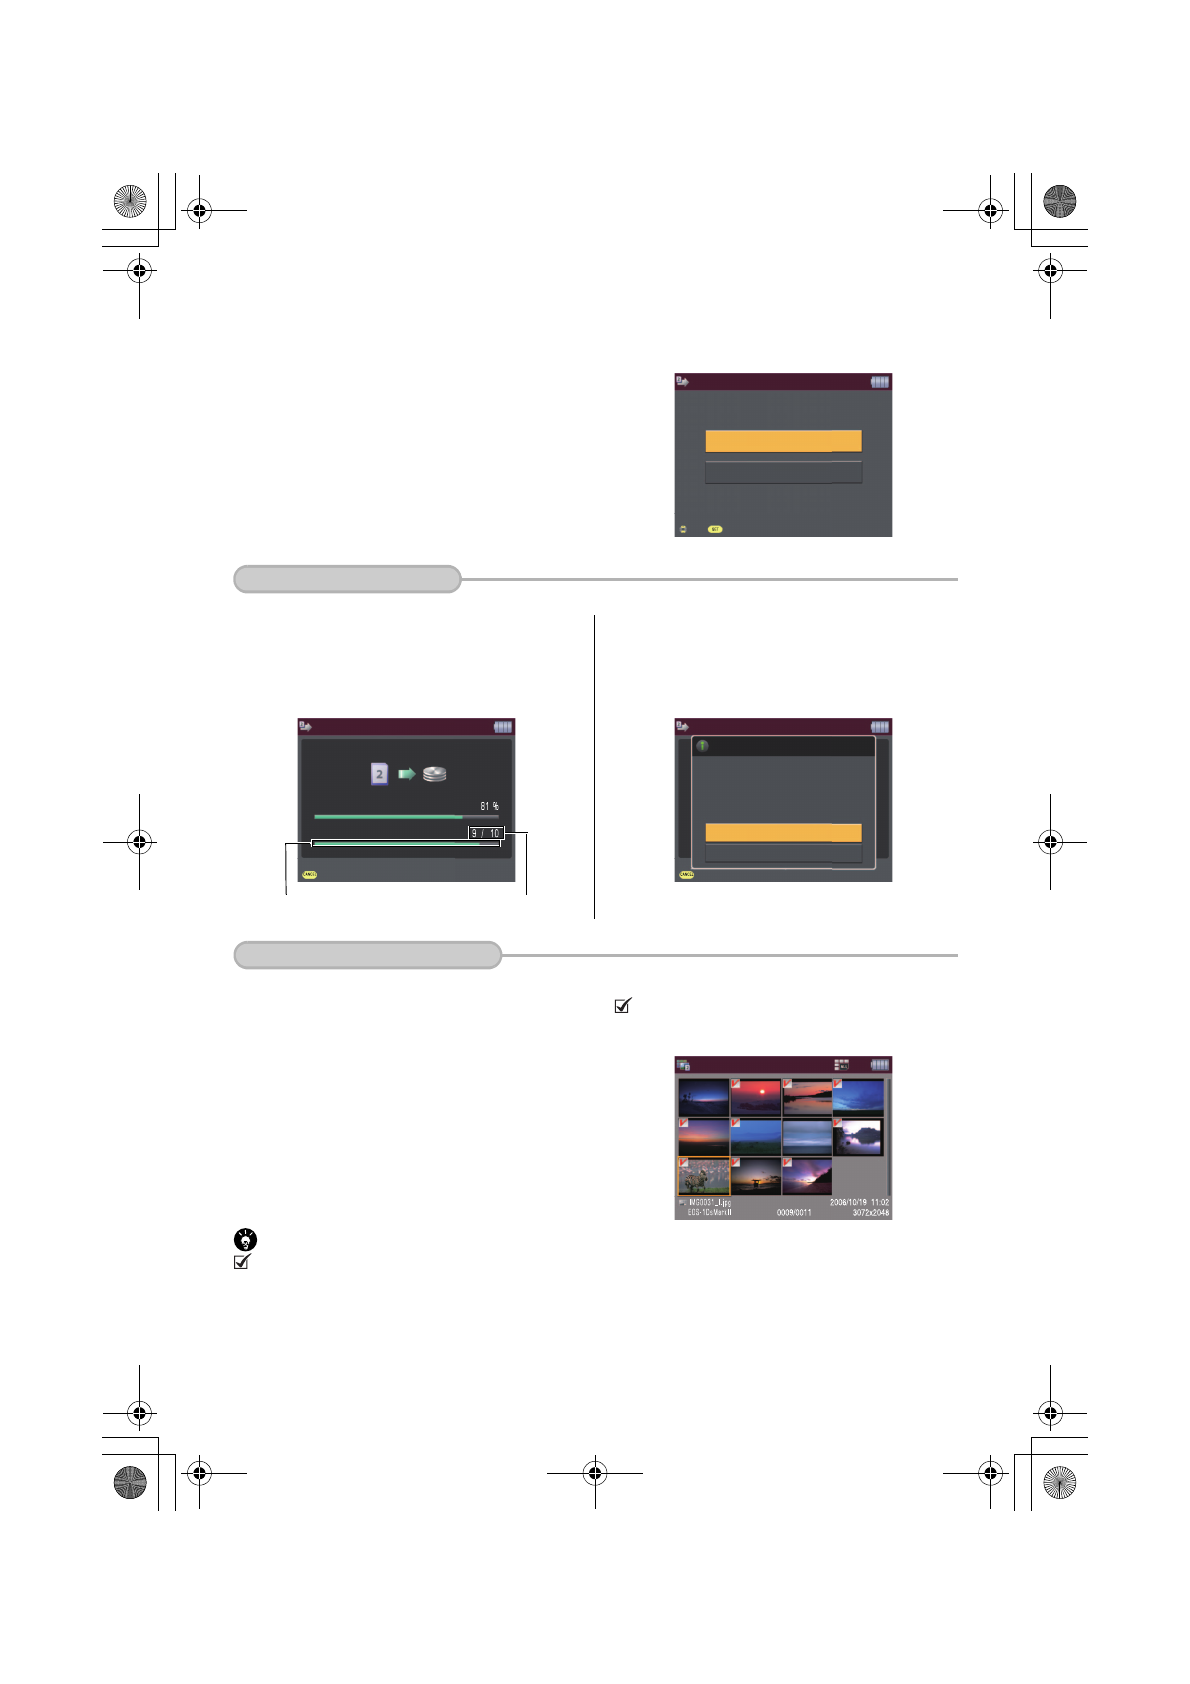
3 Select the method for backing up. On the Choose Backup Method screen that is displayed. Select a
backup method by using the <Direction> Key and press <SET>.
1 The progress of the backup will be displayed on
the screen. If you have checked the [Verification in
Backup&Copy] in [Setup], the verification will be
performed on the images beginning with the first
one, after the backup is completed.
2 When the process is completed, you will see a
backup completion message. Now, you can go to
the destination Album screen or Home screen.
1 Images in the card selected will be displayed. Select the image you want to back up and press <SET>.
Repeat this step if you want to select multiple images ( icon will be displayed on the upper left of the
images selected).
Point
To remove the icon, select the images again and press <SET>.
Backup
ALL
SELECT
Select a method for backing up data from Card 2.
Select
Confirm
If you select [ALL]
Backup-ALL
Current file
Progress
Now backing up data from Card 2.
Cancel backup
Progress indicator Files being backed up
Backup-All
Backup and Verification completed
Backup and Verification have completed
successfully.
Go to the Home screen
Cancel verification
Open the destination Album
No
w
If you select [SELECT]
Backup-Select
base_1.fm Page 25 Thursday, December 21, 2006 9:51 AM
Page 27
26
Backing up Files
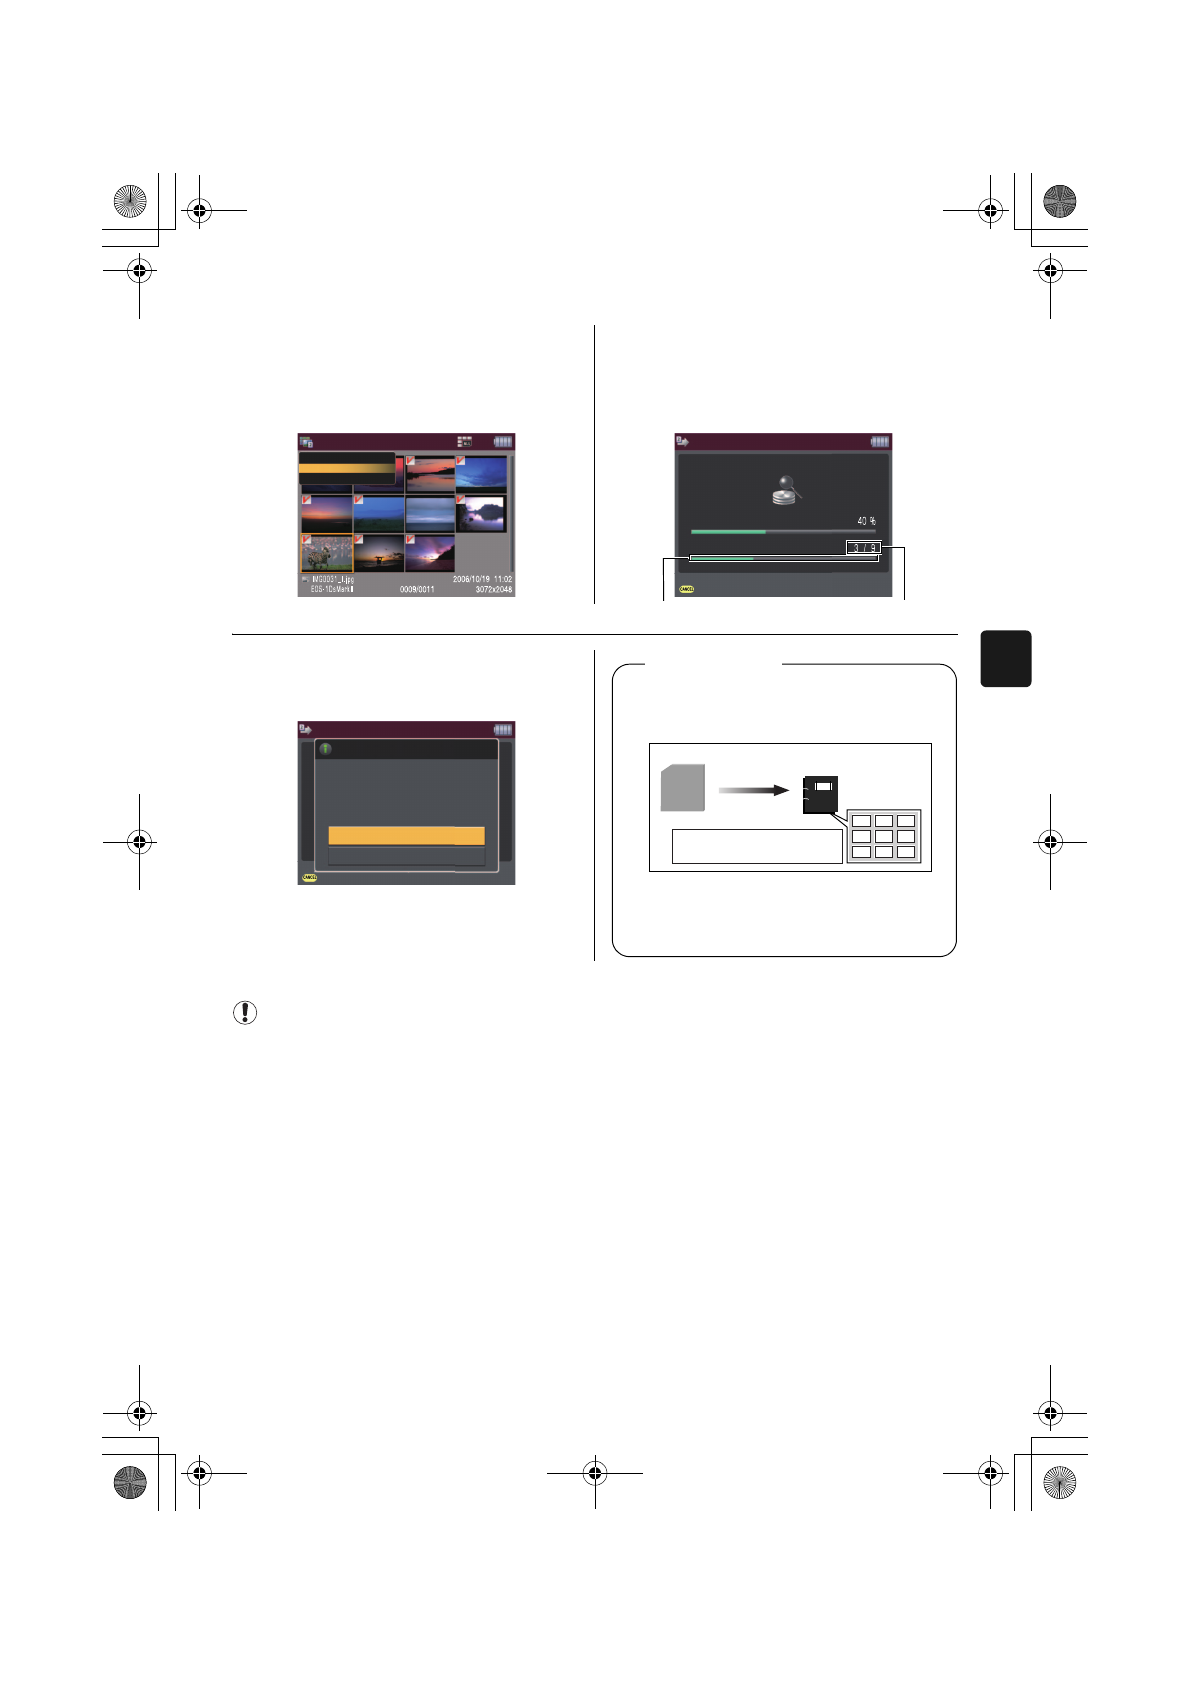
2 Press <MENU> to display the function menus,
select [Execute backup], and press <SET>.
3 The progress of the backup will be displayed on
the screen. If you have checked the [Verification in
Backup&Copy] in [Setup], the verification will be
performed on the images beginning with the first
one, after the backup is completed.
4 When the process is completed, you will see a
backup completion message. Now, you can go to
the destination Album or Home screen.
Note
• If the free HDD space is not sufficient for the amount of data you are trying to back up, the "Cannot backup" message
will be displayed. Erase unnecessary data in the HDD to increase available free space.
• Those images that the MEDIA STORAGE M30/M80 cannot play back are represented by alternative images on the Image
Index and Single display screens. They also cannot be played back after backup.
• If there are files that failed to be backed up, the number of those files will be displayed on the screen.
In this case:
1 Back up only the files that failed to be backed up again.
2 Back up all files on the same conditions again.
3 Return to the Home screen.
Choose one of these options and press <SET>.
Backup-Select
Home screen
Execute backup
Switch display mode
Backup-Select
Now verifying data on the HDD
Cancel verification
Current file
Progress
Backup and Verification have completed
successfully.
Open the destination Album
Cancel verification
No
w
Go to the Home screen
Backup-Select
Backup and Verification completed
Memory card
Backup
Album
The files are backed up
together into an album.
When you back up files from a memory card to the
HDD using the MEDIA STORAGE M30/M80, the
images will be backed up in a form of "album".
Up to 9999 files can be backed up into an album. If
you have more files to back up, the excess files will be
backed up into a second album.
*
Wh
a
t
i
s an a
lb
um
?
Progress indicator Files being backed up
Media StorageM30_M80.book Page 26 Wednesday, December 20, 2006 2:34 PM
Page 28
27
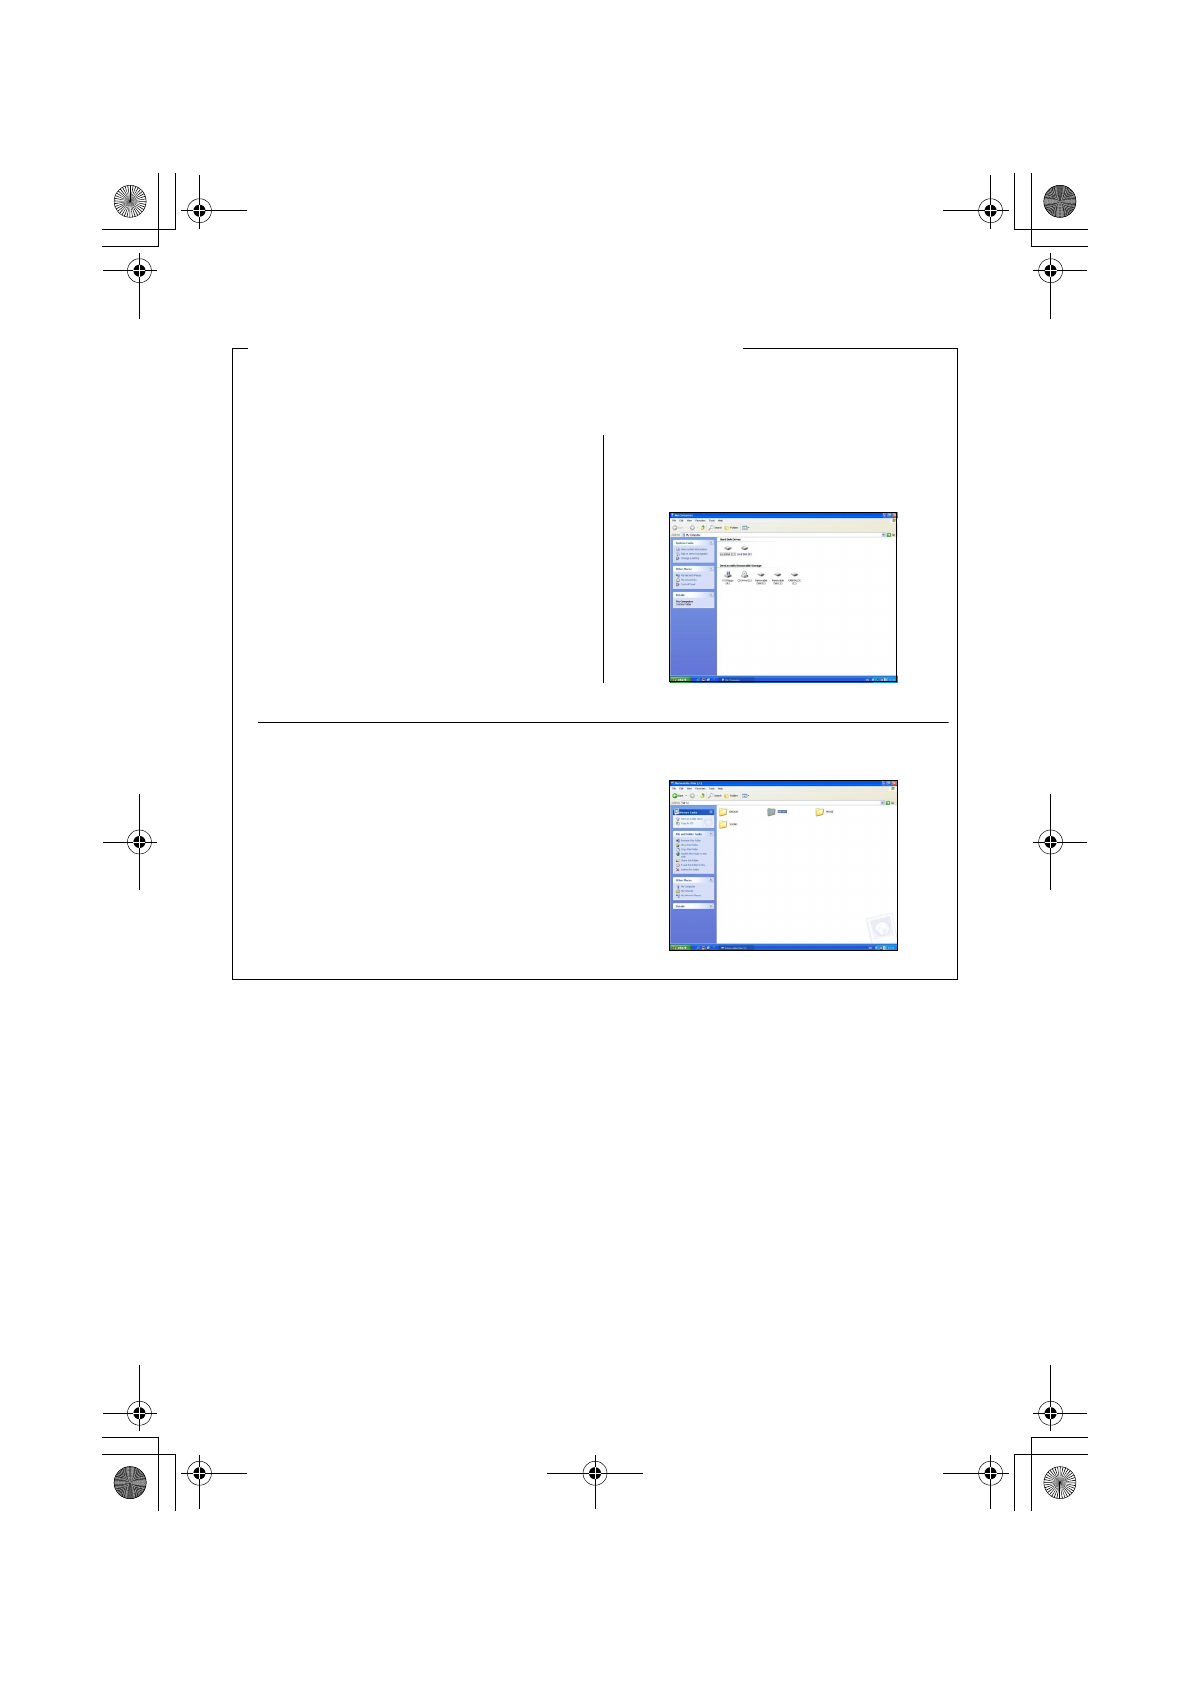
Image files can be downloaded from a computer to the MEDIA STORAGE M30/M80 built-in
HDD by connecting the MEDIA STORAGE M30/M80 to the computer.
1 Connect the supplied USB cable to the MEDIA
STORAGE M30/M80 and to the computer (see
"Connecting to a Computer" on page 19).
2
The computer considers the MEDIA STORAGE
M30/M80 as an external HDD. Click the appropriate
HDD to open it.
3 Copy the images you want to the [IMPORT] folder in the HDD you opened. Downloading image
files to the HDD is now completed.
[If You Want to Download Images from a Computer]
Media StorageM30_M80.book Page 27 Wednesday, December 20, 2006 2:34 PM
Page 29
28
Playing Back Images
● Playing Back Images●
Play back files in a memory card or the HDD.
■ Supported Files
The MEDIA STORAGE M30/M80 can display the following files by default: still image data (JPEG,
TIFF, RAW
*1
), sound data (MP3, WAVE files), and movie data (Motion JPEG
*2
, MPEG1, MPEG2,
MPEG4). Non-supported or incompatible files are represented by alternative images on the Image
Index screen and the Single View screen, but their images and sound cannot be played back (see
“Details about Supported File Formats“ on page 74).
*1: Only a raw file shot by the Canon digital camera can be played back (see “Displaying raw files“
on page 74).
*2: The Media Storage cannot play back a MotionJPEG format file in the same quality as provided
by the camera itself.
A MotionJPEG file can be backed up on your Media Storage. However, its frame rate is reduced
and the file can be played back only in the Simple playback mode without fast forwarding and
rewinding.
Select the appropriate storage option from [Playback] on the Home screen.
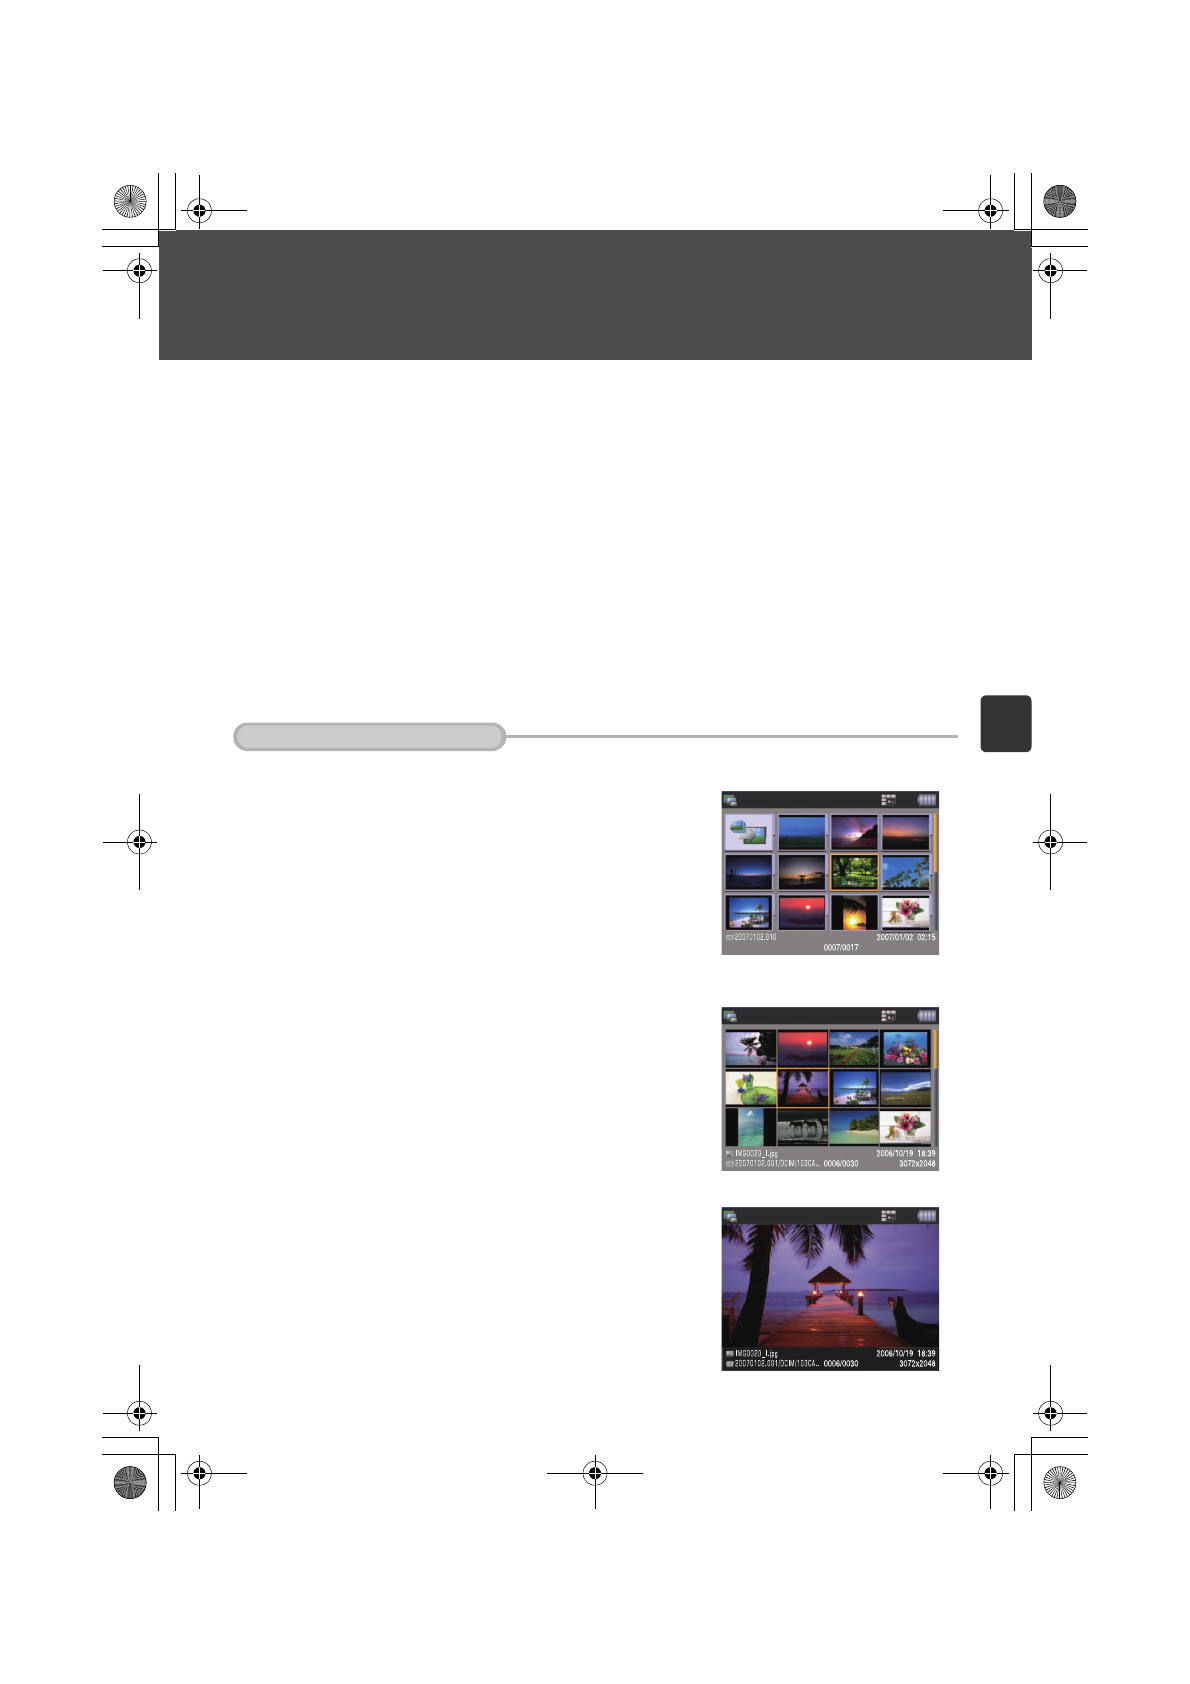
1 The screen lists 12 albums per page. Select the album that contains the file you want to play back.
2 Select the file you want to play back by pressing <SET>, which lists a different set of 12 files each time
you press it.
3 Press <SET> to display the file you selected.
If You Select the HDD
Album index
Image index
Single display
base_2.fm Page 28 Wednesday, January 31, 2007 11:00 AM
Page 30

29
Point
• On the Album Index screen, the file that has the first DFC directory and file number in the album will be used for the
front cover of the album.
• If there are 13 albums or more, they are displayed across multiple pages on the Album Index screen. In that case, use the
<Direction> key to switch the pages.
• To return to the Home screen, press <MENU> to display the function menus, select [Home screen], and press <SET>.
1 Go to the Image Index screen, which lists 12 images per page, select the file you want to play back, and
press <SET>.
2 The selected file will be displayed.
Point
• The Image Index screen lists images across multiple pages if there are more than 12 images. In that case, use the
<Direction> key to switch the screen.
• If the Single display screen displays a sound file or a sound-integrated image, you can play back the sound by pressing
<SET>. To adjust the volume, use the <Direction> key.
• If you want to see the previous or next image while you are still on the Single display screen, switch the pages by using
the <Direction> key.
Note
• Those images that the MEDIA STORAGE M30/M80 cannot play back are represented by alternative images on the Image
Index and Single display screens (see "Image Types that can be Displayed" on page 77).
• When the image display area has margins, such as when the image is portrait, the margin parts of the area is displayed
in black.
• To return to the Home screen, press <MENU> to display the function menus, select [Home screen], and press <SET>.
If You Select a Card
Image index
Single display
base_2.fm Page 29 Wednesday, January 31, 2007 9:26 AM
Page 31
30
Playing Back Images
Switching the Pages (12 Images Per Page)
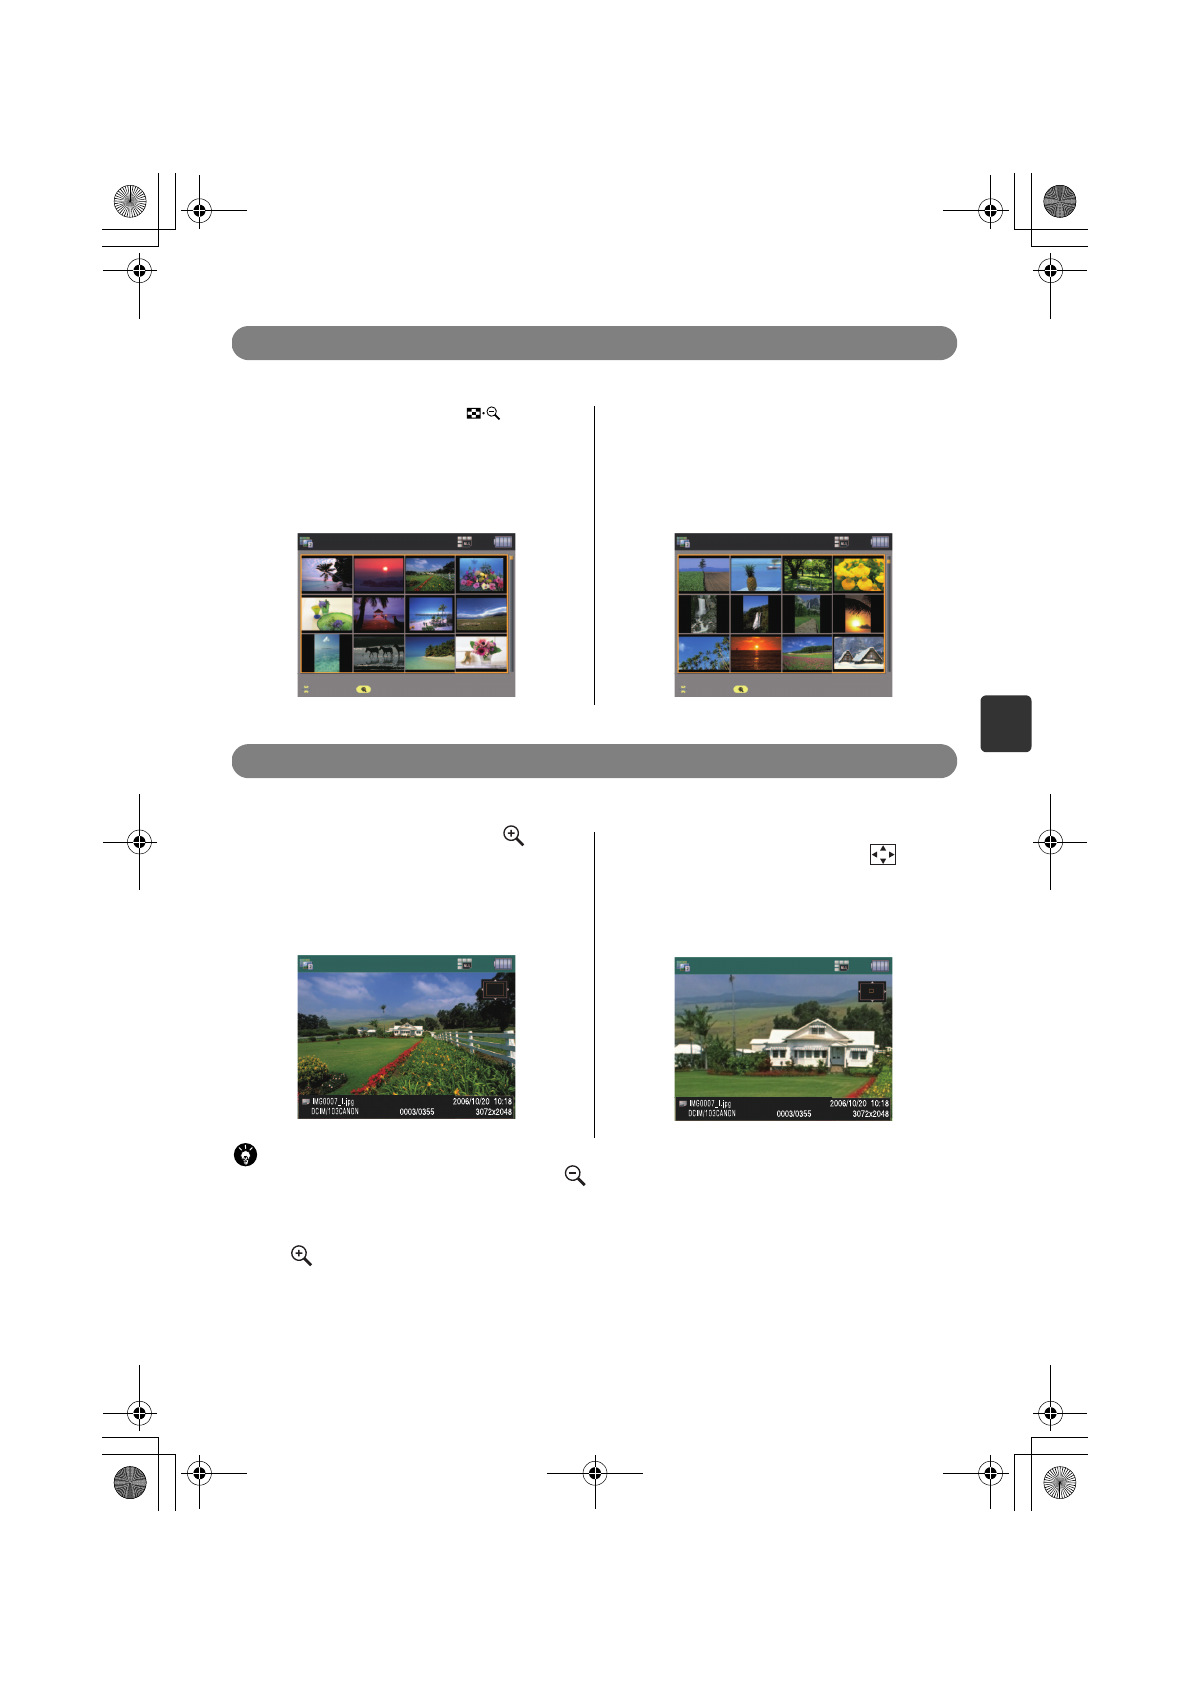
You can switch pages, each of which contains 12 images.
1 On the Image Index screen, press < >.
2 The 12 images that are displayed in the page
are selected. You can switch pages by using the
<
Direction> key.
• Use the <Direction Key: Up arrow> to move to the
previous 12 images and the <Direction Key: Down
arrow> to the next 12 images.
Zooming in on an Image (Zooming Function)
Use the zooming function to view an enlarged image.
On the Single display screen, press < > (You
can display an image at up to 100% pixel
magnification).
If the displayed image is larger than the
monitor screen, a directional icon ( ) will
appear on the upper right of the screen. Use
the <Direction> Key to scroll the image.
(When you reach an end of the image, an
arrow that shows the direction will disappear.)
Point
• To zoom out an enlarged image little by little, press < >.
• To cancel zooming, press <CANCEL>.
• To display the previous or next image at the same magnification, press <SET> after zooming and switch images using
<Direction Key: Left arrow Right arrow>.
•Press
<> on the Single display screen for a few seconds to display the image in 100% pixel magnification.
• The number of zoom-in steps and zoom-in magnification of each step depend on the size of the image.
Image index
Jump mode(0001/0003)
Scroll page
Leave from Jump mode
Image index
Jump mode(0002/0003)
Scroll page
Leave from Jump mode
Magnify
Magnify
base_2.fm Page 30 Friday, January 26, 2007 9:36 AM
Page 32
31
Rotating an Image
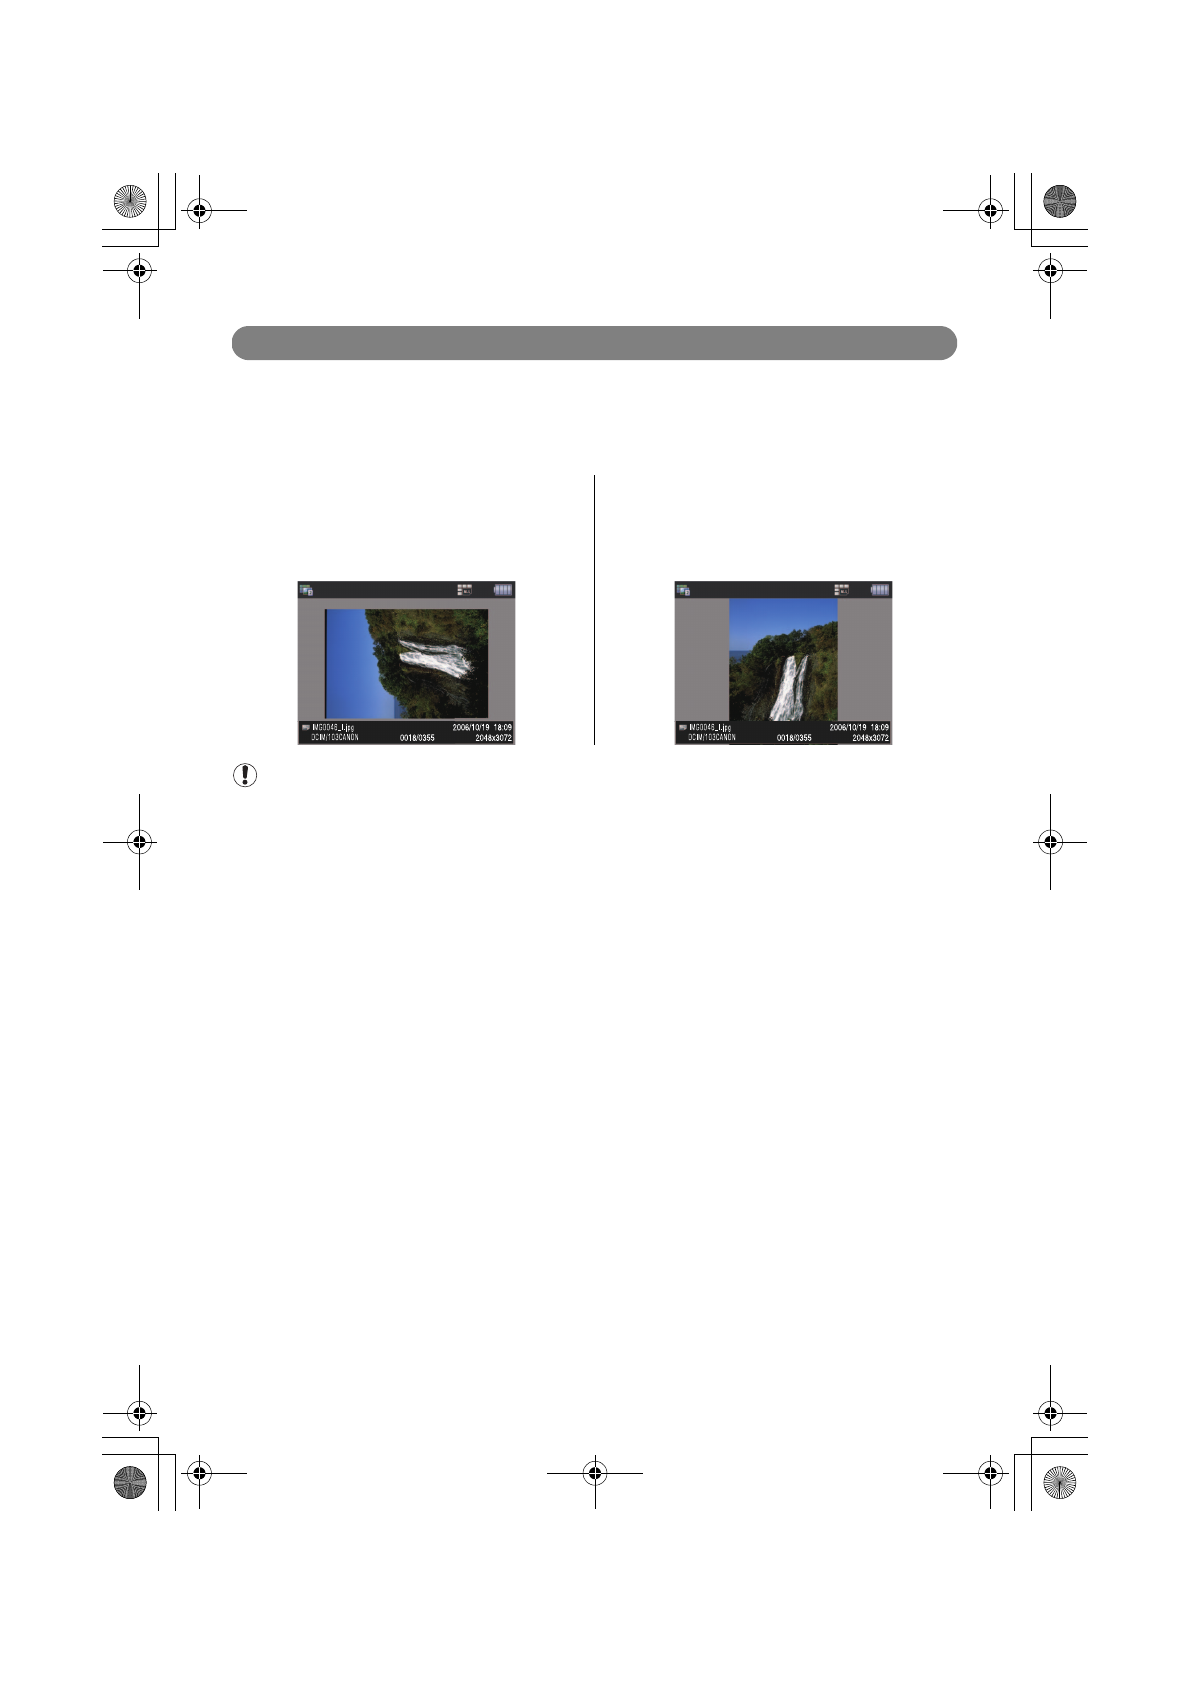
You can rotate an image using a menu function. Or, the MEDIA STORAGE
M30/M80 automatically rotates a portrait image if you have set the
[Auto rotate] (page 49) to [On] in the [Setup] of the Home screen.
1 View the image you want to rotate in single
display mode.
2
Press <MENU> to display the function menus, select
[Rotate image], and press <SET>. The rotation setting
changes in the following order: [90 degrees to the
right], [90 degrees to the left], [Original position], and
[90 degrees to the right].
Note
• Rotation does not make any change to the files in the card.
• If you display a different image after rotation, the rotation will be canceled.
Single display Single display
Media StorageM30_M80.book Page 31 Wednesday, December 20, 2006 2:34 PM
Page 33

32
Playing Back Images
Viewing a Slide Show
1 Select an album for the slide show. 2 Press <MENU> to display the function menus,
select [Slide show], and press <SET>.
3 The Slide Show Setting screen will be displayed. Set values for the items, select [Start], and press <SET>.
Album index
Album index
Home screen
Erase album
Protect album
Slide show
Print
Copy file
Move file
Arrange album
Modify album
Bookmark
Switch display mode
Start
Slide show
Interval 3 sec
Effect Off
Sound Off
Repeat On
Cancel
Please define the settings before starting a Slide show.
■ Interval between images for slide show
The valid values for the image interval are [3 sec.], [5 sec.], [10 sec.], and [Manual].
■ Effect in Slide Show
The valid values for the effect that is applied when images are switched:
• Off • Cover Right • Wipe Down
• Random • Cover Left • Wipe Right
• Cover Up • Wipe Up • Wipe Left
• Cover Down
■ Background Music (BGM) for slide show
One of the following BGMs can be set:
• Off • Memory • Resort
• Romance • Merry • File HDD
• Sunset • Snow • File card 1
• Challenger • Sporty • File card 2
Selecting [File HDD] [File card 1] [File card 2] enables you to set your favorite song from the file. Select the
desired file and song, and then press <SET>. The setting is then complete.
■ Repeating of slide show
Repeating of a slide show can be turned on and off.
[Settings for slide show]
Media StorageM30_M80.book Page 32 Wednesday, December 20, 2006 2:34 PM
Page 34
33
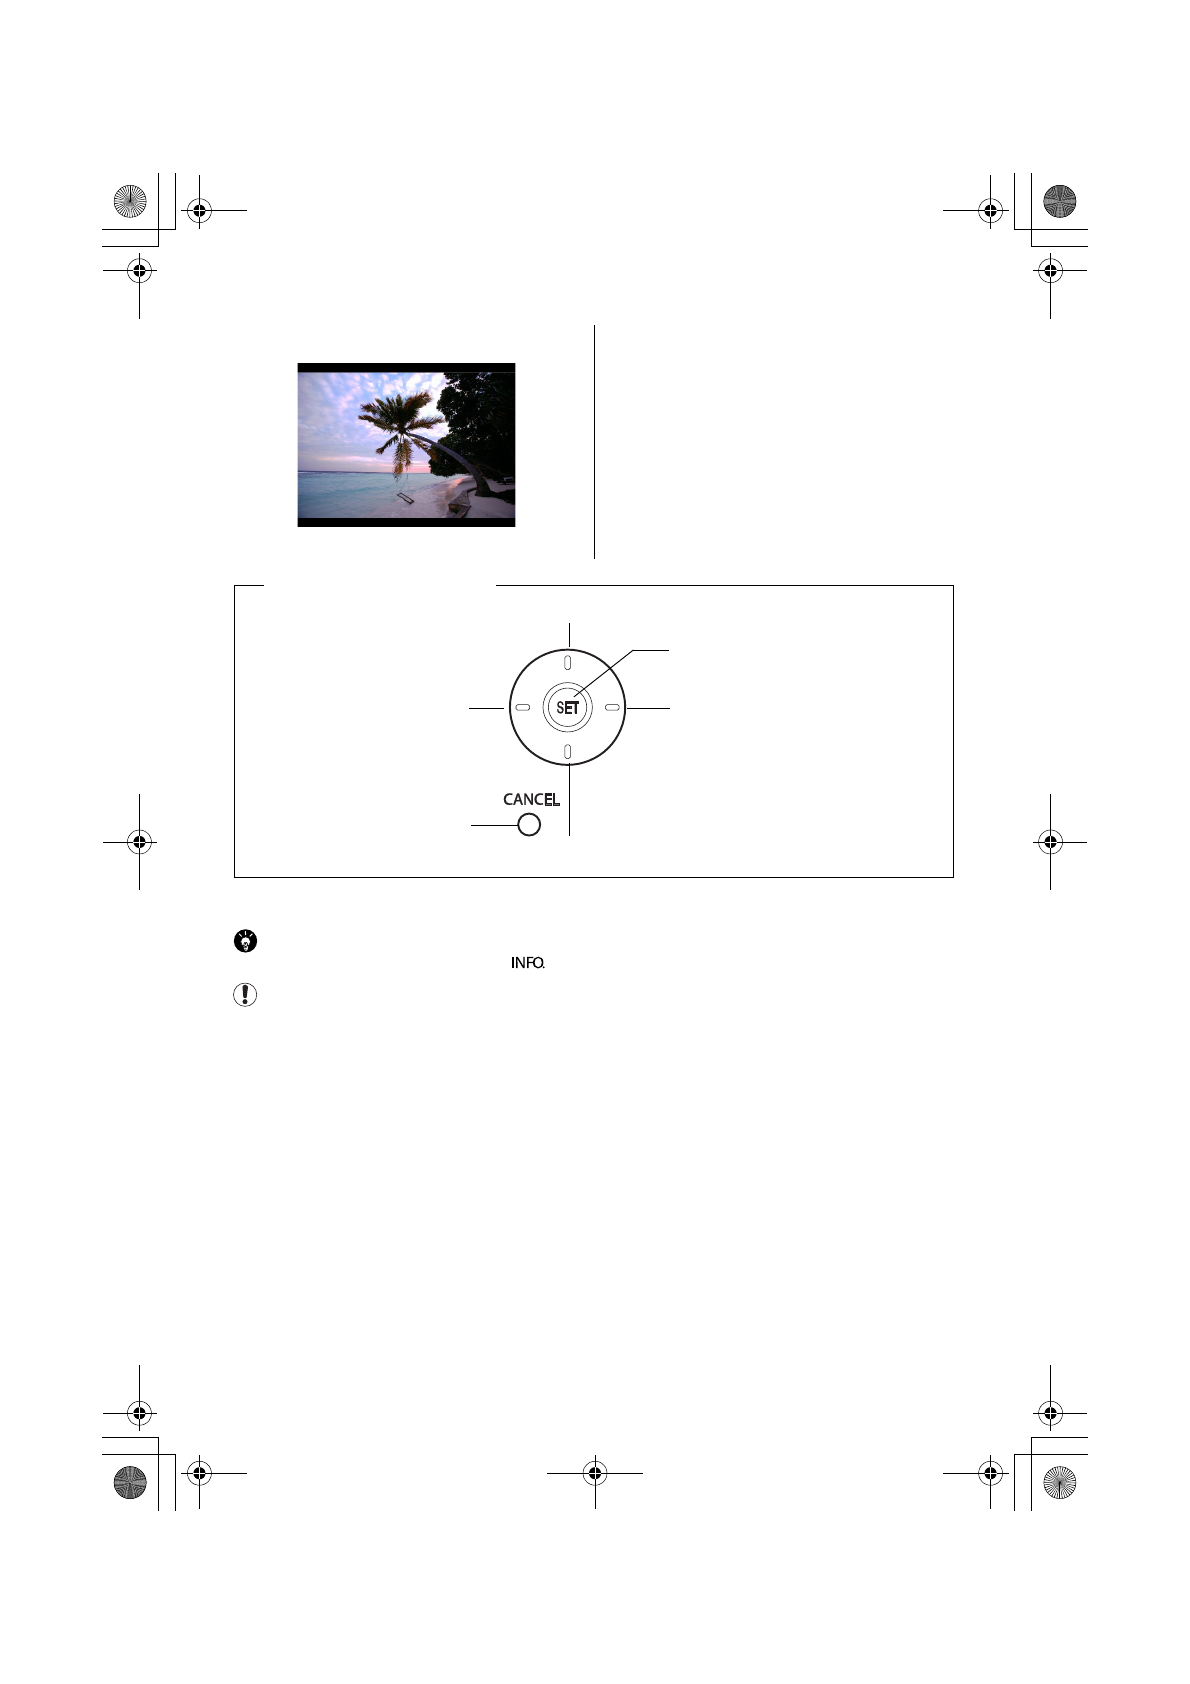
4 The slide show starts. 5 To cancel the slide show, press <CANCEL>.
Point
To display/hide the screen information, press < >.
Note
Only those files that are available to be displayed are displayed as slides.
[Operations during slide show]
Volume up
Press once to pause;
press again to resume
Volume down
To the next file
To the previous file
Exit
base_2.fm Page 33 Thursday, December 21, 2006 9:58 AM
Page 35
34
Playing Back Images
Viewing Images on TV
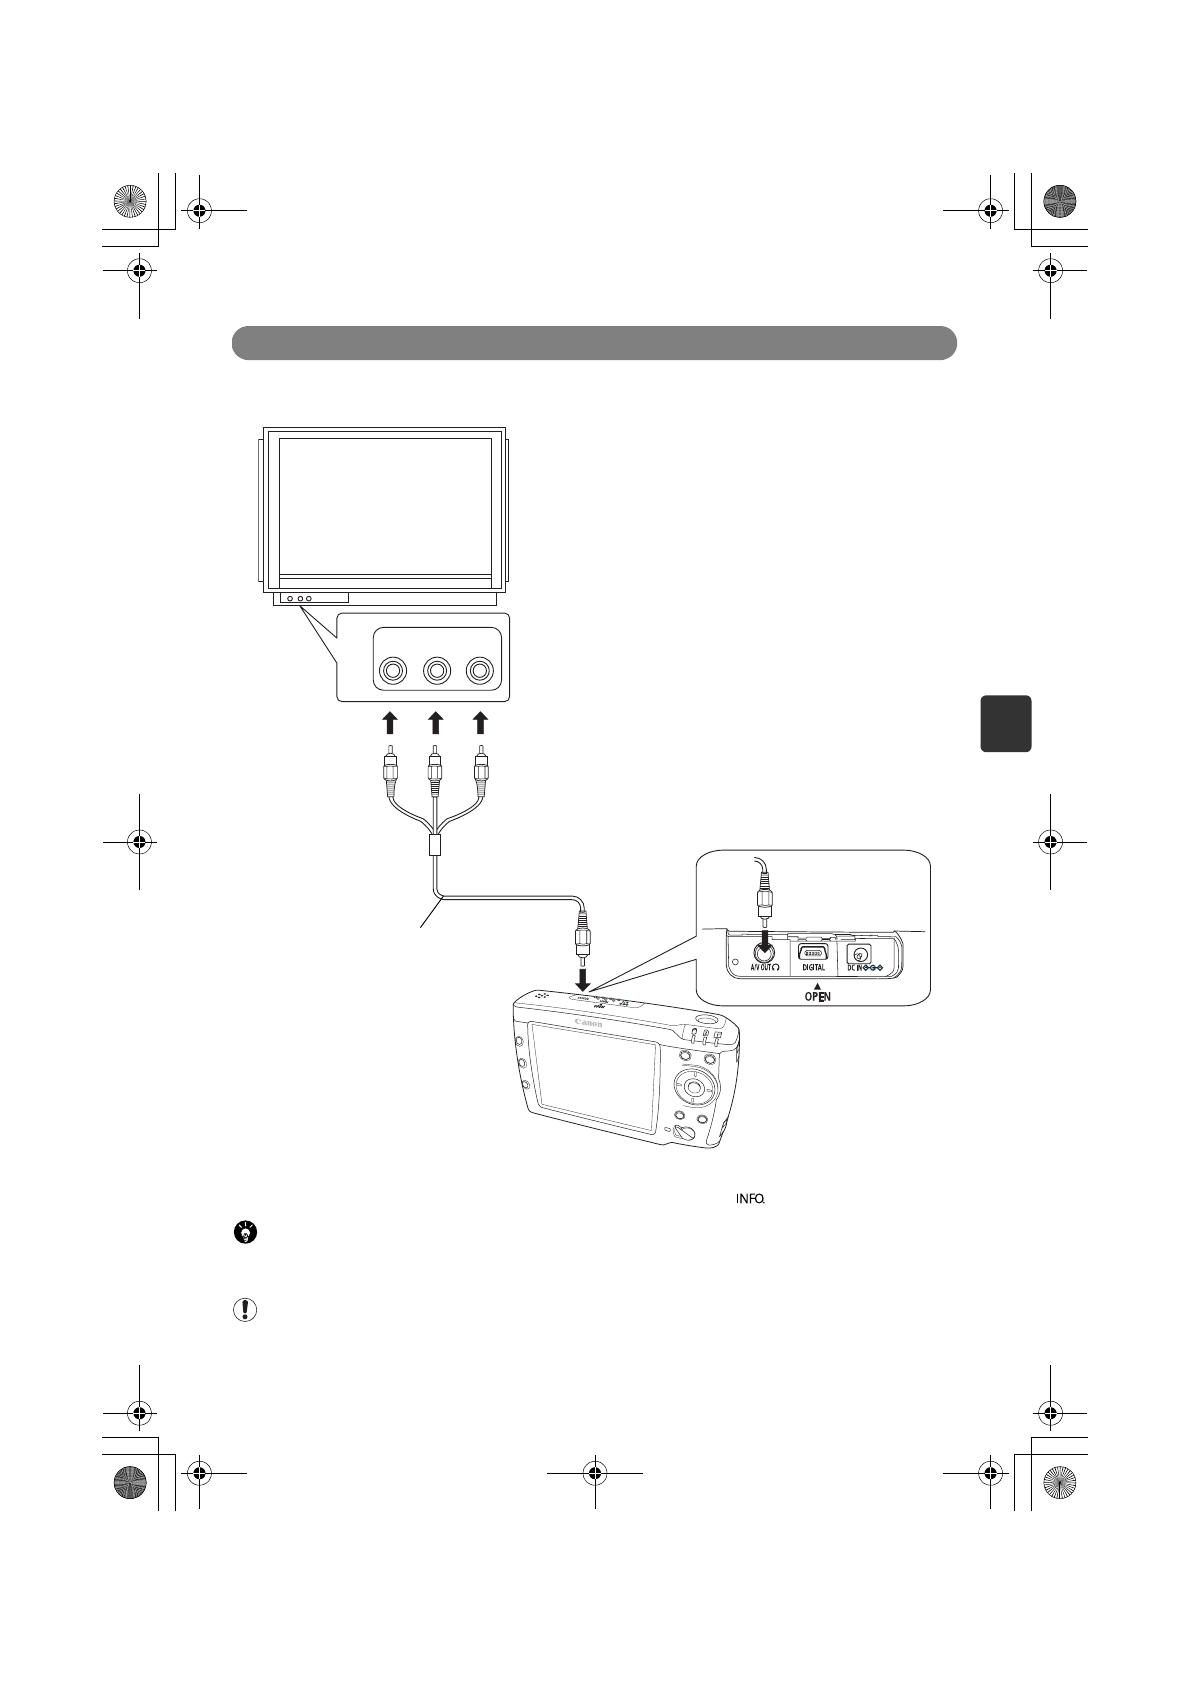
Use the supplied video cable to display images on a TV screen.
* If you plan to display images on a TV screen, change the display setting from the MEDIA STORAGE M30/M80's LCD
monitor to TV (see "Switching Screens for Output" on page 51. Or, you can use <> to change the display setting.
Point
• This wiring can be performed while the power of the MEDIA STORAGE M30/M80 is turned on.
• The LCD monitor is off while a TV screen is being used for display.
Note
• The video cable is designed for the MEDIA STORAGE. It should not be used with other equipment.
Input
Video
Sound
Left
Right
1 Connect the cable to a TV set.
2 Connect the cable to the
MEDIA STORAGE M30/M80
To the stereo sound input
terminals
Video cable
(supplied item)
To t h e v ideo
input terminal
(Yellow)
(White) (Red)
Media StorageM30_M80.book Page 34 Wednesday, December 20, 2006 2:34 PM
Page 36
35
● Listening to Music●
The MEDIA STORAGE M30/M80 supports the following music file
formats: MP3, WAVE.
Preparing to Playback Music Files on the MEDIA STORAGE M30/M80 (Downloading Music Files from a Computer)
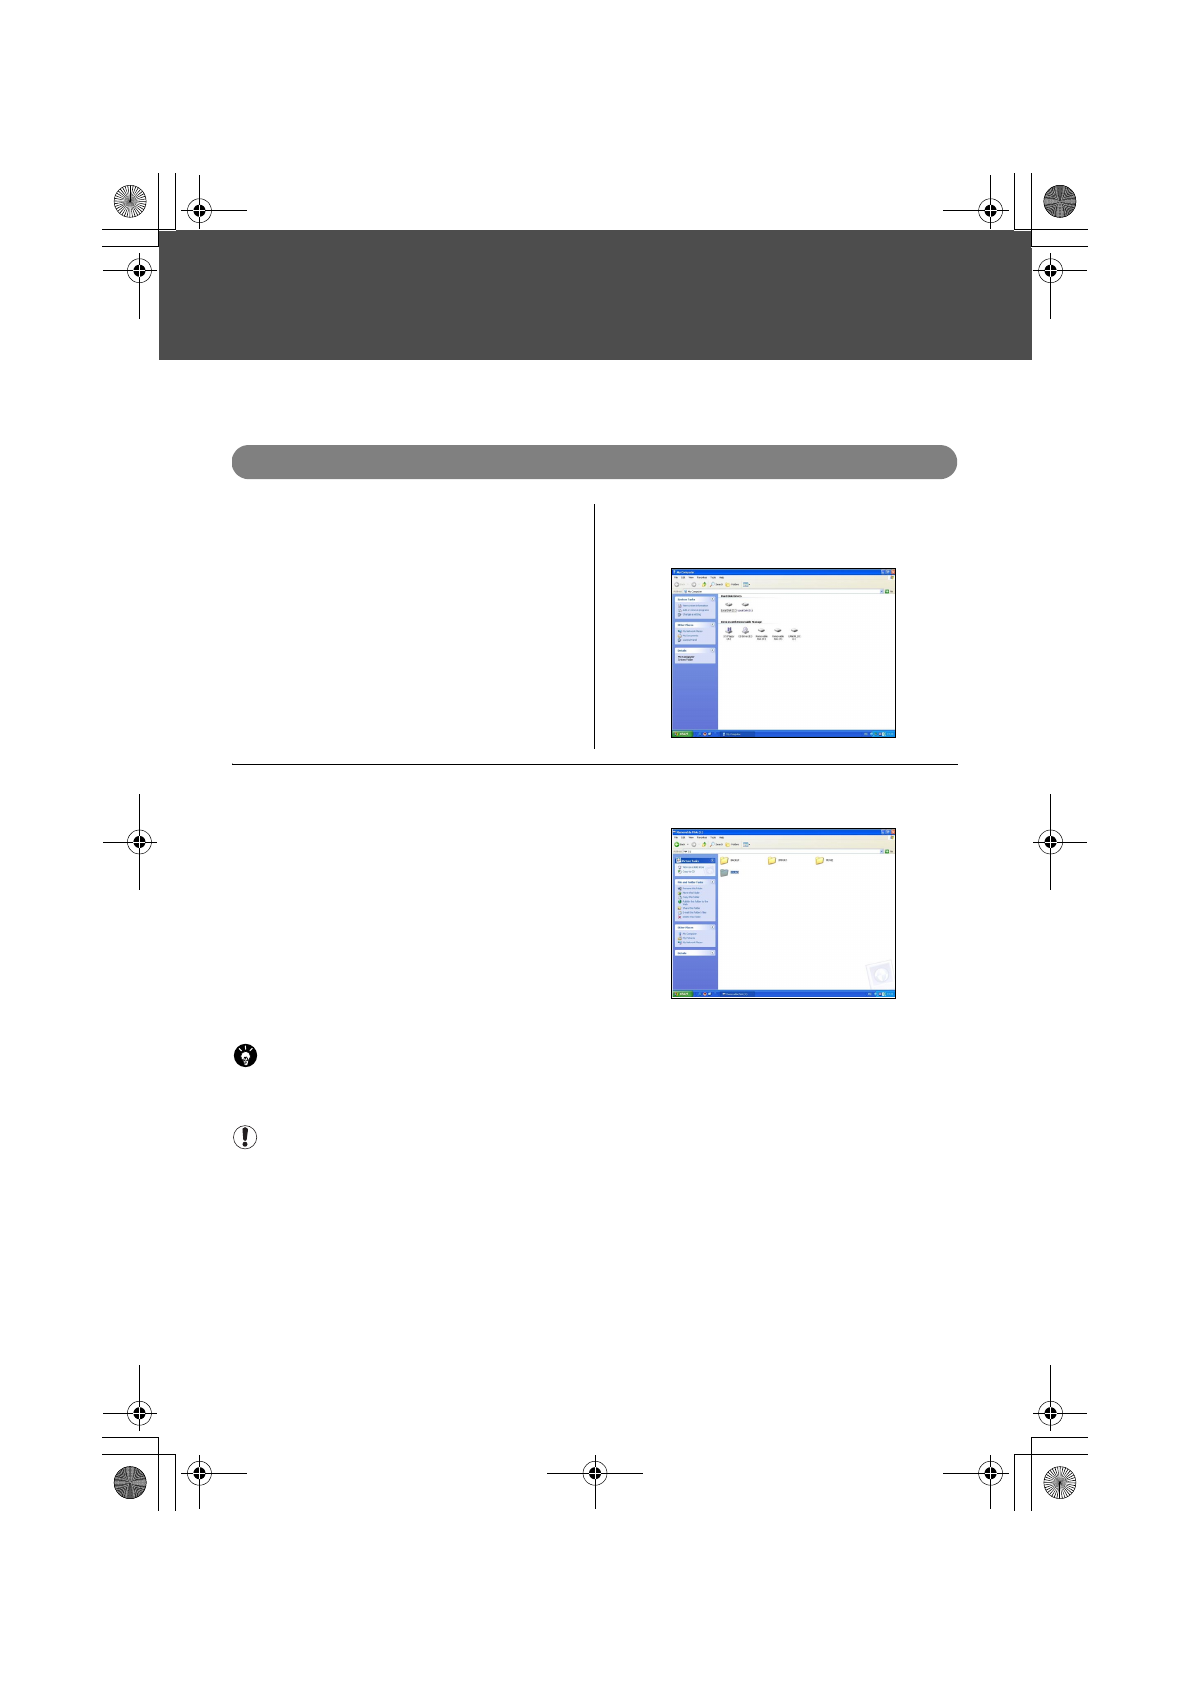
1 Connect the supplied USB cable to the MEDIA
STORAGE M30/M80 and to the computer (see
"Connecting to a Computer" on page 19).
2 The computer considers the MEDIA STORAGE
M30/M80 as an external hard disk. Click the
appropriate hard disk to open it.
3 Copy the music file you want to the [SOUND] folder in the hard disk you opened. Downloading of
music files to the HDD is now completed.
Point
Organize your favorite music folders by artist or album name before you copy them to the [SOUND] folder to display the
files in the folder on the list screen of [Sound player] in the same state as you copied them.
Note
• See "Details about Supported File Formats" on page 73 for details of supported music files.
• Music files backed up from a memory card are automatically stored in [BACKUP] folder in HDD. They cannot be found in
[SOUND] folder in HDD (see "About the Folder Structure in the Viewer" on page 75).
Media StorageM30_M80.book Page 35 Wednesday, December 20, 2006 2:34 PM
Page 37
36
Listening to Music
Playing Back Music Files
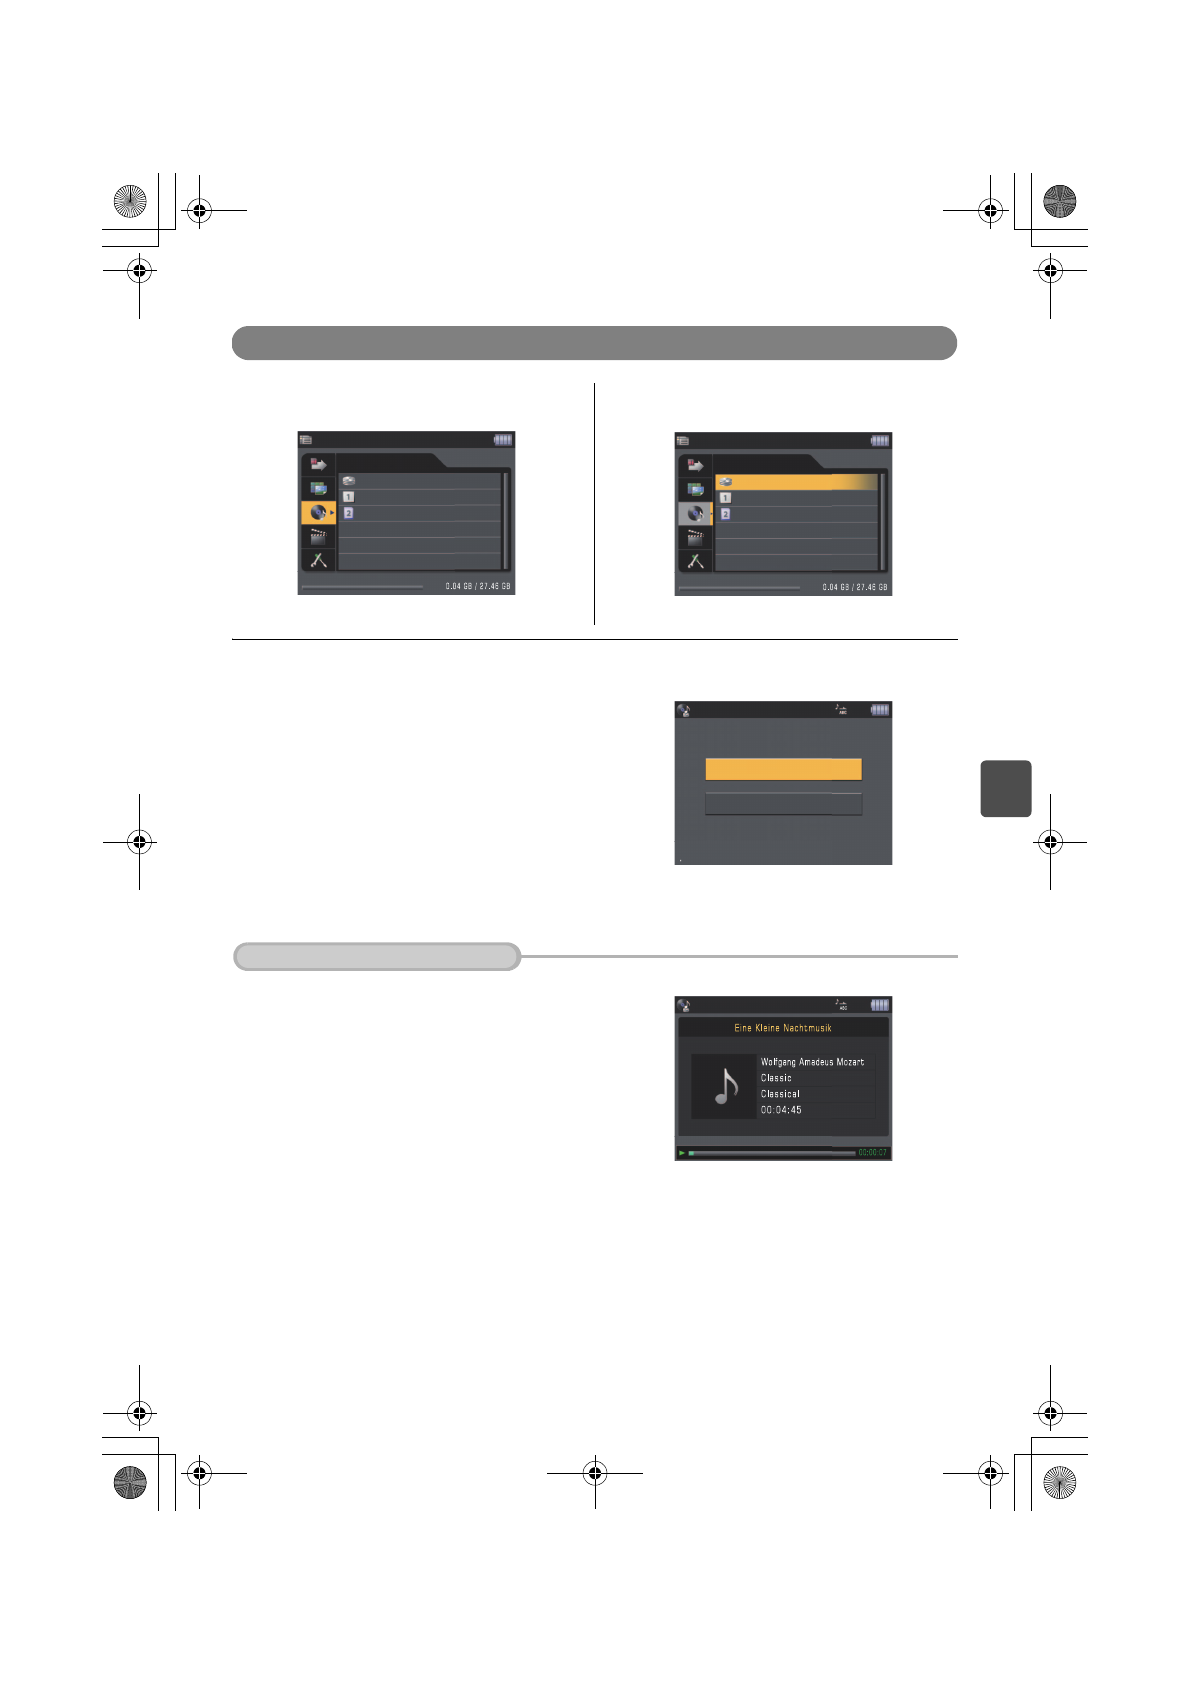
1 Select [Sound player] on the Home screen. 2 Select the storage option that contains the
music file you want to listen to and press <SET>.
3 The Sound Player Menu screen will be displayed. Select the option you want and press <SET>.
The MEDIA STORAGE M30/M80 plays back all music
files in the
storage option
.
Home
Sound player
Card 1
Card 2
HDD
Home
Sound player
Card 1
Card 2
HDD
Play ALL
Sound player
Browse files
Select a method for playing back sound files.
If you select [Play ALL]
Playing sound
Media StorageM30_M80.book Page 36 Wednesday, December 20, 2006 2:34 PM
Page 38

37
The names of the music files in the storage option will be displayed. Select the music file you want to listen
to and press <SET> to start playback.
Point
• To select shuffle ON/OFF for changing the order of the tracks to play back, press <MENU>. Select [Shuffle ON] and press
<SET> to immediately switch to random playback mode.
• Volume adjusting can be performed even while the playback is being paused.
Note
• The maximum file size that the MEDIA STORAGE M30/M80 can play back is 4GB.
• Only the ISO 8859-1 and Unicode encoding formats are supported for MP3 tag information display purposes.
If you select [Browse files]
Sound player
[Operations during playing back music]
Volum e up
Press once 3 seconds later
after the playback starts to
return to the beginning
Press once within 3 seconds
after the playback starts to
return to the previous file
Exit
Press once to pause; press again to
resume
Press once to skip to the beginning of
the next track
Volume down
base_3.fm Page 37 Thursday, February 8, 2007 9:21 AM
Page 39
38
Listening to Music
If You Want to Repeat the Music
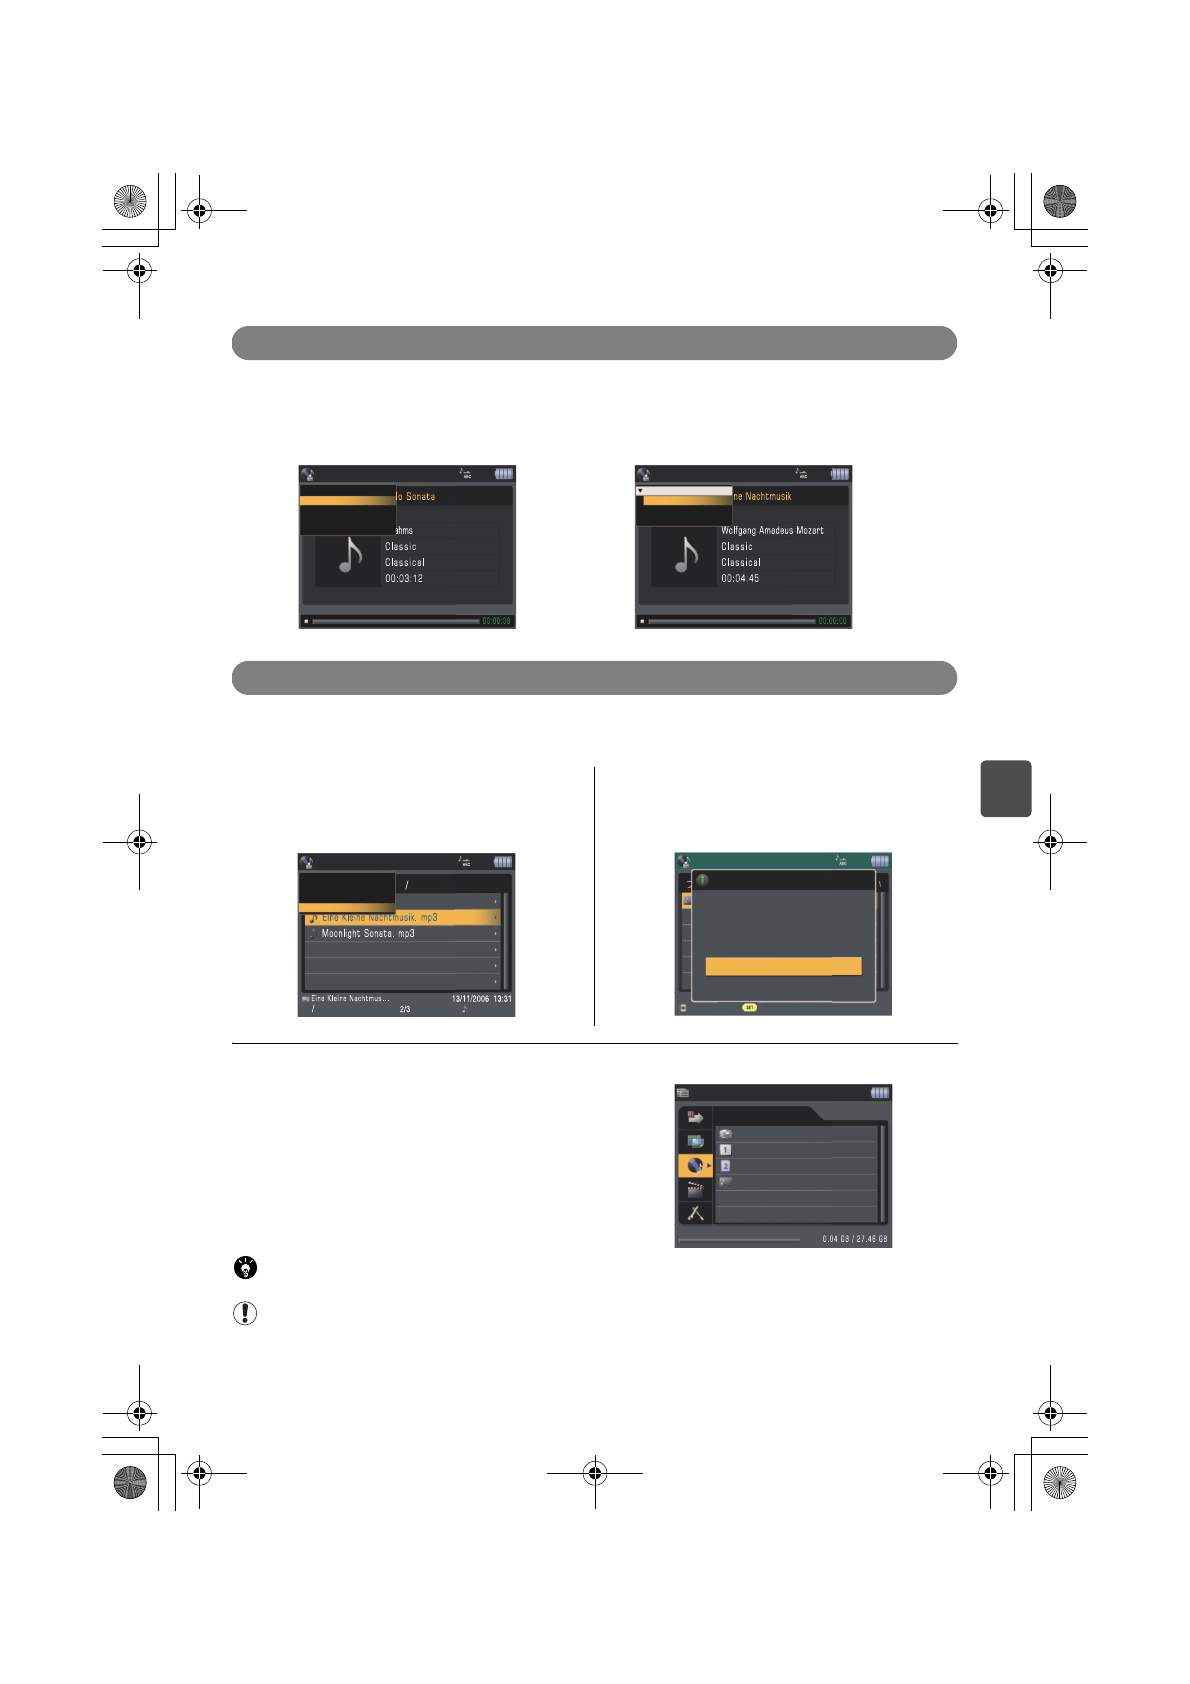
If you want to repeat the music, press <MENU> to display the
function menus and select [Repeat]. The submenus will be
displayed. Select the option you want and press <SET>.
Making a Play List
You can make your own play list by selecting music files from the
[SOUND] folder in the MEDIA STORAGE M30/M80.
1 Select music files you want to include in your
play list and press <MENU>. The function menu
will be displayed. Select [Add to Play list] and press
<SET>.
2 Select the play list to which you add the files
and press <SET> to complete the operation.
3 If you create a new play list, the play list is added in [Sound player] on the Home screen.
Point
Up to 10 play lists can be created.
Note
If you erase music files from a play list, the original files are preserved. If you want to erase files completely, erase the
original files. (See "Erasing Files" on page 58)
Submenu Display screen
Playing sound
Home screen
Repeat
Shuffle ON/OFF
Erase sound file
Add to Play list
Repeat
Repeat All
Repeat One
Repeat OFF
Playing sound
Sound player
Home screen
Repeat
Erase sound file
Add to Play list
Sound player
Play list created
Play list-1 created.
Close
Confirm
Ple
a
Select a Play list
Home
HDD
Card 1
Card 2
Play list-1
Home
Sound player
Media StorageM30_M80.book Page 38 Wednesday, December 20, 2006 2:34 PM
Page 40
39
● Watching a Movie●
The MEDIA STORAGE M30/M80 supports the following movie
formats: MotionJPEG, MPEG1, MPEG2, MPEG4.
Preparing to Play Back Movie Files on the MEDIA STORAGE M30/M80 (Downloading Movie Files from a Computer)
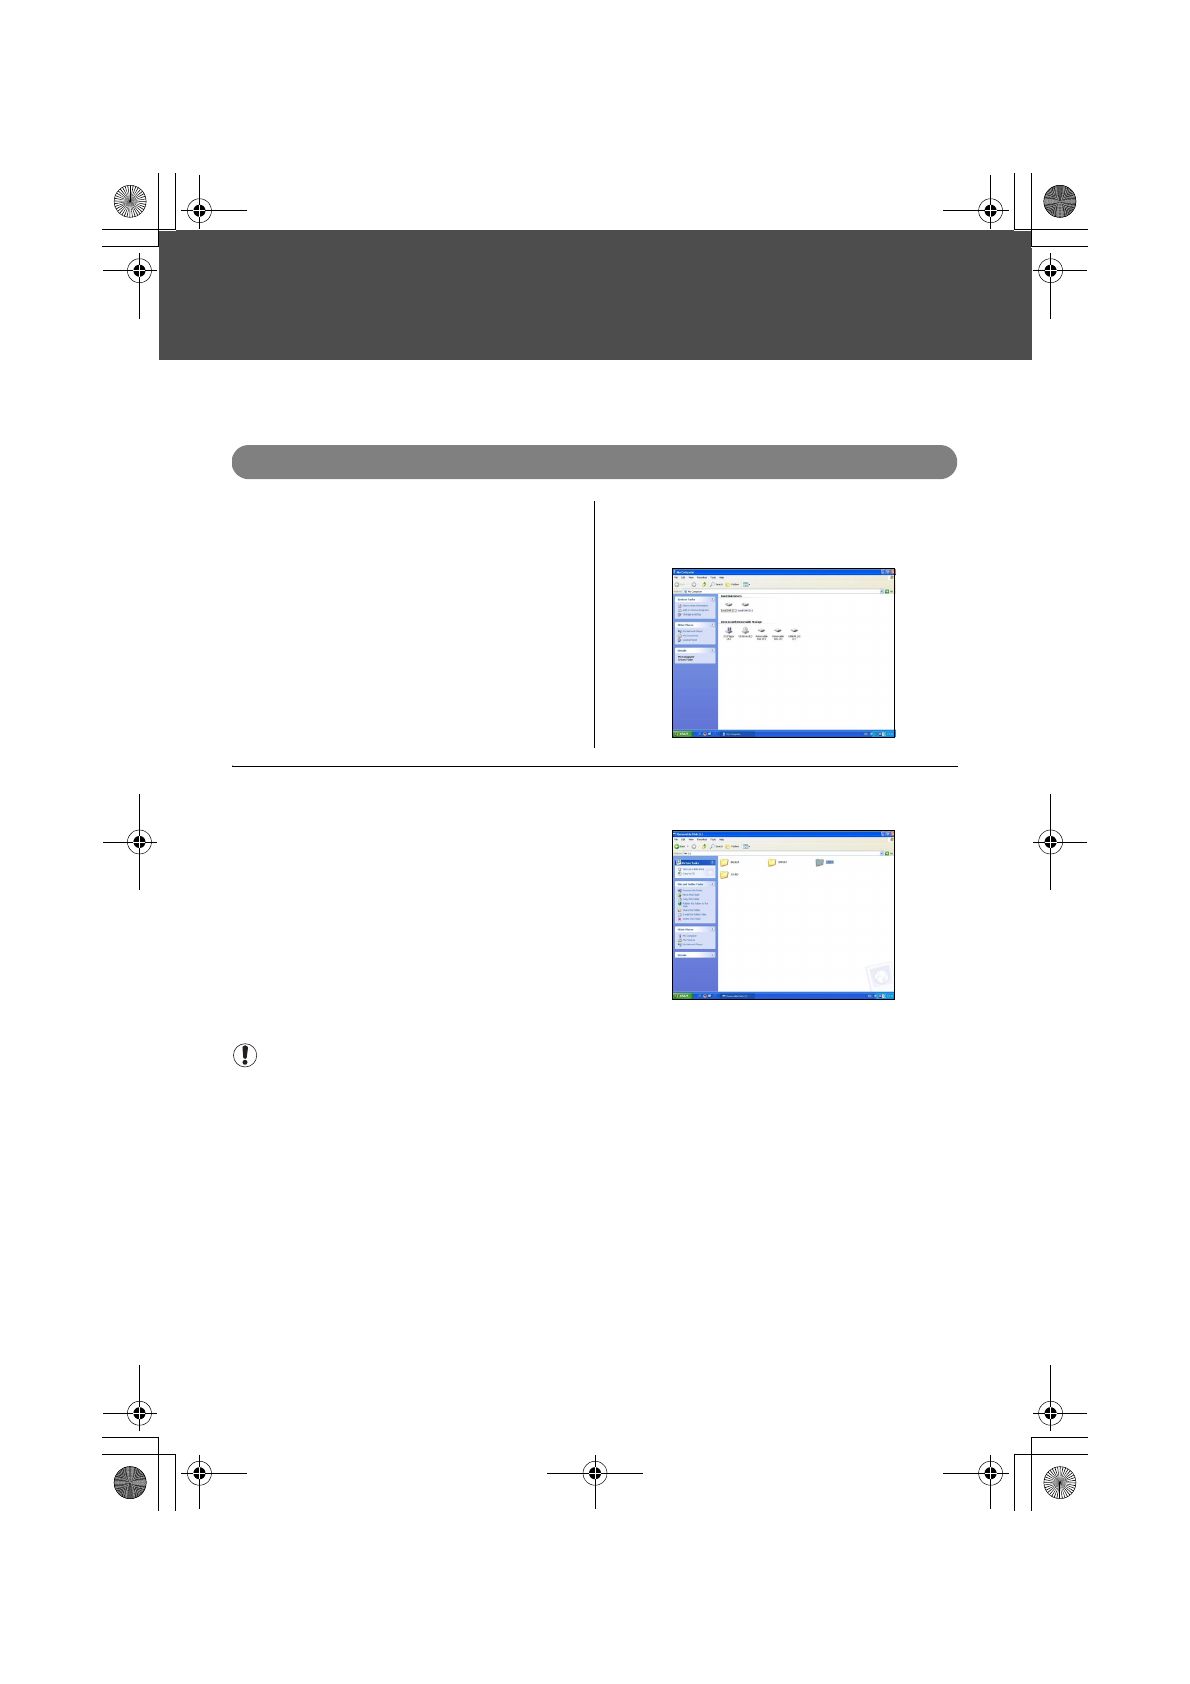
1 Connect the supplied USB cable to the MEDIA
STORAGE M30/M80 and to the computer (see
"Connecting to a Computer" on page 19).
2 The computer considers the MEDIA STORAGE
M30/M80 as an external hard disk. Click the
appropriate hard disk to open it.
3 Copy the movie file you want to the [MOVIE] folder in the hard disk you opened. Downloading movie
files to the HDD is now completed.
Note
• See "Details about Supported File Formats." on page 75 for details of supported movie files.
• Some files, even based on the formats mentioned above, may not be played back.
• The maximum size of files that can be played back is 2GB in any format.
• Movie files backed up from a memory card are automatically stored in [BACKUP] folder in HDD. They cannot be found in
[MOVIE] folder in HDD (see "About the Folder Structure in the Viewer" on page 76).
base_4.fm Page 39 Wednesday, January 31, 2007 9:15 AM
Page 41
40
Watching a Movie
Playing back Movie Files
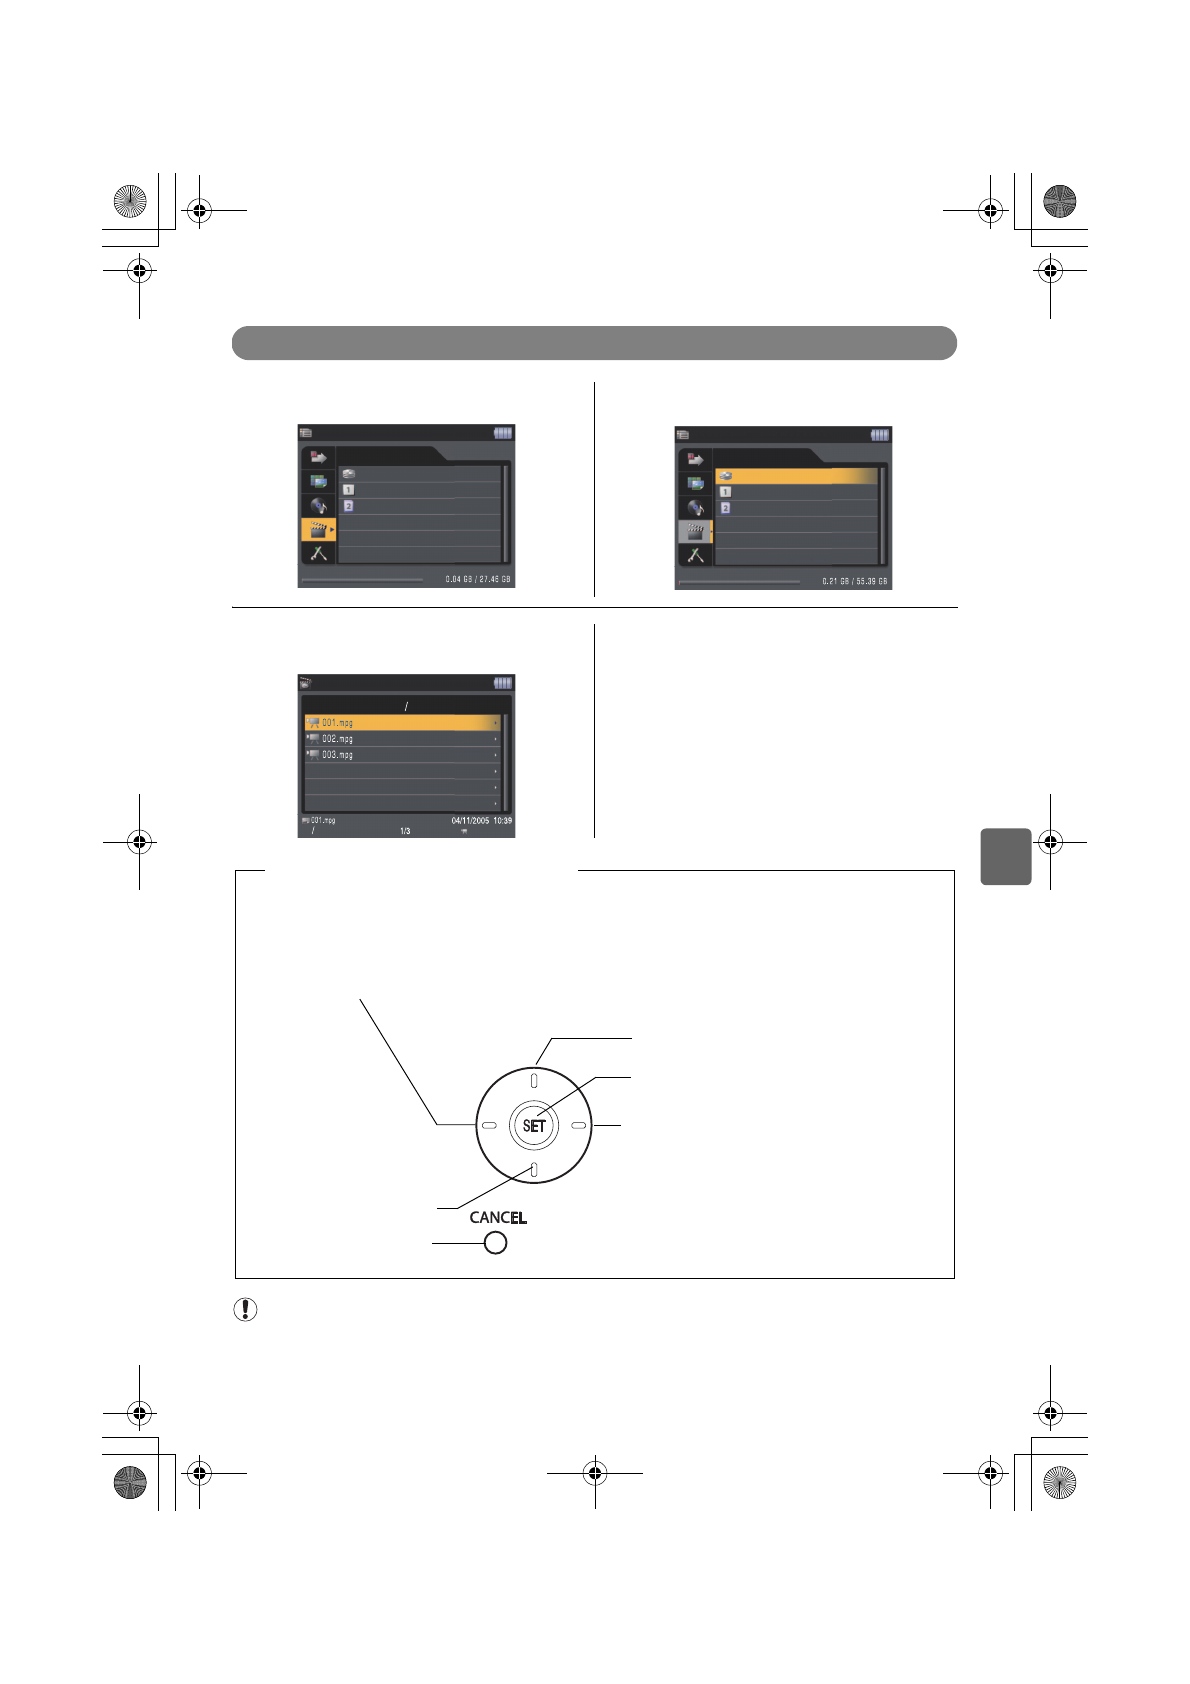
1 Select [Movie player] in the Home screen. 2 Select the storage option that contains the
movie file you want to watch and press <SET>.
3 The movie files will be listed. Select the movie
file you want to watch.
4 Press <SET> to start playback.
Home
Movie player
HDD
Card 1
Card 2
Home
Movie player
HDD
Card 1
Card 2
Movie player
While playback is stopped, press to return to the previous file
While playback is running, press once 3 seconds later after the playback starts to return
to the beginning
press once within 3 seconds after the playback starts to return to the previous file
press longer for rewinding
[Operations during playing back movie]
Volum e up
Stop
Press once to pause; press again to resume
While the playback is stopped, press to skip to
the next file
While playback is running, press once to skip
to the next file;
press longer for fast forwarding and
faster forwarding
While playback is paused, press to go to the
next frame
Volume down
Note
• MEDIA STORAGE cannot play back a MotionJPEG format file in the same quality as provided by the camera itself.
A MotionJPEG file can be backed up on your MEDIA STORAGE. However, its frame rate is reduced and the file can be
played back only in the Simple mode without fast forwarding and rewinding.
base_4.fm Page 40 Thursday, February 8, 2007 9:22 AM
Page 42

41
Making a Play List
You can make your own play list by selecting movie files from the
[MOVIE] folder in the MEDIA STORAGE M30/M80.
1 Select movie files you want to include in your
play list and press <MENU>. The function menu
will be displayed. Select [Add to Play list] and press
<SET>.
2 Select the play list to which you add the files
and press <SET> to complete the operation.
3 If you create a new play list, the play list is added in [Movie player] in the Home screen.
Point
Up to 10 play lists can be created.
Note
If you erase movies from a play list, the original files are preserved. If you want to erase files completely, erase the original
files (see "Erasing Files" on page 58).
Movie player
Home screen
Erase file
Add to Play list
Select a Play list
Close
Movie player
Play list created
Play list-1 created.
Confirm
Card 1
Home
Movie player
HDD
Card 2
Play list-1
Media StorageM30_M80.book Page 41 Wednesday, December 20, 2006 2:34 PM
Page 43
42
Watching a Movie
Displaying File Information
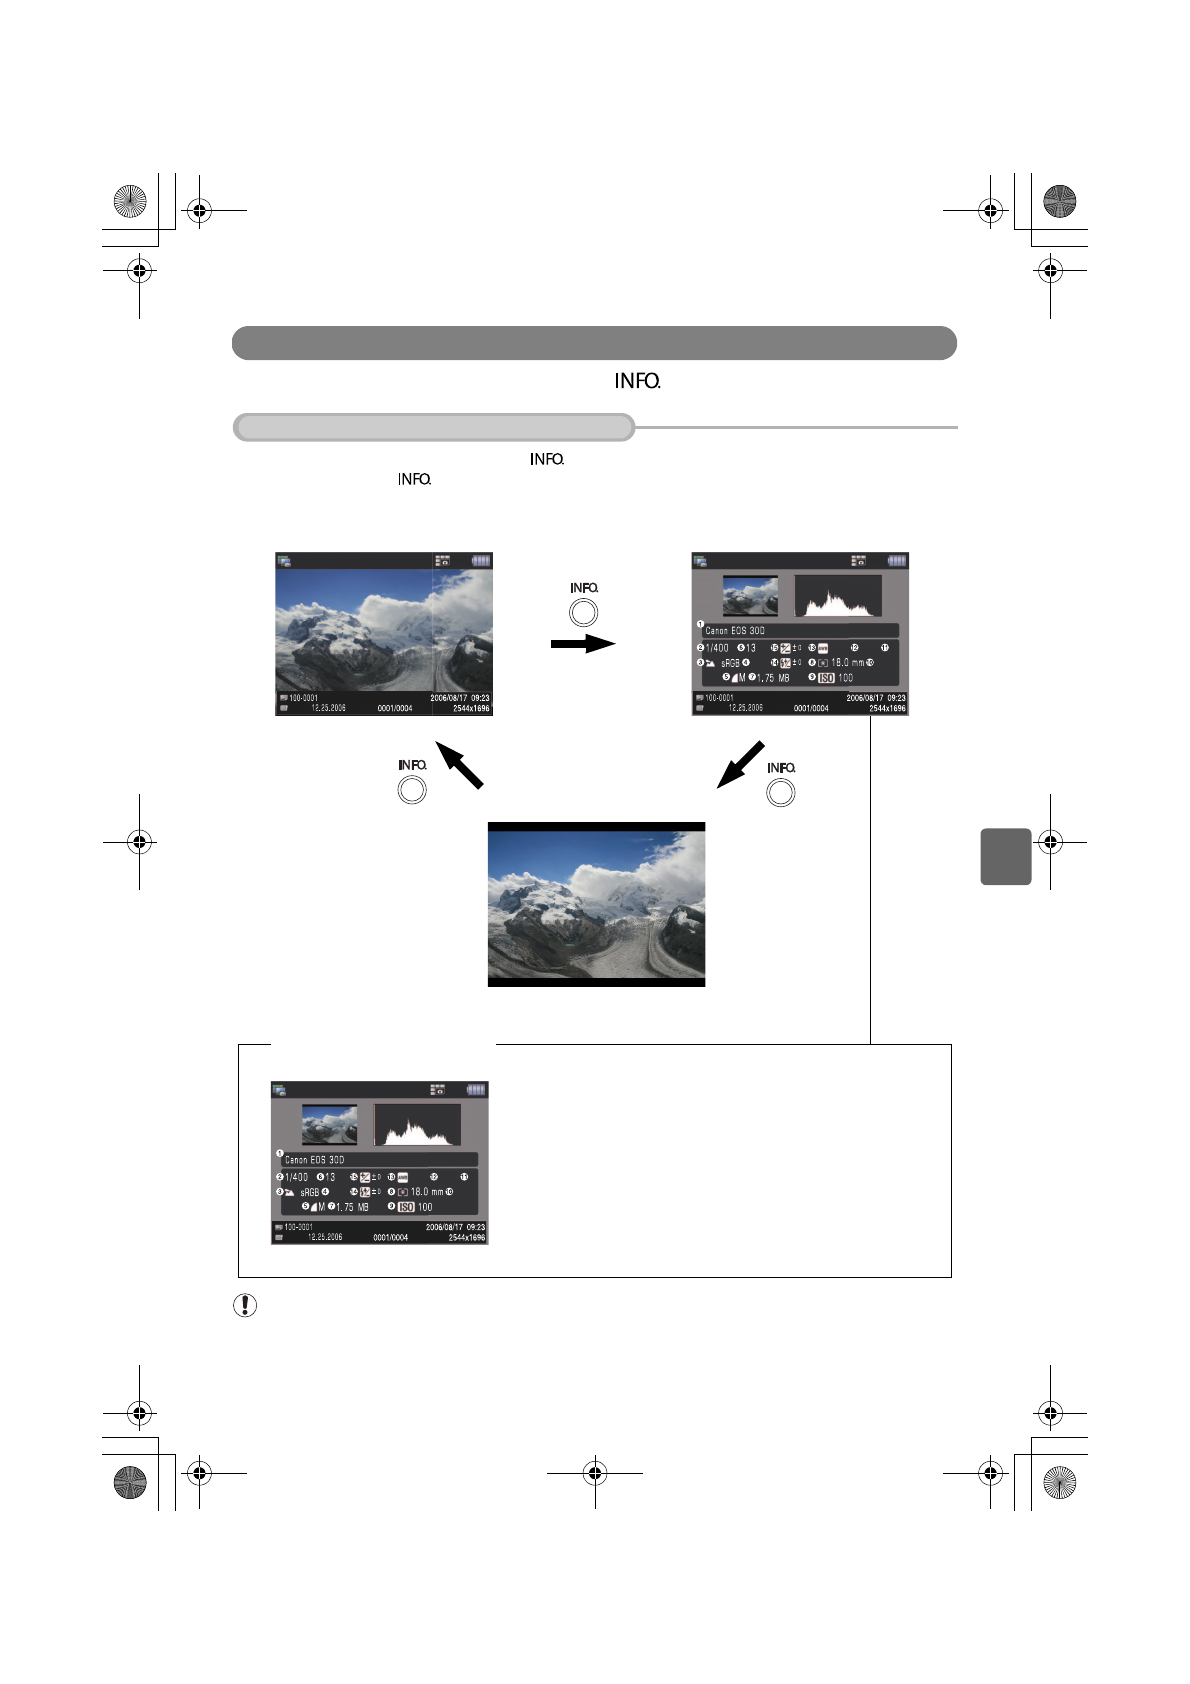
To see the file information, press < > while displaying the file.
Display the image you want and press < >.
Each time you press
< >, the screen changes in the following order: brief information,
detailed information, no information, brief information, and so on.
Note
If you display the detailed information screen for a still image file that has some sound while the sound is being played
back, the sound will stop automatically. Press <SET> to resume the playback of the sound.
Displaying Still Image Information
Single display
Winter
Single display
Winter
Brief information screen Detailed information screen
Single display
Winter
[Detailed information screen]
No information
1 Camera model name
2 Shutter speed
3 Shooting mode
4 Color space
5 Image quality and size
6 Aperture level
7 File size
8 Photometer mode
9 ISO sensitivity
0 Focal length
A
White balance compensation
B Color temperature
C White balance
D F
lash intensity compensation
E Exposure compensation
base_4.fm Page 42 Thursday, December 21, 2006 1:58 PM
Page 44

43
Select the music file whose information you want and press < >.
Note
If you press <INFO> during playback to display the detailed information screen, playback will be stopped automatically.
Press <SET> to resume the playback.
Select the movie file whose information you want and press <>.
Note
If you press <INFO> during playback to display the detailed information screen, playback will be stopped automatically.
Press <SET> to resume the playback.
Displaying Music File Information
Playing sound
Playing sound
Playing sound
[Detailed information screen]
1 Title name
2 Artist name
3 Album name
4 Playback duration
5 File format
6 File size
7 Bit rate
8 Number of channels
Displaying Movie File Information
Movie player
Movie player
Movie player
[Detailed information screen]
1 File format
2 Image size
3 Bit rate
4 Playback duration
5 File size
6 Frame rate
7 Number of channels
Media StorageM30_M80.book Page 43 Wednesday, December 20, 2006 2:34 PM
Page 45

44
Configuring Various Settings
● Configuring Various Settings●
The following setup screen will be displayed after you select
[Setup] in the Home screen.
After configuring these settings, select [Save] or [Cancel] and
press <SET> to complete the setting operation.
1 Display (page 45)
2 System (page 46)
3 Backup (page 47)
4 Playback (page 48)
5 Language (page 48)
6 Date/Time (page 48)
7 HDD Check (page 49)
8 PIN setting (page 50)
9 Switching USB connection (page 51)
0 Screen output switch (page 51)
A Firmware Version (page 51)
Home
Setup
Display
System
Backup
Playback
Language
Date/Time
Media StorageM30_M80.book Page 44 Wednesday, December 20, 2006 2:34 PM
Page 46
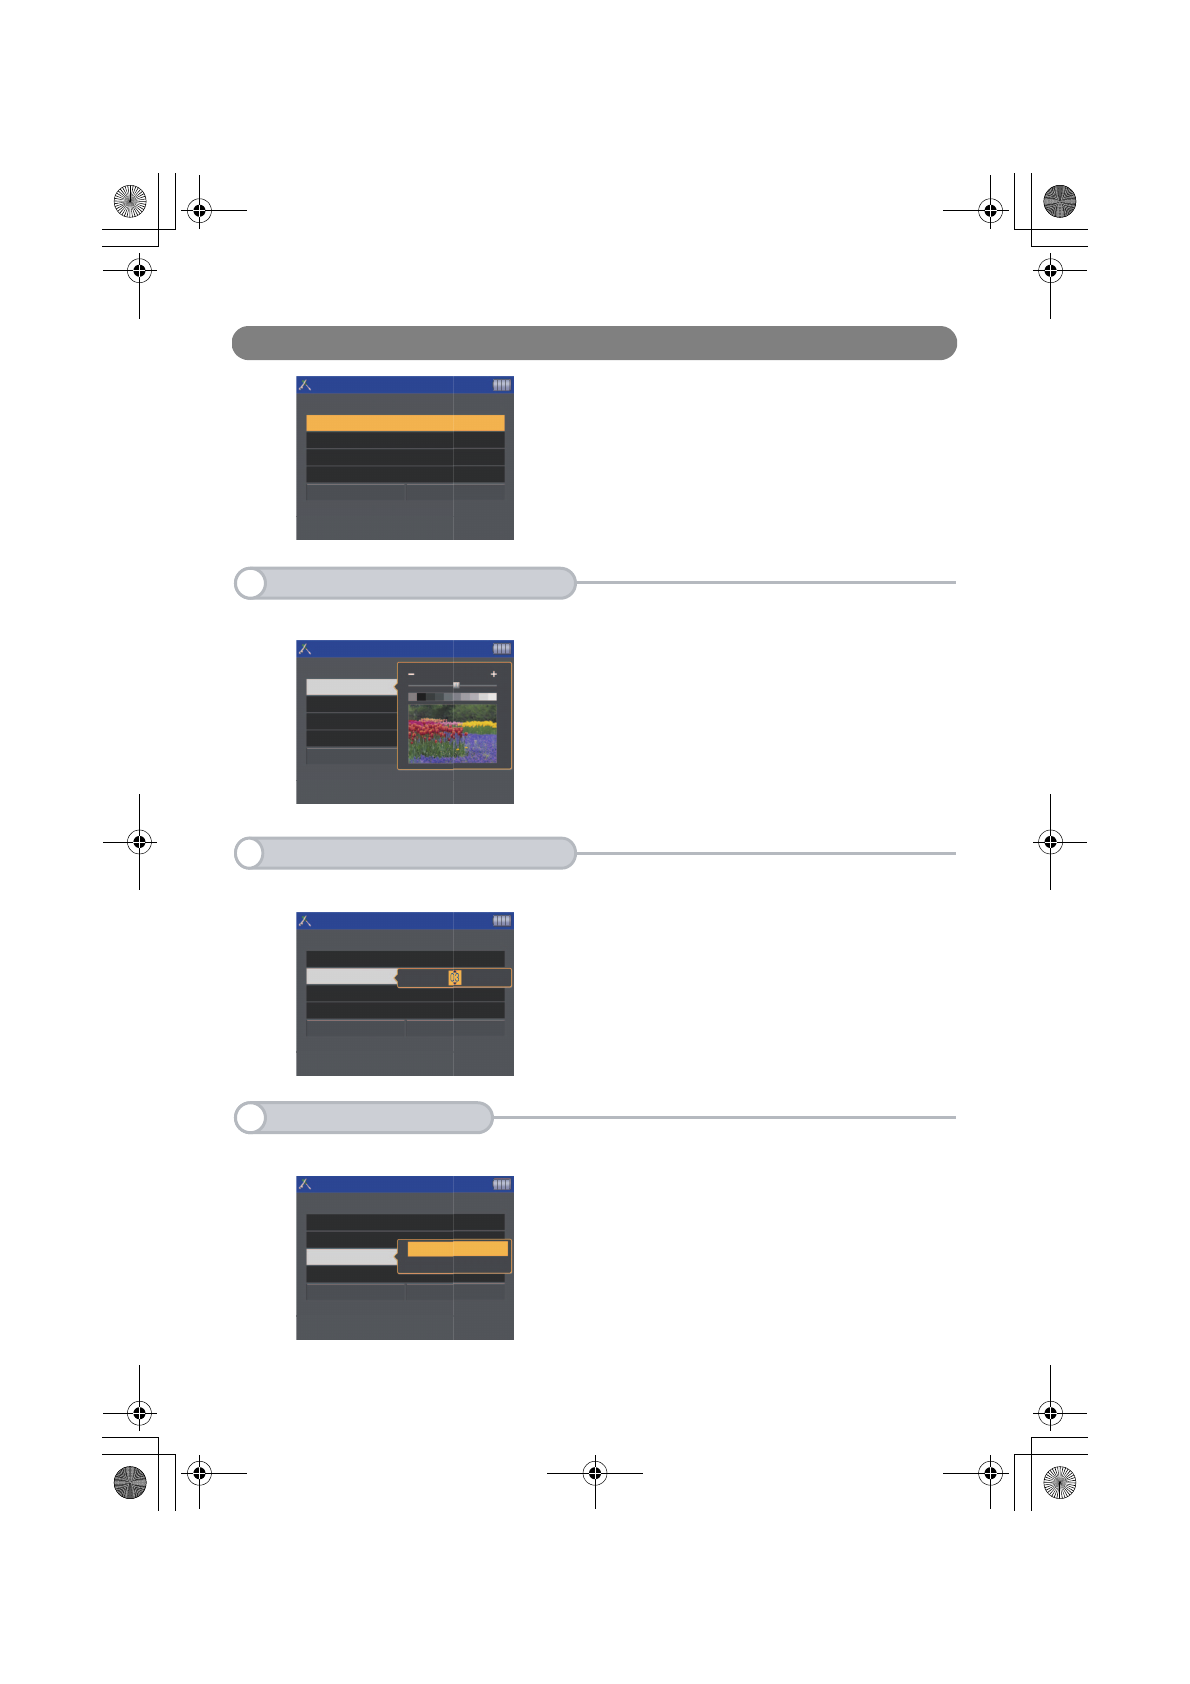
45
Display
On the screen for display settings, you can set the following
four options:
1LCD Brightness adjustment
2LCD Power OFF time setting
3TV signal switching
4Erase data in image cache
Set the brightness of the LCD.
Select [LCD Brightness] and press <SET> to display the screen
for adjusting the brightness. Adjust the brightness and press
<SET>.
You can have the LCD monitor turned off automatically after a certain period of idle time.
Select [LCD Power OFF] and press <SET> to display the screen
for setting a value for the idle time. Set a value and press
<SET>. (Valid values are 0, 1, 3, 5, and 10 minutes.)
Set a TV signal.
Select [TV signal] and press <SET> to display the screen for
switching TV signals (NTSC or PAL). Select a TV signal and
press <SET>.
Setup-Display
LCD Power OFF 03 min.
TV signal NTSC
Erase data in Image cache
Save
These are Display settings.
Setup items related to the display.
Cancel
LCD Brightness 6
1
LCD Brightness Adjustment
LCD Brightness
Setup-Display
LCD Power OFF
TV signal
Erase data
Save
These are DIsplay settings.
Setup items related to the display.
2
LCD Power OFF Time Setting
LCD Power OFF
Erase data in Image cache
Save Cancel
TV signal NTSC
LCD Brightness 6
Setup-Display
These are Display settings.
Setup items related to the display.
3
TV signal Switching
NTSC
TV signal
Setup-Display
LCD Brightness 6
LCD Power OFF
PAL
Save Cancel
These are Display settings.
Setup items related to the display.
Erase data in Image cache
Media StorageM30_M80.book Page 45 Wednesday, December 20, 2006 2:34 PM
Page 47
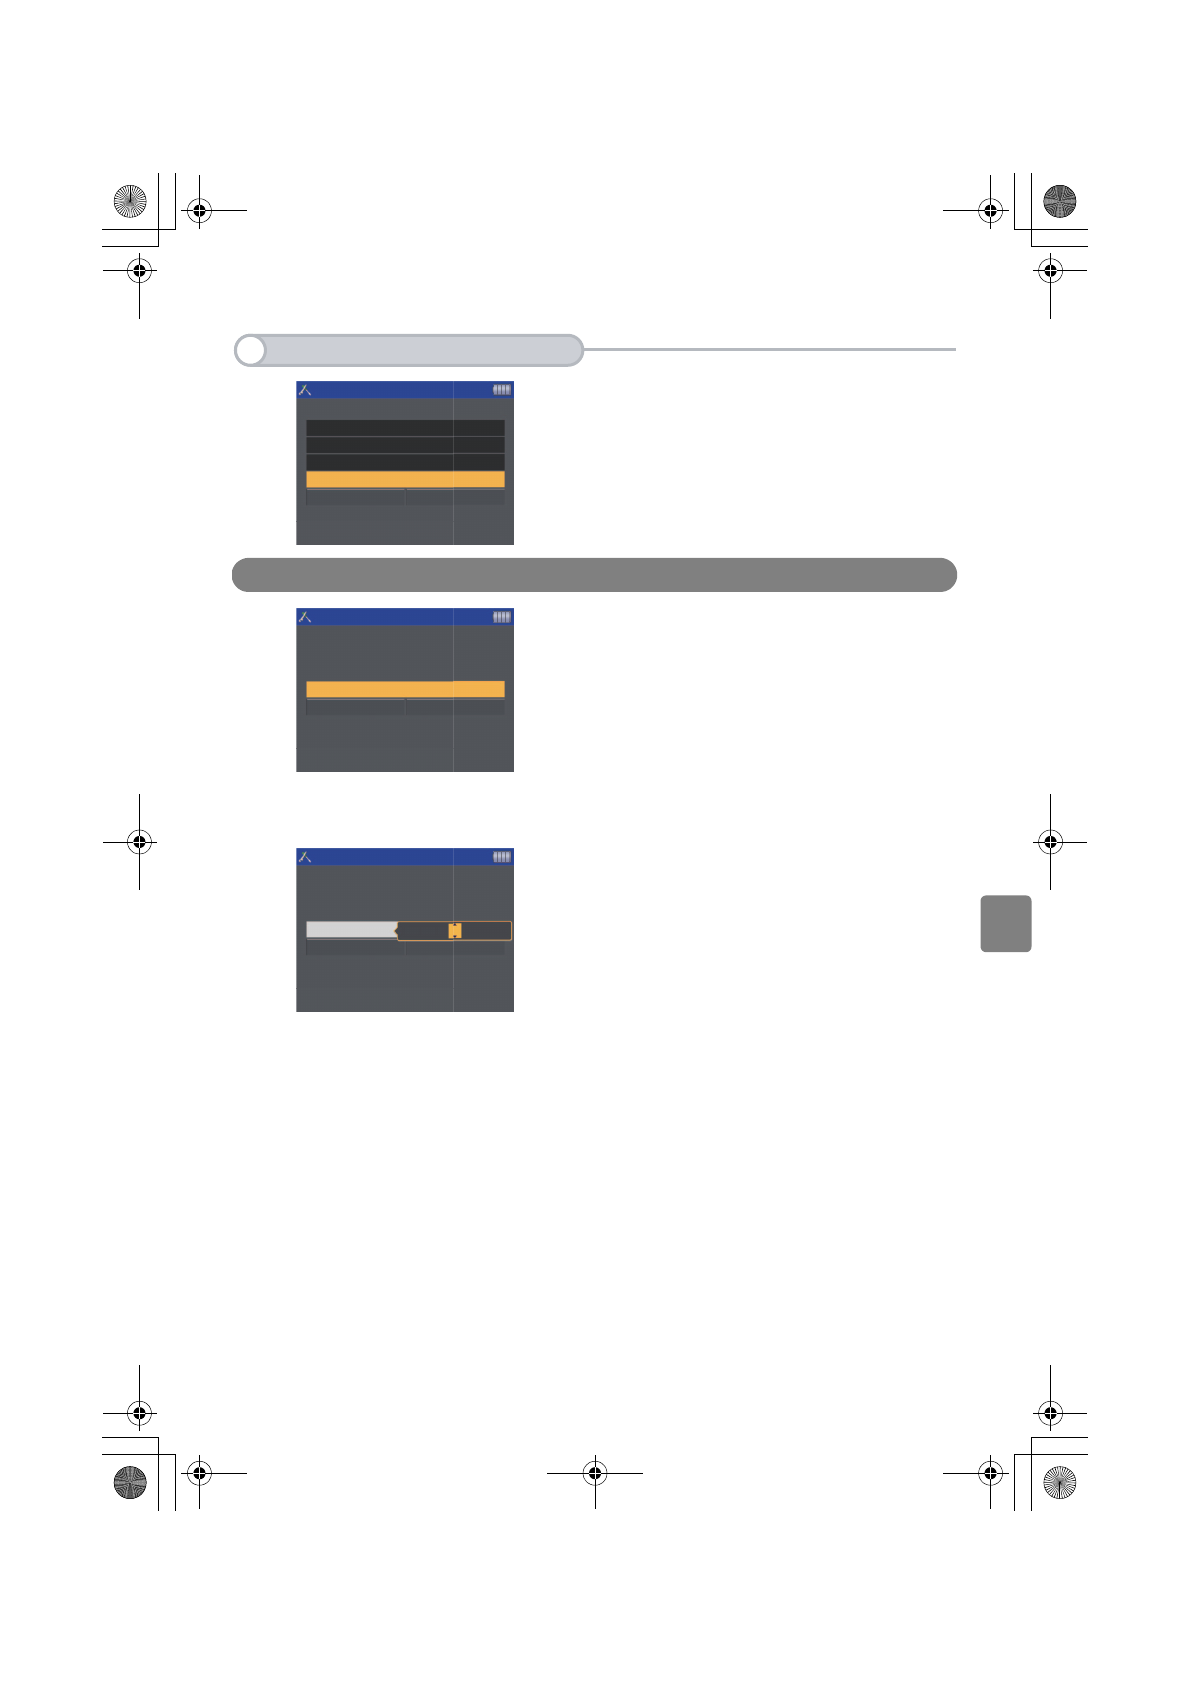
46
Configuring Various Settings
Select [Erase data in Image cache] and press <SET> to display
the screen for deleting data from an image cache. Set values
and press <SET>.
System
On the screen for system settings, you can set [Auto Power
OFF] time.
You can have the MEDIA STORAGE M30/M80 turned off automatically after a certain
period of idle time.
Select [Auto Power OFF] and press <SET> to display the
screen for setting a value for the idle time. Set a value and
press <SET>. (Valid values are 0, 1, 3, 5, 10, and 30 minutes.)
4
Erase data in Image cache
Setup-Display
LCD Brightness 6
LCD Power OFF 03 min.
TV signal NTSC
Save
Erase data in Image cache
Cancel
These are Display settings.
Setup items related to the display.
Setup-System
Save Cancel
Auto Power OFF 0 min.
These are System settings.
Setup items related to the system.
Setup-System
Auto Power OFF
Save Cancel
These are System settings.
Setup items related to the system.
00
Media StorageM30_M80.book Page 46 Wednesday, December 20, 2006 2:34 PM
Page 48
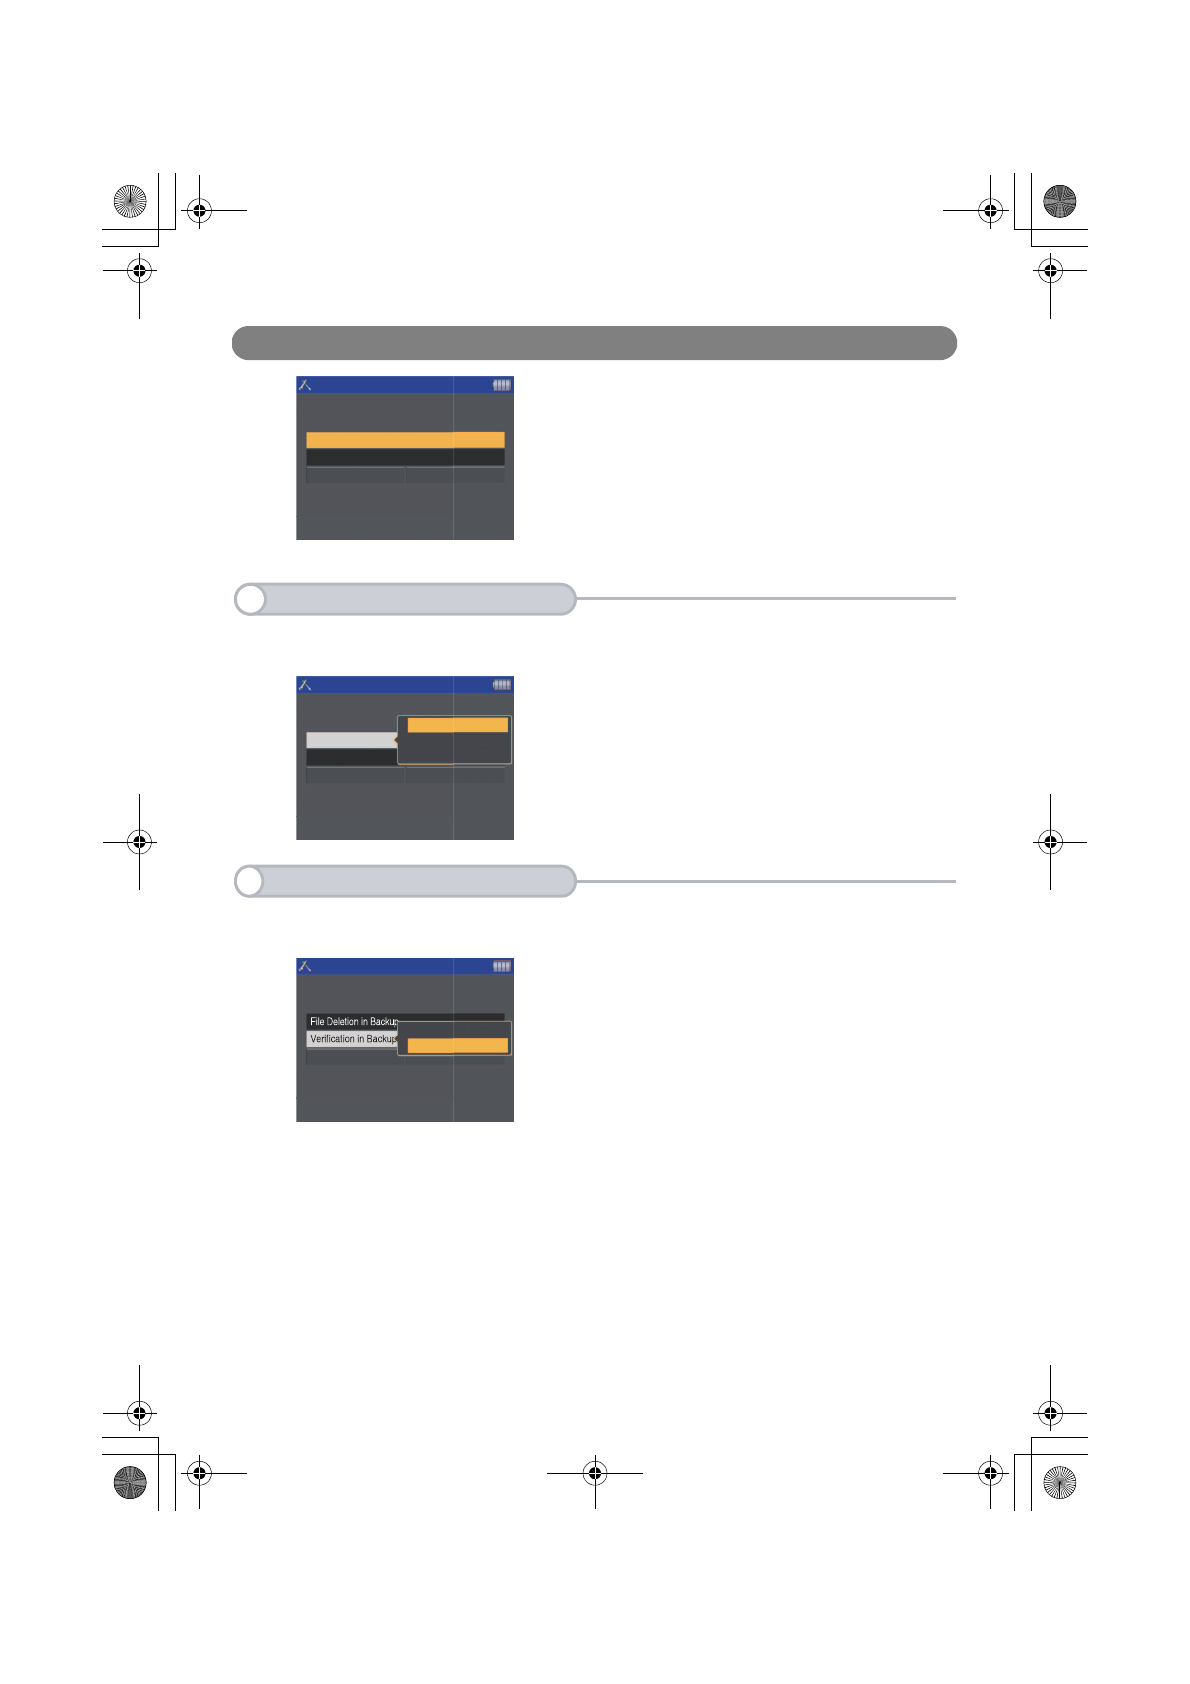
47
Backup
On the screen for backup settings, you can set the following
two options:
1File Deletion in Backup
2Verification in Backup&Copy
Specify whether the file in a memory card should be deleted after the file is
backed up.
Select [File Deletion in Backup] and press <SET> to display
the screen for specifying the system behavior after backing
up. Specify the option you want and press <SET>.
Select whether file verification should be performed after backing up and
copying.
Select [Verification in Backup&Copy] and press <SET> to
display the screen for selecting whether to perform the task.
Select a value and press <SET>.
Setup-Backup
Save Cancel
File Deletion in Backup Never
Verification in Backup&Copy On
These are backup function settings.
Setup items related to the backup function.
1
File Deletion in Backup
Setup-Backup
Never
Confirm
Always
Save Cancel
Verification in Backup
File Deletion in Backup
These are backup function settings.
Setup items related to the backup function.
2
Verification in Backup&Copy
Setup-Backup
Cancel
Save
On
Off
These are backup function settings.
Setup items related to the backup function.
Media StorageM30_M80.book Page 47 Wednesday, December 20, 2006 2:34 PM
Page 49
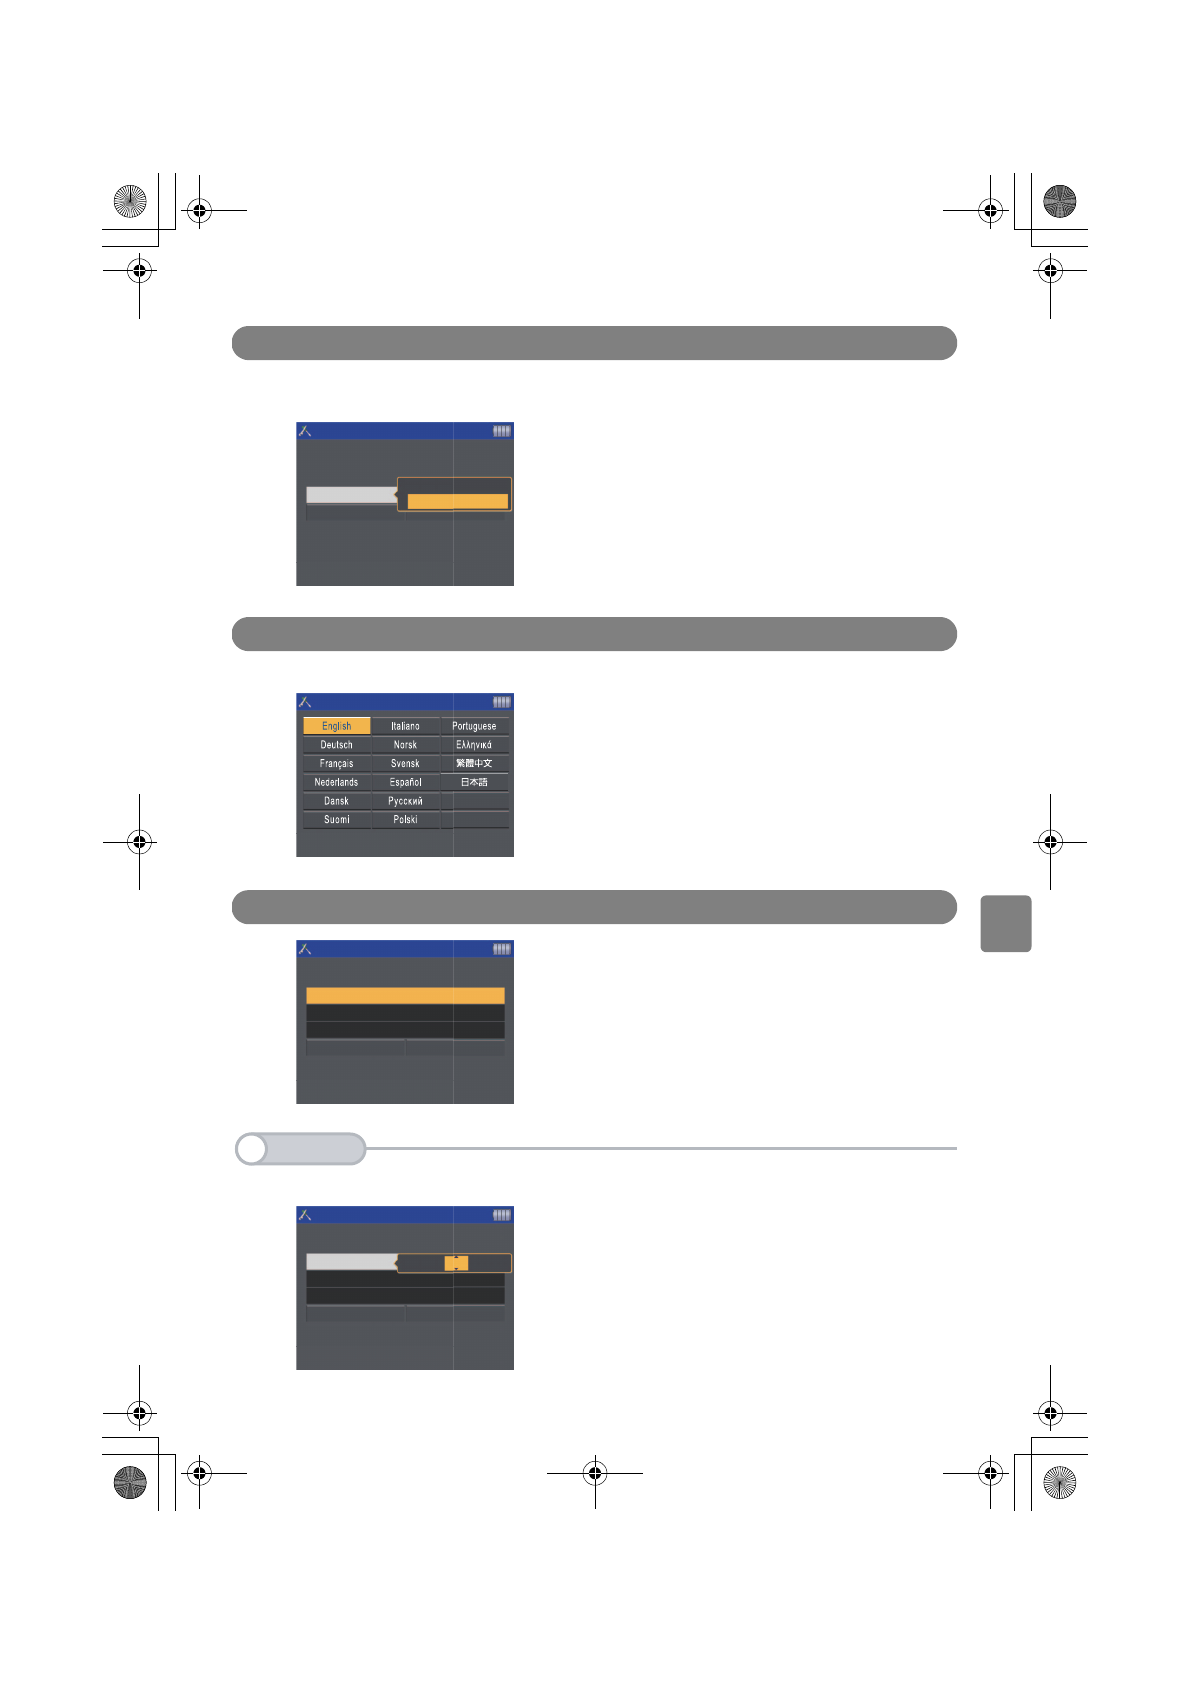
48
Configuring Various Settings
Playback
On the screen for playback setting, you can set a value for [Auto rotate].
Set a value of [On] to display portrait images in the correct orientation on playback.
Press <SET> to display the screen for selecting a value for
[Auto rotate], select a value, and press <SET>.
* This function is available in Canon digital cameras.
Check the setting of your camera before using this funtion.
Language
In this screen, you can set a language for menus and message in the LCD monitor.
Select the required language and press <SET>.
Date/Time
On the Date/Time setting screen, you can set the following
three items:
1Date
2Time
3Date format
Set a date value.
Select [Date] and press <SET> to display the screen for
setting a date value. Change the value using the <Up and
Down> arrows and the options (day, month, and year) using
the <Left and Right> arrows and press <SET>.
On
Auto rotate
Save
Cancel
Off
Setup-Playback
These are playback function settings.
Setup items related to the playback function.
These are language settings.
Select a language for the text to be displayed.
Setup-Language
Date 2007/02/14
Time 10:15:00
Date format YYYY/MM/DD
Save Cancel
Setup-Date/Time
These are Date/Time settings.
Setup the system clock.
1
Date
Save Cancel
These are Date/Time settings.
Setup the system clock.
Date
Time
Date format
01:45:04
YYYY/MM/DD
2007 / 02 / 14
Setup-Date/Time
base_5.fm Page 48 Thursday, December 21, 2006 10:02 AM
Page 50
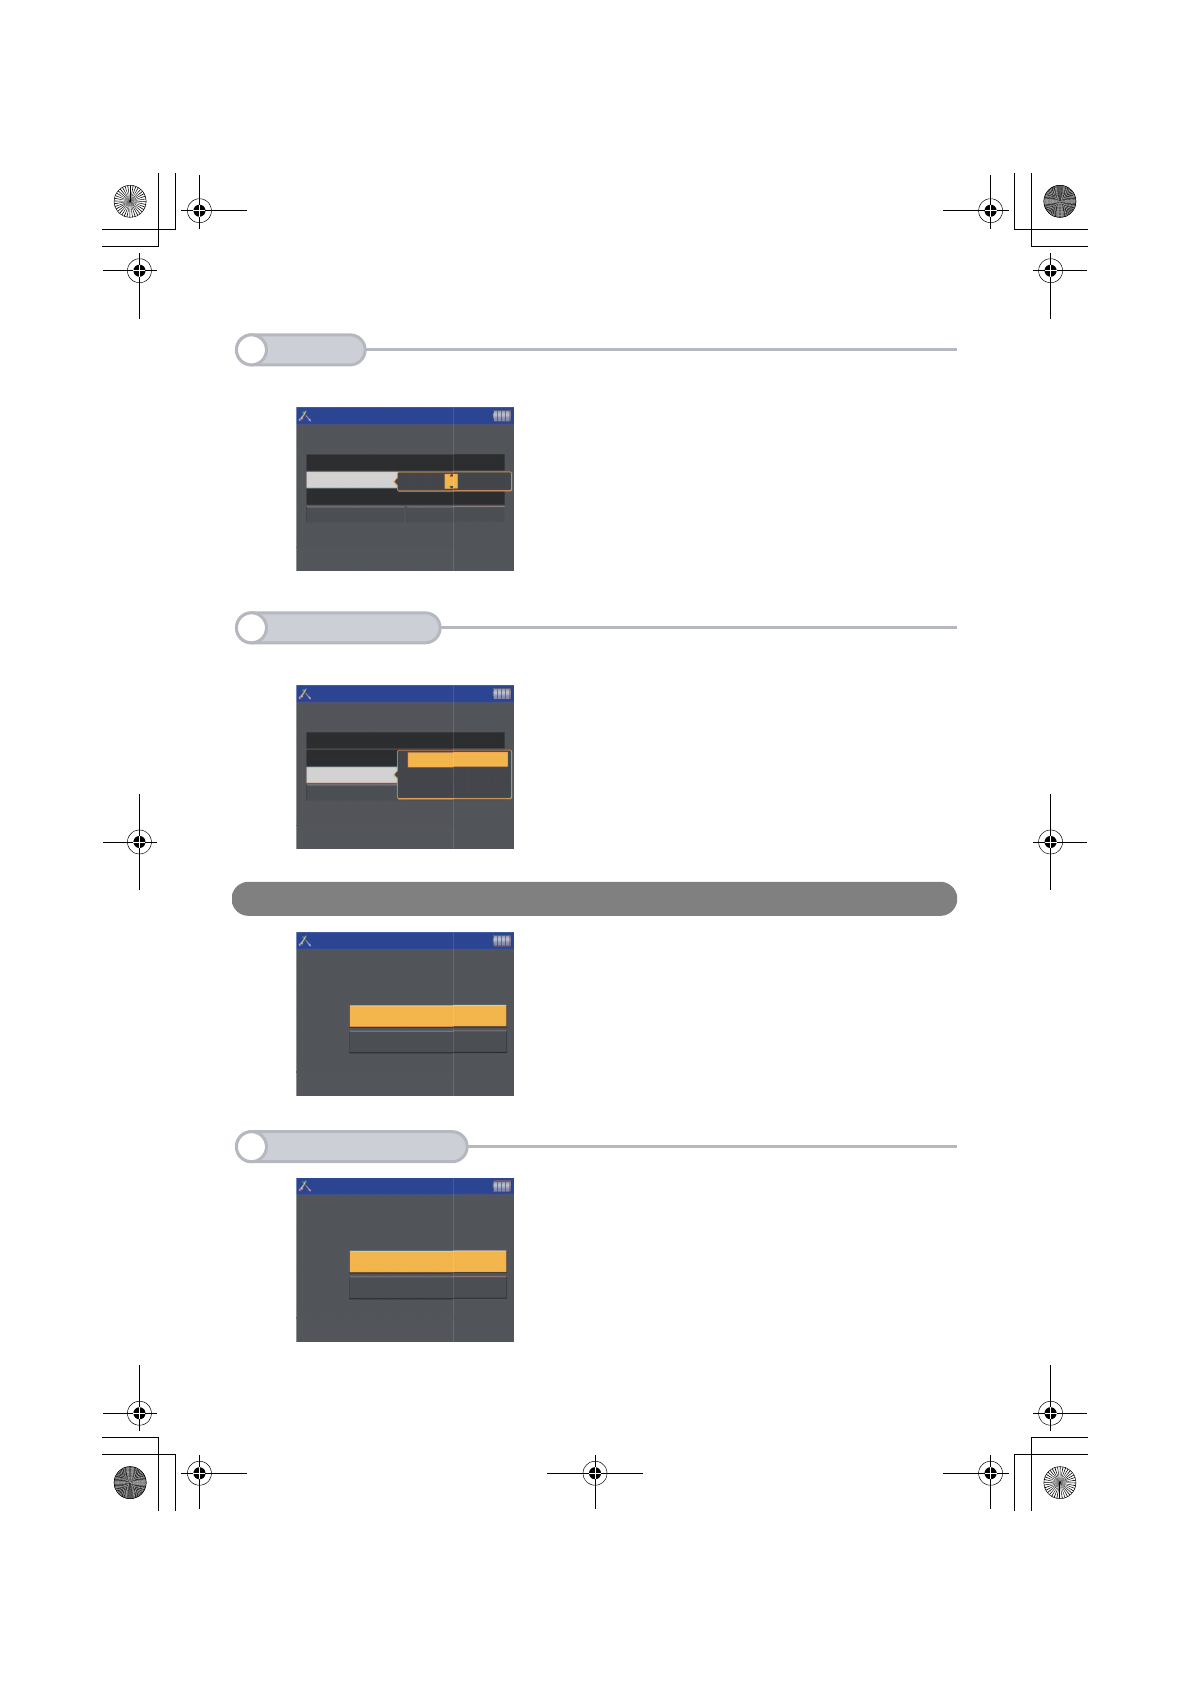
49
Set a time value.
Select [Time] and press <SET> to display the screen for
setting a time value. Change the value using the <Up and
Down> arrows and the options (hour, minute, and second)
using the <Left and Right> arrows and press <SET>.
Select a date format.
Select [Date format] and press <SET> to display the screen
for selecting a date format. Select a date format and press
<SET>.
HDD check
On the HDD Check screen, you can check and execute the
following three options:
1HDD free area
2Tools
1) File-System checker
2) Format HDD
This screen displays the free space on the HDD. (You cannot
select any.)
2
Time
Save Cancel
Time
Date format YYYY/MM/DD
Setup-Date/Time
10 15 00
::
Date 2007/02/14
These are Date/Time settings.
Setup the system clock.
3
Date format
These are Date/Time settings.
Setup the system clock.
DD/MM/YYYY
MM/DD/YYYY
Date
Time
2007/02/14
Setup-Date/Time
Date format
YYYY/MM/DD
Save
This is the HDD check screen.
Please select HDD tool.
Format HDD
55.36 GB
HDD free area
HDD check
Tools
File-System checker
1
HDD free area
This is the HDD check screen.
Please select HDD tool.
Format HDD
55.36 GB
HDD free area
HDD check
Tools
File-System checker
Media StorageM30_M80.book Page 49 Wednesday, December 20, 2006 2:34 PM
Page 51
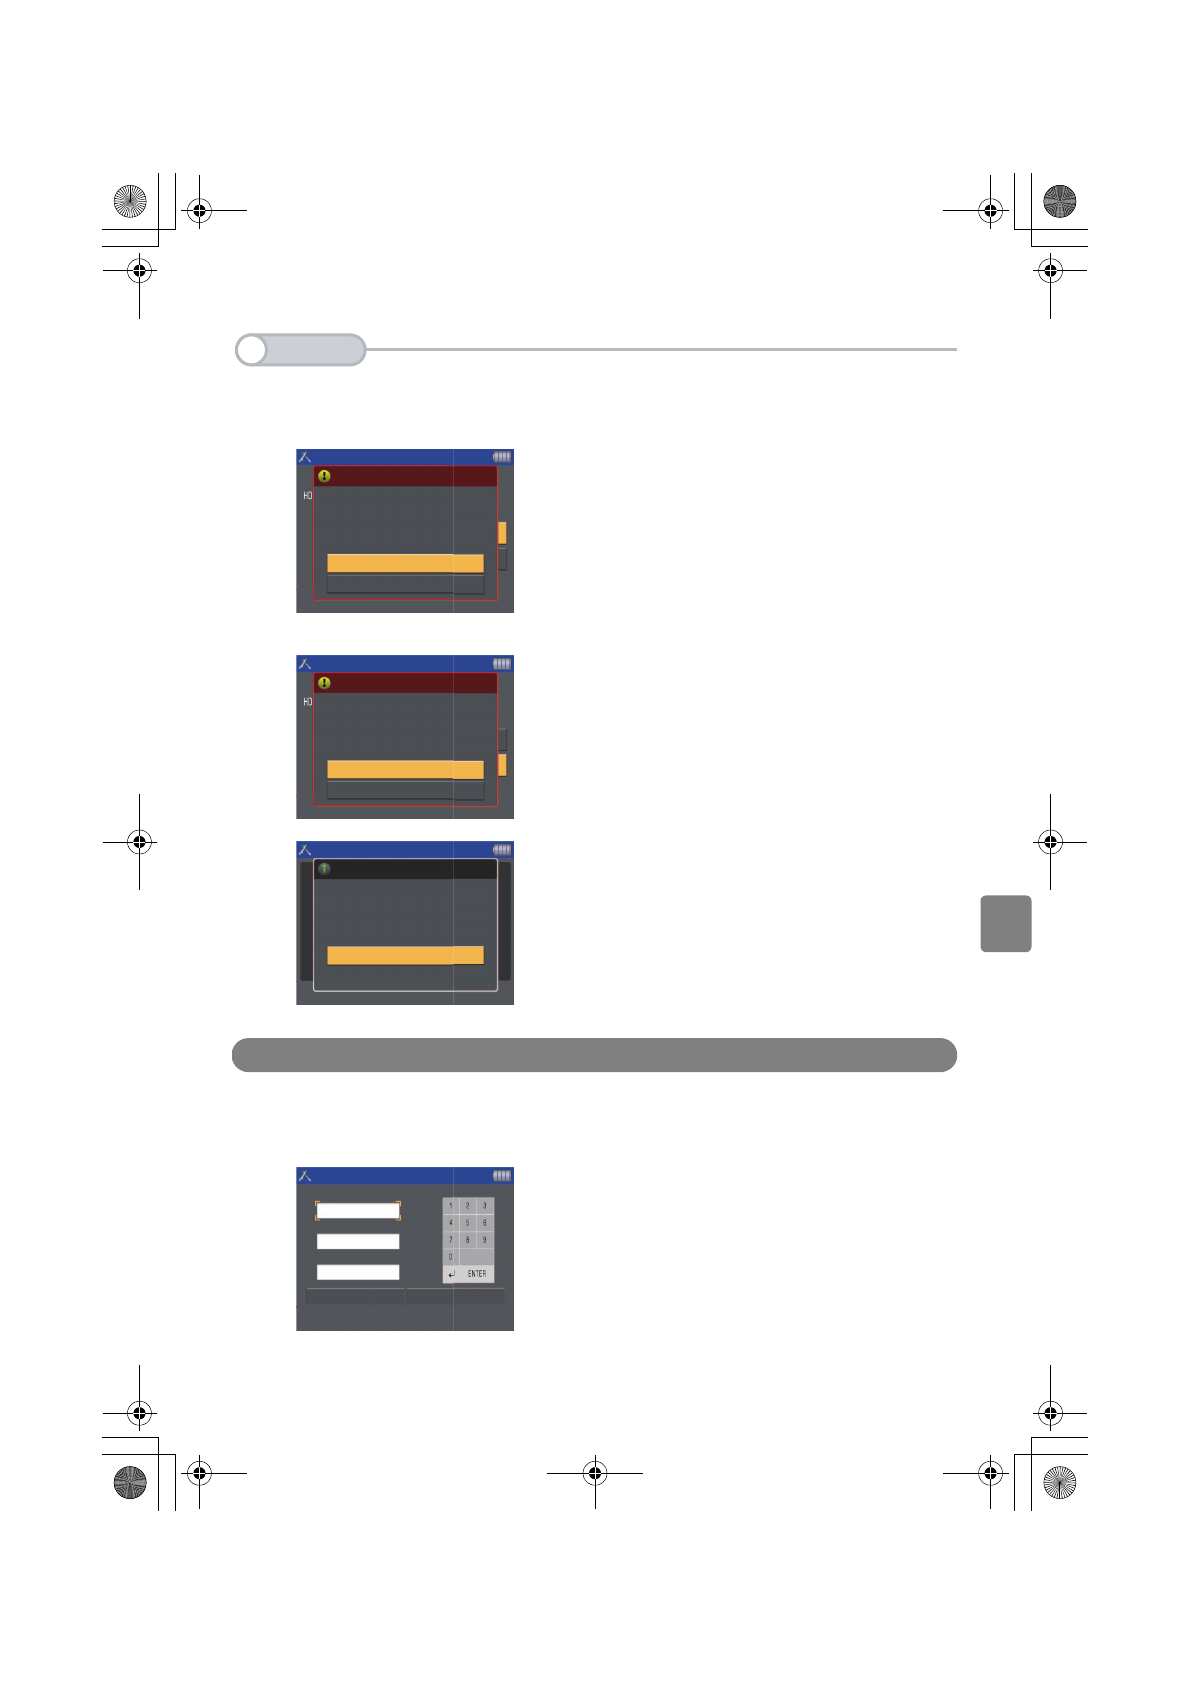
50
Configuring Various Settings
You can check the file system of the HDD and format the HDD.
1) File-System checker
Select [File-System checker] and press <SET> to check
the file system of the HDD.
When the file system check has succeeded, the “The
built-in HDD file-system check has been performed.”
message will be displayed. If the check has failed, the
“Any error was found in the file system.” message is
displayed. In this case, please call our Service Center.
2) Format HDD
1Select [Format HDD] and press <SET> to display the
screen for formatting the HDD. To execute formatting,
select [Format the HDD] and press <SET>.
(If you have set a PIN, the screen for PIN input will be
displayed before the screen used for formatting.)
2The formatting starts. A message will be displayed when
the formatting is completed. Press <SET> to return to the
Home screen.
* When formatting the HDD, always use the format
function of MEDIA STORAGE. Do not format it
directly through your PC.
PIN setting
You can set a PIN to protect the files in the HDD. Once you set a PIN, the first
screen that is displayed when you turn on the MEDIA STORAGE M30/M80 is a PIN
input screen.
Select the current PIN input field and press <SET>. The
cursor moves to the screen for number input. Select a
number and press <SET>. Continue this until you have
entered all the numbers. When finished, select ENTER and
press <SET> to confirm the setting. Performing a procedure
similar to above, enter a new PIN and re-enter the PIN in the
last step to confirm the PIN. Then select [Save] and press
<SET>. This setting operation is then completed.
* By default, no PIN is set. Therefore, the current PIN
input field should be blank when you set a PIN for
the first time.
2
Too l s
This
Please select HDD tool.
To
Execute
Are you sure you want to start file system
check? Please use fully-charged battery.
HDD check
The file system check
Cancel
This
To
Please select HDD tool.
Are you sure you want to format the
HDD? All data on HDD will be erased.
Please use fully charged battery.
HDD check
Format the HDD
Close
Format the HDD
Format
Close
Formatting the built-in HDD is complete.
The built-in HDD has been formatted
These are the PIN settings.
Setup the system PIN.
DEL
Setup-PIN
Input Current PIN
Input new PIN
Input new PIN again
Save Cancel
base_5.fm Page 50 Monday, February 26, 2007 2:30 PM
Page 52
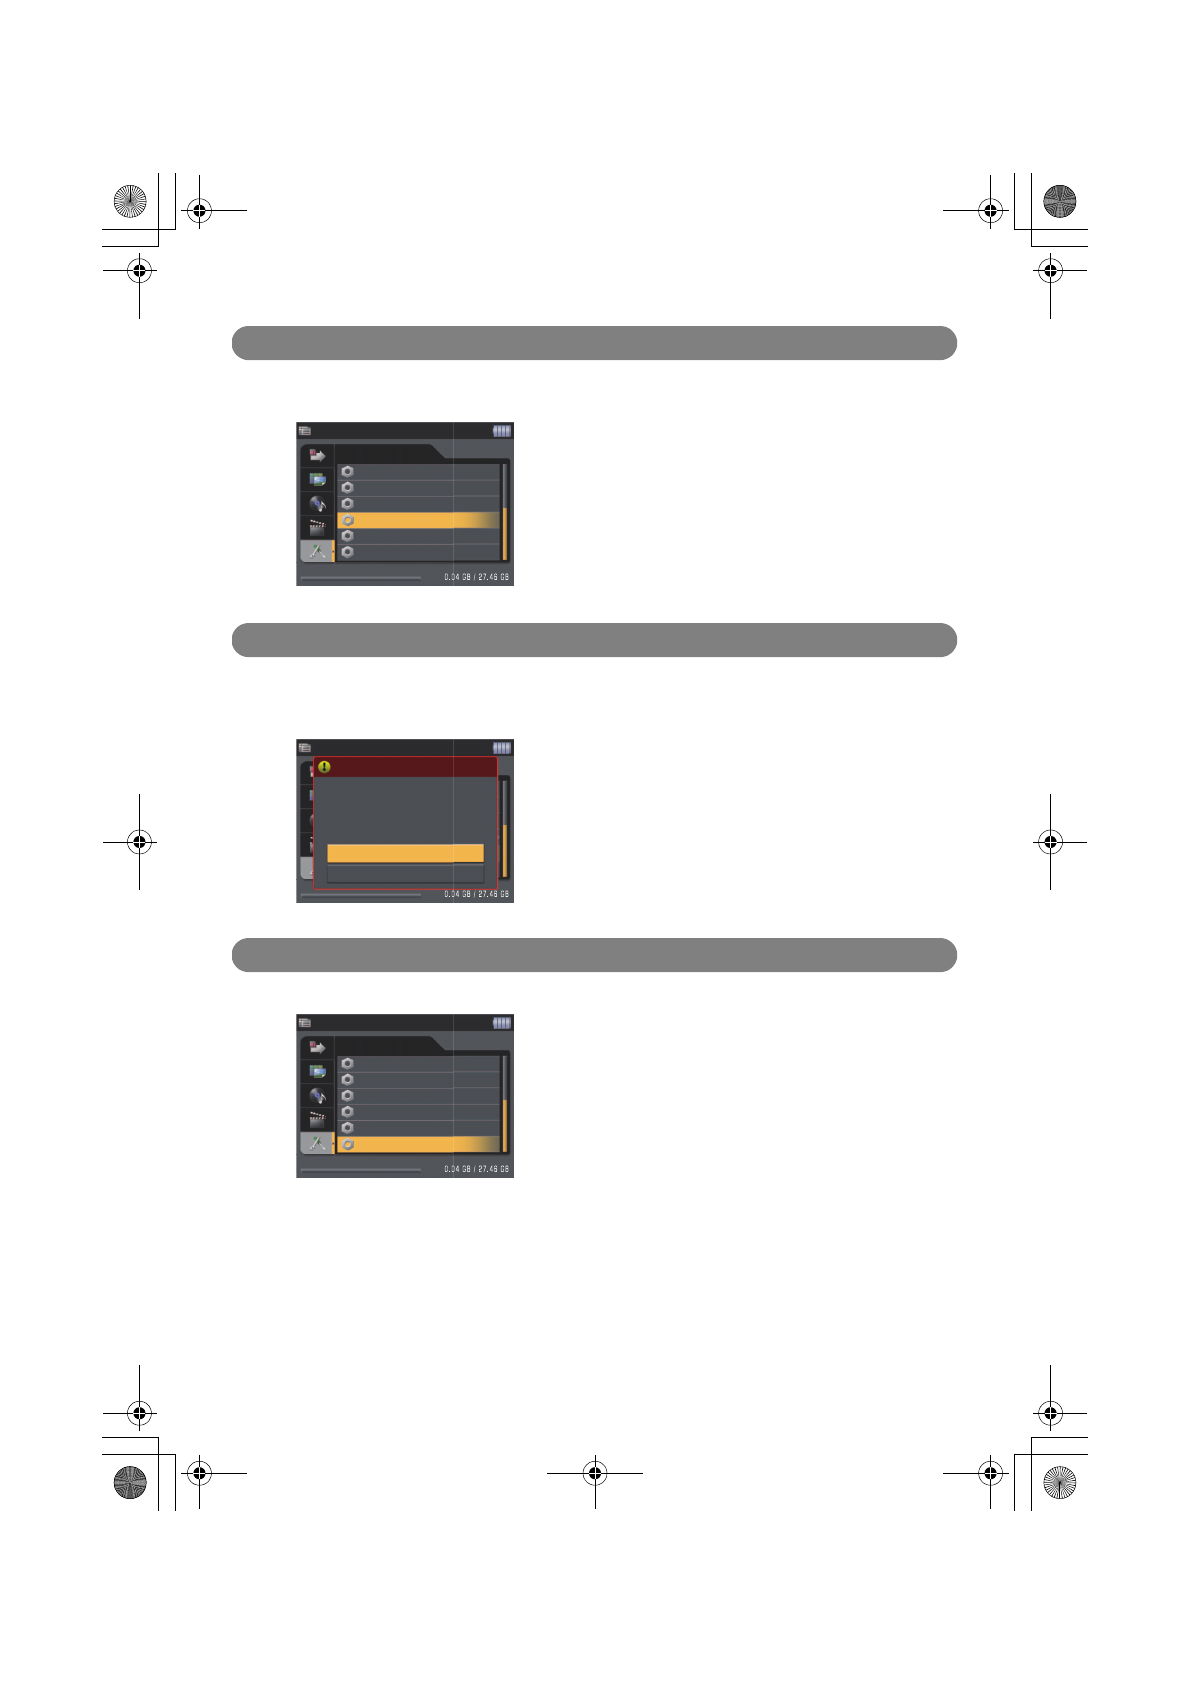
51
Switching USB connection
If you connect the MEDIA STORAGE M30/M80 to a computer or printer by using
the USB cable, you must set the USB destination.
Each time you press <SET>, the USB mode is switched to
[USB (switch to Storage mode)] or [USB (switch to Printer
mode)]. (The default is [USB (switch to Printer mode)], which
means the USB destination is a computer.)
Screen output switch
When connecting the MEDIA STORAGE M30/M80 to equipment with video input
function, such as a TV or projector, to display image files, you can choose which to
use to display the files.
Firmware Version
The version of the current firmware will be displayed on the screen.
Home
Firmware - 01.11.01
Screen output switch
USB(switch to Printer mode)
HDD check
Date/Time
Setup
PIN setting
Switch A/V output
Are you sure you want to switch A/V
output?
Switch A/V output
Home
Close
USB(switch to Printer mode)
Firmware - 01.11.01
Screen output switch
HDD check
Date/Time
Home
Setup
PIN setting
Media StorageM30_M80.book Page 51 Wednesday, December 20, 2006 2:34 PM
Page 53

52
Organizing and Managing Files
● Organizing and Managing Files●
Organize and manage files by protecting, copying, moving, and
deleting files into the built-in HDD in the MEDIA STORAGE M30/M80.
Protecting Files
You can protect important files to prevent them from being
erased in error.
1 Select an album or file you want to protect. 2 Press <MENU> to display the function menu,
select [Protect album] or [Protect file], and press
<SET>.
3 The icon is displayed on the screen of the protected album or file, and setting is completed.
Point
When canceling the protection function, select the protected album or file and execute step 2. The icon will
disappear to cancel the protection function.
Note
After being protected, the functions below will not be available.
Album index
Switch display mode
Print
Album index
Home screen
Erase album
Protect album
Slide show
Copy file
Move file
Arrange album
Modify album
Bookmark
Album index
For protected album For protected file
Erases the file. Deletes the file.
Erases the file in the album. Moves the file to another album.
Moves the file to another album.
Copies the file from another album.
Moves the file from another album.
Renames the album.
Changes a thumbnail image in the album.
Changes the print order for the album.
Media StorageM30_M80.book Page 52 Wednesday, December 20, 2006 2:34 PM
Page 54
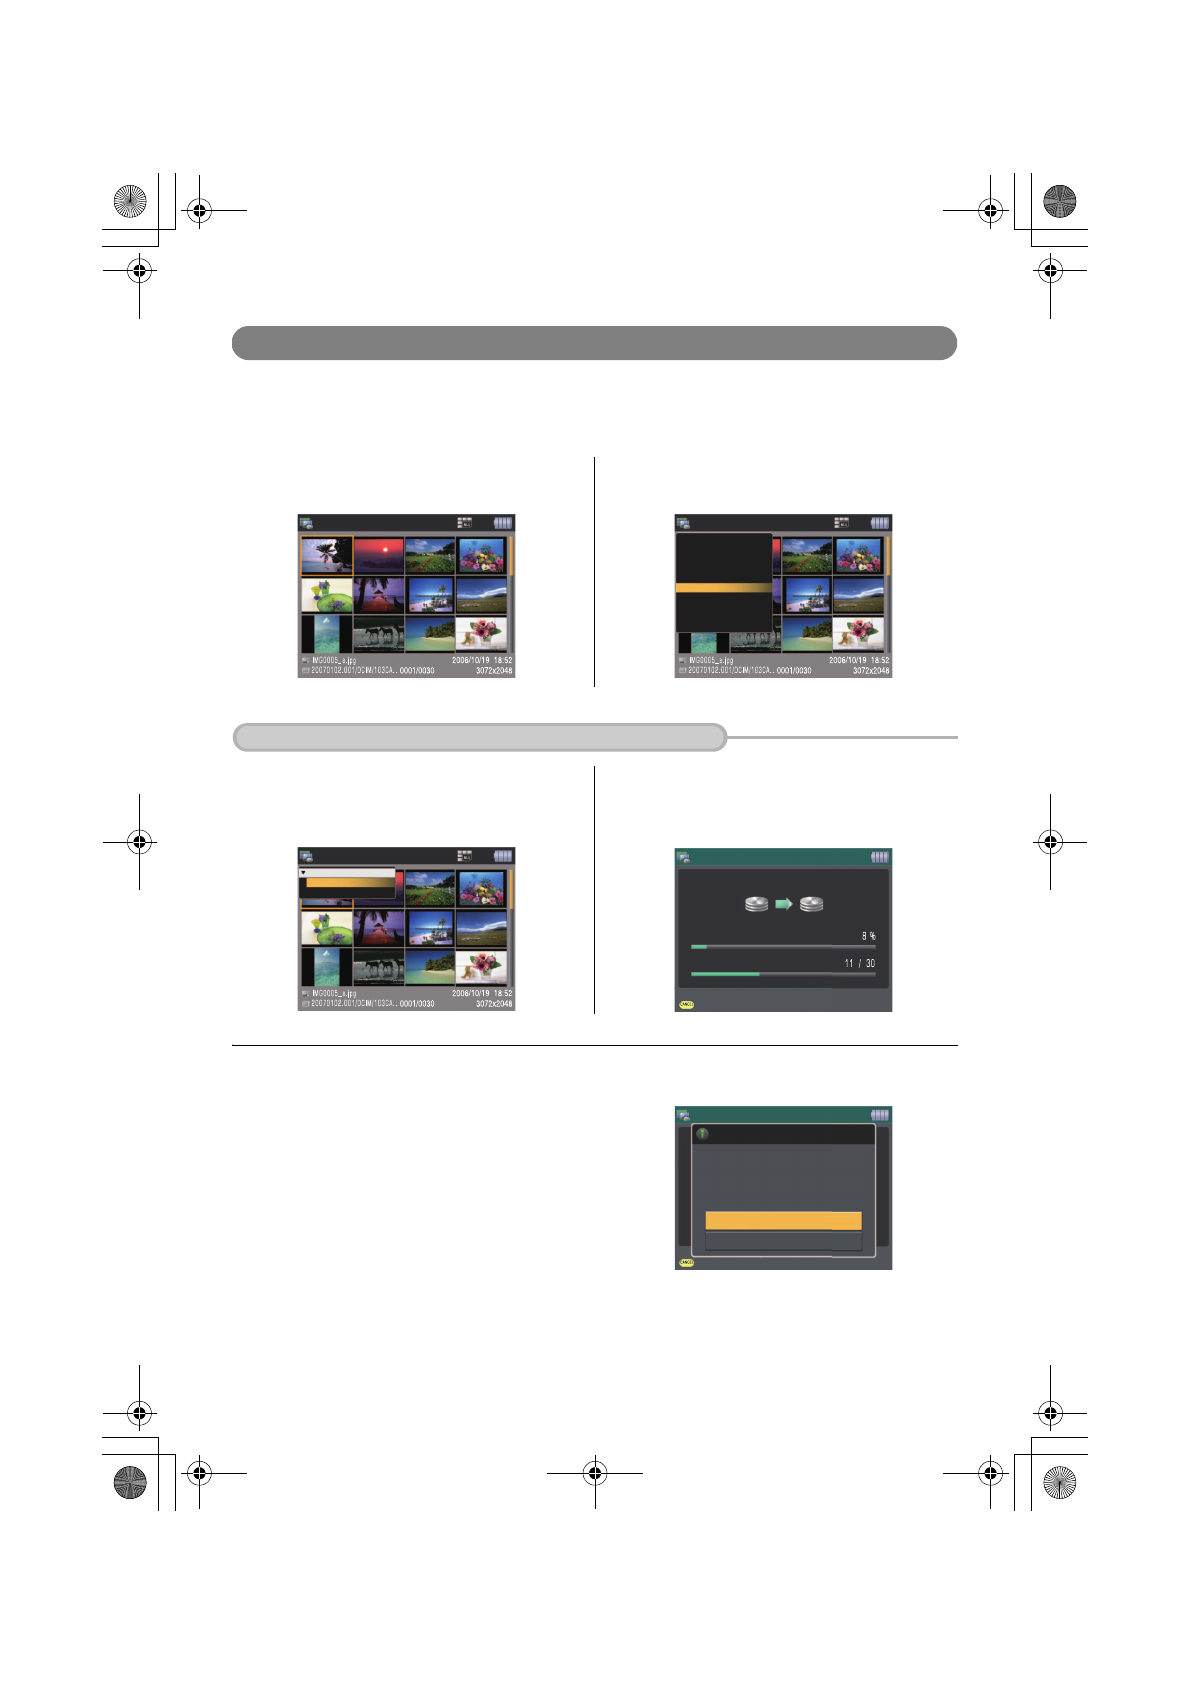
53
Copying or Moving Files
You can copy or move files to an existing album as well as to a
new one you have created.
1 Select a file you want to copy or move. 2 Press <MENU> to display the function menu,
select [Copy files] or [Move files], and press <SET>.
3 The sub menu will be displayed. Select [All from
album] and press <SET>.
4 The screen for selecting the album to copy or
move files to will be displayed. Select the desired
album and press <SET> to start copy or move.
5 When the process is completed, a message will be displayed. Open the destination album or the Album
Index, and then press <SET>.
Image index
Move files
Switch display mode
Print
Erase file
Home screen
lmage index
Protect file
Slide show
Copy files
Arrange files
Modify album
When Copying or Moving Files in an Album Together
Image index
Copy files
All from Album
Select files
Cancel copying
Copy file - All
Current file
Progress
Copying the file.
Veri
Cancel verification
Open the Album index
Open the destination Album
Copy and Verification are completed
successfully.
Copy and Verification complete
Copy file - All
Media StorageM30_M80.book Page 53 Wednesday, December 20, 2006 2:34 PM
Page 55
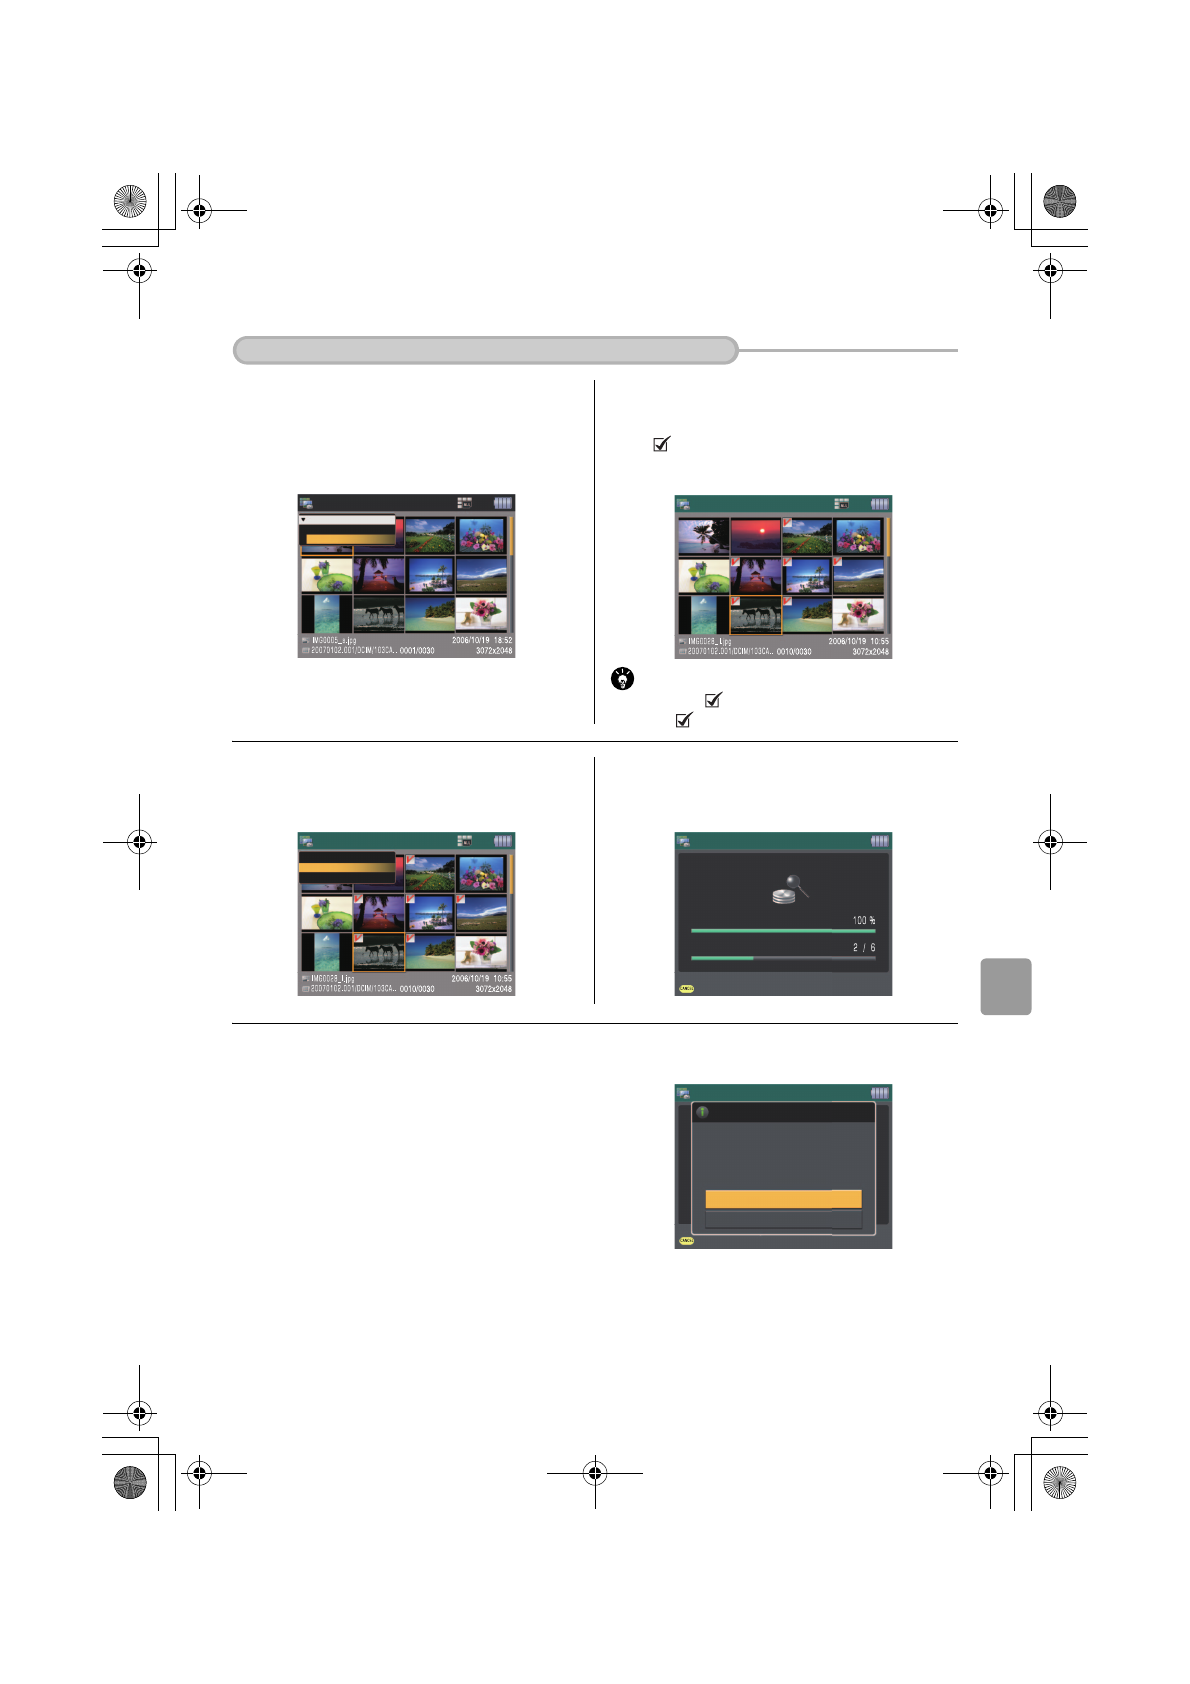
54
Organizing and Managing Files
3 The submenu will be displayed. Select [Select
files] and press <SET>.
4 The screen changes to [Copy file - Select] or
[Move file - Select]. Select the file to copy or move
and press <SET>. Repeat this step to select multiple
files. ( icon will be displayed for the selected
files).
Point
To remove the icon, select the file and press <SET>
again. The icon will disappear.
5 Press <MENU> again to display the function
menu, select [Select Album], and press <SET>.
6 The screen for selecting the album to copy or
move files to will be displayed. Select the desired
album and press <SET> to start copy or move.
7 When the process is completed, a message will be displayed. Open the destination album or the Album
Index, and then press <SET>.
When Selecting a File in an Album to Copy or Move
Image index
Copy files
All from Album
Select files
Copy file - Select
Switch display mode
Copy file - Select
Home screen
Select Album
Cancel verification
Copy file - Select
Current file
Progress
Verifying the file.
Veri
Cancel verification
Open the Album index
Copy and Verification complete
Copy file - Select
Copy and Verification are completed
successfully
Open the destination Album
Media StorageM30_M80.book Page 54 Wednesday, December 20, 2006 2:34 PM
Page 56

55
Arranging files
You can arrange albums and files in the order your desire.
1 Select the albums or files you want to arrange. 2 Press <MENU> to display the function menu,
select [Arrange Album] or [Arrange file], then press
<SET>.
3 When the submenu appears, select [Sort Album] or [Sort file] and press <SET>.
1) Sorting albums
2) Sorting files
4 To arrange files, select file items and press <SET>.
Note
• These changes do not make any changes to the data in the card.
• To undo the arranging to restore the original state, press <CANCEL>.
• If you enter your changes but return to the Home screen, or if you execute [Filter Album] or [Filter file], file arranging will
be canceled.
Album index
Switch display mode
Print
Album index
Home screen
Erase album
Protect album
Slide show
Copy file
Move file
Arrange album
Modify album
Book mark
From oldest : Arranges albums by date,
with the oldest first.
From newest : Arranges albums by date,
with the newest first.
Alphabetical order
:
Arranges albums in
alphanumeric name order.
From oldest : Arranges files by date,
with the oldest first.
From newest : Arranges files by date,
with the newest first.
By File type : Arranges files by file
type.
Media StorageM30_M80.book Page 55 Wednesday, December 20, 2006 2:34 PM
Page 57
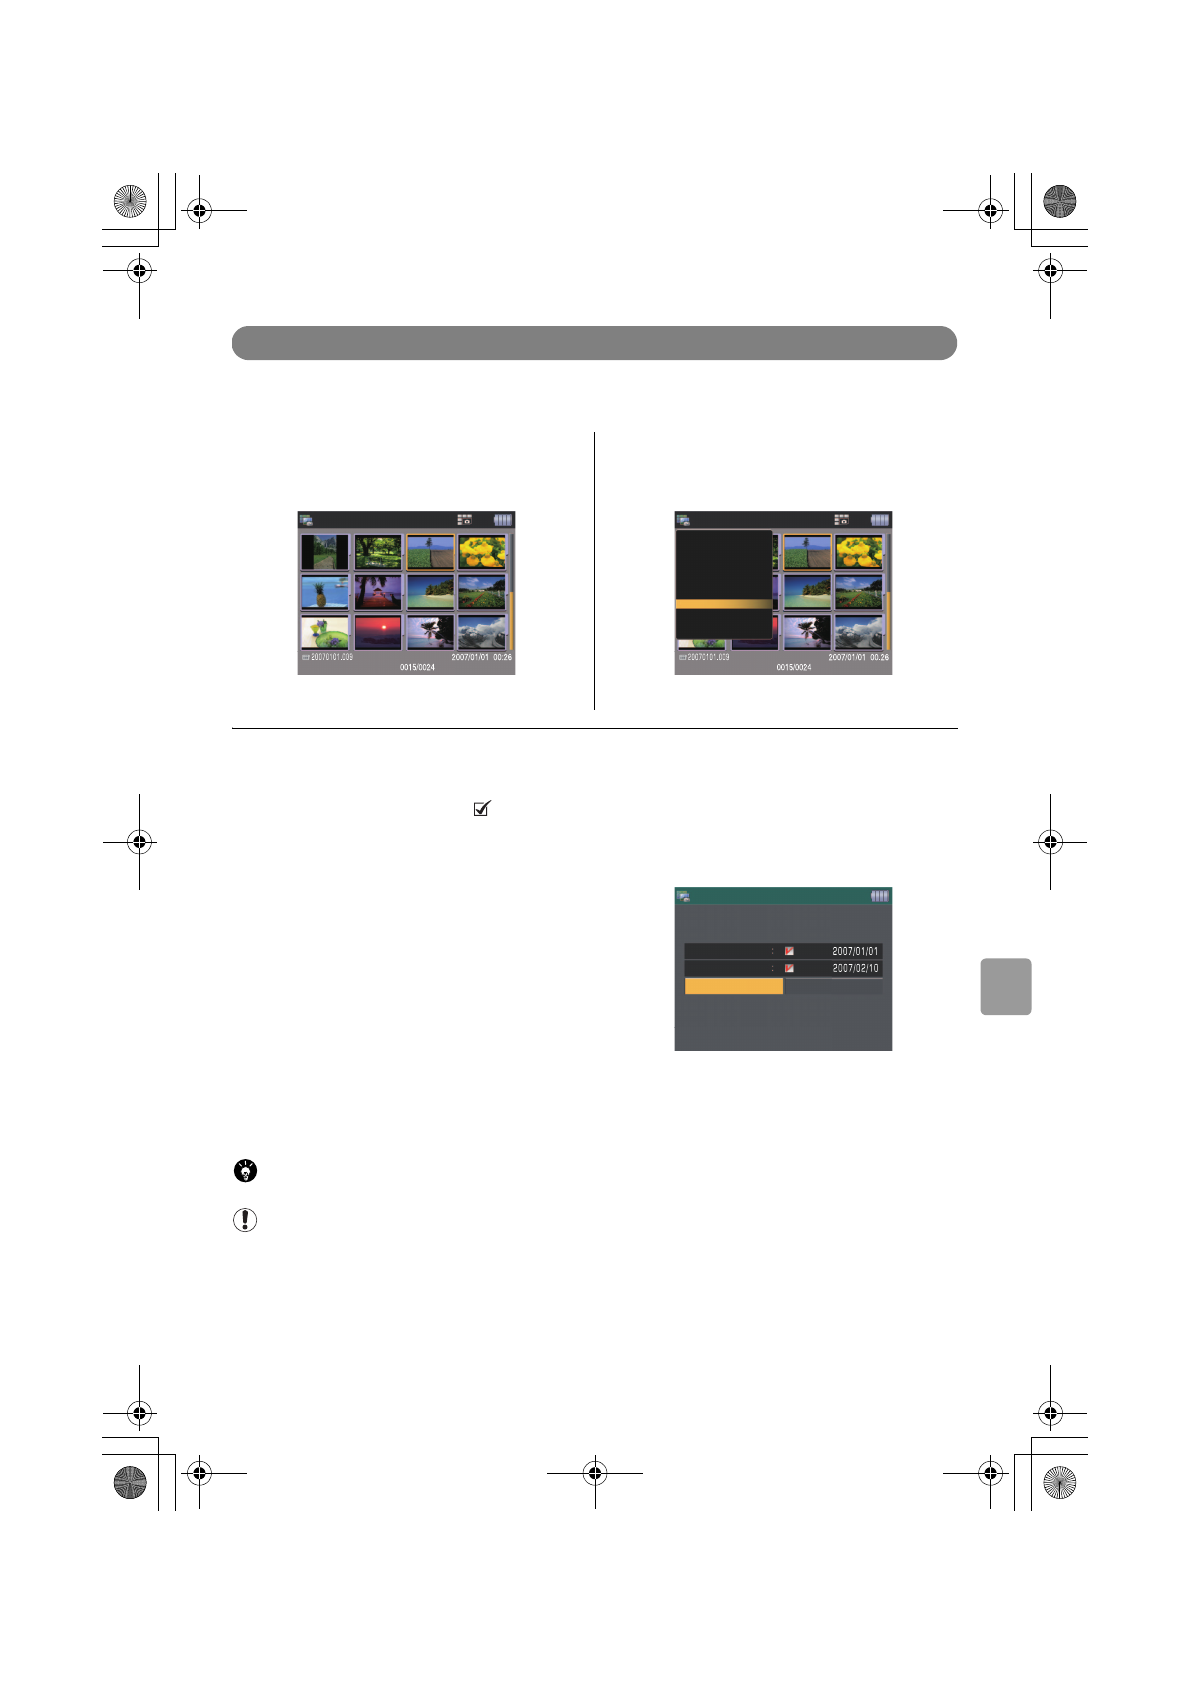
56
Organizing and Managing Files
Displaying files by specifying their date
You can display albums and files by specifying their date.
1 Select albums or files you want to display by
specifying their date.
2 Press <MENU> to display the function menu,
select [Arrange Album] or [Arrange file], then press
<SET>.
3 When the submenu appears, select [Filter Album] or [Filter file] and press <SET>. The date entry screen
appears. Use <Direction> to select each item, and press <SET>. A setup screen will be displayed. Select the
date and file type that you want. (Up arrow: increases the date value; Down arrow: decreases the date
value). After setup, check the box
and press <CANCEL> to confirm the option. Then select [Execute]
and press <SET>.
Displaying images that were shot within the
specified date range.
Example: From October 1 to November 30,
2006 is specified
Point
• Dates from January 1, 1986 to December 31, 2037 can be set in the MEDIA STORAGE M30/M80.
Note
• If the range specified is from a future date to a past date, the screen displays a message and the function will not be
activated.
• If there is no image that matches the date range specified, the screen displays a message and the function will not be
activated.
• These changes do not make any changes to the data in the card.
• To restore the original state, press <CANCEL>.
• If you return to the Home screen, the specified dates will be canceled.
Album index
Switch display mode
Print
Album index
Home screen
Erase album
Protect album
Slide show
Copy file
Move file
Arrange album
Modify album
Book mark
Execute
Filter Album
From
Cancel
You can set a filtering rule for the Album.
To
Media StorageM30_M80.book Page 56 Wednesday, December 20, 2006 2:34 PM
Page 58
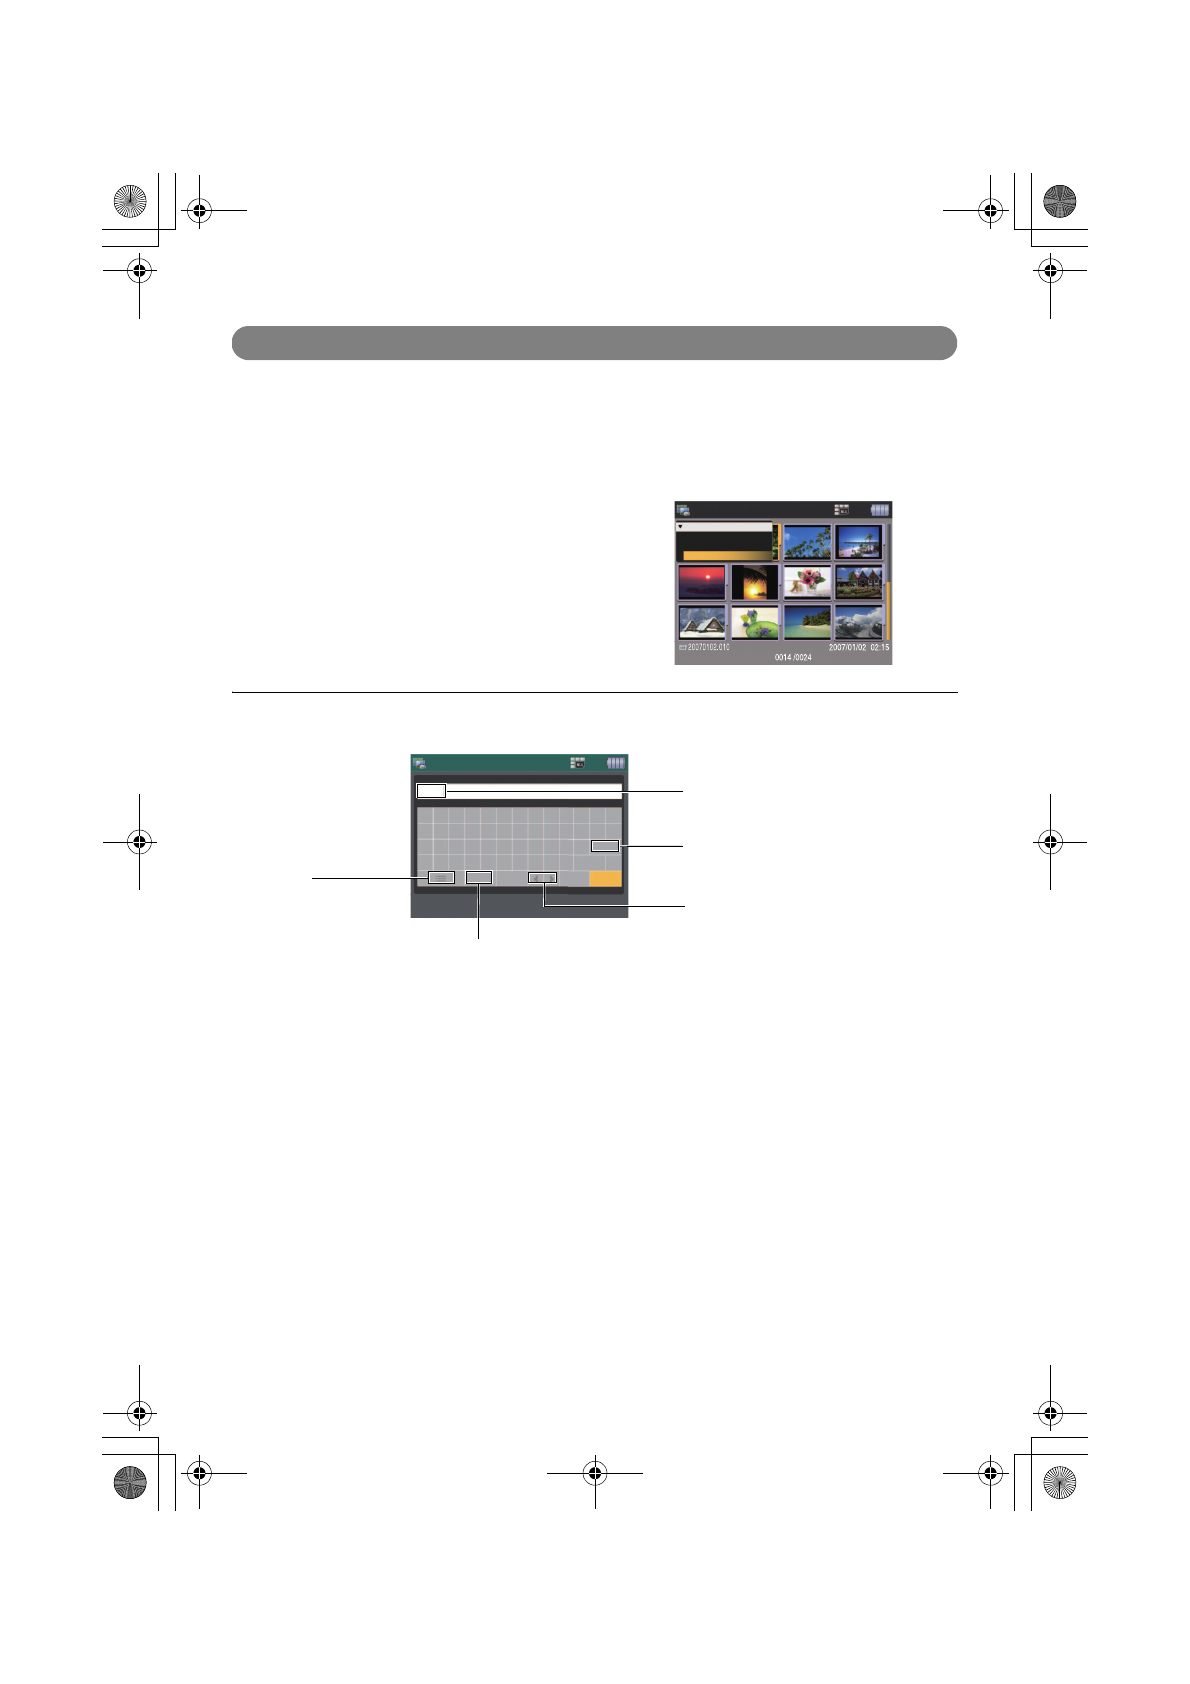
57
Searching for an album
You can easily search for an album by entering its name.
1 Press <MENU> on the [Album list] screen to display the function menu. When you select [Arrange
Album], its submenu appears. Select [Search Album] and press <SET>.
2 The character entry screen appears.
When you select characters, press <SET> to enter them. When entered, select [Finish] and press <SET>. The
album will then be searched.
• To cancel your entry and return to the previous screen, select [ESC] and press <SET>.
• If you enter multiple search words by separating them by spaces, only the first word will be recognized and searched for.
Album index
Arrange Album
Sort Album
Filter Album
Search Album
Album search
Enter an Album name.
Complete by selecting "Finish".
Holidays
,
1 2 3 4 5 6 7 8 9 0 - =
q w e r t y u i o p [ ] \
a s d f g h j k l ;
,
BS
z x c v b n m , . / Shift Cps
Del
Space
ESC Finish
List
Displays a
template to
enable you to
select desired
words.
Arrow key
Moves the cursor in the direction indicated
by the arrow.
BS (Backspace) key
Deletes the character preceding the cursor.
The characters you entered are displayed.
Delete key
Deletes the character following the cursor.
Media StorageM30_M80.book Page 57 Wednesday, December 20, 2006 2:34 PM
Page 59
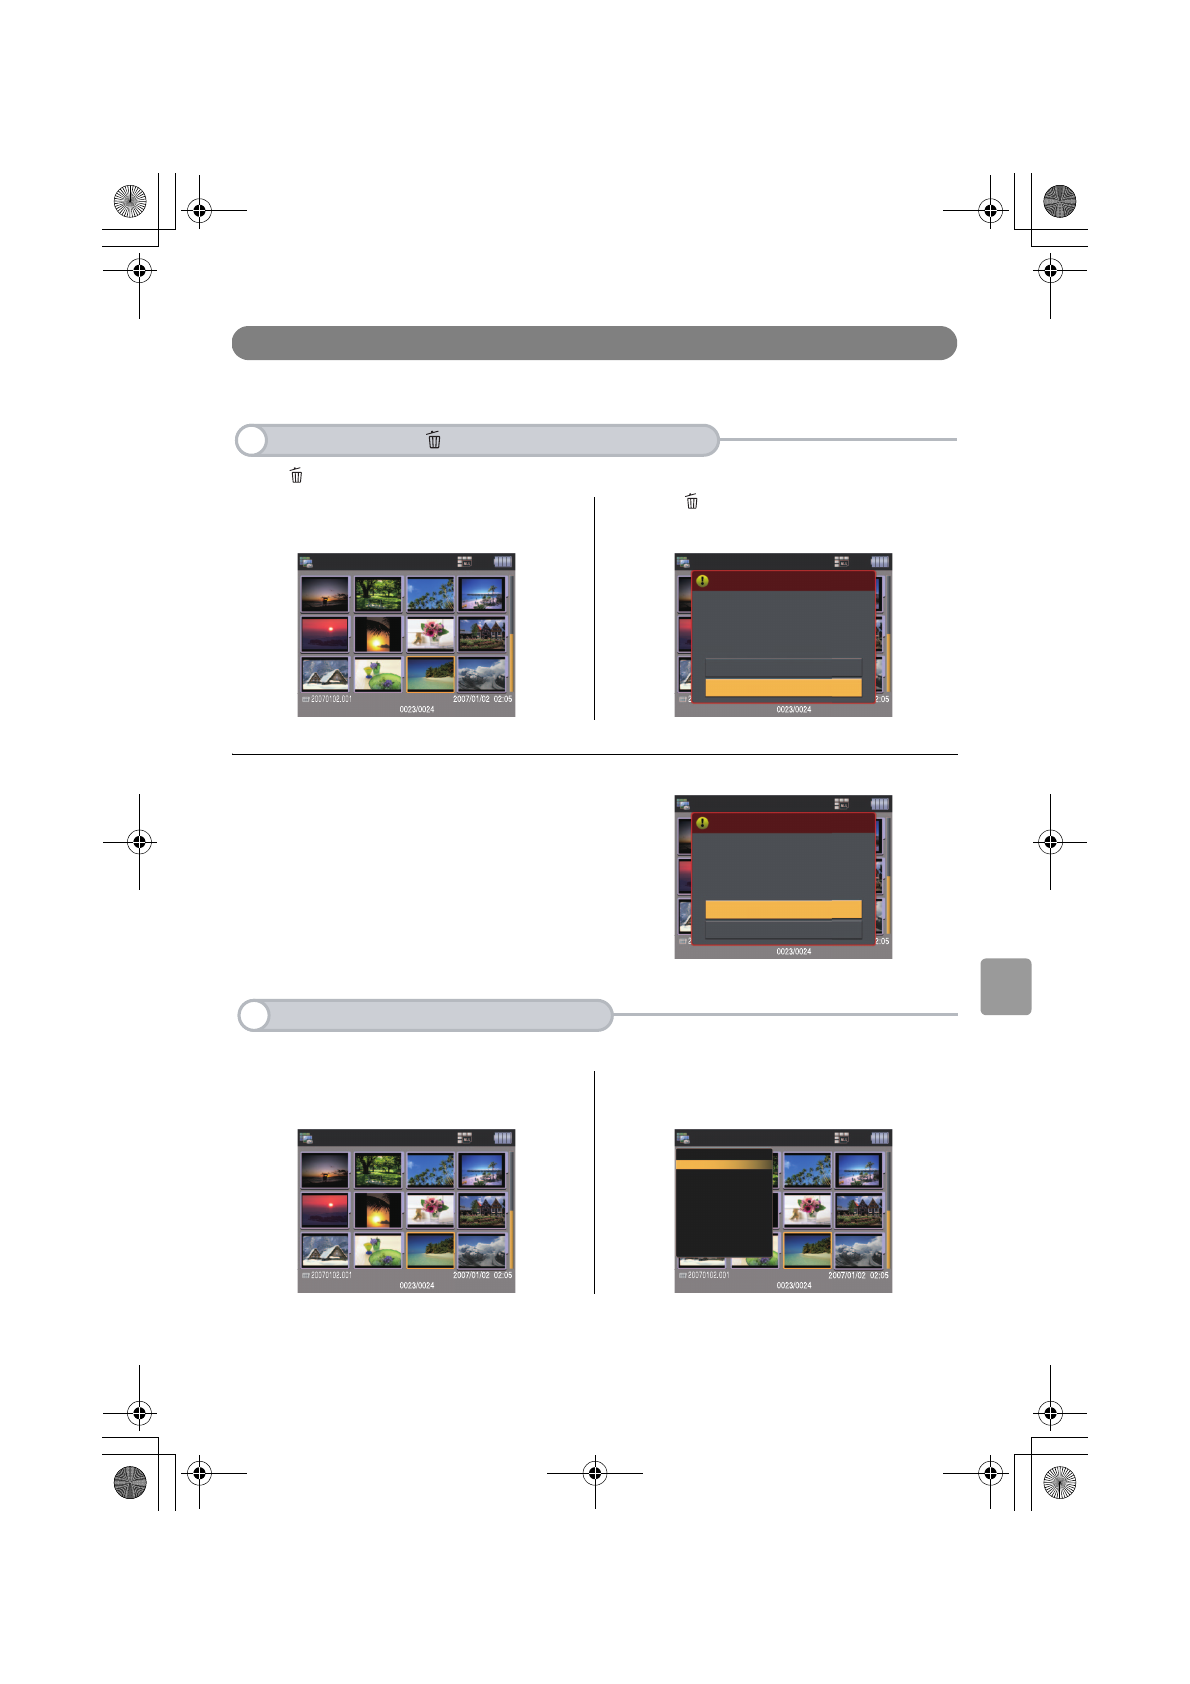
58
Organizing and Managing Files
Erasing Files
Follow the procedure below to erase unnecessary files.
Using < > enables you to easily erase files.
1 Select an album or file you want to erase. 2 Press < > to display the erase confirmation
screen.
3 Select [Erase file] and press <SET>.
Using <MENU> enables you to erase multiple files at once.
1 Select an album or files you want to erase. 2 Press <MENU> to display the function menu.
Select [Erase album] or [Erase file] and press <SET>.
1
If You Select < > (Erase button) to Erase
Album index
Album index
Are you sure you want to erase the
album? A erased album cannot be
restored.
Cancel
Erase the album?
Erase the album
Erase the album
Album index
Are you sure you want to erase the
album? A erased album cannot be
restored.
Cancel
Erase the album?
2
If You Select <MENU> to Erase
Album index
Album index
Home screen
Erase album
Protect album
Slide show
Print
Copy file
Move file
Arrange album
Modify album
Bookmark
Switch display mode
Media StorageM30_M80.book Page 58 Wednesday, December 20, 2006 2:34 PM
Page 60
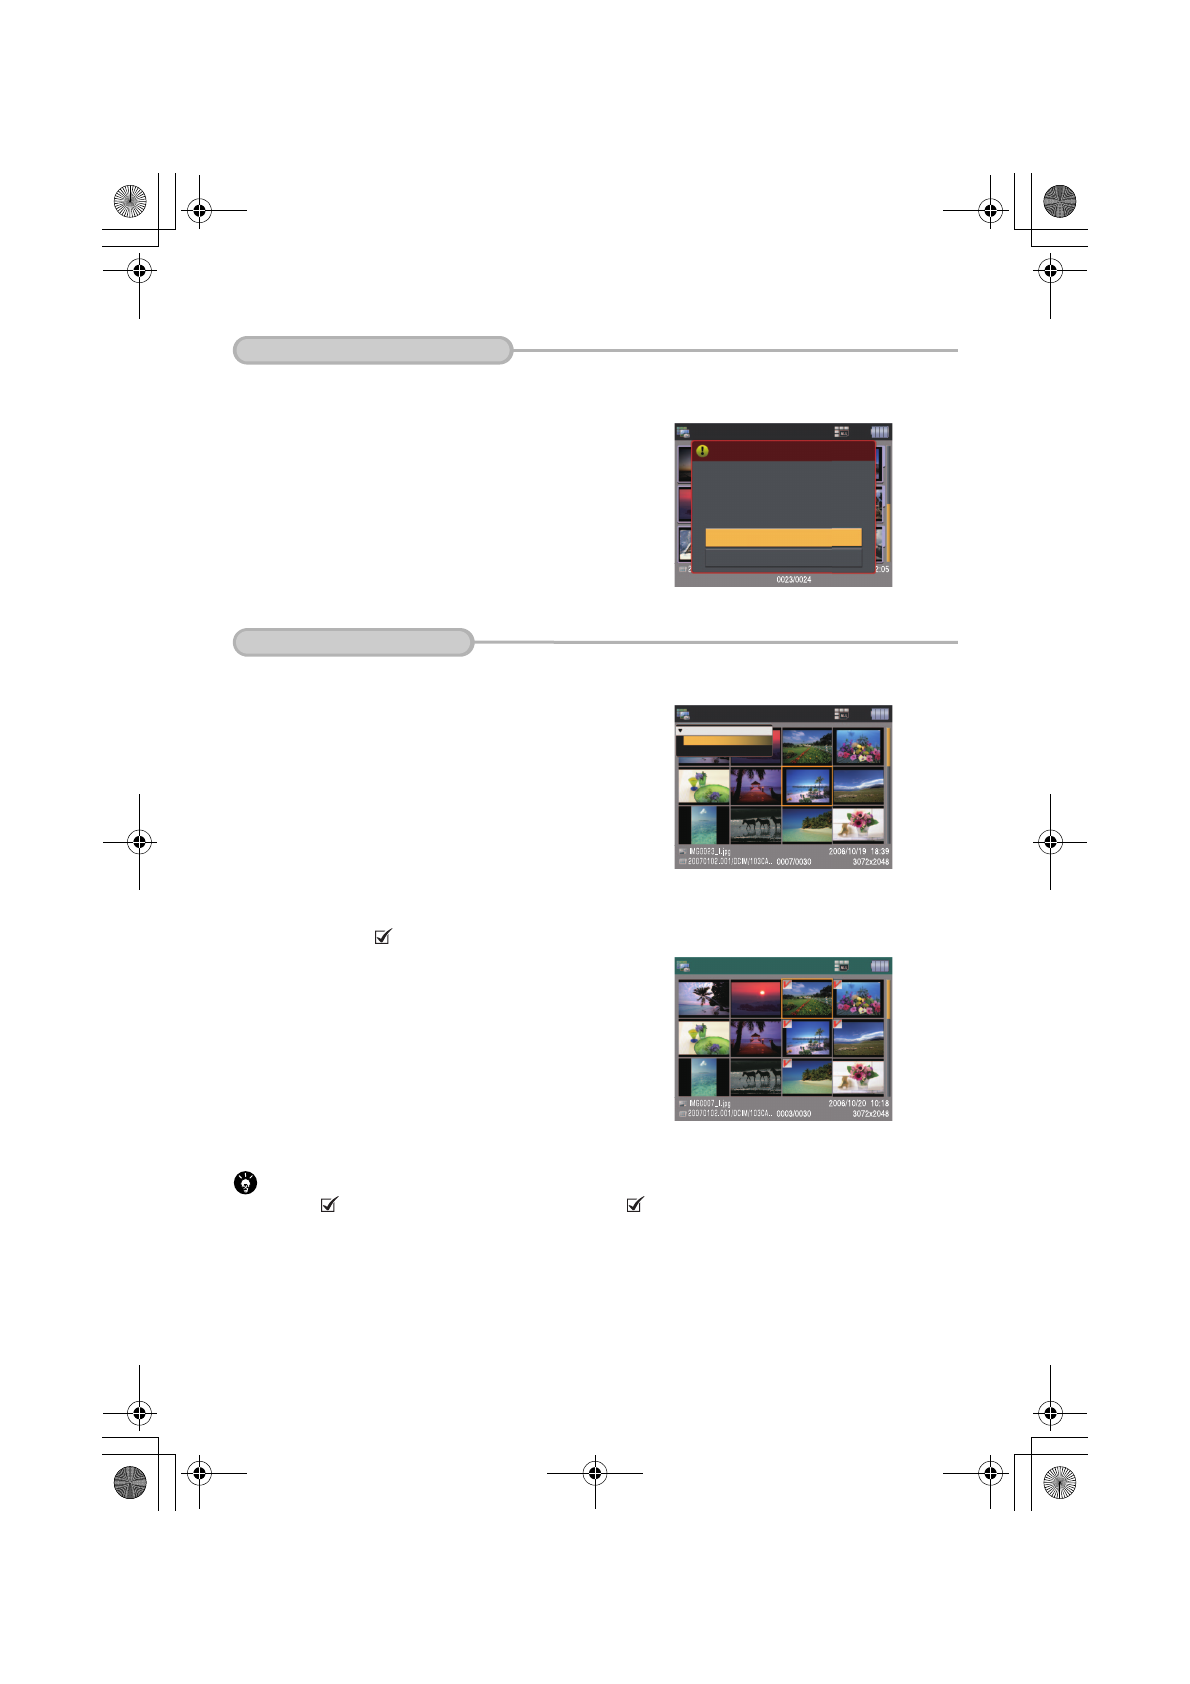
59
3 The erase confirmation screen will be displayed. Select [Erase the album] and press <SET>. The album is
then erased.
3 The submenu will be displayed. Select one from the following erase options and press <SET>.
1) Select files
2) This file only
1) When selecting files to erase
4 The screen changes to [Erase file - Select]. Select the file to erase and press <SET>. Repeat this step to
select multiple files. ( icon will be displayed for the selected file).
Point
To remove the icon, select the file and press <SET> again (the icon will disappear).
When Erasing an album
Erase the album
Album index
Are you sure you want to erase the
album? A erased album cannot be
restored.
Cancel
Erase the album?
When Erasing a File
Erase file
Select files
This file only
Image index
Erase file - Select
Media StorageM30_M80.book Page 59 Wednesday, December 20, 2006 2:34 PM
Page 61

60
Organizing and Managing Files
5 Press <MENU> again to display the function
menu, select [Erase], and press <SET>.
6 The erase confirmation screen will be displayed.
Select [Erase file] and press <SET>. The selected
files are deleted at once.
2) When erasing this file only
4 The erase confirmation screen will be displayed. Select [Erase file] and press <SET>. The file is then
erased.
Point
When an unprotected album is erased:
1) If the album does not contain protected files, the album and the contained files will be erased.
2) If the album contains any protected files, the album will not be erased, and only the protected files will remain in the
album.
Erase file - Select
Erase
Home screen
Erase file - Select
Erase the file?
Erase file
Cancel
Are you sure you want to erase the file?
Erased file cannot be restored.
Erase the file?
Erase file
Cancel
Are you sure you want to erase the file?
Erased file cannot be restored.
Image index
application_1_2.fm Page 60 Thursday, December 21, 2006 10:04 AM
Page 62
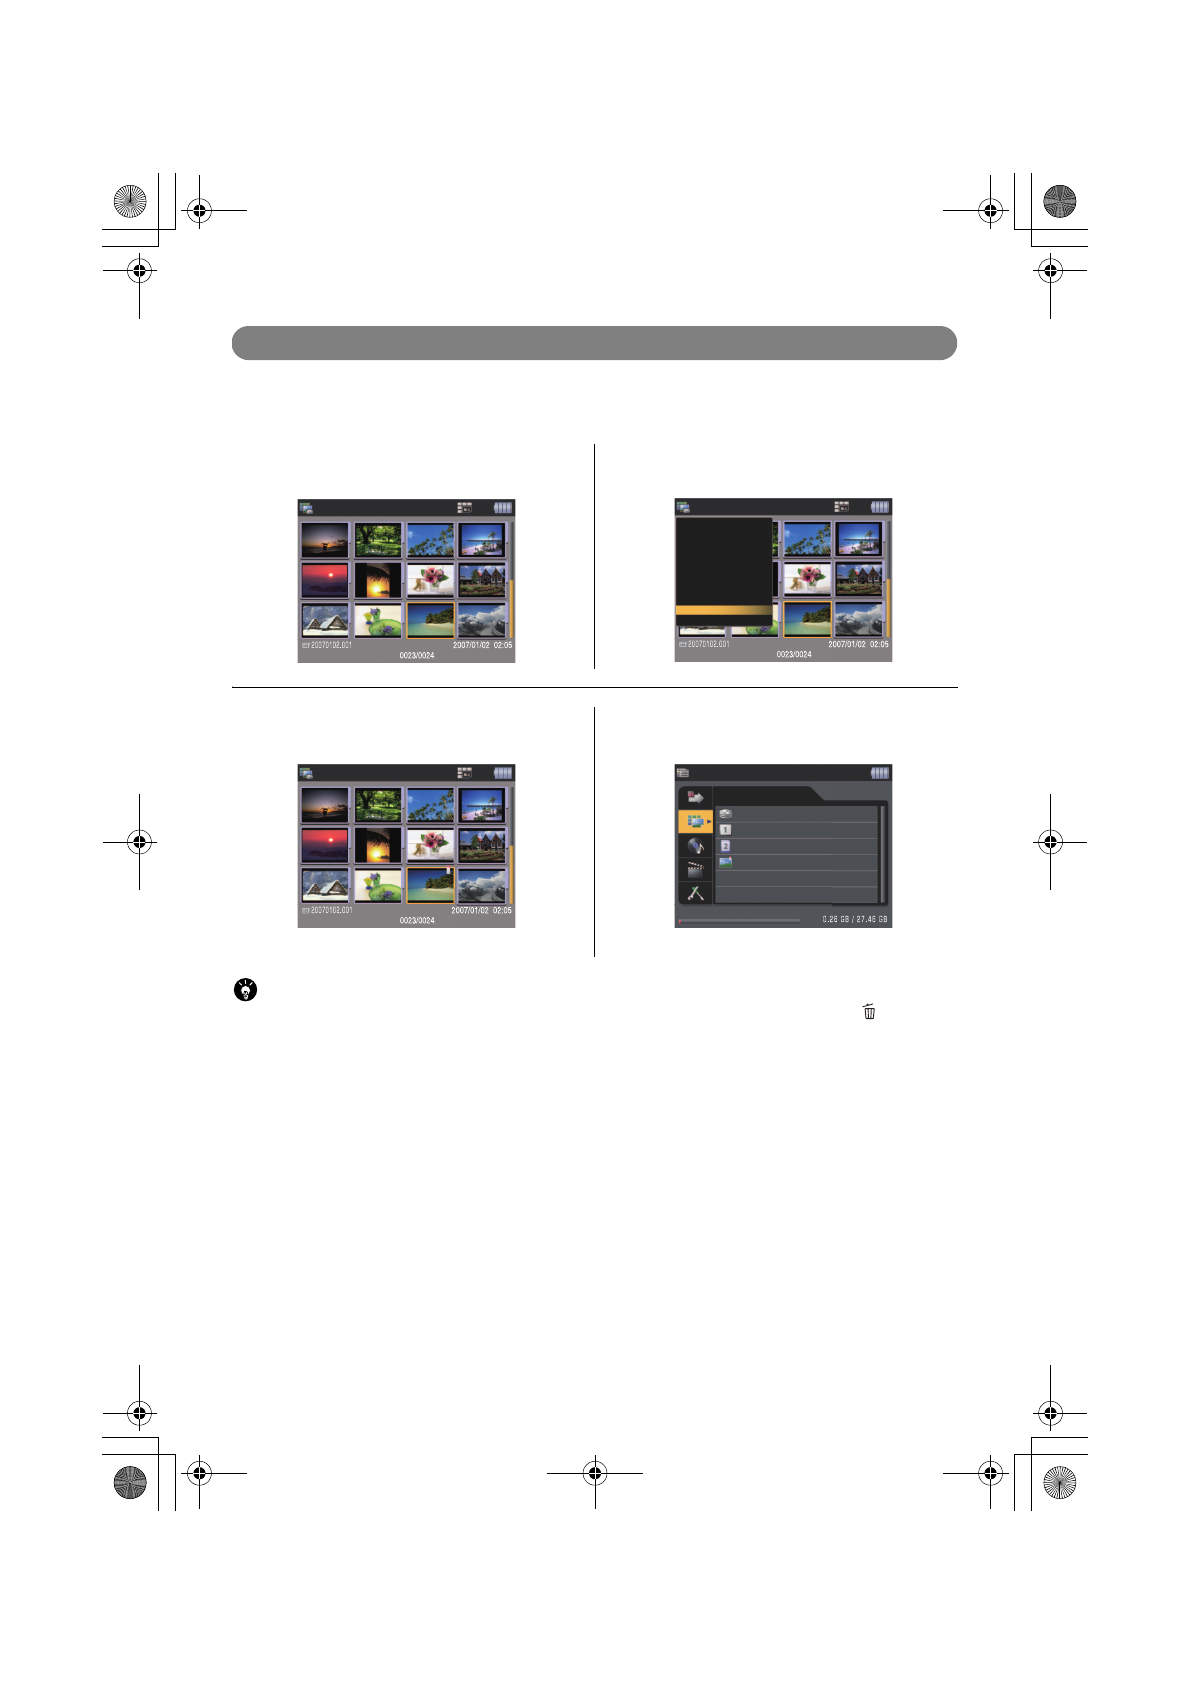
61
Using the Bookmark Function
The bookmark function is useful for easily accessing the album
you want to see on the Home screen.
1 Select an album to bookmark. 2 Press <MENU> to display the function menu,
and select [Bookmark].
3 Press <SET> to mark the album with the
bookmark icon.
4 The bookmarked album is added into [Playback]
on the Home screen.
Point
To remove the bookmark, select the album to remove the bookmark on the Home screen, and press < >. The Erase
Confirmation screen will be displayed. Select [Erase the bookmark] and press <SET>. The bookmark will be then cleared.
Album index
Album index
Home screen
Erase album
Protect album
Slide show
Print
Copy file
Move file
Arrange album
Modify album
Bookmark
Switch display mode
Album index
Playback
HDD
Card 1
Card 2
Bookmark-1 (20070102.0...
Home
Media StorageM30_M80.book Page 61 Wednesday, December 20, 2006 2:34 PM
Page 63

62
Organizing and Managing Files
Changing an Album Name
The album is automatically named with date "YYYYMMDD.XXX (a
3-digit number)", which can be changed to characters you desire.
1 Select an album to rename. 2 Press <MENU> to display the function menu,
select [Modify album], and press <SET>.
3 The submenu will be displayed. Select [Input Album name] and press <SET>.
4 The character entry screen is displayed.
Select characters and press <SET>. Then select [Finish] and press <SET>.
• To cancel your entry and return to the previous screen, select [ESC] and press <SET>.
Note
• The album folder itself is not renamed even when the album has been renamed. (See "About the Folder Structure in the
Viewer" on Page 76.)
List
Displays a
template to
enable you to
select desired
words.
Delete key
Deletes the character following the cursor.
Arrow key
Moves the cursor in the direction indicated
by the arrow.
The characters you entered are displayed.
BS (Backspace) key
Deletes the character preceding the cursor.
Enter an Album name.
Complete by selecting “Finish”.
Input Album name
'
q w e r t y u i o p [ ] \
application_1_4.fm Page 62 Friday, January 26, 2007 9:51 AM
Page 64
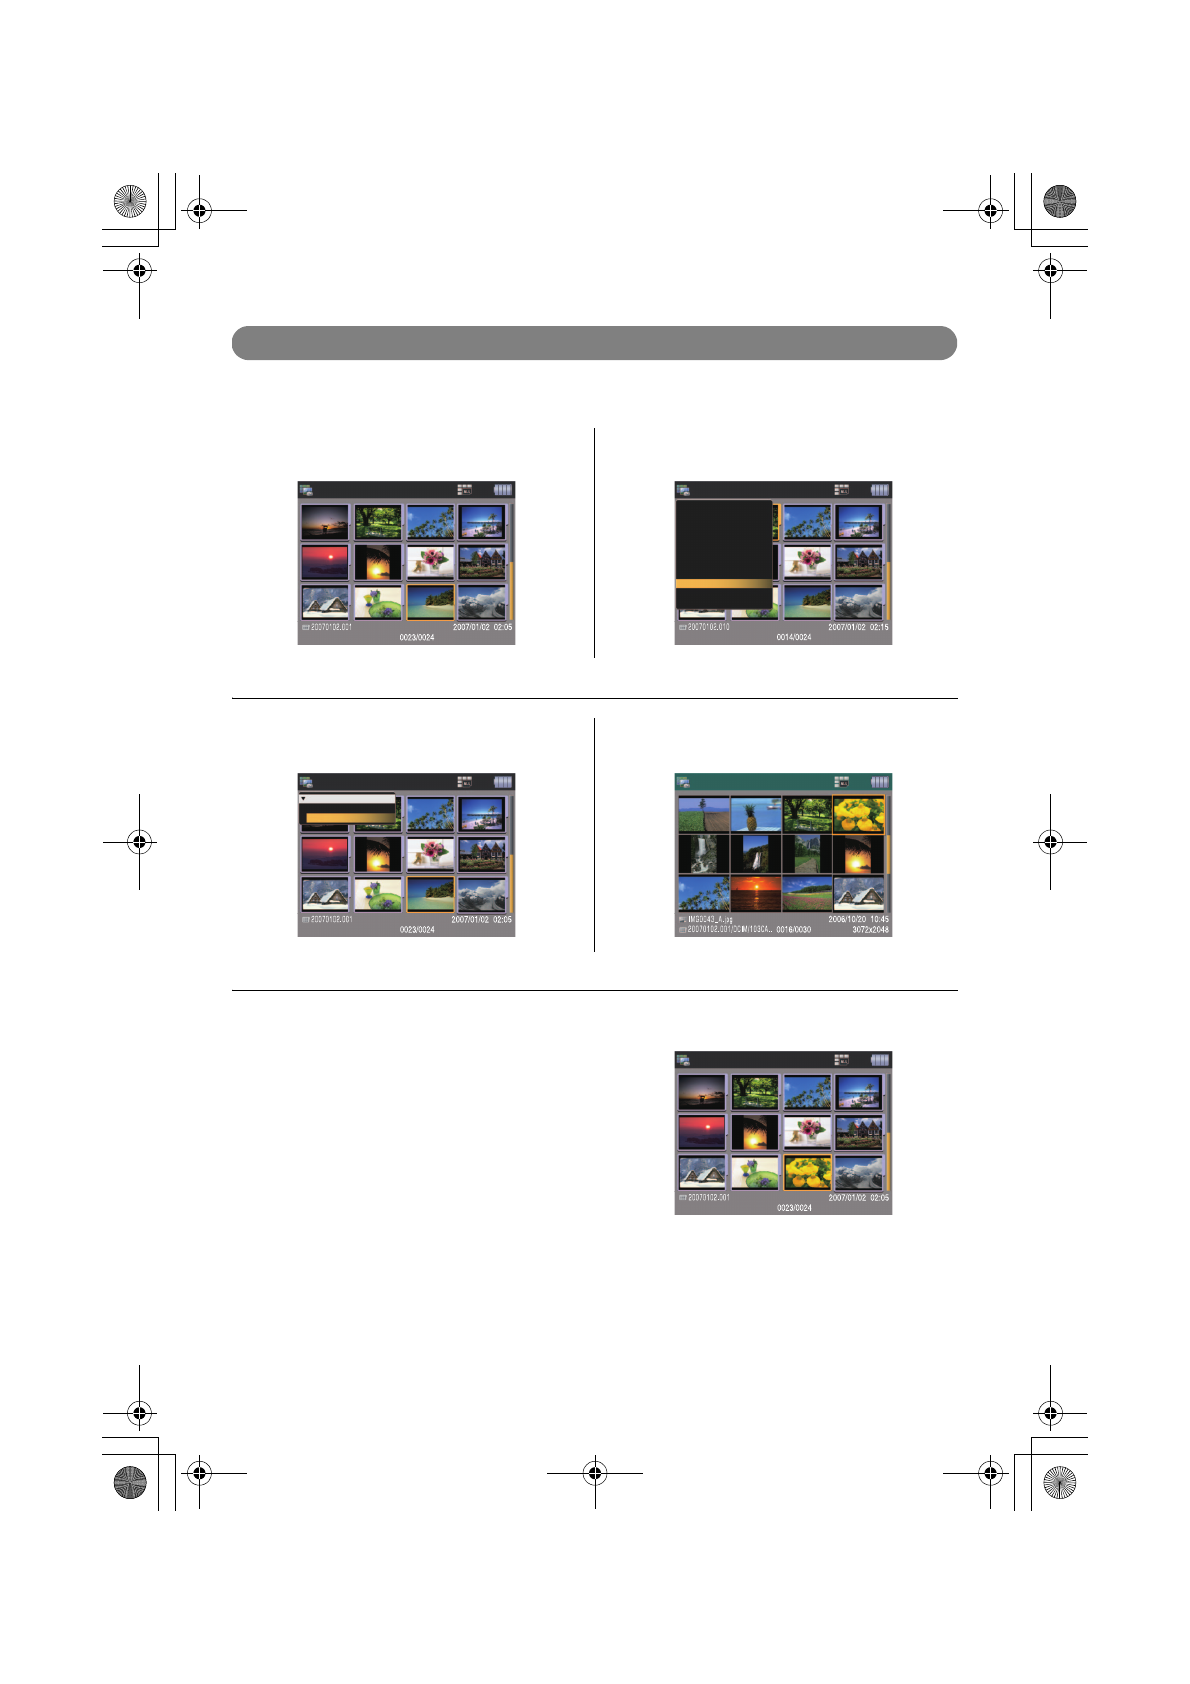
63
Setting an Image for the Album Cover
You can select an image (thumbnail) of your choice for the album cover.
1 Select an album to place the image. 2 Press <MENU> to display the function menu,
select [Modify album], and press <SET>.
3 The submenu will be displayed. Select [Change
thumbnail] and press <SET>.
4 The screen changes to [Select Album
thumbnail]. Select the image and press <SET>.
5 The screen returns to the Album Index screen and the image (thumbnail) of the album cover changes.
Album index
Album index
Home screen
Erase album
Protect album
Slide show
Print
Copy file
Move file
Arrange album
Modify album
Bookmark
Switch display mode
Album index
Modify album
Input Album name
Change thumbnail
Select Album thumbnail
Album index
Media StorageM30_M80.book Page 63 Wednesday, December 20, 2006 2:34 PM
Page 65

64
Organizing and Managing Files
Switching the Display Mode
You can switch the screen to "camera mode" or "all data mode".
Camera mode
Displays data in the same way as for the digital camera
(see "About the Folder Structure in the Viewer" on
page 76).
All data mode
Displays all data in the MEDIA STORAGE M30/M80.
1 Press <MENU> on the Album Index or Image
Index screen to display the function menu, select
[Switch display mode], and press <SET>.
2 The icon changes and then the display mode
switches to the desired mode. (The default is the
camera mode).
Refreshing Images
This function refreshes image cache files for display.
When you display an image on the MEDIA STORAGE, a cache file for this image is cre-
ated on the built-in HDD.
If you connect the MEDIA STORAGE to a PC and directly edit images in HDD, the
images you have edited may not be displayed correctly.
If this occurs, update the image cache files using this function.
1 Press <MENU> on the Single display screen to
display the function menu, select [Refresh Image],
and press <SET>.
2 The displayed image will be updated to the
latest version image. (Note that the only currently
displayed file is updated.)
Album index
Album index
Home screen
Erase album
Protect album
Slide show
Print
Copy file
Move file
Arrange album
Modify album
Bookmark
Switch display mode
Album index
application_1_4.fm Page 64 Thursday, February 8, 2007 10:22 AM
Page 66
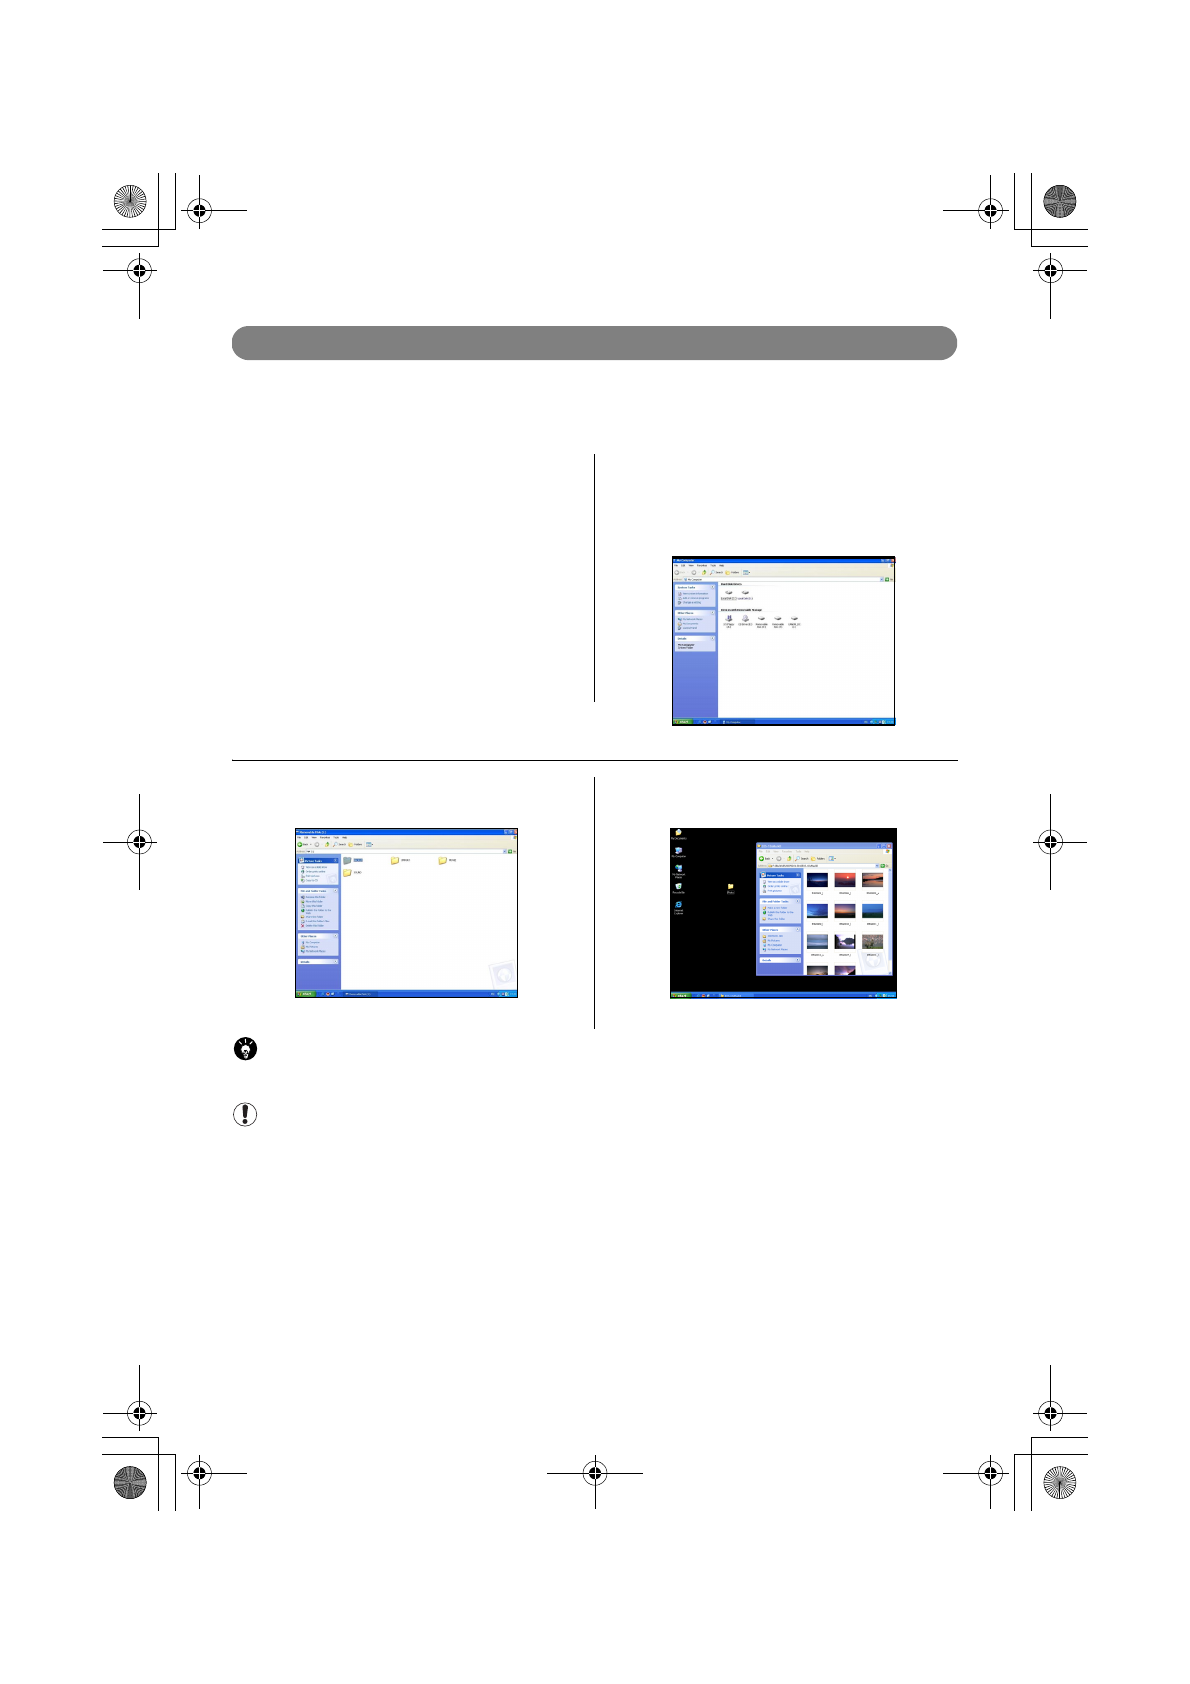
65
Backing up Files in a Computer
You should often back up the files saved in the MEDIA STORAGE
M30/M80 into your computer to protect the files from an
unexpected failure.
1 Connect the supplied USB cable to the MEDIA
STORAGE M30/M80 and to the computer (see
"Connecting to a Computer" on page 19).
2 The computer considers the MEDIA STORAGE
M30/M80 as an external hard disk. Click the
appropriate hard disk to open it.
3 Click the folder that contains the file to back
up.
4 Select the file to back up in your computer and
copy it to the backup destination in the computer.
Point
The files you backed up from the memory card are stored in the [BACKUP] folder.
Note
• To disconnect the MEDIA STORAGE M30/M80 from the computer, follow the procedure in "Disconnecting from the
Computer" (see page 20).
Media StorageM30_M80.book Page 65 Wednesday, December 20, 2006 2:34 PM
Page 67

66
Organizing and Managing Files
Connecting the MEDIA STORAGE M30/M80 to your computer using the supplied
USB cable causes the MEDIA STORAGE M30/M80 to be identified as an external
hard disk, so you can access a memory card if one is inserted.
1) For Windows
The hard disk will be displayed on the screen as shown on
the right. Clicking it enables you to access the memory card.
2) For Macintosh
The hard disk image will be displayed on the desk top
as shown on the right. Clicking it enables you to access
the memory card.
Note
If you start your computer while a memory card is still inserted in the MEDIA STORAGE M30/M80, the computer may not
normally start or identify the memory card. Disconnect the MEDIA STORAGE M30/M80 from the computer before starting it.
Using as a Card Reader
Media StorageM30_M80.book Page 66 Wednesday, December 20, 2006 2:34 PM
Page 68
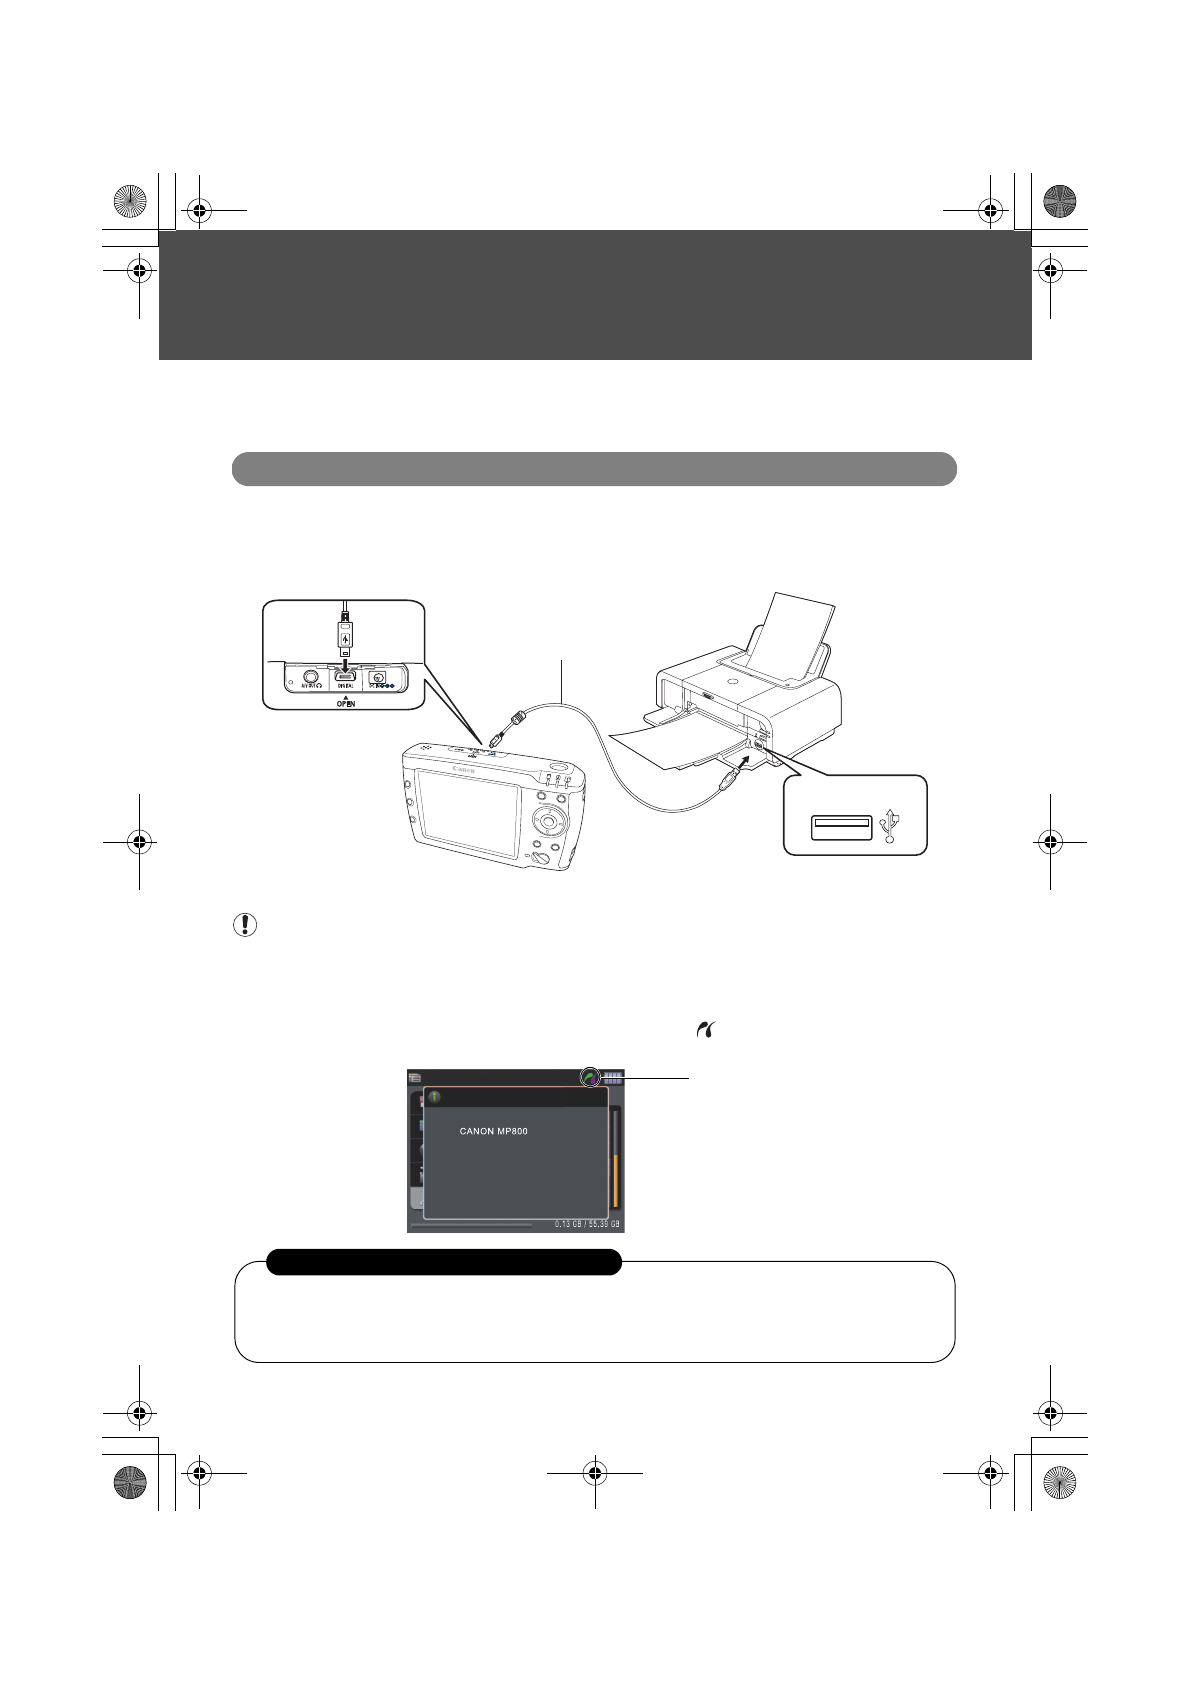
67
● Printing Images●
Directly connect the MEDIA STORAGE M30/M80 to a printer to print
images.The MEDIA STORAGE M30/M80 allows direct printing using a
PictBridge support printer based on the Direct Print Standard.
Preparing to Print
Connect the MEDIA STORAGE M30/M80 to your printer to prepare for printing.
1 In the [Setup] section on the Home screen, set the USB cable destination to the printer. (See "Switching
the USB Destination" on page 51)
2
Connect the printer's USB port and to the MEDIA STORAGE M30/M80's DIGITAL terminal using the supplied USB cable.
Note
• You do not have to turn off the power supply to the MEDIA STORAGE M30/M80 or the printer when you connect them using the USB cable.
• Make sure that the orientation of the USB cable connector is correct before you insert it.
• Use the supplied USB cable only.
3 After the connection is established, you will see an establishment completion message and also the
model and manufacturer name of the connected printer. When the icon appears on the upper right of
the LCD monitor, the connection is then completed.
RESET
USB cable
* The location of the USB port differs depending on printer models
USB Port
*
Home
Printer connected
PictBridge printer connected.
Model:
Indicates that the printer is
in process of connection
Disconnecting the connector from the printer
Make sure that printing has completed on the LCD monitor of the MEDIA STORAGE M30/M80, and
then disconnect the connector of the USB cable.
(You do not have to turn off the power supply to the MEDIA STORAGE M30/M80 or the computer
when disconnecting the USB cable.)
application_2.fm Page 67 Thursday, December 21, 2006 10:07 AM
Page 69
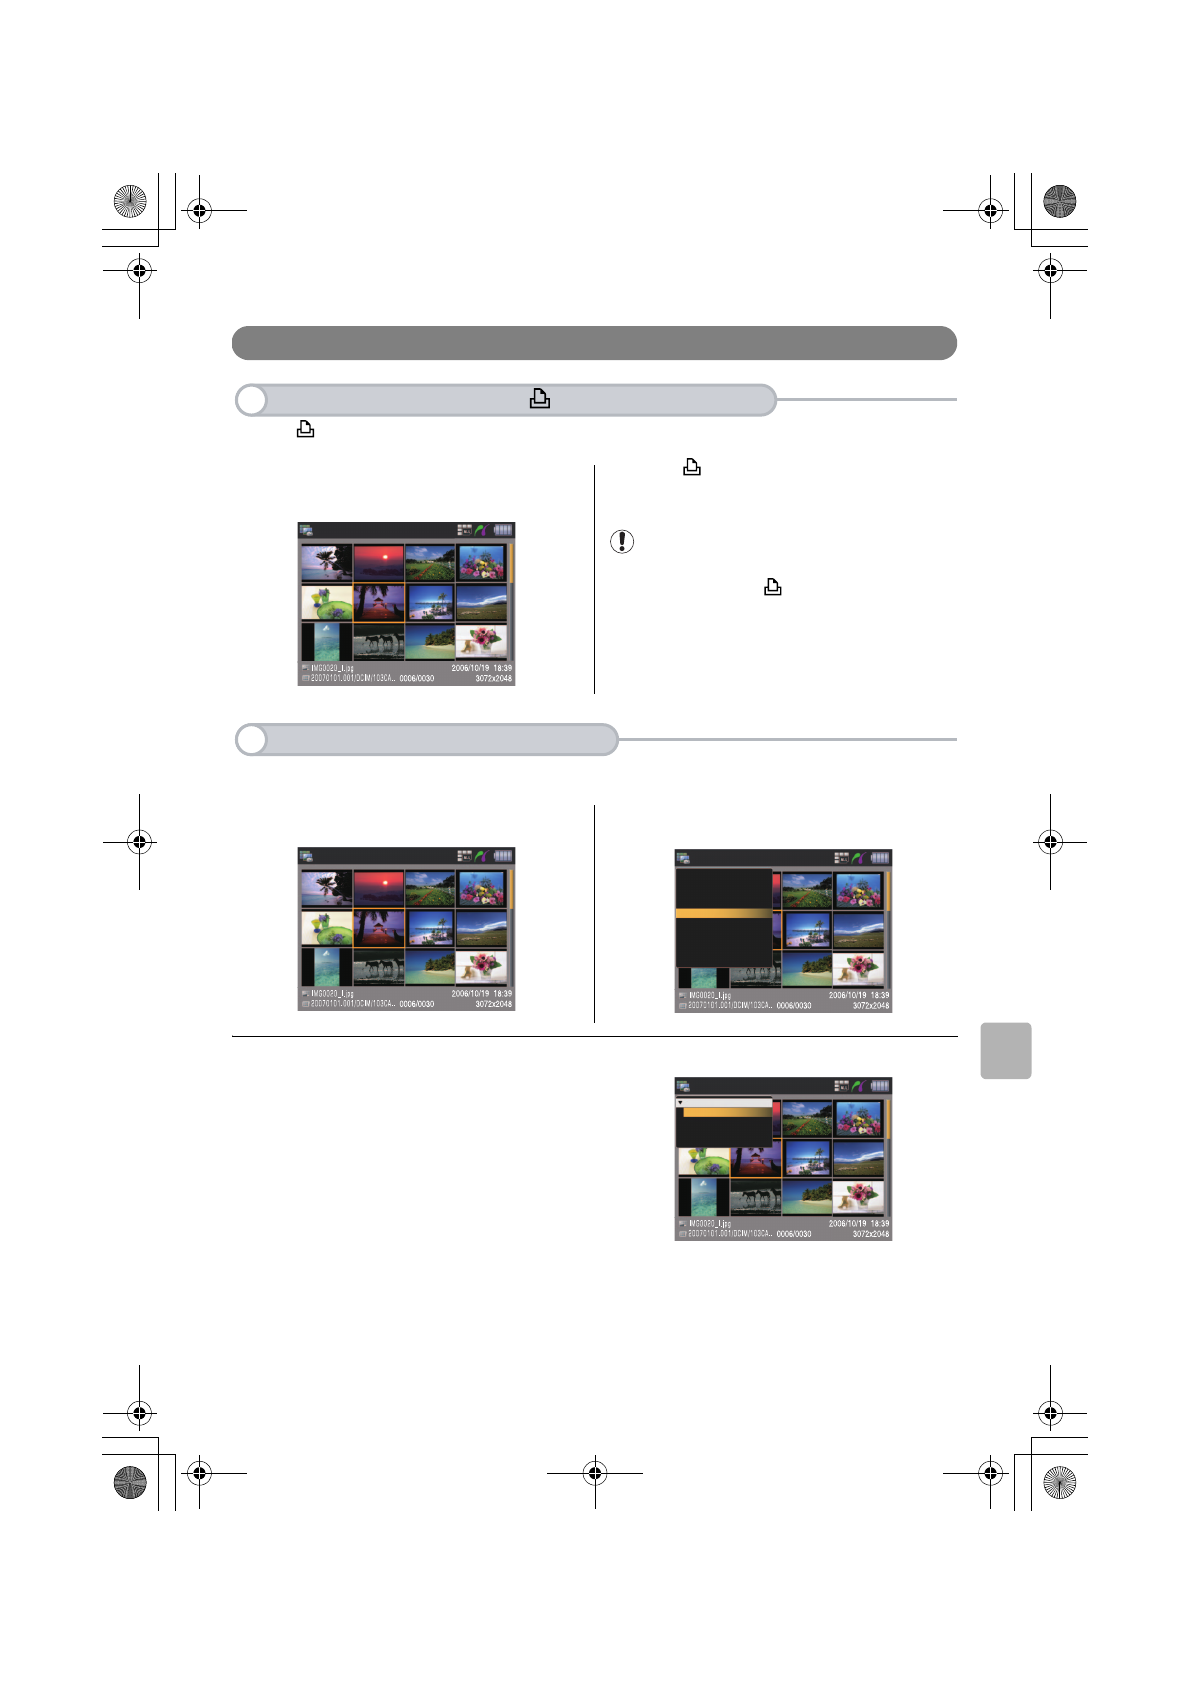
68
Printing Images
Printing Images
Using < > enables one-touch printing.
1 Select the image to print on the Image Index or
Single View screen.
2 Press < > to start printing.
Note
Printing is executed with print settings that were made
valid when you pressed < >.
Using <MENU> enables various print settings.
1 Select an album or file you want to print. 2 Press <MENU> to display the function menus,
select [Print], and press <SET>.
3 The submenus will be displayed. Select the option you want and press <SET>.
1) Printing all images in the album
2) Selecting an image for printing
3) Printing only the currently selected
image
4) Print order
1
If You Print Files Using < > (Easy print button)
Image index
2
If You Print Files Using <MENU>
Image index
Image index
Home screen
Erase file
Protect file
Slide show
Print
Copy files
Move files
Arrange files
Modify album
Switch display mode
Image index
Print
All from Album
Select images
This image only
Print order
application_2.fm Page 68 Thursday, December 21, 2006 10:07 AM
Page 70
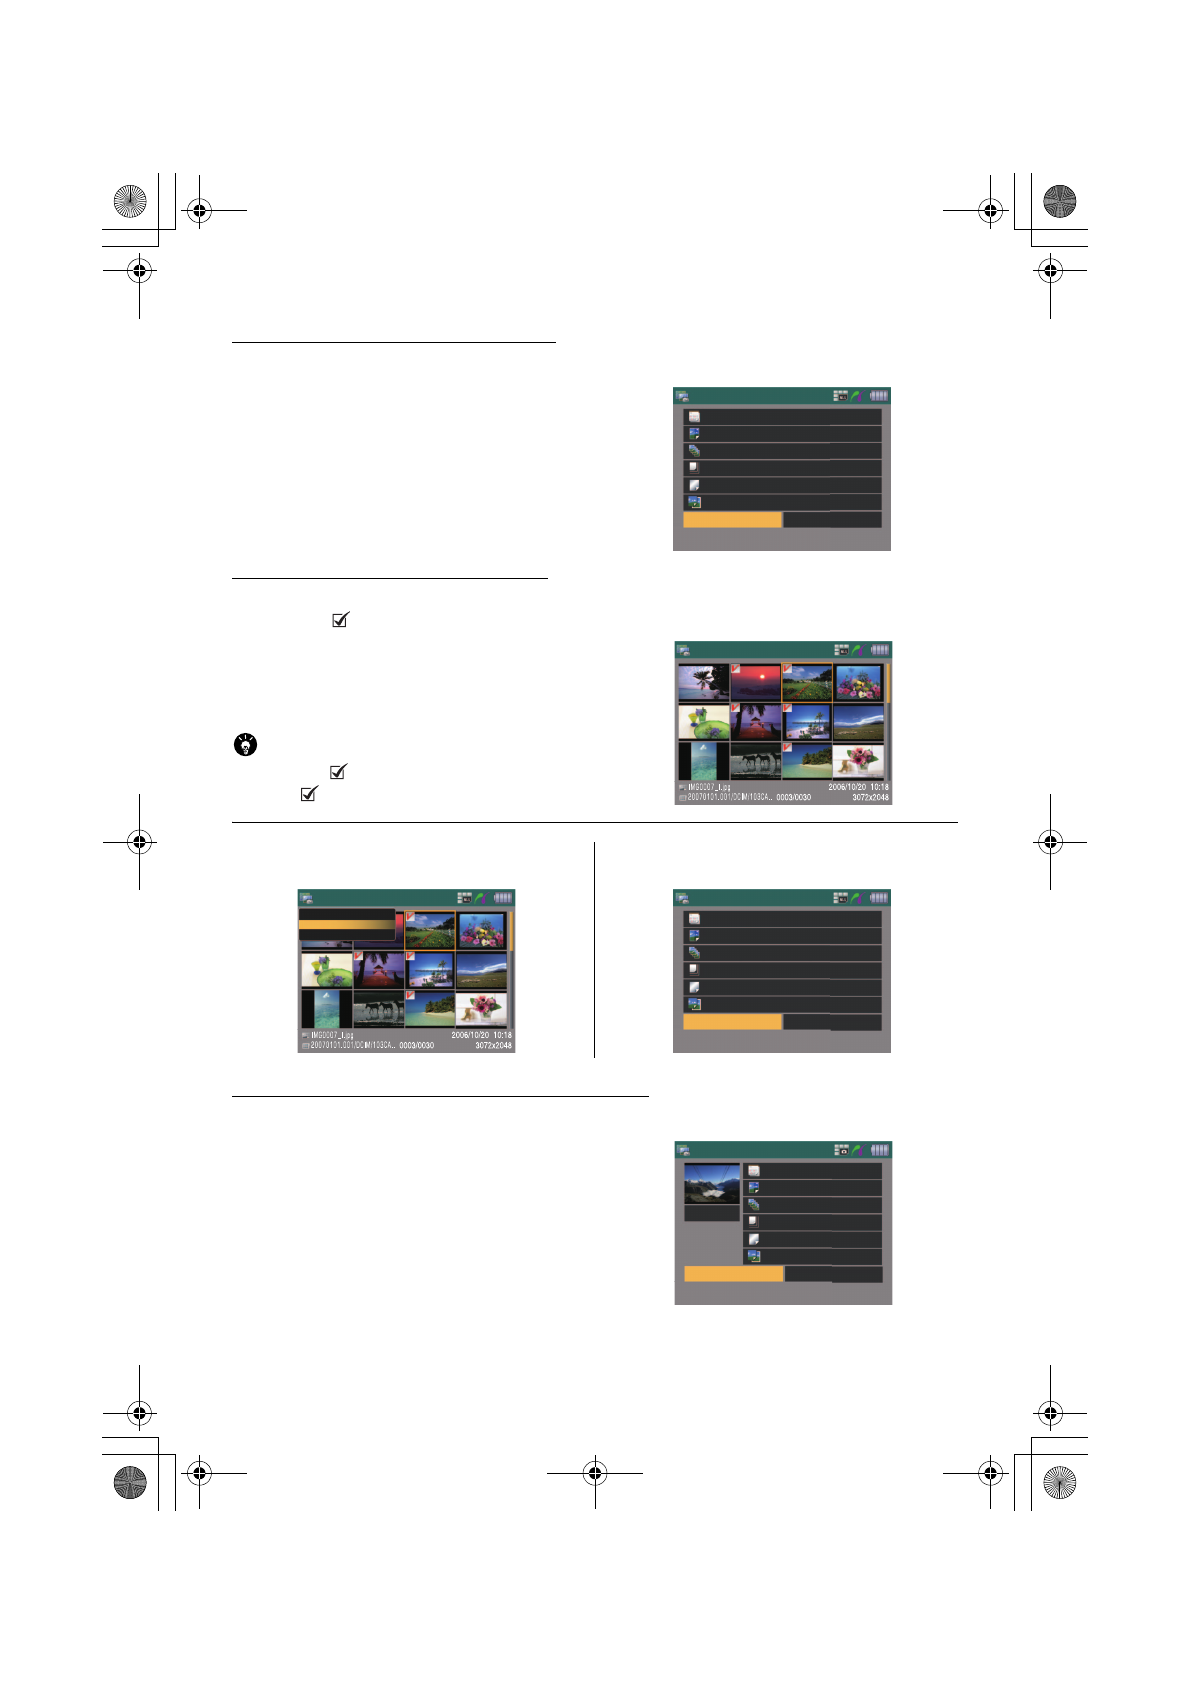
69
1) Printing all images in the album
4 The Print Setting screen will be displayed. Specify each option. Select [Print] and press <SET>.
2) Selecting an image for printing
4 The screen changes to [Print - Select]. Select the file to print and press <SET>. Repeat this step to select
multiple files ( icon will be displayed for the selected file).
Point
To remove the icon, select the file and press <SET>
again (the icon will disappear).
5 Press <MENU> again to display the function
menu, select [Go to print setting], and press <SET>.
6 The Print Setting screen will be displayed.
Specify each option. Select [Print] and press <SET>.
3) Printing only the currently selected image
4 The Print Setting screen will be displayed. Specify each option. Select [Print] and press <SET>.
Print
Date Printer’s default
Effect Printer’s default
Copies 1
Paper Size Printer’s default 1
Paper Type Printer’s default 1
Layout Printer’s default 1
Cancel
Define the settings for printings.
Print - All
Print - Select
Print - Select
Home screen
go to print setting
Switch display mode
Print
Date Printer’s default
Effect Printer’s default
Copies 1
Paper Size Printer’s default 1
Paper Type Printer’s default 1
Layout Printer’s default 1
Cancel
Define the settings for printings.
Print - All
Print Cancel
1
Print - Single
Date Printer’s default
Effect Printer’s default
Printer’s default
Printer’s default
Printer’s default
Copies
Paper Size
Paper Type
Layout
Define the settings for printing.
Trimming
Media StorageM30_M80.book Page 69 Wednesday, December 20, 2006 2:34 PM
Page 71

70
Printing Images
[Print Setting]
Your settings may vary depending on the printer you are using.
ln addition, some printer properties may be unable to be selected.
■ Printing date
Specify whether or not to print the date you took the photo.
■ Printing effect
Specify printing effects.
■ Number of copies
Use the Direction Key to specify the number of copies (Up arrow: Increase. Down arrow: Decrease).
You can specify up to 99 copies per image, and set up to 999 copies for printing in total.
■ Paper size
Select the size of the printing paper.
Example) • A4 • A5 • Post card
• L size • 2L size • The same as the default specified in the printer
■ Paper type
Select the paper type.
Example) • Normal • Photo paper • The same as the default specified in the printer
■ Layout
Select the layout.
Example)
Bordered Borderless Index 2-up 4-up 8-up
■ Trimming (When printing only the currently selected image)
You can print only a part of the image you specified.
Use the <Direction> Key and Zoom-in and Zoom-out < >
buttons to specify a printing area. Using < > enables you
to change the orientation of the frame. After setting, press the
<SET> button; only the selected area is printed.
Note
After trimming, do not change other print settings.
application_2.fm Page 70 Friday, February 2, 2007 9:00 AM
Page 72
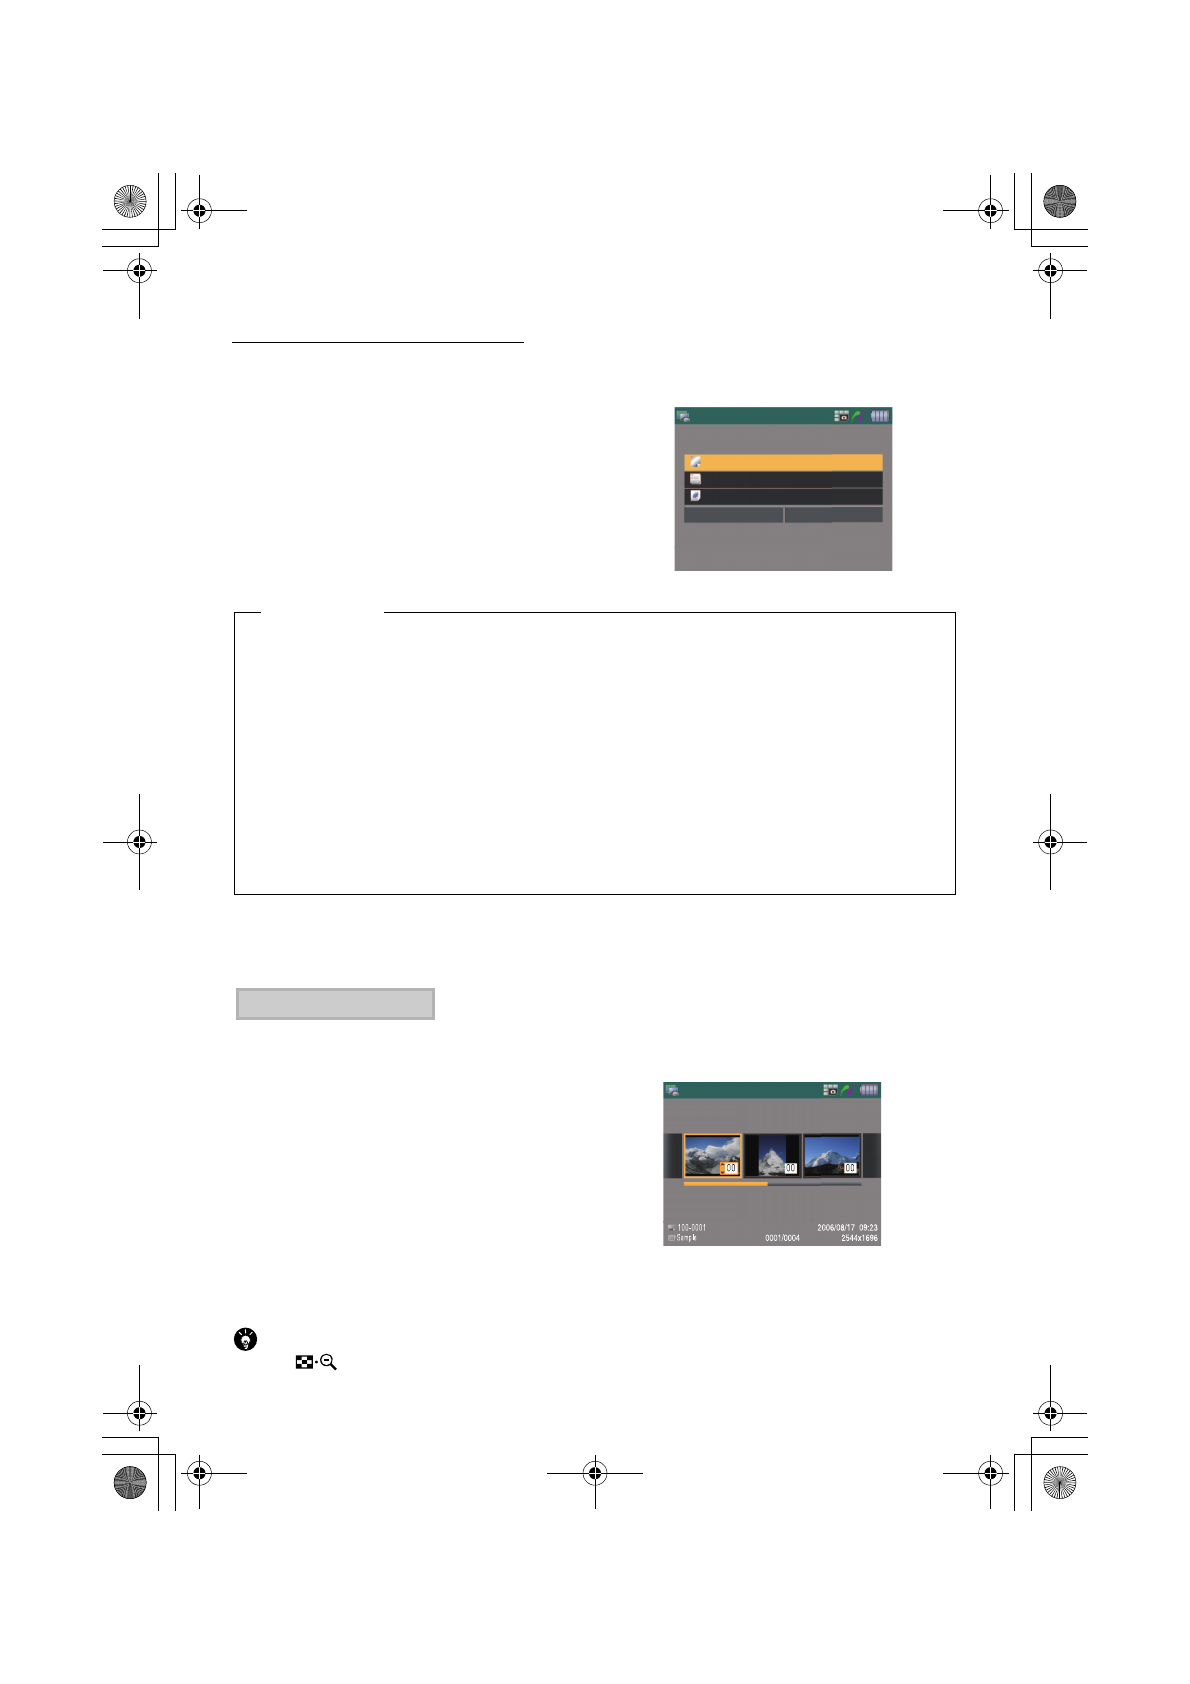
71
4) When setting the print order
4 The Print Order screen will be displayed. Select [Setup] and press <SET>. The Setup screen will be
displayed. Specify each option.
5 After setting, press <SET> while pointing the cursor to [OK]. The screen returns to the Print Order
screen. Select [Order] or [All] and press <SET>.
Execute one of the steps below depending on the print type.
• If you select [Standard] or [Both]:
Use the <Direction> key to specify the
number of copies.
(Up arrow: Increase
Down arrow: Decrease)
• If you select [Index]:
Use the <Direction> key to add a
checkmark.
(Up arrow: Add checkmark
Down arrow: Remove checkmark)
After setting, press <SET> to return to the Print Order screen.
Point
Pressing < > changes to the three-screen display mode.
Print order
Print Type: Standard
Date:
File No.:
Off
Off
OK Cancel
You can set the Print style.
[Print Setting]
■ Print Type
Specify the print type.
• Standard: Prints one image for each paper sheet.
• Index: Zooms out and prints the image in the index format.
• Both: Prints images in both the standard and index formats.
■ Date
Specify whether or not to print the date you took the photo.
■ File No.
Specify whether or not to print file numbers on images.
If you select [Order]
Print order
Media StorageM30_M80.book Page 71 Wednesday, December 20, 2006 2:34 PM
Page 73
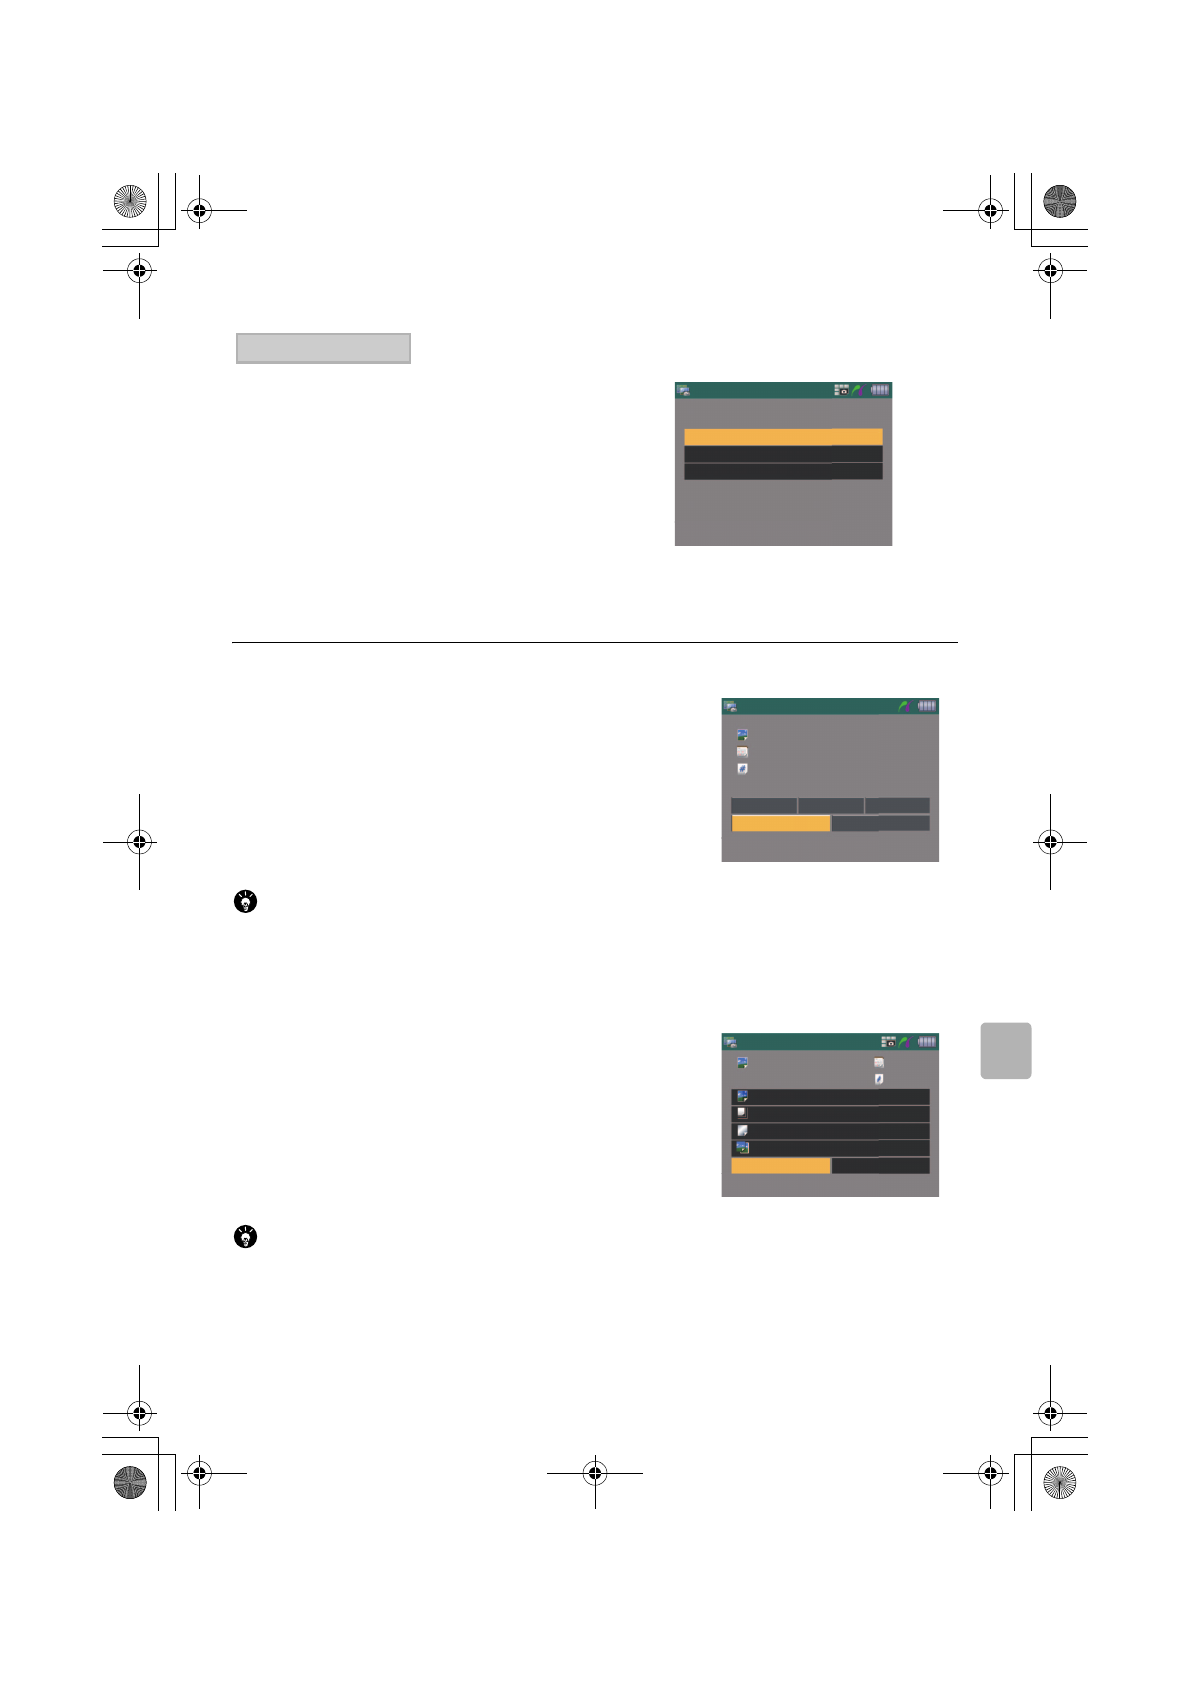
72
Printing Images
[
Cancel], [Mark all], and [Clear all] will be
displayed. Select the desired one and press
<SET> (The screen returns to the Print Order
screen).
If you select [Mark all], the process below is
executed depending on the print type.
• Set to [Standard].
→ All images are set one by one.
• Set to [Index].
→ Checkmarks are added to all images.
• Set to [Both].
→ Checkmarks are added to all images and set one by
one.
6 To execute printing now, select [Print]. To execute printing later, select [Back]. Then press <SET>.
Point
If you select [Back], settings are retained, so you will not need to set them again to execute printing later.
7 When you select [Print], the Print Setting screen will be displayed. Specify each option. Select [Print] and
press <SET>. Printing starts (see "Print Setting" on page 68).
Point
• You can specify options such as [Printing Effect], [Paper Size], [Paper Type], and [Layout] (only for standard printing).
• When you want to cancel printing in process, press <CANCEL>.
If you select [All]
Print order
All
Cancel
Mark All
Clear All
You can set the Print order
for all images at once.
Print order
Standard: 000 prints
Date: Off
File No.:
Off
Order Setup All
Back
Print
You can set the Print order.
Print order
003 prints Off
On002 images
Effect Printer’s default
Paper Size Printer’s default
Paper Type Printer’s default
Layout Printer’s default
Print Cancel
Define the settings for printing.
Media StorageM30_M80.book Page 72 Wednesday, December 20, 2006 2:34 PM
Page 74
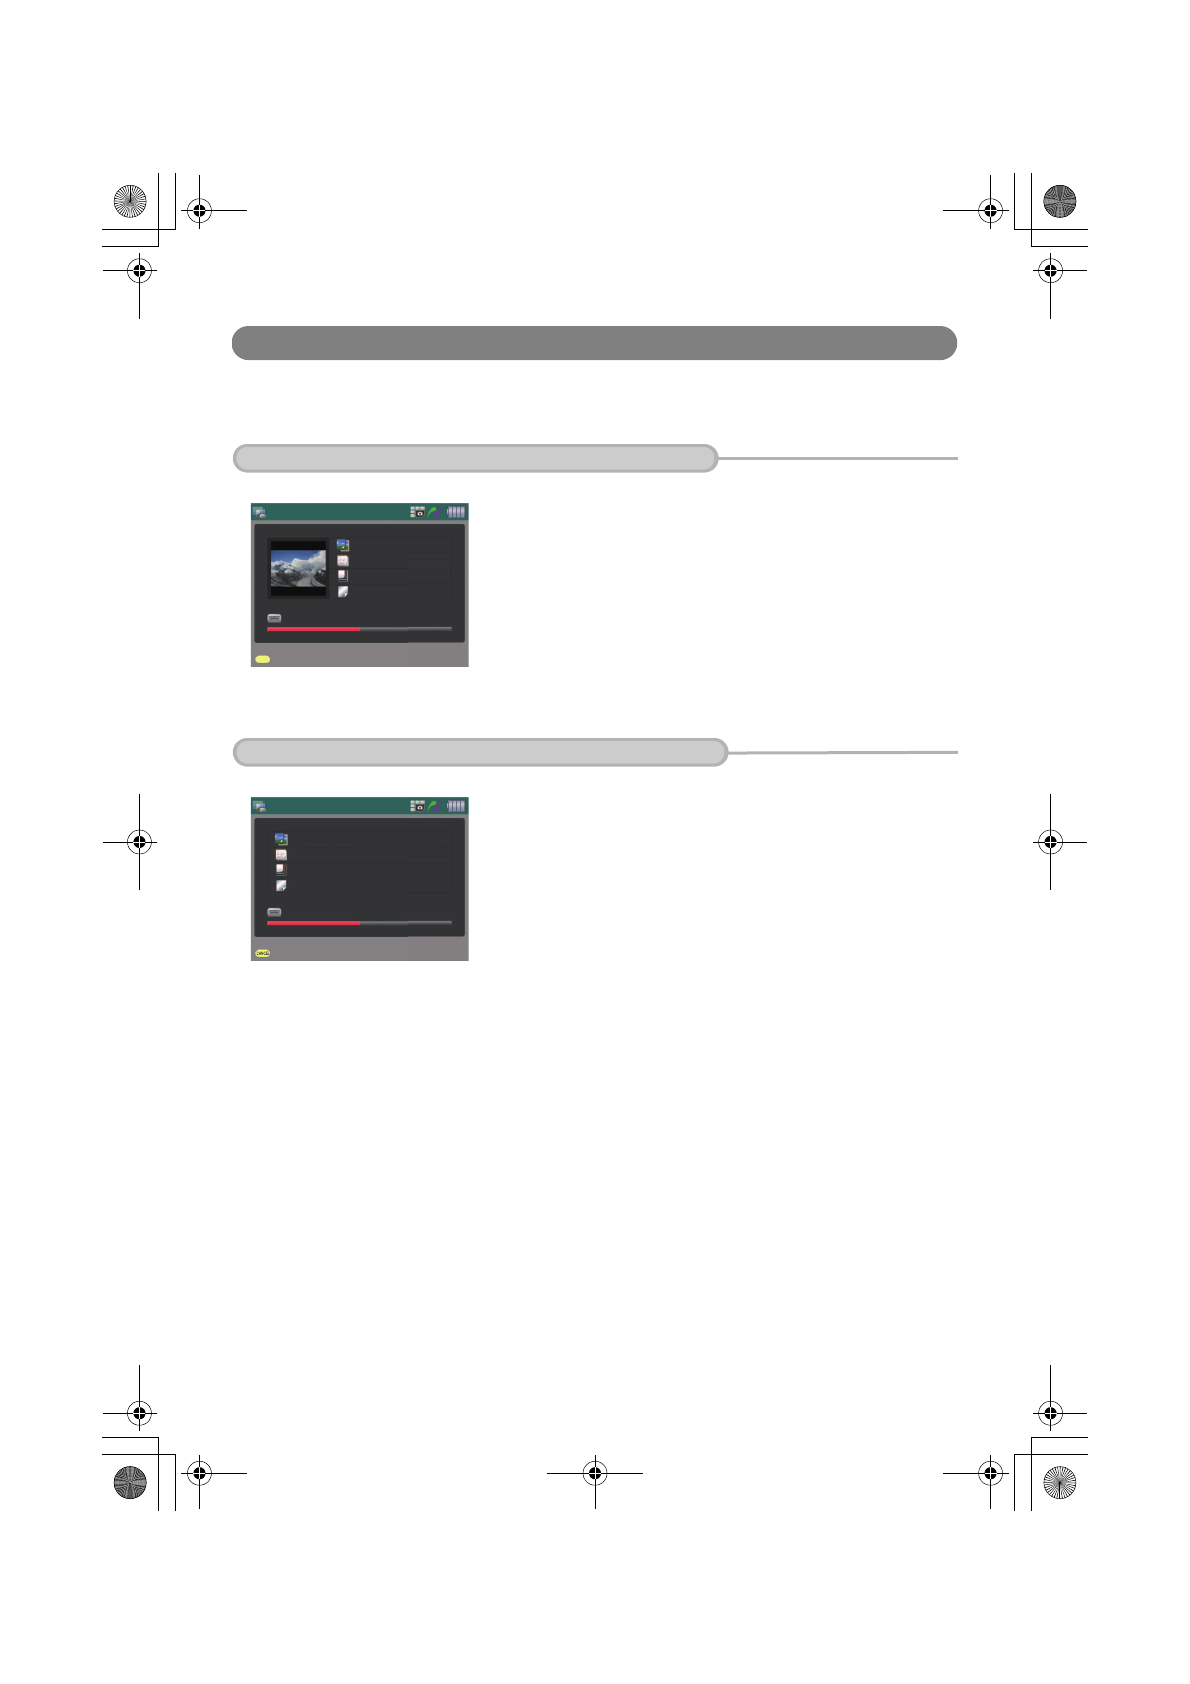
73
Information on the Screen during Printing
The LCD monitor displays the progress screen during printing.
When Printing only One Image on One Sheet
Print - Single
Printer’s default
Printer’s default
Printer’s default
Printer’s default
001/001
Printing the image(s).
Cancel printing
When Printing Multiple Images on One Sheets
Printing the image(s).
Cancel printing
Poistu hyppytilasta
Print - Print order
Index
Off
Printer’s default
Printer’s default
001/002
Media StorageM30_M80.book Page 73 Wednesday, December 20, 2006 2:34 PM
Page 75
74
Appendix
● Appendix●
Details about Supported File Formats
This appendix describes the file formats that are available for
display and playback in the MEDIA STORAGE M30/M80.
■ Displaying raw files
the MEDIA STORAGE M30/M80 is available for displaying raw files you created using the Canon
digital cameras detailed below.
Note
Some of these models are not compatible with PowerShot/IXUS series photographing information.
File format Extension Description
JPEG JPG Progressive format not supported (Up to 30 million pixels)
Exif-JPEG JPG Exif2.21 compatible (Up to 30 million pixels)
TIFF TIF TIFF-RGB (Up to 30 million pixels)
RAW
CR2
RAW file support is only with JPEG data in Canon RAW file
. We
do not support Canon RAW file without JPEG data.
(RAW files from some Canon camera models cannot be
supported.)
CRW
Still Image File
EOS-1Ds Mark II
EOS-1D Mark II
EOS-1D Mark II N
EOS 5D
EOS 10D
EOS 20D
EOS 30D
EOS 300D
EOS 350D
EOS 400D
PowerShot G6
PowerShot S70
PowerShot S60
application_3_1.fm Page 74 Monday, February 12, 2007 1:26 PM
Page 76
75
Note
The copyright-protected music files cannot be played back.
Note
• MEDIA STORAGE cannot play back a MotionJPEG format file in the same quality as provided by the camera itself.
A MotionJPEG file can be backed up on your MEDIA STORAGE. However, its frame rate is reduced and the file can be
played back only in the Simple mode without fast forwarding and rewinding.
Some files, even based on the formats mentioned above, may not be played back.
Music Files
File format Extension Description
MP3 MP3 MPEG1 Audio Layer 3 CBR 32-320kbps
WAVE WAV PCM / Mu-law PCM / IMA-ADPCM
Movie Files
File format Extension Movie codec
Sound
codec
Description
MotionJPEG AVI MotionJPEG PCM
160x120-320x240
60fps,
160x120-640x480
30fps
The actual number of
playback frames is
reduced for display.
MPEG1 MPG MPEG1 MPEG1
160x120-720x480
30fps 8Mbps
MPEG2 MPG MPEG2 Main Profile @ Main Level MPEG1/2
160x120-720x480
30fps 8Mbps
MPEG4 MP4
MPEG4 Advanced Simple Profile
@ Level 5
MPEG4
AAC
160x120-720x480
30fps 2Mbps
application_3_1.fm Page 75 Friday, February 2, 2007 9:01 AM
Page 77
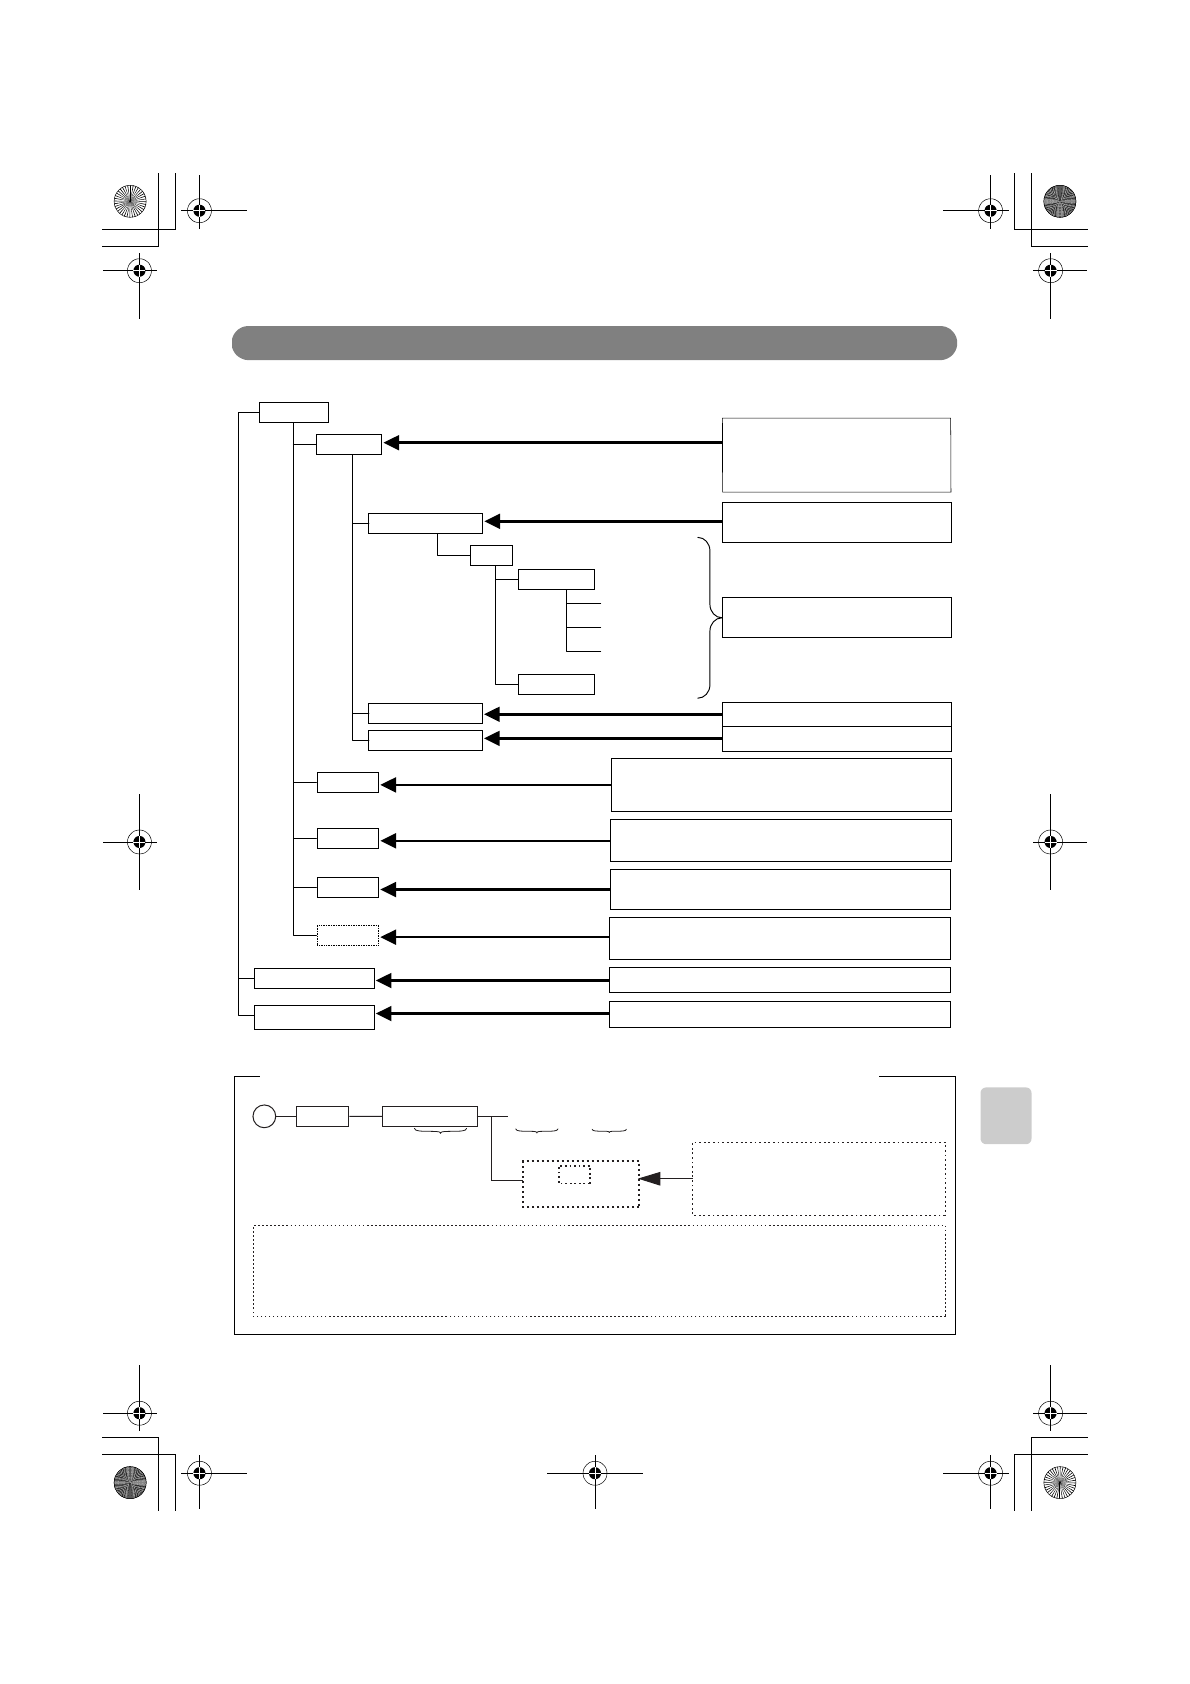
76
Appendix
About the Folder Structure in the Viewer
Files are saved in HDD based on the configuration shown below.
Built-in HDD
BACKUP
IMPORT
MOVIE
SOUND
SYSTEM
CF card slot
SD card slot
YYYYMMDD.001
YYYYMMDD.002
yyyymmdd.001
DCIM
100CANON
101CANON
IMG_0001.JPG
IMG_0002.JPG
IMG_0003.JPG
Album folder
Album folder
BACKUP folder: Folder to retain
backed up files. Backed up files are
managed on an album basis.
Album folder: Created for each
backup.
Based on the file structure in the
backed up card
IMPORT folder: Stores the files moved from your computer
to play back on the MEDIA STORAGE M30/M80. Displayed
as one of the albums in the playback function.
MOVIE folder: Stores movie files to play back with the movie player
on the MEDIA STORAGE M30/M80.
SOUND folder: Stores sound files to play back with the
sound player on the MEDIA STORAGE M30/M80.
SYSTEM folder: Stores system related files such as an
image cache file. Hidden attribute folder.
CF card slot: Can be used as an external card reader.
SD card slot: Can be used as an external card reader.
[About Files in the Memory Card that is the Backup Source]
DCIM 100_ _ _ _ _
_ _ _ _0001. _ _ _
IMG_0001.JPG
IMG_0001.WAV
3
1
2
5 alphanumeric 4 alphanumeric extension
The files specified with a file name that
contains the same four digits in one album
are handled as one object based on the DCF
standard, and displayed with one thumbnail.
1 "DCIM" folder
2 Folder that has a name "3 digits (100 or greater) + 5 alphanumeric characters" under DCIM
3 File that has a name "4 alphanumeric characters + 4 digits (0001 to 9999) + corresponding extension"
under the folder specified in 2 (see "Details about Supported File Formats" on page 74)
Media StorageM30_M80.book Page 76 Wednesday, December 20, 2006 2:34 PM
Page 78
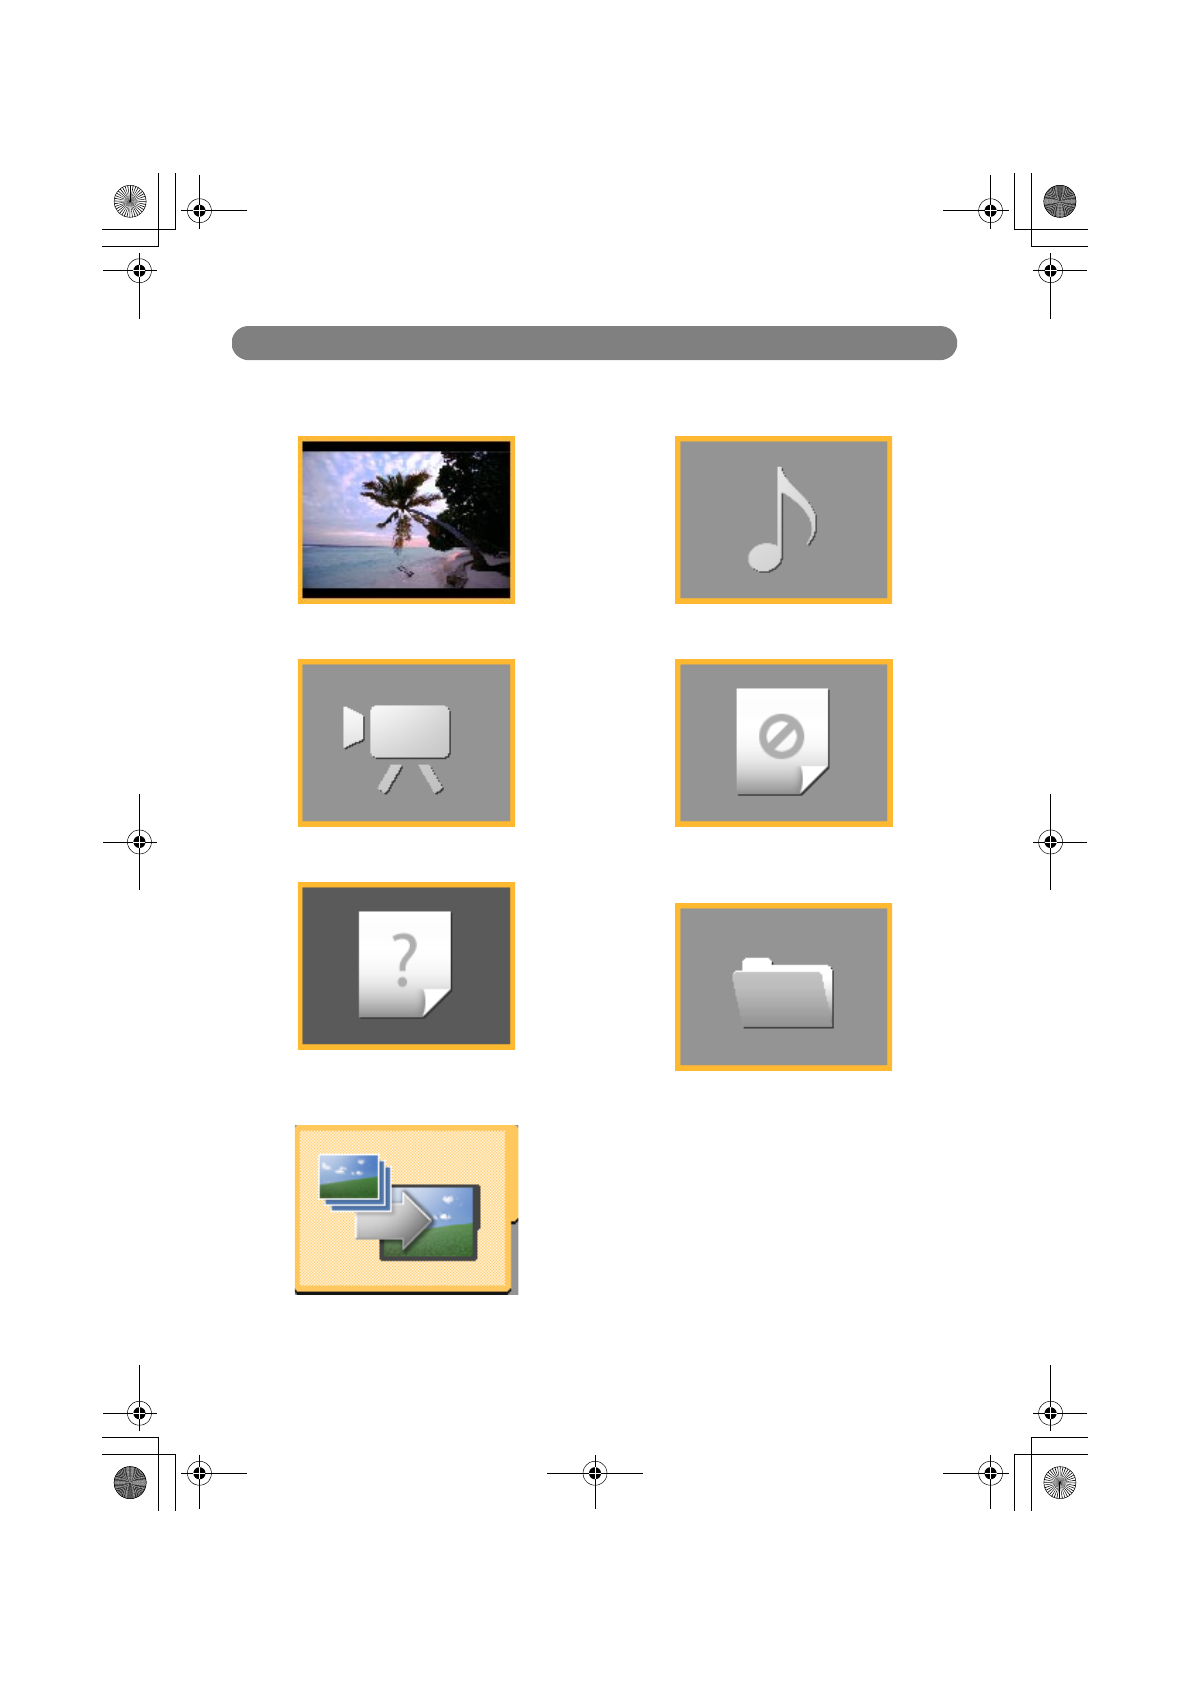
77
Image Types that can be Displayed
This section shows the types of images that are displayed on the
MEDIA STORAGE M30/M80.
Still image file
Movie file
File in data format supported by the MEDIA
STORAGE M30/M80, but incompatible
IMPORT folder
(See "If You Want to Download Images from
a Computer" on page 27)
Sound file
File in data format not supported by
the MEDIA STORAGE M30/M80
Folders in album
Displayed when folders reside in an album
while the display mode is set to [All].)
application_3_2.fm Page 77 Friday, January 26, 2007 10:07 AM
Page 79
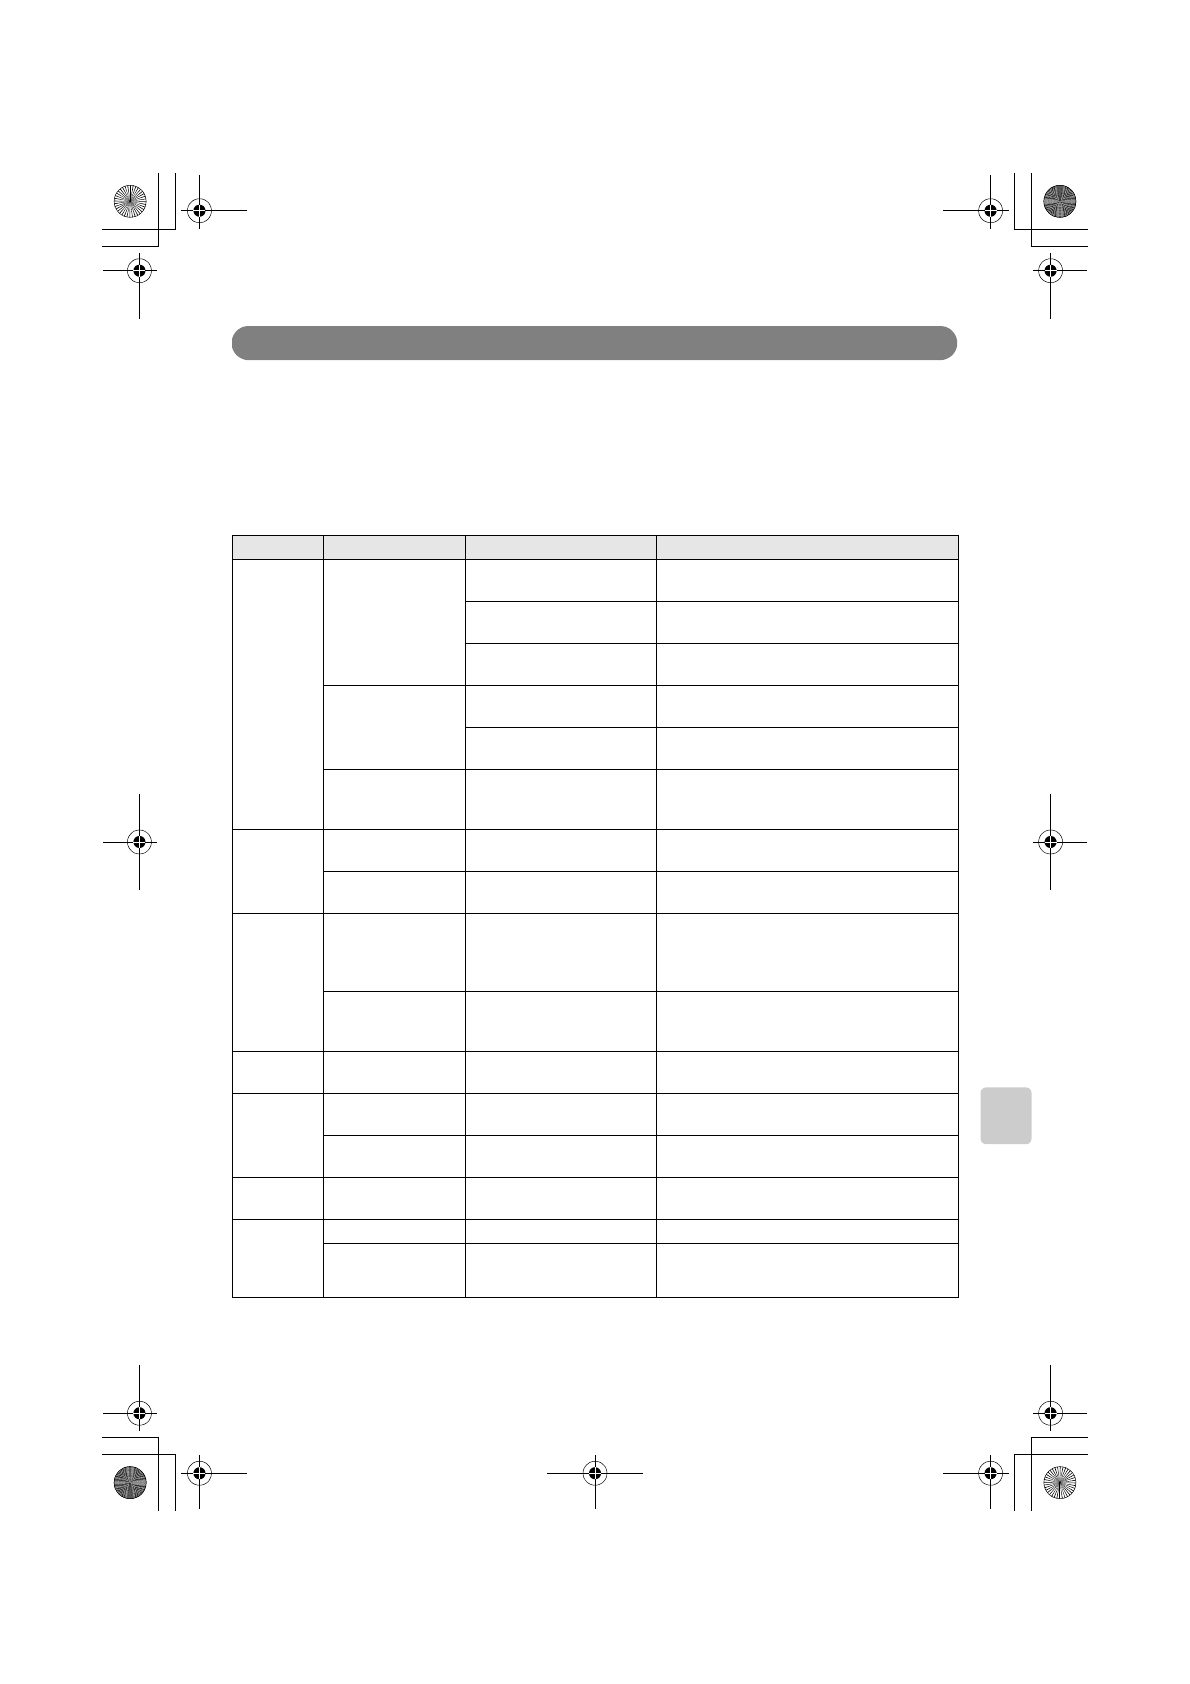
78
Appendix
Troubleshooting
If you think the MEDIA STORAGE M30/M80 has failed, check it once
more before having it repaired.
If the MEDIA STORAGE M30/M80 is connected to other equipment,
also check the cable connection. If the failure persists, contact the
shop from which you purchased the MEDIA STORAGE M30/M80 or
Canon service center.
Phenomenon Possible cause Action
Power supply
The power does not
turn on.
The battery pack is not
installed correctly.
Correctly install the battery pack.
Battery contact failure.
Clean the battery electrodes with a dry and soft
cotton-tipped swab.
Low battery.
Replace the battery pack with a fully charged
one.
The power turns off
when in use.
Low battery.
Replace the battery pack with a fully charged
one.
Automatic power-off is active.
Turn the power on. Change the automatic
power-off time if it is too short.
The power does not
turn off. The device is running.
If the access lamp is blinking, it is assumed that
the MEDIA STORAGE M30/M80 is in operation.
After blinking has stopped, turn the power off.
LCD Monitor
The screen displays
no image.
Not set to the LCD monitor
display mode.
Set [TV signal] in [Setup] to the LCD monitor
display mode, not TV mode.
Screen is not bright
enough.
The brightness of the LCD
monitor is set to "dark".
Use [LCD brightness] in [Setup] to control the
brightness.
Memory card
The MEDIA STORAGE
M30/M80 does not
recognize the
memory card.
The card is not installed
correctly.
Check the memory card for the orientation and
securely place it in the correct orientation.
When the memory card is recognized, the access
lamp lights on.
Cannot back up files in
the memory card to the
HDD
.
HDD is full. Delete unnecessary files from the HDD.
Still image
Cannot display still
images on the LCD.
The file is corrupt or in an
unsupported format.
Check supported file formats (see page 74).
Music file
Cannot play back
music.
The file is corrupt or in an
unsupported format.
Check supported file formats (see page 75).
No sound comes
from speakers.
The volume of the speaker is
set to "0".
Adjust the volume.
Movie
Cannot play back
movies.
The file is
corrupt
or in a
unsupported format.
Check supported file formats (see page 75).
Organizing
and
managing
files
Cannot copy. HDD is full. Delete unnecessary files from the HDD.
Cannot delete.
The file is protected. Release the protection setting.
Media StorageM30_M80.book Page 78 Wednesday, December 20, 2006 2:34 PM
Page 80

79
If a fault such as keys ceasing to work during operation occurs, reset the MEDIA STORAGE M30/
M80 as follows.
Note
Resetting will not erase the files saved in the MEDIA STORAGE M30/M80.
Various settings will also be retained.
Printing
Cannot print images. The MEDIA STORAGE M30/
M80 is not connected to the
printer correctly.
Correctly connect the MEDIA STORAGE M30/
M80 to your printer using the specified cable.
The printer is turned off. Turn the printer power on.
The [USB connection] in [Setup]
is set to your computer.
Set [USB connection] in [Setup] to your printer.
Personal
computer
The computer does
not recognize the
MEDIA STORAGE
M30/M80.
The OS is not supported. Check the supported OS (see page 19).
The USB connection is set to
your printer.
Set [USB connection] in [Setup] to your computer.
TV
The TV displays no
image.
Disconnected the cable.
Correctly connect the MEDIA STORAGE M30/
M80 to your TV set using the specified cable.
Not set to the TV display
mode.
Set [Screen output switch ] in [Setup] to the TV
display mode.
Not compatible with the
video output system in your
region.
Use [TV signal] in [Setup] for settings to select
the appropriate output system (set to "NTSC"
for Japan).
Others
You have forgotten
the PIN.
Please contact the Canon Self Support Centre
Phenomenon Possible cause Action
How to Reset the MEDIA STORAGE M30/M80
Press <RESET> with
fine-tipped object
Media StorageM30_M80.book Page 79 Wednesday, December 20, 2006 2:34 PM
Page 81
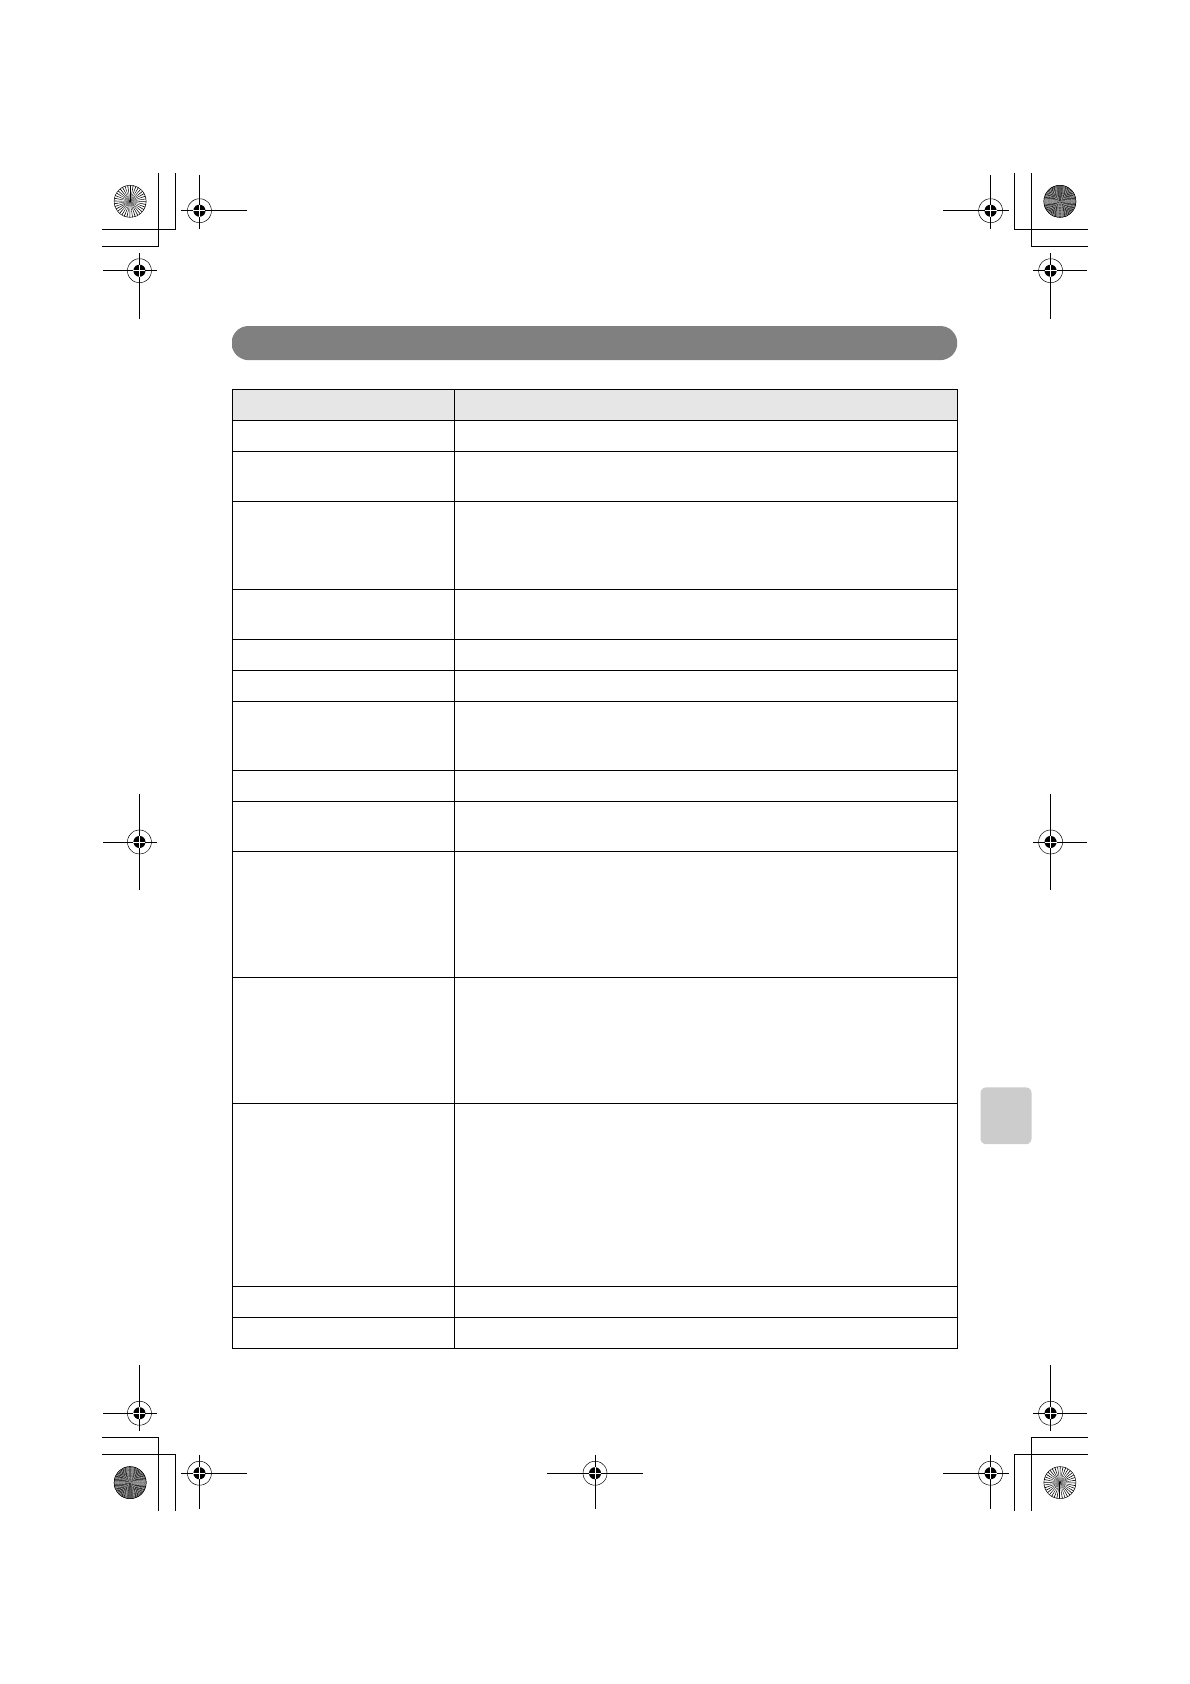
80
Appendix
MEDIA STORAGE M30/M80 Product Specifications
Format MEDIA STORAGE M30/M80
Hard disk 1.8 type 30/80 GB
LCD monitor
3.7-inch transmissive TFT-type color LCD
Approximately 307,000 pixels (640 x 480 pixels)
Supported memory cards
CompactFlash (CF) card (types I and II compatible) (maximum 8GB)
Microdrive
SD/SDHC memory card
MultiMediaCard
Supported still image formats
JPEG and RAW formats (Canon digital single-lens reflex camera only.
Excluding some models), TIFF (TIFF-RGB)
Supported movie formats Motion JPEG, MPEG1, MPEG2, MPEG4
Supported music formats MP3, WAVE
Supported OS
Windows XP (Home Edition/Professional), Windows 2000 (SP4),
Windows Vista
TM
Mac OS X 10.2 - 10.4
Supported printer PictBridge support printer
Card slot
CompactFlash (CF) card slot (types I and II compatible)
SD memory card slot
Interface
CF card slot (types I and II compatible) x 1
SD memory card slot x 1
USB 2.0 (mini-B) interface connector x 1
Video/sound output terminal x 1
AC adapter terminal x 1
Sound output speaker x 1
Power supply
(Lithium-ion battery)
Model BP-511A
Outside dimensions 38 (W) x 21 (H) x 55 (D) mm
Mass Approximately 82 g
Nominal voltage 7.4 VDC
Capacity 1390 mAh
Charging time Approximately 100 min. (At non-operation)
Use environment
Temperature:
5
°C to 35
°C during operating
-20
°C to 60
°C during non-operating
Humidity:
10 to 80% during operating
10 to 80% during non-operating
Altitude:
-300 to 3,000 m during operating
-300 to 12,000 m during non-operating
Outside dimensions 139.5 (W) x 80.5 (H) x 33.5 (D) mm
Mass Approximately 370 g (including battery, without memory card)
application_3_2.fm Page 80 Monday, February 26, 2007 2:33 PM
 Loading...