

Page 1
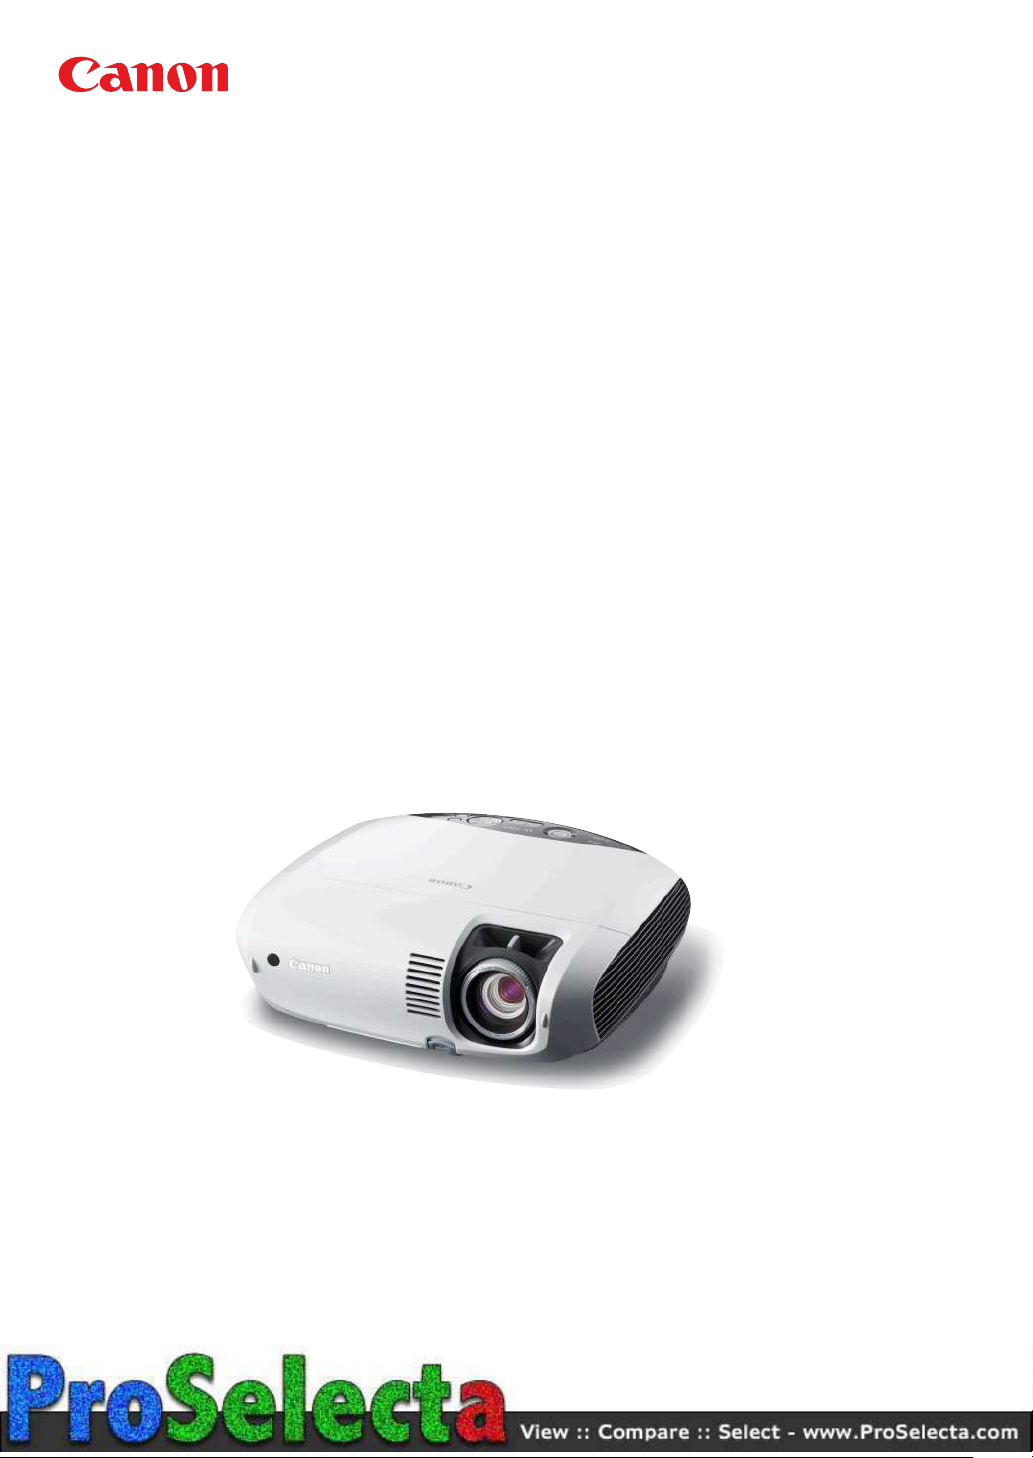
MULTIMEDIA PROJECTOR
LV-7385
LV-7380
LV-7285
LV-7280
LV-8310
LV-8215
User’s Manual
Page 2
Important Information
Safety Cautions
Precautions
Please read this manual carefully before using your Canon LV-7385/LV-7380/LV-7285/LV-7280/LV-8310/LV-8215 projector and keep the manual handy for future reference. Your serial number is located on the bottom of your projector.
Record it here:
CAUTION
To turn off main power, be sure to remove the plug from power outlet.
The power outlet socket should be installed as near to the equipment as possible, and should be easily accessible.
CAUTION
TO PREVENT SHOCK, DO NOT OPEN THE CABINET.
NO USER-SERVICEABLE PARTS INSIDE.
REFER SERVICING TO QUALIFIED SERVICE PERSONNEL.
This symbol warns the user that uninsulated voltage within the unit may be sufficient to cause electrical
shock. Therefore, it is dangerous to make any kind of contact with any part inside of the unit.
This symbol alerts the user that important information concerning the operation and maintenance of
this unit has been provided.
The information should be read carefully to avoid problems.
WARNING: TO PREVENT FIRE OR SHOCK, DO NOT EXPOSE THIS UNIT TO RAIN OR MOISTURE.
DO NOT USE THIS UNIT’S PLUG WITH AN EXTENSION CORD OR IN AN OUTLET UNLESS ALL THE
PRONGS CAN BE FULLY INSERTED.
DO NOT OPEN THE CABINET. THERE ARE HIGH-VOLTAGE COMPONENTS INSIDE. ALL SERVICING
MUST BE DONE BY QUALIFIED SERVICE PERSONNEL.
Machine Noise Information Regulation - 3. GPSGV,
The highest sound pressure level is less than 70 dB (A) in accordance with EN ISO 7779.
CAUTION
Avoid displaying stationary images for a prolonged period of time.
Doing so can result in these images being temporarily sustained on the surface of the LCD panel.
If this should happen, continue to use your projector. The static background from previous images will
disappear.
CAUTION
Do not put the projector on its side when the lamp is turned on.
Doing so may cause damage to the projector.
WARNING TO CALIFORNIA RESIDENTS:
Handling the cables supplied with this product will expose you to lead, a chemical known to the State of California to cause birth defects or other reproductive harm. WASH HANDS AFTER HANDLING.
i
Page 3
Important Information
Federal Communication Commission Notice
Multimedia Projector, Model : LV-7385, LV-7380, LV-7285, LV-7280, LV-8310, and LV-8215
This device complies with Part 15 of the FCC Rules. Operation is subject to the following two conditions:
(1) This device may not cause harmful interference, and (2) this device must accept any interference received, including interference that may cause undesired operation.
Note : This equipment has been tested and found to comply with the limits for a Class B digital device, pursuant to
part 15 of the FCC Rules. These limits are designed to provide reasonable protection against harmful interference
in a residential installation. This equipment generates, uses and can radiate radio frequency energy and, if not
installed and used in accordance with the instructions, may cause harmful interference to radio communications.
However, there is no guarantee that interference will not occur in a particular installation. If this equipment does
cause harmful interference to radio or television reception, which can be determined by turning the equipment off
and on, the user is encouraged to try to correct the interference by one or more of the following measures :
– Reorient or relocate the receiving antenna.
– Increase the separation between the equipment and receiver.
– Connect the equipment into an outlet on a circuit different from that to which the receiver is connected.
– Consult the dealer or an experienced radio/TV technician for help.
The cable with the ferrite core provided with the projector must be used with this equipment in order to comply
with Class B limits in Subpart B of Part 15 of the FCC rules.
Use of shielded cable is required to comply with class B limits in Subpart B of Part 15 of FCC Rules.
Do not make any changes or modications to the equipment unless otherwise specied in the instructions. If
such changes or modications should be made, you could be required to stop operation of the equipment.
Canon U.S.A., Inc.
One Canon Plaza, Lake Success, NY 11042, U.S.A.
Tel No. (516)328-5600
Canadian Radio Interference Regulations
This Class B digital apparatus complies with Canadian ICES-003.
Réglementation canadienne sur les intérferences radio
Cet appareil numérique de la classe B est conforme à la norme NMB-003 du Canada.
European Union (and EEA) only.
These symbols indicate that this product is not to be disposed of with your household waste,
according to the WEEE Directive (2002/96/EC), the Battery Directive (2006/66/EC) and/or your
national laws implementing those Directives.
If a chemical symbol is printed beneath the symbol shown above, in accordance with the Battery Directive, this indicates that a heavy metal (Hg = Mercury, Cd = Cadmium, Pb = Lead) is
present in this battery or accumulator at a concentration above an applicable threshold specied in the Battery Directive.
This product should be handed over to a designated collection point, e.g., on an authorized
one-for-one basis when you buy a new similar product or to an authorized collection site for
recycling waste electrical and electronic equipment (EEE) and batteries and accumulators. Improper handling of this type of waste could have a possible impact on the environment and human health due to potentially hazardous substances that are generally associated with EEE.
Your cooperation in the correct disposal of this product will contribute to the effective usage of
natural resources.
For more information about the recycling of this product, please contact your local city office,
waste authority, approved scheme or your household waste disposal service or visit
www.canon-europe.com/environment.
(EEA: Norway, Iceland and Liechtenstein)
ii
Page 4
Important Information
LAMP HANDLING
PRECAUTIONS
This projector uses a high-pressure mercury lamp which must be handled carefully and properly as mentioned below.
• Alampmayexplodewithaloudsoundorburnoutduetoashock,scratch,orexpirationoflifetime.
• Thelamplifemaydifferfromlamptolampandaccording totheenvironment ofuse.Thereisnotguarantee
of the same lifetime for each lamp. Some lamps may fail or terminate their life in a shorter period of time than
other similar lamps.
• Alampgraduallybecomesdarkerwithtimeofuse.
• Iftheprojectorindicatesthatthelampshouldbereplaced(i.e.,theLAMPindicatorblinksredrapidly),chanc-
es of explosion become higher. Replace the lamp with a new one immediately.
• Alwayskeepyourfaceawayfromtheexhaustventsothatyoudonotsufferfromthegasandbrokenshards
of the lamp.
IF A LAMP EXPLODES
If a lamp explodes, the gas and broken shards may scatter inside the projector and they may come
out of the exhaust vent. The gas contains toxic mercury.
Open windows and doors for ventilation.
If you inhale the gas or the shards of the broken lamp enter your eyes or mouth, consult the doctor
immediately.
If a lamp explodes, its shards may scatter inside the projector. Ask the Canon service representative to clean and check the inside of the projector and replace the lamp.
DISPOSAL OF WASTE LAMP
Dispose of the mercury lamp of the projector according to the local regulation just like the uorescent lamp.
Lamp Replacement
• Toreplacethelamp,followallinstructionsprovidedonpage71, 72, 73.
• Besuretoreplacethelampwhenthemessage[Replace with the new lamp.] appears. If you continue to use
the lamp after the lamp has reached the end of its usable life, the lamp bulb may shatter, and pieces of glass
may be scattered in the lamp case. Do not touch them as the pieces of glass may cause injury.
If this happens, contact your dealer for lamp replacement.
CAUTION
When removing the lamp from a ceiling-mounted projector, make sure that no one is under the projector. Glass fragments could fall if the lamp has been burned out.
NOTE FOR CUSTOMERS IN THE US
Hg LAMP(S) INSIDE THIS PRODUCT CONTAIN MERCURY AND MUST BE RECYCLED OR DISPOSED OF ACCORDING TO LOCAL, STATE OR FEDERAL LAWS.
iii
Page 5
Important Information
10˚
For UK only: In UK, a BS approved power cord with moulded plug has a Black (ve Amps) fuse installed for use
with this equipment. If a power cord is not supplied with this equipment please contact your supplier.
Important Safeguards
These safety instructions are to ensure the long life of your projector and to prevent re and shock. Please read
them carefully and heed all warnings.
Installation
• Donotplacetheprojectorinthefollowingconditions:
- on an unstable cart, stand, or table.
- near water, baths or damp rooms.
- in direct sunlight, near heaters or heat radiating appliances.
- in a dusty, smoky or steamy environment.
- on a sheet of paper or cloth, rugs or carpets.
• Ifyouwishtohavetheprojectorinstalledontheceiling:
- Do not attempt to install the projector yourself.
- The projector must be installed by qualied technicians in order to ensure proper operation and reduce
the risk of bodily injury.
- In addition, the ceiling must be strong enough to support the projector and the installation must be in accordance with any local building codes.
- Please consult your dealer for more information.
Do Not Use in the Following Environments
Do not install the projector in a humid or dusty place or a place where there is much oily
smoke or cigarette smoke. Optical parts such as a lens and mirror are stained, resulting in
poor picture.
Do not use the projector in a place where the temperature becomes very high or low.
Operating temperature: +5°C to +40°C Storage temperature: -10°C to +50°C
(Quiet mode selected automatically at 95°F to 104°F / 35°C to 40°C)
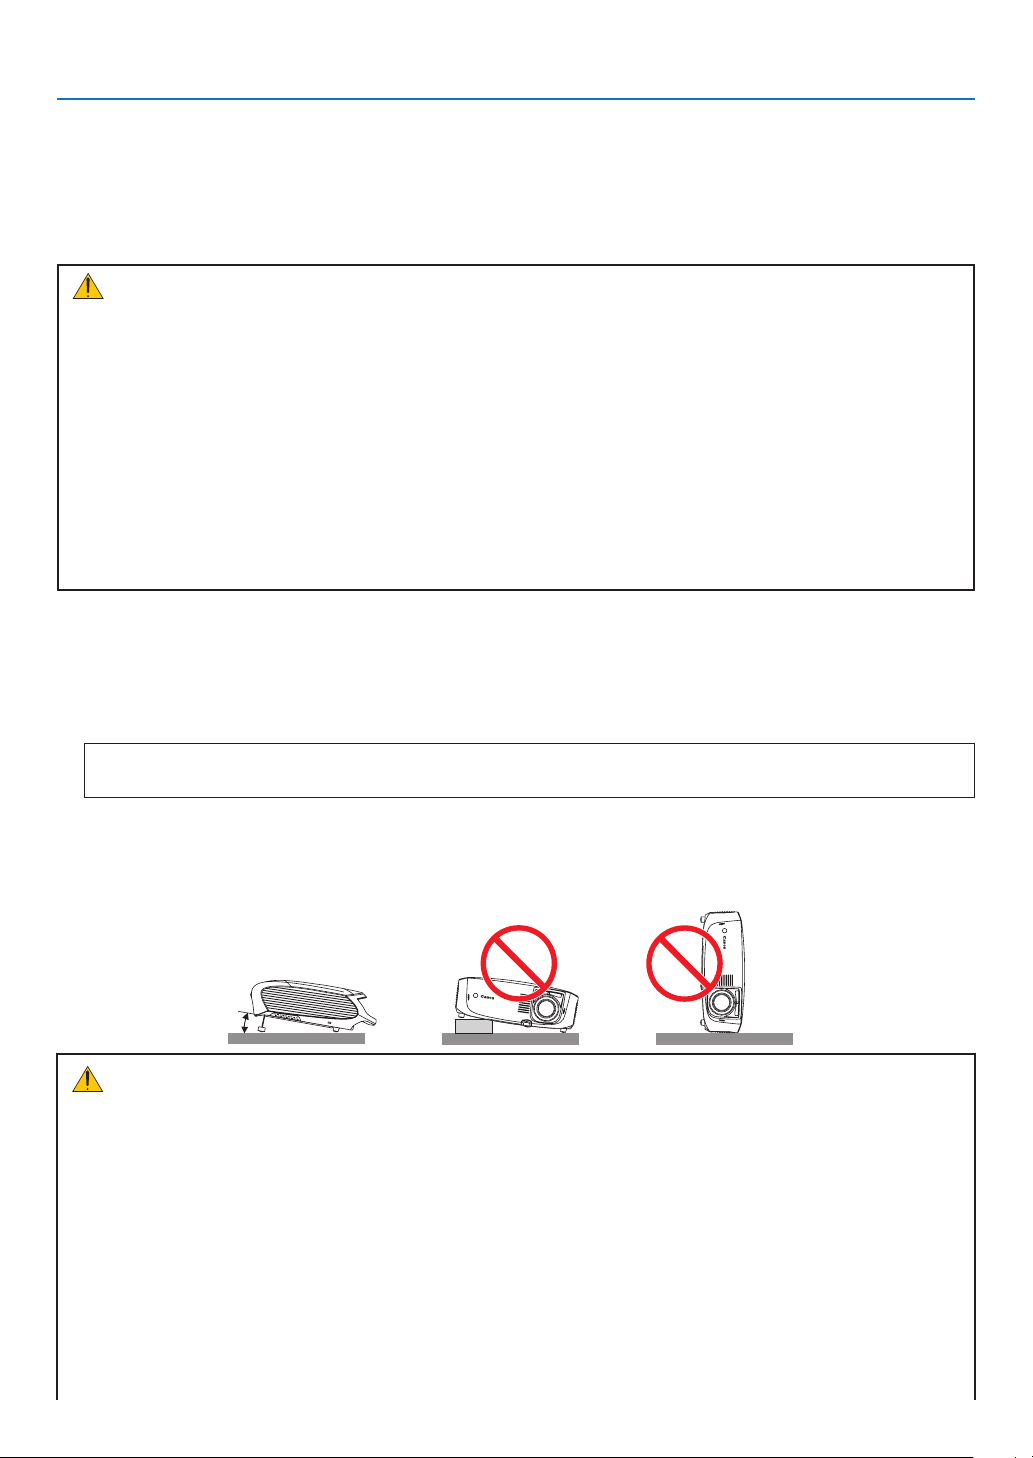
Place the projector in a horizontal position
The tilt angle of the projector should not exceed 10 degrees, nor should the projector be installed in any way other
than the desktop and ceiling mount, otherwise lamp life could decrease dramatically.
Fire and Shock Precautions
• Ensurethatthereissufficientventilationandthatventsareunobstructedtopreventthebuild-upofheatinside projector. Allow at least 1 m (3.3') of space between your projector and a wall.
• Preventforeignobjectssuchaspaperclipsandbitsofpaperfromfallingintoyourprojector.Donotattempt
retrieve any objects that might fall into your projector. Do not insert any metal objects such as a wire or
screwdriver into your projector. If something should fall into your projector, disconnect it immediately and
have the object removed by a qualied service personnel.
• Donotplaceanyobjectsontopoftheprojector.
• Donottouchthepowerplugduringathunderstorm.Doingsocancauseelectricalshockorre.
• Theprojectorisdesignedtooperateonpowersourcevoltagesindicatedontheratinglabelontheprojector.
Ensure that your power ts this requirement before attempting to use your projector.
• Donotlookintothelenswhiletheprojectorison.Seriousdamagetoyoureyescouldresult.
iv
Page 6

Important Information
• Keep any itemssuch as magnifying glass out of the light path of the projector.Thelight being projected
from the lens is extensive, therefore any kind of abnormal objects that can redirect light coming out of the
lens, can cause unpredictable outcome such as re or injury to the eyes.
• Donotcoverthelenswiththeblacklenscoverorequivalentwhiletheprojectorison.Doingsocanleadto
melting the cap and possibly burning your hands due to the heat emitted from the light output.
• Donotplaceanyobjects,whichareeasilyaffectedbyheat,infrontoftheprojectorlensoraprojectorexhaust
Doing so could lead to the object melting or getting your hands burned from the heat that is emitted from the
output and exhaust.
• Handlethepowercordcarefully.Adamagedorfrayedpowercordcancauseelectricshockorre.
- Do not use any power cords than the supplied one.
- Do not bend or tug the power cord excessively.
- Do not place the power cord under the projector, or any heavy object.
- Do not cover the power cord with other soft materials such as rugs.
- Do not heat the power cord
- Do not handle the power plug with wet hands.
• Turnofftheprojector,unplugthepowercordandhavetheprojectorservicedbyaqualiedservicepersonnel under the following conditions:
- When the power cord or plug is damaged or frayed.
- If liquid has been spilled into the projector, or if it has been exposed to rain or water.
- If the projector does not operate normally when you follow the instructions described in this user's manual.
- If the projector has been dropped or the cabinet has been damaged.
- If the projector exhibits a distinct change in performance, indicating a need for service.
• Disconnectthepowercordandanyothercablesbeforecarryingtheprojector
• Turnofftheprojectorandunplugthepowercordbeforecleaningthecabinetorreplacingthelamp.
• Turnofftheprojectorandunplugthepowercordiftheprojectorisnottobeusedforanextendedperiodof
time.
• WhenusingaLANcable:
For safety, do not connect to the connector for peripheral device wiring that might have excessive voltage.
CAUTION
• Donottry totouchtheventilationoutletontheleftside(whenseenfromthefront)asitcanbecomeheated
while the projector is turned on.
• Donot use thetilt-foot for purposesother thanoriginally intended. Misuses suchasgrippingthetilt-foot or
hanging on the wall can cause damage to the projector.
• Select[High]inFan mode ifyoucontinuetousetheprojectorforconsecutivedays.(Fromthemenu,select
[Setup]→[Options(1)]→[Fanmode]→[High].)FannoiseincreasesnoticeablyinHighmode.Seepage63.
• Donotturnoff the ACpowerfor60secondsafterthe lamp is turnedonandwhile the POWERindicatoris
blinking green. Doing so could cause premature lamp failure.
• Donotholdthelenspartwhencarryingtheprojector.
Doing so could cause the focus ring to rotate, resulting in accidental dropping of the projector.
v
Page 7

Important Information
CARRYING/TRANSPORTING THE PROJECTOR
This projector is a precision machine. Do not give a strong shock to the projector or turn it down.
Thoroughly read "Use Caution When Carrying or Transporting the Projector" below and install the lens cover before
carrying the projector. When transporting the projector by train or airplane, use a highly crashworthy transport case.
Use Caution When Carrying or Transporting the Projector
The carrying bag is intended for protection from dust and scratches on the surface of the cabinet, and it is not designed to protect the projector from external shocks. When carrying the projector with it put in the carrying bag, do
not give a shock to it, drop it, or place anything on it.
Do not transport the projector through a courier or transport service with the carrying bag. The projector can damage.
Remote Control Precautions
• Handletheremotecontrolcarefully.
• Iftheremotecontrolgetswet,wipeitdryimmediately.
• Avoidexcessiveheatandhumidity.
• Donotheat,takeapart,orthrowbatteriesintore.
• Ifyouwillnotbeusingtheremotecontrolforalongtime,removethebatteries.
• Ensurethatyouhavethebatteries'polarity(+/-)alignedcorrectly.
• Donotusenewandoldbatteriestogether,orusedifferenttypesofbatteriestogether.
• Disposeofusedbatteriesaccordingtoyourlocalregulations.
About [High altitude] mode
• Set[Fanmode]to[Highaltitude]whenusingtheprojectorat altitudesapproximately 5500feet/1600metersor
higher. See page 63.
Usingtheprojectorataltitudesapproximately 5500feet/1600meters orhigherwithout settingto[Highaltitude]
can cause the projector to overheat and the protector could shut down. Furthermore, the projector could not turn
on due to the increased temperature of the lamp after power off. If these happen, wait a couple minutes and
turn on the projector.
Fannoiseincreasesnoticeablyin[Highaltitude].Seepage63.
• Usingtheprojectorataltitudeslessthanapproximately5500feet/1600metersandsettingto[Highaltitude]can
causethelamptoovercool,causingtheimagetoicker.Switch[Fanmode]to[Auto].
• Using theprojector at altitudes approximately 5500feet/1600 meters or higher can shorten the life of optical
components such as the lamp.
About Copyright of original projected pictures:
Please note that using this projector for the purpose of commercial gain or the attraction of public attention in a
venue such as a coffee shop or hotel and employing compression or expansion of the screen image with the following functions may raise concern about the infringement of copyrights which are protected by copyright law.
[Aspect],[Keystoneadjustment],Magnifying(D.ZOOM)featureandothersimilarfeatures.
vi
Page 8

Table of Contents
Important Information
1. Introduction
What’s in the Box? ........................................................................................................ 1
Introduction to the Projector .......................................................................................... 2
Congratulations on Your Purchase of The Projector ................................................ 2
Features you’ll enjoy: ............................................................................................... 2
About this user’s manual ......................................................................................... 3
Comparative Table of Main Features ....................................................................... 3
Part Names of the Projector .......................................................................................... 4
Front/Top ................................................................................................................. 4
Rear ......................................................................................................................... 4
Top Features ............................................................................................................ 5
Terminal Panel Features .......................................................................................... 6
Part Names of the Remote Control ............................................................................... 7
Battery Installation ................................................................................................... 9
Remote Control Precautions .................................................................................... 9
Operating Range for Wireless Remote Control........................................................ 9
......................................................................................................... 1
2. Installation and Connections
Setting Up the Screen and the Projector ......................................................................11
Selecting a Location (LV-7385/LV-7380/LV-7285/LV-7280) .....................................11
Throw Distance and Screen Size ...........................................................................11
Selecting a Location (LV-8310/LV-8215) ................................................................ 12
Throw Distance and Screen Size .......................................................................... 12
Making Connections ................................................................................................... 14
Enabling the computer’s external display .............................................................. 14
Connecting Your PC or Macintosh Computer ........................................................ 14
When Viewing a DVI Digital Signal ........................................................................ 16
Connecting an External Monitor ............................................................................ 18
Connecting Your Audio-Video Equipment with Component Output ....................... 19
Connecting Your Audio-Video Equipment with Video/S-Video Output ................... 20
Connecting a Digital Video Signal ......................................................................... 21
Connecting to a Network ....................................................................................... 22
Connecting the Supplied Power Cord .................................................................... 23
.......................................................................................... i
................................................................... 10
3.
Projecting an Image (Basic Operation)
Turning on the Projector .............................................................................................. 24
Selecting a Source ...................................................................................................... 26
Adjusting the Picture Size and Position ....................................................................... 28
Correcting Keystone Distortion .................................................................................... 31
Automatically Optimizing on RGB Image .................................................................... 34
Turning Up or Down Volume ........................................................................................ 34
Turning off the Projector .............................................................................................. 35
After Use ..................................................................................................................... 36
...................................................................... 24
vii
Page 9

Table of Contents
4. Convenient Features
Turning off the Image and Sound ................................................................................ 37
Freezing a Picture ....................................................................................................... 37
Enlarging a Picture ...................................................................................................... 37
Lamp Mode and Energy-Saving Effect ........................................................................ 38
PreventingtheUnauthorizedUseoftheProjector[Password] .................................... 40
Network and Alert Mail Settings by Using an HTTP Browser ..................................... 43
5. Using On-Screen Menu
Using the Menus ......................................................................................................... 47
Menu Elements ........................................................................................................... 48
List of Menu Items ....................................................................................................... 49
MenuDescriptions&Functions[Input] ....................................................................... 51
4
MenuDescriptions&Functions[Adjustment] ............................................................. 52
MenuDescriptions&Functions[Setup] ...................................................................... 59
MenuDescriptions&Functions[Information] ............................................................. 66
MenuDescriptions&Functions[Reset] ...................................................................... 68
6. Maintenance
Cleaning or Replacing the Filter .................................................................................. 69
Cleaning the Cabinet and the Lens ............................................................................. 70
Replacing the Lamp .................................................................................................... 71
...................................................................................................... 69
.................................................................................... 37
............................................................................... 47
7. Appendix
Troubleshooting ............................................................................................................74
Specications .............................................................................................................. 77
Cabinet Dimensions .................................................................................................... 79
Pin Assignments of D-Sub ANALOG IN-1 Input Connector ........................................ 80
Compatible Input Signal List ....................................................................................... 81
Relationship between Screen Size and Projection distance ....................................... 82
PC Control Codes and Cable Connection ................................................................... 84
Troubleshooting Check List ......................................................................................... 85
...............................................................................................................74
viii
Page 10
Quick
Start
Guide
Important
Information
1. Introduction
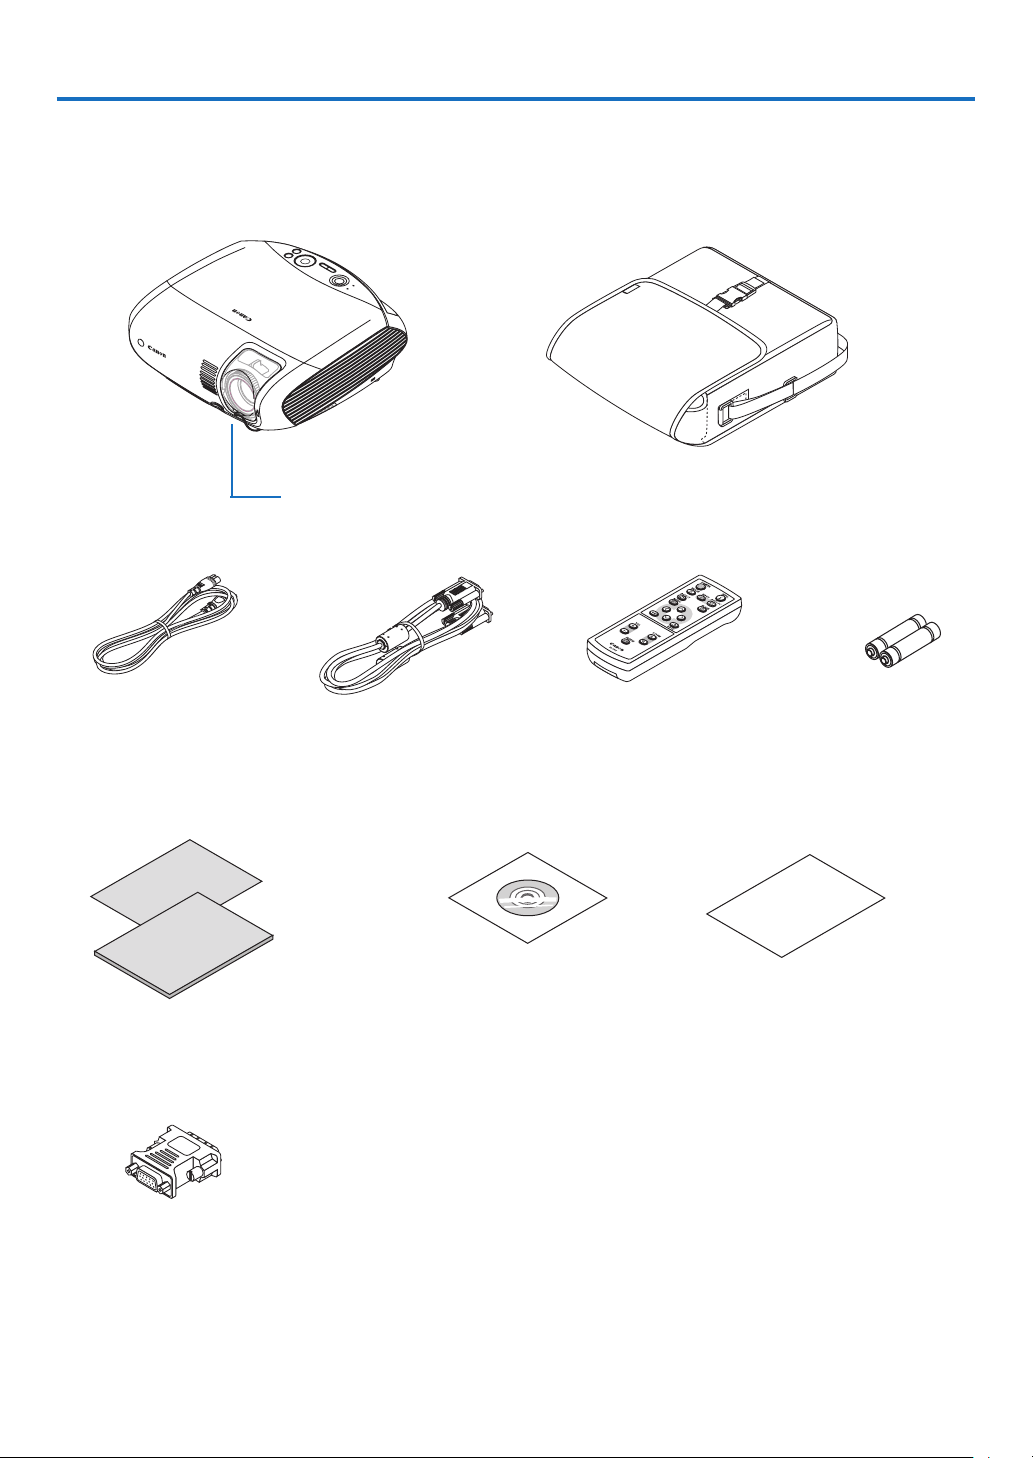
What's in the Box?
Make sure your box contains everything listed. If any pieces are missing, contact your dealer.
Please save the original box and packing materials if you ever need to ship your projector.
Projector
Soft case
Lens cover
AC power cord VGA cable
[7N520 077]
Quick Start Guide
Important Information
DVI to VGA adapter
CD-ROM
User’s manual
Remote control Batteries (AAA2)
Warranty
1
Page 11

1. Introduction
Introduction to the Projector
This section introduces you to your new projector and describes the features and controls.
Congratulations on Your Purchase of The Projector
The LV-7385/LV-7380/LV-7285/LV-7280/LV-8310/LV-8215 is one of the very best projectors available today. The
projector enables you to project precise images up to 300 inches across (measured diagonally) from your PC or
Macintosh computer (desktop or notebook), or audio-video equipment.
You can use the projector on a tabletop or cart, from behind a screen, or permanently mounted on a ceiling*
remote control can be used wirelessly.
*1 Do not attempt to mount the projector on a ceiling yourself.
The projector must be installed by qualied technicians in order to ensure proper operation and reduce the
risk of bodily injury.
In addition, the ceiling must be strong enough to support the projector and the installation must be in accor-
dance with any local building codes. Please consult your dealer for more information.
1
. The
Features you'll enjoy:
• QuickStart,QuickPowerOff,DirectPowerOff
Less than 4 seconds* after turning on the power, the projector is ready to display PC or video images. The pro-
jector can be put away immediately after the projector is powered down. No cool down period is required after
the projector is turned off from the remote control or cabinet control panel.
* Thequickstarttimeisonlywhen[Standbymode]issetto[Normal]intheon-screenmessage.
The projector has a feature called “Direct Power Off”. This feature allows the projector to be turned off (even
when projecting an image). See page 35.
• CarbonMeter
emissionreduction(kg)whentheprojector’s[Lamp
This feature will show energy-saving effect in terms of CO
mode]issetto[Quietmode].TheamountofCO
sage at the time of power-off and in the Information of the on-screen menu.
• Lessthan1Winstandbyconditionwithenergysavingtechnology
Selecting[Power-saving]for [Standbymode]fromthemenucan put the projectorinpower-saving modethat
consumes less than 1W.
• Long-lifeLampemployed
TheLong-life lampprovides4000 hoursof use atthe[Normal] for Lampmodeand5000hours ofuseatthe
[Quiet]forLampmode.
• DirectpoweronandPowerManagementfeatures
The Direct power on (AC), Direct power on (Comp1), Power management, and Off timer features eliminate the
need to always use the POWER button on the remote control or projector cabinet.
(For Direct power on (AC), Direct power on (Comp1), and Power management, see page 65; for Off timer, see
page 64.)
• Avarietyofinputportsandacomprehensivearrayofsystemcontrolinterfaces
This projector supports input signals on the following ports: DVI-I connector (DVI-I 29 Pin) with HDCP compat-
ible, 15pin D-Sub, composite and S-video.
• 7Wbuilt-inspeakerforanintegratedaudiosolution
Powerful 7 watt speaker provides volume need for large rooms.
• Autoverticalkeystonecorrection
Auto Keystone feature allows the projector to detect its tilt and correct vertical distortion automatically. (page
31)
• SupportinguptoUXGAresolution
High resolution display - up to UXGA compatible, XGA (LV-7385/LV-7380/LV-7285/LV-7280)/ WXGA (LV-8310/
LV-8215) native resolution.
• Fivepicturepresetmodesforuseradjustablepictureandcolorsettings
Each picture preset mode can be customized and memorized according to your preference. (page 52)
• Preventingunauthorizeduseoftheprojector
Enhanced smart security settings for password protection (page 40), cabinet key lock (page 62), and anti-theft
emission reduction will be displayed in the conrmation mes-
2
2
2
Page 12
1. Introduction
security cable lock (page 4) to help prevent unauthorized access, adjustments and theft deterrence.
• Notifyinganerrormessageviae-mailwhenusingwiredLAN
The Alert Mail feature noties your computer of an error message via e-mail when using wired LAN. The error
message will be notied when the projector lamp has reached the end of its usable life or an error occurs in
the projector (page 45). You can congure the network settings of the projector on your computer. (page 43)
About this user's manual
The fastest way to get started is to take your time and do everything right the rst time. Take a few minutes now to
review the user's manual. This may save you time later on. At the beginning of each section of the manual you'll
nd an overview. If the section doesn't apply, you can skip it.
• IBMisatrademarkorregisteredtrademarkofInternationalBusinessMachinesCorporation.
• Macintosh,MacOSXandPowerBookaretrademarksofAppleInc.registeredintheU.S.andothercountries.
• Microsoft,Windows,andInternetExplorerareeitherregisteredtrademarksortrademarksofMicrosoftCorpo-
ration in the United States and/or other countries.
• MicroSaverisaregisteredtrademarkofKensingtonComputerProductsGroup,adivisionofACCOBrands.
• Other product and company names mentioned in this user’s manual may be the trademarks or registered
trademarks of their respective holders.
Comparative Table of Main Features
The main features vary depending on the model name as follows.
Standard Models Wide Panel Models
LV-7 38 5 LV-7 38 0 LV-7 285 LV-7 280 LV -8 310 LV- 8215
Native Aspect Ratio
(→ page 77)
Native Resolution (dots x lines)
(→ page 77)
Screen Size (Mini. to Max)
(→ page 77)
Throw Distance
(→ page 77)
Lightoutputin[Normal]for[Lamp
mode](→ page 77)
Contrast Ratio (→ page 77) 500: 1 2000: 1* 500: 1 450: 1
Wired LAN (→ page 22, 43) RJ-45
Lamp Replacement Time
(average) (→ page 66)
Replacement Lamp (→ page 71) LV- LP3 1 LV- LP3 2 LV- LP3 1
3500 lumens 3000 lumens 2600 lumens 2200 lumens 300 0 lumens 2600 lumens
0.8 m to 11.3 m/31.5” to 444.9” 0.8m to 11.95m/31.5” to 470.5”
Standard Wide
XGA (1024 x 768) WXGA (1280 x 800)
21” - 300”
4000(H)in[Normal]mode/5000(H)in[Quiet]mode
*Thevalueismeasuredwhen[Autoiris]issetto[On].
For further details on the specications, see page 77.
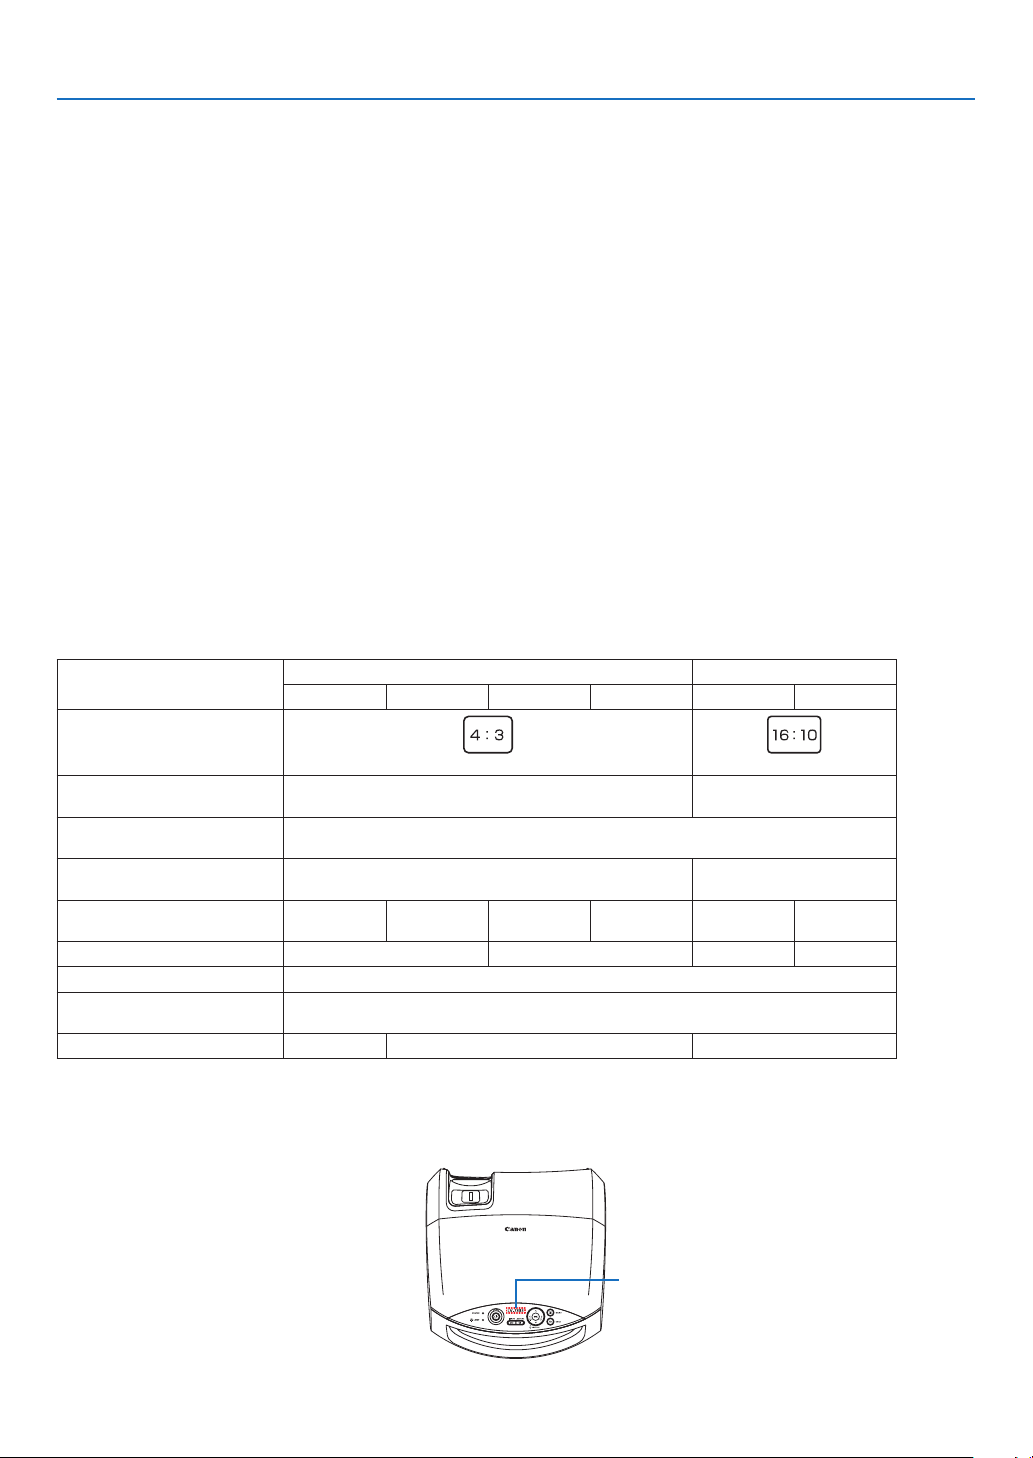
TIP: The model name is located on the cabinet.
Model name
3
Page 13
Part Names of the Projector
Front/Top
1. Introduction
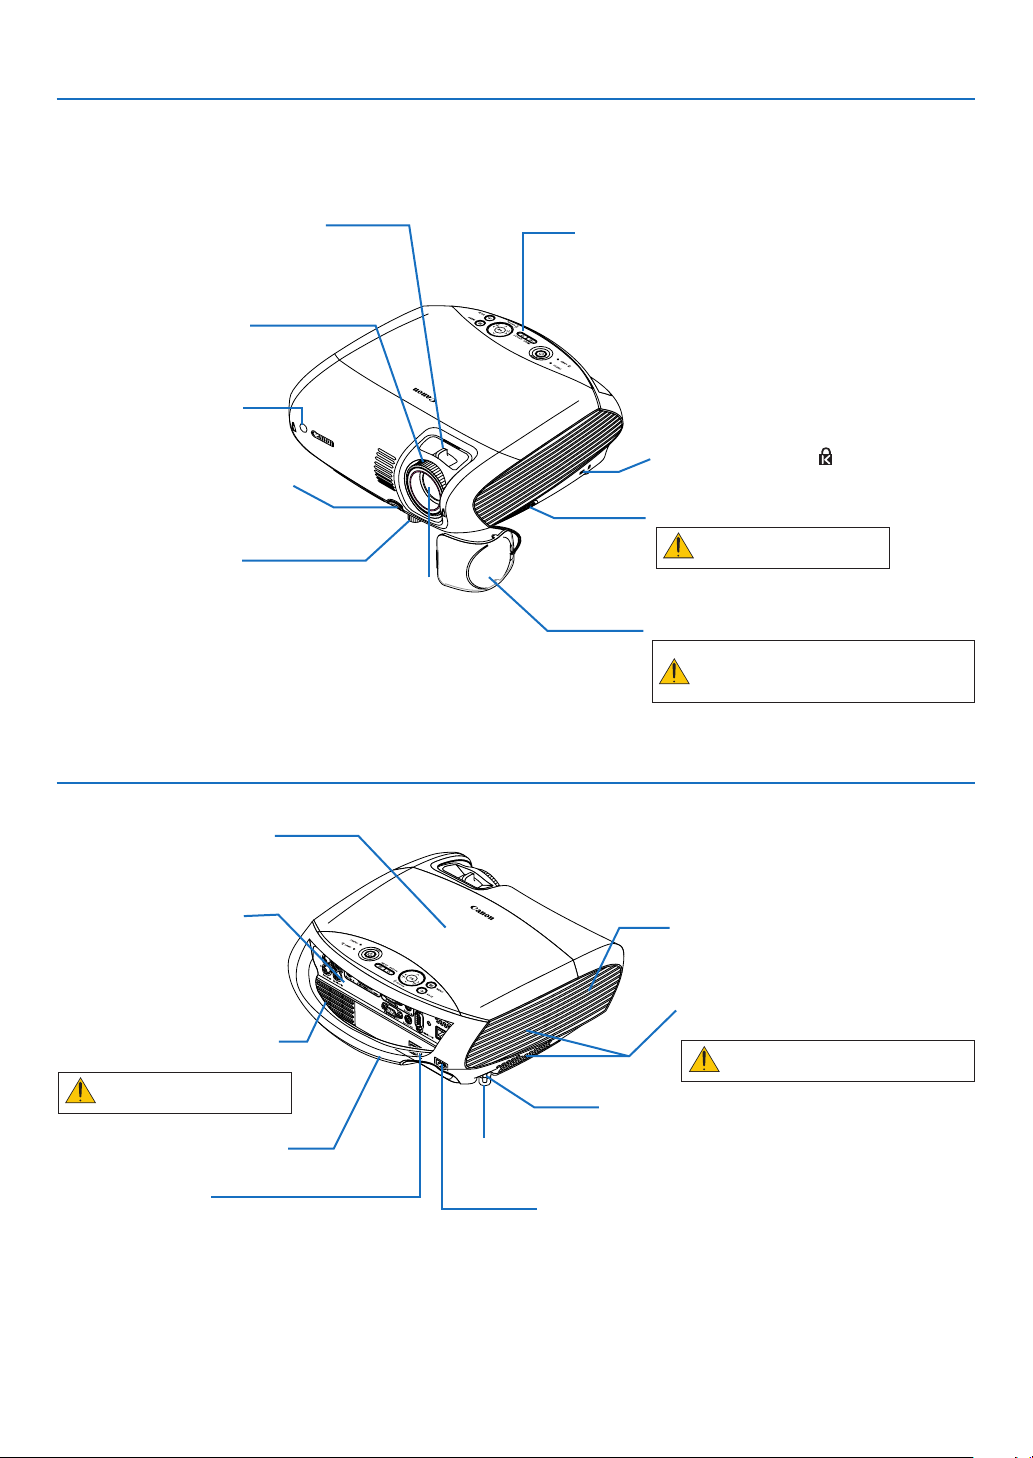
Zoom Lever
(See page 29)
Focus Ring
(See page 29)
Remote sensor
(See page 9)
Adjustable Tilt Foot Lock Button
(See page 30)
Adjustable Tilt Foot
(See page 30)
Lens
* This security slot supports the MicroSaver ® Security System.
Controls
(See page 5)
Built-in Security Slot ( )*
Ventilation (inlet) / Filter Cover
(See page 69)
Do not block this vent.
Troubles or re can result.
Lens Cover
Be sure to remove the lens cover during projection. The cap can deform or
re can occur.
Rear
Lamp Cover
(See page 72)
Terminal Panel
(See page 6)
Ventilation (inlet) / Filter Cover
(See page 69)
Do not block this vent.
Troubles or re can result.
Carrying Handle
Main Power Switch
When you plug the supplied power cord into an
active wall outlet and turn on the Main Power, the
POWER indicator turns orange and the projector
is in standby mode.
(See page 24)
Rear Foot
Monaural Speaker (7W)
Ventilation (outlet)
Heated air is exhausted from here.
Do not block this vent. Troubles
or re can result.
Spacer (black rubber)
A spacer is provided for leveling the projector.
To ne-adjust the height of the rear foot,
remove the spacer and rotate the rear
foot to the desired height.
AC Input
Connect the supplied power cord’s two-pin plug here, and
plug the other end into an active wall outlet. (See page 23)
4
Page 14
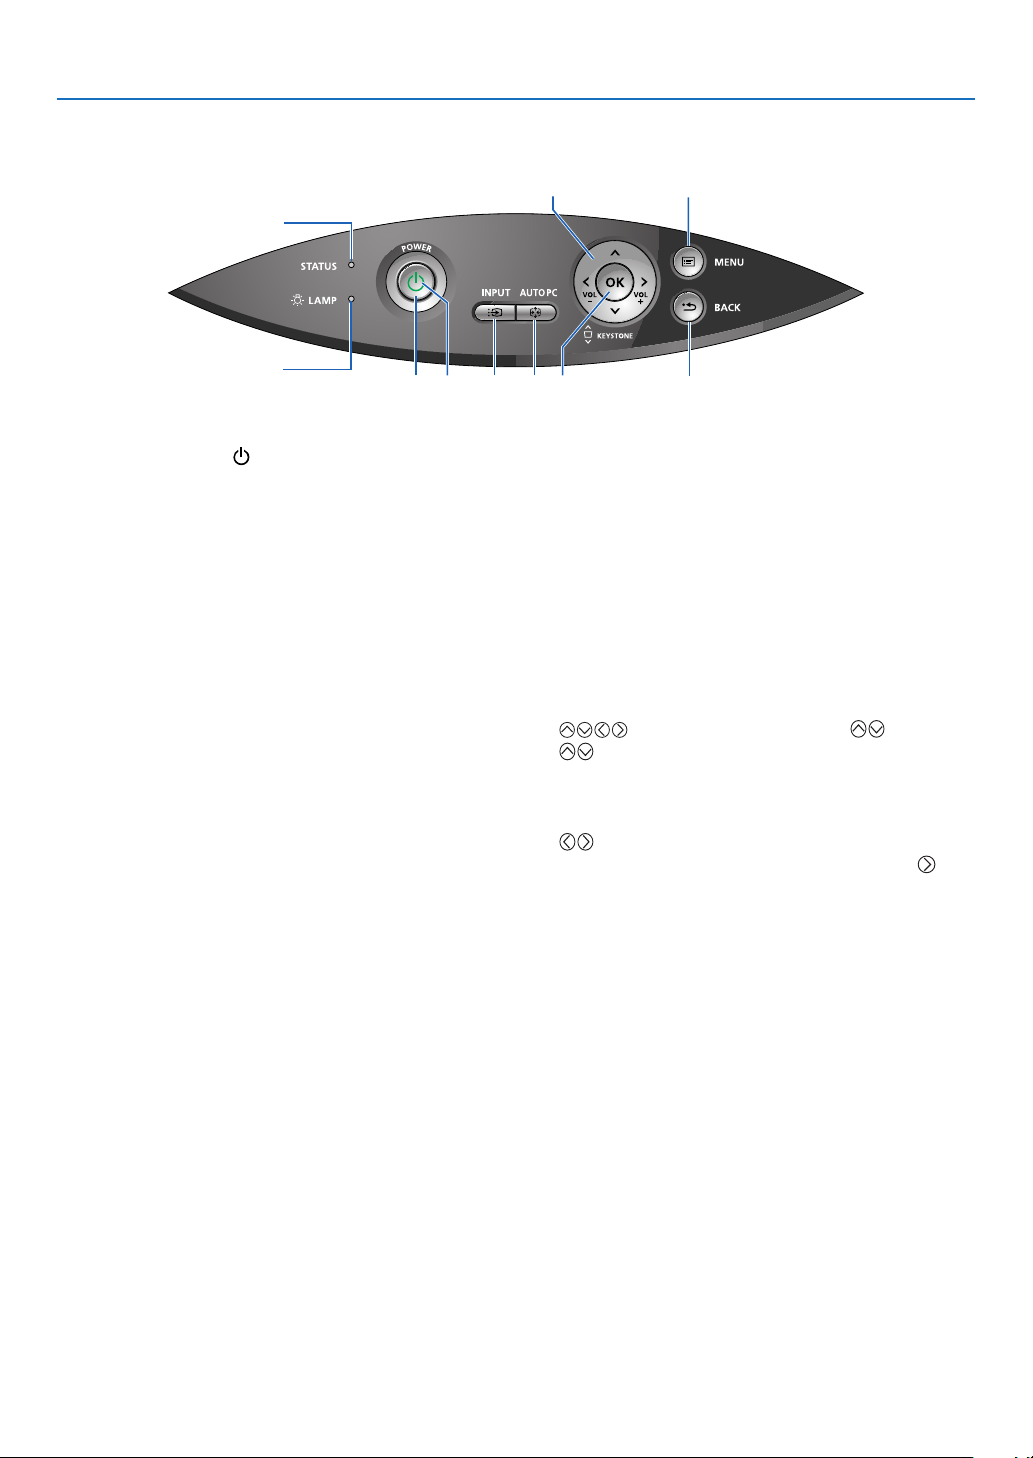
Top Features
3
4
1
5
8
9
2
10
6
7
1. Introduction
1. POWER Button ( )
Use this button to turn the power on and off when
the main power is supplied and the projector is in
standby mode.
To turn on the projector, press and hold this button
for about 1 second. To turn off the projector, press
this button twice.
2. POWER Indicator
When this indicator is green, the projector is on, when
the projector is turned off (standby mode), this indica-
torlightsorangewhen[Normal]isselectedfor[Standby
mode];itlightsredwhen[Power-saving]isselectedfor
[Standby mode]. See the POWER Indicator section
on page 74 for more details.
3. STATUS Indicator
If this light blinks red rapidly, it indicates that an error
has occurred, the lamp cover is not attached properly
or the projector has overheated. If this light remains
orange, it indicates that you have pressed a cabinet
key while the Key lock is enabled. See the STATUS
Indicator section on page 74 for more details.
4. LAMP Indicator
If this light blinks red rapidly, it's warning you that the
lamp has reached the end of its usable life. After this
light appears, replace the lamp as soon as possible
(See page 71). If this is lit green continually, it indicates
that the lamp mode is set to Quiet. See the LAMP Indicator section on page 74 for more details.
This indicator lights green for about 90 seconds immediately after the projector is powered on.
Detecting the Signal Automatically
Press and hold the INPUT button for a minimum
of 2 seconds, the projector will search for the next
available input source. See page 26.
6. AUTO PC Button
Use this button to adjust an analog RGB source for
an optimal picture. See page 34.
7. MENU Button
Displays the menu. See page 47.
8.
9. OK Button
Executes your menu selection and activates items
selected from the menu.
10. BACK Button
Pressing this but ton will retur n to the previo us
menu.
While you are in the main menu, pressing this button will close the menu.
/ VOL (+/–) / KEYSTONE ( ) Buttons
: Use these buttons to select the menu of the
item you wish to adjust. See page 47.
When no menus appear, these buttons work
as a keystone control. See page 32.
: Use these buttons to change the level of a
selected menu item. A press of the
ton executes the selection. When no menus
ap pear, th ese but ton s wo rk a s a volume
control. See page 34.
but-
5. INPUT Button
Selecting from INPUT List
Press and quickly release the INPUT button to display the INPUT list. Each time the INPUT button is
pressed, the input source will change.
To display the selected source, press the OK button
or allow 2 seconds to elapse.
5
Page 15
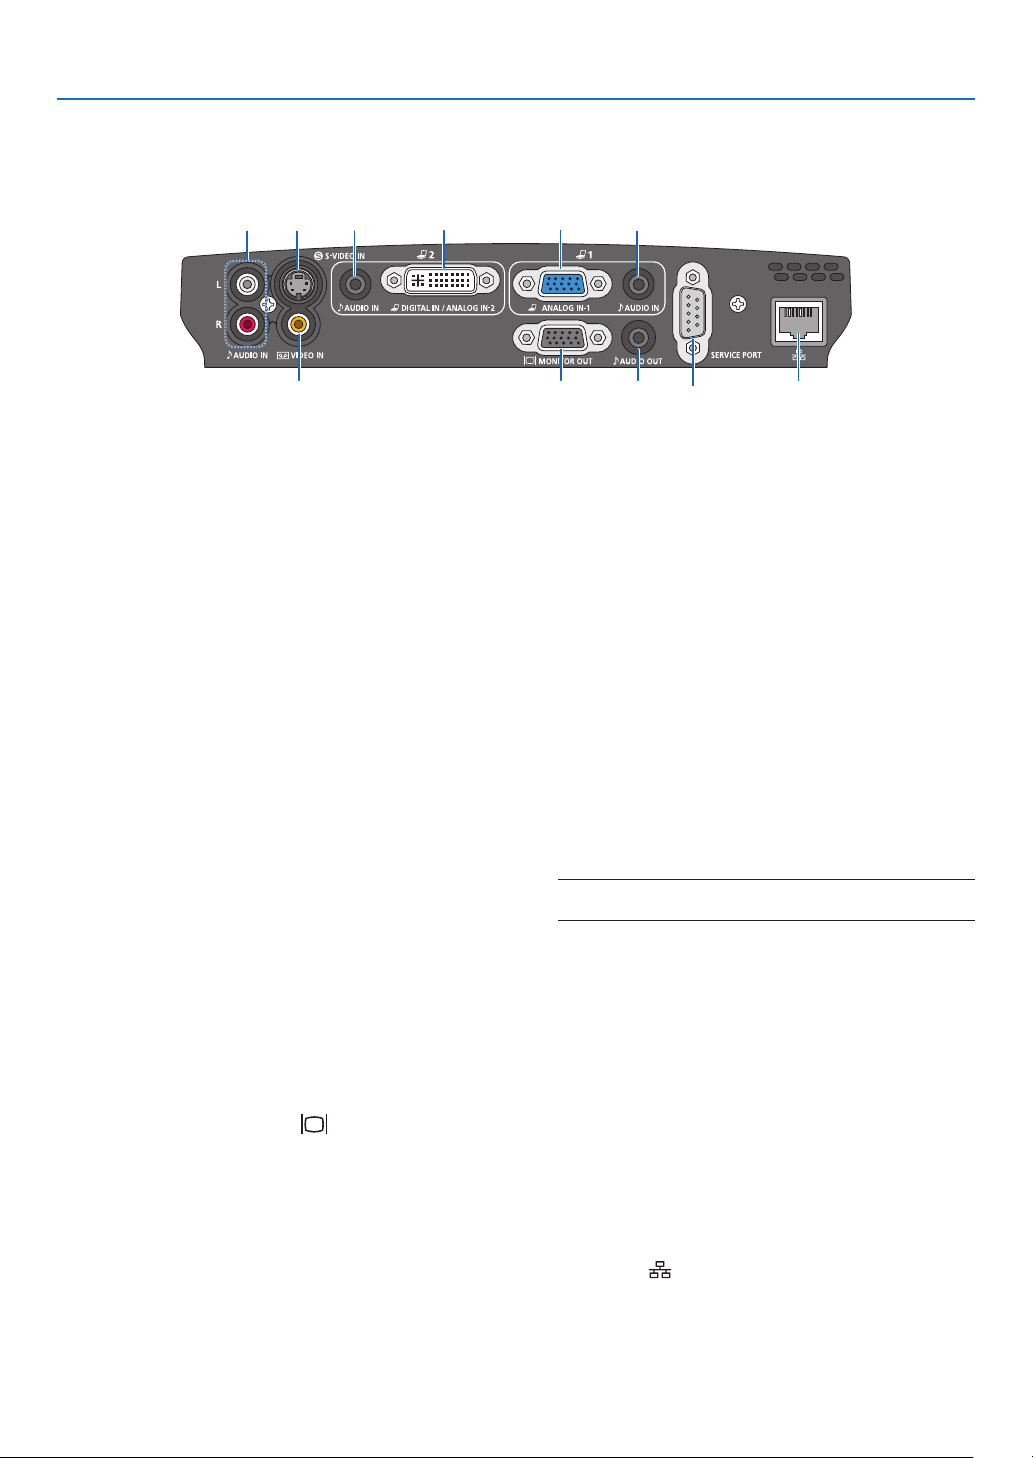
3378
12
46 5 109
Terminal Panel Features
1. Introduction
1. Computer 1 Input Connector [ANALOG IN-1]
(Mini D-Sub 15 Pin)
Connect your computer or other analog RGB equipment such as IBM compatible or Macintosh computers. Use the supplied VGA cable to connect to
your computer. This also serves as a component
input connector that allows you to connect a component video output of audio-video equipment.
See page 14, 17, 19.
2. Computer 2 Input Connector [DIGITAL IN/ANA-
LOG IN-2] (DVI-I 29 Pin)
Connect the DVI output of your computer or other
digital RGB equipment such as IBM compatible or
Macintosh computers.
You can also use the supplied DVI to VGA adapter to
connect the output of analog RGB equipment.
See page 16, 17, 21.
3. AUDIO IN Mini Jack (Stereo Mini)
This is where you connect the audio output from
your computer or audio-video equipment when connected to the ANALOG IN-1 or 2 input. A commercially available audio cable is required.
See page 14, 16, 18, 19, 21.
4.
MONITOR OUT Connector [ ] (Mini D-Sub 15 Pin)
You can use this connector to loop your computer image to an external monitor from the RGB input source
(ANALOG IN-1).
Th is c onne c tor out puts RGB sig nal in s tand by
mode. See page 18.
5. AUDIO OUT Mini Jack (Stereo Mini)
You can use this jack to output sound to your audiovideo equipment from the currently selected source.
Output sound level can be adjusted in accordance
with the sound level of the internal speaker.
Note that this cannot be used as a headphone jack.
(When audio equipment is connected, the projector
speaker is disabled.)
When a cable mini-plug is inserted into this jack, both the
right and left audio signals are not mixed, but separate.
For example, when a cable mini-plug is inserted into
the left AUDIO IN jack only, only left sound is output.
6. VIDEO IN Connector (RCA)
Connect audio-video equipment here to project video.
See page 20.
7. S-VIDEO IN Connector (Mini DIN 4 Pin)
Here is where you connect the S-Video input from
audio-video equipment.
See page 20.
NOTE: S-Video provides more vivid color and higher resolution than the traditional composite video format.
8. AUDIO IN Jacks L/R (RCA)
These are your left and right channel audio inputs for
stereo sound from a Video/S-Video source.
See page 20, 21.
9. SERVICE PORT (D-Sub 9 Pin)
Use this port to connect a computer or control system.
This enables you to control the projector using serial communication protocol. If you are writing your
own program, typical PC control codes are on page
84.
10. LAN Port [
Use this port when controlling your projector in LAN
connection from a computer. Use a commercially
available LAN cable (10 Base-T/100 Base-T) to connect the projector to the computer. See page 22.
] (RJ-45)
6
Page 16
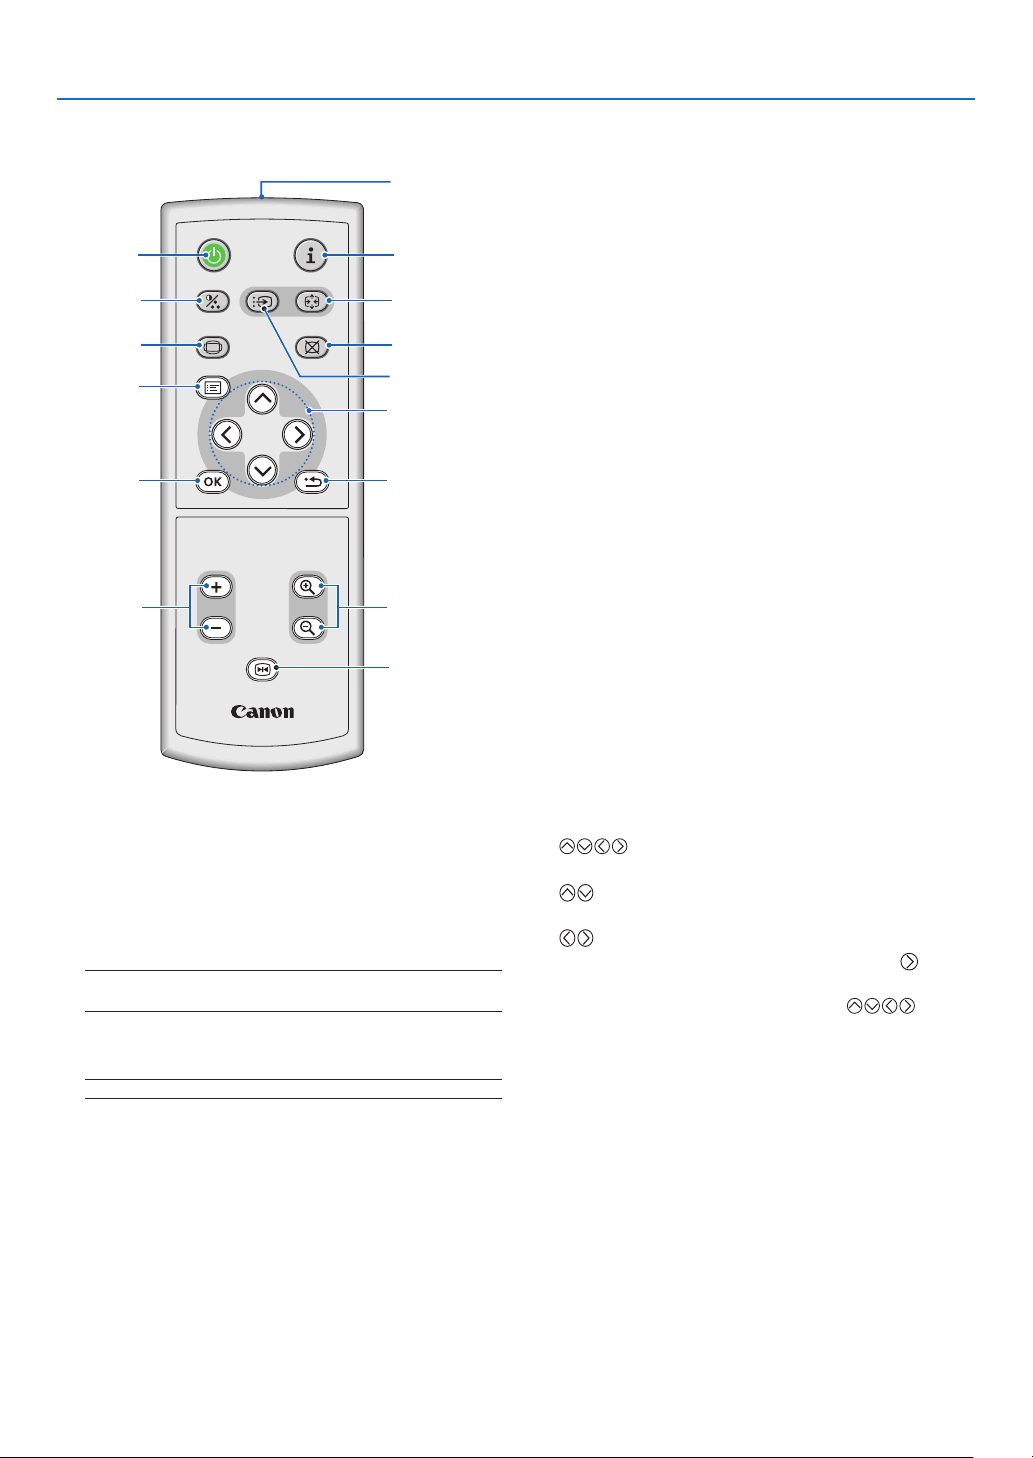
Part Names of the Remote Control
POWER
INPUTIMAGE
ASPECT
INFO.
BLANK
AUTO PC
VOL
FREEZE
RD-439E
D.ZOOM
BACK
MENU
1
2
4
6
7
8
3
5
11
13
12
14
15
9
10
1. Introduction
5. INPUT Button
Selecting from INPUT List
Press and quickly release the INPUT button to display the INPUT list. Each time the INPUT button is
pressed, the input source will change.
Detecting the Signal Automatically
Press and hold the INPUT button for a minimum
of 2 seconds, the projector will search for the next
available input source.
See page 26.
6. AUTO PC Button
Use this button to adjust an analog RGB source for
an optimal picture. See page 34.
7. ASPECT Button
Press this button once to display the Aspect select
menu. Keep pressing will change aspect ratios. See
page 56.
8. BLANK Button
This button turns off the image and sound for a
short period of time. Press again to restore the image and sound. See page 37.
1. Infrared Transmitter
Direct the remote control toward the remote sensor
on the projector cabinet.
2. POWER Button
When the main power is on, you can use this button
to turn your projector on.
NOTE: To turn on the projector, press and hold the POWER
button for about 1 second.
You can use this button to turn your projector off.
NOTE: To turn off the projector, press this button twice.
3. INFO. Button
Provides the information on the current signal and
projector settings. See page 66.
4. IMAGE Button
Press this button to display the Image adjustment
menu to adjust Image mode, Contrast, Brightness,
Sharpness, Color level and Color balance. See
pages 52 to 53.
9. MENU Button
Displays the menu for various settings and adjust-
ments. See page 47.
10.
See page 47.
When an image is magnied, the
moves the image. See page 37.
11. OK Button
Use this button to enter your menu selection. It
works the same way as the OK button on the cabinet. See page 5.
Button
: Use these buttons to select the menu of the
item you wish to adjust.
: Use these buttons to change the level of a
selected menu item. A press of the
executes the selection.
button
button
7
Page 17
POWER
INPUTIMAGE
ASPECT
INFO.
BLANK
AUTO PC
VOL
FREEZE
RD-439E
D.ZOOM
BACK
MENU
1
2
4
6
7
8
3
5
11
13
12
14
15
9
10
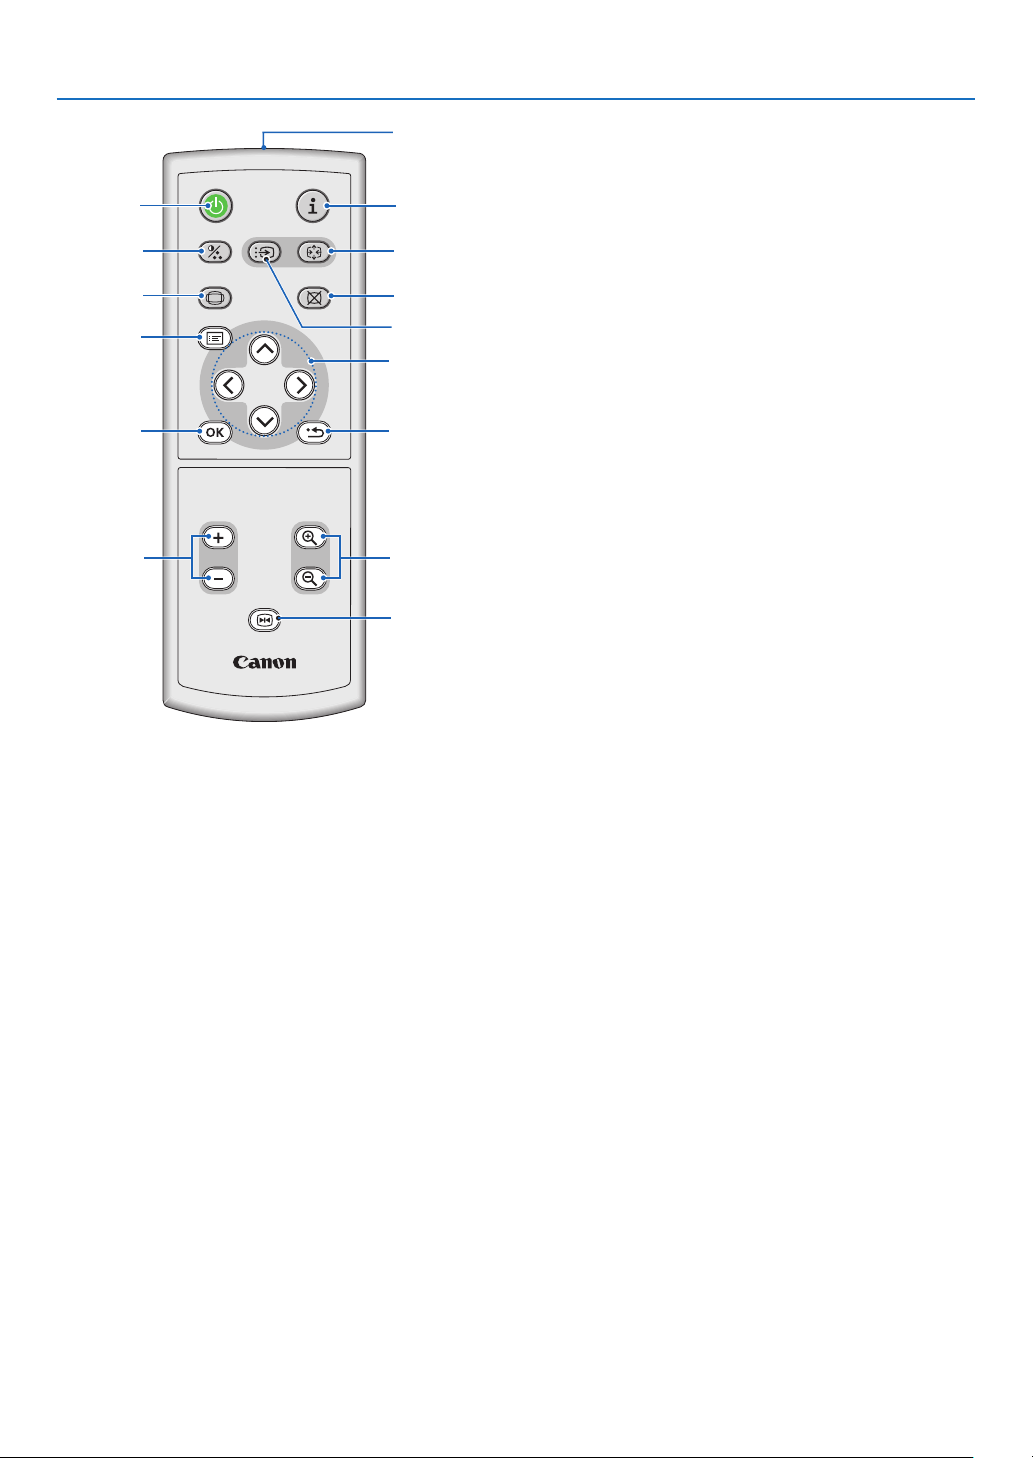
1. Introduction
12. BACK Button
It works the same way as the BACK button on the
cabinet. See page 5.
13. VOL (+) (–) Button
Press (+) to in crease the vo lume and (–) to de-
crease it. See page 34.
14. D. ZOOM (+) (–) Button
Us e this butto n to adjus t the i mage siz e up to
400%.
The image is magnifi ed about the center of the
screen. See page 37.
15. FREEZE Button
This button will freeze a picture. Press again to re-
sume motion. See page 37.
8
Page 18
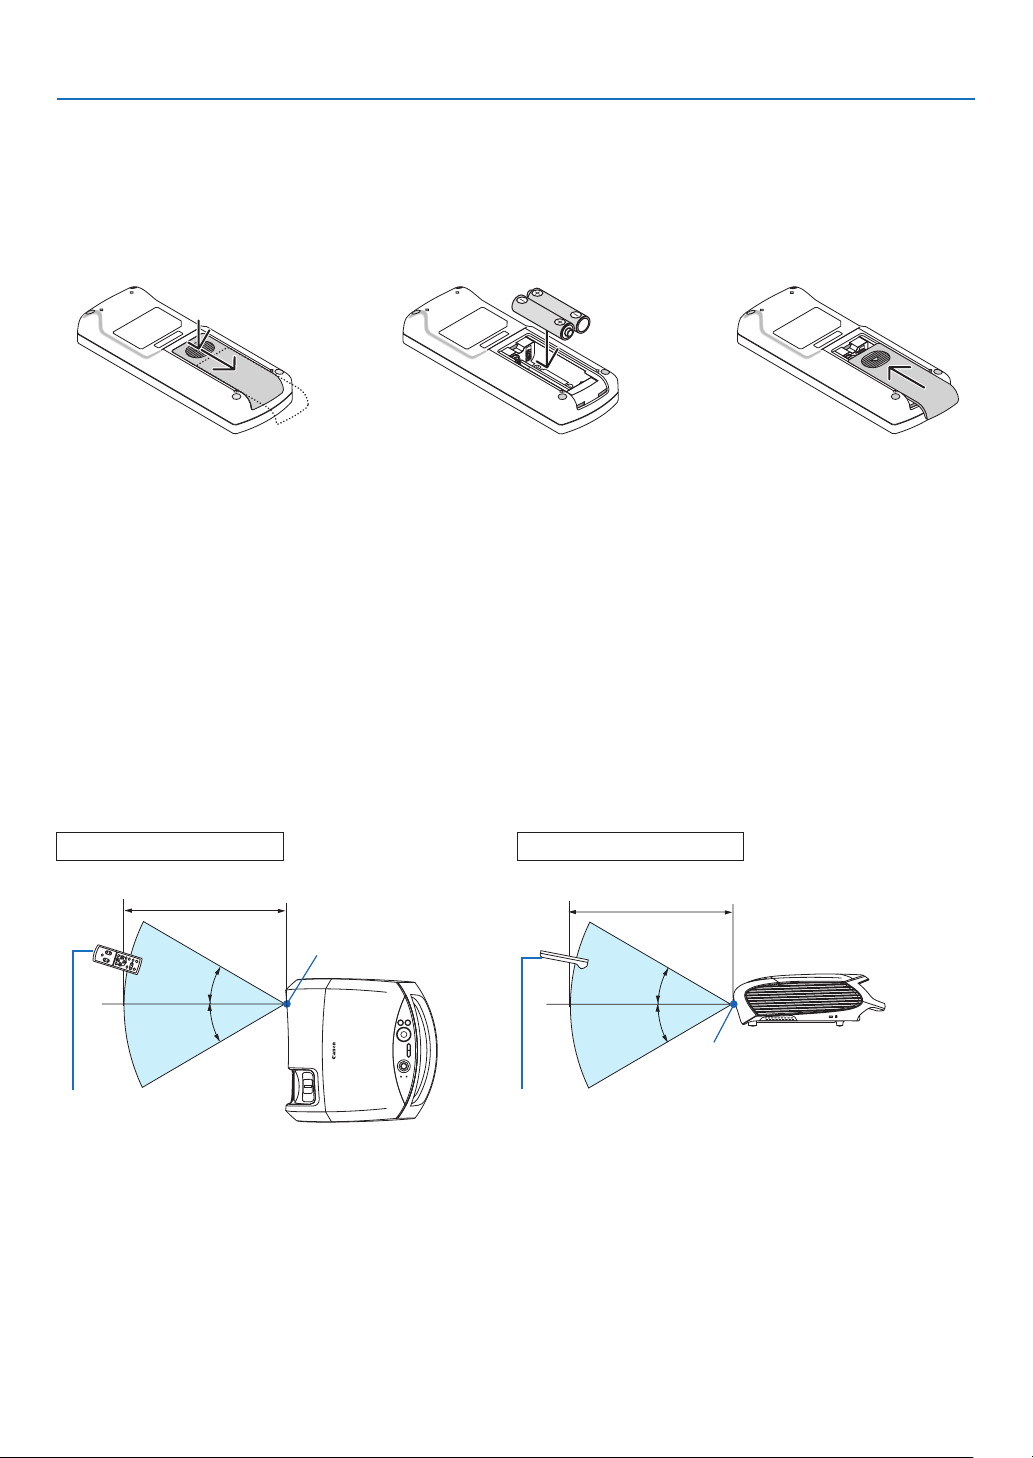
Battery Installation
1. Introduction
1
Press rmly and slide the
battery cover off.
2
Remove both old batteries and
install new ones (AAA). Ensure
that you have the batteries' polarity (+/–) aligned correctly.
3
Slip the cover back over the batteries until it snaps into place. Do
not mix different types of batteries or new and old batteries.
Remote Control Precautions
• Handletheremotecontrolcarefully.
• Iftheremotecontrolgetswet,wipeitdryimmediately.
• Avoidexcessiveheatandhumidity.
• Donotheat,takeapart,orthrowbatteriesintore.
• Ensurethatyouhavethebatteries'polarity(+/-)alignedcorrectly.
• Ifyouwillnotbeusingtheremotecontrolforalongtime,removethebatteries.
• Donotplacethebatteriesupsidedown.
• Donotusenewandoldbatteriestogether,orusedifferenttypesofbatteriestogether.
• Disposeofusedbatteriesaccordingtoyourlocalregulations.
Operating Range for Wireless Remote Control
Horizontal range Vertical range
7m/22 feet
30°
30°
Remote control
• Theinfrared signal operates by line-of-sight up to a distanceof about 7 m (22 feet) and within a 60-degree
angle of the remote sensor on the projector cabinet.
• Theprojectorwillnotrespondifthereareobjectsbetweentheremotecontrolandthesensor,orifstronglight
falls on the sensor. Weak batteries will also prevent the remote control from properly operating the projector.
Remote sensor on
projector cabinet
Remote control
7m/22 feet
30°
30°
Remote sensor on
projector cabinet
9
Page 19
2. Installation and Connections
1
3
2
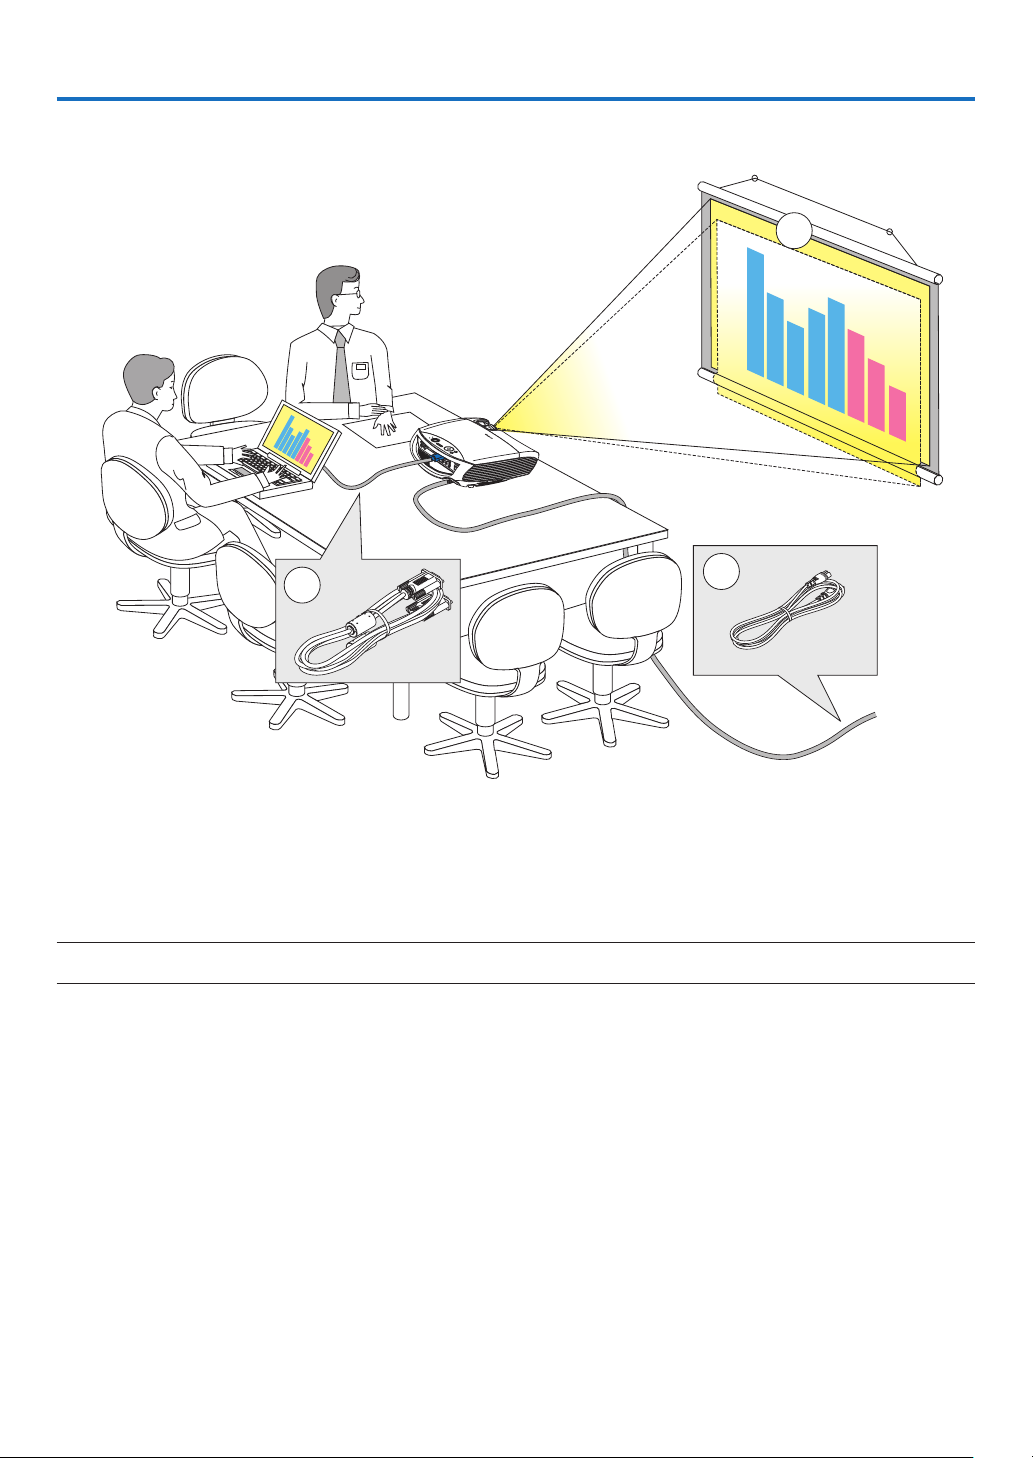
This section describes how to set up your projector and how to connect video and audio sources.
To the wall outlet.
Your projector is simple to set up and use. But before you get started, you must rst:
Set up a screen and the projector. See page 11, 12.
Connect your computer or audio-video equipment to the projector. See pages 14, 16, 17, 18, 19, 20, 21, 22.
Connect the supplied power cord. See page 23.
NOTE: Ensure that the power cord and any other cables are disconnected before moving the projector. When moving the projector or when it is not in use, cover the lens with the lens cover.
10
Page 20
2. Installation and Connections
Setting Up the Screen and the Projector
Selecting a Location (LV-7385/LV-7380/LV-7285/LV-7280)
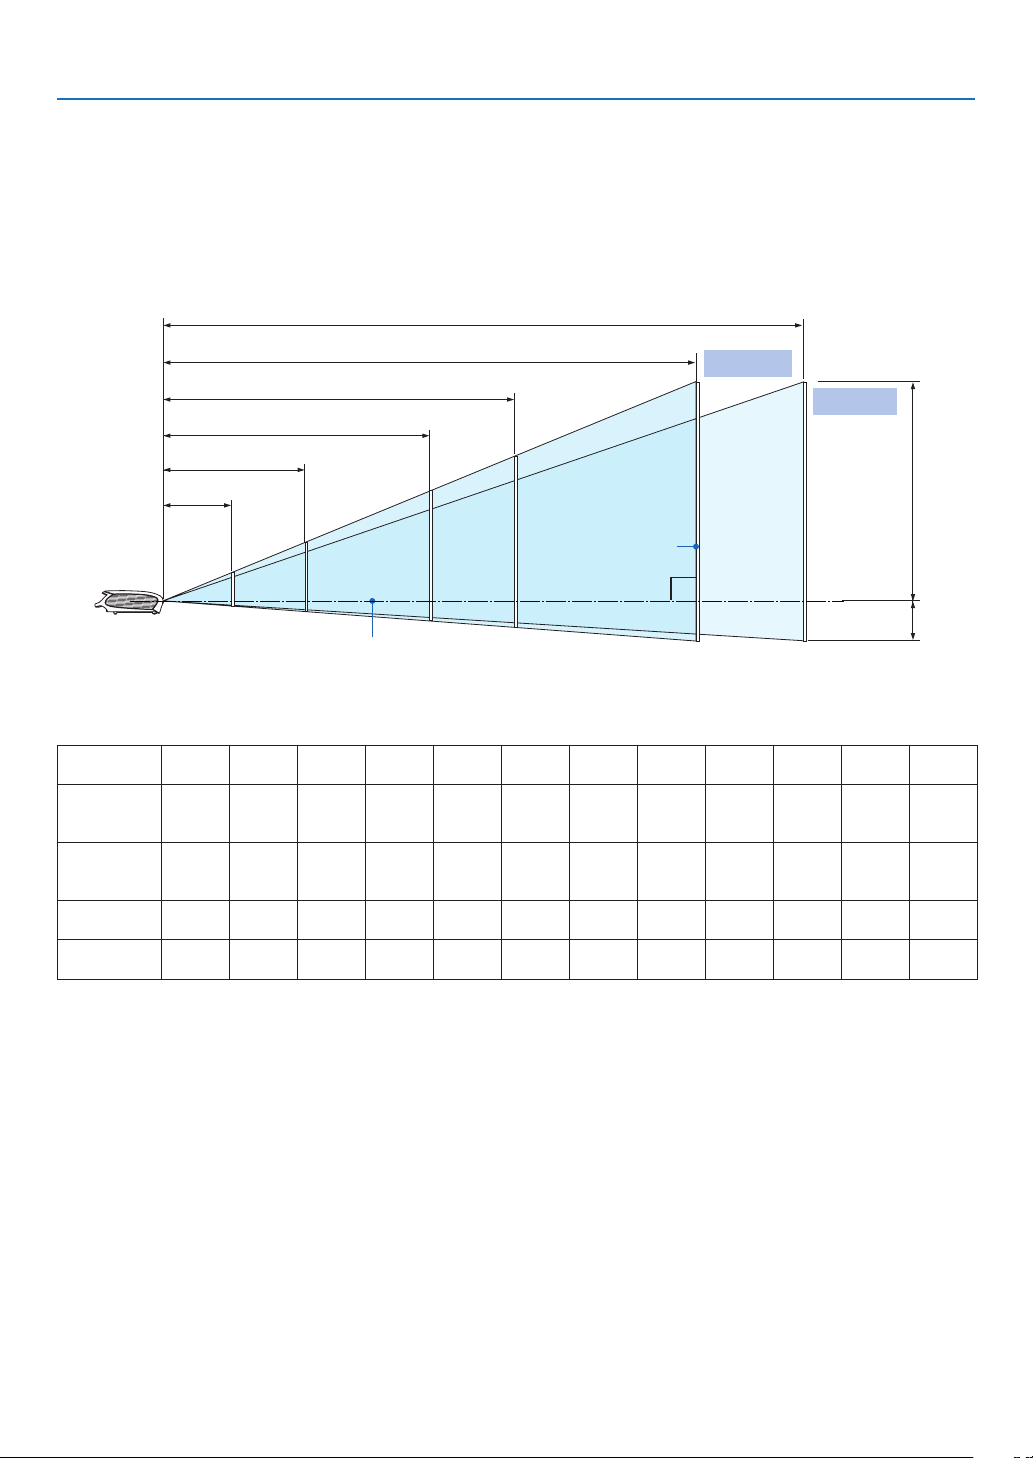
The further your projector is from the screen or wall, the larger the image. The minimum size the image can be
is approximately 21" measured diagonally when the projector is roughly 0.8 m (2.6') from the wall or screen. The
largest the image can be is 300" when the projector is about 11.3 m (37.0') from the wall or screen. Use the drawing below as a guide.
11.3m(Zoommin.)
9.4m(Zoommax.)
6.2 m
4.7 m
2.5 m
1.2 m
80" 126"
40"
32"
67"
Optional axis when image is projected
at right angle to the screen.
Throw Distance and Screen Size
Screen size
(W×H) cm
Projection
distance
Zoom (max)
Projection
distance
Zoom (min)
H1
H2
21"
43×32
–
0.8 m
(2.6’)
27 cm
(0.9’)
5 cm
(0.2’)
25"
51×38
0.8 m
(2.6’)
0.9 m
(3.0’)
32 cm
(1.1’)
6 cm
(0.2’)
30"
61×46
0.9 m
(3.0’)
1.1 m
(3.6’)
39 cm
(1.3’)
7 cm
(0.2’)
81×61
1.2 m
(3.9’)
1.5 m
(4.9’)
51 cm
(1.7’)
10 cm
(0.3’)
40"
150"
60"
122×91
1.9 m
(6.2’)
2.2 m
(7.2’)
77 cm
(2.5’)
14 cm
(0.5’)
200"
165"
80"
163×122
2.5 m
(8.2’)
3.0 m
(9.8’)
103 cm
(3.4’)
19 cm
(0.6’)
Screen
100"
203×152
3.1 m
(10.2’)
3.7 m
(12.1’)
129 cm
(4.2’)
24 cm
(0.8’)
300"
250"
150"
305×229
4.7 m
(15.4’)
5.6 m
(18.4’)
193 cm
(6.3’)
36 cm
(1.2’)
Zoom(max.)
300"
180"
366×274
5.6 m
(18.4’)
6.8 m
(22.3’)
231 cm
(7.6’)
43 cm
(1.4’)
Zoom(min.)
200"
406×305
6.2 m
(20.3’)
7.5 m
(24.6’)
257 cm
(8.4’)
48 cm
(1.6’)
250"
508×381
7.8 m
(25.6’)
9.4 m
(30.8’)
321 cm
(10.5’)
60 cm
(2.0’)
H1
H2
300"
610×457
9.4 m
(30.8’)
11.3 m
(37.1’)
386 cm
(12.7’)
71 cm
(2.3’)
H1 and H2: H1 is the height of the screen from the intersection of optical axis and screen surface, and H2 is the
height of the intersection when an image is projected at right angle to the screen.
• Thesizesintheabovetablehavebeenobtainedassumingthattheaspectratiois4:3.Theymayvaryfromthe
actual sizes depending on the type of the projected image.
11
Page 21
2. Installation and Connections
Selecting a Location (LV-8310/LV-8215)
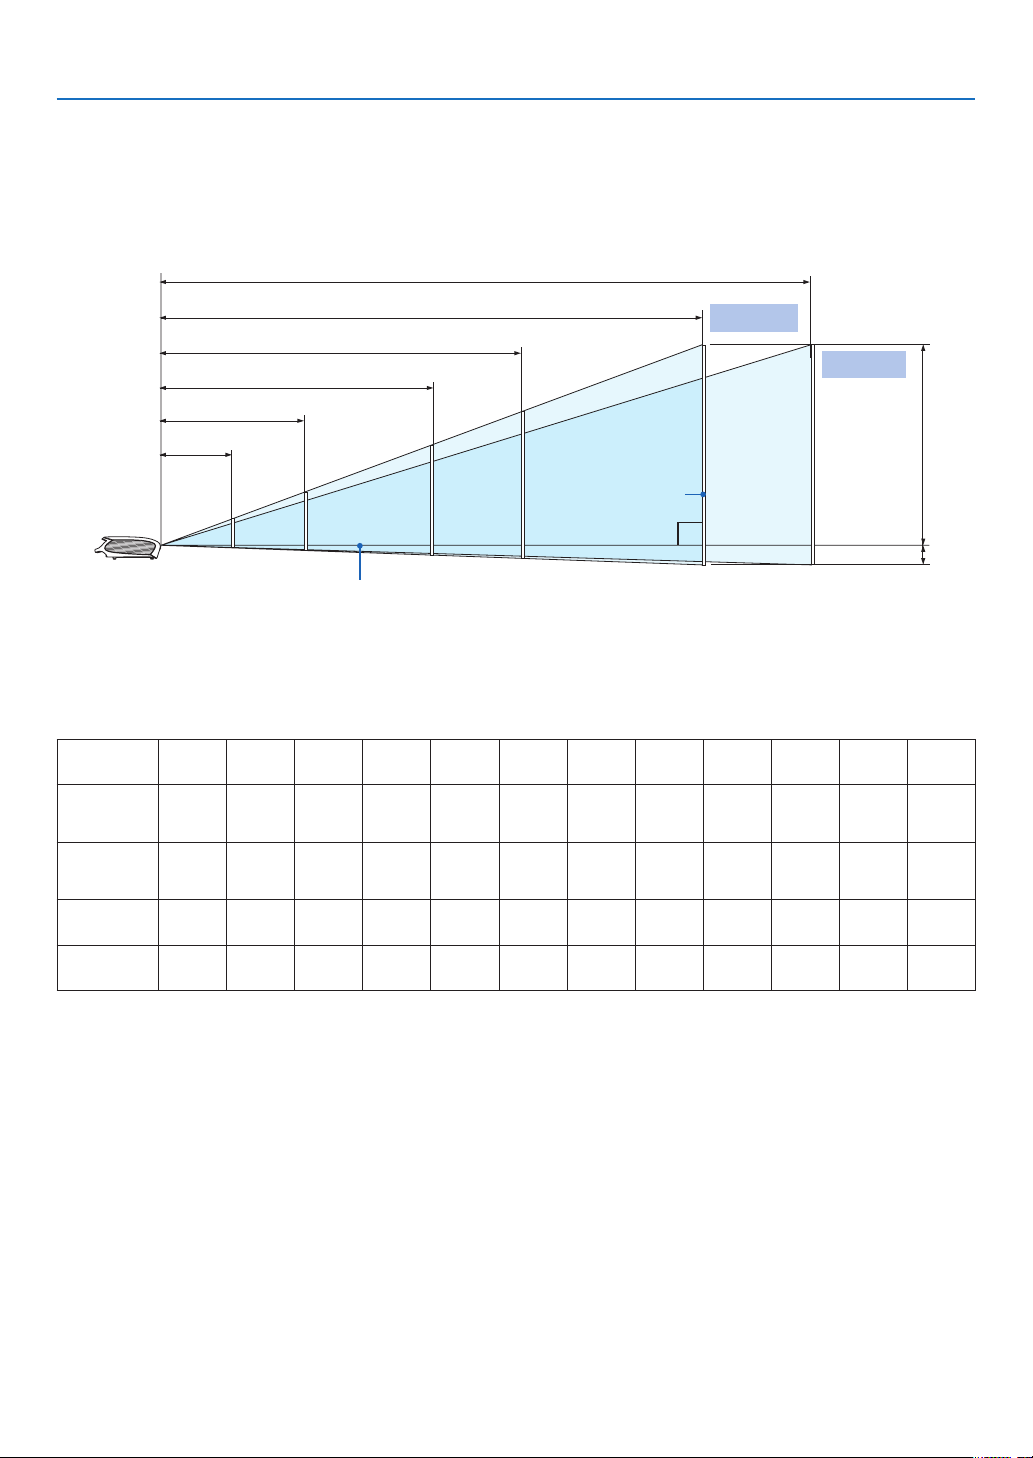
The further your projector is from the screen or wall, the larger the image. The minimum size the image can be
is approximately 21" measured diagonally when the projector is roughly 0.8 m (2.6') from the wall or screen. The
largest the image can be is 300" when the projector is about 12.0 m (39.0') from the wall or screen. Use the drawing below as a guide.
12.0m(Zoommin.)
9.9m(Zoommax.)
6.6 m
5.0 m
2.6 m
1.3 m
80"
40"
33"
65"
Optional axis when image is projected
at right angle to the screen.
Throw Distance and Screen Size
Screen size
(W x H cm)
Projection
distance
Zoom (max)
Projection
distance
Zoom (min)
H1
H2
21”
45 x 28
–
0.8 m
(2.6’)
26 cm
(0.8’)
2 cm
(0.1’)
25”
54 x 34
0.8 m
(2.6’)
1.0 m
(3.2’)
31 cm
(1.0’)
3 cm
(0.1’)
30”
65 x 40
1.0 m
(3.2’)
1.2 m
(3.8’)
37 cm
(1.2’)
4 cm
(0.1’)
86 x 54
1.3 m
(4.2’)
1.6 m
(5.1’)
49 cm
(1.6’)
5 cm
(0.2’)
40”
150"
125"
60”
129 x 81
2.0 m
(6.4’)
2.4 m
(7.7’)
74 cm
(2.4’)
7 cm
(0.2’)
200"
165"
80”
172 x 108
2.6 m
(8.6’)
3.2 m
(10.4’)
98 cm
(3.2’)
9 cm
(0.3’)
100”
215 x 135
3.3 m
(10.8’)
4.0 m
(13.0’)
123 cm
(4.0’)
12 cm
(0.4’)
Screen
150”
323 x 202
5.0 m
(16.3’)
6.0 m
(19.5’)
184 cm
(6.0’)
18 cm
(0.6’)
300"
248"
Zoom(max.)
180”
388 x 242
6.0 m
(19.5’)
7.2 m
(23.5’)
221 cm
(7.3’)
21 cm
(0.7’)
200”
431 x 269
6.6 m
(21.7’)
8.0 m
(26.1’)
246 cm
(8.1’)
24 cm
(0.8’)
Zoom(min.)
250”
538 x 337
8.3 m
(27.2’)
10.0 m
(32.7’)
307 cm
(10.1’)
29 cm
(1.0’)
H1
H2
300”
646 x 404
9.9 m
(32.6’)
12.0 m
(39.2’)
369 cm
(12.1’)
35 cm
(1.2’)
H1 and H2: H1 is the height of the screen from the intersection of optical axis and screen surface, and H2 is the
height of the intersection when an image is projected at right angle to the screen.
TIP:
• Fortherelationshipbetweenthescreensizeandprojectiondistance,seethetableonpage82, 83.
• Thesizesintheabove tablehavebeen obtainedassumingthattheaspectratiois16:9.Theymayvaryfromtheactualsizes
depending on the type of the projected image.
12
Page 22

2. Installation and Connections
NOTE:
• TheZoomleveradjuststheimagesize(diagonal)+/-10%.
Thisprojectorcanbehungfromtheceiling(Ceilingmounted)withitturnedupsidedown.
Whenatranslucentscreenisused,theprojectorcanprojectanimagefrombehindthescreen(Rear).
When the projector is hung from the ceiling or projector projects an image from behind the screen, the image must be inverted
verticallyorhorizontally.Seepage62.
•Whenhangingtheprojectorfromtheceiling,optionalbrackets(partNo.LV-CL15)arerequired.
WARNI NG
• Installing yourprojector ontheceilingmustbedonebyaqualiedtechnician.Contactyourdealerformoreinformation.
• Donotattempttoinstalltheprojectoryourself.
• Onlyuseyourprojectoronasolid,levelsurface.Iftheprojectorfallstotheground,youcan beinjuredandthe
projector severely damaged.
• Donotusetheprojectorwheretemperaturesvarygreatly.Theprojectormustbeusedattemperaturesbetween
41˚F (5˚C) and 104˚F (40˚C). (Quiet mode selected automatically at 95°F to 104°F/35°C to 40°C).
• Donotexposetheprojectortomoisture,dust,orsmoke.Thiswillharmthescreenimage.
• Ensurethatyou haveadequateventilationaround yourprojector soheatcandissipate.Donotcoverthe vents
on the side or the front of the projector.
Reecting the Image
Using a mirror to reect your projector’s image enables you to enjoy a much larger image. Contact your dealer if
you need a mirror system. If you’re using a mirror system and your image is inverted, use the MENU and
buttons on your projector cabinet or your remote control to correct the orientation. See page 62.
13
Page 23
2. Installation and Connections
ANALOG IN-1
AUDIO IN
PHONE
Making Connections
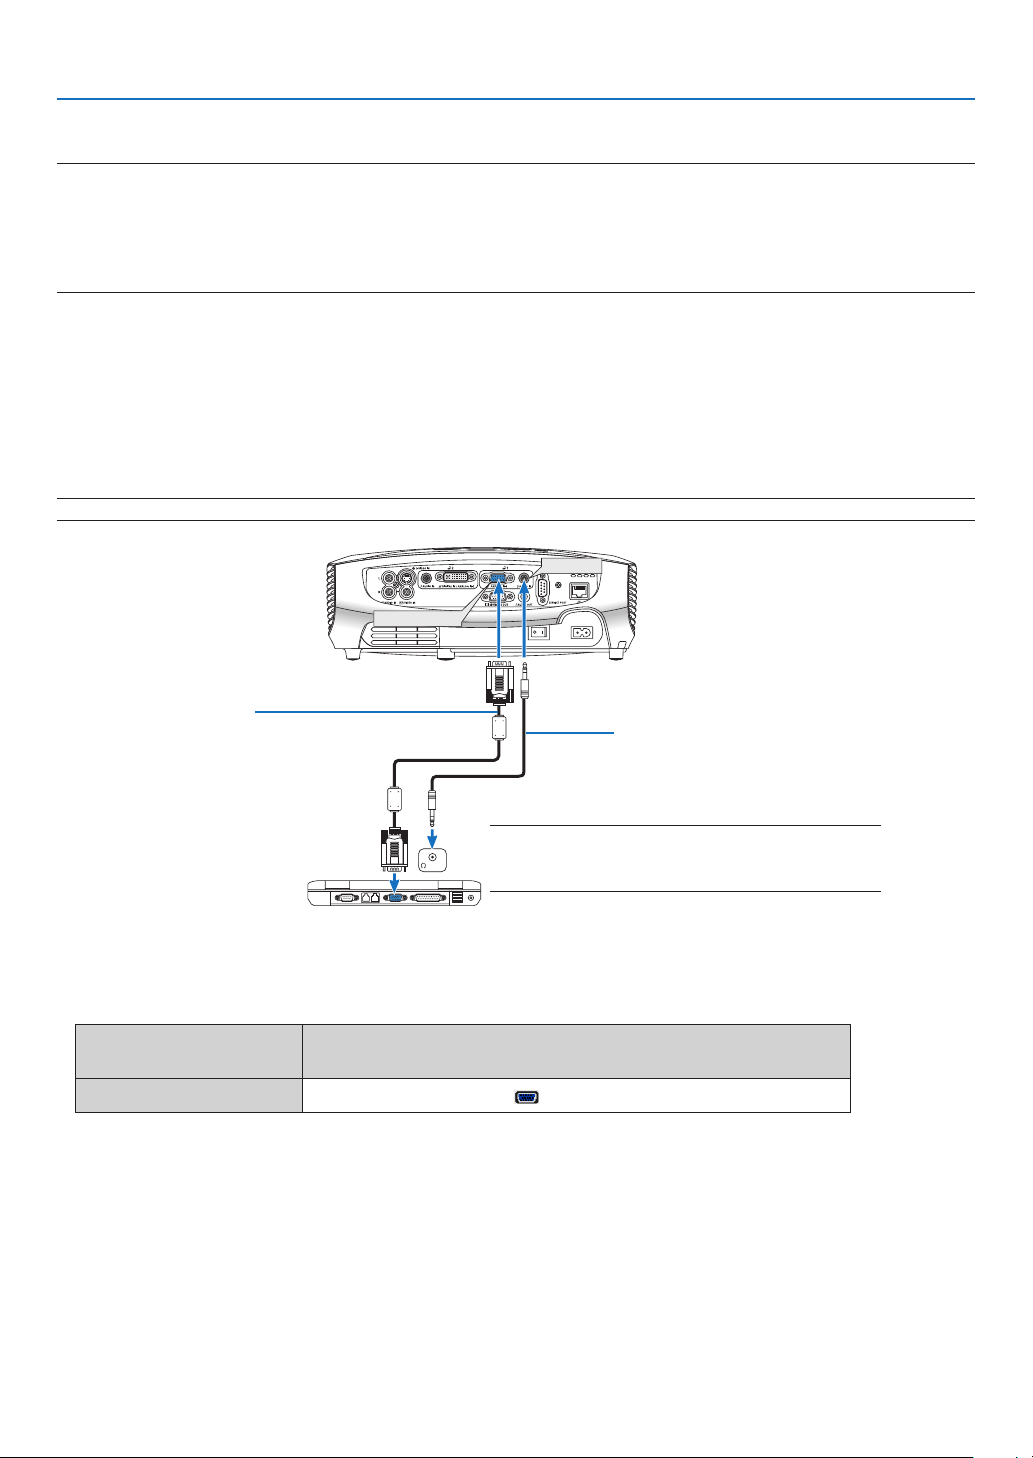
NOTE:When using with a notebook PC, besureto connect theprojector and notebook PC while the projectoris instandby
modeandbeforeturningonthepowertothenotebookPC.
InmostcasestheoutputsignalfromthenotebookPCisnotturnedonunlessconnectedtotheprojectorbeforebeingpowered
up.
* Ifthescreengoesblankwhileusingyourremotecontrol,itmaybetheresultofthecomputer'sscreen-saverorpowerman-
agement software.
Enabling the computer’s external display
Displaying an image on the notebook PC’s screen does not necessarily mean it outputs a signal to the projector.
When using a PC compatible laptop, a combination of function keys will enable/disable the external display.
Usually, the combination of the ‘Fn” key along with one of the 12 function keys gets the external display to come
on or off. For more details, refer to your computer’s owner’s manual.
Connecting Your PC or Macintosh Computer
NOTE: The ANALOG IN-1 and DIGITAL IN/ANALOG IN-2 connectors are supported by Plug & Play.
VGA cable (supplied)
To mini D-Sub 15-pin connector on the
projector. It is recommended that you use
a commercially available distribution amplier if connecting a signal cable longer
than the cable supplied.
Stereo mini-plug audio cable
(not supplied)
NOTE: For older Macintosh, use a commercially available pin adapter (not supplied) to connect to your Mac’s
video port.
IBM VGA or Compatibles (Notebook
type) or Macintosh (Notebook type)
• Selecttheinputnameforitsappropriateinputconnectorafterturningontheprojector.
Input connector
ANALOG IN-1
Use the INPUT button on the projector cabinet or the remote
control to select the appropriate input from the menu.
Computer 1
14
Page 24

2. Installation and Connections
NOTE: Use an audio cable without a built-in resistor. Using an audio cable with a built-in resistor turns down the sound.
NOTE:Animage may not bedisplayed correctlywhen a Videoor S-Video source isplayed backvia a commercially available
scan converter.
This is because the projector will process a video signal as a computer signal at the default setting. In that case, do the following.
* Whenanimageisdisplayedwiththelowerandupperblackportionofthescreenoradarkimageisnotdisplayedcorrectly:
ProjectanimagetollthescreenandthenpresstheAUTOPCbuttonontheremotecontrolortheprojectorcabinet.
15
Page 25
ANALOG IN-1
AUDIO IN
AUDIO IN
DIGITAL IN/
ANALOG IN-2
PHONE
PHONE
2. Installation and Connections
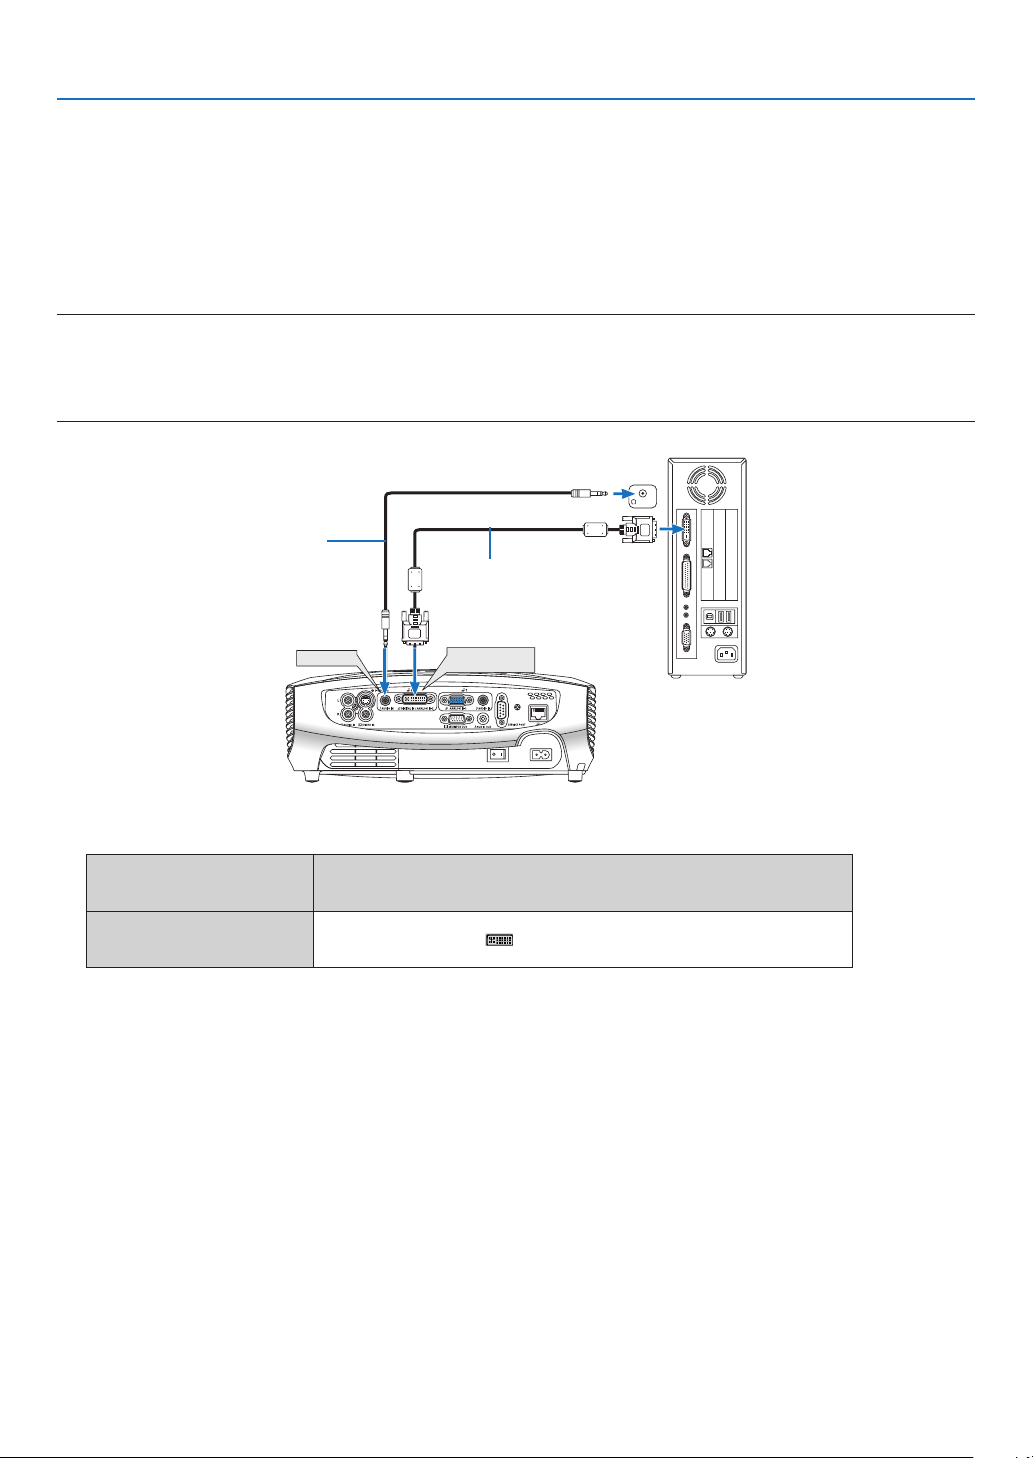
When Viewing a DVI Digital Signal
To project a DVI digital signal, be sure to connect the PC and the projector using a DVI cable (not supplied) before
turning on your PC or projector. Turn on the projector rst and select Computer 2 (Digital) from the source menu
before turning on your PC.
Failure to do so may not activate the digital output of the graphics card resulting in no picture being displayed.
Should this happen, restart your PC.
Do not disconnect the DVI cable while the projector is running. If the signal cable has been disconnected and then
re-connected, an image may not be correctly displayed. Should this happen, restart your PC.
NOTE:
• UseaDVIcableortheonecompliantwiththeDDWG(DigitalDisplayWorkingGroup)DVI(DigitalVisualInterface)revision1.0
standard.TheDVIcableshouldbewithin5m(196)long.BothsingleanddualtypesofDVIcablecanbeused.
• TheDVI(DIGITAL)connectoracceptsVGA(640x480),SVGA(800x600),1152x864,XGA(1024x768),WXGA(1280x800@up
to60Hz),andSXGA(1280x1024@upto60Hz).
Stereo mini-plug audio cable
(not supplied)
DVI cable (not supplied)
IBM PC or Compatibles (Desktop type)
or Macintosh (Desktop type)
• Selecttheinputnameforitsappropriateinputconnectorafterturningontheprojector.
Input connector
DIGITAL IN /
ANALOG IN-2
Use the INPUT button on the projector cabinet or the remote
control to select the appropriate input from the menu.
Computer 2 (Digital)
16
Page 26
ANALOG IN-1
DIGITAL IN /
ANALOG IN-2
2. Installation and Connections
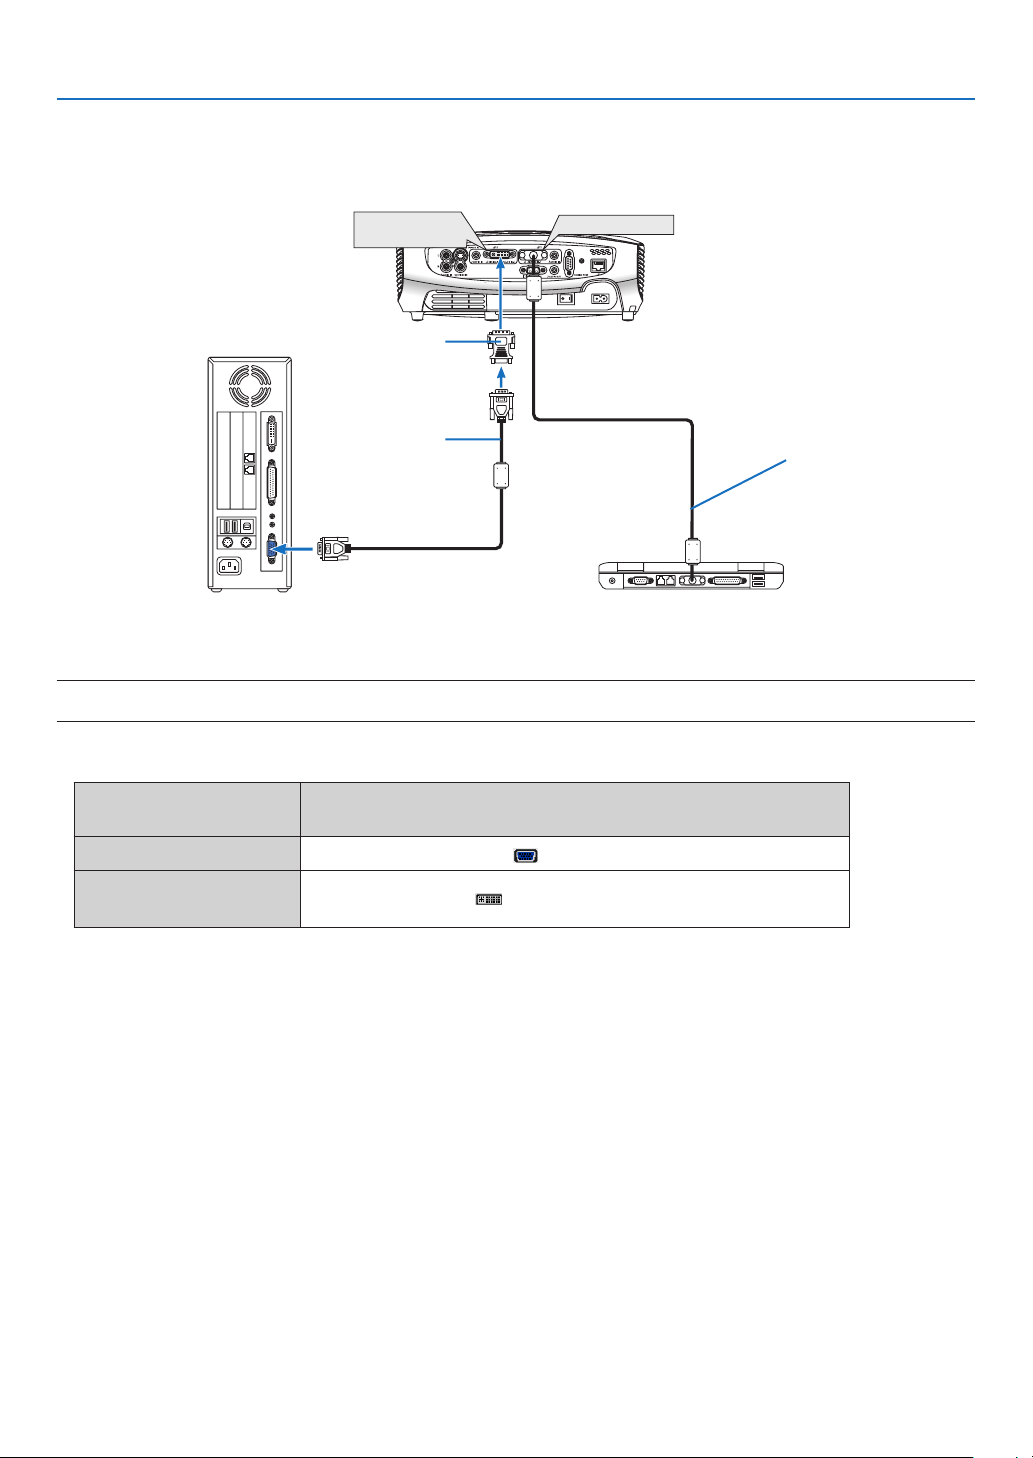
Using Two Analog Computer Inputs Simultaneously
If you need to use two analog inputs simultaneously, connect a VGA cable as shown below.
DVI to VGA adapter
(supplied)
VGA cable
(not supplied)
IBM PC or Compatibles (Desktop type)
or Macintosh (Desktop type)
IBM VGA or Compatibles (Notebook
type) or Macintosh (Notebook type)
VGA cable
(supplied)
NOTE:WhentheDVItoVGAadapterisnottobeusedforanextendedperiodoftime,removeitfromtheprojector.Failuretodo
so may cause damage to the connector of the projector.
• Selecttheinputnameforitsappropriateinputconnectorafterturningontheprojector.
Input connector
ANALOG IN-1
DIGITAL IN /
ANALOG IN-2
Use the INPUT button on the projector cabinet or the remote
control to select the appropriate input from the menu.
Computer 1
Computer 2 (Analog)
17
Page 27
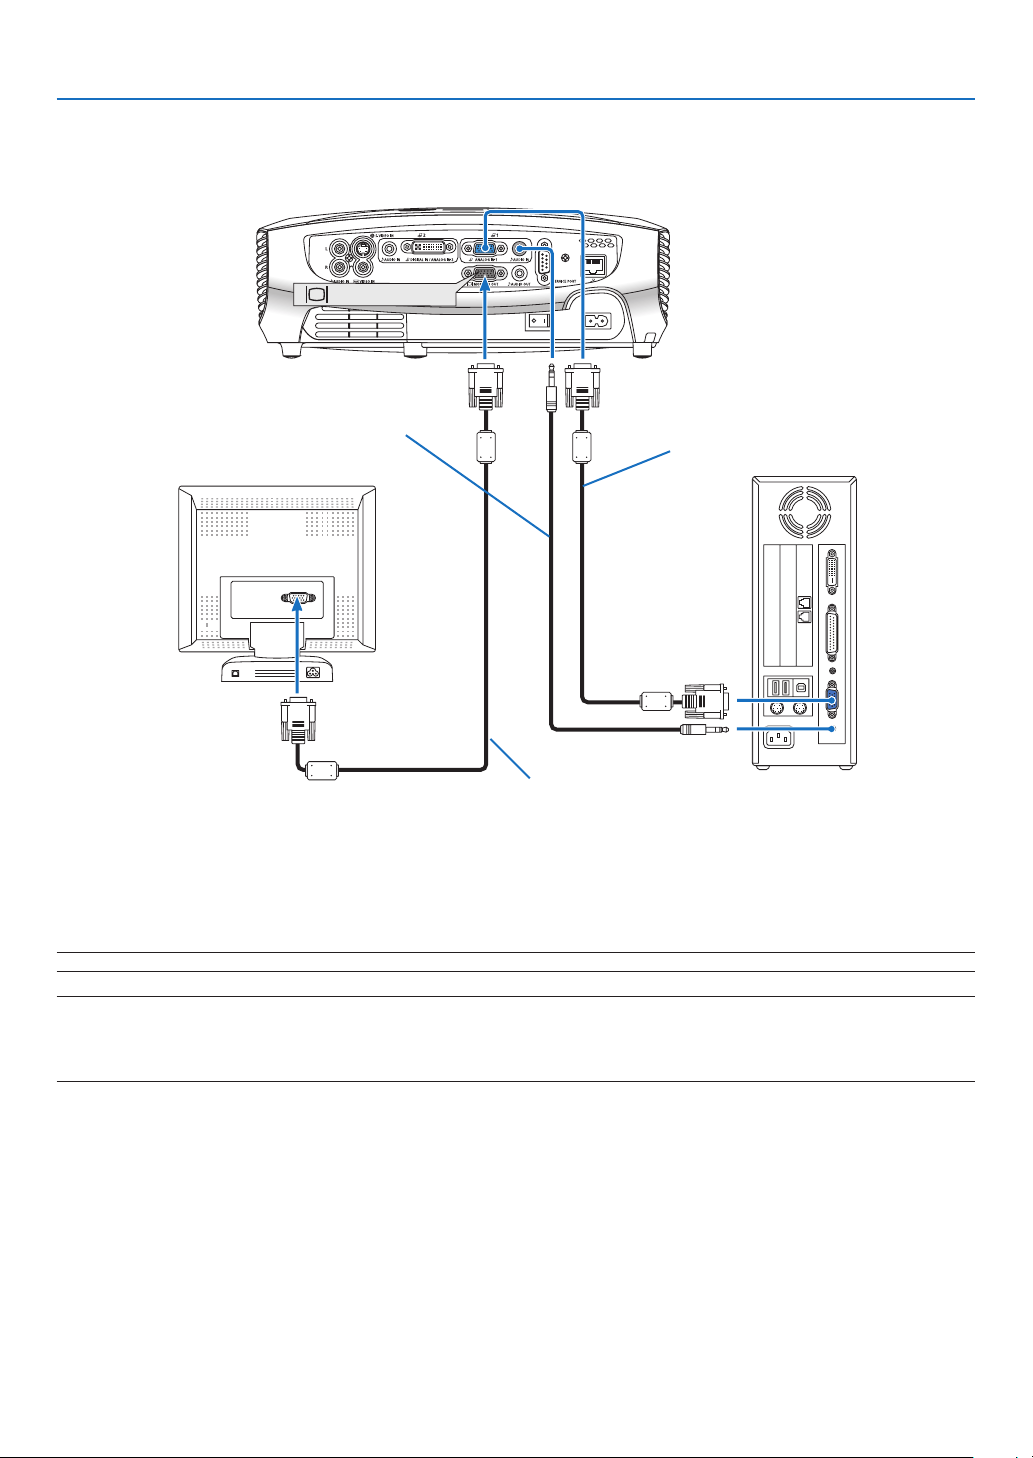
Connecting an External Monitor
MONITOR OUT
Stereo mini-plug audio cable
(not supplied)
2. Installation and Connections
VGA cable (supplied)
VGA cable (not supplied)
You can connect a separate, external monitor to your projector to simultaneously view on a monitor the RGB analog image you're projecting.
NOTE:Daisychainconnectionisnotpossible.
NOTE:
• ThesignalfromtheDIGITALIN/ANALOGIN-2connectorcannotbeoutputfromtheMONITOROUTconnector.
• Whenaudioequipmentisconnected,theprojectorspeakerisdisabled.
• Useanaudiocablewithoutabuilt-inresistor.Usinganaudiocablewithabuilt-inresistorturnsdownthesound.
18
Page 28
AUDIO IN
LR
AUDIO OUT
L R
Component
YCbCr
ANALOG IN-1
AUDIO IN
2. Installation and Connections
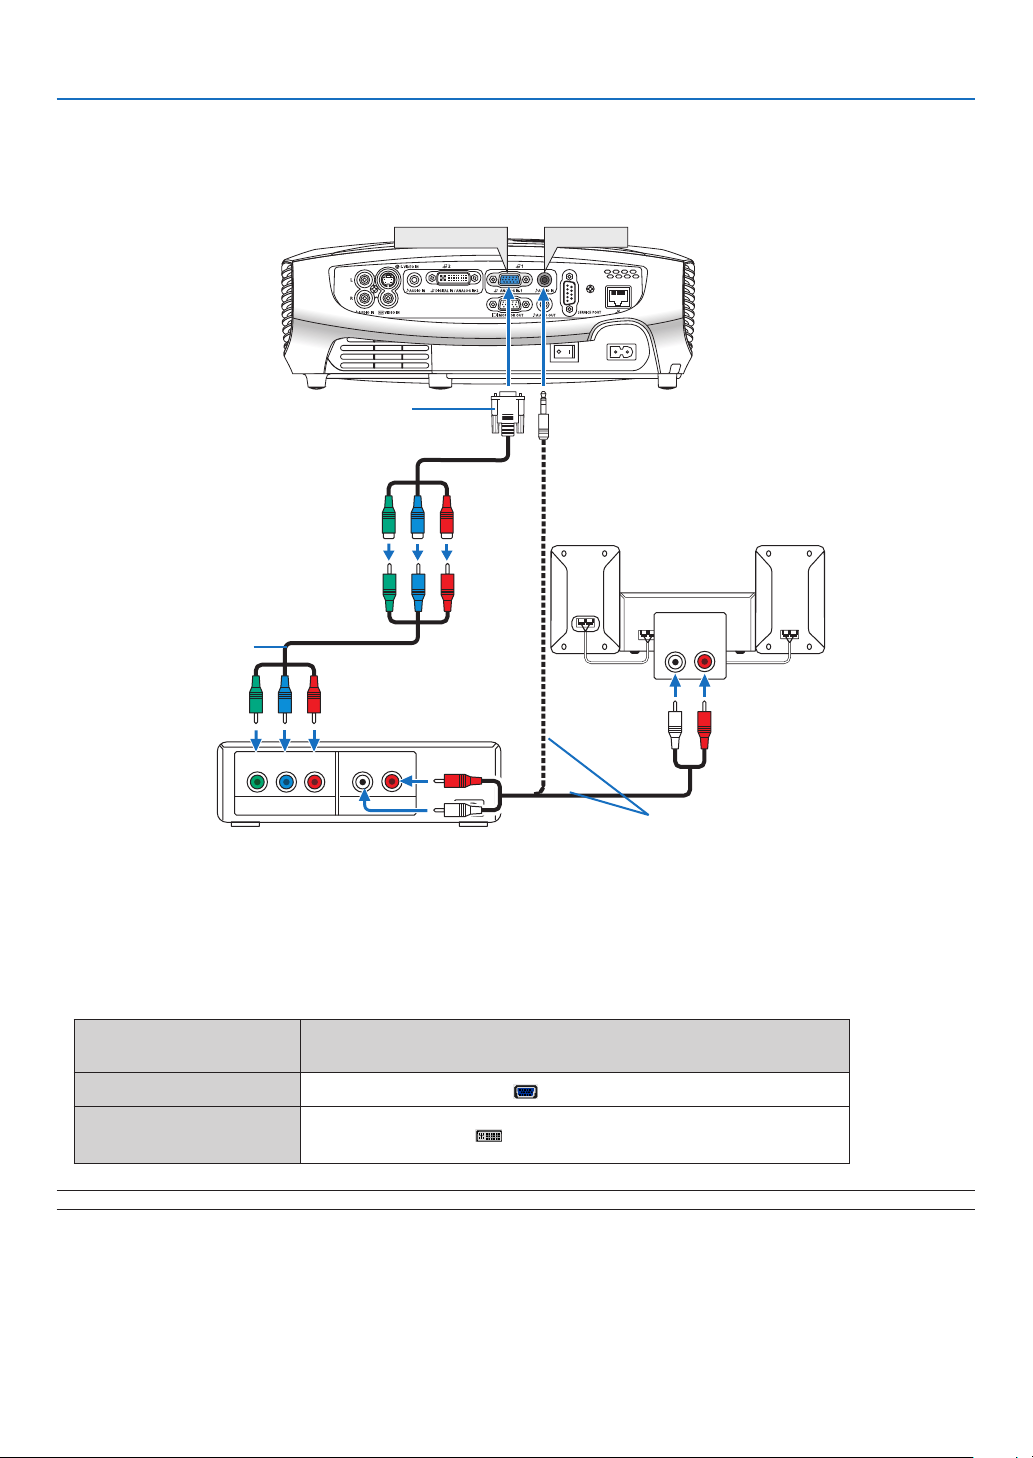
Connecting Your Audio-Video Equipment with Component Output
Use audio equipment for stereo sound.
Optional 15-pin - to - RCA (female)
3 cable (LV-CA32)
Component video RCA3
cable (not supplied)
Audio cable (not supplied)
Acomponentsignal will beautomaticallydisplayed.Ifnot,fromthe menu, select[Setup]→[Options(1)]→[Input
signalselect]or[Computer2(Analog)]→[Computer1],andthenselect[COMPONENT].
• Selecttheinputnameforitsappropriateinputconnectorafterturningontheprojector.
Input connector
ANALOG IN-1
DIGITAL IN /
ANALOG IN-2
Use the INPUT button on the projector cabinet or the remote
control to select the appropriate input from the menu.
Computer 1
Computer 2 (Analog)
NOTE:RefertoyourDVDplayer’sowner’smanualformoreinformationaboutyourDVDplayer’svideooutputrequirements.
19
Page 29
AUDIO IN
LR
AUDIO OUT
L R
VIDEO OUT
S-VIDEOVIDEO
VIDEO IN
AUDIO IN
S-VIDEO IN
2. Installation and Connections
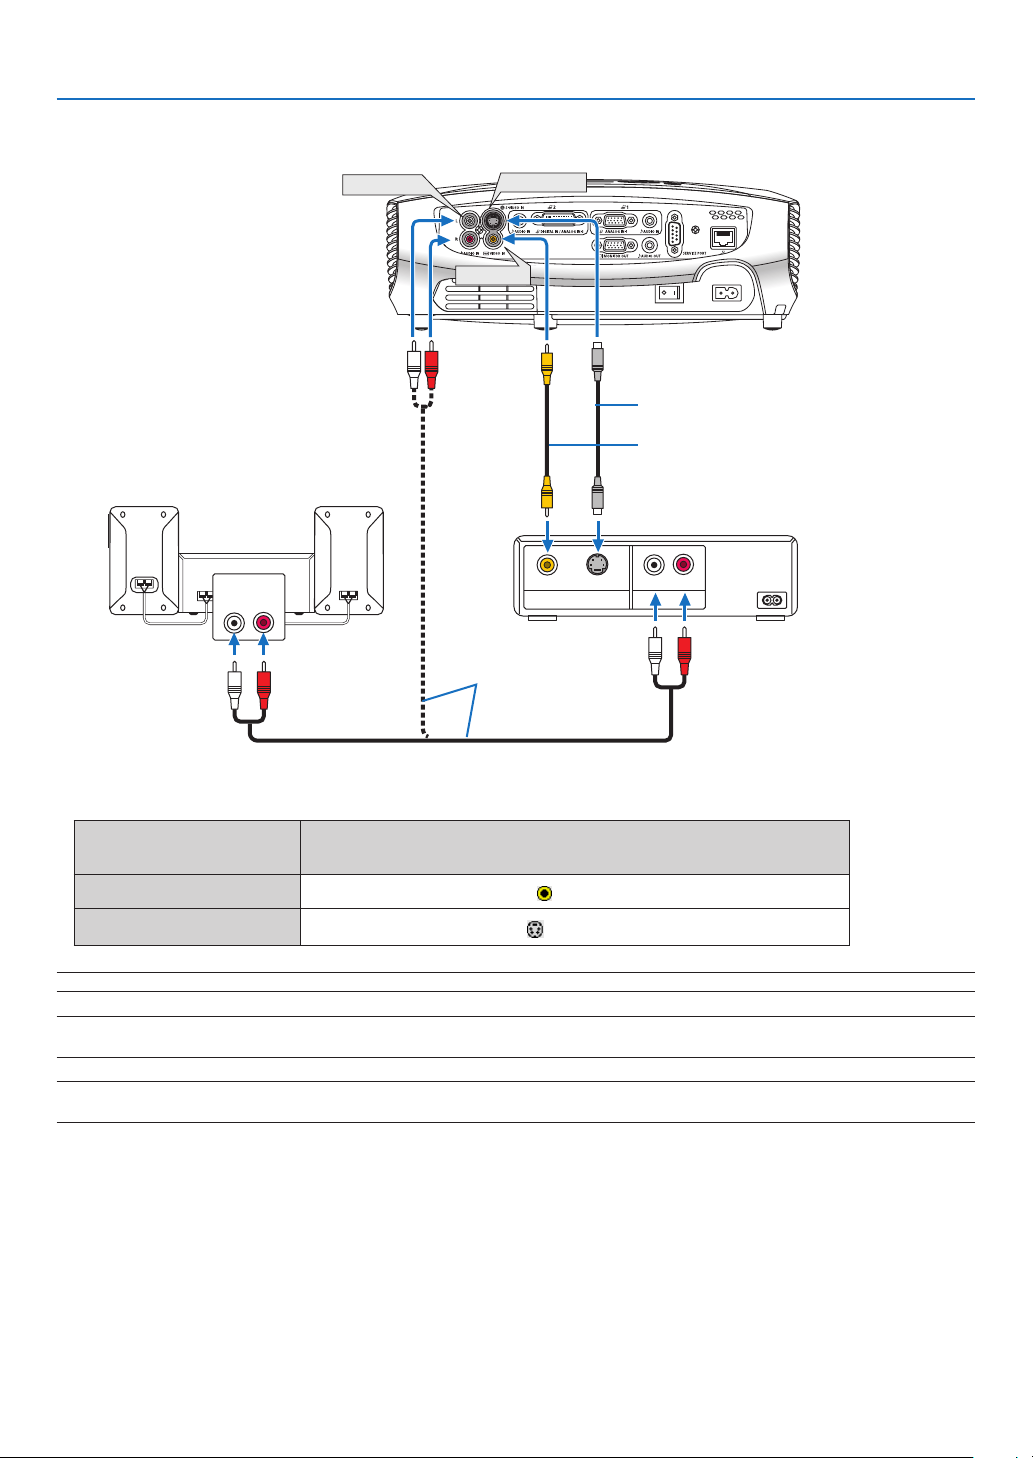
Connecting Your Audio-Video Equipment with Video/S-Video Output
S-Video cable (not supplied)
Video cable (not supplied)
Audio cable
(not supplied)
• Selecttheinputnameforitsappropriateinputconnectorafterturningontheprojector.
Input connector
VIDEO IN
S-VIDEO IN
NOTE:TheAUDIOINL/MONOandRjacks(RCA)aresharedbetweentheVideoandS-Videoinputs.
Use the INPUT button on the projector cabinet or the remote
control to select the appropriate input from the menu.
VIDEO
S-VIDEO
NOTE:Refer to your audio-videoequipment'sowner's manualfor more informationabout yourequipment's videooutput requirements.
NOTE:AnimagemaynotbedisplayedcorrectlywhenaVideoorS-Videosourceisplayedbackinfast-forwardorfast-rewindvia
a scan converter.
20
Page 30
2. Installation and Connections
AUDIO IN
LR
AUDIO OUT
LR
VIDEO OUT
HDMI OUT
S-VIDEO VIDEO
AUDIO OUT
LR
VIDEO OUT
S-VIDEO VIDEO
DVI OUT
DIGITAL IN/
ANALOG IN-2
AUDIO IN
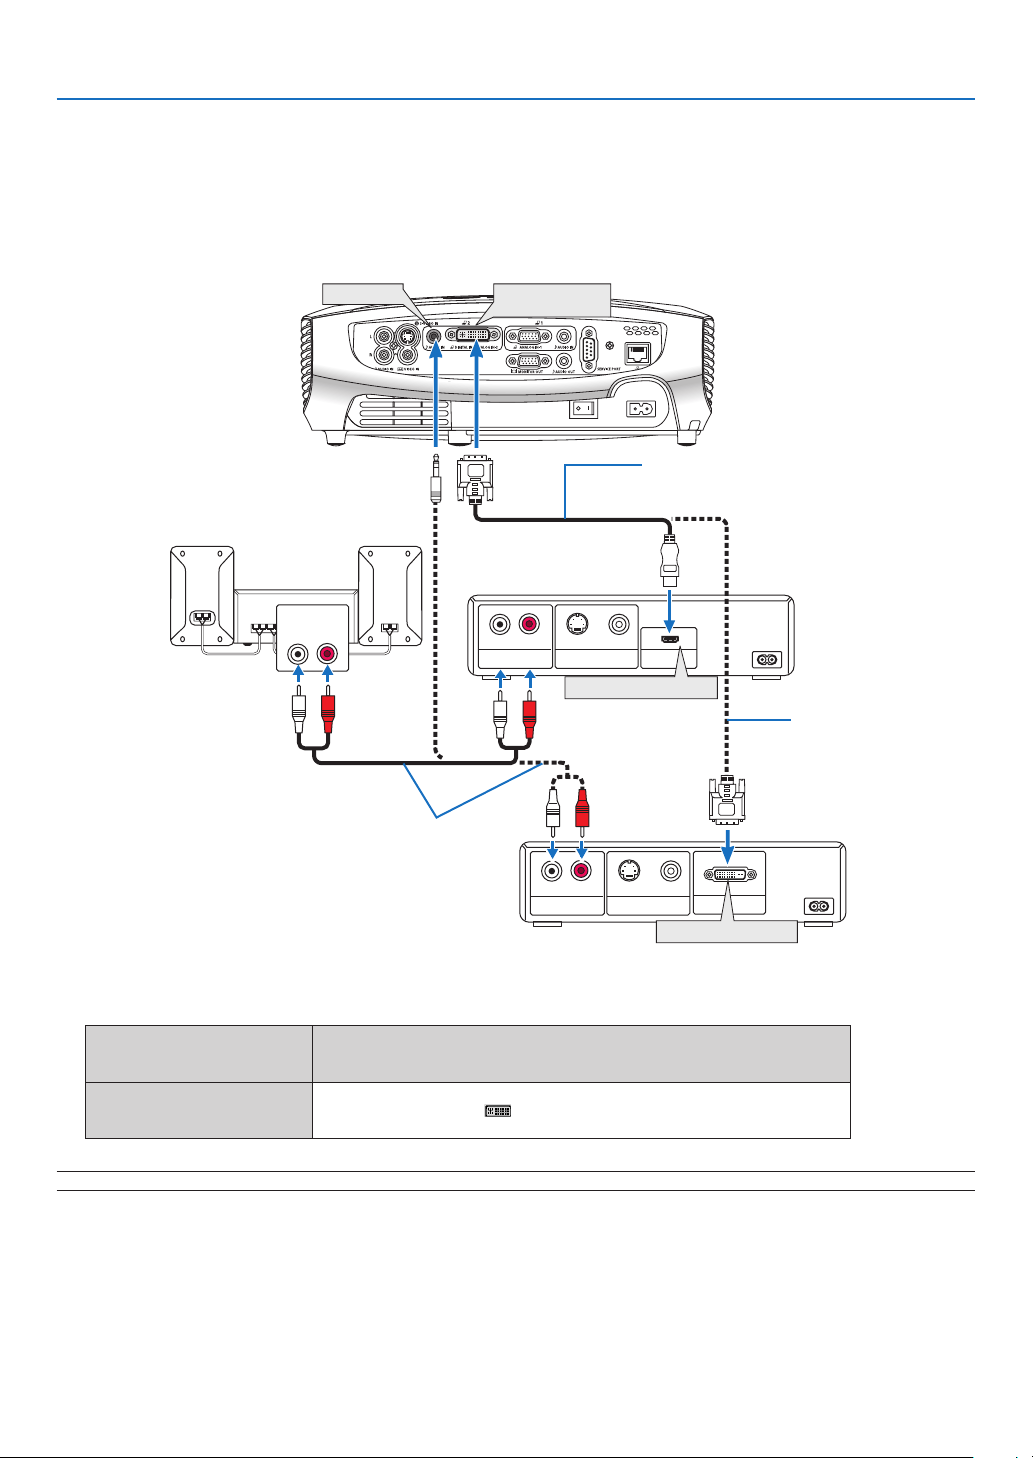
Connecting a Digital Video Signal
To project a source from audio video equipment with a digital video output such as an HDMI or DVI connector,
use a commercially available HDMI-to-DVI cable or the optional DVI digital cable to connect the Computer 2 input
[DIGITALIN/ANALOGIN-2]connectoroftheprojectorasshownbelow.
To output the sound in stereo, connect to audio equipment.
HDMI-to-DVI cable
(not supplied)
HDMI connector
DVI digital cable
(Optional: LV-CA29)
Audio cable (not supplied)
DVI connector
Audio video equipment
• Selecttheinputnameforitsappropriateinputconnectorafterturningontheprojector.
Input connector
DIGITAL IN /
ANALOG IN-2
NOTE:Animagemaynotbedisplayeddependingonthespecicationsoftheaudiovideoequipmentbeingused.
Use the INPUT button on the projector cabinet or the remote
control to select the appropriate input from the menu.
Computer 2 (Digital)
TIP:ForusersofaudiovideoequipmentwithanHDMIconnector:
Select“Enhanced”ratherthan“Normal”ifHDMIoutputisswitchablebetween“Enhanced”and“Normal”.
Thiswillprovideimprovedimagecontrastandmoredetaileddarkareas.
Formoreinformationonsettings,refertotheinstructionmanualoftheaudiovideoequipmenttobeconnected.
21
Page 31
LAN
2. Installation and Connections
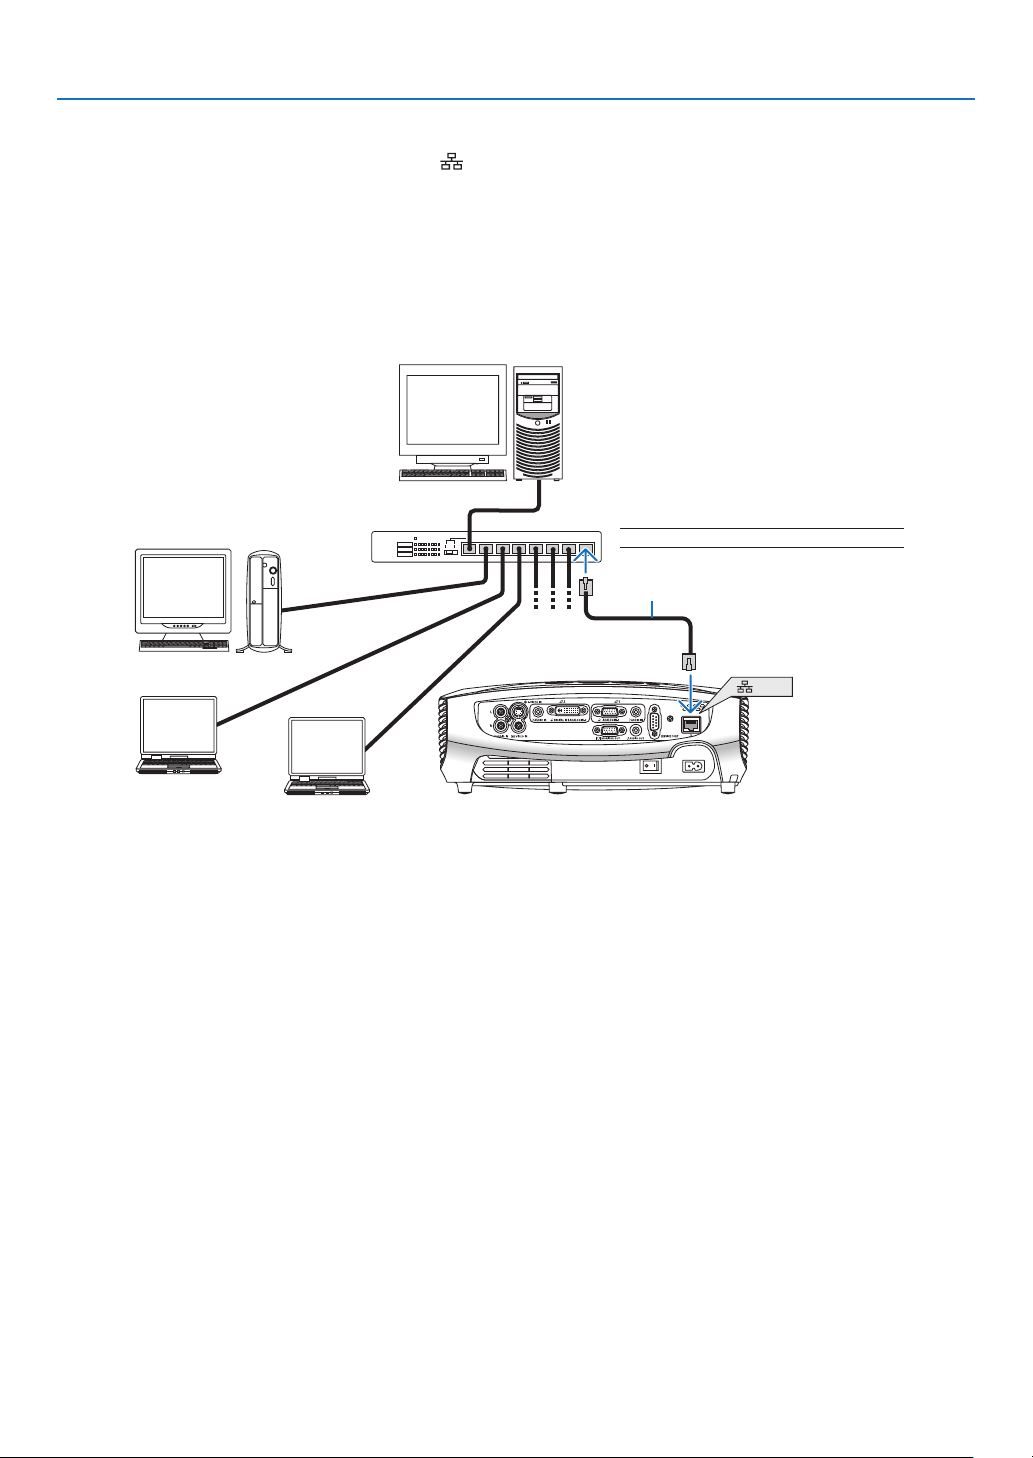
Connecting to a Network
The projector comes standard with a LAN port ( ) which provides a LAN connection using a LAN cable.
Using a LAN cable allows you to specify the Network Settings and the Alert Mail Settings for the projector over a
LAN. Touse a LANconnection,youarerequired to assignanIPaddress to the projector on the [PROJECTOR
NETWORKSETTINGS]screenofthewebbrowseronyourcomputer.Forsetting,seepage43, 44, 45, 46.
Example of wired LAN connection
Server
Hub
NOTE:UseaCategory5orhigherLANcable.
LAN cable (not supplied)
22
Page 32
2. Installation and Connections
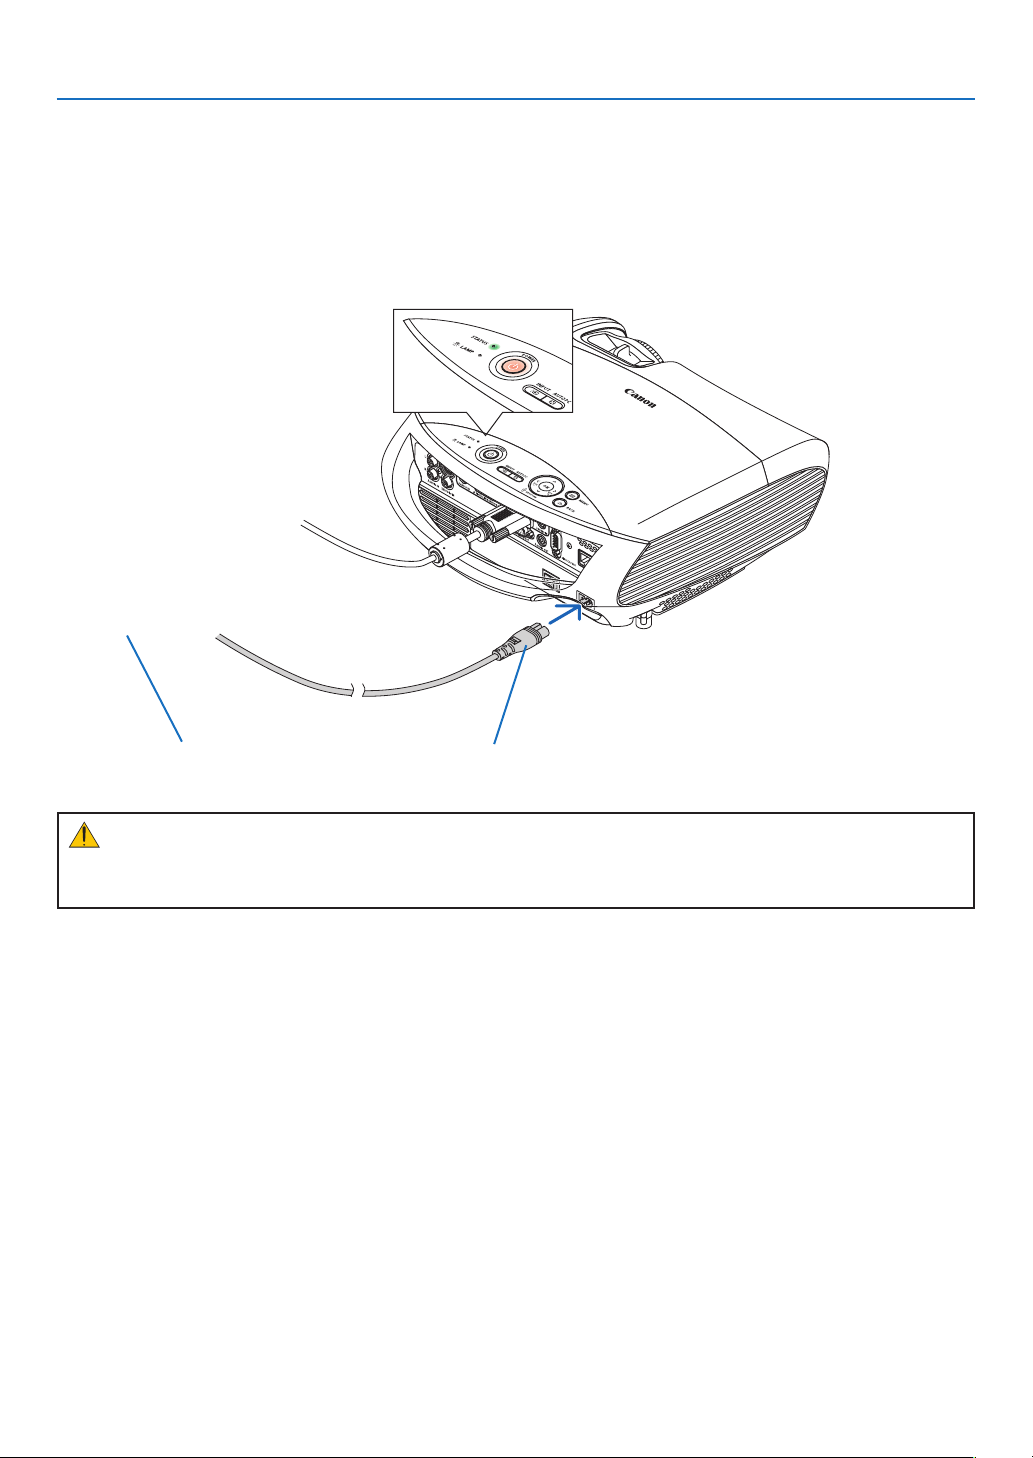
Connecting the Supplied Power Cord
Connect the supplied power cord to the projector.
First connect the supplied power cord's two-pin plug to the AC IN of the projector, and then connect the other plug
of the supplied power cord in the wall outlet.
When you press the Main Power switch to the On position (I), the projector will go into standby mode. When in
standbymode,thePOWERindicatorwilllightorangeandtheSTATUSindicatorwilllightgreentoshowthat[Normal]
modeisselectedfor[Standbymode].
To wall outlet
←
Make sure that the prongs are fully inserted into
both the AC IN and the wall outlet.
CAUTION:
Do not try to touch the ventilation outlet on the left front (when seen from the front) as it can become heated
while the projector is turned on and immediately after the projector is turned off.
23
Page 33
BLANK
MENU
POWER
INPUTIMAGE
ASPECT
INFO.
AUTO PC
3.
Projecting an Image (Basic Operation)
This section describes how to turn on the projector and to project a picture onto the screen.
Turning on the Projector
NOTE:
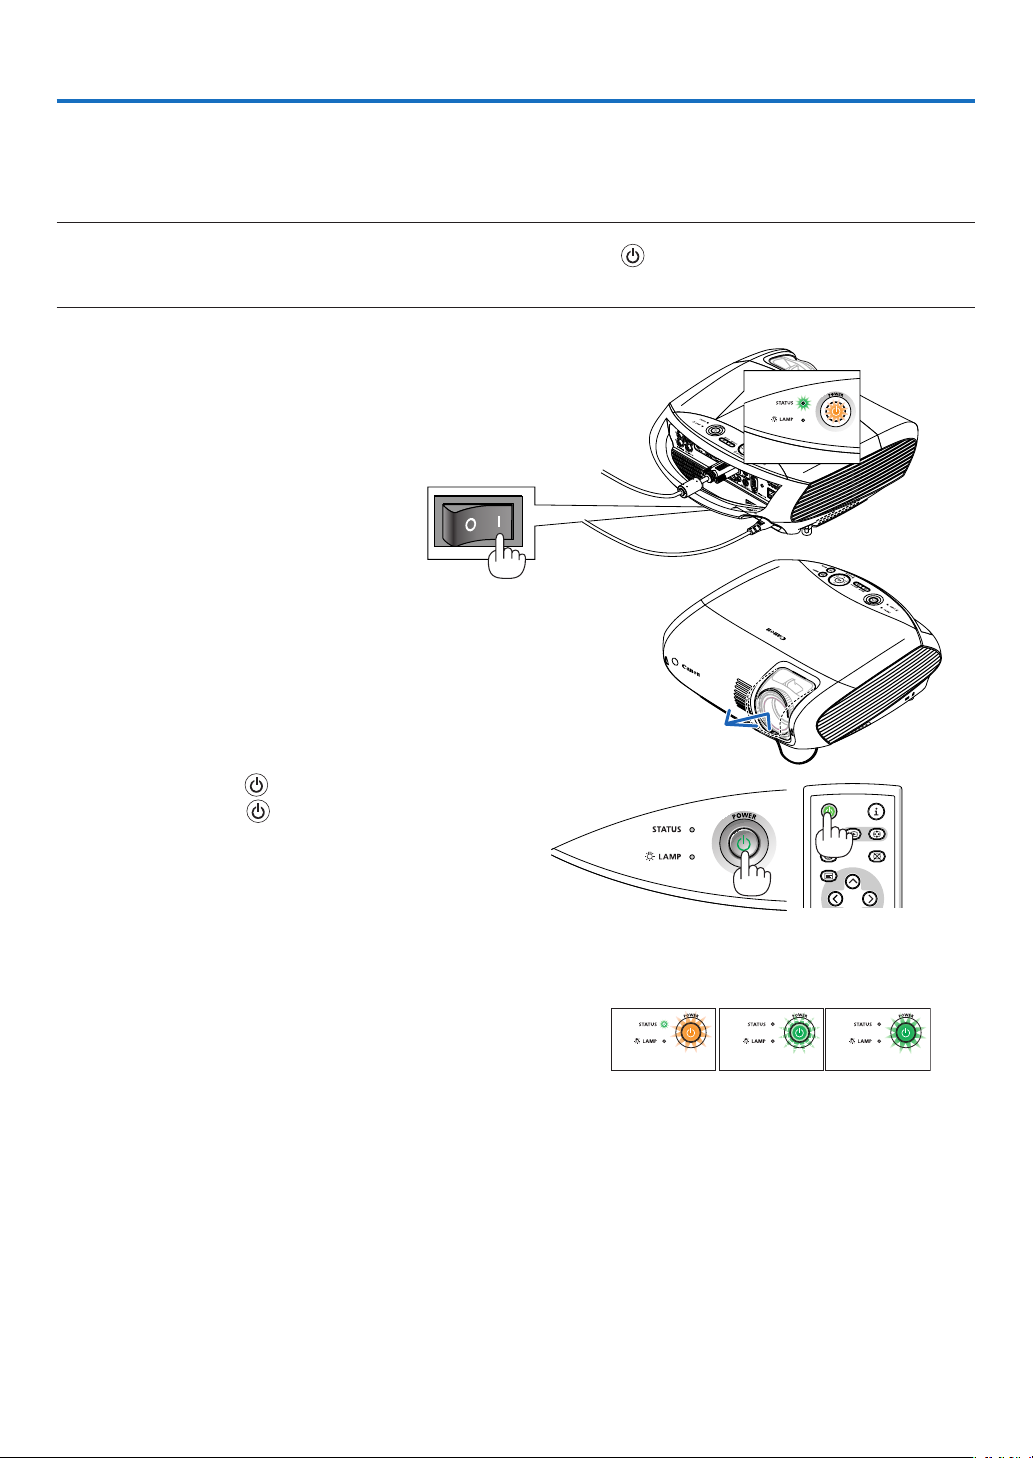
• Theprojectorhastwopowerswitches:amainpowerswitchandaPOWER(
)button.
• Whenplugginginorunpluggingthesuppliedpowercord,makesurethatthemainpowerswitchispushedtotheoff()position.Failuretodosomaycausedamagetotheprojector.
1. To turn on the main power to the projector, press the
Main Power switch to the on position ( I ).
• The proj ector wil l go i nto stan d by m ode. When in
standby mode, the POWER indicator will light orange
and the STATUS indicator will light green to show that
[Normal]modeisselectedfor[Standbymode].
2. Remove the lens cover.
3. Press the POWER (
net or the POWER (
) button on the projector cabi-
) button on the remote control
for about 1 second.
The STATUS indicator goes off and the POWER indica-
tor starts blinking.
When the POWER indicator turns a steady green, and
the projector is ready to use.
Less than 4 seconds* after turning on the power, the
projector is ready to display PC or video images (Quick
Start).Thequickstarttimeisonlywhen[Standbymode]
issetto[Normal]intheon-screenmessage.
If the projector is turned off and is turned it back on
quickly, it may take some time to start displaying an image. This is because the fans run for cooling purpose.
TIP: When the STATUS indicator lights orange, it means that
the[Keylock]isturnedon.Seepage62.
• Whenthemessage"Projectorislocked!Enteryourpassword."
isdisplayed,itmeansthatthe[Password]isturnedon.See
page 40.
After you turn on your projector, ensure that the com-
puter or video source is turned on and that your lens
cover is removed.
24
Preparing to
Standby
Steady orange
light
power on
Blinking
green light
See page 74 for more details.
Power On
Steady
green light
Page 34
BLANK
MENU
POWER
INPUTIMAGE
ASPECT
INFO.
AUTO PC
BACK
BLANK
MENU
POWER
INPUTIMAGE
ASPECT
INFO.
AUTO PC
BACK
3. Projecting an Image (Basic Operation)
Note on Startup screen (Menu Language Select screen)
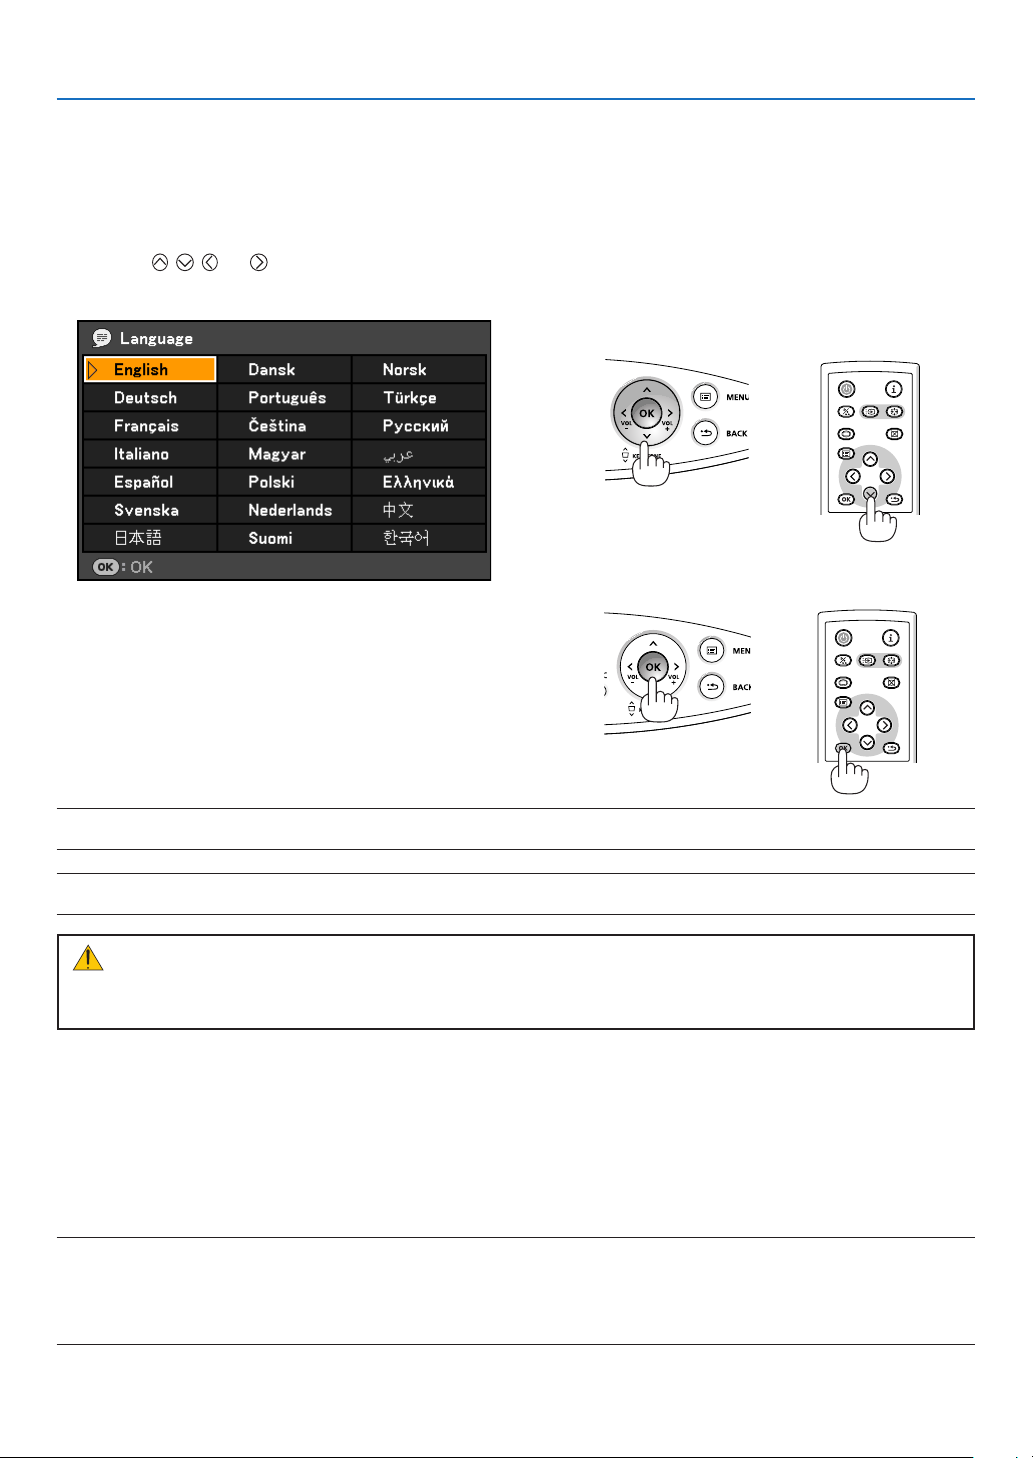
When you rst turn on the projector, you will get the Startup menu. This menu gives you the opportunity to select
one of the 21 menu languages.
To select a menu language, follow these steps:
1. Use the or button to select one of the 21
languages for the menu.
2. Press the OK button to execute the selection.
After this has been done, you can proceed to the menu operation.
If you want, you can select the menu language later. See
[Language]onpages49 and 60.
NOTE:Immediately after turning ontheprojector,screenickermayoccur.Thisisnormal.Wait 3to5minutesuntilthelamp
lightingisstabilized.
NOTE: If you turn on the projector immediately after the lamp is turned off or when the temperature is high, the fans runs without displaying an image for some time and then the projector will display the image.
CAUTION:
The projector cannot be turned off for 60 seconds after the lamp is turned on and while the POWER indicator
is blinking green. Doing so could cause premature lamp failure.
When the Lamp mode is set to Quiet, the LAMP indicator will light green.
If one of the following things happens, the projector will not turn on.
• Iftheinternaltemperatureoftheprojectoristoohigh,theprojectorwillnotturnontoprotecttheinternalsystem.
Please wait for the projector's internal components to cool down.
• Whenthelampreachesitsendofusablelife,theprojectorwillnotturnon.Ifthishappens,replacethelamp.
• Ifthelampfailstolight,andiftheSTATUSindicatorashesonandoffinacycleofsixtimes,waitafullminute
and then turn on the power.
NOTE:TurningtheMainPowerSwitchOffthenBackOn
Allowaminimumof1secondbetweenturningoffthemainpowerswitchandturningitbackonagain.
Thesamewillbeappliedwhenapowerstripequippedwithaswitchandabreakerisused.
Failingtodosocouldresultinnopowertotheprojector.(Therewillbenostand-byLED)
Should this happen, unplug the power cord and plug it in again. Turn on the main power switch.
25
Page 35
BLANK
MENU
POWER
INPUTIMAGE
ASPECT
INFO.
AUTO PC
BACK
3. Projecting an Image (Basic Operation)
Selecting a Source
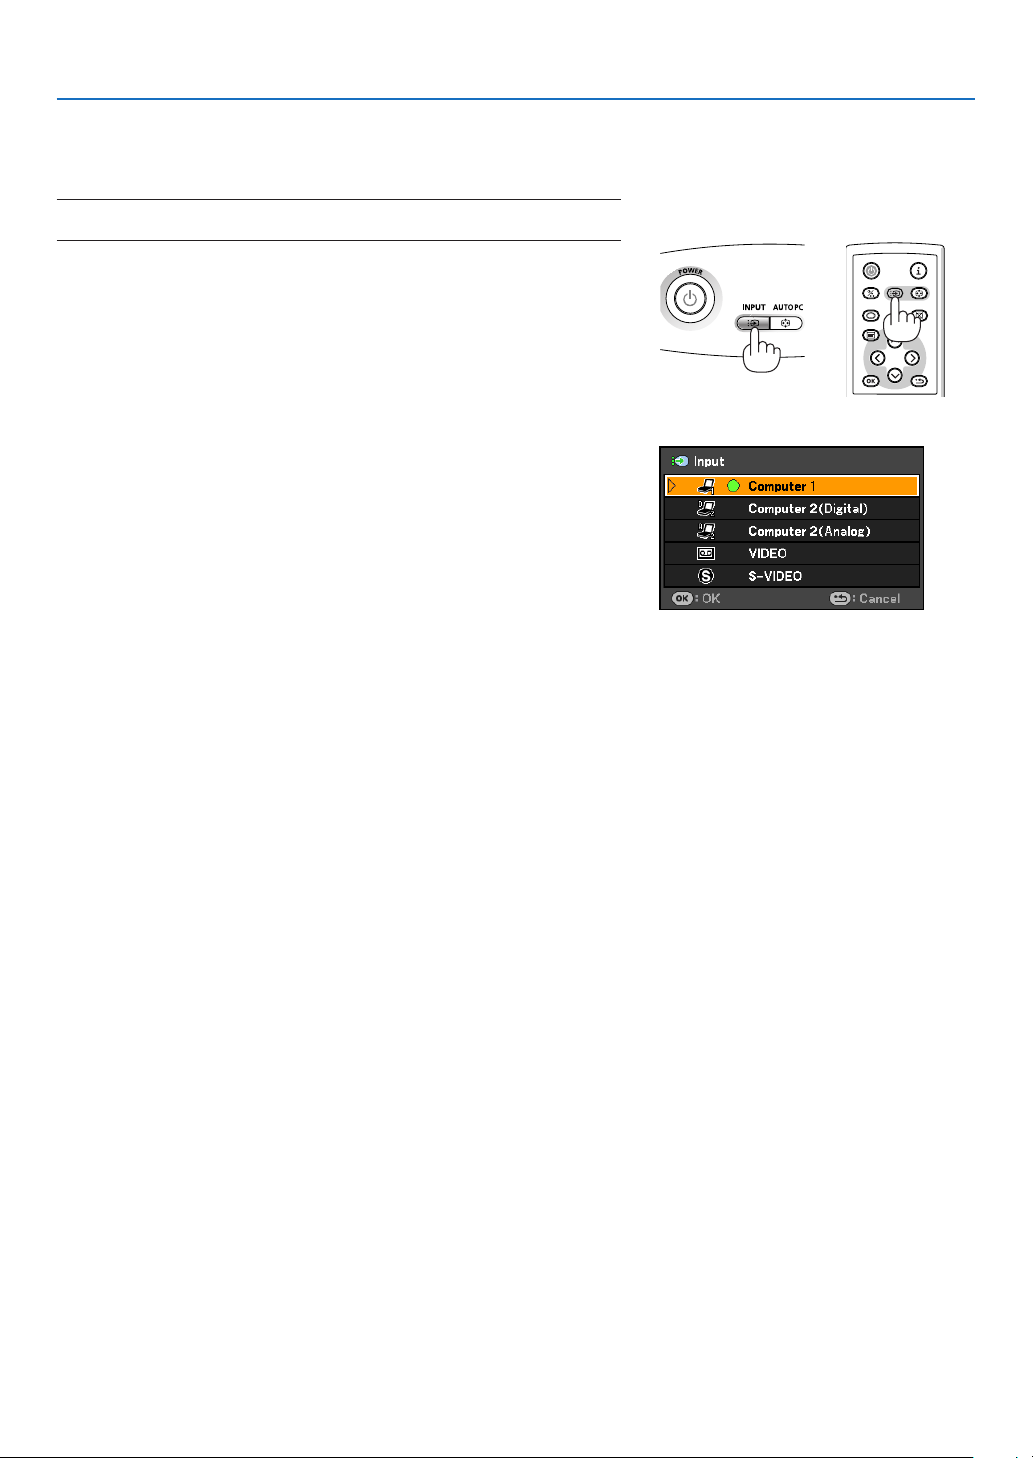
Selecting the computer or audio-video equipment
NOTE:Turnon the computeroraudio-videoequipmentconnectedtotheprojector.
Selecting from INPUT List
Press and quickly release the INPUT button on the projector cabinet
to display the Source list. Each time the INPUT button is pressed, the
input source will change as follows: “Computer 1”, “Computer 2 (Digital/
Analog)”, “VIDEO”, "S-VIDEO", To display the selected source, allow 1
second to elapse.
Detecting the Signal Automatically
Press and hold the INPUT button for a minimum of 2 seconds, the
projector will search for the next available input source. Each time you
press and hold the INPUT button for a minimum of 2 seconds, the input source will change as follows:
Computer 1 → Computer 2 (Digital) → Computer 2 (Analog) → VIDEO
S-VIDEO → Computer 1 → ...
→
TIP: Ifnoinputsignalispresent,theinputwillbeskipped.
26
Page 36
3. Projecting an Image (Basic Operation)
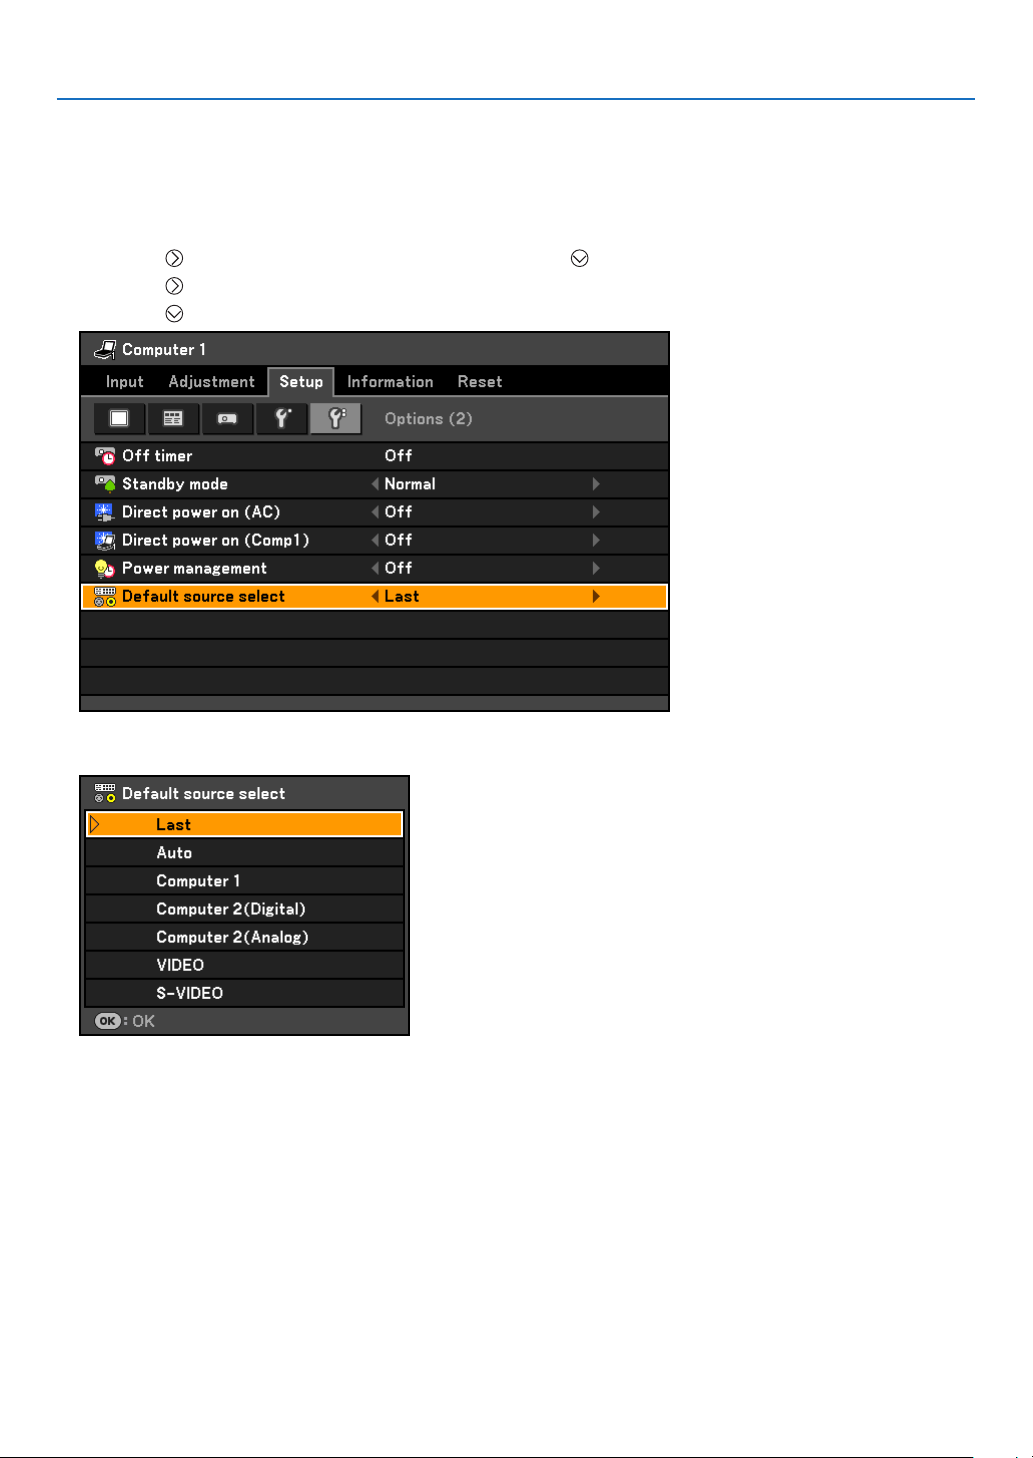
Selecting Default Source
You can set a source as the default source so that it will be displayed each time the projector is turned on.
1. Press the MENU button.
The menu will be displayed.
2. Press the
3. Press the
4. Press the
button twice to select [Setup] and press the button or the OK button to select [General].
button four times to select [Options (2)].
button six times to select [Default Source Select] and press the OK button.
The [Default Source Select] screen will be displayed. See page 65.
5. Select a source as the default source, and press the OK button.
6. Press the BACK button a few times to close the menu.
7. Restart the projector.
The source you selected in step 5 will be projected.
TIP:WhentheprojectorisinStandbymode,applyingacomputersignalfromacomputerconnectedtotheANALOGIN-1input
willpowerontheprojectorandsimultaneouslyprojectthecomputer’simage.([Directpoweron(Comp1)]Seepage65.)
27
Page 37
3. Projecting an Image (Basic Operation)
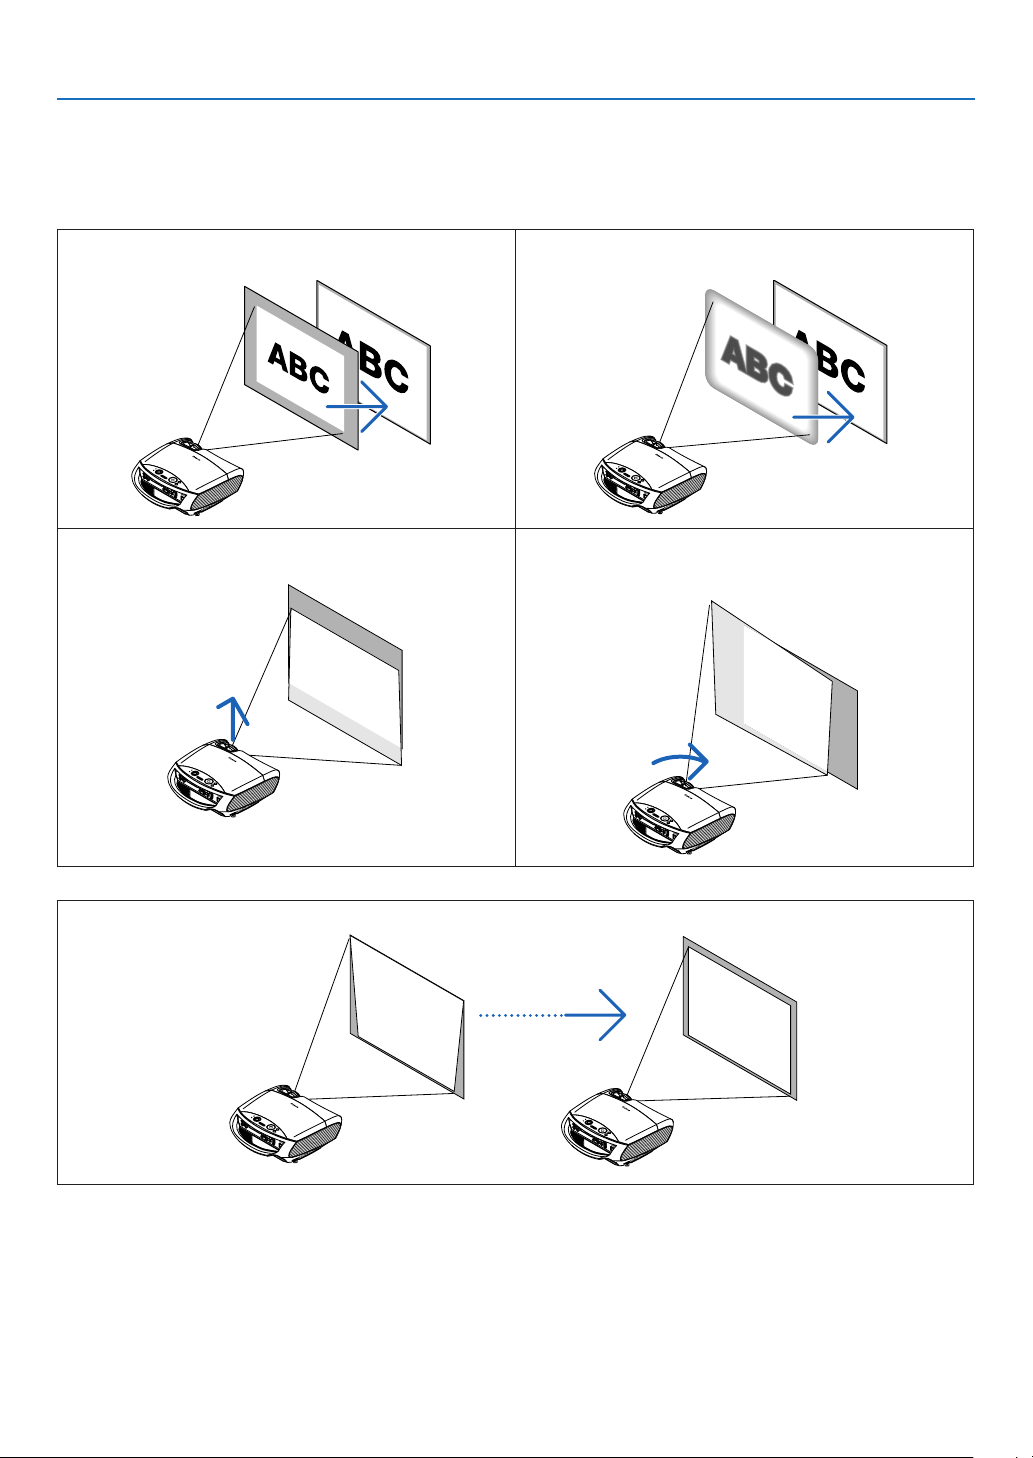
Adjusting the Picture Size and Position
Use the adjustable tilt foot, the zoom lever or the focus ring to adjust the picture size and position.
In this chapter drawings and cables are omitted for clarity.
Finely adjusting the size of an image
[Zoom](Seepage29)
Adjusting the throw angle (the height of an image)
“Adjusting the Tilt Foot” (See page 30)
Adjusting the focus
[Focus](Seepage29)
Adjusting the left and right tilt of an image
“Adjustingtheleftandrighttiltofanimage[Rearfoot]”
(See page 30)
Adjusting the keystone correction "Correcting Keystone Distortion"* (See page 32, 33)
* Keystone correction can be also performed automatically. See page 31.
28
Page 38
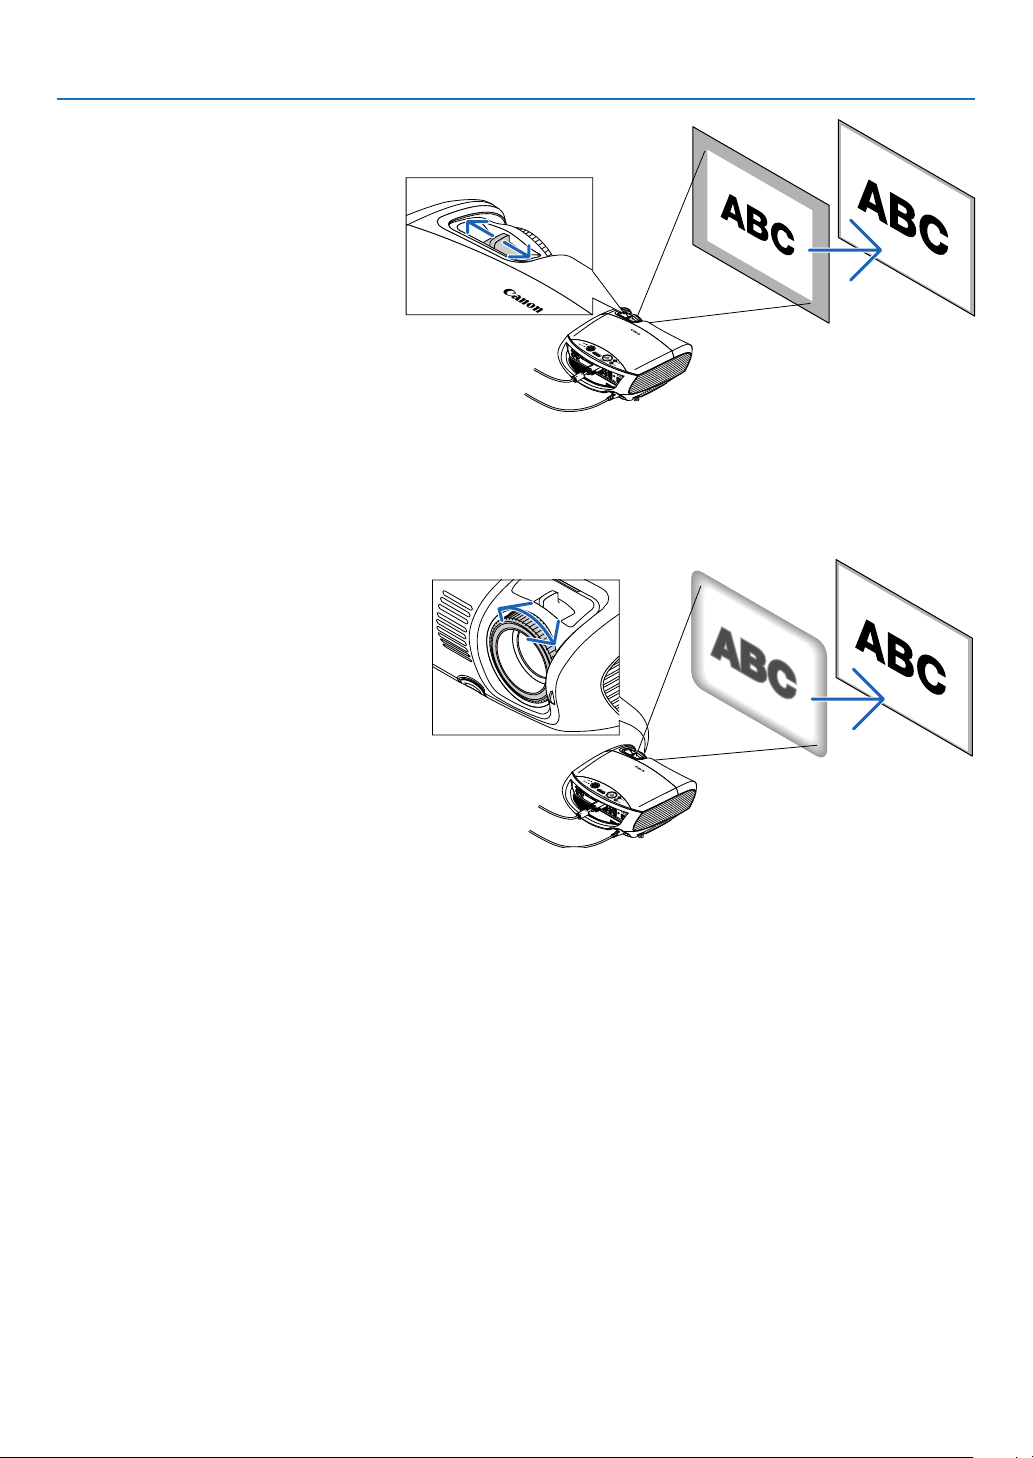
Zoom
Use the ZOOM lever to adjust the image
size on the screen.
Focus
Use the FOCUS ring to obtain the best
focus.
3. Projecting an Image (Basic Operation)
29
Page 39
3. Projecting an Image (Basic Operation)
1
2
4
3
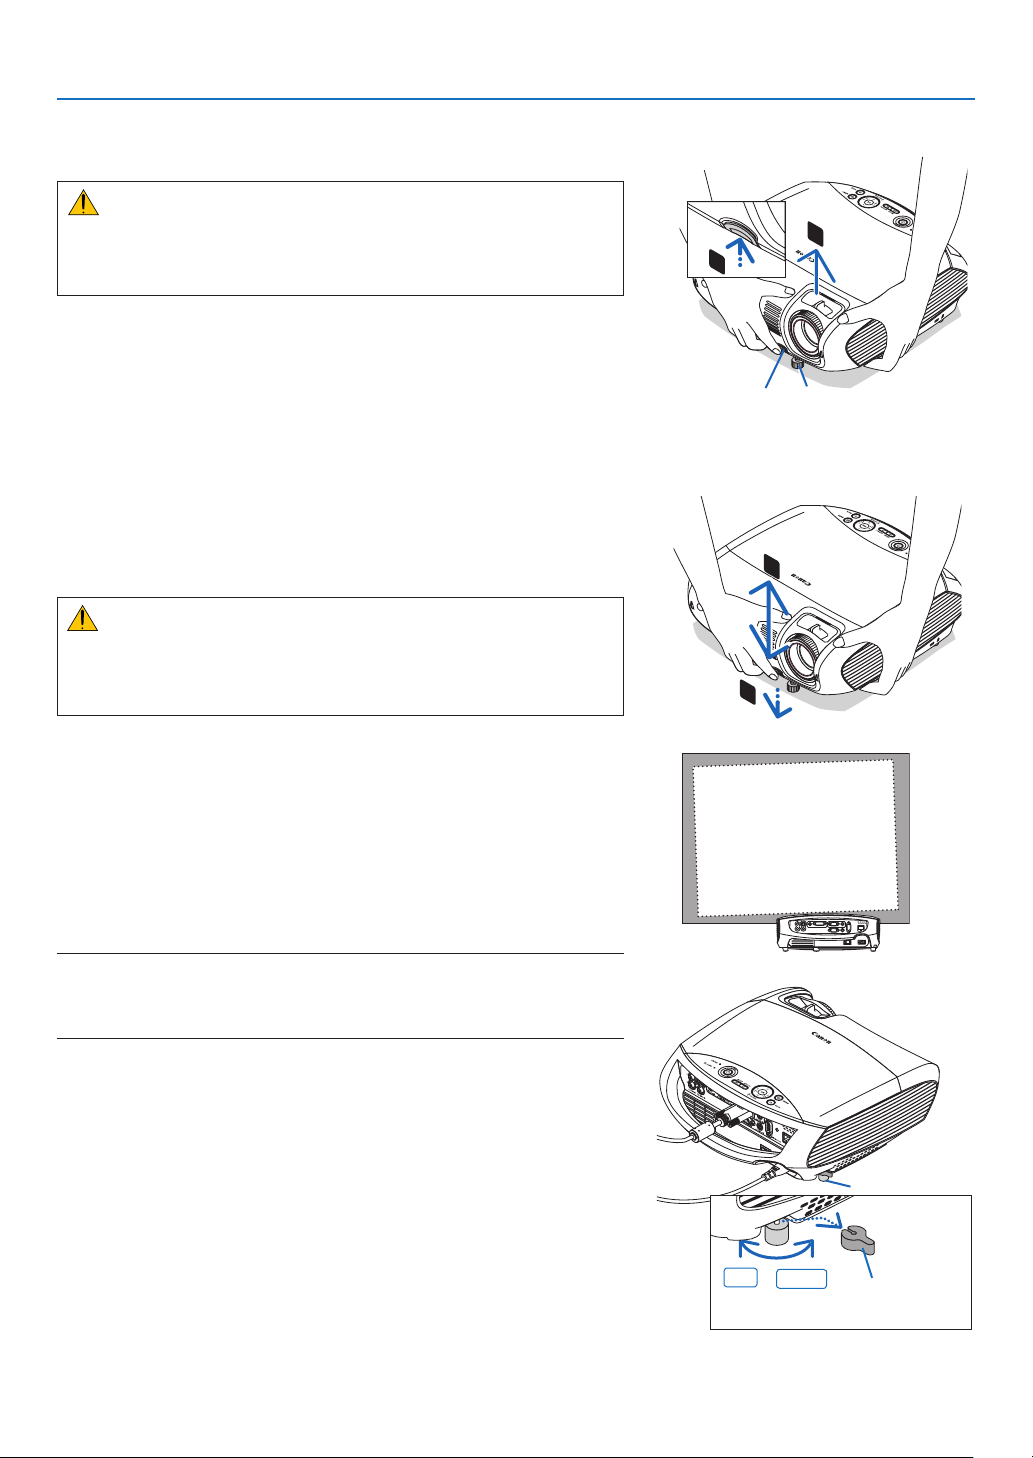
Adjusting the Tilt Foot
1. Lift the front edge of the projector.
CAUTION:
Do not try to touch the ventilation outlet during Tilt Foot adjustment
as it can become heated while the projector is turned on and during
its cool down period after it is turned off.
2. Push straight up and hold the Adjustable Tilt Foot Lever on the
front of the projector to extend the adjustable tilt foot.
3. Lower the front of the projector to the desired height.
4. Release the Adjustable Tilt Foot Lever to lock the Adjustable tilt
foot.
The tilt foot can be extended up to 1.8 inch/45 mm.
There is approximately 10 degrees (up) of adjustment for the front
of the projector.
Rotate the rear foot to the desired height in order to square the im-
age on the projection surface.
CAUTION:
• Donotusethetilt-footforpurposesotherthanoriginallyintended.
Misuses such as using the tilt foot to carry or hang (from the wall
or ceiling) the projector can cause damage to the projector.
Adjustable Tilt
Foot Lever
Adjustable Tilt Foot
Adjusting the left and right tilt of an image [Rear foot]
1. Remove the spacer (black rubber) from the rear foot.
A spacer is provided for leveling the projector. Keep the spacer for
future use.
2. Rotate the rear foot.
The rear foot can be extended up to 0.4 inch/10 mm. Rotating the
rear foot allows the projector to be placed horizontally.
NOTE:
• Donotextendtherearfootbeyonditsheightlimit(0.4inch/10mm).Doing
so may cause the rear foot to come out of the projector.
• Afterusingtheprojector,attachthespacertotherearfoot.
Up
Down
Rear foot
Spacer
(black rubber)
30
Page 40
3. Projecting an Image (Basic Operation)
Correcting Keystone Distortion
Correcting Keystone Distortion
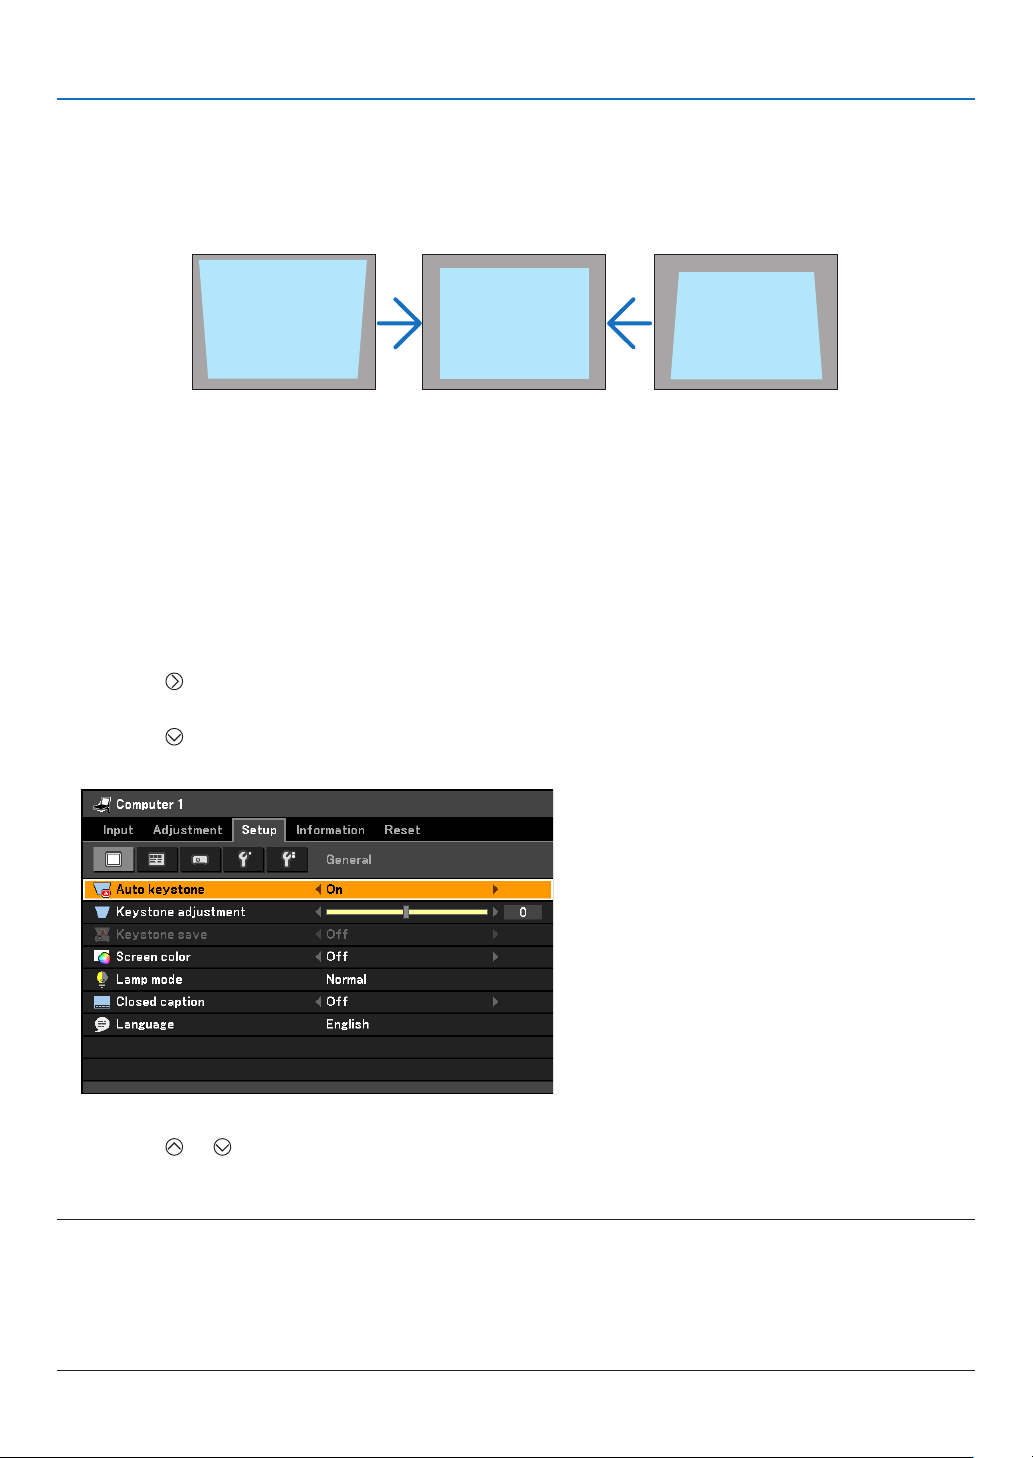
If the screen is tilted vertically, keystone distortion becomes large. Proceed with the following
steps to correct keystone distortion
Adjusting with the Auto Keystone Function
The Auto Keystone correction feature will correct the vertical distortion of a projected image on the screen. No
special operation required. Just put the projector on a at surface.
TIP: Evenwhenthemenusettingfor[Autokeystone]isturnedon,[Keystoneadjustment]canbeadjustedmanually.
Toturnoff[Autokeystone],proceedthefollowingsteps.
1. Press the MENU button
The menu will be displayed.
2. Press the
The [General] tab will be highlighted.
3. Press the
The [Auto keystone] will be highlighted.
button to select [Setup] and press the OK button.
button.
4. Press the OK button to display the [Auto keystone] screen.
5. Press the
6. Press the MENU button.
The menu will be closed.
NOTE:
• Verticaldistortionsbetweenoffsetanglesof+/-30degreescanbecorrected.
Therangeofkeystonecorrectionisnotthemaximumtiltangleofprojector.
• TheAutoKeystonecorrectionwilltakeeffectin2secondsafterchangingtheprojectionangleduringprojection.
• Theleftandright(horizontal)keystonecorrectionisnotavailable.
Place the projector so that the lens surface is parallel to the screen.
The rear feet of the projector can be adjusted to level the projector.
or button to select [Off] and press the OK button.
31
Page 41
3. Projecting an Image (Basic Operation)
NOTE:
• AutoandManualKeystonecorrectionanglecouldbelessthan30degreesdependingonthesignaland/oraspectratios.
• Usingkeystonecorrectioncancausetheimagetobeslightlyblurredbecausethecorrectionismadeelectronically.
NOTE:
• Whenthemenuisdisplayed,theKeystoneCorrectionoperationisnotavailablebyusingthebuttonsontheprojectorcabinet.
Whenthemenuisdisplayed,presstheBACKbuttontoclosethemenuandthenperformtheKeystonecorrection.
• Fromthemenu,select[Setup]→[General]→[Keystoneadjustment].Thechangescanbesavedwith[Keystonesave].
See page 59.
NOTE:Ifyouhaveoneofthefollowingconditions,theprojector'sAuto
Keystone may not be performed correctly.
- the screen is tilted
- the room temperature is too high or too low
- theopticalzoomismaximizedorminimized
NOTE: The Keystone correction can cause an image to be slightly blurred because the correction is made electronically.
NOTE: The Keystone correction range can be made narrower, depending on a signal or its aspect ratio selection.
NOTE:Turning off the projectorwill causeyourmanual keystoneadjustmentstoreturnto“0”.Tosave your manualkeystone
adjustments,rstturnoff[Autokeystone]andthenturnon[Keystonesave].Seepage59.
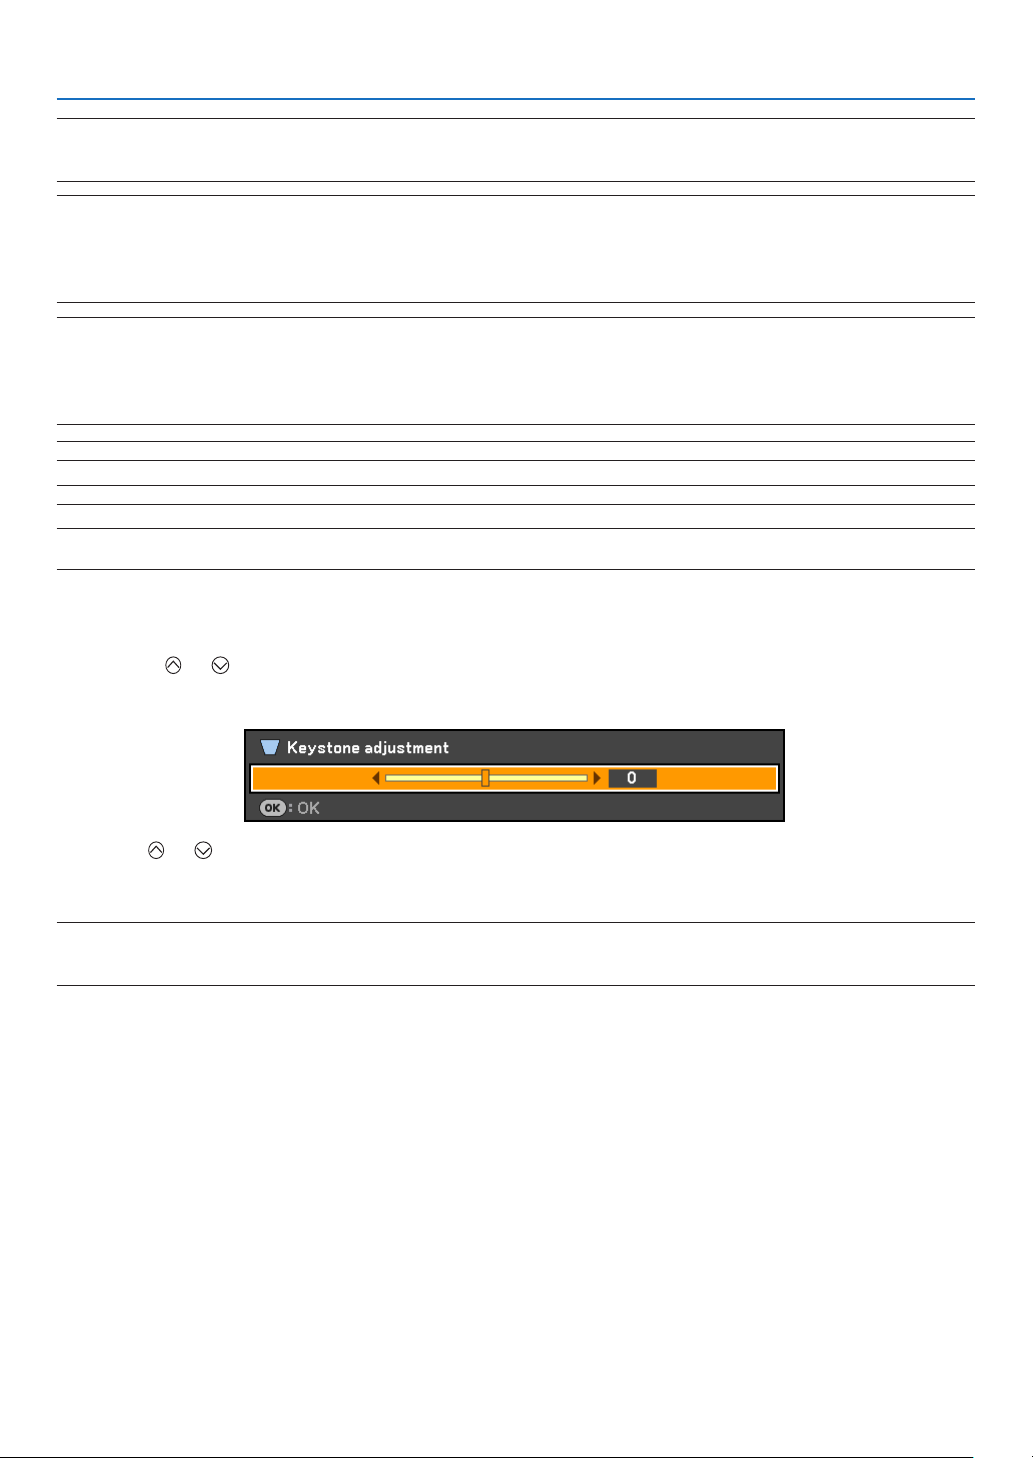
Adjusting with buttons on the cabinet
1. Press the or button with no menus displayed
The keystone bar will be displayed.
2. Use the
The keystone bar will be closed after a period of time.
NOTE:Whenthemenuisdisplayed,theaboveoperationisnotavailable.Whenthemenuisdisplayed,presstheMENUbuttonto
close the menu and start the Keystone correction.
Fromthemenu,select[Setup]→[General]→[Keystoneadjustment].Thechangescanbesavedwith[Keystonesave].Seepage59.
or to correct the keystone distortion.
32
Page 42
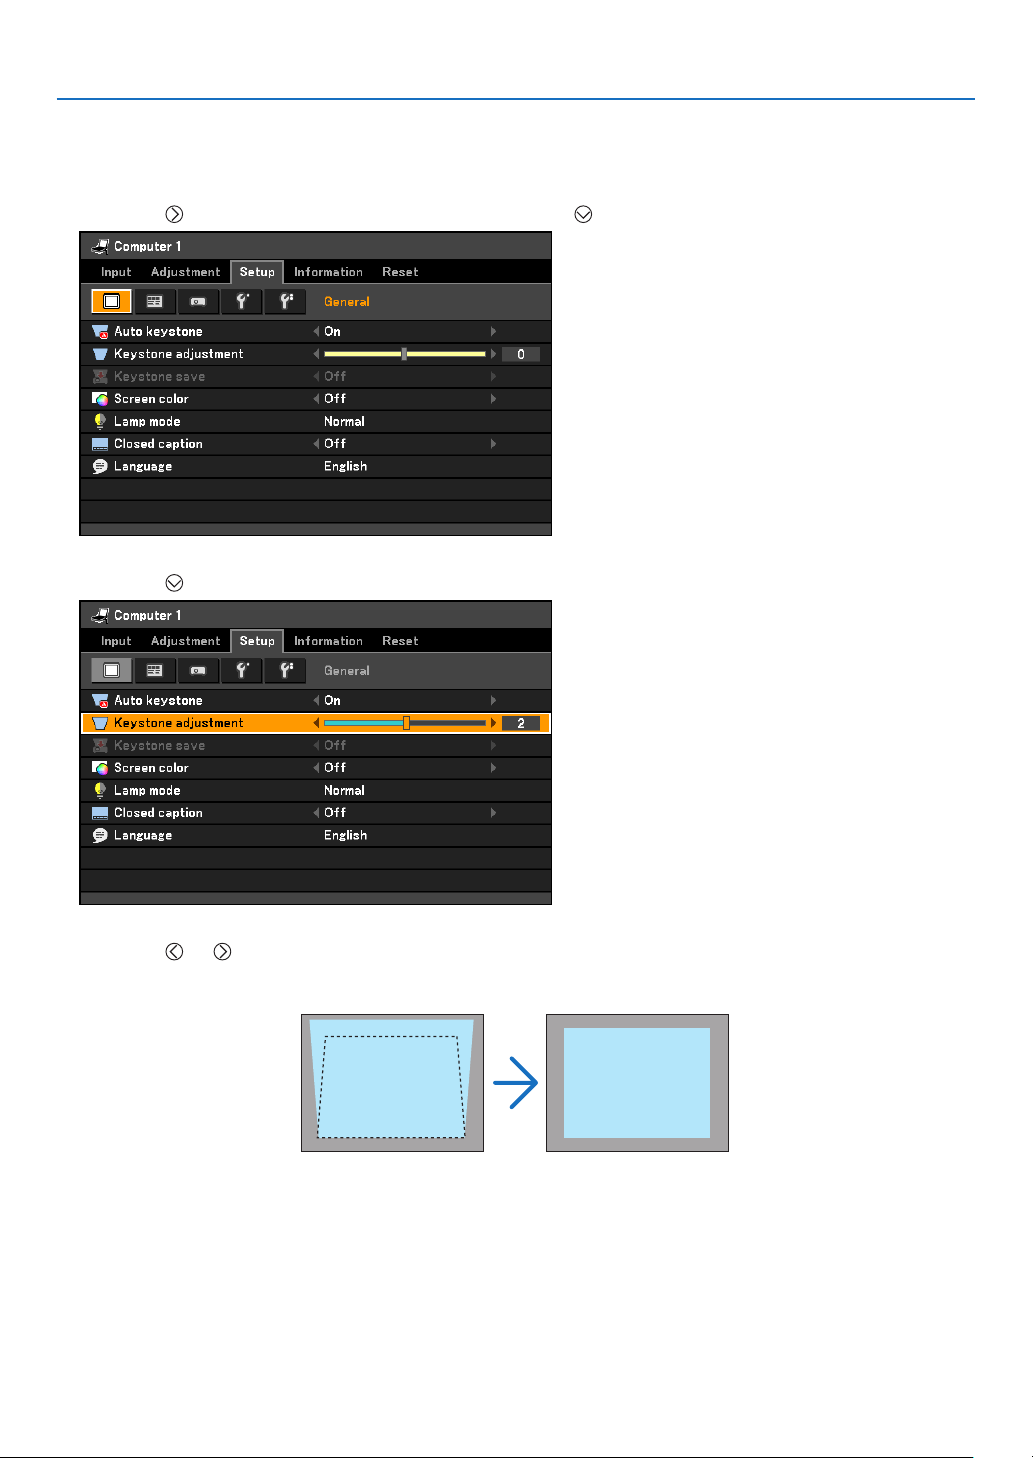
3. Projecting an Image (Basic Operation)
Adjusting with the Remote Control
1. Press the MENU button.
The menu will be displayed.
2. Press the
3. Press the button to select [Keystone adjustment] from the [General] tab.
button to select [Setup] and press the OK or button.
4. Press the or button.
Adjust so that the image is rectangular.
5. Press the MENU button.
The menu will be closed.
33
Page 43
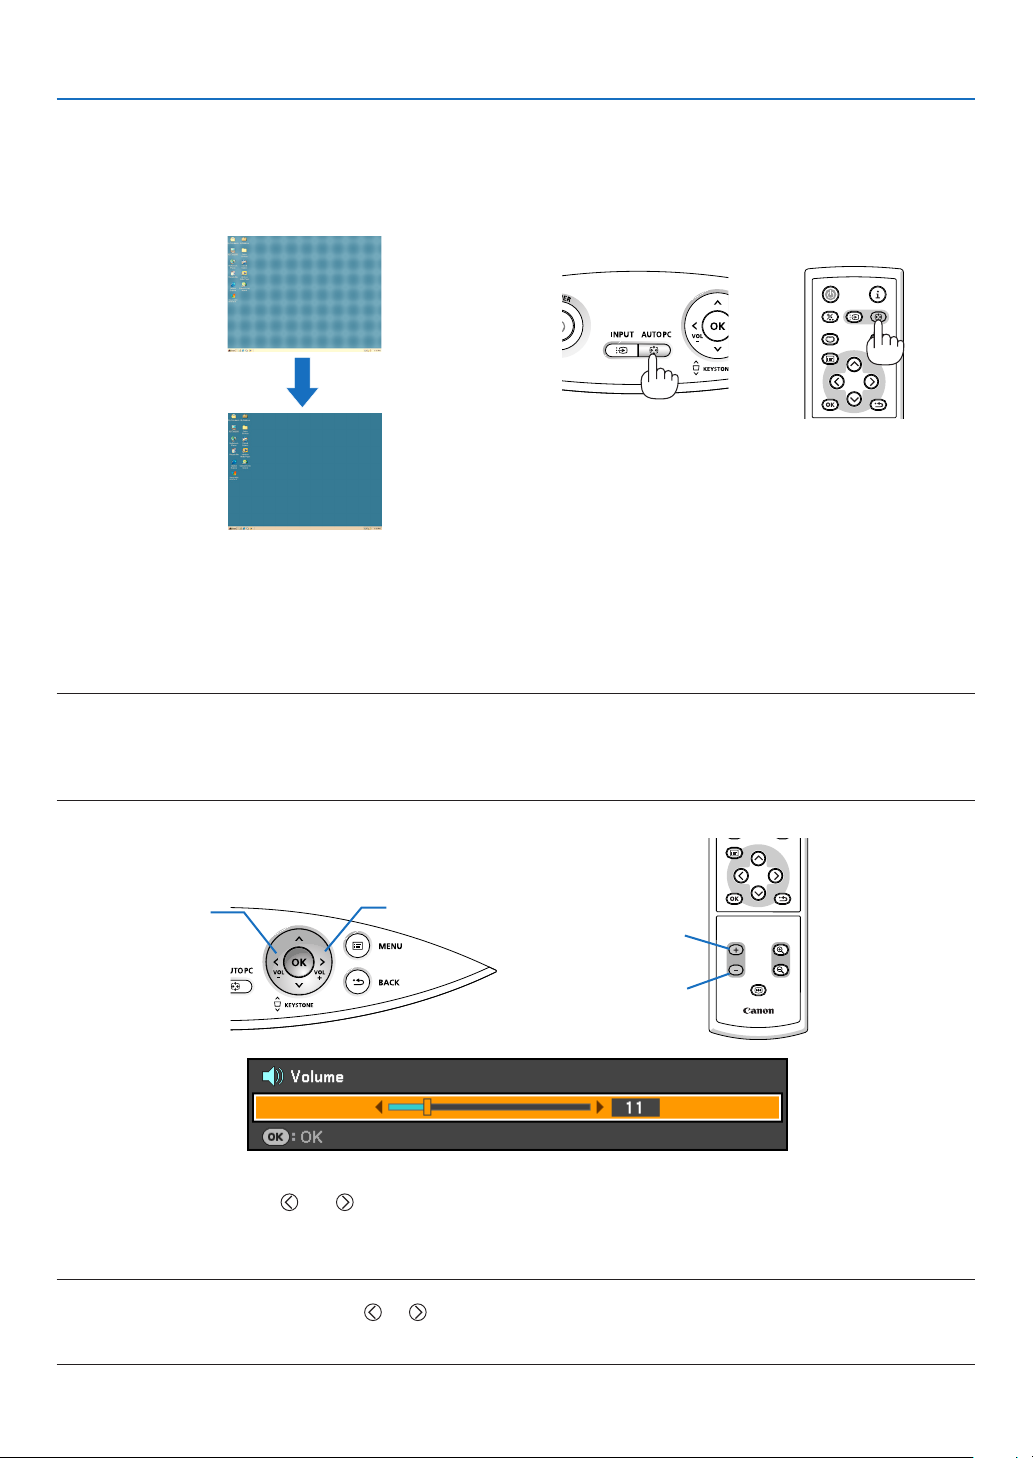
BLANK
VOL
FREEZE
D.ZOOM
MENU
RD-439E
POWER
INPUTIMAGE
ASPECT
INFO.
AUTO PC
BACK
BLANK
MENU
POWER
INPUTIMAGE
ASPECT
INFO.
AUTO PC
BACK
3. Projecting an Image (Basic Operation)
Automatically Optimizing on RGB Image
Adjusting the Image Using Auto PC adjustment
Optimizing an RGB image automatically.
Press the AUTO PC button to optimize an RGB image automatically.
[Poor picture]
[Normal picture]
Press the AUTO PC button to ne-tune the computer image or to remove any vertical banding that might appear
and to reduce video noise, dot interference or cross talk (this is evident when part of your image appears to be
shimmering). This function adjusts the clock frequencies that eliminate the horizontal banding in the image. This
function also adjusts the clock phase to reduce video noise, dot interference or cross talk. (This is evident when
part of your image appears to be shimmering.)
This adjustment may be necessary when you connect your computer for the rst time.
NOTE:
Somesignalsmaynotbedisplayedcorrectlyortaketime.
• TheAutoPCadjustmentfunctiondoesnotworkforcomponent,video,andDVIdigitalsignals.
• If the Auto PC adjustment operation cannot optimizethe RGB signal, try to adjust Horizontal/VerticalPosition Clock and
Trackingmanually.Seepage54, 55.
Turning Up or Down Volume
Sound level from the speaker can be adjusted.
Decrease volume
TIP:
• Whennomenusappear,the
• The[Beep]soundvolumecannotbeadjusted.Toturnoffthe[Beep]sound,fromthemenu,select[Setup]→[Options(1)]→
[Beep]→[Off].
and buttonsontheprojectorcabinetworkasavolumecontrol.
Increase volume
Increase volume
Decrease volume
NOTE:
• Volumecontrolisnotavailablewiththe
the menu is displayed.
• Soundvolumecanbeadjustedandsavedforeachinputseparately.
or buttonwhenanimageisenlargedbyusingtheD.ZOOM(+)buttonorwhen
34
Page 44
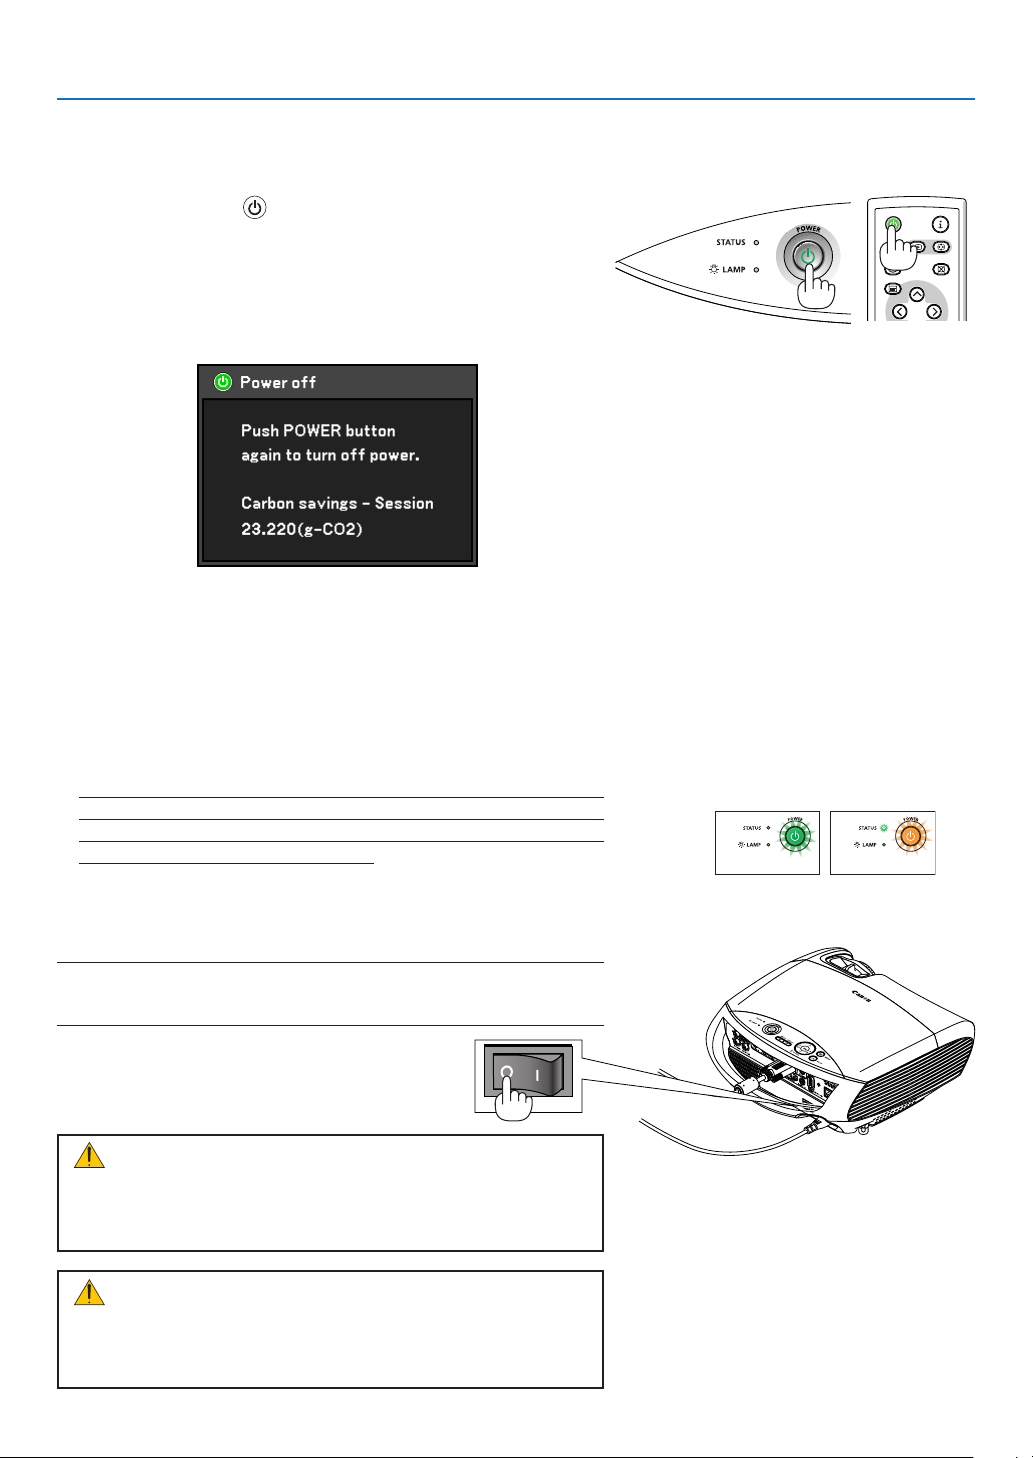
3. Projecting an Image (Basic Operation)
BLANK
MENU
POWER
INPUTIMAGE
ASPECT
INFO.
AUTO PC
Turning off the Projector
To turn off the projector:
1. Press the POWER ( ) button on the projector cabinet or the
remote control. The “Push POWER button again to turn off
power. /Carbon savings-Session 23.220(g-CO2)” message
will appear. See page 39. Amount of carbon emission reduction will be displayed only when [Lamp mode] is set to [Quiet].
When [Lamp mode] is set to [Normal], the amount of carbon
emission reduction will be displayed as “00.000 (g-CO2)”.
2. Press the POWER button again.
The projector turns off and goes into standby mode.
When in standby mode, the POWER indicator will light or-
ange (the cooling fans stop at the same time) and the STATUS indicator will light green.
3. Turn off the Main Power switch. The POWER indicator will go
out.
The projector has a feature called“Direct Power Off”. This
feature allows the projector to be turned of f (even when
projecting an image) by using the Main Power Switch or disconnecting the AC power supply. To turn off the AC power
su ppl y wh en t he project or is po wer ed o n, use t he M ain
Power Switch, or a power strip equipped with a switch and a
breaker.
NOTE:Do notturnoffthe mainpowerwithin10secondsof makingadjustment or setting changes and closing the menu.
Doingsocancauselossofadjustmentsandsettings.
CAUTION:
Parts of the projector will become heated during operation. Use
caution when picking up the projector immediately after it has
been operating.
CAUTION:
• The projector cannot be turned off for 60 seconds after the
lamp is turned on and while the POWER indicator is blinking
green. Doing so could cause premature lamp failure.
35
Power On Standby
Steady
green light
Steady
orange light
Page 45
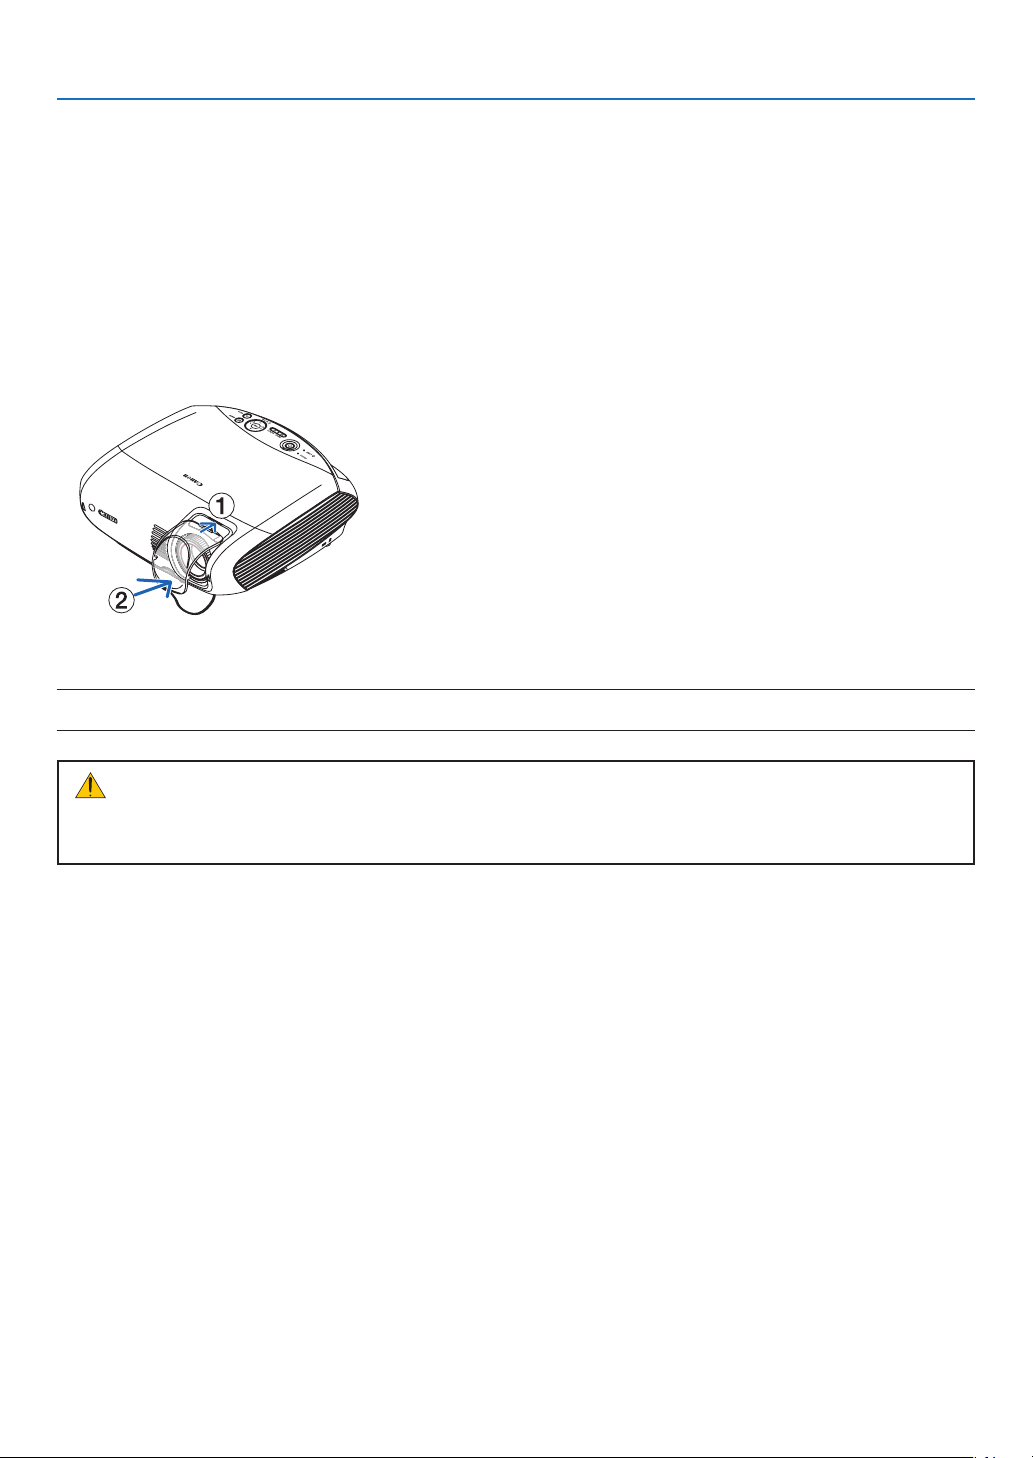
3. Projecting an Image (Basic Operation)
After Use
Preparation: Make sure that the projector is turned off.
1. Unplug the power cord.
2. Disconnect any other cables.
3. Retract adjustable tilt feet if extended.
•Reattachthespacer(blackrubber)totherearfootifitwasremoved.
4. Cover the lens with the lens cover.
5. Put the projector and its accessories in the supplied soft case.
NOTE:Whenplacingtheprojectorinthesoftcase,retractthetiltfeetandtherearfeet.Failuretodosomaycasedamagetothe
pro jec tor.
CAUTION:
Use caution when putting the projector in the soft case immediately after the projector has been operating.
The projector cabinet is hot.
36
Page 46
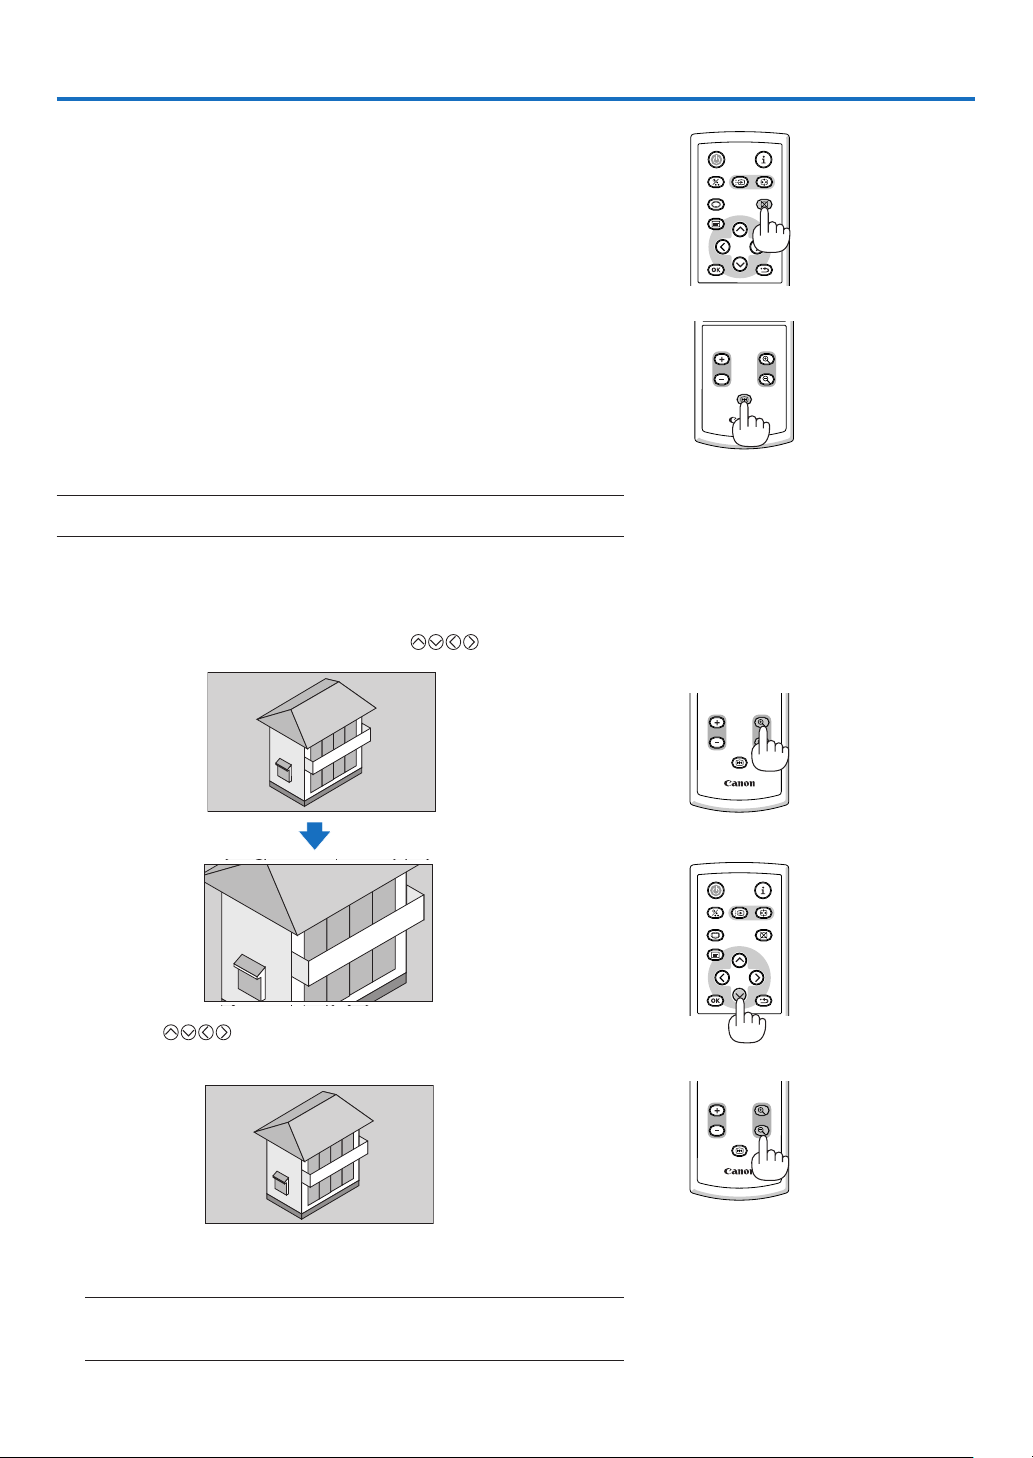
BLANK
VOL
FREEZE
D.ZOOM
MENU
RD-439E
POWER
INPUTIMAGE
ASPECT
INFO.
AUTO PC
BACK
BLANK
MENU
POWER
INPUTIMAGE
ASPECT
INFO.
AUTO PC
BACK
4. Convenient Features
VOL
FREEZE
D.ZOOM
RD-439E
BLANK
MENU
POWER
INPUTIMAGE
ASPECT
INFO.
AUTO PC
BACK
BLANK
VOL
FREEZE
D.ZOOM
MENU
RD-439E
POWER
INPUTIMAGE
ASPECT
INFO.
AUTO PC
BACK
Turning off the Image and Sound
Press the BLANK button to turn off the image and sound for a short
period of time. Press again to restore the image and sound.
Freezing a Picture
Press the FREEZE buttonto freeze a projected moving picture such
as DVD. Press again to resume motion.
Enlarging a Picture
You can enlarge the picture up to 400 percent.
NOTE:Themaximummagnicationmaybelessthanfourtimesdependingon
the signal.
To do so:
1. Press the D. ZOOM (+) button to magnify the picture.
To move the magnied image, use the
button.
2. Press the button.
The area of the magnied image will be moved.
3. Press the D.ZOOM(-) button.
Each time the D.ZOOM(-) button is pressed, the image is reduced.
NOTE:
•Theimagewillbeenlargedorreducedatthecenterofthescreen.
•Displayingthemenuwillcancelthecurrentmagnication.
37
Page 47
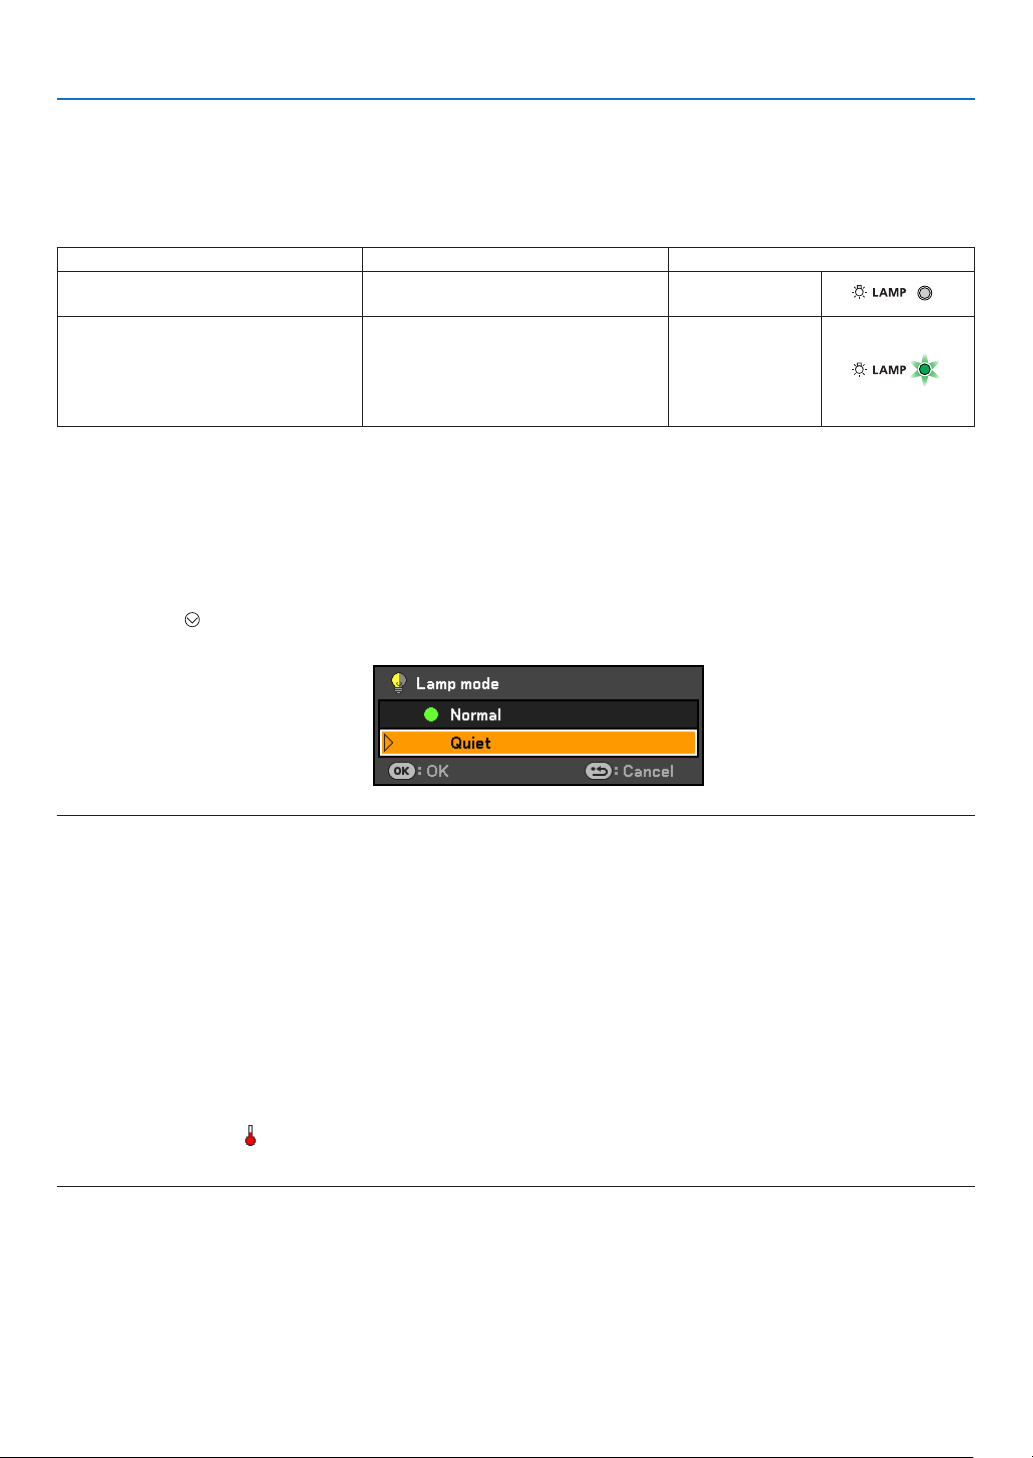
4. Convenient Features
Lamp Mode and Energy-Saving Effect
Selecting[Quiet]forLampmodewillhelpyoutoreduceCO2 emissions from the projector.
The Lamp mode enables you to select two brightness modes of the lamp: Normal and Quiet modes. The lamp life
can be extended by using the Quiet mode.
Lamp Mode Description Status of LAMP indicator
Normal Mode
Quiet Mode
This is the d e fault s et ting (10 0 %
Brightness).
Sel e c t this m o d e to i n c rease t h e
lamp life (LV-7385/LV-8310/LV-8215:
approx.75% Brightness/LV-7380/LV728 5/LV-728 0: approx.80% Brightness).
Off
Steady Green
light
Changing Lamp Mode
Tochangethe[Lampmode]from[Normal]to[Quiet],dothefollowing:
1. Press the MENU button on the remote control to display the menu.
2. Select[Setup]→[General]→[Lampmode].
3. Press the ENTER button to display the Lamp mode menu.
4. Press the
5. Press the OK button to close the menu.
buttontoselect[Quiet]andpresstheOKbutton.
NOTE:
• TheprojectorhastheEcomessagefunctionthatwillshowthestatusofQuietmodeonscreen.Select[Setup]→[Menu]→ [Eco
message]→[On].Seepage60, 61.
• Thelampliferemainingandlamphoursusedcanbecheckedin[Usagetime].Select[Information]→[Usagetime].Seepage
66.
• Theprojectorwillonlyoperateinthe[Quiet]modefor90secondsimmediatelyafterthelampisturnedon.
Thelampconditionwillnotbeaffectedevenwhen[Lampmode]ischanged.
• Ifthereisnosignalforaboutoneminute,theprojectorwilldisplayablue,blackorlogobackground(dependingonsetting)
andgointo[Quiet].
Theprojectorwillreturntothe[Normal]modeonceasignalisaccepted.
• If the projectoris overheatedin Normal mode,theremay be a casewhere the Lamp mode automatically changes to Quiet
mode to protect the projector. This is called “forced cooling operation”. When the projector is in a forced cooling operation,
thepicturebrightnessdecreases.Whentheprojectorcomesbacktonormaltemperature,theLampmodereturnstoNormal
mode.
Thermometer symbol [
temperatureistoohigh. In thiscondition, changing [Lampmode]setting in the menuwillnotaffect the actuallampmode
andtheLAMPindicatorlightsgreen.
]indicatesthe lampmode is automaticallysetto a forced cooling operationbecausethe internal
38
Page 48
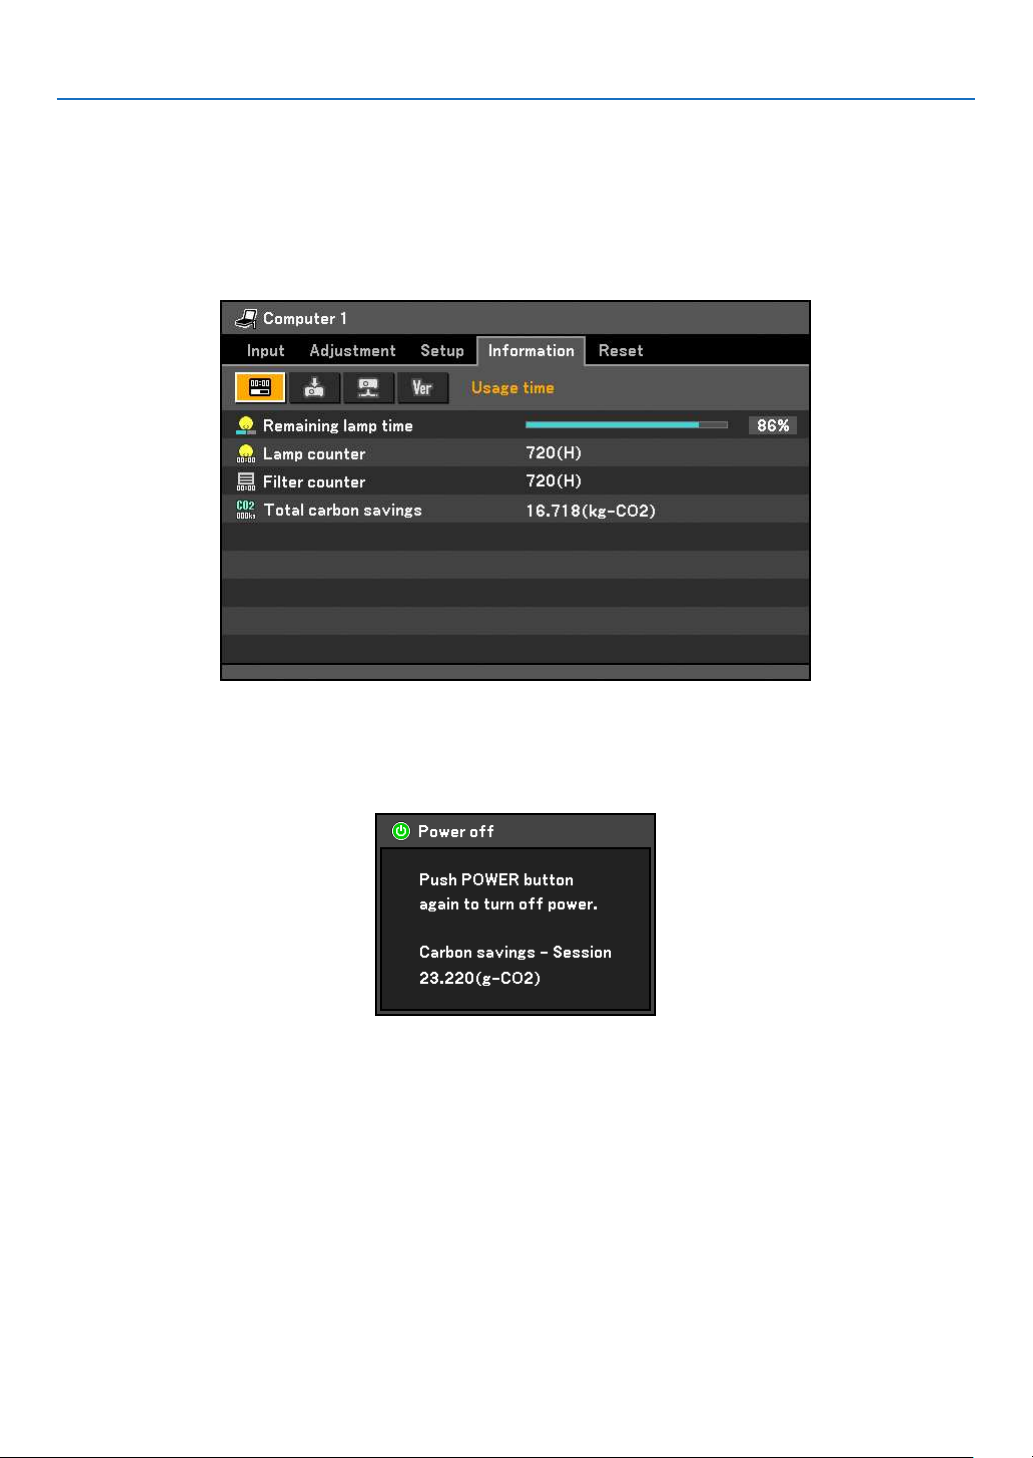
4. Convenient Features
Checking Energy-Saving Effect
This feature will show energy-saving effect in terms of CO
mode]issetto[Quiet].Thisfeatureiscalledas[Carbonmeter].
Therearetwomessages:[Totalcarbonsavings]and[Carbonsavings-Session].The[Totalcarbonsavings]mes-
sage shows the total amount of CO2 emission reduction from the time of shipment up to now. You can check the
informationon[Usagetime]from[Information]ofthemenu.Seepage66.
emissionreduction(kg)when the projector’s [Lamp
2
The [Carbon savings-Session] message shows the amount of CO2 emission reduction between the time of
changing to [Quiet] mode immediately after the time of power-on and the time of power-off. The [Carbon savings-Session] message will be displayed in the [Push POWER button again to turn off power/ CarbonsavingsSession/23.220(g-CO2)]messageatthetimeofpower-off.
TIP:
• TheformulaasshownbelowisusedtocalculatetheamountofCO
Powerconsumptionin[Quiet]for[Lampmode]–Powerconsumptionin[Quiet]forLampmodexCO
* CalculationforamountofCO
emissionreductionisbasedonanOECDpublication“CO2EmissionsfromFuelCombustion,
2
emissionreduction.AmountofCO2 emission reduction =
2
conversion factor.*
2
2008Edition”.
• Thisformulawillnotapplytothepowerconsumptionwhichisnotaffectedbywhether[Lampmode]issetto[Quiet]ornot.
39
Page 49
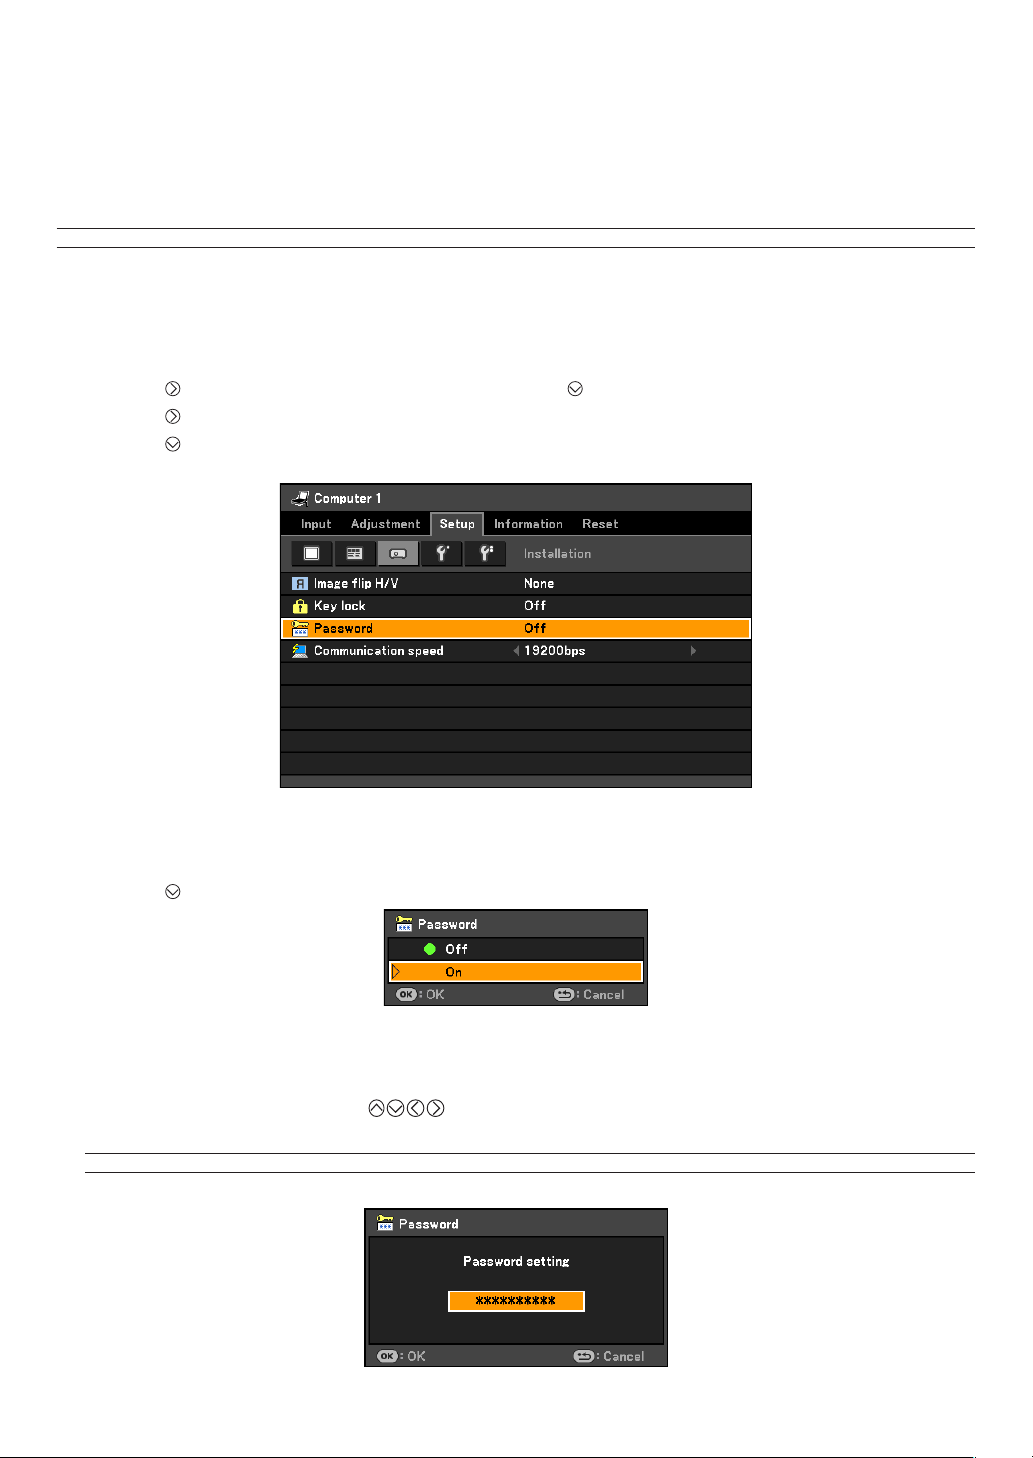
Preventing the Unauthorized Use of the Projector [Password]
A password can be set for your projector to avoid operation by an unauthorized user using the Menu. When a
password is set, turning on the projector will display the password input screen. Unless the correct password is
entered, the projector cannot project an image.
NOTE:The[Password]settingcannotbecancelledbyusingthe[Reset]ofthemenu.
To enable the Password function:
1. Press the MENU button.
The menu will be displayed.
2. Press the
3. Press the
4. Press the
The Off/On menu will be displayed.
5. Press the
button twice to select [Setup] and press the button or the OK button to select [General].
button twice to select [Installation].
button three times to select [Password] and press the OK button.
button to select [On] and press the OK button.
The [Password] screen will be displayed.
6. Type in a combination of the four
To cancel this operation, press the MENU button.
NOTE:Apasswordmustbe4to10digitsinlength.Pleasemakeanoteofyourpassword.
buttons and press the OK button.
40
Page 50
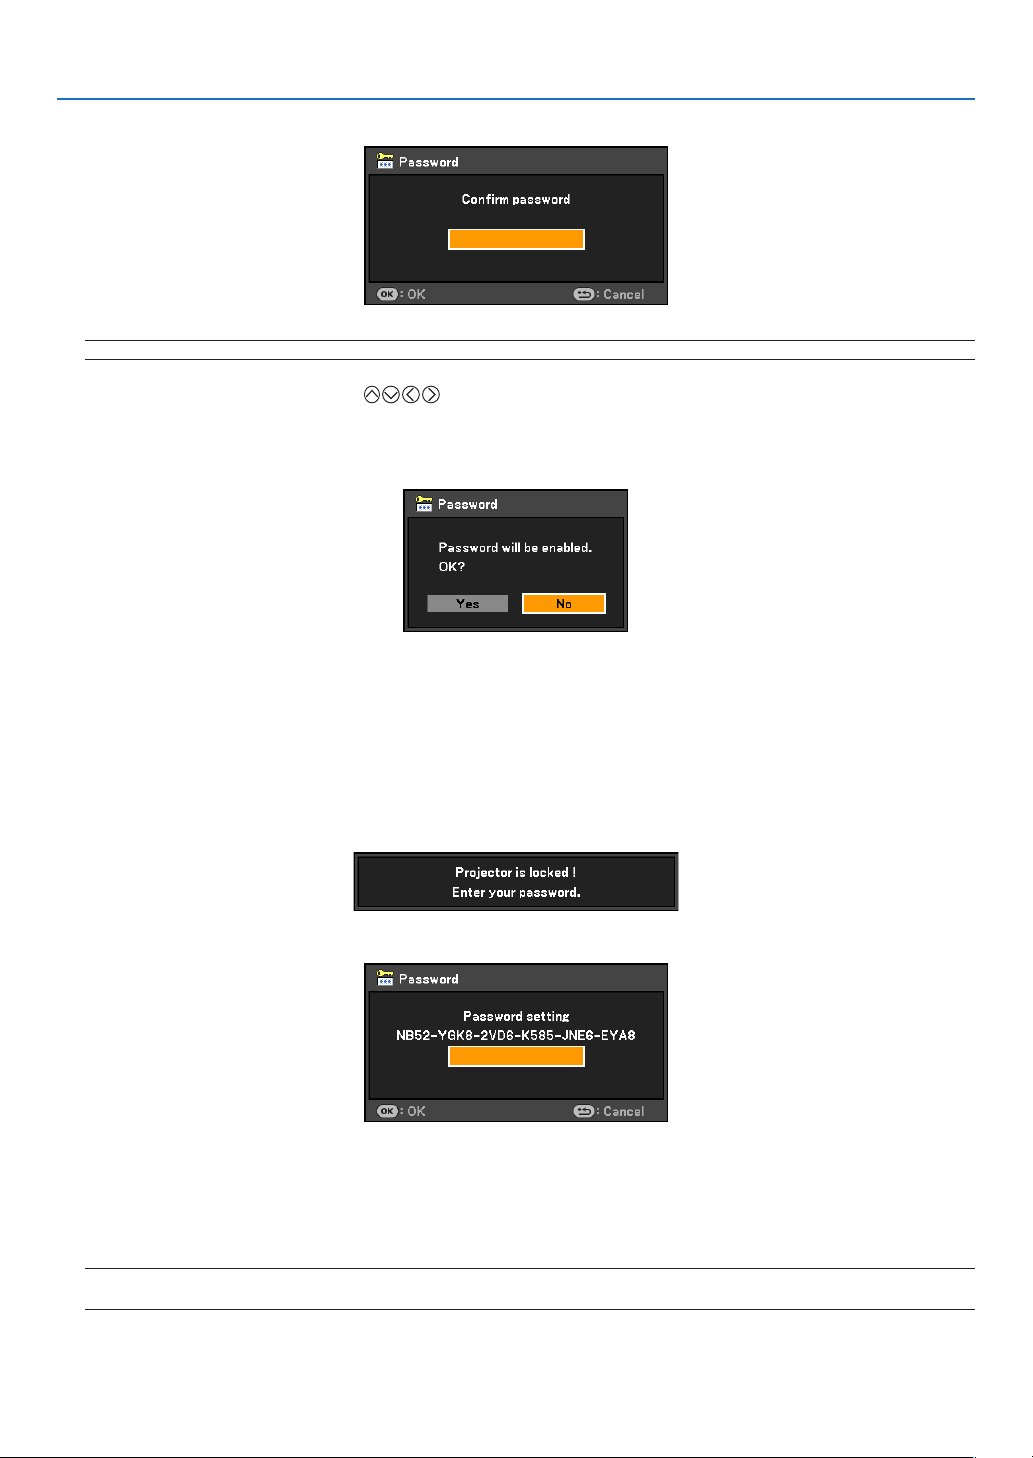
The [Conrm password] screen will be displayed.
NOTE:Donotforgetyourpassword.Ifyouforgetyourpassword,contactyourdealer.
4. Convenient Features
7. Type in the same combination of
The conrmation screen will be displayed.
8. Select [Yes] and press the OK button.
The Password function has been enabled.
buttons and press the OK button.
To turn on the projector when Password is enabled:
1. Press the Main Power Switch to the On position (I).
2. Press and hold the POWER button for about 1 second.
The projector will be turned on and display a message to the effect that the projector is password-protected.
3. Press the MENU button.
The Password screen will be displayed.
4. Enter your password in the Password screen and press the OK button.
You can view the projected image.
NOTE:Thepassworddisablemodeismaintaineduntilthemainpoweristurnedoff(bysettingthemainpowerswitchto"•"
orunpluggingthepowercord).Turningoffthemainpowerandturningitbackonwillrequirepasswordentry.
41
Page 51
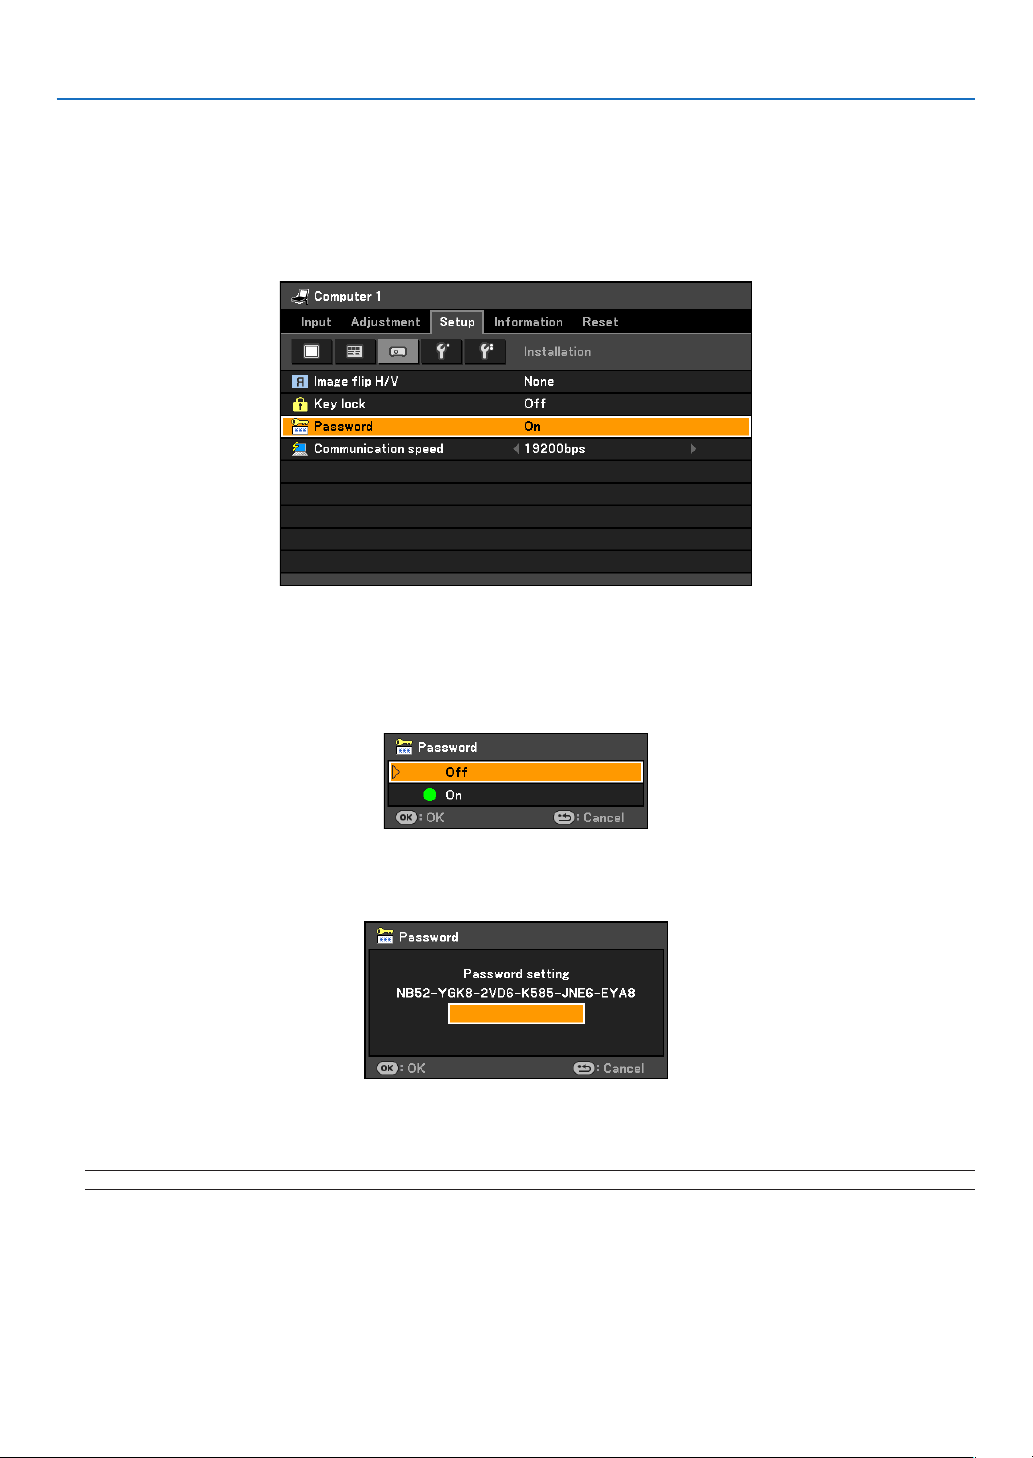
To disable the Password function:
1. Press the MENU button.
The menu will be displayed.
2. Select [Setup] → [Installation] → [Password] and press the OK button.
The Off/On menu will be displayed.
4. Convenient Features
3. Select [Off] and press the OK button.
The Password Conrmation screen will be displayed.
4. Type in your password and press the OK button.
When the correct password is entered, the Password function will be disabled.
NOTE: If you forget your password, contact your dealer.
42
Page 52

4. Convenient Features
Network and Alert Mail Settings by Using an HTTP Browser
Overview
Connecting the projector to a network allows the projector to send an alert mail that informs the user that the lamp
has reached the end of its life or an error has occurred.
The IP address and subnet mask of the projector can be set on the Network Setting screen of the web browser
by using an HTTP server function. Please be sure to use “Microsoft Internet Explorer 6.0” or a higher version for
the web browser. (This device uses “JavaScript” and “Cookies” and the browser should be set to accept these
functions. The setting method will vary depending on the version of browser. Please refer to the help les and the
other information provided in your software.)
Access is gained to the HTTP server function by starting the Web browser on the computer via the network connected to the projector and enter the following URL.
• NetworkSetting
http://<the projector’s IP address>/index.html
• AlertMailSetting
http://<the projector’s IP address>/lancong.html
Example : Network Setting
http://192.168.0.10/index.html
Alert Mail Setting
http://192.168.0.10/lancong.html
TIP: The default IP address is “192.168.0.10”.
NOTE:
• IfthePROJECTORNETWORKSETTINGSscreendoesnotappearinthewebbrowser,presstheCtrl+F5keystorefreshyour
webbrowser(orclearthecache).
• Thedisplay’sorbutton’sresponsecanbesloweddownoroperationmaynotbeaccepteddependingthesettingsofyour
network.Shouldthishappen,consultyournetworkadministrator.
Theprojectormaynotrespondifitsbuttonsarerepeatedlypressedinrapidintervals.Shouldthishappen,waitamomentand
repeat.Ifyoustillcan’tgetanyresponse,turnoffandbackontheprojector.
Preparation Before Use
Connect the projector to a commercially available LAN cable before engaging in browser operations. See page 22.
Operation with a browser that uses a proxy server may not be possible depending on the type of proxy server and
the setting method. Although the type of proxy server will be a factor, it is possible that items that have actually
been set will not be displayed depending on the effectiveness of the cache, and the contents set from the browser
may not be reected in operation. It is recommended that a proxy server not be used unless it is unavoidable.
43
Page 53
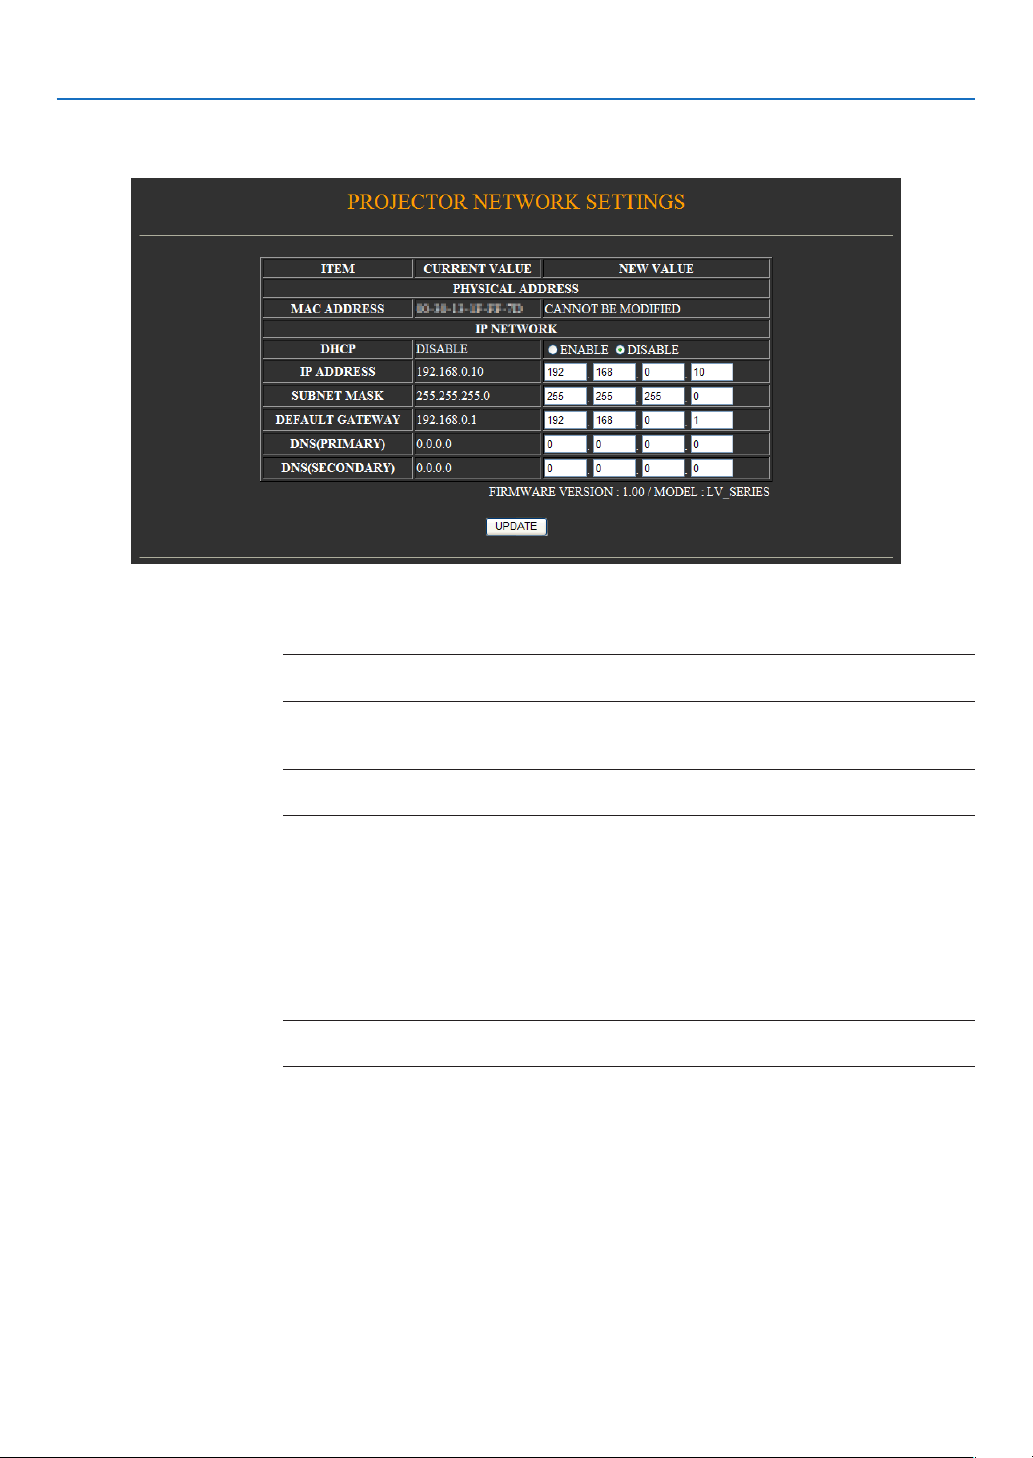
4. Convenient Features
Network Settings
http://<the projector’s IP address> /index.html
DHCP .................................. Enabling this option automatically assigns an IP address to the projector from your DHCP
server. Disabling this option allows you to register the IP address or subnet mask number
obtained from your network administrator.
NOTE:YoucanchecktheIPaddressinthemenuwhen[ENABLE]isselectedfor[DHCP].Todo
so,fromthemenu,select[Information]→[WiredLAN].
IP ADDRESS .......................Set your IP address of the network connected to the projector when [DISABLE] is selected for
[DHCP].
NOTE:YoucancheckyourspeciedIPaddressinthemenu.Todoso,fromthemenu,select
[Information]→[WiredLAN].
SUBNET MASK ................... Set your subnet mask number of the network connected to the projector when [DISABLE] is
selected for [DHCP].
DEFAULT GATEWAY
DNS (PRIMARY) ................Set your primary DNS settings of the network connected to the projector.
DNS (SECONDARY) .................
UPDATE ..............................Reflect your settings.
TIP: Selecting[Networksettings]for[Reset]fromtheprojector’smenuallowsyoutoreturnthefollowingitemstothefactory
default.
[DHCP]:DISABLE
[IPADDRESS]:192.168.0.10
[SUBNETMASK]:255.255.255.0
[DEFAULTGATEWAY]:192.168.0.1
*[DNS(PRIMARY)]and[DNS(SECONDARY)]willremainunchanged.
............... Set your default gateway of the network connected to the projector when [DISABLE] is se-
lected for [DHCP].
Set your secondar y DNS settings of the network connected to the projector.
NOTE:Closethebrowserafterclicking[UPDATE].Theprojectorwillautomaticallyupdateyour
settings.
44
Page 54
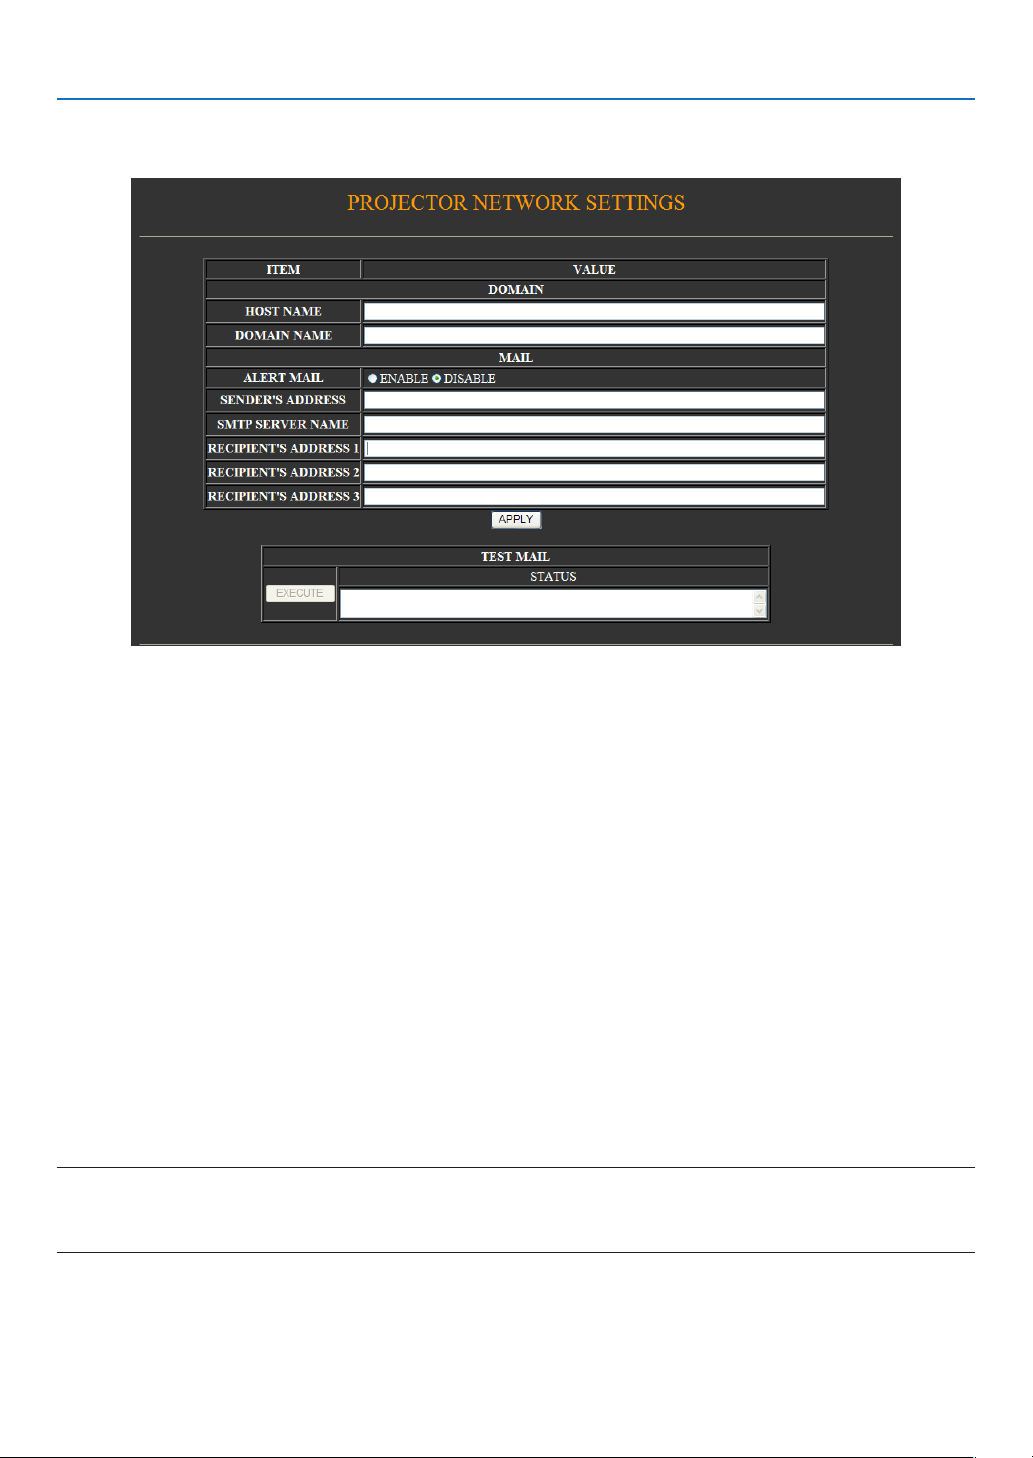
Alert Mail Setting
http:// <the projector’s IP address>/lancong.html
4. Convenient Features
This option noties your computer of an error message via e-mail when using wired LAN. An error message
notication will be sent when the projector lamp has reached the end of its usable life or an error occurs in the
projector.
HOST NAME ............................ Type in the hostname of the network connected to the projector. Up to 60 alphanumeric
characters can be used. If the host name is unknown, type in a string of characters representing the projector. Example: Projector 1
DOMAIN NAME .......................Type in the domain name of the network connected to the projector. Up to 60 alphanumeric
characters can be used. If the domain name is unknown, type in the right side of @ in the
sender's address. Example: canon.com
ALERT MAIL ............................. Checking [ENABLE] will turn on the Alert Mail feature.
Checking [DISABLE] will turn off the Alert Mail feature.
SENDER’S ADDRESS ............... Type in the senders address. Up to 60 alphanumeric and symbols characters can be used.
SMTP SERVER NAME ..............Type in the SMTP server name to be connected to the projector. Up to 60 alphanumeric
characters can be used.
RECIPIENT’S ADDRESS 1 to 3
APP LY ......................................Click this button to reflect the above settings
EXECUTE .................................. Click this button to send a test mail to check if your settings are correct.
STATUS .................................... A reply to a test mail will be displayed.
NOTE:
• Ifyouexecuteatest,youmaynotreceiveanAlertmail.Shouldthishappen,checkifthenetworksettingsarecorrect.
• Ifyouenteredanincorrectaddressinatest,youmaynotreceiveanAlertmail.Shouldthishappen,checkiftheRecipient’s
Address is correct
... Type in your recipient’s address. Up to 60 alphanumeric and symbols characters can be
used.
TIP: TheAlertMailsettingswillnotbeaffectedevenwhen[Reset]isdonefromthemenu.
45
Page 55
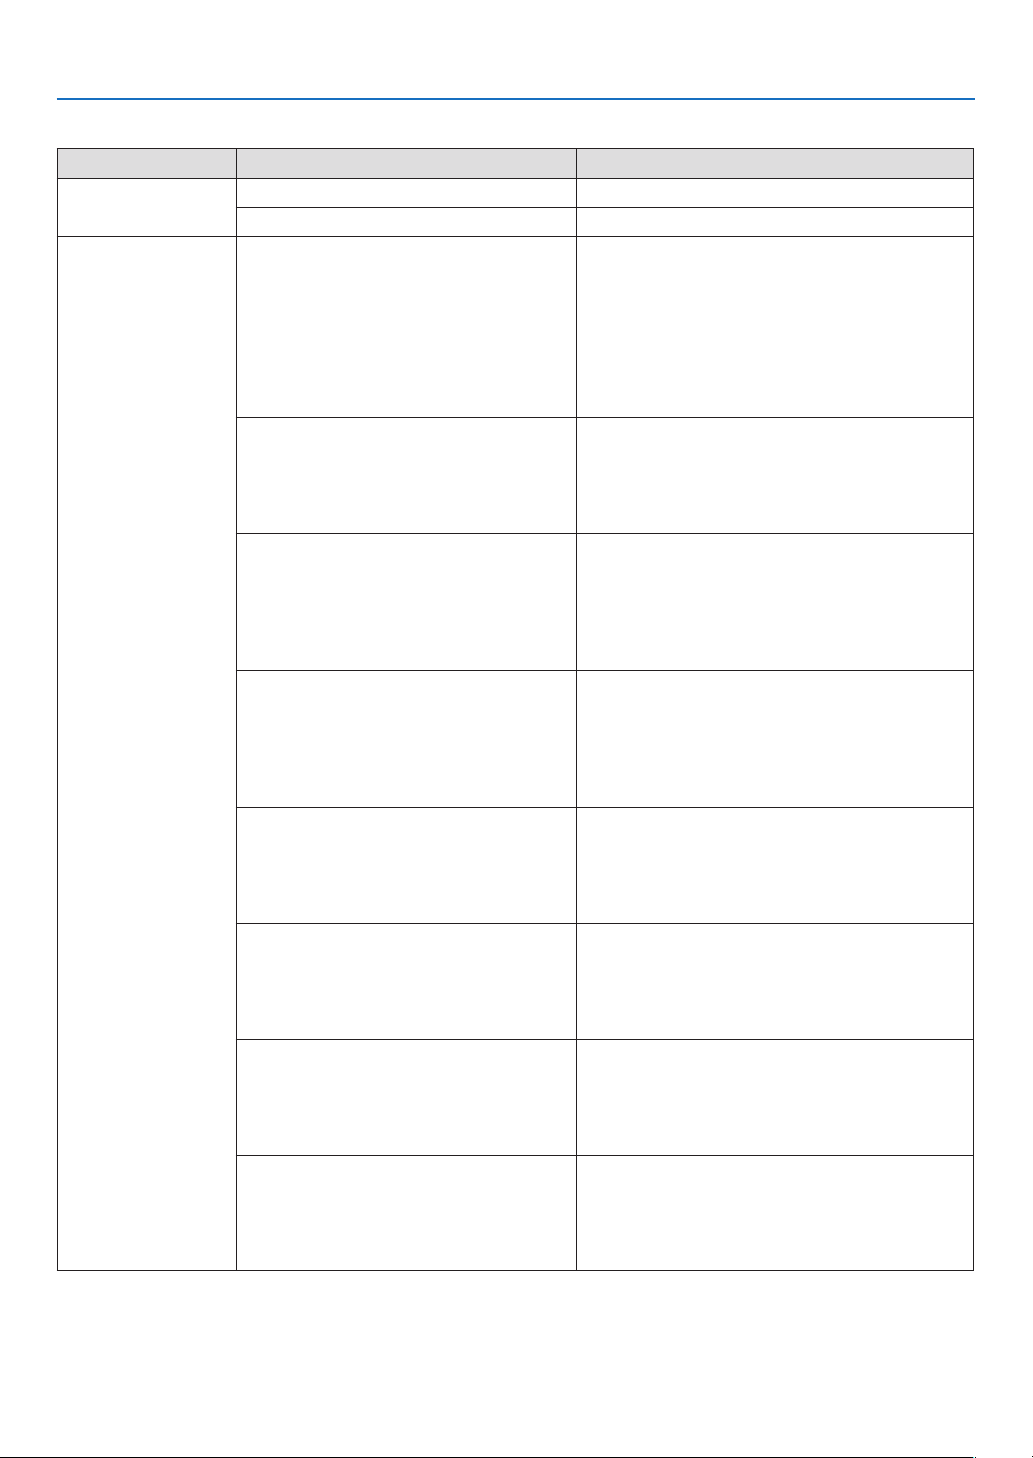
List of Error Messages
Subject/Body Projector status Message
Message subject
Message body
At the time of sending test mail [Projector]Testmail
At the time when error is found [Projector]Projectorinformation
Alert mail congurations are as follows:
Model name:
Serial number:
Test mail
Lamp replacement
Filter cleaning
Lamp cover error
Cooling fan error
Lamp error
Temperature error
Iris calibration error
Sender's address:
SMTP server name:
Recipient's address 1:
Recipient's address 2:
Recipient's address 3:
Replace with the new lamp.
[Information]
Model name:
Serial number:
Lamp counter:
Please clean lter.
[Information]
Model name:
Serial number:
Filter counter:
Lamp counter:
The lamp cover is not installed properly.
Check and re-attach it if necessary.
[Information]
Model name:
Serial number:
Lamp counter:
The cooling fan has stopped.
[Information]
Model name:
Serial number:
Lamp counter:
The lamp will not turn on.
[Information]
Model name:
Serial number:
Lamp counter:
The projector is overheated.
[Information]
Model name:
Serial number:
Lamp counter:
The calibration of the iris has failed.
[Information]
Model name:
Serial number:
Lamp counter:
4. Convenient Features
46
Page 56
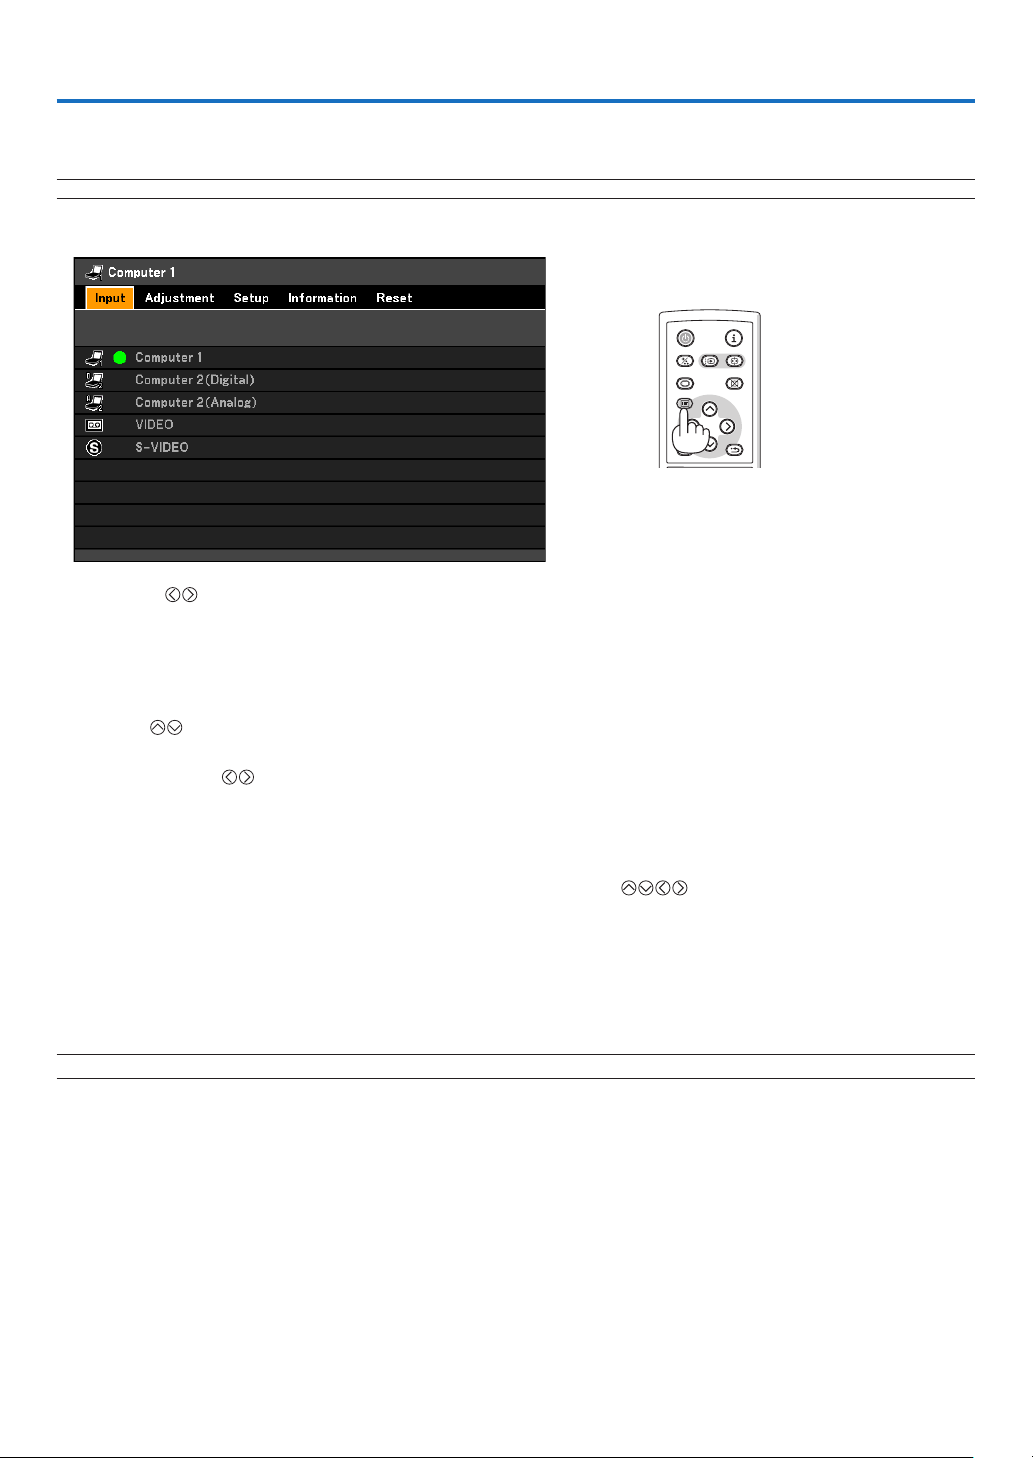
5. Using On-Screen Menu
BLANK
MENU
POWER
INPUTIMAGE
ASPECT
INFO.
AUTO PC
BACK
Using the Menus
NOTE: The on-screen menu may not be displayed correctly while interlaced motion video image is projected.
1. Press the MENU button on the remote control or projector cabinet to display the Menu.
2. Press the buttons on the remote control or the projector cabinet to display the submenu.
3. Press the OK button on the remote control or the projector cabinet to highlight the top item or the rst
tab.
4. Use the
buttons on the remote control or the projector cabinet to select the item you want to adjust
or set.
You can use the
buttons on the remote control or the projector cabinet to select the tab you want.
5. Press the OK button on the remote control or the projector cabinet to display the submenu window.
6. Adjust the level or turn the selected item on or off by using the
buttons on the remote control
or the projector cabinet.
Changes are stored until adjusted again.
7. Repeat steps 2 -6 to adjust an additional item, or press the BACK button on the remote control or the
projector cabinet to quit the menu display.
NOTE: When a menu or message is displayed, several lines of information may be lost, depending on the signal or settings.
8. Press the MENU button to close the menu.
To return to the previous menu, press the BACK button.
47
Page 57
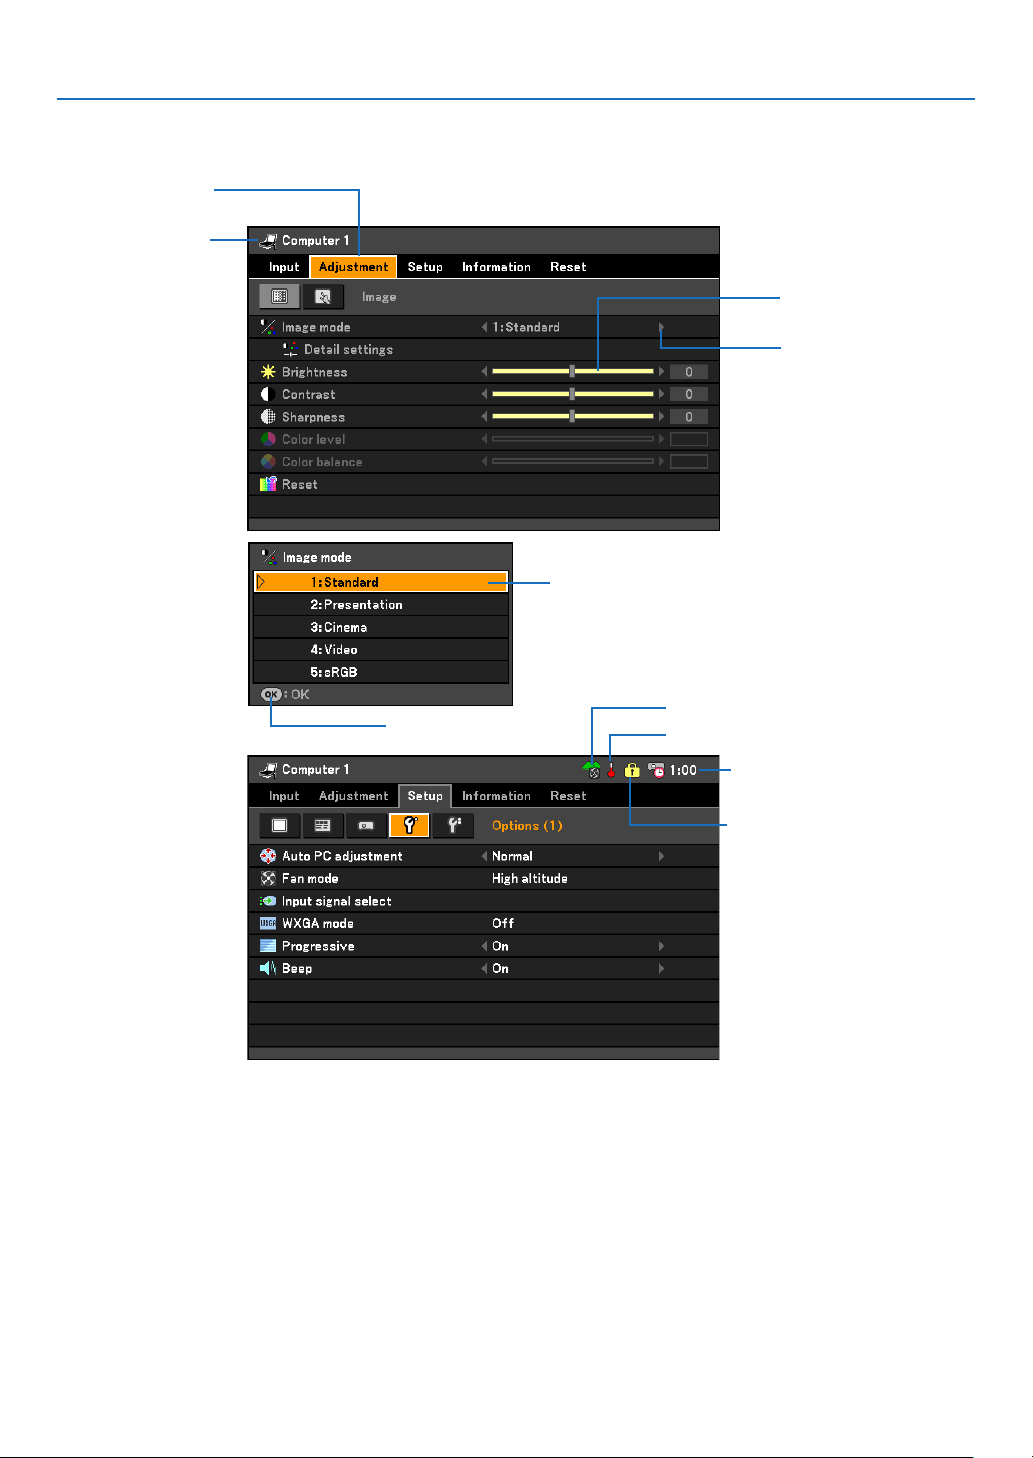
Menu Elements
Tab
Source
5. Using On-Screen Menu
Slide bar
Solid triangle
Highlight
Available button
Menu windows or dialog boxes typically have the following elements:
Highlight ................................................Indicates the selected menu or item.
Source ...................................................Indicates the currently selected source.
Slide bar ................................................Indicates settings or the direction of adjustment.
Tab .........................................................Indicates a group of features in a dialog box. Selecting on any tab brings its page to the front.
Available buttons ..................................Indicates currently available buttons on the projector cabinet or the remote control.
Solid triangle .........................................Indicates further choices are available. A highlighted triangle indicates the item is
active.
Key symbol ............................................Indicates the Key Lock is enabled.
Thermometer symbol ...........................Indicates the lamp is forcibly being cooled down because the internal temperature is
too high.
High altitude symbol .................................Indicates the [Fan mode] is set to [High altitude] mode.
Remaining countdown time ..................Indicates the remaining countdown time when the Off Timer is preset.
High altitude symbol
Thermometer symbol
Remaining countdown time
Key symbol
48
Page 58
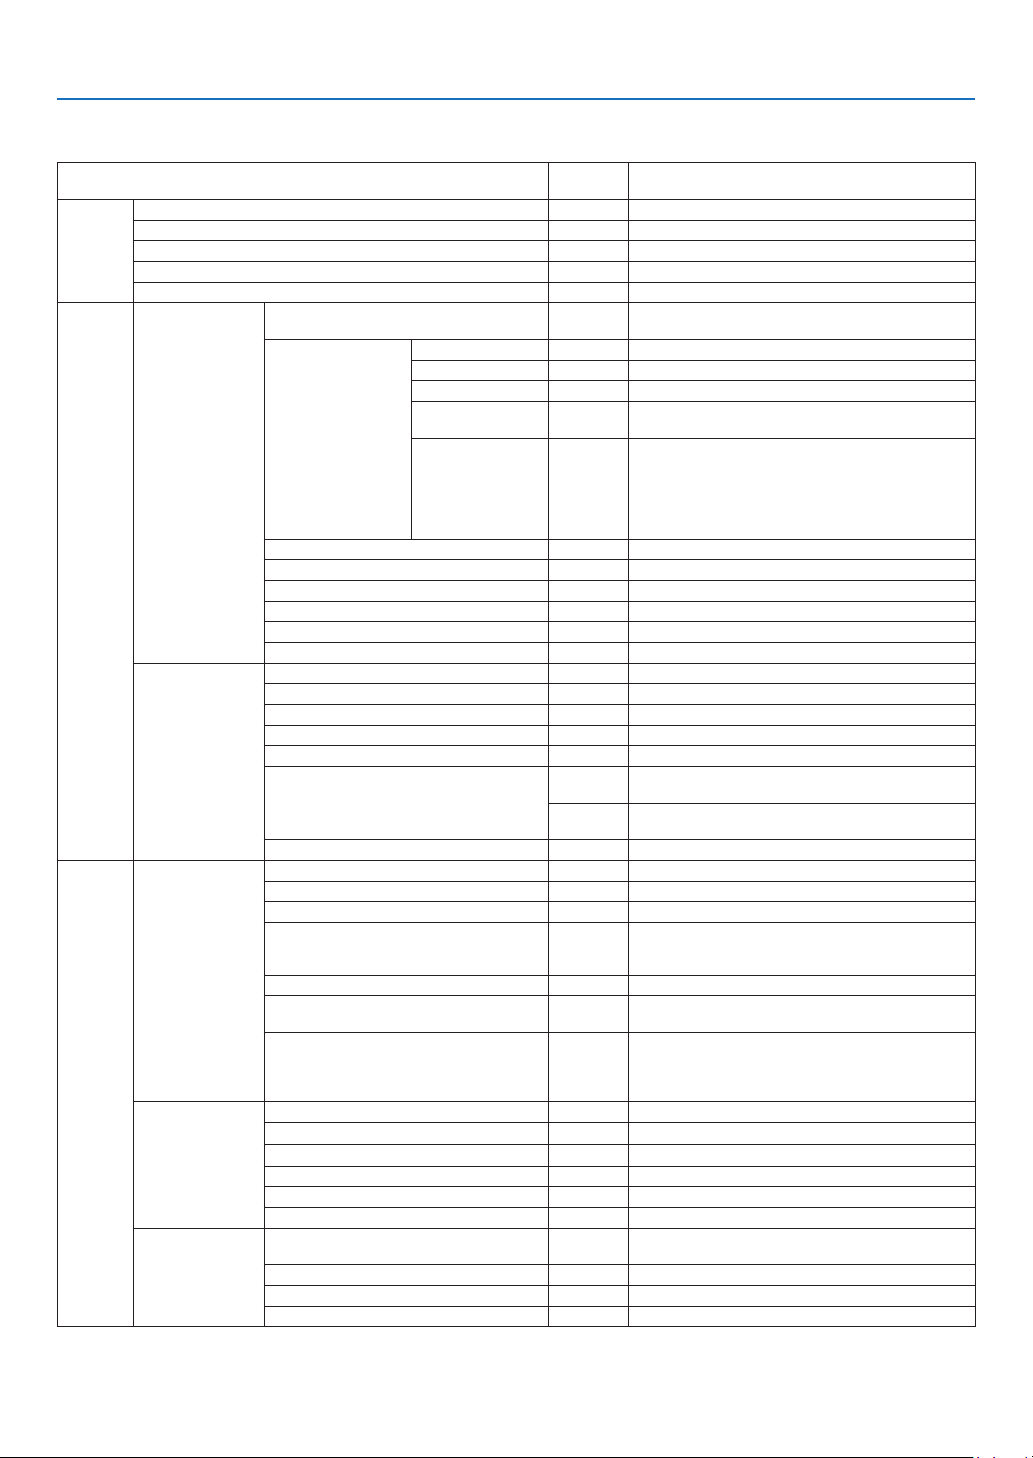
List of Menu Items
Menu Item
Computer 1 *
Computer 2 (Digital) *
Input
Adjustment
Setup
Computer 2 (Analog) *
VIDEO *
S-VIDEO *
Image mode *
Detail settings
Image
Brightness
Contrast
Sharpness
Color level
Color balance
Reset
Clock *
Tracking *
Horizontal position *
Vertical position *
Input signal
General
Menu
Installation
Overscan * 0[%],5[%],10[%]
Aspect
D.image shift 0 (Not available on LV-8310/LV-8215)
Auto keystone On Off, On
Keystone adjustment
Keystone save Off Off, On
Screen color Off
Lamp mode Normal Normal, Quiet
Closed caption Off
Language English
Color select Color Color, Monochrome
Input OSD On Off, On
Eco message Off Off, On
Display time 45 sec Manual, 5 sec, 15 sec, 45 sec
No signal screen Blue Blue, Black, Canon logo
Filter message 1500(H) Off, 100(H), 200(H), 500(H), 1000(H), 1500(H)
Image ip H/V None
Key lock Off Off, On
Password Off Off, On
Communication speed 19200bps 4800bps, 9600bps, 19200bps
5. Using On-Screen Menu
Some menu items are not available depending on the input source.
Factory
default
1:Standard, 2:Presentation, 3:Cinema, 4:Video,
5:sRGB
Reference * Standard, Presentation, Cinema, Video, sRGB
Gamma Dynamic, Natural, Black detail
Color temperature * 5000K, 6500K, 7300K, 8300K, 9300K, 10500K
Auto iris (LV-7285/
LV-7280)
Brightness R
Brightness G
Brightness B
Contrast R
Contrast G
Contrast B
Off, On
*
LV-7385/LV-7380/LV-7285/LV-7280:Auto, 4:3, 16:9,
Auto
15:9, 16:10, Wide zoom, True size
LV-8310/LV-8215: Auto, 4:3, 16:9, 15:9, 16:10, Let-
Auto
terbox, True size
Off, Whiteboard, Greenboard, Greenboard (Gray),
Light yellow, Light green, Light blue, Sky blue, Light
rose, Pink
Off, Caption 1, Caption 2, Caption 3, Caption 4, Text
1, Text 2, Text 3,Text 4
English, Deutsch, Français, Italiano, Español, Sven-
ska, 日 本 語 , Dansk, Português, Čeština, Magyar,
Polski, Nederlands, Suomi, Norsk, Türkçe, Русский ,
عربي, Ελληνικά , 中文 , 한국어
None, Rear, Ceiling mounted, Rear, Ceiling mount-
ed
Options
* The asterisk (*) indicates that the default setting varies depending on the signal.
49
Page 59
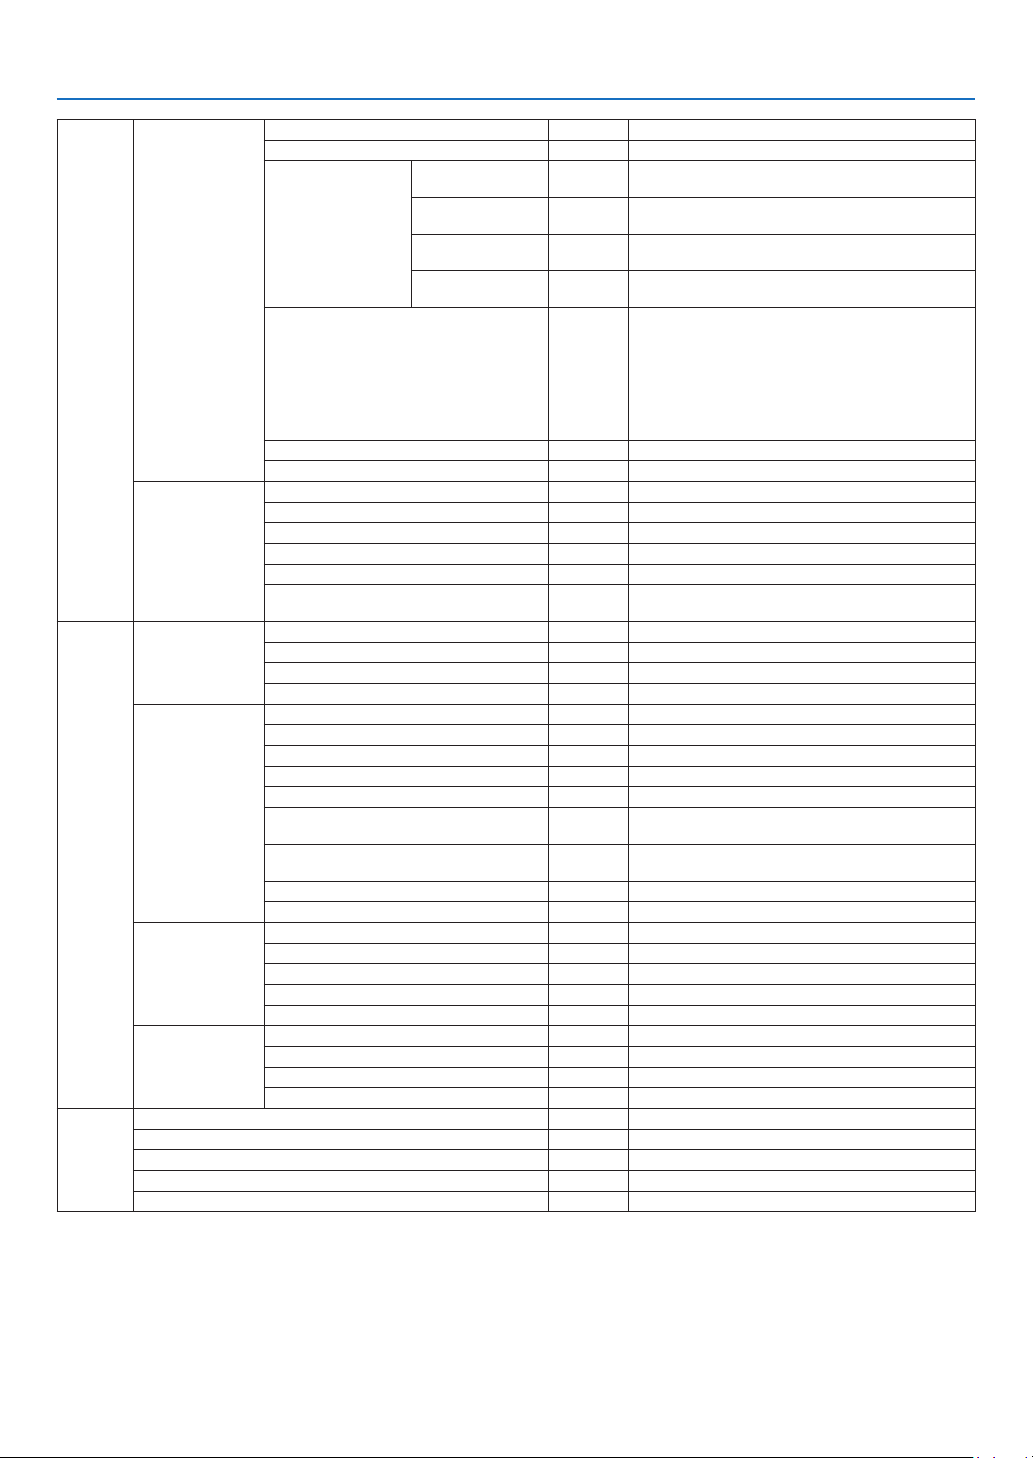
Setup
Information
Reset
Options (1)
Options (2)
Usage time
Input
Wired LAN
Version
Current signal
All data
Network settings
Lamp counter
Filter counter
5. Using On-Screen Menu
Auto PC adjustment Normal Off, Normal, Fine
Fan mode Auto Auto, High, High altitude
RGB/
Computer 1
Computer 2
Input signal select
WXGA mode
Progressive On Off, On
Beep On Off, On
Off timer Off Off, 0:30, 1:00, 2:00, 4:00, 8:00, 12:00, 16:00
Standby mode Normal Normal, Power-saving
Direct power on (AC) Off Off, On
Direct power on (Comp1) Off Off, On
Power management Off Off, 0:05, 0:10, 0:20, 0:30
Default source select Last
Remaining lamp time
Lamp counter
Filter counter
Total carbon savings
Input signal
Source index
Horizontal frequency
Vertical frequency
Input signal type RGB, COMPONENT, VIDEO, S-VIDEO, HDTV
Video type
Sync type
Sync polarity
Scan type Interlace, Progressive
Projector name
IP address
Subnet mask
Gateway address
MAC address
Model
Serial number
Firmware version
Data version
(Analog)
VIDEO Auto
S-VIDEO Auto
COMPONENT
COMPONENT
LV-7385/
LV-7380/
LV-7285/
LV-7280:
Off
LV-8310/
LV-8215:
On
RGB/COMPONENT, RGB, COMPONENT
RGB/
RGB/COMPONENT, RGB, COMPONENT
Auto, NTSC3.58, NTSC4.43, PAL, PAL-M, PAL-N,
PAL60, SECAM
Auto, NTSC3.58, NTSC4.43, PAL, PAL-M, PAL-N,
PAL60, SECAM
Off, On
Last, Auto, Computer 1, Computer 2(Digital), Com-
puter 2(Analog), VIDEO, S-VIDEO
NTSC, NTSC3.58, NTSC4.43, PAL, PAL-M, PAL-N,
PAL60, SECAM
Separate sync, Composite sync, Sync on green,
Sync on video
50
Page 60
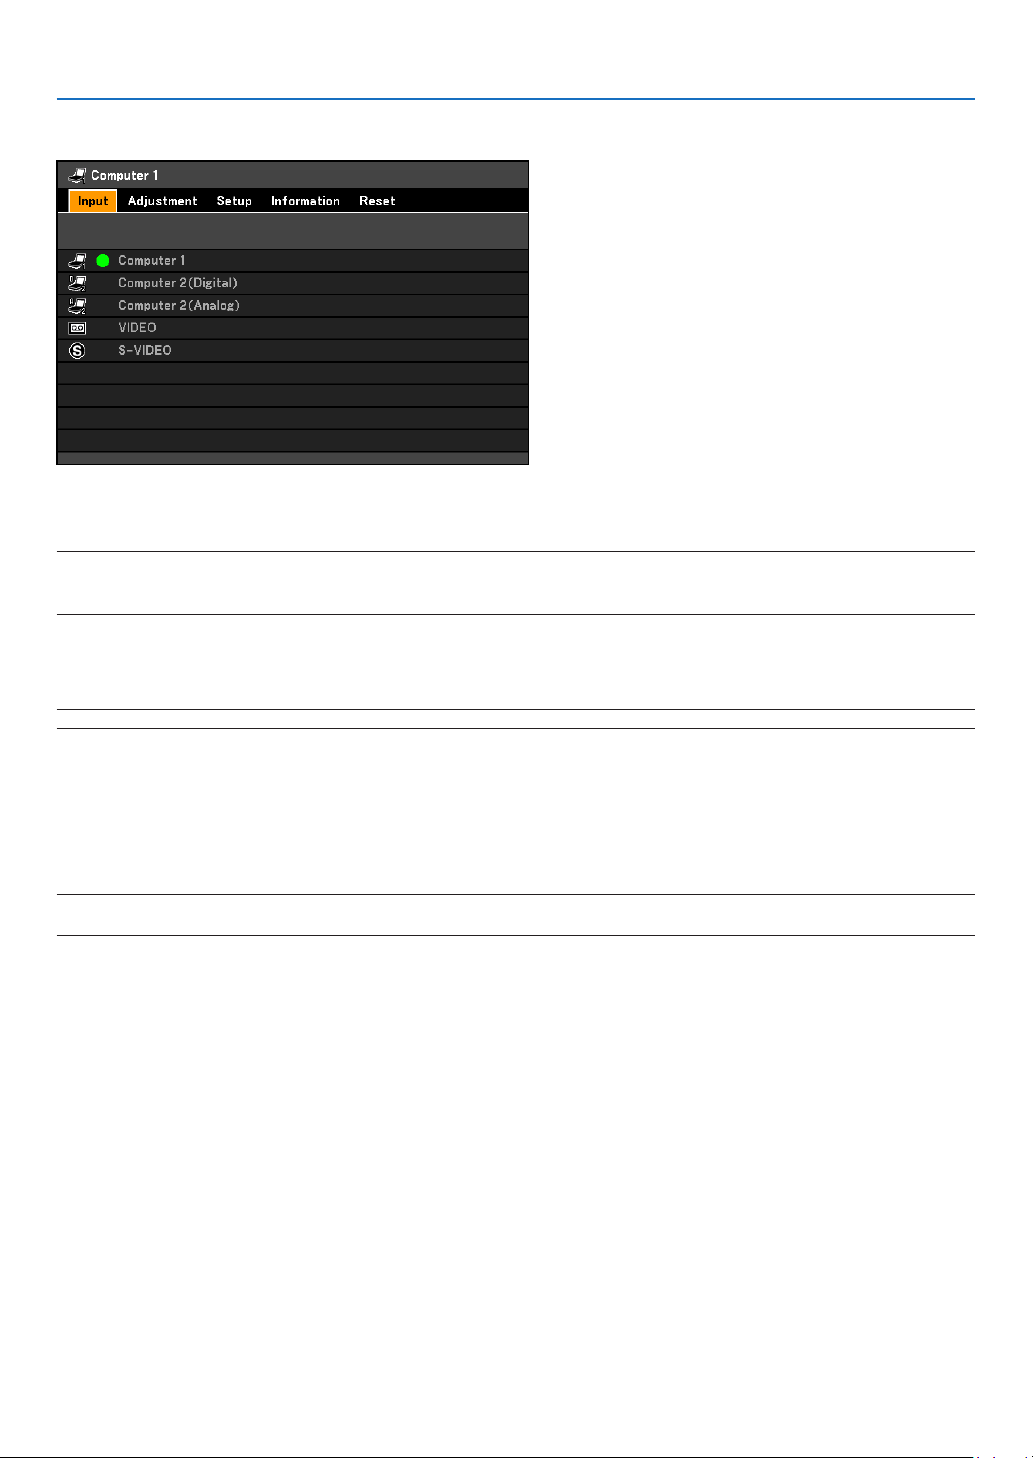
5. Using On-Screen Menu
4 Menu Descriptions & Functions [Input]
Computer 1
Selects the computer connected to your ANALOG IN-1 input connector.
NOTE:
• WhenthecomponentinputsignalisconnectedtotheANALOGIN-1connector,select[Computer1].
• TheprojectorwilldetermineiftheinputsignalisRGBorcomponentsignal.
Computer 2 (Digital & Analog)
Selects the computer connected to your DIGITAL IN / ANALOG IN-2 connector.
NOTE:WhenthecomponentinputsignalisconnectedtotheDIGITALIN/ANALOGIN-2connector,select[Computer2(Analog)].
VIDEO
Selects what is connected to your VIDEO input-audio-video equipment.
S-VIDEO
Selects what is connected to your S-VIDEO input-audio-video equipment.
NOTE:Aframemayfreeze forabriefperiodoftimewhenavideoisplayedbackinfast-forwardorfast-rewindwithaVideoor
S-Video source.
51
Page 61
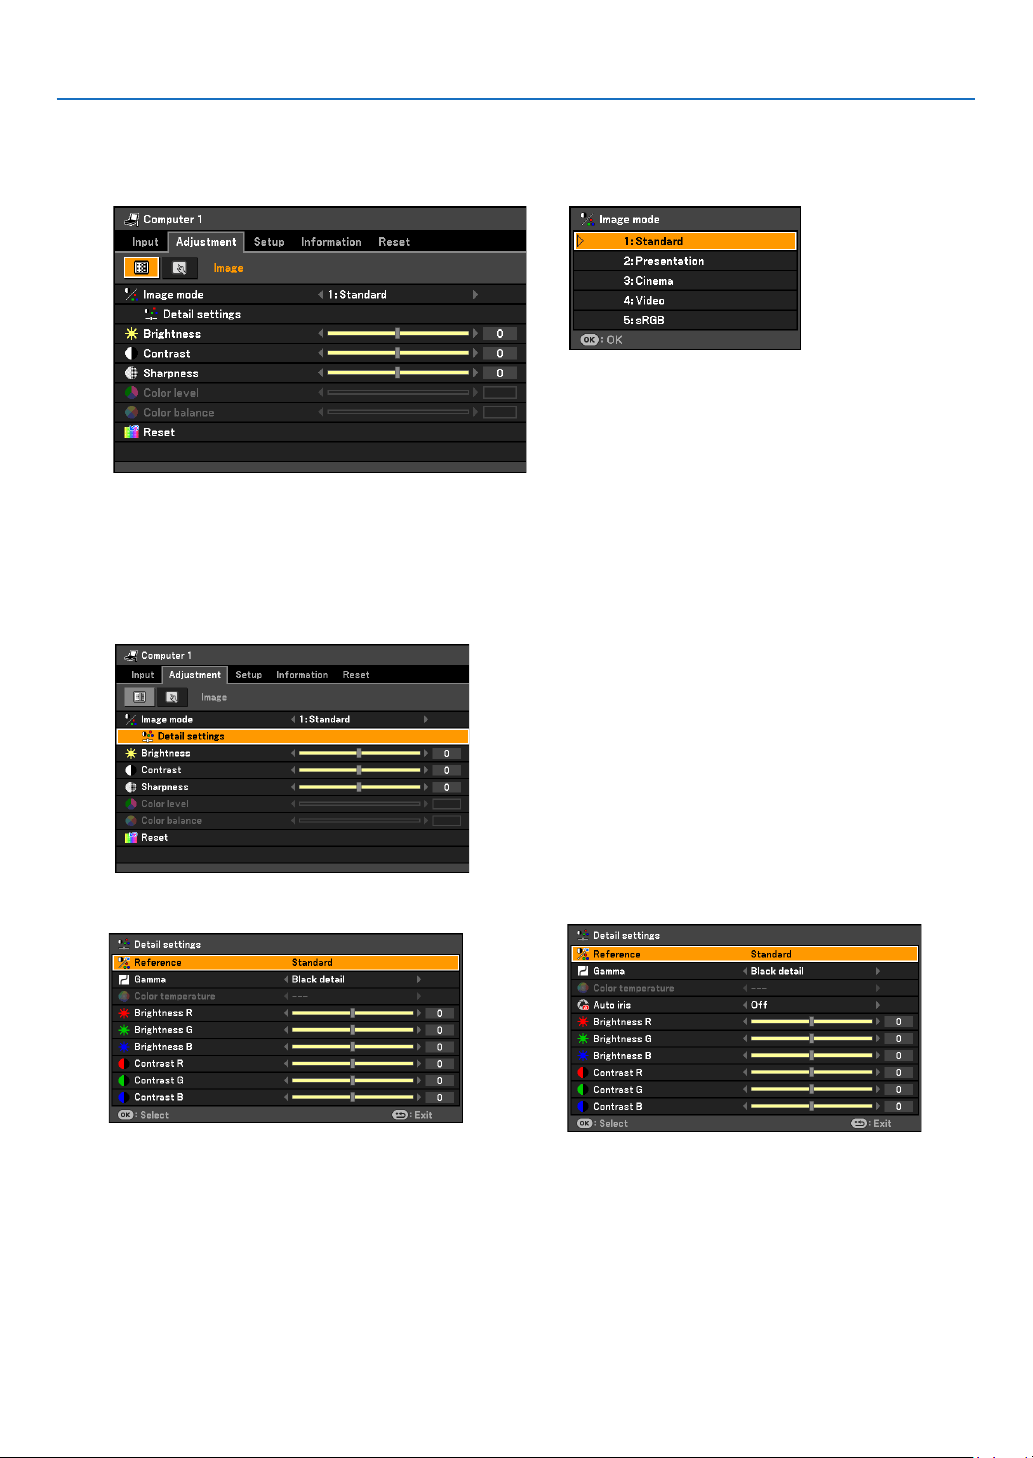
5. Using On-Screen Menu
Menu Descriptions & Functions [Adjustment]
[I mage]
[Image mode]
Whenselectinguseradjustable[Imagemode],thesubmenuwillbedisplayed.
Youcancustomizeeachgammaor color.Todoso,rstselect[Imagemode]andpresstheOKbutton,thenpro-
ceed using the following steps.
[Detail settings]
[LV-7 3 8 5 / LV -7 3 8 0 / LV- 8 310 / LV-8215] [LV-7285/LV-72 8 0 ]
Selecting Reference Setting [Reference]
This option allows you to adjust neutral tint for yellow, cyan or magenta. There are ve factory presets optimized
for various types of images, you can set user adjustable settings.
Standard................ Select this to project an image with a similar quality to that of the original image. An image is projected
with a high regard for reproduction of white.
Presentation .......... Select this to project an image with a similar quality to that of the original image. A bright and high-
contrast image is projected.
Cinema .................. Select this to project a moving picture. A picture is projected with a high regard for color tone repro-
duction.
52
Page 62
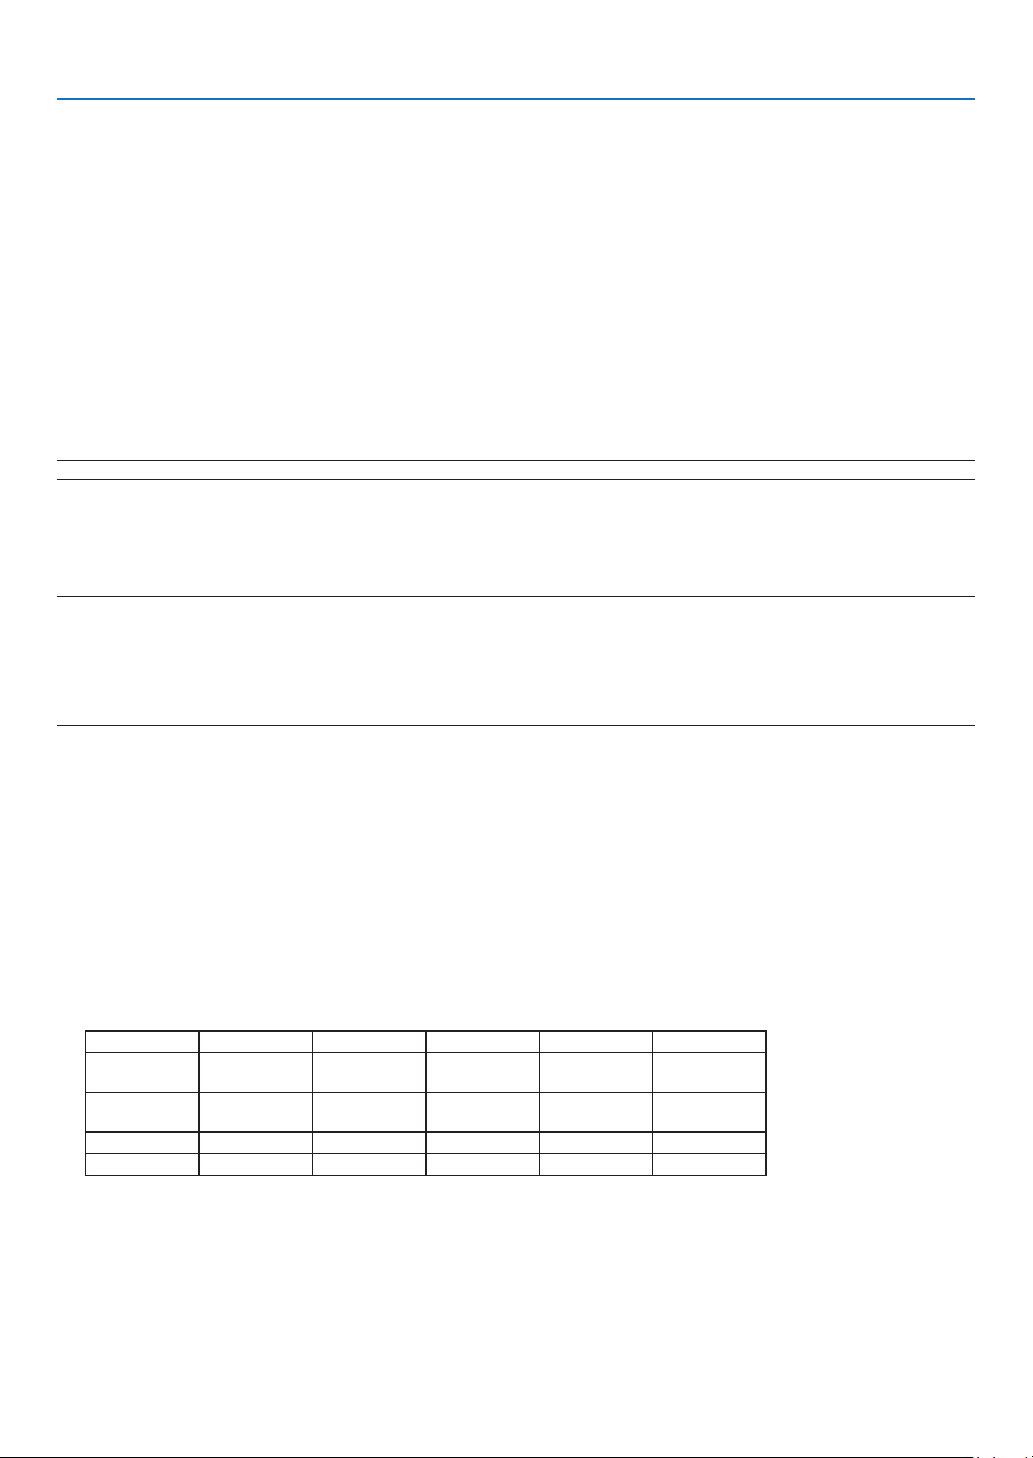
5. Using On-Screen Menu
Video ..................... Select this to project a regular picture such as TV program.
sRGB ..................... Select this when you want to project an image from an sRGBcompatible digital camera. An image is
projected in the display mode conforming to the sRGB Standard.
Selecting Gamma Correction Mode [Gamma]
Each mode is recommended for:
Dynamic ................ Creates a high-contrast picture.
Natural ................... Natural reproduction of the picture.
Black detail ............ Emphasizes detail in dark areas of the picture.
Adjusting Color Temperature [Color temperature]
This option allows you to select the color temperature of your choice:
5000K, 6500K, 7300K, 8300K, 9300K, 10500K.
NOTE:When[Standard]or[Presentation]isselectedin[Reference],[Colortemperature]isnotavailable.
Adjusting Brightness and Contrast [Auto iris] (LV-7285/LV-7280)
This function automatically controls the amount of light in response to an input signal. Reducing amount of light
can create a truer black during a dark scene.
NOTE:
• When[Presentation]or[Cinema]isselectedfor[Imagemode],[Autoiris]willautomaticallyturnonatthefactorypreset.
• [Autoiris]cannotbeselectedinthefollowingconditions:
- [Lampmode]:[Quiet]
- [Fanmode]:[High]or[Highaltitude]
- [Closedcaption]:alltheoptionsotherthan[Off]whenaVideoorS-Videoinputisselected.
Adjusting White Balance [Brightness RGB/Contrast RGB]
This allows you to adjust the white balance. Brightness for each color (RGB) is used to adjust the black level of the
screen; Contrast for each color (RGB) to adjust the white level of the screen.
Adjusting Brightness, Contrast, Sharpness, Color level and Color balance
You can adjust brightness, contrast, sharpness, color level and color balance.
Brightness ............. Adjusts the brightness level or the black level of the image.
Contrast ................. Adjusts the intensity of the image according to the incoming signal (White level of the image).
Sharpness .............. Controls the detail of the image for Video.
Color level .............. Increases or decreases the color saturation level.
Color balance ........ Varies the color level from +/- green to +/-blue. The red level is used as reference.
Input signal Brightness Contrast Sharpness Color level Color balance
Computer
(RGB Analog)
Computer
(RGB Digital)
Component Yes Yes Yes Yes Yes
Video, S-Video Yes Yes Yes Yes Yes
Yes Yes Yes No No
Yes Yes Yes No No
Yes=Adjustable, No=Not adjustable
Reset
Thesettingsandadjustmentsfor[Adjustment]willbereturnedtothefactorysettingswiththeexceptionofthefollowing;numbersand[Reference]withinthe[Imagemode]screen.
Thesettingsandadjustmentsunder[Detailsettings]withinthe[Imagemode]screenthatarenotcurrentlyselect-
ed will not be reset.
53
Page 63
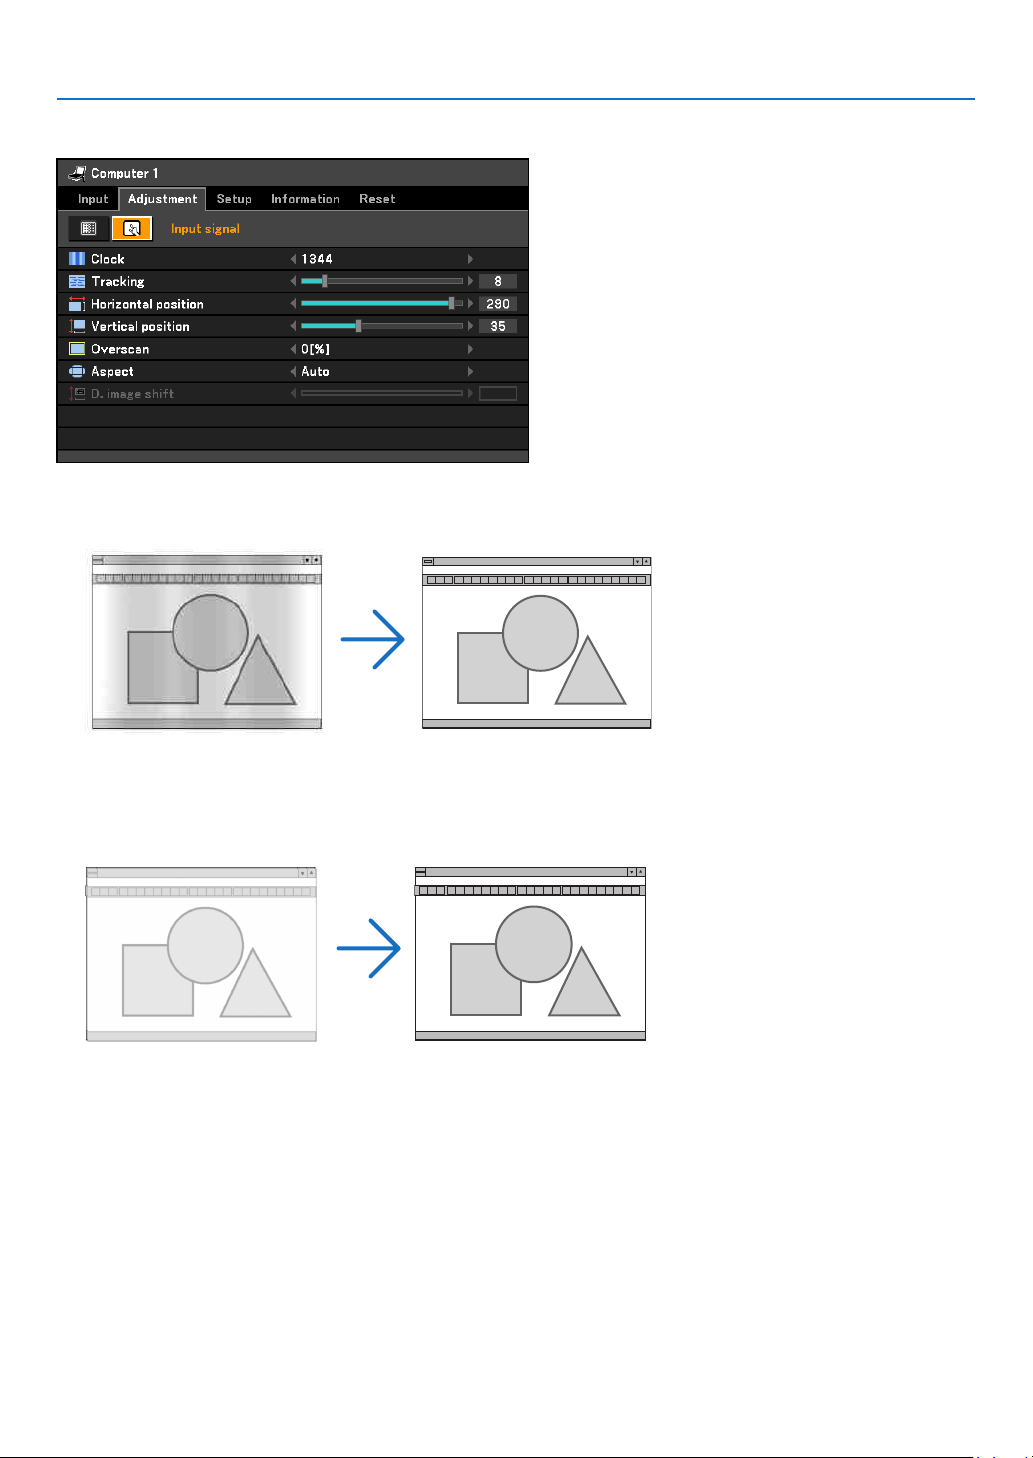
[Input signal]
Adjusting Clock and Phase [Clock /Tracking]
Thisallowsyoutomanuallyadjust[Clock]and[Tracking].
5. Using On-Screen Menu
Clock ..................... Use this item to fine tune the computer image or to remove any vertical banding that might appear.
This function adjusts the clock frequencies that eliminate the horizontal banding in the image.
This adjustment may be necessary when you connect your computer for the first time.
Tracking ................ Use this item to adjust the clock phase or to reduce video noise, dot interference or cross talk. (This is
evident when part of your image appears to be shimmering.)
Use [Tracking] only after the [Clock] is complete.
54
Page 64
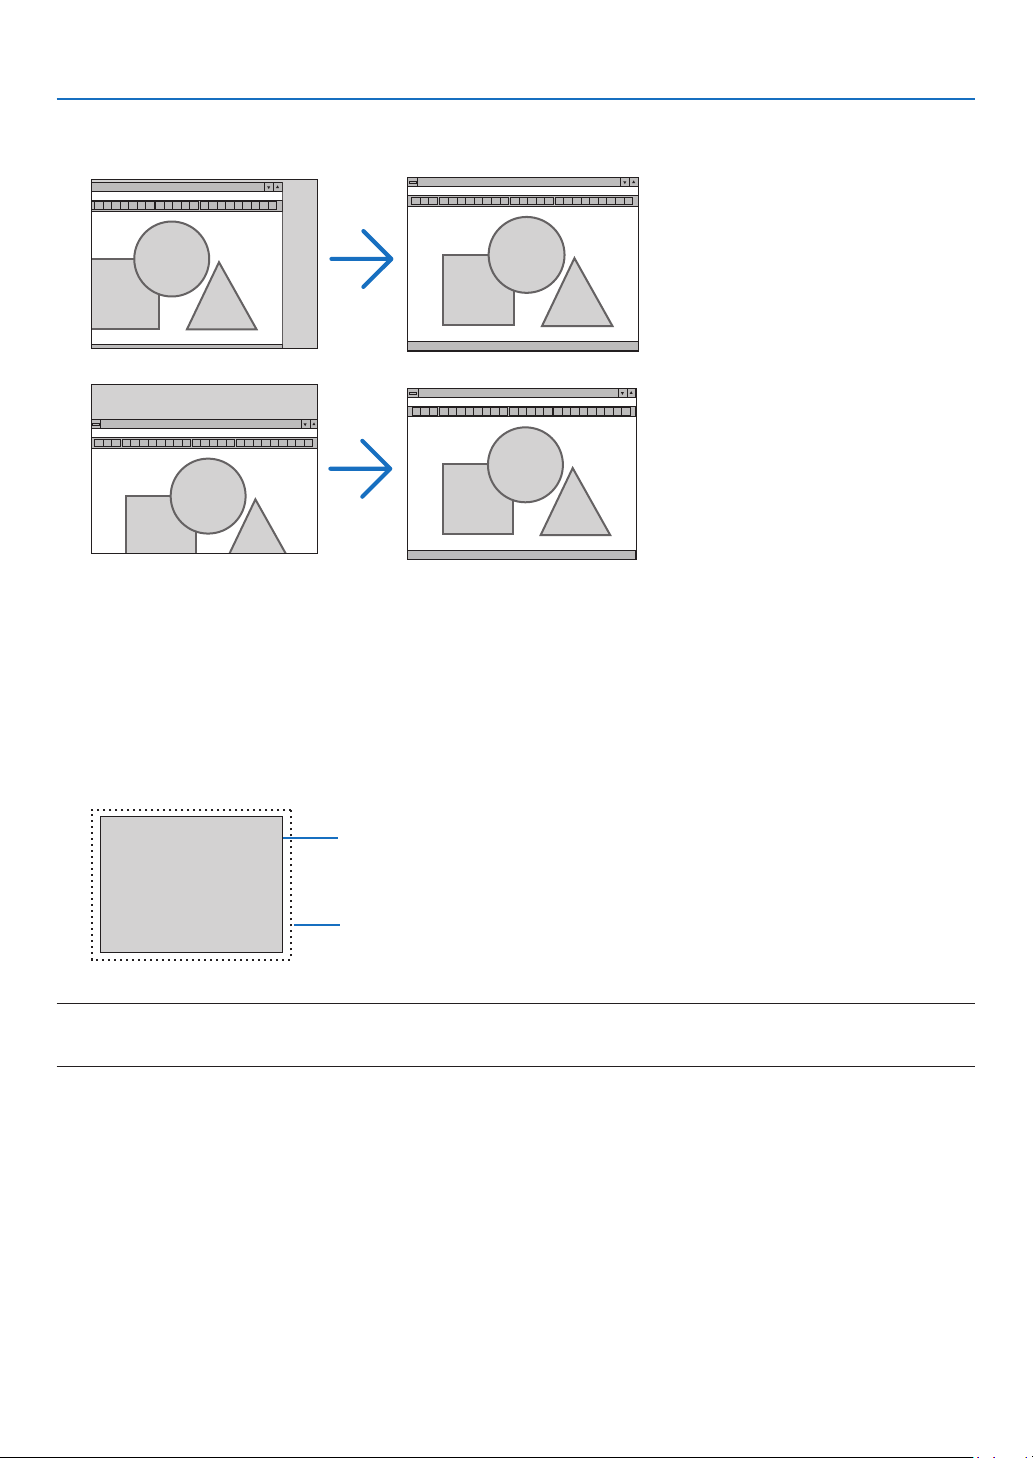
5. Using On-Screen Menu
Adjusting Horizontal/ Vertical Position [Horizontal position/Vertical position]
Adjusts the image location horizontally and vertically.
- Animagecanbedistortedduringtheadjustmentof[Clock]and[Tracking].Thisisnotmalfunction.
- Theadjustmentsfor[Clock],[Tracking],[Horizontalposition],and[Verticalposition]willbestoredinmemory
for the current signal. The next time you project the signal with the same resolution, horizontal and vertical
frequency, its adjustments will be called up and applied.
Todeleteadjustmentsstoredinmemory,fromthemenu,youselect[Reset]→[Currentsignal]or[Alldata]
and reset the adjustments.
Selecting Overscan Percentage [Overscan]
Select overscan percentage (0%, 5% and 10%) for signal.
Projected image
Overscaned by 10%
NOTE:
• The[0[%]]cannotbeselectedwhenVIDEOandS-VIDEOsignalsareused.
• [Overscan]isnotavailablewhen[Truesize]isselectedfor[Aspect].
55
Page 65
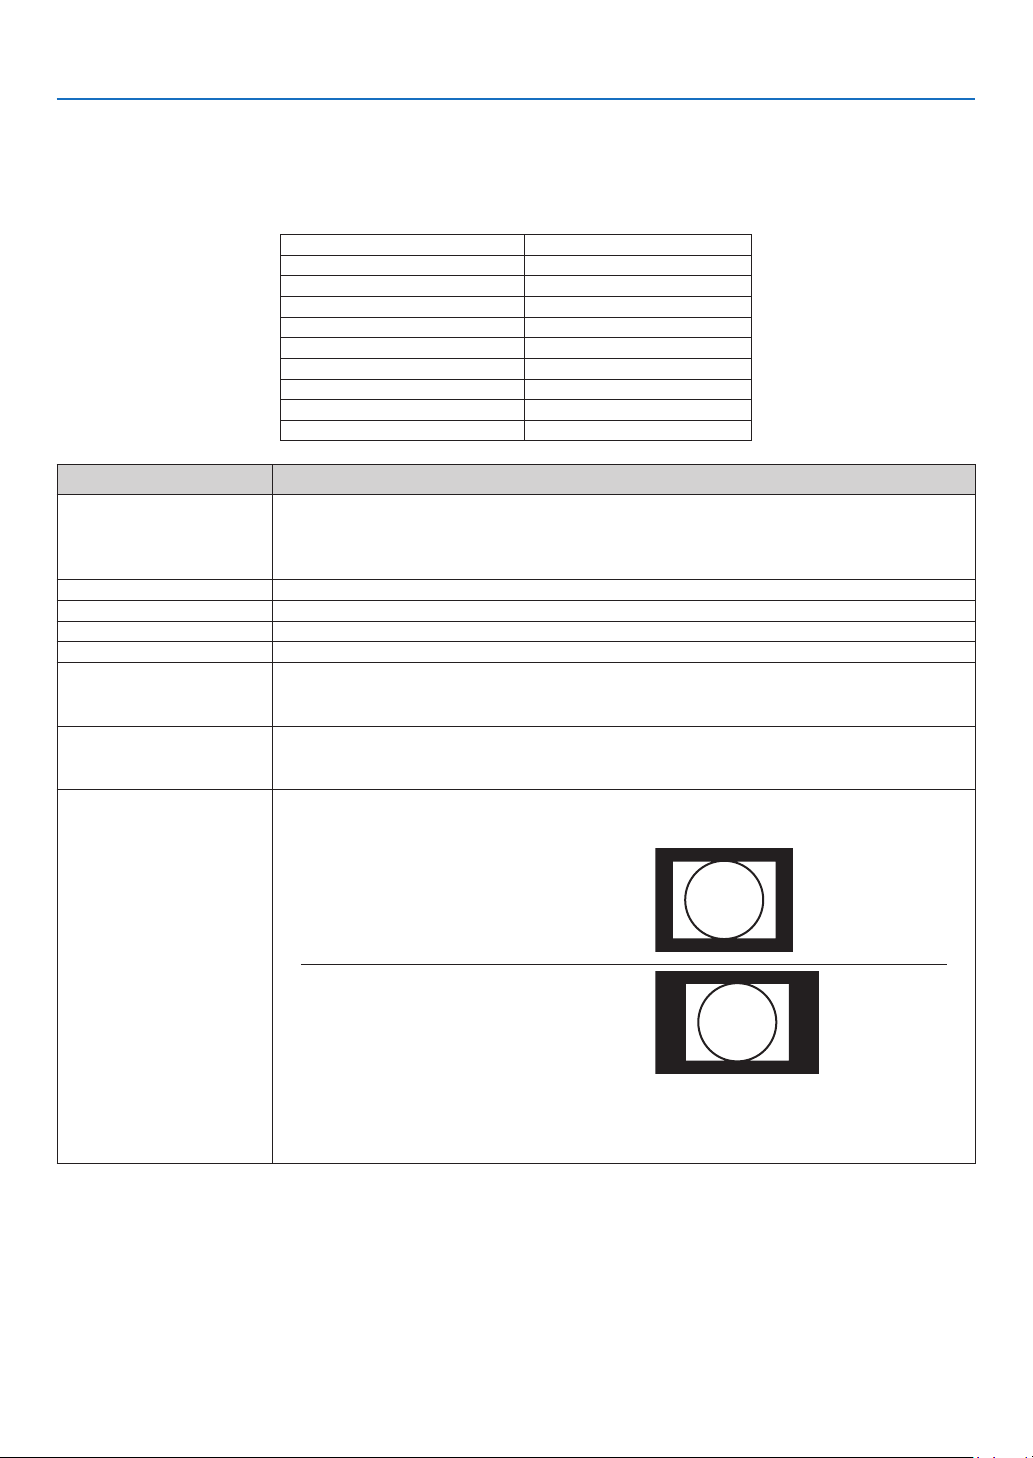
5. Using On-Screen Menu
Selecting Aspect Ratio [Aspect]
The term “aspect ratio” refers to the ratio of width to height of a projected image.
The projector automatically determines the incoming signal and displays it in its appropriate aspect ratio.
•Thistableshowstypicalresolutionsandaspectratiosthatmostcomputerssupport.
Resolution Aspect Ratio
VGA 640 x 480 4:3
SVGA 800 x 600 4:3
XGA 1024 x 768 4:3
WXGA 1280 x 768 15:9
WXGA 1280 x 800 16:10
WXGA+ 1440 x 900 16:10
SXGA 1280 x 1024 5:4
SXGA+ 1400 x 1050 4:3
UXGA 1600 x 1200 4:3
Options Function
Auto The projector will automatically determine the incoming signal and display it in its
aspect ratio. (→ next page)
The projector may erroneously determine the aspect ratio depending on its signal. If
this occurs, select the appropriate aspect ratio from the following.
4:3 The image is displayed in 4:3 aspect ratio.
16:9 The image is displayed in 16:9 aspect ratio.
15:9 The image is displayed in 15:9 aspect ratio.
16:10 The image is displayed in 16:10 aspect ratio.
Wide zoom
(LV -7 38 5/LV-7380/LV7285/LV-7280)
Letterbox
(LV - 8310/LV-8215)
True size The projector displays the current image in its true resolution when the incoming com-
The image is stretched left and right.
Parts of the displayed image are cropped at the left and right edges and therefore not
visible.
The image of a letterbox signal is stretched equally in the horizontal and vertical direc-
tions to t the screen. Parts of the displayed image are cropped at the top and bottom
edges and therefore not visible.
puter signal has a lower resolution than the projector’s native resolution.
[Example 1] When the incoming
signal with the resolution of 800 x
600 is displayed on the LV-7385/LV7380/LV-7285/LV-7280:
[Example 2] When the incoming
signal with the resolution of 800 x
600 is displayed on the LV-8310/
LV-8215:
NOTE:
• Whenanon-computersignalisdisplayed,the[Truesize]isnotavailable.
• Whenasignalwithahigherresolutionthantheprojector’snativeresolutionisdisplayed,[True
size]isnotavailable.
56
Page 66
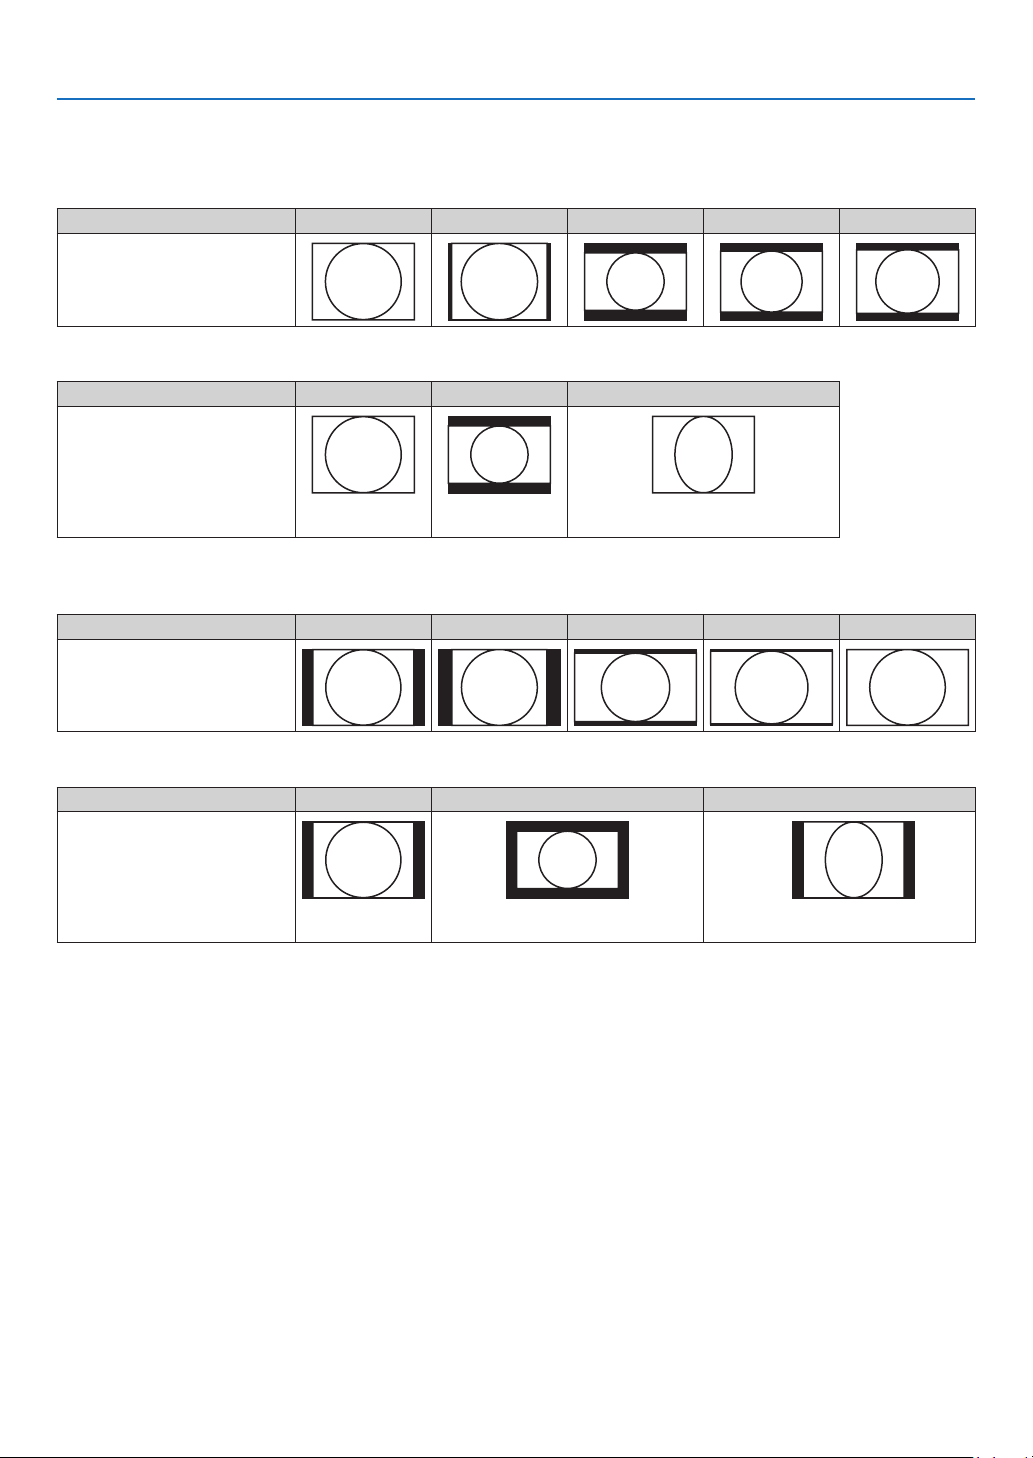
5. Using On-Screen Menu
Sample image when the appropriate aspect ratio is automatically determined
LV-738 5/LV-7380/LV-728 5/LV-7280
[Computersignal]
Aspect ratio of incoming signal 4:3 5:4 16:9 15:9 16:10
Sample image when the appropriate aspect ratio is automatically determined
[Videosignal]
Aspect ratio of incoming signal 4:3 Letterbox Squeeze
Sample image when the
aspect ratio is automatically
determined
LV- 8310/LV- 8215
[Computersignal]
Aspect ratio of incoming signal 4:3 5:4 16:9 15:9 16:10
Sample image when the appropriate aspect ratio is automatically determined
NOTE:Todisplayasqueezedsignal
properly,select[16:9]or[Widezoom].
[Videosignal]
Aspect ratio of incoming signal 4:3 Letterbox Squeeze
Sample image when the
aspect ratio is automatically
determined
NOTE:Todisplayaletterboxsignal
properly,select[Letterbox].
NOTE:Todisplayasqueezedsignal
properly,select[16:9].
TIP:
• Imagepositioncanbeadjustedverticallyusing[D.imageshift]whenthe[16:9],[15:9],or[16:10]aspectratiosareselected.
(→ next page)
• Theterm“letterbox”referstoamorelandscape-orientedimagewhencomparedtoa4:3image,whichisthestandardaspect
ratio for a vide source.
Theletterboxsignalhasaspectratioswiththevistasize“1.85:1”orcinemascopesize“2.35:1”formovielm.
• Theterm“squeeze”referstothecompressedimageofwhichaspectratioisconvertedfrom16:9to4:3.
57
Page 67

5. Using On-Screen Menu
Adjusting the Vertical Position of Image [D.image shift] (not available on LV-8310/LV-8215)
When[16:9],[15:9],or[16:10]isselectedin[Aspect],theimageisdisplayedwithblackbordersonthetopandbottom.
You can adjust the vertical position from the top to the bottom of the black area.
58
Page 68
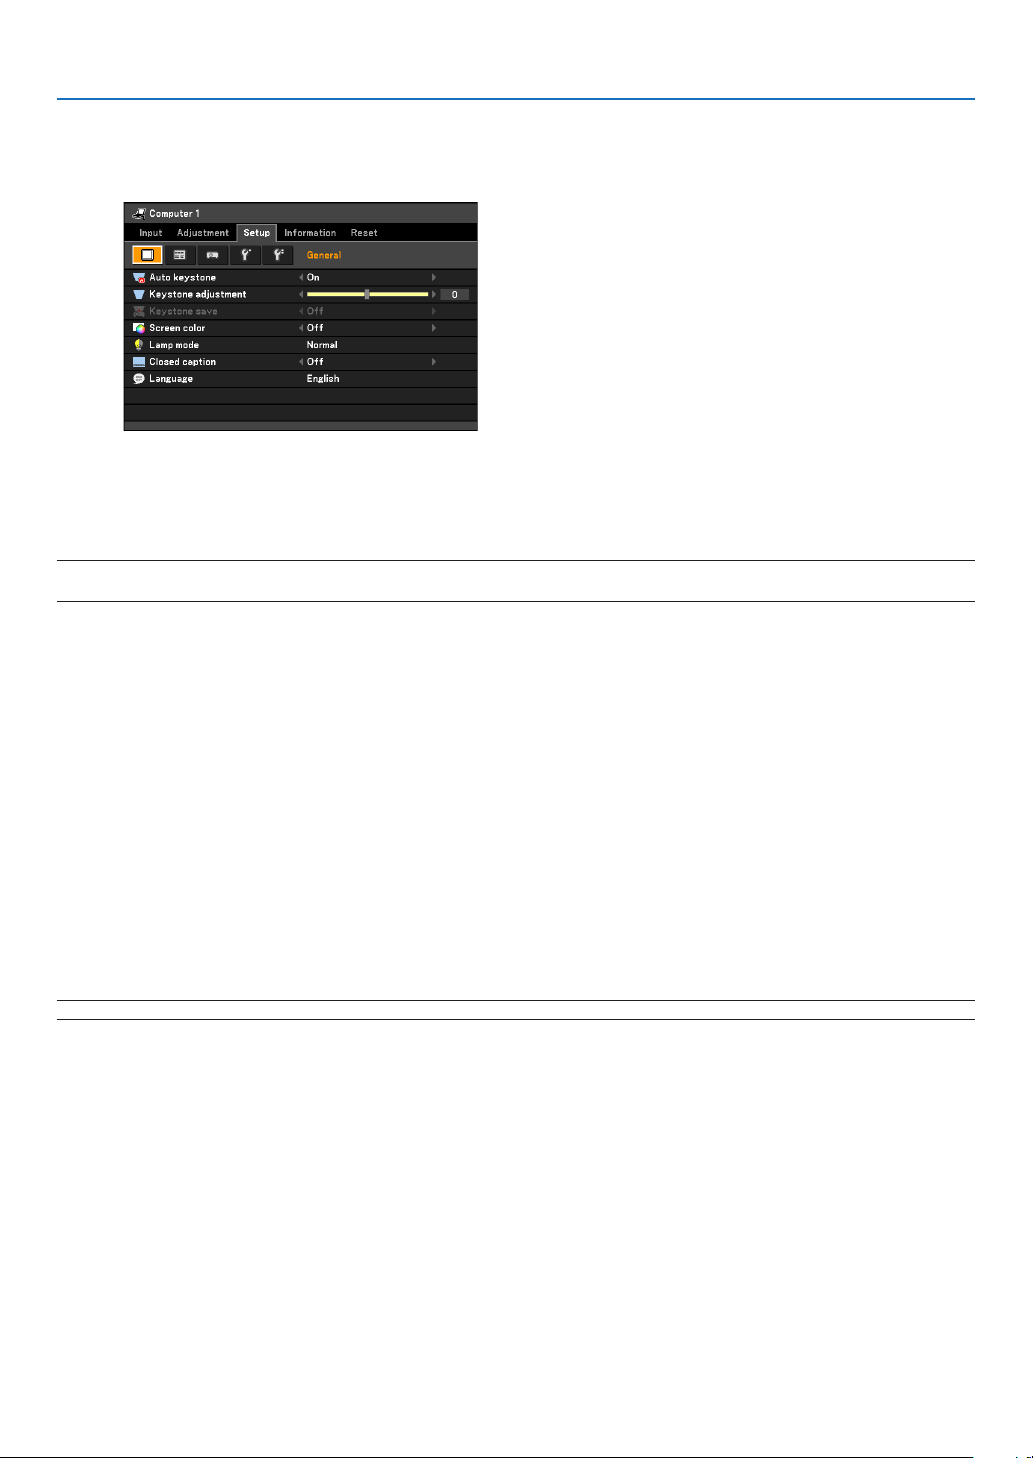
5. Using On-Screen Menu
Menu Descriptions & Functions [Setup]
[General]
Enabling Auto Keystone [Auto keystone]
This feature allows the projector to detect its tilt and correct vertical distortion automatically.
ToturnofftheAutoKeystonefeature,select[Off].
NOTE:When[Autokeystone]issetto[On],[Keystonesave]isnotavailable.Nexttimeyouturnonthepower,theAutokeystone
functionwillworkandthedatastoredwith[Keystonesave]willbeinvalid.
Correcting Vertical Keystone Distortion Manually [Keystone adjustment]
You can correct vertical distortion manually.
Saving Vertical Keystone Correction [Keystone save]
This option enables you to save your current keystone settings.
Off .......................... Does not save current keystone correction settings
On .......................... Saves current keystone correction settings
Saving your change once affects all sources. The changes are saved when the projector is off.
Selecting Wall Color Correction Mode [Screen color]
This function allows for quick adaptive color correction in applications where the screen material is not white.
The following 10 options are available: Off, Whiteboard, Greenboard, Greenboard (Gray), Light yellow, Light green,
Light blue, Sky blue, Light rose and Pink.
NOTE:When[Whiteboard]isselected,thelightoutputbecomeslow.
59
Page 69
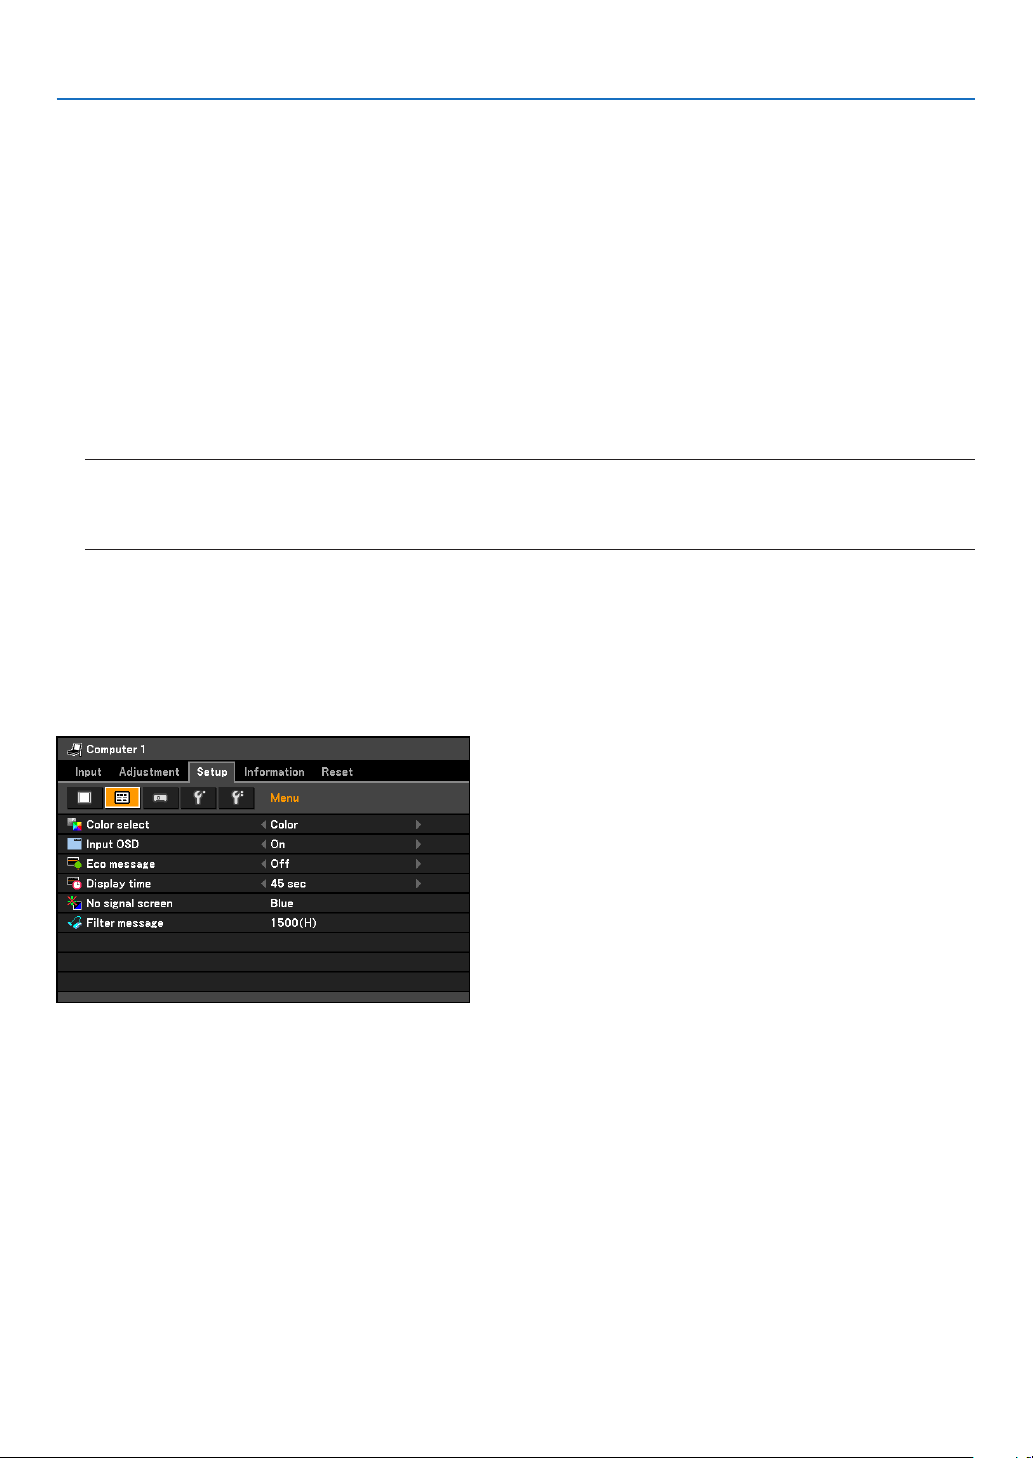
5. Using On-Screen Menu
Selecting Lamp Mode [Lamp mode]
Selecting[Quiet]forLampmodewillhelpyoutoreduceCO
(Amount of CO
emission reduction is calculated based on power consumption)
2
This feature enables you to select two brightness modes of the lamp: Normal and Quiet modes. The lamp life can
be extended by using the Quiet mode.
Setting Closed Caption [Closed caption]
This option sets several closed caption modes that allow text to be superimposed on the projected image of Video
or S-Video.
Off ......................... This exits the closed caption mode.
Caption 1-4............ Text is superimposed.
Text 1-4 ................. Text is displayed.
NOTE:
Theclosedcaptionisnotavailableunderthefollowingconditions:
• whenmessagesormenusaredisplayed.
• whenanimageismagnied,frozen,ormuted.
Selecting Menu Language [Language]
You can choose one of 21 languages for the on-screen menu.
emissions from the projector.
2
[Menu]
Selecting Menu Color [Color select]
You can choose between two color modes for menu color: Color and Monochrome.
Turning On / Off Input Display [Input OSD]
This option turns on or off input name display such as Computer 1, Computer 2(Digital), Computer 2(Aanalog),
VIDEO, S-VIDEO and No Input to be displayed on the top right of the screen.
Turning On / Off Eco Message [Eco message]
This option turns on or off the following messages when the projector is turned on.
TheEcoMessagepromptstheusertosaveenergy.When[Normal]isselectedfor[Lampmode],youwillgetamessagetopromptyoutoselect[Quiet]for[Lampmode].
60
Page 70
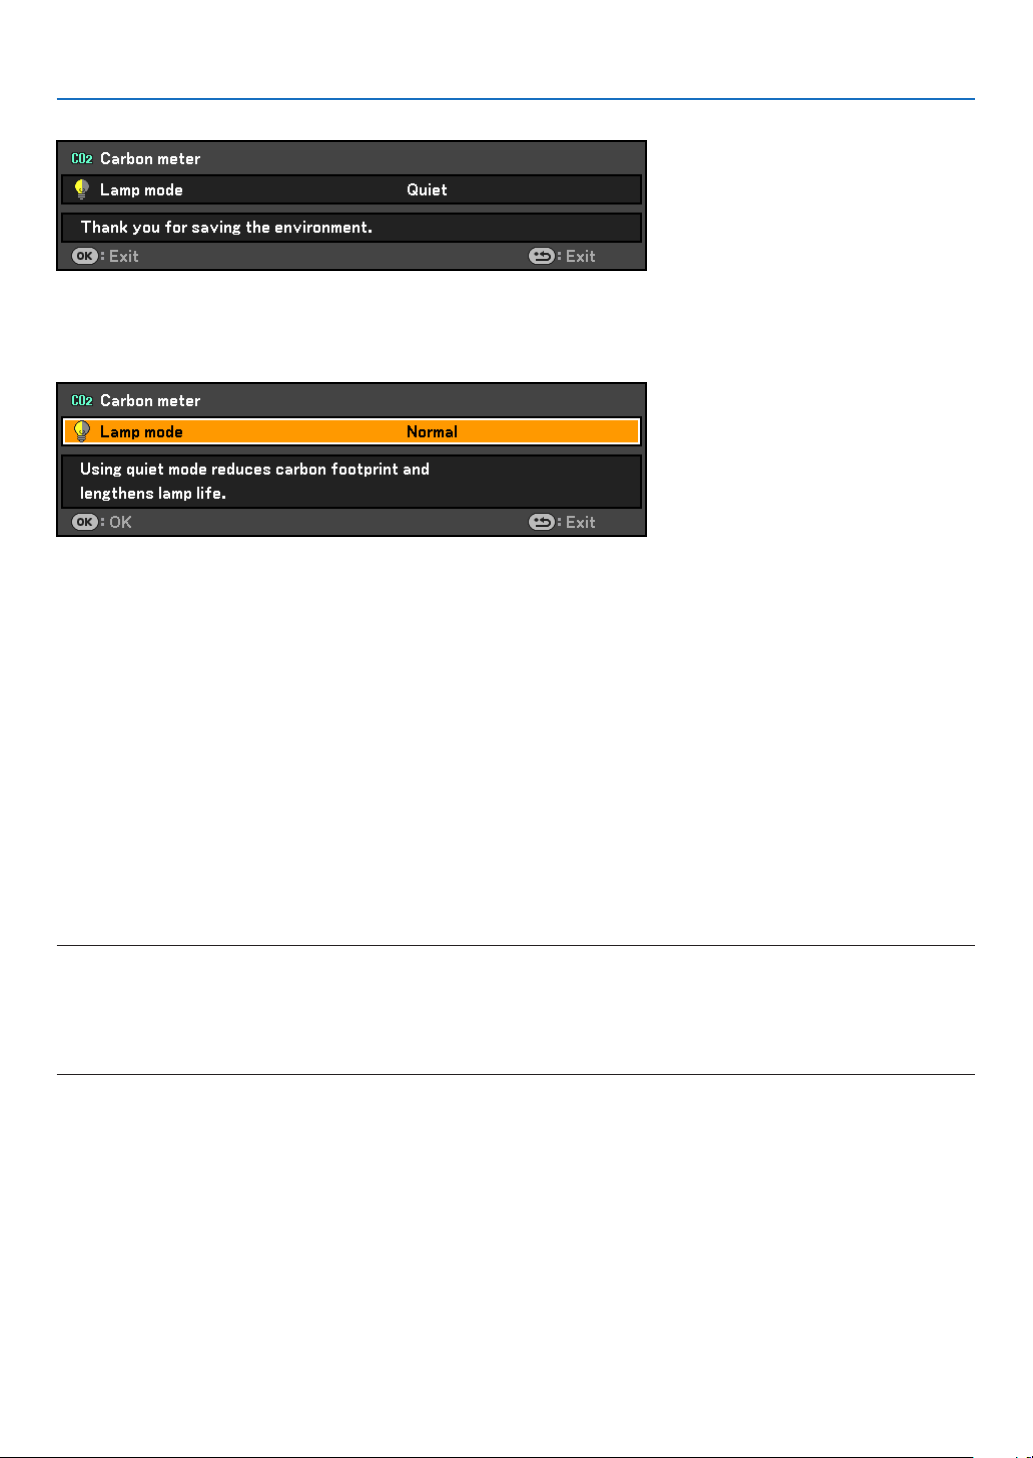
5. Using On-Screen Menu
When[Quiet]isselectedfor[Lampmode]
To close the message, press the OK or the BACK button. The message will disappear if no button operation is done
for 30 seconds.
When[Normal]isselectedfor[Lampmode]
PressingtheOKbuttonwilldisplaythe[Lampmode]screen.(→ page 38)
To close the message, press the BACK button.
Selecting Menu Display Time [Display time]
This option allows you to select how long the projector waits after the last touch of a button to turn off the menu.
The preset choices are Manual, 5 sec, 15 sec, and 45 sec.
Selecting a Color for Background [No signal screen]
Use this feature to display a blue, black screen or the Canon logo screen when no signal is available.
Selecting Interval Time for Filter Message [Filter message]
The projector has a feature that informs you of the timing for cleaning the lters.
This item allows you to select the time preference between displaying the message for cleaning the lters. Clean the
lter when you get the message “Please clean lter.” See page 69.
Five options are available: Off, 100(H), 200(H), 500(H), 1000(H), 1500(H)
The default setting is 1500(H). Change the interval time depending on the degree of dust and dirt on the lters.
NOTE:
1) Themessageforlampreplacementandltercleaningwillbedisplayedunderthefollowingconditions:
- one minute after the projector has been powered on.
- when the POWER button on the projector cabinet or on the remote control is pressed.
To cancel the message, press any button on the projector cabinet or the remote control.
2) Yoursettingwillnotbeaffectedevenwhen[Reset]isdonefromthemenu.
61
Page 71
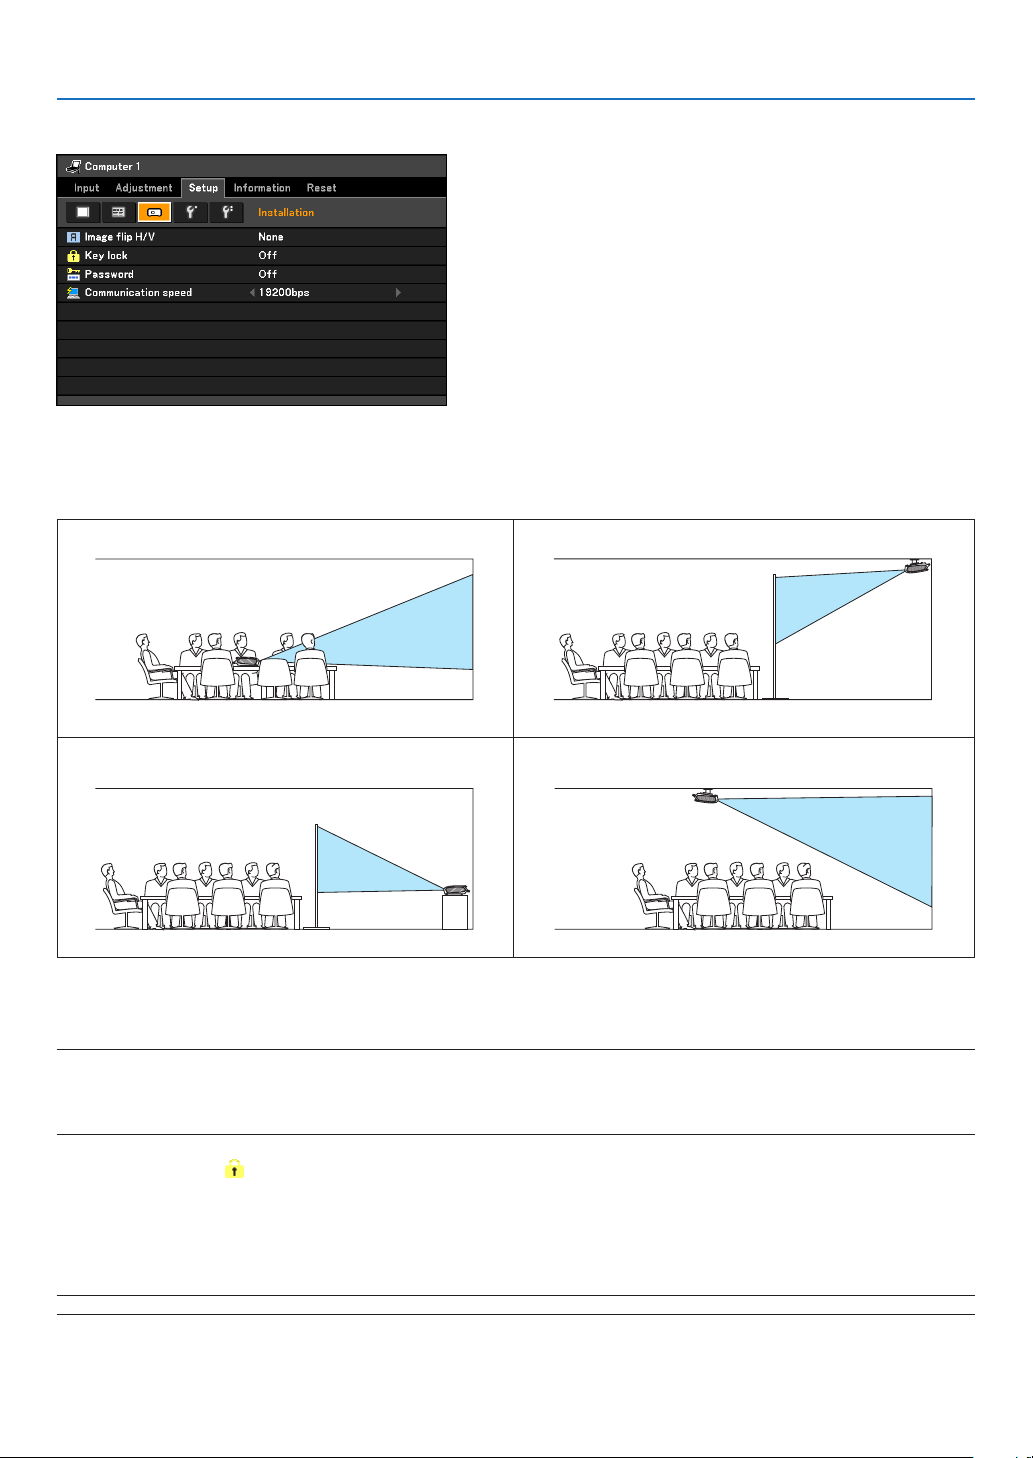
5. Using On-Screen Menu
[Installation]
Selecting Projector Orientation [Image ip H/V]
This sets your image for your type of projection application. The options are:
front projection, rear projection, ceiling mounted projection and rear ceiling mounted projection.
None
Rear
Disabling the Cabinet Buttons [Key lock]
This option turns on or off the Key Lock function for cabinet buttons.
NOTE:
• TheKeylocksettingwillnotaffecttheremotecontrolorPCcontrolfunctions.
• Whenthecabinetbuttonsaredisabled,pressingandholdingtheBACKbuttonontheprojectorcabinetforabout10seconds
will change the setting to enable.
Rear, Ceiling mounted
Ceiling mounted
TIP:TheKeylockicon(
Enabling Password [Password]
This feature turns on or off the Password function.
Unless the correct password is entered, the projector cannot project an image. See page 40.
NOTE:Yoursettingwillnotbeaffectedevenwhen[Reset]isdonefromthemenu.
)willbedisplayedatthetoprightofthemenuwhenKeylockisenabled.
62
Page 72
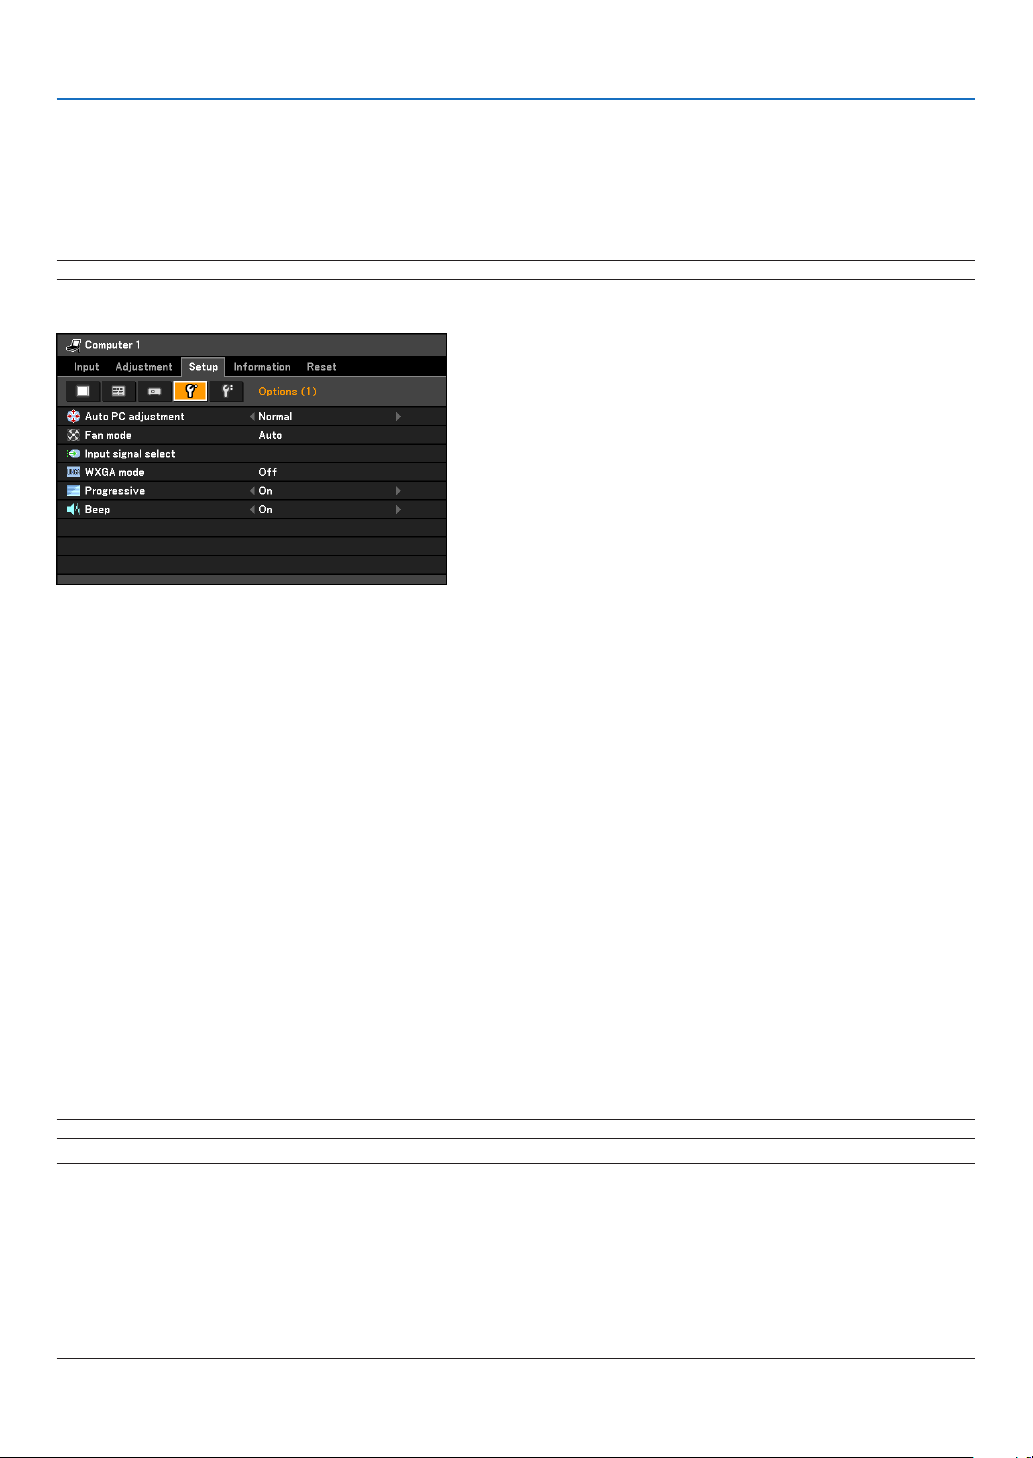
5. Using On-Screen Menu
Selecting Communication Speed [Communication speed]
This feature sets the baud rate of the SERVICE PORT (D-Sub 9 Pin). It supports data rates from 4800 to 19200
bps.
The default is 19200 bps.
Select the appropriate baud rate for your equipment to be connected (depending on the equipment, a lower baud
rate may be recommended for long cable runs).
NOTE:Yourselectedcommunicationspeedwillnotbeaffectedevenwhen[Reset]isdonefromthemenu.
[Options (1)]
Setting Auto Adjust [Auto PC adjustment]
Selecting[Normal]or[Fine]willautomaticallyexecuteAutoPCadjustmentfunctionatthetimeofsignalswitching.
This feature sets the Auto PC adjust mode so that the analog RGB image can be automatically or manually adjusted for noise and stability. You can automatically make adjustment in two ways: Normal and Fine
Off .......................... The RGB image will not be automatically adjusted.
You can manually optimize the RGB image.
Normal ................... Default setting. The RGB image will be automatically adjusted. Normally select this option.
Fine ........................ Select this option if fine adjustment is needed. It takes more time to switch to the source than when [Nor-
mal] is selected.
Enabling Fan Speed Mode [Fan mode]
This option allows you to select three modes for fan speed: Auto, High, and High altitude.
Auto .......................................... The built-in fans automatically run at a variable speed according to the internal temperature.
High .......................................... The built-in fans run at a fixed high speed.
High altitude ............................. The built-in fans run at a high speed. Select this option when using the projector in places at
5500 ft./1600 m or higher.
Whenyouwishtocooldownthetemperatureinsidetheprojectorquickly,select[High].
NOTE:ItisrecommendedthatyouselectHighspeedmodeifyoucontinuetousetheprojectorforconsecutivedays.
NOTE:
• ItisrecommendedthatyouselectHighspeedmodeifyouusetheprojectornon-stopforconsecutivedays.
• Besuretoselect[Highaltitude]whenusingtheprojectorataltitudesapproximately5500feet/1600metersorhigher.
• Usingtheprojector at altitudesapproximately 5500feet/1600metersorhigher withoutsetting to [High altitude]cancause
the projector to overheatand the protector could shut down. Furthermore, the projector could not turn on due to the in-
creased temperature of the lamp after power off. If these happen, wait a couple minutes and turn on the projector.
• Usingtheprojector at altitudesless than approximately5500 feet/1600 metersandsetting to [High altitude]cancausethe
lamptoovercool,causingtheimagetoicker.
• YourFanmodesettingwillnotbeaffectedevenwhen[Reset]isdonefromthemenu.
63
Page 73
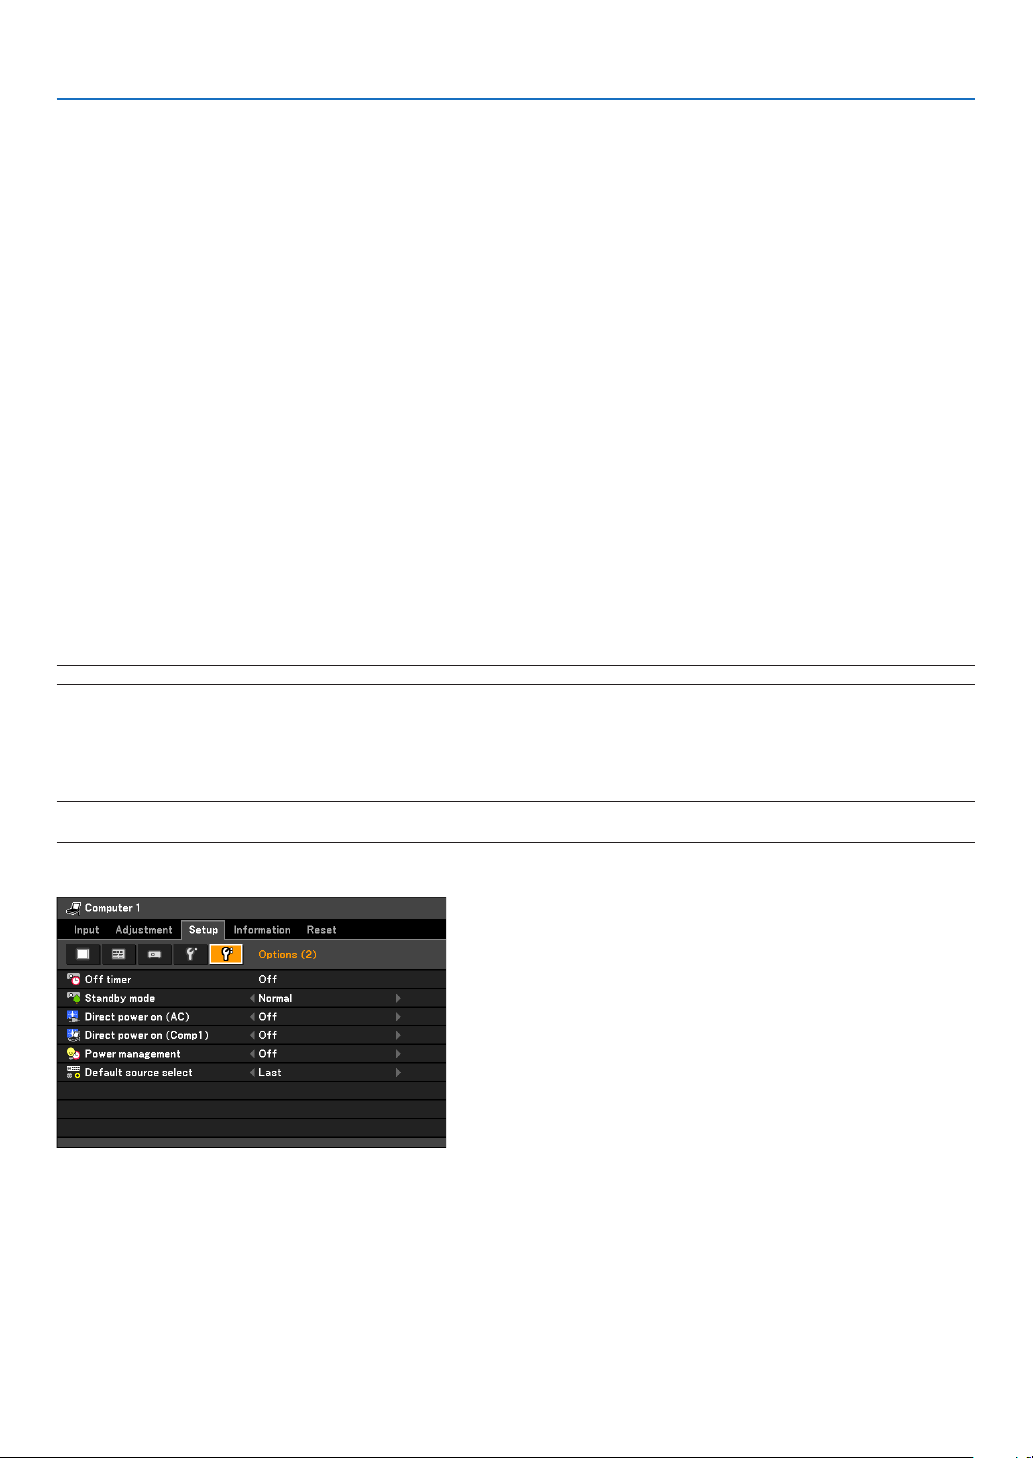
5. Using On-Screen Menu
Selecting Signal Format [Input signal select]
[Computer1],[Computer2(Analog)]
Allowsyoutochoose[Computer1]or[Computer2(Analog)]foranRGBsourcesuchasacomputer,or[COMPONENT]foracomponentvideosourcesuchasaDVDplayer.Normallyselect[RGB/COMPONENT]andthe
projector automatically detects a component signal. However there may be some component signals that the
projectorisunabletodetect.Ifthisisthecase,select[COMPONENT].
[VIDEO&S-VIDEOSystemSelect]
This feature enables you to select composite video standards automatically or manually.
Normallyselect[Auto]andtheprojectorwillautomaticallydetectthevideostandard.
In the case where the projector has difficulty detecting the video standard, select the appropriate video standard from the menu.
This must be done for VIDEO and S-VIDEO respectively.
Enabling or Disabling WXGA Mode [WXGA mode]
Selecting[On]willgiveprioritytoaWXGA(1280x768)signalinrecognizinganinputsignal.
When[WXGAmode]issetto [On],anXGA(1024x768)signalmaynotberecognizedonLV-7385,LV-7380,LV7285orLV-7280.Inthiscase,select[Off].
Enabling the deinterlace [Progressive]
Turns on or off the deinterlace function for a telecine signal.
Off ......................... Select this option if there is any jitter or artifacts in video.
On .......................... Default standard setting.
NOTE:ThisfeatureisnotavailableforRGBandHDTVsignals.
Enabling Key Sound and Error Sound [Beep]
This feature turns on or off the keypad sound or alarm when a button on the cabinet and the remote control is
pressed or an error occurs.
NOTE:The[Beep]soundvolumecannotbeadjusted.The[Beep]soundcannotbemutedbyusingtheBLANKbutton.Toturnoff
the[Beep]sound,select[Off]for[Beep].
[Options (2)]
Setting Off Timer [Off timer]
You can use the Off Timer feature to turn off the projector (standby mode) automatically at a preset time.
Eight preset times can be selected: Off, 0:30, 1:00, 2:00, 4:00, 8:00, 12:00 and 16:00.
Theremainingcount-downtimewillbeshownatthetoprightofthemenuwhenthe[Offtimer]ispreset.
ThePOWERindicatorblinksgreenincycleof2.5secondsonand0.5secondoffwhen[Offtimer]ispreset.
When the off timer remaining time reaches 3 minutes, a message will be displayed to that effect.
Selecting Power-saving in [Standby mode]
Theprojectorhastwostandbymodes:[Normal]and[Power-saving].
64
Page 74

5. Using On-Screen Menu
The Power-saving mode is the mode that allows you to put the projector in the power-saving condition which consumes less power than the Normal mode. The projector is preset for Normal mode at the factory.
Normal .................. POWER indicator: Orange light/STATUS indicator: Green light
Power-saving ........ POWER indicator: Red light/STATUS indicator: Off
The following connectors, buttons or functions will not work during this mode.
- SERVICE PORT, MONITOR OUT connector, and AUDIO OUT connector
- LAN, Mail Alert, Direct power on (Comp1) functions
- Buttons other than POWER button on the cabinet
- Buttons other than POWER button on the remote control
NOTE:Yoursettingwillnotbeaffectedevenwhen[Reset]isdonefromthemenu.
Enabling Direct Power ON [Direct power on (AC)]
Turns the projector on automatically when AC power is supplied. This eliminates the need to always use the POWER button on the remote control or projector cabinet.
Turning On the Projector By Applying Computer Signal [Direct power on (Comp1)]
When the projector is in Standby mode, applying a computer signal from a computer connected to the ANALOG
IN-1 input will power on the projector and simultaneously project the computer’s image.
This functionality eliminates the need to always use the POWER button on the remote control or the projector
cabinet to power on the projector.
To use this function, rst connect a computer to the projector and the projector to an active AC input.
NOTE:
• Disconnectingacomputersignalfromthecomputerwillnotpowerofftheprojector.Werecommendusingthisfunctionin
combinationofthePowermanagementfunction.
• Thisfunctionwillnotbeavailableunderthefollowingconditions:
- whenacomponentsignalisappliedtotheANALOGIN-1connector
- whenaSynconGreenRGBsignalorcompositesyncsignalisapplied
• Once[Directpoweron(Comp1)]isturnedon,[Power-saving]modecannotbeselected.[Power-saving]modewillnottake
effectregardlessofwhetheritisselectedfor[Standbymode].
• ToenabletheDirectpoweron(Comp1)afterturningofftheprojector,wait3secondsandinputananalogRGBsignal.
IfananalogRGBsignalisstillpresentwhentheprojectoristurnedoff,theDirectpoweron(Comp1)willnotworkandthe
projectorremainsinstandbymode.
Enabling Power Management [Power management]
When this option is selected you can enable the projector to automatically turn off (at the selected time: 5 min., 10
min., 20 min., 30 min.) if there is no operation with no signal received by any input. When the remaining time reaches 3 minutes, a message will be displayed to that effect.
Selecting Default Source [Default source select]
You can set the projector to default to any one of its inputs each time the projector is turned on.
Last ....................... Sets the projector to default to the previous or last active input each time the projector is turned on.
Auto ....................... Searches for an active source in order of Computer 1 → Computer 2 (Digital) → Computer 2 (Analog)
→ VIDEO → S-VIDEO → Computer 1 and displays the first found source.
Computer 1 ........... Displays the RGB source from the Computer 1 Input [ANALOG IN-1] connector every time the projector
is started up.
Computer 2 (Digital)
Computer 2 (Analog)
VIDEO .................... Displays the Video source from the VIDEO IN connector every time the projector is started up.
S-VIDEO ................ Displays the Video source from the S-VIDEO IN connector every time the projector is started up.
... Displays the DVI digital source from the Computer 2 Input [DIGITAL IN/ANALOG IN-2] (Digital) connec-
tor every time the projector is started up.
.. Displays the RGB analog source from the Computer 2 Input [DIGITAL IN/ANALOG IN-2] (Analog) con-
nector every time the projector is started up.
65
Page 75
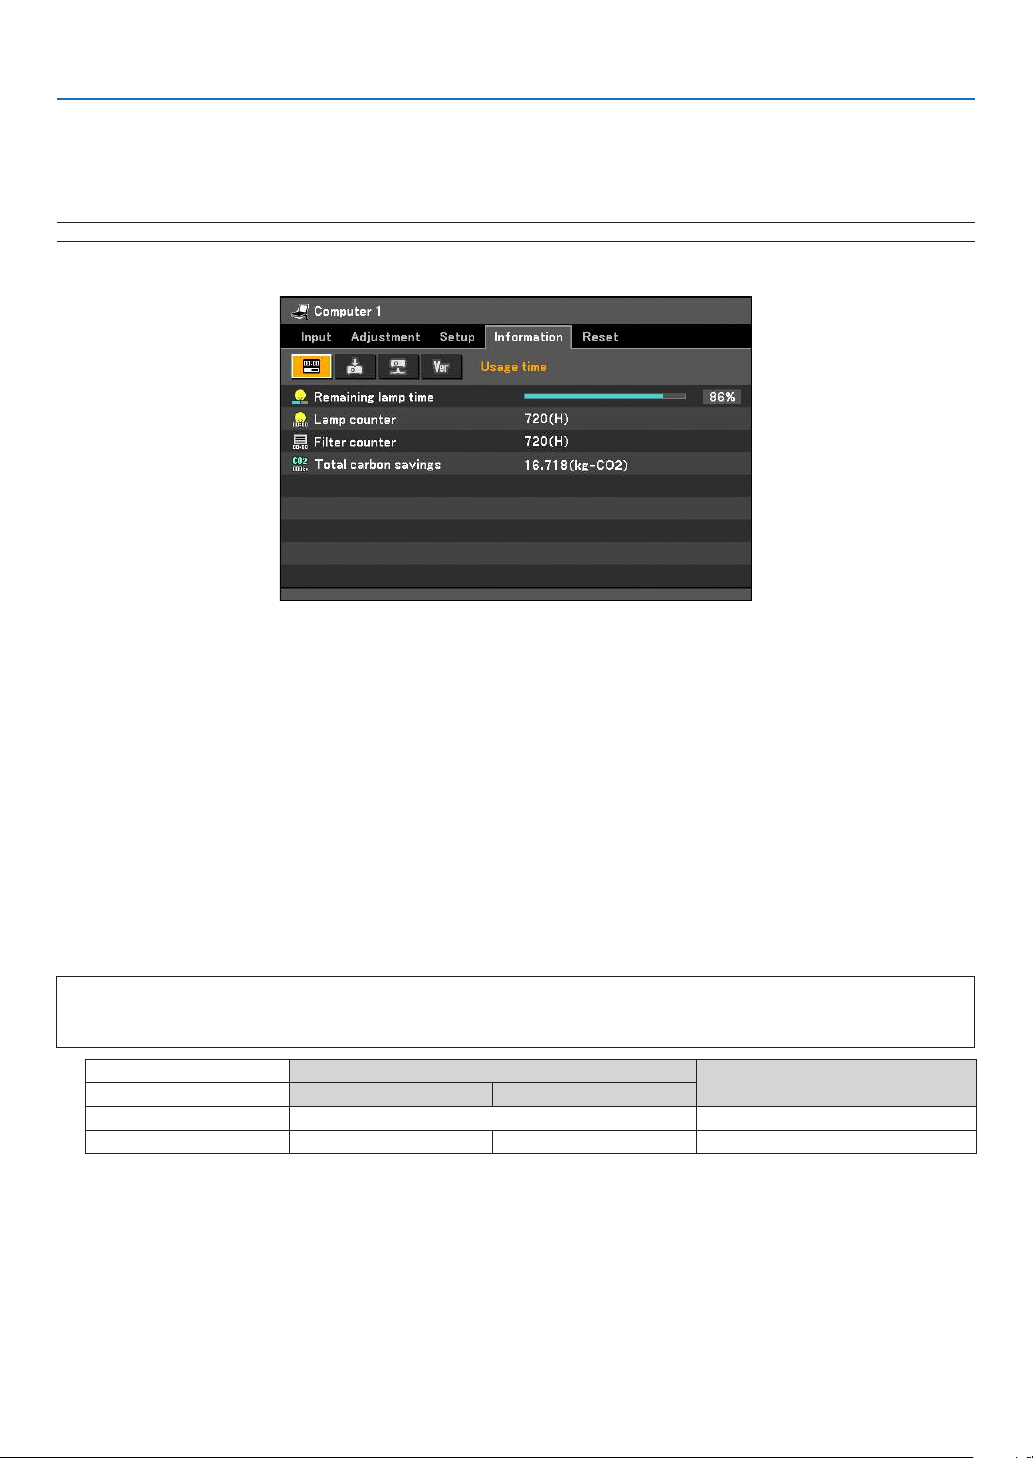
5. Using On-Screen Menu
Menu Descriptions & Functions [Information]
Displays the status of the lamp / lter, the current signal, the wired LAN, and the version. This item has four pages.
The information included is as follows:
NOTE:PressingtheINFObuttonontheremotecontrolwillshowthe[Information]menuitems.
[Usage time]
[Remaininglamptime](%) [Lampcounter](H)
[Filtercounter](H) [Totalcarbonsavings](kg-CO2)
Remaining Lamp Time/Lamp Counter
The projector has the Quiet mode. The lamp life varies depending on two modes: quiet mode and normal mode.
Selecting the Quiet mode allows you to reduce power consumption.
The[Remaininglamptime]showsthepercentageofremainingbulblife.The[Lampcounter]showstheamountof
lamp usage (hours).
• Whentheremaininglamptimereaches 0%, the “Replacewiththe newlamp.”message will be displayed.Replace with the new lamp.
See page 71 for lamp replacement.
• Themessageforlampreplacementwillbedisplayedunderthefollowingconditions:
- one minute after the projector has been powered on.
- when the POWER button on the projector cabinet or on the remote control is pressed.
To cancel the message, press any button on the projector cabinet or the remote control.
• When the remaining lamp time reaches 0%, the Remaining lamp time bar indicator changes from 0% to
100(H) in red and starts counting down.
When the remaining lamp time reaches 0 hours, the projector will not turn on.
Lamp counter
Lamp mode [Normal] only [Quiet] only
Factory setting 0 hours 100%
Lamp life 4000 hours (mini.) 5000 hours (max.) 0%
• TotalCarbonSavings
This displays the estimated carbon saving information in kg. The carbon footprint factor in the carbon saving
calculation is based on the OECD (2008 Edition).
Lamp remaining time
66
Page 76
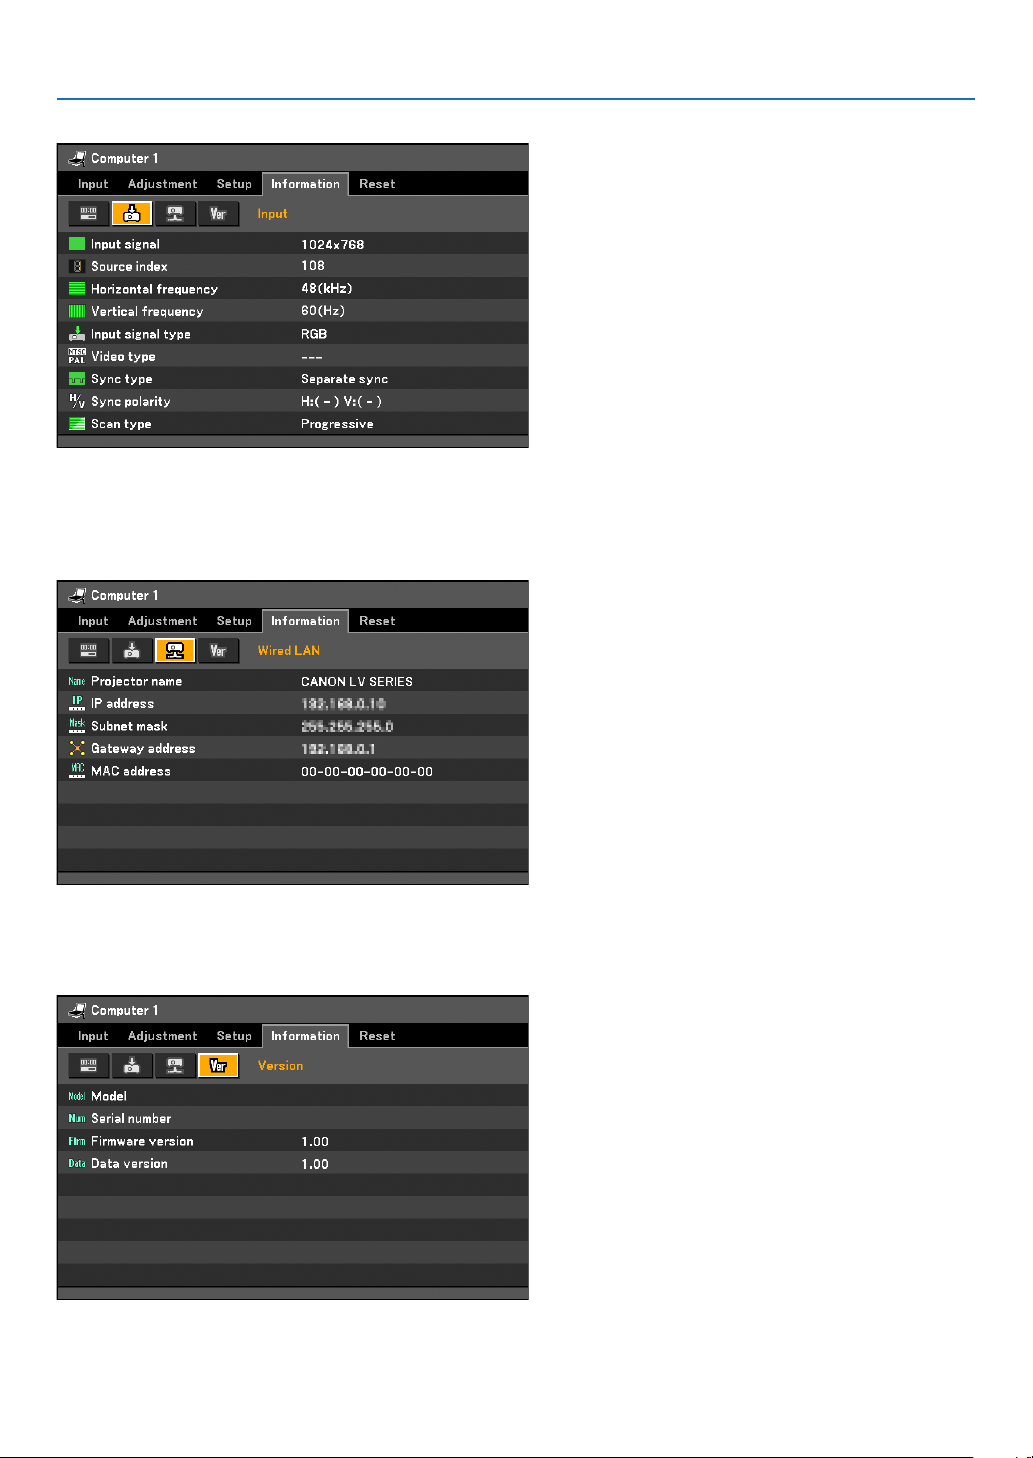
[Input]
[Inputsignal] [Sourceindex] [Horizontalfrequency]
[Verticalfrequency] [Inputsignaltype] [Videotype]
[Synctype] [Syncpolarity] [Scantype]
[Wired LAN]
5. Using On-Screen Menu
[Projectorname] [IPaddress] [Subnetmask]
[Gatewayaddress] [MACaddress]
[Version]
[Model] [Serialnumber] [Firmwareversion]
[Dataversion]
67
Page 77
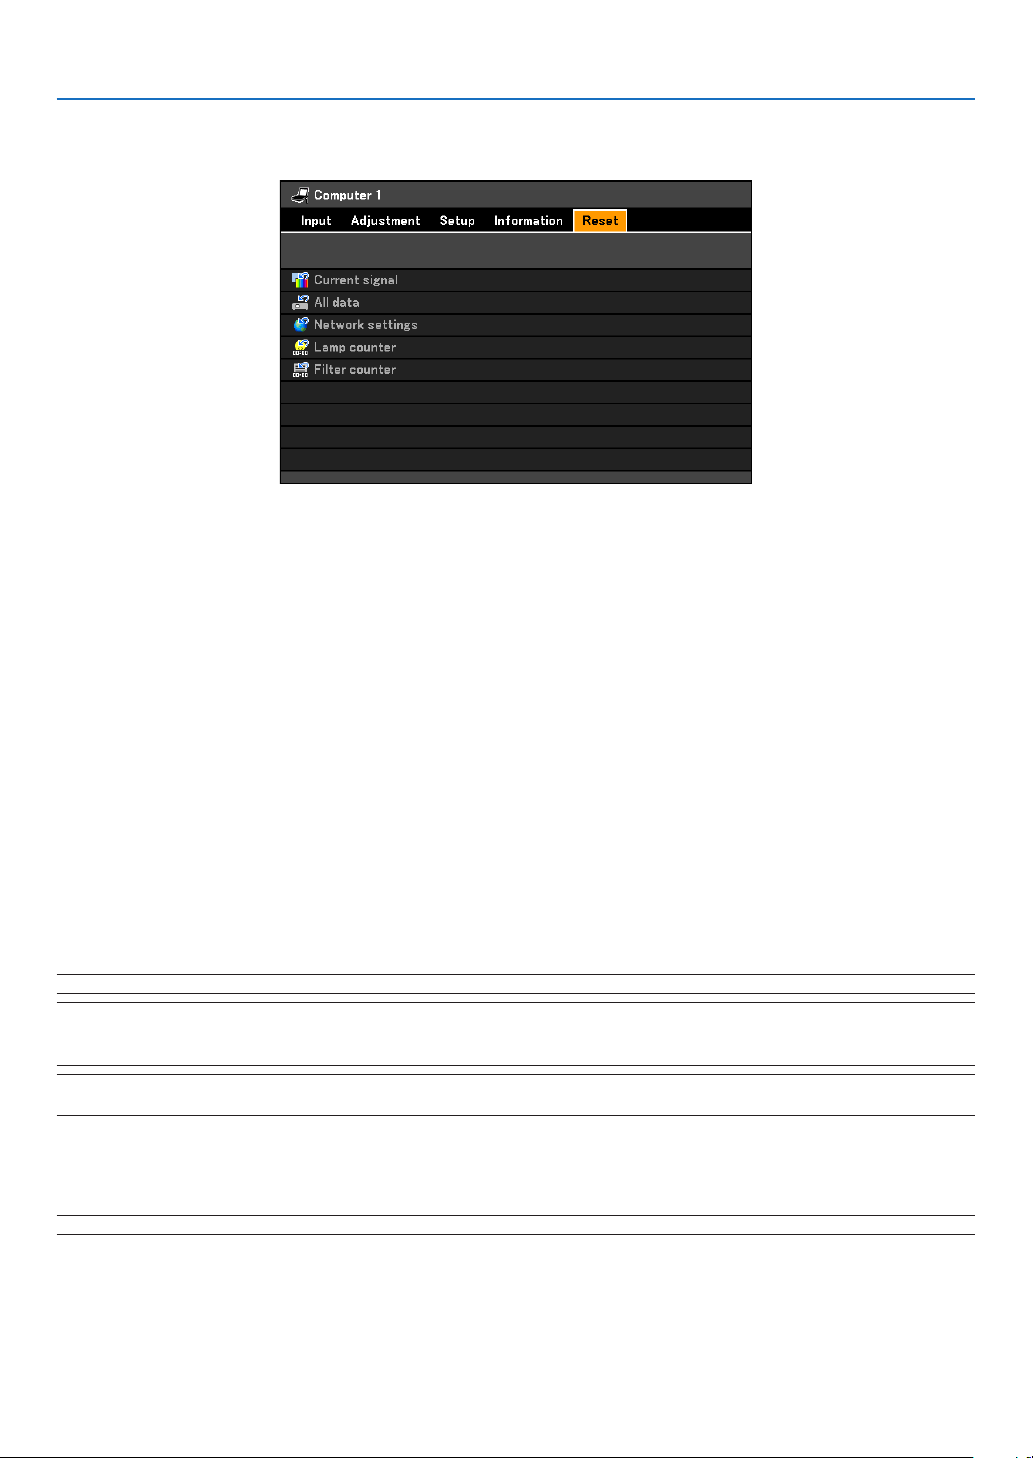
5. Using On-Screen Menu
Menu Descriptions & Functions [Reset]
Resetting settings and adjustments [Reset]
The Reset feature allows you to change adjustments and settings to the factory preset.
Clearing adjustments and settings for the current signal [Current signal]
Resets the adjustments for the current signal to the factory preset levels.
Theitemsthatcanberesetare:[Imagemode],[Brightness],[Contrast],[Sharpness],[Colorlevel],[Colorbalance],
[Aspect],[Horizontalposition],[Verticalposition],[Clock],[Tracking],and[Overscan].
Clearing all the adjustments and settings [All data]
Reset all the adjustments and settings for all the signals to the factory preset.
All items can be reset EXCEPT [Language], [No signal screen],[Filter message], [Password], [Communication
speed], [Standbymode],[Fanmode], [Remaininglamp time], [Lampcounter],[Filter counter],[Total carbonsavings],and[Networksettings].
Clearing Networking Settings [Network settings]
Returns[DHCP],[IPADDRESS],[SUBNETMASK],and[GATEWAY]tothedefaultsettings.
Clearing Lamp Hour Meter [Lamp counter]
Resetsthe lamp clock back to zero.Selecting this option displays submenu for a conrmation. Select [Yes] and
press the OK button.
NOTE:Elapsedtimeofthelampusewillnotbeaffectedevenwhen[Reset]isdonefromthemenu.
NOTE:Theprojectorwillturnoffandgointostandbymodewhenyoucontinuetousetheprojectorforanother100hoursafter
thelamphasreachedtheendofitslife.Ifthishappens,presstheINFObuttonontheremotecontrolfor10secondstoresetthe
lampclockbacktozero.Dothisonlyafterreplacingthelamp.
NOTE:Resettingthelampcounterbeforeorwithoutreplacingthelampwillnotdisplay theexactlampusagehours.Usingthe
lampbeyonditsservicelifemaycausethelamptobreak.Besuretoresetthelampcounterafterreplacingthelamp.
Clearing the Filter Usage Hours [Filter counter]
Resetsthe lter usage back to zero. Selecting this option displays submenu fora conrmation.Select [Yes] and
press the OK button.
NOTE:Elapsedtimeofthelterusewillnotbeaffectedevenwhen[Reset]isdonefromthemenu.
68
Page 78
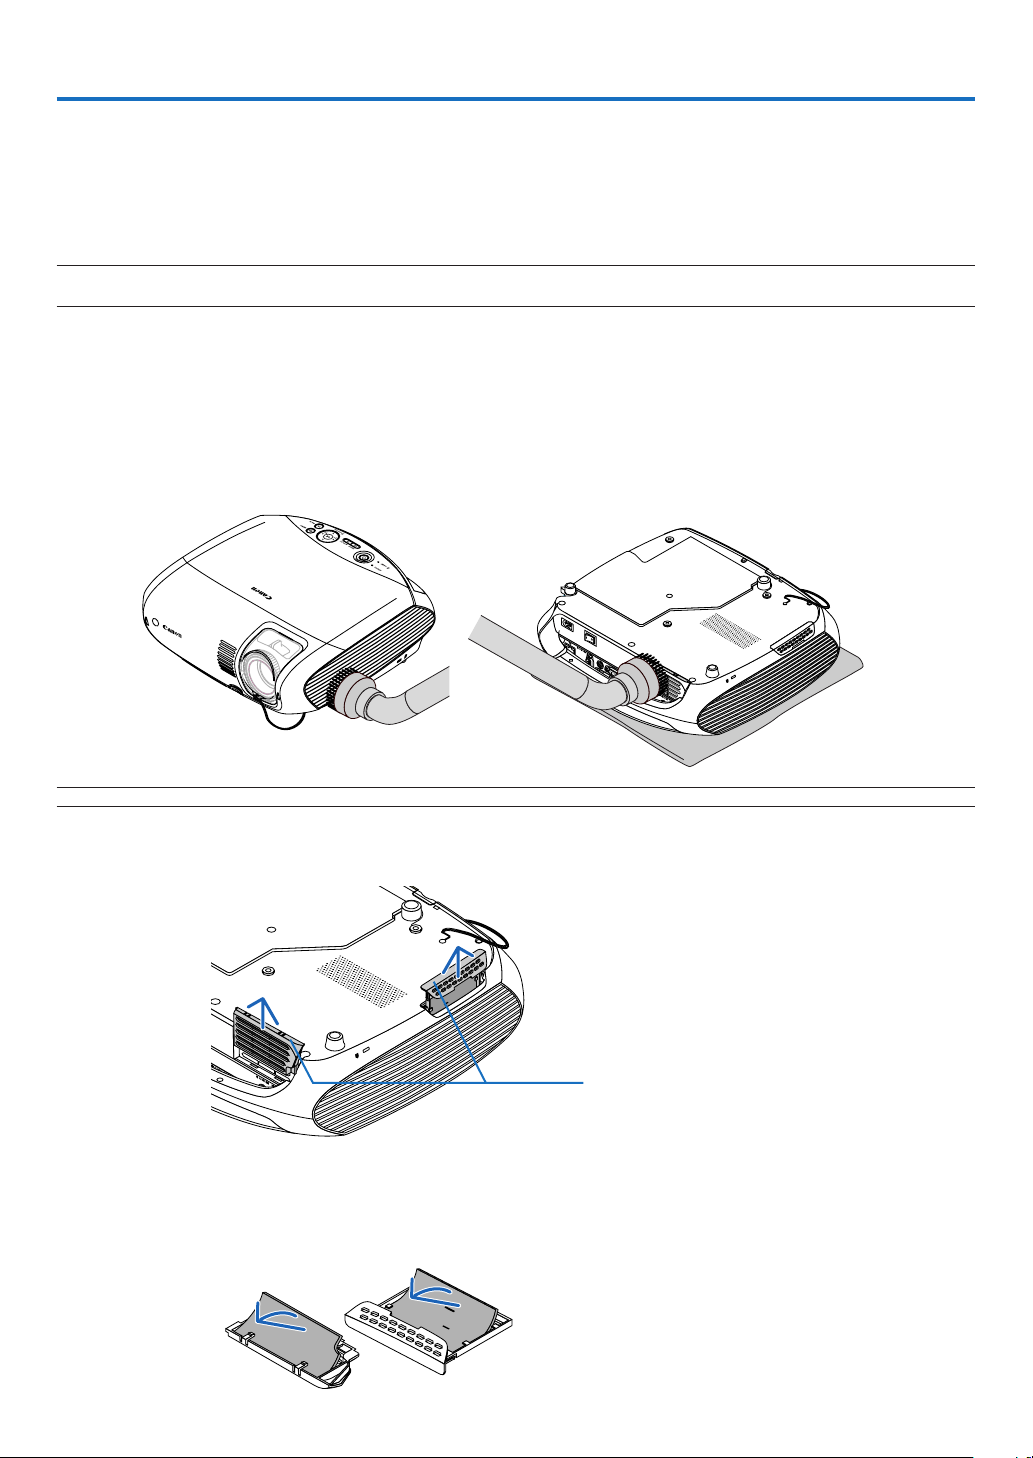
6. Maintenance
This section describes the simple maintenance procedures you should follow to clean the lter and replace the lamp.
Cleaning or Replacing the Filter
The air-lter keeps dust and dirt from getting inside the projector and should be frequently cleaned. If the lter is
dirty or clogged, your projector may overheat.
NOTE: The message for filter cleaning will be displayed for one minute after the projector is turned on or off.
To cancel the message, press any button on the projector cabinet or the remote control.
CAUTION
• Turnofftheprojector,turnoffthemainpowerswitchandunplugtheprojectorbeforereplacingthelter.
• Onlycleantheoutsideoftheltercoverwithavacuumcleaner.
• Donotattempttooperatetheprojectorwithouttheltercover.
To clean the air-lter:
Vacuum the lter-through the lter cover.
NOTE: When turning over the projector, slowly place it on a soft cloth so as not to scratch the cabinet.
To replace the lter:
1. Remove the lter cover (2 locations) by pushing up on the tab of the cover.
Tab
2. Replace two lters.
(1) Gently peel off the lter and clean the lter cover.
(2) Attach the new lter to the lter cover.
The air lter comes in two types. These two lters cannot be interchanged.
69
Page 79
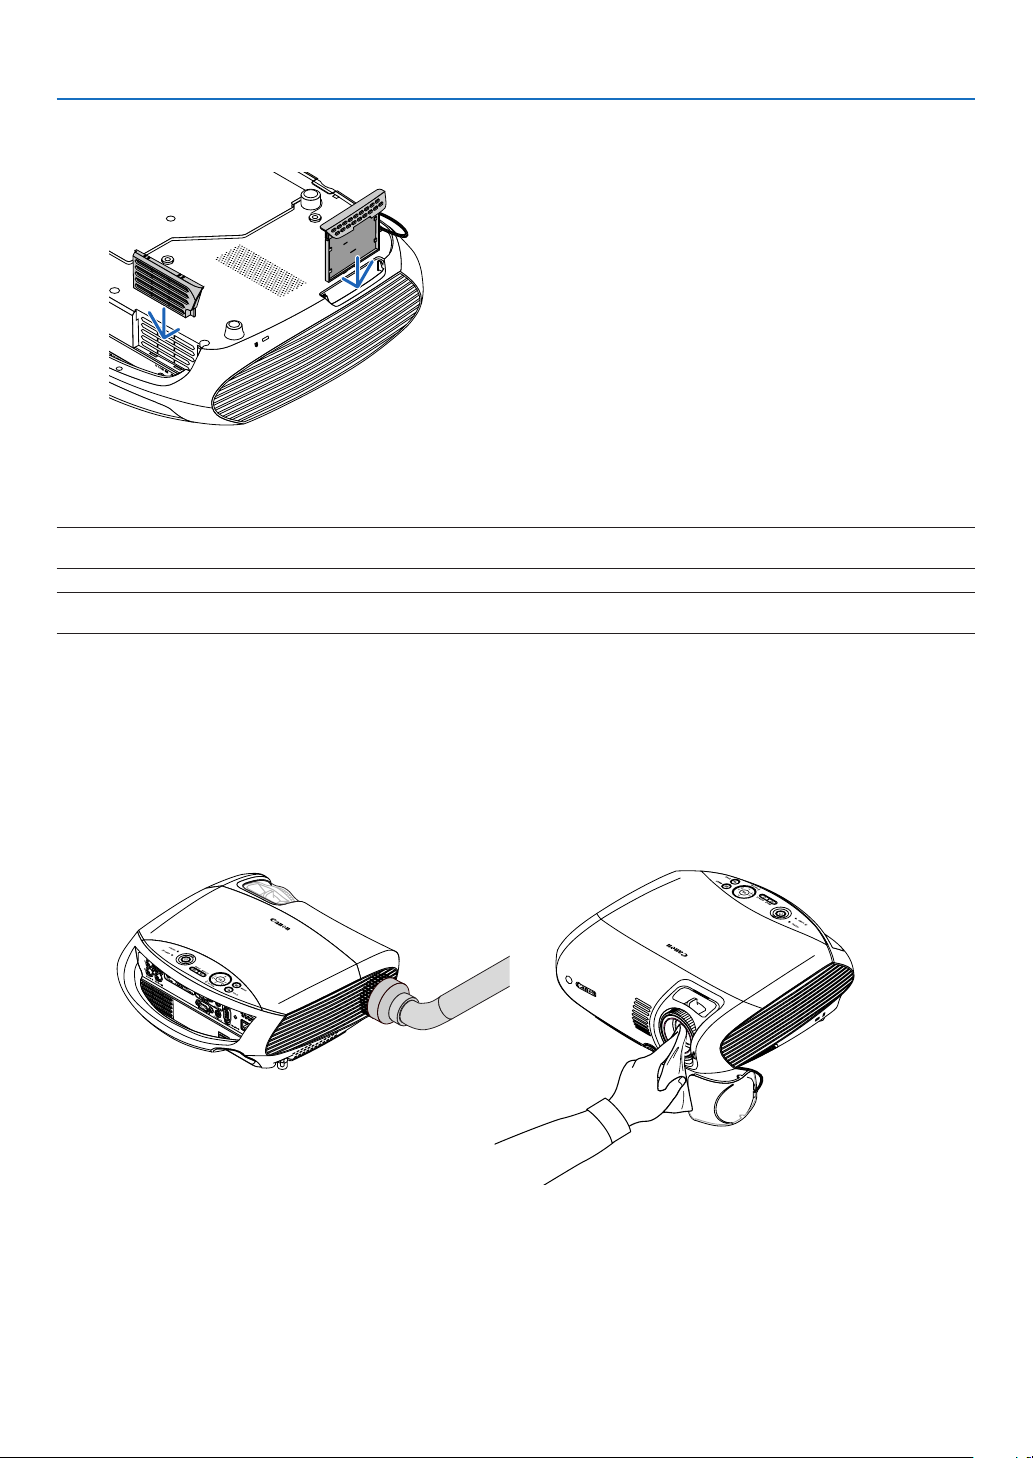
6. Maintenance
3. Reinstall the new lter cover (2 locations).
• Insert the lter cover until you feel click.
4. Clear the lter hours used.
Toresetthelterusagetime,fromthemenu,select[Reset]→[Filtercounter].
(See page 68 for resetting the lter usage time.)
NOTE:Donotwashthelterwithsoapandwater.Soap andwaterwilldamagetheltermembrane.Beforereplacingthelter,
remove dust and dirt from the projector cabinet. Keep out dust and dirt during filter replacement.
NOTE:Whenyoureplacethelamp,itisalsowisetoreplacethelter.Theltercomesinthe same packagewithyourreplacement lamp.
Cleaning the Cabinet and the Lens
1. Turn off the projector before cleaning.
2. Clean the cabinet periodically with a damp cloth. If heavily soiled, use a mild detergent. Never use
strong detergents or solvents such as alcohol or thinner.
3. Use a blower or lens paper to clean the lens, and be careful not to scratch or mar the lens.
70
Page 80
6. Maintenance
Replacing the Lamp
When the lamp reaches the end of its life, the LAMP indicator in the cabinet will blink red and the message “Replace
with the new lamp.”* will appear. Even though the lamp may still be working, replace the lamp to maintain the optimal
projector performance. After replacing the lamp, be sure to clear the lamp hour meter. See page 68.
CAUTION
• DONOTTOUCHTHELAMPimmediatelyafterithasbeenused.Itwillbeextremelyhot.Turntheprojector
off, turn off the main power switch and then disconnect the power cord. Allow at least one hour for the lamp to
cool before handling.
• DONOTREMOVEANYSCREWSexcepttwolamphousingscrews.Youcouldreceiveanelectricshock.
• Donotbreaktheglassonthelamphousing.
Keep nger prints off the glass surface on the lamp housing. Leaving nger prints on the glass surface might
cause an unwanted shadow and poor picture quality.
• Theprojectorwillturnoffandgointostandbymodewhenyoucontinuetousetheprojectorforanother
100 hours after the lamp has reached the end of its life. If this happens, be sure to replace the lamp. If you
continue to use the lamp after the lamp reaches the end of its life, the lamp bulb may shatter, and pieces of
glass may be scattered in the lamp case. Do not touch them as the pieces of glass may cause injury. If this
happens, contact your dealer for lamp replacement.
*NOTE:Themessage[Replacewiththenewlamp.]willbedisplayedunderthefollowingconditions:
• foroneminuteaftertheprojectorhasbeenpoweredon
• whenthe
(POWER)buttonontheprojectorcabinetorontheremotecontrolispressed
To turn off the message, press any button on the projector cabinet or the remote control.
To replace the lamp:
Optional lamp and tools needed for replacement:
• Replacementlamp
Lamp Projector
LV- LP31 LV-7385/LV-8310/LV- 8215
LV- LP32 LV-7380/LV-7285/LV-72 80
• Phillipsscrewdriverandatheadscrewdriver
71
Page 81
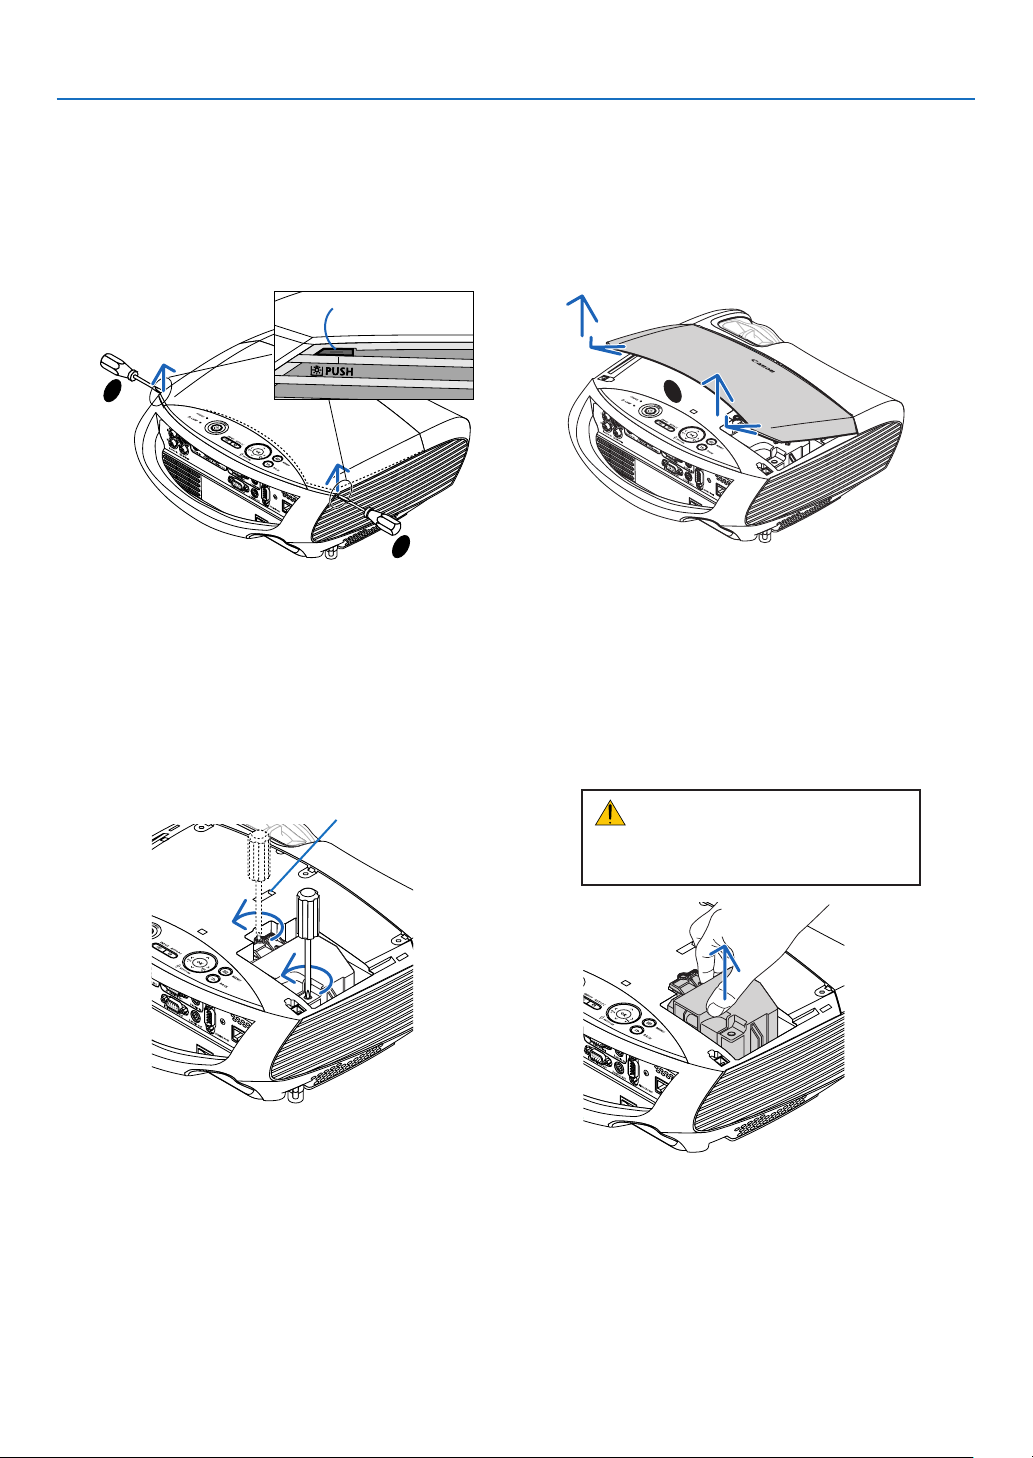
6. Maintenance
2
1
3
1. Remove the lamp cover.
There are two locks on the left and right sides.
(1) Use the tip of the athead screwdriver to push and release one lock.
(2) Do this for the other lock.
(3) Slowly pull the lamp cover in the direction of the arrow and lift it.
Lock
(Push here)
2. Remove the lamp.
(1) Loosen the two screws securing the lamp until the phillips screwdriver goes into a freewheeling condition.
•Thetwoscrewsarenotremovable.
•Thereisaninterlockonthiscasetopreventtheriskofelectricalshock.Donotattempttocircumventthis
interlock.
(2) Remove the lamp by holding it.
Interlock
CAUTION:
Make sure that the lamp is cool enough
to before removing it.
72
Page 82
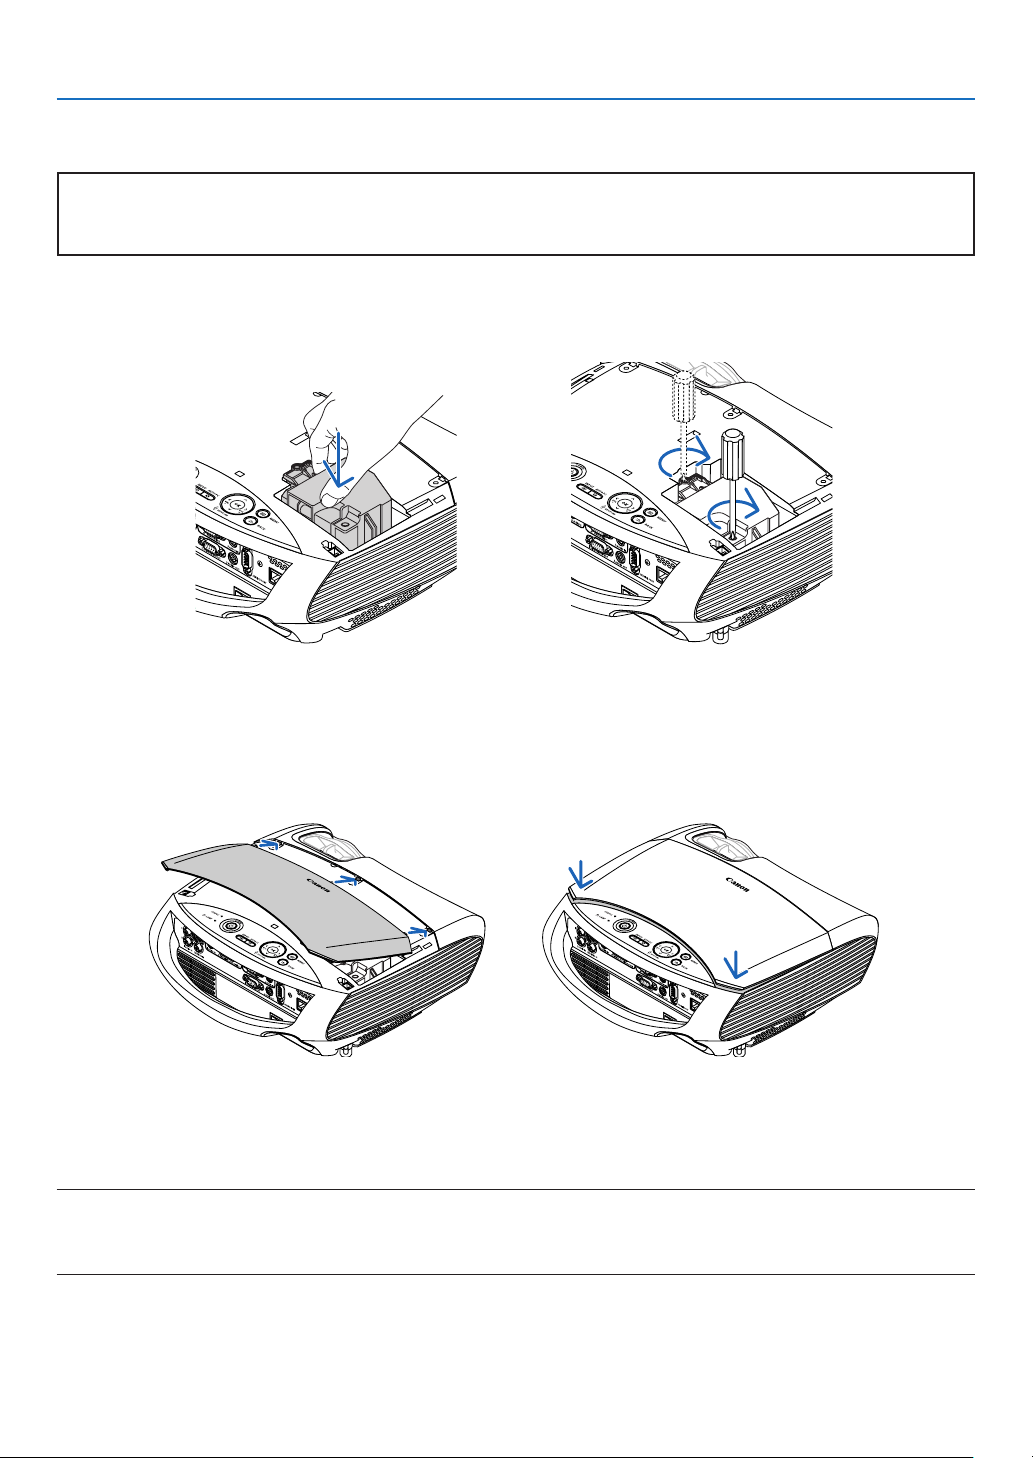
6. Maintenance
3. Install a new lamp.
(1) Insert a new lamp until the lamp is plugged into the socket.
CAUTION
Do not use a lamp other than the replacement lamp LV-LP31 (LV-7385/LV-8310/LV-8215) and LV-LP32 (LV7380/LV-7285/LV-7280). Order this from your dealer.
(2) Push the top center of the lamp to secure it.
(3) Secure it in place with the two screws.
•Besuretotightenthescrews.
4. Reattach the lamp cover.
(1) Insert three tabs into three grooves.
(2) Push down both ends of the lamp cover until you feel click.
5. Connect the supplied power cord, turn on the Main Power switch and turn on the projector.
6. Finally, select the menu → [Reset] → [Lamp counter] to reset the lamp usage hours.
NOTE:Whenyoucontinuetousetheprojectorforanother100hoursafterthelamphasreachedtheendofitslife,theprojector
cannot turn on and the menu is not displayed.
Ifthishappens,presstheINFObuttonontheremotecontrolfor10secondstoresetthelampclockbacktozero.
Whenthelamptimeclockisresettozero,theLAMPindicatorgoesout.
73
Page 83
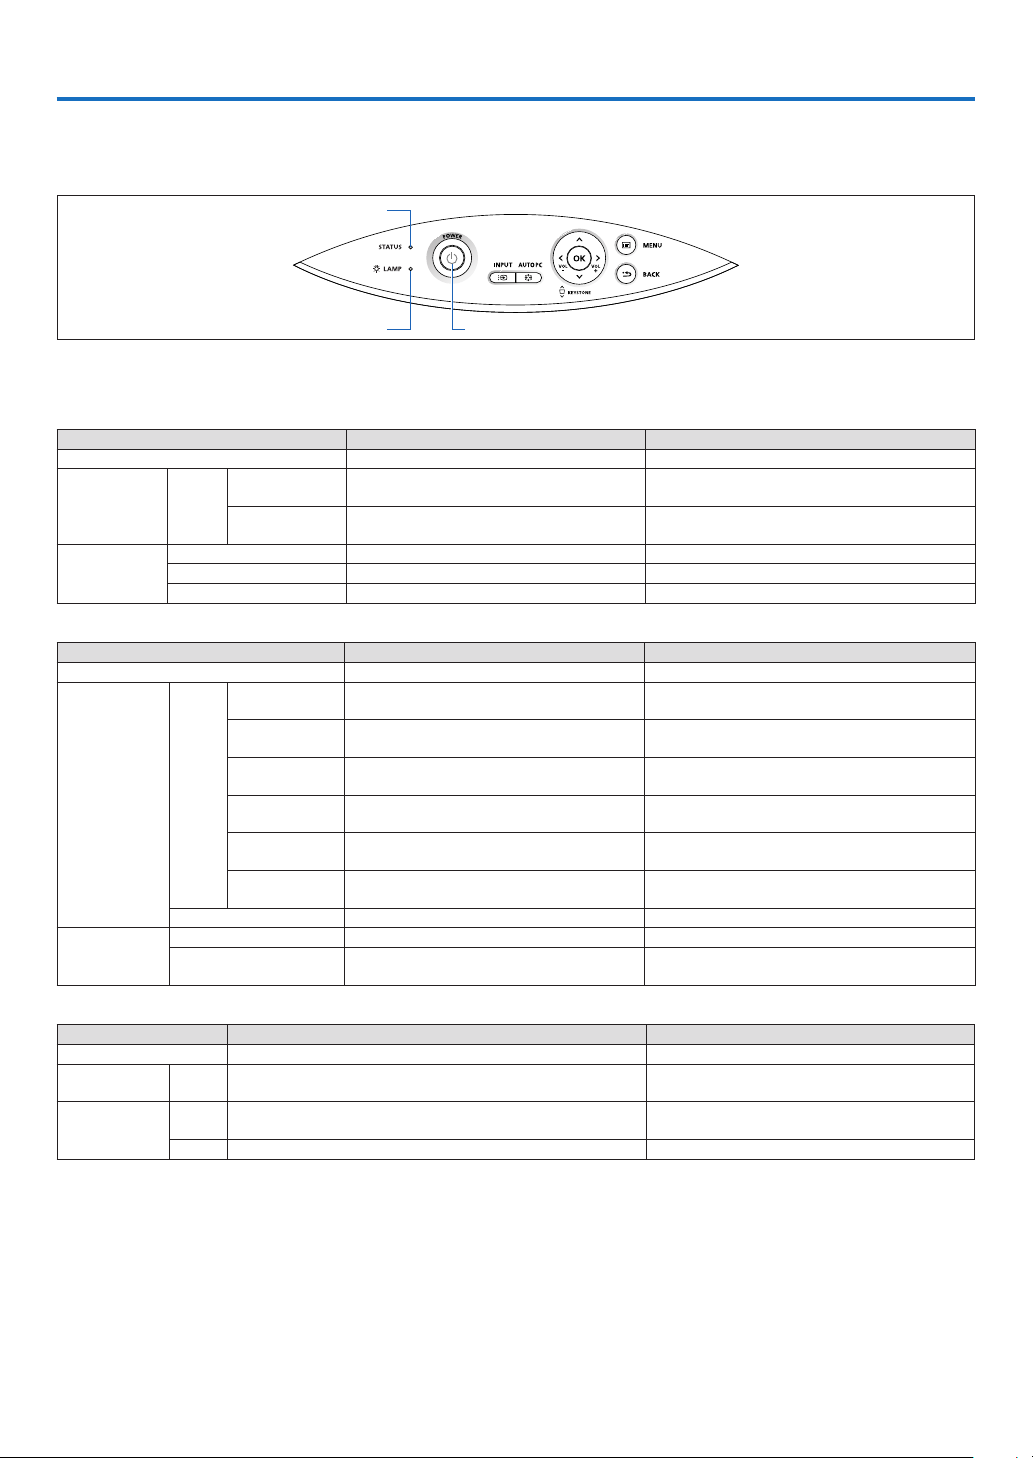
7. Appendix
Troubleshooting
This section helps you resolve problems you may encounter while setting up or using the projector.
STATUS Indicator
LAMP Indicator
POWER Indicator
Indicator Messages
POWER Indicator
Indicator C ondition Projector Condition Note
Off The main power is off –
0.5 sec On,
Blinking light Green
Green The projector is turned on. –
Steady light
0.5 sec O ff
2.5 sec On,
0.5 sec O ff
Orange [Normal] is selected for [Standby mode]
Red [Power-saving] is selected for [S tandby mode] –
STATUS Indicator
Indicator C ondition Projector C ondition Note
Off Normal –
1 cycle (0.5 sec On,
2.5 sec Off)
2 cycle (0.5 sec On,
0.5 sec O ff)
3 cycle (0.5 sec On,
0.5 sec O ff)
Blinking light
Steady light
Red
4 cycle (0.5 sec On,
0.5 sec O ff)
6 cycle (0.5 sec On,
0.5 sec O ff)
9 cycle (0.5 sec On,
0.5 sec Off)
Green Re-firing the lamp The projector is re-firing. Wait for a moment.
Green Standby([Normal] for [Standby mode]) –
Orange Key lock is on.
LAMP Indicator
Indicator C ondition Projector Condition Note
Off Normal –
Blinking light Red
Steady light
Lamp has r eached its end of life. Lamp replacement message will be displayed.
Lamp has been used beyond its limit. The projector will not turn on until
Red
the lamp is replaced.
Gre en* Lamp mode is set to Quiet mode. –
* This indicator lights green for about 90 seconds immediately after the projector is powered on.
The projector is get ting ready to turn on. Wait for a moment.
Off Timer is enabled.
Lamp cover error or lamp housing error
Temperature error
Power error
Fan error Fans will not work correctly.
Lamp error
[Auto iris] error
–
Replace the lamp cover or lamp correc tly.
See page 73.
The projec tor is overheated. Move the projector to a cooler
location.
Power unit is not working properly.
Contact your dealer
Lamp fails to ligh t. Wait a full minute and then turn on
again.
The Auto iris function is not working properly. (LV-7285
and LV-7280). Contact your dealer.
You have pressed c abinet but ton when Key lock is on.
See page 62.
Replace the lamp.
Replace the lamp.
If a temperature error occurs
If the temperature inside the projector rises too high, the over-temperature protector will automatically turn off the lamp with the
STATUS indicator blinking (2-cycle On and Off.)
Should this happen, do the following:
- Turn off the main power and unplug the AC power cord.
- Move the projector to a cooler location if the room where you are presenting is particularly too warm.
- Clean the ventilation holes if they are clogged with dust.
- Wait about 60 minutes until the inside of the projector becomes cool enough.
74
Page 84

7. Appendix
Common Problems & Solutions (→ "POWER/STATUS/LAMP Indicator" on page 74.)
Problem Check These Items
Does not turn on • Checkthat thepowercord isplugged in andthat thepowerbutton ontheprojector cabinetorthe remotecontrolis on.See
Will shut down • EnsurethattheOfftimerorPowermanagementisoff.Seepage64, 65.
No picture • UsetheINPUTbuttontoselectyoursource.Seepage26.
Picture suddenly becomes dark • CheckiftheprojectorisintheForcedcoolingoperationbecauseoftoohighambienttemperature.Ifthisisthecase,lowerthe
Color tone or Color balance is
unusual
Image isn’t square to the
screen
Picture is blurred • Adjustthefocus.Seepage29.
Picture is distorted • MakesuretheVGAcableisconnected.
Flicker appears on screen • Set[Fanmode]toothermodethan[Highaltitude] whenusingthe projectorataltitudesapproximately5500feet/1600meters
Image is scrolling vertically,
horizontally or both
Remote control does not
work
Indicator is lit or blinking • SeethePOWER/STATUS/LAMPIndicatoronpage74.
Cross color in RGB mode • PresstheAUTOPCbuttonontheprojectorcabinetortheremotecontrol.Seepage34.
Wh ene ve r the proj ec tor is
turned on, a message prompting you to clean the filter will
be displayed
The projector is behaving in
an erratic way
The [Projector overheating!
See the user’s manual.] message is displayed.
pages 23 and 24.
• Ensurethatthelampcoverorthelampisinstalledcorrectly.Seepage73.
• Checktoseeiftheprojectorhasoverheated.Ifthereisinsufcientventilationaroundtheprojectororiftheroomwhereyouare
presenting is particularly warm, move the projector to a cooler location.
• Checktoseeifyoucontinuetousetheprojectorforanother100hoursafterthelamp hasreachedtheendofitslife.Ifso,replace the lamp.
• Thelampmayfailtolight.Waitafullminuteandthenturnonthepoweragain.
• Thelamphasreachedtheendofitsusablelife.Replacethelamp.
• Set[Fan mode]to [Highaltitude] whenusing theprojector ataltitudesapproximately5500feet/1600metersorhigher.Using
the projector at altitudes approximately 5500 feet/1600 meters or higher without setting to [High altitude] can cause the projector to overheat and the projector could shut down. Also the projector could not turn on due to the increased temperature of the
lamp after power off. If these happen, wait a couple minutes and turn on the projector. See page 63.
• Alsowhenthelampisturnedoff,theprojectorinternaltemperatureishot.Ifthepoweristurnedonbeforetheprojectorhas
cooled down, the fan will run a short time before the lamp will turn on.
• Ifanyoftheaboveisnot thecause ofthe problem,turnoffthemainpowerand disconnectthe powercord. Afterallowing 5
minutes, plug the power cord and turn on the main power.
• Ensureyourcablesareconnectedproperly.
• Usemenustoadjustthebrightnessandcontrast.Seepage53.
• Removethelenscover.
Reset the settings or adjustments to factory preset levels using the [Reset] in the Menu. See page 68.
•
• EnteryourregisteredPasswordifthePasswordfunctionisenabled.Seepage40.
• WhenusingwithanotebookPC,besuretoconnectbetweentheprojectorandthenotebookPCbeforeturningonthepowerto
the notebook PC. In most cases signal cannot be output from RGB output unless the notebook PC is turned on after connecting
with the projector.
* If the screen goes blank while using your remote control, it may be the result of the computer's screen-saver or power man-
agement software.
• Seealsothenextpage.
internal temperature of the projector by selecting [High] for [Fan mode]. See page 63.
• Checkifanappropriatecolorisselectedin[Screencolor].Ifso,selectanappropriateoption.Seepage59.
• Adjust[Colorbalance]in[Adjustment].Seepage53.
• Repositiontheprojectortoimproveitsangletothescreen.Seepage28.
• UsetheKeystonecorrectionfunctiontocorrectthetrapezoiddistortion.Seepage31.
• Repositiontheprojectortoimproveitsangletothescreen.Seepage28.
• Ensurethatthedistancebetweentheprojectorandscreeniswithintheadjustmentrangeofthelens.Seepage11, 12, 82, 83.
• Condensationmayformonthelensiftheprojectoriscold,broughtintoawarmplaceand isthenturnedon.Shouldthishap-
pen, let the projector stand until there is no condensation on the lens.
• PresstheAUTOPCbu ttonontheprojectorcabinetortheremotecontrol.Seepage3 4.
or lower. Using the projector at altitudes less than approximately 5500 feet/1600 meters and setting to [High altitude] can
cause the lamp to overcool, causing the image to flicker. Switch [Fan mode] to [Auto] or [High]. See page 63.
• UsetheINPUTbuttontoselectyoursource.Seepage26.
• Adjustthecomputerimagemanually withthe[Horizontal position]or[Verticalposition]inthe [Adjustment]→ [Input signal].
See page 55.
• Installnewbatteries.Seepage9.
• Makesuretherearenoobstaclesbetweenyouandtheprojector.
• Standwithin7m(22feet)oftheprojector.Seepage9.
• Adjustthecomputerimagemanuallywith[Clock]or[Tracking]in[Inputsignal]inthemenu.Seepage54.
• CleanorreplacethelterandthenresettheFiltercounter.Seepage69, 68.
Press any button on the remote control or the projector cabinet to clear the message.
• Turnoffthemainpoweranddisconnectthepowercord.
Allow 5 minutes and then plug the power cord and turn on the main power.
• Checkforanyobstacleatventilation(inlet)oftherear.Ifthereisanobstacle,removeitorrelocatetheprojectortoanareawith
proper ventilation. If the filter is dirty or clogged, clean or replace the filter. After cleaning or replacing the filter, reset the [Filter
counter]. See page 69, 68.
For more information contact your dealer.
75
Page 85

7. Appendix
If there is no picture, or the picture is not displayed correctly.
• PoweronprocessfortheprojectorandthePC.
Be sure to connect the VGA cable between the projector and the computer before turning on the computer.
There are some notebook PCs, which do not output signal unless there is a projector or monitor connected
rst.
NOTE: You can check the horizontalfrequency of thecurrentsignal intheprojector’s menuunder Information.Ifitreads
“0kHz”,thismeansthereisnosignalbeingoutputfromthecomputer.Seepage67orgotonextstep.
• Enablingthecomputer’sexternaldisplay.
Displaying an image on the notebook PC’s screen does not necessarily mean it outputs a signal to the projec-
tor. When using a PC compatible laptop, a combination of function keys will enable/disable the external display. Usually, the combination of the ‘Fn” key along with one of the 12 function keys gets the external display to
come on or off. For more details, refer to your computer’s owner’s manual.
• Non-standardsignaloutputfromthecomputer
If the output signal from a notebook PC is not an industry standard, the projected image may not be displayed
correctly. Should this happen, deactivate the notebook PC’s LCD screen when the projector display is in use.
Each notebook PC has a different way of deactivate/reactivate the local LCD screens as described in the previous step. Refer to your computer’s documentation for detailed information.
• ImagedisplayedisincorrectwhenusingaMacintosh
When using a Macintosh with the projector, set the DIPswitch of the Mac adapter (not supplied with the projec-
tor) according to your resolution. After setting, restart your Macintosh for the changes to take affect.
For setting display modes other than those supported by your Macintosh and the projector, changing the DIP
switch on a Mac adapter may bounce an image slightly or may display nothing. Should this happen, set the
DIP switch to the 13” xed mode and then restart your Macintosh. After that, restore the DIP switches to a displayable mode and then restart the Macintosh again.
NOTE: AVideo Adaptercablemanufactured byApple Inc.is needed for a PowerBookwhichdoes not have a miniD-Sub
15-pinconnector.
• MirroringonaPowerBook
* When using the projector with a Macintosh PowerBook, output may not be set to 1024 x 768 unless “mirroring”
is off on your PowerBook. Refer to owner’s manual supplied with your Macintosh computer for mirroring.
• FoldersoriconsarehiddenontheMacintoshscreen
Foldersoriconsmaynotbeseenonthescreen.Shouldthishappen,select[View]→[Arrange]fromtheApple
menu and arrange icons.
76
Page 86
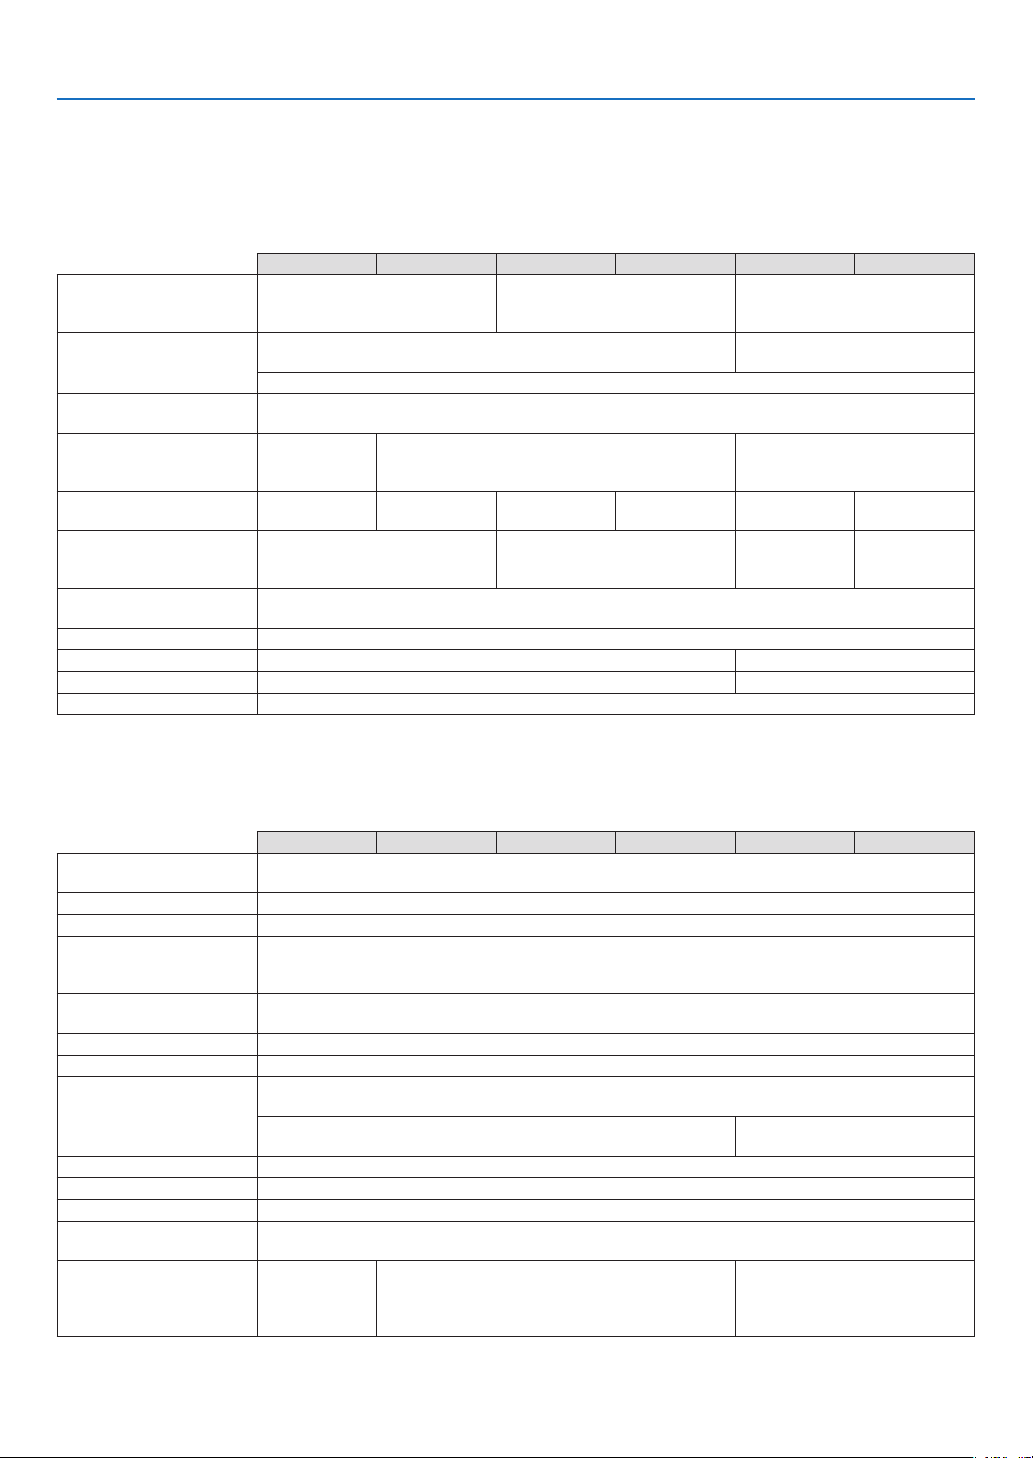
7. Appendix
Specifications
This section provides technical information about the projector’s performance.
Model Name LV-7385/LV-7380/LV-7285/LV-7280/LV-8310/LV-8215
Optical
LV-7 38 5 LV-7 38 0 LV-72 85 LV-728 0 LV-8310 LV-8215
LCD Panel
Resolution
Lens
Lamp
Brightness*²
(Presentation mode)
Contrast Ratio*²
(full white: full black)
(Presentation mode)
Uniformity
(Presentation mode)
Image Size (Diagonal) 21” to 300”/0.53 m to 7.6 m
Projection Distance 0.8 m to 11.3 m/31.5" to 444.9" 0.8m to 11.95m/31.5" to 470.5"
Projection Angle Tele: 7.9°- 8.3°/ Wide: 9.5°- 9.9° Tele: 8.0°- 8.3°/ Wide: 9.6°- 9.9°
Keystone Correction +/- 30° Vertical (Auto keystone)
0. 6 3" p - S i T F T ac t i ve-ma t rix
with Micro Lens Array (Aspect
4:3)
1024 x 768 pixels*¹ native, up to UXGA with scaling technology
(up to SXGA + 1400 dot(H) X 1050dot(V) Max. at RGB digital)
Manual zoom and manual focus
F1.7 - 2.0 f = 19.8 - 23.7 mm
230W AC lamp
(170W in Quiet
mode)
3500 lm 3000 lm 2600 lm 2200 lm 3000 lm 2600 lm
500:1 2000:1*³ 500:1 450:1
85%
180W AC lamp (145W in Quiet mode)
0. 6 3" p - S i T F T ac t i ve-ma t rix
(Aspect 4:3)
*¹ Effective pixels are more than 99.99%.
*² Compliance with ISO21118-2005”
*³Thevalueismeasuredwhen[Autoiris]issetto[On].
0. 5 9" p - S i T F T ac t i ve-ma trix
with Micro Lens Array (Aspect
16:10)
1280 x 800 pixels*¹ native, up to
UXGA with scaling technology
230W AC lamp (170W in Quiet
mode)
Electrical
LV-7 38 5 LV-7 38 0 LV-72 85 LV-728 0 LV-8310 LV-8215
Inputs
Outputs 1 RGB (D-Sub 15 Pin), 1 Stereo Mini Audio
Wired LAN Port RJ-45
Video Compatibility
Scan Rate
Video Bandwidth RGB: 80 MHz (-3dB)
Color Reproduction 16.77 million colors simultaneously, Full color
Horizontal Resolution
External Control RS232, IR, Wired LAN
Sync Compatibility Separate Sync / Composite Sync / Sync on Green
Built-in Speaker 7W (monaural)
Power Requirement
Input Current
1 RGB/Component (D-Sub 15 Pin), 1 RGB (Digital/Analog, DVI-29 P, HDCP*
Video (DIN 4 Pin), 1 Video (RCA), 1(L/R) RCA Audio, 2 Stereo Mini Audio
NTSC, NTSC4.43, PAL, PAL-60, PAL-N, PAL-M, SECAM,
1080i, 720p, 480p, 480i /60Hz
1080i, 576p, 576i /50Hz
Horizontal: 15 kHz to 100 kHz (RGB: 24 kHz or over)
Vertical: 50 Hz to 120 Hz
NTSC/NTSC4.43/PAL/PAL-M/PAL-N/PAL60/YCbCr: 540 TV lines
SECAM: 300 TV lines
RGB: 1024 dots (H) x 768 dots (V)
LV-7385/LV-7380/LV-7285/LV-7280/LV-8310/LV-8215: 100 - 240V AC, 50 / 60 Hz
LV-7385(E)/LV-7380(E)/LV-7285(E)/LV-7280(E)/LV-8310(E)/LV-8215:(E): 200 - 240V AC, 50 / 60 Hz
LV-7 38 5:
3. 8 -1.5A
LV-7385(E):
1.8A
LV-7380/LV-7285/LV-7280: 3.2-1.4A
LV-7380(E)/LV-7285(E)/LV-7280(E): 1.5A
4
supported), 1 S-
RGB: 1280 dots (H) x 800 dots
(V)
LV-8310/LV-8215: 3.8-1.5A
LV-8310(E)/LV-8215(E): 1.8A
77
Page 87
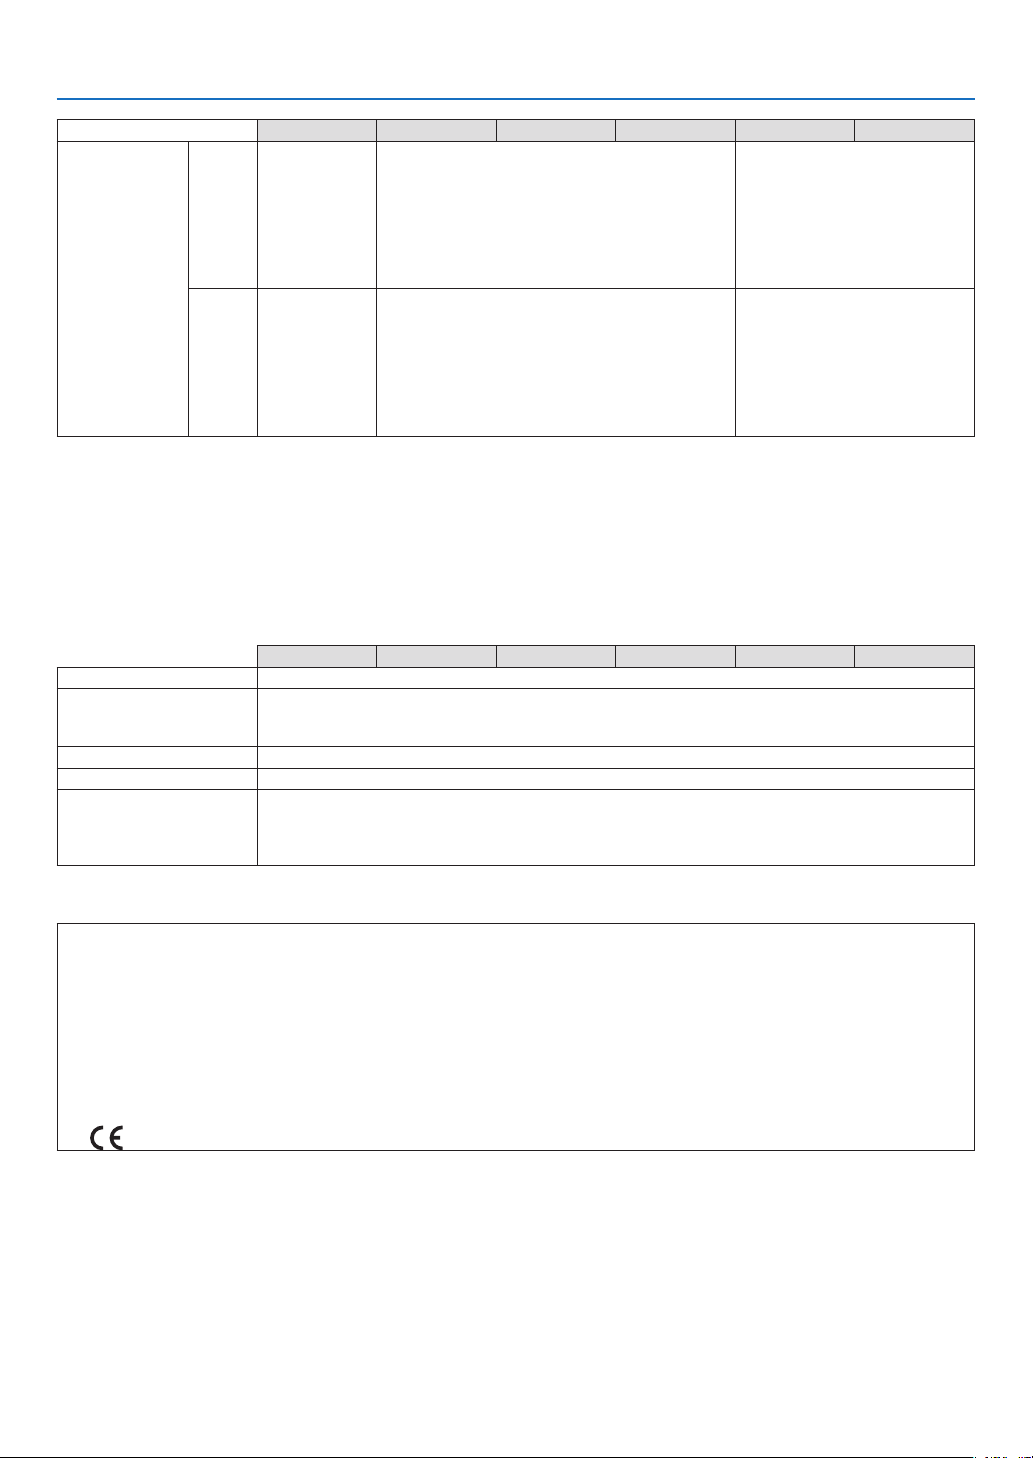
7. Appendix
LV-7 38 5 LV-7 38 0 LV-72 85 LV-728 0 LV-8310 LV-8215
0.6W in Powersa ving mode /
Power Consumption
100V AC
200V AC
10W in Standby
mode / 312W in
Lamp Normal
m o d e / 23 7 W
in Lamp Quie t
mode
0.7W in Powersa ving mode /
10W in Standby
mode / 294W in
Lamp Normal
m o d e / 2 2 8 W
in Lamp Quie t
mode
0.6W in Power-saving mode / 10W in Standby
mode / 251W in Lamp Normal
mode / 203W in Lamp Quiet mode
0.7W in Power-saving mode / 10W in Standby
mode / 239W in Lamp Normal
mode / 195W in Lamp Quiet mode
*4 What is HDCP/HDCP technology?
HDCP is an acronym for High-bandwidth Digital Content Protection. High bandwidth Digital Content Protection
(HDCP) is a system for preventing illegal copying of video data sent over a Digital Visual Interface (DVI).
If you are unable to view material via the DVI input, this does not necessarily mean the projector is not functioning
properly.
With the implementation of HDCP, there may be cases in which certain content is protected with HDCP and might
not be displayed due to the decision/intention of the HDCP community (Digital Content Protection, LLC).
Mechanical
LV-7 38 5 LV-7 38 0 LV-72 85 LV-728 0 LV-8310 LV-8215
Installation Orientation: Front / Rear / Ceiling mounted / Rear, Ceiling mounted
Dimensions
Weight 7.3 lbs / 3.3 kg
Fan Noise 35 dB (Normal mode), 29dB (Quiet mode)
Env ir onmental Consi derations
12.5”(W) x 13.2”(D) x 4.4”(H)
317 mm (W) x 336 mm (D) x 111 mm (H)
(not including protrusions)
Operational Temperatures : 41° to 104°F (5° to 40°C), (Quiet mode selected automatically at 95°F
to 104°F / 35°C to 40°C)
20% to 80% humidity (non-condensing)
Storage Temperatures : 14° to 122°F (-10° to 50°C), 20% to 80% humidity (non-condensing)
0.6W in Power-savi ng mod e /
10W in Standby mode / 312W in
Lamp Normal
mode / 237W i n La m p Quiet
mode
0.7 W i n Pow er-s av ing mo de /
10W in Standby mode / 294W in
Lamp Normal
mode / 22 8W i n La m p Quiet
mode
Regulations
For United States:
UL Approved (UL 60950-1)
Meets FCC Class B requirements
For Canada:
UL Approved (CSA 60950-1)
Meets DOC Canada Class B requirements
ForAustralia/NewZealand:
MeetsAS/NZSCISPR.22ClassB
For Europe:
Meets EMC Directive (EN55022, EN55024, EN61000-3-2, EN61000-3-3)
Meets Low Voltage Directive (EN60950-1)
The specications are subject to change without notice.
78
Page 88
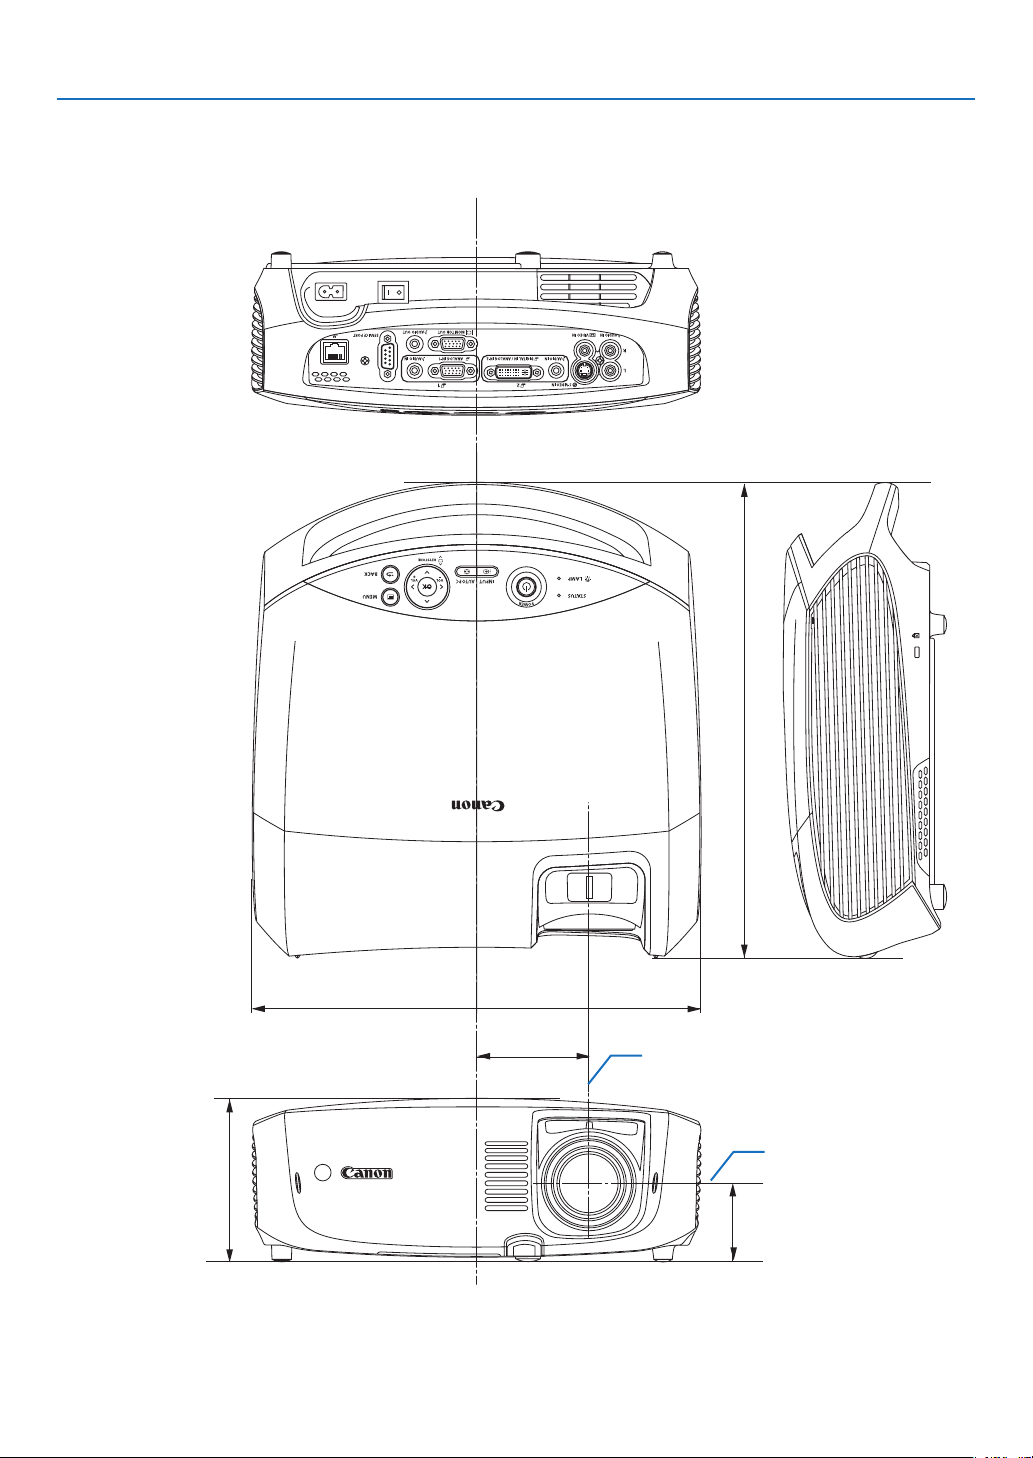
Cabinet Dimensions
7. Appendix
336 (13.2")
317 (12.5")
80 (3.2")
115 (4.5")
Lens center
Lens center
55 (2.2")
79
Unit: mm (inch)
Page 89
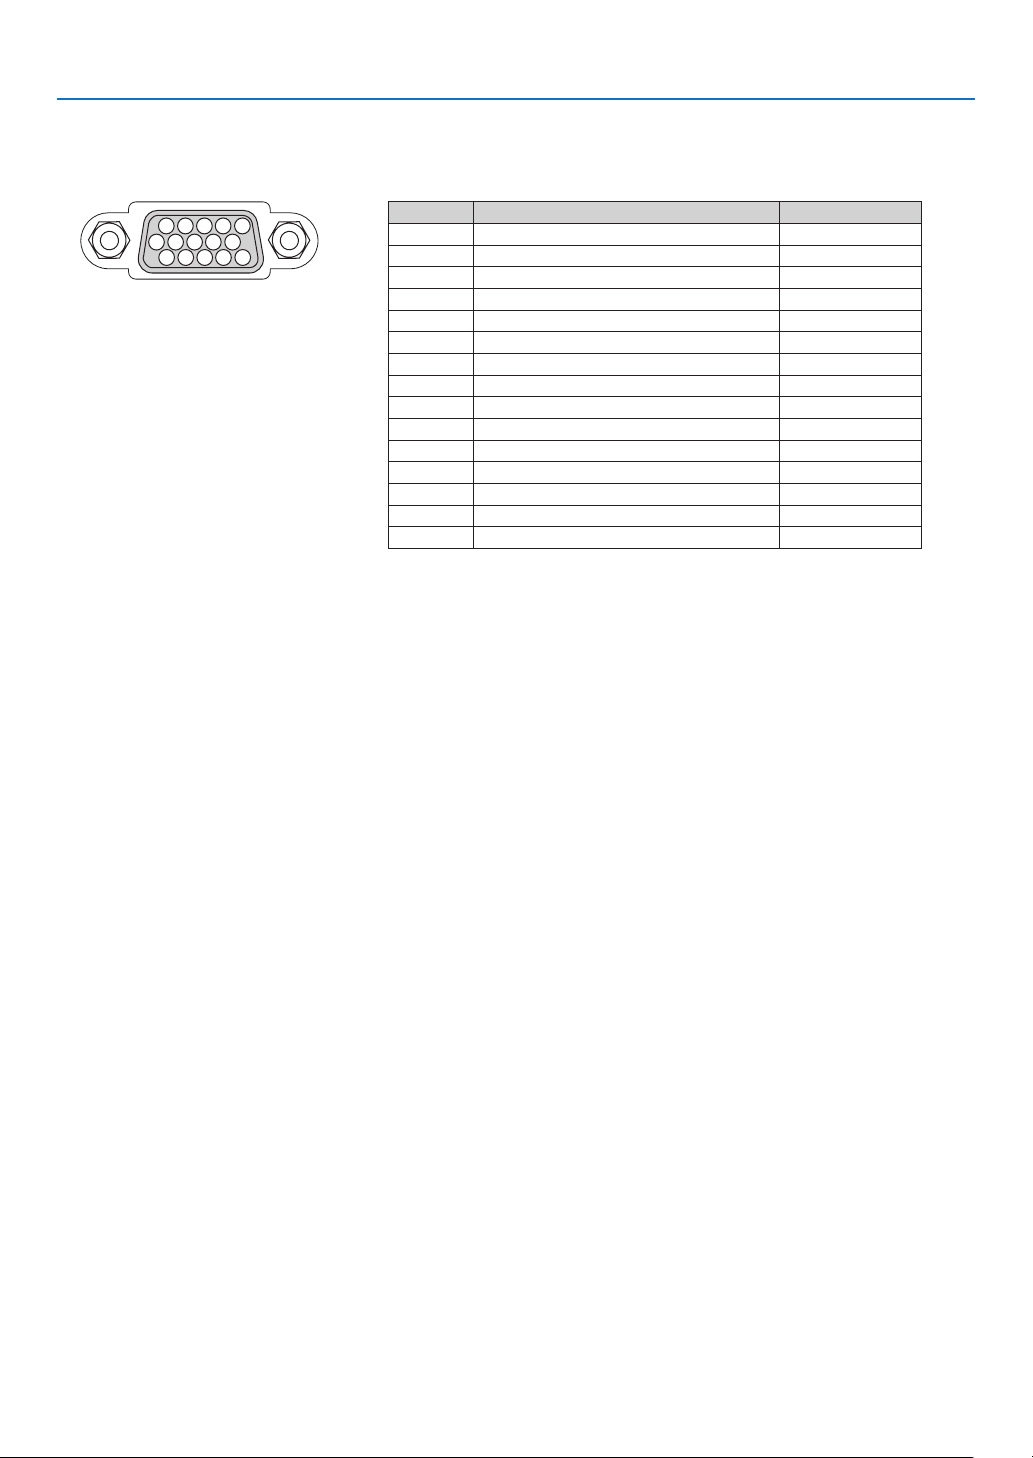
Pin Assignments of D-Sub ANALOG IN-1 Input Connector
1
11 1512 1413
6
5
4
32
1079
8
Mini D-Sub 15 Pin Connector
Pin No. RGB Signal (Analog) YCbCr Signal
1 Red Cr
2 Green or Sync on Green Y
3 Blue Cb
Signal Level
Video signal : 0.7Vp-p (Analog)
Sync signal : TTL level
4 Ground
5 Ground
6 Red Ground Cr Ground
7 Green Ground Y Ground
8 Blue Ground Cb Ground
9 No Connection
10 Sync Signal Ground
11 No Connection
12 Bi-directional DATA (SDA)
13 Horizontal Sync or Composite Sync
14 Vertical Sync
15 Data Clock
7. Appendix
80
Page 90
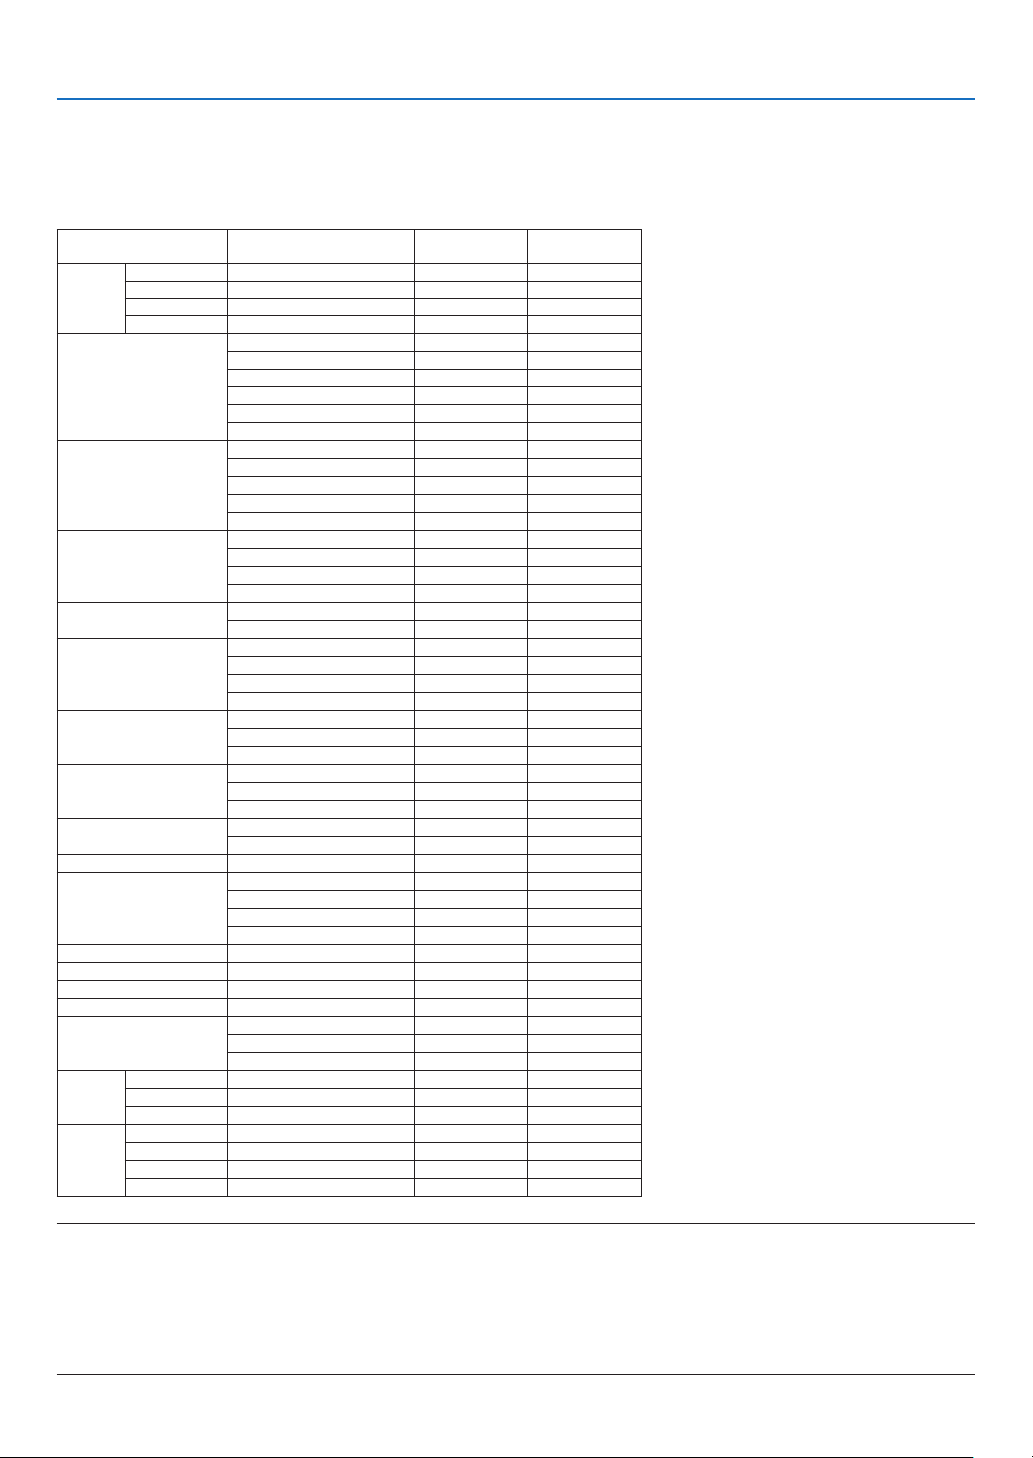
Compatible Input Signal List
Horizontal: 15KHz to 100KHz (RGB: 24KHz or over)
Vertical: 50Hz to 120Hz
7. Appendix
640
640
640
640
640
800
800
800
800
1024
1024
1024
1280
115 2
115 2
115 2
1280
1280
1280
1280
140 0
1600
1600
1600
1280
1280
Resolution
(Dots)
480 31.5 59.9
480 31.5 60.0
480 3 7.9 72.8
480 3 7.5 75.0
480 39.4 75.0
480 43.3 85.0
600 35.2 56.3
600 3 7.9 60.3
600 48 .1 72.2
600 46.9 75.0
600 53.7 85 .1
768 48.4 60.0
768 56.5 7 0.1
768 60.0 75.0
768 68.7 85.0
768 4 7.8 59.9
800 4 9.7 59.8
864 54.4 60 .1
864 64.0 70.0
864 6 7.5 75.0
864 * 7 7.5 8 5.1
960 60.0 60.0
960 * 75.0 75.0
960 * 85.9 85.0
1024 64.0 60.0
1024 * 80.0 75.0
1024 * 91. 2 85.0
1050 64.7 60.0
1050 * 65.3 60.0
900 * 55.9 59.9
1200 * 75.0 60.0
1200 * 81. 3 65.0
1200 * 8 7.5 70.0
1200 * 93.8 75.0
480 35.0 6 6.7
624 49.7 74 .6
768 60.2 74 .9
870 68.7 75 .1
1024 64.3 60.4
1024 * 69.9 65.2
1024 * 78.4 73.7
1080 33.8 60.0
1080 2 8.1 50.0
720 45.0 60.0
480 * 15.7 59.9
576 * 15.6 50.0
480 31.5 59.9
576 31.3 50.0
Signal
VIDEO NTSC - * 15.7 59.9
PAL - * 15.6 50.0
PAL60 - * 15.7 60.0
SECAM - * 15.6 50.0
VGA 640
SVGA 800
XGA 1024
WXGA 1280
- 11 52
- 12 80
SXGA 1280
SXGA+ 1400
WXGA+ 144 0
UXGA 1600
MAC13 640
MAC16 832
MAC19 1024
MAC21 115 2
MAC 128 0
HDTV 1080i/60 1920
1080i/50 1920
720p 1280
DVD 480i 720
576i 720
480p 720
576p 720
Frequency H.
(kHz)
Refresh Rate
(Hz)
NOTE:
• Imagesaboveaggedwith“*”arenotsupportedbydigitalsignal.
• Animagewithhigherorlowerresolutionthantheprojector’snativeresolution(LV-7385/LV-7380/LV-7285/LV-7280:1024x768
/LV-8310/LV-8215:1280x800)willbedisplayedwithscalingtechnology.
• Somecompositesyncsignalsmaynotbedisplayedcorrectly.
Signals other than those specified in the table above may not be displayed correctly. If this should happen, change the refresh
rateorresolutiononyourPC.RefertoDisplayPropertieshelpsectionofyourPCforprocedures.
81
Page 91
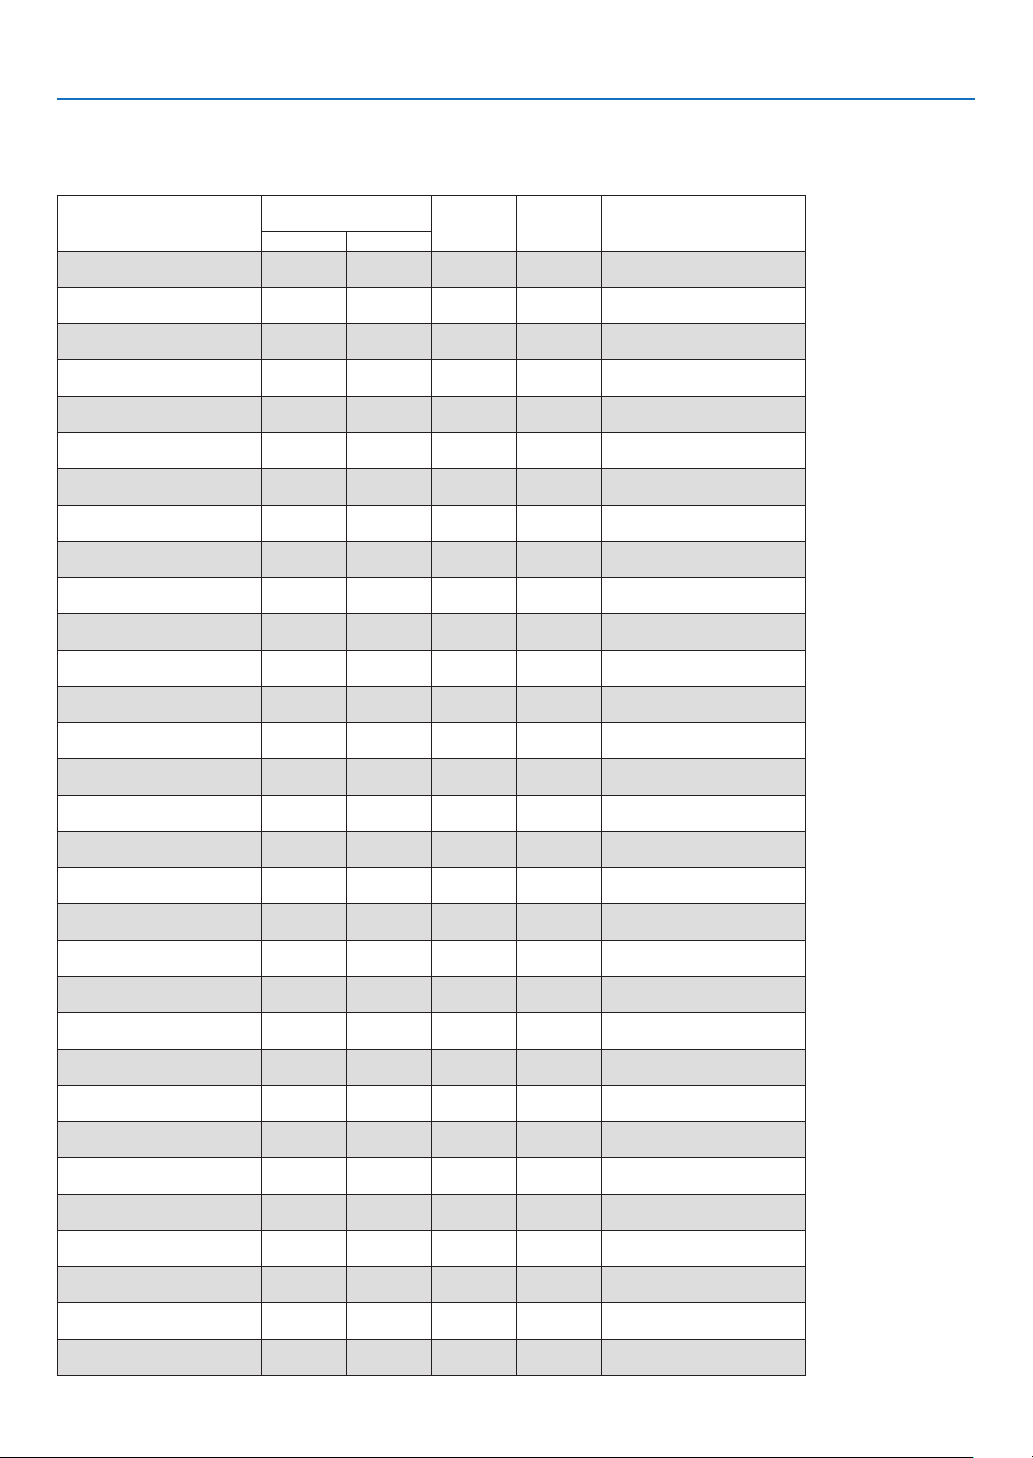
7. Appendix
Relationship between Screen Size and Projection distance
LV-738 5/LV-7380/LV-728 5/LV-7280
Screen size at 4:3
aspect ratio
W×D(cm)
21” 43 × 32 -
25” 51 × 38
30” 61 × 46
40” 81 × 61
50” 102 × 76
60” 122 × 91
70” 142 × 107
80” 163 × 122
90” 183 × 137
100 ” 203 × 152
110 ” 224 × 168
120” 244 × 183
130 ” 264 × 198
140 ” 285 × 213
150” 305 × 229
160” 325 × 244
170 ” 345 × 259
176 ” 358 × 268
180 ” 366 × 274
190 ” 386 × 290
200” 406 × 305
210” 427 × 320
220” 447 × 335
230” 467 × 351
240” 488 × 366
250” 508 × 381
260” 528 × 396
270” 549 × 412
280” 569 × 427
290” 589 × 442
300” 610 × 457
Zoomedprojectiondis-
tance
Max. Min.
0.8m
(2.6')
0.9m
(3.0')
1.2 m
(3.9')
1.5 m
(4.9 ')
1.9 m
(6.2')
2.2m
( 7.2 ')
2.5m
(8.2')
2.8m
(9.2')
3.1 m
(10. 2' )
3.4m
(11. 2 ')
3.7m
(12 .1')
4.0m
(13 .1')
4.4m
(14.4')
4.7m
(15.4')
5.0m
(16.4')
5.3m
(17. 4' )
5.5m
(18.0')
5.6m
(18.4')
5.9m
(19.4 ')
6.2m
(20.3')
6.6m
(21.7 ')
6.9m
(22.6')
7. 2m
(23.6')
7. 5m
(2
4.6')
7. 8m
(25.6')
8.1 m
(26.6')
8.4m
(2 7.6 ' )
8.8m
(28.9')
9.1m
(29.9')
9.4m
(30.8 ')
0.8m
(2.6')
0.9m
(3.0')
1.1m
(3.6')
1.5 m
(4.9 ')
1.9 m
(6.2')
2.2m
( 7.2 ')
2.6m
(8.5')
3.0m
(9.8')
3.4m
(11. 2 ')
3.7m
(12 .1')
4.1m
(13. 5')
4.5m
(14.8' )
4.9m
(16 .1')
5.2m
(17. 1')
5.6m
(18.4')
6.0m
(19.7 ')
6.4m
(21.0')
6.6m
(21.7 ')
6.8m
(22.3')
7.1m
(23.3')
7. 5m
(24.6')
7. 9m
(25.9')
8.3m
(2 7. 2' )
8.6m
(28.2 ')
9.0m
(29.5')
9.4m
(30.8 ')
9.8m
(32.2')
10 .1m
(3 3.1' )
10.5 m
(34.5')
10.9 m
(35.8 ')
11. 3m
(3 7.1' )
H1 H2
27c m
(0.9')
32cm
(1.1')
39cm
(1.3 ')
51cm
(1.7')
64cm
(2 .1')
77c m
(2.5')
90cm
(3.0')
103cm
(3.4')
116 cm
(3.8')
129cm
(4.2')
141cm
(4.6 ')
154cm
(5 .1')
167c m
(5.5')
180 cm
(5.9')
193cm
(6.3')
206cm
(6.8')
219c m
( 7.2 ')
226cm
( 7.4 ')
231cm
( 7.6 ')
244cm
(8.0')
257cm
(8.4')
270cm
(8.9')
283cm
(9.3')
296cm
(9.7' )
309cm
(10.1')
321c m
(10.5')
334cm
(11. 0' )
347cm
(11. 4' )
360cm
(11. 8' )
373cm
(12. 2')
386cm
(12.7 ')
5cm
(0.2')
6cm
(0.2')
7cm
(0.2')
10cm
(0.3')
12cm
(0.4')
14c m
(0.5')
17cm
(0.5')
19cm
(0.6')
21cm
(0.7')
24cm
(0.8')
26cm
(0.9')
29cm
(0.9')
31cm
(1.0')
33cm
(1.1')
36cm
(1.2 ')
38cm
(1.3 ')
41cm
(1.3 ')
42cm
(1.4' )
43cm
(1.4' )
45cm
(1.5')
48cm
(1.6')
50cm
(1.6')
52cm
(1.7')
55cm
(1.8 ')
57c m
(1.9 ')
60cm
(2.0')
62cm
(2.0')
64cm
(2 .1')
67c m
(2.2')
69cm
(2.3')
71cm
(2.3')
Screen size at 16:10
aspect ratio
W×D(cm)
20” 43 × 27
24” 51 × 32
28” 61 × 38
38” 81 × 51
47” 102 × 64
57” 122 × 76
66” 142 × 89
76” 163 × 102
85” 183 × 114
94” 203 × 127
104” 224 × 140
113 ” 244 × 152
123” 264 × 165
132 ” 285 × 178
142 ” 305 × 191
151” 325 × 203
160” 345 × 216
166” 358 × 224
170 ” 366 × 229
179 ” 386 × 241
189 ” 406 × 254
198” 427 × 267
208” 447 × 279
217 ” 467 × 292
226” 488 × 305
236” 508 × 318
245” 528 × 330
255” 549 × 343
264” 569 × 356
274 ” 589 × 368
283” 610 × 381
82
Page 92
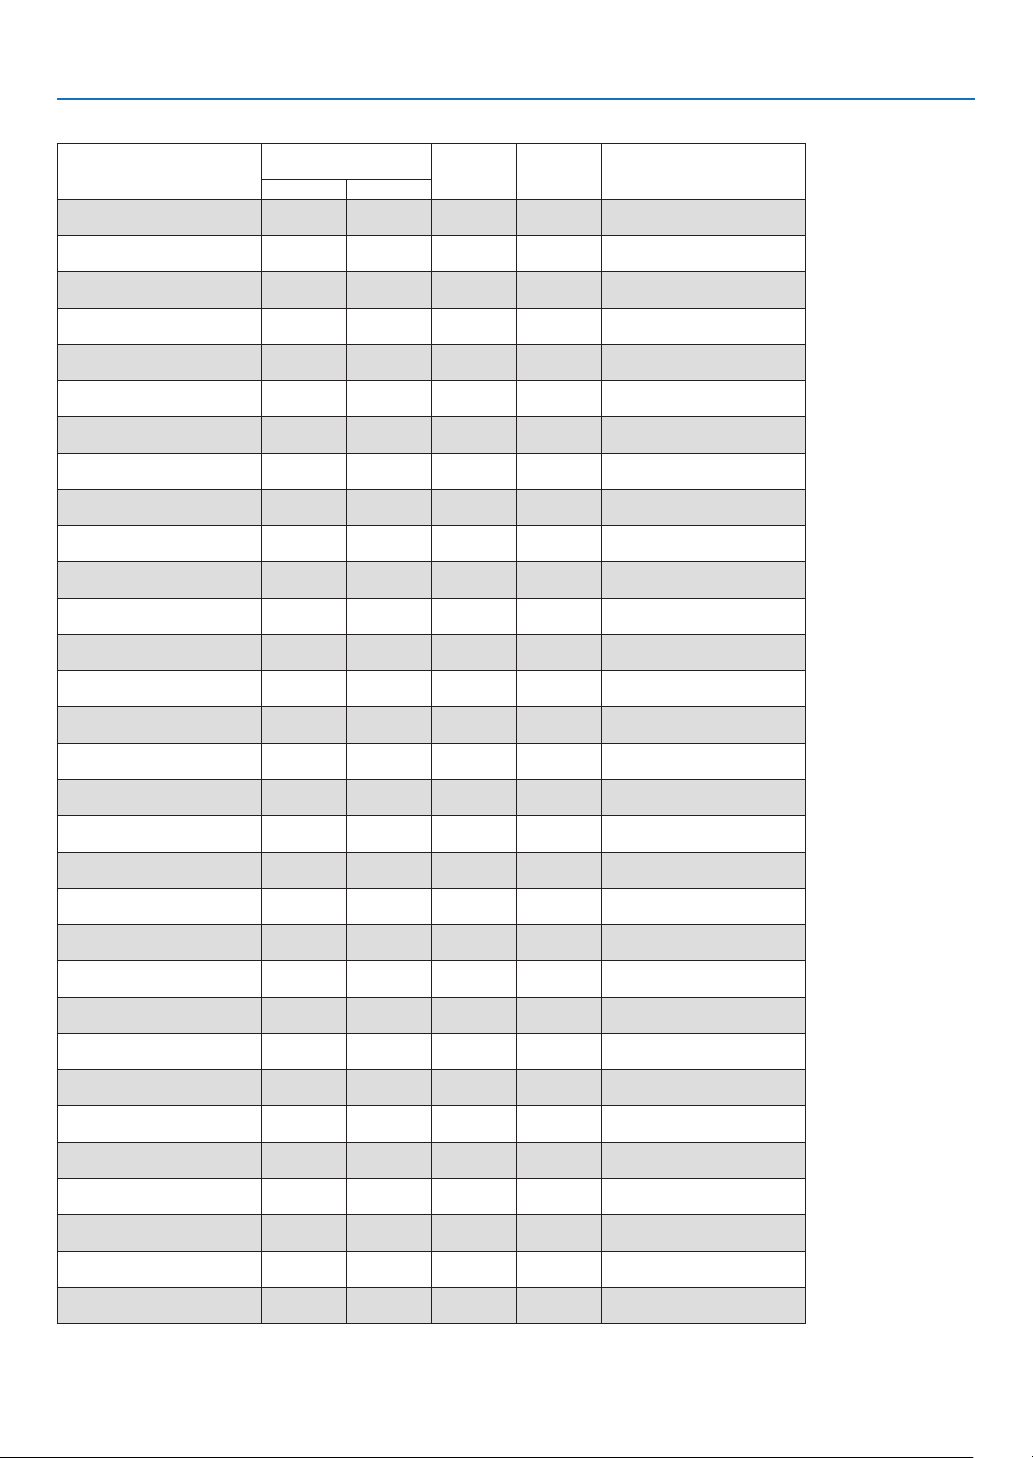
LV- 8310/LV- 8215
Screen size at 16:10
aspect ratio
W×D(cm)
21” 45 × 28 -
25” 54 × 34
30” 65 × 40
40” 86 × 54
50” 108 × 67
60” 129 × 81
70” 151 × 94
80” 172 × 108
90” 194 × 121
100 ” 215 × 135
110 ” 237 × 148
120” 258 × 162
130 ” 280 × 175
140 ” 302 × 188
150” 323 × 202
160” 345 × 215
170 ” 366 × 229
176 ” 379 × 237
180 ” 388 × 242
190 ” 409 × 256
200” 431 × 269
210” 452 × 283
220” 474 × 296
230” 495 × 310
240” 517 × 323
250” 538 × 337
260” 560 × 350
270” 582 × 363
280” 603 × 377
290” 625 × 390
300” 646 × 404
Zoomedprojectiondis-
tance
Max. Min.
0.8m
(2.6’)
1.0m
(3.2’)
1.3m
(4.2’)
1.6m
(5.3’)
2.0m
(6.4’)
2.3m
(7.5’)
2.6m
(8.6’)
3.0m
(9.7’)
3.3m
(10.8’)
3.6m
(11.9’)
4.0m
(13.0’)
4.3m
(14.1’)
4.6m
(15.2’)
5.0m
(16.3’)
5.3m
(17.4’)
5.6m
(18.4’)
5.8m
(19.1’)
6.0m
(19.5’)
6.3m
(20.6’)
6.6m
(21.7’)
7.0m
(22.8’)
7.3m
(23.9’)
7.6m
(25.0’)
8.0m
(26.1’)
8.3m
(27.2’)
8.6m
(28.3’)
9.0m
(29.4’)
9.3m
(30.5’)
9.6m
(31.6’)
9.9m
(32.6’)
0.8m
(2.6’)
1.0m
(3.2’)
1.2m
(3.8’)
1.6m
(5.1’)
2.0m
(6.4’)
2.4m
(7.7’)
2.8m
(9.1’)
3.2m
(10.4’)
3.6m
(11.7’)
4.0m
(13.0’)
4.4m
(14.3’)
4.8m
(15.6’)
5.2m
(16.9’)
5.6m
(18.2’)
6.0m
(19.5’)
6.4m
(20.9’)
6.8m
(22.2’)
7.0m
(23.0’)
7.2m
(23.5’)
7.6m
(24.8’)
8.0m
(26.1’)
8.4m
(27.4’)
8.8m
(28.7’)
9.2m
(30.0’)
9.6m
(31
.3’)
10.0m
(32.7’)
10.4m
(34.0’)
10.8m
(35.3’)
11.2m
(36.6’)
11.6m
(37.9’)
12.0m
(39.2’)
H1 H2
26cm
(0.8’)
31cm
(1.0’)
37cm
(1.2’)
49cm
(1.6’)
61cm
(2.0’)
74cm
(2.4’)
86cm
(2.8’)
98cm
(3.2’)
111cm
(3.6’)
123cm
(4.0’)
135cm
(4.4’)
147cm
(4.8’)
160cm
(5.2’)
172cm
(5.6’)
184cm
(6.0’)
197cm
(6.4’)
209cm
(6.9’)
216cm
(7.1’)
221cm
(7.3’)
233cm
(7.7’)
246cm
(8.1’)
258cm
(8.5’)
270cm
(8.9’)
283cm
(9.3’)
295cm
(9.7’)
307cm
(10.1’)
319cm
(10.5’)
332cm
(10.9’)
344cm
(11.3’)
356cm
(11.7’)
369cm
(12.1’)
2cm
(0.1’)
3cm
(0.1’)
4cm
(0.1’)
5cm
(0.2’)
6cm
(0.2’)
7cm
(0.2’)
8cm
(0.3’)
9cm
(0.3’)
11cm
(0.3’)
12cm
(0.4’)
13cm
(0.4’)
14cm
(0.5’)
15cm
(0.5’)
16cm
(0.5’)
18cm
(0.6’)
19cm
(0.6’)
20cm
(0.7’)
21cm
(0.7’)
21cm
(0.7’)
22cm
(0.7’)
24cm
(0.8’)
25cm
(0.8’)
26cm
(0.9’)
27cm
(0.9’)
28cm
(0.9’)
29cm
(1.0’)
31cm
(1.0’)
32cm
(1.0’)
33cm
(1.1’)
34cm
(1.1’)
35cm
(1.2’)
7. Appendix
Screen size at 4:3
aspect ratio
W×D(cm)
19” 38 × 28
22” 45 × 34
26” 54 × 40
35” 72 × 54
44” 90 × 67
53” 108 × 81
62” 126 × 94
71” 144 × 108
79” 162 × 121
88” 179 × 135
97” 197 × 148
106” 215 × 162
115” 233 × 175
124” 251 × 188
132” 269 × 202
141” 287 × 215
150” 305 × 229
155” 316 × 237
159” 323 × 242
168” 341 × 256
177” 359 × 269
185” 377 × 283
194” 395 × 296
203” 413 × 310
212” 431 × 323
221” 449 × 337
230” 467 × 350
238” 485 × 363
247” 503 × 377
256” 521 × 390
265” 538 × 404
83
Page 93
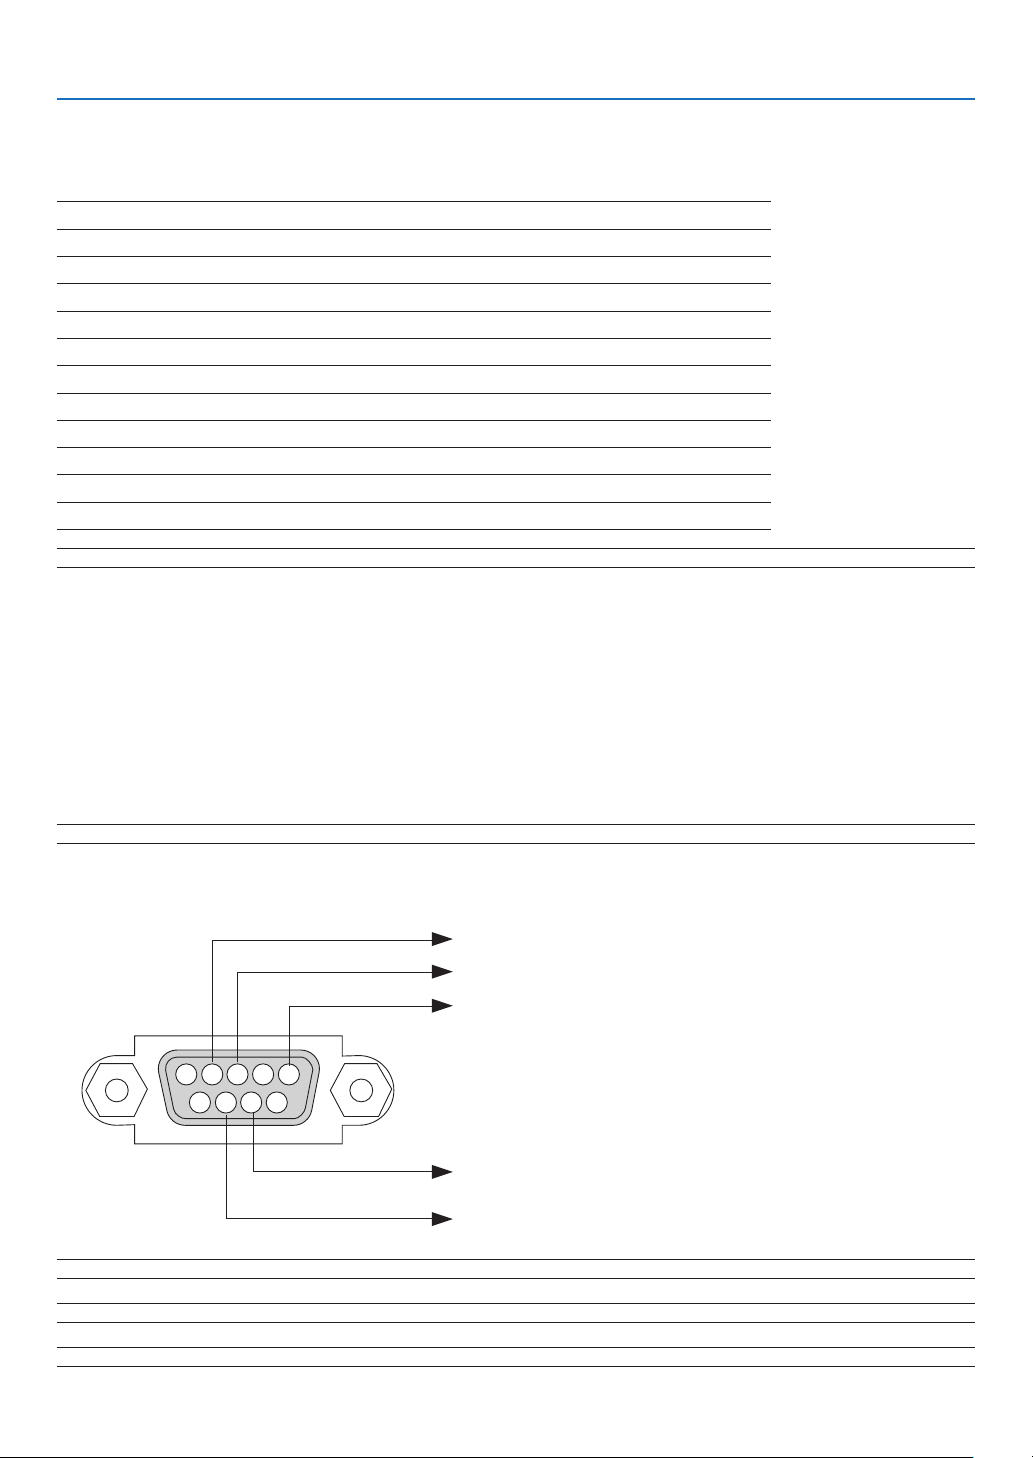
PC Control Codes and Cable Connection
15243
67 98
PC Control Codes
Function Code Data
POWER ON 02H 00H 00H 00H 00H 02H
POWER OFF 02H 01H 00H 00H 00H 03H
INPUT SELECT Computer 1 02H 03H 00H 00H 02H 01H 01H 09H
INPUT SELECT Computer 2 (Digital)
INPUT SELECT Computer 2 (Analog)
INPUT SELECT VIDEO 02H 03H 00H 00H 02H 01H 06H 0EH
INPUT SELECT S-VIDEO 02H 03H 00H 00H 02H 01H 0BH 13H
BLANK ON 02H 10H 00H 00H 00H 12H
BLANK OFF 02H 11H 00H 00H 00H 13H
SOUND MUTE ON 02H 12H 00H 00H 00H 14H
SOUND MUTE OFF 02H 13H 00H 00H 00H 15H
NOTE:ContactyourlocaldealerforafulllistofthePCControlCodesifneeded.
02H 03H 00H 00H 02H 01H 1AH 22H
02H 03H 00H 00H 02H 01H 02H 0AH
Cable Connection
Communication Protocol
Baud rate .........................................19200 bps
Data length ......................................8 bits
Parity ...............................................No parity
Stop bit ............................................One bit
X on/off ...........................................None
Communications procedure............Full duplex
7. Appendix
NOTE:Dependingontheequipment,alowerbaudratemayberecommendedforlongcableruns.
SERVICE PORT Connector (D-SUB 9P)
To TxD of PC
To RxD of PC
To GND of PC
To RTS of PC
To CTS of PC
NOTE1:Pins1,4,6and9arenoused.
NOTE2:Jumper“RequesttoSend”and“CleartoSend”togetheronbothendsofthecabletosimplifycableconnection.
NOTE3:Forlongcablerunsitisrecommendedtosetcommunicationspeedwithinprojectormenusto9600bps.
84
Page 94

7. Appendix
Troubleshooting Check List
Before contacting your dealer or service personnel, check the following list to be sure repairs are needed, you
may also refer to the “Troubleshooting” section in your user’s manual. This checklist below will help us solve your
problem more efficiently.
* Print the following pages.
Frequency of occurrence always sometimes (How often? _____________________) other ( __________________ )
Power
No power (POWER indicator does not light green) See also
“STATUS Indicator”.
Power cord's plug is fully inserted into the wall outlet.
Main power switch is pressed to the ON position.
Lamp cover is installed correctly .
Lamp counter (lamp opera tion hours) was cl eared af ter
lamp replacement.
No power even though you press and hold the POWER but-
ton for a minimum of 1 second.
Video and Audio
No image is displayed from your PC or video equipment to the
projector.
Still no image even though you connect the projector to the
PC first, then start the PC.
Enabling your notebook PC’s signal output to the projector.
• Acombination of function keys will enable/disable the
externaldisplay.Usually,thecombinationofthe“Fn”key
alongwithoneofthe 12functionkeysturns theexternal
display on or off.
No image (blue background, logo, no display).
Still no image even though you press the AUTO PC button.
Still no image even though you carr y out “Rese t” in the
projector’s menu.
Signal cable's plug is fully inserted into the input connector
A message appears on the screen.
( _____________________________________________ )
The source connected to the projector is active and available.
Still no image even though you adjust the brightness and/
or the contrast.
Input source's resolution and frequency are supported by
the projector.
Image is too dark.
Remains unchanged even though you adjust the brightness
and/or the contrast.
Image is distorted.
Image appears to be trapezoidal (unchanged even though
you carry out the “Keystone adjustment”).
Shut down during operation.
Power cord's plug is fully inserted into the wall outlet.
Lamp cover is installed correctly .
Power Management is turned off (only models with the
Power Management function).
Off timer is turned of f (only models with the Off timer func-
tion).
Parts of the image are lost.
Still unchanged even though you press the AUTO PC button.
Still unchanged even though you carry out “Reset” in the
projector’s menu.
Image is shifted in the vertical or horizontal direction.
Horizontal and vertical positions are correctly adjusted on
a computer signal.
Input source's resolution and frequency are supported by
the projector.
Some pixels are lost.
Image is flickering.
Still unchanged even though you press the AUTO PC button.
Still unchanged even though you carry out “Reset” in the
projector’s menu.
Image shows flickering or color drift on a computer signal.
Still unchanged even though you change [Fan mode] from
[High altitude] to [Auto].
Image appears blurry or out of focus.
Still unchanged even though you checked the signal’s resolution on PC and changed it to projector’s native resolution.
Still unchanged even though you adjusted the focus.
No sound.
Audio cable is correctly connected to the audio input of the
projector.
Still unchanged even though you adjusted the volume level.
AUDIO OUT is connected to your audio equipment (only
models with the AUDIO OUT connector).
Other
Remote control does not work.
No obstacles between the sensor of the projector and the
remote control.
Projector is placed near a fluorescent light that can disturb
the infrared remote controls.
Batteries are new and are not reversed in installation.
But tons on the projector cabinet do not work ( only models
with the Key lock function).
Key lock is not turned on or is disabled in the menu.
Still unchanged even though you press and hold the BACK
button for a minimum of 10 seconds.
85
Page 95
In the space below please describe your problem in detail.
Information on application and environment where your projector is used
7. Appendix
Projector
Model name:
Serial No.:
Date of purchase:
Lamp operating time (hours):
Lamp Mode:
Information on input signal:
Horizontal sync frequency [ ] kHz
Vertical sync frequency [ ] Hz
Sync polarity H (+) (–)
V (+) (–)
Sync type
STATUS Indicator:
Steady light
Flashing light [ ] cycles
Remote control model number:
Projector
Normal Quiet
Separate Composite
Sync on Green
Orange Green
PC
Installation environment
Screen size: inch
Screen type: White matte Beads Polarization
Throw distance: feet/inch/m
Orientation: Ceiling mount Desktop
Power outlet connection:
Connected directly to wall outlet
Connected to power cord extender or other (the
number of connected equipment ______________)
Connected to a power cord reel or other (the num-
ber of connected equipment ______________)
Computer
Manufacturer:
Model number:
Notebook PC / Desktop
Native resolution:
Refresh rate:
Video adapter:
Other:
Wide angle High contrast
Audio-video equipment
Signal cable
Canon standard or other manufacturer’s cable?
Model number: Length: inch/m
Distribution amplifier
Model number:
Switcher
Model number:
Adapter
Model number:
Audio-video equipment
VCR, DVD player, Video camera, Video game or other
Manufacturer:
Model number:
86
Page 96

CANON INC.
30-2, Shimomaruko 3-chome, Ohta-ku, Tokyo
146-8501, Japan
U.S.A.
CANON U.S.A. INC.
One Canon Plaza, Lake Success, NY 110421198, U.S.A.
For all inquires concerning this product, call toll
free in the U.S.
1-800-OK-CANON
CANADA
CANON CANADA INC. HEADQUARTERS
6390 Dixie Road, Mississauga, Ontario L5T
1P7, Canada
CANON CANADA INC. MONTREAL BRANCH
5990, Côte-de-Liesse, Montréal Québec H4T
1V7, Canada
CANON CANADA INC. CALGARY OFFICE
2828, 16th Street, N.E. Calgary, Alberta T2E
7K7, Canada
For all inquiries concerning this product, call toll
free in Canada
1-800-OK-CANON
CANON PORTUGAL S.A.
Rua Alfredo da Silva, 14 Alfragide 2610-016
Amadora, Portugal
CANON Belgium N.V./S.A.
Berkenlaan 3, 1831 Diegem (Mechelen), Belgium
CANON Netherland NV
Neptunusstraat 1, 2132 JA Hoofddorp, The
Netherlands
CANON LUXEMBOURG S.A.
Rue des Joncs 21, L-1818 Howald, Luxembourg
CANON DANMARK A/S
Knud Hoejgaards Vej 1 DK-2860 Soeborg, Danmark
CANON OY
Huopalahdentie 24 PL 1 00351 Helsinki, Finland
CANON SVENSKA AB
Gustav III:s Boulevard 26 169 88 Solna, Sweden
CANON NORGE as
Hallagerbakken 110, Postboks 33, Holmlia,
1201 Oslo, Norway
CENTRAL & SOUTH AMERICA
CANON LATIN AMERICA, INC.
703 Waterford Way, Ste. 400 Miami, FL 33126,
U.S.A.
EUROPE, AFRICA & MIDDLE EAST
CANON EUROPE LTD.
3 The Square, Stockley Park, Uxbridge, Middlesex,
UB11 1ET United Kingdom
CANON EUROPA N.V.
Bovenkerkerweg 59-61, 1185 XB Amstelveen,
The Netherlands
CANON FRANCE S.A.S
17, quai du President Paul Doumer, 92414
Courbevoie Cedex, France
CANON UK LTD.
Woodhatch Reigate Surrey RH2 8BF, United Kingdom
CANON DEUTSCHLAND GmbH
Europark Fichtenhain A10, 47807 Krefeld, Germany
CANON ITALIA S.p.A.
Via Milano 8 I-20097 San Donato Milanese, Milano, Italy
CANON Schweiz AG
Geschäftsbereich Wiederverkauf, Industriestrasse
12, CH-8305 Dietlikon, Switzerland
CANON GMBH
Zetschegasse 11, A-1230 Wien, Austria
CANON España, S.A.
C/Joaquín Costa, 41, 28002 Madrid, Spain
ASIA
CANON (China) Co., Ltd.
15F Jinbao Building No.89 Jinbao Street,
Dongcheng District, Beijing 100005, China
CANON HONGKONG CO., LTD.
19/F., The Metropolis Tower, 10 Metropolis
Drive, Hunghom, Kowloon, Hong Kong
CANON SINGAPORE PTE. LTD.
1 HarbourFront Avenue, #04-01 Keppel Bay
Tower, Singapore 098632
CANON KOREA CONSUMER IMAGING INC.
Gangnam Finance Center 17F,737,YeoksamDong, Gangnam-gu, Seoul, 135-984, Korea
OCEANIA
CANON AUSTRALIA PTY. LTD.
1 Thomas Holt Drive, North Ryde, N.S.W. 2113,
Australia
CANON NEW ZEALAND LTD.
Akoranga Business Park, Akoranga Drive,
Northcote, Auckland, New Zealand
000 © CANON INC. 2010
 Loading...