

Page 1

Linux
UFR II/UFRII LT Printer Driver
User's Guide
USRMA-0586-09 2020-07 en Copyright CANON INC. 2020
Page 2

Contents
Introduction ....................................................................................................................................................... 2
How to Use the Manual ............................................................................................................................................. 3
Notations Used in the Manual ................................................................................................................................ 4
Disclaimers ............................................................................................................................................................... 5
Copyright .................................................................................................................................................................. 6
Trademarks .............................................................................................................................................................. 7
About This Driver ........................................................................................................................................... 9
Before Use ......................................................................................................................................................... 12
Installing the Driver .................................................................................................................................. 14
Pre-installation Check ............................................................................................................................................. 15
System Requirements ......................................................................................................................................... 16
Cautions for Installation ...................................................................................................................................... 17
About the Readme File ........................................................................................................................................ 18
Installation Procedures ........................................................................................................................................... 19
Installing Using the Installer ................................................................................................................................... 20
Installing the Required Modules Individually ........................................................................................................... 22
Registering a Printer ............................................................................................................................................... 24
Checking the Driver Version .................................................................................................................................... 28
Overwriting the Module to Upgrade the Driver ........................................................................................................ 29
Uninstalling a Driver ............................................................................................................................................... 33
Printing ................................................................................................................................................................ 38
Printing Using the Driver UI .................................................................................................................................... 39
Printing from an Application ................................................................................................................................... 41
Registering the Printer with OpenOce 1.xx .......................................................................................................... 42
Registering the Printer with GIMP 2.x .................................................................................................................... 43
Printing from an Application ................................................................................................................................ 44
Functions Not Available from Applications ............................................................................................................. 45
Outputting PostScript Files from an Application ...................................................................................................... 46
Caution When Printing from Applications .............................................................................................................. 47
Cautions When Printing a PostScript File From the Driver UI .................................................................................... 53
Printing from the Command Line ............................................................................................................................. 54
Settings List ..................................................................................................................................................... 56
[cngplp2] Screen ...................................................................................................................................................... 57
[General] Sheet ....................................................................................................................................................... 58
[Finishing] Sheet ..................................................................................................................................................... 59
I
Page 3

[Paper Source] Sheet ............................................................................................................................................... 63
[Quality] Sheet ........................................................................................................................................................ 64
[Device Settings] Sheet ............................................................................................................................................ 67
Command List ................................................................................................................................................ 70
Command Format ................................................................................................................................................... 71
Basic Settings ......................................................................................................................................................... 72
Finishing - 1-sided/2-sided Printing .......................................................................................................................... 73
Finishing - Paper Output Method ............................................................................................................................. 74
Finishing - Paper Output Destination ....................................................................................................................... 76
Finishing - Booklet Printing ..................................................................................................................................... 79
Finishing - Paper Folding ......................................................................................................................................... 81
Finishing - Special Print Processing .......................................................................................................................... 83
Finishing - Secure Printing ....................................................................................................................................... 86
Paper Source - Paper Source/Paper Type .................................................................................................................. 87
Paper Source - Front/Back Cover .............................................................................................................................. 90
Quality - Color Adjustment ...................................................................................................................................... 92
Quality - Image Processing ...................................................................................................................................... 94
Quality - Toner Adjustment ...................................................................................................................................... 96
Device Settings - Output Method ............................................................................................................................. 98
Device Settings - Authentication Function .............................................................................................................. 100
Appendix ........................................................................................................................................................... 103
Main Restrictions .................................................................................................................................................. 104
Support ................................................................................................................................................................ 105
II
Page 4

Introduction
Introduction
Introduction .......................................................................................................................................................... 2
How to Use the Manual ......................................................................................................................................... 3
Notations Used in the Manual .......................................................................................................................... 4
Disclaimers ............................................................................................................................................................. 5
Copyright ............................................................................................................................................................... 6
Trademarks ............................................................................................................................................................ 7
1
Page 5

Introduction
How to Use the Manual(P. 3)
Disclaimers(P. 5)
Copyright(P. 6)
Trademarks(P. 7)
Introduction
6X0A-000
2
Page 6

Introduction
How to Use the Manual
This explains things that you need to know in order to use this manual.
Notations Used in the Manual(P. 4)
6X0A-001
3
Page 7

Introduction
Notations Used in the Manual
This explains symbols and settings used in this manual.
Symbols Used in This Manual
In this manual, explanations of items and operations that must be followed while using the driver are set forth
the symbols that indicate the following.
IMPORTANT
Indicates operational requirements and restrictions. Be sure to read these items carefully to operate the
product correctly, and avoid damage to the product.
NOTE
6X0A-003
Indicates a clarication of an operation, or contains additional explanations for a procedure. Reading
these notes is highly recommended.
About Settings
In this manual, setting names displayed on the computer screen are represented as shown in the following
examples.
Example:
[Print]
[OK]
4
Page 8

Introduction
Disclaimers
The information in this document is subject to change without notice.
CANON INC. MAKES NO WARRANTY OF ANY KIND WITH REGARD TO THIS MATERIAL, EITHER EXPRESS OR
IMPLIED, EXCEPT AS PROVIDED HEREIN, INCLUDING WITHOUT LIMITATION, THEREOF, WARRANTIES AS TO
MARKETABILITY, MERCHANTABILITY, FITNESS FOR A PARTICULAR PURPOSE OF USE OR NON-INFRINGEMENT.
CANON INC. SHALL NOT BE LIABLE FOR ANY DIRECT, INCIDENTAL, OR CONSEQUENTIAL DAMAGES OF ANY
NATURE, OR LOSSES OR EXPENSES RESULTING FROM THE USE OF THIS MATERIAL.
6X0A-006
5
Page 9

Introduction
Copyright
Copyright CANON INC. 2020
No part of this publication may be reproduced, transmitted, transcribed, stored in a retrieval system, or
translated into any language or computer language in any form or by any means, electronic, mechanical,
magnetic, optical, chemical, manual, or otherwise, without the prior written permission of Canon Inc.
6X0A-007
6
Page 10

Introduction
Trademarks
Microsoft, Windows, Internet Explorer, and Microsoft Edge are either registered trademarks or trademarks of
Microsoft Corporation in the United States and/or other countries.
macOS and Safari are trademarks of Apple Inc.
Other product and company names herein may be the trademarks of their respective owners.
6X0A-008
7
Page 11

About This Driver
About This Driver
About This Driver ............................................................................................................................................... 9
8
Page 12
About This Driver
About This Driver
This driver is a Linux operating system printer driver that supports Canon devices. It uses CUPS (the Common
UNIX Printing System) for Linux operating systems.
Installing this driver enables you to print with built-in device functions from the GUI (Graphical User Interface)
settings screen and command line.
Printing from the Driver Settings Screen
You can execute a command and print from the displayed driver settings screen. You can also set the built-in
device functions.
6X0A-009
Printing from the Application Settings Screen
You can display the settings screen and print from the print menu of an application. The print functions that can
be congured differ according to the application.
NOTE
● Print functions that cannot be congured from the application can be used by changing the default settings
from the driver conguration screen or the command line.
9
Page 13

About This Driver
Printing from the Command Line
You can use the lpr command to print. Built-in device functions can be specied as options.
Related Topics
Printing Using the Driver UI(P. 39)
Printing from an Application(P. 41)
Printing from the Command Line(P. 54)
10
Page 14

Before Use
Before Use
Before Use ............................................................................................................................................................ 12
11
Page 15

Before Use
Before Use
● The newest driver software is posted on the Canon web site. Please verify the operating environment etc.
and download the appropriate software as required.
Canon Global Site: https://global.canon/
● The functions that you can use may vary according to the following conditions.
- The device you are using and its settings
- The rmware version of the device
- The option structure of the device
- The driver version
- The computer environment you are using
● Depending on your screen resolution settings, the buttons at the bottom of the printer driver screen may not
be displayed. If this is the case, drag the driver screen while holding down the [Alt] key or Super key to
display the buttons.
● The screen content, procedures, etc. displayed and described in the manual may differ from those actually
displayed.
6X0A-00A
● The driver module and package le name indicated in this manual may differ according to the driver version
you are using.
● In this manual, examples using Ubuntu 16.04 are explained.
● For information on CUPS, see the following website.
CUPS Software Administrators Manual: http://www.cups.org
12
Page 16

Installing the Driver
Installing the Driver
Installing the Driver ....................................................................................................................................... 14
Pre-installation Check ......................................................................................................................................... 15
System Requirements ..................................................................................................................................... 16
Cautions for Installation ................................................................................................................................. 17
About the Readme File ................................................................................................................................... 18
Installation Procedures ....................................................................................................................................... 19
Installing Using the Installer .............................................................................................................................. 20
Installing the Required Modules Individually ................................................................................................... 22
Registering a Printer ........................................................................................................................................... 24
Checking the Driver Version ............................................................................................................................... 28
Overwriting the Module to Upgrade the Driver ................................................................................................ 29
Uninstalling a Driver ........................................................................................................................................... 33
13
Page 17

Installing the Driver
Installing the Driver
This section describes the method for installing and uninstalling the driver.
Pre-installation Check(P. 15)
Installation Procedures(P. 19)
Installing Using the Installer(P. 20)
Installing the Required Modules Individually(P. 22)
Registering a Printer(P. 24)
Checking the Driver Version(P. 28)
Overwriting the Module to Upgrade the Driver(P. 29)
Uninstalling a Driver(P. 33)
6X0A-00C
14
Page 18

Installing the Driver
Pre-installation Check
This describes what needs to be checked beforehand in order to install the driver correctly.
System Requirements(P. 16)
Cautions for Installation(P. 17)
About the Readme File(P. 18)
6X0A-00E
15
Page 19

Installing the Driver
System Requirements
Use one of the following system environments with this driver.
Hardware
A computer running Linux that is equipped with an x86 compatible 32-bit CPU or 64-bit CPU.
Software
● CUPS
Install the version of CUPS that supports the distribution you are using to the operating system and start it
before installing the driver.
The adding of printers and printing must be enabled in the various security services.
● Ghostscript
Before printing, install or update the version of Ghostscript that supports the distribution you are using.
Ghostscript can be obtained from the website for the distribution.
6X0A-00F
16
Page 20

Installing the Driver
Cautions for Installation
Note the following during installation.
● When installing the driver or registering a printer using the Canon Printer Setup Utility, start the CUPS
spooler service rst.
● If the CUPS status cannot be displayed in the network environment in which the IP address of your computer
is specied, you must set CUPS security.
Add the IP address of the computer using CUPS to the following items in /etc/cups/cupsd.conf and restart
CUPS.
<Location />
<Location /admin>
An example of adding the IP address xx.xxx.xxx.xxx to cupsd.conf is presented below.
:
<Location />
Order Deny,Allow
Deny From All
Allow From 127.0.0.1
Allow From xx.xxx.xxx.xxx
</Location>
:
<Location /admin>
:
Order Deny,Allow
Deny From All
Allow From 127.0.0.1
Allow From xx.xxx.xxx.xxx
:
</Location>
6X0A-00H
For information on the security settings, etc. related to networks for using CUPS, see the manual for CUPS.
● If you want to update version 3.70 or an earlier version of the driver to version 5.00 or later, delete the
registered printers, then uninstall the existing driver before installing version 5.00 or later.
Related Topics
Installing Using the Installer(P. 20)
Installing the Required Modules Individually(P. 22)
Overwriting the Module to Upgrade the Driver(P. 29)
Uninstalling a Driver(P. 33)
17
Page 21

Installing the Driver
About the Readme File
The Readme le describes precautions for installing and using the driver.
The Readme le is saved under the following name in the [Documents] directory of the downloaded driver.
"x.xx" indicates the version.
README-ufr2-x.xxUS.html
6X0A-00J
18
Page 22

Installing the Driver
Installation Procedures
In order to perform printing, it is necessary to register the printer in the CUPS spooler service after installing
the driver.
Select the installation method that suits your environment.
For Ubuntu/Fedora/CentOS 7.3 or later/Debian 8.6 or later
You can use the installer to newly install or update the driver.
Installing Using the Installer(P. 20)
↓
Registering a Printer(P. 24)
For other distributions
6X0A-00K
Newly Installing the Driver
Installing the Required Modules Individually(P. 22)
↓
Registering a Printer(P. 24)
Updating the Driver
Overwriting the Module to Upgrade the Driver(P. 29)
↓
Registering a Printer(P. 24)
Related Topics
System Requirements(P. 16)
Cautions for Installation(P. 17)
19
Page 23

Installing the Driver
Installing Using the Installer
You can use the installer to install a new driver.
You can also update a driver that is already installed using this procedure. Conrm the registered printer
information in advance, as it is necessary to register the printer again after the update.
When using the installer, it is recommended that you use one of the following distributions.
Ubuntu/Fedora/CentOS 7.3 or later/Debian 8.6 or later
Prerequisites
● System Requirements(P. 16)
● Cautions for Installation(P. 17)
● The computer to install the driver to is connected to the internet
● The installer has been prepared
Download the latest version of the driver from the Canon website (https://global.canon/).
Extract the downloaded driver to the computer.
6X0A-00L
Procedures
Start the installer using a command from the terminal.
1
An example in which the current directory is the directory where install.sh is stored is presented below.
Using the sudo command
$ sudo ./install.sh
Using the su command
$ su
# ./install.sh
If a message conrming whether you want to proceed with the installation is
2
displayed, check the message and enter [Y] if you wish to proceed.
If [Installation is complete. Do you want to register the printer now?] is displayed,
3
decide whether to proceed with printer registration.
Enter [Y] to proceed with printer registration. The utility (Canon Printer Setup Utility) is displayed.
If you do not want to register a printer or you want to register a printer that requires bi-directional printing
connections via a USB connection, enter [N] to close the installer.
If the installation process cannot be performed correctly, see the limitations related to installation etc. in the
Readme le.
20
Page 24

Related Topics
Registering a Printer(P. 24)
About the Readme File(P. 18)
Installing the Required Modules Individually(P. 22)
Installing the Driver
21
Page 25

Installing the Driver
Installing the Required Modules Individually
You can use a command to install the required modules individually. Follow this procedure if you cannot use the
installer.
If this procedure cannot be performed correctly, see the limitations related to installation etc. in the Readme
le.
Prerequisites
● System Requirements(P. 16)
● Cautions for Installation(P. 17)
● The computer to install the driver to is connected to the internet
● You have super user privileges
Perform this operation after executing the sudo command or su command.
● The modules required for installation have been prepared
Download the latest version of the driver from the Canon website (https://global.canon/).
Extract the downloaded driver to the computer.
6X0A-00R
Procedures
The procedures for both a Red Hat type distribution and Debian type distribution are indicated below.
"x.xx" in the le name indicates the version of the module to be installed.
The example command indicates an example when you have used the cd command to move to the directory
where the le to be specied is stored.
For Red Hat Type Distributions
Install the printer driver module.
1
For 32-bit environments
# rpm -ivh cnrdrvcups-ufr2-us-x.xx-1.i386.rpm
For 64-bit environments
# rpm -ivh cnrdrvcups-ufr2-us-x.xx-1.x86_64.rpm
Install the PPD les.
2
Using wild cards, specify all PPD le installation packages that include drivers.
# rpm –ivh cnrcups*
Restart CUPS.
3
Use one of the following commands.
22
Page 26

Installing the Driver
# /etc/init.d/cups restart
or
# service cups restart
Register the printer after CUPS has nished restarting. Do not register the printer until CUPS has completely
nished restarting.
For Debian Type Distributions
Install the printer driver module.
1
For 32-bit environments
# dpkg -i cnrdrvcups-ufr2-us_x.xx-1_i386.deb
For 64-bit environments
# dpkg -i cnrdrvcups-ufr2-us_x.xx-1_amd64.deb
Install the PPD les.
2
Using wild cards, specify all PPD le installation packages that include drivers.
# dpkg –i cnrcups*
Restart CUPS.
3
Use one of the following commands.
# /etc/init.d/cupsys restart
or
# service cups restart
It may be necessary to use a command for the rpm package, depending on the operating system and
distribution you are using.
Register the printer after CUPS has nished restarting. Do not register the printer until CUPS has completely
nished restarting.
Related Topics
Registering a Printer(P. 24)
About the Readme File(P. 18)
23
Page 27
Installing the Driver
Registering a Printer
Register the printer to the spooler service of CUPS.
If you have started the utility (Canon Printer Setup Utility) from the driver installer, start the procedure from
step 2.(P. 24) .
Prerequisites
● The driver has been installed
● The host name or IP address has been checked (when registering a network printer)
● A USB cable is not connected to the printer (when registering a printer via USB)
Procedures
6X0A-00S
Start the Canon Printer Setup Utility.
1
For Red Hat type distributions
Execute the following command with super user privileges from the terminal.
$ su
# cnsetuputil2
For Debian type distributions
Start the Canon Printer Setup Utility by either one of the following methods.
- Select the following icon (Canon Printer Setup Utility) from the app list of the operating system.
If the above icon is displayed multiple times in the app list, check the explanation of each one by rightclicking the icon and select the Canon Printer Setup Utility corresponding to this driver.
- Execute the following command.
$ cnsetuputil2
Perform one of the following operations according to the printer connection method.
2
For network printers
Click [Add] → proceed to the next step.
For printers connected via USB
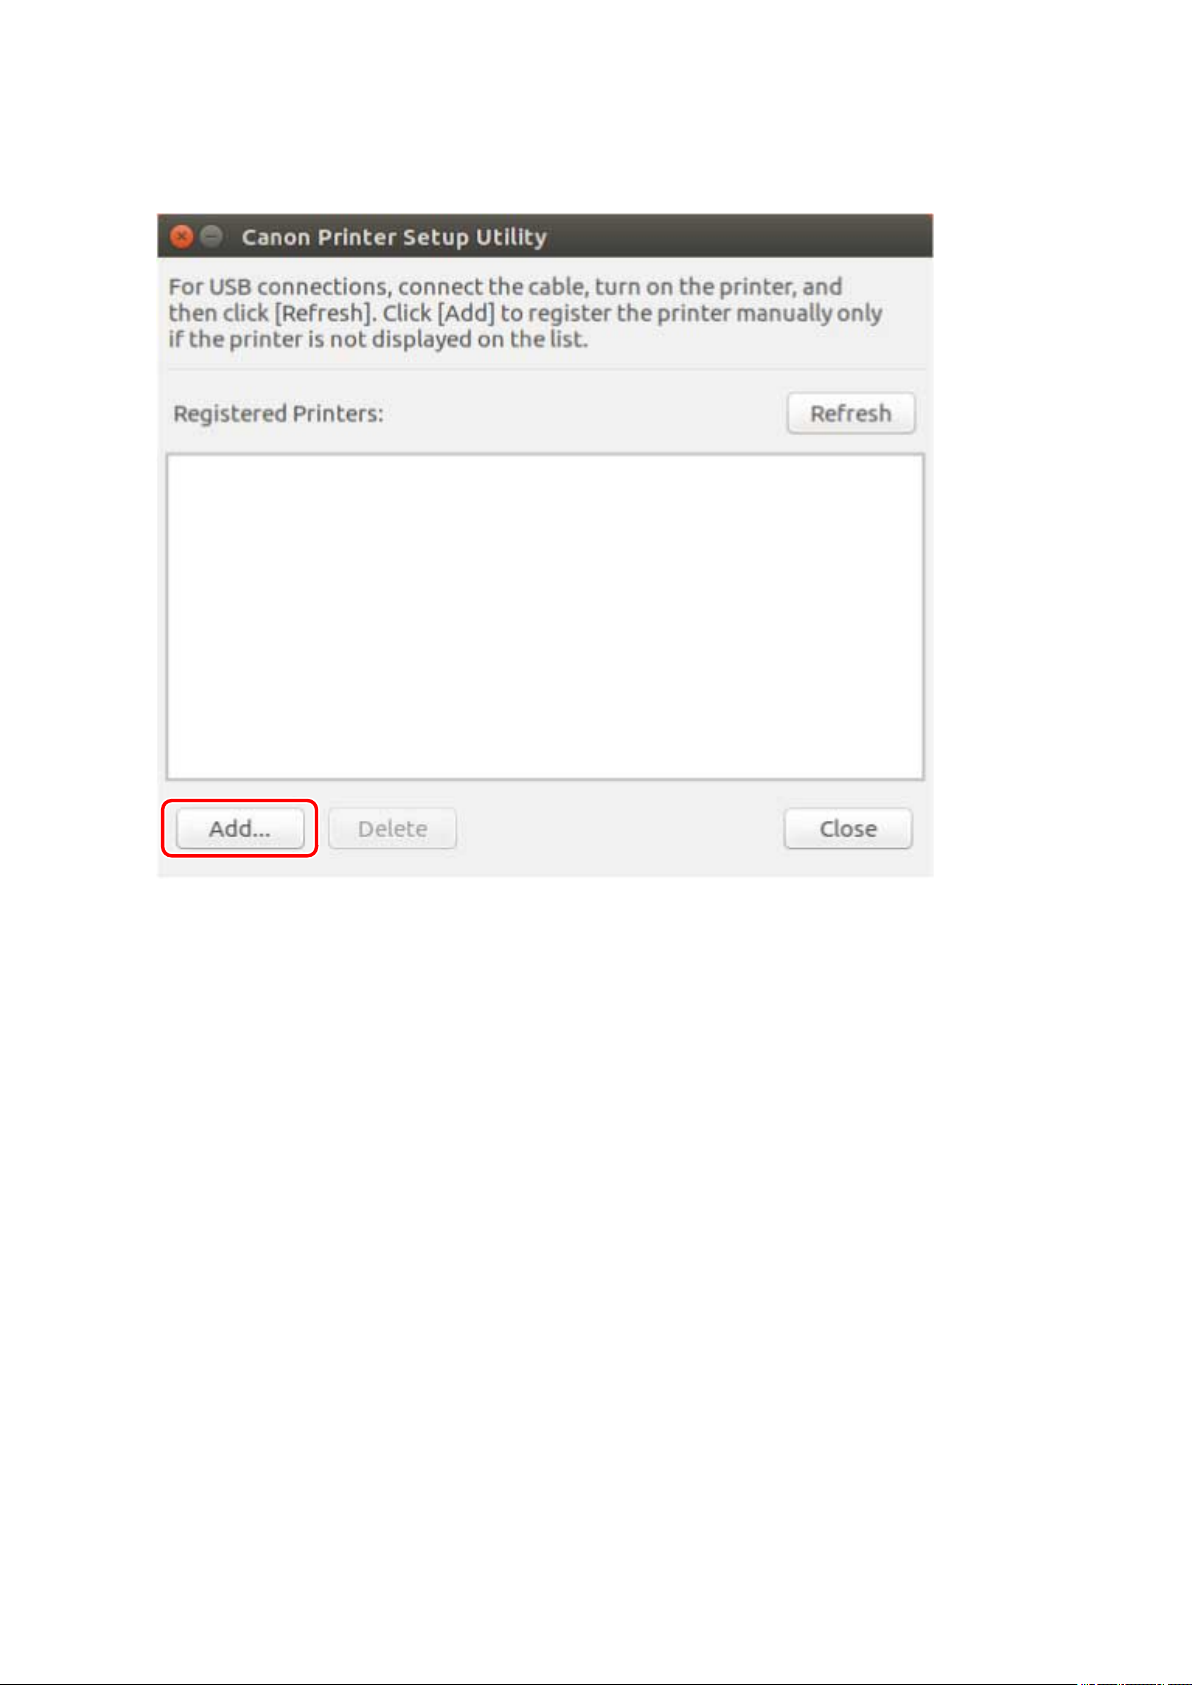
(1) Turn the main power of the printer ON → connect the computer and printer via USB cable → click
[Refresh].
24
Page 28
Installing the Driver
If the printer is displayed in the list, printer registration is complete.
If the printer is not displayed in the list, proceed to the next step.
(2) Disconnect and reconnect the cable with the main power of the printer ON → click [Refresh].
(3) If the printer is still not displayed in the list, click [Add] → proceed to the next step.
[Refresh]: Updates the list in [Registered Printers].
[Delete]: Deletes the selected printer.
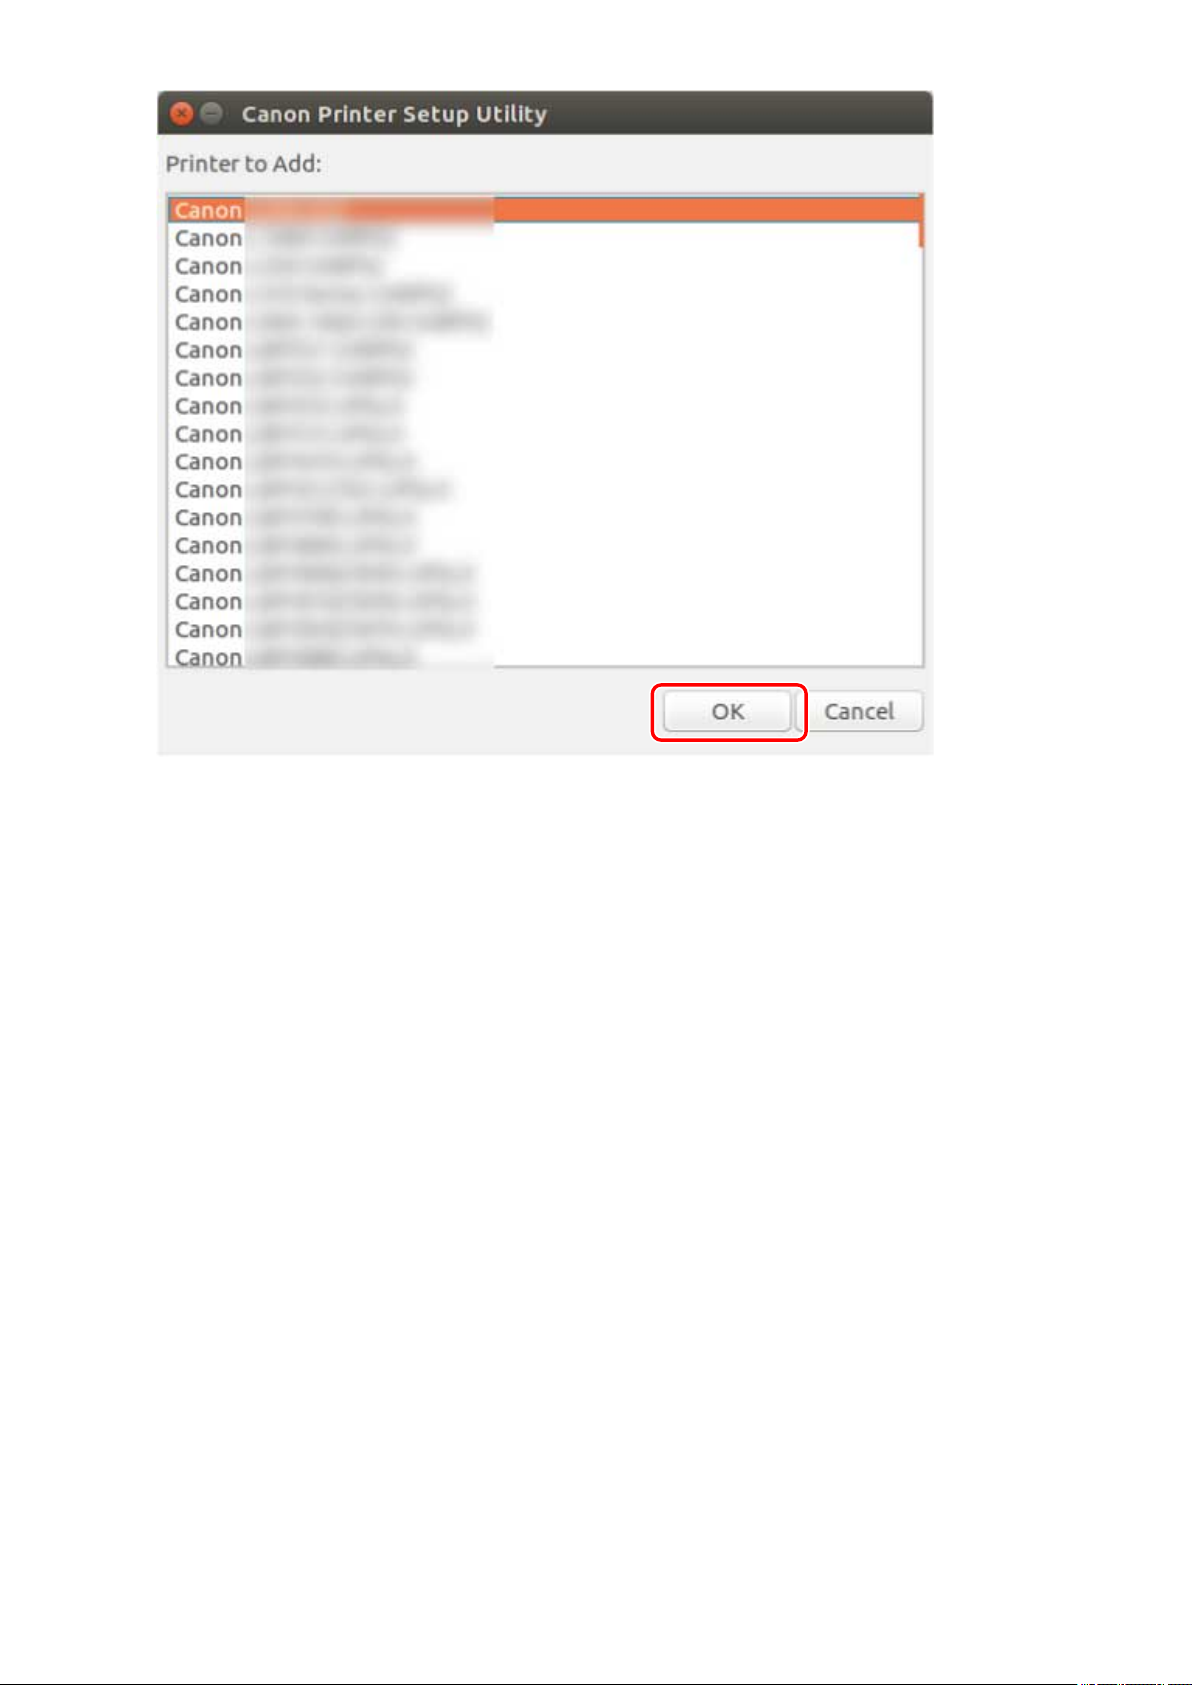
Select the printer to be registered → click [OK].
3
25
Page 29
Installing the Driver
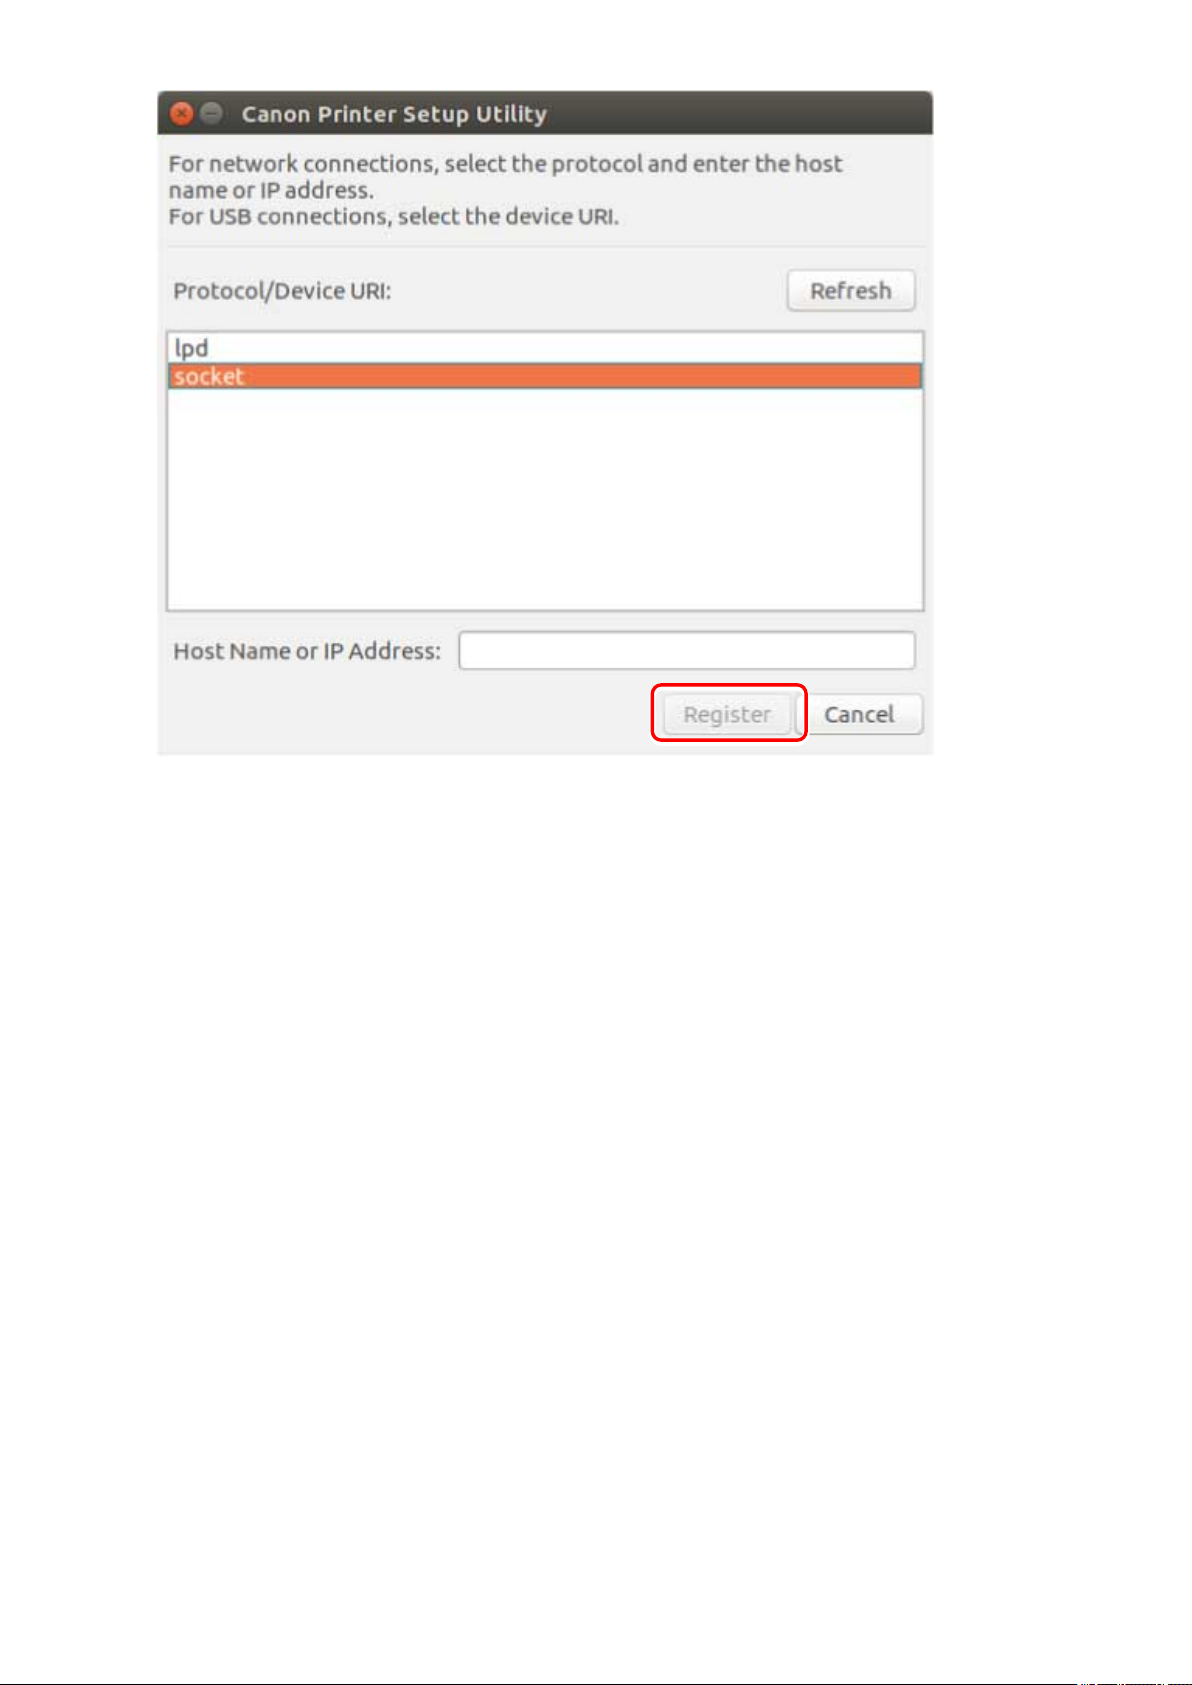
Select the protocol or device URI, depending on how the printer is connected → click
4
[Register].
For network printers
Select the [lpd] or [socket] protocol and enter [Host Name or IP Address].
Specify the IP address in one of the following formats, according to the protocol used.
IPv4: "xxx.xxx.xxx.xxx"
IPv6 global address: "xxxx:xxxx:xxxx:xxxx:xxxx:xxxx:xxxx:xxxx"
IPv6 link-local address (example when the interface name is "eth0"): "xxxx:xxxx:xxxx:xxxx:xxxx:xxxx+eth0"
For printers connected via USB
Select the device URI starting with [usb://].
26
Page 30
Installing the Driver
If you want to register multiple printers, repeat steps 2.(P. 24) to 4.(P. 26) .
When printer registration is complete, click [Close].
5
If printing cannot be performed correctly with the registered printer, use the Canon Printer Setup Utility to
delete the printer by clicking [Delete] and then register the printer again by clicking [Add].
27
Page 31

Installing the Driver
Checking the Driver Version
This section describes the procedure for using a command to check the version of a currently installed driver
and PPD les.
Display the package names of the installed driver.
1
For Red Hat type distributions
$ rpm -qa | grep cnrdrvcups
For Debian type distributions
$ dpkg -l | grep cnrdrvcups
Check the version of the driver.
2
The package names are displayed as indicated below. "x.xx" is the driver version.
cnrdrvcups-ufr2-us-x.xx-x
6X0A-00U
Display the package names of the installed PPD les.
3
For Red Hat type distributions
$ rpm –qa | grep cnrcups | grep zs
For Debian type distributions
$ dpkg -l | grep cnrcups | grep zs
Check the version of the PPD les.
4
The package names are displayed as indicated below. "x.xx" is the version of the PPD les.
The PPD le name for each model is "cnrcupsxxxxxzs", where "xxxxx" is the model name.
cnrcupsxxxxxzs-x.xx-x
28
Page 32

Installing the Driver
Overwriting the Module to Upgrade the Driver
If the installer cannot be used in your environment, overwrite the module to update the installed driver to a
newer version.
To update a driver, it is necessary to delete the registered printer. Conrm the registered printer information in
advance, as it is necessary to register the printer again after the update.
Prerequisites
● The installation package has been obtained
Download the latest version of the driver from the Canon website (https://global.canon/).
Extract the downloaded driver to the computer.
● The settings for the department management function have been backed up
If you want to use the same information after updating the driver, back up the les in the following directory
with super user privileges before updating the driver.
- When version 5.00 or later is installed
/etc/cngplp2/account
- When version 3.70 or earlier is installed
/etc/cngplp/account
● You have super user privileges
Perform this operation after executing the sudo command or su command.
6X0A-00W
Procedures
Execute the procedure corresponding to the installed driver and environment.
● Updating Version 5.00 or Later
Red Hat Type Distributions(P. 29)
Debian Type Distributions(P. 30)
● Updating Version 3.70 or Earlier
Shared Distributions(P. 31)
"x.xx" in the le name of the module in the procedure indicates the version.
The example command indicates an example when you have used the cd command to move to the directory
where the module to be specied is stored.
Updating Version 5.00 or Later - Red Hat Type Distributions
Delete the registered printer.
1
(1) Execute the following command from the terminal to start the Canon Printer Setup Utility.
# cnsetuputil2
(2) Select the printer to be deleted on the displayed screen → click [Delete] → click [Close] when the printer has
been deleted.
The Canon Printer Setup Utility closes.
29
Page 33

Installing the Driver
Install the printer driver module.
2
For 32-bit environments
# rpm -Uvh cnrdrvcups-ufr2-us-x.xx-1.i386.rpm
For 64-bit environments
# rpm -Uvh cnrdrvcups-ufr2-us-x.xx-1.x86_64.rpm
Install the PPD les.
3
Using wild cards, specify all PPD le installation packages that include drivers.
# rpm –Uvh --replacepkgs cnrcups*
Conrm that only the new version of the driver exists.
4
Display and check the information about the driver version.
# rpm -qa | grep cnrdrvcups
Display and check the information about the PPD les.
$ rpm –qa | grep cnrcups | grep zs
Restart CUPS.
5
Use one of the following commands.
# /etc/init.d/cups restart
or
# service cups restart
If the printer was already registered, register it again. However, do not register the printer until CUPS has
nished restarting.
If you want to back up the settings information of the department management function, save it to the
following directory.
/etc/cngplp2/account
Updating Version 5.00 or Later - Debian Type Distributions
Delete the registered printer.
1
(1) Start the Canon Printer Setup Utility by performing one of the following operations.
- Select [Canon Printer Setup Utility 2] from the menu screen of the operating system.
- Execute the following command.
$ cnsetuputil2
30
Page 34

Installing the Driver
(2) Select the printer to be deleted on the displayed screen → click [Delete] → click [Close] when the printer has
been deleted.
The Canon Printer Setup Utility closes.
Install the printer driver module.
2
For 32-bit environments
# dpkg -i cnrdrvcups-ufr2-us_x.xx-1_i386.deb
For 64-bit environments
# dpkg -i cnrdrvcups-ufr2-us_x.xx-1_amd64.deb
Install the PPD les.
3
Using wild cards, specify all PPD le installation packages that include drivers.
# dpkg –i cnrcups*
Conrm that only the new version of the driver exists.
4
Display and check the information about the driver version.
# dpkg -l | grep cnrdrvcups
Display and check the information about the PPD les.
$ dpkg -l | grep cnrcups | grep zs
Restart CUPS.
5
Use one of the following commands.
# /etc/init.d/cupsys restart
or
# service cups restart
It may be necessary to use a command for the rpm package, depending on the operating system and
distribution you are using.
If the printer was already registered, register it again. However, do not register the printer until CUPS has
nished restarting.
If you want to back up the settings information of the department management function, save it to the
following directory.
/etc/cngplp2/account
Updating Version 3.70 or Earlier - Shared Distributions
Uninstalling a Driver(P. 33)
1
31
Page 35

Installing the Driver
Installing the Required Modules Individually(P. 22)
2
If the printer was already registered, register it again. However, do not register the printer until CUPS has
nished restarting.
If you want to back up the settings information of the department management function, save it to the
following directory.
/etc/cngplp2/account
Related Topics
Checking the Driver Version(P. 28)
Registering a Printer(P. 24)
Installing Using the Installer(P. 20)
32
Page 36

Installing the Driver
Uninstalling a Driver
This section describes the procedure for uninstalling an unnecessary driver. It is necessary to uninstall the
driver after deleting the printer registered with the utility (Canon Printer Setup Utility).
If you also need to uninstall the driver to update it, follow this procedure to do so.
Execute the procedure corresponding to the installed driver and environment.
● Uninstalling Version 5.00 or Later
Red Hat Type Distributions(P. 33)
Debian Type Distributions(P. 34)
● Uninstalling Version 3.70 or Earlier
Red Hat Type Distributions(P. 34)
Debian Type Distributions(P. 35)
Uninstalling Version 5.00 or Later - Red Hat Type Distributions
6X0A-00X
Switch to an account with super user privileges.
1
Using the sudo command
$ sudo su
Using the su command
$ su
Delete the registered printer.
2
(1) Execute the following command from the terminal to start the Canon Printer Setup Utility.
# cnsetuputil2
(2) Select the printer to be deleted on the displayed screen → click [Delete] → click [Close] when the printer has
been deleted.
The Canon Printer Setup Utility closes.
Uninstall the PPD les.
3
# rpm -qa | grep cnrcups | grep zs | xargs rpm -e
Uninstall the printer driver module.
4
# rpm -e cnrdrvcups-ufr2-us
33
Page 37

Installing the Driver
Uninstalling Version 5.00 or Later - Debian Type Distributions
Delete the registered printer.
1
(1) Start the Canon Printer Setup Utility by performing one of the following operations.
- Select [Canon Printer Setup Utility 2] from the menu screen of the operating system.
- Execute the following command.
$ cnsetuputil2
(2) Select the printer to be deleted on the displayed screen → click [Delete] → click [Close] when the printer has
been deleted.
The Canon Printer Setup Utility closes.
Switch to an account with super user privileges.
2
Using the sudo command
$ sudo su
Using the su command
$ su
Uninstall the PPD les.
3
# dpkg -l | grep cnrcups | grep zs | awk '{print $2}' | xargs dpkg -P
Uninstall the printer driver module.
4
# dpkg -P cnrdrvcups-ufr2-us
Uninstalling Version 3.70 or Earlier - Red Hat Type Distributions
Switch to an account with super user privileges.
1
Using the sudo command
$ sudo su
Using the su command
$ su
Delete the registered printer.
2
(1) Execute the following command from the terminal to start the Canon Printer Setup Utility.
34
Page 38

Installing the Driver
# cnsetuputil
(2) Select the printer to be deleted on the displayed screen → click [Delete] → click [Close] when the printer has
been deleted.
The Canon Printer Setup Utility closes.
Uninstall the PPD les.
3
# rpm -qa | grep cncups | grep zs | xargs rpm -e
Uninstall the printer driver module.
4
# rpm -e cndrvcups-ufr2-us
Uninstall the CUPS common driver module.
5
# rpm -e cndrvcups-common
Uninstall the Canon Printer Setup Utility.
6
# rpm -e cndrvcups-utility
Uninstalling Version 3.70 or Earlier - Debian Type Distributions
Delete the registered printer.
1
(1) Start the Canon Printer Setup Utility by performing one of the following operations.
- Select [Canon Printer Setup Utility] from the menu screen of the operating system.
- Execute the following command.
$ cnsetuputil
(2) Select the printer to be deleted on the displayed screen → click [Delete] → click [Close] when the printer has
been deleted.
The Canon Printer Setup Utility closes.
Switch to an account with super user privileges.
2
Using the sudo command
$ sudo su
Using the su command
$ su
Uninstall the PPD les.
3
35
Page 39

Installing the Driver
# dpkg -l | grep cncups | grep zs | awk '{print $2}' | xargs dpkg -P
Uninstall the printer driver module.
4
# dpkg -P cndrvcups-ufr2-us
Uninstall the CUPS common driver module.
5
# dpkg -P cndrvcups-common
Uninstall the Canon Printer Setup Utility.
6
# dpkg -P cndrvcups-utility
Related Topics
Registering a Printer(P. 24)
36
Page 40

Printing
Printing
Printing .................................................................................................................................................................. 38
Printing Using the Driver UI ............................................................................................................................... 39
Printing from an Application .............................................................................................................................. 41
Registering the Printer with OpenOce 1.xx .................................................................................................. 42
Registering the Printer with GIMP 2.x ............................................................................................................. 43
Printing from an Application ........................................................................................................................... 44
Functions Not Available from Applications ..................................................................................................... 45
Outputting PostScript Files from an Application ............................................................................................. 46
Caution When Printing from Applications ....................................................................................................... 47
Cautions When Printing a PostScript File From the Driver UI .......................................................................... 53
Printing from the Command Line ....................................................................................................................... 54
37
Page 41

Printing
This section describes the printing method using the driver.
Printing Using the Driver UI(P. 39)
Printing from an Application(P. 41)
Printing from the Command Line(P. 54)
Printing
6X0A-00Y
38
Page 42
Printing
Printing Using the Driver UI
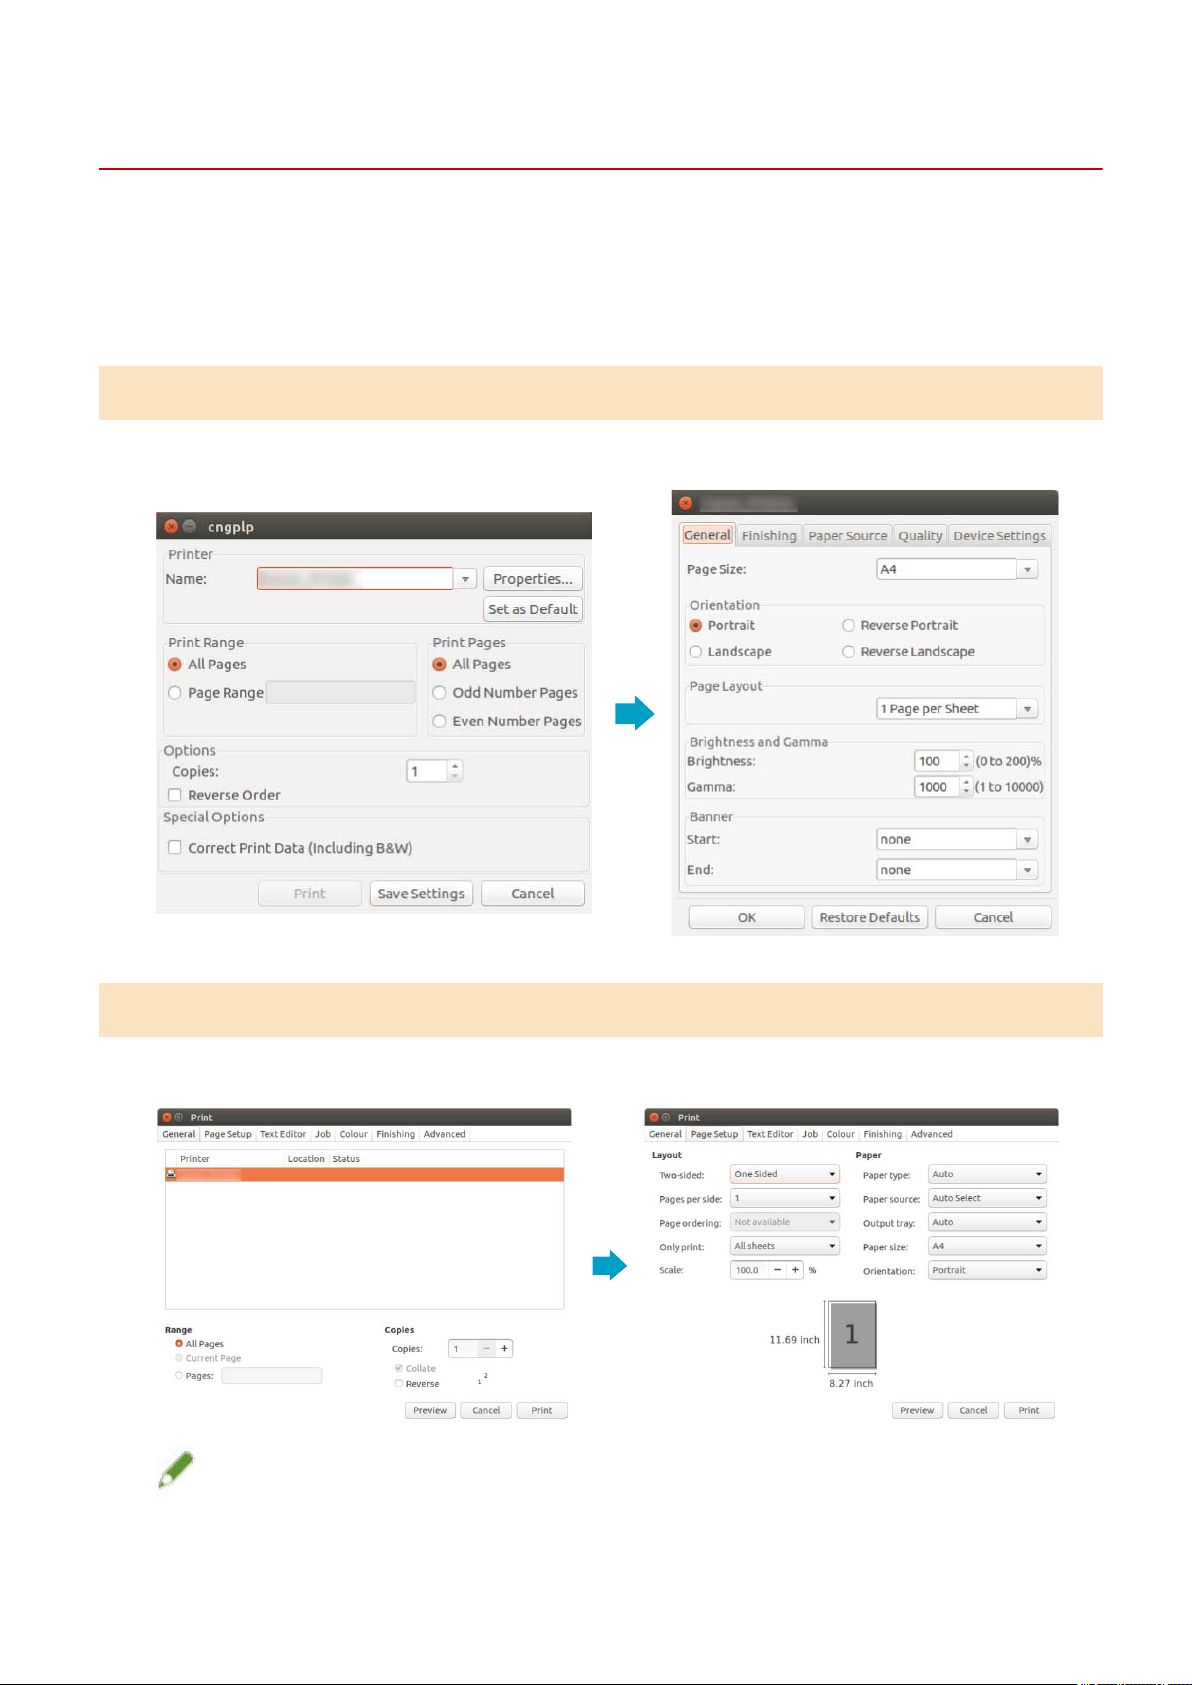
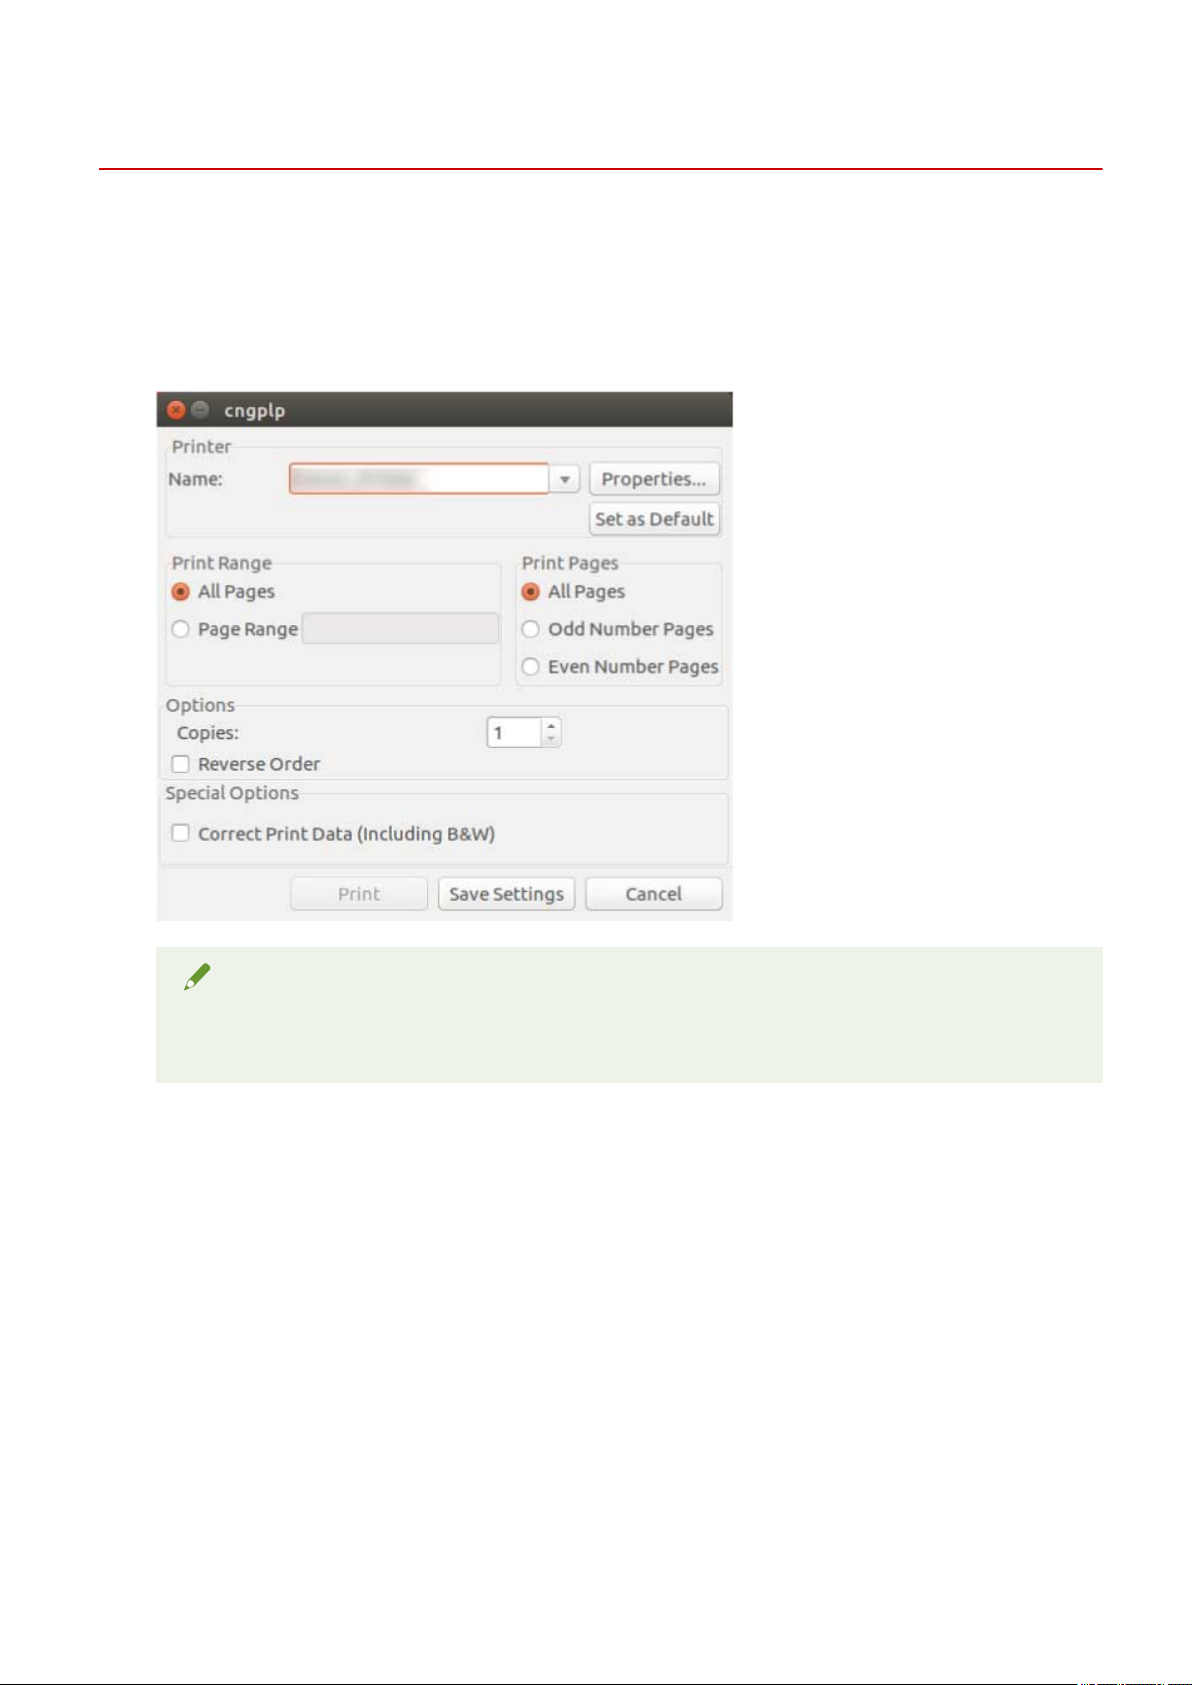
When editing default settings and performing printing using the driver UI, use the following command.
Specifying default settings: $ cngplp2
This command enables you to set the various default printing attributes. They are effective until updated or
reset.
6X0A-010
NOTE
● Because this command executes only default print attribute settings, it uses only the [Save Settings]
and [Cancel] buttons on the UI.
Printing Using the UI Settings: $ cngplp2 -p [File Name]
This command enables you to print a target le, specifying the various print settings.
39
Page 43
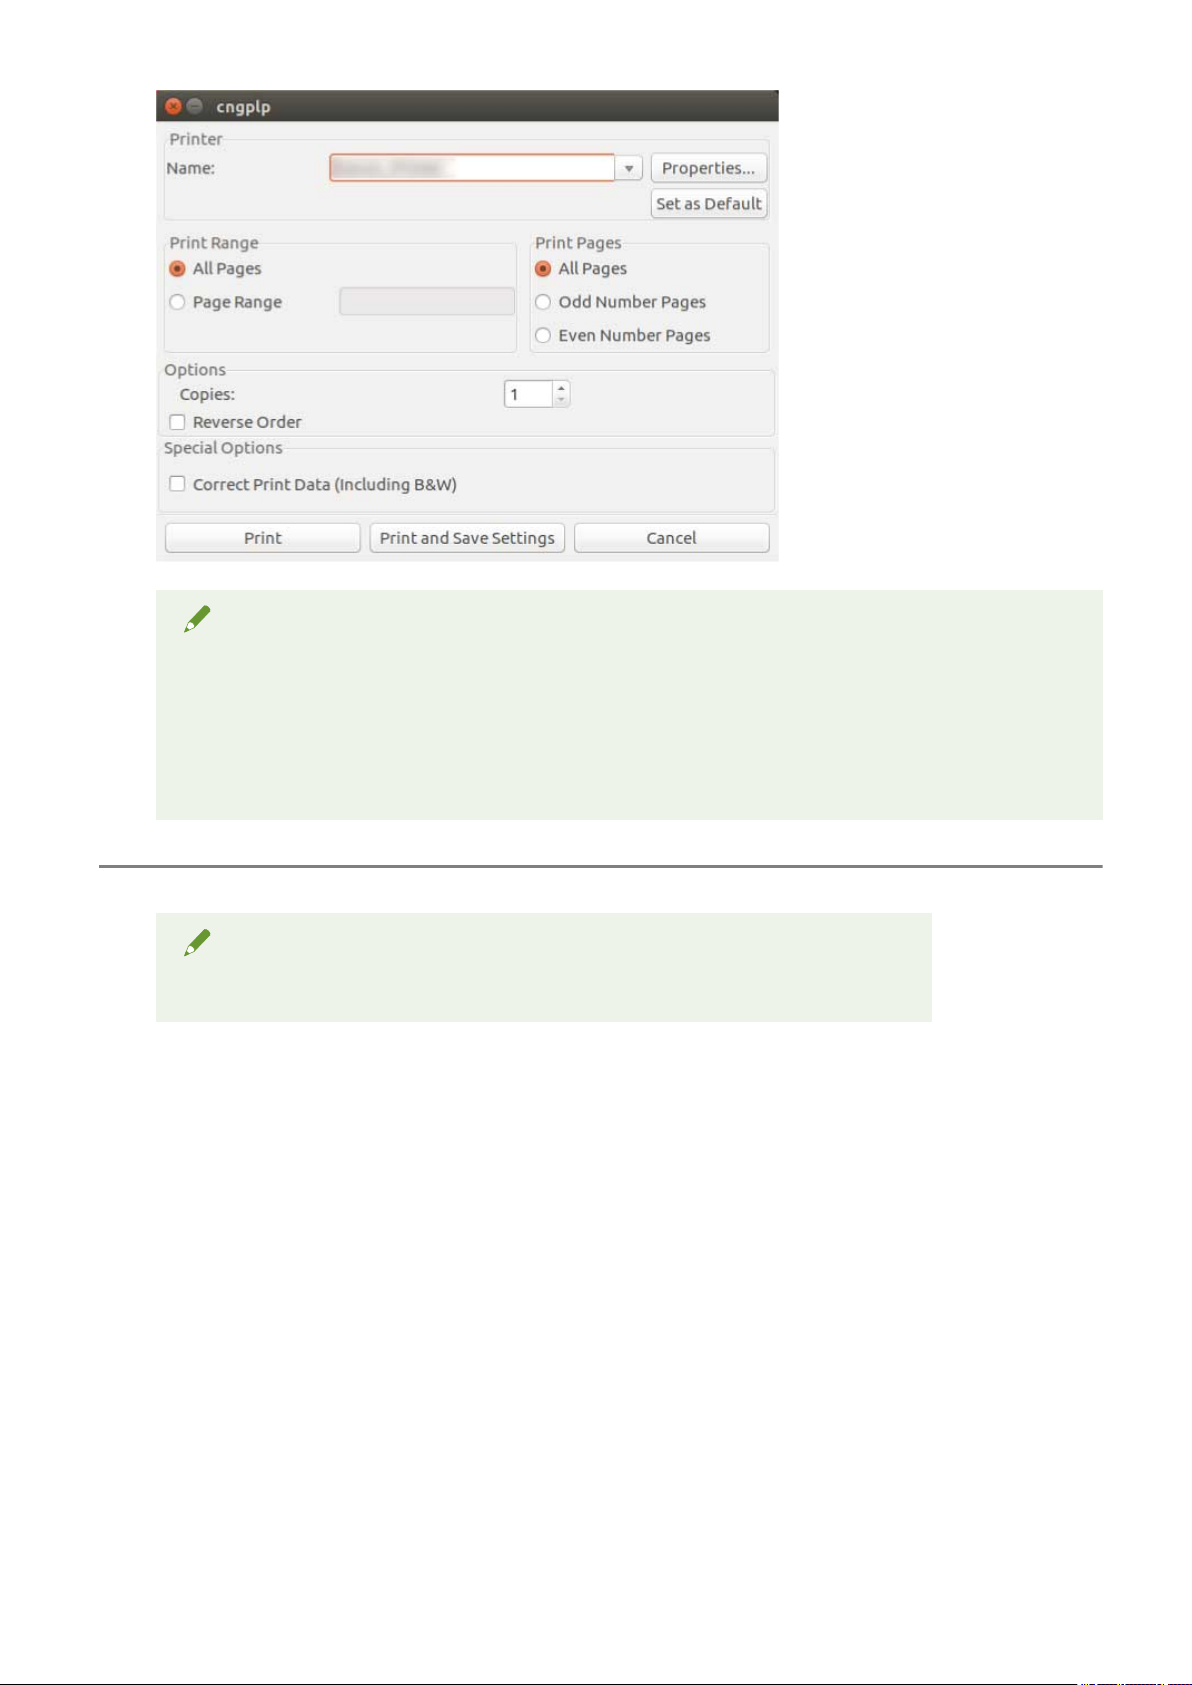
NOTE
Printing
● When you nish specifying the settings by clicking the [Print] button, those settings are available only
for the current print job.
● When you nish specifying the settings by clicking the [Print and Save Settings] button, the le is
printed with those settings, and they are saved as the default printing attributes.
● When you nish specifying the settings by clicking the [Cancel] button, the settings are not updated.
NOTE
● For details about print settings from the driver UI, refer to " Settings List(P. 56) ."
40
Page 44

Printing
Printing from an Application
When printing from an application, edit the print settings in the print settings dialog box displayed by the
application. You can also set the various default printing attributes using the driver UI (see " Settings
List(P. 56) "). However, the settings from the application take priority over those from the driver UI.
Depending on the application you use, you may need to register the printer with the application beforehand. To
register the printer with OpenOce or GIMP, follow the procedures in this section.
Registering the Printer with OpenOce 1.xx(P. 42)
Registering the Printer with GIMP 2.x(P. 43)
Printing from an Application(P. 44)
Functions Not Available from Applications(P. 45)
Outputting PostScript Files from an Application(P. 46)
Caution When Printing from Applications(P. 47)
Cautions When Printing a PostScript File From the Driver UI(P. 53)
NOTE
6X0A-011
● For detailed information about print settings from applications, refer to the manuals provided with the
applications.
● When printing from OpenOce under SuSE 9.2/9.3, you do not need to register the printer with
OpenOce.
41
Page 45

Printing
Registering the Printer with OpenOce 1.xx
On the Start menu, point to [Program] - [Oce], and then select [OpenOce Printer
1
Administration].
The [Printer Administration] dialog box is displayed.
Click the [New Printer] button.
2
The [Add Printer] dialog box is displayed.
Select [Create Printer], and then click the [Next] button.
3
6X0A-012
Click the [Import] button.
4
The [Install Driver] dialog box is displayed.
Enter '/usr/share/cups/model' under [Driver Directory], or click the [Browse] button to
5
select the directory '/usr/share/cups/model', select the driver for your printer from the
[Selection of drivers] list box, and then click the [OK] button.
The [Add Printer] dialog box is displayed.
Select the driver imported in step 5 from the list, and then click the [Next] button.
6
Select or enter a command line that you want to use to print with your printer, and
7
then click the [Next] button.
Enter the following command:
lpr -P [the printer name registered with the print spooler]
Specify a name for your printer, and click the [Finish] button.
8
If you want to set the printer as the default printer, select [Set as Default].
In the [Printer Administration] dialog box, click the [Close] button.
9
42
Page 46

Printing
Registering the Printer with GIMP 2.x
Start GIMP, and then display the print dialog box by right-clicking on an image to be
1
printed, and selecting [File] and [Print] from the pop-up menu.
Select the printer registered with the print spooler from [Printer Name] in the [Printer
2
Settings] sheet.
Click the [Setup Printer] button.
3
The [Setup Printer] dialog box is displayed.
Enter a command line that you want to use to print with your printer.
4
6X0A-013
Enter the following command:
lpr -P [the printer name registered with the print spooler]
Click the [Browse] button to specify the PPD le for your printer, or enter the full path
5
to the le.
NOTE
● The PPD le is located in /usr/share/cups/model.
Click the [OK] button, and then click the [Save Settings] button in the print dialog box.
6
43
Page 47

Printing
Printing from an Application
The procedures and menus described below may differ depending on the application you use. This section
describes the printing method with OpenOce.org.
Open the application, and create a document.
1
Select [Print] from the [File] menu.
2
Select that the name of the printer you want to use is displayed in [Name], and click
3
the [Properties] button.
NOTE
6X0A-014
● In case of using OpenOce.org, select the printer name which is not surrounded by "<Printer Name>"
(<iR105+>). If you select the printer name surrounded by "<Printer Name>", you can't print.
Set the printing conditions in the Settings dialog box, and click the [OK] button.
4
Click the [Print] button.
5
NOTE
● It may be necessary to specify printing commands and PPD les from within the application.
44
Page 48

Printing
Functions Not Available from Applications
The following functions cannot be set from the print settings dialog box displayed from applications.
Use the driver UI or the command line to set these functions.
Function Note
Gutter *1
Creep (displacement) adjustment *1
Trim width *1
Print starting position (front/back, long edge/short edge) *1
Offset number *1
Secure print settings in output method *2
Store destination settings in output method *1
Department ID Management *3
6X0A-015
Stack Details (Number of Copies) *1
Department ID Management, with black and white printing specied *1
User Authentication *3
● *1: Can be set from applications that accept command line input (example: Adobe Reader 7.x)
● *2: Can be set by starting the supplied cnjatool or driver UI from the command line with user privileges
● *3: Can be set from the command line using the supplied cnjatool
NOTE
If you want to use the above functions to perform printing from an application, output to a PostScript le
and then print that PostScript le from the driver UI. (See " Outputting PostScript Files from an
Application(P. 46) .")
45
Page 49

Printing
Outputting PostScript Files from an Application
When you want to perform printing using functions that cannot be used from an application (see " Functions
Not Available from Applications(P. 45) ") or it is not obtained the print result that you aimed at (see Caution
When Printing from Applications(P. 47) ), output to a PostScript le, and then print that PostScript le from
the driver UI.
The method for outputting a PostScript le differs according to the application. This section describes the
procedure for outputting a PostScript le with Adobe Reader 7.x/8.x/9.x and Open Oce 1.x/2.x/3.x.
Select [Print] from the [File] menu.
1
The [Print] dialog box is displayed.
Select [Print to le] → click [OK].
2
6X0A-016
NOTE
Use the default settings of the application for the print settings.
Specify the location to save the le and the lename.
3
NOTE
If you can specify the le type (output format), select PostScript.
Click [Save] ([Print]/[OK]).
4
NOTE
● Use the default (initial values) for the print settings in the application. When you used it anything other
than the default, the print result of no intention of you might come out.
46
Page 50

Printing
Caution When Printing from Applications
6X0A-017
This section describes problems that may occur when printing from applications, and how to avoid them.
Specifying Two-Sided (Short Edge) Printing (Adobe Reader 7.x/8.x and Open Oce 2.x)(P. 47)
Printing When Print Settings Are Disabled (Adobe Reader 7.x)(P. 47)
Specifying the Page Layout (Open Oce 2.x)(P. 48)
Setting Secured Printing(P. 48)
Setting Department ID Management(P. 49)
Setting the User Authentication Function(P. 51)
Specifying Two-Sided (Short Edge) Printing (Adobe Reader 7.x/8.x and Open
Oce 2.x)
When you specify two-sided (short edge) printing from the print settings dialog box of Adobe Reader 7.x/8.x or
Open Oce 2.x, you cannot perform two-sided printing. The method for avoiding this problem is indicated
below.
Output a PostScript le from the application. (See " Outputting PostScript Files from an
1
Application(P. 46) .")
Enter the following command from the command line to start the driver UI:
2
$ cngplp2 -p [PostScript filename].ps
The [cngplp2] dialog box is displayed.
Select the name of the printer you are using in [Printer Name] → click [Properties].
3
Click the [Finishing] tab → select [2-sided Printing] in [Print Style].
4
Select short edge in [Binding Location] → click [OK].
5
The screen returns to the [cngplp2] dialog box.
Click [Print].
6
Printing When Print Settings Are Disabled (Adobe Reader 7.x)
When you specify multiple print settings on the printer properties screen of the Adobe Reader 7.x print dialog
box, the settings you specify become disabled. The method for avoiding this problem is indicated below.
Output a PostScript le from the application. (See " Outputting PostScript Files from an
1
Application(P. 46) .")
47
Page 51

Printing
Enter the following command from the command line to start the driver UI:
2
$ cngplp2 -p [PostScript filename].ps
The [cngplp2] dialog box is displayed.
Select the name of the printer you are using in [Printer Name] → click [Properties].
3
Specify the desired print settings → click [OK].
4
The screen returns to the [cngplp2] dialog box.
Click [Print].
5
Specifying the Page Layout (Open Oce 2.x)
You cannot select the page layout in the print settings dialog box of Open Oce 2.x.
The procedure for printing with the page layout specied is indicated below.
Output a PostScript le from the application. (See " Outputting PostScript Files from an
1
Application(P. 46) .")
Enter the following command from the command line to start the driver UI:
2
$ cngplp2 -p [PostScript filename].ps
The [cngplp2] dialog box is displayed.
Select the name of the printer you are using in [Printer Name] → click [Properties].
3
Select the desired layout in [Page Layout] on the [General] sheet → click [OK].
4
The screen returns to the [cngplp2] dialog box.
Click [Print].
5
Setting Secured Printing
The user name and PIN for secured printing cannot be set from an application. Follow the procedure below to
register the user name and PIN from the driver UI or cnjatool in advance.
48
Page 52

Printing
From the Driver UI
Enter the following command from the command line to start the driver UI:
1
$ cngplp2 -p [PostScript filename].ps
The [cngplp2] dialog box is displayed.
Select the name of the printer you are using in [Printer Name] → click [Properties].
2
click [Device Settings], and select [Secured Print] from [Output Method].
3
Click [Settings].
4
The [Secured Print Settings] dialog box is displayed.
Enter the user name and PIN → click [OK].
5
Click [OK] in the [Device Settings] sheet.
6
Click [Save Settings].
7
From the cnjatool
Enter the following command with user privileges to start cnjatool.
1
$ cnjatool2 -ps [Printer Name]
Enter the user name and PIN.
2
Setting Department ID Management
The Department ID Management function cannot be enabled or disabled from an application. The ID and PIN
for the Department ID Management function also cannot be registered from an application. Follow the
procedure below to use the driver UI or cnjatool to enable the function with administrator privileges, and
register the ID and PIN with user privileges.
From the Driver UI
Enter the following command from the command line to start the driver UI:
1
49
Page 53

Printing
$ cngplp2 -p [PostScript filename].ps
The [cngplp2] dialog box is displayed.
Select the name of the printer you are using in [Printer Name] → click [Properties].
2
click [Device Settings], and Select [Job Accounting].
3
Click [Settings].
4
The [ID/PIN Settings] dialog box is displayed.
Enter the ID and PIN → click [OK].
5
Click [OK] in the [Device Settings] sheet.
6
Click [Save Settings].
7
Enter the following command with user privileges to start cnjatool.
8
Enter the ID and PIN again, and save the settings.
9
From the cnjatool
Enter the following command with administrator privileges to enable the Department
1
ID Management function.
# cnjatool2 -e [Printer Name]
Enter the following command with user privileges to start cnjatool.
2
$ cnjatool2 -p [Printer Name]
Enter the ID and PIN.
3
NOTE
Also use the driver UI or cnjatool when disabling the Department ID Management function.
50
Page 54

Printing
Setting the User Authentication Function
The User Authentication Function cannot be enabled or disabled from an application. The user name and PIN
for the User Authentication Function also cannot be registered from an application. Follow the procedure below
to use the driver UI or cnjatool to enable the function with administrator privileges, and register the user name
and PIN with user privileges.
From the Driver UI
Enter the following command from the command line to start the driver UI:
1
$ cngplp2 -p [PostScript filename].ps
The [cngplp2] dialog box is displayed.
Select the name of the printer you are using in [Printer Name] → click [Properties].
2
click [Device Settings], and Select [Use User Authentication Function].
3
Click [Settings].
4
The [User Name/PIN Settings] dialog box is displayed.
Enter the user name and PIN → click [OK].
5
Click [OK] in the [Device Settings] sheet.
6
Click [Save Settings].
7
Enter the cngplp2 command from the command line with user privileges.
8
Enter the user name and PIN again, and save the settings.
9
From the cnjatool
Enter the following command with administrator privileges to enable the User
1
Authentication Function.
# cnjatool2 -e [Printer Name]
51
Page 55

Printing
Enter the following command with user privileges to start cnjatool.
2
$ cnjatool2 -pu [Printer Name]
Enter the User Name and PIN.
3
NOTE
Also use the driver UI or cnjatool when disabling the User Authentication Function.
52
Page 56

Printing
Cautions When Printing a PostScript File From the Driver UI
If you print a PostScript le output from an application with the driver UI, the printed result may not be as
intended, depending on the settings used. If the result is not as intended, when outputting the PostScript le
from the application, use the default print settings.
Several examples of settings are given below, with expected results when the same setting is used in both the
application and the driver.
Setting Setting Content Expected Result
6X0A-018
[Page Layout] 4 pages per
sheet
[Print Range]-[Page Range] 1,3,5 If the document is 5 pages, only pages 1 and 3 are printed.
[Print Pages] Odd number
pages/Even
number pages
[Reverse Order] Reverse order is executed twice, resulting in the actual output
[Copies]* 2 In the case of a 10-page document, 40 pages (10 pages x 2 x 2)
NOTE
If you set multiple copies for the number of copies to be printed, depending on the application, a
PostScript le consisting of only part of the page data may be created. If this happens, even if you specify
multiple copies in both the application and the driver UI, only the number of copies specied in the
application will be printed.
Because [4 Pages per Sheet] is set and then printed as [4 Pages
per Sheet], the printed result resembles [16 Pages per Sheet].
If the document is 10 pages, only pages 1, 5, and 9 are printed.
order being normal.
are printed.
53
Page 57

Printing
Printing from the Command Line
In the command line mode, various printer driver parameters can be specied from the command line without
using the GUI. If you want to print a le directly from the command line, use the following lpr command.
$ lpr -P [Printer Name] [File Name]
NOTE
● When printing is executed from a terminal interface command line, printing is performed immediately
without the settings window being displayed.
● Various printer options can be specied by combining keywords (e.g. "Duplex") and parameters
included in the PPD le for the relevant printer, as shown below, after the -o option. For details about
the keywords and parameters for printer options, see " Command List(P. 70) ."
$ lpr -P [Printer Name] [File Name] -o [Option]=[Parameter]
6X0A-019
Start the console.
1
The method for starting the console differs according to the operating system/distribution used.
Enter the lpr/lp command as follows.
2
E.g.: From the printer called iR105+, print the le sample.ps:
$ lpr -P iR105+ sample.ps
NOTE
● Specify printer options (option) and parameters (value) after -o (option) as "option name = value".
● If the printer name is omitted, the default printer will be used.
● Supported print options, parameters, and combinations thereof differ according to the type of printer
used.
● If no options are specied or there is an error in a specied option, the option is ignored and print
processing is executed using the default options and settings.
54
Page 58

Settings List
Settings List
Settings List ......................................................................................................................................................... 56
[cngplp2] Screen .................................................................................................................................................. 57
[General] Sheet .................................................................................................................................................... 58
[Finishing] Sheet .................................................................................................................................................. 59
[Paper Source] Sheet ........................................................................................................................................... 63
[Quality] Sheet ..................................................................................................................................................... 64
[Device Settings] Sheet ........................................................................................................................................ 67
55
Page 59

Settings List
Settings List
This section describes the settings for printing from the driver settings screen.
[cngplp2] Screen(P. 57)
[General] Sheet(P. 58)
[Finishing] Sheet(P. 59)
[Paper Source] Sheet(P. 63)
[Quality] Sheet(P. 64)
[Device Settings] Sheet(P. 67)
6X0A-01A
56
Page 60

Settings List
[cngplp2] Screen
You can select the printer to use for printing and specify the basic print functions.
[Name]
Select the printer to use for printing.
[Properties]
Displays the driver settings screen, which enables you to set the functions of the printer selected from [Name].
[Set as Default]
Sets the printer selected from [Name] as the default printer.
[Print Range]/[Print Pages]
Species the pages to print.
6X0A-01C
If you select [Page Range], you can specify a range such as "1-4, 7, 9-12."
[Copies]
Species the number of copies to be printed.
[Reverse Order]
Prints from the last page.
[Correct Print Data (Including White Space on Colored Background)]
Corrects the data when data that includes light colors on colored backgrounds is not printed correctly.
57
Page 61

[General] Sheet
You can set the paper size, print layout, and brightness, etc.
[Page Size]
Species the paper size to print on.
[Orientation]
Species the orientation of the print data.
[Page Layout]
Species the number of pages to print on a single sheet.
Settings List
6X0A-01E
[Brightness and Gamma]
Species the brightness and gamma to adjust the brightness.
[Banner]
Prints a banner page indicating the user name, job name, and print date/time when starting or nishing
printing.
If you select [None], a banner page is not printed.
If you select [Standard], a standard banner page is printed.
If you select an item other than the above, a banner page with the label of the selected item is printed.
58
Page 62
Settings List
[Finishing] Sheet
You can set the print layout and output method, etc.
[Print Style]
Select [1-sided Printing], [2-sided Printing], or [Booklet Printing].
If you select [Booklet Printing], the paper can be folded to create a booklet.
6X0A-01F
[Booklet]
Enables you to congure the detailed settings such as the binding direction and displacement correction, etc.
[Book Opening]
Select the binding direction of the booklet.
[Use Creep (Displacement) Correction]
Corrects the displacement between the print area of the inner pages and outer pages when the paper is
folded.
Select the correction method from [Displacement Correction Method]. If you select [Manual Correction],
specify the correction width.
[Booklet] Dialog Box
[Binding Location]
Select the binding location.
[Gutter]
Enables you to specify the gutter width.
[Gutter Settings] Dialog Box
[Finishing]
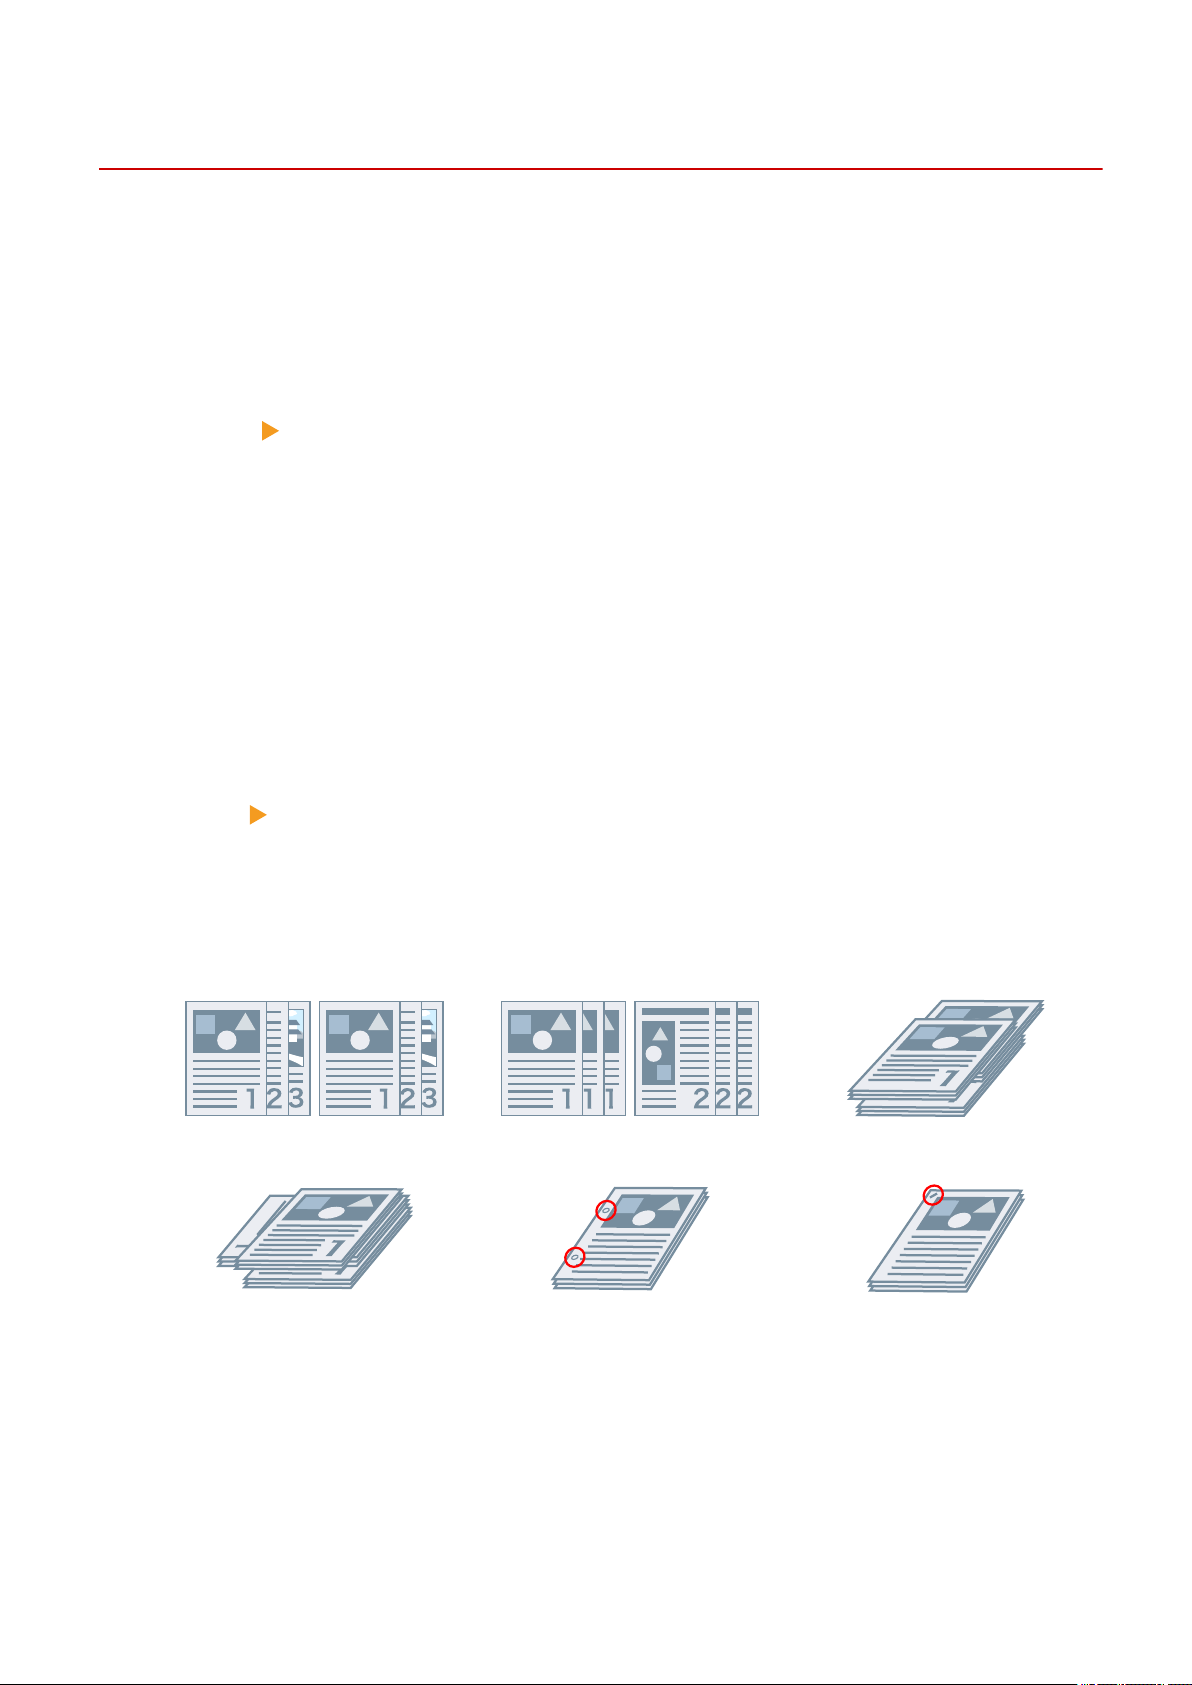
Species a separating method and whether to perform stapling when printing multiple copies.
Collate Group Offset
Rotate Hole Punch Staple
Eco (Staple-Free)
[Offset]
Offsets each stack of output pages.
[Hole Punch]
Punches holes in the margin of the output. The type of holes can be selected according to the optional
installed in the printer.
59
Page 63

[Rotate]
Rotates and outputs each stack at 90 degrees.
[Fold]
Outputs pages folded into one of a variety of forms.
Settings List
C-fold Z-fold [Half Fold] (Saddle
Fold)
Accordion Z-fold Double Parallel Fold
[Fold Details]
Select the fold direction and document orientation for the folding method selected from [Fold].
[Sheets per Set]
Species the number of sheets per set when folding the output with multiple sets.
[Staple Position]
Select the staple position.
[Number of Copies for Offset]
Offsets the paper each specied number of copies.
[Saddle Stitch Setting]
Folds the paper in half and staples it in the center.
[Adjust Trim Width by]
Enables you to switch the trim width and adjustment method.
This can be set when [Fold + Trim] or [Fold + Saddle Stitch + Trim] is selected from [Saddle Stitch Setting].
If you selected [Manual Setting], specify the width in [Trim Width].
[Paper Output]
Species the printed paper output destination.
[Stack Details]
Enables you to specify the number of copies for each stack and the timing for retrieving the paper when
[Stacker] is selected from [Paper Output].
[Stack Details] Dialog Box
[Face Up/Face Down]
Select whether the printed side is output face up or face down.
60
Page 64

Settings List
[Transparency Printing]
Select the print method according to the projector that will be used.
[Special Print Mode]
Improves the problem where black streaks appear in the printed output. Try the settings in order, starting with
[Mode 1].
[Special Print Mode (Plain Paper)]
Improves the xability problem where the paper curls when printing on plain paper. Try the settings in order,
starting with [Mode 1].
[Special Print Mode]
Improves the print result. Try the settings in order, starting with [Special Settings 1].
[Special Settings 1]/[Barcode Adjustment Mode]
Adjusts the line width when you want to print small text and thin lines more clearly. Try the settings in order,
starting with [Mode 1].
[Special Print Adjustment A]/[Blurry Image Correction]
Improves the problem where black streaks appear in the printed output by thinning out the dots. Try the
settings in order, starting with [Mode 1].
[Special Print Adjustment B]
Improves the problem where black streaks appear in the printed output by increasing the xability. Try the
settings in order, starting with [Mode 1].
[Special Print Adjustment C]/[Quiet Mode]
Lowers the print speed to improve the toner xability and print more quietly.
[Image Special Process]
Corrects the data when thick text and lines are interrupted. Try the settings in order, starting with [Mode 1].
[Special Smoothing Mode]
Smooths the contours of characters, lines, images, and inside gradations.
Normally, select [Mode 1]. If [Mode 1] does not make things smoother, try another mode, according to the
content of the data.
[Mode 1]
Smooths the contours of text, lines, and images.
[Mode 2]
Smooths the inside halftones in addition to the image contours.
61
Page 65

Settings List
[Mode 3]
Smooths dense letters and lines over halftone backgrounds.
[Mode 4]
Smooths the contours of large text and thick lines when they are jagged.
[Mode 5]
Corrects non-uniformity in images and halftones.
[Mode 6]
Smooths print data as a whole.
[Output Adjustment Mode]
Increases the resolution when the data includes a mix of text, images, and graphs, etc.
[Glossy Plain Paper Processing]
Performs processing with the glossy xing mode when printing on plain paper.
[Prevent Postcard Fogging]
Alleviates the problem of the printed image being entirely or partially fogged when printing to postcards.
Select [Mode 1] for normal use. If the problem is not solved by [Mode 1], you can select [Mode 2], but this may
affect the printed image itself.
[Advanced Settings] [Advanced Settings] Dialog Box
Enables you to adjust the print start position. Specify the amount to shift in the vertical direction and the
horizontal direction.
This function is useful for adjusting the margins when the vertical margin differs from the horizontal margin, or
when hiding the information in the header and footer.
[Finishing Details]
Enables you to embed a watermark or tracking information, etc. when printing to prevent leaks of condential
documents.
[Finishing Details] Dialog Box
[Use Secure Watermark Function of Device]
Embeds hidden text in the background that appears when the document is copied, if the [Device Settings]
sheet > [Secure Watermark Function of Device] is set.
[Use Secure Printing Function of Device]
Embeds restriction information and tracking information, if the [Device Settings] sheet > [Secure Printing
Function of Device] is set.
[Copy Set Numbering]
Prints the copy set as a serial number. The number is faintly printed in the top, bottom, left, right, and center
(ve locations).
Specify the start number in [Starting Number].
Related Topics
[Device Settings] Sheet(P. 67)
62
Page 66

Settings List
[Paper Source] Sheet
You can set the paper type and paper source.
[Select by]/[Paper Source]/[Paper Type]
Species the paper to print on by paper source or paper type.
[Feed A5 Vertically]/[Feed A5 Horizontally]
The paper is fed vertically or horizontally when the [General] sheet > [Page Size] > [A5] is set.
[Insert Interleaf Sheets]
Select the type of paper to insert between transparencies when the [Paper Source] sheet > [Paper Type] >
[Transparency] is set.
6X0A-01H
Select [Print on Interleaf Sheets] to print on the inserted paper.
[Use Document Insertion Unit]
Inserts the paper loaded in the Document Insertion Unit as covers or separators.
[Front/Back Cover Settings]
Enables you to insert a cover and back cover. You can select the side to print on and the paper source for each.
[Front/Back Cover Settings] Dialog Box
Related Topics
[General] Sheet(P. 58)
[Paper Source] Sheet(P. 63)
63
Page 67

Settings List
[Quality] Sheet
You can adjust the color, toner, and print processing method.
[Resolution]
Select the print resolution.
[Color Mode]
Switches between printing in color or in black-and-white.
Select [Auto Detect] to automatically determine whether each page is color or grayscale and switch the color
mode accordingly.
[Number of Colors]
6X0A-01J
Switches between printing in full color or in two colors.
[Color to Use with Black]
If you select [Two Colors] from [Number of Colors], specify the color to combine with black.
The achromatic areas of the data are printed in grayscale and the chromatic areas are printed in the specied
color.
[Color Halftones]/[B & W Halftones]/[Halftones]
Enables you to specify methods for representing halftones (areas between dark areas and light areas).
[Printer Default]
Uses the printer settings.
[Resolution]
Gives priority to resolution and prints contours smoothly.
[Gradation]
Gives priority to gradation and prints gradations smoothly.
[Color Tone]
Gives priority to gradation more than [Gradation].
[Toner Density]
Adjusts the toner density.
[Prioritize for Processing When in Raster Mode]
When the print data conversion method is set to raster mode, set the subject to be prioritized when processing.
You can select images, graphics, or text.
[Toner Save]/[Draft Mode]
Thins out the print data to save toner.
64
Page 68

Settings List
[Ink Saving]
Thins out the print data to save ink.
[Line Control]
Improves reproduction of text and lines.
Select [Resolution Priority] to give priority to the resolution. Select [Gradation Priority] to give priority to the
reproduction of gradations.
[Toner Volume Adjustment]
Adjusts the amount of toner to match the content of the print data.
For data that contains many graphics or computer graphics using gradations, select [Gradation Priority]. For
data that contains mainly text, select [Text Priority].
[Image Renement]
Smooths the contours of text, lines, and images.
[Line Renement]
Corrects thin lines to clearly print small characters and barcodes.
[Advanced Smoothing]
Smooths the contours of text, lines, and images. [Smooth 2] performs a stronger smoothing process than
[Smooth 1].
[Sharpness]/[Sharpness (Photo)]
Strengthens and blurs the contours of text and images.
[Image Compression Optimization]
Optimizes switching between lossy and lossless compression according to the content of the data.
[Width Adjustment]
Enhances the width of text and lines.
[Adjust Toner Volume Used for Color Printing]
Reduces the toner volume to prevent too much toner from being applied.
Select [Level 1] to reduce the toner volume for areas with high color density. Select [Level 2] to reduce the
overall toner density.
[Prole Settings]
Enables you to set the prole when you want to adjust the colors.
Select the prole suitable for the monitor you are using from [Source Prole].
[Prole Settings] Dialog Box
65
Page 69

Settings List
Select the element to prioritize matching of from [Matching Method].
66
Page 70

Settings List
[Device Settings] Sheet
You can congure print options and administrator settings.
[Output Method]
Enables you to switch the method for outputting print data. You can save the data to the printer or set a PIN for
the data.
[Print]
Performs normal printing.
[Hold]
Saves print data in a hold queue (temporary storage area) in the printer. You can change the print order or
settings of the stored data from the control panel of the printer or the Remote UI.
[Settings]
Enables you to set the document name displayed on the control panel or Remote UI.
[Secured Print]
You can attach a PIN to print data and save it in the printer. This function is useful when printing condential
documents etc. The saved data can be printed by entering the PIN in the control panel of the printer.
[Settings]
Enables you to set the document name, user name, and PIN displayed on the control panel or Remote UI.
[Store]
Saves the print data to a box in the printer. You can change the settings of or combine the stored data from
the control panel of the printer or the Remote UI.
[Settings] [Store Destination] Dialog Box
Enables you to set the document name and destination box number displayed on the control panel or
Remote UI.
[Name Setting] Dialog Box
[Secured Print Settings] Dialog Box
6X0A-01K
[Device Settings]
Sets the paper output options and paper source options, etc. attached to the printer.
Select [Secure Watermark Function of Device] to use the Secure Watermark Kit.
Select [Secure Printing Function of Device] to use the Job Lock Expansion Kit.
[Job Accounting]
Performs print management using the department ID management function. The ID and PIN must be entered
when printing or saving settings.
This function can be enabled by logging in as an account with super user privileges.
[Settings]
Enables you to set the ID and PIN registered in the printer. Leave the PIN blank if it is not registered.
If you are logged in as a general user, use a command to set them.
[ID/PIN Settings] Dialog Box
[Dept. ID Management Authentication]/[Secured Print Authentication]
Select the authentication method supported by the printer.
67
Page 71

Settings List
[Do Not Use Job Accounting When B&W Printing]
If you are using the department ID management function, selecting the [Quality] sheet > [Color Mode] > [Black
and White] enables black-and-white printing without authentication.
[Use User Authentication Function]
Performs print management using the user authentication function. The user name and PIN must be entered
when printing or saving settings.
This function can be enabled by logging in as an account with super user privileges.
[Settings] [User Name/PIN Settings] Dialog Box
Enables you to set the user name and PIN registered in the printer. Leave the PIN blank if it is not registered.
If you are logged in as a general user, use a command to set them.
Related Topics
[Quality] Sheet(P. 64)
Device Settings - Authentication Function(P. 100)
68
Page 72

Command List
Command List
Command List .................................................................................................................................................... 70
Command Format ................................................................................................................................................ 71
Basic Settings ...................................................................................................................................................... 72
Finishing - 1-sided/2-sided Printing .................................................................................................................... 73
Finishing - Paper Output Method ....................................................................................................................... 74
Finishing - Paper Output Destination ................................................................................................................ 76
Finishing - Booklet Printing ................................................................................................................................ 79
Finishing - Paper Folding ..................................................................................................................................... 81
Finishing - Special Print Processing .................................................................................................................... 83
Finishing - Secure Printing .................................................................................................................................. 86
Paper Source - Paper Source/Paper Type ........................................................................................................... 87
Paper Source - Front/Back Cover ........................................................................................................................ 90
Quality - Color Adjustment ................................................................................................................................. 92
Quality - Image Processing ................................................................................................................................. 94
Quality - Toner Adjustment ................................................................................................................................ 96
Device Settings - Output Method ....................................................................................................................... 98
Device Settings - Authentication Function ...................................................................................................... 100
69
Page 73

Command List
Command List
This section describes the options for printing from the command line.
Command Format(P. 71)
Basic Settings(P. 72)
Finishing - 1-sided/2-sided Printing(P. 73)
Finishing - Paper Output Method(P. 74)
Finishing - Paper Output Destination(P. 76)
Finishing - Booklet Printing(P. 79)
Finishing - Paper Folding(P. 81)
Finishing - Special Print Processing(P. 83)
Finishing - Secure Printing(P. 86)
Paper Source - Paper Source/Paper Type(P. 87)
Paper Source - Front/Back Cover(P. 90)
Quality - Color Adjustment(P. 92)
Quality - Image Processing(P. 94)
Quality - Toner Adjustment(P. 96)
Device Settings - Output Method(P. 98)
Device Settings - Authentication Function(P. 100)
6X0A-01L
70
Page 74

Command List
Command Format
This section describes the notation used for the format of the list of commands.
Format
[ ]
Indicates optional options. Can be omitted.
{ }
Indicates mutually-exclusive options or parameters, which are separated by the | (separator character).
Specify one of them.
The underlined parameter is the default parameter, as indicated by {True | False}.
Parameter Legend
6X0A-01R
This section describes the main parameters. Please check the explanation of each option together.
None: Do not specify (the printer settings may be used, depending on the options.)
Auto: Use the printer setting (may be set automatically, depending on the options.)
Manual: Manually set
True: Use
False: Do not use
On: On
Off: Off
< >: Specify a value or string of characters
NOTE
● The value or string of characters to specify depends on the model. Specify the value or string of characters
within the range supported by the model you are using.
71
Page 75

Command List
Basic Settings
You can set the number of copies to be printed and paper to use.
Format
lpr <le path>
-o CNCopies=<Number of Copies>
-o PageSize=<Page Size>
-o CNFeedAFiveVertically={True | False}
-o CNFeedAFiveHorizontally={True | False}
Options
6X0A-01S
CNCopies
Species the number of copies to be printed. (default: 1)
PageSize
Species one of the following document sizes. (default: Letter)
Standard Size
A3 / A4 / A5 / A6 / B4 / B5 / SRA3 / Letter / Legal / Executive / Statement / 11x17 / 12x18 / 13x19 / Index_3x5
Local Standard Size
Foolscap / Ocio / A_Ocio (Argentina) / B_Ocio (Brazil) / E_Ocio (Ecuador) / M_Ocio (Mexico) / A_Letter
(Argentina) / G_Letterr (Government) / G_Legall (Government) / I_Legall (India) / F4A / A_Foolscap (Australia) /
16K / 8K
Envelope
Com10 / dl_envelope / Envelope_B5 / Envelope_C5 / Monarch
CNFeedAFiveVertically
Feeds the paper vertically when the A5 size is specied.
CNFeedAFiveHorizontally
Feeds the paper horizontally when the A5 size is specied.
Example
To print the le "sample.txt" with the following setting:
● Copies: 5
● Page Size: A3
$ lpr sample.txt -o CNCopies=5 -o PageSize=A3
72
Page 76

Command List
Finishing - 1-sided/2-sided Printing
You can switch between one-sided printing and two-sided printing. You can also adjust margins.
Format
lpr <le path>
-o Duplex={None | DuplexNoTumble | DuplexTumble}
-o BindEdge={Left | Top} [-o CNBindEdgeShift=<Gutter>]
Options
Duplex
6X0A-01U
Species None (one-sided), DuplexNoTumble (two-sided, long edge), or DuplexTumble (two-sided, short edge).
BindEdge
Species the margin position based on the portrait (vertical) orientation.
Left is the long edge. Top is the short edge. To specify this together with two-sided printing, match the margin
position.
The CNBindEdgeShift option enables you to specify the margin width. (units: inch, default: 0)
Example
To print the le "sample.txt" with the following setting:
● 2-sided Printing: Long Edge
● Binding Location: Left
● Gutter: 0.8 inch
$ lpr sample.txt -o Duplex=DuplexNoTumble -o BindEdge=Left -o CNBindEdgeShift=0.8
73
Page 77

Command List
Finishing - Paper Output Method
You can set the method for sorting and processing output paper.
Format
lpr <le path>
-o Collate={{True | False | Group} | {Staple | StapleCollate | EcoStapleCollate | StapleGroup |
EcoStapleGroup} [-o StapleLocation={None | TopLeft | Top | TopRight | Left | Bottom}]}
-o CNOutputPartition={None | rotation | offset [-o CNOffsetNum=<Sheets per Set>]}
-o CNOutputFace={None | FaceUp | FaceDown}
-o CNPunch={None | Left | Top}
-o CNMultiPunch={Off | On | PUNU2 | PUNU3 | PUNU23 | PUNF2 | PUNF4 | PUNS4 | PUNM}
6X0A-01W
Options
Collate
Species the sorting method when printing multiple copies.
True: Collates by copy set, such as "123..., 123."
False / Group: Collates by page, such as "111..., 222."
Staple / StapleCollate / EcoStapleCollate: Collates by copy set and performs stapling or staple-free binding.
StapleGroup / EcoStapleGroup: Collates by page and performs stapling or staple-free binding.
When performing stapling or staple-free binding, the StapleLocation option can be used to specify the margin
position.
CNOutputPartition
Species the method for collating by copy set.
rotation: Rotates the output.
offset: Offsets the output. To specify the number of copy sets to offset by, use the CNOffsetNum option.
(default: 1)
CNOutputFace
Species whether the printed side is output face up or face down.
CNPunch
Species the hole punch position.
CNMultiPunch
Species the hole punch type.
On: 2 Holes (for printer models that support only two holes)
PUNU2: 2 Holes (for printer models that support two or more holes)
PUNU3: 3 Holes
74
Page 78

Command List
PUNU23: 2/3 Holes
PUNF2: 2 Holes (French)
PUNF4: 4 Holes (French)
PUNS4: 4 Holes (Swedish)
PUNM: Multi Holes
NOTE
● If Off is specied for the CNMultiPunch option when the CNPunch option is specied, the CNPunch option is
processed as None.
Example
To print the le "sample.txt" with the following setting:
● Copies: 5
● Finishing: Staple & Collate
● Staple Position: Upper Left (Single)
$ lpr sample.txt -o CNCopies=5 -o Collate= StapleCollate -o StapleLocation=TopLeft
75
Page 79

Command List
Finishing - Paper Output Destination
You can set a printed paper output destination.
Format
lpr <le path>
-o OutputBin=<Paper Output> [-o CNFinisher={None | <Output Options>}]
-o CNSpecifyNumOfCopiesStack={False | True -o CNStackCopiesNum=<Number of Copies> [o CNTimingOfAutoEjectStacker={None | NotEject | Before | After | BeforeAfter}]}
Options
6X0A-01X
OutputBin
Species the output destination.
If a paper output option is attached to the printer, specify the attached option in the CNFinisher option.
<Paper Output> parameter(P. 76)
<Output Options> parameter(P. 77)
CNSpecifyNumOfCopiesStack
Uses the Specify Number of Copies to Stack function.
To specify the number of copies to stack, use the CNStackCopiesNum option. (default: 1)
To specify the timing for retrieving the paper, use the CNTimingOfAutoEjectStacker option.
NotEject: Do not eject automatically
Before: Before printing starts
After: After printing ends
BeforeAfter: Before and after printing starts
<Paper Output> parameter
Auto: Auto
TrayA: Tray A
TrayB: Tray B
TrayC: Tray C
TrayUpper: Tray (Upper)
TrayMiddle: Tray (Middle)
TrayLower: Tray (Lower)
TrayInternal: Tray (Internal)
TrayRight: Tray (Right)
TrayUpperInternal: Tray (Upper Internal) / Tray (Finisher, Upper Internal)
TrayLowerInternal: Tray (Lower Internal) / Tray (Finisher, Internal)
76
Page 80

TrayUpperLeft: Tray (Upper Left)
TrayLowerLeft: Tray (Lower Left)
Bin<NUM>: Bin (where <NUM> indicates the number)
Stack: Stacker
StackerAOutTray: Stacker a (Output Tray)
StackerAStack: Stacker a (Stack)
<Output Options> parameter
Copy Tray
CPYTRAY: Copy Tray
Shift Tray/Shift Sorter
SHIFTTRAY: Shift Tray
INSSTRA1: Inner Shift Sorter-A1
INSSTRA1CT: Inner Shift Sorter-A1 + Copy Tray
Command List
INSSTRA1AT: Inner Shift Sorter-A1 + Inner Finisher Additional Tray
INSSTRA1ATCT: Inner Shift Sorter-A1 + Inner Finisher Additional Tray + Copy Tray
Finisher
FINAM1: Finisher-AM1
FINAM1STKU1: Finisher-AM1 + High Capacity Stacker-G1
FINU2: Finisher-U2
FINU2FT: Finisher-U2 + Finisher Tray
Saddle Finisher
SFINAM2: Saddle Finisher-AM2
Inner Finisher
IFINK1: Inner Finisher-K1
IFINK1CT: Inner Finisher-K1 + Copy Tray
IFINK1AT: Inner Finisher-K1 + Inner Finisher Additional Tray
IFINK1ATCT: Inner Finisher-K1 + Inner Finisher Additional Tray + Copy Tray
2BINSS: Inner Finisher (2-bin)
IN2TRAY: Inner 2way Tray
In2CT: Inner 2way Tray + Copy Tray
IFINB1: Inner Finisher-B1
IFINB1AT: Inner Finisher-B1 + Inner Finisher Additional Tray
IFING1: Inner Finisher-G1
IFING13W: Inner Finisher-G1 + 3 Way Unit
IFING13WCT: Inner Finisher-G1 + 3 Way Unit + Copy Tray
IFINH1: Inner Finisher-H1
IFINH1CT: Inner Finisher-H1 + Copy Tray
IFINJ1: Inner Finisher-J1
Staple Finisher
77
Page 81

Command List
STFINAA1: Staple Finisher-AA1
STFINAA1CT: Staple Finisher-AA1 + Copy Tray
STFINAC1: Staple Finisher-AC1
STFINH1: Staple Finisher-H1
STFINT1: Staple Finisher-T1
STFINU1: Staple Finisher-U1
STFINV1: Staple Finisher-V1/V2
STFINW1: Staple Finisher-W1 PRO
STFINW1STKU1: Staple Finisher-W1 PRO + High Capacity Stacker-H1
STFINX1: Staple Finisher-X1
STFINY1: Staple Finisher-Y1
STFINY1CT: Staple Finisher-Y1 + Copy Tray
STFINZ1: Staple Finisher-Z1
Booklet Finisher
BFINAA1: Booklet Finisher-AA1
BFINAA1CT: Booklet Finisher AA1 + Copy Tray
BFINAC1: Booklet Finisher-AC1
BFINT1: Booklet Finisher-T1
BFINU1: Booklet Finisher-U1
BFINV1: Booklet Finisher-V1/V2
BFINW1: Booklet Finisher-W1 PRO
BFINW1STKU1: Booklet Finisher-W1 PRO + High Capacity Stacker-H1
BFINX1: Booklet Finisher-X1
BFINY1: Booklet Finisher-Y1
BFINY1CT: Booklet Finisher-Y1 + Copy Tray
High Capacity Stacker
STKU1: High Capacity Stacker-H1
STKU1: High Capacity Stacker-G1
Example
To print the le "sample.txt" with the following setting:
● Paper Output: Tray A
● Output Options: Staple Finisher-T1
$ lpr sample.txt -o OutputBin=TrayA -o CNFinisher=STFINT1
78
Page 82

Command List
Finishing - Booklet Printing
You can print with the pages of a document arranged so that the paper can be folded in half to create a booklet.
To congure detailed print quality settings, specify the required options after the Booklet option.
Format
lpr <le path> -o Booklet={None | Left | Right}
-o CNVfolding={None |True | False}
-o CNSaddleStitch={None | True | False}
-o CNTrimming={None | False | True [-o CNAdjustTrim={None | Manual [-o CNAdjustTrimNum=<Trim
Width>]}]}
-o CNCreep={False | True [-o CNDisplacementCorrection={Device | Auto | Manual o CNGutterShiftNum=<Correction Width>}]
6X0A-01Y
Options
Booklet
Species the binding direction of the booklet.
CNVfolding
Folds the paper in two.
CNSaddleStitch
Staples in the center of the paper using the Saddle Stitch function.
CNTrimming
Trims and aligns the edges of the pages.
To specify the adjustment method for the trim width, use the CNAdjustTrim option. If you specify Manual, the
CNAdjustTrimNum option can be used to specify the trim width. (units: inch, increments: 0.001, default: 0 or
0.080)
CNCreep
Corrects the displacement between the print area of the inner pages and outer pages when the paper is folded.
To specify the displacement correction method, use the CNDisplacementCorrection option.
Device: Follows the printer settings.
Auto: Performs automatic adjustment according to the paper.
Manual: To specify the correction width, use the CNGutterShiftNum option. (units: inch, increments: 0.001,
default: 0)
79
Page 83

Command List
Example
To print the le "sample.txt" with the following setting:
● Book Opening: Left Binding
● Half Fold: Use
● Trim: Use
● Adjust Trim Width by: Manual Setting
● Trim Width: 0.61 inch
$ lpr sample.txt -o Booklet=Left -o CNVfolding=True -o CNTrimming=True -o CNAdjustTrim=Manual -o
CNAdjustTrimNum=0.61
80
Page 84

Command List
Finishing - Paper Folding
You can output pages folded into one of a variety of forms.
You can also use an option to specify the folding direction and original orientation. With face down, the printed
surface is on the outside. With face up, the printed surface is on the inside.
Format
lpr <le path>
-o CNZfolding={None | True | False}
-o CNCfolding={None | False | True [-o CNCfoldSetting={pattern1 | pattern2 | pattern3 | pattern4}]}
-o CNSaddleFolding={None | False | True [-o CNSaddleFoldSetting={pattern1 | pattern2}] [o CNSaddleFoldSheetsNum=<Sheets per Set>]}
-o CNHalfFolding={None | False | True [-o CNHalfFoldSetting={pattern1 | pattern2}]}
-o CNAccordionZfolding={None | False | True [-o CNAccordionZfoldSetting={pattern1 | pattern2}]}
-o CNDoubleParallelFolding={None | False | True [-o CNDoubleParallelFoldSetting={pattern1 | pattern2 |
pattern3 | pattern4}]}
6X0A-020
Options
CNZfolding
Performs Z-folding.
CNCfolding
Performs C-folding.
pattern1: Face Down + Portrait
pattern2: Face Down + Landscape
pattern3: Face Up + Portrait
pattern4: Face Up + Landscape
CNSaddleFolding
Performs saddle folding.
pattern1: Face Down + Portrait
pattern2: Face Up + Landscape
The CNSaddleFoldSheetsNum option enables you to specify the number of pages for each stack. (default: 1)
CNHalfFolding
Performs bi-folding.
pattern1: Face Down + Portrait
pattern2: Face Up + Landscape
81
Page 85

CNAccordionZfolding
Performs accordion Z-folding.
pattern1: Portrait
pattern2: Landscape
CNDoubleParallelFolding
Performs double parallel folding.
pattern1: Face Down + Portrait
pattern2: Face Down + Landscape
pattern3: Face Up + Portrait
pattern4: Face Up + Landscape
Example
To print the le "sample.txt" with the following setting:
● Saddle Fold: Use
Command List
● Folding Direction & Original Orientation: Face Down + Portrait
● Sheets per Set: 5
$ lpr sample.txt -o CNSaddleFolding=True -o CNSaddleFoldSetting=pattern1 -o CNSaddleFoldSheetsNum=5
82
Page 86

Command List
Finishing - Special Print Processing
You can set the print processing method when you want to improve the print result or use special paper.
Specify a function supported by the model you are using.
Format
lpr <le path>
-o CNSpecialPrintMode={None | Mode1 | Mode2 | Mode3 | Mode4 | True | False}
-o CNPlainPaperCurlCorrect={None | Off | Mode1 | Mode2}
-o CNSpecialPrintAdjustment={Off | Settings1 | Settings2}
-o CNBarCodeMode={None | Off | Mode1 | Mode2 | Mode3 | Mode4 | Mode5}
-o CNSpecialPrintAdjustmentA={None | Off | Mode1 | Mode2 | Mode3 | Mode4}
-o CNSpecialPrintAdjustmentB={None | Off | Mode1 | Mode2 | Mode3}
-o CNSpecialPrintAdjustmentC={None | On | Off}
-o CNImageSpecialProcess={None | Off | Level1 | Level2}
-o CNSpecialSmooth={None | Mode1 | Mode2 | Mode3 | Mode4 | Mode5 | Mode6}
-o CNOutputAdjustment={True | False}
-o CNGlossyPlainPaperProc= {None | True | False}
-o CNPreventPostcardFogging= {None | Off | Mode1 | Mode2}
-o CNShiftStartPrintPosition={False | True [-o CNShiftFrLongEdge=<Start Position>] [o CNShiftFrShortEdge=<Start Position>] [-o CNShiftBkLongEdge=<Start Position>] [o CNShiftBkShortEdge=<Start Position>]}
6X0A-021
Options
CNSpecialPrintMode
Improves the problem where black streaks appear in the printed output by using the Special Print
Adjustment function. Try the settings in order, starting with Mode1.
CNPlainPaperCurlCorrect
Improves the xability problem where the paper curls when printing on plain paper by using the Special Print
Mode (Plain Paper) function.
Try the settings in order, starting with Mode1.
CNSpecialPrintAdjustment
Improves the print result by using the Special Print Mode function. Try the settings in order, starting with
Settings1.
CNBarCodeMode
Adjusts the line width when you want to print small text and thin lines more clearly by using the Special Settings
1 function or Barcode Adjustment Mode function.
Try the settings in order, starting with Mode1.
83
Page 87

Command List
CNSpecialPrintAdjustmentA
Improves the problem where black streaks appear in the printed output by thinning out the dots by using
the Special Print Adjustment A function or Blurry Image Correction function.
Try the settings in order, starting with Mode1.
CNSpecialPrintAdjustmentB
Increases the toner xability when black streaks appear in the printed output by using the Special Print
Adjustment B function.
Try the settings in order, starting with Mode1.
CNSpecialPrintAdjustmentC
Lowers the print speed to improve the toner xability and print more quietly by using the Special Print
Adjustment C or Quiet Mode function.
CNImageSpecialProcess
Corrects the data when thick text and lines are interrupted by using the Image Special Process function.
Try the settings in order, starting with Level1.
CNSpecialSmooth
Smooths the contours of characters, lines, images, and inside gradations by using the Special Smoothing Mode
function.
Normally, specify Mode1. If Mode1 does not make things smoother, click the subsequent "Open details" and try
another mode, according to the content of the data.
Mode1: Smooths the contours of text, lines, and images.
Mode2: Smooths the inside halftones in addition to the image contours.
Mode3: Smooths dense letters and lines over halftone backgrounds.
Mode4: Smooths the contours of large text and thick lines when they are jagged.
Mode5: Corrects non-uniformity in images and halftones.
Mode6: Smooths print data as a whole.
CNOutputAdjustment
Increases the resolution when the data includes a mix of text, images, and graphs, etc. by using the Output
Adjustment Mode function.
CNGlossyPlainPaperProc
Performs processing with the glossy xing mode when printing on plain paper by using the Glossy Plain Paper
Processing function.
CNPreventPostcardFogging
Alleviates the problem of the printed image being entirely or partially fogged when printing to postcards by
using the Prevent Postcard Fogging function.
Specify Mode1 for normal use. If the problem is not solved by Mode1, you can specify Mode2, but this may
affect the printed image itself.
84
Page 88

Command List
CNShiftStartPrintPosition
Adjusts the print start position by using the Shift the Position to Start Printing function. This function is useful
for adjusting the margins when the vertical margin differs from the horizontal margin, or when hiding the
information in the header and footer.
The following options enable you to specify the start position (displacement width). (units: inch, default: 0)
CNShiftFrLongEdge option: Long Edge (Front Side)
CNShiftFrShortEdge option: Short Edge (Front Side)
CNShiftBkLongEdge option: Long Edge (Back Side)
CNShiftBkShortEdge option: Short Edge (Back Side)
Example
To print the le "sample.txt" with the following setting:
● Shift the Position to Start Printing: Use
● Long Edge (Front Side): 2.0 inches
● Short Edge (Front Side): 1.6 inches
● Long Edge (Back Side): -1.2 inches
● Short Edge (Back Side): -0.8 inch
$ lpr sample.txt CNShiftStartPrintPosition=True -o CNShiftFrLongEdge=2.0 -o CNShiftFrShortEdge=1.6 -o
CNShiftBkLongEdge=-1.2 -o CNShiftBkShortEdge=-0.8
85
Page 89

Command List
Finishing - Secure Printing
You can embed a watermark or tracking information, etc. when printing to prevent leaks of condential
documents.
Format
lpr <le path>
-o CNTrustPrint={True | False}
-o CNCopySetNumbering={None | False | True [-o CNStartingNumber=<Starting Number>]}
Options
6X0A-022
CNTrustPrint
Embeds hidden text in the background that appears when the document is copied, if you are using the Secure
Watermark function of the printer.
Embeds restriction information and tracking information, if you are using the Secure Printing function of the
printer.
CNCopySetNumbering
Prints the copy set as a serial number. The number is faintly printed in the top, bottom, left, right, and center
(ve locations).
The CNStartingNumber option enables you to specify the start number. (default: 1)
Example
To print the le "sample.txt" with the following setting:
● Copy Set Numbering: Use
● Starting Number: 5
$ lpr sample.txt -o CNCopySetNumbering=True -o CNStartingNumber=5
86
Page 90

Command List
Paper Source - Paper Source/Paper Type
You can set the paper to print on by paper source or paper type.
Format
lpr <le path>
-o InputSlot=<Paper Source>
-o MediaType={{None | Auto | <Paper Type>} | OHP -o CNInterleafSheet={None | False | True [o CNInterleafMediaType=<Paper Type>] [-o CNInterleafPrint={None | True | False}]} | OHP o CNOHPPrintMode={Transparent | Reective}}
Options
6X0A-023
InputSlot
Species one of the following paper sources.
Auto (Auto) / Manual (Multi-purpose Tray) / Cas<NUM> (Cassette, where <NUM> indicates the number) /
PodDeck (POD Deck/Cassette 4) / Deck3_Cas<NUM> (Cassette, where <NUM> indicates the number) /
PodDeckLite (POD Deck Lite) / SideDeck (Side Paper Deck) / Env (Envelope Feeder/Envelope Tray) / Env2
(Envelope Feeder)
MediaType
Species the paper type.
<Paper Type> parameter(P. 87)
CNInterleafSheet
Inserts sheets between transparencies when transparency is specied as the paper type.
To specify the paper type to insert, use the CNInterleafMediaType option. However, Transparency cannot be
specied.
To print on the inserted paper, specify True for the CNInterleafPrint option.
CNOHPPrintMode
Species the print method according to the projector that will be used when transparency is specied as the
paper type.
Transparent: Transmissive Projector
Reective: Reective Projector
<Paper Type> parameter
Plain Paper
PlainPaper / PlainPaper1 / PlainPaper2 / PlainPaper3 / PlainPaper4 / PlainPaperL / PlainPaperL2 / PlainPaperL3
Thin
87
Page 91

Command List
THIN1 / THIN2
Recycled Paper
RECYCLED / RECYCLED1 / RECYCLED2 / RECYCLED3
Color Paper
COLOR / COLOR1 / COLOR2
Bond Paper
BOND / BOND1 / BOND2 / BOND3
Heavy Paper
HEAVY / HEAVY1 / HEAVY2 / HEAVY3 / HEAVY4 / HEAVY5 / HEAVY6 / HEAVY7 / HEAVY8 / HEAVY9 / ThickPaperH
Envelope
ENVELOPE / ENVELOPE1 / ENVELOPE2 / EnvelopeH
Film
OHP / CLEARFILM
Pre-punched Paper
PREPUNCHED / PREPUNCHED1 / PREPUNCHED2
Tab Paper
TAB1 / TAB2 / TAB3 / TAB4
Texture Paper
EMBOSS1 / EMBOSS2 / EMBOSS3 / EMBOSS4 / EMBOSS5 / EMBOSS6 / EMBOSS7 / EMBOSS8
Vellum
VELLUM1 / VELLUM2 / VELLUM3
1-sided Coated
1SIDECOATEDF1 / 1SIDECOATEDF2 / 1SIDECOATED1 / 1SIDECOATED2 / 1SIDECOATED3 / 1SIDECOATED4 /
1SIDECOATED5 / 1SIDECOATED6 / 1SIDECOATED7 / 1SIDECOATED8 / 1SIDECOATED9
2-sided Coated
2SIDECOATEDF1 / 2SIDECOATEDF2 / 2SIDECOATED1 / 2SIDECOATED2 / 2SIDECOATED3 / 2SIDECOATED4 /
2SIDECOATED5 / 2SIDECOATED6 / 2SIDECOATED7 / 2SIDECOATED8 / 2SIDECOATED9
Matte Coated
MATTECOATEDF1 / MATTECOATEDF2 / MATTECOATED1 / MATTECOATED2 / MATTECOATED3 / MATTECOATED4 /
MATTECOATED5 / MATTECOATED6 / MATTECOATED7 / MATTECOATED8 / MATTECOATED9
Rough Paper
ROUGH / ROUGH1 / ROUGH2 / ROUGH3
Glossy Paper
GLOSSY1 / GLOSSY2 / GLOSSY3 / GLOSSY4
Others
LHEAD (Letterhead) / LABELS (Labels) / MATTEPHOTO (Matte Photo) / SYNPP (Synthetic (Polypropylene)) /
SYNPES (Synthetic (Polyester))
Example
To print the le "sample.txt" with the following setting:
● Paper Type: Transparency
● Insert Interleaf Sheets: Use (Paper Type: Plain Paper)
88
Page 92

Command List
● Print on Interleaf Sheets: Use
$ lpr sample.txt -o MediaType=OHP -o CNInterleafSheet=True -o CNInterleafMediaType=PlainPaper -o
CNInterleafPrint=True
89
Page 93

Command List
Paper Source - Front/Back Cover
You can insert a cover and back cover. You can select the side to print on and the paper source for each.
Format
lpr <le path>
-o CNSetFrontSheet={False | True [-o CNFrontPrintOn={Off | OnlyFrontSide | OnlyBackSide | BothSides}] [o CNFrontPaperSrc=<Paper Source>]}
-o CNSetBackSheet={False | True [-o CNBackPrintOn={Off | OnlyFrontSide | OnlyBackSide | BothSides}] [o CNBackPaperSrc=<Paper Source>]}
-o CNInserter={True | False}
Options
6X0A-024
CNSetFrontSheet/ CNSetBackSheet
Inserts the front or back cover.
CNFrontPrintOn/ CNBackPrintOn
Species the side to print on.
Off: None
OnlyFrontSide: Only Front Side
OnlyBackSide: Only Back Side
BothSides: Both Sides
CNFrontPaperSrc/ CNBackPaperSrc
Species one of the following paper sources.
Manual: Multi-purpose Tray
Cas<NUM>: Cassette (where <NUM> indicates the number)
PodDeck: POD Deck/Cassette 4
SideDeck: Side Paper Deck
Deck3_Cas<NUM>: Cassette (where <NUM> indicates the number)
PodDeckLite: POD Deck Lite
InsertionUnit: Insertion Unit
InsertionUnit<NUM>: Insertion Unit (where <NUM> indicates the number)
CNInserter
Inserts the paper loaded in the Document Insertion Unit as covers or separators.
Example
To print the le "sample.txt" with the following setting:
90
Page 94

Command List
● Set Front Cover: Use
● Print on: Both Sides
● Paper Source: Cassette 2
$ lpr sample.txt -o CNSetFrontSheet=True -o CNFrontPrintOn=BothSides -o CNFrontPaperSrc=Cas2
91
Page 95

Command List
Quality - Color Adjustment
You can switch between color printing and black-and-white printing. You can also adjust colors.
Format
lpr <le path>
-o CNColorMode={Auto | color [-o CNColorHalftone={None | Resolution | Gradation | ColorTone}] | mono
[-o CNHalftone={None | Resolution | Gradation | ColorTone}]}
-o CNObjectPrioritizeProcessing={Images | Graphics | Text}
-o CNNumberOfColors={FullColor | TwoColors -o CNColorToUseWithBlack={Red | Green | Blue | Yellow |
Magenta | Cyan}}
-o CNMonitorProle={sRGBv1.20(Canon) | sRGBv3.0(Canon) | HDTVgamma1.5 | HDTVgamma1.8 |
HDTVgamma2.1 | HDTVgamma2.4}
-o CNMatchingMethod={None | Saturation | Monitor | Photographic | Colorimetric | Vividphoto |
CustomColor_1}
6X0A-025
Options
CNColorMode
Species whether to print in color or in black-and-white.
CNColorHalftone / CNHalftone
Enables you to specify methods for representing halftones (areas between dark areas and light areas).
Resolution: Gives priority to resolution and prints contours smoothly.
Gradation: Gives priority to gradation and prints gradations smoothly.
ColorTone: Gives priority to gradation more than Gradation.
CNObjectPrioritizeProcessing
When the print data conversion method is set to raster mode, set the subject to be prioritized when
processing. You can select images, graphics, or text.
CNNumberOfColors
Species whether to print in full color or in two colors.
If you specify TwoColors, use the CNColorToUseWithBlack option to specify the color to combine with black.
CNMonitorProle
Species the prole that matches your monitor when you want to adjust the colors.
CNMatchingMethod
Species the element to prioritize matching of.
To use a special red to print vivid rec colors, specify CustomColor_1.
92
Page 96

Command List
Example
To print the le "sample.txt" with the following setting:
● Number of Colors: Two Colors
● Color to Use with Black: Red
$ lpr sample.txt -o CNNumberOfColors=TwoColors -o CNColorToUseWithBlack=Red
93
Page 97

Command List
Quality - Image Processing
You can set the processing to perform, such as smoothing and sharpness.
Specify a function supported by the model you are using.
Format
lpr <le path>
-o Resolution={300 |
-o CNLinecontrol={None | Resolution | Gradation}
-o CNImageRenement={None | True | False}
-o CNLineRenement={None | True | False}
-o CNAdvancedSmoothing={None | Off | Smooth1 | Smooth2}
-o CNSharpness={None | -3 | -2 | -1 | 0 | 1 | 2 | 3}
-o CNHyperSharpness={None | Off | Low | Middle | High}
-o CNOptimizeImageComp={None | On | Off}
-o CNWidthAdjustment={None | On | Off}
600 | 1200}
6X0A-026
Options
Resolution
Species the print resolution in dpi (dots per inch).
CNLineControl
Improves reproduction of text and lines by using the Line Control function.
To give priority to the resolution, specify Resolution. To give priority to the reproduction of gradations, specify
Gradation.
CNImageRenement
Smooths the contours of text, lines, and images by using the Image Renement function.
CNLineRenement
Widens small text and barcodes for higher visibility by using the Line Renement function.
CNAdvancedSmoothing
Smooths the contours of text, lines, and images by using the Advanced Smoothing function.
Smooth2 gives priority to gradation more than Smooth1.
94
Page 98

Command List
CNSharpness / CNHyperSharpness
Strengthens and blurs the contours of text and images by using the Sharpness function or Sharpness (Photo)
function.
The CNSharpness option is specied with a value from -3 (weak) to 3 (strong). 0 is the default value.
CNOptimizeImageComp
Optimizes switching between lossy and lossless compression according to the content of the data by using the
Image Compression Optimization function.
CNWidthAdjustment
Enhances the width of text and lines by using the Width Adjustment function.
Example
To print the le "sample.txt" with the following setting:
● Line Control: Gradation Priority
$ lpr sample.txt -o CNLineControl=Gradation
95
Page 99

Command List
Quality - Toner Adjustment
You can adjust the toner density and volume.
Specify a function supported by the model you are using.
Format
lpr <le path>
-o CNTonerDensity={None | <Toner Density>}
-o CNTonerSaving={Auto | True | False}
-o CNDraftMode={Auto | True | False}
-o CNTonerVolumeAdjustment={None | Normal | Gradation | Text}
-o CNSmallSizeCurl={None | On | Off}
-o CNColorTonerVolumeAdjustment={None | Off | Level1 | Level2}
6X0A-027
Options
CNTonerDensity
Species the toner density with a value from 1 (low) to 17 (high). 9 is the default value.
CNTonerSaving
Thins out the data to print using the Toner Save function or Ink Saving function.
CNDraftMode
Thins out the data to print using the Draft Mode function.
CNTonerVolumeAdjustment
Adjusts the amount of toner to match the content of the print data by using the Toner Volume Adjustment
function.
For data that contains many graphics or computer graphics using gradations, specify Gradation. For data that
contains mainly text, specify Text.
CNColorTonerVolumeAdjustment
Reduces the toner volume when printing in color to prevent too much toner from being applied by using the
Adjust Toner Volume Used for Color Printing function.
To reduce the toner volume for areas with high color density, specify Level1. To reduce the overall toner density,
specify Level2.
Example
To print the le "sample.txt" with the following setting:
● Toner Save: Use
96
Page 100

Command List
● Toner Volume Adjustment: Text Priority
$ lpr sample.txt -o CNTonerSaving=True -o CNTonerVolumeAdjustment=Text
97
 Loading...