

Canon ImageRunner Series, ImageRunner 1643i, ImageRunner 1643iF Getting Started

Getting Started
Getting Started
Introducción
Quick Setup
NEXT PAGE
Quick Operation
Please read "Important Safety Instructions" before operating this product. After you finish
reading this guide, store it in a safe place for future reference.
The information in this document is subject to change without notice.
https://oip.manual.canon
P.13


Getting Started
Please read "Important Safety Instructions" before operating
this product.
P.18
After you nish reading this guide, store it in a safe place for future
reference.
The information in this document is subject to change without
notice.
Introducción
Lea las "Instrucciones de seguridad importantes" antes de usar
este producto.
página 26
Cuando termine de leer esta guía, guárdela en un lugar seguro
para futuras consultas.
La información de este documento puede ser modicada sin
previo aviso.
Quick Setup
You can access
https://oip.manual.canon to read the User's Guide that
describes all functions of this machine.
Puede acceder a
https://oip.manual.canon para leer la Guía de usuario donde se
describen todas las funciones de este equipo.
En
Es
3
Quick Setup
Conguring the Machine
Conguring the Initial Settings of
the Machine
About Application Library*
Application Library is an application
that allows you to use useful functions
for routine jobs or other convenient
functions in a one-touch operation
without necessity of making functional
settings every time. You can access each
registered function by simply pressing
the appropriate button displayed in
the Home screen. For the respective
function, see the description displayed in
the Setup Guide.
* This function may not be available, depending
on the model of the machine.
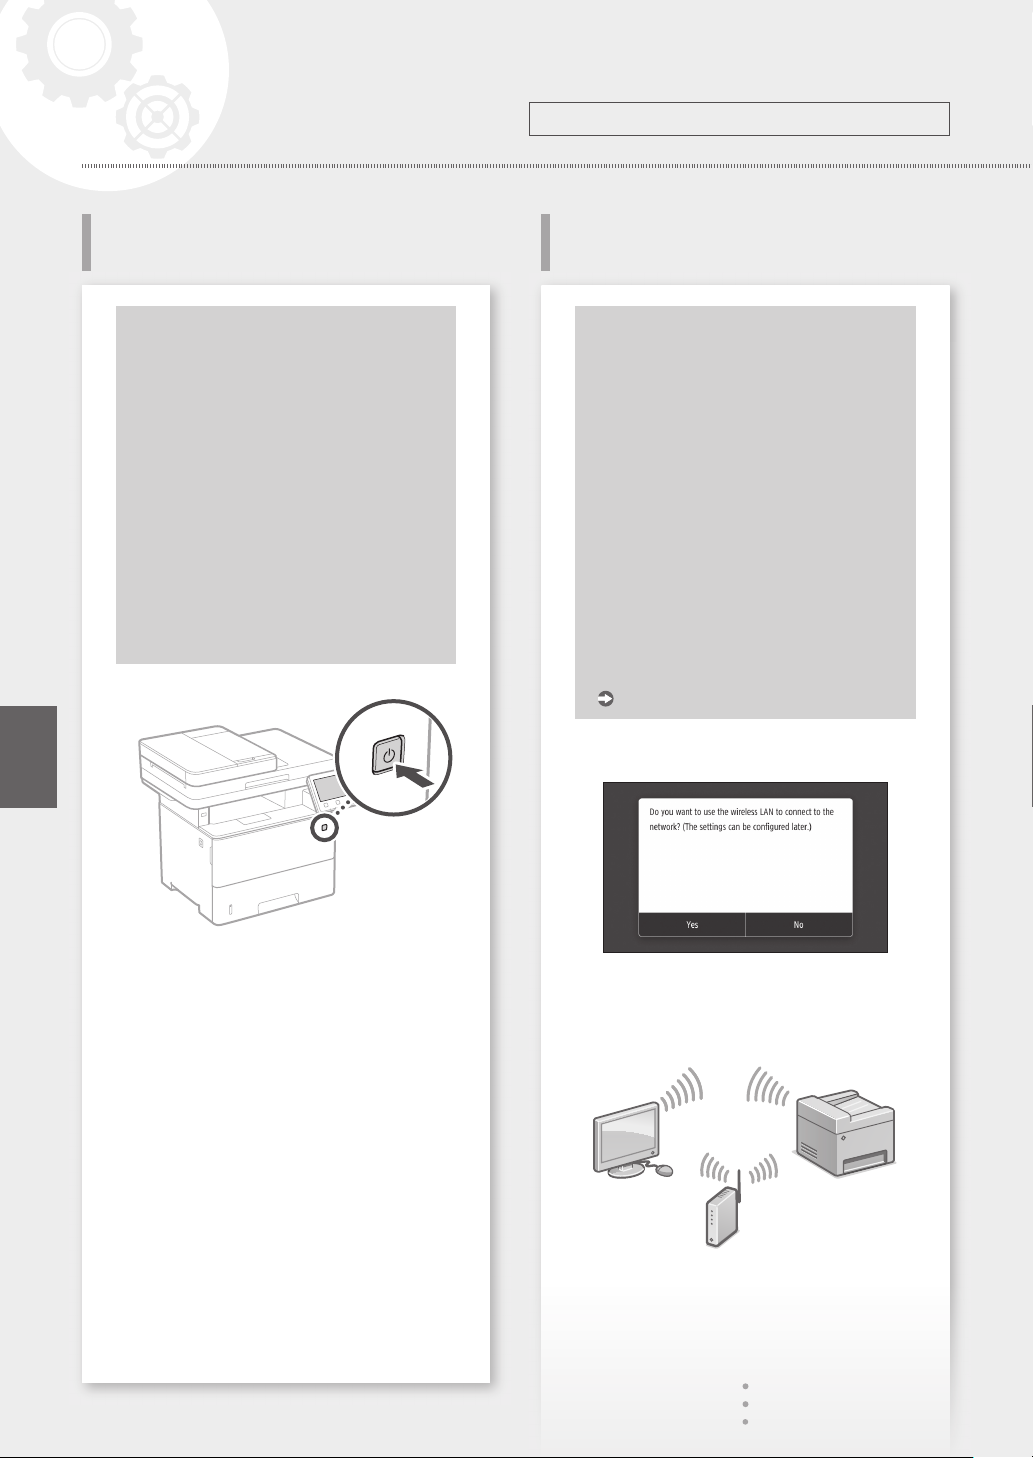
1.
Configure the settings in the following order.
Conguring the Method of
Connecting to a Computer
Before starting the configuration
• The machine cannot be connected to
both wired and wireless LANs at the
same time.
• If the machine is connected to an
unsecured network, your personal
information might be leaked to a third
party. Please be aware and careful of this.
• The machine does not come with a
router. Please have one ready, if necessary.
• Even in an environment without wireless
LAN router, you can use Access Point
Mode to make a wireless connection to
the machine directly from your mobile
device (Direct Connection).
User's Guide
En
Configure the initial settings, according to the
2.
screen.
• Set the language and country/region.
• Set the time zone and current date/time.
• Configure the settings to prevent
unauthorized access.
• For the purpose of confirmation, enter the
same PIN twice.
Specifying the connection method
• To connect via wireless LAN : <Yes>
• To connect via wired LAN or USB : <No>
To connect via wireless LAN
Make sure that the computer is connected to a
1.
router properly.
Check the network settings on the computer.
2.
4
For details
"Setting Up Using the Setup Guide" in the User's Guide
Quick Setup
Take note of the SSID and network key.
3.
• Check the label on the router.
• The setting operation is easier if the router is
provided with a WPS mark.
Set the access point and network key
4.
according to the screen below.
1. Select <OK>.
2. Select <SSID Settings>.
3. Select <Select Access Point>.
4. Select the access point (SSID), and select
<Next>.
5. Select <OK>.
6. Enter a network key, and select <Apply>.
7. Select <Yes>.
• Wait until message <Connected.> is
displayed.
8. Select <Close>.
• The IP address will be automatically
configured in a few minutes.
Install the driver and software.
5.
P.6 "Installing the software"
User's Guide
User's Guide
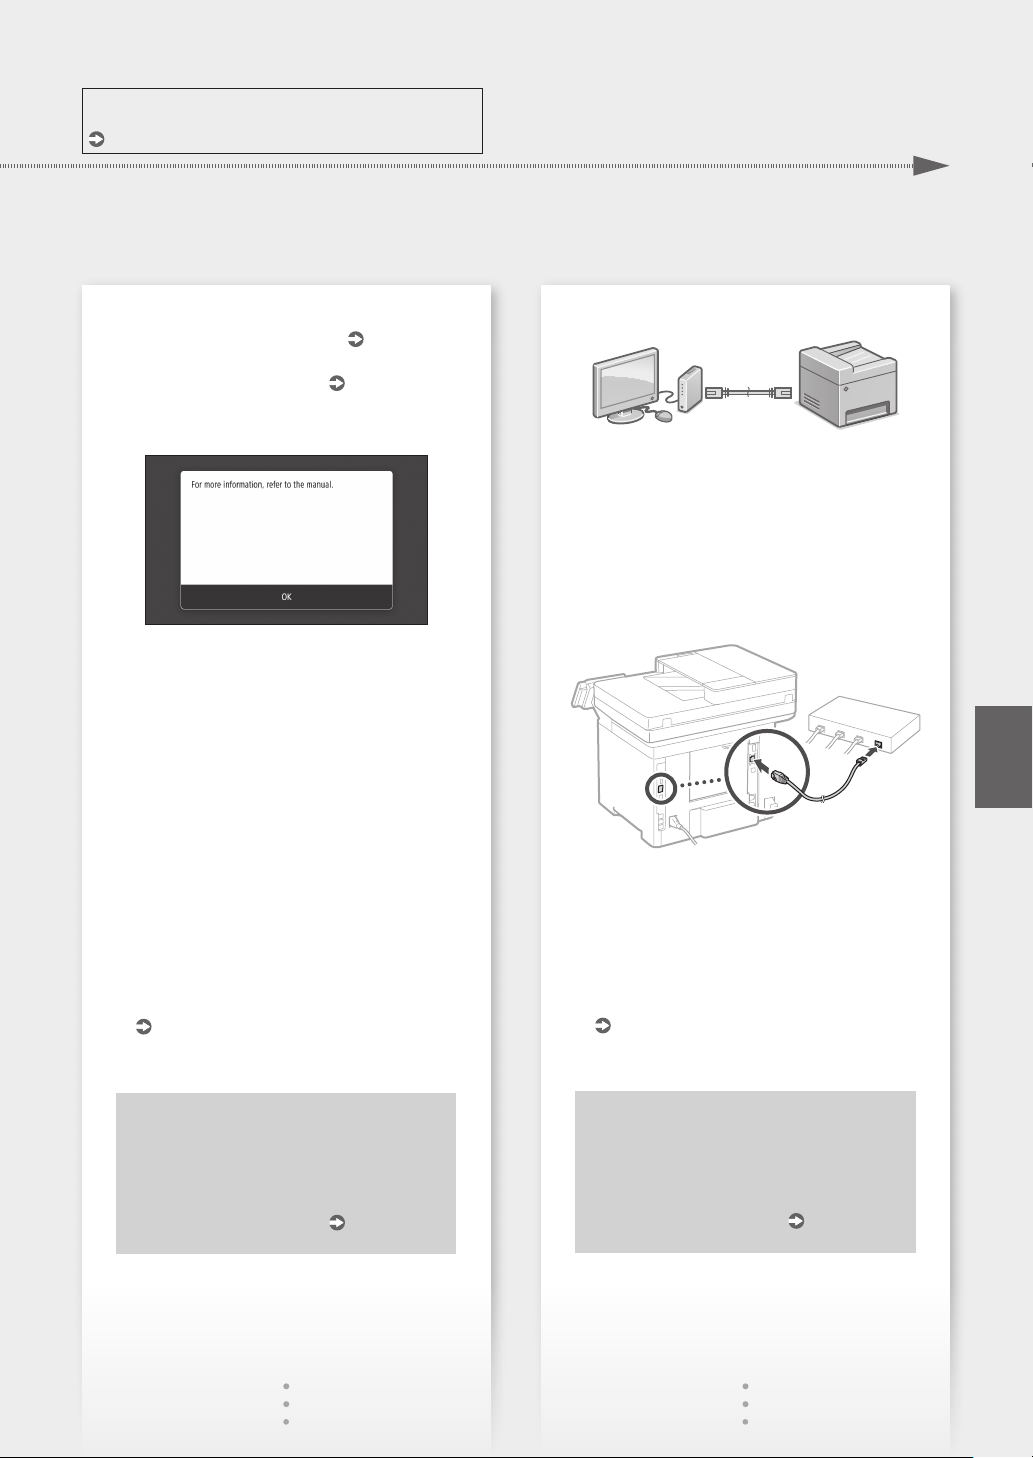
To connect via wired LAN
The machine does not come with a LAN cable.
Please have one ready, if necessary.
Make sure that the computer is connected to a
1.
router properly.
Check the network settings on the computer.
2.
Connect the LAN cable.
3.
• After connecting the cable, wait a few minutes
(until the IP address is set automatically).
• If a static IP address has been set on the
computer, set the machine's IP address
manually.
Install the driver and software.
4.
P.6 "Installing the software"
En
Now you are finished with the
configuration of the initial settings.
If your machine is provided with the fax
function, proceed to configuring
the fax settings.
P. 7
Now you are finished with the
configuration of the initial settings.
If your machine is provided with the fax
function, proceed to configuring
the fax settings.
P. 7
5

Quick Setup
Conguring the Machine
En
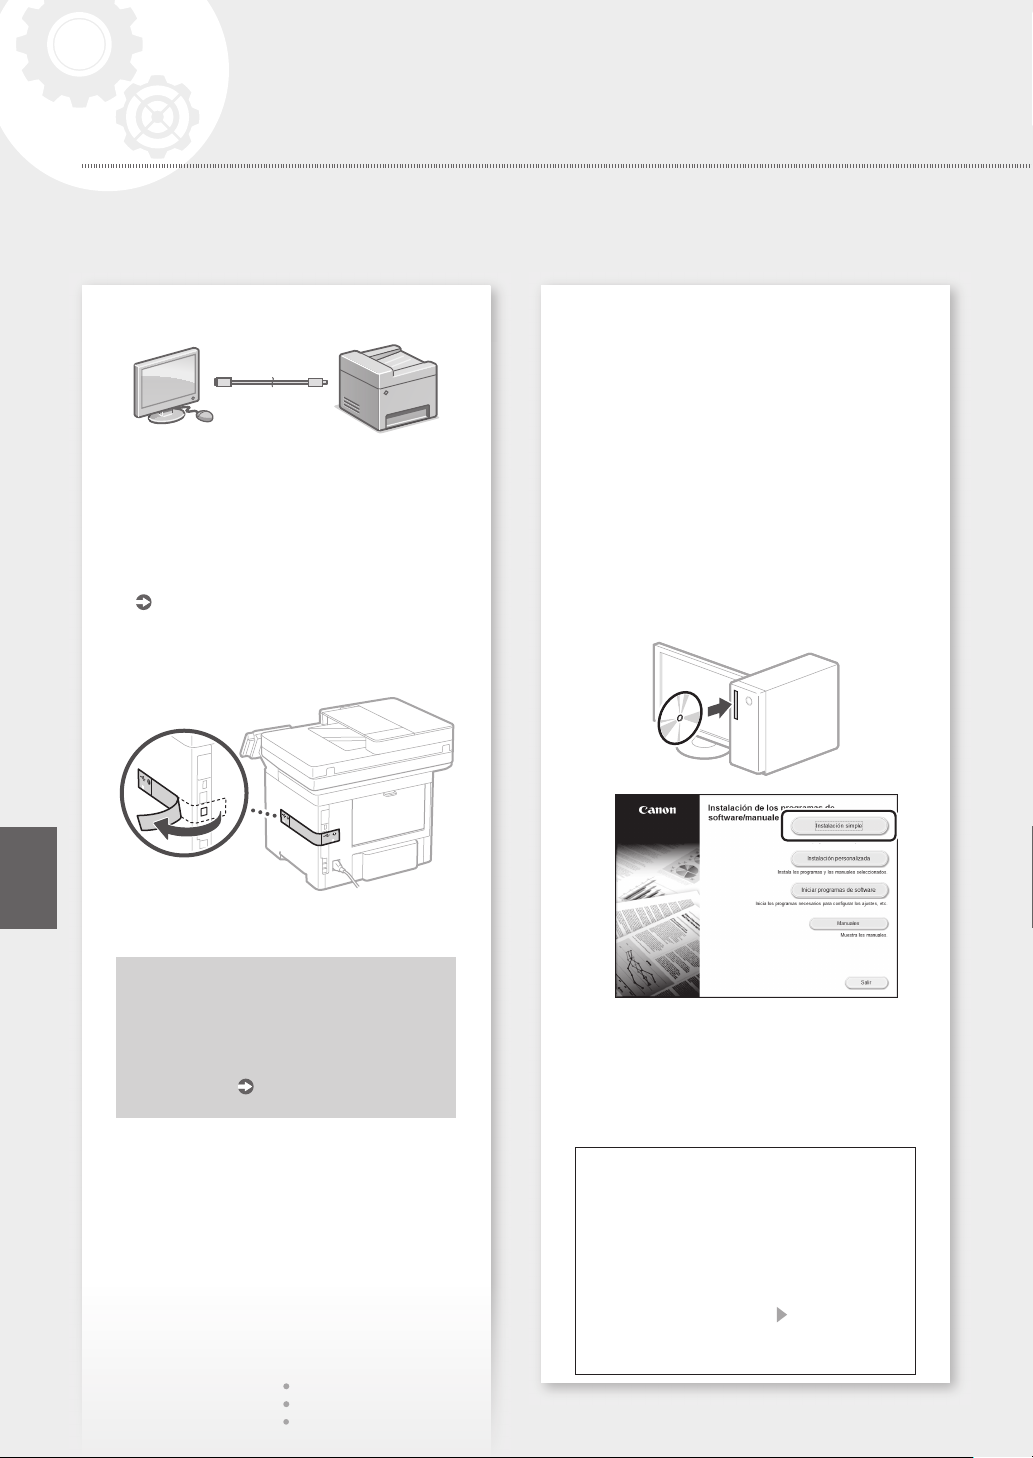
To connect via USB
Do not connect the USB cable before installing the
driver. If you did, disconnect the USB cable from the
computer, close the dialog box, and then perform
the following procedure from step 1.
Install the driver and software.
1.
P.6 "Installing the software"
• When a screen with instructions for
connecting the USB cable to the machine is
displayed, remove the sticker that covers the
USB port.
Installing the software
• The procedure described here is only applicable
when your computer runs on the Windows OS.
For more details on the software installation
procedure, see the driver's manual.
• For the installation when your computer runs on
the macOS, see the driver's manual.
• Your machine may not come with the driver for
the macOS, depending on the time of purchase.
New drivers are uploaded to the Canon website,
and you can download and use the latest one.
1.
2.
Now you are finished with the
configuration of the initial settings.
If your machine is provided with the fax
function, proceed to configuring
the fax settings.
P. 7
If the screen is not displayed properly, reinsert the CD-ROM/DVD-ROM or search for
"D:\MInst.exe" on the Windows platform (This
description assumes that "D:" is the CD-ROM/
DVD-ROM drive name).
Using the scanner conveniently
Configuring the network settings with "Send
Function Setting Tool" allows you to directly
send scanned originals with e-mail or I-Fax
or store them in a shared folder or on the FTP
server.
In the screen displayed in step 2, select [Start
Software Programs] [Send Function Setting
Tool] to start the Send Function Setting Tool.
6
For details
"Conguring Initial Settings for Fax Functions" in the User's Guide
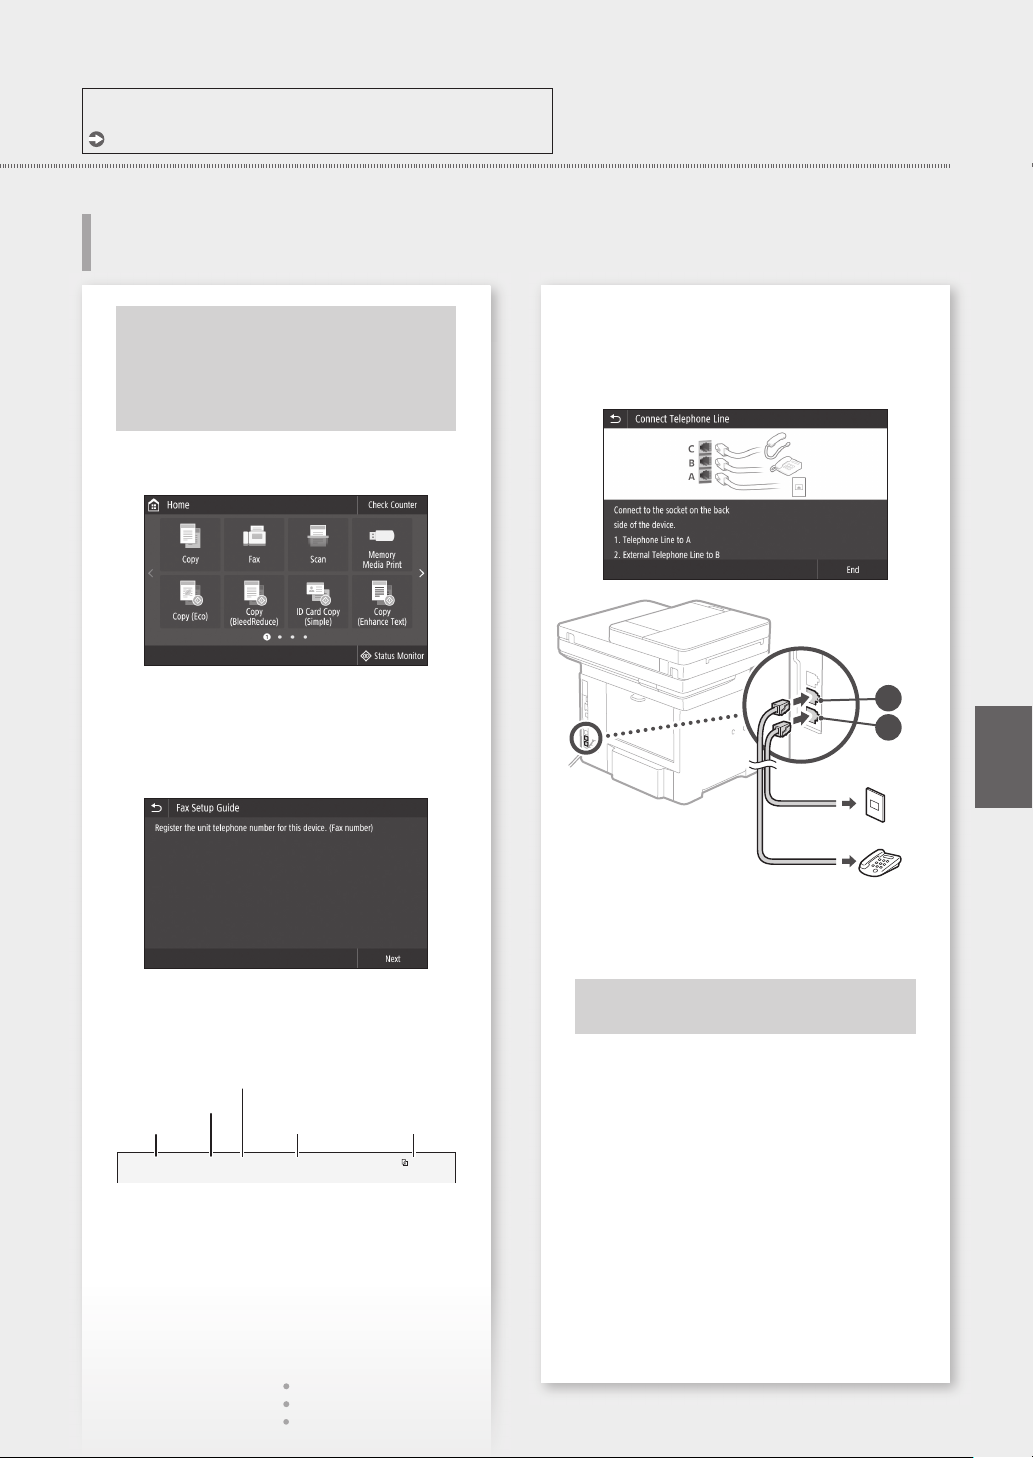
Conguring Fax Settings
Before starting the configuration
If your machine does not come with
a telephone cable, have one ready, as
necessary.
Congure the fax settings, according to the screen
below.
Quick Setup
Set the reception mode.
4.
• Make the setting by answering the questions
on your purposes of using the fax function.
Connect to a telephone line.
5.
Select <Fax>.
1.
Select <Set Up Now>.
2.
Register the machine's telephone number (fax
3.
number) and abbreviated user name.
• The information below will be printed at
the top part of the paper output from the
destination machine as sender information.
Fax Number
Number's Type
Sent Time Unit Name Page Number
02/02 2017 10:00AM CANON123XXXXXXXFAX 0001
Select <End>.
6.
Select <Yes>.
7.
B
A
En
Telephone line jack
Telephone
Now you are finished
with the configuration.
7

Configuración rápida
Configuración del equipo
Configuración de las opciones
iniciales del equipo
Acerca de Application Library
(Biblioteca de aplicaciones)*
Application Library (Biblioteca de
aplicaciones) es una aplicación que
permite usar funciones útiles para
realizar trabajos rutinarios u otras
funciones prácticas en operaciones
de un solo toque, sin necesidad
de cambiar la configuración de las
funciones. Para acceder a las funciones
registradas, basta con pulsar el botón
correspondiente en la pantalla Inicio.
Para obtener información sobre cada una
de las funciones, consulte la descripción
incluida en la Guía de configuración.
* Esta función puede no estar disponible según
el modelo del equipo.
Congure las opciones en el orden siguiente.
Configuración del método de
conexión a un ordenador
Antes de iniciar la configuración
• El equipo no se puede conectar a la
LAN por cable y a la inalámbrica al
mismo tiempo.
• Si el equipo está conectado a una red
no segura, su información personal
puede filtrarse a terceros. Téngalo en
cuenta y sea precavido.
•
El equipo no incluye ningún router, así que
tenga uno preparado en caso necesario.
• Incluso en entornos sin router de LAN
inalámbrica, puede usar el Modo de
Punto de Acceso para establecer una
conexión inalámbrica directamente
entre el equipo y un dispositivo móvil
(Conexión directa).
Guía de usuario
Es
1.
Configure las opciones iniciales según la
2.
pantalla.
• Establezca el idioma y el país/región.
• Establezca la zona horaria y la fecha/hora
actuales.
• Configure las opciones para evitar accesos no
autorizados.
• Para confirmar, introduzca dos veces el
mismo PIN.
Especificar el método de conexión
• Para conectar mediante LAN inalámbrica : <Sí>
Para conectar mediante LAN por cable o USB : <No>
•
Para conectar mediante LAN inalámbrica
Compruebe que el ordenador está bien
1.
conectado a un router.
Compruebe las opciones de red en el ordenador.
2.
8
Para obtener más detalles
"Configurar usando la guía de configuración" en la Guía de usuario
Configuración rápida
Apunte el SSID y la clave de red.
3.
• Consulte la etiqueta del router.
Guía de usuario
• La operación de configuración es más sencilla
si el router se suministra con una marca WPS.
Guía de usuario
Establezca el punto de acceso y la clave de red
4.
según la pantalla.
1. Seleccione <Aceptar>.
2. Seleccione <Opciones de SSID>.
3. Seleccione <Seleccionar punto de acceso>.
4. Seleccione el punto de acceso (SSID) y
seleccione <Siguiente>.
5. Seleccione <Aceptar>.
6. Introduzca una clave de red y seleccione
<Aplicar>.
7. Seleccione <Sí>.
• Espere a que aparezca el mensaje
<Conectado.>.
8. Seleccione <Cerrar>.
• La dirección IP se configurará
automáticamente en unos minutos.
Instale el controlador y el software.
5.
página 10 "Instalar el software"
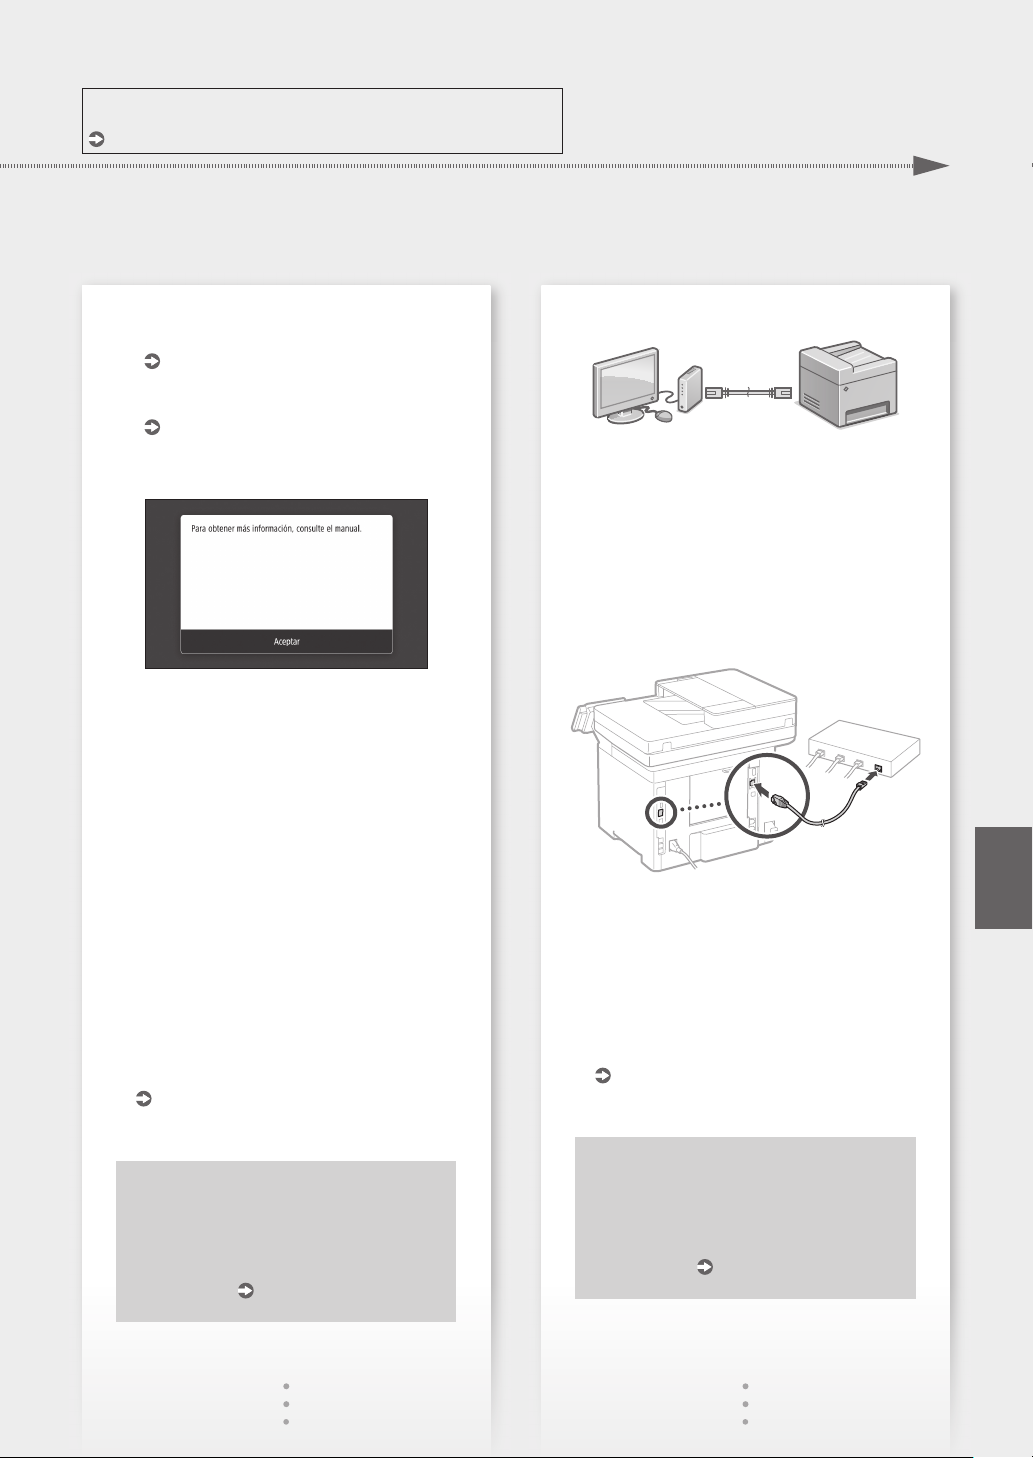
Para conectar mediante LAN por cable
El equipo no incluye ningún cable LAN, así que
tenga uno preparado en caso necesario.
Compruebe que el ordenador está bien
1.
conectado a un router.
Compruebe las opciones de red en el
2.
ordenador.
Conecte el cable LAN.
3.
• Tras conectar el cable, espere unos minutos
(hasta que la dirección IP se configure
automáticamente).
• Si se ha configurado una dirección IP estática
en el ordenador, configure la dirección IP del
ordenador manualmente.
Instale el controlador y el software.
4.
página 10 "Instalar el software"
Es
Ya ha finalizado la configuración de las
opciones iniciales.
Si su equipo incorpora función de fax,
proceda a configurar las opciones de fax.
página 11
Ya ha finalizado la configuración de las
opciones iniciales.
Si su equipo incorpora función de fax,
proceda a configurar las opciones de fax.
página 11
9
Configuración rápida
Configuración del equipo
Es
Para conectar mediante USB
No conecte el cable USB antes de instalar el
controlador. Si lo ha hecho, desconecte el cable
USB del ordenador, cierre el cuadro de diálogo
y aplique el procedimiento siguiente a partir del
paso 1.
Instale el controlador y el software.
1.
página 10 "Instalar el software"
• Cuando aparezca la pantalla con instrucciones
para conectar el cable USB al equipo, quite el
adhesivo que protege el puerto USB.
Instalar el software
•
El procedimiento aquí descrito solo es aplicable si el
sistema operativo de su ordenador es Windows. Para
obtener más detalles sobre el procedimiento de instalación
del software, consulte el manual del controlador.
• Para obtener información sobre la instalación si
el sistema operativo de su ordenador es macOS,
consulte el manual del controlador.
• En función del momento de la compra, es
posible que su equipo no incluya el controlador
para macOS. Los nuevos controladores se van
publicando en el sitio web de Canon, así que
puede descargar el más reciente y utilizarlo.
1.
2.
10
Ya ha finalizado la configuración de las
opciones iniciales.
Si su equipo incorpora función de fax,
proceda a configurar las opciones de fax.
página 11
Si la pantalla no se visualiza correctamente,
vuelva a introducir el CD-ROM/DVD-ROM
o busque "D:\MInst.exe" en Windows. (Esta
descripción da por supuesto que "D:" es la
unidad de CD-ROM/DVD-ROM).
Usar el escáner de forma sencilla
Configurar las opciones de red con la "Herramienta
de configuración de la función de envío" permite
enviar los originales escaneados directamente por
correo electrónico o I-Fax, o guardarlos en una
carpeta compartida o en el servidor FTP.
En la pantalla que se muestra en el paso 2, seleccione
[Iniciar programas de software] [Herramienta de
config. de func. de envío] para iniciar la Herramienta
de configuración de la función de envío.
 Loading...