

Canon imageRUNNER C5051 ADVANCE, imageRUNNER C5051i ADVANCE, imageRUNNER C5030 ADVANCE, imageRUNNER C5030i ADVANCE, imageRUNNER C5045i ADVANCE Maintenance Manual
...
Maintenance Guide
Please read this guide before operating this product.
After you finish reading this guide, store it in a safe place for future reference.
ENG


imageRUNNER ADVANCE
C5051/C5051i
C5045/C5045i
C5035/C5035i
C5030/C5030i
Maintenance Guide

Manuals for the Machine
$%30.
$%30.
$%30.
$%30.
$%30.
$%30.
$%30.
$%30.
$%30.
The manuals for this machine are divided as follows. Please refer to them for detailed information.
Guides with this symbol are printed manuals.
Basic Information •
Precautions for Using Your Machine and Settings Required after
•
Machine Installation
Quick Reference for Basic and Useful Operations•
Maintenance and Troubleshooting•
Frequently Asked Questions and Answers•
Windows Printer Driver Installation and Instructions•
Mac Printer Driver Installation and Instructions
•
The Mac UFR II Driver Guide and the Mac PS Driver Guide
Guides with this symbol are included on the accompanying CD-ROM.
User’s Guide
Getting Started
Quick Reference
Maintenance Guide
(This Document)
Frequently Asked Questions
Printer Driver Installation Guide
Mac Printer Driver Guide
v
Windows Fax Driver Installation and Instructions•
Fax Driver Installation Guide
Windows Network ScanGear Installation and Instructions•
Network ScanGear Installation
Guide

•Comprehensive Manual for Basic Operations and Handling Your
$%30.
Machine
-Before You Start Using This Machine
-How to Use This Manual
-Basic Operations
-Optional Products
-Settings/Registration
-Problem Solving
-Maintenance
-Practical Workflows
-Copy
-Fax
-Scan and Send
-Scan and Store
-Access Stored Files
-Fax/I-Fax Inbox
-Secured Print
-Web Access
-Scanner
-Quick Menu
-Status Monitor/Cancel
- Print
- Network
- Remote UI
- MEAP
- Security
- Software
e-Manual
To view the manual in PDF format, Adobe Reader/Adobe Acrobat Reader is required. If Adobe Reader/Adobe Acrobat Reader is not installed on your system, please download it from the Adobe
Systems Incorporated website.

How This Manual Is Organized
Chapter 1
Chapter 2
Chapter 3
Routine Maintenance
Troubleshooting
Appendix
Includes the index.
Considerable effort has been made to ensure that this manual is free of inaccuracies and omissions. However, as we are constantly improving our products, if you need an exact specification,
please contact Canon.

Contents
Preface . . . . . . . . . . . . . . . . . . . . . . . . . . . . . . . . . . . . . . . . . . . . . . . . . . . . . . . . . . . . . . . . . . . . . . . . . . . . . . . . . . . . vii
How To Use This Manual . . . . . . . . . . . . . . . . . . . . . . . . . . . . . . . . . . . . . . . . . . . . . . . . . . . . . . . . . . . . . . . . . . . . vii
Symbols Used in This Manual . . . . . . . . . . . . . . . . . . . . . . . . . . . . . . . . . . . . . . . . . . . . . . . . . . . . . . . . . . . . . . . . . . . . . . . . . vii
Keys Used in This Manual . . . . . . . . . . . . . . . . . . . . . . . . . . . . . . . . . . . . . . . . . . . . . . . . . . . . . . . . . . . . . . . . . . . . . . . . . . . . viii
Displays Used in This Manual . . . . . . . . . . . . . . . . . . . . . . . . . . . . . . . . . . . . . . . . . . . . . . . . . . . . . . . . . . . . . . . . . . . . . . . . viii
Illustrations Used in This Manual . . . . . . . . . . . . . . . . . . . . . . . . . . . . . . . . . . . . . . . . . . . . . . . . . . . . . . . . . . . . . . . . . . . . . . ix
Abbreviations Used in This Manual . . . . . . . . . . . . . . . . . . . . . . . . . . . . . . . . . . . . . . . . . . . . . . . . . . . . . . . . . . . . . . . . . . . ix
Trademarks . . . . . . . . . . . . . . . . . . . . . . . . . . . . . . . . . . . . . . . . . . . . . . . . . . . . . . . . . . . . . . . . . . . . . . . . . . . . . . . . . . . . . . . . . . . x
Copyright . . . . . . . . . . . . . . . . . . . . . . . . . . . . . . . . . . . . . . . . . . . . . . . . . . . . . . . . . . . . . . . . . . . . . . . . . . . . . . . . . . . . . . . . . . . . . x
Disclaimers . . . . . . . . . . . . . . . . . . . . . . . . . . . . . . . . . . . . . . . . . . . . . . . . . . . . . . . . . . . . . . . . . . . . . . . . . . . . . . . . . . . . . . . . . . . x
Chapter 1 Routine Maintenance
Paper Drawers . . . . . . . . . . . . . . . . . . . . . . . . . . . . . . . . . . . . . . . . . . . . . . . . . . . . . . . . . . . . . . . . . . . . . . . . . . . . 1-2
Loading Paper . . . . . . . . . . . . . . . . . . . . . . . . . . . . . . . . . . . . . . . . . . . . . . . . . . . . . . . . . . . . . . . . . . . . . . . . . . . . . . . . . . . . . . 1-2
Adjusting a Paper Drawer to Hold a Different Paper Size . . . . . . . . . . . . . . . . . . . . . . . . . . . . . . . . . . . . . . . . . . . . . .1-6
Paper Deck Unit-B1 (Optional) . . . . . . . . . . . . . . . . . . . . . . . . . . . . . . . . . . . . . . . . . . . . . . . . . . . . . . . . . . . . . 1-8
Loading Paper . . . . . . . . . . . . . . . . . . . . . . . . . . . . . . . . . . . . . . . . . . . . . . . . . . . . . . . . . . . . . . . . . . . . . . . . . . . . . . . . . . . . . . 1-8
Envelope Feeder Attachment-D1 (Optional) . . . . . . . . . . . . . . . . . . . . . . . . . . . . . . . . . . . . . . . . . . . . . . . 1-12
How to Use the Envelope Feeder Attachment . . . . . . . . . . . . . . . . . . . . . . . . . . . . . . . . . . . . . . . . . . . . . . . . . . . . . . .1-12
Preparing the Envelopes . . . . . . . . . . . . . . . . . . . . . . . . . . . . . . . . . . . . . . . . . . . . . . . . . . . . . . . . . . . . . . . . . . . . . . . . . . .1-13
Loading Envelopes . . . . . . . . . . . . . . . . . . . . . . . . . . . . . . . . . . . . . . . . . . . . . . . . . . . . . . . . . . . . . . . . . . . . . . . . . . . . . . . . . 1-15
Loading the Envelope after Specifying the Size . . . . . . . . . . . . . . . . . . . . . . . . . . . . . . . . . . . . . . . . . . . . . . . . . . . . . . 1-17
Feeder (Optional) . . . . . . . . . . . . . . . . . . . . . . . . . . . . . . . . . . . . . . . . . . . . . . . . . . . . . . . . . . . . . . . . . . . . . . . . 1-22
Replacing the Stamp Cartridge (Duplex Color Image Reader Unit-B1) . . . . . . . . . . . . . . . . . . . . . . . . . . . . . . . .1-22
Replacing the Stamp Cartridge (Color Image Reader Unit-B1) . . . . . . . . . . . . . . . . . . . . . . . . . . . . . . . . . . . . . . . . 1-25
Inner Finisher-A1 (Optional) . . . . . . . . . . . . . . . . . . . . . . . . . . . . . . . . . . . . . . . . . . . . . . . . . . . . . . . . . . . . . . 1-27
Replacing the Staple Cartridge . . . . . . . . . . . . . . . . . . . . . . . . . . . . . . . . . . . . . . . . . . . . . . . . . . . . . . . . . . . . . . . . . . . . .1-27
Staple Finisher-C1/Booklet Finisher-C1/Puncher (Optional) . . . . . . . . . . . . . . . . . . . . . . . . . . . . . . . . . 1-30
Replacing the Staple Cartridge in the Stapler Unit . . . . . . . . . . . . . . . . . . . . . . . . . . . . . . . . . . . . . . . . . . . . . . . . . . .1-30
Replacing the Staple Cartridge in the Saddle Stitcher Unit . . . . . . . . . . . . . . . . . . . . . . . . . . . . . . . . . . . . . . . . . . .1-33
Removing Punch Waste . . . . . . . . . . . . . . . . . . . . . . . . . . . . . . . . . . . . . . . . . . . . . . . . . . . . . . . . . . . . . . . . . . . . . . . . . . . .1-36
Replacing the Toner Cartridge . . . . . . . . . . . . . . . . . . . . . . . . . . . . . . . . . . . . . . . . . . . . . . . . . . . . . . . . . . . . 1-38
Replacing the Waste Toner Container . . . . . . . . . . . . . . . . . . . . . . . . . . . . . . . . . . . . . . . . . . . . . . . . . . . . . . 1-43
Routine Cleaning . . . . . . . . . . . . . . . . . . . . . . . . . . . . . . . . . . . . . . . . . . . . . . . . . . . . . . . . . . . . . . . . . . . . . . . .1-46
Platen Glass and Cover . . . . . . . . . . . . . . . . . . . . . . . . . . . . . . . . . . . . . . . . . . . . . . . . . . . . . . . . . . . . . . . . . . . . . . . . . . . . .1-46
Manual Feeder Cleaning. . . . . . . . . . . . . . . . . . . . . . . . . . . . . . . . . . . . . . . . . . . . . . . . . . . . . . . . . . . . . . . . . . . . . . . . . . . .1-47
Duplex Color Image Reader Unit-B1 . . . . . . . . . . . . . . . . . . . . . . . . . . . . . . . . . . . . . . . . . . . . . . . . . . . . . . . . . . . .1-47
Color Image Reader Unit-B1 . . . . . . . . . . . . . . . . . . . . . . . . . . . . . . . . . . . . . . . . . . . . . . . . . . . . . . . . . . . . . . . . . . . .1-50
Automatic Feeder Cleaning . . . . . . . . . . . . . . . . . . . . . . . . . . . . . . . . . . . . . . . . . . . . . . . . . . . . . . . . . . . . . . . . . . . . . . . . .1-54
Cleaning the Inside of the Main Unit . . . . . . . . . . . . . . . . . . . . . . . . . . . . . . . . . . . . . . . . . . . . . . . . . . . . . . . . . . . . . . . .1-55
Cleaning the Dust Proof Glass . . . . . . . . . . . . . . . . . . . . . . . . . . . . . . . . . . . . . . . . . . . . . . . . . . . . . . . . . . . . . . . . . . . . . .1-55
Consumables . . . . . . . . . . . . . . . . . . . . . . . . . . . . . . . . . . . . . . . . . . . . . . . . . . . . . . . . . . . . . . . . . . . . . . . . . . . . 1-57
Chapter 2 Troubleshooting
Reducing the Frequency of Paper Jams . . . . . . . . . . . . . . . . . . . . . . . . . . . . . . . . . . . . . . . . . . . . . . . . . . . . . 2-2
Clearing Paper Jams . . . . . . . . . . . . . . . . . . . . . . . . . . . . . . . . . . . . . . . . . . . . . . . . . . . . . . . . . . . . . . . . . . . . . . 2-3
Screens Indicating the Locations of Paper Jams . . . . . . . . . . . . . . . . . . . . . . . . . . . . . . . . . . . . . . . . . . . . . . . . . . . . . . 2-3
Paper Output Unit (Inside the Main Unit) . . . . . . . . . . . . . . . . . . . . . . . . . . . . . . . . . . . . . . . . . . . . . . . . . . . . . . . . . . . . . 2-6
Fixing Unit (Inside the Main Unit) . . . . . . . . . . . . . . . . . . . . . . . . . . . . . . . . . . . . . . . . . . . . . . . . . . . . . . . . . . . . . . . . . . . . 2-8
Entrance of Duplexing Unit (Inside the Main Unit) . . . . . . . . . . . . . . . . . . . . . . . . . . . . . . . . . . . . . . . . . . . . . . . . . . .2-10
Duplexing Unit (Inside the Main Unit) . . . . . . . . . . . . . . . . . . . . . . . . . . . . . . . . . . . . . . . . . . . . . . . . . . . . . . . . . . . . . . . 2-12
Multi-Purpose Tray . . . . . . . . . . . . . . . . . . . . . . . . . . . . . . . . . . . . . . . . . . . . . . . . . . . . . . . . . . . . . . . . . . . . . . . . . . . . . . . . .2-14
Paper Drawer 1 . . . . . . . . . . . . . . . . . . . . . . . . . . . . . . . . . . . . . . . . . . . . . . . . . . . . . . . . . . . . . . . . . . . . . . . . . . . . . . . . . . . .2-17
Paper Drawer 2 . . . . . . . . . . . . . . . . . . . . . . . . . . . . . . . . . . . . . . . . . . . . . . . . . . . . . . . . . . . . . . . . . . . . . . . . . . . . . . . . . . . .2-20
Cassette Feeding Unit-AD1 (Optional) . . . . . . . . . . . . . . . . . . . . . . . . . . . . . . . . . . . . . . . . . . . . . . . . . . . . . . . . . . . . . .2-23
Paper Deck Unit-B1 (Optional) . . . . . . . . . . . . . . . . . . . . . . . . . . . . . . . . . . . . . . . . . . . . . . . . . . . . . . . . . . . . . . . . . . . . . .2-26
Feeder (Optional) . . . . . . . . . . . . . . . . . . . . . . . . . . . . . . . . . . . . . . . . . . . . . . . . . . . . . . . . . . . . . . . . . . . . . . . . . . . . . . . . . . 2-29
Inner Finisher-A1 (Optional) . . . . . . . . . . . . . . . . . . . . . . . . . . . . . . . . . . . . . . . . . . . . . . . . . . . . . . . . . . . . . . . . . . . . . . . .2-34
Inside the Top Cover of the Staple Finisher-C1/Booklet Finisher-C1 (Optional) . . . . . . . . . . . . . . . . . . . . . . . . 2-38
Inside the Buffer Pass Unit-G1 of the Staple Finisher-C1/Booklet Finisher-C1 (Optional) . . . . . . . . . . . . . . .2-40
Inside the Front Cover of the Booklet Finisher-C1 (Optional) . . . . . . . . . . . . . . . . . . . . . . . . . . . . . . . . . . . . . . . . .2-42
Saddle Stitcher Unit (Optional) . . . . . . . . . . . . . . . . . . . . . . . . . . . . . . . . . . . . . . . . . . . . . . . . . . . . . . . . . . . . . . . . . . . . .2-44
v

Puncher (Optional) . . . . . . . . . . . . . . . . . . . . . . . . . . . . . . . . . . . . . . . . . . . . . . . . . . . . . . . . . . . . . . . . . . . . . . . . . . . . . . . . . 2-47
Inner 2Way Tray-F1 (Optional) . . . . . . . . . . . . . . . . . . . . . . . . . . . . . . . . . . . . . . . . . . . . . . . . . . . . . . . . . . . . . . . . . . . . . .2-50
Copy Tray-J1 (Optional) . . . . . . . . . . . . . . . . . . . . . . . . . . . . . . . . . . . . . . . . . . . . . . . . . . . . . . . . . . . . . . . . . . . . . . . . . . . . . 2-53
Clearing Staple Jams . . . . . . . . . . . . . . . . . . . . . . . . . . . . . . . . . . . . . . . . . . . . . . . . . . . . . . . . . . . . . . . . . . . . . 2-55
Inner Finisher-A1 (Optional) . . . . . . . . . . . . . . . . . . . . . . . . . . . . . . . . . . . . . . . . . . . . . . . . . . . . . . . . . . . . . . . . . . . . . . . .2-55
Staple Finisher-C1/Booklet Finisher-C1 (Optional) . . . . . . . . . . . . . . . . . . . . . . . . . . . . . . . . . . . . . . . . . . . . . . . . . . .2-58
Saddle Stitcher Unit (Optional) . . . . . . . . . . . . . . . . . . . . . . . . . . . . . . . . . . . . . . . . . . . . . . . . . . . . . . . . . . . . . . . . . . . . .2-60
List of Error Messages . . . . . . . . . . . . . . . . . . . . . . . . . . . . . . . . . . . . . . . . . . . . . . . . . . . . . . . . . . . . . . . . . . . . 2-65
Self-Diagnostic Display . . . . . . . . . . . . . . . . . . . . . . . . . . . . . . . . . . . . . . . . . . . . . . . . . . . . . . . . . . . . . . . . . . . . . . . . . . . . .2-65
List of Error Codes without Messages . . . . . . . . . . . . . . . . . . . . . . . . . . . . . . . . . . . . . . . . . . . . . . . . . . . . . . . . . . . . . . . 2-69
If Memory Becomes Full during Scanning . . . . . . . . . . . . . . . . . . . . . . . . . . . . . . . . . . . . . . . . . . . . . . . . . . 2-77
Service Call Message . . . . . . . . . . . . . . . . . . . . . . . . . . . . . . . . . . . . . . . . . . . . . . . . . . . . . . . . . . . . . . . . . . . . . 2-78
Contacting Your Local Authorized Canon Dealer . . . . . . . . . . . . . . . . . . . . . . . . . . . . . . . . . . . . . . . . . . . . . . . . . . . .2-78
Setting the Limited Functions Mode from the Service Call Message Screen . . . . . . . . . . . . . . . . . . . . . . . . . . .2-80
When the Power Does Not Turn ON . . . . . . . . . . . . . . . . . . . . . . . . . . . . . . . . . . . . . . . . . . . . . . . . . . . . . . . . 2-81
Printer/Fax Driver Troubleshooting . . . . . . . . . . . . . . . . . . . . . . . . . . . . . . . . . . . . . . . . . . . . . . . . . . . . . . . 2-82
Chapter 3 Appendix
Index . . . . . . . . . . . . . . . . . . . . . . . . . . . . . . . . . . . . . . . . . . . . . . . . . . . . . . . . . . . . . . . . . . . . . . . . . . . . . . . . . . . . 3-2
vi

Preface
Thank you for purchasing the Canon imageRUNNER ADVANCE C5051/C5051i/C5045/C5045i/C5035/C5035i/C5030/C5030i. Please
read this manual thoroughly before operating the product to familiarize yourself with its capabilities, and to make the most of its
many functions. After reading this manual, store it in a safe place for future reference.
How To Use This Manual
Symbols Used in This Manual
The following symbols are used in this manual to explain procedures, restrictions, handling precautions, and instructions that
should be observed for safety.
Indicates a warning concerning operations that may lead to death or injury to persons if not performed
correctly. To use the machine safely, always pay attention to these warnings.
Indicates a caution concerning operations that may lead to injury to persons, or damage to property if not
performed correctly. To use the machine safely, always pay attention to these cautions.
Indicates operational requirements and restrictions. Be sure to read these items carefully to operate the
machine correctly, and avoid damage to the machine.
Indicates a clarification of an operation, or contains additional explanations for a procedure. Reading
these notes is highly recommended.
vii
viii
Keys Used in This Manual
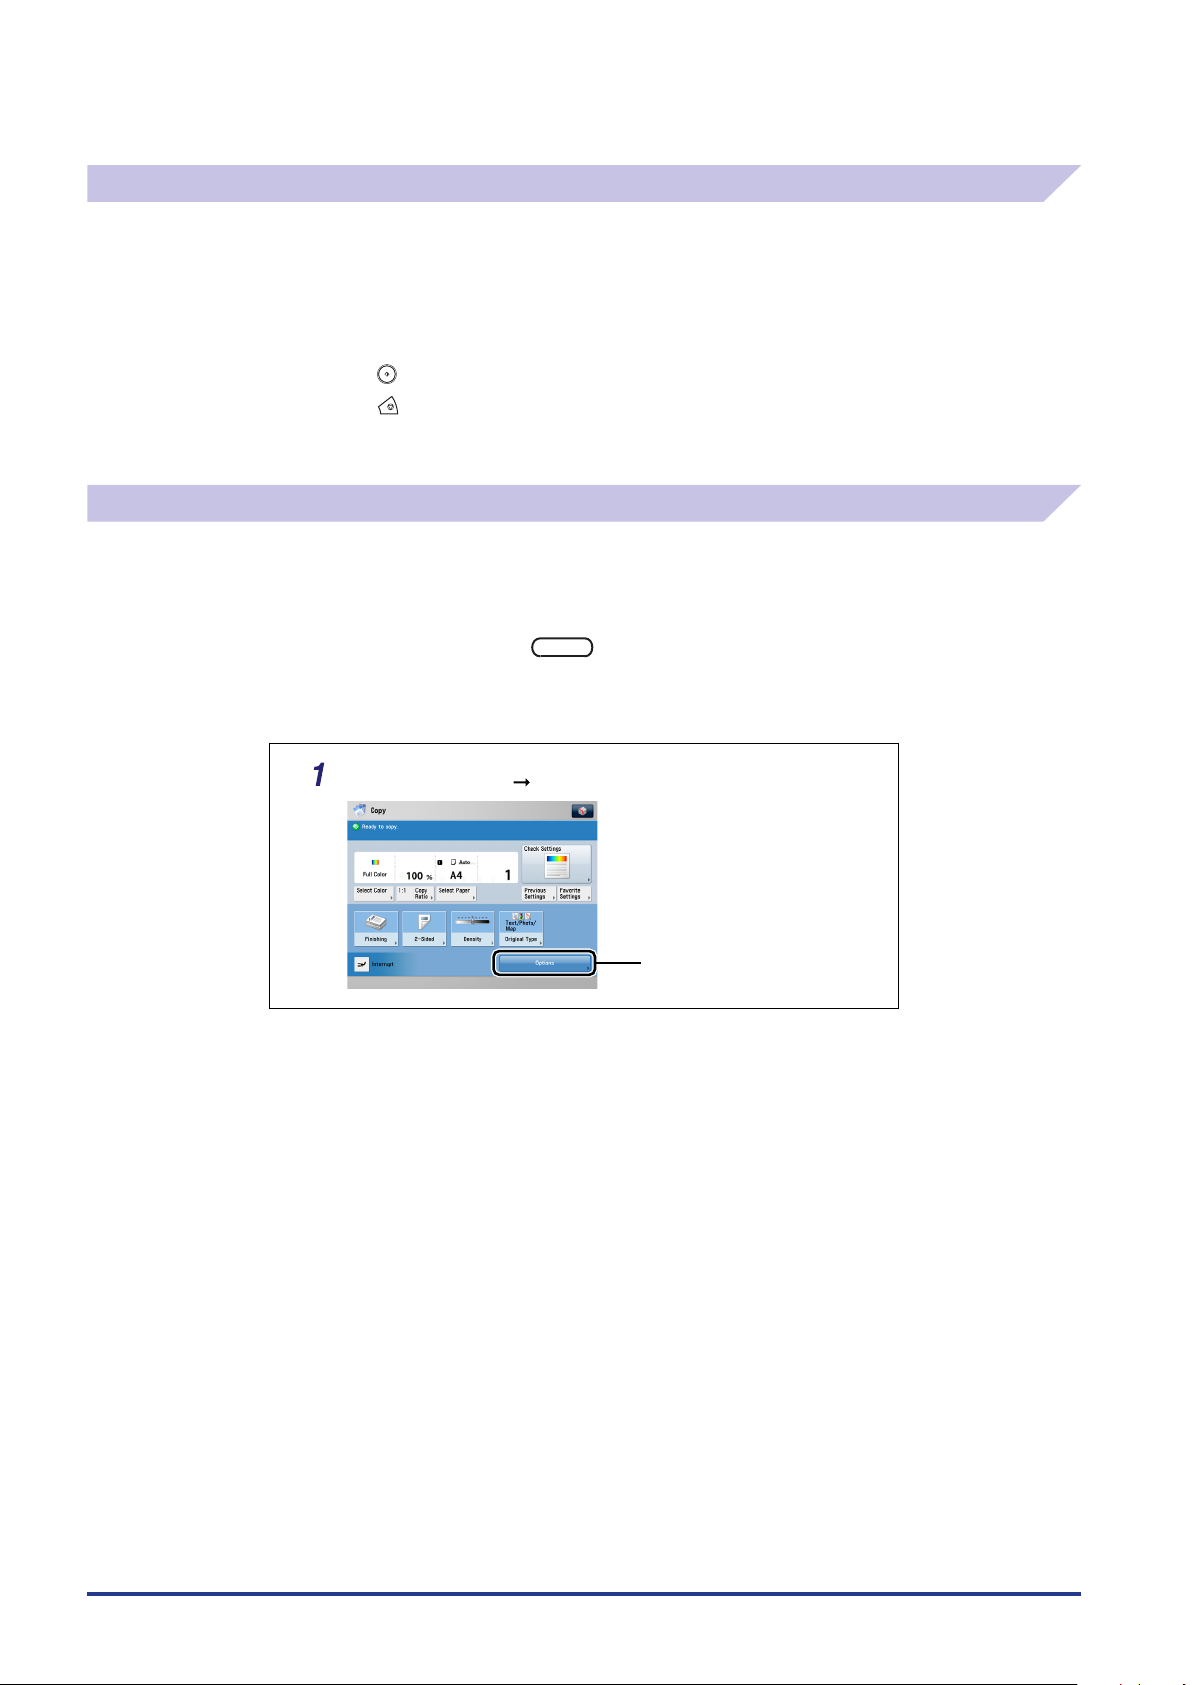
Place your originals press [Options].
Press this key for operation.
The following symbols and key names are a few examples of how keys to be pressed are expressed in this manual:
•
Touch Panel Display Keys: [Key Name]
Example:
•
Control Panel Keys: Key Icon (Key Name)
Example:
[Cancel]
[Close]
Displays Used in This Manual
Screen shots of the touch panel display used in this manual are those taken when the following optional equipment is
attached to the imageRUNNER ADVANCE C5051 : the Duplex Color Image Reader Unit-B1, Super G3 FAX Board, Inner FinisherA1, and Cassette Feeding Unit-AD1.
Note that functions that cannot be used depending on the model or options, are not displayed on the touch panel display.
The keys which you should press are marked with a , as shown below.
When multiple keys can be pressed on the touch panel display, all keys are marked. Select the keys which suit your needs.
Screen shots used in this manual may differ from the ones you actually see.
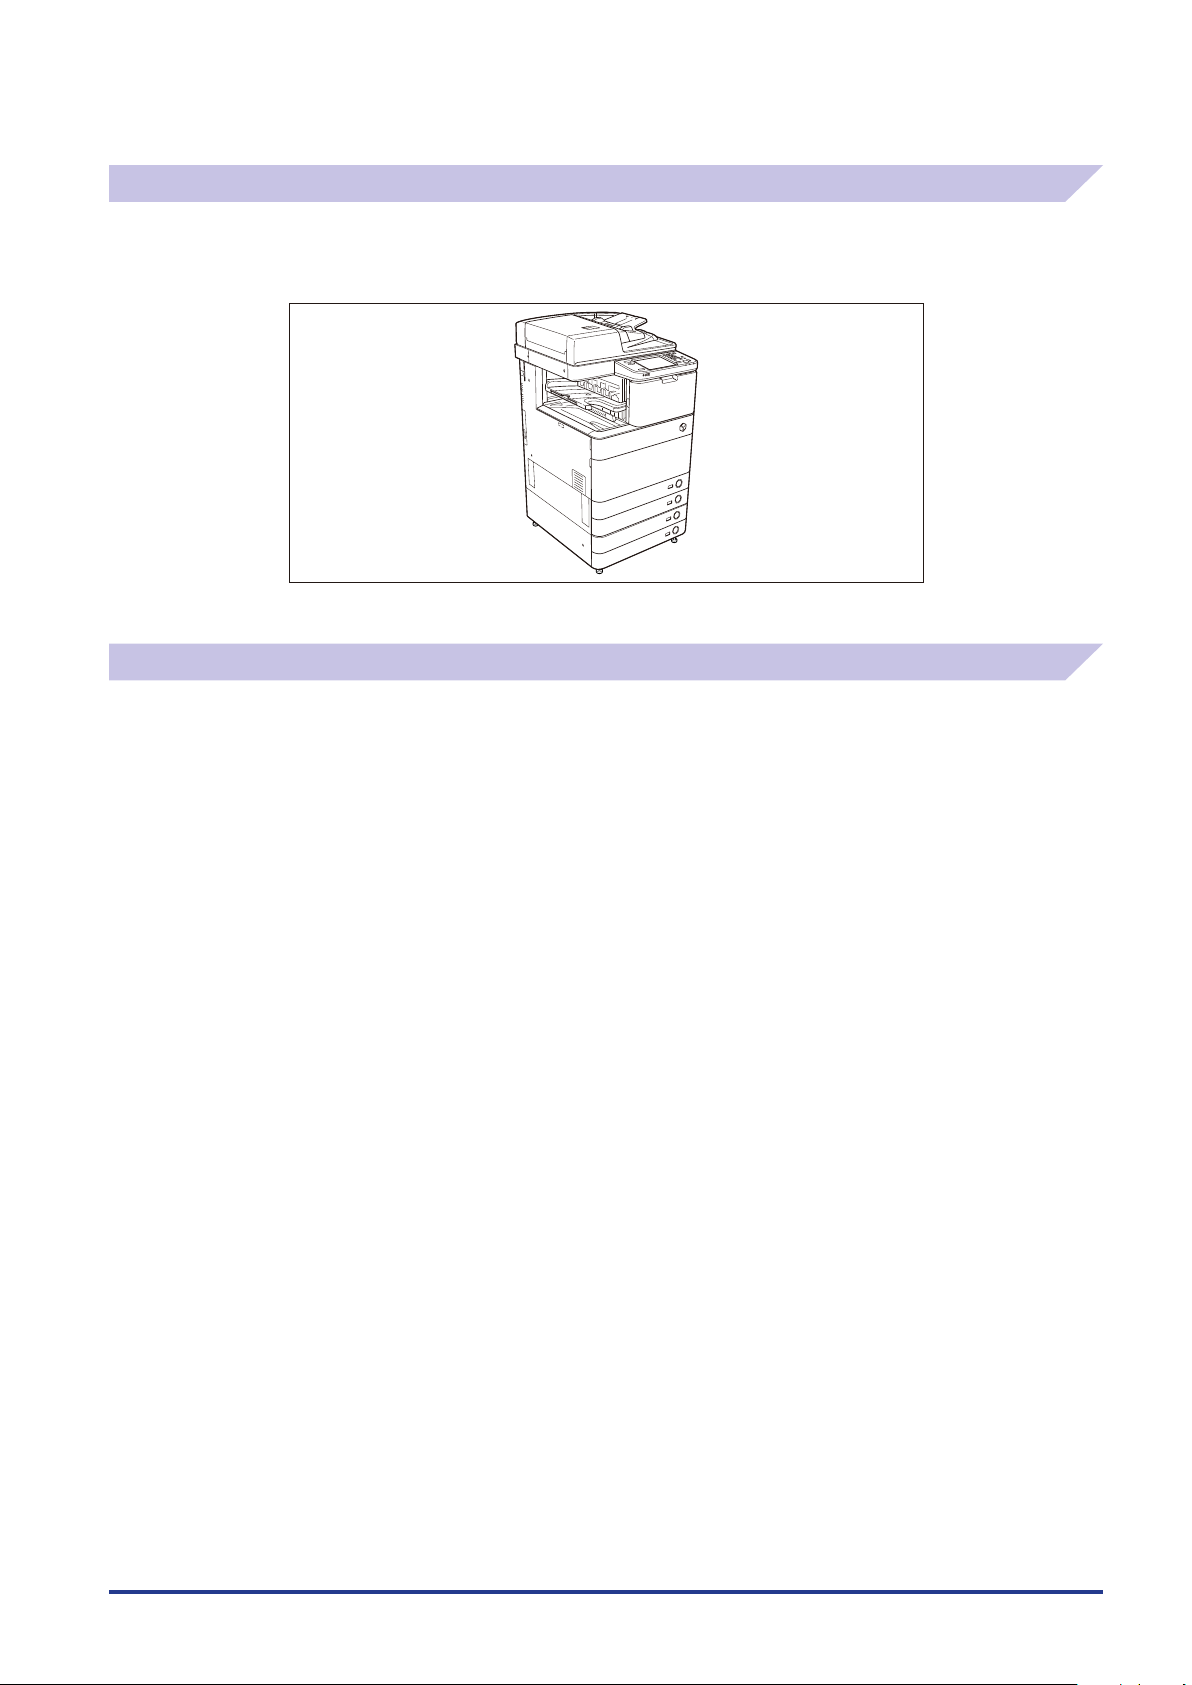
Illustrations Used in This Manual
Illustrations used in this manual are those displayed when the imageRUNNER ADVANCE C5051 has the following optional
equipment attached to it: the Duplex Color Image Reader Unit-B1, Super G3 FAX Board, Inner Finisher-A1, and Cassette
Feeding Unit-AD1.
Abbreviations Used in This Manual
In this manual, product names and model names are abbreviated as follows:
Microsoft Windows operating system: Windows
Apple Mac: Mac
ix

x
Trademarks
Apple and Mac are trademarks of Apple Inc., registered in the U.S. and other countries.
Windows is a trademark or a registered trademark of Microsoft Corporation in the U.S. and/or other countries.
Other product and company names herein may be the trademarks of their respective owners.
Copyright
Copyright 2009 by Canon Inc. All rights reserved.
No part of this publication may be reproduced or transmitted in any form or by any means, electronic or mechanical,
including photocopying and recording, or by any information storage or retrieval system without the prior written permission
of Canon Inc.
Disclaimers
The information in this document is subject to change without notice.
CANON INC. MAKES NO WARRANTY OF ANY KIND WITH REGARD TO THIS MATERIAL, EITHER EXPRESS OR IMPLIED, EXCEPT
AS PROVIDED HEREIN, INCLUDING WITHOUT LIMITATION, THEREOF, WARRANTIES AS TO MARKETABILITY, MERCHANTABILITY,
FITNESS FOR A PARTICULAR PURPOSE OF USE OR AGAINST INFRINGEMENT OF ANY PATENT. CANON INC. SHALL NOT BE
LIABLE FOR ANY DIRECT, INCIDENTAL, OR CONSEQUENTIAL DAMAGES OF ANY NATURE, OR LOSSES OR EXPENSES RESULTING
FROM THE USE OF THIS MATERIAL.

$)"15&3
Routine Maintenance
This chapter describes how to load paper, perform routine cleaning operations, and replace consumables, such as toner and staple
cartridges.
Paper Drawers . . . . . . . . . . . . . . . . . . . . . . . . . . . . . . . . . . . . . . . . . . . . . . . . . . . . . . . . . . . . . . . . . . . . . . . . . . . . . . . . . . . . . . . . . 1-2
Loading Paper . . . . . . . . . . . . . . . . . . . . . . . . . . . . . . . . . . . . . . . . . . . . . . . . . . . . . . . . . . . . . . . . . . . . . . . . . . . . . . . . . . . . . . . . . . . . . . . . . . . 1-2
Adjusting a Paper Drawer to Hold a Different Paper Size. . . . . . . . . . . . . . . . . . . . . . . . . . . . . . . . . . . . . . . . . . . . . . . . . . . . . . . . . . . 1-6
Paper Deck Unit-B1 (Optional) . . . . . . . . . . . . . . . . . . . . . . . . . . . . . . . . . . . . . . . . . . . . . . . . . . . . . . . . . . . . . . . . . . . . . . . . . . 1-8
Loading Paper . . . . . . . . . . . . . . . . . . . . . . . . . . . . . . . . . . . . . . . . . . . . . . . . . . . . . . . . . . . . . . . . . . . . . . . . . . . . . . . . . . . . . . . . . . . . . . . . . . . 1-8
Envelope Feeder Attachment-D1 (Optional). . . . . . . . . . . . . . . . . . . . . . . . . . . . . . . . . . . . . . . . . . . . . . . . . . . . . . . . . . . .1-12
How to Use the Envelope Feeder Attachment . . . . . . . . . . . . . . . . . . . . . . . . . . . . . . . . . . . . . . . . . . . . . . . . . . . . . . . . . . . . . . . . . . . . 1-12
Preparing the Envelopes . . . . . . . . . . . . . . . . . . . . . . . . . . . . . . . . . . . . . . . . . . . . . . . . . . . . . . . . . . . . . . . . . . . . . . . . . . . . . . . . . . . . . . . . 1-13
Loading Envelopes . . . . . . . . . . . . . . . . . . . . . . . . . . . . . . . . . . . . . . . . . . . . . . . . . . . . . . . . . . . . . . . . . . . . . . . . . . . . . . . . . . . . . . . . . . . . . . 1-15
Loading the Envelope after Specifying the Size. . . . . . . . . . . . . . . . . . . . . . . . . . . . . . . . . . . . . . . . . . . . . . . . . . . . . . . . . . . . . . . . . . . 1-17
Feeder (Optional) . . . . . . . . . . . . . . . . . . . . . . . . . . . . . . . . . . . . . . . . . . . . . . . . . . . . . . . . . . . . . . . . . . . . . . . . . . . . . . . . . . . . .1-22
Replacing the Stamp Cartridge (Duplex Color Image Reader Unit-B1) . . . . . . . . . . . . . . . . . . . . . . . . . . . . . . . . . . . . . . . . . . . . . 1-22
Replacing the Stamp Cartridge (Color Image Reader Unit-B1) . . . . . . . . . . . . . . . . . . . . . . . . . . . . . . . . . . . . . . . . . . . . . . . . . . . . . 1-25
Inner Finisher-A1 (Optional) . . . . . . . . . . . . . . . . . . . . . . . . . . . . . . . . . . . . . . . . . . . . . . . . . . . . . . . . . . . . . . . . . . . . . . . . . . . 1-27
Replacing the Staple Cartridge. . . . . . . . . . . . . . . . . . . . . . . . . . . . . . . . . . . . . . . . . . . . . . . . . . . . . . . . . . . . . . . . . . . . . . . . . . . . . . . . . . . 1-27
Staple Finisher-C1/Booklet Finisher-C1/Puncher (Optional) . . . . . . . . . . . . . . . . . . . . . . . . . . . . . . . . . . . . . . . . . . . . .1-30
Replacing the Staple Cartridge in the Stapler Unit . . . . . . . . . . . . . . . . . . . . . . . . . . . . . . . . . . . . . . . . . . . . . . . . . . . . . . . . . . . . . . . . 1-30
Replacing the Staple Cartridge in the Saddle Stitcher Unit . . . . . . . . . . . . . . . . . . . . . . . . . . . . . . . . . . . . . . . . . . . . . . . . . . . . . . . . 1-33
Removing Punch Waste . . . . . . . . . . . . . . . . . . . . . . . . . . . . . . . . . . . . . . . . . . . . . . . . . . . . . . . . . . . . . . . . . . . . . . . . . . . . . . . . . . . . . . . . . 1-36
Replacing the Toner Cartridge . . . . . . . . . . . . . . . . . . . . . . . . . . . . . . . . . . . . . . . . . . . . . . . . . . . . . . . . . . . . . . . . . . . . . . . . .1-38
Replacing the Waste Toner Container . . . . . . . . . . . . . . . . . . . . . . . . . . . . . . . . . . . . . . . . . . . . . . . . . . . . . . . . . . . . . . . . . .1-43
Routine Cleaning. . . . . . . . . . . . . . . . . . . . . . . . . . . . . . . . . . . . . . . . . . . . . . . . . . . . . . . . . . . . . . . . . . . . . . . . . . . . . . . . . . . . . . 1-46
Platen Glass and Cover . . . . . . . . . . . . . . . . . . . . . . . . . . . . . . . . . . . . . . . . . . . . . . . . . . . . . . . . . . . . . . . . . . . . . . . . . . . . . . . . . . . . . . . . . . 1-46
Manual Feeder Cleaning. . . . . . . . . . . . . . . . . . . . . . . . . . . . . . . . . . . . . . . . . . . . . . . . . . . . . . . . . . . . . . . . . . . . . . . . . . . . . . . . . . . . . . . . . 1-47
Automatic Feeder Cleaning. . . . . . . . . . . . . . . . . . . . . . . . . . . . . . . . . . . . . . . . . . . . . . . . . . . . . . . . . . . . . . . . . . . . . . . . . . . . . . . . . . . . . . 1-54
Cleaning the Inside of the Main Unit . . . . . . . . . . . . . . . . . . . . . . . . . . . . . . . . . . . . . . . . . . . . . . . . . . . . . . . . . . . . . . . . . . . . . . . . . . . . . 1-55
Cleaning the Dust Proof Glass . . . . . . . . . . . . . . . . . . . . . . . . . . . . . . . . . . . . . . . . . . . . . . . . . . . . . . . . . . . . . . . . . . . . . . . . . . . . . . . . . . . 1-55
Consumables . . . . . . . . . . . . . . . . . . . . . . . . . . . . . . . . . . . . . . . . . . . . . . . . . . . . . . . . . . . . . . . . . . . . . . . . . . . . . . . . . . . . . . . . .1-57
1
1-1
Paper Drawers
Front
4
3
2
1
Paper Drawer 2 (Face up)
This section describes how to load paper into the paper drawers.
•
1
•
Loading Paper
If the selected paper runs out, or the selected paper drawer runs out of paper during printing, a screen prompting you to load
Routine Maintenance
paper appears on the touch panel display.
Follow the procedure below to load paper into the paper drawers.
•
•
•
•
The following paper sizes can be loaded into Paper Drawers 1, 2, 3, and 4.
Paper Drawer 1: Custom size (139.7 mm × 182 mm to 304.8 mm × 390 mm), A4, A4R, and A5R
Paper Drawer 2: Custom size (139.7 mm × 182 mm to 304.8 mm × 457.2 mm), 305mm × 457mm, A3, A4, A4R, A5R, and envelopes
Paper Drawer 3, 4: Custom size (139.7 mm × 182 mm to 304.8 mm × 457.2 mm), 305mm × 457mm, A3, A4, A4R, and A5R
Envelopes can be loaded into Paper Drawer 2 only if the Envelope Feeder Attachment-D1 is attached.
Paper Drawers 3 and 4 can only be used if the Cassette Feeding Unit-AD1 is attached.
-
For more information on available paper stock that can be loaded into the paper drawers, see e-Manual > Basic Operations.
When loading paper, take care not to cut your hands on the edges of the paper.
A screen prompting you to load paper also appears if the selected paper drawer is not fully inserted into the machine. Make sure that the
paper drawer is properly in place.
Do not load the following types of paper into the paper drawers. Doing so may cause a paper jam.
Severely curled or wrinkled paper
Thin straw paper
Heavy 3 paper 210 to 256g/m
Paper which has been printed on using a thermal transfer printer (Do not print on the reverse side of this paper either.)
-
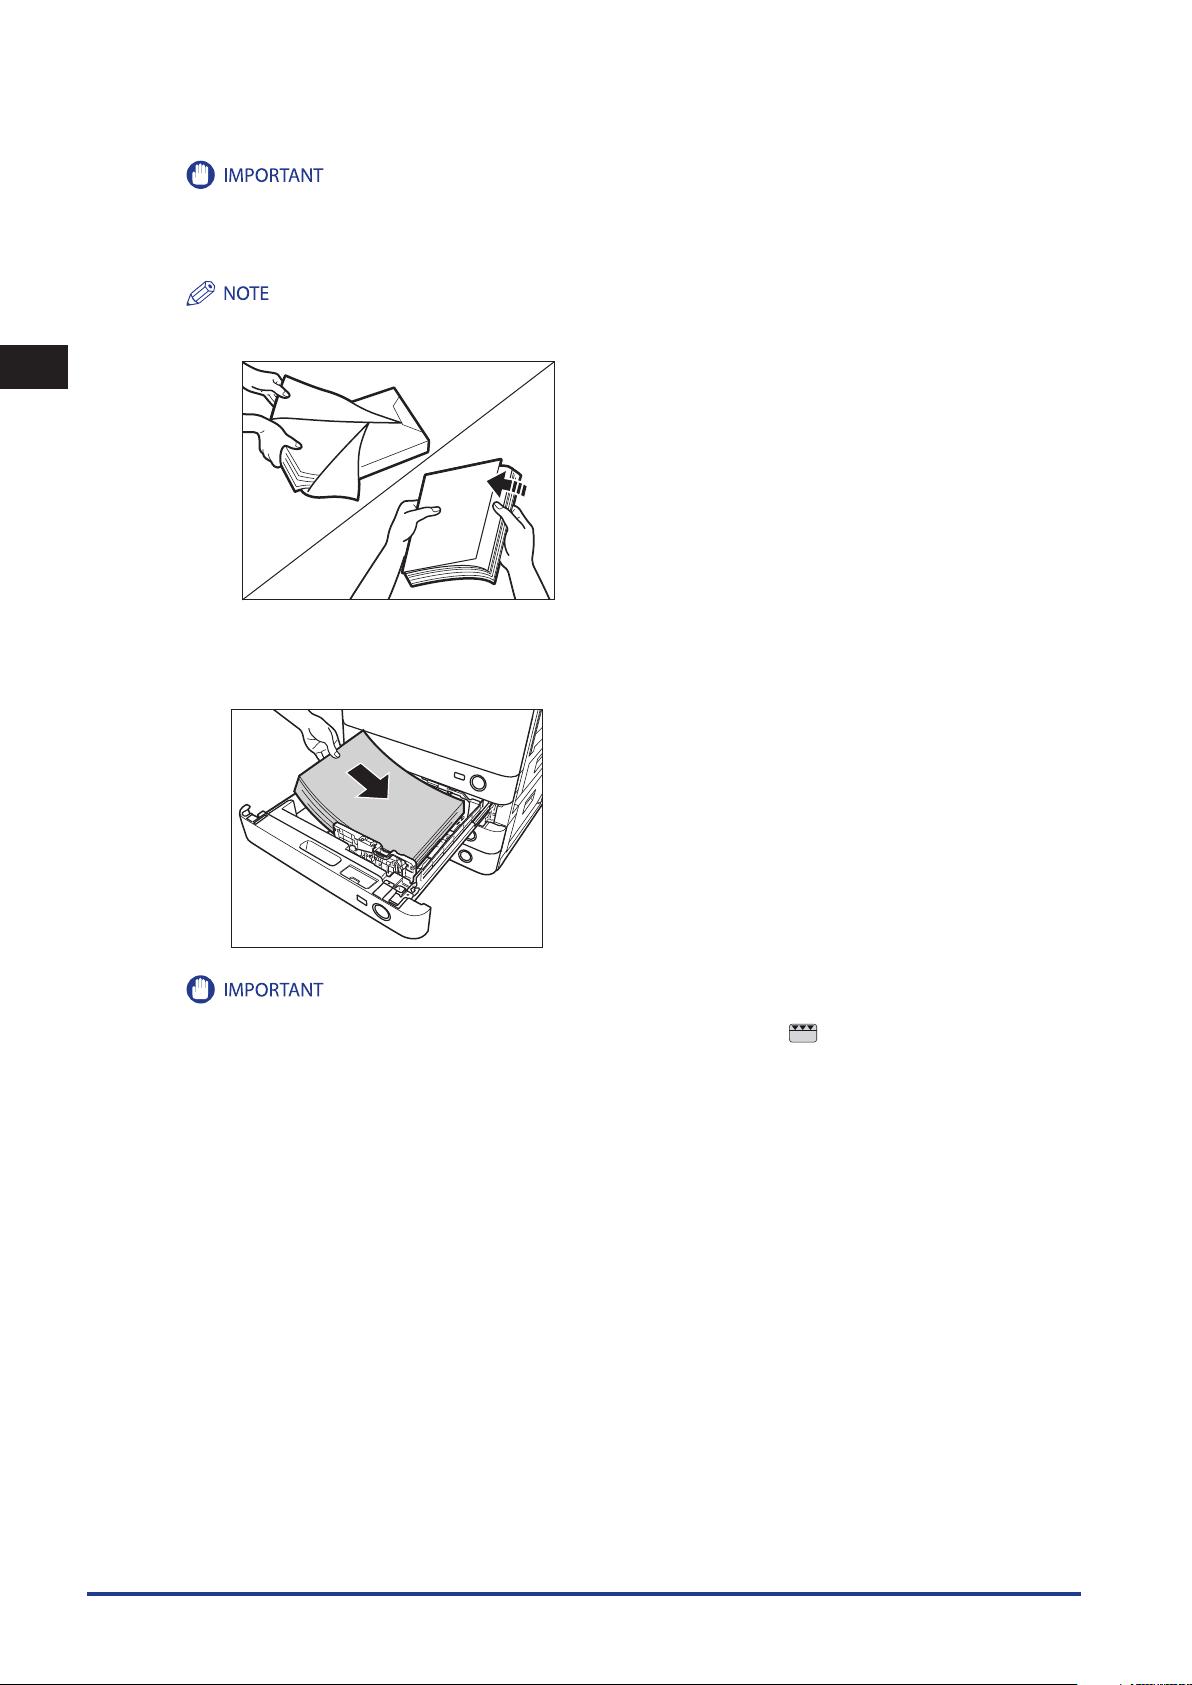
Fan the stack of paper well before loading it. Paper such as thin paper, recycled paper, pre-punched paper, heavy paper, transparencies,
and tab papers should be fanned particularly well before loading it.
Never place paper or any other items in the empty part of the drawer next to the paper stack. Doing so may cause paper jams.
2
If a message prompting you to load paper appears during printing, the remaining prints are automatically made after you load the correct
•
paper. If you select another paper drawer, the remaining prints are made after you press [OK].
To cancel printing, press [Stop].
•
Tab papers can be loaded in Paper Drawer 2 if optional equipment is attached.
•
Tab papers loaded in Paper Drawer 2 can be used only when printing from a computer.
•
1-2
Paper Drawers
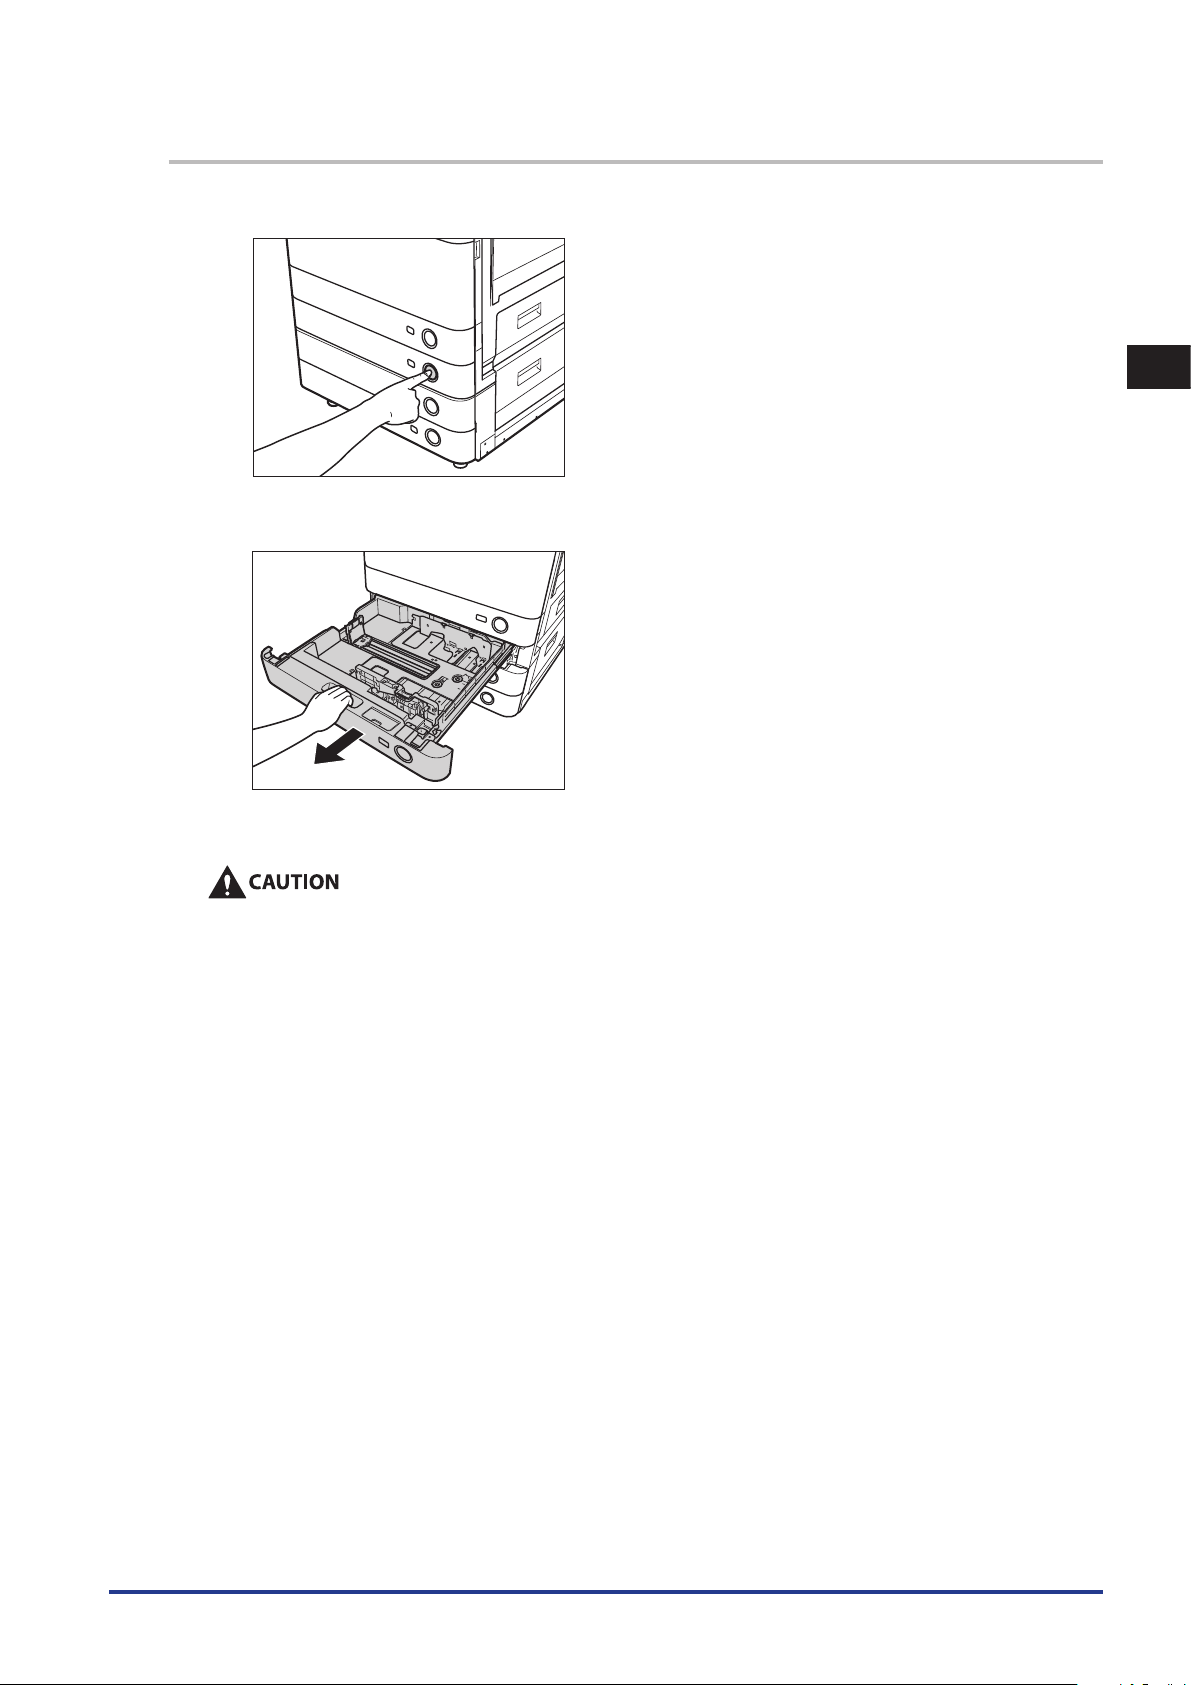
1
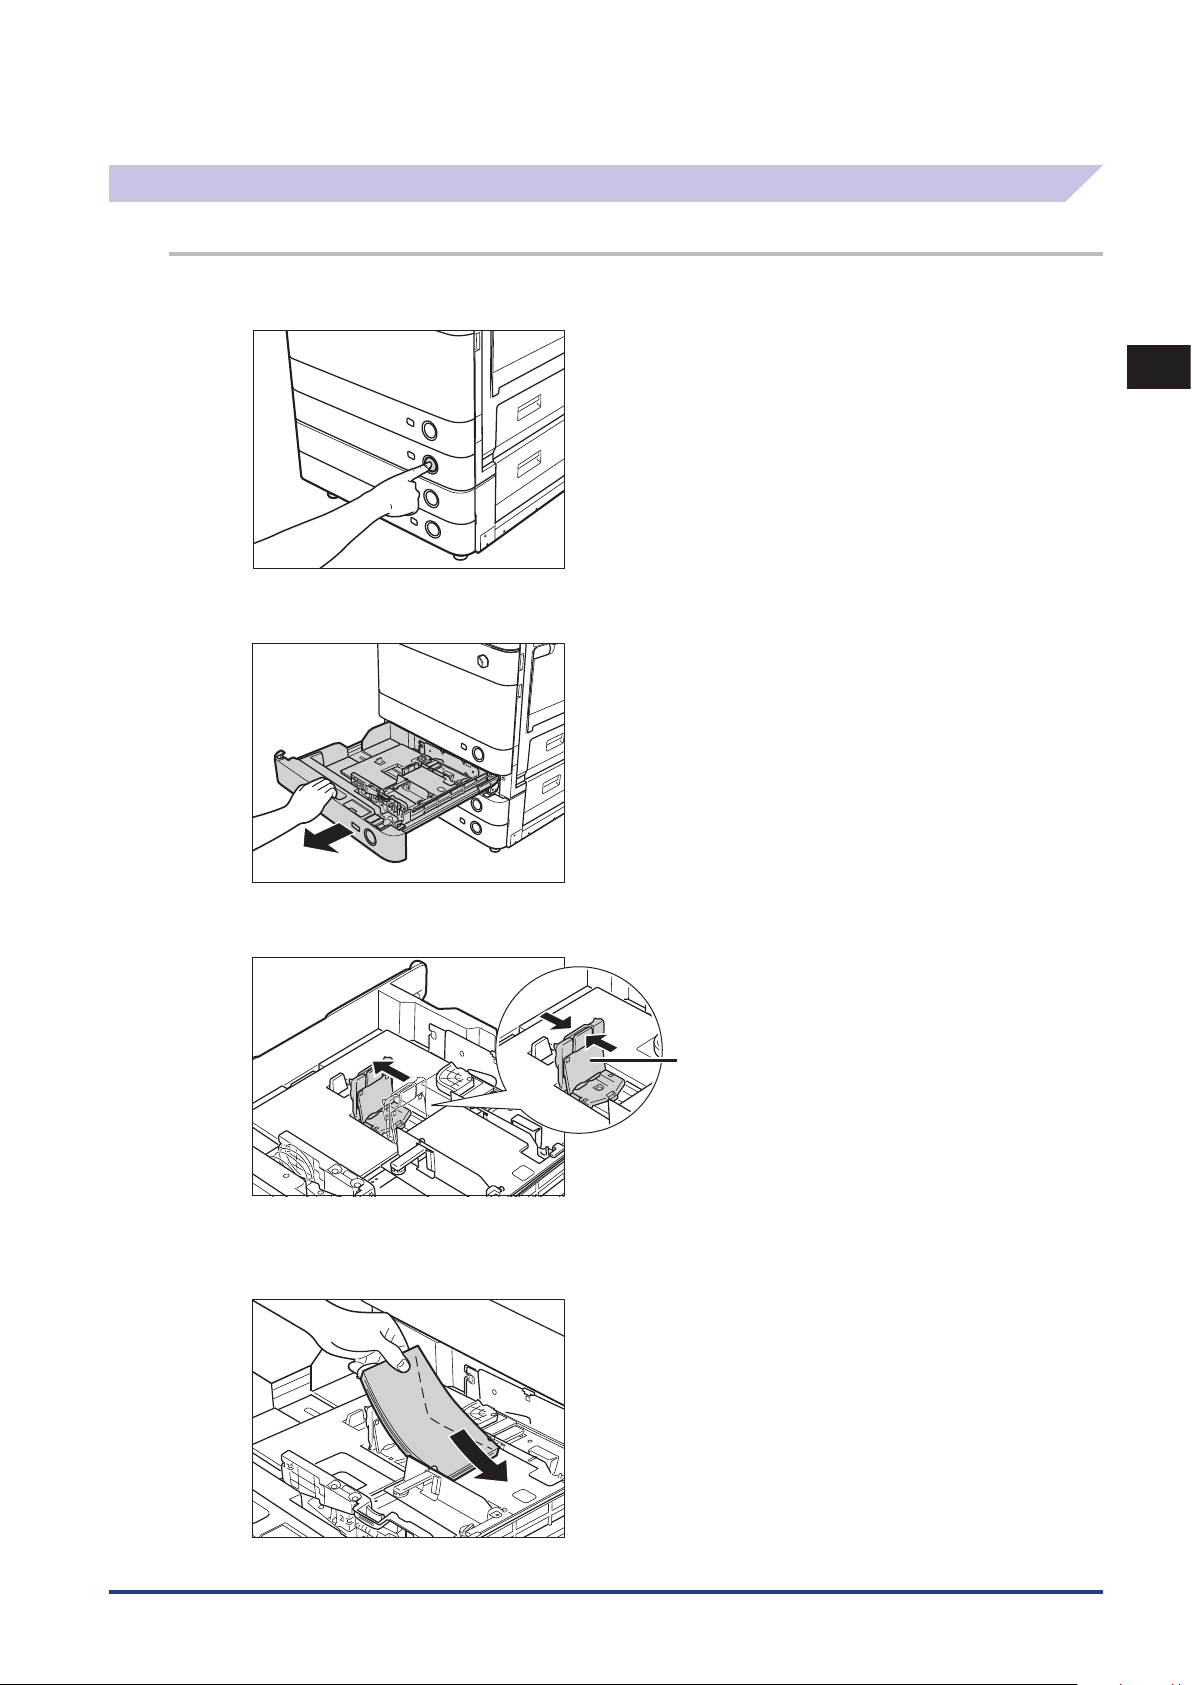
Press and release the button on the paper drawer in which you want to load paper.
2
Grip the handle, and pull out the paper drawer until it stops.
1
Routine Maintenance
3
Open a package of paper, and remove the paper stack.
When loading paper, take care not to cut your hands on the edges of the paper.
Paper Drawers
1-3
1
Routine Maintenance
Rewrap any remaining paper in its original package, and store it in a dry place, away from direct sunlight.
•
If you print on the paper which has absorbed moisture, steam may come out from the output area of the machine. This is because
•
the moist on the paper evaporates when the high temperature is applied when a toner is fixed to the paper. It is not a malfunction.
(This especially happens in low room temperature.)
For high-quality printouts, use paper recommended by Canon.
•
Before loading paper, always fan the sheets several times, and align the edges to facilitate feeding.
•
4
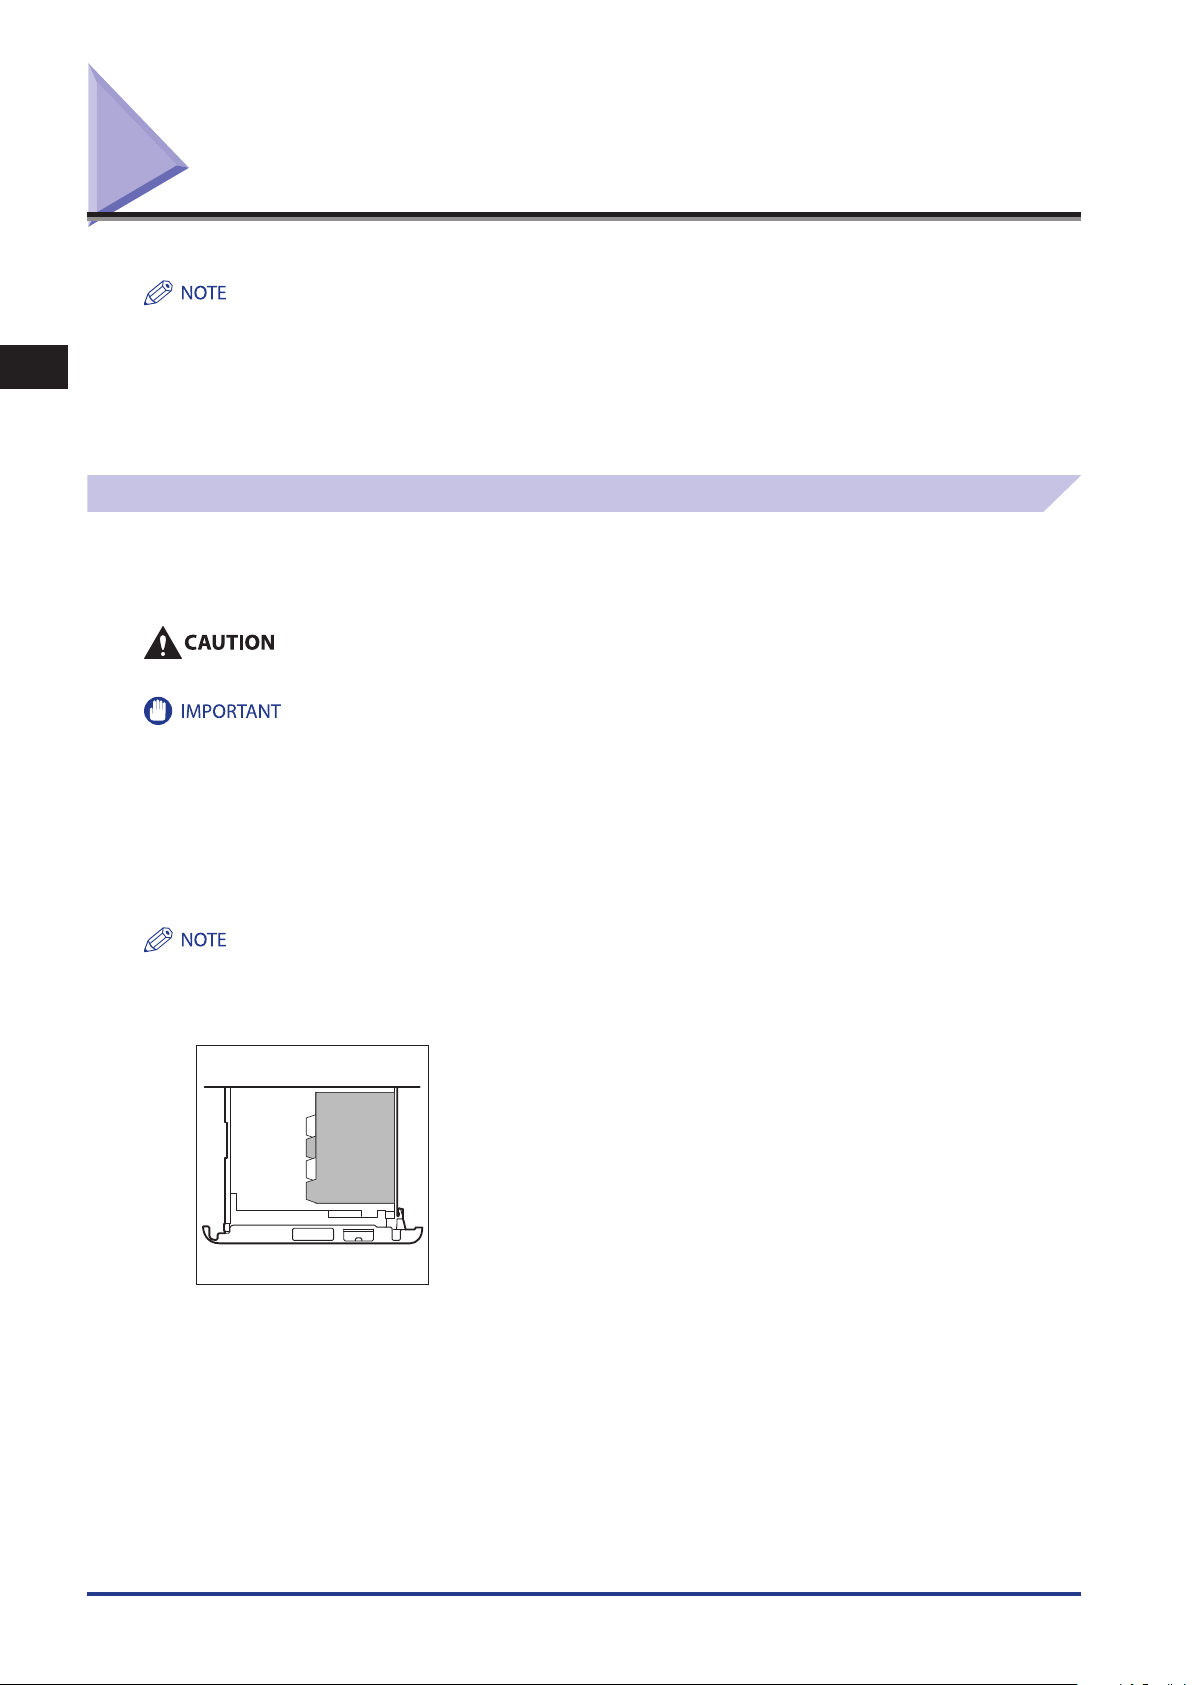
Load the paper stack into the paper drawer.
Even out the edges of the paper stack. Load the paper stack against the right wall of the paper drawer.
Paper which has been rolled or curled must be straightened out prior to use.
•
Make sure that the height of the paper stack does not exceed the loading limit mark ( ) at the back of the paper drawer.
•
1-4
Paper Drawers
Each paper drawer holds approximately 550 sheets of paper (80 g/m2).
•
If there are instructions on the package of paper about which side of the paper to load, follow those instructions.
•
When the paper is loaded into the paper drawer, the side facing up is the one printed on.
•
If problems occur, such as poor print quality or paper jams, try turning the paper stack over, and reload it.
•
For more information on the print direction of preprinted paper (paper which has logos or patterns already printed on it), see
•
Chapter 16, "Appendix," in
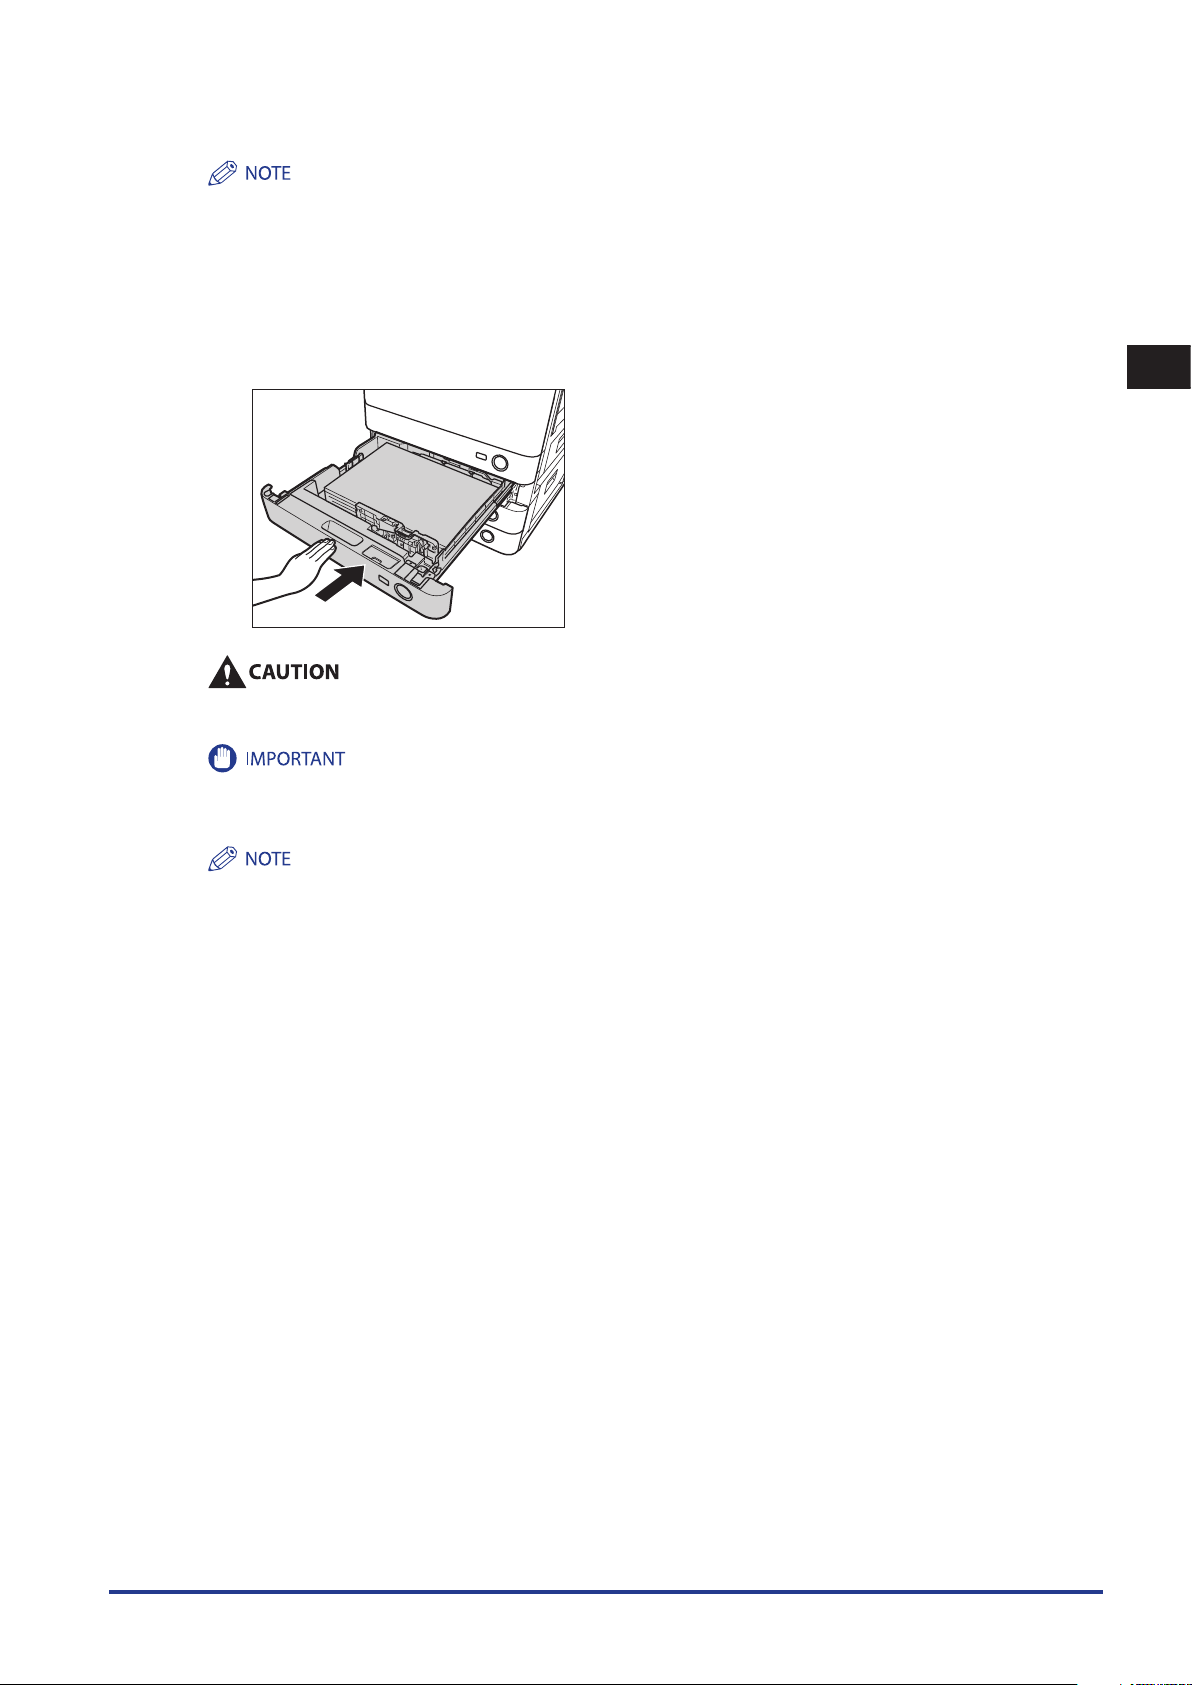
5
Gently push the paper drawer back into the machine until it clicks into place in the closed
Getting Started
.
position.
When returning the paper drawer to its original position, be careful not to get your fingers caught, as this may result in
personal injury.
1
Routine Maintenance
You will not be able to make copies or print if you load paper that exceeds the loading limit, or if the paper drawer is not
completely pushed into the machine. Always check that the paper drawers are in place, and that the paper does not exceed the
loading limit.
If paper runs out during copying or printing, load a new paper stack, and follow the instructions on the touch panel display. The
machine automatically restarts, and produces the remaining copies or prints.
Paper Drawers
1-5
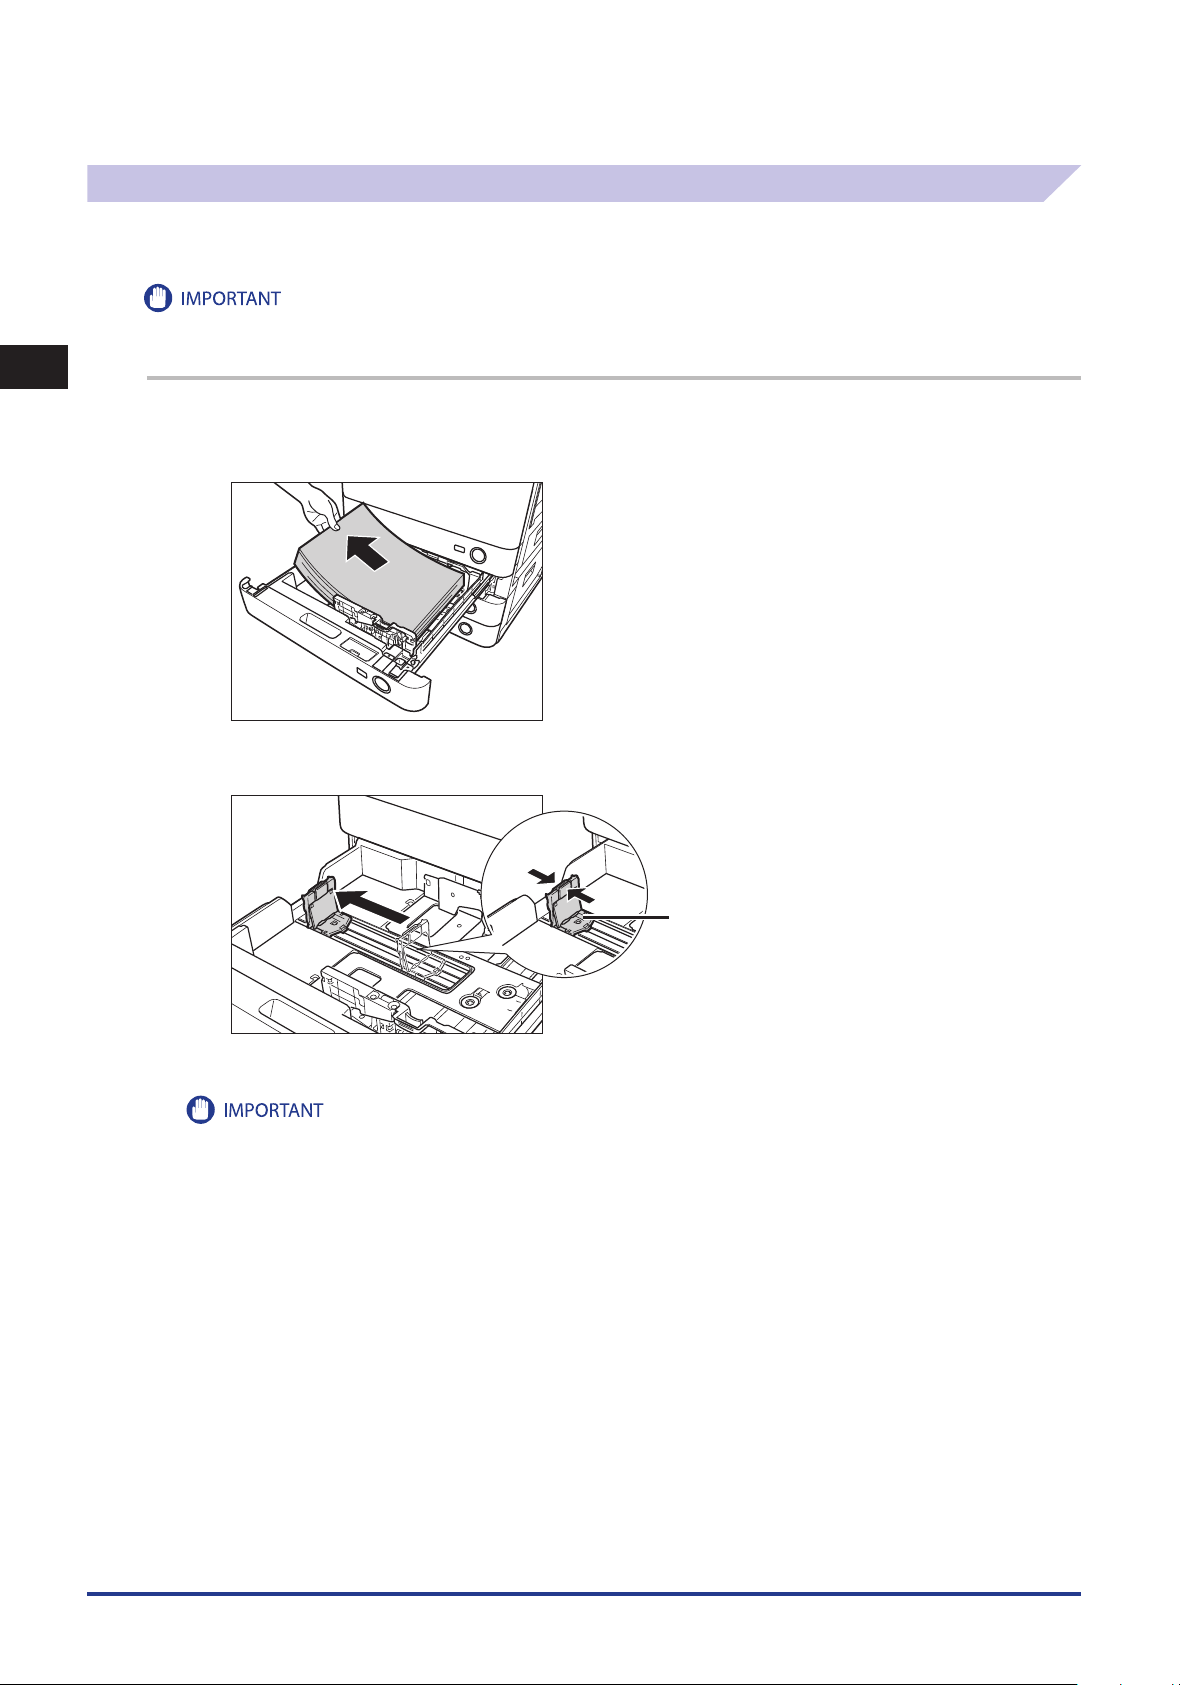
Adjusting a Paper Drawer to Hold a Different Paper Size
Left Guide
If you want to load a different paper size into a paper drawer, follow the procedure described below to adjust the paper
drawer guides.
1
Routine Maintenance
Only A4 transparencies can be used. Make sure that the left guide is set to ‘A4’ when loading transparencies in a paper drawer. If
transparencies of a different size (other than A4) are loaded in a paper drawer, the paper size and remaining amount of paper will not be
detected correctly.
1
Press and release the button on the paper drawer that you want to adjust. Grip the handle, and
pull out the paper drawer until it stops. Remove all of the remaining paper.
2
Slide the left guide to align it with the mark for the desired paper size.
Slide the guide until it clicks.
When loading 305 mm x 457 mm paper in the paper drawer, slide the left guide to align it with the mark on the front left side of
the paper drawer.
1-6
Paper Drawers
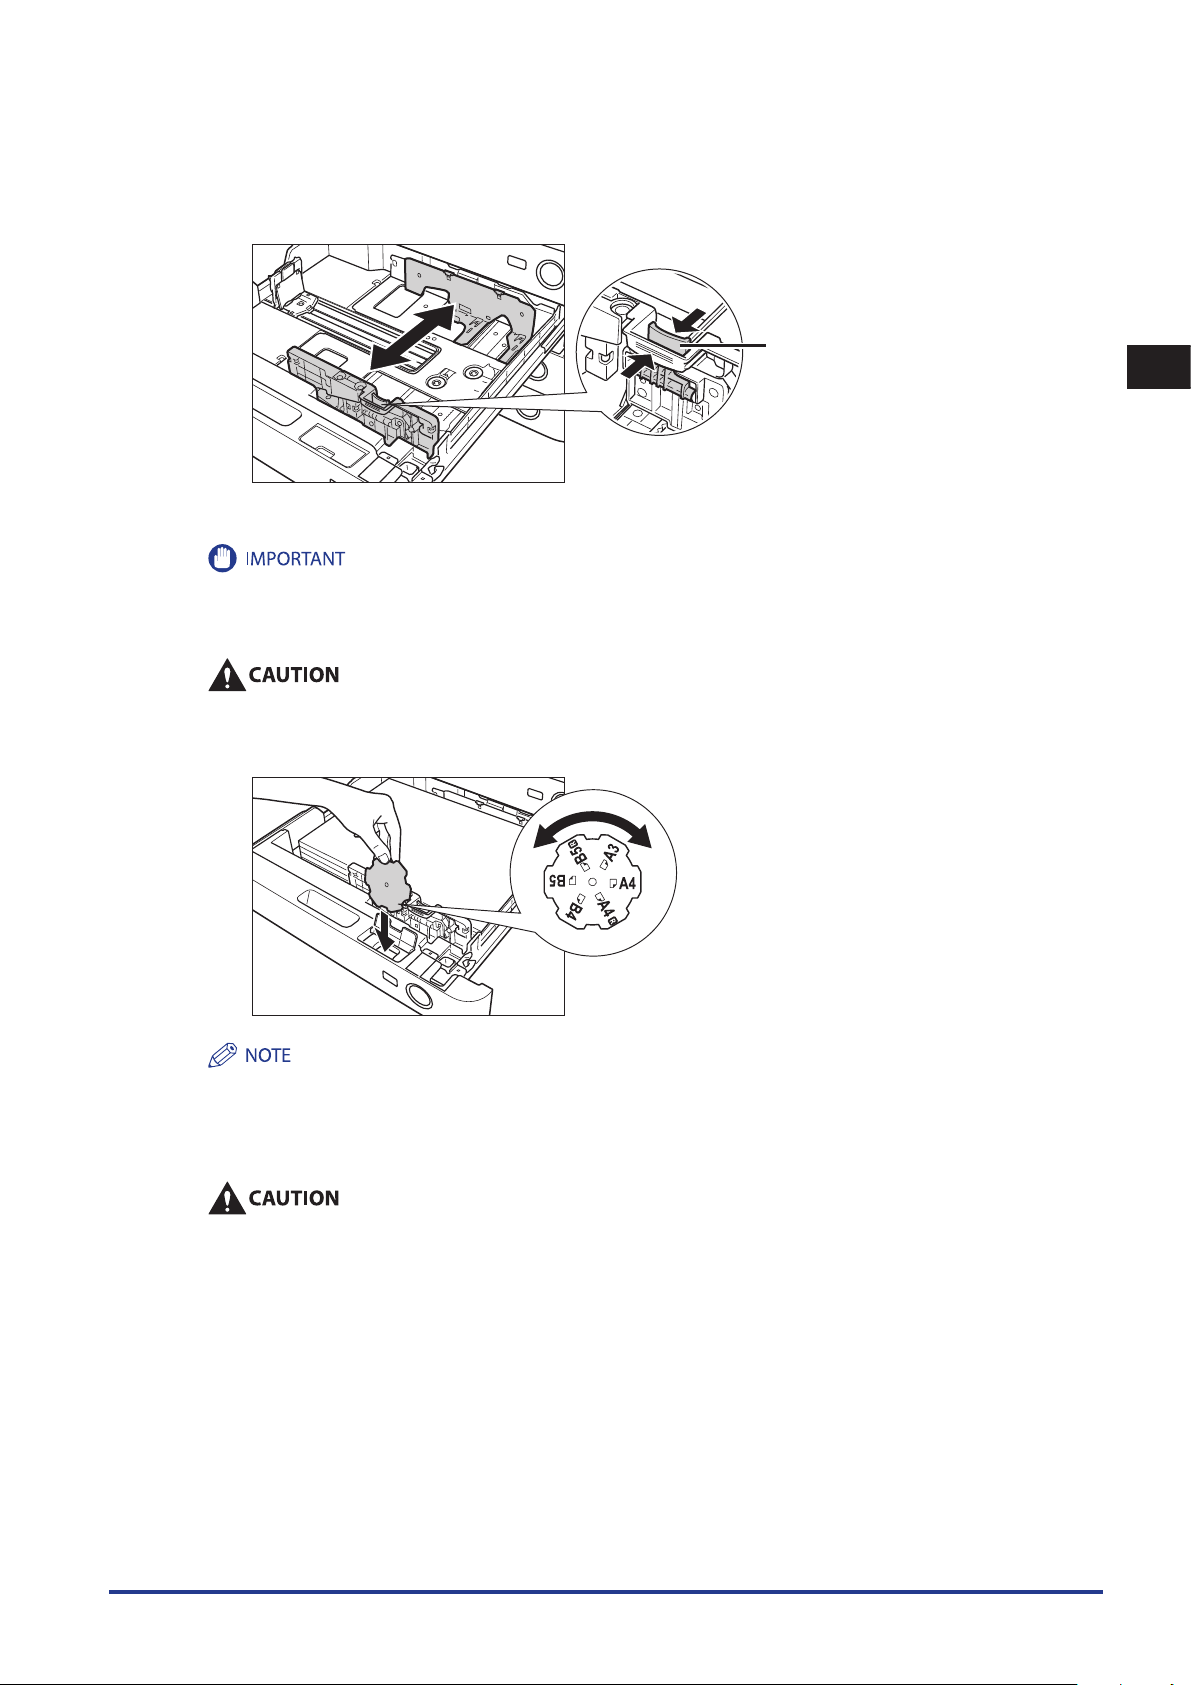
Front Guide
3
Squeeze the lever on the front guide, as shown below. Without releasing the lever, slide the
front guide to align it with the mark for the desired paper size.
Slide the guide until it clicks.
1
Adjust the guides correctly to avoid causing a paper jam, dirty prints, or making the inside of the machine dirty.
4
Load the appropriate size paper into the paper drawer.
When loading paper, take care not to cut your hands on the edges of the paper.
5
Change the paper drawer's paper size plate to match the new paper size.
Some paper sizes listed on the paper size plate may not be used depending on the models and settings.
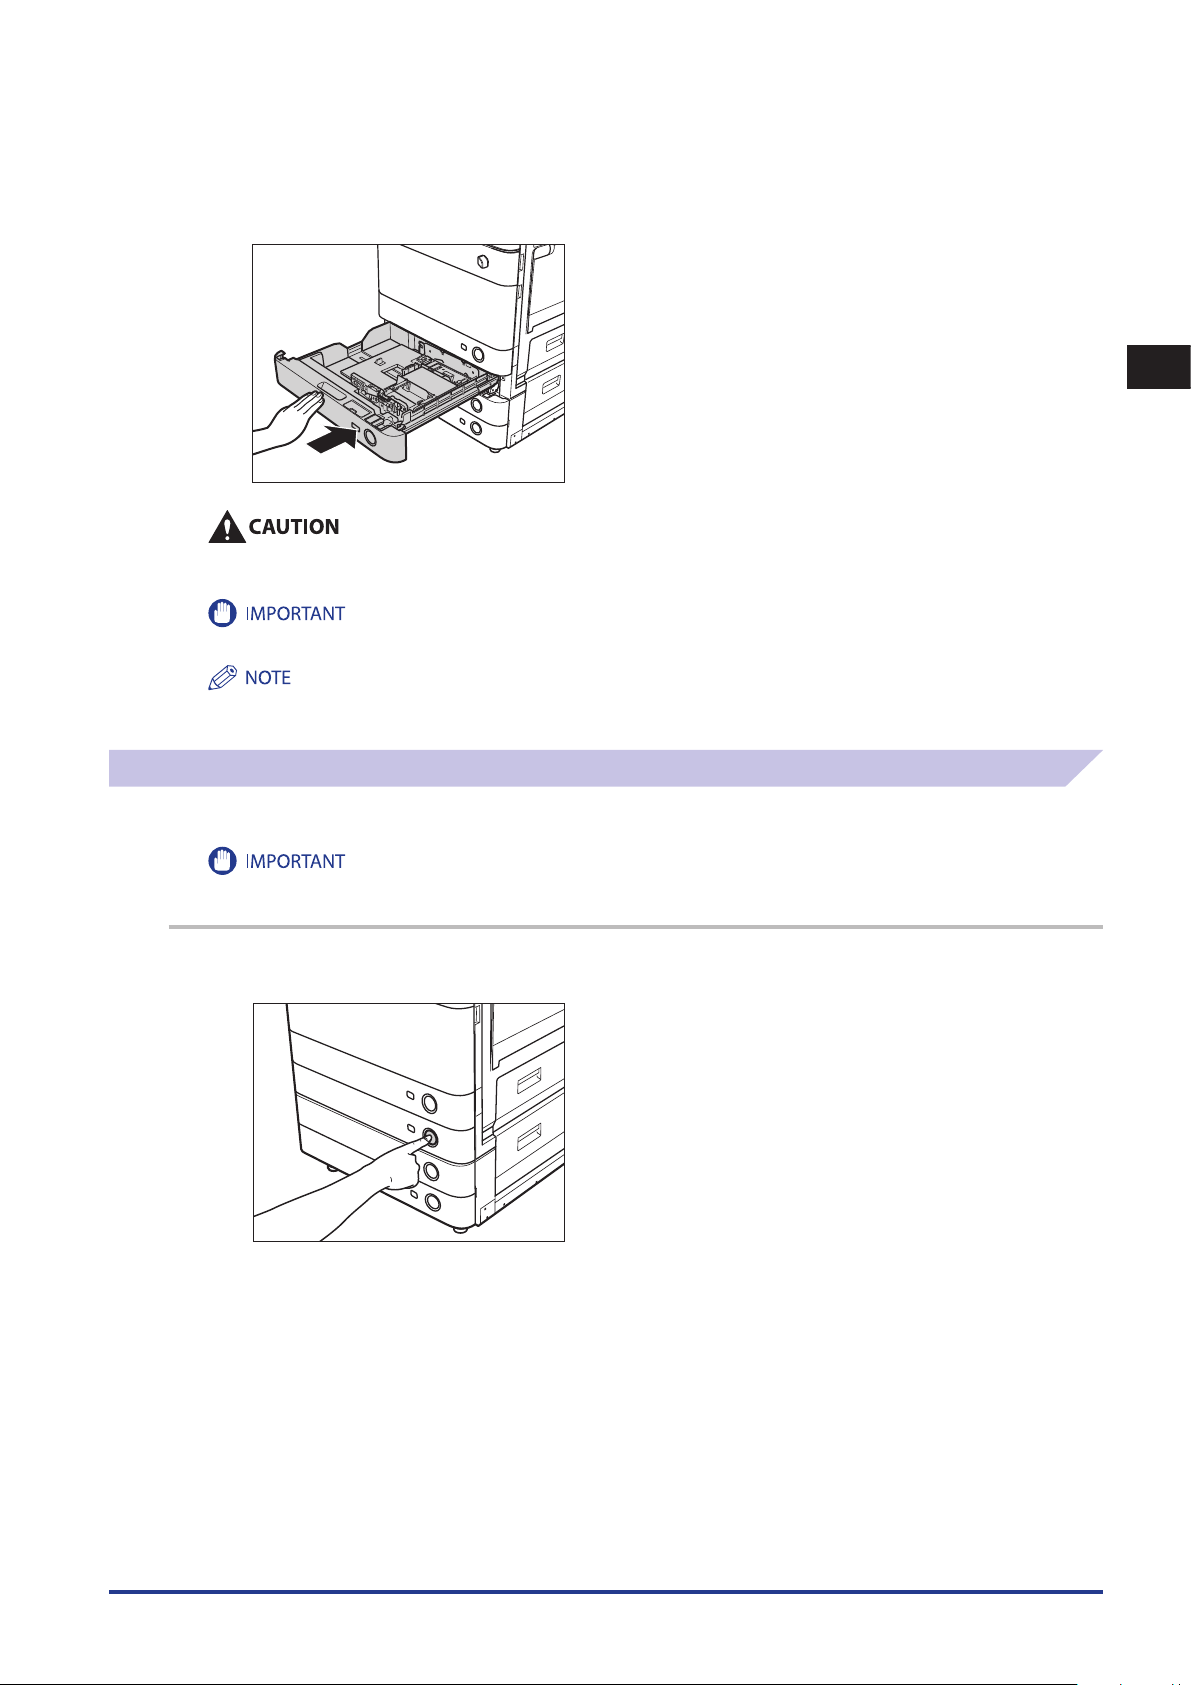
6
Gently push the paper drawer back into the machine until it clicks into place in the closed
position.
Routine Maintenance
When returning the paper drawer to its original position, be careful not to get your fingers caught, as this may result in
personal injury.
Paper Drawers
1-7

Paper Deck Unit-B1 (Optional)
If you attach the Paper Deck Unit-B1 to the machine, you have one additional source of paper for printing jobs. The Paper
Deck Unit-B1 holds up to 2,700 sheets of paper (80 g/m2).
If the machine is in the Sleep mode (the touch panel is not displayed, and only the main power indicator is lit), you may not be able to
1
Loading Paper
Routine Maintenance
open the paper deck unit. In this case, press the control panel power switch to reactivate the machine, and then press the open button on
the paper deck unit.
The paper size of the Paper Deck Unit-B1 is fixed to A4.
If you select the paper deck unit when it has no paper, or if the paper deck unit runs out of paper during a print job, a screen
prompting you to load paper appears on the touch panel display.
Follow the procedure below to load paper into the paper deck unit.
When loading paper, take care not to cut your hands on the edges of the paper.
The paper deck unit can only accommodate paper from 52 to 105g/m2 in weight. Use the multi-purpose tray to load paper that is heavier.
If a message prompting you to load paper appears during printing, the remaining prints are automatically made after you load the correct
paper. If you select another drawer, the remaining prints are made after you press [OK].
1-8
Paper Deck Unit-B1 (Optional)
1
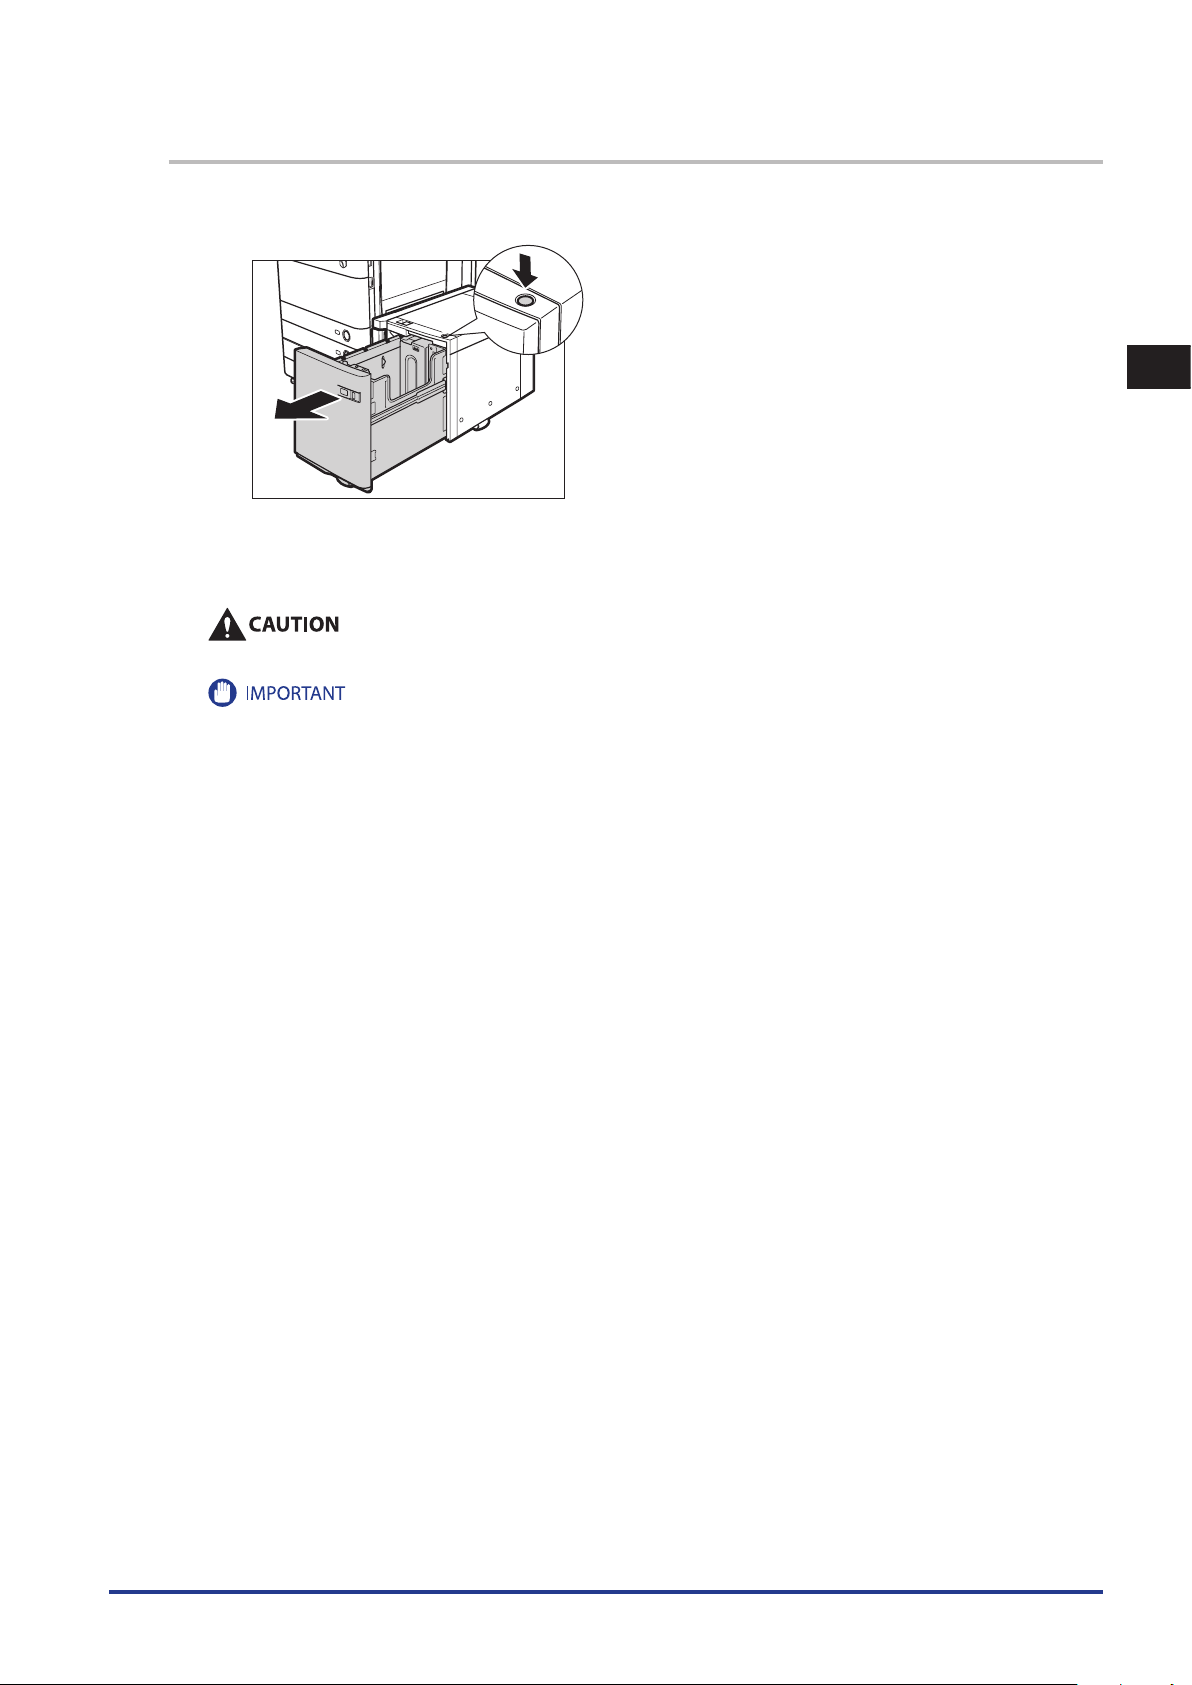
Press the open button to open the paper deck unit.
The inside lifter automatically descends to the paper loading position.
1
2
Open a package of paper, and remove the paper stack.
When loading paper, take care not to cut your hands on the edges of the paper.
Rewrap any remaining paper in its original package, and store it in a dry place, away from direct sunlight.
•
Do not load the following types of paper into the paper deck unit. Doing so may cause a paper jam.
•
Severely curled or wrinkled paper
Thin straw paper
Transparencies
Paper which has been printed on using a thermal transfer printer (Do not print on the reverse side of this paper either.)
-
Routine Maintenance
Paper Deck Unit-B1 (Optional)
1-9

1
Routine Maintenance
For high-quality printouts, use paper recommended by Canon.
•
Before loading paper, always fan the sheets several times, and align the edges to facilitate feeding.
•
3
Load the paper stack into the paper deck.
Make sure that the inside lifter has lowered before loading paper, and even out the edges of the paper stack.
1-10
Paper Deck Unit-B1 (Optional)
Paper which has been rolled or curled must be straightened out before loading it into the paper deck unit.
•
Make sure that the height of the paper stack does not exceed the loading limit mark ( ) on the inside of the paper deck unit.
•
The paper deck unit holds approximately 2,700 sheets of paper (80 g/m2).
•
Load the paper stack in stages, adding approximately 500 sheets of paper (80 g/m2) at a time. If the paper deck unit can
•
accommodate more paper, the lifter will descend.
Only load A4 paper into the paper deck unit. Paper cannot be loaded horizontally.
•
If there are instructions on the package of paper about which side of the paper to load, follow those instructions.
•
When paper is loaded in the paper deck unit, the side facing down is the one printed on.
•
If problems occur, such as poor print quality or paper jams, try turning the paper stack over, and reload it.
•
For more information on the print direction of preprinted paper (paper which has logos or patterns already printed on it), see
•
Chapter 16, "Appendix," in
4
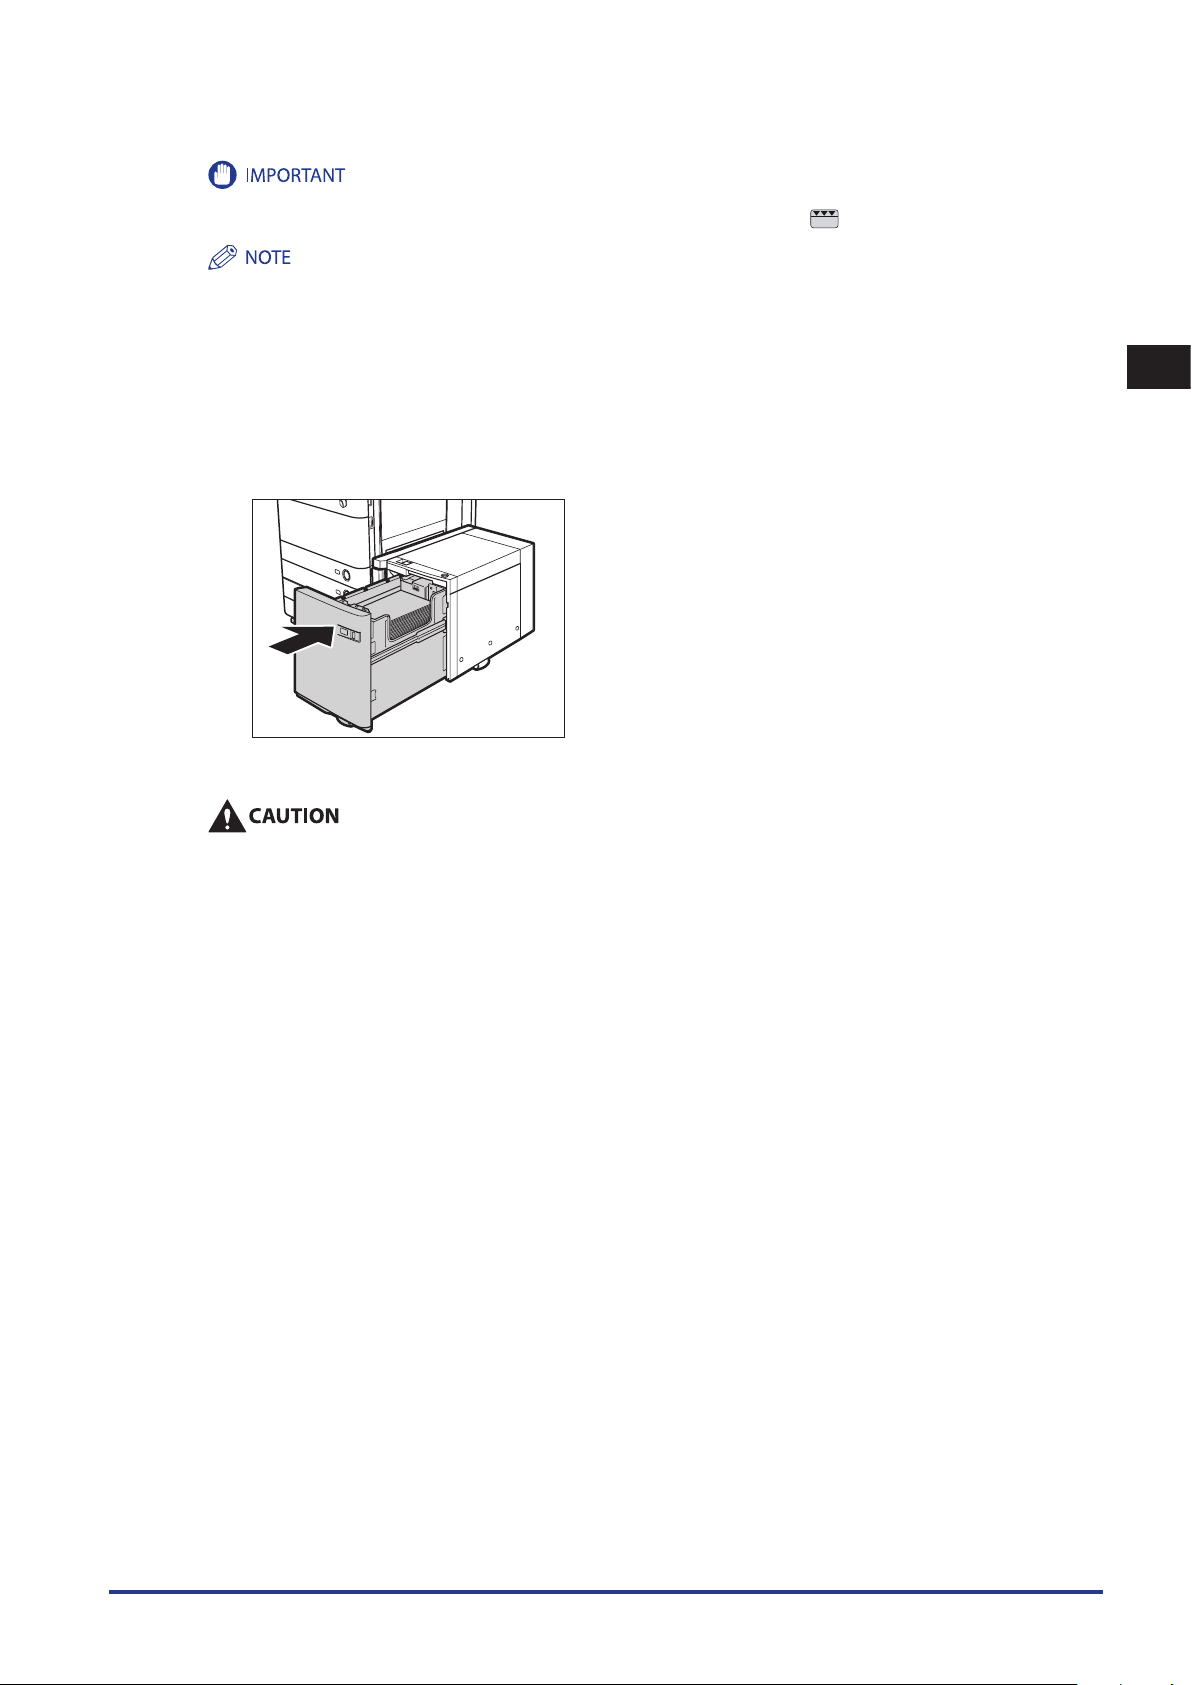
Close the paper deck unit.
The inside lifter automatically rises, and the machine becomes ready for printing.
Getting Started
.
1
Routine Maintenance
When closing the paper deck unit, be careful not to get your fingers caught, as this may result in personal injury.
Paper Deck Unit-B1 (Optional)
1-11

Envelope Feeder Attachment-D1 (Optional)
This section explains how to use the Envelope Feeder Attachment-D1.
The Envelope Feeder Attachment-D1 can only be attached to Paper Drawer 2.
1
How to Use the Envelope Feeder Attachment
The following five types of envelopes can be loaded into the envelope feeder attachment: COM10 No.10, Monarch, DL, ISOB5, and ISO-C5.
The setting of the machine and guide size is set to COM10 No. 10 as the default setting.
Make sure that [COM10] is selected for ENV.1 in Preferences (from the Settings/Registration screen).
•
The guides are adjusted to hold COM10 No.10 envelopes.
•
Routine Maintenance
When you attach the envelope feeder attachment to the paper drawer, do not forcefully move the front guide of the paper drawer in the
•
wrong direction. Doing so may detach the envelope feeder attachment from the paper drawer.
Do not print on both sides of an envelope. Doing so may cause paper jams, dirty prints, or make the inside of the machine dirty.
•
Do not load the following types of envelopes inside the envelope cassette. Doing so may cause paper jams, dirty prints, or make the inside
•
of the machine dirty.
Curled, creased, or folded envelopes
Very thick or thin envelopes
Damp or wet envelopes
Torn envelopes
Irregularly shaped envelopes
Envelopes with clasps or windows
Envelopes that have already been sealed
Envelopes with holes or perforations
Envelopes with specially coated surfaces
Envelopes made of surface treated coloured paper
Envelopes that are self-sticking, which use ink, glue, or other substances that can melt, burn, vaporize, or emit smells under the heat of a
fixing unit (approximately 200 °C). Depending on the materials used for the seal, the glue may melt under the fixing unit’s heat, sealing
the envelopes.
When the envelop cassette is attached and envelope is selected for the paper type, it outputs to the tray located under the scanner unit.
•
If you are printing on envelopes, empty the output tray when up to 10 printed envelopes accumulate in the tray.
•
Envelopes should be stored in a place away from high-temperatures and humidity.
•
If there is a temperature difference between the location where the envelopes were stored and the location where the envelopes are
•
being printed, leave the envelopes in the printing location at room temperature before you use them.
Correctly match the paper size dial, size switch, and Register Envelope Drawer in Preferences (from the Settings/Registration screen) with
•
the size of the envelopes being loaded. Failure to do so may cause paper jams, dirty prints, or make the inside of the machine dirty.
If you want to adjust the width guides to load ISO-C5 or ISO-B5 envelopes, contact your local authorized Canon dealer.
•
1-12
For more information on envelope types that can be loaded in the envelope feeder attachment, see e-Manual > Basic Operations.
•
Sizes of the envelopes are as follows:
•
COM10 No.10: 104.7 mm x 241.3 mm
Monarch: 98.4 mm x 190.5 mm
DL: 110 mm x 220 mm
ISO-B5: 176 mm x 250 mm
ISO-C5: 162 mm x 229 mm
-
Envelope Feeder Attachment-D1 (Optional)
Preparing the Envelopes
This section explains how to prepare the envelopes before loading them into the paper drawer.
Using curled, creased, or folded envelopes may cause paper jams. Load envelopes after following the procedure below.
1
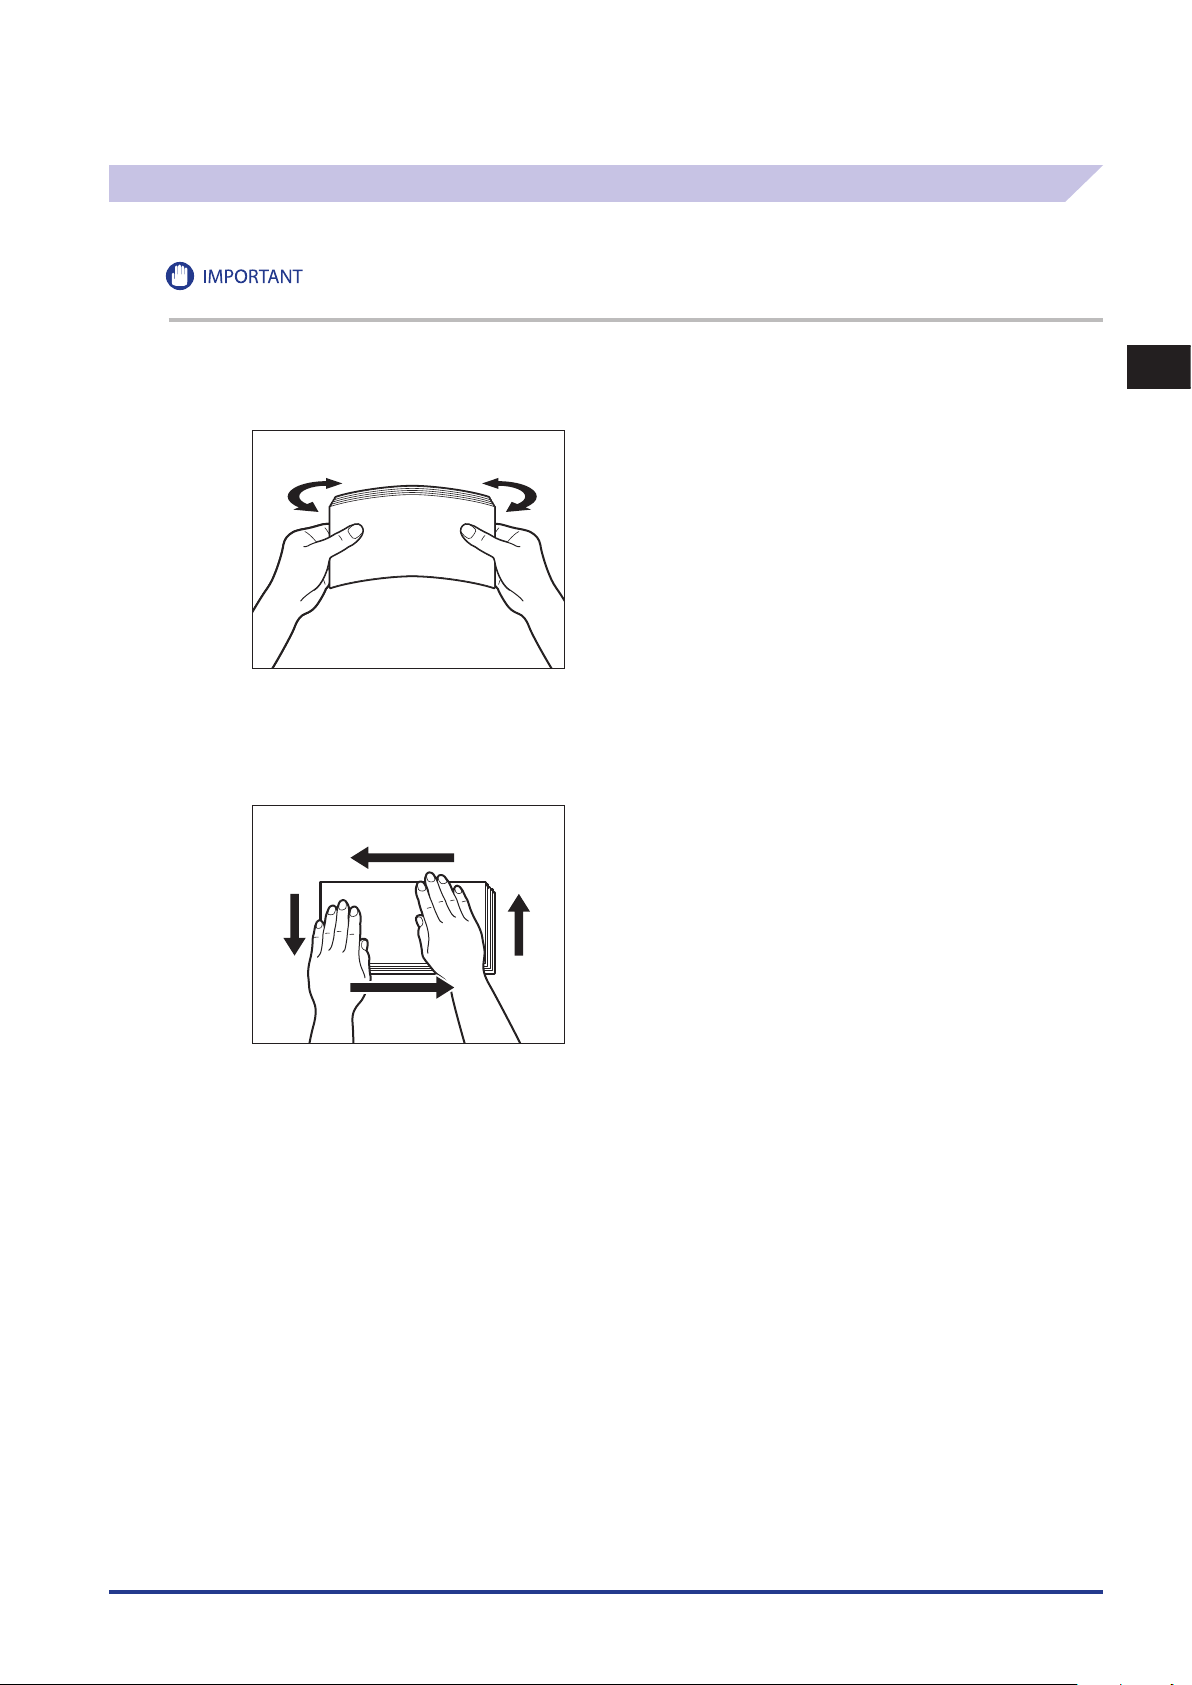
Take five envelopes, loosen them as shown, and stack them together.
Repeat this step five times for each set of five envelopes.
2
Place the envelopes on a clean, level surface, and press all the way around the envelopes by
hand, in the direction of the arrows, to remove any curls.
Repeat this step five times for each set of five envelopes.
1
Routine Maintenance
Envelope Feeder Attachment-D1 (Optional)
1-13
1
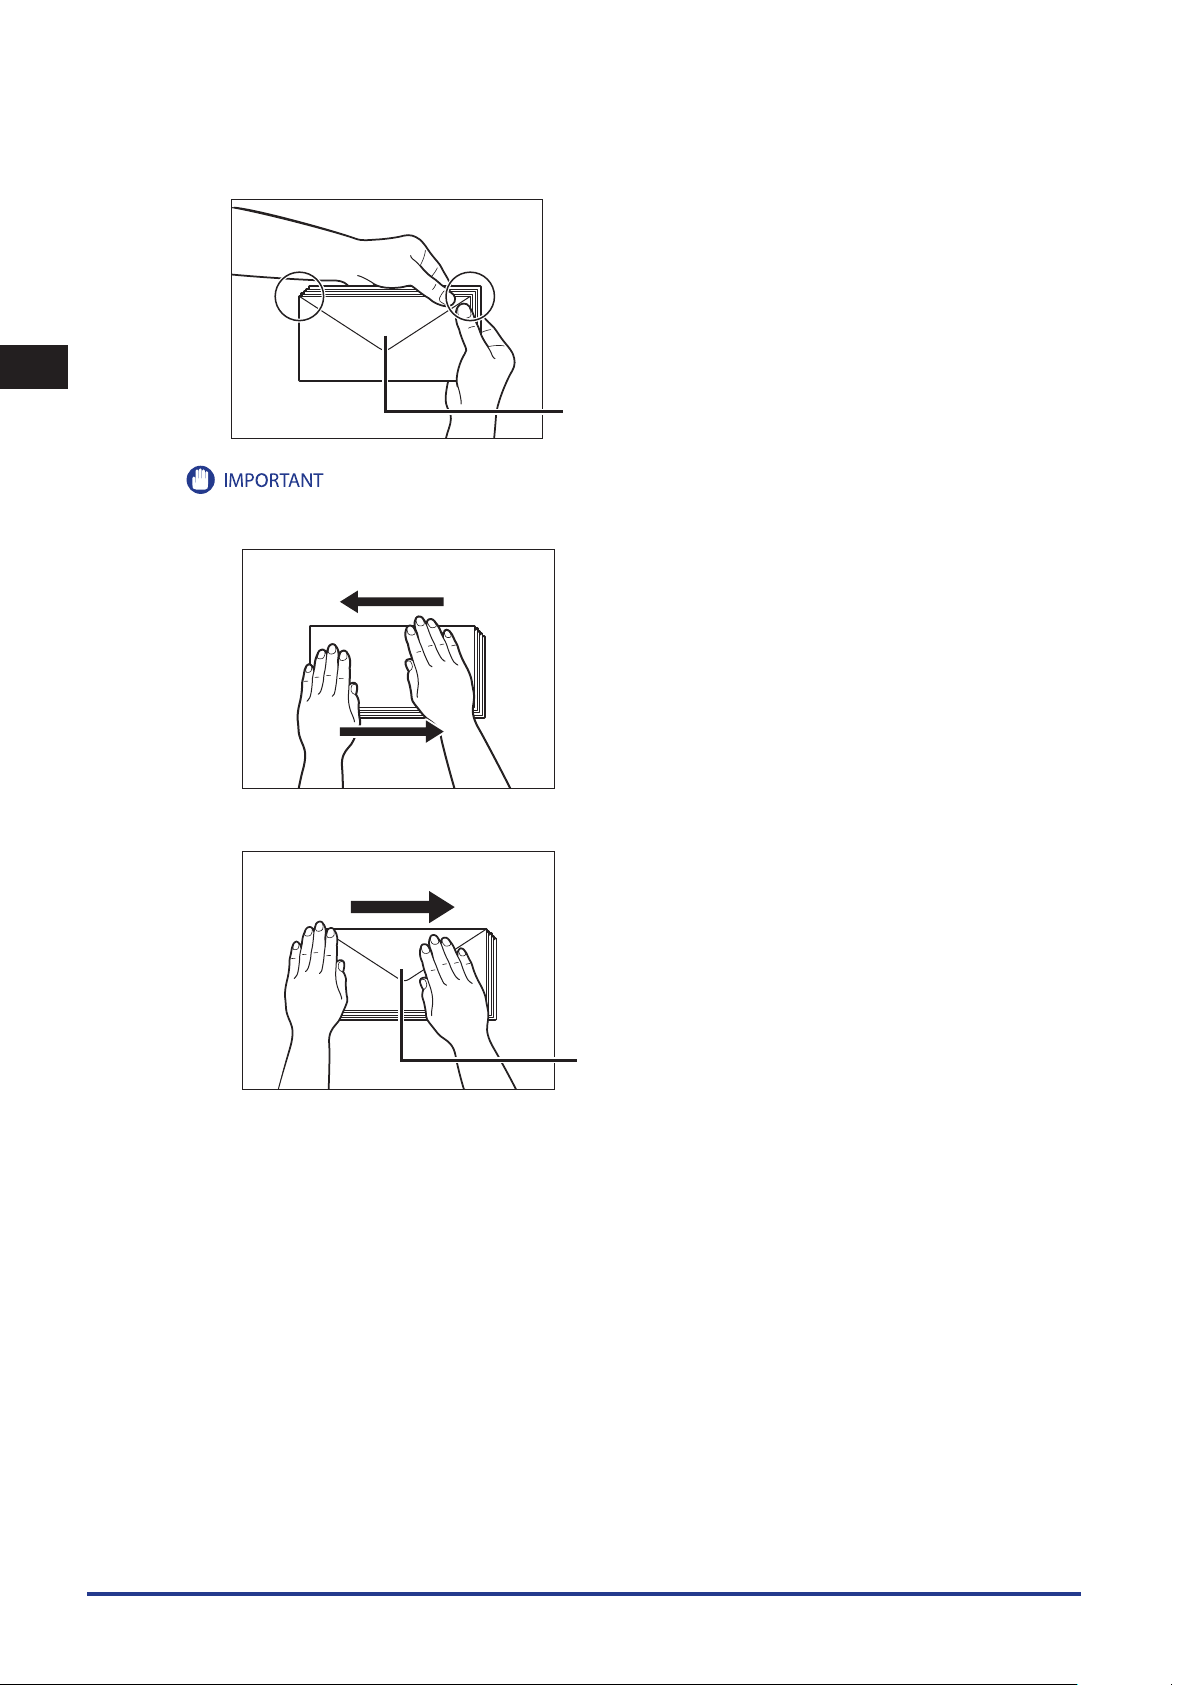
Flap
Flap
Routine Maintenance
Hold down the four corners of the envelopes firmly, so that they and the sealed or glued portion stay flat.
If you use envelopes that have glue attached to their flaps, the glue may melt due to the heat and pressure of the fixing unit.
•
Take particular care to spread the envelopes out in the direction that they will be fed.
•
Do not print on the back side of the envelopes (the side with the flap).
•
If the envelopes become filled with air, flatten them by hand before loading them into the envelope feeder attachment.
•
1-14
Envelope Feeder Attachment-D1 (Optional)
Loading Envelopes
Left Guide
This section explains how to load envelopes into Paper Drawer 2.
1
Press and release the button on Paper Drawer 2.
1
2
Grip the handle, and pull out the paper drawer until it stops.
3
Move the left guide as far as it can go.
Routine Maintenance
4
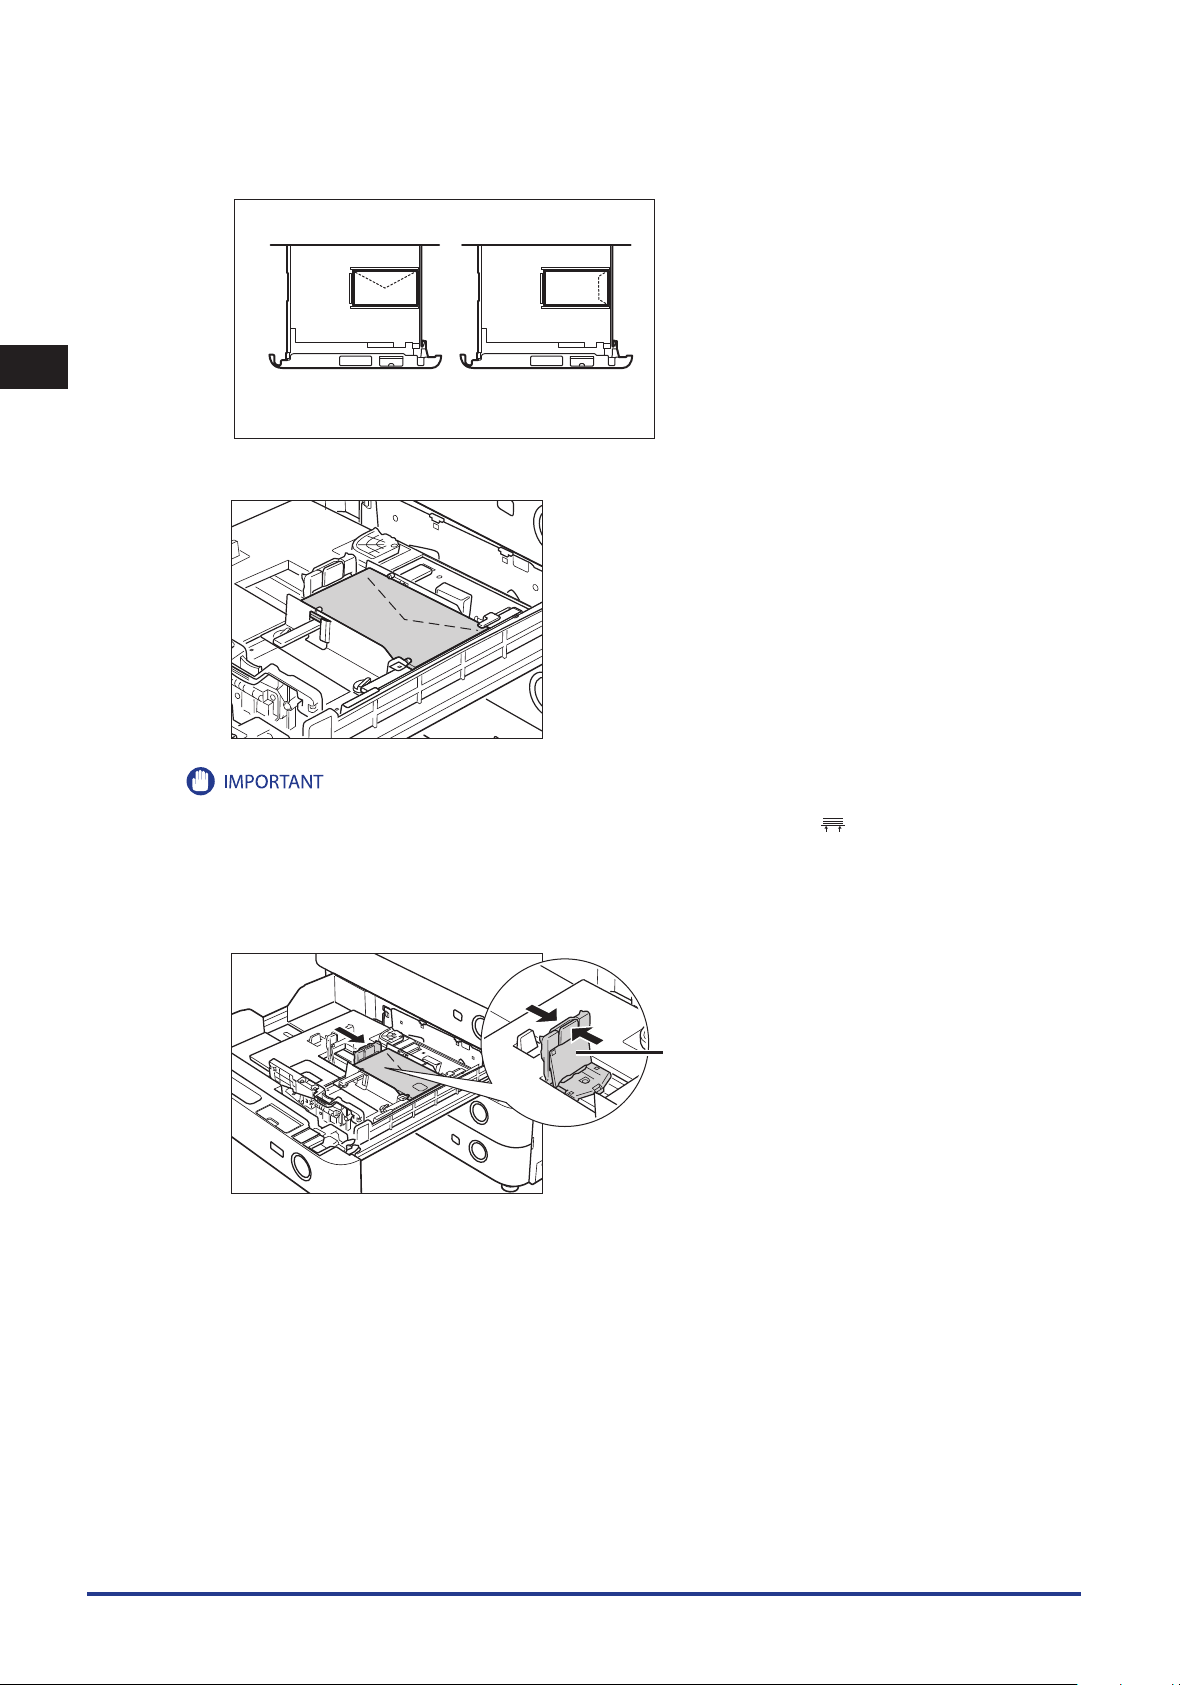
Load 10 envelopes at a time with the side you want to print on facing up. While loading the
envelopes, press down on the left side of the receptacle to lock them into place.
Envelope Feeder Attachment-D1 (Optional)
1-15
1
Front
Left Guide
Routine Maintenance
Load the envelopes, as shown below.
Align the leading edges of the envelopes, and make sure that they are held in place under the claw.
Envelopes which have been rolled or curled must be straightened out prior to use.
•
Make sure that the height of the envelope stack does not fall below the height limit mark ( ).
•
The maximum height (quantity) of envelopes that can be loaded into the cassette is approximately 30 mm.
•
The maximum height (quantity) of envelopes varies according to the envelope type and user operating conditions; but, as a
•
reference, 30 mm is approximately 50 envelopes.
5
Slide the left guide to align it with the envelopes.
1-16
Envelope Feeder Attachment-D1 (Optional)
6
Gently push the paper drawer back into the machine until it clicks into place in the closed
position.
1
When returning the paper drawer to its original position, be careful not to get your fingers caught, as this may result in
personal injury.
Never place paper or any other items in the empty part of the paper drawer next to the envelopes. Doing so may cause paper jams.
If output has been stopped due to an insufficient number of envelopes, load more envelopes, and follow the instructions on the
touch panel display. Printing resumes.
Loading the Envelope after Specifying the Size
This section explains how to load the envelopes that where specified in Settings/Registration into the envelope cassette.
Make sure that you change the envelope settings from the Settings/Registration screen before carrying out the following
procedure. (See e-Manual > Settings/Registration.) Otherwise, the machine may not recognize the changes you have made.
1
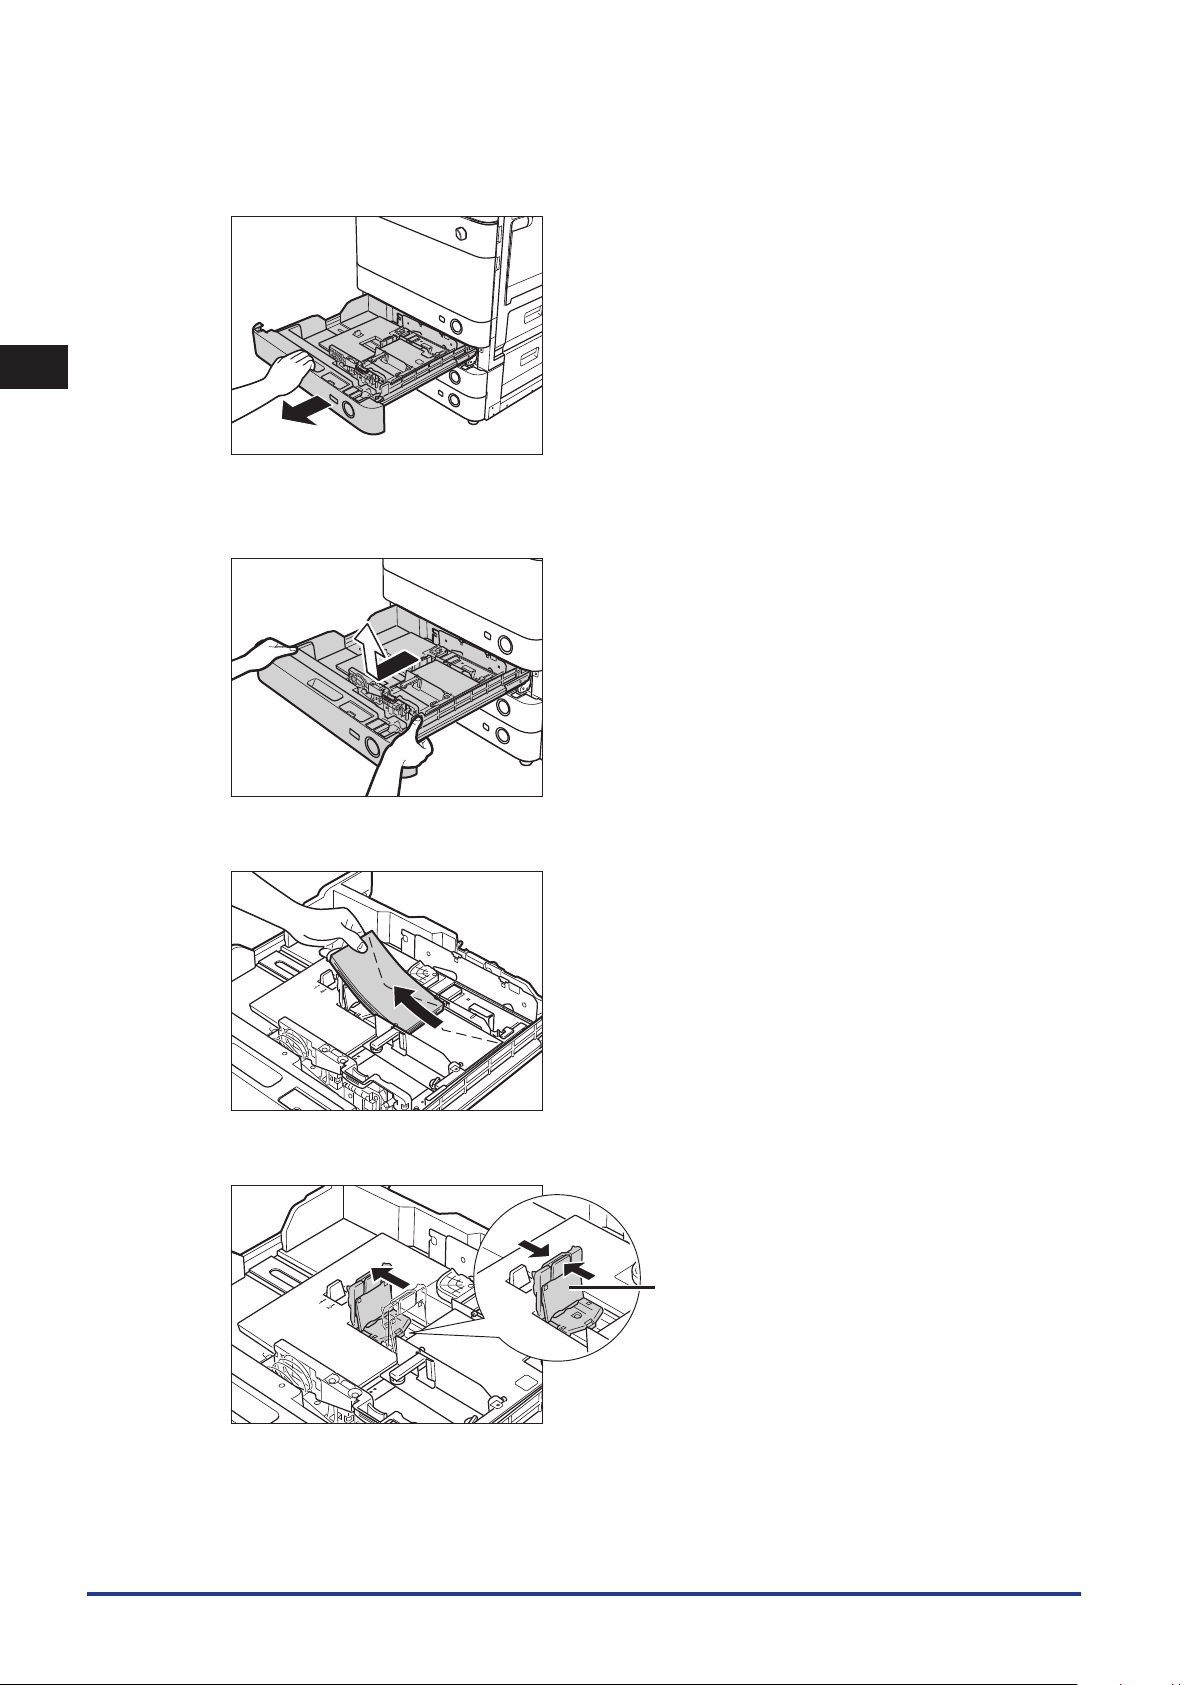
Press and release the button on Paper Drawer 2.
Routine Maintenance
Envelope Feeder Attachment-D1 (Optional)
1-17
1
Left Guide
Routine Maintenance
2
Grip the handle, and pull out the paper drawer until it stops.
3
Pull and lift the paper drawer out of the machine by holding its left and right sides with both
hands.
4
Remove the envelopes that are loaded in the paper drawer (several envelopes at a time).
5
Slide the left guide to align it with the mark for the desired paper size.
1-18
Envelope Feeder Attachment-D1 (Optional)
 Loading...