

Canon imageRunner 400, imageRunner 330, imageRUNNER 400N, imageRUNNER 400S, imageRUNNER 330N Reference Manual
...Page 1
Page 2
As an ENERGY STAR® Partner, Canon USA Inc., has determined that this copier
model meets the ENERGY STAR® Program for energy efficiency.
The International ENERGY STAR® Office Equipment Program is an international program that
promotes energy saving through the use of computers and other office equipment. The program
backs the development and dissemination of products with functions that effectively reduce energy
consumption. It is an open system in which businesses proprietors can participate voluntarily.The
targeted products are office equipment such as computers, displays, printers, facsimiles, and
copiers. Their standards and logos are uniform among participating nations.
Note:
This equipment has been tested and found to comply with the limits for a Class A digital device,
pursuant to Part 15 of the FCC Rules. These limits are designed to provide reasonable protection
against harmful interference when the equipment is operated in a commercial environment. This
equipment generates, uses, and can radiate radio frequency energy and, if not installed and used in
accordance with the Operator’s Manual, may cause harmful interference to radio communications.
Operation of this equipment in a residential area is likely to cause harmful interference in which case
the user will be required to correct the interference at his own expense.
Do not make any changes or modifications to the equipment unless otherwise specified in the
manual. If such changes or modifications should be made, you could be required to stop operation
of the equipment.
PREFACE
Thank you for purchasing the Canon imageRUNNER 400/330 Series. This Manual describes the
imageRUNNER 400/330 Series, its functions, and its methods of use. It also describes the various precautions to be observed in order to ensure safe operation. Please read this manual thoroughly before operating
the imageRUNNER 400/330 Series in order to familiarize yourself with its capabilities, and to make the most
of its many functions. After reading this manual, store it in a safe place for future reference.
CAUTION:
In this manual, CAUTION MESSAGES with this symbol indicate that neglecting the suggested
procedure or practice could result in personal injury.
NOTICE:
Considerable effort has been made to ensure that this manual is free of inaccuracies and omissions.
However, as we are constantly improving our products, some of the data contained herein may not
exactly reflect the current model of the particular product with which this manual has been included.
If you have a need for an exact specification, please contact Canon for the current specification.
The imageRUNNER 400/330 Series
There are 4 types of machine in the imageRUNNER 400/330 Series. See the list below to confirm the
specifications in each type.
Feeder
FAX function
printer function
Memory
imageRUNNER 400N
imageRUNNER 400S
imageRUNNER 330N
imageRUNNER 330S
DADF-A1
Option
DADF-A1
Option
64MB
32MB
64MB
32MB
Installed
Option
Installed
Option
*The imageRUNNER 400S/330S conforms to the ENERGY STAR® Program.
Page 3
Chapter 2 Basic Copying
This chapter describes the most commonly used copy functions.
How This Manual is
Organized
Chapter 4 Setting and Adjusting Custom Common
Setting to Suit Your Needs
This chapter describes the initial settings and how to change them
to suit your needs.
Chapter 5 Loading Paper and Adding the Toner
This chapter describes how to load paper and add toner.
Chapter 6 Troubleshooting
This chapter describes what to do when there is a paper jam or
a problem with copy quality.
Chapter 7 Handling Options
This chapter describes the use of accessories and what to
do if there is a paper jam in an accessory unit.
Chapter 8 Appendix
This chapter describes how to use the Control Card, and Mail
Box which can be used when the printer function is installed.
Chapter 3 Useful Copy Functions
This chapter describes more advanced copy functions.
Chapter 1 Before You Start Using Copy Functions
This chapter describes items you should understand and be familiar with
before using the machine, and gives an outline of how the copy functions work.
Some information in this manual is also relevant when using the Fax
functions or printer functions of this machine.
Page 4

2
Safety Information
A. Laser Safety
This Product complies with 21 CFR Chapter 1 Subchapter J as a Class 1 laser product under the U.S.
Department of Health and Human Services (DHHS) Radiation Performance Standard according to the
Radiation Control for Health and Safety Act of 1968. This means that the Product does not produce
hazardous laser radiation.
Since radiation emitted inside the Product is completely confined within protective housings and external
covers, the laser beam can not escape from the machine during any phase of user operation.
B. CDRH Regulations
The Center for Devices and Radiological Health (CDRH) of the U.S. Food and Drug Administration
implemented regulations for laser products on August 2, 1976. These regulations apply to laser products
manufactured from August 1, 1976. Compliance is mandatory for products marketed in the United States.
The label shown below indicates compliance with the CDRH regulations and must be attached to laser
products marketed in the United States.
DANGER: INVISIBLE LASER RADIATION WHEN OPEN.
AVOID DIRECT EXPOSURE TO BEAM.
VORSICHT: UNSICHTBARE LASERSTRAHLUNG, WENN
ABDECKUNG GEÖFFNET UND
SICHERHEITSVERRIEGELUNG ÜBERBRÜCKT
NICHT DEM STRAHL AUSSETZEN.
CAUTION: INVISIBLE LASER RADIATION WHEN OPEN.
AVOID EXPOSURE TO BEAM.
ATTENTION: RAYONNEMENT LASER EN CAS
D'OUVERTURE EXPOSITION DANGEREUSE
AU FAISCEAU.
[CAUTION]
Use of controls, adjustments or performance of procedures other than those specified in the manual may
result in hazardous radiation exposure.
CANON INC.
3-30-2 SHIMOMARUKO, OHTA-KU, TOKYO, JAPAN
CANON U.S.A., INC
ONE CANON PLAZA, LAKE SUCCESS, N.Y. 11042, U.S.A.
CANON CANADA INC.
6390 DIXIE ROAD MISSISSAUGA, ONTARIO L5T, 1P7, CANADA
MANUFACTURED:
THIS PRODUCT CONFORMS WITH DHHS RADIATION PERFORMANCE STANDARD, 21 CFR
CHAPTER 1 SUBCHAPTER J.
Laserstrahl
750-850nm
10mW
FS4-8846
Page 5
3
What the imageRUNNER 400/330 Series Can Do
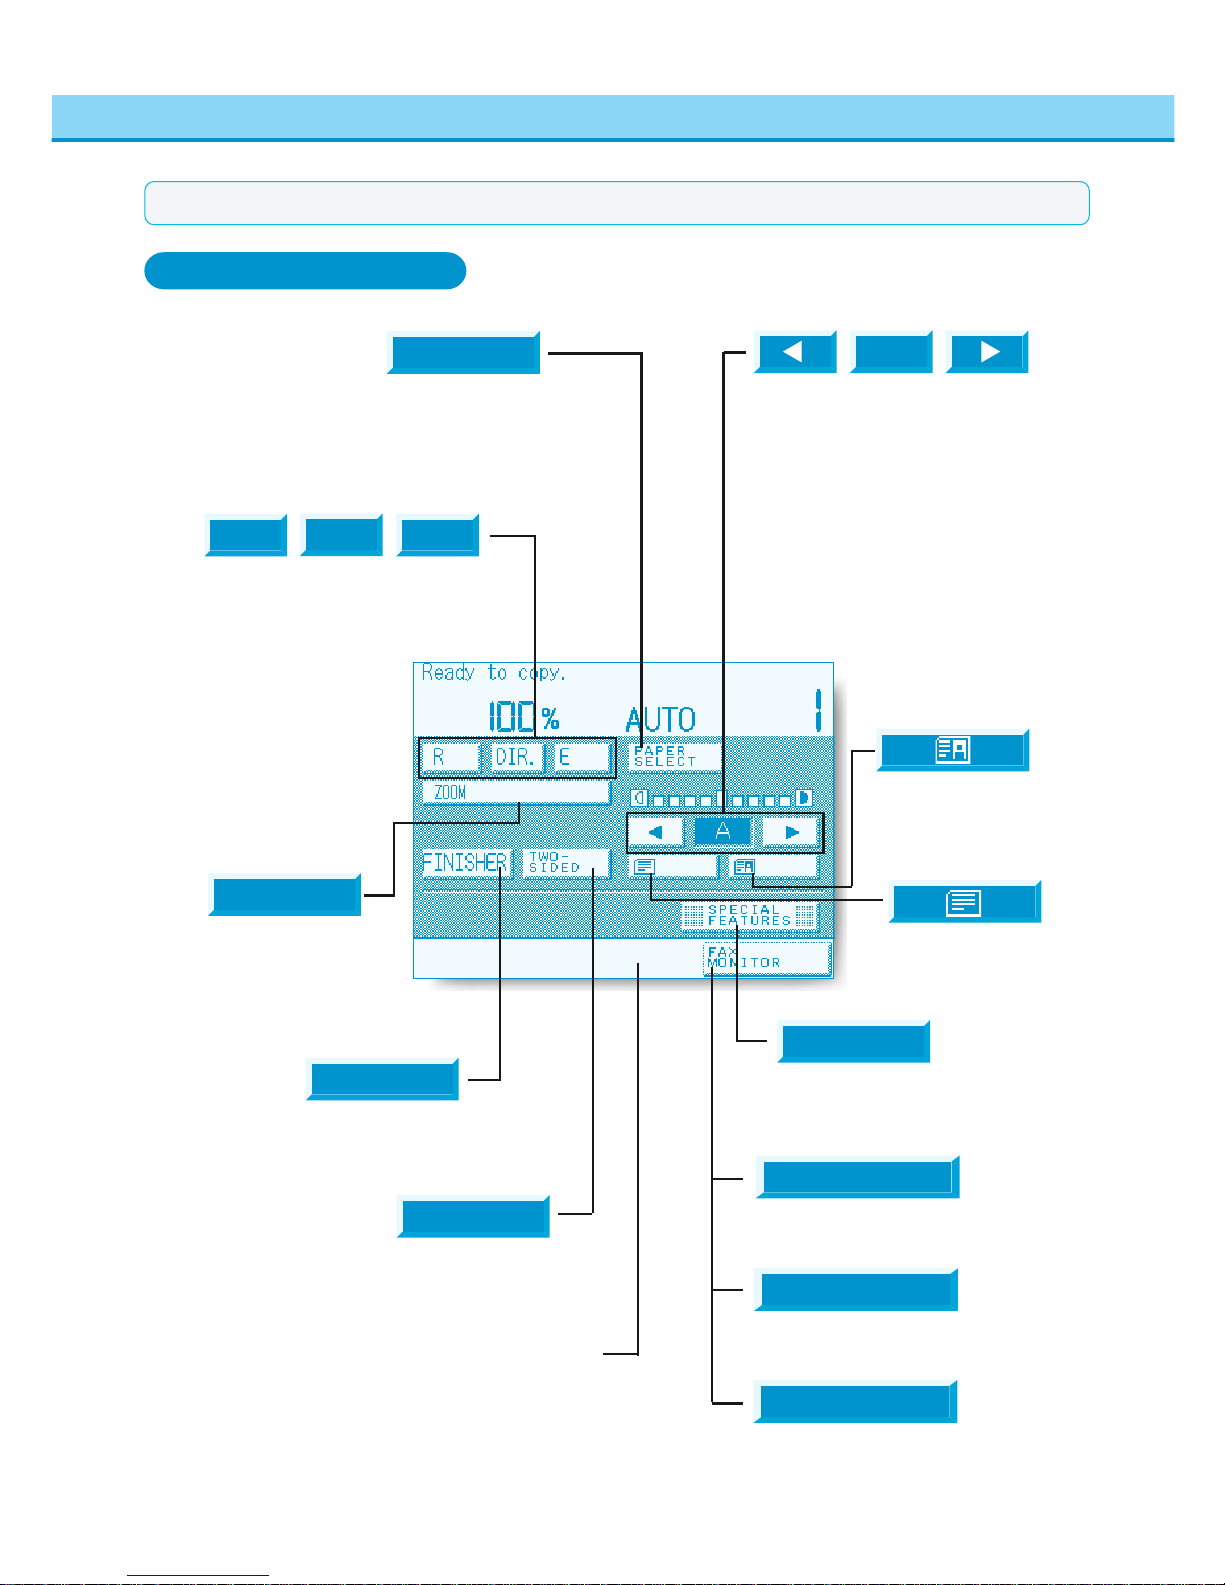
Press to reduce or enlarge using a preset
copy ratio, or return the copy ratio to direct
copying (100%).
See “Changing the Copy Ratio (Enlarging/
Reducing Originals),” on p. 2-8.
R DIR. E
Press to select the paper size (Auto Paper
Selection, drawer or stack bypass).
See “Selecting the Copy Paper Size (PAPER
SELECT),” on p. 2-2.
PAPER
SELECT
Press [▼] or [▼] to manually control the
copy exposure.
Press the [A] key to select or cancel Auto
Exposure Control.
See “Adjusting Copy Exposure ,” on p. 2-24.
See “Automatic Adjustment of Exposure and
Image Quality (A),” on p. 2-26.
A
Press to select or cancel Collate, StapleCollate, or Group modes.
See “Collating Copies (FINISHER),” on
p. 2-39.
FINISHER
Press to select or cancel the Two-sided
mode.
See “Two-Sided Copying,” on p. 2-33.
Press to copy originals
containing text.
See “Selecting Image
Quality,” on p. 2-25.
Press to check the printing status or to cancel a
printing job from a computer. This key appears
only when the printer functions are installed.
Press to select the Special Features
mode.
See “Useful Copy Functions,” in
Chapter 3.
Displays the current status of the copy job or other
functions.
Basic Features Screen
TWO-
SIDED
SPECIAL
FEATURES
Press to copy originals
containing text and photos.
See “Selecting Image
Quality,” on p. 2-25.
Press to make settings for
zooming to ratios other than
the preset ratios.
See “Specifying the Copy
Ratio by %,” on p. 2-9.
ZOOM
PRINT MONITOR
Press to check the Fax status and/or
printing status, or to cancel a Fax operation
and/or printing job. This key appears only
when both the Fax functions and the printer
functions are installed.
SYSTEM MONITOR
Press to check the status of FAX
communications. This is displayed only
when FAX functions are installed.
FAX MONITOR
DIR.
MEMO
●Please refer to the "Facsimile Manual" for an explanation of each screen when the Fax function is installed.
Page 6
4
What the
imageRUNNER 400/330 Series
Can Do
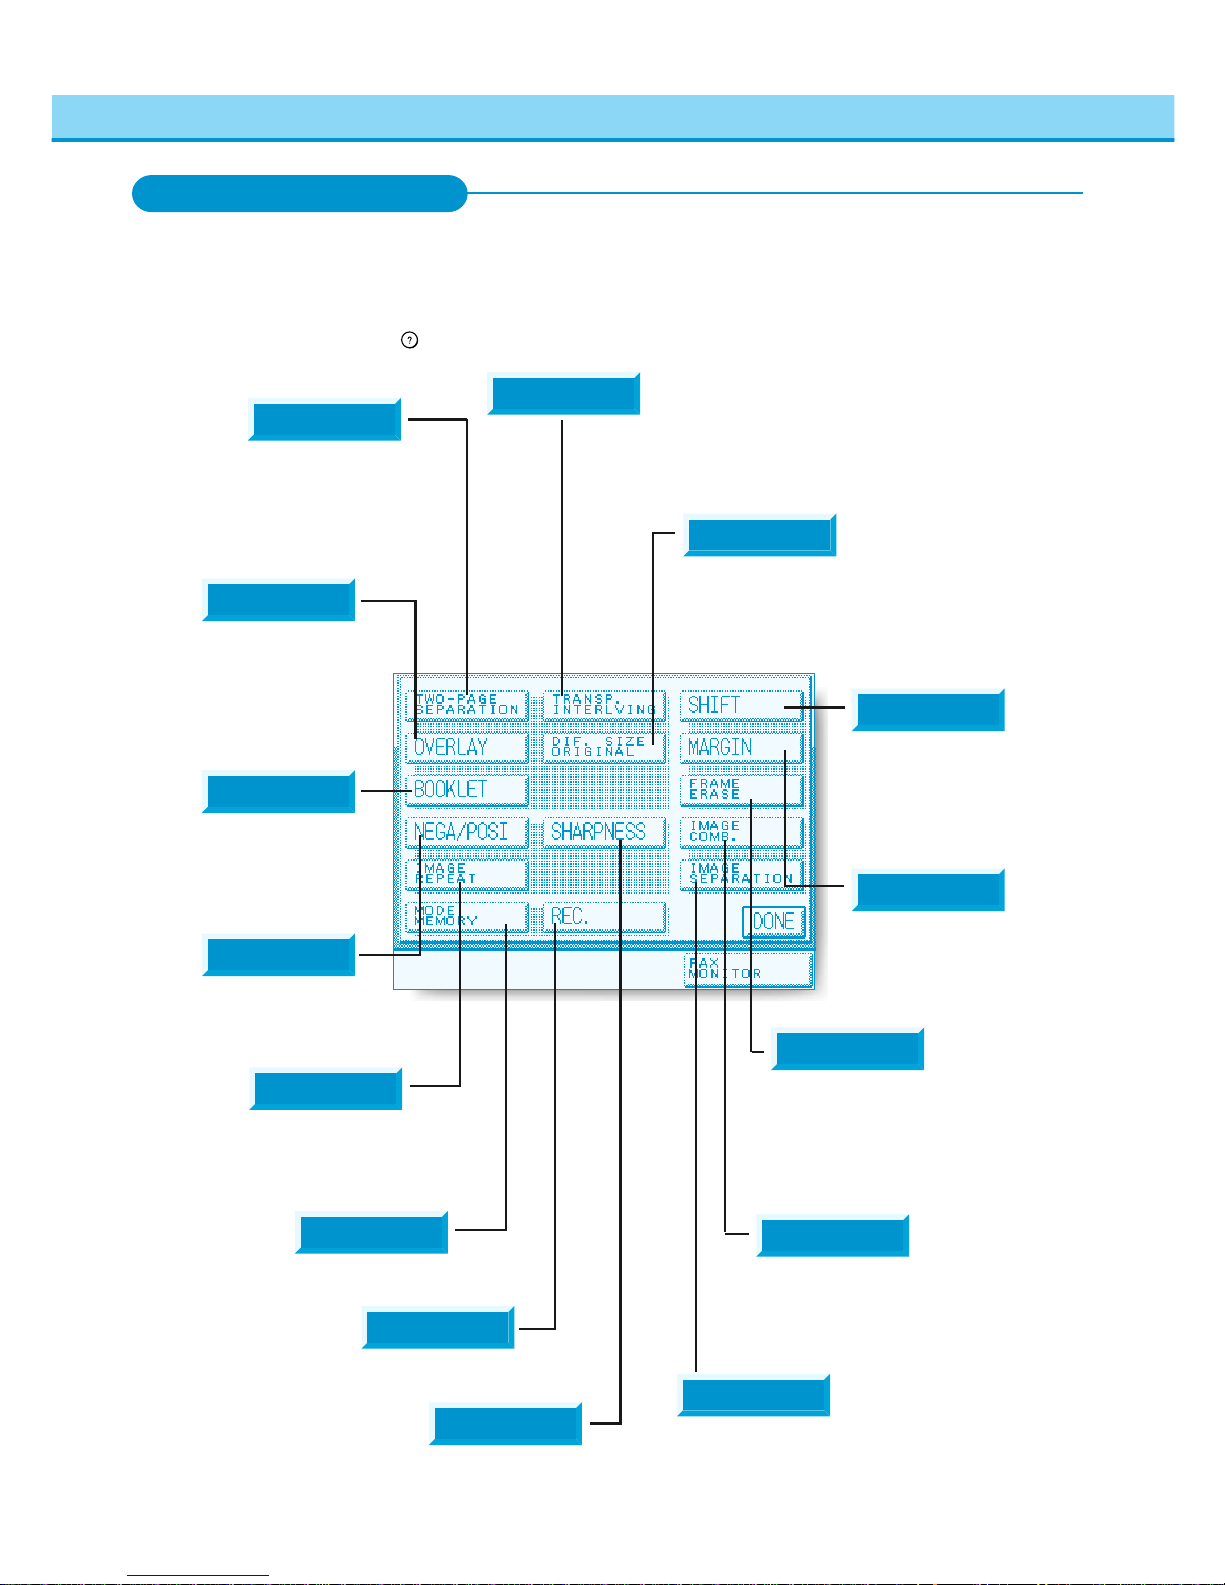
Press to set or cancel the Different Size Original mode. This mode
enables you to feed different-size originals together in one group in the
feeder providing that the leading edge of each page is the same length.
See “Feeding Different-size Originals Together in the Feeder (DIF. SIZE
ORIGINAL),” on p. 3-10.
Press to select or cancel the Shift mode.
This mode enables you to shift the
position of the original image on the copy
sheet.
See “Making Copies with Original Images
Shifted (SHIFT),” on p. 3-13.
SHIFT
Press to select or cancel the Margin
mode. This mode enables you to create
margins along the sides of copies.
See “Making Copies with Margins
(MARGIN),” on p. 3-14.
MARGIN
Press to select or cancel the Frame Erase mode. This mode
enables you to eliminate dark border areas and lines that
appear around original images, or shadows from punched
holes.
See “Erasing Shadows and Frame Lines from Copies
(FRAME ERASE),” on p. 3-16.
Press to select or cancel the Image Combination mode. This
mode enables you to automatically reduce two, four or eight
originals to fit on a single-sided or two-sided copy sheet.
See “Reducing Two, Four or Eight Originals to Fit on a
Single Copy Sheet (IMAGE COMB.),” on p. 3-20.
Press to select or cancel the Image Separation mode. This mode enables
you to divide an original into 2 or 4 sections and enlarge each section onto
a copy sheet of specified size.
See “Dividing an Original Into Equal Sections and Enlarging Each Section
on a Separate Copy Sheet (IMAGE SEPARATION),” on p. 3-24.
SHARPNESS
Press to select or cancel the Two-page Separation mode.
This mode enables you to copy two pages of an opened
book onto separate copy sheets in one step.
See “Making Copies of Facing Pages in a Book onto Two
Separate Copy Sheets in One Step (TWO-PAGE
SEPARATION),” on p. 3-2.
Press to copy two pages originals or two
pages of an opened book onto a single
sheet of copy paper.
See “Superimposing Two Original
Images on a Single Copy Sheet
(OVERLAY),” on p. 3-7.
Press to store or recall copy jobs.
See “Storing Often Used Copy Settings in Memory
(MODE MEMORY),” on p. 3-32.
Press to recall a previously set copy job.
See “Recalling a Previous Copy Job (RECALL),” on p. 3-39.
REC.
BOOKLET
Press when making copies of several
originals for a booklet.
See “Making Copies for Use as a Booklet
(BOOKLET),” on p. 3-11.
NEGA/POSI
Press to make copies with the entire
black/white image inverted.
See “Inverting Original Images (NEGA/
POSI),” on p. 3-27.
Special Features Screen
When you press [SPECIAL FEATURES] in the Copy Basic Features screen, the Special Features
screen appears in the touch panel display. The Special Features screen displays special functions
available for copying. When a function is selected, a more detailed screen for the selected mode
appears. To close the Special Features screen and return to the Basic Features screen, press the
[DONE] key. Pressing the
Guide
key after selecting a function brings up a help screen with guidance
information.
Press to select or cancel the Transparency Interleaving mode. This mode
enables you to insert a blank sheet between each transparency when
copying transparencies. It is also possible to have the same image printed
on the inserted sheet as on the transparency.
See “Making Copies with Sheets of Paper Interleaved between
Transparencies (TRANSP. INTERLVING),” on p. 3-4.
Press to select or cancel the Sharpness mode. This mode enables you to
make copies of original images with the contrast reproduced more sharply.
See “Making Sharp Contrast Copies (SHARPNESS),” on p. 3-28.
TWO-PAGE
SEPARATION
MODE
MEMORY
IMAGE
SEPARATION
IMAGE
COMB.
FRAME
ERASE
DIF. SIZE
ORIGINAL
TRANSP.
INTERLVING
OVERLAY
Press to repeatedly copy the image of an original
in either the lengthwise or widthwise direction.
See “Making Copies with the Original Image
Repeated (IMAGE REPEAT),” on p. 3-30.
IMAGE
REPEAT
Page 7

5
NOTICE
●When the printer function is not installed with the imageRUNNER 400S/330S, the mail box function can not
be used.
●When the optional expansion memory (32MB, 64MB) is not installed with the imageRUNNER 400S/330S,
the mail box function can not be used either .
●Each Mail Box can store up to 100 documents.
What the
imageRUNNER 400/330 Series
Can Do
Selecting Mail Box Screen
When you press the
PRINT•I/F
key, the Selecting a Mail Box Screen appears in the touch panel display.
(It depends on the initial setting of additional functions. See "Setting the Initial Screen for the Printer
Functions", on p.4-17.
When printing data from a computer using this machine, you can first input the data to a registered Mail
Box, then print it whenever desired.
The printing operation is performed from this machine, enabling you to avoid mixing the prints with
copies. Also, you can set a password in the Mail Box, enabling you to make prints while preventing
other persons from observing the data in the Mail Box.
Print Monitor Screen
By using the Print Monitor screen, you can check the status of a printing document or cancel printing.
PRINT•I/F
MEMO
●For details on how to use the Mail Box, see chapter 8.
MEMO
● [PRINT MONITOR] is displayed when only the printer function is installed with the machine. [SYSTEM
MONITOR] is displayed when both the FAX function and the printer function are installed.
● See Chapter 8 "Checking Printing Status" on p.8-15 for the detail of the function.
NOTICE
●This screen appears only when the printer function is installed.
Page 8
6
MEMO
●For details on how to set custom copy settings, see the following manuals :
This Manual : Chapter 4 [Setting and Adjusting Custom Common Settings to Suit Your Needs]
Facsimile Manual : Chapter 6 [Storing and Setting Custom Fax Settings to suit your Needs]
● [CUSTOM FAX SETTINGS] does not appear if the fax function is not installed.
●[IMAGE SERVER CUSTOM SETTINGS] does not appear if the printer functions are not installed.
[IMAGE SERVER CUSTOM SETTINGS] does not appear if the optional expansion memory(32MB, 64MB)
is not installed with the imageRUNNER 400S/330S, even if the printer functions are installed.
What the
imageRUNNER 400/330 Series
Can Do
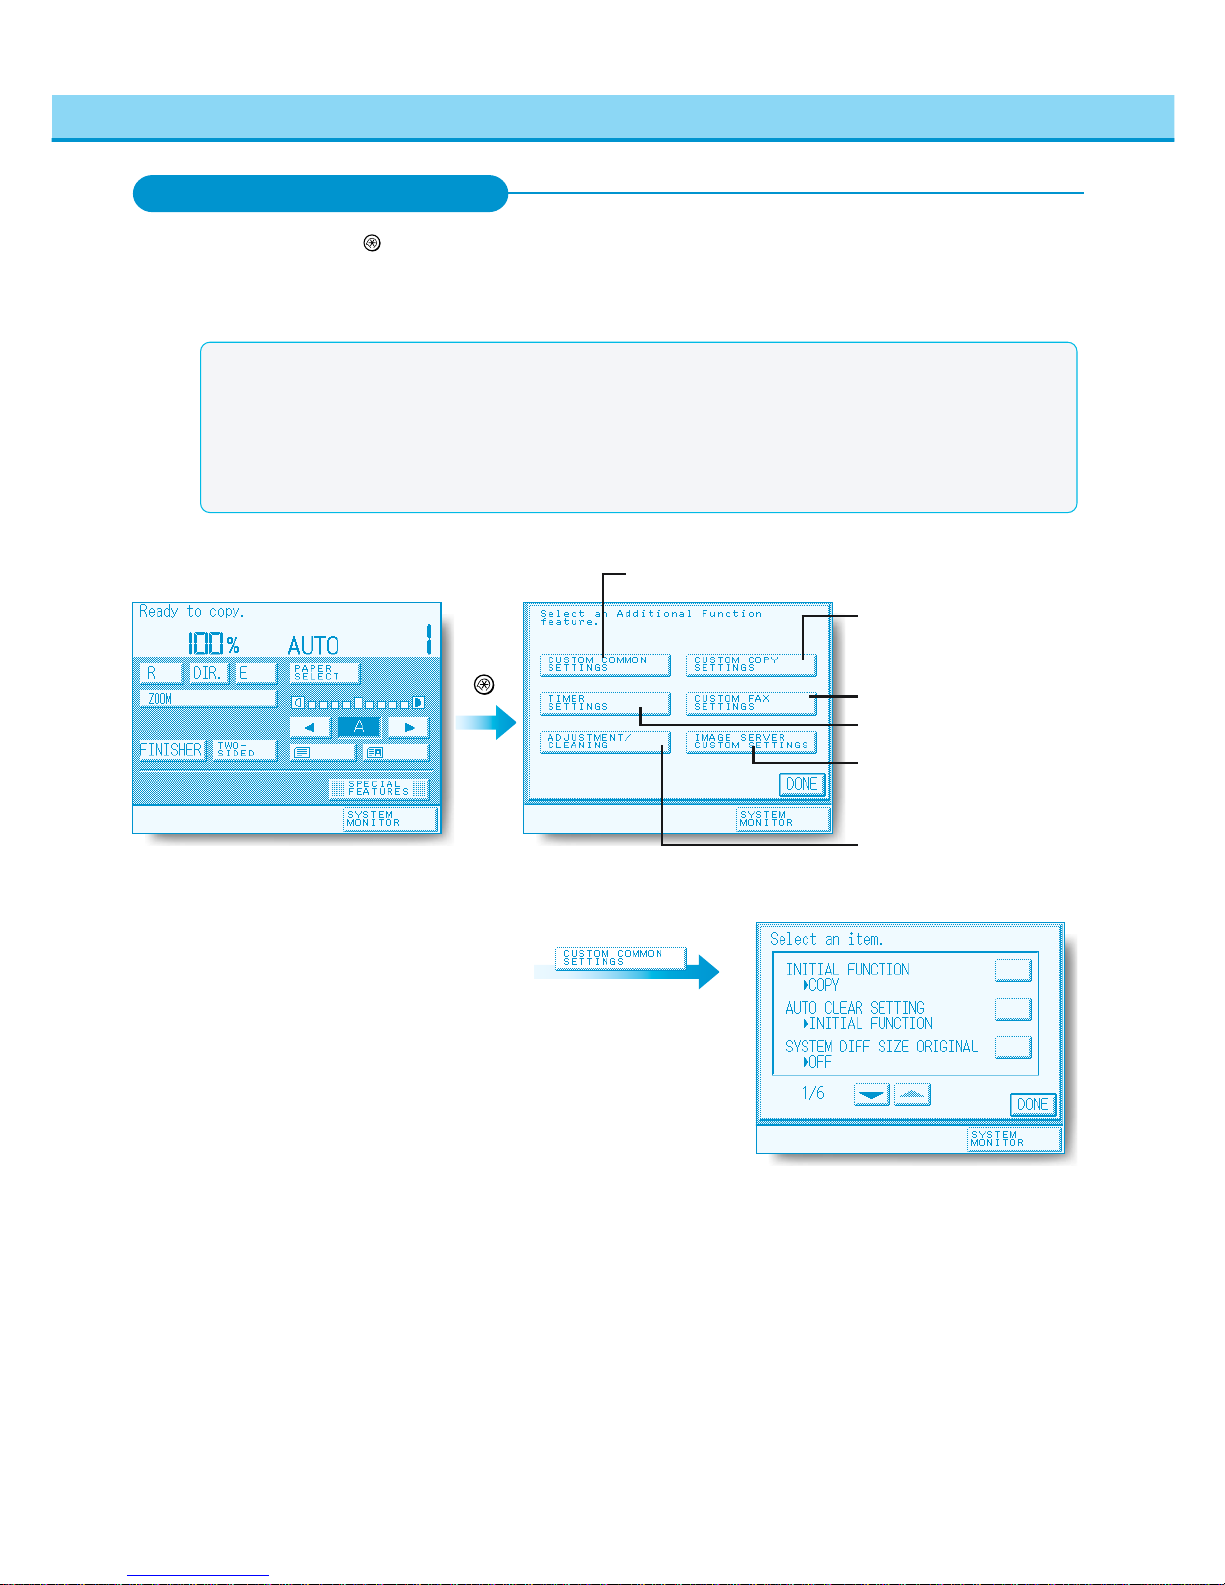
Additional Function Screen
CUSTOM COPY SETTINGS
CUSTOM COMMON SETTINGS
TIMER SETTINGS
ADJUSTMENT/CLEANING
When you press the
Additional Functions
key, the Additional Function Screen appears in the touch panel display. With
Additional Functions, you can set the specifications common to all copy functions. By pressing the
[CUSTOM COPY SETTINGS] key you can change the initial settings (defaults) of copy functions. For
example, you can set Auto Collate to ON or OFF, or set the Photo Mode to ON or OFF.
Additional Functions
CUSTOM FAX SETTINGS
IMAGE SERVER CUSTOM
SETTINGS
EXAMPLE:
Page 9
7
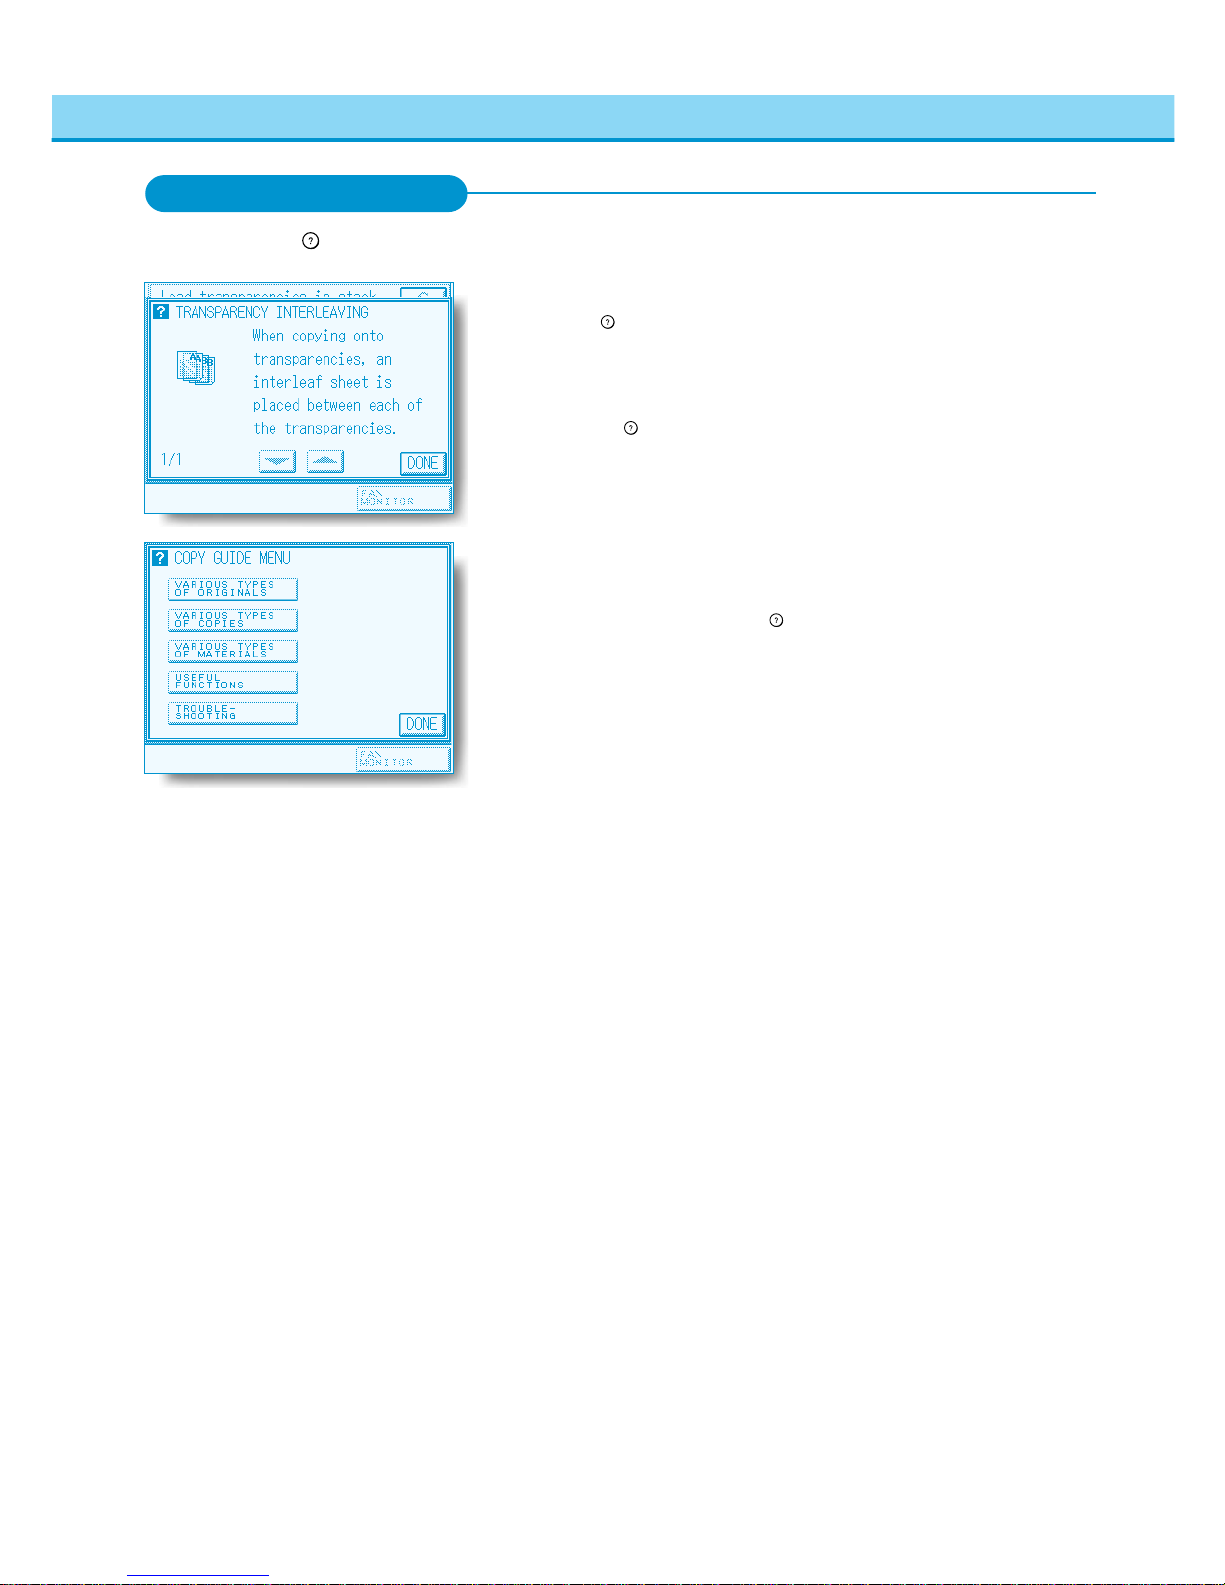
Usage Guide
Pressing the
Guide
key after selecting a function brings up a guide screen with
an explanation for that function. Use this guide function if you do not
understand how to use the copy mode you are setting.
(In this example, the Transparency Interleaving mode has been selected)
If you press the
Guide
key, while setting [TRANS. INTERLVING], the touch panel
display changes to the Guide Function Screen shown on the left. To return to
the display for [TRANS. INTERLVING], press the [DONE] key.
Information Guide
This machine supports many functions.
To find the right function for your particular copy needs or to find a simple
description of a function, press the
Guide
key while the Basic Features screen or
Special Features screen is displayed.
(In this example, copies are being made from photo originals.)
Press the [VARIOUS TYPES OF ORIGINALS] key.
You can display simple explanations of the TEXT/PHOTO or Book Frame
Erase modes using the [▼] or [▼] keys.
To return the display to the Types of Originals screen, press the [DONE] key.
Guide Function Screen
Pressing the
Guide
key brings up a guide screen with information about the various copying features that
are available with your copier.
What the
imageRUNNER 400/330 Series
Can Do
Page 10

8
How This Manual is Organized .............................................................................. 1
Safety Infomation ................................................................................................... 2
What the imageRUNNER 400/330 Series Can Do ................................................ 3
Contents................................................................................................................. 8
How to Use This Manual ...................................................................................... 13
Safety Considerations .......................................................................................... 14
Installation Precautions ........................................................................................ 22
Handling Precautions ........................................................................................... 24
Chapter 1 Before You Start Using Copy Functions
Parts and Their Functions ................................................................................... 1-2
External View ....................................................................................................................................................................... 1-2
Internal View ........................................................................................................................................................................ 1-3
Control Panel Parts and Functions ...................................................................................................................................... 1-4
Integrated Operation ...........................................................................................1-5
Entering Characters on the Touch Panel Display................................................ 1-6
Main Power and Control Panel Power ................................................................1-8
Flow of Copy Operations..................................................................................... 1-9
Placing Originals ............................................................................................... 1-11
Orientation of Originals .......................................................................................................................................................1-11
Placing an Original on the Platen Glass ............................................................................................................................ 1-12
Placing Originals in the Feeder (DADF-A1) ....................................................................................................................... 1-13
Checking the Copy Mode Settings....................................................................1-15
Changing or Canceling a Selected Copy Mode ................................................1-16
Chapter 2 Basic Copying
Selecting the Copy Paper Size
(PAPER SELECT) ............................................................
2-2
Automatic Paper Selection................................................................................................................................................... 2-2
Manual Paper Selection ....................................................................................................................................................... 2-3
Using the Stack Bypass ....................................................................................................................................................... 2-4
Changing the Copy Ratio
(Enlarging/Reducing Originals)...................................................
2-8
Enlarging/Reducing Originals to a Standard Size................................................................................................................ 2-8
Specifying the Copy Ratio by %........................................................................................................................................... 2-9
Automatically Setting the Copy Ratio Based on the Original and Copy Paper Sizes (AUTO ZOOM) ................................2-11
Slightly Reducing Images to Prevent the Original Periphery from Being Cut (ENTIRE IMAGE) ....................................... 2-13
Calculating the Copy Ratio Based on the Original and Copy Paper Sizes (ZOOM PROGRAM) ...................................... 2-14
Enlarging/Reducing Originals at Copy Ratios Set Independently for X and Y Axes (XY ZOOM) ...................................... 2-16
Making Copies Separated onto Multi-pages Match to an Englarged Copy Size (MULTI-PG ENLARGE) ......................... 2-18
Adjusting Exposure and Image Quality
(COPY EXPOSURE) .......................................
2-24
Adjusting Copy Exposure................................................................................................................................................... 2-24
Changing the Exposure During Copying............................................................................................................................ 2-24
Selecting Image Quality ..................................................................................................................................................... 2-25
Automatic Adjustment of Exposure and Image Quality (A) ................................................................................................ 2-26
Entering the Copy Quantity ............................................................................... 2-27
Specifying the Required Number of Copies....................................................................................................................... 2-27
Changing the Copy Quantity .............................................................................................................................................. 2-27
Contents
Page 11

9
Contents
Using the Memory for Copying.......................................................................... 2-28
Making a Copy while the Machine is Warming Up (AUTO START) ................................................................................... 2-28
Memory Copy of Original on Platen Glass ......................................................................................................................... 2-29
If Memory Becomes Full During Copying .......................................................................................................................... 2-30
Interrupting the Current Copy Job to Make Priority Copies
(INTERRUPT MODE) .
2-31
Two-Sided Copying ........................................................................................... 2-33
Making Two-sided Copies from One-sided Originals (1 → 2-SIDED) ................................................................................ 2-33
Making Two-sided Copies from Two-sided Originals (2 → 2-SIDED)................................................................................. 2-35
Making One-sided Copies from Two-sided Originals (2 → 1-SIDED) ................................................................................ 2-36
Making Two-sided Copies from Facing Pages in a Book in One Step (BOOK → 2-SIDED).............................................. 2-37
Collating Copies
(FINISHER) ...............................................................................................
2-39
Chapter 3 Useful Copy Functions
Making Copies of Facing Pages in a Book onto Two Separate Copy Sheets in
One Step
(TWO-PAGE SEPARATION) ..............................................................................
3-2
Making Copies with Sheets of Paper Interleaved between Transparencies
(TRANSP. INTERLVING) .......................................................................................................
3-4
Superimposing Two Original Images on a Single Copy Sheet
(OVERLAY) .........................
3-7
Superimposing Two Originals (SHEET OVERLAY) ............................................................................................................. 3-8
Superimposing Facing Pages in a Book (BOOK OVERLAY)............................................................................................... 3-9
Feeding Different-size Originals Together in the Feeder
(DIF. SIZE ORIGINAL) .....
3-10
Making Copies for Use as a Booklet
(BOOKLET) ..........................................................
3-11
Making Copies with Original Images Shifted
(SHIFT)..................................................
3-13
Making Copies with Margins
(MARGIN) ...........................................................................
3-14
Erasing Shadows and Frame Lines from Copies
(FRAME ERASE) ..........................
3-16
Reducing Two , Four or Eight Originals to Fit on a Single Cop y Sheet
(IMAGE COMB.)....
3-20
Dividing an Original Into Equal Sections and Enlarging Each Section on a Separate
Copy Sheet
(IMAGE SEPARATION) .................................................................................
3-24
Inverting Original Images
(NEGA/POSI)............................................................................
3-27
Making Sharp Contrast Copies
(SHARPNESS)...............................................................
3-28
Making Copies with the Original Image Repeated
(IMAGE REPEAT) .......................
3-30
Storing Often Used Copy Settings in Memory
(MODE MEMORY) .............................
3-32
Storing Copy Settings for a Copy Job ................................................................................................................................ 3-32
Storing a Memory Key Name ............................................................................................................................................. 3-34
Recalling a Copy Job ......................................................................................................................................................... 3-36
Erasing a Copy Job............................................................................................................................................................ 3-37
Recalling a Previous Copy Job
(RECALL).......................................................................
3-39
Chapter 4
Setting and Adjusting Custom Common Setting to Suit Your Needs
Common Functions ............................................................................................. 4-2
What are “Additional Functions”?......................................................................................................................................... 4-2
Sleep Function ..................................................................................................................................................................... 4-2
Auto Sleep ........................................................................................................................................................................... 4-2
Energy Saver Mode ............................................................................................................................................................. 4-3
Page 12

10
Contents
Auto Drawer Switching......................................................................................................................................................... 4-3
Auto Clear Function ............................................................................................................................................................. 4-3
Paper Supply Indicator Function .......................................................................................................................................... 4-4
Face Down Copy Output Function ....................................................................................................................................... 4-4
Additional Functions Settings Table .................................................................... 4-5
Custom Settings for Copying, FAX and Printing ................................................. 4-6
Selecting the Default Function (Copy/FAX) at Power On .................................................................................................... 4-6
Selecting the Default Display After Auto Clear ..................................................................................................................... 4-6
Making the Setting to Allow Placing of Different Size Originals ........................................................................................... 4-7
Setting Entry Tone, Error Tone, Job Done Tone (AUDIBLE TONES)................................................................................... 4-8
Setting a Drawer for Auto Drawer Switching (DRAWER ELIGIBILITY FOR APS/ADS) ...................................................... 4-8
Setting Whether to use a Cassette when Copying Tracing Paper (TRACING PAPER CASSETTE SETTINGS).............. 4-10
Identifying the type of paper in a cassette using the touch panel display ...........................................................................4-11
Setting for Stack Bypass Tray Paper Size Selection ......................................................................................................... 4-12
Setting up Dedicated Trays for Copy, FAX and Printer ...................................................................................................... 4-13
Setting the Printing Priority ................................................................................................................................................ 4-13
Shift Stacking ..................................................................................................................................................................... 4-14
Changing the Energy Saver Mode Setting......................................................................................................................... 4-15
Setting Inch Input ............................................................................................................................................................... 4-15
Setting or Changing the System Settings Password ......................................................................................................... 4-16
Restricting Use of the FAX Function.................................................................................................................................. 4-16
Setting the Initial Screen for the Printer Functions............................................................................................................. 4-17
Setting the Dept. ID for Managing the Number of Prints by Department (DEPT. ID MANAGEMENT) .............................. 4-18
Returning the Custom Common Settings to Their Defaults (INITIALIZE CUSTOM COMMON SETTINGS)..................... 4-24
Timer Settings ...................................................................................................4-25
Setting the Current Date and Time (DATE/TIME) .............................................................................................................. 4-25
Setting the Time to Initiate Auto Sleep after Finishing Operations (AUTO SLEEP TIME) ................................................. 4-25
Setting the Time Taken for Display to Return to Basic Features Screen after Finishing Operations (AUTO CLEAR TIME) . 4-26
Setting the Time Taken for the Unit to Quiet Down after Last Task (TIME UNTIL UNIT QUIETS DOWN ) ....................... 4-26
Setting the Time That the Unit’s Power Tur ns OFF on Different Days of the Week (DAILY TIMER SETTINGS) .............. 4-27
Zoom Fine Adjustment ......................................................................................4-28
Fine-adjusting Zoom When Differences in Original Image and Copy Image Occur (ZOOM FINE ADJUSTMENT) .......... 4-28
Adjusting the Standard Exposure (EXPOSURE RECALIB.).............................................................................................. 4-28
Staple Realignment for Saddle Finisher ............................................................................................................................ 4-29
Changing the Saddle Stitch Position.................................................................................................................................. 4-30
Custom Copy Settings ......................................................................................4-31
Setting Standard Keys (STANDARD KEY1/KEY2 SETTING) ........................................................................................... 4-31
Auto Orientation ................................................................................................................................................................. 4-32
Setting Automatic Collate ON/OFF (AUTO COLLATE) ...................................................................................................... 4-32
Photo Mode........................................................................................................................................................................ 4-33
Storing the Current Standard Settings (STANDARD SETTINGS) ..................................................................................... 4-33
Restoring Settings to Initial Settings (INITIALIZE CUSTOM COPY SETTINGS) .............................................................. 4-36
Image Server Custom Settings .........................................................................4-37
Mail Box Setting/Storing..................................................................................................................................................... 4-37
Deleting a Mail Box ............................................................................................................................................................ 4-39
Chapter 5 Loading Paper and Adding the Toner
Loading Paper..................................................................................................... 5-2
Page 13

11
Contents
Loading Paper in the Drawers ............................................................................................................................................. 5-2
Loading Paper for the First Time.......................................................................................................................................... 5-4
Adjusting a Paper Drawer to Hold a Different Paper Size.................................................................................................... 5-6
Adding Toner .......................................................................................................5-8
Consumables and Options................................................................................ 5-12
Consumables ..................................................................................................................................................................... 5-12
Options............................................................................................................................................................................... 5-13
Chapter 6 Troubleshooting
Clearing Paper Jams........................................................................................... 6-2
Display Indicating How to Clear the Jam ............................................................................................................................. 6-2
Paper Jam in the Main Unit.................................................................................................................................................. 6-4
Paper Jam in the Duplexing Unit ......................................................................................................................................... 6-6
Paper Jam in the Copy Tray ................................................................................................................................................ 6-7
Paper Jam in the Right cover............................................................................................................................................... 6-9
Paper Jam in the Drawers ................................................................................................................................................. 6-10
Frequently Occurring Paper Jams ..................................................................................................................................... 6-12
Clearing a Paper Jam in the Stack Bypass........................................................................................................................ 6-14
Routine Cleaning............................................................................................... 6-16
Original is not Being Scanned Cleanly............................................................................................................................... 6-16
Original Scanned Using The Feeder Becomes Dirty (FEEDER CLEANING).................................................................... 6-17
Streaks Appear on Copy Sheet (ROLLER CLEANING) .................................................................................................... 6-18
Self-diagnostic (Error) Display ..........................................................................6-19
Self-diagnostic (Error) Displays ......................................................................................................................................... 6-19
Service Call Message .......................................................................................6-21
Chapter 7 Handling Options
System Configuration.......................................................................................... 7-2
Cassette Feeding Unit-S1 ................................................................................... 7-3
Parts and Their Functions.................................................................................................................................................... 7-3
Clearing Paper Jams ........................................................................................................................................................... 7-3
Main Specifications .............................................................................................................................................................. 7-4
Cassette Feeding Unit-R1................................................................................... 7-5
Parts and Their Functions.................................................................................................................................................... 7-5
Clearing Paper Jams ........................................................................................................................................................... 7-5
Main Specifications .............................................................................................................................................................. 7-6
Paper Deck-B1.................................................................................................... 7-7
Parts and Their Functions.................................................................................................................................................... 7-7
Clearing Paper Jams ........................................................................................................................................................... 7-7
Paper Jam in the Paper Deck .............................................................................................................................................. 7-8
Loading Paper in the Paper Deck ........................................................................................................................................ 7-9
Main Specifications ............................................................................................................................................................ 7-10
DADF-A1 (Feeder) ............................................................................................ 7-11
Parts and Their Functions...................................................................................................................................................7-11
Replacing the Stamp Cartridge (When the FAX function is installed)................................................................................ 7-12
Clearing Paper Jams ......................................................................................................................................................... 7-13
Page 14

12
Contents
Main Specifications ............................................................................................................................................................ 7-15
Finisher-C1 /Saddle Finisher-C2....................................................................... 7-16
Parts and Their Functions.................................................................................................................................................. 7-16
Staple-Collate Functions .................................................................................................................................................... 7-17
TRAY Functions ................................................................................................................................................................. 7-18
Booklet Function ................................................................................................................................................................ 7-18
Clearing Paper Jams ......................................................................................................................................................... 7-19
Replacing the Staple Case in the Stapler Unit................................................................................................................... 7-21
Removing Jammed Staples from the Stapler Unit ............................................................................................................. 7-23
When a Paper Jam Occurs in the Saddle Stitcher Unit ..................................................................................................... 7-25
Replacing the Saddle Stitcher Unit Staple Cartridge ......................................................................................................... 7-27
Removing Jammed Staples from the Saddle Stitcher Unit ................................................................................................ 7-29
When a Paper Jam Occurs in the Interrupt Tray................................................................................................................ 7-31
Output Indication Function ................................................................................................................................................. 7-32
Main Specifications ............................................................................................................................................................ 7-33
Finisher-E1........................................................................................................ 7-34
Parts and Their Functions.................................................................................................................................................. 7-34
Staple-Collate Functions .................................................................................................................................................... 7-35
Clearing a Paper Jam ........................................................................................................................................................ 7-36
Replacing the Staple Case in the Stapler Unit................................................................................................................... 7-38
Removing Jammed Staples from the Stapler Unit ............................................................................................................. 7-40
Main Specifications ............................................................................................................................................................ 7-42
Consumables ..................................................................................................................................................................... 7-42
Chapter 8 Appendix
Operation When User Restrictions are Enabled .................................................8-2
Inserting the Control Card .................................................................................................................................................... 8-2
Entering the Dept. ID and Password.................................................................................................................................... 8-3
Using the Mail Box (When the printer function is installed)................................. 8-5
Printing Documents stored in the Mail Box .......................................................................................................................... 8-6
Printing Multiple Documents ................................................................................................................................................ 8-8
Checking the Document Details......................................................................................................................................... 8-10
Erasing a Document from the Mail Box ..............................................................................................................................8-11
Erasing Multiple Documents .............................................................................................................................................. 8-13
Checking Printing Status................................................................................... 8-15
Checking Detailed Information for Printing Documents ..................................................................................................... 8-15
Canceling Printing .............................................................................................................................................................. 8-16
Checking the Printing History............................................................................................................................................. 8-17
Main Specifications ...........................................................................................8-18
Index .................................................................................................................8-20
Page 15
13
How to Use This Manual
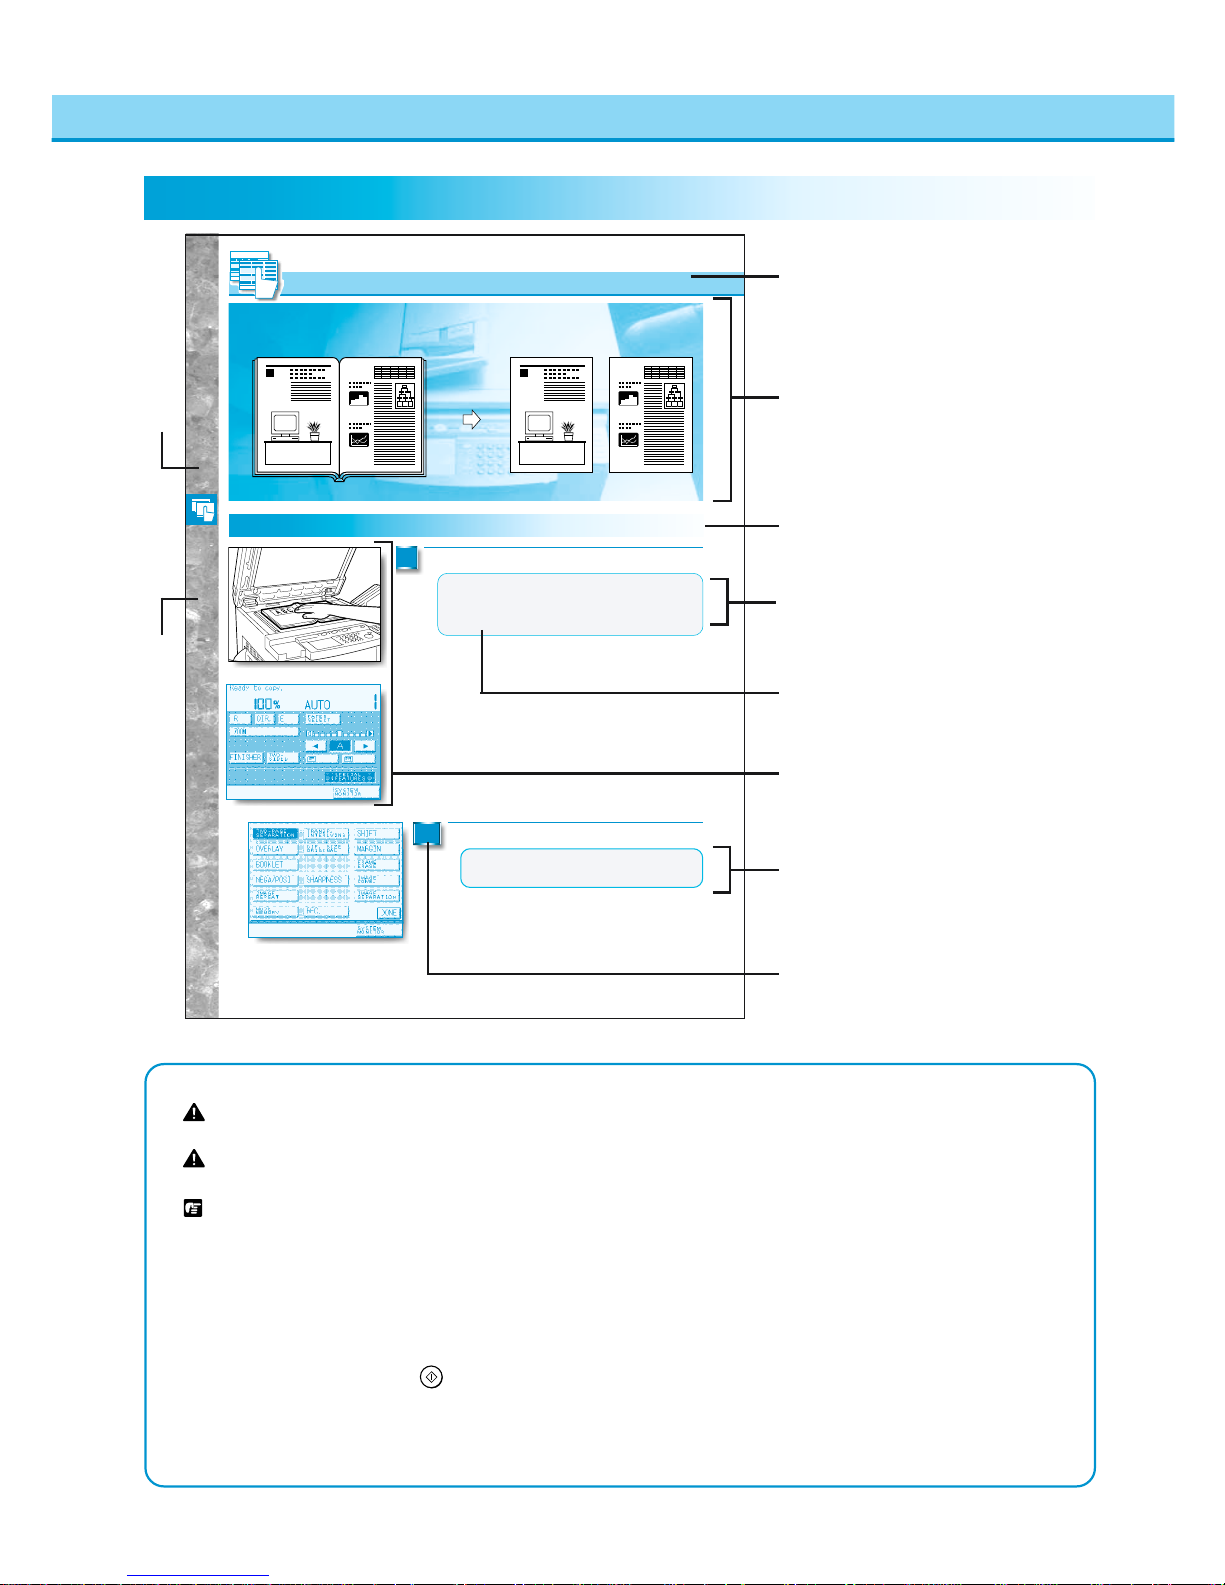
The descriptions in this manual are presented using the following general format.
Symbols Used in This Manual
WARNING Indicates a warning concerning operations that may lead to death or injury to persons if not
performed correctly. In order to use the machine safely, always pay attention to these warnings.
CAUTION Indicates a caution concerning operations that may lead to injury to persons or damage to property if
not performed correctly. In order to use the machine safely, always pay attention to these cautions.
REQUEST Indicates important items or prohibited actions that should always be followed when operating the
machine. These should always be read to avoid damage to the machine or injury to persons.
●NOTICE Indicates operational warnings. Be certain to read these items so that you operate the machine
correctly.
●MEMO Indicates notes for operation or additional explanations. Reading these is recommended.
The following symbols, key names and unit names are used in this manual.
Key on control panel ............
Start
key Key on touch panel display .............. [OK] key
● Screen shots of the touch-panel display used in this manual are those taken when the machine
is equipped with the DADF-A1, Saddle Finisher-C2, Cassette Feeding Unit-R1,and the FAX
function is installed. Note that functions that cannot be used depending on the combination of
optional items are not displayed in the touch-panel display.
NOTICE
● Combined use of the Two-sided, Transparency
Interleaving, Overlay, Image Combination and
Image Separation modes cannot be set.
11
MEMO
● If you want to make copies in page order begin copying
from the last pages and work your way forward.
● Place the original face down so that the top of it is against
the top edge of the platen glass.
(See "Display Indicating How to Clear the Jam" on p. 6-2.)
This feature enables you to copy facing pages in a book or magazine on separate
sheets of copy paper in one step.
Orijinal Copy
Description of modes and
operations.
Main heading
Subheading
MEMO
Indicates notes for operation or
additional explanations. Reading these
is recommended.
Illustrations
Illustrations help you identify keys and
parts of the copier.
NOTICE
Indicates operational warnings. Be
certain to read these items so that you
operate the machine correctly.
Operation Instructions
Numbered steps describe how to set
and operate various functions.
Chapter heading
Content details
The above sample page does not actually exist in this manual.
Making Copies of Facing Pages in a Book onto Two Separate Copy Sheets in One Step
Useful Copy Functions
Making Copies of Facing Pages in a Book onto Two Separate Copy Sheets in One Step
Making Copies of Facing Pages in a
Book onto Two Separate Copy Sheets in
One Step (TWO-PAGE SEPARATION)
2
1
Place the original the machine and press [OK].
Press the [TWO-PAGE SEPARATION] key.
3-12
Reference
Page and chapter numbers containing
related items are provided.
Page 16

14
Safety Considerations
●Do not install the machine in unstable locations
such as on unsteady platforms or on inclined
floors, or in locations which are subject to
excessive vibrations, as this may cause the
machine to fall or tip over, resulting in personal
injury.
●Do not install the machine in such a way that
the ventilation ports are blocked by objects. If
the ventilation ports are blocked, heat will build
up inside the machine and may result in a fire.
●Do not place heavy objects on the machine, as
they may tip over or fall resulting in personal
injury.
Installation
WARNING
●Do not install the machine near alcohol, paint
thinner or other inflammable substances. If
inflammable substances come into contact with
electrical parts inside the machine, this may
result in fire or electrical shock.
●Do not place the following items on the machine.
If these items come into contact with a highvoltage area inside the machine, this may result
in a fire or electrical shock.
• Necklaces and other metal objects
• Cups, vases, flowerpots and other containers
filled with water or liquids
If these items are dropped or spilled inside the
machine, immediately turn OFF the main power
switch and unplug the power plug from the
outlet. Then, contact your service representative.
CAUTION
●Do not install the machine in the following
locations.
•A damp or dusty location
•A location which is exposed to direct sunlight
•A location subject to high temperatures
•A location that is subject to open flames
Page 17
15
Safety Considerations
WARNING
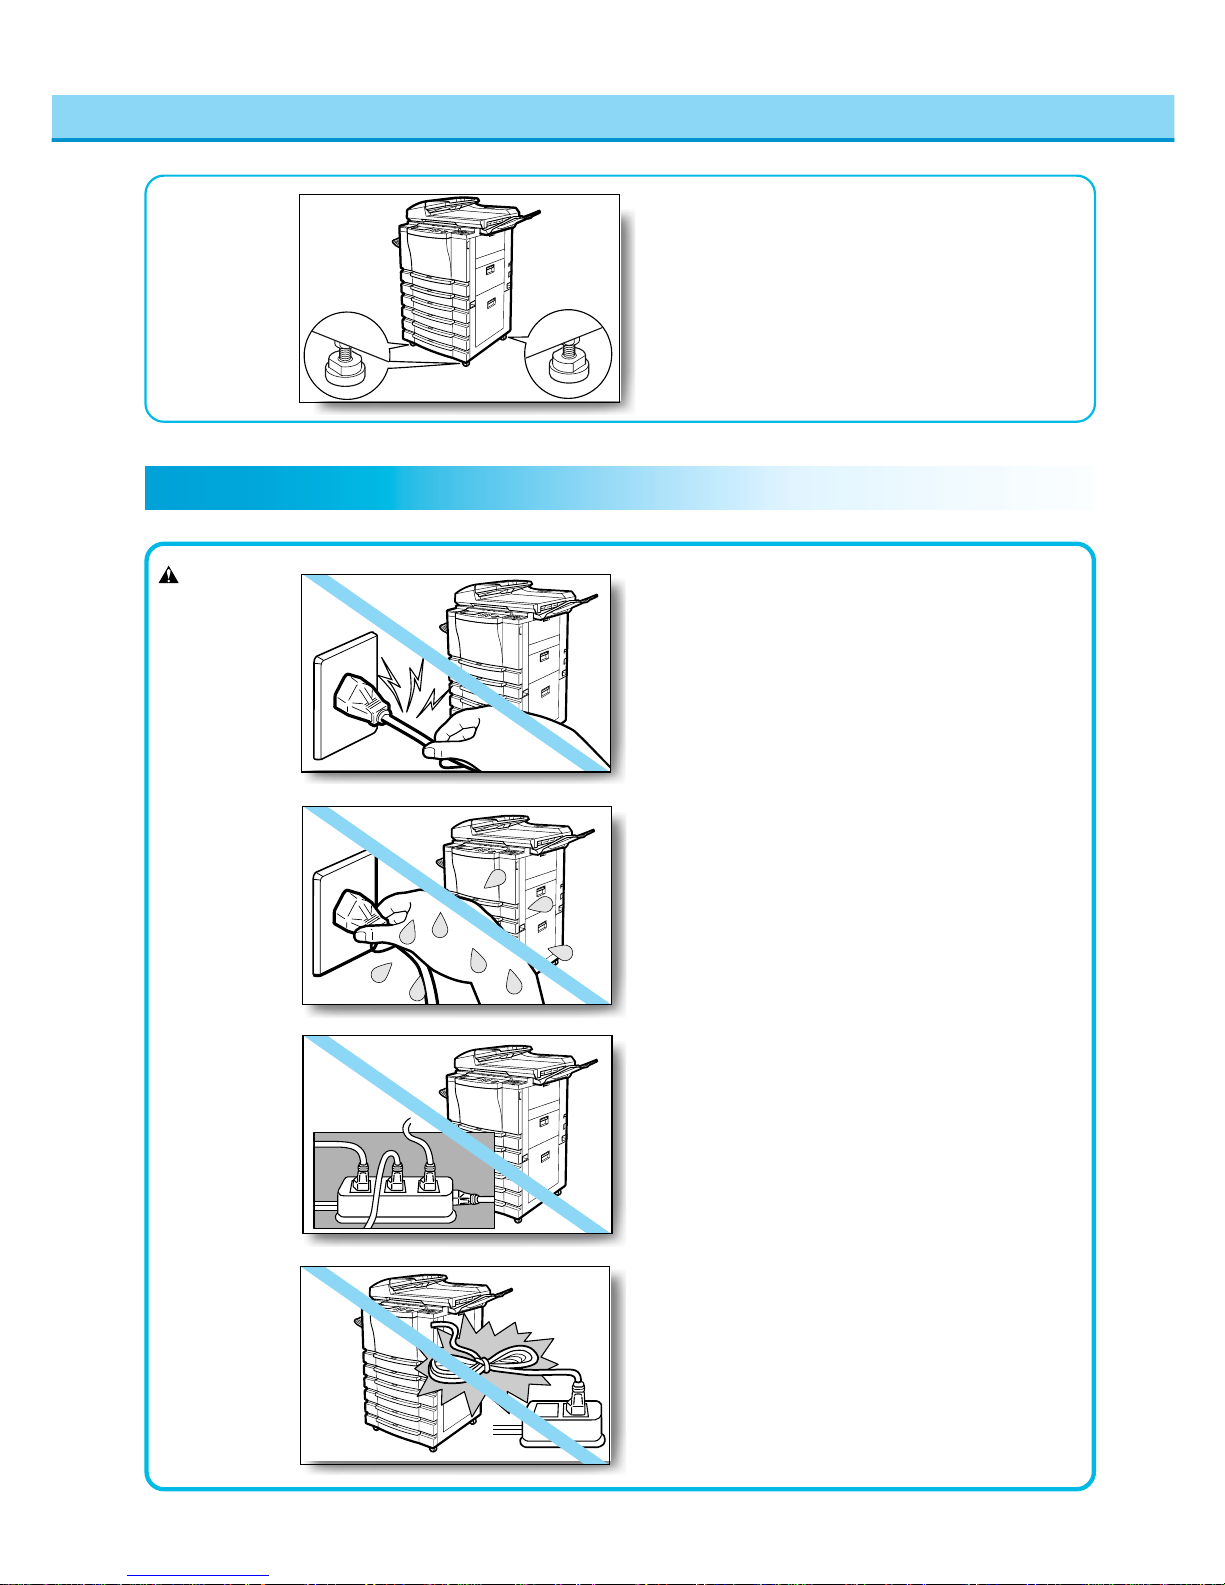
●Do not remove the machine’s fixing stoppers
after the machine has been installed, as this
may cause the machine to fall or tip over,
resulting in personal injury.
Power Supply
●Do not damage or modify the power cord. Also,
do not place heavy objects on the power cord,
or pull on or excessively bend it, as this could
cause electrical damage and result in a fire or
electrical shock.
●Do not insert or unplug the power plug with wet
hands, as this may result in electrical shock.
●Do not plug the machine into a multi-plug power
strip, as this may cause fire or electrical shock.
●Do not bundle up or tie the power cord in a knot,
as this may result in a fire or electrical shock.
Page 18
16
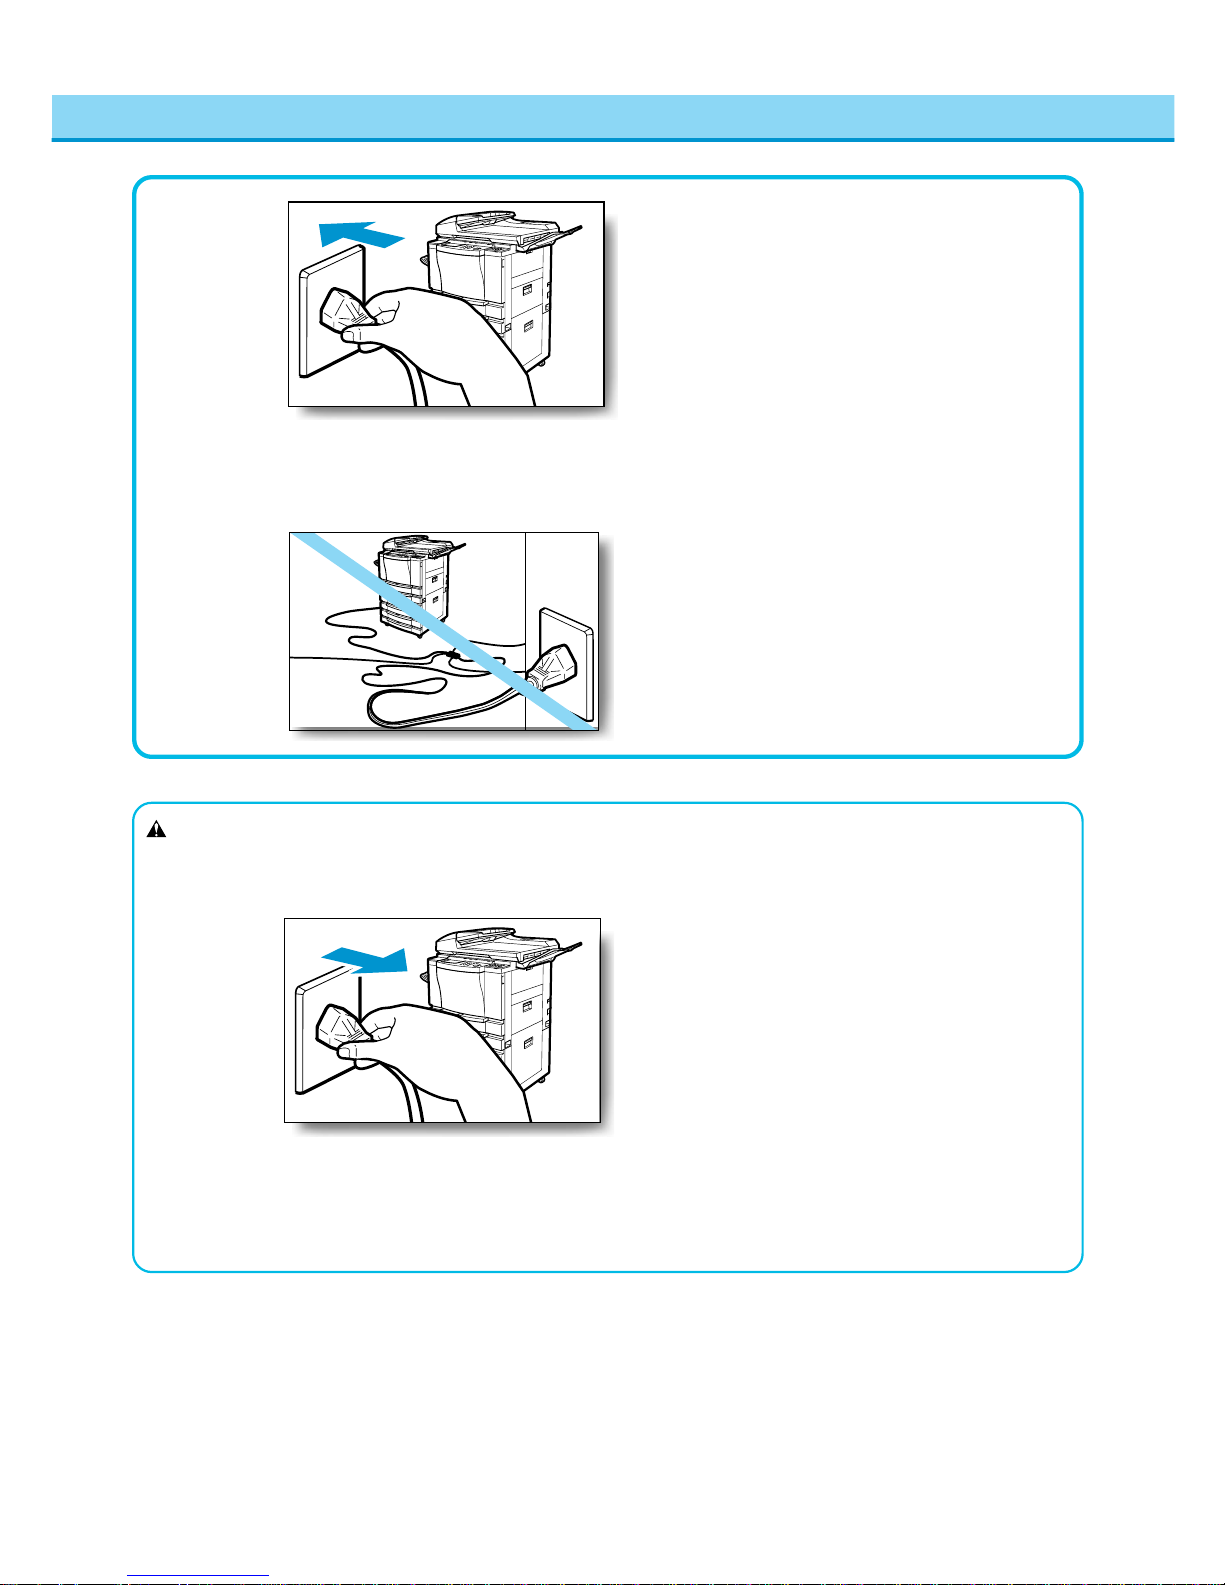
●Insert the power cord completely into the outlet,
as failure to do so may result in a fire or
electrical shock.
Safety Considerations
●Do not use power cords other than the provided
power cord, as this may result in a fire or
electrical shock.
●As a general rule, do not use extension cords.
Using an extension cord may result in a fire or
electrical shock. If an extension cord must be
used, however, untie the cord binding and insert
the power plug completely into the extension
cord outlet to ensure a firm connection between
the power and extension cords.
●Do not use power supplies with voltages other
than 120 V AC, as this may result in a fire or
electrical shock.
●Always grasp the plug portion when unplugging
the power plug. Pulling on the power cord may
expose or snap the core wire, or otherwise
damage the power cord. If the cord is damaged,
this could cause an electricity leak and result in
a fire or electrical shock.
CAUTION
●Leave sufficient space around the power plug
so that it can be unplugged easily. If objects are
placed around the power plug, you will be
unable to unplug it in an emergency.
Page 19
17
Safety Considerations
WARNING
Handling
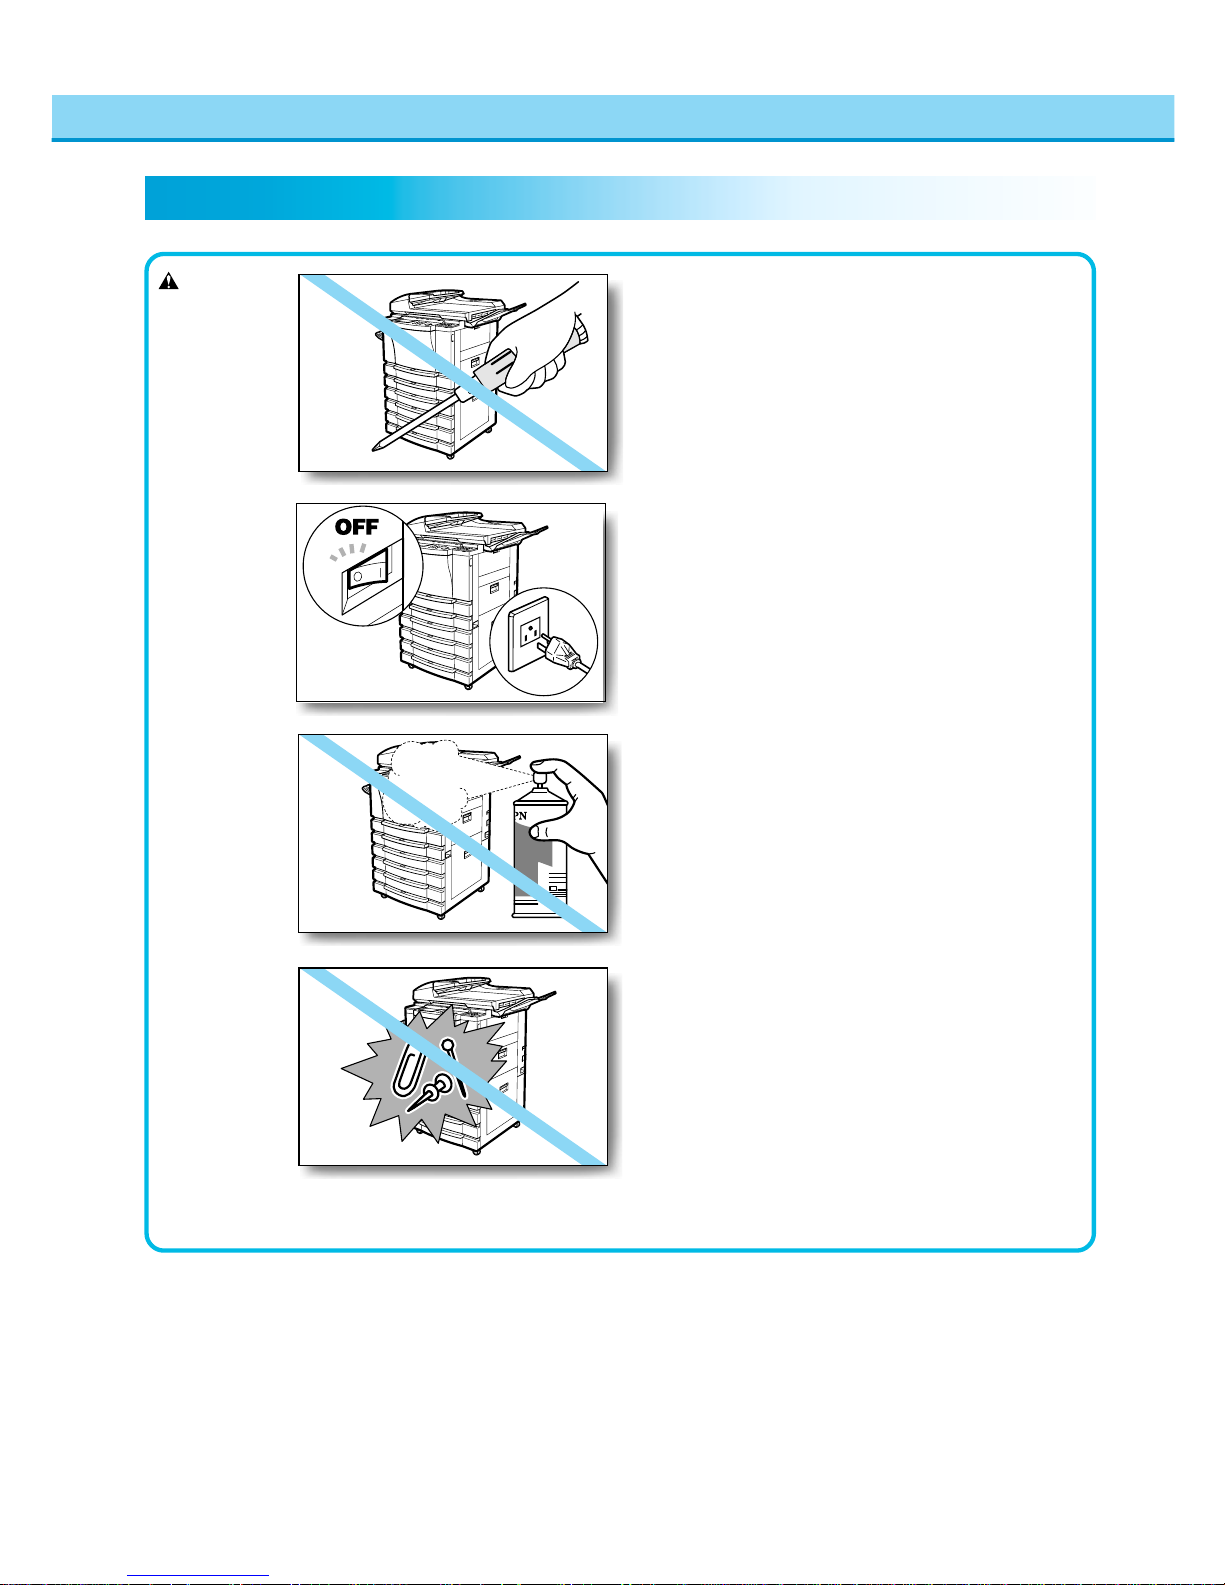
●Do not attempt to disassemble or modify the
machine. There are high-temperature and highvoltage components inside the machine which
may result in a fire or electrical shock.
●If the machine makes strange noises, or emits
smoke, heat or unusual smells, immediately turn
OFF the main power switch and unplug the
power plug from the outlet. Then, contact your
service representative. Continued use of the
machine in this condition may result in a fire or
electrical shock.
●Do not use highly flammable sprays near the
machine. If gas from these sprays comes into
contact with the electrical components inside
the machine, this may result in a fire or electrical
shock.
●Do not drop paper clips, staples or other metal
objects inside the machine. Also, do not spill
water, liquids or inflammable substances
(alcohol, benzene, paint thinner, etc.) inside the
machine. If these items come into contact with a
high-voltage area inside the machine, this may
result in a fire or electrical shock. If these items
are dropped or spilled inside the machine,
immediately turn OFF the main power switch
and unplug the power plug from the outlet.
Then, contact your service representative.
Page 20
18
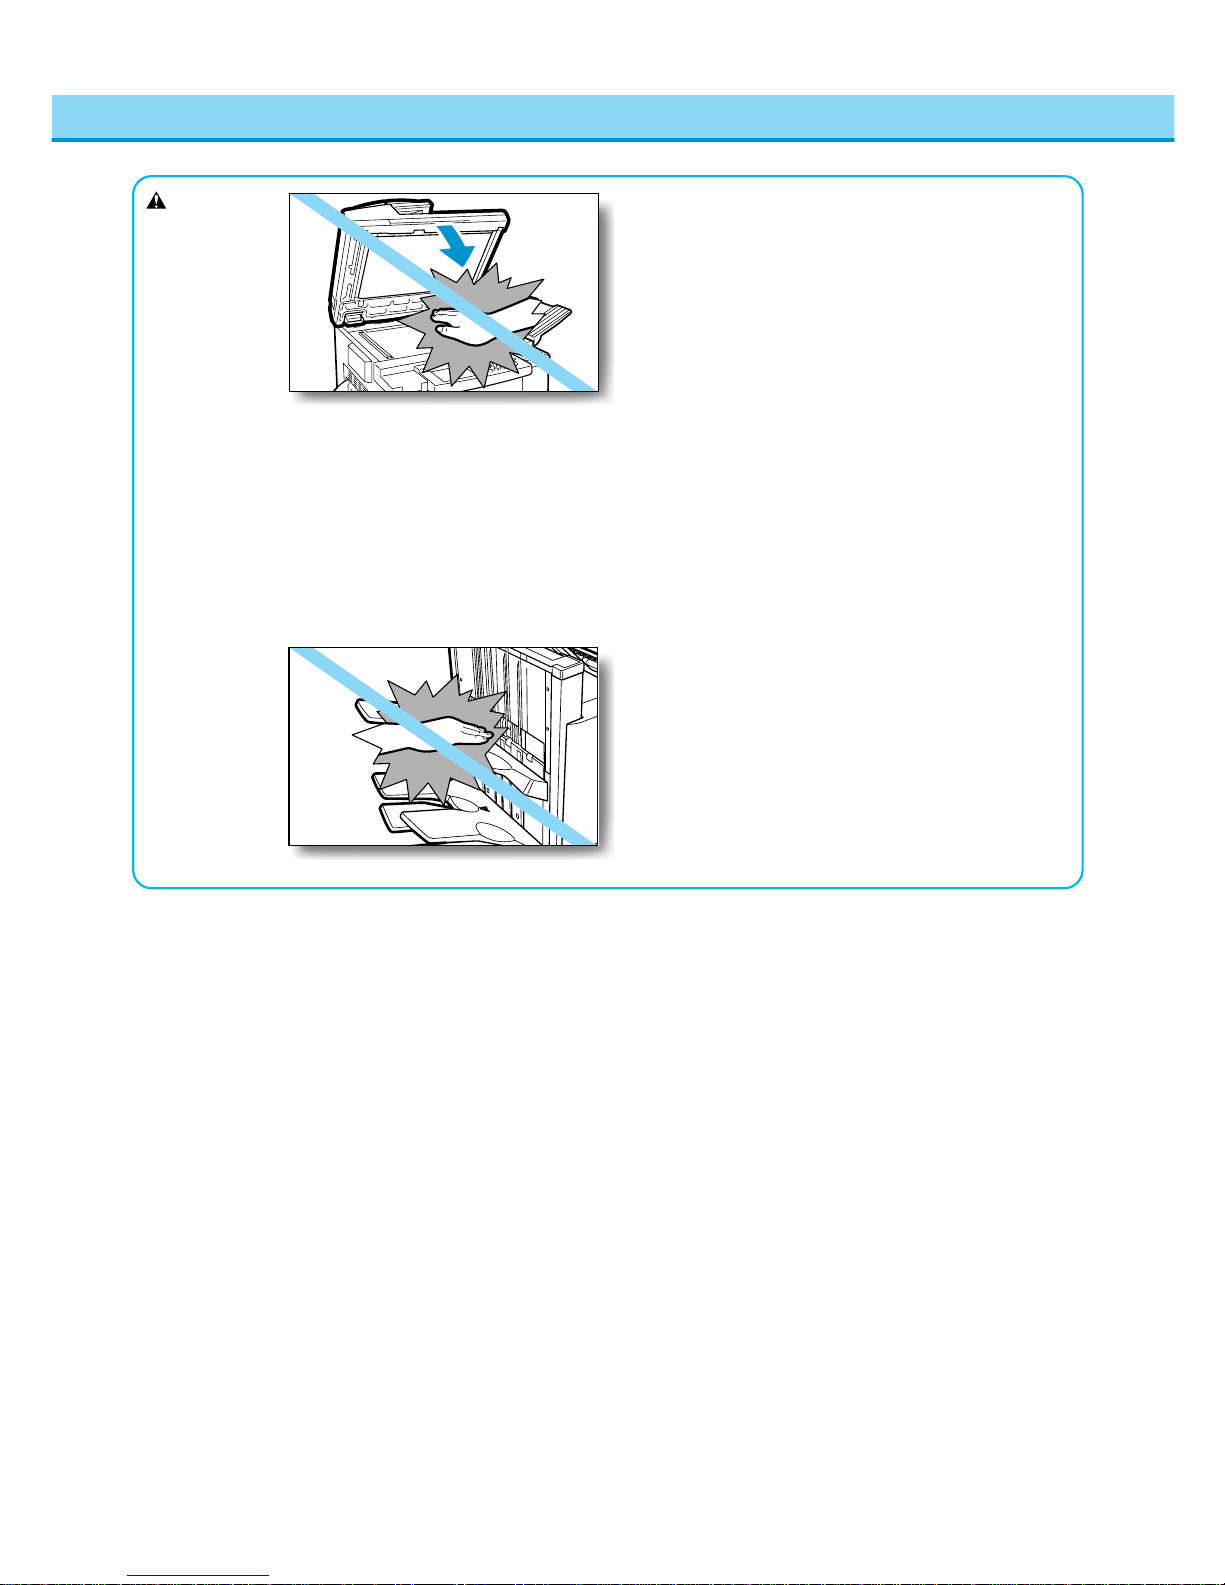
●Close the platen cover and feeder gently to
avoid catching your hand, as this may result in
personal injury .
●Do not touch the Finisher while making copies,
as this may result in personal injury.
●Turn OFF the power switch for safety when the
machine will not be used for a long period of
time such as overnight. Also, unplug the power
plug for safety when the machine will not be
used for an extended period of time such as
during consecutive holidays.
●Do not place your hand in the part of the tray
where stapling is performed while a Finisher is
attached, as this may result in personal injury.
Safety Considerations
CAUTION
Page 21
19
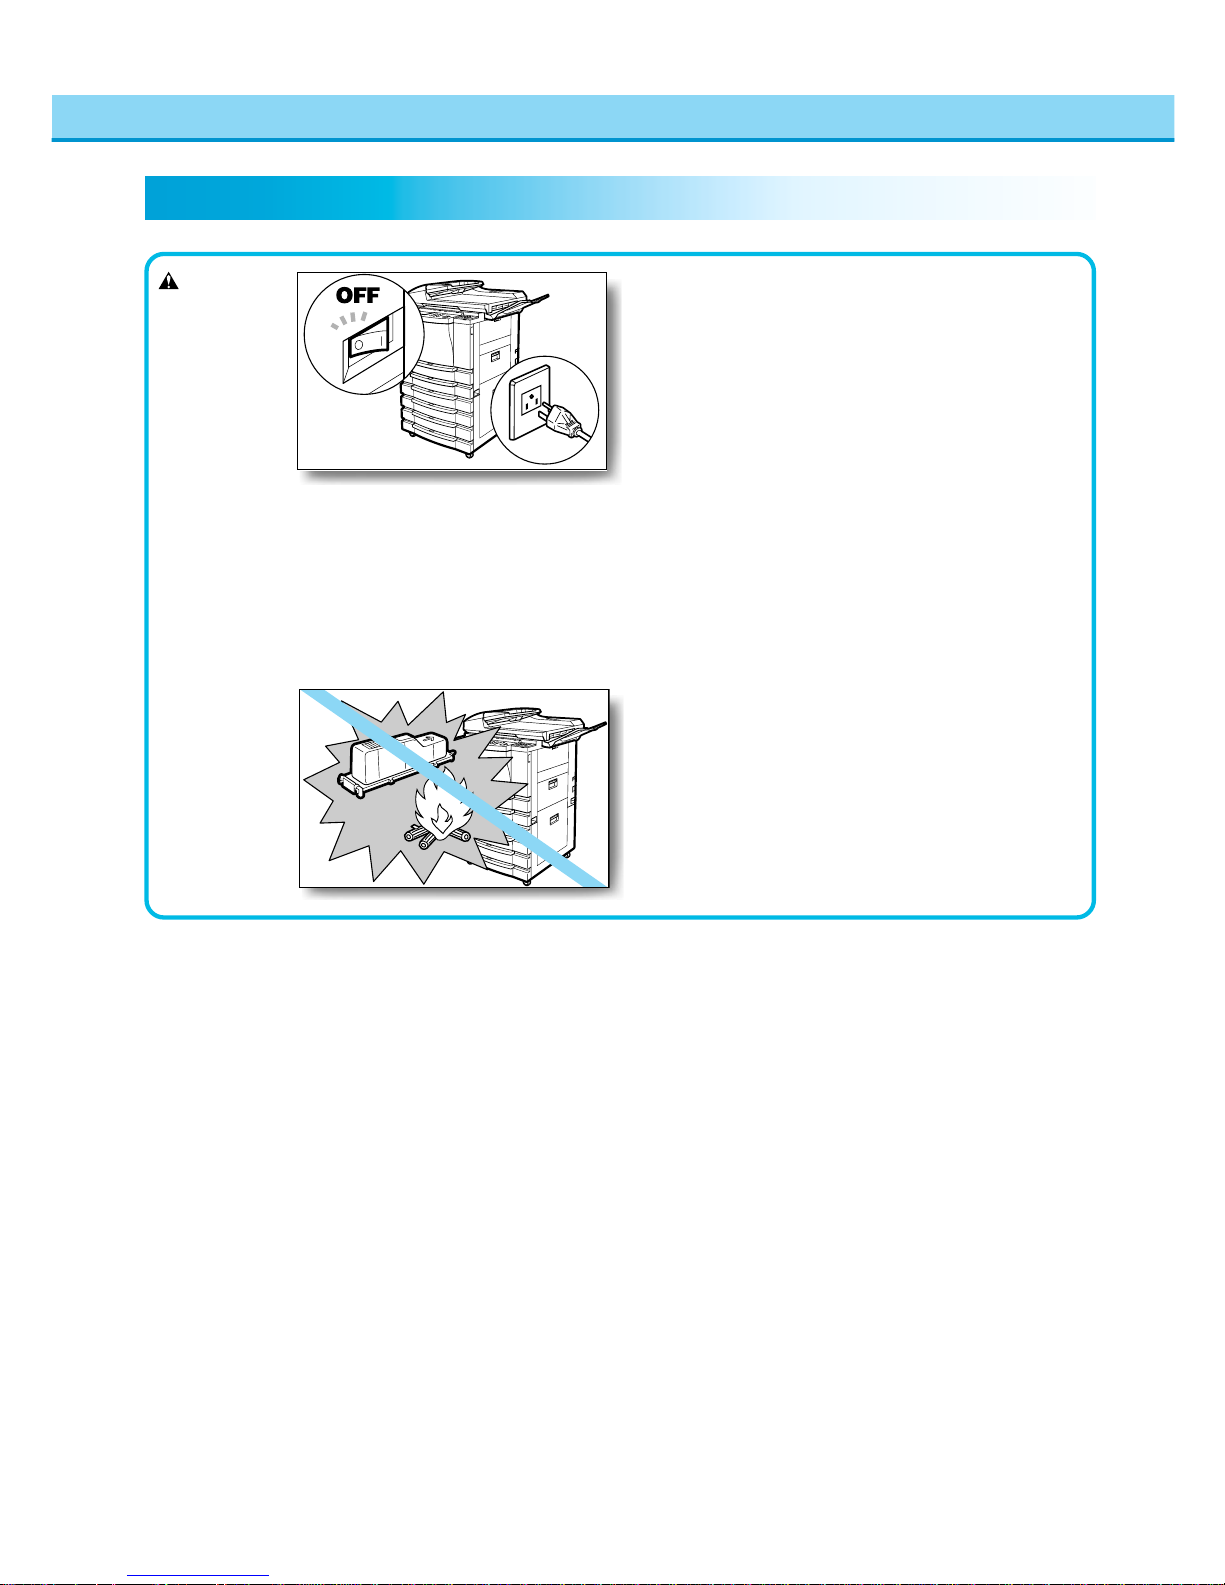
●When cleaning the machine, first turn OFF the
main power switch and unplug the power plug.
Failure to observe these items may result in a
fire or electrical shock.
WARNING
Maintenance and Inspections
●Clean the machine using a firmly wrung-out
cloth dampened with a mild cleansing detergent.
Do not use alcohol, benzene, paint thinner or
other inflammable substances. If inflammable
substances come into contact with a highvoltage area inside the machine, this may result
in a fire or electrical shock.
●Do not throw a used toner cartridge into open
flames, as this may ignite the toner remaining
inside the cartridge and result in burns or a fire.
Safety Considerations
Page 22
20
Safety Considerations
CAUTION
●Unplug the power plug from the outlet at least
once a year, and clean the area around the
base of the plug’s metal pins to ensure all dust
is removed. If dust accumulates in this area, it
may result in a fire.
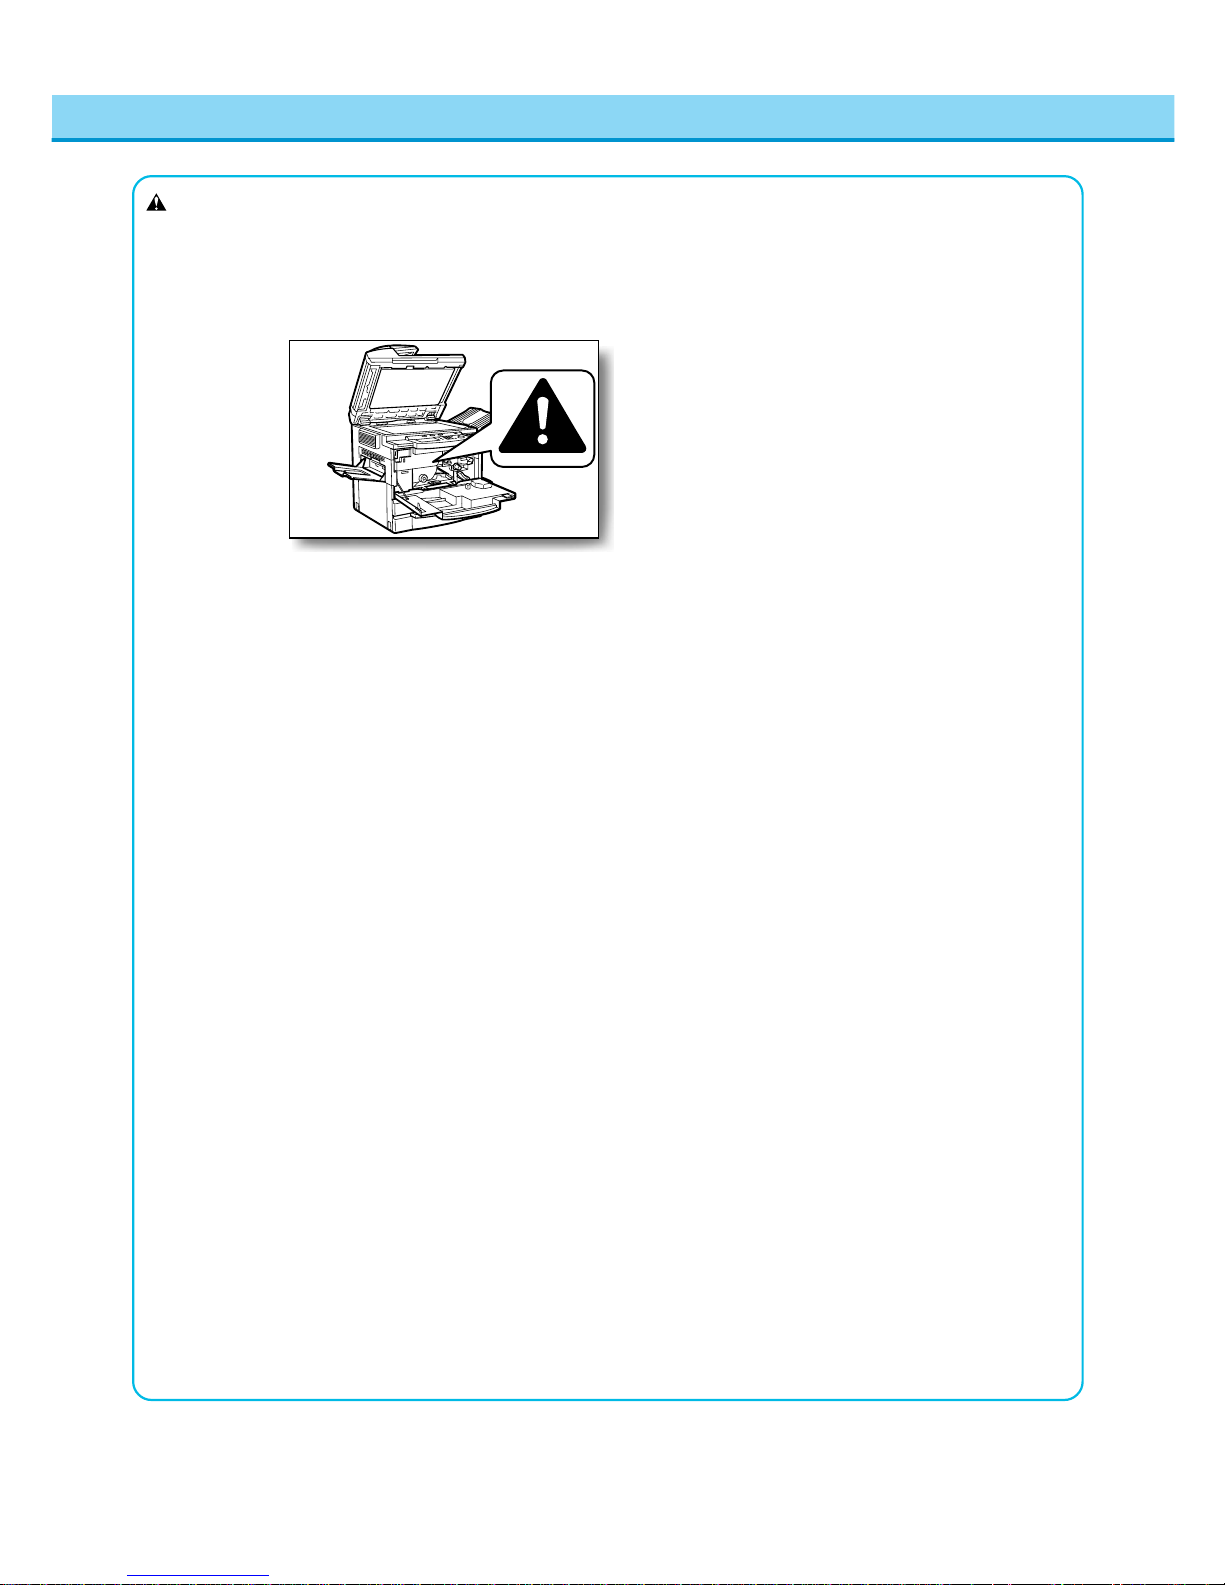
●There are some areas inside the machine which
are subject to high voltages and high temperatures. Take adequate precautions when
performing internal inspections to avoid burns or
electrical shock.
●When removing jammed paper or when
inspecting the inside of the machine, do not
allow necklaces, bracelets or other metal
objects to touch the inside of the machine, as
this may result in burns or electrical shock.
●When removing copy paper which has become
jammed inside the machine, take care not to
allow the toner on the jammed copy paper to
come into contact with your hands or clothing,
as this will dirty your hands or clothing. If they
become dirty, wash them immediately with cold
water. Washing with warm water will set the
toner and make it impossible to remove the
toner stains.
●When removing copy paper which has become
jammed inside the machine, remove the
jammed copy paper gently to prevent the toner
on the paper from scattering and entering your
eyes or mouth. If toner enters your eyes or
mouth, wash immediately with cold water and
consult a physician.
●When loading copy paper or removing jammed
originals or copy paper, take care not to cut your
hands on the edges of the original or copy
paper.
●When removing a used toner cartridge from the
toner supply port, remove the cartridge carefully
to prevent toner from scattering and entering
your eyes or mouth. If toner enters your eyes or
mouth, wash immediately with cold water and
consult a physician.
Page 23
21
Safety Considerations
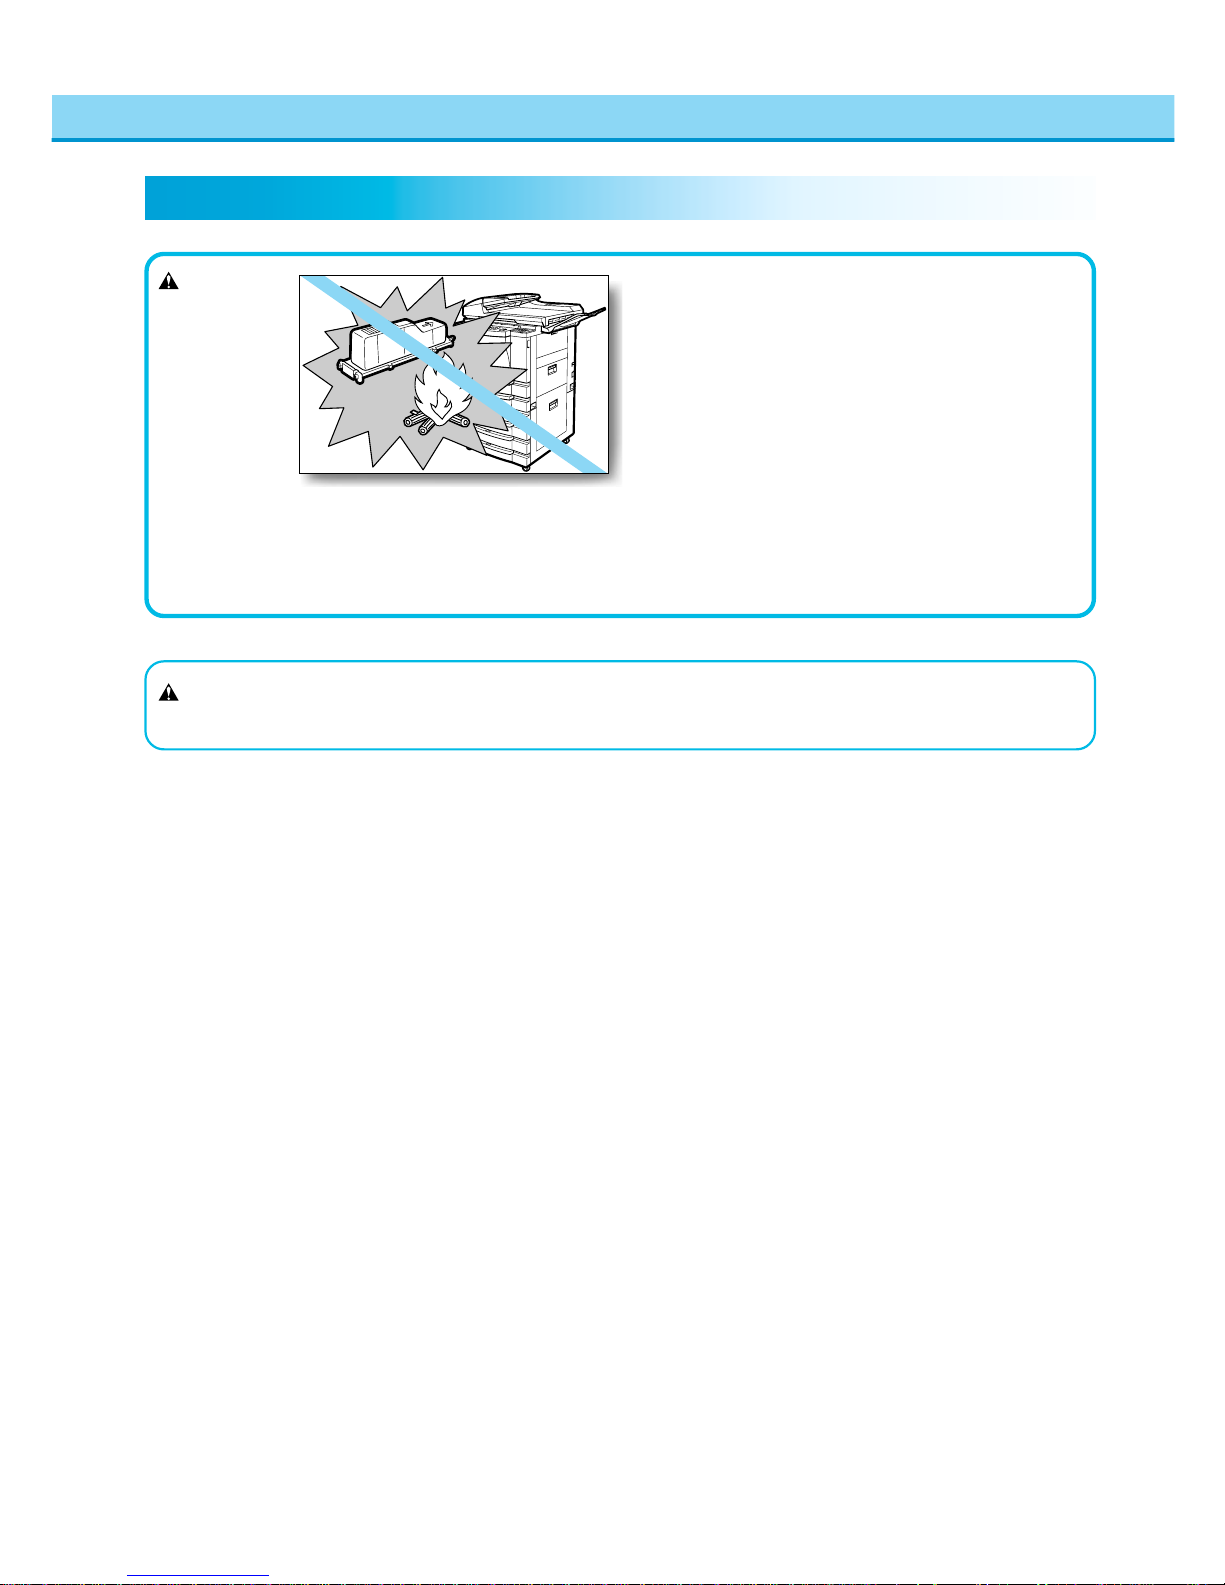
●Do not throw a toner cartridge into open flames,
as this may cause the toner to ignite and result
in burns or a fire.
WARNING
Consumables
●Do not store toner cartridges or copy paper in
places exposed to open flames, as this may
cause the toner or copy paper to ignite and
result in burns or a fire.
CAUTION
●Keep toner and other consumables out of the reach of small children. If these items
are ingested, consult a physician immediately.
Page 24
22
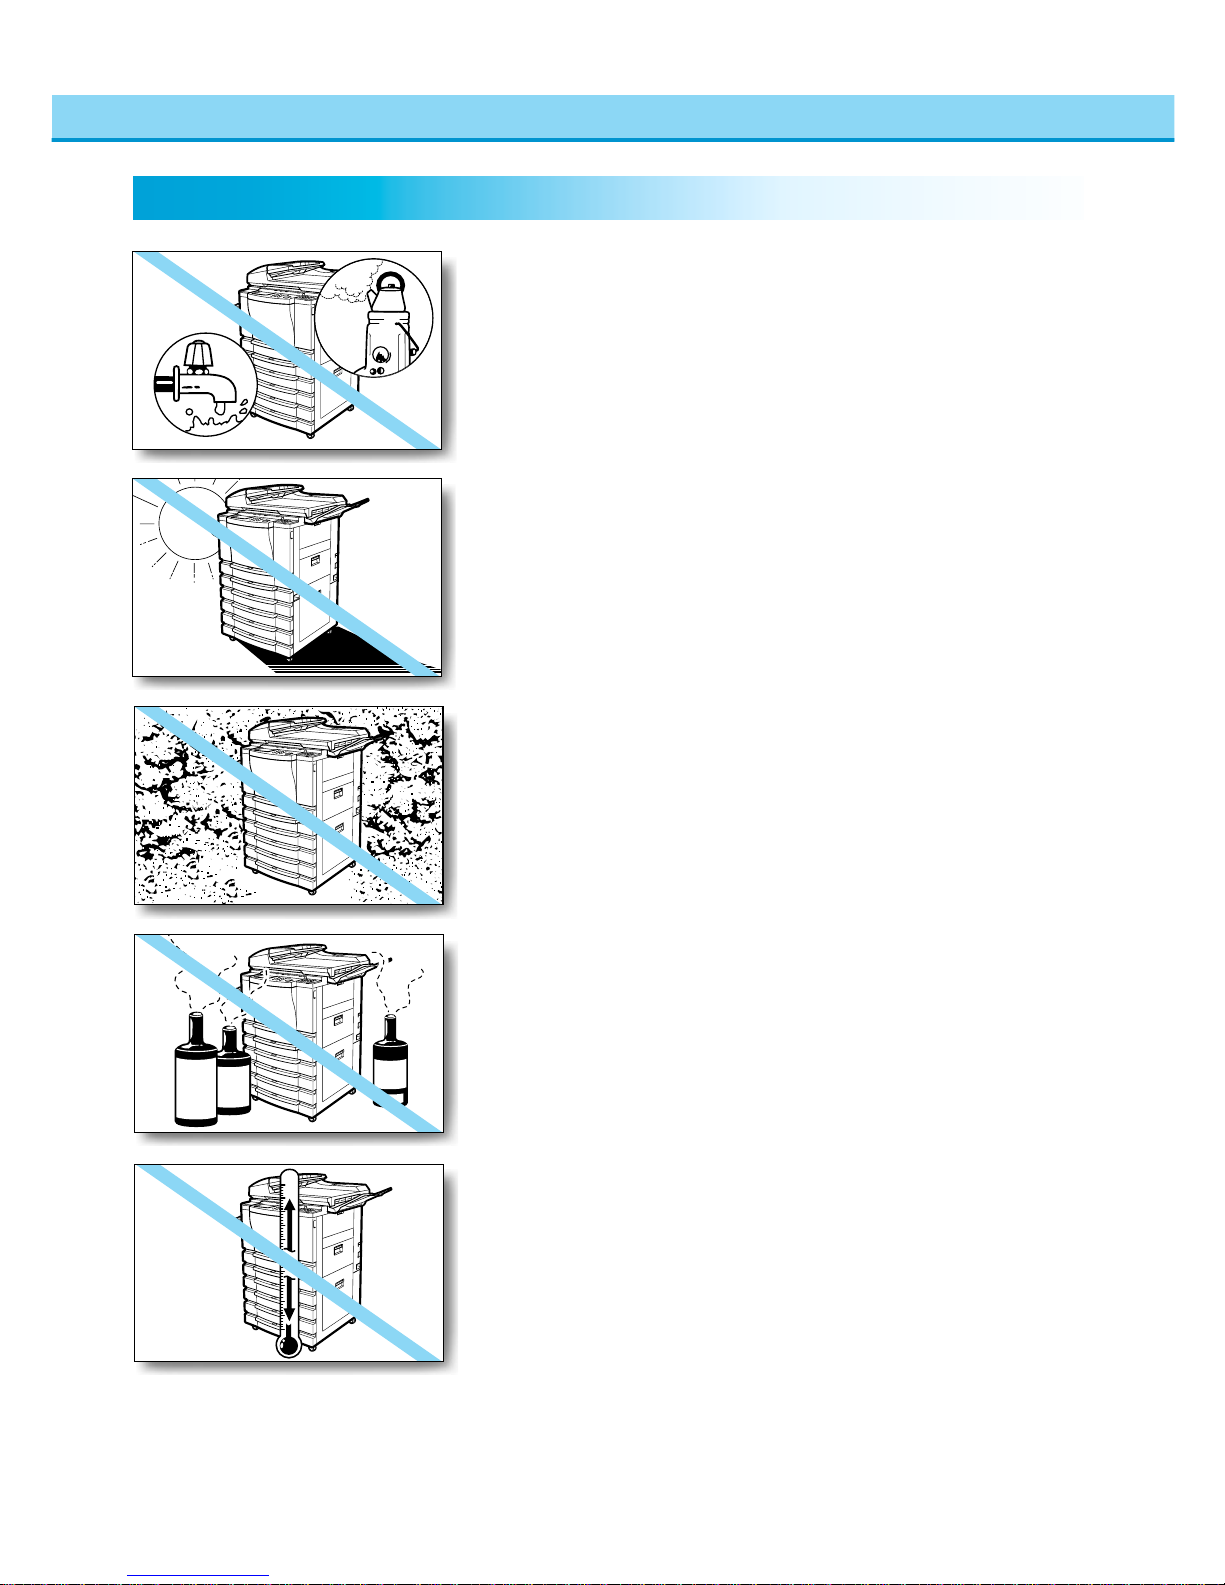
■ Avoid locations which are subject to low temperatures
and low humidity, or high temperatures and high humidity.
For example, avoid installing the machine near water faucet, hot
water heaters, humidifiers, air conditioners, heaters and stoves.
Avoid installing the machine in the following locations.
Installation Precautions
■ Avoid installing the machine in the direct sunlight.
If unavoidable, shade the machine using curtains.
■ Avoid poorly ventilated locations.
During use, the machine generates ozone. However, the amount of
ozone generated is not enough to affect the human body.
Nevertheless, if the machine is used for a prolonged period of time
in a poorly ventilated room, or when making lots of copies, be sure
to ventilate the room to make the working environment as comfortable as possible.
■ Avoid locations where a considerable amount of dust
accumulates.
■ Avoid locations where ammonia gas is emitted.
■ Avoid locations near volatile flammables, such as
alcohol or paint thinner.
■ Avoid locations which are subject to vibrations.
For example, avoid installing the machine on unstable floors or
stands.
■ Avoid rapid changes in temperature.
If the room in which the machine is installed is rapidly heated from
a low temperature, condensation may form inside the machine.
This can adversely affect copy quality or result in an inability to
obtain copy images.
■ Avoid installing the machine near computers or other
precision electronic equipment.
Electrical interference and vibrations generated by the machine
during copying can adversely aff ect the operation of such equipment.
■ Avoid installing the machine near televisions, radios or
other similar electronic equipment.
The machine might interfere with sound and picture signal reception, etc. Plug the machine into a dedicated power outlet and
maintain as much space as possible between the machine and
other electronic equipment.
Page 25
23
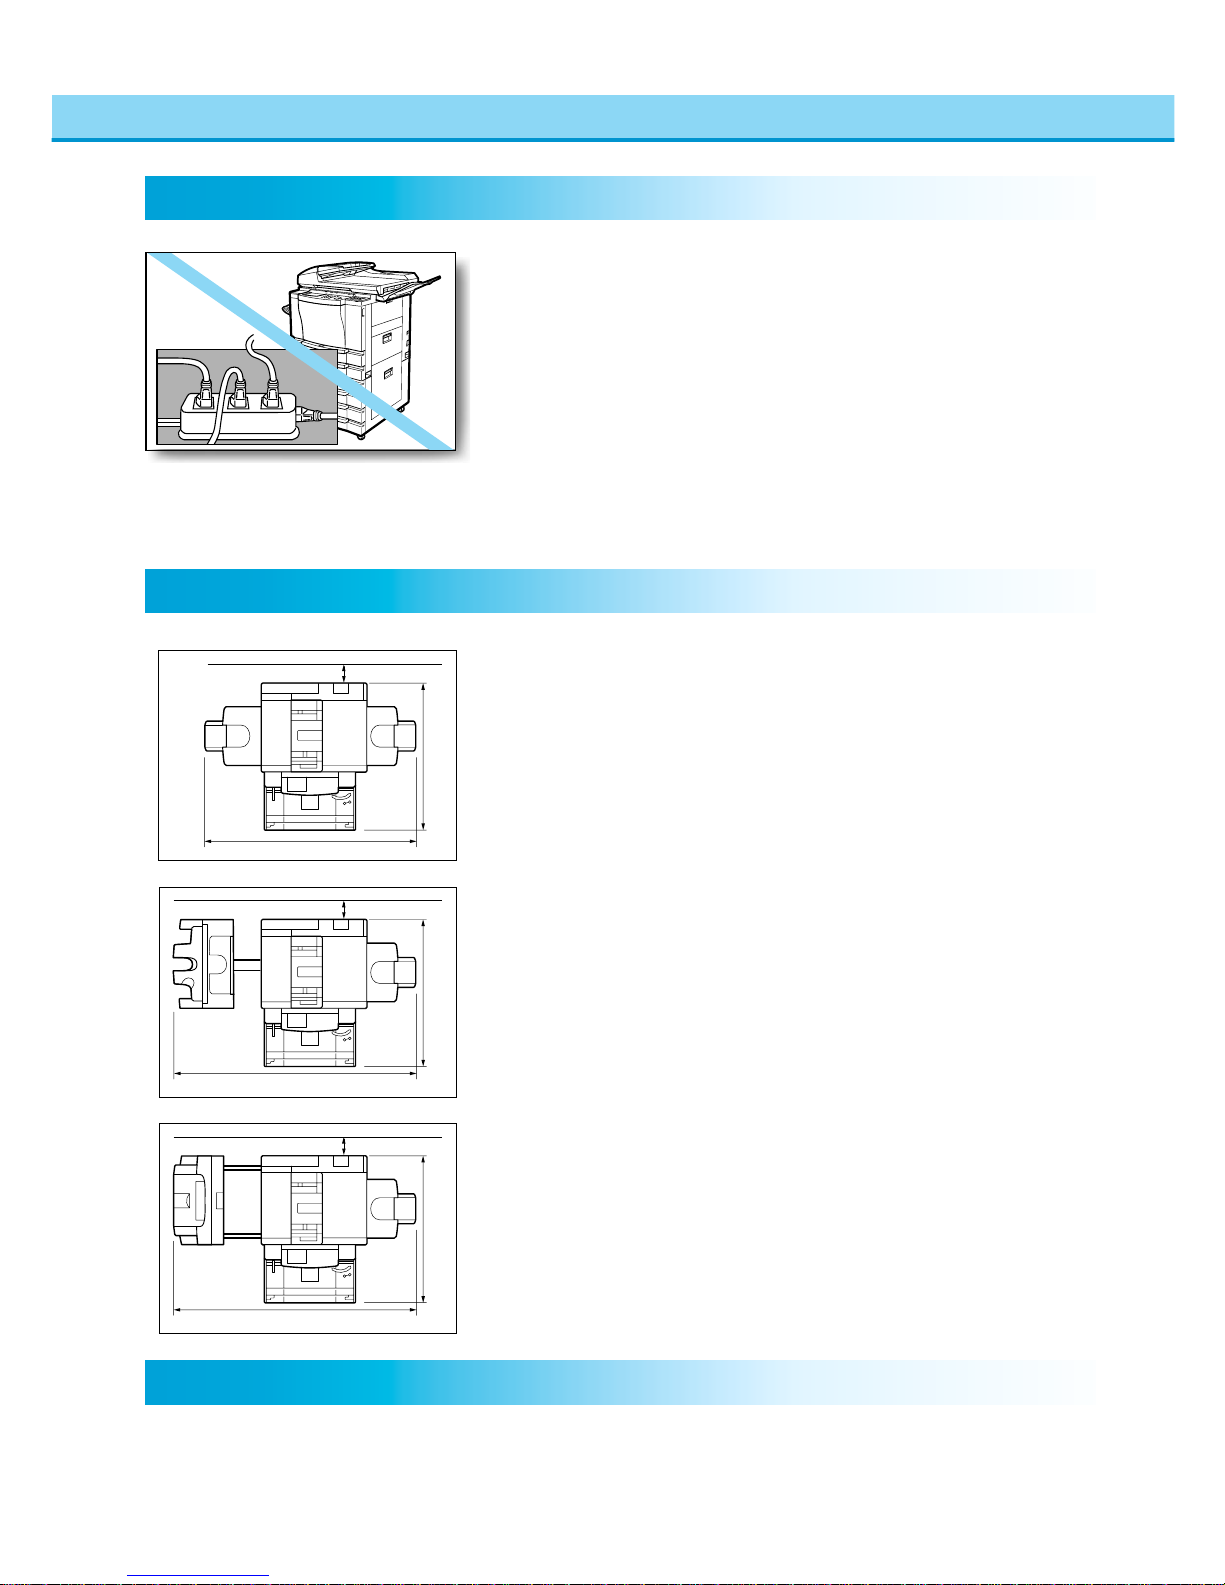
■ Plug the machine into a 120V AC outlet.
■ Do not plug other electrical equipment into the outlet to
which the machine is connected.
■ Do not plug the machine into a multi-plug power strip.
Doing so might cause a fire.
■ The power cable may become damaged if it is often
stepped on or heavy objects are placed on it. Continued
use of a damaged power cable can lead to an accident.
Select a safe power supply.
Installation Precautions
Provide adequate installation space.
■ Provide enough space on each side of the machine for
unrestricted operation.
Main Unit only
Moving the machine
■ If you intend to move the machine, contact your service
representative beforehand.
51" (1296mm)
36"-3/4 (934mm)
45"-1/2 (1155mm)(cassette extended)
36"-3/4 (934mm)
45"-1/2 (1155mm)(cassette extended)
36"-3/4 (934mm)
45"-1/2 (1155mm)(cassette extended)
more than 4" (100mm)
more than 4" (100mm)
more than 4" (100mm)
75"-1/4 (1912mm)
59"-3/8 (1507.4mm)
When installing the Finisher-C1 or the Saddle Finisher-C2
When installing the Finisher-E1
Page 26

24
■ Do not attempt to disassemble or modify the machine.
■ Some parts inside the machine are subject to high
voltages and temperatures. Take adequate precaution
when inspecting the inside of the machine. Do not carry
out any inspections not described in this manual.
Handling Precautions
■ Be careful not to drop any foreign objects such as paper
clips or staples inside the machine. If a foreign object
comes into contact with electrical parts inside the
machine, it might cause a short circuit and result in a
fire or electrical shock.
■ If there is unusual noise or smoke, immediately turn the
main power switch OFF, then call your service representative. Using the machine in this state might cause a fire
or electric shock. Also, avoid placing objects around the
plug so that the machine can be unplugged whenever
necessary.
■ Do not turn the main power switch OFF or open the
front cover during copying. This might result in paper
jams.
■ To avoid danger of ignition, do not use flammable
aerosol products near the machine.
■ If the machine will not be used for a prolonged period of
time, for example during the night, turn the main power
switch OFF.
Page 27
Parts and Their Functions ............................................................... 1-2
Integrated Operation........................................................................ 1-5
Entering Characters on the Touch Panel Display..........................1-6
Main Power and Control Panel Power ............................................ 1-8
Flow of Copy Operations................................................................. 1-9
Placing Originals............................................................................ 1-11
Checking the Copy Mode Settings ............................................... 1-15
Changing or Canceling a Selected Copy Mode........................... 1-16
Chapter 1
Before You Start Using
Copy Functions
Page 28
Before You Start Using Copy Functions
1–2
Parts and Their Functions
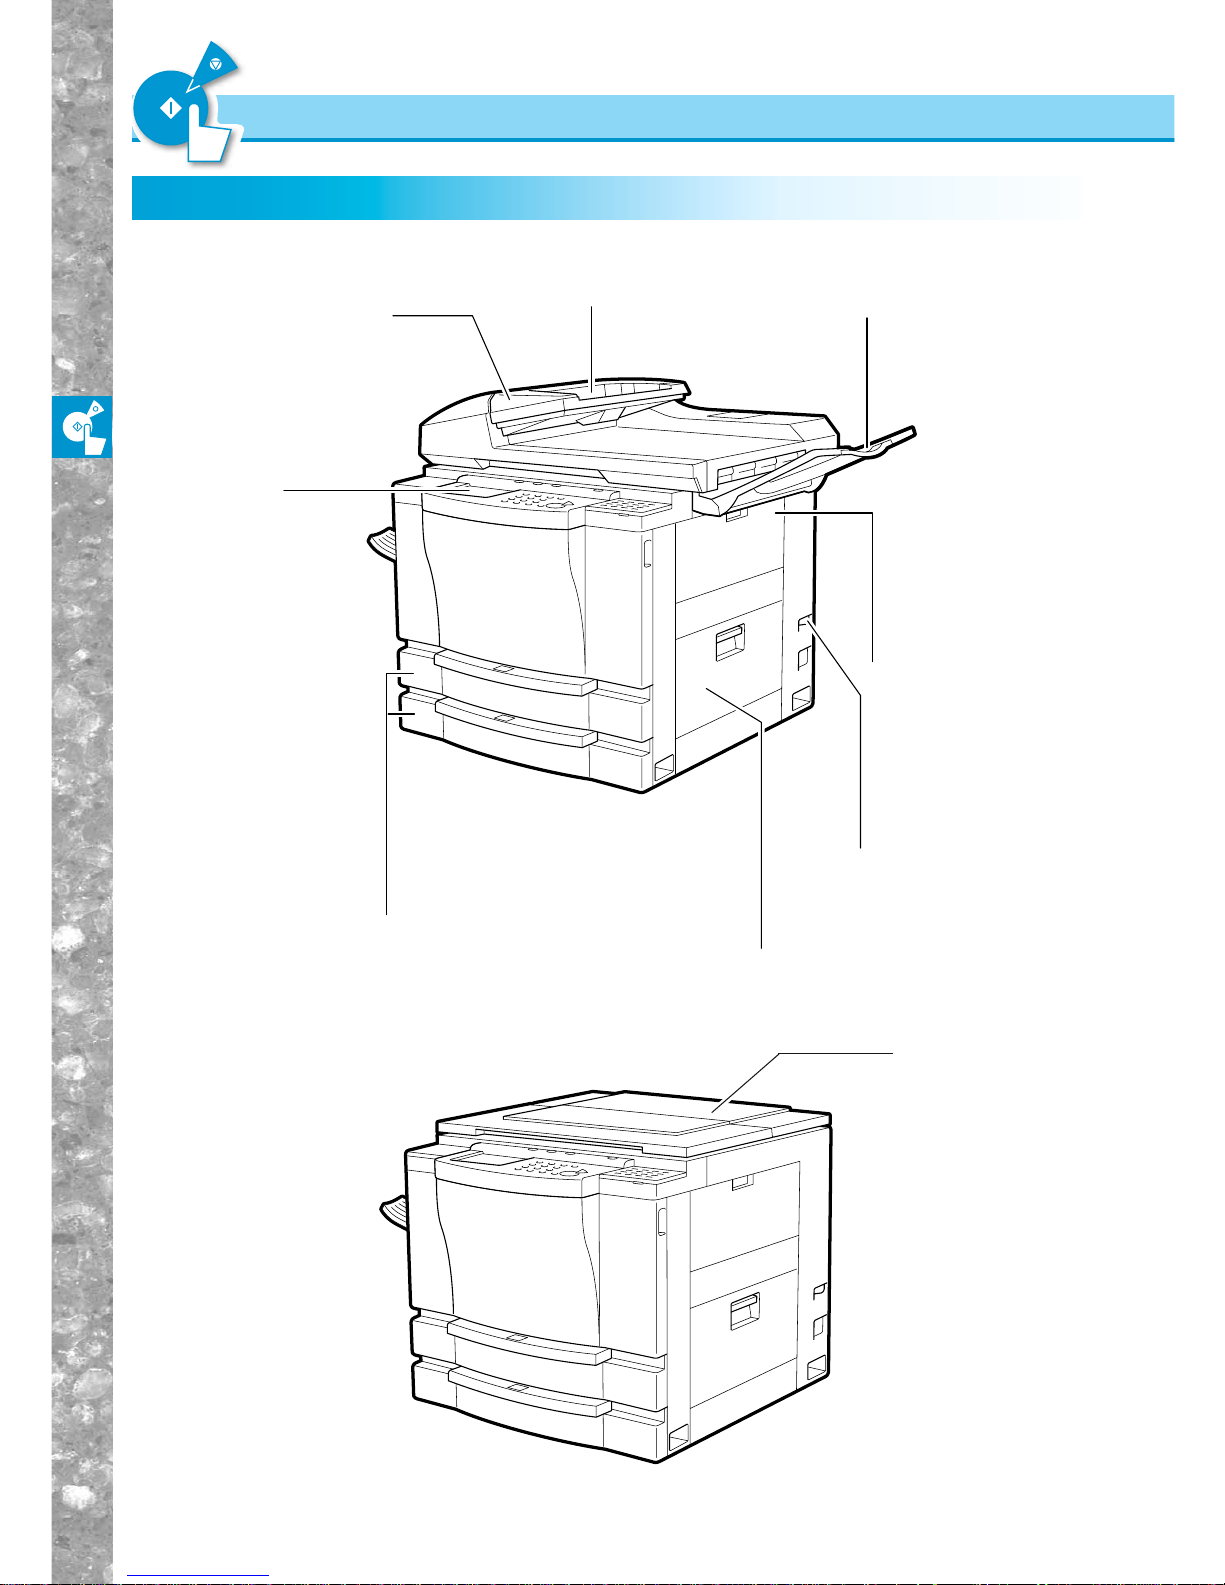
External View
Stack bypass
Feeds transparencies
and heavier weight
copy stock.
(See "Using the Stack
Bypass," on p. 2-4.)
Control Panel
(See "Control
Panel Parts
and Functions ,"
on p. 1-4.)
Main power switch
Press to the "I" position
to turn the power ON.
(See "Main power and
Control Panel Power,"
on p. 1-8.)
Feeder
Original output tray
Right cover
Open to remove jammed copy paper
(See Chapter 6, "Troubleshooting".)
Original supply tray
Paper drawers
Each drawer holds up to
500 sheets (20-lb bond)
of copy paper. The 1st
drawer holds LGL to
STMT size copy paper.
The 2nd drawer holds
11"x17" to STMT size
copy paper.
External View
■DADF-A1 attached
■Platen cover T ype D attached
Platen cover
Type D
Page 29
Before You Star t Using Copy Functions
1–3
Parts and Their Functions
Internal View
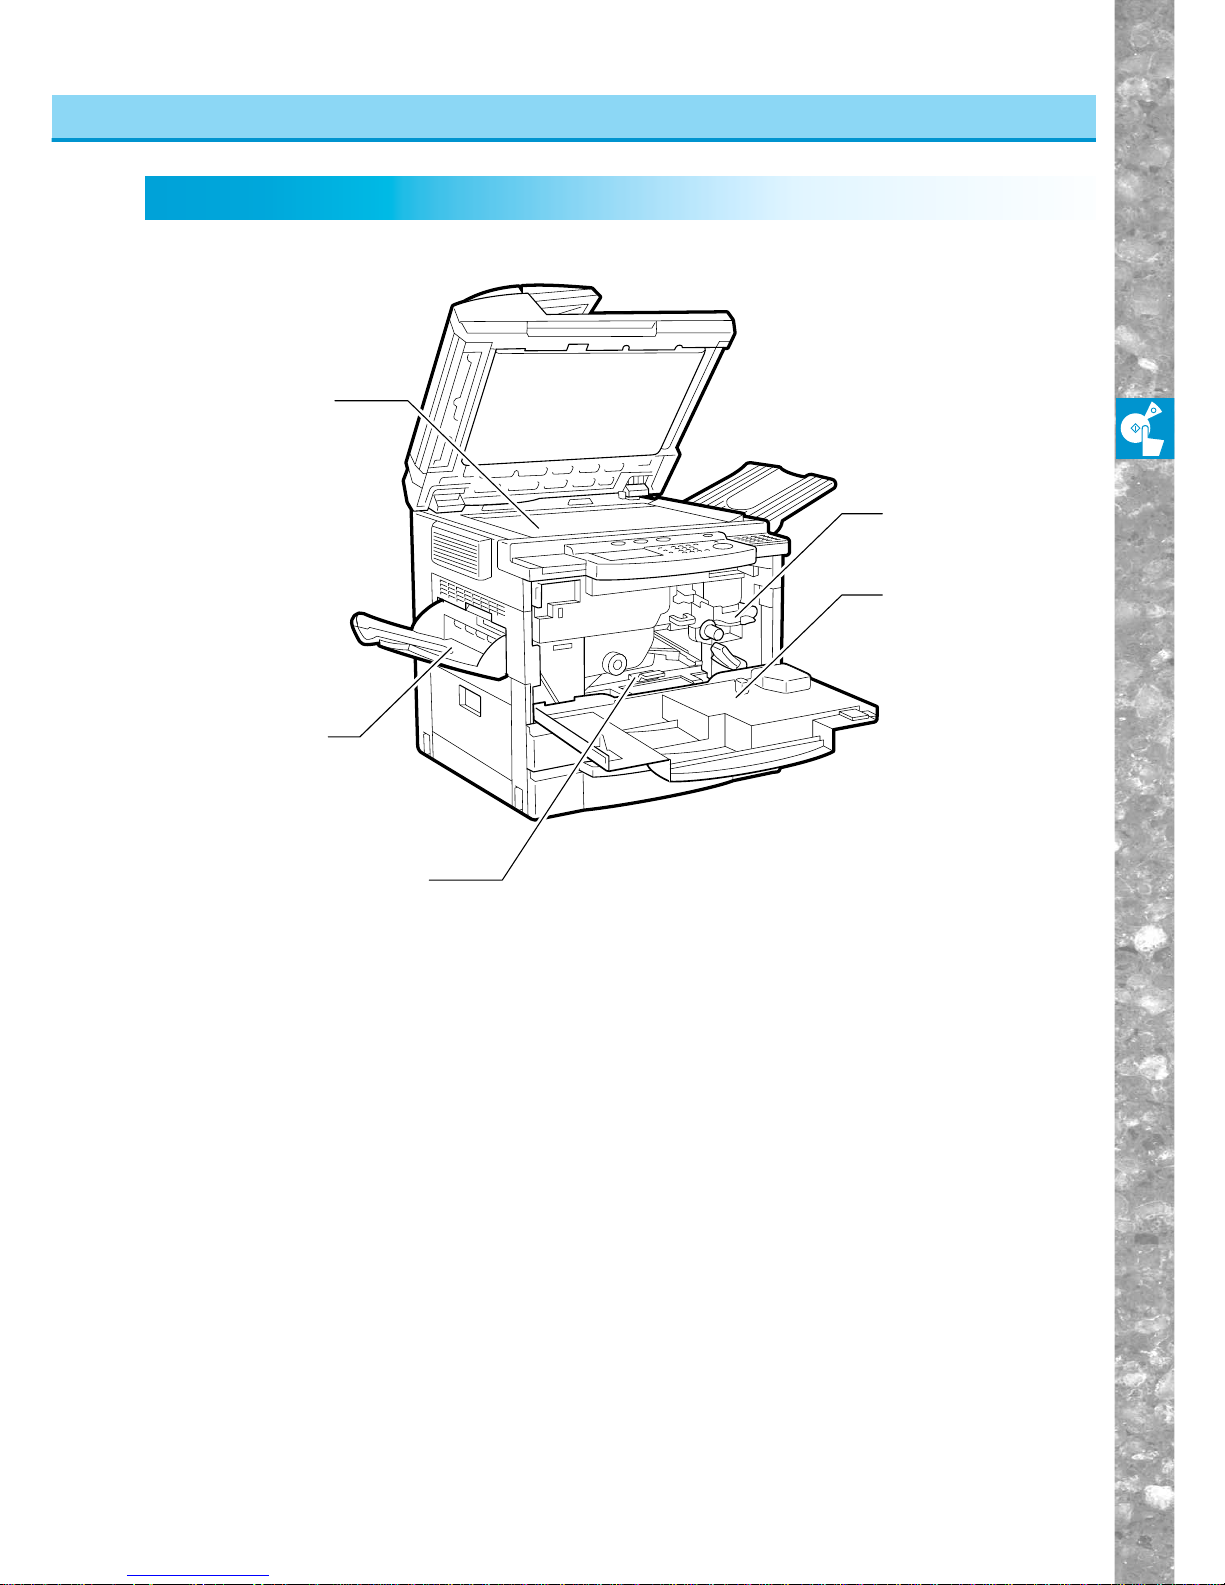
Internal View
Toner box
Platen glass
Front cover
Open this cover when
clearing a paper jam or
adding toner.
Duplexing unit
Copy tray
Copies are output to
this tray.
Page 30
Before You Star t Using Copy Functions
1–4
Parts and Their Functions
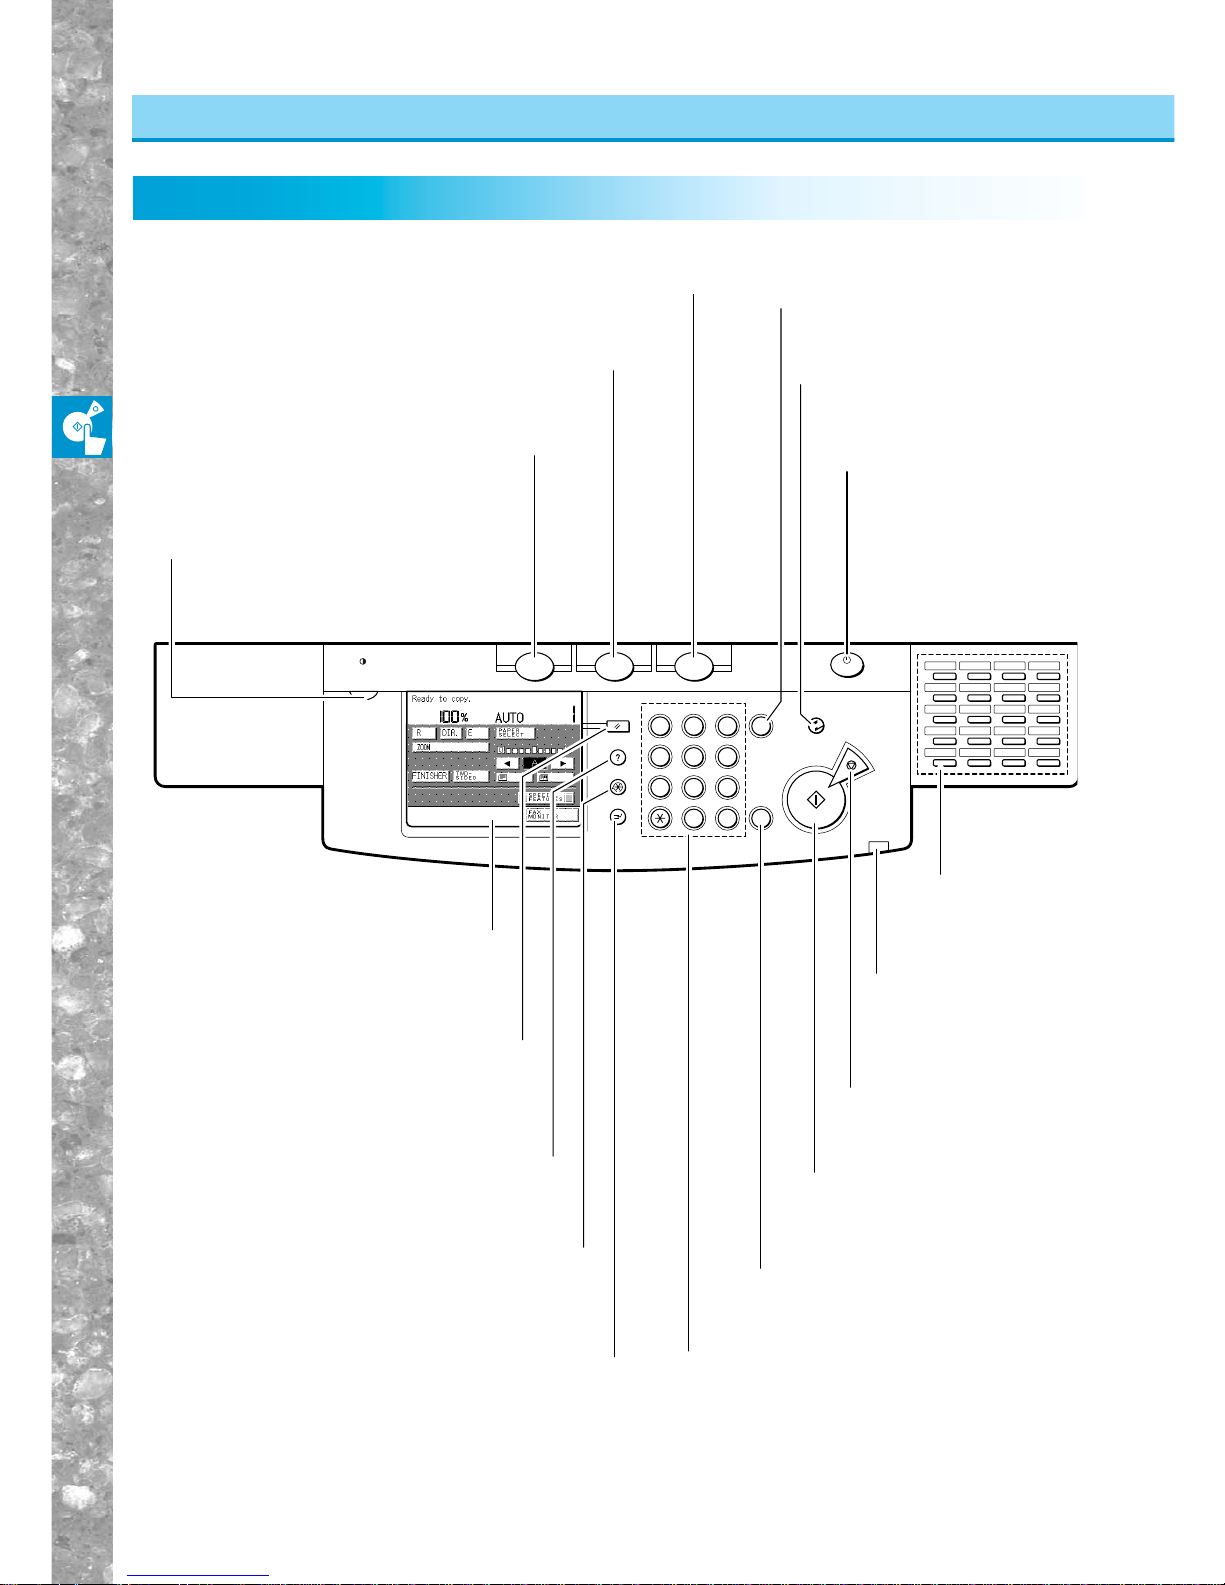
Control Panel Parts and Functions
Control Panel Parts and Functions
ON/OFF
Copying
Clear
Start
Stop
Reset
Guide
Additional Functions
Interrupt
Error
Memory
TX/RX
Error Data Error
Display Contrast
ID
C
FAXCOPY
ABC DEF
JKLGHI MNO
TUVPRS WXY
1
23
4
56
7
809
#
OPER
Energy Saver
COPY key
Press to use the machine as a copier service.
The Copy Basic Features screen appears
in the touch panel display.
FAX key
Press to use the machine as a FAX service.
PRINT I/F key
Press to use expanded functions other than
copy or FAX, such as the printer function.
Control panel power
switch
(sub power supply)
Press to tum the control
panel ON or OFF. When
set to OFF, the machine is
in the Sleep mode.
CLEAR key
Press to clear incorrectly
entered values or characters.
Touch panel display
Display contrast control
Use to adjust the brightness
of the touch panel display.
STOP key
Press to stop scanning of
originals for copy
operations
ENERGY SAVER key
Press to place the copier in the
Energy Saver mode.
START key
Press to start scanning of
originals for copy operations.
ID key
Press when setting the department
ID management function.
Number keys
Press to enter numerical values.
RESET key
Press to return the copy settings
to the Standard mode.
GUIDE key
Press to display explanations of modes or
functions in the touch panel display.
ADDITIONAL FUNCTIONS key
Press to set additional functions.
INTERRUPT key
Press to interrupt a continuous copying job
when you need to make priority copies.
Power indicator
Lights when the main
power is turned ON.
One-touch
dial buttons
Used for the fa
x
function.
PRINT•I/F
Page 31
Before You Star t Using Copy Functions
1–5
Integrated Operation
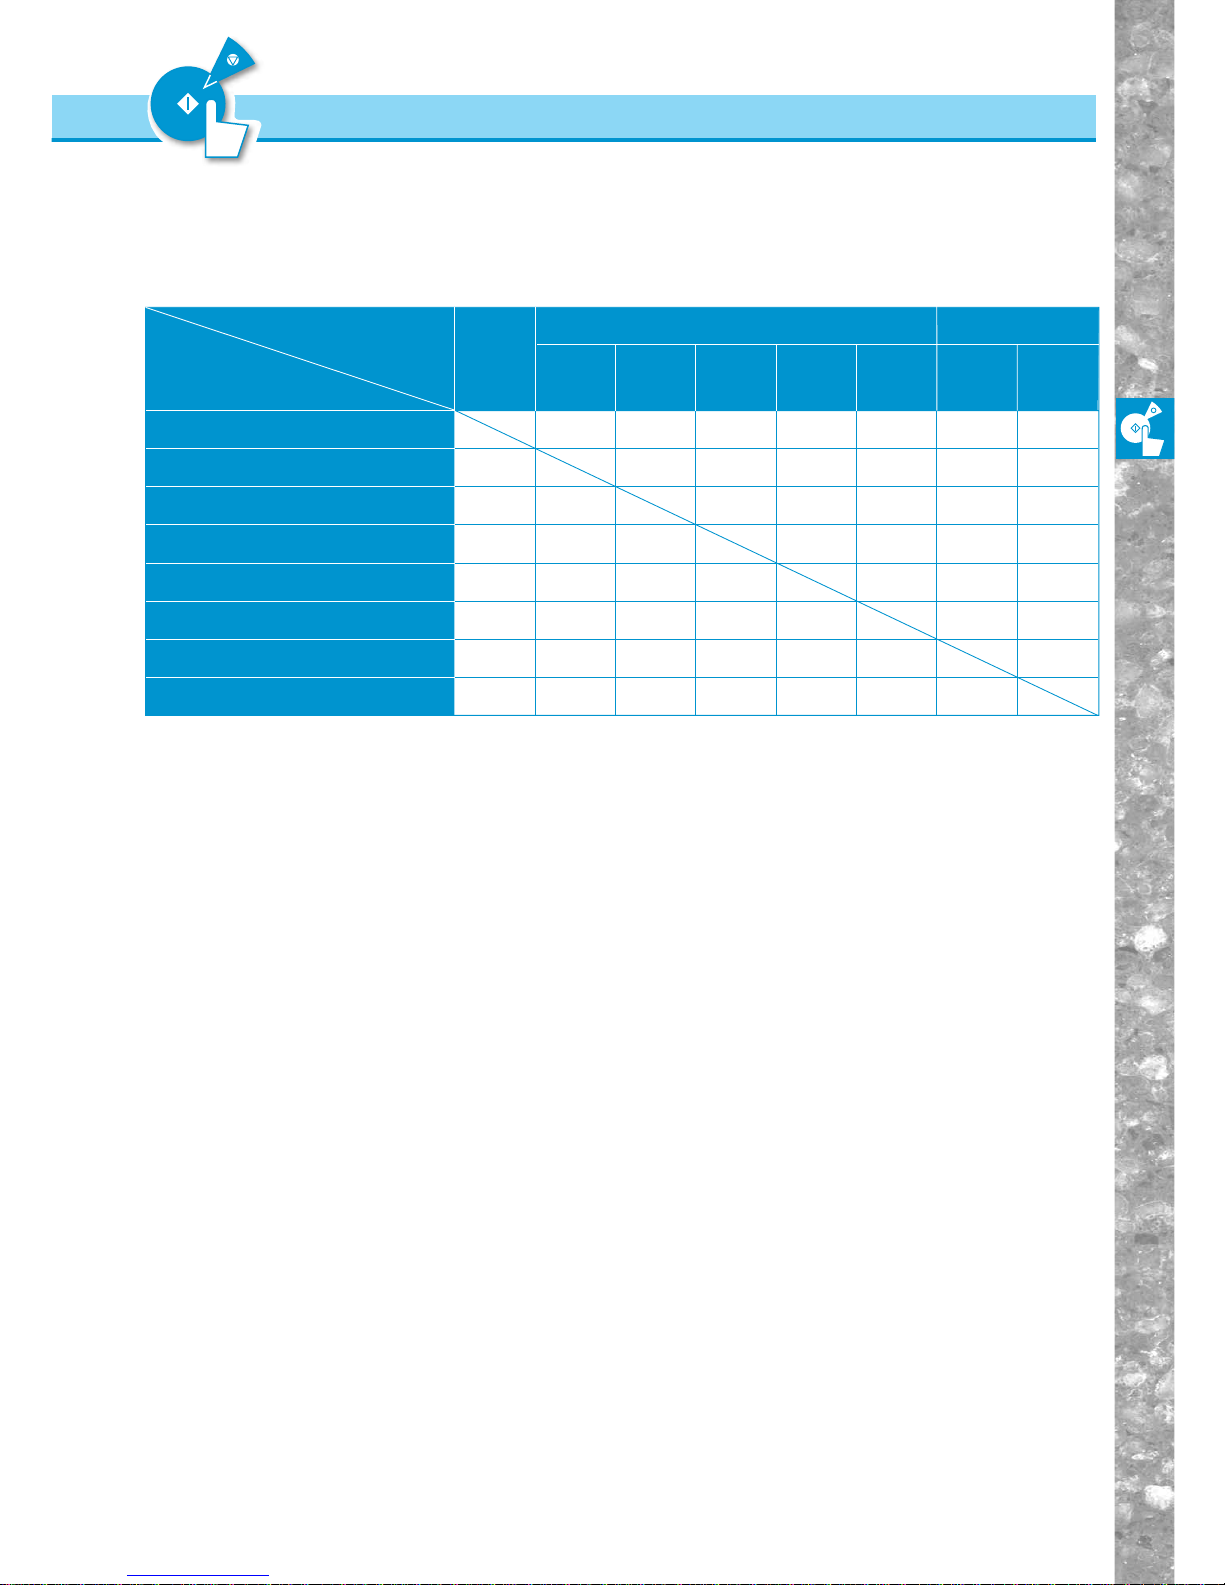
Integrated Operation
This machine supports multiple functions such as copier, FAX and printer. These functions can be used simultaneously ("integrated operation"). Refer to the chart below for a
more detailed description.
*1 This is dependent on the Printing Priority setting when your machine is equipped with a Finisher. (See p.
4-13.)
You can set the printing order to match your particular needs. The initial setting is copy, FAX and printer
in that order.
The following applies when your machine is not equipped with a Finisher.
•Priority is given to Copying even when the output of another function, such as Printer, is being
performed.
• The printing priority between FAX and printer is given to whichever function starts the earliest.
*2 With direct TX*
4
, transmission of originals is reserved. Direct transmission is executed after the current
operation (TX*
4
or RX*5) has ended.
*3 When scanning is completed you can send a document.
*4 TX: Transmission
*5 RX: Reception
Next job
Previous job Copy
Copy
FAX
Printer
▲*3
▲*3
Yes
Yes
▲*1
Yes
▲*1
Scanning
FAX Printer
No
No
Yes
Yes
Yes
Yes
Yes
Direct
TX *4
No
No
No
No
Yes
Yes
Yes
Memory
TX *4
Yes
Yes
▲*2
No
Yes
Yes
Yes
Memory
RX *5
Yes
Yes
▲*2
No
Yes
Yes
Yes
Printing of
Auto RX
Documents *5
▲*1
Yes
Yes
Yes
Yes
Yes
▲*1
Scanning
Direct TX *4
Memory TX *4
Memory RX *5
Printing of Auto
RX Documents *5
Data RX *5
Printing
Data
RX *5
Yes
Yes
Yes
Yes
Yes
Yes
Yes
Printing
▲*1
Yes
Yes
Yes
Yes
▲*1
Yes
Yes: Usable No: Unusable ▲: Conditional
Page 32
Before You Star t Using Copy Functions
1–6
Entering Characters on the Touch
Panel Display
Mode key
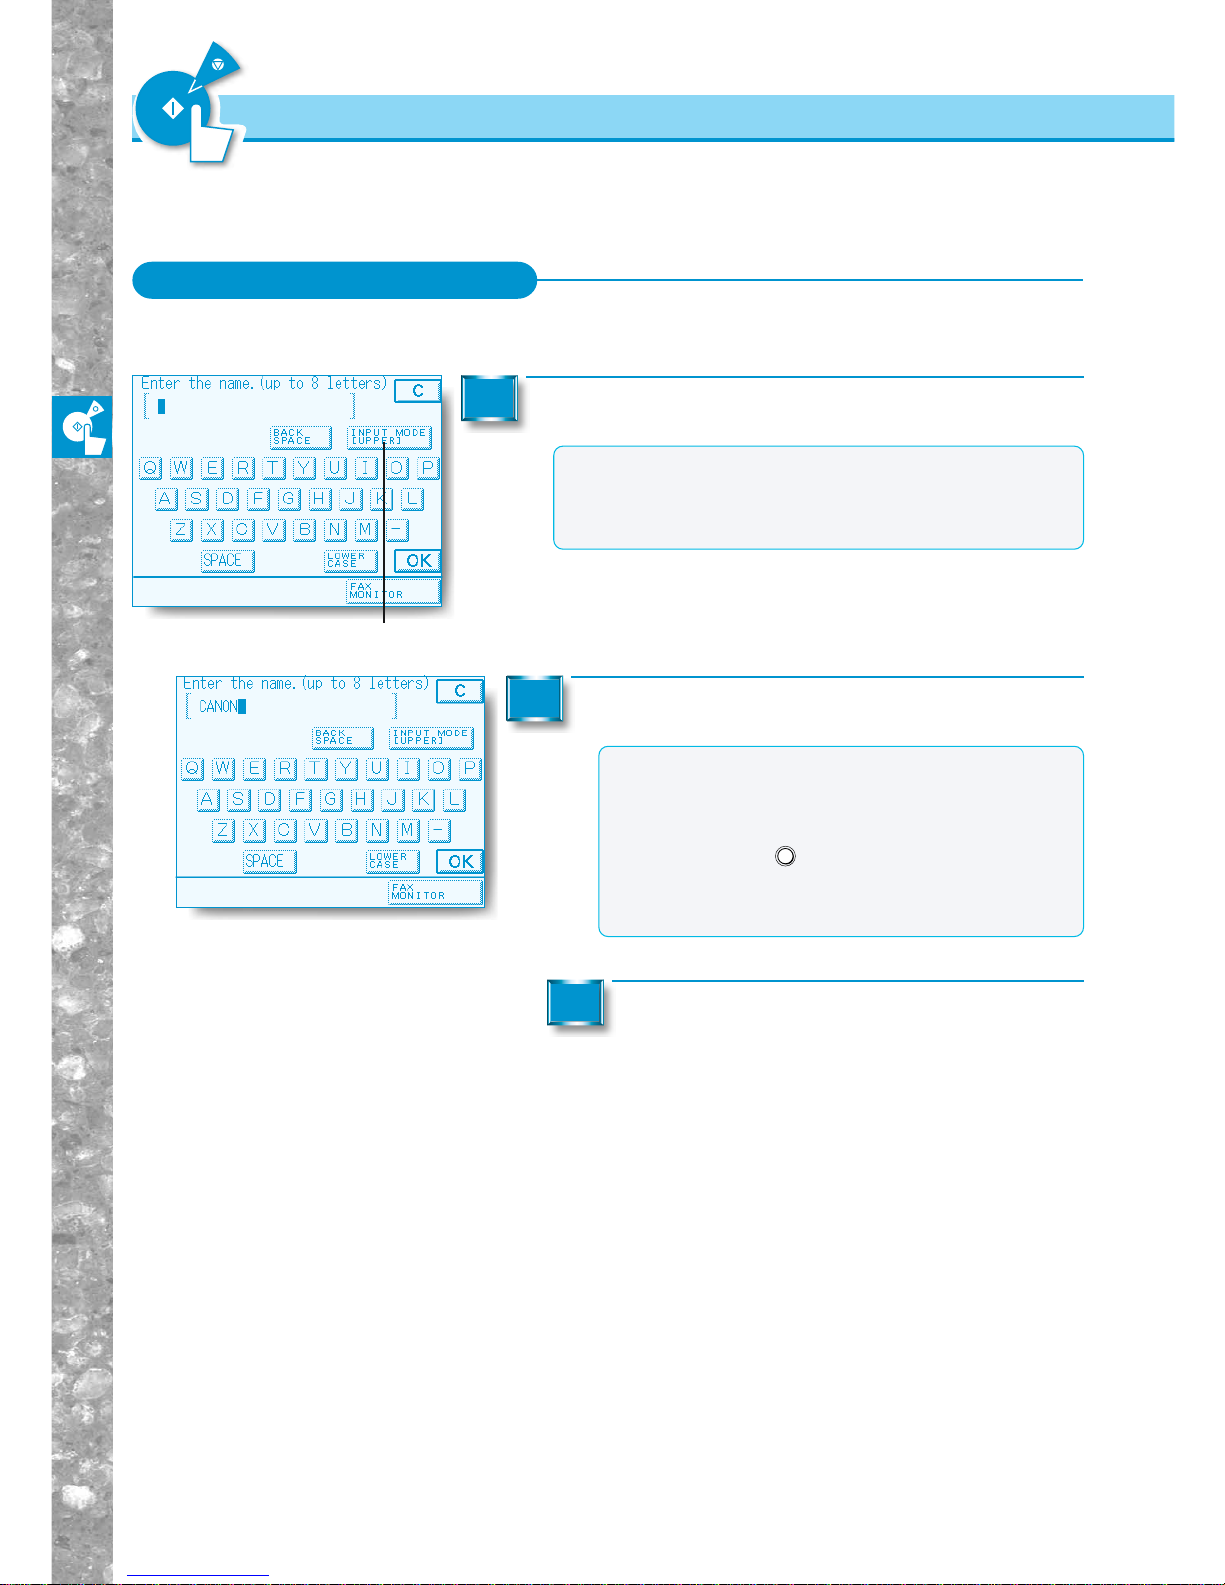
Entering Alphabet Characters
Entering Alphabet Characters
Example: Enter "CANON".
Press the mode key, and select "UPPER."
1
MEMO
●Each press of the mode key switches the entry mode.
●If you press the [LOWER CASE] key, the entry mode
changes to the lower case mode, and lower case characters
can be entered.
Enter "CANON".
2
MEMO
●If you make a mistake when entering characters,
press the [BACK SPACE] key to delete the character.
Then, enter the correct character again.
●You can also delete all characters you have entered
by pressing the
C
Clear
key.
●To continue entering special letters, press the mode
key to select the desired mode. Then, press the [OK]
key.
When you have entered all characters,
press the [OK] key.
3
At screens which require alphanumeric input, enter characters using the alphabet keys
displayed in the touch-panel display and the Number keys as described below.
Page 33
Before You Star t Using Copy Functions
1–7
Entering Special Letters
Entering Special Letters
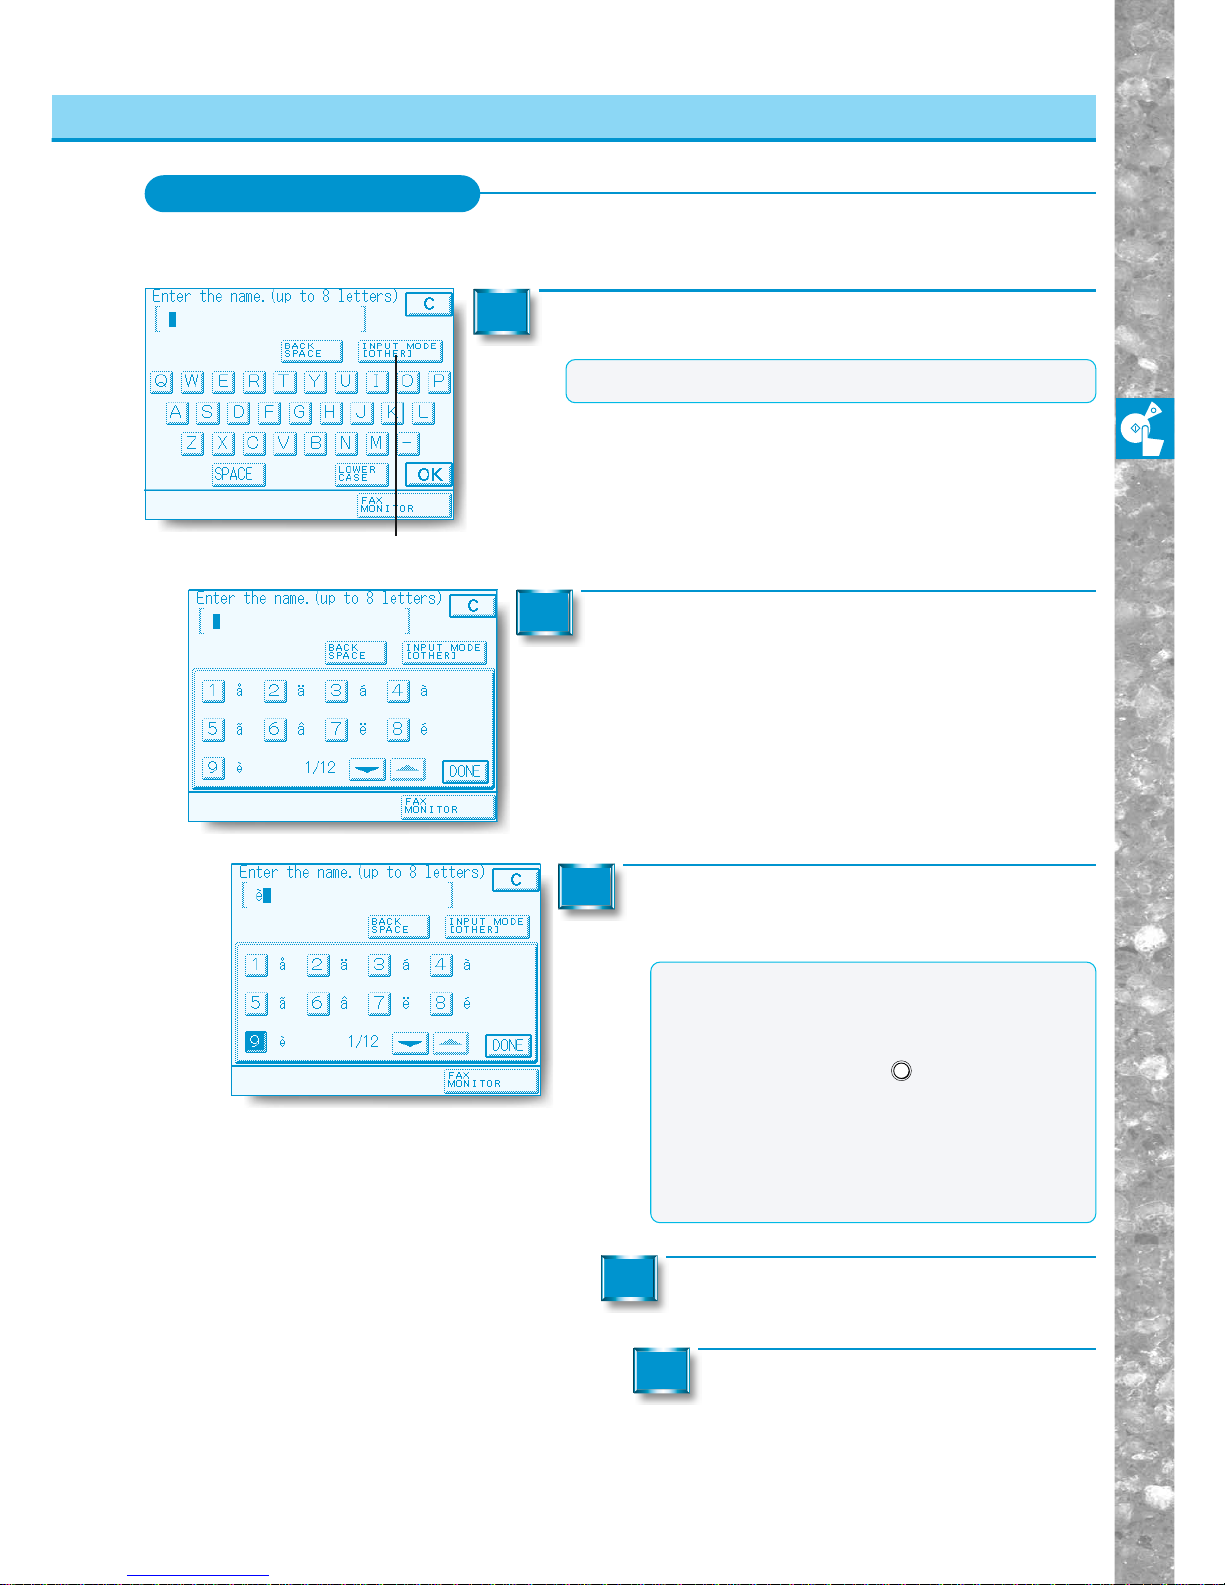
Example:Enter "è".
Press the mode key, and select "OTHER".
1
MEMO
●Each press of the mode key switches the entry mode.
Entering Characters on the Touch Panel Display
Mode key
Press the [▼] or [▲] keys to display the desired
special letter.
2
Press the number of the desired special
letter in the touch panel display.
3
MEMO
●If you make a mistake when entering special
letters, press the [BACK SPACE] key to delete the
character. Then, enter the correct character again.
●You can also delete all characters you have
entered by pressing the
C
Clear
key.
●You can also press the number of the desired
special letter with the Number keys to select the
special letter.
●
To continue entering alphabet characters, press the
mode key to select the desired mode. When you
have entered all characters, press the [OK] key.
Press the [DONE] key.
4
When you have entered all characters,
press the [OK] key.
5
Page 34
Before You Star t Using Copy Functions
1–8
MEMO
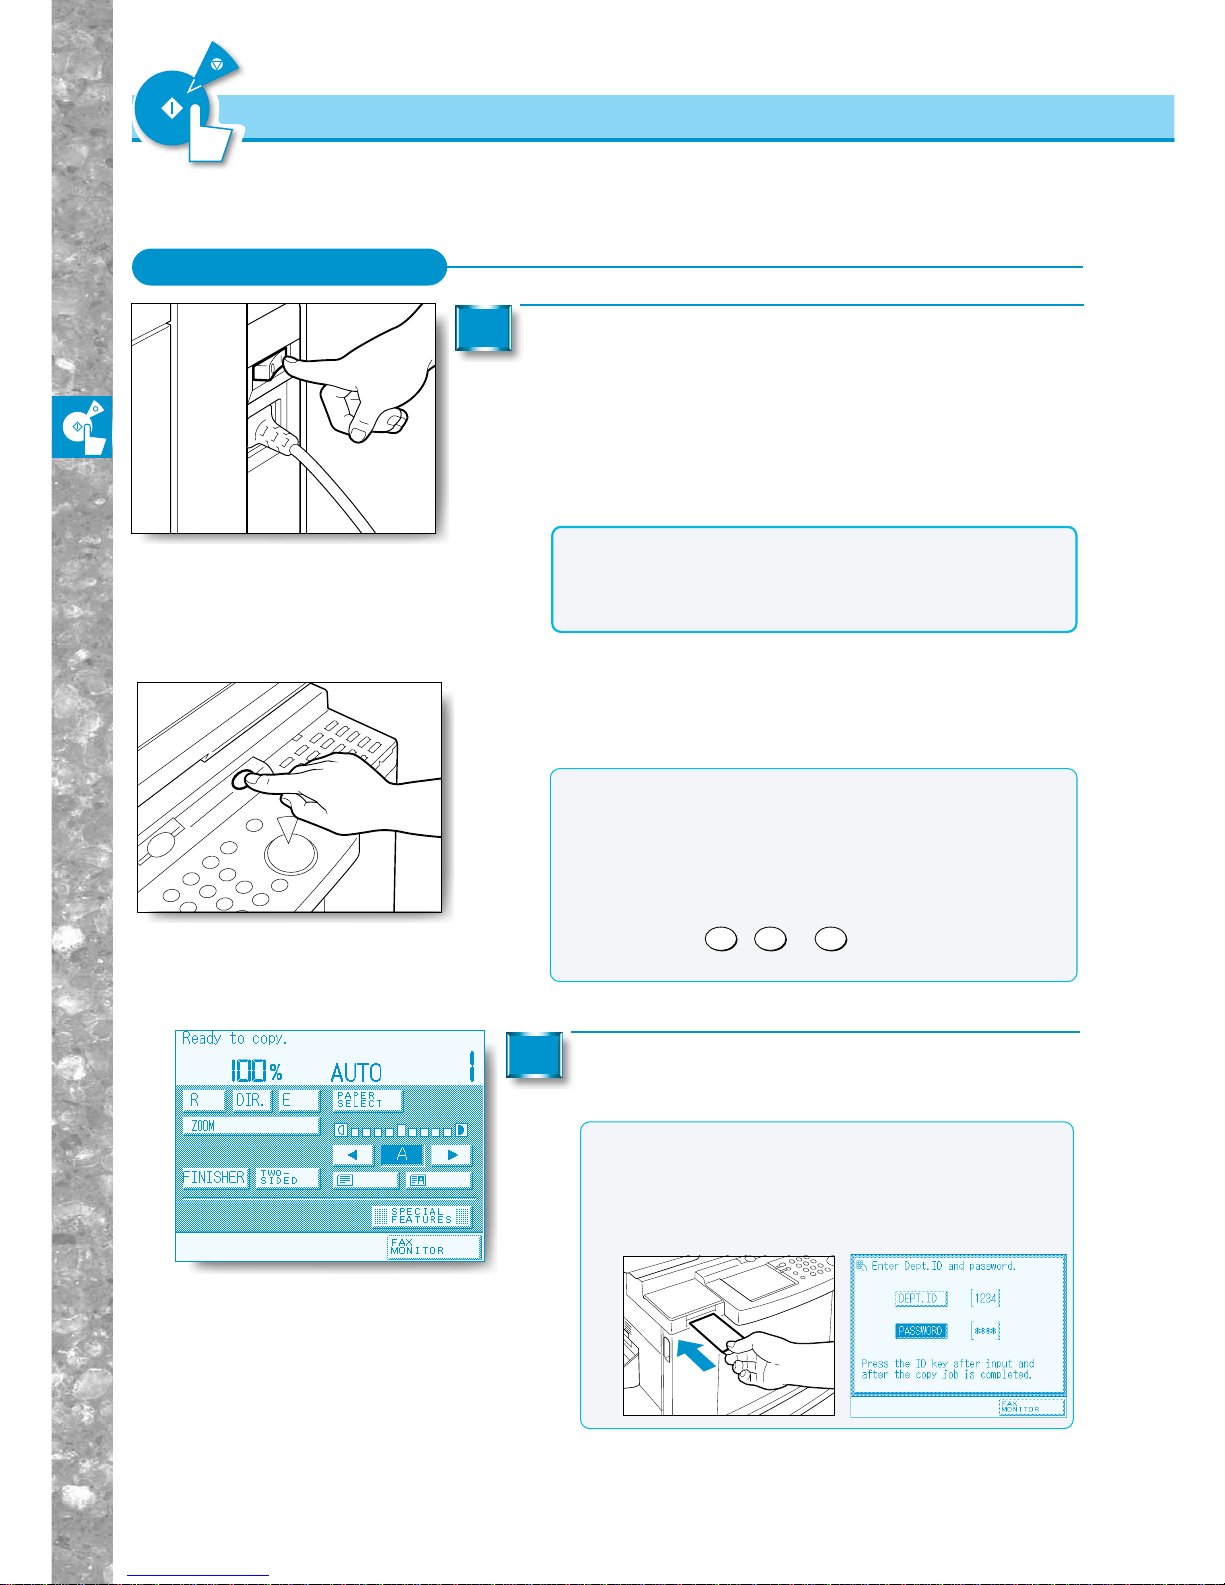
●The copy mode on the Basic Features screen is set to
the Standard mode.
●If the message “Please insert a control card.” appears,
insert a control card.
●If the message “Enter Dept. ID and password.”
appears, enter the department ID and password.
Turning the Power ON
The machine is provided with two power switches, a main power switch and a control
panel power switch.
Turning the Power ON
Make sure that the power plug is firmly inserted into
the power outlet, and press the power switches to
the ON position.
■ Main power switch
The main power switch is located on the right side of the machine.
The main power lamp on the control panel lights when the main
power switch is turned ON.
1
■ Control panel power switch
Press the control panel power switch to cancel the sleep mode and
resume normal machine operations.
The Basic Features screen appears in the
touch-panel display.
2
Main Power and Control Panel Power
NOTICE
●When this machine supports FAX functions , we recommend
that you do not turn the main power switch OFF. If you turn
the main power switch OFF, you will no longer be able to
receive or send originals.
MEMO
●This machine can receive documents sent by FAX, and print
out received documents even in the Sleep mode. We
recommend using the Sleep mode to receive FAX documents while you are out of the office.
●Documents received by FAX and instructions from a host
computer can be printed even while the machine is in the
Sleep mode.
●Pressing the
COPY
,
FAX
or
PRINT•I/F
key also wakes the unit up
from the Sleep mode.
Page 35
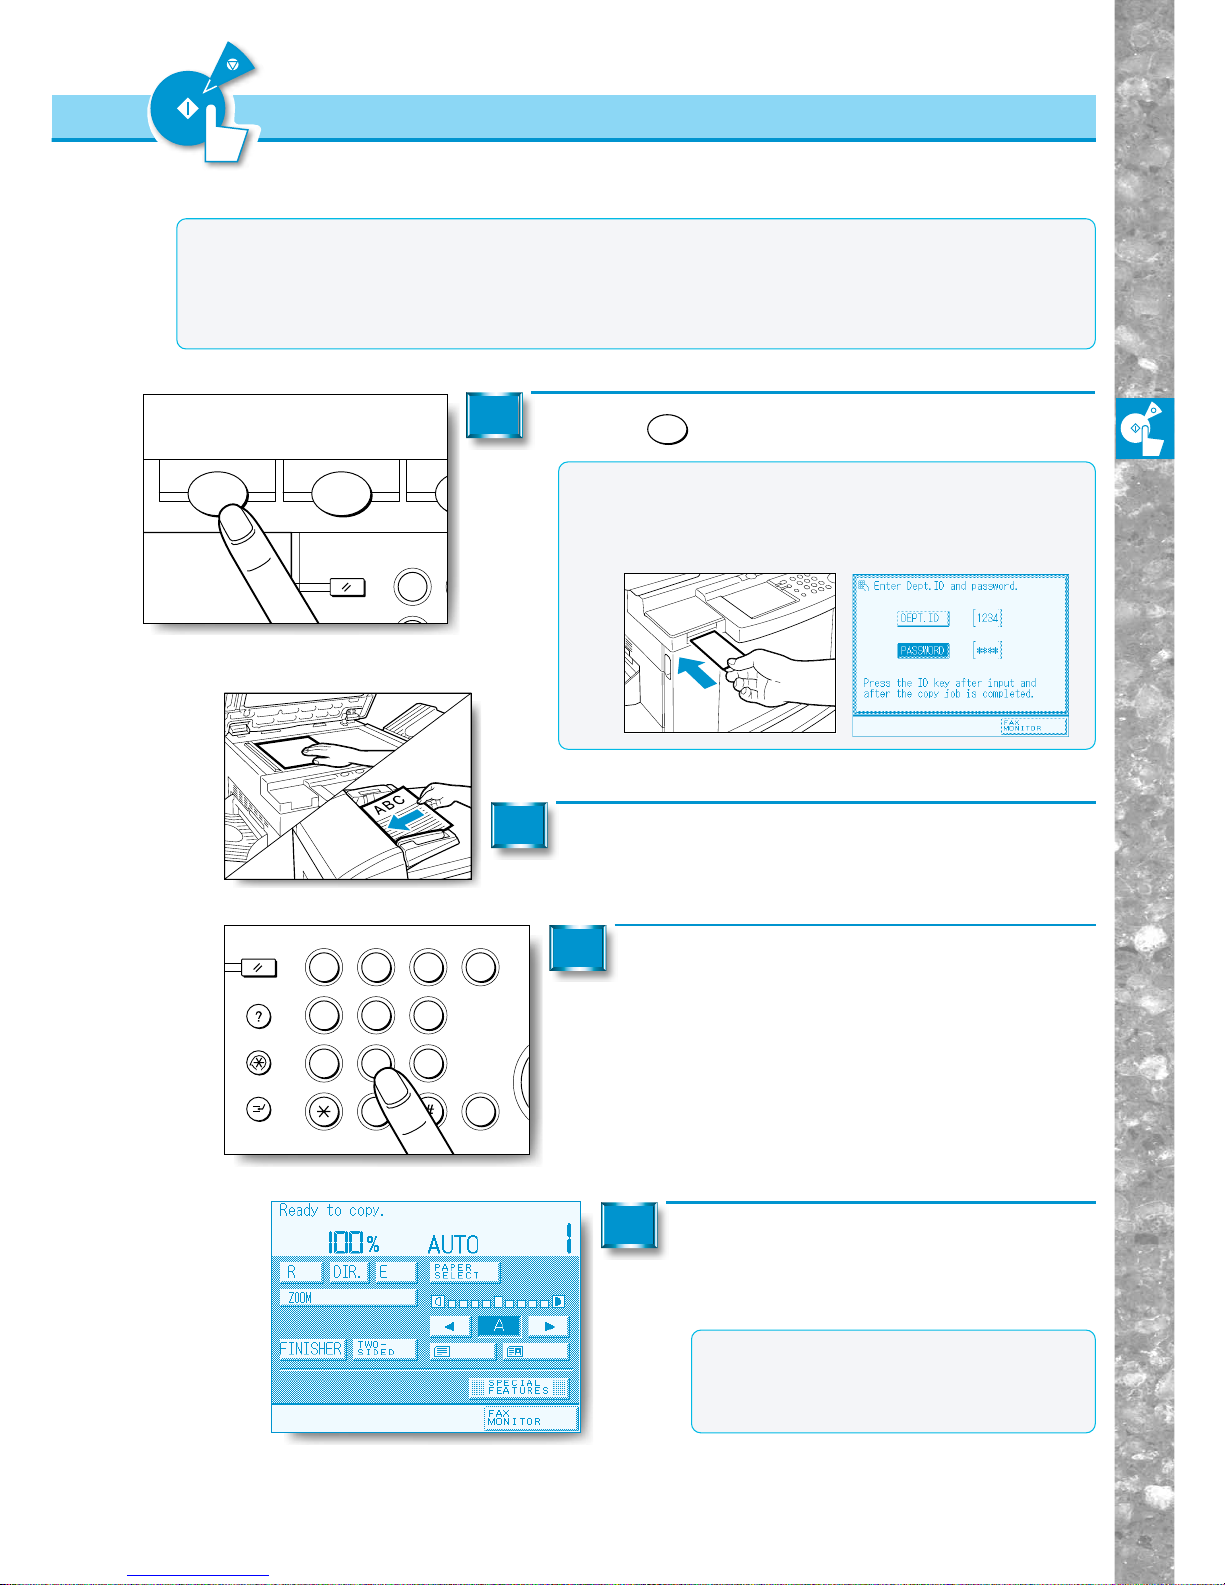
Before You Star t Using Copy Functions
1–9
Flow of Copy Operations
Flow of Copy Operations
This section describes the flow of basic copy operations.
MEMO
●For details on the following items, see the indicated pages.
• Main Power and Control Panel Power (See p.1-8)
• Loading Paper and Adding the Toner (See chapter 5)
• Loading Paper (See p.5-2)
• Routine Cleaning (See p.6-16)
OPER
Reset
Clear
S
Guide
Interrupt
Additional Functions
1 2 3
4 5 6
7 8 9
0
C
ID
ABC
DEF
JKL
GHI MNO
TUV
PRS
WXY
Reset
Guide
1
P
Data
GHI
COPY
FAX
Error
Copying
Memory
TX/RX Error
Press the
COPY
key.
1
MEMO
●If the message “Please insert a control card.” appears, insert
a control card.
●If the message “Enter Dept. ID and password.” appears,
enter the department ID and password.
Place your originals.
(See "Placing Originals," on p. 1-11.)
2
Enter the copy quantity.
(See "Entering the Copy Quantity," on p. 2-27.)
3
Set the copy mode in the Basic Features screen.
(See chapter 2, "Basic Copying".)
4
MEMO
●In the Basic Features screen, you can
select the copy paper size, set exposure
and image quality, and select the desired
collating function.
Page 36
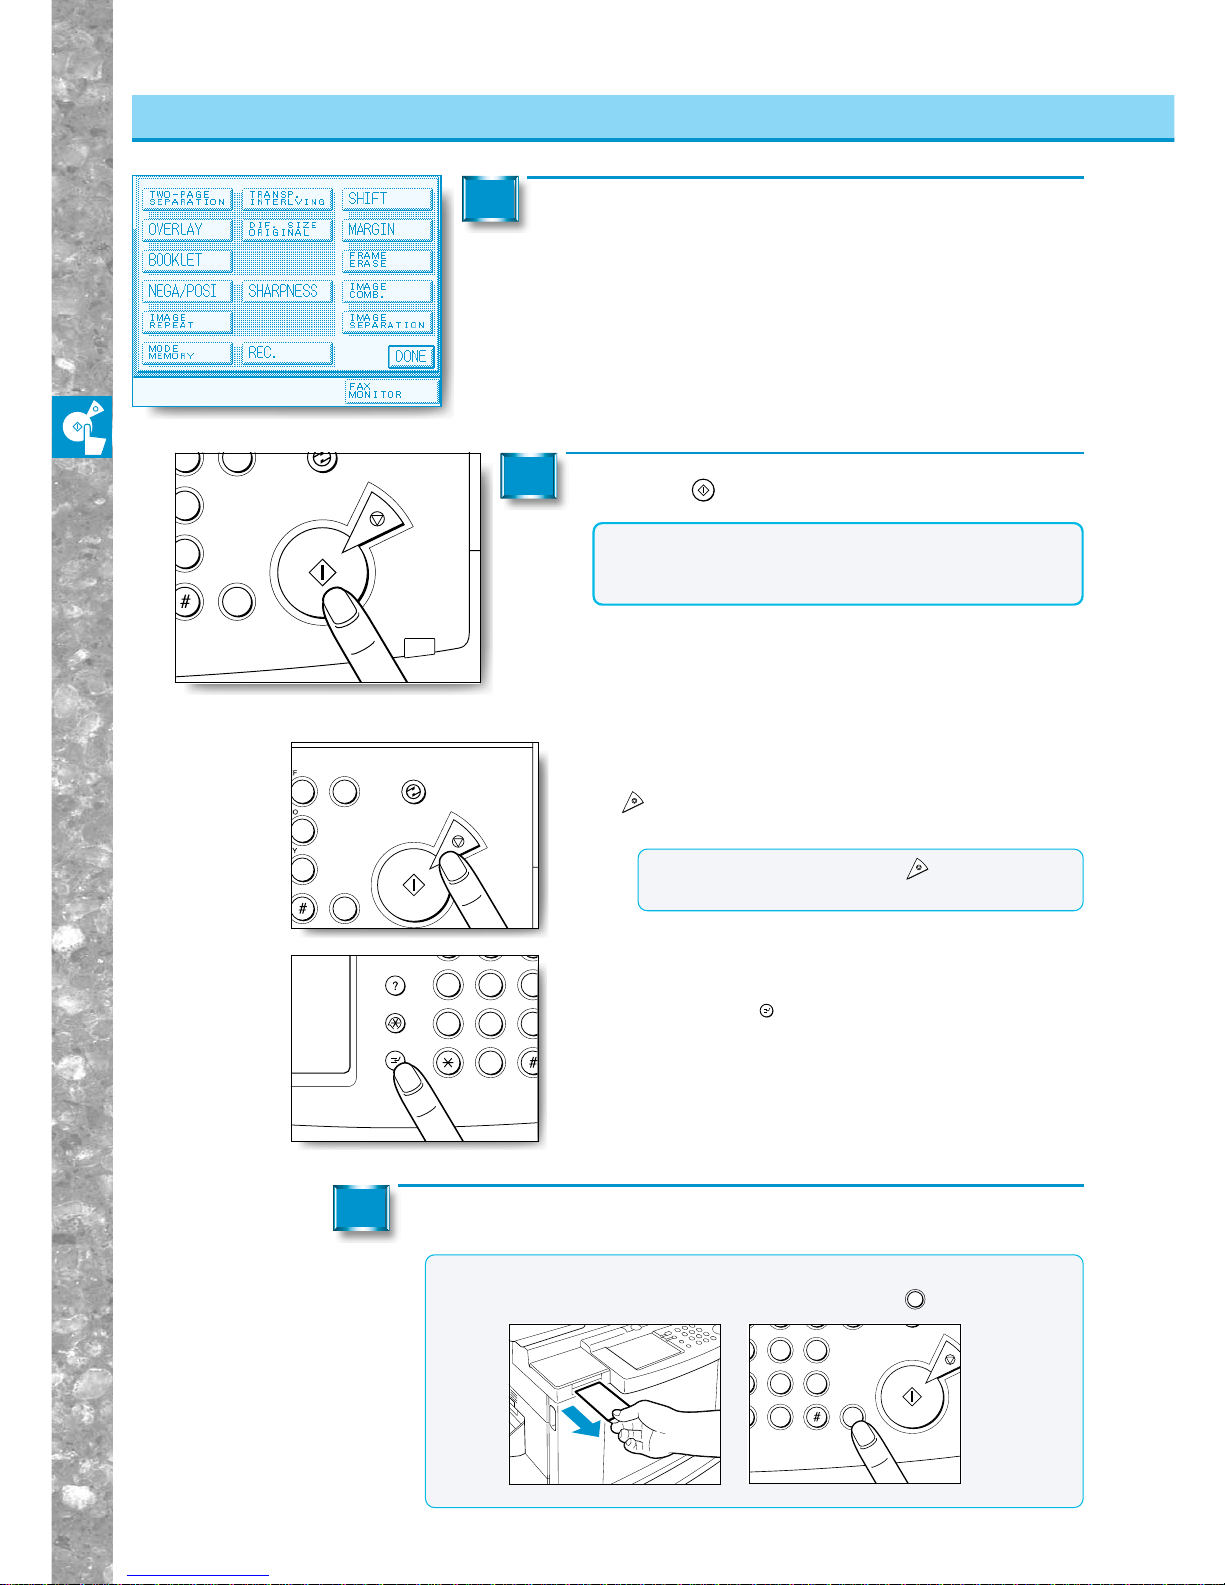
Before You Star t Using Copy Functions
1–10
Flow of Copy Operations
Stop
Start
3
6
9
C
ID
Clear
Stop
Energy Saver
Start
3
6
9
C
ID
Guide
Interrupt
Additional Functions
4 5 6
7 8 9
0
OPER
JKL
GHI MNO
TUV
PRS
WXY
START
5 6
8 9
0
ID
OPER
JKL
MNO
TUV
WXY
Flow of Copy Operations
Set the copy mode in the Special Features screen.
(See chapter 3, "Useful Copy Functions".)
5
Press the
Start
key.
6
NOTICE
●You cannot change copy mode settings such as the
copy quantity, copy paper size and copy ratio during
copying.
■ Stopping before copying is completed
•To stop the machine before copying is completed, press the
Stop
key.
MEMO
●After you have pressed the
Stop
key, several
copies may be output from the machine.
■ To interrupt a copying job
•To interrupt a copying job when you need to make priority
copies, press the
Interrupt
key.
(See "Interrupting the Current Copy Job to Make Priority
Copies," on p. 2-31.)
When the copy has been made, remove it from the tray.
7
MEMO
●If the optional Control Card is attached, remove the control card.
●If you have set Department ID Management, press the ID key .
Page 37
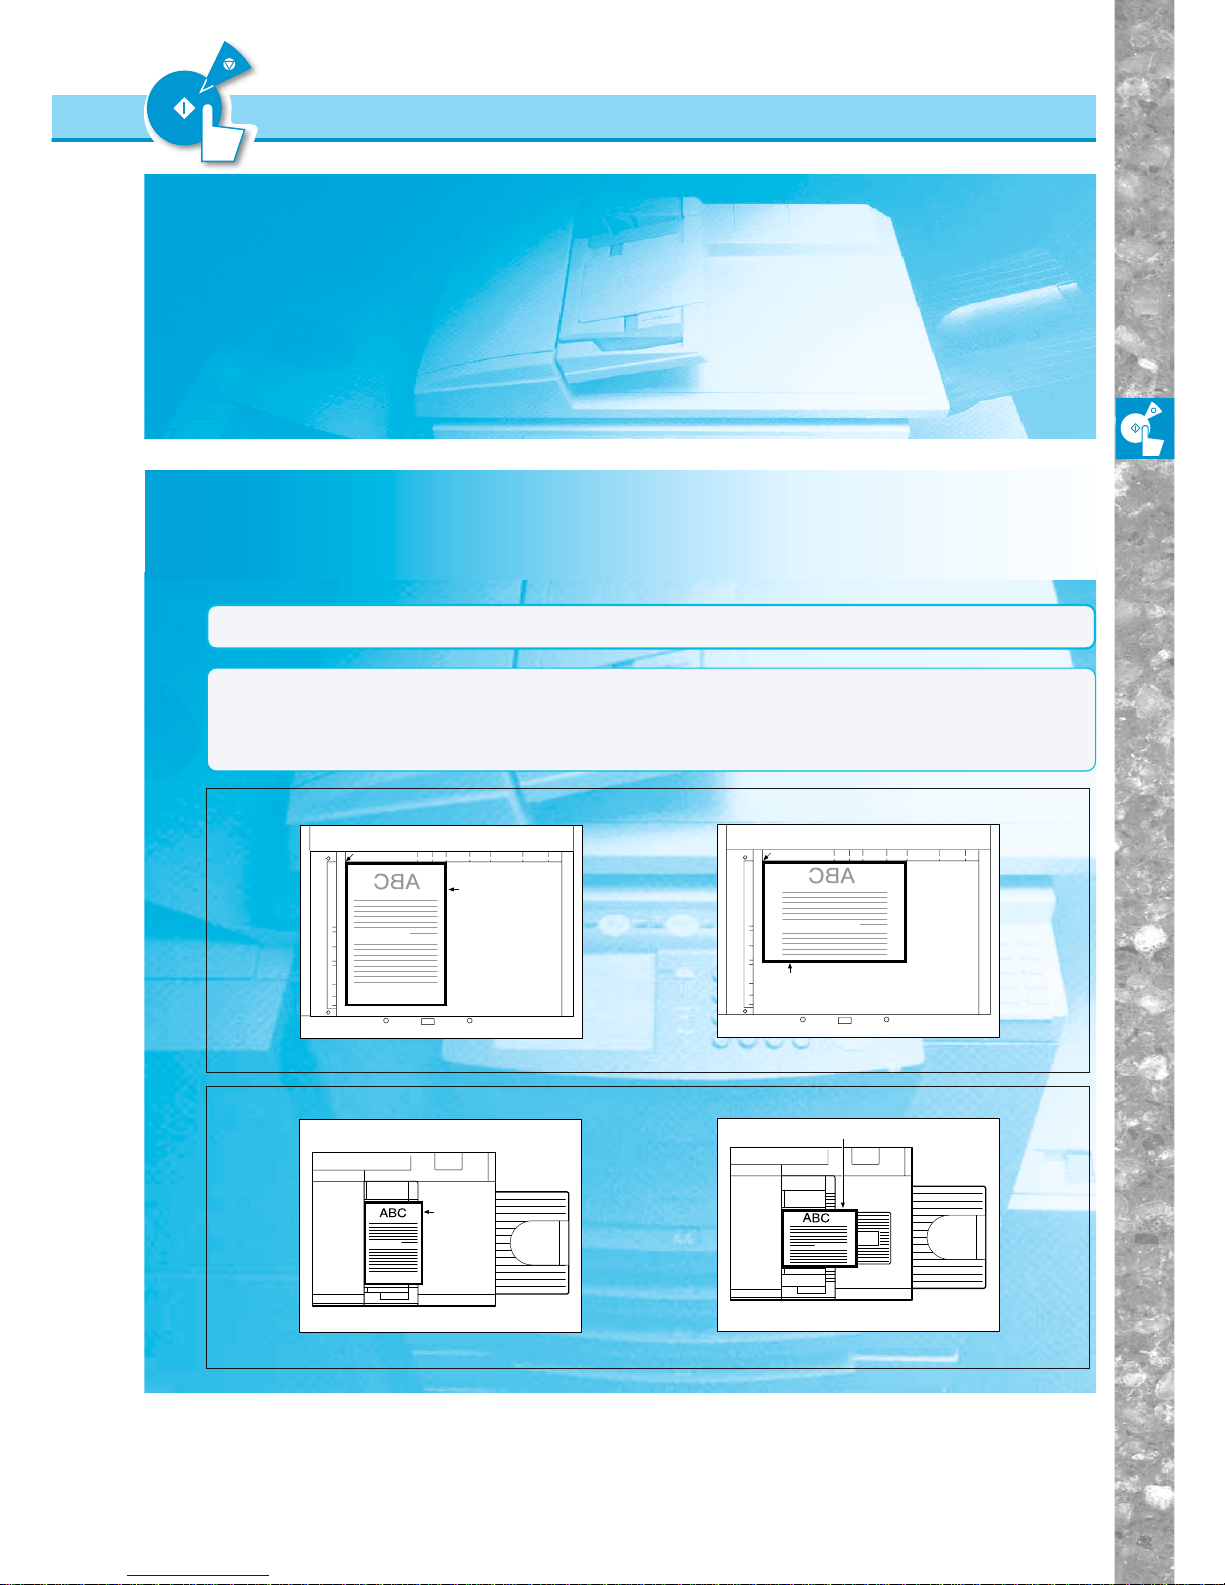
Before You Star t Using Copy Functions
1–11
Place the original face up.
Place the original
face down.
Place the original
face down.
Place the
original
face up.
Placing Originals
Orientation of Originals
Orientation of Originals
You can place originals vertically or horizontally. Always align the top edge of your original with the back
edge of the platen glass.
NOTICE
●If the original is not placed correctly , copies ma y not be made correctly depending on the cop y mode y ou ha v e set.
MEMO
●LTR/STMT-size originals can be placed vertically or horizontally. However, the copy speed for vertically
placed originals is somewhat faster than that for horizontally placed originals. (Horizontally placed LTR/
STMT-size originals are referred to as “LTRR/STMTR.”)
●11" × 17"-size originals must be placed horizontally.
[Platen glass]
[Feeder]
Vertical placement Horizontal placement
Vertical placement Horizontal placement
There are two ways to place originals for copying. The method that you select will depend
on the size and type of the original that you are using, and the copy settings that you
have programmed.
■Platen glass
Use when copying books, originals on hea vy paper , lightweight paper, and transparencies.
■Feeder (Automatic Document Feeder)
Place a stack of originals in the feeder, and they are automatically fed to the platen
glass for copying. Two-sided copies can also be automatically made from two-sided
originals.
Page 38
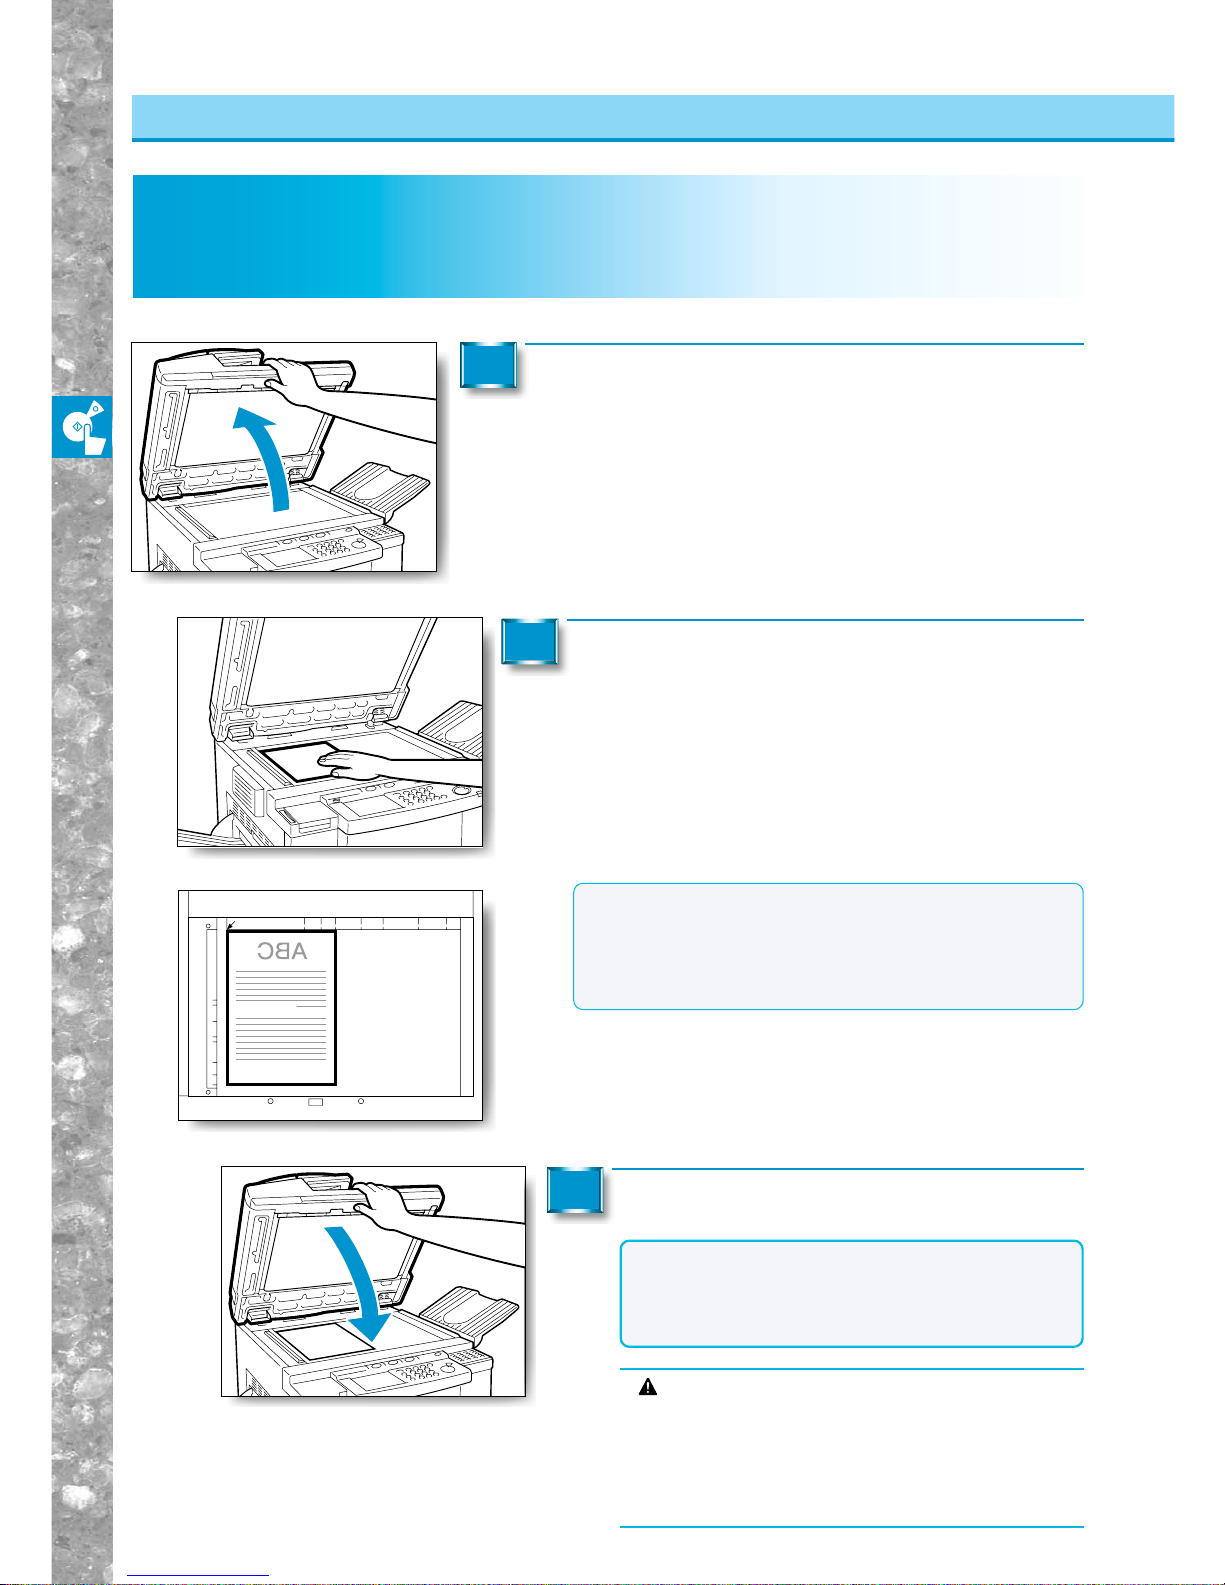
Before You Star t Using Copy Functions
1–12
Placing Originals
Placing an Original on the Platen Glass
Placing an Original on the Platen Glass
You should use the platen glass when copying books, originals on heavy or thin paper, and transparencies, etc.
Lift up the feeder or platen cover.
1
Place your original.
The surface that you want to copy must be placed face down.
Align the corner of the original with the mark at the top left corner
of the platen glass.
2
NOTICE
●When placing originals on the platen glass, the size
of the original is detected after the feeder or platen
cover has been lowered. Be sure to lower the
feeder or platen cover before copying.
MEMO
●Place books and other bound originals on the platen
glass in the same way.
●When enlarging LTR/STMT-size originals to 11" × 17"-
size paper, place the original horizontally on the platen
glass and align it with the LTRR or STMTR marks.
Gently lower the feeder or platen cover.
3
CAUTION
●Close the feeder (or platen glass) gently to avoid
catching your hand, as this may result in personal
injury.
●Do not press down hard on the platen cover (or
feeder) when using the platen glass to copy thick
books. This may damage the platen glass.
Page 39
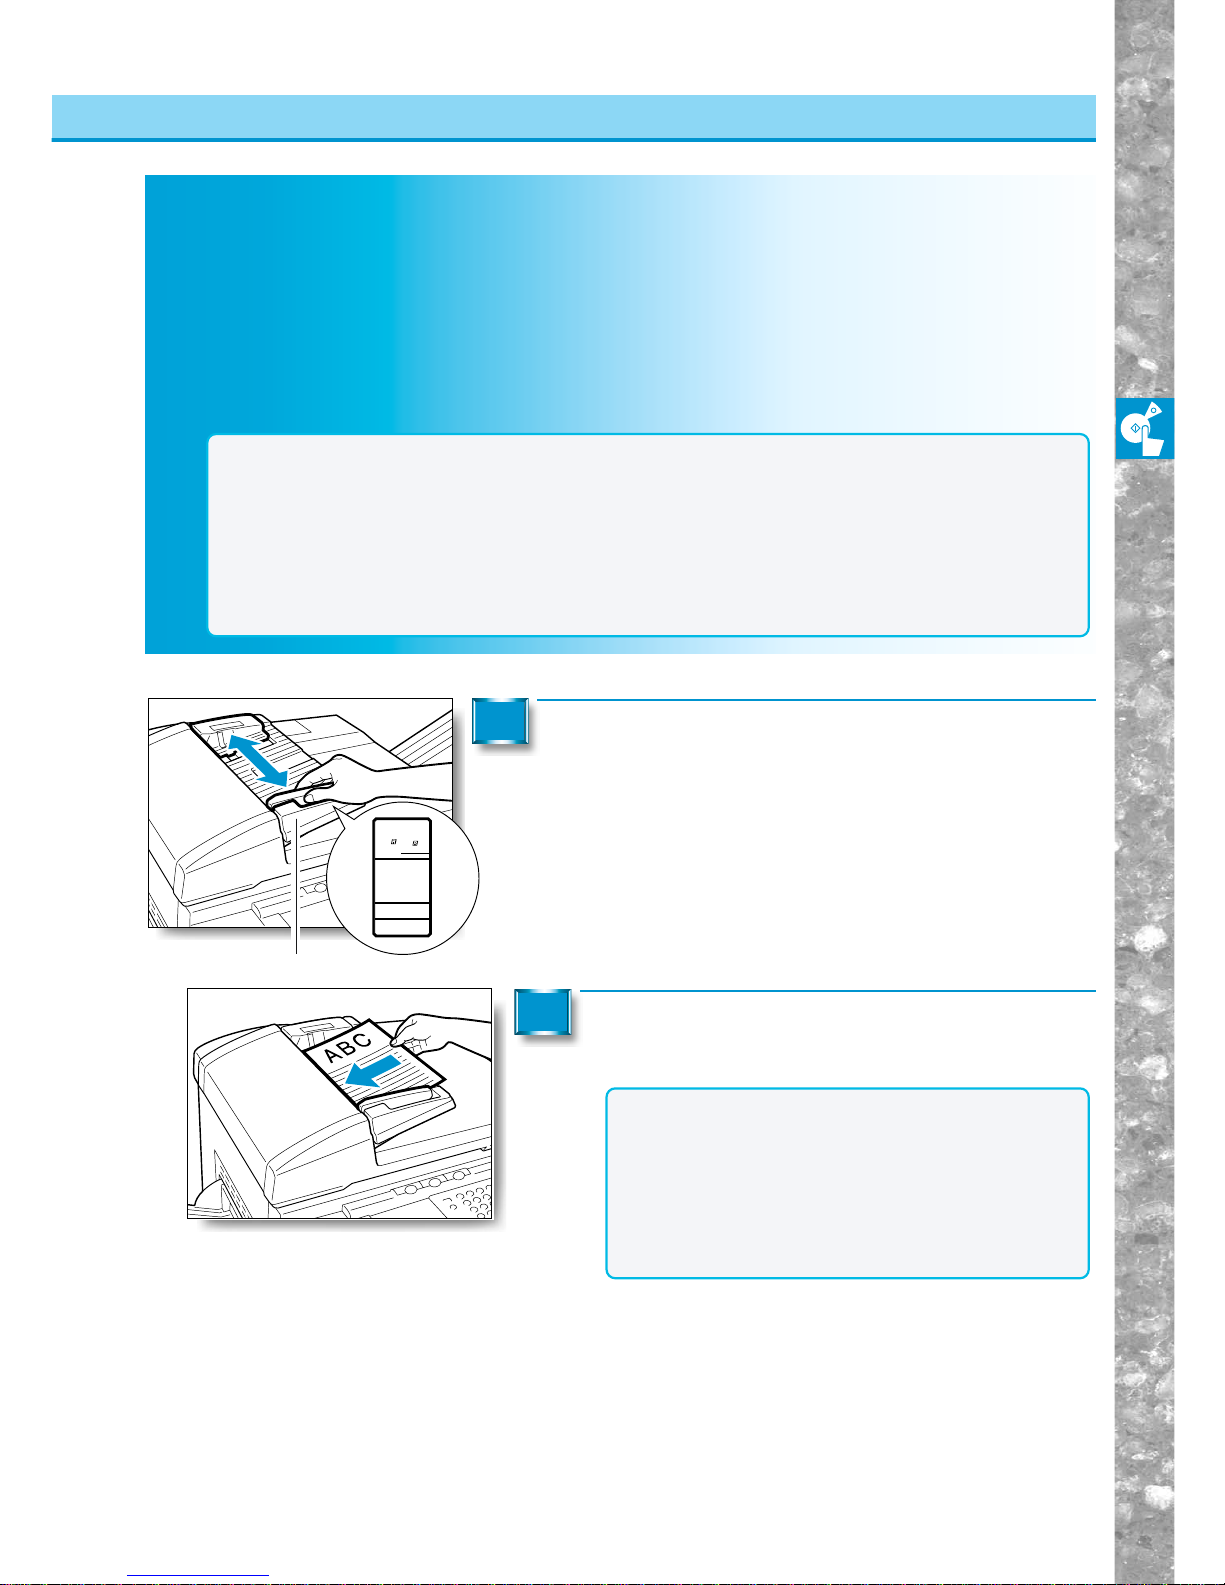
Before You Star t Using Copy Functions
1–13
A3A4
LDR
LDR
LGL
STMT
LTR
A4
A5
/
/
Placing Originals
Placing Originals in the Feeder (DADF-A1)
Placing Originals in the Feeder (DADF-A1)
Place a stack of originals in the feeder, and they are automatically fed to the platen glass for copying.
Two-sided copies can also be automatically made from two-sided originals.
You can place the following originals in the original supply tray:
•Weight:13 to 28-Ib bond (50 to 105 g/m2)
•Size:STMT, LTR, LGL, 11"× 17"
•Tray capacity: 11"× 17"/LGL-size: 25 (20-Ib bond or 80 g/m2),
LTR/LTRR/STMT/STMTR-size: 50 (20-Ib bond or 80 g/m2)
NOTICE
●Do not place the following types of originals in the feeder:
•Originals with tears or large binding holes
• Severely curled originals or originals with sharp folds
•Clipped or stapled originals
•Carbon-backed paper or other originals which might not feed smoothly
•Transparencies and other highly transparent originals
●Check the condition of originals which have been fed through the feeder many times. Originals which
have been fed through the feeder many times can become folded or wrinkled and might not feed
smoothly.
Adjust the slide guides to fit the size of the originals.
1
Slide guides
Neatly stack your originals face up in the original supply tray.
2
NOTICE
●After copying begins, do not add or remove originals.
●Copies made using the Feeder may show black
marks, or marks that are not on the originals, caused
by pencil powder etc on the rollers.
In such a case, circulate plain white originals (copy
paper) through the Feeder to clean the dirt from the
rollers. (See “Original Scanned Using The Feeder
Becomes Dirty (FEEDER CLEANING),” on p.6-17.)
Page 40
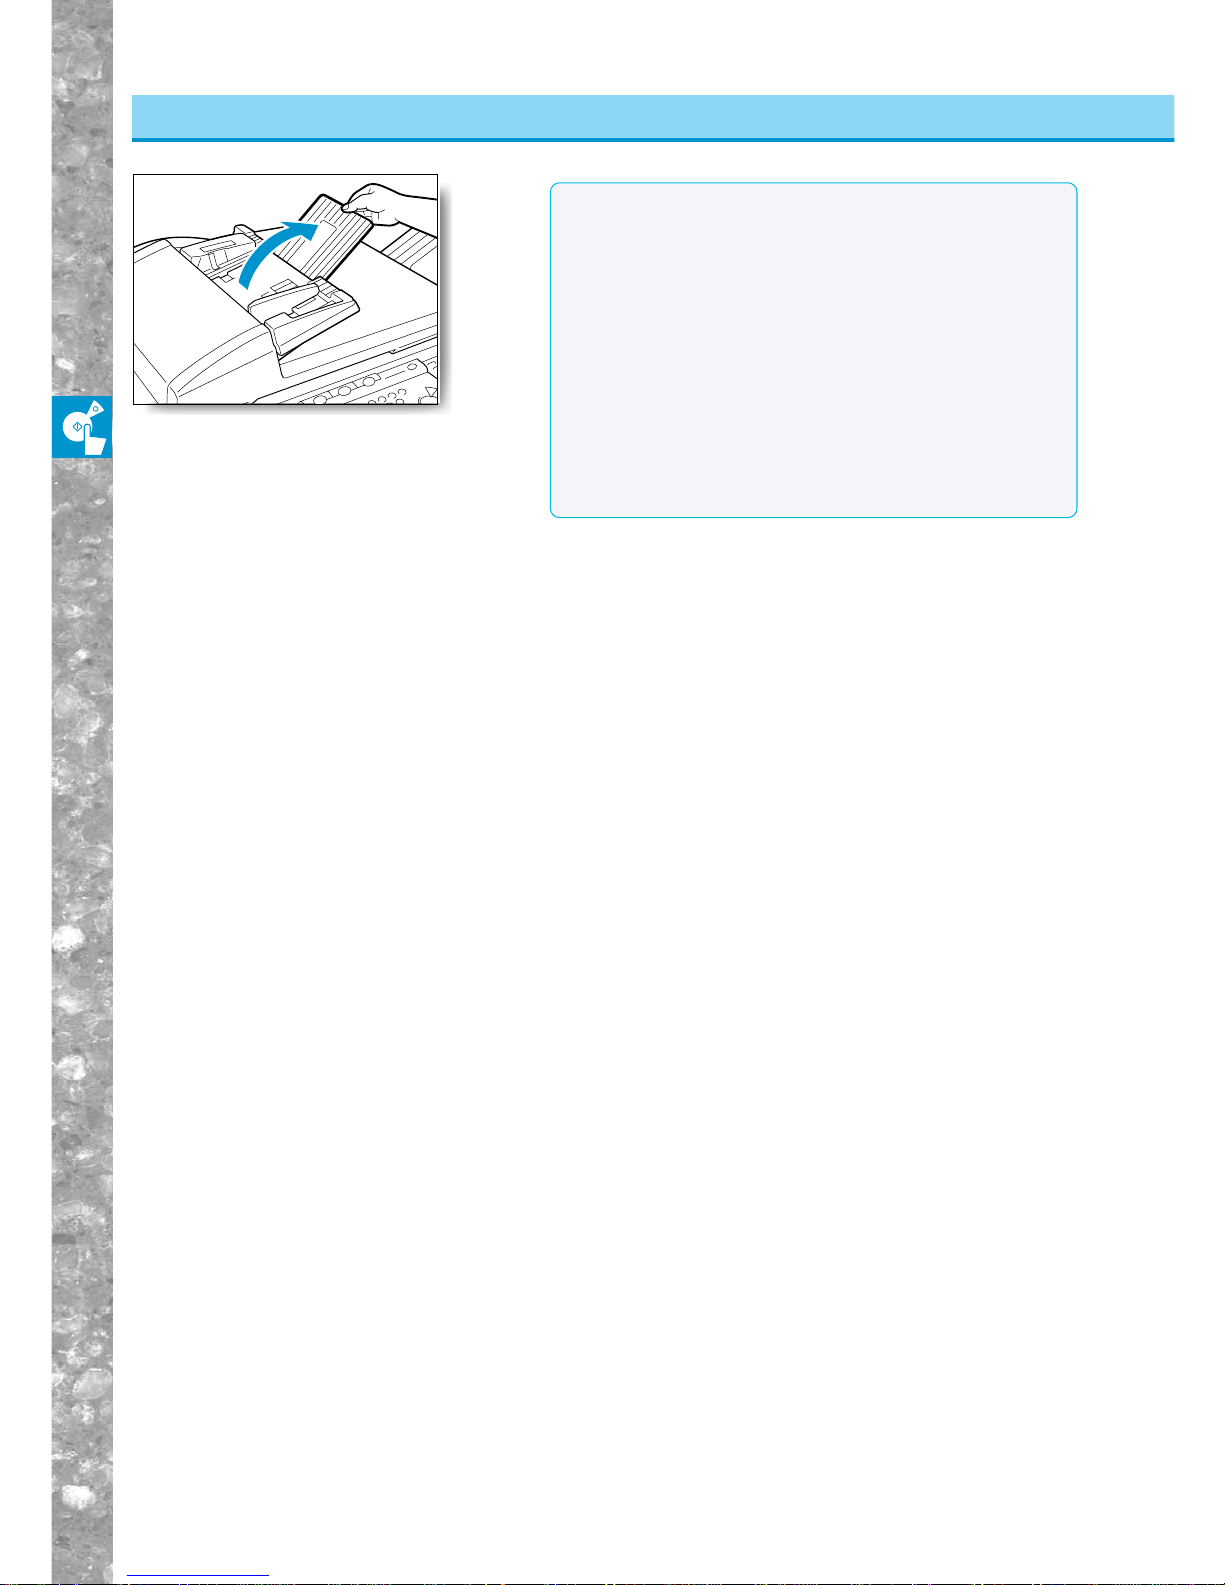
Before You Star t Using Copy Functions
1–14
MEMO
●STMT-size original can be placed only vertically.
●When enlarging LTR-size originals to 11"× 17"-size paper,
place your originals horizontally.
●Before placing the following types of or iginals in the feeder,
flip open the auxiliary tray:
• 11"× 17"/LTRR-size originals (horizontal placement)
• STMT-size originals (vertical placement)
•Different-size originals
●You can place different-size originals together in one group
in the feeder provided that the leading edge of each page is
the same length and the originals are the same thickness.
(See “Feeding Different-size Originals Together in the
Feeder,” on p. 3-10.)
●Once copies are made from originals, originals are output to
the original output tray in the same order and facing down.
Placing Originals in the Feeder (DADF-A1)
Placing Originals
Page 41
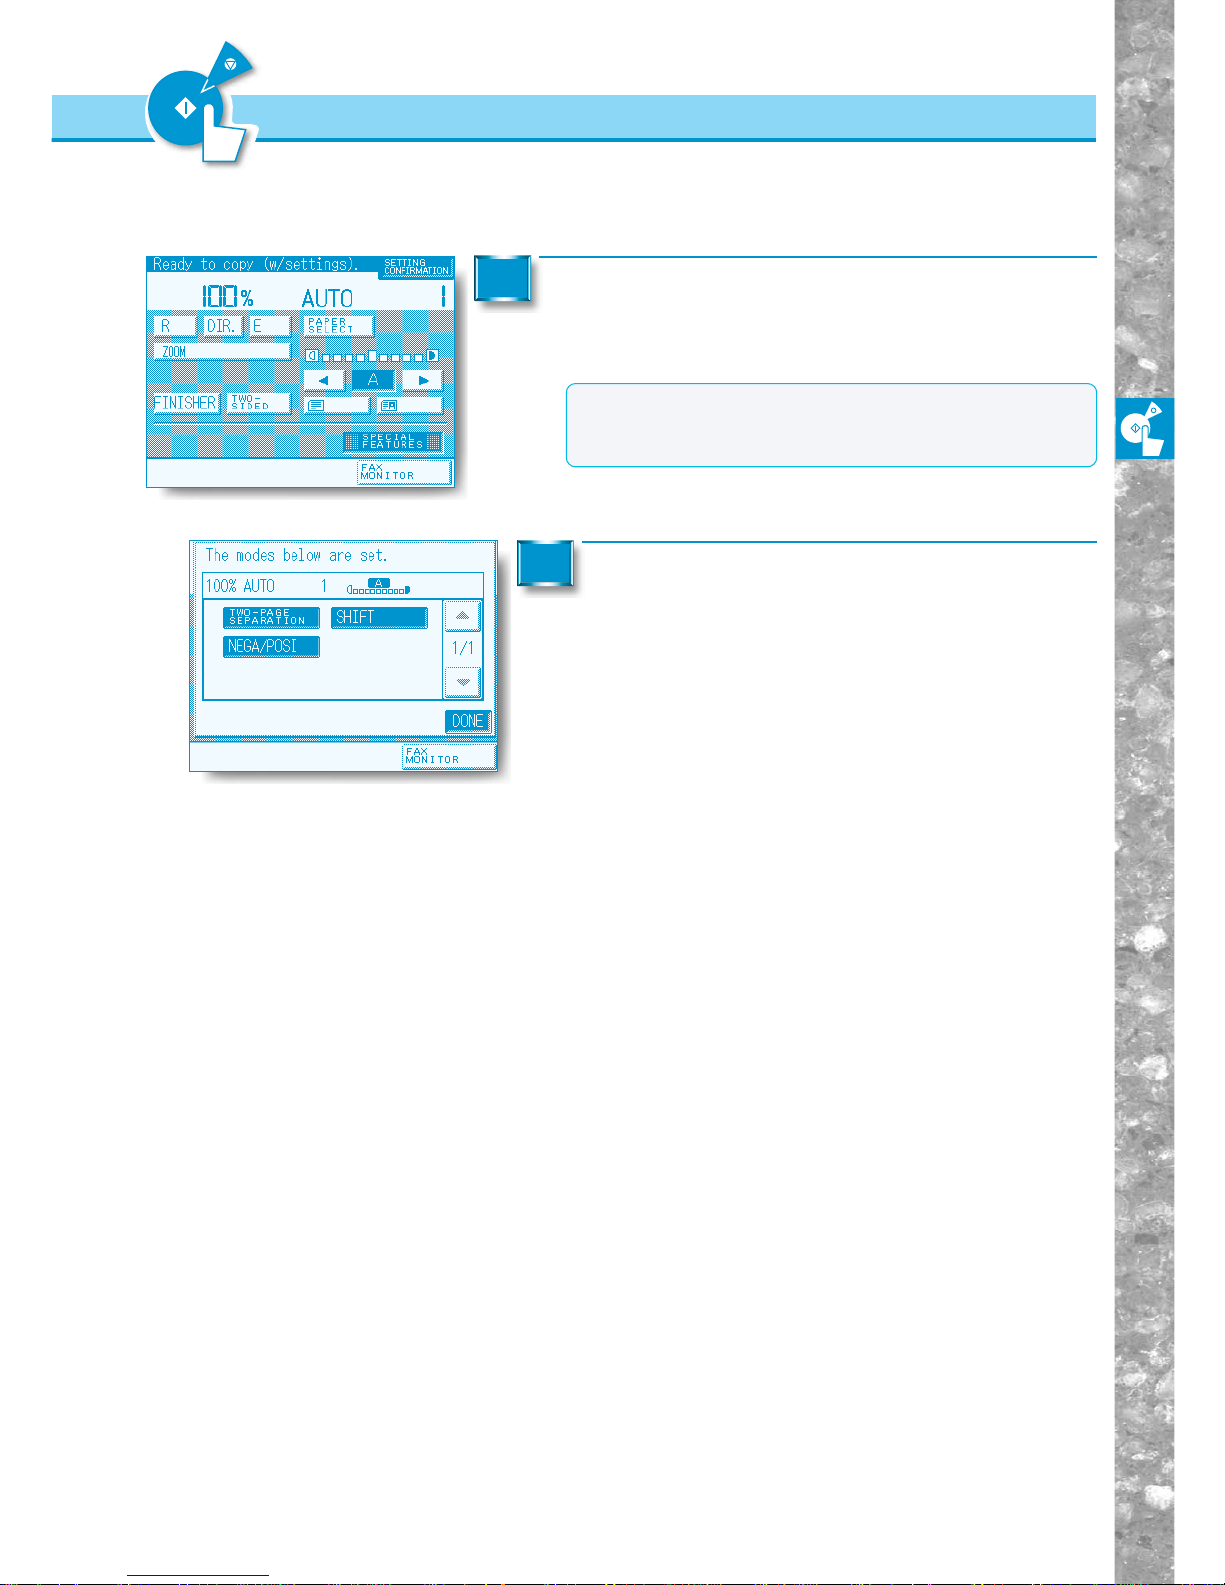
Before You Star t Using Copy Functions
1–15
Checking the Copy Mode Settings
Press the [SETTING CONFIRMATION] key on the
Basic Features screen.
The display shows the selected copy mode settings.
1
MEMO
●When six or more copy modes have been set, use the [▼]
key to bring up the next screen. To return to the previous
screen, press the [▲] key.
Press the [DONE] key.
The display returns to the Basic Features screen.
2
Checking the Copy Mode Settings
When the copy mode settings are selected on the Special Features screen, you can check
the current settings.
Page 42
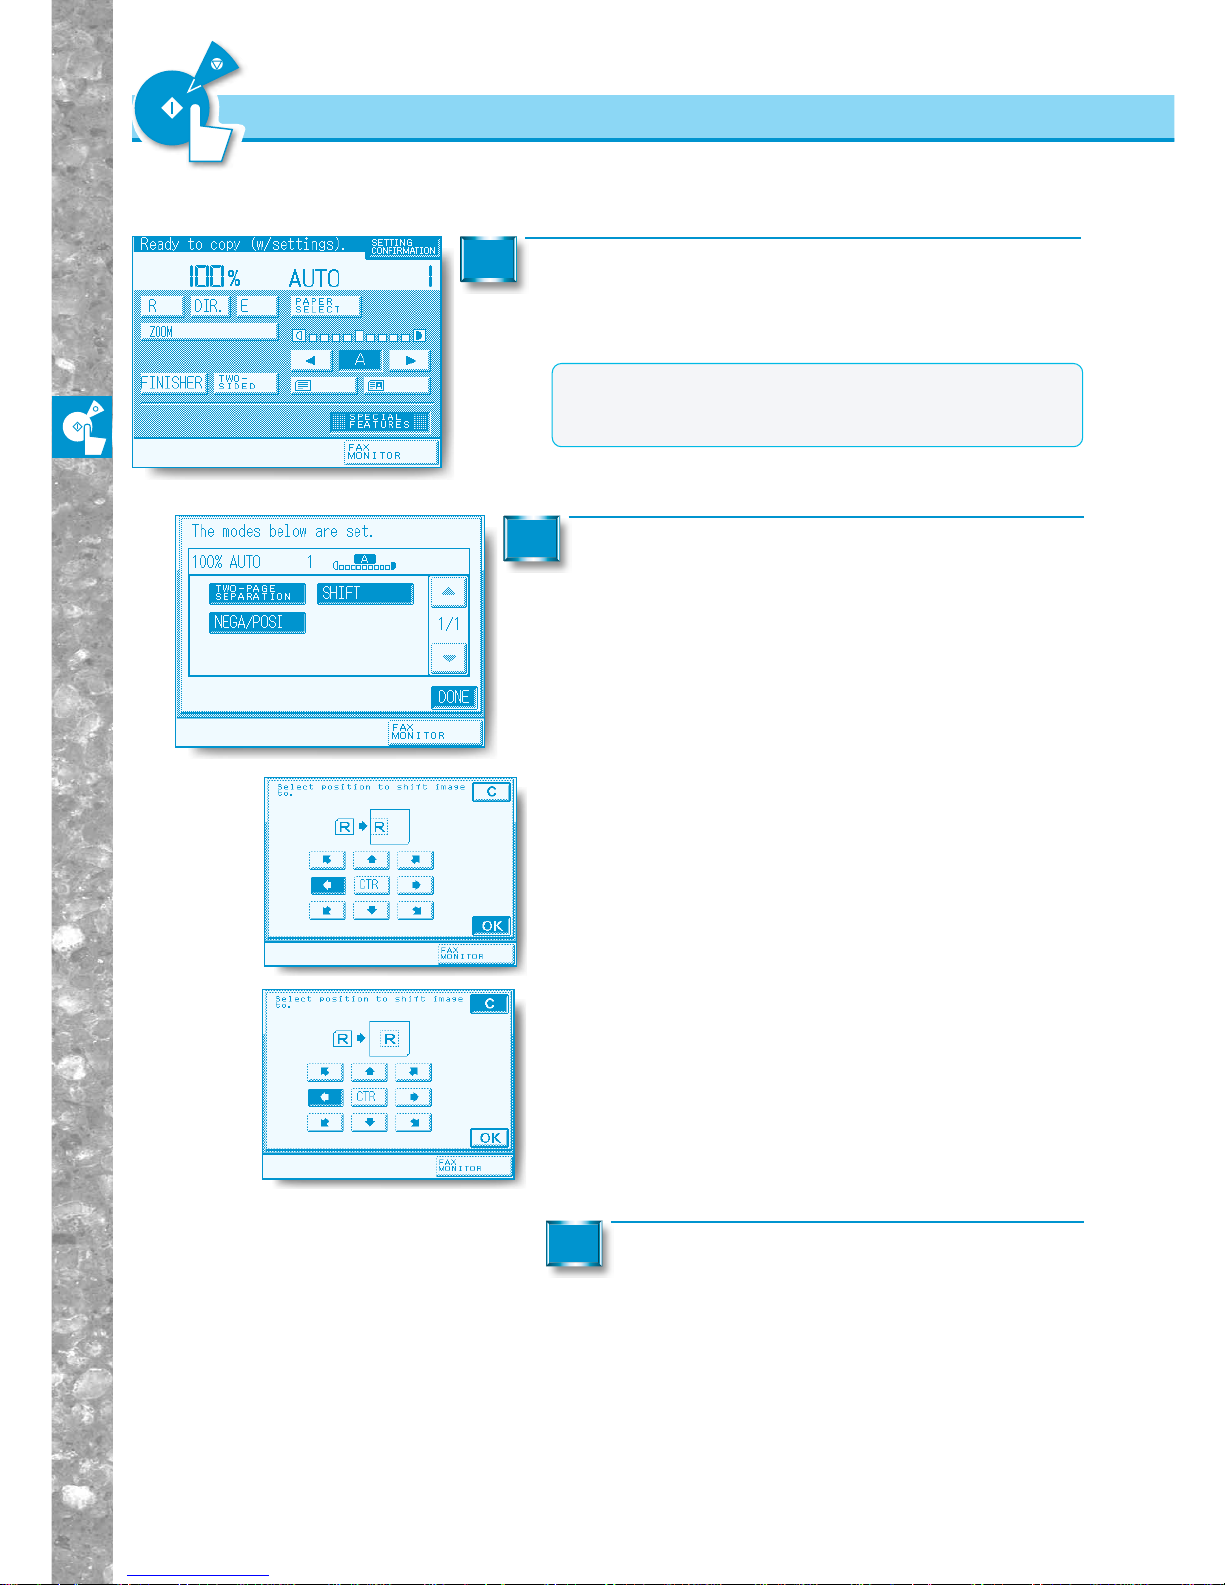
Before You Star t Using Copy Functions
1–16
Changing or Cancelling a Selected Copy Mode
Press the [SETTING CONFIRMATION] key on the
Basic Features screen.
The display shows the selected copy mode settings.
1
MEMO
●When six or more copy modes have been set, use the [▼]
key to bring up the next screen. To return to the previous
screen, press the [▲] key.
Press the key for the copy mode you want to
change or cancel.
The copy mode settings screen appears.
2
Press the [DONE] key.
The display returns to the Basic Features screen.
3
Changing or Canceling a Selected
Copy Mode
From the Setting Confirmation screen, you can also change or cancel functions.
■ To change a mode (example: SHIFT)
Perform the same steps as when setting the mode. When the
setting is as you want it, press [OK].
The display returns to the Setting Confirmation screen.
■ To cancel a mode
Press the [C] key.
The display returns to the Setting Confirmation screen.
Page 43
Selecting the Copy Paper Size (PAPER SELECT) ......................... 2-2
Changing the Copy Ratio (Enlarging/Reducing Originals) .......... 2-8
Adjusting Exposure and Image Quality (COPY EXPOSURE)..... 2-24
Entering the Copy Quantity........................................................... 2-27
Using the Memory for Copying.....................................................2-28
Interrupting the Current Copy Job to Make Priority Copies
(INTERRUPT MODE) ......................................................................2-31
Two-Sided Copying ........................................................................ 2-33
Collating Copies (FINISHER)......................................................... 2-39
Chapter 2
Basic Copying
Page 44
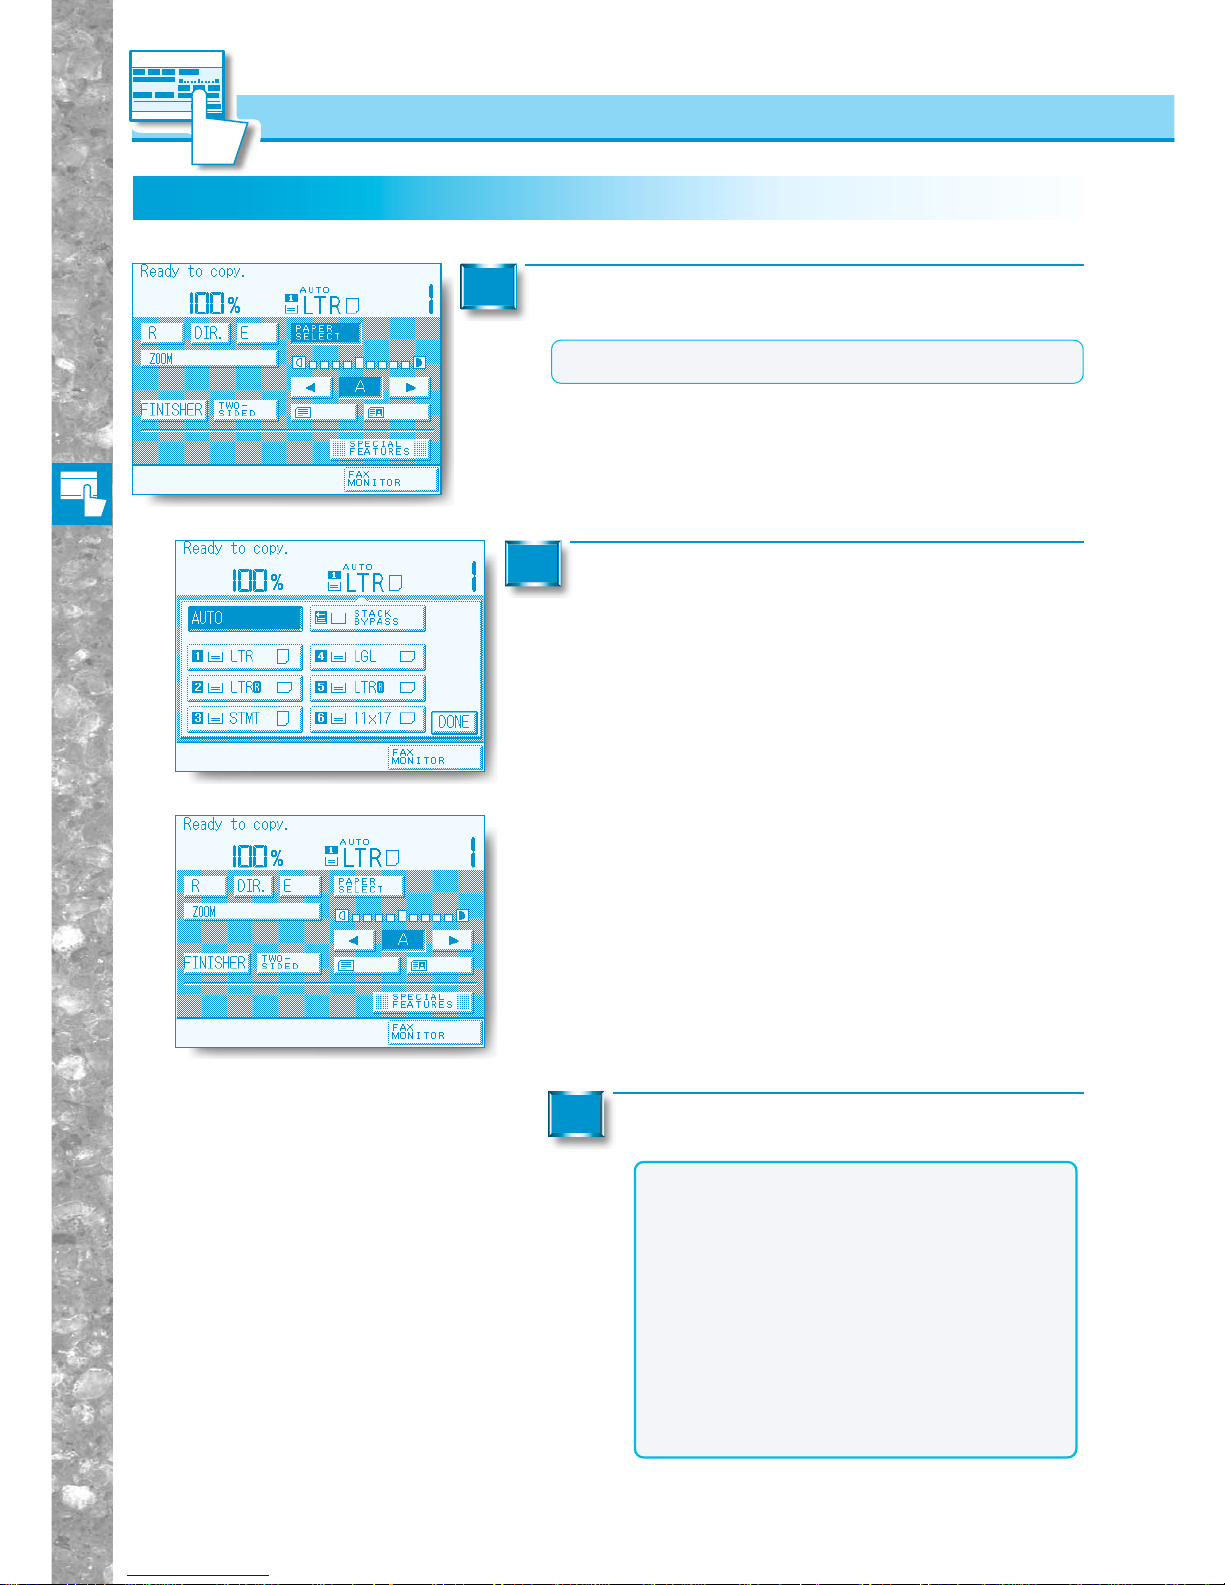
Basic Copying
2–2
Selecting the Copy Paper Size (PAPER SELECT)
Automatic Paper Selection
Automatic Paper Selection
Place your originals and press the [PAPER SELECT] key.
1
MEMO
●Auto Paper Selection is the Standard mode setting.
Select the [AUTO] key.
2
The screen on the left appears.
Proceed to make copies in the usual way.
3
NOTICE
●You cannot use Auto Paper Selection when
copying the following types of originals. Copy
these using Manual Paper Selection.
•Non-standard size originals
•Highly transparent originals such as transpar-
encies
•Originals with an extremely dark background
•Originals smaller than STMT in size
●Auto Paper Selection cannot be used together
with the following modes: ZOOM, XY ZOOM,
AUTO ZOOM, IMAGE COMB., IMAGE SEPARATION, XY AUTO, Rotate Collate, Rotate
Group, and BOOKLET.
Page 45
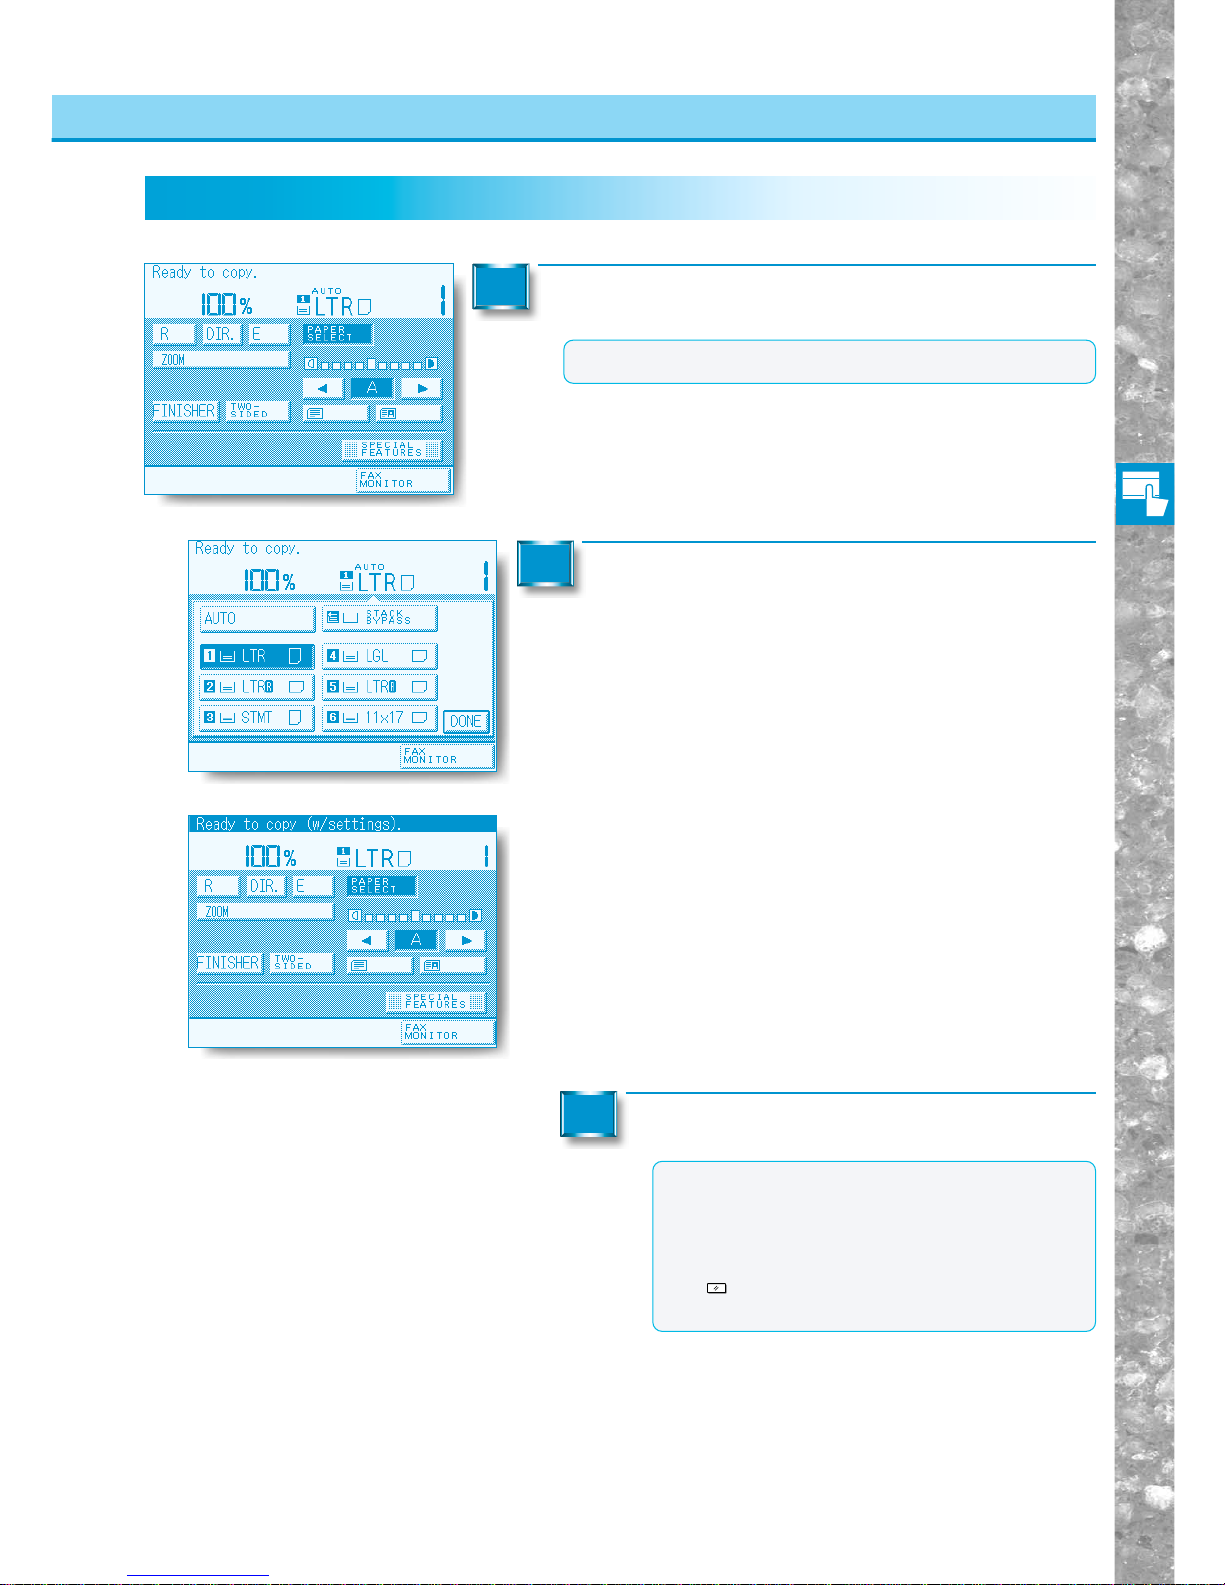
Basic Copying
2–3
Manual Paper Selection
Selecting the Copy Paper Size (PAPER SELECT)
Manual Paper Selection
Place your originals and press the [PAPER SELECT] key.
1
MEMO
●Auto Paper Selection is the Standard mode setting.
Select the desired paper size.
2
The display returns to the Basic Features screen, and the
selected paper size is displayed.
Proceed to make copies in the usual way.
3
MEMO
●The paper sizes are displayed in the order in
which they are loaded in the paper drawers.
●The paper sizes which are loaded in the paper
drawers are shown in the display.
●You can also cancel the mode by pressing the
Reset
key.
(The machine returns to the Standard mode.)
Page 46
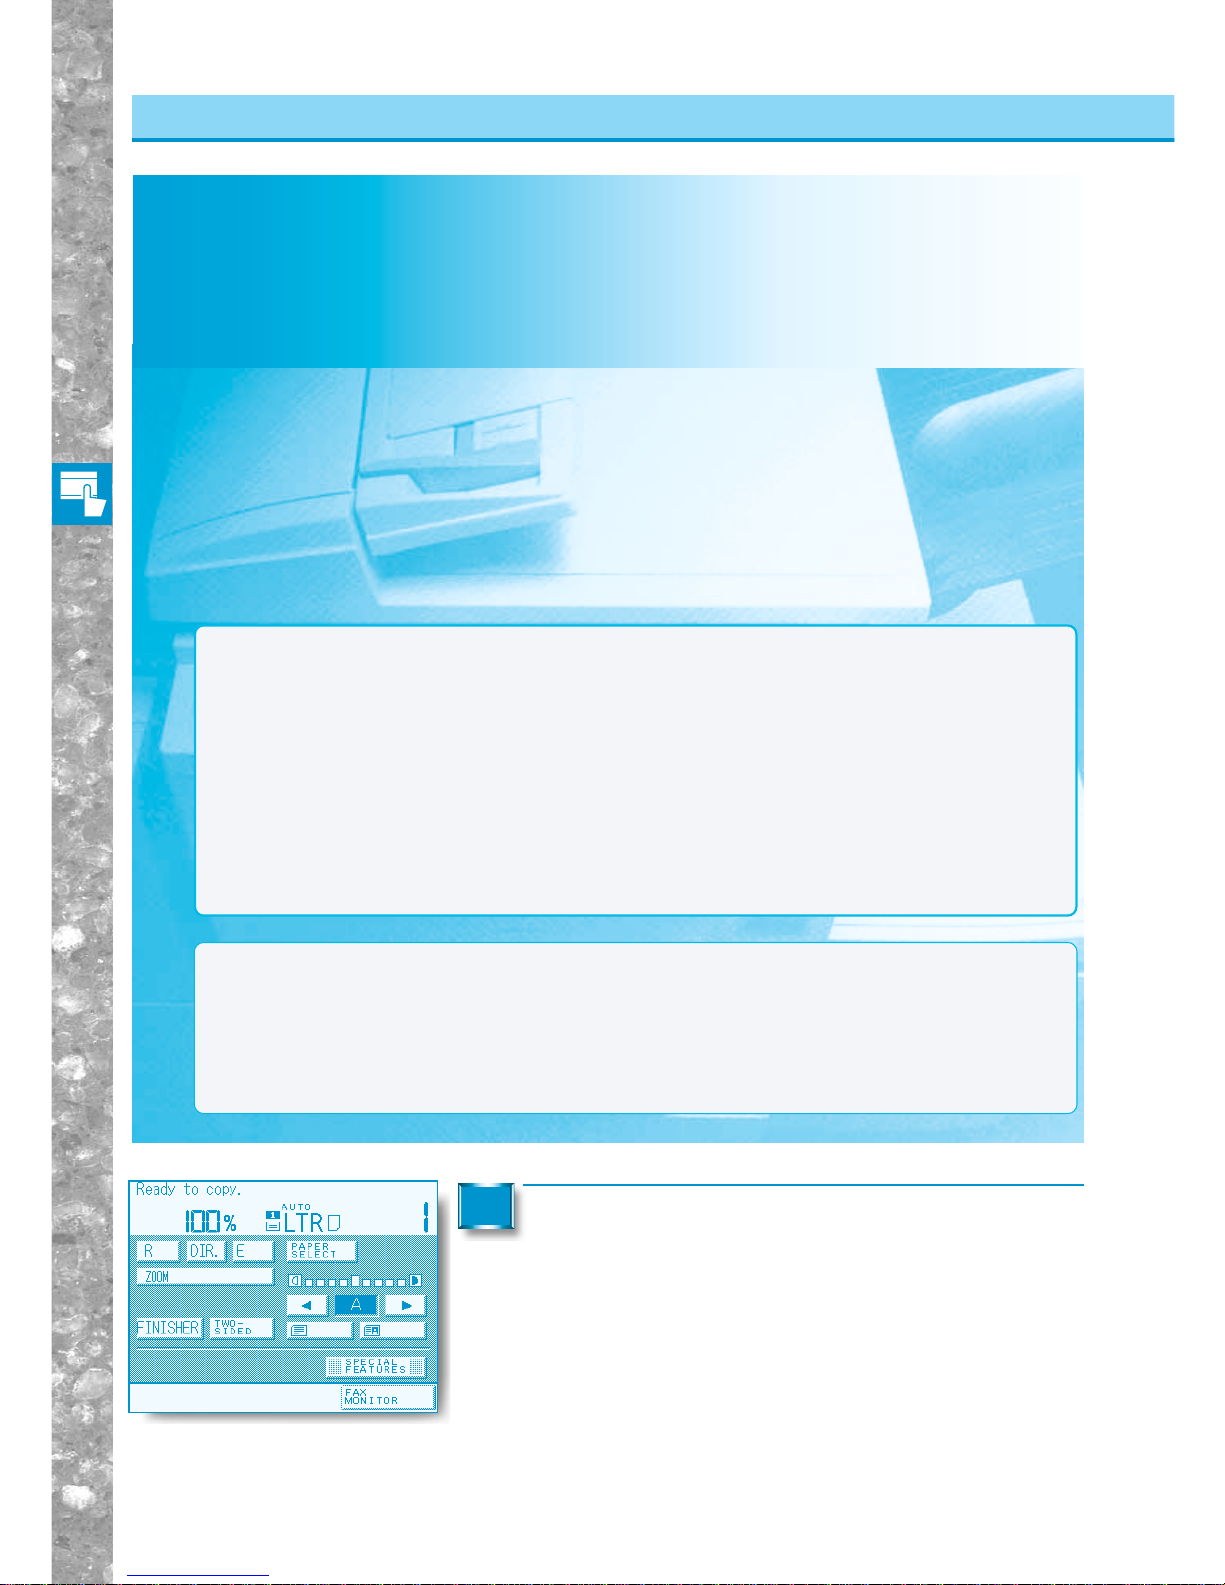
Basic Copying
2–4
Selecting the Copy Paper Size (PAPER SELECT)
Using the Stack Bypass
To make copies on transparencies or special (thick) copy stock, use the stack bypass. Copies can not
be made on paper fed from the paper drawers. Paper in the stack bypass will automatically be fed into
the machine.
If you select the Stack Bypass mode at paper selection, you can make copies from the stack bypass.
The following three types of paper can be copied using the stack bypass.
Place your originals and programme the copy
settings.
1
Using the Stack Bypass
■Standard Size
You can select standard inch system copy paper, or A or B series copy paper.
■Free Size
You can place standard-size or non-standard size copy paper.
■Material
You can place plain copy paper, thick copy paper and tracing paper.
■Post card
You can place the post card.
NOTICE
●Note the following points when using the stack bypass.
•Copy quantity: 1 to about 50 sheets (stack about 3/16" high)
• Paper size: 4-1/8" x 5-1/8" to 11" x 17"
• Paper weight: 17 to 32-lb bond (64 g/m2 to 128 g/m2)
•Curl down copy paper before use.
(Curling amount : copy paper less than 3/8", post card less than 3/16")
• There are some types of copy stock which may meet the above specifications but cannot be fed in the
stack bypass.
●When copying on transparencies while a paper output accessory except the Finisher-E1 is installed, the
output tray must be set to tray A. Verify and change the setting if necessar y. (See “Setting up Dedicated
Tray for Copy, Fax and Printer,” on p. 4-13.)
●When copying on a transparency, the output tray must be set to tray A. Check the setting and change it if
necessary.(See "Setting up Dedicated Trays for Copy and Fax" on p. 4-12.)
MEMO
●When copying the following originals, you cannot use Auto Paper Selection:
•Highly transparent originals such as transparencies
•Originals with an extremely dark background
Use Manual Paper Selection with these types of paper.
●When the Transparency Interleaving mode is already set, you cannot make copies by Free Size using the
stack bypass. When the Transparency Interleaving mode is selected when making copies by Free Size,
enter the copy size during mode-setting operations.
Page 47
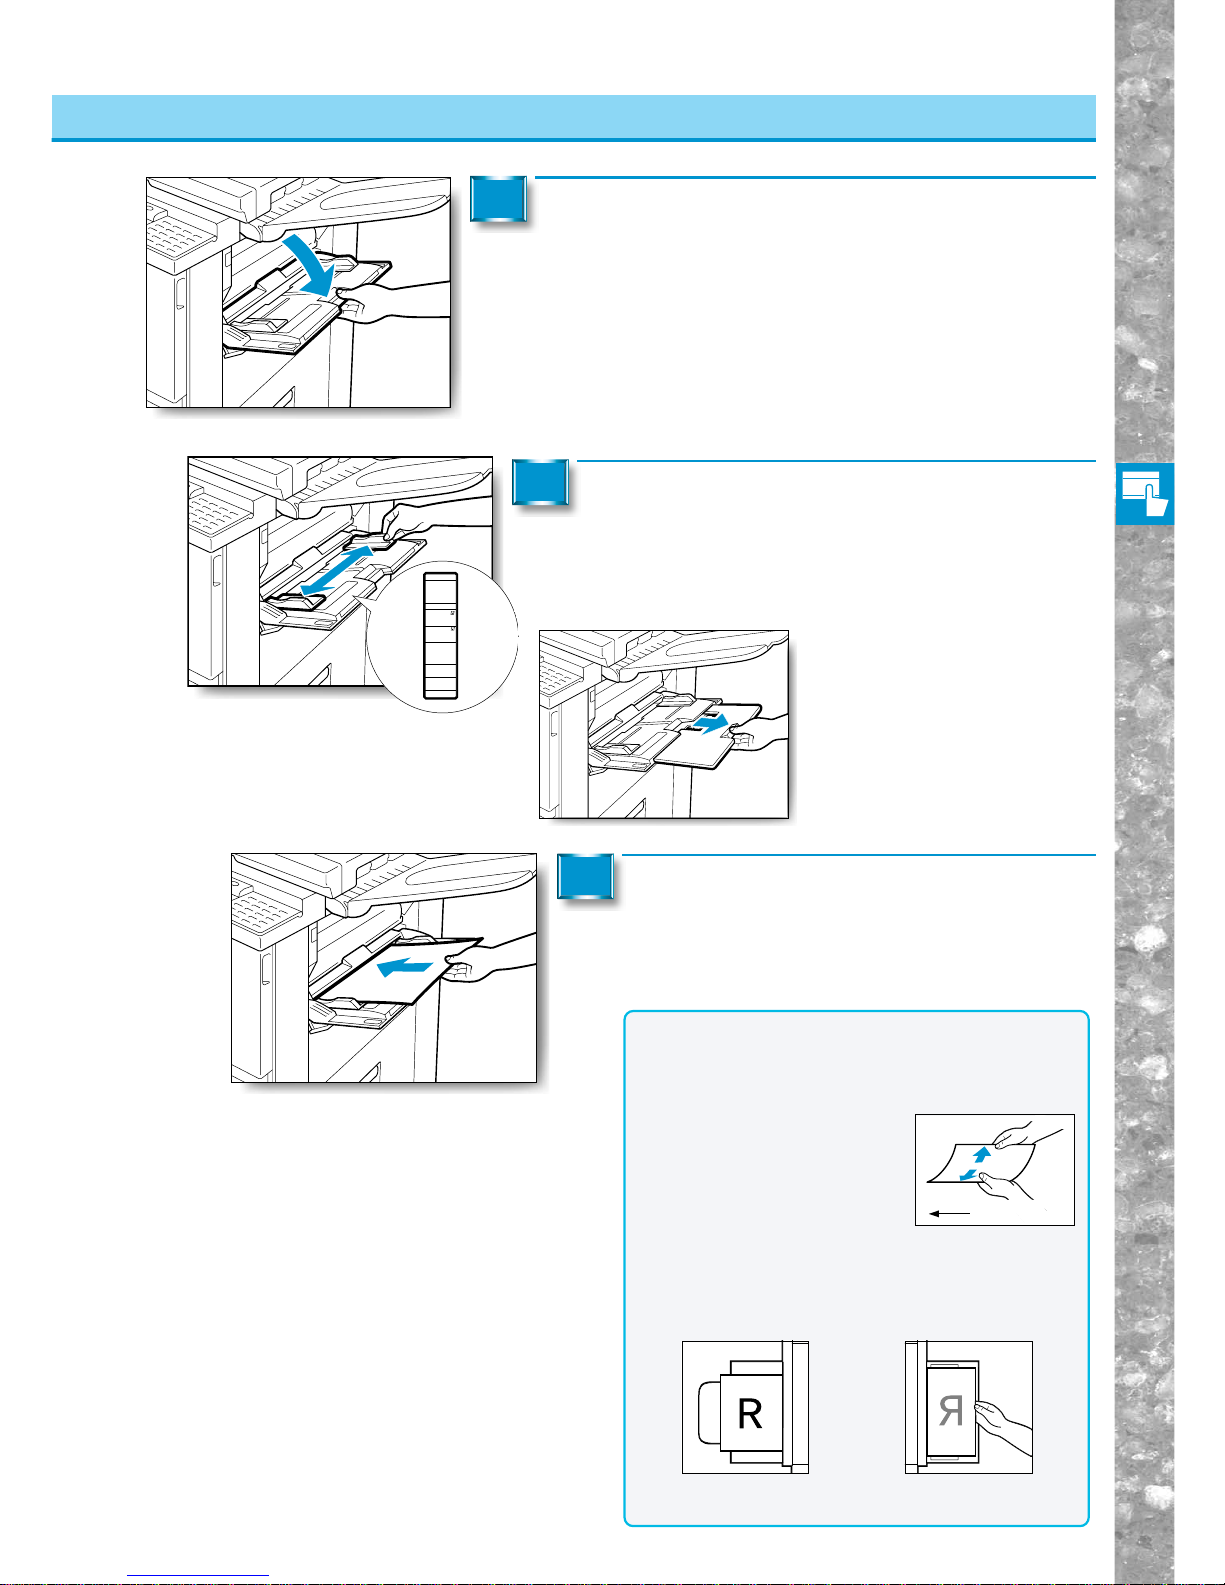
Basic Copying
2–5
A3A4
B5 B4/
/
A5
B5
LGL.LTR·R
STMT
LGR.LTR
Using the Stack Bypass
Selecting the Copy Paper Size (PAPER SELECT)
Open the stack bypass.
2
Adjust the slide guides to the size of the copy
paper.
3
When feeding large-size
copy paper, pull out the
auxiliary tray.
Place the copy paper in the stack bypass.
Align the required number of sheets of copy paper with the
slide guides. The surface that you want to copy on must be
placed face up. Insert the copy paper into the machine until
it stops.
4
NOTICE
●When resupplying paper to the stack bypass
remove any previous remaining paper, stack it with
the new paper and set it in place after making sure
the paper edges are nearly aligned.
●
When copying using the stack
bypass, a paper jam will occur
easily if the copy stock is curled.
Therefore, curl down all curled copy
stock as shown in the figure before
placing it in the stack bypass.
●
When copying onto the reverse side of a copy sheet which has
been copied on one side, after curling down the copy sheet
place it in the stack bypass with the side you wish to copy onto
facing up, and the edge which was output first when copying
the first side, at the rear of the stack bypass (see below).
Paper feed direction
When copying of the
first side is completed
When copying the
reverse side
Page 48
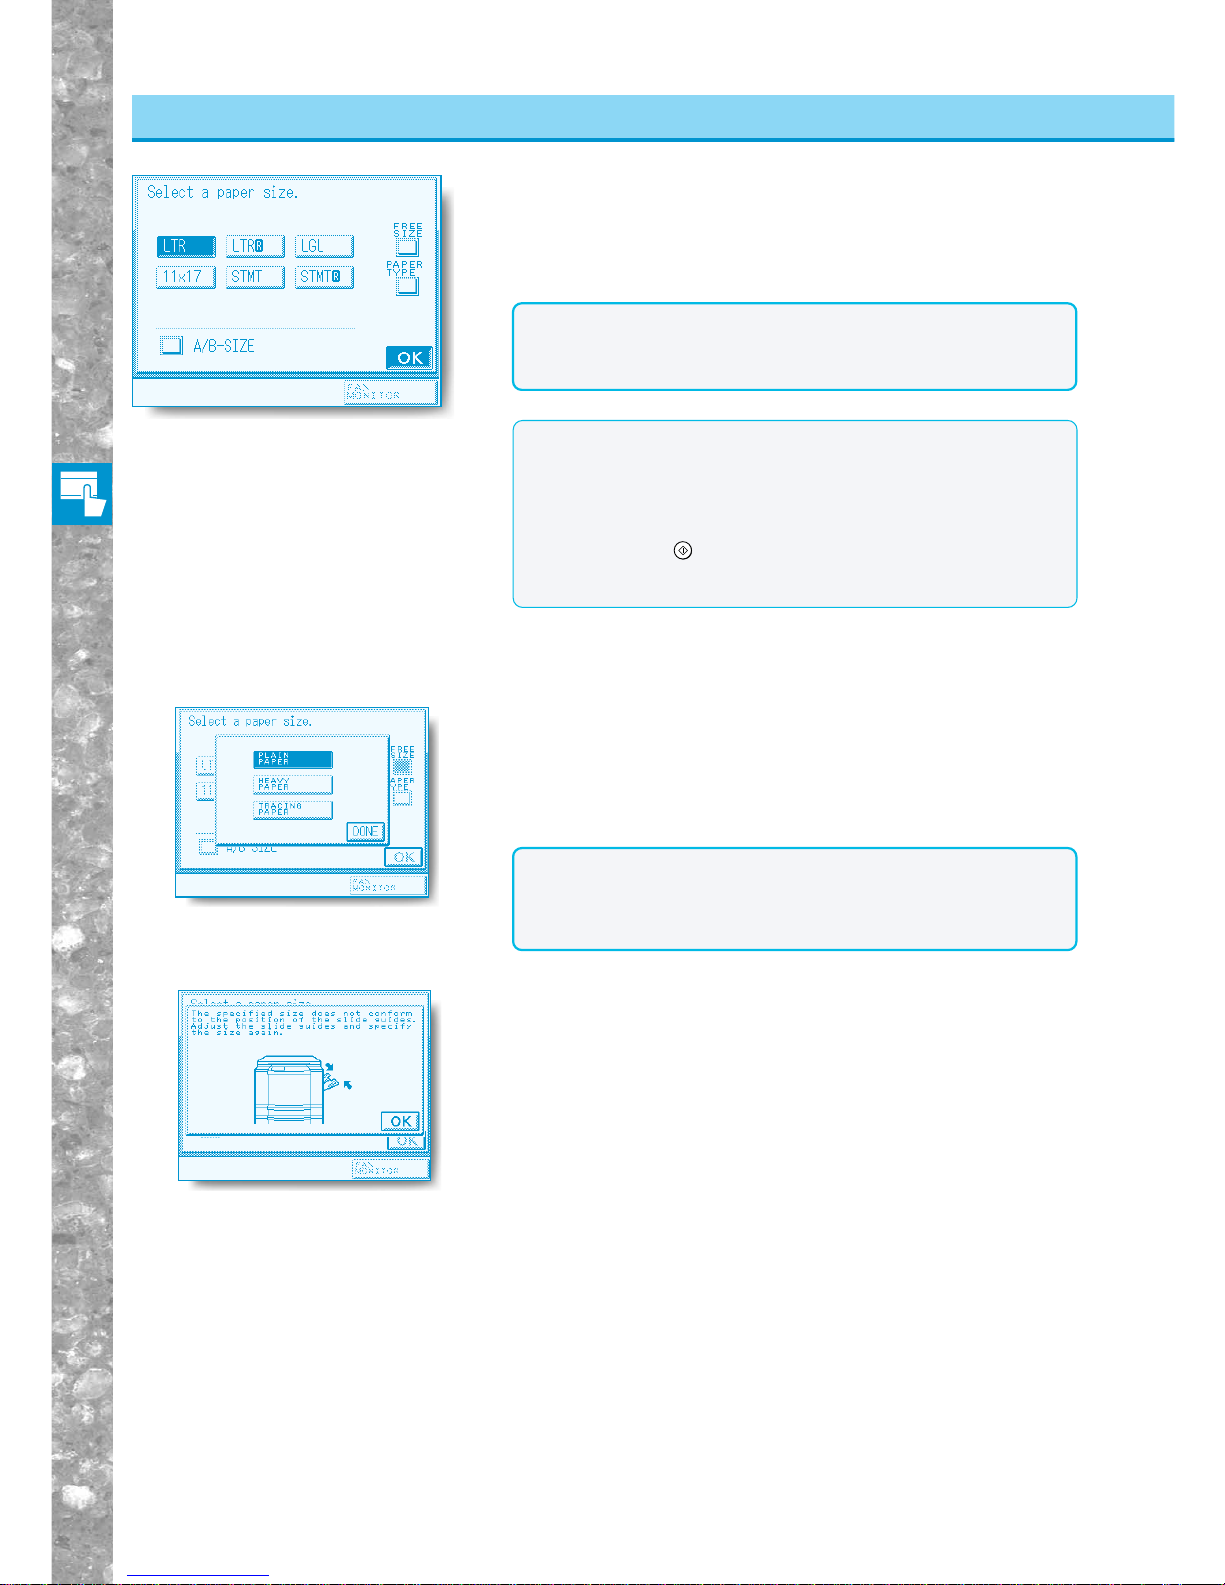
Basic Copying
2–6
Selecting the Copy Paper Size (PAPER SELECT)
NOTICE
●Set the paper size to the same size as the original placed on the
stack bypass tra y.
●For thick paper, use the LTRR setting.
When STACK BYPASS SIZE ENTRY is ON, select the
paper size and then press [OK] key.
◆ If the screen on the left is displayed, adjust the width of the slide
guides to match the paper size.
Using the Stack Bypass
MEMO
●To select the paper size, set the STACK BYPASS SIZE ENTRY to
ON. (See “Settings for Stack Bypass Tray Paper Size Selection,”
on p. 4-12.)
●When STACK BYPASS SIZE ENTRY is OFF and one of Twosided, Overlay, or Image Combination modes has been set,
pressing the
Start
key will bring up the paper size setting screen.
From the sizes displayed on this screen, select the size that
matches the paper placed on the stack bypass tray.
◆ When using plain paper, think paper or tracing paper.
The screen on the left is displayed when the [PAPER TYPE] key is
pressed. After selecting the papers type, press the [DONE] key and
then the [OK] key.
NOTICE
●When using tracing paper with the Finisher-E1 installed, select
[TRACING PAPER].
●[TRACING PAPER] is only displayed when the Finisher-E1 is
installed.
Go to step 6.
Page 49
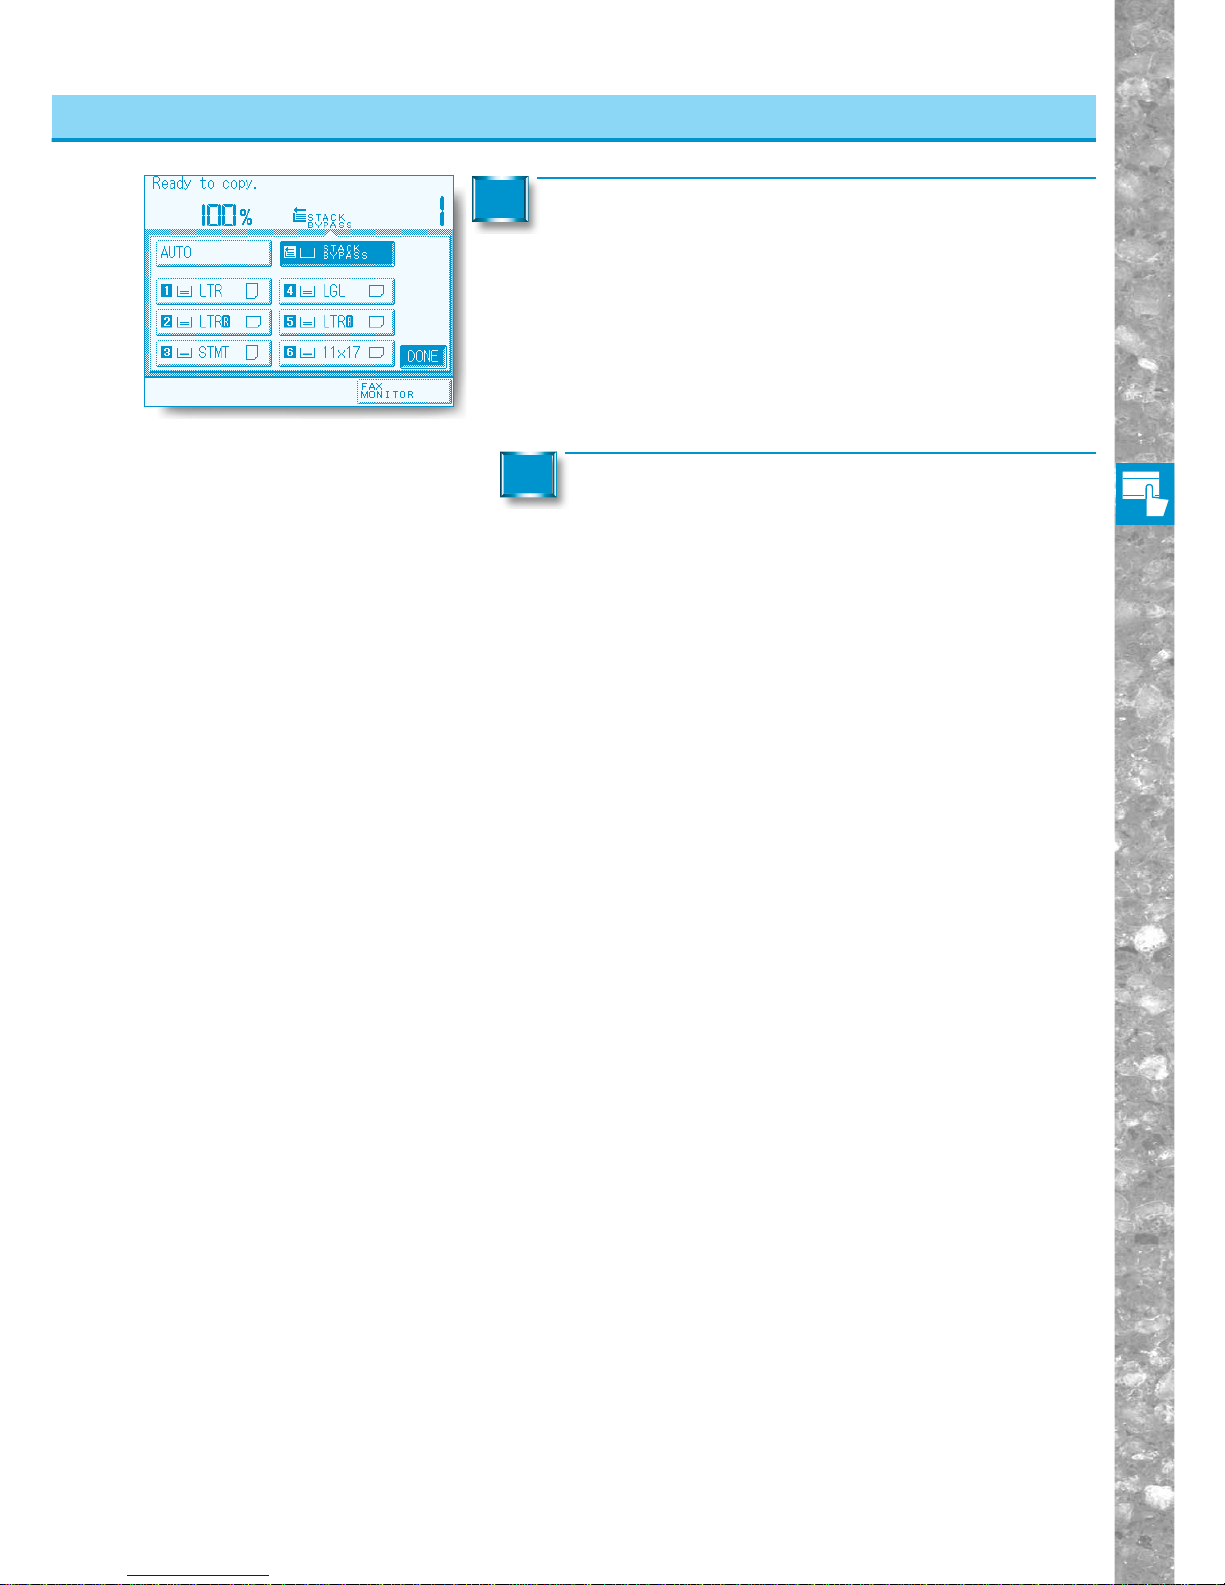
Basic Copying
2–7
Proceed to make copies in the usual way.
6
Press the [DONE] key.
5
Selecting the Copy Paper Size (PAPER SELECT)
Using the Stack Bypass
Page 50
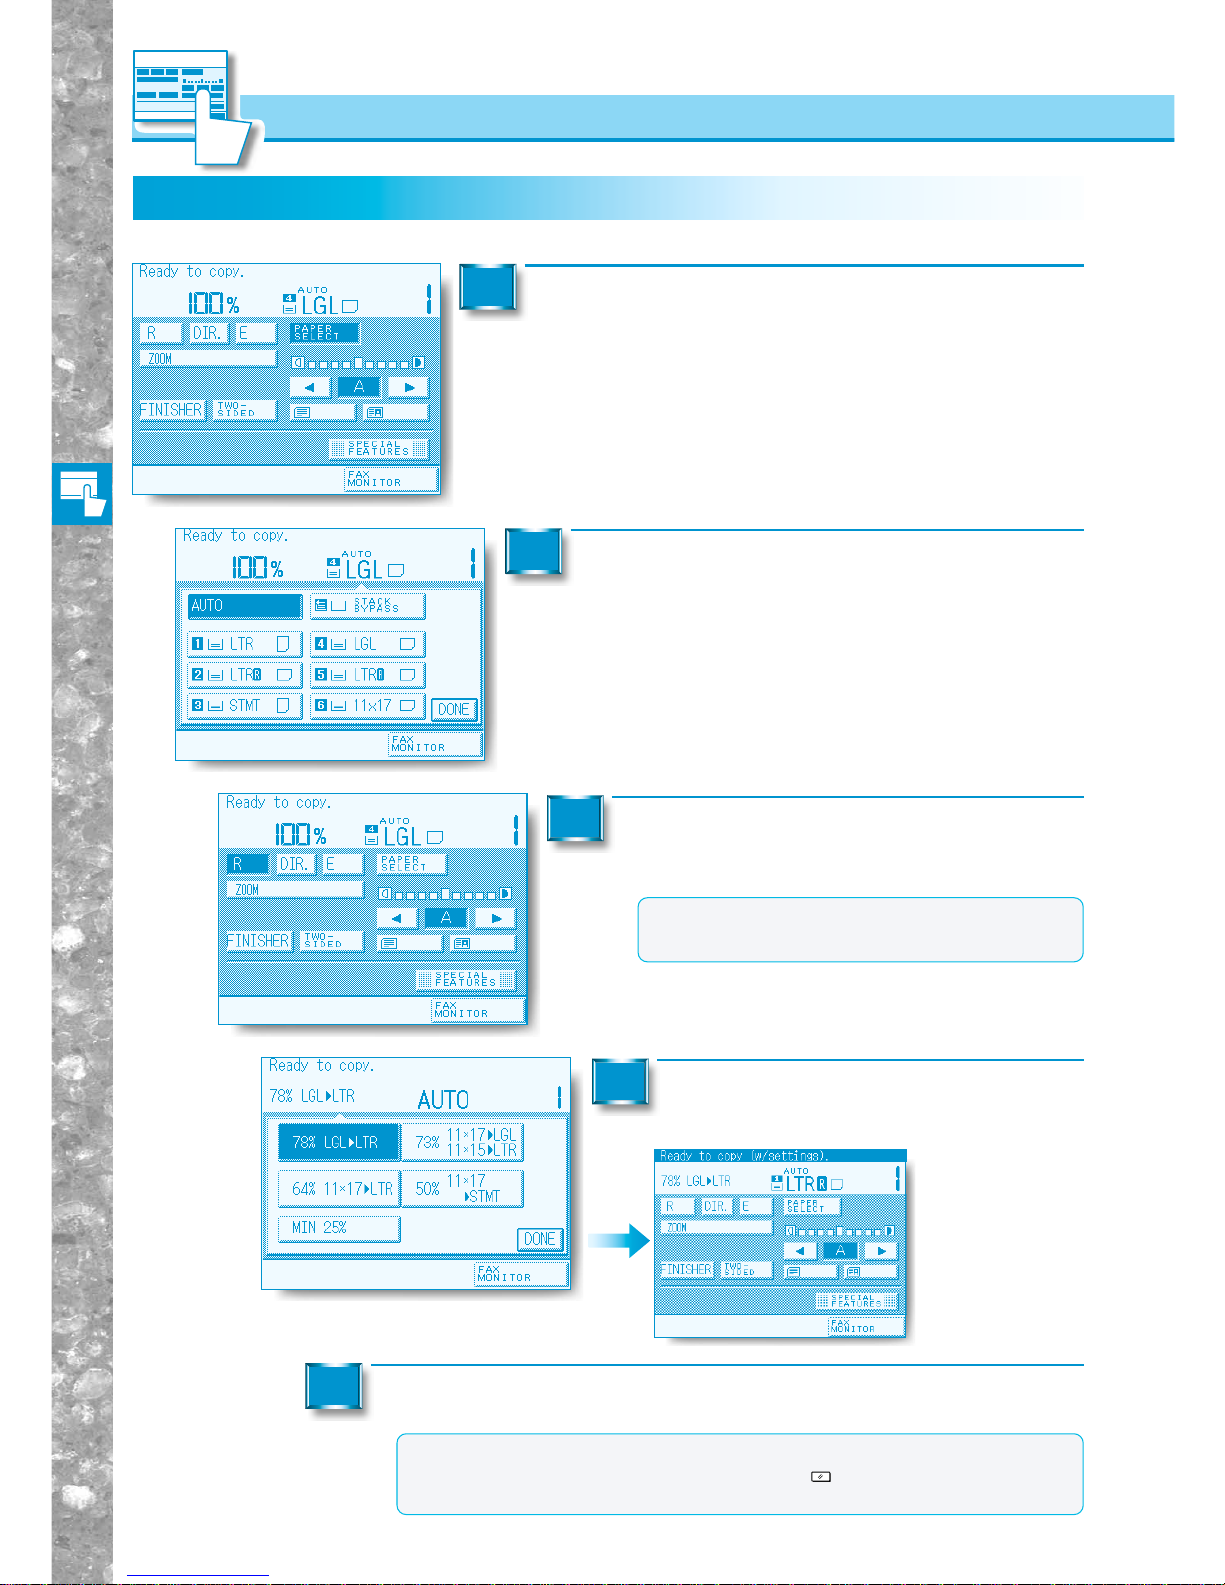
Basic Copying
2–8
MEMO
●To return the copy ratio to 100%, press the [DIR.]
key.
Enlarging/Reducing Originals to a Standard Size
Changing the Copy Ratio (Enlarging/
Reducing Originals)
Place your originals and press the [PAPER SELECT] key.
1
Select the [AUTO] key.
2
To enlarge, press the [E] key. To reduce,
press the [R] key.
3
Select a preset copy ratio.
4
The display returns
to the Basic
Features screen,
and the selected
copy ratio is
displayed.
Proceed to make copies in the usual way.
5
MEMO
●To return the copy ratio to 100%, press the [DIR.] key.
●You can also cancel the mode by pressing the
Reset
key. (The machine returns to
the Standard mode.)
Enlarging/Reducing Originals to a Standard Size
Page 51
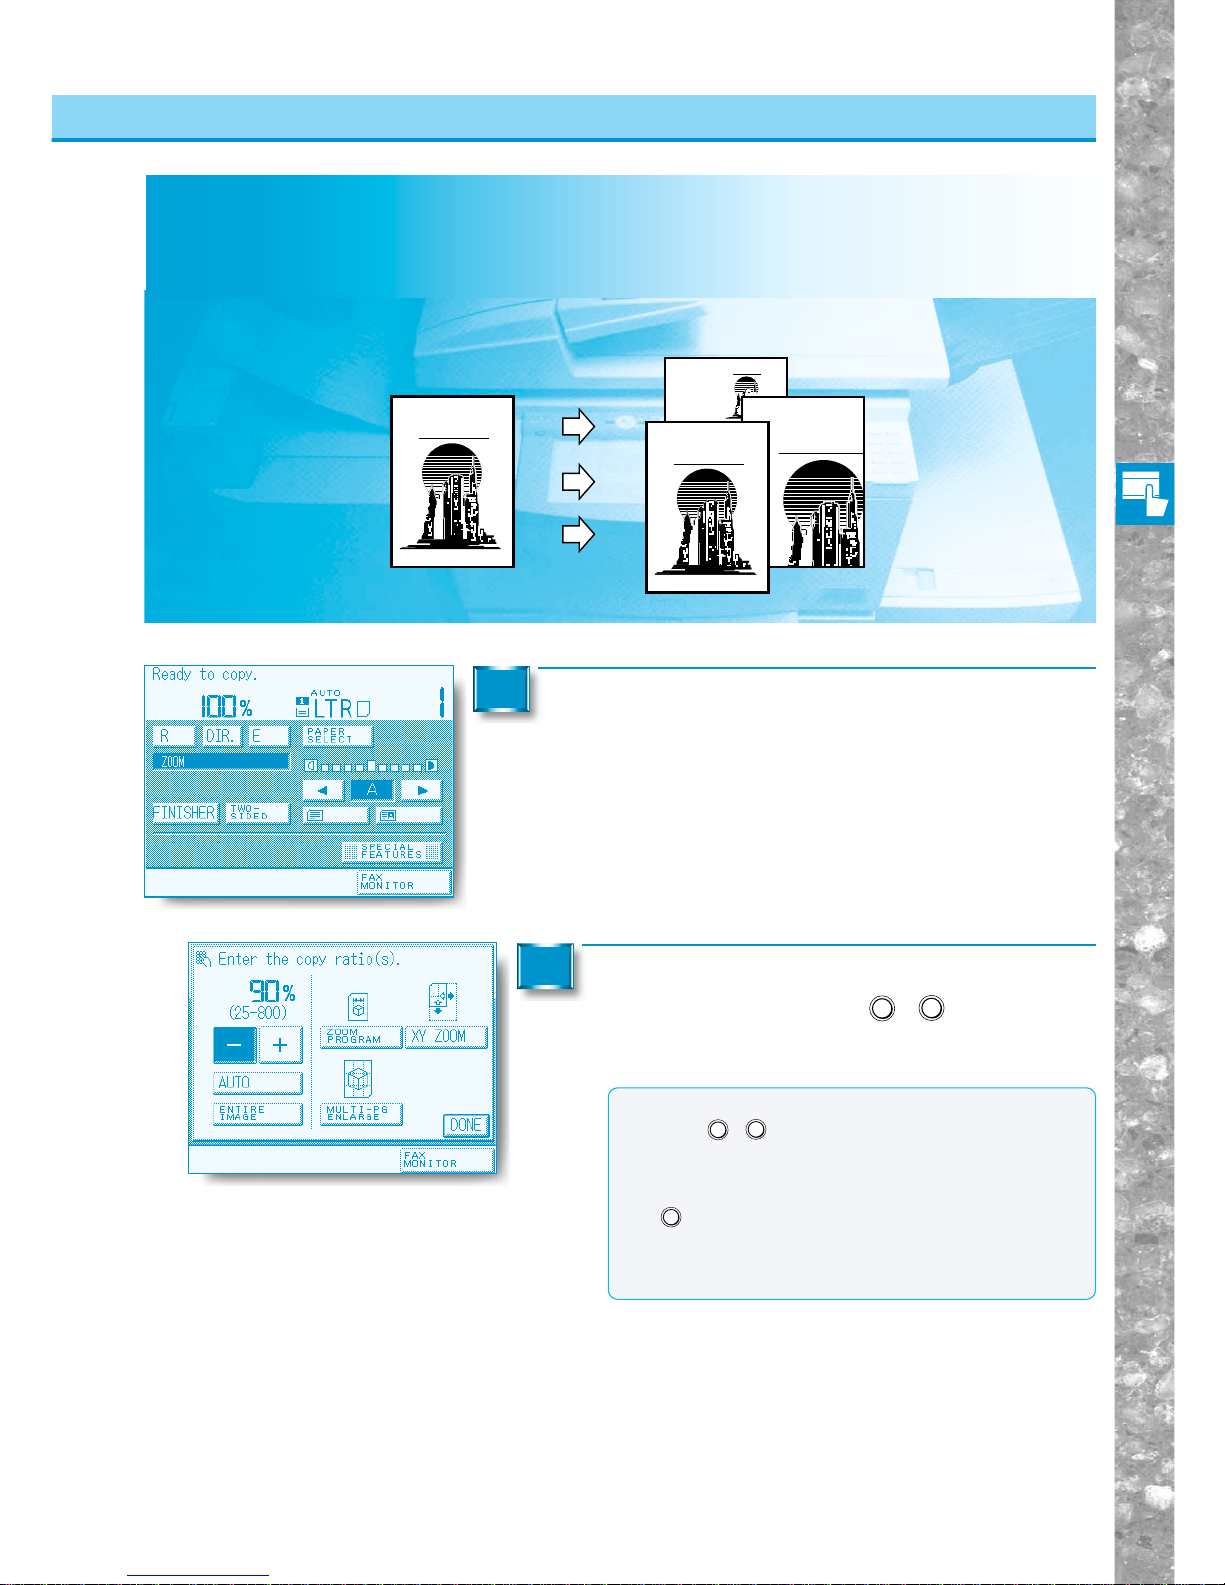
Basic Copying
2–9
Changing the Copy Ratio (Enlarging/Reducing Originals)
Specifying the Copy Ratio by %
You can reduce or enlarge images by any copy ratio, selectable in 1% increments.
The copy ratios are 25% to 800%.
Place your originals and press the [ZOOM] key.
1
Specifying the Copy Ratio by %
MEMO
●Even if you entered the copy ratio with the Number
keys (0 - 9), you can directly change (increase/
decrease) the entered values with the [–] [+] keys in
the touch panel display.
●If you make a mistake when entering values, press the
C
Clear
key, and enter the correct value.
●If you enter a value outside the setting range, a
message prompting you to enter the appropriate value
will appear on screen.
CITY
CITY
CIT
Y
CITYCITY
Copy
Original
You can enter the copy ratio with the [–] [+]
keys or the Number keys (0 - 9) in 1%
increments.
2
Page 52
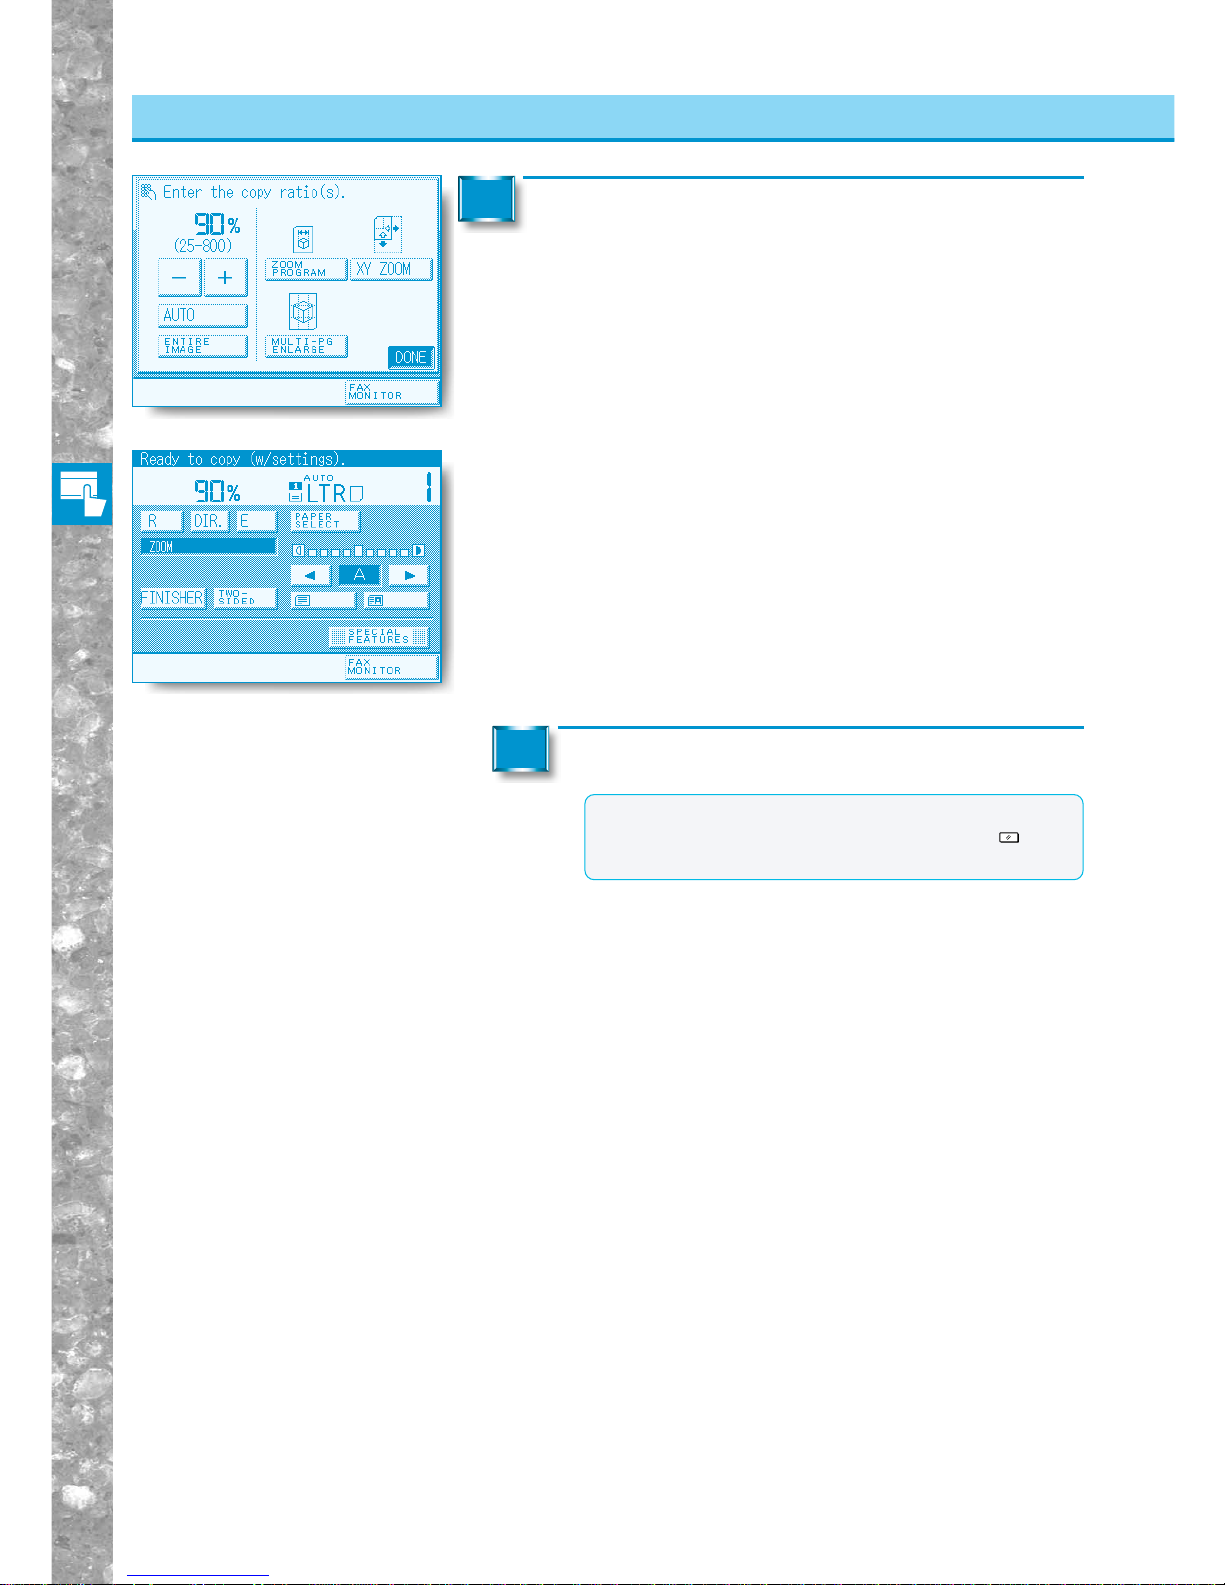
Basic Copying
2–10
Specifying the Copy Ratio by %
Changing the Copy Ratio (Enlarging/Reducing Originals)
Press the [DONE] key.
3
Proceed to make copies in the usual way.
4
MEMO
●To return the copy ratio to 100%, press the [DIR.] key.
●You can also cancel the mode by pressing the
Reset
key.
(The machine returns to the Standard mode.)
The display returns to the Basic Features screen, and the selected
copy ratio is displayed.
Page 53
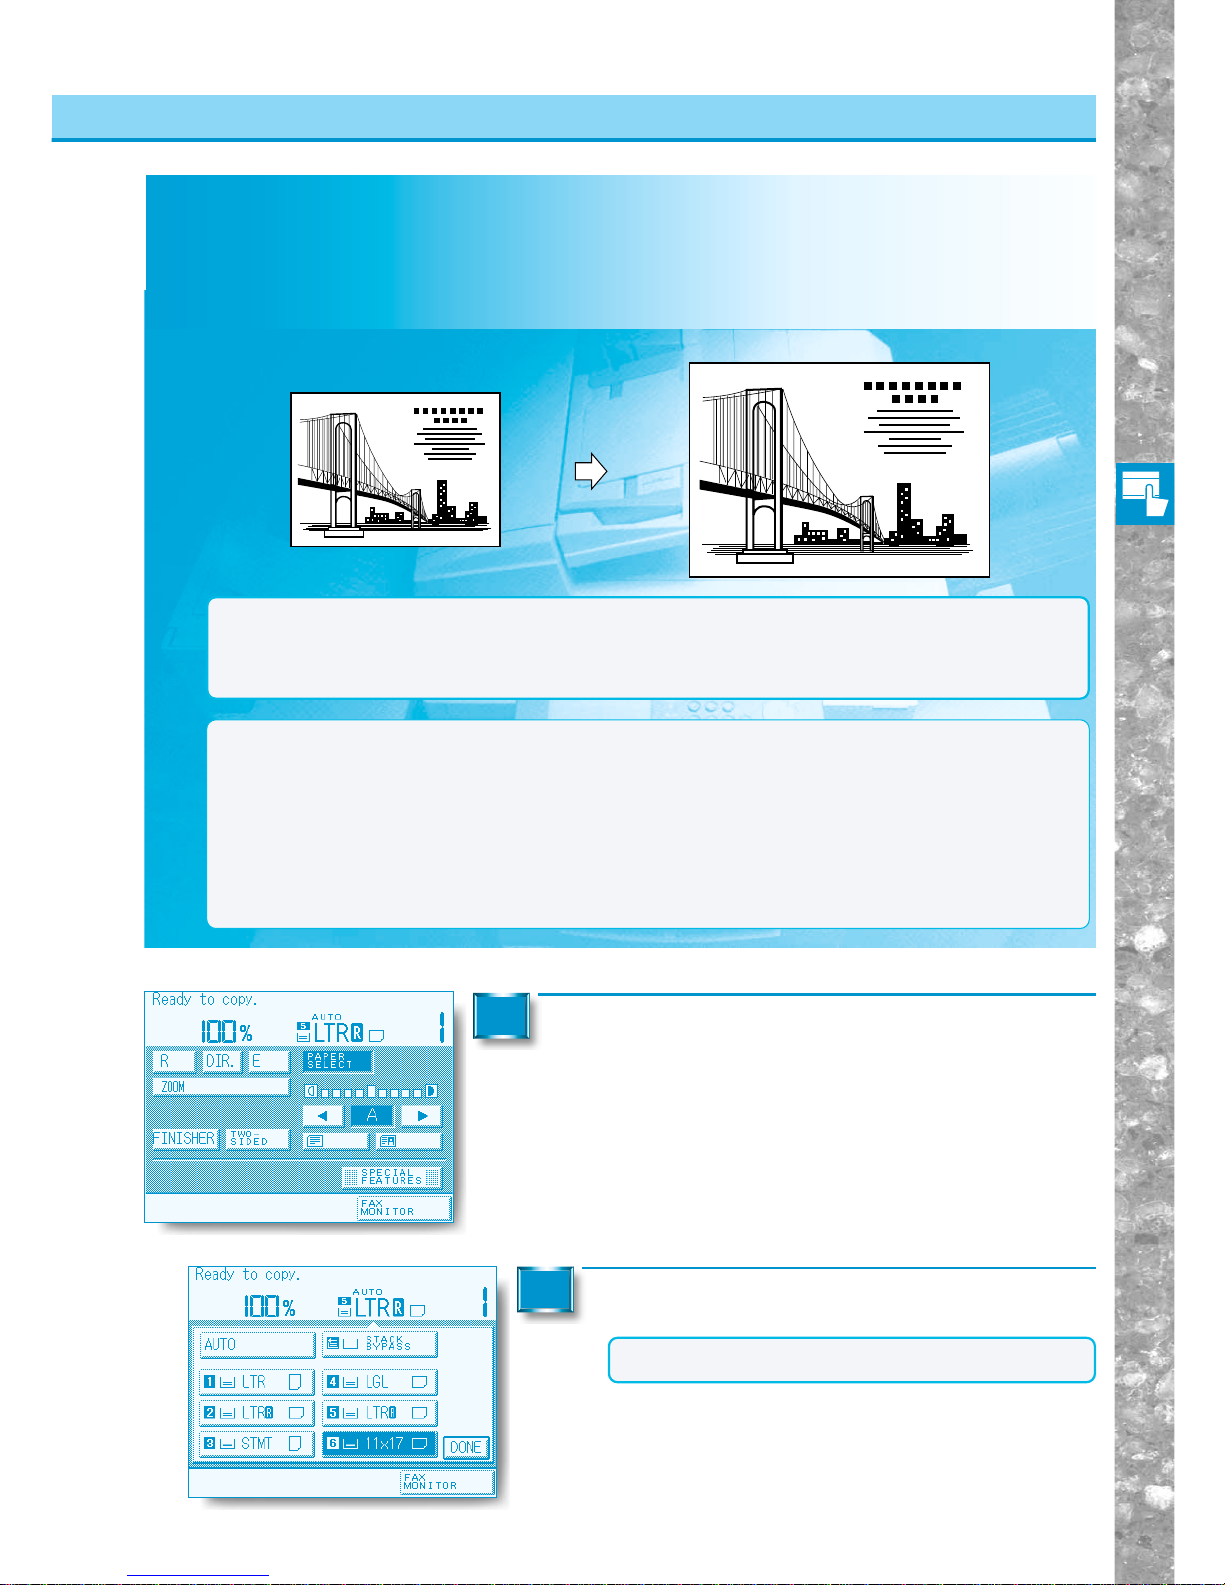
Basic Copying
2–11
Changing the Copy Ratio (Enlarging/Reducing Originals)
Automatically Setting the Copy Ratio Based on the Original
and Copy Paper Siz es
(AUTO ZOOM)
In this mode, the machine automatically selects the appropriate copy ratio based on the size of the
originals and the selected copy paper. The copy ratios are 25% to 800%.
Place your originals and press the [PAPER SELECT] key.
1
Automatically Setting the Copy Ratio Based on the Original and Copy Paper Sizes (AUTO ZOOM)
NOTICE
●Select a copy paper size other than “AUTO”.
Select the copy paper size.
2
Copy
Original
NOTICE
●You cannot use the Auto Zoom mode with Auto Paper Selection.
●You cannot copy highly transparent originals, such as transparencies, in the Auto Zoom mode. Use the
Reduction, Enlargement or Zoom modes.
●To use the Auto Zoom mode, your originals must conform to a standard paper size.
MEMO
●If an error occurs between the Auto Zoom copy ratio and the actual copy size, you can adjust this with the
Zoom Fine Adjustment function. (See "Fine-adjusting Zoom When Differences in Original Image and Copy
Image Occur," on p. 4-28.)
●The copy paper placed in the stack bypass normally is not processed in the Auto Zoom mode. To process
this paper in the Auto Zoom mode, you must first specify the size of the copy paper to be placed in the
stack bypass. (See "Using the Stack Bypass," on p. 2-4.)
●The paper sizes that can be used with Auto Zoom are as follows:
For an original placed on the platen glass : 11”x17”, LGL, LTR, STMT
For originals placed in the feeder : 11”x17”, LGL, LTR, LTRR, STMT, STMTR
Page 54
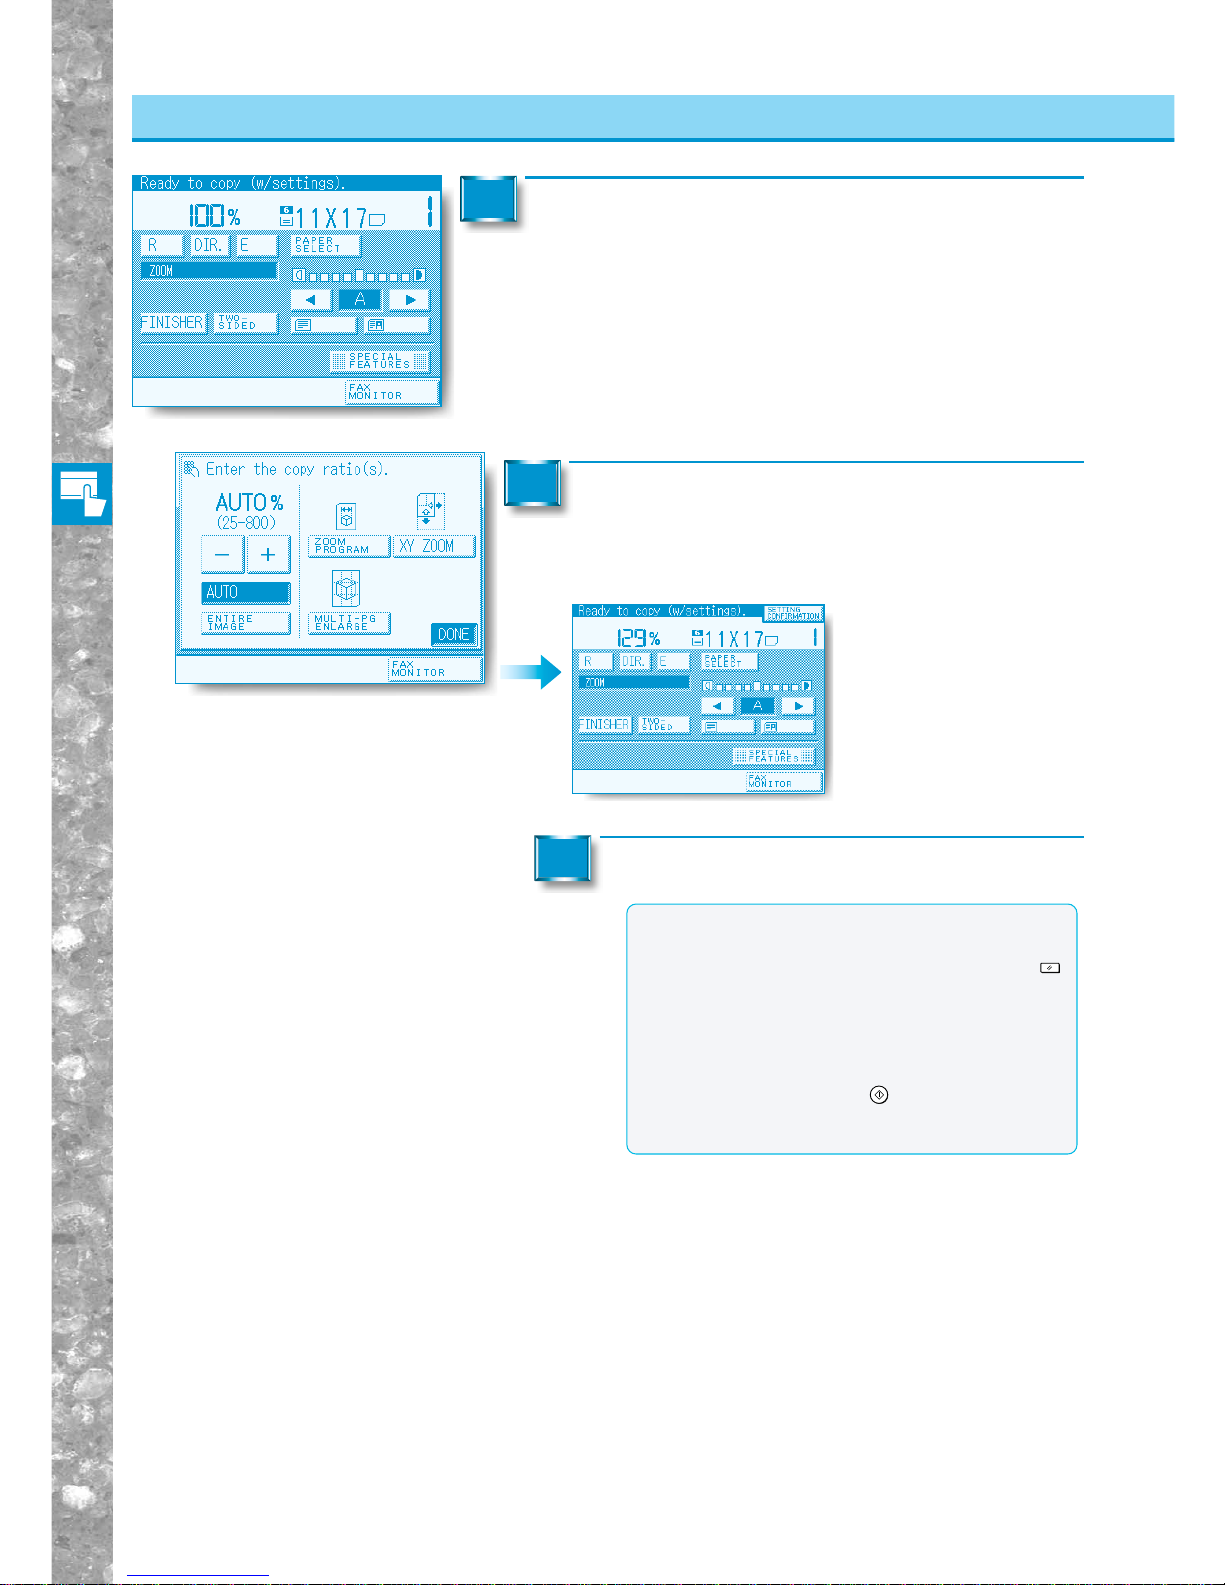
Basic Copying
2–12
MEMO
●To return the copy ratio to 100%, press the [DIR.]
key.
●You can also cancel the mode by pressing the
Reset
key. (The machine retur ns to the Standard mode.)
●If the original was placed on the platen glass, the
zoom ratio appears when the platen cover or
feeder is lowered.
●If the original was placed in the feeder, the zoom
ratio appears when the
Start
key is pressed.
●The copy ratio is set within the range of 25% to
800%.
Automatically Setting the Copy Ratio Based on the Original and Copy Paper Sizes (AUTO ZOOM)
Changing the Copy Ratio (Enlarging/Reducing Originals)
Press the [ZOOM] key.
3
Press the [AUTO] key and then the [DONE] key.
4
Proceed to make copies in the usual way.
5
Page 55
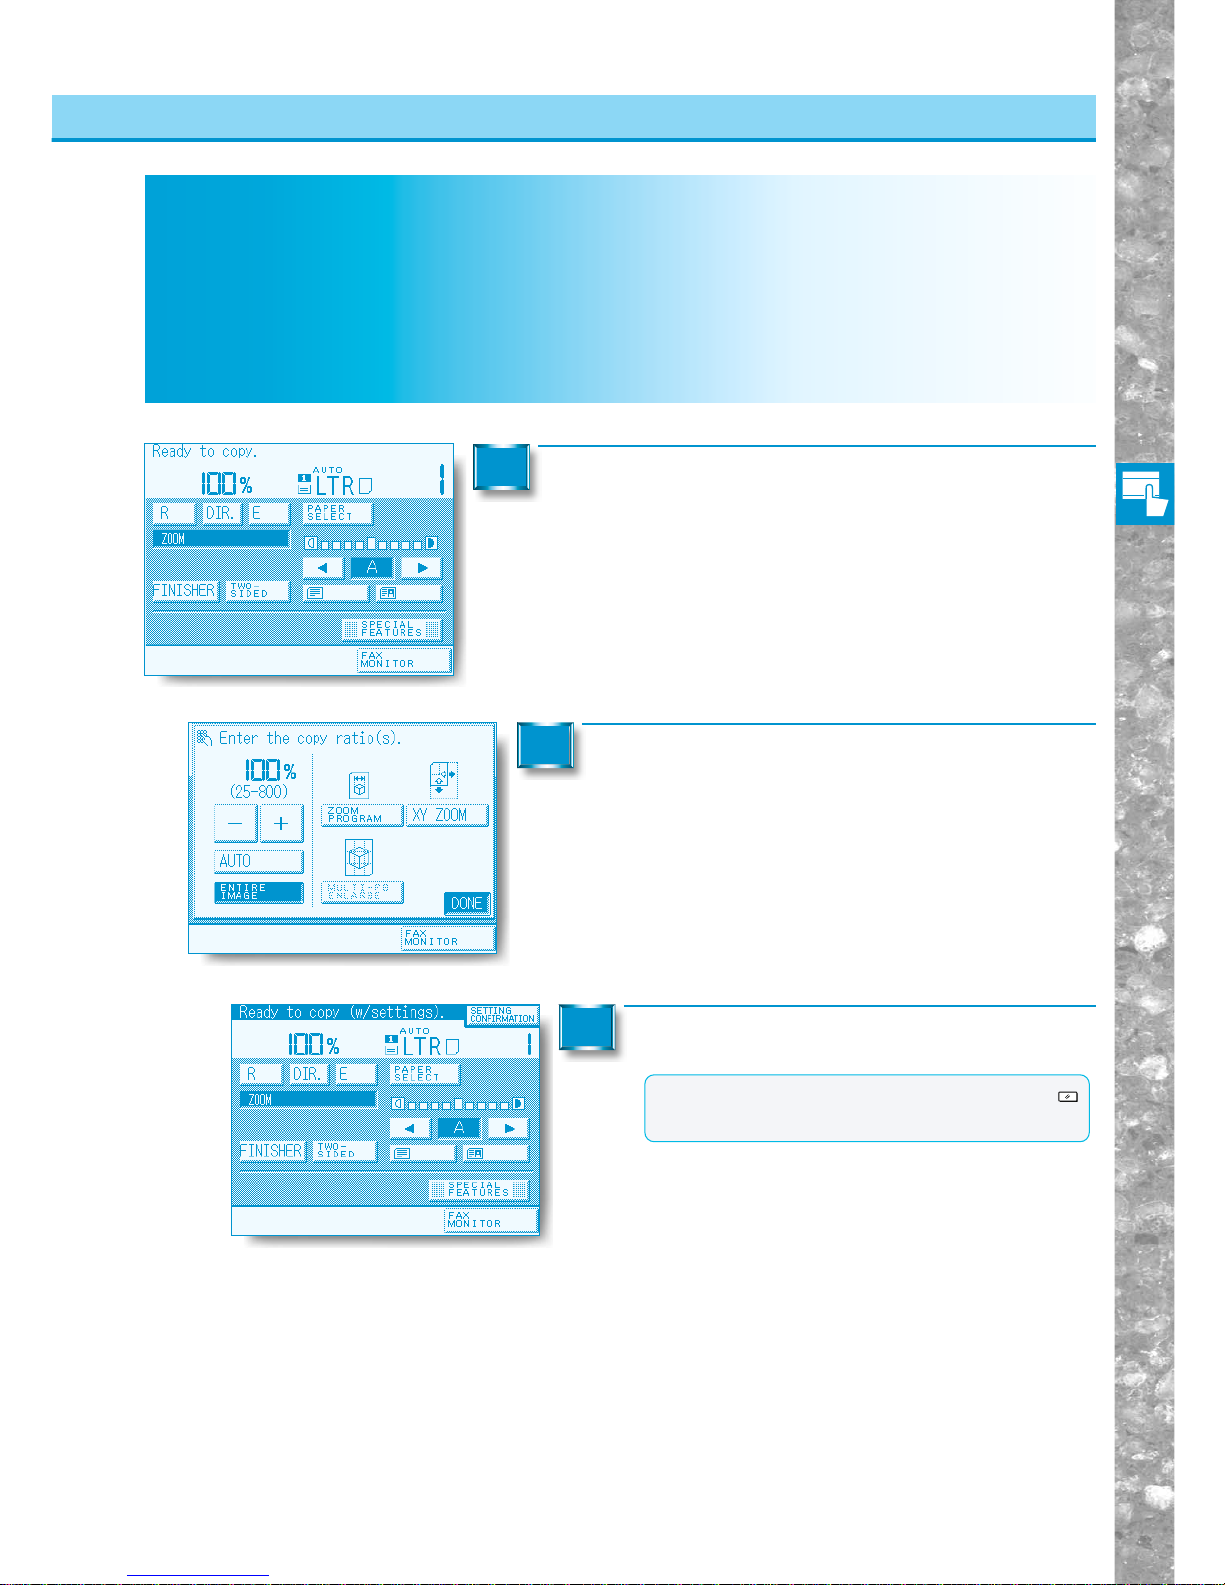
Basic Copying
2–13
Changing the Copy Ratio (Enlarging/Reducing Originals)
Slightly Reducing Images to Prevent the Original Periphery from Being Cut (ENTIRE IMAGE)
Slightly Reducing Images to Prevent the Original Periphery from Being Cut
(ENTIRE IMAGE)
When copying an original onto the same size of paper at a 100% copy ratio, the periphery of the original
may be cut slightly on the copy.
However, if you set the Entire Image mode, the copied image is automatically reduced slightly based on
the copy paper size and copy image size. As a result, the entire original image is reproduced on the
copy without its periphery being cut off.
Place your original and press the [ZOOM] key.
1
Proceed to make copies in the usual way.
3
MEMO
●You can also cancel the mode by pressing the
Reset
key. (The machine returns to the Standard mode.)
Press the [ENTIRE IMAGE] key, then press the
[DONE] key.
The display returns to the Basic Features screen.
2
Page 56
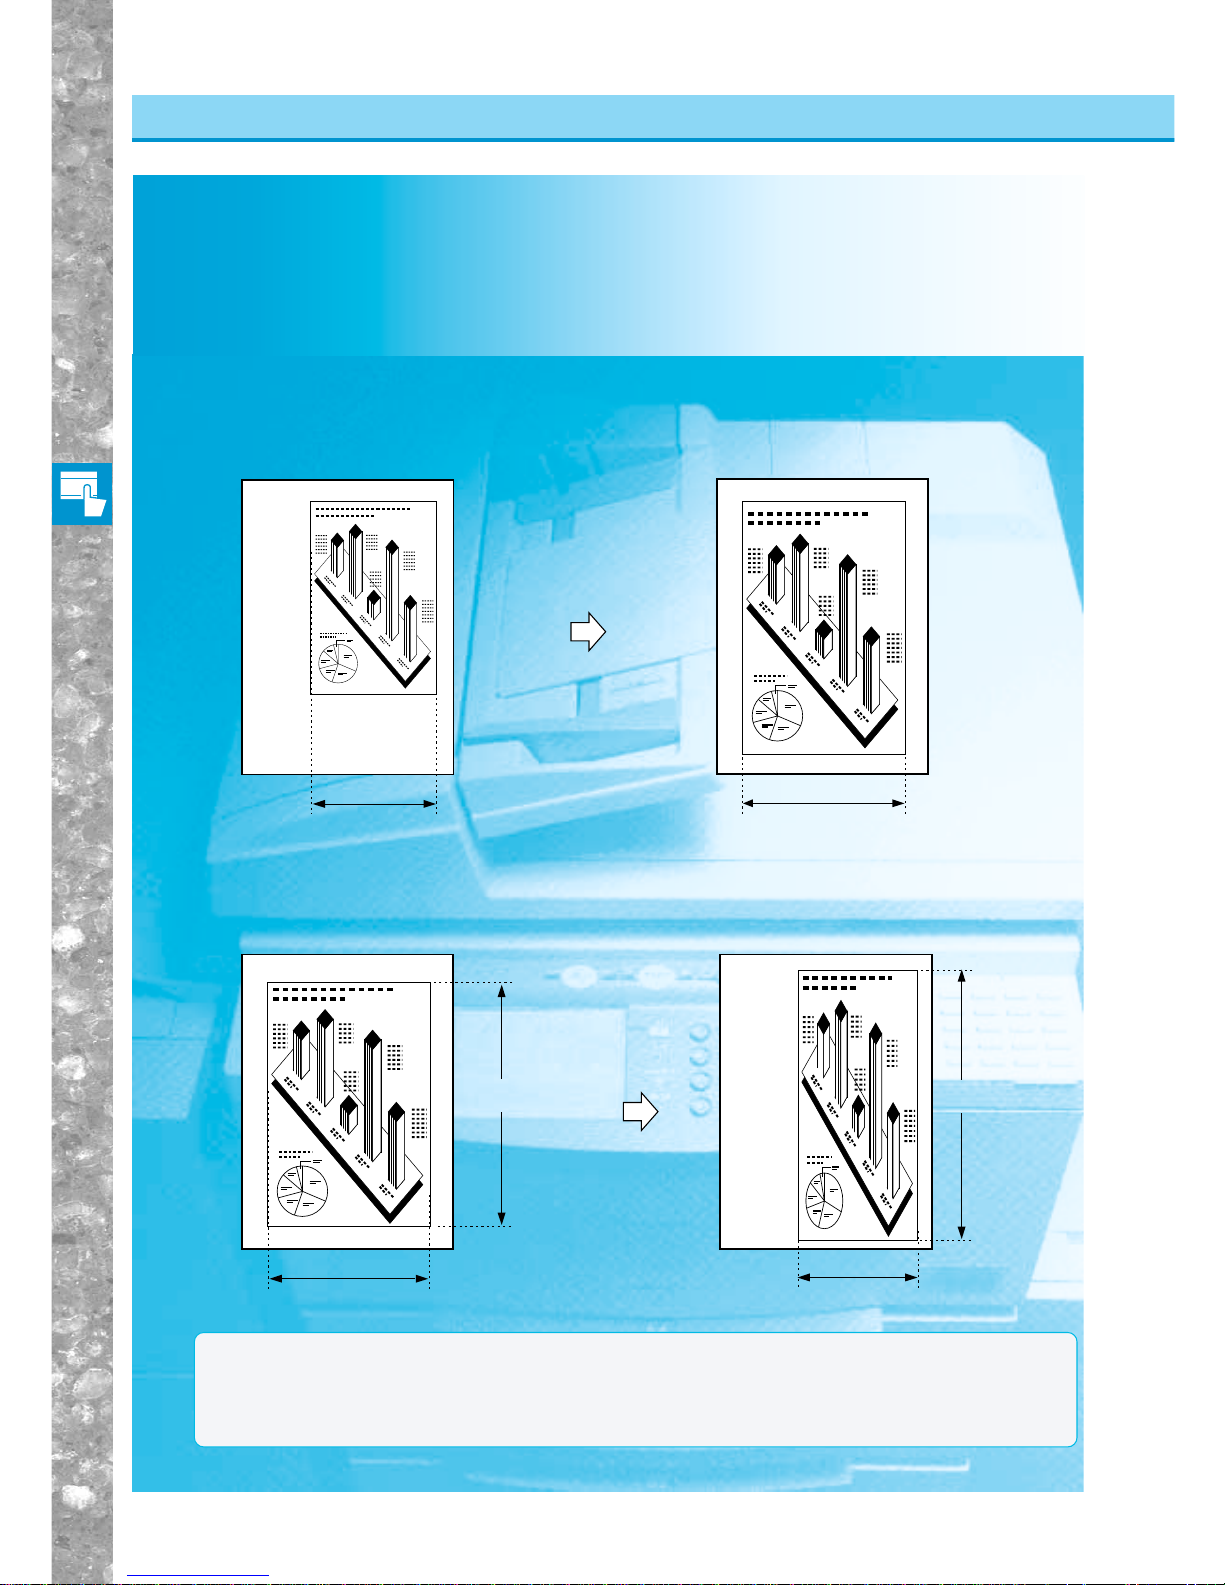
Basic Copying
2–14
Calculating the Copy Ratio Based on the Original and Copy Paper Sizes
(ZOOM PROGRAM)
If you enter measurements for the original and desired copy images (or sheets), the machine will
automatically calculate and set the appropriate copy ratio. The following two Zoom Program modes are
available.
MEMO
●Sizes designated in millimeters are converted to the copy ratio (%) as follows:
copy ratio (%) = copy size (mm)/original size (mm) ×100
Numbers past the decimal point are discarded.
●If the calculated copy ratio is smaller than 25%, it is set to 25%. If it is larger than 800%, it is set to 800%.
Calculating the Copy Ratio Based on the Original and Copy Paper Sizes (ZOOM PROGRAM)
Changing the Copy Ratio (Enlarging/Reducing Originals)
■ Making copies with a different XY copy ratio (XY ZOOM)
Designate a different copy ratio for the vertical and horizontal directions.
Copy size
Original size
Original
Copy
Original
Copy
Original size (X)
Copy size (X)
Copy size (Y)Original size (Y)
■ Making copies with the same XY copy ratio (ZOOM)
Designate the same copy ratio for the vertical and horizontal directions.
Page 57
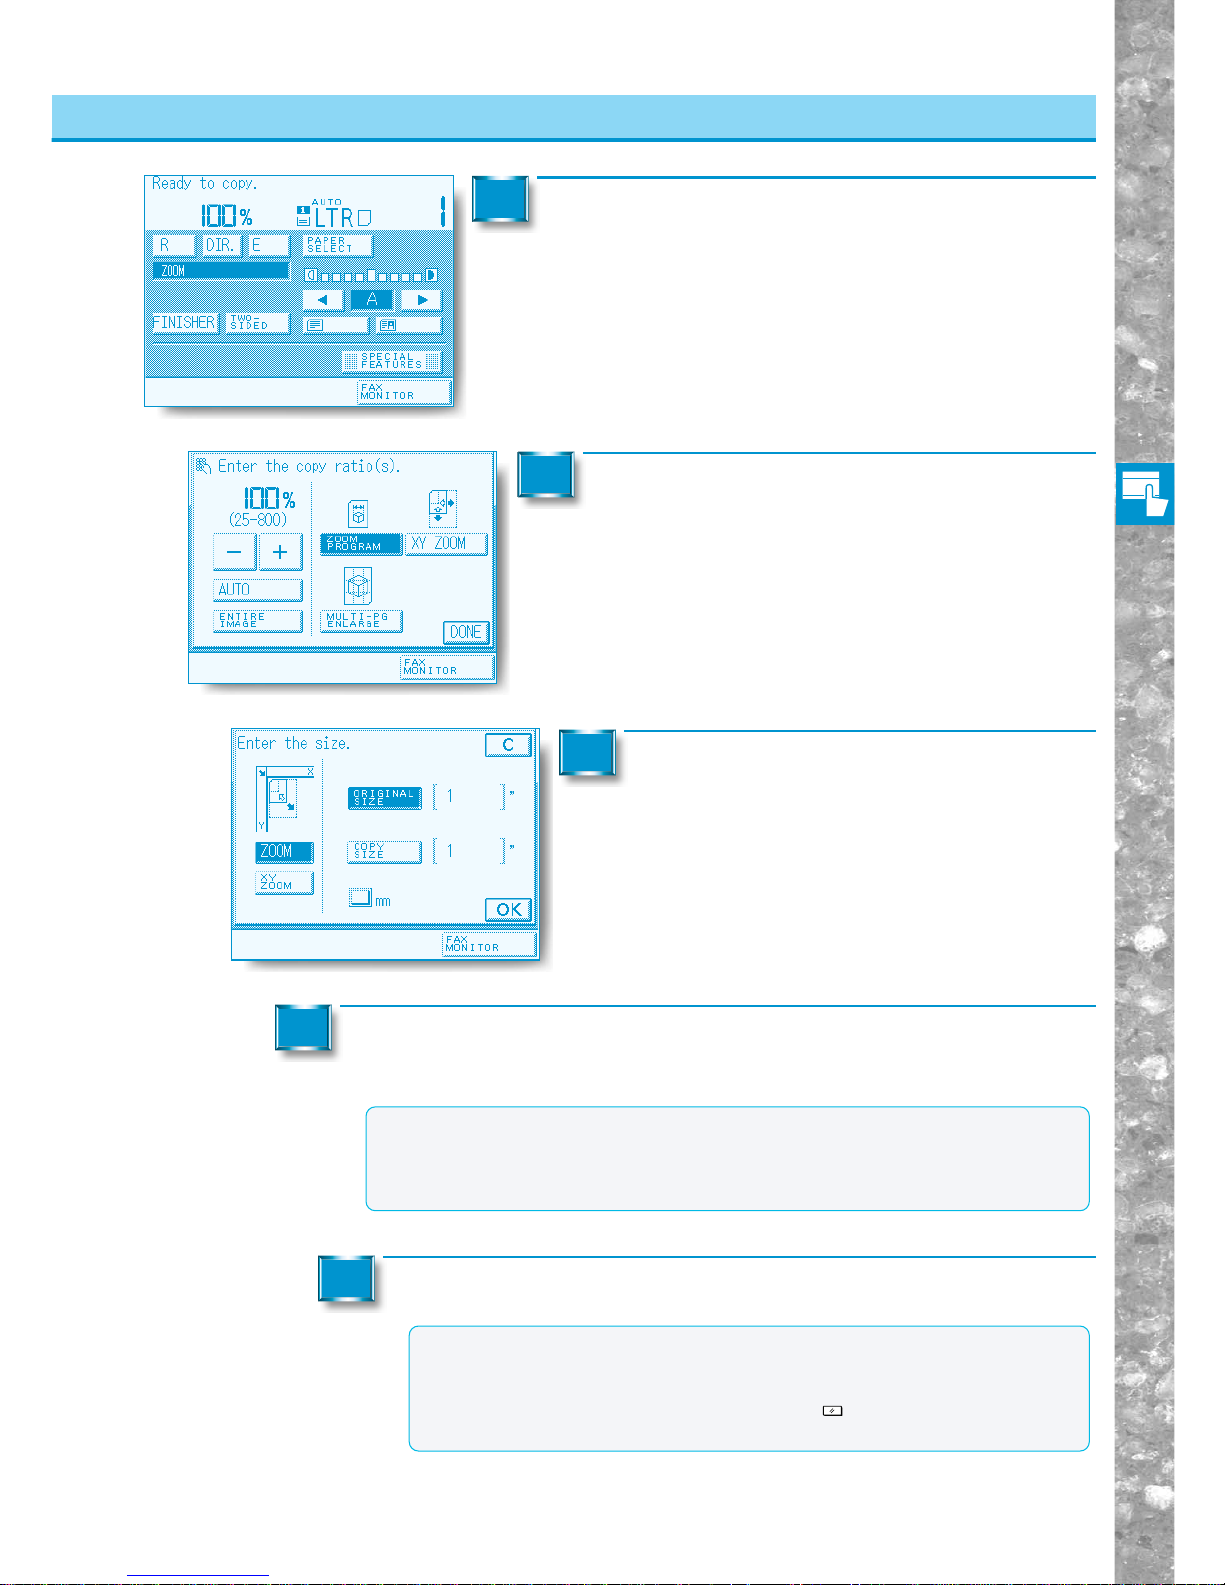
Basic Copying
2–15
Changing the Copy Ratio (Enlarging/Reducing Originals)
Calculating the Copy Ratio Based on the Original and Copy Paper Sizes (ZOOM PROGRAM)
Place your originals and press the [ZOOM] key.
1
Press the [ZOOM PROGRAM] key.
2
Press the [ZOOM] or [XY ZOOM] key.
3
Press the [ORIGINAL SIZE] key and enter the original size, then press the
[COPY SIZE] key and enter the copy size, using the Number keys.
4
MEMO
●If you make a mistake when entering values, press the [C] key, and enter the values
again.
●When setting the deistance in inches, you need to the function in the Additional
Functions beforehand. (See “Setting Inch Input,” on p.4-15.)
Proceed to make copies in the usual way.
5
MEMO
●To return the copy ratio to 100%, press the [DIR.] key.
●To cancel the settings, press the [ZOOM] , [ZOOM PROGRAM] and [C] keys in
that order.
●You can also cancel the mode by pressing the
Reset
key.(The machine returns to
the Standard mode.)
Page 58
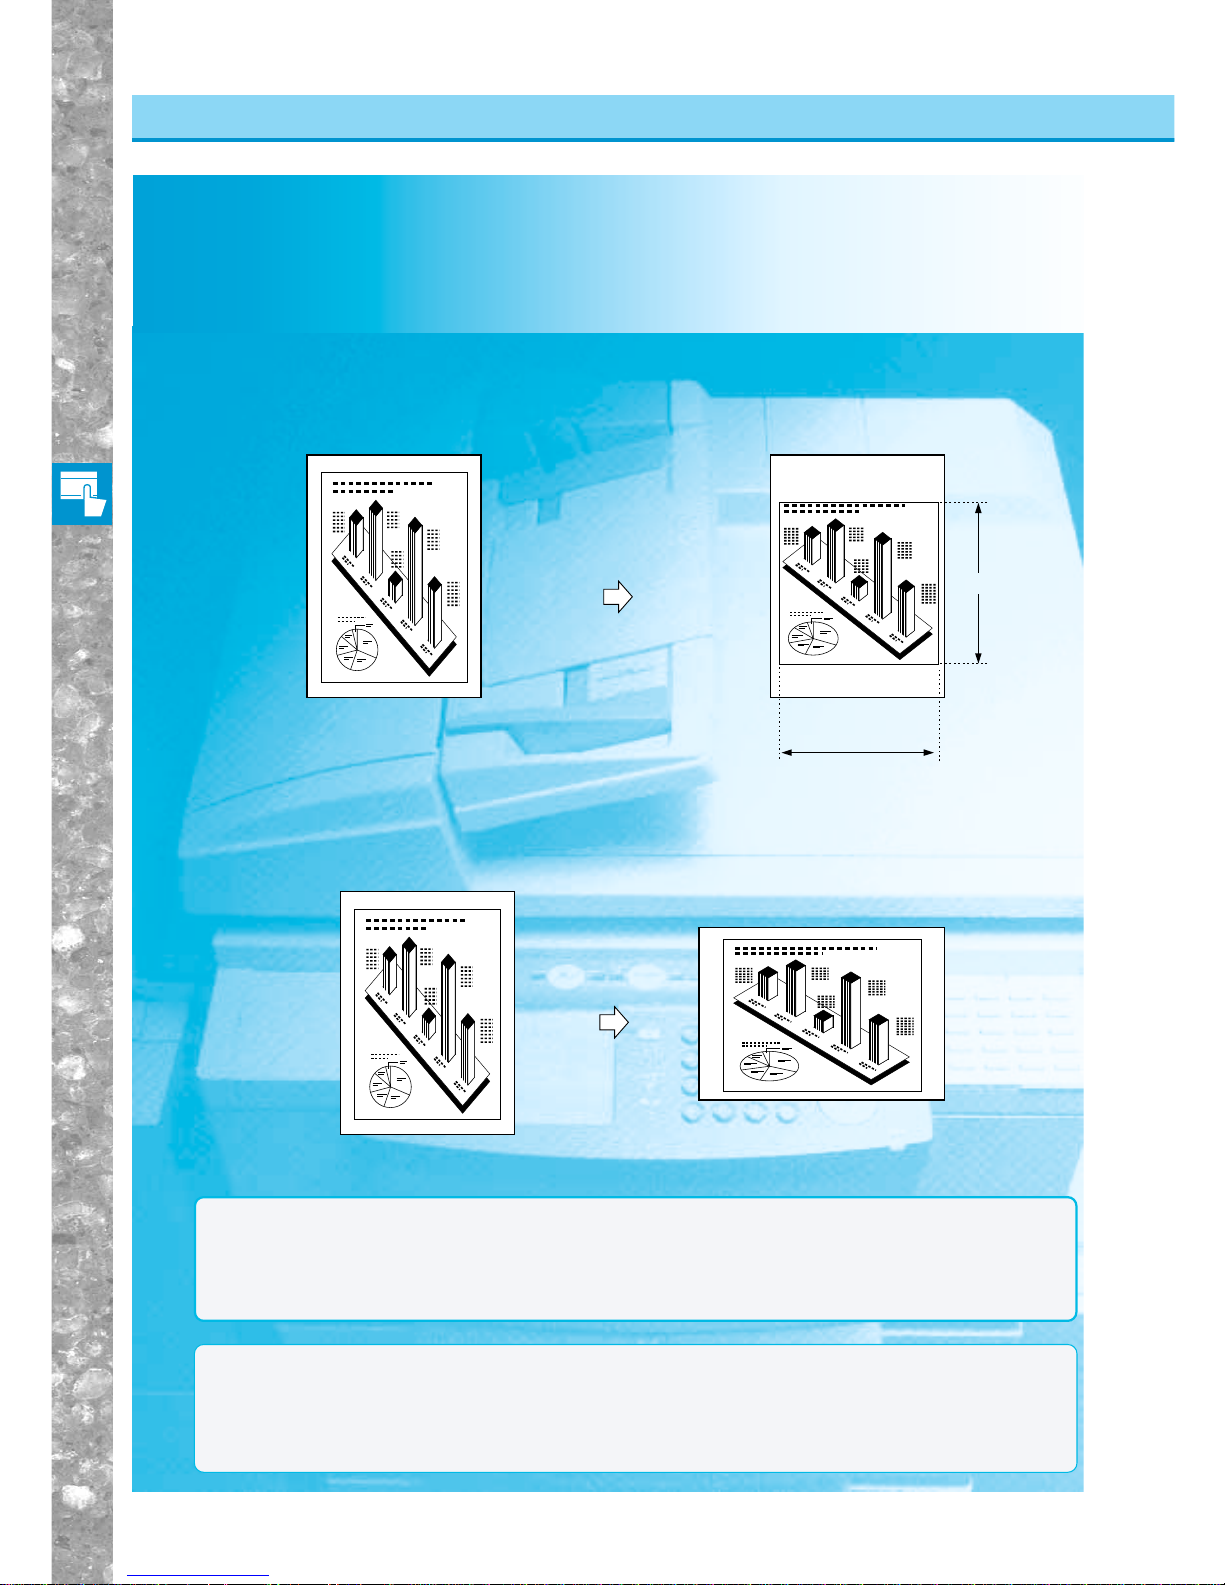
Basic Copying
2–16
Enlarging/Reducing Originals at Copy Ratios Set Independently for X and Y Axes
(XY ZOOM)
If you set the XY Zoom mode, you can make enlarged or reduced copies at a different XY copy ratio.
The following two XY Zoom modes are available.
MEMO
●If the copy ratio is smaller than 25% in the Auto XY Zoom mode, it will automatically be set to 25%. If it is
larger than 800%, it is set to 800%.
●If an error occurs between the Auto XY Zoom copy ratio and the actual copy size, you can adjust this with
the Zoom Fine Adjustment function. (See "Fine-adjusting Zoom When Differences in Original Image and
Copy Image Occur," on p.4-28.)
■ Automatically specifying the copy ratio (AUTO XY ZOOM)
The XY copy ratio is automatically set to suit the size of the selected copy paper.
■ Manually specifying the copy ratio (XY ZOOM)
Manually specify the XY copy ratio in 1% increments.
Enlarging/Reducing Originals at Copy Ratios Set Independently for X and Y Axes (XY ZOOM)
Changing the Copy Ratio (Enlarging/Reducing Originals)
LTR
LTRR
LTRR selected
Original
Copy
X=120%
Y=80%
Original Copy
Enlarging and reducing at
different XY copy ratios
NOTICE
●If you set the Auto XY Zoom mode, select the copy paper size by Manual Paper Selection. If you do not
select the copy paper size, the copy ratio is automatically set to the size of the copy paper set in the
topmost paper drawer during copying.
●You cannot copy highly transparent originals, such as transparencies, in the Auto XY Zoom mode. Use
the Reduction, Enlargement or Zoom modes.
Page 59
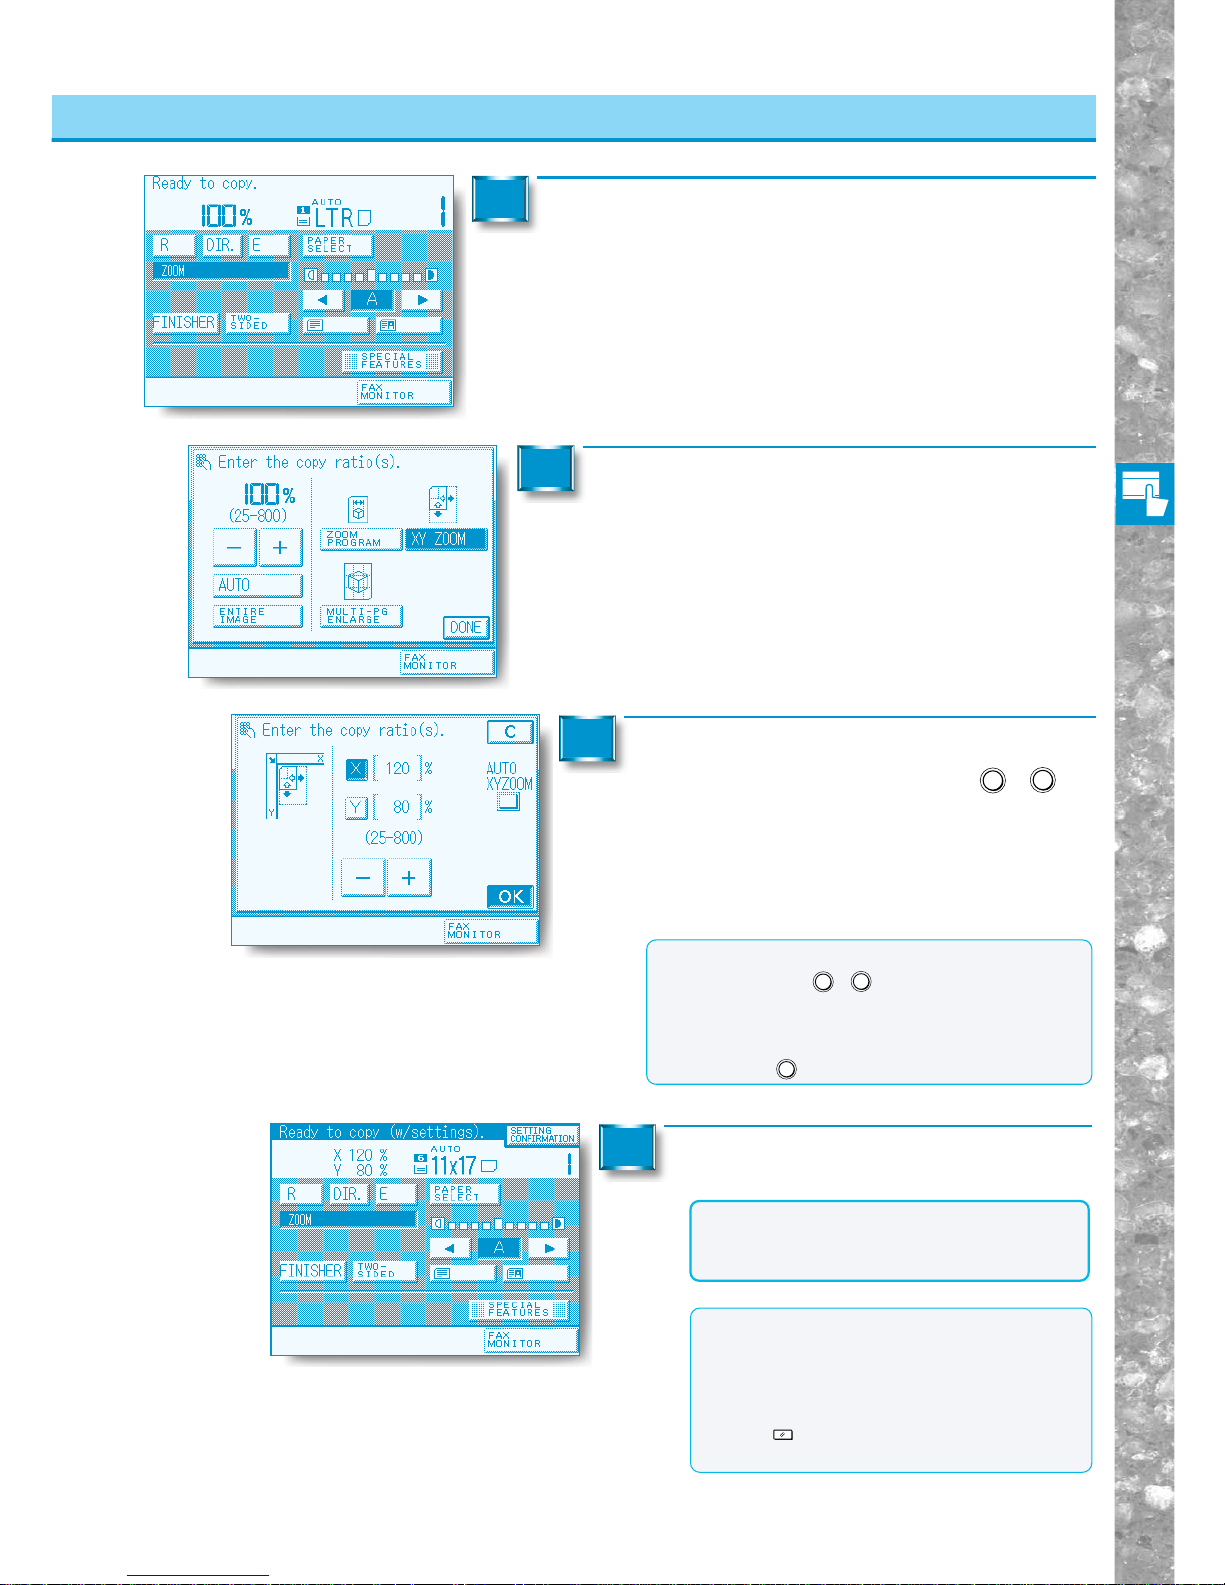
Basic Copying
2–17
MEMO
●To return the copy ratio to 100%, press the [DIR.]
key .
●To cancel the settings, press the [ZOOM],
[XY ZOOM], and [C] keys in that order.
●You can also cancel the mode by pressing
the
Reset
key. (The machine returns to the
Standard mode.)
Changing the Copy Ratio (Enlarging/Reducing Originals)
Enlarging/Reducing Originals at Copy Ratios Set Independently for X and Y Axes (XY ZOOM)
Place your originals and press the [ZOOM] key.
1
Press the [XY ZOOM] key.
2
Press the [X] and [Y] keys and enter the values
for X and Y with the Number keys (0 - 9) or
the [+] and [–] keys. Then press the [OK] k e y.
When setting an automatic XY copy ratio , press the
[AUTO XY ZOOM] key.
The display returns to the Basic Features screen, and the
selected copy ratio is displayed.
3
MEMO
●Even if you entered the copy ratio with the
Number keys (0 - 9), you can directly change
(increase/decrease) the entered values with the
[–] [+] keys in the touch panel display.
●If you make a mistake when entering values,
press the
C
Clear
key, and enter the correct value.
Proceed to make copies in the usual wa y.
4
NOTICE
●When XY zoom is selected, the selected
copy ratios for “X” and “Y” are displayed on
the Basic Features screen.
Page 60
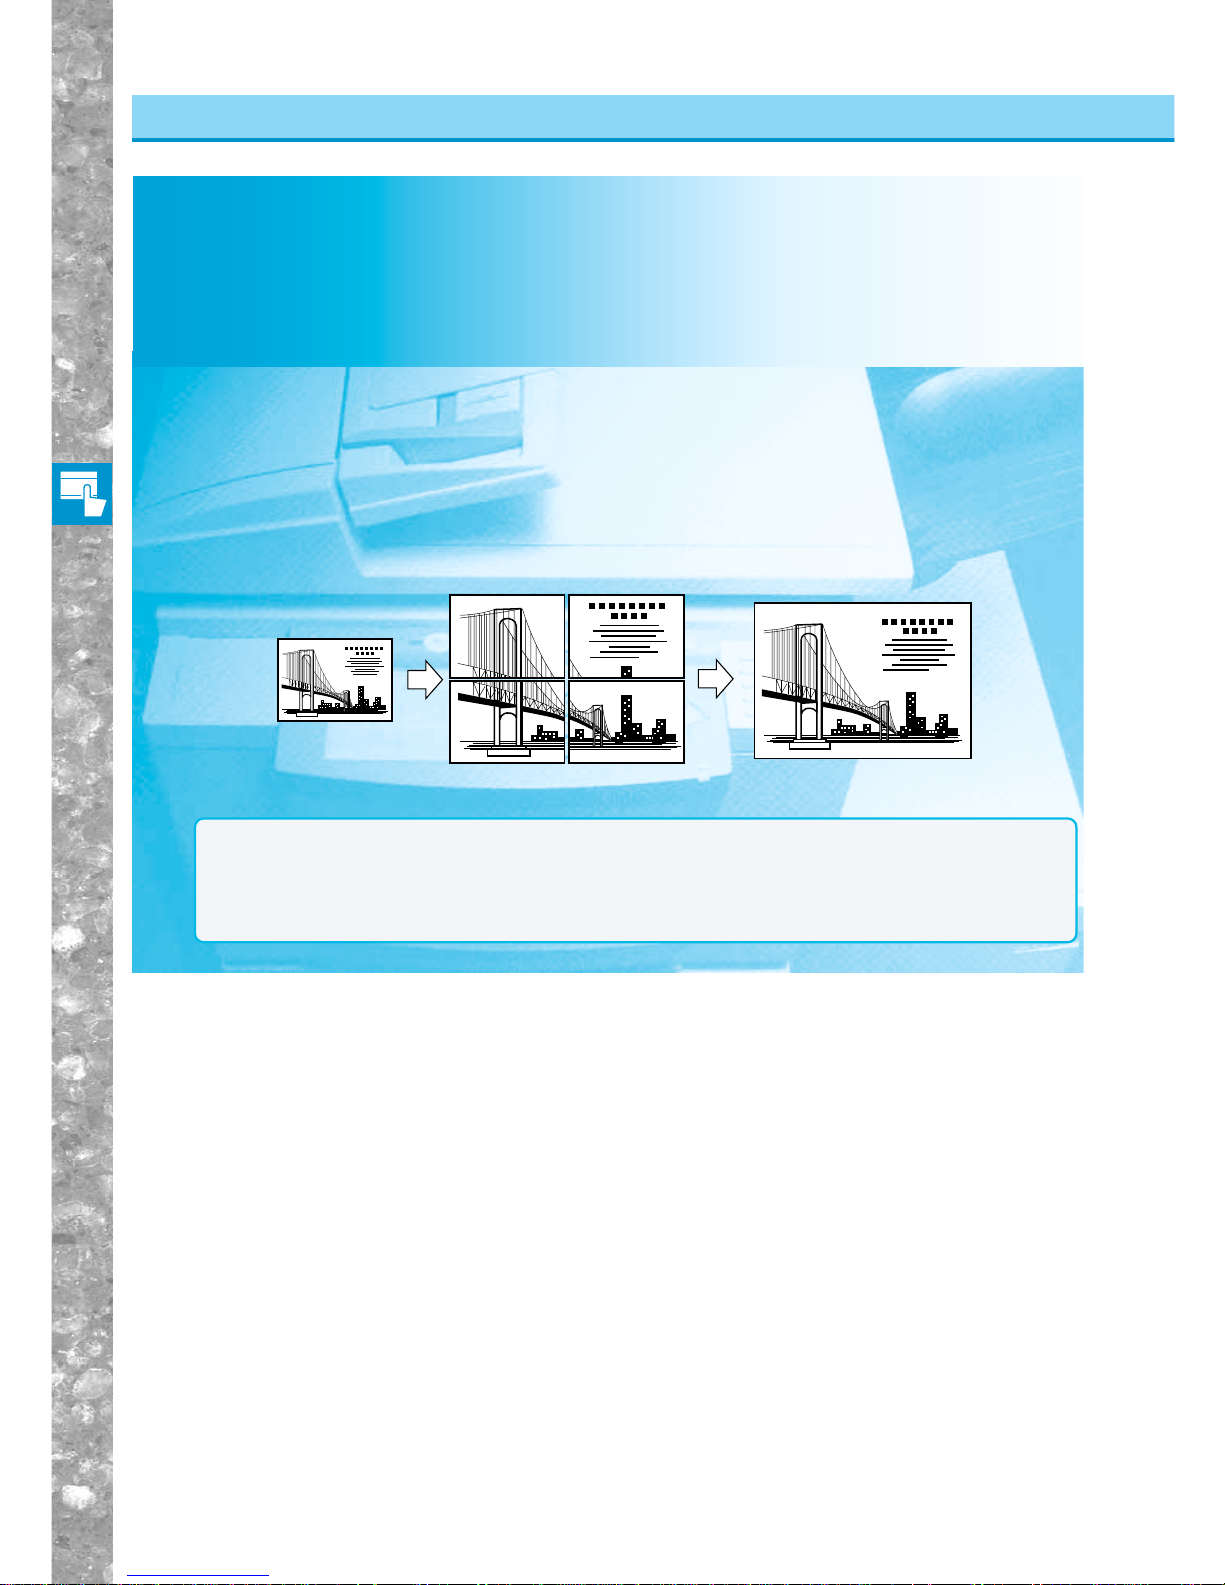
Basic Copying
2–18
Making Copies Separated onto Multi-pages Match to an
Enlarged Copy Size
(MULTI-PG ENLARGE)
If you set the Multi-page Enlarge mode, you can make copies of images of originals on several sheets of
paper matched to the enlarged copy size.
If you paste together the copy sheets output in this mode, you can make copies larger than 11” × 17”,
the maximum size paper for this machine. There are two ways to use this feature.
■ Specifying the Copy Ratio by % (COPY RATIO(S)) (See p. 2-20.)
Specify the copy ratio up to 800%. The number of output pages is automatically set.
■ Specifying the Copy Ratio by Number of Output Pages (See p. 2-22.)
Specify the copy paper size and number of output pages. The copy ratio is automatically set.
Copies Copies assemblées
NOTICE
●Copies output in the Multi-page Enlarge mode are output so that adjacent images are overlapping. When
cutting and pasting these copies together, overlap and paste duplicated image areas.
●Only the following standard-size originals can be copied in the Multi-page Enlarge mode:
11”x17”, LGL, LTR, LTRR, STMT, STMTR
●Only one copy can be made in the Multi-page Enlarge mode.
Changing the Copy Ratio (Enlarging/Reducing Originals)
Making Copies Separated onto Multi-pages Match to an Enlarged Copy Size (MULTI-PG ENLARGE)
Page 61
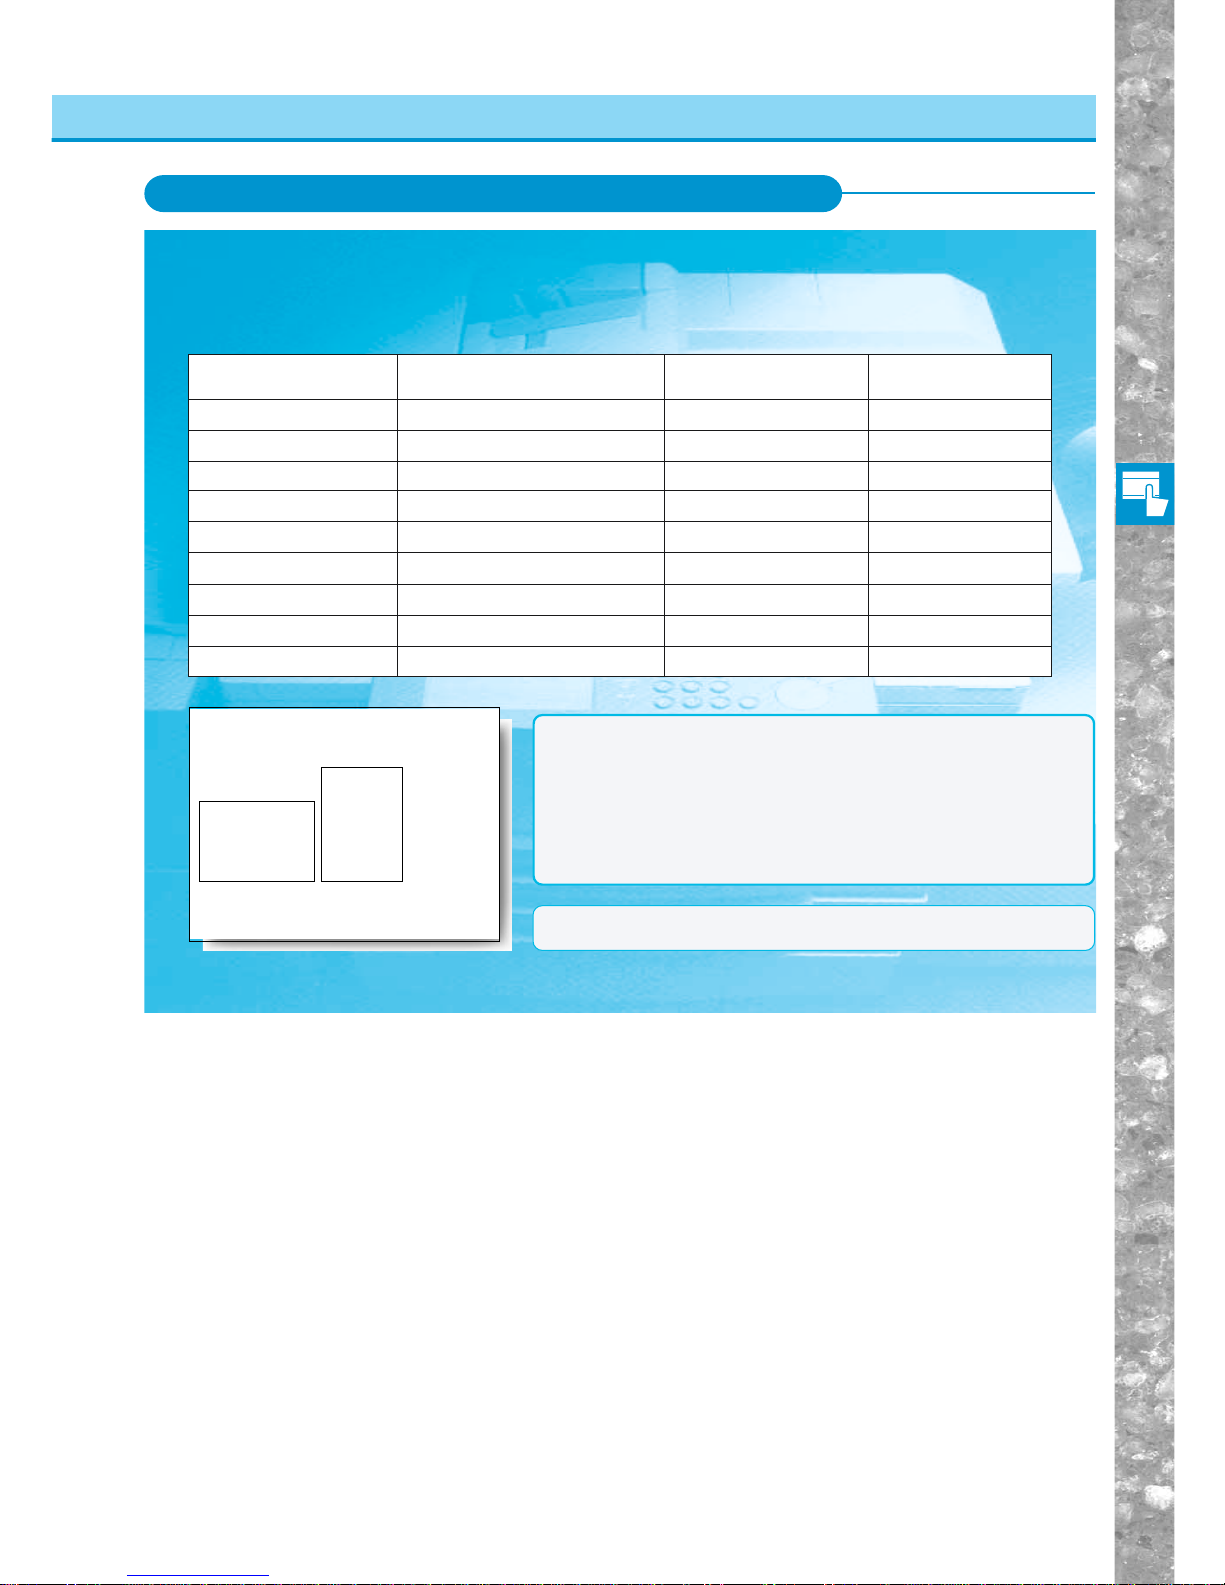
Basic Copying
2–19
Copy Ratio Specification and Required Paper Sizes and Quantities
When making an enlarged copy with a specified copy ratio, the size of the copy paper and the number
of sheets required for the resulting copy depend on the copy ratio that was specified. The following table
shows typical copy ratios and the size and number of sheets of copy paper required. Use this table as a
guide when determining the desired copy ratio.
Copy ratio Selected paper size Number of pages Total size
200%
200%
400%
400%
400%
200%
300%
300%
300%
15
12
25
45
42
9
16
28
25
22"✕34"
22"✕34"
44"✕68"
44"✕68"
44"✕68"
22"✕34"
33"✕51"
33"✕51"
33"✕51"
8-1/2"× 11"(LTR)
8-1/2"× 11"(LTRR)
11"× 17"
8-1/2"× 11"(LTR)
8-1/2"× 11"(LTRR)
11"× 17"
11"× 17"
8-1/2"× 11"(LTR)
8-1/2"× 11"(LTRR)
NOTICE
●The values shown in the above table are only meant as a guide.
The actual values may be slightly different.
●The resulting size after the printed copies have been cut and
pasted together will be slightly smaller than the size indicated in
the above table.
●For originals as large as 11”x17”-size, the copy ratio can be set
freely from 25% to 800%.
MEMO
●Horizontal placement and vertical placement are shown on the left.
Horizontale
placement
Vertical
placement
Far side
(closer to the
control panel)
Near side
Changing the Copy Ratio (Enlarging/Reducing Originals)
Copy Ratio Specification and Required Paper Sizes and Quantities
Page 62
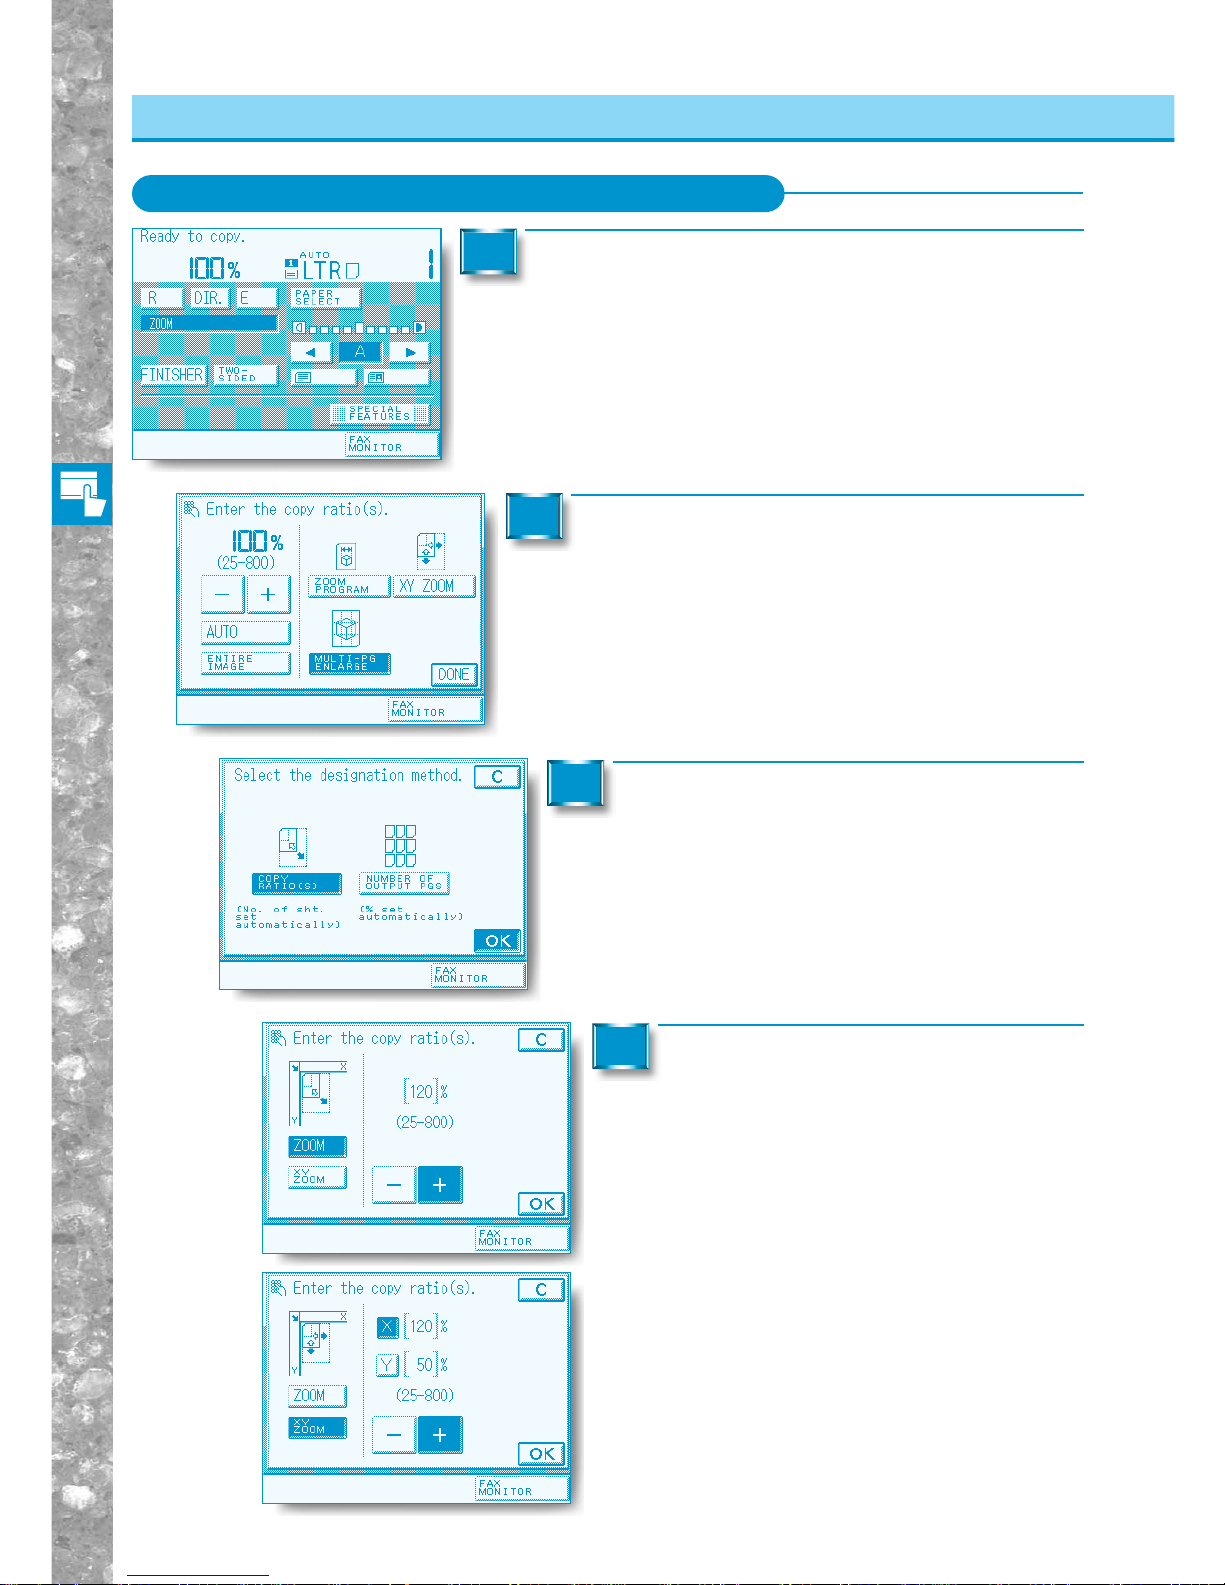
Basic Copying
2–20
Specifying the Copy Ratio by % (COPY RATIO (S))
Place your original and press the [ZOOM] key.
1
Press the [MULTI-PG ENLARGE] key.
2
Press the [COPY RATIO(S)] key, then press
the [OK] key.
3
To set the XY copy ratio to the same
copy ratio, press the [ZOOM] key. To
set the XY copy ratio to different copy
ratios, press the [XY ZOOM] key.
4
Changing the Copy Ratio (Enlarging/Reducing Originals)
Specifying the Copy Ratio by % (COPY RATIO (S)
Page 63
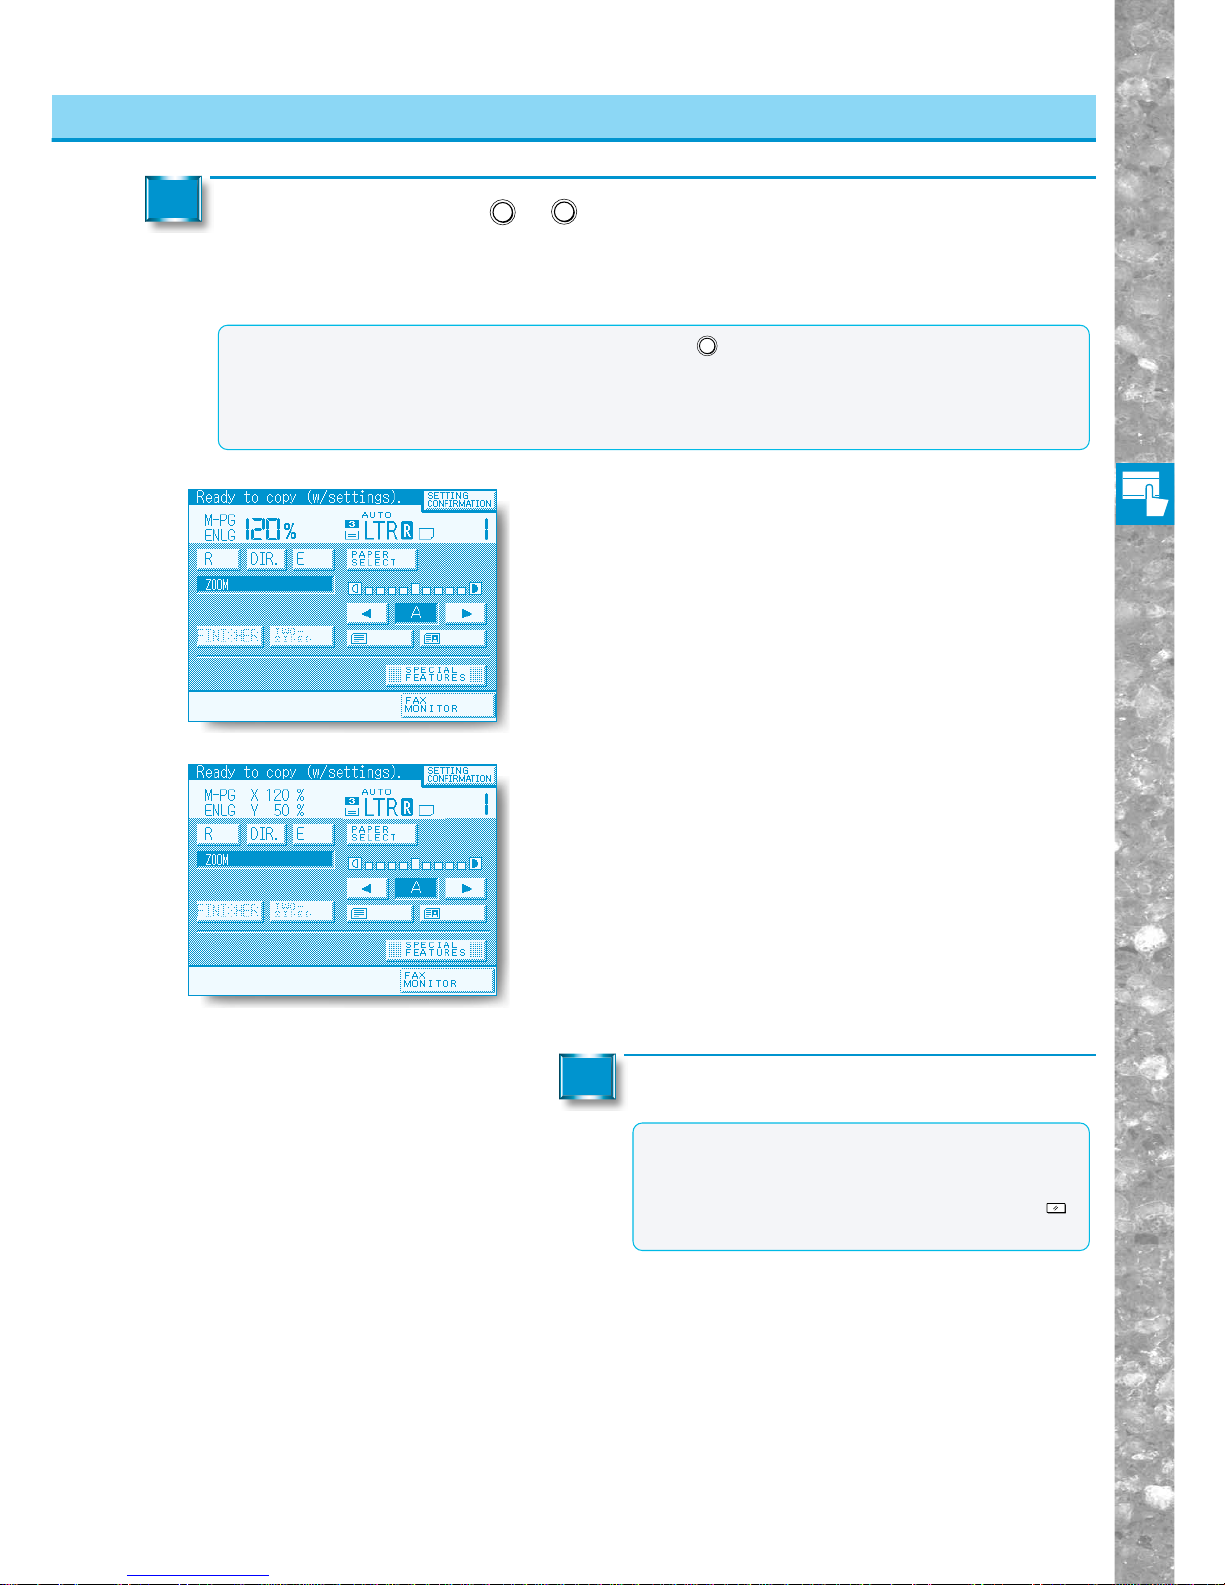
Basic Copying
2–21
Use the numeric keypad (0 to 9) or the [+] and [–] keys to set the ratio and then
press the [OK] key.
When XY ZOOM is selected, press [X] and [Y] and set each ratio separately, then press the [OK] key.
The display returns to the Basic Features screen, and the selected copy ratio is displayed.
5
Proceed to make copies in the usual way.
6
MEMO
●If you make a mistake when entering values, press the
C
Clear
key, and enter the values again.
●If you enter the copy ratio with the Number keys, you can directly change (increase/decrease) the entered
values with the [–] [+] keys on the touch panel display.
●The number of copy sheets an original is copied onto is determined by the copy ratio and selected copy
paper size.
MEMO
●To return the copy ratio to 100%, press [DIR.].
●To cancel the settings, press the [ZOOM], [MULTI-
PG ENLARGE], and [C] keys in that order.
●You can also cancel the mode by pressing the
Reset
key. (The machine returns to the Standard mode.)
(ZOOM)
(XY ZOOM)
Changing the Copy Ratio (Enlarging/Reducing Originals)
Specifying the Copy Ratio by % (COPY RATIO (S))
Page 64
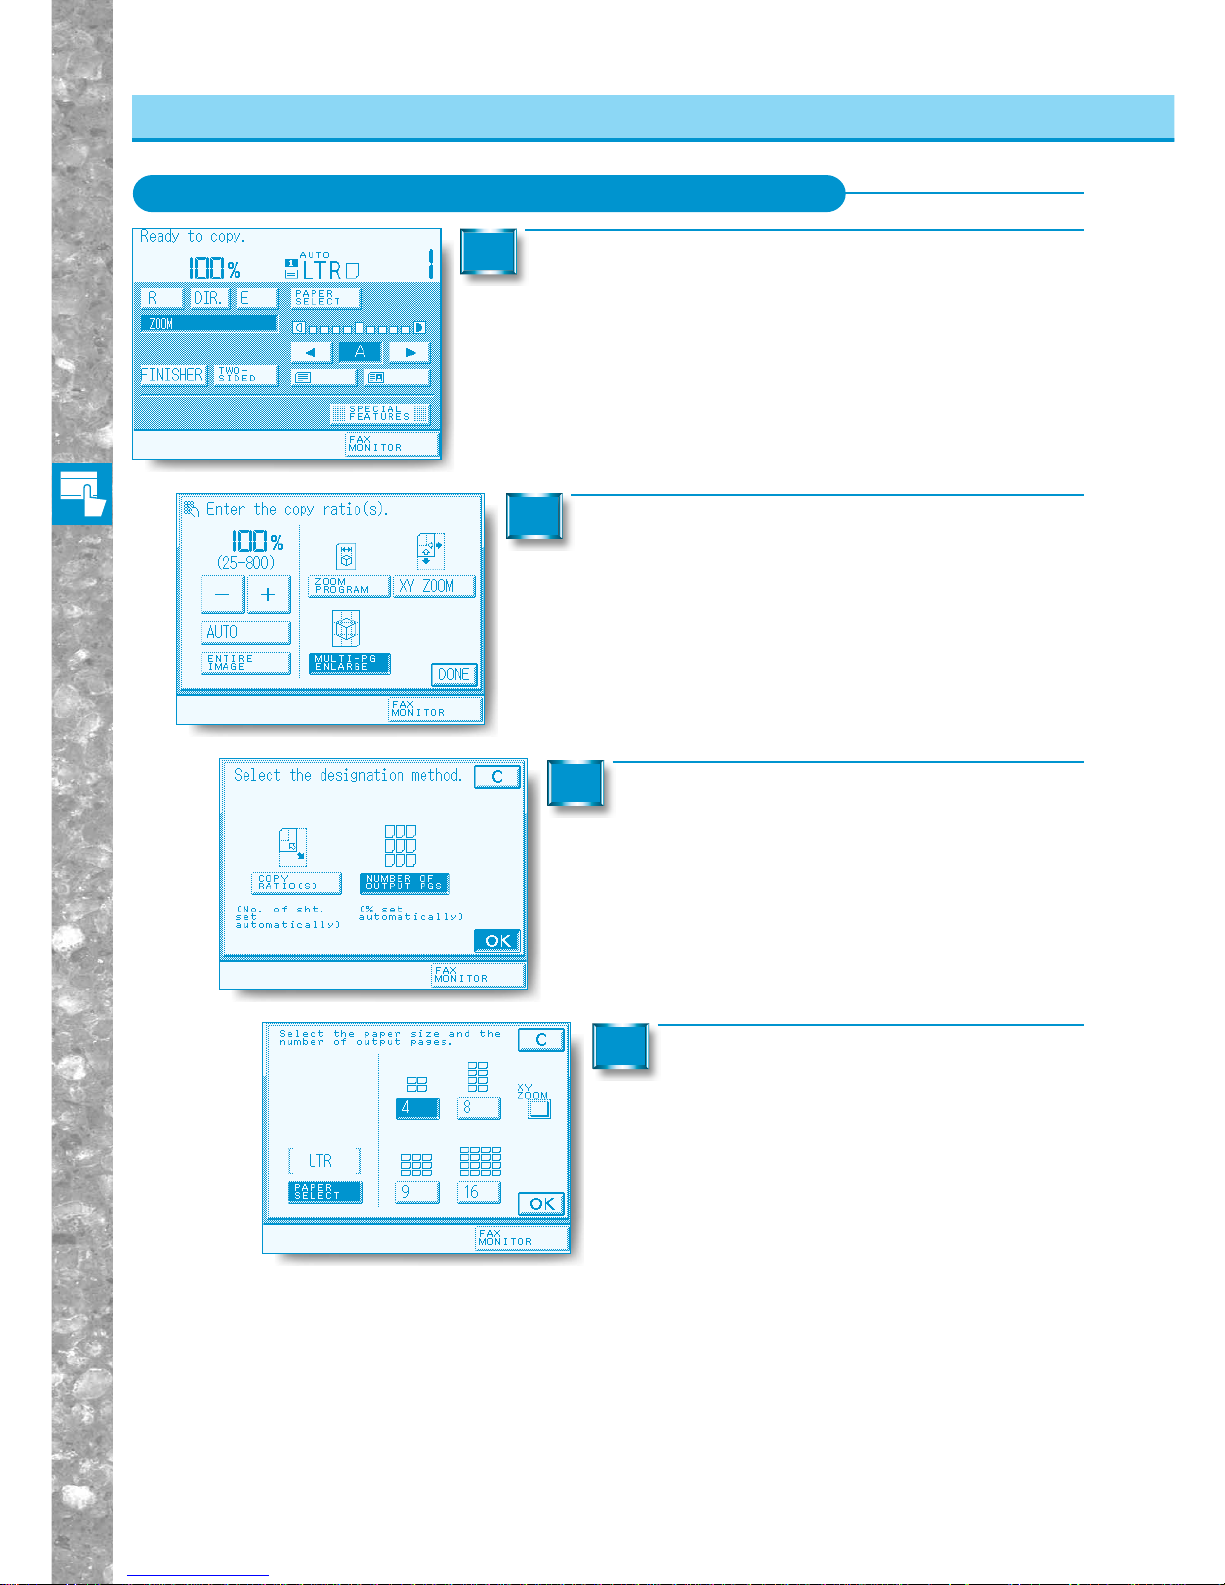
Basic Copying
2–22
Specifying the Copy Ratio by Number of Output Pages
Place your original and press the [ZOOM] key.
1
Press the [MULTI-PG ENLARGE] key.
2
Press the [NUMBER OF OUTPUT PGS]
key, then press the [OK] key.
3
Press the [PAPER SELECT] key.
4
Changing the Copy Ratio (Enlarging/Reducing Originals)
Specifying the Copy Ratio by Number of Output Pages (NUMBER OF OUTPUT PGS)
Page 65
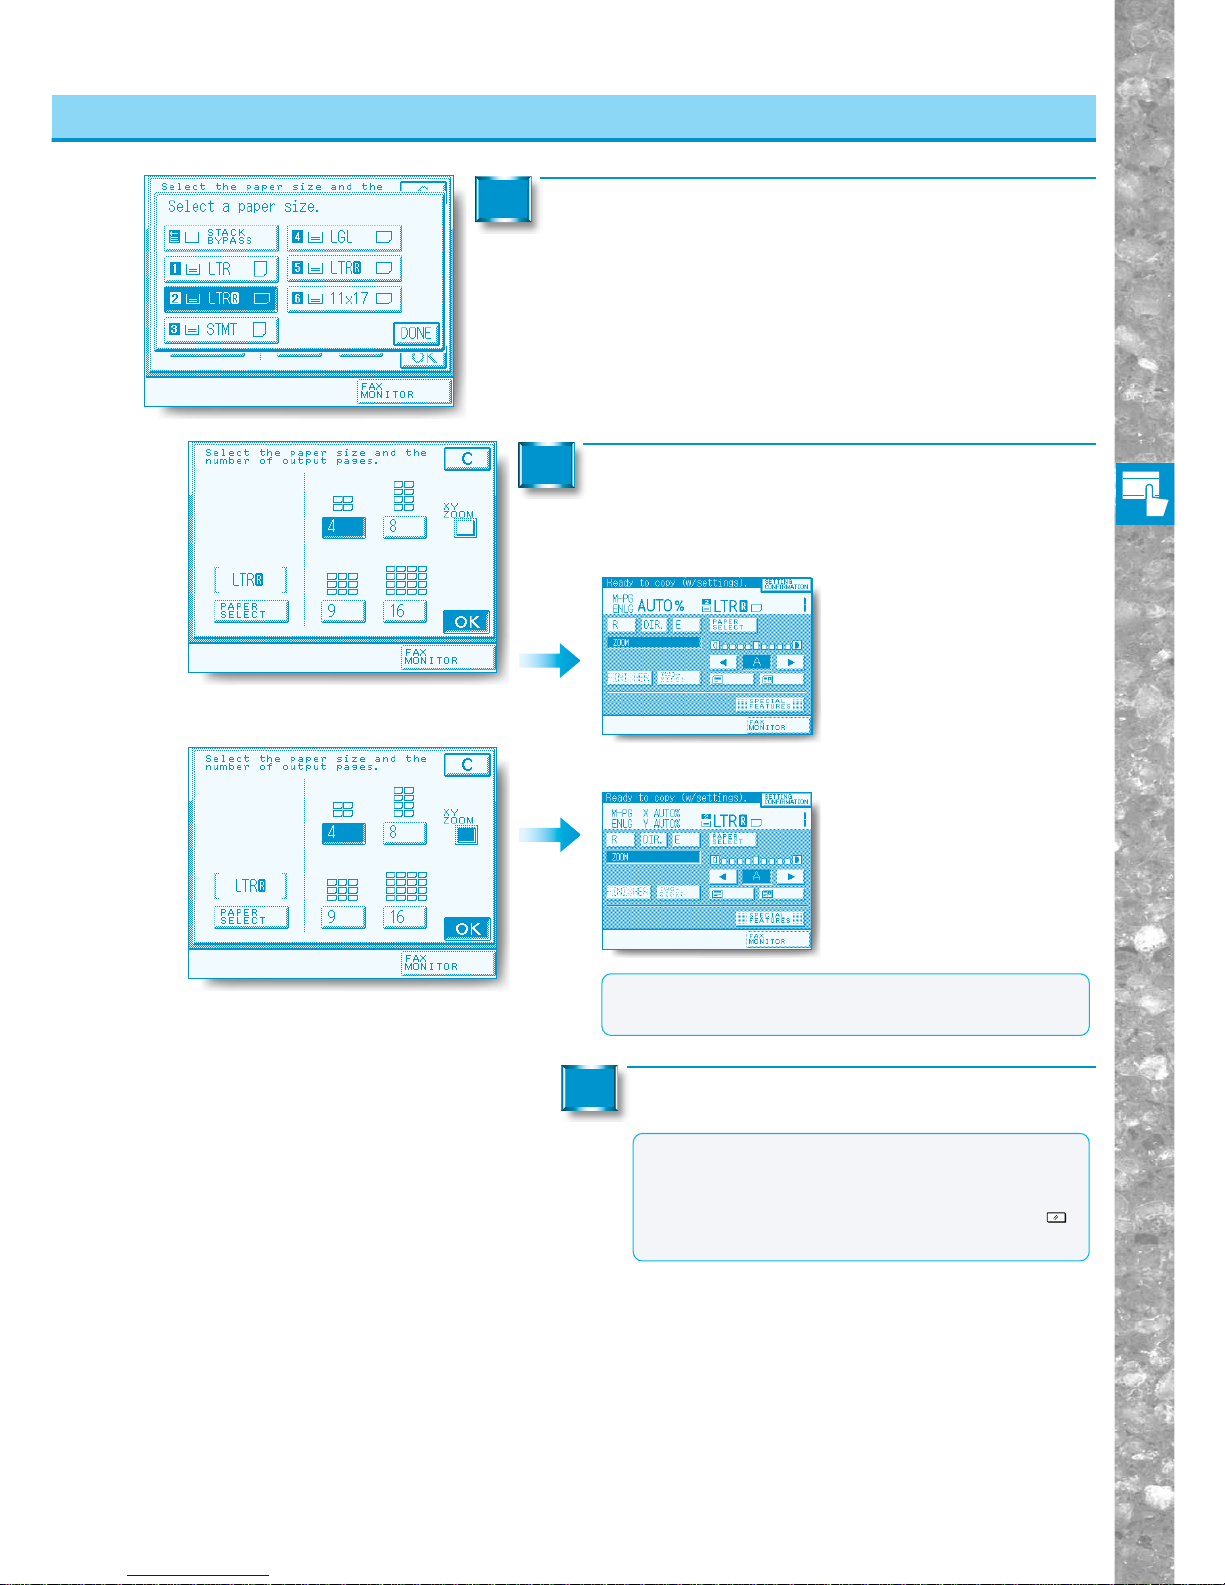
Basic Copying
2–23
Select the desired copy paper size.
5
After select the number of sheets, press the
[OK] key.
The display returns to the Basic Features screen, and the
automatic copy ratio is displayed.
6
Proceed to make copies in the usual way.
7
MEMO
●Copy ratio is determined by the size of paper and
number of outputs selected.
MEMO
●To return the copy ratio to 100%, press [DIR.].
●To cancel the settings, press the [ZOOM], [MULTI-
PG ENLARGE], and [C] keys in that order.
●You can also cancel the mode by pressing the
Reset
key. (The machine returns to the Standard mode.)
Changing the Copy Ratio (Enlarging/Reducing Originals)
Specifying the Copy Ratio by Number of Output Pages (NUMBER OF OUTPUT PGS)
When [XY ZOOM] is selected, a different copy ratio is automatically set for the X and Y directions.
Page 66
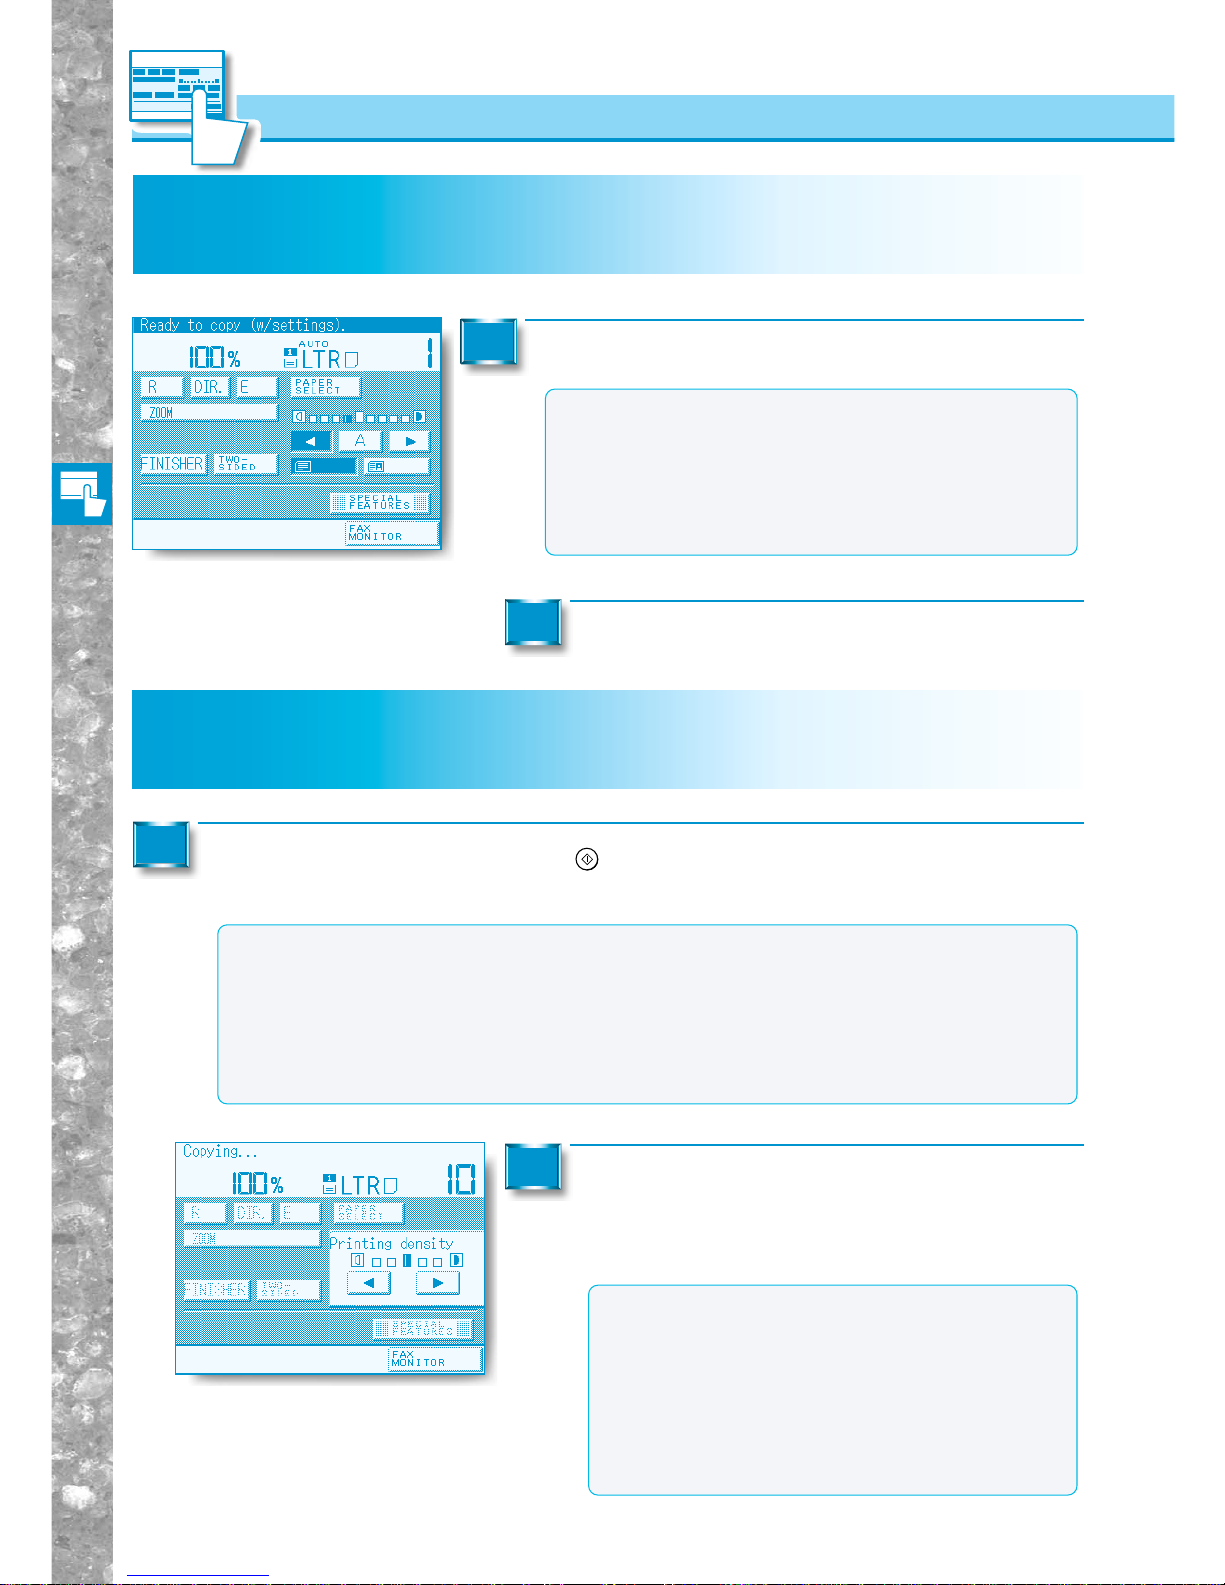
Basic Copying
2–24
Adjusting Exposure and Image Quality
(COPY EXPOSURE)
Adjusting Copy Exposure
Changing the Exposure During Copying
Place your originals and press the [▼] or [▼] key.
1
MEMO
●Move the indicator above the [▼] [A] [▼] keys to the left to
make the exposure lighter or to the right to make the
exposure darker.
●If you press the [▼] or [▼] keys while Automatic Exposure
Control is active (i.e. the [A] key is highlighted), the [A] key
returns to normal and Manual Exposure Control become
active.
Proceed to make copies in the usual way.
2
Adjusting Copy Exposure
Manually adjust the copy exposure to the most appropriate level for the original.
Place your originals and press the
Start
key.
Copying starts and the exposure adjustment screen is displayed.
1
Changing the Exposure During Copying
The exposure can also be changed while a copy is being produced.
Press the [▼] or [▼] key
Copy exposure is changed.
After copying is finished, the display returns to the Basic Features
screen.
2
MEMO
●Move the indicator above the [▼] [A] [▼] keys to the left
to make the exposure lighter or to the right to make the
exposure darker.
●The copy exposure adjustment screen is also displayed
when the Automatic Exposure Control is active (i.e. the
[A] key is highlighted).
●Adjusting exposure after copying has started will
produce a different result to adjusting exposure before
copying the original.
MEMO
●The copy exposure adjustment screen is displayed when the following modes are selected.
•When making two or more copies • IMAGE COMB.
•ENTIRE IMAGE • IMAGE SEPARATION (when the copy quantity is one, the
• SHIFT [ROTATE] mode must be set.)
•OVERLAY • 2 ▼ 2-SIDED
•MARGIN • 1 ▼ 2-SIDED
• BOOKLET
Page 67
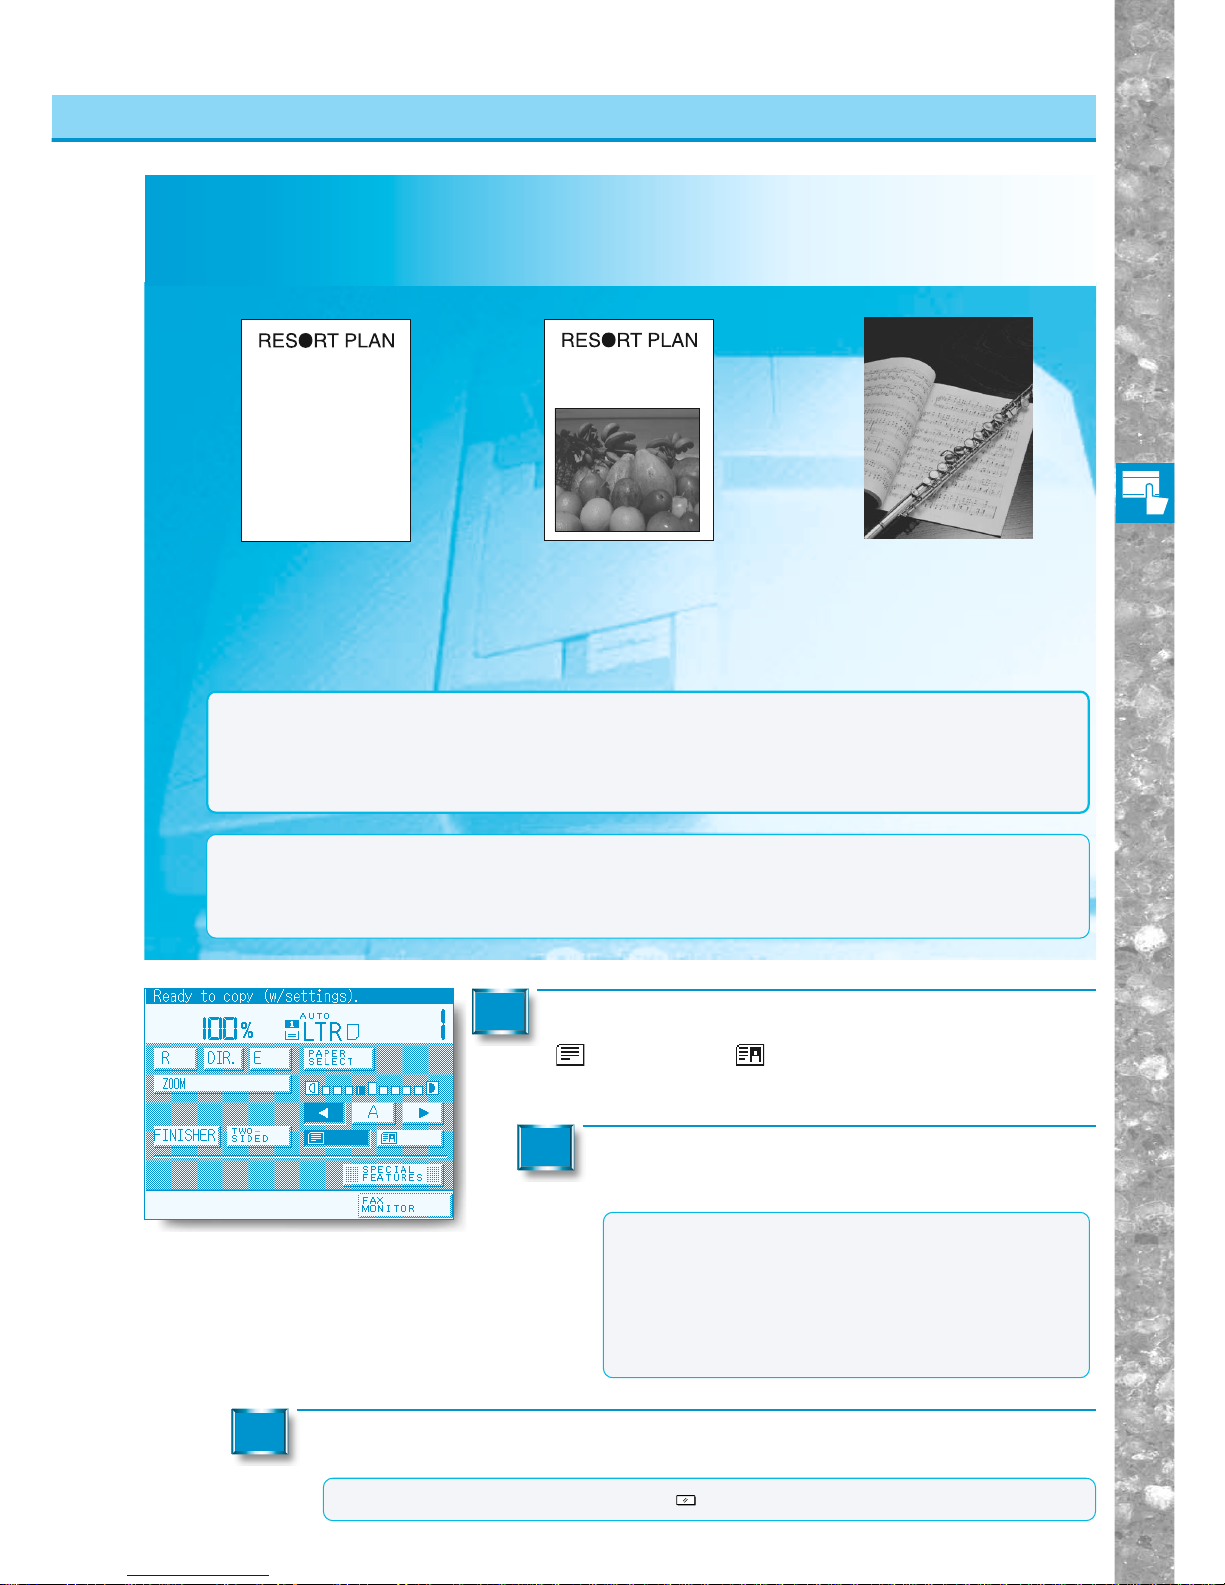
Basic Copying
2–25
Selecting Image Quality
The world'scoral reefs, where
brilliantly colored fish and a
myriad of other creatures of the
tropics come together.Aptly
nicknamed "Tropical torests under
the sea". these spots of
breathtaking beuty serve as home
to countless varieties of life. And
to us of the land, the warm
tropical seas and all the romantic,
dream-like, alluring world. Sadly,
however, the continuing
contamination of the world's
oceans in recent years has dealt
blow afeter destructive blow to a
great many reefs.
PHOTO
TEXT/PHOTOTEXT
The world'scoral reefs, where
brilliantly colored fish and a
myriad of other creatures of the
tropics come together.
This mode is best suited for
making copies from text originals
(Equivalent to 1200 dpi).
You can make a fine copy even if
text original is thin like written by a
pencil.
This mode is best suited for making
copies from originals containing both
text and photos, or photo originals
containing half-tones (i.e. printed
photos) (Equivalent to 1200 dpi).
Selecting Image Quality
You can adjust image quality to the level best suited to the quality of text or photo or iginals. The
following three modes are available for adjusting image quality.
Adjusting Exposure and Image Quality (COPY EXPOSURE)
NOTICE
●If you make copies of an original containing half-tones such as a printed photograph using the Photo
mode, moiré may occur. If this happens, you can soften this moiré effect by using the Sharpness mode.
(See "Making Sharp Contrast Copies," on p. 3-28.)
●Combinations of these three modes cannot be set. If you select one of these modes, the previously set
mode is cancelled.
MEMO
●When you have selected the Text, Text/Photo or Photo mode, the copy exposure can be adjusted only by
Manual Exposure Control. Automatic Exposure Control [A] cannot be selected.
●If the original is a transparency, select the Text, Text/Photo or Photo mode to adjust the image quality to
the most appropriate level.
Place your original on the machine and press the
[
] (TEXT), or [ ] (TEXT/PHOTO) key.
1
Press the [▼] or [▼] ke y to adjust the copy exposure.
2
MEMO
●Move the indicator above the [▼] [A] [▼] keys to the
left to make the exposure lighter or to the right to
make the exposure darker.
●If you press the [▼] [A] [▼] keys while Automatic
Exposure Control is active (i.e. the [A] key is highlighted), the [A] key returns to normal and Manual
Exposure Control become active.
Proceed to make copies in the usual way.
3
MEMO
●You can cancel the mode by pressing the
Reset
key. (The machine returns to the Standard mode.)
This mode is best suited for making
copies from photos printed on photographic paper (Equivalent to 600 dpi).
When the Photo mode in the custom copy
setting is set to [ON], [PHOTO] is
displayed.(See "Photo Mode," on p. 4-33.)
Page 68
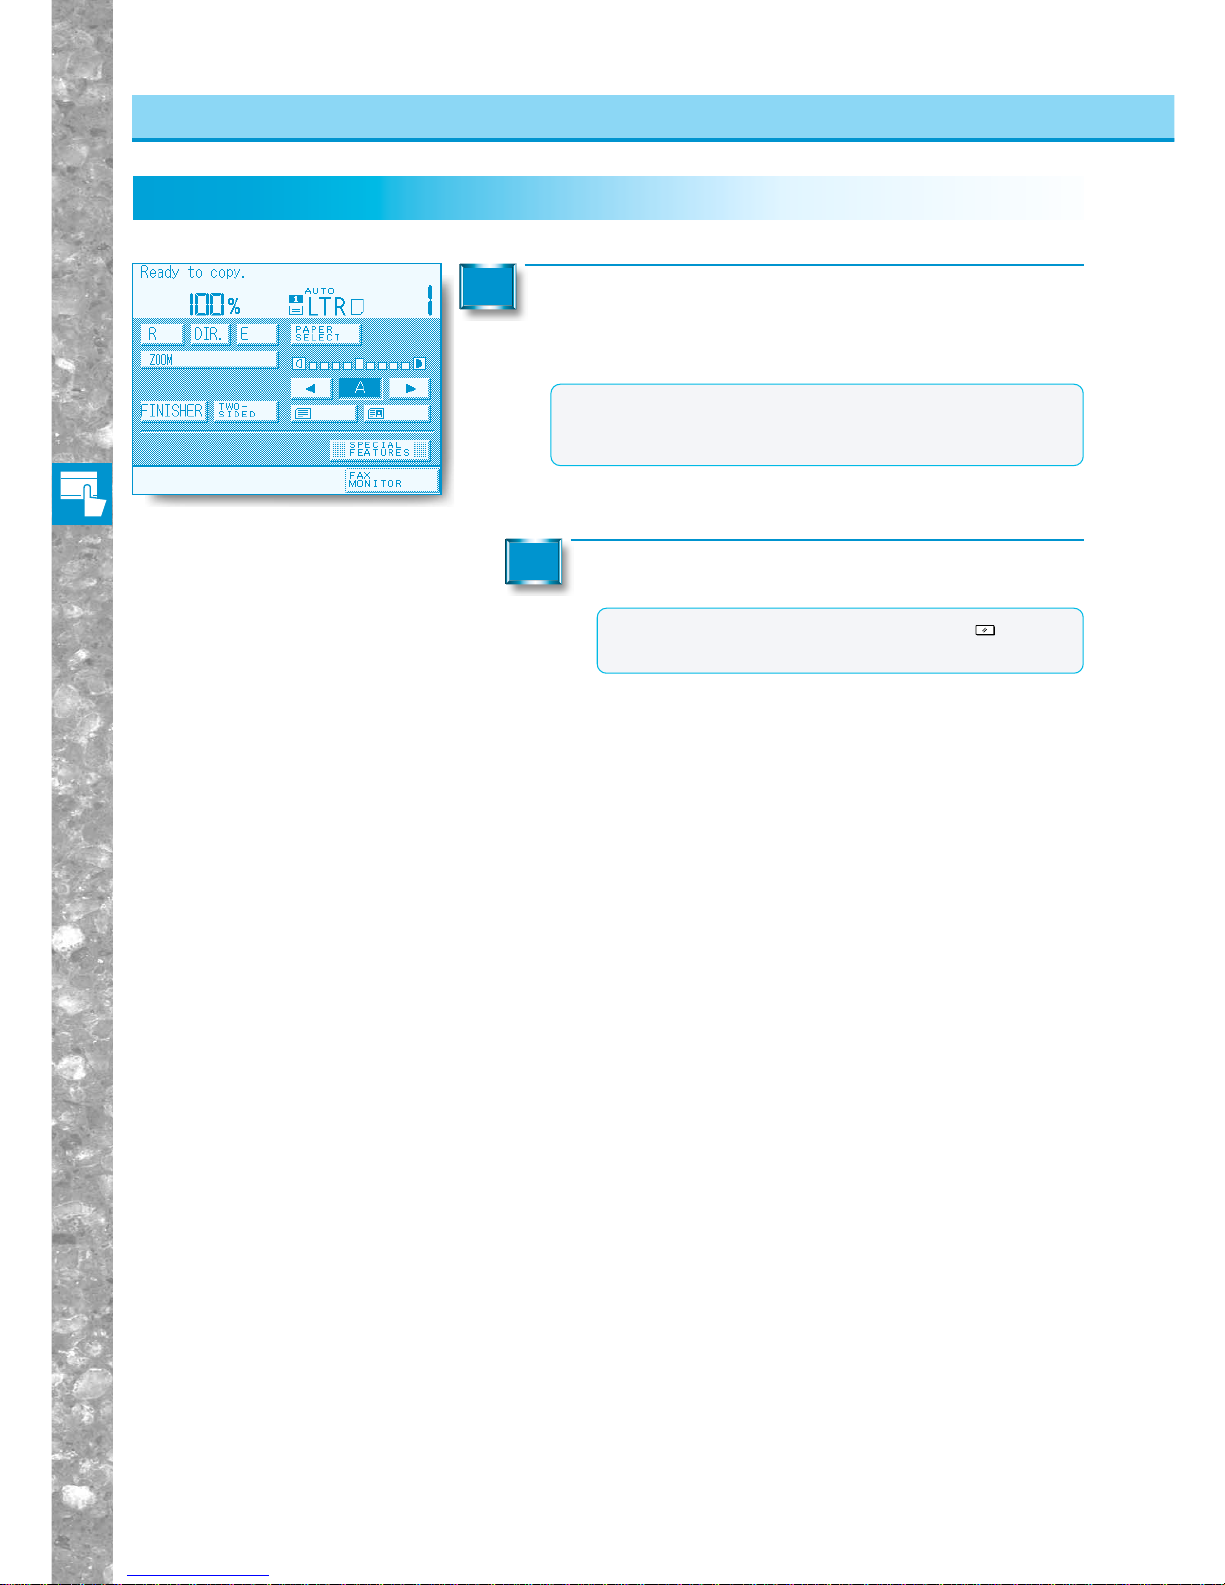
Basic Copying
2–26
Adjusting Exposure and Image Quality (COPY EXPOSURE)
Automatic Adjustment of Exposure and Image Quality (A)
Automatic Adjustment of Exposure and Image Quality (A)
Place your originals and press the [A] key.
The copy exposure is automatically adjusted to the level best suited to
the quality of the original.
1
Proceed to make copies in the usual way.
2
MEMO
●You can cancel the mode by pressing the
Reset
key. (The
machine returns to the Standard mode.)
MEMO
●If the original is a transparency, you may not be able to use
Automatic Exposure Control. If so, adjust the copy exposure
using Manual Exposure Control.
Page 69
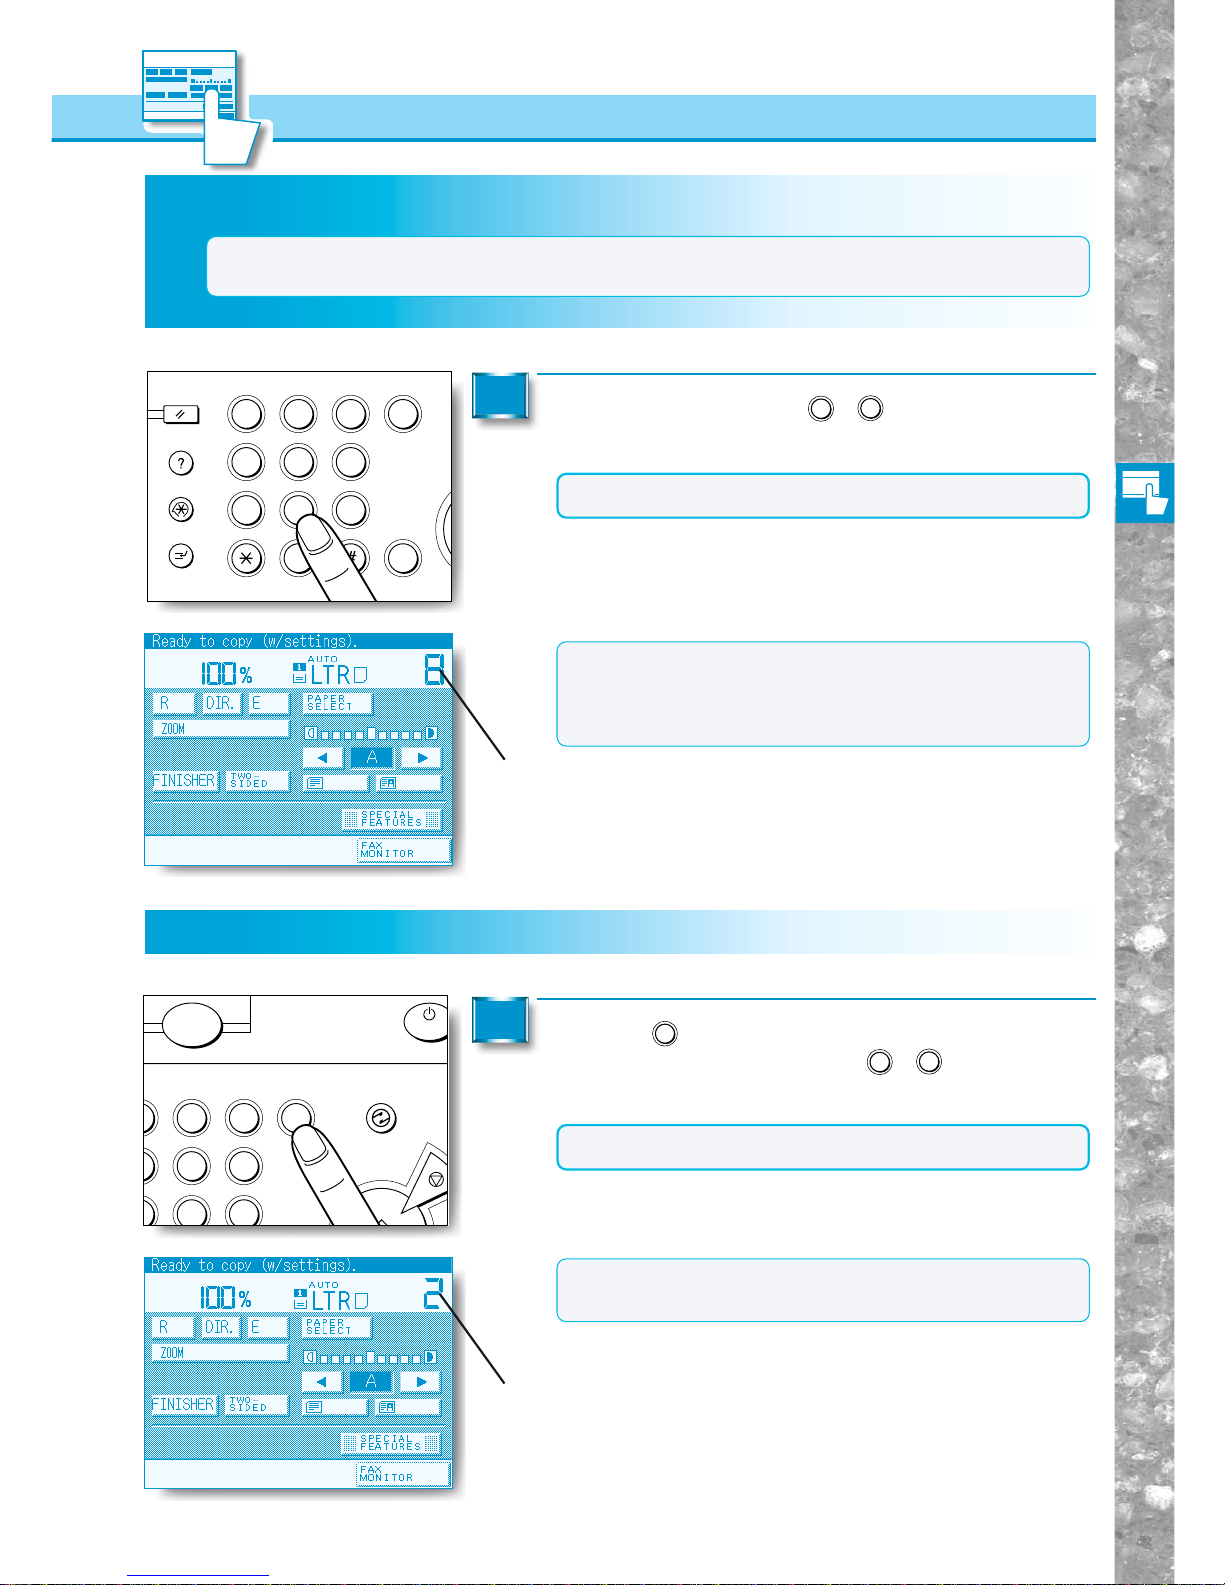
Basic Copying
2–27
Specifying the Required Number of Copies
Changing the Copy Quantity
Entering the Copy Quantity
Specifying the Required Number of Copies
MEMO
●Up to 999 copies can be set. The maximum number of copies can also be changed. (For details, contact
your service representative.)
Copy quantity
Copy quantity
Press the Number keys (0 - 9) to enter the
desired copy quantity (1 to 999).
1
NOTICE
●After copying begins, you cannot change the copy quantity.
MEMO
●The maximum copy quantity varies according to the copy job
settings.
●The copy quantity appears in the right side of the touch
panel display.
Changing the Copy Quantity
Press the
C
Clear
key to clear the entered number.
Then press the Number keys (0 - 9) to enter the
copy quantity again.
1
NOTICE
●After copying begins, you cannot change the copy quantity.
MEMO
●The copy quantity appears in the right side of the touch
panel display.
Clear
Energy Saver
Start
ON/OF
F
2 3
5 6
8 9
C
ABC
DEF
JKL
MNO
TUV
WXY
data
Error
PRINT•I/F
OPER
Reset
Clear
S
Guide
Interrupt
Additional Functions
1 2 3
4 5 6
7 8 9
0
C
ID
ABC
DEF
JKL
GHI MNO
TUV
PRS
WXY
Page 70
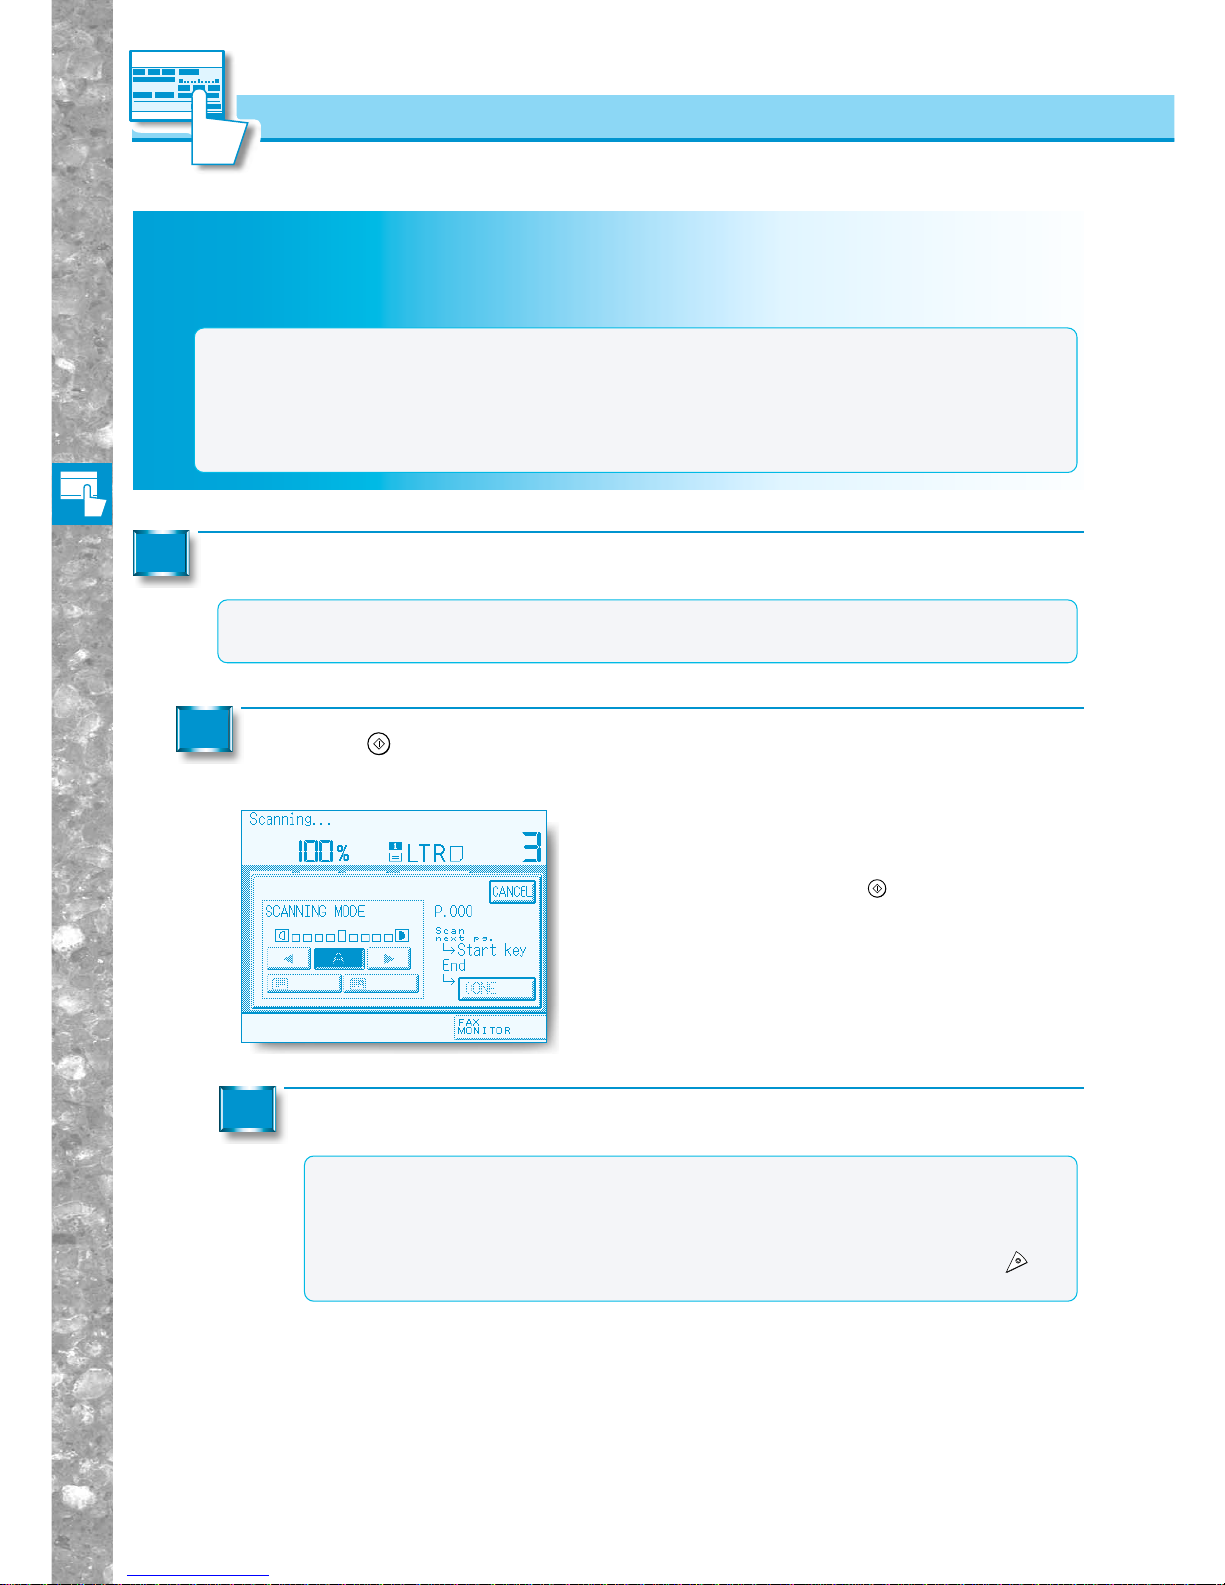
Basic Copying
2–28
Making a Copy while the Machine is Warming Up (AUTO START)
Using the Memory for Copying
For certain copy functions, the image is first scanned into memory and then used for copying.
Making a Copy while the Machine is W arming Up (AUT O ST ART)
While the machine is warming up, an original can be scanned. The message “Ready to scan” is
displayed.
Place your originals and select the desired copy mode.
1
MEMO
●When wishing to copy several originals and a special copy mode is not required, use the feeder.
●If no copy mode selection has been made, only one original can be scanned from the platen glass.
Press the
Start
key.
The message “Scanning ...” appears on the display.
2
When an original has been placed on the platen glass, a display
such as shown at left appears on the touch panel display,
depending on the copy mode.
To scan the next original, press the
Start
key again.
When scanning is completed, press the [DONE] key.
After the machine has finished warming up, copying starts.
3
MEMO
●If warmup ends while scanning is still in progress, copying starts at that point.
●During scanning, the image quality setting can be changed.
●Adjusting exposure during scanning will produce a different result from adjusting exposure
after copying has started.
●To cancel copying, press the [CANCEL] key on the touch-panel display or press the
Stop
key on the control panel.
MEMO
●Depending on the memory size of the machine, number of originals (LTR size Canon standard chart no.1)
scanned, differs as follows.
memory size number of originals
32MB 150 originals
64MB 360 originals
96MB 650 originals
Page 71
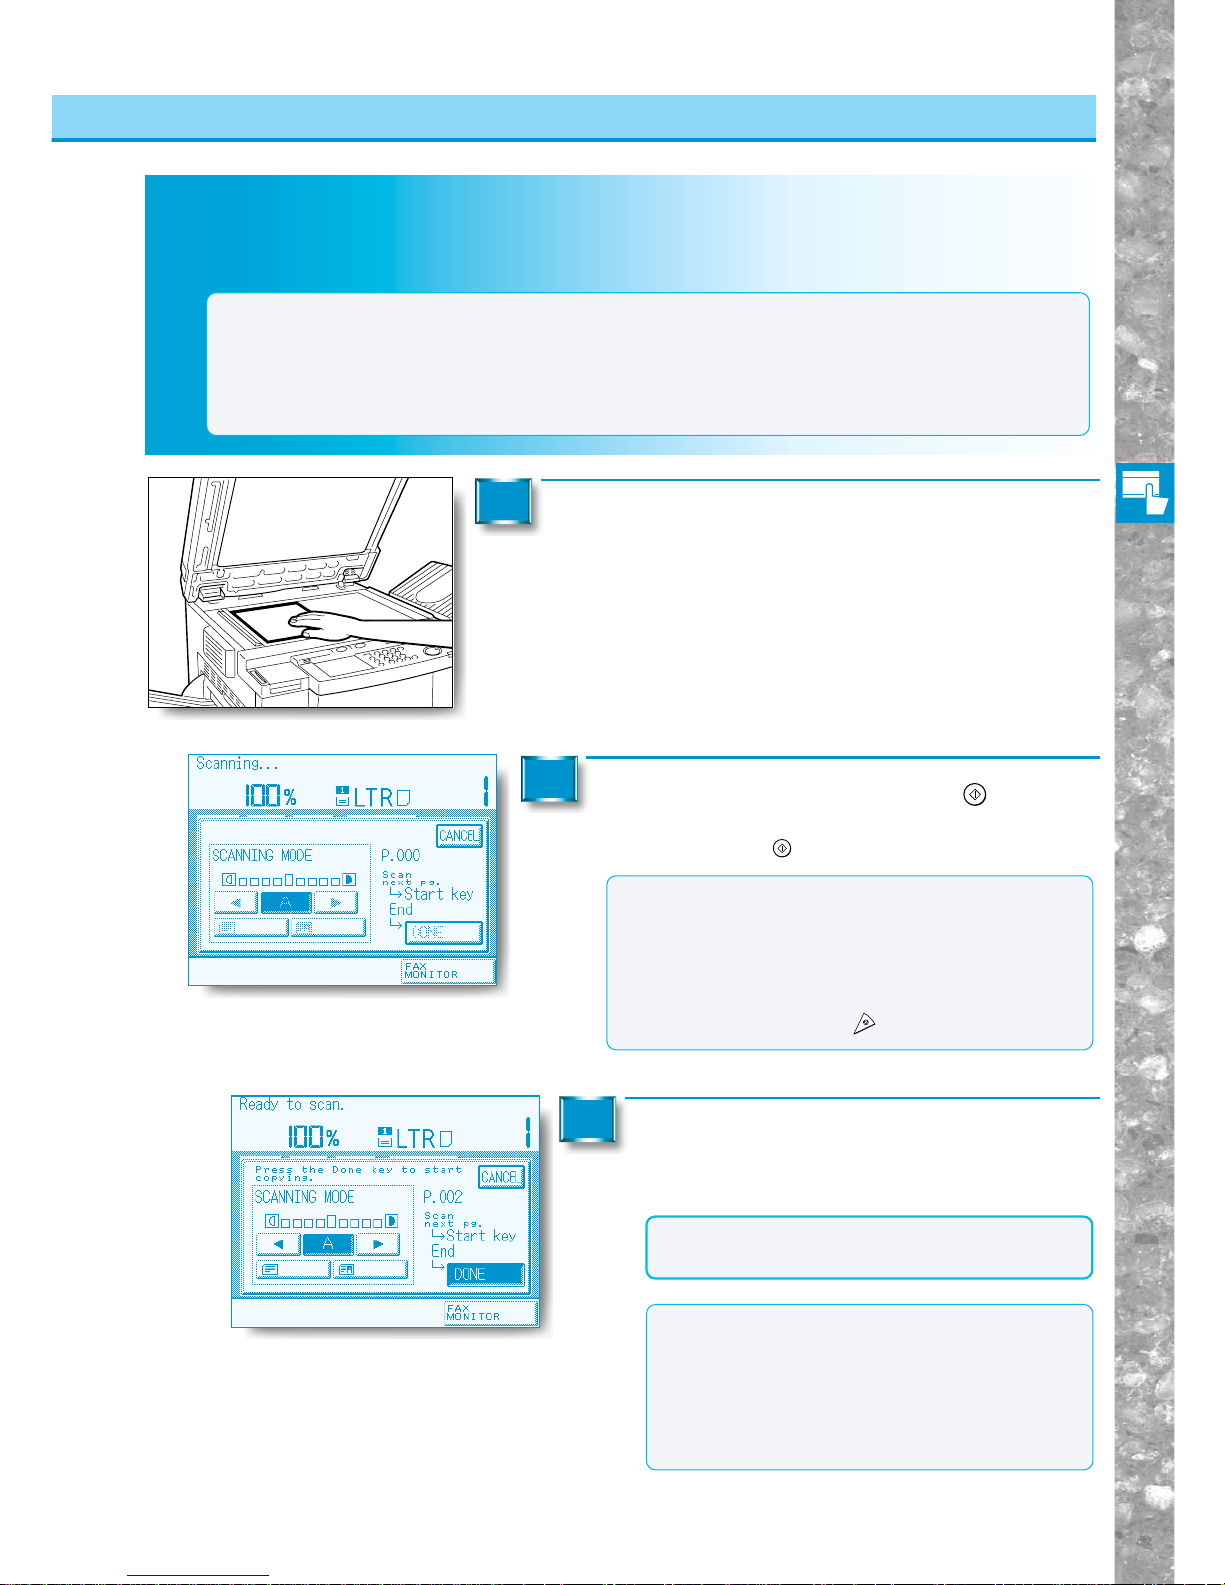
Basic Copying
2–29
MEMO
●Depending on the memory size of the machine, number of originals (LTR size Canon standard chart no.1)
scanned, differs as follows.
memory size number of originals
32MB 150 originals
64MB 360 originals
96MB 650 originals
Memory Copy of Original on Platen Glass
Memory Copy of Original on Platen Glass
If two-sided copying of an original on the platen glass is selected, the original is first scanned into
memory and then copied.
Using the Memory for Copying
Place your original on the platen glass.
1
Set the copy mode and press the
Start
key .
Original scanning starts. To copy several originals, place the next
original and press the
Start
key again.
2
MEMO
●During scanning, the image quality setting can be
changed.
●Adjusting exposure during scanning produces a
different result from adjusting exposure after copying
has started.
●To stop the process, press the [CANCEL] key on the
touch-panel or press the
Stop
key on the control panel.
Press the [DONE] key.
The display reverts to the Basic Features screen and
copying starts.
3
NOTICE
●Originals of differing sizes cannot be scanned in
continuously.
MEMO
●During copying, the copy exposure can be
changed. (See “Changing the Exposure During
Copying,” on p. 2-24.)
●Adjusting the exposure after scanning the original
before and copying, will produce a different result
to adjusting the exposure during direct copying
(no scanning).
Page 72
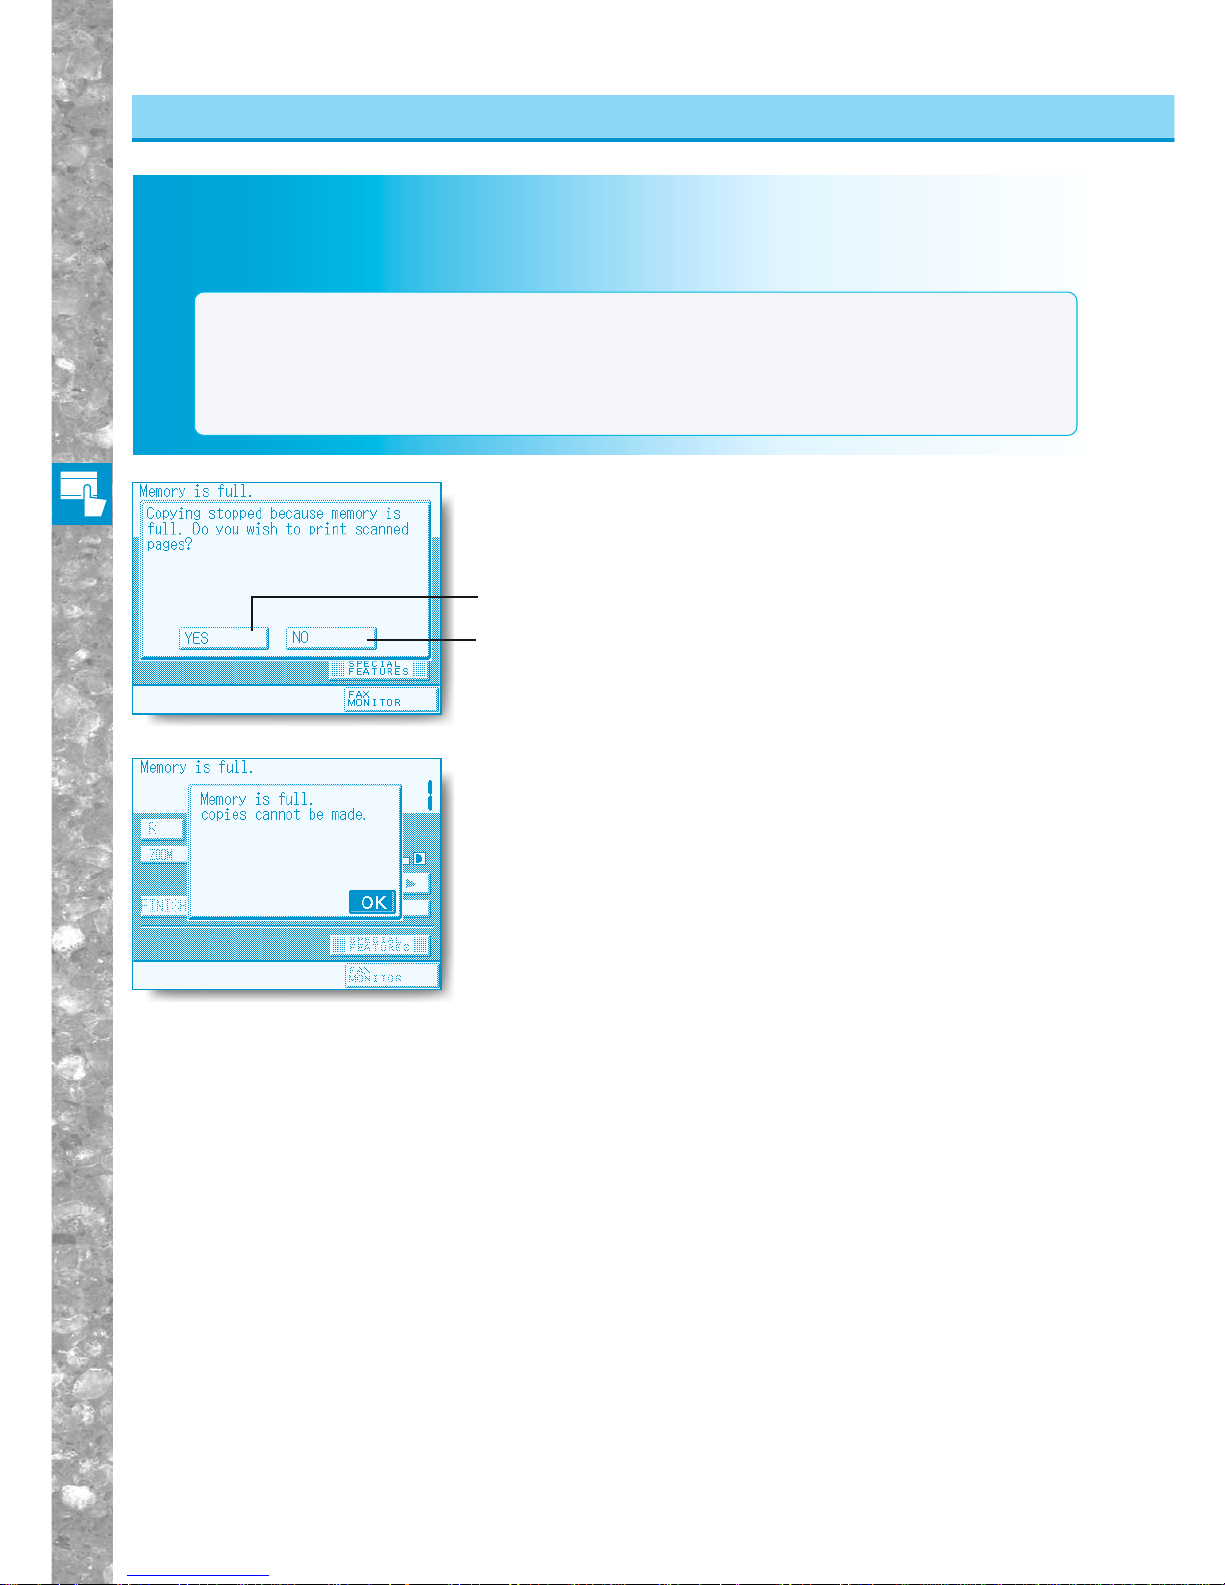
Basic Copying
2–30
MEMO
●Depending on the memory size of the machine, number of originals (LTR size Canon standard chart no.1)
scanned, differs as follows.
memory size number of originals
32MB 150 originals
64MB 360 originals
96MB 650 originals
Using the Memory for Copying
If Memory Becomes Full During Copying
If Memory Becomes Full During Copying
If the memory becomes full during scanning of originals, the following messages appear on the touchpanel display.
If the message asking whether to print the original pages
scanned into memory appears, select [YES] or [NO] as
appropriate.
● [YES] : Pages in memory are printed, and remaining originals are then
scanned.
● [NO] : Pages in memory are not printed.
When processing is completed, the display returns to the Basic Features
screen.
If the screen displayed on the left appears, press [OK]
to return to the Basic Features screen. Divide the
number of originals to be copied into several smaller
batches, and restart the copy process.
Alternatively, you can install the optional expansion
memory which will enable the machine to scan more
original pages into memory. Please contact your service
representative for details.
Page 73
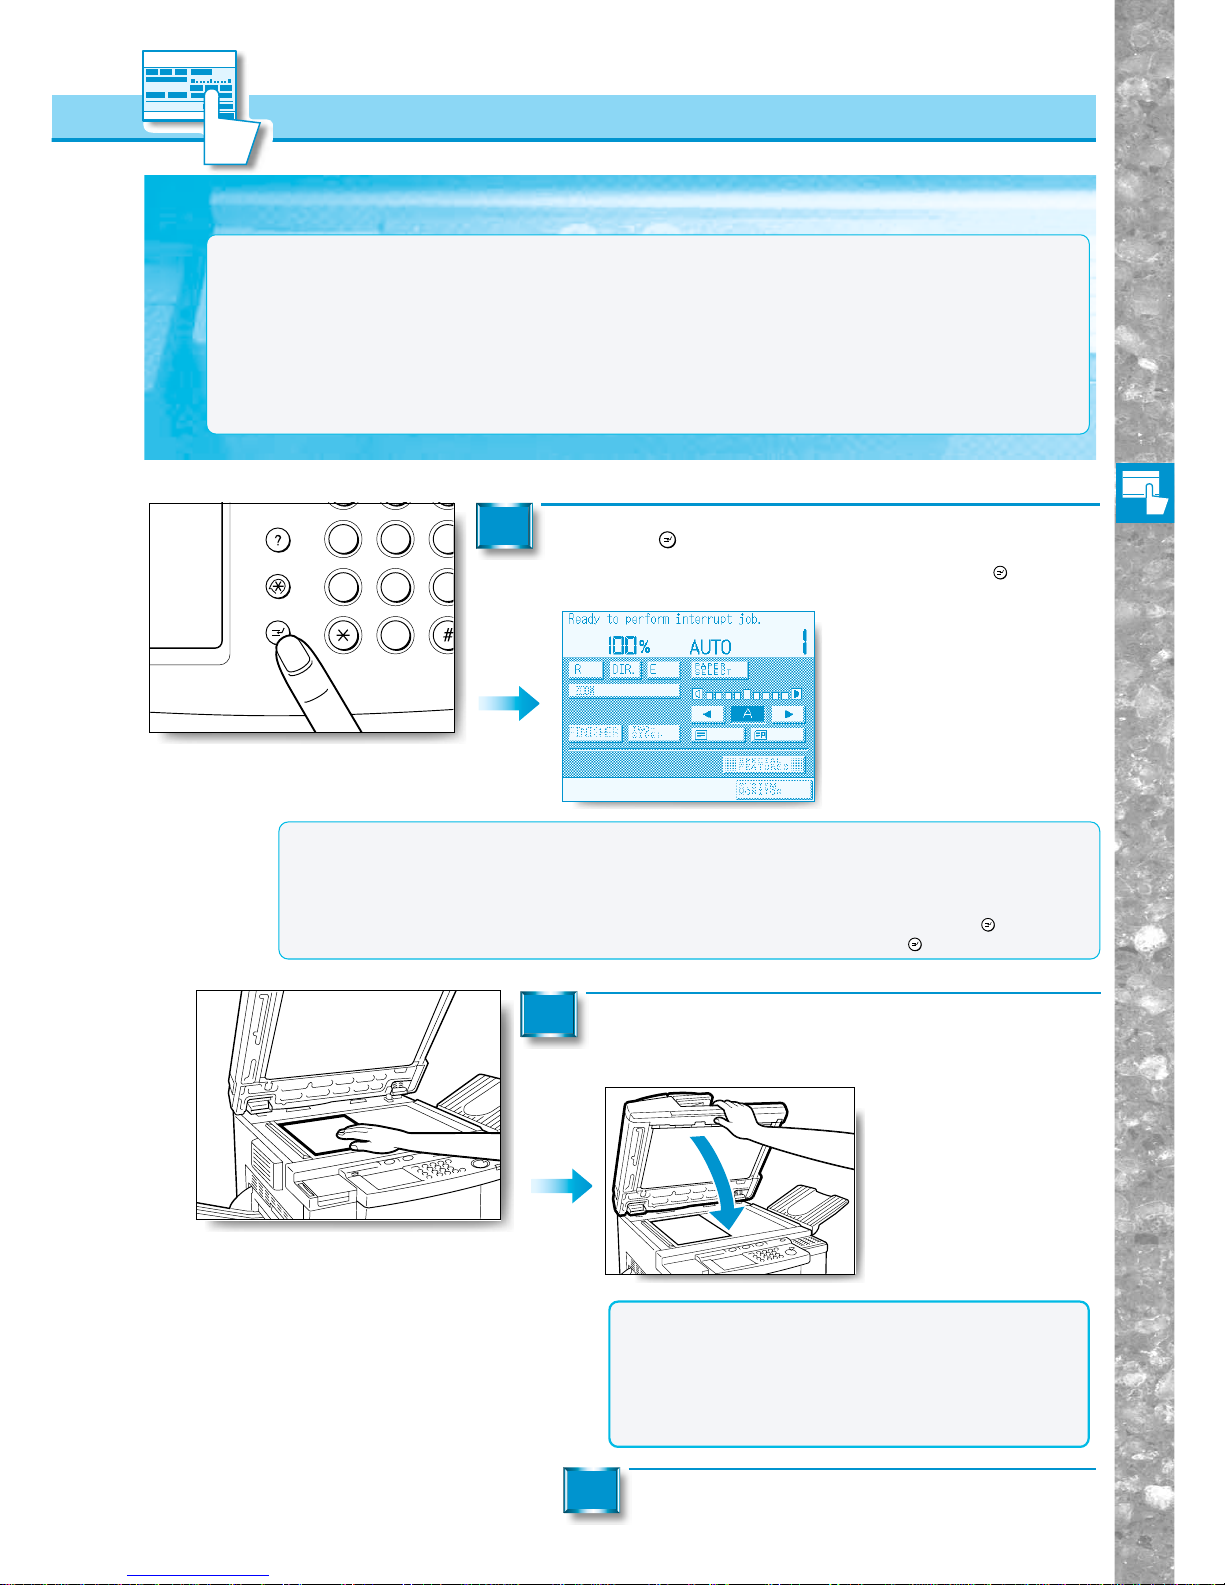
Basic Copying
2–31
Interrupting the Current Copy job Using the Platen Glass
Press the
Interrupt
key.
When the machine is ready for the Interrupt copy job, the
Interrupt
key stops
flashing and remains constantly lit.
1
Interrupting the Current Copy Job to
Make Priority Copies
(INTERRUPT MODE)
The Interrupt mode enables you to stop the current cop y job long enough to make other priority
copies. This mode comes in useful when making a rush copy during a continuous cop y job.
MEMO
●When using the lnterrupt mode, place your originals on the platen glass. Originals cannot be scanned from
the feeder.
●There are four modes which can be set in the Interrupt mode:
• Enlarging/Reducing Originals to a Standard Sizes (except 25%) (See p. 2-8.)
• Selecting the Copy Paper Size (See p. 2-2.)
• Adjusting Exposure and Image Quality (See p. 2-24.)
• Entering the Copy Quantity (See p. 2-27.)
●Auto Clear is not carried out while the Interrupt mode is set.
●Up to 999 copies can be made in the Interrupt mode.
MEMO
●If a department ID was being used to run the current copy job, the screen for entering the
department ID and password appears. (See "Entering the Dept. ID and Password," on p. 8-3.)
●When managing copying using the control card, the control card must be replaced before using
the Interrupt mode. (See "Inserting the Control Card," on p. 8-2.)
●If a paper jam message or out of paper message appears on the display after pressing the
Interrupt
key, follow
the instructions in the message to take the appropriate action and then press the
Interrupt
key again.
Place the priority copy original on the platen
glass and lower the feeder or platen cover.
2
Select the desired copy mode.
3
NOTICE
●If the interrupted copy job was being run using the
platen glass, temporarily remove the original from the
platen glass.
●If the interrupted copy job was being run using the
feeder, slowly lift the feeder so that none of the
originals fall out of the original supply tray.
Guide
Interrupt
Additional Functions
4 5 6
7 8 9
0
OPER
JKL
GHI MNO
TUV
PRS
WXY
Page 74
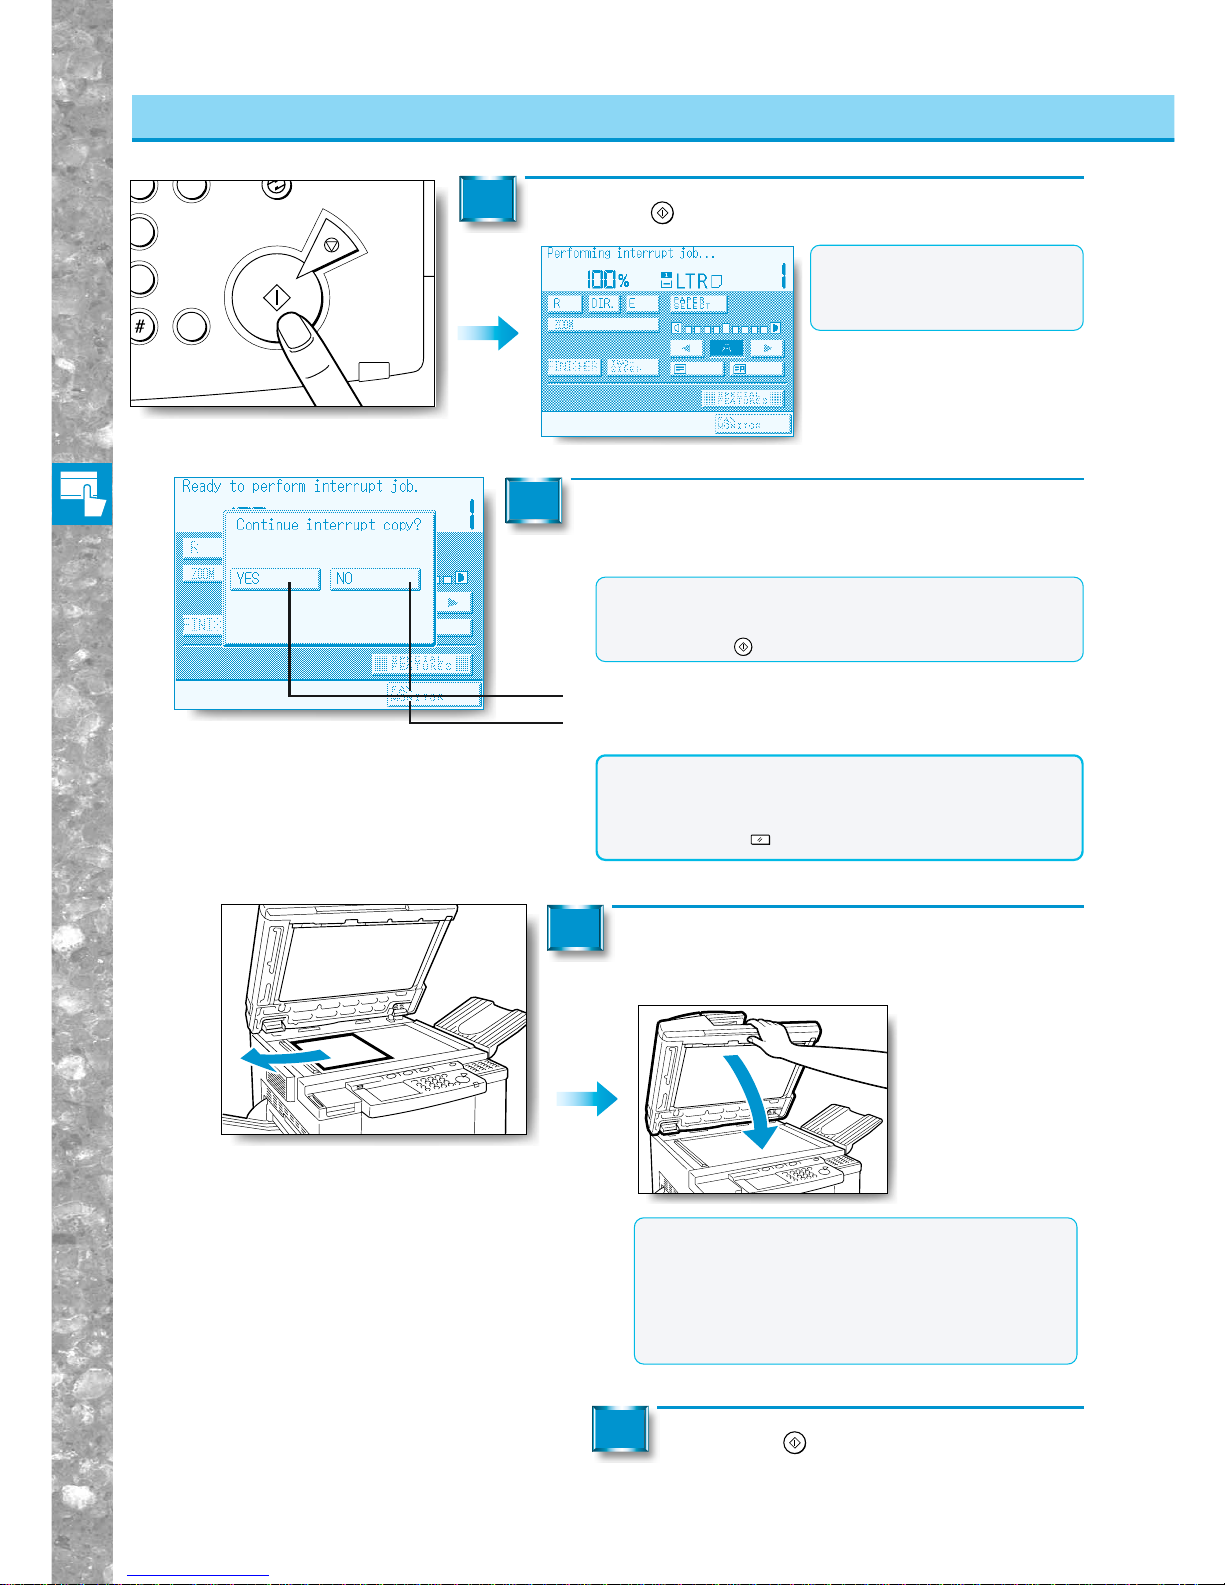
Basic Copying
2–32
Interrupting the Current Copy Job to Make Priority Copies
Interrupting the Current job Copy by Using the Platen Glass
Press the
Start
key .
4
When you finish copying, the touch panel
display changes as shown on the left.
5
Remove the priority copy original from the platen
glass and then close the feeder or platen co ver.
6
Press the
Start
key.
The machine resumes the interrupted copy job.
7
NOTICE
●Copies cannot be made in the regular mode unless
the Interrupt mode is cancelled.
●The Interrupt mode will not be cancelled even by
pressing the
Reset
key.
MEMO
●If the Finisher is installed,
the copy is delivered to the
interrupt tray.
● Continue interrupt copy
● End interrupt copy
MEMO
●If you want to copy another original, press the [YES]
key, place the new original, set the copy mode, and
press the
Start
key.
MEMO
●When the feeder was used, re-sort the originals
so that the first page is on top, and then replace
them in the original tray.
●When all originals on the feeder have already
been scanned, there is no need to return the
originals to the tray.
Stop
Start
3
6
9
C
ID
Page 75
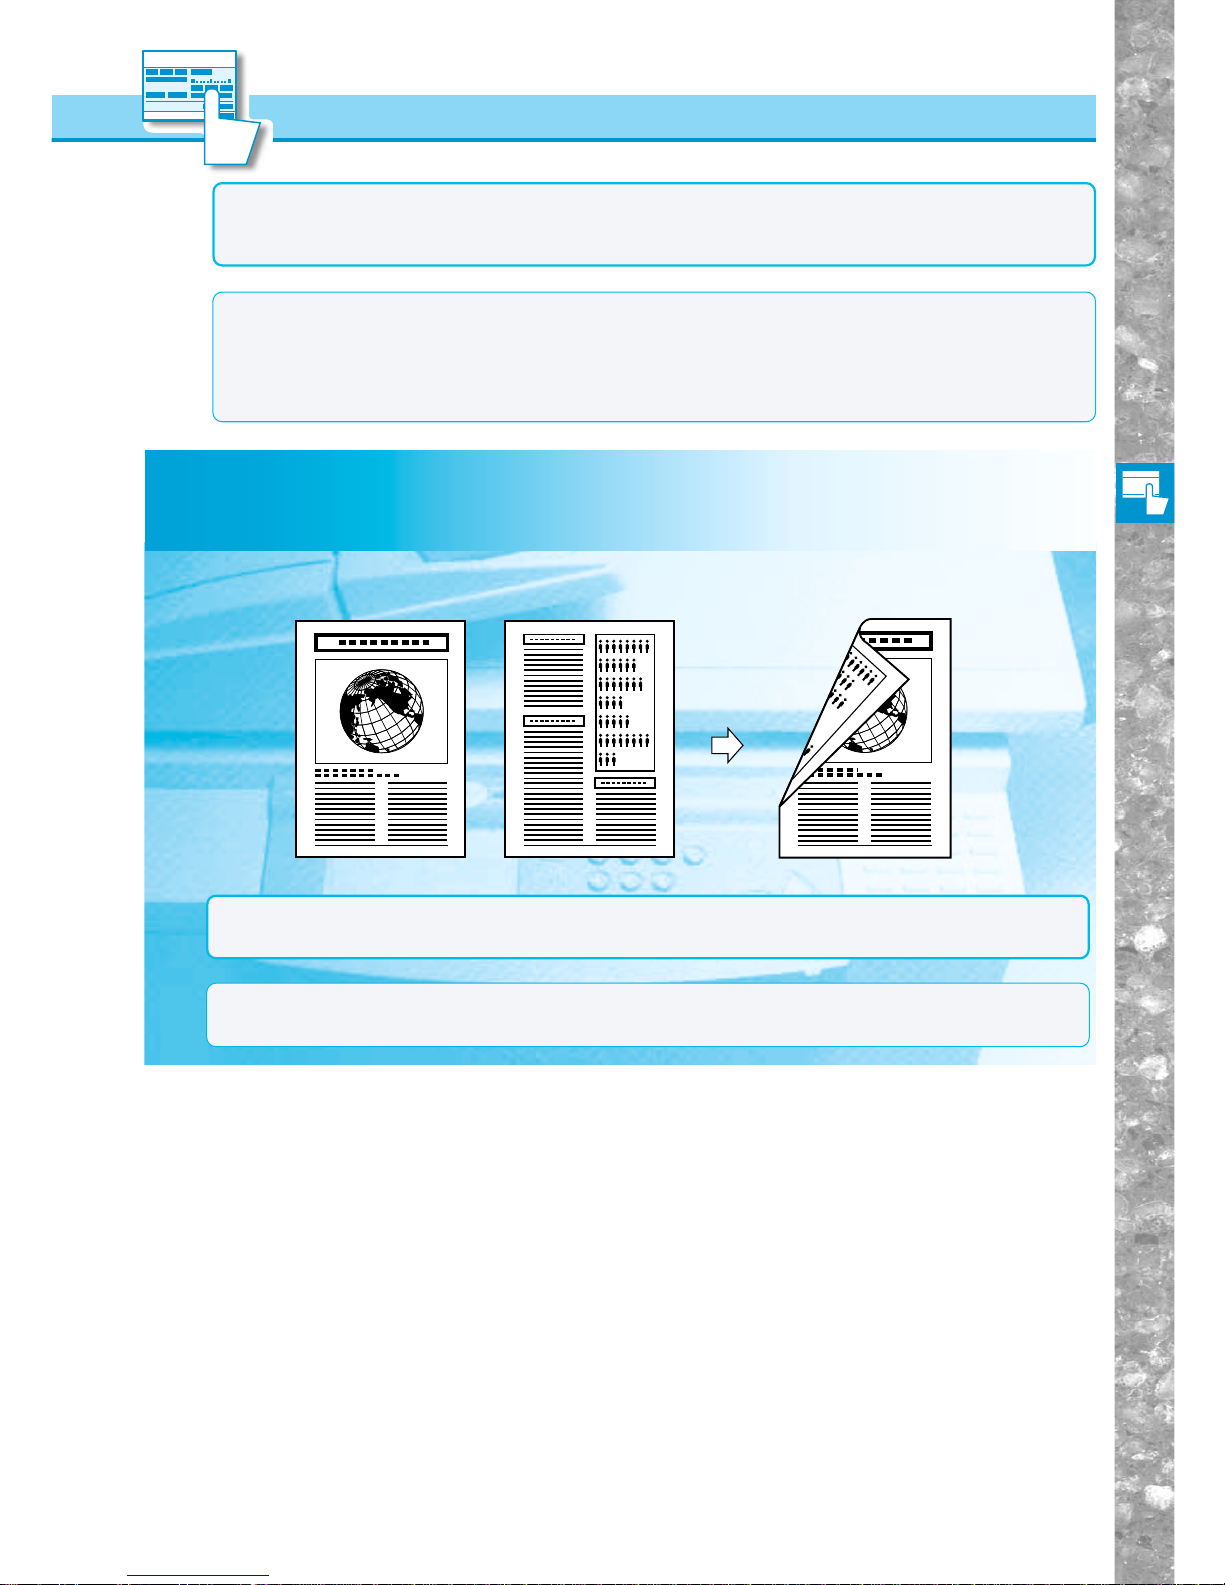
Basic Copying
2–33
Making T w o-sided Copies from One-sided Originals (1 → 2-SIDED)
This feature enables you to make two-sided copies from one-sided originals.
Making Tw o-sided Copies from One-sided Originals (1 → 2-SIDED)
Two-Sided Copying
Copy
Originals
NOTICE
●Non-standard paper sizes cannot be used to make two-sided copies.
●Two-sided modes cannot be used with the Overlay, Two-page Separation, Image Combination, Image
Separation, Multi-page Enlarge, Transparency Interleaving and Booklet modes.
MEMO
●The Two-sided mode that you have set is displayed above the [TWO-SIDED] key in the Basic Features
screen.
●Copy paper used to make two-sided copies must conform to the following specifications.
•Paper size : 11”x17” to STMT (STMTR-size and paper less than 182 mm wide cannot be used.)
• Paper weight : 17-lb bond (64 g/m2) to 20-lb bond (80 g/m2)
NOTICE
●Be certain to place the original horizontally when making copies from LTRR, STMTR and other horizontal
sizes. If these originals are placed vertically, the back of the copy will be printed upside down.
MEMO
●If there are an odd number of originals, the back of the last page is left blank. (The machine's counter
does not count the blank page as a copy.)
Page 76
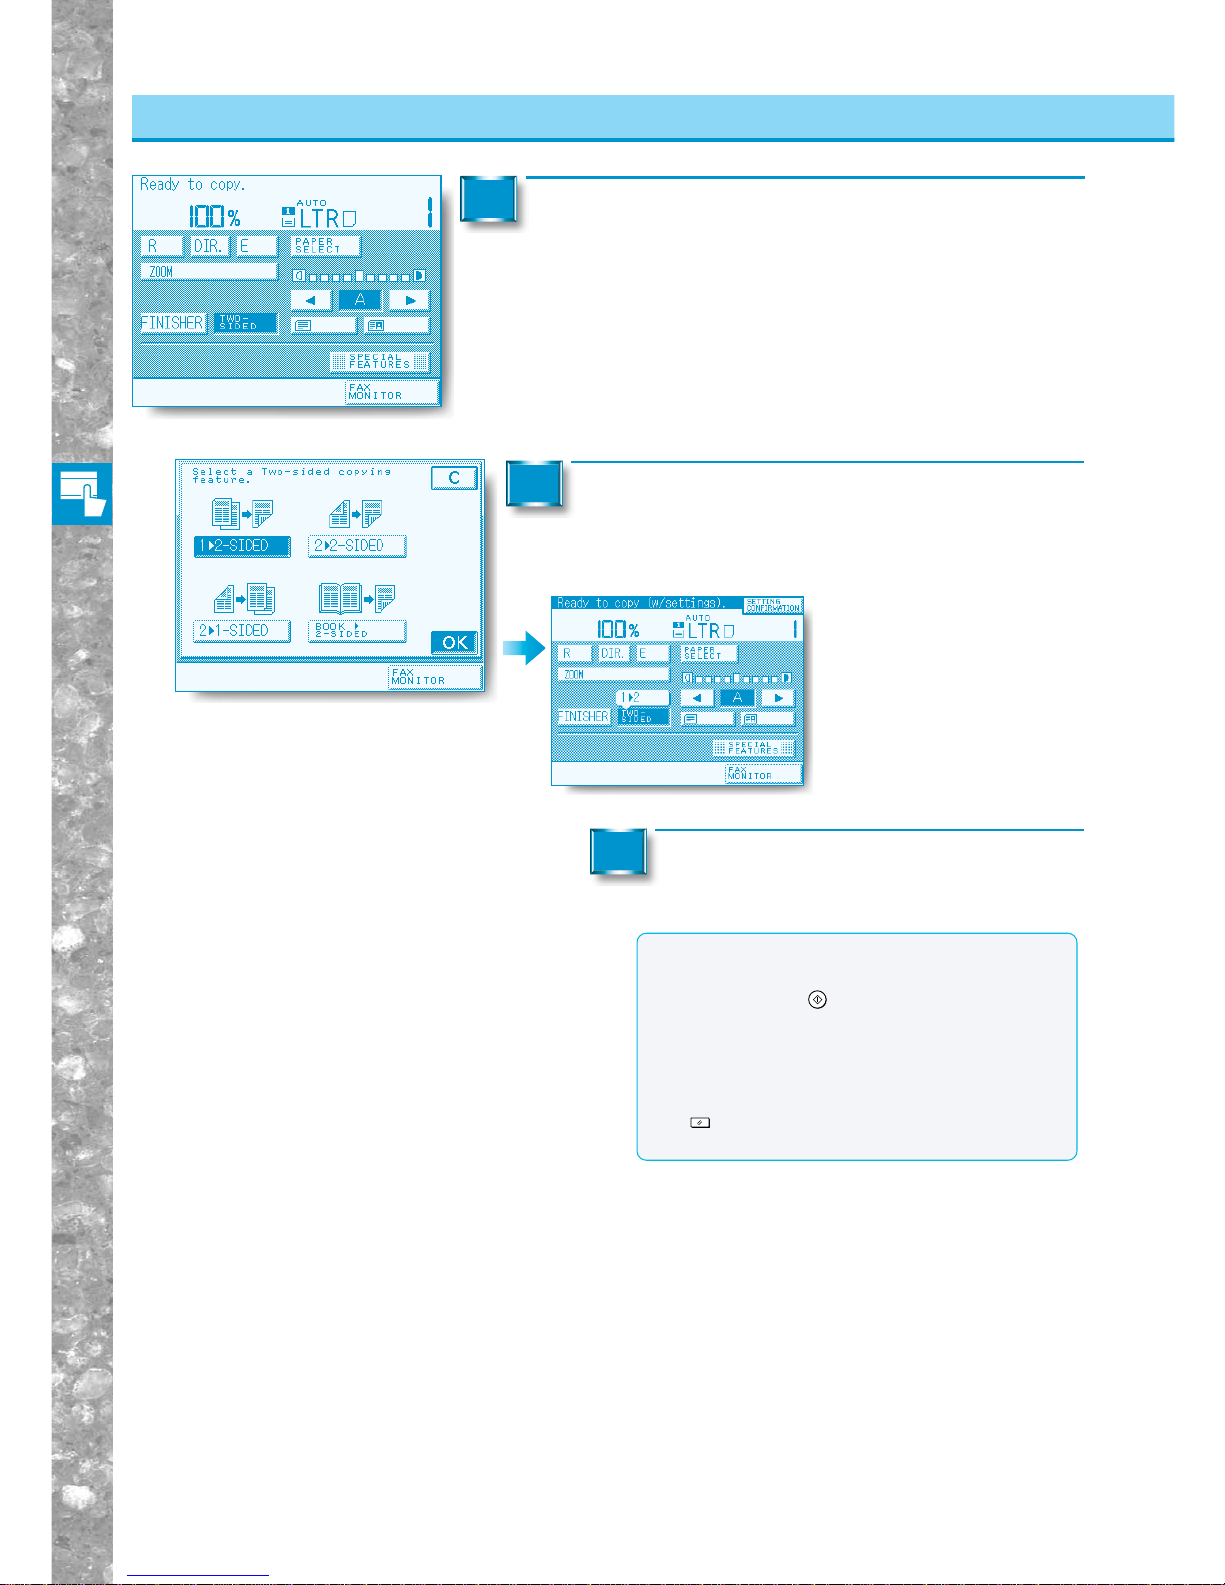
Basic Copying
2–34
Two-Sided Copying
Making Tw o-sided Copies from One-sided Originals (1 → 2-SIDED)
Place your originals and press the [TWO-SIDED] key.
1
Press the [1 ▼ 2-SIDED] key, then press the
[OK] key.
2
The display returns to the Basic
Features screen, and "1 ▼ 2" is
displayed above the [TWOSIDED] key.
Proceed to make copies in the usual
way.
3
MEMO
●When the original is placed on the platen glass,
follow the instructions that appear on the screen
and press the
Start
key once for each original.
(See “Memory Copy of Original on Platen Glass,”
on p. 2-29.)
●To cancel the settings, press the [TWO-SIDED]
and [C] keys in that order.
●You can also cancel the mode by pressing the
Reset
key. (The machine retur ns to the Standard
mode.)
Page 77
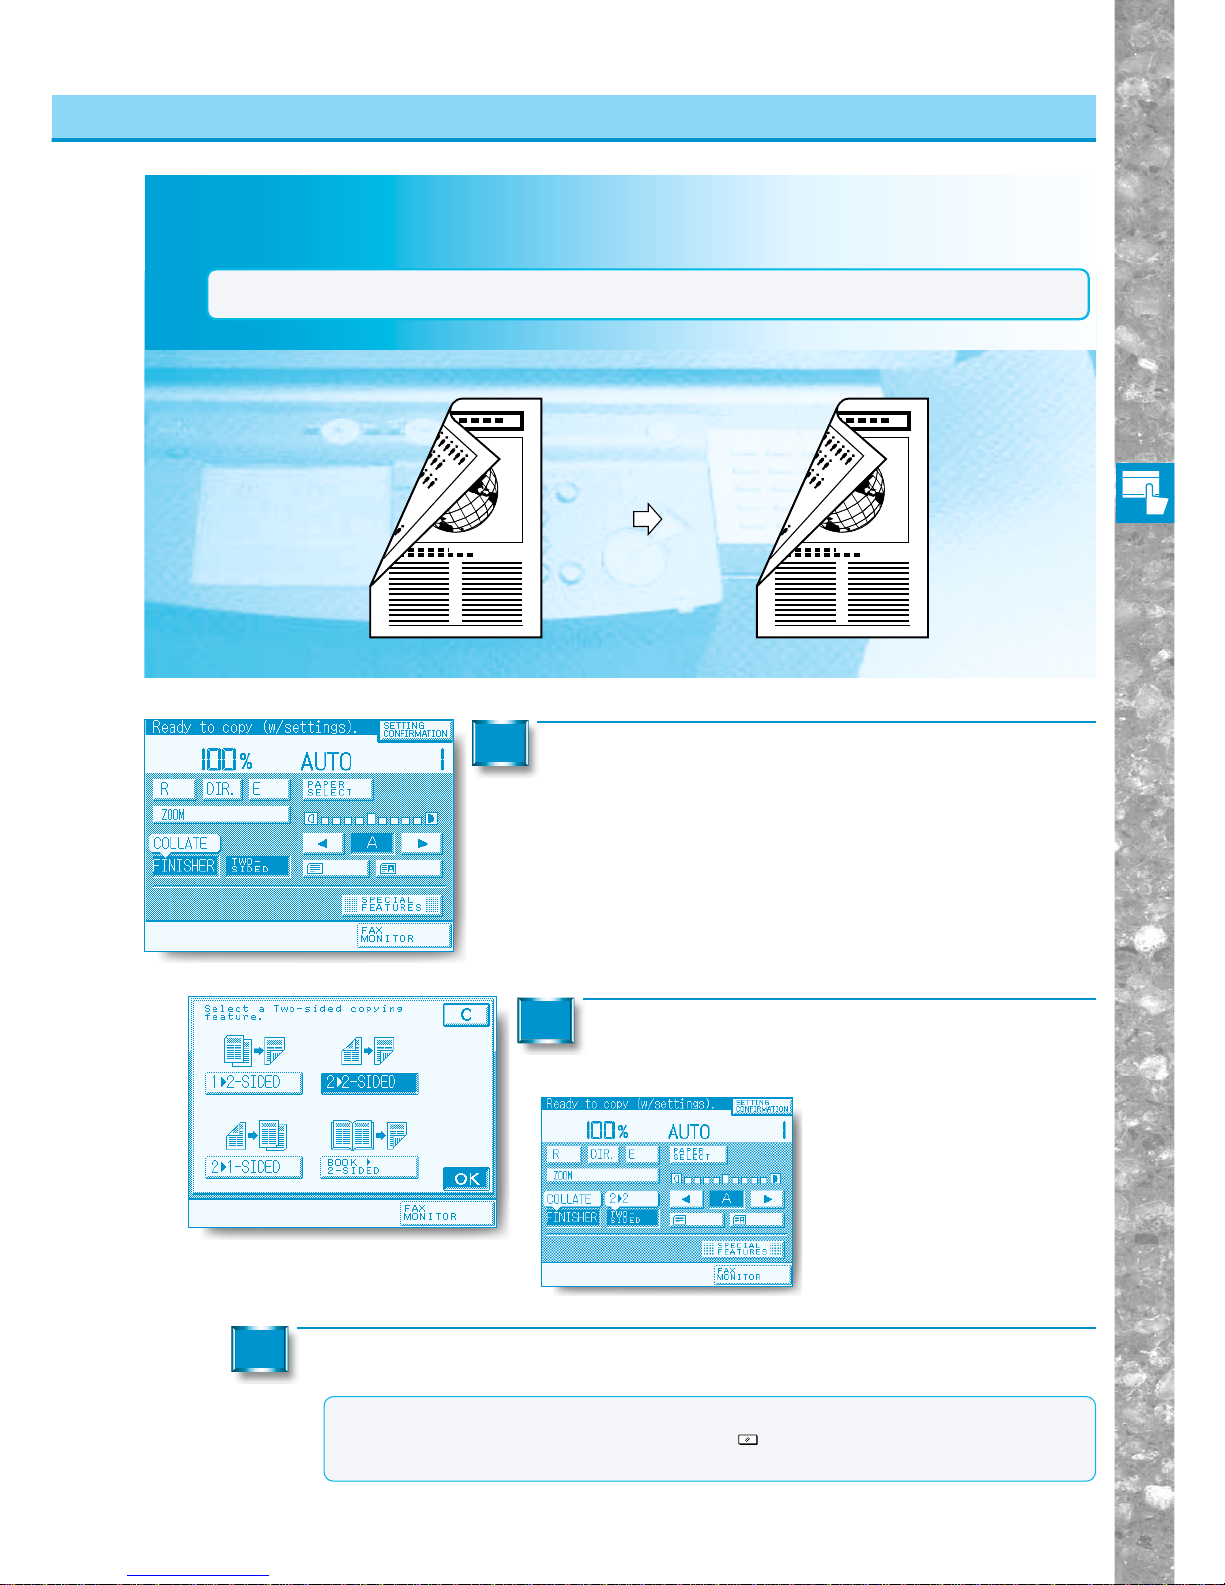
Basic Copying
2–35
Making T wo-sided Copies from T wo-sided Originals (2 → 2-SIDED)
This feature automatically turns over two-sided originals placed in the feeder to make two-sided copies.
Making Tw o-sided Copies from Two-sided Originals (2 → 2-SIDED)
Two-Sided Copying
Copy
Original
Place your originals in the feeder and press the
[TWO-SIDED] key.
1
Press the [2 ▼2-SIDED] key, then press the [OK]
key .
2
Proceed to make copies in the usual way.
3
The display returns to the Basic
Features screen, and "2 ▼ 2" is
displayed above the [TWO-SIDED]
key.
MEMO
●To cancel the settings, press the [TWO-SIDED] and [C] keys in that order.
●You can also cancel the mode by pressing the
Reset
key. (The machine retur ns to the
Standard mode.)
NOTICE
●If the feeder is not installed, this function can not be used.
Page 78
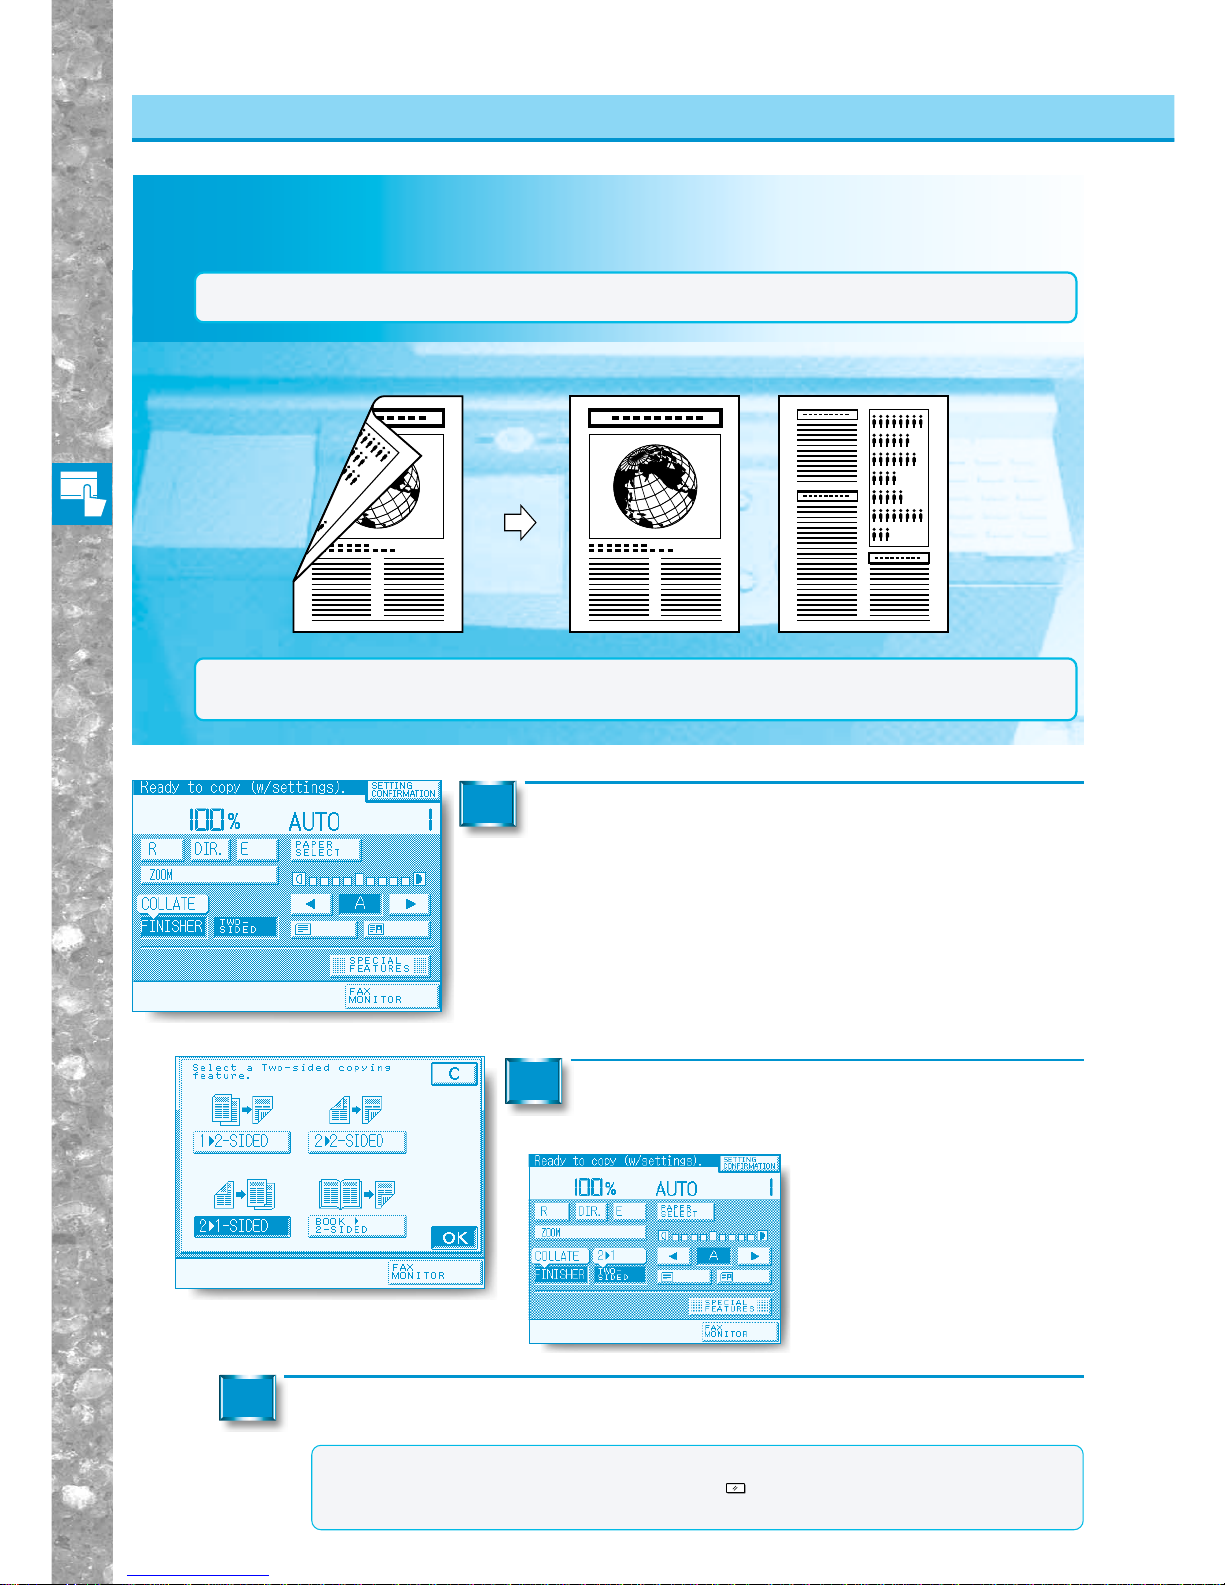
Basic Copying
2–36
Making One-sided Copies from T wo-sided Originals (2 → 1-SIDED)
This feature automatically turns over two-sided originals placed in the feeder to make one-sided copies.
Place your originals in the feeder and press the
[TWO-SIDED] key.
1
Press the [2 ▼1-SIDED] key, then press the [OK]
key .
2
Proceed to make copies in the usual way.
3
The display returns to the Basic
Features screen, and "2 ▼ 1" is
displayed above the [TWO-SIDED]
key.
MEMO
●To cancel the settings, press the [TWO-SIDED] and [C] keys in that order.
●You can also cancel the mode by pressing the
Reset
key. (The machine retur ns to the
Standard mode.)
Two-Sided Copying
Making One-sided Copies from Two-sided Originals (2 → 1-SIDED)
Copy
Original
NOTICE
●Be certain to place the original horizontally when making copies from LTRR, STMTR and other horizontal
sizes. If these originals are placed vertically, the back of the copy will be printed upside down.
NOTICE
●If the feeder is not installed, this function can not be used.
Page 79
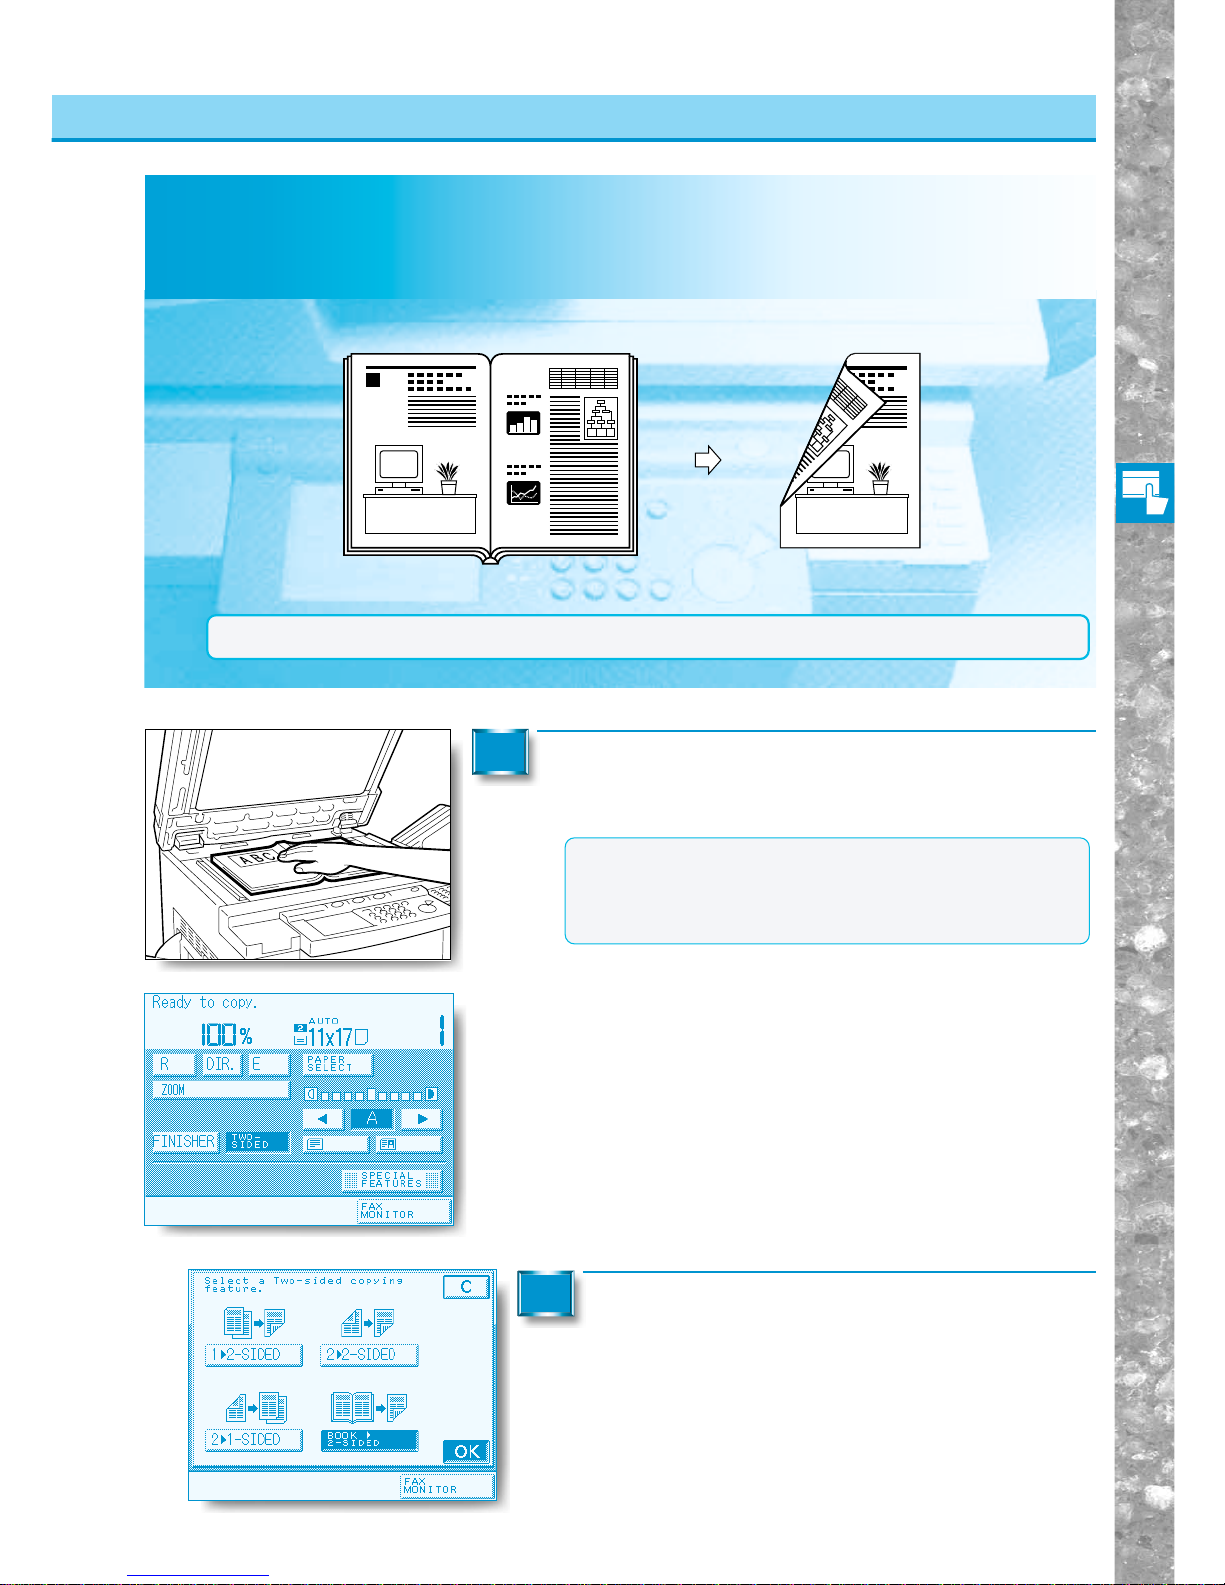
Basic Copying
2–37
Making T wo-sided Copies fr om F acing P ages in a Book in One Step (BOOK→ 2-SIDED)
This feature enables you to make two-sided copies from facing pages in a bound original, such as a
magazine.
Place your original on the platen glass and press
the [TWO-SIDED] key.
1
Press the [BOOK ▼2-SIDED] key, then press
the [OK] key.
2
Making Two-sided Copies from Facing Pages in a Book in One Step (BOOK
→
2-SIDED)
Two-Sided Copying
Copy
Original
NOTICE
●When using this feature, select LTR or STMT-size copy paper.
1
MEMO
●If you want to make copies in page order, begin copying
from the last page and work your way forward.
●Place the original face down so that its top edge rests
against the back edge of the platen glass.
Page 80
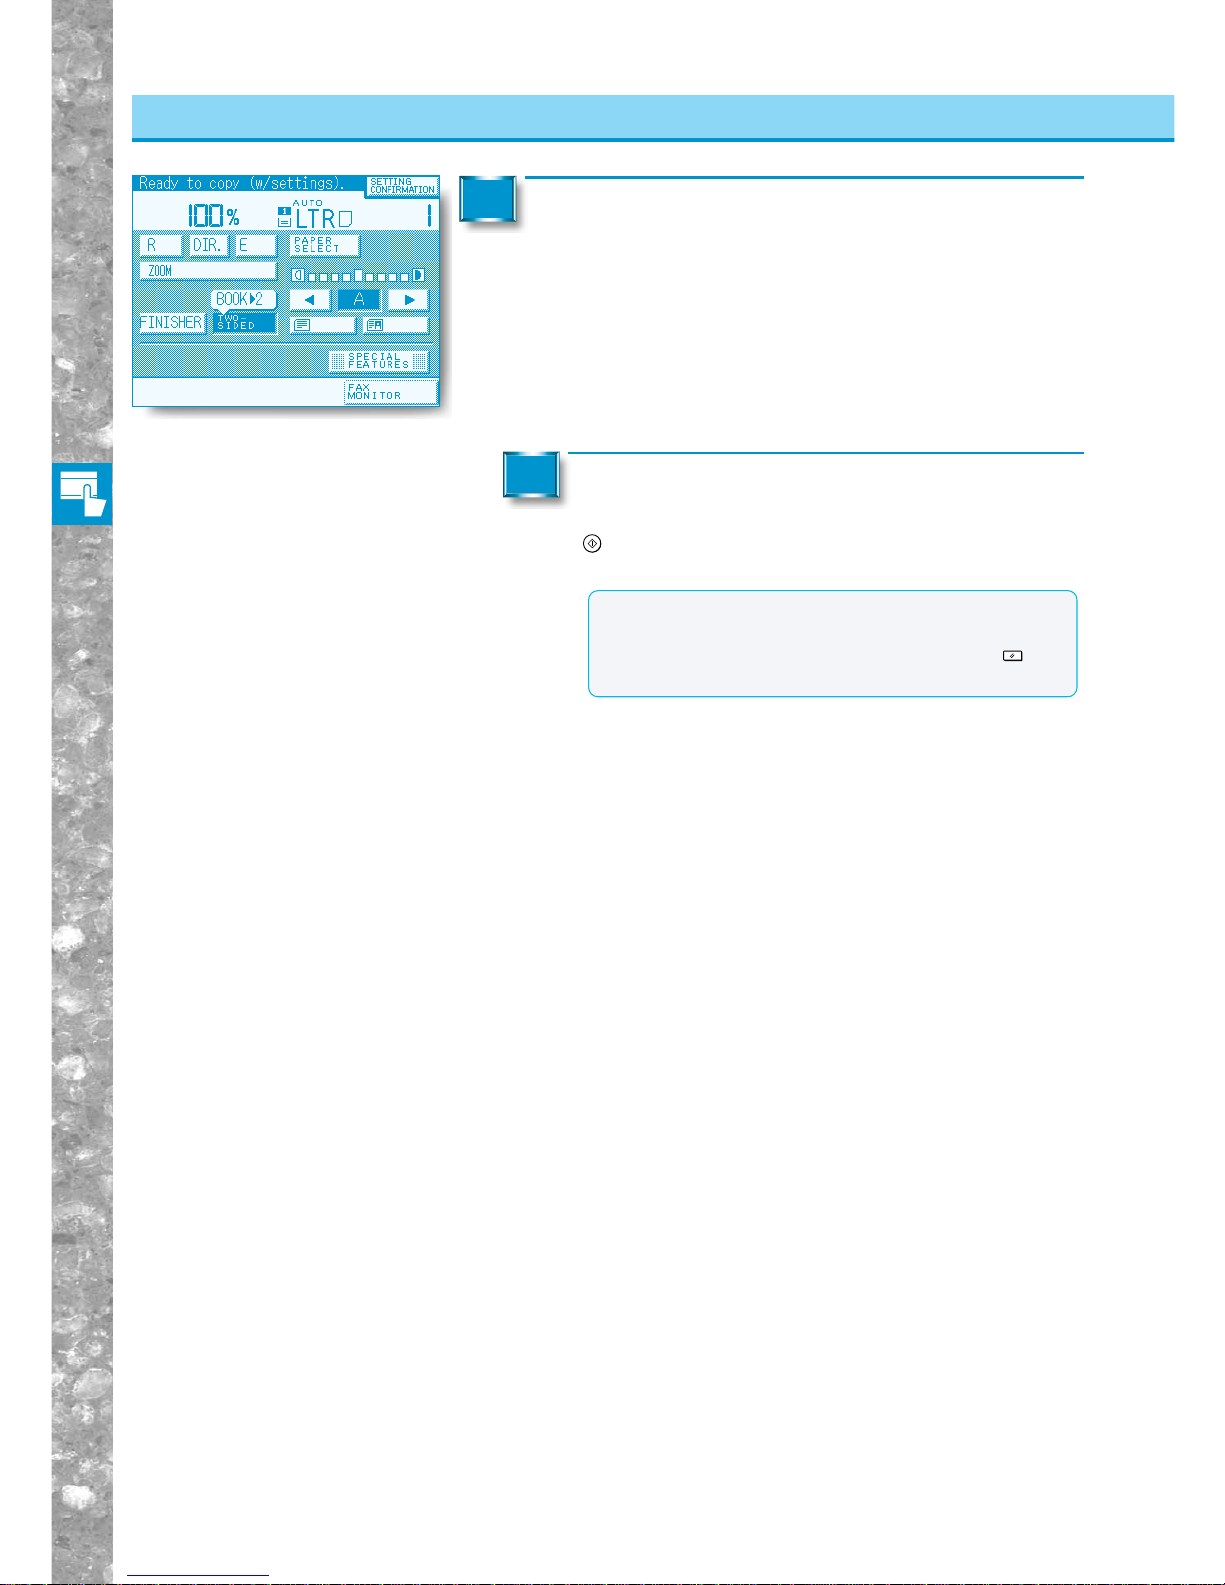
Basic Copying
2–38
Two-Sided Copying
Making Two-sided Copies from Facing Pages in a Book in One Step (BOOK
→
2-SIDED)
The display returns to the Basic Features screen
and “BOOK
▼
2 ” is displayed above the [TWO-
SIDED] key.
3
Proceed to make copies in the usual way.
For the next two facing pages, place the original and press the
Start
key again. (See "Memory Copy of Original on Platen Glass,"
on p. 2-29.)
4
MEMO
●To cancel the setting, press the [TWO-SIDED] and [C]
keys in that order.
●You can also cancel the mode by pressing the
Reset
key.
(The machine returns to the standard mode.)
Page 81
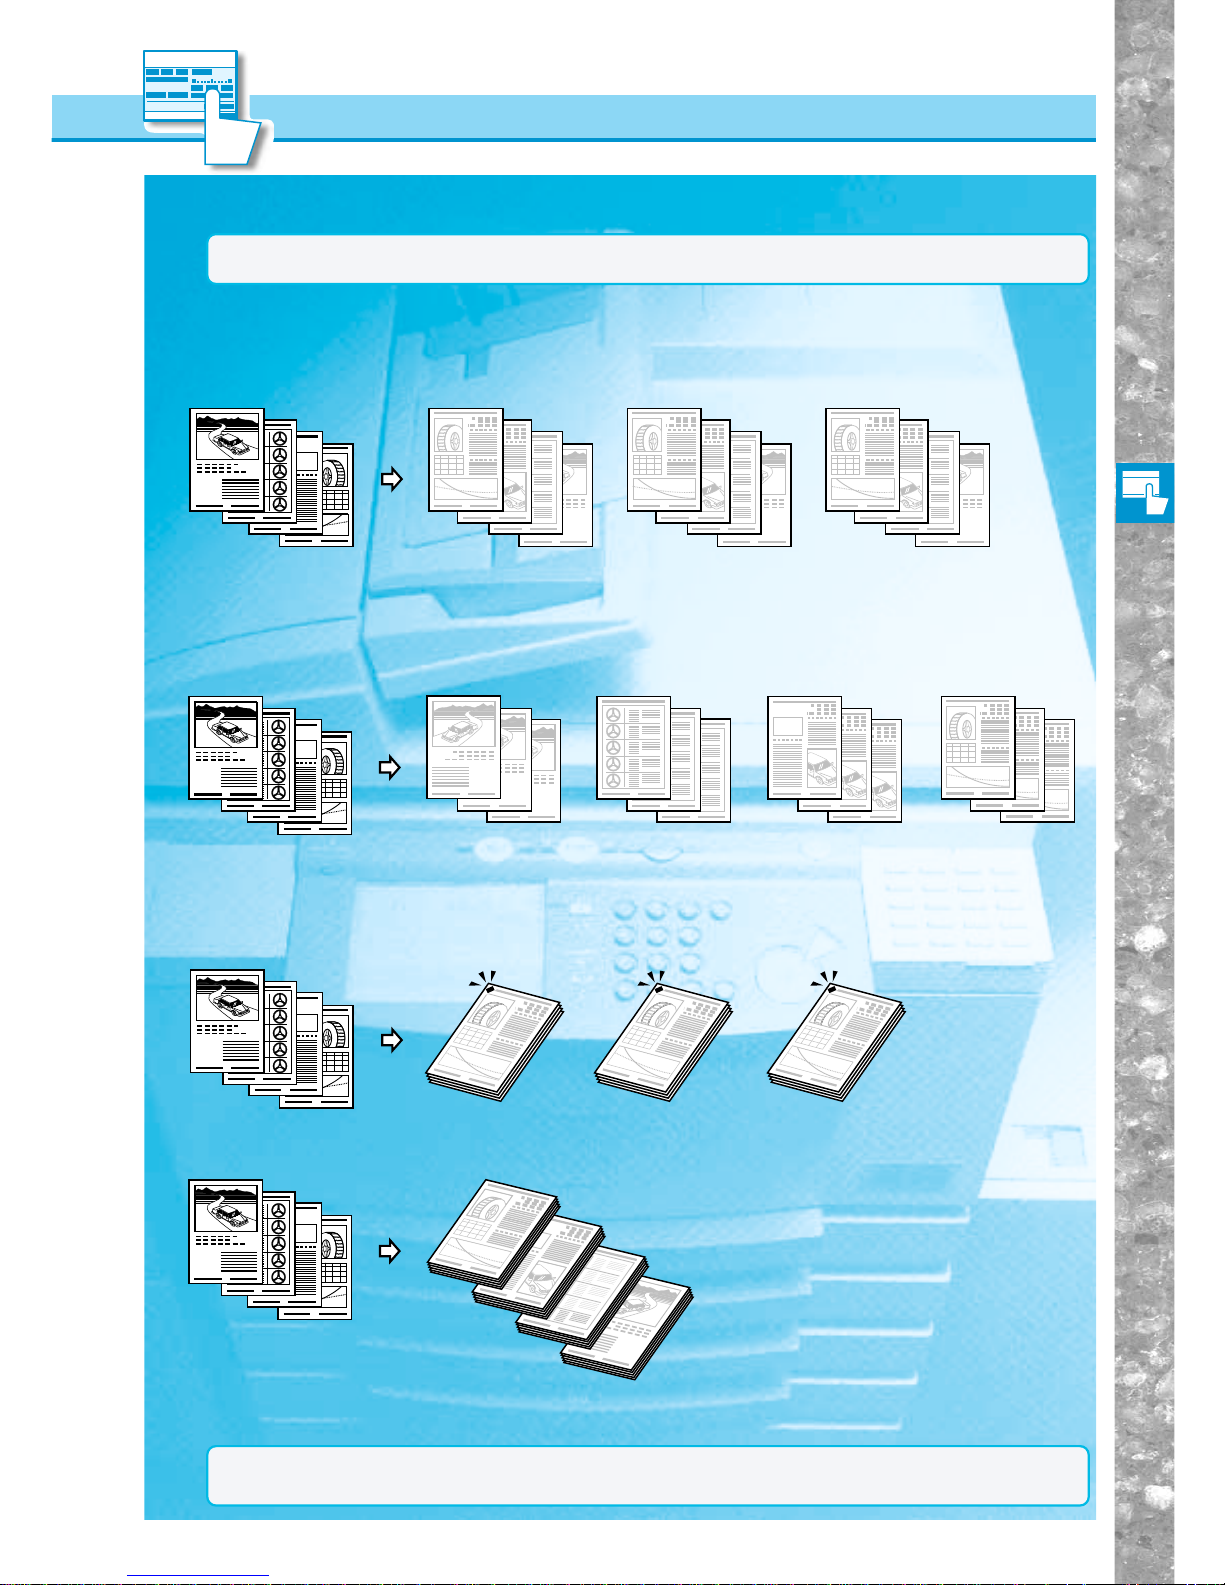
Basic Copying
2–39
4
4
4
3
3
3
2
2
2
1
1
1
4
3
2
1
4
4
4
4
3
2
1
Collating Copies (FINISHER)
Collating Copies (FINISHER)
■ When "Collate" is set:
Copies are automatically collated into sets arranged in page order, and output onto the
trays as follows.
Copy set 1
Copy set 2
Copy set 3
Three sets
of copies
specified
Originals
Originals
Three sets
of copies
specified
Grouped copies
of page 1
■ When "Group" is set:
All copies of the same original page are automatically collated and grouped together,
and output onto the trays as follows.
Only possible with Finisher C1, Saddle Finisher C2 or Finisher E1
Three sets
of copies
specified
Originals
Copy set 1 Copy set 2 Copy set 3
Originals Copies
■ When "Staple" is set:
Copies are automatically collated into sets arranged in page order, output onto the
trays as shown below, and then automatically stapled.
■ When none of the above (Collate, Group or Staple) are set:
All copies are output into the top tray as follows.
1
2
3
4
1
2
3
4
1
2
3
4
4
3
2
1
1
2
3
4
4
3
2
1
When [FINISHER] is selected, copied papers can be collated into copy sets or groups of
the same page and output.
■ When “Rotate” is specified
When the same size of copy papers are placed both vertically and horizontally, the copies
are collated into sets in page order, and output one set at a time in alternating directions.
NOTICE
●Only sizes LTR, STMT can be selected.
●When Staple is selected, Memory Collating (Rotate) cannot be performed.
Grouped copies
of page 2
Grouped copies
of page 3
Grouped copies
of page 4
NOTICE
●If the feeder is not installed, this function can not be used.
Page 82
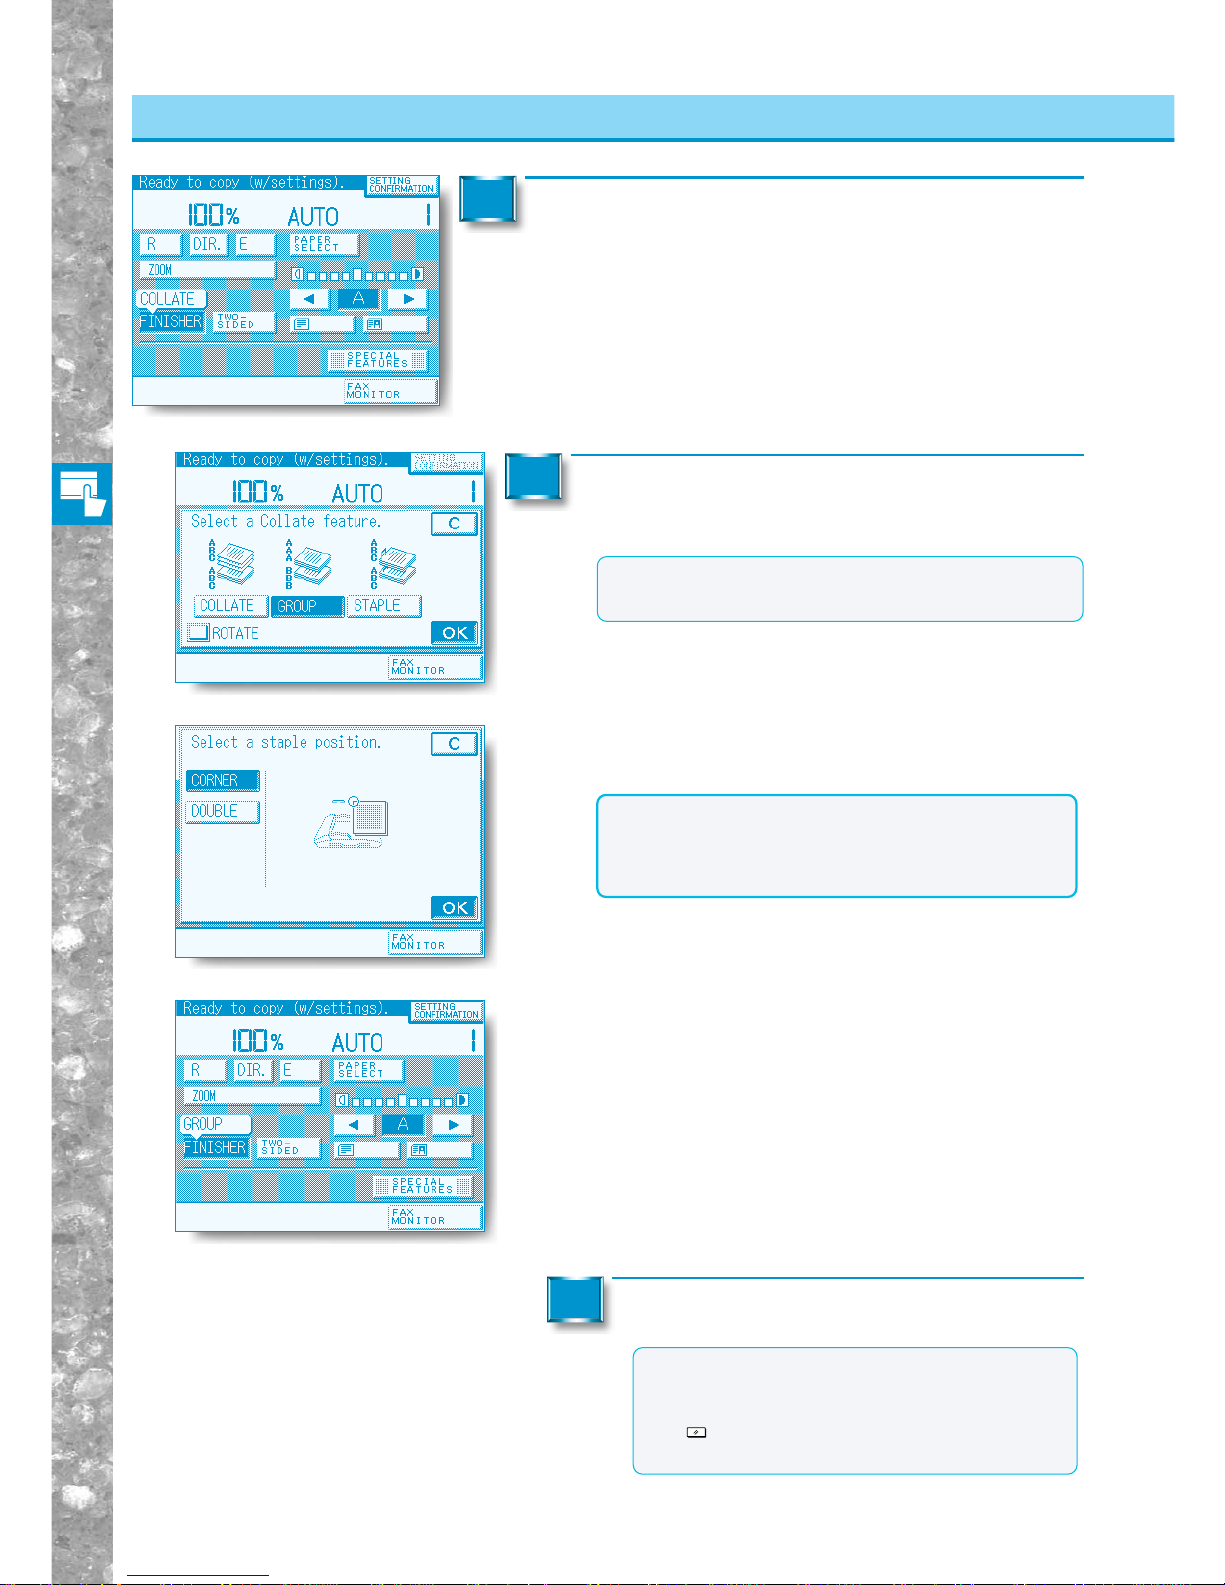
Basic Copying
2–40
Collating Copies (FINISHER)
Collating Copies (FINISHER)
Place your originals in the feeder and press the
[FINISHER] key.
1
Press the desired collate feature, and press the
[OK] key.
2
Proceed to make copies in the usual way.
3
NOTICE
●Double-stapling cannot be performed when the
Finisher-E1 is installed.
●STMT, STMTR paper cannot be corner-stapled.
●LTRR, STMT, STMTR paper cannot be double-stapled.
MEMO
●[STAPLE] is only displayed when the optional FinisherC1, Saddle Finisher-C2 or Finisher-E1 is installed.
MEMO
●To cancel the settings, press the [FINISHER] and
[C] keys in that order.
●You can also cancel the mode by pressing the
Reset
key. (The machine retur ns to the Standard
mode.)
■ When [STAPLE] is selected, select the stapling
position and press the [OK] key.
The display returns to the Basic Features screen and the
selected setting is displayed above [FINISHER].
Page 83
Making Copies of Facing Pages in a Book onto Two Separate Copy
Sheets in One Step (TWO-PAGE SEPARATION) ............................3-2
Making Copies with Sheets of Paper Interleaved between Transpar-
encies (TRANSP. INTERLVING) ....................................................... 3-4
Superimposing Two Original Images on a Single Copy Sheet
(OVERLAY)........................................................................................3-7
Feeding Different-size Originals Together in the Feeder (DIF. SIZE
ORIGINAL) ......................................................................................3-10
Making Copies for Use as a Booklet (BOOKLET) ....................... 3-11
Making Copies with Original Images Shifted (SHIFT)................. 3-13
Making Copies with Margins (MARGIN)....................................... 3-14
Erasing Shadows and Frame Lines from Copies (FRAME ERASE).. 3-16
Reducing Two, Four or Eight Originals to Fit on a Single Cop y Sheet
(IMAGE COMB.) .............................................................................. 3-20
Dividing an Original Into Equal Sections and Enlarging Each Sec-
tion on a Separate Copy Sheet (IMAGE SEPARATION) ..............3-24
Inverting Original Images (NEGA/POSI)....................................... 3-27
Making Sharp Contrast Copies (SHARPNESS) ........................... 3-28
Making Copies with the Original Image Repeated (IMAGE REPEAT) 3-30
Storing Often Used Copy Settings in Memory (MODE MEMORY) .... 3-32
Recalling a Previous Copy Job (RECALL)................................... 3-39
Chapter 3
Useful Copy Functions
Page 84
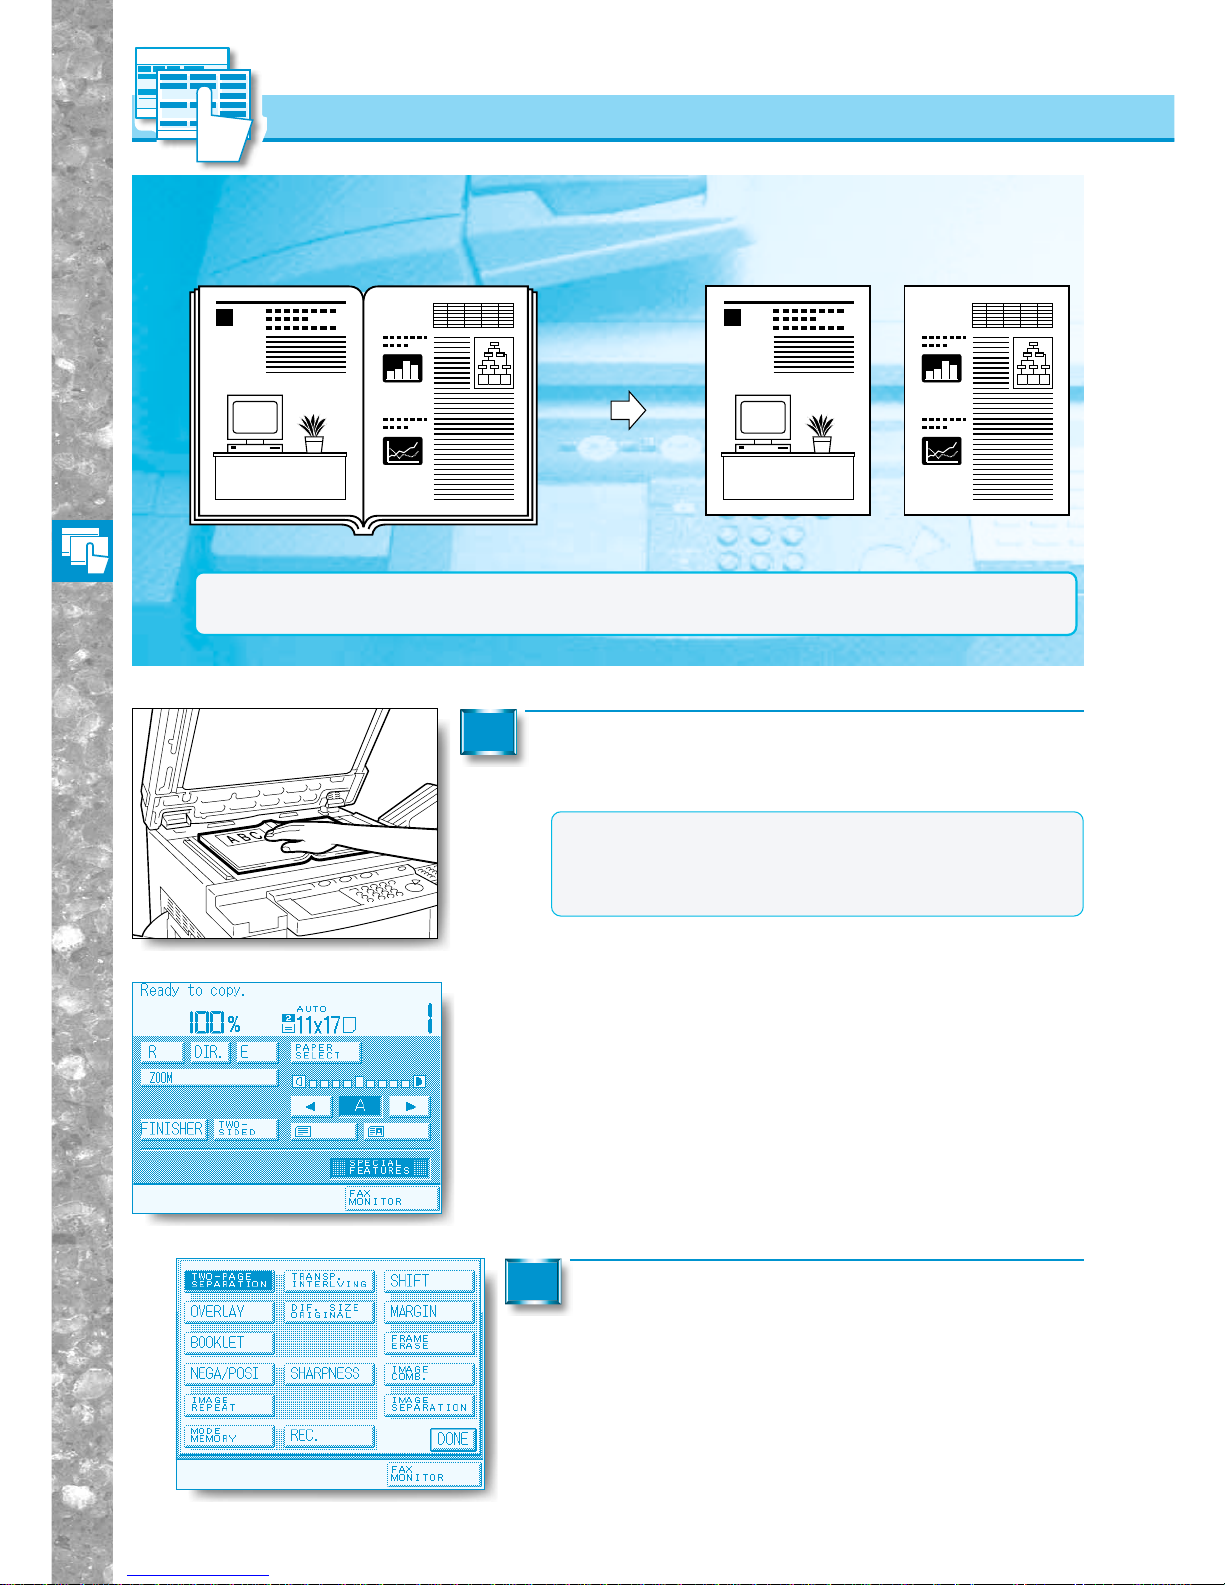
Useful Copy Functions
3–2
This feature enables you to copy facing pages in a book or magazine on separate sheets
of copy paper in one step.
Making Copies of Facing Pages in a
Book onto Two Separate Copy Sheets
in One Step
(TWO-PAGE SEPARATION)
Place your original on the platen glass and press
the [SPECIAL FEATURES] key.
1
MEMO
●If you want to make copies in page order, begin copying
from the first pages and work your way forward.
●Place the original face down so that the original’s top edge
is against the top edge of the platen glass.
Press the [TWO-PAGE SEPARATION] key.
2
11
Original Copy
Making Copies of Facing Pages in a Book onto Two Separate Copy Sheets in One Step (TWO-PAGE SEPARATION)
NOTICE
●In the Two-Page Separation mode, combined use of the Overlay, Transparency Interleaving, Image
Combination, Image Separation, Two-sided, Booklet and Multi-Page Enlargement modes cannot be set.
Page 85
Useful Copy Functions
3–3
Making Copies of Facing Pages in a Book onto Two Separate Copy Sheets in One Step (TWO-PAGE SEPARATION)
Press the [DONE] key.
The display returns to the Basic Features screen.
3
Proceed to make copies in the usual way.
4
MEMO
●To cancel the settings, press the [SPECIAL FEATURES], [TWO-PAGE SEPARATION], and [C]
keys in that order.
●You can also cancel the mode by pressing the
Reset
key. (The machine returns to the Standard
mode.)
Making Copies of Facing Pages in a Book onto Two Separate Copy Sheets in One Step
Page 86
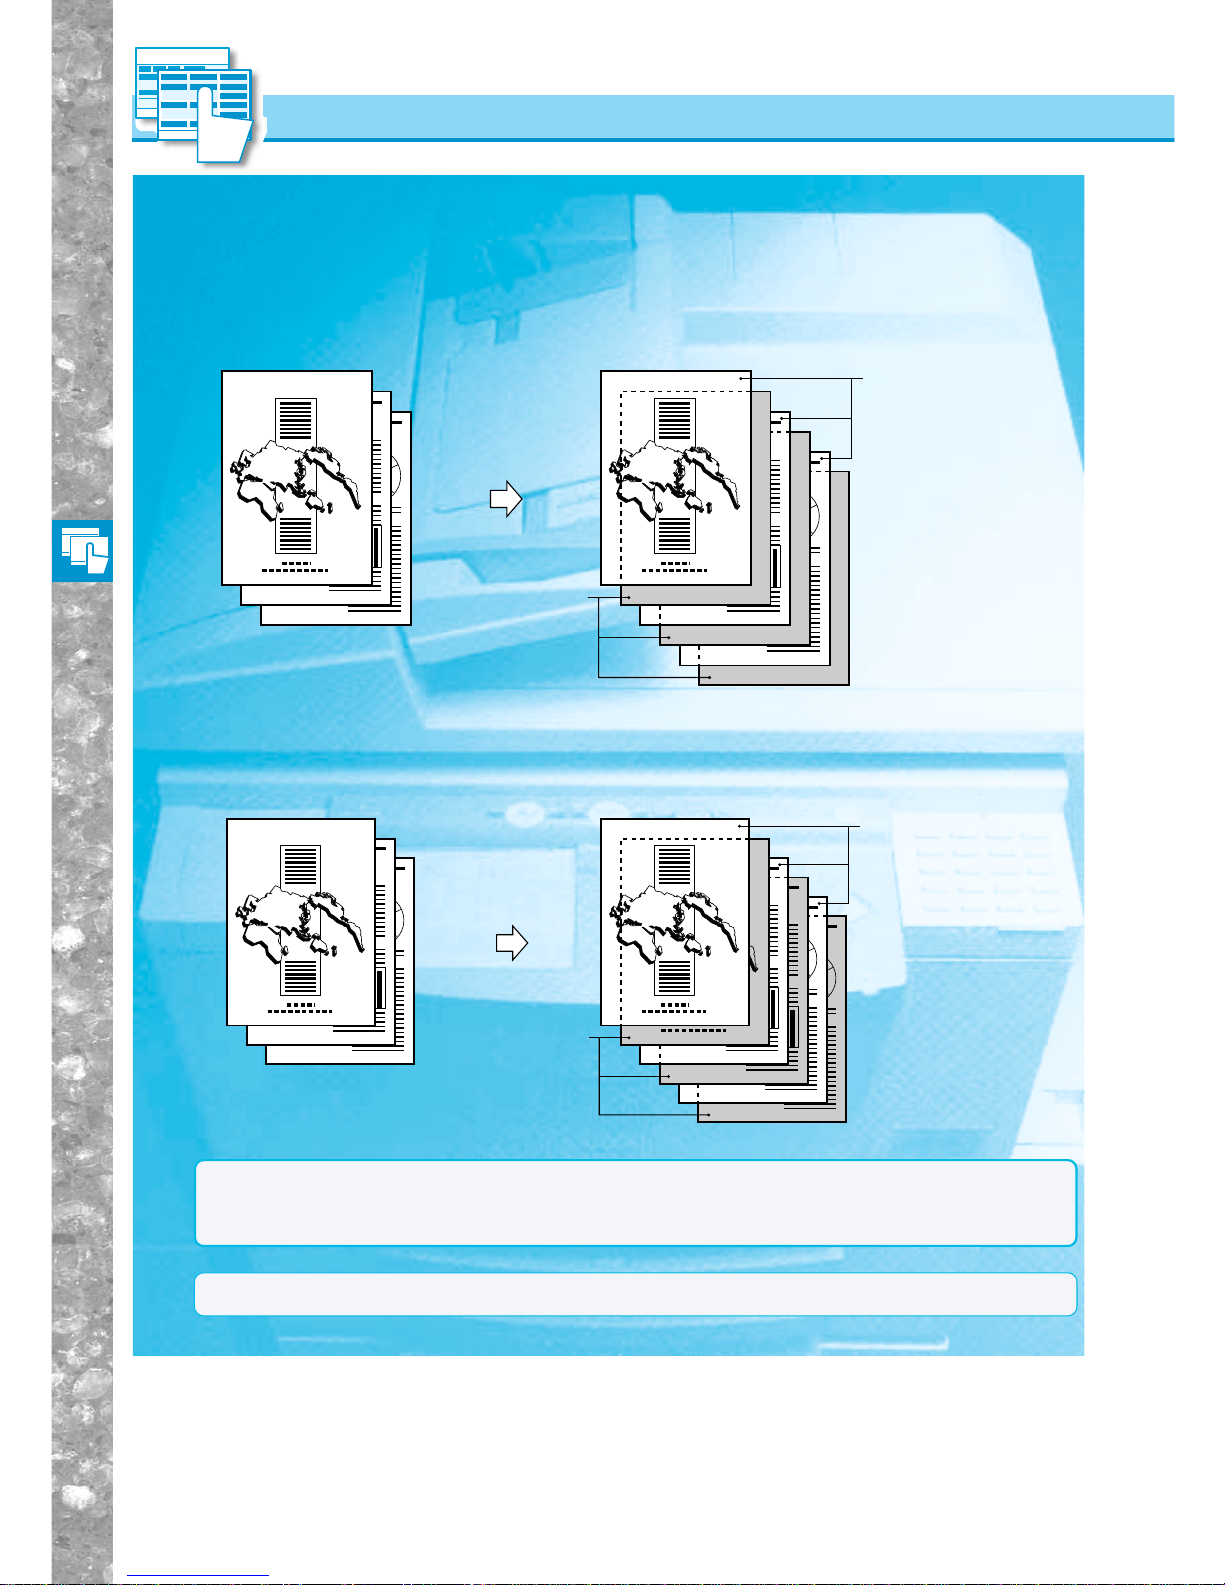
Useful Copy Functions
3–4
■ Printed interleaf sheets selected in the Transparency Interleaving mode.
REPORT
REPORT
REPORT
Originals
Copy
Transparency
Printed interleaf
sheets
REPORT REPORT
Copy
Blank interleaf
sheets
Transparency
Originals
Use this mode when copying onto transparencies fed from the stack bypass. The machine
automatically interleaves a sheet of copy paper between each transparency. The interleaf
sheets protect the copied surface of the transparencies. They can also either be printed
with the same images as the transparencies or left blank.
■ Blank interleaf sheets selected in the Transparency Interleaving mode.
Making Copies with Sheets of Paper
Interleaved between Transparencies
(TRANSP. INTERLVING)
Making Copies with Sheets of Paper Interleaved between Transparencies (TRANSP. INTERLVING)
NOTICE
●You cannot make more than one set of copies at a time in the Transparency Inter leaving mode.
●In the Transparency Interleaving mode, combined use of the Multi-page Enlargement, Two-page Separation,
Image Combination, Image Separation, Overlay, Two-sided, Booklet and Finisher modes cannot be set.
MEMO
●When copying interleaf sheets, those sheets are included in the count of the total number of copies.
Page 87
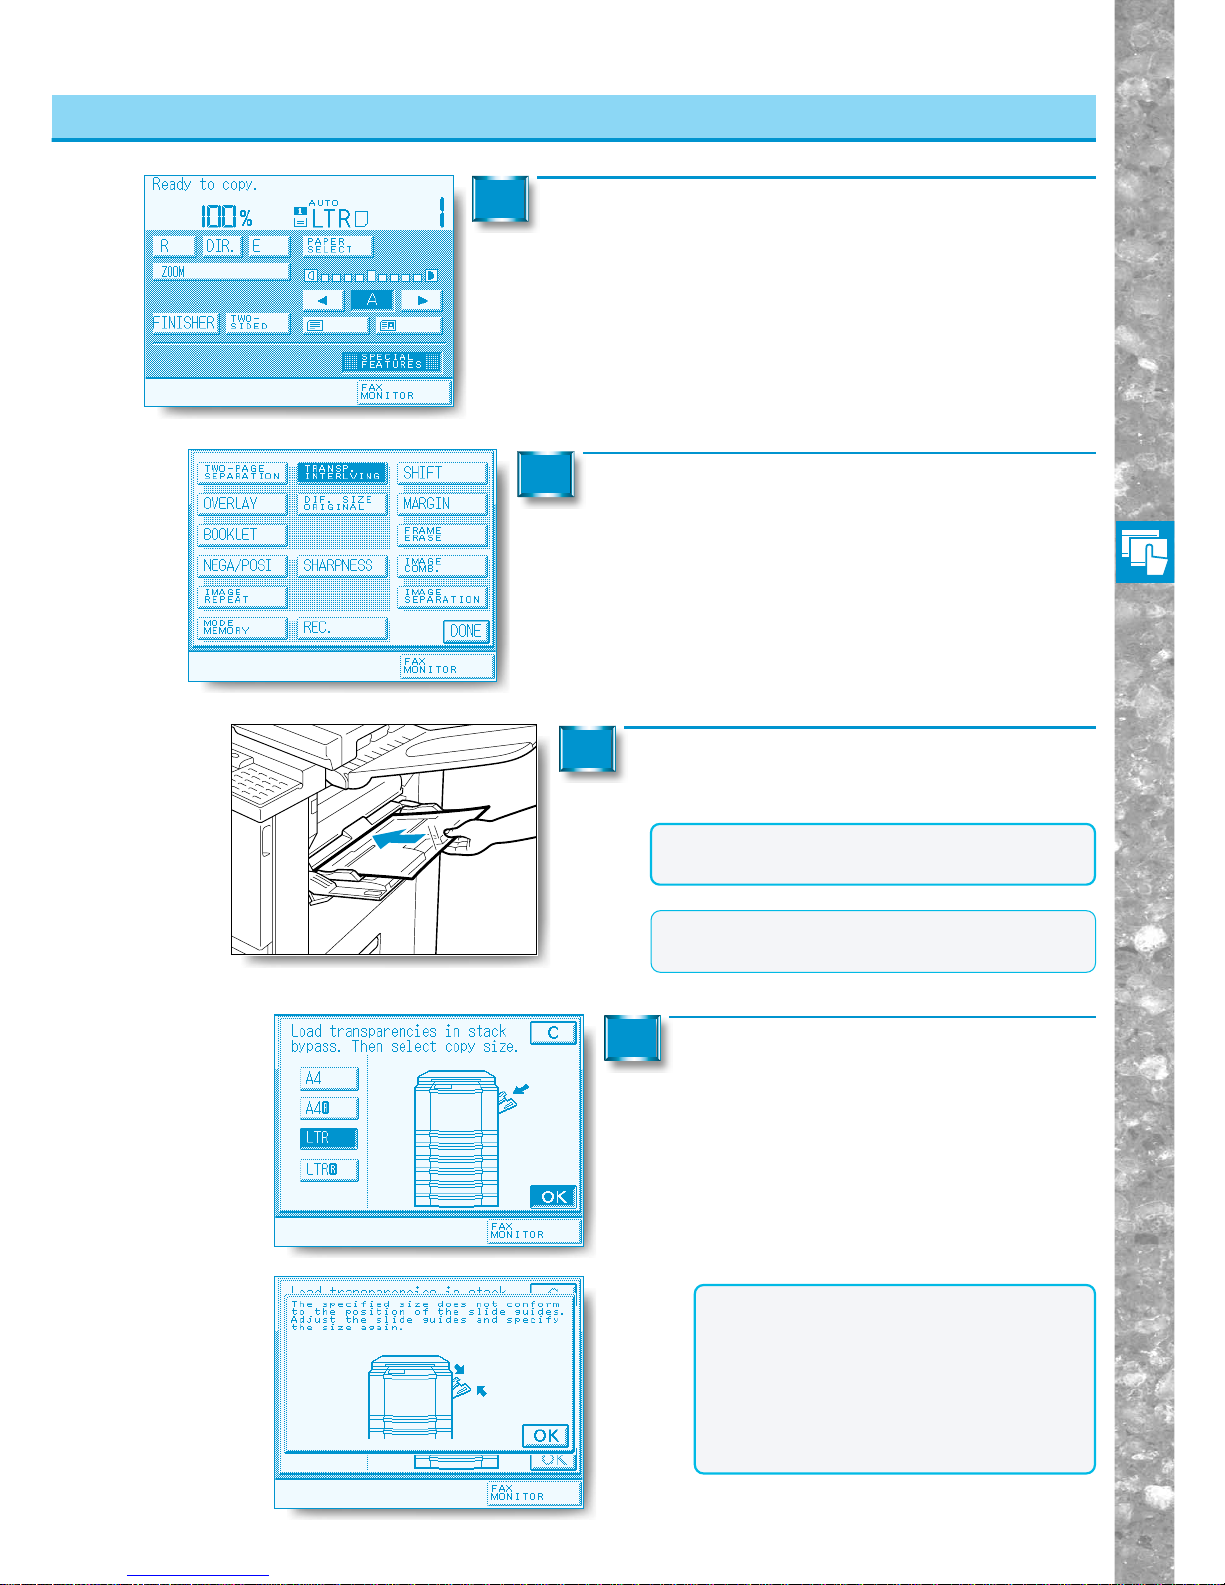
Useful Copy Functions
3–5
Making Copies with Sheets of Paper Interleaved between Transparencies (TRANSP. INTERLVING)
Making Copies with Sheets of Paper Interleaved between Transparencies
Place your originals and press the [SPECIAL
FEATURES] key.
1
Press the [TRANSP. INTERLVING] key.
2
Place the transparencies in the stack
bypass.
3
Select the size of the transparencies,
then press the [OK] key.
4
NOTICE
●Adjust the slide guides in the stack bypass to fit
the size of the transparencies.
MEMO
●You can place a stack of transparencies of up to
1/4" in height in the stack bypass.
NOTICE
●If the message shown on the left appears
in the touch panel display, adjust the slide
guides and select the size of the transparencies again.
●In the Transparency Inter leaving mode, the
transparencies are fed from the stack
bypass and the copy paper is fed from the
paper drawer.
Page 88
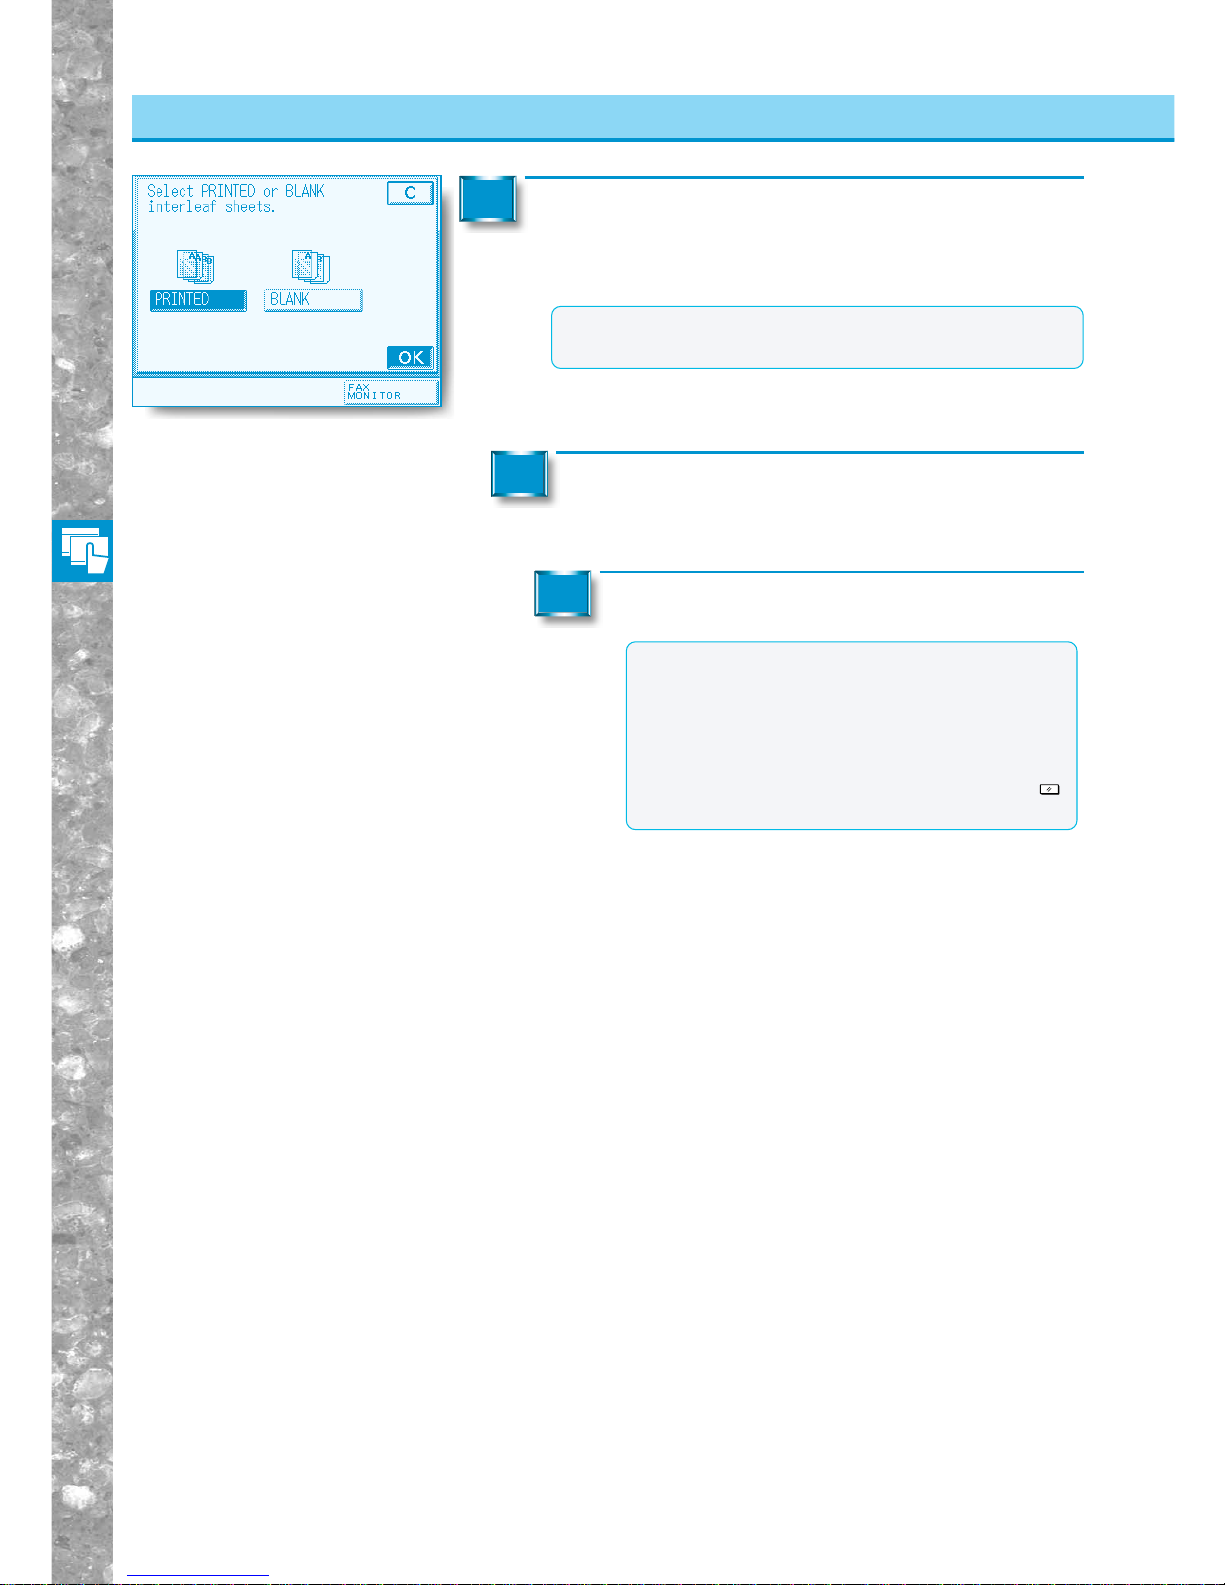
Useful Copy Functions
3–6
Making Copies with Sheets of Paper Interleaved between Transparencies (TRANSP. INTERLVING)
Making Copies with Sheets of Paper Interleaved between Transparencies
Select whether or not to copy the image onto the
interleaf sheet and then press the [OK] key.
The display returns to the Special Features screen.
5
MEMO
●When copying interleaf sheets, those sheets are counted in
the total number of copies.
Press the [DONE] key.
The display returns to the Basic Features screen.
6
Proceed to make copies in the usual way.
7
MEMO
●The copies are output with the copied side facing
down, with the transparency first, followed by the
interleaf sheet.
●To cancel the settings, press the [SPECIAL
FEATURES], [TRANSP. INTERLVING], and [C]
keys in that order.
●You can also cancel the mode by pressing the
Reset
key. (The machine returns to the Standard mode.)
Page 89
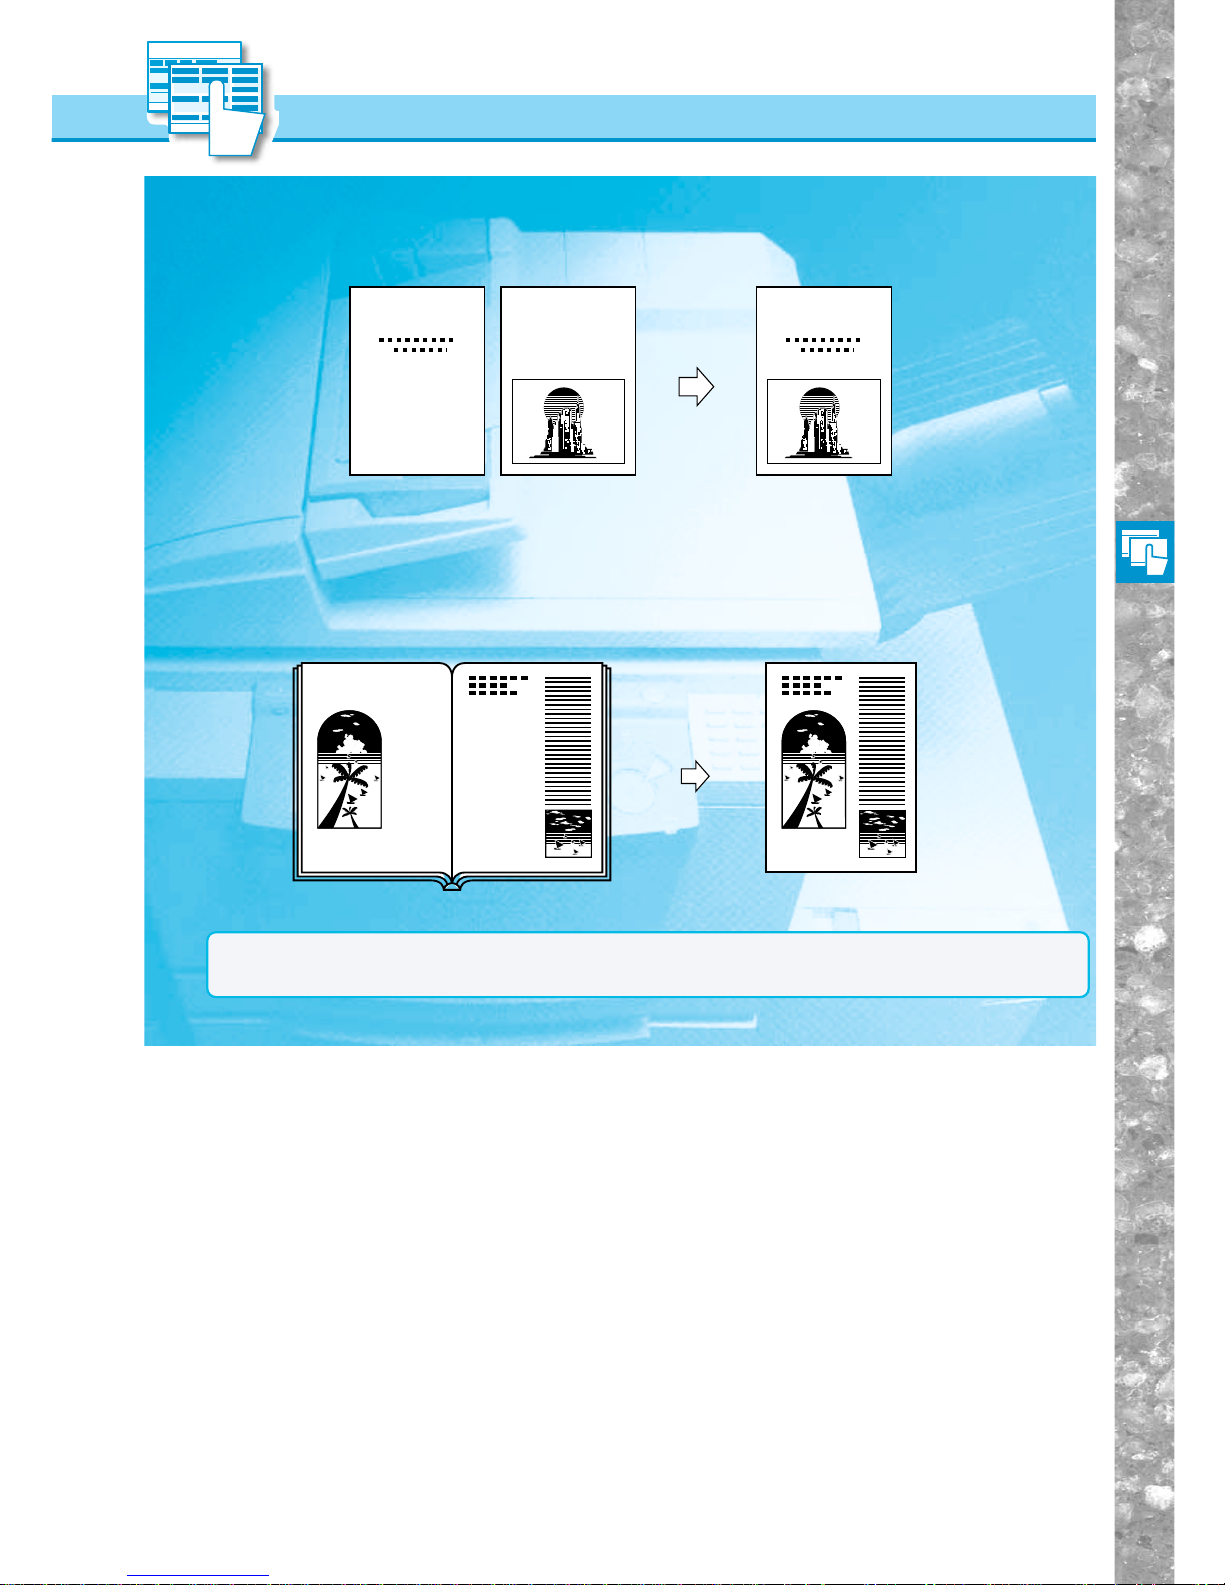
Useful Copy Functions
3–7
Superimposing Two Original Images on a Single Copy Sheet (OVERLAY)
Superimposing Two Original Images
on a Single Copy Sheet
(OVERLAY)
Originals Copy
NOTICE
●In the Overlay mode, Combined use of the Two-sided, Two-page separation, Transparency Interleaving,
Image Combination, Image Separation, Multi-page Enlargement and Booklet modes cannot be set.
■ SHEET OVERLAY (See p. 3-8.)
Superimposes two sheet originals onto a single sheet of copy paper.
■ BOOK OVERLAY (See p. 3-9.)
Superimposes facing pages in a bound original onto a single sheet of copy paper.
Original
Copy
SCENESCENE
Page 90
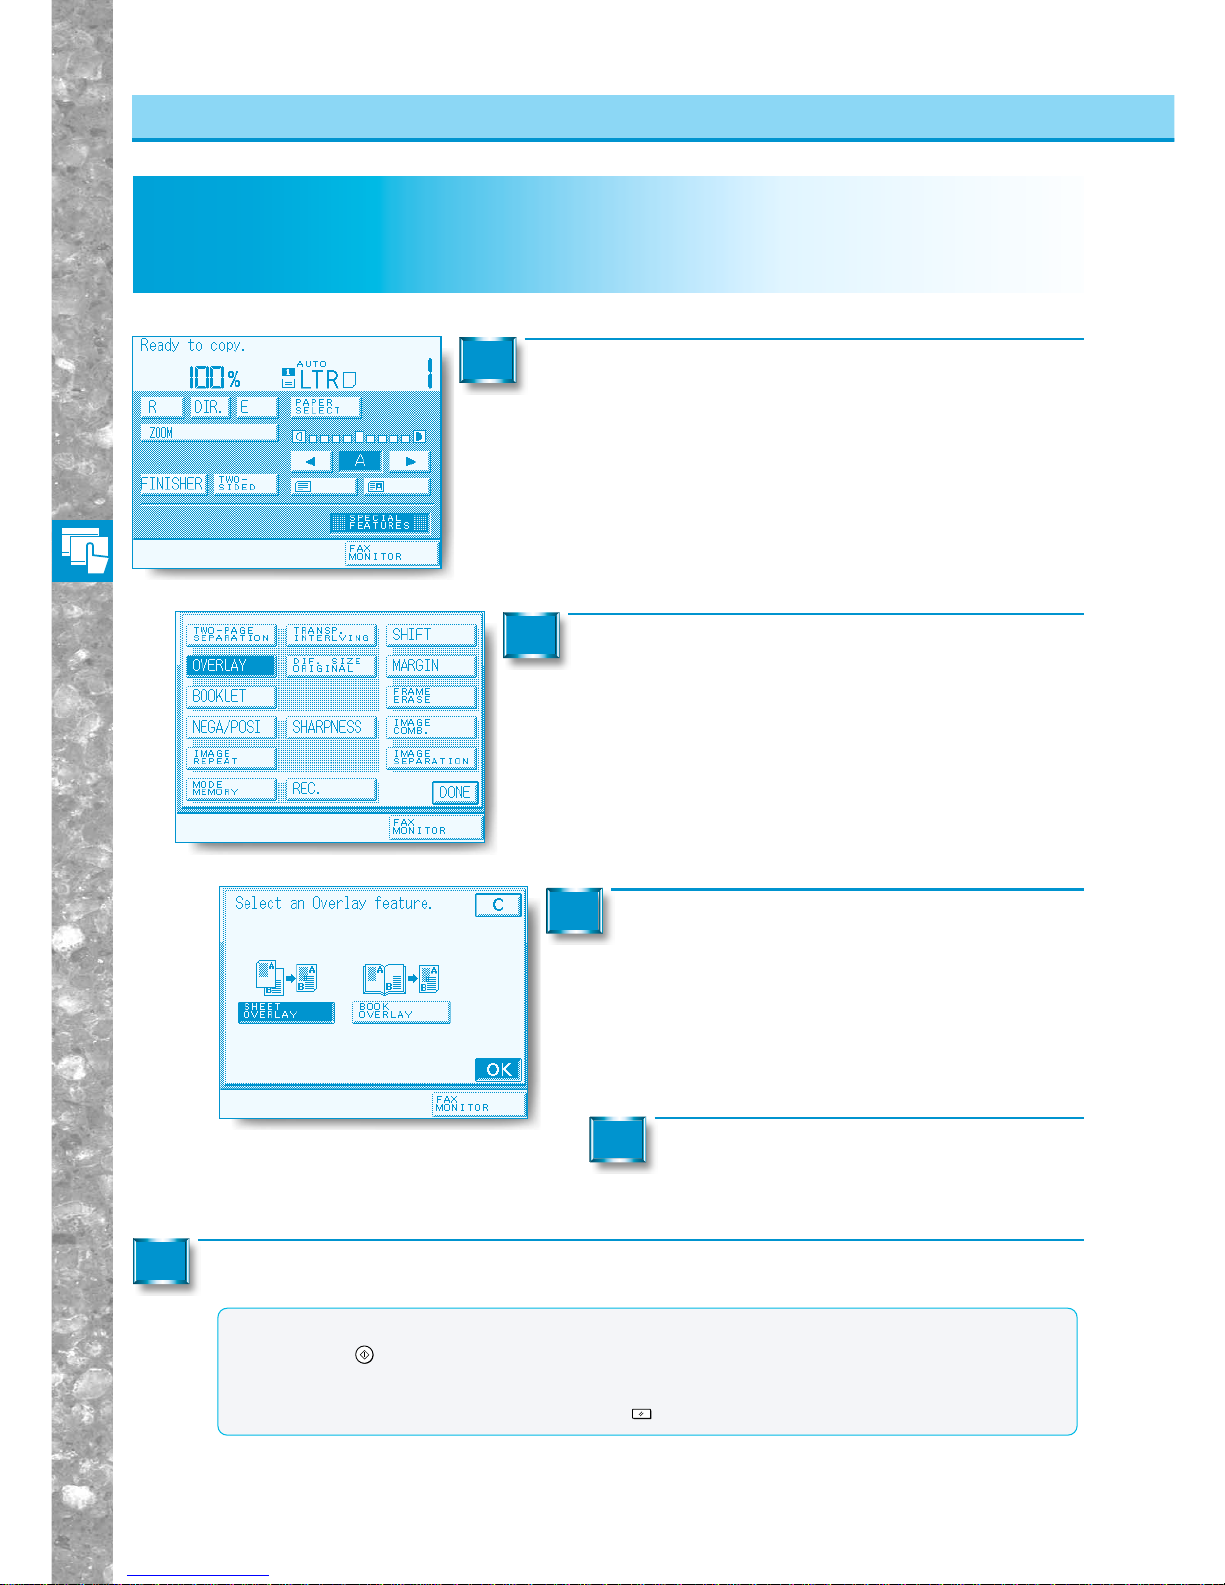
Useful Copy Functions
3–8
Superimposing Two Originals (SHEET OVERLAY)
Superimposing Two Original Images on a Single Copy Sheet
Superimposing T wo Originals (SHEET OVERLAY)
This feature enables you to superimpose the images from two sheet originals onto a single sheet of
copy paper.
Place your original and press the [SPECIAL FEATURES] key.
1
Press the [OVERLAY] key.
2
Press the [SHEET OVERLAY] key, then
press the [OK] key.
The display returns to Special Features screen.
3
Press the [DONE] key.
The display returns to the Basic Features screen.
4
Proceed to make copies in the usual way.
5
MEMO
●When the original is placed on the platen glass, follow the instructions that appear on the screen and
press the
Start
key once for each original. When scanning is completed, press [DONE].(See “Memory
Copy of Original on Platen Glass,” on p. 2-29.)
●To cancel the settings, press the [SPECIAL FEATURES], [OVERLAY], and [C] keys in that order.
●You can also cancel the mode by pressing the
Reset
key. (The machine returns to the Standard mode.)
Page 91
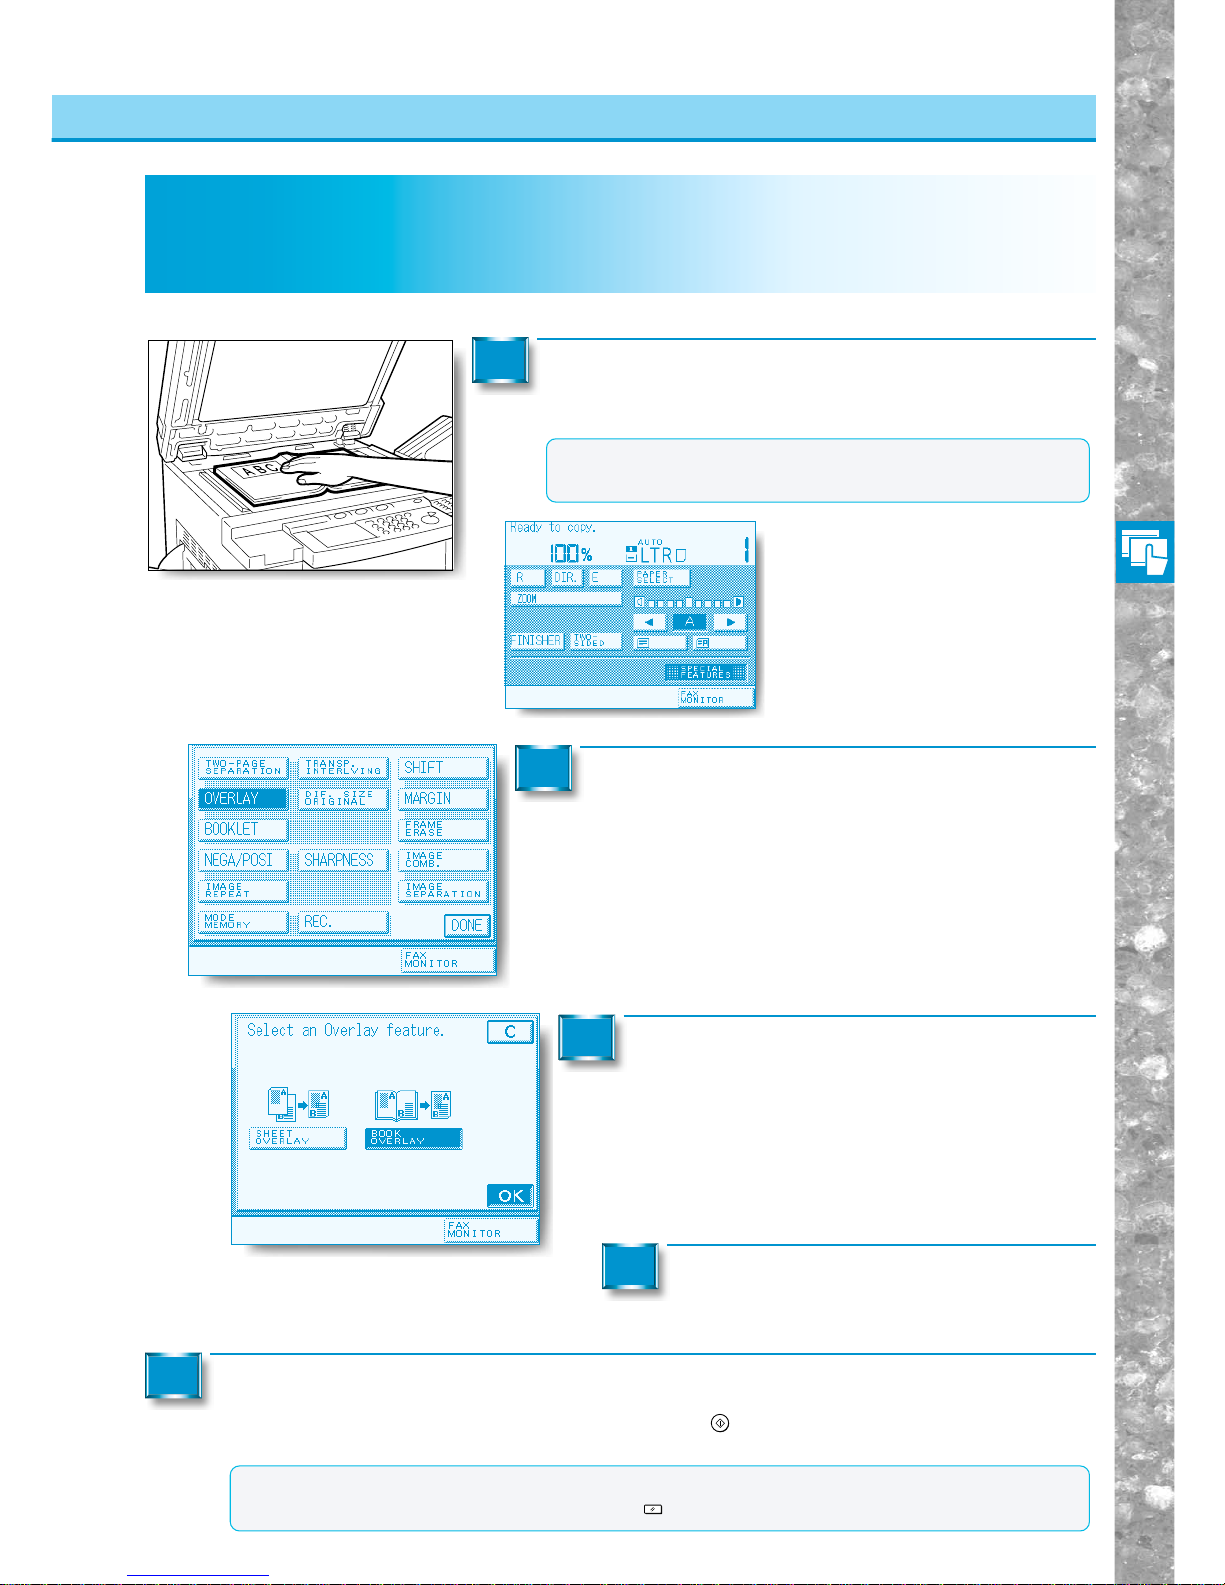
Useful Copy Functions
3–9
Superimposing Facing Pages in a Book (BOOK OVERLAY)
Superimposing Two Original Images on a Single Copy Sheet
Superimposing Facing Pages in a Book (BOOK OVERLAY)
This feature enables you to superimpose the images from facing pages in a book or magazine onto a
single sheet of copy paper.
Place the original on the platen glass and press
[SPECIAL FEATURES].
1
Press the [OVERLAY] key.
2
Press the [BOOK OVERLAY] key, then
press the [OK] key.
The display returns to the Special Features screen.
3
Press the [DONE] key.
The display returns to the Basic Features screen.
4
Proceed to make copies in the usual way.
For the next two facing pages, place the original and press the
Start
key again. (See “Memory Copy of Original on
Platen Glass,” on p. 2-29.)
5
MEMO
●To cancel the settings, press the [SPECIAL FEATURES], [OVERLAY], and [C] keys in that order.
●You can also cancel the mode by pressing the
Reset
key. (The machine returns to the Standard mode.)
MEMO
●Place the original face down so that the top of it is against the
top edge of the platen glass.
Page 92
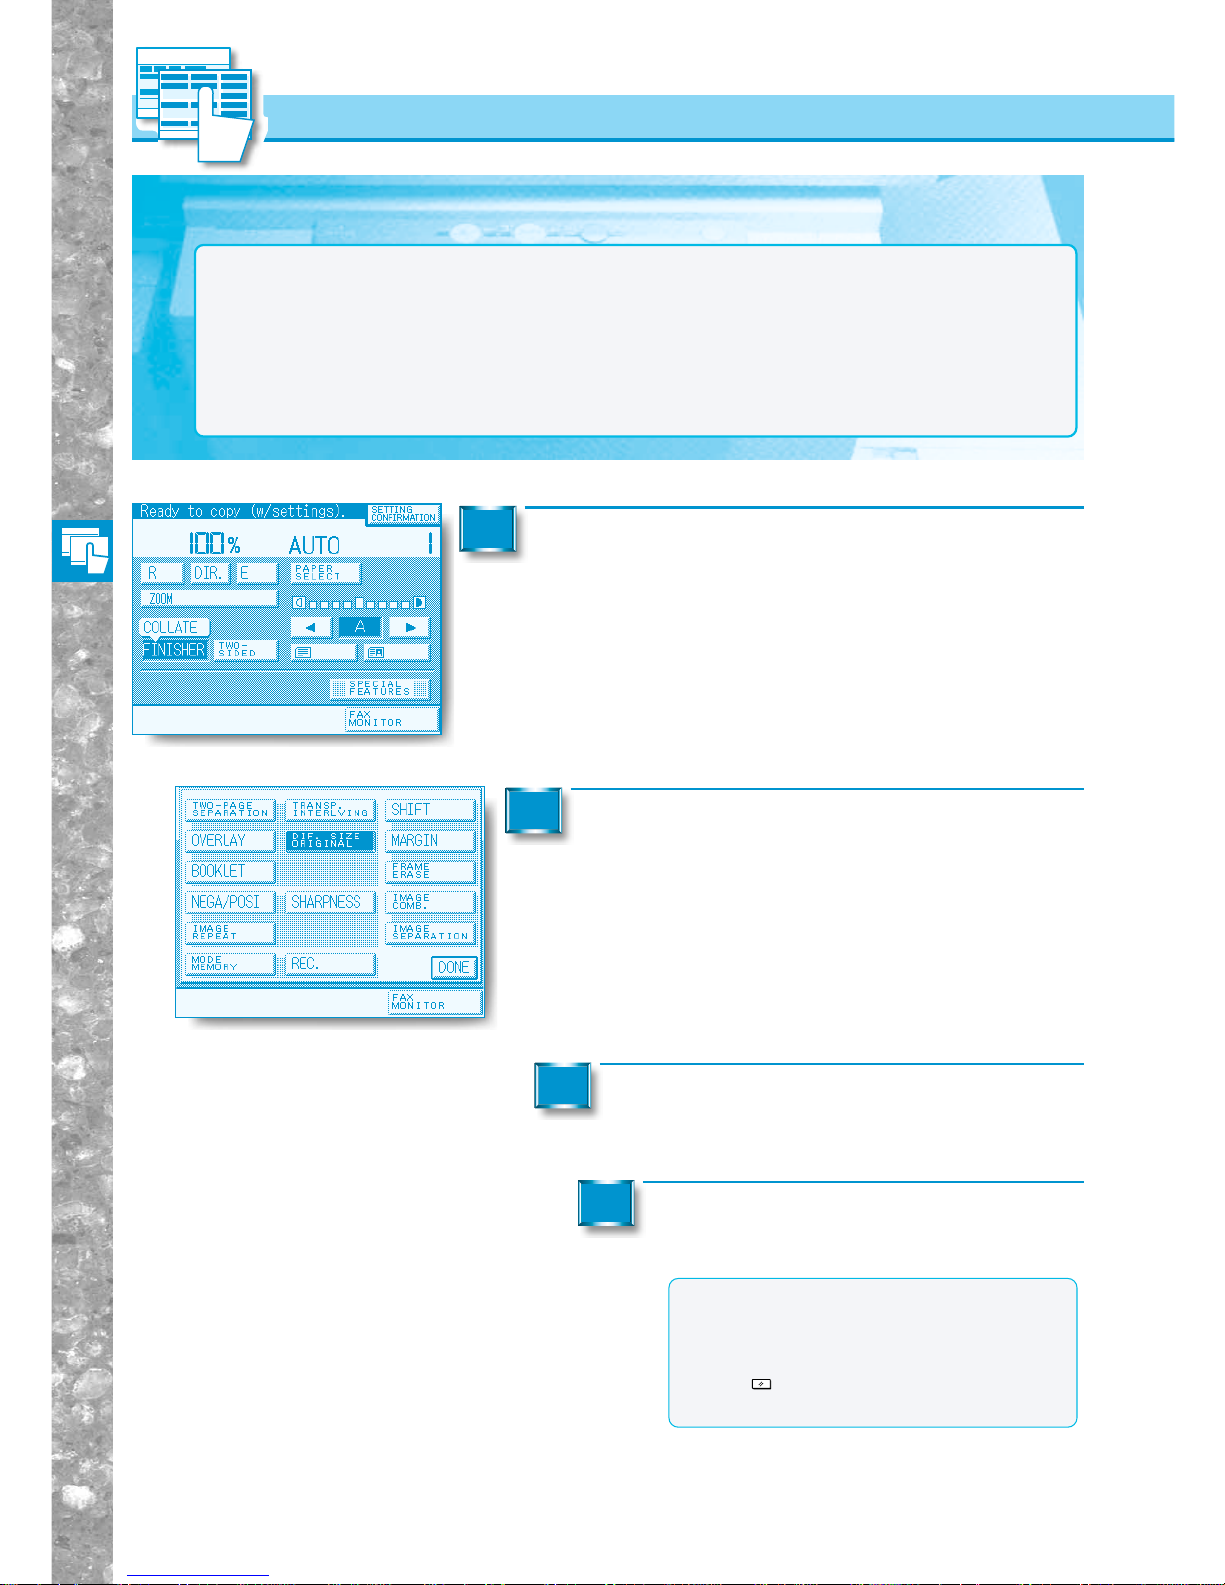
Useful Copy Functions
3–10
Feeding Different-size Originals Together in the Feeder (DIF. SIZE ORIGINAL)
You can feed different-size of originals (e.g.11"x17" and L TR) together in one group in the
feeder, provided that the leading edge of each page is the same length.
Feeding Different-size Originals T ogether
in the Feeder
(DIF. SIZE ORIGINAL)
NOTICE
●This feature is only available when the machine is equipped with the feeder.
●All originals placed together in the feeder must be the same weight (paper type).
●Paper sizes in which the leading edge of each page are different (e.g. 11"x17" and LTR) cannot be fed
together.
●Note that if you mix paper in the order LTRR followed by STMT, stapling will result in the copies being
stapled the wrong side up.
●You cannot use this mode together with the Multi-page Enlargement, Entire Image, Image Combination,
Image Separation or Booklet modes.
Place your originals in the feeder and press the
[SPECIAL FEATURES] key.
1
Press the [DIF. SIZE ORIGINAL] key.
2
Press the [DONE] key.
The display returns to the Basic Features screen.
3
Proceed to make copies in the usual
way.
4
MEMO
●To cancel the settings, press the [SPECIAL
FEATURES] and [DIF. SIZE ORIGINAL] keys
in that order.
●You can also cancel the mode by pressing
the
Reset
key. (The machine returns to the
Standard mode.)
Page 93
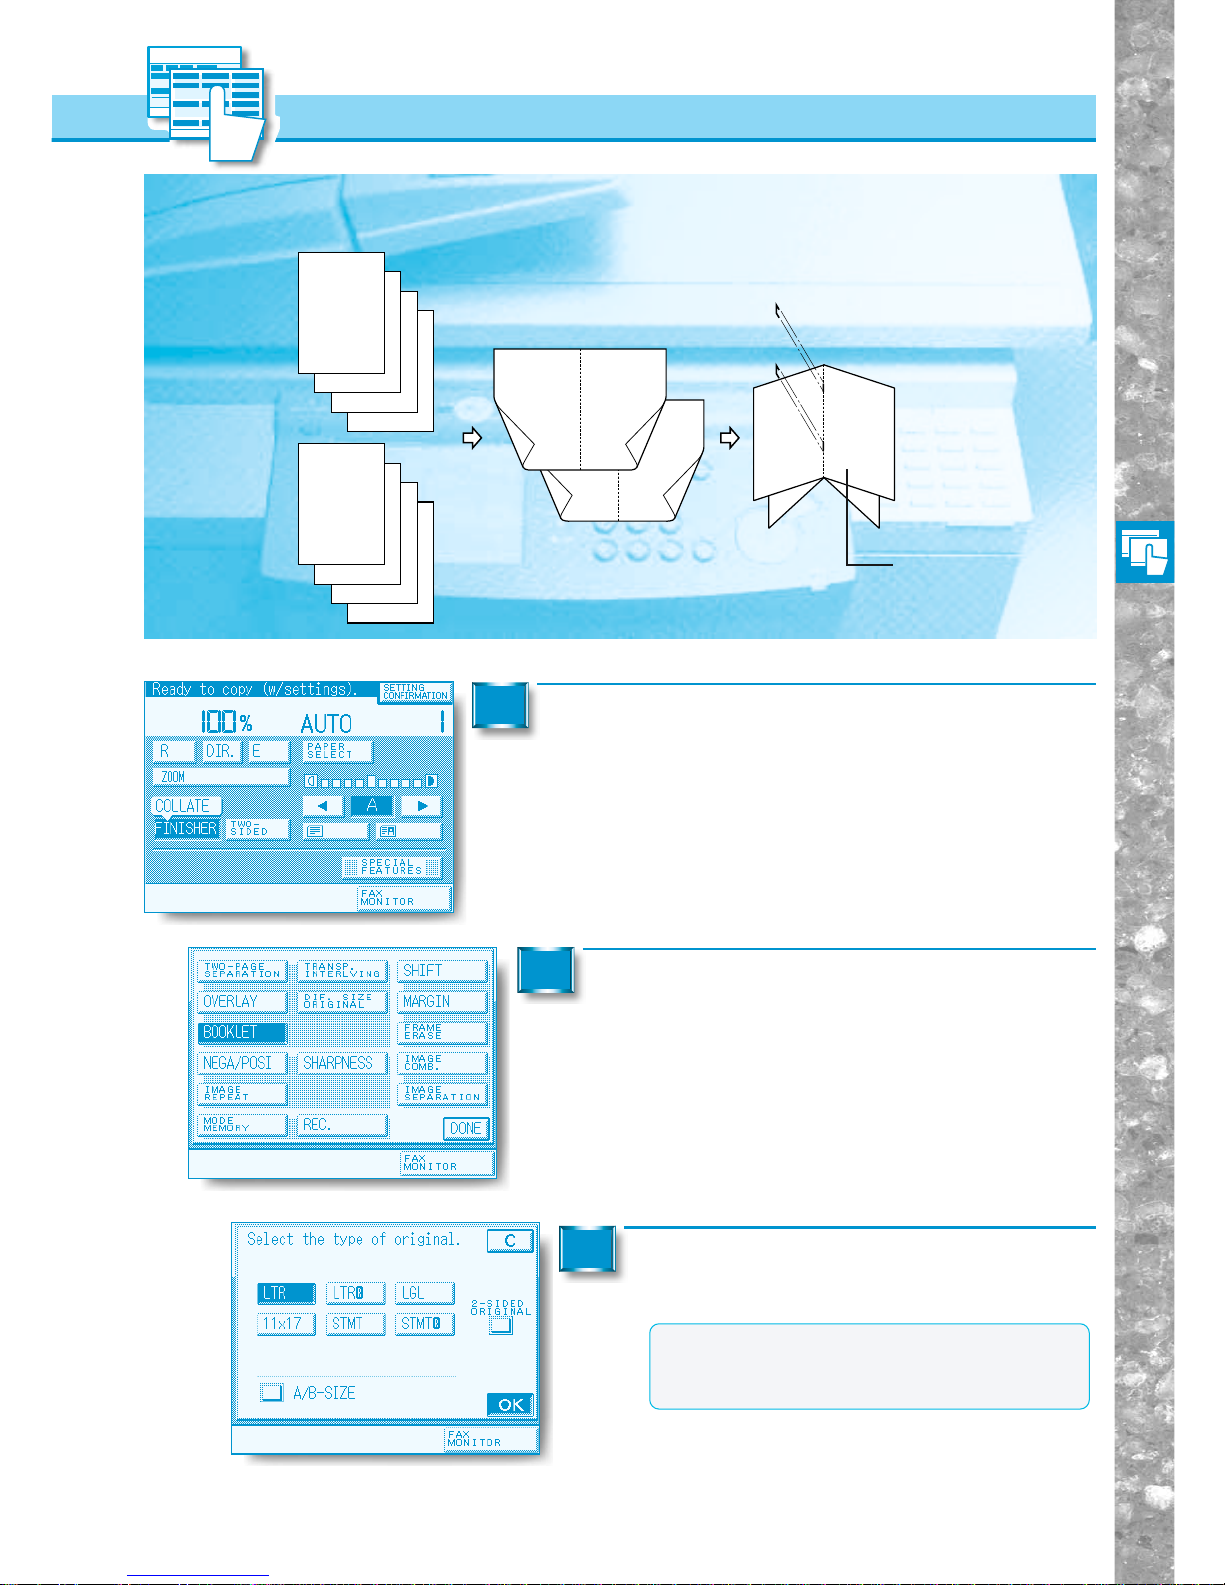
Useful Copy Functions
3–11
Making Copies for Use as a Booklet (BOOKLET)
You can copy single-sided or two-sided originals in such a way that the copies can be
easily made into a booklet.
6
5
4
3
4
3
2
1
3
8
7
6
5
8
7
2
1
6
8
1
Originals
Copy
Making Copies for Use as a Booklet (BOOKLET)
Place your originals in the feeder and press the
[SPECIAL FEATURES] key.
1
Press the [BOOKLET] key.
2
Select original type and size and press the
[OK] key.
3
MEMO
●To make a copy of two-sided original with
[BOOKLET] , select the size and type of original
and press the [2-SIDED ORIGINAL] key.
Saddle stitch and fold
●Possib le only with
Saddle Finisher-C2
Page 94
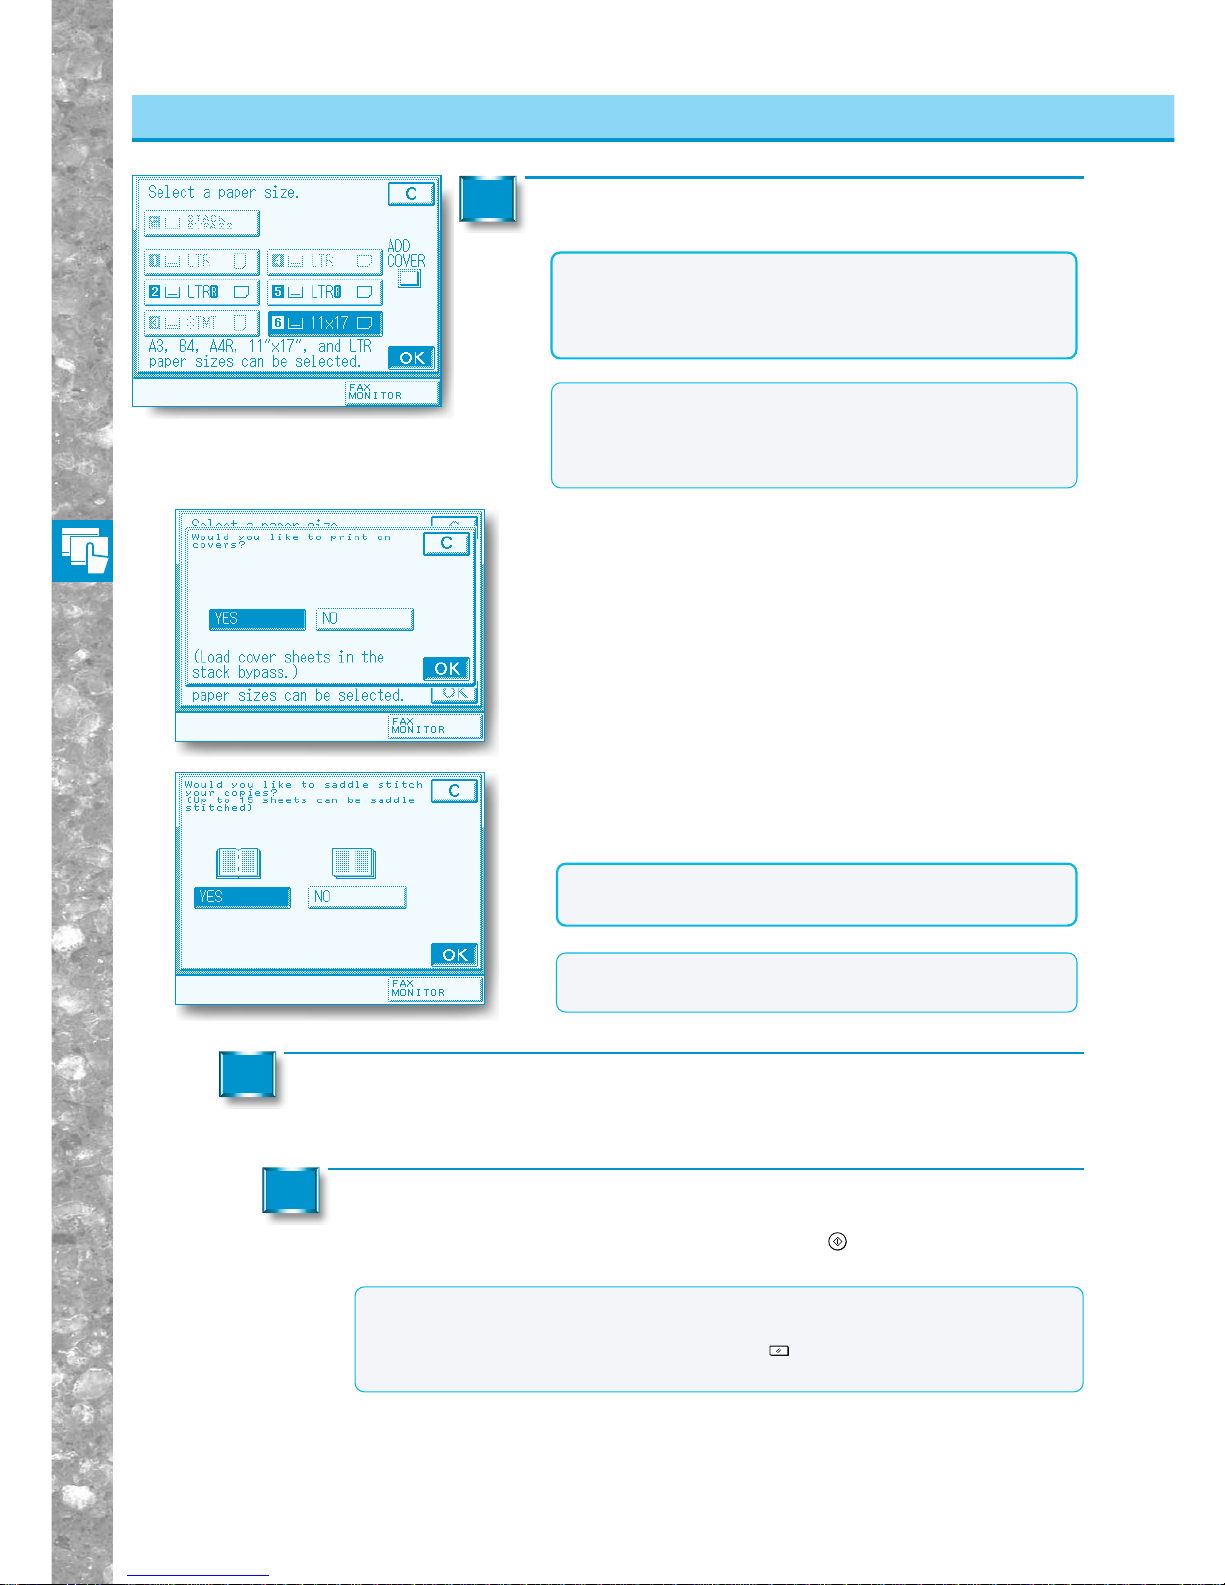
Useful Copy Functions
3–12
Making Copies for Use as a Booklet (BOOKLET)
Making Copies For Use as a Booklet
Select the paper size and press the [OK] key.
4
Press the [DONE] key.
The display returns to the Basic Features Screen.
5
NOTICE
●The paper used for the cover page must be the same size
as the other pages.
●The paper used for the cover page must not be heavier than
32-lb bond (128 g/m2).
MEMO
●11"x17" and LTRR-size paper can be used.
●To add a cover page, press the [ADD COVER] key.
●Insert the paper for the cover page in the stack bypass tray.
●The cover page can only be copied on the front.
■ To copy on the cover page, select the [YES] key,
otherwise select the [NO] key, and then press the [OK]
key.
The display returns to the Special Features screen.
Proceed to make copies in the usual way.
For the next two facing pages, place the original and press the
Start
key again.(See "Memory
Copy of Original on Platen Glass," on p. 2-29.)
6
MEMO
●To cancel the setting, press the [SPECIAL FEATURES] , [BOOKLET] and [C] keys in
that order.
●You can also cancel the mode by pressing the
Reset
key.
(The machine returns to the standard mode.)
■ When Saddle Finisher- C2 is installed
Select the saddle stitch setting and press the [OK] key.
The display rev erts to the Special Features screen.
MEMO
●The maximum number of sheets that can be saddle stitched
is 15.
NOTICE
●The saddle stitch setting is available only when the Saddle
Finisher-C2 is installed.
Page 95
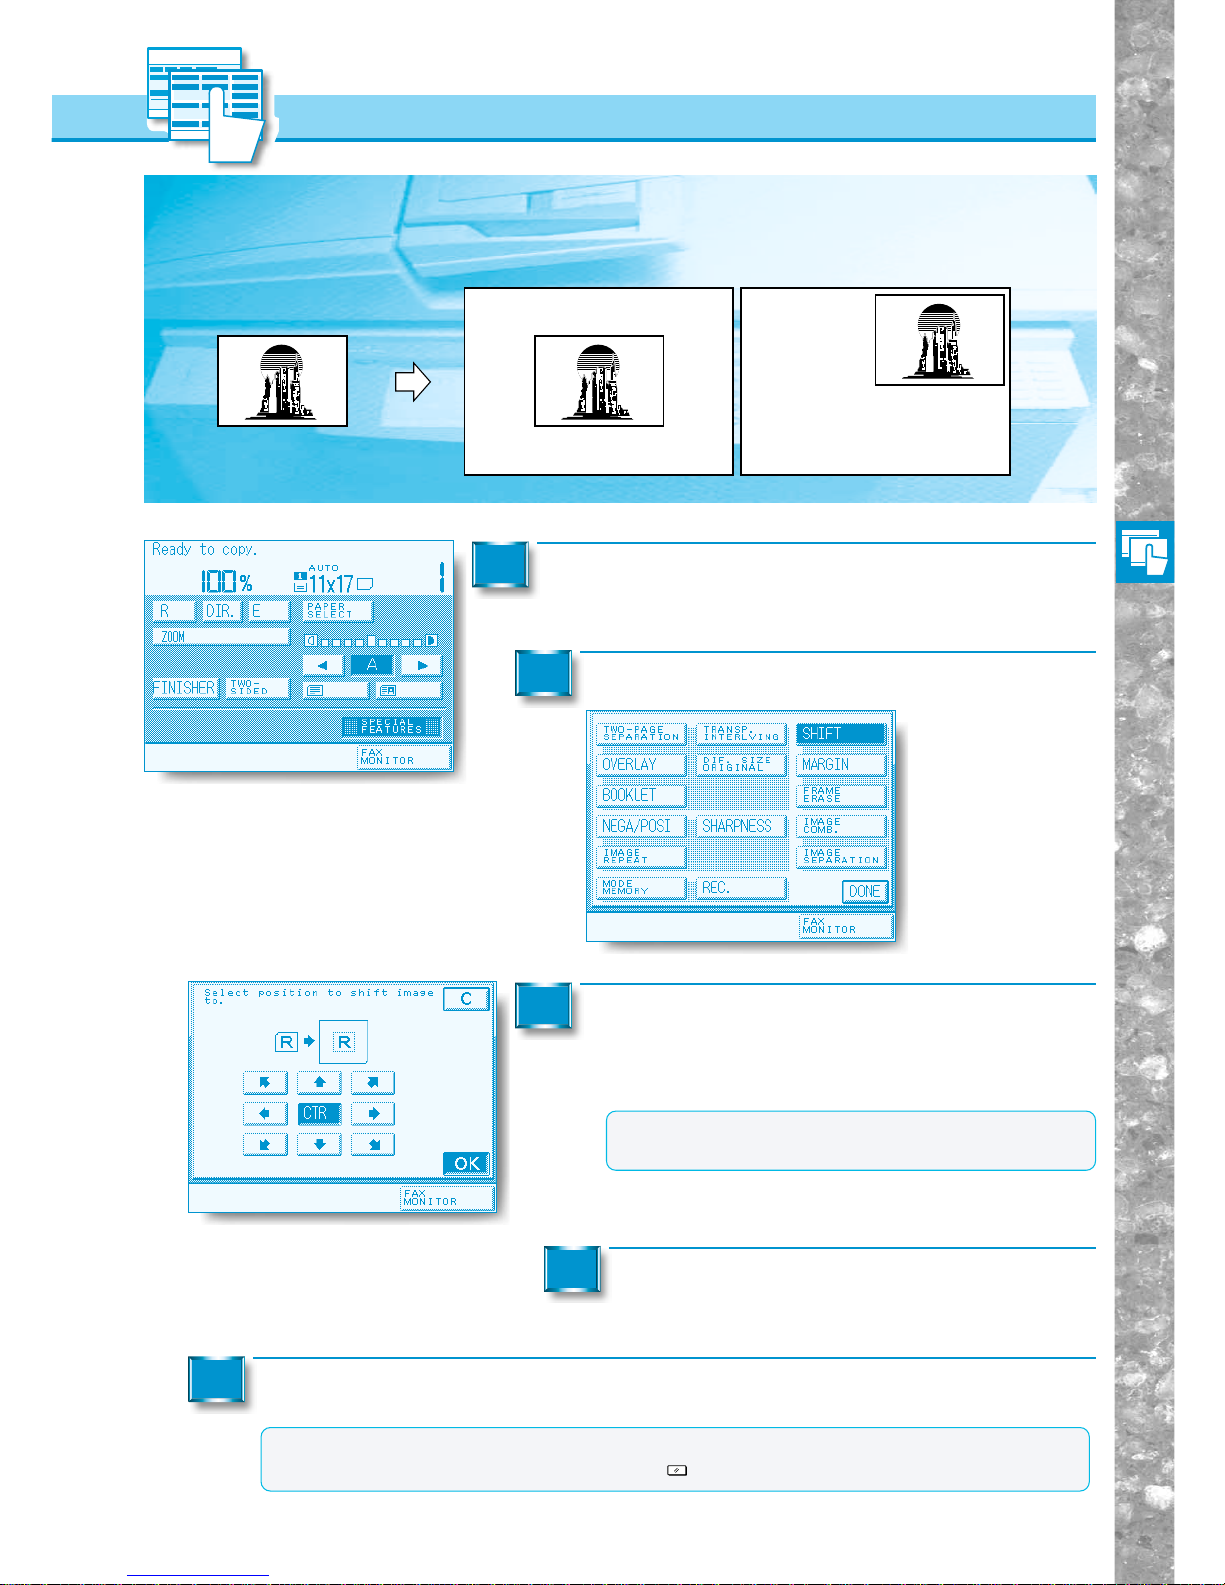
Useful Copy Functions
3–13
Makes copies with the entire image shifted to the center or a corner.
Making Copies with Original Images
Shifted
(SHIFT)
11”×17”
Copy with original image
shifted to the center
11”✕17”
Copy with original image
shifted to a corner
11”✕17”
11”×17”
Original
STMTR
Place your original and press the [SPECIAL FEATURES] key.
1
Press the [SHIFT] key.
2
Select the shift direction by using the arrow
keys, then press the [OK] key.
The display returns to the Special Features screen.
3
MEMO
●The image will shift in the exactly opposite direction of
the selected arrow.
Press the [DONE] key.
The display returns to the Basic Features screen.
4
Proceed to make copies in the usual way.
5
MEMO
●To cancel the settings, press the [SPECIAL FEATURES], [SHIFT], and [C] keys in that order .
●You can also cancel the mode by pressing the
Reset
key. (The machine returns to the Standard mode.)
Making Copies with Original Images Shifted (SHIFT)
Page 96
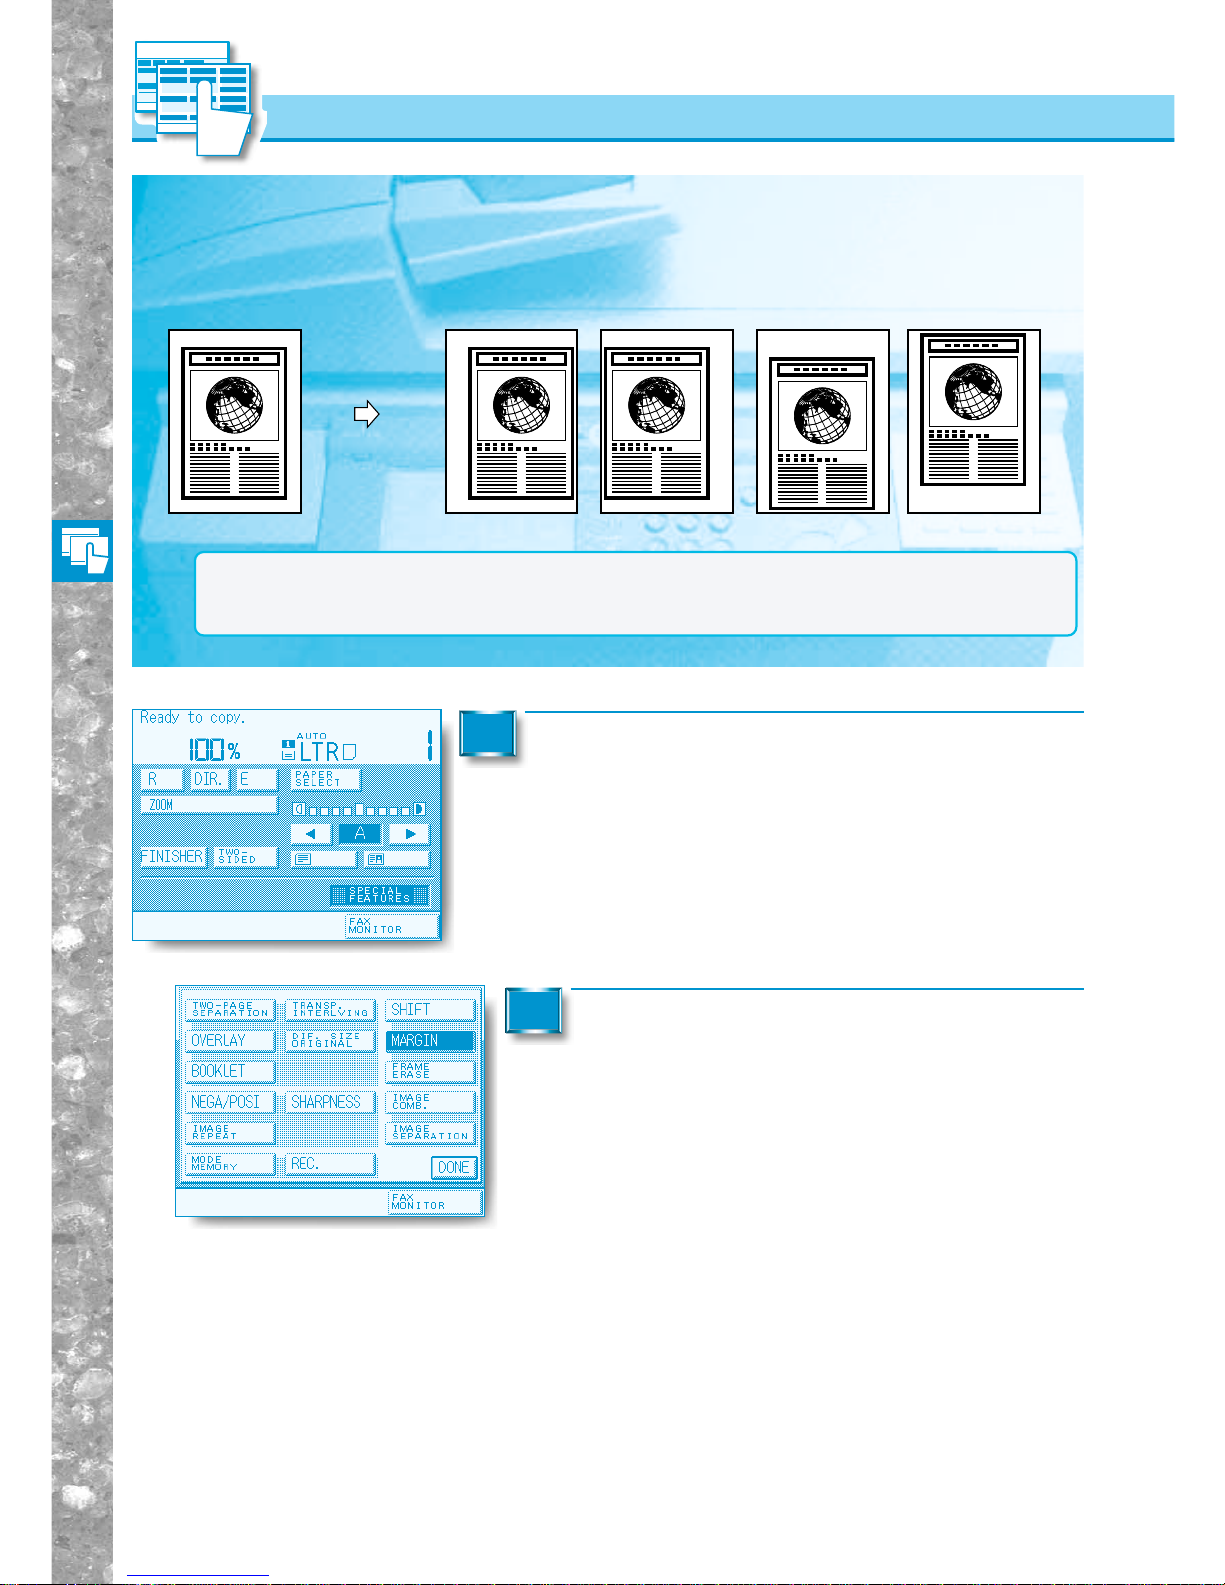
Useful Copy Functions
3–14
This mode enables you to make copies with the entire original image shifted by a designated
width (0" to 3/4"/0 to 20 mm) to the left, right, top or bottom to create a margin on copy
sheets. Use this mode to make copies ready for placement in ring binders or folders.
Making Copies with Margins (MARGIN)
NOTICE
●When the Margin mode is set, the entire original image is shifted to the left, right, top or bottom by a
selected width and copied. When copying an original image that extends to the edge of the sheet, part of
that image will be cut off.
Place your original and press the [SPECIAL FEATURES] key.
1
Press the [MARGIN] key.
2
Left margin
selected
Right margin
selected
Top margin
selected
Bottom margin
selected
Original
Making Copies with Margins (MARGIN)
Page 97
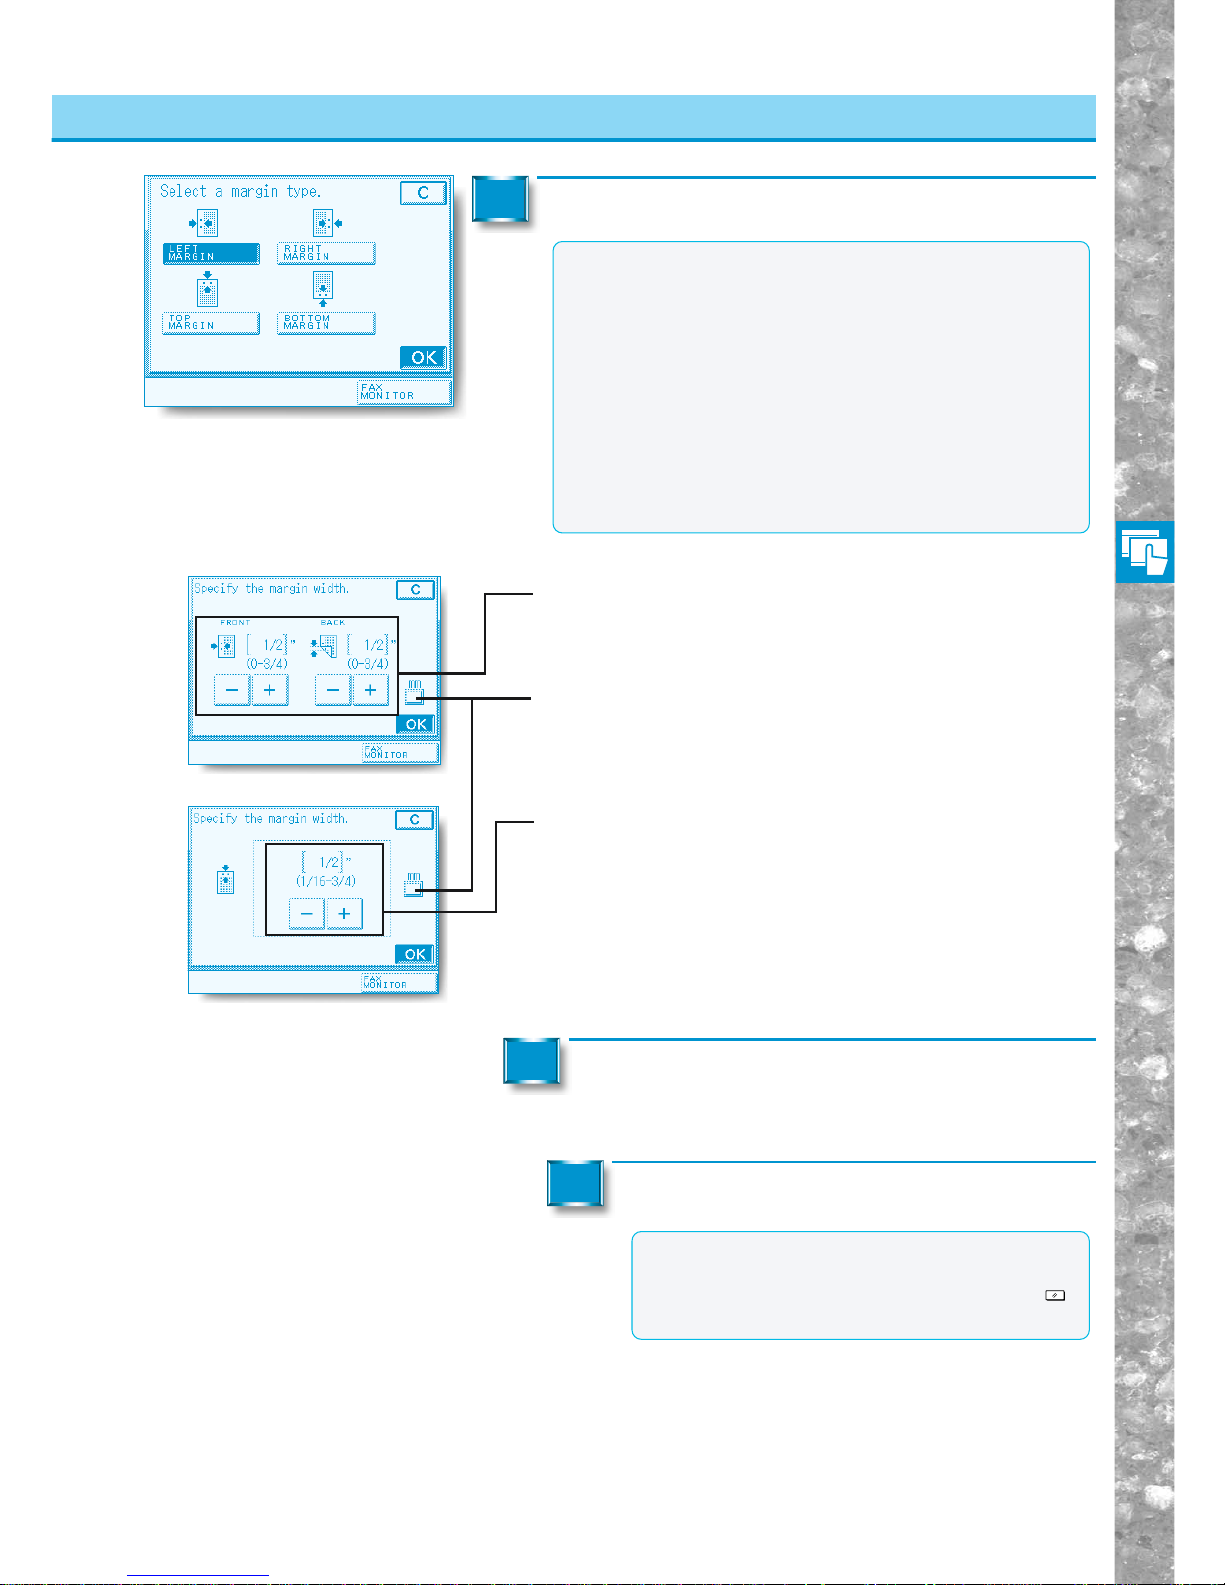
Useful Copy Functions
3–15
Making Copies with Margins
Select the margin type and press the [OK] key.
3
■ When the [LEFT MARGIN] or [RIGHT MARGIN] key is
selected
Use [+] and [–] to set the margin for the front and back (0" to 3/4").
Then press the [OK] key.
■ When the [TOP MARGIN] or [BOTTOM MARGIN] key
is selected
Use the numeric keypad or [+] and [-] to set the margin (1/16" to 3/4").
Then press the [OK] key.
● If you want to make the input in millimeters.
Press the [DONE] key.
The display returns to the Basic Features screen.
4
Proceed to make copies in the usual way.
5
MEMO
●You can cancel settings by pressing the [SPECIAL
FEATURES], [MARGIN], and [C] keys in that order.
●You can also cancel the mode by pressing the
Reset
key. (The machine retur ns to the Standard mode.)
NOTICE
●If you are using the Margin and Two-sided modes together
and copying an original that already has a margin, follow the
instructions below:
•1 → 2 sided :Set the margin for the back only.
•2 → 2 sided :You do not need to set the margin. Proceed to
make copies in the usual way.
•2 → 1 sided :Set the margin for the back only.
●If you are using the Margin and Two-sided modes together
and copying an original that does not have a margin, follow
the instructions below:
•1 → 2 sided :Set the margin for both the front and back.
•2 → 2 sided :Set the margin for both the front and back.
•2 → 1 sided :Set the margin.
Making Copies with Margins (MARGIN)
Page 98
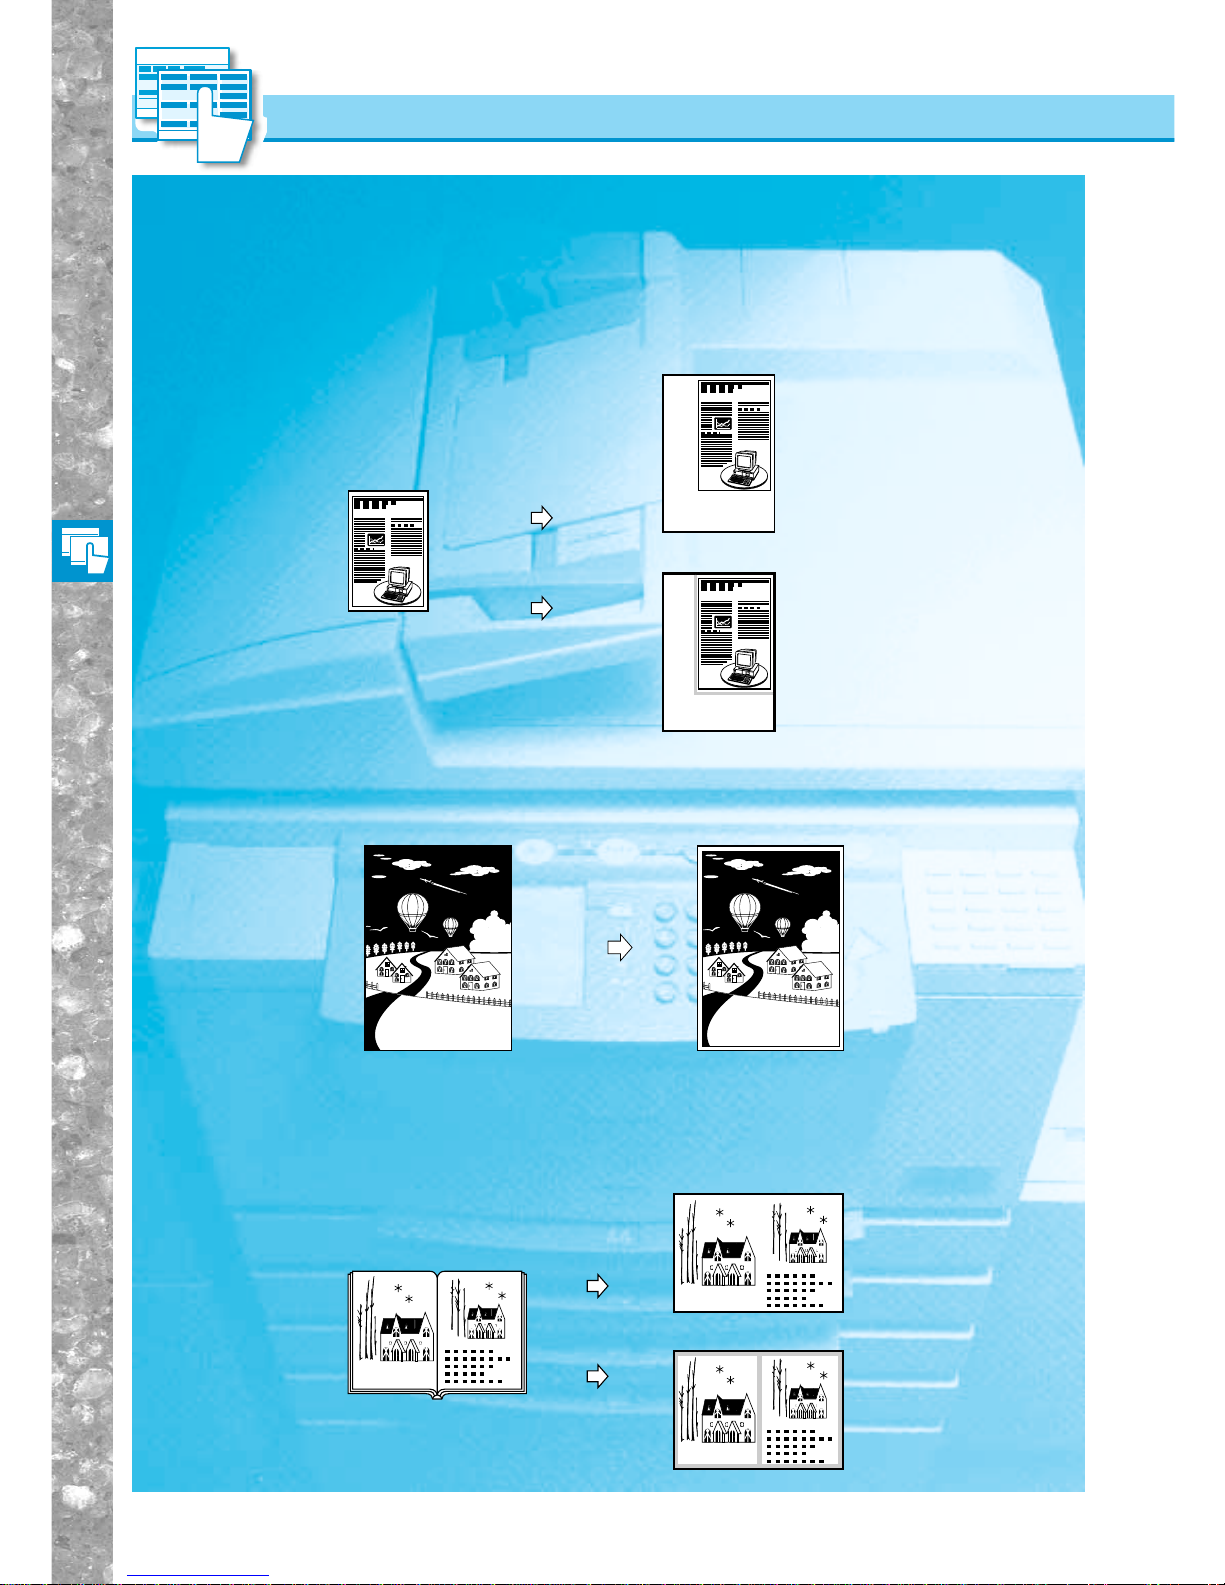
Useful Copy Functions
3–16
■ SHEET FRAME ERASE
Creates a blank border about 1/4" in width around the edge of the copy sheet.
This mode erases shadows and lines that appear when copying various types of originals.
The following four Frame Erase features are available.
■ ORIGINAL FRAME ERASE
Erases the dark borders and frame lines that appear around the original image when the
original is smaller than the selected copy paper size.
Erasing Shadows and Frame Lines
from Copies
(FRAME ERASE)
Erasing Shadows and Frame Lines from Copies (FRAME ERASE)
Book Frame Erase not
selected
Book Frame Erase
selected
Original
Copy
Copy
Original Copy
Original
(STMT)
Copy (LTR)
Copy (LTR)
Original Frame Erase
mode not selected
Original Frame Erase
mode selected
■ BOOK FRAME ERASE
Erases the dark border as well as centre and contour lines that appear when copying
facing pages in a bound original onto a single copy sheet.
Page 99
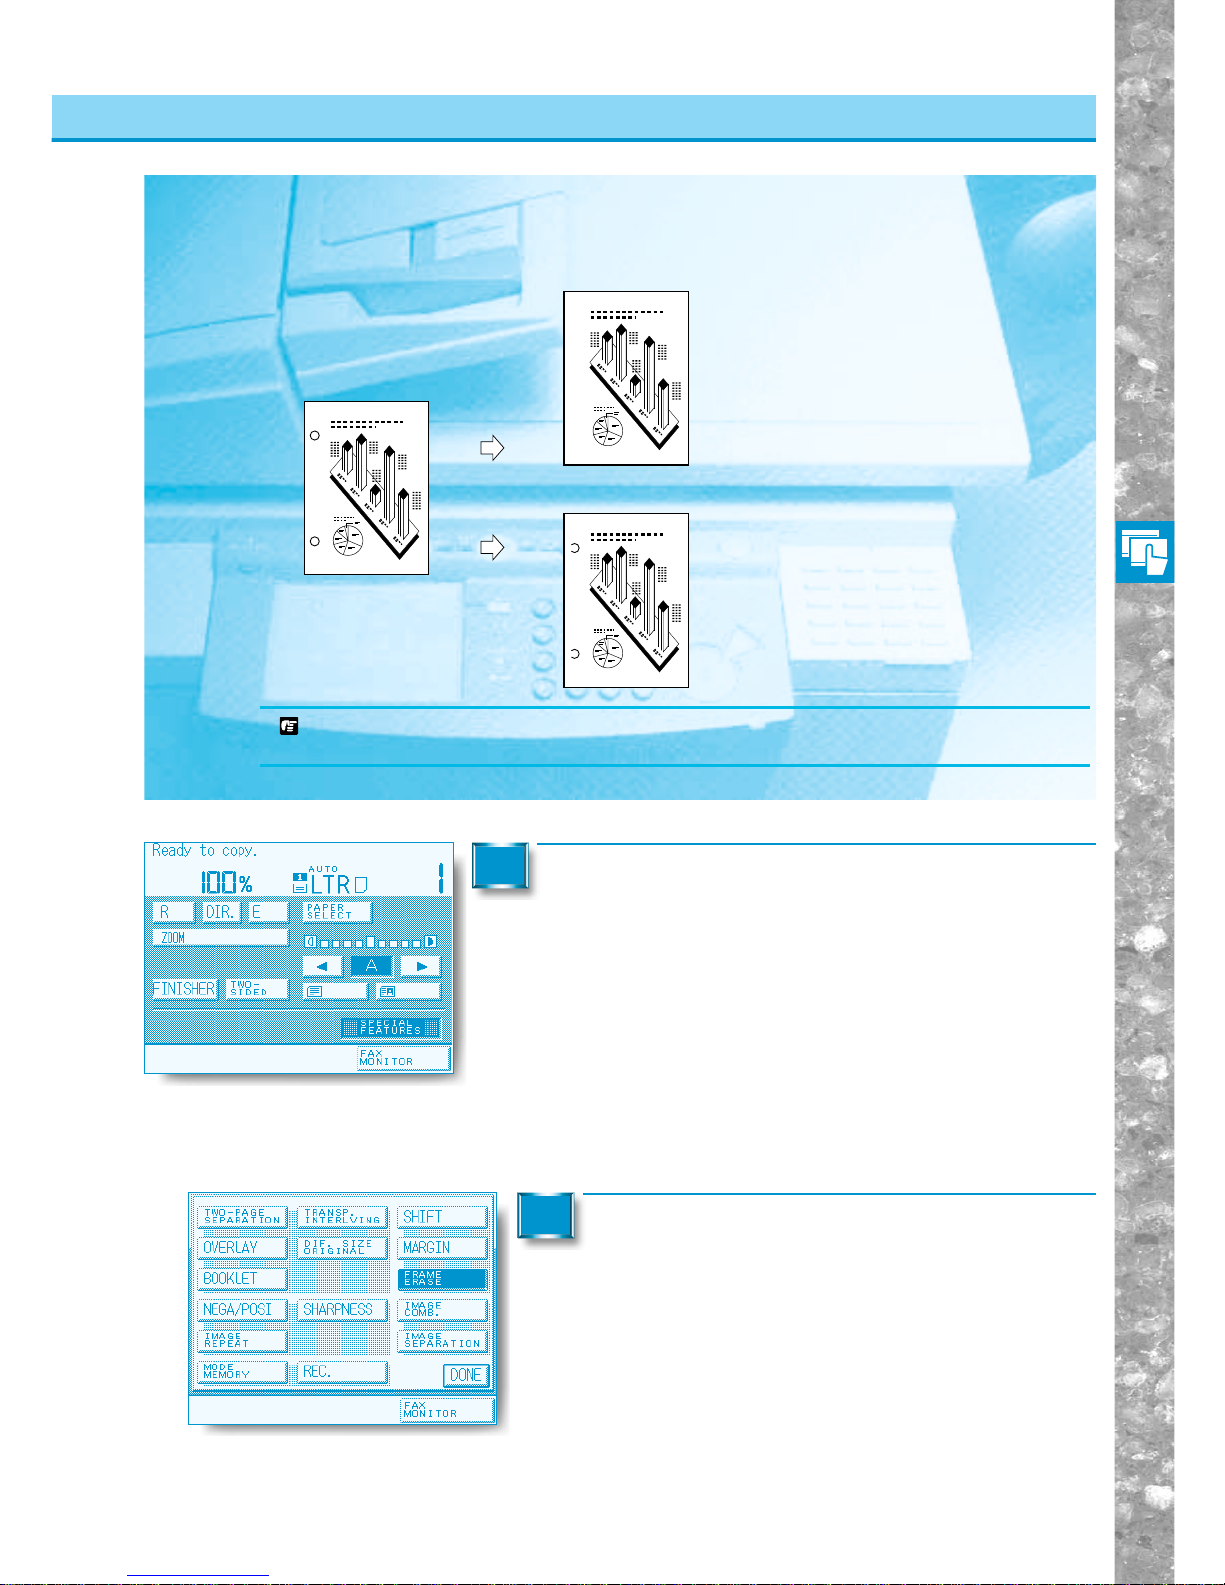
Useful Copy Functions
3–17
■ BINDING ERASE
Erases the shadows that appear in copies from binding holes in originals.
Erasing Shadows and Frame Lines from Copies (FRAME ERASE)
Erasing Shadows and Frame Lines from Copies
Original
Copy
Copy
Binding Erase mode selected
Binding Erase mode not selected
REQUEST
●Do not place originals with binding holes in the feeder, as this may damage the originals.
Place your originals and press the [SPECIAL
FEATURES] key.
1
Press the [FRAME ERASE] key.
2
Page 100
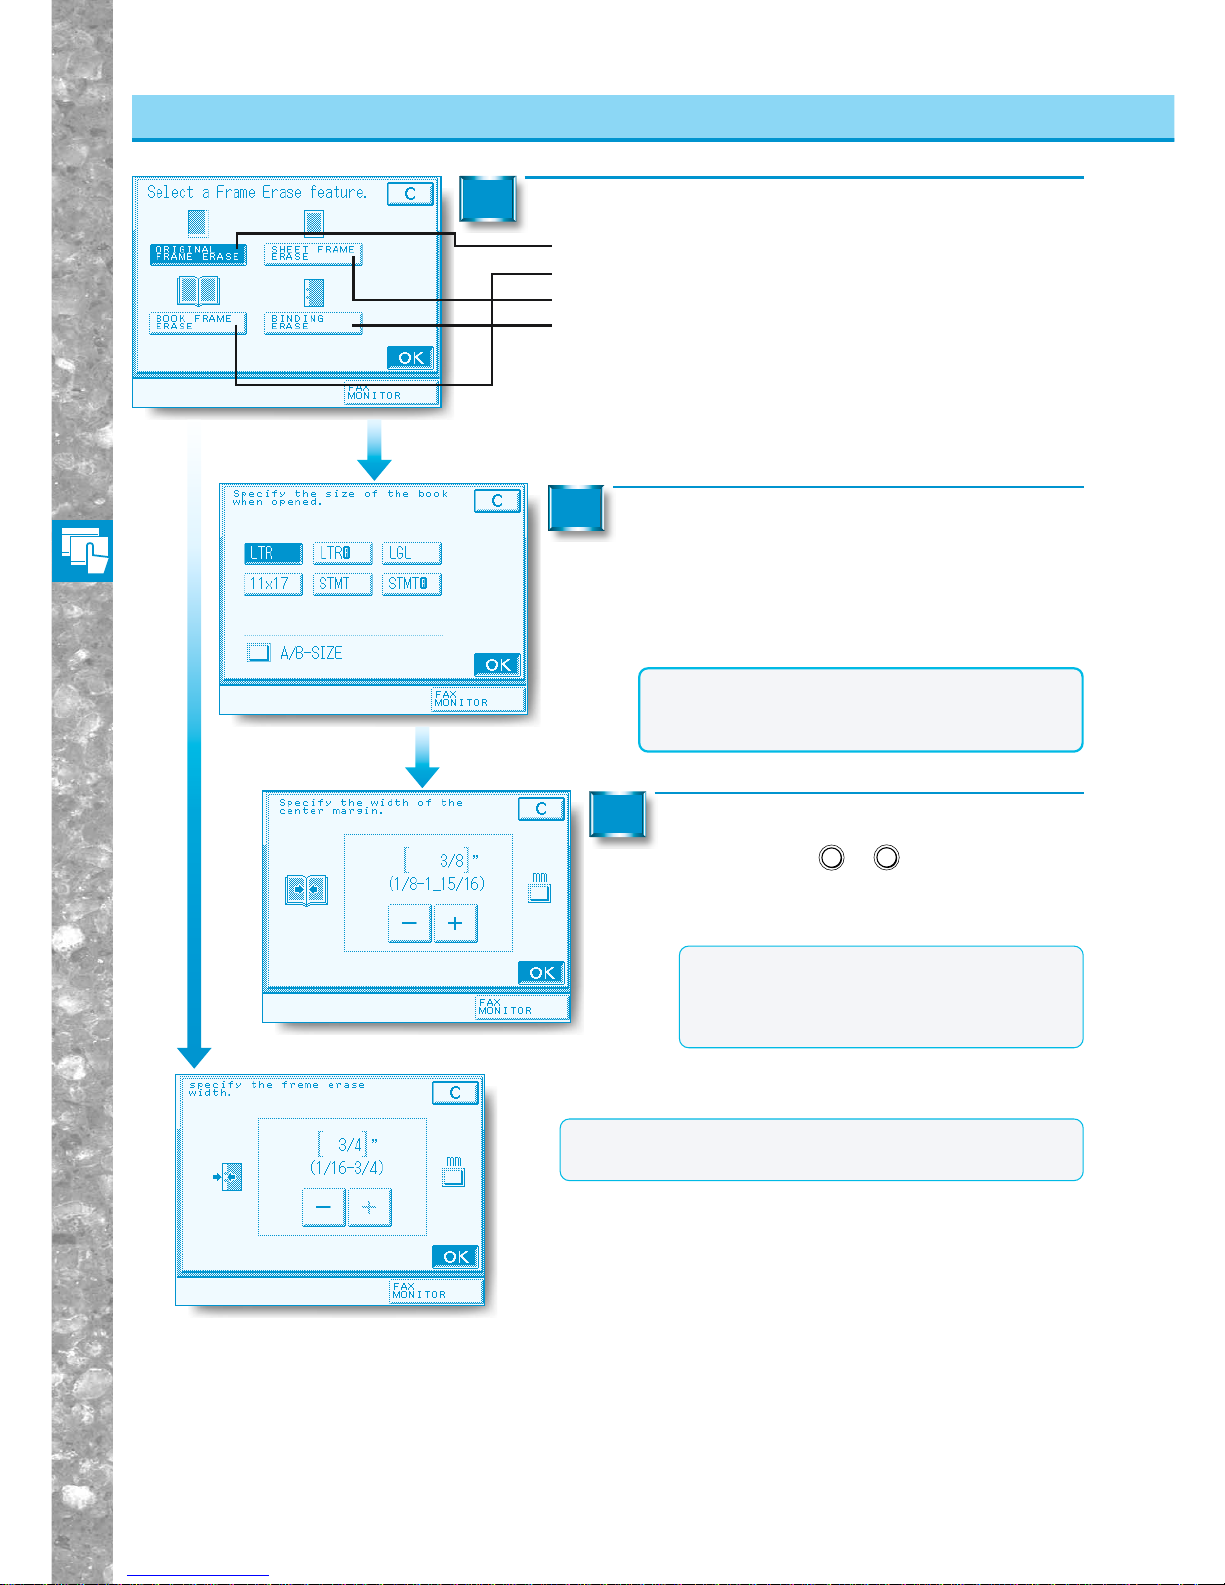
Useful Copy Functions
3–18
Erasing Shadows and Frame Lines from Copies (FRAME ERASE)
Erasing Shadows and Frame Lines from Copies
Select the Frame Er ase f eature, then press the [OK] k ey.
3
Select the size of the book when opened or
the original size, then press the [OK] key.
Original frame erase selected, “Specify the original size.” is
displayed.
■ Original frame erase selected: go to step 6.
4
5
■ Original frame erase selected: go to step 4.
■ Book frame erase selected: go to step 4.
■ Sheet frame erase selected: go to step 6.
■ Binding erase selected: go to step 5.
NOTICE
●You can use the Original Frame Erase mode
only on original sizes shown in the touch panel
display.
MEMO
●For book frame erase, enter the centre
frame erase width (centre width). The
centre width can be set within the range of
1/8" to 1-15/16".
MEMO
●The frame erase width for binding erase can be set with in
the range of 1/16" to 3/4".
■ Binding erase selected
■ If you want to make the input in millimeters, set inch
entry to OFF in Additional Functions. (See “Setting inch
Input,” on p. 4-15.)
Set the frame erase width using the
Number keys (0 – 9) or the [+] and
[– ] keys, then press the [OK] key.
■ When book frame erase is selected
 Loading...