

Canon imageRunner 2220i, imageRunner 3320i User Manual
Sending and Facsimile Guide
Sending and Facsimile Guide
Please read this guide before operating this equipment.
After you finish reading this guide, store it in a safe place for future reference.
ENG

imageRUNNER
3320i/2220i
Sending and Facsimile
Guide
Manuals for the Machine
The manuals for this machine are divided as follows. Please refer to them for detailed information.
The manuals supplied with optional equipment are included in the list below. Depending on the system
configuration and product purchased, some manuals may not be needed.
Guides with this symbol are printed manuals.
•
Basic Operations
•
Troubleshooting
Copying Instructions
•
Mail Box Instructions
•
•
Sending and Fax Instructions
(imageRUNNER 3320i/2220i)
•
Fax Instructions
(imageRUNNER 3320N/2220N and imageRUNNER 3320G)
•
Setting Up the Network Connection and
Installing the CD-ROM Software
Remote User Interface Instructions
•
•
Network Connectivity and Setup Instructions
Guides with this symbol are PDF manuals included on the
CD-ROM
accompanying CD-ROM.
Reference Guide
Copying Guide
Mail Box Guide
Sending and Facsimile
Guide
(This Document)
Facsimile Guide
Network Quick Start Guide
Remote UI Guide
Network Guide
CD-ROM
CD-ROM
Network ScanGear Installation and
•
Instructions
PS/PCL Printer Instructions
•
PCL Printer Driver Installation and
•
Instructions
PS Printer Driver Installation and
•
Instructions
Network ScanGear
User’s Guide
PS/PCL Printer Guide
PCL Driver Guide
PS Driver Guide
CD-ROM
CD-ROM
CD-ROM
CD-ROM

•
Fax Driver Installation and Instructions
•
Installing MEAP Applications and
Using the Login Service
Fax Driver Guide
MEAP SMS Administrator
Guide
CD-ROM
CD-ROM
The machine illustration on the cover may differ slightly from your machine.

How This Manual Is Organized
Chapter 1
Chapter 2
Chapter 3
Chapter 4
Chapter 5
Chapter 6
Various Sending Methods
Receiving a Document
Setting/Storing the Communications Settings
Registering/Editing Address Book Settings
Troubleshooting
Appendix
Includes the glossary and index.
A considerable effort has been made to make sure that this manual is free of inaccuracies and omissions. However, as we are constantly improving
our products, if you need an exact specification, please contact Canon.

Contents
Preface . . . . . . . . . . . . . . . . . . . . . . . . . . . . . . . . . . . . . . . . . . . . . . . . . . . . . . . . . . ix
How to Use This Manual . . . . . . . . . . . . . . . . . . . . . . . . . . . . . . . . . . . . . . . . . . . . ix
Symbols Used in This Manual . . . . . . . . . . . . . . . . . . . . . . . . . . . . . . . . . . . . . . ix
Keys Used in This Manual . . . . . . . . . . . . . . . . . . . . . . . . . . . . . . . . . . . . . . . . . ix
Displays Used in This Manual . . . . . . . . . . . . . . . . . . . . . . . . . . . . . . . . . . . . . . .x
Illustrations Used in This Manual. . . . . . . . . . . . . . . . . . . . . . . . . . . . . . . . . . . . .x
Abbreviations Used in This Manual . . . . . . . . . . . . . . . . . . . . . . . . . . . . . . . . . . xi
Legal Notices . . . . . . . . . . . . . . . . . . . . . . . . . . . . . . . . . . . . . . . . . . . . . . . . . . . . xii
FCC (Federal Communications Commission) . . . . . . . . . . . . . . . . . . . . . . . . . .xii
Users in the U.S.A . . . . . . . . . . . . . . . . . . . . . . . . . . . . . . . . . . . . . . . . . . . . . . xiii
PRE-INSTALLATION REQUIREMENTS FOR CANON FACSIMILE
EQUIPMENT. . . . . . . . . . . . . . . . . . . . . . . . . . . . . . . . . . . . . . . . . . . . . . . . xiii
Users in Canada . . . . . . . . . . . . . . . . . . . . . . . . . . . . . . . . . . . . . . . . . . . . . . . . xv
PRE-INSTALLATION REQUIREMENTS FOR CANON FACSIMILE
EQUIPMENT. . . . . . . . . . . . . . . . . . . . . . . . . . . . . . . . . . . . . . . . . . . . . . . . xv
Utilisation au Canada. . . . . . . . . . . . . . . . . . . . . . . . . . . . . . . . . . . . . . . . . . . . xvii
CONDITIONS À REMPLIR PRÉALABLEMENT À L’INSTALLATION D’UN
TÉLÉCOPIEUR CANON . . . . . . . . . . . . . . . . . . . . . . . . . . . . . . . . . . . . . . . xvii
SUPER G3. . . . . . . . . . . . . . . . . . . . . . . . . . . . . . . . . . . . . . . . . . . . . . . . . . . . xix
Trademarks . . . . . . . . . . . . . . . . . . . . . . . . . . . . . . . . . . . . . . . . . . . . . . . . . . . xix
Copyright . . . . . . . . . . . . . . . . . . . . . . . . . . . . . . . . . . . . . . . . . . . . . . . . . . . . . xix
Disclaimers . . . . . . . . . . . . . . . . . . . . . . . . . . . . . . . . . . . . . . . . . . . . . . . . . . . .xx
Chapter 1 Various Sending Methods
What This Machine Can Do. . . . . . . . . . . . . . . . . . . . . . . . . . . . . . . . . . . . . . . . . 1-3
Things You Must Do Before Using This Machine . . . . . . . . . . . . . . . . . . . . . . . 1-9
Selecting the Type of Telephone Line (Tel Line Type) . . . . . . . . . . . . . . . . . . 1-11
Setting the Current Date and Time (Date & Time Settings) . . . . . . . . . . . . . . 1-12
Registering This Machine’s Telephone Number (Unit Telephone #). . . . . . . . 1-16
Registering the Name of the Company and Department (Unit Name) . . . . . 1-18
Registering Sender’s Names (Sender’s Names (TTI)). . . . . . . . . . . . . . . . . . 1-20
Flow of Sending Operations. . . . . . . . . . . . . . . . . . . . . . . . . . . . . . . . . . . . . . . 1-23
Sending Fax Documents Manually . . . . . . . . . . . . . . . . . . . . . . . . . . . . . . . . . 1-34
Specifying a Destination Using the Address Book (Address Book) . . . . . . 1-37
Specifying a Destination Not Registered in the Address Book
(New Address) . . . . . . . . . . . . . . . . . . . . . . . . . . . . . . . . . . . . . . . . . . . . . . . . . . 1-39
Specifying a Fax Number. . . . . . . . . . . . . . . . . . . . . . . . . . . . . . . . . . . . . . . . 1-39
Contents
v

Specifying an E-mail Address . . . . . . . . . . . . . . . . . . . . . . . . . . . . . . . . . . . .1-42
Specifying an I-Fax Address . . . . . . . . . . . . . . . . . . . . . . . . . . . . . . . . . . . . .1-44
Specifying a File Server . . . . . . . . . . . . . . . . . . . . . . . . . . . . . . . . . . . . . . . . .1-49
Storing a Scanned Document in an Inbox . . . . . . . . . . . . . . . . . . . . . . . . . . .1-62
Specifying a Destination Using One-Touch Buttons
(One-Touch Buttons) . . . . . . . . . . . . . . . . . . . . . . . . . . . . . . . . . . . . . . . . . . . . .1-64
Configuring the Favorites Buttons (Favorites Buttons). . . . . . . . . . . . . . . . .1-66
Searching a Destination via a Server (Search on Server) . . . . . . . . . . . . . . . 1-68
Checking/Changing a Destination’s Detailed Information (Details) . . . . . . .1-79
Erasing a Destination (Erase). . . . . . . . . . . . . . . . . . . . . . . . . . . . . . . . . . . . . .1-82
Selecting a Scan Mode . . . . . . . . . . . . . . . . . . . . . . . . . . . . . . . . . . . . . . . . . . .1-83
Changing the Scan Settings . . . . . . . . . . . . . . . . . . . . . . . . . . . . . . . . . . . . . . .1-86
Two-Sided Originals . . . . . . . . . . . . . . . . . . . . . . . . . . . . . . . . . . . . . . . . . . . .1-86
Document Size Select . . . . . . . . . . . . . . . . . . . . . . . . . . . . . . . . . . . . . . . . . .1-88
Specifying the Document Size . . . . . . . . . . . . . . . . . . . . . . . . . . . . . . . . 1-88
Registering the Specified Document Size . . . . . . . . . . . . . . . . . . . . . . . 1-93
Resolution . . . . . . . . . . . . . . . . . . . . . . . . . . . . . . . . . . . . . . . . . . . . . . . . . . .1-96
Scanning Exposure . . . . . . . . . . . . . . . . . . . . . . . . . . . . . . . . . . . . . . . . . . . . 1-98
Manual Exposure Adjustment . . . . . . . . . . . . . . . . . . . . . . . . . . . . . . . . 1-98
Selecting Image Quality . . . . . . . . . . . . . . . . . . . . . . . . . . . . . . . . . . . . 1-100
Automatic Exposure Adjustment . . . . . . . . . . . . . . . . . . . . . . . . . . . . . 1-103
Copy Ratio . . . . . . . . . . . . . . . . . . . . . . . . . . . . . . . . . . . . . . . . . . . . . . . . . .1-105
Scanning Originals After Enlarging/Reducing Them to a Standard
Record Size (Preset Zoom) . . . . . . . . . . . . . . . . . . . . . . . . . . . . . . . . . 1-105
Specifying the Scanning Ratio by Percentage (Zoom Designation) . . 1-108
Two-Page Separation . . . . . . . . . . . . . . . . . . . . . . . . . . . . . . . . . . . . . . . . . . 1-110
Different Size Originals. . . . . . . . . . . . . . . . . . . . . . . . . . . . . . . . . . . . . . . . .1-112
Job Build . . . . . . . . . . . . . . . . . . . . . . . . . . . . . . . . . . . . . . . . . . . . . . . . . . .1-115
Frame Erase. . . . . . . . . . . . . . . . . . . . . . . . . . . . . . . . . . . . . . . . . . . . . . . . .1-119
Original Frame Erase . . . . . . . . . . . . . . . . . . . . . . . . . . . . . . . . . . . . . . 1-120
Book Frame Erase . . . . . . . . . . . . . . . . . . . . . . . . . . . . . . . . . . . . . . . . 1-123
Binding Erase . . . . . . . . . . . . . . . . . . . . . . . . . . . . . . . . . . . . . . . . . . . . 1-126
Adjusting the Contrast (Sharpness) . . . . . . . . . . . . . . . . . . . . . . . . . . . . . . .1-129
Storing/Erasing Scanning Mode. . . . . . . . . . . . . . . . . . . . . . . . . . . . . . . . . .1-131
Storing a Scanning Mode. . . . . . . . . . . . . . . . . . . . . . . . . . . . . . . . . . . 1-131
Storing a Scanning Mode Name . . . . . . . . . . . . . . . . . . . . . . . . . . . . . 1-135
Erasing Scanning Mode . . . . . . . . . . . . . . . . . . . . . . . . . . . . . . . . . . . . 1-137
Configuring Send Settings (Send Settings) . . . . . . . . . . . . . . . . . . . . . . . . .1-140
Specifying the Time to Send a Job (Delayed Send). . . . . . . . . . . . . . . . . . . 1-140
E-mail Notification at the End of a Send Job (Job Done Notice) . . . . . . . . .1-143
Stamping Scanned Originals (Stamping Original) . . . . . . . . . . . . . . . . . . . .1-146
Sending a Job to a Fax . . . . . . . . . . . . . . . . . . . . . . . . . . . . . . . . . . . . . . . .1-149
Sending a Job to an E-mail Address . . . . . . . . . . . . . . . . . . . . . . . . . . . . . .1-153
Sending a Job to Another I-Fax . . . . . . . . . . . . . . . . . . . . . . . . . . . . . . . . . .1-162
Sending a Job to a File Server. . . . . . . . . . . . . . . . . . . . . . . . . . . . . . . . . . .1-170
vi
Contents

Sending a Job to a User Inbox. . . . . . . . . . . . . . . . . . . . . . . . . . . . . . . . . . . 1-174
Previewing Originals (Preview) . . . . . . . . . . . . . . . . . . . . . . . . . . . . . . . . . . . 1-178
Job Recall (Recall). . . . . . . . . . . . . . . . . . . . . . . . . . . . . . . . . . . . . . . . . . . . . . 1-184
Dialing With a PIN Code . . . . . . . . . . . . . . . . . . . . . . . . . . . . . . . . . . . . . . . . . 1-186
Dialing With the PIN Code Before/After the Number . . . . . . . . . . . . . . . . . . 1-186
Setting the PIN Code Position . . . . . . . . . . . . . . . . . . . . . . . . . . . . . . . . . . . 1-187
Chapter 2 Receiving a Document
Various Receiving Functions . . . . . . . . . . . . . . . . . . . . . . . . . . . . . . . . . . . . . . . 2-2
Receiving Documents . . . . . . . . . . . . . . . . . . . . . . . . . . . . . . . . . . . . . . . . . . . 2-3
Setting the Memory Lock Mode . . . . . . . . . . . . . . . . . . . . . . . . . . . . . . . . . . . . 2-4
Forwarding Received Documents . . . . . . . . . . . . . . . . . . . . . . . . . . . . . . . . . . 2-4
Received Documents Processing . . . . . . . . . . . . . . . . . . . . . . . . . . . . . . . . . . 2-5
Paper for Printing Received I-Fax/Fax Documents . . . . . . . . . . . . . . . . . . . . . 2-7
Using Fax Information Services. . . . . . . . . . . . . . . . . . . . . . . . . . . . . . . . . . . . . 2-8
Chapter 3 Setting/Storing the Communications Settings
Communications Settings Table . . . . . . . . . . . . . . . . . . . . . . . . . . . . . . . . . . . . 3-2
Setting Automatic Document Deletion (Erase Failed TX) . . . . . . . . . . . . . . . . 3-4
Handling Documents That Fail to Be Forwarded
(Handle Documents with Forwarding Errors). . . . . . . . . . . . . . . . . . . . . . . . . . 3-6
Setting the Photo Mode (Photo Mode) . . . . . . . . . . . . . . . . . . . . . . . . . . . . . . . 3-8
Setting the Number of Retry Attempts (Retry Times) . . . . . . . . . . . . . . . . . . 3-10
Setting the Standard Send Settings (Edit Standard Send Settings). . . . . . . 3-12
Registering Favorites Buttons (Store Favorites Button) . . . . . . . . . . . . . . . .3-15
Registering a Favorites Button. . . . . . . . . . . . . . . . . . . . . . . . . . . . . . . . . . . . 3-15
Storing a Favorites Button Name . . . . . . . . . . . . . . . . . . . . . . . . . . . . . . . . . . 3-18
Erasing a Favorites Button Name . . . . . . . . . . . . . . . . . . . . . . . . . . . . . . . . . 3-20
Setting the Initial Display of the Send Screen
(Default Screen for Send) . . . . . . . . . . . . . . . . . . . . . . . . . . . . . . . . . . . . . . . . . 3-23
Attaching a Transmission Terminal ID to the Document Being Sent
(TX Terminal ID) . . . . . . . . . . . . . . . . . . . . . . . . . . . . . . . . . . . . . . . . . . . . . . . . . 3-26
Initializing TX Settings (Initialize TX Settings) . . . . . . . . . . . . . . . . . . . . . . . . 3-30
Two-Sided Printing of Received Documents (Two-Sided Print) . . . . . . . . . . 3-32
Specifying the Method of Printing Received Documents
(Select Cassette) . . . . . . . . . . . . . . . . . . . . . . . . . . . . . . . . . . . . . . . . . . . . . . . . 3-34
Printing Received Documents in Reduced Form (Receive Reduction) . . . . 3-37
Specifying Whether to Print Information on Received Documents
(Received Page Footer). . . . . . . . . . . . . . . . . . . . . . . . . . . . . . . . . . . . . . . . . . . 3-41
Setting 2 On 1 Log (2 On 1 Log). . . . . . . . . . . . . . . . . . . . . . . . . . . . . . . . . . . . 3-43
Contents
vii

Adjusting the Alarm Volume and Monitor Volume (Volume Control). . . . . . .3-45
Specifying Whether to Use ECM Transmission (ECM TX) . . . . . . . . . . . . . . .3-47
Setting the Pause Time (Pause Time) . . . . . . . . . . . . . . . . . . . . . . . . . . . . . . . .3-49
Setting Auto Redial (Auto Redial). . . . . . . . . . . . . . . . . . . . . . . . . . . . . . . . . . .3-51
Specifying Whether to Use ECM Reception (ECM RX). . . . . . . . . . . . . . . . . .3-55
Chapter 4 Registering/Editing Address Book Settings
Address Book Settings Table . . . . . . . . . . . . . . . . . . . . . . . . . . . . . . . . . . . . . . .4-2
About the Address Book. . . . . . . . . . . . . . . . . . . . . . . . . . . . . . . . . . . . . . . . . . . 4-3
Storing New Addresses (Store/Edit Address Book). . . . . . . . . . . . . . . . . . . . . 4-5
Storing Fax Numbers . . . . . . . . . . . . . . . . . . . . . . . . . . . . . . . . . . . . . . . . . . . .4-5
Storing E-mail Addresses. . . . . . . . . . . . . . . . . . . . . . . . . . . . . . . . . . . . . . . .4-13
Storing I-Fax Addresses. . . . . . . . . . . . . . . . . . . . . . . . . . . . . . . . . . . . . . . . .4-18
Storing File Server Addresses . . . . . . . . . . . . . . . . . . . . . . . . . . . . . . . . . . . .4-25
Storing Group Addresses. . . . . . . . . . . . . . . . . . . . . . . . . . . . . . . . . . . . . . . .4-37
Storing Addresses Searched via a Server . . . . . . . . . . . . . . . . . . . . . . . . . . .4-45
Changing Address Details . . . . . . . . . . . . . . . . . . . . . . . . . . . . . . . . . . . . . . . .4-60
Erasing Addresses . . . . . . . . . . . . . . . . . . . . . . . . . . . . . . . . . . . . . . . . . . . . . .4-63
Registering a Name for an Address Book (Store Address Book Name) . . .4-65
Registering the One-Touch Buttons (One-Touch Buttons) . . . . . . . . . . . . . . 4-67
Storing/Editing a One-Touch Button . . . . . . . . . . . . . . . . . . . . . . . . . . . . . . . . 4-67
Erasing a One-Touch Button . . . . . . . . . . . . . . . . . . . . . . . . . . . . . . . . . . . .4-102
Chapter 5 Troubleshooting
When Problems Occur . . . . . . . . . . . . . . . . . . . . . . . . . . . . . . . . . . . . . . . . . . . .5-2
Problems Sending Documents. . . . . . . . . . . . . . . . . . . . . . . . . . . . . . . . . . . . .5-2
Problems Receiving Documents . . . . . . . . . . . . . . . . . . . . . . . . . . . . . . . . . . . 5-4
Other Problems . . . . . . . . . . . . . . . . . . . . . . . . . . . . . . . . . . . . . . . . . . . . . . . . 5-5
Questions & Answers . . . . . . . . . . . . . . . . . . . . . . . . . . . . . . . . . . . . . . . . . . . . . 5-7
Chapter 6 Appendix
Glossary . . . . . . . . . . . . . . . . . . . . . . . . . . . . . . . . . . . . . . . . . . . . . . . . . . . . . . . .6-2
Index . . . . . . . . . . . . . . . . . . . . . . . . . . . . . . . . . . . . . . . . . . . . . . . . . . . . . . . . . .6-10
viii
Contents

Preface
Thank you for purchasing the Canon imageRUNNER 3320i/2220i. Please read this manual
thoroughly before operating the machine in order to familiarize yourself with its capabilities,
and to make the most of its many functions. After reading this manual, store it in a safe place
for future reference.
How to Use This Manual
Symbols Used in This Manual
The following symbols are used in this manual to explain procedures, restrictions,
handling precautions, and instructions that should be observed for safety.
WARNING
CAUTION
IMPORTANT
NOTE
Indicates a warning concerning operations that may
lead to death or injury to persons if not performed
correctly. In order to use the machine safely, always
pay attention to these warnings.
Indicates a caution concerning operations that may
lead to injury to persons, or damage to property if not
performed correctly. In order to use the machine
safely, always pay attention to these cautions.
Indicates operational requirements and restrictions. Be sure to
read these items carefully in order to operate the machine
correctly, and to avoid damage to the machine.
Indicates a clarification of an operation, or contains additional
explanations for a procedure. Reading these notes is highly
recommended.
Keys Used in This Manual
The following symbols and key names used in this manual are expressed in the
following way:
Control Panel Keys ............. <Key icon> + (Key Name)
•
Example: (Start)
(Stop)
Touch Panel Display Keys .. [Key Name]
•
Example: [Cancel]
[Done]
How to Use This Manual
ix
Displays Used in This Manual
Screen shots of the touch panel display used in this manual are those taken when
the imageRUNNER 3320i has the following optional equipment attached to it: the
Image Reader-B1, Super G3 Fax Board, Finisher-J1, and Cassette Feeding UnitW1.
Note that functions that cannot be used depending on the model or options, are not
displayed on the touch panel display.
The keys which you should press are marked with a , as shown below.
When multiple keys can be pressed on the touch panel display, all keys are marked.
Select the keys which suit your needs.
Place your original ➞ press [Special Features].
Press this key for operation.
Illustrations Used in This Manual
Illustrations used in this manual are those displayed when the imageRUNNER
3320i has been following optional equipment attached: the Image Reader-B1,
Finisher-J1, and Cassette Feeding Unit-W1.
x
How to Use This Manual

Abbreviations Used in This Manual
In this manual, product names and model names are abbreviated as follows:
Microsoft® Windows® 95 is referred to as Windows 95.
Microsoft® Windows® 98 is referred to as Windows 98.
Microsoft® Windows® Millennium Edition is referred to as Windows Me.
Microsoft® Windows NT® is referred to as Windows NT.
Microsoft® Windows® 2000 is referred to as Windows 2000.
Microsoft
Microsoft
Novell NetWare
®
Windows XP® Home/Professional Edition is referred to as Windows XP.
®
Windows® operating system is referred to as Windows.
®
is referred to as NetWare.
How to Use This Manual
xi

Legal Notices
FCC (Federal Communications Commission)
This equipment has been tested and found to comply with the limits for a Class A
digital device, pursuant to Part 15 of the FCC Rules. These limits are designed to
provide reasonable protection against harmful interference when the equipment is
operated in a commercial environment. This equipment generates, uses, and can
radiate radio frequency energy and, if not installed and used in accordance with the
Operator’s Manual, may cause harmful interference to radio communications.
Operation of this equipment in a residential area is likely to cause harmful
interference in which case the user will be required to correct the interference at his
own expense.
Use of a shielded cable is required to comply with Class A limits in Subpart B of
Part 15 of FCC Rules.
Do not make any changes or modifications to the equipment unless otherwise
specified in the manual. If such changes or modifications should be made, you
could be required to stop operation of the equipment.
xii
Legal Notices

Users in the U.S.A
PRE-INSTALLATION REQUIREMENTS FOR CANON FACSIMILE
EQUIPMENT
■
Location
Supply a suitable table, cabinet, or desk for the machine. See Chapter 8, "Appendix," in
the
Reference Guide
■ Order Information
1.Only a single telephone line (touch-tone or rotary) should be used.
2.Order an RJ11-C modular wall jack (USOC), which should be installed by the telephone
company. If the RJ11-C wall jack is not present, telephone/facsimile operation is not
possible.
3.Order a normal business line from your telephone company’s business representative. The
line should be a regular voice grade line or an equivalent one. Use one line per unit.
DDD (Direct Distance Dial) line
-or-
IDDD (International Direct Distance Dial) line if you communicate overseas
NOTE
Canon recommends an individual line following industry standards, i.e., 2500 (touchtone) or 500 (rotary/pulse dial) telephones. A dedicated extension off a PBX (Private
Branch Exchange) unit without “Call Waiting” can be used with your facsimile unit. Key
telephone systems are not recommended because they send nonstandard signals to
individual telephones for ringing and special codes, which may cause a facsimile error.
for specific dimensions and weight.
■ Power Requirements
The machine should be connected to a standard 120 volt AC, three-wire grounded outlet
only.
Do not connect this machine to an outlet or power line shared with other appliances that
cause “electrical noise.” Air conditioners, electric typewriters, copiers, and machines of
this sort generate electrical noise that often interferes with communications equipment
and the sending and receiving of documents.
■ Connection of The Equipment
This equipment complies with Part 68 of the FCC rules. On the rear panel of this
equipment is a label that contains, among other information, the FCC Registration
Number and Ringer Equivalence Number (REN) for this equipment. If requested, this
information should be given to the telephone company. (Note: REN is not required for
some types of analog or digital facilities.) This equipment cannot be used on public coin
service provided by the telephone company. Connection to party lines is subject to state
tariffs. (Contact the state public utility commission, public service commission or
corporation commission for information.)
Legal Notices
xiii

The REN is used to determine the number of devices that may be connected to a
telephone line. Excessive RENs on a telephone line may result in the devices not ringing
in response to an incoming call. In most, but not all areas, the sum of the RENs should not
exceed five (5.0). To be certain of the number of devices that may be connected to a line
as determined by the total RENs, contact the local telephone company to determine the
maximum REN for the calling area.
An FCC compliant telephone cord and modular plug is provided with this equipment. This
equipment is designed to be connected to the telephone network or premises wiring using
a compatible modular jack that is Part 68 compliant.
Note: RENs are associated with loop-start and ground-start ports. Do not use for E&M or
digital ports.
■ In Case of Equipment Malfunction
Should any malfunction occur which cannot be corrected by the procedures described in
this guide or the Reference Guide, disconnect the equipment from the telephone line
cable and disconnect the power cord. The telephone line cable should not be reconnected
or the main power switch turned ON until the problem is completely resolved. Users
should contact their local authorized Canon Facsimile Service Dealer for the servicing of
equipment.
■ Rights of The Telephone Company
If this equipment (imageRUNNER 3320i/2220i) causes harm to the telephone network,
the telephone company may temporarily disconnect service. The telephone company also
retains the right to make changes in facilities and services that may affect the operation of
this equipment. When such changes are necessary, the telephone company is required to
give adequate prior notice to the user. However, if advance notice is not possible, the
telephone company will notify the customer as soon as possible. Also, the customer will
be advised of his/her right to file a complaint with the FCC if he/she believes it is
necessary.
xiv
WARNING
The Telephone Consumer Protection Act of 1991 makes it unlawful for any
person to use a computer or other electronic device to send any message via a
telephone facsimile machine unless such message clearly contains in a margin
at the top or bottom of each transmitted page, or on the first page of the
transmission, the date and time it is sent and an identification of the business or
other entity, or other individual sending the message and the telephone number
of the sending machine or such business, other entity, or individual.
NOTE
In order to program this information into your machine, you should complete the
procedure to register your name, unit’s telephone number, time, and date in Chapter 1.
(For instructions explaining how to enter characters, see Chapter 1, “Before You Start
Using This Machine,” in the Reference Guide.)
Legal Notices

Users in Canada
PRE-INSTALLATION REQUIREMENTS FOR CANON FACSIMILE
EQUIPMENT
■ Location
Supply a suitable table, cabinet, or desk for the machine. See Chapter 8, "Appendix," in
the Reference Guide for specific dimensions and weight.
■ Order Information
1.Provide only a signal line touch-tone or rotary telephone set terminated with a standard
4-pin modular telephone plug. (Touch-tone is recommended if available in your area.)
2.Order a CA11A modular jack which should be installed by the telephone company. If the
CA11A jack is not present, installation cannot occur.
3.Order a normal business line from your telephone company’s business representative. The
line should be a regular voice grade line or an equivalent one. Use one line per unit.
DDD (Direct Distance Dial) line
or
IDDD (International Direct Distance Dial) line if you communicate overseas
NOTE
Canon recommends an individual line following industry standards, such as 2500 (touchtone) or 500 (rotary/pulse dial) telephones. A dedicated extension off a PBX (Private
Branch Exchange) unit without “Call Waiting” can be used with your facsimile unit. Key
telephone systems are not recommended because they send nonstandard signals to
individual telephones for ringing and special codes which may cause a facsimile error.
■ Power Requirements
The power outlet should be a three-prong grounded receptacle (Single or Duplex). It
should be independent from copiers, heaters, air conditioners, or any electric equipment
that is thermostatically controlled. The rated value is 115 volts and 15 amperes. The
CA11A modular jack should be relatively close to the power outlet to facilitate installation.
Legal Notices
xv

■ Notice
• This equipment meets the applicable Industry Canada technical specifications.
• Before installing this equipment, users should ensure that it is permissible to be connected
to the facilities of the local telecommunications company. The equipment must also be
installed using an acceptable method of connection. In some cases, the company’s inside
wiring associated with a single line individual service may be extended by means of a
certified connector assembly (telephone extension cord). The customer should be aware
that compliance with the above conditions may not prevent deterioration of service in some
situations.
• The Ringer Equivalence Number is an indication of the maximum number of devices
allowed to be connected to a telephone interface. The termination on an interface may
consist of any combination of devices subject only to the requirement that the sum of the
RENs of all the devices does not exceed five.
• The REN of this product is 0.3
• Repairs to certified equipment should be made by an authorized Canadian maintenance
facility designated by the supplier. Any repairs or alterations made by the user to this
equipment, or equipment malfunctions, may give the telecommunications company cause
to request the user to disconnect the equipment.
• Users should ensure for their own protection that the electrical ground connections of the
power utility, telephone lines and internal metallic water pipe system, if present, are
connected together. This precaution may be particularly important in rural areas.
CAUTION
Users should not attempt to make such connections themselves, but should
contact the appropriate electric inspection authority, or electrician, as
appropriate.
xvi
NOTE
This equipment complies with the Canadian ICES-003 class A limits.
Legal Notices

Utilisation au Canada
CONDITIONS À REMPLIR PRÉALABLEMENT À L’INSTALLATION D’UN
TÉLÉCOPIEUR CANON
■ Emplacement
Prévoir une table, un meuble, ou un bureau suffisamment solide et de taille appropriée
pour le poids et les dimensions de l’appareil, voir le chapitre 8 “Annexe” du Guide de
référence.
■ Installation téléphonique
1.Cet appareil peut être installé comme un appareil téléphonique à clavier ou à cadran et
doit être raccordé à une seule ligne.
2.Il faut commander un jack modulaire CA11A qui sera installé par la compagnie
téléphonique. Sans ce jack, la mise en place serait impossible.
3.Si vous vous abonnez à une nouvelle ligne, demandez une ligne d’affaires normale de
qualité téléphonique courante ou équivalente. Prenez un abonnement d’une ligne par
appareil.
Ligne automatique interurbaine
ou
Ligne automatique internationale
(si vous communiquez avec les pays étrangers)
NOTE
Canon vous conseille d’utiliser une ligne individuelle conforme aux normes industrielles,
à savoir: ligne téléphonique 2500 (pour appareil à clavier) ou 500 (pour appareil à
cadran/impulsions). Il est également possible de raccorder ce télécopieur à un système
téléphonique à poussoirs car la plupart de ces systèmes émettent des signaux d’appel
non normalisés ou des codes spéciaux qui risquent de perturber le fonctionnement du
télécopieur.
■ Condition d’alimentation
Raccordez le télécopieur à une prise de courant plus terre à trois branches, du type
simple ou double, et qui ne sert pas à alimenter un copieur, un appareil de chauffage, un
climatiseur ou tout autre appareil électrique à thermostat. L’alimentation doit être de 115
volts et 15 ampères. Pour faciliter l’installation, le jack CA11A doit être assez proche de la
prise de courant.
Legal Notices
xvii

■ REMARQUES
• Le présent matériel est conforme aux spécifications techniques applicables d’Industrie
Canada.
• Avant d’installer cet appareil, l’utilisateur doit s’assurer qu’il est permis de le connecter à
l’équipement de la compagnie de télécommunication locale et doit installer cet appareil en
utilisant une méthode de connexion autorisée. Il se peut qu’il faille étendre la circuiterie
intérieure de la ligne individuelle d’abonné, qui a été installée par la compagnie, au moyen
d’un jeu de connecteurs homologués (rallonge téléphonique). L’attention de l’utilisateur est
attirée sur le fait que le respect des conditions mentionnées ci-dessus ne constitue pas une
garantie contre les dégradations de qualité du service dans certaines circonstances.
• L’indice d’équivalence de la sonnerie (IES) attribué à chaque équipement terminal fournit
une indication sur le nombre maximum d’appareils pouvant être connectés sur une
interface téléphonique. La terminaison sur une interface peut consister en n’importe quelle
combinaison d’appareils, à la condition seulement que la somme des indices d’
équivalence de la sonnerie de tous les appareils ne soit pas supérieure à 5.
• L’indice d’équivalence de la sonnerie (IES) de ce produit est 0,3.
• Les réparations sur un appareil certifié doivent être faites par une société d’entretien
canadienne autorisée par le Gouvernement canadien et désignée par le fournisseur.
• Toute réparation ou modification que pourrait faire I’utilisateur de cet appareil, ou tout
mauvais fonctionnement, donne à la compagnie de télécommunication le droit de
débrancher I’appareil.
• Pour sa propre protection, I’utilisateur doit s’assurer que les prises de terre de I’appareil
d’alimentation, les lignes téléphoniques et les tuyaux métalliques internes, s’il y en a, sont
bien connectés entre eux. Cette précaution est particulièrement importante dans les zones
rurales.
xviii
ATTENTION
Au lieu d’essayer de faire ces branchements eux-mêmes, les utilisateurs sont invités à faire
appel à un service d’inspection faisant autorité en matière d’électricité ou à un électricien,
selon le cas.
NOTE
Cet appareil respecte les limites de la classe A de la NMB-003 du Canada.
Legal Notices

SUPER G3
Super G3 is a phrase used to describe the new generation of
fax machines that use ITU-T V.34 standard 33.6 Kbps*
modems. Super G3 High Speed Fax machines allow
transmission times of approximately three seconds* per page
which results in reduced telephone line charges.
* Approximately 3 seconds per page fax transmission time
based on CCITT/ITU-T No.1 Chart (JBIG, Standard Mode), at
33.6 Kbps modem speed. The Public Switched Telephone
Network (PSTN) currently supports 28.8 Kbps modem
speeds or slower, depending on telephone line conditions.
Trademarks
Canon, the Canon logo, NetSpot Accountant, imageWARE, imageRUNNER, MEAP and
MEAP logo are trademarks of Canon Inc.
Adobe and Acrobat are trademarks of Adobe Systems Incorporated.
Macintosh and Mac OS are trademarks of Apple Computer, Inc.
IBM and OS/2 are trademarks of International Business Machines Corporation.
Active Directory, Microsoft, MS-DOS, Windows, and Windows NT are registered trademarks
of Microsoft Corporation in the United States and other countries.
NetWare and Novell are registered trademarks of Novell, Inc.
IPX/SPX, and NDS are trademarks of Novell, Inc. ©1996 Novell, Inc.
Sun and Solaris are trademarks of Sun Microsystems, Inc. in the United States and other
countries.
UNIX is a registered trademark in the United States and other countries licensed exclusively
to X/Open Company, Ltd..
Other product and company names herein may be the trademarks of their respective owners.
Copyright
Copyright 2003 by Canon Inc. All rights reserved.
No part of this publication may be reproduced or transmitted in any form or by any means,
electronic or mechanical, including photocopying and recording, or by any information
storage or retrieval system without the prior written permission of Canon Inc.
Legal Notices
xix

Disclaimers
The information in this document is subject to change without notice.
CANON INC. MAKES NO WARRANTY OF ANY KIND WITH REGARD TO THIS
MATERIAL, EITHER EXPRESS OR IMPLIED, EXCEPT AS PROVIDED HEREIN,
INCLUDING WITHOUT LIMITATION, THEREOF, WARRANTIES AS TO
MARKETABILITY, MERCHANTABILITY, FITNESS FOR A PARTICULAR
PURPOSE OF USE OR AGAINST INFRINGEMENT OF ANY PATENT. CANON
INC. SHALL NOT BE LIABLE FOR ANY DIRECT, INCIDENTAL, OR
CONSEQUENTIAL DAMAGES OF ANY NATURE, OR LOSSES OR EXPENSES
RESULTING FROM THE USE OF THIS MATERIAL.
xx
Legal Notices

Various Sending Methods
This chapter describes the sending function.
What This Machine Can Do . . . . . . . . . . . . . . . . . . . . . . . . . . . . . . . . . . . . . . . . . . . . . . . 1-3
Things You Must Do Before Using This Machine . . . . . . . . . . . . . . . . . . . . . . . . . . . . . . . 1-9
Selecting the Type of Telephone Line (Tel Line Type) . . . . . . . . . . . . . . . . . . . . . . . . . . . . . . . .1-11
Setting the Current Date and Time (Date & Time Settings) . . . . . . . . . . . . . . . . . . . . . . . . . . . .1-12
Registering This Machine’s Telephone Number (Unit Telephone #) . . . . . . . . . . . . . . . . . . . . .1-16
Registering the Name of the Company and Department (Unit Name) . . . . . . . . . . . . . . . . . . .1-18
Registering Sender’s Names (Sender’s Names (TTI)) . . . . . . . . . . . . . . . . . . . . . . . . . . . . . . . .1-20
Flow of Sending Operations . . . . . . . . . . . . . . . . . . . . . . . . . . . . . . . . . . . . . . . . . . . . . . 1-23
Sending Fax Documents Manually. . . . . . . . . . . . . . . . . . . . . . . . . . . . . . . . . . . . . . . . . 1-34
Specifying a Destination Using the Address Book (Address Book) . . . . . . . . . . . . . . . . 1-37
Specifying a Destination Not Registered in the Address Book (New Address) . . . . . . . 1-39
Specifying a Fax Number. . . . . . . . . . . . . . . . . . . . . . . . . . . . . . . . . . . . . . . . . . . . . . . . . . . . . .1-39
Specifying an E-mail Address . . . . . . . . . . . . . . . . . . . . . . . . . . . . . . . . . . . . . . . . . . . . . . . . . .1-42
Specifying an I-Fax Address . . . . . . . . . . . . . . . . . . . . . . . . . . . . . . . . . . . . . . . . . . . . . . . . . . .1-44
Specifying a File Server . . . . . . . . . . . . . . . . . . . . . . . . . . . . . . . . . . . . . . . . . . . . . . . . . . . . . . .1-49
Storing a Scanned Document in an Inbox . . . . . . . . . . . . . . . . . . . . . . . . . . . . . . . . . . . . . . . . .1-62
Specifying a Destination Using One-Touch Buttons (One-Touch Buttons) . . . . . . . . . . . 1-64
Configuring the Favorites Buttons (Favorites Buttons) . . . . . . . . . . . . . . . . . . . . . . . . . . 1-66
Searching a Destination via a Server (Search on Server) . . . . . . . . . . . . . . . . . . . . . . . 1-68
Checking/Changing a Destination’s Detailed Information (Details) . . . . . . . . . . . . . . . . 1-79
Erasing a Destination (Erase). . . . . . . . . . . . . . . . . . . . . . . . . . . . . . . . . . . . . . . . . . . . . 1-82
Selecting a Scan Mode. . . . . . . . . . . . . . . . . . . . . . . . . . . . . . . . . . . . . . . . . . . . . . . . . . 1-83
Changing the Scan Settings . . . . . . . . . . . . . . . . . . . . . . . . . . . . . . . . . . . . . . . . . . . . . . 1-86
Two-Sided Originals . . . . . . . . . . . . . . . . . . . . . . . . . . . . . . . . . . . . . . . . . . . . . . . . . . . . . . . . . .1-86
Resolution. . . . . . . . . . . . . . . . . . . . . . . . . . . . . . . . . . . . . . . . . . . . . . . . . . . . . . . . . . . . . . . . . .1-96
Scanning Exposure . . . . . . . . . . . . . . . . . . . . . . . . . . . . . . . . . . . . . . . . . . . . . . . . . . . . . . . . . .1-98
Copy Ratio . . . . . . . . . . . . . . . . . . . . . . . . . . . . . . . . . . . . . . . . . . . . . . . . . . . . . . . . . . . . . . . .1-105
Two-Page Separation . . . . . . . . . . . . . . . . . . . . . . . . . . . . . . . . . . . . . . . . . . . . . . . . . . . . . . . .1-110
Different Size Originals. . . . . . . . . . . . . . . . . . . . . . . . . . . . . . . . . . . . . . . . . . . . . . . . . . . . . . .1-112
Job Build . . . . . . . . . . . . . . . . . . . . . . . . . . . . . . . . . . . . . . . . . . . . . . . . . . . . . . . . . . . . . . . . .1-115
Frame Erase . . . . . . . . . . . . . . . . . . . . . . . . . . . . . . . . . . . . . . . . . . . . . . . . . . . . . . . . . . . . . . .1-119
1
CHAPTER
1-1

1. Various Sending Methods
Adjusting the Contrast (Sharpness) . . . . . . . . . . . . . . . . . . . . . . . . . . . . . . . . . . . . . . . . . . . . 1-129
Storing/Erasing Scanning Mode . . . . . . . . . . . . . . . . . . . . . . . . . . . . . . . . . . . . . . . . . . . . . . . 1-131
Configuring Send Settings (Send Settings) . . . . . . . . . . . . . . . . . . . . . . . . . . . . . . . . . 1-140
1
Various Sending Methods
Specifying the Time to Send a Job (Delayed Send). . . . . . . . . . . . . . . . . . . . . . . . . . . . . . . . 1-140
E-mail Notification at the End of a Send Job (Job Done Notice) . . . . . . . . . . . . . . . . . . . . . . 1-143
Stamping Scanned Originals (Stamping Original) . . . . . . . . . . . . . . . . . . . . . . . . . . . . . . . . . 1-146
Sending a Job to a Fax. . . . . . . . . . . . . . . . . . . . . . . . . . . . . . . . . . . . . . . . . . . . . . . . . . . . . . 1-149
Sending a Job to an E-mail Address . . . . . . . . . . . . . . . . . . . . . . . . . . . . . . . . . . . . . . . . . . . 1-153
Sending a Job to Another I-Fax . . . . . . . . . . . . . . . . . . . . . . . . . . . . . . . . . . . . . . . . . . . . . . . 1-162
Sending a Job to a File Server . . . . . . . . . . . . . . . . . . . . . . . . . . . . . . . . . . . . . . . . . . . . . . . . 1-170
Sending a Job to a User Inbox . . . . . . . . . . . . . . . . . . . . . . . . . . . . . . . . . . . . . . . . . . . . . . . . 1-174
Previewing Originals (Preview) . . . . . . . . . . . . . . . . . . . . . . . . . . . . . . . . . . . . . . . . . . . 1-178
Job Recall (Recall) . . . . . . . . . . . . . . . . . . . . . . . . . . . . . . . . . . . . . . . . . . . . . . . . . . . . 1-184
Dialing With a PIN Code . . . . . . . . . . . . . . . . . . . . . . . . . . . . . . . . . . . . . . . . . . . . . . . . 1-186
Dialing With the PIN Code Before/After the Number . . . . . . . . . . . . . . . . . . . . . . . . . . . . . . . 1-186
Setting the PIN Code Position. . . . . . . . . . . . . . . . . . . . . . . . . . . . . . . . . . . . . . . . . . . . . . . . . 1-187
1-2

What This Machine Can Do
When you press [Send], the Send Basic Features screen appears. The Send
function enables you to scan documents and send them to specified destinations
via e-mail, I-fax, and fax. Alternatively, you can store the scanned documents in a
User Inbox for processing at a later date.
IMPORTANT
If the Canon Super G3 Fax Board-J1 (optional) is installed in this machine, refer to this
manual for basic fax instructions instead of the Fax Board’s manual.
Original
Mail Box
File
Scanning
I-Fax
1
Various Sending Methods
Fax
Group
I-Fax
E-mail
etc
E-mail
What This Machine Can Do
1-3
Place your originals
1
Specify New
Address:
Various Sending Methods
Sending to an
e-mail address
Sending to an I-fax
Sending to a file server
Sending to a
User Inbox
Scan Settings
p. 1-39
Specify the destinations registered.
You can store destinations from
the Additional Functions screen.
When the destination is registered in the
Address Book:
When the address is
registered in the Favorites
Buttons:
p. 1-66
p. 1-37
When the address is
registered in the One-touch
p. 1-64
Buttons:
[Option]
Specify the destinations
via a server:
You can store servers from
the Additional Functions screen.
p. 1-68
1-4
[Send Settings]
Send Settings
Start
What This Machine Can Do

IMPORTANT
•
The Send function is only available when the Image Reader-B1 is attached to the
machine.
•
You need to set up network settings if you want to send to an e-mail address, I-fax
address, or file server. (See the Network Guide.)
NOTE
To send documents to another fax machine, it is necessary for the Super G3 Fax Board
(optional) to be installed.
Send Basic Features Screen
The screen on the left, which appears when
[Send] is selected, is called the Send Basic
Features screen.
Displays current scan settings.
Address List
Displays a list of destinations.
➞p. 1-83
Press to select the scan settings.
1
Various Sending Methods
➞p. 1-37
Press to select a destination from the address book and search through the directory
listing on an LDAP (Lightweight Directory Access Protocol) server to specify a
destination.
➞p. 1-79
Press to check or change the destination information selected from the Address List.
➞p. 1-82
Press to erase a destination displayed in the Address List.
➞p. 1-184
Press to recall the set destination, scan settings, or send settings.
What This Machine Can Do
1-5
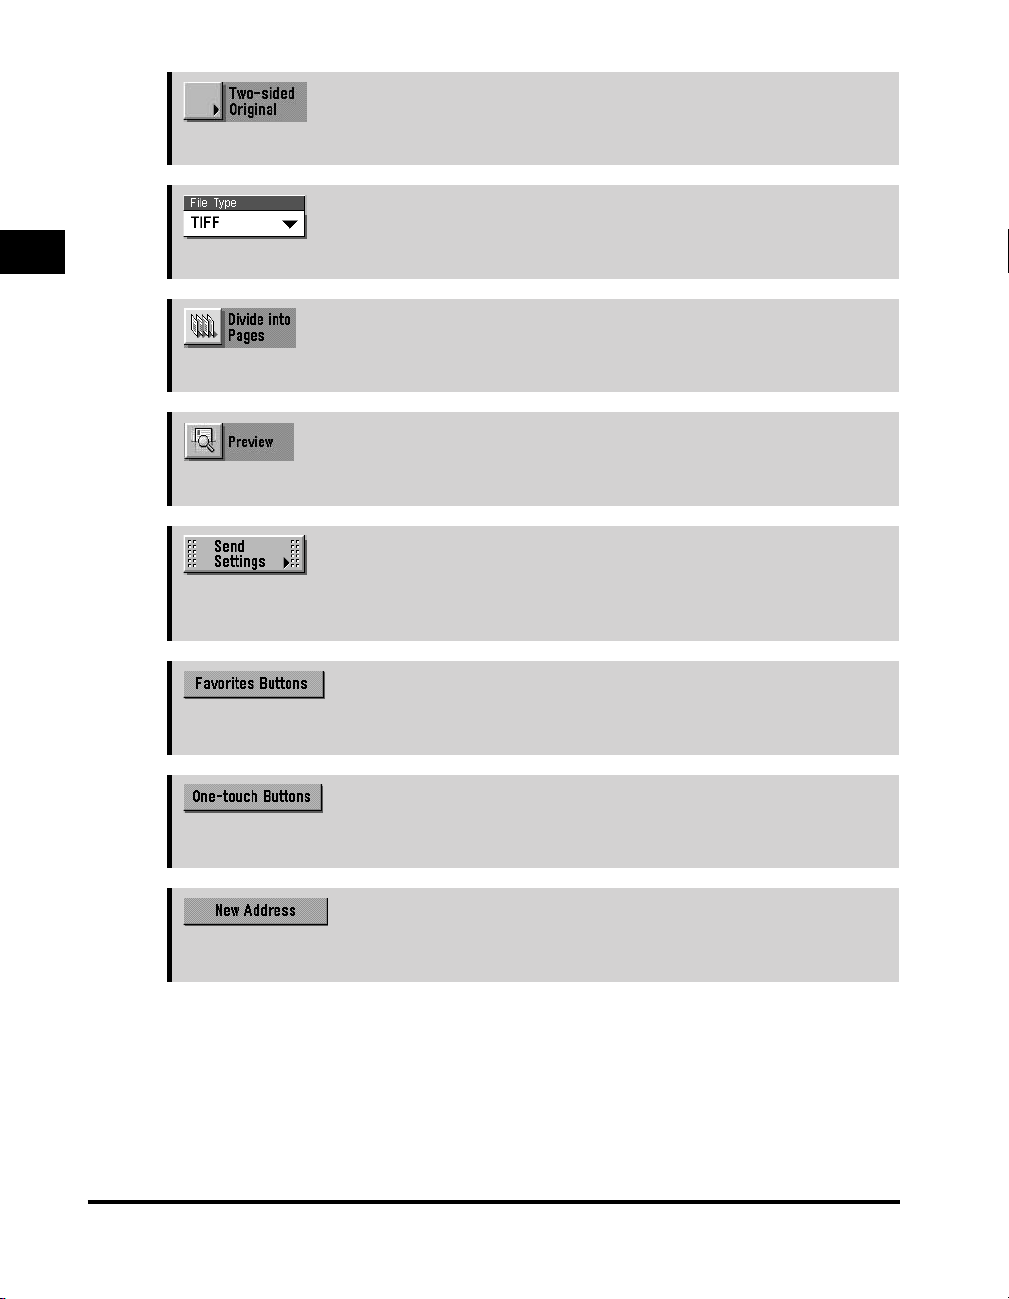
➞p. 1-86
Press to scan both sides of an original.
1
Press to select the file type (TIFF, MTIFF, PDF) of the document to be sent.
Press to divide a document into separate pages.
Press to preview the images on documents before sending.
Various Sending Methods
Press to set the send settings. You can specify to send a document at a specified time
and specify settings, such as e-mail and I-fax subject lines.
Press to recall the destination and settings registered in favorites buttons.
➞p. 1-178
➞p. 1-140
➞p. 1-66
➞p. 1-64
1-6
Press to select the destinations and settings registered in one-touch buttons.
➞p. 1-39
Press to specify addresses that are not registered in the Address Book.
What This Machine Can Do
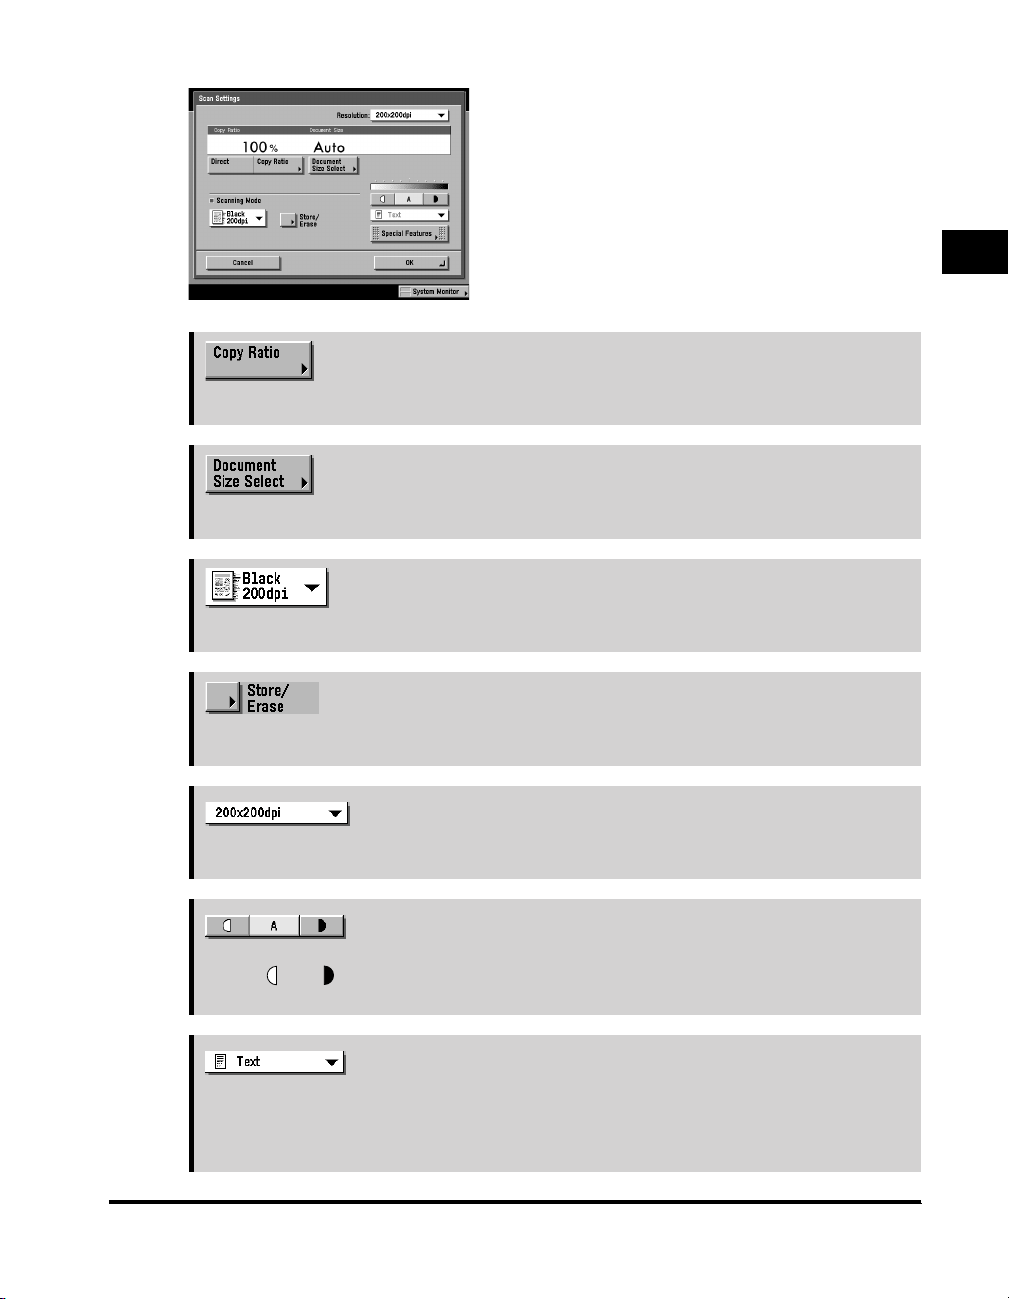
Scan Settings Screen
The screen on the left, which appears when you
press [Option] in the scan settings drop-down
list, is called the Scan Settings screen.
Display this screen to set the scan settings for
sending originals.
➞p. 1-105
Press to scan originals at a different scan (zoom) ratio.
➞p. 1-88
Press to select the size of the original that you want to scan.
➞p. 1-83
Press to select a stored scanning mode.
1
Various Sending Methods
➞p. 1-131
Press to store or erase the scanning mode.
➞p. 1-96
Press to select the resolution.
➞p. 1-98
Press [ ] or [ ] to manually control the scan exposure. Press [A] to select or cancel
Automatic Exposure Control.
➞p. 1-100
Press to select the type of original (Text, Text/Photo, or Photo) that you want to scan. You
can also select the type of photo (Printed Image or Photo) if you set the Photo mode
from the Additional Functions screen.
What This Machine Can Do
1-7
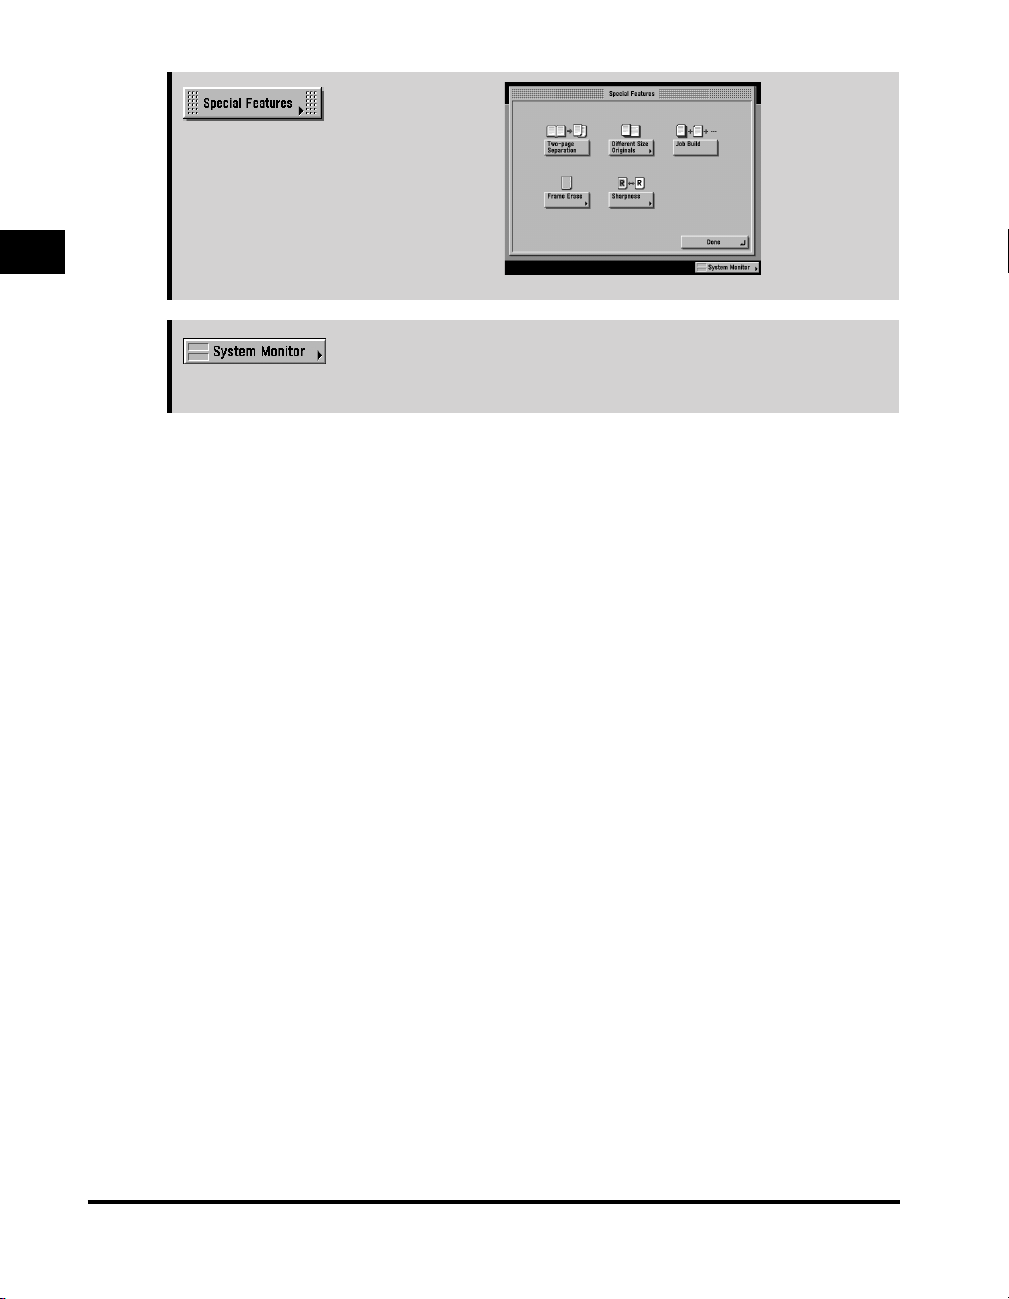
Press to select the Special Features
mode.
1
Press to check the status or details of a send or receive job, or to cancel a job.
Various Sending Methods
➞ The Reference Guide
1-8
What This Machine Can Do

Things You Must Do Before Using This Machine
This section describes the important setting registrations and procedures that must
be done before the machine is used for faxing operations.
According to recent amendments to the FCC (Federal Communications
Commission) rules governing the use of facsimile equipment in the United States,
the following sender information must be printed on every facsimile transmission:
• Your fax number
• Your personal name or company name
• Time and date of transmission
IMPORTANT
•
If you attempt to use the machine without registering the necessary information correctly,
the machine may not function properly.
•
You need to set up network settings if you want to send to an e-mail address, I-fax
address, or file server. (See the Network Guide.)
NOTE
To send documents to another fax machine, it is necessary for the Super G3 Fax Board
(optional) to be installed.
■ Setting the Fax Line Type
To set the type of telephone line connected to the machine, check whether it is a rotary
dial (rotary pulse) or a touch-tone type, and make the correct setting. (See “Selecting the
Type of Telephone Line (Tel Line Type),” on p. 1-11.)
1
Various Sending Methods
Things You Must Do Before Using This Machine
1-9
 Loading...