

Canon imageRUNNER 3300 series, imageRUNNER 2800 series, imageRUNNER 2200 series Function Manual
Page 1
Please read this guide before operating this equipment.
After you finish reading this guide, store it in a safe place for future reference.
ENG
Mail Box Function Guide
Mail Box Function Guide
Series
Page 2

About the Manuals for the Machine
The manuals for this machine are divided as follows. Please read them to suit your needs.
For Basic Use ................................................
Troubleshooting .............................................
For Basic Copying ...........................................
For Convenient Copying ....................................
For Basic Mail Box Function Use .........................
For Convenient Mail Box Function Use ..................
For Fax Use...................................................
For Convenient Fax Use ....................................
For Remote UI Use ..........................................
For Setting Up the Network Connection & Installing
the CD-ROM Software ......................................
Reference Guide
Copying Guide
Mail Box Function
Guide
(This Document)
Facsimile Guide
Remote UI Guide
Setup Guide
For Printer Use...............................................
For Installing Printer Driver, etc. .........................
PS/PCL Printer Guide
PS Driver Guide
PCL Driver Guide
For Connecting and Setting the Network.................
The manuals supplied with optional equipment are included in the list above.
Depending on the system configuration and product purchased, some manuals may be unavailable
(irrelevant).
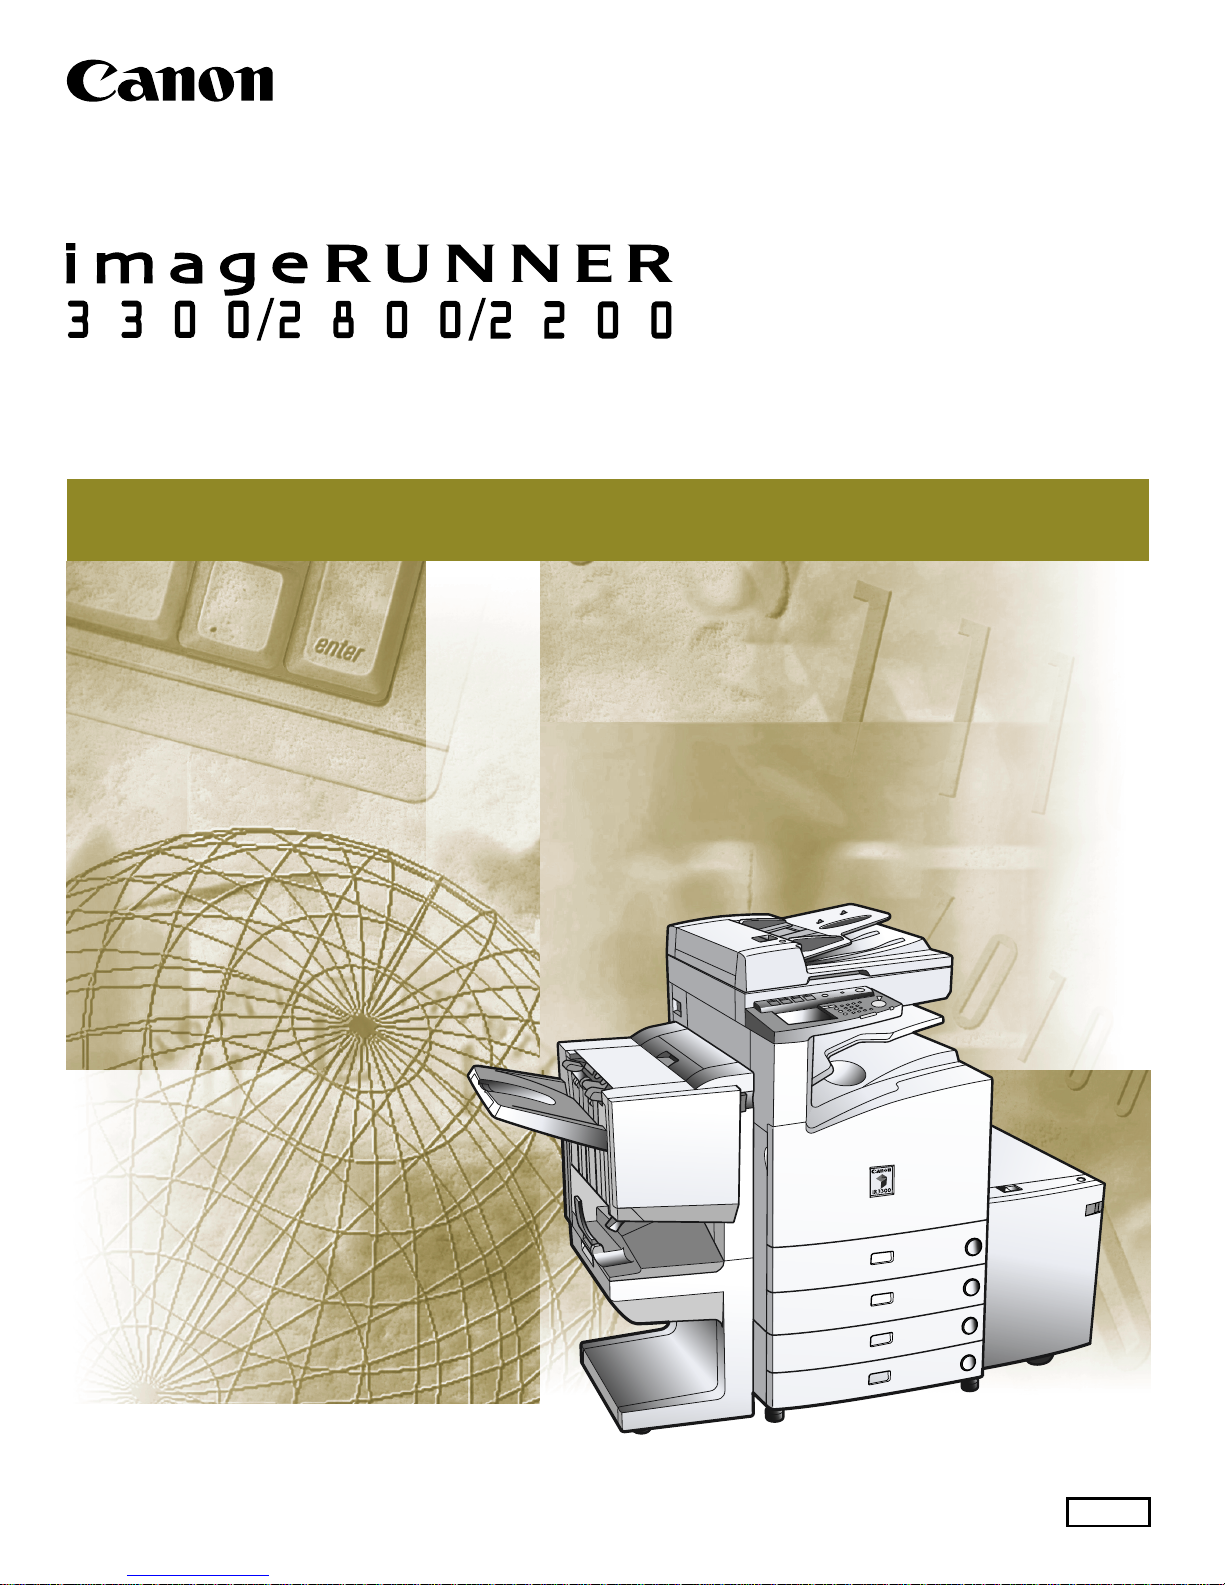
• The product illustration on the cover may differ slightly from your product.
Network Guide
Page 3
How This Manual Is Organized
Chap 1
Chap 2
Chap 3
Chap 4
Chap 5
Basic Use of the Mail Box Function
Scanning Originals into a Mail Box
Using/Arranging Documents Stored in the Mail Box
Setting/Storing the Mail Box Settings
Appendix
1
2
3
4
5
Copyright 2001 by Canon, Inc. All rights reserved.
No part of this publication may be reproduced or transmitted in any f orm or by any means , electronic or
mechanical, including photocopying and recording, or by any information storage or retrieval system
without the prior written permission of Canon, Inc.
• Considerable effort has been made to make sure that this manual is free of inaccuracies and omissions.
•However, as we are constantly improving our products, if you need an exact specification, please contact Canon.
Page 4

Table of Contents
How This Manual Is Organized . . . . . . . . . . . . . . . . . . . . . . . . . . . . . . . . . . . ii
Table of Contents. . . . . . . . . . . . . . . . . . . . . . . . . . . . . . . . . . . . . . . . . . . . . .iii
How to Use This Manual . . . . . . . . . . . . . . . . . . . . . . . . . . . . . . . . . . . . . . . .vi
Symbols Used in This Manual . . . . . . . . . . . . . . . . . . . . . . . . . . . . . . . . . . vi
Keys Used in This Manual . . . . . . . . . . . . . . . . . . . . . . . . . . . . . . . . . . . . . vi
Displays Used in This Manual . . . . . . . . . . . . . . . . . . . . . . . . . . . . . . . . . .vii
Illustrations Used in This Manual . . . . . . . . . . . . . . . . . . . . . . . . . . . . . . . .vii
Chapter 1 Basic Use of the Mail Box Function
What the imageRUNNER 3300/2800/2200 Series Machine Can Do. . . . .1-2
Storing Data and Printing It at Your Convenience . . . . . . . . . . . . . . . . . .1-2
Flow of Mail Box Operations . . . . . . . . . . . . . . . . . . . . . . . . . . . . . . . . . . .1-9
Storing Originals in the Mail Box . . . . . . . . . . . . . . . . . . . . . . . . . . . . . . .1-9
Printing Documents Stored in the Mail Box . . . . . . . . . . . . . . . . . . . . . .1-13
Chapter 2 Scanning Originals into a Mail Box
Specifying the Document Name Before Scanning (Document Name) . .2-3
Specifying Document Size (Document Size Select). . . . . . . . . . . . . . . . .2-5
Adjusting the Exposure and Image Quality Before Scanning the
Originals. . . . . . . . . . . . . . . . . . . . . . . . . . . . . . . . . . . . . . . . . . . . . . . . . . . .2-7
Manual Adjustment of the Scanning Exposure . . . . . . . . . . . . . . . . . . . .2-7
Selecting Image Quality. . . . . . . . . . . . . . . . . . . . . . . . . . . . . . . . . . . . . .2-8
Automatic Adjustment of Exposure and Image Quality . . . . . . . . . . . . .2-10
Changing the Scanning Ratio (Copy Ratio) . . . . . . . . . . . . . . . . . . . . . .2-12
Scanning Originals After Enlarging/Reducing Them to a Stan-
dard Record Size. . . . . . . . . . . . . . . . . . . . . . . . . . . . . . . . . . . . . . . . . .2-12
Specifying the Scanning Ratio by % . . . . . . . . . . . . . . . . . . . . . . . . . . .2-13
Automatically Setting the Ratio Based on the Selected Record Size
(Auto). . . . . . . . . . . . . . . . . . . . . . . . . . . . . . . . . . . . . . . . . . . . . . . . . . .2-15
Calculating the Scanning Ratio Based on the Original and
Record Size (Zoom Program) . . . . . . . . . . . . . . . . . . . . . . . . . . . . . . . .2-17
Enlarging/Reducing Originals at Scanning Ratios Set Independently
for X and Y Axes (XY Zoom) . . . . . . . . . . . . . . . . . . . . . . . . . . . . . . . . .2-21
Scanning Two-sided Originals (2-sided Original). . . . . . . . . . . . . . . . . .2-24
Scanning Facing Pages in a Book onto Two Separate Sheets in
One Step (Two-page Separation) . . . . . . . . . . . . . . . . . . . . . . . . . . . . . . .2-26
Scanning Originals for Use as a Booklet (Booklet Scanning). . . . . . . .2-28
Erasing Shadows and Frame Lines (Frame Erase) . . . . . . . . . . . . . . . .2-30
iii
Table of Contents
Page 5

Erasing Frame Lines and Storing the Original
(Original Frame Erase) . . . . . . . . . . . . . . . . . . . . . . . . . . . . . . . . . . . . .2-31
Erasing the Book Frame and Storing the Original
(Book Frame Erase) . . . . . . . . . . . . . . . . . . . . . . . . . . . . . . . . . . . . . . . 2-33
Erasing the Binding Holes and Storing the Original
(Binding Erase) . . . . . . . . . . . . . . . . . . . . . . . . . . . . . . . . . . . . . . . . . . .2-36
Reducing Two, Four, or Eight Originals to
Fit on a Single Print Sheet and Storing It (Image Combination). . . . . .2-39
Scanning Different-size Originals Together (Different Size Originals). 2-43
Scanning Separately-set Originals as One Document (Job Build). . . . 2-45
Inverting Original Images (Nega/Posi). . . . . . . . . . . . . . . . . . . . . . . . . . .2-48
Scanning Originals After Making Them Sharply Contrasted
(Sharpness) . . . . . . . . . . . . . . . . . . . . . . . . . . . . . . . . . . . . . . . . . . . . . . . .2-49
Storing/Recalling Scanning Modes (Mode Memory) . . . . . . . . . . . . . . .2-51
Storing Scanning Modes . . . . . . . . . . . . . . . . . . . . . . . . . . . . . . . . . . . . 2-51
Storing a Memory Key Name. . . . . . . . . . . . . . . . . . . . . . . . . . . . . . . . .2-54
Recalling Scanning Settings . . . . . . . . . . . . . . . . . . . . . . . . . . . . . . . . .2-56
Erasing a Scanning Setting. . . . . . . . . . . . . . . . . . . . . . . . . . . . . . . . . . 2-57
Chapter 3 Using/Arranging Documents Stored in the Mail Box
Printing a Document in a Mail Box After Changing the Settings . . . . . . 3-2
Selecting the Print Paper Size (Paper Select). . . . . . . . . . . . . . . . . . . . .3-2
Collating Prints (Finisher) . . . . . . . . . . . . . . . . . . . . . . . . . . . . . . . . . . . . 3-5
Printing on Two Sides (Two-sided Printing) . . . . . . . . . . . . . . . . . . . . . .3-16
Adding Job Separator Sheets, Front and Back Covers to Printed
Sets (Cover/Job Separator). . . . . . . . . . . . . . . . . . . . . . . . . . . . . . . . . .3-18
Making Prints for Use as a Booklet (Booklet) . . . . . . . . . . . . . . . . . . . .3-22
Storing/Recalling Printing Modes (Mode Memory) . . . . . . . . . . . . . . . .3-25
Printing Multiple Documents as One Document (Merge Documents). .3-33
Checking the Print Result or the Image of the Stored Document
(Sample Print) . . . . . . . . . . . . . . . . . . . . . . . . . . . . . . . . . . . . . . . . . . . . . . 3-36
Reserving Jobs . . . . . . . . . . . . . . . . . . . . . . . . . . . . . . . . . . . . . . . . . . . . . 3-38
Changing the Exposure During Printing. . . . . . . . . . . . . . . . . . . . . . . . .3-40
Checking the Document’s Detailed Information. . . . . . . . . . . . . . . . . . . 3-41
Changing the Name of a Document. . . . . . . . . . . . . . . . . . . . . . . . . . . . . 3-42
Moving a Document . . . . . . . . . . . . . . . . . . . . . . . . . . . . . . . . . . . . . . . . .3-44
Erasing a Document from a Mail Box . . . . . . . . . . . . . . . . . . . . . . . . . . .3-46
Chapter 4 Setting/Storing the Mail Box Settings
Mail Box Settings Table. . . . . . . . . . . . . . . . . . . . . . . . . . . . . . . . . . . . . . . .4-2
Setting/Storing the Mail Box . . . . . . . . . . . . . . . . . . . . . . . . . . . . . . . . . . .4-3
Table of Contents
iv
Page 6

Initializing a Mail Box . . . . . . . . . . . . . . . . . . . . . . . . . . . . . . . . . . . . . . . . .4-6
Setting the Photo Mode of the Mail Box Function . . . . . . . . . . . . . . . . . .4-9
Setting the Standard Mode for Scanning . . . . . . . . . . . . . . . . . . . . . . . .4-10
Storing New Standard Settings for Scanning. . . . . . . . . . . . . . . . . . . . .4-10
Initializing the Standard Mode for Scanning. . . . . . . . . . . . . . . . . . . . . .4-12
Chapter 5 Appendix
Chart of Available Combination of Functions. . . . . . . . . . . . . . . . . . . . . .5-2
Index . . . . . . . . . . . . . . . . . . . . . . . . . . . . . . . . . . . . . . . . . . . . . . . . . . . . . . .5-4
v
Table of Contents
Page 7
How to Use This Manual
Symbols Used in This Manual
The following symbols are used in this manual, for explanations of procedures and
restrictions, handling precautions, and instructions that should be observed for safety.
WARNING
CAUTION
IMPORTANT
NOTE
Indicates a warning concerning operations that may lead to death or injury
to persons if not performed correctly. In order to use the machine safely,
always pay attention to these warnings.
Indicates a caution concerning operations that may lead to injury to
persons or damage to property if not performed correctly. In order to use
the machine safely, always pay attention to these cautions.
Indicates operational warnings and restrictions. Be certain to read these
items to operate the machine correctly, and to avoid damage to the
machine.
Indicates notes for operation or additional explanations. Reading these
notes is highly recommended.
Keys Used in This Manual
The following symbols and key names are used in this manual.
• Control panel keys……………… (Start)
•Touch panel display keys………“OK”
How to Use This Manual
vi
Page 8
Displays Used in This Manual
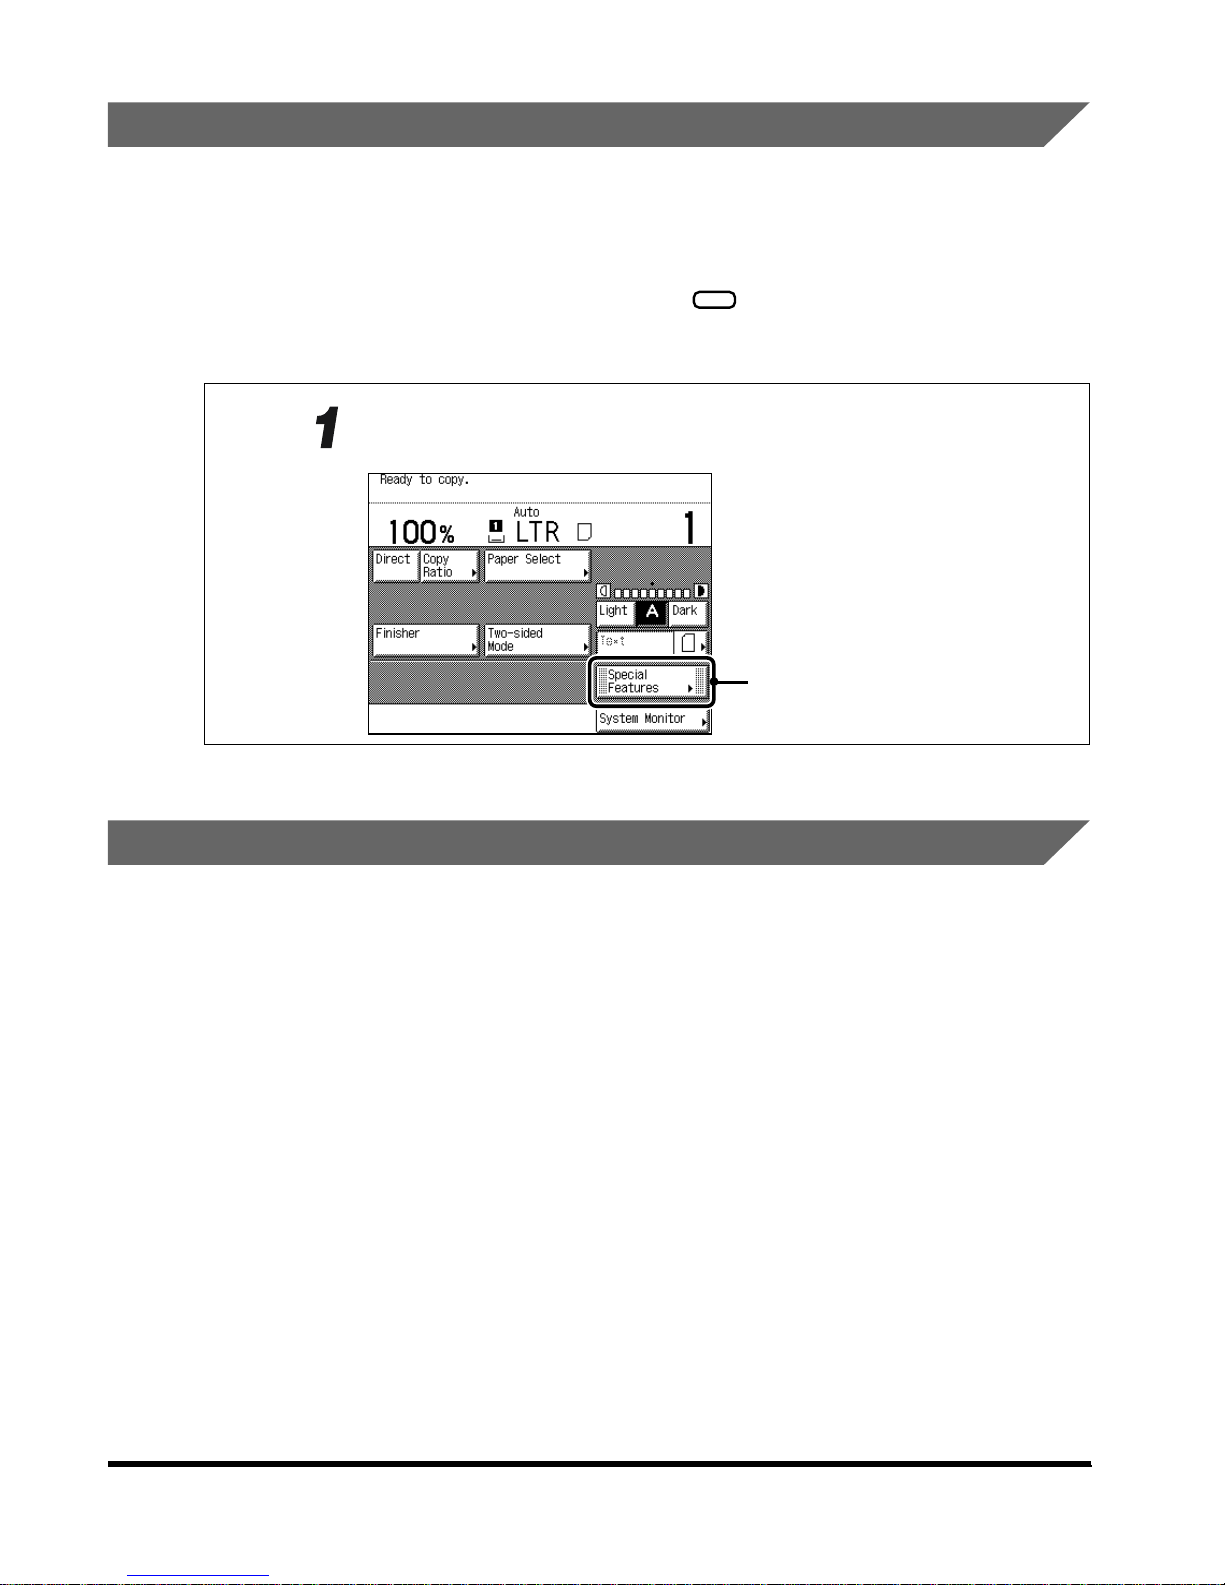
Screenshots of the touch panel display used in this manual are those taken when the
Finisher-J1, Cassette Feeding Unit-W1, Feeder (DADF-H1), Printer Kit, and FAX Board are
attached to the imageRUNNER 3300. Note that functions that cannot be used depending on
the model or options, are not displayed on the touch panel display.
The keys which you should press are marked with , as shown below.
When multiple keys can be pressed on the touch panel display, all keys are marked. Select
the keys which suit your needs.
Place the original, and press “Special Features.”
Illustrations Used in This Manual
Unless otherwise noted, illustrations used in this manual are those taken when the FinisherJ1 and Cassette Feeding Unit-W1 are attached to the imageRUNNER 3300.
Press this key for operation
vii
How to Use This Manual
Page 9

Basic Use of the Mail Box Function
This chapter describes the basic use of the Mail Box function.
What the imageRUNNER 3300/2800/2200 Series Machine Can Do. . . . . . . . . . . . . . . .1-2
Storing Data and Printing It at Your Convenience . . . . . . . . . . . . . . . . . . . . . . . . . . . . . . . . . . . .1-2
Flow of Mail Box Operations. . . . . . . . . . . . . . . . . . . . . . . . . . . . . . . . . . . . . . . . . . . . . . .1-9
Storing Originals in the Mail Box . . . . . . . . . . . . . . . . . . . . . . . . . . . . . . . . . . . . . . . . . . . . . . . . .1-9
Printing Documents Stored in the Mail Box . . . . . . . . . . . . . . . . . . . . . . . . . . . . . . . . . . . . . . . .1-13
1
CHAPTER
1-1
Page 10
1
What the imageRUNNER 3300/2800/2200 Series
Machine Can Do
Most operations of this machine are done from the touch panel display. To use the Mail Box
function, press keys in accordance with the message displayed on the touch panel display.
Storing Data and Printing It at Your Convenience
Basic Use of the Mail Box Function
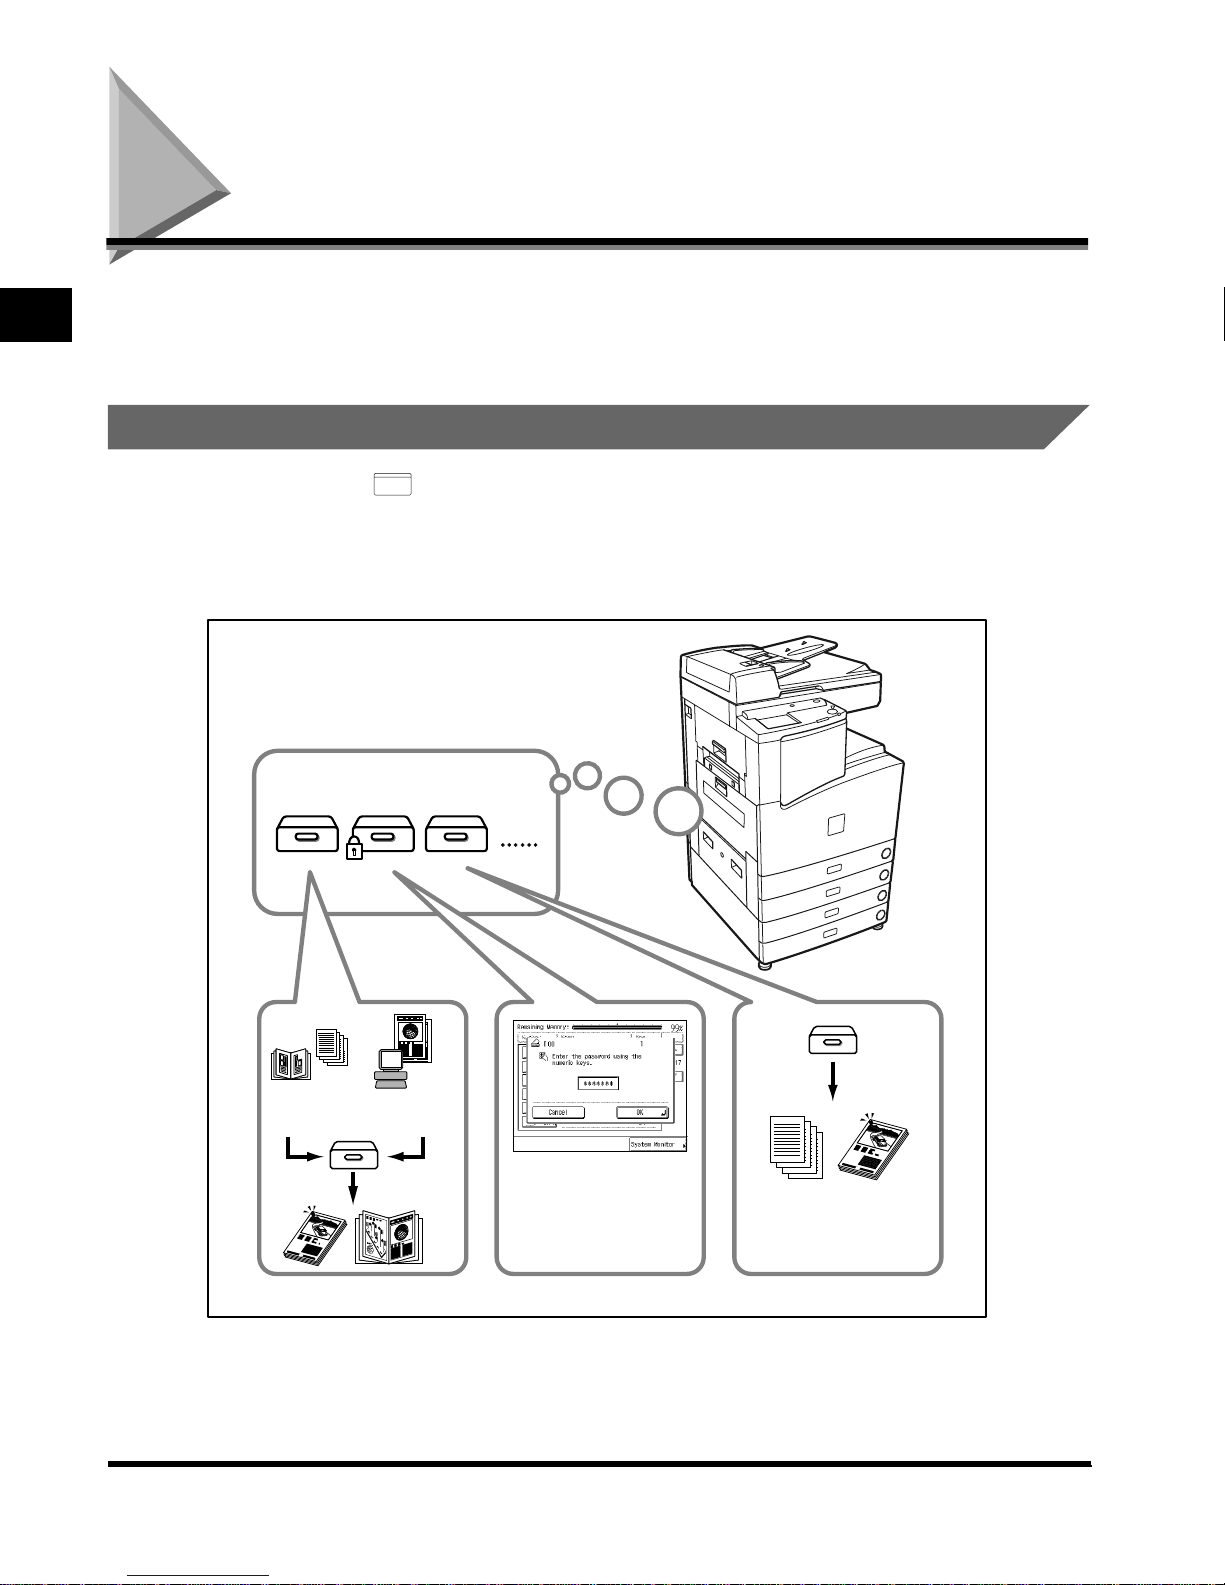
When you press (Mail Box), the Mail Box Selection screen appears. The Mail Box
MAIL BOX
function allows you to store data scanned using this machine, or data sent from a personal
computer, as if storing documents in binders. The documents (data) stored in a Mail Box can
be printed at any time with the print settings you want. Also, when you select the Merge
Documents mode, you can print documents stored separately, together as one document.
100 mail boxes
Scanning
various
originals
1
1-2
What the imageRUNNER 3300/2800/2200 Series Machine Can Do
Sending
data from
computers
Printing
merged
documents
By storing a password,
you can print data
without other people
observing it.
1
You can print data
whenever desired, with
the necessary settings.
Page 11

Mail Box Selection screen
Document Selection screen
Mail Box Selection screen
Print Screen
Scan screen
Document Selection screen
COPY FAX
SCAN
MAIL BOX
Select a mail box
You can store a name for a
mail box or a password in the
Mail Box Settings of
Additional Functions. (See
’Setting/Storing the Mail Box
Settings,’ in Chapter 4.)
Scanned originals and
documents sent from personal
computers are stored.
1
Basic Use of the Mail Box Function
Select a document
Prints documents stored in a mail box. When you
press Change P Settings, you can change the
Print settings. (See ’Using/Arranging Documents
Stored in the Mail Box,’ in Chapter 3.)
Scan screenPrint screen
You can select various settings when scanning
originals. (See ’Scanning Originals into a Mail
Box,’ in Chapter 2.)
Start
What the imageRUNNER 3300/2800/2200 Series Machine Can Do
1-3
Page 12
IMPORTANT
•
Each mail box can store up to 100 items of document or image data.
You can store a total of up to 1,000 items of document or image data, or up to 3,700 pages (LTR-
•
size Canon Standard Chart) of document or image data, using all of the mail boxes.
•
Depending on the conditions under which the hard disk is used, it may not be possible to attain
the above values, in some cases.
1
Basic Use of the Mail Box Function
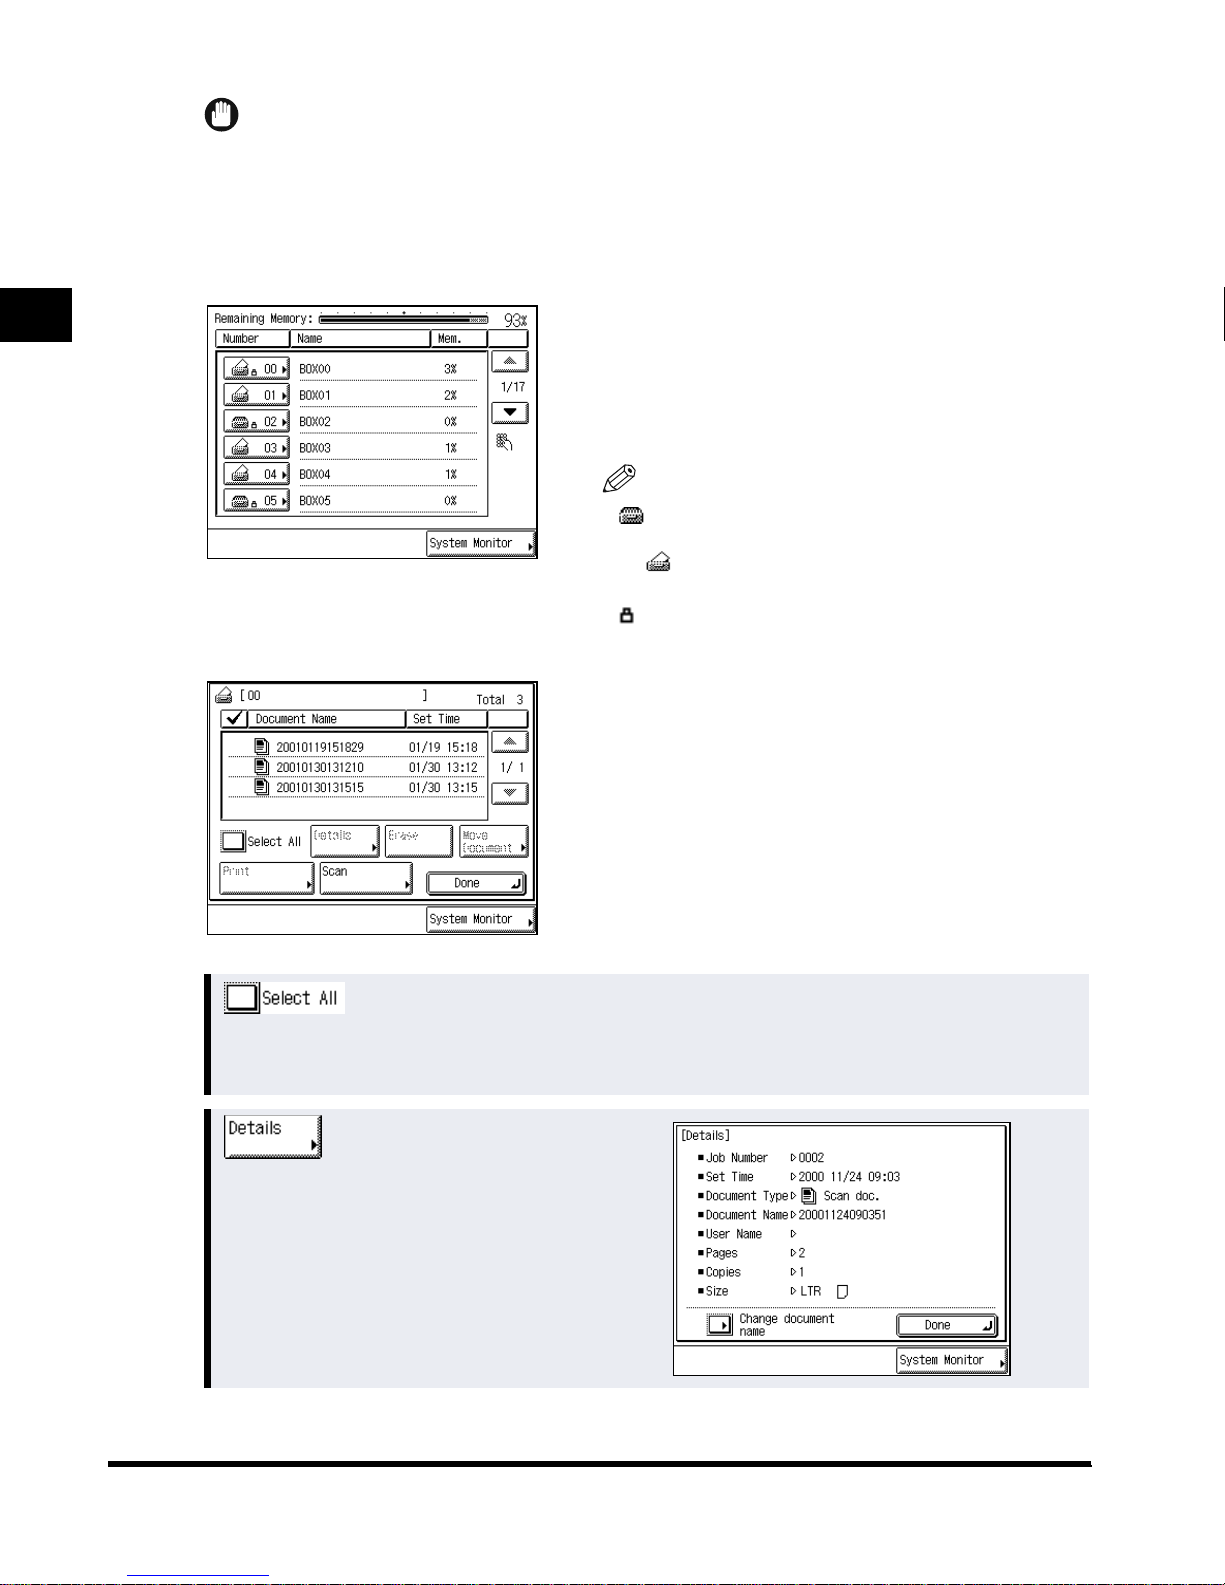
Mail Box Selection screen
The screen on the left, which appears when you select
the mail box functions, is called the Mail Bo x Selection
screen.
Mail Box numbers, names and available memory are
displayed for each mail box.
NOTE
•
is called a mail box icon. If a document is stored
in a mail box, that mail box is displayed with
the icon.
If a mail box is set with a password, a locked mark
•
is displayed next to the icon of that mail box.
Document Selection screen
The screen on the left, which appears when you select
the mail box you want, is called the Document
Selection screen.
If a password is stored, the Document Selection
screen appears after you enter the password.
Press to select all documents in the mail box. If a document is selected, then it will become “Clear
Selection.”
Press to check the details of a document
stored in the mail box.
1-4
What the imageRUNNER 3300/2800/2200 Series Machine Can Do
See p. 1-13.
See p. 3-42.
Page 13
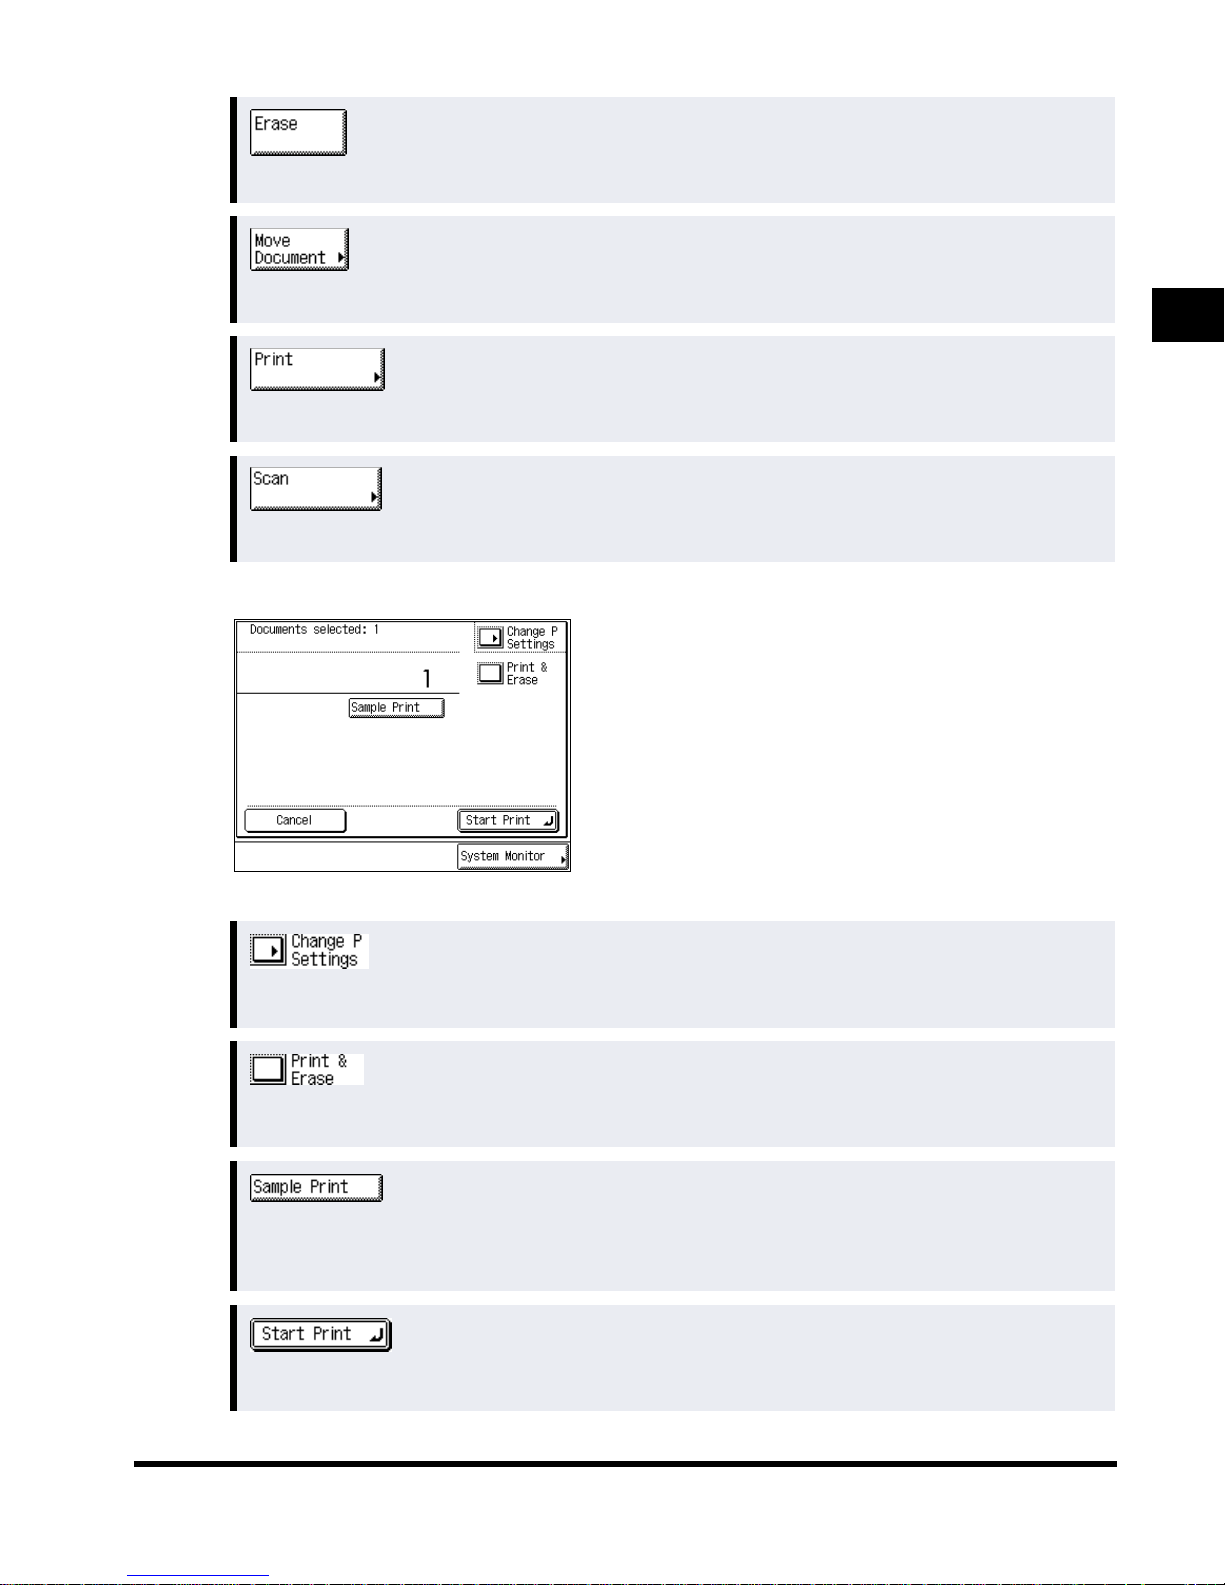
See p. 3-46.
Press to erase a document stored in the mail box.
See p. 3-44.
Press to move a document to another mail box.
See p. 1-13.
Press to print documents.
See p. 1-9.
Press to scan originals.
Print screen
The screen on the left, which appears when you select
documents to print and press “Print” from the
Document Selection screen, is called the Print screen.
The Print screen allows you to print documents from
the mail box.
1
Basic Use of the Mail Box Function
See p. 1-13.
Press to change the settings when you print a document.
See p. 1-13.
Press to automatically erase a document after it is printed.
See p. 3-36.
Press to print an image sample for you to check the print result and the contents of a document
stored in the mail box.
See p. 1-13.
Press to start printing.
What the imageRUNNER 3300/2800/2200 Series Machine Can Do
1-5
Page 14
1
Basic Use of the Mail Box Function
Change Print Settings screen
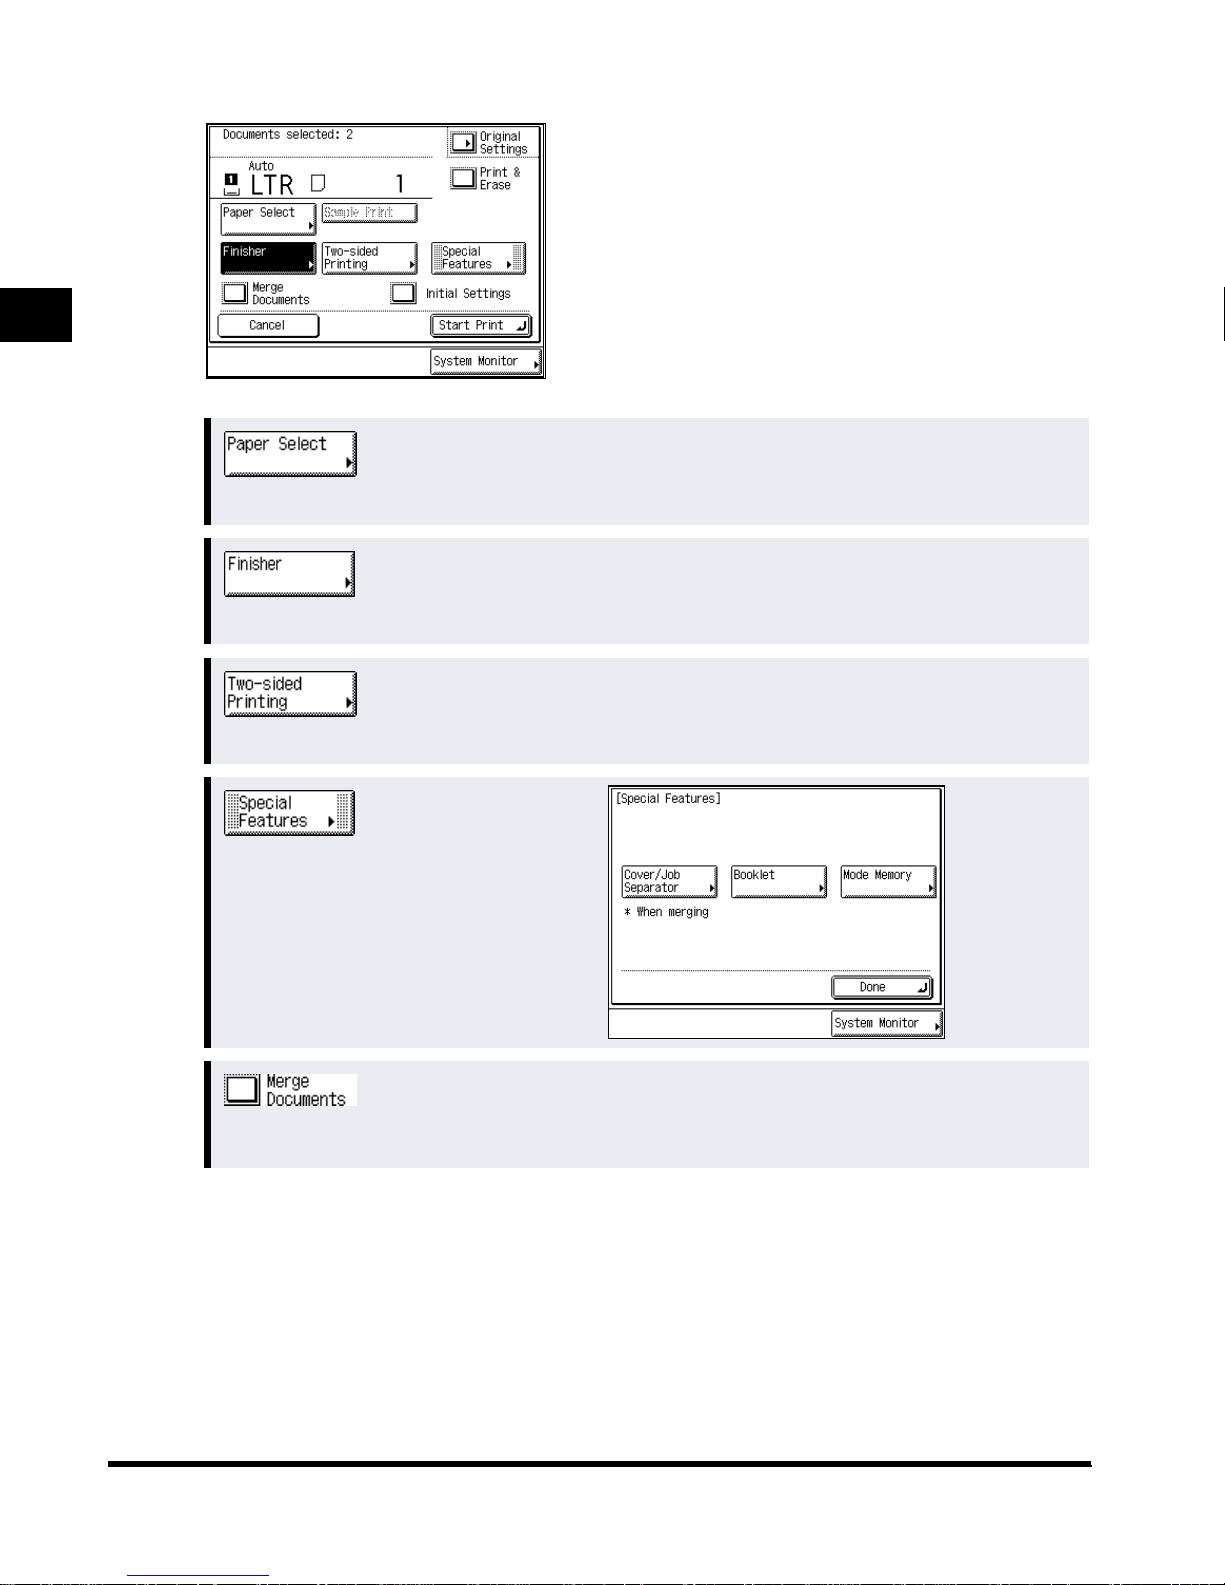
The screen on the left, which appears when you press
“Change P Settings” from the Print screen, is called
the Change Print Settings screen.
The Change Print Settings screen allows you to
change the settings made when the documents are
stored in the mail box, and print them.
See p. 3-2.
Press to select the paper and the paper source.
See p. 3-5.
Press to select or cancel the Collate, Group, or Staple modes.
See p. 3-16.
Press to select the Two-sided Print mode.
Press to display the screen on the right
when you want to make a Booklet print
and Cover/Job Separator print.
Press the function keys on the screen on
the right to set the desired mode.
See p. 3-33.
Press to merge multiple documents into one document.
1-6
What the imageRUNNER 3300/2800/2200 Series Machine Can Do
Page 15
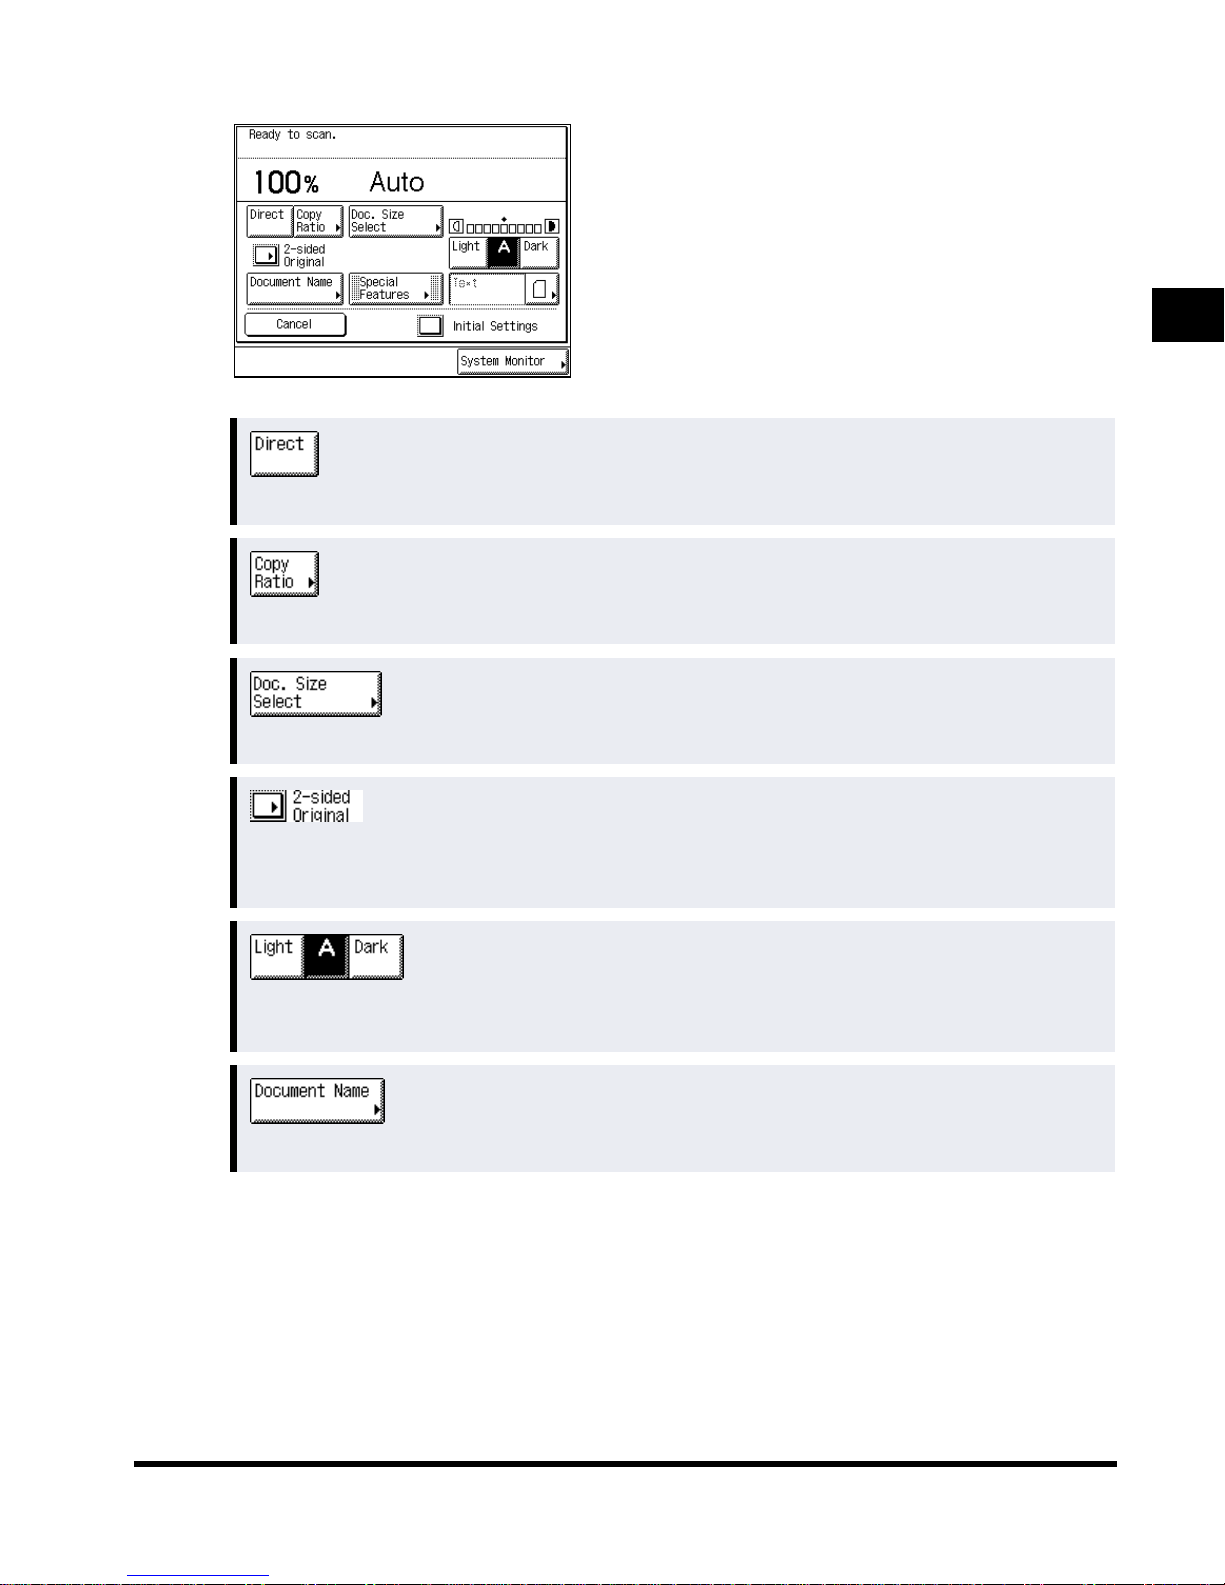
Scan screen
The screen on the left, which appears when you press
“Scan” from the Document Selection screen, is called
the Scan screen.
The Scan screen allows you to scan documents into
the mail box.
See p. 2-43.
Press to make copies of the same size as the original.
See p. 2-43.
Press to make copies at a different copy ratio.
See p. 2-5.
Press to select the size of the original you want to scan.
1
Basic Use of the Mail Box Function
See p. 2-24.
Press to select the Two-sided mode. The machine automatically turns over two-sided originals and
scans them as two-sided image data.
See p. 2-7.
Press “Light” or “Dark” to manually control print exposure. Press “A” to select or cancel Auto
Exposure Control.
See p. 2-3.
Press to name a document to be stored.
What the imageRUNNER 3300/2800/2200 Series Machine Can Do
1-7
Page 16
1
Basic Use of the Mail Box Function
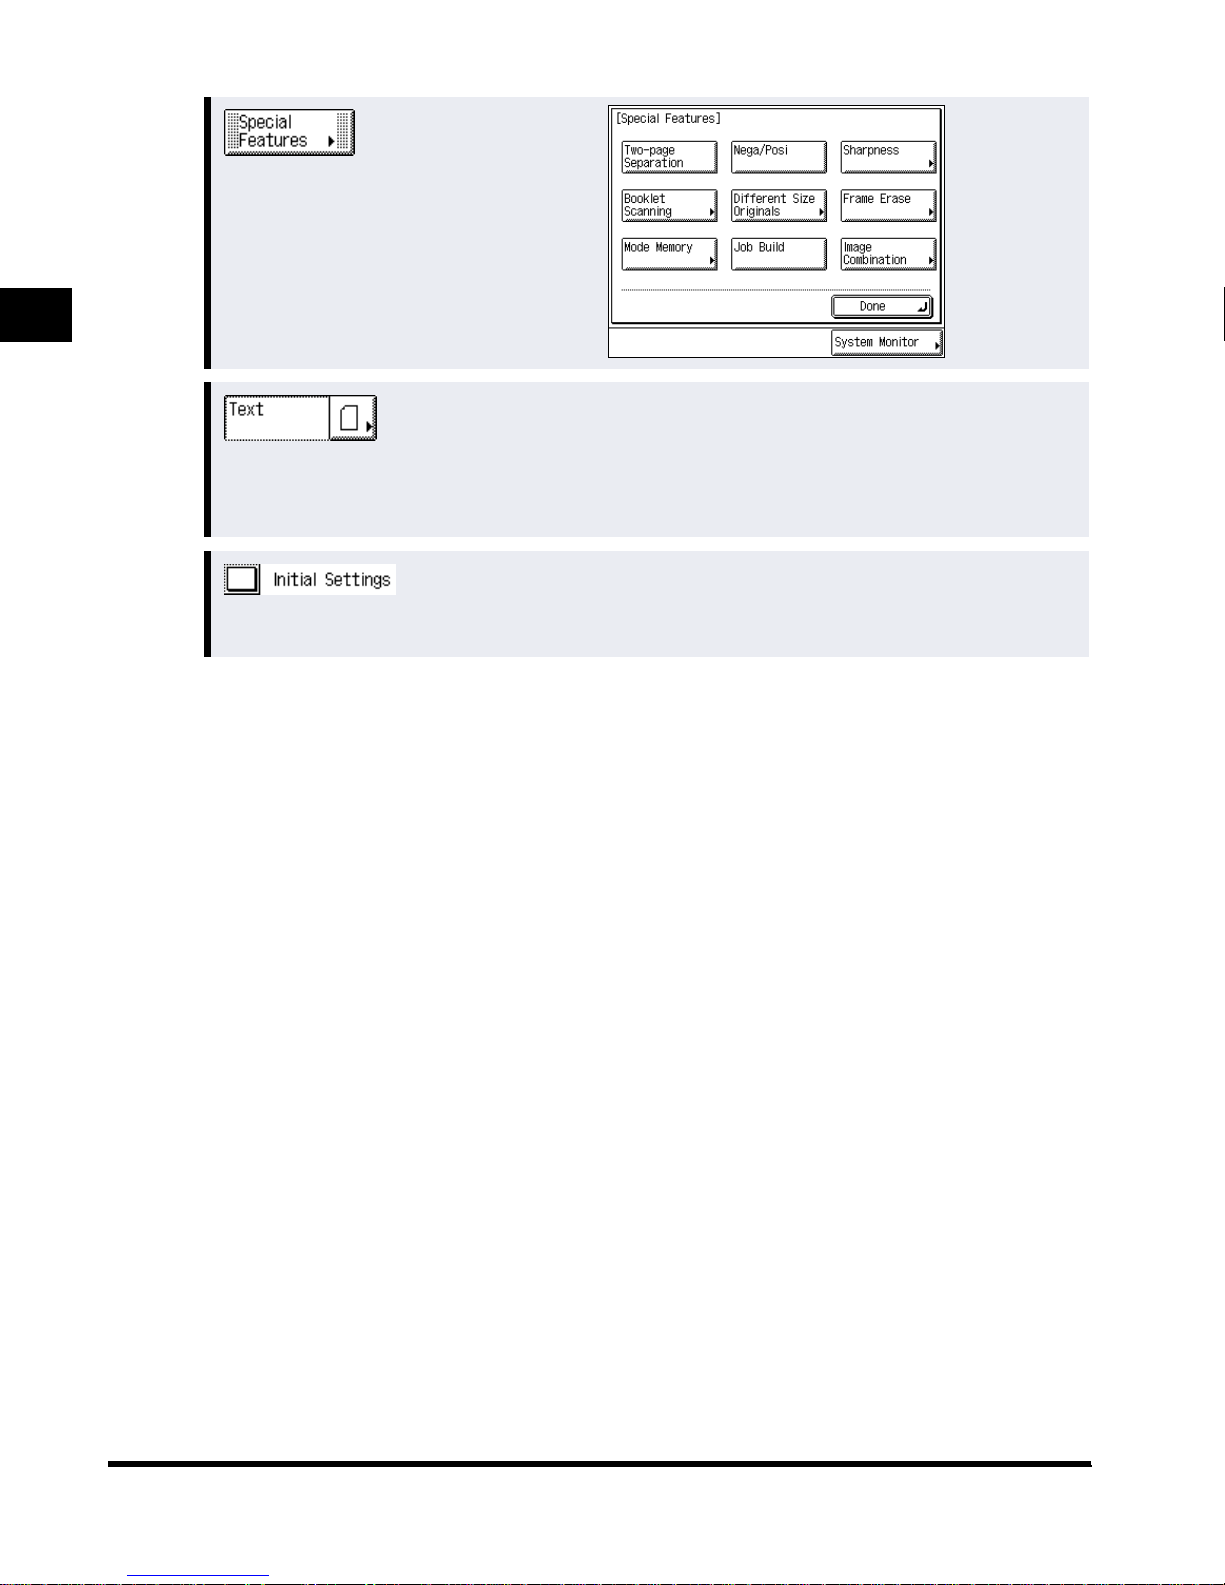
Press to select the Special Features
mode.
See p. 2-8.
Press to scan originals specifying the image quality (text only, text and photo, photo only). You can
also select the type of photo (printed image/photo) when you set the Photo mode in Additional
Functions beforehand.
Press to cancel all settings at once. (The machine returns to the Standard Scanning mode.)
1-8
What the imageRUNNER 3300/2800/2200 Series Machine Can Do
Page 17
Flow of Mail Box Operations
This section describes the basic flow of Mail Box operations in two parts: scanning originals
and printing.
NOTE
• For the following items, see the
- Main power and control panel power
- Routine maintenance
Storing Originals in the Mail Box
This operation is the same as when you make copies of a document. First, place the
originals you want to store in the feeder or on the platen glass, and set the desired modes.
When the machine is used as a network printer, you can store data into the mail box from a
computer.
Reference Guide
1
.
Basic Use of the Mail Box Function
1
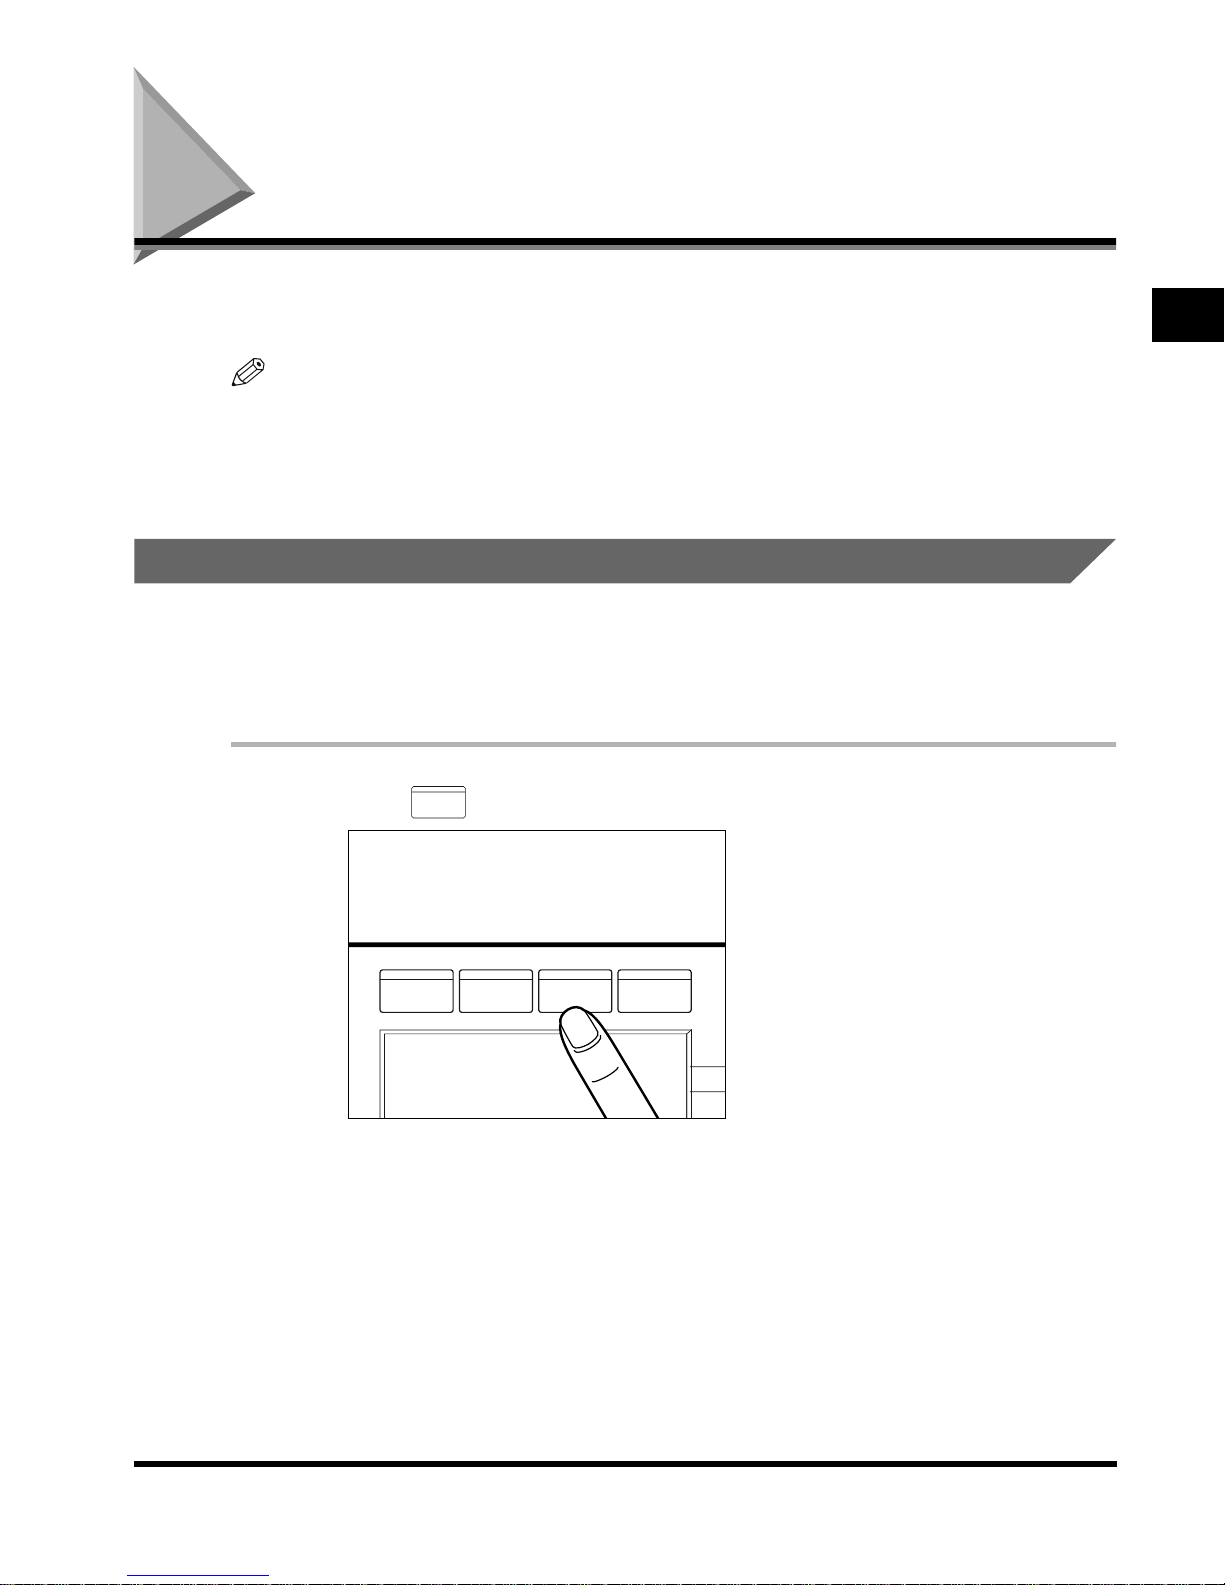
Press (Mail Box).
MAIL BOX
COPY FAX
MAIL BOX
SCAN
Flow of Mail Box Operations
1-9
Page 18
1
Basic Use of the Mail Box Function
2
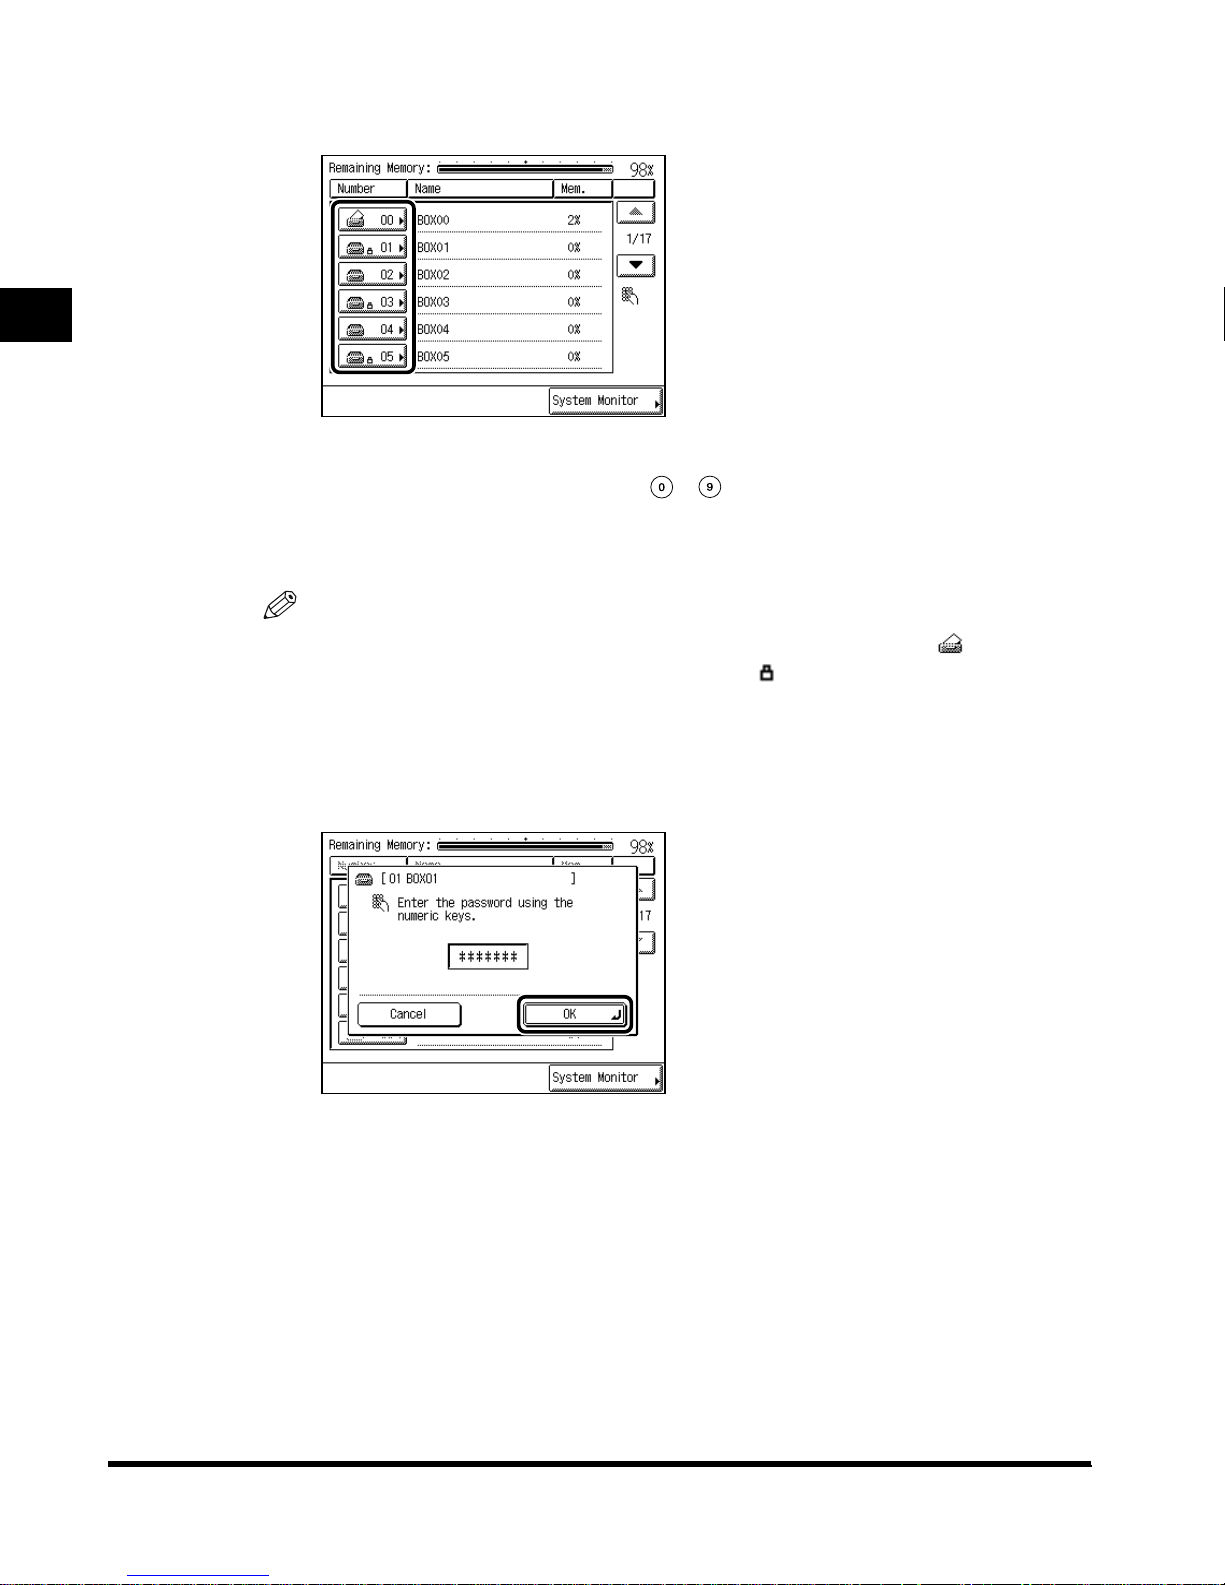
Select the desired mail box number.
If the desired mail box is not displayed, press “▲” or “▼.”
If you enter the mail box number using - (numeric keys), press “OK” after entering
the mail box number.
If you make a mistake when entering values, press “Done,” and enter the correct value.
NOTE
• If a document is stored in a mail box, that mail box is displayed with the icon.
• If a mail box is set with a password, a locked mark is displayed next to the icon of that
mail box.
• If you make a mistake when selecting a mail box, press “Done.”
3
Enter the password, and press “OK.”
Enter the password set when the mail box was stored. (See ‘Setting/ Storing the Mail Box,’
on p. 4-3.)
If a password was not stored, this operation is not necessary.
1-10
Flow of Mail Box Operations
Page 19
4
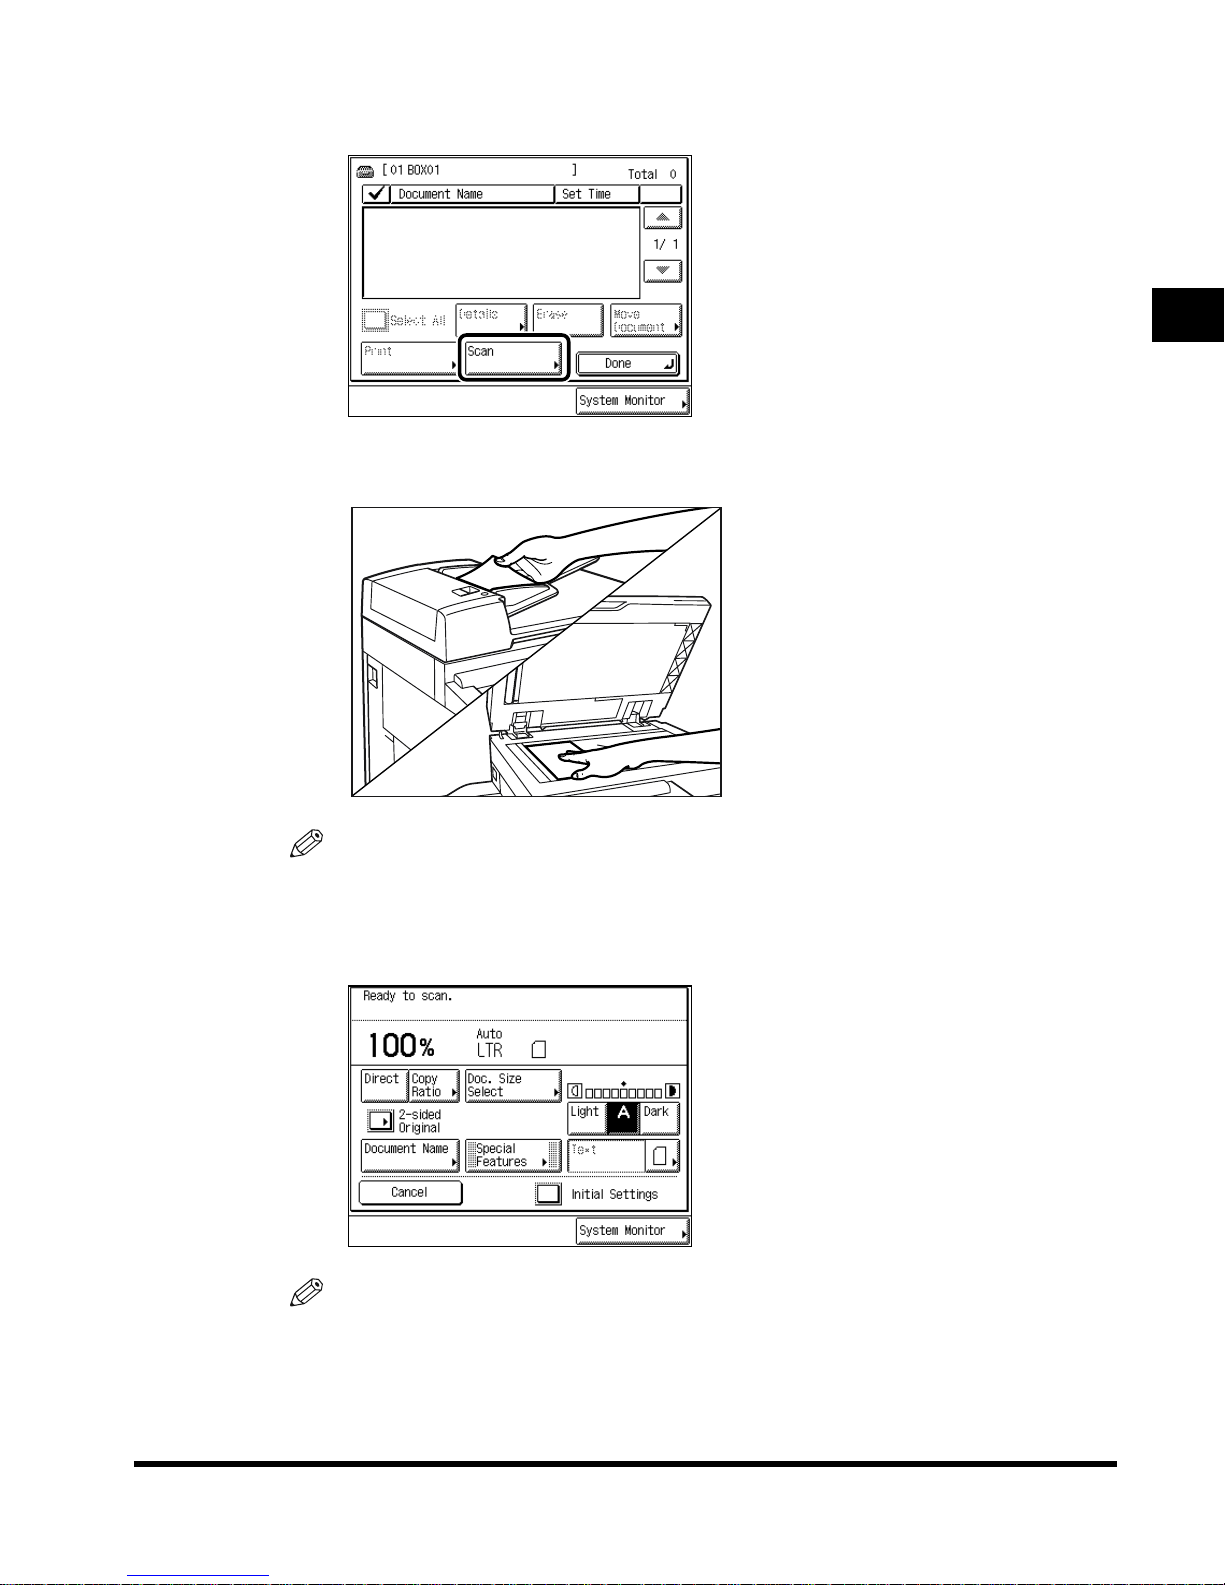
Press “Scan. ”
5
Place your originals.
1
NOTE
• For instructions on how to place the original, see the Reference Guide.
6
Specify the scanning mode.
NOTE
• You can set various modes when scanning the original, as when making copies.
• If you want to give the document a name when scanning it, press “Document Name.” (See
‘Specifying the Document Name Before Scanning (Document Name),’ on p. 2-3.)
Basic Use of the Mail Box Function
Flow of Mail Box Operations
1-11
Page 20
7
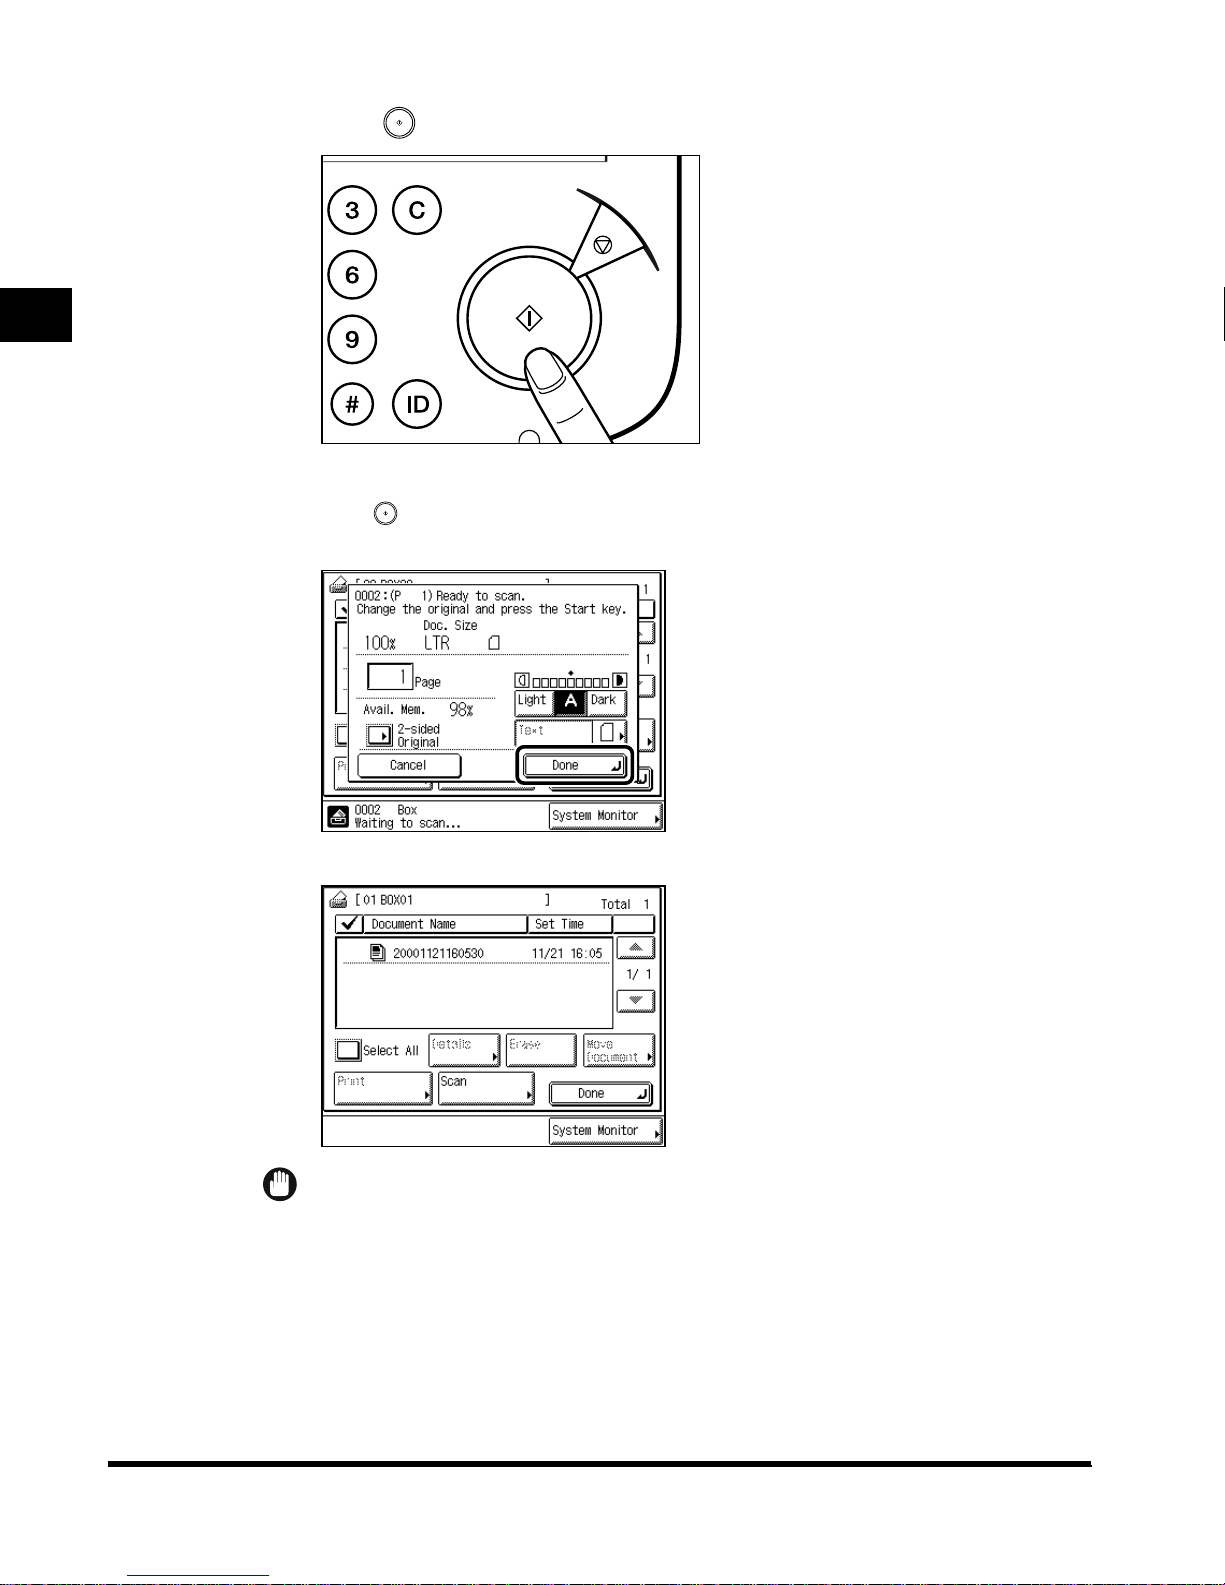
Press (Start).
1
Basic Use of the Mail Box Function
F
O
Y
Clear
Stop
Start
Power
● When the screen below appears:
Press (Start) once for each original. When scanning is completed, press
“Done.”
When scanning is completed, the scanned data is stored in the selected mail box.
IMPORTANT
• You cannot change the settings, such as the scanning size or record size , during scanning.
• The stored data is automatically deleted after three days. This can be changed to a value
between 0 (no limit) and 30 days. (See ‘Setting/Storing the Mail Box,’ on p. 4-3.)
1-12
Flow of Mail Box Operations
Page 21
NOTE
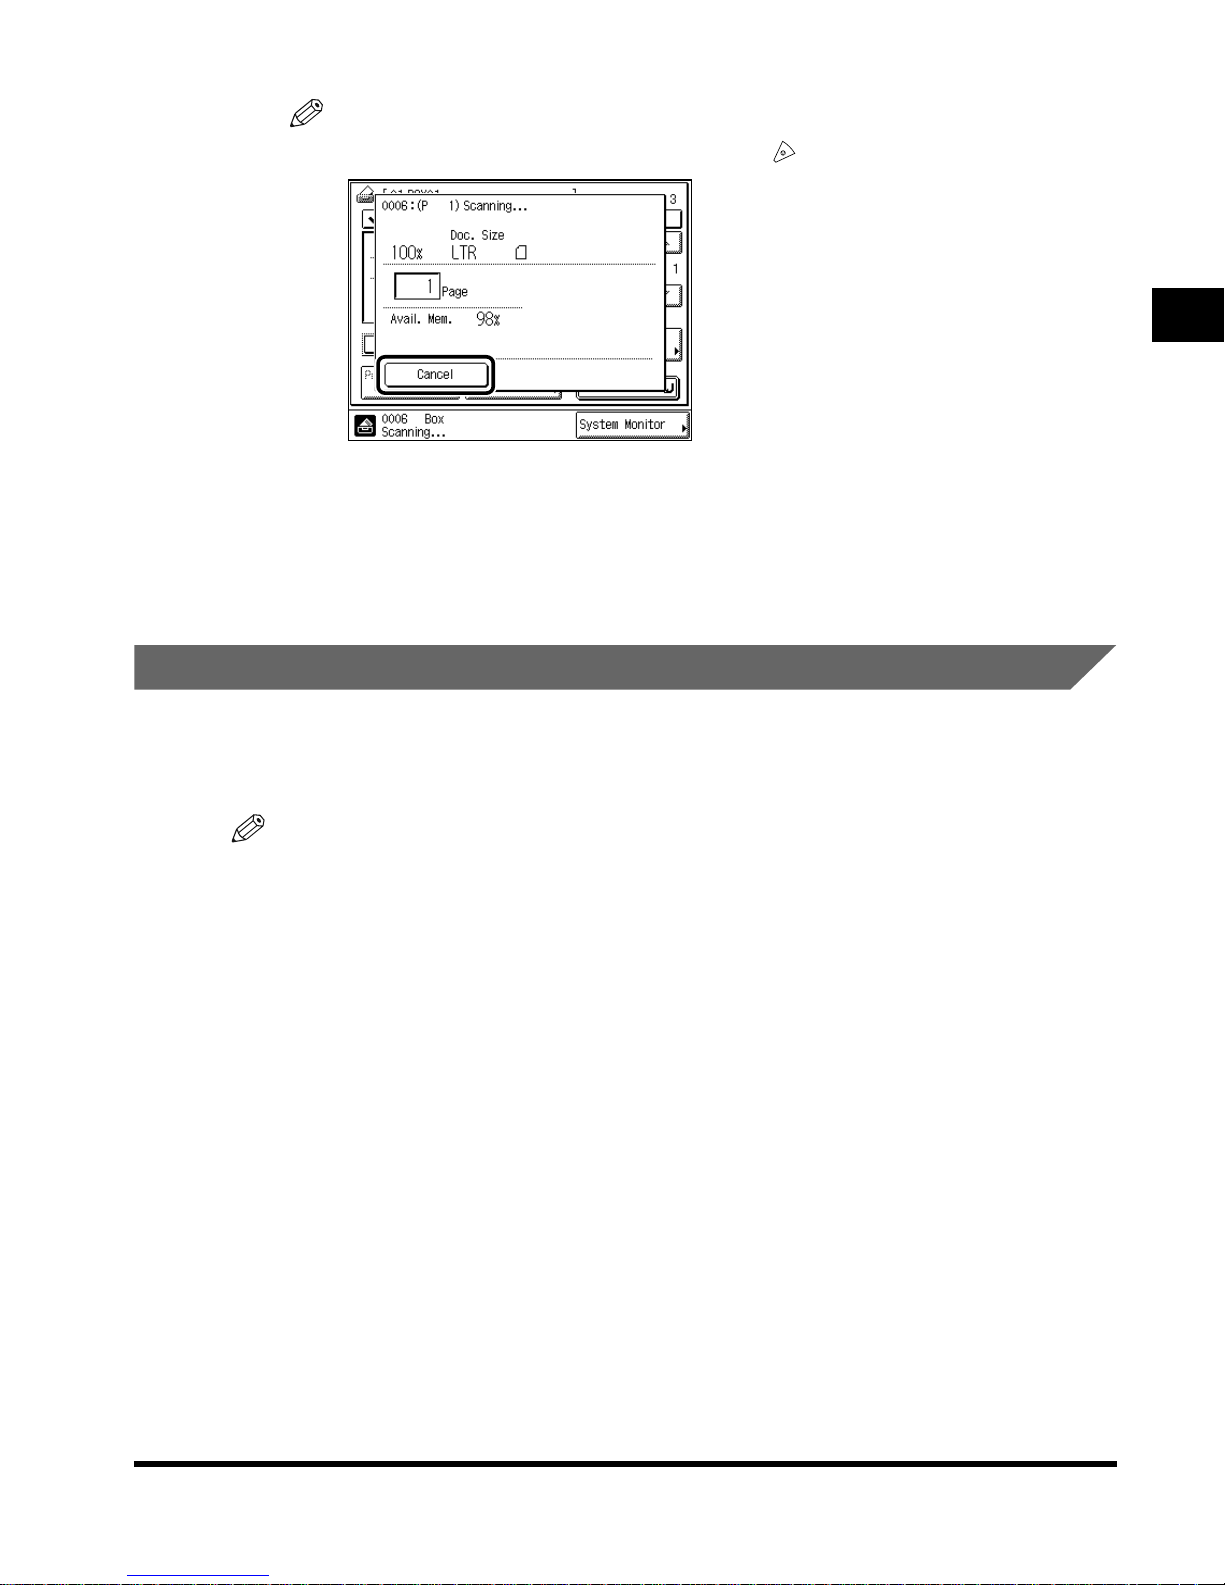
• If you want to cancel scanning, press “Cancel” or (Stop).
• If you store a document without specifying its name, the document is automatically given
the name of <year, month, date, and time>. For example, if the data was scanned at 1:35
p.m., 41 seconds, on August 12, 2000, the document’s name is <20000812133541>.
• You can change the name of the stored document. (See ‘Changing the Name of a
Document,’ on p. 3-42.)
Printing Documents Stored in the Mail Box
1
You can print documents in a mail box once they have been stored. When the machine is
used as a network printer, you can specify printing from a computer on the network. For
details on how to operate the machine from personal computers, see the Remote UI Guide.
NOTE
• You can select and print up to 32 documents in one mail box, at a time. When you merge
documents, you can select and print up to 100 documents. However, when there are reserved
jobs in the mail box, the number you can select and print varies depending on the number of
documents in the reserved jobs.
• You can only select multiple documents for printing when those documents are stored in the
same mail box. To print multiple documents stored in different mail boxes, you need to move the
documents to one of the mail boxes beforehand. (See ‘Moving a Document,’ on p. 3-44.)
• When documents are printed without changing the settings, the documents sent from computers
are printed with the settings selected from the computers, and the documents scanned into
memory are printed with the Standard Local Print settings. (See the Reference Guide.)
Basic Use of the Mail Box Function
Flow of Mail Box Operations
1-13
Page 22
1
1
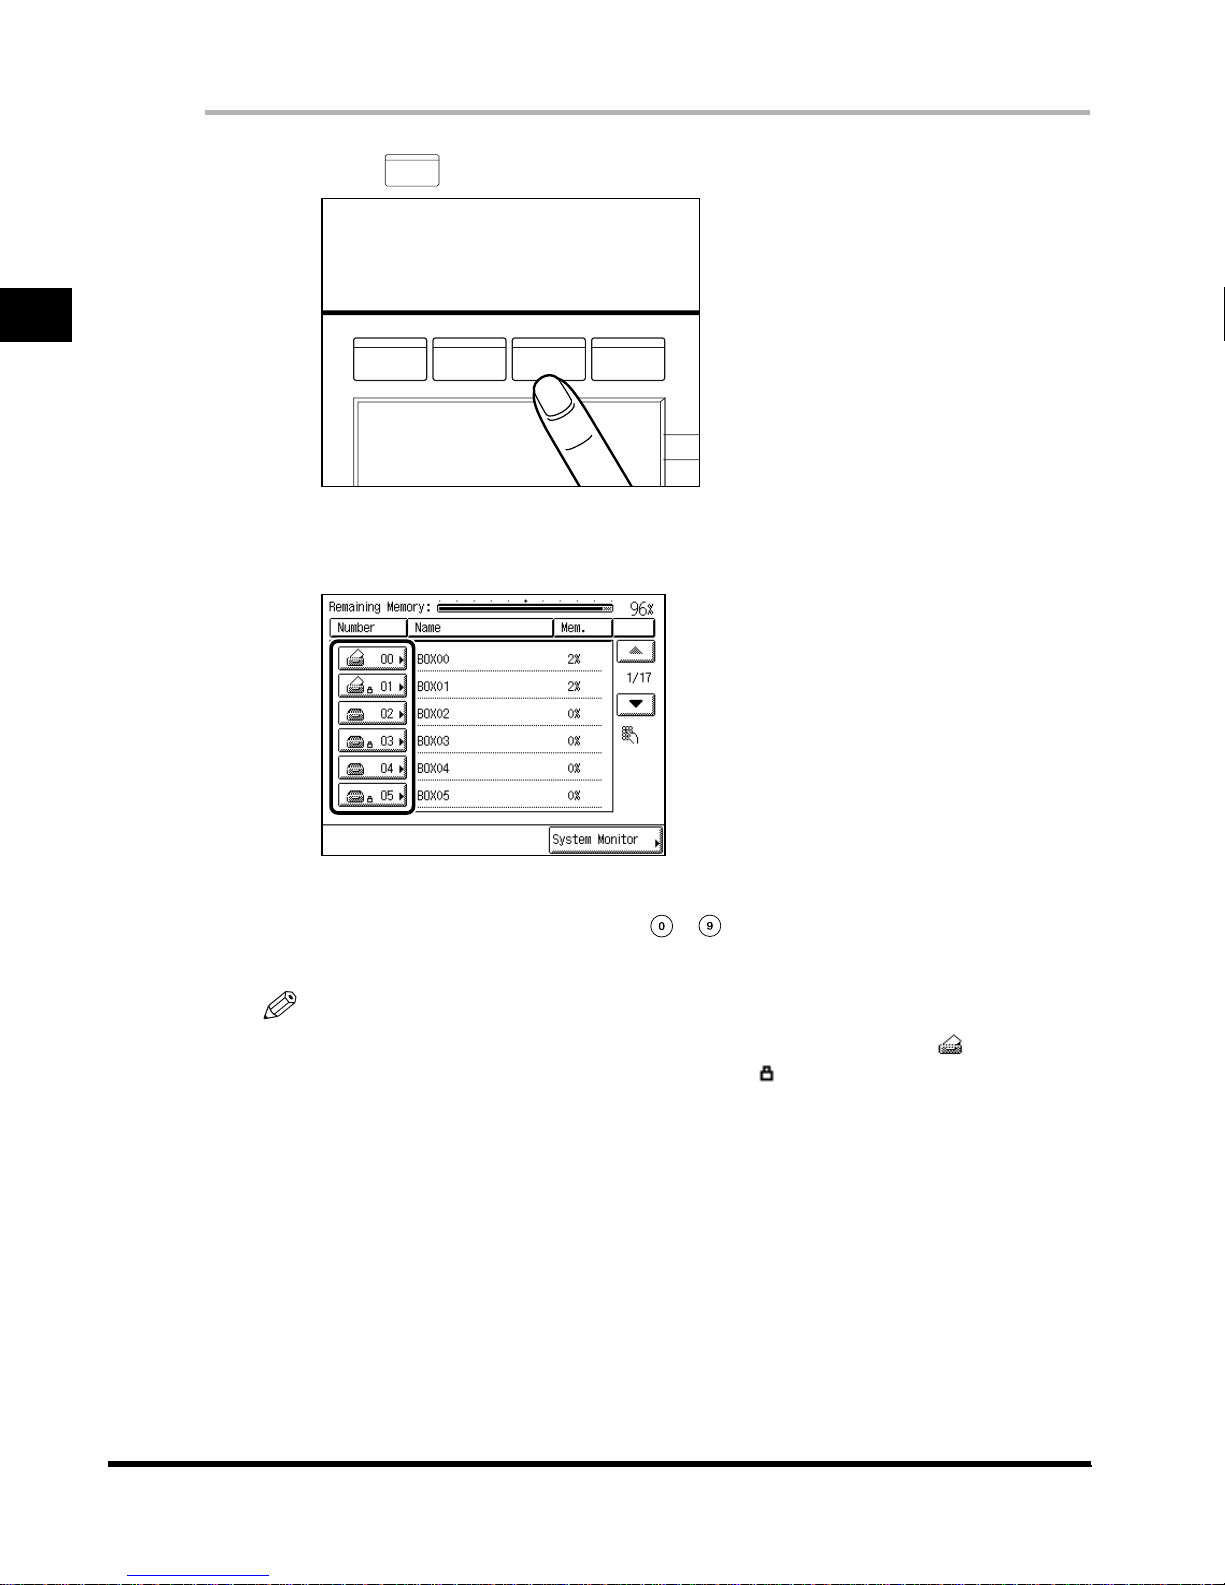
Press (Mail Box).
MAIL BOX
Basic Use of the Mail Box Function
COPY FAX
2
Press the desired mail box number.
If the desired mail box is not displayed, press “▲” or “▼.”
If you enter the mail box number using - (numeric keys), press “OK” after entering
the mail box number.
MAIL BOX
SCAN
NOTE
• If a document is stored in a mail box, that mail box is displayed with the icon.
• If a mail box is set with a password, a locked mark is displayed next to the icon of that
mail box.
• If you make a mistake when selecting a mail box, press “Done.”
1-14
Flow of Mail Box Operations
Page 23
3
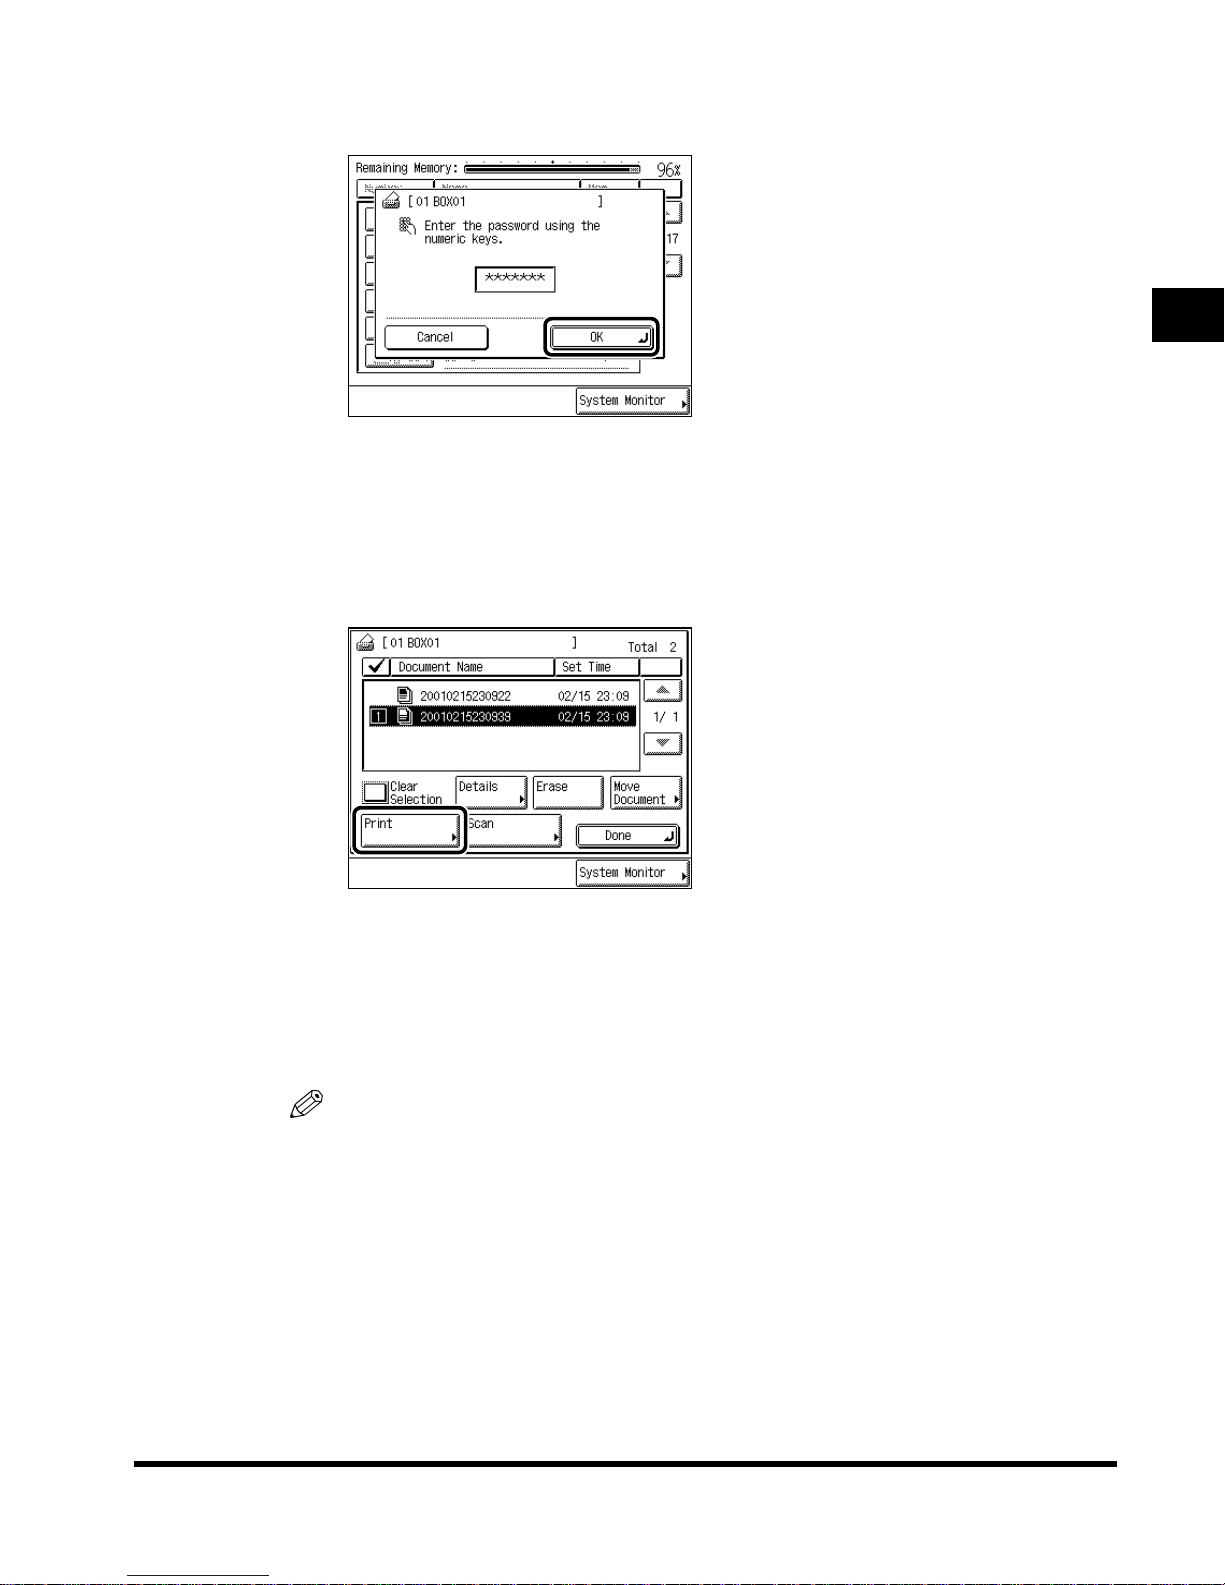
Enter the password, and press “OK.”
Enter the password set when the mail box was stored. (See ‘Setting/Storing the Mail Box,’
on p. 4-3.)
If a password was not stored, this operation is not necessary.
4
Select the document you want to print, and press “Print.”
1
When there are more than five stored documents, press “▲” or “▼” to display the
documents you want to select.
You can select multiple documents stored in the mail box.
If you press “Select All,” you can select all documents in the mail box. (“Select All” changes
to “Clear Selection” when it is pressed.)
NOTE
• The selected documents are numbered in the order specified, and are printed in the order
numbered.
• You can cancel the selection by pressing the document again.
• When you press “Clear Selection,” you can cancel all selected documents. (“Clear
Selection” changes to “Select All” when it is pressed.)
Basic Use of the Mail Box Function
Flow of Mail Box Operations
1-15
Page 24
1
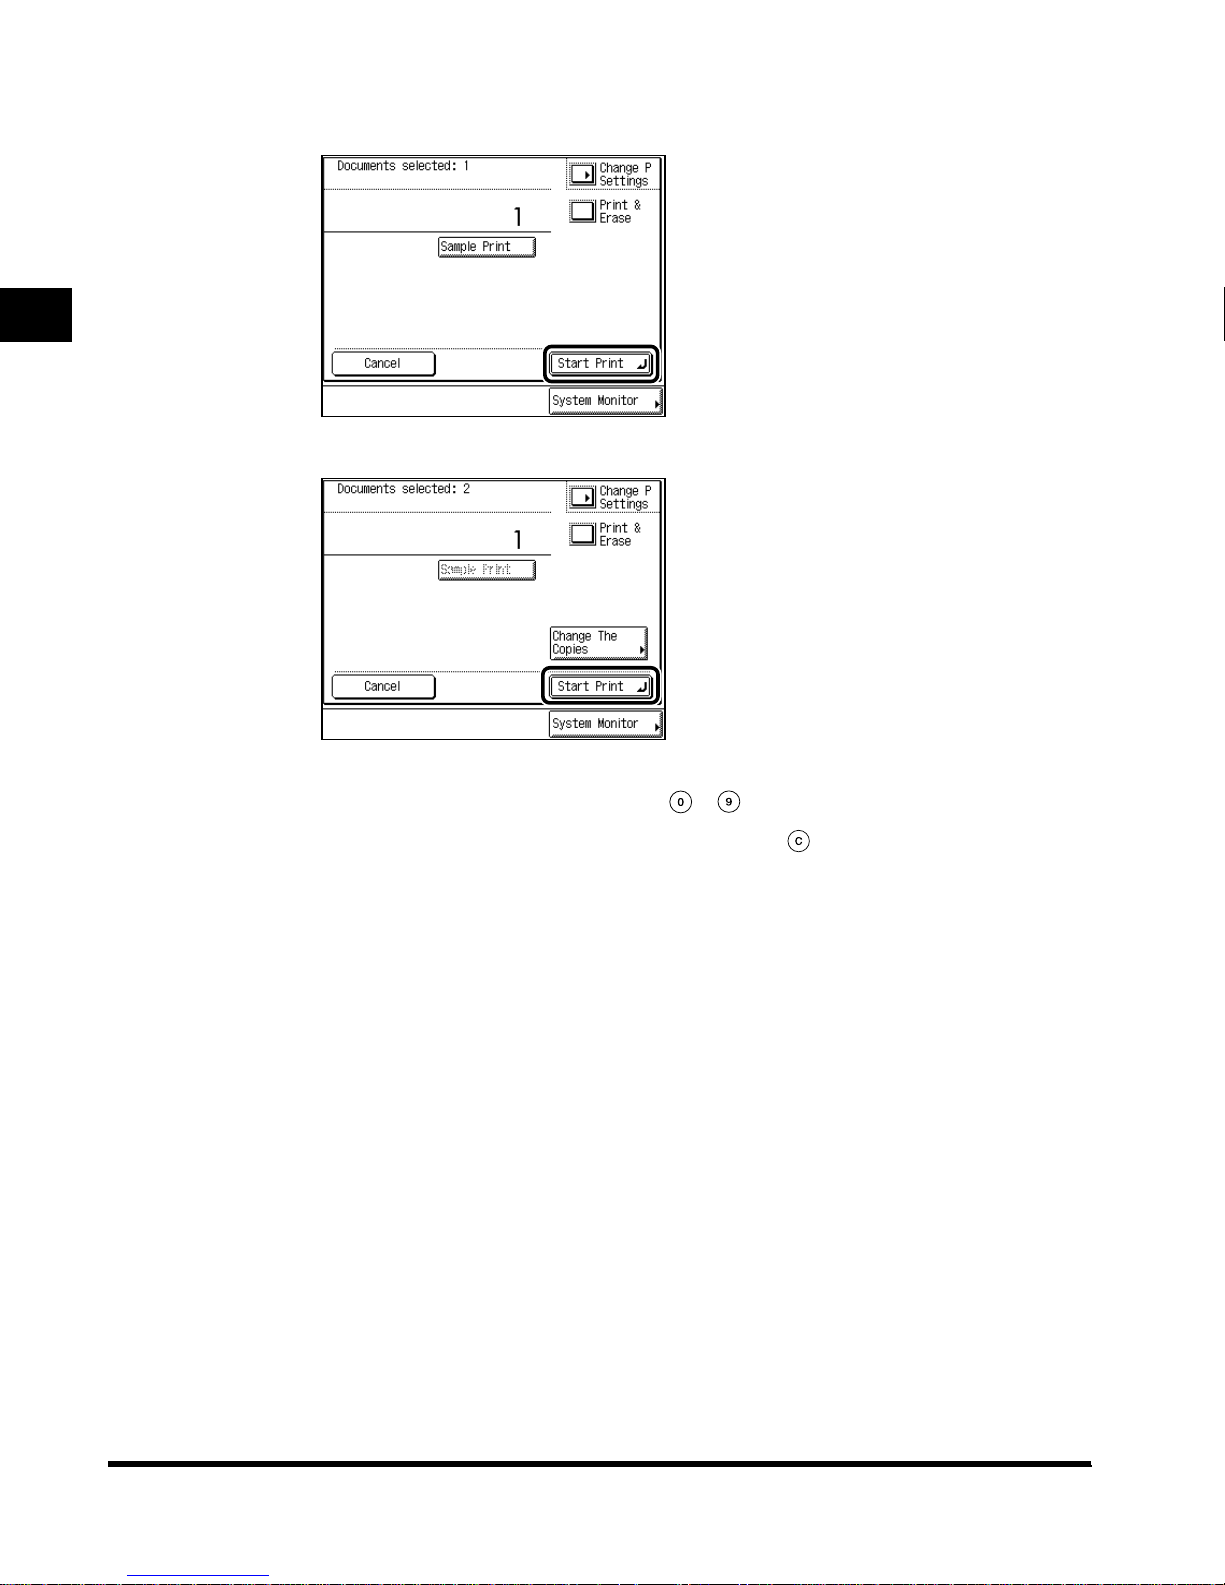
5
Press “Start Print. ”
When you select one document
Basic Use of the Mail Box Function
When you select multiple documents
You can enter the printing quantity using - (numeric keys).
If you make a mistake when entering the values, press (Clear), and enter the correct
value.
To print a copy to check your print results and stored documents, press “Sample Print.”
(See ‘Checking the Print Result or the Image of the Stored Document (Sample Print),’ on p.
3-36.)
To change print settings, press “Change P Settings.” (See ‘Printing a Document in a Mail
Box After Changing the Settings,’ on p. 3-2.)
To delete data after it is printed, press “Print & Erase.”
When you select multiple documents, you can change the number of print sets by pressing
“Change The Copies.”
1-16
Flow of Mail Box Operations
Page 25
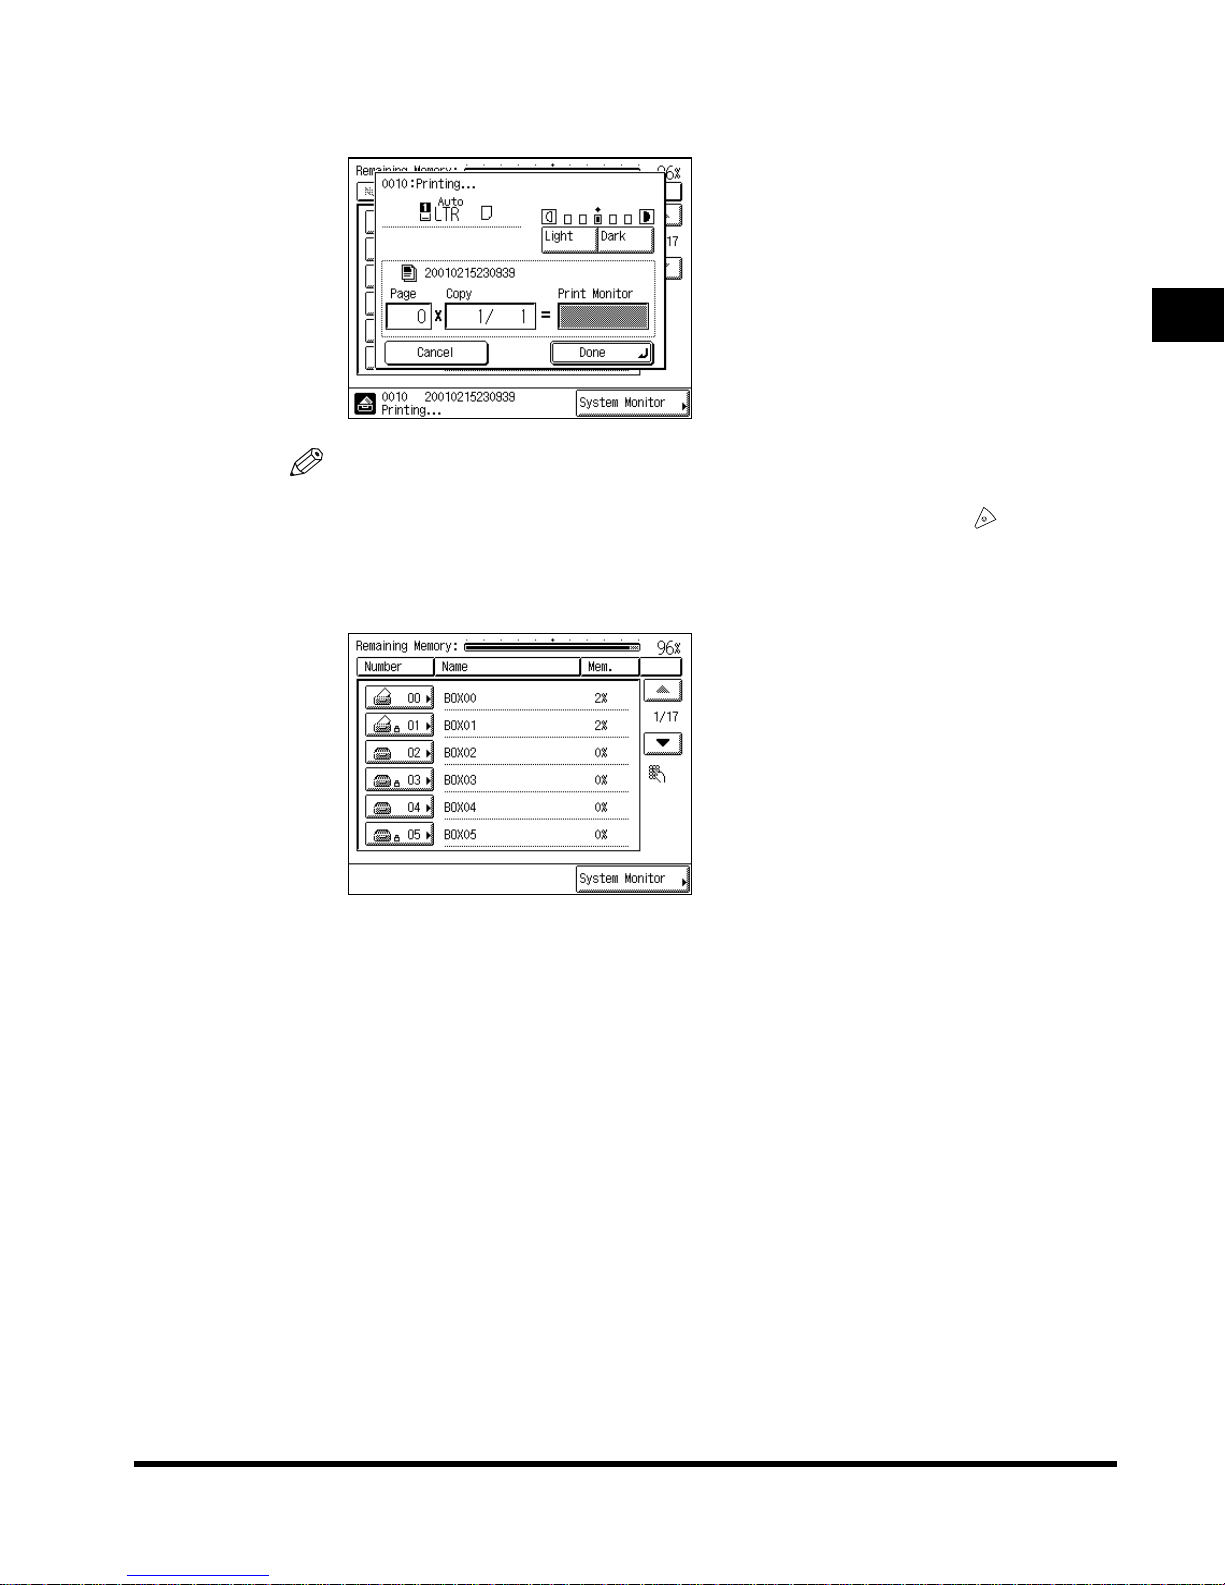
If there is a current job or reserved job, the machine starts printing after that job is
completed. When printing starts, the screen below appears.
NOTE
• You can change settings such as exposure or cancel printing during printing.
• To cancel printing, press “Cancel.” You cannot cancel printing by pressing (Stop).
• To reserve the next print job, press “Done,” and select the mail box in which the desired
document is stored. (See ‘Reserving Jobs,’ on p. 3-38.)
When printing is completed, the display returns to the Mail Box Selection screen.
1
Basic Use of the Mail Box Function
Flow of Mail Box Operations
1-17
Page 26

1
Basic Use of the Mail Box Function
1-18
Flow of Mail Box Operations
Page 27

Scanning Originals into a Mail Box
This chapter describes how to scan originals into a mail box.
Specifying the Document Name Before Scanning (Document Name). . . . . . . . . . . . . . .2-3
Specifying Document Size (Document Size Select). . . . . . . . . . . . . . . . . . . . . . . . . . . . .2-5
Adjusting the Exposure and Image Quality Before Scanning the Originals . . . . . . . . . . .2-7
Manual Adjustment of the Scanning Exposure . . . . . . . . . . . . . . . . . . . . . . . . . . . . . . . . . . . . . .2-7
Selecting Image Quality . . . . . . . . . . . . . . . . . . . . . . . . . . . . . . . . . . . . . . . . . . . . . . . . . . . . . . . .2-8
Automatic Adjustment of Exposure and Image Quality . . . . . . . . . . . . . . . . . . . . . . . . . . . . . . .2-10
Changing the Scanning Ratio (Copy Ratio) . . . . . . . . . . . . . . . . . . . . . . . . . . . . . . . . . .2-12
Scanning Originals After Enlarging/Reducing Them to a Standard Record Size . . . . . . . . . . .2-12
Specifying the Scanning Ratio by % . . . . . . . . . . . . . . . . . . . . . . . . . . . . . . . . . . . . . . . . . . . . .2-13
Automatically Setting the Ratio Based on the Selected Record Size (Auto) . . . . . . . . . . . . . . .2-15
Calculating the Scanning Ratio Based on the Original and Record Size
(Zoom Program) . . . . . . . . . . . . . . . . . . . . . . . . . . . . . . . . . . . . . . . . . . . . . . . . . . . . . . . . . . . . .2-17
Enlarging/Reducing Originals at Scanning Ratios Set Independently for X and Y Axes
(XY Zoom). . . . . . . . . . . . . . . . . . . . . . . . . . . . . . . . . . . . . . . . . . . . . . . . . . . . . . . . . . . . . . . . . .2-21
2
CHAPTER
Scanning Two-sided Originals (2-sided Original) . . . . . . . . . . . . . . . . . . . . . . . . . . . . . .2-24
Scanning Facing Pages in a Book onto Two Separate Sheets in One Step
(Two-page Separation) . . . . . . . . . . . . . . . . . . . . . . . . . . . . . . . . . . . . . . . . . . . . . . . . . .2-26
Scanning Originals for Use as a Booklet (Booklet Scanning). . . . . . . . . . . . . . . . . . . . .2-28
Erasing Shadows and Frame Lines (Frame Erase) . . . . . . . . . . . . . . . . . . . . . . . . . . . .2-30
Erasing Frame Lines and Storing the Original (Original Frame Erase) . . . . . . . . . . . . . . . . . . .2-31
Erasing the Book Frame and Storing the Original (Book Frame Erase). . . . . . . . . . . . . . . . . . .2-33
Erasing the Binding Holes and Storing the Original (Binding Erase). . . . . . . . . . . . . . . . . . . . .2-36
Reducing Two, Four, or Eight Originals to Fit on a Single Print Sheet and Storing
It (Image Combination). . . . . . . . . . . . . . . . . . . . . . . . . . . . . . . . . . . . . . . . . . . . . . . . . .2-39
Scanning Different-size Originals Together (Different Size Originals). . . . . . . . . . . . . . .2-43
Scanning Separately-set Originals as One Document (Job Build). . . . . . . . . . . . . . . . .2-45
Inverting Original Images (Nega/Posi) . . . . . . . . . . . . . . . . . . . . . . . . . . . . . . . . . . . . . .2-48
Scanning Originals After Making Them Sharply Contrasted (Sharpness) . . . . . . . . . . .2-49
Storing/Recalling Scanning Modes (Mode Memory) . . . . . . . . . . . . . . . . . . . . . . . . . . .2-51
Storing Scanning Modes . . . . . . . . . . . . . . . . . . . . . . . . . . . . . . . . . . . . . . . . . . . . . . . . . . . . . .2-51
Storing a Memory Key Name . . . . . . . . . . . . . . . . . . . . . . . . . . . . . . . . . . . . . . . . . . . . . . . . . . .2-54
2-1
Page 28

2
2. Scanning Originals into a Mail Box
Recalling Scanning Settings . . . . . . . . . . . . . . . . . . . . . . . . . . . . . . . . . . . . . . . . . . . . . . . . . . . 2-56
Erasing a Scanning Setting. . . . . . . . . . . . . . . . . . . . . . . . . . . . . . . . . . . . . . . . . . . . . . . . . . . . 2-57
Scanning Originals into a Mail Box
2-2
Page 29
Specifying the Document Name Before Scanning
(Document Name)
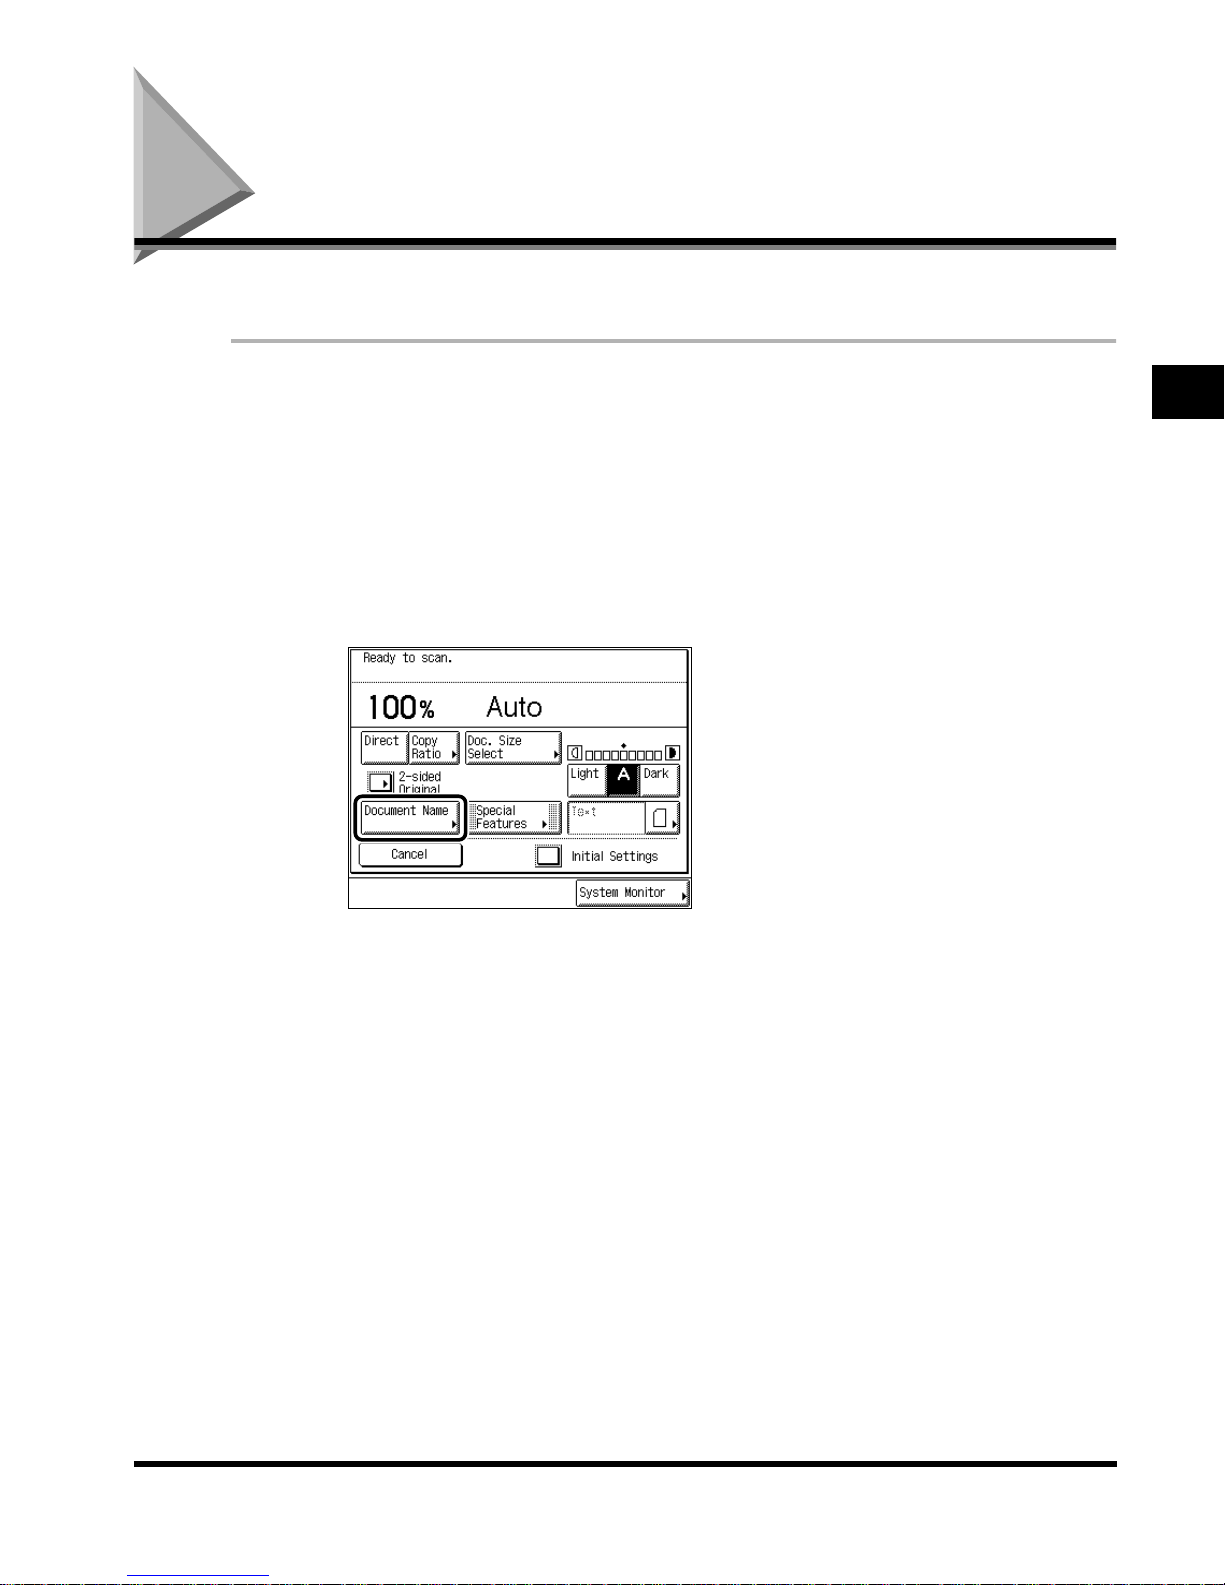
With this function, you can give a name to the document before you scan it.
1
Select the desired mail box number to display the Document
Selection screen, and press “Scan.”
When you select a mail box set with a password, enter the password after selecting the
mail box, and press “OK.”
The Scan screen is displayed.
2
Place the original, and press “Document Name.”
2
Scanning Originals into a Mail Box
Specifying the Document Name Before Scanning (Document Name)
2-3
Page 30
2
3
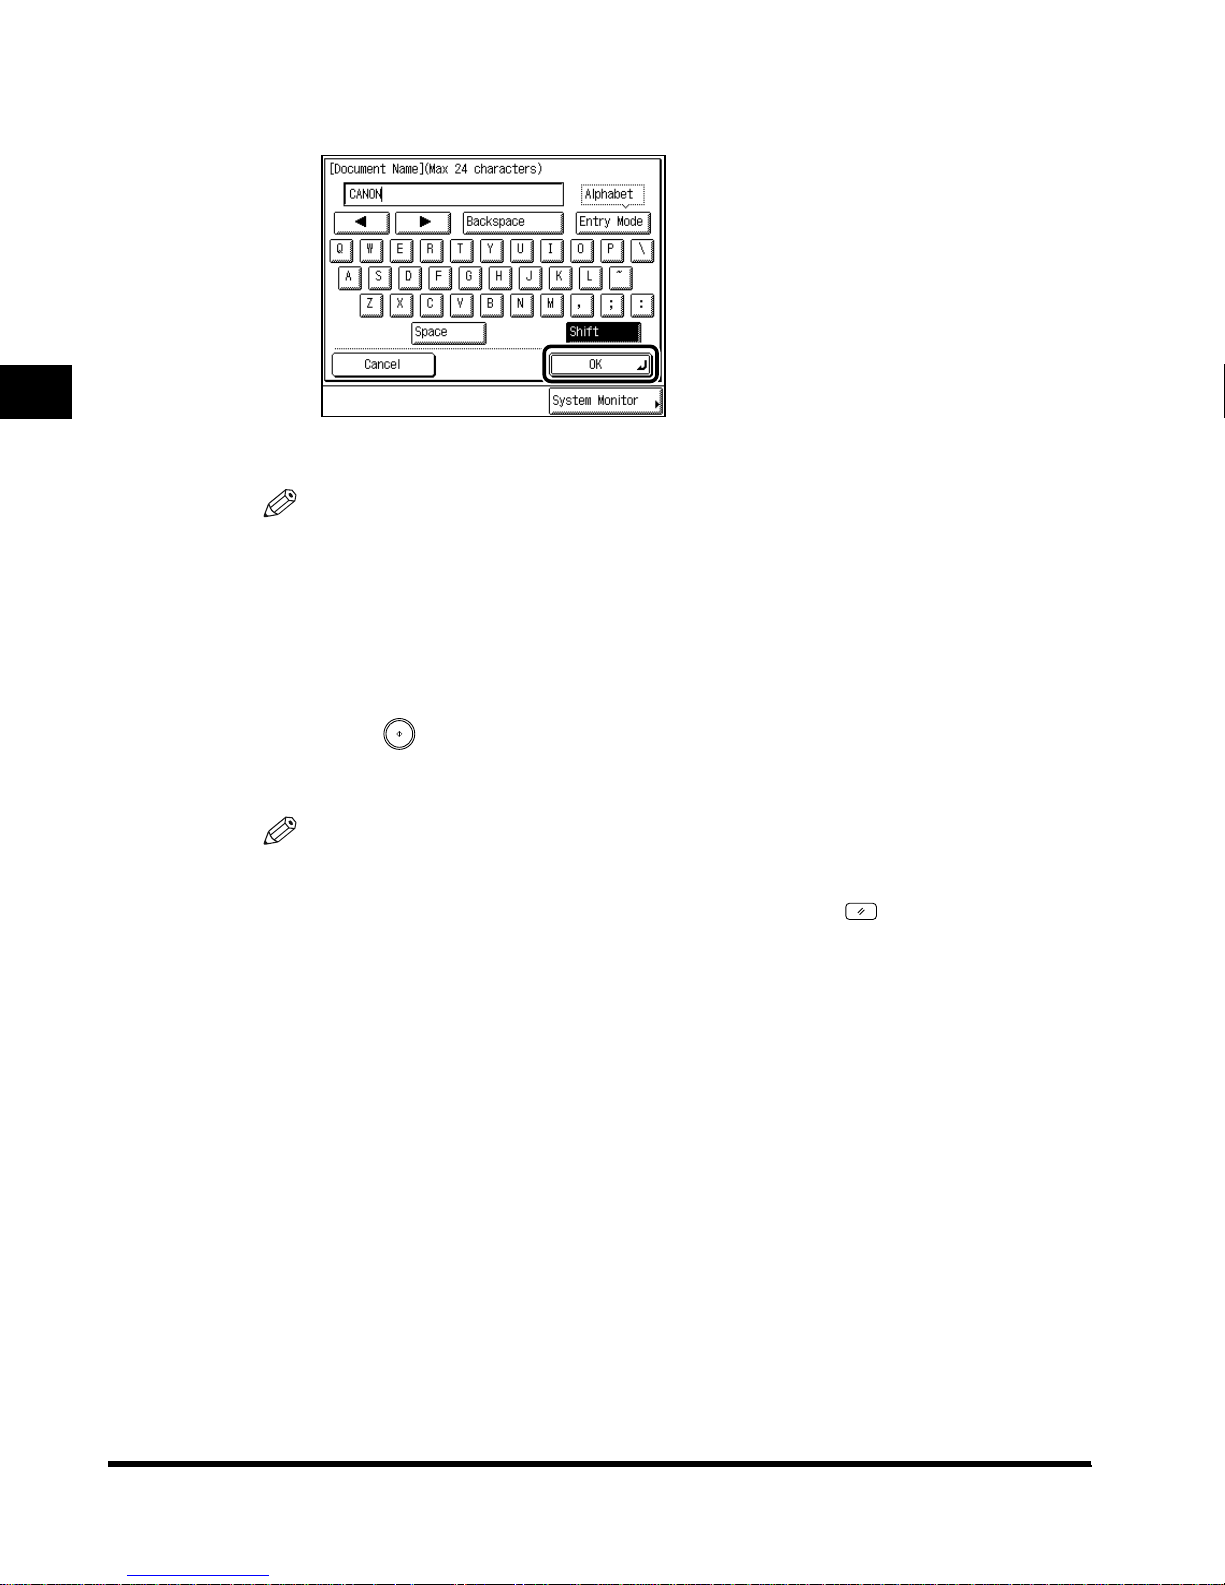
Enter a name for the document, and press “OK.”
The display returns to the Scan screen.
NOTE
• For details of how to enter characters on the touch panel display, see the Reference
Guide.
• The maximum number of characters you can use for a name is 24.
• If “OK” is pressed without entering any characters, the document is automatically stored
with the name of <year, month, date, and time>. For example, if the data was scanned at
1:35 p.m., 41 seconds, on August 12, 2000, the document’s name is <20000812133541>.
4
Press (Start).
Scanning Originals into a Mail Box
The machine starts scanning. (See ‘Storing Originals in the Mail Box,’ on p. 1-9.)
NOTE
• To cancel all settings at once, press “Initial Settings .” (The machine returns to the standard
scanning mode.)
• To return the display to the Mail Box Selection screen, press (Reset).
2-4
Specifying the Document Name Before Scanning (Document Name)
Page 31
Specifying Document Size (Document Size Select)
With this function, you can specify the document size before you scan it. When scanning
transparencies, you must use this function.
NOTE
• The default setting is “Auto.”
1
Select the desired mail box number to display the Document
Selection screen, and press “Scan.”
When you select a mail box set with a password, enter the password after selecting the
mail box, and press “OK.”
The Scan screen is displayed.
2
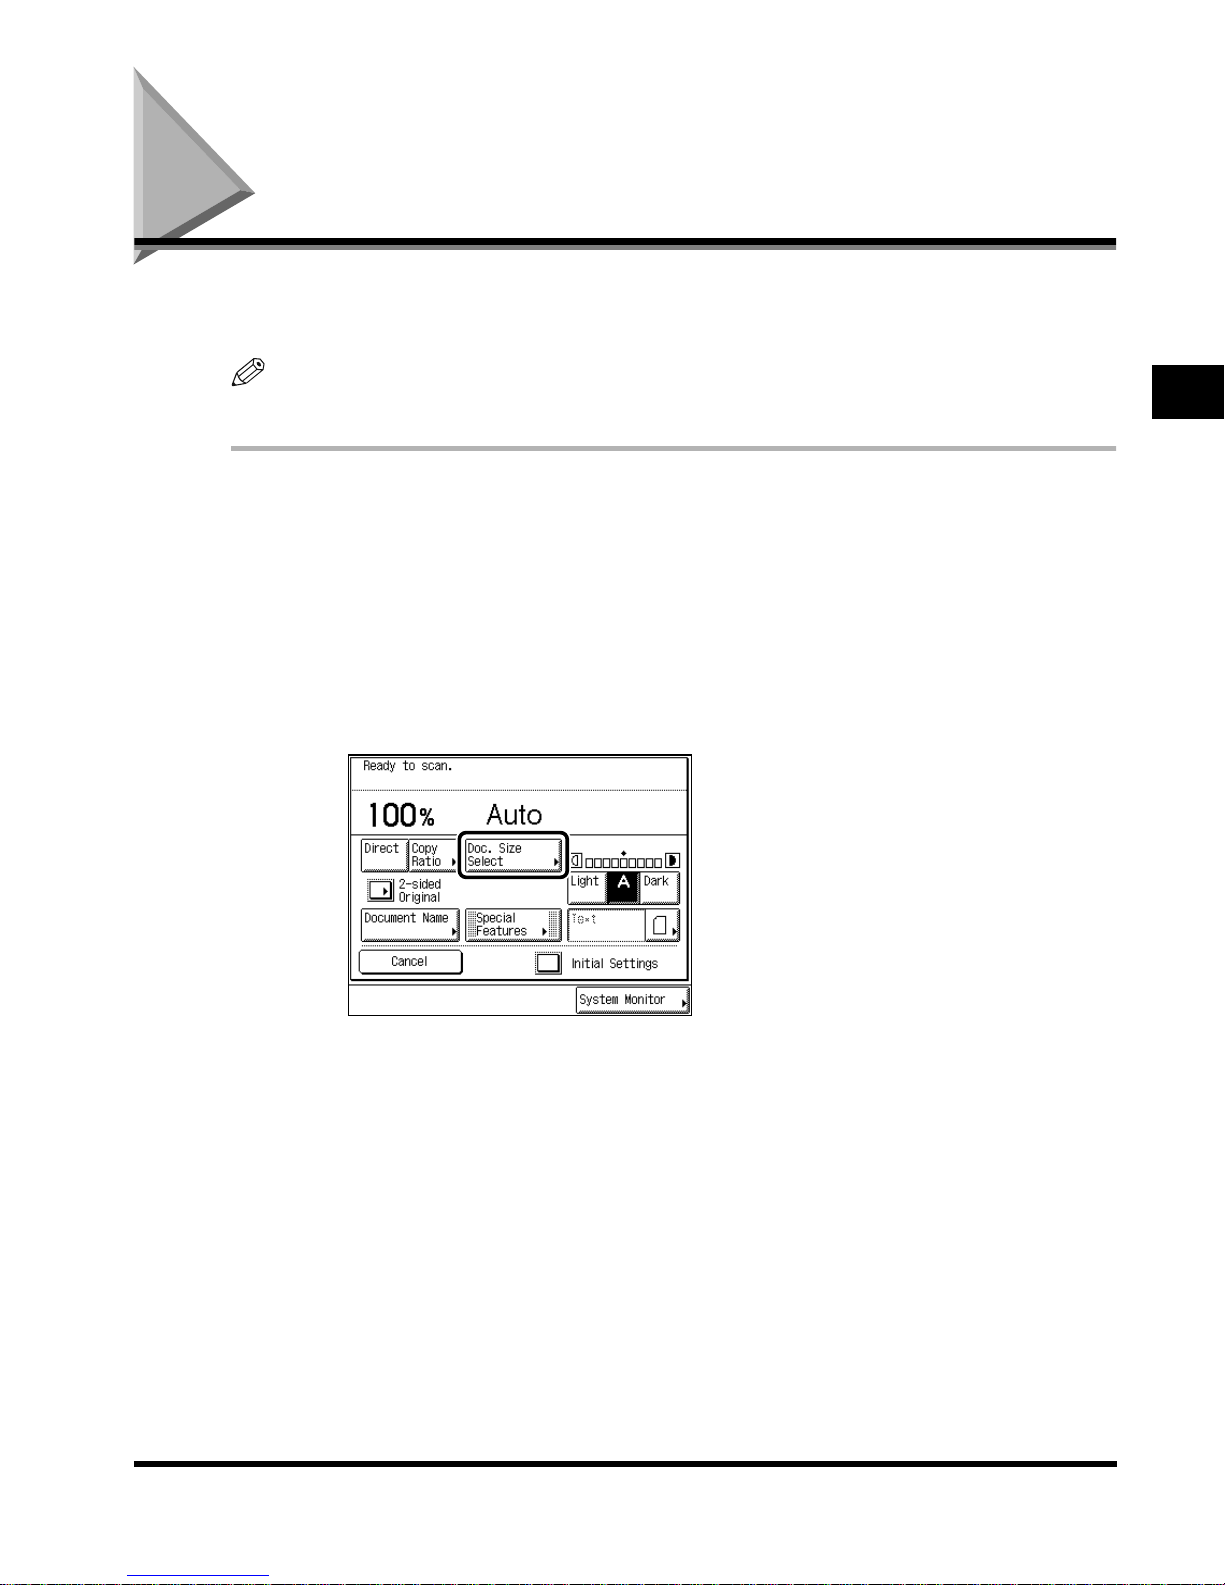
Place the original, and press “Doc. Size Select.”
2
Scanning Originals into a Mail Box
Specifying Document Size (Document Size Select)
2-5
Page 32
2
3
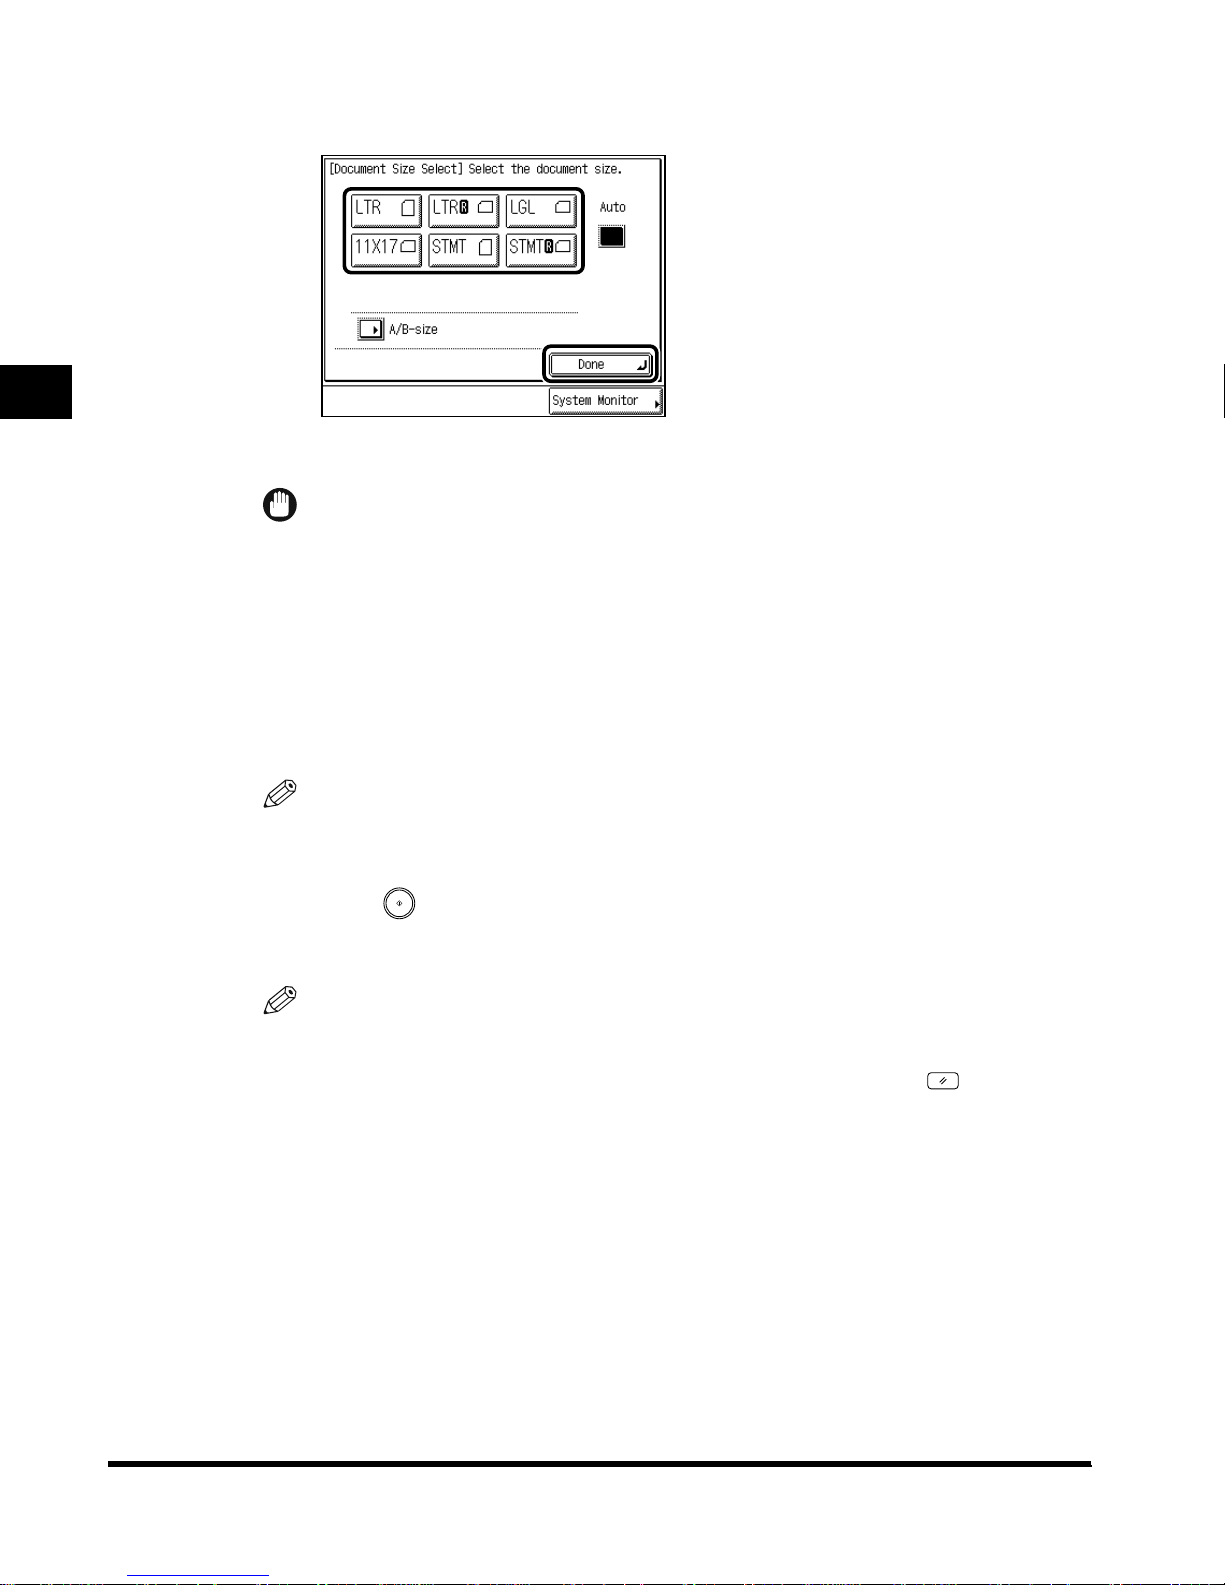
Select the document size, and press “Done.”
The specified size is set and the display returns to the Scan screen.
IMPORTANT
• When the machine is operating in the Auto (Automatic Document Size Selection) mode,
you cannot use the Booklet Scanning, Original Frame Er ase, Book Frame Erase, or Image
Combination modes.
• You cannot select “Auto” when scanning the follo wing types of originals. Specify the size of
the document manually.
- Non-standard size originals
- Highly transparent originals, such as transparencies
-Originals with an extremely dark background
-Originals smaller than STMT in size
Scanning Originals into a Mail Box
NOTE
• To select an A or B series paper size, press “A/B-size.”
4
Press (Start).
The machine starts scanning. (See ‘Storing Originals in the Mail Box,’ on p. 1-9.)
NOTE
• To cancel all settings at once, press “Initial Settings .” (The machine returns to the standard
scanning mode.)
• To return the display to selecting the Mail Box Selection screen, press (Reset).
2-6
Specifying Document Size (Document Size Select)
Page 33
Adjusting the Exposure and Image Quality Before
Scanning the Originals
With this function, you can adjust the exposure and image quality of a document before you
scan it.
Manual Adjustment of the Scanning Exposure
You can manually adjust the scanning exposure to the level best suited to the original.
1
Select the desired mail box number to display the Document
Selection screen, and press “Scan.”
When you select a mail box set with a password, enter the password after selecting the
mail box, and press “OK.”
The Scan screen is displayed.
2
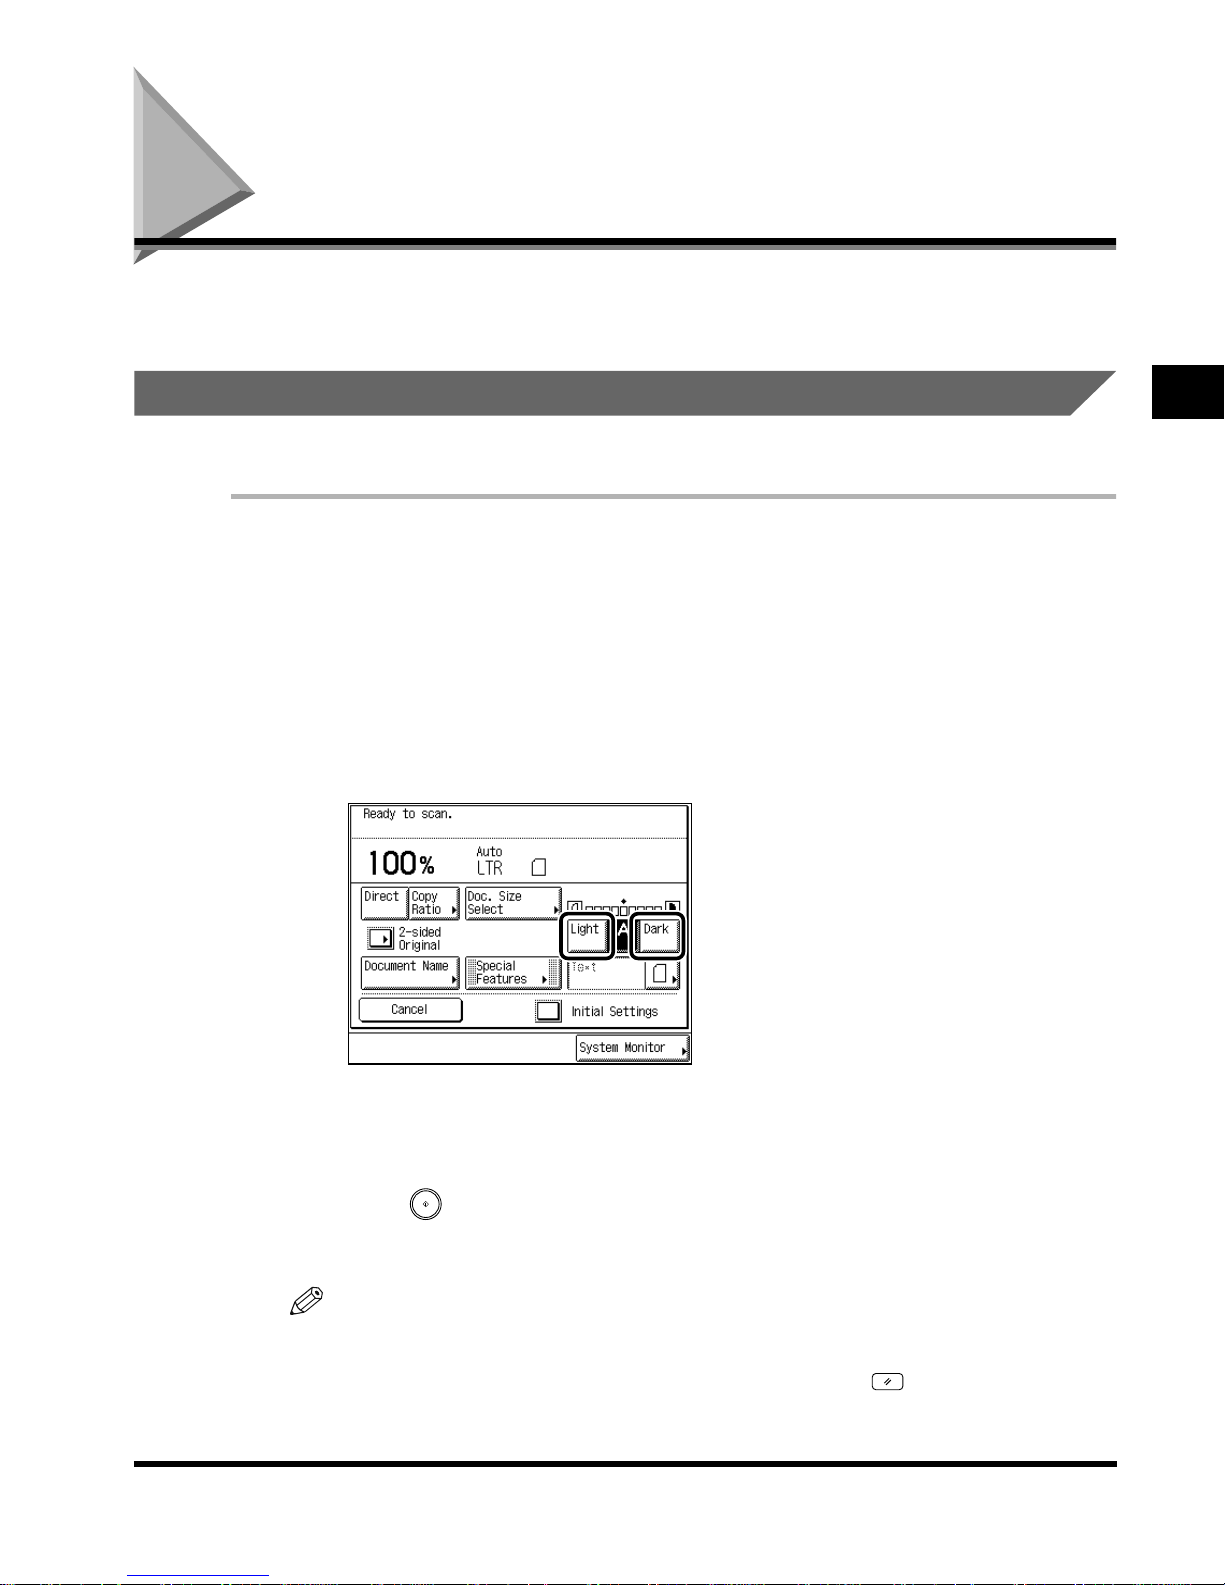
Place your originals, and press “Light” or “Dark.”
2
Scanning Originals into a Mail Box
Move the indicator above “Light” and “Dark” to the left to make the exposure lighter, or to
the right to make the exposure darker.
3
Press (Start).
The machine starts scanning. (See ‘Storing Originals in the Mail Box,’ on p. 1-9.)
NOTE
• To cancel all settings at once, press “Initial Settings .” (The machine returns to the standard
scanning mode.)
• To return the display to the Mail Box Selection screen, press (Reset).
Adjusting the Exposure and Image Quality Before Scanning the Originals
2-7
Page 34
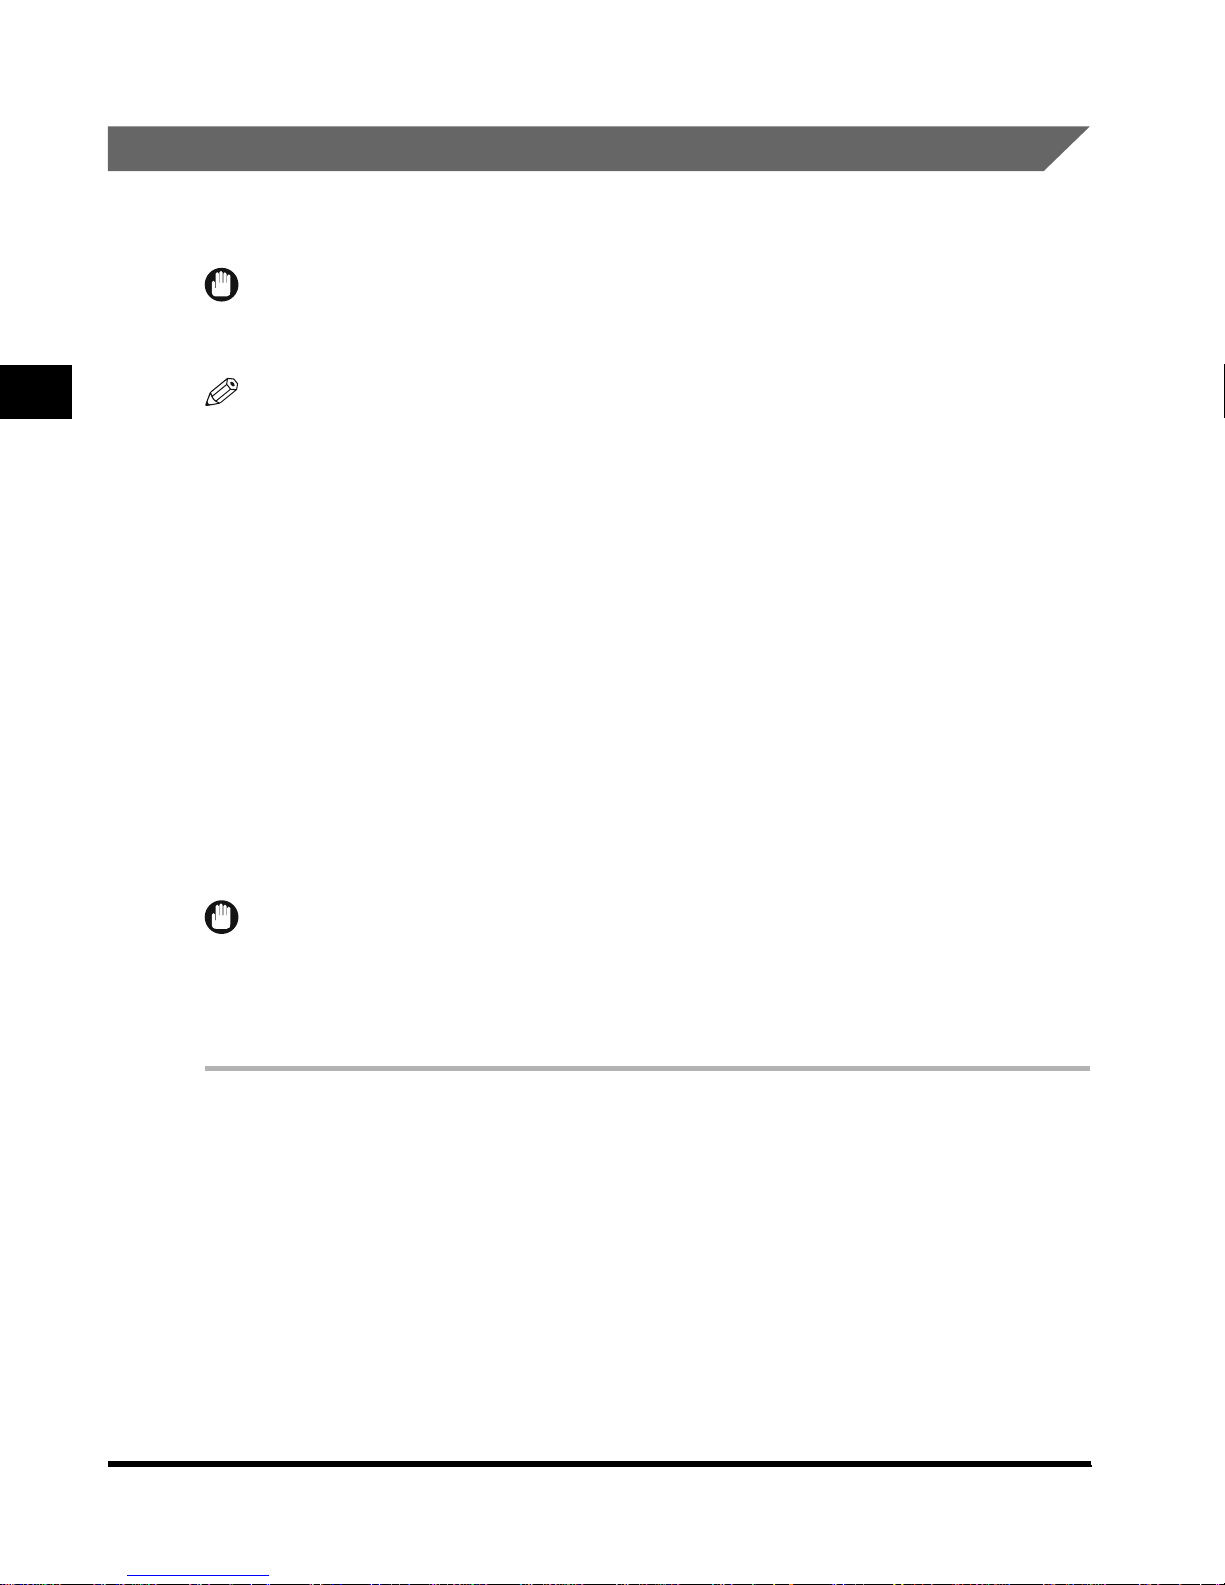
Selecting Image Quality
You can adjust the image quality to the level best suited to the quality of text or photo
originals. The following three modes are available for adjusting image quality.
IMPORTANT
• Combinations of the Text, Text/Photo, or Photo modes cannot be set. If you select one of these
modes, the previously set mode is canceled.
2
NOTE
• When you select the Text, Text/Photo, or Photo mode, the scanning exposure can be adjusted
only by Manual Exposure Control. Automatic Exposure Control cannot be set.
• When the “Photo Mode” of Mail Box Settings is set to “On,” you can select “Printed Img.” or
“Photo.” (See ‘Setting the Photo Mode of the Mail Box Function,’ on p. 4-9.)
• If the original is a transparency, then select the Text, Text/Photo, or Photo mode and adjust the
exposure to the most appropriate level.
■ Text mode
This mode is best suited for scanning text originals. Blue prints or penciled originals can
be scanned clearly.
■ Text/Photo mode
This mode is best suited for scanning originals containing both text and photos.
Scanning Originals into a Mail Box
■ Photo mode
This mode is best suited for scanning photos printed on photographic paper, or photo
originals containing half-tones (i.e., printed photos).
IMPORTANT
• If you scan an original containing half-tones, such as a printed photograph using the Photo
mode, moire may occur. If this happens , y ou can soften this moire eff ect b y reducing the contr ast
of the print. (See ‘Scanning Originals After Making Them Sharply Contrasted (Sharpness),’ on p.
2-49.)
1
Select the desired mail box number to display the Document
Selection screen, and press “Scan.”
When you select a mail box set with a password, enter the password after selecting the
mail box, and press “OK.”
The Scan screen is displayed.
2-8
Adjusting the Exposure and Image Quality Before Scanning the Originals
Page 35
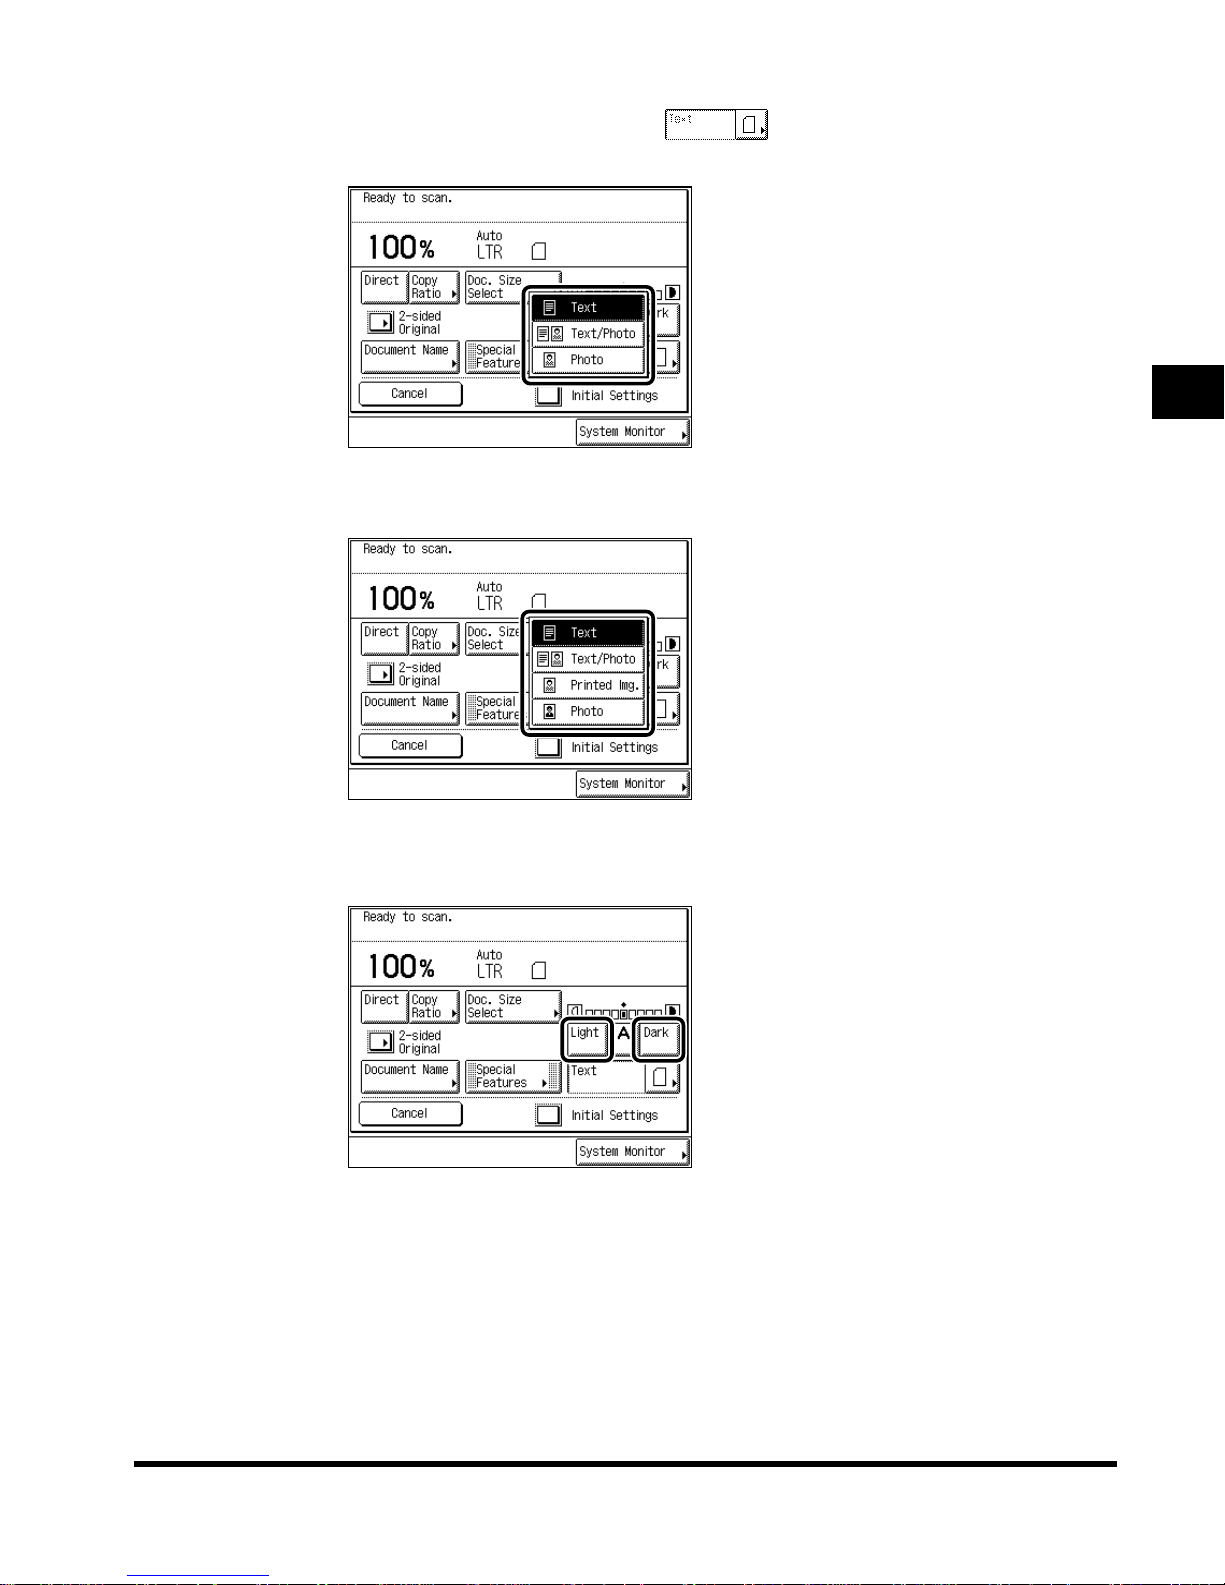
2
Place your originals → press → select the type of originals
(T ext, T ext/Photo, Photo).
When the “Photo Mode” of Mail Box Settings is set to “On,” you can select “Printed Img.” or
“Photo.” (See ‘Setting the Photo Mode of the Mail Box Function,’ on p. 4-9.)
2
3
Press “Light” or “Dark” to adjust the scanning exposure.
Move the indicator above “Light” and “Dark” to the left to make the exposure lighter, or to
the right to make the exposure darker.
Scanning Originals into a Mail Box
Adjusting the Exposure and Image Quality Before Scanning the Originals
2-9
Page 36
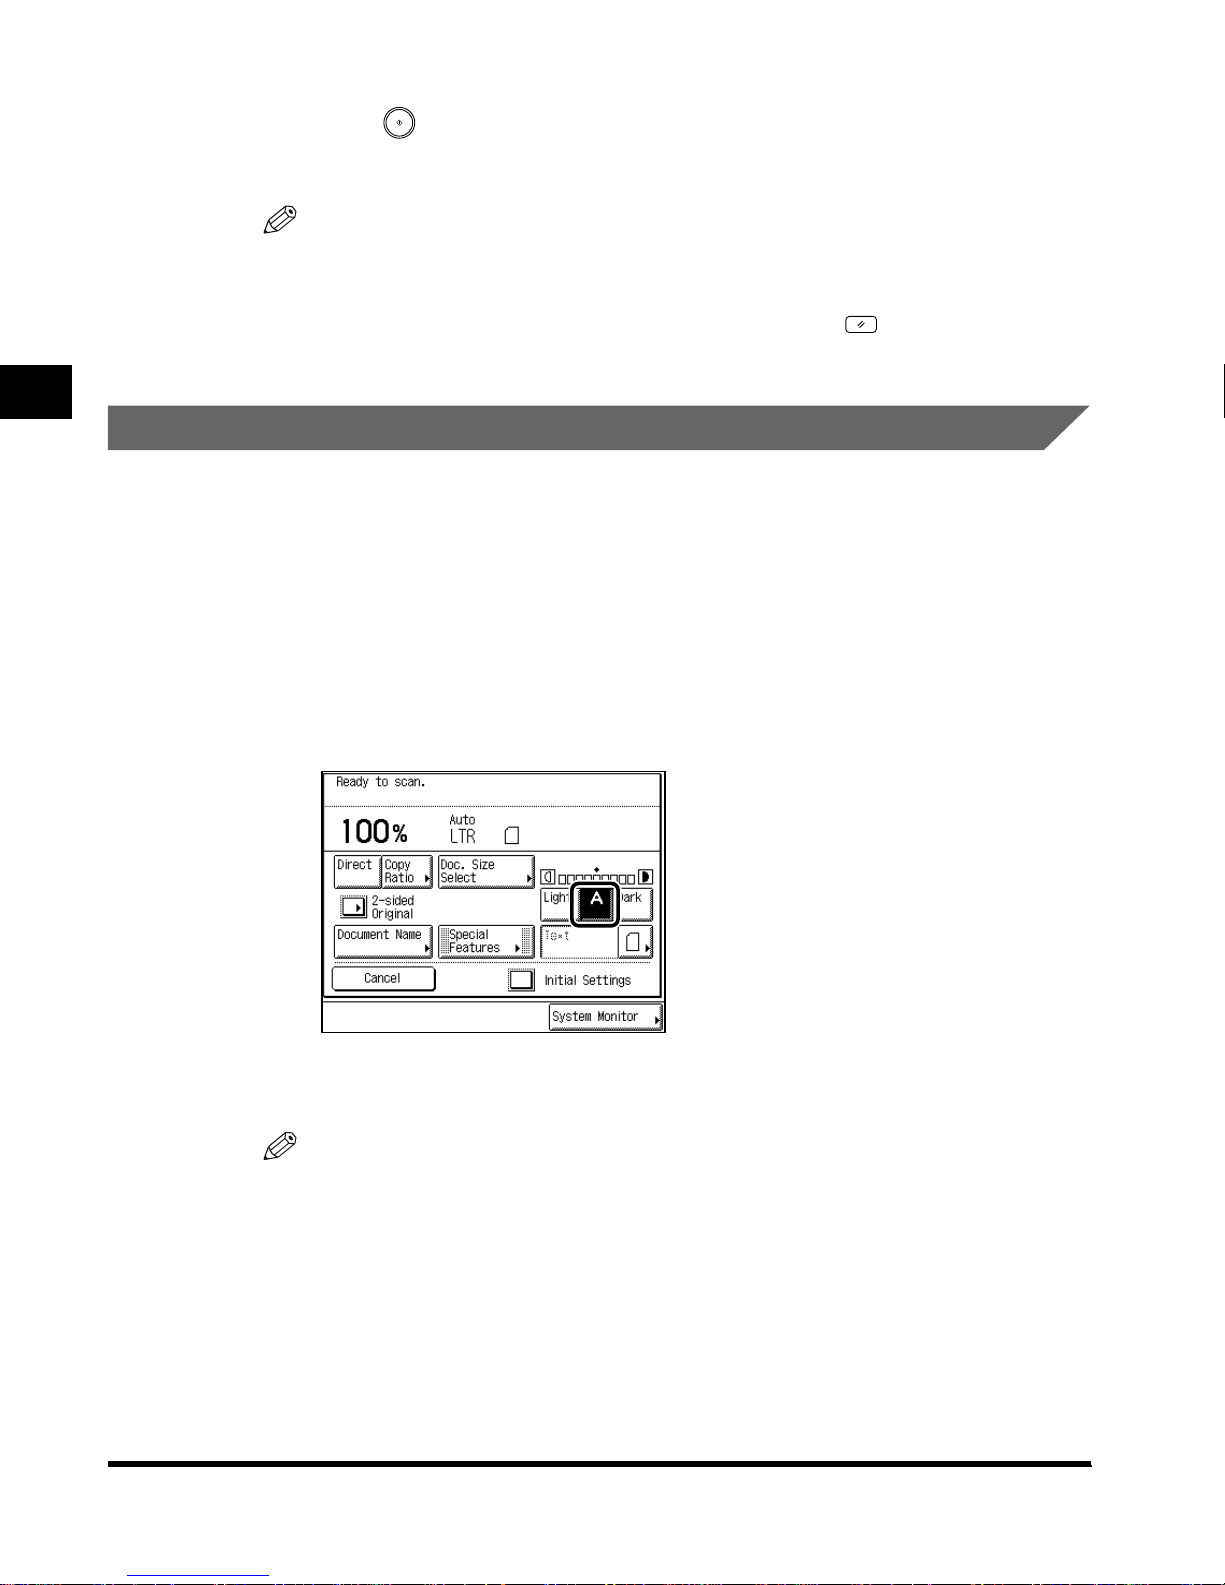
2
4
Press (Start).
The machine starts scanning. (See ‘Storing Originals in the Mail Box,’ on p. 1-9.)
NOTE
• To cancel the setting, press “A.”
• To cancel all settings at once, press “Initial Settings .” (The machine returns to the standard
scanning mode.)
• To return the display to the Mail Box Selection screen, press (Reset).
Automatic Adjustment of Exposure and Image Quality
1
Select the desired mail box number to display the Document
Selection screen, and press “Scan.”
When you select a mail box set with a password, enter the password after selecting the
mail box, and press “OK.”
The Scan screen is displayed.
2
Place the original, and press “A.”
Scanning Originals into a Mail Box
The scanning exposure is automatically adjusted to the lev el best suited to the quality of the
original.
NOTE
• If the original is a transparency, you may not be able to use the Automatic Exposure
Control. If so, adjust the scanning exposure using Manual Exposure Control.
2-10
Adjusting the Exposure and Image Quality Before Scanning the Originals
Page 37

3
Press (Start).
The machine starts scanning. (See ‘Storing Originals in the Mail Box,’ on p. 1-9.)
NOTE
• To cancel all settings at once, press “Initial Settings .” (The machine returns to the standard
scanning mode.)
• To return the display to the Mail Box Selection screen, press (Reset).
2
Scanning Originals into a Mail Box
Adjusting the Exposure and Image Quality Before Scanning the Originals
2-11
Page 38
2
Changing the Scanning Ratio (Copy Ratio)
With this function, you can specify the copy ratio of a document before you scan it or let the
machine set the copy ratio automatically.
NOTE
• To set the copy ratio 100%, press “Direct.”
Scanning Originals After Enlarging/Reducing Them to a
Standard Record Size
You can scan the originals after enlarging/reducing them to a standard record size.
NOTE
• The scanning ratio of 800% is available only when the original is placed on the platen glass.
1
Select the desired mail box number to display the Document
Scanning Originals into a Mail Box
Selection screen, and press “Scan.”
When you select a mail box set with a password, enter the password after selecting the
mail box, and press “OK.”
The Scan screen is displayed.
2
Place the original, and press “Copy Ratio.”
2-12
Changing the Scanning Ratio (Copy Ratio)
Page 39
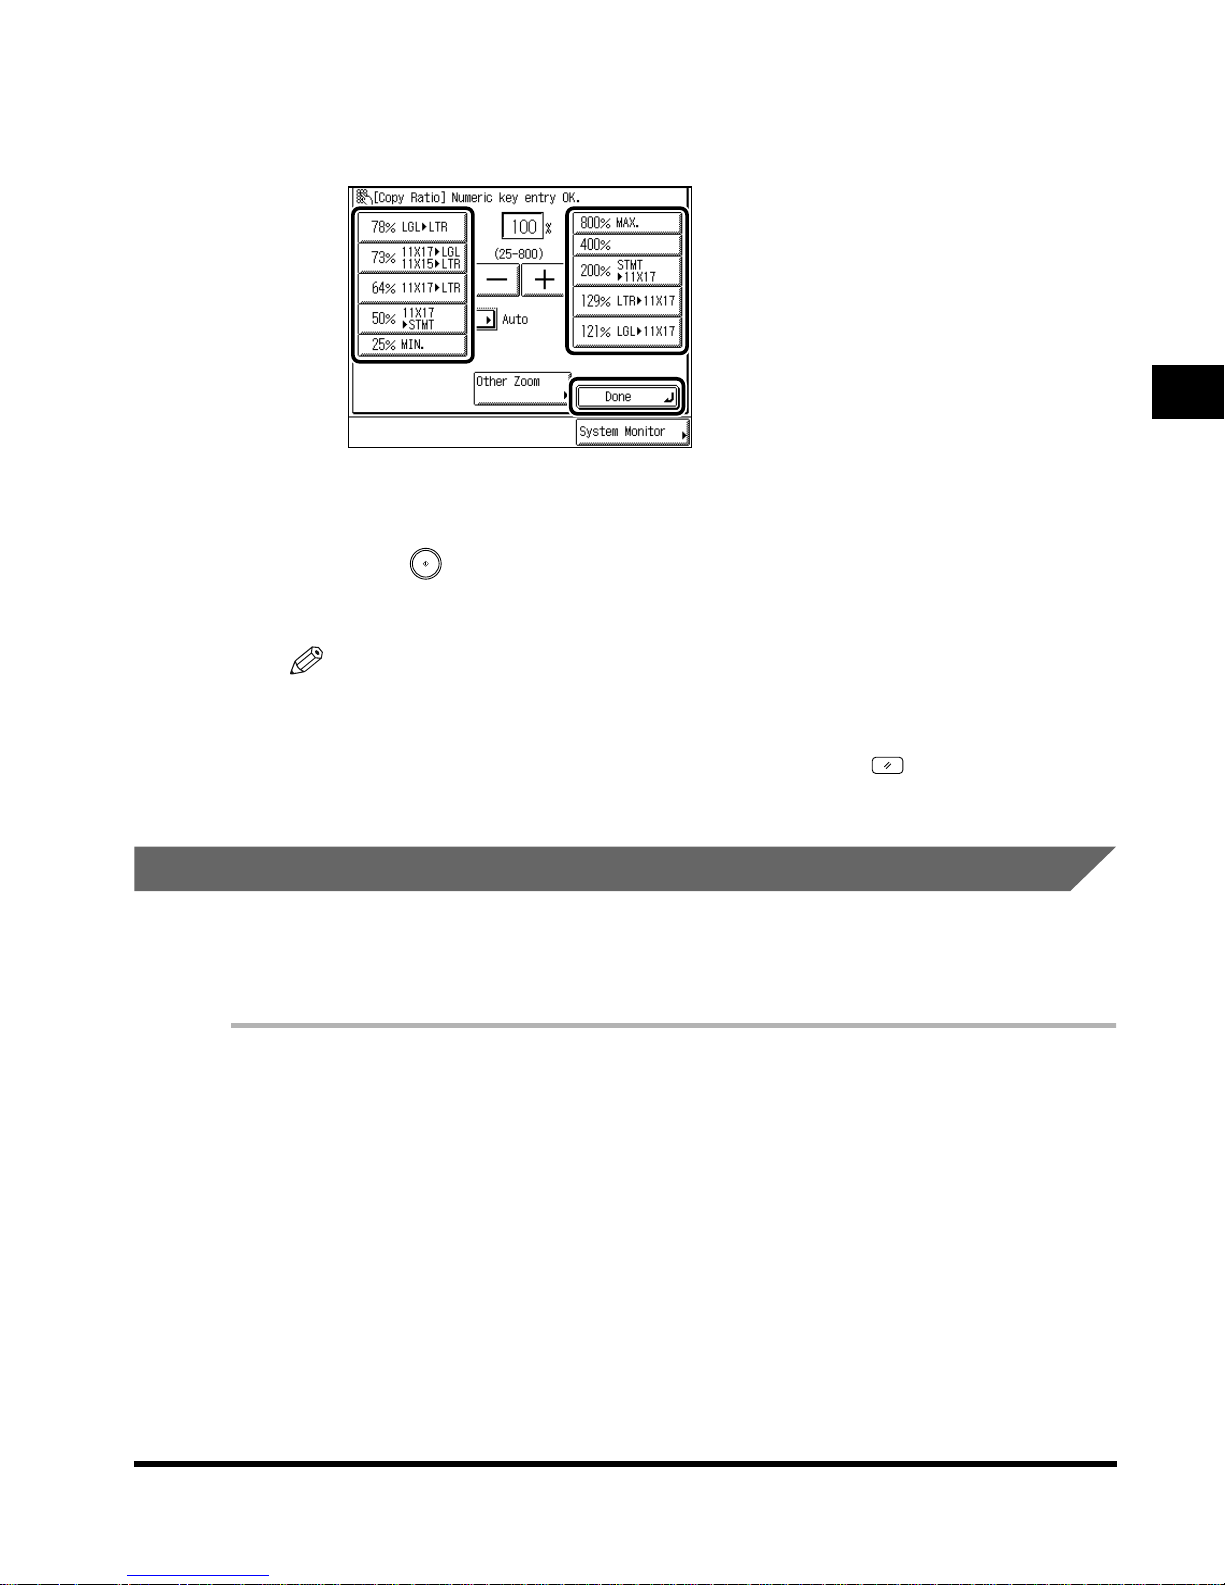
3
To reduce the image, select a reduction ratio. To enlarge the image,
select an enlargement ratio, and press “Done.”
The specified mode is set and the display returns to the Scan screen.
4
Press (Start).
The machine starts scanning. (See ‘Storing Originals in the Mail Box,’ on p. 1-9.)
NOTE
• To return the ratio to 100%, press “Direct.”
• To cancel all settings at once, press “Initial Settings. ” (The machine returns to the Standard
Scanning mode.)
• To return the display to the Mail Box Selection screen, press (Reset).
2
Scanning Originals into a Mail Box
Specifying the Scanning Ratio by %
You can reduce or enlarge images by any scanning ratio, in 1% increments. The available
scanning ratios are from 25% to 800% when the original is placed on the platen glass, and
from 25% to 400% when the original is placed in the feeder.
1
Select the desired mail box number to display the Document
Selection screen, and press “Scan.”
When you select a mail box set with a password, enter the password after selecting the
mail box, and press “OK.”
The Scan screen is displayed.
2
Place the original, and press “Copy Ratio.”
Changing the Scanning Ratio (Copy Ratio)
2-13
Page 40
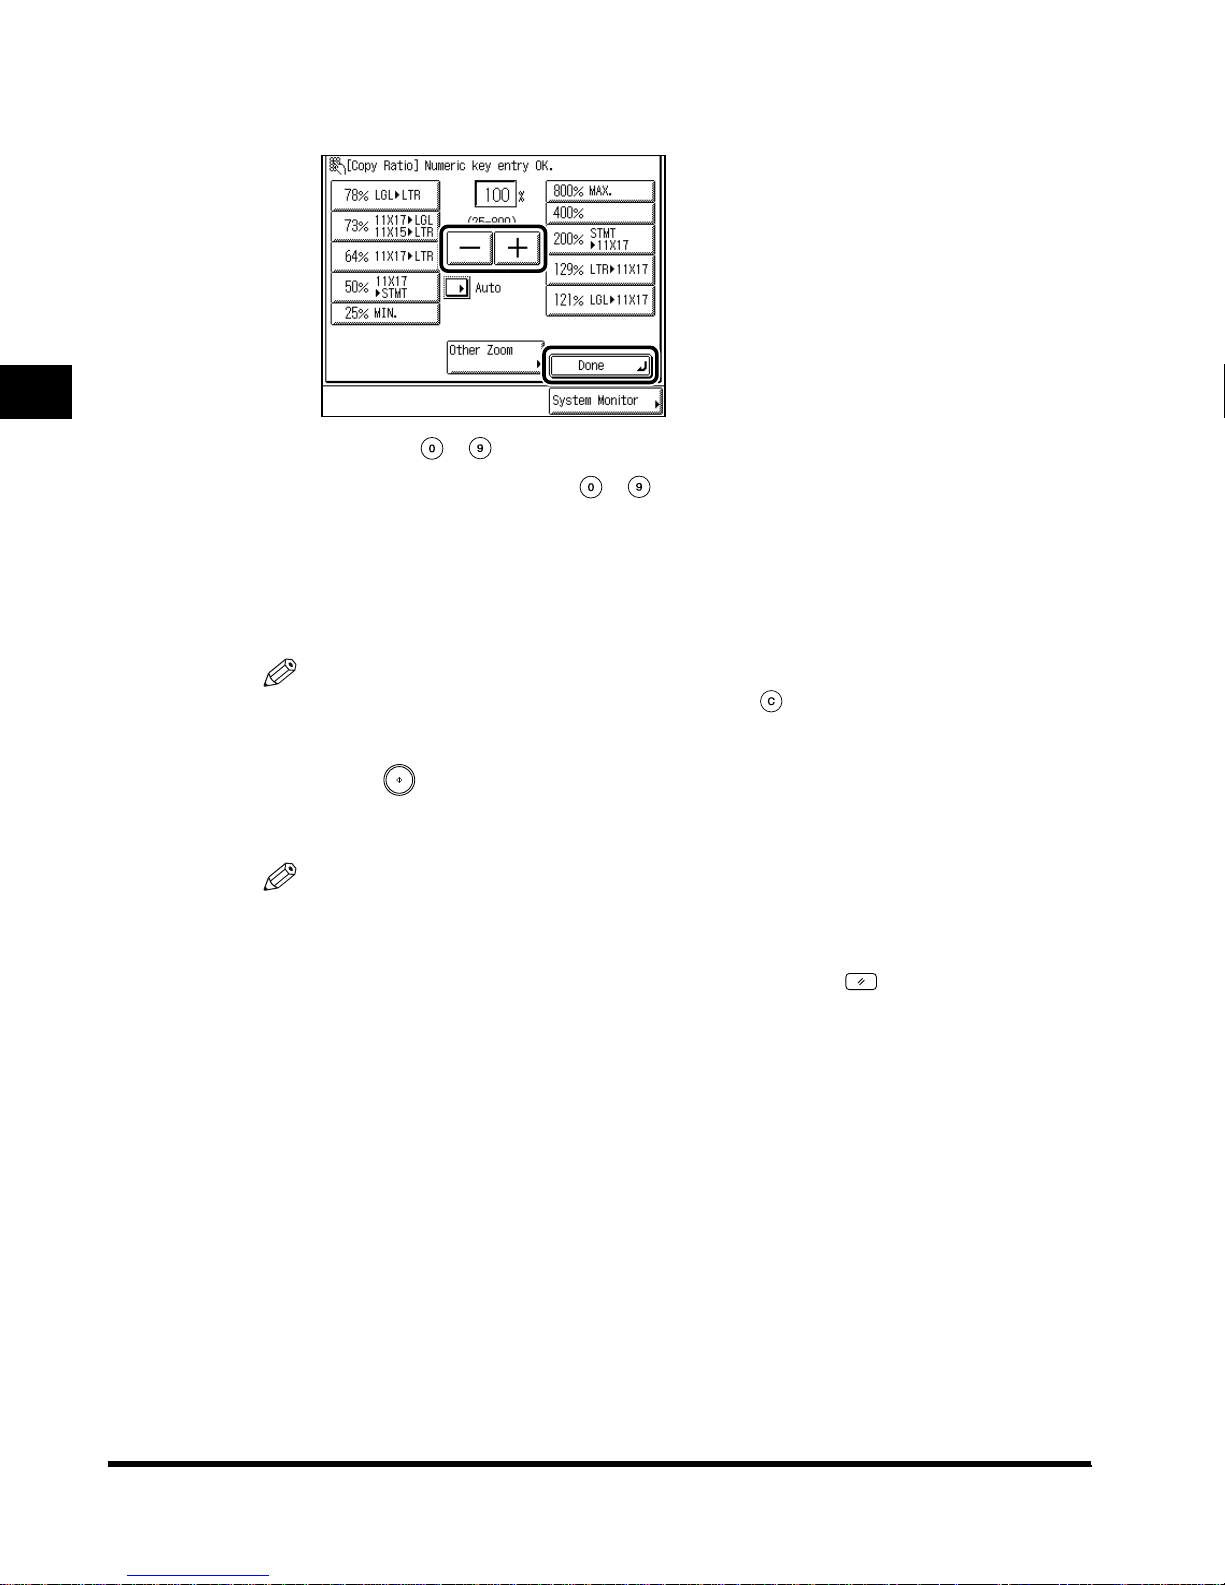
2
3
Set a copy ratio by pressing “–” or “+,” and press “Done.”
You can use - (numeric keys) to enter the value.
Even if you enter the ratio with - (numeric keys), you can change the entered
values with “-” or “+.”
The specified mode is set and the display returns to the Scan screen.
If you enter a value outside the setting range, a message prompting you to enter the
appropriate value appears in the screen.
NOTE
• If you make a mistake when entering values, press (Clear) and enter the correct value.
4
Scanning Originals into a Mail Box
Press (Start).
The machine starts scanning. (See ‘Storing Originals in the Mail Box,’ on p. 1-9.)
NOTE
• To return the ratio to 100%, press “Direct.”
• To cancel all settings at once, press “Initial Settings .” (The machine returns to the standard
scanning mode.)
• To return the display to the Mail Box Selection screen, press (Reset).
2-14
Changing the Scanning Ratio (Copy Ratio)
Page 41
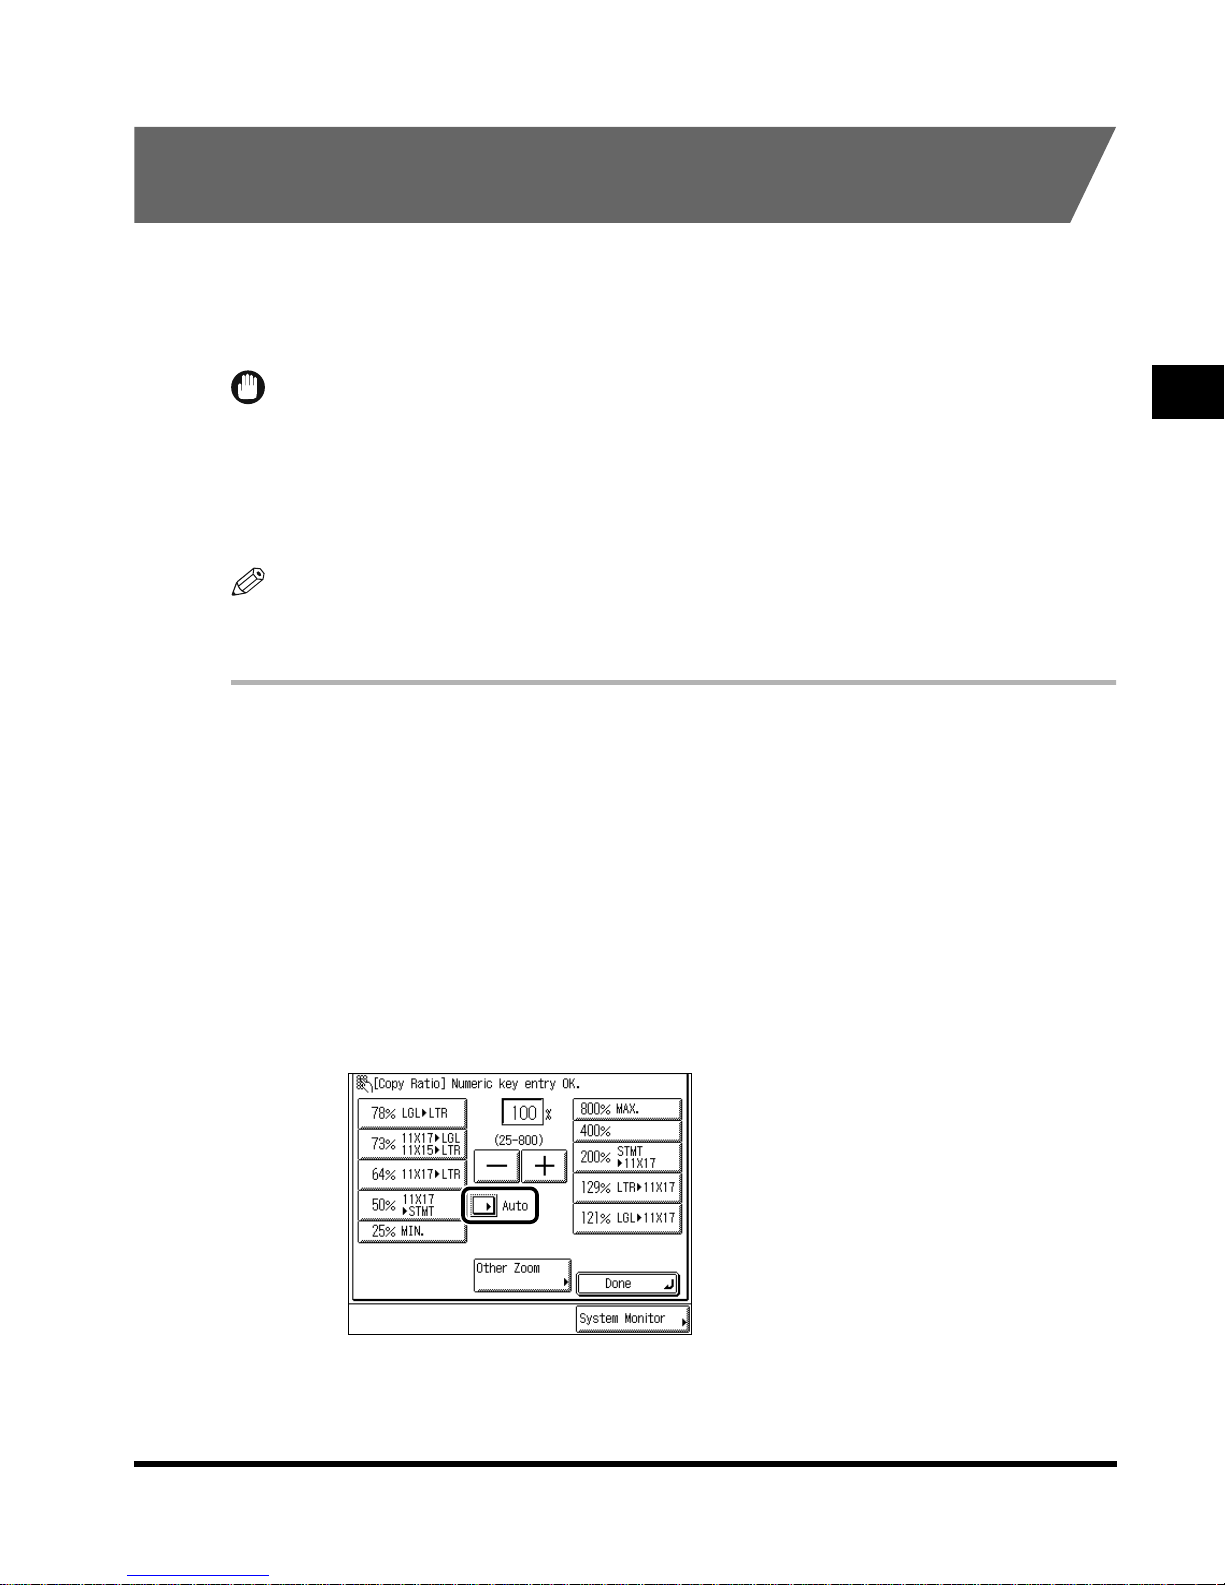
Automatically Setting the Ratio Based on the Selected
Record Size (Auto)
In this mode, the machine automatically selects the appropriate scanning ratio based on the
selected record size.The available scanning ratios are from 25% to 800% when the original
is placed on the platen glass, and from 25% to 400% when the original is placed in the
feeder.
IMPORTANT
• You cannot scan highly transparent originals, such as transparencies, in the Auto mode. Use the
Preset Zoom or Zoom Designation mode.
• To use the Auto mode, your originals must conform to a standard paper size.
• The record sizes that can be used with the Auto mode are 11" x 17", LGL, LTR, LTRR, STMT,
and STMTR.
NOTE
• If an error occurs between the Auto scanning ratio and the actual scanning size, you can adjust
this with the Zoom Fine Adjustment function. (See the Reference Guide.)
1
Select the desired mail box number to display the Document
Selection screen, and press “Scan.”
When you select a mail box set with a password, enter the password after selecting the
mail box, and press “OK.”
The Scan screen is displayed.
2
Place the original, and press “Copy Ratio.”
2
Scanning Originals into a Mail Box
3
Press “Auto.”
Changing the Scanning Ratio (Copy Ratio)
2-15
Page 42
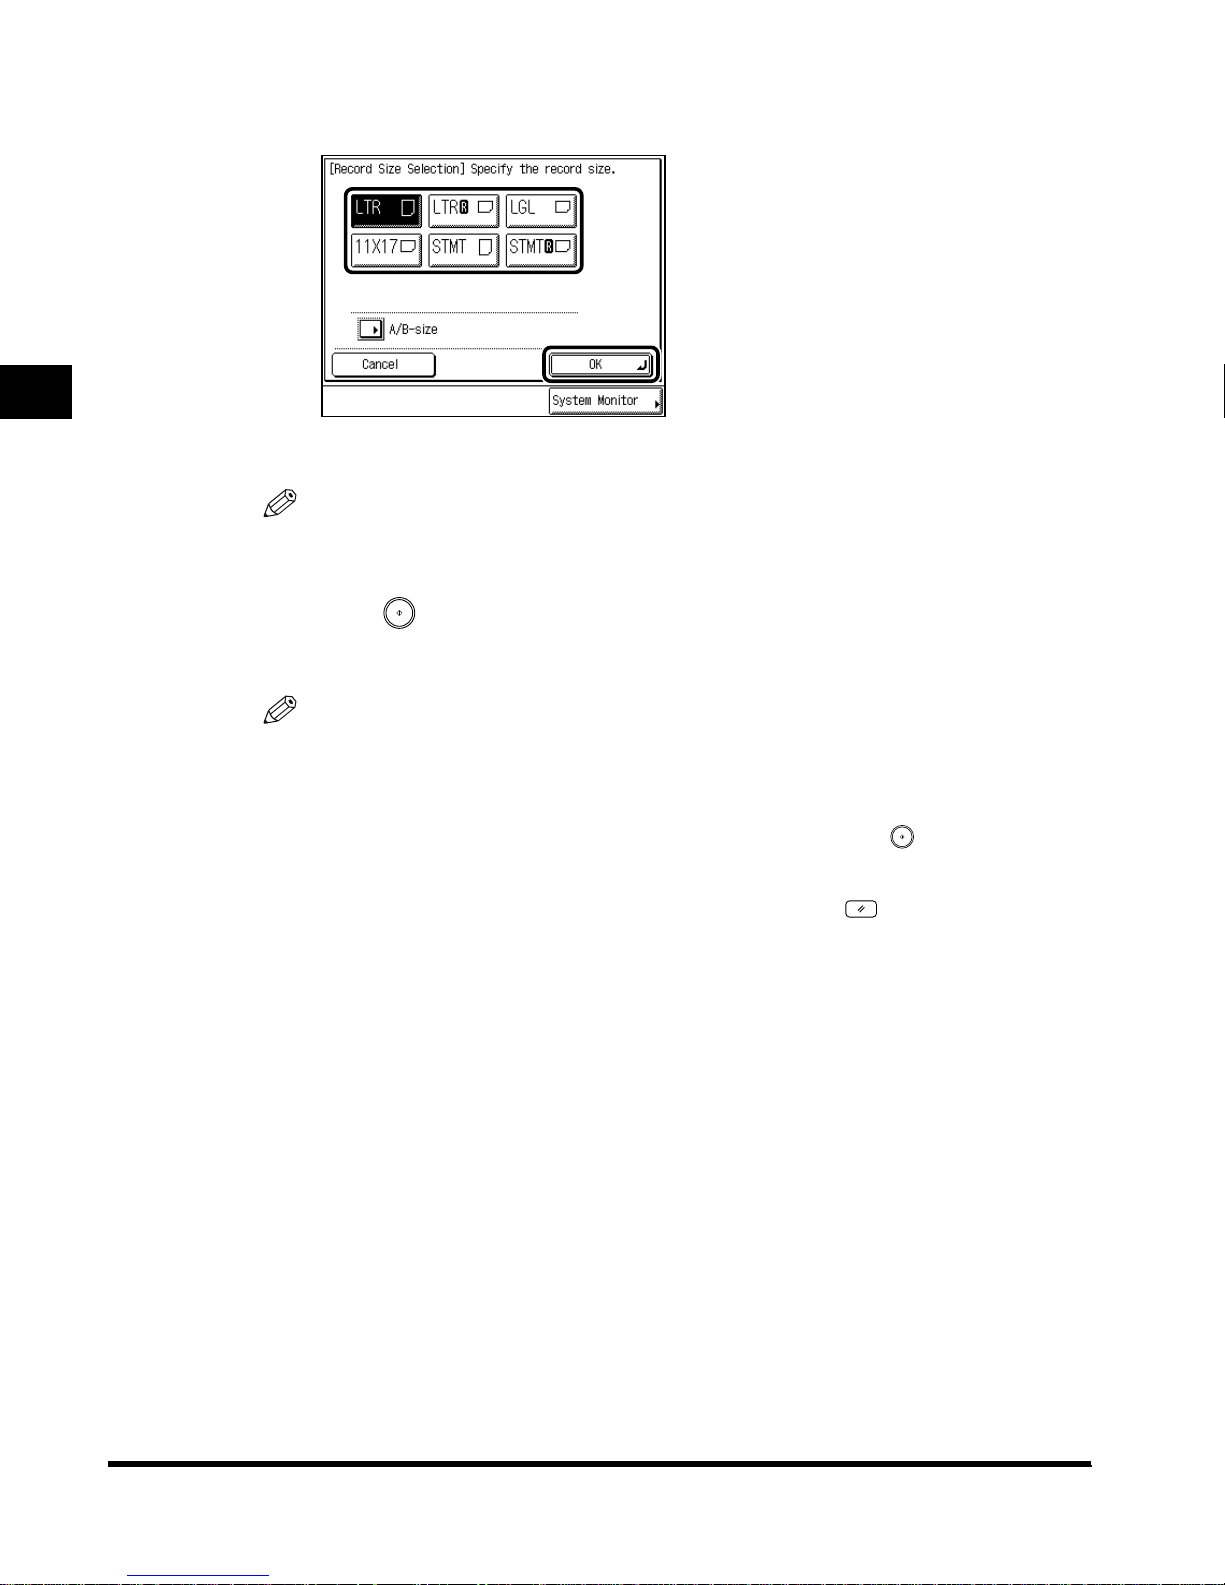
2
4
Select the size you want to record in, and press “OK.”
The specified mode is set and the display returns to the Scan screen.
NOTE
• To select an A or B series paper size, press “A/B-size.”
5
Press (Start).
The machine starts scanning. (See ‘Storing Originals in the Mail Box,’ on p. 1-9.)
NOTE
• To return the ratio to 100%, press “Direct.”
• To cancel the setting, press “Copy Ratio” →“Auto” → “Cancel,” in this order.
Scanning Originals into a Mail Box
• If the original is placed on the platen glass, the zoom ratio appears when the feeder is
lowered, provided that the original size can be detected.
• If the original is placed in the feeder, the zoom ratio appears when (Start) is pressed.
• To cancel all settings at once, press “Initial Settings .” (The machine returns to the standard
scanning mode.)
• To return the display to the Mail Box Selection screen, press (Reset).
2-16
Changing the Scanning Ratio (Copy Ratio)
Page 43
Calculating the Scanning Ratio Based on the Original and
Record Size (Zoom Program)
If you enter measurements for the original and the desired scan images (or printed sheets),
the machine automatically calculates and sets the appropriate scanning ratio. The available
scanning ratios are from 25% to 800% when the original is placed on the platen glass, and
from 25% to 400% when the original is placed in the feeder.
NOTE
• The designated sizes are converted to the scanning ratio (%) as follows:
- Scanning ratio (%) = (record size ÷ original size) x 100
■ Scanning with the same XY scanning ratio (Zoom):
Designate the same scanning ratio for the vertical and horizontal directions.
■ Scanning with different XY scanning ratios (XY Zoom):
Designate different scanning ratios for the vertical and horizontal directions.
Scanning with the same XY scanning ratio (Zoom)
1
Select the desired mail box number to display the Document
Selection screen, and press “Scan.”
When you select a mail box set with a password, enter the password after selecting the
mail box, and press “OK.”
The Scan screen is displayed.
2
Scanning Originals into a Mail Box
2
Place the original, and press “Copy Ratio.”
3
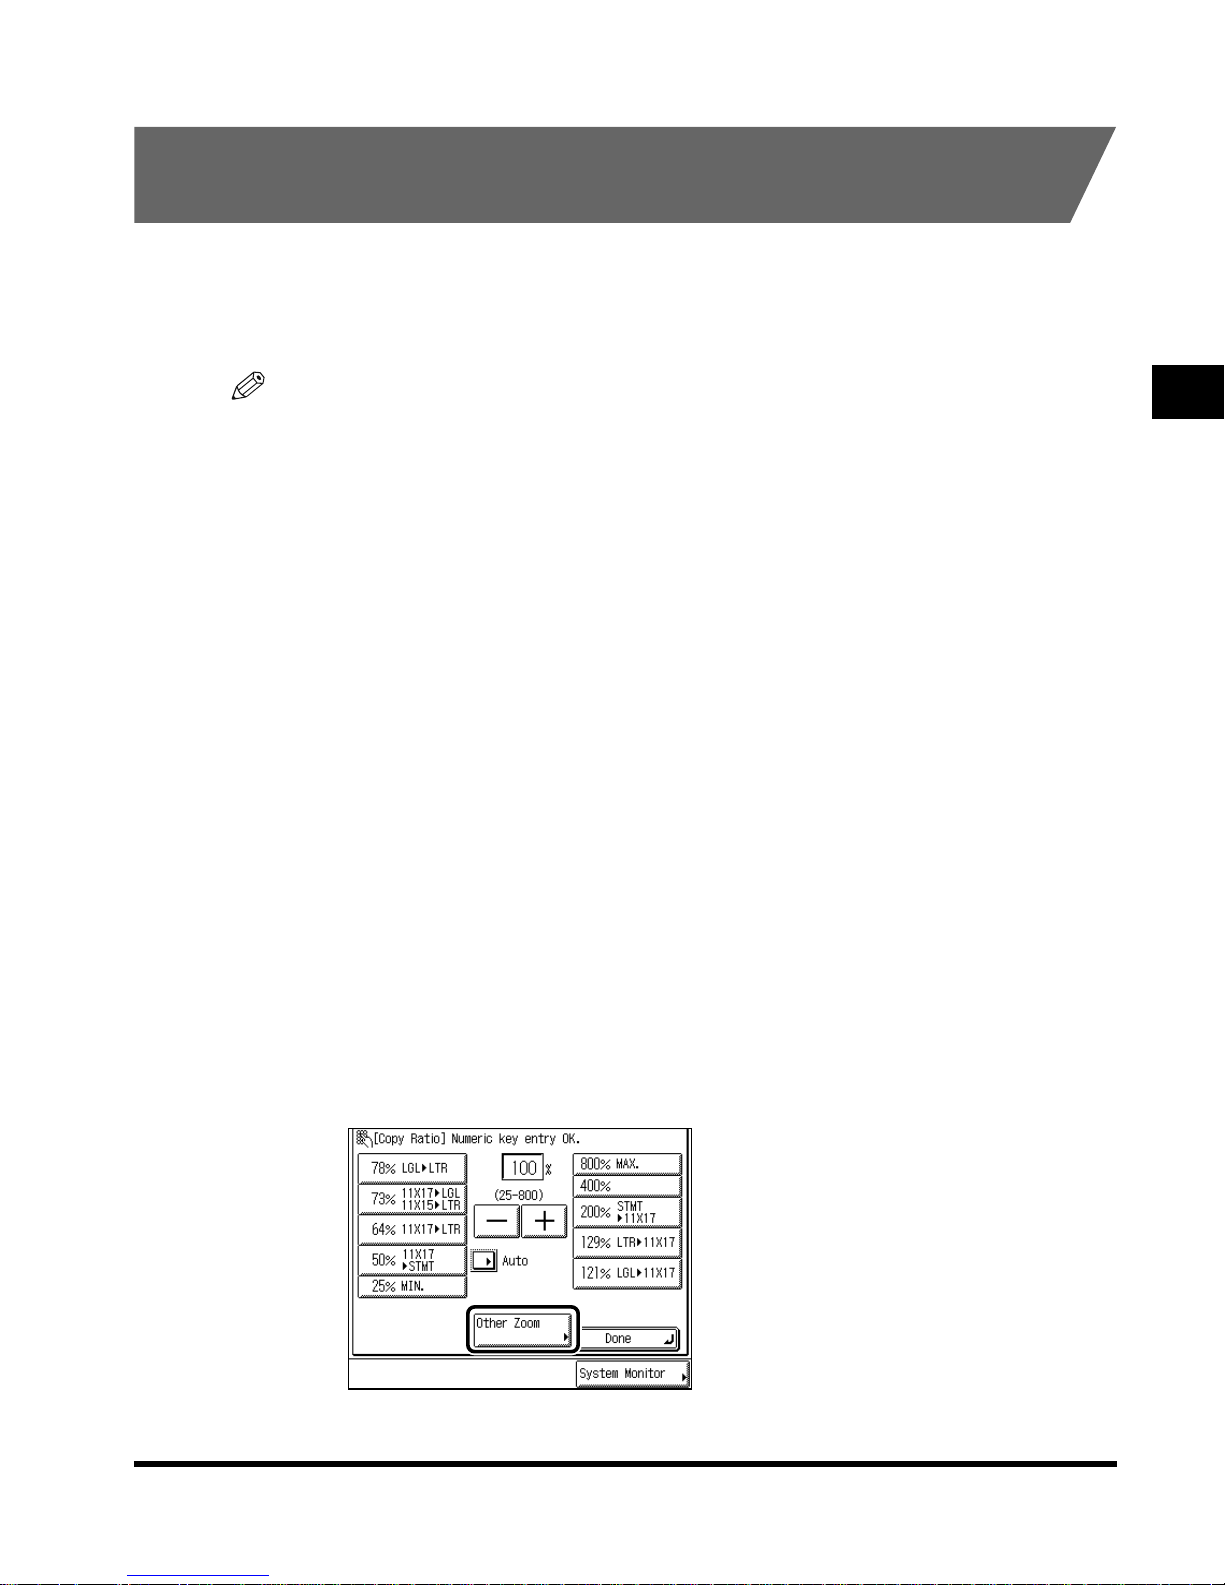
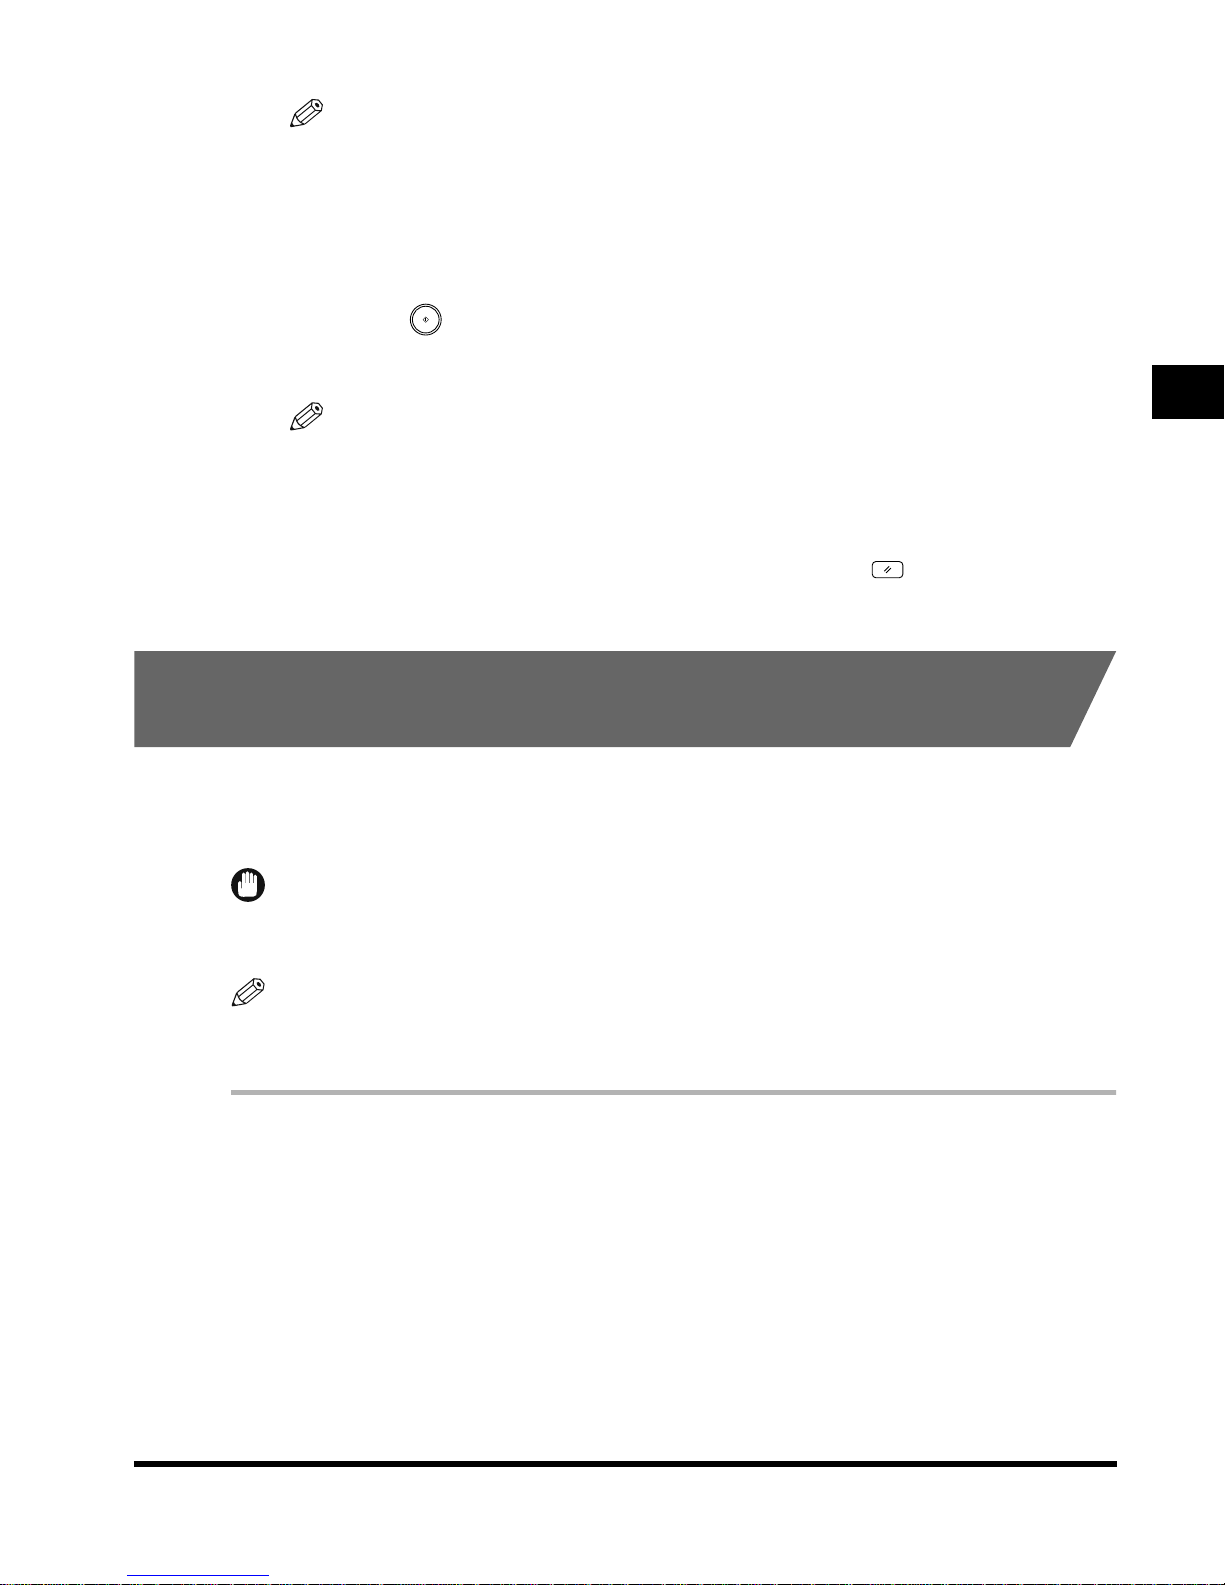
Press “Other Zoom. ”
Changing the Scanning Ratio (Copy Ratio)
2-17
Page 44
2
4
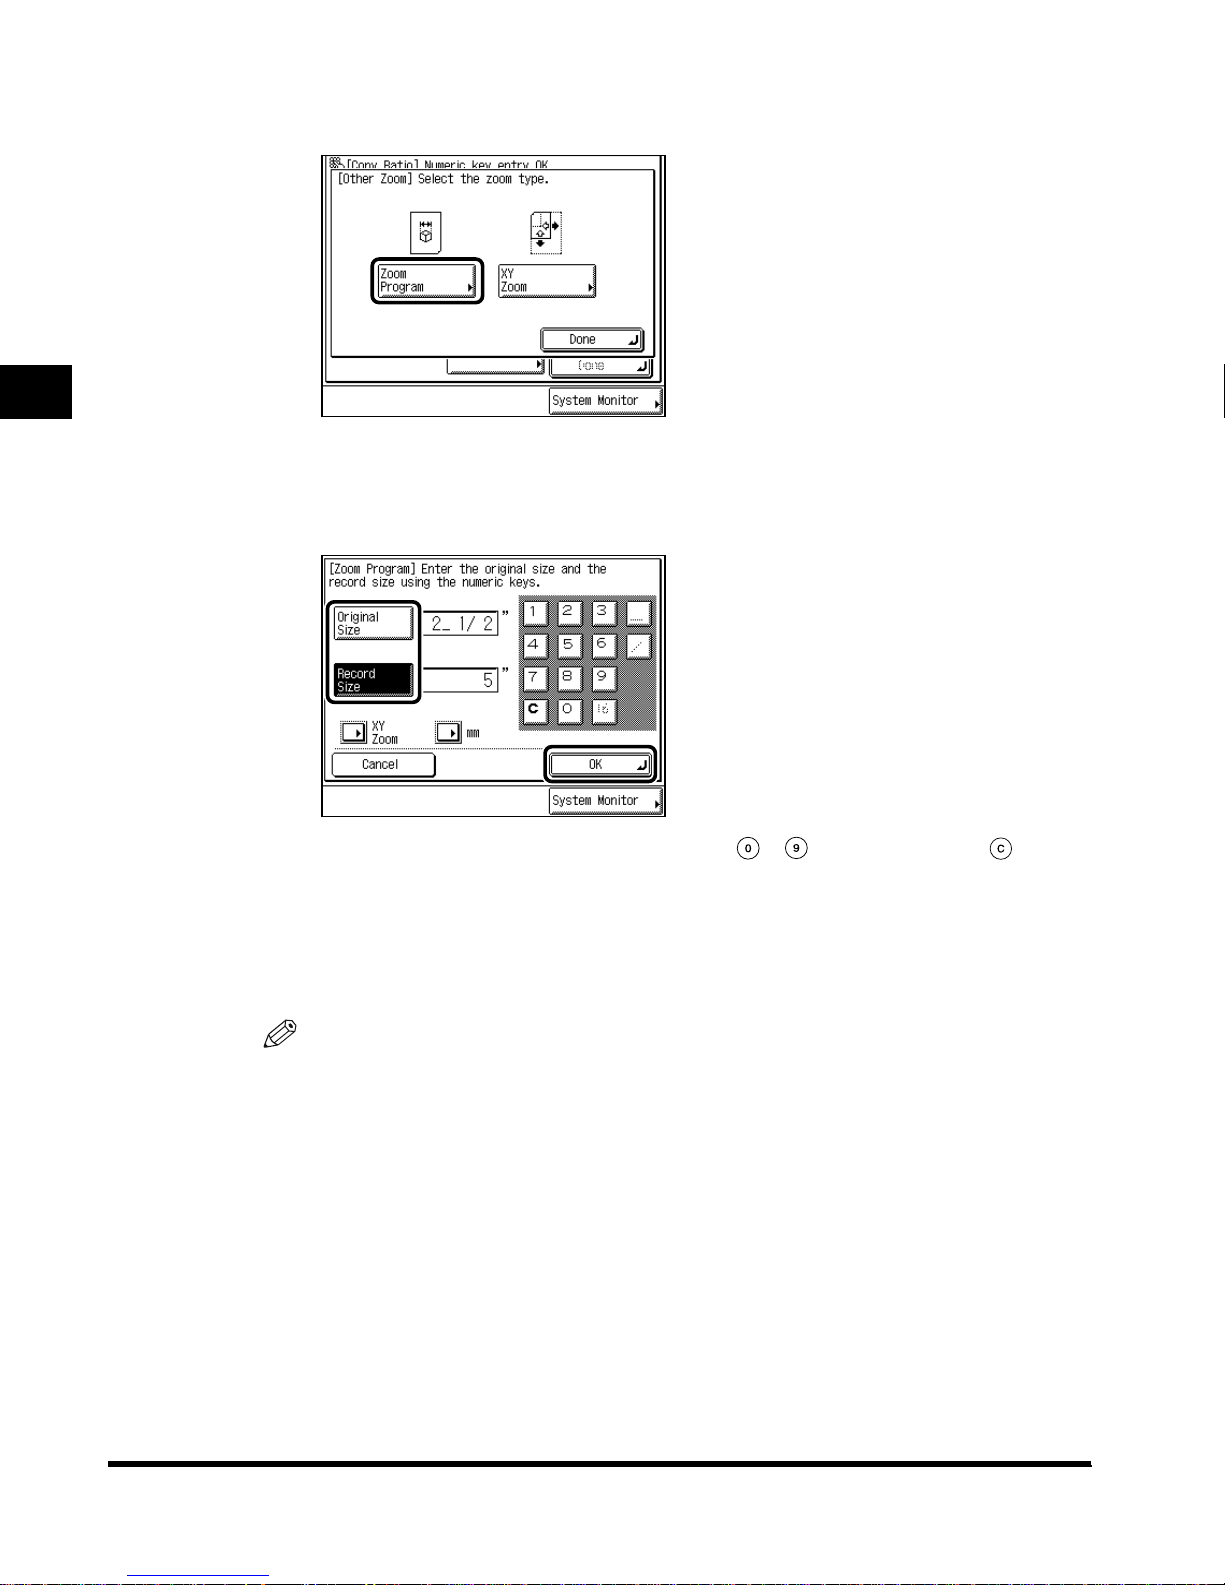
Press “Zoom Program. ”
5
Press “Original Size” and enter the size → press “Record Size” and
enter the size to be recorded → press “OK. ”
Scanning Originals into a Mail Box
When entering values in millimeters, you can use - (numeric keys) and (Clear).
The specified mode is set and the display returns to the Scan screen.
If the zoom ratio is less than 25%, a message telling you that the ratio will be adjusted to
25% appears. If it is more than 800%, a message telling you that the ratio will be adjusted
to 800% appears.
NOTE
• Place the original on the platen glass if the zoom ratio is more than 400%.
• If you make a mistake when entering values, press “C,” and enter the correct value.
• To designate the sizes of the horizontal direction (X) and the vertical direction (Y)
independently, press “XY Zoom.”
• If you want to enter values in millimeters, press “mm.”
• For details of how to enter values in inches, see the Reference Guide.
2-18
Changing the Scanning Ratio (Copy Ratio)
Page 45
6
Press (Start).
The machine starts scanning. (See ‘Storing Originals in the Mail Box,’ on p. 1-9.)
NOTE
• To return the ratio to 100%, press “Direct.”
• To cancel the setting, press “Copy Ratio” → “Other Zoom”→ “Zoom Program” → “Cancel,”
in this order.
• To cancel all settings at once, press “Initial Settings .” (The machine returns to the standard
scanning mode.)
• To return the display to the Mail Box Selection screen, press (Reset).
Scanning with different XY scanning ratios (XY Zoom)
1
Select the desired mail box number to display the Document
Selection screen, and press “Scan.”
When you select a mail box set with a password, enter the password after selecting the
mail box, and press “OK.”
The Scan screen is displayed.
2
2
Place the original, and press “Copy Ratio.”
3
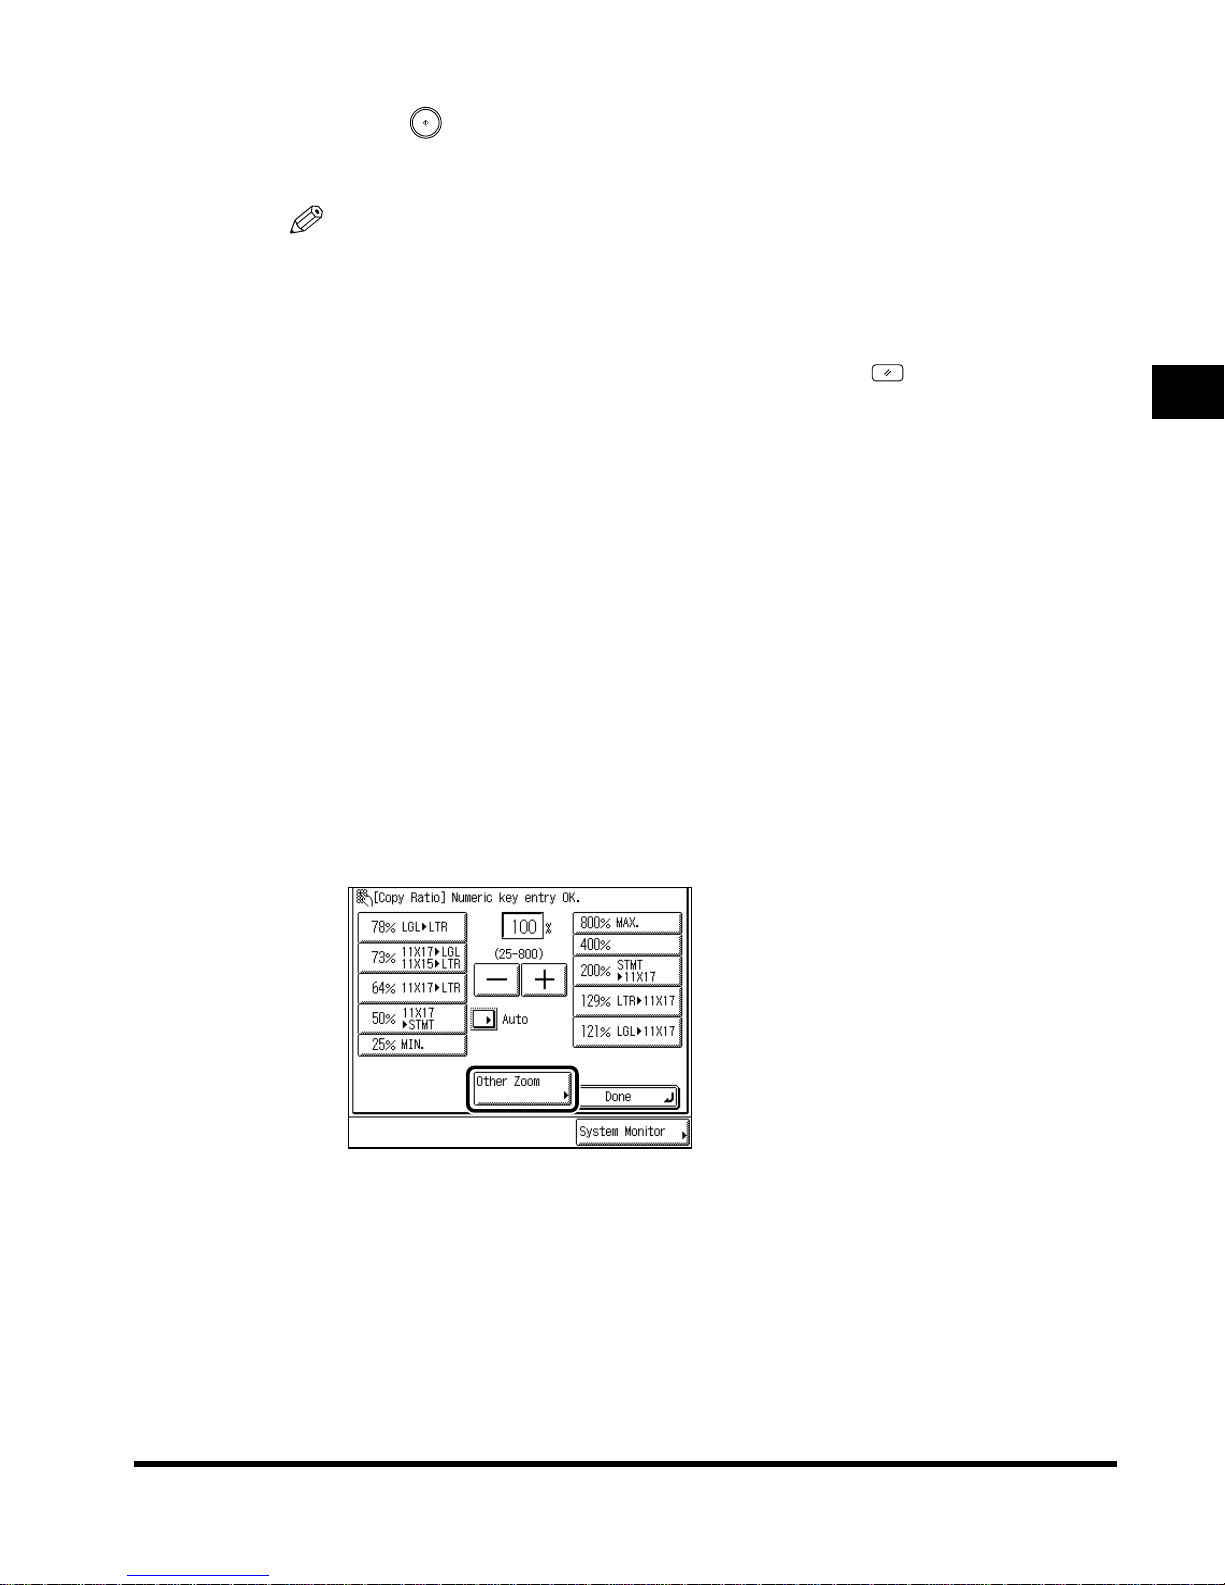
Press “Other Zoom. ”
Scanning Originals into a Mail Box
Changing the Scanning Ratio (Copy Ratio)
2-19
Page 46
2
4
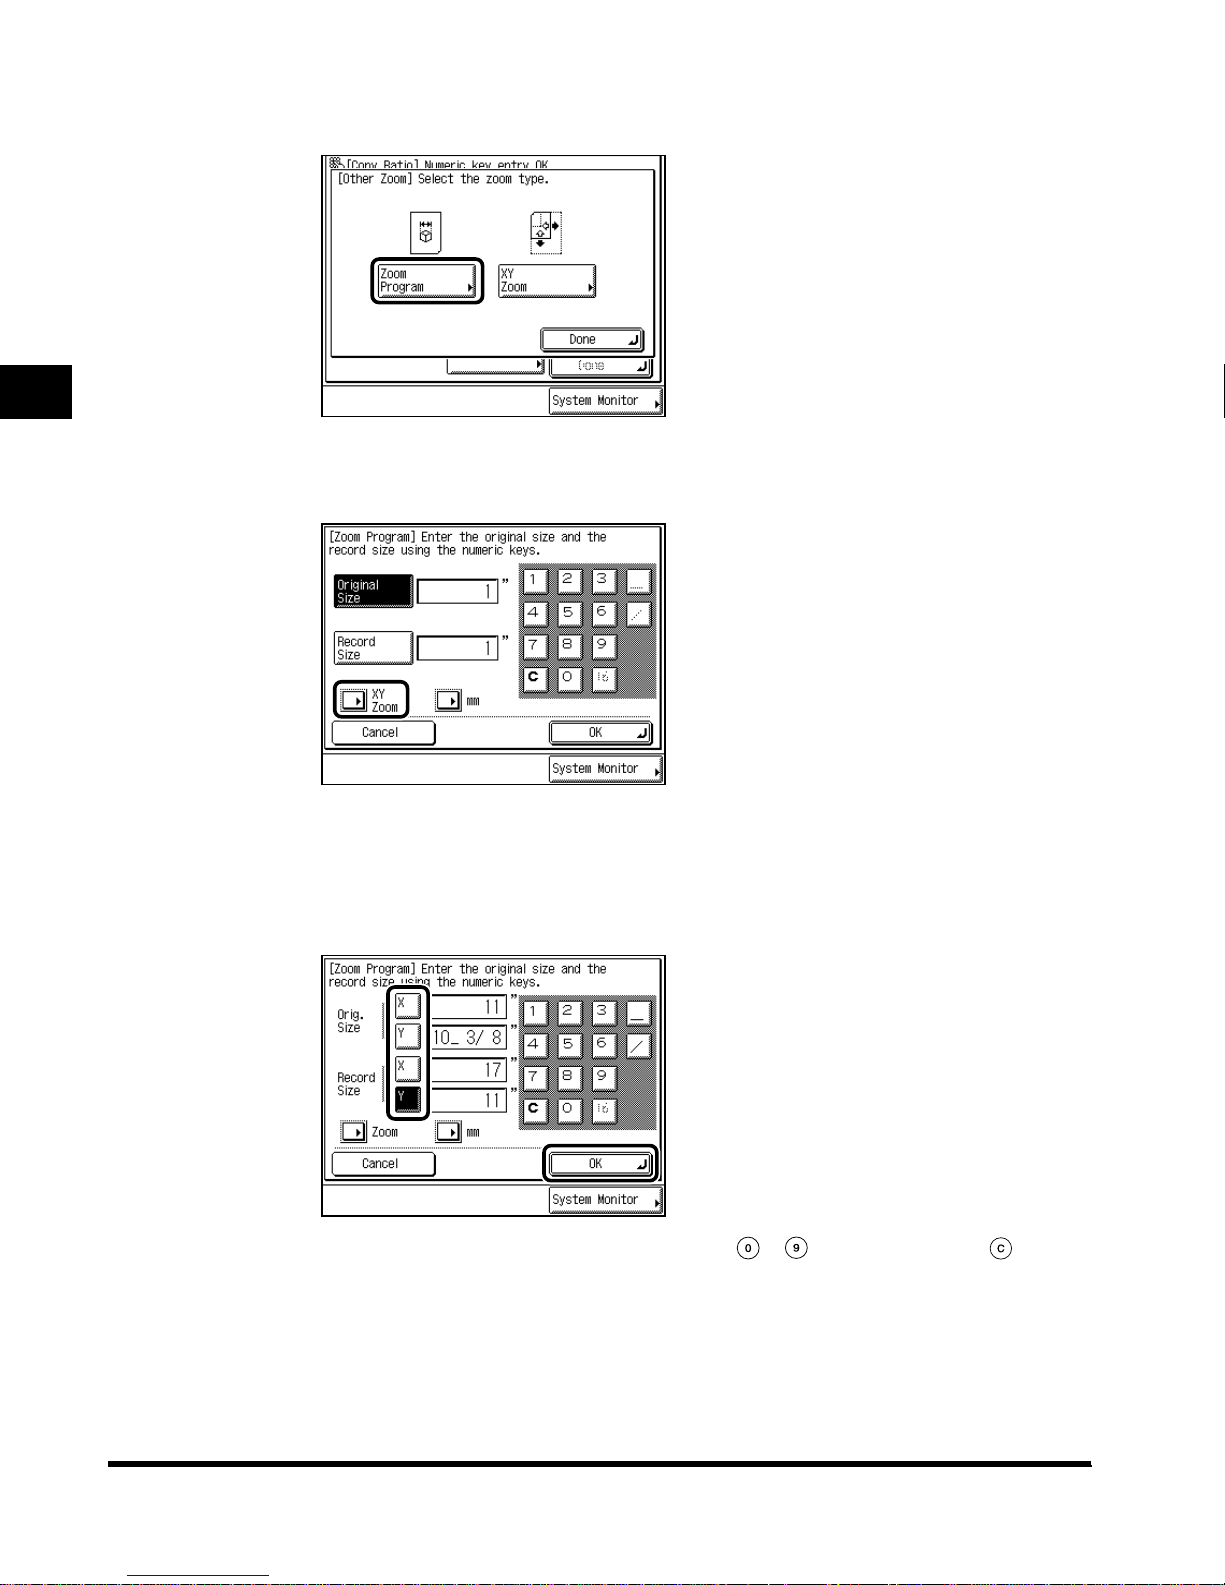
Press “Zoom Program. ”
5
Press “XY Zoom. ”
Scanning Originals into a Mail Box
6
Press “X” (horizontal direction) then “Y” (vertical direction) for both
the original size and the record size → enter each value f or X and Y →
press “OK. ”
When entering values in millimeters, you can use - (numeric keys) and (Clear).
The specified mode is set and the display returns to the Scan screen.
If the zoom ratio is less than 25%, a message telling you that the ratio will be adjusted to
25% appears. If it is more than 800%, a message telling you that the ratio will be adjusted
to 800% appears.
2-20
Changing the Scanning Ratio (Copy Ratio)
Page 47
NOTE
• Place the original on the platen glass if the zoom ratio is more than 400%.
• If you make a mistake when entering values, press “C,” and enter the correct values.
• To set the same values for the X and Y axes, press “Zoom.”
• If you want to enter values in millimeters, press “mm.”
• For details of how to enter values in inches, see the Reference Guide.
7
Press (Start).
The machine starts scanning. (See ‘Storing Originals in the Mail Box,’ on p. 1-9.)
NOTE
• To return the ratio to 100%, press “Direct.”
• To cancel the setting, press “Copy Ratio” → “Other Zoom”→ “Zoom Program” → “Cancel,”
in this order.
• To cancel all settings at once, press “Initial Settings .” (The machine returns to the standard
scanning mode.)
• To return the display to the Mail Box Selection screen, press (Reset).
Enlarging/Reducing Originals at Scanning Ratios Set
2
Independently for X and Y Axes (XY Zoom)
If you set the XY Zoom mode, you can scan an original enlarging or reducing it to different
XY scanning ratios. The a v ailab le scanning r atios are from 25% to 800% when the original is
placed on the platen glass, and from 25% to 400% when the original is placed in the feeder.
IMPORTANT
• You cannot scan highly transparent originals, such as transparencies, in the XY Zoom mode.
Specify the scanning ratio for these originals.
NOTE
• If an error occurs between the XY Zoom scanning and the actual scanning size, then you can
adjust this with the Zoom Fine Adjustment function. (See the Reference Guide.)
1
Select the desired mail box number to display the Document
Selection screen, and press “Scan.”
When you select a mail box set with a password, enter the password after selecting the
mail box, and press “OK.”
The Scan screen is displayed.
Scanning Originals into a Mail Box
Changing the Scanning Ratio (Copy Ratio)
2-21
Page 48
2
2
Place the original, and press “Copy Ratio.”
NOTE
• Place the original on the platen glass if the zoom ratio is more than 400%.
3
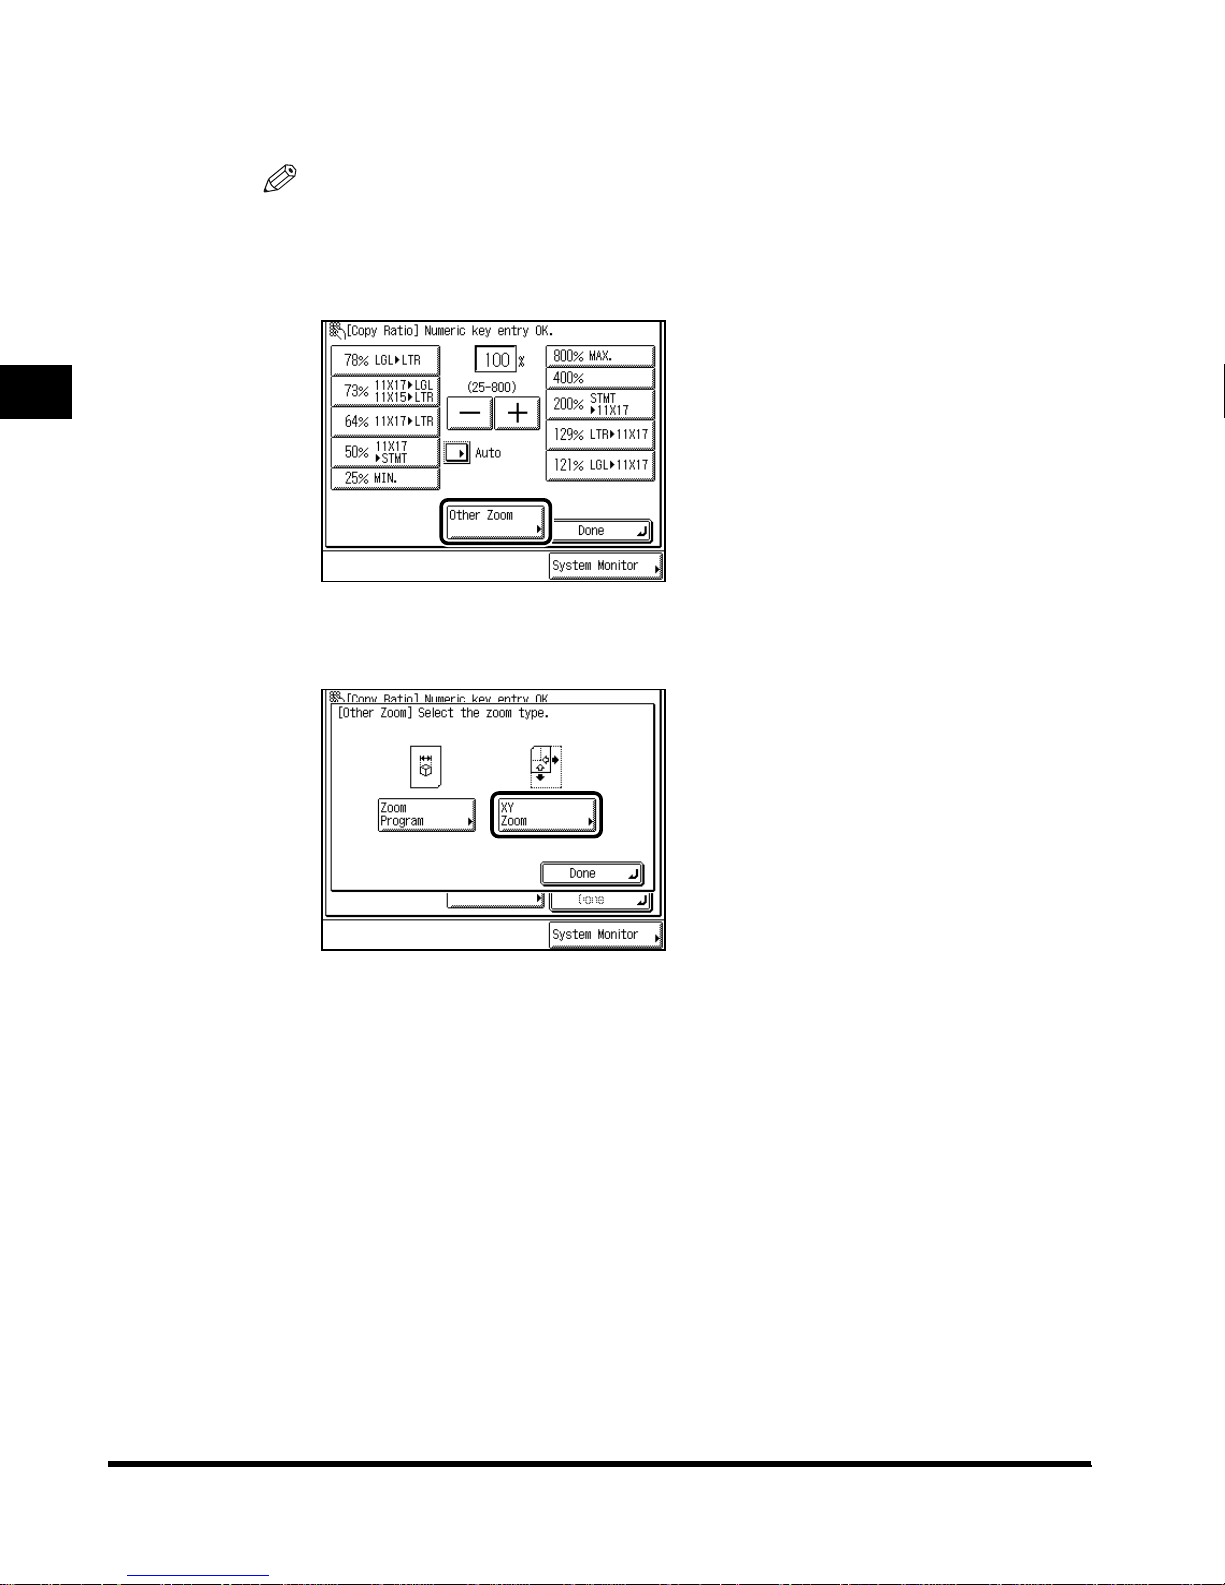
Press “Other Zoom. ”
4
Press “XY Zoom. ”
Scanning Originals into a Mail Box
2-22
Changing the Scanning Ratio (Copy Ratio)
Page 49
5
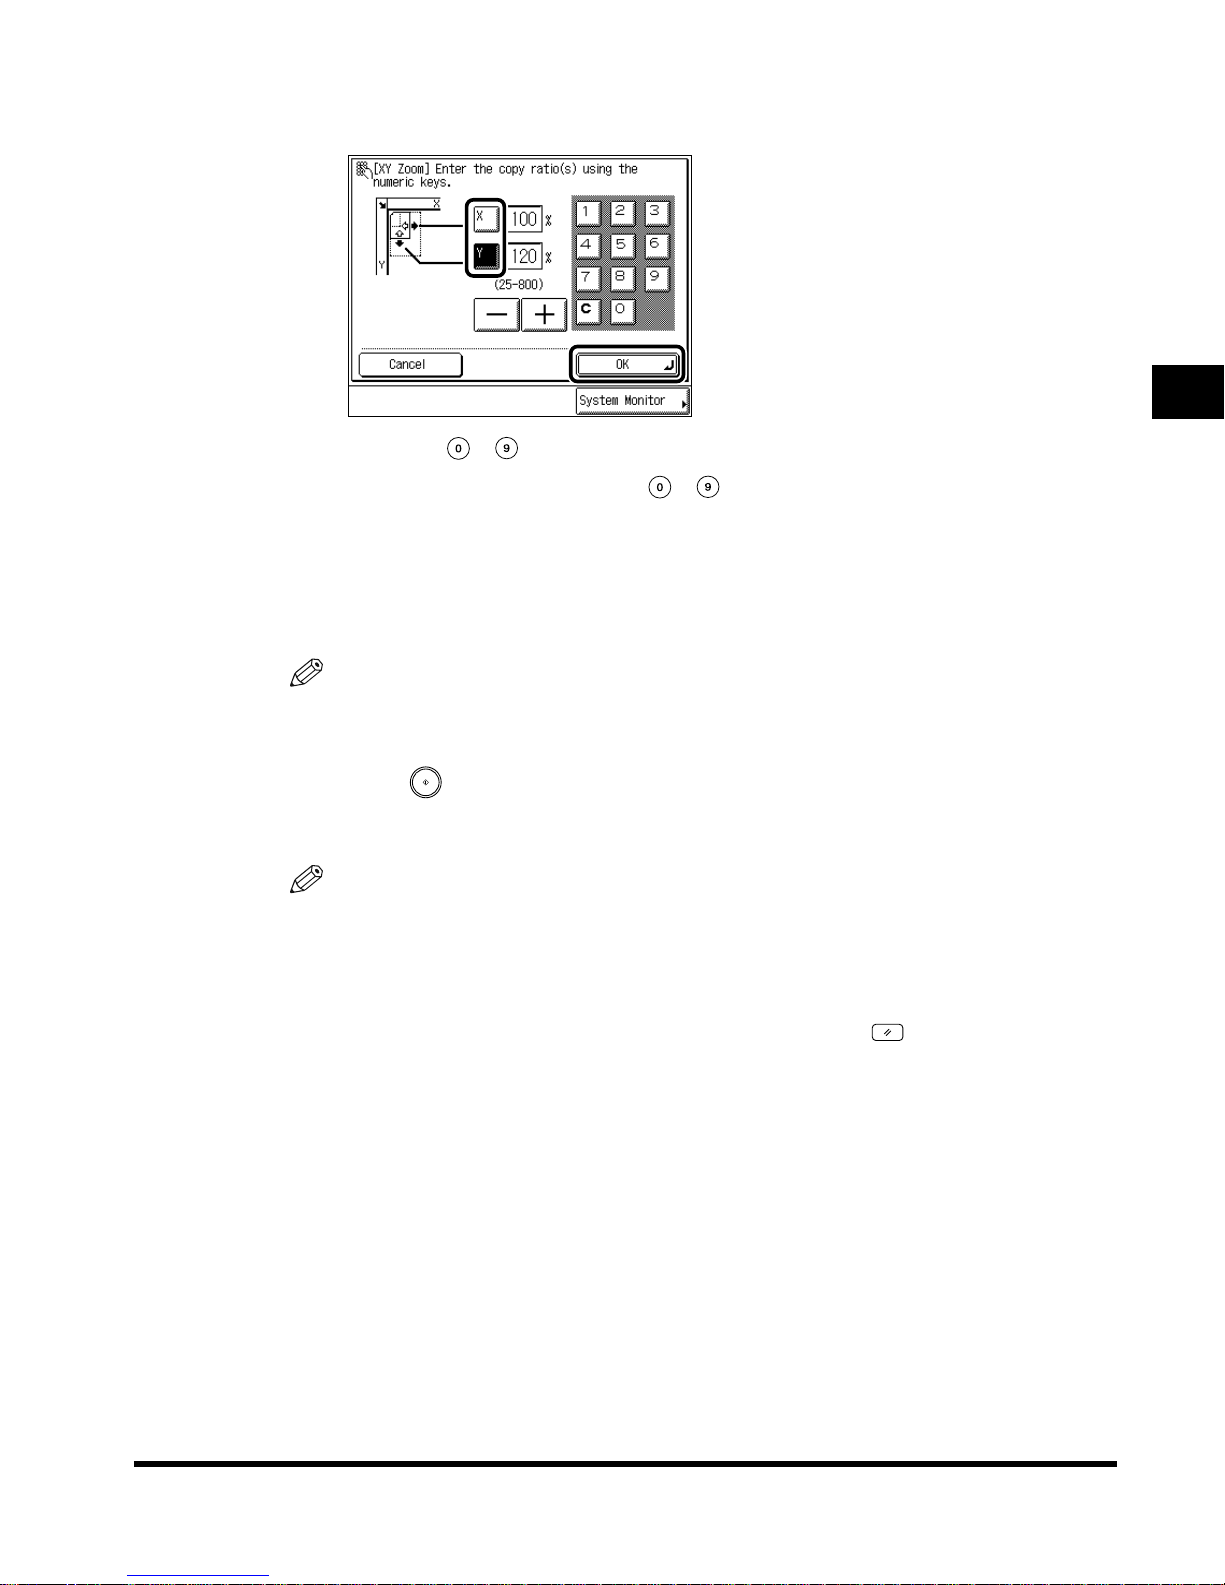
Press “X” and “Y” → enter each value for X and Y → press “OK.”
You can use - (numeric keys) to enter the value.
Even if you enter the copy ratio with - (numeric keys), you can change the entered
values with “–” or “+.”
The specified mode is set and the display returns to the Scan screen.
If you enter a value outside the setting range, a message prompting you to enter the
appropriate value appears in the screen.
NOTE
• If you make a mistake when entering values, press “C,” and enter the correct value.
2
6
Press (Start).
The machine starts scanning. (See ‘Storing Originals in the Mail Box,’ on p. 1-9.)
NOTE
• To return the ratio to 100%, press “Direct.”
• To cancel the setting, press “Copy Ratio” → “Other Zoom” → “XY Zoom” → “Cancel,” in
this order.
• To cancel all settings at once, press “Initial Settings .” (The machine returns to the standard
scanning mode.)
• To return the display to the Mail Box Selection screen, press (Reset).
Scanning Originals into a Mail Box
Changing the Scanning Ratio (Copy Ratio)
2-23
Page 50
Scanning Two-sided Originals (2-sided Original)
With this function you can specify that the machine automatically turns over two-sided
originals placed in the feeder to scan each side separately or that it prompts you to scan the
second side of an original placed on the platen glass.
2
IMPORTANT
• When the machine is operating in the Two-sided Original mode, you cannot use the Two-page
Separation, Booklet Scanning or Image Combination modes.
• Place the original horizontally when scanning originals such as LTRR and STMTR size. If these
originals are placed vertically, the back side of the print is printed upside down.
1
Select the desired mail box number to display the Document
Selection screen, and press “Scan.”
When you select a mail box set with a password, enter the password after selecting the
mail box, and press “OK.”
The Scan screen is displayed.
Scanning Originals into a Mail Box
2
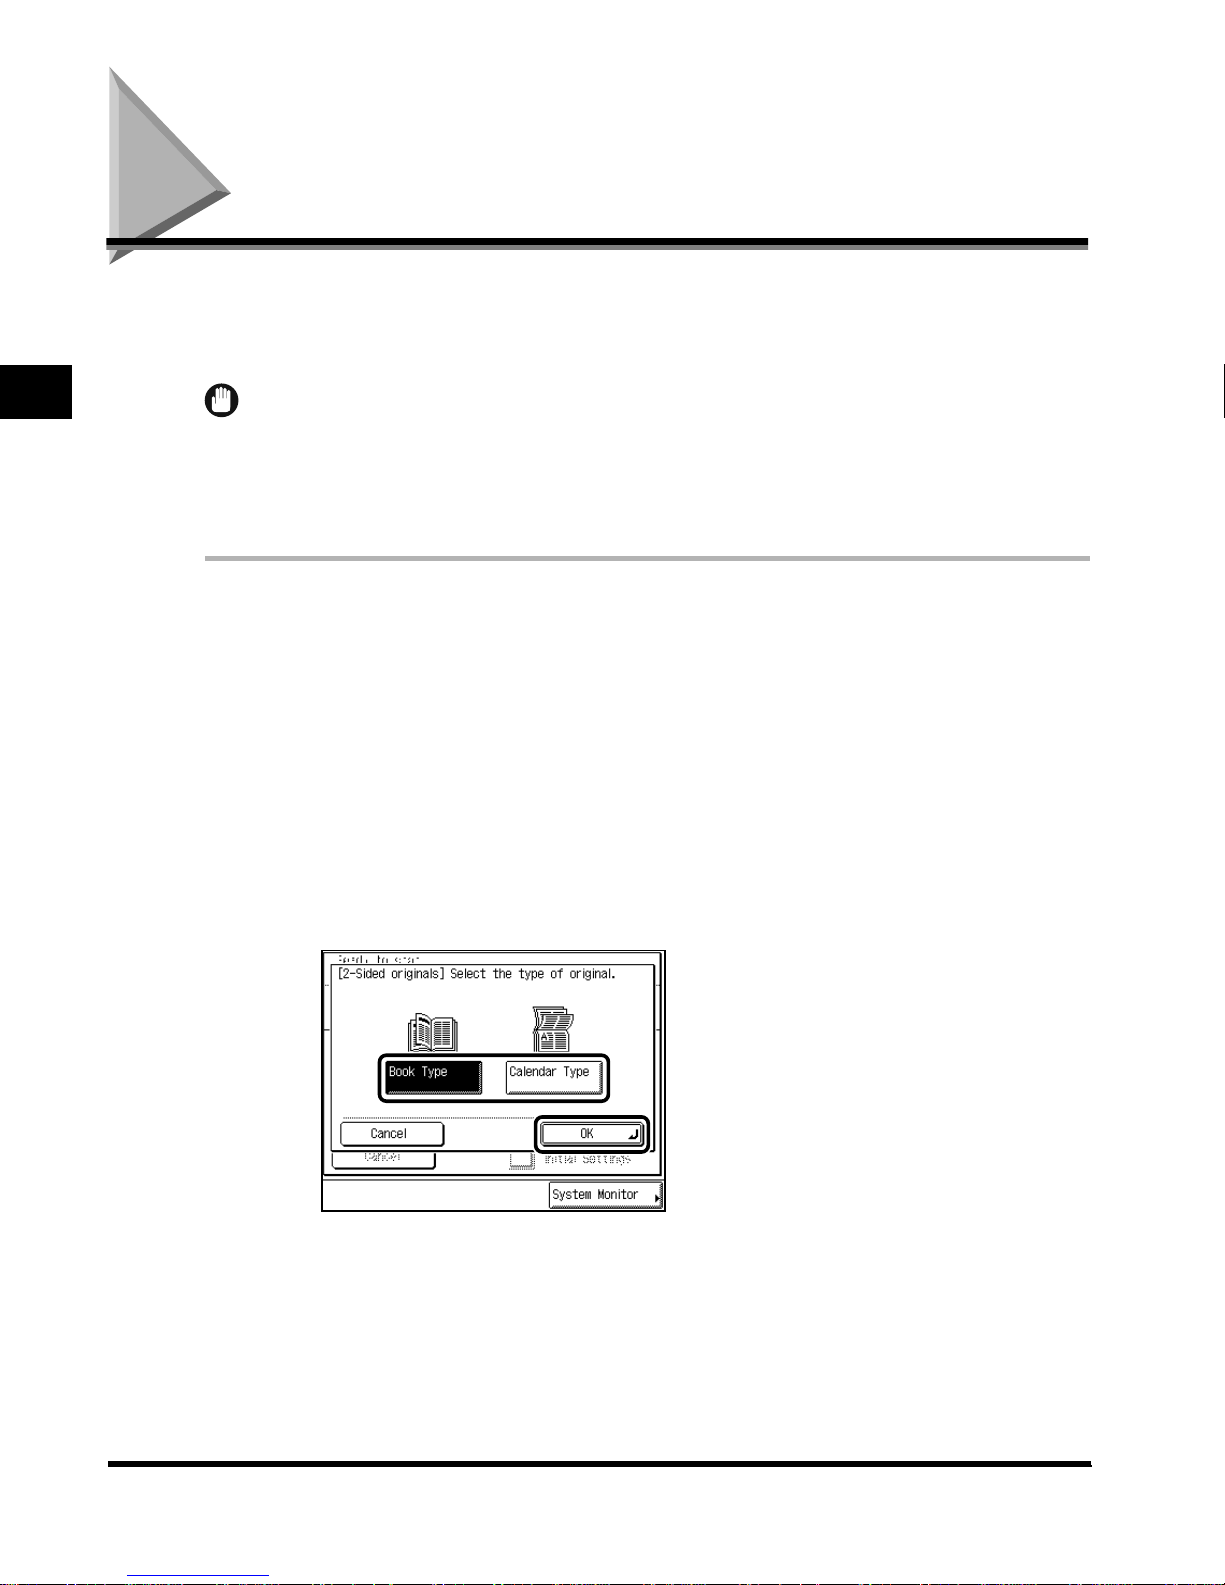
Place the original, and press “2-sided Original.”
3
Select the type of original, and press “OK.”
The specified mode is set and the display returns to the Scan screen.
2-24
Scanning Two-sided Originals (2-sided Original)
Page 51

4
Press (Start).
The machine starts scanning. (See ‘Storing Originals in the Mail Box,’ on p. 1-9.)
When the original is placed on the platen glass, follow the instructions that appear on the
display and press (Start) once for each original. When scanning is completed, press
“Done.”
NOTE
• To cancel the setting, press “Special Features” → “2-sided Original” → “Cancel,” in this
order.
• To cancel all settings at once, press “Initial Settings .” (The machine returns to the standard
scanning mode.)
• To return the display to the Mail Box Selection screen, press (Reset).
2
Scanning Originals into a Mail Box
Scanning Two-sided Originals (2-sided Original)
2-25
Page 52
Scanning Facing Pages in a Book onto Two
Separate Sheets in One Step (Two-page Separation)
With this function you can scan facing pages in a book or a magazine onto separate sheets
of paper in a single operation.
2
IMPORTANT
• When the machine is operating in the Two-page Separation mode, you cannot use the 2-sided
Original, Booklet Scanning, Different Size Originals, Binding Erase, or Image Combination
modes.
• Place your originals on the platen glass. Y ou cannot scan originals placed in the feeder using the
Two-page Separation mode.
1
Select the desired mail box number to display the Document
Selection screen, and press “Scan.”
When you select a mail box set with a password, enter the password after selecting the
mail box, and press “OK.”
The Scan screen is displayed.
Scanning Originals into a Mail Box
2
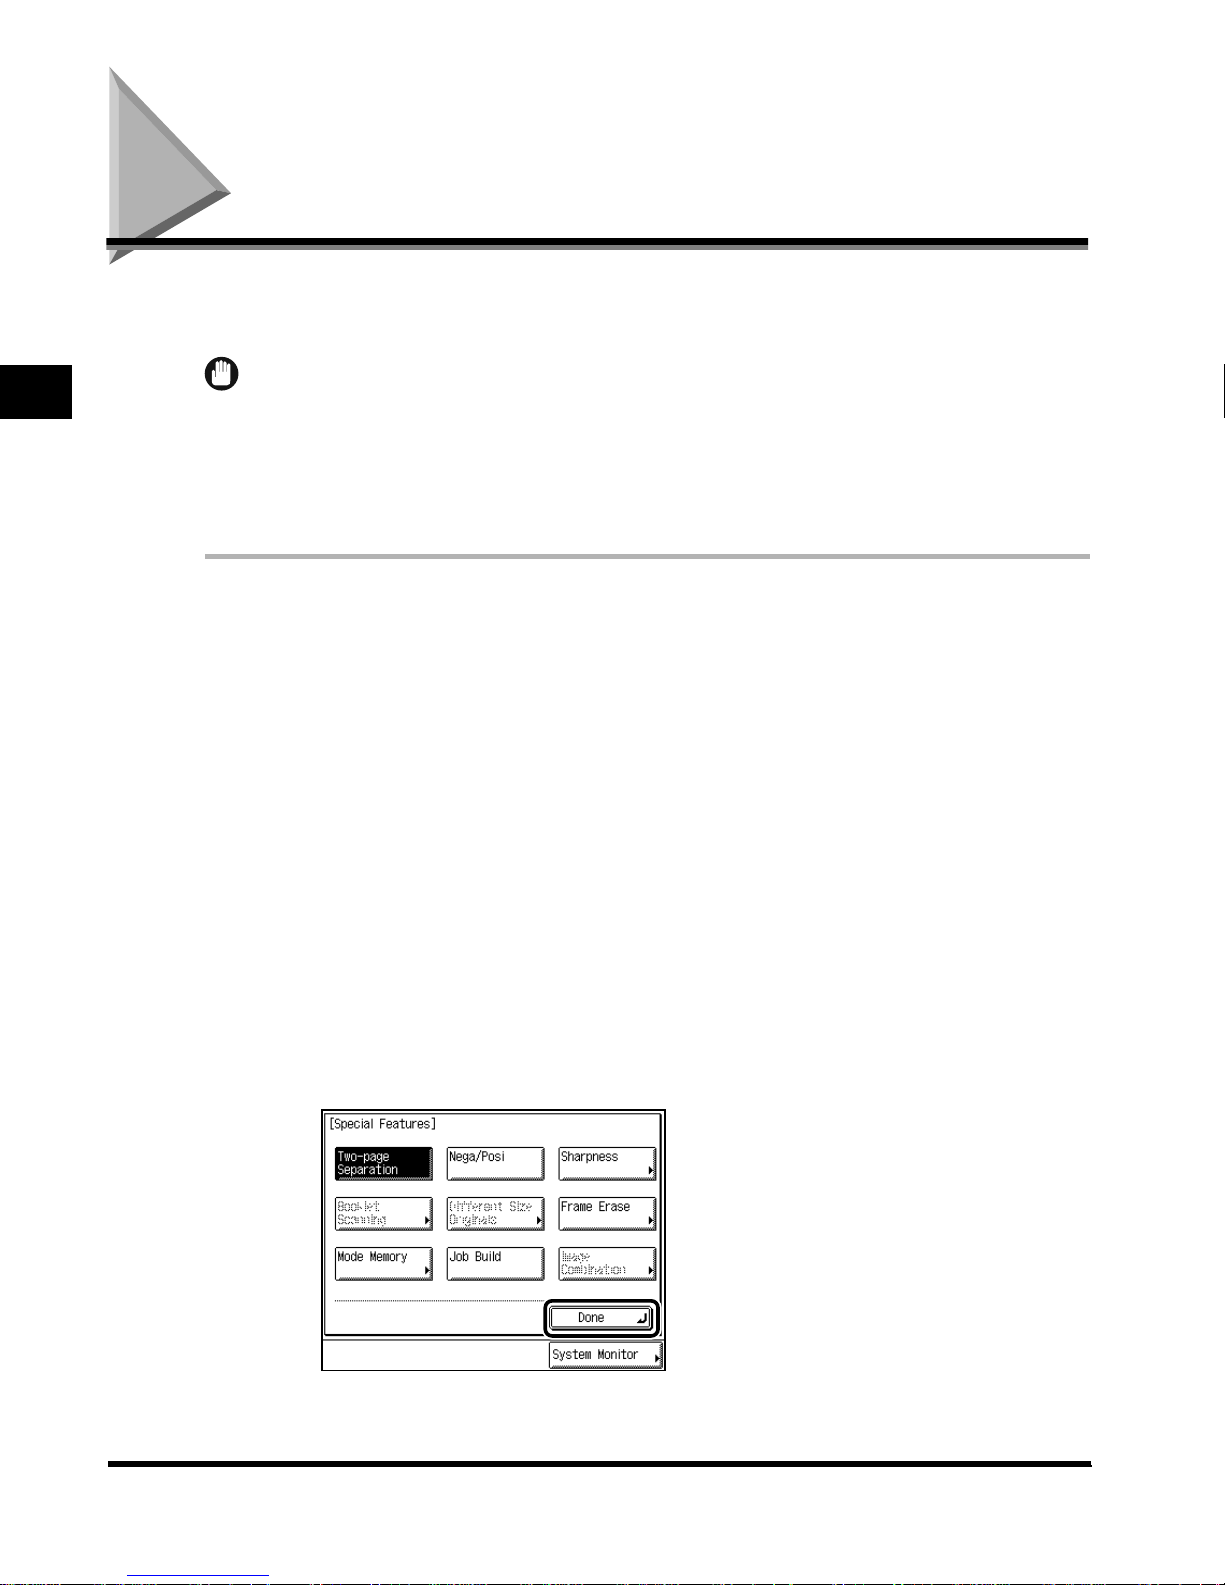
Place the original on the platen glass → press “Special Features” →
press “T wo-page Separation. ”
To scan in page order, begin scanning from the first facing pages and work your way
forward.
2-26
Place the original face down so that the original’s top edge is against the top left corner of
the platen glass.
3
Press “Done. ”
The specified mode is set and the display returns to the Scan screen.
Scanning Facing Pages in a Book onto Two Separate Sheets in One Step (Twopage Separation)
Page 53

4
Press (Start).
The machine starts scanning. (See ‘Storing Originals in the Mail Box,’ on p. 1-9.)
NOTE
• To cancel the setting, press “Special Features” → “Two-page Separation,” in this order.
• To cancel all settings at once, press “Initial Settings .” (The machine returns to the standard
scanning mode.)
• To return the display to the Mail Box Selection screen, press (Reset).
2
Scanning Originals into a Mail Box
Scanning Facing Pages in a Book onto Two Separate Sheets in One Step (Two-
2-27
page Separation)
Page 54
Scanning Originals for Use as a Booklet
(Booklet Scanning)
With this function you can scan originals in such a way that, when printing the scanned data,
the output paper can be easily made into a booklet. Specify the Booklet mode when printing
the scanned data. (See ‘Making Prints for Use as a Booklet (Booklet),’ on p. 3-22.)
2
IMPORTANT
• When the machine is operating in the Booklet Scanning mode, you cannot use the Two-page
Separation, Different Size Originals, Frame Erase, or Image Combination modes.
• If you place originals with vertical orientation (portrait) horizontally and scan them, the images on
the even number pages are printed upside down. Place these originals vertically.
1
Select the desired mail box number to display the Document
Selection screen, and press “Scan.”
When you select a mail box set with a password, enter the password after selecting the
mail box, and press “OK.”
The Scan screen is displayed.
Scanning Originals into a Mail Box
2
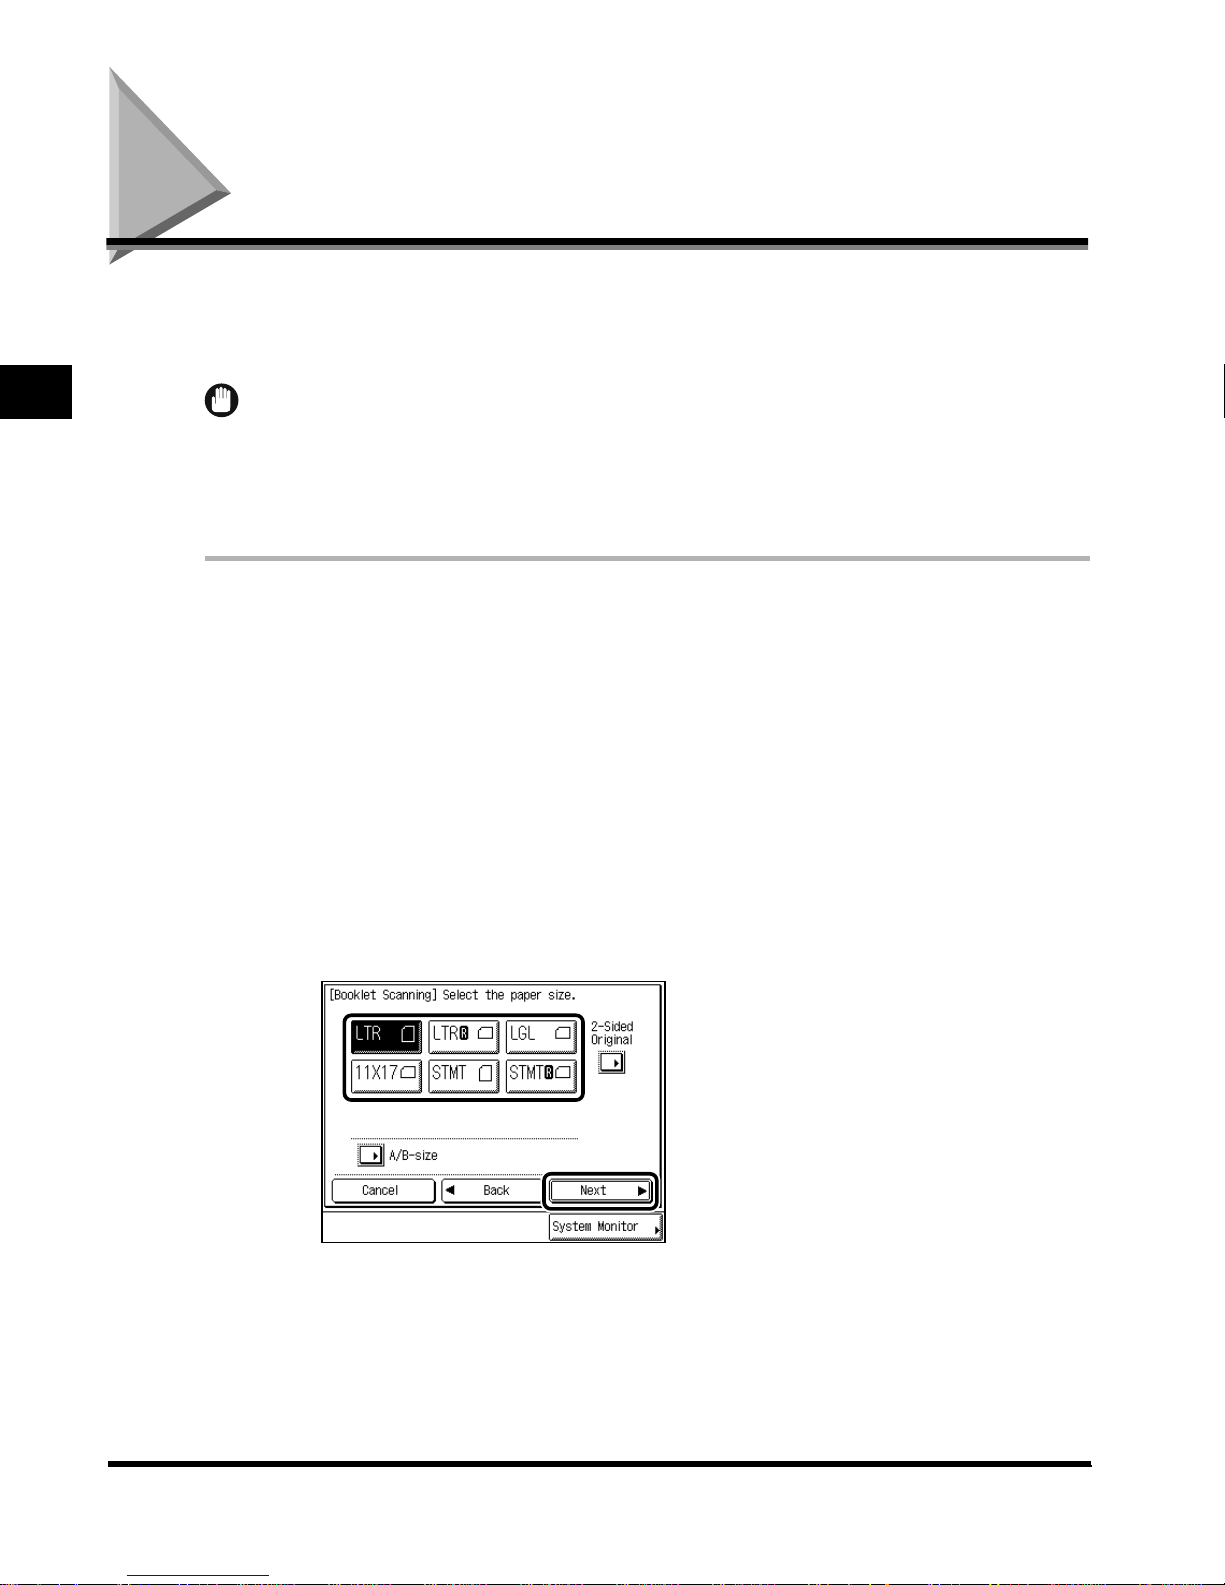
Place the originals → press “Special Features” → press “Booklet
Scanning.”
3
Select the original size, and press “Next.”
2-28
Scanning Originals for Use as a Booklet (Booklet Scanning)
Page 55
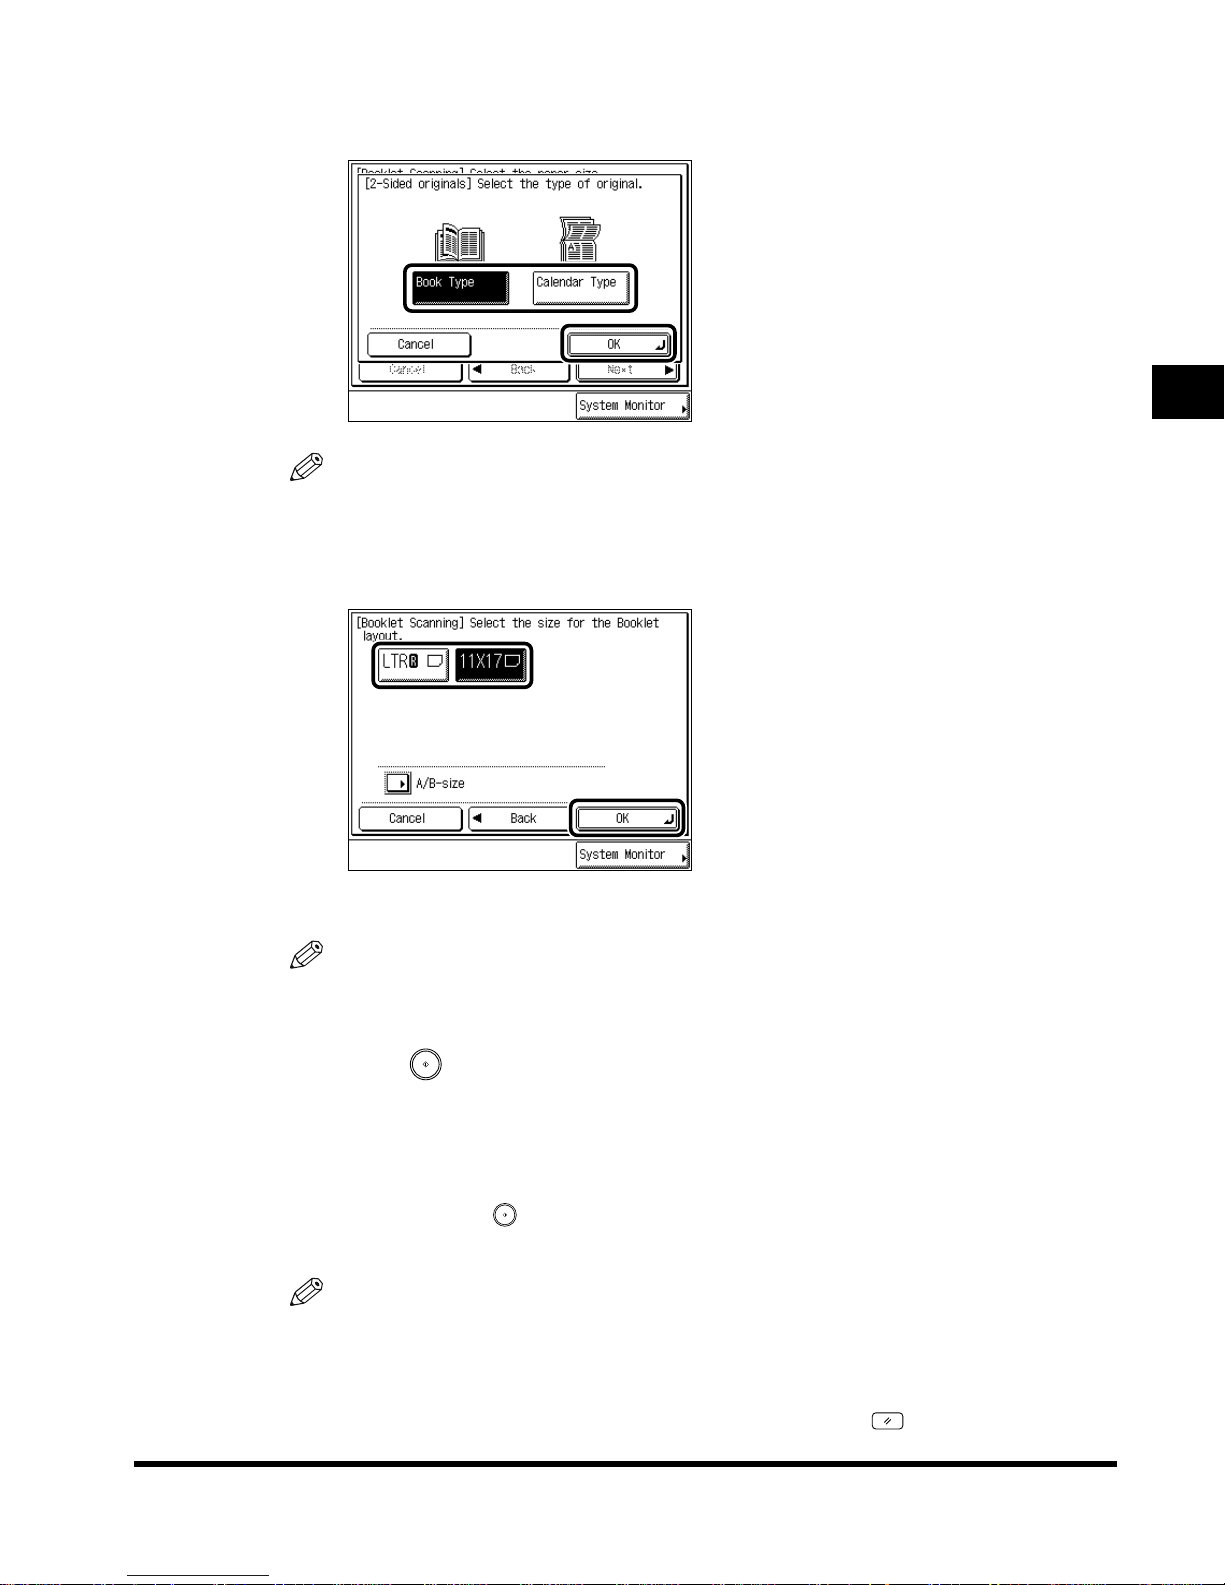
When printing two-sided originals, press “2-Sided Original” to select how the two-sided
originals are stitched, and press “OK.”
NOTE
• To select an A or B series paper size, press “A/B-size.”
4
Select the booklet layout size → press “OK” → press “Done.”
2
The specified mode is set and the display returns to the Scan screen.
NOTE
• To select an A or B series paper size, press “A/B-size.”
5
Press (Start).
The machine starts scanning. (See ‘Storing Originals in the Mail Box,’ on p. 1-9.)
The originals are recorded to match half the size of the selected paper size.
When the original is placed on the platen glass, follow the instructions that appear on the
display and press (Start) once for each original. When scanning is completed, press
“Done.”
NOTE
• To cancel the setting, press “Special Features” → “Booklet Scanning” → “Cancel,” in this
order.
• To cancel all settings at once, press “Initial Settings. ” (The machine returns to the Standard
Scanning mode.)
• To return the display to the Mail Box Selection screen, press (Reset).
Scanning Originals into a Mail Box
Scanning Originals for Use as a Booklet (Booklet Scanning)
2-29
Page 56
Erasing Shadows and Frame Lines (Frame Erase)
With this function you can erase shadows and lines that appear when scanning various
types of originals.
2
IMPORTANT
• Combinations of the Original Frame Erase, Book Frame Erase, or Binding Erase modes cannot
be set. If you select one of these modes, the previously set mode is canceled.
■ Original Frame Erase
Erases the dark borders and frame lines that appear around the printed paper when the
original is smaller than the selected paper size, and records the original.
IMPORTANT
• When the machine is operating in the Original Frame Erase mode, you cannot use the A utomatic
Document Size Select, Booklet Scanning, Different Size Originals, or Image Combination modes .
■ Book Frame Erase
Erases the dark borders, as well as center and contour lines that appear when printing the
facing pages in a book on a single sheet of paper, and records the original.
Scanning Originals into a Mail Box
IMPORTANT
• When the machine is operating in the Book Frame Erase mode, you cannot use the Automatic
Document Size Select, Booklet Scanning, Different Size Originals, or Image Combination modes .
■ Binding Erase
Erases the shadows that appear in prints from binding holes in originals, and records the
original.
IMPORTANT
• When the machine is operating in the Binding Erase mode, you cannot use the Two-page
Separation, or Booklet Scanning modes.
• Do not place originals with binding holes in the feeder, as this may damage the originals.
2-30
Erasing Shadows and Frame Lines (Frame Erase)
Page 57
Erasing Frame Lines and Storing the Original
(Original Frame Erase)
1
Select the desired mail box number to display the Document
Selection screen, and press “Scan.”
When you select a mail box set with a password, enter the password after selecting the
mail box, and press “OK.”
The Scan screen is displayed.
2
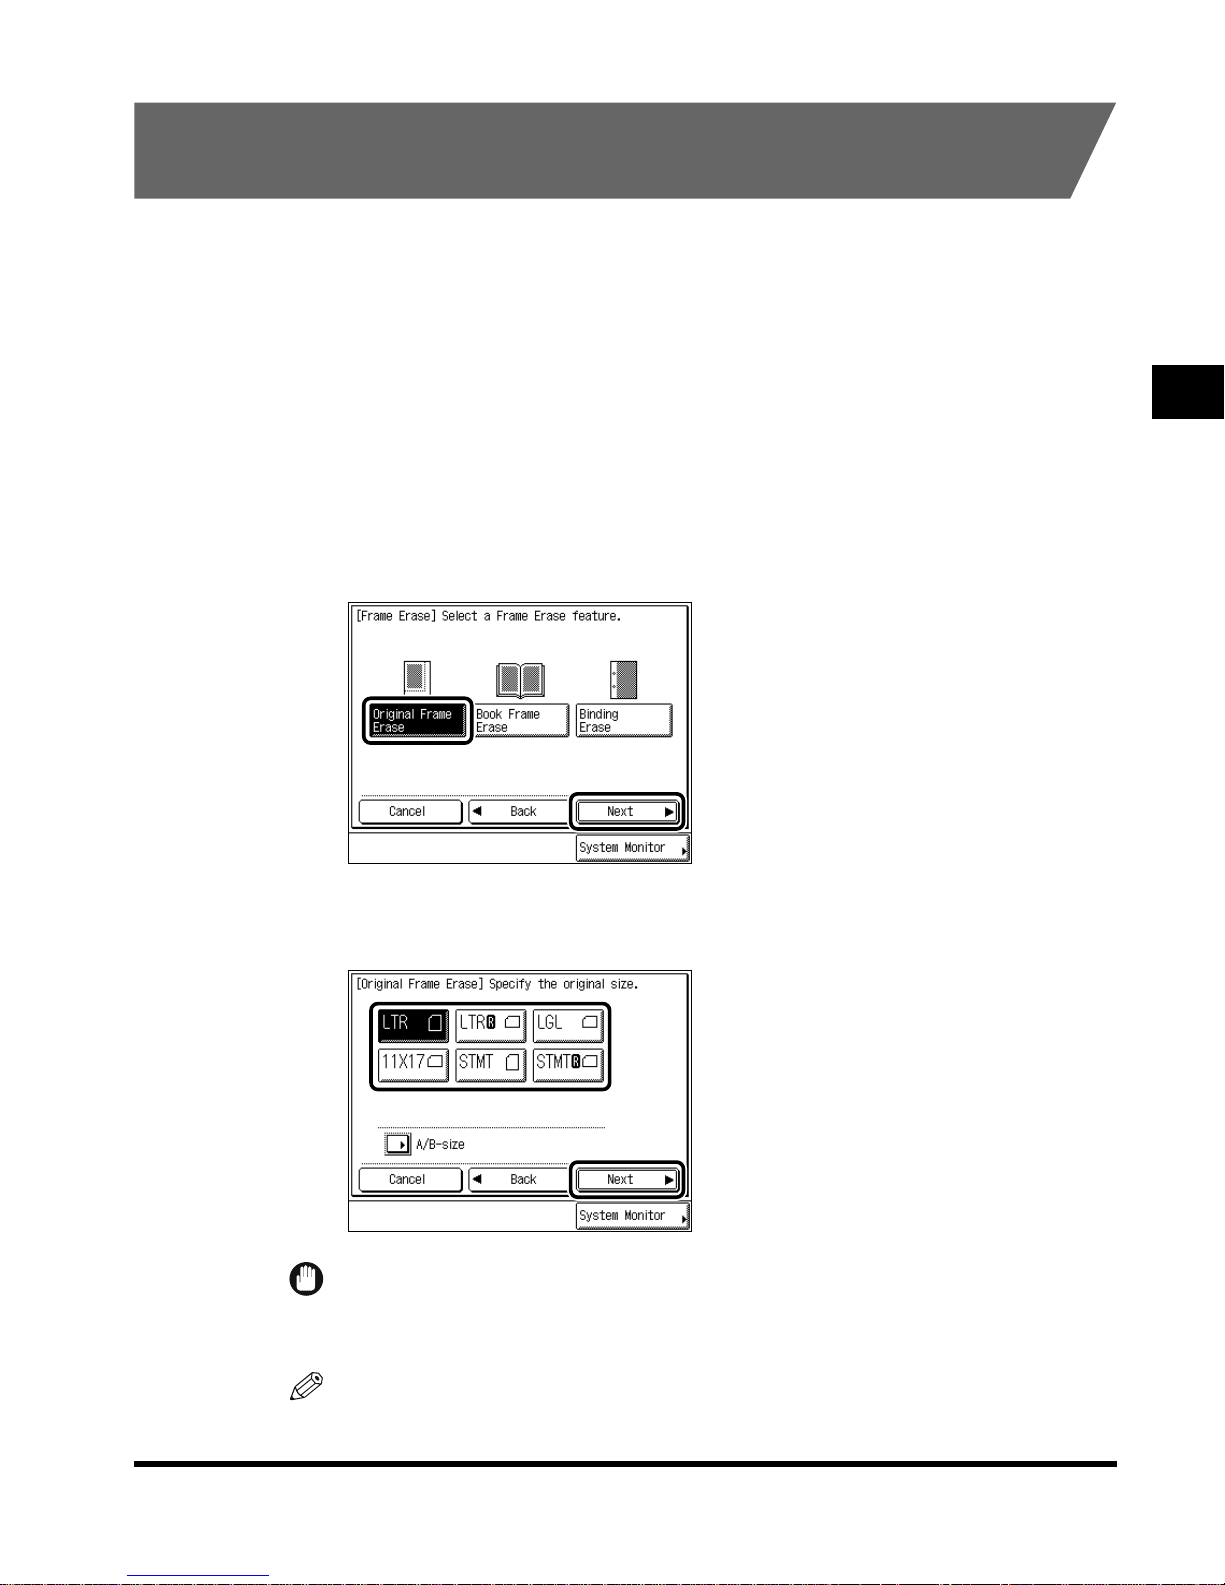
Place the original → press “Special Features”→ press “Frame Erase. ”
3
Press “Original Frame Erase,” and press “Next.”
2
4
Select the size of the original, and press “Next.”
IMPORTANT
• You can only set the Original Frame Erase mode for the original sizes shown in the touch
panel display.
Scanning Originals into a Mail Box
NOTE
• To select an A or B series paper size, press “A/B-size.”
Erasing Shadows and Frame Lines (Frame Erase)
2-31
Page 58
2
5
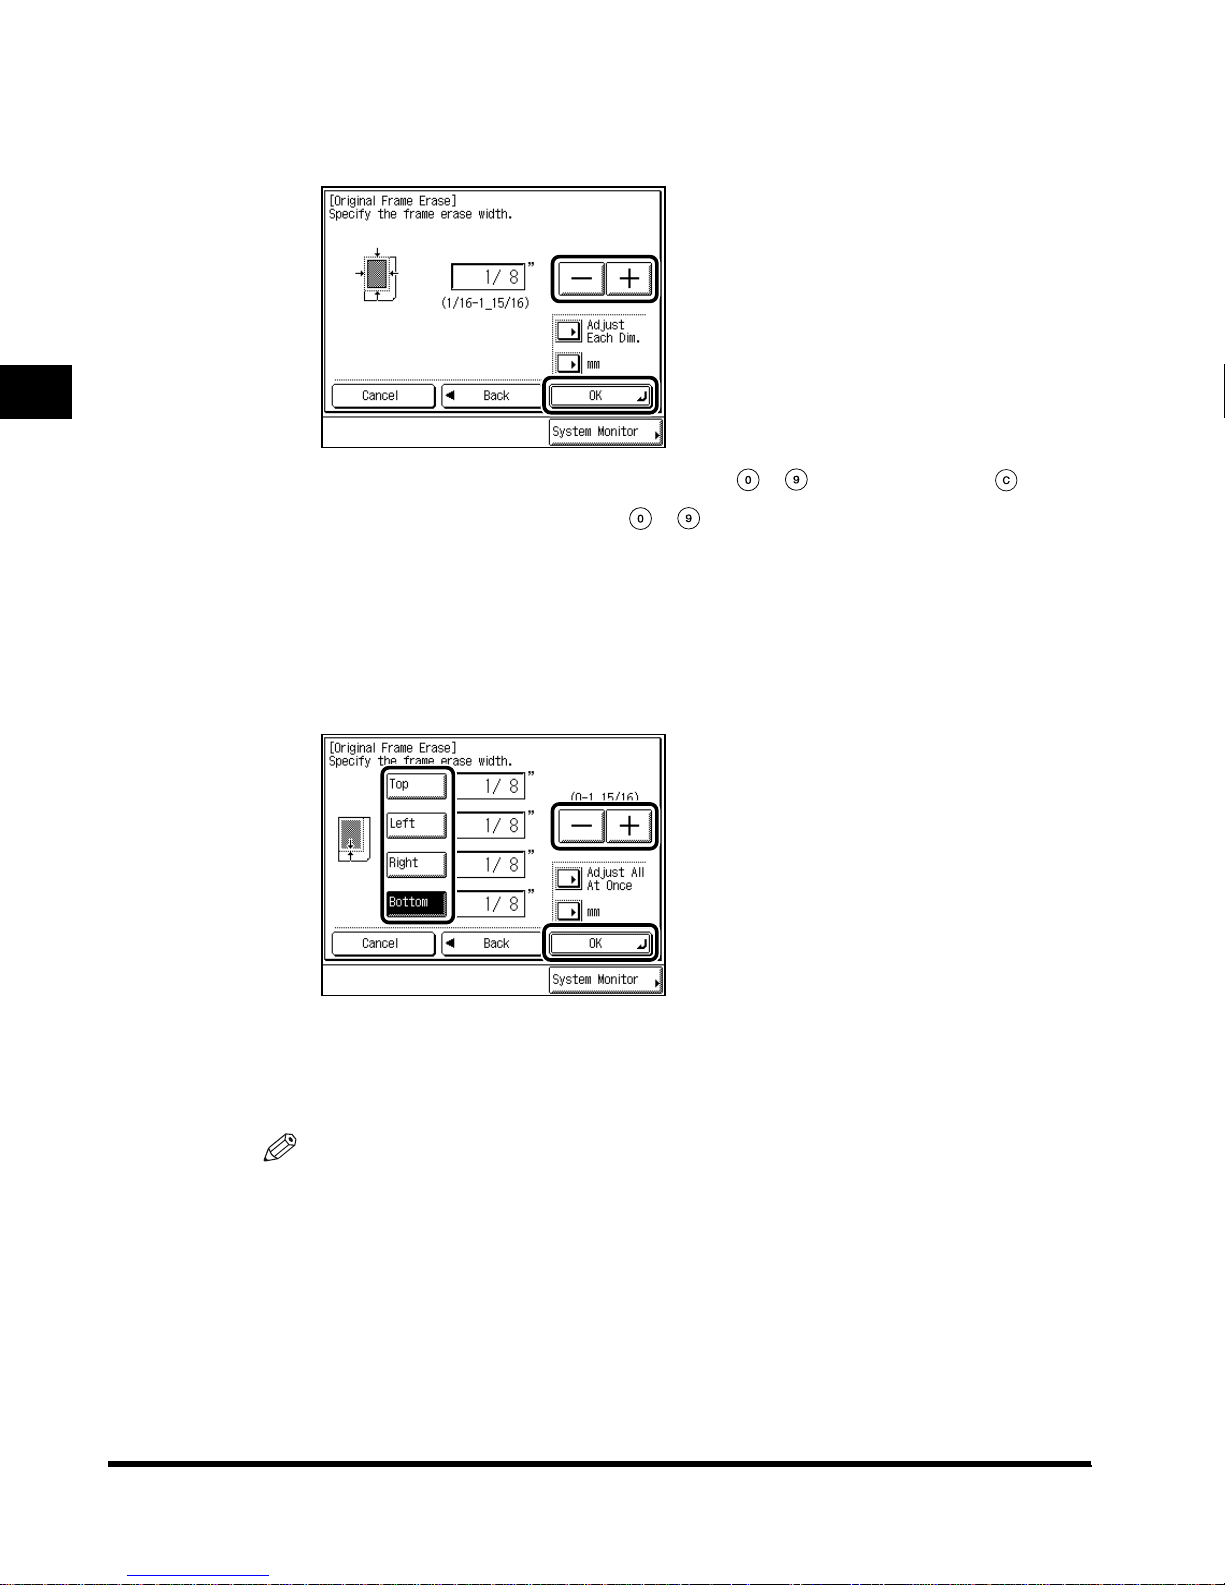
Set the desired original frame erase width using “–” or “+,” and
press “OK” → press “Done.”
When entering values in millimeters, you can use - (numeric keys) and (Clear).
Even when you enter the values with - (numeric keys), you can change the values
with “–” or “+.”
The value set here is specified uniformly around the original. To set frame erase width
values for the top, bottom, left, and right sides of the original independently, press “Adjust
Each Dim.”
If you press “Adjust Each Dim.,” select each side of the original, and enter the value using
“–” or “+” → press “OK”→ press “Done.”
Scanning Originals into a Mail Box
The specified mode is set and the display returns to the Scan screen.
If you enter a value outside the setting range, a message prompting you to enter the
appropriate value appears in the screen.
NOTE
• If you want to enter values in millimeters, press “mm.”
• The default setting is 1/8" (4mm).
2-32
Erasing Shadows and Frame Lines (Frame Erase)
Page 59
6
Press (Start).
The machine starts scanning. (See ‘Storing Originals in the Mail Box,’ on p. 1-9.)
NOTE
• To cancel the setting, press “Special Features”→ “Frame Erase” → “Cancel,” in this order.
• To cancel all settings at once, press “Initial Settings .” (The machine returns to the standard
scanning mode.)
• To return the display to the Mail Box Selection screen, press (Reset).
Erasing the Book Frame and Storing the Original
(Book Frame Erase)
1
Select the desired mail box number to display the Document
Selection screen, and press “Scan.”
When you select a mail box set with a password, enter the password after selecting the
mail box, and press “OK.”
2
The Scan screen will be displayed.
2
Place the original → press “Special Features” → press “Frame
Erase.”
3
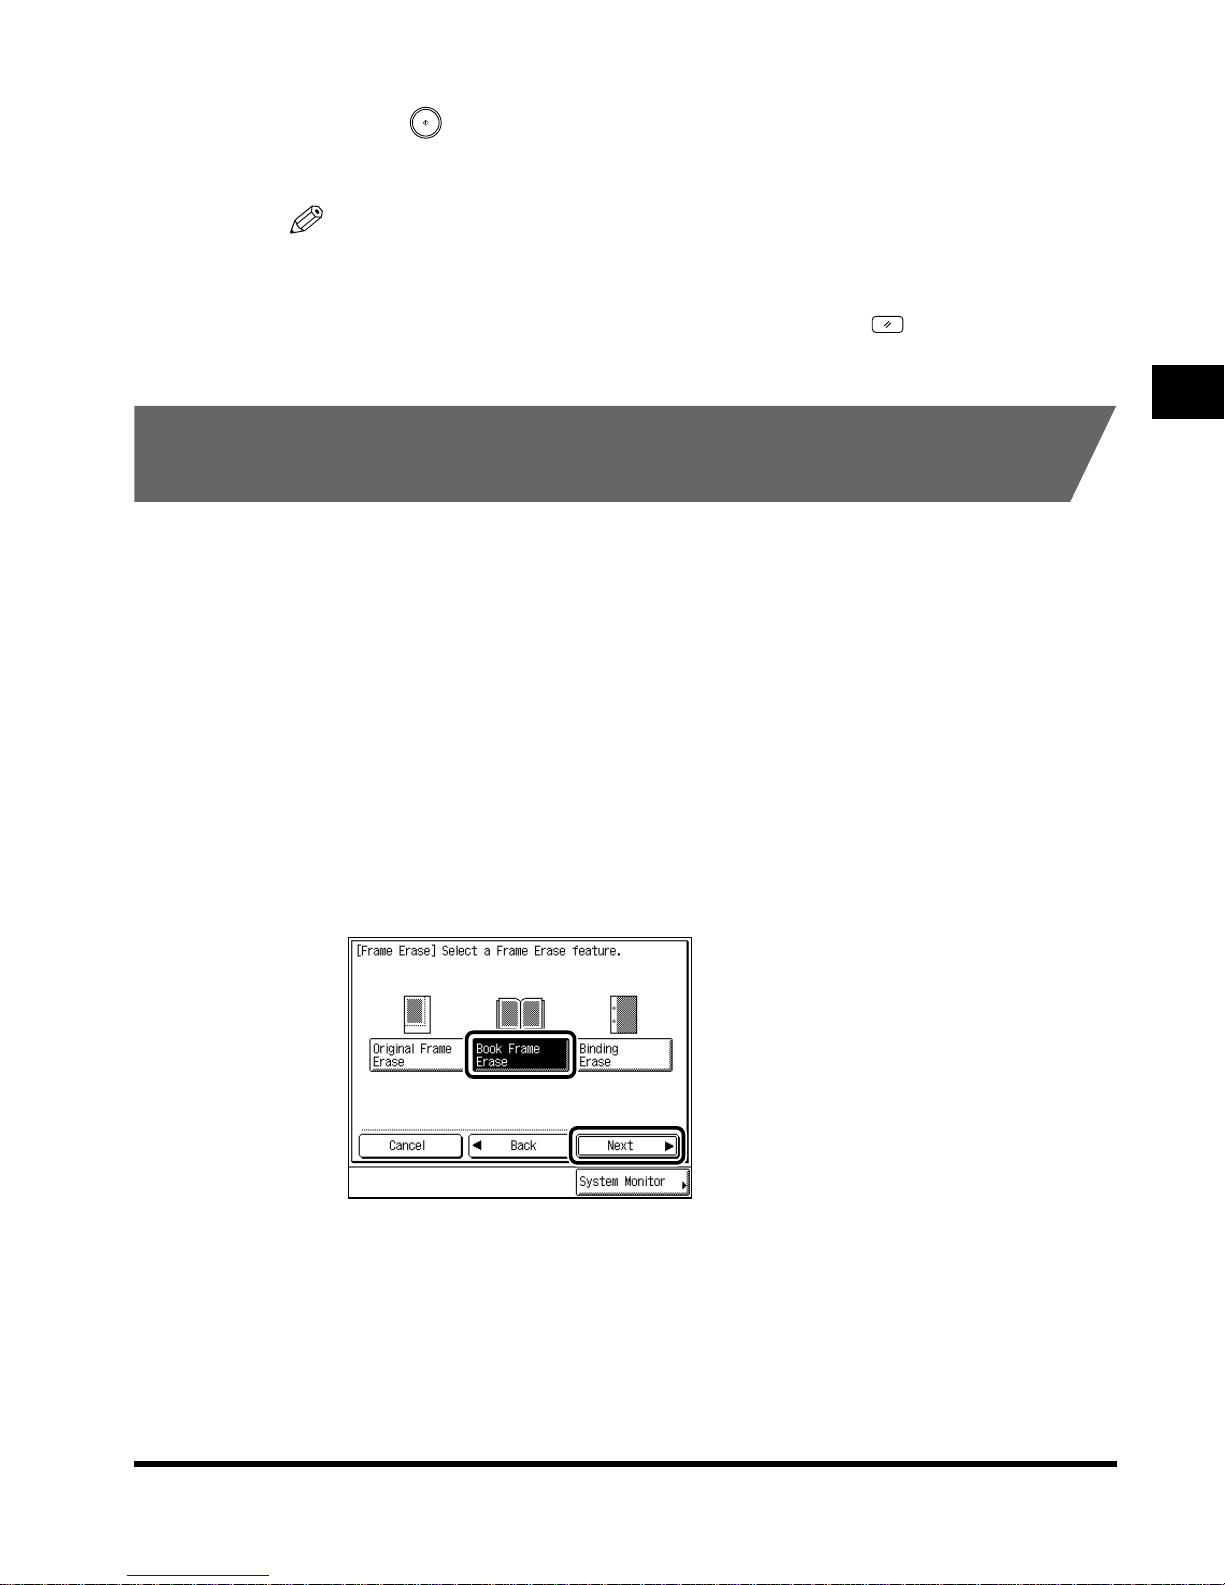
Press “Book Frame Erase,” and press “Next.”
Scanning Originals into a Mail Box
Erasing Shadows and Frame Lines (Frame Erase)
2-33
Page 60
2
4
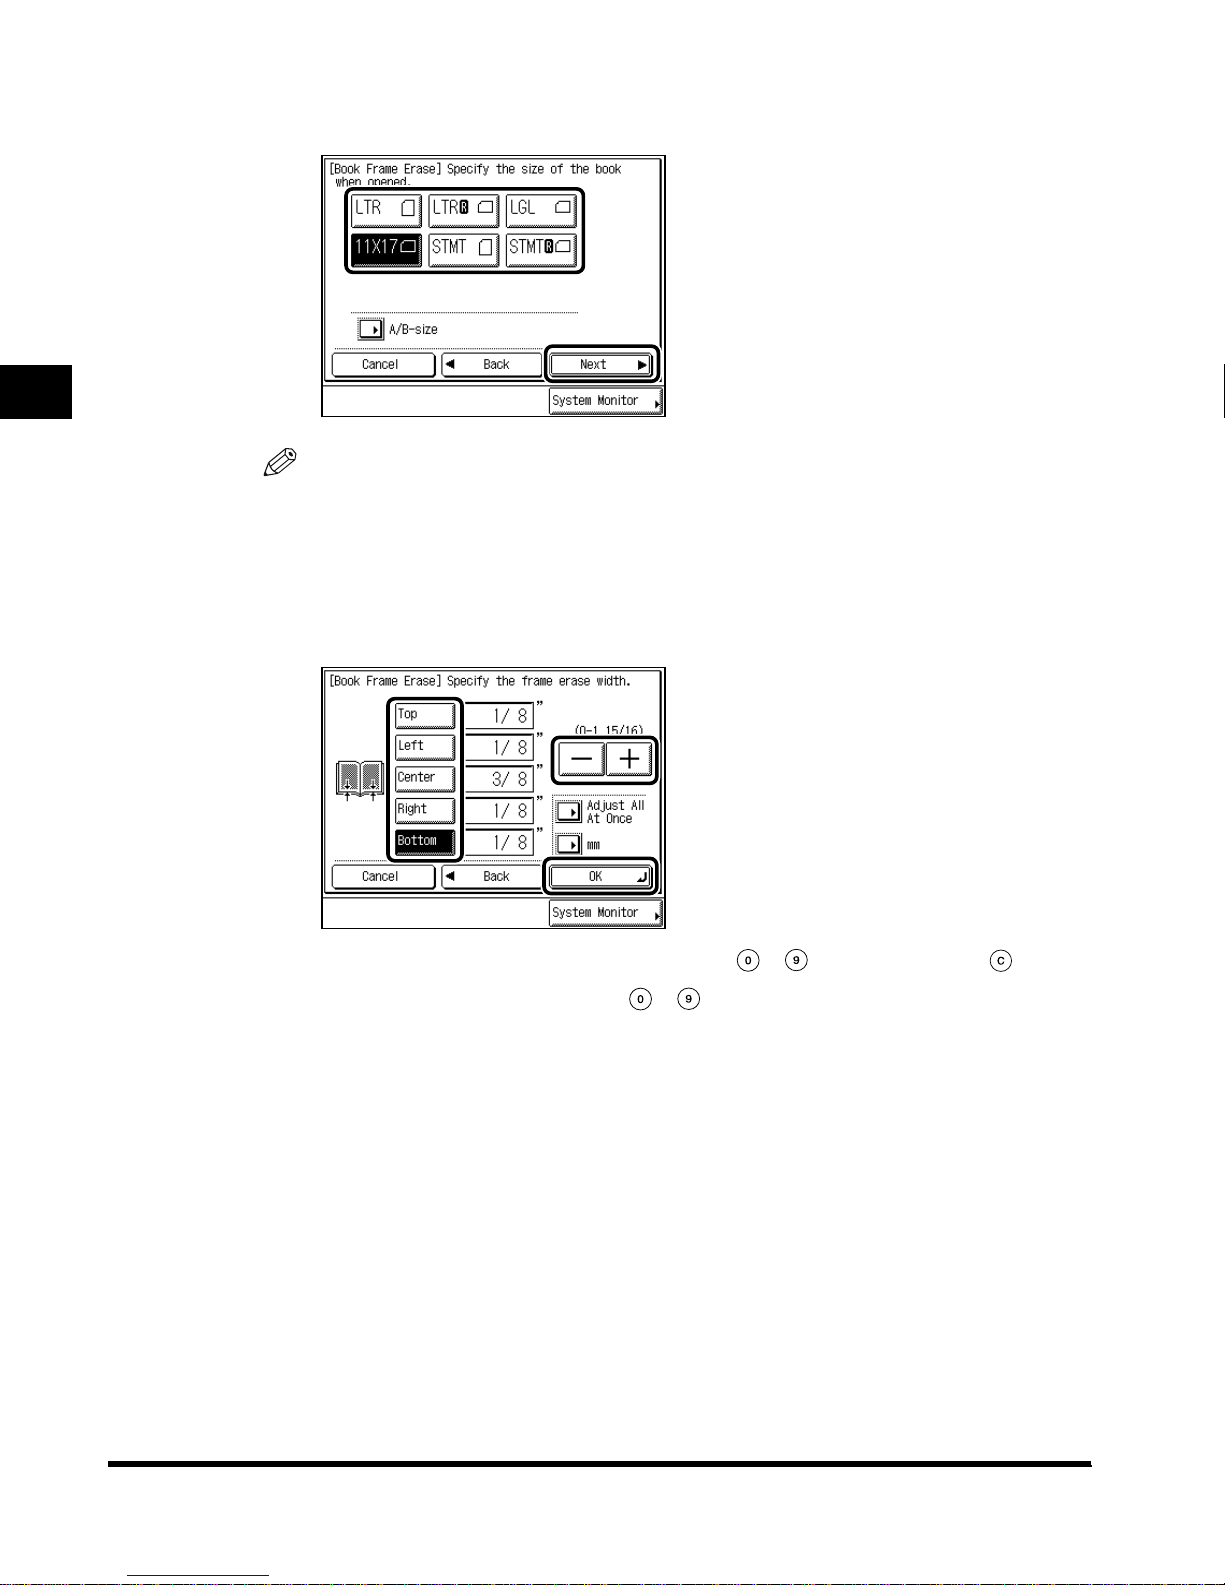
Select the size of the book when opened, and press “Next.”
NOTE
• To select an A or B series paper size, press “A/B-size.”
5
Press each key (“Top,” “Left,” “Center,” “Right,” and “Bottom”) and
set the desired book frame erase width using “–” or “+,” and press
“OK” → press “Done.”
Scanning Originals into a Mail Box
When entering values in millimeters, you can use - (numeric keys) and (Clear).
Even when you enter the values with - (numeric keys), you can change the values
with “–” or “+.”
The values set here are specified independently around the original. To set a value
uniformly around the original, press “Adjust All At Once.”
2-34
Erasing Shadows and Frame Lines (Frame Erase)
Page 61
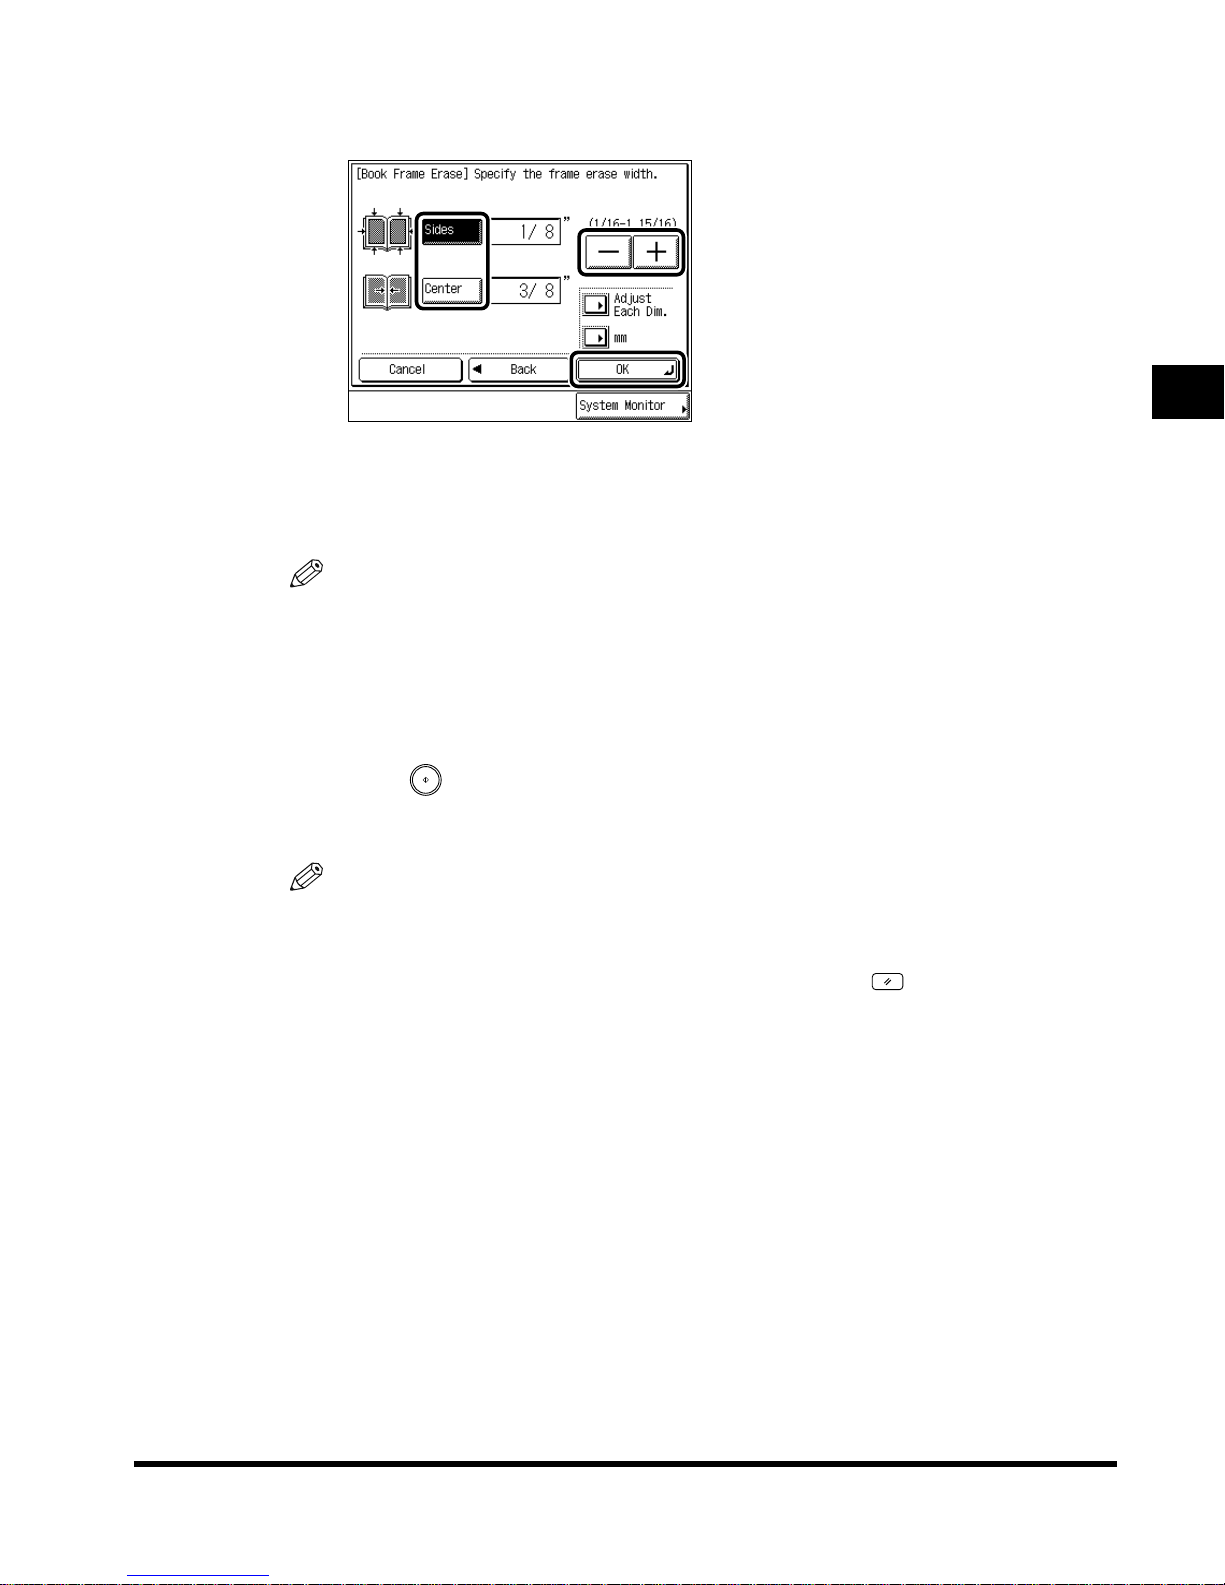
If you press “Adjust All At Once,” select “Sides” and “Center,” and enter the value using
“–” or “+” → press “OK” → press “Done.”
The specified mode is set and the display returns to the Scan screen.
If you enter a value outside the setting range, a message prompting you to enter the
appropriate value appears in the screen.
NOTE
• If you want to enter values in millimeters, press “mm.”
• The default settings are 3/8"(10mm) for “Center” and 1/8" (4mm) for “Top,” “Left,” “Right,”
and “Bottom.”
• If you press “Adjust Each Dim.,” and want to set the frame erase width uniformly around
the original, press “Adjust All At Once.”
2
6
Press (Start).
The machine starts scanning. (See ‘Storing Originals in the Mail Box,’ on p. 1-9.)
NOTE
• To cancel the setting, press “Special Features” → “Frame Erase” → “Cancel,” in this order.
• To cancel all settings at once, press “Initial Settings .” (The machine returns to the standard
scanning mode.)
• To return the display to the Mail Box Selection screen, press (Reset).
Scanning Originals into a Mail Box
Erasing Shadows and Frame Lines (Frame Erase)
2-35
Page 62
2
Erasing the Binding Holes and Storing the Original
(Binding Erase)
1
Select the desired mail box number to display the Document
Selection screen, and press “Scan.”
When you select a mail box set with a password, enter the password after selecting the
mail box, and press “OK.”
The Scanning screen is displayed.
2
Place the original on the platen glass → press “Special Features” →
press “Frame Erase. ”
IMPORTANT
• Do not place the original in the feeder as it may become damaged.
3
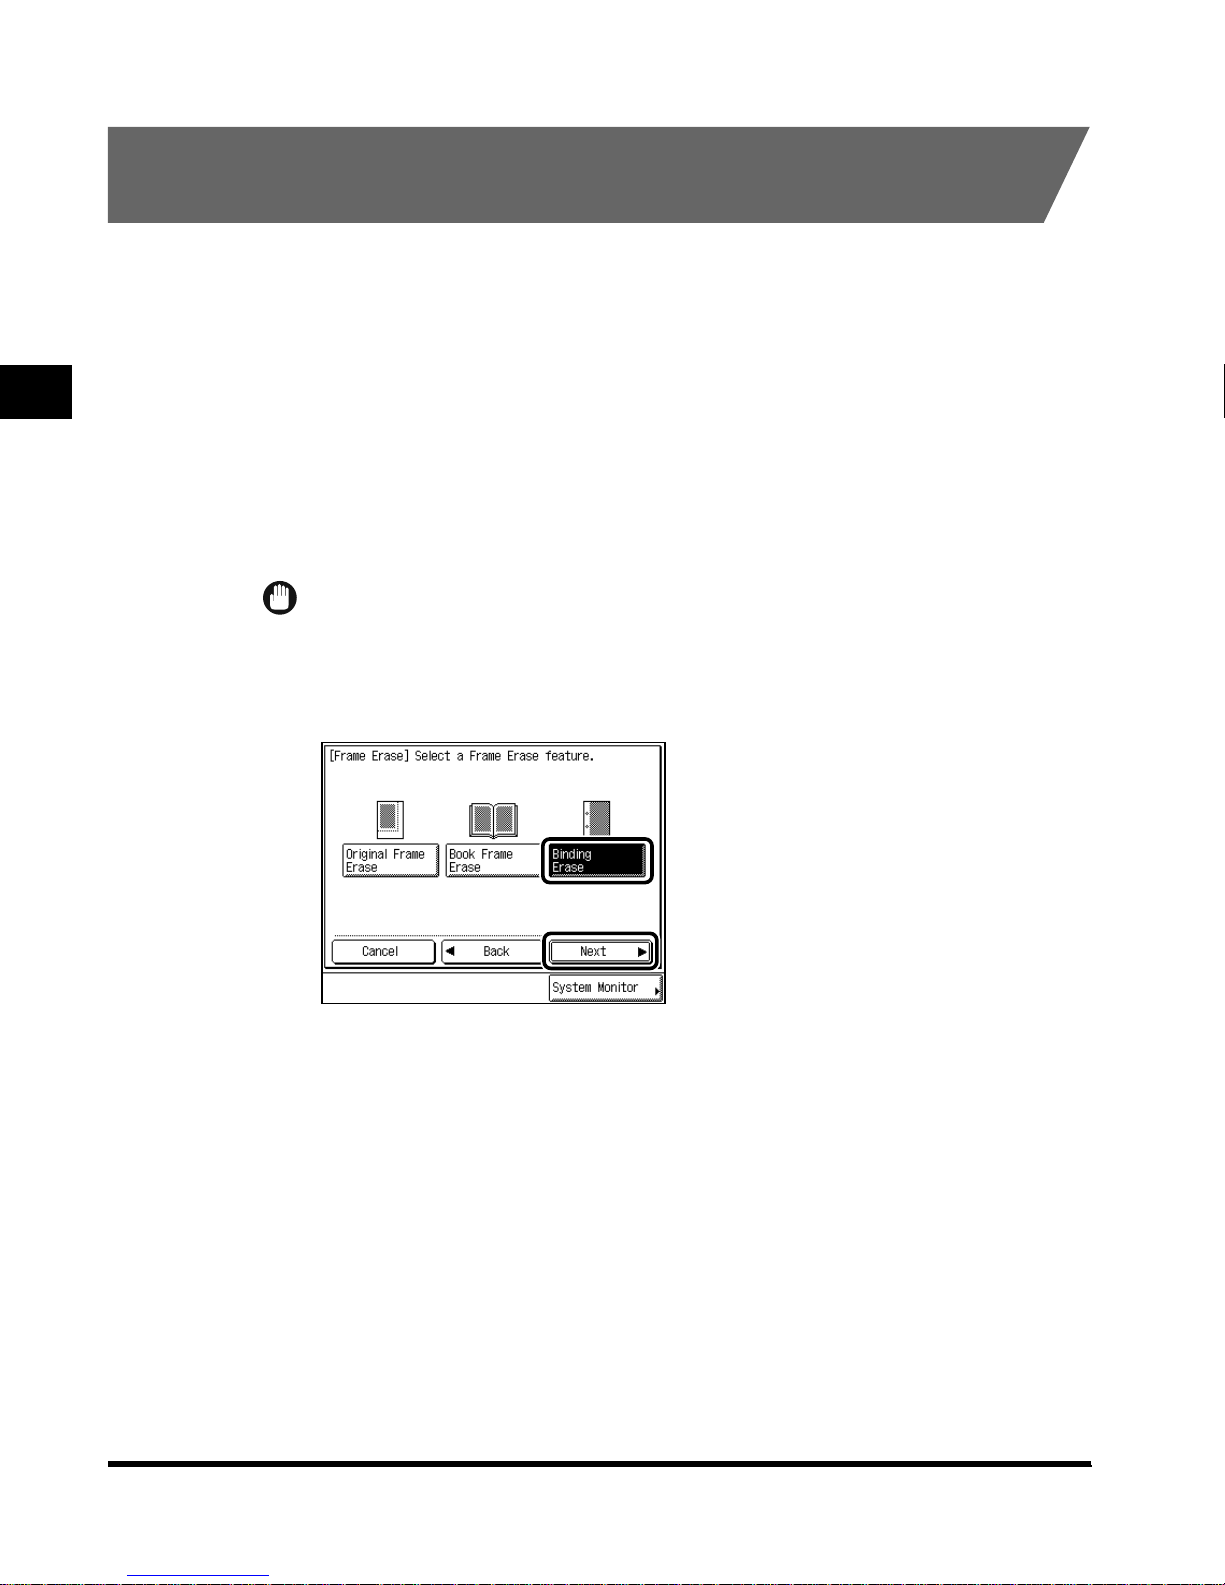
Press “Binding Erase,” and press “Next.”
Scanning Originals into a Mail Box
2-36
Erasing Shadows and Frame Lines (Frame Erase)
Page 63
4
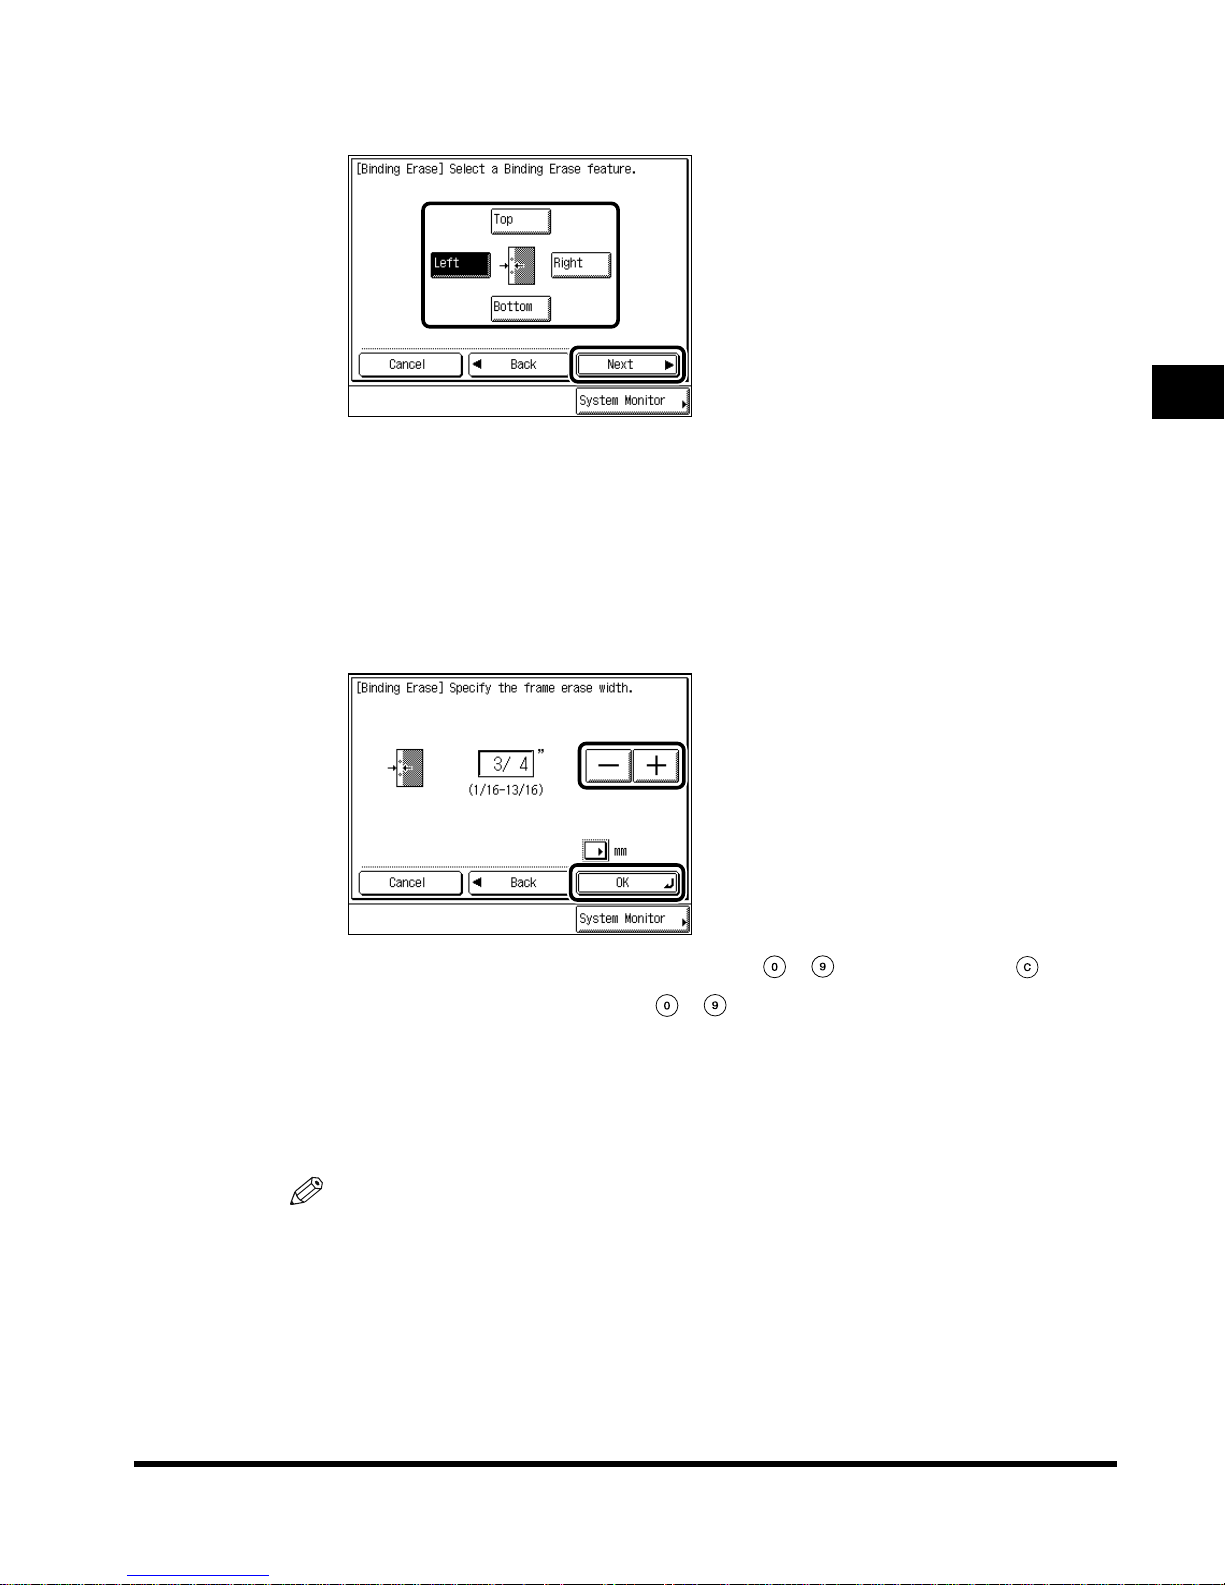
Specify the binding erase feature, and press “Next.”
The position of the binding holes refers not to the position in which the original is placed on
the platen glass, but to the position of the binding holes viewed when the surface of the
original that you want to scan is face up, with its top edge aligned with the top left corner of
the platen glass.
5
Set the desired binding erase width using “–” or “+” → press “OK” →
press “Done. ”
2
When entering values in millimeters, you can use - (numeric keys) and (Clear).
Even when you enter the values with - (numeric keys), you can change the values
using “–” or “+.”
The specified mode is set and the display returns to the Scan screen.
If you enter a value outside the setting range, a message prompting you to enter the
appropriate value appears on the screen.
NOTE
• If you want to enter values in millimeters, press “mm.”
• The default setting is 3/4" (18mm).
Scanning Originals into a Mail Box
Erasing Shadows and Frame Lines (Frame Erase)
2-37
Page 64

2
6
Press (Start).
The machine starts scanning. (See ‘Storing Originals in the Mail Box,’ on p. 1-9.)
NOTE
• To cancel the setting, press “Special Features” → “Frame Erase” → “Cancel,” in this order.
• To cancel all settings at once, press “Initial Settings .” (The machine returns to the standard
scanning mode.)
• To return the display to the Mail Box Selection screen, press (Reset).
Scanning Originals into a Mail Box
2-38
Erasing Shadows and Frame Lines (Frame Erase)
Page 65
Reducing Two, Four, or Eight Originals to Fit on a
Single Print Sheet and Storing It (Image Combination)
With this function you can automatically reduce two, four, or eight originals and record them
to fit on one side or both sides of a selected paper size.
IMPORTANT
• When the machine is operating in the Image Combination mode, you cannot use the Automatic
Document Size Select, Two-page Separation, Booklet Scanning, Different Size Originals,
Original Frame Erase, or Book Frame Erase modes.
• Originals to be printed in the Image Combination mode must all be the same size. You cannot
use the Image Combination mode in combination with the Different Size Originals mode.
NOTE
• The reduction ratio is automatically set so that the originals fit on the selected print sheet size.
■ 2 On 1
Reduces two 1-sided originals or one 2-sided original to fit on one side or both sides of
the print sheet and records them.
■ 4 On 1
Reduces four 1-sided or two 2-sided originals to fit on one side or both sides of the print
sheet and records them.
■ 8 On 1
Reduces eight 1-sided or four 2-sided originals to fit on one side or both sides of the print
sheet and records them.
2
Scanning Originals into a Mail Box
1
Select the desired mail box number to display the Document
Selection screen, and press “Scan.”
When you select a mail box set with a password, enter the password after selecting the
mail box, and press “OK.”
The Scan screen is displayed.
2
Place your originals → press “Special Features” → press “Image
Combination.”
Reducing Two, Four, or Eight Originals to Fit on a Single Print Sheet and Storing It
2-39
(Image Combination)
Page 66
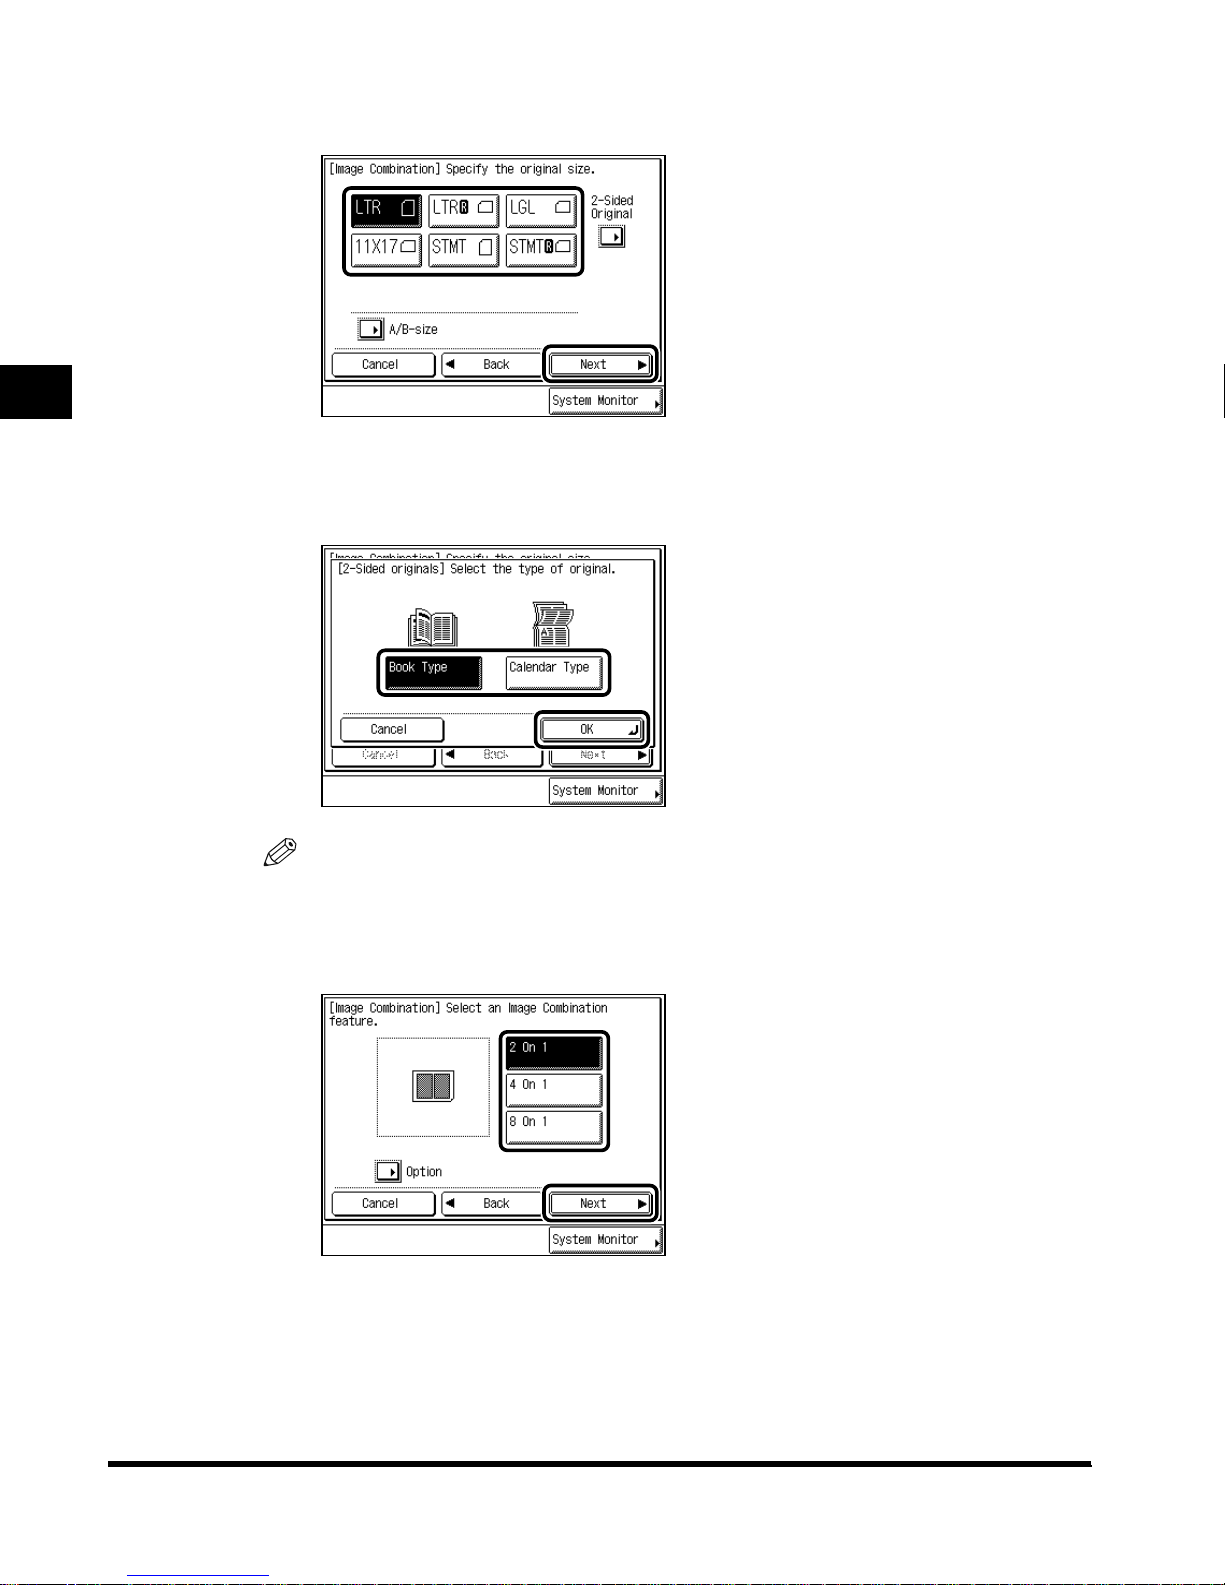
2
3
Select the size of the originals, and press “Next.”
When reducing a two-sided original, press “2-Sided Original” after selecting the original
size.
Press “2-Sided Original” to select the opening method, and press “OK.”
Scanning Originals into a Mail Box
NOTE
• To select an A or B series paper size, press “A/B-size.”
4
Select the desired Image Combination feature, and press “Next.”
2-40
Reducing Two, Four, or Eight Originals to Fit on a Single Print Sheet and Storing It
(Image Combination)
Page 67
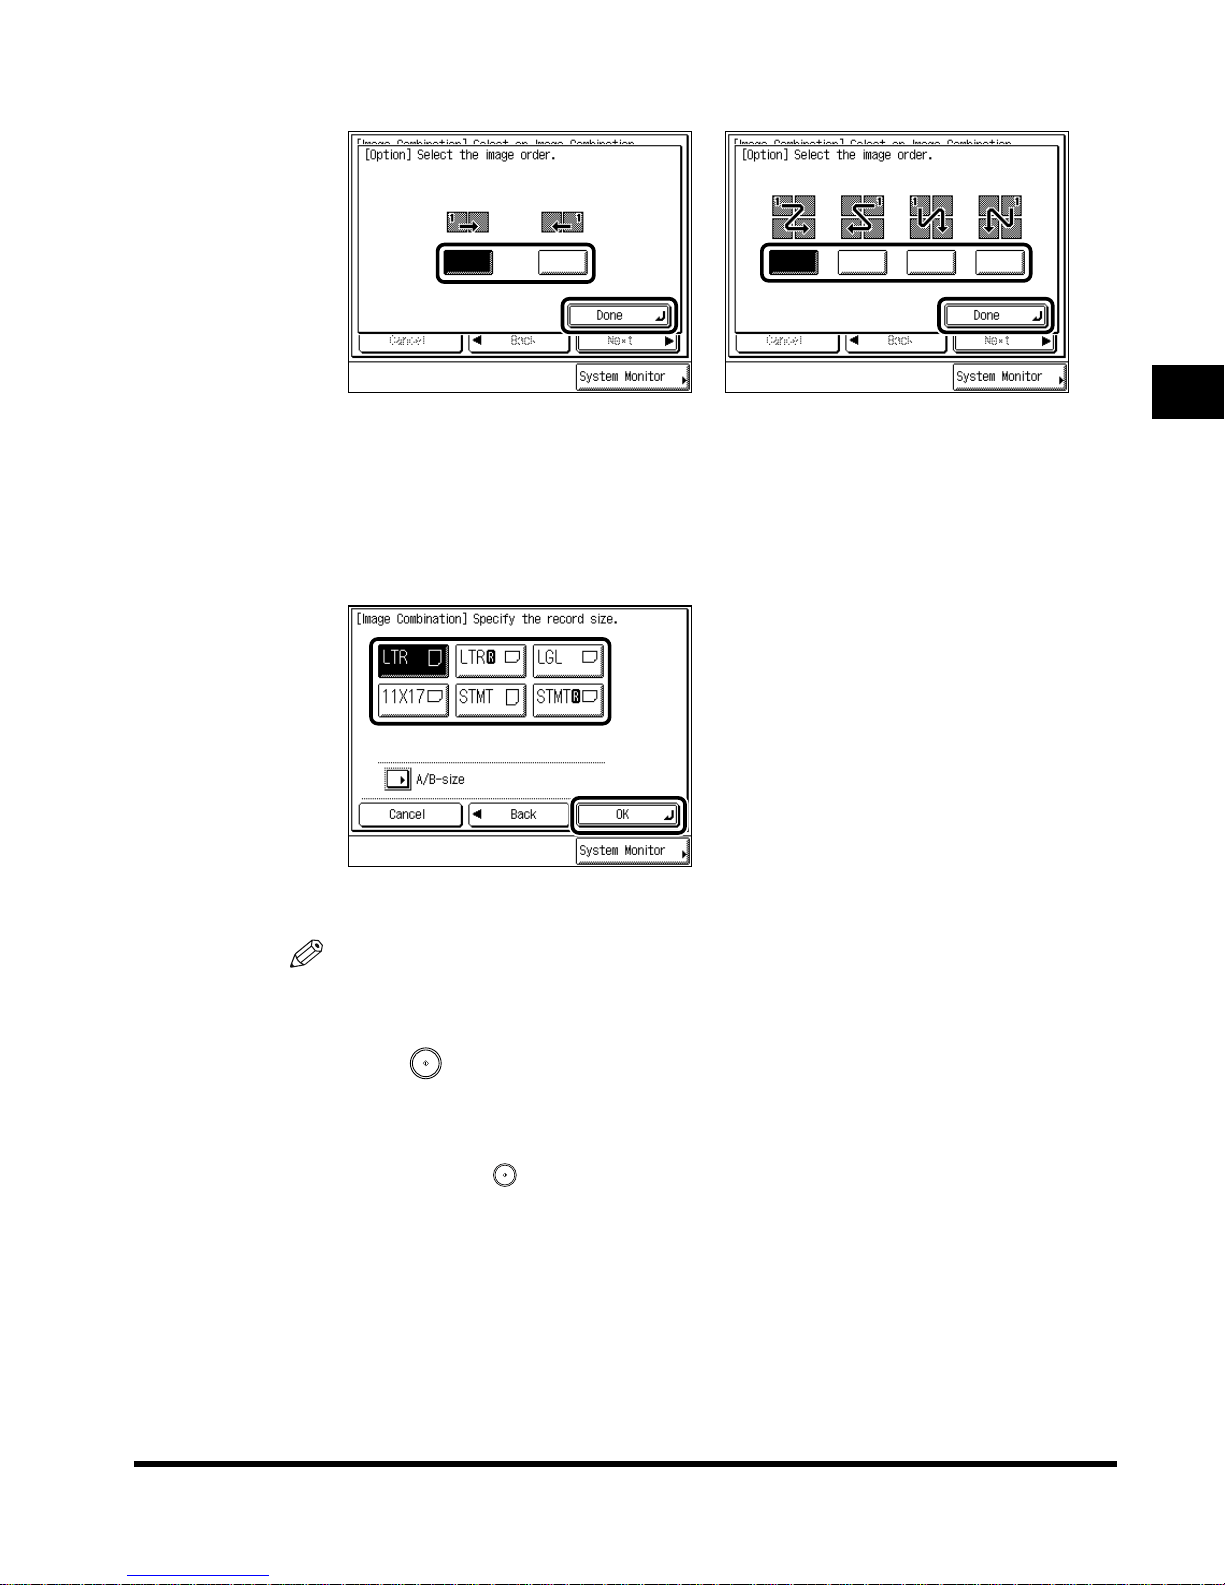
Press “Option” to select the order of image layout, and press “Done.”
2 On 1
If you do not specify “Option,” the images are printed in the following order: left → right for
2 On 1; upper left → upper right → lower left → lower right for 4 On 1 or 8 On 1.
5
Select the size you want to record in → press “OK” → press “Done.”
The specified mode is set and the display returns to the Scan screen.
NOTE
• To select an A or B series paper size, press “A/B-size.”
4 On 1, 8 On 1
2
Scanning Originals into a Mail Box
6
Press (Start).
The machine starts scanning. (See ‘Storing Originals in the Mail Box,’ on p. 1-9.)
When the original is placed on the platen glass, follow the instructions that appear on the
display and press (Start) once for each original. When scanning is completed, press
“Done.”
The document is scanned with the reduction ratio automatically set, depending on the
selected size to record.
Reducing Two, Four, or Eight Originals to Fit on a Single Print Sheet and Storing It
2-41
(Image Combination)
Page 68

2
NOTE
• To cancel the setting, press “Special Features” → “Image Combination” → “Cancel,” in this
order.
• To cancel all settings at once, press “Initial Settings .” (The machine returns to the standard
scanning mode.)
• To return the display to the Mail Box Selection screen, press (Reset).
Scanning Originals into a Mail Box
2-42
Reducing Two, Four, or Eight Originals to Fit on a Single Print Sheet and Storing It
(Image Combination)
Page 69
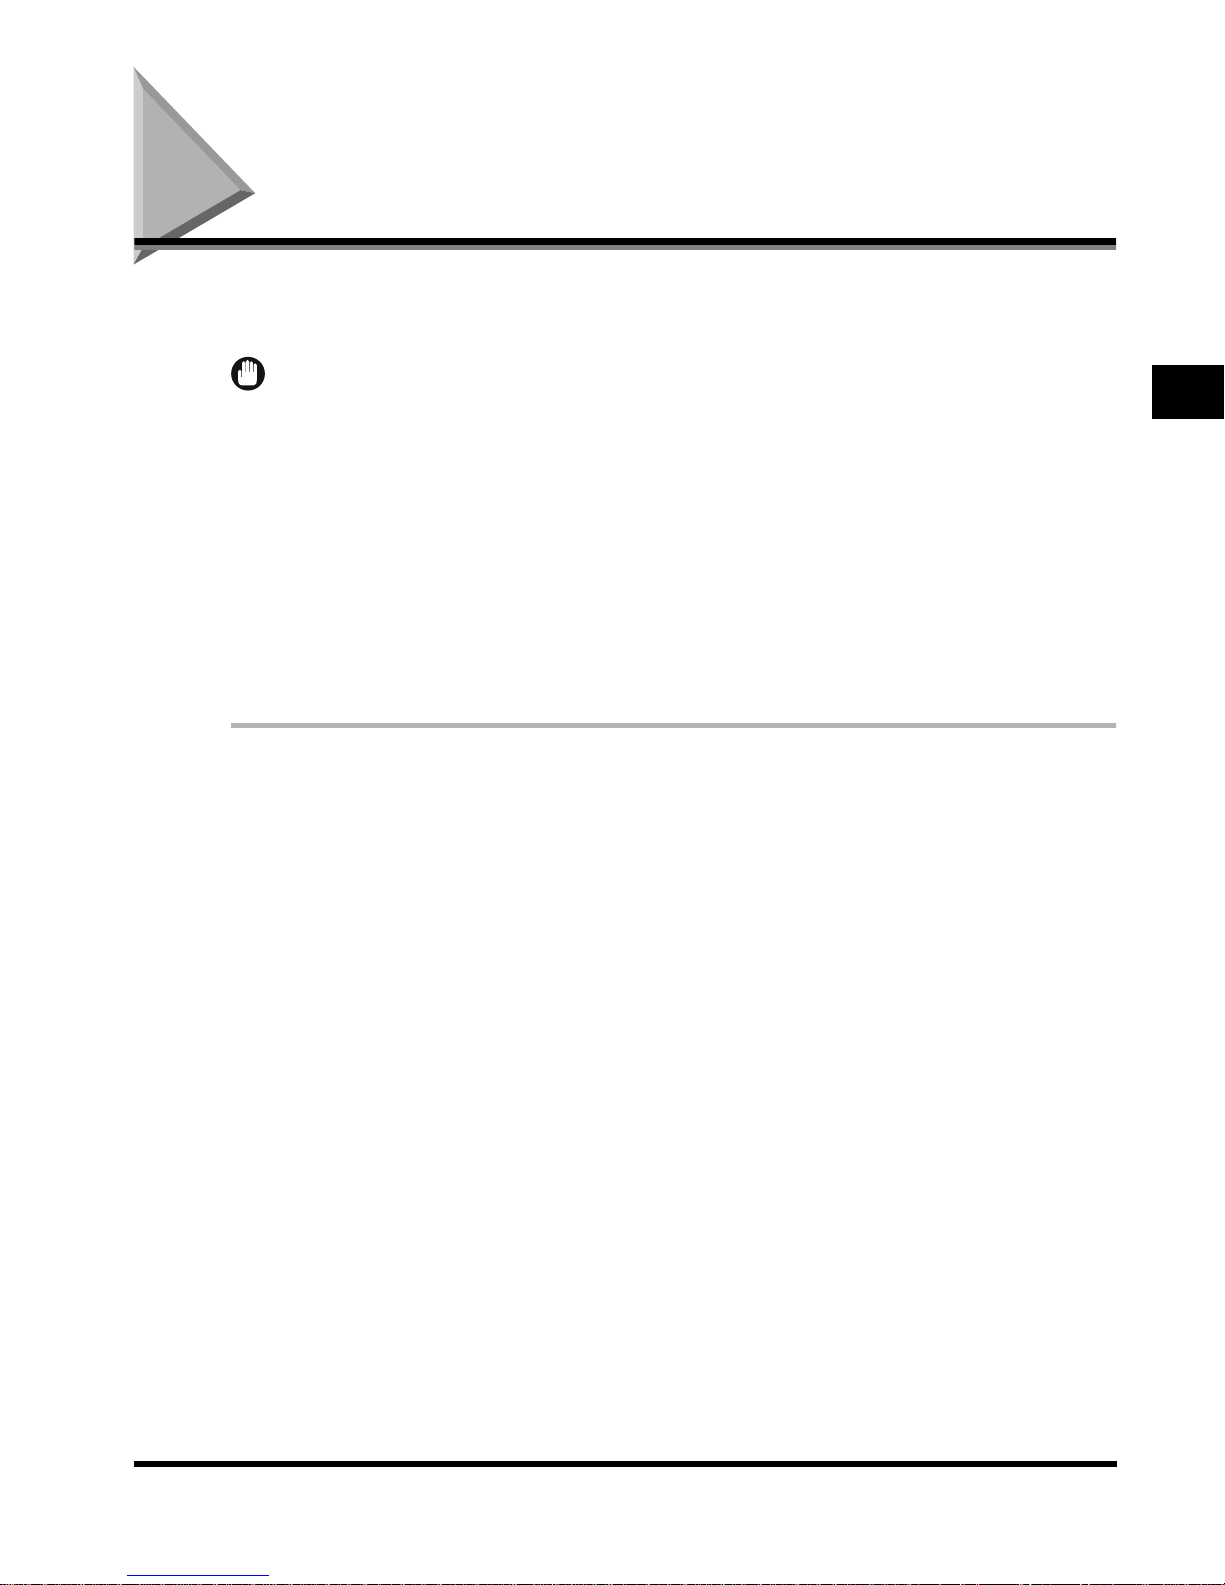
Scanning Different-size Originals Together
(Different Size Originals)
With this function you can scan different-size originals of the same width, or different-size
originals of different widths, together in one group.
IMPORTANT
• When the machine is operating in the Different Size Originals mode, you cannot use the Manual
Document Size Select, Two-page Separation, Booklet Scanning, Original Frame Erase, Book
Frame Erase, or Image Combination modes.
• All originals placed together in the feeder/platen glass must be the same weight (paper type).
• Align the top edge of the originals with the back edge of the feeder when placing different-width
originals.
• Set the different-size originals with different width in the following combinations. Other
combinations may damage the originals.
- 11" x 17" and LGL, LTR and LGL, LTR and LTRR.
• When you place different-width originals, the originals may be slightly moved when fed to the
platen glass, and as a result, the images may be scanned slanted.
1
Select the desired mail box number to display the Document
Selection screen, and press “Scan.”
When you select a mail box set with a password, enter the password after selecting the
mail box, and press “OK.”
The Scan screen is displayed.
2
Scanning Originals into a Mail Box
2
Place your originals → press “Special Features” → press “Different
Size Originals.”
Scanning Different-size Originals Together (Different Size Originals)
2-43
Page 70
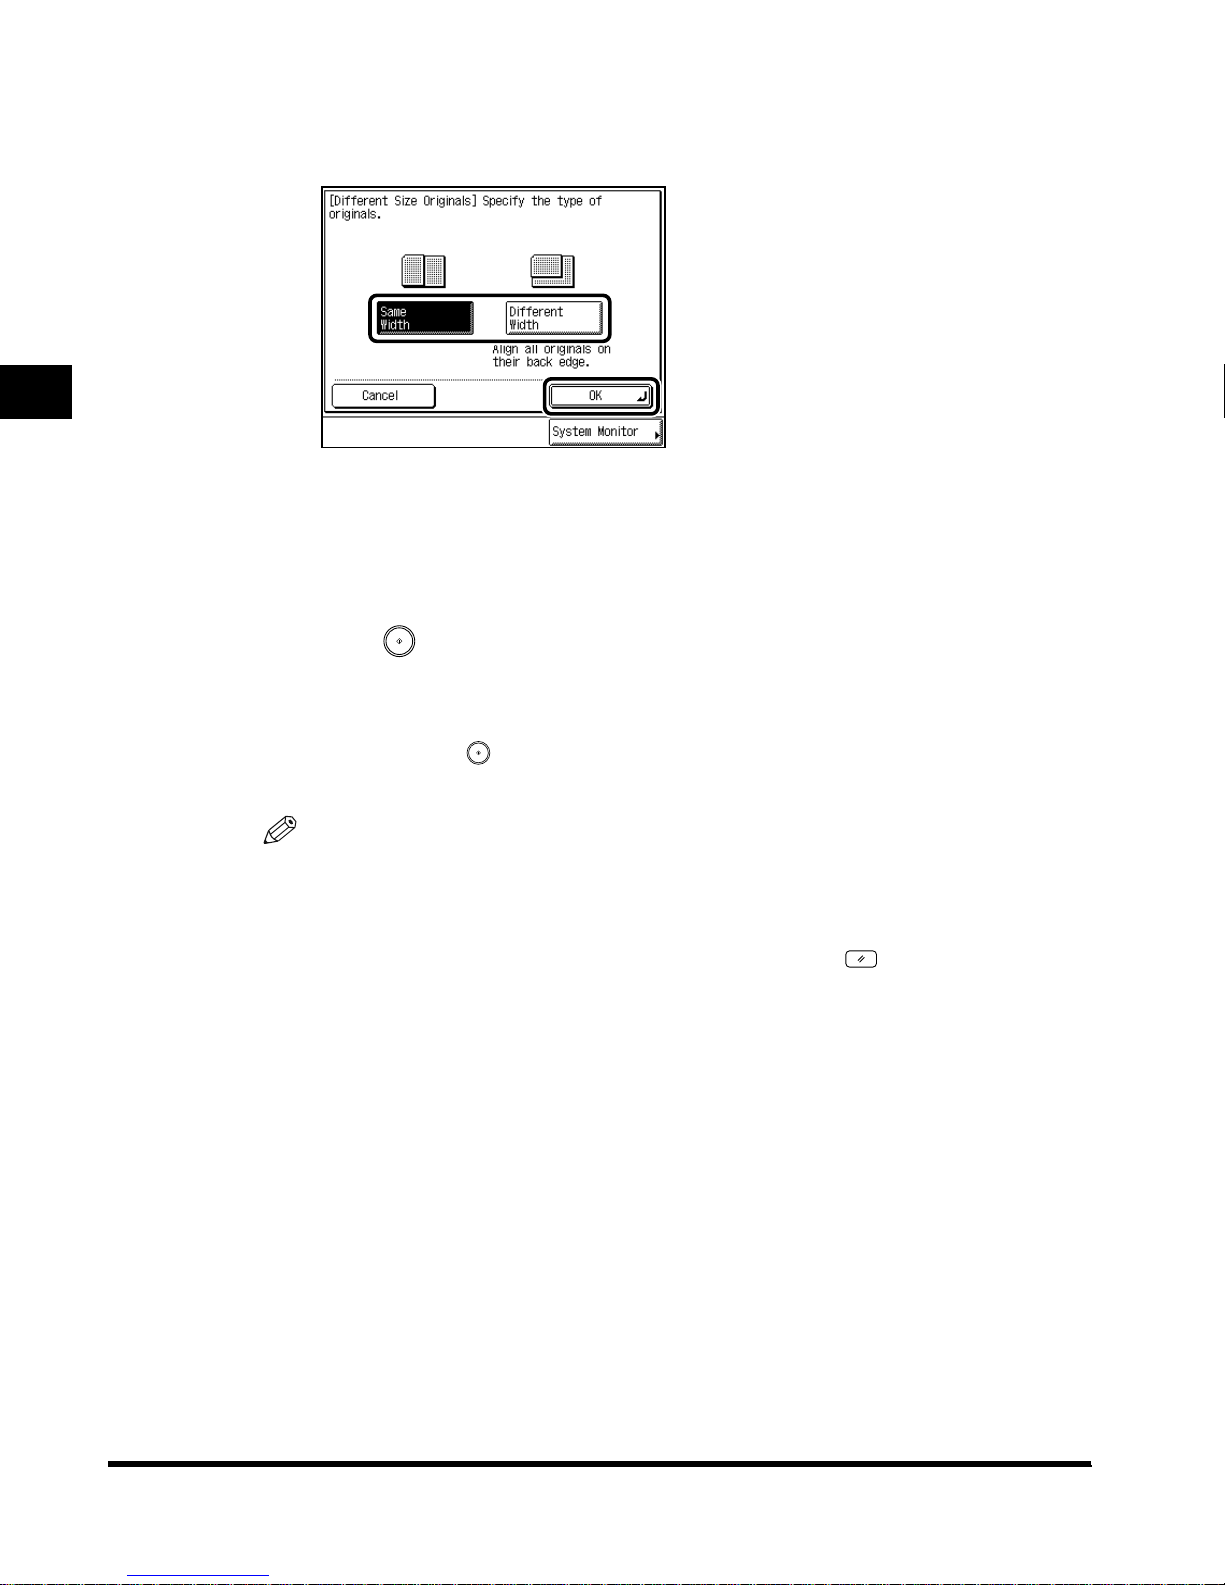
2
3
Select the type of the Different Size Originals → press “OK” → press
“Done.”
When you set the same-width originals, press “Same Width.”
When you set different-width originals, press “Different Width.”
The specified mode is set and the display returns to the Scan screen.
4
Press (Start).
The machine starts scanning. (See ‘Storing Originals in the Mail Box,’ on p. 1-9.)
When the original is placed on the platen glass, follow the instructions that appear on the
display and press (Start) once for each original. When scanning is completed, press
Scanning Originals into a Mail Box
“Done.”
NOTE
• To cancel the setting, press “Special Features” → “Different Size Originals” → “Cancel,” in
this order.
• To cancel all settings at once, press “Initial Settings. ” (The machine returns to the Standard
Scanning mode.)
• To return the display to the Mail Box Selection screen, press (Reset).
2-44
Scanning Different-size Originals Together (Different Size Originals)
Page 71
Scanning Separately-set Originals as One
Document (Job Build)
With this function you can scan originals that are too numerous to scan at once, by dividing
them into multiple batches. You can use both the feeder and the platen glass for scanning.
The originals are stored as one document after all the batches have been scanned.
IMPORTANT
• You cannot change the scan settings while scanning originals in the Job Build mode. You need to
set the necessary scan settings beforehand according to the type of original and desired Finisher
mode.
• You can change or specify the following bef ore scanning the ne xt originals, i.e., betw een jobs: the
number of copies, image quality, exposure, and 2-sided mode.
• If you place the originals in the feeder, remove the originals sequentially from the original output
area when scanning is completed.
NOTE
• When you place different-size originals in the feeder, set the “Different size Originals” mode.
• To scan one-sided and two-sided originals as two-sided, set the “Two-sided Original” mode
beforehand, if the first batch of original is two-sided. To scan the next original(s), set or cancel the
Two-sided Original mode according to the type of original.
• It also is useful to store originals in a box and print them with the Merge Documents mode when
you cannot prepare originals at once, or when you want to select different settings for each
original. (See ‘Printing Multiple Documents as One Document (Merge Documents),’ on p. 3-33.)
1
Select the desired mail box number to display the Document
Selection screen, and press “Scan.”
2
Scanning Originals into a Mail Box
When you select a mail box set with a password, enter the password after selecting the
mail box, and press “OK.”
The Scan screen is displayed.
2
Place your first original, and press “Special Features.”
Scanning Separately-set Originals as One Document (Job Build)
2-45
Page 72
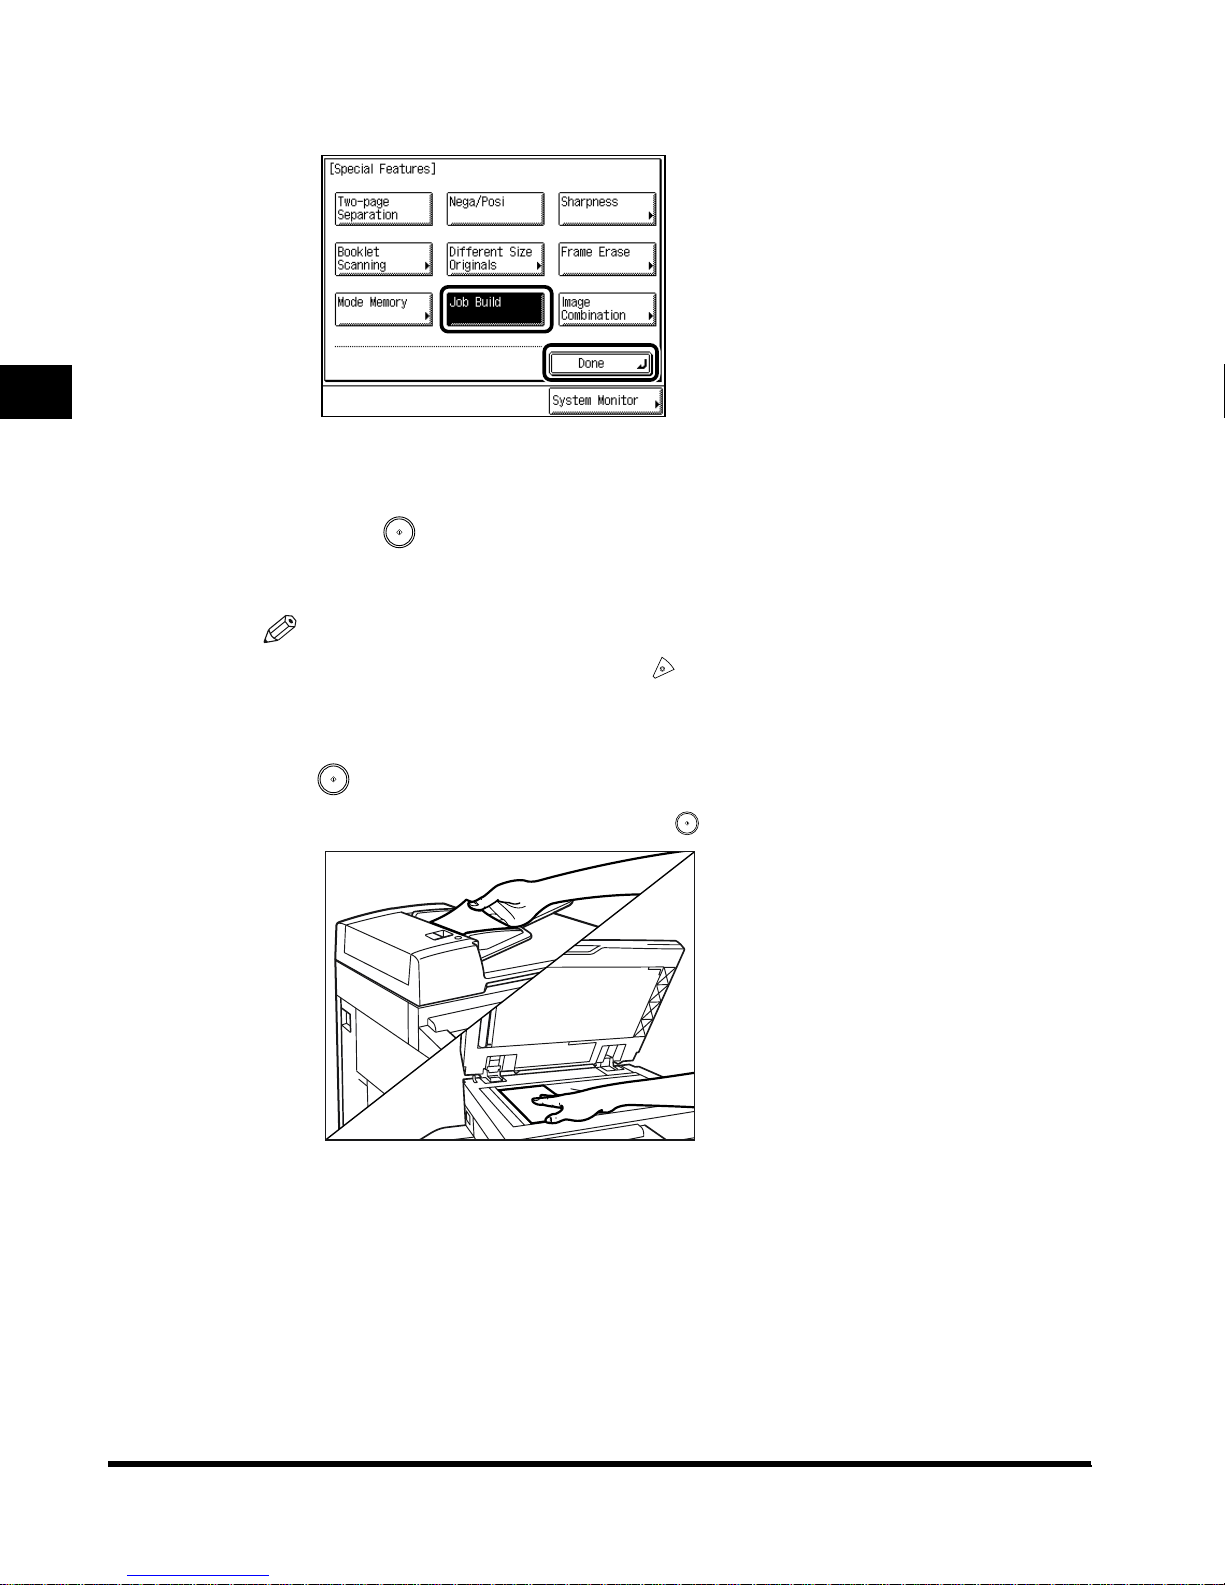
2
3
Press “Job Build,” and press “Done.”
The specified mode is set and the display returns to the Scan screen.
4
Press (Start).
The machine starts scanning. (See ‘Storing Originals in the Mail Box,’ on p. 1-9.)
NOTE
• To cancel scanning, press “Cancel” or (Stop).
5
When scanning is completed, place the next original, and press
Scanning Originals into a Mail Box
(Start).
Change the scan settings before pressing (Start), if necessary.
-You can adjust the Exposure and the Image Quality. (See ‘Adjusting the Exposure and
Image Quality Before Scanning the Originals,’ on p. 2-7.)
-You can change the setting of the original type (One-sided/Two-sided). (See ‘Scanning
Two-sided Originals (2-sided Original),’ on p. 2-24.)
2-46
Scanning Separately-set Originals as One Document (Job Build)
Page 73
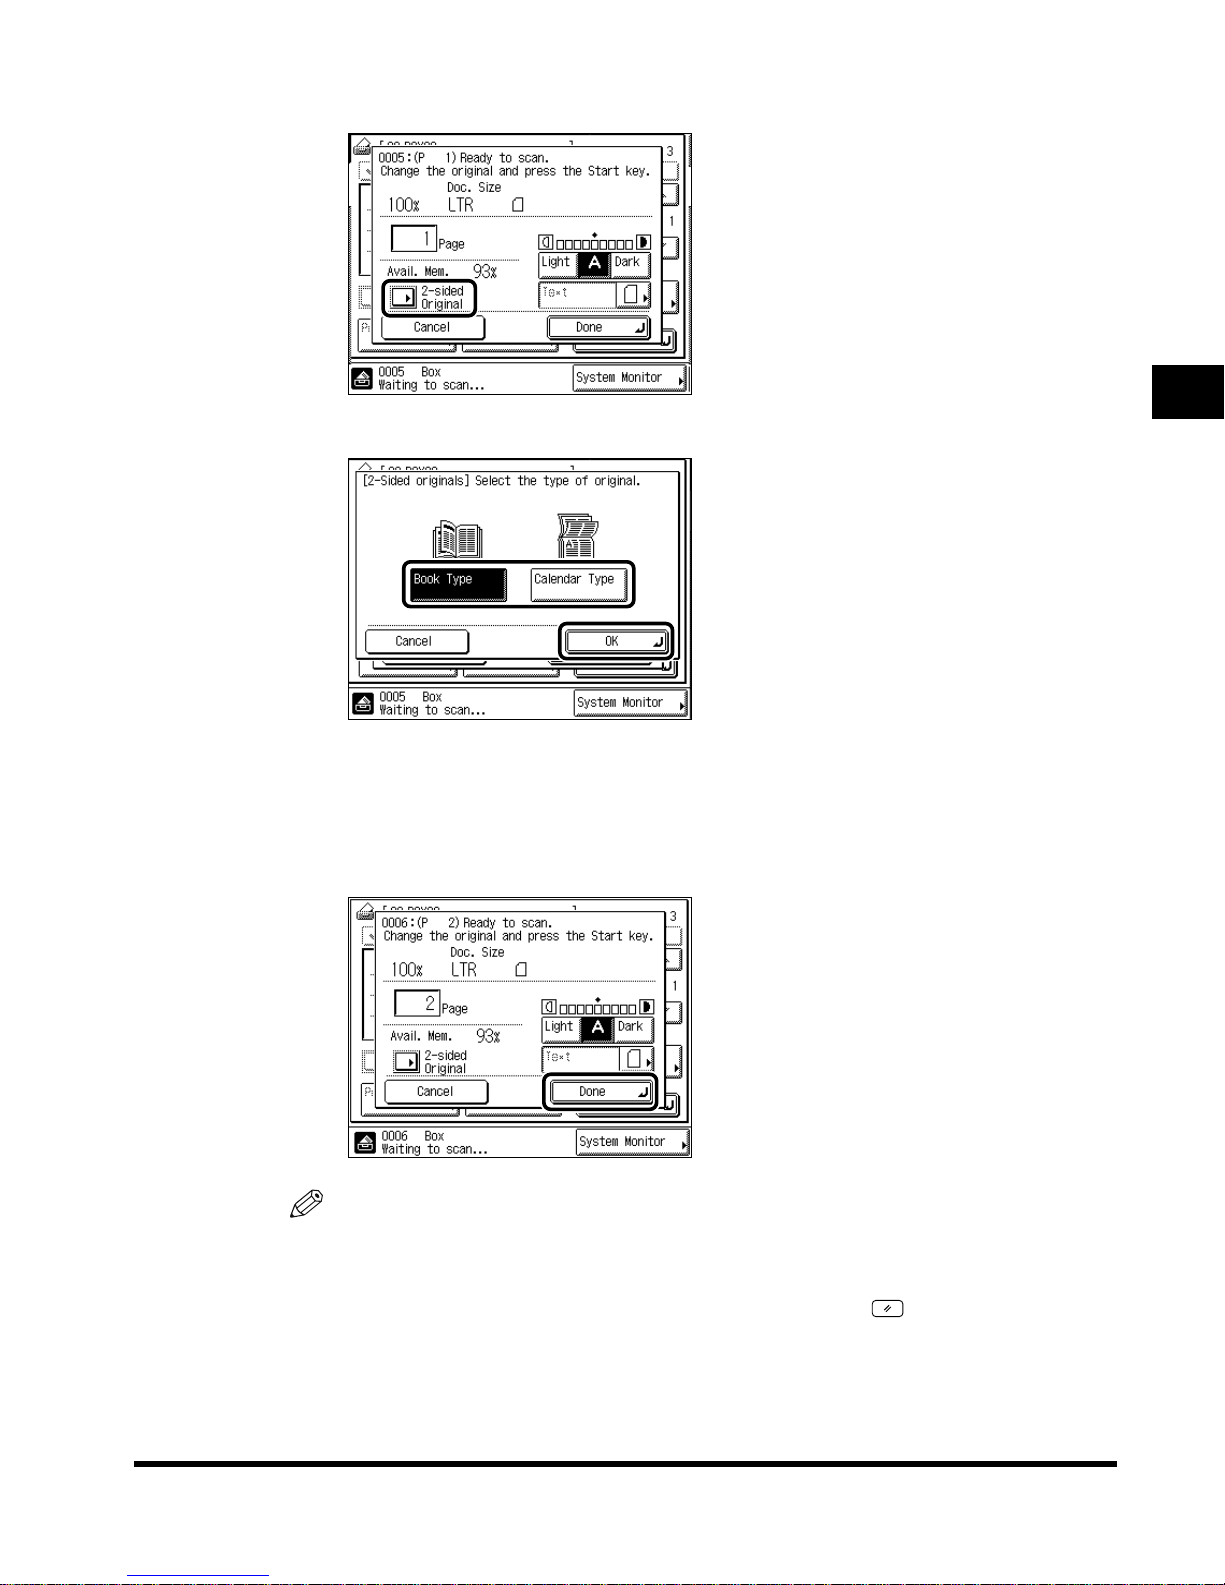
- When scanning both sides of the original, press “2-sided Original.”
Select the type of original, and press “OK.”
2
- Do not forget to set or cancel the 2-Sided Original mode according to the type of original.
Repeat this operation as necessary.
6
When the last original is scanned, press “Done.”
NOTE
• To cancel the setting, press “Special Features” → “Job Build,” in this order.
• To cancel all settings at once, press “Initial Settings .” (The machine returns to the standard
scanning mode.)
• To return the display to the Mail Box Selection screen, press (Reset).
Scanning Originals into a Mail Box
Scanning Separately-set Originals as One Document (Job Build)
2-47
Page 74
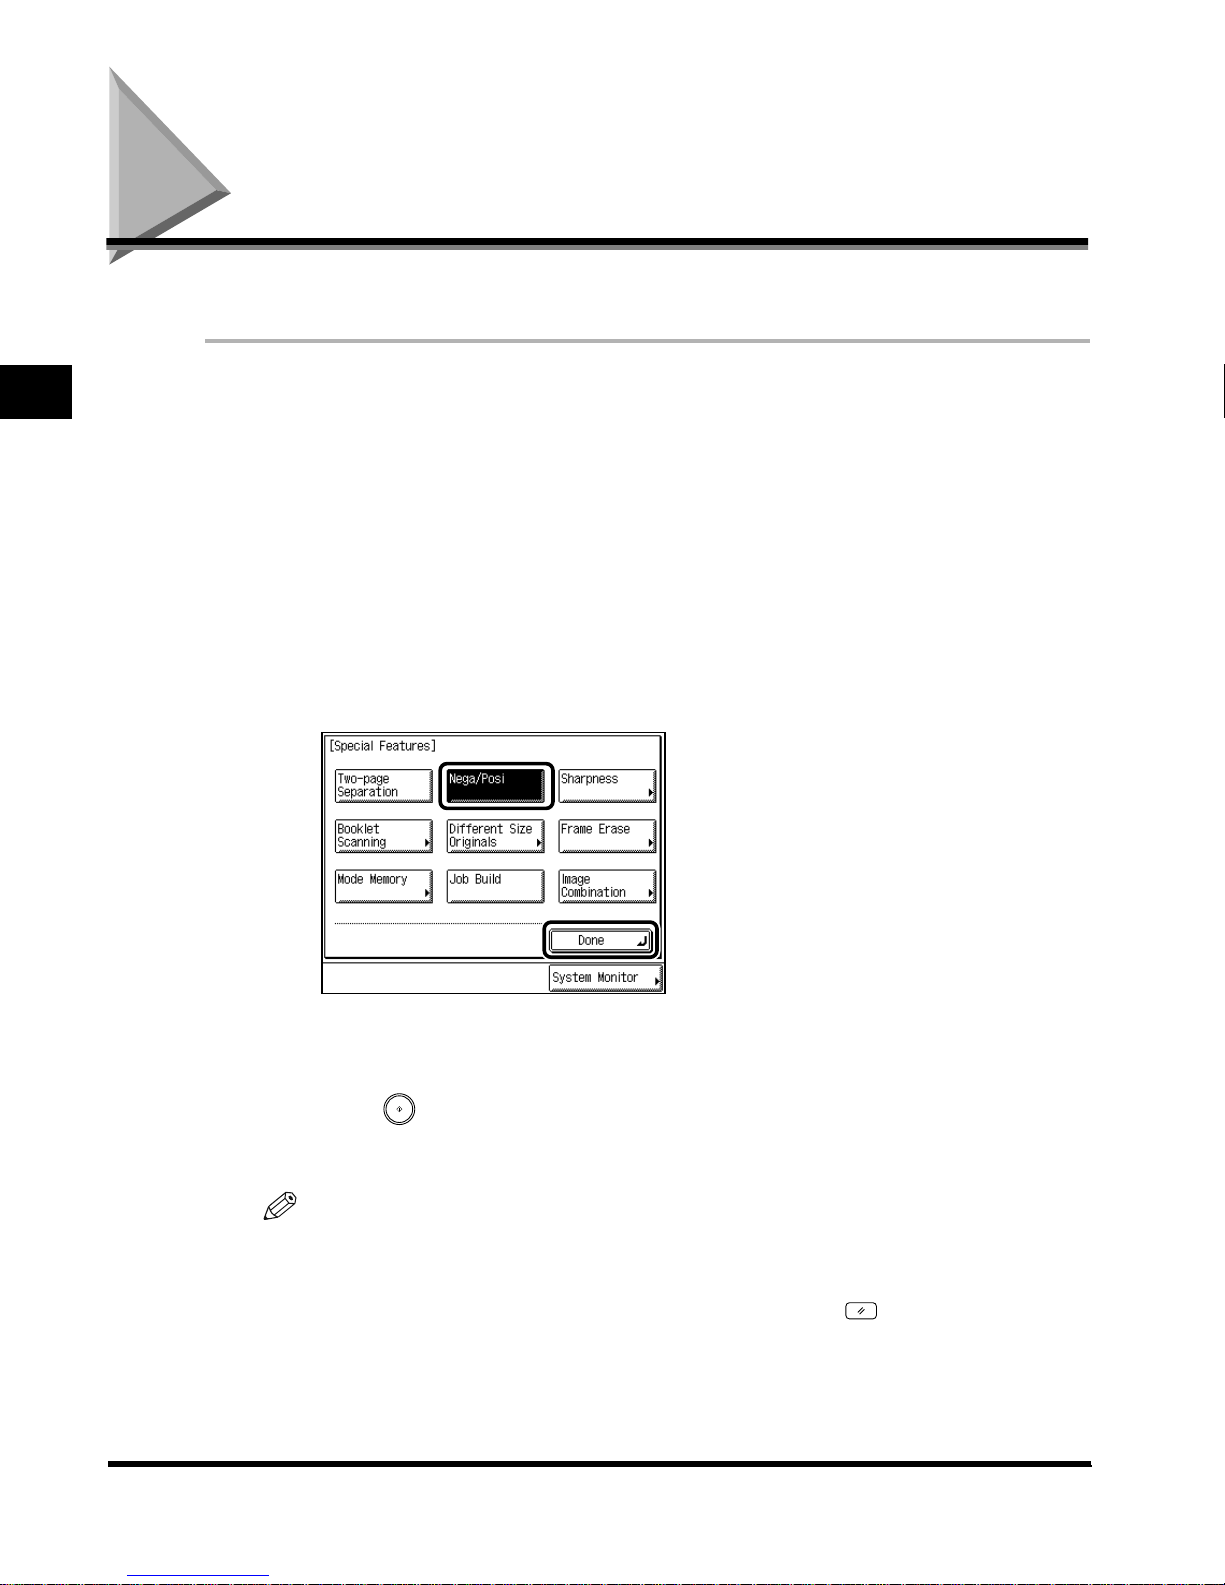
Inverting Original Images (Nega/Posi)
This function enables you to record the original image, inverting the black and white areas.
2
1
Select the desired mail box number to display the Document
Selection screen, and press “Scan.”
When you select a mail box set with a password, enter the password after selecting the
mail box, and press “OK.”
The Scan screen is displayed.
2
Place the original, and press “Special Features.”
3
Press “Nega/Posi,” and press “Done.”
Scanning Originals into a Mail Box
The specified mode is set and the display returns to the Scan screen.
4
Press (Start).
The machine starts scanning. (See ‘Storing Originals in the Mail Box,’ on p. 1-9.)
NOTE
• To cancel the setting, press “Special Features” → “Nega/Posi,” in this order.
• To cancel all settings at once, press “Initial Settings .” (The machine returns to the standard
scanning mode.)
• To return the display to the Mail Box Selection screen, press (Reset).
2-48
Inverting Original Images (Nega/Posi)
Page 75
Scanning Originals After Making Them Sharply
Contrasted (Sharpness)
This mode allows you to scan original images with the contrast reproduced more sharply or
more softly. To scan originals with text or lines reproduced more sharply, use “High.” To scan
originals with photographs or other half-tones reproduced more softly, use “Low.”
■ Low
If you want to scan an original containing half-tones, such as a printed photograph, using
the Photo mode, moire may occur. However, by using “Low,” you can soften this moire
effect so that the print is easier on the eyes.
■ High
This feature enhances the edges of original images so that faint or fine te xt is reproduced
more sharply. This feature is particularly suited to blueprints and faint pencil-drawn
originals.
1
Select the desired mail box number to display the Document
Selection screen, and press “Scan.”
When you select a mail box set with a password, enter the password after selecting the
mail box, and press “OK.”
The Scan screen is displayed.
2
Place your originals → press “Special Features” → press
“Sharpness.”
2
Scanning Originals into a Mail Box
Scanning Originals After Making Them Sharply Contrasted (Sharpness)
2-49
Page 76
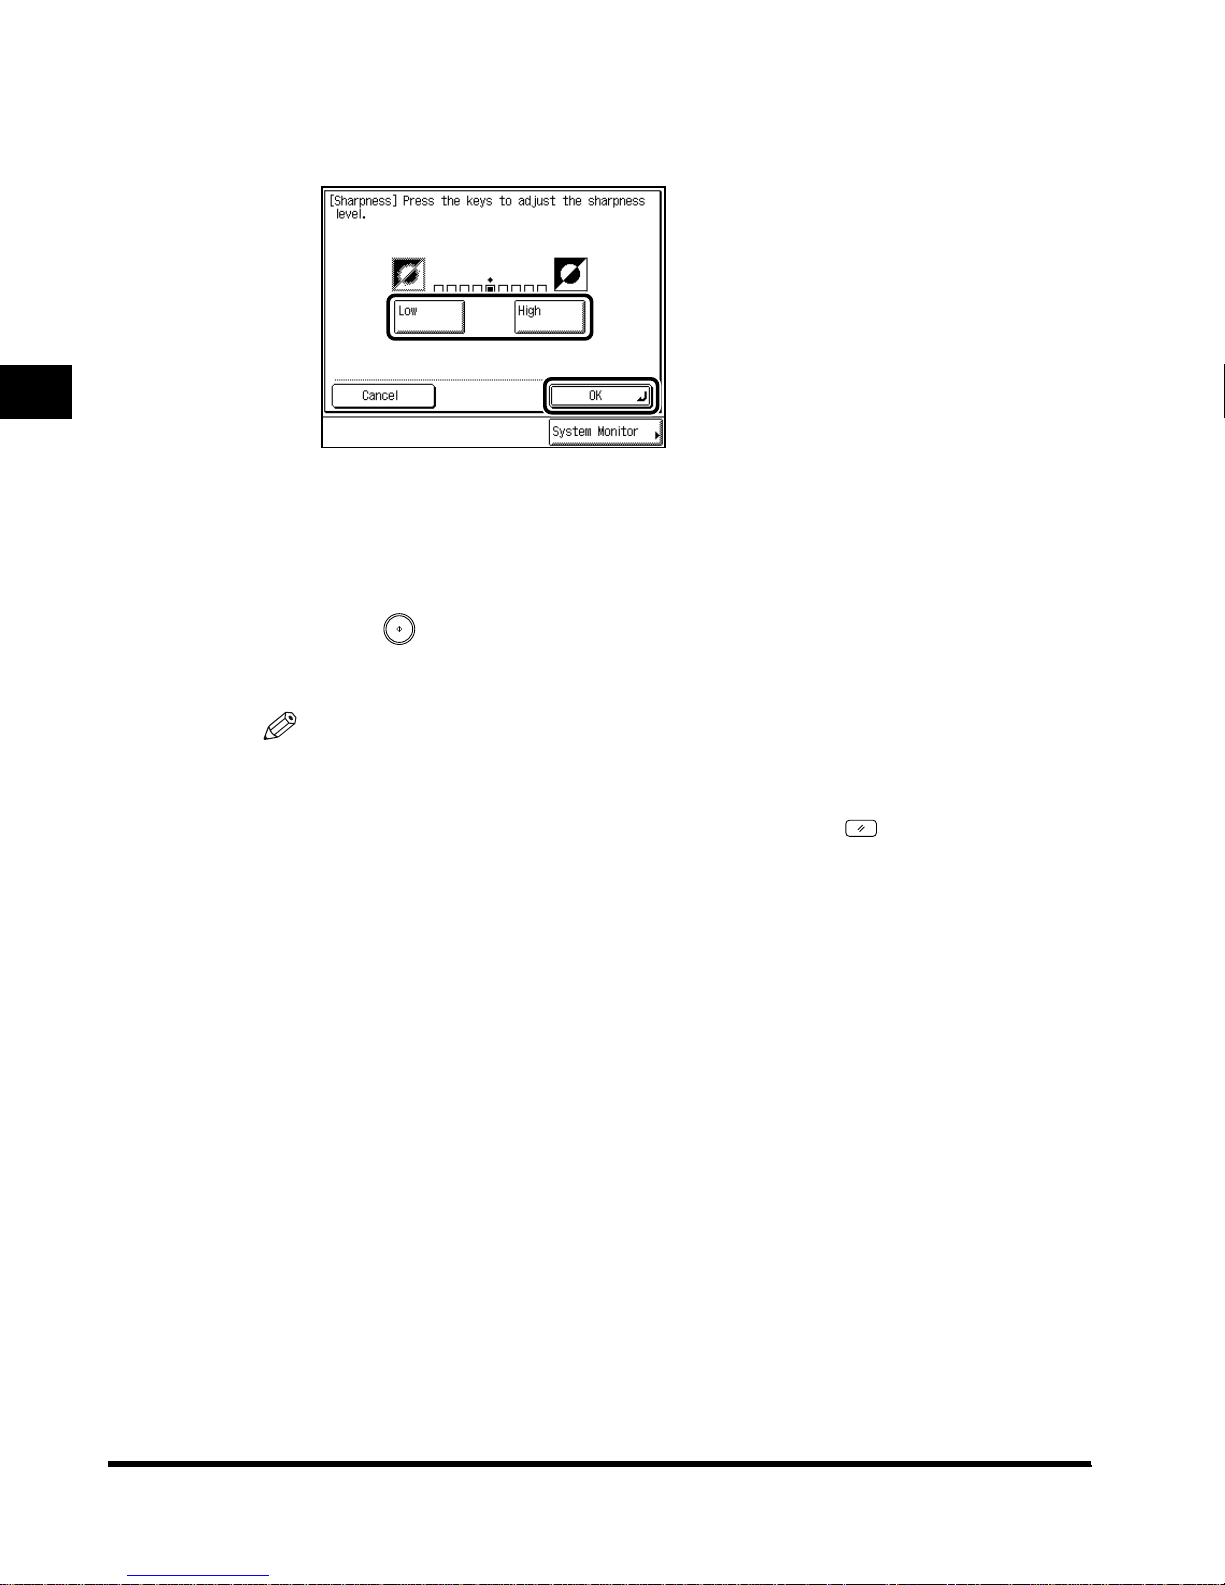
2
3
Adjust the sharpness by pressing “Low” or “High” → press “OK” →
press “Done. ”
To scan text and lines clearly, the setting should be towards “High.” To scan photographs
or other half-tones, the setting should be towards “Low.”
The specified mode is set and the display returns to the Scan screen.
4
Press (Start).
The machine starts scanning. (See ‘Storing Originals in the Mail Box,’ on p. 1-9.)
NOTE
• To cancel the setting, press “Special Features” → “Sharpness” → “Cancel,” in this order.
Scanning Originals into a Mail Box
• To cancel all settings at once, press “Initial Settings .” (The machine returns to the standard
scanning mode.)
• To return the display to the Mail Box Selection screen, press (Reset).
2-50
Scanning Originals After Making Them Sharply Contrasted (Sharpness)
Page 77
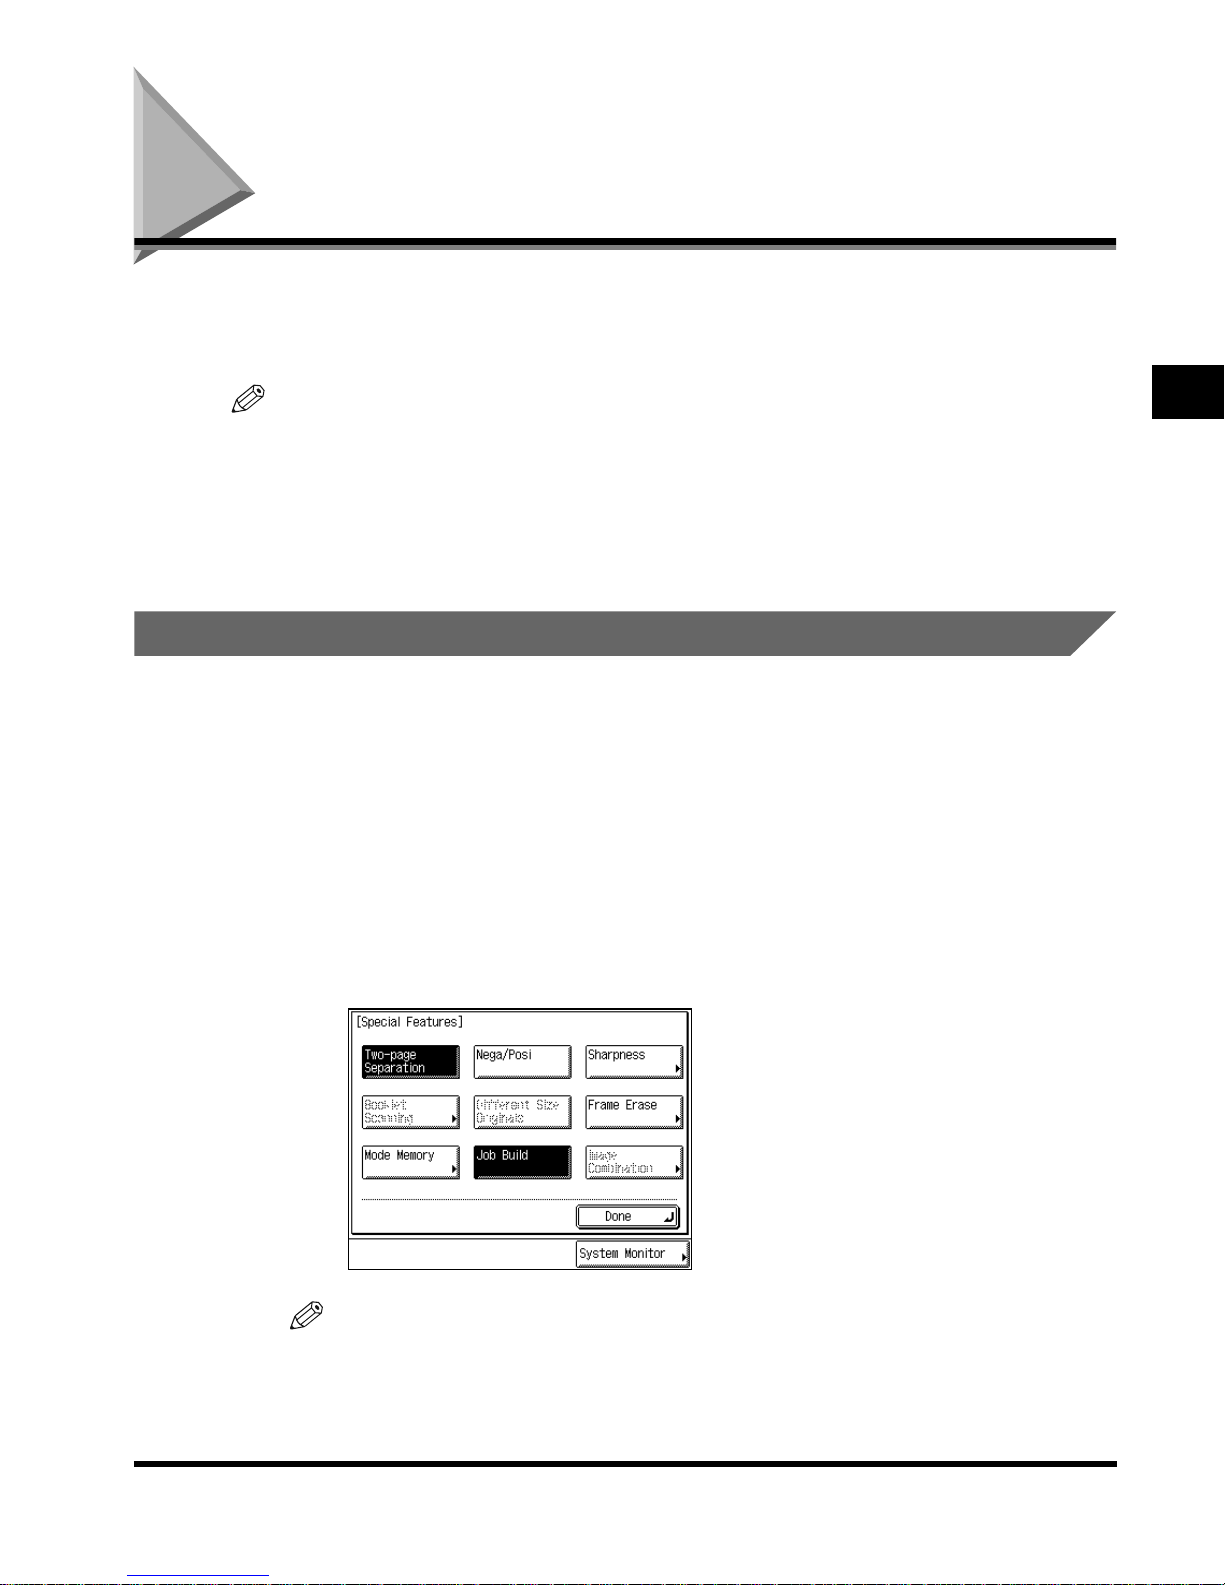
Storing/Recalling Scanning Modes (Mode Memory)
With this function you can store up to nine settings, each setting consisting of any possible
combination of the Scanning functions, in a memory key which you can name. This feature is
useful when you want to store the settings used frequently.
NOTE
• The scanning modes in memory are not erased even when you turn the machine’s power off.
• The scanning modes you can store in a memory key are: Document Name, Image Quality,
Document Size Select, Scanning Exposure, Copy Ratio, 2-sided Original, Two-page Separation,
Booklet Scanning, Frame Erase, Image Combination, Different Size Originals, Job Build, Nega/
Posi, and Sharpness.
Storing Scanning Modes
1
Select the desired mail box number to display the Document
selection screen, and press “Scan.”
When you select a mail box set with a password, enter the password after selecting the
mail box, and press “OK.”
The Scanning screen is displayed.
2
Set the scan settings that you want to store, in either the Scan
screen or Special Features screen.
2
Scanning Originals into a Mail Box
NOTE
• In the case shown above, the Two-page Separation and Job Build modes are set.
Storing/Recalling Scanning Modes (Mode Memory)
2-51
Page 78
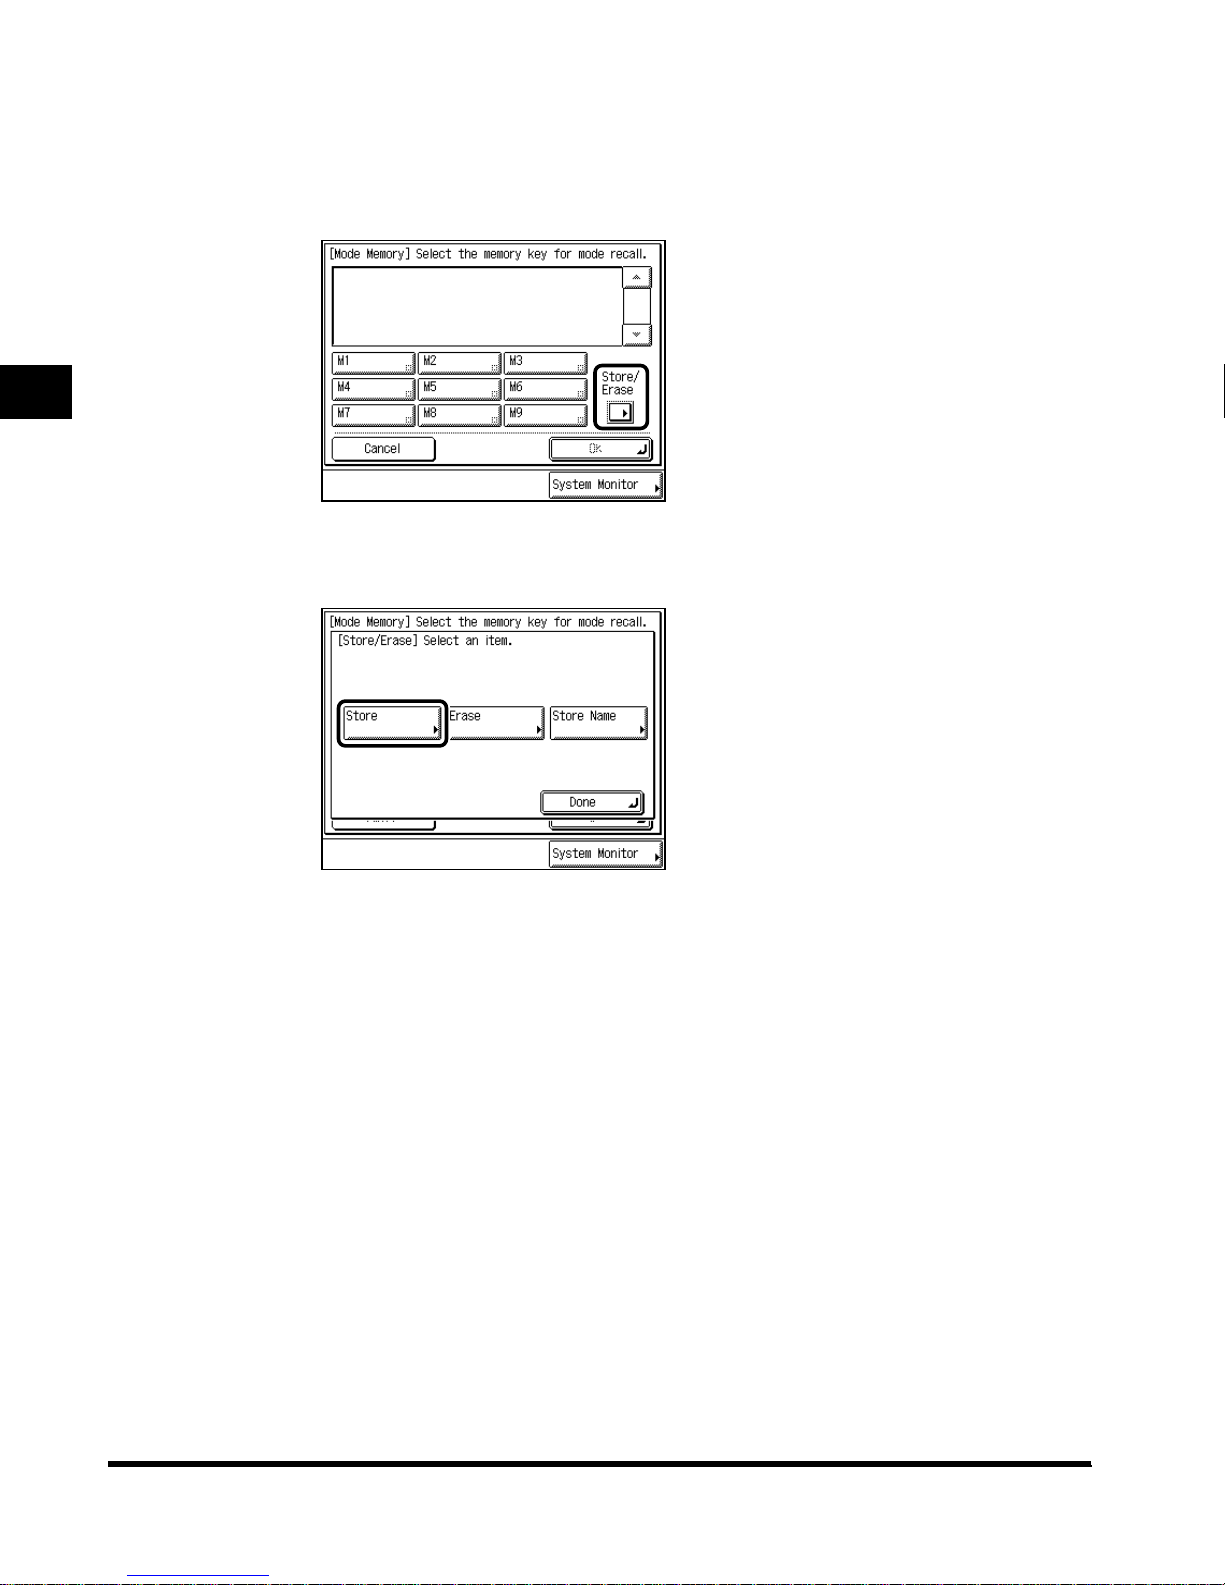
2
3
Press “Special Feature,” and press “Mode Memory.”
4
Press “Store/Erase. ”
5
Press “Store. ”
Scanning Originals into a Mail Box
2-52
Storing/Recalling Scanning Modes (Mode Memory)
Page 79
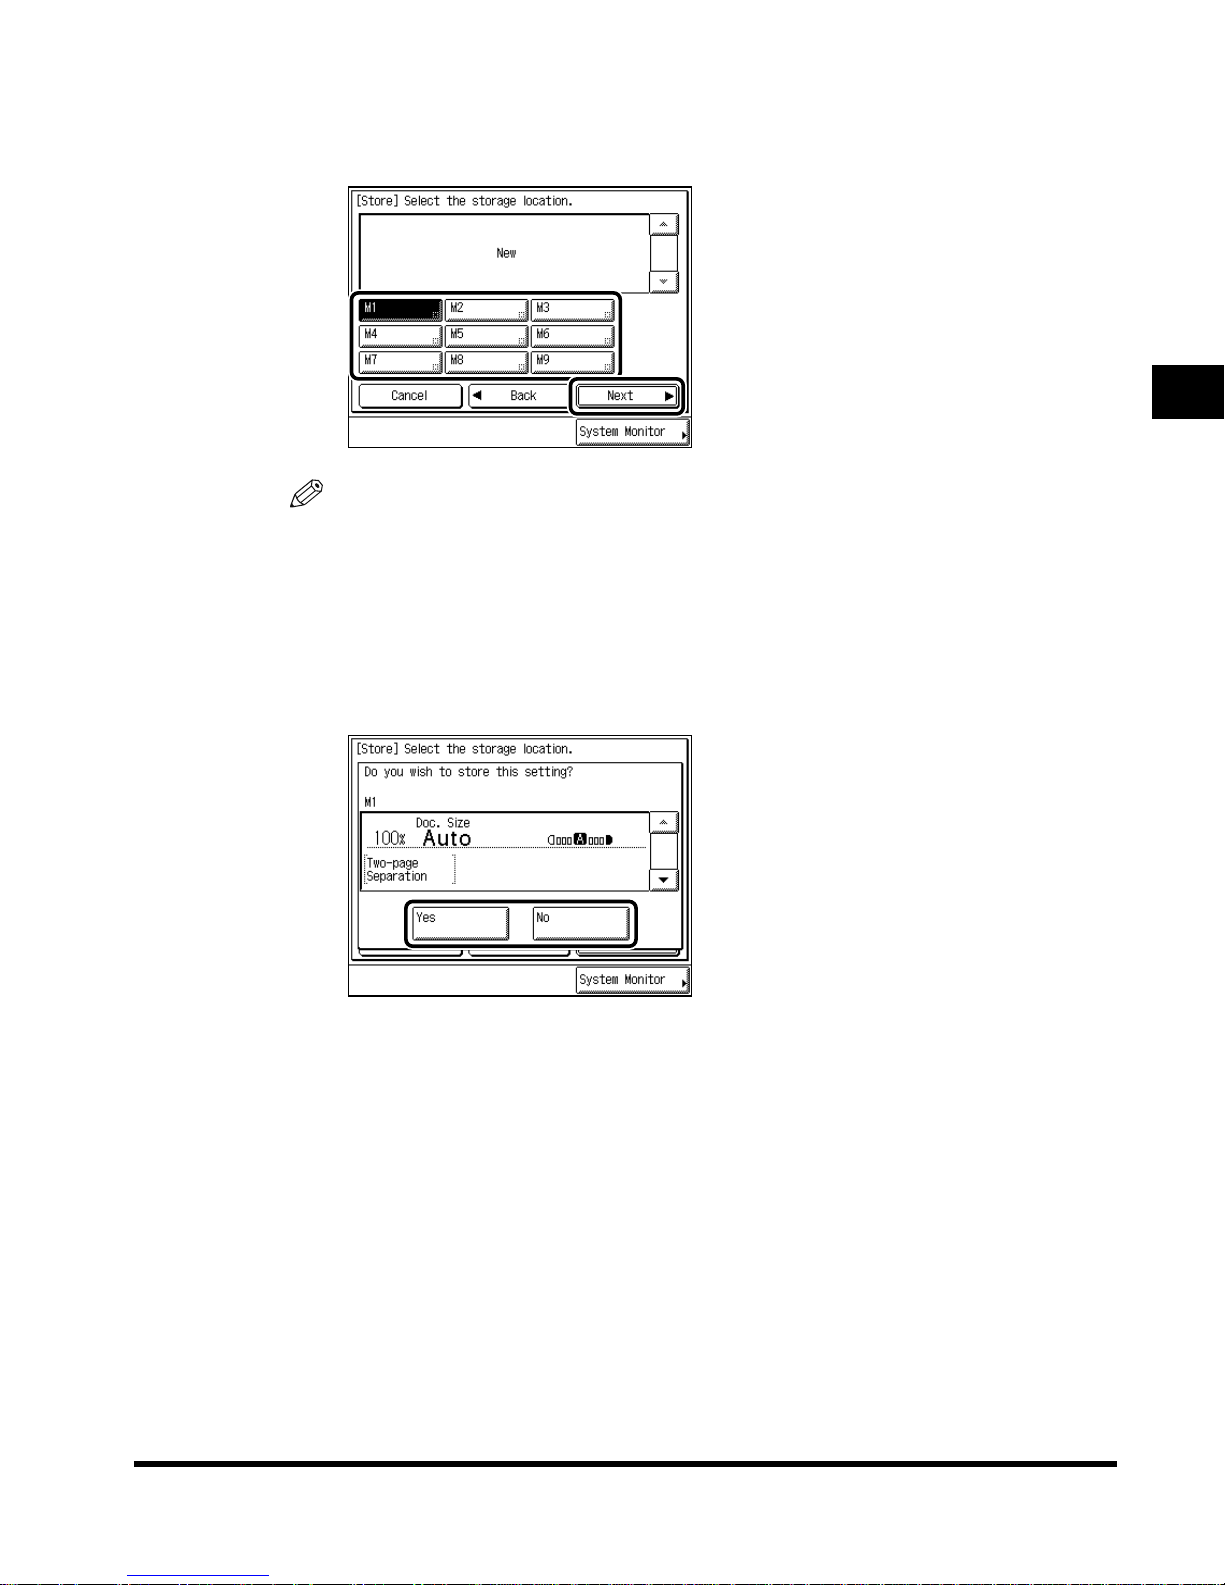
6
Select the desired memory key from the memory keys “M1” to “M9,”
and press “Next.”
NOTE
• The mode memory key already storing scanning settings shows a small, blac k square (■)
in the lower right corner.
• If you select a memory key already storing scanning settings, the settings are displayed.
• If there are more stored scanning settings than are currently displayed, you can scroll the
list using “▲” or “ ▼.”
● If you select a memory key not already storing scanning settings:
2
Select “Yes” to store scanning settings.
Select “No” to cancel storing.
When storing is completed, the message <Stored in memory> appears for about two
seconds.
The color of a memory key storing the scanning setting changes, and the stored settings
are displayed.
Scanning Originals into a Mail Box
Storing/Recalling Scanning Modes (Mode Memory)
2-53
Page 80
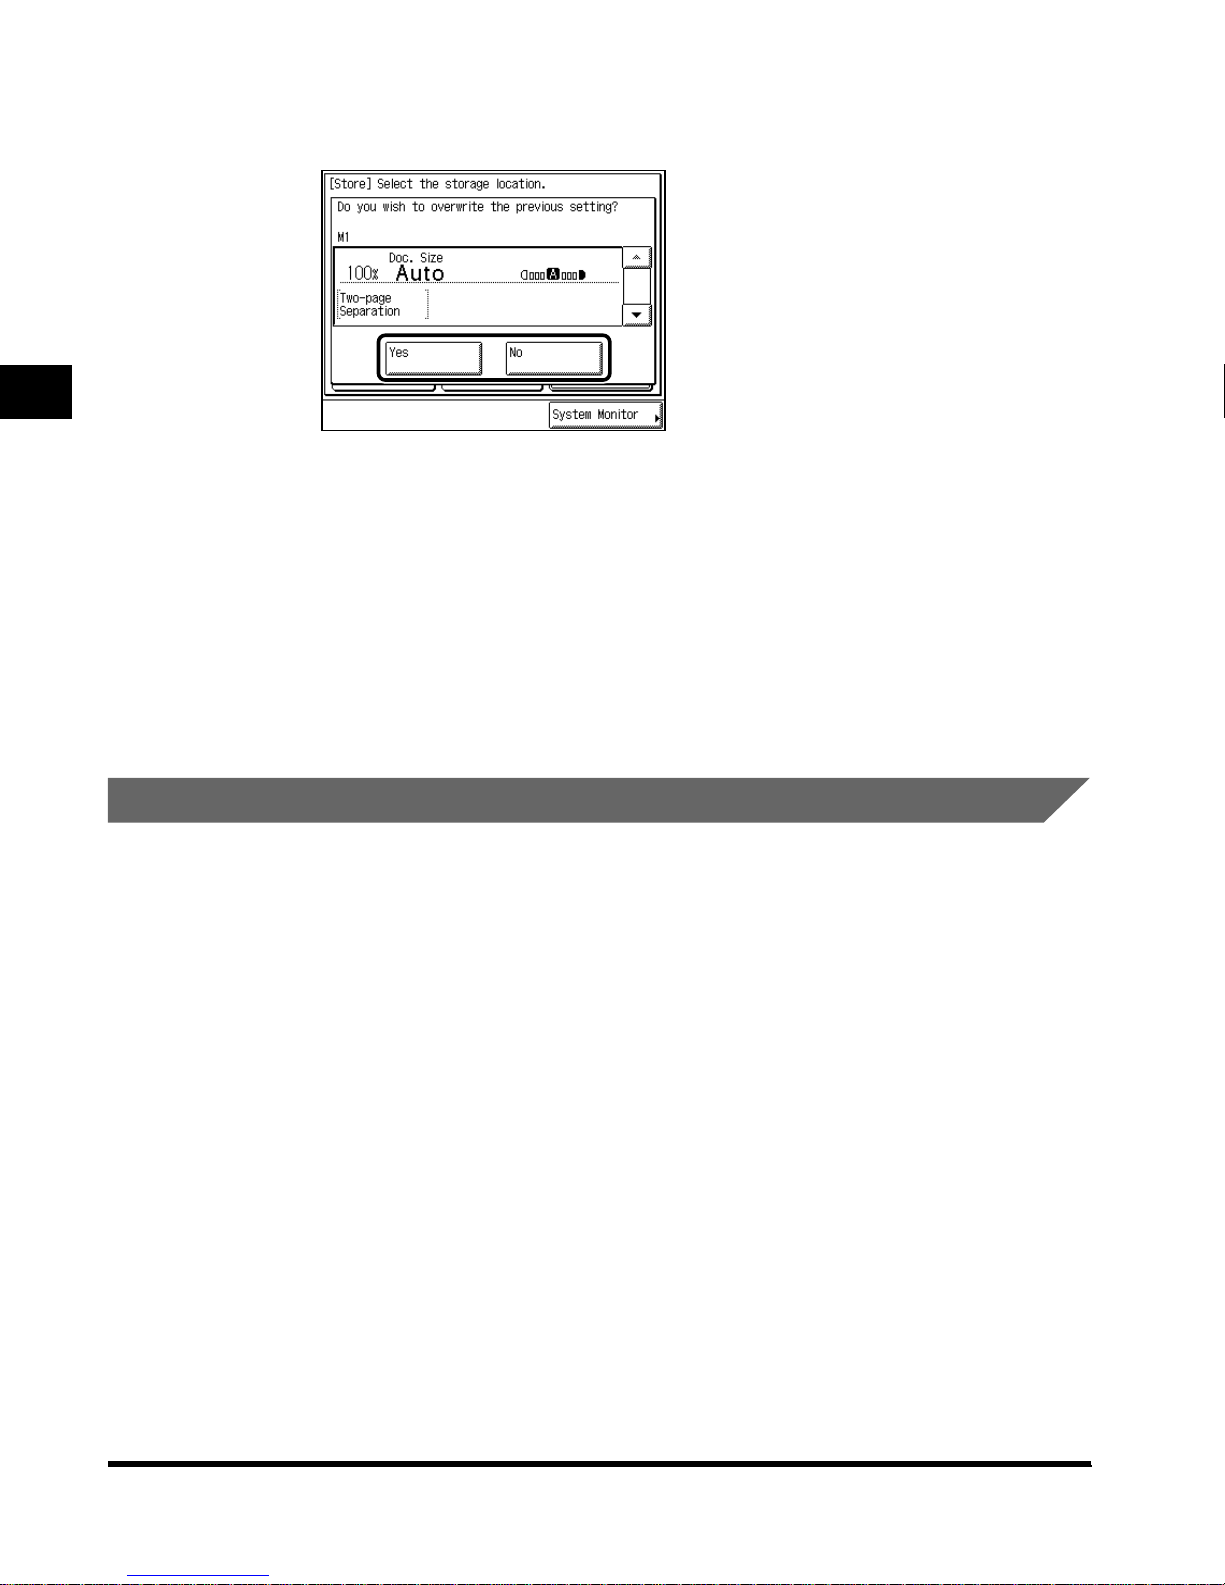
2
● If you select a memory key already storing a scanning setting:
Select “Yes” to overwrite the stored settings.
Select “No” to cancel storing.
When storing is completed, the message <Stored in memory> appears for about two
seconds.
The color of the memory key storing the scanning settings changes, and the stored
settings are displayed.
7
Press “OK,” and press “Done.”
The display returns to the Scan screen.
Scanning Originals into a Mail Box
Storing a Memory Key Name
1
Select the desired mail box number to display the Document
Selection screen, and press “Scan.”
When you select a mail box set with a password, enter the password after selecting the
mail box, and press “OK.”
The Scan screen is displayed.
2
Press “Special Features,” and press “Mode Memory.”
2-54
Storing/Recalling Scanning Modes (Mode Memory)
Page 81
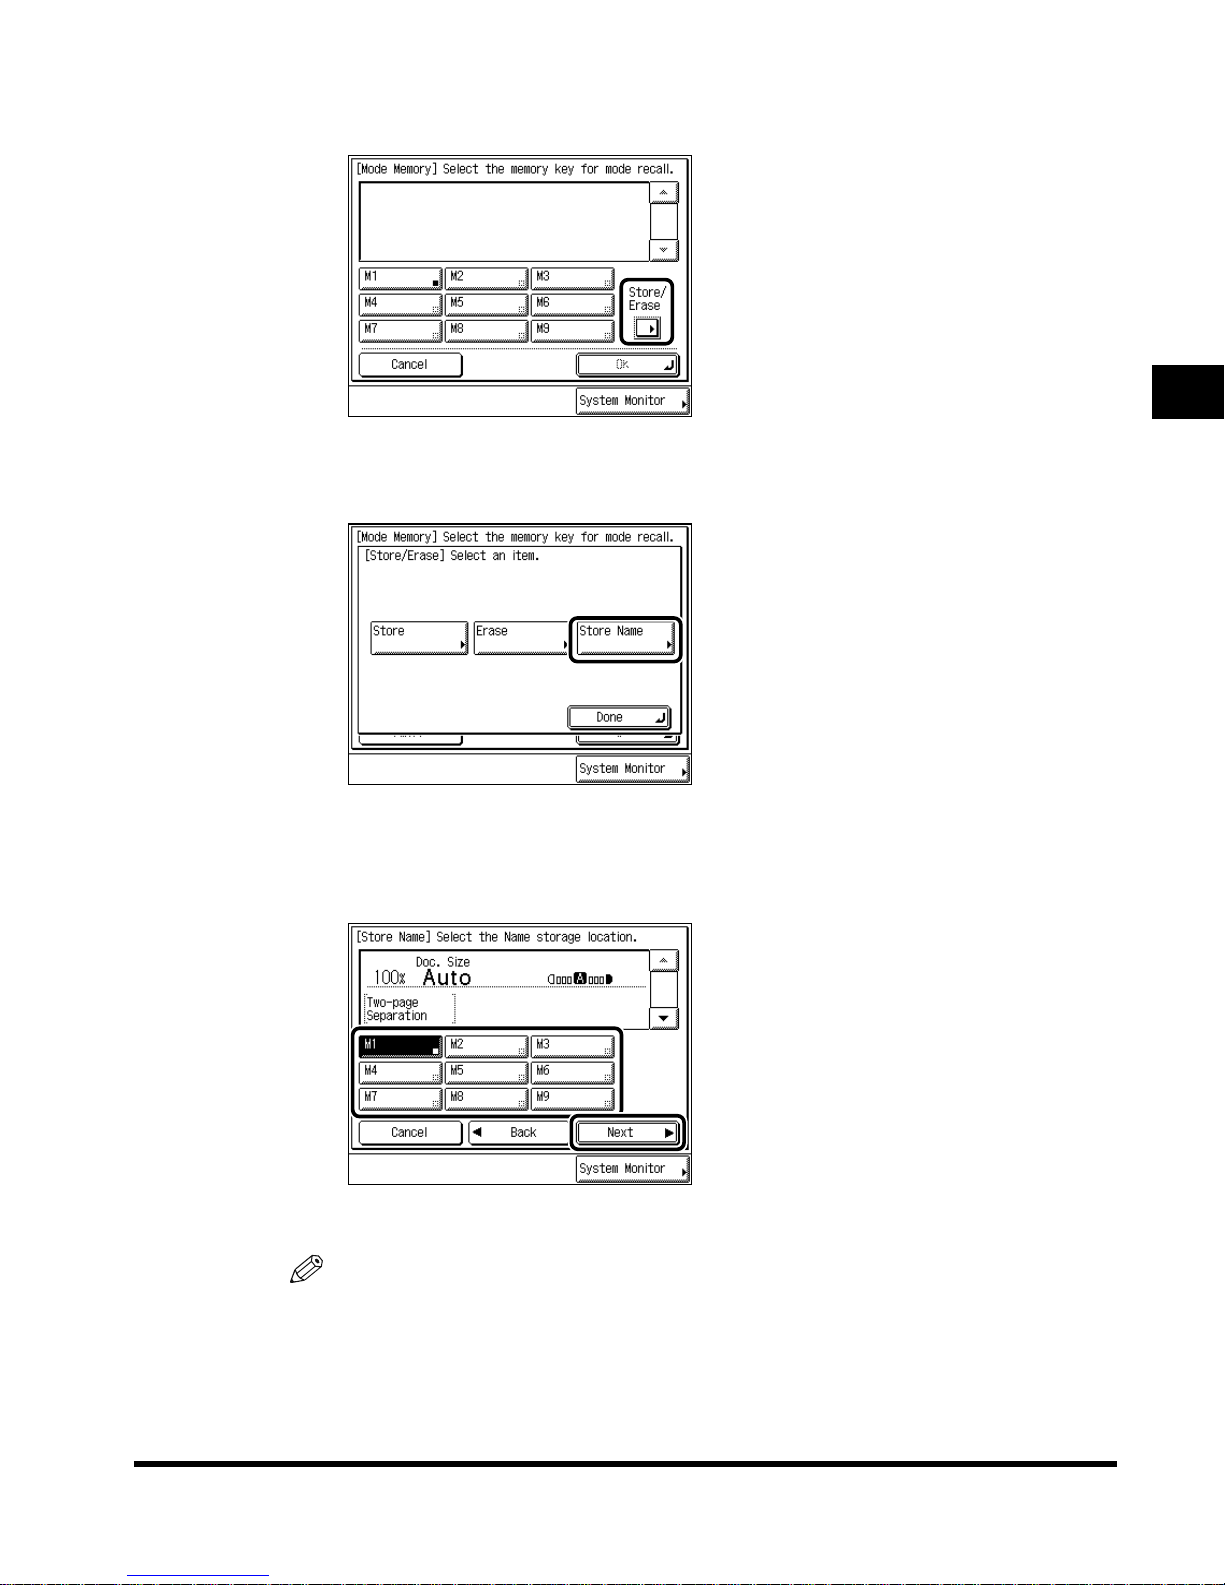
3
Press “Store/Erase. ”
4
Press “Store Name. ”
2
5
Select the desired memory key from the memory keys “M1” to “M9,”
and press “Next.”
A keyboard appears on the touch panel display.
NOTE
• A mode memory key already storing scanning settings shows a small, black square (■) in
the lower right corner.
• If you select a memory key already storing scanning settings, the settings are displayed.
• If there are more stored scanning settings than are currently displayed, you can scroll the
list using “▲” or “ ▼.”
Scanning Originals into a Mail Box
Storing/Recalling Scanning Modes (Mode Memory)
2-55
Page 82
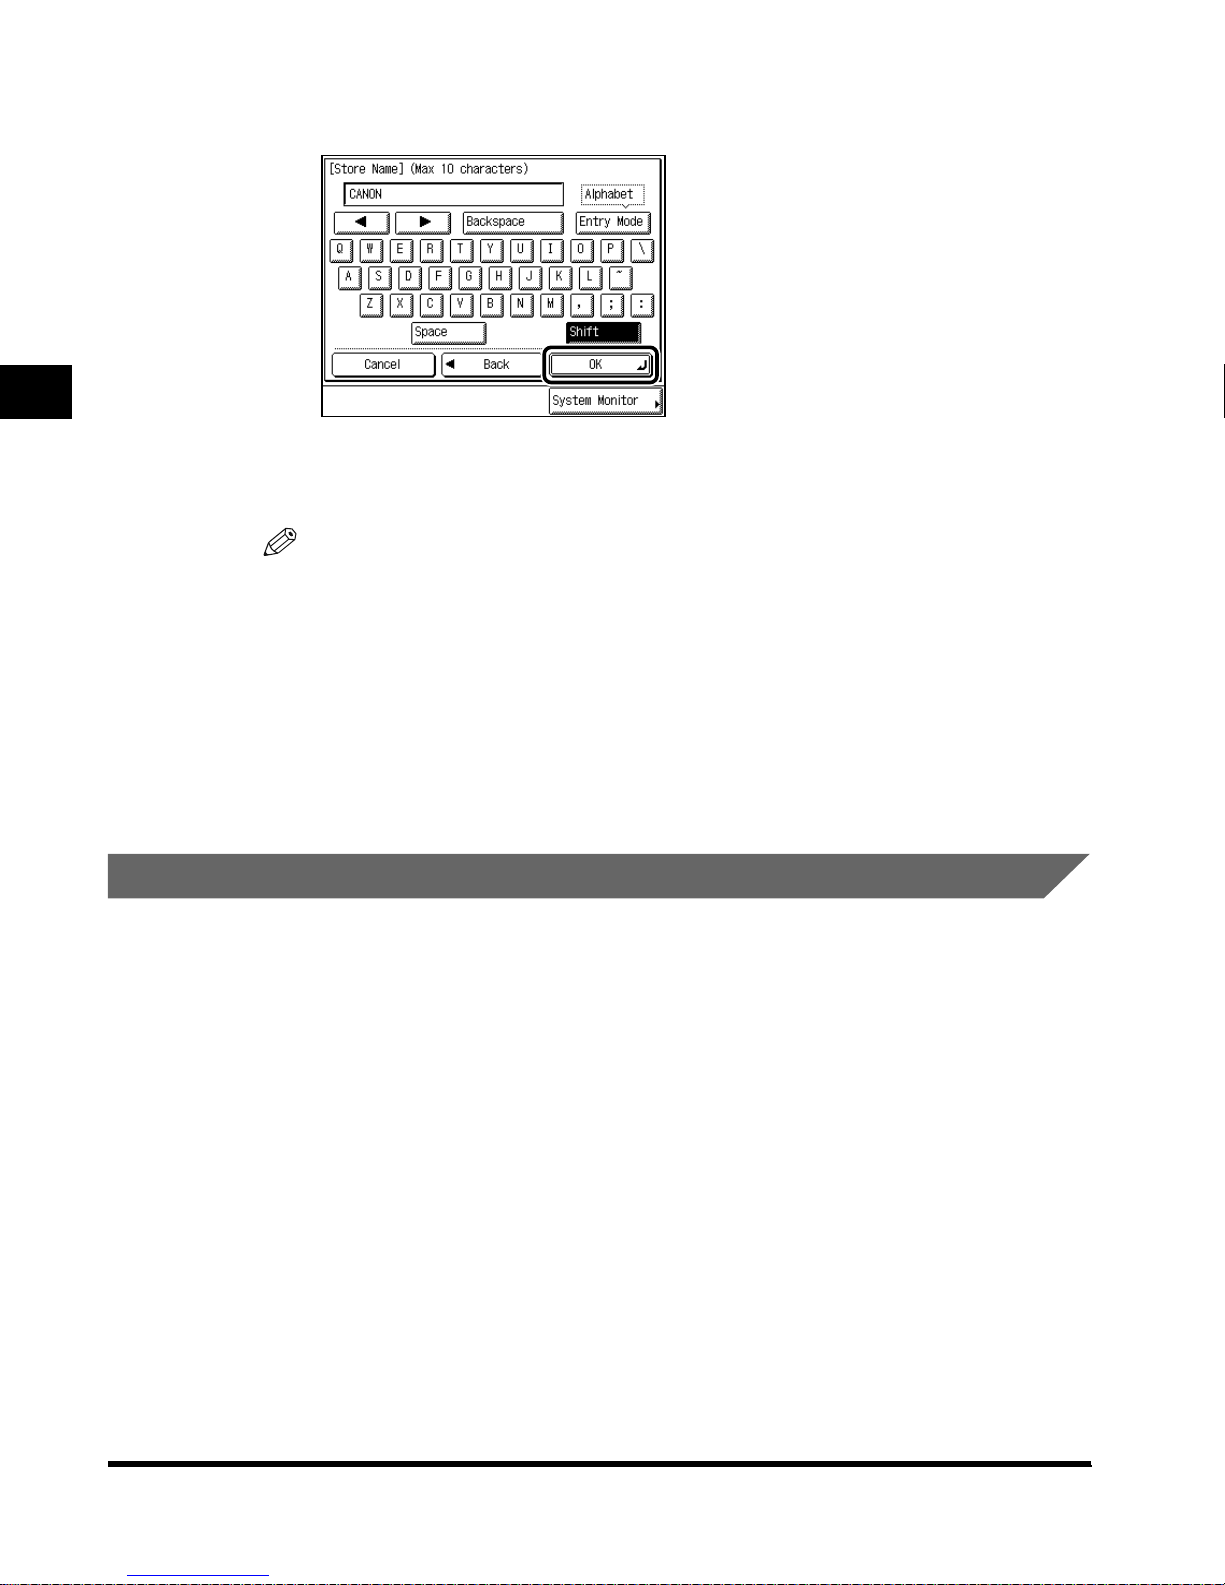
2
6
Enter the new name, and press “OK.”
The maximum number of characters you can use for the name is 10.
The name appears on the memory key.
NOTE
• For details of how to enter characters from the touch panel display, see the Reference
Guide.
• If you press “OK” without any characters entered, the name of the memory key returns
back to its default setting, e.g., “M1” or “M2.”
7
Press “OK,” and press “Done.”
The display returns to the Scan screen.
Scanning Originals into a Mail Box
Recalling Scanning Settings
1
Select the desired mail box number to display the Document
Selection screen, and press “Scan.”
When you select a mail box set with a password, enter the password after selecting the
mail box, and press “OK.”
The Scan screen is displayed.
2
Press “Special Features,” and press “Mode Memory.”
2-56
Storing/Recalling Scanning Modes (Mode Memory)
Page 83
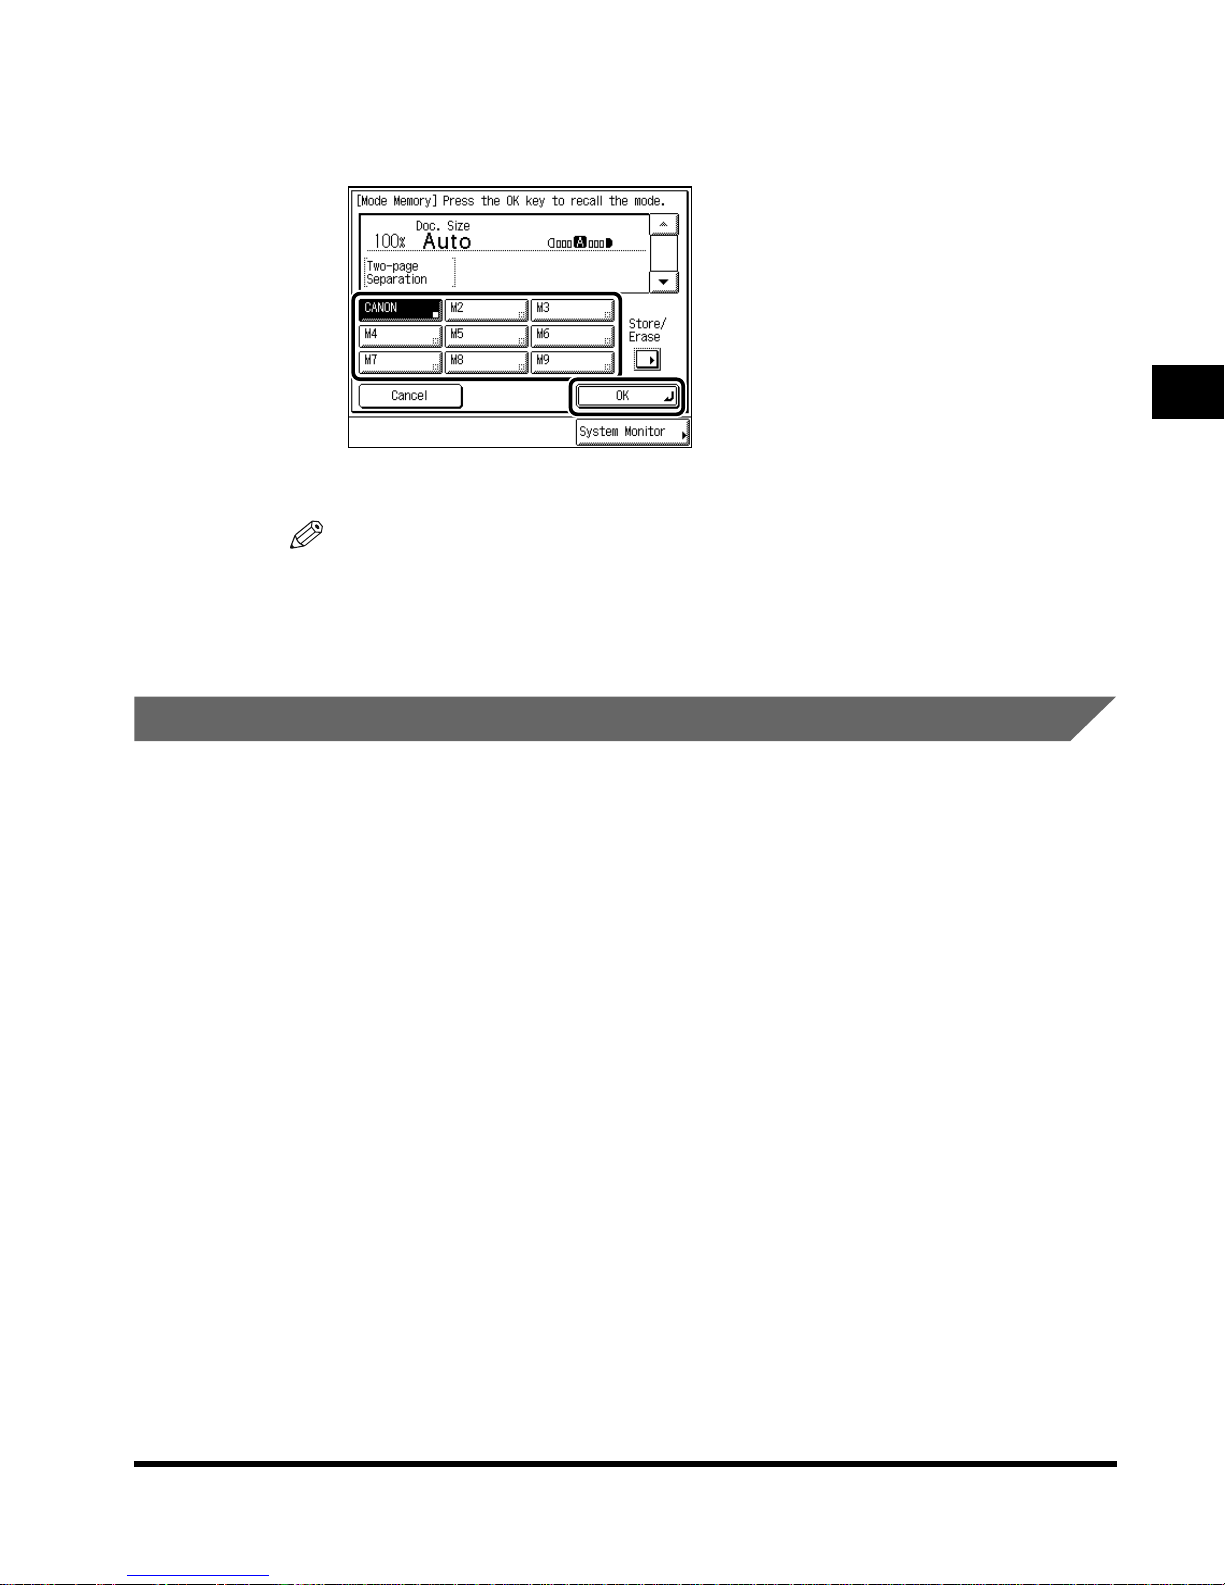
3
Select the memory key storing the scanning settings you want to
use → confirm the stored settings → press “OK” → press “Done.”
The display returns to the Scan screen.
NOTE
• Recalling scanning settings from memory cancels the current scanning settings.
• You can change the recalled settings before you scan your originals.
• If you press another memory key, the scanning settings stored in that key are recalled.
2
Erasing a Scanning Setting
1
Select the desired mail box number to display the Document
Selection screen, and press “Scan.”
When you select a mail box set with a password, enter the password after selecting the
mail box, and press “OK.”
The Scan screen is displayed.
2
Press “Special Features,” and press “Mode Memory.”
Scanning Originals into a Mail Box
Storing/Recalling Scanning Modes (Mode Memory)
2-57
Page 84
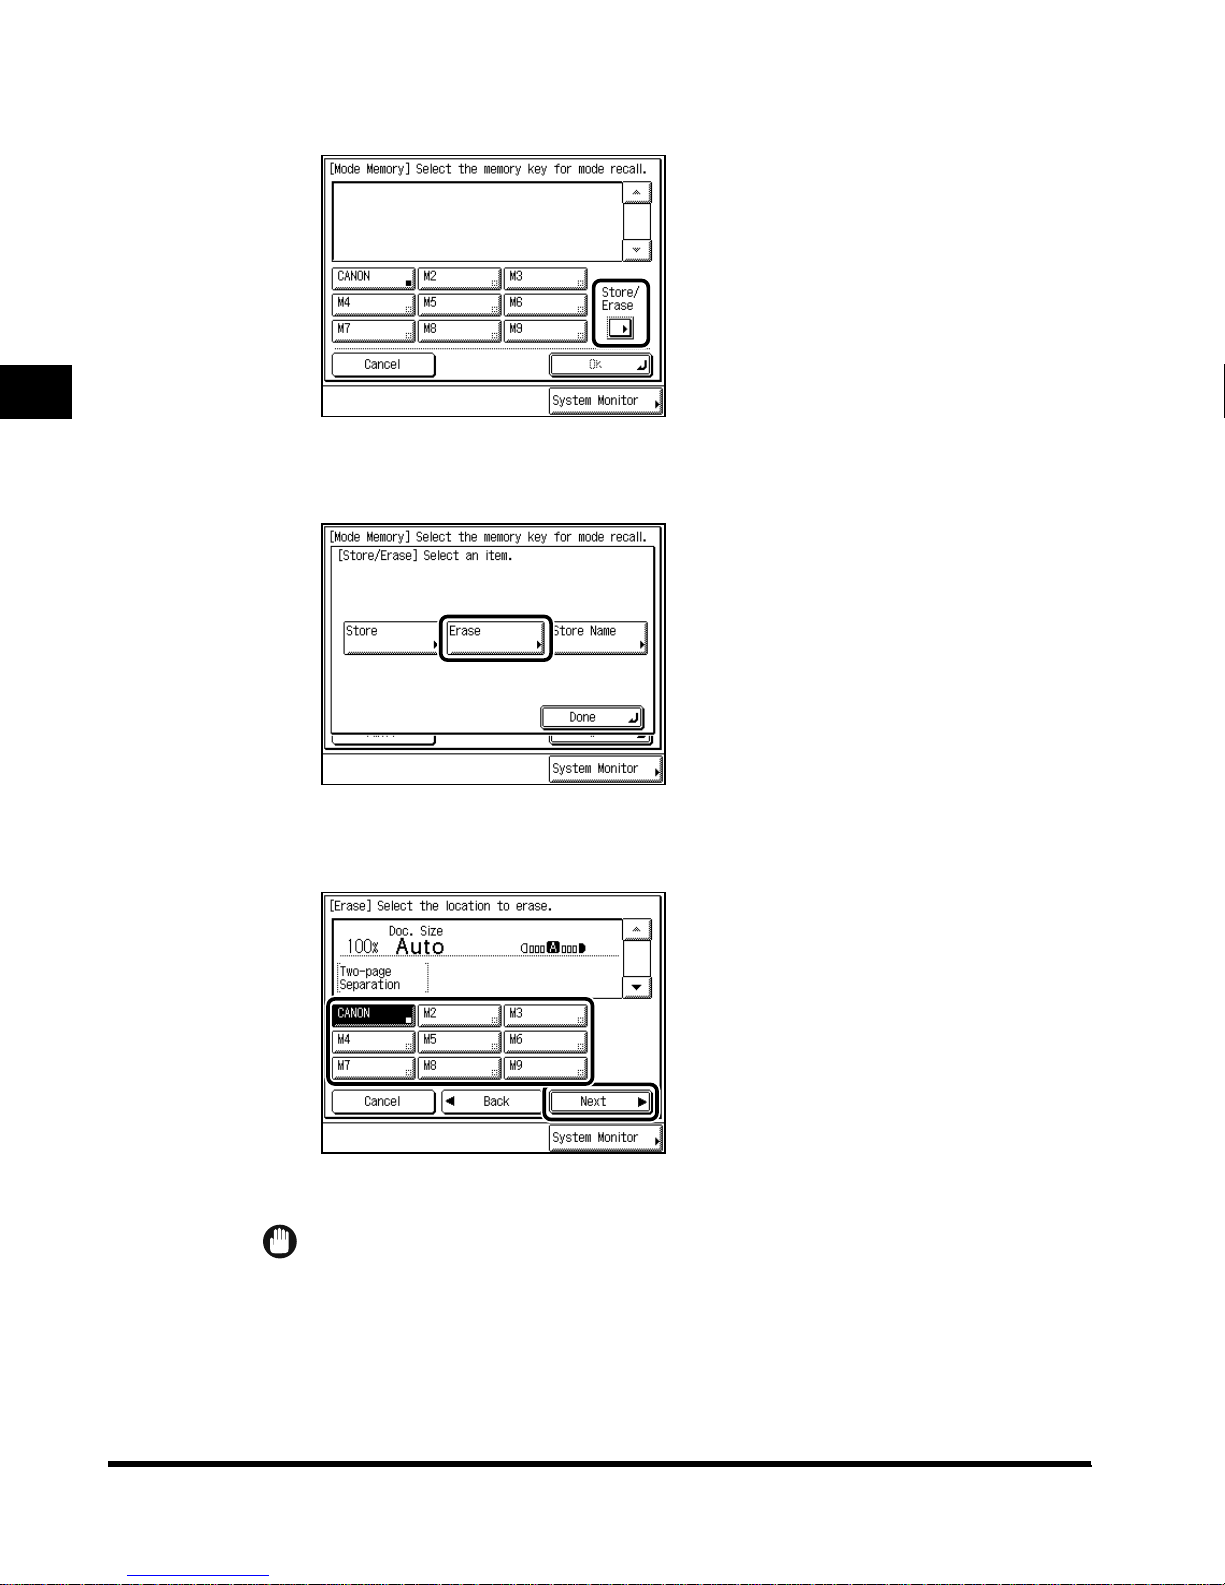
2
3
Press “Store/Erase. ”
4
Press “Erase. ”
Scanning Originals into a Mail Box
5
Select a memory key to be erased, and press “Next.”
The message appears to confirm that you want to erase the printing mode.
IMPORTANT
• Check the scanning settings before you erase them.
2-58
Storing/Recalling Scanning Modes (Mode Memory)
Page 85
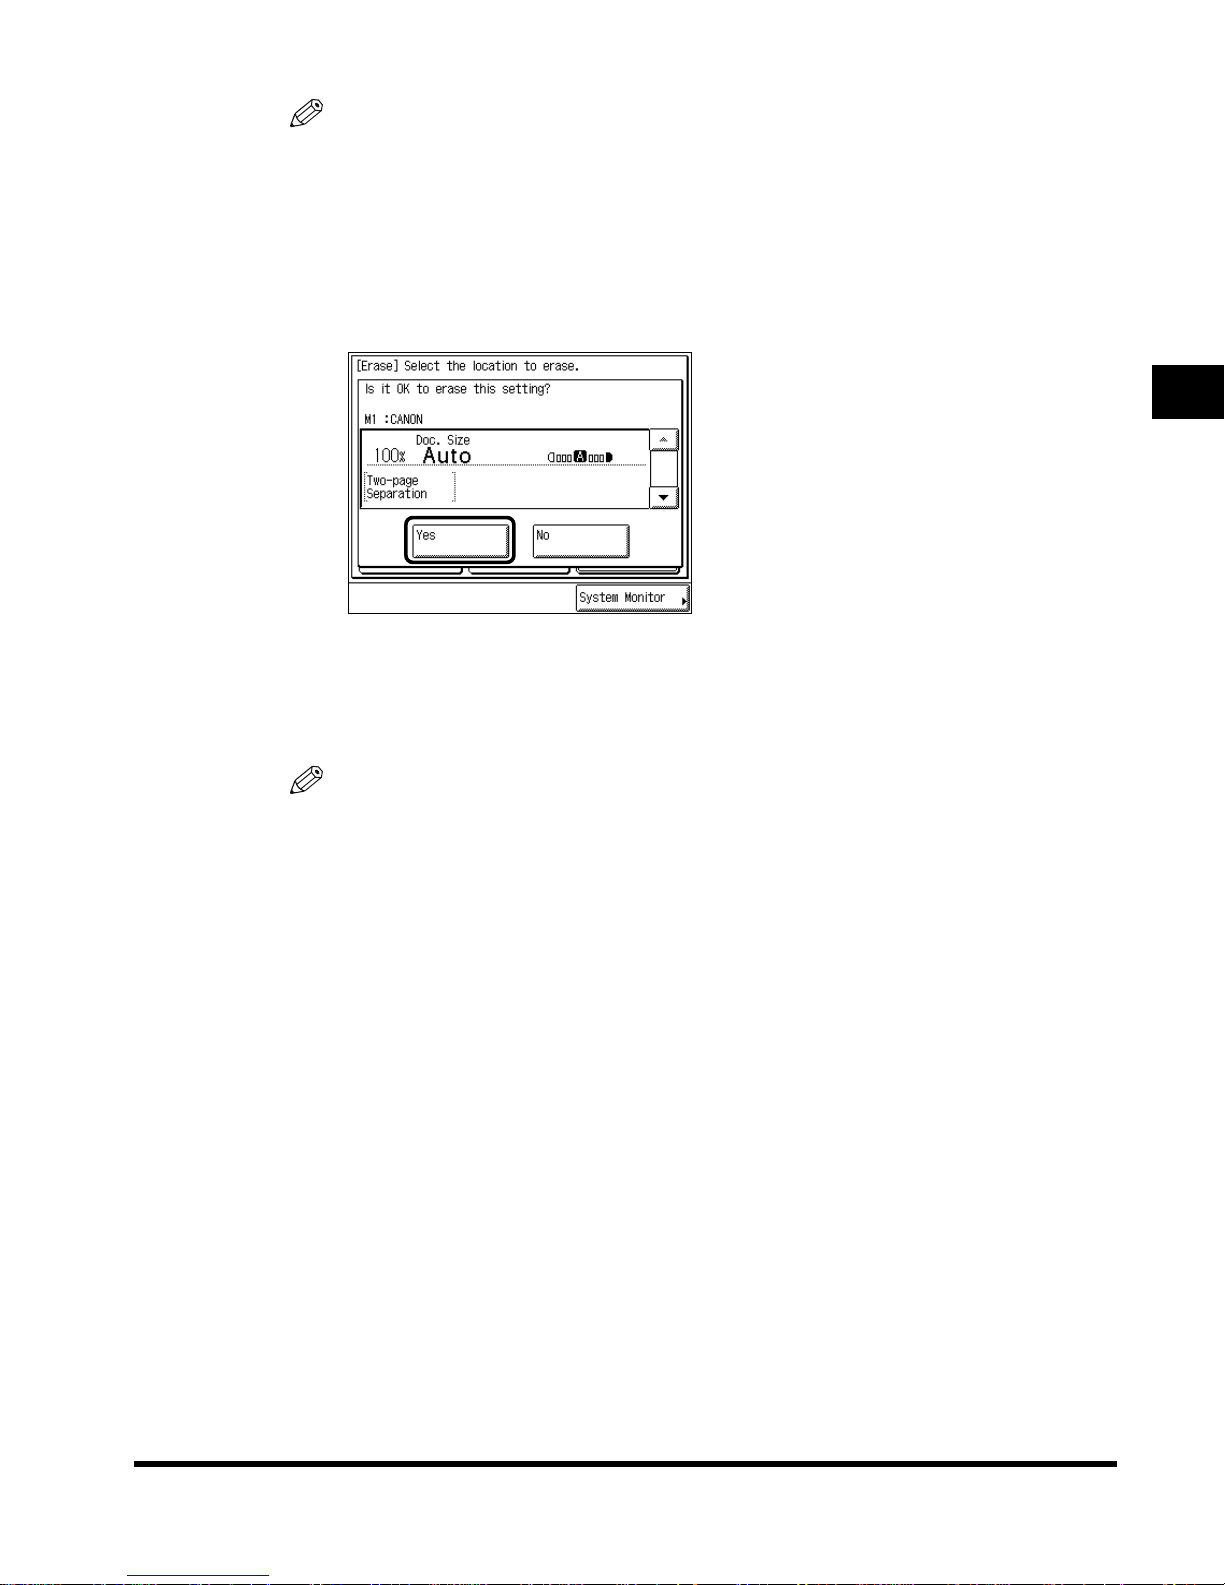
NOTE
• A mode memory key already storing scanning settings shows a small, black square (■) in
the lower right corner.
• If you select a memory key already storing scanning settings, the settings are displayed.
• If there are more stored scanning settings than are currently displayed, you can scroll the
list using “▲” or “ ▼.”
6
Press “Y es. ”
If you want to cancel erasing, press “No.”
The message <Erased.> appears for about two seconds on the touch panel display.
2
The stored scanning mode is erased.
NOTE
• The name of the memory key is not erased. For details of how to change the name, see
‘Storing a Memory Key Name,’ on p. 2-54.
7
Press “Cancel,” and press “Done.”
The display returns to the Scan screen.
Scanning Originals into a Mail Box
Storing/Recalling Scanning Modes (Mode Memory)
2-59
Page 86

2
Scanning Originals into a Mail Box
2-60
Storing/Recalling Scanning Modes (Mode Memory)
Page 87

Using/Arranging Documents Stored
in the Mail Box
This chapter describes functions that allow you to use and arrange documents
stored in a mail box.
Printing a Document in a Mail Box After Changing the Settings. . . . . . . . . . . . . . . . . . . .3-2
Selecting the Print Paper Size (Paper Select) . . . . . . . . . . . . . . . . . . . . . . . . . . . . . . . . . . . . . . .3-2
Collating Prints (Finisher) . . . . . . . . . . . . . . . . . . . . . . . . . . . . . . . . . . . . . . . . . . . . . . . . . . . . . . .3-5
Printing on Two Sides (Two-sided Printing) . . . . . . . . . . . . . . . . . . . . . . . . . . . . . . . . . . . . . . . .3-16
Adding Job Separator Sheets, Front and Back Covers to Printed Sets
(Cover/Job Separator) . . . . . . . . . . . . . . . . . . . . . . . . . . . . . . . . . . . . . . . . . . . . . . . . . . . . . . . .3-18
Making Prints for Use as a Booklet (Booklet) . . . . . . . . . . . . . . . . . . . . . . . . . . . . . . . . . . . . . . .3-22
Storing/Recalling Printing Modes (Mode Memory) . . . . . . . . . . . . . . . . . . . . . . . . . . . . . . . . . .3-25
Recalling a Printing Mode . . . . . . . . . . . . . . . . . . . . . . . . . . . . . . . . . . . . . . . . . . . . . . . . . . . . .3-30
Erasing a Print Setting . . . . . . . . . . . . . . . . . . . . . . . . . . . . . . . . . . . . . . . . . . . . . . . . . . . . . . . .3-31
Printing Multiple Documents as One Document (Merge Documents) . . . . . . . . . . . . . . . . . . . .3-33
Checking the Print Result or the Image of the Stored Document (Sample Print). . . . . .3-36
Reserving Jobs. . . . . . . . . . . . . . . . . . . . . . . . . . . . . . . . . . . . . . . . . . . . . . . . . . . . . . . .3-38
3
CHAPTER
Changing the Exposure During Printing . . . . . . . . . . . . . . . . . . . . . . . . . . . . . . . . . . . . .3-40
Checking the Document’s Detailed Information . . . . . . . . . . . . . . . . . . . . . . . . . . . . . . .3-41
Changing the Name of a Document . . . . . . . . . . . . . . . . . . . . . . . . . . . . . . . . . . . . . . . .3-42
Moving a Document . . . . . . . . . . . . . . . . . . . . . . . . . . . . . . . . . . . . . . . . . . . . . . . . . . . .3-44
Erasing a Document from a Mail Box. . . . . . . . . . . . . . . . . . . . . . . . . . . . . . . . . . . . . . .3-46
3-1
Page 88
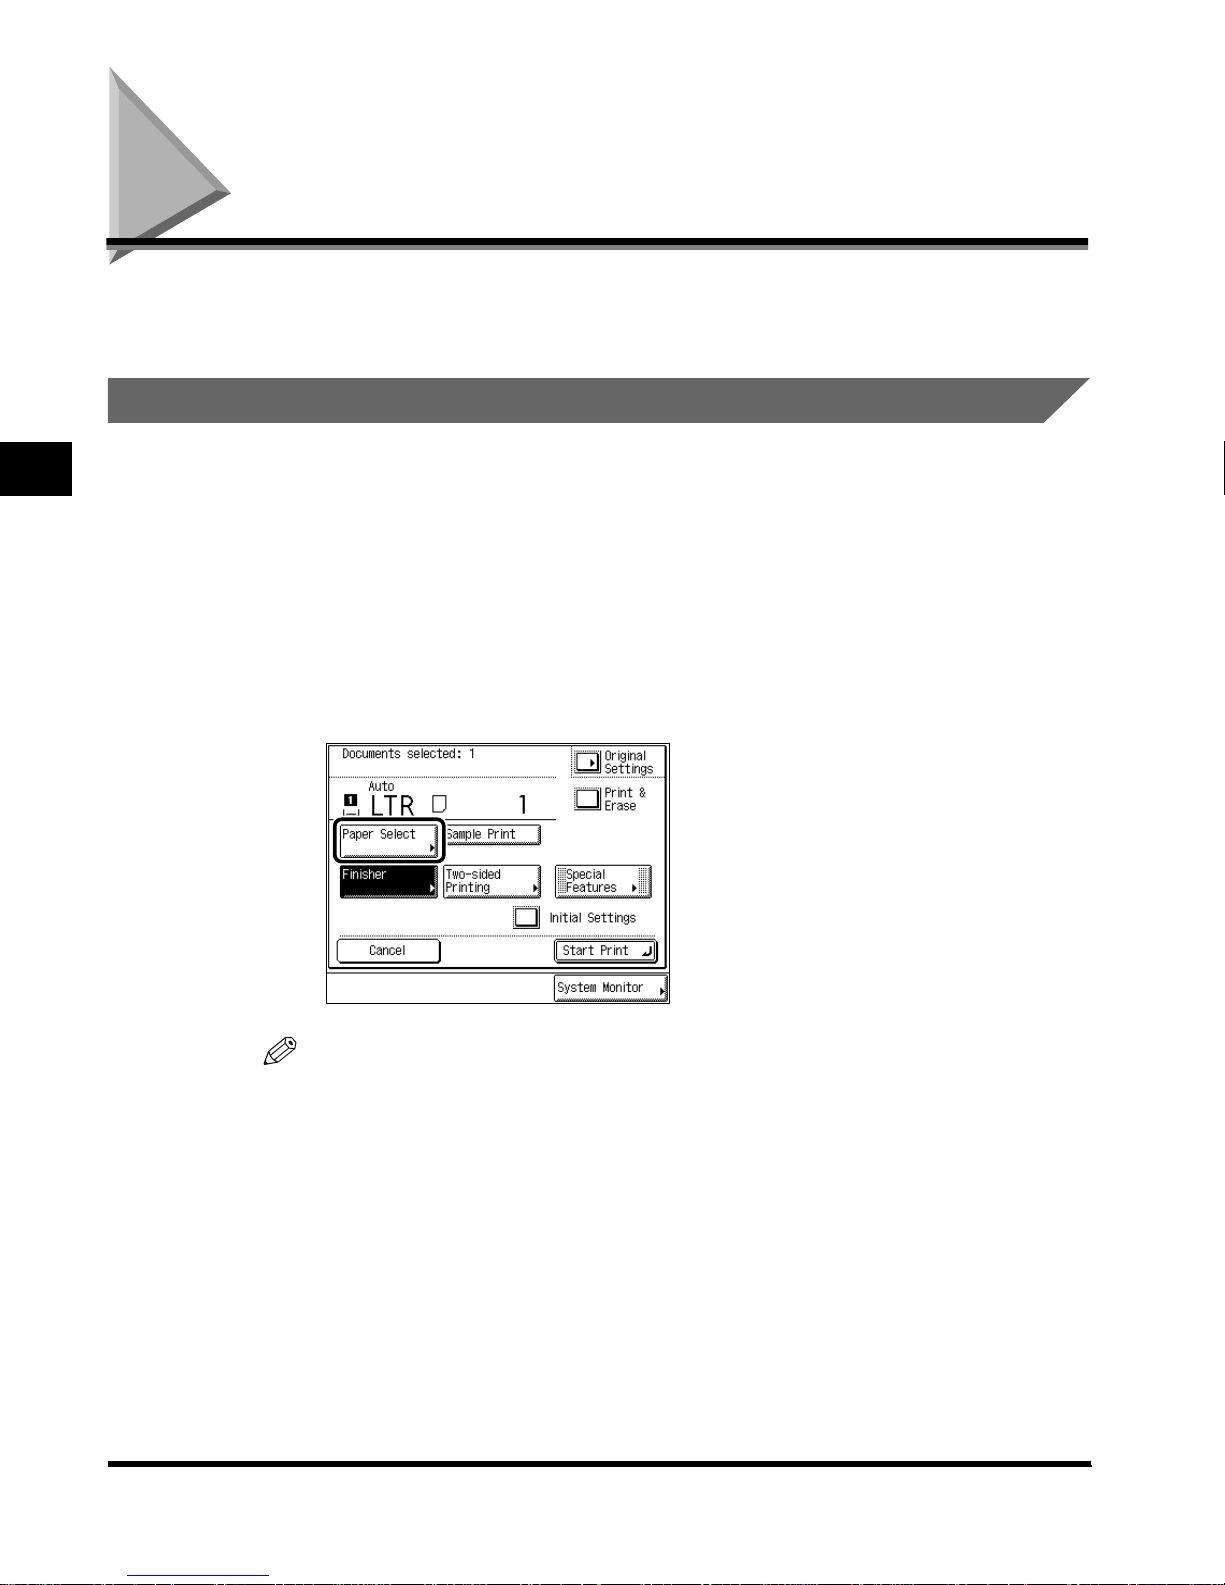
3
Printing a Document in a Mail Box After Changing
the Settings
With this function you can select the settings when printing documents stored in a mail box.
Selecting the Print Paper Size (Paper Select)
1
Select the desired mail box number and document to print → press
“Print” → press “Change P Settings.”
When you select a mail box set with a password, enter the password after selecting the
mail box, and press “OK.”
The Change Print Settings screen is displayed.
2
Press “Paper Select. ”
Using/Arranging Documents Stored in the Mail Box
3-2
Printing a Document in a Mail Box After Changing the Settings
NOTE
• When you press “Original Settings,” a document recorded from a personal computer
returns to the former settings specified from the computer, and a scanned document
returns to the standard mode of Local Printing.
Page 89
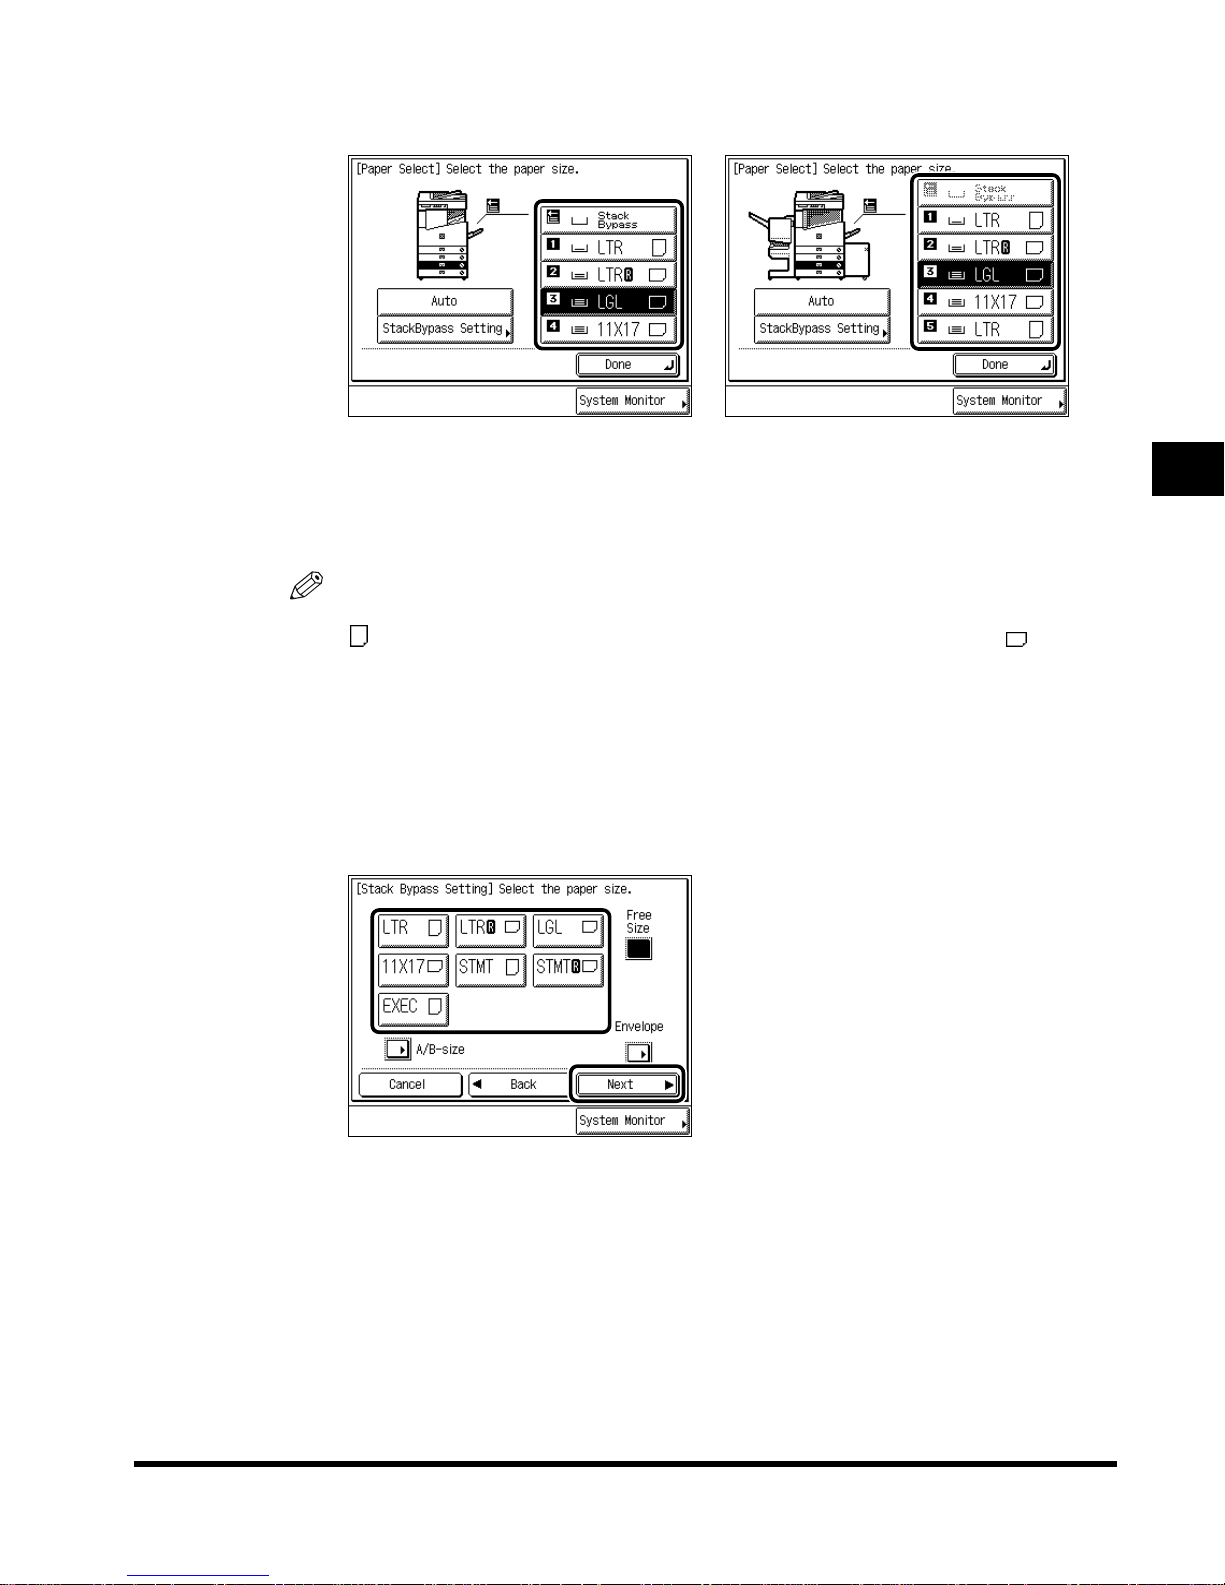
3
Select the print paper size.
When Finisher-J1 is attached
To select the stack bypass when paper is fed from the stack bypass for the current job or
reserved job, press “Stack Bypass Setting.”
NOTE
• The paper sizes are displayed in the order in which they are loaded in the paper drawers.
• displayed on the touch panel indicates that the paper is set v ertically, and indicates
that the paper is set horizontally. Paper sizes with the suffix <R> (such as LTRR) indicate
paper placed in the paper drawer or the stack bypass horizontally.
•
The paper sizes which are loaded in the paper drawers are shown on the display.
•
The type of paper (color , recycled) loaded in the paper drawers can be indicated by the icons.
(See the Reference Guide.)
● When you select “Stack Bypass Setting”:
Select the paper size, and press “Next.”
When Saddle Finisher-G1 and
Paper Deck-L1 are attached
3
Printing a Document in a Mail Box After Changing the Settings
Using/Arranging Documents Stored in the Mail Box
3-3
Page 90
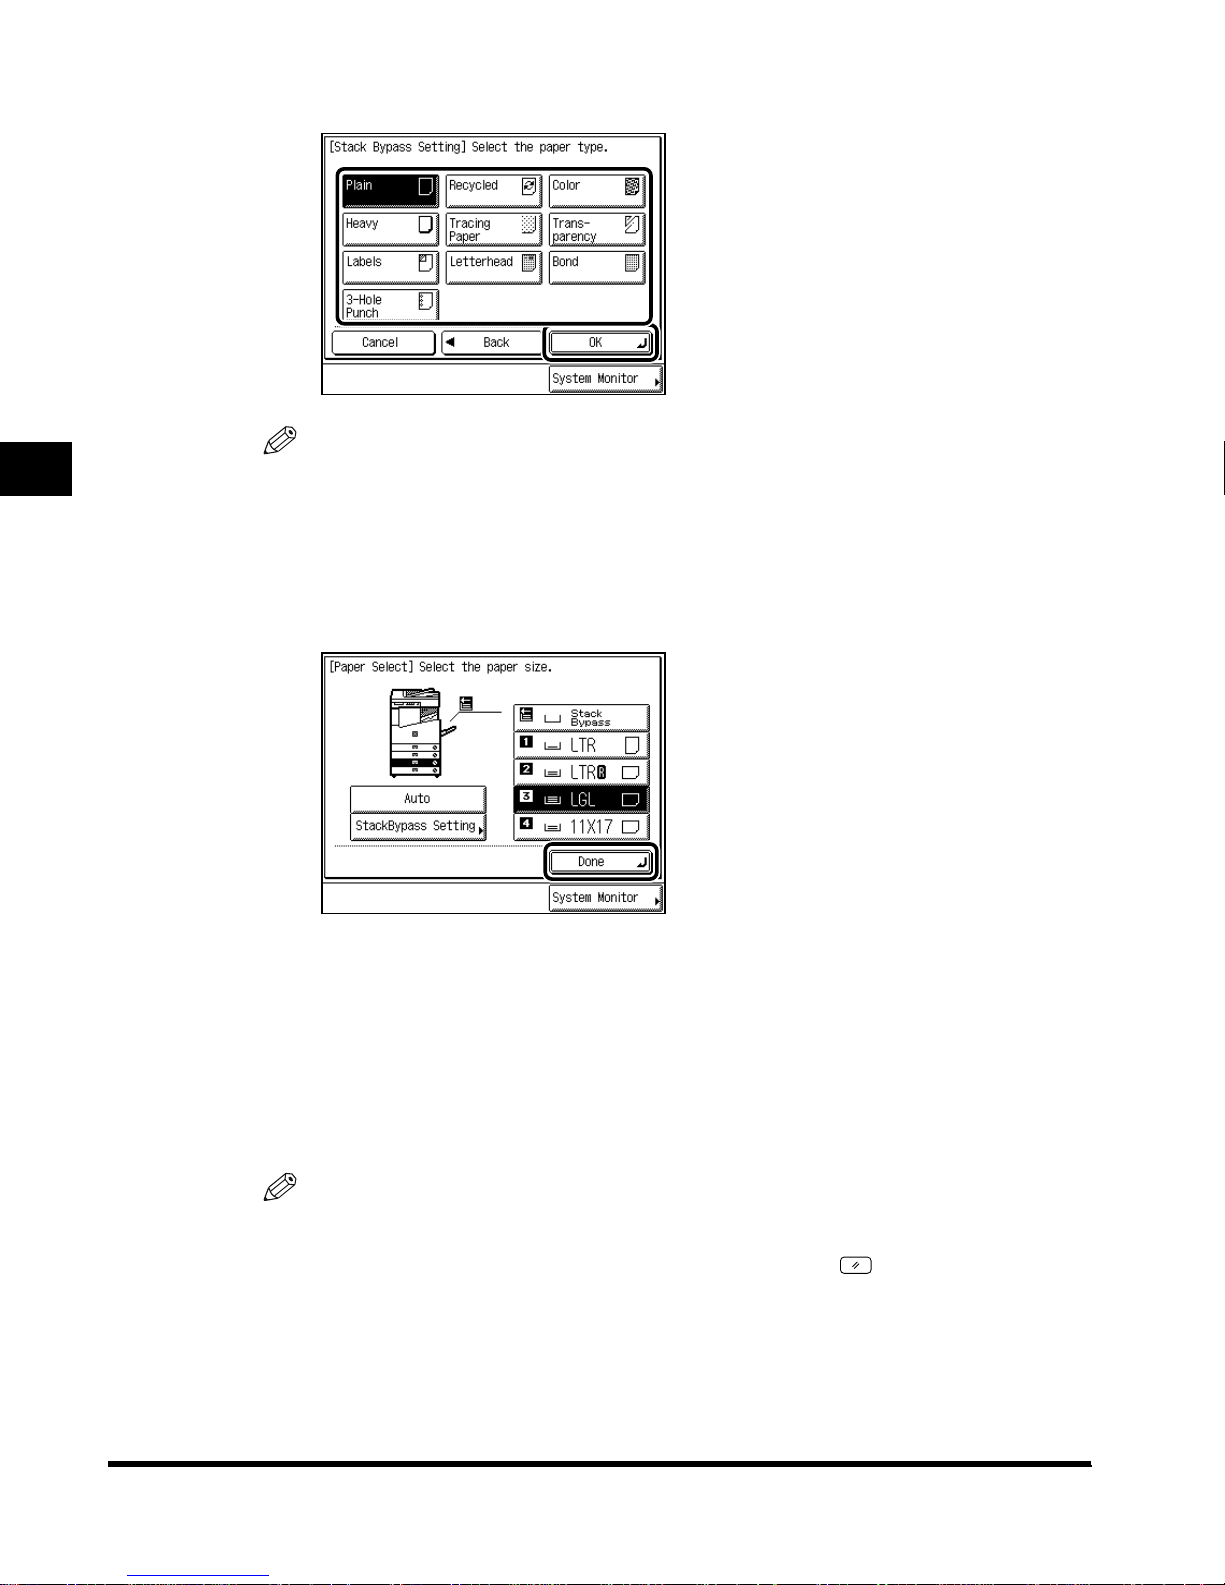
3
Select the type of paper, and press “OK.”
NOTE
• Some sizes/types of paper cannot be selected depending on the set mode.
• When placing paper other than a standard size, press “Free Size.’”
• When placing envelopes, press “Envelope.”
• To select an A or B series paper size, press “A/B-size.”
4
Press “Done. ”
The specified mode is set and the display returns to the Print screen.
5
Using/Arranging Documents Stored in the Mail Box
3-4
Printing a Document in a Mail Box After Changing the Settings
Press “Start Print. ”
The machine starts printing. (See ‘Printing Documents Stored in the Mail Box,’ on p. 1-13.)
If there is a current job or reserved job, the machine starts printing after that job is
completed.
NOTE
• To cancel all settings at once, press “Initial Settings .” (The machine returns to the standard
mode of Local Printing.)
• To return the display to the Mail Box Selection screen, press (Reset).
Page 91
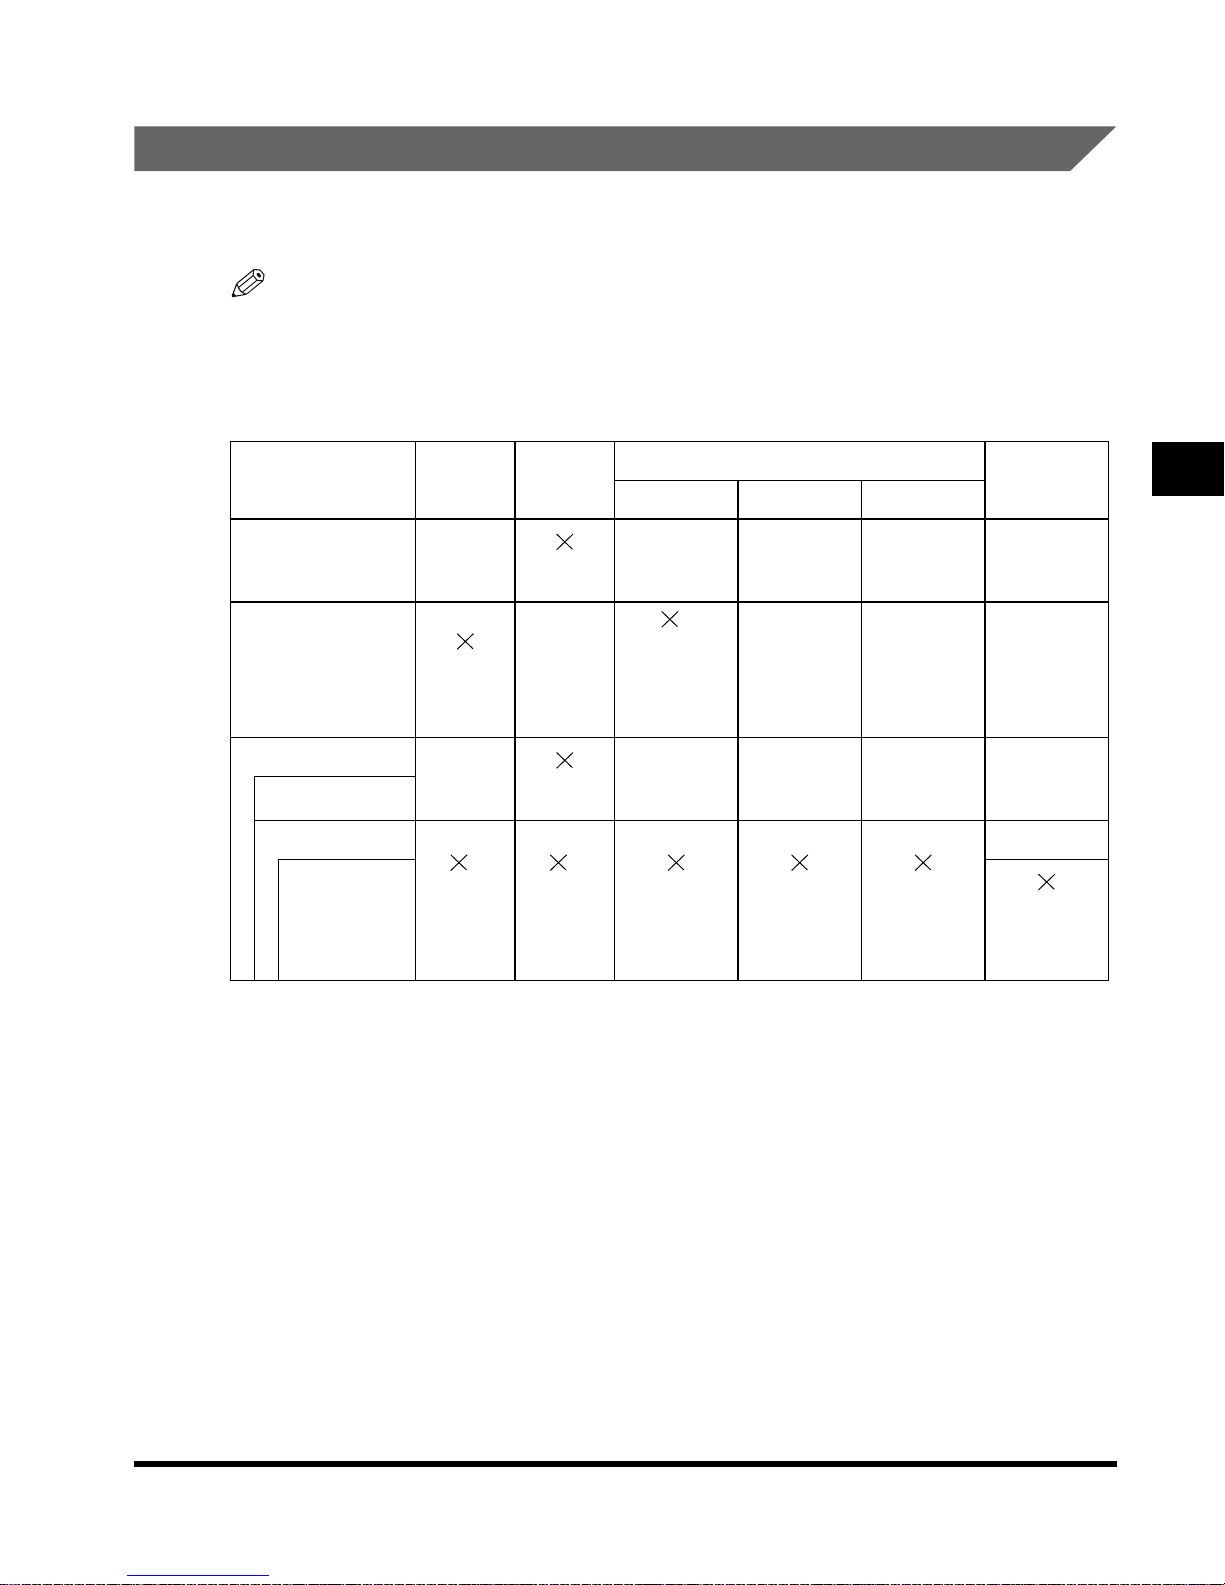
Collating Prints (Finisher)
The Finisher mode can be selected to collate the copies in various ways by pages or copy
sets.
NOTE
• When envelopes, tracing paper , transparencies , or labels are selected, Finisher functions cannot
be set.
• When heavyweight paper is selected, the Staple or Hole Punch mode cannot be set.
Below is a list of finishing functions and paper sizes available for each optional unit.
Optional units Offset Rotate
None –
Finisher-J1
Inner 2way Tray-A1
Copy Tray-F1
Saddle Finisher-G1
Puncher Unit-K1
*1 If Tray A is selected as a designated tray in the Additional Functions → Common Settings → Tray Designation
screen, Offset is applied. If it is not selected, Rotate is applied.
*2 Stapling position cannot be selected.
11"x17", LGL,
LTR, LTRR,
STMT
–
11"x17", LGL,
LTR, LTRR,
STMT
*1
LTR, LTRR,
STMT, STMTR
–
LTR, LTRR,
STMT, STMTR
*1
LTR, L TRR,
STMT, STMTR
Corner Double Saddle Stitch
––––
*2
11"x17":
15 sheets;
LGL: 20 sheets;
LTR, LTRR:
30 sheets
––––
11"x17", LGL:
25 sheets;
LTR, LTRR:
50 sheets
Staple
–––
11"x17", LGL:
25 sheets;
LTR, LTRR:
50 sheets
11"x17",
LTRR:
10 sheets
Hole Punch
–
11"x17", LTR:
3 holes;
LGL, LTRR:
2 holes
3
Using/Arranging Documents Stored in the Mail Box
Printing a Document in a Mail Box After Changing the Settings
3-5
Page 92
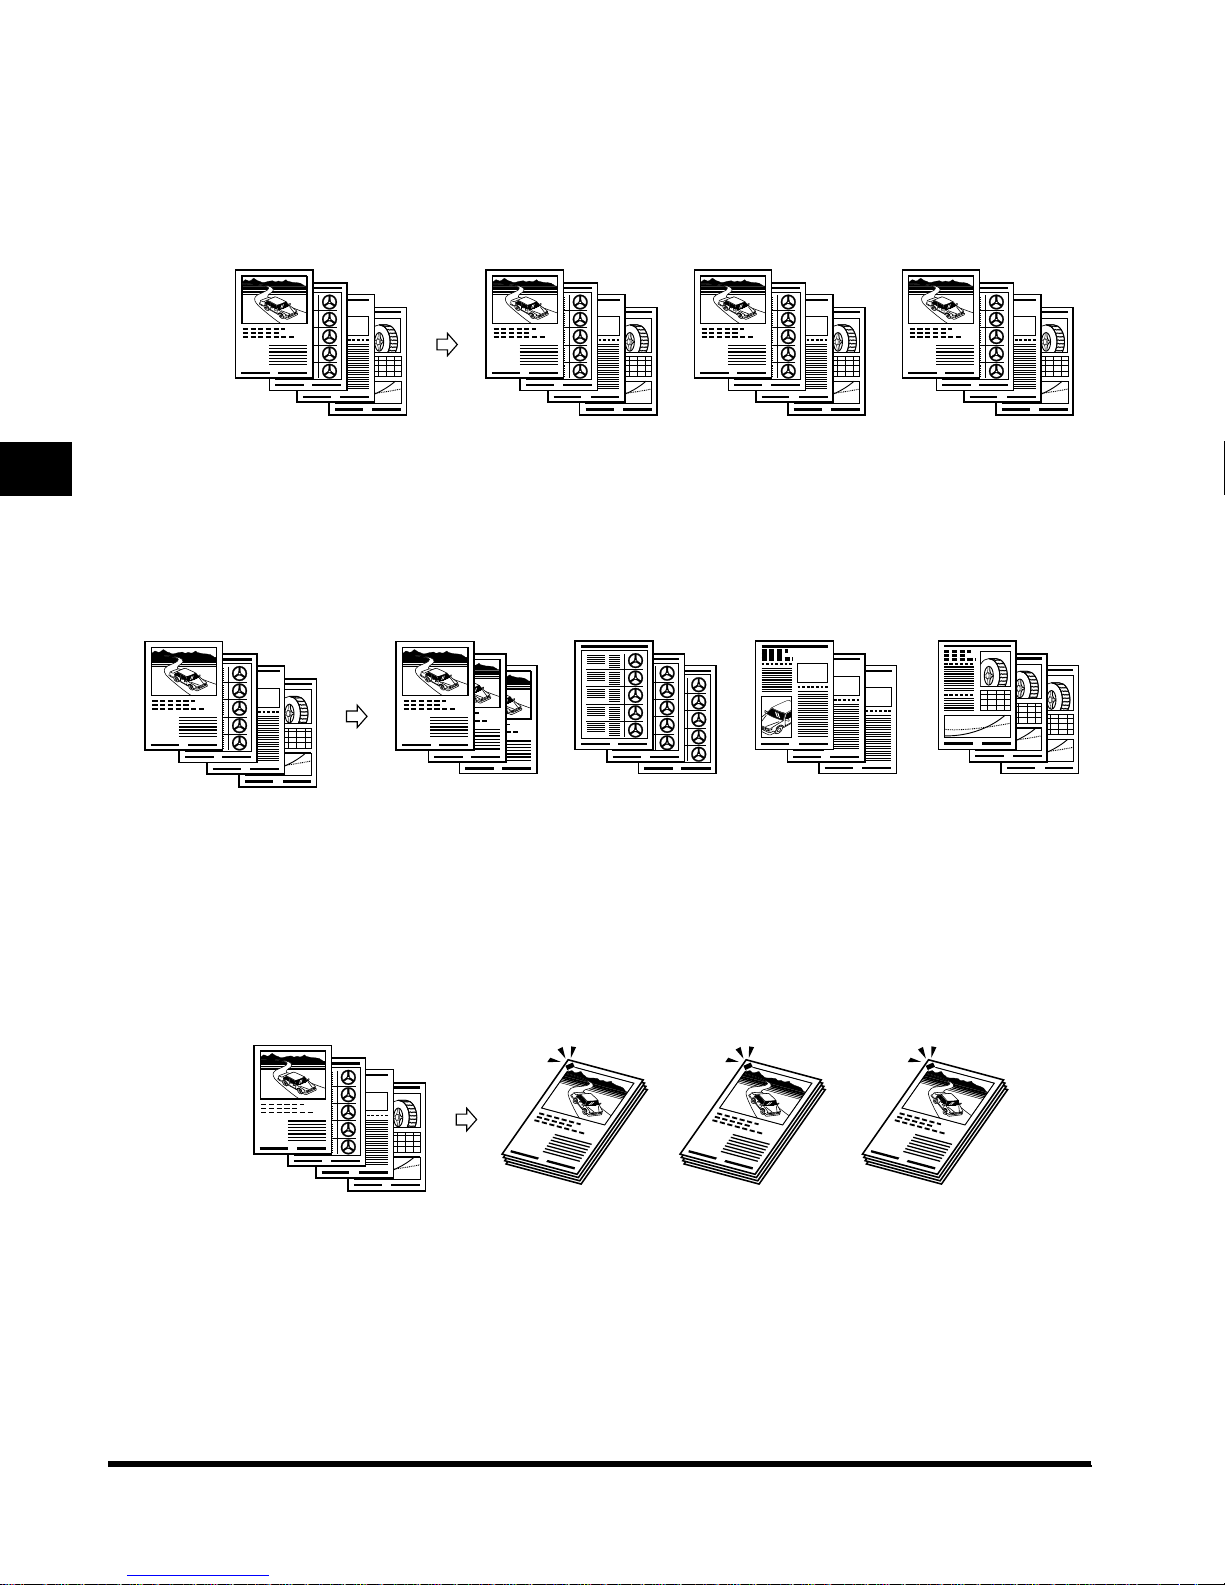
■ When <Collate> Is Set:
Prints are automatically collated into sets arranged in page order, and output into the tra ys
as follows:
3
Selected documents
Three sets of
prints specified
1
2
3
4
■ When <Group> Is Set:
All copies of the same original page are automatically collated and grouped together, and
output into the trays as follows:
Selected documents
Three sets of
prints specified
1 1
2
3
4
Print set 1
1
Grouped
prints of
page 1
1
1
2
3
4
Grouped
prints of
page 2
2
Print set 2
1
2
3
4
Grouped
prints of
page 3
2
2
3
3
3
Print set 3
1
2
3
4
Grouped
prints of
page 4
4
4
4
■ When <Staple> Is Set:
Prints are automatically collated into sets arranged in page order, automatically stapled,
and output into the trays, as shown below.
• When you select “Corner” (Top Left):
Selected documents
Print set 1
Print set 2
Print set 3
Three sets of
prints specified
Using/Arranging Documents Stored in the Mail Box
1
2
3
4
1
1
1
3-6
Printing a Document in a Mail Box After Changing the Settings
Page 93
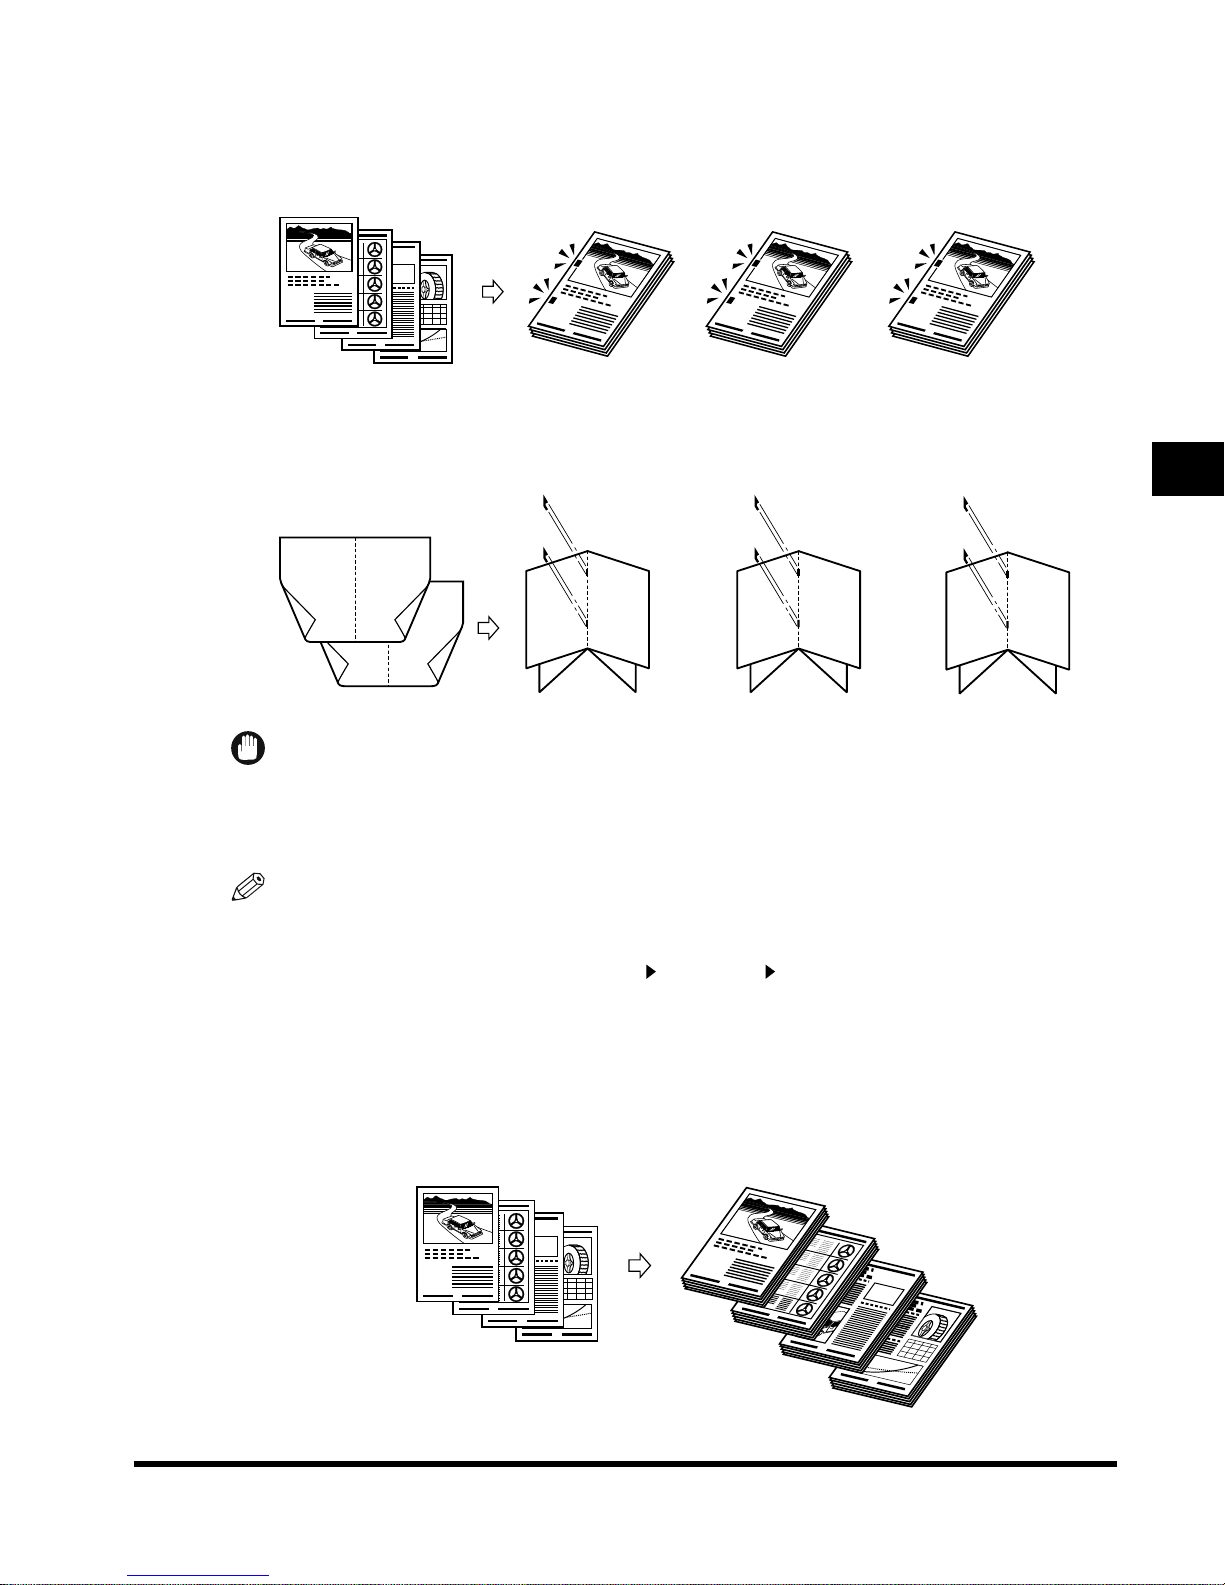
• When you select “Double” (Left):
Selected documents
Print set 1
Three sets of
prints specified
1
2
3
4
1
• When you select “Saddle Stitch”:
Selected documents
Print set 1
Three sets of
prints specified
7
2
8
1
5
4
6
3
8
6
Print set 2
1
Print set 2
Print set 3
1
Print set 3
3
1
3
8
6
1
3
8
6
1
3
IMPORTANT
•
You cannot select the position to be stapled when the Finisher-J1 (option) is attached. (See the
Reference Guide for staple position.)
•
Folds may appear differently depending on the type of paper.
NOTE
• You must place the completed original as a Booklet, as shown in the above illustration. (See
‘Making Prints for Use as a Booklet (Booklet),’ on p. 3-22.)
•
“Saddle Stitch” can only be set when the 1 2-Sided or 2 2-Sided mode is selected. (See ‘Printing
on Two Sides (Two-sided Printing),’ on p. 3-16.)
■ When <Non-collate> Is Set:
When neither Collate, Group, nor Staple is set, prints are output into the trays as shown
below.
Selected documents
1
2
3
4
1
Prints
2
3
4
Using/Arranging Documents Stored in the Mail Box
Printing a Document in a Mail Box After Changing the Settings
3-7
Page 94
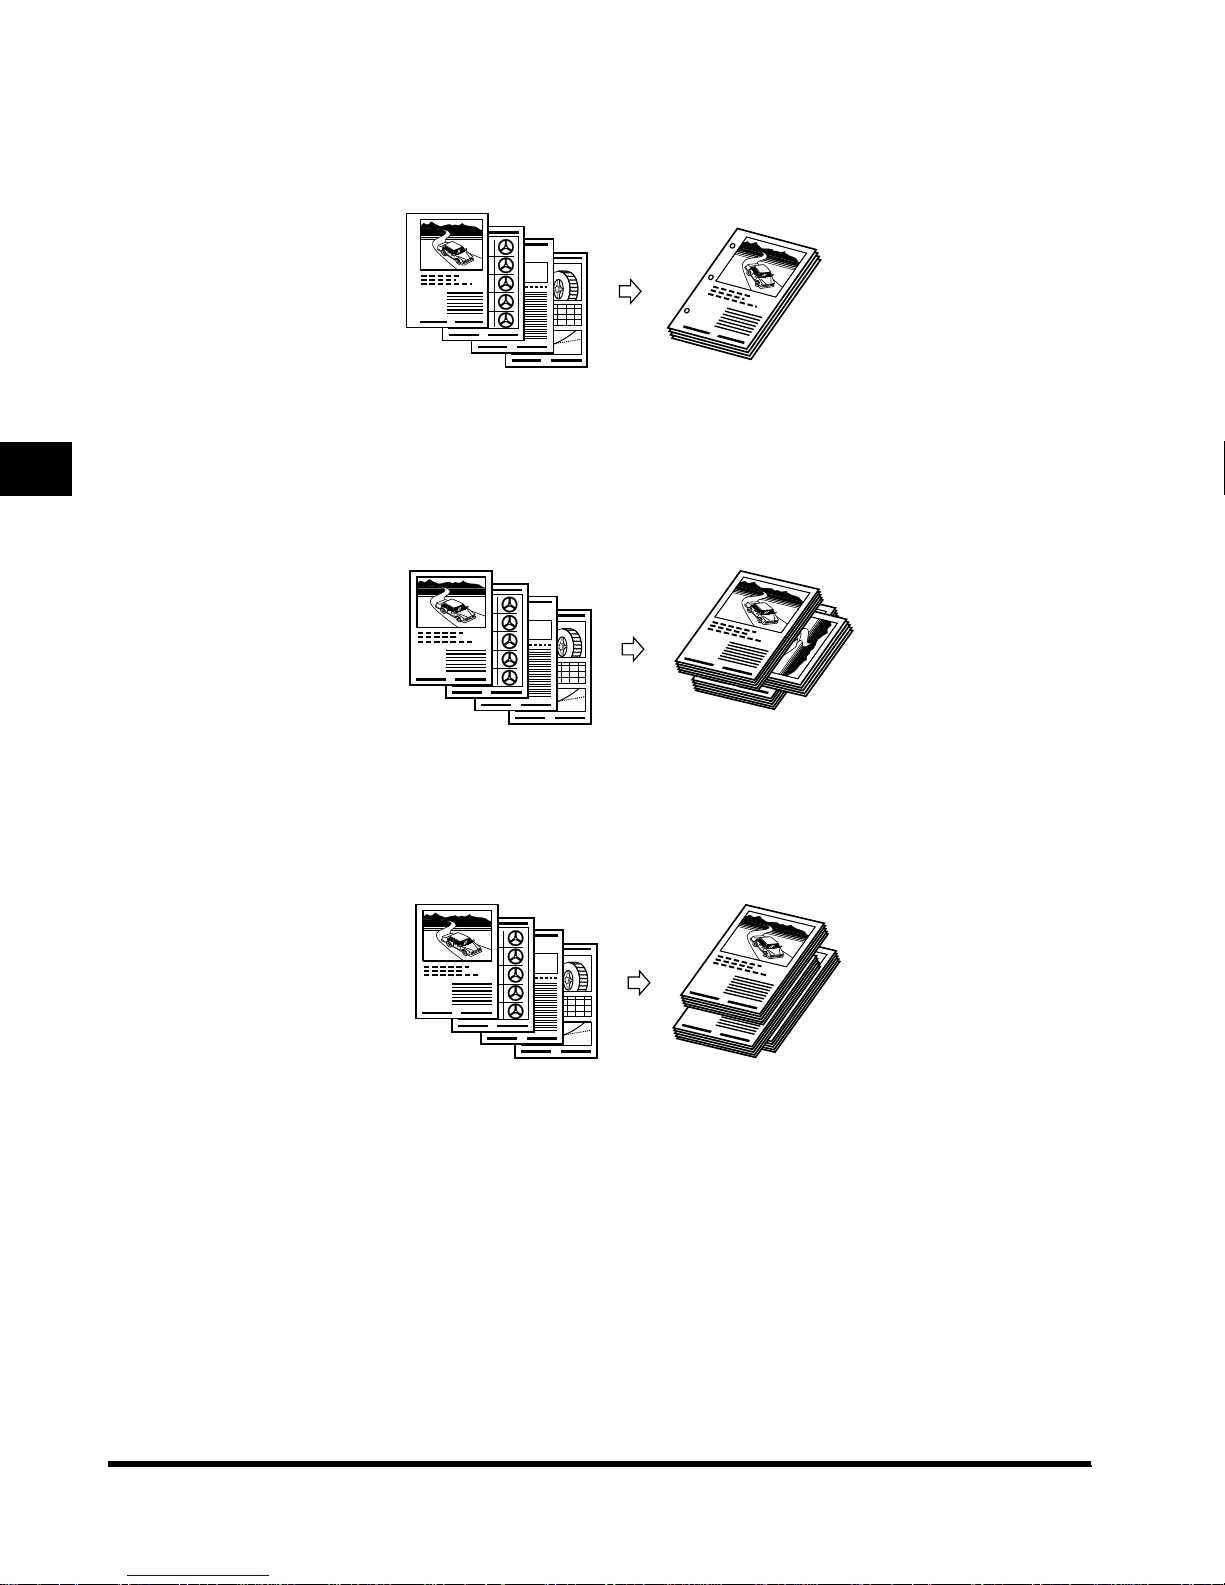
■ When <Hole Punch> Is Set:
The machine punches 2 or 3 holes in the printed sheets.
3
Selected documents
1
2
3
4
prints
1
■ When <Rotate> Is Set:
When originals of the same size are printed, prints are automatically collated into sets
arranged in page order, and are output into the output trays in alternating directions.
Selected documents
1
2
3
4
prints
1
1
1
■ When <Offset> Is Set:
Prints are shifted to the front and back, alternately.
Selected documents
1
2
Using/Arranging Documents Stored in the Mail Box
3
4
Prints
1
1
1
3-8
Printing a Document in a Mail Box After Changing the Settings
Page 95
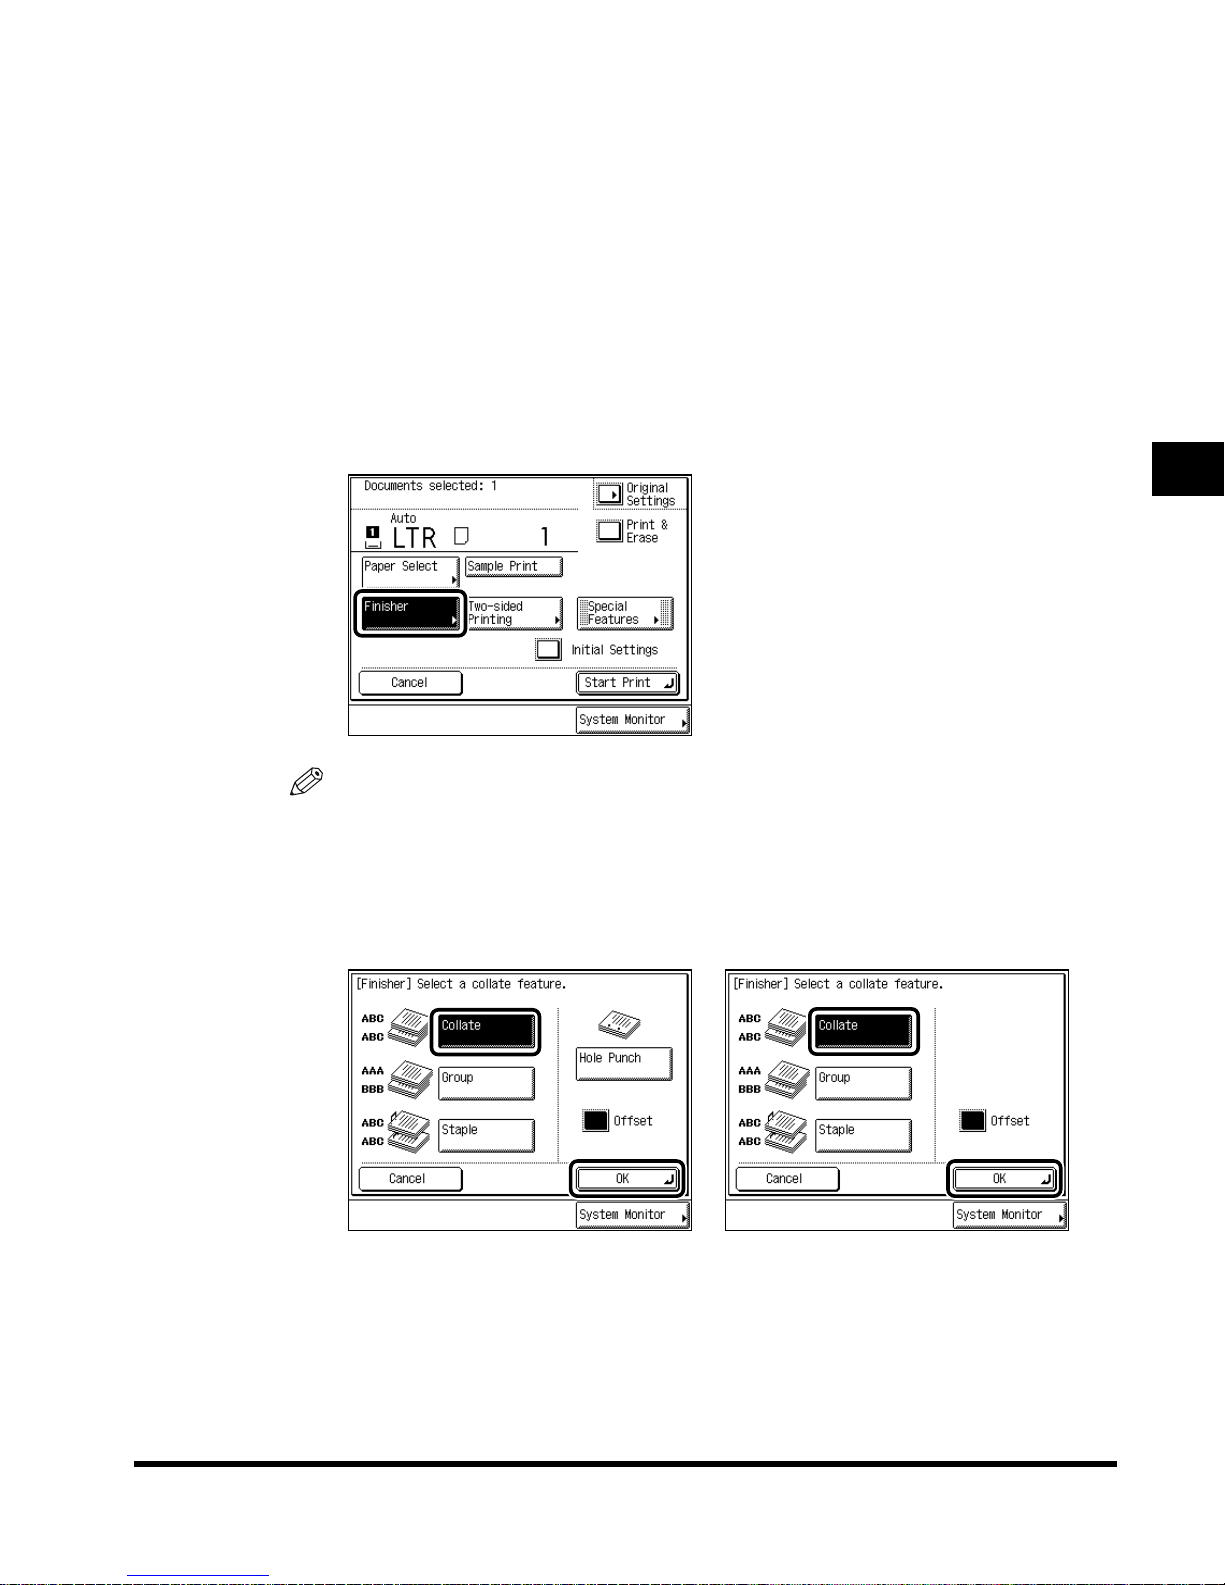
Collating Prints (Collate)
1
Select the desired mail box number and document to print → press
“Print” → press “Change P Settings.”
When you select a mail box set with a password, enter the password after selecting the
mail box, and press “OK.”
The Change Print Settings screen is displayed.
2
Press “Finisher . ”
3
NOTE
• When you press “Original Settings,” a document recorded from a personal computer
returns to the former settings specified from the computer, and a scanned document
returns to the standard mode of Local Printing.
3
Press “Collate,” and press “OK.”
When Saddle Finisher-G1 and
Puncher Unit-K1 are attached,
and Tray A exit slot is selected
When Finisher-J1 is attached
Using/Arranging Documents Stored in the Mail Box
Printing a Document in a Mail Box After Changing the Settings
3-9
Page 96
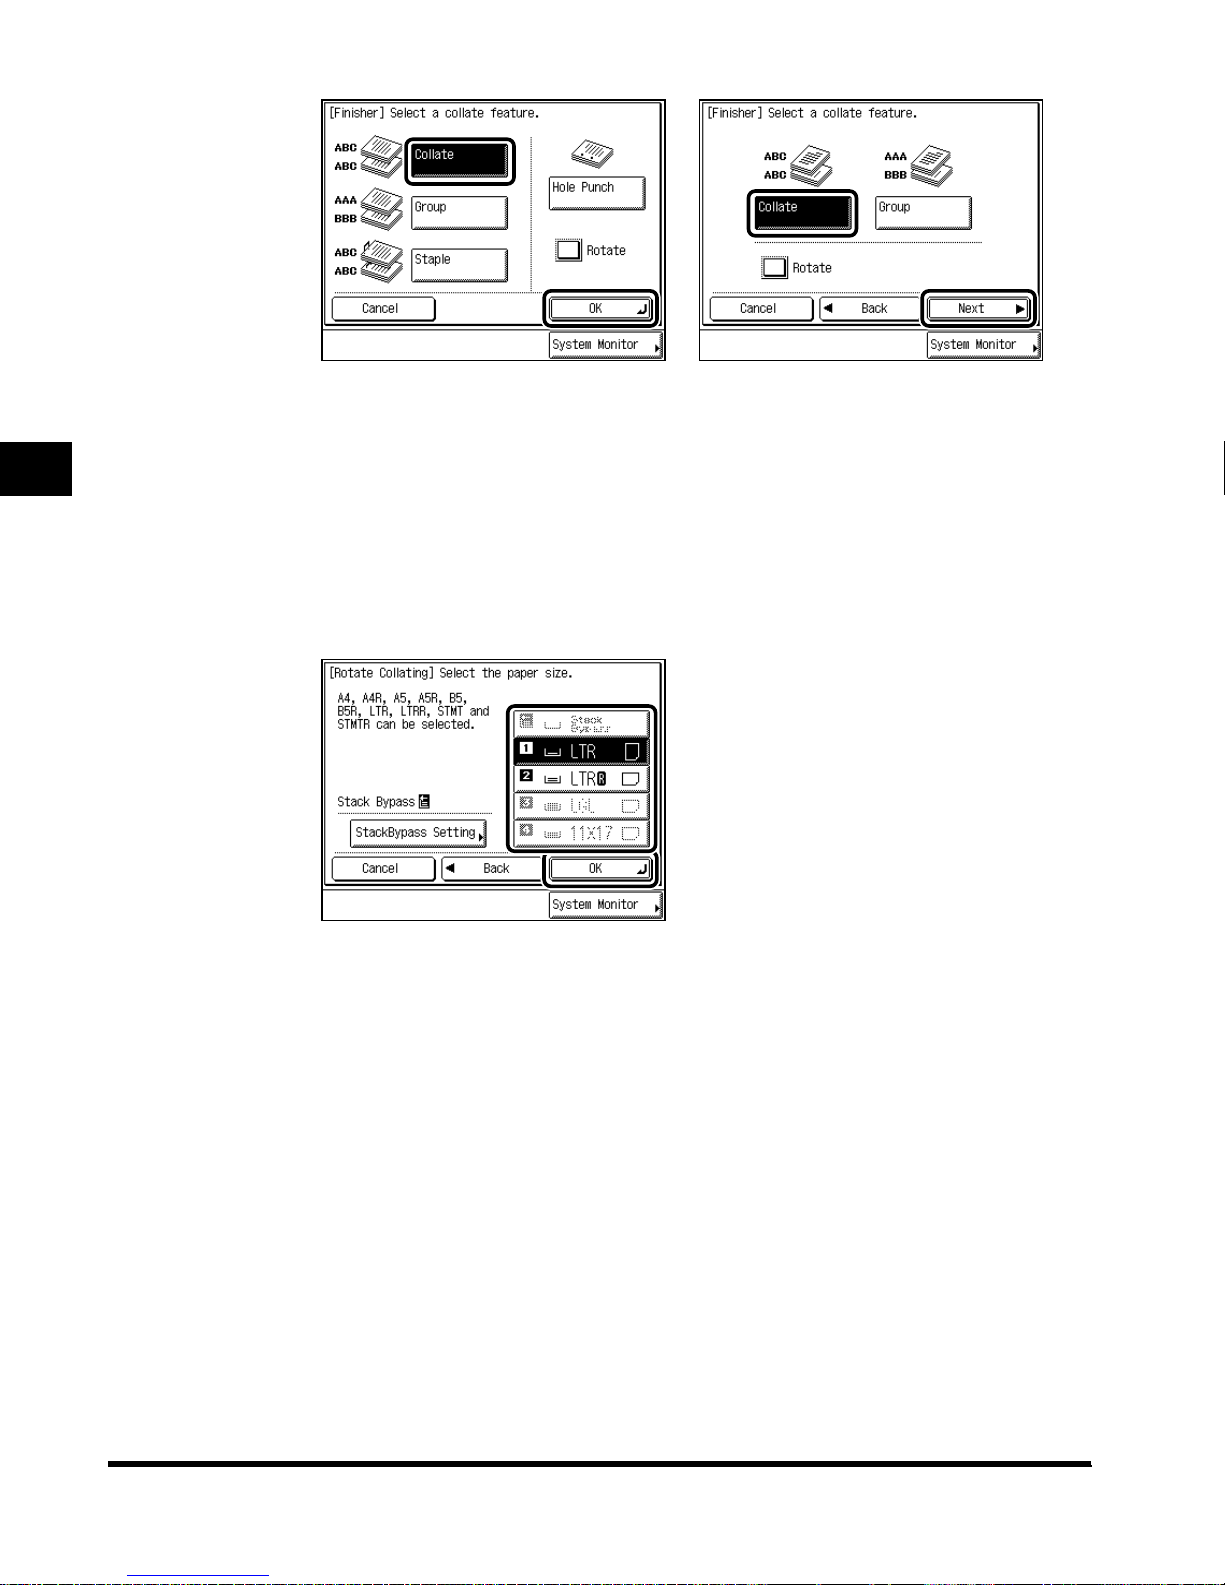
3
When Saddle Finisher-G1 and
Puncher Unit-K1 are attached,
and Tray A exit slot is not
selected
When you want hole punches made, press “Hole Punch.”
● When you select “Rotate”:
When no finisher is attached, or
when only Inner 2way Tray-A1 is
attached
When the Automatic P aper Selection is set, press “Next”
STMT, or STMTR-size paper
Press “OK” in the following cases:
-Available paper size is selected manually.
-Available paper size is loaded in both horizontal and vertical directions.
Using/Arranging Documents Stored in the Mail Box
- Drawer Eligibility for APS/ADS of the paper drawers loaded with the available paper size,
is set to “On.”
4
Press “Start Print. ”
→ press “OK.”
→ select the LTR, L TRR,
The machine starts printing. (See ‘Printing Documents Stored in the Mail Box,’ on p. 1-13.)
If there is a current job or reserved job, the machine starts printing after that job is
completed.
3-10
Printing a Document in a Mail Box After Changing the Settings
Page 97
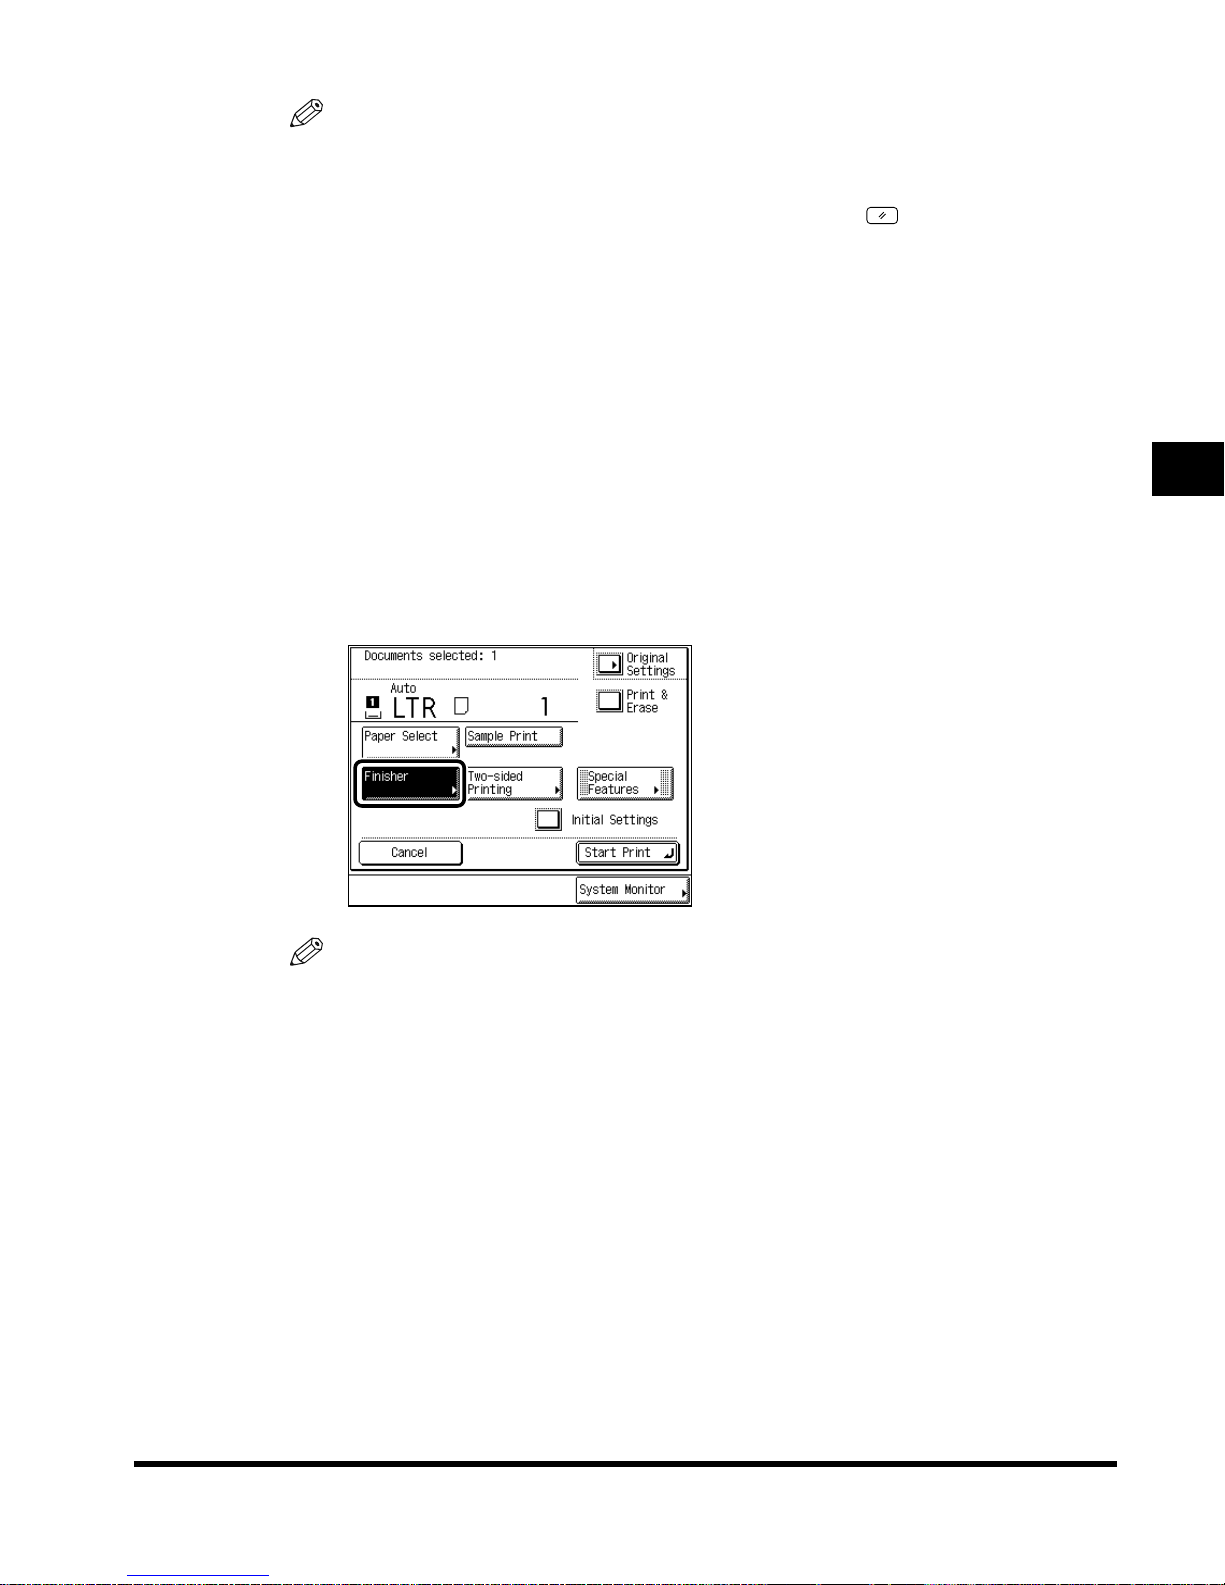
NOTE
• To cancel the setting, press “Finisher” → “Cancel,” in this order.
• To cancel all settings at once, press “Initial Settings .” (The machine returns to the standard
mode of Local Printing.)
• To return the display to the Mail Box Selection screen, press (Reset).
Grouping Prints (Group)
1
Select the desired mail box number and document to print → press
“Print” → press “Change P Settings.”
When you select a mail box set with a password, enter the password after selecting the
mail box, and press “OK.”
The Change Print Settings screen is displayed.
2
Press “Finisher . ”
NOTE
• When you press “Original Settings,” a document recorded from a personal computer
returns to the former settings specified from the computer, and a scanned document
returns to the standard mode of Local Printing.
3
Using/Arranging Documents Stored in the Mail Box
Printing a Document in a Mail Box After Changing the Settings
3-11
Page 98
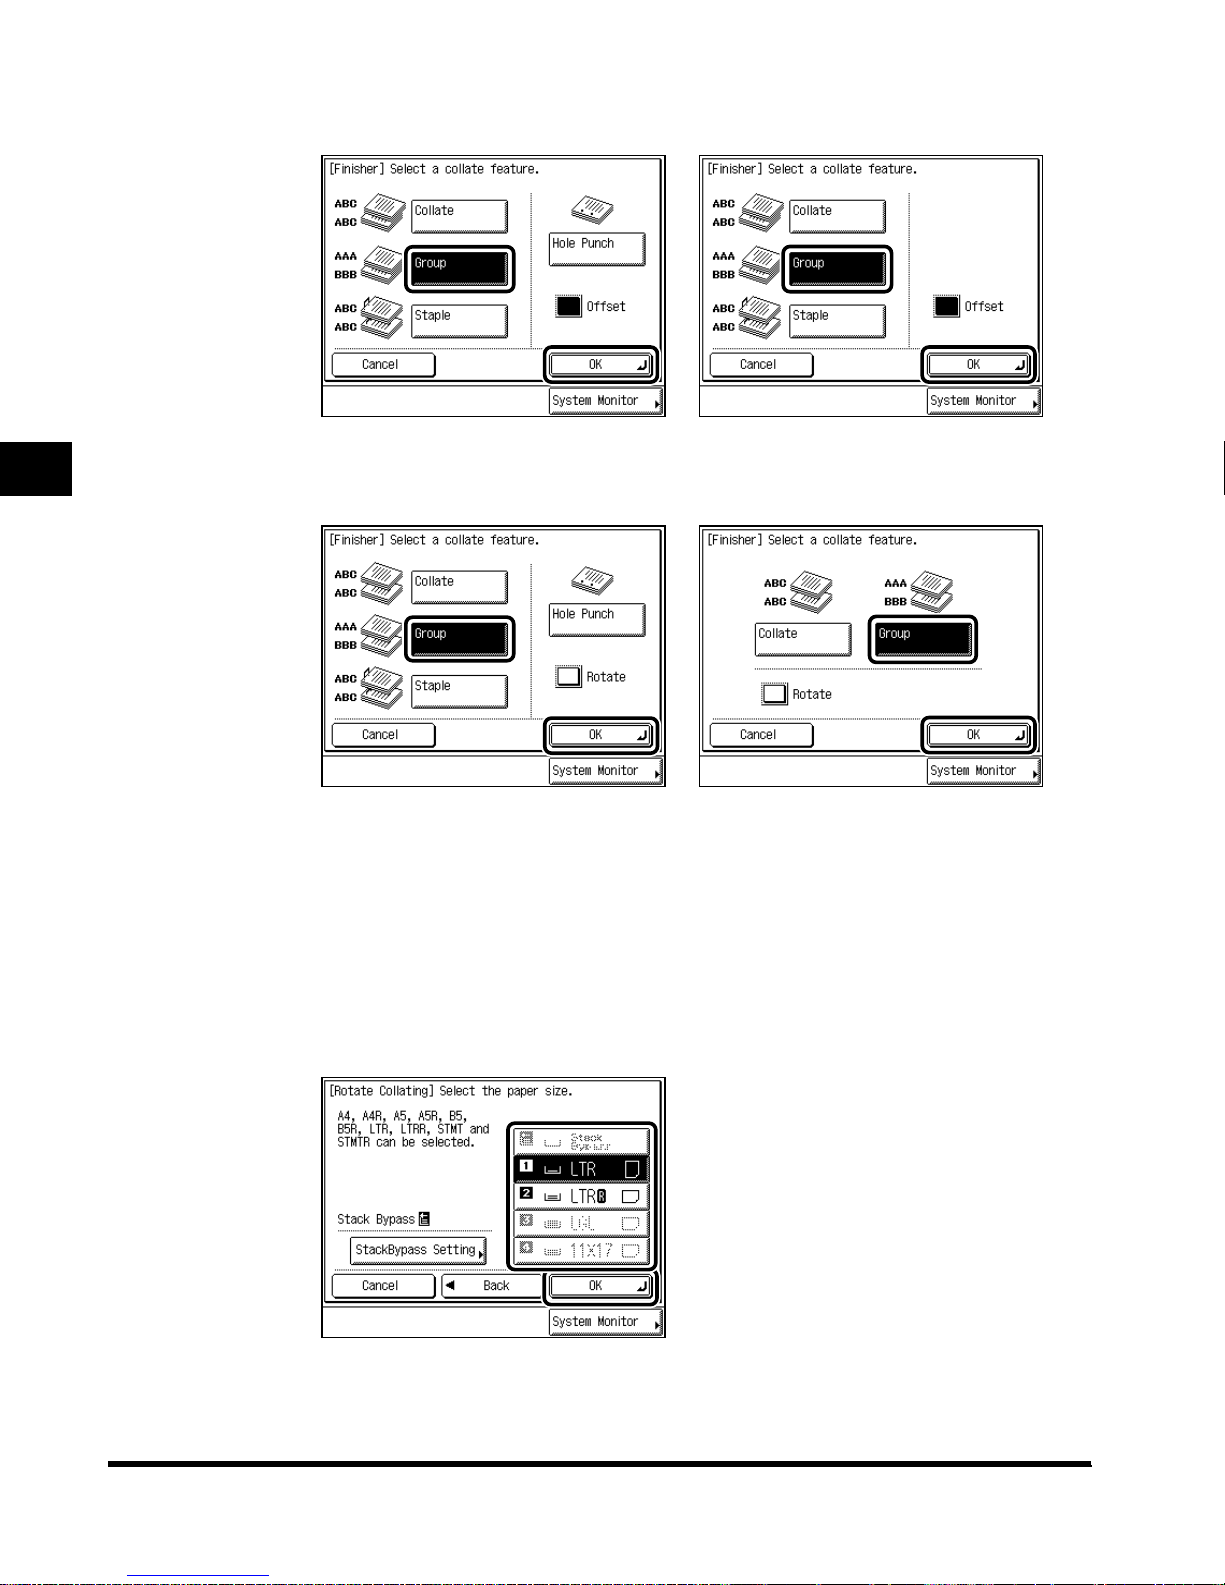
3
Press “Group,” and press “OK.”
3
When Saddle Finisher-G1 and
Puncher Unit-K1 are attached,
and Tray A exit slot is selected
When Saddle Finisher-G1 and
Puncher Unit-K1 are attached,
and Tray A exit slot is not
selected
When you want hole punches made, press “Hole Punch.”
● When you select “Rotate”:
When Finisher-J1 is attached
When no finisher is attached, or
when only Inner 2way Tray-A1 is
attached
When the Automatic P aper Selection is set, press “Next”
Using/Arranging Documents Stored in the Mail Box
3-12
Printing a Document in a Mail Box After Changing the Settings
STMT, or STMTR-size paper
→ select the LTR, L TRR,
→ press “OK.”
Page 99
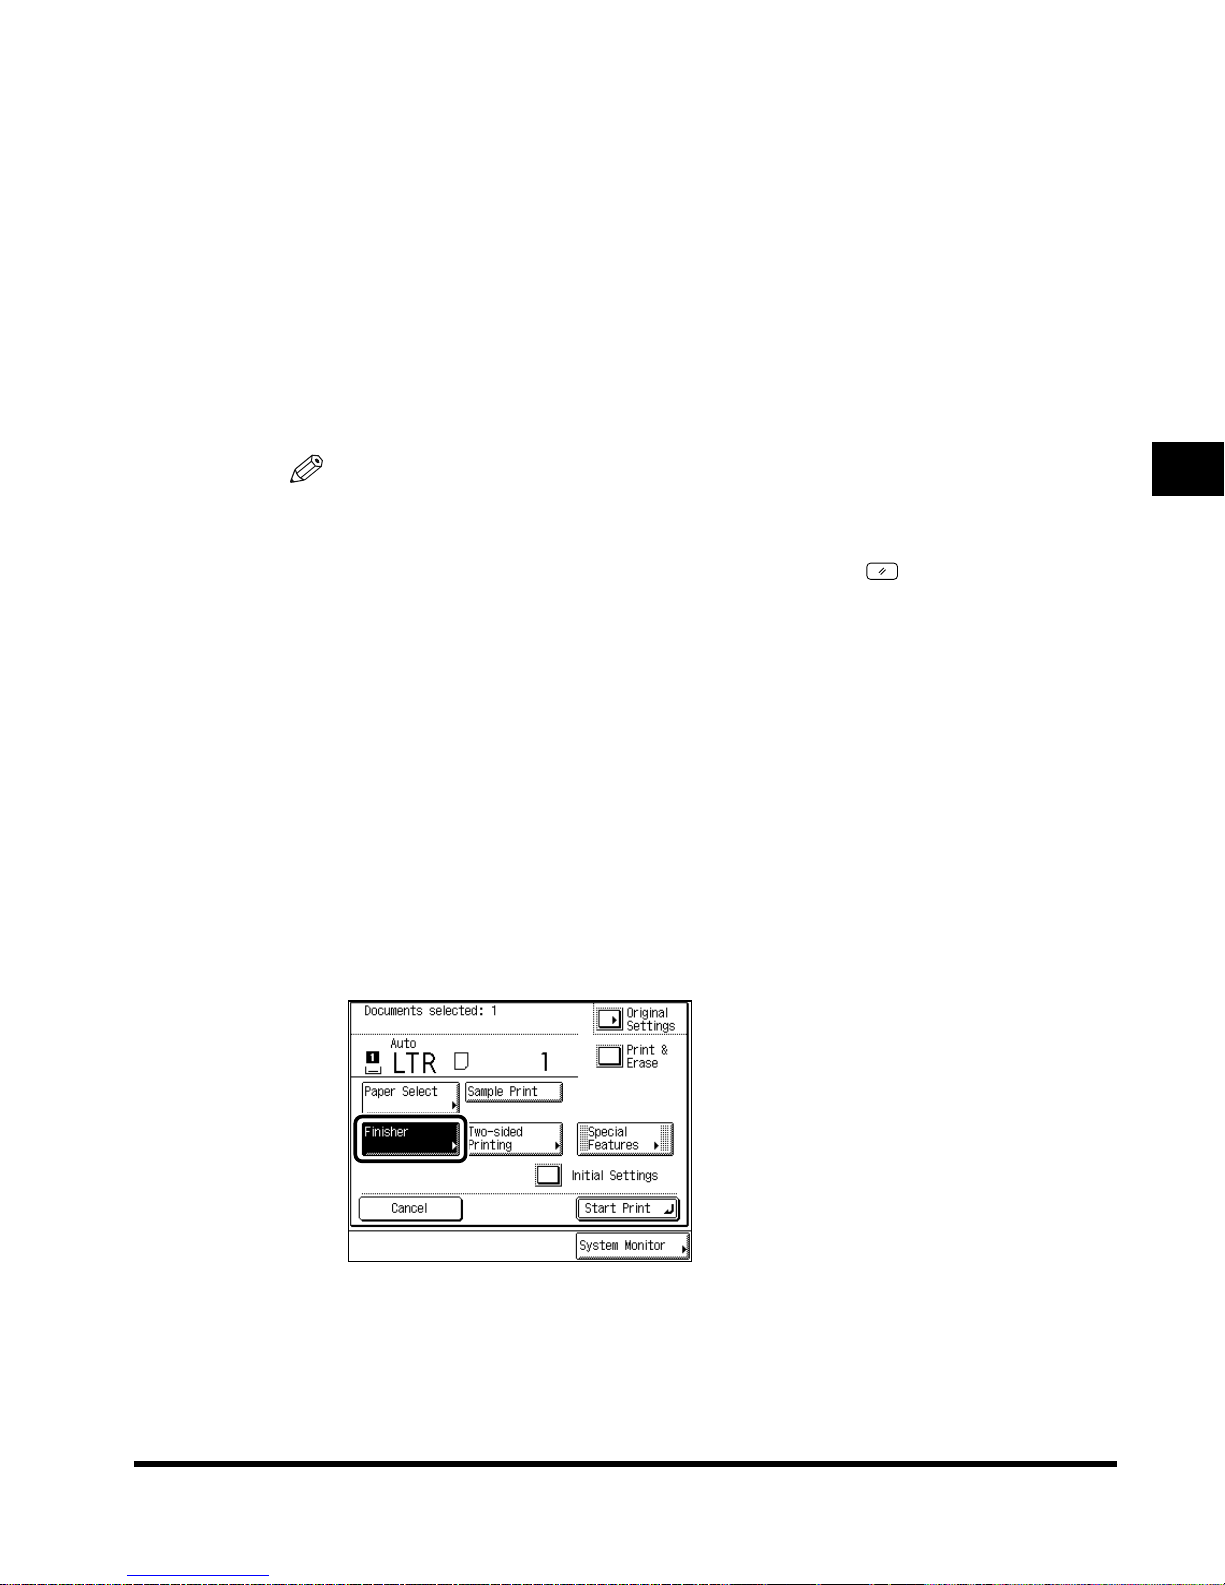
Press “OK” in the following cases:
-Available paper size is selected manually.
-Available paper size is loaded in both horizontal and vertical directions.
- Drawer Eligibility for APS/ADS of the paper drawers loaded with the available paper size
is set to “On.”
4
Press “Start Print. ”
The machine starts printing. (See ‘Printing Documents Stored in the Mail Box,’ on p. 1-13.)
If there is a current job or reserved job, the machine starts printing after that job is
completed.
NOTE
• To cancel the setting, press “Finisher” → “Cancel,” in this order.
• To cancel all settings at once, press “Initial Settings .” (The machine returns to the standard
mode of Local Printing.)
• To return the display to the Mail Box Selection screen, press (Reset).
Stapling Prints (Staple)
1
Select the desired mail box number and document to print → press
“Print” → press “Change P Settings.”
When you select a mail box set with a password, enter the password after selecting the
mail box, and press “OK.”
The Change Print Settings screen is displayed.
2
Press “Finisher . ”
3
Using/Arranging Documents Stored in the Mail Box
Printing a Document in a Mail Box After Changing the Settings
3-13
Page 100
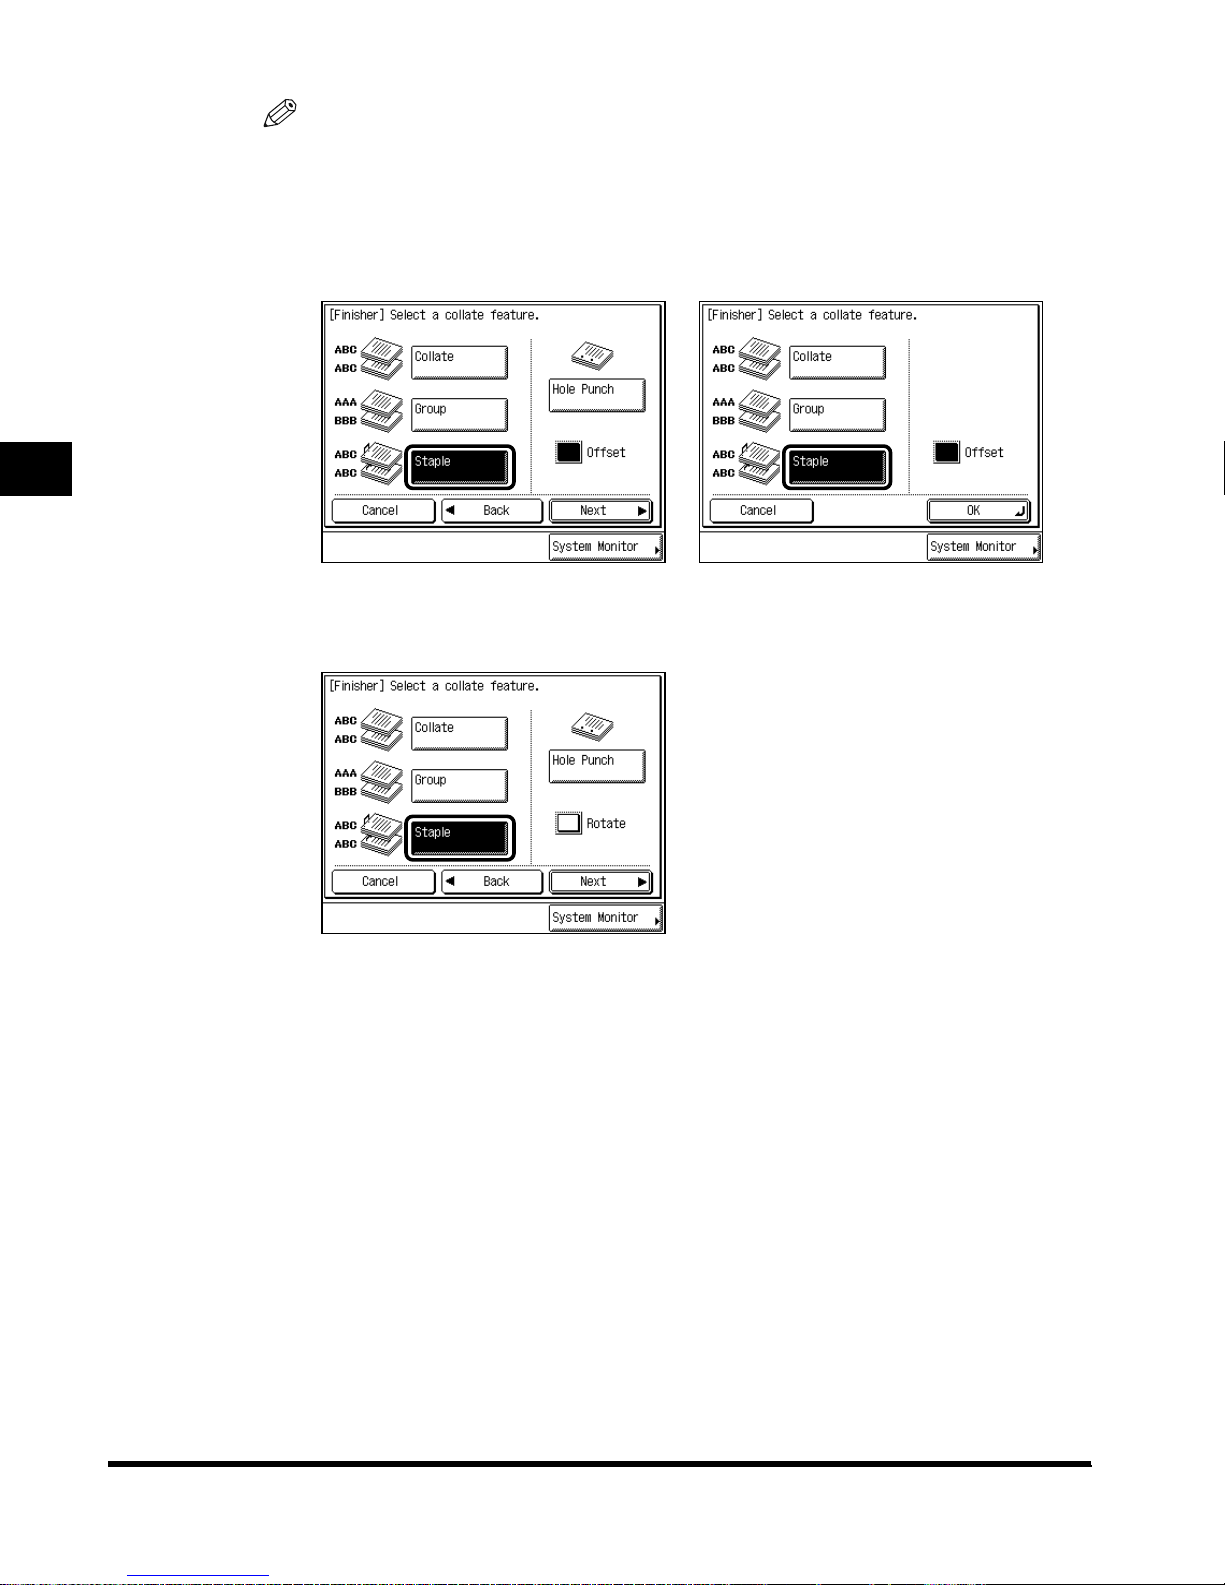
3
NOTE
• When you press “Original Settings,” a document recorded from a personal computer
returns to the former settings specified from the computer, and a scanned document
returns to the standard mode of Local Printing.
3
Press “Staple. ”
When Saddle Finisher-G1 and
Puncher Unit-K1 are attached,
and Tray A exit slot is selected
When Saddle Finisher-G1 and
Puncher Unit-K1 are attached,
and Tray A exit slot is not
Using/Arranging Documents Stored in the Mail Box
selected
When you want hole punches made, press “Hole Punch.”
When Finisher-J1 (option) is attached, you cannot select the positions of the staples. See
the Reference Guide for staple positions.
When Finisher-J1 is attached
3-14
Printing a Document in a Mail Box After Changing the Settings
 Loading...