

Page 1

Series
What Can I Do with This Machine?
Basic Operation Guide
Before Using the Machine
Document Handling
Print Media
Sending Documents
Receiving Fax/I-Fax Documents
Copying
Printing
Scanning
PC Faxing
Remote UI
System Manager Settings
Please read this guide before operating this product.
After you finish reading this guide, store it in a safe place for future reference.
Maintenance
Troubleshooting
Machine Settings
Appendix
ENG
Page 2

Page 3
Manuals for the Machine
● Machine Set-Up
● Software Installation
Quick Start Guide
● Basic Features
● Maintenance
● Machine Settings
● Specifications
● Advanced Features
● Network and Remote User Interface
● System Monitor
● Reports and Lists
● Scanning Features
Basic Operation Guide
(This Document)
Advanced Operation
Guide
(This manual is provided in print for the
imageRUNNER 1019J.)
Scanner Driver Guide
(This manual is not available for the
imageRUNNER 1019J.)
Indicates the manual is supplied in PDF format in the accompanying CD-ROM.
CD-ROM
CD-ROM
CD-ROM
● To view the manuals in PDF format, Adobe Reader/Acrobat Reader/Acrobat is required. If Adobe
Reader/Acrobat Reader/Acrobat is not installed on your system, please download it from the Adobe
Systems Incorporated website (http://www.adobe.com).
● Considerable effort has been made to ensure that this manual is free of inaccuracies and omissions.
However, as we are constantly improving our products if you need an exact specification, please
contact Canon.
● The machine illustration on the cover may differ slightly from your machine.
i
Page 4
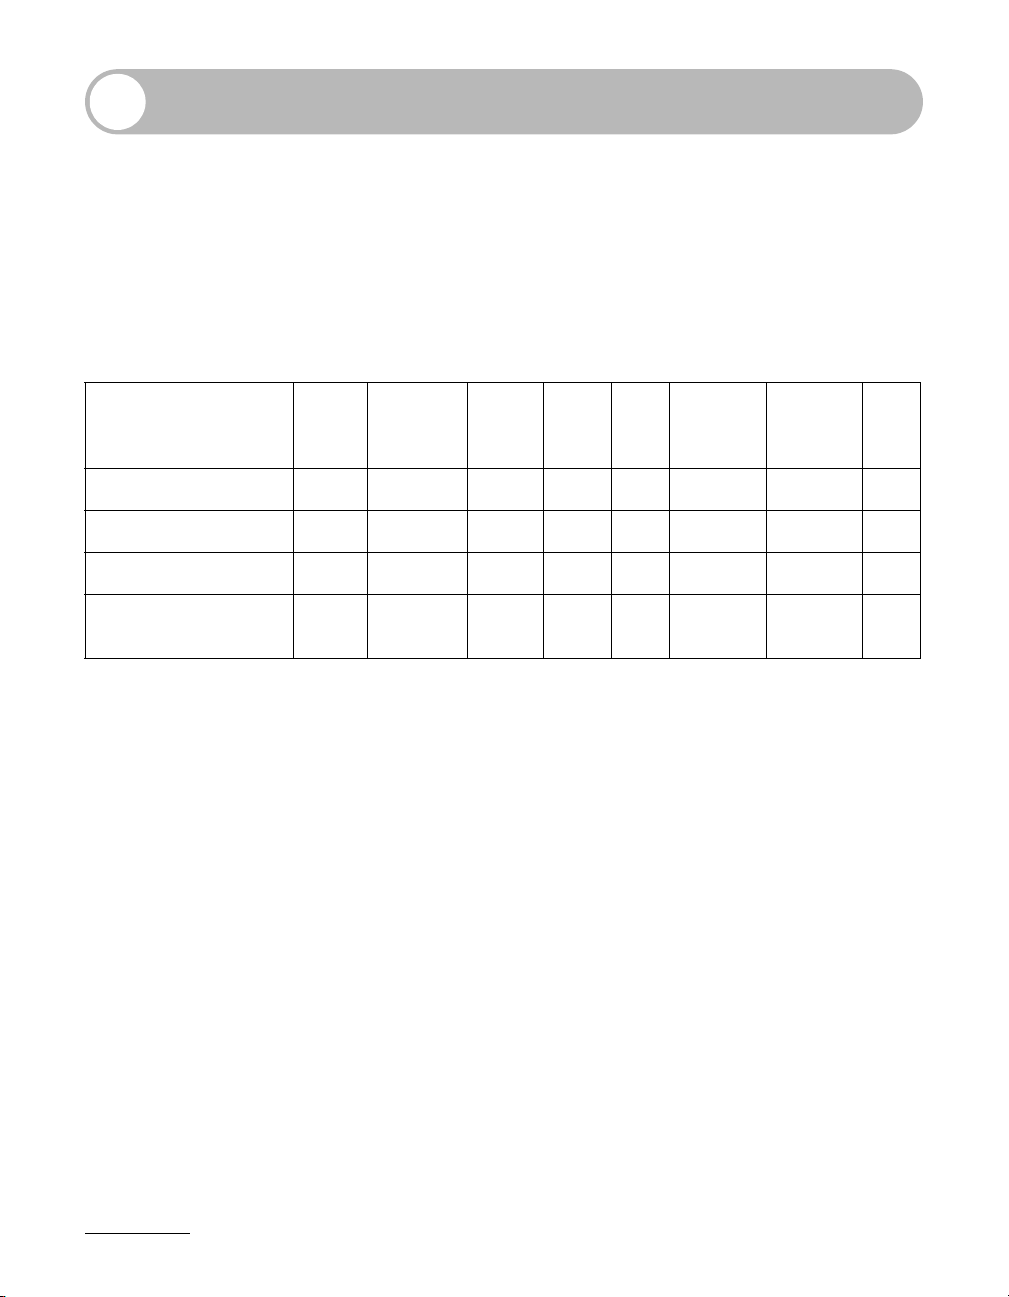
Available Features
The procedures described in this manual are based on the imageRUNNER
1023iF. Depending on the system configuration and product purchased, some
features described in the manuals may not be functional. The table below shows
the available features on a product basis.
✔ : available
– : not available
opt. : optional
COPY
imageRUNNER 1019J ✔ ––––– ––
imageRUNNER 1023 ✔✔opt. ✔ – – opt. –
imageRUNNER 1023N ✔✔opt. ✔ –– ✔✔
imageRUNNER
1023iF
✔✔opt. ✔✔ ✔ ✔ ✔
PRINT
(UFRII LT)
PRINT
(PCL)
SCAN FAX
IFAX/
E-MAIL/
FTP/SMB
RUI
(Network
Board)
ADF
– Optional Card Reader-E1 and Cassette Feeding Module-N1 are available for the
imageRUNNER 1019J/1023/1023N/1023iF.
– Optional Barcode Printing Kit is available for the imageRUNNER 1023/1023N/1023iF.
ii
Page 5

iii
Page 6
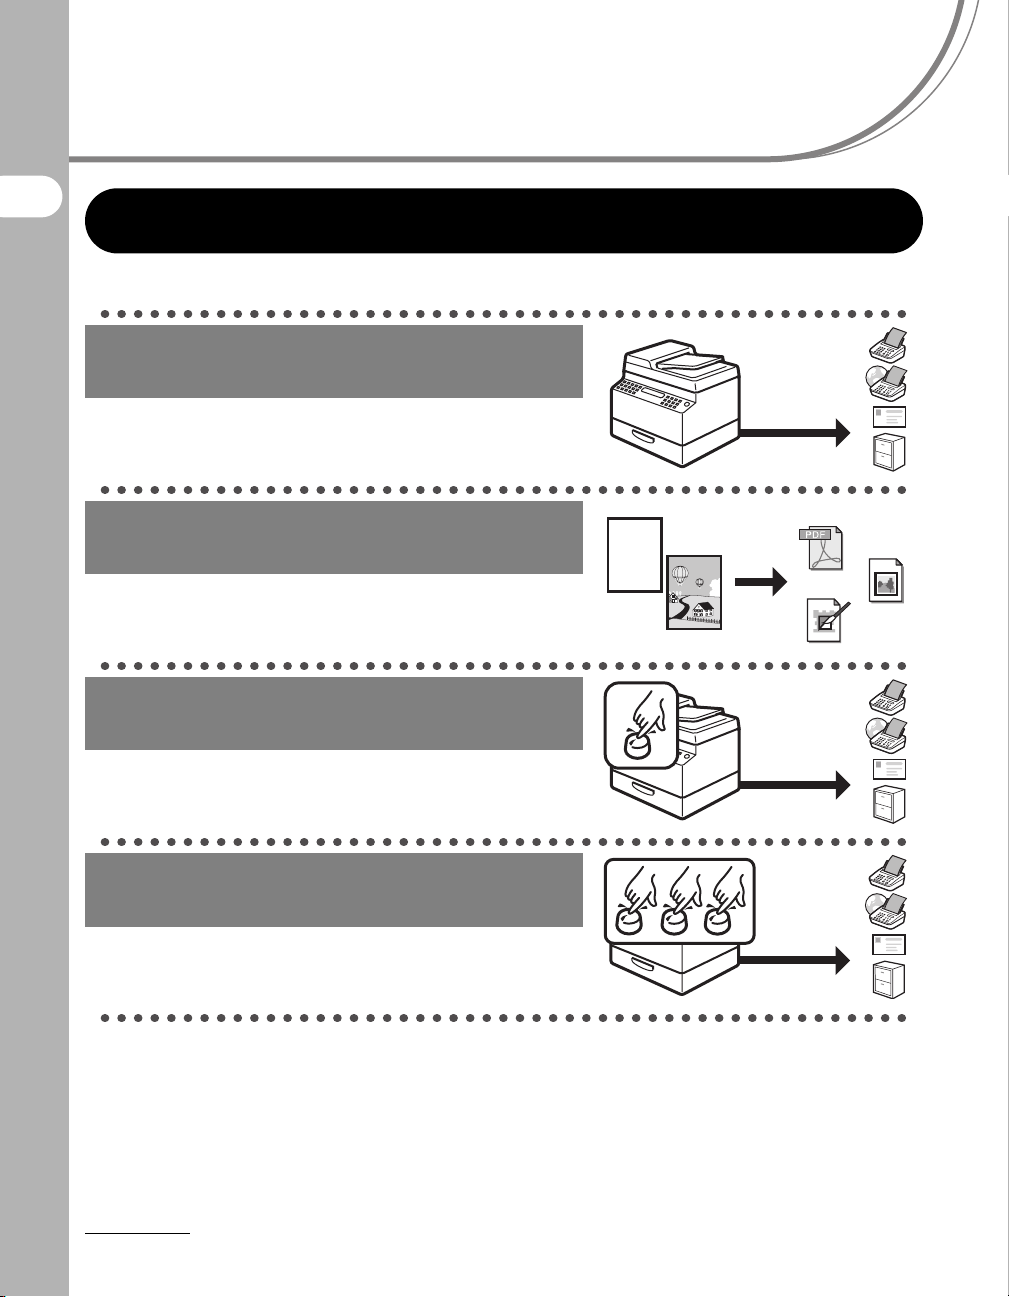
What Can I Do with This Machine?
Sending Features
Send documents with diverse
sending methods
Fax, E-Mail, I-Fax, and File Server
What Can I Do with This Machine?
→ Chapter 4
Send documents in a variety of file
formats
Send Settings
→ p. 4-7
Specify a recipient with a single key
Sending with One-Touch Keys
→ p. 4-15
Specify a recipient with a three-digit
code
Sending with Coded Dial Codes
→ p. 4-17
ABC
ABC
ABC
ABC
PDF
TIFF
JPEG
iv
Page 7
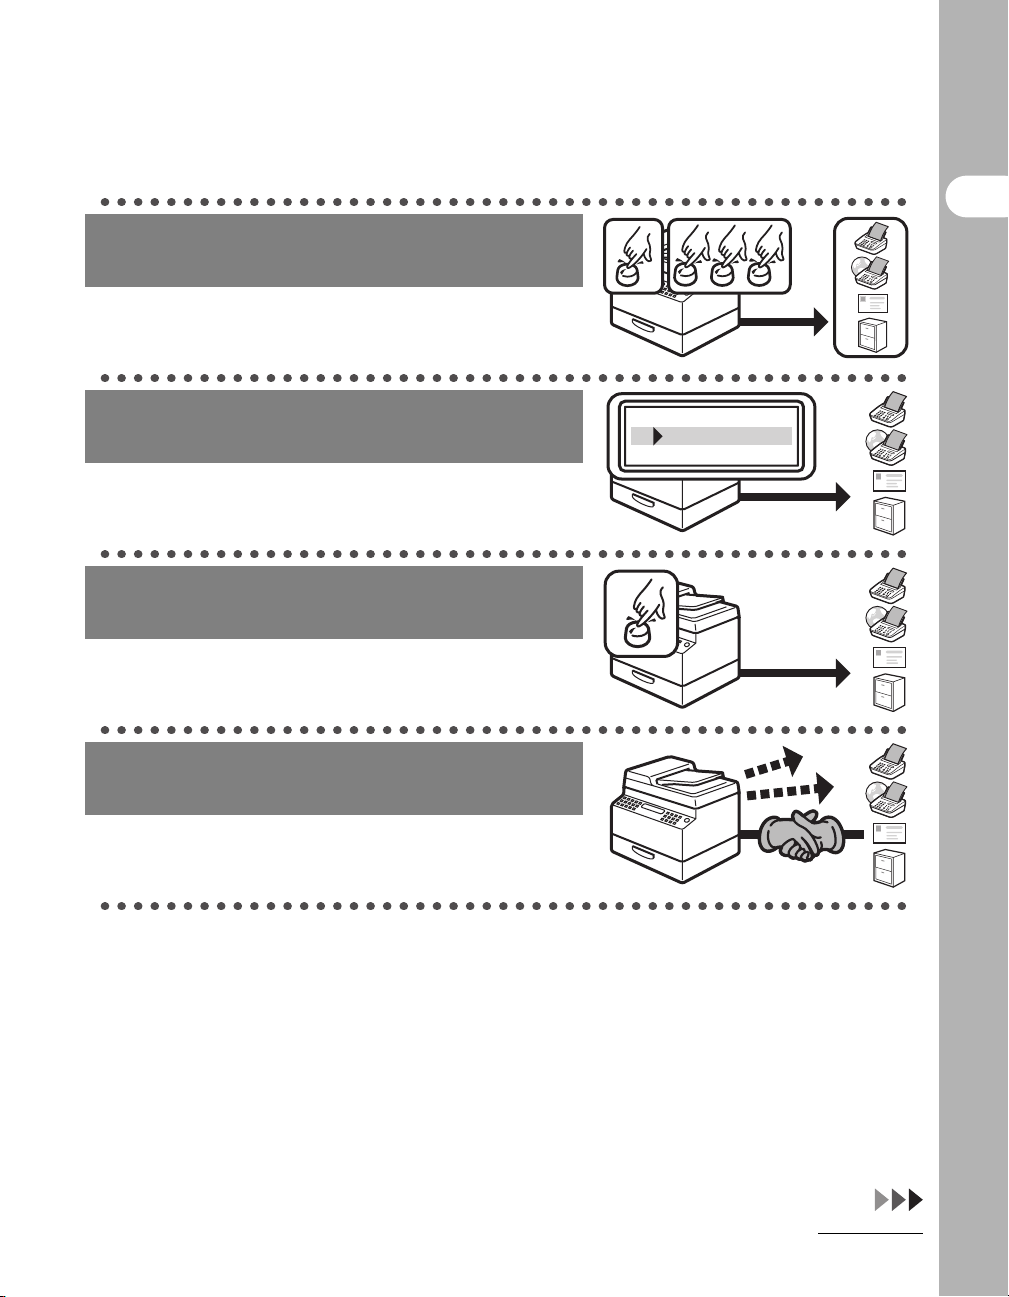
Specify multiple recipients as a
group
Sending to Group Addresses
→ p. 4-19
What Can I Do with This Machine?
Look up a particular recipient
Address Book Search
→ p. 4-21
Specify a recipient with its scan/
send settings
Favorites Buttons
→ p. 4-25
Retry sending documents
automatically
Auto Retry
→ Advanced Operation Guide
AAAAA
BBBBB
CCCCC
M1
v
Page 8
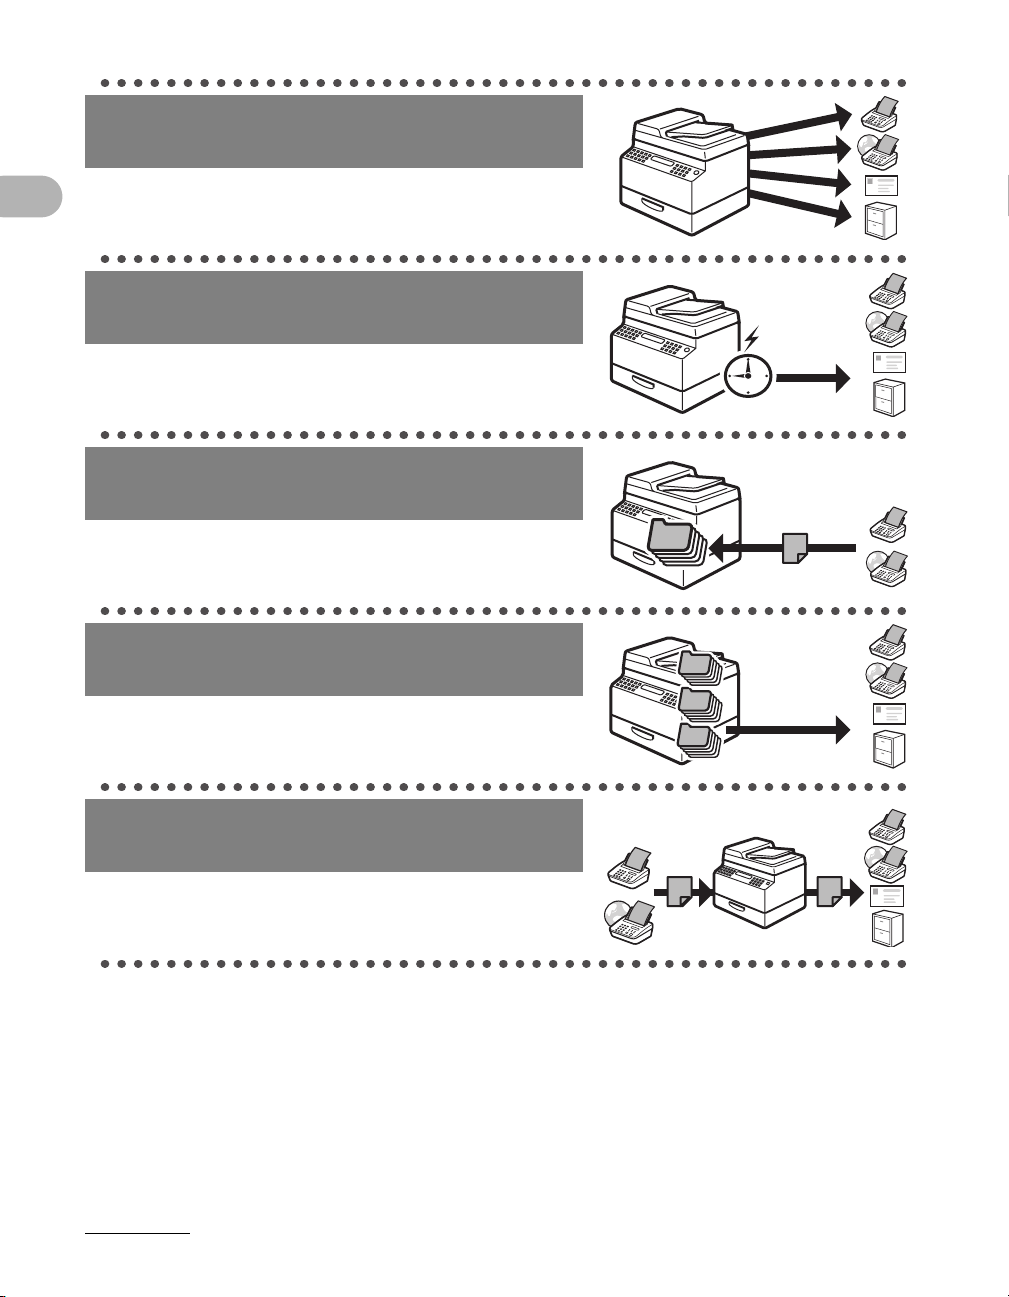
Send documents to multiple
recipients
Broadcasting
→ Advanced Operation Guide
Send documents at a specified time
Delayed Sending
→ Advanced Operation Guide
What Can I Do with This Machine?
Receive faxes/I-faxes in memory
Memory Reception
→ Advanced Operation Guide
Recall the last three sending jobs
Job Recall
→ Advanced Operation Guide
Forward received fax/I-fax
documents
Forwarding Documents
→ Advanced Operation Guide
1
2
3
vi
Page 9
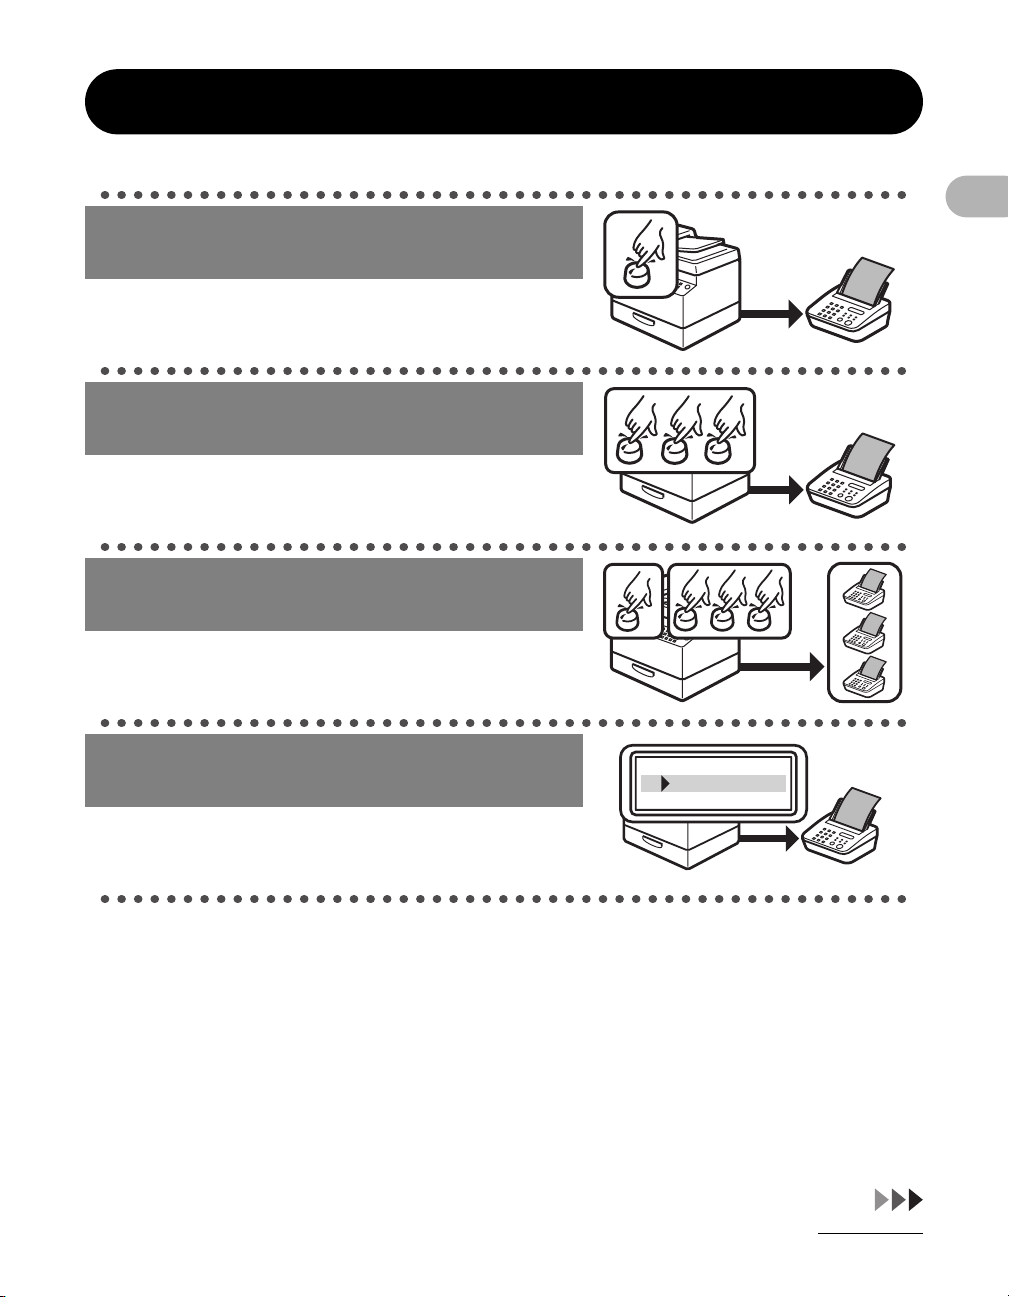
Fax Features
Specify a recipient with a single key
One-Touch Speed Dialing
→ p. 4-15
Specify a recipient with a three-digit
code
Coded Speed Dialing
→ p. 4-17
Specify multiple recipients as a
group
Group Dialing
→ p. 4-19
Look up a particular recipient
Address Book Dialing
→ p. 4-21
What Can I Do with This Machine?
AAAAA
BBBBB
CCCCC
vii
Page 10

Specify a recipient with its scan
settings
Favorites Buttons
→ p. 4-25
Redial when the line is busy
Automatic Redialing
→ Advanced Operation Guide
M1
What Can I Do with This Machine?
Send a fax to multiple recipients
Broadcasting
→ Advanced Operation Guide
Send a fax at a specified time
Delayed Sending
→ Advanced Operation Guide
Receive faxes in memory without
printing out
Memory Reception
→ Advanced Operation Guide
viii
Page 11
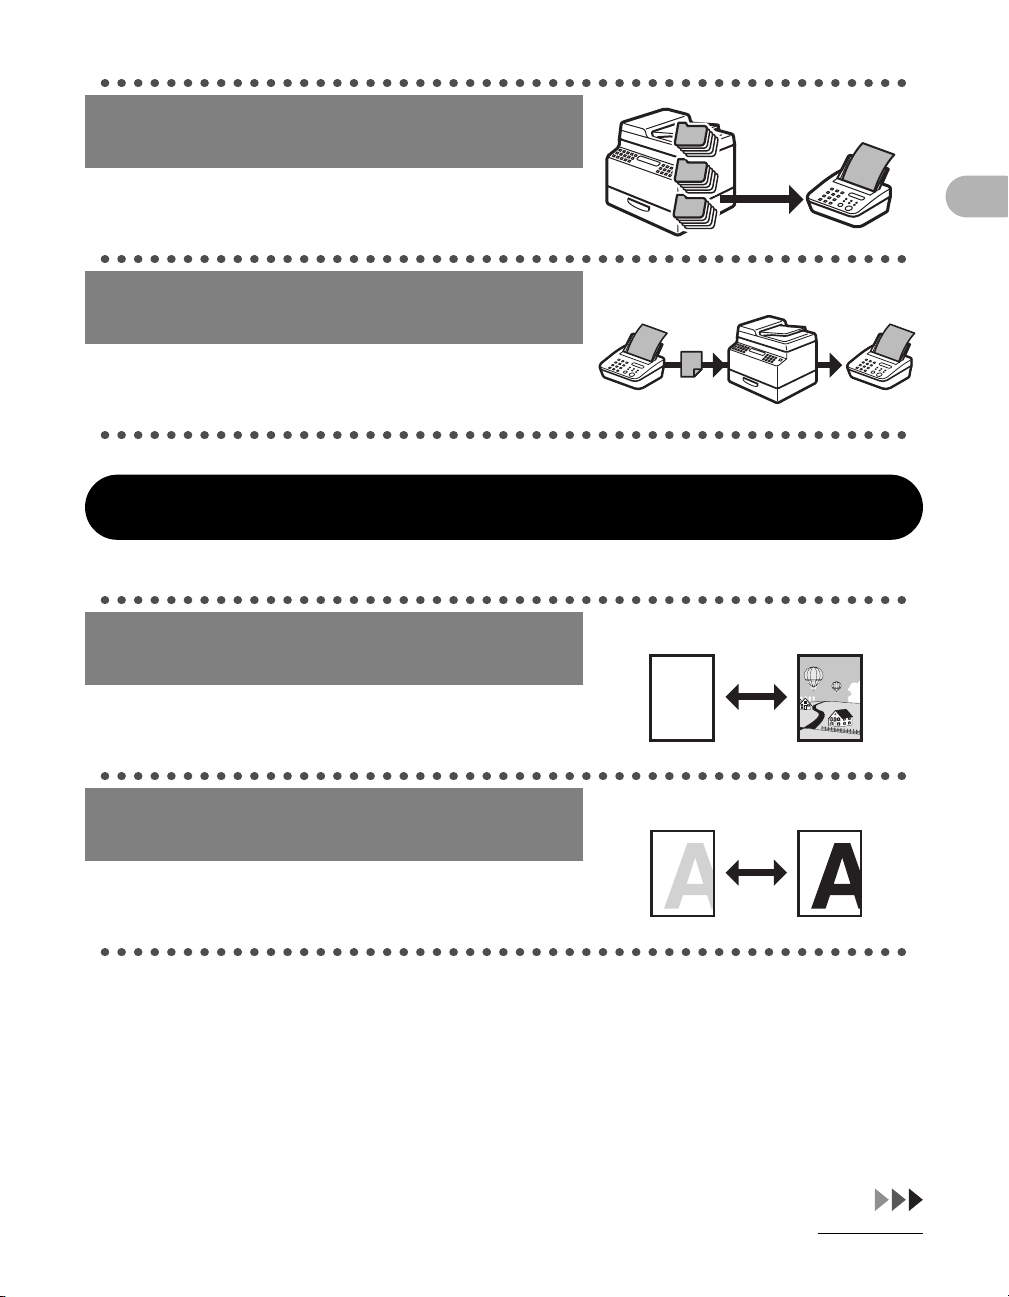
Recall the last three sending jobs
1
Job Recall
→ Advanced Operation Guide
Forward received fax documents
Forwarding Documents
→ Advanced Operation Guide
Copy Features
Select a scan mode depending on
the type of image
Image Quality
→ p. 6-3
2
3
ABC
ABC
ABC
ABC
What Can I Do with This Machine?
Adjust the density level of scanned
images
Density
→ p. 6-4
ix
Page 12
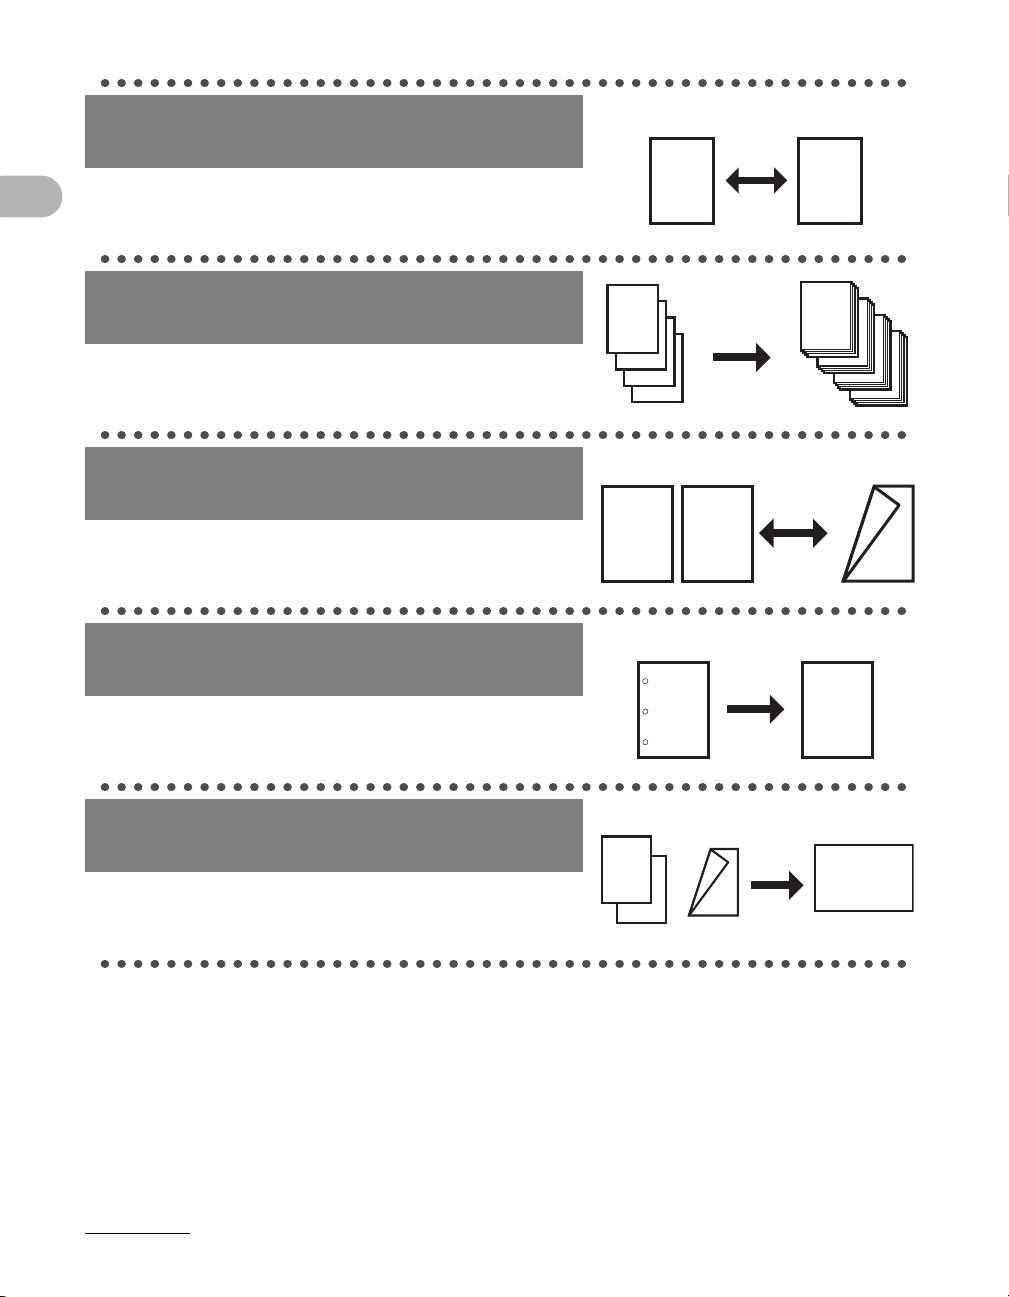
Enlarge or reduce copied images
DEF
DEF
DEF
DEF
ABC
ABC
ABC
ABC
1
DEF
DEF
DEF
DEF
ABC
ABC
ABC
ABC
1
DEF
DEF
DEF
DEF
What Can I Do with This Machine?
Zoom Ratio
→ p. 6-6
Sort copies by page order
Collate Copying
→ Advanced Operation Guide
Make two-sided copies
Two-Sided Copy
→ Advanced Operation Guide
Erase shadows and lines in copies
Frame Erase Copy
→ Advanced Operation Guide
AAAA
AAAA
BBBB
AAAA
BBBB
CCCC
AAAA
BBBB
CCCC
DDDD
1
BBBB
CCCC
DDDD
2
CCCC
DDDD
3
DDDD
ABC
ABC
ABC
ABC
1
A
4
ABC
ABC
ABC
ABC
A
AAAA
AAAA
AAAA
AAAA
AAAA
AAAA
AAAA
AAAA
AAAA
AAAA
1
AAAA
AAAA
AAAA
1
AAAA
AAAA
1
AAAA
1
2
ABC
ABC
ABC
ABC
Copy two documents on one sheet
2 on 1 Combination
→ Advanced Operation Guide
x
ABC
ABC
ABC
ABC
1
ABC
ABC
ABC
2
ABC
2
1
Page 13
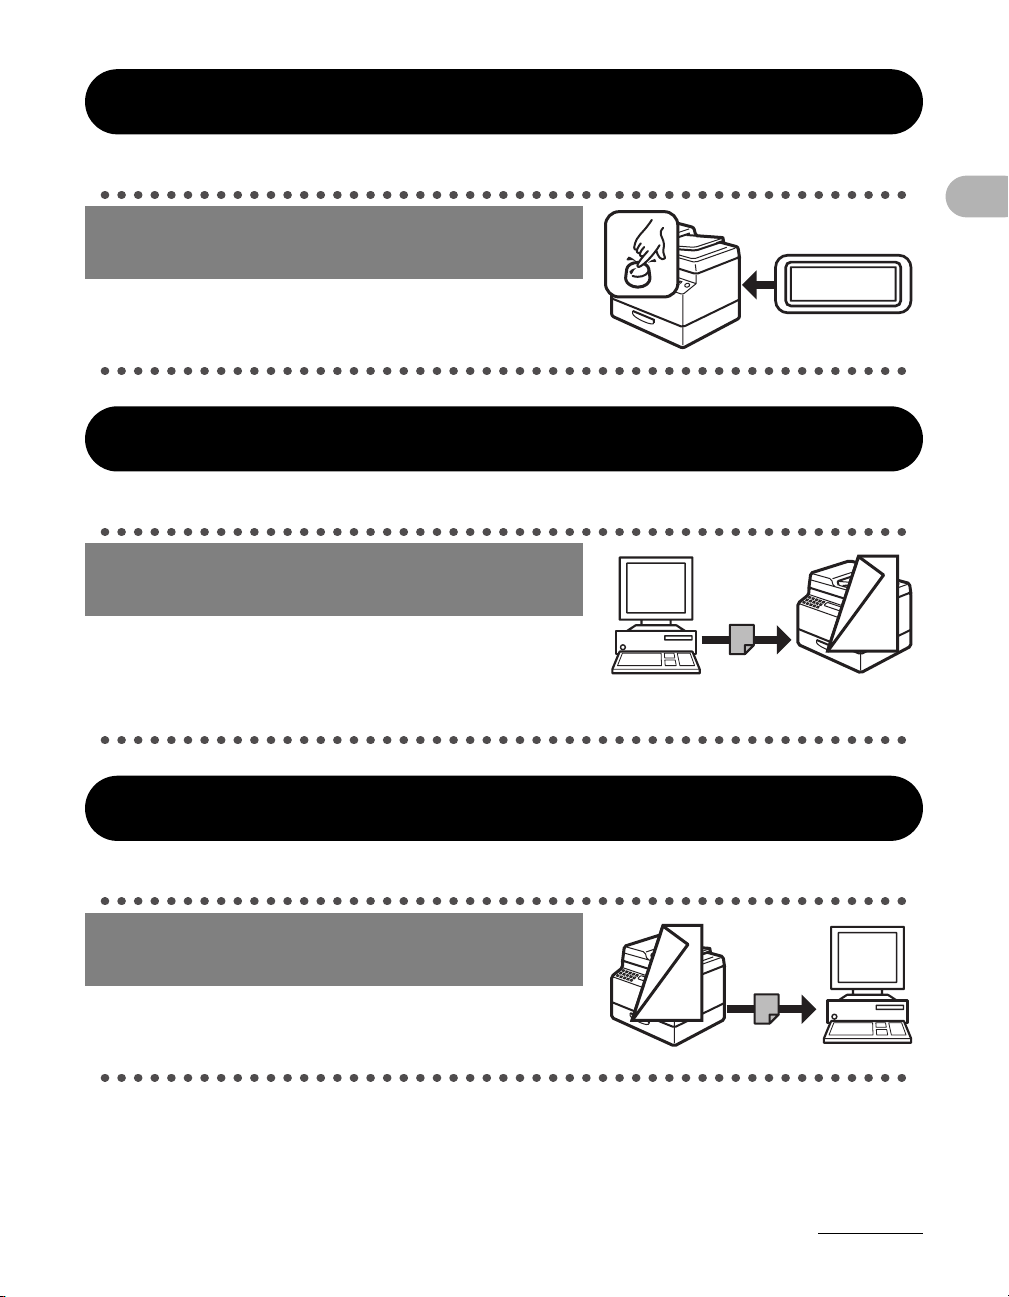
System Manager Settings
ABC
ABC
ABC
ABC
1
F
F
ABC
ABC
ABC
ABC
1
Restrict the use of the machine with
department IDs
Department ID Management
→ Advanced Operation Guide
Printer Feature
Print a document from a PC
Printing*
→ Online Help
* The optional Barcode Printing Kit is required for the
BarDIMM function.
ID
What Can I Do with This Machine?
000001
Scanner Feature
Specify detailed scanning options
to suit various images
Scanning
→ Scanner Driver Guide
xi
Page 14

PC Fax Feature
Send a fax from a PC
PC Faxing
→ Online Help
What Can I Do with This Machine?
Remote UI Feature
Access and manage the machine
from a PC
Remote UI
→ Advanced Operation Guide
xii
Page 15

Contents
Manuals for the Machine.................................................................i
Available Features..........................................................................ii
What Can I Do with This Machine? ..............................................iv
Sending Features ........................................................... iv
Fax Features...................................................................vii
Copy Features ................................................................ ix
System Manager Settings............................................... xi
Printer Feature................................................................ xi
Scanner Feature............................................................. xi
PC Fax Feature ..............................................................xii
Remote UI Feature .........................................................xii
Contents .......................................................................................xiii
Preface...........................................................................................xx
Important Safety Instructions ......................................... xx
Handling and Maintenance............................................ xx
Location .........................................................................xxi
Power Supply................................................................xxii
How to Use This Guide.............................................................. xxiii
Symbols Used in This Manual .....................................xxiii
Illustrations Used in This Manual.................................xxiv
What Can I Do with This Machine?
Legal Notices ..............................................................................xxv
Copyright ......................................................................xxv
Disclaimers ...................................................................xxv
Legal Limitations on the Usage of Your Product and
the Use of Images........................................................xxvi
Trademarks.................................................................xxvii
FCC (Federal Communications Commission) ........... xxviii
xiii
Page 16

Users in the U.S.A.......................................................................xxx
Preinstallation Requirements for Canon Facsimile
Equipment.....................................................................xxx
In Case of Equipment Malfunction..............................xxxii
Rights of the Telephone Company ............................. xxxii
Users in Canada.......................................................................xxxiii
Preinstallation Requirements for Canon Facsimile
Equipment.................................................................. xxxiii
Notice.........................................................................xxxiv
Utilisation au Canada ...............................................................xxxv
Conditions à Remplir Préalablement à L’installation
d’un Télécopieur Canon..............................................xxxv
What Can I Do with This Machine?
Laser Safety ............................................................................xxxvii
CDRH Regulations ...................................................xxxvii
1 Before Using the Machine ......................................................1-1
Machine Components .................................................................1-1
Operation Panel ...........................................................................1-3
xiv
Main Operation Panel ...................................................1-3
Send Operation Panel ..................................................1-6
LCD (Standby Mode) ...................................................................1-7
Copy Mode ...................................................................1-7
Send Mode ...................................................................1-7
Scan Mode....................................................................1-7
Toner Cartridge............................................................................1-8
Maintaining the Toner Cartridge ...................................1-8
Page 17

Operation Panel Power Switch.................................................1-10
Energy Consumption in the Sleep Mode.................................1-11
Timer Settings............................................................................1-13
Setting the Sleep Mode ..............................................1-13
Setting Auto Clear Time..............................................1-15
Setting Time Zone ......................................................1-17
Setting Daylight Saving Time......................................1-18
2 Document Handling.................................................................2-1
Document Requirements ............................................................2-1
Scanning Area..............................................................................2-3
Loading Documents ....................................................................2-4
On the Platen Glass......................................................2-4
In the ADF.....................................................................2-6
3 Print Media ...............................................................................3-1
Paper Requirements....................................................................3-1
What Can I Do with This Machine?
Printable Area ..............................................................................3-3
Paper Guidelines .........................................................................3-4
Loading Paper..............................................................................3-5
In the Stack Bypass (e.g., Envelopes)..........................3-5
Setting Paper Type and Size.......................................................3-8
For the Paper Drawer ...................................................3-8
For the Stack Bypass..................................................3-11
xv
Page 18

4 Sending Documents................................................................4-1
Scan Settings...............................................................................4-3
Image Quality................................................................4-3
Density..........................................................................4-5
Two-Sided.....................................................................4-6
Send Settings...............................................................................4-7
Specifying Destinations............................................................4-11
Using Numeric Keys ...................................................4-12
Using One-Touch Keys...............................................4-15
Using Coded Dial Codes ............................................4-17
Using Group Addresses..............................................4-19
Using Address Book Key ............................................4-21
What Can I Do with This Machine?
Storing/Editing Address Book..................................................4-27
Manual Sending .........................................................................4-51
Using Favorites Buttons..............................................4-25
Storing/Editing One-Touch Keys/
Coded Dial Codes.......................................................4-27
Storing/Editing Group Addresses ...............................4-40
Direct Sending ...........................................................................4-54
5 Receiving Fax/I-Fax Documents ............................................5-1
6 Copying ....................................................................................6-1
Scan Settings...............................................................................6-3
Image Quality................................................................6-3
Density..........................................................................6-4
Zoom Ratio ...................................................................6-6
xvi
Page 19

7 Printing.....................................................................................7-1
8 Scanning ..................................................................................8-1
9 PC Faxing.................................................................................9-1
10 Remote UI............................................................................. 10-1
11 System Manager Settings................................................... 11-1
Department ID Management .....................................................11-1
Procedure before Using the Machine .........................11-1
Procedure after Using the Machine ............................11-2
Optional Card Reader................................................................11-3
Procedure before Using the Machine .........................11-3
Procedure after Using the Machine ............................11-3
12 Maintenance.........................................................................12-1
Cleaning the Machine................................................................12-1
Exterior .......................................................................12-1
Fuser Roller ................................................................12-2
Scanning area.............................................................12-3
Cleaning the ADF Automatically .................................12-6
Transcription Roller.....................................................12-7
Drum Unit....................................................................12-8
What Can I Do with This Machine?
Replacing the Toner Cartridge .................................................12-9
Replacing the Drum Unit.........................................................12-12
Transporting the Machine.......................................................12-14
xvii
Page 20

13 Troubleshooting ..................................................................13-1
Clearing Jams ............................................................................13-1
Document Jams..........................................................13-1
Paper Jams.................................................................13-3
LCD Messages ...........................................................................13-6
Error Codes..............................................................................13-12
If a Power Failure Occurs........................................................13-19
Service Call Message ..............................................................13-20
Contacting Your Local Authorized Canon Dealer .....13-20
14 Machine Settings.................................................................14-1
What Can I Do with This Machine?
Machine Settings .......................................................................14-1
Printing USER’S DATA LIST ......................................14-1
Accessing the Setting Menu .......................................14-3
Setting Menu ..............................................................................14-5
COMMON SETTINGS ...............................................14-5
COPY SETTINGS ....................................................14-10
TX/RX SETTINGS ...................................................14-12
ADDRESS BOOK SET. ...........................................14-21
PRINTER SETTINGS ..............................................14-30
TIMER SETTINGS ...................................................14-34
ADJUST./CLEANING ..............................................14-35
REPORT SETTINGS ...............................................14-38
SYSTEM SETTINGS ...............................................14-40
xviii
Page 21

15 Appendix ..............................................................................15-1
Specifications ............................................................................15-1
General.......................................................................15-1
Copier .........................................................................15-3
Printer .........................................................................15-3
Facsimile.....................................................................15-3
Telephone...................................................................15-5
Send Feature..............................................................15-6
Cassette Feeding Module-N1 (Optional) ....................15-7
Card Reader-E1 (Optional).........................................15-7
Index ...........................................................................................15-8
What Can I Do with This Machine?
xix
Page 22

Preface
Thank you for choosing a Canon product. Before using the machine, please read
the following instructions for your safety.
Important Safety Instructions
WARNING
Except as specifically described in this guide, do not attempt to service the machine yourself. Never
attempt to disassemble the machine: opening and removing its interior covers will expose you to
dangerous voltages and other risks. For all service, contact your local authorized Canon dealer.
What Can I Do with This Machine?
Handling and Maintenance
– Follow all warnings and instructions marked on the machine.
– Do not subject the machine to strong physical shocks or vibrations.
– Always unplug the machine before moving or cleaning it.
– To avoid paper jams, never unplug the power cord, open the left cover, or add or
remove paper in the machine while printing.
– Always grip the handle on the sides of the machine when you lift the machine. Never
lift the machine by any of its trays or attachments.
– Do not insert any objects into the slots or openings on the machine since they may
touch dangerous voltage points or short out parts. This could result in fire or electric
shock.
– Do not allow small objects (such as pins, paper clips, or staples) to fall into the
machine.
– To avoid spillage in or around the machine, do not eat or drink near it.
– Keep the machine clean. Dust accumulation can prevent the machine from operating
properly.
xx
Page 23

– Unplug the machine from the wall outlet and contact your local authorized Canon
dealer in any of the following cases:
– When the power cord or plug is damaged or frayed.
– If liquid or small object has fallen into the machine.
– If the machine has been exposed to rain or water.
– If the machine does not operate normally when you have followed the instructions
in this guide. Adjust only those controls that are covered by the instructions in this
guide. Improper adjustment of other controls may result in damage and may
require extensive work by a qualified technician to restore the product to normal
operation.
– If the machine has been dropped.
– If the machine exhibits a distinct change in performance, indicating a need for
servicing.
Location
– Place the machine on a flat, stable, vibration-free surface that is strong enough to
support its weight.
– Place the machine in a cool, dry, clean, well ventilated place.
– Make sure the area is free from dust.
– Make sure the location is not exposed to high temperature or humidity.
– Keep the machine away from direct sunlight as this can damage it. If you have to
place the machine near a window, install heavy curtains or blinds.
– Do not use the machine near water. Make sure that no wet or humid objects come
into contact with the machine.
– Do not use or store the machine outdoors.
– Do not place the machine near devices that contain magnets or generate magnetic
fields, such as speakers.
– If possible, place the machine near an existing telephone line outlet for easy
connection of the telephone line cord, and to avoid the expense of installing a new
outlet.
– Place the machine near a standard 120 V AC (60 Hz) power outlet.
What Can I Do with This Machine?
xxi
Page 24

– To ensure reliable operation of the machine and to protect it from overheating (which
can cause it to operate abnormally and create a fire risk), do not block the exhaust
vent. Never block or cover any openings on the machine by placing it on a bed, sofa,
rug, or other similar surface. Do not place the machine in a cupboard or built-in
installation, or near a radiator or other heat source unless proper ventilation is
provided. Leave enough space around all sides of the machine, and make sure that
the clearance between the machine’s ventilation slot and wall or other equipment is
more than
1
/4" (5 cm).
– Do not stack boxes or furniture around the power outlet. Keep the area free so you
can reach the outlet quickly. If you notice anything unusual (smoke, strange odors,
noises) around the machine, unplug the power cord immediately. Contact your local
authorized Canon dealer.
– Do not allow anything to rest on the power cord, and do not place the machine where
What Can I Do with This Machine?
the cord will be walked on. Make sure the cord is not knotted or kinked.
Power Supply
– During electrical storms, unplug the power cord from the power outlet.
(Please note that any documents stored in the machine’s memory will be deleted
when you unplug the power cord.)
– Whenever you unplug the power cord, wait at least five seconds before you plug it in
again.
– Do not plug the power cord into an uninterruptible power supply (UPS).
WARNING
This product emits low level magnetic flux. If you use a cardiac pacemaker and feel abnormalities, please
move away from this product and consult your doctor.
xxii
Page 25
How to Use This Guide
Symbols Used in This Manual
The following symbols are used throughout the manuals for the machine and indicate
the warnings, cautions and notes you should keep in mind when using the machine.
What Can I Do with This Machine?
WARNING
CAUTION
NOTE
In addition, this guide uses distinctive notations to identify keys and information in the
LCD:
– The keys you press appear in square brackets: [Stop].
– Information in the LCD appears in angle brackets: <STOP KEY PRESSED>.
The numbers that point to the keys on the operation panel diagram correspond to the
order of steps to take in the procedure.
Indicates a warning that may lead to death or serious injury if not
observed.
Explains how to avoid actions that could injure you or damage your
machine.
Explains operating restrictions and how to avoid minor difficulties.
xxiii
Page 26
Illustrations Used in This Manual
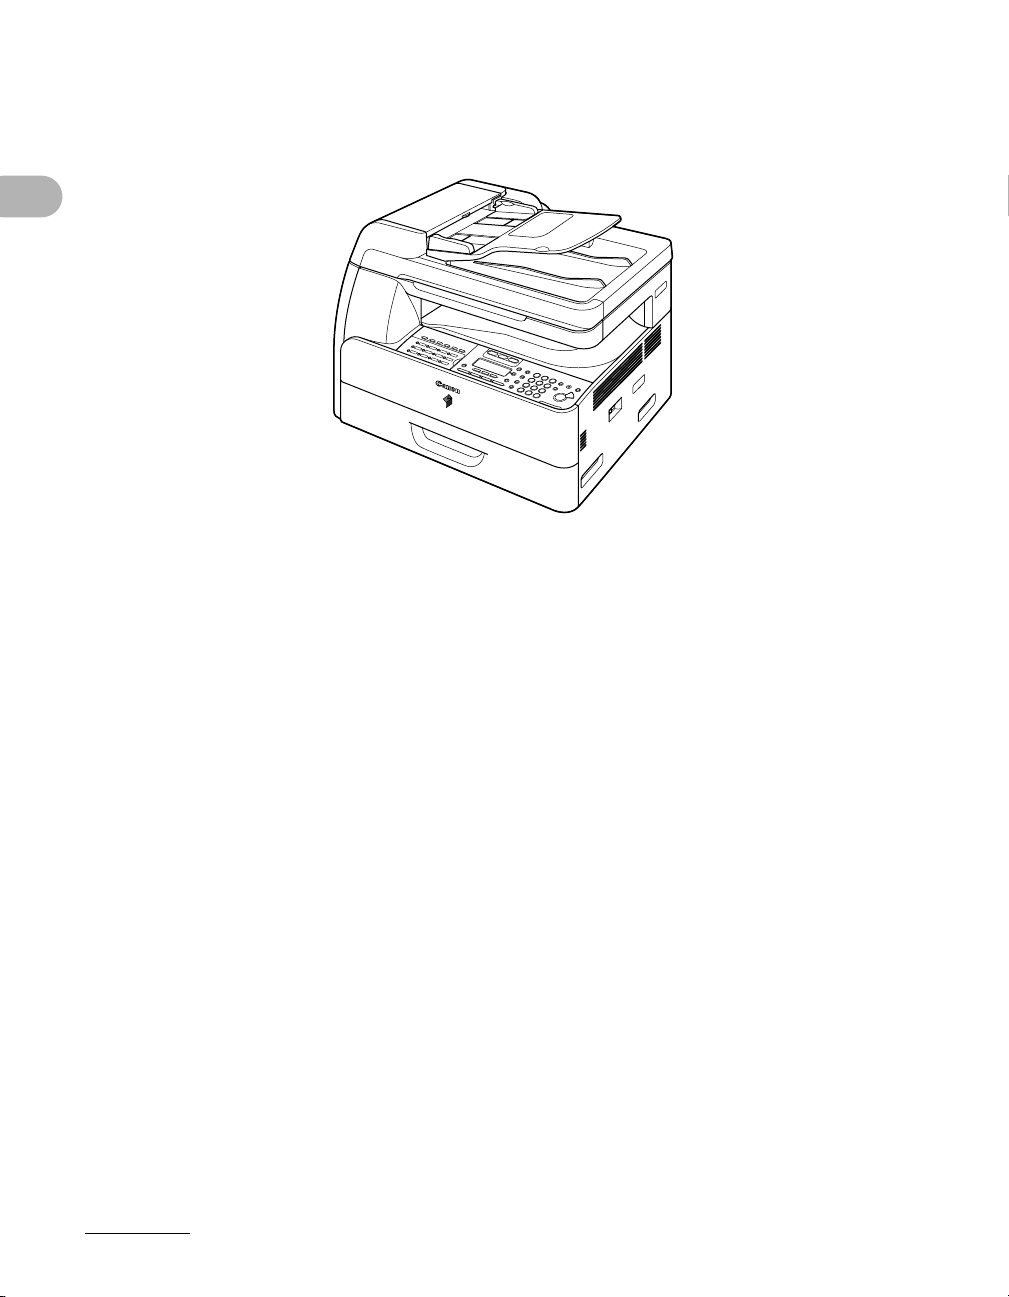
Unless otherwise mentioned, illustrations used in this manual are those taken when no
optional equipment is attached to the imageRUNNER 1023iF.
What Can I Do with This Machine?
The imageRUNNER 1023iF is used for illustration purposes in this manual.
For information on the standard features and available options for each model, see
“Available Features,” on p. ii.
xxiv
Page 27

Legal Notices
Copyright
Copyright © 2006 by Canon Inc. All rights reserved. No part of this publication may be
reproduced, transmitted, transcribed, stored in a retrieval system, or translated into any
language or computer language in any form or by any means, electronic, mechanical,
magnetic, optical, chemical, manual, or otherwise, without the prior written permission
of Canon Inc.
Disclaimers
The information in this document is subject to change without notice.
CANON INC. MAKES NO WARRANTY OF ANY KIND WITH REGARD TO THIS
MATERIAL, EITHER EXPRESS OR IMPLIED, EXCEPT AS PROVIDED HEREIN,
INCLUDING WITHOUT LIMITATION, THEREOF, WARRANTIES AS TO
MARKETABILITY, MERCHANTABILITY, FITNESS FOR A PARTICULAR PURPOSE
OF USE OR NON-INFRINGEMENT. CANON INC. SHALL NOT BE LIABLE FOR ANY
DIRECT, INCIDENTAL, OR CONSEQUENTIAL DAMAGES OF ANY NATURE, OR
LOSSES OR EXPENSES RESULTING FROM THE USE OF THIS MATERIAL.
What Can I Do with This Machine?
xxv
Page 28

Legal Limitations on the Usage of Your Product and the Use of Images
Using your product to scan, print or otherwise reproduce certain documents, and the
use of such images as scanned, printed or otherwise reproduced by your product, may
be prohibited by law and may result in criminal and/or civil liability.
A non-exhaustive list of these documents is set forth below. This list is intended to be a
guide only. If you are uncertain about the legality of using your product to scan, print or
otherwise reproduce any particular document, and/or of the use of the images
scanned, printed or otherwise reproduced, you should consult in advance with your
legal advisor for guidance.
– Paper Money – Travelers Checks
– Money Orders – Food Stamps
What Can I Do with This Machine?
– Certificates of Deposit – Passports
– Postage Stamps (canceled or
uncanceled)
– Identifying Badges or Insignias – Internal Revenue Stamps (canceled or
– Selective Service or Draft Papers – Bonds or Other Certificates of
– Checks or Drafts Issued by
Governmental Agencies
– Motor Vehicle Licenses and Certificates
of Title
– Immigration Papers
uncanceled)
Indebtedness
– Stock Certificates
– Copyrighted Works/Works of Art
without Permission of Copyright Owner
xxvi
Page 29

Trademarks
Canon, the Canon logo, and imageRUNNER are registered trademarks of Canon Inc.
in the United States and may also be trademarks or registered trademarks in other
countries.
Microsoft and Windows are registered trademarks of Microsoft Corporation in the
United States and other countries.
Other product and company names herein may be the trademarks of their respective
owners.
What Can I Do with This Machine?
As an E
this product meets the E
The International E
NERGY STA R Partner, Canon U.S.A., Inc. has determined that
NERGY STA R Program for energy efficiency.
NERGY STA R Office Equipment Program is an
international program that promotes energy saving through the use of
computers and other office equipment.
The program backs the development and dissemination of products
with functions that effectively reduce energy consumption. It is an
open system in which business proprietors can participate voluntarily.
The targeted products are office equipment, such as computers,
displays, printers, facsimiles, and copiers. The standards and logos
are uniform among participating nations.
xxvii
Page 30

FCC (Federal Communications Commission)
imageRUNNER 1019J: Model F189204
imageRUNNER 1023/1023N: Model F189200
imageRUNNER 1023iF: Model F189202
This device complies with Part 15 of the FCC Rules.
Operation is subject to the following two conditions:
(1) This device may not cause harmful interference,
and
(2) This device must accept any interference received, including interference that may
cause undesired operation.
What Can I Do with This Machine?
This equipment has been tested and found to comply with the limits for a Class B digital
device, pursuant to Part 15 of the FCC Rules. These limits are designed to provide
reasonable protection against harmful interference in a residential installation. This
equipment generates, uses, and can radiate radio frequency energy and, if not installed
and used in accordance with the instructions, may cause harmful interference to radio
communications. However, there is no guarantee that interference will not occur in a
particular installation. If this equipment does cause harmful interference to radio or
television reception, which can be determined by turning the equipment off and on, the
user is encouraged to try to correct the interference by one or more of the following
measures:
- Reorient or relocate the receiving antenna.
- Increase the separation between the equipment and receiver.
- Connect the equipment to an outlet on a circuit different from that to which the receiver is
connected.
- Consult the dealer or an experienced radio/TV technician for help.
Use of shielded cables is required to comply with Class B limits in Subpart B of Part 15 of
the FCC Rules.
Do not make any changes or modifications to the equipment unless otherwise specified in
this manual. If you make such changes or modifications, you could be required to stop
operation of the equipment.
xxviii
Page 31

If your equipment malfunctions, please contact your local authorized Canon dealer from
whom you purchased the equipment (if under warranty), or with whom you have a
servicing contact. If you are not sure who to contact, and have both purchased and are
using the equipment in the U.S.A., please refer to the “SUPPORT” page on Canon USA’s
Web site (http://www.usa.canon.com).
Canon U.S.A. Inc.
One Canon Plaza, Lake Success, NY 11042, U.S.A.
TEL No. (516) 328-5600
What Can I Do with This Machine?
xxix
Page 32

Users in the U.S.A.
Preinstallation Requirements for Canon Facsimile Equipment
A. Location
Supply a suitable table, cabinet, or desk for the machine. See Chapter 14, “Appendix,” for
specific dimensions and weight.
B. Order Information
1. A single telephone line (touch-tone or rotary) should be used.
What Can I Do with This Machine?
2. Order an RJ11-C telephone wall jack (USOC), which should be installed by the
telephone company. If the RJ11-C wall jack is not present, telephone/facsimile
operation is not possible.
3. Order a normal business line from your telephone company’s business representative.
The line should be a regular voice grade line or an equivalent one. Use one line per
unit.
DDD (Direct Distance Dial) line
-or-
IDDD (International Direct Distance Dial) line if you communicate overseas
NOTE
Canon recommends an individual line following industry standards, i.e., 2,500 (touch-tone) or 500
(rotary/pulse dial) telephones. A dedicated extension off a PBX (Private Branch eXchange) unit
without “Call Waiting” can be used with your facsimile unit. Key telephone systems are not
recommended because they send nonstandard signals to individual telephones for ringing and
special codes, which may cause a facsimile error.
xxx
Page 33

C. Power Requirements
The machine should be connected to a standard 120 volt AC, three-wire grounded outlet
only.
Do not connect this machine to an outlet or power line shared with other appliances that
cause “electrical noise.” Air conditioners, electric typewriters, copiers, and machines of this
sort generate electrical noise that often interferes with communications equipment and the
sending and receiving of documents.
Connection of the Equipment
This equipment complies with Part 68 of the FCC rules and the requirements adopted
by the ACTA. On the rear panel of this equipment is a label that contains, among other
information, a product identifier in the format of US:AAAEQ##TXXXX. If requested, this
number must be provided to the telephone company.
The REN (Ringer Equivalence Number) is used to determine the number of devices
that may be connected to a telephone line. Excessive RENs on a telephone line may
result in the devices not ringing in response to an incoming call. In most, but not all
areas, the sum of the RENs should not exceed five (5.0). To be certain of the number
of devices that may be connected to a line, as determined by the total RENs, contact
the local telephone company. The REN for this product is part of the product identifier
that has the format US:AAAEQ##TXXXX. The digits represented by ## are the REN
without a decimal point (e.g., 10 is a REN of 1.0).
What Can I Do with This Machine?
An FCC compliant telephone line cable and modular plug is provided with this
equipment. This equipment is designed to be connected to the telephone network or
premise wiring using a compatible modular jack that is Part 68 compliant.
This equipment may not be used on coin service provided by the telephone
company. Connection to party lines is subjected to state tariffs.
xxxi
Page 34

In Case of Equipment Malfunction
Should any malfunction occur which cannot be corrected by the procedures described
in this guide or the Advanced Operation Guide, disconnect the equipment from the
telephone line cable and disconnect the power cord. The telephone line cable should
not be reconnected or the main power switch turned ON until the problem is completely
resolved. Users should contact their local authorized Canon Facsimile Service Dealer
for the servicing of equipment.
If your equipment malfunctions, please contact your local authorized Canon dealer
from whom you purchased the equipment (if under warranty), or with whom you have a
servicing contract. If you are not sure who to contact, and have both purchased and
are using the equipment in the U.S.A., please refer to the “SUPPORT” page on Canon
U.S.A.’s Web site (http://www.usa.canon.com).
What Can I Do with This Machine?
Rights of the Telephone Company
If this equipment (imageRUNNER 1023iF) causes harm to the telephone network, the
telephone company may temporarily disconnect service. The telephone company also
retains the right to make changes in facilities and services that may affect the operation
of this equipment. When such changes are necessary, the telephone company is
required to give adequate prior notice to the user. However, if advance notice is not
possible, the telephone company will notify the customer as soon as possible. Also, the
customer will be advised of his/her right to file a complaint with the FCC if he/she
believes it is necessary.
WARNING
The Telephone Consumer Protection Act of 1991 makes it unlawful for any person to use a computer or
other electronic device to send any message via a telephone facsimile machine unless such message
clearly contains in a margin at the top or bottom of each transmitted page, or on the first page of the
transmission, the date and time it is sent and an identification of the business or other entity, or other
individual sending the message and the telephone number of the sending machine or such business,
other entity, or individual.
NOTE
In order to program this information into your machine, complete the procedure for registering your name,
unit’s telephone number, time, and date in the Quick Start Guide.
xxxii
Page 35

Users in Canada
Preinstallation Requirements for Canon Facsimile Equipment
A. Location
Supply a suitable table, cabinet, or desk for the machine. See Chapter 15, “Appendix,” for
specific dimensions and weight.
B. Order Information
1. A single telephone line (touch-tone or rotary) should be used.
2. Order a CA11A modular jack, which should be installed by the telephone company. If
the CA11A jack is not present, installation cannot occur.
3. Order a normal business line from your telephone company’s business representative.
The line should be a regular voice grade line or an equivalent one. Use one line per
unit.
DDD (Direct Distance Dial) line
-or-
IDDD (International Direct Distance Dial) line if you communicate overseas
What Can I Do with This Machine?
NOTE
Canon recommends an individual line following industry standards, i.e., 2,500 (touch-tone) or 500
(rotary/pulse dial) telephones. A dedicated extension off a PBX (Private Branch eXchange) unit
without “Call Waiting” can be used with your facsimile unit. Key telephone systems are not
recommended because they send nonstandard signals to individual telephones for ringing and
special codes, which may cause a facsimile error.
C. Power Requirements
The power outlet should be a three-prong grounded receptacle (Single or Duplex).
It should be independent from copiers, heaters, air conditioners, or any electric equipment
that is thermostatically controlled. The rated value is 115 volts and 15 amperes. The
CA11A modular jack should be relatively close to the power outlet to facilitate installation.
xxxiii
Page 36

Notice
● This product meets the applicable Industry Canada technical specifications.
● The Ringer Equivalence Number is an indication of the maximum number of devices
allowed to be connected to a telephone interface. The termination of an interface
may consist of any combination of devices subject only to the requirement that the
sum of the RENs of all the devices does not exceed five.
● The REN of this product is 1.0.
● Before installing this equipment, users should ensure that it is permissible to be
connected to the facilities of the local telecommunications company. The equipment
must also be installed using an acceptable method of connection. In some cases,
the company’s inside wiring associated with a single line individual service may be
extended by means of a certified connector assembly (telephone extension cord).
What Can I Do with This Machine?
The customer should be aware that compliance with the above conditions may not
prevent deterioration of service in some situations.
● Repairs to certified equipment should be made by an authorized Canadian
maintenance facility designated by the supplier. Any repairs or alterations made by
the user to this equipment, or equipment malfunctions, may give the
telecommunications company cause to request the user to disconnect the
equipment.
● Users should ensure for their own protection that the electrical ground connections
of the power utility, telephone lines, and internal metallic water pipe system, if
present, are connected together. This precaution may be particularly important in
rural areas.
CAUTION
Users should not attempt to make such connections themselves, but should contact the appropriate
electric inspection authority, or electrician, as appropriate.
NOTE
This equipment complies with the Canadian ICES-003 Class B limits.
xxxiv
Page 37

Utilisation au Canada
Conditions à Remplir Préalablement à L’installation d’un Télécopieur Canon
A. Emplacement
Prévoir une table, un meuble, ou un bureau suffisamment solide et de taille appropriée
(voir le chapitre 14, Annexe (Appendix), pour les indications de poids et dimensions).
B. Installation téléphonique
1. Une seule ligne téléphonique (tonalités ou impulsions) doit être utilisée.
2. Il faut commander un jack modulaire CA11A qui sera installé par la compagnie
téléphonique. Sans ce jack, la mise en place serait impossible.
3. Si vous vous abonnez à une nouvelle ligne, demandez une ligne d’affaires normale de
qualité téléphonique courante ou équivalente. Prenez un abonnement d’une ligne par
appareil.
Ligne automatique interurbaine
ou
Ligne automatique internationale
(si vous communiquez avec les pays étrangers)
What Can I Do with This Machine?
NOTE
Canon vous conseille d’utiliser une ligne individuelle conforme aux normes industrielles, à savoir:
ligne téléphonique 2,500 (pour appareil à clavier) ou 500 (pour appareil à cadran/impulsions). Il est
également possible de raccorder ce télécopieur à un système téléphonique à poussoirs car la
plupart de ces systèmes émettent des signaux d’appel non normalisés ou des codes spéciaux qui
risquent de perturber le fonctionnement du télécopieur.
C. Condition d’alimentation
Raccordez le télécopieur à une prise de courant plus terre à trois branches, du type simple
ou double, et qui ne sert pas à alimenter un copieur, un appareil de chauffage, un
climatiseur ou tout autre appareil électrique à thermostat. L’alimentation doit être de
115 volts et 15 ampères. Pour faciliter l’installation, le jack CA11A doit être assez proche
de la prise de courant.
xxxv
Page 38

Remarques
● Le présent matériel est conforme aux spécifications techniques applicables
d’Industrie Canada.
● Avant d’installer cet appareil, l’utilisateur doit s’assurer qu’il est permis de le
connecter à l’équipement de la compagnie de télécommunication locale et doit
installer cet appareil en utilisant une méthode de connexion autorisée. Il se peut qu’il
faille étendre la circuiterie intérieure de la ligne individuelle d’abonné, qui a été
installée par la compagnie, au moyen d’un jeu de connecteurs homologués (rallonge
téléphonique).
● L’attention de l’utilisateur est attirée sur le fait que le respect des conditions
mentionnées ci-dessus ne constitue pas une garantie contre les dégradations de
qualité du service dans certaines circonstances.
● L’indice d’équivalence de la sonnerie (IES) sert à indiquer le nombre maximal de
What Can I Do with This Machine?
terminaux qui peuvent être raccordés à une interface téléphonique. La terminaison
d’une interface peut consister en une combinaison quelconque de dispositifs, à la
seule condition que la somme d’indices d’équivalence de la sonnerie de tous les
dispositifs n’excède pas 5.
● Le nombre d’équivalents sonnerie (REN) de ce produit est 1,0.
● Les réparations sur un appareil certifié doivent être faites par une société d’entretien
canadienne autorisée par le Gouvernement canadien et désignée par le fournisseur.
Toute réparation ou modification que pourrait faire I’utilisateur de cet appareil, ou
tout mauvais fonctionnement, donne à la compagnie de télécommunication le droit
de débrancher I’appareil.
● Pour sa propre protection, I’utilisateur doit s’assurer que les prises de terre de
I’appareil d’alimentation, les lignes téléphoniques et les tuyaux métalliques internes,
s’il y en a, sont bien connectés entre eux. Cette précaution est particulièrement
importante dans les zones rurales.
CAUTION
Au lieu d’essayer de faire ces branchements eux-mêmes, les utilisateurs sont invités à faire appel à un
service d’inspection faisant autorité en matière d’électricité ou à un électricien, selon le cas.
NOTE
Respecte les limites de la classe B de la NMB-003 du Canada.
xxxvi
Page 39
Laser Safety
This machine complies with 21 CFR Chapter 1 Subchapter J as a Class 1 laser
product under the U.S. Department of Health and Human Services (DHHS) Radiation
Performance Standard according to the Radiation Control for Health and Safety Act of
1968. This means that the machine does not produce hazardous radiation.
Since radiation emitted inside the machine is completely confined within protective
housings and external covers, the laser beam cannot escape from the machine during
any phase of user operation.
CDRH Regulations
The Center for Devices and Radiological Health (CDRH) of the U.S. Food and Drug
Administration implemented regulations for laser products on August 2, 1976. These
regulations apply to laser products manufactured from August 1, 1976. Compliance is
mandatory for products marketed in the United States.
CAUTION
Use of controls, adjustments, or performance of procedures other than those specified in this manual may
result in hazardous radiation exposure.
What Can I Do with This Machine?
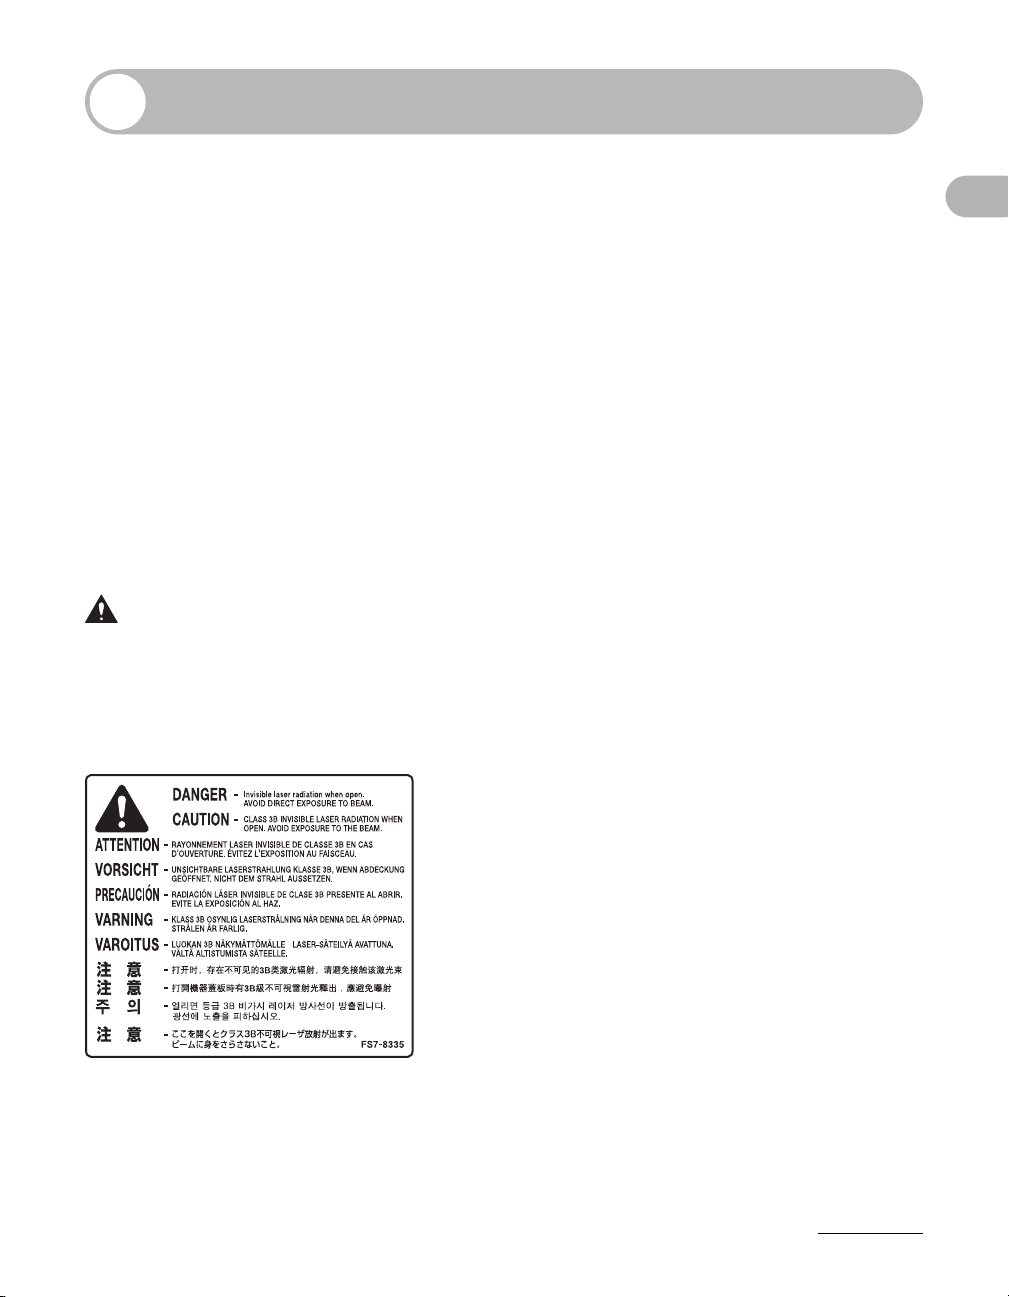
The label is attached to the laser scanner machine inside the machine and is not in a
user access area.
xxxvii
Page 40
Before Using the Machine
Before Using the
Machine
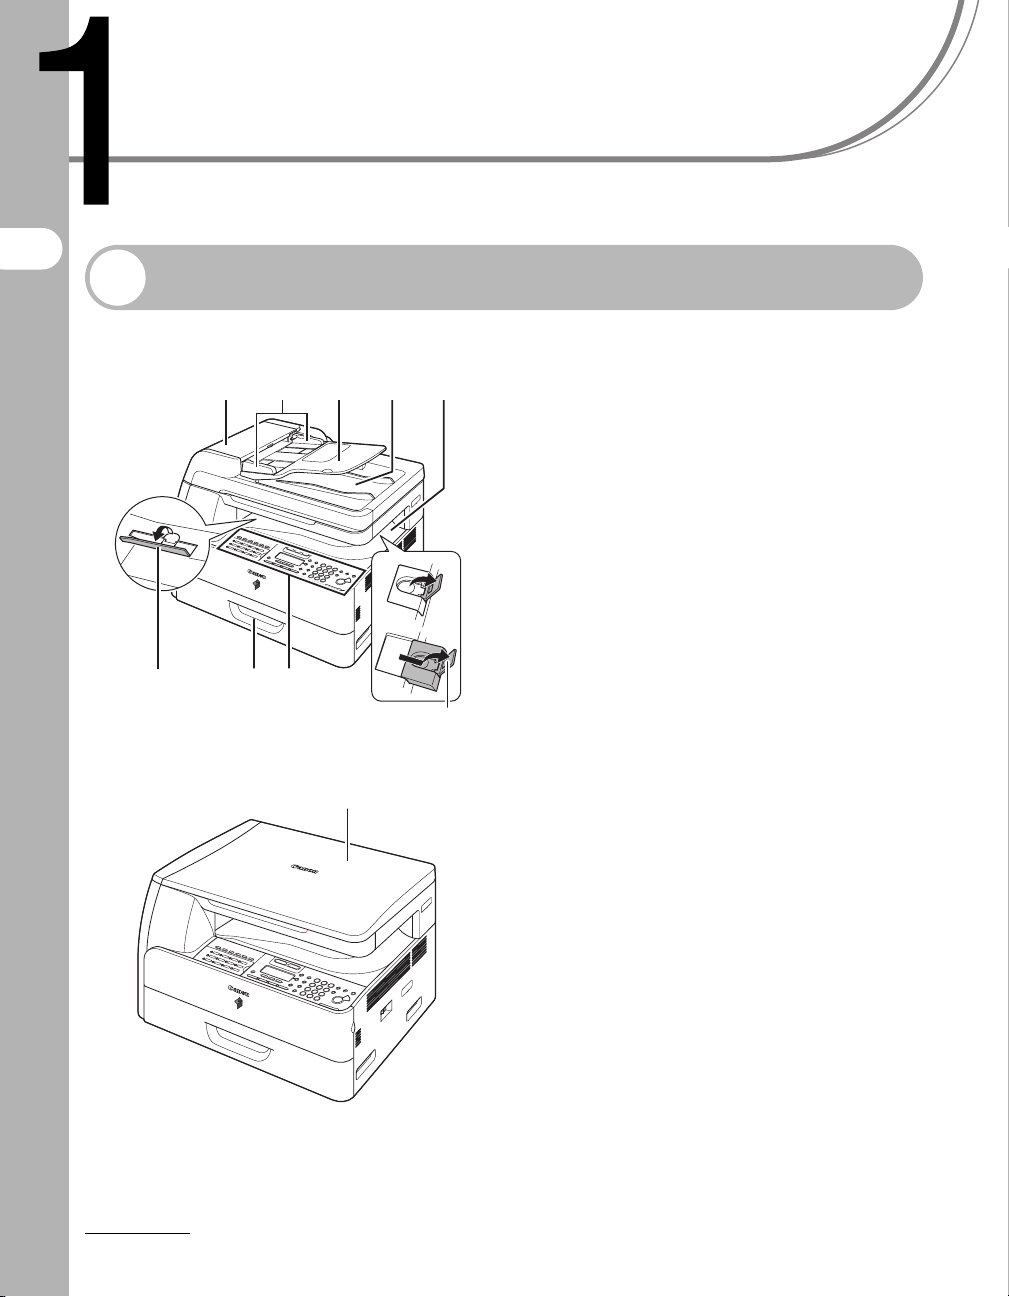
Machine Components
A ADF (Automatic Document Feeder)
Holds documents and feeds them
ADE
I
H
CB
G
F
J
automatically into the scanning area.
B Slide guides
Adjusts to the width of the document.
C Document feeder tray
Holds documents.
D Document delivery tray
Receives documents.
E Paper delivery tray
Receives copies, prints and faxes.
F Paper stopper
Prevents the paper from falling off the paper
delivery tray.
Open the stopper from its original position for
A4/LTR size paper. For LGL size paper, pull
out the extension first, and then open the
stopper.
G Operation panel
Machine controls.
H Paper drawer
Holds the paper supply.
I Stacking support
Helps prevent paper curl on the output tray.
Open as far as it goes when using curl-prone
paper.
J Platen glass cover
Open this cover when placing a document on
the platen glass.
1-1
Page 41
K
ML N
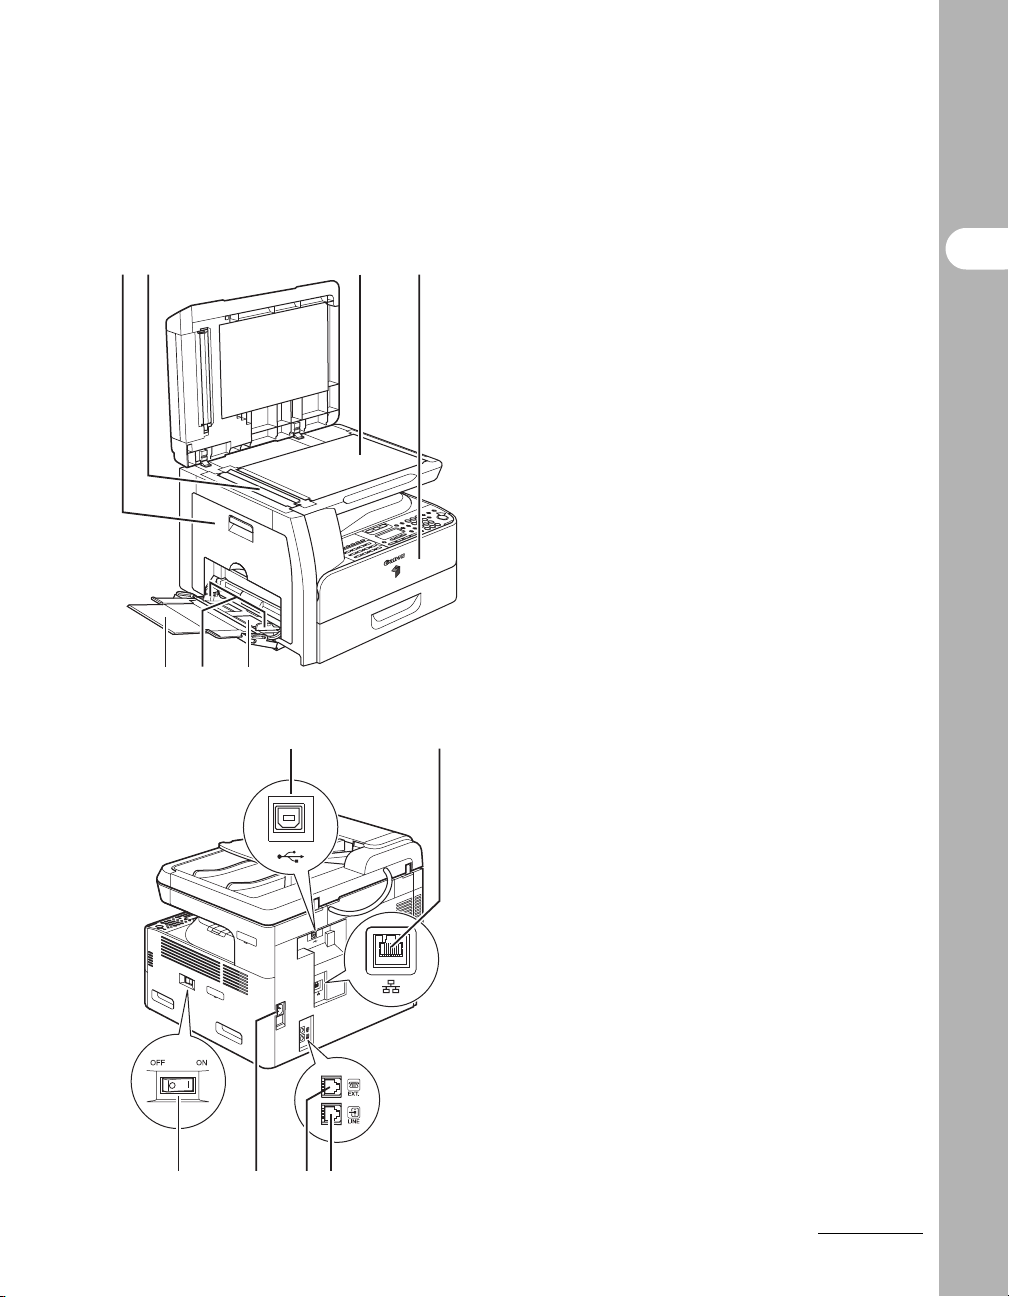
Open this cover when replacing the drum unit
or clearing paper jams.
Before Using the Machine
L Scanning area
K Left cover
Scans documents from the ADF.
M Platen glass
Place documents.
N Front cover
Open this cover to replace the toner bottle.
OStack Bypass
Feeds non-standard size or thick/thin type
paper stacks.
P Slide guides for stack bypass
Adjusts to the width of the paper.
Q Stack bypass extension
Pull out to load paper stack.
OQ P
R S
R USB port
Connect the USB (Universal Serial Bus)
cable.
S Ethernet port
Connect the network cable.
T Telephone line jack
Connect the external telephone cable.
U External device jack
Connect an external device.
V Power socket
Connect the power cord.
W Main power switch
Turns the power on or off.
UW V T
Machine components vary depending on the model
you purchased. For information on the standard
features and available options for each model, see
“Available Features,” on p. ii.
1-2
Page 42
Operation Panel
Address
Book
Paper
Select
COPY SEND SCAN
Image Quality Density Copy RatioOKTwo-Sided
System
Monitor
View
Settings
Reset Collate
GHI
@./
PQRS
Ton e
JKL
ABC
TUV
MNO
DEF
Clear ON/OFF
Stop
Start
Processing/
Data
Error
Power
WXYZ
SYMBOLS
Additional
Functions
2 on 1
Frame
Erase
l
1
4
7
2
5
8
0#
3
C
6
9
Log In/Out
ID
Counter
Check
M4
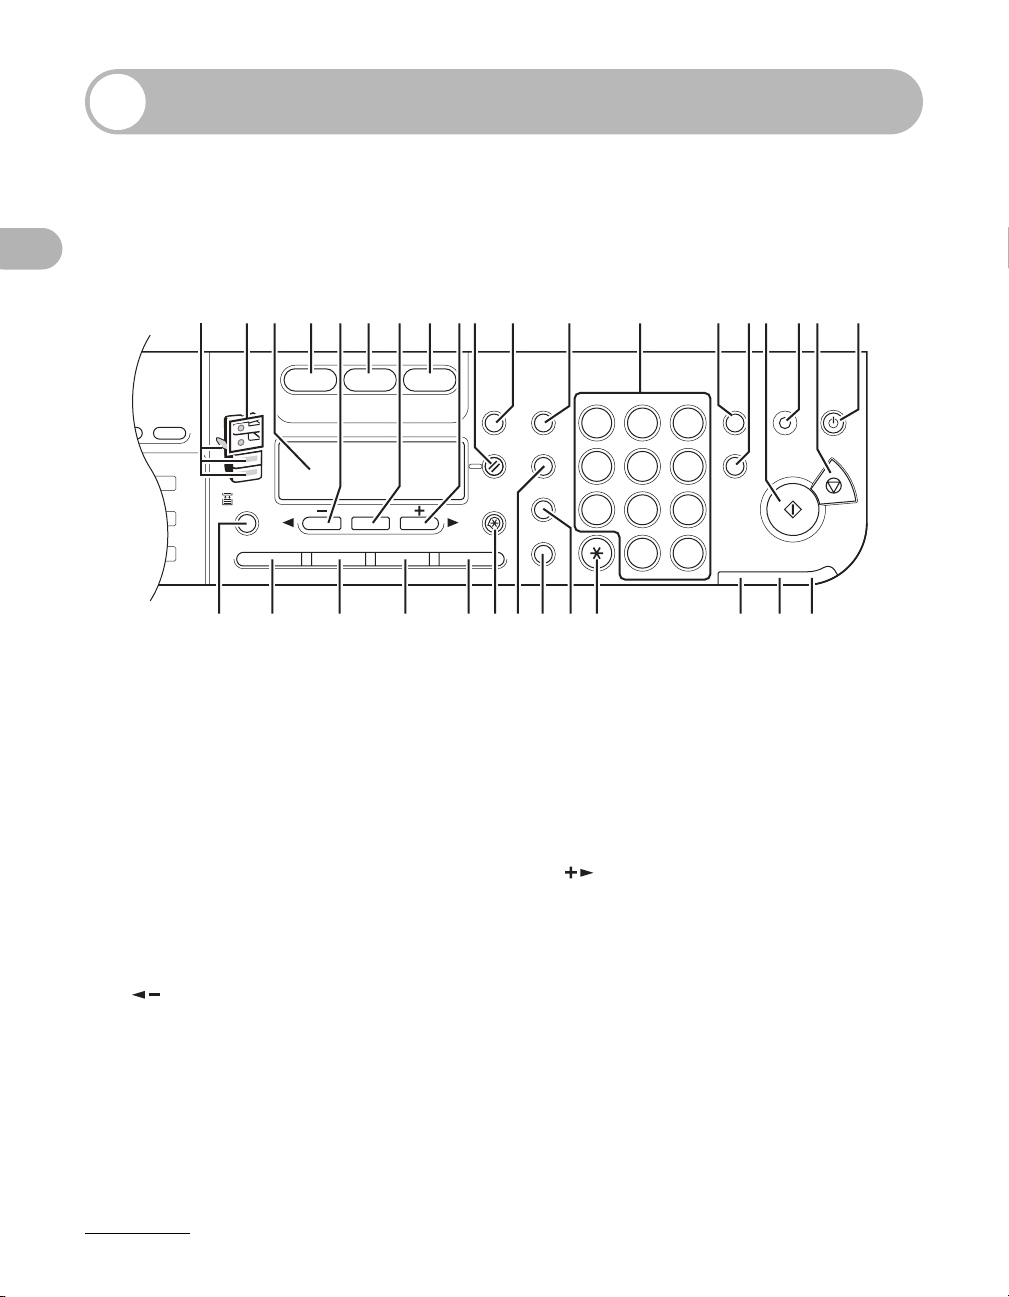
Main Operation Panel
● imageRUNNER 1023iF
Before Using the Machine
D
f
e d c b Ya Z X V U TW
A Paper Select indicator
Indicates the selected paper source.
* The number of paper sources varies
depending on the model used.
B Jam Location indicator
Indicates the location of paper jams.
C LCD display
Displays messages and prompts during
operation. Displays selection, text, and
numbers when adjusting the settings.
DCOPY key
Press to switch to the Copy mode.
E key
Press to decrease the value for various
settings. Also press to see the previous item
in the menu.
1-3
GC E IF H J K L MN RQP
F SEND key
Press to switch to the Send mode.
GOK key
Press to determine the contents you set or
register.
HSCAN key
Press to switch to the Scan mode.
I key
Press to increase the value for various
settings. Also press to see the next item in
the menu.
OA B
S
Page 43

J Reset key
Press to return the machine to the standby
mode.
K System Monitor key
Press to check fax transmission, print, copy,
or report output status.
L View Settings key
Press to confirm settings of the copy function.
MNumeric keys
Enter letters and numbers.
NClear key
Press to clear entered alphanumeric
characters.
O Log In/Out key
Press to operate the machine when the
department ID management is activated.
Also press to enable the department ID
management when you finished using the
machine.
P Start key
Press to start copying, scanning and sending
faxes.
Q Counter Check key
Press to display counter status. (Press again
to close counter status.)
RStop key
Press to cancel machine operations.
S ON/OFF key (operation panel power
switch)
Press to turn the operation panel on/off. Also
press to enter the Sleep mode or to resume
the normal mode from the Sleep mode
manually.
T Power indicator
Lights up when the main power is turned on.
U Error indicator
Flashes or lights up when an error has
occurred.
V Processing/Data indicator
Flashes when the machine is working. Lights
up when the machine has waiting jobs.
W Tone key
Press to switch from rotary pulse to tone
dialing.
X 2 on 1 key
Press to set 2 on 1 copying.
Y Frame Erase key
Press to set frame erase for copying.
Z Collate key
Press to set collate copying.
a Additional Functions key
Press to select or cancel modes in Additional
Functions.
bTwo-Sided key
Press to set two-sided copying or sending
documents.
c Copy Ratio key
Press to enlarge or reduce copy ratio.
d Density key
Press to lighten or darken the copies or
documents you send.
e Image Quality key
Press to select image quality for copying and
sending documents.
f Paper Select key
Press to select a paper source (paper drawer
or stack bypass).
Before Using the Machine
1-4
Page 44
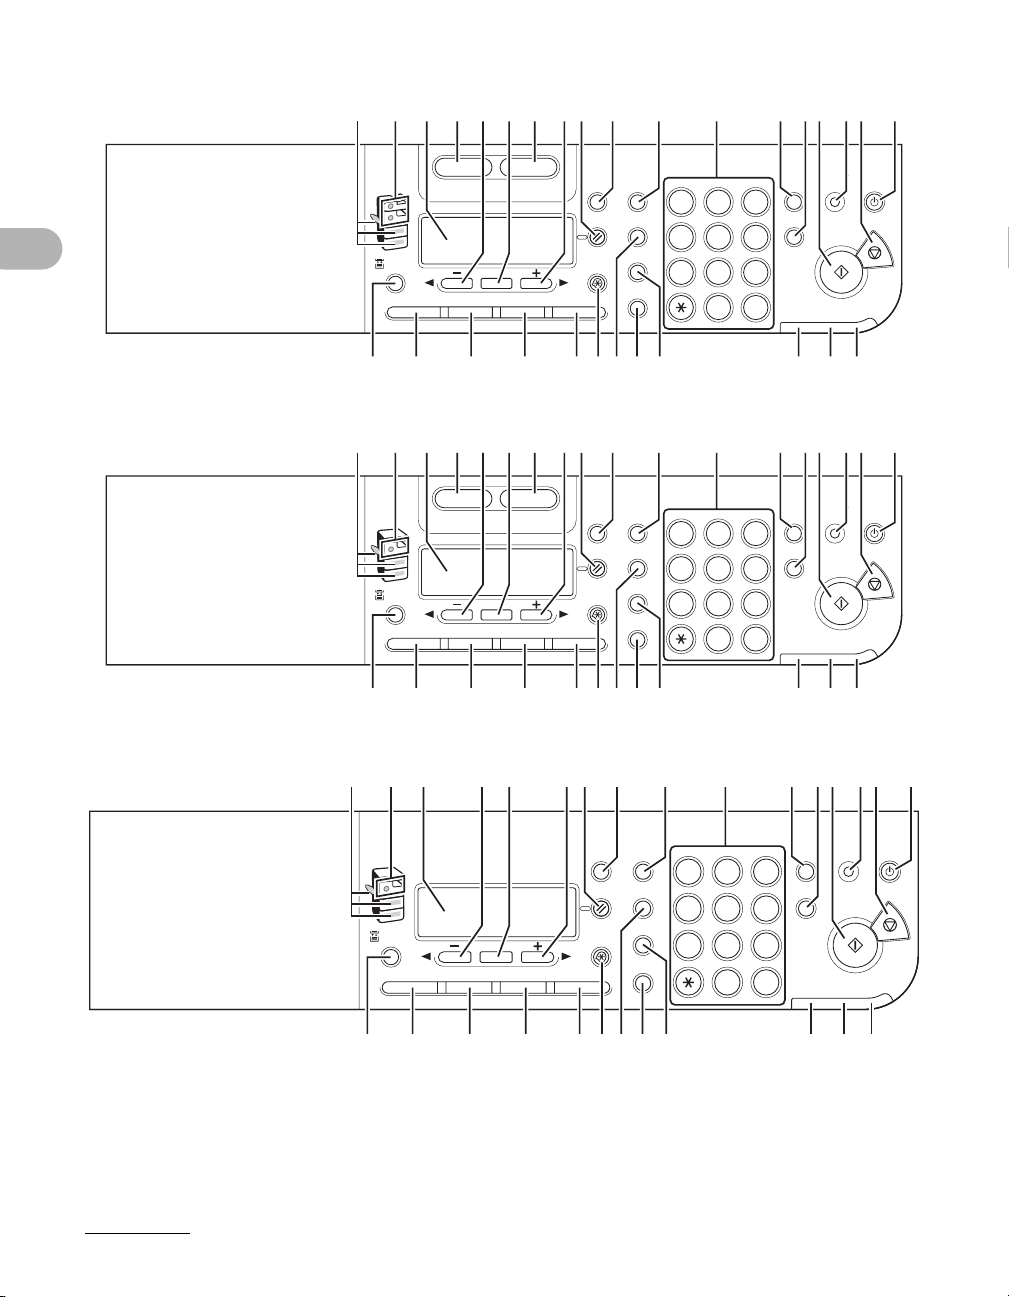
● imageRUNNER 1023N
S
D GC E IH J K L M NA B
RQP
O
● imageRUNNER 1023
Before Using the Machine
● imageRUNNER 1019J
COPY SCAN
Paper
Select
Image Quality Density Copy RatioOKTwo-Sided
f
edcb YaZ X V U T
System
Monitor
Reset Collate
Additional
Functions
Frame
View
Settings
2 on 1
Erase
1
4
7
2
3
6
5
9
8
0#
A B D GC E IH J K L M N
COPY SCAN
Paper
Select
Image Quality Density Copy RatioOKTwo-Sided
f
edcb YaZ X V U T
System
Monitor
Reset Collate
Additional
Functions
Frame
View
Settings
2 on 1
Erase
1
4
7
2
3
6
5
9
8
0#
Counter
Check
Clear ON/OFF
C
Log In/Out
Start
ID
Processing/
Error
Power
Data
RQP
O
Counter
Check
Clear ON/OFF
C
Log In/Out
Start
ID
Processing/
Error
Power
Data
Stop
S
Stop
1-5
GC E IJ K L M NA B
System
View
Monitor
Settings
1
2
Reset Collate
4
Additional
Paper
Select
Image Quality Density Copy RatioOKTwo-Sided
f
edcb YaZ X V U T
Functions
Frame
2 on 1
Erase
7
3
6
5
9
8
0#
RQP
O
Counter
Check
Clear ON/OFF
C
Log In/Out
Start
ID
Processing/
Data
Error
Power
S
Stop
Page 45
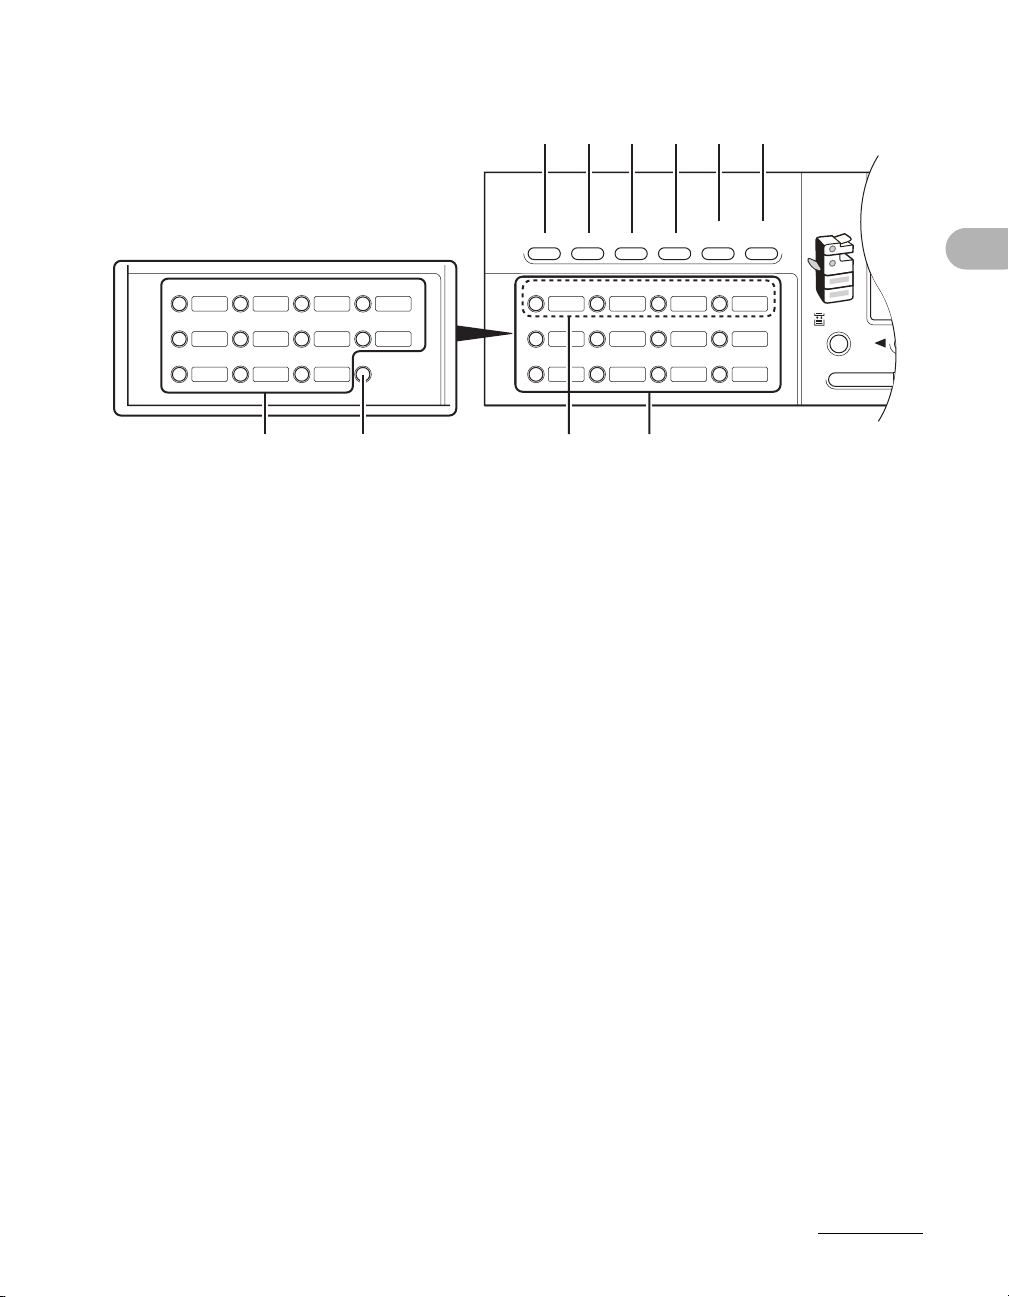
Send Operation Panel
Direct TX
01 02 03 04
05 06 07 08
09 10 11 12
Address
Book
Paper
Select
CO
Image Quality
Coded
DialRecallHookPause
Panel open
A B C D E F
13 14 15 16
17 18 19 20
21 22 23
Delayed
IG H
A Direct TX key
Press to set Direct Sending.
B Pause key
Inserts a pause when entering a fax number.
C Hook key
Press when you want to dial without lifting the
handset of the external telephone.
D Recall key
Press to recall previously set send jobs,
including the destinations, scan settings, and
send settings.
E Coded Dial key
Press to specify destinations registered
under coded dial codes.
M4M3M2M1
TX
Before Using the Machine
G
F Address Book key
Press to search preregistered destinations
under one-touch keys or coded dial codes by
name, number, or address.
GOne-Touch keys
Press to specify destinations registered
under one-touch keys.
H Favorites buttons
Press to specify destinations registered
under favorites buttons.
I Delayed TX key
Press to set Delayed Sending.
1-6
Page 46
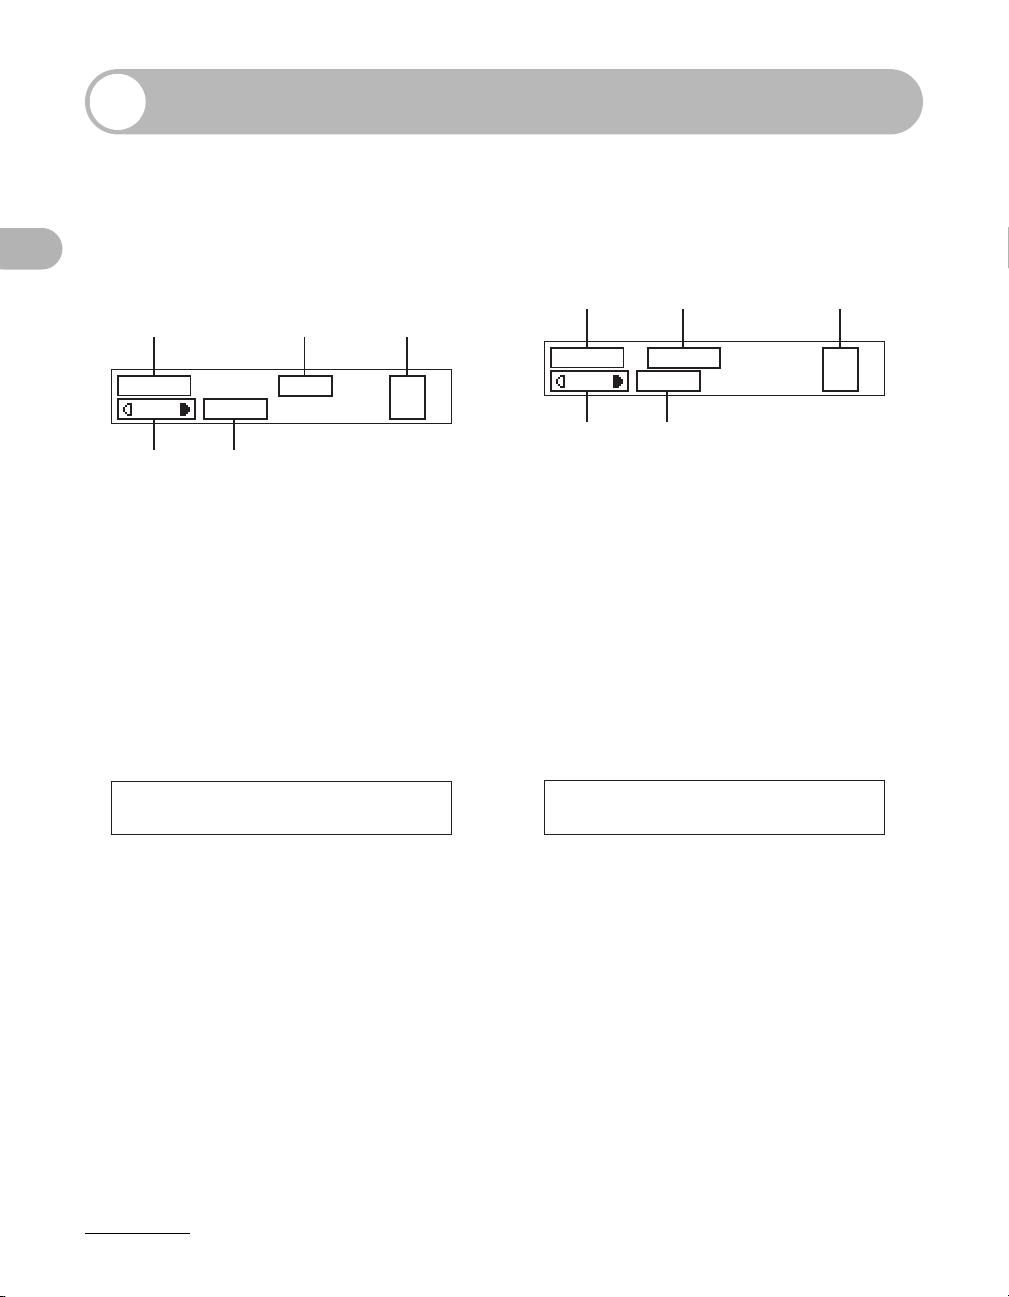
LCD (Standby Mode)
Copy Mode
● Without optional paper
drawer
A
100% LTR
TEXTA
Before Using the Machine
AZoom ratio
B Paper size
C Quantity
DDensity
E Image quality
D
E
Send Mode
SELECT SEND METHOD
FAX
B
C
O1
● With optional paper drawer
A
100% AUTO
D
B
TEXTA
E
C
O1
Scan Mode
SCANNING MODE
1-7
Page 47
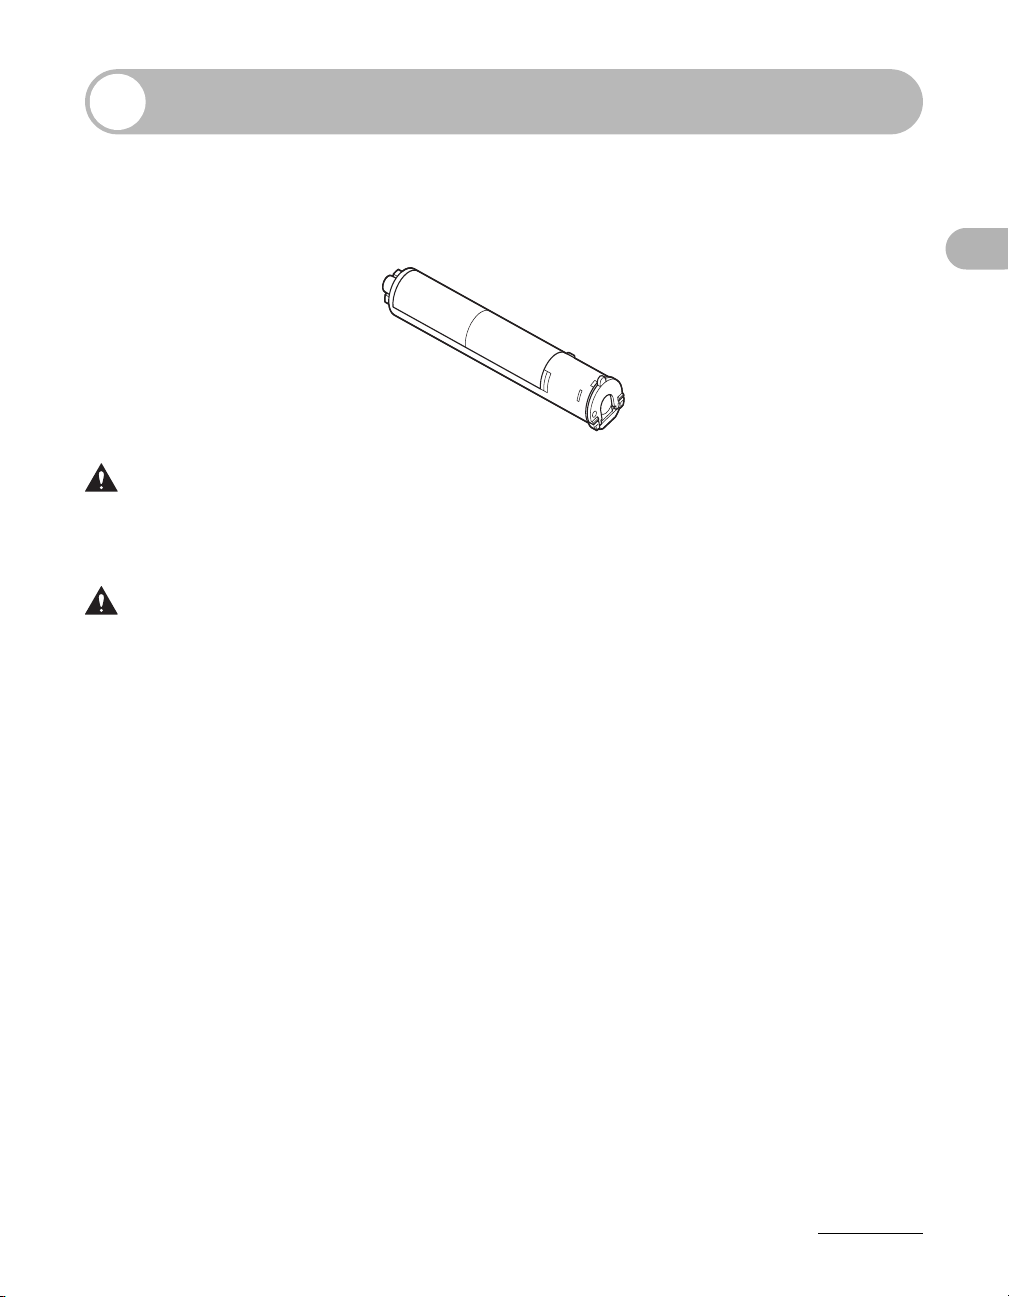
Toner Cartridge
If a message prompting you to replace the toner cartridge appears on the LCD
display, replace the toner cartridge with a new one.
Use only the toner cartridges recommended for use with this machine.
WARNING
• Never dispose toner cartridges in a fire or incinerator, as this may result in an explosion.
• Do not store toner cartridges in places exposed to open flames, as this may cause the toner to ignite
and result in burns or a fire.
CAUTION
– Keep toner and other consumables out of the reach of small children. If these items are ingested,
consult a physician immediately.
– When removing a used toner cartridge, remove the toner cartridge carefully to prevent the toner from
scattering and getting into your eyes or mouth. If the toner gets into your eyes or mouth, wash them
immediately with cold water and immediately consult a physician.
– When discarding used toner cartridges, put the cartridges into a case to prevent the toner remaining
inside the cartridges from scattering, and dispose of them in a location away from open flames.
Before Using the Machine
Maintaining the Toner Cartridge
● Store toner cartridges in a cool location, away from direct sunlight.
– The recommended storage conditions are: temperature below 86 °F (30 °C), and
humidity below 80%.
● Never store the cartridges in a vertical position.
1-8
Page 48

■ Genuine Supplies
Before Using the Machine
Canon has developed and manufactured Toner, Parts, and Supplies specifically for use in this
machine. For optimal print quality and for optimal machine performance and productivity, we
recommend that you use Genuine Canon Toner, Parts, and Supplies.
Contact your Canon Authorized Dealer or Service Provider for Genuine Canon Supplies.
1-9
Page 49
Operation Panel Power Switch
To turn the operation panel ON or OFF, press the operation panel power switch. When
turned OFF, the machine is in the Sleep mode.
Operation Panel Power Switch Machine Status
ON Standby mode (ready for immediate copying
or printing)
OFF Sleep mode
NOTE
– The machine can receive and print documents from a personal computer when it is in the Sleep mode.
I-fax/fax documents can also be received while the machine is in the Sleep mode.
– The energy consumption while the machine is in the Sleep mode can be set in the Additional Functions
menu. (See “Energy Consumption in the Sleep Mode,” on p. 1-11, and “Setting Menu,” on p. 14-5.)
– The length of time taken by the machine to enter the Sleep mode can be set in the Additional Functions
menu. (See “Setting the Sleep Mode,” on p. 1-13, and “Setting Menu,” on p. 14-5.)
– The machine will not enter the Sleep mode if it is scanning or printing.
– The machine may not enter the Sleep mode completely depending on certain conditions. (For more
information, see “Energy Consumption in the Sleep Mode,” on p. 1-11.)
– Turn the operation panel power switch OFF when not using the machine for a prolonged period of time,
for example, at night.
Before Using the Machine
1-10
Page 50
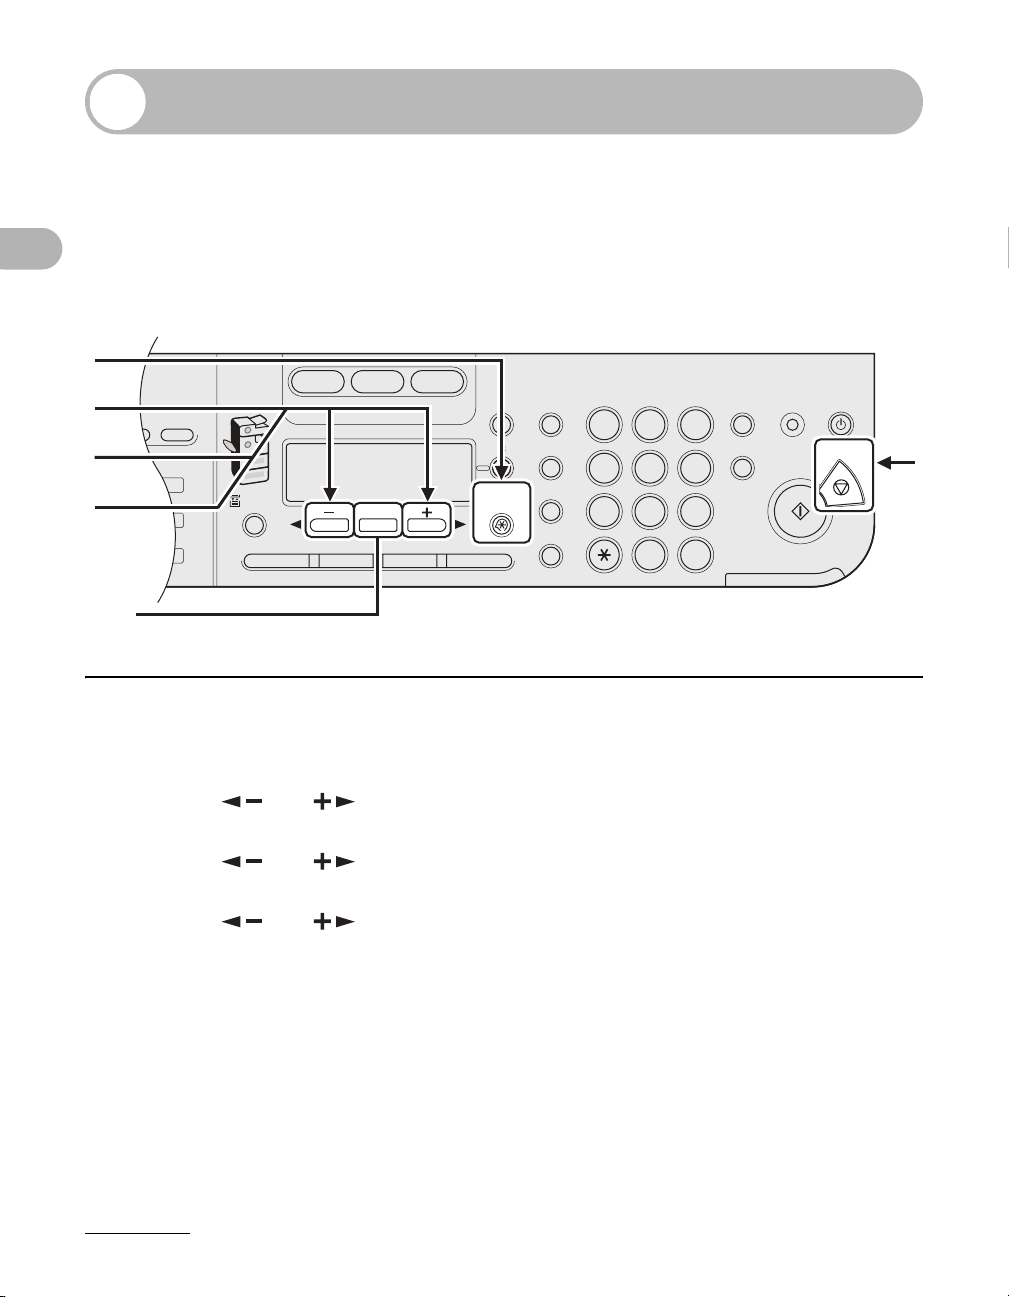
Energy Consumption in the Sleep Mode
2
Address
Book
Paper
Select
COPY SEND SCAN
Image Quality Density Copy RatioOKTwo-Sided
System
Monitor
View
Settings
Reset Collate
GHI
@./
PQRS
Ton e
JKL
ABC
TUV
MNO
DEF
Clear ON/OFF
Stop
Start
Processing/
Data
Error
Power
WXYZ
SYMBOLS
Additional
Functions
2 on 1
Frame
Erase
al
1
4
7
2
5
8
0#
3
C
6
9
Log In/Out
ID
Counter
Check
M4
[OK]
You can set the amount of energy that the machine consumes when it is in the Sleep
mode. If you set the power consumption to <LOW>, the machine consumes less
energy during the Sleep mode than when you set it to <HIGH>. However, it takes more
time for the machine to resume normal operation.
1
2
3
Before Using the Machine
4
1 Press [Additional Functions].
2 Press [ ] or [ ] to select <COMMON SETTINGS>, then press [OK].
3 Press [ ] or [ ] to select <ENERGY IN SLEEP>, then press [OK].
4 Press [ ] or [ ] to select <HIGH> or <LOW>, then press [OK].
5 Press [Stop] to retrun to the standby mode.
5
1-11
Page 51
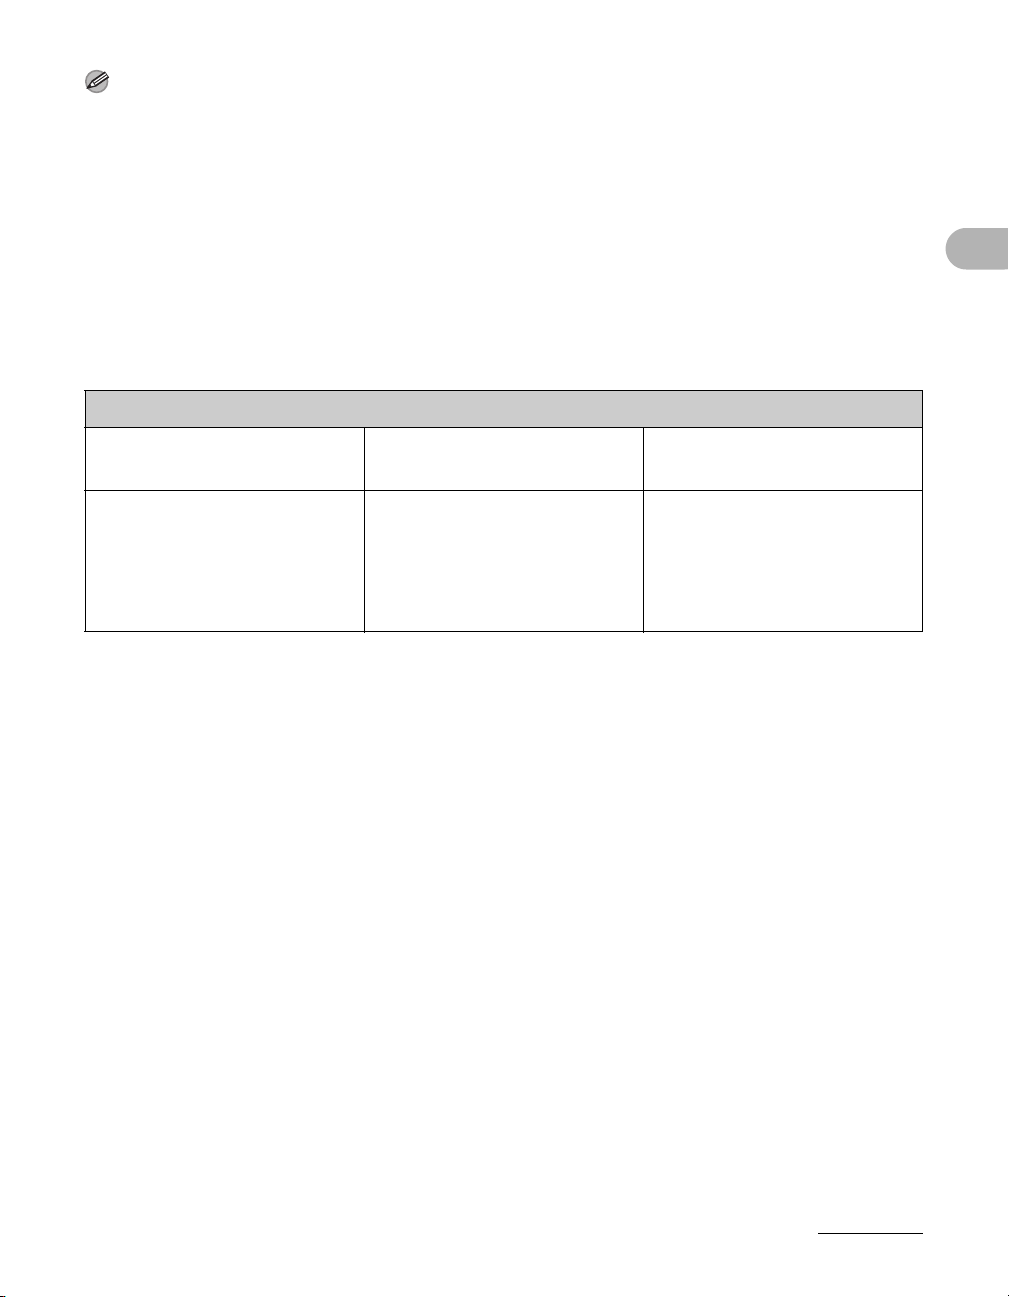
NOTE
– If there is less time than specified in <AUTO SLEEP TIME> remaining before sending a job which has
been reserved for delayed sending, the machine will not enter the Sleep mode completely.
– If you are using a management application (such as NetSpot Console) to view or manage the settings
and status of the machine via the network, the machine may not enter the Sleep mode completely.
– If you are using the machine as a Windows printer, the machine may not enter the Sleep mode
completely if SNMP Status is enabled for your operating system (unless your computer is turned OFF).
For more information on disabling SNMP Status, contact your network administrator.
– In some cases, the energy consumption level in the Sleep mode is <HIGH> even when the energy
consumption level is set to <LOW>, such as when:
• A job is being processed (including a forwarding job, report job, receive job, and sending a forwarding
done notice).
• Any of the following settings are set in the Additional Functions menu:
SYSTEM SETTINGS
COMMUNICATION MEMORY LOCK MEMORY RX TM is set to
ON*.
Before Using the Machine
NETWORK SETTINGS TCP/IP SETTINGS
SMB SETTINGS
DHCP is set to ON.
USE SMB CLIENT is set
to ON.
E-MAIL/I-FAX
POP INTERVAL is set to
more than 1MIN.
*
If there is more time than specified in <AUTO SLEEP TIME> remaining before the set time limit is
reached, the machine consumes the same amount of energy as when the energy consumption level is
set to <LOW>.
– The default setting is <LOW>.
– For information on each setting, see Chapter 1, “Advanced Send Features” or Chapter 3, “Network” in
the Advanced Operation Guide.
1-12
Page 52
Timer Settings
2
Address
Book
Paper
Select
COPY SEND SCAN
Image Quality Density Copy RatioOKTwo-Sided
System
Monitor
View
Settings
Reset Collate
GHI
@./
PQRS
Ton e
JKL
ABC
TUV
MNO
DEF
Clear ON/OFF
Stop
Start
Processing/
Data
Error
Power
WXYZ
SYMBOLS
Additional
Functions
2 on 1
Frame
Erase
al
1
4
7
2
5
8
0#
3
C
6
9
Log In/Out
ID
Counter
Check
M4
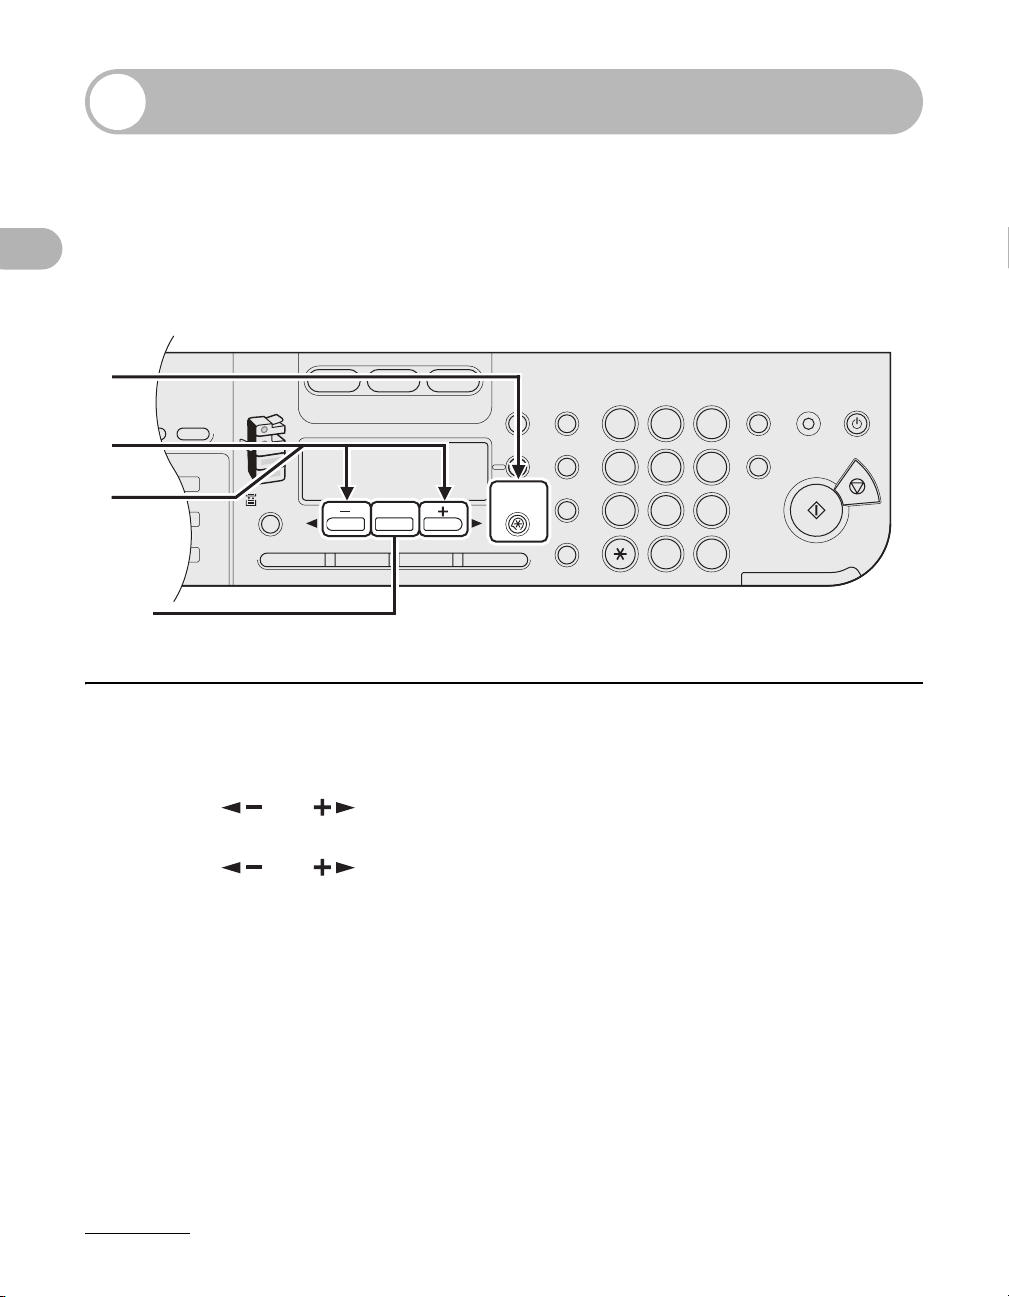
Setting the Sleep Mode
When the machine remains idle for a certain period of time, it automatically enters the
Sleep mode.
1
2
Before Using the Machine
3
[OK]
1 Press [Additional Functions].
2 Press [ ] or [ ] to select <TIMER SETTINGS>, then press [OK].
3 Press [ ] or [ ] to select <AUTO SLEEP TIME>, then press [OK].
1-13
Page 53
2
Address
Book
Paper
Select
COPY SEND SCAN
Image Quality Density Copy RatioOKTwo-Sided
System
Monitor
View
Settings
Reset Collate
GHI
@./
PQRS
Ton e
JKL
ABC
TUV
MNO
DEF
Clear ON/OFF
Stop
Start
Processing/
Data
Error
Power
WXYZ
SYMBOLS
Additional
Functions
2 on 1
Frame
Erase
al
1
4
7
2
5
8
0#
3
C
6
9
Log In/Out
ID
Counter
Check
M4
4
6
5
[OK]
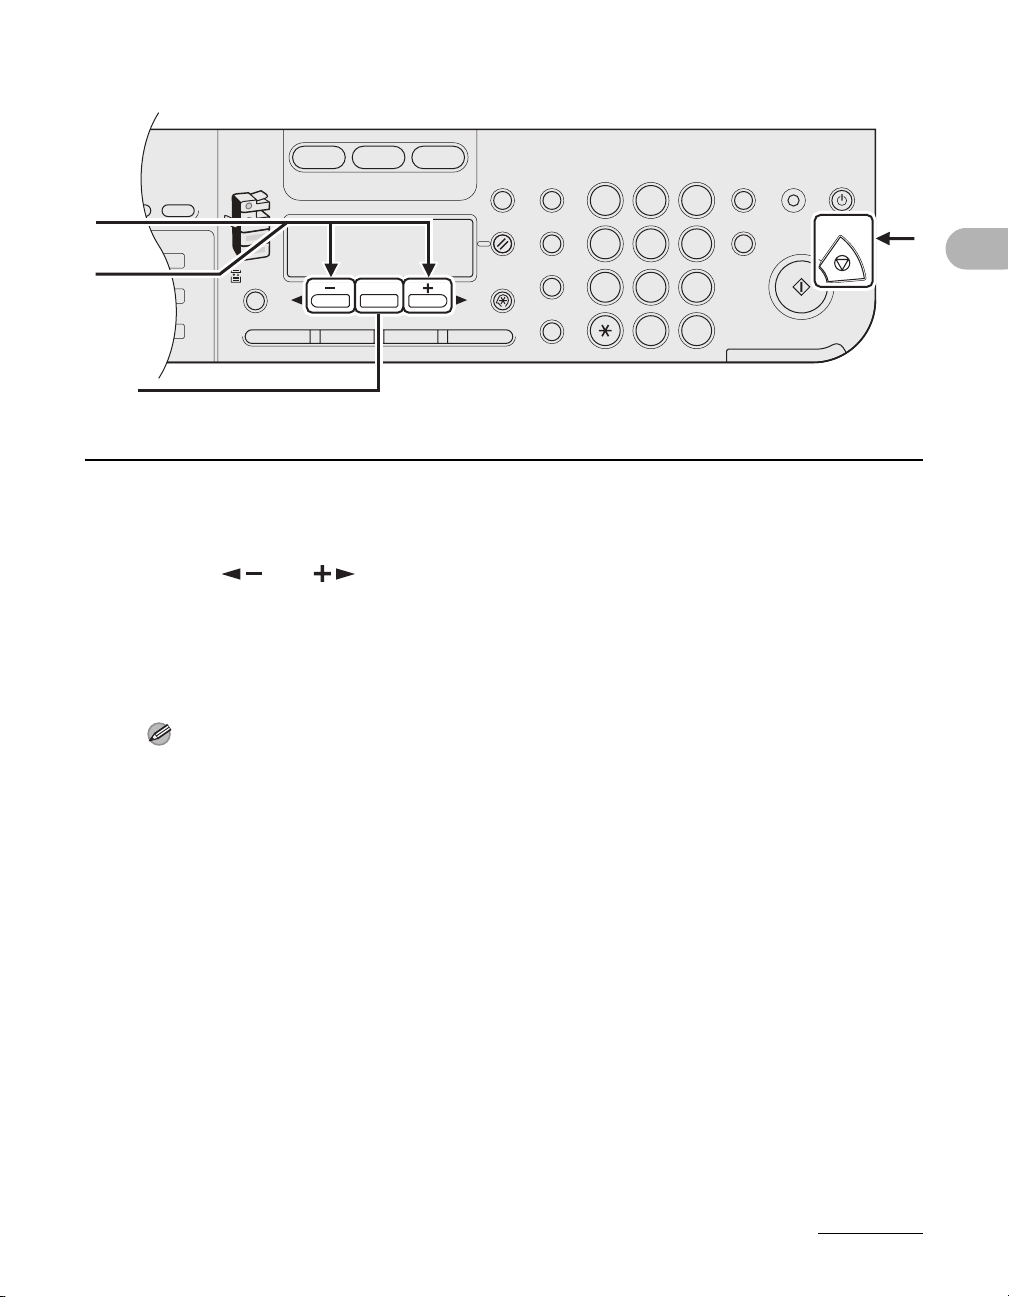
4 Confirm that <ON> is displayed, then press [OK].
5 Press [ ] or [ ] to select the desired interval, then press [OK].
You can set the interval from 3 to 30 minutes (in one-minute increments).
You can also enter values using numeric keys.
6 Press [Stop] to return to the standby mode.
NOTE
– To resume the normal mode from the Sleep mode, press [ON/OFF] on the operation panel.
– To enter the Sleep mode manually, press [ON/OFF] on the operation panel.
– The machine will not enter the Sleep mode when:
• the machine is in operation
• a system error occurs
• the handset of the external telephone is off the hook
– The machine will leave the Sleep mode when:
• you press [ON/OFF] on the operation panel
• a computer performs a scan through the machine
Before Using the Machine
1-14
Page 54
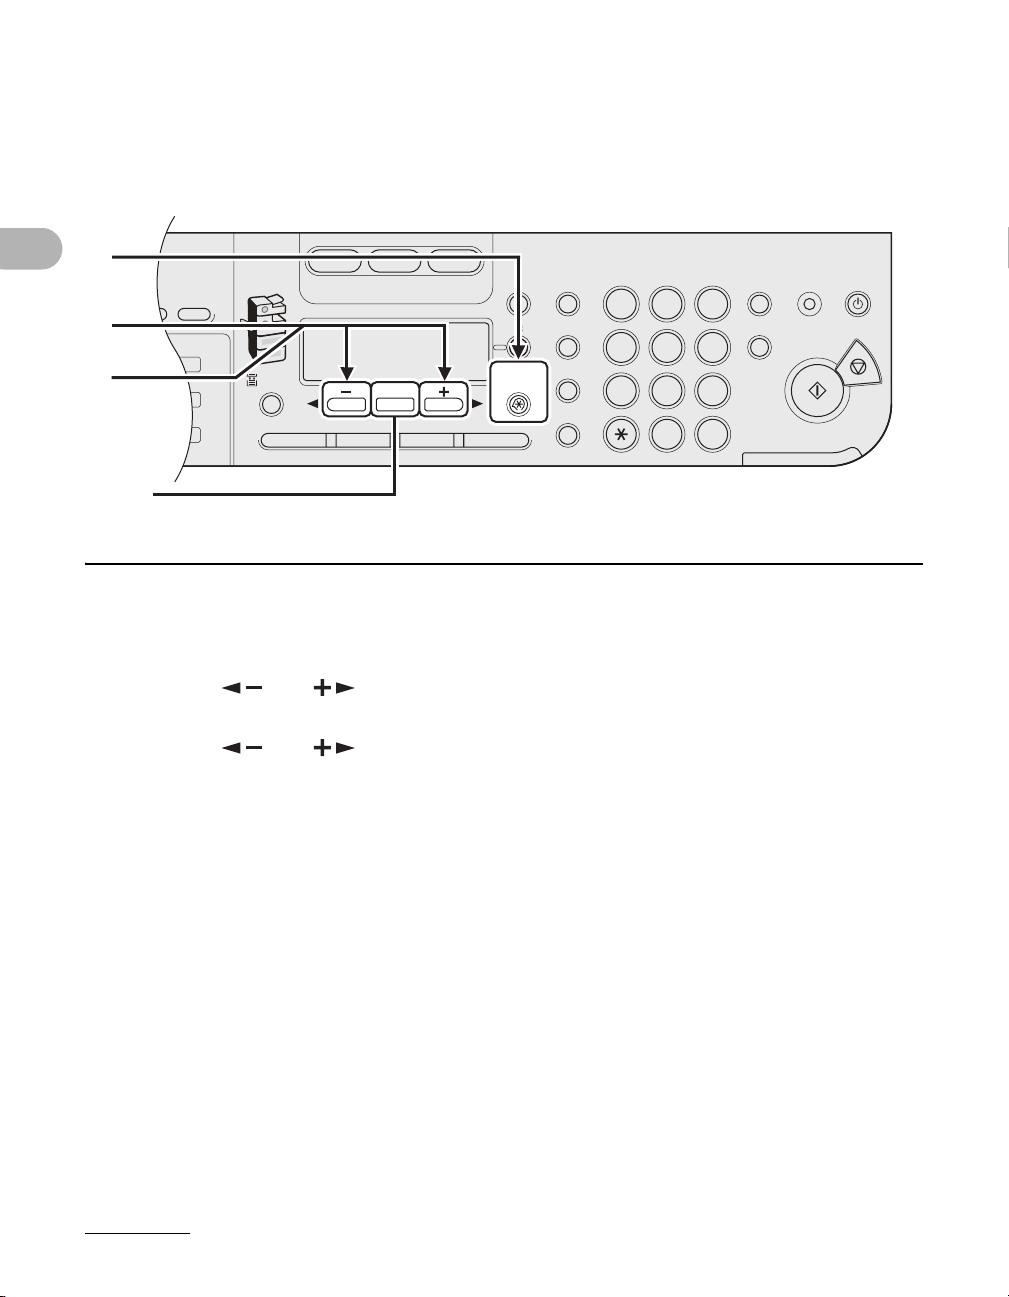
Setting Auto Clear Time
2
Address
Book
Paper
Select
COPY SEND SCAN
Image Quality Density Copy RatioOKTwo-Sided
System
Monitor
View
Settings
Reset Collate
GHI
@./
PQRS
Ton e
JKL
ABC
TUV
MNO
DEF
Clear ON/OFF
Stop
Start
Processing/
Data
Error
Power
WXYZ
SYMBOLS
Additional
Functions
2 on 1
Frame
Erase
al
1
4
7
2
5
8
0#
3
C
6
9
Log In/Out
ID
Counter
Check
M4
If the machine remains idle for a certain period of time, the display returns to the
standby mode (Auto Clear function).
1
2
3
Before Using the Machine
[OK]
1 Press [Additional Functions].
2 Press [ ] or [ ] to select <TIMER SETTINGS>, then press [OK].
3 Press [ ] or [ ] to select <AUTO CLEAR TIME>, then press [OK].
1-15
Page 55
2
Address
Book
Paper
Select
COPY SEND SCAN
Image Quality Density Copy RatioOKTwo-Sided
System
Monitor
View
Settings
Reset Collate
GHI
@./
PQRS
Ton e
JKL
ABC
TUV
MNO
DEF
Clear ON/OFF
Stop
Start
Processing/
Data
Error
Power
WXYZ
SYMBOLS
Additional
Functions
2 on 1
Frame
Erase
al
1
4
7
2
5
8
0#
3
C
6
9
Log In/Out
ID
Counter
Check
M4
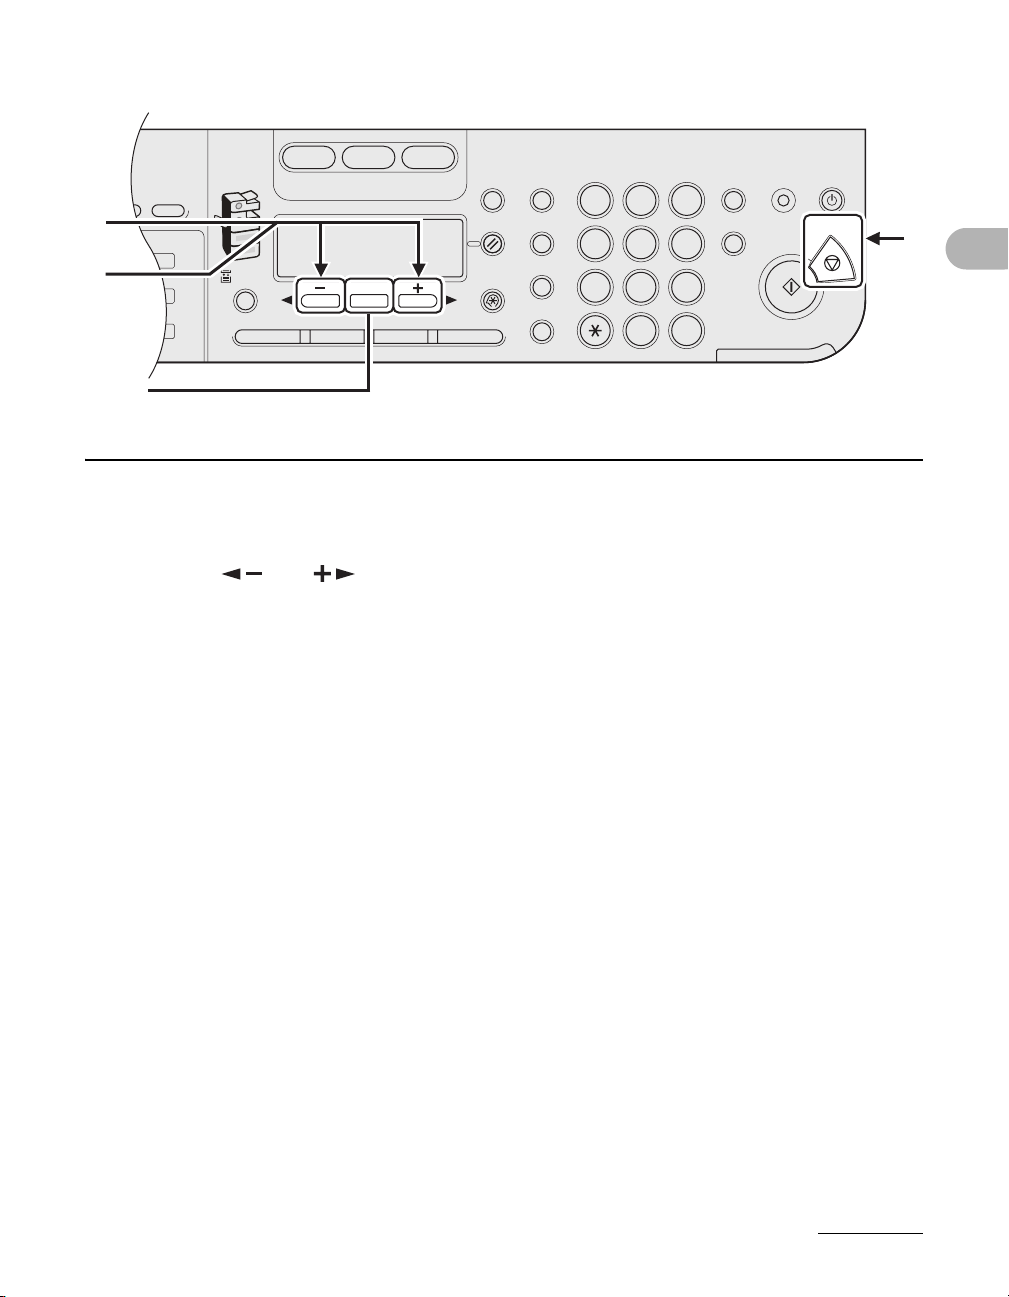
4
6
5
[OK]
4 Confirm that <ON> is displayed, then press [OK].
5 Press [ ] or [ ] to select the desired interval, then press [OK].
You can set the interval from 1 to 9 minutes (in one-minute increments).
You can also enter values using numeric keys.
6 Press [Stop] to return to the standby mode.
Before Using the Machine
1-16
Page 56
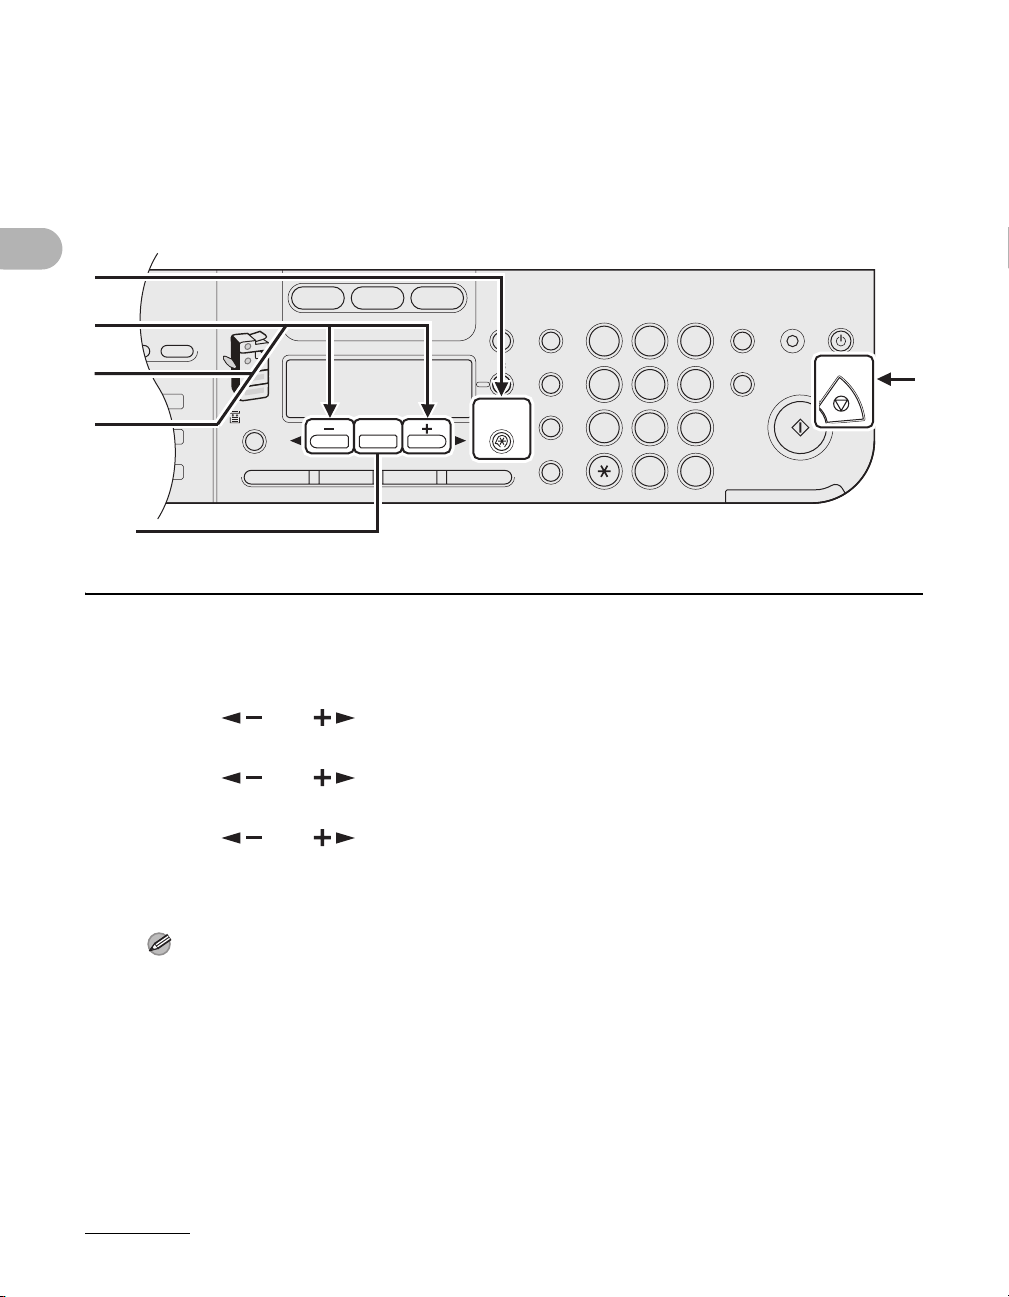
Setting Time Zone
2
Address
Book
Paper
Select
COPY SEND SCAN
Image Quality Density Copy RatioOKTwo-Sided
System
Monitor
View
Settings
Reset Collate
GHI
@./
PQRS
Ton e
JKL
ABC
TUV
MNO
DEF
Clear ON/OFF
Stop
Start
Processing/
Data
Error
Power
WXYZ
SYMBOLS
Additional
Functions
2 on 1
Frame
Erase
al
1
4
7
2
5
8
0#
3
C
6
9
Log In/Out
ID
Counter
Check
M4
[OK]
The standard time zones of the world are expressed globally in terms of the difference
in hours (± up to 12 hours) from GMT (0 hours). A time zone is a region throughout
which this time difference is the same.
1
2
3
4
Before Using the Machine
1 Press [Additional Functions].
2 Press [ ] or [ ] to select <TIMER SETTINGS>, then press [OK].
3 Press [ ] or [ ] to select <TIME ZONE SETTING>, then press [OK].
4 Press [ ] or [ ] to select the time zone, then press [OK].
5 Press [Stop] to return to the standby mode.
5
NOTE
The specified time zone setting becomes effective after the machine is restarted.
1-17
Page 57
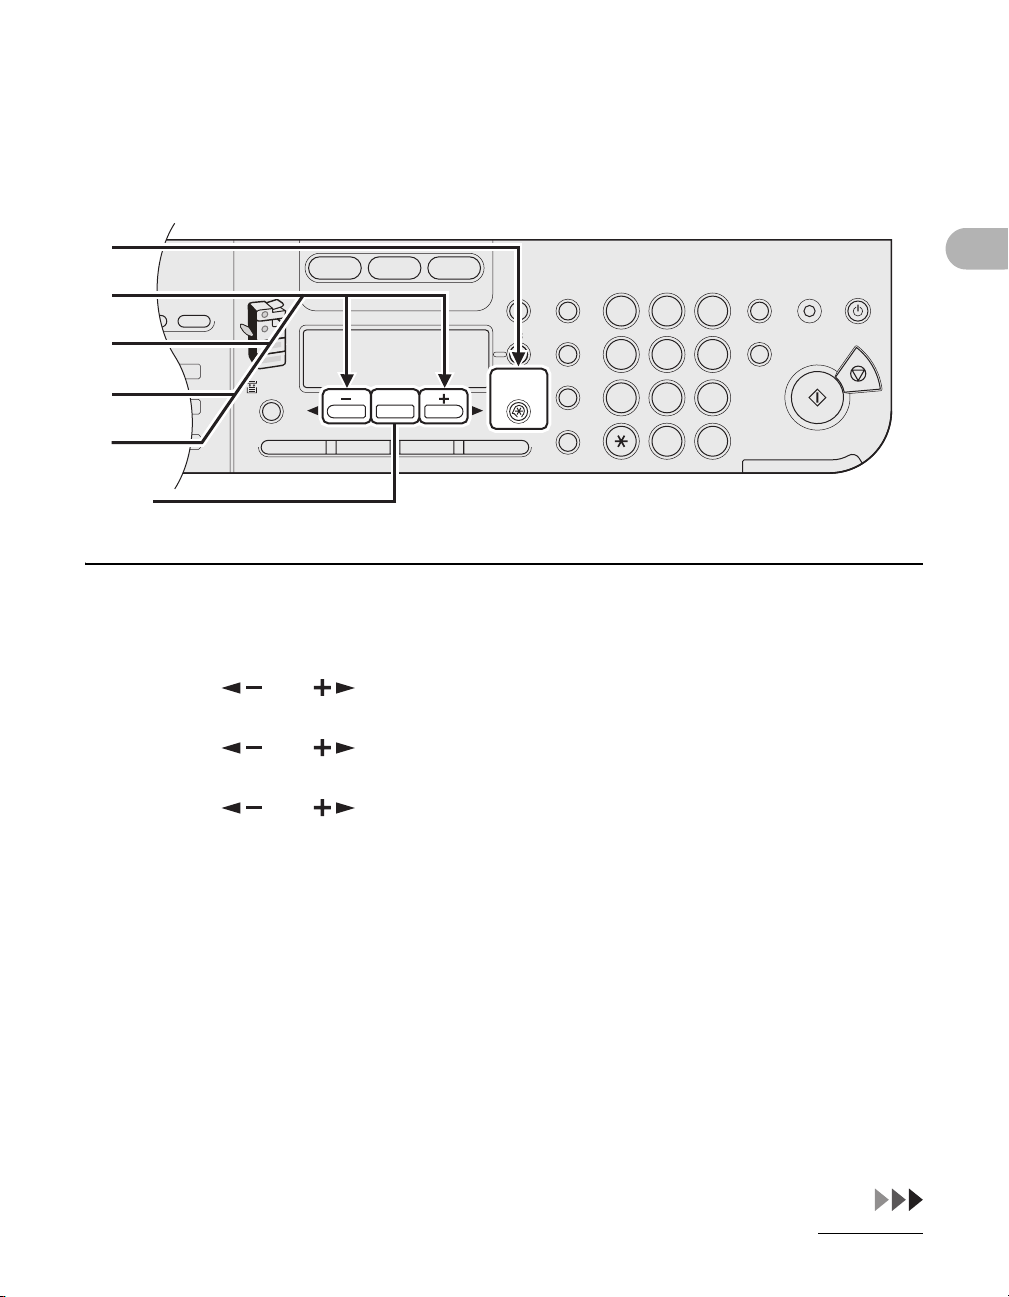
Setting Daylight Saving Time
2
Address
Book
Paper
Select
COPY SEND SCAN
Image Quality Density Copy RatioOKTwo-Sided
System
Monitor
View
Settings
Reset Collate
GHI
@./
PQRS
Ton e
JKL
ABC
TUV
MNO
DEF
Clear ON/OFF
Stop
Start
Processing/
Data
Error
Power
WXYZ
SYMBOLS
Additional
Functions
2 on 1
Frame
Erase
al
1
4
7
2
5
8
0#
3
C
6
9
Log In/Out
ID
Counter
Check
M4
[OK]
In some countries or areas, time is advanced throughout the summer season. This is
called “Daylight Saving Time.”
1
2
3
4
5
1 Press [Additional Functions].
2 Press [ ] or [ ] to select <TIMER SETTINGS>, then press [OK].
3 Press [ ] or [ ] to select <DAYLIGHT SV.TIME>, then press [OK].
4 Press [ ] or [ ] to select <ON>, then press [OK].
Before Using the Machine
5 Confirm that <START DATE/TIME> is displayed, then press [OK].
1-18
Page 58
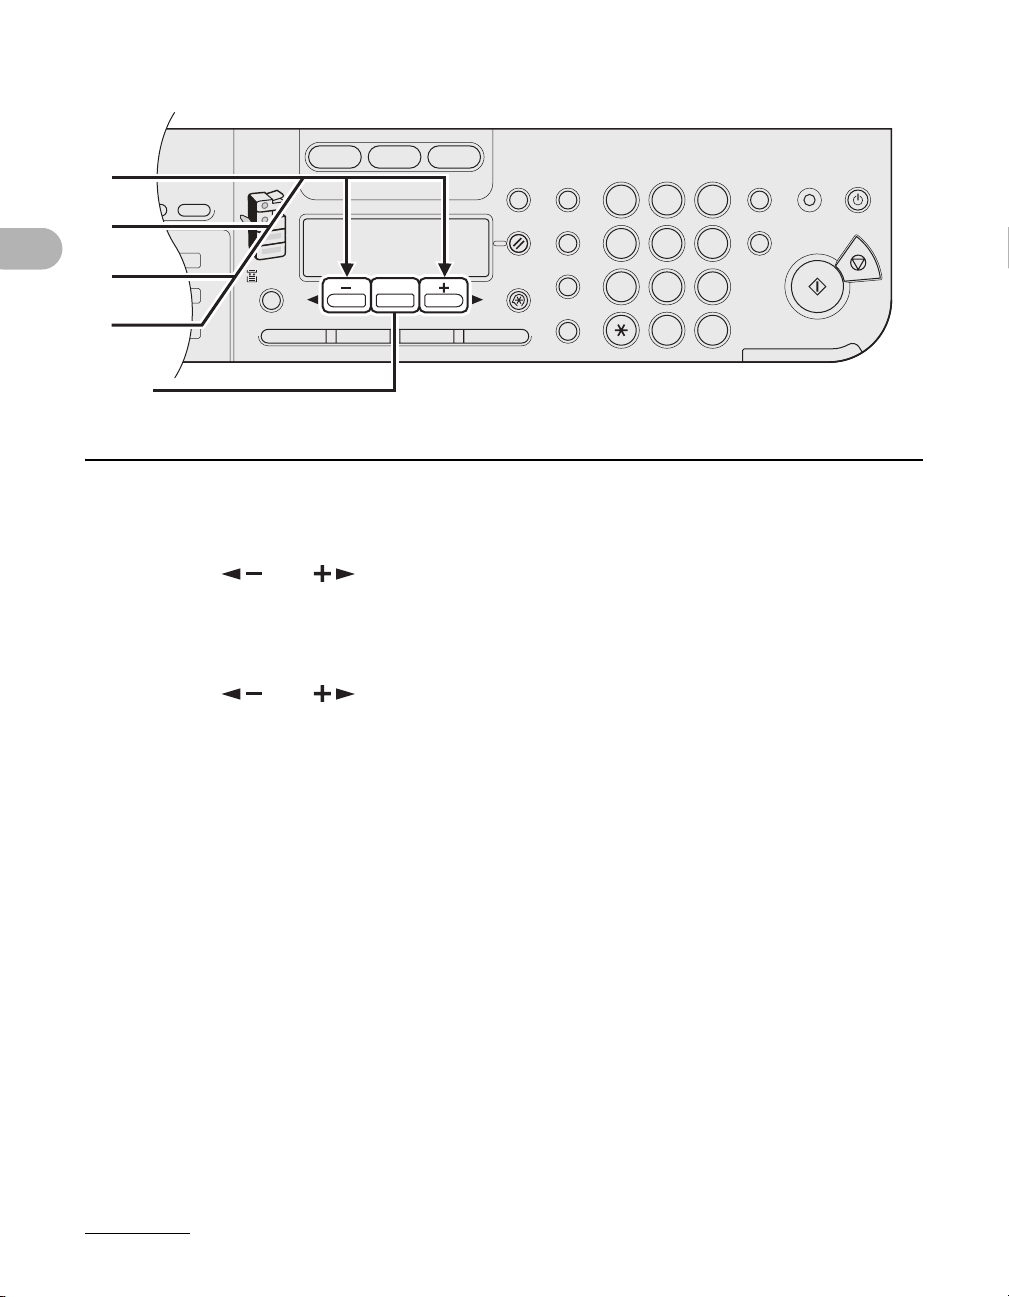
2
Address
Book
Paper
Select
COPY SEND SCAN
Image Quality Density Copy RatioOKTwo-Sided
System
Monitor
View
Settings
Reset Collate
GHI
@./
PQRS
Ton e
JKL
ABC
TUV
MNO
DEF
Clear ON/OFF
Stop
Start
Processing/
Data
Error
Power
WXYZ
SYMBOLS
Additional
Functions
2 on 1
Frame
Erase
al
1
4
7
2
5
8
0#
3
C
6
9
Log In/Out
ID
Counter
Check
M4
6
7
8
9
[OK]
Before Using the Machine
6 Confirm that <MONTH> is displayed, then press [OK].
7 Press [ ] or [ ] to select the month, then press [OK].
8 Confirm that <WEEK> is displayed, then press [OK].
9 Press [ ] or [ ] to select the week, then press [OK].
1-19
Page 59
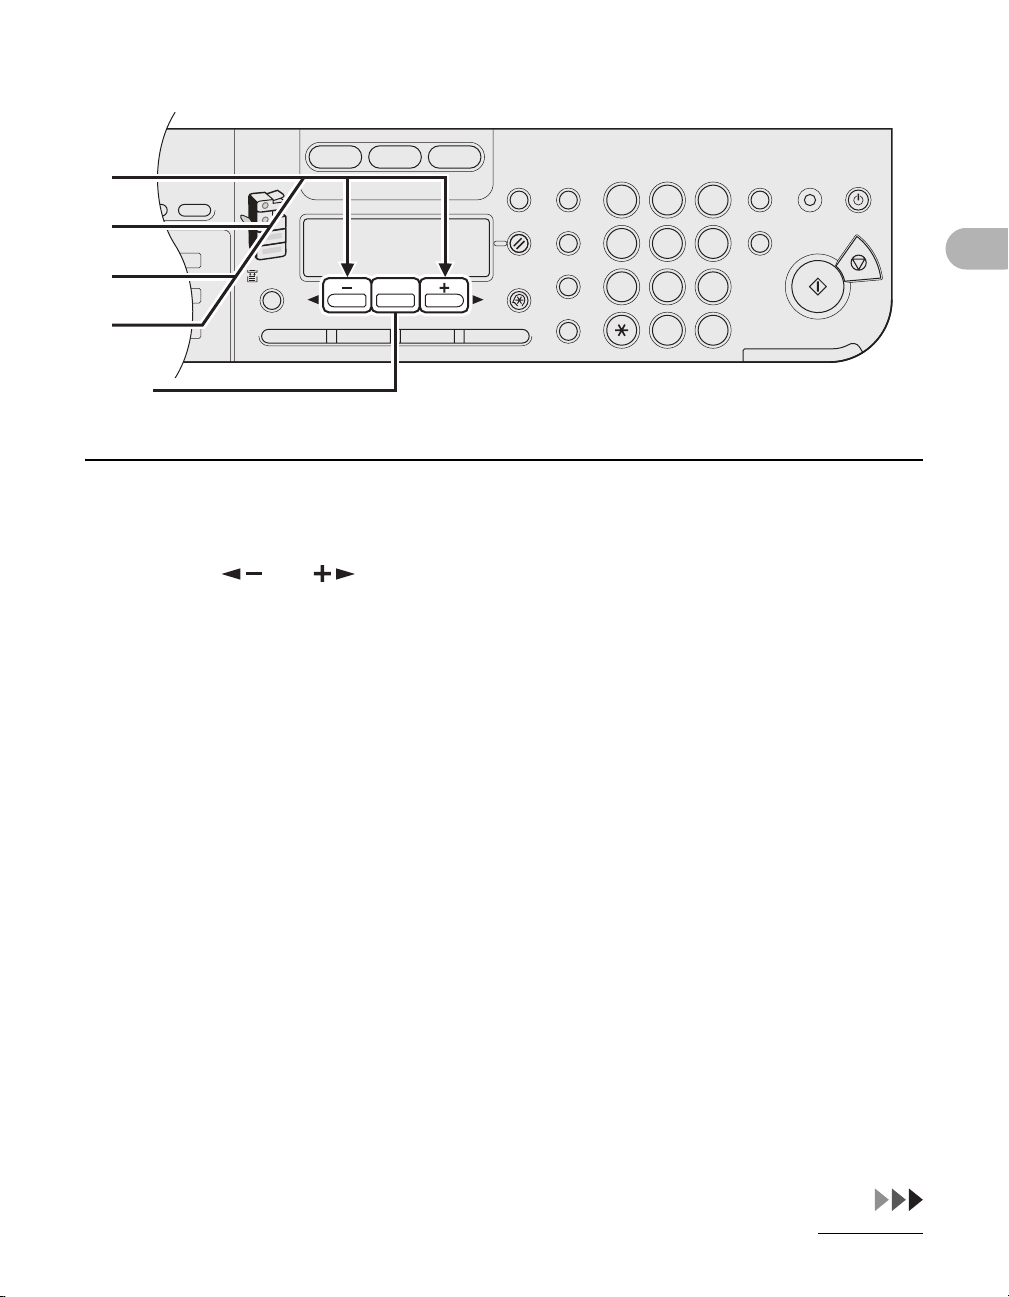
2
Address
Book
Paper
Select
COPY SEND SCAN
Image Quality Density Copy RatioOKTwo-Sided
System
Monitor
View
Settings
Reset Collate
GHI
@./
PQRS
Ton e
JKL
ABC
TUV
MNO
DEF
Clear ON/OFF
Stop
Start
Processing/
Data
Error
Power
WXYZ
SYMBOLS
Additional
Functions
2 on 1
Frame
Erase
al
1
4
7
2
5
8
0#
3
C
6
9
Log In/Out
ID
Counter
Check
M4
10
11
12
13
[OK]
10 Confirm that <DAY> is displayed, then press [OK].
11 Press [ ] or [ ] to select the day, then press [OK].
12 Confirm that <END DATE/TIME> is displayed, then press [OK].
13 Confirm that <MONTH> is displayed, then press [OK].
Before Using the Machine
1-20
Page 60
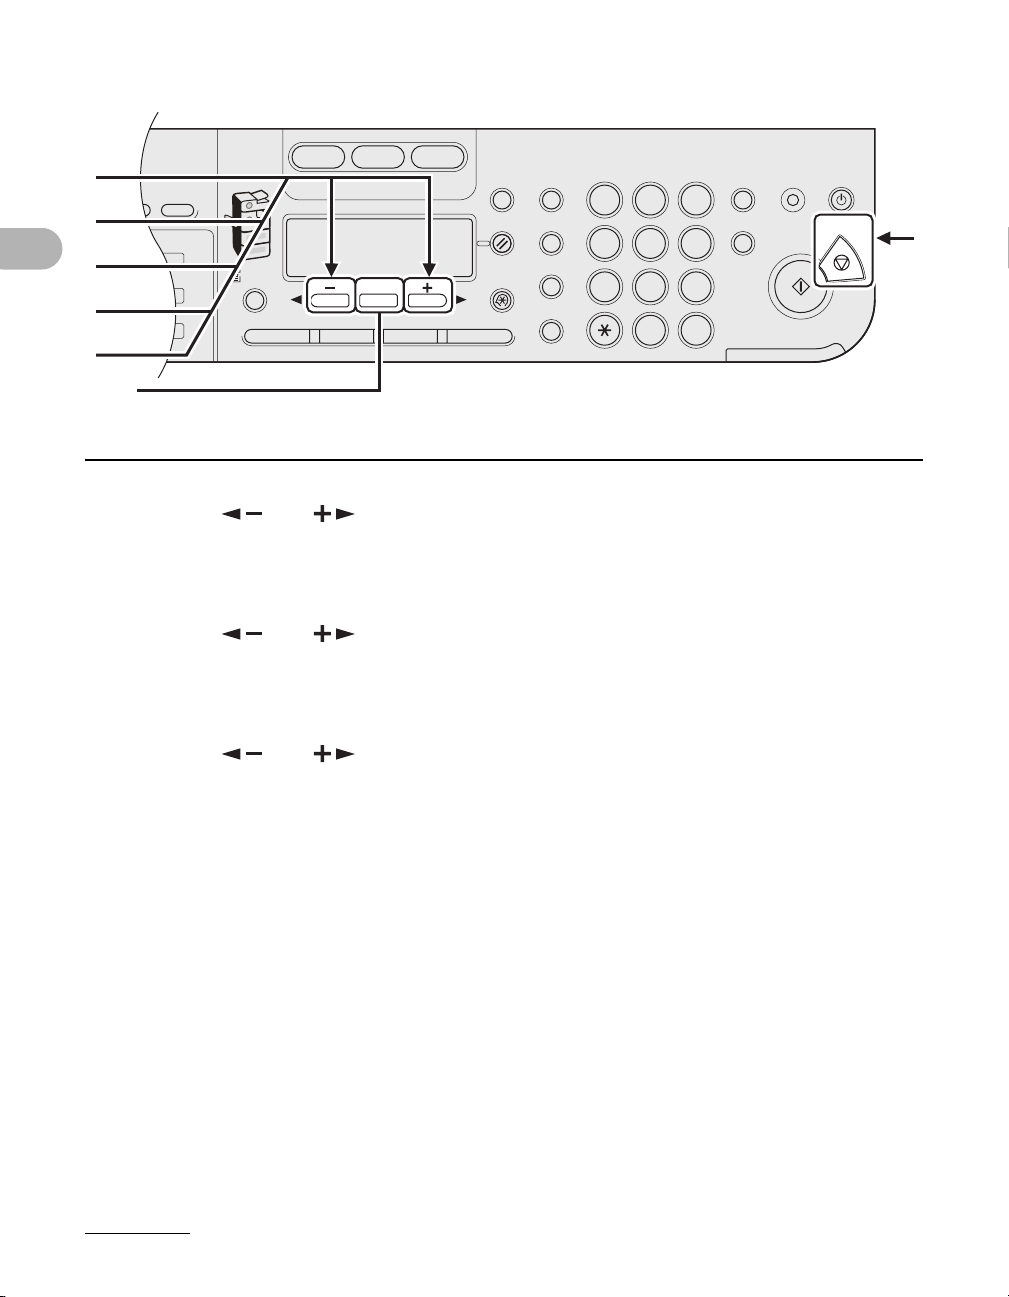
2
Address
Book
Paper
Select
COPY SEND SCAN
Image Quality Density Copy RatioOKTwo-Sided
System
Monitor
View
Settings
Reset Collate
GHI
@./
PQRS
Ton e
JKL
ABC
TUV
MNO
DEF
Clear ON/OFF
Stop
Start
Processing/
Data
Error
Power
WXYZ
SYMBOLS
Additional
Functions
2 on 1
Frame
Erase
al
1
4
7
2
5
8
0#
3
C
6
9
Log In/Out
ID
Counter
Check
M4
14
15
16
17
18
[OK]
Before Using the Machine
14 Press [ ] or [ ] to select the month, then press [OK].
15 Confirm that <WEEK> is displayed, then press [OK].
16 Press [ ] or [ ] to select the week, then press [OK].
17 Confirm that <DAY> is displayed, then press [OK].
18 Press [ ] or [ ] to select the day, then press [OK].
19
19 Press [Stop] to return to the standby mode.
1-21
Page 61

Before Using the Machine
1-22
Page 62
Document Handling
Document Requirements
Platen Glass ADF
Type – Plain paper
Document Handling
– Thick documents
– Photographs
– Small documents (e.g., index cards)
Plain paper (Multipage documents of
the same size, thickness and weight
or one page documents.)
– Special types of paper (e.g., tracing
1
paper*
– Book (Height: max.
Size (W x L) Max. 8
(Max. 216 x 356 mm)
, transparencies*1, etc.)
7
/8" (20 mm))
1
/2" x 14"
Max. 8 1/2" x 14"
(Max. 216 x 356 mm)
1
Min. 5
/2" x 5"
(Min. 139.7 x 128 mm)
Weight Max. 4.4 lb (2 kg) one-sided scanning: 13 to 34 lb bond
(50 to 128 g/m
2
)
two-sided scanning: 13 to 28 lb bond
(50 to 105 g/m
Quantity 1 sheet Max. 50 sheets*
2
)
2
(Max. 25 sheets for LGL documents)
*1When copying a transparent document such as tracing paper or transparencies, use a piece of plain
white paper to cover the document after placing it face-down on the platen glass.
2
21 lb bond (80 g/m2) paper
*
2-1
Page 63

● Do not place the document on the platen glass or in the ADF until the glue, ink or
correction fluid on the document is completely dry.
● Remove all fasteners (staples, paper clips, etc.) before loading the document in the
ADF.
● To prevent document jams in the ADF, do not use any of the following:
– Wrinkled or creased paper
– Carbon paper or carbon-backed paper
– Curled or rolled paper
– Coated paper
– Torn paper
– Onion skin or thin paper
– Paper printed with a thermal transfer printer
– Transparencies
Document Handling
2-2
Page 64
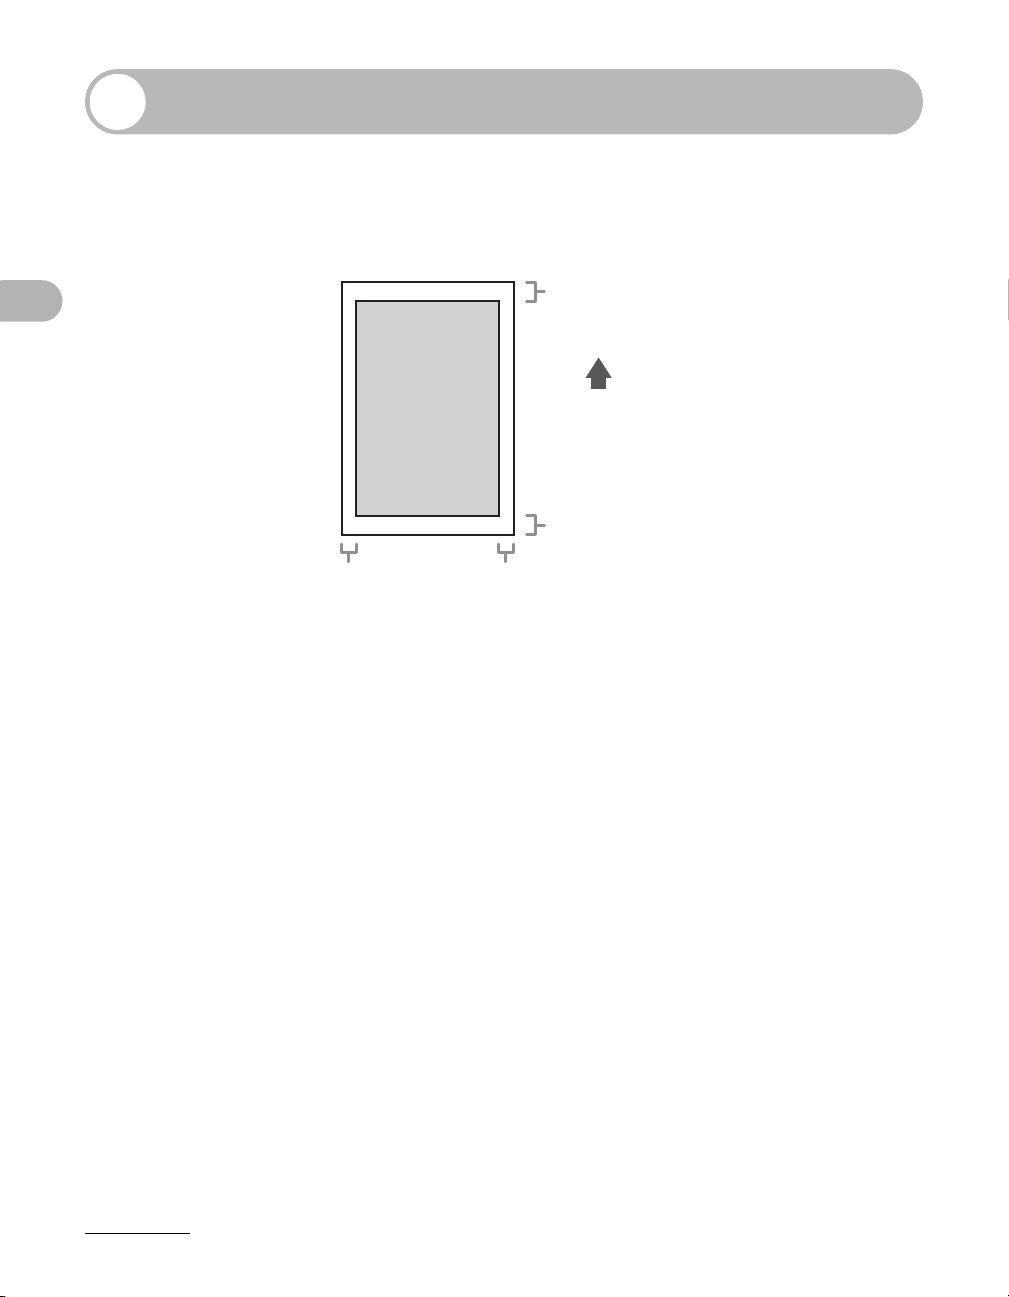
Scanning Area
Make sure your document’s text and graphics fall within the shaded area in the
following diagram. Note that the margin widths listed are approximate and there
may be slight variations in actual use.
1
/8" (2 mm)
Document Handling
1
/8" (2 mm)
1
/8"
(2 mm)
1
/8"
(2 mm)
2-3
Page 65
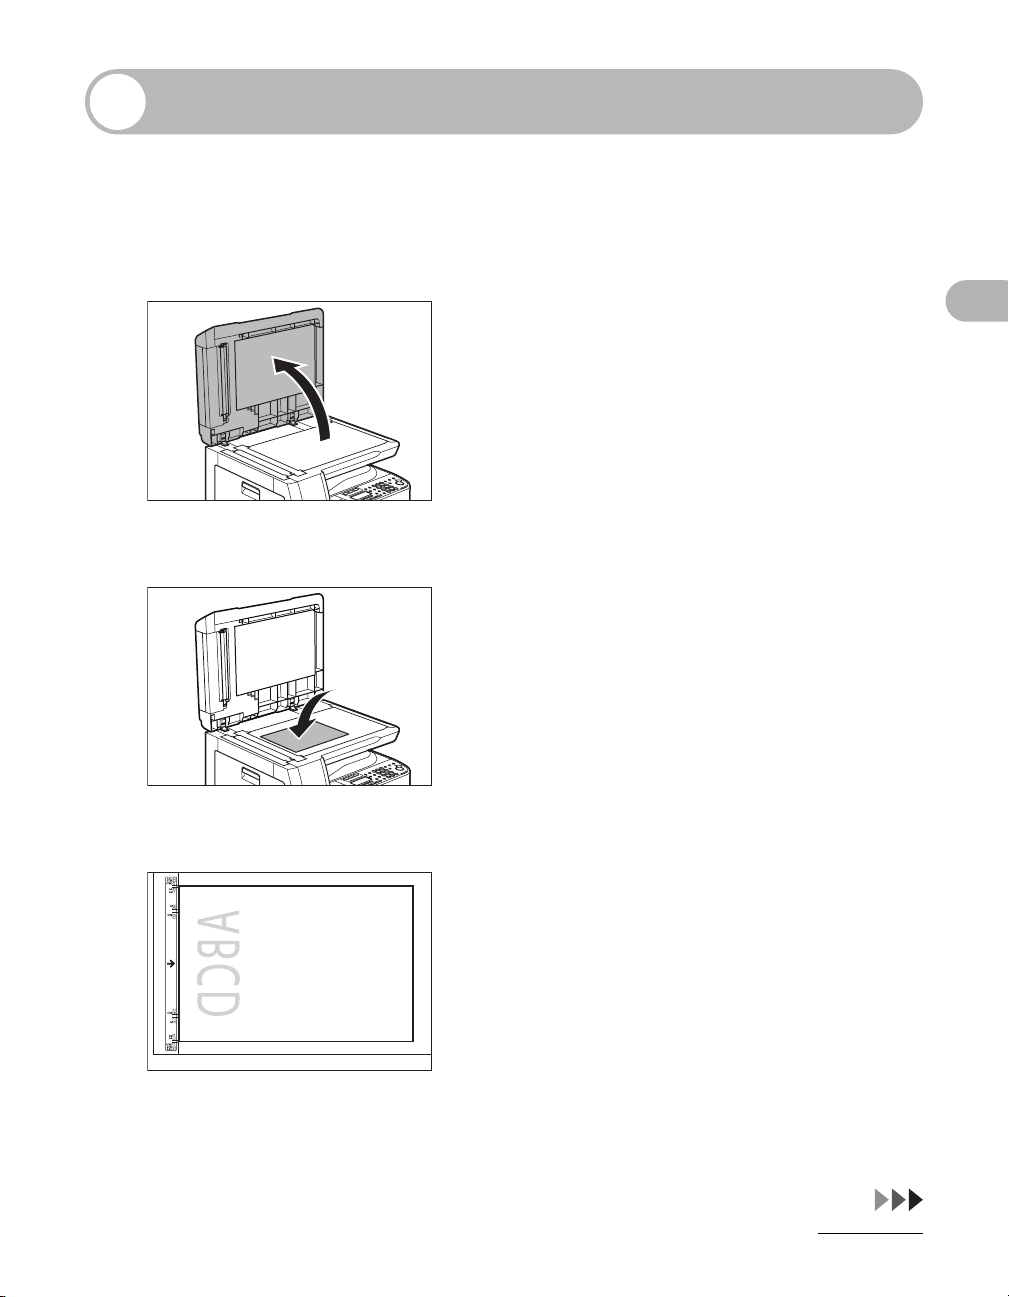
Loading Documents
On the Platen Glass
1 Lift up the ADF/platen glass cover.
2 Place your document face down.
Document Handling
3 Align the document with the appropriate paper size marks.
If your document does not match any of the paper size marks, align the center of your document
with the arrow mark.
2-4
Page 66
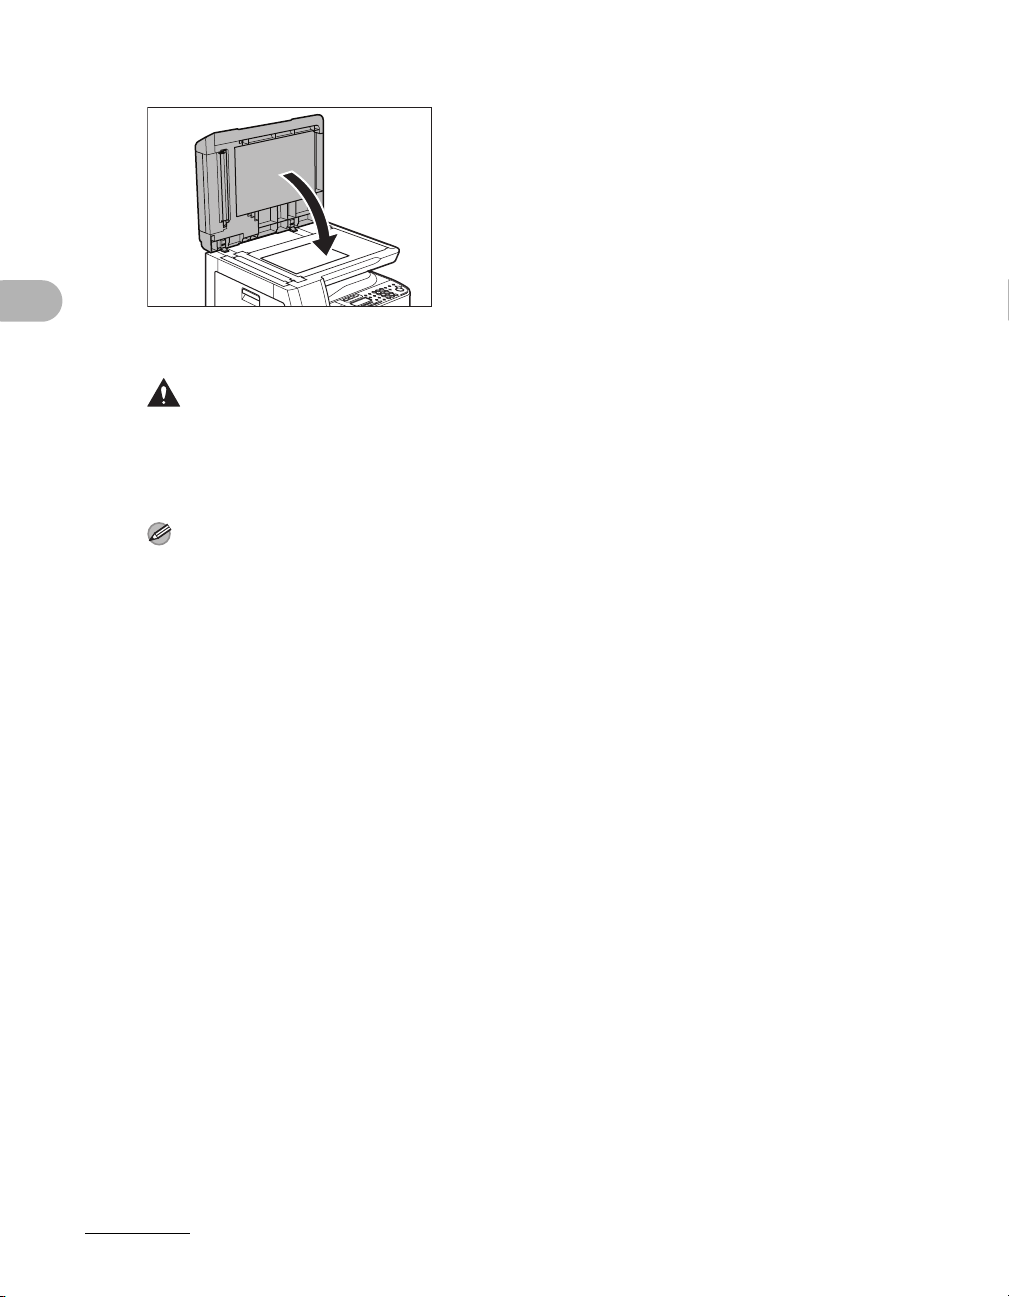
4 Gently lower the ADF/platen glass cover.
The document is ready for scanning.
CAUTION
– When closing the ADF/platen glass cover, be careful not to get your fingers caught, as
Document Handling
this may result in personal injury.
– Do not press down the ADF/platen glass cover forcefully, as this may damage the platen
glass and cause personal injury.
NOTE
Remove the document from the platen glass when scanning is complete.
2-5
Page 67
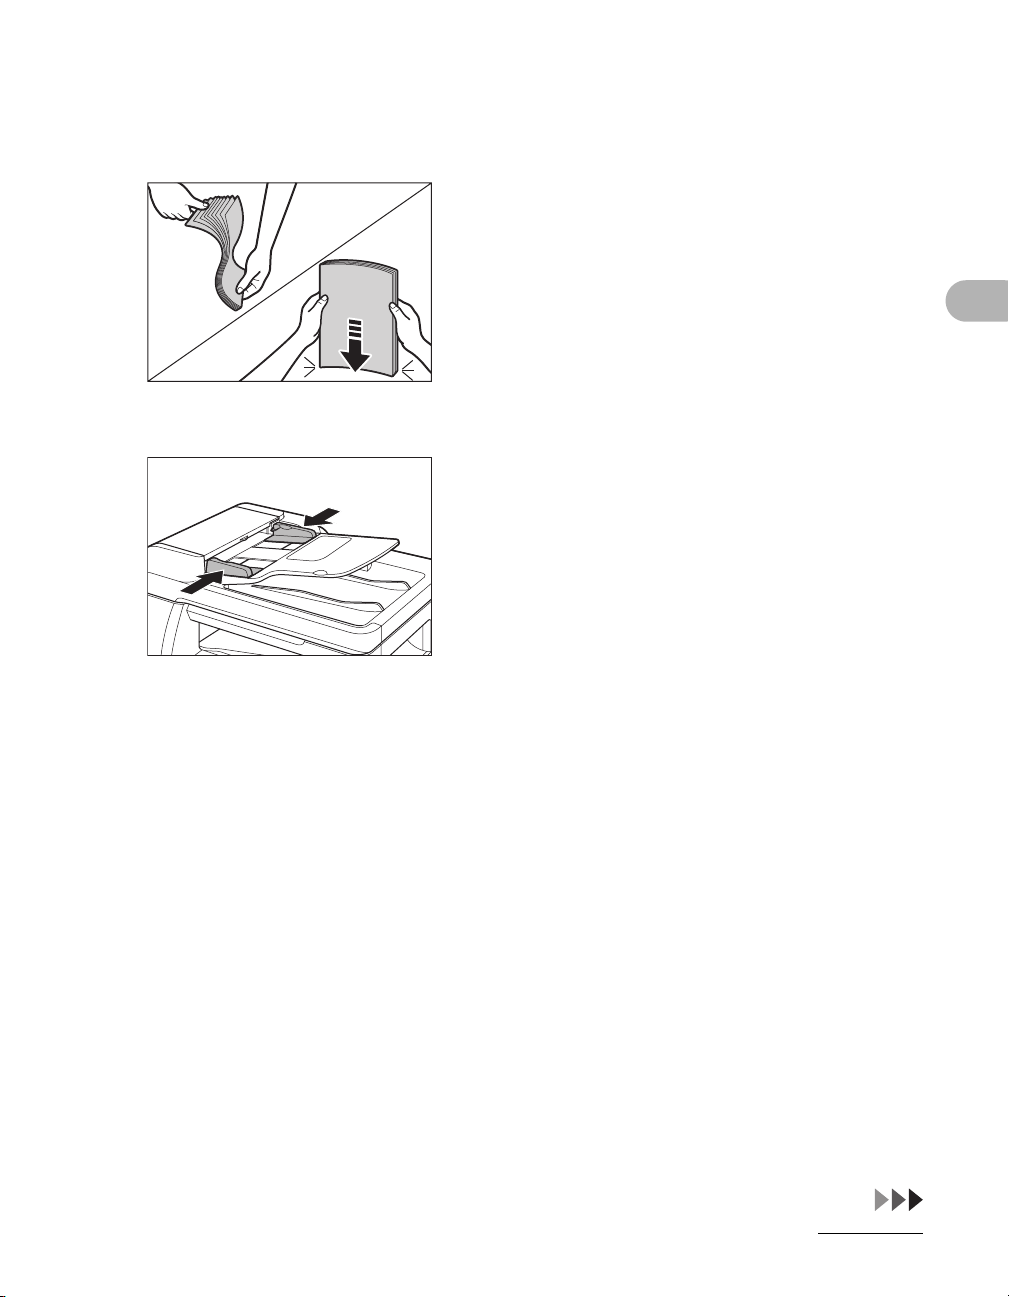
In the ADF
1 Fan the document stack and even the edges.
2 Adjust the slide guides to the width of the documents.
Document Handling
2-6
Page 68
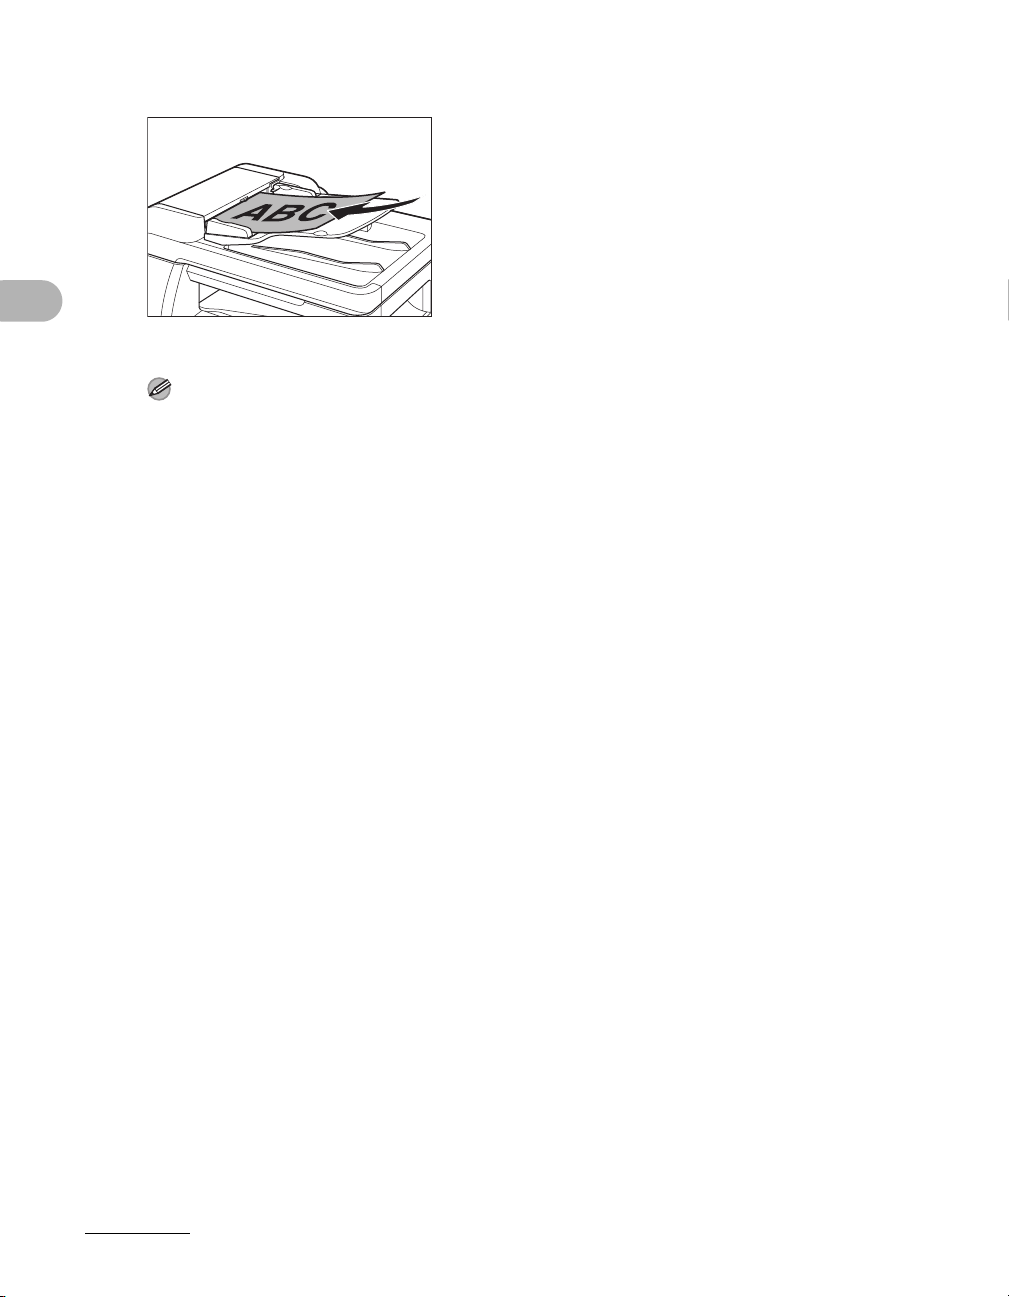
3 Neatly place the documents face up in the document feeder tray.
The document is ready for scanning.
NOTE
– Do not add or remove documents while they are being scanned.
– When scanning is complete, remove the documents from the document delivery tray to avoid
Document Handling
paper jams.
– Avoid using ADF to scan the same document more than 30 times. When scanned repeatedly,
documents can become folded or torn, which may cause paper jams.
– If the feeder rollers are soiled from scanning a document written in pencil, clean them. (See
“Cleaning the Machine,” on p. 12-1.)
2-7
Page 69

Document Handling
2-8
Page 70
Print Media
Paper Requirements
Paper Drawer Stack Bypass
Size (W x L) LGL, LTR, OFICIO,
FLSP, BRAZIL-OFICIO,
Print Media
MEXICO-OFICIO, A4
3" x 5" to Legal (8
1
/2" x 14")
(76 x 127 to 216 x 356 mm)
Weight 17 to 24 lb bond
(64 to 90 g/m
2
Quantity Max. 500 sheets
Type Plain
*2
*2
Color
Recycled
Heavy 1
Heavy 2
Heavy 3
Bond
*2
*3
*4
*5
*6
3hole punch paper
Transparency
*8
{{
{{
{{
{{
– {
– {
{{
*7
{{
– {
Labels – {
Envelopes – {
({: available –: not available)
15 to 34 lb bond
)
*1
(56 to 128 g/m2)
Max. 100 sheets
*1
3-1
Page 71

*1
21 lb bond (80 g/m2) paper
*2
From 17 to 21 lb bond (64 to 80 g/m2)
*3
From 22 to 24 lb bond (81 to 90 g/m2)
*4
From 24 to 28 lb bond (91 to 105 g/m2)
*5
From 28 to 34 lb bond (106 to 128 g/m2)
*6
20 lb bond (75 g/m2)
*7
LTR size only
*8
Use only LTR transparencies made especially for this machine.
NOTE
The default paper size is LTR. If you use a different paper size, you must change the paper size settings.
(See “Setting Paper Type and Size,” on p. 3-8.)
Print Media
3-2
Page 72
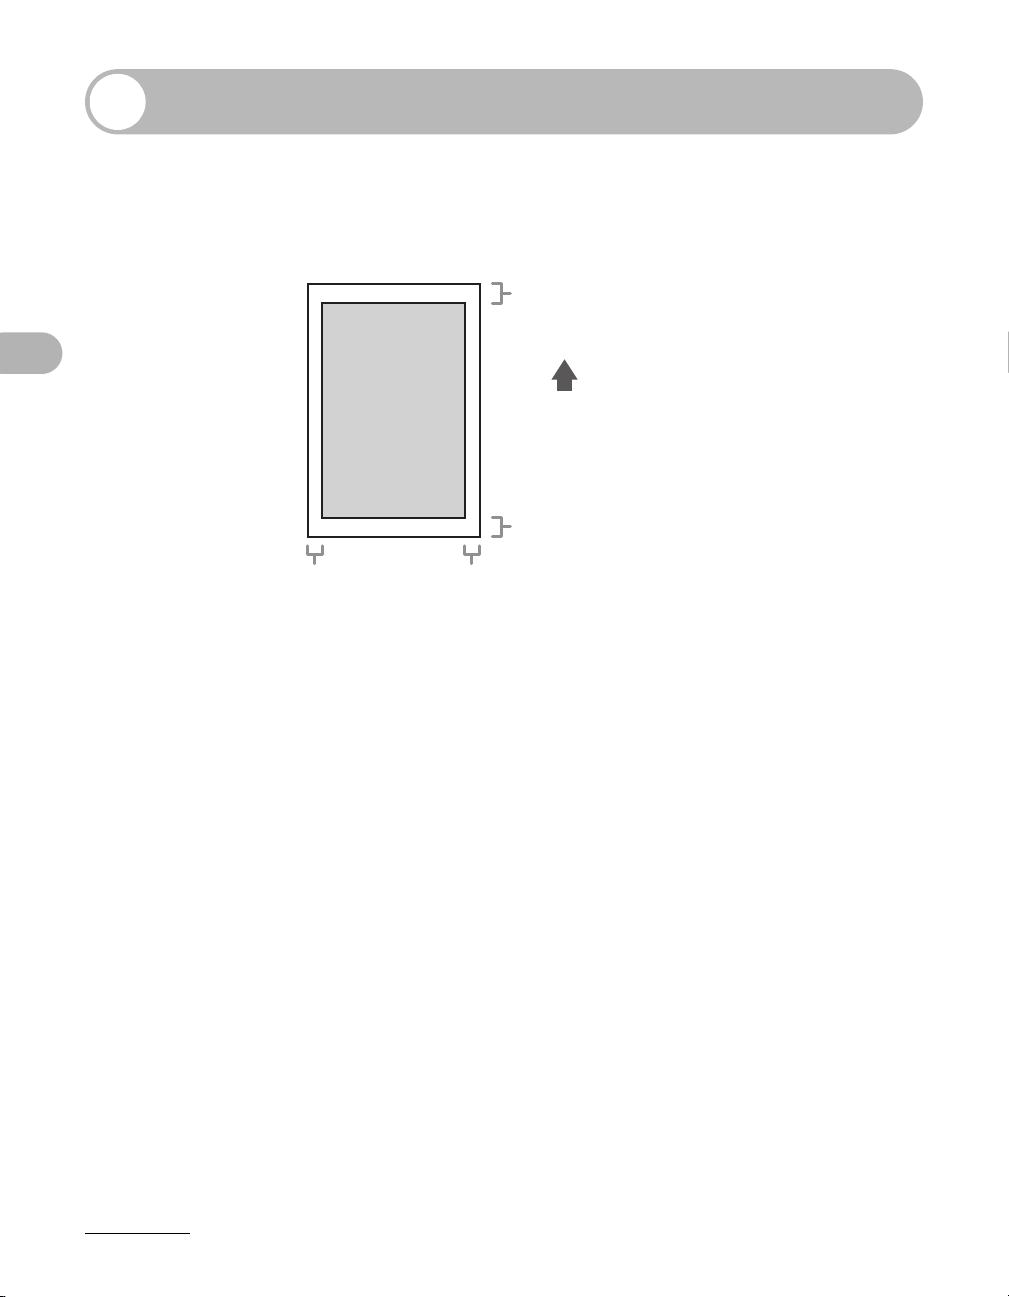
Printable Area
The shaded area indicates the approximate printable area of LTR paper.
Note that the margin widths listed are approximate and there may be slight
variations in actual use.
Fax : 1/8" (4.0 mm)
1
/8" (2.9 mm)
1
/4" (6.0 mm)
1
/4" (4.7 mm)
Print Media
1
Fax :
(3.0 mm)
Copy :
/8"
1
/8"
(3.6 mm)
Copy :
Fax :
Copy :
Fax : 1/8"
(3.0 mm)
Copy : 1/8"
(2.7 mm)
3-3
Page 73

Paper Guidelines
● To prevent paper jams, do not use any of the following:
– Wrinkled or creased paper
– Curled or rolled paper
– Coated paper
– Torn paper
– Damp paper
– Very thin paper
– Paper which has been printed on using a thermal transfer printer (Do not copy on
the reverse side.)
● The following types of paper do not print well:
– Highly textured paper
– Very smooth paper
– Shiny paper
● Make sure the paper is free from dust, lint, and oil stains.
● Be sure to test paper before purchasing large quantities.
● Store all paper wrapped and on a flat surface until ready for use. Keep opened packs
in their original packaging in a cool, dry location.
● Store paper at 64.4°F–75.2°F (18°C–24°C), 40%–60% relative humidity.
● Use only transparencies designed for laser printers. Canon recommends you use
Canon type transparencies with this machine.
Print Media
3-4
Page 74
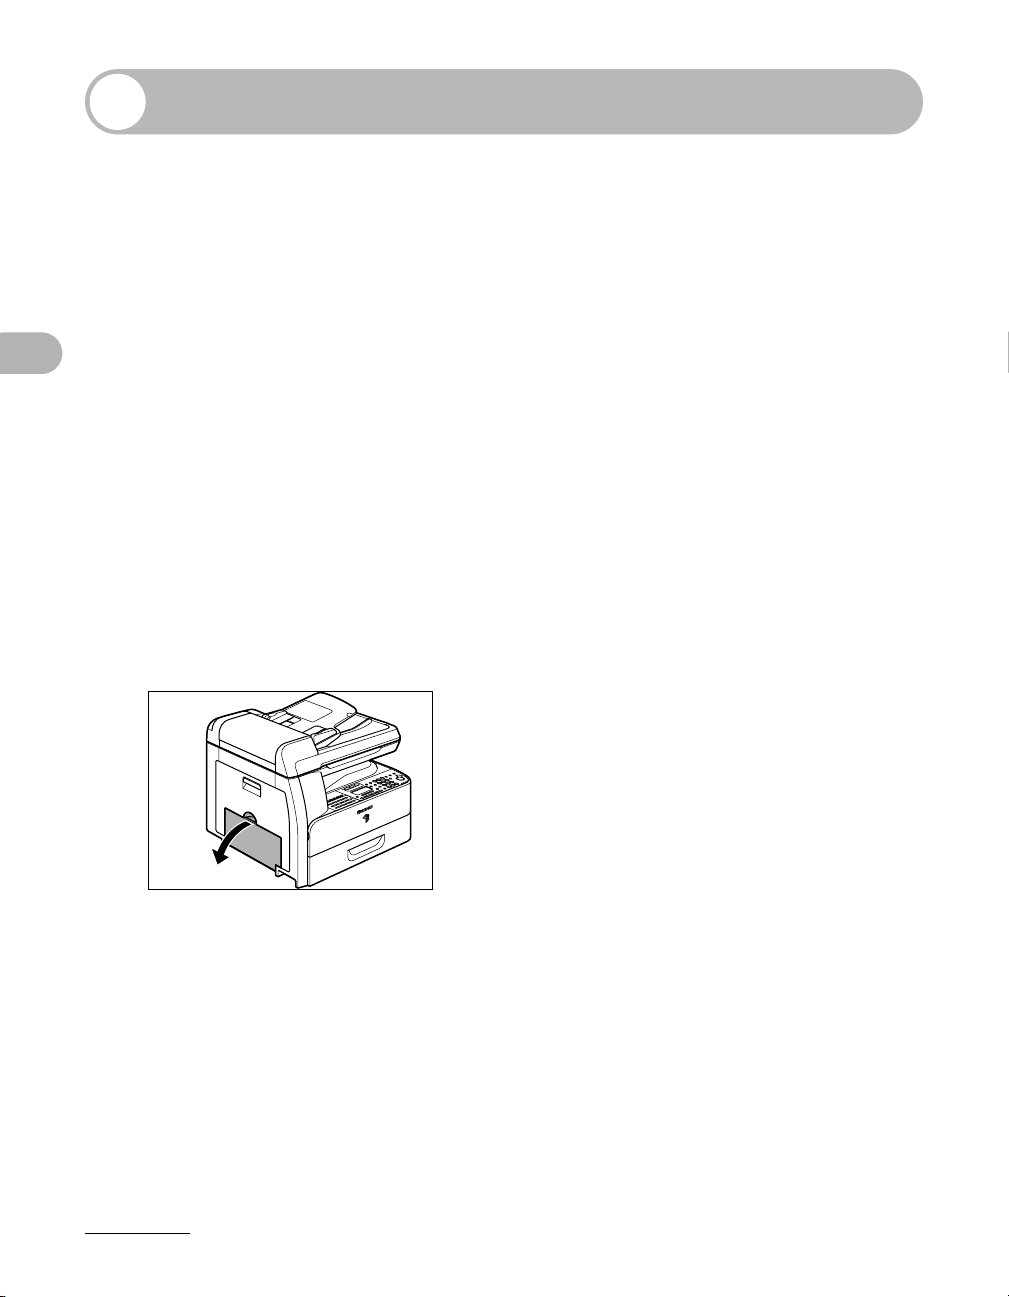
Loading Paper
To load paper in the paper drawer, see “Set Up the Machine,” in the Quick Start
Guide.
In the Stack Bypass (e.g., Envelopes)
If you are making prints on transparencies, labels, nonstandard-sized paper, or
envelopes, load them into the stack bypass.
● Use standard envelopes with diagonal seams and flaps.
● To prevent jams, do not use the following:
Print Media
– Envelopes with windows, holes, perforations, cutouts, or double flaps
– Envelopes made with special coated paper or deeply embossed paper
– Envelopes with peel-off sealing strips
– Envelopes with letters enclosed
● Make sure to set the correct envelope size in the printer driver. (See Online Help.)
1 Open the stack bypass.
3-5
Page 75
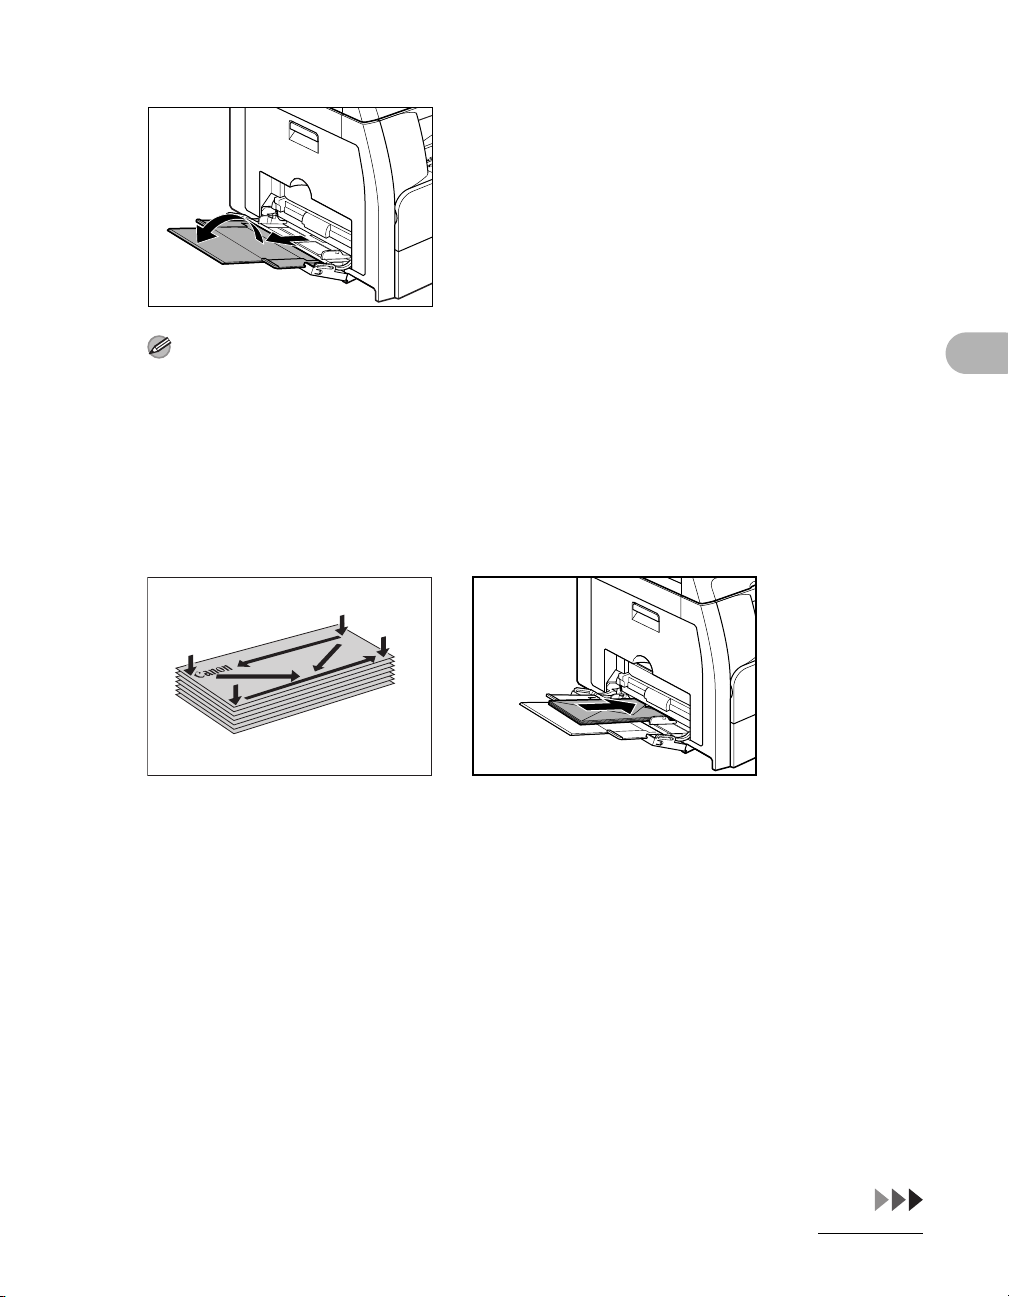
2 Pull out the stack bypass extension until it clicks, then open it.
NOTE
Do not load the paper without using the stack bypass extension.
3 Gently load the stack of envelopes with the address side facing down and
the flap side to the left. Be sure to insert the envelopes as far as they will
go.
When you load the envelopes, arrange the stack of envelopes on a firm, clean surface first, then
press down firmly on the edges to make the folds crisp.
Print Media
3-6
Page 76
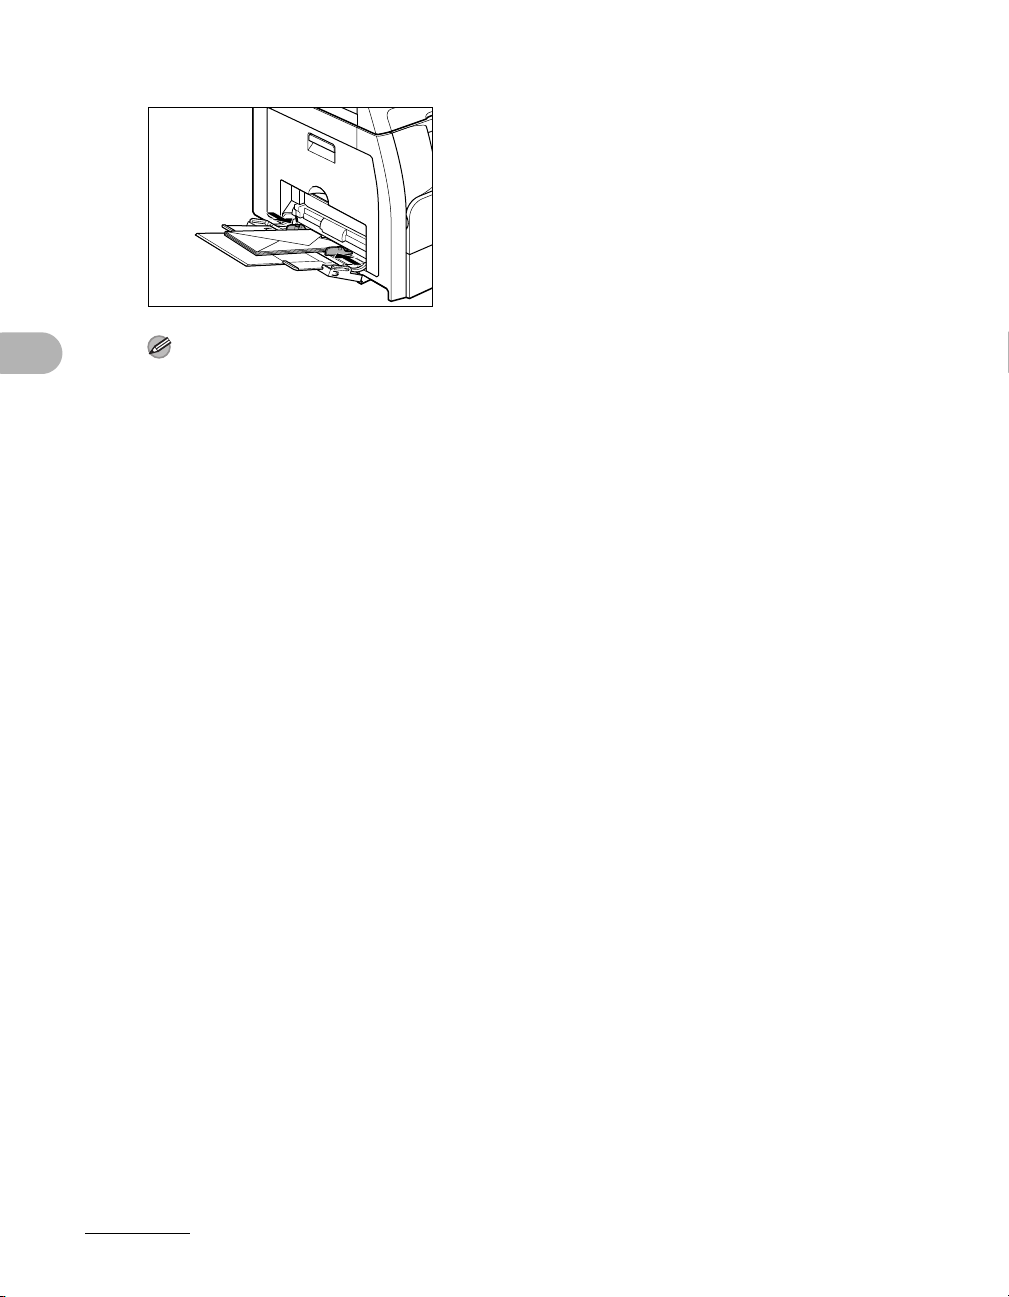
4 Adjust the slide guides to the width of the paper stack.
NOTE
– Make sure that the paper stack does not exceed the paper limit guide.
– Some types of paper may not feed properly into the stack bypass. For high quality copies, be
sure to use the paper and transparencies recommended by Canon.
Print Media
– When making copies of a small document or thick paper, etc., the copy speed may be slightly
slower than usual.
3-7
Page 77
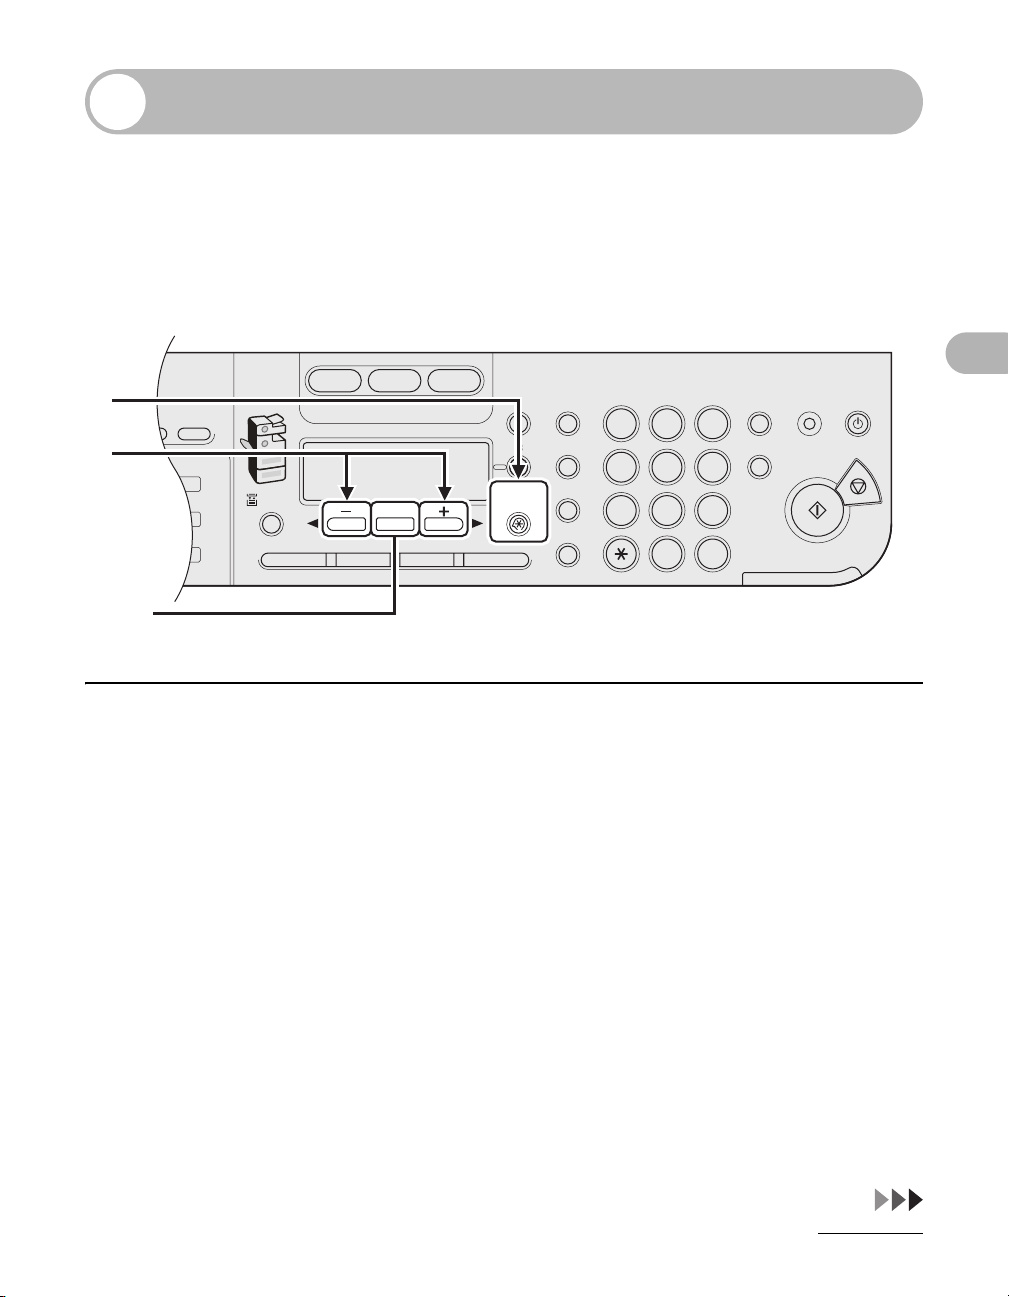
Setting Paper Type and Size
2
Address
Book
Paper
Select
COPY SEND SCAN
Image Quality Density Copy RatioOKTwo-Sided
System
Monitor
View
Settings
Reset Collate
GHI
@./
PQRS
Ton e
JKL
ABC
TUV
MNO
DEF
Clear ON/OFF
Stop
Start
Processing/
Data
Error
Power
WXYZ
SYMBOLS
Additional
Functions
2 on 1
Frame
Erase
al
1
4
7
2
5
8
0#
3
C
6
9
Log In/Out
ID
Counter
Check
M4
For the Paper Drawer
The default settings are <PLAIN PAPER> and <LTR>. When you place other types
and/or sizes of paper, follow this procedure to change the settings.
1
2
[OK]
1 Press [Additional Functions].
2 Confirm that <COMMON SETTINGS> is displayed, then press [OK].
Print Media
3-8
Page 78
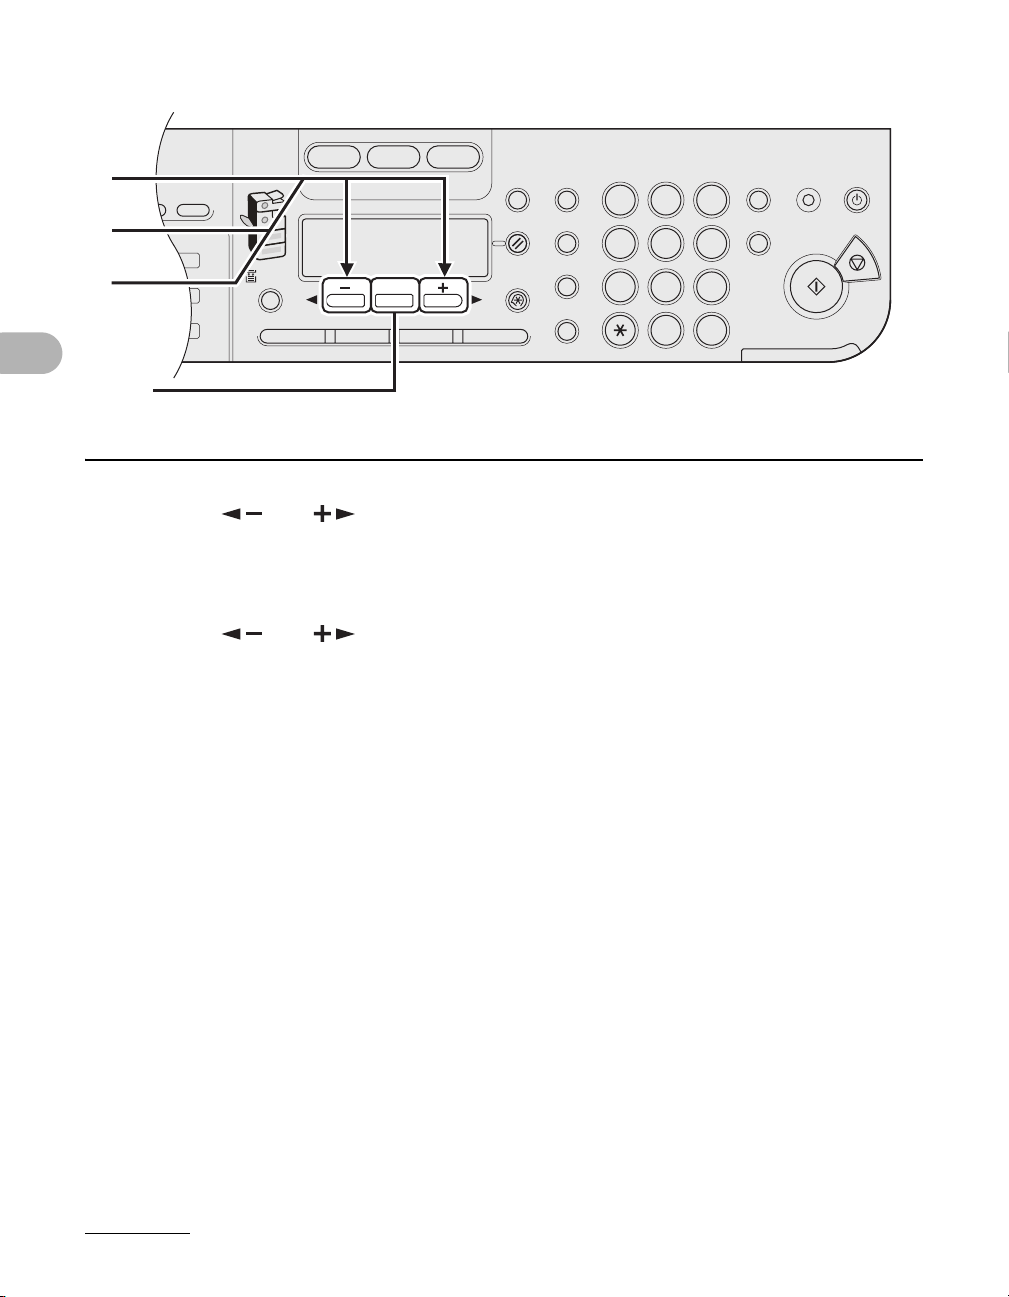
2
Address
Book
Paper
Select
COPY SEND SCAN
Image Quality Density Copy RatioOKTwo-Sided
System
Monitor
View
Settings
Reset Collate
GHI
@./
PQRS
Ton e
JKL
ABC
TUV
MNO
DEF
Clear ON/OFF
Stop
Start
Processing/
Data
Error
Power
WXYZ
SYMBOLS
Additional
Functions
2 on 1
Frame
Erase
al
1
4
7
2
5
8
0#
3
C
6
9
Log In/Out
ID
Counter
Check
M4
3
4
5
[OK]
Print Media
3 Press [ ] or [ ] to select <SELECT PAPER TYPE>, then press [OK].
4 Confirm that <DRAWER 1> is displayed, then press [OK].
5 Press [ ] or [ ] to select the paper type, then press [OK].
<PLAIN PAPER>, <COLOR>, <RECYCLED>, <HEAVY PAPER 1>, <BOND>, <3HOLE PUNCH
PAPER>
If you use the optional paper drawer, confirm that <DRAWER 2> is displayed and press [OK]. Then
repeat this step to set the paper type for <DRAWER 2>.
3-9
Page 79
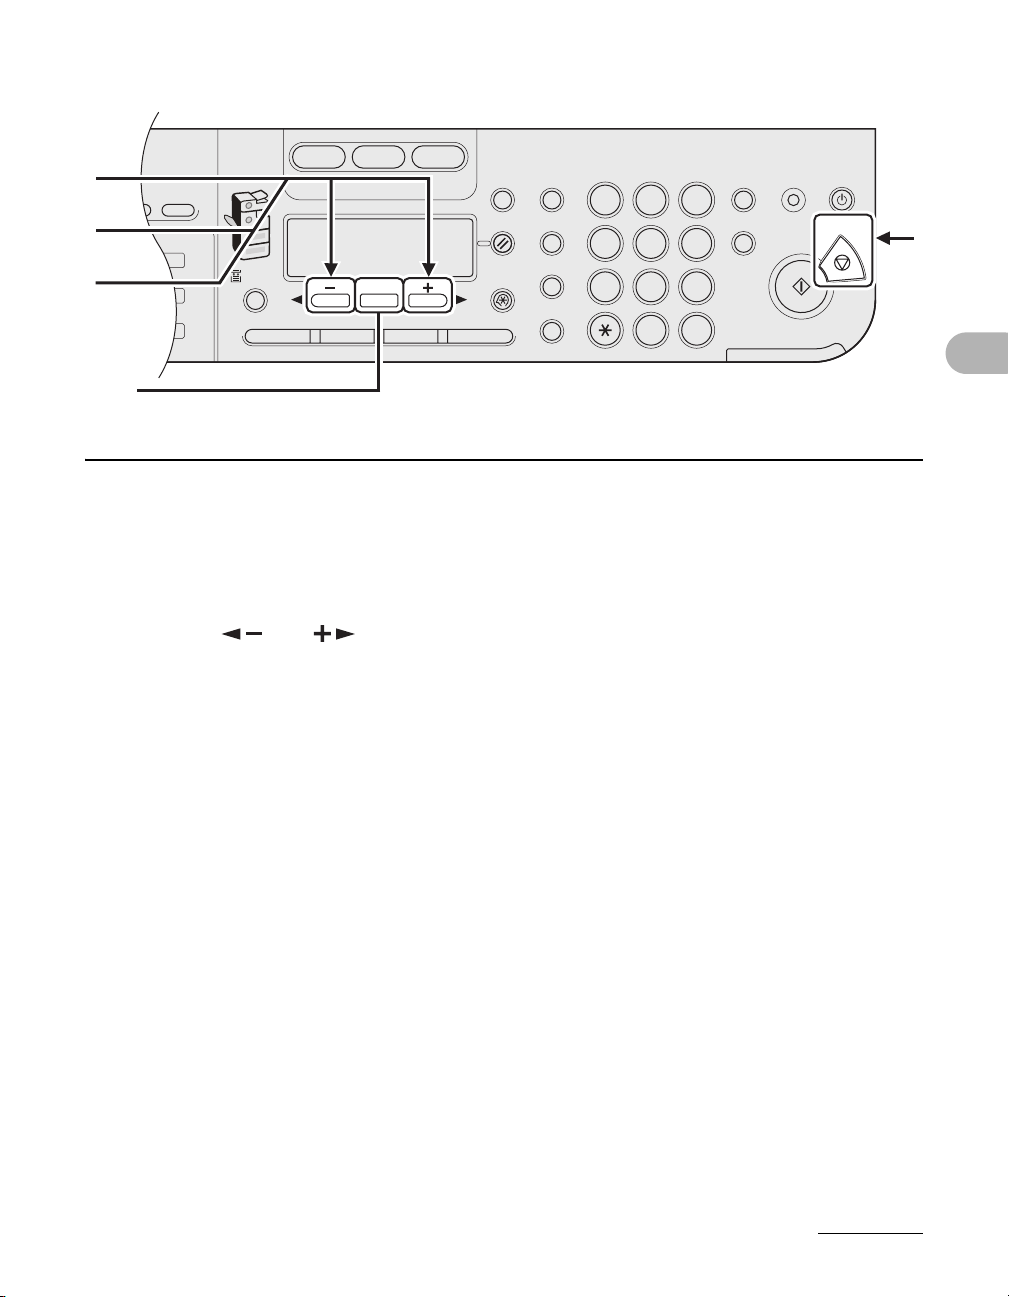
2
Address
Book
Paper
Select
COPY SEND SCAN
Image Quality Density Copy RatioOKTwo-Sided
System
Monitor
View
Settings
Reset Collate
GHI
@./
PQRS
Ton e
JKL
ABC
TUV
MNO
DEF
Clear ON/OFF
Stop
Start
Processing/
Data
Error
Power
WXYZ
SYMBOLS
Additional
Functions
2 on 1
Frame
Erase
al
1
4
7
2
5
8
0#
3
C
6
9
Log In/Out
ID
Counter
Check
M4
6
7
8
[OK]
6 Confirm that <REG. PAPER SIZE> is displayed, then press [OK].
7 Confirm that <DRAWER 1> is displayed, then press [OK].
8 Press [ ] or [ ] to select the paper size, then press [OK].
<LTR>, <LGL>, <OFICIO>, <FLSP>, <BRAZIL-OFICIO>, <MEXICO-OFICIO>, <A4>
If you use the optional paper drawer, confirm that <DRAWER 2> is displayed and press [OK]. Then
repeat this step to set the paper size for <DRAWER 2>.
9 Press [Stop] to return to the standby mode.
9
Print Media
3-10
Page 80
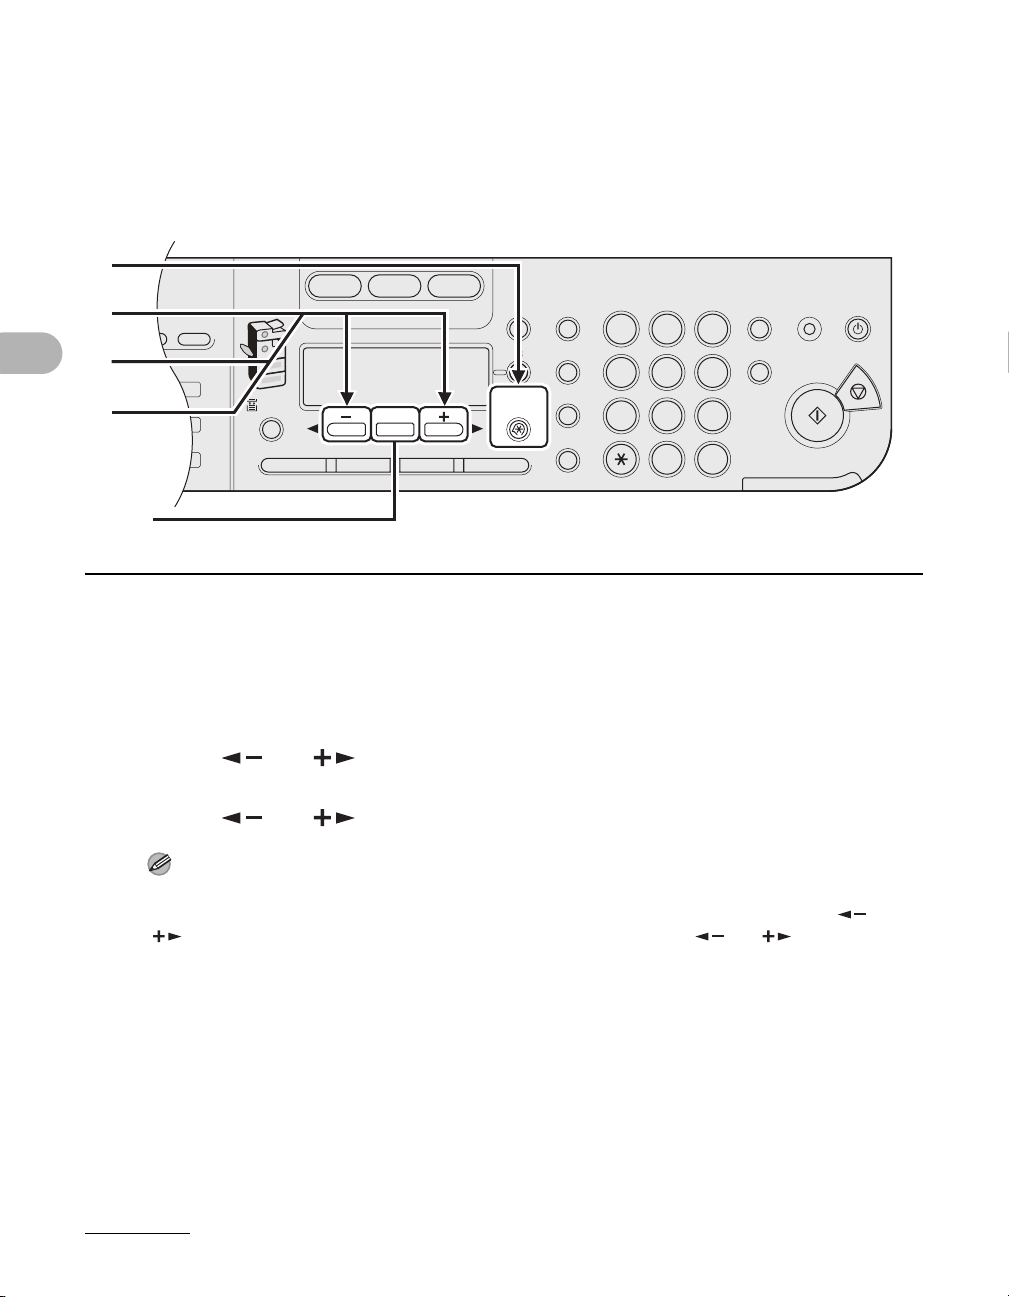
For the Stack Bypass
2
Address
Book
Paper
Select
COPY SEND SCAN
Image Quality Density Copy RatioOKTwo-Sided
System
Monitor
View
Settings
Reset Collate
GHI
@./
PQRS
Ton e
JKL
ABC
TUV
MNO
DEF
Clear ON/OFF
Stop
Start
Processing/
Data
Error
Power
WXYZ
SYMBOLS
Additional
Functions
2 on 1
Frame
Erase
al
1
4
7
2
5
8
0#
3
C
6
9
Log In/Out
ID
Counter
Check
M4
[OK]
To print using the stack bypass, follow this procedure to specify the paper size and
type.
1
2
3
4
Print Media
1 Press [Additional Functions].
2 Confirm that <COMMON SETTINGS> is displayed, then press [OK].
3 Press [ ] or [ ] to select <BYPASS STD SET>, then press [OK].
4 Press [ ] or [ ] to select <ON>, then press [OK].
NOTE
If you select <OFF>, you must specify paper size and type every time you load paper on the stack
bypass. When the display to specify the paper size for the stack bypass appear, press [ ] or
[ ] to select the paper size, then press [OK]. Consequently, press [ ] or [ ] to select the
paper type, then press [OK].
3-11
Page 81
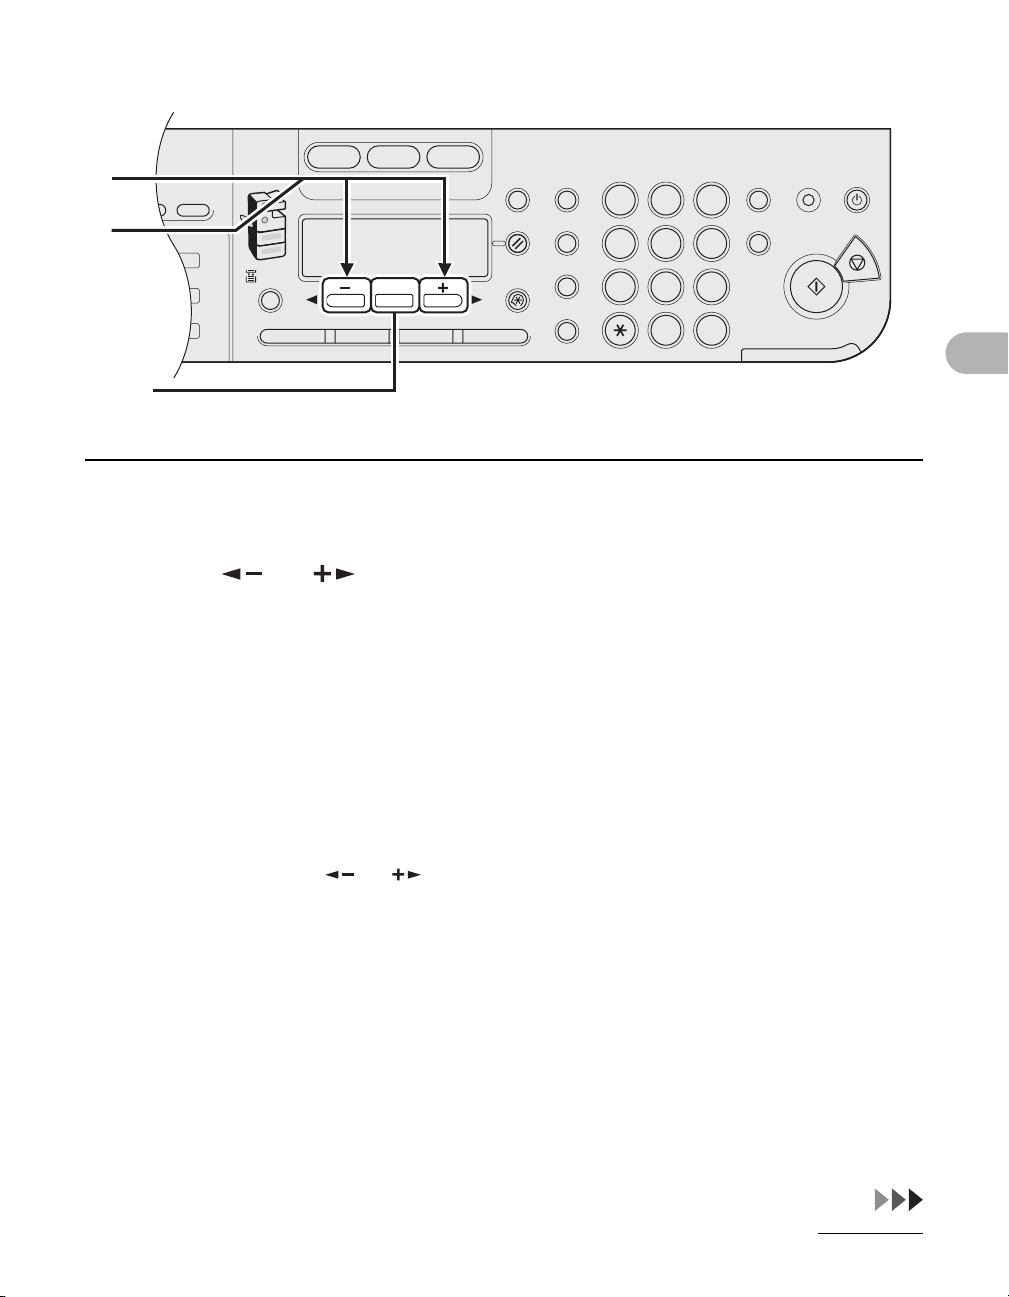
2
Address
Book
Paper
Select
COPY SEND SCAN
Image Quality Density Copy RatioOKTwo-Sided
System
Monitor
View
Settings
Reset Collate
GHI
@./
PQRS
Ton e
JKL
ABC
TUV
MNO
DEF
Clear ON/OFF
Stop
Start
Processing/
Data
Error
Power
WXYZ
SYMBOLS
Additional
Functions
2 on 1
Frame
Erase
al
1
4
7
2
5
8
0#
3
C
6
9
Log In/Out
ID
Counter
Check
M4
5
6
[OK]
5 Confirm that <PAPER SIZE> is displayed, then press [OK].
6 Press [ ] or [ ] to select the paper size, then press [OK].
<LTR>, <STMTR>, <EXECUTIV>, <OFICIO>, <BRAZIL-OFICIO>, <MEXICO-OFICIO>,
<FOLIO>, <G-LTR>, <G-LGL>, <FLSP>, <COM10>*1, <MONARCH>*1, <DL>*1, <ISO-C5>*1,
<ISO-B5>*
*1For envelopes.
If you select this size, <ENVELOPE> is automatically selected for the paper type, and the
display for selecting the paper type does not appear. Skip to step 9.
2
For non-standard paper size.
*
If you select this size, enter the vertical size in <VERTICAL SIZE> (76 to 216 mm (3 to 8
inch)) with the numeric keys, then press [OK].
Enter the horizontal size in <HORIZONTAL SIZE> (127 to 356 mm (5 to 14
numeric keys, then press [OK].
You can also press [ ] or [ ] to specify the size.
(<VERTICAL SIZE> represents the length of the paper that feeds into the machine.)
1
, <FREESIZE>*2, <A4>, <B5>, <A5R>, <LGL>
1
/8 inch)) with the
Print Media
1
/2
3-12
Page 82
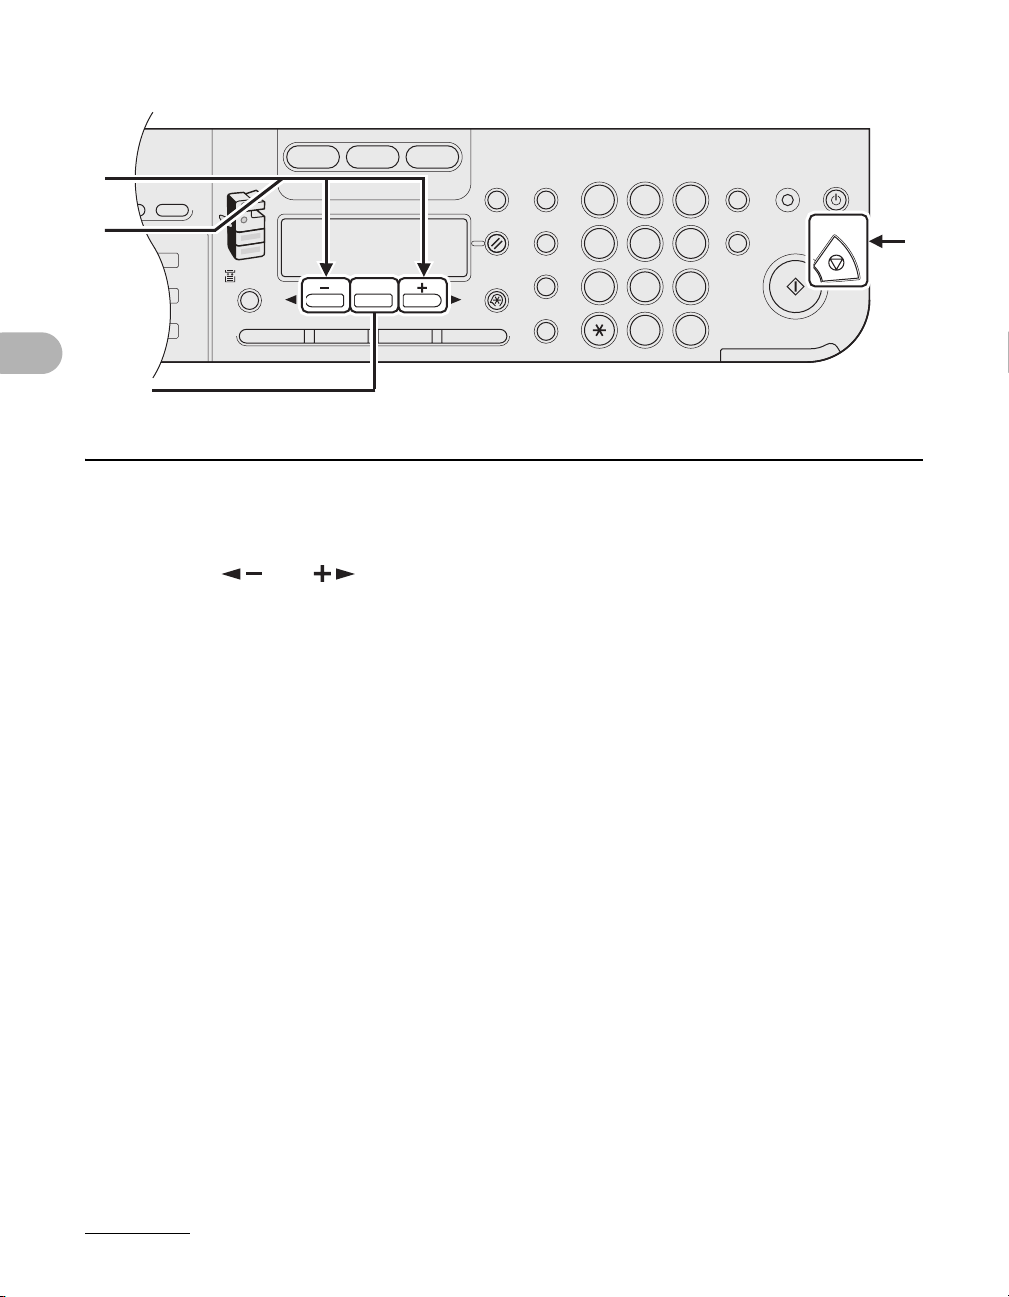
2
Address
Book
Paper
Select
COPY SEND SCAN
Image Quality Density Copy RatioOKTwo-Sided
System
Monitor
View
Settings
Reset Collate
GHI
@./
PQRS
Ton e
JKL
ABC
TUV
MNO
DEF
Clear ON/OFF
Stop
Start
Processing/
Data
Error
Power
WXYZ
SYMBOLS
Additional
Functions
2 on 1
Frame
Erase
al
1
4
7
2
5
8
0#
3
C
6
9
Log In/Out
ID
Counter
Check
M4
7
8
[OK]
Print Media
7 Confirm that <SELECT PAPER TYPE> is displayed, then press [OK].
8 Press [ ] or [ ] to select the paper type, then press [OK].
<PLAIN PAPER>, <COLOR>, <RECYCLED>, <HEAVY PAPER 1>, <HEAVY PAPER 2>,
<HEAVY PAPER 3>, <BOND>, <3HOLE PUNCH PAPER>, <TRANSPARENCY>, <LABELS>,
<ENVELOPE>
9 Press [Stop] to return to the standby mode.
9
3-13
Page 83

Print Media
3-14
Page 84
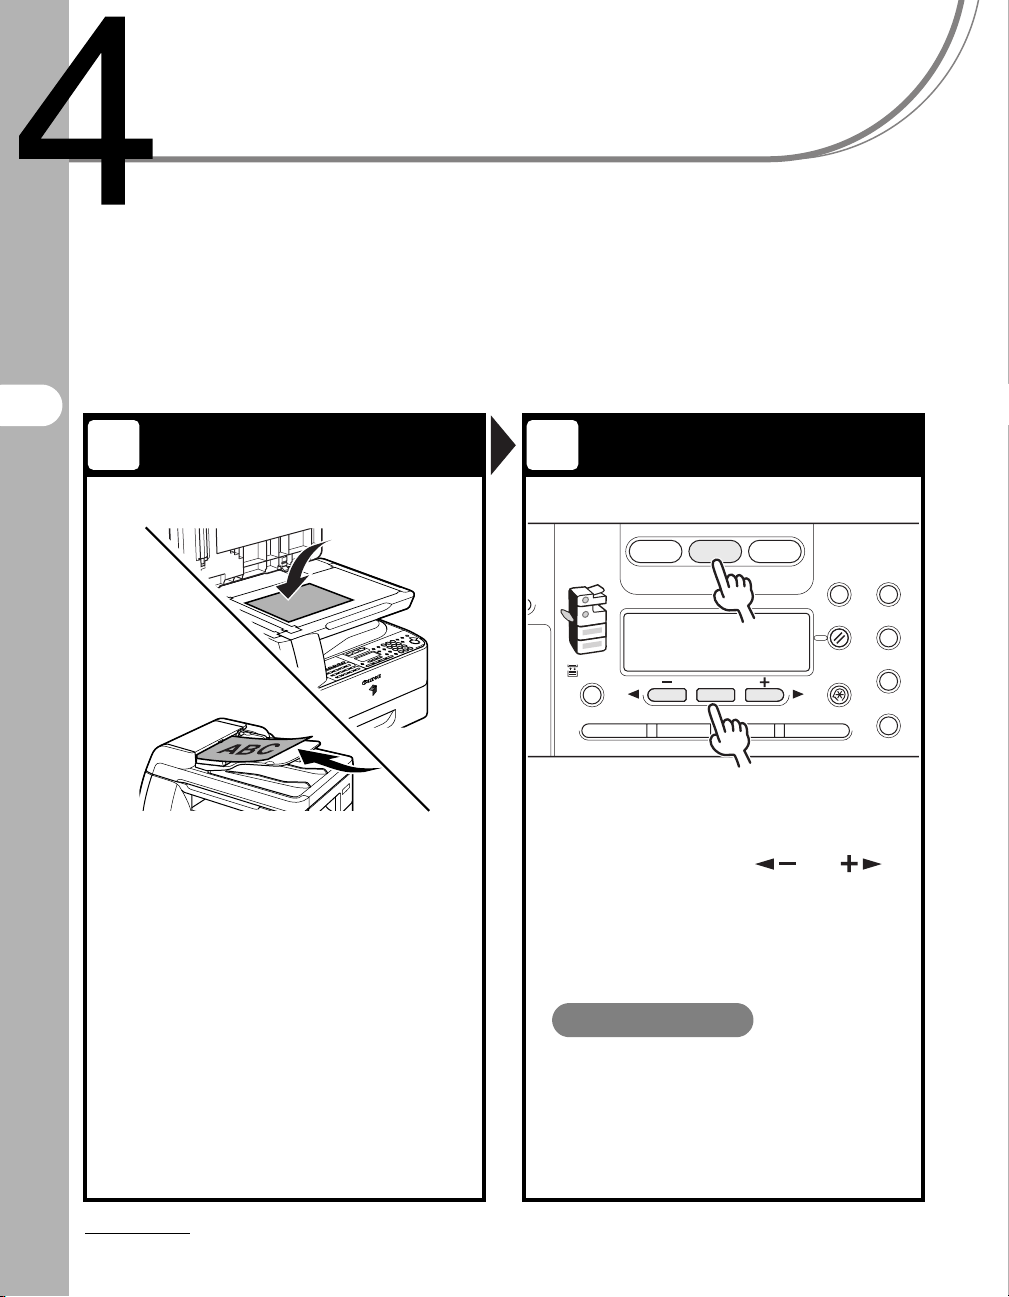
Sending Documents
ABC
Q
Follow this procedure to send faxes, e-mails, and I-faxes, or to send documents to a file
server.
For network connection, see “Set the Machine for Network Usage,” in the Quick Start
Guide, and for advanced sending features, see Chapter 1, “Advanced Send Features,”
in the Advanced Operation Guide.
1 2
Sending Documents
Set a Document
Place the document on the platen
glass or load it in the ADF.
For documents you can send, see “Document
Requirements,” on p. 2-1.
Select the Sending Method
COPY SEND SCAN
s
Paper
Select
Image Quality Density Copy RatioOKTwo-Sided
Press [SEND], press [ ] or [ ]
to select the sending method, then
press [OK].
The SEND indicator lights up and the machine enters
the send standby mode.
What if...
System
Monitor
Reset Collate
Additional
Functions
Settings
2 on 1
Frame
View
Erase
P
4-1
● You want to send document to a file
server:
You can specify the file server addresses
only with one-touch keys, coded dial
codes, or [Address Book] key. See
“Specifying Destinations,” on p. 4-11.
Page 85
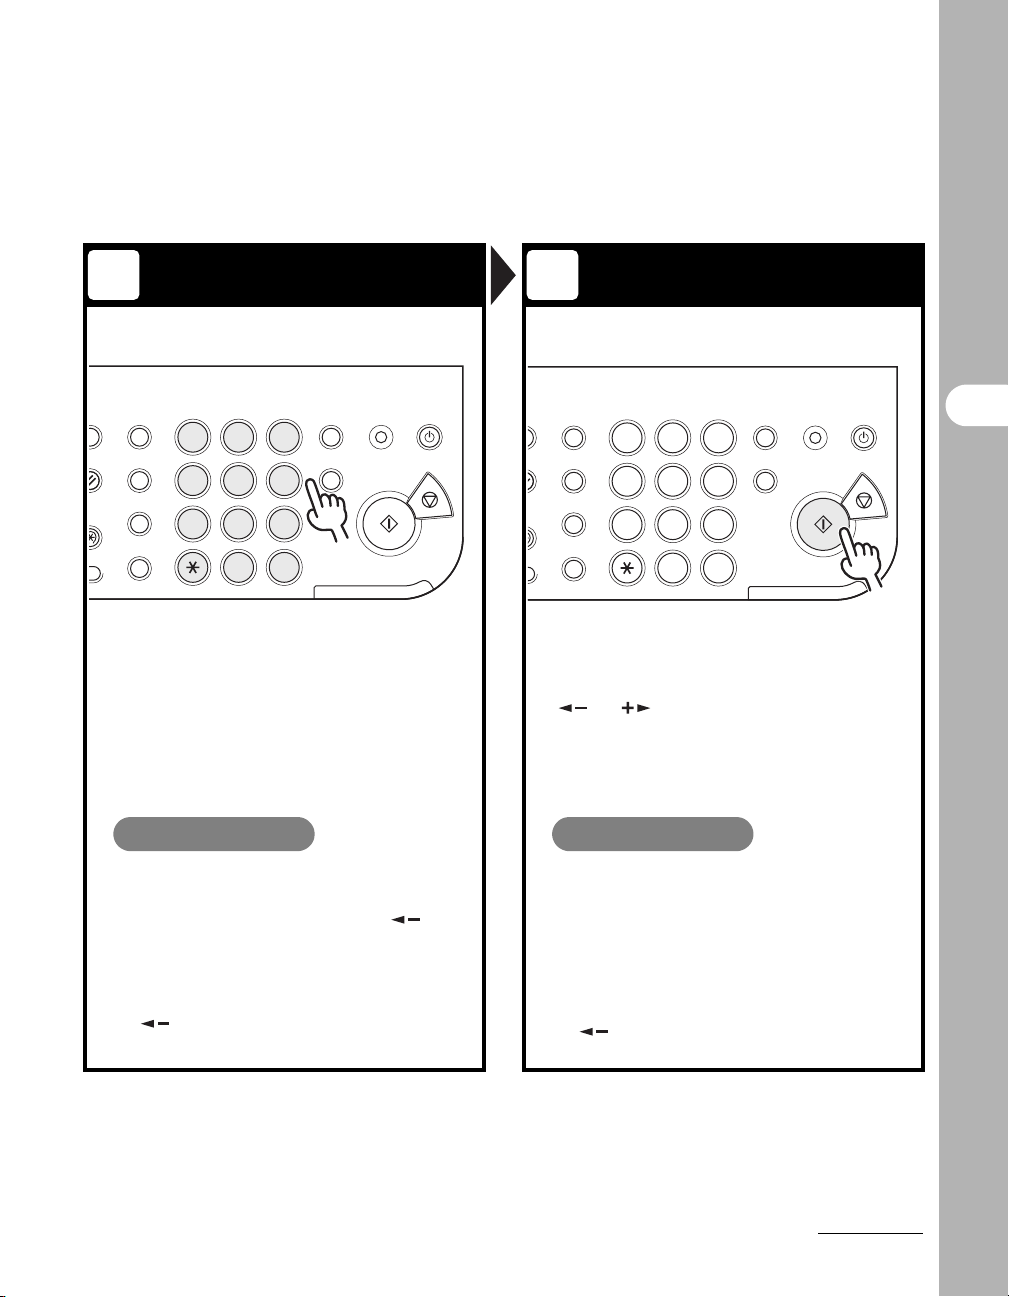
Specify the Destination Send the Document
View
Settings
GHI
@./
PQRS
Ton e
JKL
ABC
TUV
MNO
DEF
Clear ON/OFF
Stop
Start
Processing/
Data
Error
Power
WXYZ
SYMBOLS
onal
2 on 1
Frame
Erase
1
4
7
2
5
8
0#
3
C
6
9
Log In/Out
ID
Counter
Check
3 4
tem
View
Settings
itor
set Collate
ional
2 on 1
tions
Frame
Erase
@./
PQRS
1
GHI
4
7
Ton e
ABC
DEF
2
JKL
MNO
5
WXYZ
TUV
8
SYMBOLS
0#
3
6
9
Counter
Check
Clear ON/OFF
C
Log In/Out
Processing/
ID
Data
Error
Start
Power
Specify the fax number or e-mail/
I-fax address with the numeric keys.
What if...
● You enter a wrong number when
specifying a fax number:
Go back to the wrong digit with [ ].
● You enter a wrong character when
specifying an e-mail or I-fax address :
Go back to the wrong character with
[ ], then press [Clear]. Or press and
hold [Clear] to delete the entire entry.
Stop
Press [Start].
When you set the documents on the platen glass, press
[ ] or [ ] to select the document size, then
press [Start] for each document. When scanning is
complete, press [OK] to start dialing.
What if...
● You want to cancel sending:
Press [Stop] on the operation panel.
When the <STOP KEY PRESSED>
message appears, press [OK].
When the <CANCEL DURING TX/RX?>
message appears, select <YES> with
[].
Sending Documents
4-2
Page 86
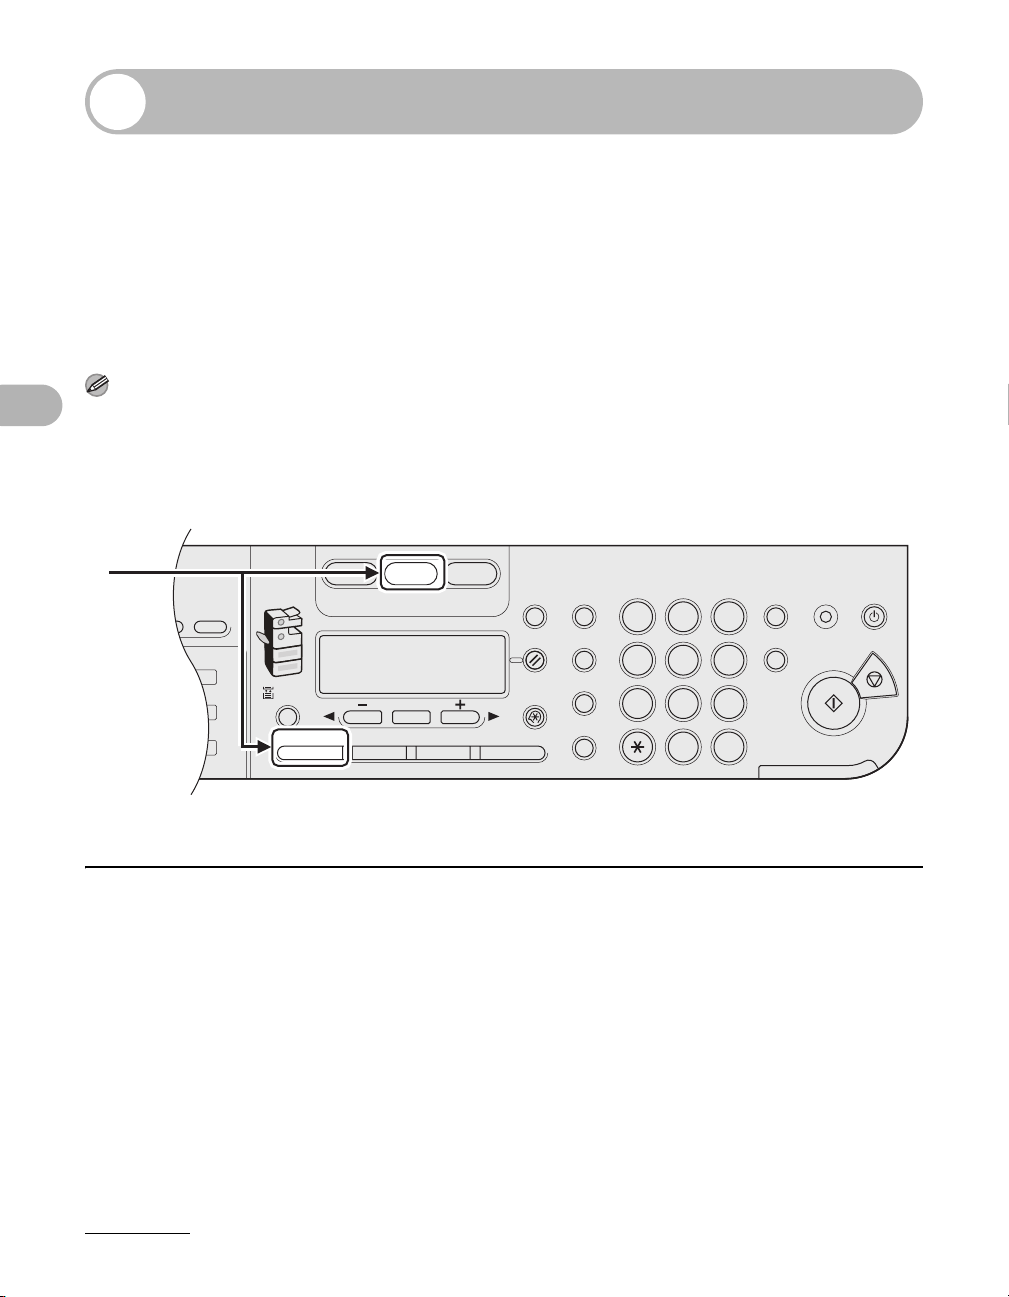
Scan Settings
2
Address
Book
Paper
Select
COPY SEND SCAN
Image Quality Density Copy RatioOKTwo-Sided
System
Monitor
View
Settings
Reset Collate
GHI
@./
PQRS
Ton e
JKL
ABC
TUV
MNO
DEF
Clear ON/OFF
Stop
Start
Processing/
Data
Error
Power
WXYZ
SYMBOLS
Additional
Functions
2 on 1
Frame
Erase
al
1
4
7
2
5
8
0#
3
C
6
9
Log In/Out
ID
Counter
Check
M4
You can adjust the image quality and density of the document you send. The
higher image quality you set, the better the output will be, but the longer the
transmission will take. You can also scan two sided documents. Adjust the scan
settings according to the type of document you are sending.
Image Quality
NOTE
If you are sending documents to an e-mail, I-fax, or file server address, you can also specify the resolution
(Image Quality) by pressing [OK] after specifying the destination. For instructions, see “Send Settings,” on
p. 4-7.
Sending Documents
1
1 After pressing [SEND] and selecting the sending method, or after
specifying the destination, press [Image Quality].
For instructions on selecting sending methods and specifying destinations, see “Specifying
Destinations,” on p. 4-11.
4-3
Page 87
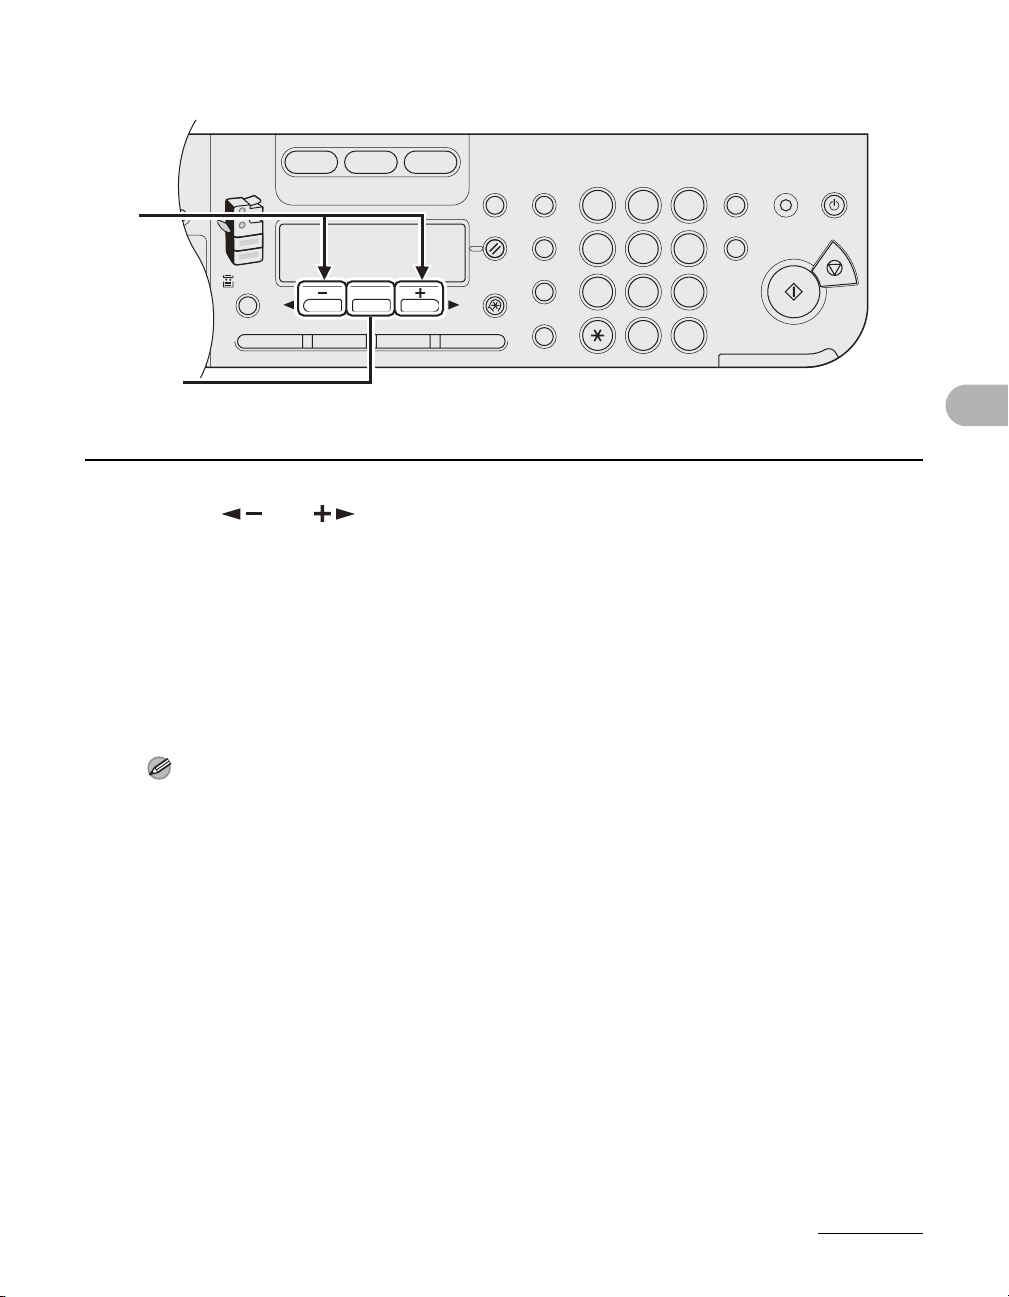
Paper
Select
COPY SEND SCAN
Image Quality Density Copy RatioOKTwo-Sided
System
Monitor
View
Settings
Reset Collate
GHI
@./
PQRS
Ton e
JKL
ABC
TUV
MNO
DEF
Clear ON/OFF
Stop
Start
Processing/
Data
Error
Power
WXYZ
SYMBOLS
Additional
Functions
2 on 1
Frame
Erase
1
4
7
2
5
8
0#
3
C
6
9
Log In/Out
ID
Counter
Check
2
[OK]
2 Press [ ] or [ ] to select the image quality, then press [OK].
You can also press [Image Quality] repeatedly to select the image quality.
E-mail (B&W): <200x200dpi>, <300x300dpi>, <400x400dpi>, <600X600dpi>, <150X150dpi>,
<200x100dpi>
E-mail (Color): <200x200dpi>, <300x300dpi>, <100X100dpi>, <150X150dpi>
I-fax: <200x200dpi>, <200x100dpi>
File server (FTP and SMB): <200x200dpi>, <300x300dpi>, <400x400dpi>, <600X600dpi>,
<150X150dpi>, <200x100dpi>
NOTE
– If <PDF (COMPACT)> is selected as the file format, only <300x300dpi> can be selected for
sending color images attached to an e-mail message.
– If you specify an e-mail address from Address Book without selecting the sending method,
settings specified in <STANDARD SETTINGS> in <TX SETTINGS> in <COMMON SETTINGS>
in <TX/RX SETTINGS> are displayed.
– If you want to send color images to a file server or attached to an e-mail message, select
<E-MAIL (COLOR)> as a sending method.
Sending Documents
4-4
Page 88
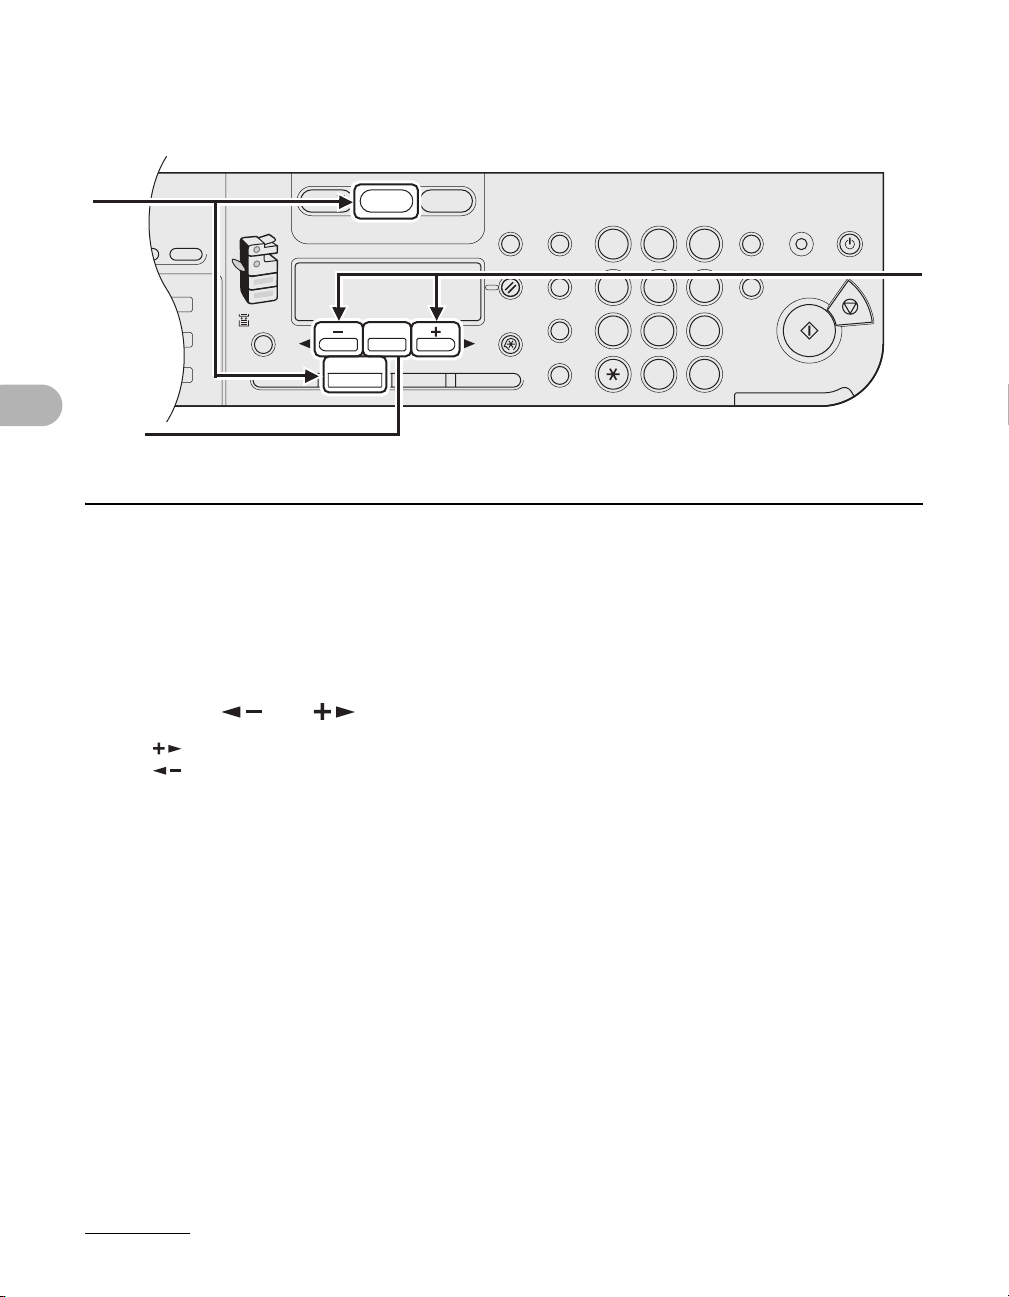
Density
2
Address
Book
Paper
Select
COPY SEND SCAN
Image Quality Density Copy RatioOKTwo-Sided
System
Monitor
View
Settings
Reset Collate
GHI
@./
PQRS
Ton e
JKL
ABC
TUV
MNO
DEF
Clear ON/OFF
Stop
Start
Processing/
Data
Error
Power
WXYZ
SYMBOLS
Additional
Functions
2 on 1
Frame
Erase
al
1
4
7
2
5
8
0#
3
C
6
9
Log In/Out
ID
Counter
Check
M4
1
[OK]
1 After pressing [SEND] and selecting the sending method, or after
Sending Documents
specifying the destination, press [Density].
For instructions on selecting sending methods and specifying destinations, see “Specifying
Destinations,” on p. 4-11.
2
2 Press [ ] or [ ] to adjust the density, then press [OK].
[ ]: to make light documents darker.
[ ]: to make documents lighter.
4-5
Page 89
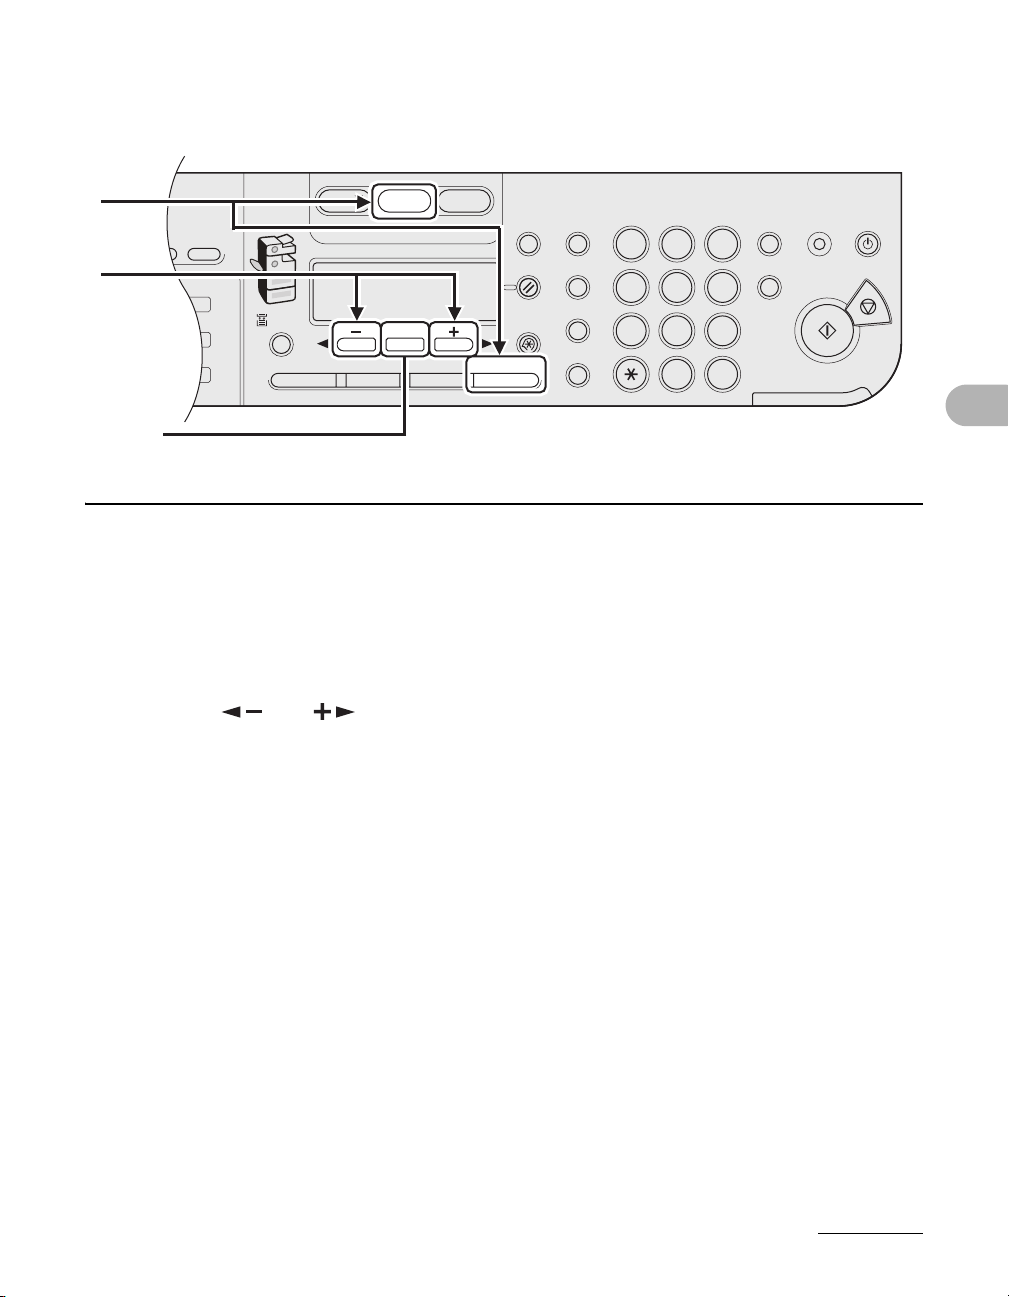
Two-Sided
2
Address
Book
Paper
Select
COPY SEND SCAN
Image Quality Density Copy RatioOKTwo-Sided
System
Monitor
View
Settings
Reset Collate
GHI
@./
PQRS
Ton e
JKL
ABC
TUV
MNO
DEF
Clear ON/OFF
Stop
Start
Processing/
Data
Error
Power
WXYZ
SYMBOLS
Additional
Functions
2 on 1
Frame
Erase
al
1
4
7
2
5
8
0#
3
C
6
9
Log In/Out
ID
Counter
Check
M4
1
2
[OK]
1 After pressing [SEND] and selecting the sending method, or after
specifying the destination, press [Two-Sided].
For instructions on selecting sending methods and specifying destinations, see “Specifying
Destinations,” on p. 4-11.
2 Press [ ] or [ ] to select the binding type, then press [OK].
<BOOK TYPE>: The front and back sides of the document have the same top-bottom orientation.
<CALENDAR TYPE>: The front and back sides of the document have opposite top-bottom
orientations.
Sending Documents
4-6
Page 90
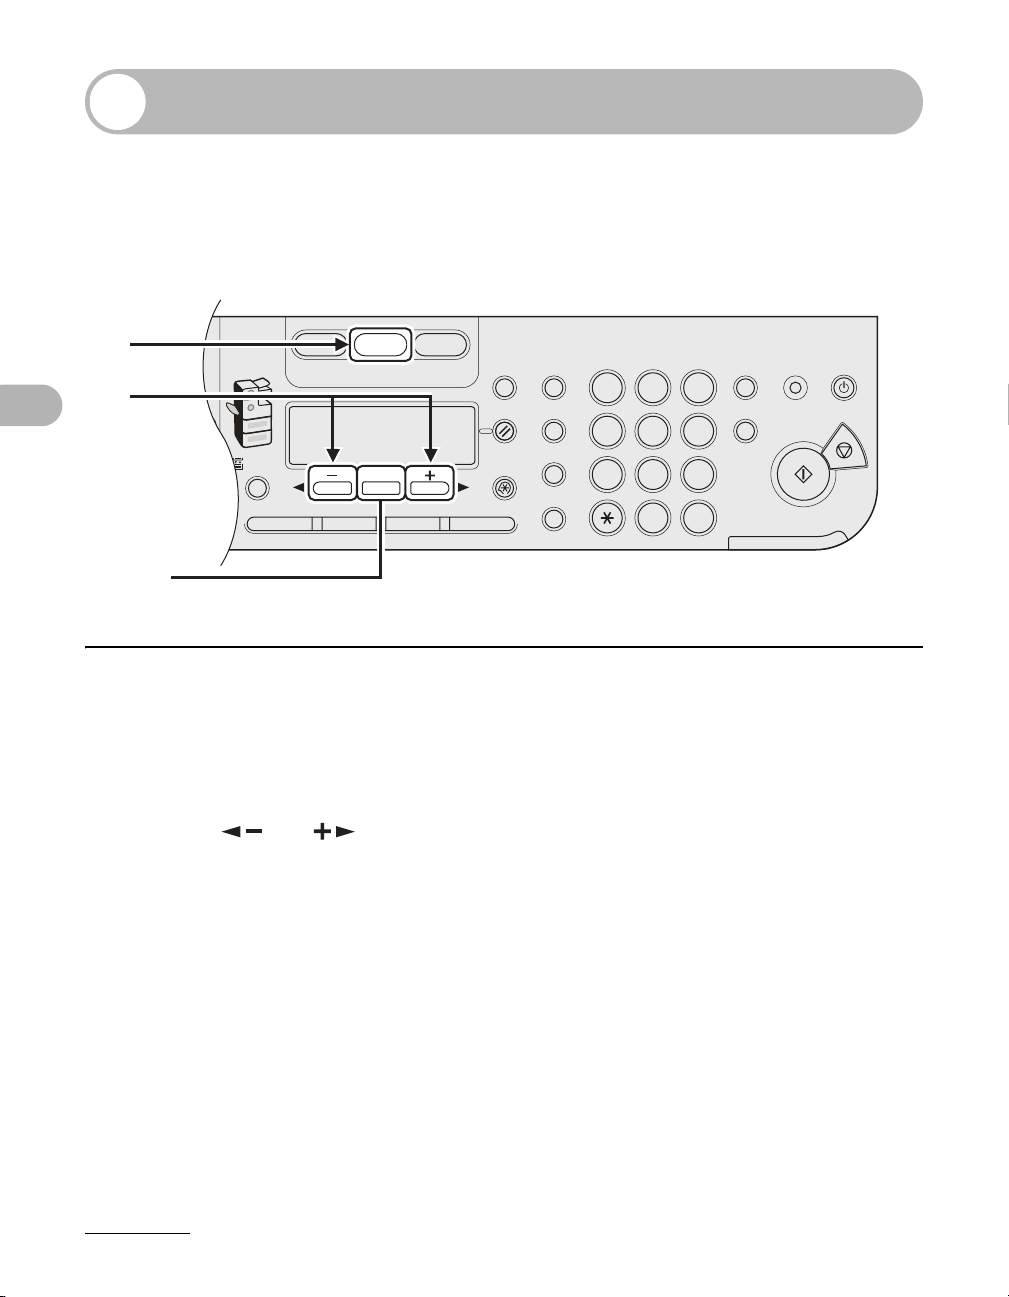
Send Settings
Paper
Select
COPY SEND SCAN
Image Quality Density Copy RatioOKTwo-Sided
System
Monitor
View
Settings
Reset Collate
GHI
@./
PQRS
Ton e
JKL
ABC
TUV
MNO
DEF
Clear ON/OFF
Stop
Start
Processing/
Data
Error
Power
WXYZ
SYMBOLS
Additional
Functions
2 on 1
Frame
Erase
1
4
7
2
5
8
0#
3
C
6
9
Log In/Out
ID
Counter
Check
You can optionally set the file format, if multiple images are sent as separate
files or a single file, resolution, and original type after specifying the e-mail, I-fax,
or file server address.
2
3
Sending Documents
[OK]
1 Place the document on the platen glass or load it in the ADF.
2 Press [SEND].
3 Press [ ] or [ ] to select the sending method, then press [OK].
If you are specifying the destination registered in one-touch keys or coded dial codes, you can skip
this step.
4 Specify the destination.
For instructions on specifying destinations, see “Specifying Destinations,” on p. 4-11.
4-7
Page 91
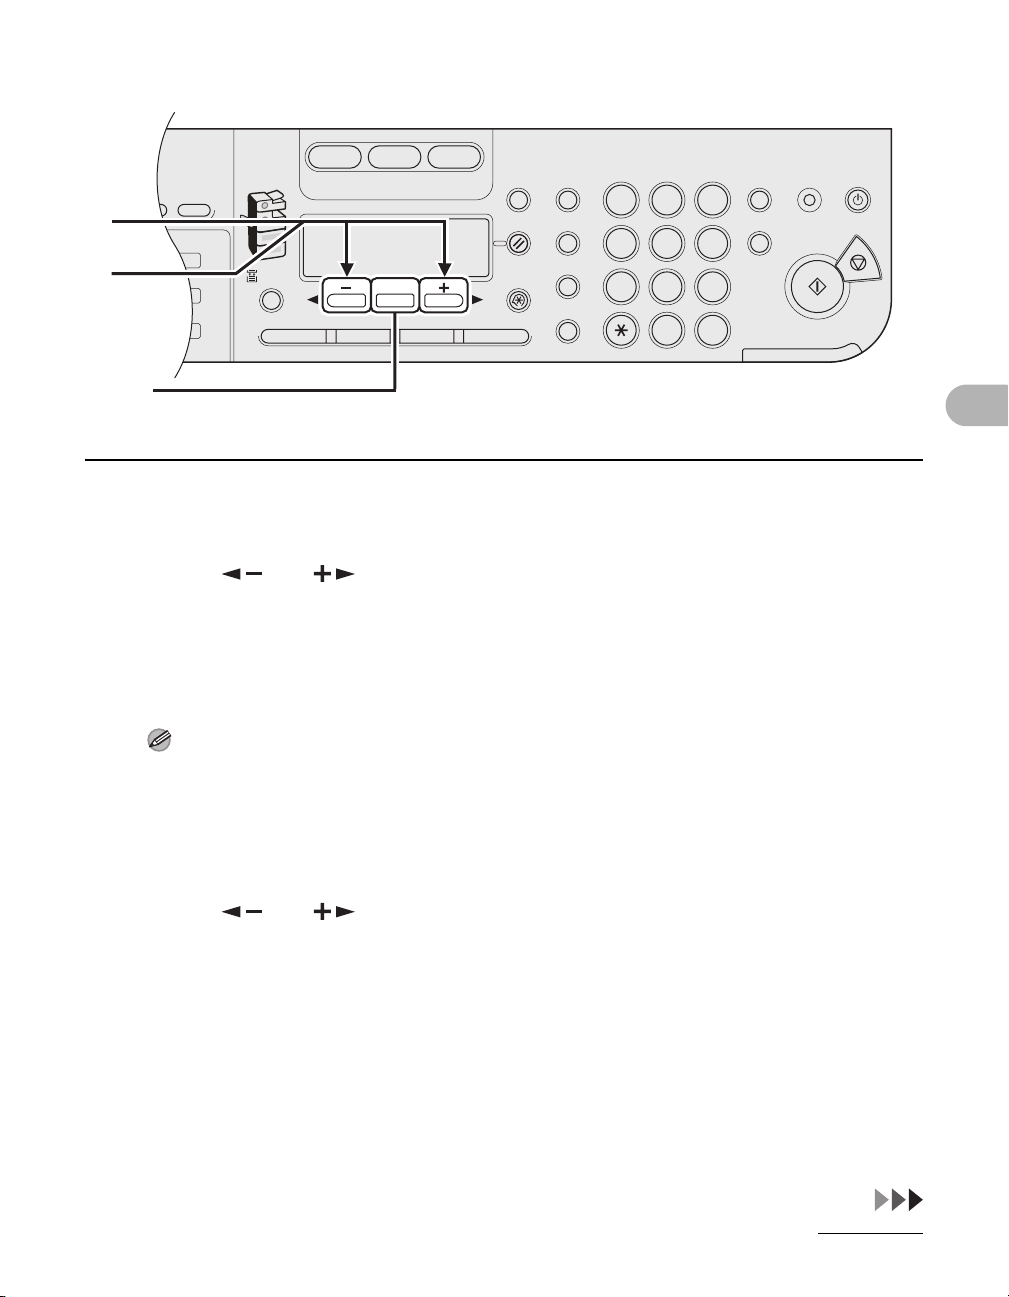
2
Address
Book
Paper
Select
COPY SEND SCAN
Image Quality Density Copy RatioOKTwo-Sided
System
Monitor
View
Settings
Reset Collate
GHI
@./
PQRS
Ton e
JKL
ABC
TUV
MNO
DEF
Clear ON/OFF
Stop
Start
Processing/
Data
Error
Power
WXYZ
SYMBOLS
Additional
Functions
2 on 1
Frame
Erase
al
1
4
7
2
5
8
0#
3
C
6
9
Log In/Out
ID
Counter
Check
M4
6
7
[OK]
5 Press [OK].
6 Press [ ] or [ ] to select the file format, then press [OK].
If you have specified an I-fax address in step 3, this setting is not available. The file format is
automatically set to <TIFF (B&W)> when sending an I-fax.
E-mail (B&W): <PDF>, <TIFF (B&W)>
E-mail (Color): <JPEG>, <PDF (COMPACT)>
File server (FTP and SMB): <PDF>, <TIFF (B&W)>
NOTE
– If you specify an e-mail address from Address Book without selecting the sending method,
settings specified in <STANDARD SETTINGS> in <TX SETTINGS> in <COMMON SETTINGS>
in <TX/RX SETTINGS> are displayed.
– If you want to send color images to a file server or attached to an e-mail message, select
<E-MAIL (COLOR)> as a sending method.
Sending Documents
7 Press [ ] or [ ] to select <ON> or <OFF> for <DIVIDE INTO PAGES>,
then press [OK].
If you have selected <JPEG> in step 6, this setting is not available.
<DIVIDE INTO PAGES> is automatically set to <ON> when sending documents in JPEG format.
<OFF>: Sends multiple images as a single file without dividing them.
<ON>: Separates multiple images and send them as separate files.
4-8
Page 92
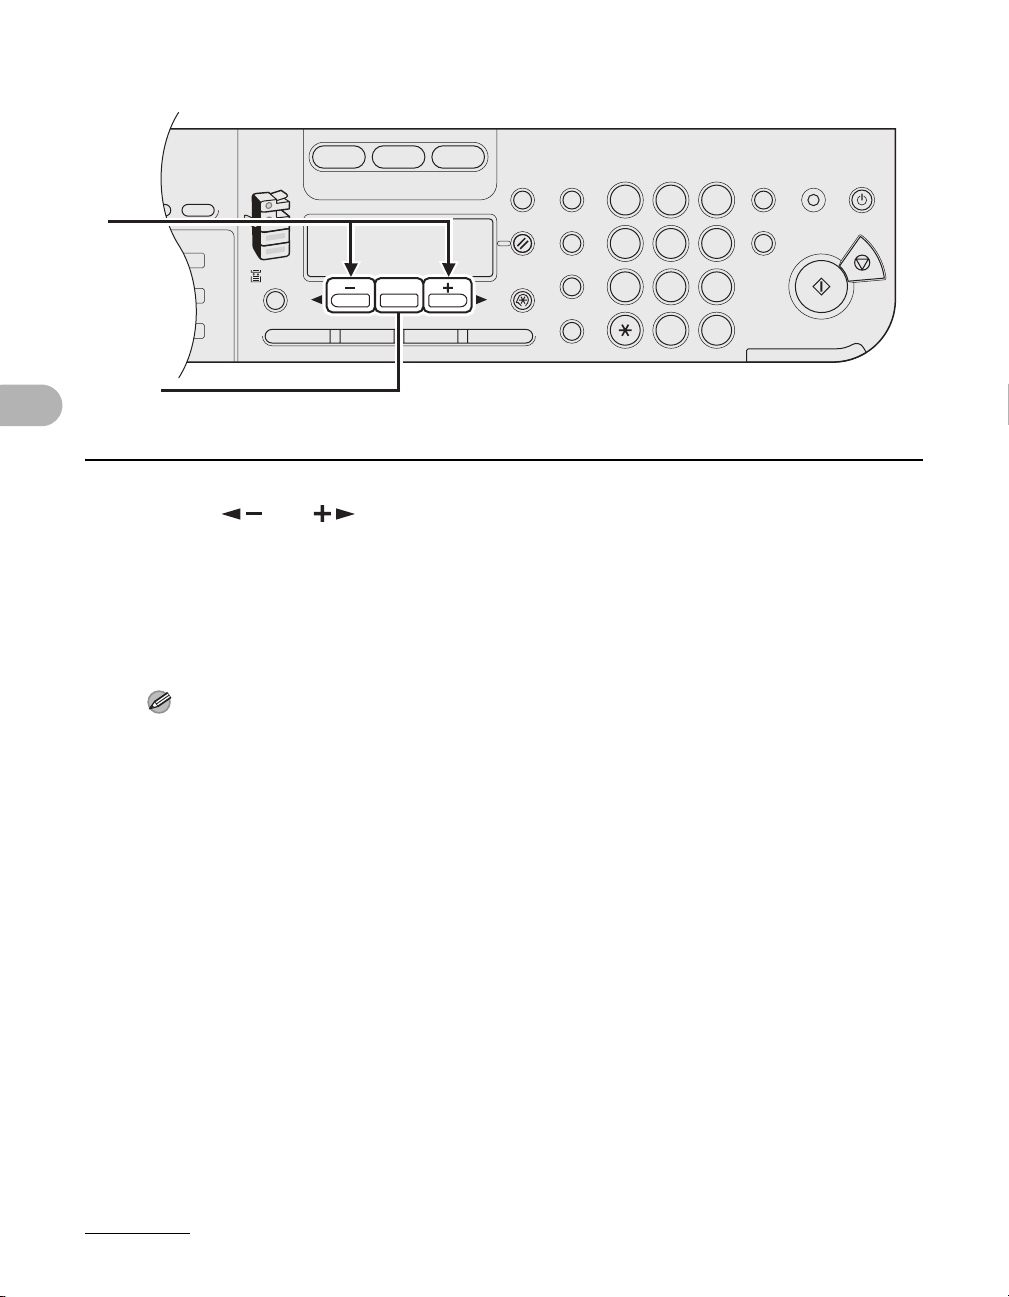
2
Address
Book
Paper
Select
COPY SEND SCAN
Image Quality Density Copy RatioOKTwo-Sided
System
Monitor
View
Settings
Reset Collate
GHI
@./
PQRS
Ton e
JKL
ABC
TUV
MNO
DEF
Clear ON/OFF
Stop
Start
Processing/
Data
Error
Power
WXYZ
SYMBOLS
Additional
Functions
2 on 1
Frame
Erase
al
1
4
7
2
5
8
0#
3
C
6
9
Log In/Out
ID
Counter
Check
M4
8
[OK]
8 Press [ ] or [ ] to select the resolution, then press [OK].
E-mail (B&W): <200x200dpi>, <300x300dpi>, <400x400dpi>, <600X600dpi>, <150X150dpi>,
Sending Documents
<200x100dpi>
E-mail (Color): <200x200dpi>, <300x300dpi>, <100X100dpi>, <150X150dpi>
I-fax: <200x200dpi>, <200x100dpi>
File server (FTP and SMB): <200x200dpi>, <300x300dpi>, <400x400dpi>, <600X600dpi>,
<150X150dpi>, <200x100dpi>
NOTE
– If <PDF (COMPACT)> is selected as the file format, only <300x300dpi> can be selected for
sending color images attached to an e-mail message.
– If you want to send color images to a file server or attached to an e-mail message, select
<E-MAIL (COLOR)> as a sending method.
4-9
Page 93
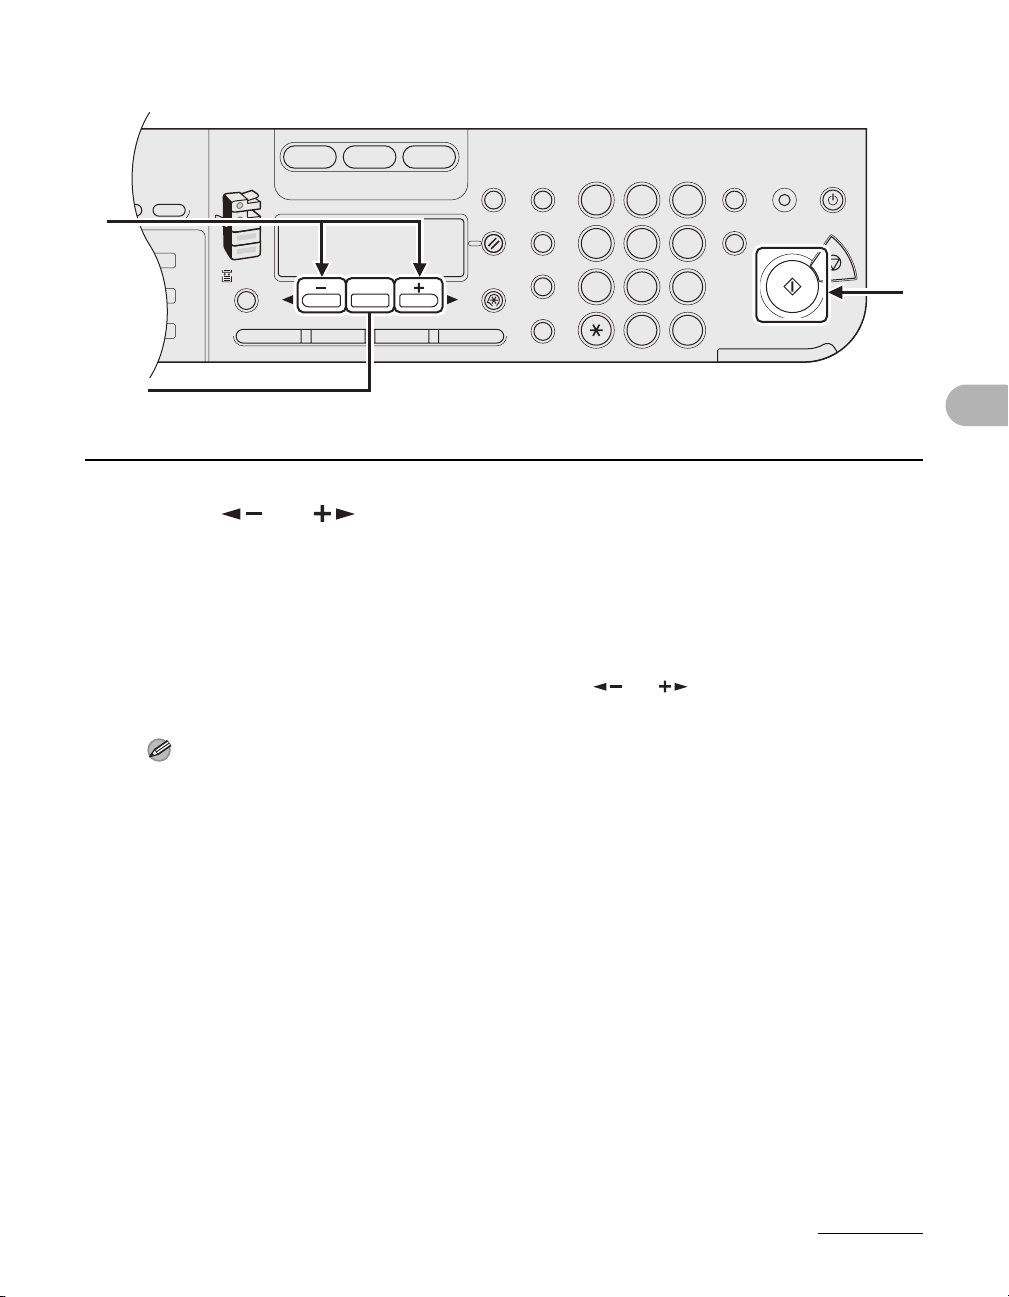
2
Address
Book
Paper
Select
COPY SEND SCAN
Image Quality Density Copy RatioOKTwo-Sided
System
Monitor
View
Settings
Reset Collate
GHI
@./
PQRS
Ton e
JKL
ABC
TUV
MNO
DEF
Clear ON/OFF
Stop
Start
Processing/
Data
Error
Power
WXYZ
SYMBOLS
Additional
Functions
2 on 1
Frame
Erase
al
1
4
7
2
5
8
0#
3
C
6
9
Log In/Out
ID
Counter
Check
M4
9
[OK]
9 Press [ ] or [ ] to select the original type, then press [OK].
<TEXT/PHOTO>, <TEXT>, <PHOTO>
If you have selected <PDF (COMPACT)> as the file format in step 6, the original type is
automatically set to <TEXT/PHOTO>. Skip to step 10.
10 Press [Start].
When you set the documents on the platen glass, press [ ] or [ ] to select the document size,
then press [Start] for each document. When scanning is complete, press [OK] to start sending.
NOTE
– When <TIME OUT> is set to <ON> in <TX SETTINGS> in <FAX SETTINGS> in <TX/RX
SETTINGS>, and if you have specified the destination by any other method than using numeric
keys, the machine starts scanning automatically without pressing [Start], after the preset time for
this setting is elapsed.
– You can set the document’s name, a subject line, message body text, and reply-to address, and
e-mail priority common to all sending jobs. For instructions, see Chapter 1, “Advanced Send
Features” in the Advanced Operation Guide.
10
Sending Documents
4-10
Page 94

Specifying Destinations
This machine provides you with various ways to specify the destination:
● Using Numeric Keys (p. 4-12)
– You can specify a fax number, e-mail address, or I-fax address using the numeric
keys.
● Using One-Touch Keys (p. 4-15)
– You can specify one or more destinations by pressing one-touch keys. You can
register up to 23 one-touch keys, including group addresses and favorites buttons.
● Using Coded Dial Codes (p. 4-17)
– You can specify one or more destinations by pressing [Coded Dial] followed by
three-digit code. You can register up to 177 coded dial codes, including group
addresses.
● Using Group Addresses (p. 4-19)
– You can specify one or more groups of destinations registered in one-touch keys
Sending Documents
and coded dial codes. You can register up to 199 destinations in a group.
● Using Address Book Key (p. 4-21)
– You can specify destinations by pressing [Address Book] and searching a
destination from Address Book.
● Using Favorites Buttons (p. 4-25)
– You can specify destinations together with their scan and send settings by
pressing one-touch keys assigned for favorites buttons. Up to four favorites
buttons can be registered.
NOTE
For easy reference, print out the list of recipients registered in one-touch keys or coded dial codes.
(See “REPORT SETTINGS,” on p. 14-38.)
4-11
Page 95
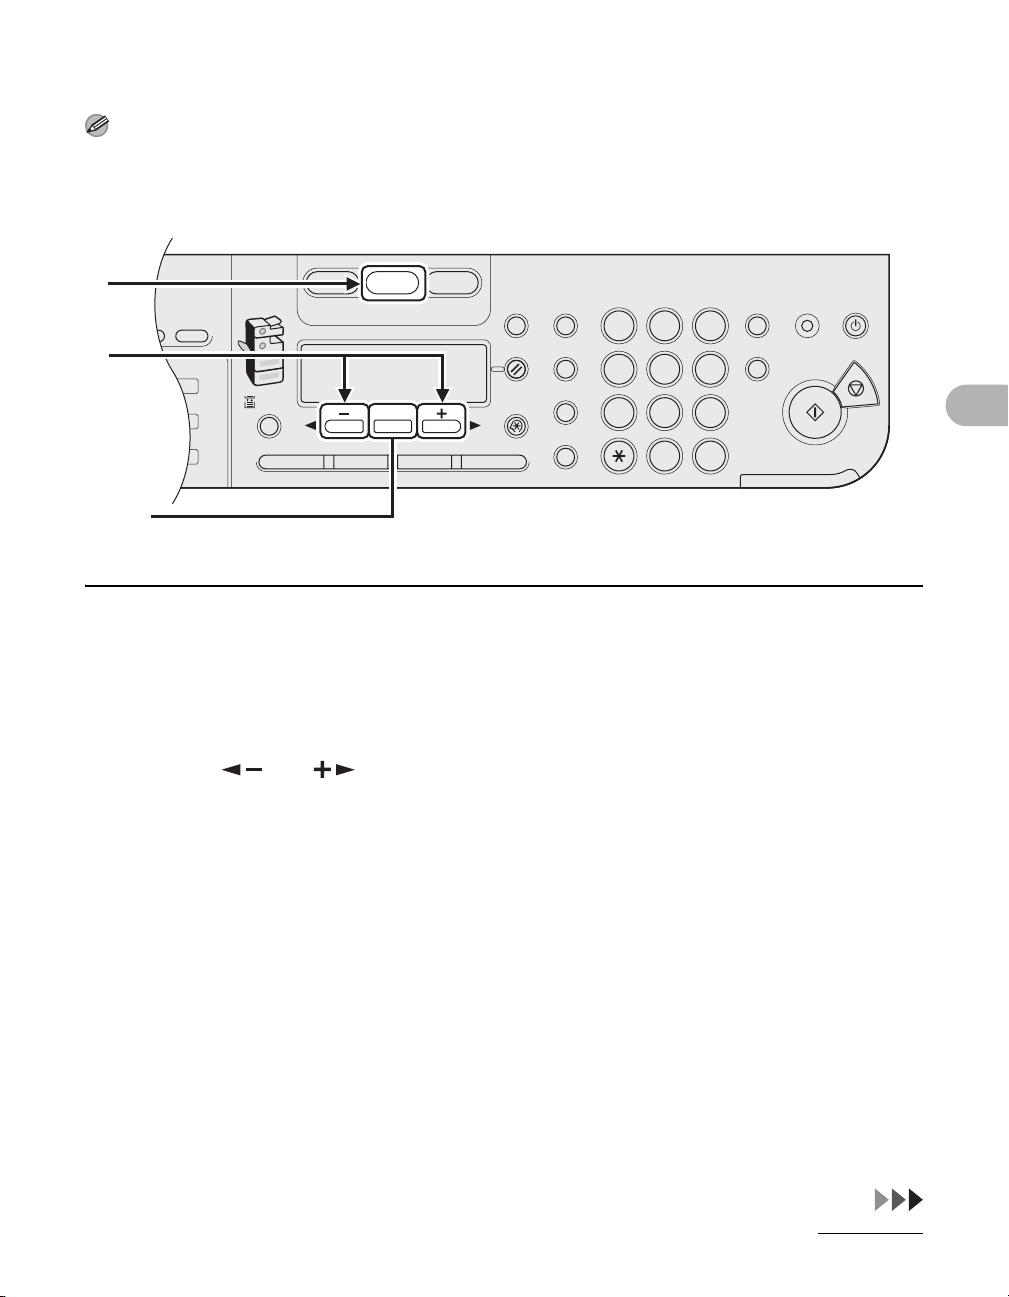
Using Numeric Keys
2
Address
Book
Paper
Select
COPY SEND SCAN
Image Quality Density Copy RatioOKTwo-Sided
System
Monitor
View
Settings
Reset Collate
GHI
@./
PQRS
Ton e
JKL
ABC
TUV
MNO
DEF
Clear ON/OFF
Stop
Start
Processing/
Data
Error
Power
WXYZ
SYMBOLS
Additional
Functions
2 on 1
Frame
Erase
al
1
4
7
2
5
8
0#
3
C
6
9
Log In/Out
ID
Counter
Check
M4
NOTE
– You can specify only one destination at a time using the numeric keys.
– You cannot specify a file server using the numeric keys.
2
3
[OK]
1 Place the document on the platen glass or load it in the ADF.
Sending Documents
2 Press [SEND].
3 Press [ ] or [ ] to select the sending method, then press [OK].
<FAX>, <E-MAIL:B&W>, <E-MAIL:COLOR>, <I-FAX>
4-12
Page 96
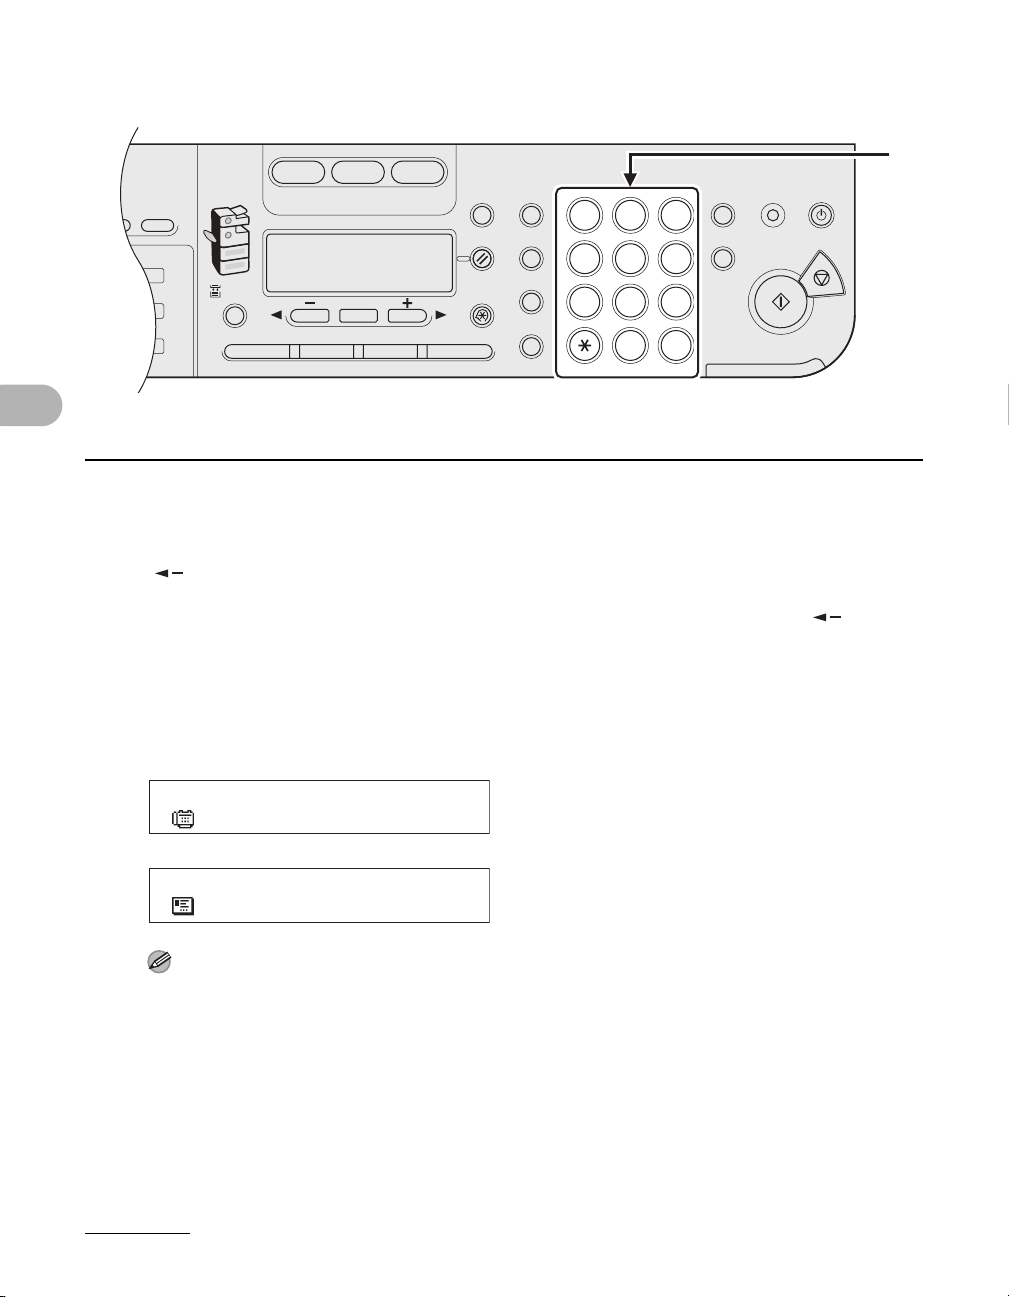
4 Enter the fax number or e-mail/I-fax address with the numeric keys.
Address
Book
Paper
Select
COPY SEND SCAN
Image Quality Density Copy RatioOKTwo-Sided
System
Monitor
View
Settings
Reset Collate
GHI
@./
PQRS
Ton e
JKL
ABC
TUV
MNO
DEF
Clear ON/OFF
Stop
Start
Processing/
Data
Error
Power
WXYZ
SYMBOLS
Additional
Functions
2 on 1
Frame
Erase
l
1
4
7
2
5
8
0#
3
C
6
9
Log In/Out
ID
Counter
Check
M4
If you entered a wrong number when specifying a fax number, go back to the wrong digit with
Sending Documents
[].
If you entered a wrong character when specifying an e-mail or I-fax address, press [ ] to go
back to the part you want to correct, then press [Clear]. You can also delete the entire entry by
pressing and holding [Clear].
If you specify an e-mail or I-fax address, you can enter the optional settings by pressing [OK]. (See
“Send Settings,” on p. 4-7.)
4
Ex.
FAX NUMBER
=012XXXXXXXXX
Ex.
ADDRESS :a
[email protected]
NOTE
If <CONFIRM FAX NO.> in <ACCESS TO DEST.> in <SYSTEM SETTINGS> is set to <ON> and
you specify a fax number using the numeric keys, you must enter the fax number again for
confirmation. Enter the same fax number you entered in step 4, then press [OK].
4-13
Page 97
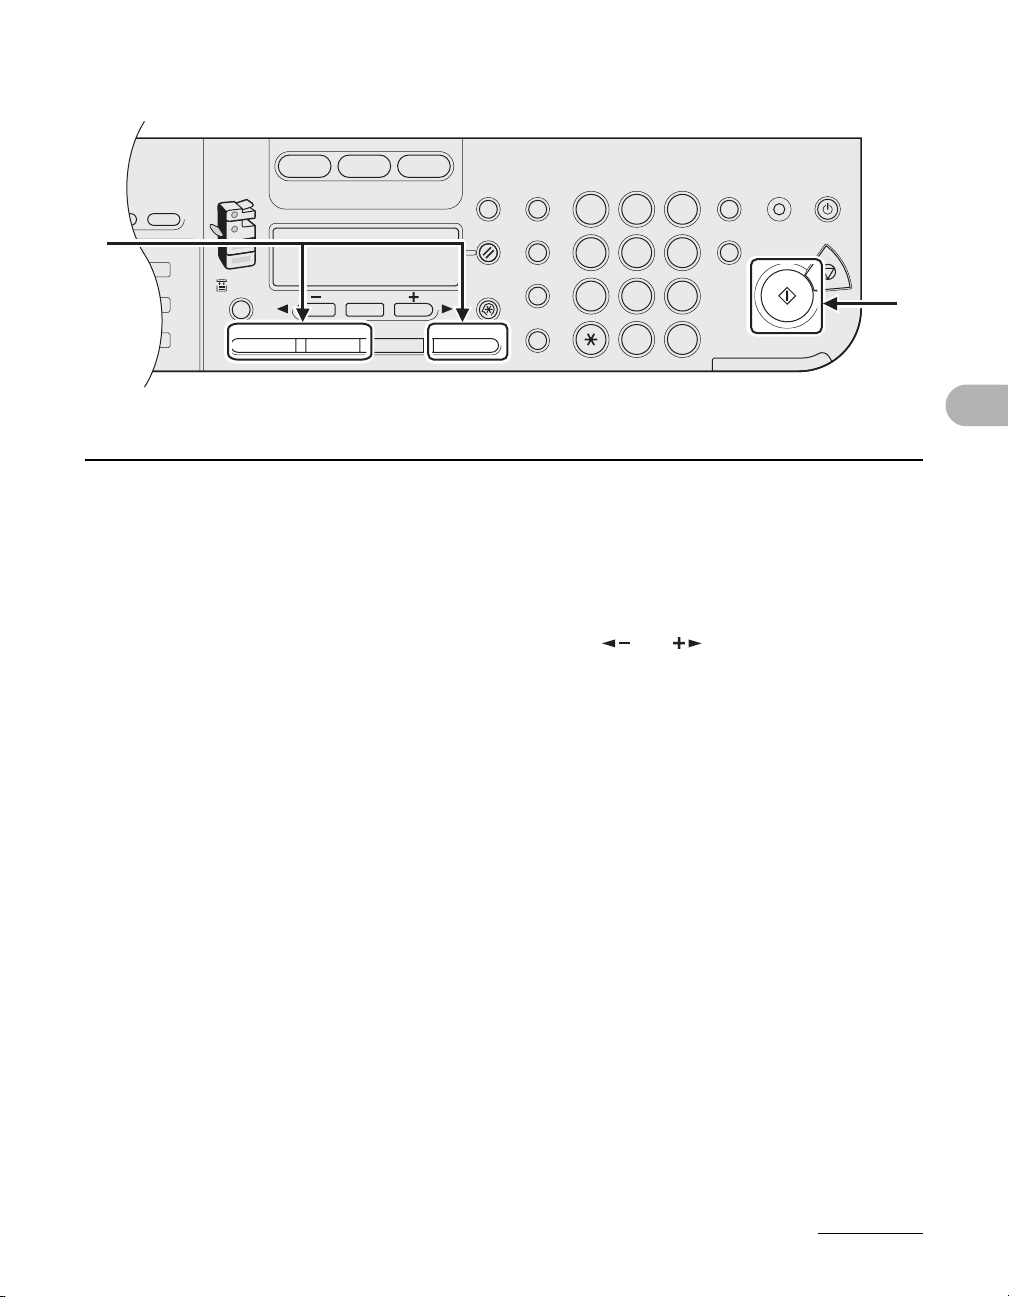
2
Address
Book
Paper
Select
COPY SEND SCAN
Image Quality Density Copy RatioOKTwo-Sided
System
Monitor
View
Settings
Reset Collate
GHI
@./
PQRS
Ton e
JKL
ABC
TUV
MNO
DEF
Clear ON/OFF
Stop
Start
Processing/
Data
Error
Power
WXYZ
SYMBOLS
Additional
Functions
2 on 1
Frame
Erase
al
1
4
7
2
5
8
0#
3
C
6
9
Log In/Out
ID
Counter
Check
M4
5
5 Adjust any necessary settings for your document.
For details, see “Scan Settings,” on p. 4-3.
6 Press [Start].
When you set the documents on the platen glass, press [ ] or [ ] to select the document
size, then press [Start] for each document. When scanning is complete, press [OK] to start
sending.
6
Sending Documents
4-14
Page 98
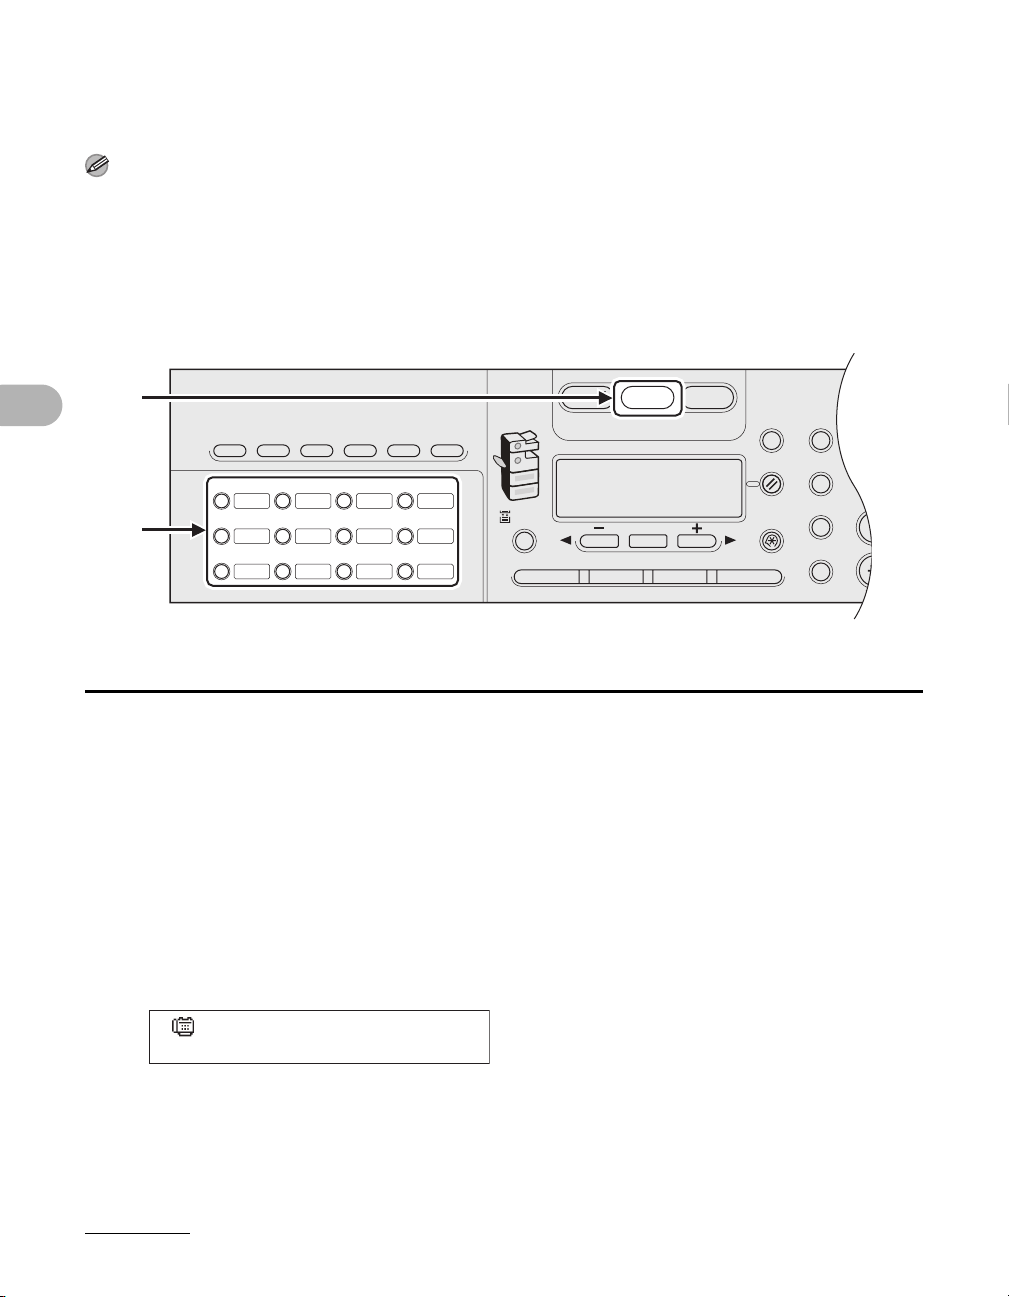
Using One-Touch Keys
Direct TX
01 02 03 04
05 06 07 08
09 10 11 12
Address
Book
Paper
Select
COPY SEND SCAN
Image Quality Density Copy RatioOKTwo-Sided
System
Monitor
View
Settings
Reset Collate
GHI
@./
PQRS
To
Additional
Functions
2 on 1
Frame
Erase
Coded
DialRecallHookPause
1
4
7
M4M3M2M1
You can specify up to 23 destinations using one-touch keys.
NOTE
– To use this feature, you must register destinations in one-touch keys beforehand. (See “Storing/Editing
Address Book,” on p. 4-27.)
– A maximum of 201 destinations can be specified at the same time. (Out of the 201 destinations, a
number or address can be specified with the numeric keys.) If you specify a group, which is made up of
several destinations, each destination in the group is counted as a separate address.
2
3
Sending Documents
1 Place the document on the platen glass or load it in the ADF.
2 Press [SEND].
3 Press the desired one-touch key (01 to 23).
If you pressed a wrong key, press [Clear] and try again.
If you specify an e-mail, I-fax, or file server address, you can enter the optional settings by
pressing [OK]. (See “Send Settings,” on p. 4-7.)
Ex.
=0123XXXXXX
[05]CANON USA
4-15
Page 99
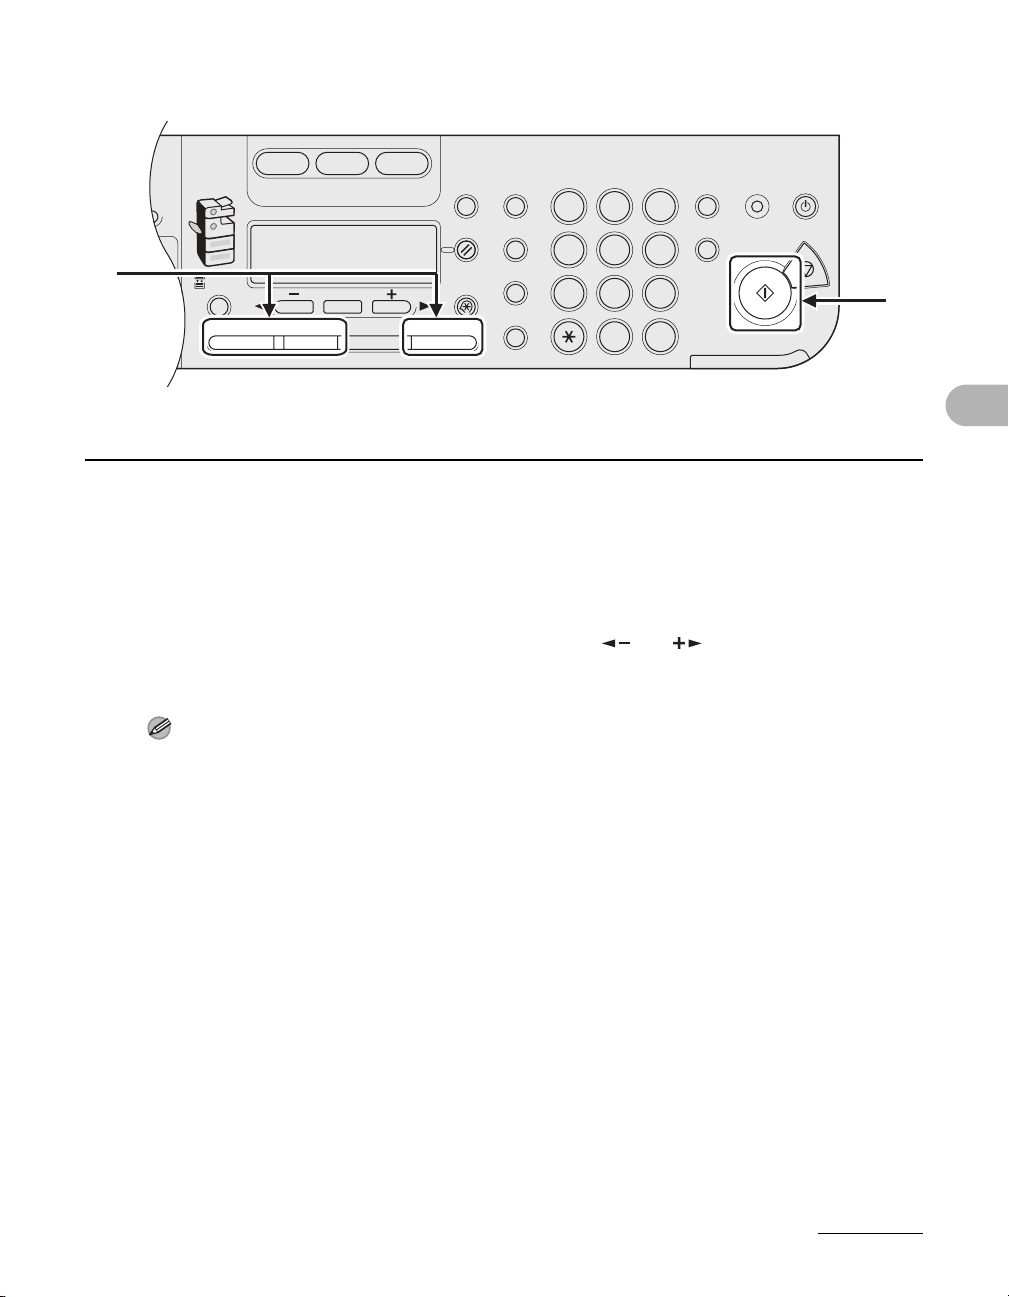
ss
k
Paper
Select
COPY SEND SCAN
Image Quality Density Copy RatioOKTwo-Sided
System
Monitor
View
Settings
Reset Collate
GHI
@./
PQRS
Ton e
JKL
ABC
TUV
MNO
DEF
Clear ON/OFF
Stop
Start
Processing/
Data
Error
Power
WXYZ
SYMBOLS
Additional
Functions
2 on 1
Frame
Erase
1
4
7
2
5
8
0#
3
C
6
9
Log In/Out
ID
Counter
Check
4
4 Adjust any necessary settings for your document.
For details, see “Scan Settings,” on p. 4-3.
5 Press [Start].
When you set the documents on the platen glass, press [ ] or [ ] to select the document
size, then press [Start] for each document. When scanning is complete, press [OK] to start
sending.
NOTE
When <TIME OUT> is set to <ON> in <TX SETTINGS> in <FAX SETTINGS> in <TX/RX
SETTINGS>, and if you have specified the destination by any other method than using numeric
keys, the machine starts scanning automatically without pressing [Start], after the preset time for
this setting is elapsed.
5
Sending Documents
4-16
Page 100
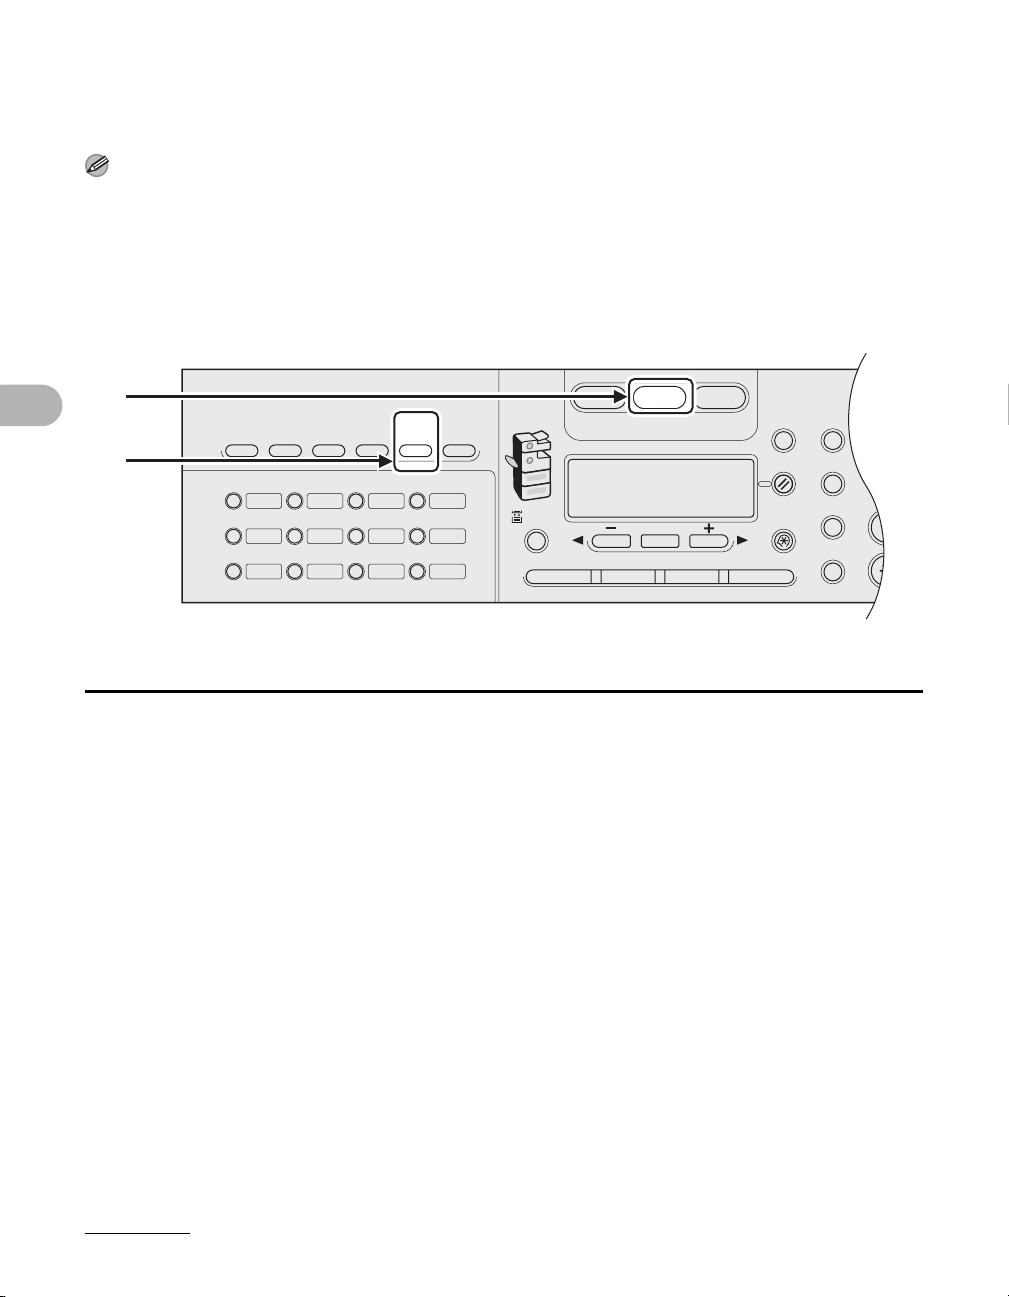
Using Coded Dial Codes
Direct TX
01 02 03 04
05 06 07 08
09 10 11 12
Address
Book
Paper
Select
COPY SEND SCAN
Image Quality Density Copy RatioOKTwo-Sided
System
Monitor
View
Settings
Reset Collate
GHI
@./
PQRS
To
Additional
Functions
2 on 1
Frame
Erase
Coded
DialRecallHookPause
1
4
7
M4M3M2M1
You can specify up to 177 destinations using coded dial codes.
NOTE
– To use this feature, you must register destinations in coded dial code beforehand. (See “Storing/Editing
Address Book,” on p. 4-27.)
– A maximum of 201 destinations can be specified at the same time. (Out of the 201 destinations, a
number or address can be specified with the numeric keys.) If you specify a group, which is made up of
several destinations, each destination in the group is counted as a separate address.
2
3
Sending Documents
1 Place the document on the platen glass or load it in the ADF.
2 Press [SEND].
3 Press [Coded Dial].
4-17
 Loading...