

Canon imagePROGRAFi PF830 series, imagePROGRAFi iPF840 series, imagePROGRAFi iPF850 series Setup Manual
Introductory Information
ENG
Setup Guide
Series
Series
Series
* Q T 5 7 4 1 9 V 1 *
Caution
150mm
100mm
600mm
200mm
200mm
150mm
100mm
600mm
200mm
200mm
1500mm
600mm
900mm(*)
258mm
150mm
200mm
200mm
100mm
Assemble the Stand*
(P.3)
(P.3)
Install the Printer
(P.3)
Attach the Media Take-up Unit
(P.5)
Set Up the Output Stacker
(P.5)
Prepare to Turn the Power On
(P.5)
Install the Ink Tanks
(P.7)
Install the Printhead
(P.9)
Load Paper to Adjust the Printhead
(P.10)
Install the Software
(P.11)
Store Accessories in the Pockets
(P.17)
How to Display the Electronic
Manuals
(P.18)
*
*
*
Attach the Stacker
(P.17)
*
Install the Roll Unit
Read this manual before attempting to operate the printer.
MEM
O
Keep this manual in a handy location for future reference.
Instructions in this Setup Guide show the iPF840 printer. Note that your printer may look different from these illustrations in some cases.
•
However, the basic operations are the same.
•
The markers used in this setup guide are for the iPF830 series, for the iPF840 series, and for the iPF850
series.
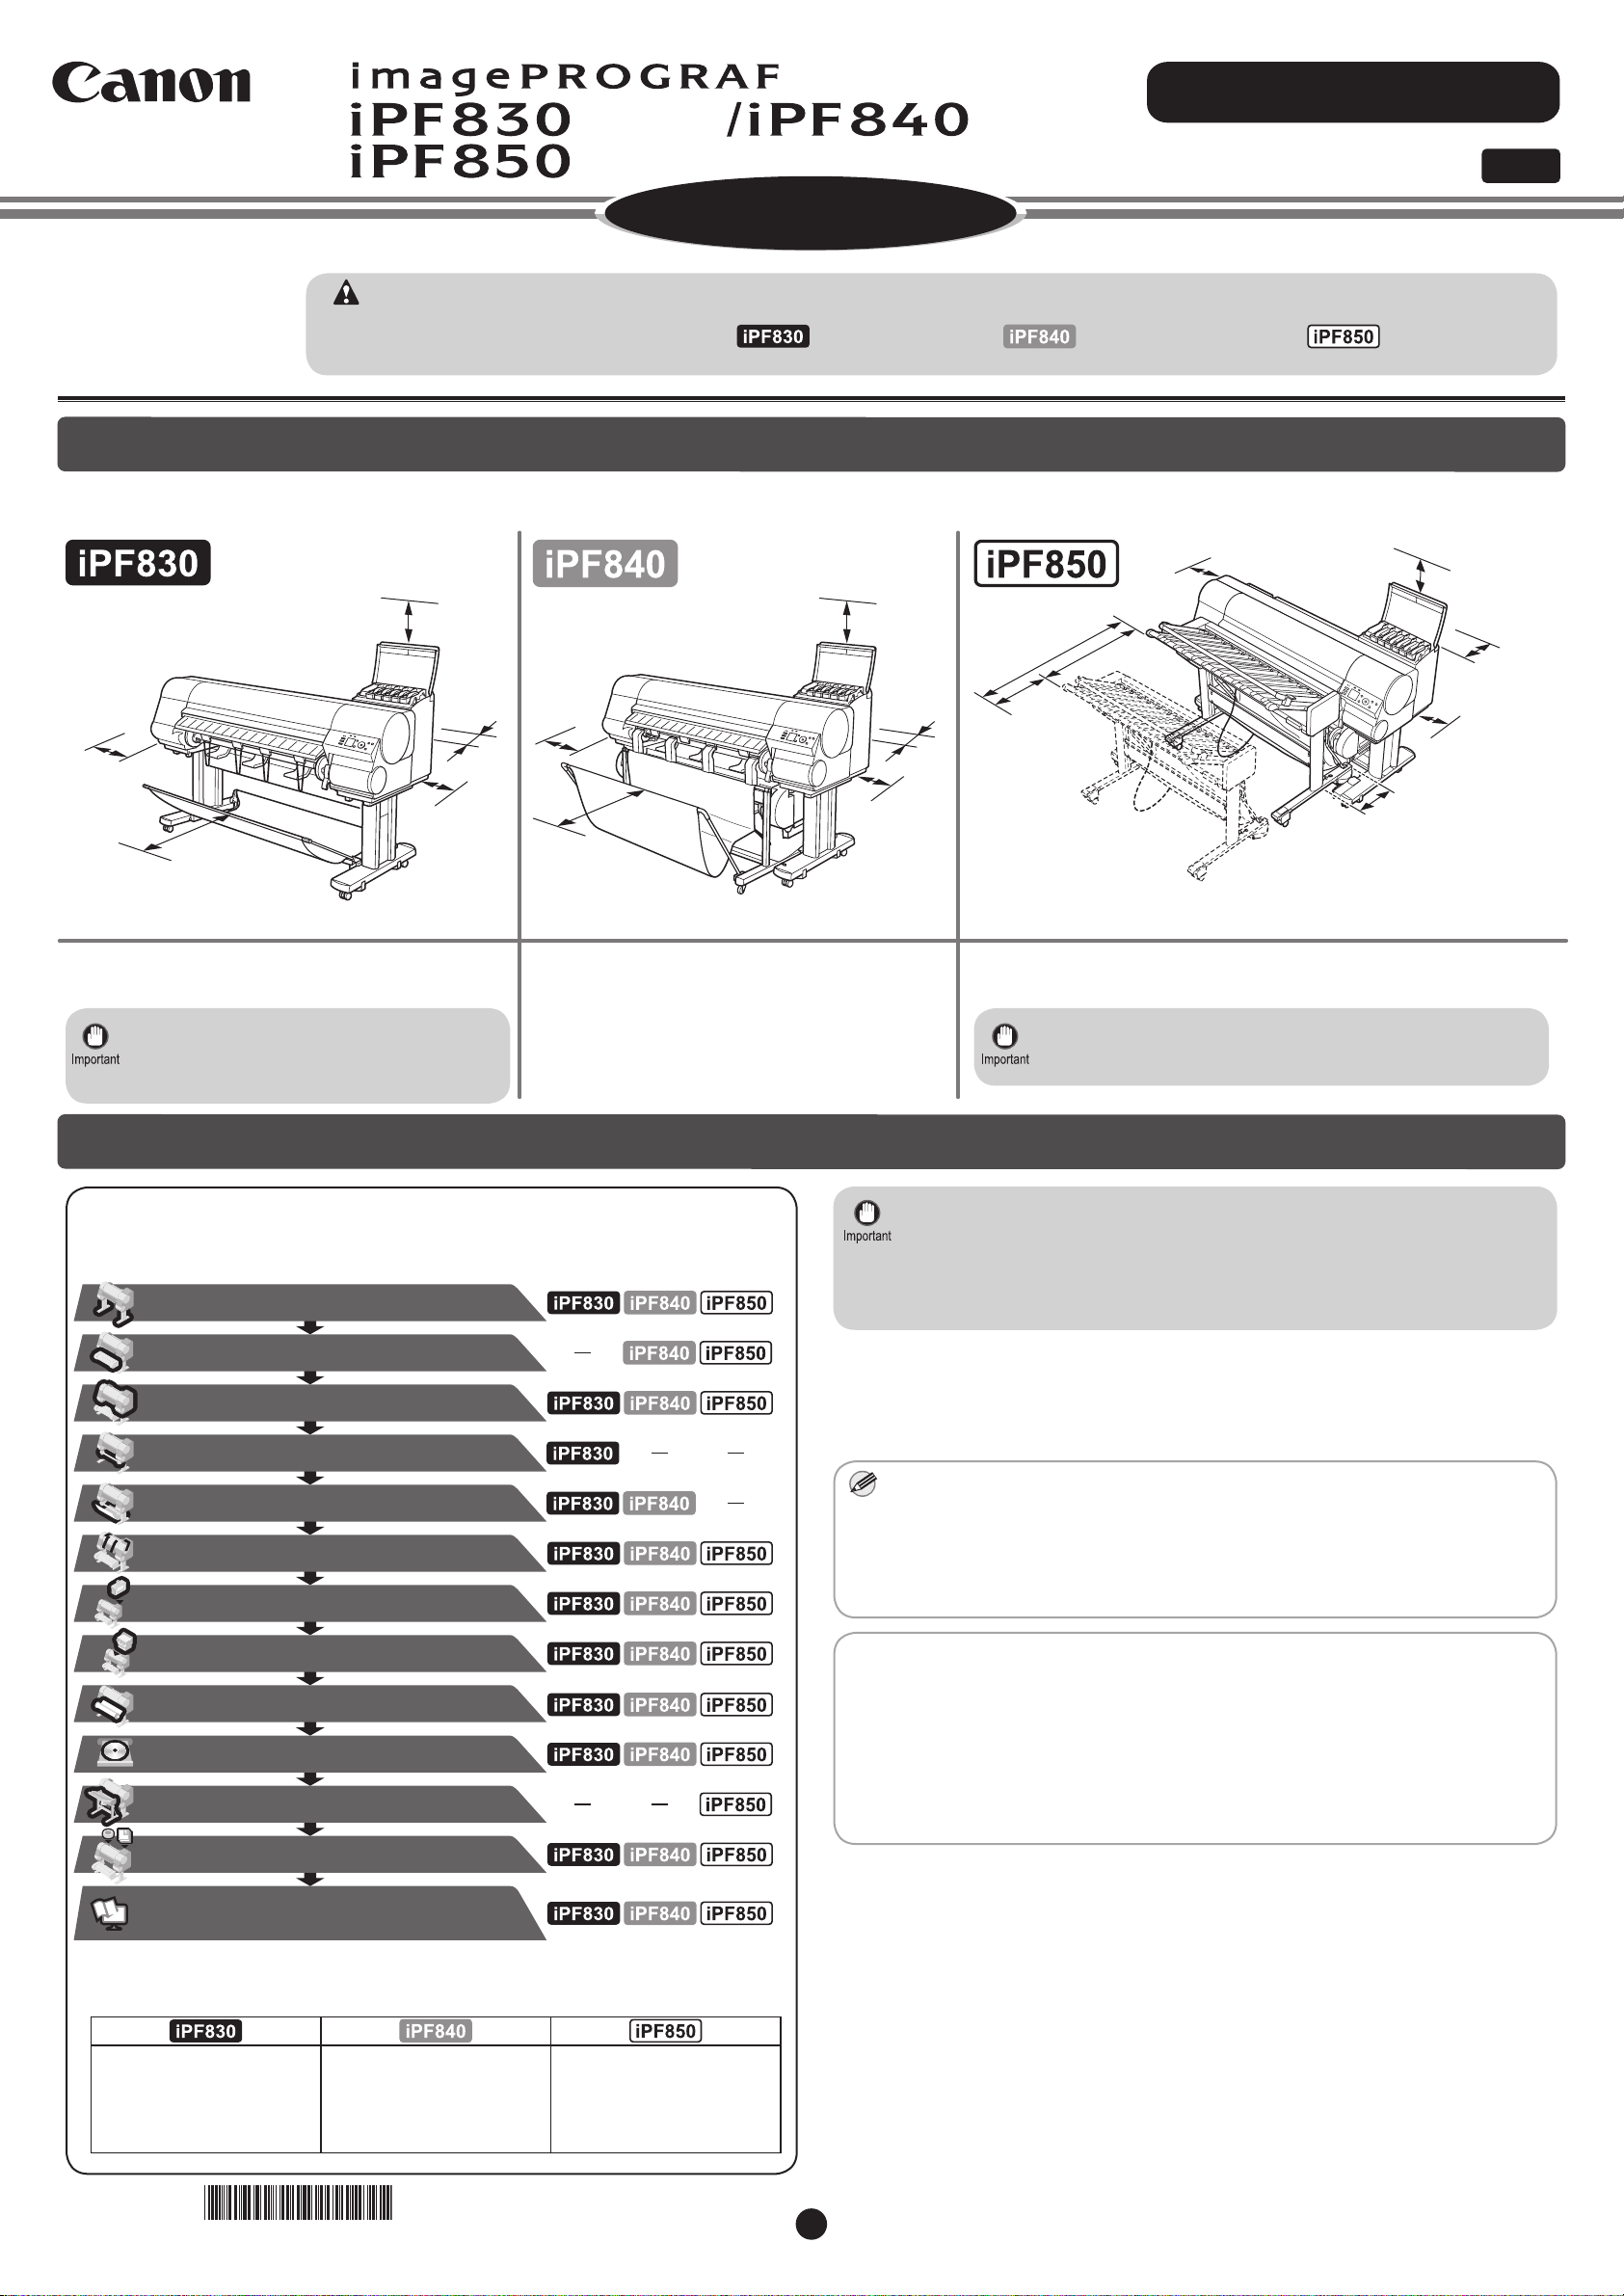
Introduction
Before Setting Up the Printer
Before setting up the printer, check the completed image of the printer you purchased and make sure you have enough space to set up the printer. It is
recommended that you reserve space of the following dimensions to allow you to work around the printer.
Installation space 2293 × 1675 × 1518
(W x D x H mm)
• If you are using the optional wheeled
output stacker, you should reserve space
of the same dimensions as the iPF840.
Installation space 2293 × 1991 × 1518
(W x D x H mm)
Overview of Setup
Set up the printer using the following procedure.
Only perform the steps for which the name of the model you purchased is
specied on the right of the printer.
* This is the space that is required for
working between the stacker and
printer such as when replacing paper
or using the output stacker.
Installation space 2293 × 3017 × 1518
(W x D x H mm)
• Reserve space that does not have any steps so that there
are no obstacles to moving the Stacker.
Even if you do not use the printer driver, be sure to install Media
•
Conguration Tool from the provided User Software CD-ROM. With Media
Conguration Tool, the paper types that are available in your area can be
registered to the printer. For instructions on installation, refer to "Install the
Software" on page 11. (In Windows, select Install Individual Software in
the Setup Menu window to install Media Conguration Tool only.)
Details for each step are given in this Setup Guide. Simply follow the instructions to
install the printer.
If an error message is displayed during setup or other problems occur, refer to
"Responding to Messages" on page 20.
* Refer also to the Setup Guide for the accessories and options in the following
table.
-List of accessories and options
Some items are included with the printer but not described in this manual.
•
Keep these items in a safe place after setup because they are used in
various printing applications.
For instructions on the included items not described in this manual, refer to
•
the User's Guide.
•
A cable to connect the printer to a computer is not provided with the printer.
• Canon, the Canon logo, and imagePROGRAF are trademarks or registered trademarks of CANON
INC.
• Microsoft is a registered trademark of Microsoft Corporation.
• Windows is a trademark or registered trademark of Microsoft Corporation in the U.S. and/or other
countries.
• Windows Vista is a trademark or registered trademark of Microsoft Corporation in the U.S. and/or
other countries.
• Mac, Mac OS, OS X and Bonjour are trademarks of Apple Inc., registered in the U.S. and other
countries.
• All other trademarks or registered trademarks described in this Setup Guide are the property of
their respective owners.
• Printer Stand
• BU-03 Wheeled output
stacker (Option)
• TU-06 Media take-up unit
(Option)
QT5-7419-V1 PRINTED IN CHINA©CANON INC. 2015
• Printer Stand
(Roll unit support)
• BU-03 Wheeled output
stacker
• Printer Stand
(Roll unit support)
• RS-01 Stacker
1
d
k
j
l
i
h
f
a
e
b
c
g
BU-03
A
B
A
B
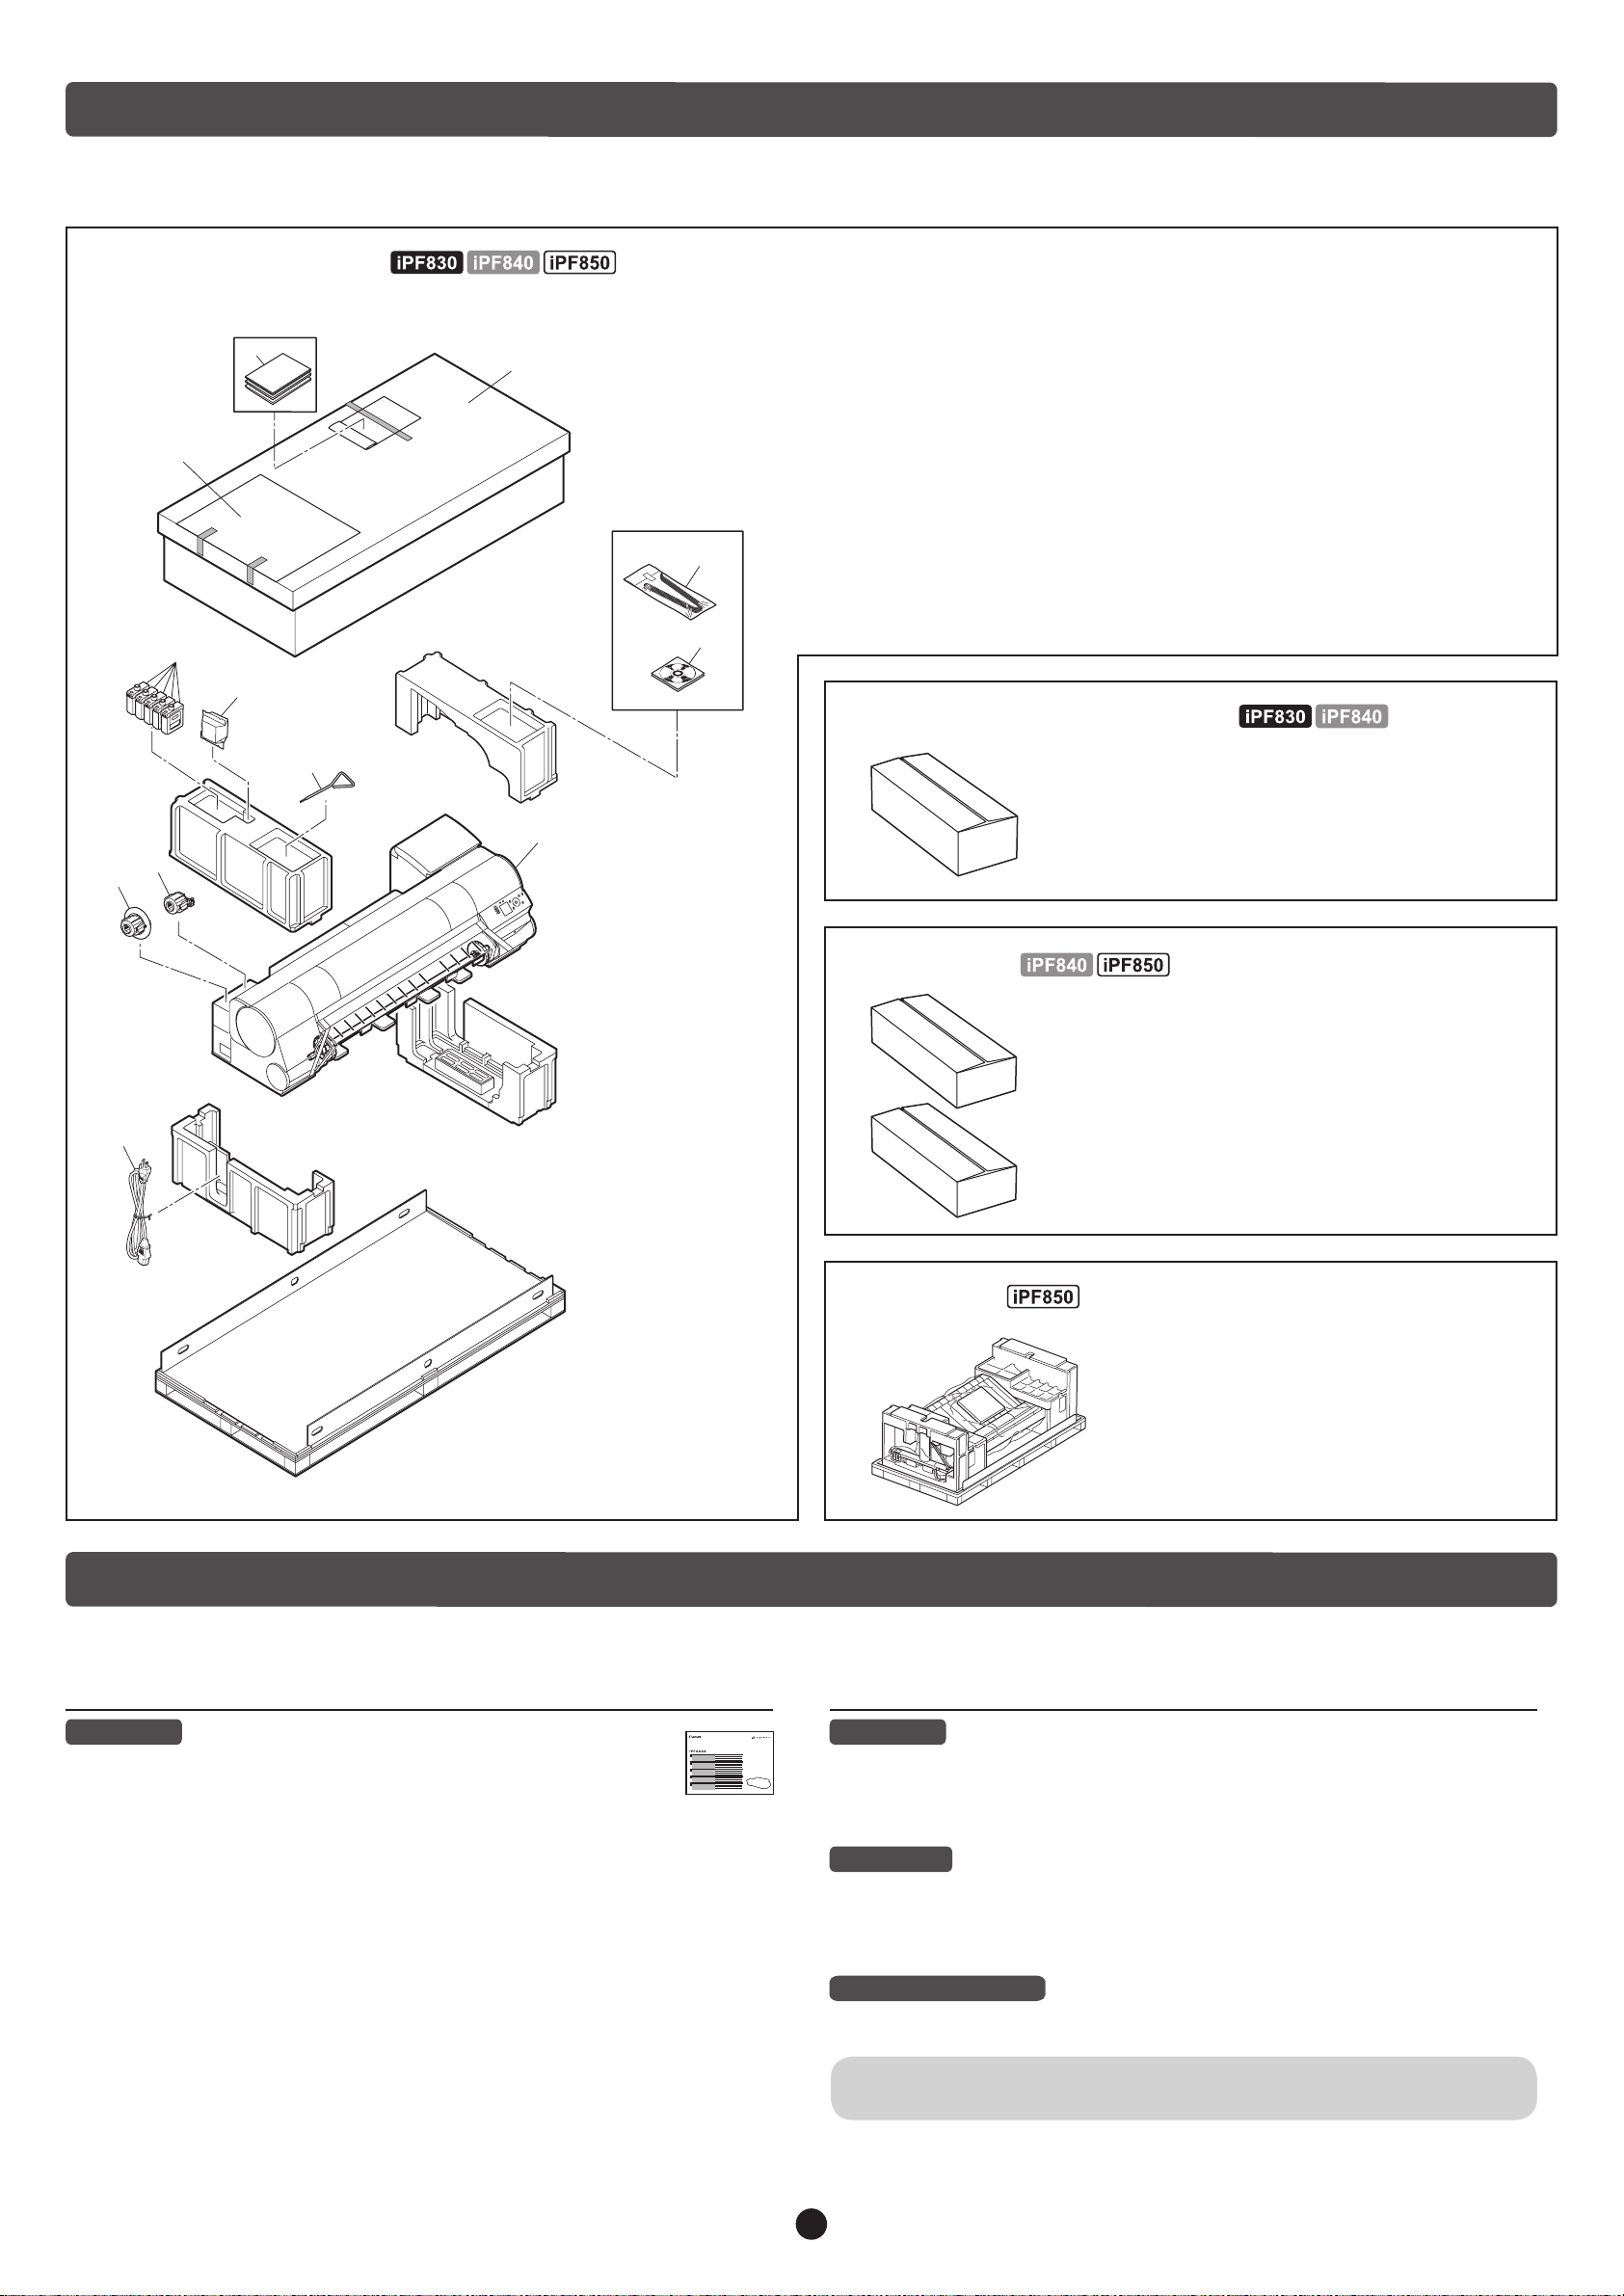
Package Contents
The product is packaged divided into several separate boxes.
The wheeled output stacker and roll unit may be included in the box labeled "RB-01" depending on the region where you purchased the printer.
The stacker and roll unit may be included in the box labeled "RS-01" depending on the region where you purchased the printer.
● Printer and Stand
Printera.
Set of stands (*1)
b.
Included paper
c.
d.
Set of printer documentation
e.
Starter ink tanks (x5)
(C, M, Y, MBK, BK)
f.
Printhead
Includes the stand for the stationary output stacker or the stand for the wheeled output
*1 :
stacker.
If you purchased the iPF850 Series, the Allen wrench is also used for setting up the stacker.
*2 :
Only included when the stationary output stacker or the stacker is included as standard.
*3 :
g. Allen wrench (*2)
h.
3-inch paper core attachment #1
3-inch paper core attachment #2
i.
Ejection support (x4) (*3)
j.
Set of CD-ROMs
k.
Power cordl.
● Wheeled Output Stacker
Contained in the box labeled "BU-03". Refer to the
"Wheeled Output Stacker Setup Guide" for details
on the products included in the box. Although this is
optional on the iPF830 Series, it may be included as
standard in some regions.
● Roll Unit
Contained in the boxes labeled "A" and "B". Refer
to the "Printer Stand Setup Guide" for details on the
products included in the boxes.
● Stacker
Refer to the "Stacker Setup Guide" for
details on the products included with the
Stacker.
After installing the printer as shown in this Setup Guide, refer to the manuals for instructions on operation and maintenance.
Printed Manuals
Quick Guide
The Quick Guide contains information such as warnings for using this
product safely and how to operate the navigation that is useful when
replacing paper, ink tanks, and the printhead.
The Manuals Supplied with This Printer
Electronic Manuals
Basic Guide
The Basic Guide describes the following information.
• Loading paper, Replacing the consumables, Control Panel menus, and others
• Troubleshooting tips and Error messages
• Preparations for transferring the printer
User's Guide
This guide describes advanced usage of the printer such as paper saving tips,
how to print a poster and banner with the supplied software and print quality
adjusting method, in addition to the basic instructions for printing on roll paper or
cut sheet.
Paper Reference Guide
This guide describes about the types and specications of the available media on
the printer.
To refer to the electronic manuals Refer to "How to Display the Electronic
Manuals" (P.18)
2
3
Caution
Assemble the Stand
2 31
5
4
Install the Roll Unit
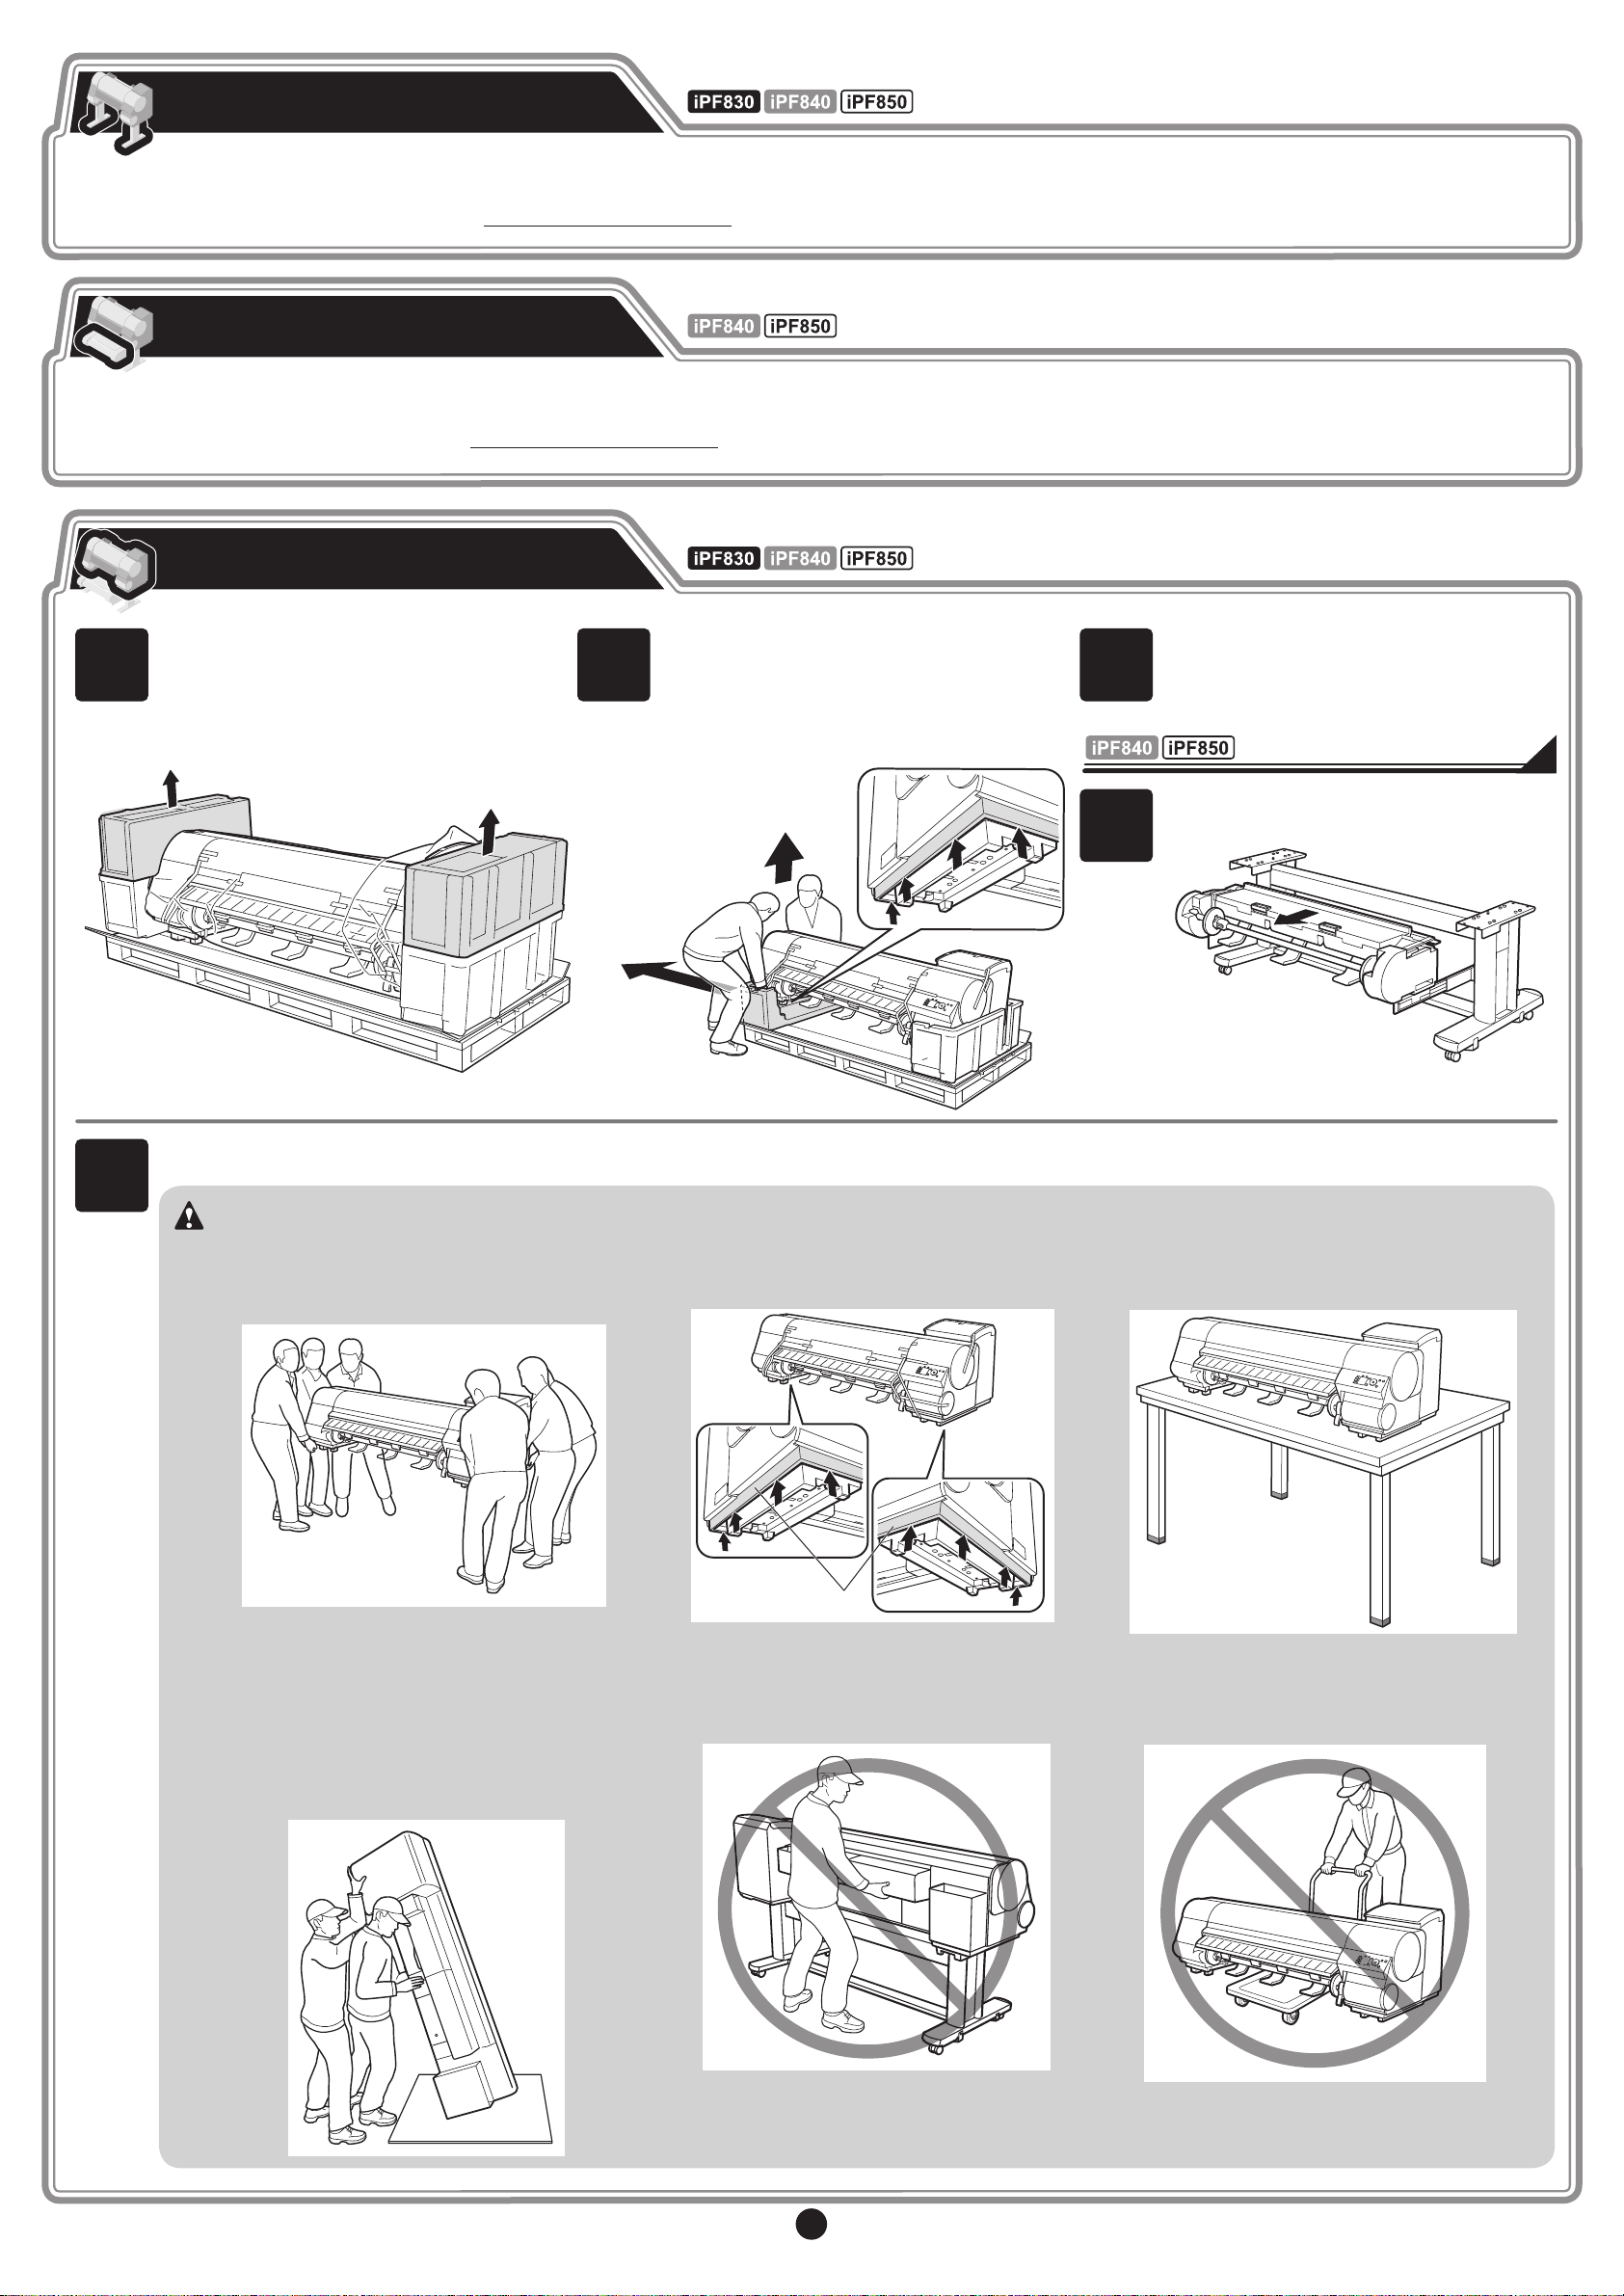
Install the Printer
a
Assemble the stand on which you will install the printer.
-> Refer to "Assemble the Stand" in the Printer Stand Setup Guide
Remove the packaging material and the
plastic covering from the other side of the
printer the same way.
Remove the packaging material on top of
the printer.
While two people hold the carrying handles
under the printer on one end and lift the
printer a little, have a third person remove the
packaging material and the plastic covering
from under the printer. After the packaging
material has been removed, lower the printer.
Pull out the roll unit.
With three people holding the carrying handles under the printer on both ends, lift the printer.
• The printer alone weighs approximately 112
kg. Moving the printer requires at least six
people, three on either side. Be careful to
avoid back strain and other injuries.
• When moving the printer, firmly grasp the
carrying handles (a) under each side. Holding
the printer at other positions is dangerous
and cause injury and damage if the printer is
dropped.
Attach the roll unit to the stand.
-> Refer to "Install the Roll Unit" in the Printer Stand Setup Guide
• When setting the printer down temporarily
make sure to put the printer on a flat, stable
place.
• When standing the printer up, make sure the
side with the control panel is up, and place
cardboard or other material underneath to
prevent scratching. Furthermore, make sure
that the weight of the printer is taken by the
corner of the printer. If the weight is taken by
any other part of the printer, the printer may
become damaged.
• When standing up the printer or supporting the
printer, hold the metal parts of the printer. If
you hold a plastic part, the printer may become
damaged.
• The way to set the printer down or to carry with
the load only to the center of the printer, may
cause damage to the printer.
MEM
O
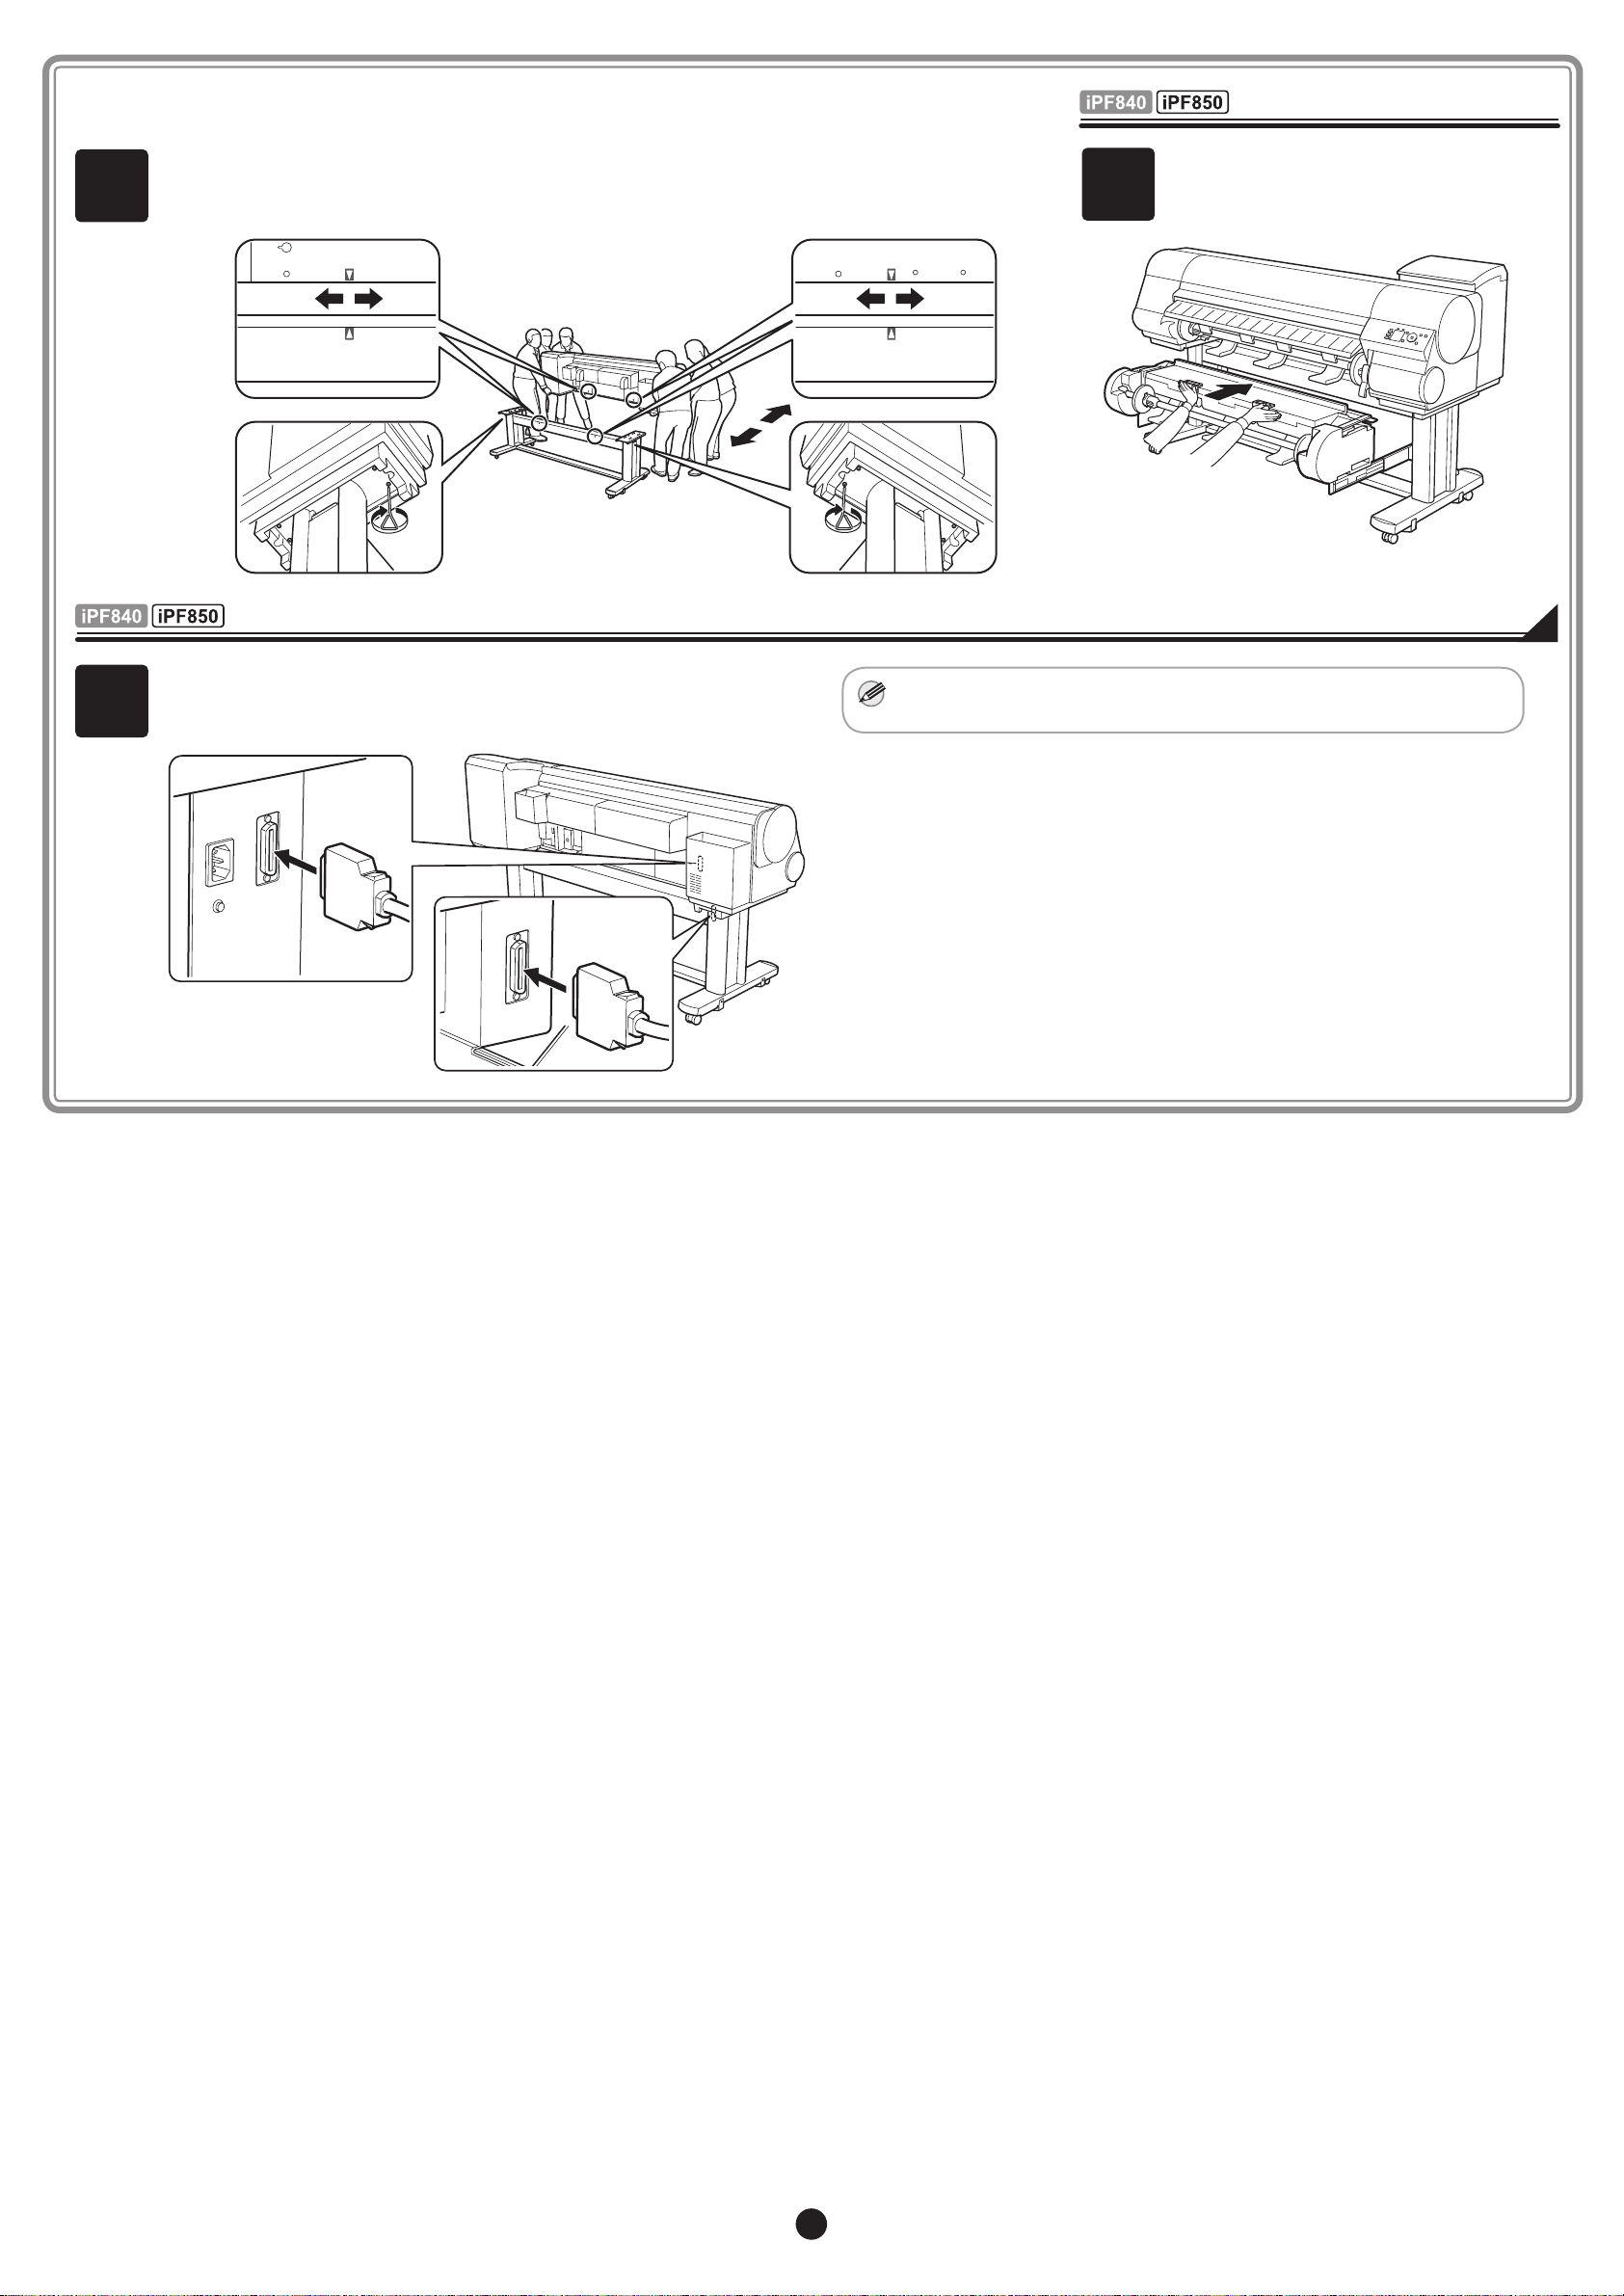
6
8
Align the triangles on the back of the printer and Stand when setting the printer on the Stand.
Secure the printer and Stand rmly together using four M4 hex screws on each side by the
Allen Wrench.
Use the Roll Unit Cable to connect the port on the back of the roll
unit to the Roll Unit Port on the back of the printer.
• Insert the Roll Unit Cable firmly, all the way in.
Push in the roll unit.
7
4

MEM
O
Attach the Media Take-up Unit
a
a
Attach the media take-up unit (optional) which automatically takes up printed roll paper.
-> Refer to the Media Take-up Unit Setup Guide included with the media take-up unit
(Option)
Set Up the Output Stacker
Attach the wheeled output stacker or stationary output stacker to collect ejected paper.
-> Refer to "Attach the Output Stacker" in the Printer Stand Setup Guide
Prepare to Turn the Power On
Remove the protective packaging material from the printer.
Remove the tape and other packaging material used to secure the
1 2
3
printer.
Use the Allen Wrench to loosen the screw of the Belt Stopper (a).
Rotate the Belt Stopper to the left and remove the stopper.
Open the Top Cover.
• Keep the Belt Stopper you removed
and the Allen Wrench for future use.
You will need them in case you move
the printer to another location.
• When you open the top cover, a
cleaning brush is stored on the right
side. Take it out and use it when
cleaning inside the top cover.
(when using the stationary output stacker or the stacker)
Lift the Ejection Guide. Attach the four Ejection Supports (a) on the back of the Ejection
4
5
Guide.
5
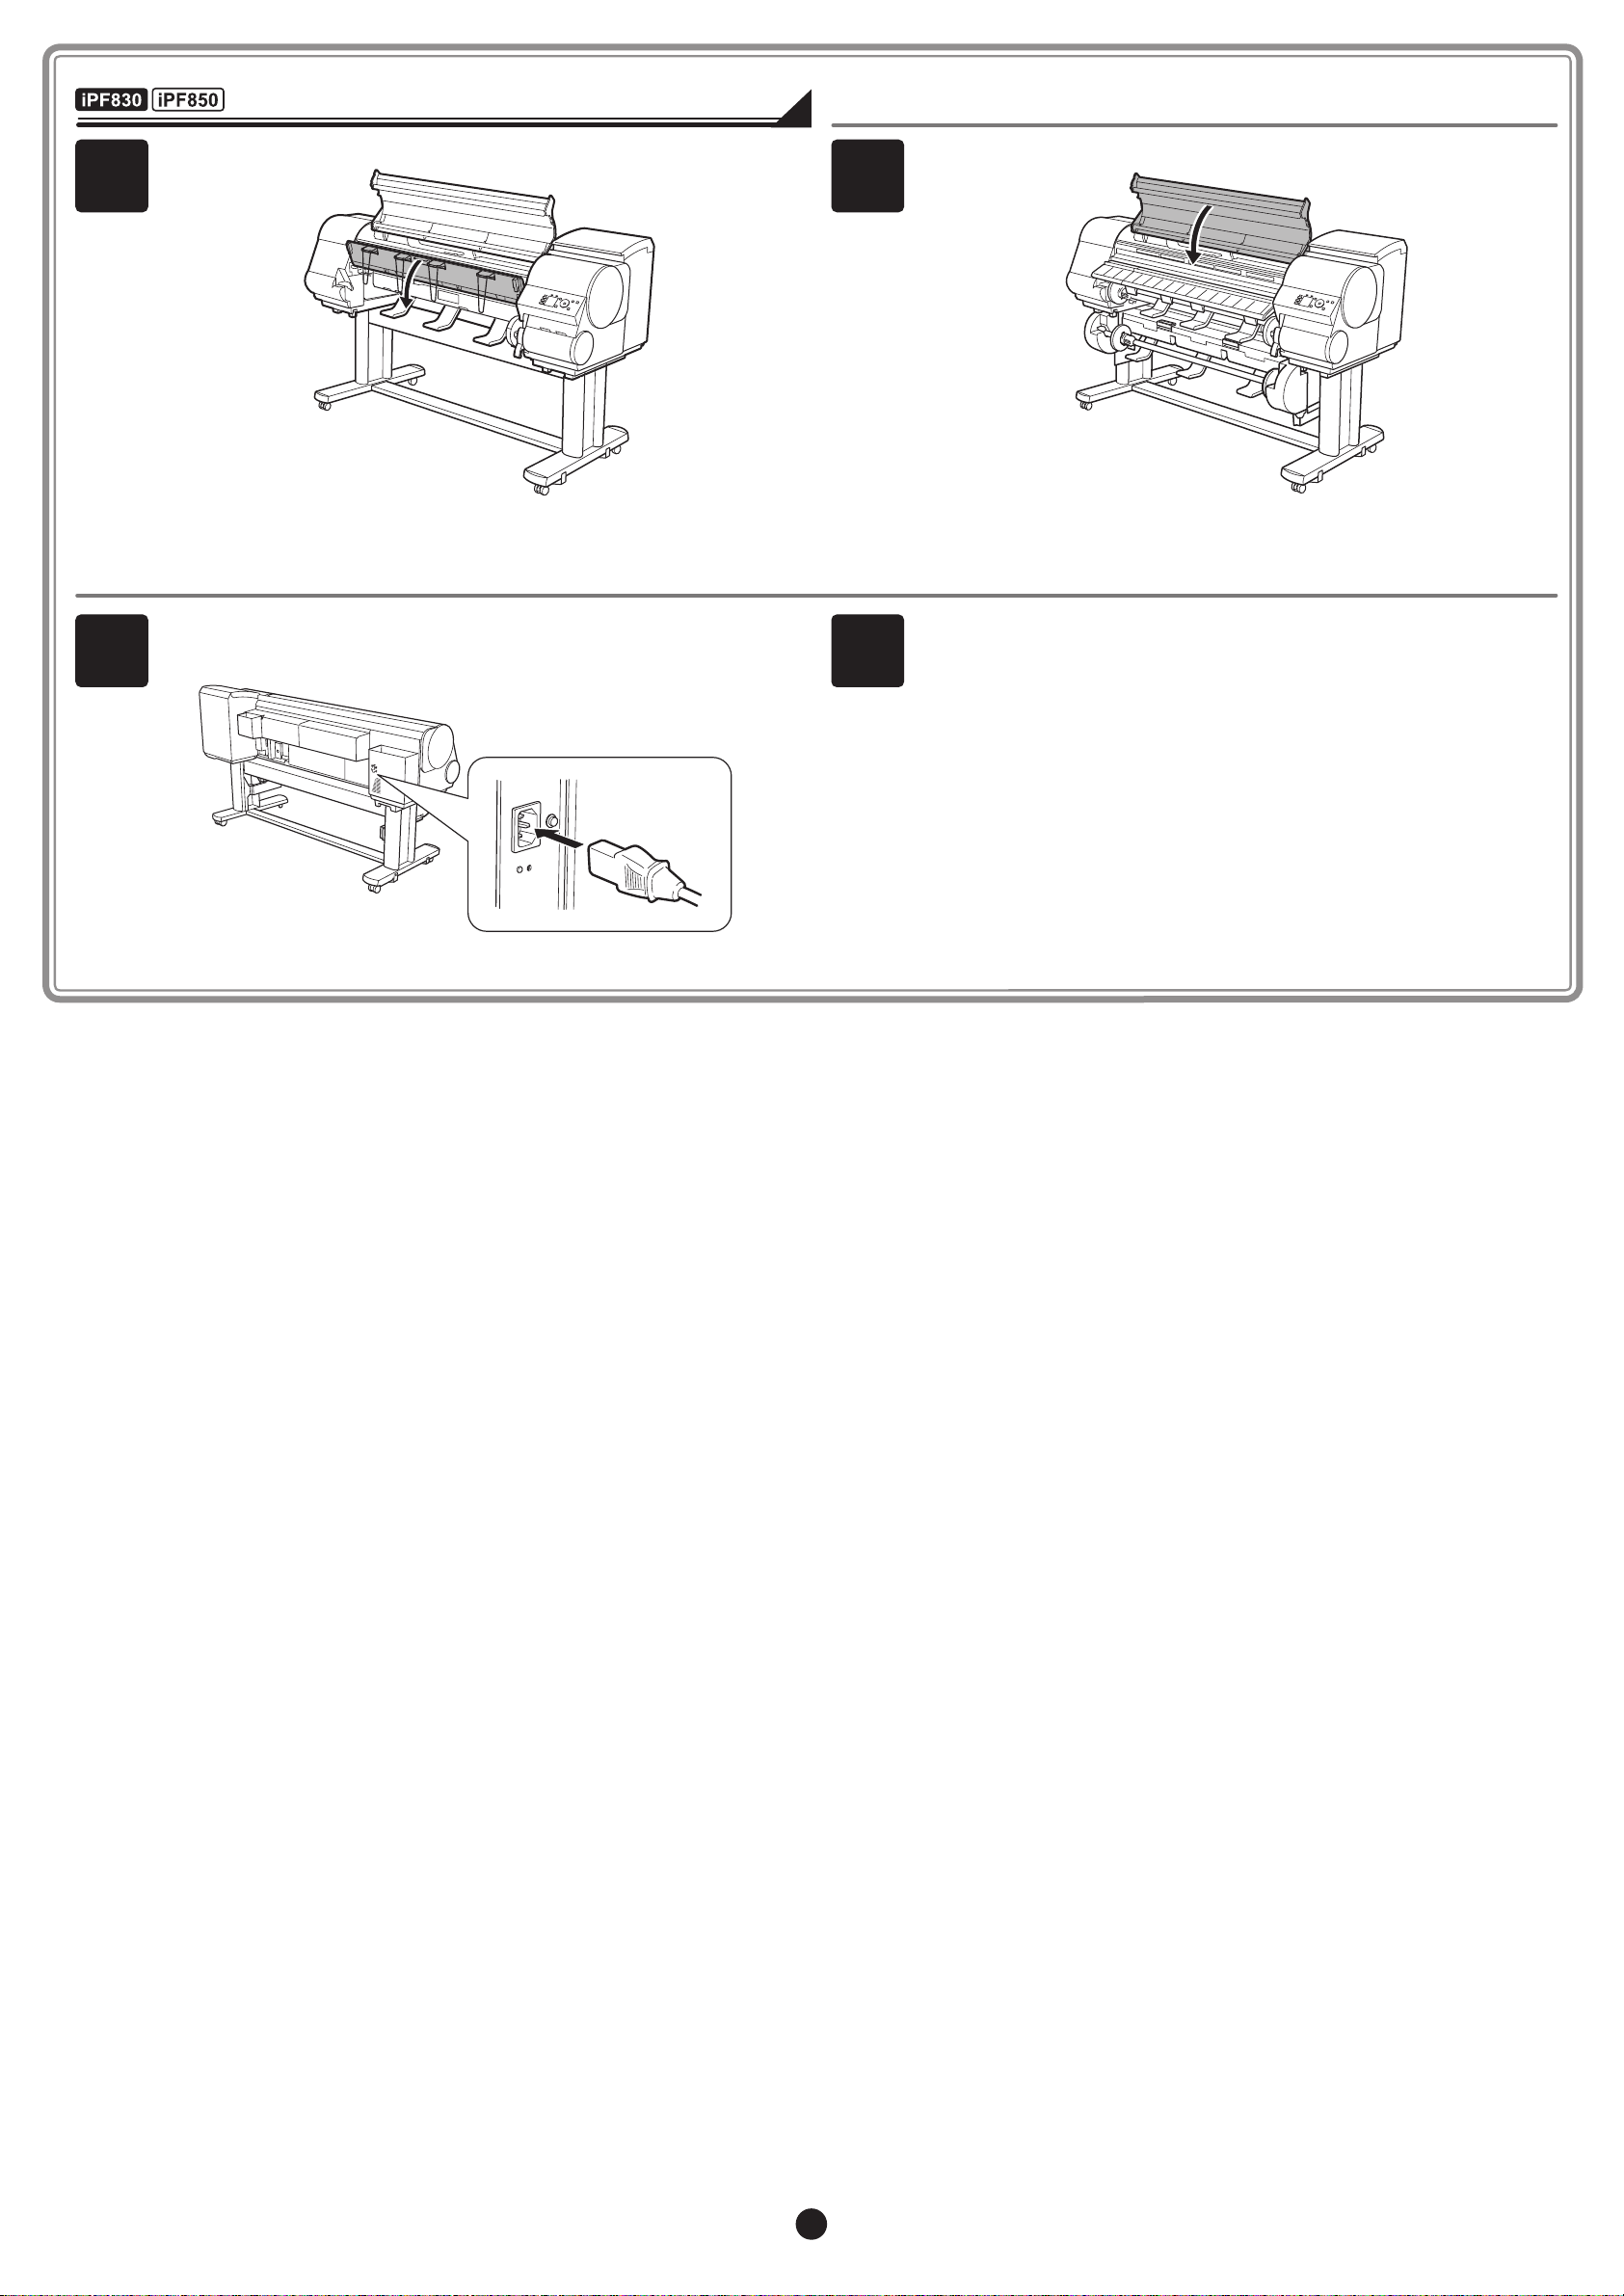
(when using the stationary output stacker or the stacker)
Lower the Ejection Guide. Close the Top Cover.
6 7
Plug the power cord into the Power Supply Connector on the back of
the printer.
Plug the power cord into the outlet.
98
6
 Loading...