

Page 1
Quick Guide
Asia/Oceania
Read this guide rst.
Please read "Important Safety Instructions" before operating this product.
After you finish reading this guide, store it in a safe place for future
reference.
The information in this document is subject to change without notice.
canon.com/oip-manual
Page 2
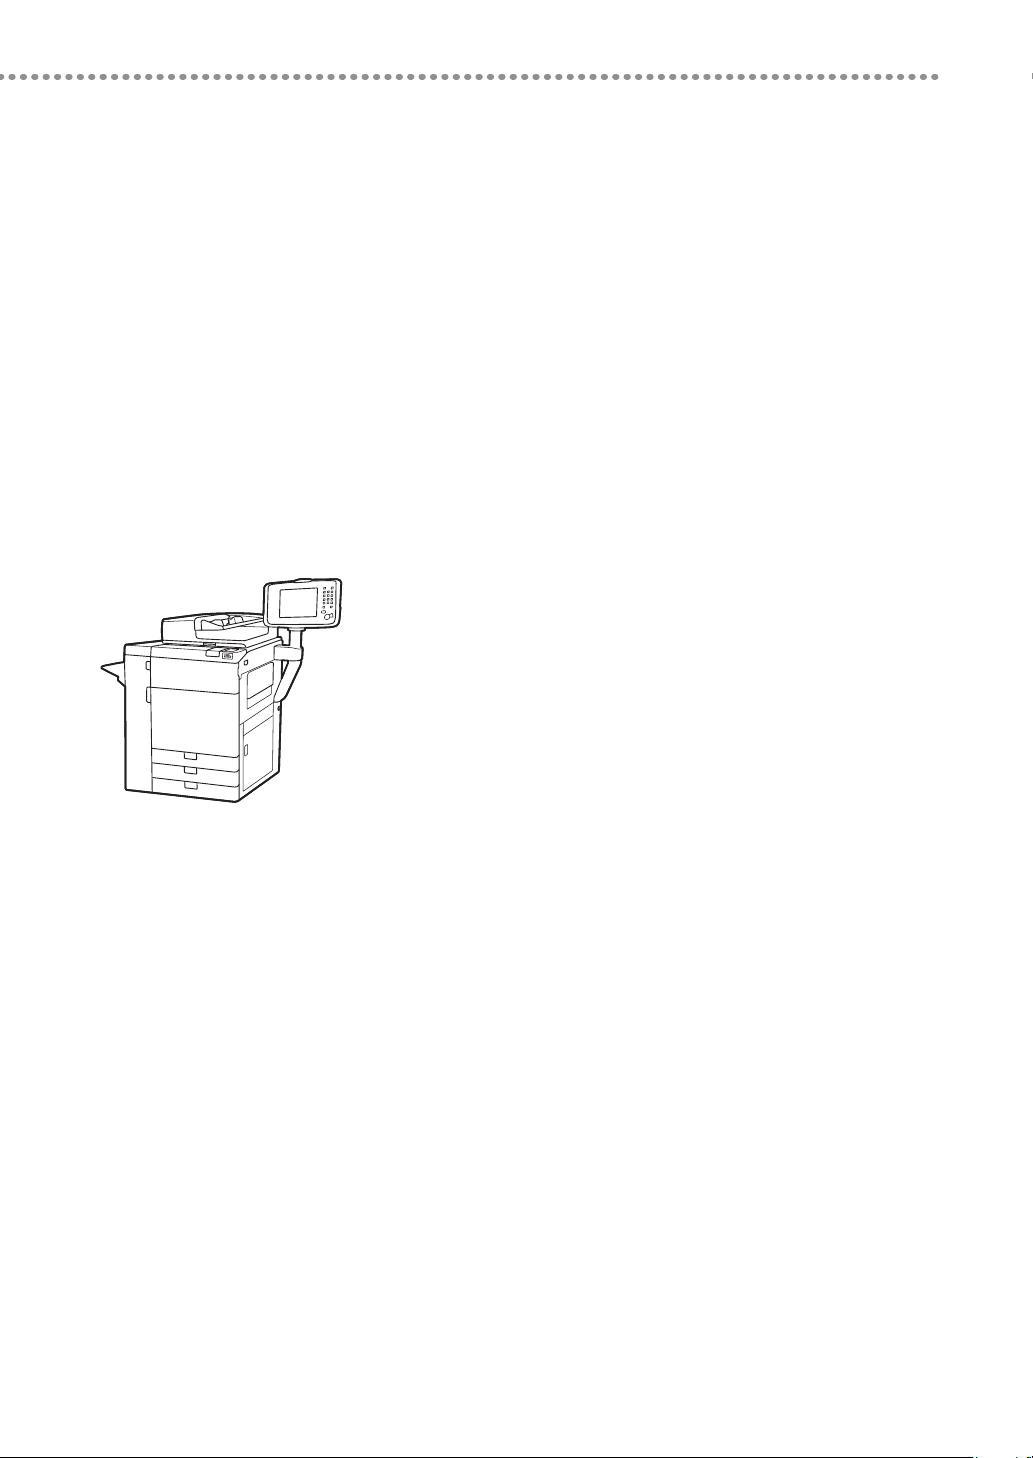
imagePRESS C910/C810/C710
Practical Features
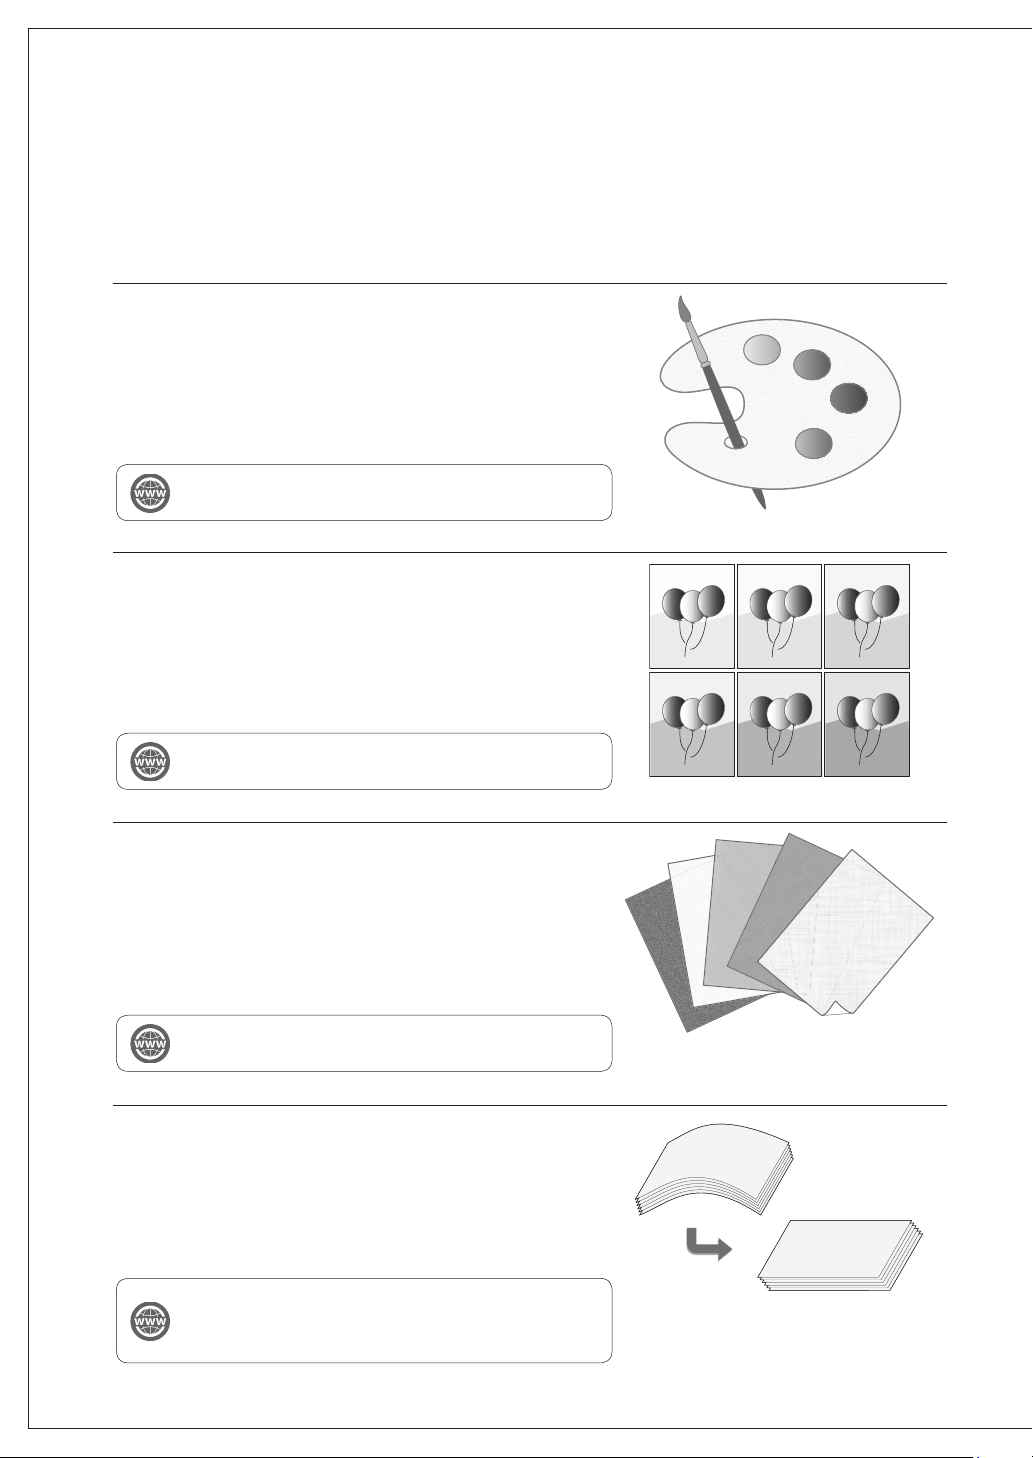
Auto Gradation Adjustment for Various
Paper Types
The Auto Adjust Gradation function adjusts the gradation, density,
and color tone of images, and only requires you to scan the test
page. This function can be used for various weights of paper so that
a high quality print result can be obtained in different paper types.
"Adjustment for Image Quality and Finishing (Calibration)" in the
User's Guide
Achieve High Quality Color Reproduction
with Auto Color Tone Correction
Compared to the Auto Adjust Gradation function, which adjusts
CMYK, the Auto Correct Color Tone function adjusts mixed colors
that are expressed with multiple toner. By using these functions
together, you can perform the precise color adjustment.
"Adjustment for Image Quality and Finishing (Calibration)" in the
User's Guide
Optimum Print Result for Each Paper Type
Paper information, which includes the basis weight, finish, fixing, and
curl correction level, can be registered as the paper characteristics.
As the detailed information can be specified for each different paper
type, you can obtain the fine print result with considering the paper
characteristics. This function is also effective for improving paper
conveyance and print quality.
"Paper Type Management" in the User's Guide
Curl Correction for Stable Paper Conveyance
The machine constantly corrects the paper curl which occurs due
to the pressure applied when toner is fixed. Moreover, by correcting
the paper curl during outputting, the machine reduces the risk of
a paper jam, and achieves the stable paper conveyance. The curl
correction can be specified for each paper type you want to use.
"Adjustment for Image Quality and Finishing (Calibration)" in the
User's Guide
"Paper Type Management" in the User's Guide
Page 3
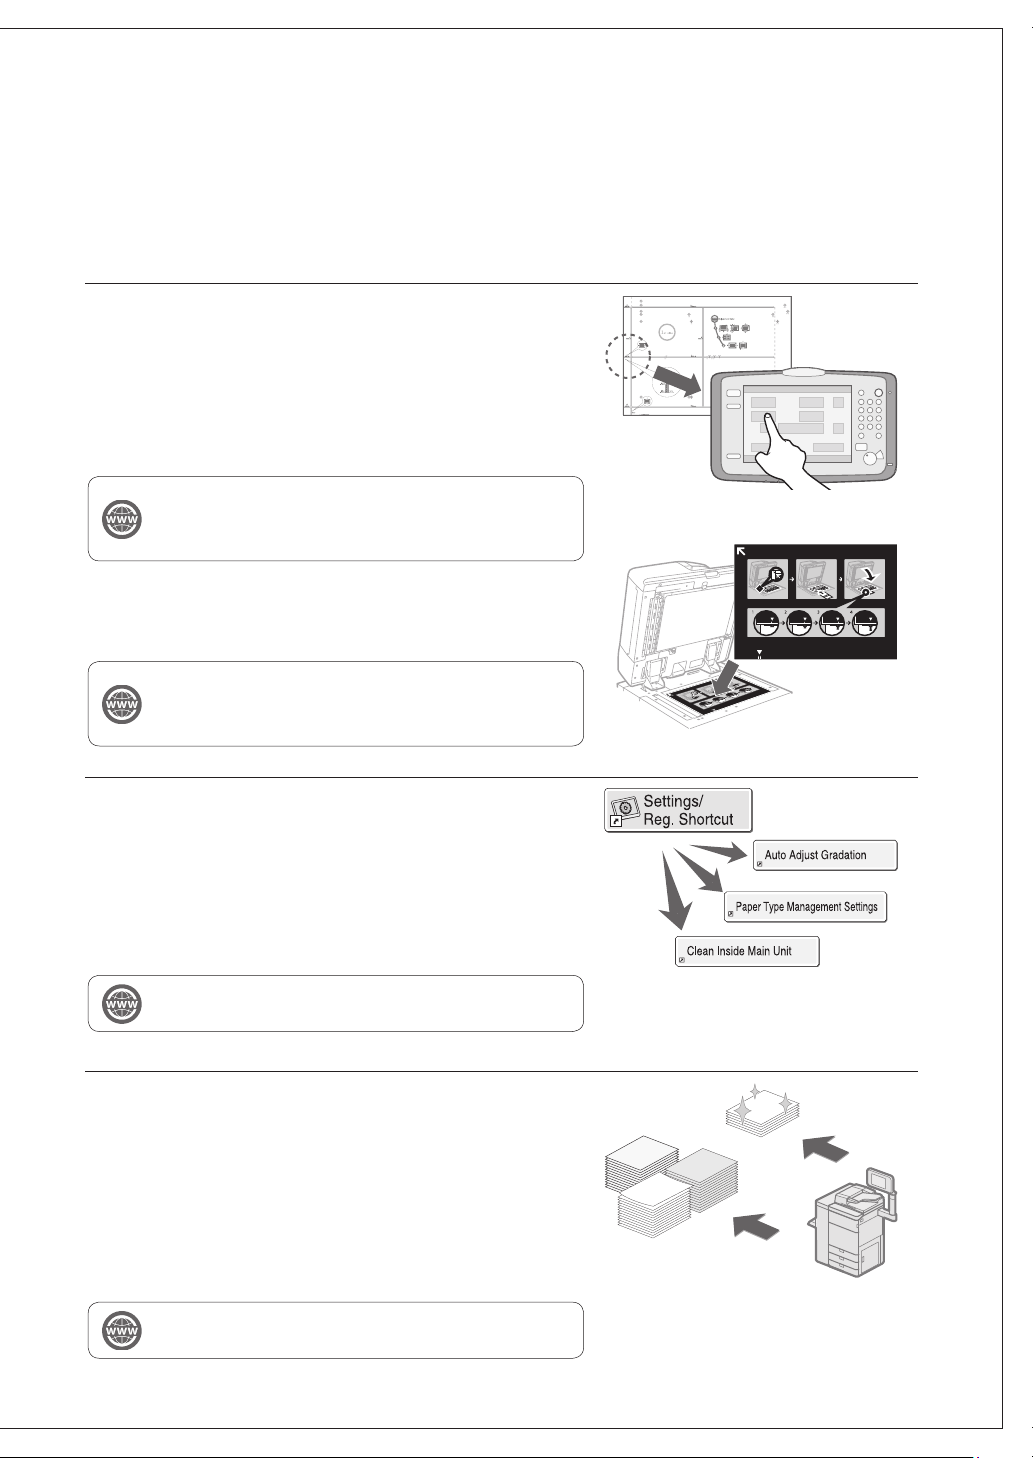
Easy Operation for Adjusting Image Position
You can adjust the image positions easily with this machine. All you
need is measuring marks on the test page and then entering the
measured values on the touch panel display. After that, the machine
will automatically adjust the image positions. You can make the
complicated adjustment easily by entering values for each edge of
front and back sides on a single screen.
"Paper Type Management" > "Adjusting the Image Position" >
"Adjusting Individual Image Position Setting by Using the Test Page"
in the User's Guide
You can adjust the image position quickly by using the guide sheet.
(This adjustment can be performed when the Duplex Color Image
Reader Unit-M is attached.)
Test page
"Paper Type Management" > "Adjusting the Image Position" >
"Adjusting Image Position by Using the Guide Sheet" in the User's
Guide
Quick Access to Frequently Used Settings
Different settings are required, depending on the printing purpose
or paper types, but accessing setting items located in various menus
every time is a quite complicated operation. In this case, register
frequently used settings in "Settings/Registration Shortcut" button.
You can directly access to the setting screen with this button and
save the effort to search necessary setting items.
"Settings/Registration" in the User's Guide
Alternative Settings for Your Needs,
"Productivity" or "Quality"
You can set a priority to either print productivity or image quality. For
instance, select "Productivity Priority" when printing a large number
of documents to achieve speedy printing. On the other hands, select
"Quality Priority" when printing documents which contain many
pictures to obtain precisely printed images. This function can be set
for each paper type to suit your various needs for printing.
Guide sheet
"Settings/Registration" in the User's Guide
Page 4

Contents
O
Thank you for purchasing this Canon product. Please read this manual thoroughly before operating the machine
to familiarize yourself with its capabilities, and to make the most of its many functions. For more information on the
detailed settings for the functions, see the User's Guide. After reading this manual, store it in a safe place for future
reference.
Parts and Their Functions . . . . . . . . . . . . . . . . . . . . . . . . . . . 6
External View . . . . . . . . . . . . . . . . . . . . . . . . . . . . . . . . . . . . . . . . . . . . . . . . .6
Internal View . . . . . . . . . . . . . . . . . . . . . . . . . . . . . . . . . . . . . . . . . . . . . . . . .7
Control Panel (Upright Control Panel-G) . . . . . . . . . . . . . . . . . . . . . . .8
Status Monitor/Cancel Screen . . . . . . . . . . . . . . . . . . . . . 10
How to Turn ON the Main Power . . . . . . . . . . . . . . . . . . . 11
Turning ON the Main Power . . . . . . . . . . . . . . . . . . . . . . . . . . . . . . . . .11
Shutting Down the Machine . . . . . . . . . . . . . . . . . . . . . . . . . . . . . . . . .11
Loading Paper . . . . . . . . . . . . . . . . . . . . . . . . . . . . . . . . . . . . 12
Paper Source . . . . . . . . . . . . . . . . . . . . . . . . . . . . . . . . . . . . . . . . . . . . . . . .12
Registering Paper Types in the Paper Database . . . . . . . . . . . . . . .14
Loading Paper into the Paper Drawer . . . . . . . . . . . . . . . . . . . . . . . .15
Registering Custom Paper Types . . . . . . . . . . . . . . . . . . . . . . . . . . . . .16
Cleaning and Maintenance . . . . . . . . . . . . . . . . . . . . . . . .18
Cleaning the Platen Glass . . . . . . . . . . . . . . . . . . . . . . . . . . . . . . . . . . . .18
Cleaning the Original Scanning Area . . . . . . . . . . . . . . . . . . . . . . . . .18
Cleaning the Feeder . . . . . . . . . . . . . . . . . . . . . . . . . . . . . . . . . . . . . . . . .19
Automatic Feeder Cleaning . . . . . . . . . . . . . . . . . . . . . . . . . . . . . . . . . .21
Cleaning the Inside of the Main Unit . . . . . . . . . . . . . . . . . . . . . . . . .21
Refreshing the Fixing Belt . . . . . . . . . . . . . . . . . . . . . . . . . . . . . . . . . . . .22
Cleaning the Touch Panel Display . . . . . . . . . . . . . . . . . . . . . . . . . . . .22
Inspection of the Breaker . . . . . . . . . . . . . . . . . . . . . . . . . . . . . . . . . . . .23
Consumables . . . . . . . . . . . . . . . . . . . . . . . . . . . . . . . . . . . . . 24
Troubleshooting . . . . . . . . . . . . . . . . . . . . . . . . . . . . . . . . . . 26
Clearing Paper Jams and Staple Jams . . . . . . . . . . . . . . . . . . . . . . . .26
Reducing the Frequency of Paper Jams . . . . . . . . . . . . . . . . . . . . . .26
When an Error Message Is Displayed . . . . . . . . . . . . . . . . . . . . . . . . .27
Contacting Your Local Authorized Canon Dealer . . . . . . . . . . . . .28
If Memory Becomes Full . . . . . . . . . . . . . . . . . . . . . . . . . . . . . . . . . . . . .29
If the Main Power Does Not Turn ON . . . . . . . . . . . . . . . . . . . . . . . . .29
Appendix . . . . . . . . . . . . . . . . . . . . . . . . . . . . . . . . . . . . . . . . . 30
Symbols Used in This Manual
IMP
RTANT
NOTE
OPTION
Indicates operational requirements and restrictions. Be sure to read these items carefully to
operate the machine correctly, and avoid damage to the machine or property.
Indicates a clarification of an operation, or contains additional explanations for a procedure.
Reading these notes is highly recommended.
Indicates useful functions or tips for using the machine.
You can find further information from the online manual site (canon.com/oip-manual).
A detailed explanation is described on the specified page of this manual.
Indicates an optional product which can be used with this machine.
Page 5

Keys and Buttons Used in This Manual
The followings are examples of how keys and
buttons are expressed in this manual.
Touch Panel Display Keys: [Key Name]
•
[Copy] [Close]
Control Panel Keys: Key Icon
•
Buttons on Computer Operation Screens: [Button
•
Name]
[OK], [Add], [Cancel]
Page 6
Parts and Their Functions
This section provides you with the names and functions of all the parts of the machine. The keys and display on the
control panel are also described. Read this section to use the machine’s various functions smoothly.
"Optional Products" in the User's Guide
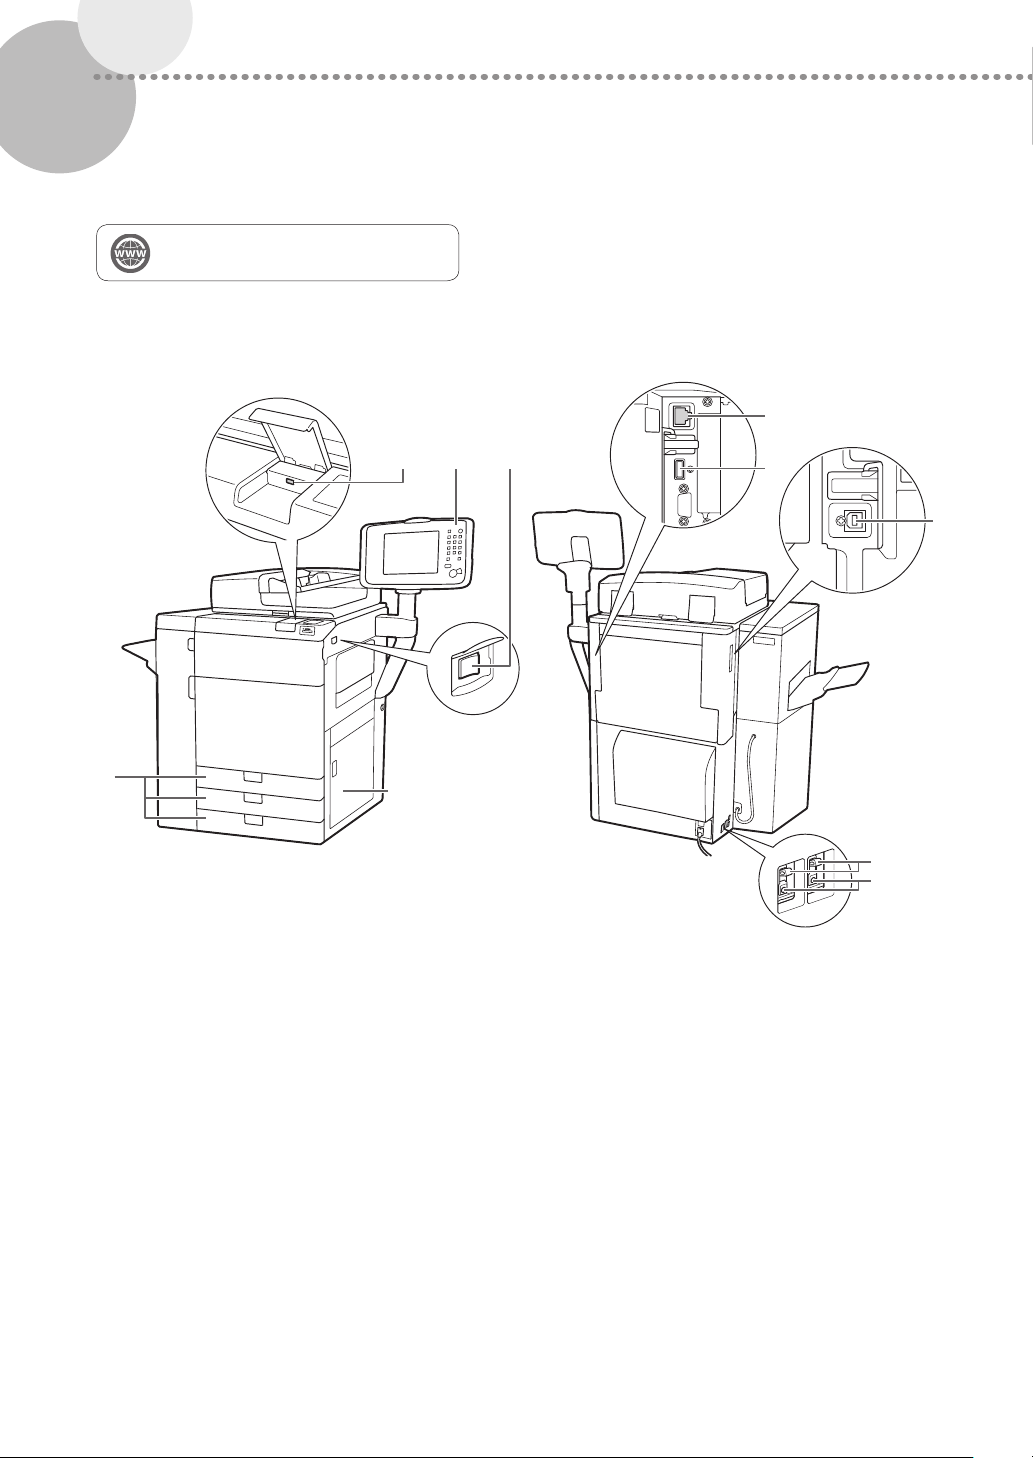
External View
▀
6
123
5
Front Side Back Side
4
1 USB Port (Front side of the machine)
Use to connect memory media to the machine via
USB.
7
8
9
10
6 LAN Port
Use a LAN cable to connect the machine to a
network.
2 Upright Control Panel-G
Includes the keys, touch panel display, and
indicators required for operating the machine.
3 Main Power Switch
Press to the "|" side to turn ON the power.
4 Main Unit’s Right Cover
Open this cover when clearing a paper jam inside
the main unit.
5 Paper Drawer
Holds up to 550 sheets of paper (80 g/m2).
6
7 USB Port (Back side of the machine)
Use the USB port to connect external hard disks
and other devices to the machine.
8 USB Port (For connection to a computer)
Use a USB cable to connect the machine to a
computer.
9 Breaker
Detects excess current or leakage current.
10 Test Button
Press this button to test the circuit breaker.
Page 7
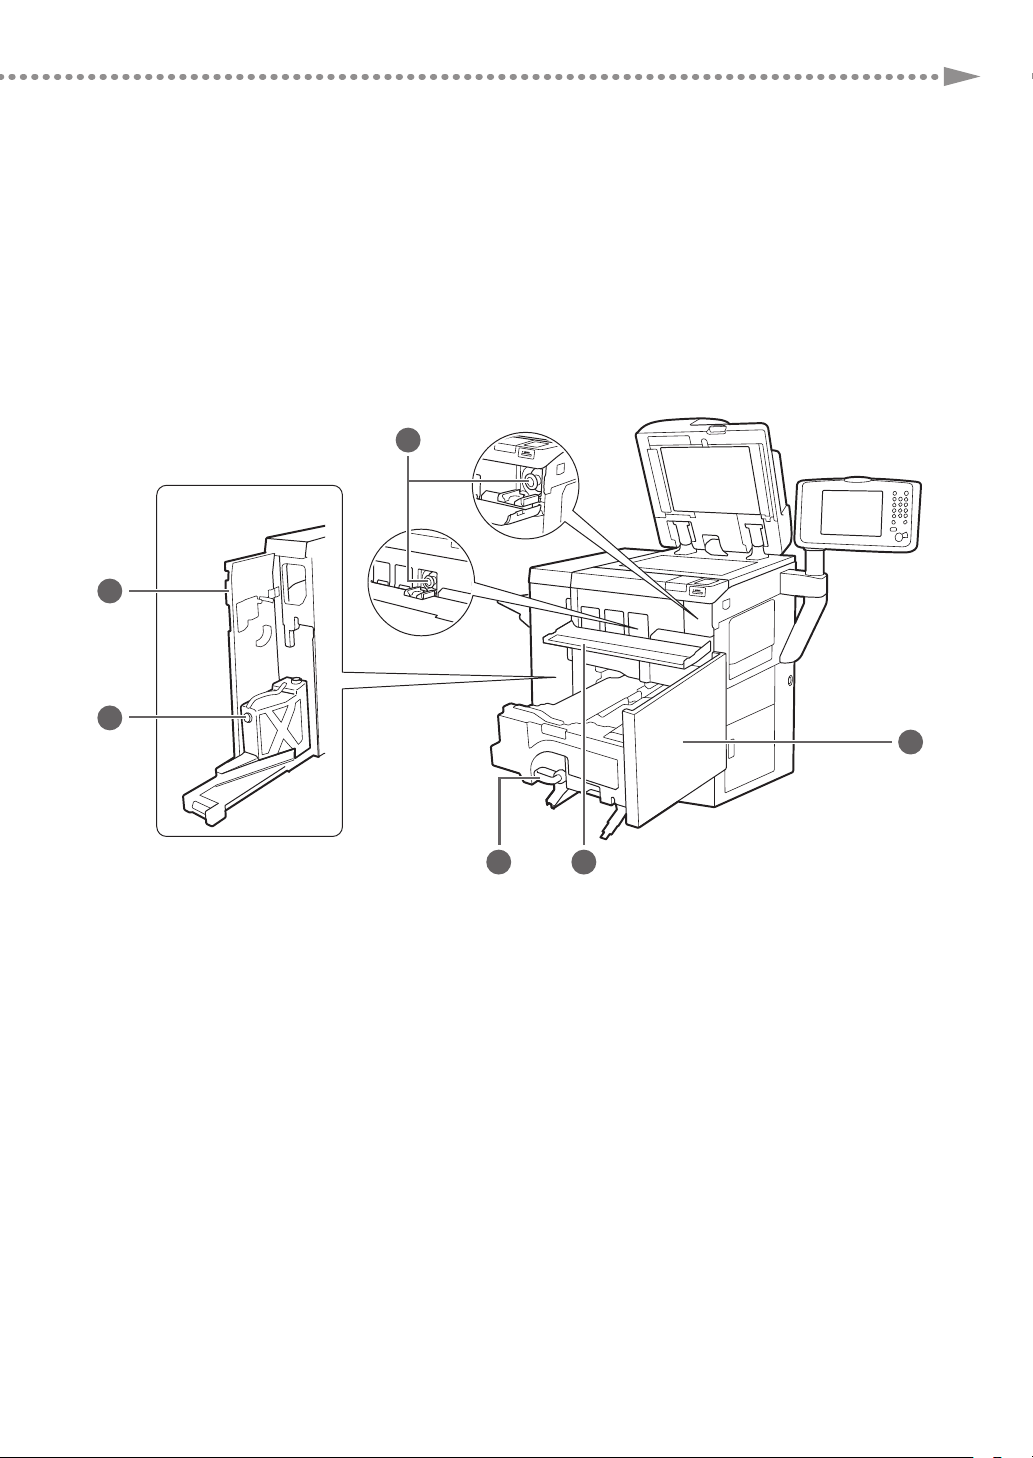
Internal View
▀
6
Parts and Their Functions
1
5
1 Toner Cartridge
This cartridge contains toner. Pull out this cartridge
when replacing it with a new one.
2 Front Cover
Open this cover to clear a paper jam in the
fixing transport unit.
3 Toner Replacement Cover
Open this cover to replace the toner cartridge.
4 Fixing Transport Unit
Pull the fixing transport unit out to clear a paper jam.
34
5 Waste Toner Container
Waste toner accumulates in this container. Pull out
this container when replacing it with a new one.
6 Left Cover on the Front Side
Open this cover to clear a paper jam or to replace
the waste toner container.
2
7
Page 8
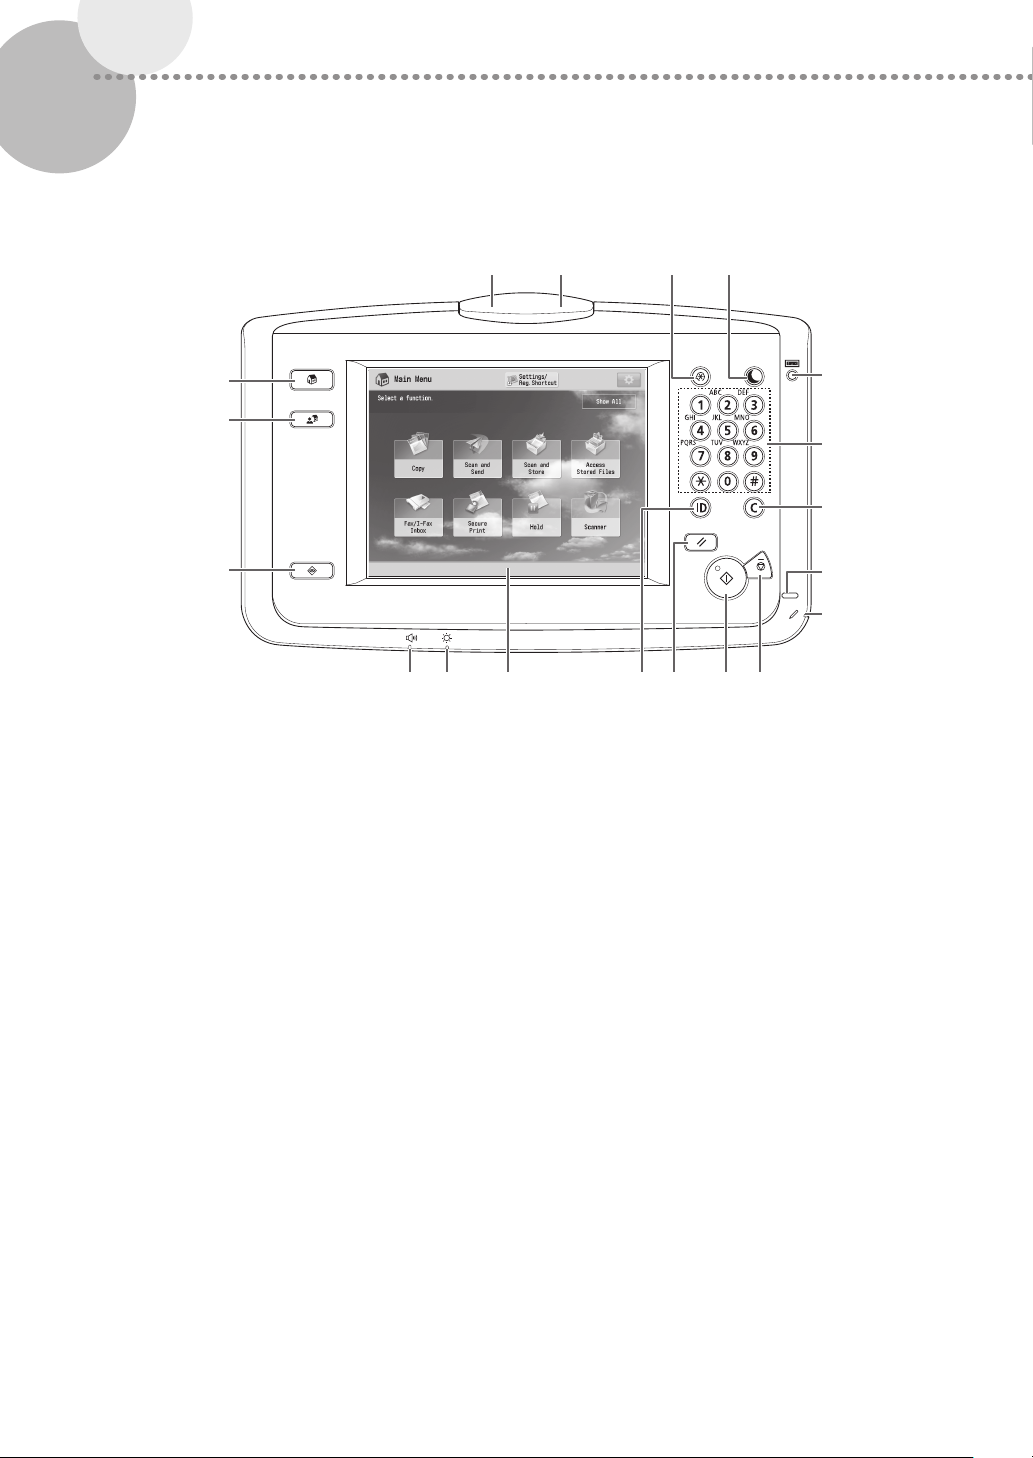
Control Panel (Upright Control Panel-G)
▀
12 34
19
18
17
1 Processing/Data Indicator
Blinks green when the machine is performing
operations, and maintains a steady green light
when received data is stored in memory.
2 Error Indicator
Blinks or lights if there is an error in the machine.
When the Error indicator blinks, follow the
instructions that appear on the touch panel display.
When the Error indicator maintains a steady red
light, contact your local authorized Canon dealer.
3 Settings/Registration key
Press to register and specify settings.
4 Energy Saver key
Press to set the Energy Saver mode or Sleep mode.
The mode activated after pressing the Energy
Saver key can be selected beforehand. This key
lights when the machine enters either mode. To
reactivate the machine, press this key again.
5
6
7
8
9
10111213141516
5 Counter Check key
Press to display the copy and print count totals.
6 Numeric keys
Press to enter numerical values.
7 Clear key
Press to clear entered values or characters.
8 Main Power Indicator
Lights when the main power is turned ON.
9 Edit Pen
Use when operating the touch panel display, such
as to enter characters.
10
Stop key
Press to stop a job in progress.
11
Start key
Press to start an operation, such as scanning or
copying.
8
Page 9
12
Reset key
Press to restore the standard settings of the
machine.
13
ID (Log In/Out) key
Press to log in/out when a login service such as
Department ID Management or SSO-H has been
set.
14
Touch Panel Display
The settings screen for each function is shown on
this display.
15
Brightness Adjustment Dial
Use to adjust the brightness of the touch panel
display.
16
Volume Settings key
Press to display the screen to specify the audible
tones for the fax function.
Parts and Their Functions
17
Status Monitor/Cancel key
Press to check the status of jobs or to cancel print
jobs. Also, press to check status of the machine,
such as checking the amount of paper remaining.
18
Quick Menu key
Press to retrieve favorite functions stored in Quick
Menu. Also, if you are using authentication, Quick
Menu set for each individual user can be displayed.
19
Main Menu key
Press to return to the Main Menu screen, such as
when you want to switch functions.
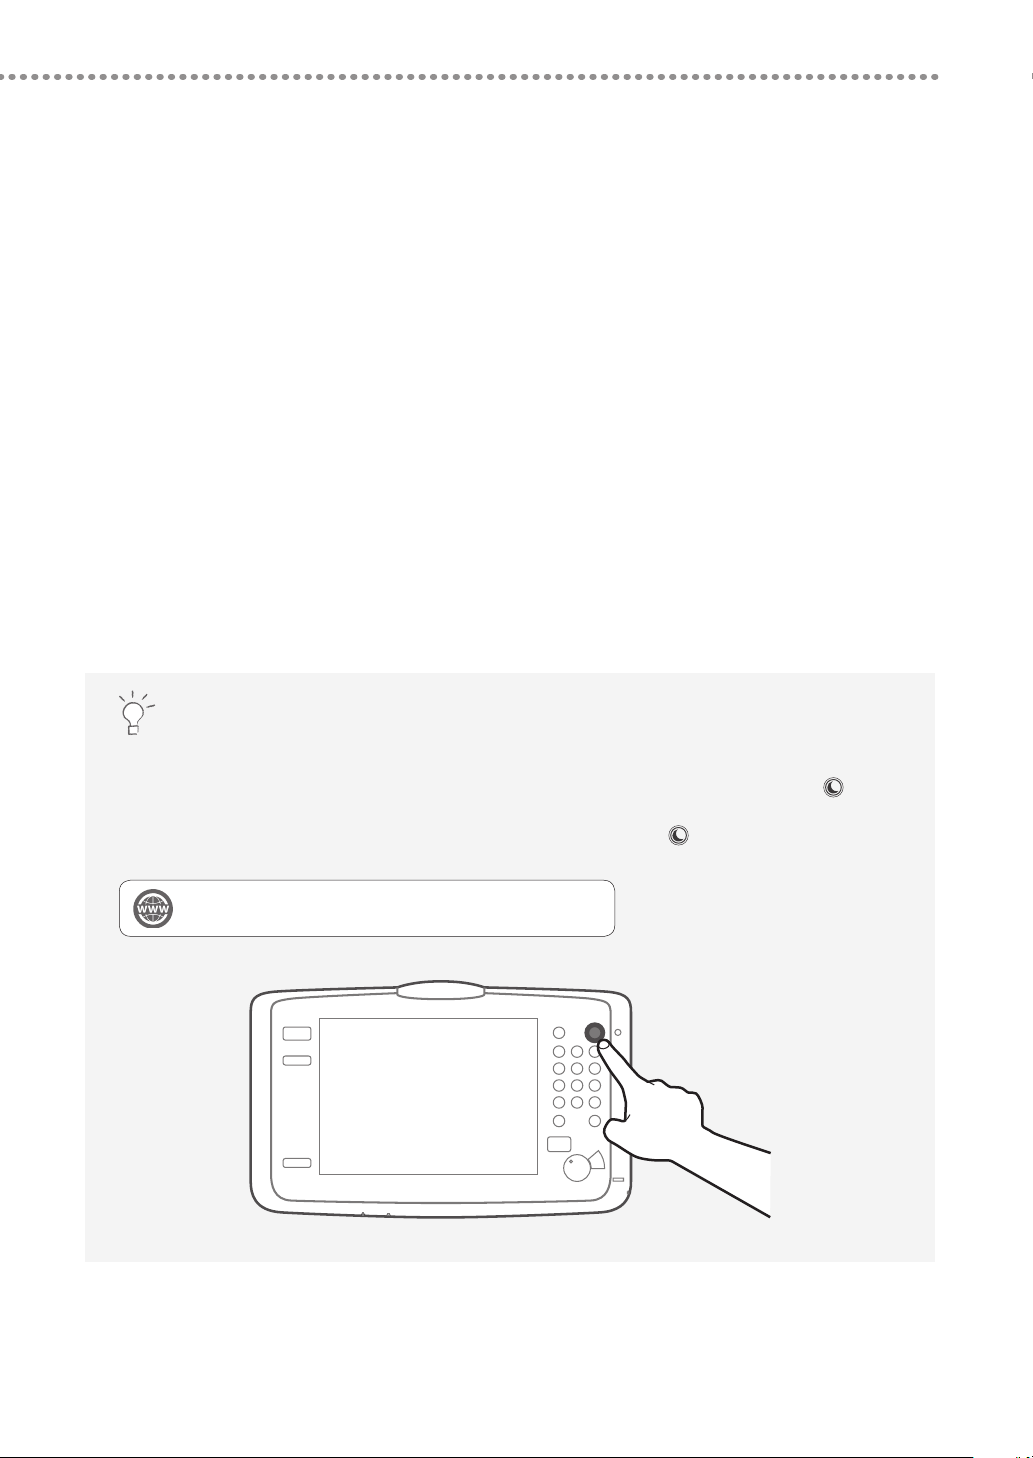
Setting the Energy Saver mode/Sleep mode to minimize energy consumption
You can save energy consumption by using the Energy Saver mode/Sleep mode when the machine is not
being used for a prolonged period of time, such as a lunch time. To use these modes, simply press
the control panel. If the machine is idle for a certain period of time, the machine will enter the Sleep mode
(Auto Sleep mode). For more information on the mode which activates after
information on the Auto Sleep mode, see the User's Guide.
"Basic Operations" > "Energy Saving Features" in the User's Guide
is pressed, and detailed
on
9
Page 10
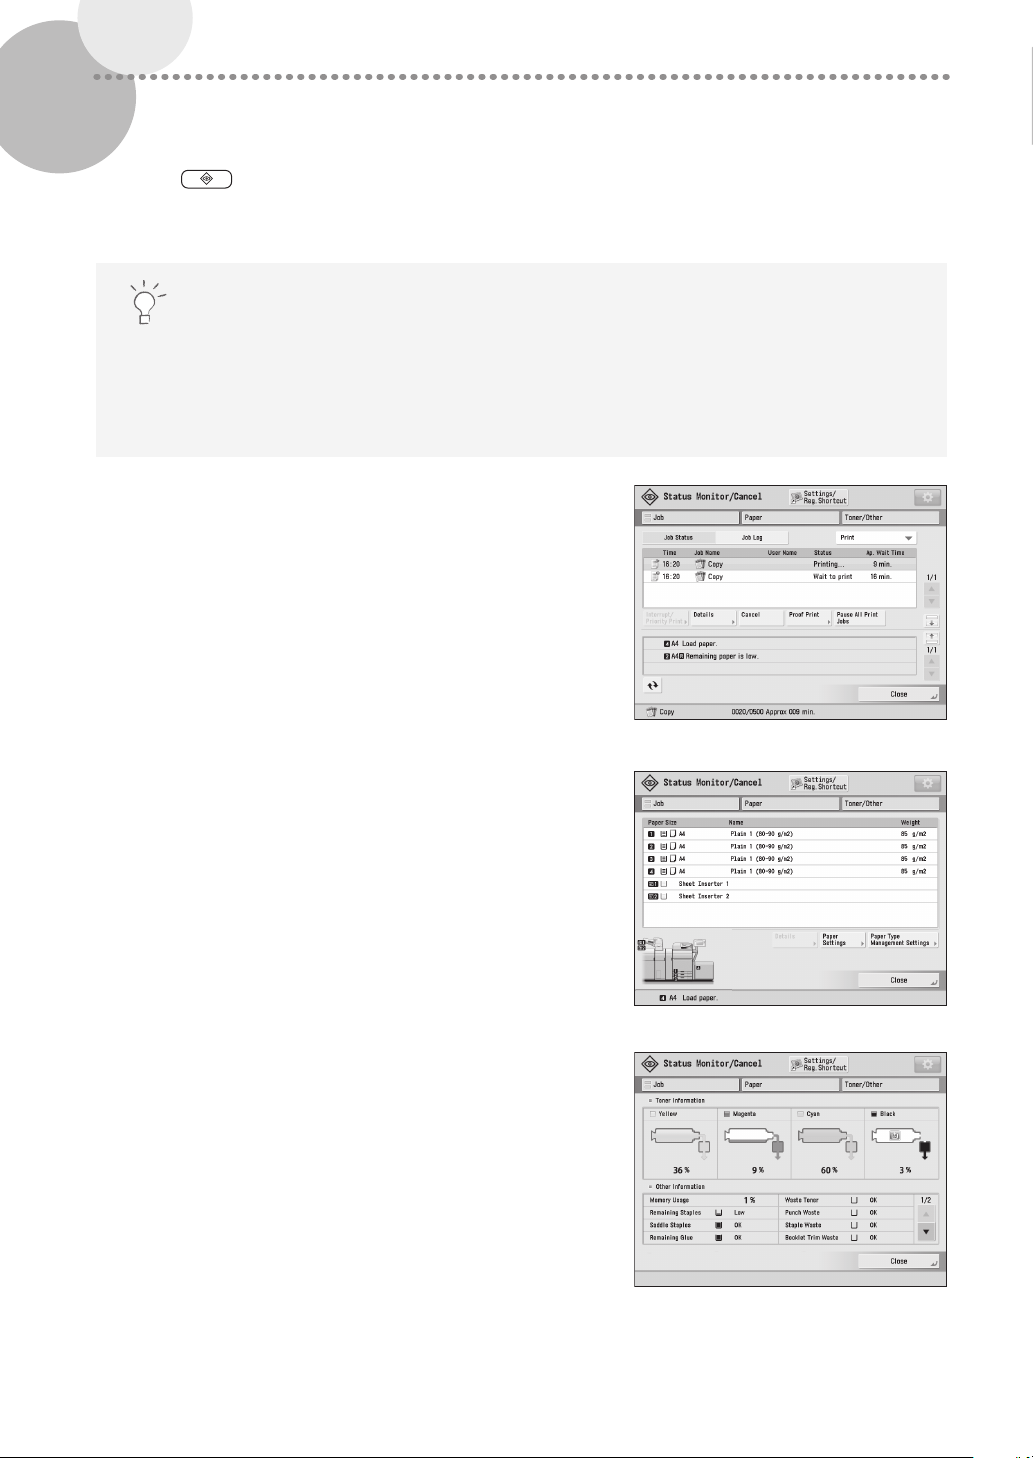
Status Monitor/Cancel Screen
If you press , the Status Monitor/Cancel screen appears, and you can confirm the status of jobs and
consumables on this screen. By obtaining information, such as the completion time of the current job or the amount
of paper remaining, you can perform smooth printing operation without interruption.
Useful situations
•
When you want to know the completion time of jobs
•
When you want to check the amount of paper remaining for efficient paper loading
•
When you want to cancel a job which is registered by mistake
[Job] screen
The [Job] screen enables you to check the status of jobs in
the job list. On this screen, you can cancel a job in progress
and change the order of waiting jobs to print your job prior to
others.
[Paper] screen
You can check the paper information and the remaining
amount of paper in all paper sources. You can also specify the
paper type for each paper source in [Paper Settings].
[Toner/Other] screen
The remaining amount of toner is displayed in illustrations. You
can also check the remaining amount of staples, the amount of
punch waste, and the percentage of memory usage.
10
Page 11
How to Turn ON the Main Power
This section explains how to turn ON the main power.
Turning ON the Main Power
▀
Make sure that the power plug is firmly inserted into the power outlet, and the breaker is turned ON.
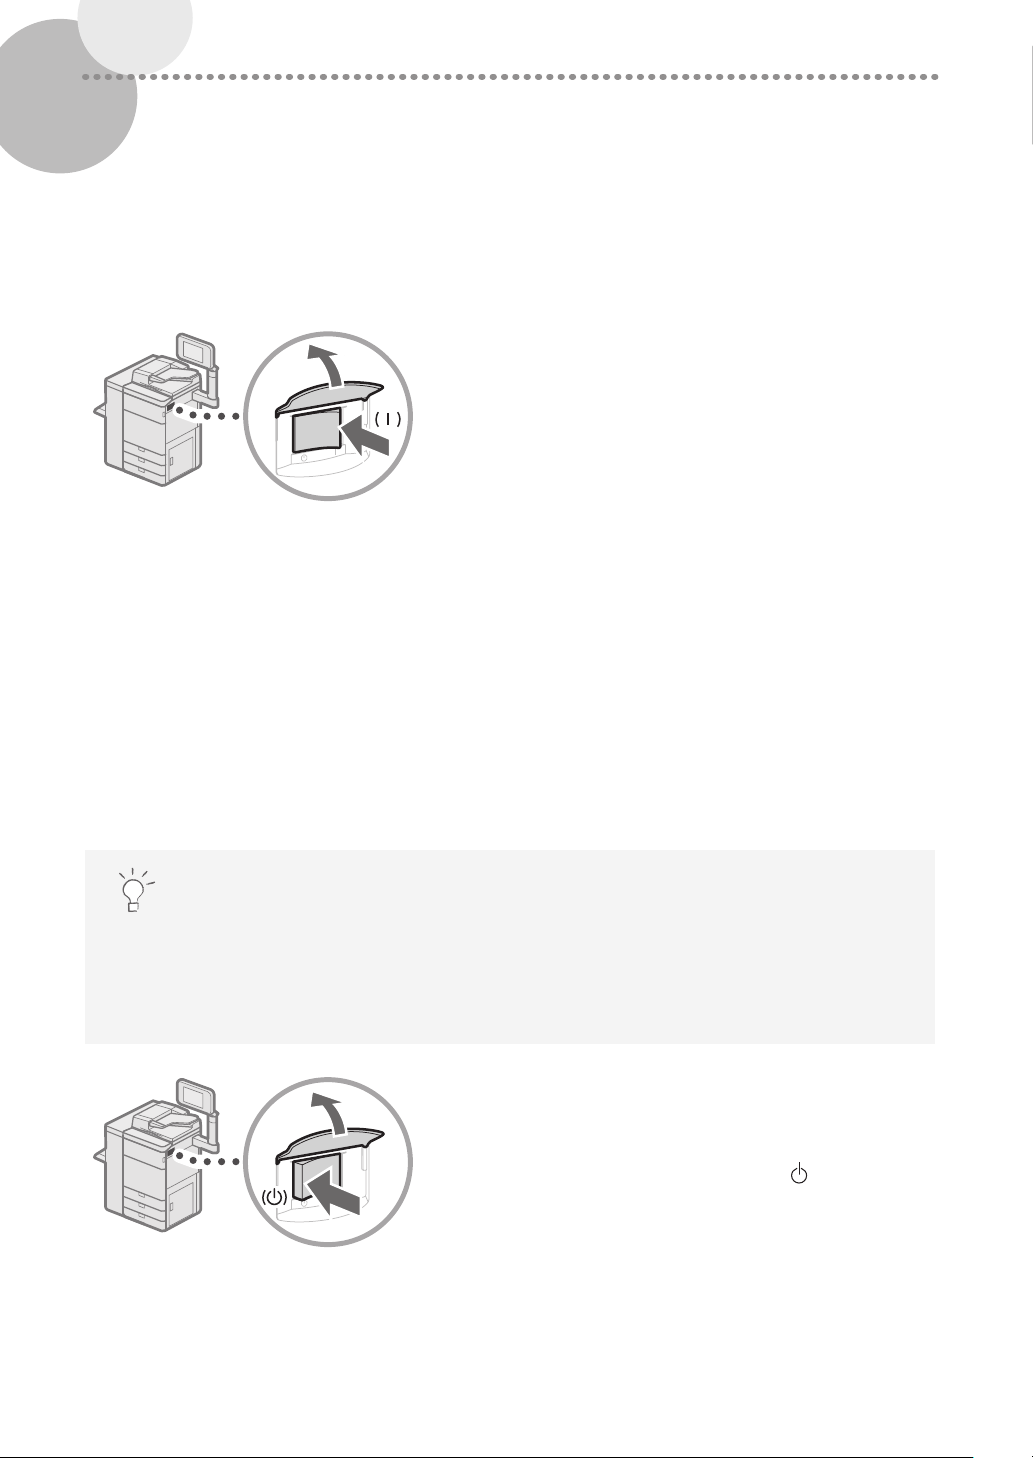
Open the main power switch cover.
1
Press the main power switch to the "|" side.
2
•
The main power indicator on the control panel lights.
IMPORTANT
If you want to turn ON the main power again, wait for at least 10 seconds after the main power and the main power
indicator are turned OFF. However, when [Quick Startup Settings for Main Power] is enabled, if you don’t wait more
than 20 seconds after the Main Power indicator is turned OFF, quick startup is not performed.
NOTE
The response of the keys and buttons may not be optimal immediately after turning ON the main power of the
machine.
Shutting Down the Machine
▀
Do not turn OFF the main power in the following situations
•
When using the I-Fax function
•
When the message <Backing up stored data from the Remote UI...> is displayed
•
When operating scan or print function
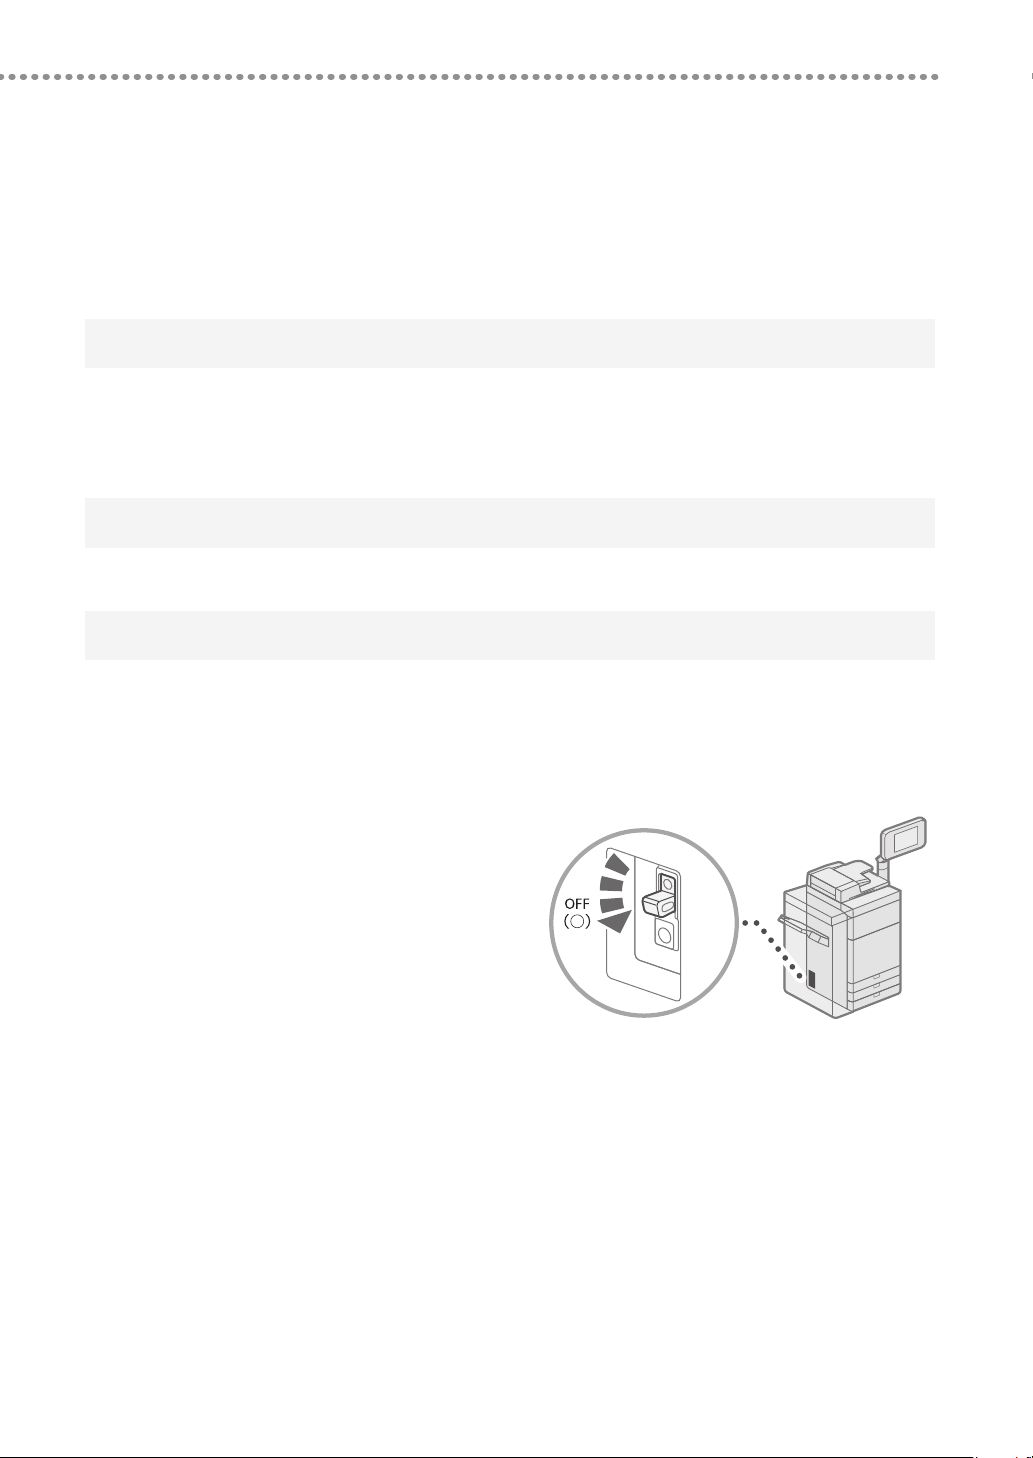
Open the main power switch cover.
1
Press the main power switch to the " " side.
2
•
The main power indicator on the control panel turns
OFF.
11
Page 12
Loading Paper
Load paper by following the procedure below. In this section, A4 custom size paper is used as an example.
Confirm the paper types that can be loaded.
Confirmation
Preparation
Operation
Registration
Pre-register the paper types you are going to use.
Load paper in the paper drawer.
Specify the loaded paper size and type for the paper drawer.
"Basic Operations" > "Available Paper Stock" in the User's Guide
"Registering Paper Types in the Paper Database," on p. 14
"Loading Paper into the Paper Drawer," on p. 15
"Registering Custom Paper Types," on p. 16
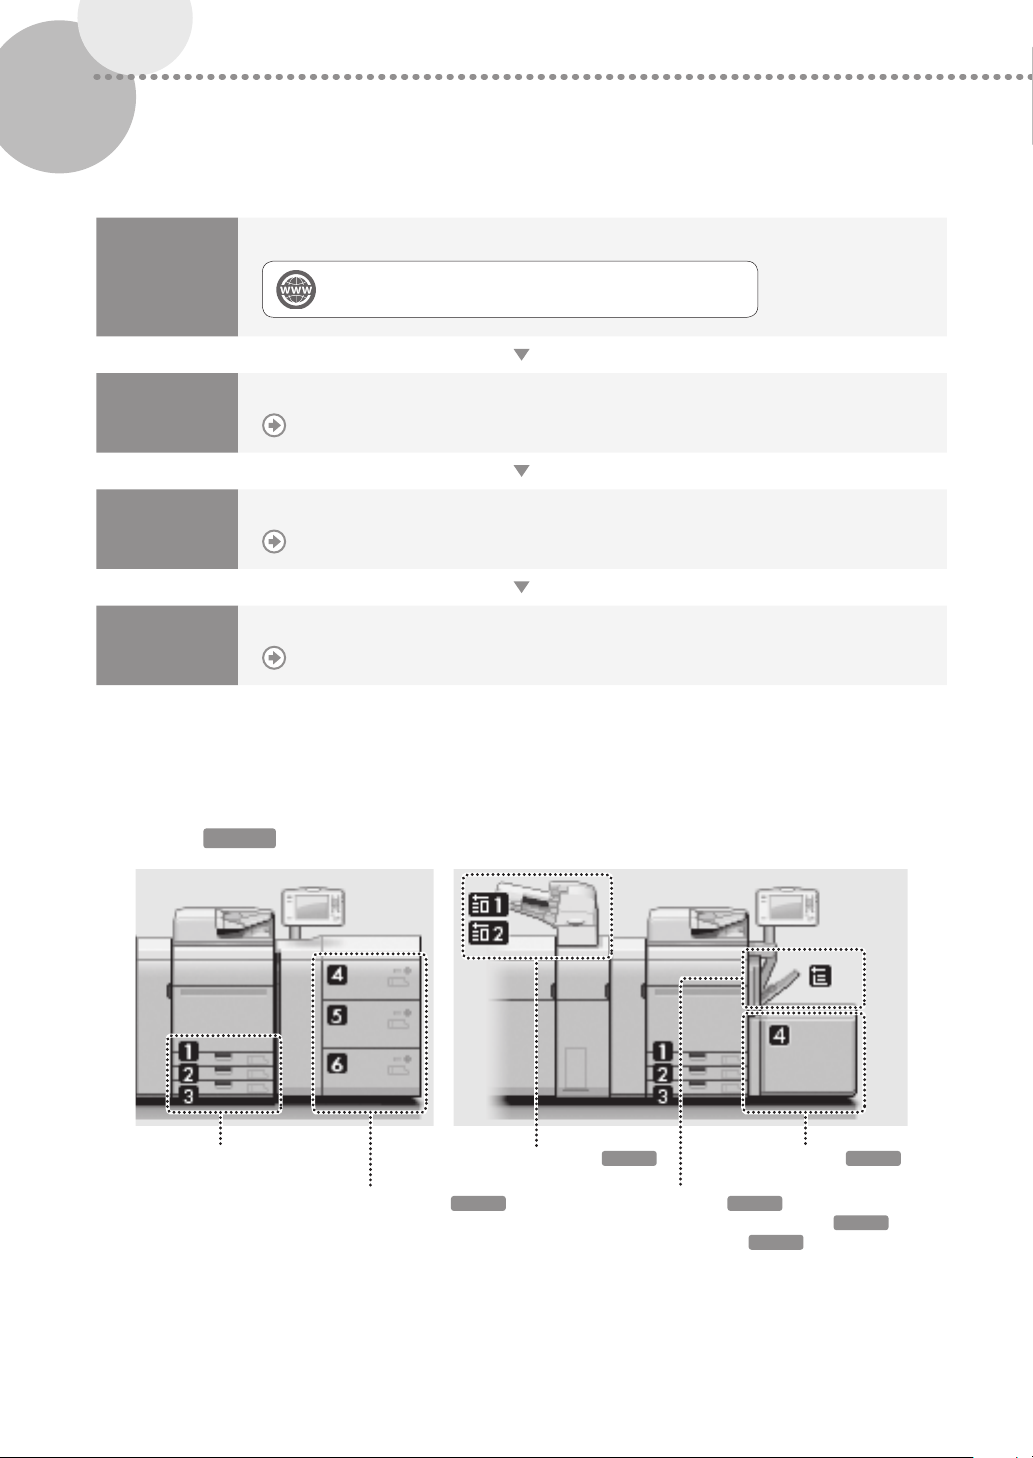
Paper Source
▀
This section describes available paper sources. Paper that can be loaded differs, depending on the paper sources. The
following description includes the optional products as well as the standard paper drawers. The optional products are
indicated with
OPTION
.
12
Paper Drawer
Document Insertion Unit-N
Multi-drawer Paper Deck-C
OPTION
OPTION
Stack Bypass-C
Stack Bypass Alignment Tray-D
Long Sheet Tray-B
POD Deck Lite-C
OPTION
OPTION
OPTION
OPTION
Page 13
Loading Paper
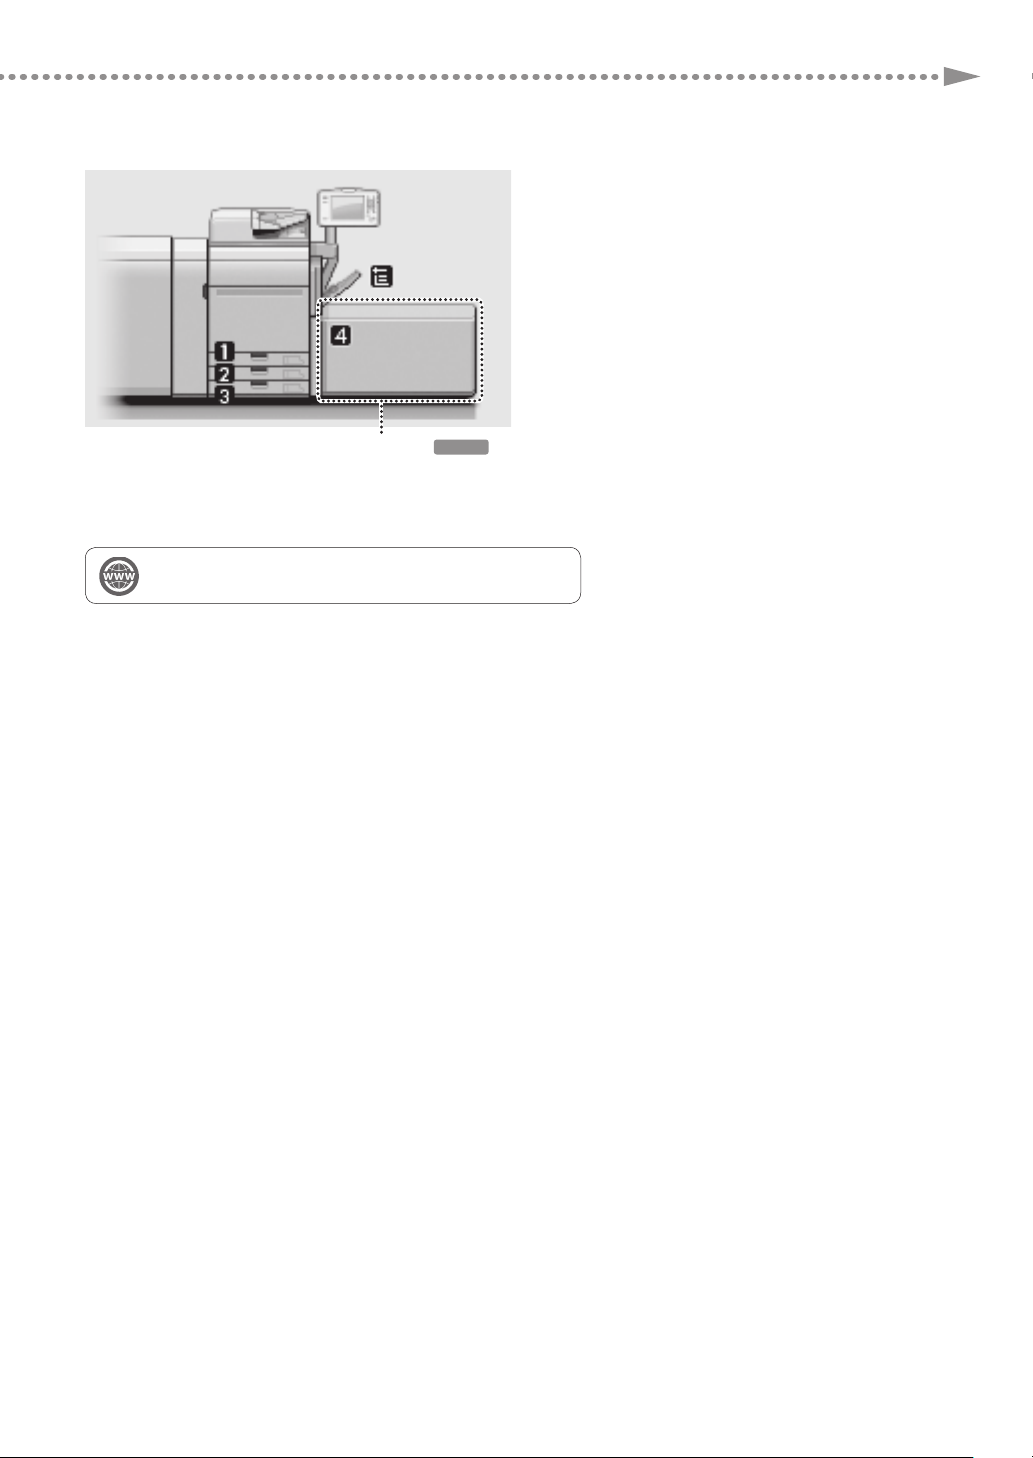
POD Deck Lite XL-A
OPTION
NOTE
For details on paper that can be loaded, see the User's Guide.
"Basic Operations" > "Available Paper Stock" in the User's Guide
13
Page 14
Registering Paper Types in the Paper Database
▀
Register all paper types you are going to use with this machine. You can register paper types by selecting paper types
from the Paper Database.
NOTE
If you load paper which is already registered in the machine, such as plain or recycled paper, this step is not
necessary. Proceed to the next step "Loading Paper into the Paper Drawer".
You cannot change the settings of the default paper types registered in the machine. If you edit the settings, make
sure t
o duplicate and register them as a new one beforehand.
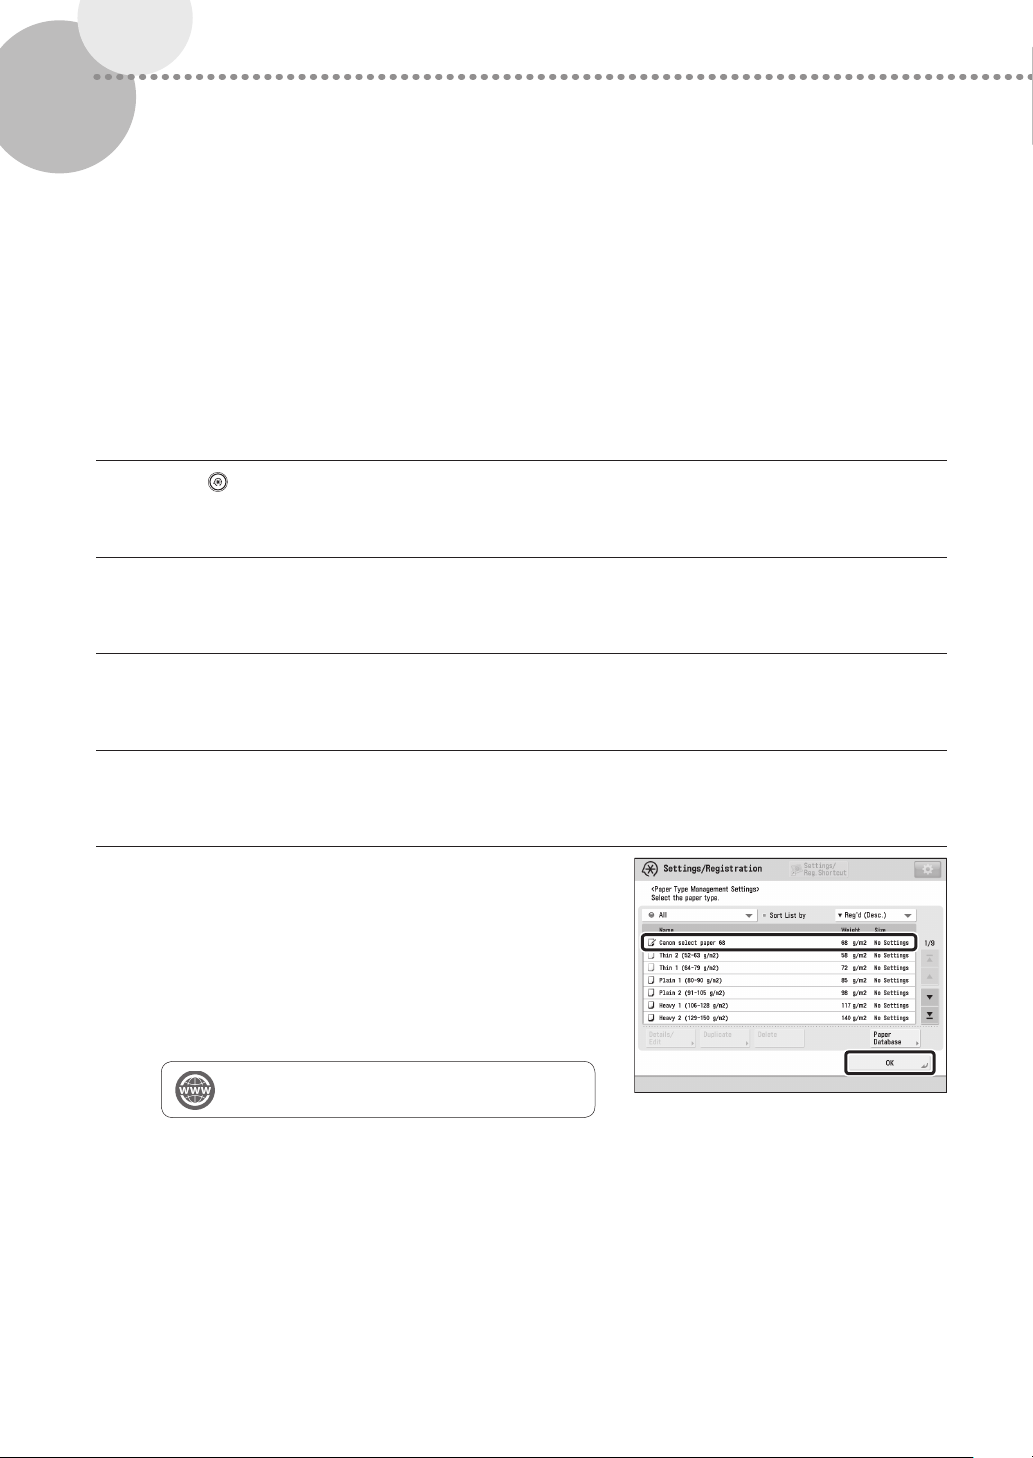
Press .
1
Press [Preferences] [Paper Settings] [Paper Type Management Settings].
2
Press [Paper Database].
3
Select the paper type from the list press [OK].
4
Confirm that the selected paper type is displayed in
5
the <Paper Type Management Settings> screen
press [OK].
•
If the desired paper type is not listed in the Paper Database,
select and duplicate a paper type that closely matches the
characteristics of the desired paper type, and then change
the necessary settings.
"Paper Type Management" in the User's Guide
14
Page 15
Loading Paper into the Paper Drawer
▀
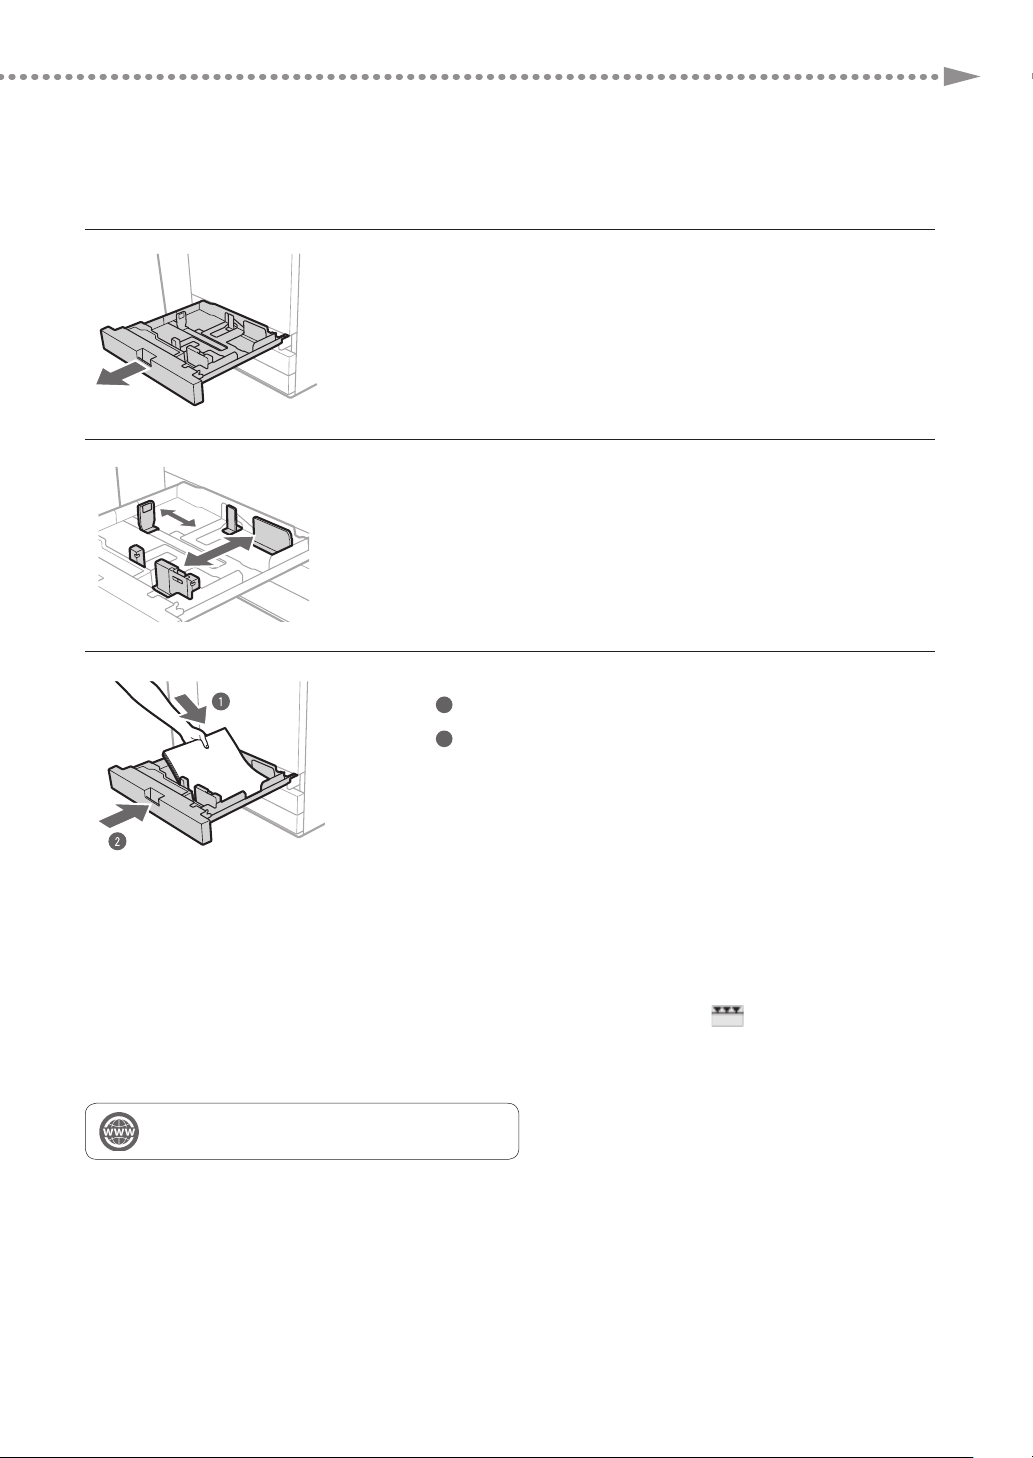
Open the paper drawer.
1
•
Gently pull out the paper drawer until it stops.
Adjust the position of the paper drawer guides.
2
•
Slide each guide while squeezing it on the top to align for the
desired paper size.
Load the paper stack into the paper drawer.
3
1
Load the paper stack against the right wall of the paper drawer.
2
Gently push the paper drawer back into the machine until it clicks
into place in the closed position.
Loading Paper
NOTE
•
Make sure to fan the paper stack, and align the edges before loading paper.
•
Curled paper must be straightened out prior to use.
•
Make sure that the height of the paper stack does not exceed the loading limit mark (
•
When loading pre-punched paper, transparencies/clear film, tab paper, and envelopes, make sure to load paper in
an appropriate orientation as the paper orientation differs, depending on the paper source.
"Maintenance" > "Loading Paper" in the User's Guide
).
15
Page 16
Registering Custom Paper Types
▀
You can register the paper size and type for each paper source.
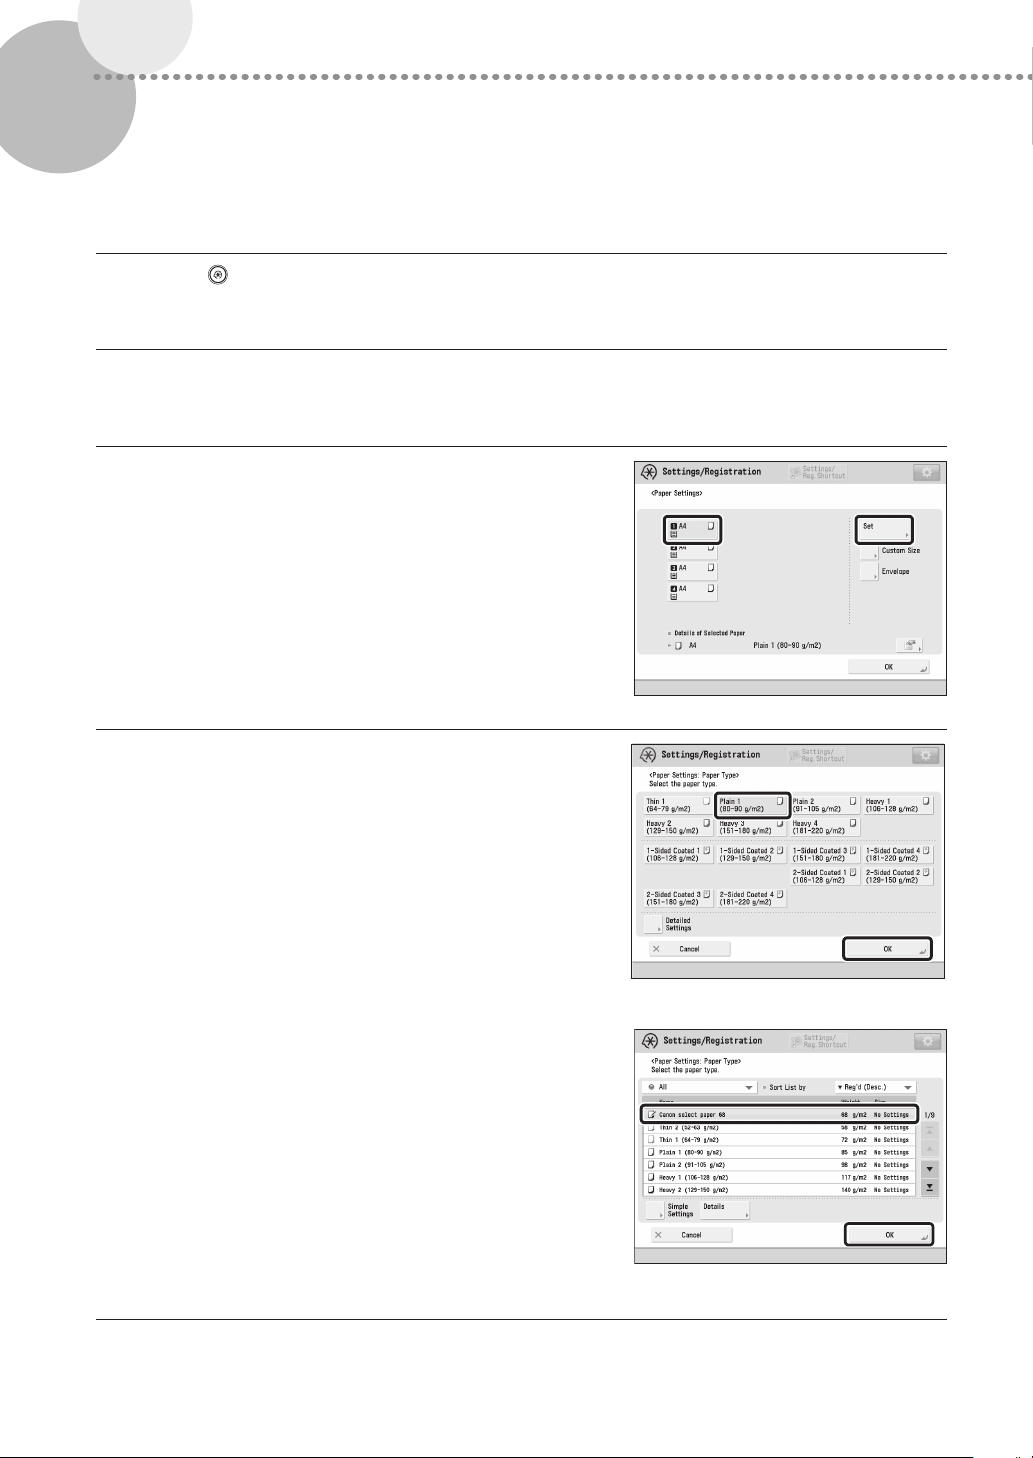
Press .
1
Press [Preferences] [Paper Settings] [Paper Settings].
2
Select the paper source in which you loaded paper
3
press [Set].
•
If you load paper other than standard paper, select [Custom
Size] or [Envelope].
Select the loaded paper type from the list press
4
[OK].
•
You can select the paper type from the simple or detailed
setting screen. For paper types that are not displayed on the
simple setting screen, press [Detailed Settings] select the
paper type from the detailed setting screen.
Simple Settings Screen
Detailed Settings Screen
16
Page 17

Confirm that the selected paper type is displayed in
5
<Details of Selected Paper> press [OK].
Loading Paper
17
Page 18
Cleaning and Maintenance
For optimum operation of the machine, we recommend to clean and check the machine regularly.
NOTE
The following cleaning should be performed only when the Duplex Color Image Reader Unit-M is attached.
•
Cleaning the Platen Glass
•
Cleaning the Original Scanning Area
•
Cleaning the Feeder
•
Automatic Feeder Cleaning
Cleaning the Platen Glass
▀
If originals cannot be scanned properly, follow the cleaning procedure below. Clean with a cloth which is wrung after
being dampened in water, and then clean with a soft and dry cloth. Use the provided glass cleaning cloth for simple
cleaning.
Shutting down the machine.
1
"Shutting Down the Machine," on p. 11
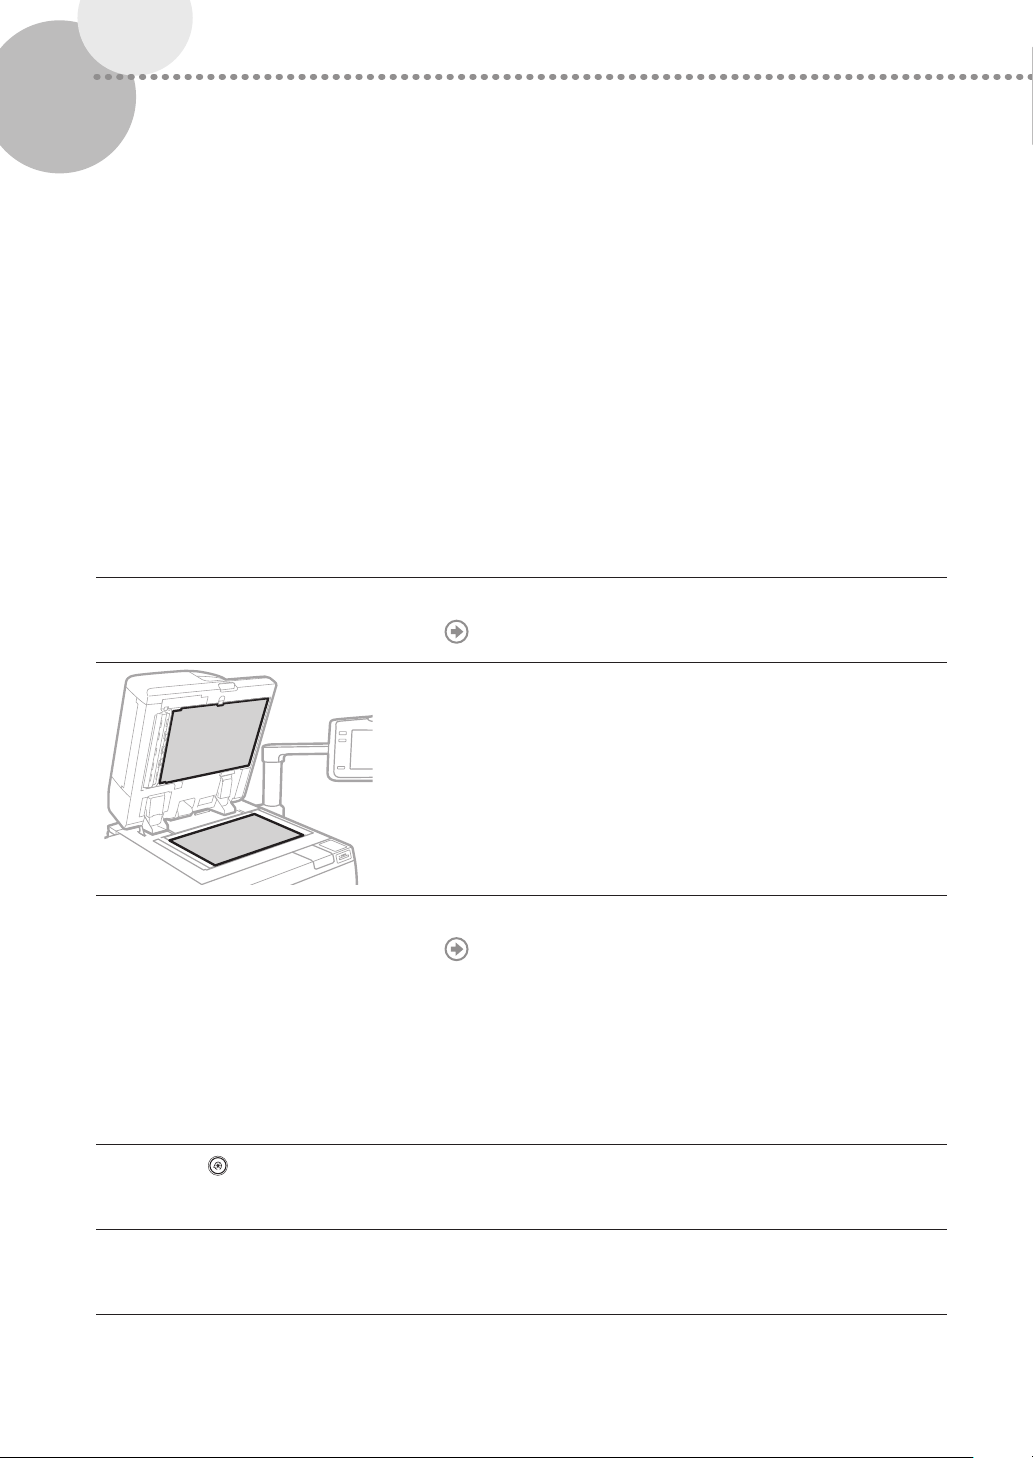
Clean the Platen Glass.
2
•
Clean the platen glass and the underside of the feeder.
Turning on the main power.
3
"Turning ON the Main Power," on p. 11
Cleaning the Original Scanning Area
▀
If originals which are fed from the feeder cannot be scanned properly, follow the procedure below.
Press .
1
Press [Adjustment/Maintenance] [Maintenance] [Original Scanning Area Cleaning
2
Method].
18
Page 19
Cleaning and Maintenance
Follow the cleaning instructions on the touch panel display.
3
Cleaning the Feeder
▀
If originals which are fed from the feeder become dirty, follow the cleaning procedure below. Clean with a cloth which
is wrung after being dampened in water, and then clean with a soft and dry cloth. Use the provided glass cleaning
cloth for simple cleaning.
Shutting down the machine.
1
"Shutting Down the Machine," on p. 11
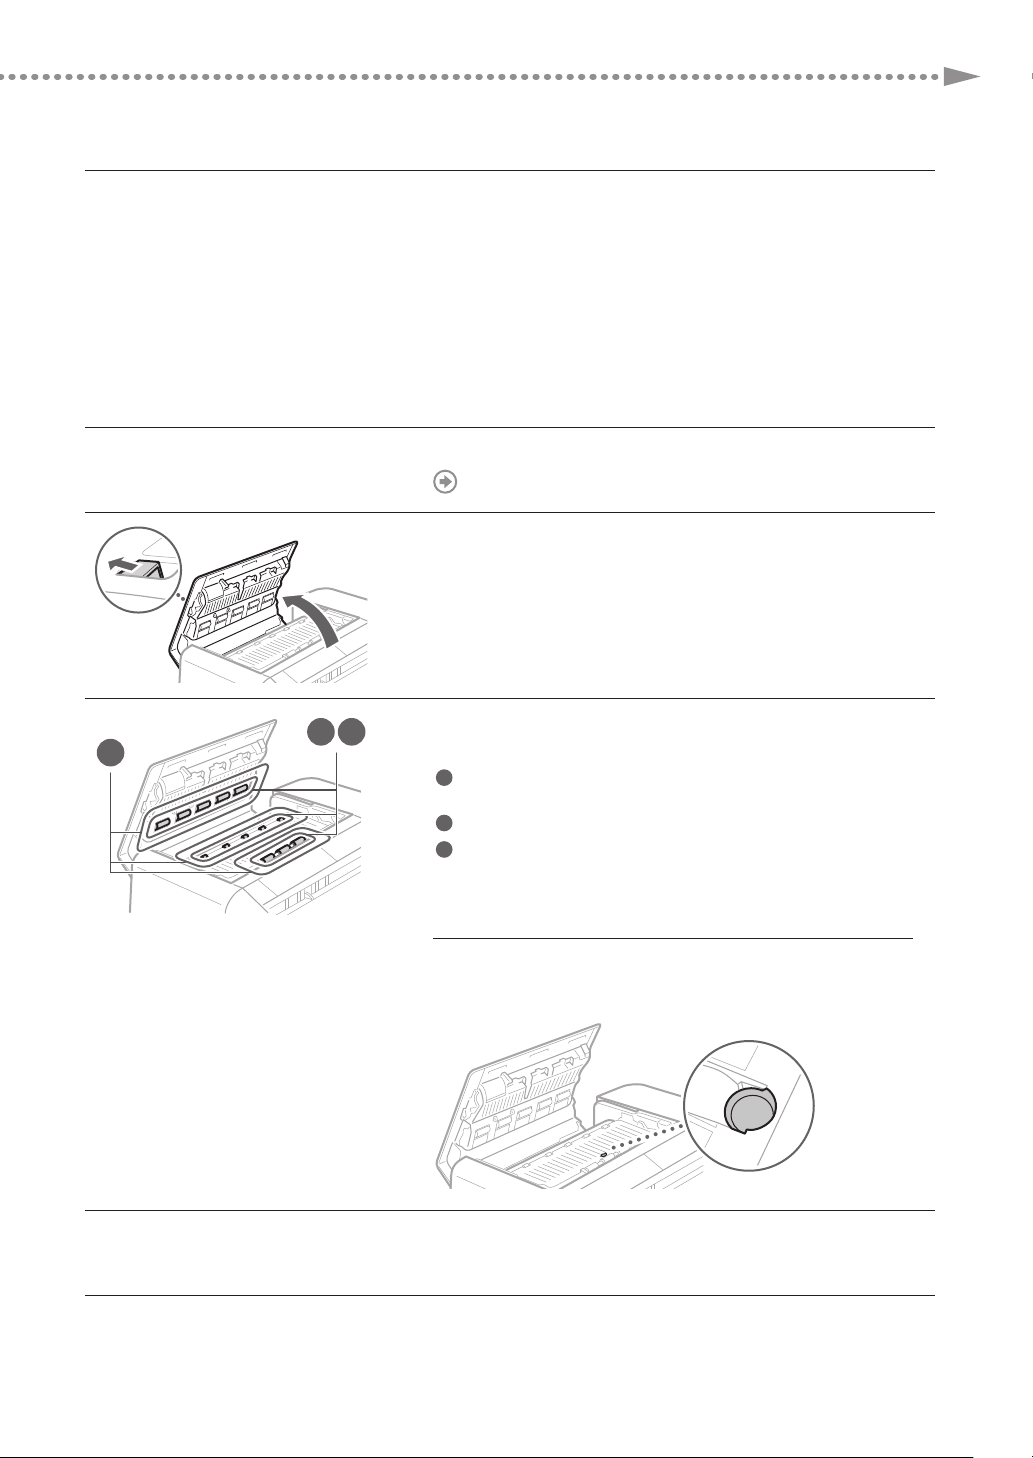
Pull the lever, and open the feeder cover.
2
1
3
the feeder cover.
1
Wet a soft cloth with water and wring it out well, then wipe the
rollers with it.
2
Wipe the rollers with a soft and dry cloth.
3
If the surrounding areas of the rollers are very dirty, clean them
out as well.
IMPORTANT
Make sure that no trash such as pieces of paper gets into the
groove of the multiple sheet feed detection sensor. If trash does
get in, remove it using a soft cloth.
Gently close the feeder cover.
4
Clean the rollers and surrounding areas of them inside
3
2
19
Page 20
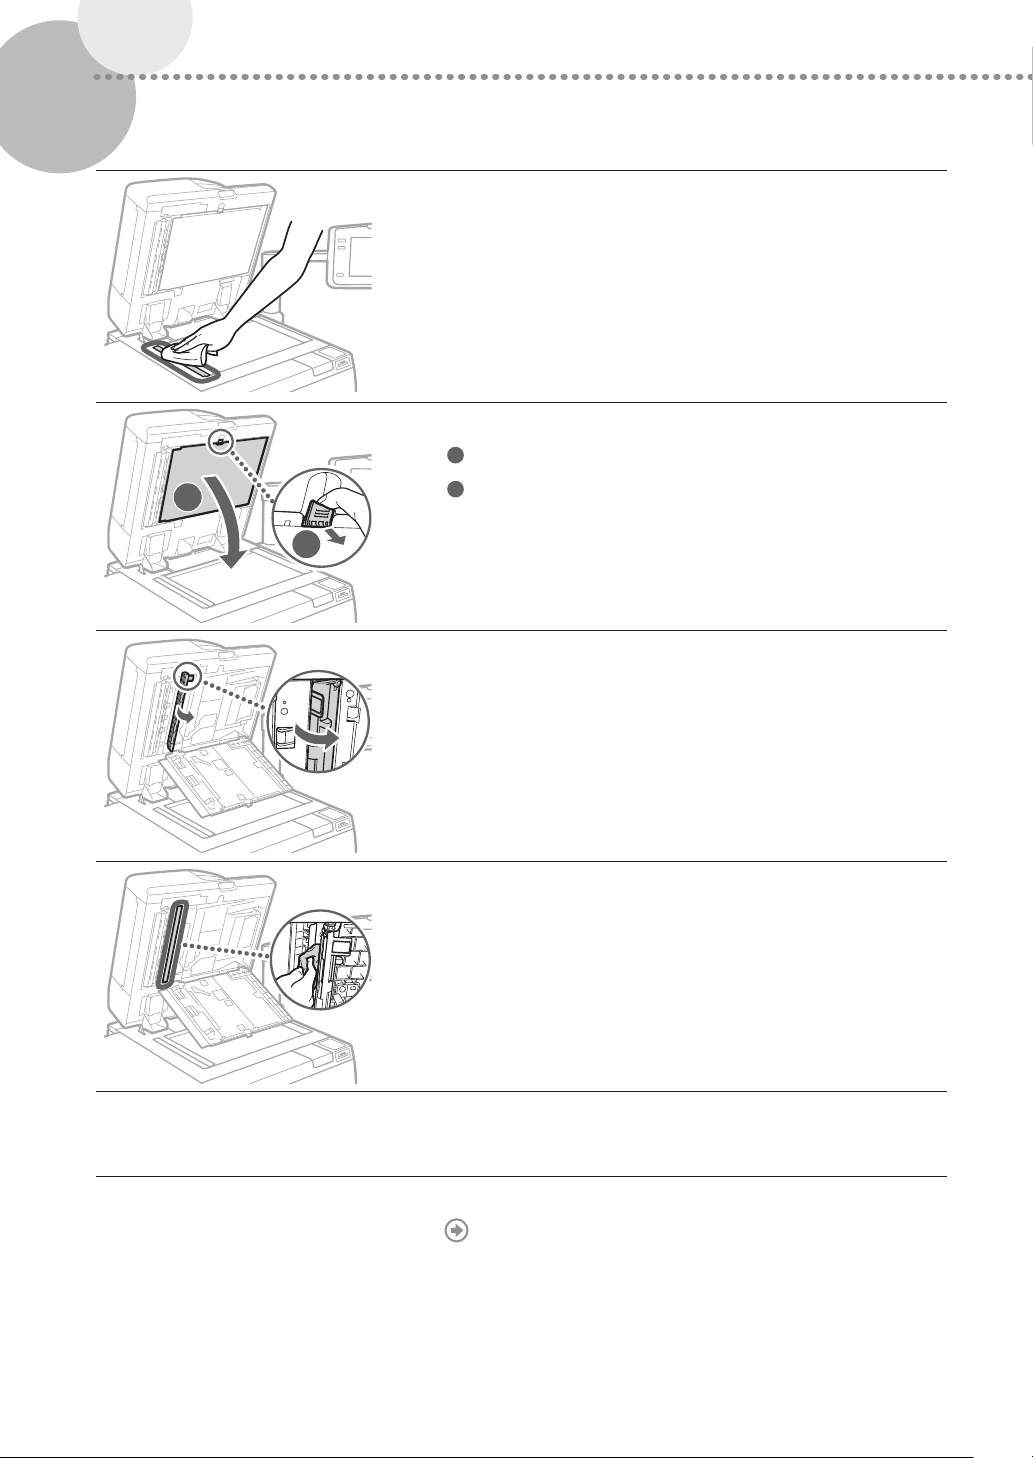
Clean the original scanning area.
5
•
Open the feeder and clean the original scanning area (thin glass
strip).
Open the document scan cover.
6
1
Pull the lever above the feeder.
2
2
Open the document scan cover.
1
Open the inside cover.
7
20
Wipe the thin
glass strip area.
Clean the original scanning area of the feeder.
8
Close the inside cover and document scan cover in order,
9
and then close the feeder.
Turning on the main power.
10
"Turning ON the Main Power," on p. 11
Page 21

Automatic Feeder Cleaning
▀
If originals which are fed from the feeder become dirty, follow the procedure below.
Place 10 sheets of blank paper into the feeder.
1
•
Use A4 plain paper.
Press .
2
Press [Adjustment/Maintenance] [Maintenance] [Clean Feeder].
3
Press [Start].
4
Cleaning the Inside of the Main Unit
▀
If output paper becomes dirty, follow the procedure below.
Cleaning and Maintenance
Press .
1
Press [Adjustment/Maintenance] [Maintenance] [Clean Inside Main Unit].
2
Press [Start].
3
NOTE
•
Similarly perform [Adjustment/Maintenance] [Maintenance] [Clean Wire] and [Adjustment/Maintenance]
[Maintenance] [Clean Roller].
•
Paper may be cleaned by performing [Adjustment/Maintenance] [Maintenance] [Clean Belt]. After loading three
or more sheets of plain paper into the upper paper drawer of the main unit, perform the above procedure.
21
Page 22
Refreshing the Fixing Belt
▀
If streaks appear on the output paper, or gloss unevenness occurs in the high density area of the printed heavy paper,
follow the procedure below.
Press .
1
Press [Adjustment/Maintenance] [Maintenance] [Refresh Fixing Belt].
2
Press [Start].
3
NOTE
The fixing belt is refreshed automatically every several sheets of paper is printed. You can adjust the refresh frequency
and time in [Fixing Roller Auto Refresh Level].
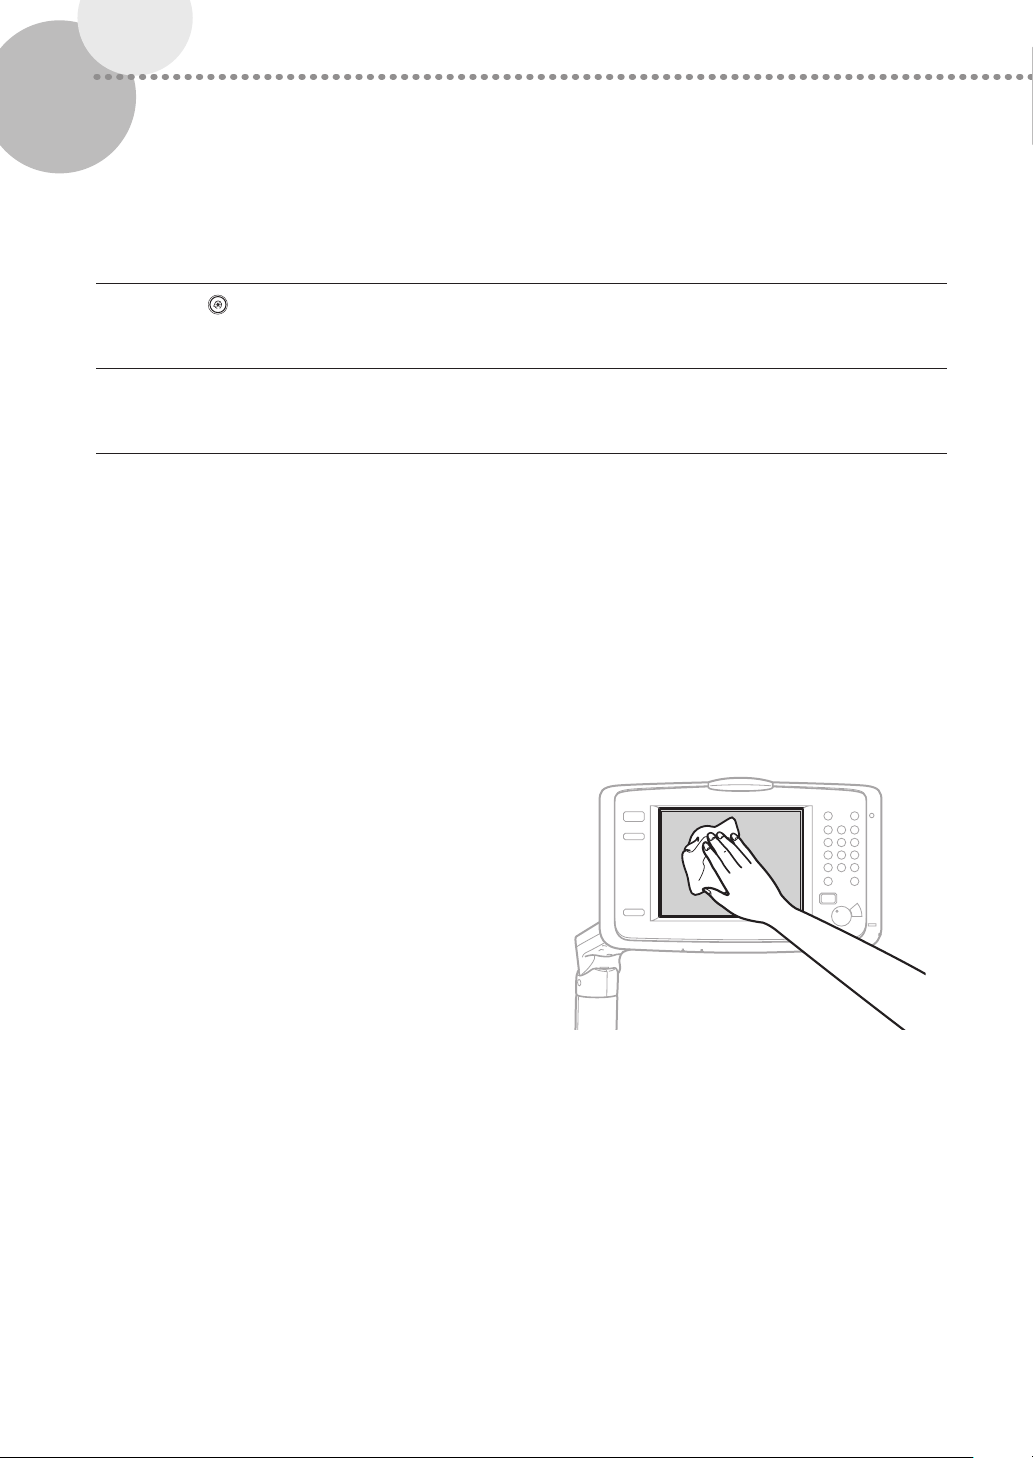
Cleaning the Touch Panel Display
▀
Wipe the touch panel display with a cloth dampened in water
or a mild cleaning agent, and then wipe with a soft, dry cloth.
22
Page 23
Cleaning and Maintenance
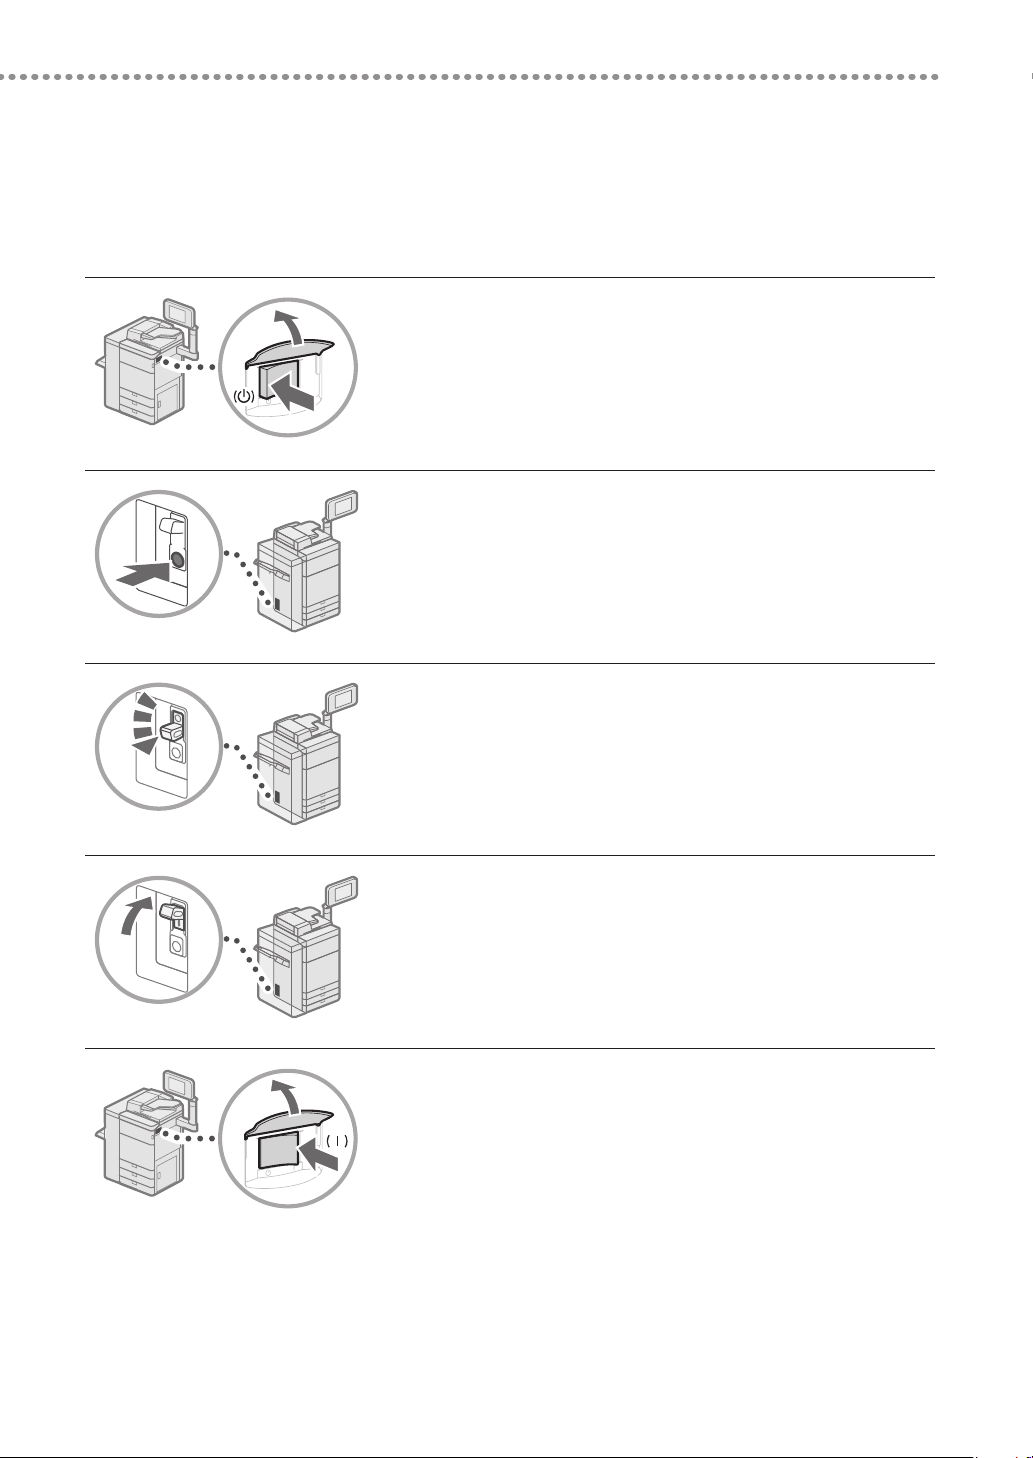
Inspection of the Breaker
▀
This machine has a breaker that detects excess current or leakage current. Make sure to test the breaker once a month
by following the procedure below.
Turn OFF the main power.
1
•
Make sure that the main power is turned OFF, before inspecting
the breaker.
Push the test button located on the rear of the machine.
2
•
Push the test button with the tip of a ball-point pen or a similar
object. Briefly push the test button.
Confirm that the breaker lever is switched to the OFF
3
position.
•
If the breaker lever is not switched to the OFF position, repeat
step 2. If the breaker lever is not switched to the OFF position,
despite carrying out the above procedure two or three times,
contact your local authorized Canon dealer.
Switch the breaker lever to ON.
4
Turn ON the main power.
5
23
Page 24
Consumables
The following consumables are available for this machine. For more information, contact your local authorized Canon
dealer. For information on using and storing consumables, see "Consumables," on p. 32.
Paper
In addition to plain paper, other types of paper stock are available, such as recycled paper, color paper, transparencies/
clear film (recommended for this machine), vellums, and labels. For high-quality printouts, use paper recommended by
Canon.
Toner
If a message prompting you to replace the toner cartridge appears on the touch panel display, replace the used toner
cartridge with a new one. For information on how to replace the toner cartridge, see the User's Guide. For optimum
print quality, using Canon genuine toner is recommended.
"Maintenance" > "Replacing the Toner Cartridge" in the User's Guide
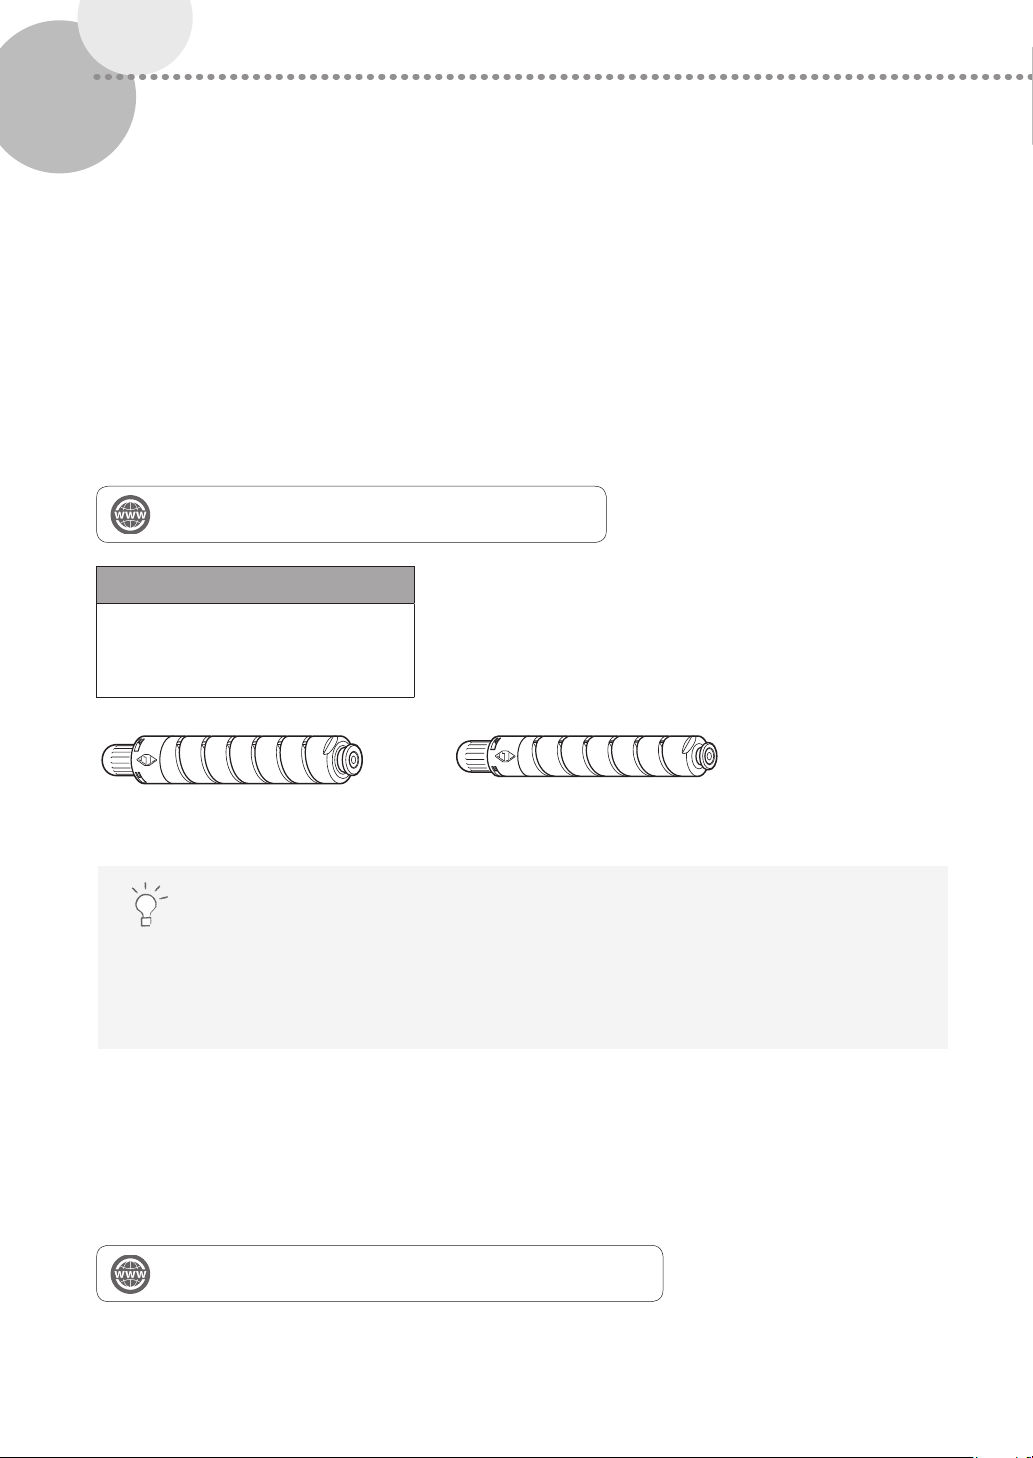
Supported Canon Genuine Toner
Canon imagePRESS Toner T01 Black
Canon imagePRESS Toner T01 Cyan
Canon imagePRESS Toner T01 Magenta
Canon imagePRESS Toner T01 Yellow
Black Toner Cartridge Cyan, Magenta, or Yellow Toner Cartridge
Be careful of counterfeit toners
Please be aware that there are counterfeit Canon toners in the marketplace. Use of counterfeit toner may
result in poor print quality or machine performance. Canon is not responsible for any malfunction, accident
or damage caused by the use of counterfeit toner. For more information, see global.canon/ctc.
Waste Toner Container
The waste toner is accumulated in the waste toner container, and when the container is nearly full, a message
prompting you to replace the container appears on the touch panel display. For information on how to replace the
waste toner container, see the User's Guide. Your local authorized Canon dealer will dispose of the used waste toner
container.
"Maintenance" > "Replacing the Waste Toner Container" in the User's Guide
24
Page 25
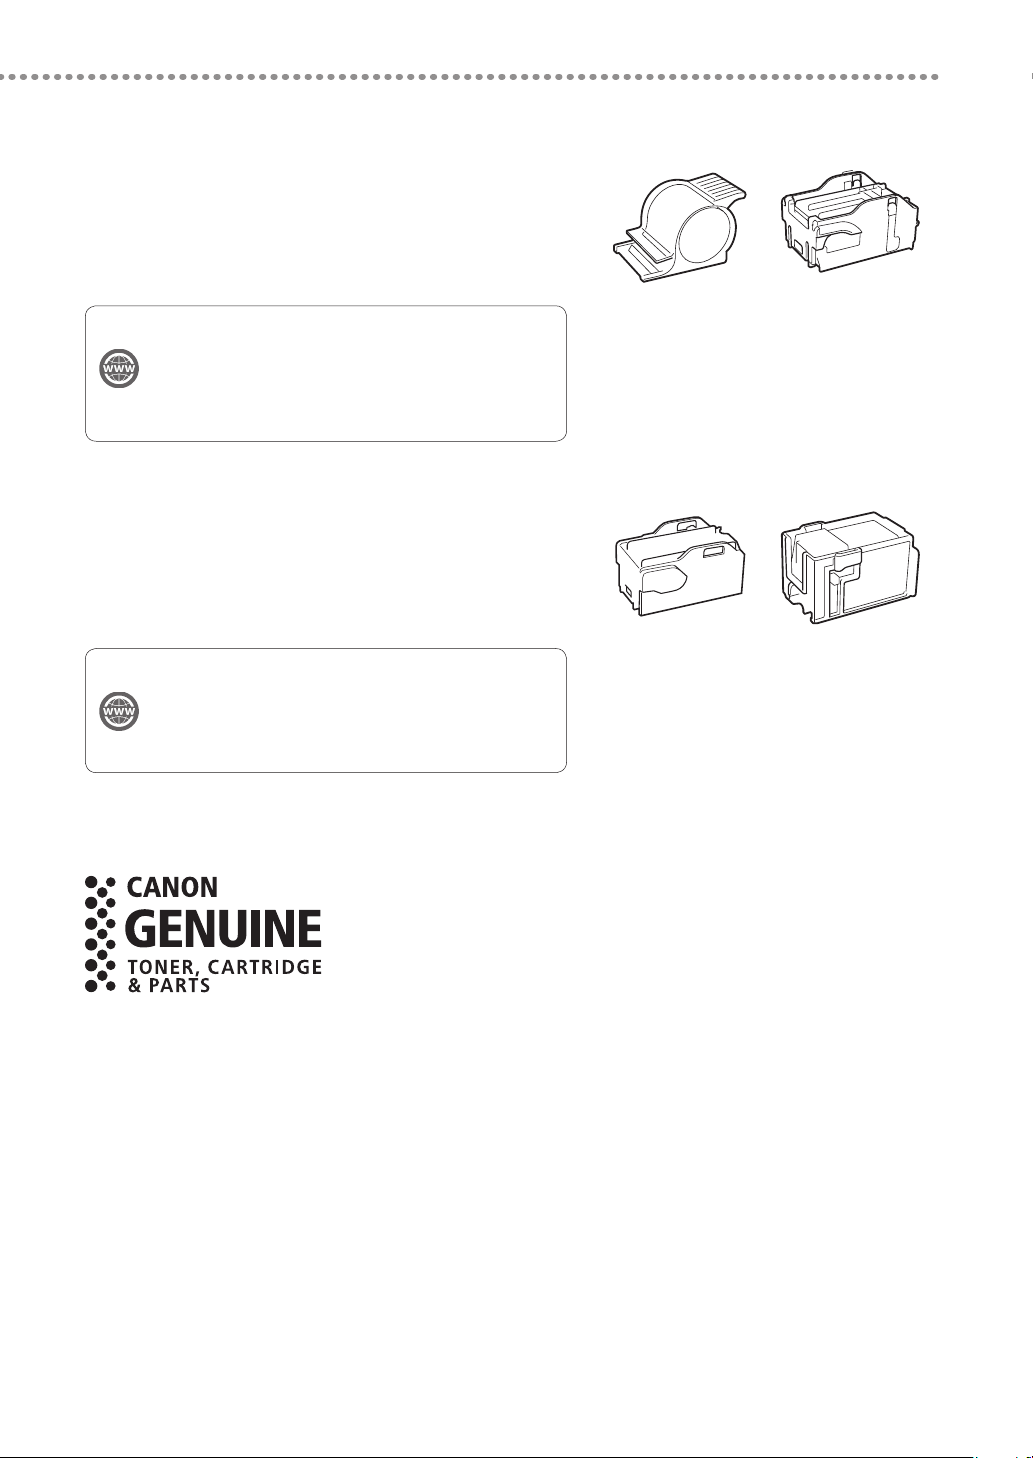
Staple Cartridge for the Stapler Unit
The Staple-N1/Staple Cartridge-X1 can be attached to the Staple
Finisher-W PRO/Booklet Finisher-W PRO/Staple Finisher-AC
Finisher-AC
*
for stapling. For information on how to replace the staple
cartridge, see the User's Guide.
"Maintenance" > "Replacing the Staple Cartridge (For Optional
Products)" > "Replacing the Staple Cartridge in the Stapler Unit
(Staple Finisher-W PRO/Booklet Finisher-W PRO)", "Replacing the
Staple Cartridge in the Stapler Unit (Staple Finisher-AC/Booklet
Finisher-AC)" in the User's Guide.
* If you are using the imagePRESS C910, you cannot use the Staple Finisher-AC/Booklet Finisher-AC.
*
/Booklet
Staple-N1 Staple Cartridge-X1
Staple Cartridge for the Saddle Stitcher Unit
The Staple-P1/Staple Cartridge-Y1 can be attached to the Booklet
Finisher-W PRO/Booklet Finisher-AC
information on how to replace the staple cartridge, see the User's
Guide.
"Maintenance" > "Replacing the Staple Cartridge (For Optional
Products)" > "Replacing the Staple Cartridge in the Saddle Stitcher
Unit (Booklet Finisher-W PRO)", "Replacing the Staple Case in the
Saddle Stitcher Unit (Booklet Finisher-AC)" in the User's Guide.
*
for saddle stitching. For
Staple-P1 Staple Cartridge-Y1
Consumables
* If you are using the imagePRESS C910, you cannot use the Booklet Finisher-AC.
For optimum print quality, using Canon genuine Toner, Cartridge and Parts is recommended.
25
Page 26
Troubleshooting
This section explains how to solve problems when paper jam occurs frequently or error messages are displayed. For
information on the detailed procedures and precautions, see the User's Guide.
"Problem Solving" in the User's Guide
Clearing Paper Jams and Staple Jams
▀
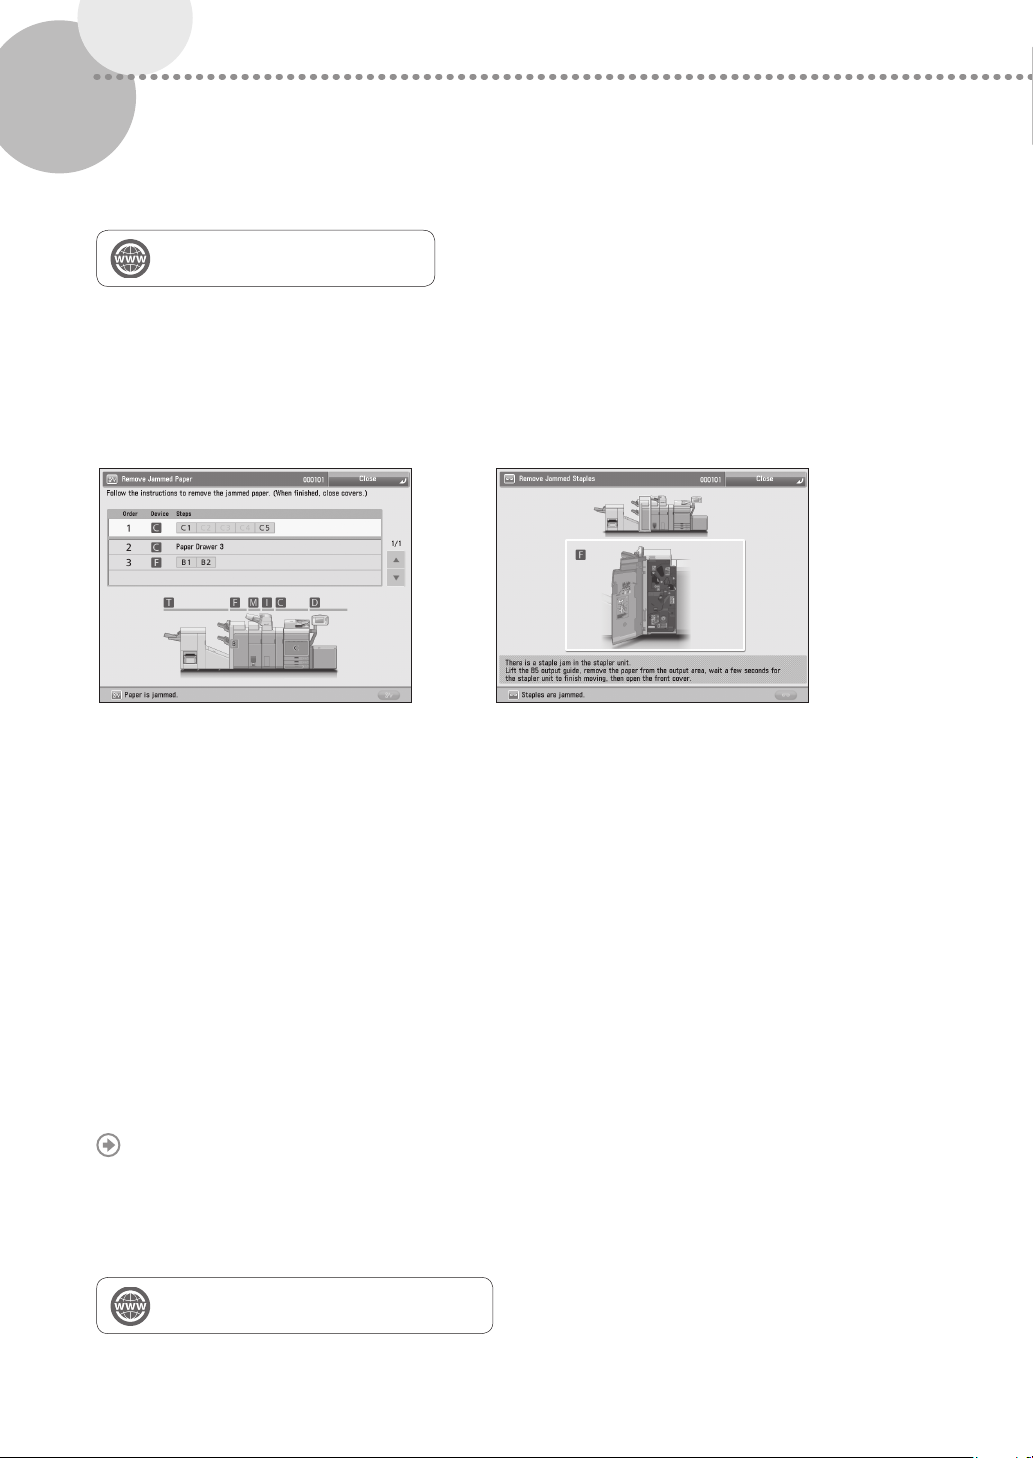
If a paper jam or staple jam occurs, follow the instructions displayed on the touch panel display to clear the jam. If you
press [Close], you can continue operations, such as scanning originals, even if the jammed paper is not removed.
Paper Jam screen
The location of a paper jam is displayed with
animations.
Reducing the Frequency of Paper Jams
▀
If paper jams occur frequently, the following reasons may be the cause.
Staple Jam screen
The location of a staple jam and procedures for
clearing the jam are displayed.
There are torn pieces of paper left inside the machine.
As a result of pulling jammed paper out by force, torn pieces of paper may be left inside the machine.
Remove all of the torn pieces.
Paper which does not match with the setting is loaded.
Make sure that the paper loaded in the paper drawer matches the paper size and type registered in [Paper Settings]
in [Preferences].
"Registering Custom Paper Types," on p. 16
Paper jams occur frequently only when using the specific custom paper.
The paper information may be registered incorrectly.
Confirm the paper information settings for the paper you are using.
26
"Paper Type Management" in the User's Guide
Page 27
When an Error Message Is Displayed
▀
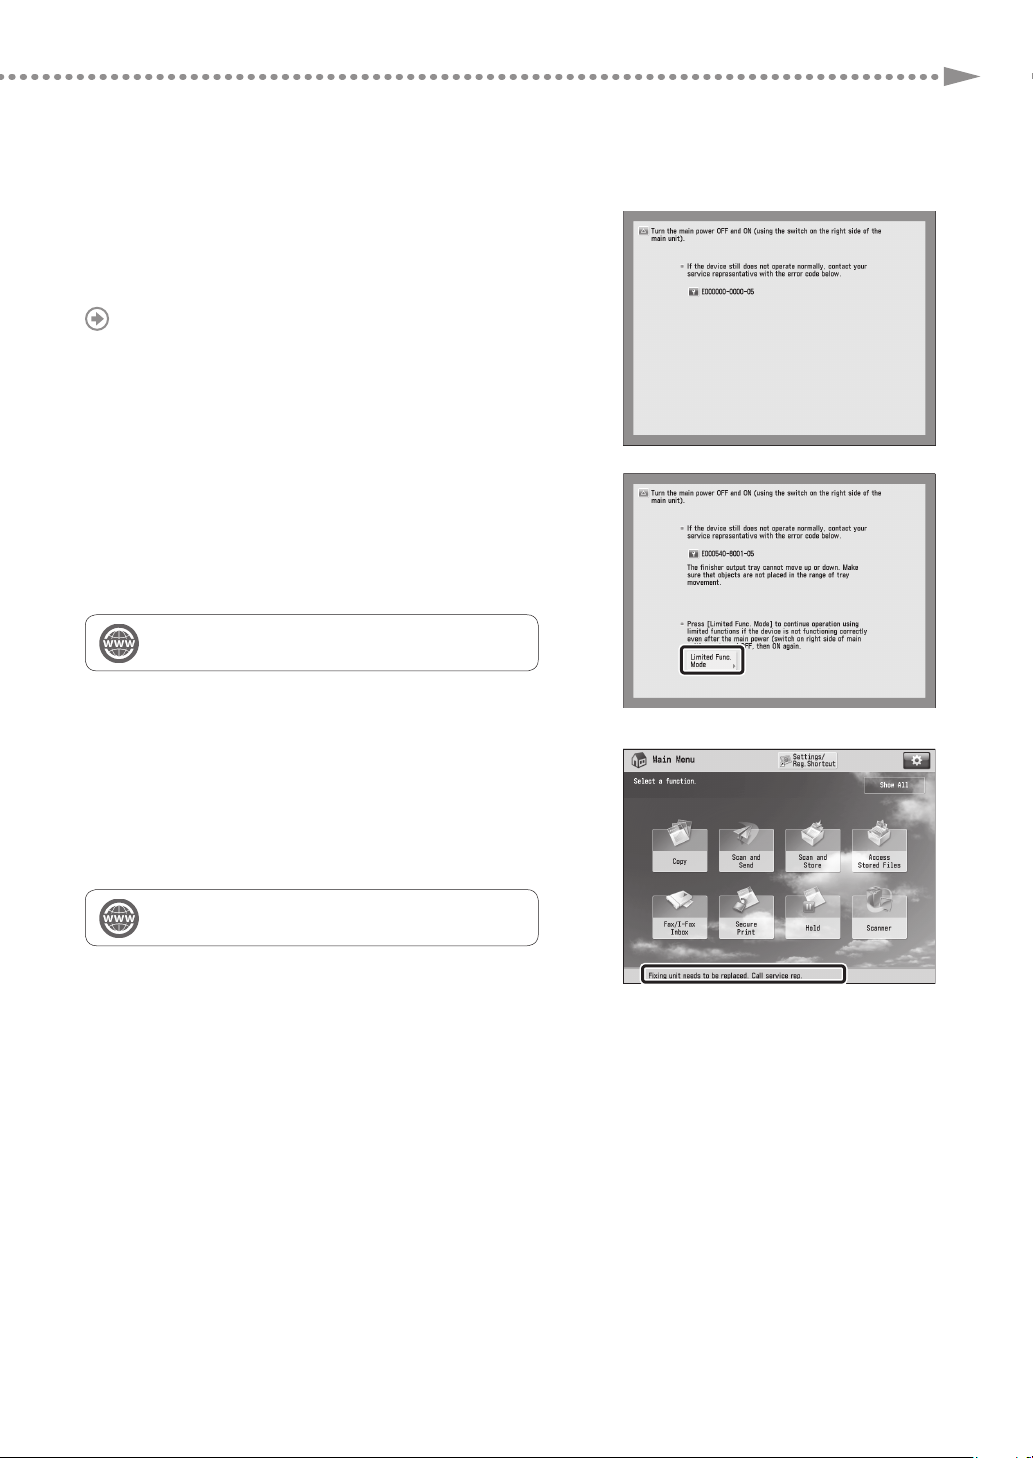
If a malfunction occurs and the machine cannot operate
normally, a screen shown on the right appears. If the machine
cannot operate normally after turning the main power OFF
and then ON, contact your local authorized Canon dealer.
"Contacting Your Local Authorized Canon Dealer," on p. 28
If a key for the Limited Functions mode is
displayed:
If [Limited Functions Mode] is displayed, you can temporally
set the Limited Functions mode to continue to use some
functions.
"Problem Solving" > "Service Call Message" in the User's
Guide
Troubleshooting
If a message is displayed on the bottom of the
screen:
If an error message appears on the bottom of the screen,
printing and scanning functions are restricted, but some
functions may still be available.
"Problem Solving" > "Service Call Message" in the User's
Guide
27
Page 28
Contacting Your Local Authorized Canon Dealer
▀
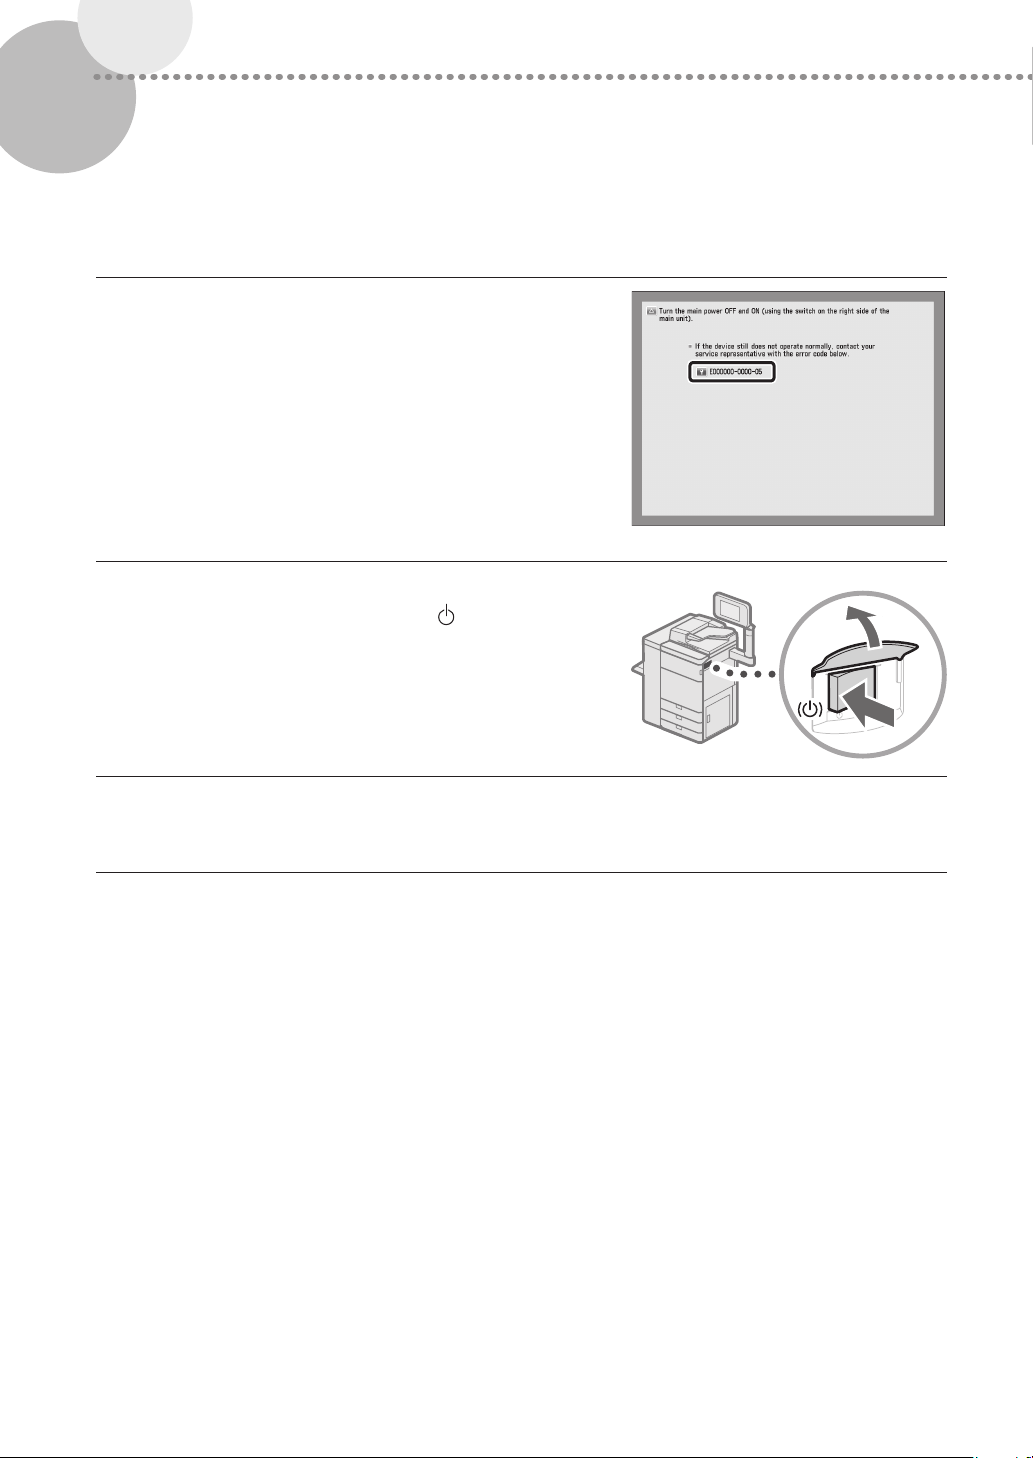
If you cannot operate the machine normally after turning the main power OFF and then ON, contact your local
authorized Canon dealer by following the procedure below.
Note the error code.
1
•
Write down the error code "EXXXXX-XXXX".
Turn OFF the main power.
2
•
Press the main power switch to the "
" side.
Remove the power plug from the power outlet.
3
Confirm the product name, and contact your local authorized Canon dealer.
4
28
Page 29
Troubleshooting
If Memory Becomes Full
▀
If memory becomes full during scanning, the following messages appear on the touch panel display. Follow the
procedures on the screen, and then delete unnecessary files stored in the Mail Box and Fax/I-Fax Inbox to make more
memory available.
Scanning will be canceled because the memory is full. Do you want to print (send, store)* the scanned pages?
* A part of the message differs, depending on the function used.
[Yes]: A job for the pages scanned into memory is processed. After processing the job, scan the remaining pages.
[No]: A job for the pages scanned into memory is canceled. Scan the whole pages again.
Scanning will be canceled because the memory is full. Wait a moment, then try again.
[OK]: Scan the whole pages again after the current operation is complete.
Could not perform the operation because the memory is full.
[OK]: Delete unnecessary data from memory, and then scan the whole pages again.
If the Main Power Does Not Turn ON
▀
If the machine cannot operate when the main power is turned
ON, check the breaker. If the breaker is switched to the OFF
position, do not attempt to turn ON the breaker yourself, and
be sure to contact your local authorized Canon dealer.
29
Page 30
Appendix
Important Safety
Instructions
This chapter describes important safety
instruc tions for the prevention of injur y to users
of this machine and others, and damage to
property. Read this chapter before using the
machine, and follow the instructions to use the
machine properly. Do not perform any operations
not described in this manual. Canon will not be
responsible for any damages resulting from
operations not described in this manual, improper
use, or repair or changes not performed by Canon
or a third party authorized by Canon. Improper
operation or use of this machine could result in
personal injury and/or damage requiring
extensive repair that may not be covered under
your Limited Warranty.
WARNING
Indicates a warning concerning operations
that may lead to death or injury to persons if
not performed correctly. To use the machine
safely, always pay attention to these warnings.
CAUTION
Indicates a caution concerning operations
that may lead to injury to persons if not
performed correctly. To use the machine
safely, always pay attention to these cautions.
IMPORTANT
Indicates operational requirements and
restrictions. Be sure to read these items
carefully to operate the machine correctly and
avoid damage to the machine or property.
Installation
To use this machine safely and comfortably,
carefully read the following precautions and
install the machine in an appropriate location.
WARNING
Do not install in a location that may result in a
re or electrical shock
•
A location where the ventilation slots are
blocked (too close to walls, beds, sofas, rugs,
or similar objects)
•
A damp or dusty location
•
A location exposed to direct sunlight or
outdoors
•
A location subject to high temperatures
•
A location exposed to open flames
•
Near alcohol, paint thinners or other
flammable substances
Other warnings
•
Do not connect unapproved cables to this
machine. Doing so may result in a fire or
electrical shock.
•
Do not place necklaces and other metal
objects or containers filled with liquid on the
machine. If foreign substances come in
contact with electrical parts inside the
machine, it may result in a fire or electrical
shock.
•
If any foreign substance falls into this machine,
unplug the power plug f rom the AC power
outlet and contact your local authorized Canon
dealer.
CAUTION
Do not install in the following locations
The machine may drop or fall, resulting in injury.
•
An unstable location
•
A location exposed to vibrations
Other cautions
•
Do not connect any unauthorized optional
products to the outlet for connecting
optional products, as this could result in a fire
or smoke.
•
When disconnecting the power cord, wait at
least 5 seconds before connecting the power
cord again.
•
Excessive voltage drop may cause a
malfunction or loss of data in the machine
and computers.
Leveling feet (only for products with leveling
feet)
Do not remove the machine's leveling feet after
the machine has been installed, as this may
cause the machine to fall or tip over, resulting in
personal injury.
IMPORTANT
Do not install in the following locations
Doing so may result in damage to the
machine.
•
A location subject to temperature and
humidity extremes, whether low or high
•
A location subject to dramatic changes in
temperature or humidity
•
A location near equipment that generates
magnetic or electromagnetic waves
•
A laboratory or location where chemical
reactions occur
•
A location exposed to corrosive or toxic gases
•
A location that may warp from the weight of
the machine or where the machine is liable to
sink (a carpet, etc.)
Avoid poorly ventilated locations
This machine generates a slight amount of
ozone and other emissions during normal use.
These emissions are not harmful to health.
However, they may be noticeable during
extended use or long production runs in poorly
ventilated rooms. To maintain a comfortable
working environment, it is recommended that
the room where the machine operates be
appropriately ventilated. Also avoid locations
where people would be exposed to emissions
from the machine.
Do not install in a location where
condensation occurs
Water droplets (condensation) may form inside
the machine when the room where the
machine is installed is heated rapidly, and when
the machine is moved from a cool or dry
location to a hot or humid location. Using the
machine under these conditions may result in
paper jams, poor print quality, or damage to the
machine. Let the machine adjust to the ambient
temperature and humidity for at least 2 hours
before use.
Avoid installing the machine near computers
or other precision electronic equipment.
Electrical interf erence and vibrations generated
by the machine while printing can adversely
affect the operation of such equipment.
Avoid installing the machine near televisions,
radios, or similar elec tronic equipment.
The machine might interfere with sound and
picture signal reception.
Insert the power plug into a dedicated power
outlet, and maintain as much space as possible
between the machine and other electronic
equipment.
In altitudes of above sea level 3,000 m or
higher
Machines with a hard disk may not operate
properly when used at high altitudes of about
3,000 meters above sea level, or higher.
If the operating noise concerns you
Depending on the use environment and
operating mode, if the operating noise is of
concern, it is recommended that the machine
be installed in a place other than the office.
Moving the Machine
If you intend to move the machine, even to a
location on the same floor of your building,
contact your local authorized Canon dealer
beforehand. Do not attempt to move the
machine yourself.
Power Supply
WARNING
•
Use only a power supply that meets the
specified voltage requirements. Failure to do
so may result in a fire or electrical shock.
•
The machine must be connected to a
socket-outlet with grounding connection by
the provided power cord.
•
Do not use power cords other than the one
provided, as this may result in a fire or
electrical shock.
•
The provided power cord is intended for use
with this machine. Do not connect the power
cord to other devices.
•
Do not modify, pull, forcibly bend, or perform
any other act that may damage the power
cord. Do not place heavy objects on the
power cord. Damaging the power cord may
result in a fire or electrical shock.
•
Do not plug in or unplug the power plug
with wet hands, as this may result in an
electrical shock.
•
Do not use extension cords or multi-plug
power strips with the machine. Doing so may
result in a fire or electrical shock.
•
Do not wrap the power cord or tie it in a knot,
as this may result in a fire or electrical shock.
•
Insert the power plug completely into the AC
power outlet. Failure to do so may result in a
fire or electrical shock.
•
Remove the power plug completely from the
AC power outlet during a thunder storm.
Failure to do so may result in a fire, electrical
shock, or damage to the machine.
•
Make sure that the power supply for the
machine is safe, and has a steady voltage.
•
Keep the power cord away from a heat
source; failure to do this may cause the power
cord coating to melt, resulting in a fire or
electrical shock.
Avoid the following situations:
If excessive stress is applied to the connection
part of the power cord, it may damage the
power cord or the wires inside the machine
may disconnect. This could result in a fire.
•
Connecting and disconnecting the power
cord frequently.
30
Page 31
Appendix
•
Tripping over the power cord.
•
The power cord is bent near the connection
part, and continuous stress is being applied
to the power outlet or the connection part.
•
Applying excessive force on the power plug.
CAUTION
Install this machine near the power outlet and
leave sufficient space around the power plug so
that it can be unplugged easily in an
emergency.
IMPORTANT
When connecting power
•
Do not connect the power cord to an
uninterruptible power source. Doing so may
result in malfunction of or damage to the
machine at power failure.
•
If you plug this machine into an AC power
outlet with multiple sockets, do not use the
remaining sockets to connect other devices.
•
Do not connect the power cord to the
auxiliary AC power outlet on a computer.
Other precautions
Electrical noise may cause this machine to
malfunction or lose data.
Handling
WARNING
•
Immediately unplug the power plug from the
AC power outlet and contact an authorized
Canon dealer if the machine makes an
unusual noise, emits an unusual smell, or
emits smoke or excessive heat. Continued use
may result in a fire or electrical shock.
•
Do not disassemble or modify this machine.
There are high-voltage and high-temperature
components inside the machine. Disassembly
or modification may result in a fire or electrical
shock.
•
Place the machine where children will not
come in contact with the power cord and
other cables or gears and electrical parts
inside the machine. Failure to do so may
result in unexpected accidents.
•
Do not use flammable sprays near this
machine. If flammable substances come into
contact with electrical parts inside this
machine, it may result in a fire or electrical
shock.
•
When moving this machine, be sure to turn
OFF the power of this machine, and then
unplug the power plug and interface cables.
Failure to do so may damage the power cord
or interface cables, resulting in a fire or
electrical shock.
•
When plugging or unplugging a USB cable
when the power plug is plugged into an AC
power outlet, do not touch the metal part of
the connector, as this may result in an
electrical shock.
If you are using a cardiac pacemaker
This machine generates a low level magnetic
flux and ultrasonic waves. If you use a cardiac
pacemaker and feel abnormalities, please move
away from this machine and consult your
physician immediately.
CAUTION
•
Do not place heavy objects on this machine
as they may fall, resulting in injury.
•
For safety, unplug the power plug if the
machine will not be used for a long period of
time.
•
Use caution when opening and closing
covers to avoid injury to your hands.
•
Keep hands and clothing away from the
rollers in the output area. If the rollers catch
your hands or clothing, this may result in
personal injury.
•
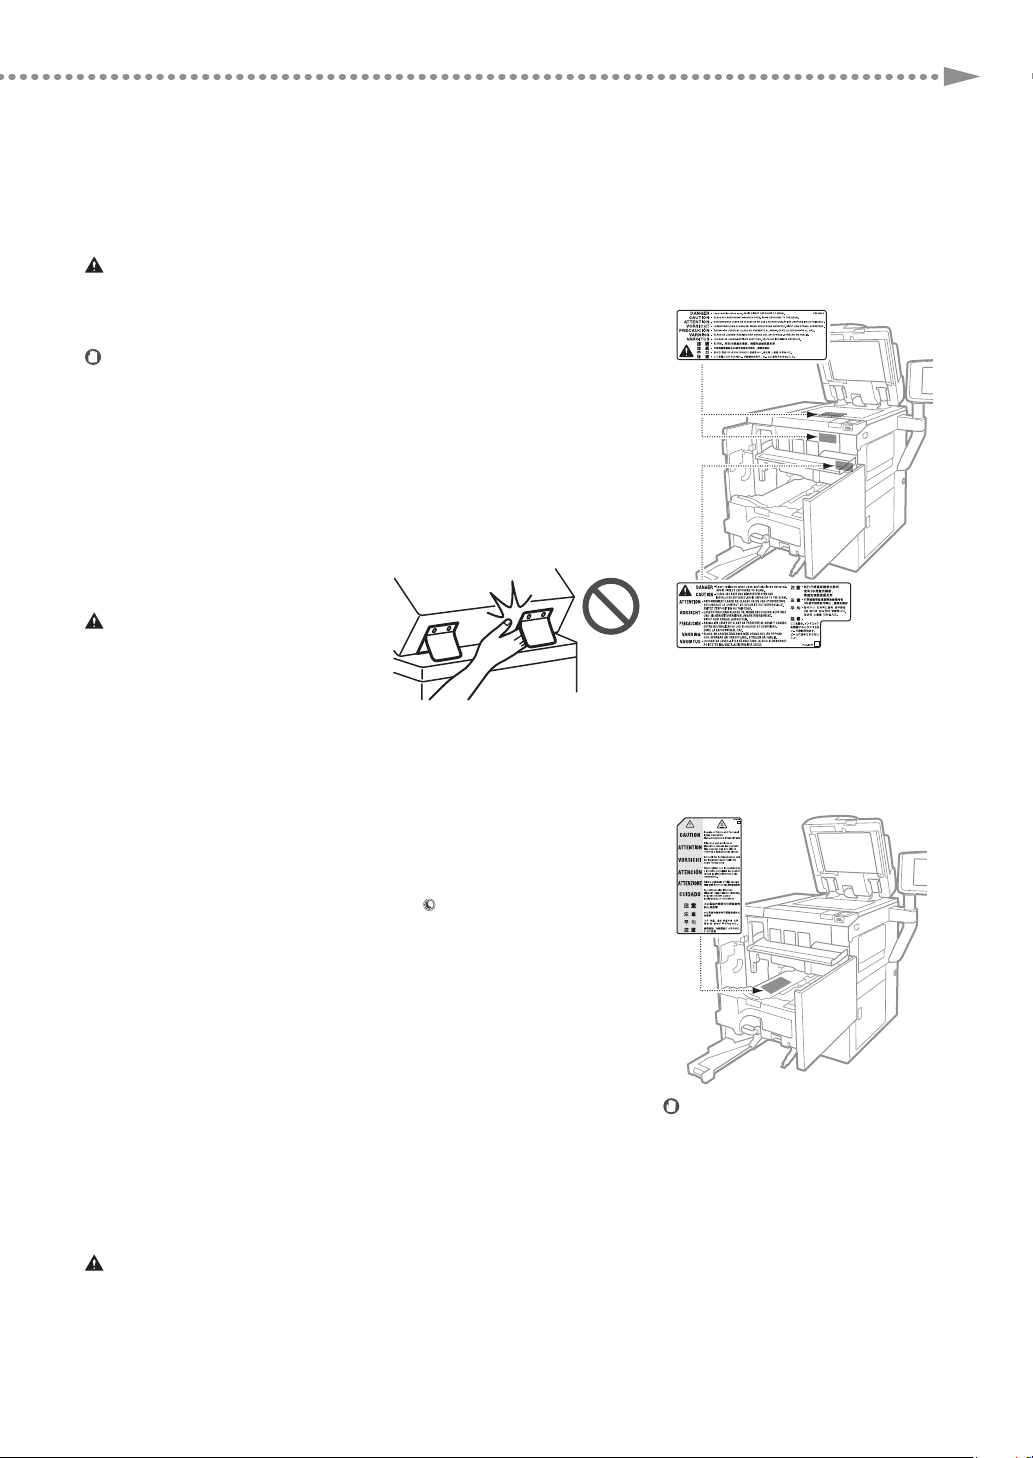
The inside of the machine and the output slot
are very hot during and immediately after
use. Avoid contact with these areas to
prevent burns. Also, printed paper may be
hot immediately after being output, so use
caution when handling it. Failure to do so
may result in burns.
Feeder
•
Do not press down hard on the feeder when
using the platen glass to make copies of thick
books. Doing so may damage the platen glass
and result in personal injury.
•
Close the feeder gently to avoid catching
your hands, as this may result in personal
injury.
•
Be careful not to put your hands or fingers
into the feeder. Otherwise, you may be
injured.
Finisher
•
Do not place your hands in the part of the
tray where stapling is performed (near the
rollers), especially pay careful attention to the
sharp staples, as this may result in personal
injury.
Paper drawer
•
Do not insert your hand into the machine
while the paper drawer is removed, as this
may result in personal injury.
Energy Saver key
•
Press (Energy Saver) for safety when the
machine will not be used for a long period of
time, such as overnight. Also, turn OFF the
main power switch, and disconnect the
power cord for safety when the machine will
not be used for an extended period of time,
such as during consecutive holidays.
Laser Safety
This product is confirmed as a Class 1 laser
product in IEC60825-1:2014 and EN60825-1:2014.
CLASS 1 LASER PRODUCT
LASER KLASSE 1
APPAREIL À LASER DE CLASSE 1
APPARECCHIO LASER DI CLASSE 1
PRODUCTO LÁSER DE CLASE 1
APARELHO A LASER DE CLASSE 1
LUOKAN 1 L ASER-TUOTE
LASERPRODUKT KLASS 1
The laser beam can be harmful to human
bodies. Since radiation emit ted inside the
product is completely confined within
protective housings and external covers, the
laser beam cannot escape from the machine
during any phase of user operation. Read the
following remarks and instructions for safety.
•
Never open covers other than those
instructed in the manuals for this machine.
•
If the laser beam should escape and enter
your eyes, exposure may cause damage to
your eyes.
•
Use of controls, adjustments, or performance
of procedures other than those specified in
this manual may result in hazardous radiation
exposure.
Laser Safety Caution
Fixing Unit
When removing jammed paper or when
inspecting the inside of the machine, do not
expose yourself to the heat emitted from the
fixing unit and its surroundings for a prolonged
period of time. Doing so may result in low
temperature burns, even though you did not
touch the fixing unit and its surroundings
directly.
IMPORTANT
•
Follow the caution instructions on labels and
the like found on this machine.
•
Do not subject the machine to strong shocks
or vibration.
•
Do not forcibly open and close doors, covers,
and other parts. Doing so may result in
damage to the machine.
•
Do not turn the main power switch OFF or
open the covers while the machine is in
operation. This may result in paper jams.
•
Use a modular cable that is shorter than 3
meters.
•
Use a USB cable that is shorter than 3 meters.
31
Page 32
Safety-Related Symbols
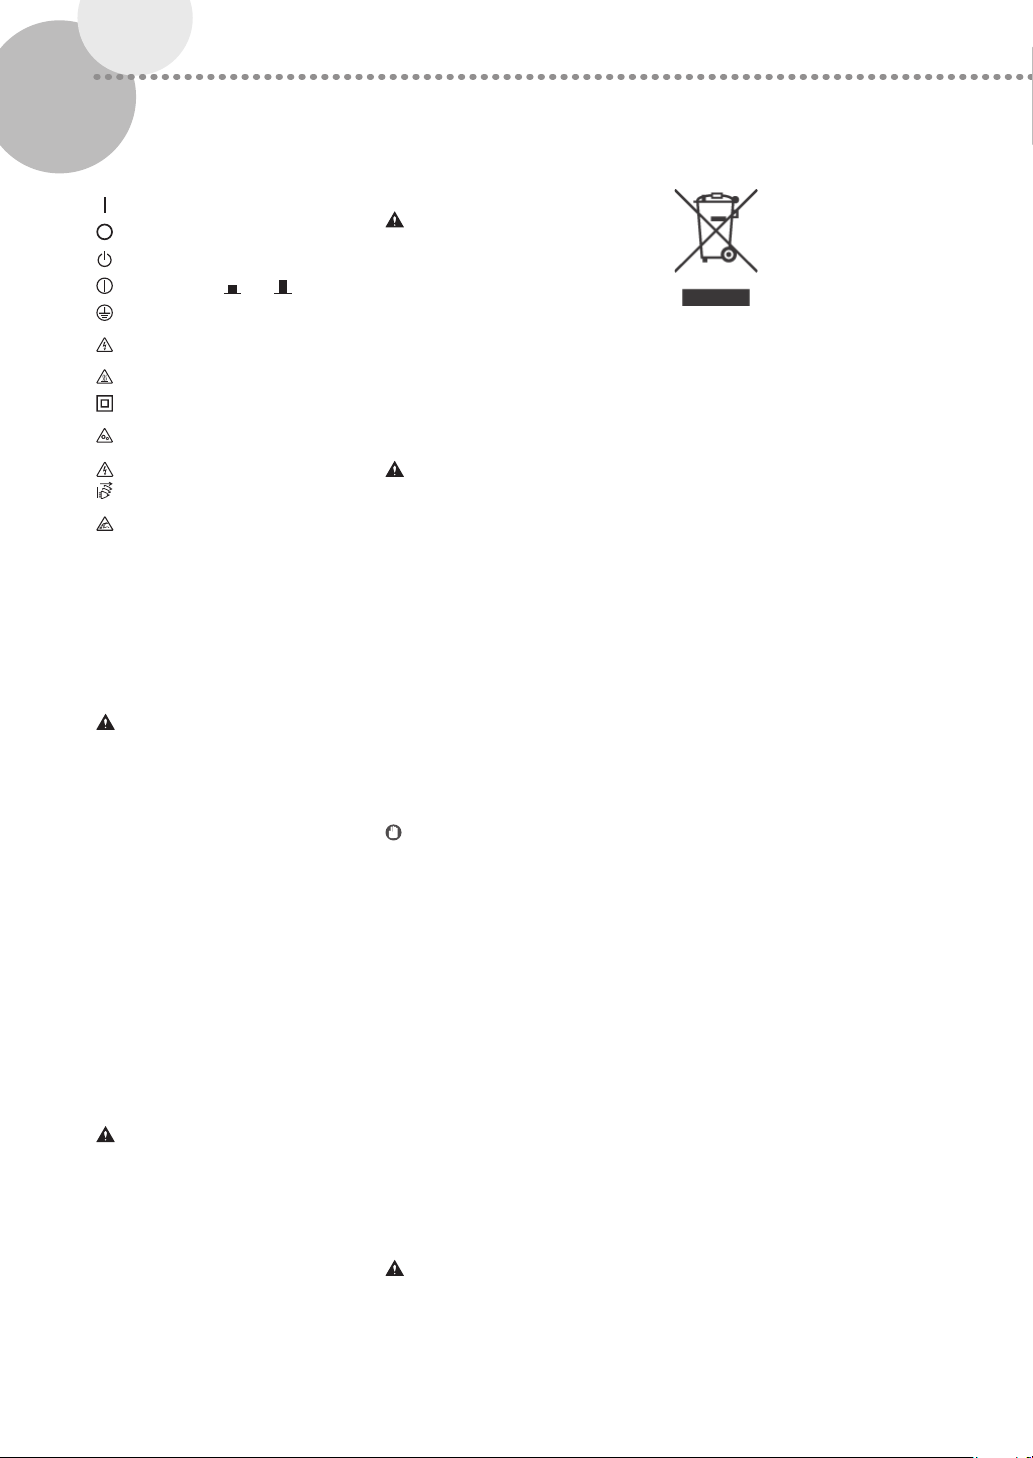
Power switch: “ON” position
Power switch: “OFF” position
Power switch: “STAND-BY” position
Push-push switch “ON” “OFF”
Protective ear thing terminal
Dangerous voltage inside. Do not open
covers other than instructed.
CAUTION: Hot surface. Do not touch.
Class II equipment
Moving parts: Keep body parts away from
moving parts
CAUTION: An electrical shock may occur.
Remove all the power plugs from the power
outlet.
There are sharp edges. Keep body parts
away from sharp edges.
[NOTE]
Some of symbols shown above may not be
affixed depending on the product.
Maintenance and Inspections
Clean this machine periodically. If dust
accumulates, the machine may not operate
properly. When cleaning, be sure to observe the
following. If a problem occurs during operation,
see "Problem Solving" in the User's Guide.
WARNING
•
Before cleaning, turn OFF the power and
unplug the power plug from the AC power
outlet. Failure to do so may result in a fire or
electrical shock.
•
Unplug the power plug periodically and clean
with a dry cloth to remove dust and grime.
Accumulated dust may absorb humidity in
the air and may result in a fire if it comes into
contact with electricity.
•
Use a damp, well wrung-out cloth to clean
the machine. Dampen cleaning cloths with
water only. Do not use alcohol, benzine, paint
thinner, or other flammable substances. Do
not use tissue paper or paper towels. If these
substances come into contact with electrical
parts inside the machine, they may generate
static electricity or result in a fire or electrical
shock.
•
Check the power cord and plug periodically
for damage. Check the machine for rust,
dents, scratches, cracks, or excessive heat
generation. Use of poorly-maintained
equipment may result in a fire or electrical
shock.
CAUTION
•
The inside of the machine has hightemperature and high-voltage components.
Touching these components may result in
burns. Do not touch any part of the machine
that is not indicated in the manual.
•
When loading paper or removing jammed
paper, be careful not to cut your hands with
the edges of the paper.
C o n s u m a b l e s
WARNING
•
Do not throw toner cartridges or waste toner
containers into open flame, or do not store
them or printing/copy paper in a place
exposed to open flame. This may cause
them to ignite, resulting in burns or fire.
•
If you accidentally spill or scatter toner,
carefully gather the toner particles together
or wipe them up with a soft, damp cloth in a
way that prevents inhalation. Never use a
vacuum cleaner that does not have
safeguards against dust explosions to clean
up spilled toner. Doing so may cause a
malfunction in the vacuum cleaner, or result
in a dust explosion due to static discharge.
CAUTION
•
Keep toner and other consumables out of
the reach of small children. If these items are
ingested, consult a physician immediately.
•
If toner touches your clothes or skin, wash it
away with water immediately. Do not use
warm water, as this may cause toner to fix,
resulting in a permanent stain.
•
Do not dismantle the toner cartridge, as
doing so may cause toner to fly out and
enter your eyes or mouth. If toner gets into
your eyes or mouth, wash them immediately
with cold water and immediately consult a
physician.
•
If toner escapes from the toner cartridge,
make sure not to ingest the toner or allow it
to directly touch your skin. If your skin still
feels irritated after washing it, or you ingest
toner, consult a physician immediately.
•
When pulling out the waste toner container,
be careful not to let it fall. This may result in
injury.
IMPORTANT
•
Store toner cartridges in a cool location,
away from direct sunlight.
•
Do not store toner cartridges in an upright
position.
Notice
Product Name
Safety regulations require the product's name to
be regis tered. In some regions where this product
is sold, the following name(s) in parentheses ( )
may be registered instead.
im ageP RES S C9 10/C 810/ C710 (F16 30 00)
EMC requirements of EC Directive
This equipment conforms with the essential EMC
requirements of EC Directive. We declare that this
product conforms with the EMC requirements of
EC Direc tive at nominal mains input 230 V, 50 Hz
although the rated input of the product is 220 to
240 V, 50/60 Hz. Use of shielded cable is necessary
to comply with the technical EMC requirements
of EC Directive.
WARNING
•
This is a class A product. In a domestic
environment this product may cause radio
interference in which case the user may be
required to take adequate measures.
India E-Waste Rule
You can see the information about proper
handling equipment after use in the latest
User's Guide (HTML manual) from the Canon
website (canon.com/oip-manual).
Legal Limitations on the Usage of Your
Product and the Use of Images
Using your product to scan, print or otherwise
reproduce certain documents, and the use of
such images as scanned, printed or otherwise
reproduced by your product, may be prohibited
by law and may result in criminal and/or civil
liability. A non- exhaustive list of these
documents is set forth below. This list is
intended to be a guide only. If you are uncertain
about the legality of using your product to scan,
print or otherwise reproduce any particular
document, and/or of the use of the images
scanned, printed or otherwise reproduced, you
should consult in advance with your legal
advisor for guidance.
•
Paper Money
•
Travelers Checks
•
Money Orders
•
Food Stamps
•
Certificates of Deposit
•
Passports
•
Postage Stamps (canceled or uncanceled)
•
Immigration Papers
•
Identifying Badges or Insignias
•
Internal Revenue Stamps (canceled or
uncanceled)
•
Selective Service or Draft Papers
•
Bonds or Other Certificates of Indebtedness
•
Checks or Drafts Issued by Governmental
Agencies
•
Stock Certificates
•
Motor Vehicle Licenses and Certificates of
Title
•
Copyrighted Works/Works of Art without
Permission of Copyright Owner
Disclaimers
•
The information in this document is subject
to change without notice.
•
CANON INC. MAKES NO WARRANTY OF ANY
KIND WITH REGARD TO THIS MATERIAL,
EITHER EXPRESS OR IMPLIED, EXCEPT AS
PROVIDED HEREIN, INCLUDING WITHOUT
LIMITATION, THEREOF, WARRANTIES AS TO
MARKETABILITY, MERCHANTABILITY, FITNESS
FOR A PARTICULAR PURPOSE OF USE, OR
NON-INFRINGEMENT. CANON INC. SHALL
NOT BE LIABLE FOR ANY DIRECT, INCIDENTAL,
OR CONSEQUENTIAL DAMAGES OF ANY
NATURE, OR LOSSES OR EXPENSES RESULTING
FROM THE USE OF THIS MATERIAL.
32
Page 33
Appendix
About This Manual
Screens
Screens of the touch panel display used in this
manual are those taken when the imagePRESS
C910 has the following optional equipment
attached to it:
•
Booklet Trimmer-F
•
Booklet Finisher-W PRO
•
Puncher Unit-BT
•
Paper Folding Unit-J
•
Document Insertion Unit-N
•
POD Deck Lite-C
Note that functions that cannot be used
depending on the model or options do not
appear on the touch panel display.
Illustrations
Illustrations used in this manual are those
displayed when the imagePRESS C910 has the
following optional equipment attached to it:
•
Duplex Color Image Reader Unit-M
•
Upright Control Panel-G
•
Copy Tray-R
If your machine is of the model dedicated to
printing only
The machine dedicated to printing only cannot
be used for any other functions than printing.
Although this Guide contains the descriptions
of the functions and operations for copying,
faxing, and scanning as well as printing, please
read only the necessary descriptions to use your
machine.
Tra dem ark s
Mac is a trademark of Apple Inc.
Microsoft, Windows, Windows Vista, Windows
Server, Internet E xplorer, Excel, and PowerPoint
are either registered trademark s or trademarks of
Microsoft Corporation in the United States and/or
other countries.
Other product and company names herein may
be the trademarks of their respective owners.
Third Party Software
This Canon product (the “PRODUCT”) includes
third-par ty software modules. Use and
distribution of these sof tware modules,
including any updates of such sof tware
modules (collectively, the “SOFTWARE”) are
subject to license conditions (1) through (9)
below.
(1) You agree that you will comply with any
applicable export control laws, restrictions
or regulations of the countries involved in
the event that this PRODUCT including the
SOFTWARE is shipped, transferred or
exported into any countr y.
(2) Rights holders of the SOFT WARE retain in all
respects the title, ownership and intellectual
property rights in and to the SOFT WARE.
Except as expressly provided herein, no
license or right, expressed or implied, is
hereby conveyed or granted by rights
holders of the SOFTWARE to you for any
intellectual propert y of rights holders of the
SOFTWARE.
(3) You may use the SOFTWARE solely for use
with the PRODUCT.
(4) You may not assign, sublicense, market,
distribute, or transfer the SOFTWARE to any
third part y without prior writ ten consent of
rights holders of the SOFTWARE.
(5) Notwithstanding the foregoing, you may
transfer the SOFTWARE only when (a) you
assign all of your rights to the PRODUC T and
all rights and obligations under the license
conditions to transferee and (b) such
transferee agrees to be bound by all these
conditions.
(6) You may not decompile, reverse engineer,
disassemble or otherwise reduce the code
of the SOFTWARE to human readable form.
(7) You may not modify, adapt, translate, rent,
lease or loan the SOFTWARE or create
derivative works based on the SOFT WARE.
(8) You are not entitled to remove or make
separate copies of the SOFTWARE from the
PRODUCT.
(9) The human-readable portion (the source
code) of the SOFTWARE is not licensed to
you.
Notwithstanding (1) through (9) above, the
PRODUCT includes third-party software
modules accompanying the other license
conditions, and these software modules are
subject to the other license conditions.
Please refer to the other license conditions of
third-par ty software modules described in
Appendix of Manual for the corresponding the
PRODUCT. This Manual is available at
http://canon.com/oip-manual.
By using the PRODUCT, you shall be deemed to
have agreed to all applicable license conditions.
If you do not agree to these license conditions,
please contact your service representative.
V_180727
33
Page 34

34
Page 35

Page 36

CANON INC.
30-2, Shimomaruko 3-chome, Ohta-ku, Tokyo 146-8501, Japan
CANON U.S.A., INC.
One Canon Park, Melville, NY 11747, U.S.A.
CANON CANADA INC.
8000 Mississauga Road Brampton ON L6Y 5Z7, Canada
CANON EUROPA N.V.
Bovenkerkerweg 59, 1185 XB Amstelveen, The Netherlands
(See http://www.canon-europe.com/ for details on your regional dealer)
CANON AUSTRALIA PTY LTD
Building A, The Park Estate, 5 Talavera Road, Macquarie Park, NSW 2113, Australia
CANON CHINA CO. LTD.
2F Jinbao Building No.89 Jinbao Street, Dongcheng District, Beijing 100005, China
CANON SINGAPORE PTE LTD
1 Fusionopolis Place, #15-10, Galaxis, Singapore 138522
FT6-2202 (000) XXXXXXXXXX Copyright CANON INC. 2019 PRINTED IN CHINA
 Loading...