

SCANNING BASICS
USEFUL FEATURES
TROUBLESHOOTING
QUICK REFERENCE
DOCUMENT SCANNER

PRECAUTIONS
1
● Make sure that your documents are within the acceptable scanning sizes.
Width: 2.2 – 12 inches (55 – 305 mm)
Length: 2.8 – 17 inches (70 – 432 mm)
Documents up to 39.4 inches (1000 mm) can be scanned in the extra long mode.
Thickness: 0.06 – 0.15 mm (auto feed), 0.05 – 0.3 mm (manual feed)
Weight: 16 – 32 lb. bond (60 – 120 g/m2)
● If there is any wet ink or paste on the document, wait until the ink or paste has thoroughly
dried before scanning the document.
● Always clean the scanning rollers after scanning a document that has pencil writing on it.
● Scanning a double-sided document printed on thin paper may result in an image in which
elements from the opposite page show through. To avoid this, adjust brightness in the
application software.
● If you scan documents with a rough surface, friction between the documents may cause a
feeding error. If this happens, select manual feeding and scan the documents one by one.
● When you scan a batch of NCR documents, make sure they are not stuck together.
Refer to Chapter 4.1 of the DR-6080/9080C Instructions manual for further details on acceptable document types and how
to place documents on the scanner.
■
DOCUMENT TYPES TO AVOID
The Canon DR-6080 and DR-9080C are compact desktop document scanners that
offer rapid scanning, a large document feeding capacity, and reliable paper
feeding. To ensure optimum performance with either unit, please follow the
recommendations below.
To avoid paper jams, damage to documents, and scanner malfunction, do not feed the following types of documents.
Instead, make a copy of the document and scan the copy.
Wrinkled or
creased paper
Curled paper
Torn paper
Paper with clips
or staples
Carbon-backed paper
Coated paper or fax
recording paper
Onion skin or
other thin paper
Paper with binding
holes
SCANNING BASICS
GETTING STARTED
This section explains the basic steps involved in scanning a
document. It assumes that the batch to be scanned contains papers
all of the same size and thickness. When using either the DR-6080 or
the DR-9080C, you should always make sure that the scanner has
been turned ON before turning on the computer connected to it.
STEP
1
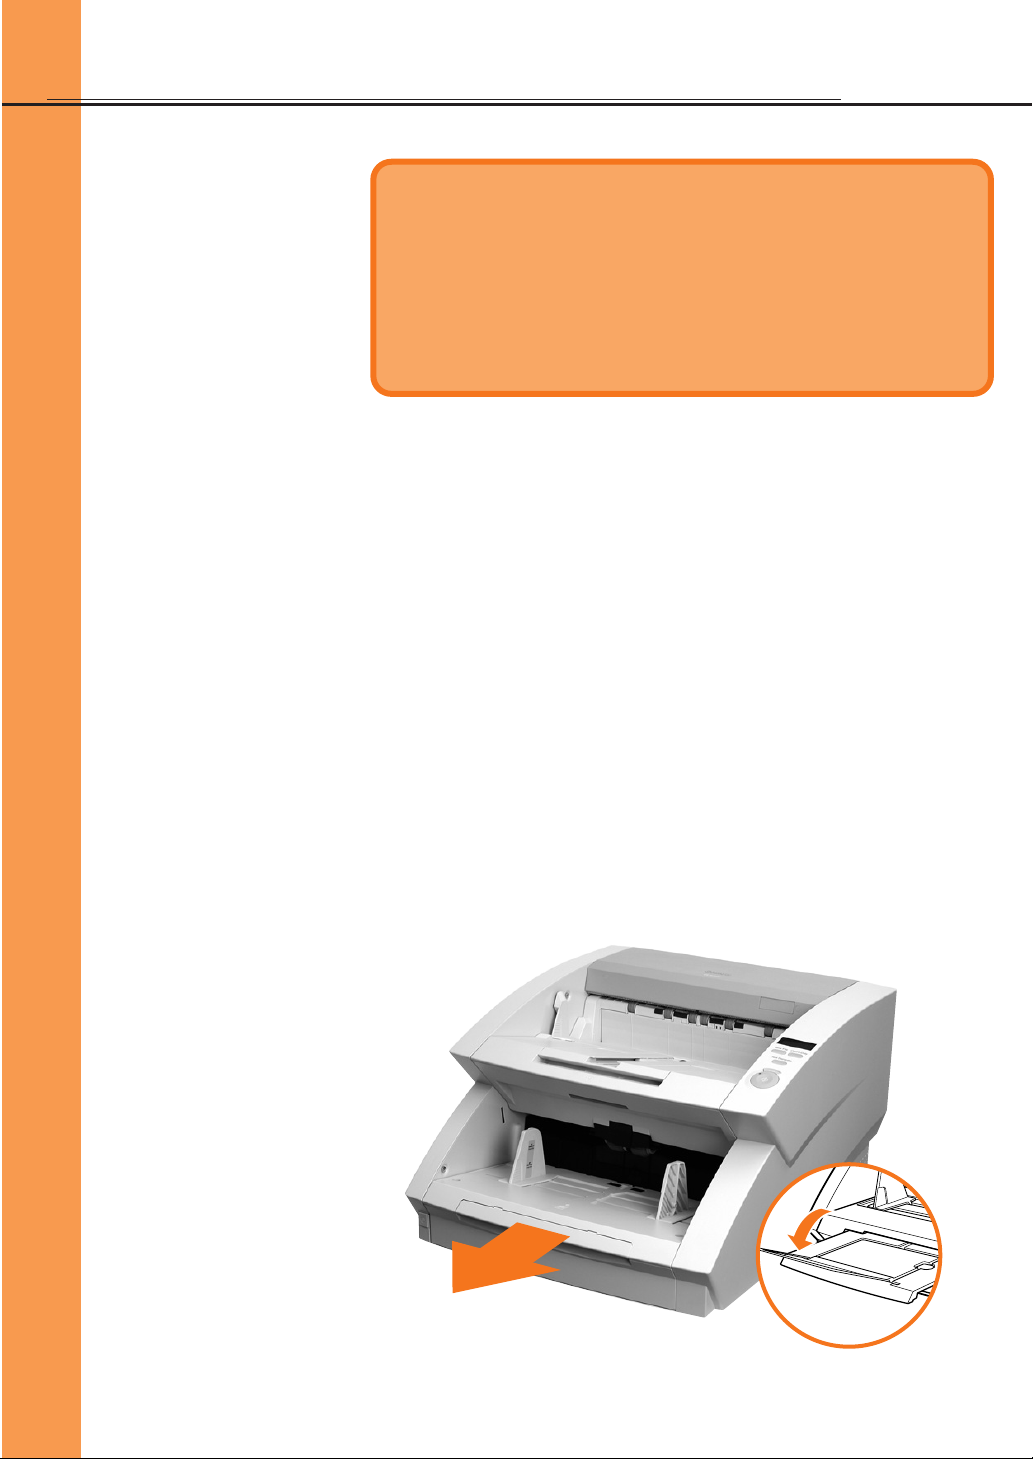
To prepare the DR-6080/9080C for document scanning, first pull out
the document tray extension from the scanner’s lower section (the
document tray). If the document extends beyond the edge of the
document tray, then also open the extension wire.
2
The purpose of this Quick Reference is to provide a
concise overview of the DR-6080/9080C. It is designed
to supplement—not replace—the Instructions manual
included with the scanner. Please review the DR6080/9080C Instructions manual for key information
on safety precautions, installation procedures, and
maintenance guidelines.
▲▲
Document tray extension
1
Extension wire
3
SCANNING BASICS
STEP
2
▲
1
■ Long Documents
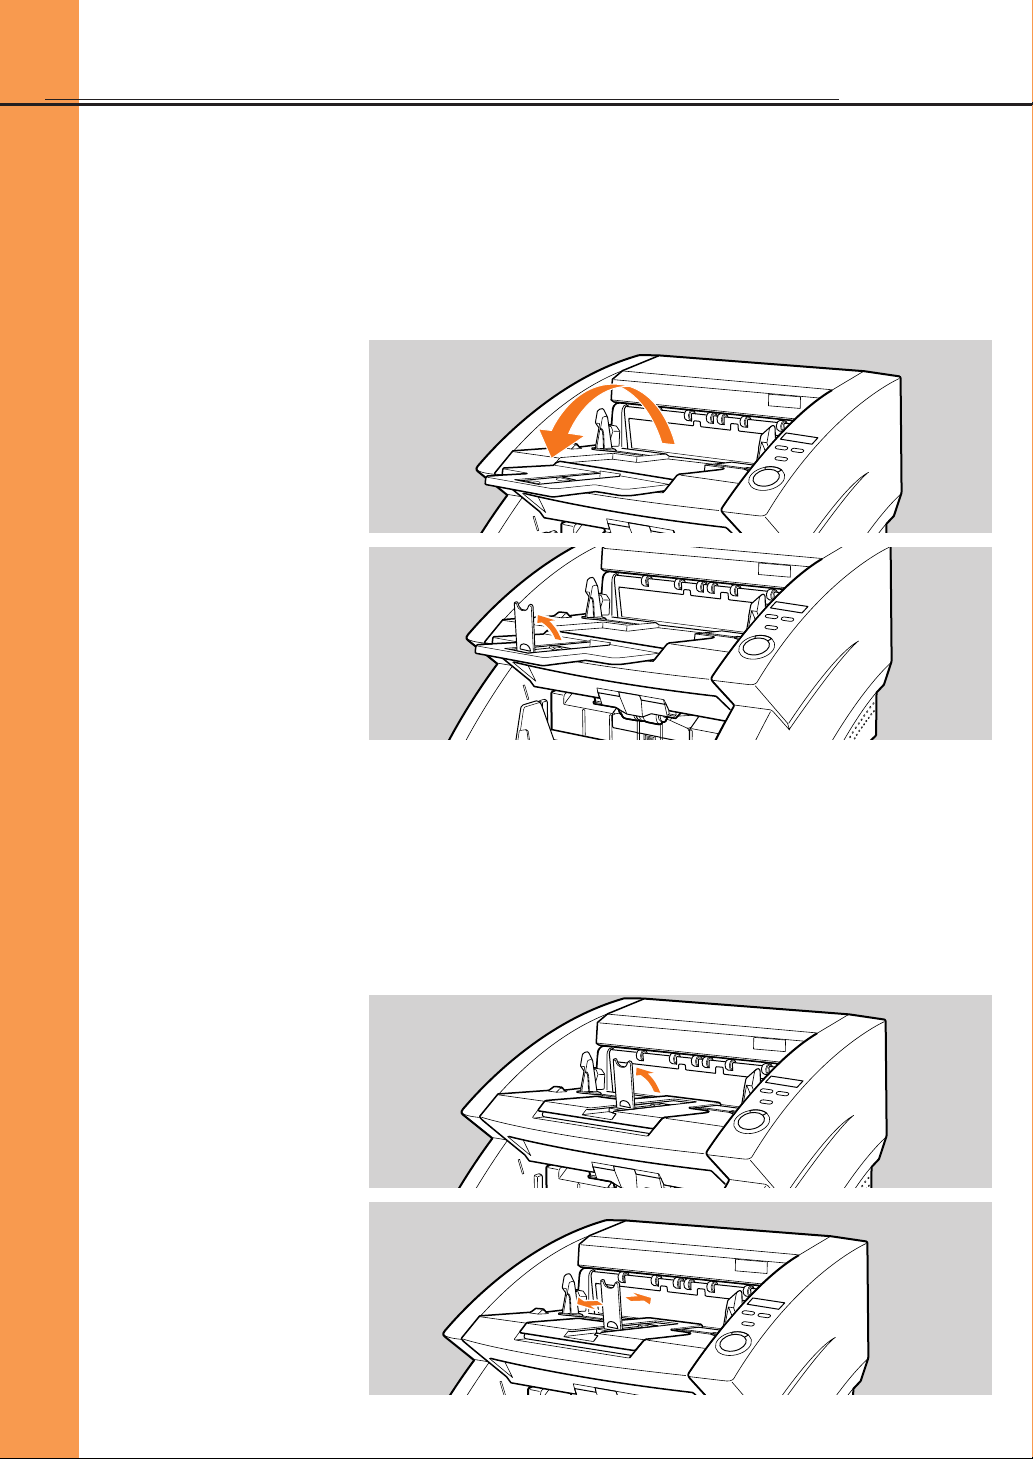
If the document you are scanning is long, open the document eject
tray extension. Next, lift up the stopper and adjust its position to match
the length of the document.
■ Short Documents
If the document you are scanning is short, use the stopper without
opening the document eject tray extension. Lift up the stopper and adjust
its position to match the length of the document.
If the document being ejected drifts to the left or right, then adjust the
position of the document eject guides. These are located on either
side of the scanner’s upper tray (the document eject tray).
Document eject
tray extension
Stopper
STEP
3
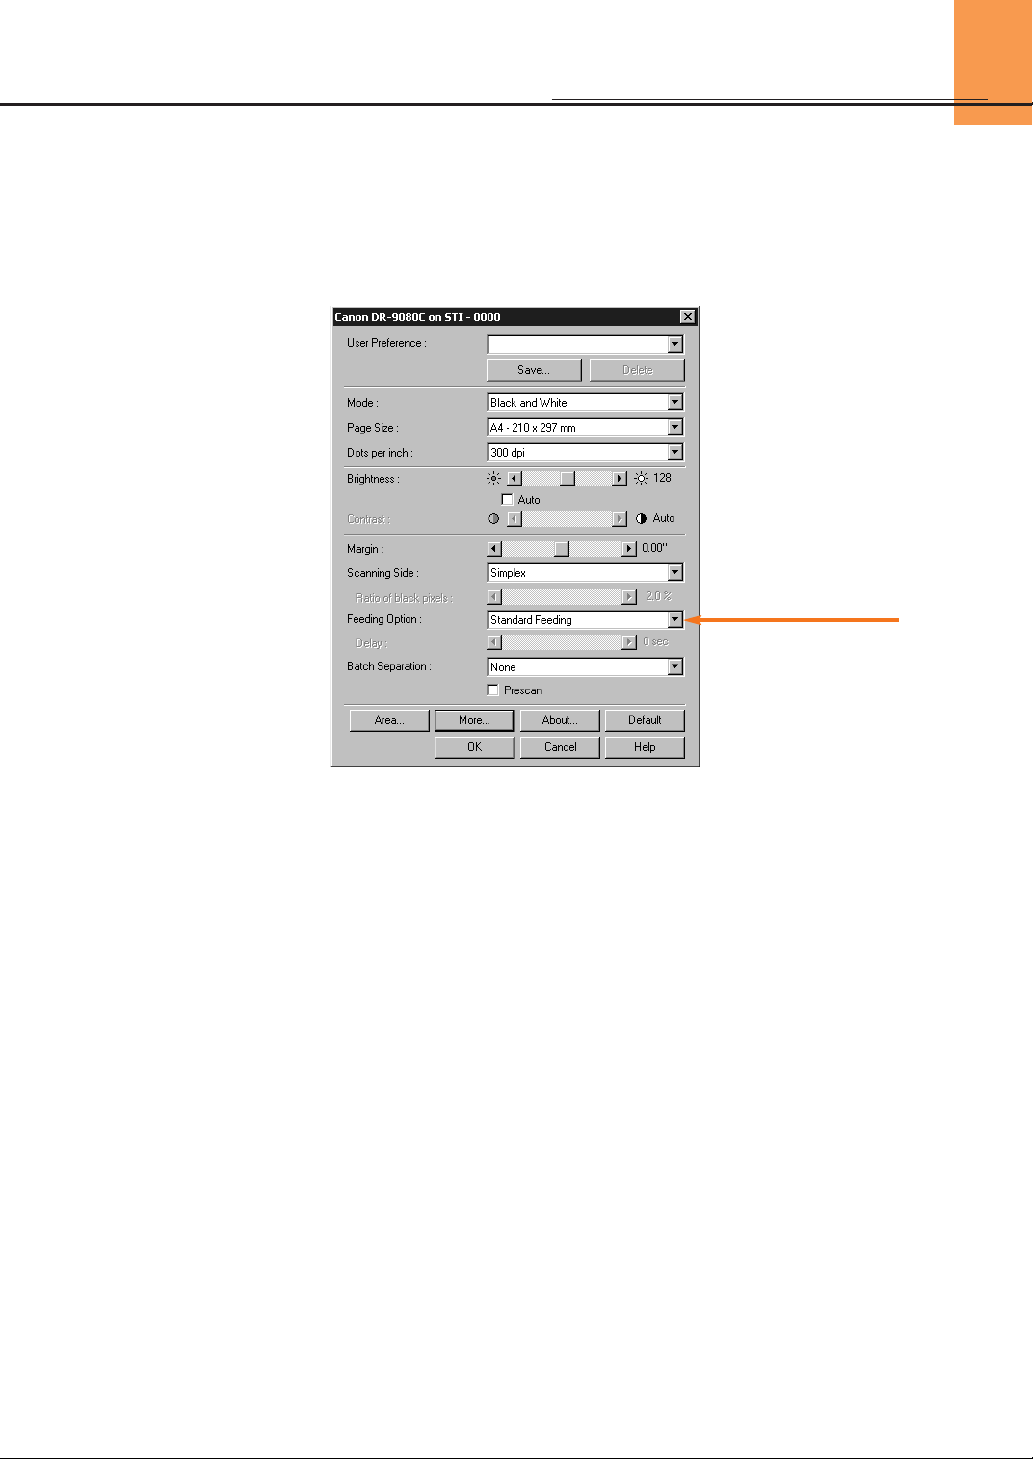
The DR-6080 and the DR-9080C are operated via the bundled
ISIS/TWAIN driver, which is compatible with a wide range of
application software. Use the ISIS/TWAIN driver to select the feeding
option that matches your need.
4
▲
In addition to selecting the feeding option, use the ISIS/TWAIN driver
to make any other scan settings you require.
SCANNING BASICS
1
■ Standard:
Select this mode when you wish to use your application software to start or stop
scanning.
■ Panel:
Select this mode when you need to continuously scan multiple batches of
documents, and the batches differ from one another in the size of the
documents they contain. Scanning starts by pressing the scanner’s built-in Start
key.
■ Automatic:
Select this mode to continuously scan multiple batches of documents that are
all the same size. The scanner will detect documents placed on its Document
Tray and begin scanning automatically.
■ Manual (Bypass Mode):
This mode is intended for documents which cannot be smoothly fed into the
scanner. In this mode, documents are fed into the scanner one page at a time.
Wait until step 5 to select this mode. (See p.7)
Feeding Option

5
STEP
4
Prepare your documents by aligning the batch so that its edges are
even. Then place the batch on the document tray with the documents
face up. The top edge of the batch should be placed against the back
of the document tray.
▲
STEP
5
Adjust the document guides to the width of the documents.
Panel mode: To scan more documents, reload the document tray and press the Start
key. To end scanning, press the Stop key.
▲
STEP
6
Use your application software to instruct scanning to start. In
Standard mode, scanning will begin at this point. In Panel mode, the
Start key will change color from red to green. Press the Start key.
▲
STANDARD FEEDING • PANEL FEEDING
SCANNING BASICS
1

6
SCANNING BASICS
1
STEP
4
Place the first page of the batch face up in the document tray. Adjust
the document guides to the width of the page.
▲
STEP
5
Use your application software to instruct scanning to start.
To scan more documents, simply reload the document tray. Scanning will continue
automatically. To end scanning, press the Stop key.
▲
STEP
6
Prepare your documents by aligning the batch so that its edges are
even. Then place the batch on the document tray with the documents
face up. The top edge of the batch should be placed against the back
of the document tray. Scanning will start automatically when the
sensor on the document tray detects your documents.
▲
AUTOMATIC FEEDING

7
1
STEP
4
Place one page face up on the document tray. Adjust the document
guides to the width of the page.
STEP
5
Select Manual Feeding in
Feeding Option on the
ISIS/TWAIN driver’s settings
screen. Alternatively, press the
Bypass Mode key on the
operation panel. The document
tray will rise.
STEP
6
Use your application software to instruct scanning to start. The page
will now be scanned. To continue scanning, place one page on the
document tray at a time. To end scanning, press the Stop key.
The document tray will stay up as long as the Bypass Mode key is lit. After scanning
has been completed, press the Bypass Mode key to lower the document tray.
MANUAL FEEDING (BYPASS MODE)
SCANNING BASICS
Bypass Mode key
▲▲▲

COUNT ONLY
MODE
In this mode, documents are fed through the scanner and counted,
not scanned. To use this mode, press the Count Only key on the
operation panel. Then place a batch on the document tray and press
the Start key. The number of pages in the batch will appear in the
counter display.
8
▲
PATCH CODE
SHEETS
The scanner can recognize sheets of
paper with patch codes printed on
them. This allows files to be separated
without interrupting the scan. Two patch
code patterns are provided.
▲
DOUBLE FEED
DETECTION
This function automatically detects whether two or more pages have
been fed into the scanner at the same time. An error code is
displayed when a double feed occurs. Two detection methods are
provided: detection by page length and ultrasonic detection. They
can be used separately or together.
▲
STAPLE
DETECTION
Sensors are used to detect feed errors
caused by stapled documents. This
function works with documents that are
larger than A5 (148 x 210 mm) and
stapled in only one corner.
▲
2
USEFUL FEATURES
Count Only key

9
USER
PREFERENCES
To promote ease of use, the bundled ISIS/TWAIN driver offers
registration of up to 100 sets of customized scan settings. After
registration, you can prepare the scanner for a job by simply selecting
a desire setting from a pull-down menu.
▲
PRESCAN
Prescan allows you to scan the first page
of your batch, adjust the brightness and
contrast of the on-screen image to desired
levels, and then continue scanning the
rest of the batch without having to go back
and scan the first page again.
▲
AUTOMATIC
IMAGE ROTATION
You can choose to rotate images by 90, 180, or 270 degrees. Also,
the scanner can be set to recognize how text is oriented by reading
the characters on fed documents. It then automatically rotates images
to their correct position.
▲
MULTISTREAM™
The scanner can produce two images from a single document scan
(for example, a color image for archiving and a binary image for
OCR). Use of this feature requires a compatible software application.
MultiStream is a trademark of Pixel Translations, a division of Captiva Software Corp.
▲
ADVANCED TEXT
ENHANCED
This feature optimizes your scans so that various hard-to-scan
elements (such as text printed on dark color backgrounds, text printed
with light colors, and pencil writing) are clearly legible in the image data.
▲
2
SKEW DETECTION
Skew correction automatically detects if the document is fed at an
angle, and straightens out skewed documents.
▲
USEFUL FEATURES
2000
1996
1997
1998
1999
170
238
189
242
228
QUARTERLY SALES REVIEW
Summary of regional performance profiles
As mentioned in the previous page, the performances of subsidiaries operating in
the three major marketing regions (Asia, Europe, the Americas) have diverged
only slightly over the past five years. These subsidiaries each demonstrate a
different performance profile, and these difference can be accounted for in part by
the contrasting economic conditions prevailing in each region. The Asian
subsidiary has experienced a sustained period of growth during the five-year
period covered in this report. Performances in Europe and the Americas have also
been positive. The European market, in particular, continues to show a constant,
steady growth towards higher overall sales figures. As for the Americas, this
region has also reported healthy growth.
Evaluation of current term sales volume
Early indications for the current term suggest that the trends described in this
report will continue their upward trajectory. Cumulative sales statistics for FY2000
indicated a profit of USD242 million, a figure that exceeded both the initial
estimate and the revised estimate. This was the fifth consecutive fiscal year that
the actual earnings had exceeded both the initial and revised earnings estimates.
The trend began in FY1996,
the first year for which net
earnings figures were
consolidated among the
three regional subsidiaries.
As is visible from the
following graph, the most
significant jump occurred
during FY97 and FY98,
when new systems were
implemented to boost
production capabilities in a
number of key strategic
sub-regions.
Init. Est.
Rev. Est.
Unit: 1 million USD
August 23, 2000
QUARTERLY SALES REVIEW
August 23, 2000
2000
1996
1997
1998
1999
Summary of regional performance profiles
As mentioned in the previous page, the performances of subsidiaries operating in
the three major marketing regions (Asia, Europe, the Americas) have diverged
only slightly over the past five years. These subsidiaries each demonstrate a
different performance profile, and these difference can be accounted for in part by
the contrasting economic conditions prevailing in each region. The Asian
subsidiary has experienced a sustained period of growth during the five-year
period covered in this report. Performances in Europe and the Americas have also
been positive. The European market, in particular, continues to show a constant,
steady growth towards higher overall sales figures. As for the Americas, this
region has also reported healthy growth.
Evaluation of current term sales volume
Early indications for the current term suggest that the trends described in this
report will continue their upward trajectory. Cumulative sales statistics for FY2000
indicated a profit of USD242 million, a figure that exceeded both the initial
estimate and the revised estimate. This was the fifth consecutive fiscal year that
the actual earnings had exceeded both the initial and revised earnings estimates.
The trend began in FY1996,
the first year for which net
earnings figures were
consolidated among the
three regional subsidiaries.
As is visible from the
following graph, the most
significant jump occurred
during FY97 and FY98,
when new systems were
implemented to boost
production capabilities in a
number of key strategic
sub-regions.
Init. Est.
Rev. Est.
Unit: 1 million USD
170
238
189
242
228
Original document Text Enhanced OFF Text Enhanced ON

10
2
SKIP BLANK PAGE
Useful for scanning batches that include single- and double-sided
documents, this feature
automatically removes
blank pages from the
image file.
▲
AUTOMATIC PAGE
SIZE DETECTION
This function automatically detects the size/thickness of documents
and adjusts the scanner. It enables you to feed a batch that contains
mixed paper sizes.
▲
COLOR SCANNING
(DR-9080C ONLY)
In addition to binary and grayscale, the DR-9080C provides 24-bit
color scanning of documents.
▲
COLOR DROPOUT
You can instruct the DR-6080 or DR-9080C to remove a specific color
(red, green, or blue) from the image data. This leads to improved
readability for OCR applications.
▲
OPTIONS & CONSUMABLES
▲
■ Imprinter
The imprinter unit is installed inside the scanner, and prints a text
message on the front of the document being scanned. You can set the
text message that is imprinted in the application software.
■ Endorser ED600
The Endorser ED600 unit is installed on top of the scanner, and prints a
eight-digit number on the back of the document being scanned.
■ Hard Counter
A seven-digit counter that is installed inside the upper scanner. It keeps
track of how many pages are fed through the scanner.
■ Barcode Module
Add-on software for the ISIS/TWAIN driver to recognize bar codes. Your
application software must support barcode recognition in order to use this
option.
■ Exchange Roller Kit
Includes pickup rollers, feed rollers, and retard rollers. These must be
changed periodically to maintain scanning quality.
USEFUL FEATURES
TECHNICAL REPORT
INTERDEPARTMENTAL RESOURCE FILE
Shipping & Local Transport: An Overview
Our firm is currently positioned as one of the world's largest provider of
cargo shipping and transport solutions. We have developed service
networks in five continents (60-plus countries), with 210 offices and over
5,000 dedicated professionals ready to serve our customers. We offer an
industry-leading range of ships, containers, specialized cargo options, and
other shipping services. Our diversified range of containers includes dry
freight, flat-rack, reefer, and open containers. Dry freight containers come
in several sizes and designs, with average payloads of 25.3 metric tons.
Flat rack containers are used with heavy cargo that needs special attention
and/or which does not fit into a standard container, e.g., heavy machinery.
Reefer containers, for the transportation of refrigerated cargo, is one of our
Economic and market analysis for future
most highly specialized areas. Standard equipment on this kind of vessel
includes temperature and humidity controls for controlling atmosphere.
development strategies
The last category, open containers, is reserved for over-sized cargo which
does not fit into standard containers. This group is further divided into
The following case study is for interdepartmental knowledge sharing purposes only.
following two types: open-top containers and open-side containers.
Our services were engaged by the Metropolis urban planning department to
conduct market research and analysis in order to identify implementable real
estate development strategies for Metropolis. Our research and analysis was
August 23, 2000
directed toward providing an initial information base and strategic framework for
the formation an ongoing economic development program. We identified: (1)
potential target industries and the comparative advantages these industries
derive from a Metropolis location; and (2) the policies, programs and actions to
enhance the ability of the local economy to respond to the needs of the target
businesses and to encourage beneficial development and redevelopment, while
avoiding marginal development. These included: facilitating the continued
attraction of businesses to the Industrial Park; encouraging retail businesses and
property owners and developers to adapt, redevelop and build new facilities; and
preserving and enhancing the strength downtown Metropolis area.
August 23, 2000
QUARTERLY SALES REVIEW
TECHNICAL REPORT
Summary of regional performance profiles
As mentioned in the previous page, the performances of subsidiaries operating in
the three major marketing regions (Asia, Europe, the Americas) have diverged
only slightly over the past five years. These subsidiaries each demonstrate a
different performance profile, and these difference can be accounted for in part by
the contrasting economic conditions prevailing in each region. The Asian
subsidiary has experienced a sustained period of growth during the five-year
period covered in this report. Performances in Europe and the Americas have also
been positive. The European market, in particular, continues to show a constant,
steady growth towards higher overall sales figures. As for the Americas, this
region has also reported healthy growth.
Evaluation of current term sales volume
Early indications for the current term suggest that the trends described in this
report will continue their upward trajectory. Cumulative sales statistics for FY2000
indicated a profit of USD242 million, a figure that exceeded both the initial
estimate and the revised estimate. This was the fifth consecutive fiscal year that
the actual earnings had
Shipping & Local Transport: An Overview
exceeded both the initial
and revised earnings
Our firm is currently positioned as one of the world's largest provider of
estimates. The trend began
cargo shipping and transport solutions. We have developed service
in FY1996, the first year for
networks in five continents (60-plus countries), with 210 offices and over
which net earnings figures
5,000 dedicated professionals ready to serve our customers. We offer an
were consolidated among
industry-leading range of ships, containers, specialized cargo options, and
the three regional
other shipping services. Our diversified range of containers includes dry
freight, flat-rack, reefer, and open containers. Dry freight containers come
subsidiaries. As is visible
in several sizes and designs, with average payloads of 25.3 metric tons.
from the following graph,
Flat rack containers are used with heavy cargo that needs special attention
the most significant jump
and/or which does not fit into a standard container, e.g., heavy machinery.
occurred during FY97 and
Reefer containers, for the transportation of refrigerated cargo, is one of our
FY98, when new systems
most highly specialized areas. Standard equipment on this kind of vessel
were implemented to boost
includes temperature and humidity controls for controlling atmosphere.
The last category, open containers, is reserved for over-sized cargo which
production capabilities in a
does not fit into standard containers. This group is further divided into the
following two types: open-top containers and open-side containers.
August 23, 2000
August 23, 2000
2000
242
1999
238
1998
228
1997
189
1996
170
Rev. Est.
Init. Est.
Unit: 1 million USD
A
u
g
u
st 2
3
, 2
00
1
INTERDEPARTMENTAL RESOURCE FILE
Economic and market analysis for future
development strategies
The following case study is for interdepartmental knowledge sharing purposes only.
Our services were engaged by the Metropolis urban planning department to
conduct market research and analysis in order to identify implementable real
estate development strategies for Metropolis. Our research and analysis was
directed toward providing an initial information base and strategic framework for
the formation an ongoing economic development program. We identified: (1)
potential target industries and the comparative advantages these industries
derive from a Metropolis location; and (2) the policies, programs and actions to
enhance the ability of the local economy to respond to the needs of the target
businesses and to encourage beneficial development and redevelopment, while
avoiding marginal development. These included: facilitating the continued
attraction of businesses to the Industrial Park; encouraging retail businesses and
property owners and developers to adapt, redevelop and build new facilities; and
preserving and enhancing the strength downtown Metropolis area.
August 23, 2000
This blank page gets omitted from the image file.

11
3
STEP
1
Remove documents from the scanner’s upper and lower trays, and
remove any extra parts attached to the upper tray. Close the
document eject tray extension if it is open.
Paper may have jammed if scanning stops midway or “PXX” appears
on the counter display. Follow the procedure below to remove
jammed paper from inside the scanner. When finished, check your
PC monitor to see which document was last scanned before
continuing to scan.
▲
STEP
2
Press the open/close button to open the upper scanner. Lift the upper
scanner gently until it stops and locks in the open position.
▲
STEP
3
Remove the jammed paper from inside the scanner.
▲
STEP
4
Carefully close the upper scanner. Do not force the upper
scanner down. Doing so might damage the scanner. Once the
upper scanner is near its original position, press down firmly on both
sides until you hear the upper scanner click into place.
▲
PAPER JAMS IN THE PAPER FEED UNIT
TROUBLESHOOTING

12
3
STEP
1
Remove documents from the scanner’s upper and lower trays, and
remove any extra parts attached to the upper tray. Close the
document eject tray extension if it is open.
If a document is jammed in the scanner’s paper exit section, the
upper scanner only needs to be lifted up slightly for you to remove the
document.
▲
STEP
2
Press the open/close button to open the upper scanner. Lift the upper
scanner slightly.
▲
STEP
3
Remove the jammed paper from the paper exit section.
▲
STEP
4
Press the upper scanner down firmly on both sides to close it. If you
press the upper scanner down only on one side, the opposite side will
not fully close. Make sure that you hear the upper scanner click into
place.
▲
PAPER JAMS IN THE PAPER EXIT SECTION
TROUBLESHOOTING

13
3
ERROR CODES
TROUBLESHOOTING
Error codes appear on the operation panel’s counter display when a
scanner malfunction occurs.
Error Code Cause and Solution
The document does not feed correctly.
Press the Stop key to reset the counter. Place the document back on
the document tray and scan the document again.
A01
C01
C04
C06
The upper scanner is open.
Close the upper scanner.
The Endorser ED600 cover is open (with the optional
Endorser ED600 installed).
Close the Endorser ED600 cover.
The imprinter cover and Endorser ED600 cover are open
(with the optional imprinter and Endorser ED600 installed).
Close the imprinter cover and Endorser ED600 cover.
C02
The imprinter cover is open (with the optional imprinter
installed).
Close the imprinter cover.
C03
The upper scanner and imprinter cover are open (with the
optional imprinter installed).
Close the upper scanner and imprinter cover.
C05
The upper scanner and Endorser ED600 cover are open (with
the optional Endorser ED600 installed).
Close the upper scanner and Endorser ED600 cover.
C07
The upper scanner, imprinter cover, and Endorser ED600
cover are open (with the optional imprinter and Endorser
ED600 installed).
Close all covers.
d02
Double feed detected by document length.
Check the document against the scanned image, and scan the
document again.
d04
Double feed detected by ultrasonic.
Check the document against the scanned image, and scan the
document again.

14
3
A complete list of error codes and solutions to other types of
scanner trouble can be found in Chapter 6 of the Instructions
manual (“Troubleshooting”).
TROUBLESHOOTING
Error Code Cause and Solution
Double feed detected by document length and ultrasonic.
Check the document against the scanned image, and scan the
document again.
d06
Exx
J01
J02
Scanner internal error
Service call error. The scanner must be repaired by a service
engineer. Turn OFF the power, contact your service representative,
and notify them of the error code.
Staple detected, document transfer stopped.
Open the upper scanner and remove the document. Check to see if
the document was scanned correctly, and scan the document again.
Staple detected, document feed stopped.
Open the upper scanner and remove the document. Check to see if
the document was scanned correctly, and scan the document again.
J18
Detected a skewed document, document feed stopped.
Open the upper scanner and remove the document. Check to see if
the document was scanned correctly, and scan the document again.
P00
Document detected in the scanner when the power was
turned ON or the upper scanner was open.
Remove the document that was left in the scanner. (See p.11)
P02
Detected a document that is longer than the document that
is set.
Open the scanner and remove the document. Check to see if the
document was scanned correctly, and scan the document again.
P03
Detected a document that is shorter than the document that
is set.
Open the scanner and remove the document. Check to see if the
document was scanned correctly, and scan the document again.

CANON Customer Service Centers
© CANON ELECTRONICS INC. 2003 PRINTED IN JAPANPUB.CE-CE-305 0104AB0.2
*CE-CE-305*
 Loading...