

Page 1
Quick Reference Guide
Quick Reference Guide
Read this guide first.
Please read this guide before operating this equipment.
After you finish reading this guide, store it in a safe place for future reference.
ENG
Page 2

Copyright
Copyright © 2003 by Canon Inc. All rights reserved. No part of this publication may be
reproduced, transmitted, transcribed, stored in a retrieval system, or translated into any
language or computer language in any form or by any means, electronic, mechanical, magnetic,
optical, chemical, manual, or otherwise, without the prior written permission of Canon Inc.
Model Name
• H12269 (imageCLASS MP730)
• H12270 (imageCLASS MP700)
Trademarks
Canon and BJ are registered trademarks. BCI, imageCLASS, UHQ, and ScanGear are trademarks
of Canon Inc.
All other product and brand names are registered trademarks, trademarks or service marks of
their respective owners.
As an ENERGY STAR® Partner, Canon Inc. has determined that this
product meets the ENERGY STAR® guidelines for energy efficiency.
Super G3 is a phrase used to describe the new generation of fax machines that
use ITU-T V.34 standard 33.6 Kbps* modems. Super G3 High Speed Fax
machines allow transmission time of approximately 3 seconds* per page
which results in reduced telephone line charges.
* Approximately 3 seconds per page fax transmission time based on Canon FAX Standard Chart (Standard
Mode) at 33.6 Kbps modem speed. The Public Switched Telephone Network (PSTN) currently supports
28.8 Kbps modem speeds or lower, depending on telephone line conditions.
II
Preface
Page 3
How to use the documentation provided
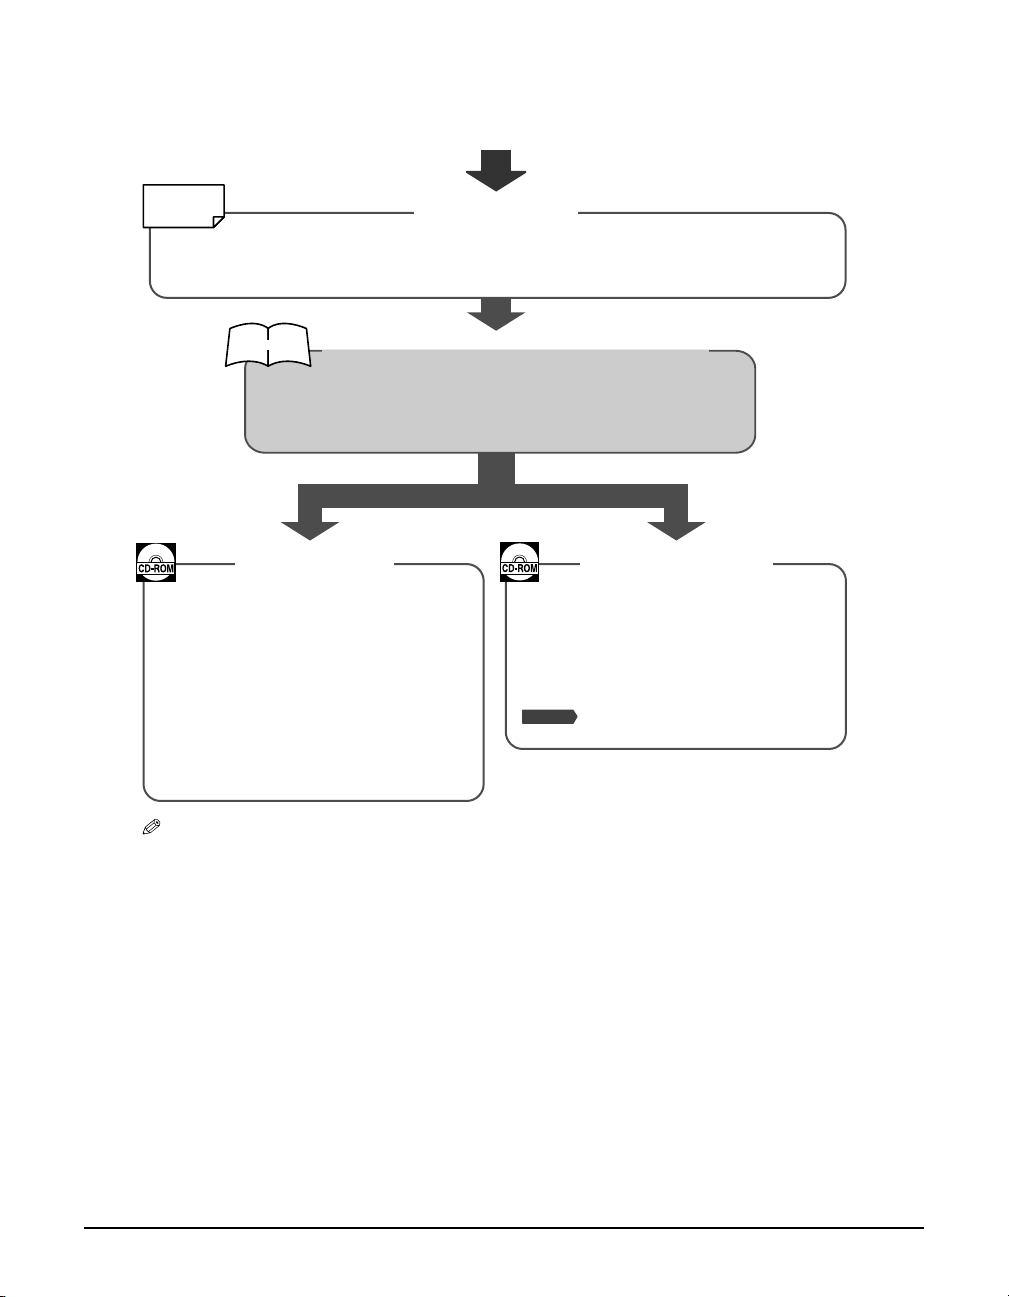
START HERE
Printed sheet
This sheet includes instructions for setting up your machine and getting it ready for use.
Follow all steps in this sheet before using your machine.
Printed manual
Quick Reference Guide (This guide)
After following instructions in the Set-Up Sheet, we
recommend you read this guide to familiarize yourself with the
basic operation of all functions of your machine.
Set-Up Sheet
Be sure to read this sheet first!
User's Guide Software Guide
This guide, included as a PDF file in the
Canon MP730/700 Setup CD-ROM,
includes instructions on functions that can
be performed directly from your machine
as well as detailed information on
memory cards. Refer to this guide for indepth instructions not included in the
Quick Reference Guide, or if you want to
learn more about advanced features.
This guide, included as a PDF file in the
Canon MP730/700 Setup CD-ROM,
includes comprehensive instructions on
using the software. Refer to this guide for
full instructions on printing, scanning, and
Fax Model
faxing from your computer.
NOTE
• In addition to the above documentation, you can also refer to the online help in the software for online
information about a window or dialog box, and for step by step instructions on performing software
tasks. To access the online help, select or click [Help] in the software.
Preface
III
Page 4

Reading the documentation
Installing the Utility Software
To Install the Utility Software, in the [MP Setup] screen, click [Install Utility Software].
Software included in this CD-ROM:
• Easy-WebPrint
Easy-WebPrint is a plug-in program for Internet Explorer that allows you to print a whole web
page without complicated settings.
• Easy-PhotoPrint
Easy-PhotoPrint is an application that allows you to print an image in your digital camera only
by selecting the image and paper type. Easy-Photoprint also allows you to perform simple
image modification such as rotating and trimming an image.
• Scansoft OmniPage
OmniPage is an application that converts PDF and paper documents– letters, contracts,
tables, manuals– using OCR technology, into editable word processing and spreadsheet
documents.
• Presto! PageManager
Presto! PageManager is an application that allows you to scan, share and organize photos and
documents.
• Adobe Acrobat Reader
Adobe Acrobat Reader allows you to read Adobe Portable Document Format (PDF) files.
Viewing the documentation on the CD-ROM
1
Insert the MP730/700 Setup CD-ROM into
the disk drive.
• The [MP Setup] screen will be displayed. If this
screen is not displayed, on the Windows desktop,
double-click [My Computer] (Windows XP: Click
[Start], then click [My Computer]). Open the
CD-ROM icon, then double-click
[setup(setup.exe)].
CAUTION
• The documentation included in the CD-ROM is in PDF and HTML format.
• To view the documentation in PDF format, you will need to have Adobe Acrobat
Reader installed. If you do not have installed Adobe Acrobat Reader, in the [MP Setup]
screen, click [Install Utility Software] to install the software.
2
In the [MP Setup] screen, click [View User’s Manual].
In the [View User’s Manual] screen, click the button of the guide you want to
3
view.
• You can copy the documentation on your computer and display start-up icons for the “MP
Software Guide” (PDF), “MP User’s Guide” (PDF), and “Application Guide” (HTML) on the
Windows desktop.
IV
Preface
Page 5
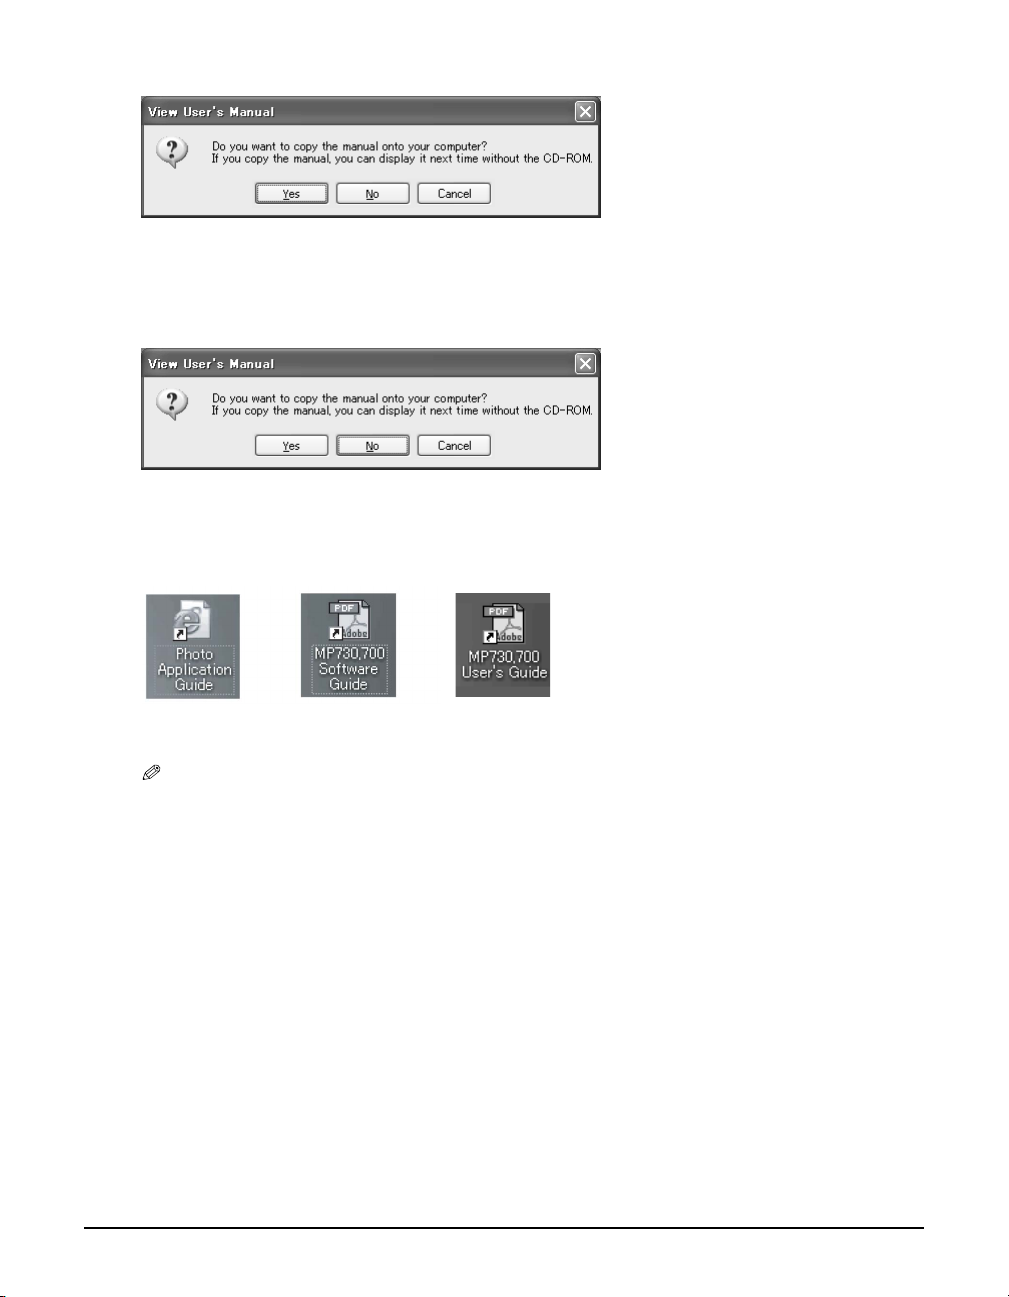
If you are copying the documentation on your computer
Click [Yes].
The manual will be displayed after it is copied onto your computer’s hard disk.
If you are not copying the documentation on your computer
Click [No].
The manual will be displayed without being copied onto your computer’s hard disk.
As you copy them, a start-up icon for each guide will be placed on the Windows desktop.
Double-click the icon of the guide you want to open.
NOTE
• Go to the following folder if you want to delete the installed documentation.
/Program Files/Canon/MP Drivers/MP730700
Preface
V
Page 6

Type conventions
Please read the list below of symbols, terms, and abbreviations used in this guide.
WARNING
CAUTION
IMPORTANT
NOTE
Fax Model
( p. n-nn) Indicates a page number where additional information can be found.
Set-Up Sheet
User’s Guide
Software Guide Refer to the Software Guide (included in the CD-ROM) for more details.
machine General term used to represent the imageCLASS MP730 or imageCLASS
default A setting that remains in effect unless you change it.
document The original sheet(s) of paper you copy or scan with the machine.
menu A list of settings from which you select an item to set up or change. A menu
[key name] Text enclosed in these brackets indicate a key name or item on the
<message> Text enclosed in these brackets indicate an LCD message.
click, double-click Term used to select or choose a command or option on your computer,
Fax model only:
fax or document The original sheet(s) of paper you send or receive with the machine.
transaction number A four-digit number assigned automatically to any document you send or
TX/RX NO. Denotes Transaction number .
TX Denotes Sending .
RX Denotes Receiving .
Indicates a warning concerning operations that may lead to death or
injury to persons if not performed correctly. In order to use the
machine safely, always pay attention to these warnings.
Indicates a caution concerning operations that may lead to injury to
persons or damage to property if not performed correctly. In order to
use the machine safely, always pay attention to these cautions.
Indicates operational warnings and restrictions. Be certain to read
these items to operate the machine correctly, and to avoid damage to
the machine.
Indicates notes for operation or additional explanations. Reading these is
highly recommended.
Indicates information exclusively for the imageCLASS MP730 model.
Refer to the Set-Up Sheet for more details.
Refer to the User’s Guide (included in the CD-ROM) for more details.
MP700.
has a title which appears in the LCD.
computer you have to click, double-click, or point to.
generally with a mouse.
receive.
VI
Preface
Page 7

Contents
1: Introduction
Unpacking your machine ........................................1-1
System requirements................................................ 1-2
Main components of the machine....................... 1-3
Operation panel of the machine...................... 1-4
2: Document and print media
handling
Documents ...................................................................2-1
Document requirements..................................... 2-1
Loading documents.............................................. 2-1
Using the platen glass .....................................2-1
Fax Model
Using the ADF.................................... 2-1
Print media.................................................................... 2-2
Loading requirements.......................................... 2-2
Setting the paper thickness lever ....................2-3
Setting the print media size and type............ 2-3
Loading print media ............................................. 2-4
3: Printing from your computer
— Basic operation
Printing documents................................................... 3-1
Setting the paper type and print
quality/[Main] tab ........................................3-2
More information .......................................................3-3
4: Photo printing from a memory
card —Basic operation
Before printing from a memory card ..................4-1
Inserting/removing a memory card .................... 4-2
Inserting a memory card..................................... 4-2
Removing a memory card ..................................4-3
Printing methods........................................................ 4-4
Printing an index.................................................... 4-5
Printing all frames..................................................4-6
Printing a single frame......................................... 4-7
Reading from or writing to a memory card ......4-9
Enabling/disabling overwriting
memory card data .......................................4-9
More information .....................................................4-10
5: Copying —Basic operation
Before copying.............................................................5-1
Making copies..............................................................5-1
Improving copied images........................................5-1
Setting color or black & white copying ..........5-1
Adjusting the image quality (resolution).......5-2
Adjusting the contrast (density) .......................5-2
More information........................................................5-2
Fax Model
6: Faxing from your computer
—Basic operation
Sending a fax ................................................................6-1
Characters and symbols for fax numbers......6-2
More information........................................................6-2
Fax Model
7: Faxing with your machine
— Basic operation
Sending faxes from your machine........................7-1
Before sending faxes.............................................7-1
Sending methods...................................................7-3
Memory sending................................................7-3
Speed dialing...........................................................7-4
Registering one-touch speed dialing.........7-4
Registering coded speed dialing .................7-5
Using speed dialing ..........................................7-6
Receiving faxes to your machine...........................7-7
Before receiving faxes to your machine.........7-7
Receiving faxes manually....................................7-8
Canceling receiving...............................................7-8
More information........................................................7-8
8: Scanning —Basic operation
Scanning methods .....................................................8-1
Using the [Scan] key on the operation panel..8-1
More information........................................................8-1
9: Maintenance
Replacing ink tanks ....................................................9-1
When to replace an ink tank...............................9-1
Guidelines .................................................................9-1
Replacing an ink tank............................................9-2
Maintaining the printhead ......................................9-3
Flowchart of printhead maintenance .............9-3
Printing the nozzle check pattern ....................9-4
Cleaning the printhead ........................................9-4
Aligning the printhead.........................................9-5
More information........................................................9-6
Preface
VII
Page 8

10: Troubleshooting
Problems installing and removing software...10-1
Problems turning on the computer...................10-2
Problems printing from your computer...........10-2
Copying problems....................................................10-2
Problems scanning ..................................................10-3
Fax Model
Problems receiving faxes......................10-3
Fax Model
Problems sending faxes........................10-5
Fax Model
Telephone problems..............................10-7
Problems using a memory card ..........................10-7
If nothing displays in the LCD
(if there is no power).................................10-9
Fax Model
If the power disconnects
unexpectedly...............................................10-9
Removing jammed paper................................... 10-10
Removing jams in the paper output tray.10-10
Removing jams from the machine’s
interior ........................................................ 10-10
If there are repeated paper jams................. 10-11
Fax Model
Removing jammed documents ......10-11
If the nozzle check pattern does not print
properly...................................................... 10-12
Interpreting the messages................................. 10-12
LCD messages.................................................... 10-13
If you cannot solve the problem...................... 10-17
11: Machine settings
Fax Model
Printing a list to check the current
settings.......................................................... 11-1
Accessing the machine settings .........................11-1
Settings........................................................................ 11-2
Menu: SPECIAL COPY..................................... 11-2
Menu: MAINTENANCE................................... 11-2
Menu: USER DATA ........................................... 11-3
Fax Model
Menu: RECEIVE MODE................... 11-6
Fax Model
Menu: MEMORY REFERENCE....... 11-7
Fax Model
Menu: REPORTS/LISTS ...................11-7
Menu: PHOTO PRINT MODE ........................11-7
Appendix: Specifications
General specifications ..............................................A-1
System requirements................................................ A-3
Ink specifications........................................................ A-3
Print specifications .................................................... A-4
Photo print specifications.......................................A-4
Copy specifications ................................................... A-4
Fax specifications.......................................................A-5
Scan specifications ....................................................A-6
Telephone specifications.........................................A-6
Index
......................................................................................I-1
VIII
Preface
Page 9
Safety information
Read this safety information thoroughly before using your machine, and keep it handy in case
you need to refer to it later. Only the main points are described here. For detailed safety
information, refer to the User’s Guide .
WARNING
• This product emits low level magnetic flux. If you use a cardiac pacemaker and feel abnormalities,
please move away from this product and consult your doctor.
CAUTION
• Do not disassemble or modify. There are high-temperature and high-voltage components inside
the machine which may result in a fire or electrical shock.
• Follow all warnings and instructions marked on the machine.
Location
WARNING
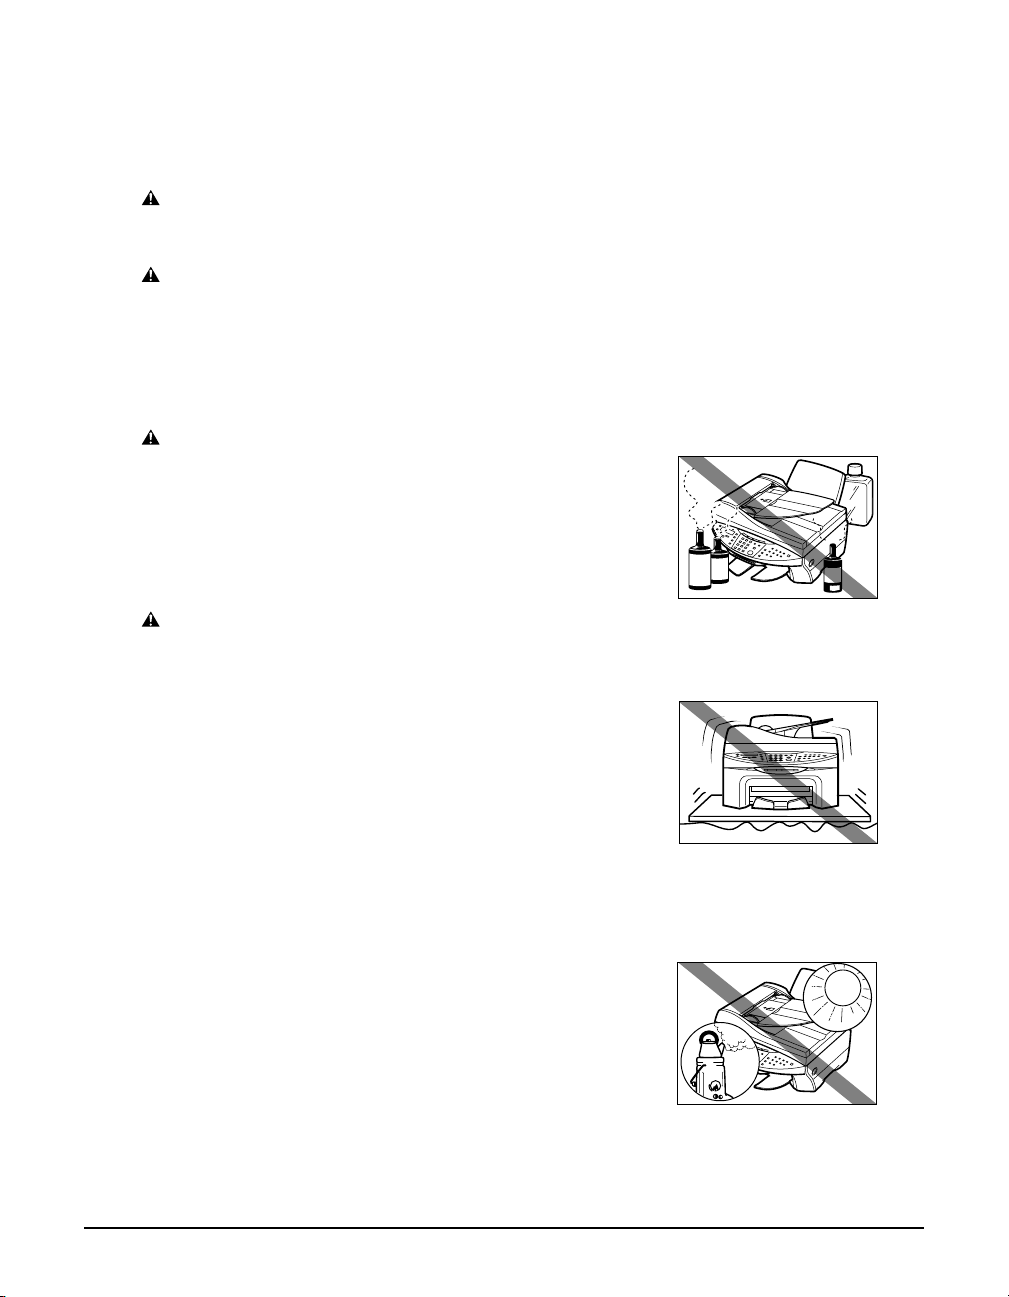
• Do not place the machine near alcohol, paint thinner, or
other flammable substances. If flammable substances
come into contact with electrical parts inside the
machine, it may result in fire or electrical shock.
CAUTION
• Do not place the machine on top of a carpet or rug which
has long pile. The threads may get inside the machine
and cause a fire.
• Place the machine on a flat, stable, vibration-free
surface that is strong enough to support its weight. (For
the weight of the machine, see the User’s Guide.)
• Do not place objects around the power plug so that you
are able to readily disconnect the power plug from the
wall socket at any time. Otherwise you will be unable to
disconnect the power plug in case of an emergency.
• Make sure the relative humidity of the area is between 20%
and 80%.
• Keep the machine away from direct sunlight.
Preface
IX
Page 10
Power Supply
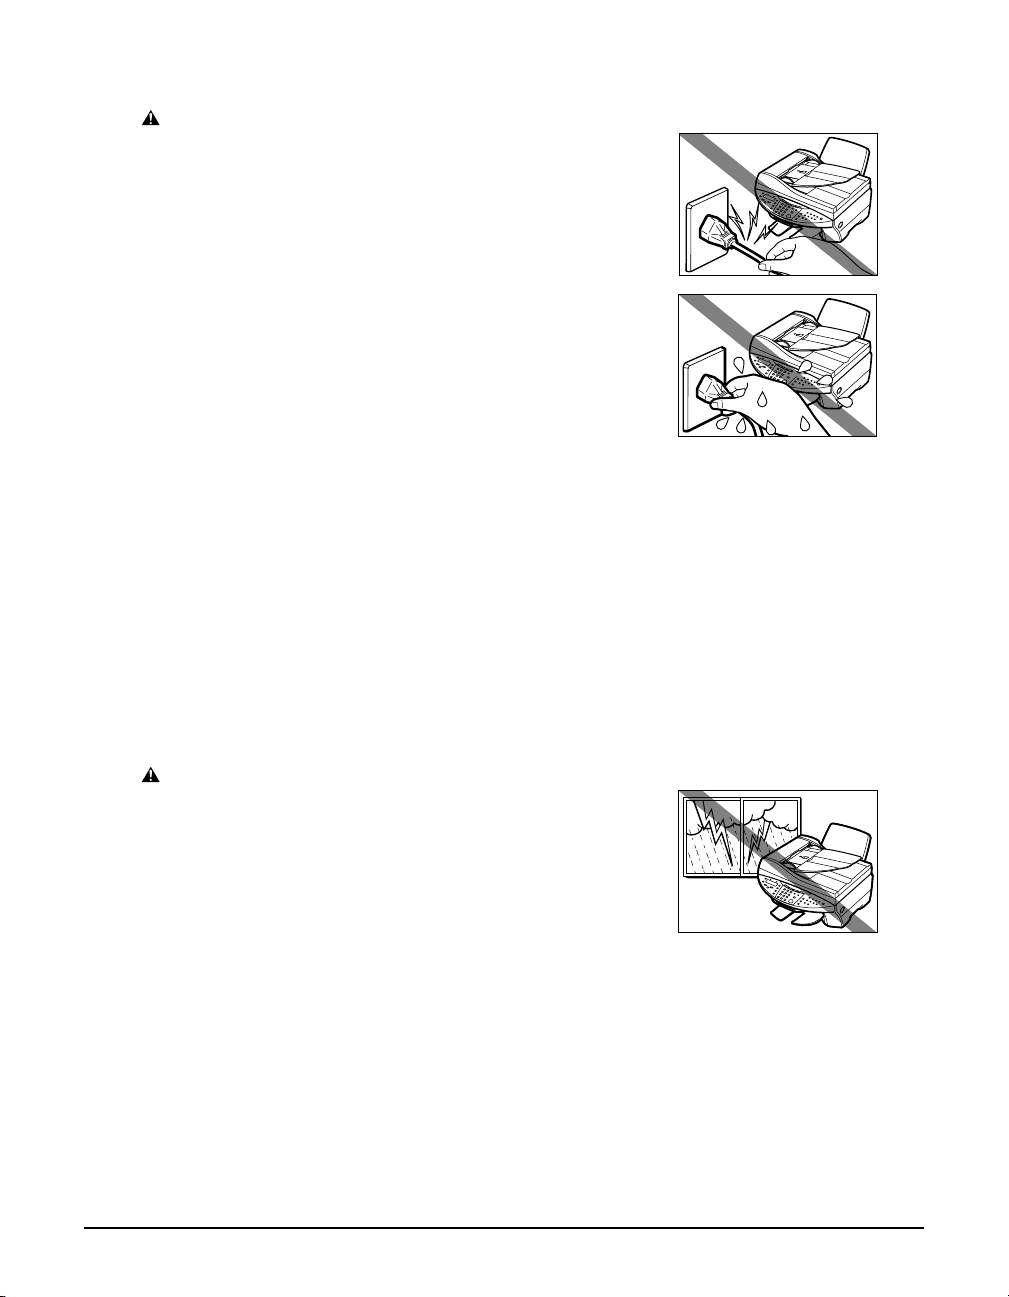
WARNING
• Do not damage or modify the power cord and power
plug. Also do not place heavy objects on the power cord,
pull on it, or extensively bend it. These actions may
cause electrical damage and result in fire or electrical
shock.
• Do not insert or unplug the power plug with wet hands,
as this may result in electrical shock.
• Do not overload the wall outlet with too many electrical
appliances, as this may result in fire or electrical shock.
• Plug the machine into a standard 200–240 V AC,
50/60 Hz, three-prong* outlet. Operate the machine
only from the type of power source indicated on the
machine’s label or a fire, electrical shock or malfunction
may occur. If you are not sure of the type of power
available, consult your local power company.
• Do not allow the power cord to be near objects that emit
heat. The outer cover of the power cord may melt
resulting in fire or electrical shock.
• Make sure the power cord is fully extended and has no
knots in it when electricity is running through it. Knots
etc. in the cord may result in fire or electrical shock.
CAUTION
• During electrical storms, turn off the power and
disconnect the power cord from the power outlet.
(Please note that any documents stored in the machine’s
memory will be deleted when you turn off the power.)
* The shape of the plug and outlet vary depending on the country of purchase.
X
Preface
Page 11
• Turn off the power and disconnect the power cord if the
machine will not be used for a long period such as
during holidays.
IMPORTANT
• If dust accumulates around the plug of the power cord
when it is connected to a power outlet, unplug the
machine and wipe the plug with a clean, dry cloth.
Fax Model
• Do not plug the machine into the same circuit as
appliances such as an air conditioner, television, or
copier. These devices generate electrical noise which
may interfere with your machine’s operation.
Handling
WARNING
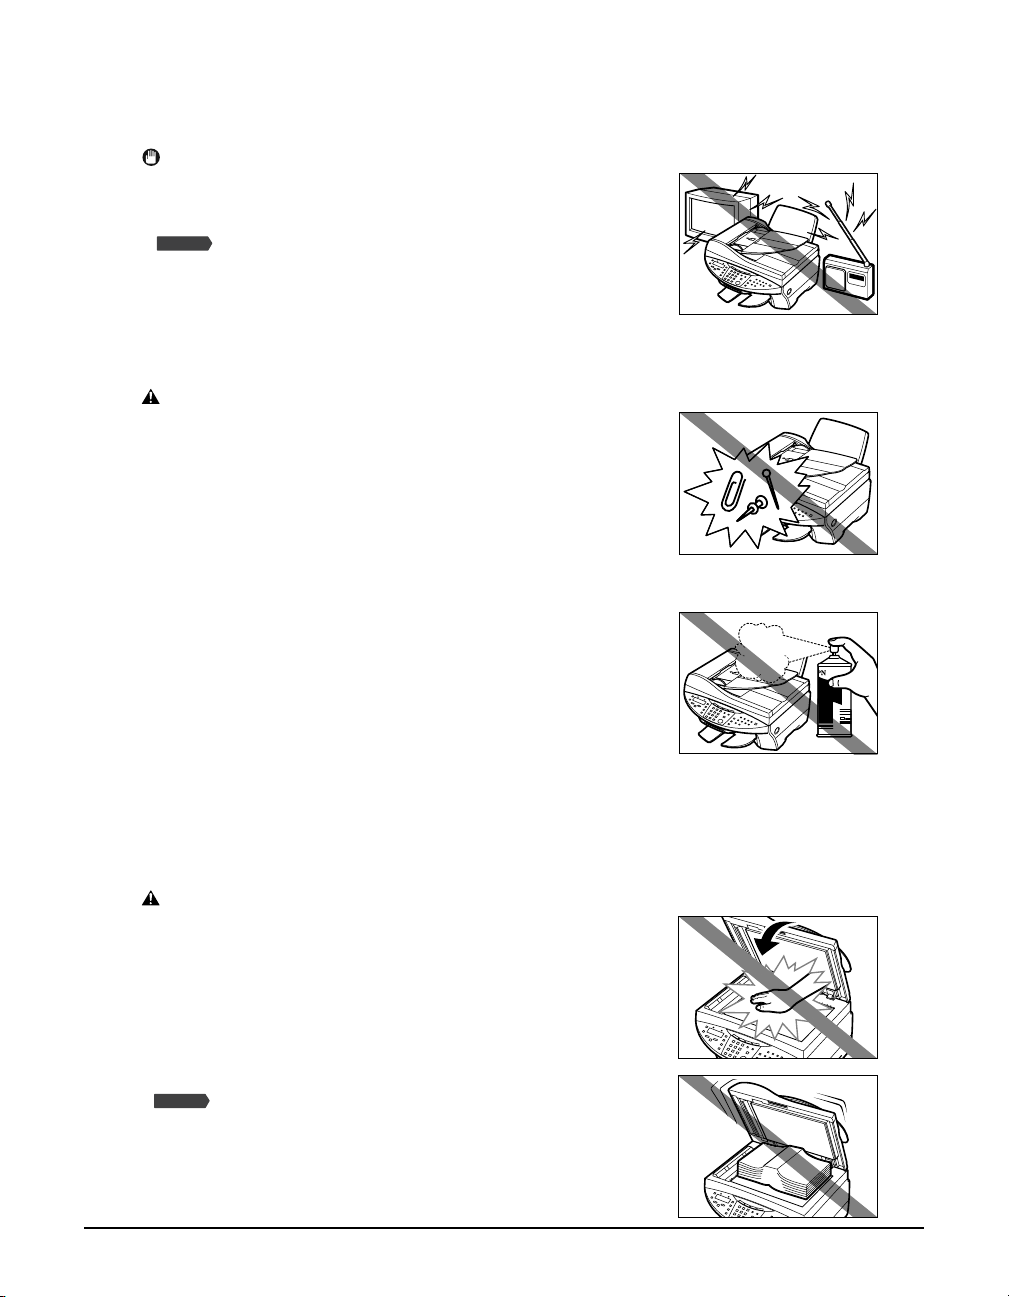
• Do not drop paper clips, staples, or other metal objects
inside the machine. Also do not spill water, liquid, or
flammable substances inside the machine. If these items
come into contact with high-voltage parts inside the
machine, it may result in fire or electrical shock. If these
items are dropped or spilled in the machine, turn off the
power and unplug the power cord immediately with dry
hands. Then contact your local authorized Canon dealer
or the Canon help line.
• Do not use any highly flammable sprays near the
machine. If gas from a spray comes into contact with the
electrical components inside the machine, it will result
in fire.
• There are high-voltage components inside the machine.
If you are looking inside the machine to remove paper
jams etc., do not allow metallic objects such as jewelry
to come into contact with the inside of the machine.
Contact may result in burns or electrical shock.
CAUTION
• Close the document cover and scanning unit gently to
avoid catching your hand. Failing to do so may result in
personal injury.
• Do not press down hard on the document cover or
Fax Model
ADF when using the platen glass to scan thick
books. This may damage the platen glass and/or result
in personal injury.
Preface
XI
Page 12

• Do not lift the machine by any of its attachments. Lift it by
the recessed areas on the sides of the machine.
Maintenance
WARNING
• Do not service the machine yourself except as specifically described in this guide. If further
servicing is required, contact your local authorized Canon dealer or the Canon help line.
• Keep the machine clean. Dust accumulation may prevent the machine from operating properly.
For your safety (Australia Only)
To ensure safe operation the three-pin plug supplied must be inserted only into a standard
three-pin power point which is effectively earthed through the normal household wiring.
Extension cords used with the equipment must be three-core and be correctly wired to provide
connection to earth. Wrongly wired extension cords are a major cause of fatalities.
The power point shall be located near the equipment and shall be easily accessible.
The fact that the equipment operates satisfactorily does not imply that the power point is
earthed and the installation is completely safe. For your safety, if in any doubt about the
effective earthing of the power point, consult a qualified electrician.
Caution (New Zealand Only)
1. This equipment may not necessarily provide for the effective hand-over of a call to or from a
telephone connected to the same line.
2. The operation of this equipment on the same line as telephone or other equipment with
audible warning devices or automatic ring detectors will give rise to bell tinkle or noise and
may cause false tripping of the ring detector. Should such problems occur, the user is not to
contact Telecom faults service.
3. Should this equipment become physically damaged, disconnect immediately from the
Telecom connection and power source and contact your nearest service agent.
4. To relocate this equipment please.
1) Disconnect the equipment from the Telecom connection.
2) Disconnect the equipment from the power source.
3) Reconnect the equipment to the power source.
4) Reconnect the equipment to the Telecom connection.
XII Preface
Page 13

5. If the supply cord of this equipment is damaged, it must be replaced by an approved Canon
part. Please contact your authorized Canon dealer or the Canon help line.
6. Not all standard telephones will respond to incoming ringing when connected to the
extension socket.
7. This device may be subject to bell tinkle, or mistakenly enter receive mode when calls are
made from another device on the same line. If this occurs, the problem should not be
referred to the Telecom Faults service.
8. Please note when you connect an extension phone to this device, if you use an extension
phone which has features such as “last number redial”, redial memory numbers may be lost.
Preface XIII
Page 14

XIV Preface
Page 15
Chapter
1
Introduction
Unpacking your machine
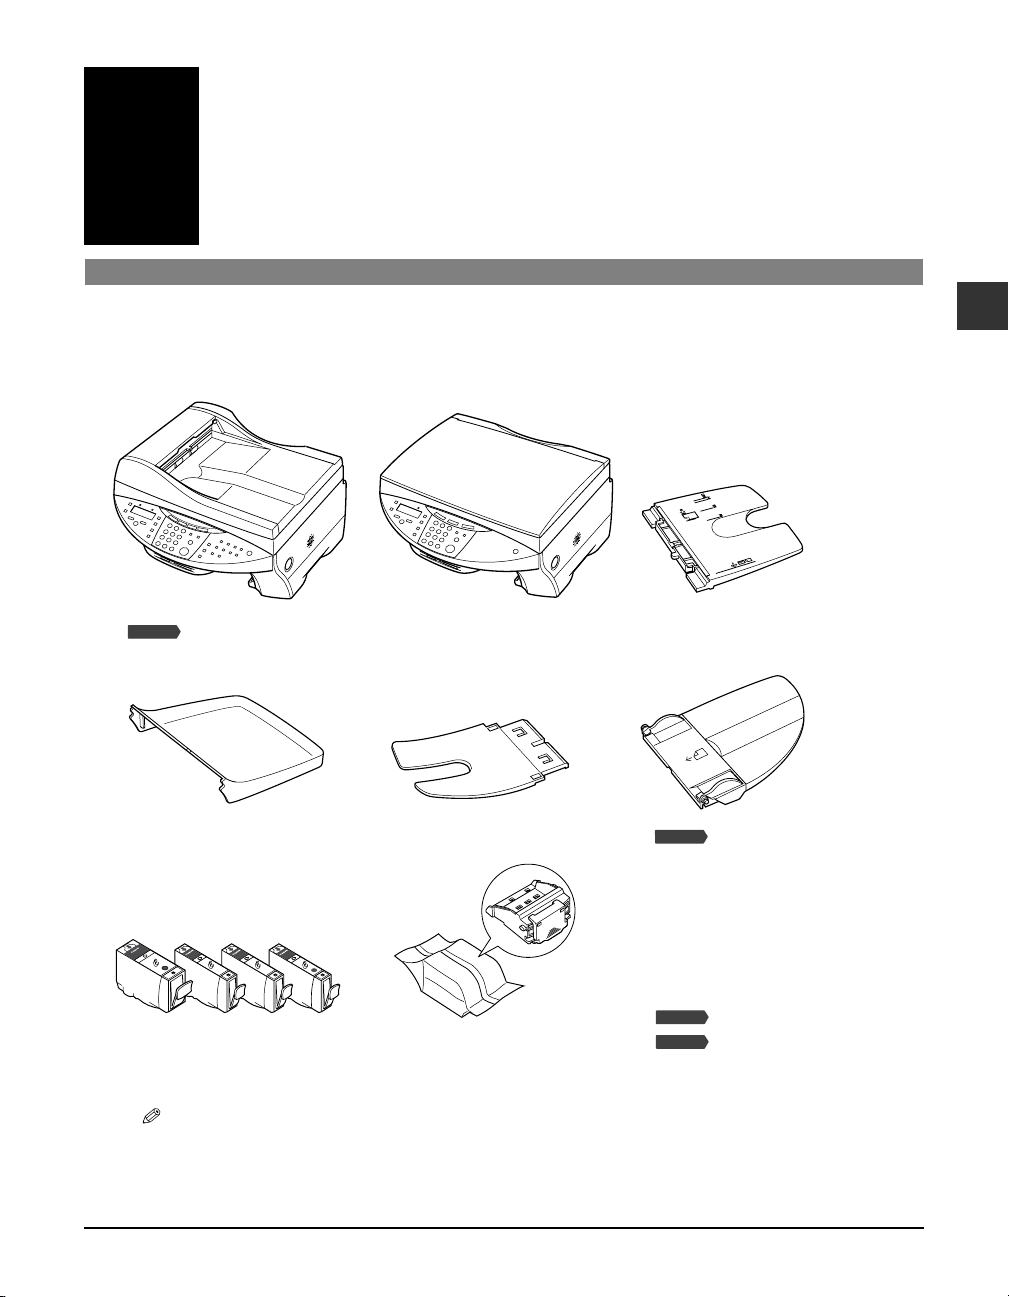
When you unpack your machine, check that you have the following components:
Fax Model
● MP730
Machine
● MP700
● Multi-purpose tray
1
Introduction
● Tray cover
● Ink tanks
(Black, cyan, magenta, yellow)
NOTE
•A USB cable is not included. You must purchase a USB cable (less than 5 m/16 #/8 ft.) to connect your
machine to a computer.
Chapter 1 Introduction 1-1
● Paper output tray
● Printhead
Fax Model
● Document tray
● Power cord
● Documentation
(Set-Up Sheet,
Quick Reference Guide)
● MP730/700 Setup CD-ROM
Fax Model
● Telephone line cord
Fax Model
● Destination labels
Page 16

System requirements
To successfully install and operate the software, your system must meet the following
requirements:
• CD-ROM drive, or access to one over a network connection
• 256-color SVGA monitor or greater
• Microsoft Internet Explorer version 4.01 or later (Service Pack 2 or later)
• 65 MB of available hard disk space (150 MB recommended)
MP drivers : 50 MB
MP Toolbox : 15 MB
• USB cable 5 m (16 #/8 ft.) or shorter
Windows 98
• IBM or compatible computer with a Pentium® 90 processor or higher
• 32 MB of RAM (64 MB or more recommended)
Windows Me
• IBM or compatible computer with a Pentium® 150 processor or higher
• 32 MB of RAM (64 MB or more recommended)
Windows 2000 (Service Pack 1 or later)
• IBM or compatible computer with a Pentium® 133 processor or higher
• 64 MB of RAM (128 MB or more recommended)
Windows XP
• IBM or compatible computer with a Pentium® 300 processor or higher
• 64 MB of RAM (128 MB or more recommended)
User privileges when using Windows 2000/XP
When installing, you must have Administrator privileges.
When using, you must have user privileges or greater.
1-2 Introduction Chapter 1
Page 17

Main components of the machine
Fax Model
Fax Model
Fax Model
Fax Model
Fax Model
Fax model shown here.
eq w
r
t
y
u
i
o
!0
1
!1
!2
!3
!8
!6
!5
!4
!7
q ADF (Automatic Document Feeder) !0 Scanning unit (Printer Cover)
w Feeder cover !1 [Open] button
e Document guides !2 Paper output tray
r Multi-purpose tray !3 Card slot
t Tray cover !4 Indicator light
y Automatic sheet feeder !5 Operation panel
u Document tray !6 Platen glass
i Document output slot !7 Printhead holder
o Document cover !8 Paper thickness lever
Introduction
Chapter 1 Introduction 1-3
Page 18
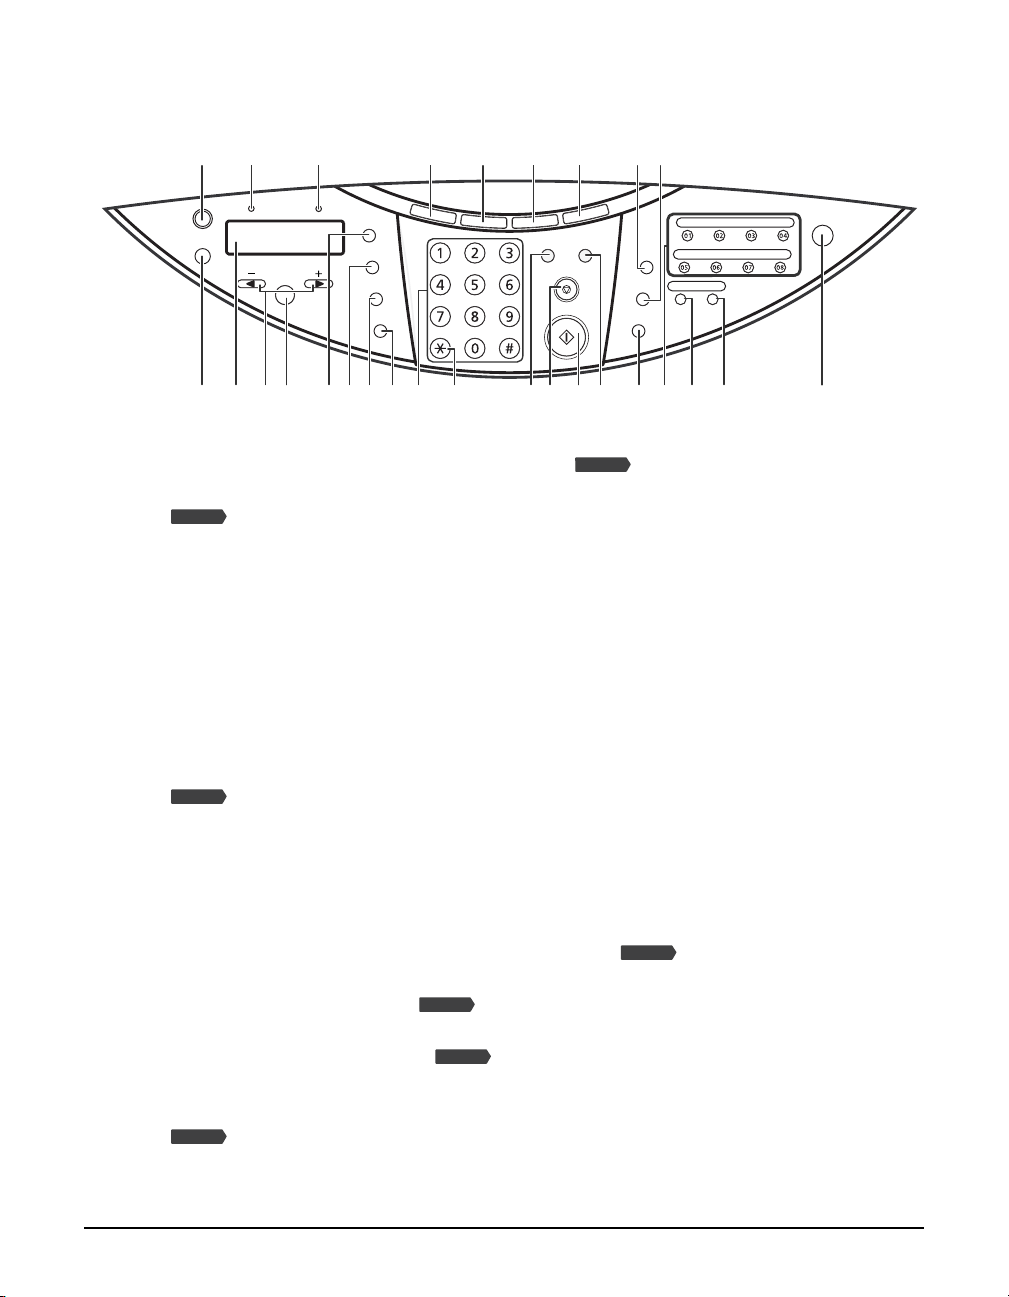
Operation panel of the machine
Fax Model
Fax Model
Fax Model
Fax model shown here.
q w
e
!2
!4 !5 @2 @3
!3
!7uytr !1!0oi !6
!9 @1@0 @4 @5 @6 @7
!8
@8
q [Resume] key
Resumes an operation after an error is corrected. Also ejects a document remaining
Fax Model
in the ADF.
w In Use/Memory light
Blinks or lights during operation. Lights also when there are documents in the machine’s
memory.
e Alarm light
Blinks when an error occurs or when the machine needs attention.
r [Menu] key
Accesses the settings to customize operation of your machine.
t LCD
Displays messages and selections, and prompts during operation.
y [2222]([–]) and [3333] ([+]) keys
Scroll through selections, select the number of copies, and the photograph file number.
[2] also clears an entry and [3] enters a space between characters.
u [OK] key
Selects or confirms settings.
i [Enlarge/Reduce] key
Sets the copy enlargement or reduction ratio.
o [Paper Select] key
Selects the paper size and paper type for copying and received faxes.
Fax Model
!0 [Contrast] key
Selects the copy contrast and fax contrast.
Fax Model
!1 [Image Quality] key
Selects the copy resolution and fax resolution.
Fax Model
!2 [Copy] key
Switches the machine to copy mode.
!3 [Fax] key
Switches the machine to fax mode.
1-4 Introduction Chapter 1
Page 19
!4 [Scan] key
Fax Model
Fax Model
Fax Model
Fax Model
Fax Model
Fax Model
Fax Model
Scans a document to your computer according to the action selected.
!5 [Photo Card] key
Switches the machine to photo card print mode.
!6 Numeric keys
Enter numerical values as well as fax/telephone numbers and characters.
Fax Model
!7 [T] key
Switches temporarily to tone dialing.
!8 [Color] key
Sets the machine for color copying and color sending.
Fax Model
!9 [Stop/Reset] key
Cancels operations and returns the machine to standby mode.
@0 [Start] key
Starts operations.
@1 [B&W] key
Sets the machine for black & white copying and black & white sending.
Fax Model
@2 [Redial/Pause] key
Redials the last number dialed with the numeric keys. Also enters pauses between or after
numbers when dialing or registering numbers.
@3 [Coded Dial] key
Press this key and a two-digit code to dial a pre-registered fax/telephone number or group.
@4 [Hook] key
Engages or disengages the telephone line.
@5 One-touch speed dialing keys
Dial a pre-registered fax/telephone number or group.
@6 [Polling] key
Polls another fax machine.
@7 [R] key
Dials the outside line access number when the machine is connected to a switchboard
(PBX).
@8 [ON/OFF (1 sec.)] key
Turns the machine on and off (keep pressed for a brief interval). Before turning on the
machine, make sure the document cover is closed.
1
Introduction
IMPORTANT
• To prevent the printhead from drying up, the machine automatically caps it when the power is
turned off with the [ON/OFF (1 sec.)] key. If you need to disconnect the machine from the main
power source (e.g. disconnect the power cord), be sure to turn off the machine first by pressing
[ON/OFF (1 sec.)] before disconnecting it.
• If you are not using the machine for a long period of time, we recommend that you print (in black
and color) or clean the printhead approximately once a month to maintain the printhead in good
working condition. The printhead contains high-precision nozzles that will become blocked if the
printhead is not used for a long period of time.
Chapter 1 Introduction 1-5
Page 20

NOTE
• The power cannot be turned off when the machine is operating or when the In Use/Memory light is on
or blinking.
• Your machine performs printhead cleaning every time you turn on the machine. This ensures optimum
print quality, but also consumes a small amount of ink during the cleaning process. For this reason, it is
recommended that you always leave your machine turned on, and only turn it off when instructed to do
so in this guide, or when not using the machine for a long period of time (one month or more). This will
avoid unnecessary ink consumption.
1-6 Introduction Chapter 1
Page 21
Chapter
Fax Model
Document and
2
print media handling
Documents
Document requirements
For details on the documents you can load on the platen glass or ADF for copying,
scanning, and sending, refer to the User’s Guide.
Fax Model
Loading documents
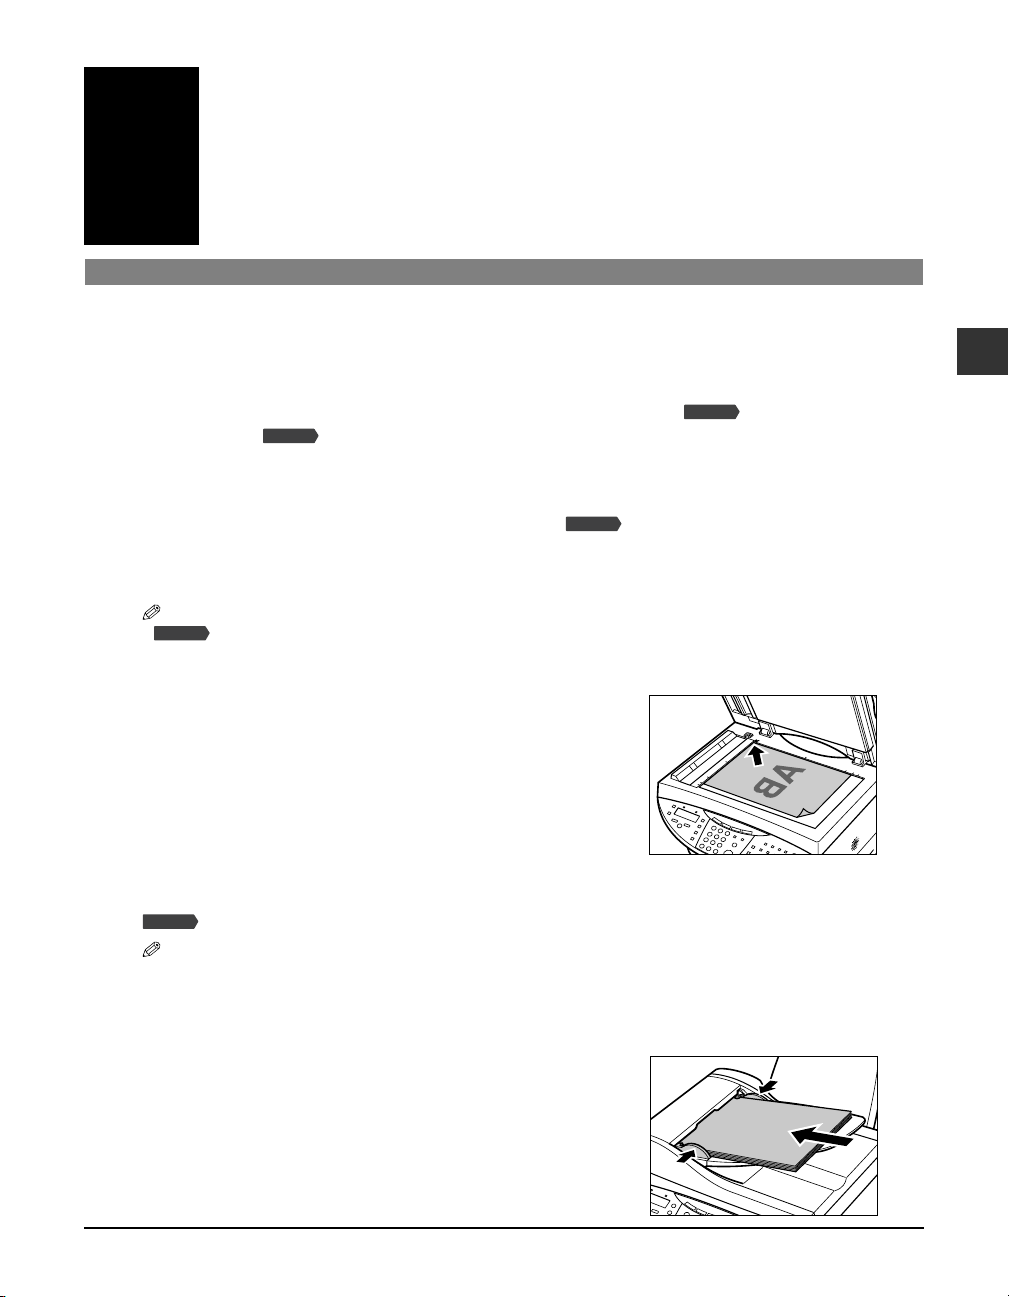
You can load your document on the platen glass or ADF. Where you load it depends on
the type of document and the machine you are using ( User’s Guide).
Using the platen glass
NOTE
Fax Model
• Load legal-size documents in the ADF.
1 Lift the document cover.
2 Place your document face down on the
platen glass. Align the upper left corner of
your document with the alignment mark on
the upper left corner of the platen glass.
Fax Model
Fax Model
2
Document and print media handling
3 Gently lower the document cover.
Using the ADF
NOTE
• For clearer scans, use the platen glass.
1 Check first that there is no document on the
platen glass.
2 Insert the top of your document, face up,
into the ADF until you hear a beep q. Then
adjust the document guides to the width of
the document w.
Chapter 2 Document and print media handling 2-1
w
AB
q
Page 22
Print media
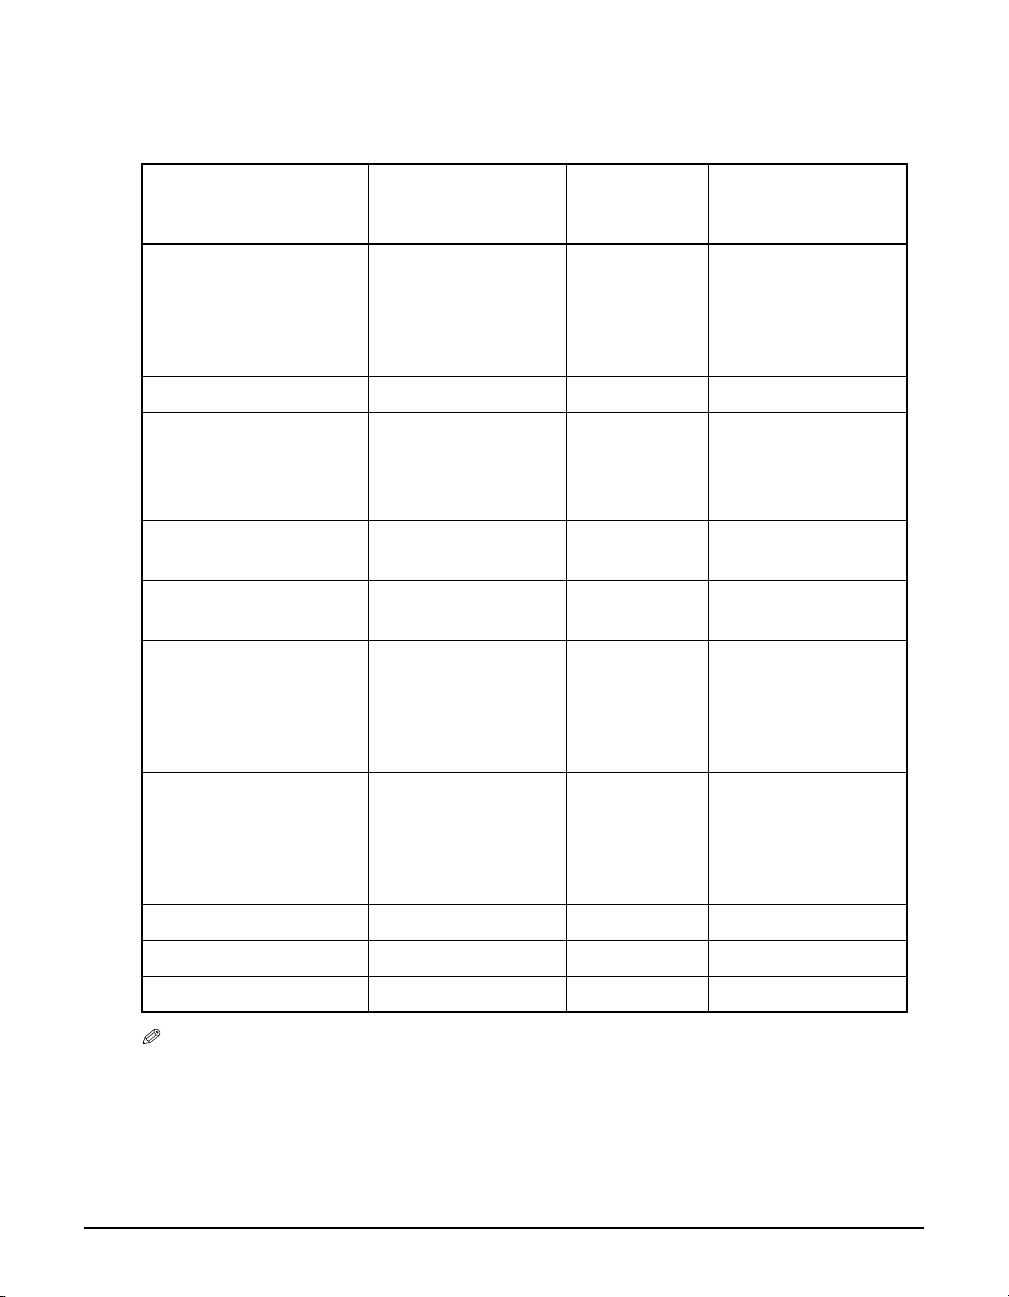
Loading requirements
Print media Maximum loading
quantity
Plain paper Approx. 150 sheets
(64 g/m2 or 17 lb.)
or
Maximum stack
height of 13 mm (!/2 in.)
Envelopes 10 envelopes Right [Envelope]
High Resolution Paper
HR-101N
Glossy Photo Paper
GP-301/GP301N
Matte Photo Paper
MP-101
Photo Paper Plus Glossy
PP-101
Approx. 80 sheets
or
Maximum stack
height of 13 mm (!/2 in.)
10 sheets Left [Glossy Photo Paper]
10 sheets Left [Matte Photo Paper]
• A4, Letter: 10 sheets
• 101.6 × 152.4 mm (4
× 6 in.): 20 sheets
• 127.0 × 177.8 mm (5
× 7 in.): 10 sheets
Paper
thickness
lever position
Left [Plain Paper]
Left [High Resolution
Left [Photo Paper Plus
Printer driver
setting
([Media Type])
Paper]
Glossy]
Photo Paper Pro PR-101 • A4, Letter: 10 sheets
• 101.6 × 152.4 mm (4
× 6 in.): 20 sheets
• 127.0 × 177.8 mm (5
× 7 in.): 10 sheets
Photo Paper Pro PC-101S 20 sheets Left [Photo Paper Pro]
Transparencies CF-102 30 sheets Left [Transparency]
T-Shirt Transfers TR-201 1 sheet Right [T-Shirt Transfer]
NOTE
• For detailed description of print media types, refer to the User’s Guide.
Left [Photo Paper Pro]
2-2 Document and print media handling Chapter 2
Page 23
Setting the paper thickness lever
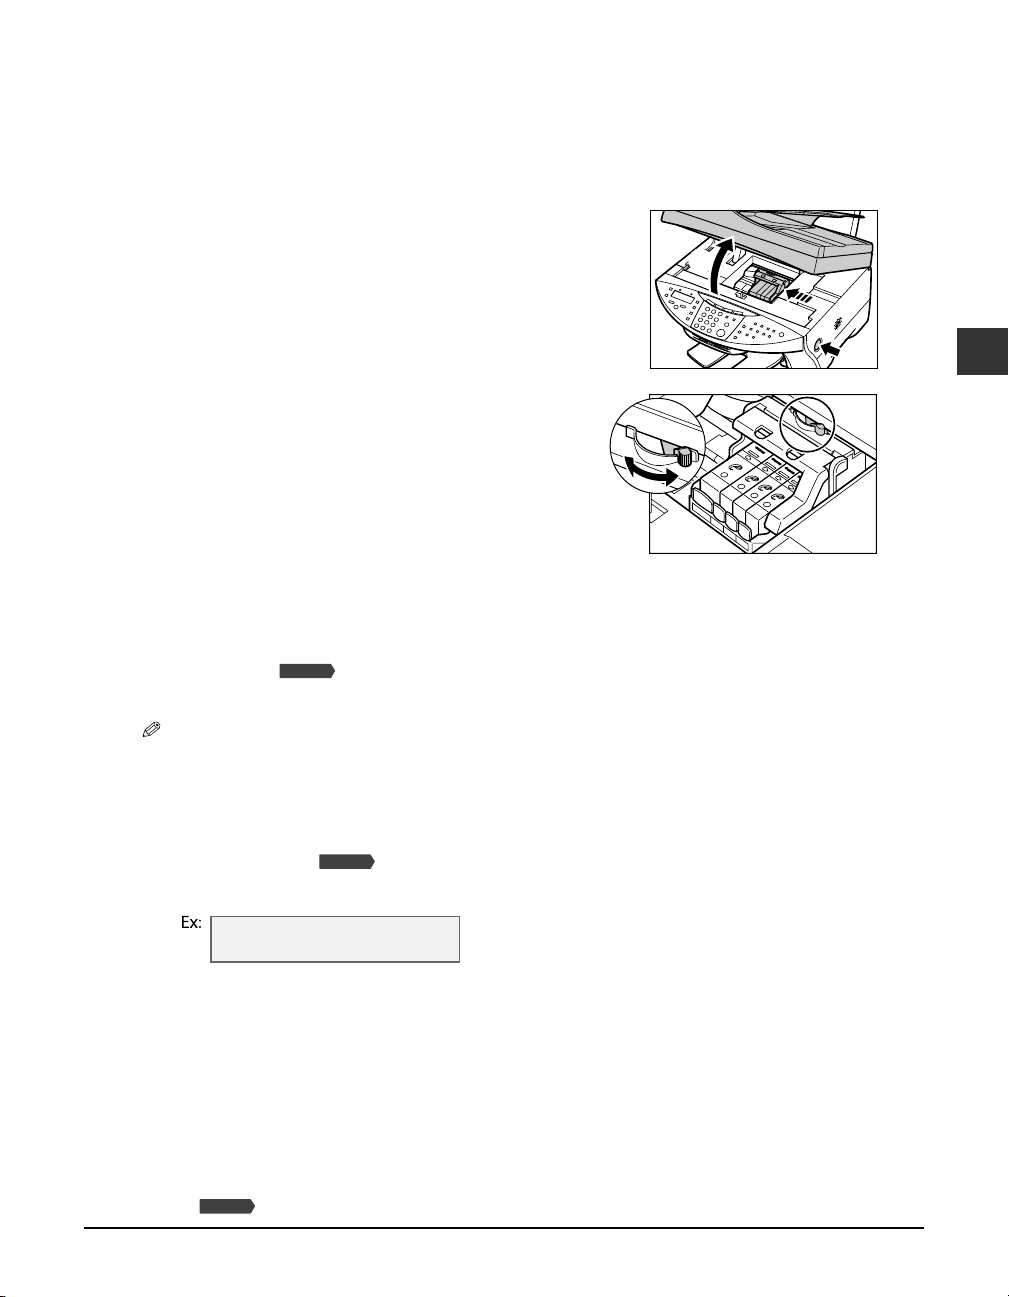
The paper thickness lever adjusts the gap between the printhead and the print media to suit
the print media’s thickness. Before printing, be sure to set the paper thickness lever.
Follow this procedure to set the paper thickness lever:
1 Press [Open] q and lift up the scanning unit
w.
w
2 Move the paper thickness lever to the
appropriate setting.
• For details on which position to set for the print
media you are using, see pp. 2-2 to 2-4.
3 Close the scanning unit until it locks into place.
Setting the print media size and type
For copying and receiving faxes, you need to set the size and type of print media loaded
in the multi-purpose tray.
NOTE
• For documents printed from your computer, specify the print media size and type on your computer
( Software Guide).
• For photo printing, specify the print media size as described in Chapter 4.
Follow this procedure to set the print media size and type:
1 Press [Copy] or [Fax].
2 Press [Paper Select].
SIZE : < A4 >
TYPE : PLAIN
Fax Model
Fax Model
q
2
Document and print media handling
3 Use [22
Chapter 2 Document and print media handling 2-3
22
] or [3333] to select the print media size.
• Select:
–<A4> for A4-size print media.
–<LTR> for letter-size print media.
–<LGL> for legal-size print media.
–<B5> for B5-size print media.
–<A5> for A5-size print media.
–<4" × 6"> for card-size print media.
–<5" × 7"> for card-size print media.
Fax Model
• For received faxes, select <A4>, <LTR>, or <LGL>.
Page 24

4 Press [OK].
SIZE : A4
TYPE : < PLAIN >
5 Use [22
22
] or [3333] to select the print media type.
• Select:
–<PLAIN> for plain paper.
–<GLOSSY> for glossy photo paper.
–<H.RES.> for high resolution paper.
–<TRANS.> for transparencies.
–<PHOTO> for photo paper pro, photo paper plus glossy, or matte photo paper.
6 Press [OK].
• If you are in copy mode, the LCD will display the print media size and type.
Loading print media
For details on loading print media in the multi-purpose tray, refer to the Set-Up Sheet or the
User’s Guide.
2-4 Document and print media handling Chapter 2
Page 25
Chapter
Printing from your
computer
3
—Basic operation
Printing documents
The general steps for printing a document are set out below.
1 Load paper in the printer.
2 Open the application from which you will print the document and select the
command to print. (This in most cases will be [Print] in the File menu.)
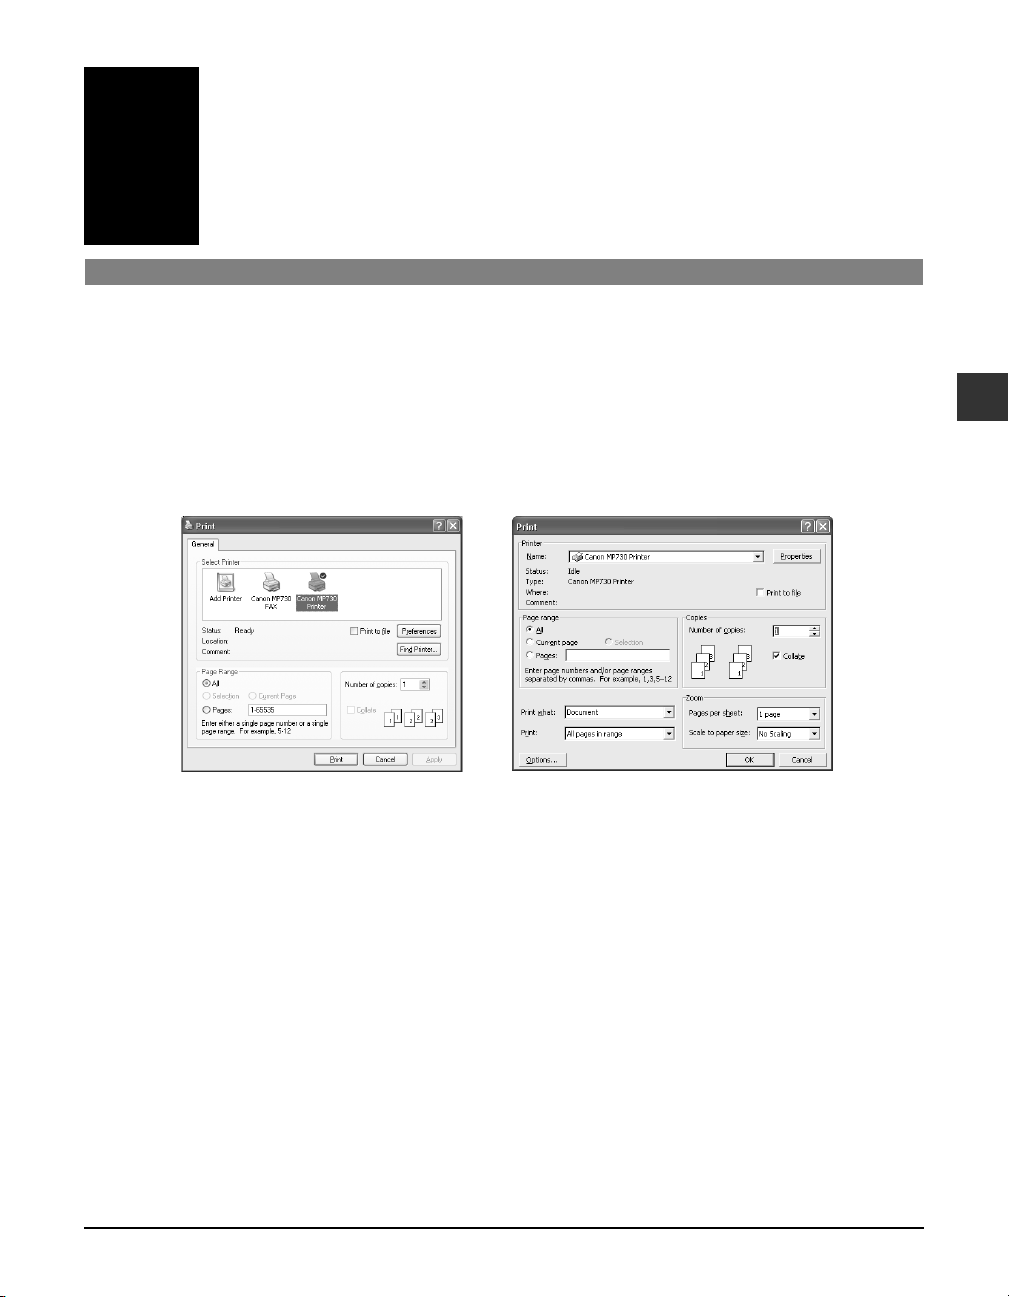
To print with the current printer driver settings, click the print button on the Toolbar.
[Print] dialog box [Print] dialog box in Word
3
Printing from your computer — Basic operation
3 In the [Print] dialog box, in [Select Printer] or [Name], select the printer, then click
[Preferences] or [Properties].
4 Specify the required settings and click [OK] (
5 Click [Print] or [OK] to begin printing.
Chapter 3 Printing from your computer —Basic operation 3-1
p. 3-2).
Page 26
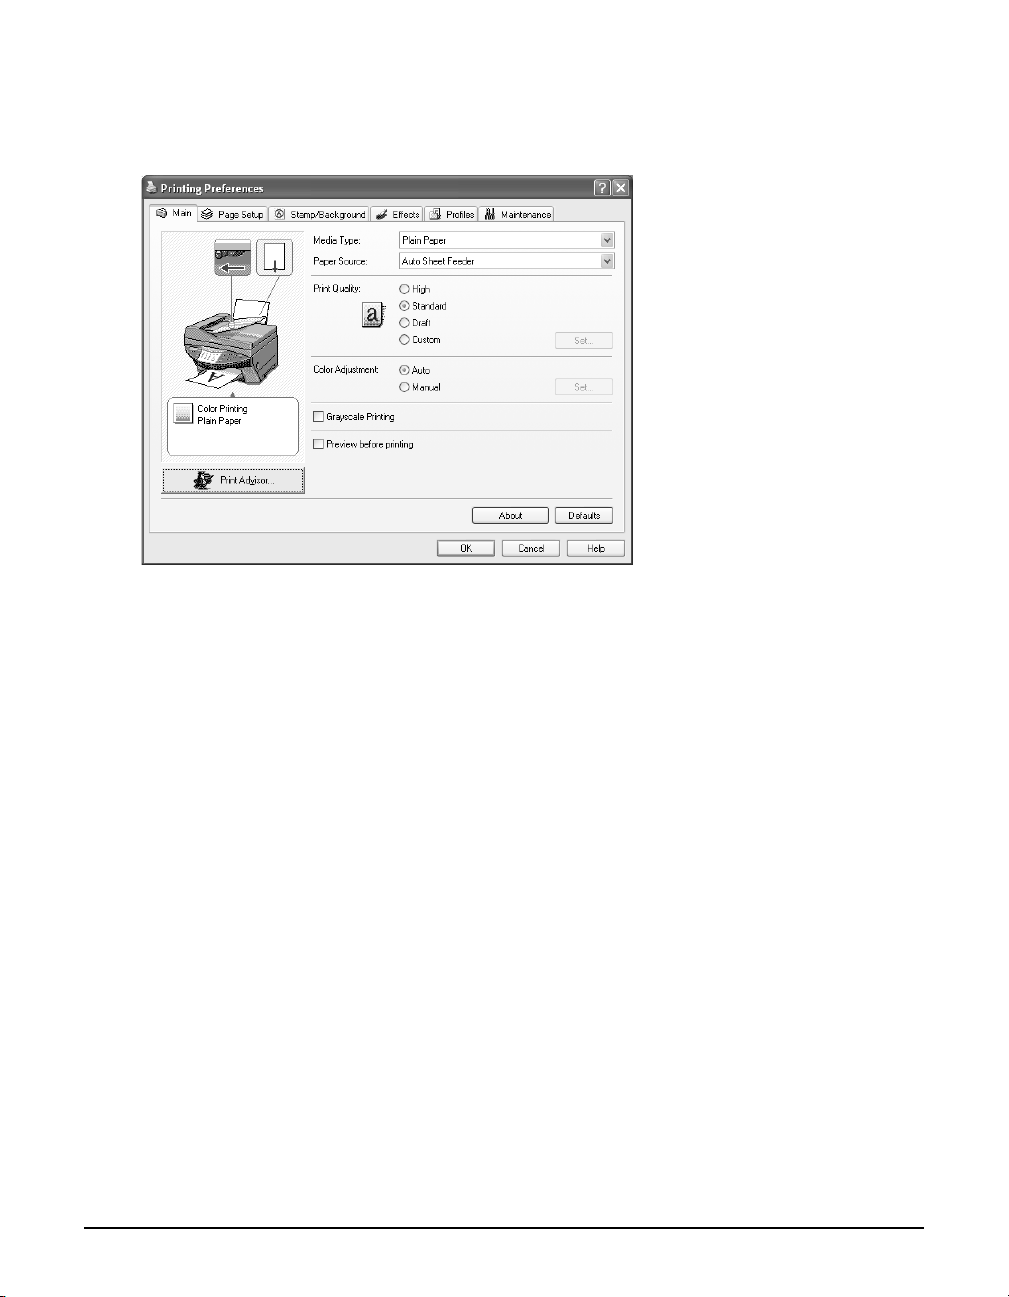
Setting the paper type and print quality/[Main] tab
In the [Printer Properties] dialog box, on the [Main] tab, you can change settings such as print
media type, paper source and print quality.
[Main] tab
[Media Type]
Select the print media type (e.g. plain paper) for printing. Depending on the print media you
select, the choices available for the other items will change.
[Paper Source]
• Auto Sheet Feeder
Display the source from which paper is supplied.
[Print Quality]
Select a print quality suitable for the document to be printed.
• [High]
The print quality will be higher but printing speed will be slower.
• [Standard]
For average printing speed and quality.
• [Draft]
Printing quality will be reduced but the printing speed will be faster. This setting is suitable
when printing multiple-page documents or printing drafts of documents.
• [Custom]
For selecting image quality and halftone settings individually ( Software Guide).
3-2 Printing from your computer —Basic operation Chapter 3
Page 27

[Color Adjustment]
Select the color adjustment method for printing.
• [Auto]
For automatic color correction by the printer driver.
• [Manual]
For adjusting color with detailed specifications ( Software Guide).
[Grayscale Printing]
Select to print a color document in black and white.
[Preview before printing]
Select if you want to display a preview of your document before printing to check how it will
print ( Software Guide).
[Print Advisor]
Select to use the Print Advisor to help you configure printer driver settings by answering a series
of questions.
The printer illustration at the left of the [Main] tab shows the current settings.
More information
For detailed information on all printing features, refer to the online help or the Software Guide.
3
Chapter 3 Printing from your computer —Basic operation 3-3
Printing from your computer—Basic operation
Page 28

3-4 Printing from your computer —Basic operation Chapter 3
Page 29

Chapter
Photo printing from a
memory card
4
This feature allows you to insert a memory card directly into your machine and print
photographs from it. You can also read and write to a memory card from your computer.
—Basic operation
Before printing from a memory card
Before printing from a memory card, check the following:
Is your digital camera’s memory card compatible with the machine?
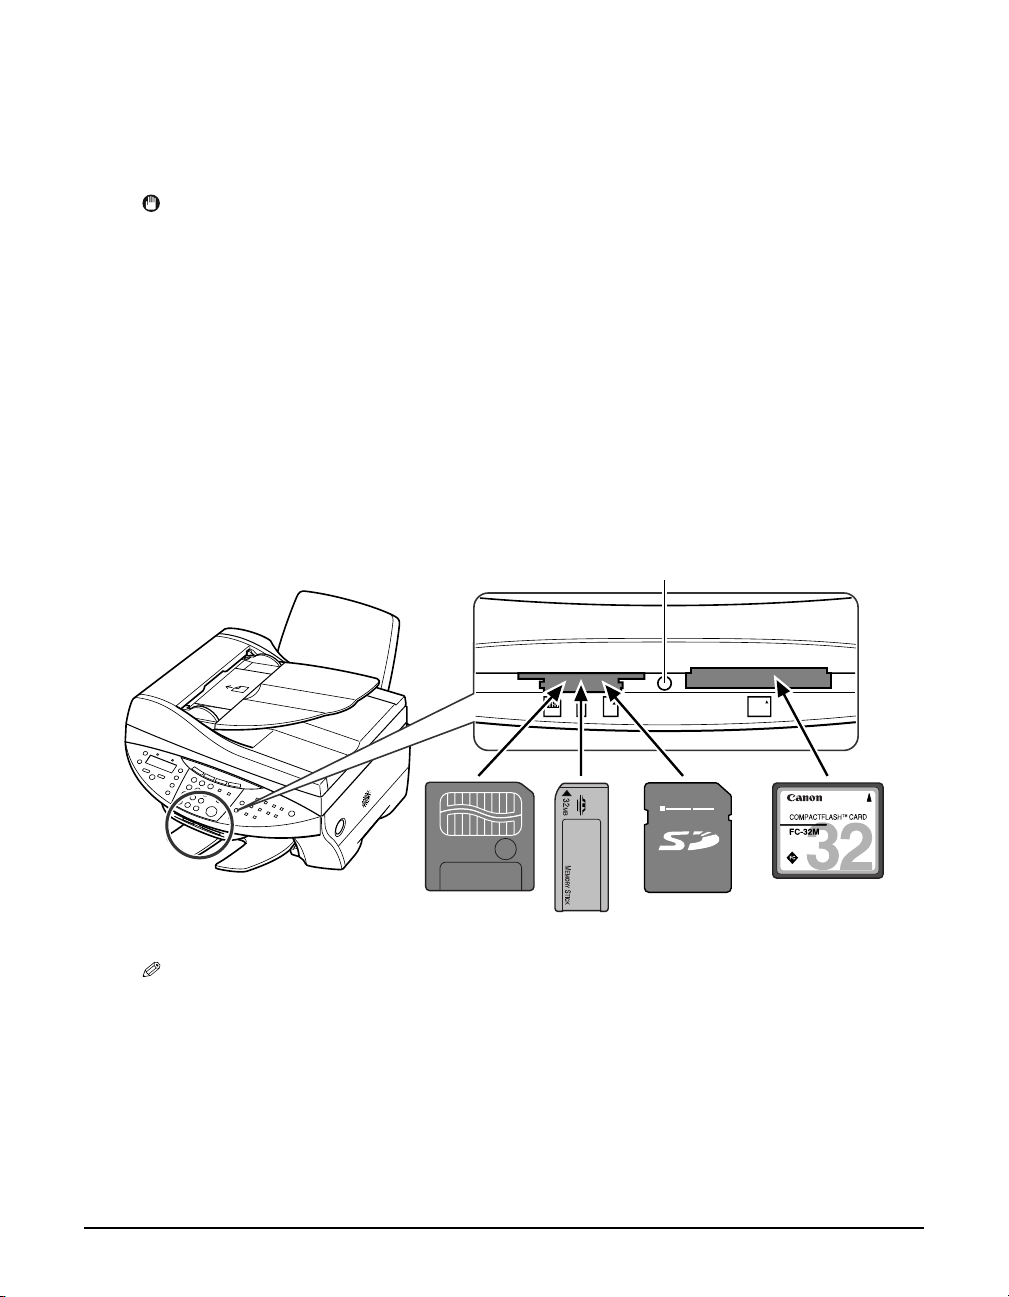
The following cards are compatible with the machine:
• Compact flash type I • Compact flash type II (Except Microdrive memory cards)
• Memory stick • Smart media
• Multimedia card • SD memory card
CAUTION
• You cannot use Microdrive memory cards.
• You cannot use Smart media that has less than 2 MB of memory.
NOTE
• The above cards are acceptable for this machine. However, due to varying specifications, Canon cannot
guarantee that all card brands will be fully compatible.
• The file format is compatible with the JPEG (DCF/Exif 2.2 or lower/JFIF) format.
• Some digital cameras are not compatible with 64 MB and 128 MB memory cards. Photographs on
memory cards that are not compatible with the camera may be unreadable or the image data may be
damaged.
• Format the memory card with a digital camera. The memory card may not be able to be used with the
machine if formatted by a computer.
• For information on memory cards compatible with your digital camera, contact your digital camera
manufacturer.
• If you have edited memory card data on your computer, be sure to print this data from your computer.
Saving photographs edited on your computer onto a memory card and then printing them from your
machine will not produce good results.
Is the correct print media loaded in the multi-purpose tray?
Although you can use plain paper, Photo Paper Pro paper is recommended for high-quality
images ( p. 2-2).
4
Photo printing from a memory card — Basic operation
Chapter 4 Photo printing from a memory card —Basic operation 4-1
Page 30
Inserting/removing a memory card
Inserting a memory card
Follow this procedure to insert a memory card into the machine:
IMPORTANT
• The machine only recognizes one memory card at a time. Do not insert memory cards into both
slots or the same slot at the same time as the machine will not recognize them.
• When switching between memory cards of the same type or inserting a memory card into a
different card slot, press [ON/OFF (1 sec.)] to turn off the power before removing the card. Once
removed, press [ON/OFF (1 sec.)] again to turn on the power before inserting the other memory
card.
• In Windows 2000, if you turn off the machine, the [Unsafe Removal of Device] screen will be displayed. In
this case, click [OK]. This will not affect your machine or computer’s operation.
• If you insert memory cards into both slots, the compact flash card will be recognized.
1 Make sure the machine is on.
• If not, press [ON/OFF (1 sec.)].
2 Insert a memory card into the appropriate slot.
• The indicator light A will be blinking when the memory card is being accessed.
• Insert the Multimedia card into the same slot as the SD memory card.
A
512
MB
Smart media
Memory stick
NOTE
• If the memory card cannot be read, check that:
–the memory card is inserted all the way into the card slot.
–the memory card was not removed while being read.
–you are using a compatible memory card.
–your memory card contains photographs.
SD memory card Compact flash
4-2 Photo printing from a memory card —Basic operation Chapter 4
Page 31
Removing a memory card
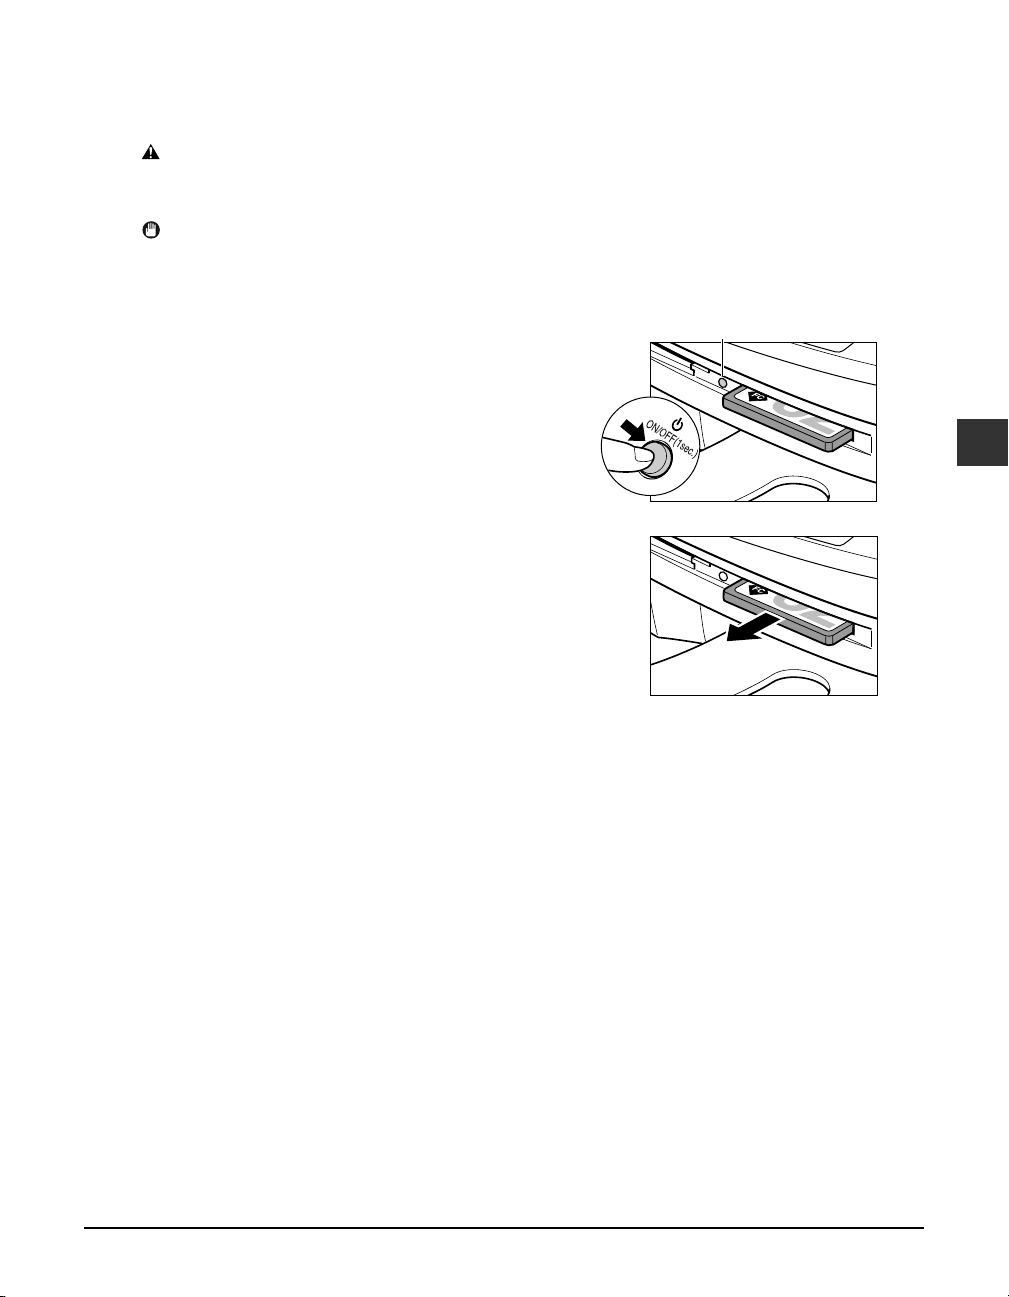
Follow this procedure to remove a memory card:
CAUTION
• Do not remove the memory card or turn off the machine when the indicator light is blinking as this
may damage the data in the memory card.
IMPORTANT
• If an error occurs during printing (e.g. paper runs out), do not remove the memory card as this may
damage the data in the memory card.
1 Check that the indicator light is not blinking
q, then press [ON/OFF (1 sec.)] to turn the
machine off w.
2 Pull out the memory card.
q
w
4
Photo printing from a memory card —Basic operation
Chapter 4 Photo printing from a memory card —Basic operation 4-3
Page 32
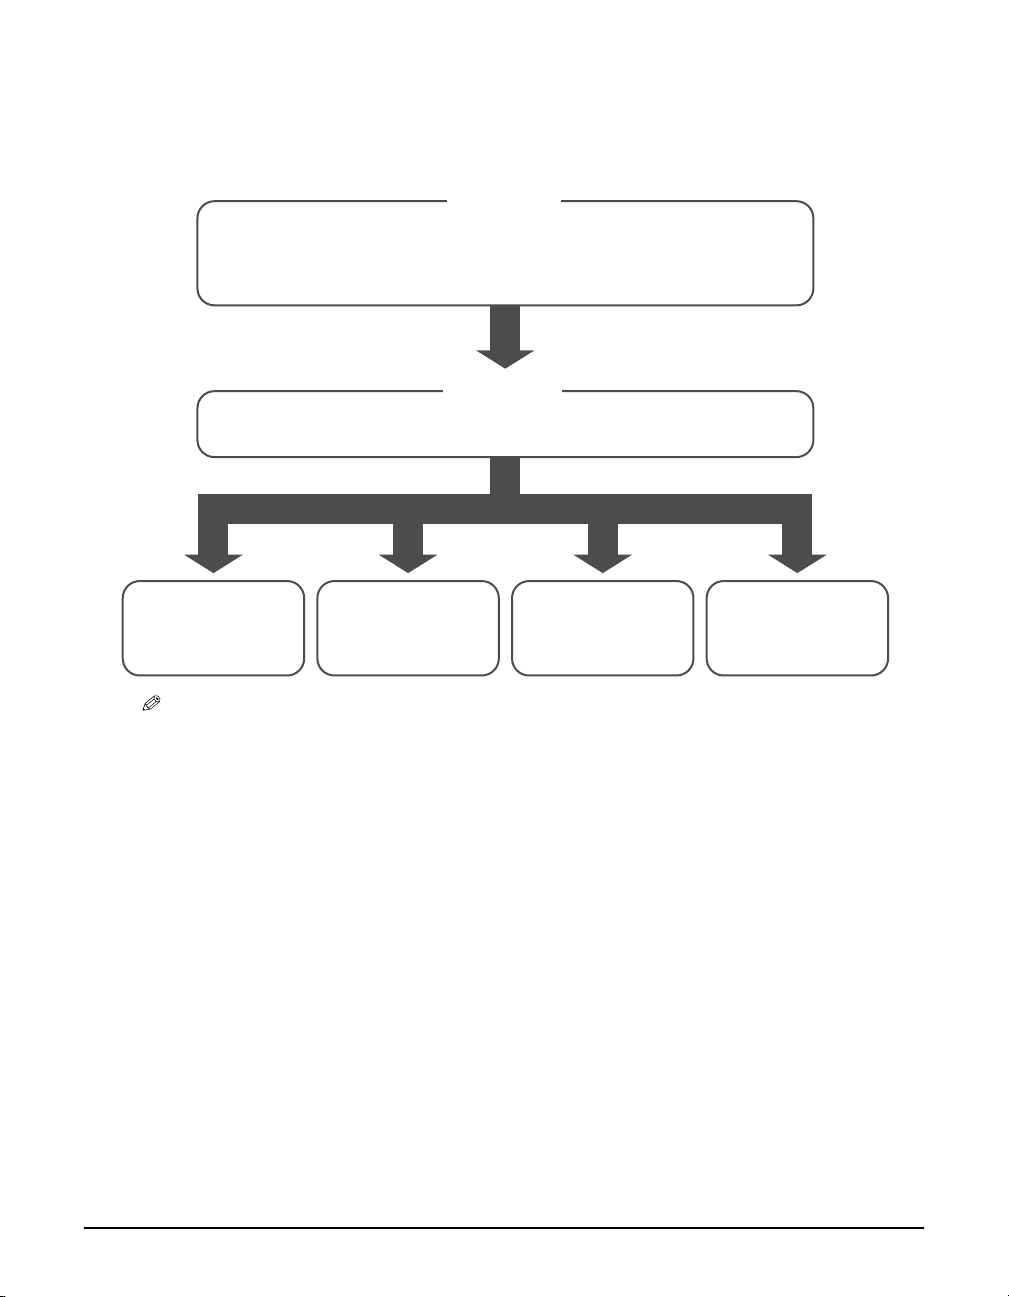
Printing methods
There are different methods for printing photographs from a memory card. Follow this general
procedure to print photographs:
Step 1
Print an index ( p. 4-5) to see thumbnails of all the
photographs in the memory card.
•Note the number below the photograph(s) you want to print.
Step 2
Select a printing method.
All frames
( p. 4-6)
NOTE
• You may not be able to print photographs if their file sizes are too large.
• You can set vivid photo printing to make your photographs appear more vibrant. For details, see the
User’s Guide.
• For each printing method except DPOF, you can set date printing from the machine. For details, see
the User’s Guide.
Single frame
( p. 4-7)
Frame range
User's Guide
(
)
DPOF
(
User's Guide
)
4-4 Photo printing from a memory card —Basic operation Chapter 4
Page 33
Printing an index
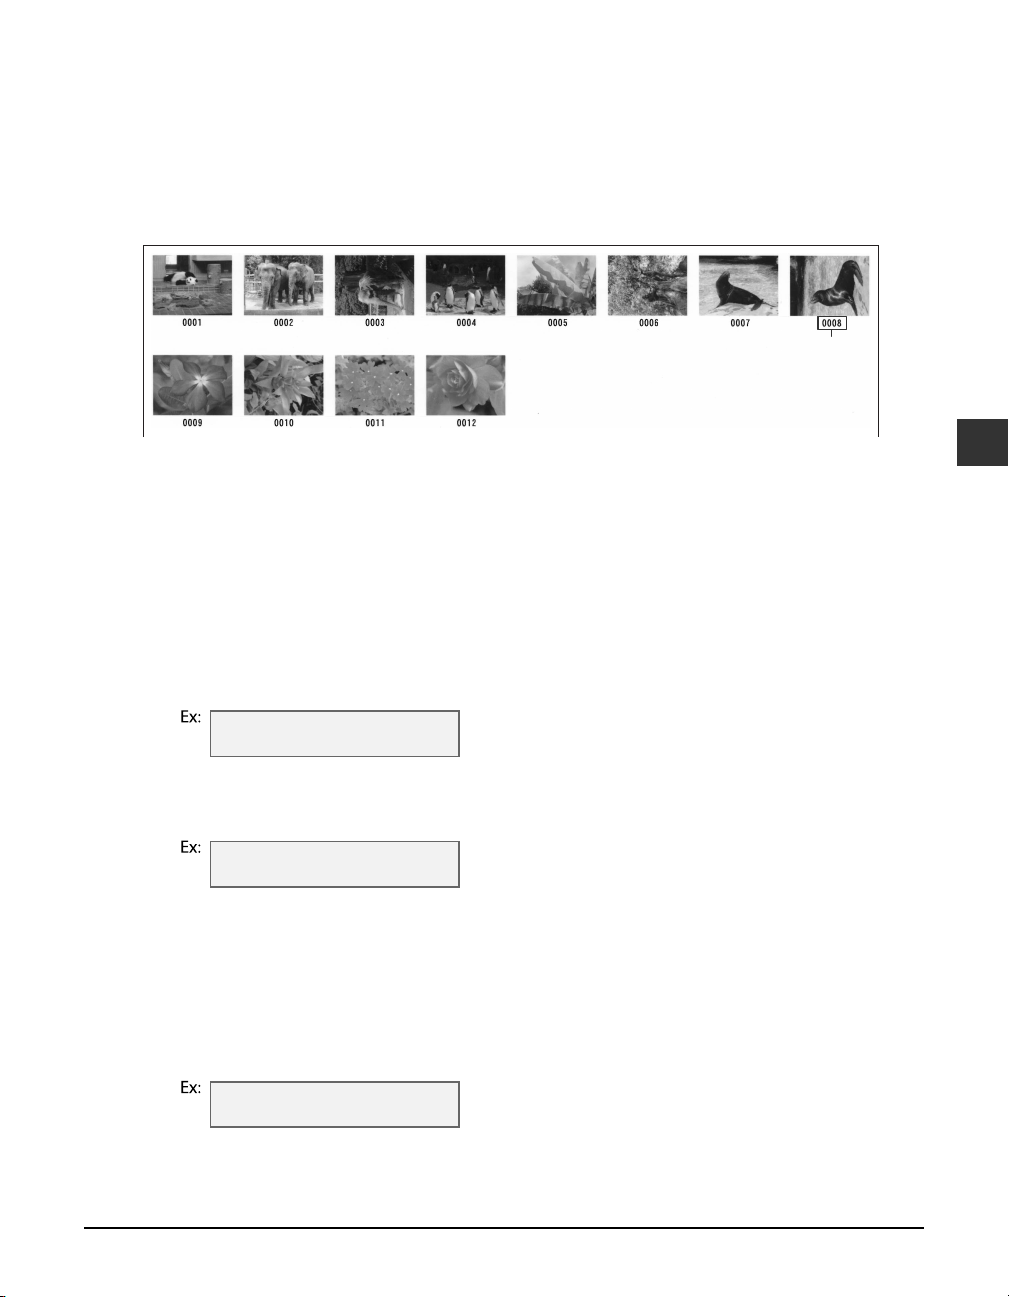
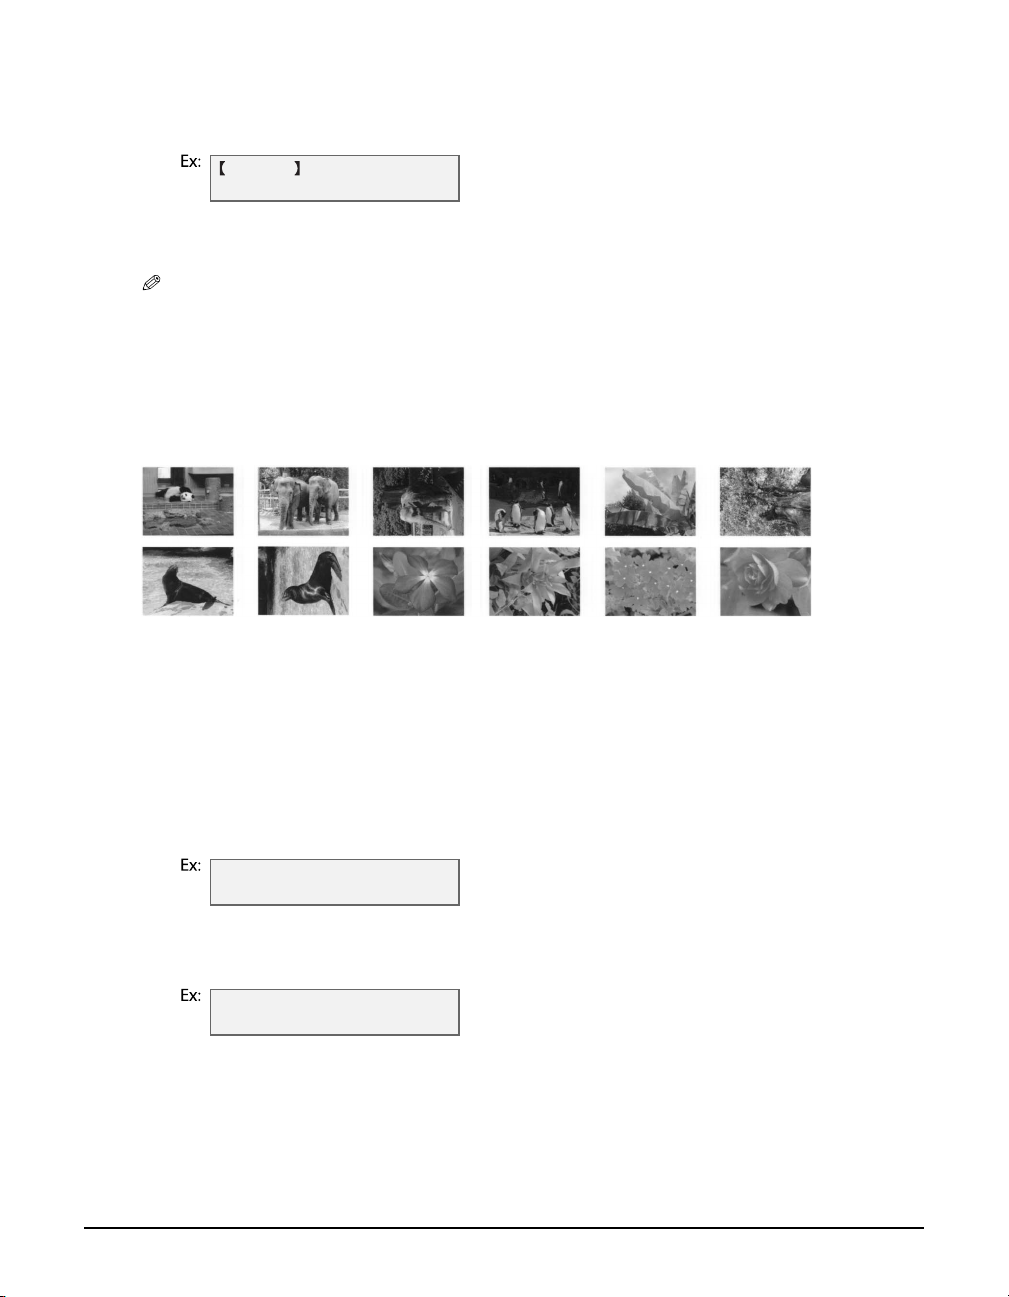
This printing method prints thumbnails of the photographs in a memory card. An index is useful
to see small versions of all photographs in a memory card without having to print each
photograph individually.
When you print an index, a number A is assigned to each thumbnail. You will need these
numbers to select the photographs you want to print in a larger format.
A
If “?” appears in the index, see p. 10-7.
Follow this procedure to print an index:
1 Load the correct print media in the multi-purpose tray.
• For details on print media, see p. 2-2, and how to load it, see the Set-up Sheet or User’s Guide.
2 Insert the memory card as described on p. 4-2.
3 Press [Photo Card].
4 Press [Menu].
5 Press [OK].
PHOTO PRINT MODE
INDEX
6 Use [22
22
] or [3333] to select <INDEX>.
7 Press [OK].
SELECT PAPER SIZE
A4
8 Use [22
22
] or [3333] to select the print media size.
• Select:
–<A4> for A4-size print media.
–<LTR> for letter-size print media.
–<4" × 6"> for card-size print media.
–<5" × 7"> for card-size print media.
9 Press [OK].
4
Photo printing from a memory card —Basic operation
SELECT PAPER TYPE
PHOTO PAPER PRO
10 Use [22
Chapter 4 Photo printing from a memory card —Basic operation 4-5
22
] or [3333] to select the print media type.
• Select from the following:
–<PHOTO PAPER PRO>
Page 34
–<PLAIN PAPER>
• If you selected <4" × 6"> or <5" × 7"> in step 8, you can only select <PHOTO PAPER PRO>.
11 Press [OK].
INDEX
PHOTO A4
12 Press [Start].
• To cancel printing, press [Stop/Reset].
NOTE
• You can only print one index print at a time.
• The number assigned to each thumbnail on the index print is different from the ID numbers assigned by
the digital camera.
Printing all frames
This printing method prints individually all photographs stored in a memory card.
Follow this procedure to print individually all photographs in a memory card:
1 Load the correct print media in the multi-purpose tray.
• For details on print media and how to load it, see the User’s Guide.
2 Insert the memory card as described on p. 4-2.
3 Press [Photo Card].
4 Press [Menu].
5 Press [OK].
PHOTO PRINT MODE
INDEX
6 Use [22
22
] or [3333] to select <ALL FRAMES>.
7 Press [OK].
SELECT PAPER SIZE
A4
8 Use [22
22
] or [3333] to select the print media size.
• Select:
–<A4> for A4-size print media.
–<LTR> for letter-size print media.
–<4" × 6"> for card-size print media.
–<5" × 7"> for card-size print media.
9 Press [OK].
4-6 Photo printing from a memory card —Basic operation Chapter 4
Page 35
SELECT PAPER TYPE
PHOTO PAPER PRO
10 Use [22
If you selected <PLAIN PAPER> in step 10:
22
] or [3333] to select the print media type.
• Select from the following:
–<PHOTO PAPER PRO>
–<PLAIN PAPER>
• If you selected <4" × 6"> or <5" × 7"> in step 8, you can only select <PHOTO PAPER PRO>.
11 Go to step 13.
If you selected <PHOTO PAPER PRO> in step 10:
11 Press [OK].
BORDERLESS PRINT
OFF
12 Use [22
22
] or [3333] to select borderless printing.
• Select:
–<OFF> to print the photographs with borders.
–<ON> to print the photographs without borders.
13 Press [OK].
ALL FRAMES
PHOTO A4
14 Press [Start].
NOTE
• Printing is enlarged or reduced automatically according the print media size. Depending on the print
media type and whether borderless printing is selected, the photographs may be cropped.
•A margin may still appear even if you select borderless printing on letter-size print media.
• You can select the width cropped from the borders of the original image ( <EXTENSION AMOUNT>,
User’s Guide).
4
Printing a single frame
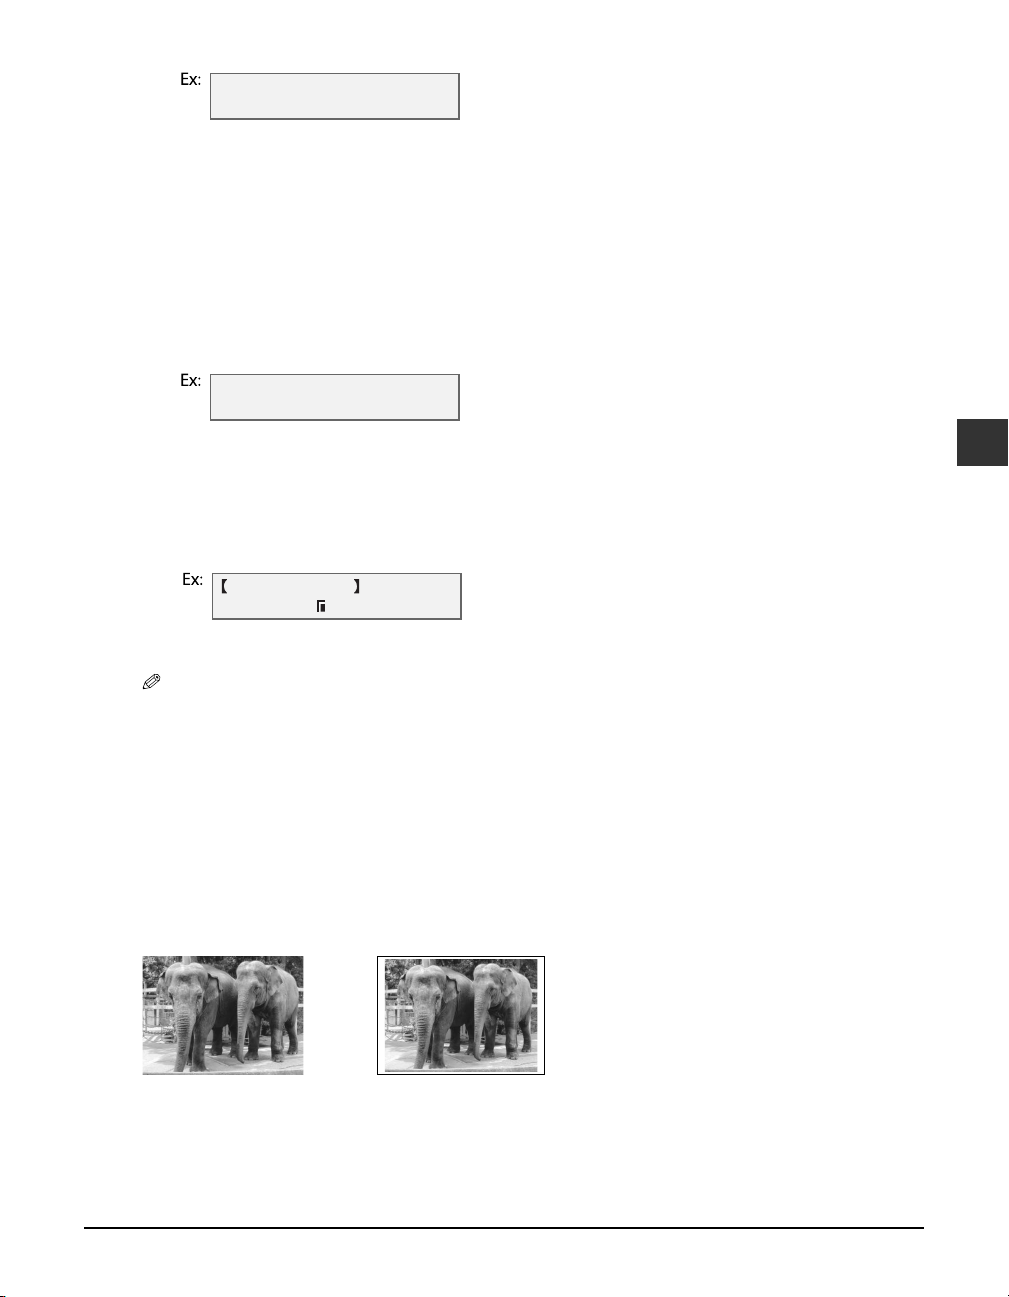
This printing method prints a specified single photograph from a memory card. In order to
select the photograph you want to print, you will need to print the index and note the number
assigned to the photograph. To print an index, see p. 4-5.
Without a border With a border
Follow this procedure to print a single photograph from a memory card:
1 Load the correct print media in the multi-purpose tray.
• For details on print media, see p. 2-2, and how to load it, see the Set-up Sheet or User’s Guide.
Chapter 4 Photo printing from a memory card —Basic operation 4-7
Photo printing from a memory card —Basic operation
Page 36
2 Insert the memory card as described on p. 4-2.
3 Press [Photo Card].
4 Press [Menu].
5 Press [OK].
PHOTO PRINT MODE
INDEX
6 Use [22
22
] or [3333] to select <SINGLE FRAME>.
7 Press [OK].
FILE NO:
0001
8 Use the numeric keys to enter the frame number.
• You can also use [2] or [3] to select the frame number.
• To find the frame number, you will need to print the index beforehand ( p. 4-5).
9 Press [OK].
NUMBER OF PRINTS
1COPIES
10 Use the numeric keys to enter the number of copies of the photograph you want.
• You can also use [2] or [3] to select the quantity.
11 Press [OK].
SELECT PAPER SIZE
A4
12 Use [22
22
] or [3333] to select the print media size.
• Select:
–<A4> for A4-size print media.
–<LTR> for letter-size print media.
–<4" × 6"> for card-size print media.
–<5" × 7"> for card-size print media.
13 Press [OK].
SELECT PAPER TYPE
PHOTO PAPER PRO
14 Use [22
If you selected <PLAIN PAPER> in step 14:
22
] or [3333] to select the print media type.
• Select from the following:
–<PHOTO PAPER PRO>
–<PLAIN PAPER>
• If you selected <4" × 6"> or <5" × 7"> in step 12, you can only select <PHOTO PAPER PRO>.
15 Go to step 17.
If you selected <PHOTO PAPER PRO> in step 14:
15 Press [OK].
4-8 Photo printing from a memory card —Basic operation Chapter 4
Page 37
BORDERLESS PRINT
OFF
16 Use [22
22
] or [3333] to select borderless printing.
• Select:
–<OFF> to print the photograph with a border.
–<ON> to print the photograph without a border.
17 Press [OK].
• Use [2] or [3] to view your settings in the LCD.
SINGLE FRAME
PHOTO A4
SINGLE FRAME
or
NO.0002 01
18 Press [Start].
NOTE
• Printing is enlarged or reduced automatically according the print media size. Depending on the print
media type and whether borderless printing is selected, the photograph may be cropped.
•A margin may still appear even if you select borderless printing on letter-size print media.
• You can select the width cropped from the borders of the original image ( <EXTENSION AMOUNT>,
User’s Guide).
Reading from or writing to a memory card
When your machine is connected to a computer, the memory card drive (Removable Disk) will
appear on your computer’s [My Computer].
By inserting a memory card in the machine, you can view photographs on the memory card by
opening the [Removable Disk] on your computer. You can then copy the photographs to your
computer’s hard disk (similar to copying other files on the hard disk), or by changing the setting,
can copy hard disk files onto the memory card.
4
IMPORTANT
• Do not put your computer in standby or sleep mode when a memory card is inserted in a card slot.
Also, do not remove or switch memory cards when your computer is in standby or sleep mode.
• Insert only one memory card at a time into the machine.
• When switching between memory cards of the same type or inserting a memory card into a
different card slot, press [ON/OFF (1 sec.)] to turn off the power before removing the card. Once
removed, press [ON/OFF (1 sec.)] again to turn on the power before inserting the other memory
card.
• In Windows 2000, if you turn off the machine, the [Unsafe Removal of Device] screen will be displayed. In
this case, click [OK]. This will not affect your machine or computer’s operation.
• If you insert memory cards into both slots, the compact flash card will be recognized.
Enabling/disabling overwriting memory card data
You can enable or disable overwriting memory card data. This setting is initially set to disable
overwriting.
Follow this procedure to change the setting:
1 Make sure there is no memory card inserted in the machine.
2 Press [Menu].
Chapter 4 Photo printing from a memory card —Basic operation 4-9
Photo printing from a memory card —Basic operation
Page 38
3 Use [22
22
] or [3333] to select <USER DATA>.
4 Press [OK].
USER DATA
1.TEL REGISTRATION
5 Use [22
22
] or [3333] to select <SYSTEM SETTINGS>.
6 Press [OK].
7 Use [22
22
] or [3333] to select <CARD PROTECT>.
8 Press [OK].
CARD PROTECT
ON
9 Use [22
22
] or [3333] to select <ON> to disable overwriting or <OFF> to enable overwriting.
10 Press [OK].
11 Press [Stop/Reset] to return to standby mode.
12 Press [Copy], [Fax], or [Scan] to select a mode other than photo print mode.
• To avoid damage to data being accessed on a memory card, you cannot overwrite in photo print
mode.
13 Insert a memory card into the appropriate slot.
IMPORTANT
• If you change the above setting while a memory card is inserted in a card slot, turn the machine off
then on again. The new setting will not be activated until you do so.
More information
For detailed information on all photo printing features, refer to the User’s Guide.
4-10 Photo printing from a memory card —Basic operation Chapter 4
Page 39

Chapter
Copying
5
—Basic operation
Before copying
Before copying, check the following:
Does the document you want to copy meet the requirements for loading on the platen
glass or ADF?
For details, see the User’s Guide.
Is the correct print media loaded in the multi-purpose tray?
For details, see the User’s Guide.
Fax Model
Making copies
Follow this procedure to make color or black & white copies:
1 Load the document on the platen glass or
• For details on how to load documents, see p. 2-1.
2 Press [Copy].
3 Use the numeric keys to enter the number of copies.
4 Adjust any necessary settings for your document.
• Press [Color] for color copying, or [B&W] for black & white copying ( below).
• Press [Paper Select] to select the print media size and type ( p. 2-3).
• Press [Image Quality] to select the scanning resolution ( p. 5-2).
• Press [Contrast] to select the scanning contrast ( p. 5-2).
• Press [Enlarge/Reduce] to select the copy ratio ( User’s Guide).
5 Press [Start].
• To cancel copying, press [Stop/Reset].
Fax Model
ADF.
5
Copying — Basic operation
Improving copied images
Setting color or black & white copying
Refer to Making copies above and in step 4, set color or black & white copying as follows:
For color copying: Press [Color] to turn on its light.
For black & white copying: Press [B&W] to turn on its light.
Chapter 5 Copying —Basic operation 5-1
Page 40

Adjusting the image quality (resolution)
Refer to Making copies on p. 5-1 and in step 4, adjust the image quality as follows:
1 Press [Image Quality].
2 Use [22
22
] or [3333] to select the image quality.
• In black & white mode, select:
–<B&W TEXT> for text-only documents.
–<B&W PHOTO> for photographs.
–<B&W DRAFT> for high-speed copying at a lower resolution.*
• In color mode, select:
–<COLOR NORMAL> for color text-only documents.**
–<COLOR FINE> for color photographs.
–<COLOR FAST> for high-speed color copying at a lower resolution.*
3 Press [OK].
NOTE
• When using <COLOR FAST>, if the color output is different from that expected, select <COLOR NORMAL>
or <COLOR FINE> and try copying again.
Adjusting the contrast (density)
Contrast (density) is the degree of difference between light and dark. A high contrast setting
will make blacks darker and whites brighter, whereas a low contrast setting will make the
differences between black and white less marked.
Refer to Making copies on p. 5-1 and in step 4, adjust the contrast as follows:
1 Press [Contrast].
2 Use [22
3 Press [OK].
22
] or [3333] to select the contrast.
More information
For detailed information on all copying features, refer to the User’s Guide.
* This setting is only available when <PLAIN> is selected as the print media type ( p. 2-3).
** This setting is not available when <GLOSSY> or <PHOTO> is selected as the print media type ( p. 2-3).
5-2 Copying —Basic operation Chapter 5
Page 41
Chapter
Fax Model
Faxing from your computer
6
—Basic operation
Sending a fax
With the fax driver, you can send documents created in applications that support document
printing.
You can only send to one recipient at a time.
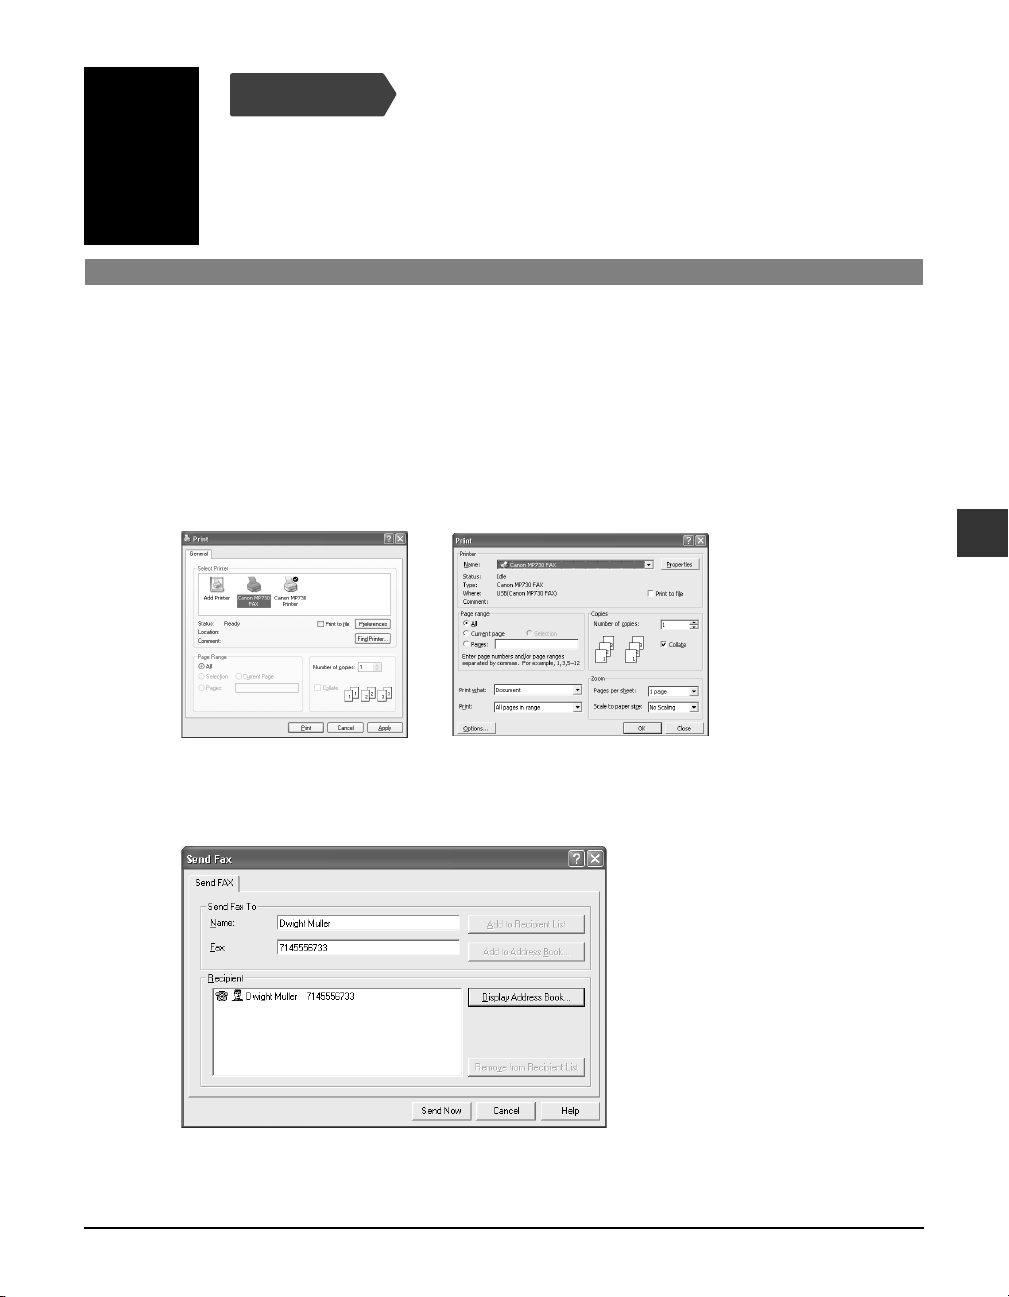
1 With the document you want to fax open in an application (such as Word), click the
Print command. (In most Windows applications, the command is [Print] on the File
menu.)
[Print] dialog box [Print] dialog box in Word
2 In the [Print] dialog box, in the [Select Printer] or [Name] list, select [Canon MP730
FAX], then click [Print] or [OK].
6
[Send Fax] dialog box
Chapter 6 Faxing from your computer —Basic operation 6-1
Faxing from your computer — Basic operation
Page 42

3 In the [Send Fax] dialog box, enter the [Name] and [Fax] of the recipient, then click
[Add to Recipient List].
• You can also send by just entering the [Fax] of the recipient.
• You can only enter one recipient.
• You can use 0 through 9, dash (–), and parentheses ( ) etc. in fax numbers ( below).
• You can specify a recipient from the Address Book ( Software Guide).
• If you register a recipient in the Address Book, you can use the information the next time you send
a fax to the same recipient ( Software Guide).
4 Click [Send Now].
Characters and symbols for fax numbers
You can use the following characters and symbols in the faxes you send from your computer or
for a recipient you register in the Address Book.
Character/symbol Explanation
0–9 T # For use in telephone and fax numbers.
, p To place a pause between numbers.
P To place a pause at the end of an array of numbers.
T Numbers after the T will be sent as a tone signal.
. DT detection function (Europe).
R PSTN/PBX switchover function (Europe).
+ - (), space To make the number easier to read. You cannot insert a space at the
front of a number.
More information
For detailed information on all faxing features that can be performed from your computer, refer
to the online help or the Software Guide.
6-2 Faxing from your computer —Basic operation Chapter 6
Page 43
Chapter
Fax Model
Faxing with your machine
7
—Basic operation
Sending faxes from your machine
Before sending faxes
Before sending faxes from your machine, check the following:
Does the document you want to send meet the requirements for loading on the platen
glass or ADF?
For details, see the User’s Guide.
Have you entered the sender information?
Before sending faxes, you can register the date and time, your name and fax/telephone number
so that they are printed at the top of faxes you send. For more details on what sender
information is, see the User’s Guide.
Follow this procedure to enter the sender information:
1 Press [Menu].
2 Use [22
3 Press [OK].
22
] or [3333] to select <USER DATA>.
USER DATA
1.TEL REGISTRATION
7
4 Use [22
5 Press [OK] three times.
6 Use the numeric keys to enter the date (day/month year) and time (in 24-hour
7 Press [OK].
8 Use [22
Chapter 7 Faxing with your machine —Basic operation 7-1
22
] or [3333] to select <FAX SETTINGS>.
DATE & TIME
27/12 2003 15:10
format).
• Enter only the last two digits of the year.
USER SETTINGS
2.DATE SETUP
22
] or [3333] to select <UNIT TELEPHONE #>.
Faxing with your machine — Basic operation
Page 44
9 Press [OK].
UNIT TELEPHONE #
TEL=
10 Use the numeric keys to enter your fax/telephone number (max. 20 digits, including
spaces).
• To enter a plus sign (+) before the number, press [#].
11 Press [OK] twice.
UNIT NAME :A
12 Use the numeric keys to enter your name (max. 24 characters, including spaces).
Uppercase
Key
letter mode
[1] 1
[2] ABCЕДБАГВЖЗ abcедбагвжз 2
[3] DEFDËÉÈÊ def ëéèê 3
[4] GHIÏÍÌÎ ghiïíìî 4
[5] JKL jkl 5
[6] MNOСШЦУТХФ mnoсшцутхф 6
[7]
PQRS
[8]
TUVÜÚÙÛ
[9]
WXYZY
[0] 0
[#]
-.A#!",;:^`_=/|'?$@%&+()[]{}<>
Lowercase
letter mode
6
pqrs 7
tuvüúùû 8
wxyzy 9
Number mode
[T] switches between uppercase letter mode (:A), lowercase letter mode (:a), and number
mode (:1).
• To enter a space: Press [3].
• To delete a character: Press [2].
• To delete an entire entry: Press and hold [2].
13 Press [OK].
14 Press [Stop/Reset].
Have you set the correct telephone line type?
Before using your machine, make sure you have set the correct telephone line type for your
telephone line. If you are unsure of your telephone line type, contact your telephone company.
For ISDN or ADSL connections, contact the telephone company or service provider to confirm
your line type.
NOTE
• You can print the USER’S DATA LIST to check the current setting ( User’s Guide).
7-2 Faxing with your machine —Basic operation Chapter 7
Page 45
Follow this procedure to set the telephone line type:
1 Press [Menu].
2 Use [22
22
] or [3333] to select <USER DATA>.
3 Press [OK].
USER DATA
1.TEL REGISTRATION
4 Use [22
22
] or [3333] to select <FAX SETTINGS>.
5 Press [OK] twice.
USER SETTINGS
1.DATE & TIME
6 Use [22
22
] or [3333] to select <TEL LINE TYPE>.
7 Press [OK].
TEL LINE TYPE
TOUCH TONE
8 Use [22
22
] or [3333] to select the telephone line type.
• Select:
–<TOUCH TONE> for tone dialing.
–<ROTARY PULSE> for pulse dialing.
9 Press [OK].
10 Press [Stop/Reset].
Sending methods
There are two methods of sending faxes from your machine:
Memory sending ( below)
Manual sending ( User’s Guide)
7
Memory sending
You should normally use memory sending to send documents fast and efficiently.
Follow this procedure for memory sending:
1 Load the document on the platen glass or ADF.
• For details on how to load documents, see p. 2-1.
2 Press [Fax].
3 Press [Color] for color sending, or [B&W] for black & white sending.
4 Press [Image Quality].
Chapter 7 Faxing with your machine —Basic operation 7-3
Faxing with your machine —Basic operation
Page 46

5 Use [22
22
] or [3333] to select the resolution.
• In black & white mode, select:
–<B&W STANDARD> for text-only documents.
–<B&W FINE> for fine-print documents.
–<B&W PHOTO> for photographs.
• In color mode select:
–<COLOR STANDARD> for normal color documents.
–<COLOR FINE> for fine color documents.
6 Press [OK].
7 Press [Contrast].
8 Use [22
22
] or [3333] to select the contrast.
9 Press [OK].
10 Dial the recipient’s number.
• For details on the different dialing methods, see the User’s Guide.
11 Press [Start].
If you are using the platen glass, you will be prompted when the page has been
scanned. Load the next page (for a multipage document) and press [Start]. To start
sending, press [OK].
To cancel memory sending: Press [Stop/Reset] and follow any instructions in the LCD.
Speed dialing
You can simplify dialing of fax/telephone numbers by registering numbers under speed dialing
keys or codes.
Registering one-touch speed dialing
Before you can use one-touch speed dialing ( p. 7-6), you need to register the recipients’
numbers. Follow this procedure:
1 Press [Menu].
2 Use [22
22
] or [3333] to select <USER DATA>.
3 Press [OK] three times.
1-TOUCH SPD DIAL
01=
4 Use [22
22
] or [3333] to select a one-touch speed dialing key (01 to 08).
• You can also select a key by pressing the one-touch speed dialing key.
5 Press [OK] twice.
TELEPHONE NUMBER
TEL=
6 Use the numeric keys to enter the fax/telephone number you want to register (max.
120 digits*, including spaces and pauses).
• For details on how to enter or delete numbers, see p. 7-1.
* Korea : 40 digits
7-4 Faxing with your machine —Basic operation Chapter 7
Page 47
7 Press [OK] twice.
NAME :A
8 Use the numeric keys to enter a name for the one-touch speed dialing key (max. 16
characters, including spaces).
• For details on how to enter or delete characters, see p. 7-1.
9 Press [OK].
10 To continue registering one-touch speed dialing keys, repeat the procedure from
step 4.
-orPress [Stop/Reset] to return to standby mode.
NOTE
• Use the destination labels provided with your machine to label the one-touch speed dialing keys with
the recipients’ names.
• For a list of the recipients you have registered, print the one-touch speed dialing list ( User’s Guide).
To change or delete an entry: Refer to the User’s Guide.
Registering coded speed dialing
Before you can use coded speed dialing ( p. 7-7), you need to register the recipients’ numbers.
Follow this procedure:
1 Press [Menu].
2 Use [22
22
] or [3333] to select <USER DATA>.
3 Press [OK] twice.
7
TEL REGISTRATION
1.1-TOUCH SPD DIAL
4 Use [22
22
] or [3333] to select <CODED SPEED DIAL>.
5 Press [OK].
CODED SPEED DIAL
00=
6 Use [22
22
] or [3333] to select a coded speed dialing code (00 to 99).
• You can also select a code by pressing [Coded Dial] and then using the numeric keys to enter a
two-digit code.
7 Press [OK] twice.
TELEPHONE NUMBER
TEL=
8 Use the numeric keys to enter the fax/telephone number you want to register (max.
120 digits*, including spaces and pauses).
• For details on how to enter or delete numbers, see p. 7-1.
* Korea : 40 digits
Chapter 7 Faxing with your machine —Basic operation 7-5
Faxing with your machine —Basic operation
Page 48
9 Press [OK] twice.
NAME :A
10 Use the numeric keys to enter a name for the coded speed dialing code (max. 16
characters, including spaces).
• For details on how to enter or delete characters, see p. 7-1.
11 Press [OK].
12
To continue registering coded speed dialing codes, repeat the procedure from step 6.
-orPress [Stop/Reset] to return to standby mode.
NOTE
• For a list of the recipients you have registered, print the coded speed dialing list ( User’s Guide).
To change or delete an entry: Refer to the User’s Guide.
Using speed dialing
Follow this procedure to dial speed dialing number:
One-touch speed dialing:
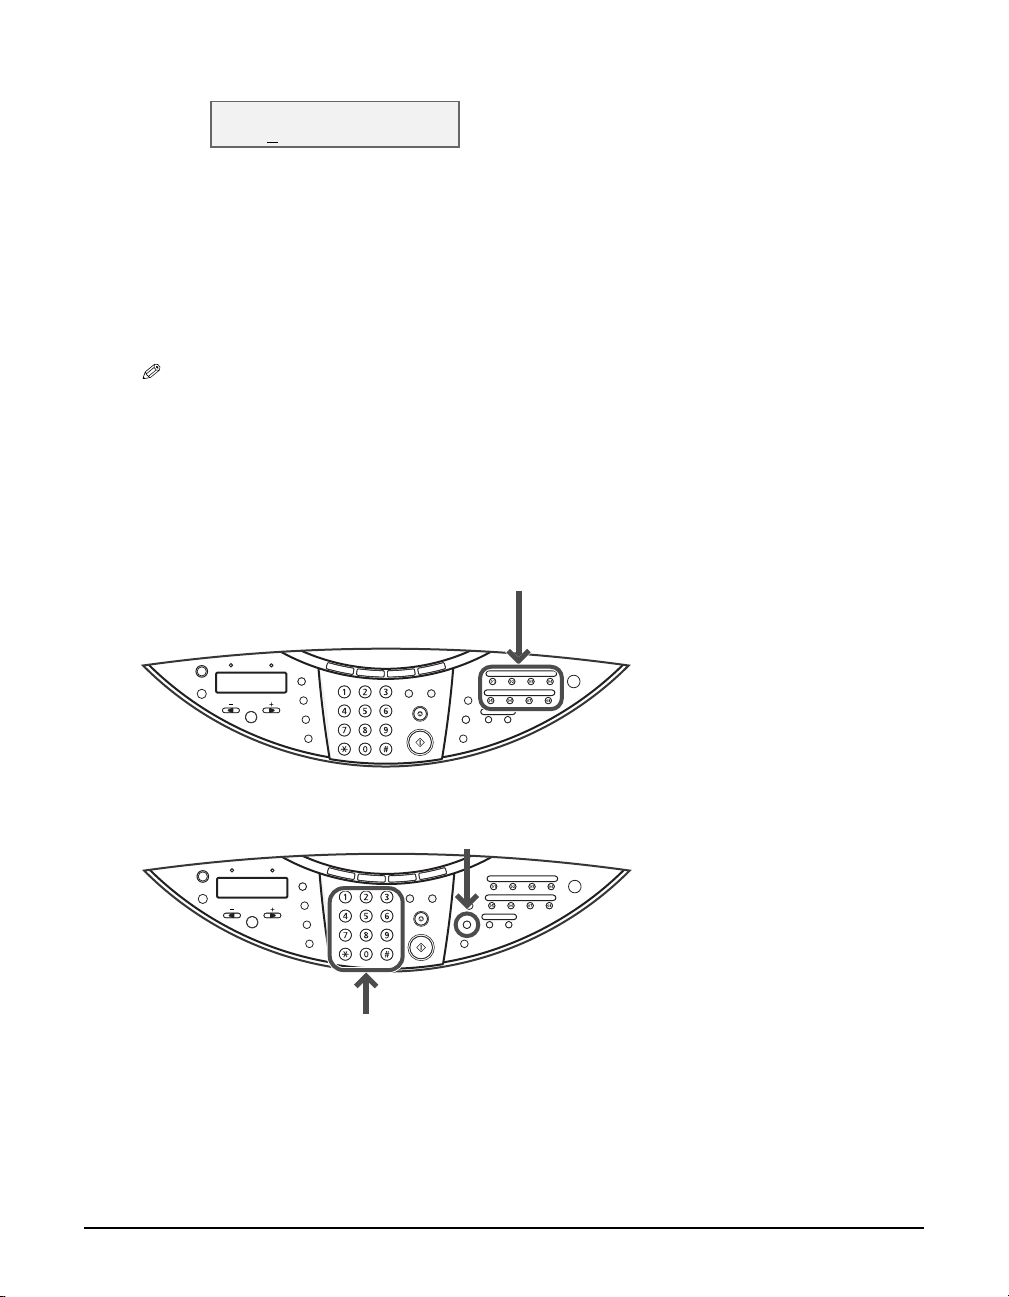
1 Press the one-touch speed dialing
key assigned to the number you
want to dial (01 to 08).
Coded speed dialing:
1 Press [Coded Dial].
2 Use the numeric keys to enter the two-digit
code assigned to the number you want to dial
(00 to 99).
If you use speed dialing to send a fax, press [Start] after dialing, or wait a few seconds for the
machine to automatically begin scanning your document for sending. If you do not want the
machine to begin scanning automatically, disable the <TIME OUT> setting ( p.11-4).
7-6 Faxing with your machine —Basic operation Chapter 7
Page 49

Receiving faxes to your machine
Before receiving faxes to your machine
Before receiving faxes, check the following:
Is the power turned on?
You cannot receive faxes if the power is turned off.
Is the correct paper loaded in the multi-purpose tray?
Load plain paper in the multi-purpose tray. For details, see the Set-Up sheet or User’s Guide.
Have you set the paper size setting?
Before receiving faxes, you must set the paper size setting for the paper loaded in the
multi-purpose tray. For details, see p. 2-3.
Have you set the receive mode?
Before using your machine to receive faxes, you need to set the receive mode according to how
you plan to use your machine.
Follow this procedure to set the receive mode:
1 Press [Fax].
2 Press [Menu].
3 Press [OK].
RECEIVE MODE
FAX ONLY MODE
7
4 Use [22
22
] or [3333] to select the receive mode:
• Select:
–<FAX ONLY MODE> to automatically receive faxes only. Voice calls will be disconnected.
–<NET SWITCH>* if you have subscribed to the Telstra FaxStream™ Duet service (Australia) or the
Telecom FaxAbility service (New Zealand).
–<MANUAL MODE> for the machine to ring for fax and voice calls. Fax calls must be answered
manually.
–<ANS.MACHINE MODE> to receive faxes automatically and route voice calls to an answering
machine connected to your machine.
–<FAX/TEL AUTO SW> to automatically switch between fax and voice calls. Faxes will be received
automatically, and the machine will ring for voice calls. A phone connected to your machine will
not ring.
5 Press [OK].
• The receive mode will be displayed on the bottom left of the LCD.
27/12 2003 SAT 15:30
FaxOnly STANDARD
Have you connected the external devices correctly?
Depending on how you plan to use your machine, you may need to connect an external device
to it. For details on the different connection combinations, refer to the Set-Up Sheet.
* This setting is only available in Australia and New Zealand.
Chapter 7 Faxing with your machine —Basic operation 7-7
Faxing with your machine —Basic operation
Page 50

Receiving faxes manually
If you have set <MANUAL MODE>, follow this procedure to receive a fax manually:
1 Make sure you have set <MANUAL MODE> (
2 Make sure you have connected a telephone to your machine (
3 When the telephone rings, pick up the handset.
4 • If you hear a person’s voice:
Start your conversation. If the caller wants to send a fax after talking to you, ask
them to perform the operation to begin sending. When you hear a slow beep tone,
press [Start] on your machine to begin receiving the fax. Hang up the handset.
• If you hear a slow beep tone or silence:
Someone is trying to send you a fax. If your telephone is close to your machine,
press [Start] on the machine to begin receiving the fax. Hang up the handset. If you
are far from your machine, dial 25 (the remote receiving ID) on your telephone and
hang up.
NOTE
• You can customize remote receiving by enabling/disabling it, or by changing the remote receiving ID
( <REMOTE RX>, p. 11-5).
• If you have an answering machine connected to your machine that can carry out remote-control
operations (controlling your answering machine from a remote telephone), the security code for this
function may be the same as the remote receiving ID. If so, make sure you change the machine’s remote
receiving ID to make it distinct from the answering machine’s security code ( <REMOTE RX ID>,
p. 11-5).
p. 7-7).
Set-Up Sheet).
Canceling receiving
Press [Stop/Reset] and follow any instructions in the LCD.
More information
For detailed information on all faxing features that can be performed directly from your
machine, refer to the User’s Guide.
7-8 Faxing with your machine —Basic operation Chapter 7
Page 51

Chapter
Scanning
8
—Basic operation
Scanning methods
There are three methods of scanning images to your computer:
Using the MP Toolbox
Using a TWAIN- or WIA- (Windows XP) compliant Windows application
Using the [Scan] key on the operation panel
This section explains how to scan using the [Scan] key on the operation panel.
Using the [Scan] key on the operation panel
By pressing the [Scan] key on the machine, you can scan documents to your computer.
Pressing the [Scan] key has the same effect as clicking the [Save] key in the MP Toolbox.
1 Load the document on the platen glass or ADF.
• For details on how to load documents, see p. 2-1.
2 Press the [Scan] key on the operation panel.
The document will be scanned.
The MP Toolbox and the MP Toolbox settings dialog box will open but the document will
scan without you having to click [Scan].
Your document will be processed according to your settings.
When you use the [Scan] key for the first time, a folder with the scanning date will be
created in the [My Pictures] folder in the [My Documents] folder, and your document will
be saved in this folder. If there is no [My Pictures] folder, the folder with the scanning date
will be created in the [My Documents] folder and your document saved in this folder.
Fax Model
8
Scanning — Basic operation
More information
For detailed information on all scanning features, refer to the online help or the Software Guide.
Chapter 8 Scanning —Basic operation 8-1
Page 52

8-2 Scanning —Basic operation Chapter 8
Page 53

Chapter
9
Maintenance
Replacing ink tanks
When to replace an ink tank
If one of the following messages appears in the LCD, replace the necessary ink tank(s) as
described on p. 9-2:
<C INK EMPTY> . . . . . . . .Cyan ink tank empty
<M INK EMPTY>. . . . . . . .Magenta ink tank empty
<Y INK EMPTY> . . . . . . . .Yellow ink tank empty
<Bk INK EMPTY> . . . . . . .Black ink tank empty
If more than one ink tank is empty, several letters may appear (e.g. <C Y INK EMPTY>).
If no message appears but print quality is below standard, refer to the flow chart to determine
the problem ( p. 9-3).
Guidelines
CAUTION
• Keep the printhead and ink tanks out of the reach of children. If a child inadvertently ingests ink,
consult a physician immediately.
• Damage caused by using refilled ink tanks is not covered by Canon’s warranty. To ensure
optimum printing results and to avoid printing problems, Canon recommends using original
Canon ink tank only.
• Ink tanks compatible with the machine are as follows:
–Black ink tank (BCI-3eBK) – Cyan ink tank (BCI-3eC)
–Magenta ink tank (BCI-3eM) –Yellow ink tank (BCI-3eY)
• Replaced ink tanks should be new. If you install partially used ink tanks, the nozzles may block
and the ink tank replacement warning may not be accurate.
• For best ink quality, use ink tanks within one year of purchase. After placing ink tanks in the
machine, use the ink tanks within six months.
• Do not open the ink tank packaging until ready to install.
• Do not touch printed paper with wet hands or spill liquids on it as the ink may run.
• Replace ink tanks quickly and do not leave them out in the open. Doing so may cause the ink
tank not to function properly when reinstalled in the machine.
9
Maintenance
Chapter 9 Maintenance 9-1
Page 54
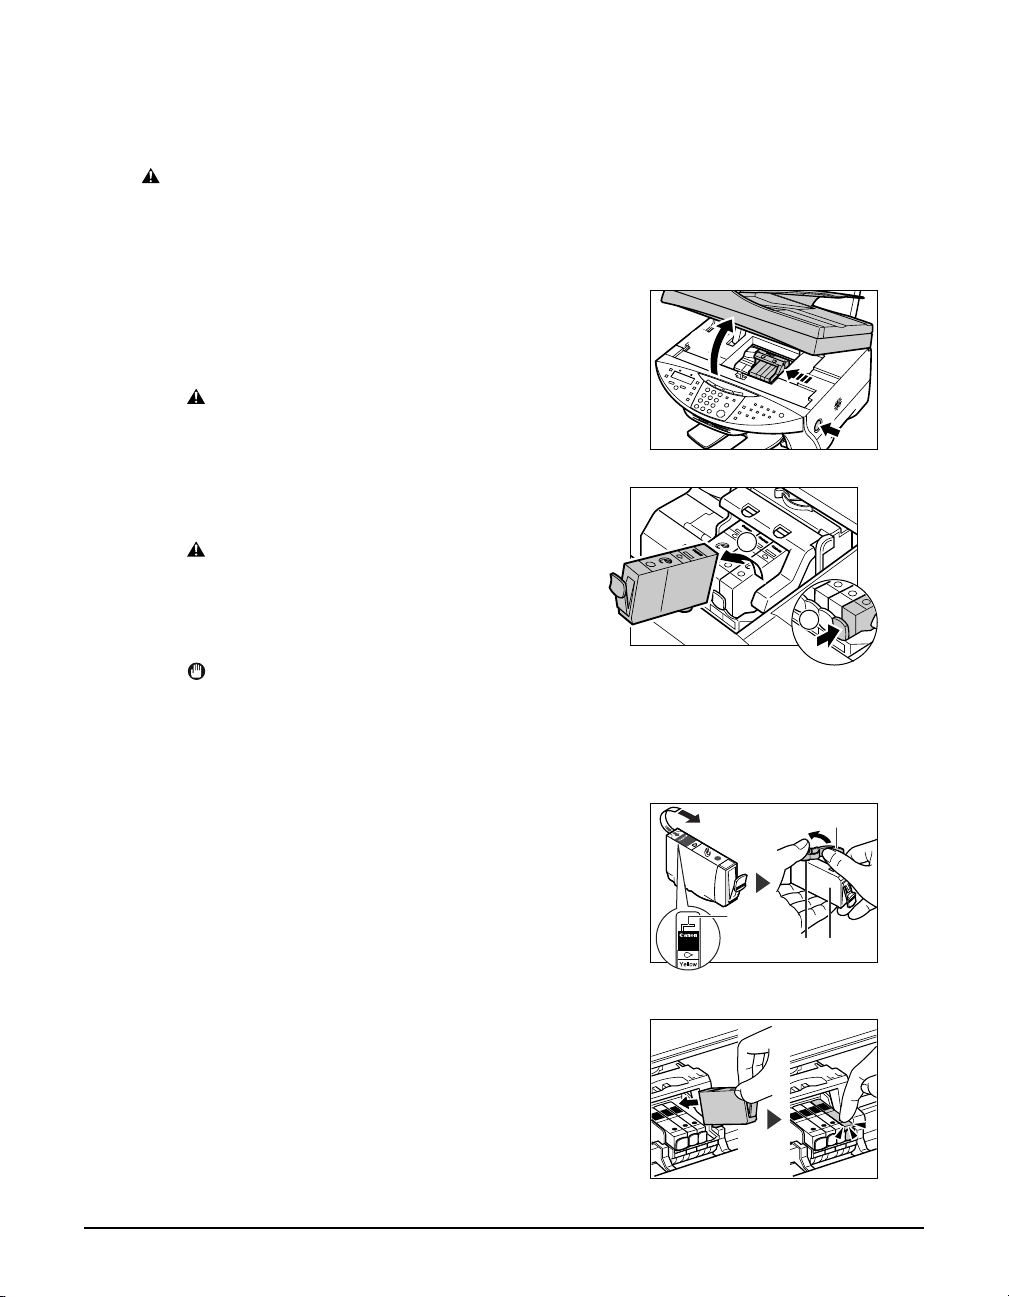
Replacing an ink tank
BCI-3eY
Ink Tank
This section describes how to replace an ink tank. Before replacing an ink tank, be sure to read
the section When to replace an ink tank ( p. 9-1).
CAUTION
• Do not replace ink tanks while the machine is printing or performing another operation.
Follow this procedure to replace an ink tank:
1 Make sure the power is turned on.
2 Press [Open] q and lift up the scanning unit
w.
• The printhead holder automatically moves to the
center of the machine.
CAUTION
• Do not try to manually move or stop the
printhead holder.
• Do not touch any metal parts.
3 Press on the tab to release the empty ink
tank q, then remove it from its slot w.
CAUTION
• Do not remove the printhead from the
machine.
• If several ink tanks need replacing, remove
and replace each one individually.
w
w
q
q
IMPORTANT
• Discard the empty ink tank immediately
according to local laws and regulations for
disposal of consumables.
• Handle ink tanks carefully to avoid staining
clothing or the surrounding area.
4 On the new ink tank, pull the orange tape in
the direction of the arrow and remove the
plastic wrapper so you can see the air hole
PULL
ULL
P
k
n
a
Y
T
e
k
3
n
I
IC
B
w
llo
e
Y
n
a
p
a
J
n
i
e
d
a
M
PUSU
A. Hold the ink tank as shown and remove
the protective cap B.
• To avoid spilling ink, never press on the long sides
of the ink tank C.
• Once you remove the cap B, do not touch the ink
port D.
A
5 Insert the ink tank into the empty slot on
the printhead. Press down gently on the ink
tank until an audible click is heard.
• Make sure the ink tank is the correct color for the
slot.
6 Close the scanning unit until it locks into place.
9-2 Maintenance Chapter 9
B
D C
Page 55
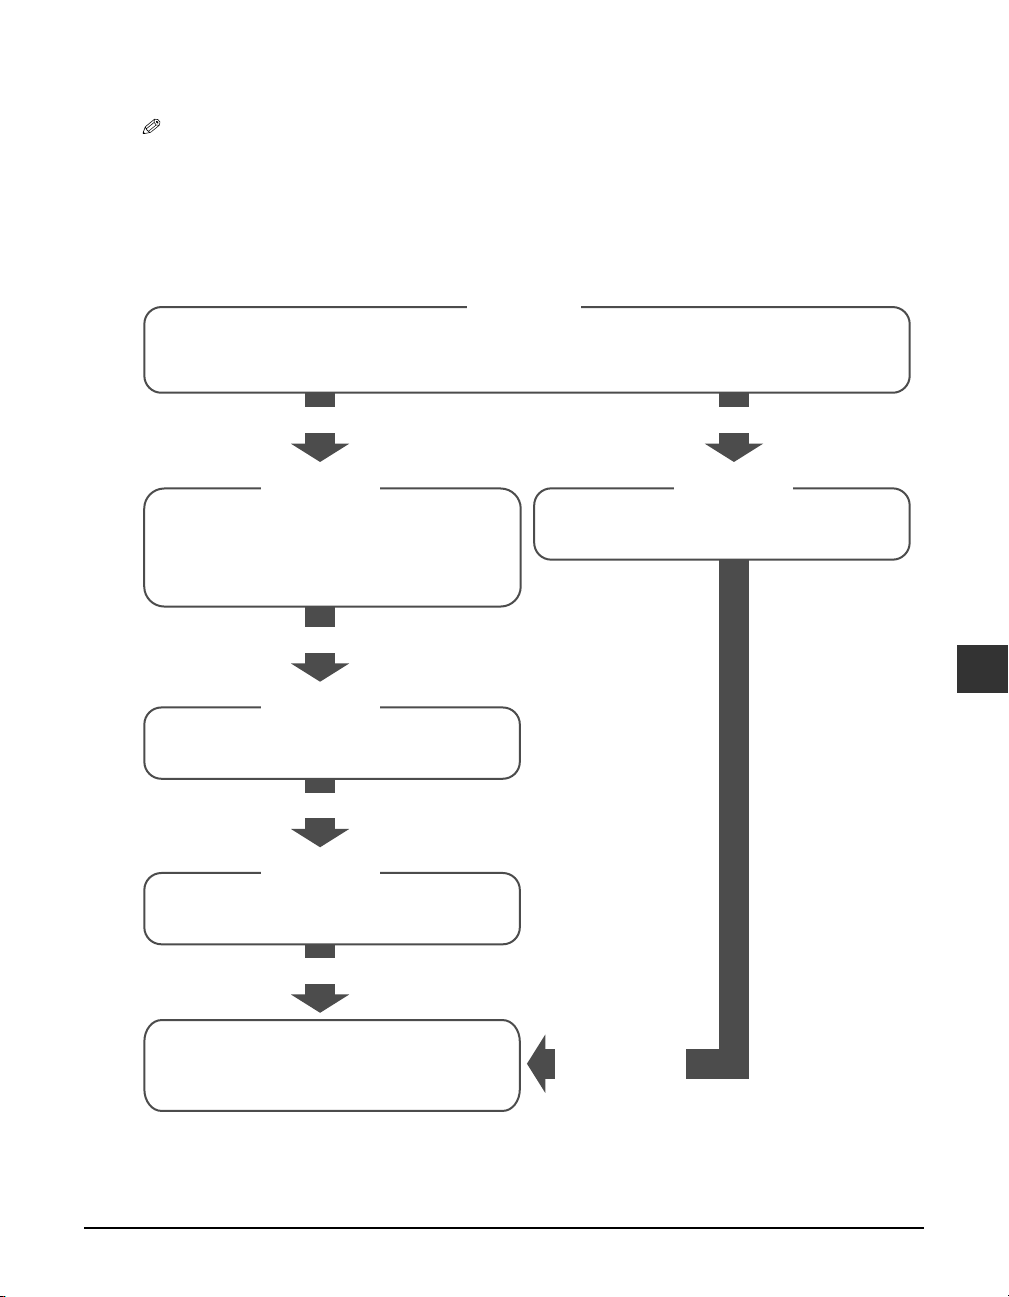
Maintaining the printhead
NOTE
• Before doing the following, open the scanning unit, press “PUSH” on the ink tanks and check that they
are securely inserted. Check how much ink is left and if there is none, replace the ink tank ( p. 9-1).
Flowchart of printhead maintenance
If print quality deteriorates, follow this procedure:
Step 1
Print the nozzle check pattern ( p. 9-4).
This pattern allows you to check if the ink is coming out of the printhead nozzles
correctly and if the printhead is aligned.
The ink is not coming out correctly.
Step 2 Step 2
Perform normal printhead cleaning
(<HEAD CLEANING> setting) ( p. 9-4).
You can perform normal printhead
cleaning up to three times.
If there is no improvement.
Step 3
Perform deep printhead cleaning (<HEAD
REFRESHING> setting) ( p. 9-4).
If there is no improvement.
Step 4
Replace the ink tank(s) ( p. 9-1).
If there is no improvement.
The printhead is misaligned.
Align the printhead ( p. 9-5).
9
Maintenance
The printhead may be damaged. Contact
your local authorized Canon dealer or the
Canon help line.
Chapter 9 Maintenance 9-3
If there is no
improvement.
Page 56
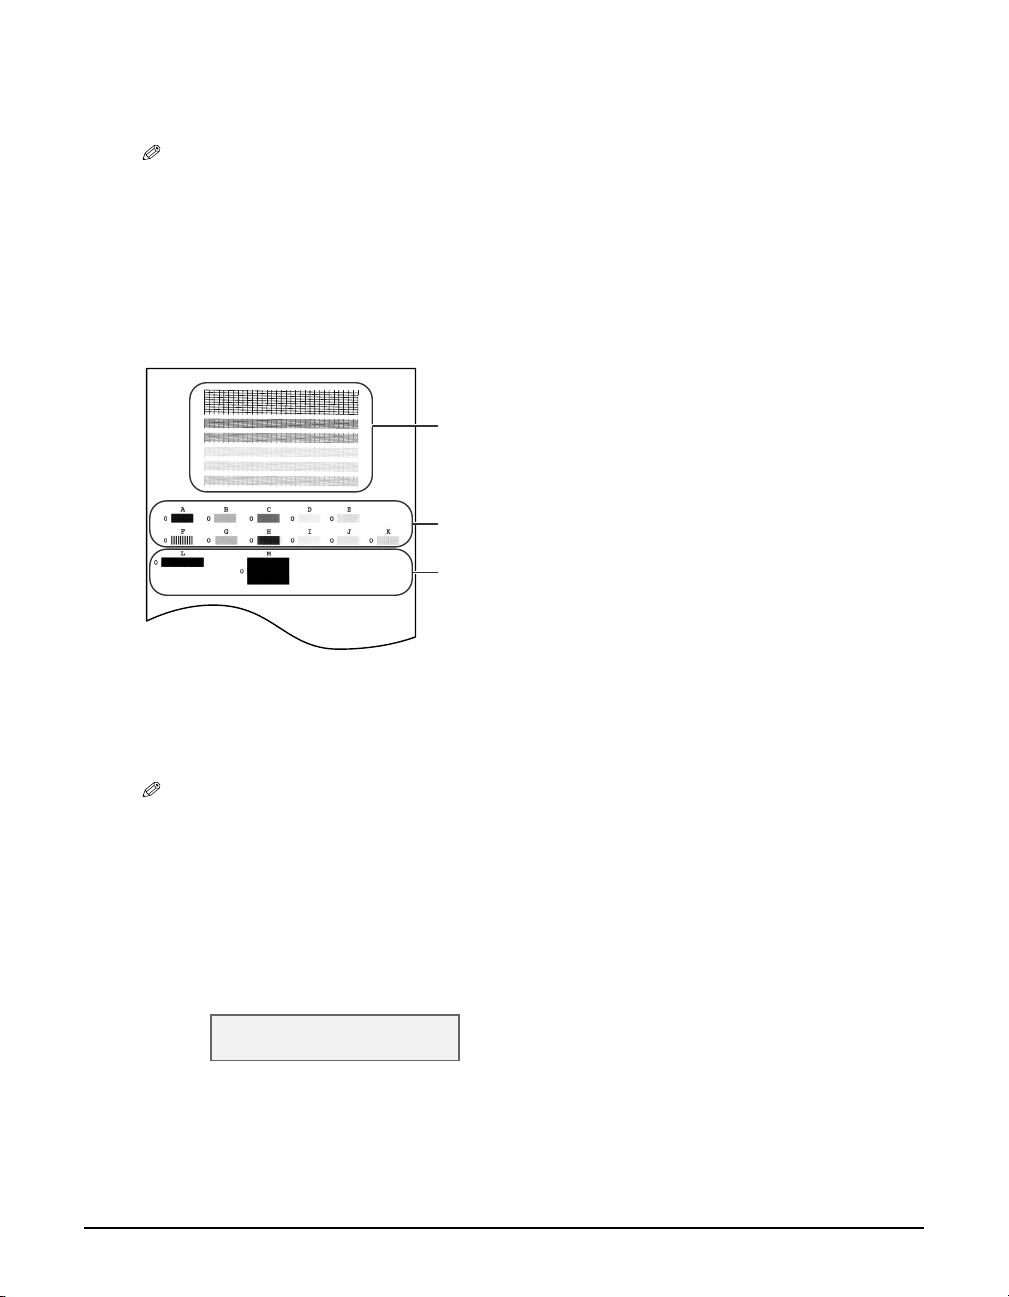
Printing the nozzle check pattern
The nozzle check pattern shows if each printhead nozzle is operating properly.
NOTE
• You can also print the nozzle check pattern from your computer ( Software Guide).
Follow this procedure to print the nozzle check pattern from the machine:
1 Load A4 plain paper in the multi-purpose tray.
2 Press [Menu].
3 Use [22
4 Press [OK] twice.
22
] or [3333] to select <MAINTENANCE>.
Nozzle check pattern
If the pattern is broken, missing, or a specific color is not
printed, see Cleaning the printhead, below.
Printhead position
If the pattern is not uniform, align the printhead ( p. 9-5).
If lateral lines are visible, align the printhead ( p. 9-5).
Cleaning the printhead
If the printed nozzle check pattern is broken, missing, or a specific color is not printed, clean the
printhead.
NOTE
• Cleaning the printhead consumes a small amount of ink. Cleaning too often reduces the amount of ink
in the ink tanks.
• You can also clean the printhead from your computer ( Software Guide).
Follow this procedure to clean the printhead from the machine:
1 Press [Menu].
2 Use [22
3 Press [OK].
4 Use [22
5 Press [OK].
9-4 Maintenance Chapter 9
22
] or [3333] to select <MAINTENANCE>.
MAINTENANCE
1.NOZZLE CHECK
22
] or [3333] to select the cleaning setting you want.
• Select:
–<HEAD CLEANING> for normal printhead cleaning.
–<HEAD REFRESHING> for deep printhead cleaning.
• For details on which to select, see p. 9-3.
Page 57
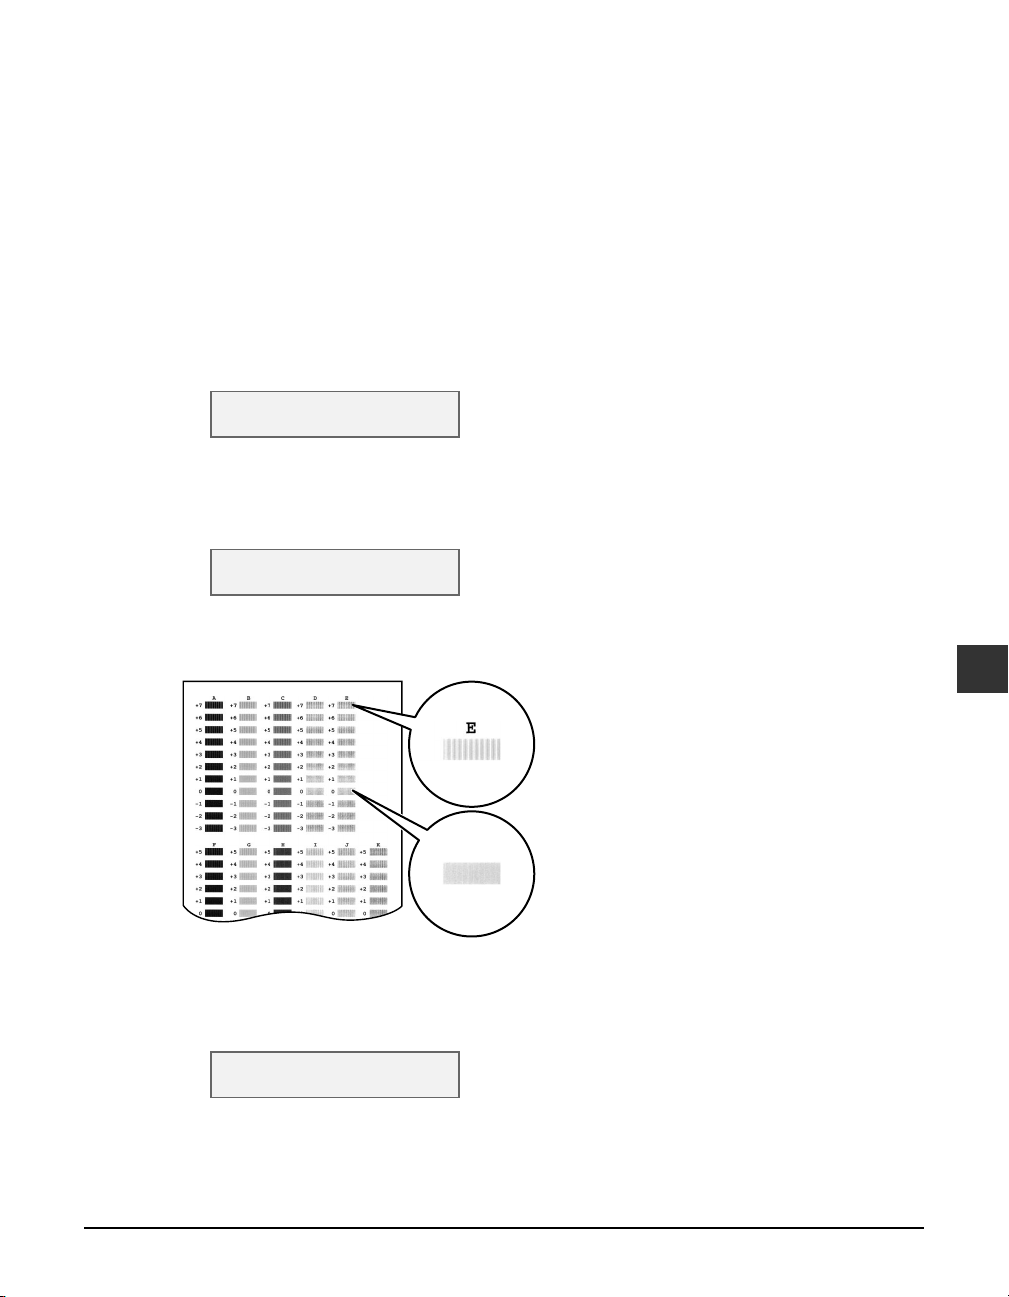
Aligning the printhead
To align the printhead after you have just installed it, follow the procedure in the Set-Up Sheet.
If you have printed the nozzle check pattern ( p. 9-4) and determined that the printhead
needs aligning, align it from the operation panel ( below) or from the software ( Software
Guide).
Follow this procedure to align the printhead from the operation panel:
1 Load A4 plain paper in the multi-purpose tray.
2 Press [Menu].
3 Use [22
4 Press [OK].
22
] or [3333] to select <MAINTENANCE>.
MAINTENANCE
1.NOZZLE CHECK
5 Use [22
22
] or [3333] to select <ALIGN PRINT HEAD>.
6 Press [OK].
• The machine prints a horizontal pattern.
CHANGE H VALUE
A 0
7 In column A on the printout, note which box has the most solid image. Note the value
next to this box and use [2222] or [3333] to enter it.
BAD SAMPLE
Least solid
box
GOOD SAMPLE
Most solid
box
8 Press [OK].
9 Repeat steps 7 and 8 for columns B to K.
When all values have been entered, the LCD displays the following:
9
Maintenance
PRINT VERT.PATTERN?
YES=() NO= (#)
10 Press [TT
Chapter 9 Maintenance 9-5
TT
].
Page 58
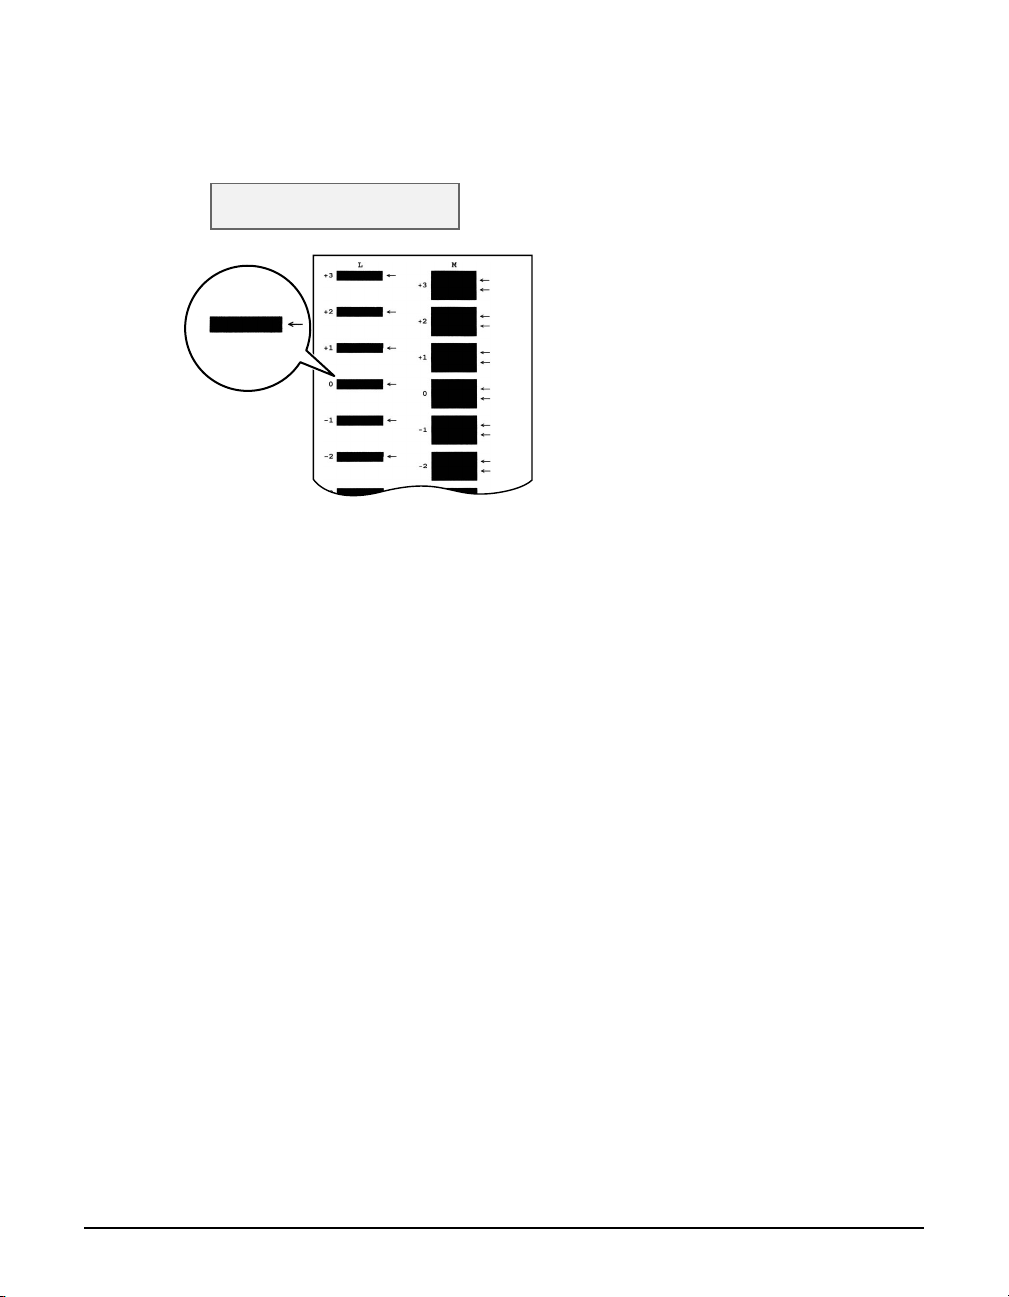
11 When the horizontal pattern has been adjusted, the machine will print a vertical
pattern.
12 In column L on the printout, note which box has the most solid image. Note the value
next to this box and use [2222] or [3333] to enter it.
CHANGE V VALUE
L 0
GOOD SAMPLE
Most solid
box
13 Press [OK].
14 Repeat steps 12 and 13 for column M.
More information
For detailed information on cleaning your machine, refer to the User’s Guide.
9-6 Maintenance Chapter 9
Page 59

Chapter
10
Troubleshooting
Problems installing and removing software
See below if you were unable to install or remove the software.
[MP Drivers/MP Toolbox]
Cannot install the software.
1. Have you followed the instructions in the Set-Up Sheet to install the software?
If you have not followed the installation procedure correctly, try reinstalling the software. If there was
an error during installation and installation was not completed, restart your computer and try
reinstalling the software.
2. Are any other applications open?
If you have other applications open, quit all of these and try reinstalling the software.
3. Have you installed an earlier version of the software (version 4.4 or earlier)? (Is Canon MultiPASS
registered as the startup item in the Start menu program?)
Remove the old version of the software following the instructions in the Software Guide of that version
and try reinstalling the new version.
[MP Toolbox only]
Installation or removal of the MP Toolbox cannot be completed.
1. To prepare for forced re-installation, on the Windows desktop, double-click [My Computer].
Open the CD-ROM icon, then double-click [\MP\English\Toolbox\Setup\FrcInst.exe].
2. Return to a folder a level above, then double-click [\MP\English\Toolbox\Setup.exe] to
re-install. ( Software Guide)
[MP Drivers only]
Removal of the MP drivers takes too long (Windows XP).
Removal of the software will take longer if an application such as a virus checker is running. Quit any
applications (including virus checkers) before removing the software.
Removal of the software was completed, but [Canon] remains.
When removing the software, if you remove the MP drivers before removing the MP Toolbox,
[Canon] will remain displayed in [(All) Programs]. To remove [Canon], in the Start menu, open
[Taskbar and Start Menu Properties] and remove it from here.
The message <Version conflict> appears on your computer (Windows 98).
If the message <Version conflict> or <Windows 98 file language or ...> appears during installation,
click [Yes] or [No]. Whichever you click, installation thereafter will continue trouble-free.
This message will appear if you have Photoshop installed on your computer.
10
Troubleshooting
Chapter 10 Troubleshooting 10-1
Page 60

Cannot use the software after upgrading to Windows XP.
If the software was installed in Windows 98/Me/2000 and you upgraded to Windows XP without
removing the software, the machine may not be able to be recognized. Remove the software and
then reinstall it ( Software Guide).
In [Device Manager], green mark “?” is displayed (Windows Me).
Under [Device Manager], green mark “?” is displayed on [USB Composite Device] in [USB (Universal
Serial Bus) Controller] in Windows Me. However, this is not a problem so continue to use it as is.
Problems turning on the computer
See below if you cannot start your computer.
Computer will not start.
Did you turn on your computer with a memory card inserted in the machine?
If a memory card is inserted in the machine and the machine is connected to the computer, your
computer may not start depending on its settings.
In the computer’s BIOS settings, if you set up the order so that the hard disk that starts Windows
starts before the USB device, your computer will start even with a memory card inserted in the
machine. For details on BIOS settings, refer to your computer’s documentation.
Problems printing from your computer
For detailed information on “Problems printing from your computer”, refer to the User’s
Guide or the Software Guide.
Copying problems
See below if you are having problems copying.
For printing-related problems, see the items marked with in Problems printing from your
computer, above.
Cannot make a copy (the document or paper will not feed into the machine).
1. Is there anything displayed in the LCD?
If nothing is displayed, see p. 10-9.
2. Is the Alarm light blinking?
If it is blinking, see p. 10-12.
3. Is the document loaded correctly?
Check that the document is loaded correctly on the platen glass or ADF ( p. 2-1).
4. See Paper does not feed properly on the User’s Guide.
5. Are the ink tanks installed correctly?
Press [open], and lift up the scanning unit. Press “PUSH” on the ink tank, and set the ink tank firmly.
6. Print the nozzle check pattern ( Maintaining the printhead, p. 9-3).
Paper comes out but there is nothing copied on it.
1. Is the document loaded correctly?
If placing the document on the platen glass, the side to be copied should be face down. If
placing the document in the ADF, the side to be copied should be face up.
10-2 Troubleshooting Chapter 10
P
Fax Model
Fax Model
Page 61
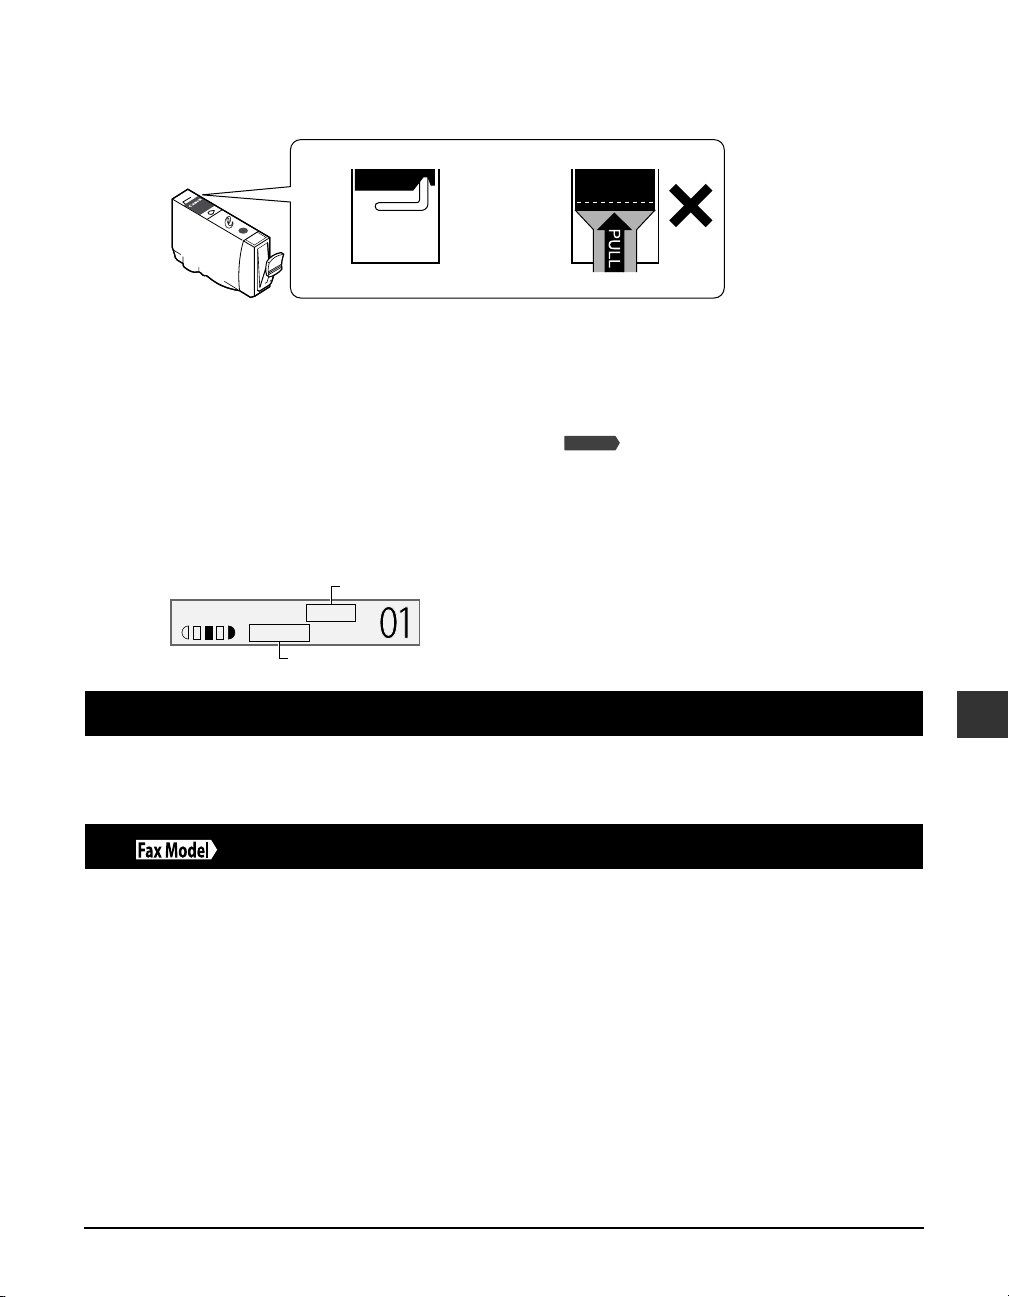
2. Has ink run out?
If nothing prints or one of the colors does not print, check if the ink tanks are empty. Replace the ink
tank(s) if necessary. Also, make sure the orange tape has been completely removed from the ink tanks.
Correct Tape not removed completely
Ink Tank
BCI-3eY
w
llo
e
Y
SU
Made in Japan
U
P
Remove the tape up to the perforations
3. Print the nozzle check pattern ( Maintaining the printhead, p. 9-3).
Copy quality is poor (or documents are printed with streaks).
1. Are you copying a document or photograph printed from your machine?
Image quality may be poor when you copy a document or photograph printed from your machine. Try
printing the photograph from the memory card, or the document from your computer.
2. Clean the scanning area ( User’s Guide) and the ADF area ( User’s Guide).
3. Clean the printhead ( User’s Guide).
4. Does the LCD show the correct type of print media loaded?
If not, set the print media type ( p. 2-2).
5. Is the image quality displayed in the LCD suitable for the document?
If not, set an image quality suitable for the document ( p. 5-2).
Image quality
100% A4 TEXT
PLAIN
Print media type
Fax Model
Problems scanning
For detailed information on “Problems scanning”, refer to the User’s Guide or the Software
Guide.
See below if you are having problems receiving faxes.
Cannot receive a fax, cannot print a fax.
1. Is there anything displayed in the LCD?
2. Is the Alarm light blinking?
3. Is the machine making a noise and is the In Use/Memory light blinking?
Chapter 10 Troubleshooting 10-3
Problems receiving faxes
If nothing is displayed, see p. 10-9.
If it is blinking, see p. 10-12.
A telephone (or other peripheral device such as an answering machine or computer modem) is
connected to the L jack. Reconnect to the t jack (
Set-Up Sheet).
10
Troubleshooting
Page 62

4. Nothing is printed on the printout.
Print the nozzle check pattern (
If the nozzle check pattern does not print properly, see User’s Guide.
If the nozzle check pattern does print properly, see the items marked with in Problems printing from
your computer, p. 10-2.
NOTE
• Once printed, received faxes are automatically deleted from the machine’s memory. Accordingly make
sure the printhead is cleaned periodically ( User’s Guide) to avoid clogging and potential loss of data.
5. In manual receive mode, did you pick up the handset to receive a fax and before replacing the
handset, did you press [Start] or dial the remote receiving ID number?
If you replace the handset without doing either of these things, the call will disconnect.
6. Which receive mode is displayed on the bottom left of the LCD? Have you followed the
procedure for that receive mode correctly?
27/12 2003 SAT 15:00
FaxOnly STANDARD
Receive mode
<FAX ONLY MODE>: The machine automatically receives faxes without ringing. You cannot manually
answer calls.
<NET SWITCH>*: If you have subscribed to the Telstra FaxStream™ Duet service (Australia) or the
Telecom FaxAbility service (New Zealand), allows you to have one telephone line with two numbers:
one for fax and one for telephone.
<MANUAL MODE>: The machine rings for both voice and fax calls. If you hear the machine ring, pick
up the handset and either press [Start] or dial the remote receiving ID to receive a fax.
<ANS.MACHINE MODE>: Fax calls are received automatically and voice calls are received by the
answering machine connected to the machine. There are no procedures to follow for receiving faxes.
The answering machine should be connected.
<FAX/TEL AUTO SW>: Fax calls are received automatically and the telephone rings for voice calls. There
are no procedures to follow for receiving faxes. Ringing indicates a voice call so pick up the handset.
7. Are there documents in the machine’s memory?
The memory may be full. Either print or delete documents ( User’s Guide) to free up memory. Then
ask the sender to resend the fax.
8. Was there an error during reception?
Check the LCD for an error message ( User’s Guide).
Print the ACTIVITY REPORT and check for an error ( User’s Guide).
9. Is there a telephone line connected?
Check that the telephone line is correctly connected ( Set-Up Sheet).
User’s Guide).
P
Cannot receive faxes automatically.
1. Is <FaxOnly>, <NET SW.>*, <AnsMode>, or <FaxTel> receive mode displayed on the bottom left
of the LCD?
If <Manual> is displayed, you cannot receive faxes unless you pick up the handset and either press [Start]
or dial the remote receiving ID.
If you want to receive faxes automatically which means not having to do anything when you are sent a fax,
set the receive mode to <FAX ONLY MODE>, <NET SWITCH>*, <ANS.MACHINE MODE>, or <FAX/TEL AUTO
SW> ( p. 7-7).
If set to <ANS.MACHINE MODE>, connect an answering machine to the machine ( Set-Up Sheet) and
check that a message plays when the answering machine answers.
* This setting is only available in Australia and New Zealand.
10-4 Troubleshooting Chapter 10
Page 63
Machine does not switch automatically between voice and fax reception.
1. Is <NET SW.>*, <FaxTel>, or <AnsMode> receive mode displayed on the bottom left of the LCD?
There will be no automatic switching between voice and fax calls unless the receive mode is set to
<NET SWITCH>*, <ANS.MACHINE MODE>, or <FAX/TEL AUTO SW>. If set to <ANS.MACHINE MODE>,
connect an answering machine to the machine ( Set-Up Sheet) and check that a message plays when
the answering machine answers.
2. Is the sender’s fax machine unable to send a CNG signal (the signal which indicates that the call
is a fax call)?
Some fax machines are not able to send CNG signals. If so, receive the fax manually ( p. 7-7).
Quality of received fax is poor.
1. Are you using recommended print media?
For recommended print media, see p. 2-2.
2. Print the nozzle check pattern ( Maintaining the printhead, p. 9-3).
Print the nozzle check pattern ( User’s Guide).
If the nozzle check pattern does not print properly ( User’s Guide).
3. Is <ECM RX> set to <OFF>?
Set <ECM RX> to <ON> ( User’s Guide).
4. The printed fax is poor quality.
See the items marked with in Problems printing from your computer, p. 10-2.
5. Check whether the sender’s fax machine is dirty.
The image quality of the fax is mainly determined by the sender’s fax machine. Contact the sender and
check whether the document cover and platen glass of his fax machine are dirty.
P
Cannot receive a fax in ECM mode.
If you receive a fax in ECM mode, “ECM” will show on the ACTIVITY REPORT. If “ECM” is not shown,
the fax was not received in ECM mode.
1. Is <ECM RX> set to <OFF>?
Set <ECM RX> to <ON> ( User’s Guide).
2. Is the sender’s fax machine ECM-compatible?
If the sender’s fax machine is not ECM-compatible, the fax will be received in standard mode without
error correction.
Repeated errors occur when you receive a fax.
If there is an error, a message will be displayed in the LCD. The ACTIVITY REPORT and RX REPORT will
show “NG” and an error code.
1. Reduce the reception start speed ( User’s Guide).
If there is a bad line or connection, reducing the reception start speed may correct the error.
2. Check whether the sender’s fax machine is operating normally.
Contact the sender and check whether his fax machine is operating normally.
10
Troubleshooting
Problems sending faxes
See the items marked with (machine) if you are having problems sending a fax from the machine.
See the items marked with (computer) if you are having problems sending a fax from
your computer.
Cannot send a fax.
1. Is the machine making a noise and is the In Use/Memory light blinking?
The telephone line is connected to the t jack. Reconnect to the L jack ( Set-Up Sheet).
* This setting is only available in Australia and New Zealand.
Chapter 10 Troubleshooting 10-5
M
C
Page 64

M C
2. Did you set the correct line type?
You can still receive faxes even if the telephone line type is not set correctly. If you can receive but
cannot send, check the telephone line type setting ( p. 7-2).
M C
3. Is there anything displayed in the LCD?
If nothing is displayed, see p. 10-9.
M C
4. Is the Alarm light blinking?
If it is blinking, see p. 10-12.
M C
5. Is the telephone line cord connected properly?
Check that the telephone line cord is connected properly ( Set-Up Sheet).
M C
6. Press [Hook] or pick up the handset of the telephone connected to the machine. Can you hear a
tone?
If not, there is a problem with the telephone line. Contact your telephone company.
M
7. Is the document loaded correctly?
Check that the document is loaded correctly on the platen glass or ADF ( p. 2-1).
M
8. Is one-touch or coded speed dialing registered with fax numbers?
If you are using one-touch or coded speed dialing, check that the fax number is correctly registered
( p. 7-4).
M C
9. Is the number dialed correct?
Check the number and try dialing again.
M C
10. Is the In Use/Memory light blinking? Is the fax recipient shown in the LCD?
Another document is being sent from memory. Wait until the document has been finished sending.
M
11. Was there an error during transmission?
Print the ACTIVITY REPORT and check for an error ( User’s Guide).
M C
12. Is the recipient’s fax machine G3-compatible?
Check that the recipient’s fax machine is G3-compatible. If not, you will be unable to send faxes.
Fax sent is dirty (or documents are printed with streaks).
M
1. Is the document loaded correctly?
Check that the document is loaded correctly on the platen glass or ADF ( p. 2-1).
M
2. Try making a copy.
If you can make a clean copy, it is probably that the recipient’s fax machine is the source of the
problem. Contact the recipient to confirm.
If you are unable to make a clean copy, clean the machine ( User’s Guide).
Cannot send a fax in ECM mode.
If you send a fax in ECM mode, “ECM” will show on the ACTIVITY REPORT. If “ECM” is not shown, the
fax was not sent in ECM mode.
M C
1. Is <ECM TX> set to <OFF>?
Set <ECM TX> to <ON> ( User’s Guide).
2. Is the recipient’s fax machine ECM-compatible?
If the recipient’s fax machine is not ECM-compatible, the fax will be sent in standard mode without
error correction.
Repeated errors occur when you send a fax.
M C
1. Reduce the transmission start speed ( User’s Guide).
If there is a bad line or connection, reducing the transmission start speed may correct the error.
10-6 Troubleshooting Chapter 10
Page 65

See below if you have problems using the telephone.
Telephone problems
Cannot dial.
1. Is there anything displayed in the LCD?
If nothing is displayed, see p. 10-9.
2. Is the Alarm light blinking?
If it is blinking, see p. 10-12.
3. Is there a telephone line correctly connected?
Check that the telephone line is correctly connected ( Set-Up Sheet).
4. Did you set the correct telephone line type?
Make sure the machine is set for the correct telephone line type ( p. 7-2).
Telephone disconnects during a call.
This will happen if the power cord is not connected securely to the machine and wall outlet.
Check that the power cord is securely inserted into the machine and wall outlet, and that the power
is on ( Set-Up Sheet).
If the machine is connected to a table tap, OA tap or extension cord, make sure they are connected
correctly and, if there is a power switch, that it is on.
Problems using a memory card
See below if the memory card is not recognized when inserted into the machine’s slot, or if
the image data is not being read.
Memory card is not recognized.
1. Is the memory card securely inserted into the machine’s slot?
2. Is the memory card inserted into the correct slot?
For details on which slot to insert the memory card, see p. 4-2.
3. The memory card is not recognized although it is inserted securely into the machine’s slot.
Remove and reinsert the memory card as explained on p. 4-3.
4. Are there any images on the memory card?
Check if there is any image data on the memory card using your digital camera or computer.
5. Is the image data valid?
If standby mode is displayed in photo print mode, there are valid images on the memory card. If a
message is displayed, see the User’s Guide.
6. Try again with another memory card.
If you can print without any problems using a different memory card, the first memory card may be
damaged. In this case, reformatting the memory card with a digital camera may fix the problem.
However, please note that when you reformat the memory card with a digital camera, all the data will
be deleted. If you can read the image data on the computer, copy the image data to your computer
before reformatting the memory card.
“?” is printed in the index.
Yellow “?”: The photograph data is large. Printing of this photograph may take a long time when
printing in single frame, frame range, or all frame mode.
Red “?”: The photograph data is damaged and cannot be printed on your machine.
10
Troubleshooting
Chapter 10 Troubleshooting 10-7
Page 66

Cannot write to the memory card (write protect error displayed in Windows).
1. Is the machine in photo print mode and the <CARD PROTECT> setting set to <ON>?
Switch to a different mode and set the <CARD PROTECT> setting to <OFF> ( p. 4-9). Then turn the
machine off and on again.
2. If a delayed write failed error is displayed in Windows 2000. Is the machine in photo print mode
and the <CARD PROTECT> setting set to <ON>?
Switch to a different mode and set the <CARD PROTECT> setting to <OFF> ( p. 4-9). Then turn the
machine off and on again.
If you want to enable card protection, set the <CARD PROTECT> setting to <ON> ( p. 4-9). Then turn
the machine off and on again.
CAUTION
• In Windows 2000, if you set the <CARD PROTECT> setting to <ON>, turn the machine off then
on again. If you copy data from the hard disk to the memory card and a delayed write failed
error occurs, the original file may be lost.
3. Have you connected in Windows XP?
The date and time of access is written in the Windows XP preview, and if <CARD PROTECT> is set to <ON>
or photo print mode is selected, a write protect error may be displayed. Turn the machine off then on again.
Removable disk does not appear in Windows Explorer.
This behavior can occur if you map a network drive to the next available drive letter after the local volumes
and CD-ROM drives have been assigned drive letters. Do the following if you experience this problem:
1. Assign the network drive to any other drive letters.
2. Restart your computer.
The [Unplug/Eject] icon does not appear (Windows 2000).
In Windows 2000, the [Unplug/Eject] icon does not appear even when you select [Show Unplug/Eject icon
on the taskbar] in the [Unsafe Removal of Device] dialog box that is displayed when you turn off the machine
or disconnect the USB cable.
You do not need to use the [Unplug/Eject] icon when you turn off the machine or disconnect the USB cable.
The machine does not appear in [Hardware devices] in the [Add/Remove Hardware]
dialog box (Windows 2000).
In Windows 2000, the machine does not appear in [Hardware devices] in the [Select Device to
Unplug] dialog box in [Add/Remove Hardware] of [Control Panel].
In Windows 2000, the [Unsafe Removal of Device] dialog box will appear when you turn off the
machine or disconnect the USB cable, and the message [To safely unplug or eject any of the
following devices, first use the Hardware wizard in the Control Panel to stop the device] will appear.
There is however no need to unplug a device with [Add/Remove Hardware] when you turn off the
machine or disconnect the USB cable.
In Windows Explorer, you cannot display [Thumbnails] (Windows 2000).
In Windows 2000, if you display the contents of a memory card in Windows Explorer, and change the
display to [Thumbnails] on the [View] menu, the images may not display and the computer may
freeze. This is a problem that occurs with USB card readers in general, and not just with this machine.
If you want to change the display to [Thumbnails] in Windows Explorer, set the <CARD PROTECT>
setting to <OFF> ( p. 4-9). Then turn the machine off and on again.
The memory card is recognized as a drive other than [Removable Disk].
Did you start your computer with a memory card inserted in a card slot?
Depending on your computer, this may occur if you start your computer with a memory card
inserted in the machine.
Remove the memory card and restart your computer.
10-8 Troubleshooting Chapter 10
Page 67
If nothing displays in the LCD (if there is no power)
When you connect the power cord to the machine and wall outlet, and press [ON/OFF (1 sec.)],
the machine powers up and a message is displayed in the LCD.
While the Alarm light blinks, the machine is initializing and you will not be able to use it. Wait
until the Alarm light stops blinking.
If nothing is displayed in the LCD, make the checks in the following order until something is
displayed.
1. Is the power cord correctly connected?
Securely connect the power cord to the machine and wall outlet.
2. Have you pressed [ON/OFF (1 sec.)]?
The machine will power up and the LCD will show a message when you connect the power cord and
press [ON/OFF (1 sec.)].
3. Check that the wall outlet is working normally.
Connect another electrical appliance to the wall outlet and check whether the wall outlet is working
properly.
4. Connect the power cord directly to the wall outlet.
Disconnect the power cord from any table taps, OA taps or extension cords and connect directly to the
wall outlet. If the machine powers up when the power cord is connected directly, the table taps, OA
taps or extension cords are probably defective and should be replaced.
If they have a power switch, turn it on.
5. Check that the power cord is not defective.
Either replace the power cord with another, or using a tester, check whether the cord is defective.
If the power disconnects unexpectedly
User data and speed dialing settings are stored using the internal battery if there is a power
failure or if you accidentally disconnect the power cord. However, all documents stored in
memory will be deleted.
If the power disconnects, the following will apply:
• You will not be able to send or receive faxes, or make copies.
• If a telephone is connected to the machine, you may be able to receive and/or make voice calls
(depending on your telephone).
When power is restored, the MEMORY CLEAR REPORT will be printed automatically listing the documents
deleted from memory. Note however that this report will not be printed if the print media size is set to a
setting other than <A4>, <LTR>, or <LGL>, or if black ink or paper has run out.
Chapter 10 Troubleshooting 10-9
10
Troubleshooting
Page 68
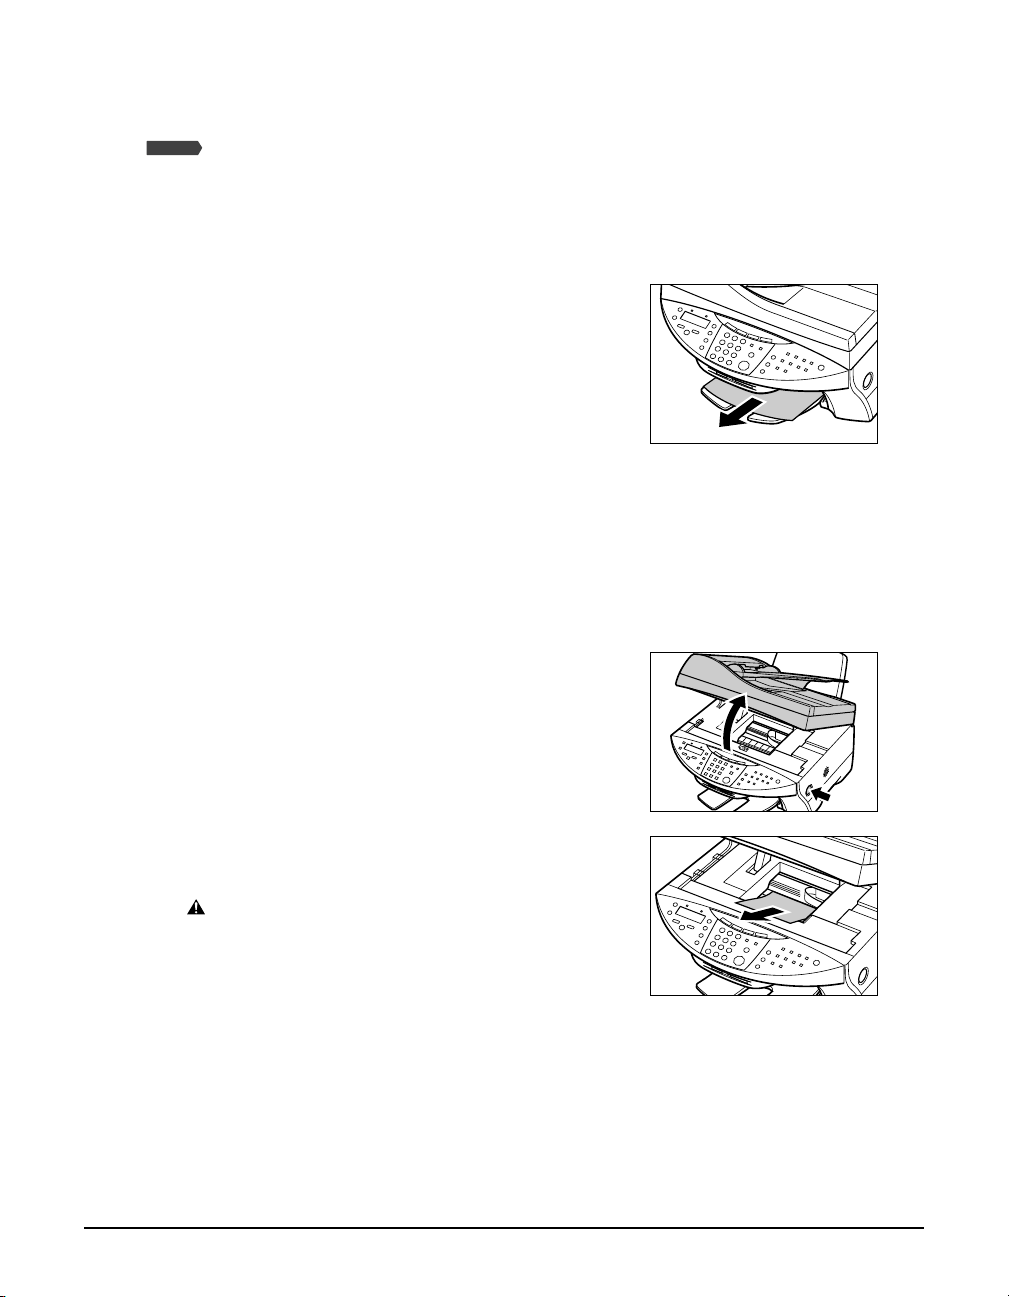
Removing jammed paper
If <CLEAR PAPER JAM> is displayed in the LCD, follow this procedure to clear the paper jam.
Fax Model
printed automatically when you clear the jam and press [Resume].
Removing jams in the paper output tray
Follow this procedure to remove jams from the paper output tray:
1 Gently pull any jammed paper out of the
2 Press [Resume].
Removing jams from the machine’s interior
Follow this procedure to remove jams from the machine’s interior:
1 Press [Open] q and lift up the scanning unit
If a paper jam occurs when receiving a fax, that fax will be stored in memory and
paper output tray.
• If you cannot see any jammed paper in the paper
output tray, remove it from the machine’s interior
( below).
• If you are printing from a Windows application,
follow the instructions displayed on your computer.
w.
w
q
2 Gently gather the jammed paper to the
center of the opening and then remove it.
CAUTION
• Be careful not to touch the components inside
the machine.
• If the jammed paper tears while you are pulling
and you cannot remove the torn pieces, turn the
machine off then on with the [ON/OFF (1 sec.)].
The jammed pieces will automatically be ejected.
3 Close the scanning unit until it locks into place.
4 Press [Resume].
• If you are printing from a Windows application,
follow the instructions displayed on your computer.
10-10 Troubleshooting Chapter 10
Page 69
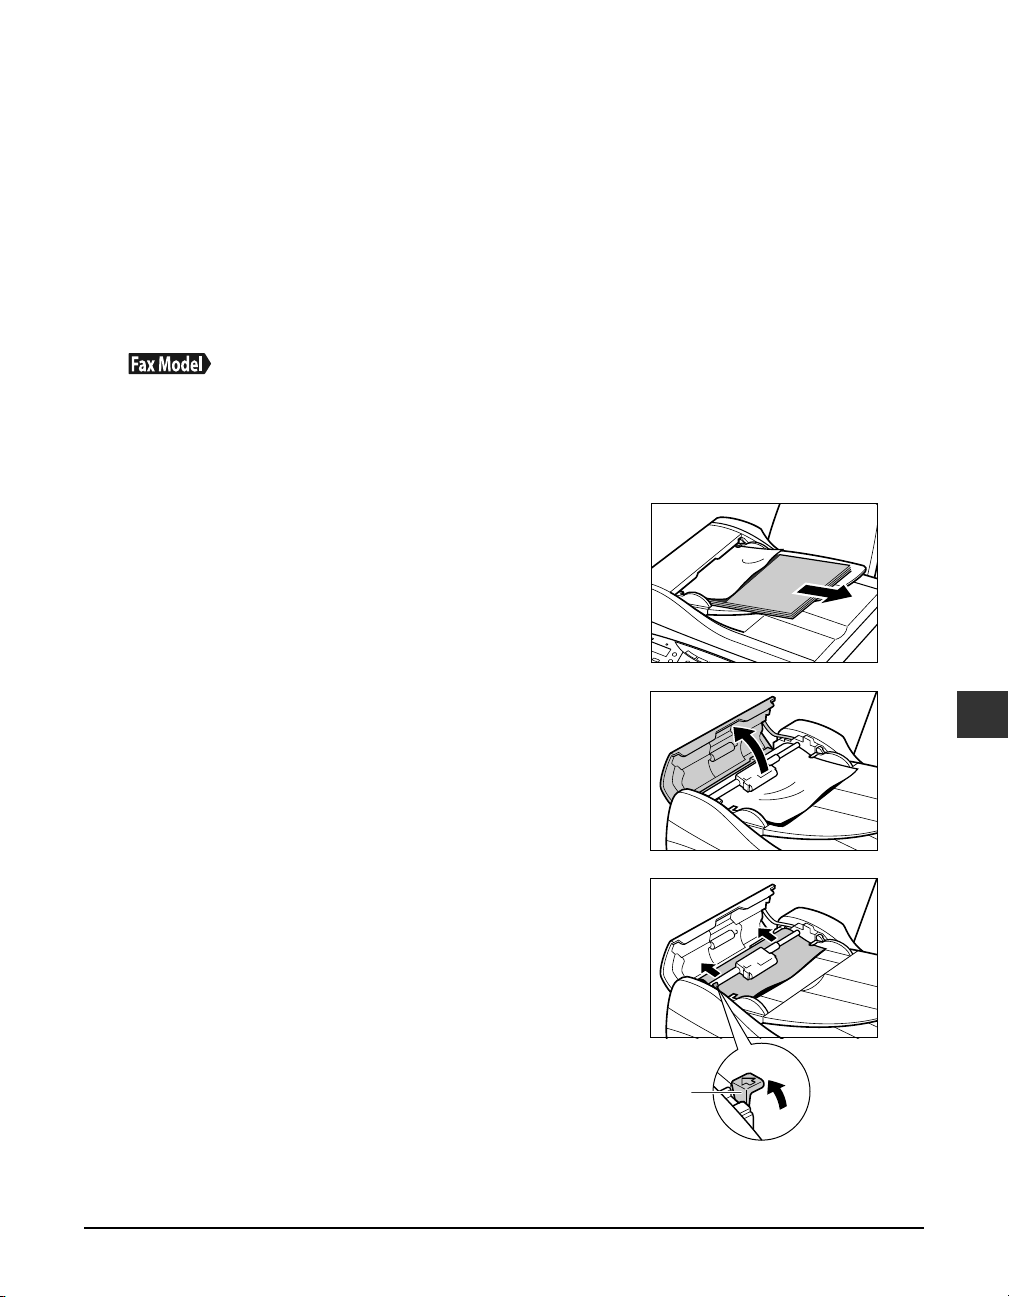
If there are repeated paper jams
Paying attention to the following points, reload the paper.
1. Fan out the sheets of paper well so that they do not stick together.
2. Align the edges of the paper.
3. Adjust the paper guide correctly.
4. Make sure the paper stack does not exceed the paper limit mark (s|).
5. Make sure the paper loaded does not exceed the capacity of the multi-purpose tray ( p. 2-2).
6. Do not force paper into the multi-purpose tray.
7. Only use the same type of paper.
8. Use recommended print media ( p. 2-2).
If documents jam in the ADF or do not feed properly, <DOC. TOO LONG> is displayed in the LCD.
You do not need to turn off the power when clearing document jams.
1 Press [Stop/Reset].
2 If a multipage document is loaded, remove
Removing jammed documents
from the ADF all pages except for the
jammed page.
3 Open the feeder cover.
4 Raise the paper release lever A and slide
the page under the roller towards the
feeder cover.
A
Chapter 10 Troubleshooting 10-11
10
Troubleshooting
Page 70
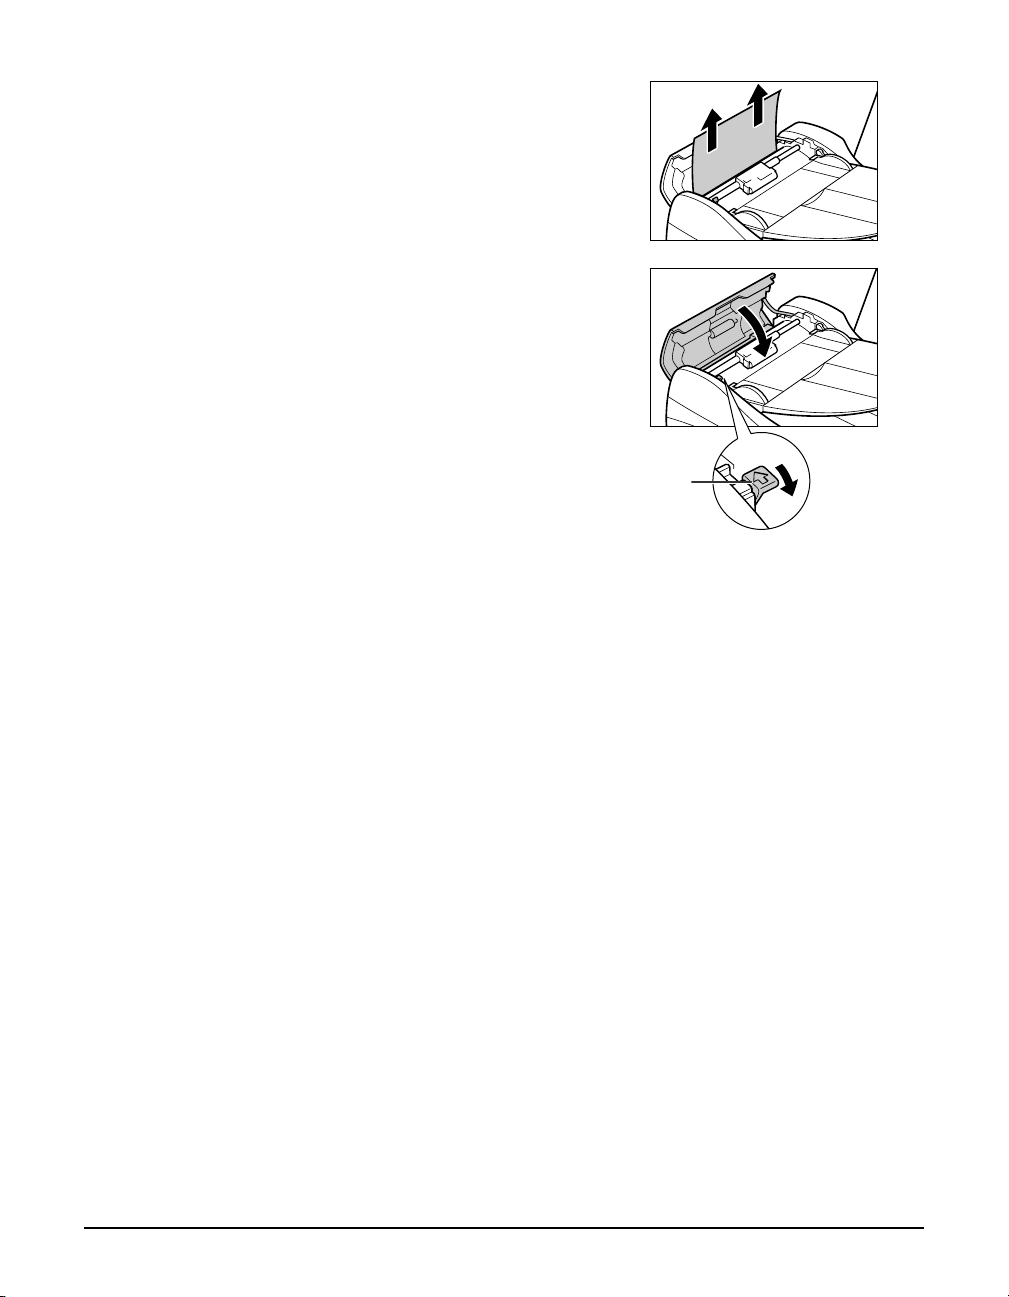
5 Pull out the jammed page from the ADF.
6 Lower the paper release lever A and then
close the feeder cover.
• If [Stop/Reset] is pressed during scanning and the
document remains in the ADF, wait for the
machine to return to standby mode, then press
[Resume]. Documents left in the ADF will be
ejected automatically.
A
If the nozzle check pattern does not print properly
Refer to Maintaining the printhead, p. 9-3.
Interpreting the messages
When the Alarm light blinks
Check the message in the LCD. If there is a message, follow the instructions and correct the
error. Then to resume operation, press [Resume]. The Alarm light will turn off.
If the error remains, turn off the machine and disconnect the power cord. Wait 15 seconds, then
reconnect the power cord and turn on the power.
If you cannot clear a paper jam
Turn off the machine and disconnect the power cord. Wait five seconds, reconnect the power
cord and turn on the power. If the problem has been resolved, the Alarm light will turn off.
If the Alarm light still lights even after you have turned the power on again
Contact your local authorized Canon dealer or the Canon help line.
Error codes are printed in the ACTIVITY REPORT.
10-12 Troubleshooting Chapter 10
Page 71
LCD messages
Message (Error code) Cause Action Details
Fax Model
Bk INK EMPTY The black ink tank in the
Fax Model
SIGNAL (#018)
C INK EMPTY The cyan ink tank in the
CANNOT USE THIS CARD
TURN OFF AND ON
CARD READER BUSY You tried to start photo printing
CARTRIDGE JAMMED The printhead holder cannot
Fax Model
PAPERSIZE:FAX
AUTO REDIAL The machine is waiting to redial
the other party’s number
because the line was busy or the
recipient did not answer when
you tried to send a document.
printhead is empty.
BUSY/NO
CHANGE
The telephone number you
dialed is busy.
The fax number dialed was
incorrect.
The other party’s fax machine is
not working.
The other party is not using a G3
machine.
The touch tone/rotary pulse
setting on your machine is
incorrect.
The receiving fax machine did
not answer within 55 seconds
(after all automatic redialing
attempts).
printhead is empty.
You have inserted a Microdrive
memory card or a damaged card
into the card slot.
when the memory card slot was
in use by the computer.
move. This is normally due to a
paper jam.
The print media size setting is set
to a size other than A4, letter, or
legal.
Wait for the machine to automatically
redial the number. If you want to
cancel automatic redialing, wait until
the machine starts dialing the
number, press [Stop/Reset], then
follow the instructions in the LCD.
Replace the ink tank. p. 9-2
Try sending the document at a later
time.
Check the fax number and dial again.
Contact the other party and have
them check their fax machine.
Contact the other party and ask them
to send or receive the document
using a G3 machine.
Set your machine to the setting that
matches your telephone line.
Contact the other party and have
them check their fax machine. You
can try to send the document using
manual sending. For an overseas call,
add pauses to the registered number.
Replace the ink tank. p. 9-2
Remove the memory card from the
slot, then turn the power off and on
again.
You cannot use Microdrive memory
cards with this machine.
Wait until the memory card slot is no
longer being used by the computer.
Clear the paper jam or whatever is
obstructing the printhead holder and
then press [Resume]. Do not attempt
to move the printhead holder
manually.
Set the print media size setting to A4,
letter, or legal and load paper of the
same size. The received fax will then
be printed automatically.
User’s
Guide
User’s
Guide
User’s
Guide
p. 4-1
p. 10-10
p. 2-3
10
Troubleshooting
Chapter 10 Troubleshooting 10-13
Page 72

Message (Error code) Cause Action Details
Fax Model
DOCUMENT
CHECK PAPER SIZE The print media size in the
CHECK PRINTER
(PRESS RESUME KEY)
CHECK
The feeder cover may not be
closed properly.
The document is not loaded
properly in the ADF, or there may
be a document jam.
multi-purpose tray and that
specified in the print media size
setting are different.
There may be an obstruction
that is not allowing the
printhead holder mechanism
to move.
Close the feeder cover properly. p. 10-11
Remove the document from the ADF
and reload it.
p. 2-1
p. 10-11
Clear the document jam if necessary.
Load the correct print media size or
change the print media size setting.
Then press [Resume].
Set-Up
Sheet
User’s
Guide
Check for any obstruction (paper clip,
p. 10-10
small object, etc.). Check also for a
paper jam and clear the jam if
necessary. Then press [Resume] and
start again. If the message does not
clear after pressing [Resume], contact
the your local authorized Canon
dealer or the Canon help line.
The waste ink tank (which holds
the ink used for printhead
cleaning) may be full.
Contact your local authorized Canon
dealer or the Canon help line to have
the waste ink tank replaced
immediately.
CLEAR PAPER JAM
(PRESS START KEY)
There is a paper jam. Clear the paper jam and reload paper
in the multi-purpose tray. Then press
p. 10-10
[Start] or [Resume].
COVER OPEN You opened the scanning unit
Close the scanning unit.
during an operation.
DATA IN MEMORY
CANNOT TURN OFF
You are unable to turn the
machine off with the [ON/OFF
Print or delete any documents stored
in memory, then turn off the machine.
User’s
Guide
(1 sec.)] key because there are
documents in memory.
Fax Model
DOC. TOO
LONG (#003)
The document is longer than
1 meter (3
#/8 ft.).
Reduce the length of the document to
within 1 meter (3 #/8 ft.), and then
re-send it.
Fax Model
There is a document jam in the
ADF.
ECM RX The machine is receiving a fax
using Error Correction Mode
(ECM).
Clear the document jam and reload
the document in the ADF.
ECM receptions may take longer than
normal receptions. Turn off ECM if you
need to receive quickly, or if you know
p. 10-11
User’s
Guide
your local lines are in good condition.
Fax Model
ECM TX The machine is sending a fax
using Error Correction Mode
(ECM).
ECM transmissions may take longer
than normal transmissions. Turn off
ECM if you need to transmit quickly, or
User’s
Guide
if you know your local lines are in
good condition.
FILE NOT READABLE There are photographs that have
been edited on a computer or
digital camera.
Check which photographs were not
printed and try reprinting them from
your computer.
10-14 Troubleshooting Chapter 10
Page 73
Message (Error code) Cause Action Details
INSERT PHOTO CARD There is no memory card in the
memory card slot.
INVALID KEY/SETTING An invalid key was pressed or an
invalid setting was selected.
LOAD PAPER
(PRESS START KEY)
M INK EMPTY The magenta ink tank in the
MACHINE IN USE
CANNOT TURN OFF
MEMORY FULL
(#037)
Fax Model
USED nn %
NO FILES ON CARD There are no available files in the
Fax Model
(#012)
Fax Model
(#022)
MEMORY
NO RX PAPER
NO TEL #
The multi-purpose tray is empty. Load paper in the multi-purpose tray.
printhead is empty.
You are unable to turn the
machine off with the [ON/OFF
(1 sec.)] key because the machine
is performing an operation.
The machine’s memory is full
because you tried to send or
copy too many pages at once, or
a very long or detailed
document.
In photo print mode, the
photograph data is too large to
print from your machine.
Fax Model
is full because it has received too
many documents, or a very long
or detailed document.
Fax Model
you tried to print photographs
when the machine’s memory
was full.
Shows the percentage of
memory currently in use.
memory card.
The other party’s fax machine is
out of paper or its memory is full.
The one-touch speed dialing key
or coded speed dialing code you
entered has not been registered.
The machine’s memory
In photo print mode,
If you want to use the photo print
function, insert a memory card into
the appropriate slot.
Check the key or setting you want to
enter.
Make sure the stack is below the
paper limit mark (s|). Then press
[Start] or [Resume].
Replace the ink tank. p. 9-2
Wait until the machine has finished,
then turn off the machine.
Divide the document and send or
copy each part separately. To free up
space in the machine’s memory, print
or delete any documents in memory
you no longer need.
Print the photograph from your
computer.
Print any documents stored in
memory. Then start again.
Print or delete any documents in
memory, or wait for the machine to
send any documents stored in
memory. Then try printing
photographs again.
If you need more space, wait for the
machine to send any faxes. Also, print
or delete any documents in memory
you no longer need.
Make sure you have recorded
photographs in the appropriate
format on the memory card.
Contact the other party and have
them load paper in their fax machine
or free up space in their fax machine’s
memory.
Register the one-touch speed dialing
key or coded speed dialing code.
p. 4-2
Set-Up
Sheet
User’s
Guide
User’s
Guide
User’s
Guide
User’s
Guide
p. 7-4
10
Troubleshooting
Chapter 10 Troubleshooting 10-15
Page 74
Message (Error code) Cause Action Details
Fax Model
AVAILABLE
NOT
In manual sending, you entered
a speed dialing number that is
assigned to a group.
Use regular dialing, or enter a
one-touch speed dialing key or coded
speed dialing code that only has one
User’s
Guide
fax/telephone number registered.
PROBLEM READING CARD
REINSERT MEMORY CARD
PROBLEM READING CARD
TURN OFF AND ON
The data on the memory card
may be inaccessible.
There is a problem with the card
slot.
Check the data on the memory card in
your digital camera.
Try switching to another mode or
turning the machine off and on. If the
message remains, contact your local
authorized Canon dealer or the Canon
help line.
PUT IN CARTRIDGE There is no printhead installed in
the machine.
Fax Model
MEMORY
REC’D IN
The machine received the fax in
memory because paper or ink
ran out, or a paper jam occurred.
Install the printhead. Set-Up
Sheet
Load paper in the multi-purpose tray,
replace the ink tank(s), or clear the
paper jam.
Set-Up
Sheet
p. 9-2
p. 10-10
Fax Model
B&W (#085)
Fax Model
SCANNING P. nnn
MEMORY FULL
TRY AGAIN IN
TX nnnn
You tried sending a color
document to a machine that
does not support color faxing.
The machine is sending a
document and its memory is full.
Try sending again in black & white.
Alternatively, enable the <COLOR
DIRECT TX> setting.
The machine continues to send the
document as memory becomes
available.
p. 11-4
PLEASE WAIT
Fax Model
CANCELLED
Fax Model
nnnn
TX/RX
TX/RX NO.
You pressed [Stop/Reset] to
cancel the transmission.
When the machine sends or
receives a fax, it assigns it a
If required, try sending or receiving
again.
Write the number down if you will
need it later.
unique identification number
(nnnn).
WAIT COOLING During printing, the printhead
may have become too hot.
Allow the machine to cool down. The
machine will resume printing when it
has cooled down.
WASTED INK NEAR FULL The waste ink tank is nearly full. If <CHECK PRINTER> appears, contact
your local authorized Canon dealer or
the Canon help line.
WRONG CARTRIDGE The printhead is not installed
correctly.
Try to reinstall the printhead. If the
message remains in the LCD, the
printhead may be defective. Contact
your local authorized Canon dealer or
the Canon help line.
Y INK EMPTY The yellow ink tank in the
Replace the ink tank. p. 9-2
printhead is empty.
10-16 Troubleshooting Chapter 10
Page 75

If you cannot solve the problem
If you have a problem with your machine that you cannot solve with the information provided
in this chapter, contact your local authorized Canon dealer or the Canon help line.
CAUTION
• If the machine makes strange noises, emits smoke or strange smells, unplug it immediately and
contact your local authorized Canon dealer or the Canon help line. Do not attempt to disassemble
or repair the machine yourself.
IMPORTANT
• Attempting to repair the machine yourself may void the limited warranty.
If you contact your local authorized Canon dealer or the Canon help line, make sure you have
the following information ready:
• Product name: imageCLASS MP730 or imageCLASS MP700
• Serial number (located on the label located at the back of the machine)
• Details of the problem
• Steps taken to try to resolve the problem and the results
Chapter 10 Troubleshooting 10-17
10
Troubleshooting
Page 76

10-18 Troubleshooting Chapter 10
Page 77
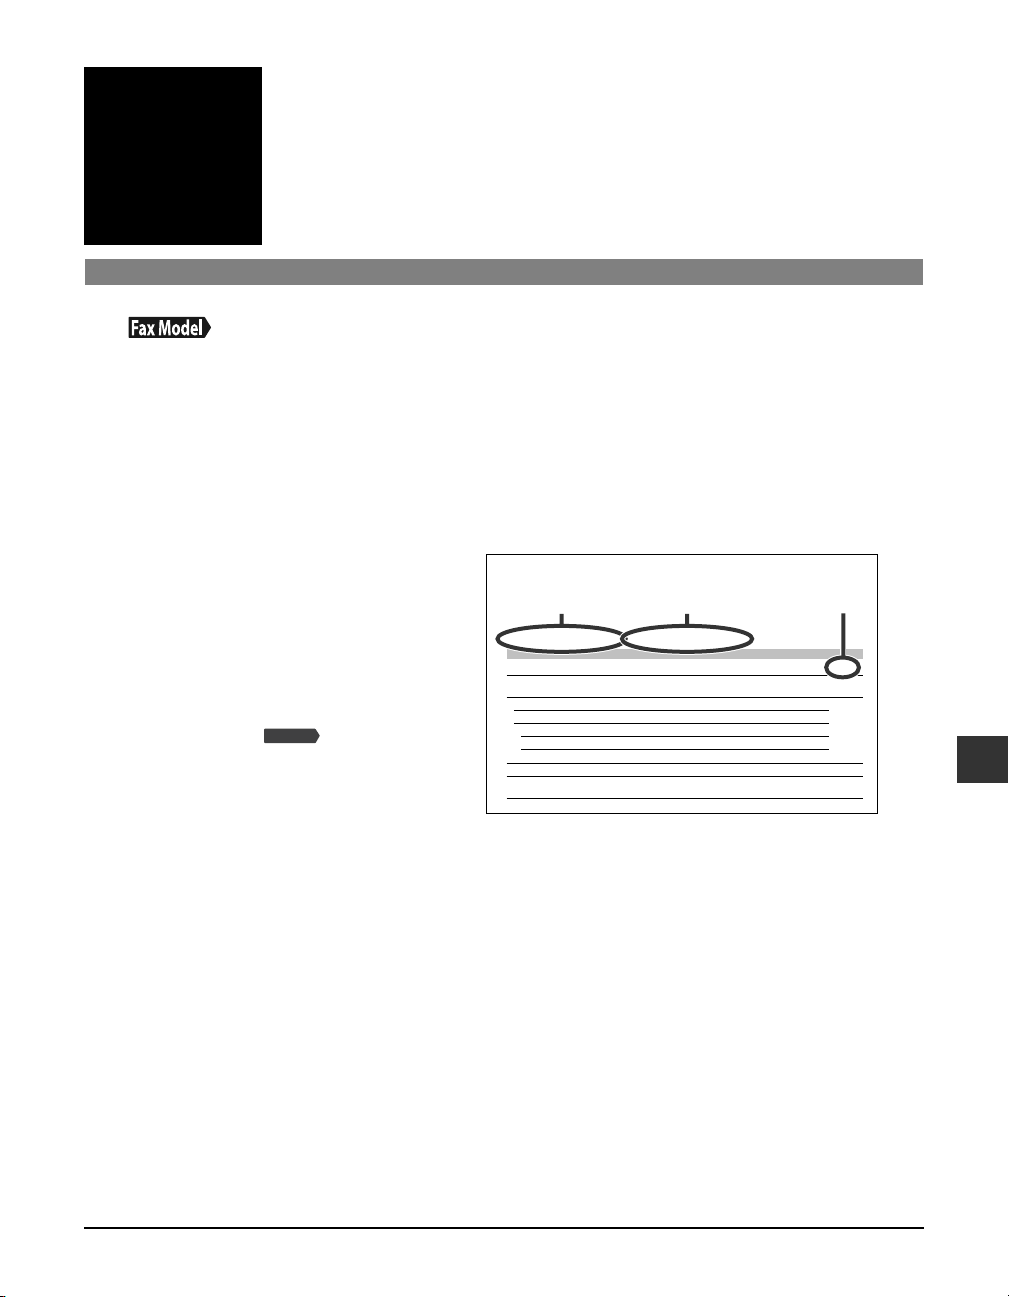
Chapter
11
Before changing any settings, you can print the USER’S DATA LIST to check the current settings
of your machine. For details, see the User’s Guide.
Printing a list to check the current settings
Machine settings
Accessing the machine settings
Follow this procedure to change a setting:
1 Refer to the lists on the following pages to find the setting you want to change.
2 If there is a reference for the
setting q, refer to that page or
guide for details. If not, at the
top of the list, note under which
function key w and menu e the
setting is located.
3 Press [Copy], [Scan], [Photo
Card], or [Fax] depending
under which function key w the
setting is located.
Fax Model
4 Press [Menu].
Example:
e w
Menu: SPECIAL COPY Function key: [Copy]
Name Description Setting Details
1. 2 on 1 Copies two pages on one page (A4- or letter-size only). — p. 5-4
2. BORDERLESS COPY Copies without any borders (A4-, letter-, 4” × 6”, or
3. IMAGE REPEAT Prints multiple copies of an image on a single sheet. — p. 5-6
AUTO Automatically selects the number of repetitions. —
MANUAL Manually selects the number of repetitions.
VERTICAL Selects the number of vertical repetitions. 1/2/3/4
HORIZONTAL Selects the number of horizontal repetitions. 1/2/3/4
4. MIRROR IMAGE Prints a mirror image of the original. — p. 5-8
5. ENTIRE IMAGE Prints the original image to fit the selected print media
5” × 7”-size only).
size.
— p. 5-9
q
p. 5-5
11
5 Use [22
22
] or [3333] to select the menu e under which the setting is located.
6 Press [OK].
• You have now accessed the settings in the list.
7 Use [22
22
] or [3333] to select the setting you want.
8 Press [OK].
9 Follow these guidelines to scroll through and register settings:
• Use [2222] or [3333] to scroll through settings.
• To register a setting or access sub-settings, press [OK].
• To return to a previous level, press [Menu].
10 When you have finished, press [Stop/Reset].
Chapter 11 Machine settings 11-1
Machine settings
Page 78
Reference abbreviation
Settings
UG=User’s Guide
Menu: SPECIAL COPY Function key: [Copy]
Name Description Setting Details
1. 2 on 1 Copies two pages on one page (A4- or letter-size only). — UG
2. BORDERLESS COPY Copies without any borders (A4-, letter-, 4” × 6”, or
5” × 7”-size only).
3. IMAGE REPEAT Prints multiple copies of an image on a single sheet. — UG
AUTO Automatically selects the number of repetitions. —
MANUAL Manually selects the number of repetitions.
VERTICAL Selects the number of vertical repetitions. 1/2/3/4
HORIZONTAL Selects the number of horizontal repetitions. 1/2/3/4
4. MIRROR IMAGE Prints a mirror image of the original. — UG
5. ENTIRE IMAGE Prints the original image to fit the selected print media
size.
—UG
—UG
Menu: MAINTENANCE
Name Description Setting Details
1. NOZZLE CHECK Prints the nozzle check pattern. — p. 9-4
2. HEAD CLEANING Performs normal printhead cleaning. — p. 9-4
3. HEAD REFRESHING Performs deep printhead cleaning. — p. 9-4
4. ALIGN PRINT HEAD Aligns the printhead. — p. 9-5
HORIZ. PATTERN Prints the horizontal pattern. —
CHANGE H VALUE Selects the horizontal value for columns A to K on the
printout.
PRINT VERT. PATTERN? Selects whether the vertical pattern is printed. YES=(T)
VERTICAL PATTERN Prints the vertical pattern.
CHANGE V VALUE Selects the vertical value for columns L and M on the
printout.
5. ROLLER CLEANING Cleans the roller. — UG
Function keys: [Copy], [Scan], [Photo Card],
A, B, C, D, E: -3 to +7
F, G, H, I, J, K: -5 to +5
NO=(#)
L, M: -3 to +3
Fax Model
[Fax]
11-2 Machine settings Chapter 11
Page 79
Menu: USER DATA Function keys: [Copy], [Scan], [Photo Card], [Fax]
Fax Model
Fax Model
Name Description Setting Details
1. TEL REGISTRATION — —
1. 1-TOUCH SPD DIAL Registers one-touch speed dialing. — p. 7-4
2. CODED SPEED DIAL Registers coded speed dialing. — p. 7-5
3. GROUP DIAL Registers group dialing. — UG
2. FAX SETTINGS — —
1. USER SETTINGS — —
1. DATE & TIME Sets the current date and time. — p. 7-1
2. DATE SETUP Selects the date format displayed in the LCD and
printed on faxes you send.
3. UNIT TELEPHONE # Enters the fax/telephone number printed on faxes you
send.
4. UNIT NAME Enters the name printed on faxes you send. — p. 7-1
5. TX TERMINAL ID Enables/disables printing of the sender information. ON
1. TTI POSITION If you select <ON>, selects the position of the sender
information (outside or inside the image area) when
sending black & white faxes. (Automatically set inside
the image area for color faxes.)
2. TELEPHONE #
MARK
6. OFFHOOK ALARM Enables/disables the alarm that alerts you if the handset
7. VOLUME CONTROL — —
1. CALLING
VOLUME
2. LINE MONITOR
VOL
8. RX CALL LEVEL Selects the ring type for incoming calls. HIGH
9. TEL LINE TYPE Selects the telephone line type setting for your
10. R-KEY SETTING Enables/disables dialing through a switchboard. If you
If you select <ON>, selects the mark to appear before
the fax/telephone number printed on faxes you send.
is not hung up properly.
When the machine is set to ring, selects the ring volume. 1/2/3
Selects the dialing and on-hook volume. 0 (off)/1/2/3
machine.
select <PBX>, you can select additional sub-settings.
DD/MM YYYY
YYYY MM/DD
MM/DD/YYYY
— p. 7-1
OFF
OUTSIDE IMAGE
INSIDE IMAGE
FAX
TEL
ON
OFF
STANDARD
TOUCH TONE
ROTARY PULSE*
PSTN
PBX
Fax Model
UG
UG
11
Machine settings
* The default setting for Hong Kong and Malaysia is ROTARY PULSE.
Chapter 11 Machine settings 11-3
Page 80
Name Description Setting Details
2. REPORT SETTINGS — —
1. TX REPORT Enables/disables automatic printing of a transmission
report after sending.
PRINT ERROR ONLY
OUTPUT YES
UG
OUTPUT NO
PRINT WITH IMAGE If you select <PRINT ERROR ONLY> or <OUTPUT YES>,
selects whether the first page of the fax is printed under
ON
OFF
the report (black & white faxes only).
2. RX REPORT Enables/disables automatic printing of a reception
report after receiving.
OUTPUT NO
PRINT ERROR ONLY
UG
OUTPUT YES
3. ACTIVITY REPORT Enables/disables automatic printing of an ACTIVITY
REPORT after every 20 transactions.
AUTO PRINT ON
AUTO PRINT OFF
UG
3. TX SETTINGS — —
1. ECM TX*
Enables/disables Error Correction Mode (ECM) during
sending.
ON
OFF
2. UN/LOCK PHONE Enables/disables restriction of the machine. — UG
1. LOCK PHONE Enables/disables restriction of the machine to make
calls and send faxes.
2. PASSWORD Enters a password to restrict access to the <LOCK
OFF
ON
0000 to 9999
PHONE> setting.
3. MID PAUSE SET Selects the pause length when you press [Redial/Pause].
4. AUTO REDIAL Enables/disables automatic redialing. ON
2 SEC (1 to 15)**
UG
OFF
1. REDIAL TIMES If you select <ON>, selects the number of redialings.***
2. REDIAL
INTERVAL
If you select <ON>, selects the length of time between
redialings.
5. TIME OUT Enables/disables automatic scanning without having to
press [Start] after using speed dialing or redialing to
2 TIMES (1 to 10)****
2 MIN.
(1 to 99)*****
ON
OFF
send a document.
6. TX START SPEED Selects the speed at which the machine starts
transmitting.
33600bps
14400bps
9600bps
7200bps
4800bps
2400bps
7. COLOR DIRECT TX Enables/disables sending of color documents to fax
machines that do not have color faxing capability.
*ECM stands for Error Correction Mode. Resends image data that was lost due to phone line interference so there-
by making sent and received images seamless.
**Hong Kong : 4 SEC (4 to 11).
***Even if the machine is set to redial several times, it will redial only once if there is no tone or there is a ring back
tone during the first attempt (Korea only).Even if the machine is set to redial several times, it will redial only once
if there is no tone or there is a ring back tone during the first attempt (Korea only).
****Australia : 1 to 2, New Zealand : 1 to 5, Hong Kong : 1 to 3.
***** China : 5 Min (5 to 99), Singapore : 2 to 99.
OFF
ON
11-4 Machine settings Chapter 11
Page 81
Name Description Setting Details
4. RX SETTINGS — —
1. ECM RX*
2. FAX/TEL AUTO SW If you select <FAX/TEL AUTO SW> as the receive mode,
1. RING START TIME Selects the time the machine takes to check whether a
2. F/T RING TIME Selects the ring length for voice calls.
3. DEFAULT
ACTION
3. INCOMING RING If you select <FAX ONLY MODE>, <NET SWITCH>**, or
RING COUNT If you select <ON>, selects the number of rings for fax
4. MAN/AUTO
SWITCH
F/T RING TIME If you select <ON>, selects the length of time the
5. REMOTE RX Enables/disables remote receiving. ON
REMOTE RX ID If you select <ON>, selects the remote receiving ID. 25 (00 to 99)
6. RX REDUCTION Enables/disables automatic reduction of faxes to fit the
REDUCE
DIMENSION
7. RX START SPEED Selects the speed at which the machine starts receiving. 33600bps
3. PRINTER SETTINGS — —
1. QUIET MODE Enables/disables quiet printing mode. OFF
2. EXTENSION AMOUNT For borderless printing or copying, selects the width
*ECM stands for Error Correction Mode. Resends image data that was lost due to phone line interference so there-
by making sent and received images seamless.
**<NET SWITCH> is only available in Australia and New Zealand.
***New Zealand : 1 to 5.
Enables/disables Error Correction Mode (ECM) during
reception.
customizes its settings.
call is a fax or voice call.
Selects whether the machine switches to receive mode
after the ring time has elapsed, or whether it
disconnects the call.
<FAX/TEL AUTO SW> as the receive mode, enables/
disables ringing for fax calls. (A telephone must be
connected to your machine for ringing to occur.)
calls.
If you select <MANUAL MODE> as the receive mode,
selects if the machine switches to fax receive mode after
ringing for a specified length of time.
machine rings before switching to fax receive mode.
paper loaded.
Selects the direction of the reduction.
cropped from the borders of the original image.
ON
OFF
—UG
8 SEC (0 to 30)
22 SEC (10 to 60)
RECEIVE
DISCONNECT
OFF
ON
2 TIMES
(1 to 99)***
OFF
ON
15 SEC (5 to 99)
OFF
ON
OFF
VERTICAL ONLY
HORIZ & VERTICAL
14400bps
9600bps
7200bps
4800bps
2400bps
ON
SMALL
LARGE
UG
11
Machine settings
Chapter 11 Machine settings 11-5
Page 82
Name Description Setting Details
4. SYSTEM SETTINGS —
Fax Model
1.
1. KEYPAD VOLUME Selects the beep volume when pressing keys on the
2. ALARM VOLUME Selects the alarm volume. 0 (off)/1/2/3
2. CARD PROTECT Enables/disables overwriting memory card/stick data in
3. DISPLAY LANGUAGE Selects the language for LCD messages and reports. ENGLISH
Fax Model
4. SUMMER
TIME*
AUDIBLE TONES
operation panel.
all modes except photo print mode.
Enables/disables the summer time. If you select <ON>,
you can select additional sub-settings.
0 (off)/1/2/3
ON
OFF
FRENCH
SPANISH
GERMAN
ITALIAN
DUTCH
FINNISH
PORTUGUESE
NORWEGIAN
SWEDISH
DANISH
SLOVENE
CZECH
HUNGARIAN
RUSSIAN
ON
OFF
p. 4-9
Fax Model
Menu: RECEIVE MODE Function key: [Fax]
Name Description Setting Details
FAX ONLY MODE Selects <FAX ONLY MODE> receive mode. — UG
NET SWITCH** Selects <NET SWITCH> receive mode. — UG
MANUAL MODE Selects <MANUAL MODE> receive mode. — UG
ANS.MACHINE MODE Selects <ANS.MACHINE MODE> receive mode. — p. 7-8
FAX/TEL AUTO SW Selects <FAX/TEL AUTO SW> receive mode. — UG
Fax Model
Menu: MEMORY REFERENCE Function key: [Fax]
These settings can only be accessed when there is a document in memory.
Name Description Setting Details
1. DOC. MEMORY LIST Prints the DOC. MEMORY LIST. — UG
2. PRINT DOCUMENT Prints a document in memory. — UG
3. DELETE DOCUMENT Deletes a document in memory. — UG
*This setting is only available in some countries.
**<NET SWITCH> is only available in Australia and New Zealand.
11-6 Machine settings Chapter 11
Page 83
Fax Model
Menu: REPORTS/LISTS Function key: [Fax]
Name Description Setting Details
1. ACTIVITY REPORT Prints an ACTIVITY REPORT. — UG
2. SPEED DIAL LIST — —
1. 1-TOUCH LIST Prints the 1-TOUCH SPD DIAL LIST. — UG
SORTED OUTPUT Selects the order of the destinations in the list.
<YES=(T)>: Prints the list in alphabetical order.
<NO=(#)>: Prints the list in key order.
2. CODED DIAL LIST Prints the CODED SPEED DIAL LIST. — UG
SORTED OUTPUT Selects the order of the destinations in the list.
<YES=(T)>: Prints the list in alphabetical order.
<NO=(#)>: Prints the list in key order.
3. GROUP DIAL LIST Prints the GROUP DIAL LIST. — UG
3. USER DATA LIST Prints the USER DATA LIST. — UG
4. DOC. MEMORY LIST Prints the DOC. MEMORY LIST. — UG
YES=(T)
NO=(#)
YES=(T)
NO=(#)
Menu: PHOTO PRINT MODE Function key: [Photo Card]
Name Description Setting Details
1. PHOTO PRINT MODE —
INDEX — p. 4-5
SELECT PAPER SIZE Selects the print media size for the index. A4
LTR
4" × 6"
5" × 7"
SELECT PAPER TYPE Selects the print media type for the index.
ALL FRAMES — — p. 4-6
SELECT PAPER SIZE Selects the print media size for the photographs. A4
SELECT PAPER TYPE Selects the print media type for the photographs.
BORDERLESS PRINT If you select <PHOTO PAPER PRO>, enables/disables
borderless printing for the photographs.
PHOTO PAPER PRO
PLAIN PAPER
LTR
4" × 6"
5" × 7"
PHOTO PAPER PRO
PLAIN PAPER
OFF
ON
11
Machine settings
Chapter 11 Machine settings 11-7
Page 84
Name Description Setting Details
SINGLE FRAME — — p. 4-7
FILE NO: Selects the file number. 0001 to 9999
NUMBER OF PRINTS Selects the number of copies. 1 to 99 COPIES
SELECT PAPER SIZE Selects the print media size for the photograph. A4
LTR
4" × 6"
5" × 7"
SELECT PAPER TYPE Selects the print media type for the photograph.
BORDERLESS PRINT If you select <PHOTO PAPER PRO>, enables/disables
borderless printing for the photograph.
FRAME RANGE — — UG
FIRST FILE: Selects the first photograph number. 0001 to 9999
LAST FILE: Selects the last photograph number. 0001 to 9999
SELECT PAPER SIZE Selects the print media size for the photographs. A4
SELECT PAPER TYPE Selects the print media type for the photograph.
BORDERLESS PRINT If you select <PHOTO PAPER PRO>, enables/disables
borderless printing for the photographs.
DPOF — — UG
SELECT PAPER SIZE Selects the print media size for the photographs. A4
SELECT PAPER TYPE Selects the print media type for the photographs.
BORDERLESS PRINT If you select <PHOTO PAPER PRO>, enables/disables
borderless printing for the photographs.
2. VIVID PHOTO PRINT Enables/disables to make colors, especially blues and
greens, appear more vibrant.
3. PRINT PHOTO DATE Enables/disables date printing. OFF
PHOTO PAPER PRO
PLAIN PAPER
OFF
ON
LTR
4" × 6"
5" × 7"
PHOTO PAPER PRO
PLAIN PAPER
OFF
ON
LTR
4" × 6"
5" × 7"
PHOTO PAPER PRO
PLAIN PAPER
OFF
ON
OFF
ON
ON
UG
UG
11-8 Machine settings Chapter 11
Page 85
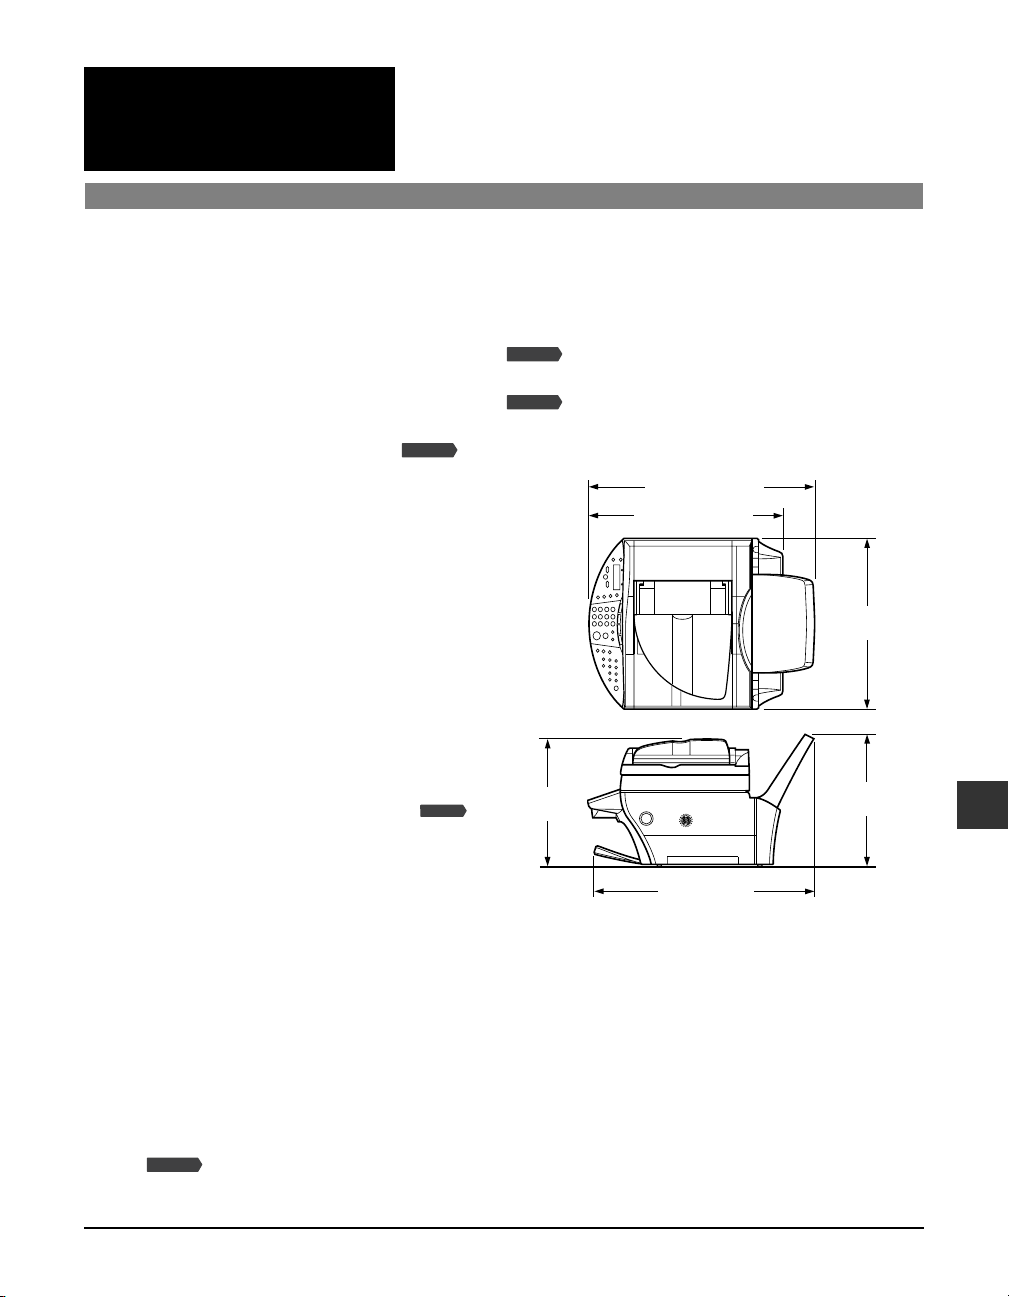
Appendix
Specifications
General specifications
Power source
Power consumption
Weight
(Components attached)
Dimensions
200–240V, 50/60 Hz
• Maximum: Approx. 42.1 W
Fax Model
Approx. 50.8 W
• Standby: Approx. 8.6 W
Fax Model
Approx. 10.6 W
10.9 kg/24 lb.
Fax Model
12.8 kg/28.2 lb.
Fax Model
253 mm (10")
326 mm (12 !/8")
578 mm (22 #/4")
496 mm (19 !/2")
439 mm
(17 !/4")
340 mm
(13 #/8")
A
558 mm (22")
Environmental conditions
Liquid Crystal Display (LCD)
Display languages
Applicable standards
Fax Model
ADF capacity
Multi-purpose tray capacity
Appendix Specifications A-1
• Temperature: 15º–27.5ºC (59º–81.5ºF)
• Humidity: 20%–80%
20 × 2
English/French/Spanish/German/Italian/Dutch/Finnish/
Portuguese/Norwegian/Swedish/Danish/Slovene/Czech/
Hungarian/Russian
• Electrical safety: EN60950
• Emission: EN55022 Class B
• Immunity: EN55024
• Other: Energy Star Compliant
p. 2-1
p. 3-1
Specifications
Page 86
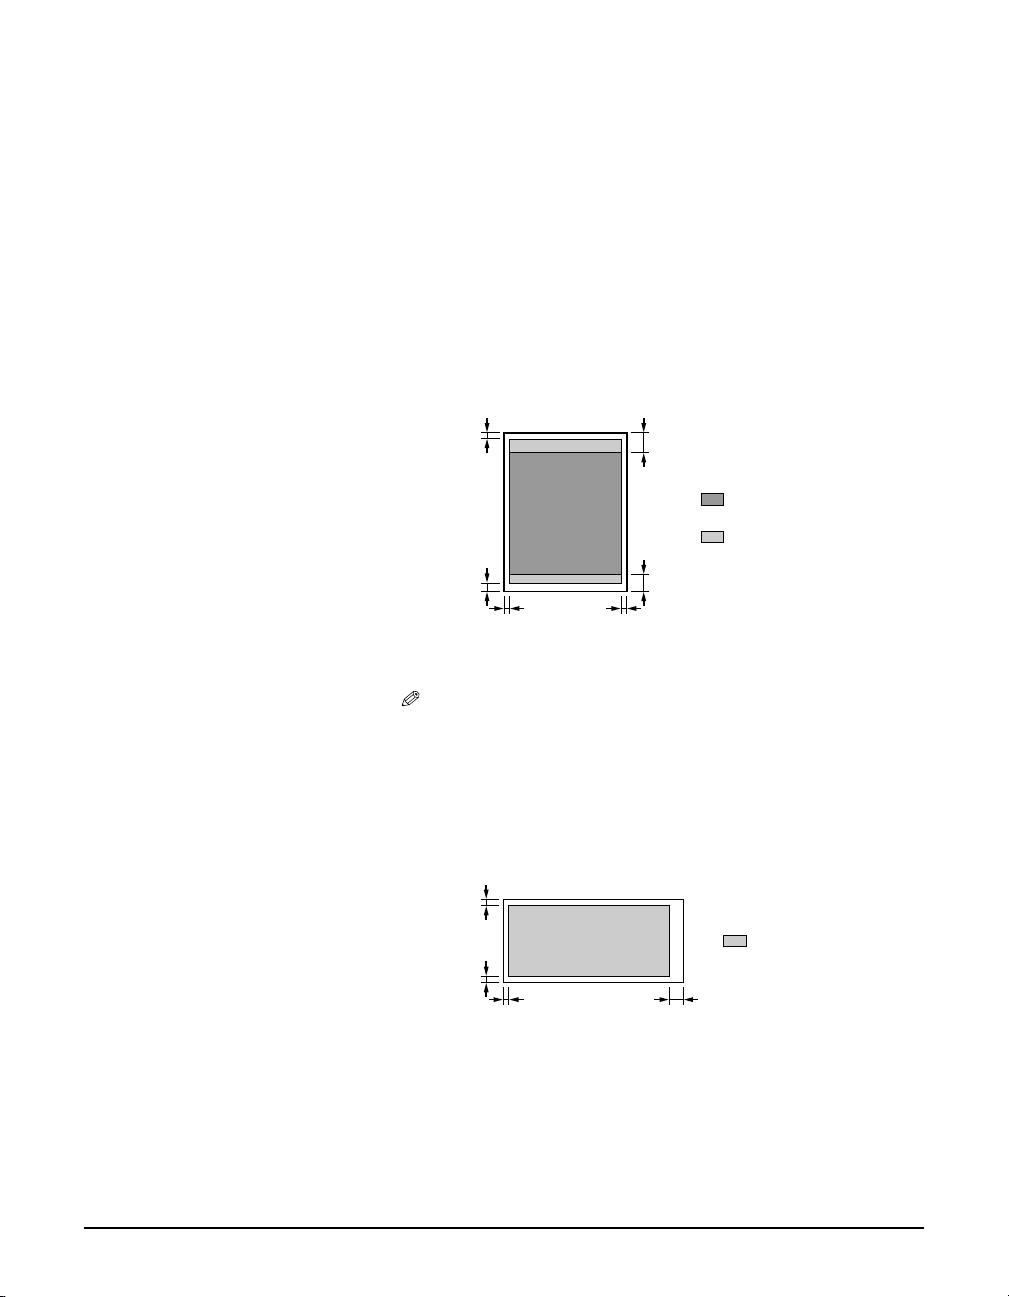
Printable areas Note on printing area illustrations:
Printing area: Canon recommends that you print within
(dark shade) this area.
Printable area: The area where it is possible to print.
(light shade) However, printing in this area can adversely
affect print quality or paper feed precision.
• Paper printable areas:
A4 size: 203.2 × 289 mm (8 × 11 #/8 in.)
B5 size: 175.2 × 249 mm (6 &/8 × 9 &/8 in.)
A5 size: 141.2 × 202 mm (5 %/8 × 8 in.)
Letter size: 203.2 × 271.4 mm (8 × 10 #/4 in.)
Legal size: 203.2 × 347.6 mm (8 × 13 #/4 in.)
4" × 6" size: 94.8 × 144.4 mm (3 #/4 × 5 #/4 in.)
5" × 7" size: 120.2 × 169.8 mm (4 #/4 × 6 #/4 in.)
3.0 mm (!/8")
5.0 mm (!/4")
Letter, Legal:
3.4 mm (!/8")
6.4 mm (!/4")
3.4 mm (!/8")
Letter, Legal:
6.4 mm (!/4")
33.0 mm (1 #/8")
Recommended print area
Printable area
31.5 mm (1 !/4")
NOTE
• Borderless printing allows you to make prints with no margins.
However, it may cause the top and bottom paper edges to decrease
in print quality or become soiled.
• Envelope printable areas:
European DL: 190.5 × 103.2 mm (7 !/2 × 4 !/8 in.)
US COM #10: 211.8 × 98 mm (8 #/8 × 3 &/8 in.)
3.4 mm (!/8")
Printable area
3.4 mm (!/8")
3.0 mm (!/8") 26.5 mm (1 !/8")
A-2 Specifications Appendix
Page 87
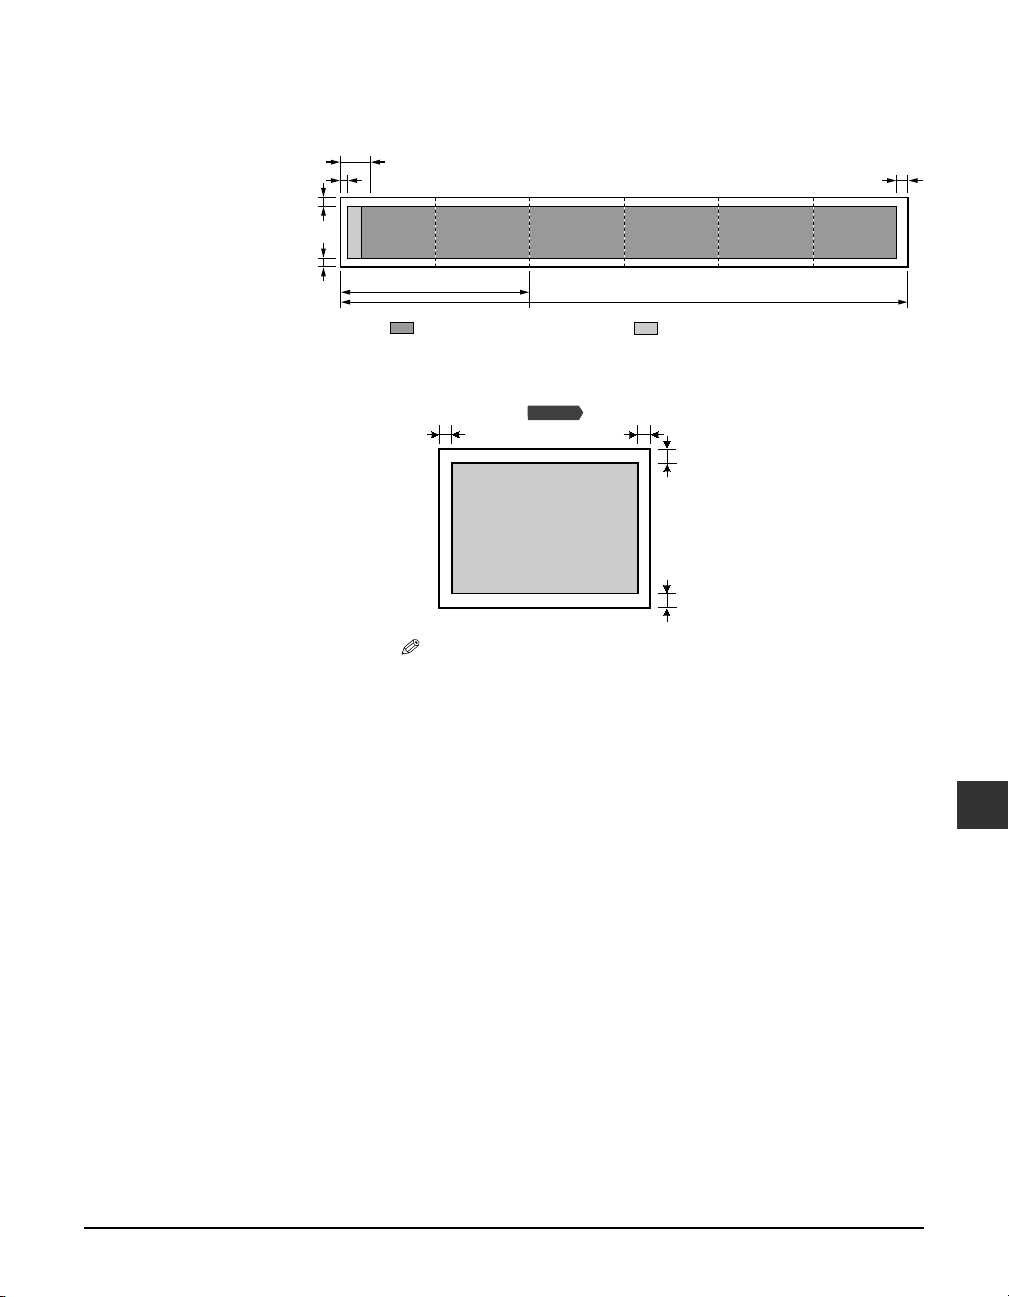
3.4 mm (!/8")
3.4 mm (!/8")
• Banner paper printable areas:
A4 size: 203.2 × 1774 mm (8 × 69 &/8 in.)
Letter size: 203.2 × 1668.4 mm (8 × 65 #/4 in.)
33.0 mm (1 #/8")
3.0 mm (!/8")
Min. 2 sheets
Max. 6 sheets
5.0 mm (!/4")
Scanned area
Recommended print area
Max. 4.0 mm
(Max. !/8")
Max. 4.0 mm (Max. !/8")
imageCLASS MP700, legal size: Max. 8.0 mm (Max. #/8")
Fax Model
Color fax: Max. 6.0 mm (Max. !/4")
Printable area
A4
Letter
Legal
NOTE
• For entire image copying, the entire area of the document is
scanned.
System requirements
p. 1-2
Ink specifications
Ink tank colors/capacity • Black (BCI-3eBK): approx. 740*, approx. 1500**
• Cyan (BCI-3eC): approx. 570**
• Magenta (BCI-3eM): approx. 440**
• Yellow (BCI-3eY): approx. 380**
Max. 4.5 mm
(Max. !/4")
Max. 4.5 mm
(Max. !/4")
A
Specifications
* 1500 characters per page, normal text, at standard and plain paper mode with XP printer driver.
** Based on printing the ISO JIS-SCID No. 5 pattern at standard and plain paper mode with XP printer driver.
Appendix Specifications A-3
Page 88

Print specifications
Printing method
Paper handling
Print media size and weight
Recommended print media
Print speed
Print width
Printing resolution
Bubble jet on-demand
Automatic feed
p. 3-1
p. 3-1
• Black printing: Fast: 22 pages/minute
• Color printing: Fast: 14 pages/minute
(Based on Canon standard pattern)
• Max. 203.2 mm (8 in.)
• Borderless printing: 216.0 mm (8 !/2 in.)
Max. 4800 (horizontal) × 1200 (vertical) dpi
Photo print specifications
Interface
Memory card
Print media
Layout
Features
Card slot
• Compact flash (Except Microdrive)–Type I, II
• Smart media
• Memory stick
• SD memory card
• Multimedia card
• Plain paper
• Photo Paper Pro PR-101/PC-101S
• Photo Paper Plus Glossy PP-101
• Matte Photo Paper MP-101
• Photo Paper Pro:
A4/Letter: With/without borders, index (max. 70 frames)
Card: With borders, index (max. 15 frames)
• Plain paper:
A4/Letter: With/without borders, index (max. 70 frames)
• Date printing
• Vivid photo printing
• DPOF function-compatible (Index printing, specified
quantity, specified frames, date printing, image number
printing)
Standard: 13.0 pages/minute
Standard: 9.0 pages/minute
Copy specifications
Copy speed
No. of copies
Density adjustment
Zoom
A-4 Specifications Appendix
• Black & white: <B&W DRAFT> Approx. 22 pages/minute (A4
size)
• Color: <COLOR FAST> Approx. 14 pages/minute
(A4 size)
(Based on BJ printer specific speed test pattern.)
Maximum 99 copies
9 levels
25%–400%
Page 89

Fax Model
Applicable line
Compatibility
Data compressing system
Modem type
Modem speed
Transmission speed
Scanning image processing
Memory
Fax scanning speed
Fax resolution
Dialing
Networking
Fax specifications
Public Switched Telephone Network (PSTN)
G3
MH, MR, MMR, JBIG, JPEG
Fax modem
33600/14400/9600/7200/4800/2400 bps
Automatic fallback
• Black & white: Approx. 3 seconds/page at 33.6 Kbps,
ECM-MMR, transmitting from memory
(Based on Canon FAX Standard Chart, standard mode.)
• Color: Approx. 1 minute/page at 33.6 Kbps, ECM-JPEG,
transmitting from memory
(Based on Canon COLOR FAX TEST SHEET.)
• UHQ™ (Ultra High Quality) image enhancement
• Halftones: 64 levels of gray
• Density adjustment: 3 levels
Transmission/reception: 250 pages
(Based on Canon FAX Standard Chart, standard mode.)
Approx. 5.3 seconds/page
(Based on Canon FAX Standard Chart, standard mode.)
• <B&W STANDARD>: 8 pels/mm × 3.85 lines/mm
(203 pels/in. × 98 lines/in.)
• <B&W FINE>, <B&W PHOTO>: 8 pels/mm × 7.70 lines/mm
(203 pels/in. × 196 lines/in.)
• <COLOR STANDARD>, <COLOR FINE>: 200 × 200 dpi
• Automatic dialing
One-touch speed dialing (8 destinations)
Coded speed dialing (100 destinations)
Group dialing (Max. 107 destinations)
• Regular dialing (with numeric keys)
• Automatic redialing
• Manual redialing (with [Redial/Pause] key)
• Sequential broadcast (Max. 109 destinations)
• Automatic reception
• Automatic fax/tel switchover
• Remote reception by telephone (Default ID: 25)
• Polling reception
• Non-ring reception
• ECM deactivation
• ACTIVITY REPORT (after every 20 transactions)
• Non-delivery report
• TTI (Transmit Terminal Identification)
A
Specifications
Appendix Specifications A-5
Page 90

Scan specifications
Compatibility
Scanning speed
Scanning resolution
Scanning image processing
TWAIN/WIA (Windows XP)
• Black & white text/grayscale, 300 dpi:
Min. 5.3 seconds/page (A4 size)
• Color, 150 dpi: Min. 15.9 seconds/page (A4 size)
(Data transfer not included)
• 1200 × 2400 dpi optical
• 9600 dpi enhanced
• Halftones: 256 levels of gray
• Color: 16,777,216 colours
Telephone specifications
Connection Telephone/answering machine (CNG detecting signal)/data
modem
Specifications subject to change without notice.
A-6 Specifications Appendix
Page 91

Index
2 (-) key 1-4
3 (+) key 1-4
ADF 1-3
loading documents in 2-1
Alarm light 1-4
Aligning printhead 9-5, 9-6
All frames printing 4-6, 4-7
AUTO REDIAL message 10-13
Automatic Document Feeder. See ADF
B&W key 1-5
Bk INK EMPTY message 10-13
Black & white
copying 5-1
sending 7-3
BUSY/NO SIGNAL message 10-13
C INK EMPTY message 10-13
Canceling
memory sending 7-4
receiving 7-8
CANNOT USE THIS CARD message 10-13
CARD READER BUSY message 10-13
Card slot 1-3
CARTRIDGE JAMMED message 10-13
CHANGE PAPERSIZE:FAX message 10-13
Characters, entering 7-2
CHECK DOCUMENT message 10-14
CHECK PAPER SIZE message 10-14
CHECK PRINTER message 10-14
CLEAR PAPER JAM message 10-14
Coded Dial key 1-5
Coded speed dialing
registering 7-5, 7-6
using 7-6
Color
copying 5-1
key 1-5
Components 1-3 to 1-6
Computer
problems turning on 10-2
Contrast
adjusting for copying 5-2
key 1-4
Copy key 1-4
Copying 5-1
adjusting contrast 5-2
adjusting image quality 5-2
document requirements 2-1
in black & white 5-1
in color 5-1
problems 10-2
COVER OPEN message 10-14
DATA IN MEMORY/CANNOT TURN OFF message
10-14
Date entering 7-1
Density. See Contrast
DOC. TOO LONG message 10-14
Document
cover 1-3
guides 1-3
loading 2-1
output slot 1-3
removing jams 10-11, 10-12
requirements 2-1
tray 1-3
ECM RX message 10-14
ECM TX message 10-14
Enlarge/Reduce key 1-4
Envelopes 2-2
Fax
key 1-4
Resolution. See Image quality
sending 6-1
Features 1-1
Feeder cover 1-3
FILE NOT READABLE 10-14
Glossy Photo Paper GP-301/GP301N 2-2
High Resolution Paper HR-101N 2-2
Hook key 1-5
Image quality adjusting for copying 5-2
Image Quality key 1-4
I
Index
Index I-1
Page 92

In Use/Memory light 1-4
Index printing 4-5, 4-6
Indicator light 1-3
Ink tank
guidelines 9-1
replacing 9-2
when to replace 9-1
INSERT PHOTO CARD message 10-15
INVALID KEY/SETTING message 10-15
Jams
removing document 10-11, 10-12
removing paper 10-10, 10-11
LCD 1-4
if nothing displays 10-9
messages 10-13 to 10-16
LOAD PAPER (PRESS START KEY) message 10-15
M INK EMPTY message 10-15
MACHINE IN USE/CANNOT TURN OFF message 10-15
MAINTENANCE menu 11-2
MANUAL MODE 7-8
Matte Photo Paper MP-101 2-2
Memory card 4-1
inserting 4-2
problems using 10-7, 10-8
removing 4-2
MEMORY FULL message 10-15
MEMORY REFERENCE menu 11-7
Memory sending from machine 7-3
MEMORY USED nn % message 10-15
Menu key 1-4
Menus 11-2 to 11-8 . S ee also individual menu names
Messages 10-13 to 10-16 . S ee also individual menu
names
LCD 10-13 to 10-16
Multi-purpose tray 1-3
NO FILES ON CARD message 10-15
NO RX PAPER message 10-15
NO TEL # message 10-15
NOT AVAILABLE message 10-16
Nozzle check pattern, printing 9-4
Numeric keys 1-5
OK key 1-4
ON/OFF (1 sec.) key 1-5
One-touch speed dialing
keys 1-5
registering 7-4, 7-5
using 7-6
Open button 1-3
Operation panel 1-3
Paper
loading 2-4
removing jams 10-10, 10-11
Select key 1-4
Paper output tray 1-3
removing jams in 10-10
Paper thickness lever 1-3
setting 2-3
Photo Card
key 1-5
Photo Paper
Plus Glossy PP-101 2-2
Pro PC-101S 2-2
Pro PR-101 2-2
PHOTO PRINT MODE menu 11-7
Photo printing
all frames 4-6, 4-7
index 4-5, 4-6
methods 4-4
problems 10-8
single frame 4-7 to 4-9
Plain paper 2-2
Platen glass 1-3
loading documents on 2-1
Polling key 1-5
Power problems 10-9
Print media
recommended 2-2
setting size 2-3
setting type 2-3
Printhead
aligning 9-5, 9-6
cleaning 9-4
holder 1-3
maintaining 9-3
Printing documents 3-1
PROBLEM READING CARD message 10-16
Problems
cannot solve 10-17
copying 10-2
installing software 10-1
power 10-9
receiving faxes 10-3 to 10-5
removing software 10-1
sending 10-5, 10-6
telephone 10-7
turning on computer 10-2
I-2 Index
Page 93

using memory card 10-7
PUT IN CARTRIDGE message 10-16
REC’D IN MEMORY message 10-16
Receive mode
setting from machine 7-7
RECEIVE MODE menu 11-6
Receiving to machine
problems 10-3 to 10-5
Redial/Pause key 1-5
Replacing ink tanks 9-2
REPORTS/LISTS menu 11-7
Resolution. See Image quality
Resume key 1-4
Scan
contrast. See Contrast
key 1-5, 8-1
Scanning
document requirements 2-1
methods 8-1
with Scan key 8-1
Scanning unit 1-3
Sender information
entering from machine 7-1, 7-2
Sending from computer
problems 10-5, 10-6
Sending from machine
document requirements 2-1
memory 7-3
methods 7-3
problems 10-5, 10-6
Settings 11-2 to 11-8
accessing 11-1
Single frame printing 4-7 to 4-9
Software
problems installing 10-1
problems removing 10-1
SPECIAL COPY menu 11-2
Speed dialing
registering 7-4 to 7-6
using 7-6
Start key 1-5
Stop/Reset key 1-5
Symbols, entering 7-2
System requirements 1-2
T key 1-5
Telephone line type 7-2
Telephone problems 10-7
Transparencies CF-102 2-2
Tray cover 1-3
TRY AGAIN IN B&W message 10-16
T-Shirt Transfers TR-201 2-2
TX nnnn/SCANNING P. nnn/MEMORY FULL/PLEASE
WAIT message 10-16
TX/RX CANCELLED message 10-16
TX/RX NO. nnnn message 10-16
USER DATA menu 11-3 to 11-6
VIVID PHOTO PRINT menu 11-8
WAIT COOLING message 10-16
WASTED INK NEAR FULL message 10-16
WRONG CARTRIDGE message 10-16
Y INK EMPTY message 10-16
I
Index
Index I-3
Page 94

I-4 Index
Page 95

Page 96

CANON INC.
30-2, Shimomaruko 3-chome, Ohta-ku, Tokyo 146-8501, Japan
CANON U.S.A., INC.
One Canon Plaza, Lake Success, NY 11042, U.S.A.
CANON CANADA INC.
6390 Dixie Road Mississauga, Ontario L5T 1P7, Canada
CANON EUROPA N.V.
Bovenkerkerweg 59-61 P.O. Box 2262, 1180 EG Amstelveen, The Netherlands
CANON FRANCE S.A.
17, quai du President Paul Doumer 92414 Courbevoie Cedex, France
CANON (U.K.) LTD.
Woodhatch, Reigate, Surrey, RH2 8BF, United Kingdom
CANON DEUTSCHLAND GmbH
Europark Fichtenhain A10, 47807 Krefeld, Germany
CANON ITALIA S.p.A.
Palazzo L Strada 6 20089 Milanofiori Rozzano (MI) Italy
CANON LATIN AMERICA, INC.
703 Waterford Way, Suite 400, Miami, Florida 33126, U.S.A.
CANON AUSTRALIA PTY. LTD
1 Thomas Holt Drive, North Ryde, Sydney, N.S.W. 2113, Australia
CANON SINGAPORE PTE. LTD.
79 Anson Road #09-01/06, Singapore 079906
CANON HONGKONG CO., LTD
9/F., The Hong Kong Club Building, 3A Chater Road, Central, Hong Kong
230V
AUS/AE
HT1-2224-000-V.2.0 XX2003A © CANON INC. 2003 PRINTED IN THAILAND
 Loading...