

Page 1
5.1
1 ImageBrowser Software User Guide
Page 2
Table of Contents (1/2)
Chapter 1 What is ImageBrowser ?
What Can ImageBrowser Do? .................................................. 5
Guide to the ImageBrowser Windows ..................................... 6
Chapter 2 Downloading and Printing Images
Downloading Images to Your Computer .................................. 8
Printing Images .......................................................................14
Chapter 3 What You Can Do with a Camera Connected
Camera Control Window ........................................................ 16
Downloading Images Automatically—Camera Operations ......... 18
Downloading Images Automatically—Computer Operations .....19
Checking Images in the Camera before Downloading ............22
Deleting Images from the Camera ..........................................24
Other Features of the Camera Browser Window ....................25
Saving the “My Camera Settings” to the Camera .................... 26
Setting up Slide Shows on the Camera .................................... 34
Setting the DPOF Print Settings ............................................... 35
Checking and Modifying the Camera Settings ........................37
Adding Computer Images to the Camera ................................38
Operating the Camera Shutter from a Computer ................... 39
Chapter 4 Viewing Images
Starting ImageBrowser ............................................................43
Selecting Folders ..................................................................... 44
Changing the Display Mode .................................................... 46
Changing the Browser Window Display ..................................48
Opening Images ...................................................................... 50
Using the Viewer Window ...................................................... 51
Chapter 5 Organizing Images
Selecting Images ...................................................................... 55
Setting Star Ratings ................................................................. 56
Assigning Keywords ................................................................58
Sorting Images ........................................................................ 60
Renaming Images .................................................................... 62
Searching Images .................................................................... 64
Moving and Copying Images ...................................................66
Deleting Images ...................................................................... 68
Rotating Images ...................................................................... 69
Viewing Image Information .................................................... 70
Creating Folders ...................................................................... 71
2 ImageBrowser Software User Guide
Page 3
Table of Contents (2/2)
Chapter 6 Using Supplementary Features
Editing Images ......................................................................... 72
Editing Images with Other Programs ......................................76
Creating Images for E-mail ...................................................... 77
Exporting Images .................................................................... 79
Running Slide Shows ...............................................................82
Adding Sounds to Images ........................................................ 85
Printing Images ....................................................................... 87
Printing Images over Multiple Pages ....................................... 95
Sorting Images by Date and Time - TimeTunnel ......................96
Playing Movies ........................................................................ 98
Editing Movies ......................................................................... 99
Converting RAW Images ....................................................... 102
Stitching Panoramic Images - PhotoStitch ............................. 107
Appendices
Supported Image Types ......................................................... 108
Customizing Preferences .......................................................109
Troubleshooting .................................................................... 112
Index
Index ..................................................................................... 113
3 ImageBrowser Software User Guide
Page 4
Notations and Conventions
Symbol Usage
This guide uses the following symbols.
Information essential to operations, such as explanations of
functions or terminology, follows this symbol.
Information about the steps to perform follows this symbol.
Operating tips and convenient ways of using the program
follow this symbol. Read these topics as you see fit.
IMPORTANT
Points that you need to follow to perform the procedures and
other important topics follow this symbol. Always read these
topics.
Terminology Usage
The following terms are used in this guide as indicated below.
• CF card, SD card, PC card, multimedia card ➜ memory card
NOTE
○○○○○○○○○○○○○○○○○○○○○○○○○○○○○○○○○○○○○○○○○○
• This guide uses Mac OS X v10.3 screen shots and procedures in
the explanations. The screen shots and procedures may vary
slightly if you are using another version of the Mac OS.
REFERENCE
Supplementary explanations and procedures follow this symbol.
Read these topics as you see fit.
4 ImageBrowser Software User Guide
Page 5
Chapter 1
What is ImageBrowser?
What Can ImageBrowser Do?
This section provides a brief explanation of the ImageBrowser features.
What You Can Do with a Camera Connected
• Download images from the camera to the computer.
• Save computer images to the camera.
• Operate the camera shutter remotely from the computer
(only on models supporting remote shooting).
• Set up camera slide shows or DPOF print settings (only
available on some models).
• Check and modify camera settings.
• Set the My Camera Settings (start-up image, start-up sound,
operation sound, self-timer sound and shutter sound).
View Images
• Display the downloaded images and their shooting
information.
• Switch between display modes (Preview, List and TimeTunnel)
Use the Additional Features
• Print images.
• Edit images and movies.
• Stitch panoramic images.
• Convert RAW images to standard images (only available on
some models).
• Format images as screensaver and wallpaper files.
• Export image shooting information as a text file.
REFERENCE
○○○○○○○○○○○○○○○○○○○○○○○○○○○○○○○○○○○○○○○○○○
• The Canon CD-ROM supplied with the camera contains My
Camera Settings files. These files are automatically copied to
your computer when ImageBrowser is installed.
Organize Images
• Assign a Star Rating or keywords to images.
• Sort images according to their shooting date or Star Rating.
• Perform image searches.
5 ImageBrowser Software User Guide
Page 6
Chapter 1
What is ImageBrowser?
This section briefly introduces the purposes and features of the two
main windows for operating ImageBrowser.
Guide to the ImageBrowser Windows (1/2)
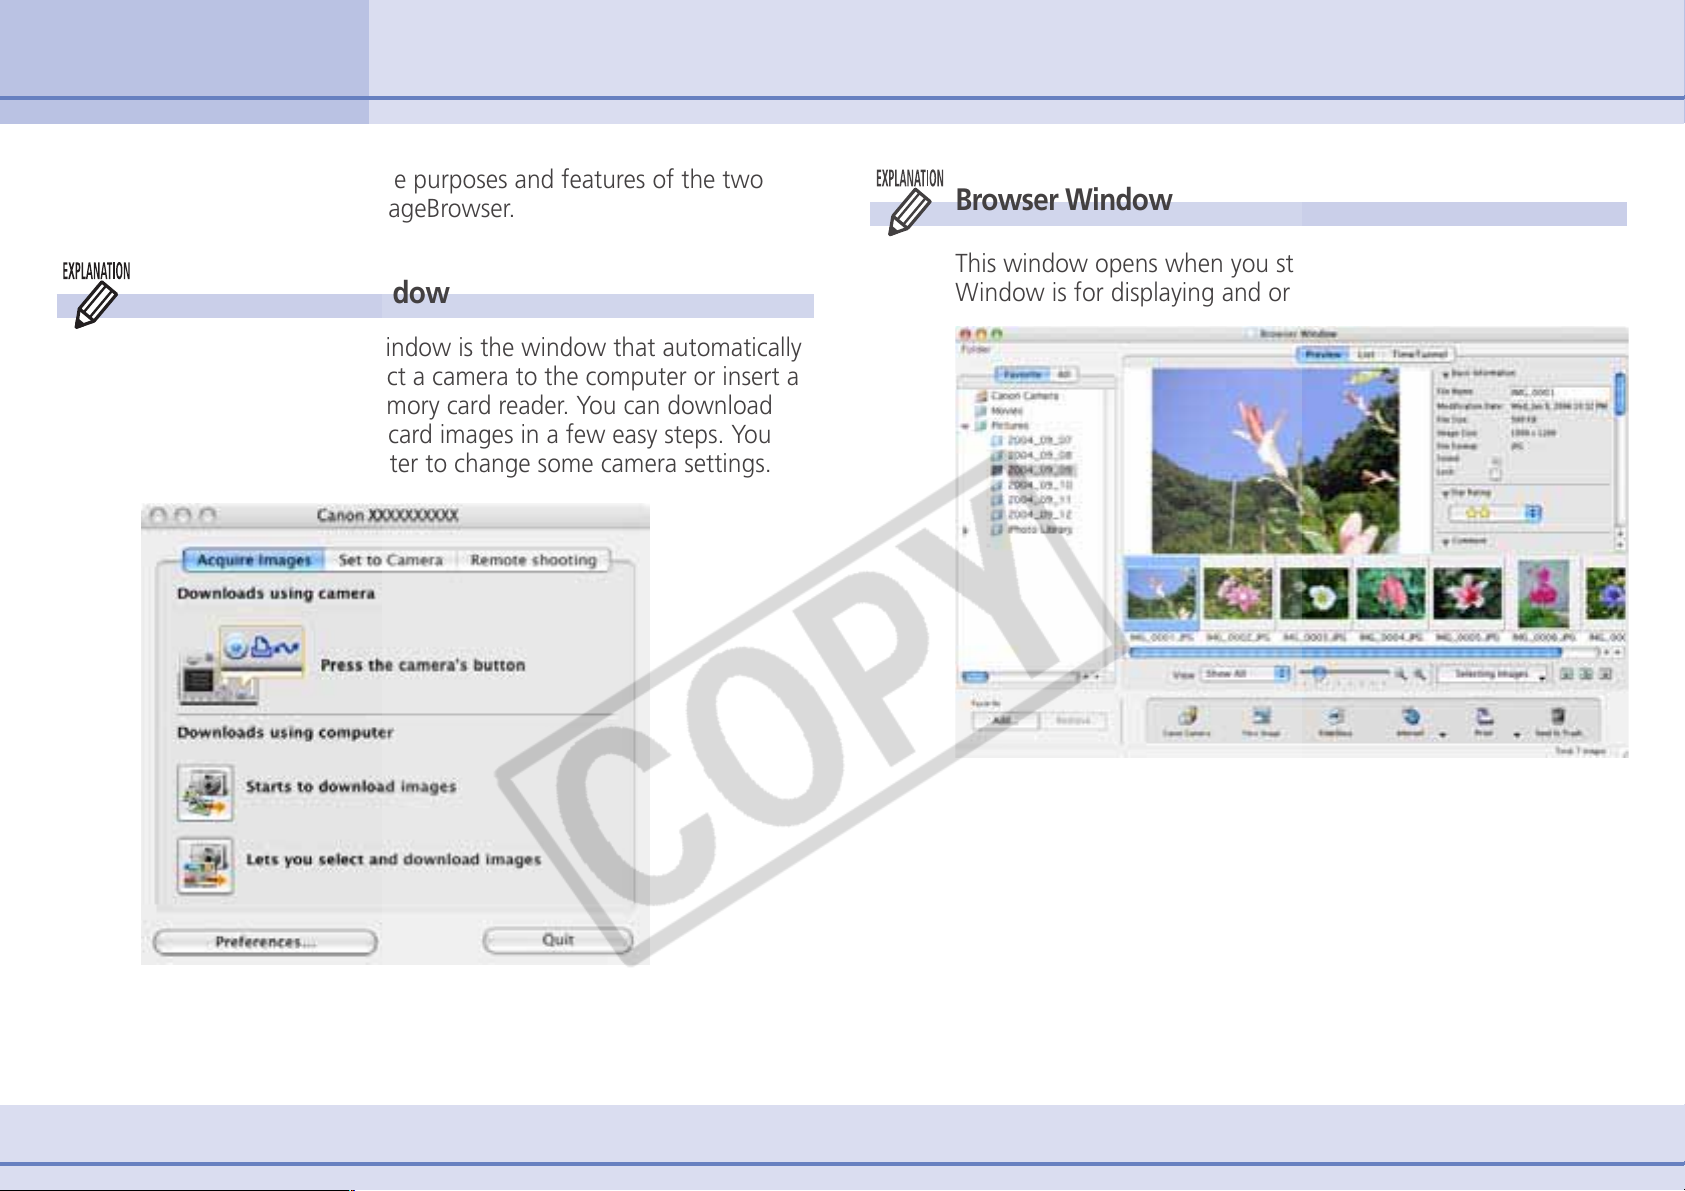
Camera Control Window
The Camera Control Window is the window that automatically
opens when you connect a camera to the computer or insert a
memory card into a memory card reader. You can download
the camera or memory card images in a few easy steps. You
can also use the computer to change some camera settings.
Browser Window
This window opens when you start ImageBrowser. The Browser
Window is for displaying and organizing downloaded images.
6 ImageBrowser Software User Guide
Page 7
Chapter 1
What is ImageBrowser?
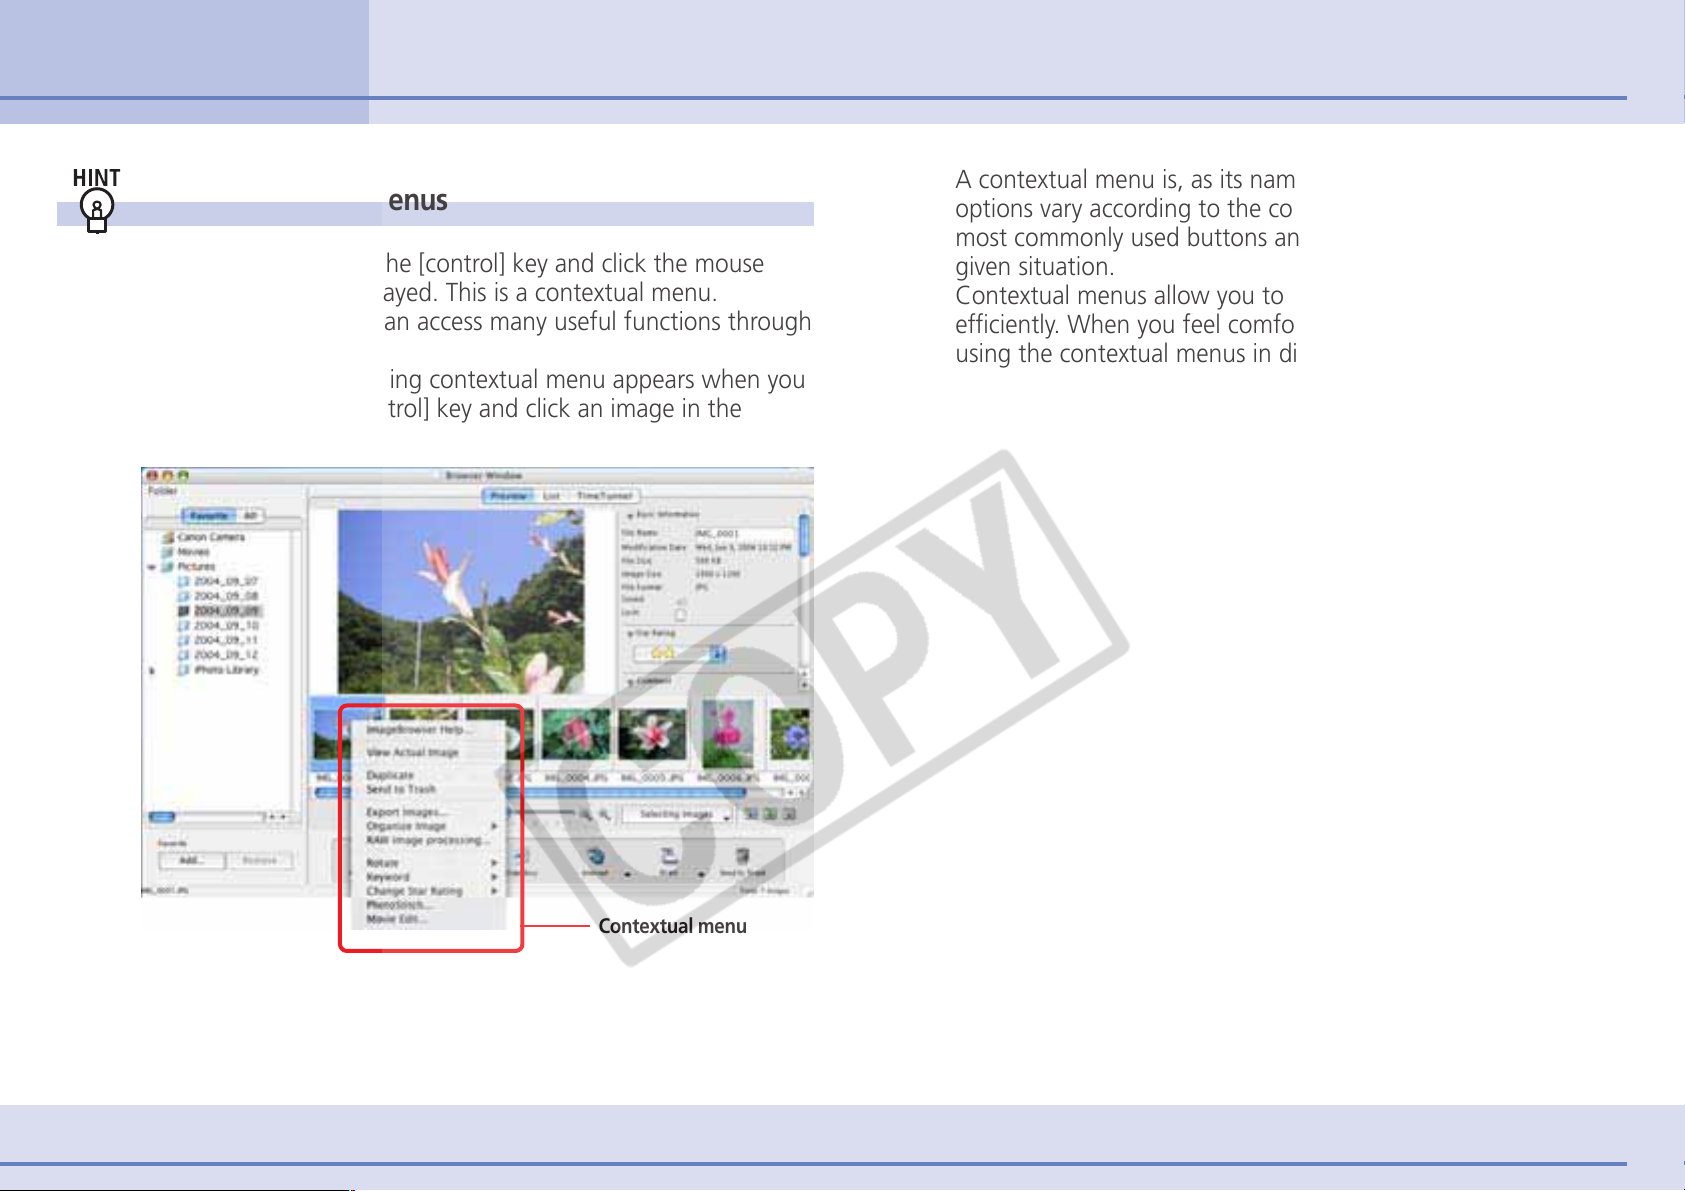
Using Contextual Menus
When you hold down the [control] key and click the mouse
button, a menu is displayed. This is a contextual menu.
In ImageBrowser, you can access many useful functions through
contextual menus.
For example, the following contextual menu appears when you
press and hold the [control] key and click an image in the
Browser Area.
Guide to the ImageBrowser Windows (2/2)
A contextual menu is, as its name implies, a menu whose
options vary according to the context. It is a collection of the
most commonly used buttons and commands that apply to a
given situation.
Contextual menus allow you to use ImageBrowser more
efficiently. When you feel comfortable with ImageBrowser, try
using the contextual menus in different situations.
7 ImageBrowser Software User Guide
Contextual menu
Page 8
Chapter 2
Downloading and Printing Images
Downloading Images to Your Computer (1/6)
This chapter explains a sequence of ImageBrowser basic procedures in
order, such as downloading images from the camera and printing
downloaded images. This section starts by explaining the procedures for
downloading images from the camera.
IMPORTANT
○○○○○○○○○○○○○○○○○○○○○○○○○○○○○○○○○○○○○○○○○
• This guide assumes that all the relevant software programs
and drivers have been correctly installed on your computer. If
you have not yet installed them, read the guides for the
software supplied with your camera and install them.
Auto Start Settings the First Time ImageBrowser Is Used
This section explains the settings for automatically opening the
Camera Control Window when you connect your camera to a
computer.
IMPORTANT
○○○○○○○○○○○○○○○○○○○○○○○○○○○○○○○○○○○○○○○○○
• You must perform this step before connecting the camera to a
computer for the first time.
1.
2.
3.
4.
5.
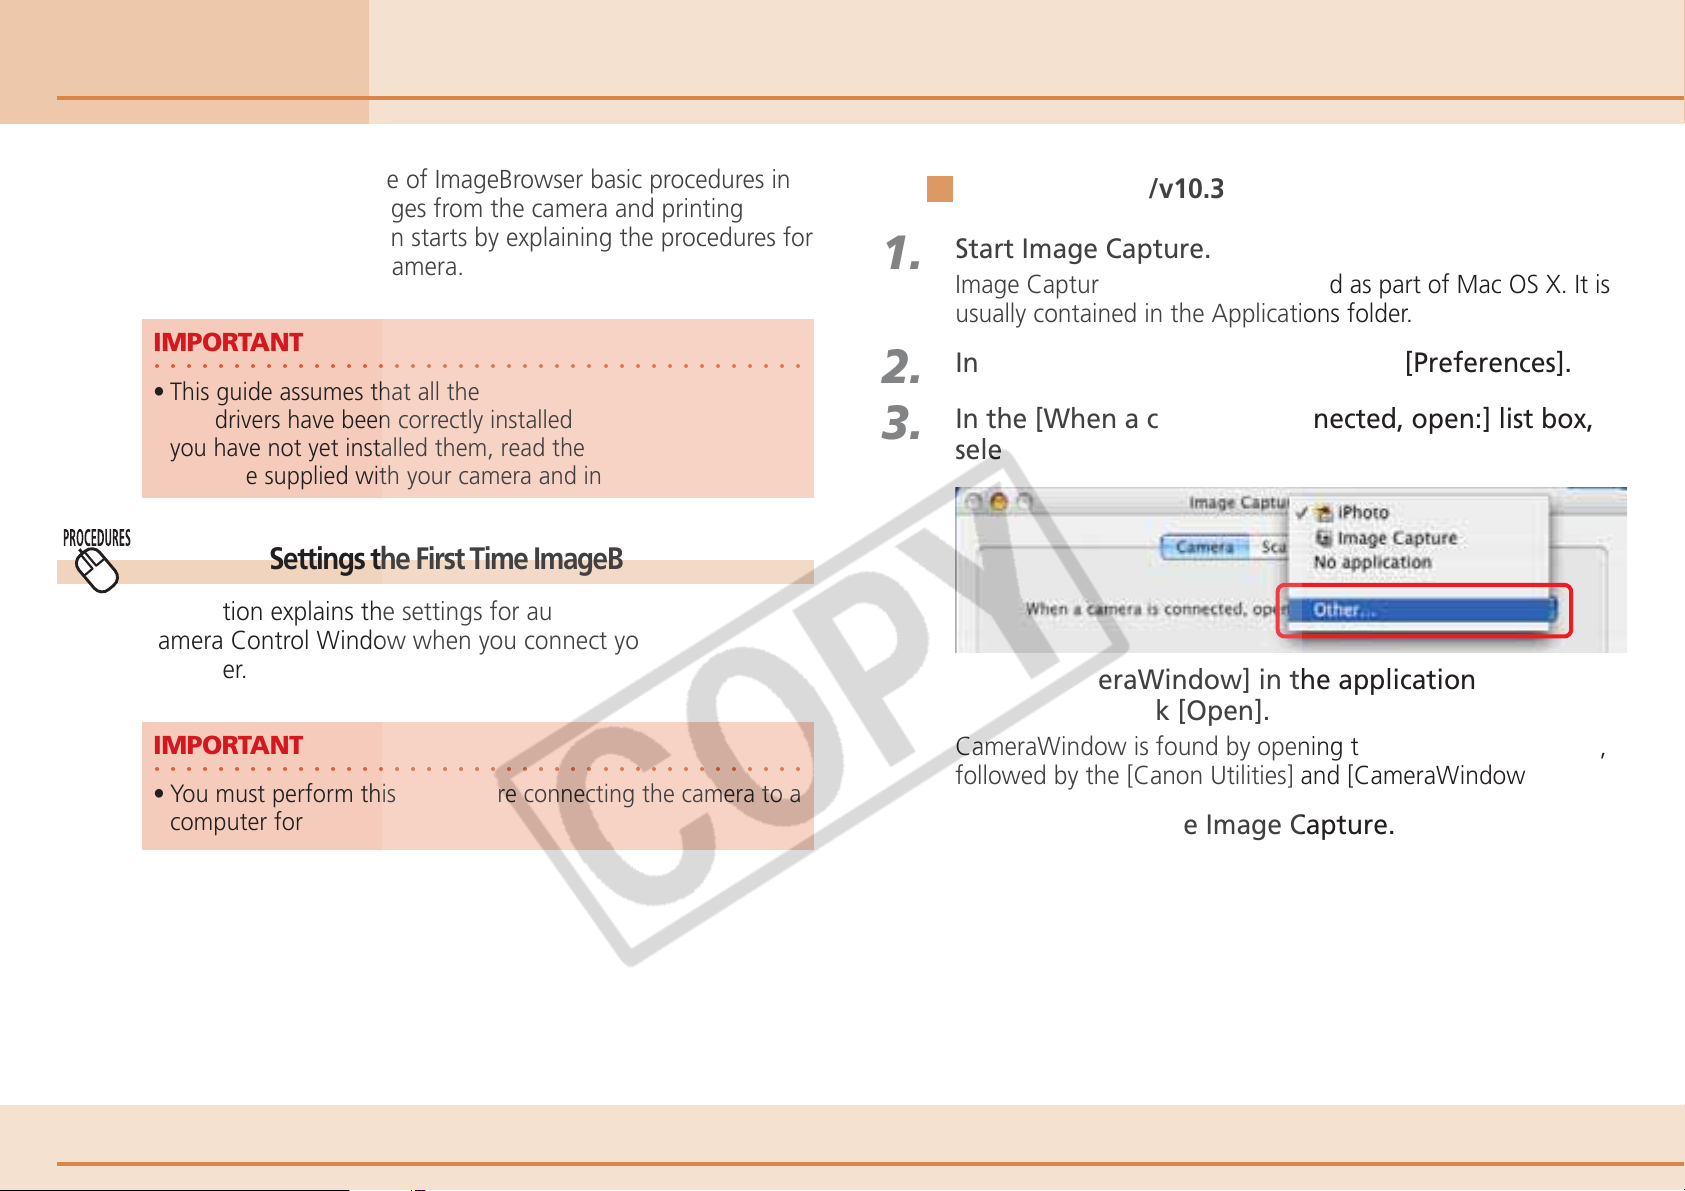
Mac OS X v10.2/v10.3
Start Image Capture.
Image Capture is a program supplied as part of Mac OS X. It is
usually contained in the Applications folder.
In the [Image Capture] menu, select [Preferences].
In the [When a camera is connected, open:] list box,
select [Other].
Select [CameraWindow] in the application selection
window and click [Open].
CameraWindow is found by opening the [Applications] folder,
followed by the [Canon Utilities] and [CameraWindow] folders.
Click [OK] and close Image Capture.
8 ImageBrowser Software User Guide
Page 9
Chapter 2
Downloading and Printing Images
Mac OS X v10.1
Downloading Images to Your Computer (2/6)
1.
2.
3.
4.
Start Image Capture.
Image Capture is a program supplied as part of Mac OS X. It is
usually contained in the Applications folder.
In the [Hot Plug Action] list box, select [Other].
Select [CameraWindow] in the application selection
window.
CameraWindow is found by opening the [Applications] folder,
followed by the [Canon Utilities] and [CameraWindow] folders.
Close Image Capture.
9 ImageBrowser Software User Guide
Page 10
Chapter 2
Downloading and Printing Images
Downloading Images to Your Computer (3/6)
Connecting the Camera to Download
This section describes two methods for downloading images
shot with the camera to a computer.
Downloading Images with Camera Commands
You can use this method to download images with cameras
that support the direct transfer function.
Downloading Images with Computer Commands
This method uses commands entered on the computer to
download images from a memory card in a camera or in a
memory card reader. This method can be used regardless of
whether your camera supports the direct transfer function or not.
This method is explained later in the Using Computer
Commands to Download Images section.
REFERENCE
○○○○○○○○○○○○○○○○○○○○○○○○○○○○○○○○○○○○○○○○○○
• This section uses the “Download All Camera Images Not Yet
Downloaded” method, a simple method, to download images.
Chapter 3 explains in greater detail how to select images for
downloading from a camera or memory card and how to
perform tasks such as changing the file destination.
• If images shot on different dates are contained on the memory
card, the images will be grouped in folders by shooting date
when they are downloaded and the folder with the most recent
shooting date will display.
1.
Using Camera Commands to Download Images
You can download images using camera commands if your
camera supports the direct transfer function (camera has a
(Print/Share) button).
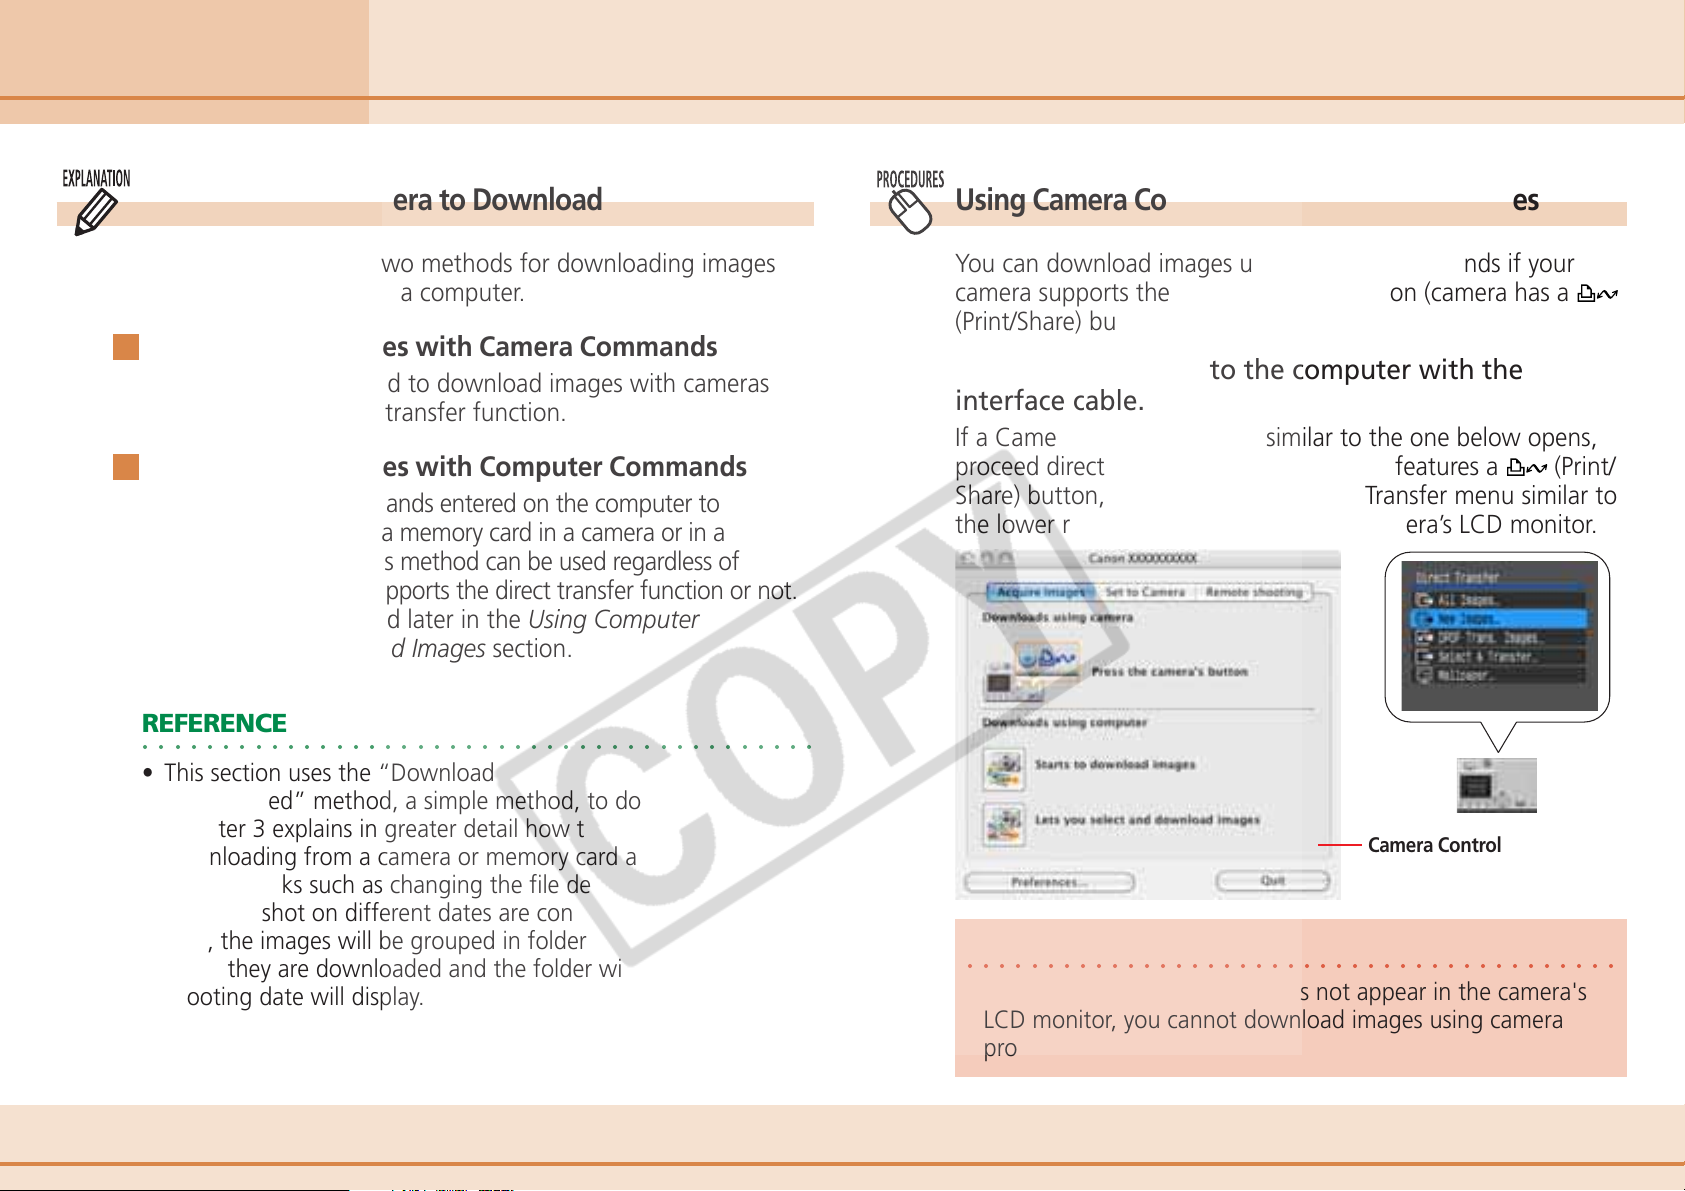
Connect the camera to the computer with the
interface cable.
If a Camera Control Window similar to the one below opens,
proceed directly to Step 2. If your camera features a
Share) button, it will flash and a Direct Transfer menu similar to
the lower right one will appear on the camera’s LCD monitor.
Camera Control Window
IMPORTANT
○○○○○○○○○○○○○○○○○○○○○○○○○○○○○○○○○○○○○○○○○
* If the Direct Transfer menu does not appear in the camera's
LCD monitor, you cannot download images using camera
procedures.
(Print/
10 ImageBrowser Software User Guide
Page 11
Chapter 2
Downloading and Printing Images
Downloading Images to Your Computer (4/6)
2.
Some camera models must have settings, such as the Playback
mode, set to communicate with the computer. If your camera
requires this, consult your Camera User Guide to set the
necessary settings for communication.
REFERENCE
○○○○○○○○○○○○○○○○○○○○○○○○○○○○○○○○○○○○○○○○○○
• If a remote shooting window opens, the Camera Control Window
will not open. Please close the remote shooting window.
• A dialog will appear if a camera and a memory card reader are
both connected to allow you to select the device from which
images are shown. Select the desired device from the list box
and click [OK].
Set the Direct transfer settings on the camera, and
push the
REFERENCE
○○○○○○○○○○○○○○○○○○○○○○○○○○○○○○○○○○○○○○○○○○
• See your Camera User Guide for explanations of the settings
and commands related to the Direct Transfer menu that appears
in the camera’s LCD monitor.
• If you click Settings on the computer, you can change the
destination folder for image files. See “Downloading Images
Automatically” in Chapter 3 for instructions on how to change
the destination folder.
• By the default settings, downloaded images are saved to the
[Pictures] folder.
(Print/Share) button or [SET] button.
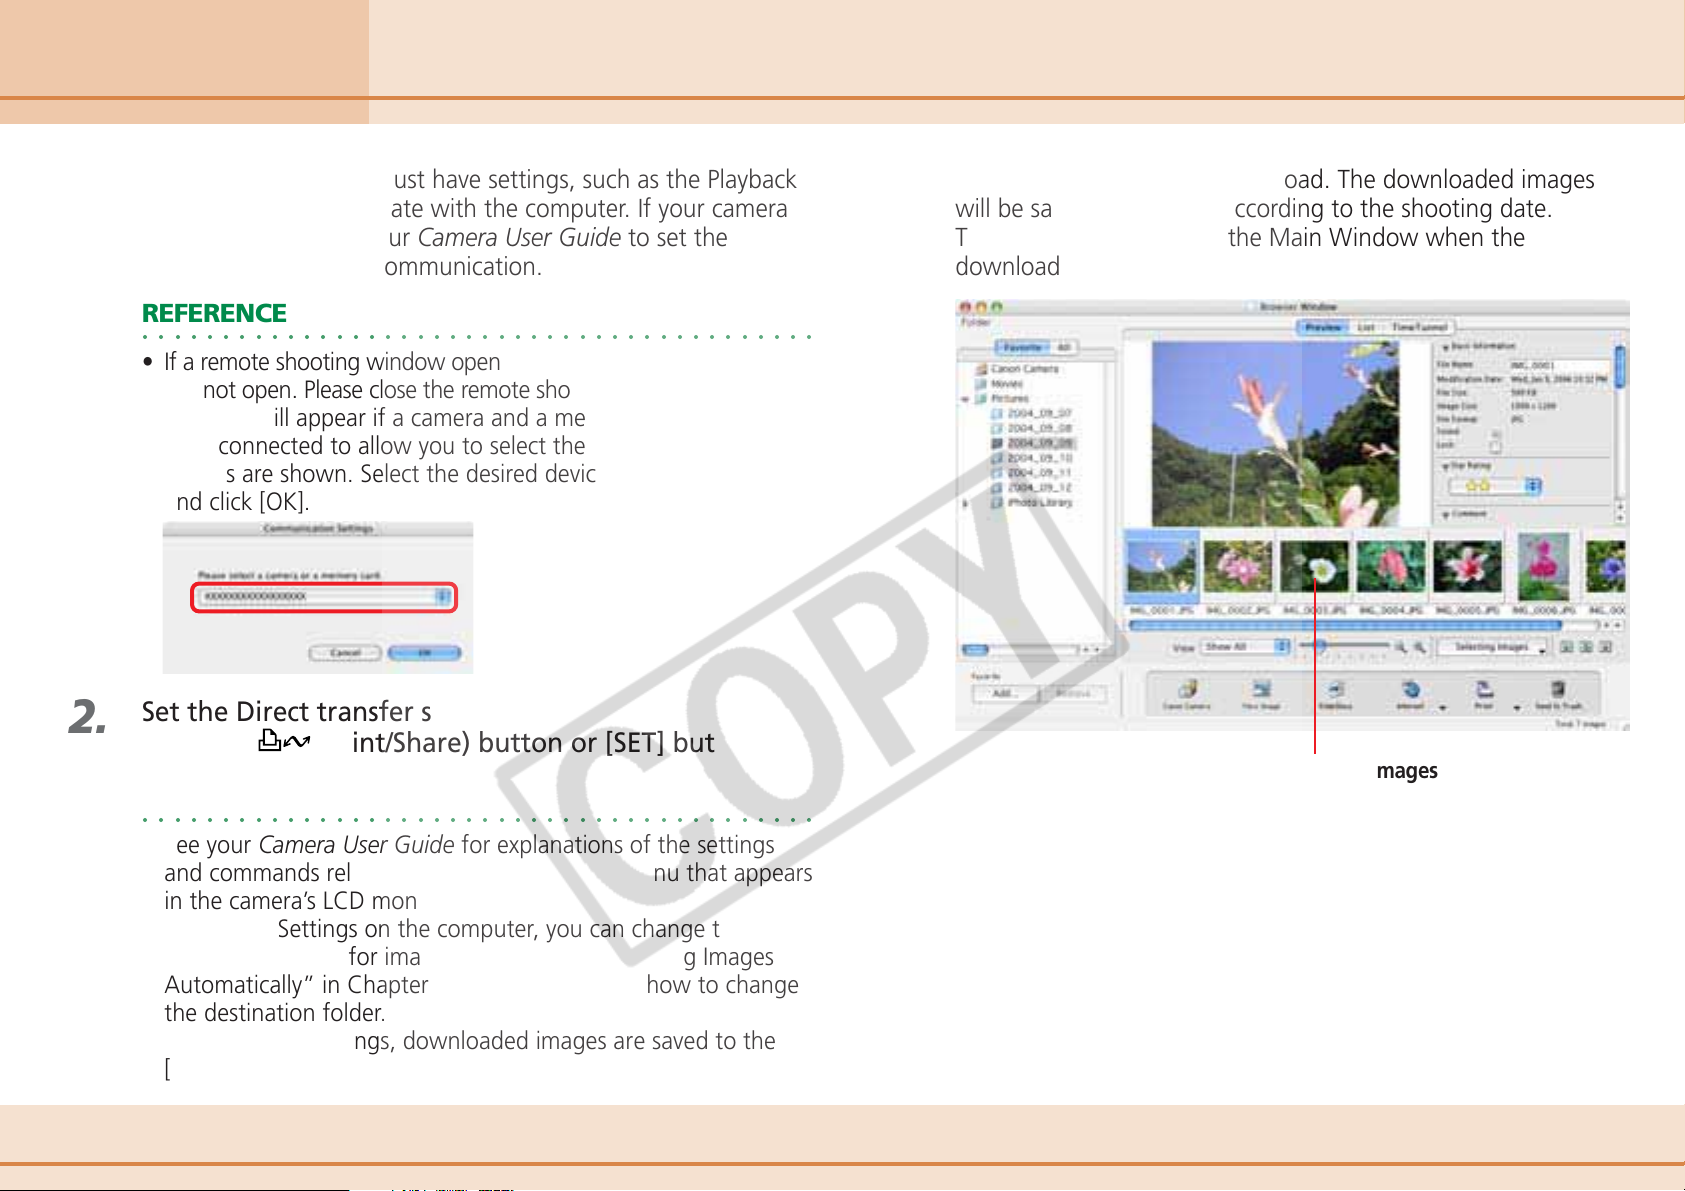
The images will begin to download. The downloaded images
will be saved into folders according to the shooting date.
The images will display in the Main Window when the
download is complete.
Downloaded Images
11 ImageBrowser Software User Guide
Page 12
Chapter 2
Downloading and Printing Images
Downloading Images to Your Computer (5/6)
Using Computer Commands to Download Images
1.
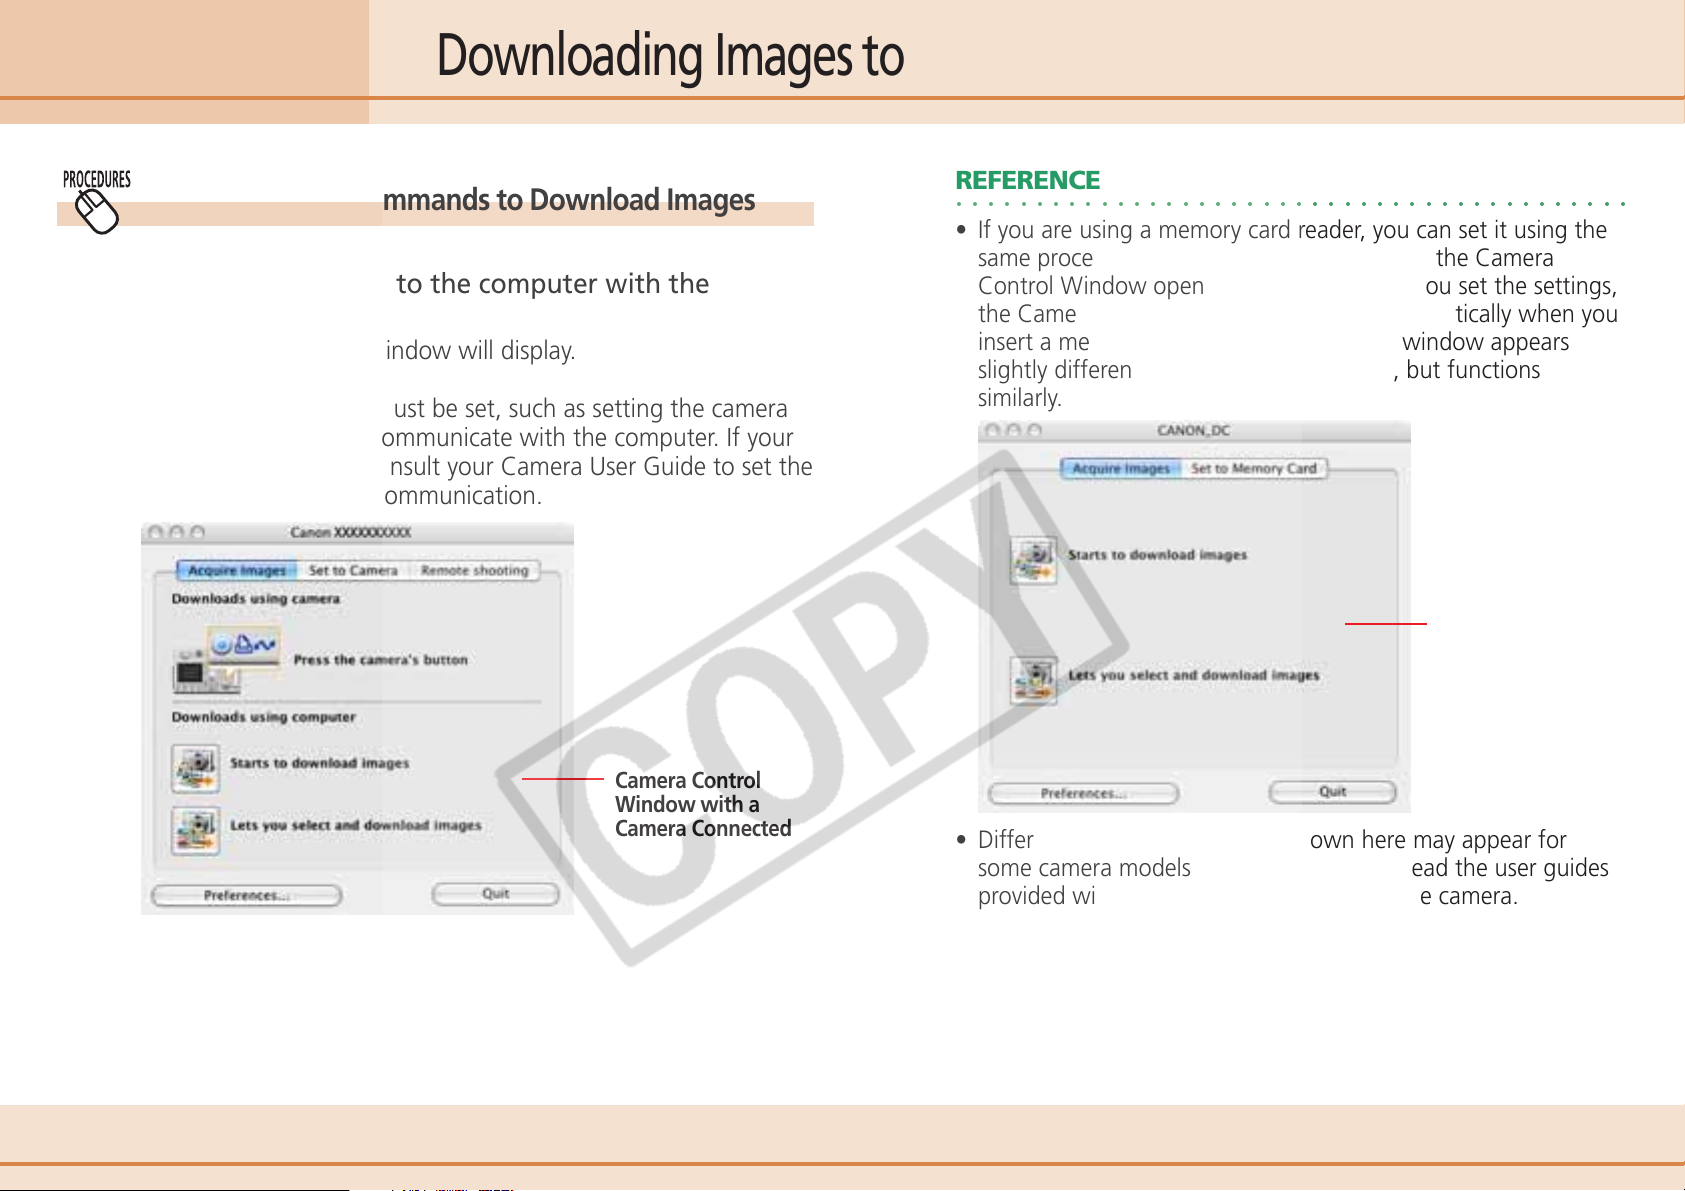
Connect the camera to the computer with the
interface cable.
The Camera Control Window will display.
Some camera models must be set, such as setting the camera
to Playback mode, to communicate with the computer. If your
camera requires this, consult your Camera User Guide to set the
necessary settings for communication.
REFERENCE
○○○○○○○○○○○○○○○○○○○○○○○○○○○○○○○○○○○○○○○○○○
• If you are using a memory card reader, you can set it using the
same procedures as with the camera to have the Camera
Control Window open automatically. After you set the settings,
the Camera Control Window will open automatically when you
insert a memory card into the reader. The window appears
slightly different from the camera version, but functions
similarly.
12 ImageBrowser Software User Guide
Camera Control
Window with a
Camera Connected
Camera Control
Window with a
Memory Card
Reader Connected
• Different windows from those shown here may appear for
some camera models. In that case, please read the user guides
provided with the software bundled with the camera.
Page 13
Chapter 2
Downloading and Printing Images
Downloading Images to Your Computer (6/6)
2.
REFERENCE
○○○○○○○○○○○○○○○○○○○○○○○○○○○○○○○○○○○○○○○○○○
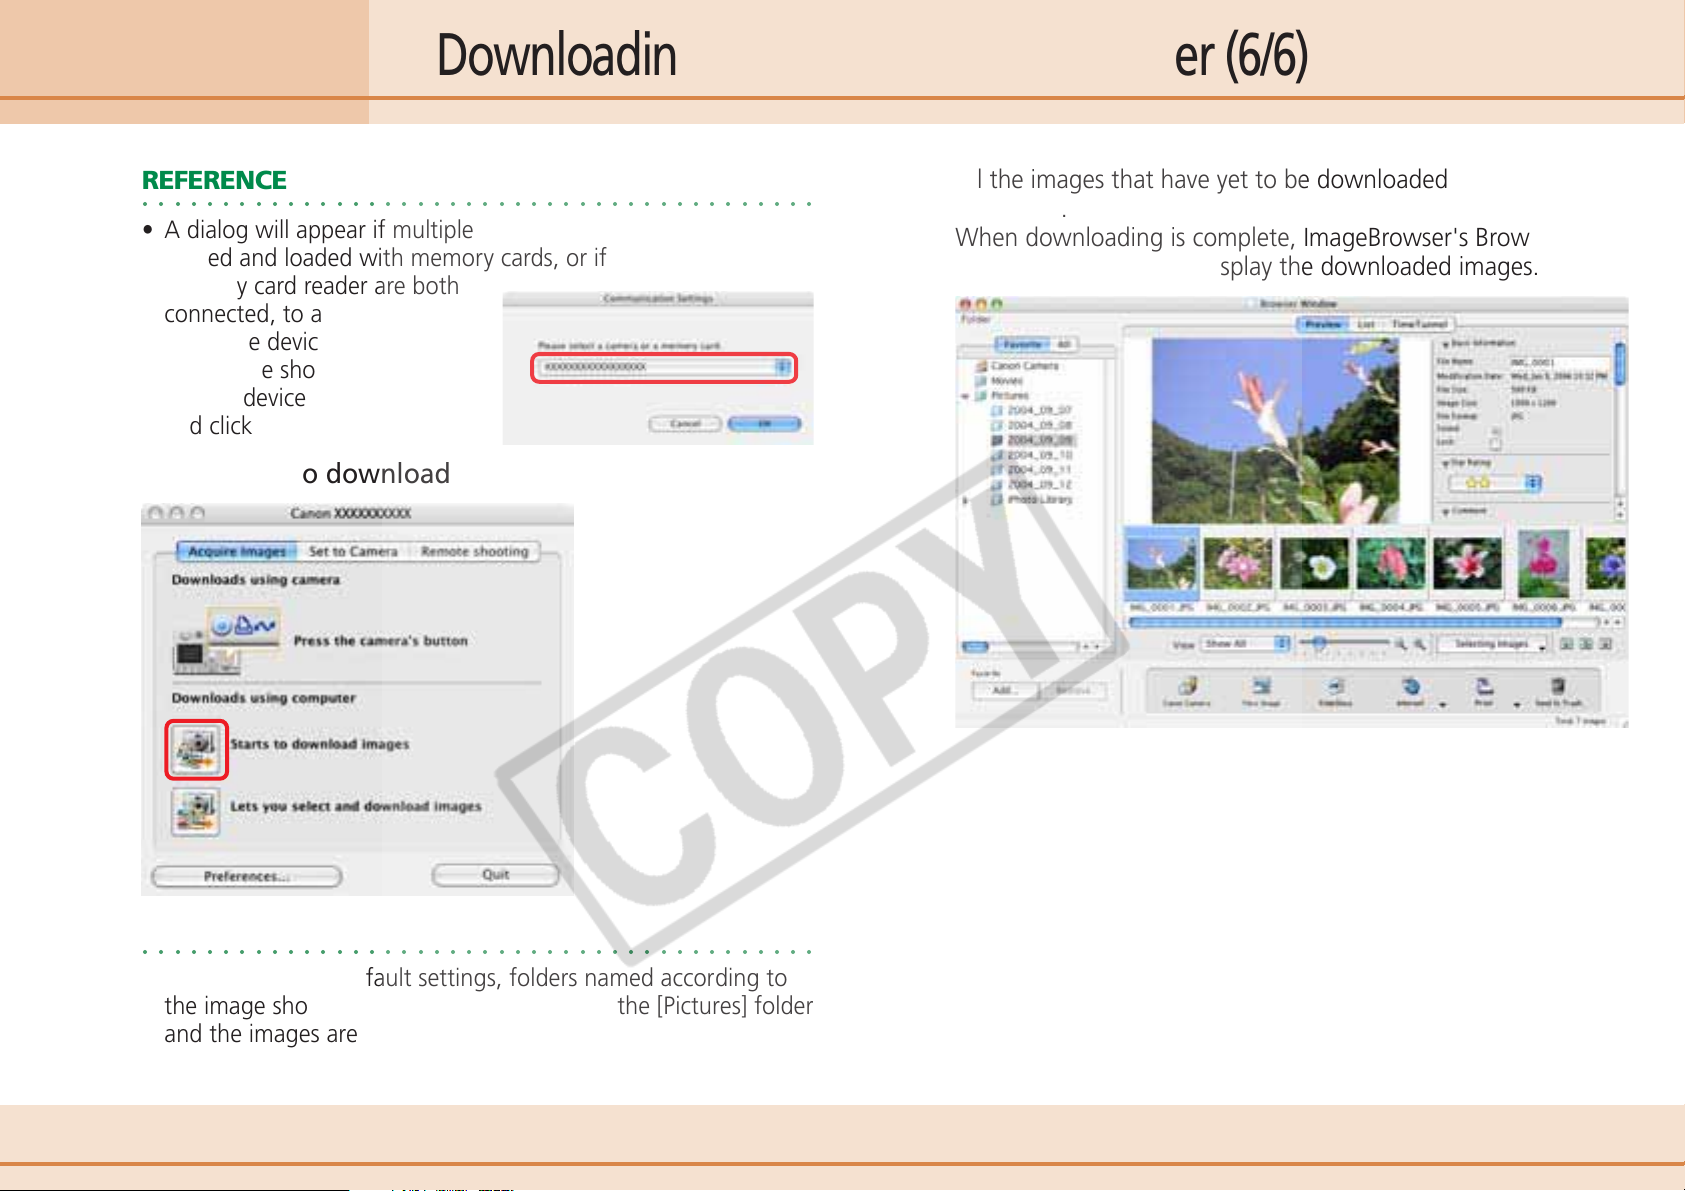
• A dialog will appear if multiple memory card readers are con-
nected and loaded with memory cards, or if a camera and a
memory card reader are both
connected, to allow you to
select the device from which
images are shown. Select the
desired device from the list box
and click [OK].
Click [Starts to download images].
All the images that have yet to be downloaded will start to
download.
When downloading is complete, ImageBrowser's Browser
Window will open and display the downloaded images.
REFERENCE
○○○○○○○○○○○○○○○○○○○○○○○○○○○○○○○○○○○○○○○○○○
• According to the default settings, folders named according to
the image shooting dates are created within the [Pictures] folder
and the images are downloaded to them.
13 ImageBrowser Software User Guide
Page 14
Chapter 2
Downloading and Printing Images
Printing Images (1/2)
This section explains the procedures for printing downloaded images on
a printer.
REFERENCE
○○○○○○○○○○○○○○○○○○○○○○○○○○○○○○○○○○○○○○○○○○
• Images recorded in the Adobe RGB color space will appear
unsaturated when printed using PhotoRecord. Color space
settings are only available on select camera models.
1.
2.
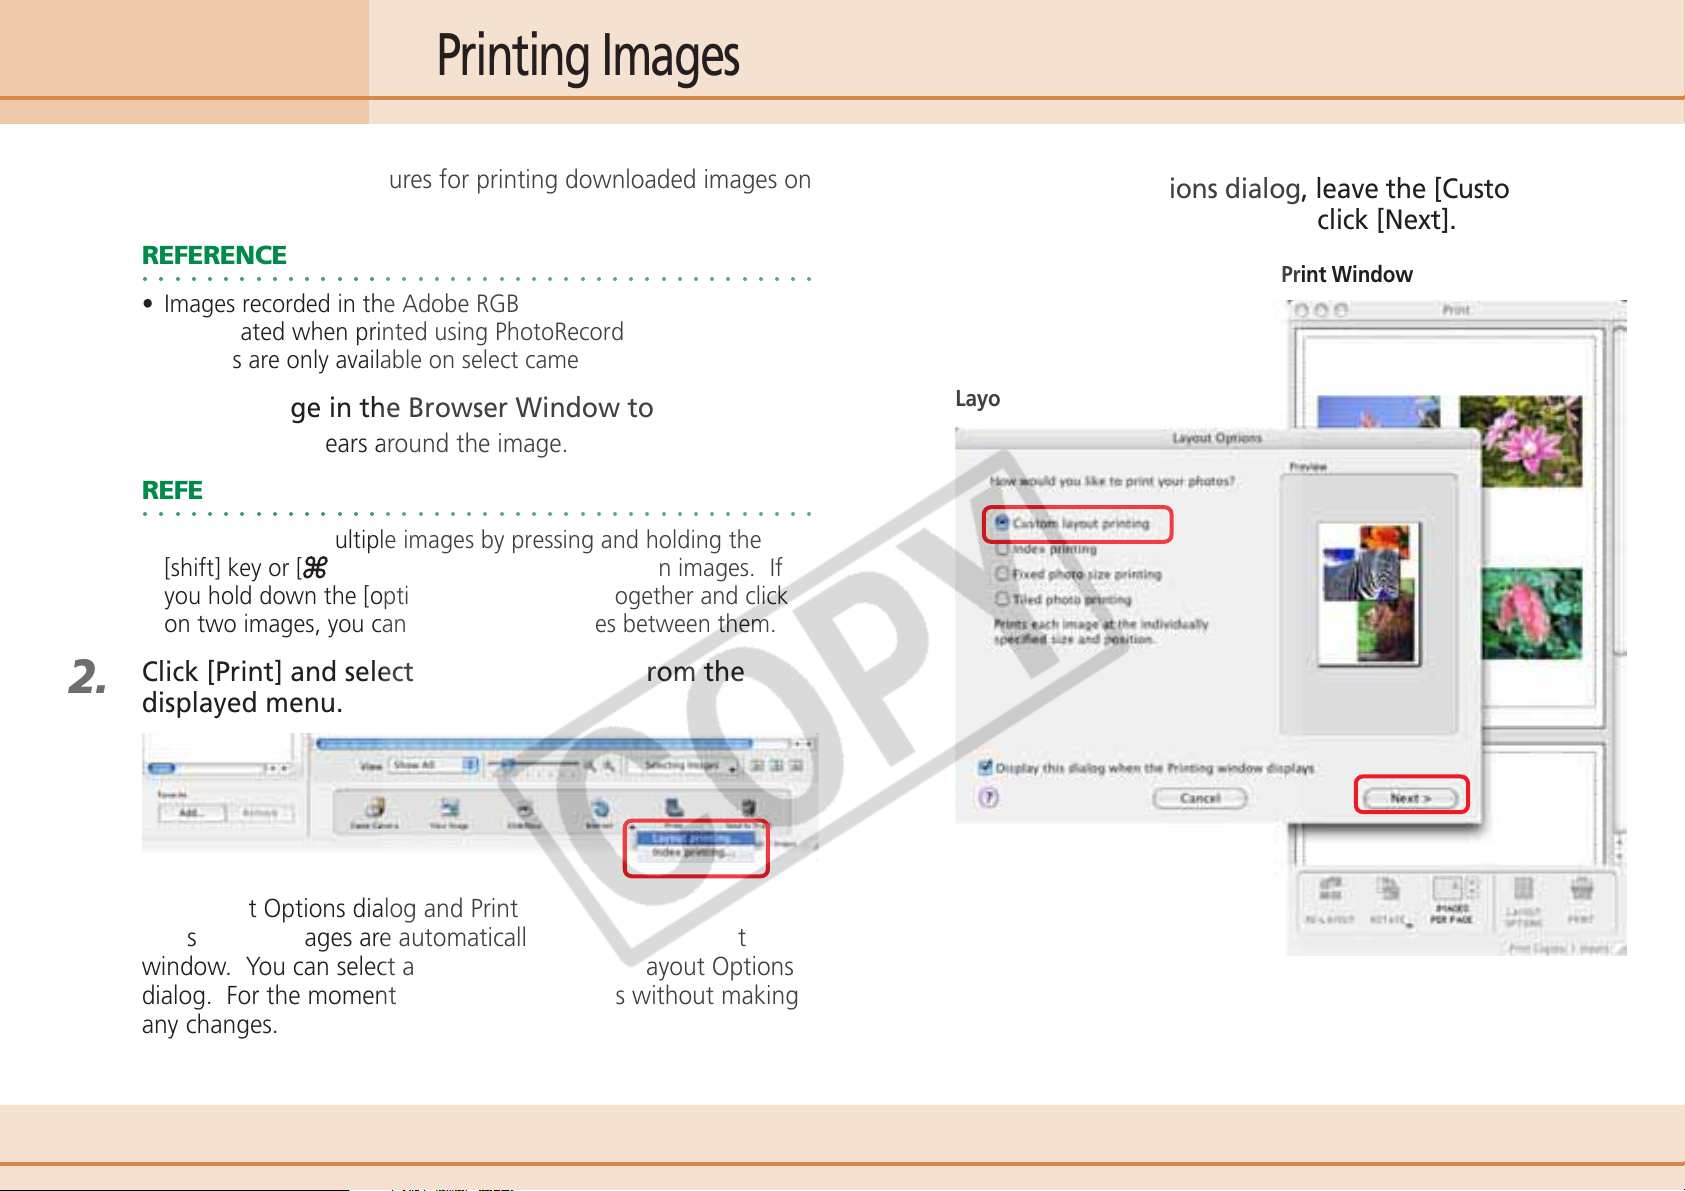
Click an image in the Browser Window to print.
A blue frame appears around the image.
REFERENCE
○○○○○○○○○○○○○○○○○○○○○○○○○○○○○○○○○○○○○○○○○○
• You can select multiple images by pressing and holding the
[shift] key or [
you hold down the [option] and [shift] keys together and click
on two images, you can select all the images between them.
] (command) key while clicking on images. If
Click [Print] and select [Layout Printing] from the
displayed menu.
3.
In the Layout Options dialog, leave the [Custom layout
printing] option selected and click [Next].
Print Window
Layout Options Dialog
The Layout Options dialog and Print window open.
The selected images are automatically laid out in the Print
window. You can select a layout option in the Layout Options
dialog. For the moment, just print the images without making
any changes.
14 ImageBrowser Software User Guide
Page 15
Chapter 2
Downloading and Printing Images
Printing Images (2/2)
4.
5.
If the Page Setup window appears, set the settings as
appropriate and click [OK].
The Layout Options dialog will close.
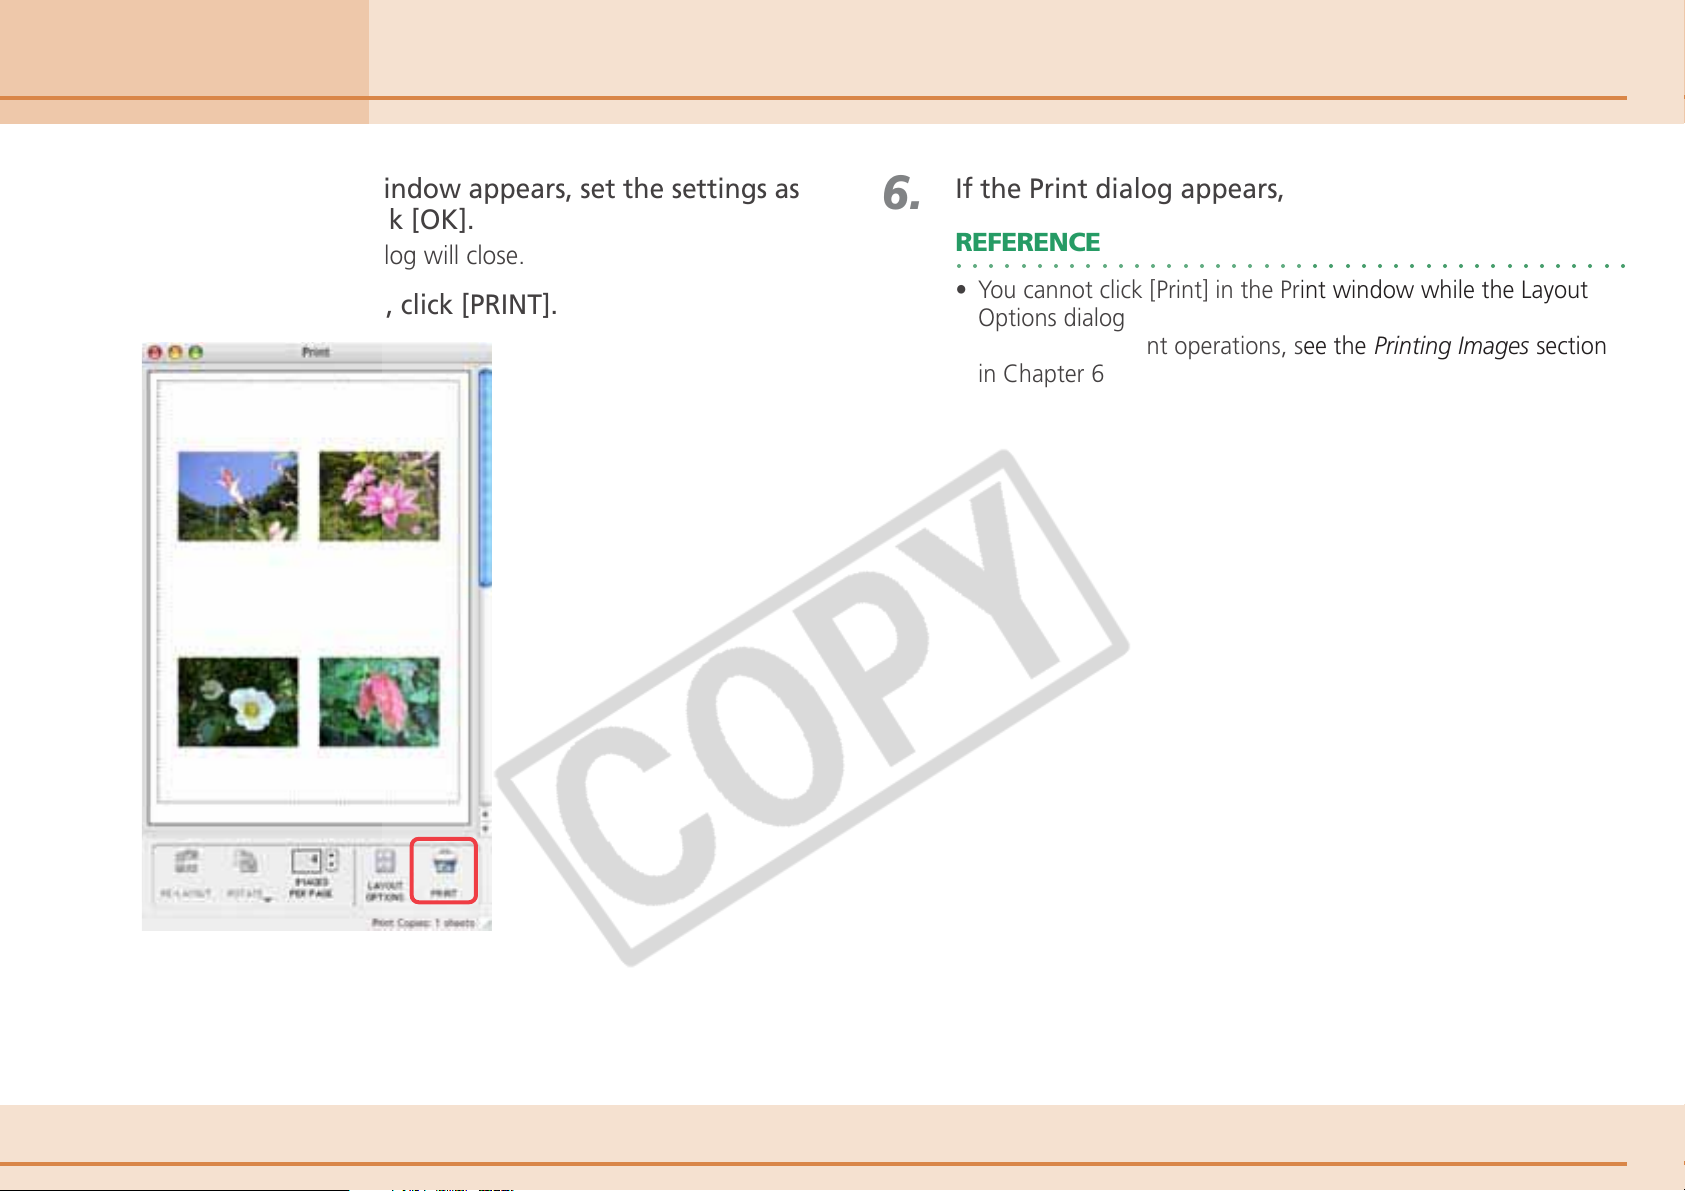
In the Print window, click [PRINT].
6.
If the Print dialog appears, click [Print].
REFERENCE
○○○○○○○○○○○○○○○○○○○○○○○○○○○○○○○○○○○○○○○○○○
• You cannot click [Print] in the Print window while the Layout
Options dialog is open.
• For details on print operations, see the Printing Images section
in Chapter 6.
15 ImageBrowser Software User Guide
Page 16
Chapter 3
What You Can Do with a
Camera Connected
Camera Control Window (1/2)
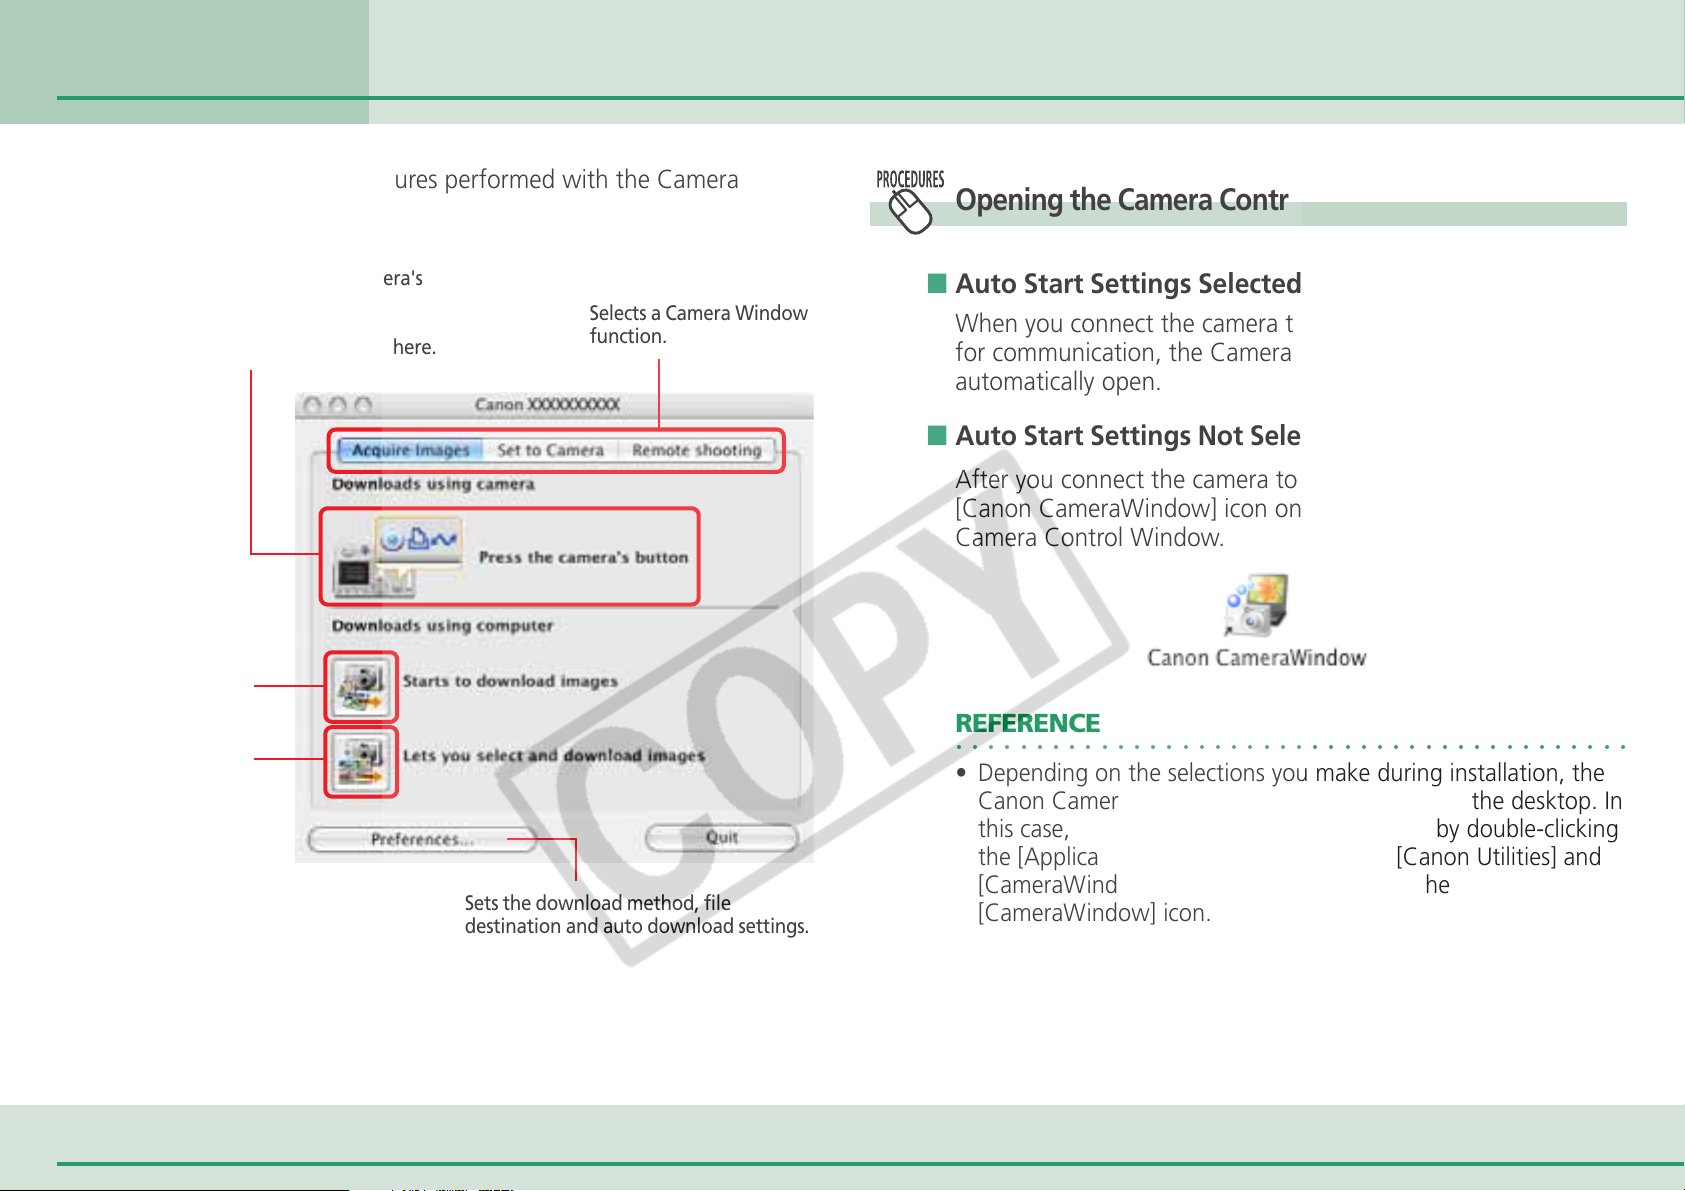
This chapter explains the procedures performed with the Camera
Control Window.
Opening the Camera Control Window
When you are using the camera's
Direct Transfer function, the
downloading procedures for
camera images are explained here.
You can download all
images at once using
computer procedures.
Or you can check the
images and then
download them using
computer procedures.
Selects a Camera Window
function.
Sets the download method, file
destination and auto download settings.
■ Auto Start Settings Selected
When you connect the camera to the computer and prepare it
for communication, the Camera Control Window will
automatically open.
■ Auto Start Settings Not Selected
After you connect the camera to the computer, double-click the
[Canon CameraWindow] icon on the desktop to open the
Camera Control Window.
REFERENCE
○○○○○○○○○○○○○○○○○○○○○○○○○○○○○○○○○○○○○○○○○○
• Depending on the selections you make during installation, the
Canon CameraWindow icon may not appear on the desktop. In
this case, open the Camera Control Window by double-clicking
the [Applications] folder, followed by the [Canon Utilities] and
[CameraWindow] folders, and double-click the
[CameraWindow] icon.
16 ImageBrowser Software User Guide
Page 17
Chapter 3
What You Can Do with a
Camera Connected
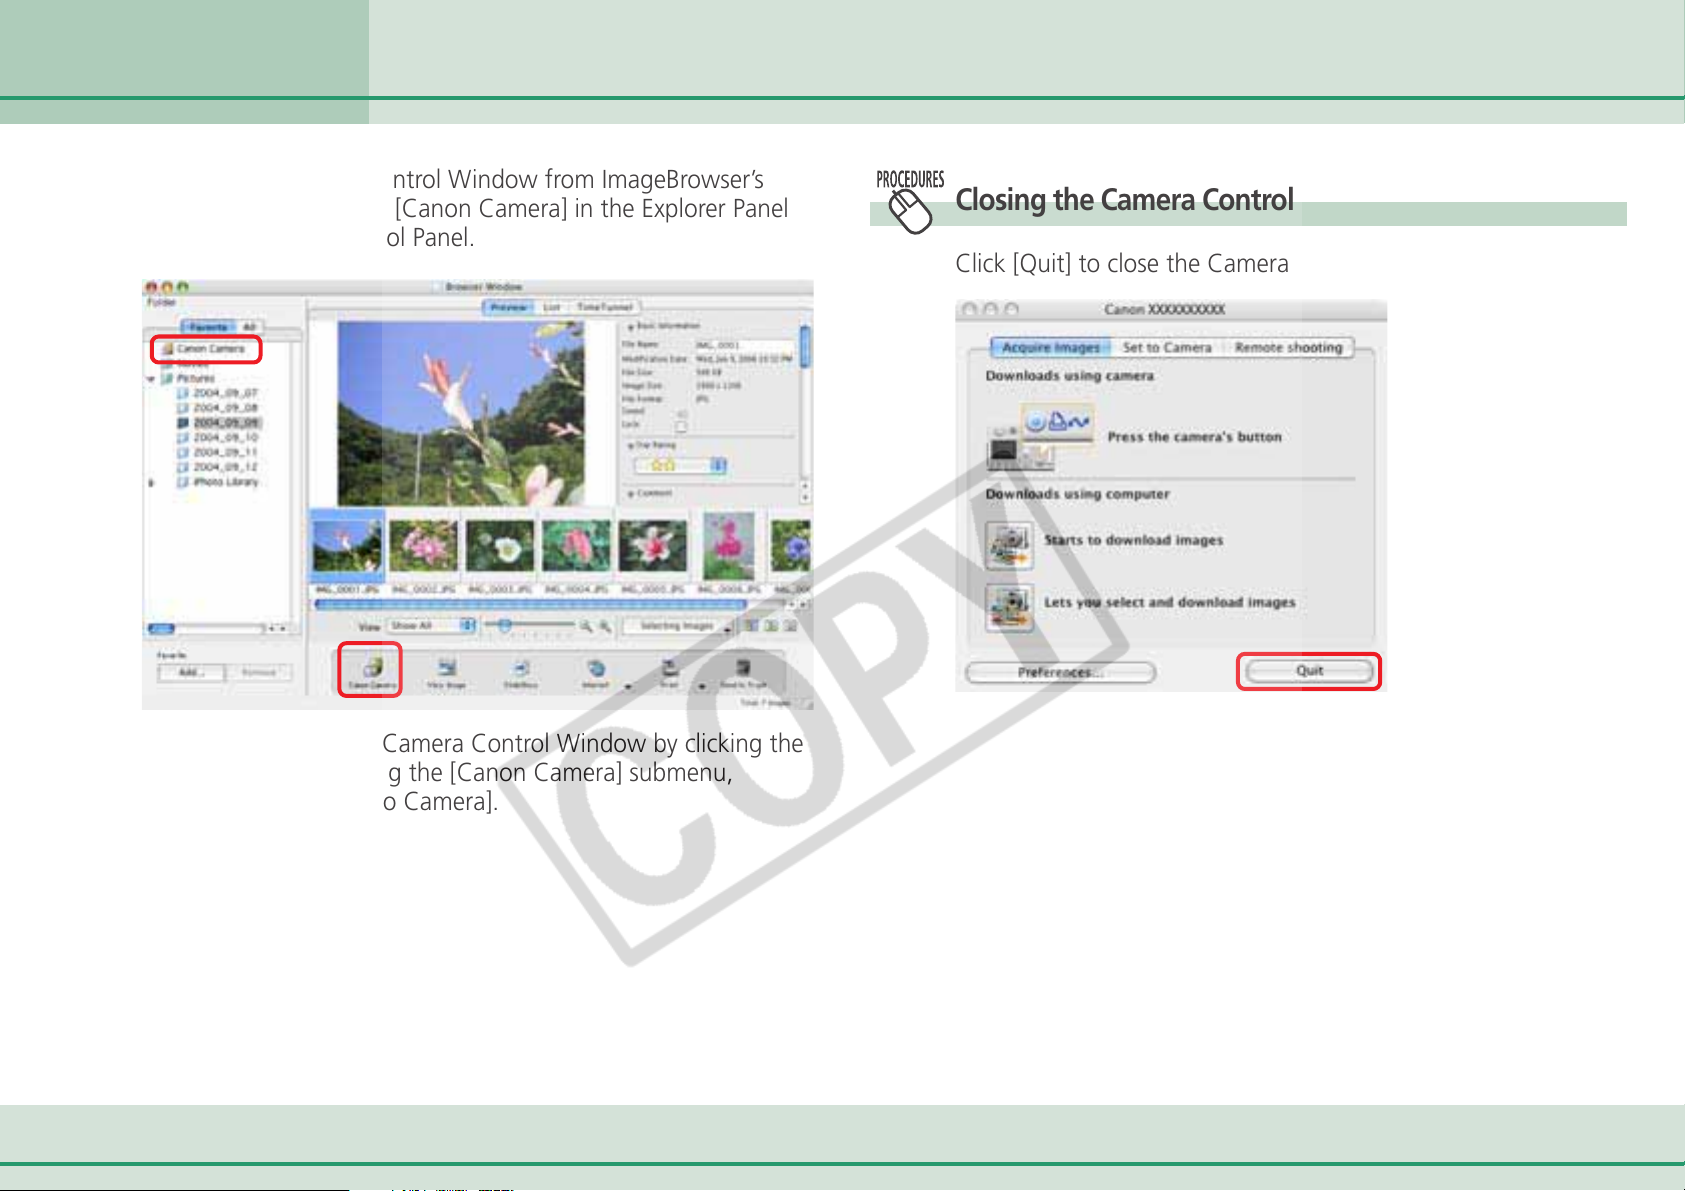
To open the Camera Control Window from ImageBrowser’s
Browser Window , click [Canon Camera] in the Explorer Panel
section or on the Control Panel.
Camera Control Window (2/2)
Closing the Camera Control Window
Click [Quit] to close the Camera Control Window.
You can also open the Camera Control Window by clicking the
[File] menu and selecting the [Canon Camera] submenu,
followed by [Connect to Camera].
17 ImageBrowser Software User Guide
Page 18
Chapter 3
What You Can Do with a
Camera Connected
Downloading Images Automatically—Camera Operations
1.
Starting Auto Downloading
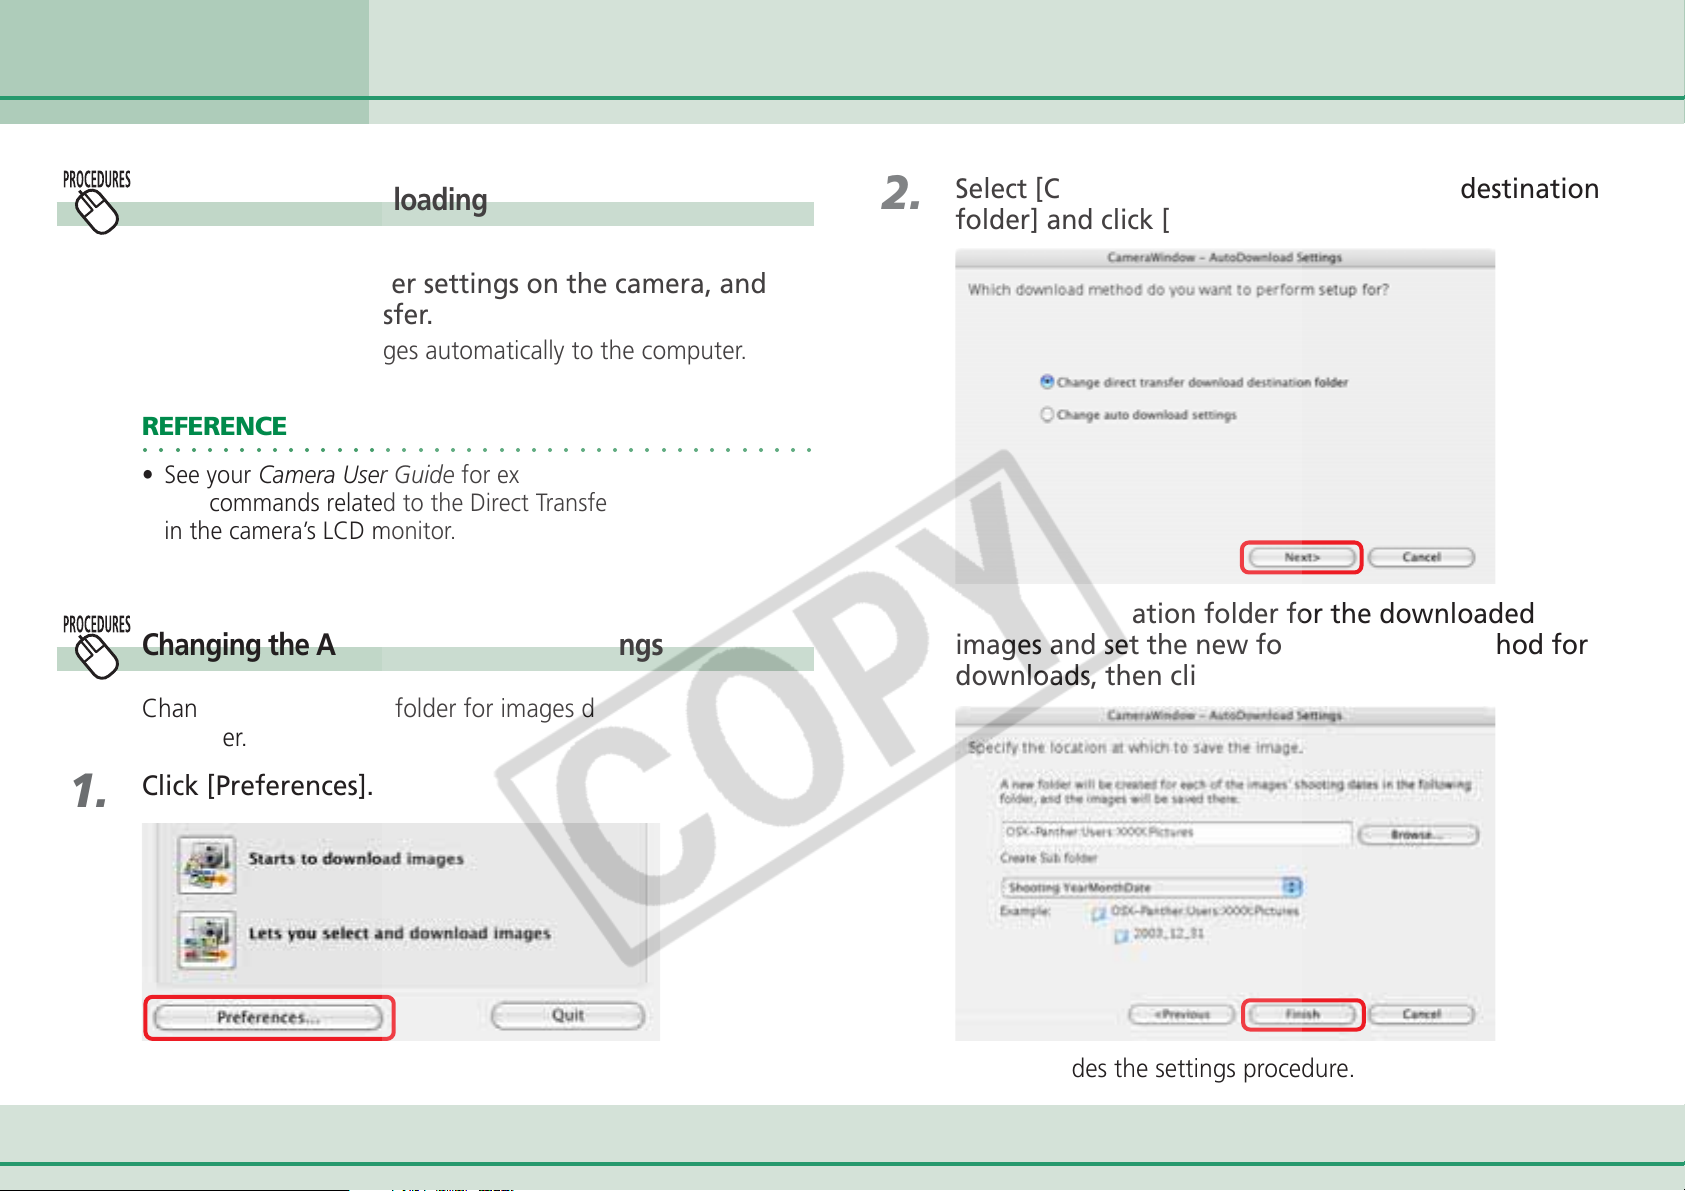
Set the Direct Transfer settings on the camera, and
start the direct transfer.
This will download images automatically to the computer.
REFERENCE
○○○○○○○○○○○○○○○○○○○○○○○○○○○○○○○○○○○○○○○○○○
• See your Camera User Guide for explanations of the settings
and commands related to the Direct Transfer menu that appears
in the camera’s LCD monitor.
Changing the Auto Downloading Settings
Change the destination folder for images downloaded to the
computer.
2.
3.
Select [Change direct transfer download destination
folder] and click [Next].
Select a destination folder for the downloaded
images and set the new folder creation method for
downloads, then click [Finish].
1.
18 ImageBrowser Software User Guide
Click [Preferences].
This concludes the settings procedure.
Page 19

Chapter 3
What You Can Do with a
Camera Connected
Downloading Images Automatically
—
Computer Operations (1/3)
1.
Starting Auto Downloading
Click [Starts to download images] in the Camera
Control Window.
This will download all the images automatically that have not
yet been downloaded to the computer.
1.
2.
Changing the Auto Download Settings
Change the type of image to download or the destination
folder.
Click [Preferences].
Select [Change auto download settings] and click
[Next].
19 ImageBrowser Software User Guide
Page 20
Chapter 3
What You Can Do with a
Camera Connected
Downloading Images Automatically
—
Computer Operations (2/3)
3.
4.
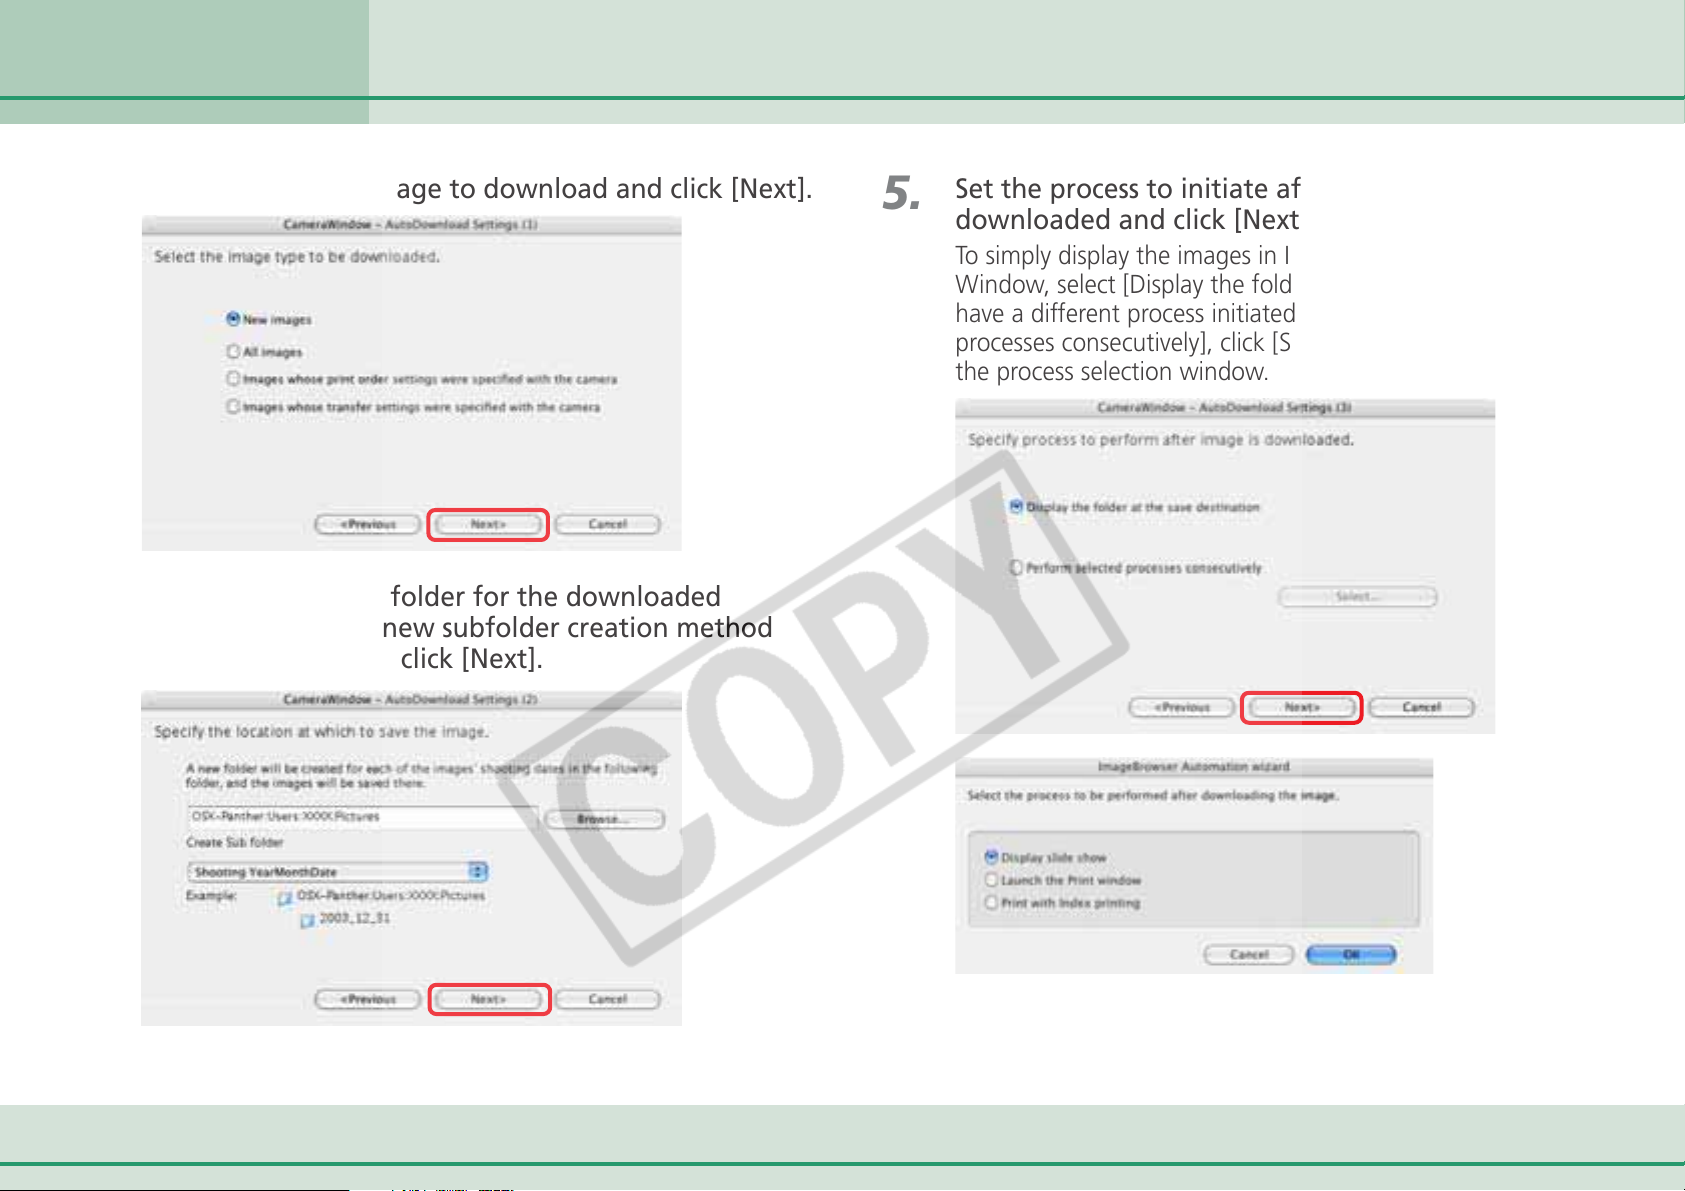
Select the type of image to download and click [Next].
Select a destination folder for the downloaded
images and set the new subfolder creation method
for downloads, then click [Next].
5.
Set the process to initiate after the images are
downloaded and click [Next].
To simply display the images in ImageBrowser's Browser
Window, select [Display the folder at the save destination]. To
have a different process initiated, select [Perform selected
processes consecutively], click [Select] and select a process in
the process selection window.
20 ImageBrowser Software User Guide
Page 21
Chapter 3
What You Can Do with a
Camera Connected
Downloading Images Automatically
—
Computer Operations (3/3)
6.
7.
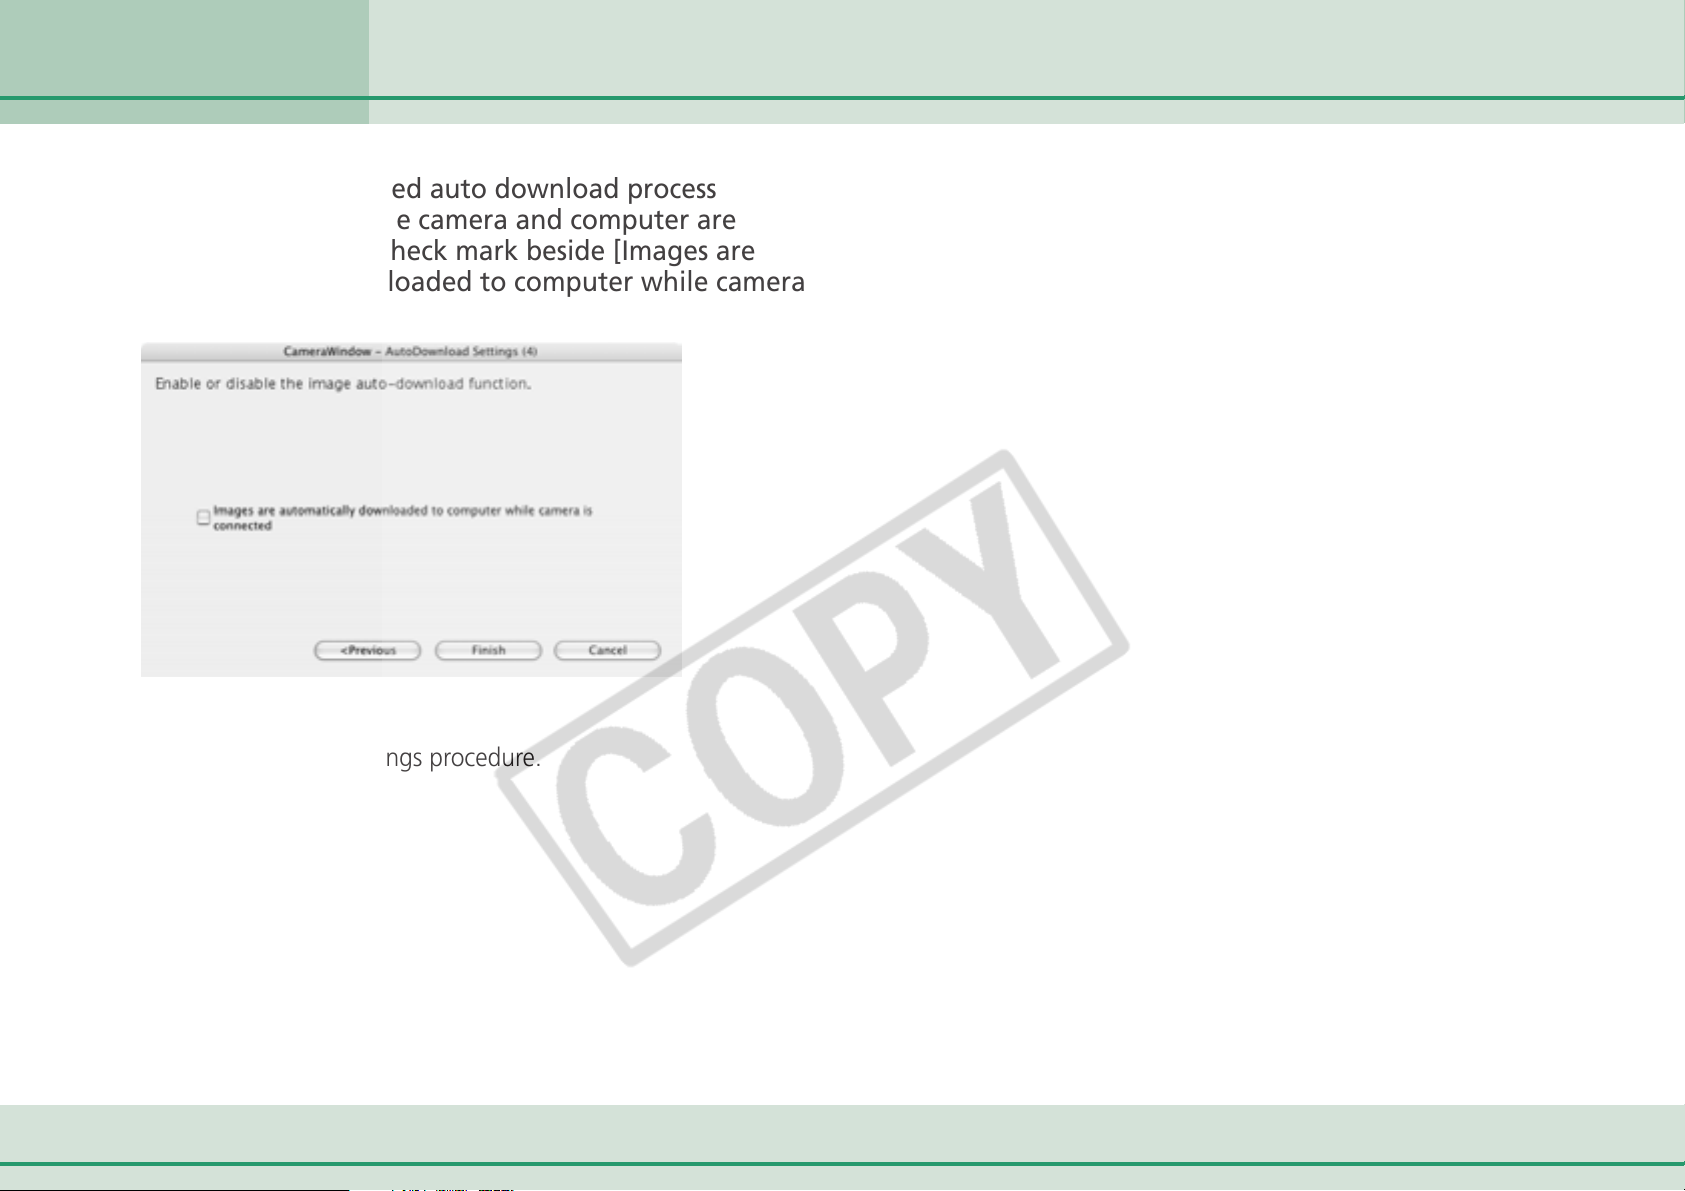
To initiate the selected auto download process
immediately after the camera and computer are
connected, place a check mark beside [Images are
automatically downloaded to computer while camera
is connected].
Click [Finish].
This concludes the settings procedure.
21 ImageBrowser Software User Guide
Page 22
Chapter 3
What You Can Do with a
Camera Connected
Checking Images in the Camera before Downloading (1/2)
1.
Selecting Images and Initiating the Download
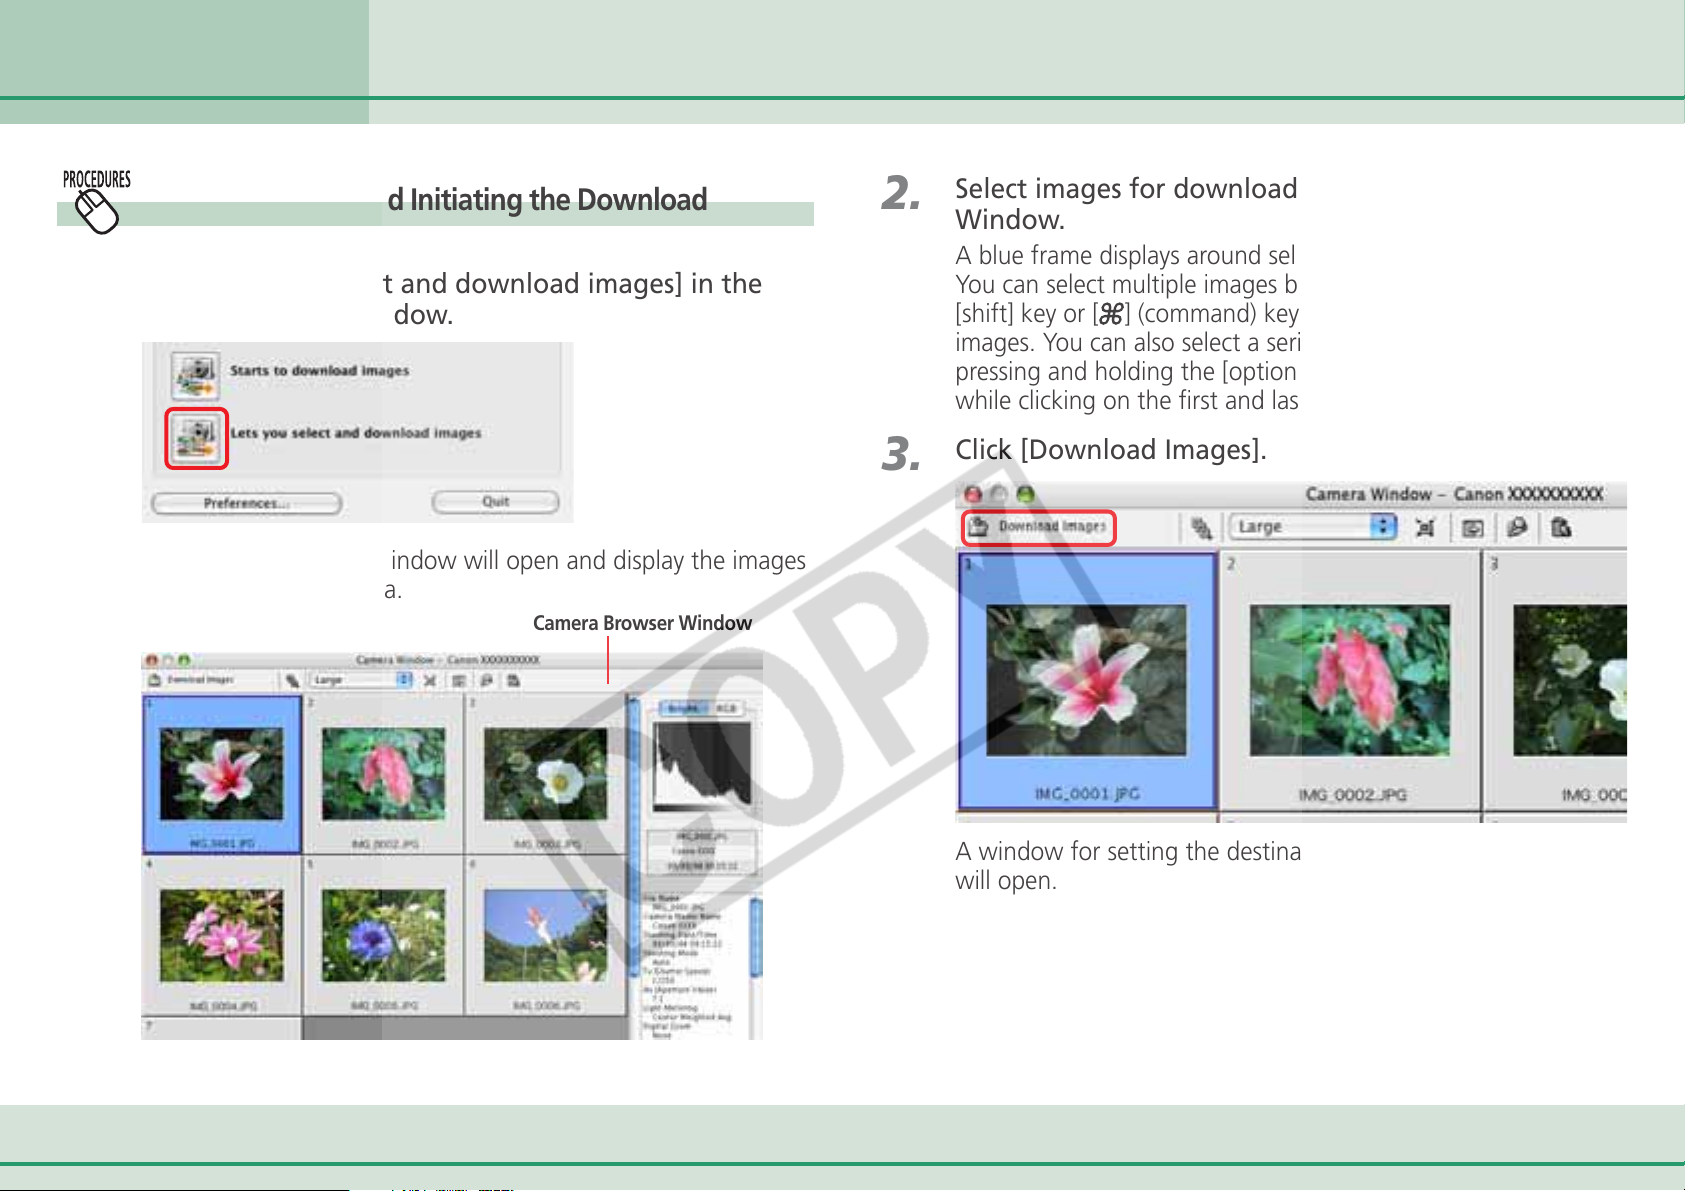
Click [Lets you select and download images] in the
Camera Control Window.
The Camera Browser Window will open and display the images
contained in the camera.
Camera Browser Window
2.
3.
Select images for downloading in the Camera Browser
Window.
A blue frame displays around selected images.
You can select multiple images by pressing and holding the
[shift] key or [
images. You can also select a series of adjacent images by
pressing and holding the [option] and [shift] keys together
while clicking on the first and last images.
Click [Download Images].
] (command) key while you click on successive
22 ImageBrowser Software User Guide
A window for setting the destination folder and other settings
will open.
Page 23
Chapter 3
What You Can Do with a
Camera Connected
Checking Images in the Camera before Downloading (2/2)
4.
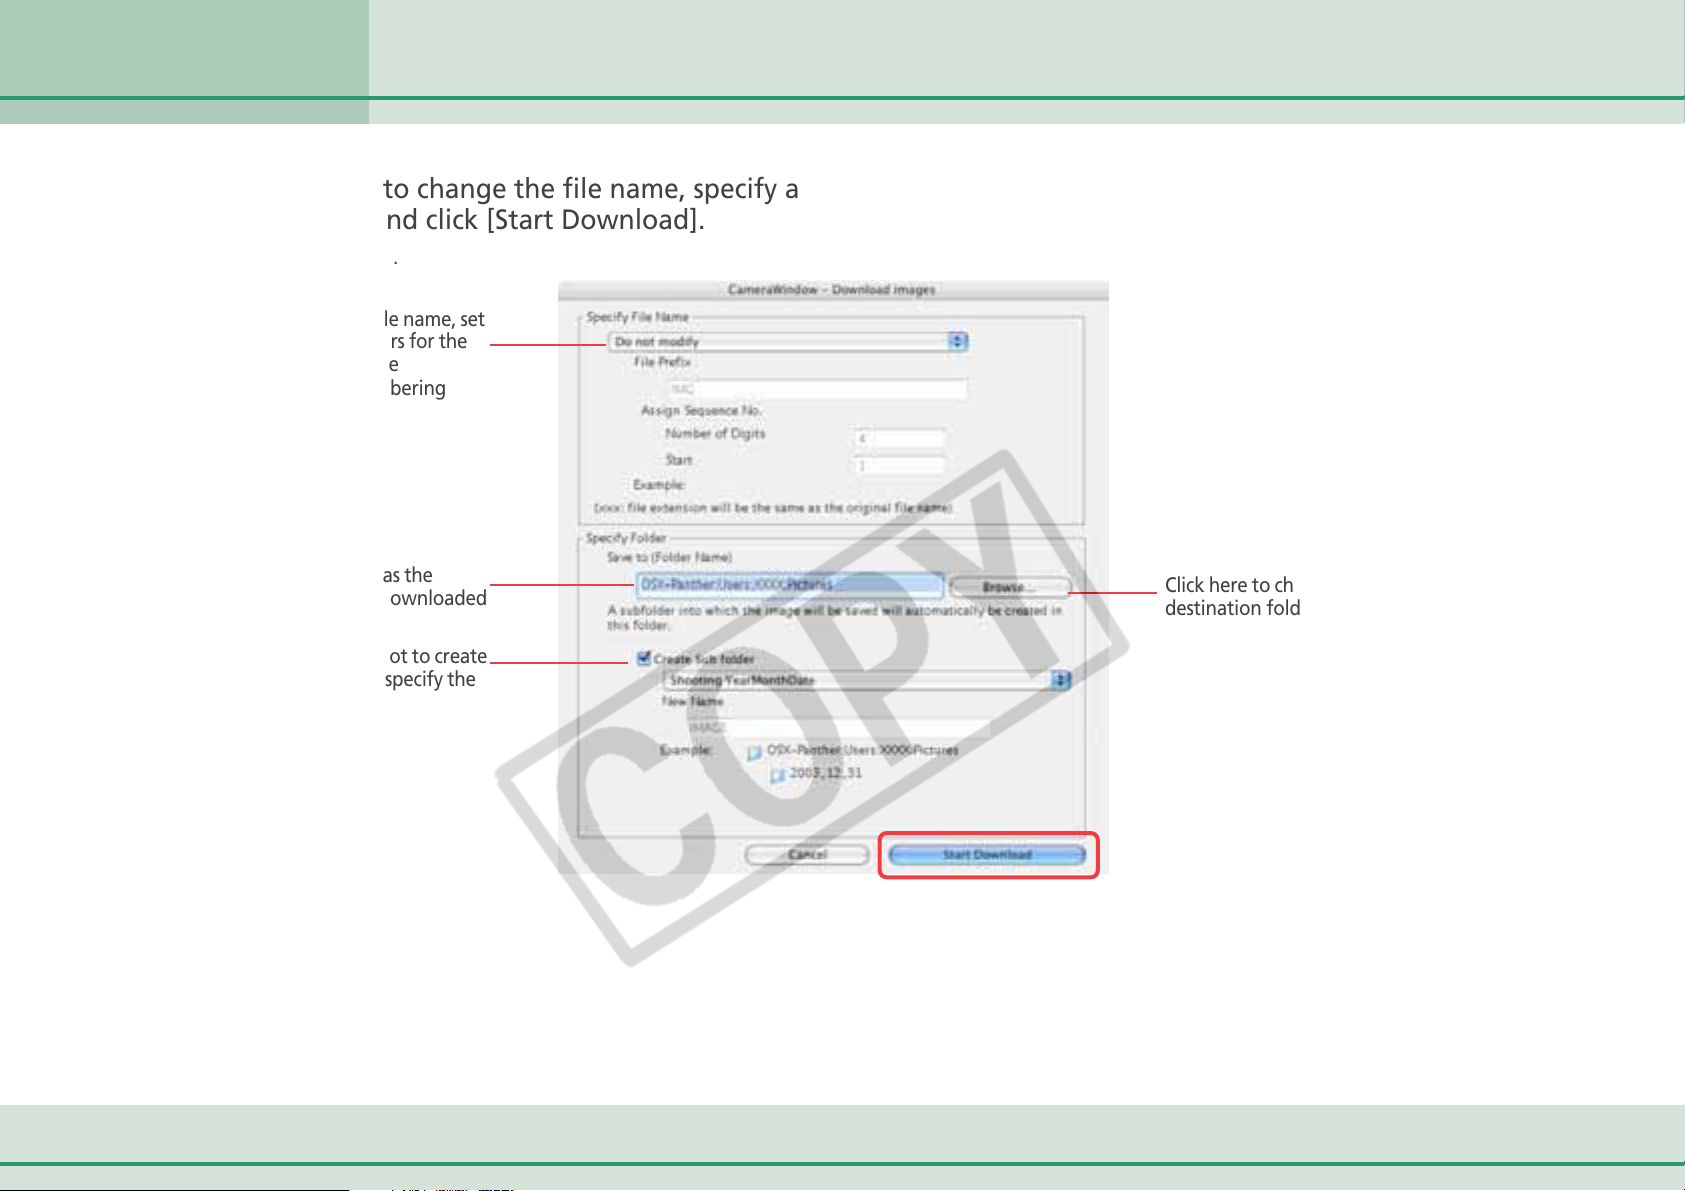
Set whether or not to change the file name, specify a
destination folder and click [Start Download].
The image will be saved.
To change the file name, set
the text characters for the
file prefix and the
consecutive numbering
system.
Specify a folder as the
destination for downloaded
images.
Set whether or not to create
a subfolder and specify the
name.
Click here to change the
destination folder.
23 ImageBrowser Software User Guide
Page 24
Chapter 3
What You Can Do with a
Camera Connected
Deleting Images from the Camera
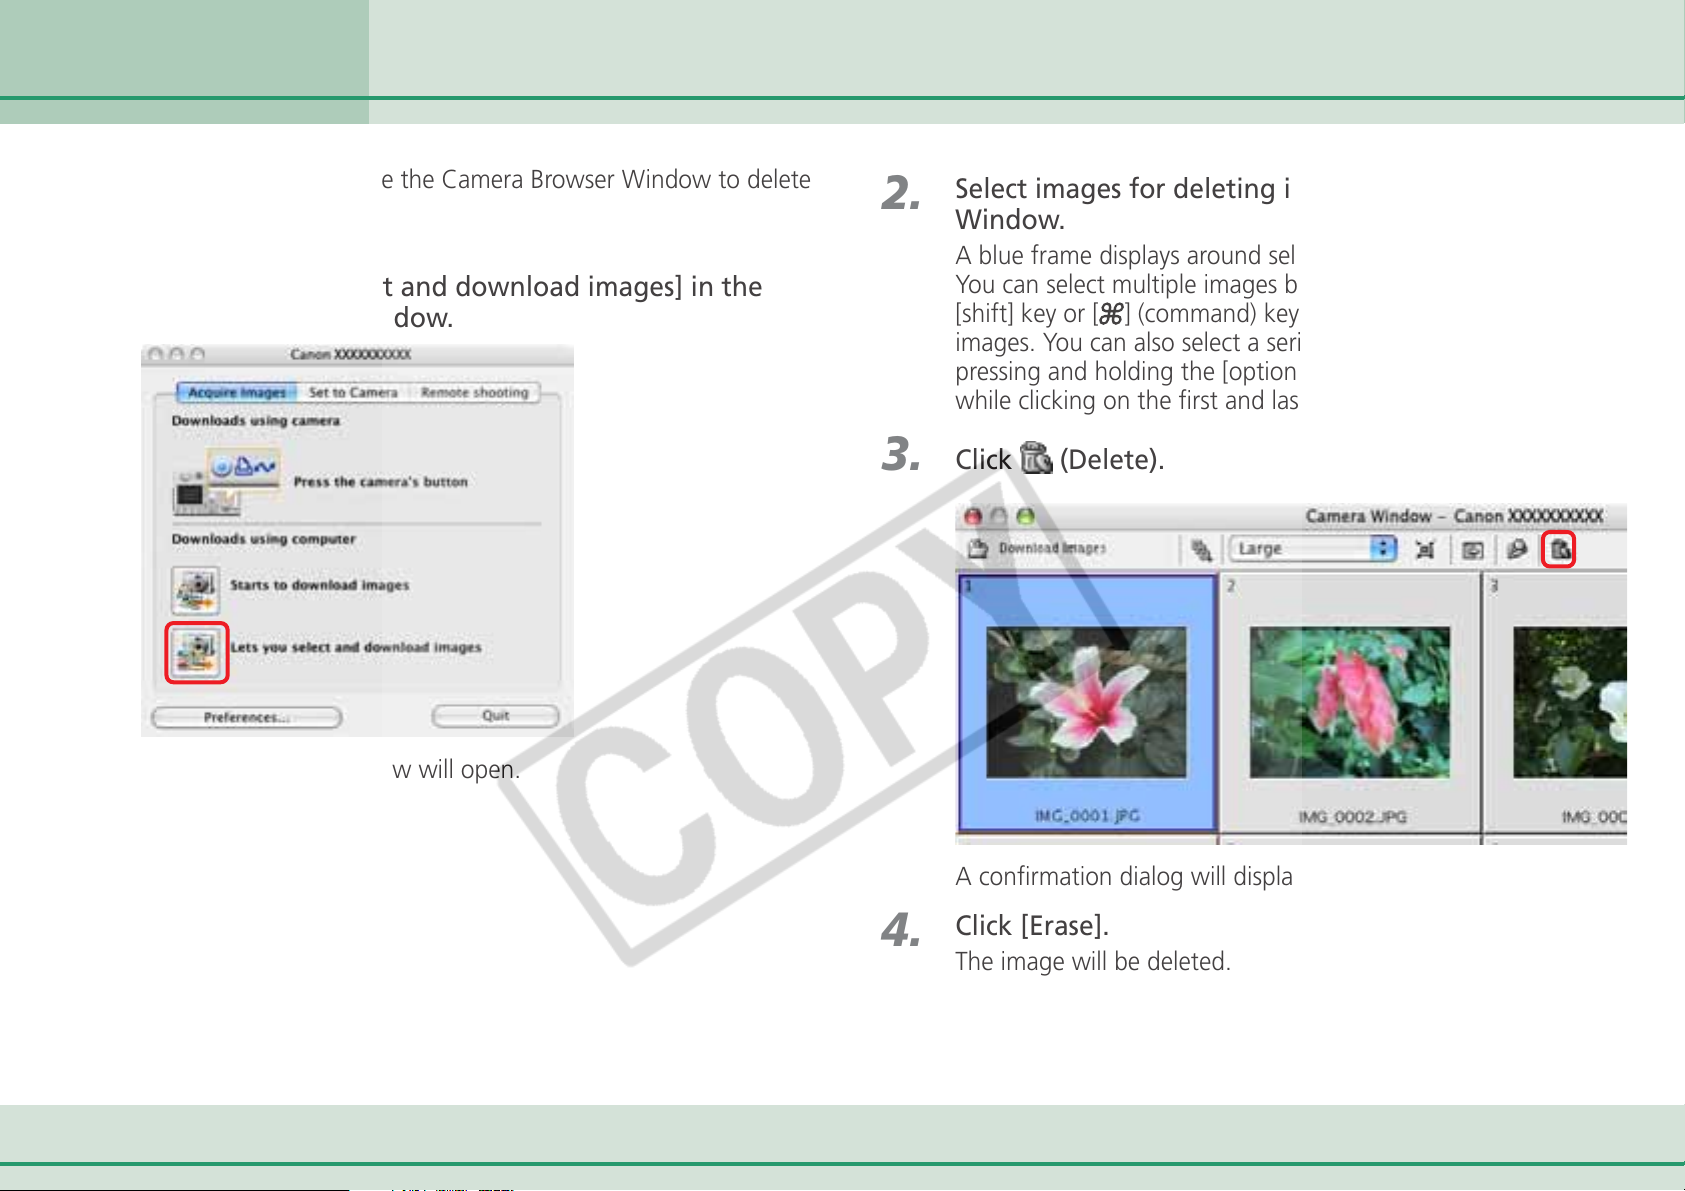
This section explains how to use the Camera Browser Window to delete
images from the camera.
1.
Click [Lets you select and download images] in the
Camera Control Window.
2.
3.
Select images for deleting in the Camera Browser
Window.
A blue frame displays around selected images.
You can select multiple images by pressing and holding the
[shift] key or [
images. You can also select a series of adjacent images by
pressing and holding the [option] and [shift] keys together
while clicking on the first and last images.
Click (Delete).
] (command) key while you click on successive
Camera Browser Window will open.
24 ImageBrowser Software User Guide
4.
A confirmation dialog will display.
Click [Erase].
The image will be deleted.
Page 25
Chapter 3
What You Can Do with a
Camera Connected
Other Features of the Camera Browser Window
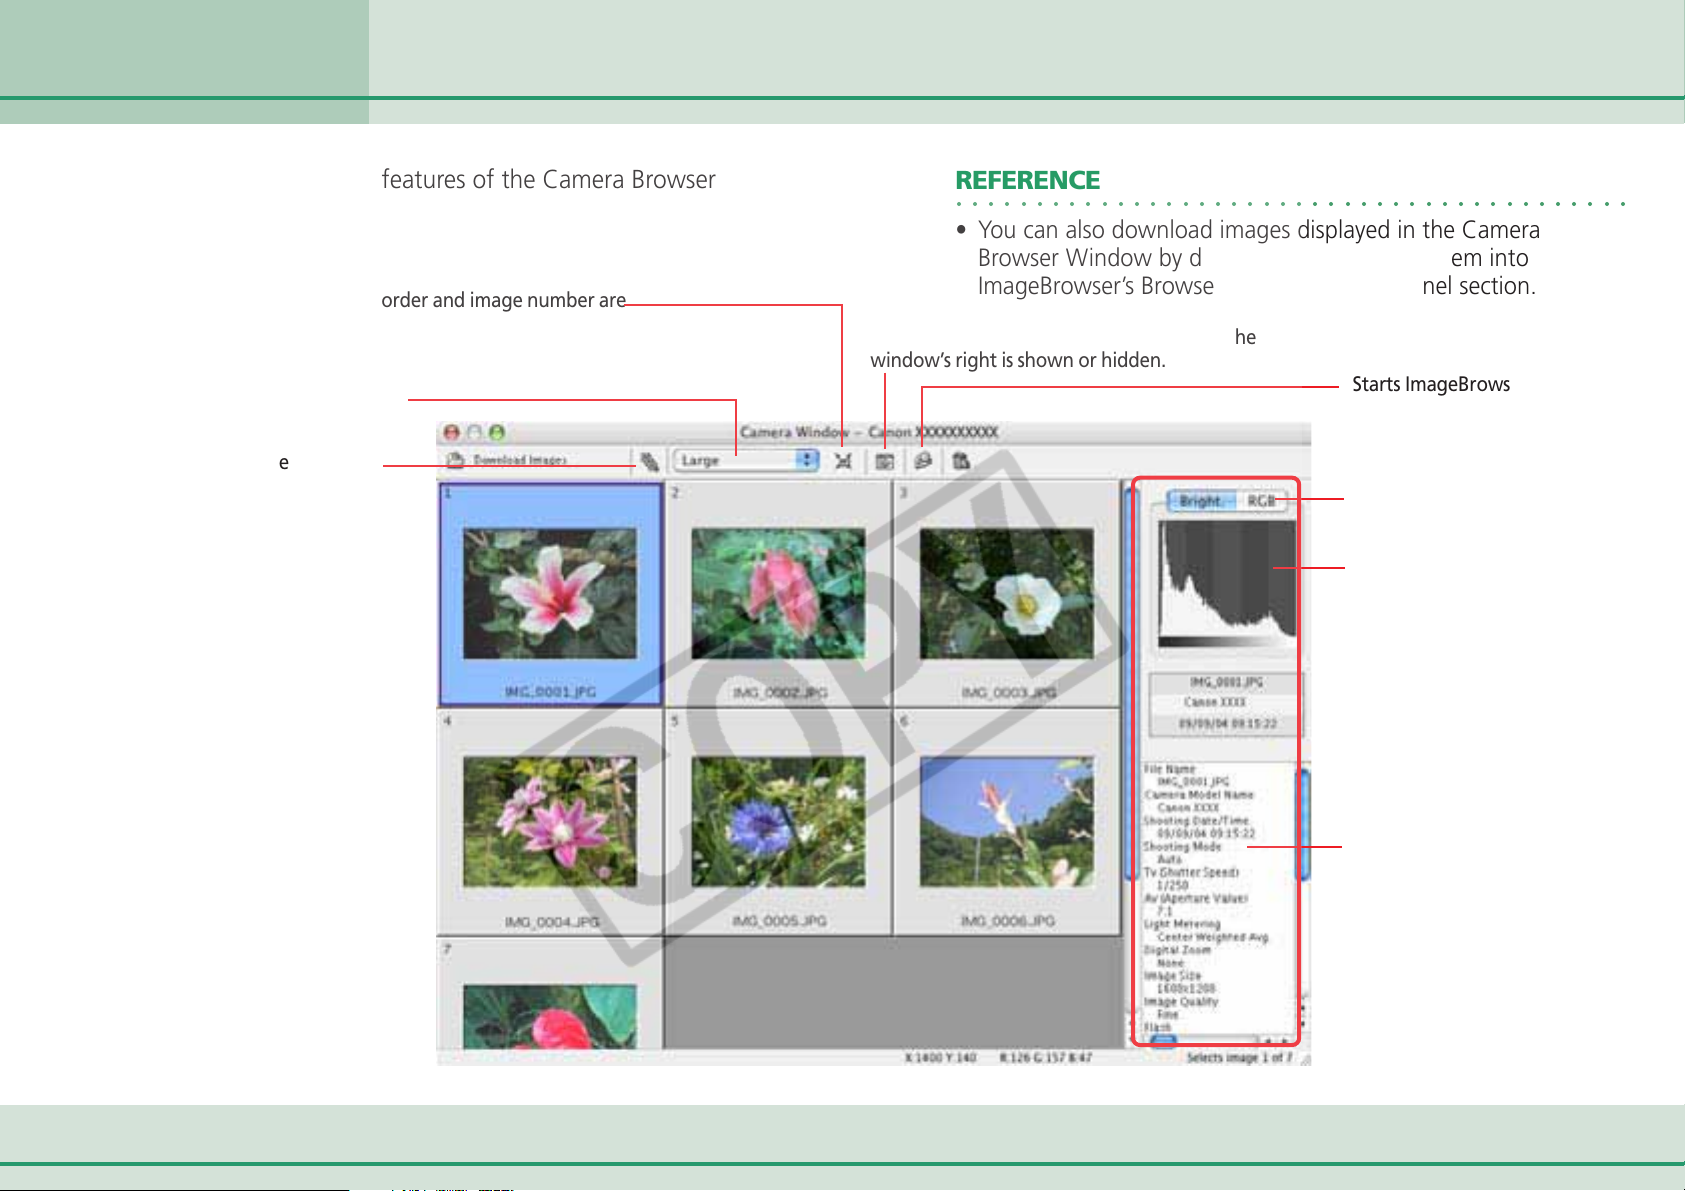
This section explains the other features of the Camera Browser
Window.
Selects whether the image border and image number are
shown or hidden.
Changes the size of the image
thumbnail (tiny version).
Selects the image selection
method.
REFERENCE
○○○○○○○○○○○○○○○○○○○○○○○○○○○○○○○○○○○○○○○○○○
• You can also download images displayed in the Camera
Browser Window by dragging and dropping them into
ImageBrowser’s Browser Area or Explorer Panel section.
Selects whether the image information at the
window’s right is shown or hidden.
Starts ImageBrowser.
Displays separate histograms of
brightness or RGB data.
Histogram
25 ImageBrowser Software User Guide
Image Information
Page 26
Chapter 3
What You Can Do with a
Camera Connected
This section explains how to save the “My Camera Settings” on your
computer to the camera or vice versa.
Saving the “My Camera Settings” to the Camera (1/8)
What are the My Camera settings?
Displaying the My Camera window
Display the existing My Camera Settings supplied with
ZoomBrowser EX.
The start-up image for the camera and sounds such as the
start-up sound, the shutter sound, operation sound and the
self-timer sound are collectively referred to as the My Camera
Settings. You can add your favorite images and sounds from
your computer to the My Camera Settings in the camera.
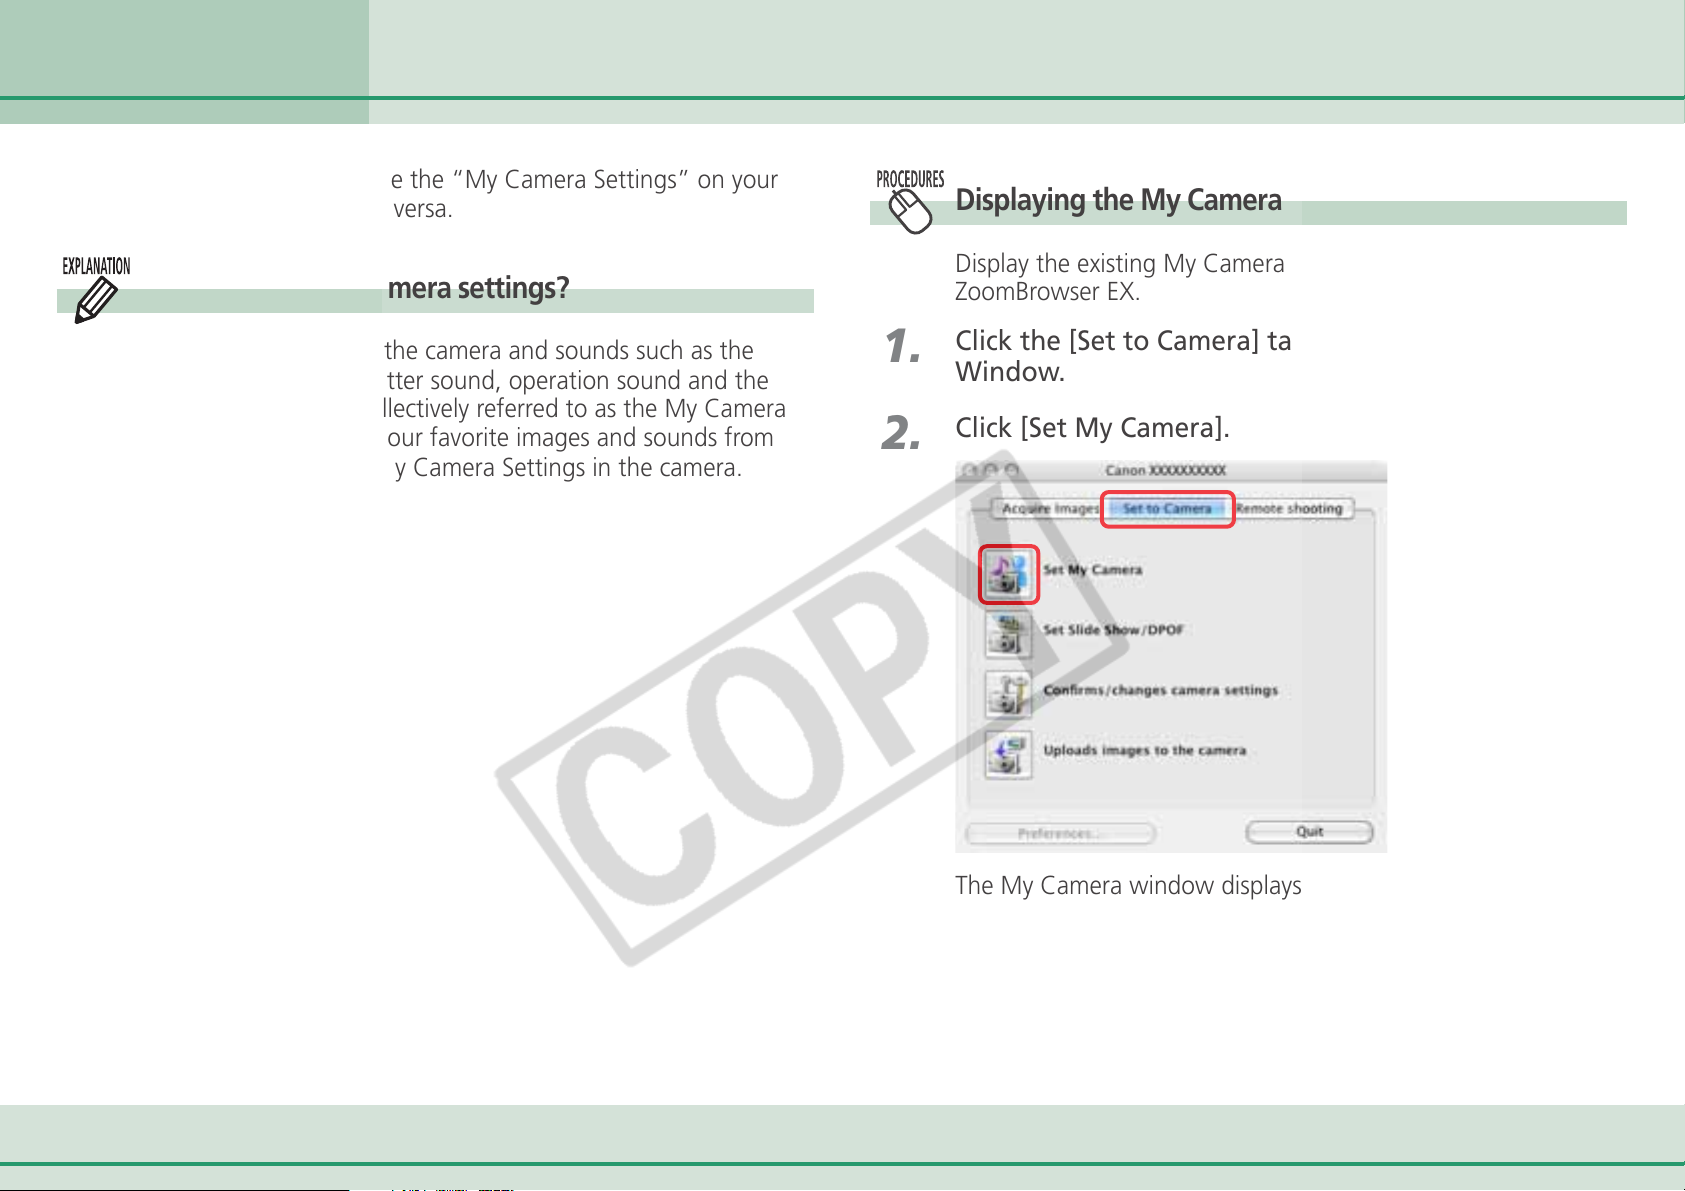
1.
2.
Click the [Set to Camera] tab in the Camera Control
Window.
Click [Set My Camera].
The My Camera window displays.
26 ImageBrowser Software User Guide
Page 27
Chapter 3
What You Can Do with a
Camera Connected
Saving the “My Camera Settings” to the Camera (2/8)
3.
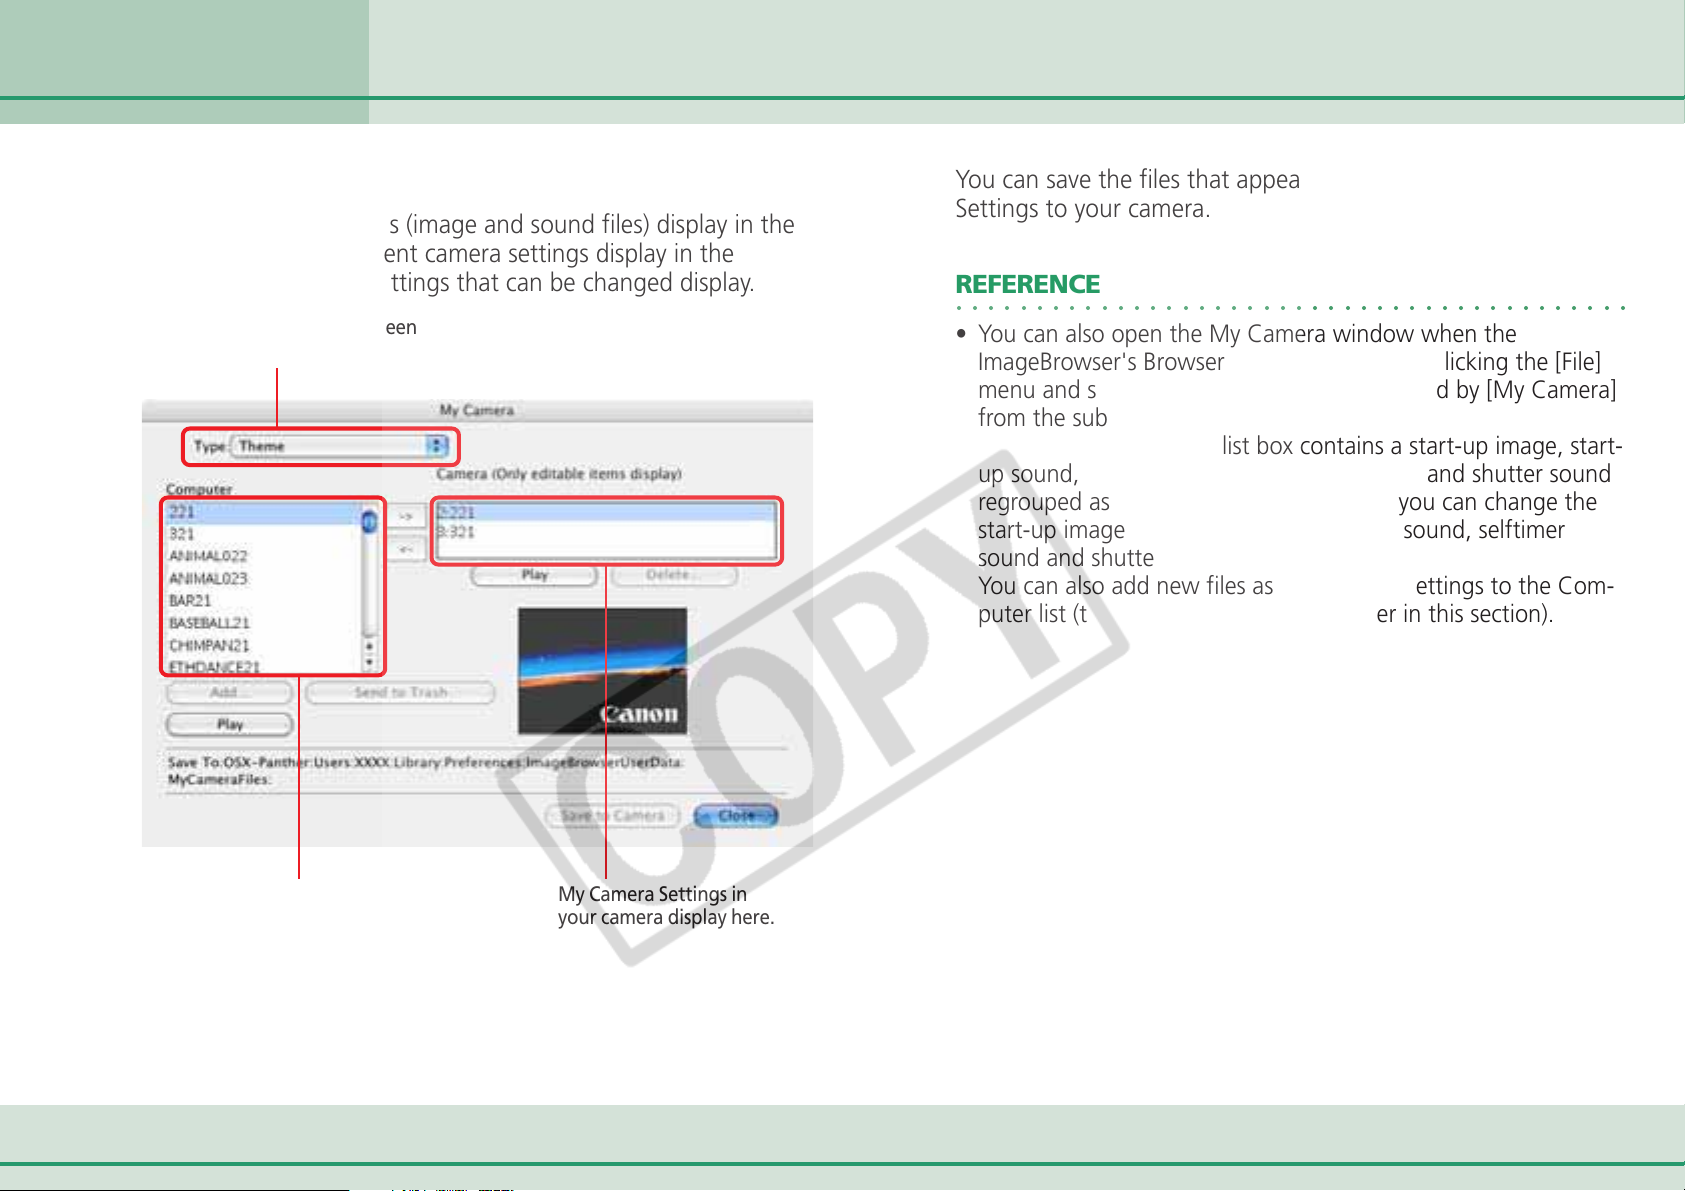
Change the [Type].
The My Camera Settings (image and sound files) display in the
Computer list. The current camera settings display in the
Camera list. Only the settings that can be changed display.
Switches between
settings types.
You can save the files that appear in this list as My Camera
Settings to your camera.
REFERENCE
○○○○○○○○○○○○○○○○○○○○○○○○○○○○○○○○○○○○○○○○○○
• You can also open the My Camera window when the
ImageBrowser's Browser Window is open by clicking the [File]
menu and selecting [Canon Camera], followed by [My Camera]
from the submenu.
• The theme in the [Type] list box contains a start-up image, startup sound, operation sound, selftimer sound and shutter sound
regrouped as a set. By selecting a theme, you can change the
start-up image, start-up sound, operation sound, selftimer
sound and shutter sound in one easy step.
• You can also add new files as My Camera Settings to the Computer list (the procedure is explained later in this section).
My Camera Settings that are
already on your computer
display here.
27 ImageBrowser Software User Guide
My Camera Settings in
your camera display here.
Page 28
Chapter 3
What You Can Do with a
Camera Connected
Saving the “My Camera Settings” to the Camera (3/8)
1.
Saving the My Camera Settings to the camera
This topic explains how to save the previously prepared My
Camera Settings files to the camera.
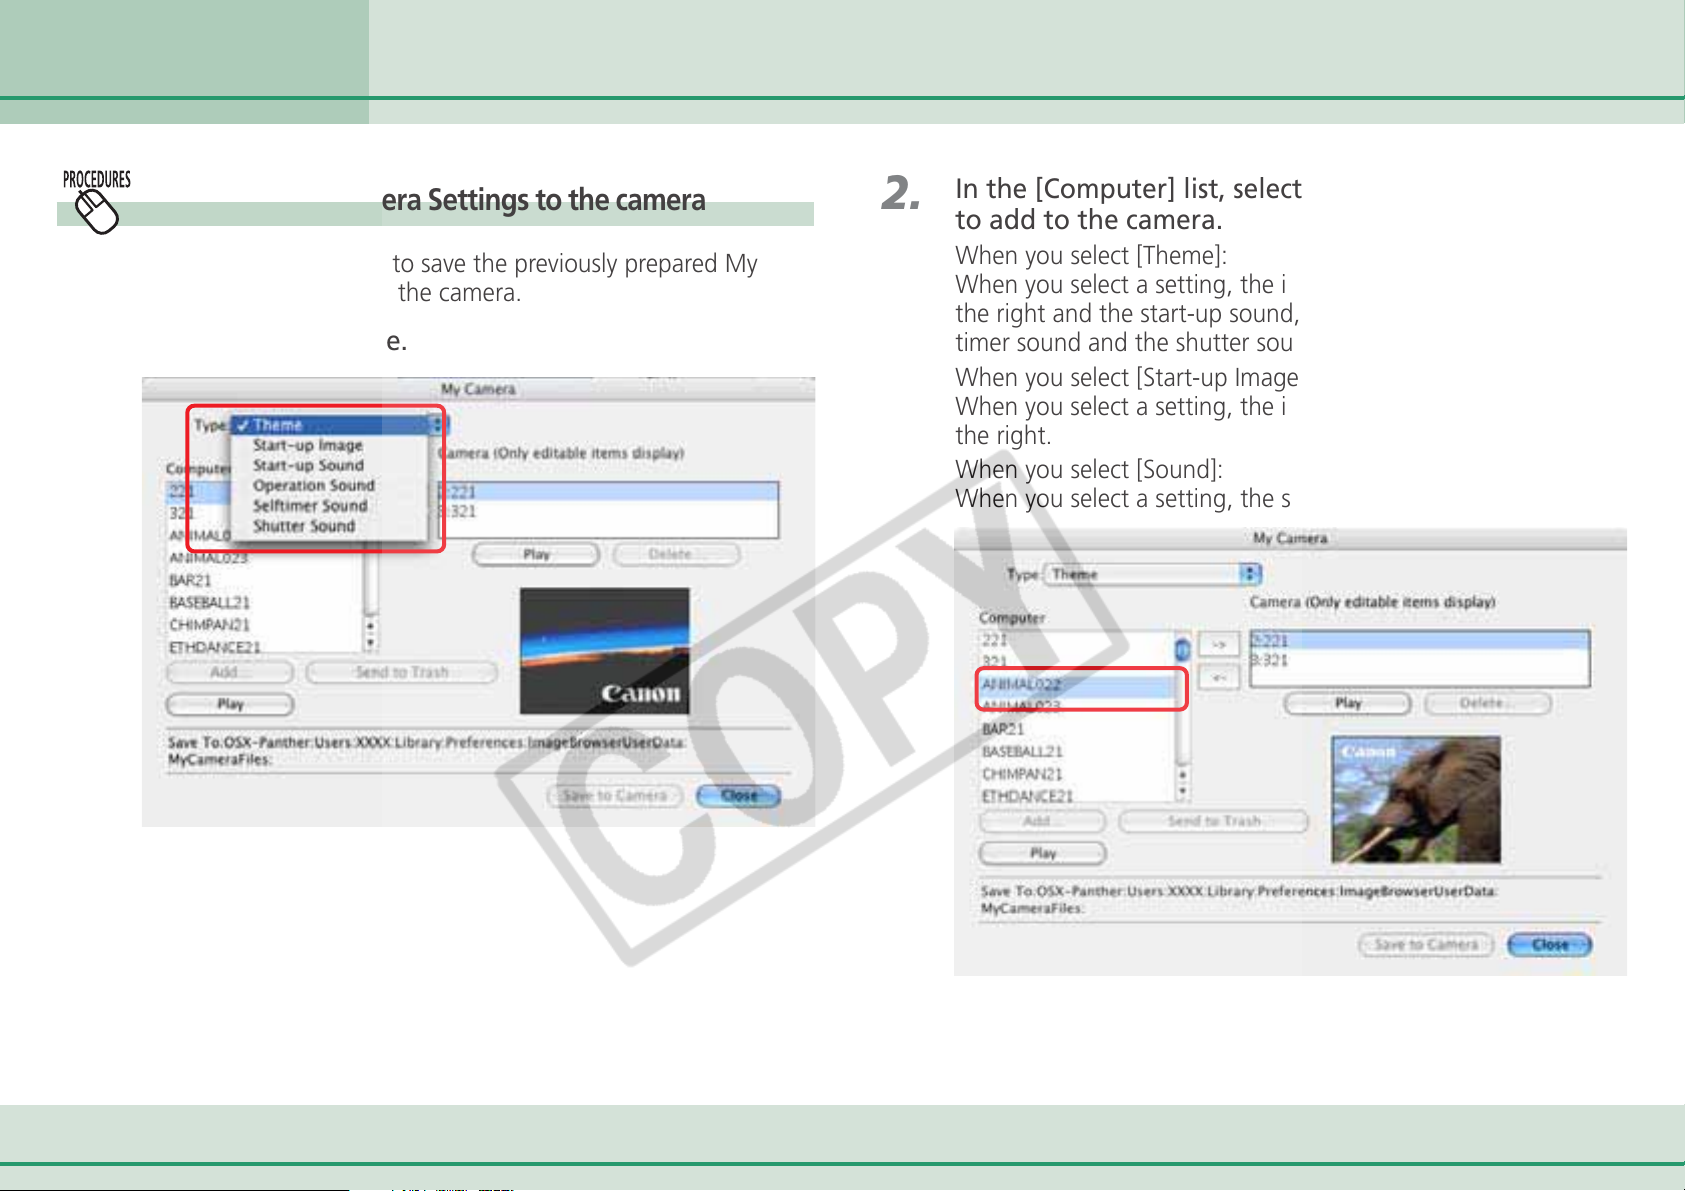
Select a settings type.
2.
In the [Computer] list, select a setting you would like
to add to the camera.
When you select [Theme]:
When you select a setting, the image will preview in the area to
the right and the start-up sound, the operation sound, the selftimer sound and the shutter sound will play in order.
When you select [Start-up Image]:
When you select a setting, the image will preview in the area to
the right.
When you select [Sound]:
When you select a setting, the sound will play automatically.
28 ImageBrowser Software User Guide
Page 29
Chapter 3
What You Can Do with a
Camera Connected
Saving the “My Camera Settings” to the Camera (4/8)
3.
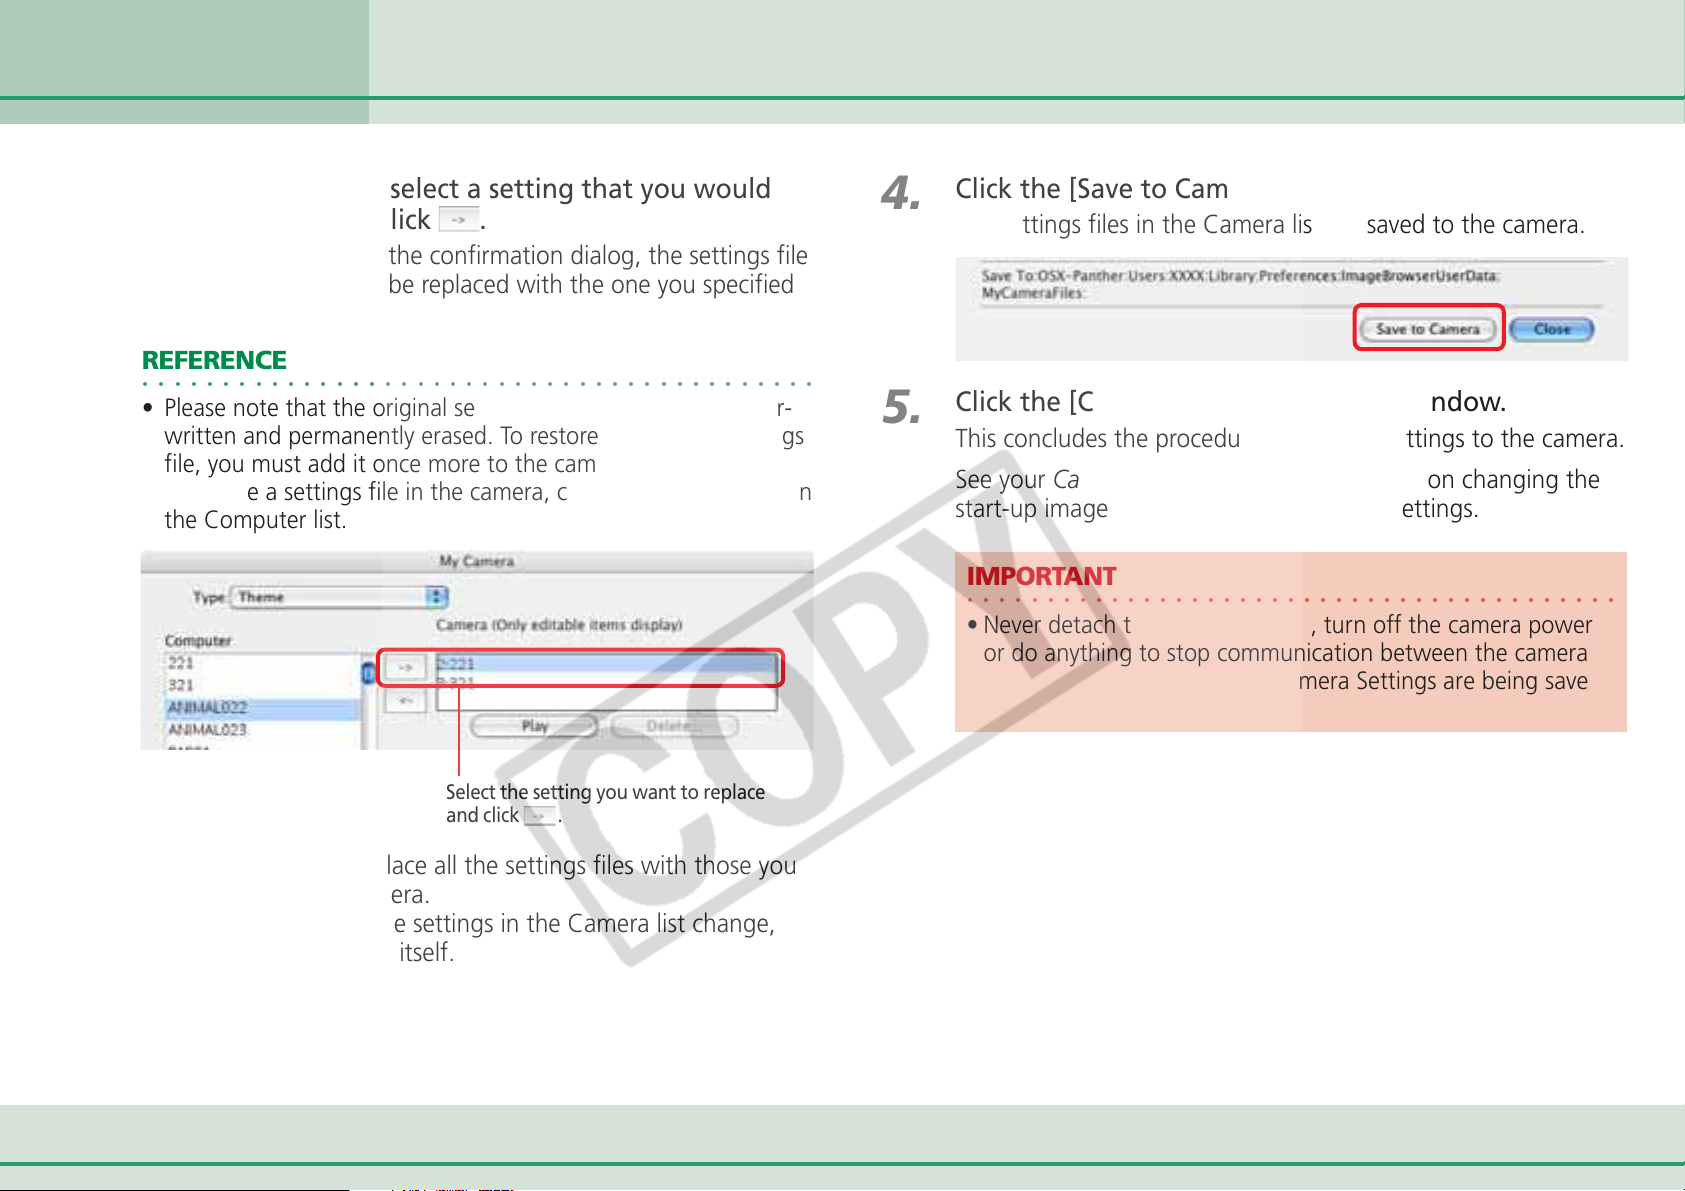
In the [Camera] list, select a setting that you would
like to change and click
When you click [OK] in the confirmation dialog, the settings file
in the camera will now be replaced with the one you specified
from the computer.
REFERENCE
○○○○○○○○○○○○○○○○○○○○○○○○○○○○○○○○○○○○○○○○○○
• Please note that the original settings file in the camera is over-
written and permanently erased. To restore the original settings
file, you must add it once more to the camera. Before you
overwrite a settings file in the camera, confirm that it appears in
the Computer list.
.
4.
5.
Click the [Save to Camera] button.
The settings files in the Camera list are saved to the camera.
Click the [Close] button to close the window.
This concludes the procedure for adding settings to the camera.
See your Camera User Guide for instructions on changing the
start-up image, start-up sound and other settings.
IMPORTANT
○○○○○○○○○○○○○○○○○○○○○○○○○○○○○○○○○○○○○○○○○
• Never detach the interface cable, turn off the camera power
or do anything to stop communication between the camera
and computer while the My Camera Settings are being saved
to the camera.
Select the setting you want to replace
and click
Repeat steps 1-3 to replace all the settings files with those you
wish to save to the camera.
Up to this stage, only the settings in the Camera list change,
not those in the camera itself.
29 ImageBrowser Software User Guide
.
Page 30
Chapter 3
What You Can Do with a
Camera Connected
REFERENCE
○○○○○○○○○○○○○○○○○○○○○○○○○○○○○○○○○○○○○○○○○○
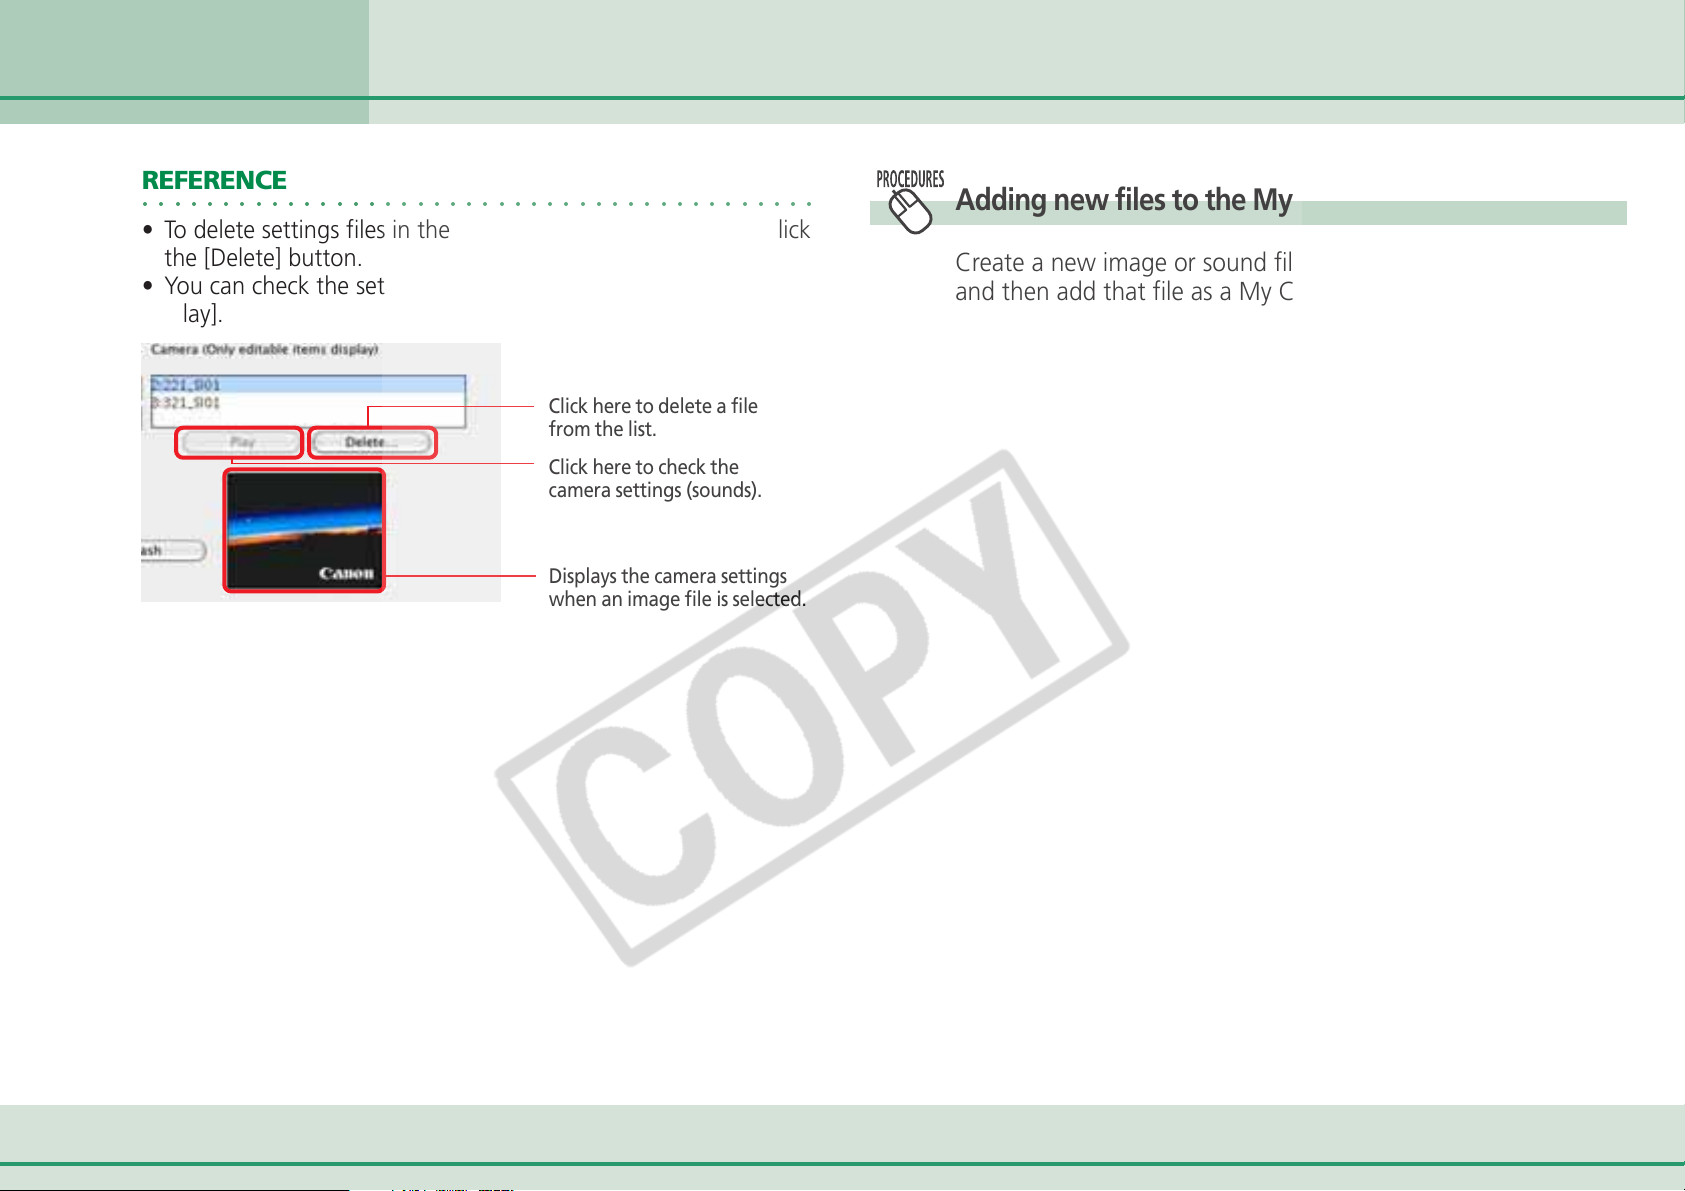
• To delete settings files in the Camera list, select the file and click
the [Delete] button.
• You can check the settings in the camera (sounds) by clicking
[Play].
Saving the “My Camera Settings” to the Camera (5/8)
Adding new files to the My Camera Settings
Create a new image or sound file and save it to the computer
and then add that file as a My Camera Settings file.
Click here to delete a file
from the list.
Click here to check the
camera settings (sounds).
Displays the camera settings
when an image file is selected.
30 ImageBrowser Software User Guide
Page 31
Chapter 3
What You Can Do with a
Camera Connected
Saving the “My Camera Settings” to the Camera (6/8)
Create new files before adding them
1.
Create an image or sound file that will become the
camera start-up image or sound setting and save it to
the computer.
■ Creating a Start-Up Image File
Create an image file using an image editing program.
The image should be a JPEG, 320 x 240 pixels and less than
20KB in size.
REFERENCE
○○○○○○○○○○○○○○○○○○○○○○○○○○○○○○○○○○○○○○○○○○
• See the manual and help facility for the editing program for a
detailed explanation of how to use it.
■ Creating a Sound File
Record the sound as an 11.025 kHz or 8.000 kHz, 8 bit, Mono
sound and save it in the WAV file format.
Sound files that can be added to the camera should conform to
these guidelines.
2.
3.
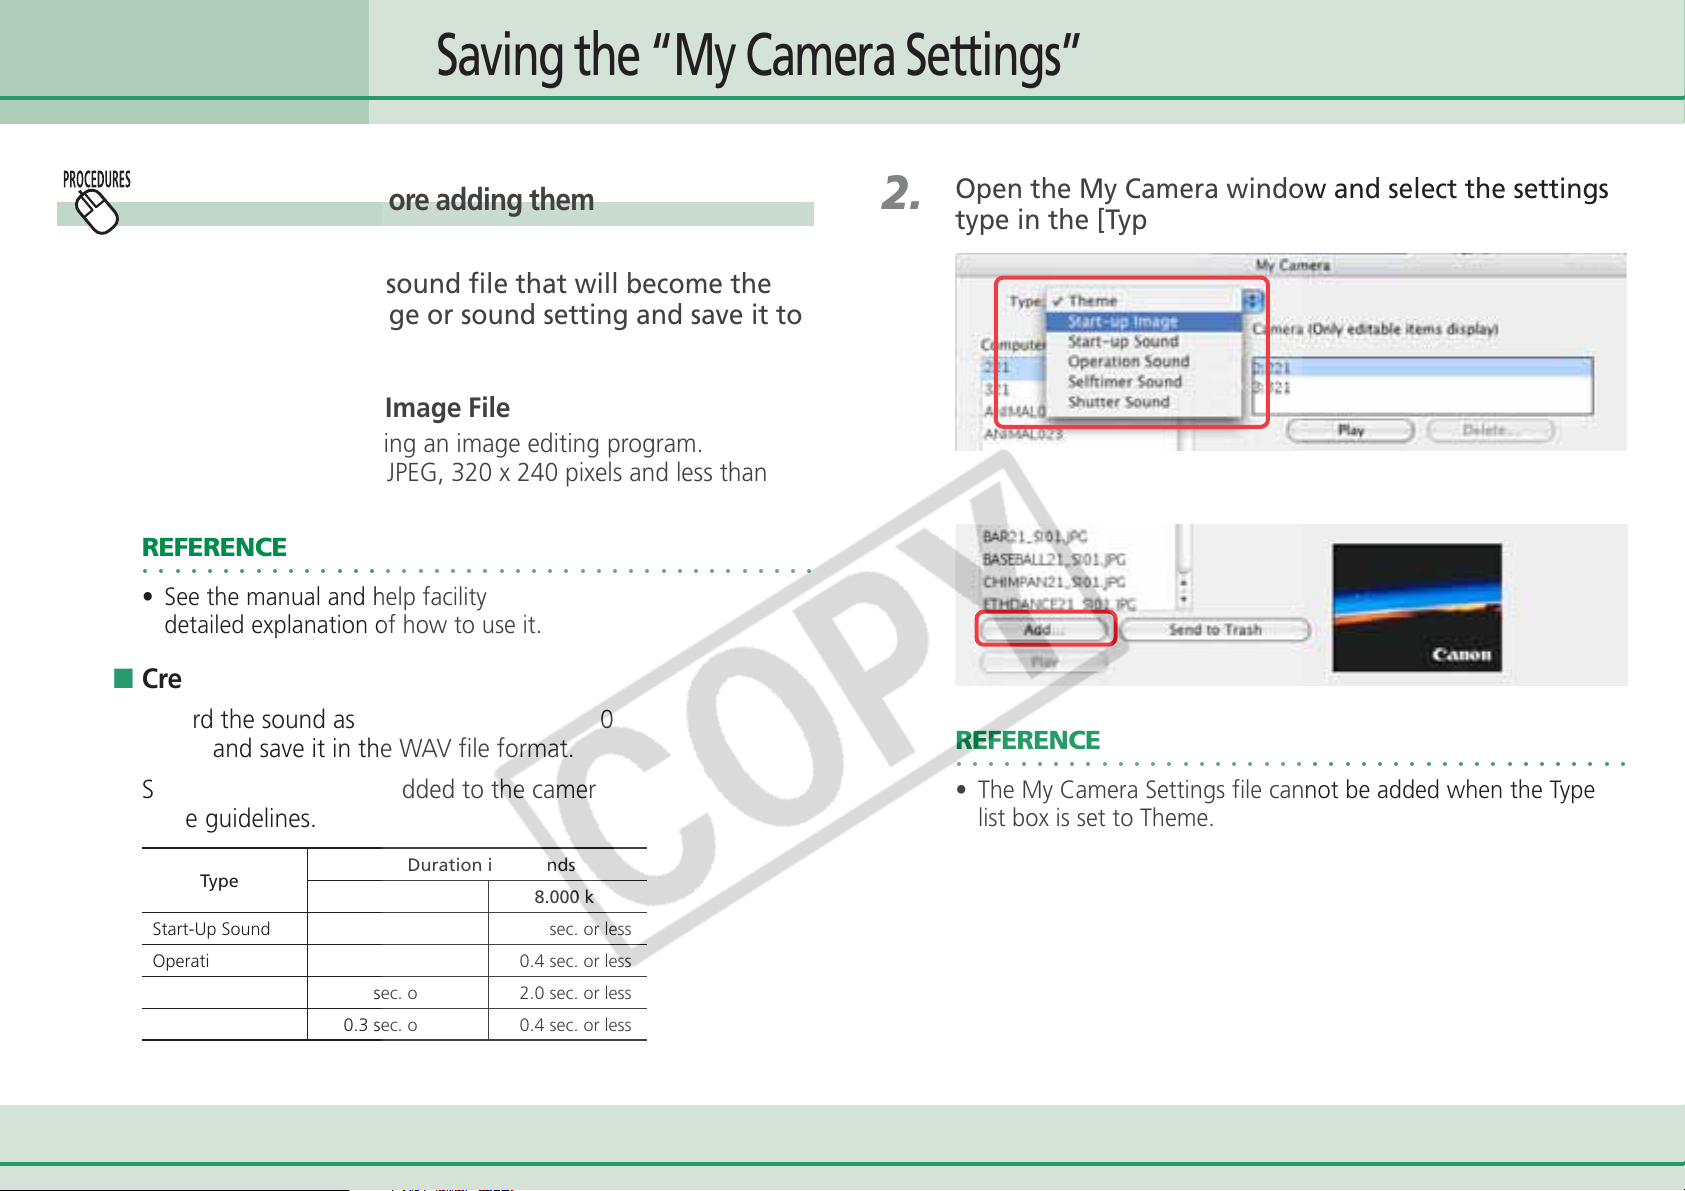
Open the My Camera window and select the settings
type in the [Type] list box.
Click [Add].
REFERENCE
○○○○○○○○○○○○○○○○○○○○○○○○○○○○○○○○○○○○○○○○○○
• The My Camera Settings file cannot be added when the Type
list box is set to Theme.
Type
Start-Up Sound
Operation Sound
Self-Timer Sound
Shutter Sound
1.0 sec. or less
0.3 sec. or less
2.0 sec. or less
0.3 sec. or less
Duration in Seconds
11.025 kHz
31 ImageBrowser Software User Guide
8.000 kHz
1.3 sec. or less
0.4 sec. or less
2.0 sec. or less
0.4 sec. or less
Page 32
Chapter 3
What You Can Do with a
Camera Connected
Saving the “My Camera Settings” to the Camera (7/8)
4.
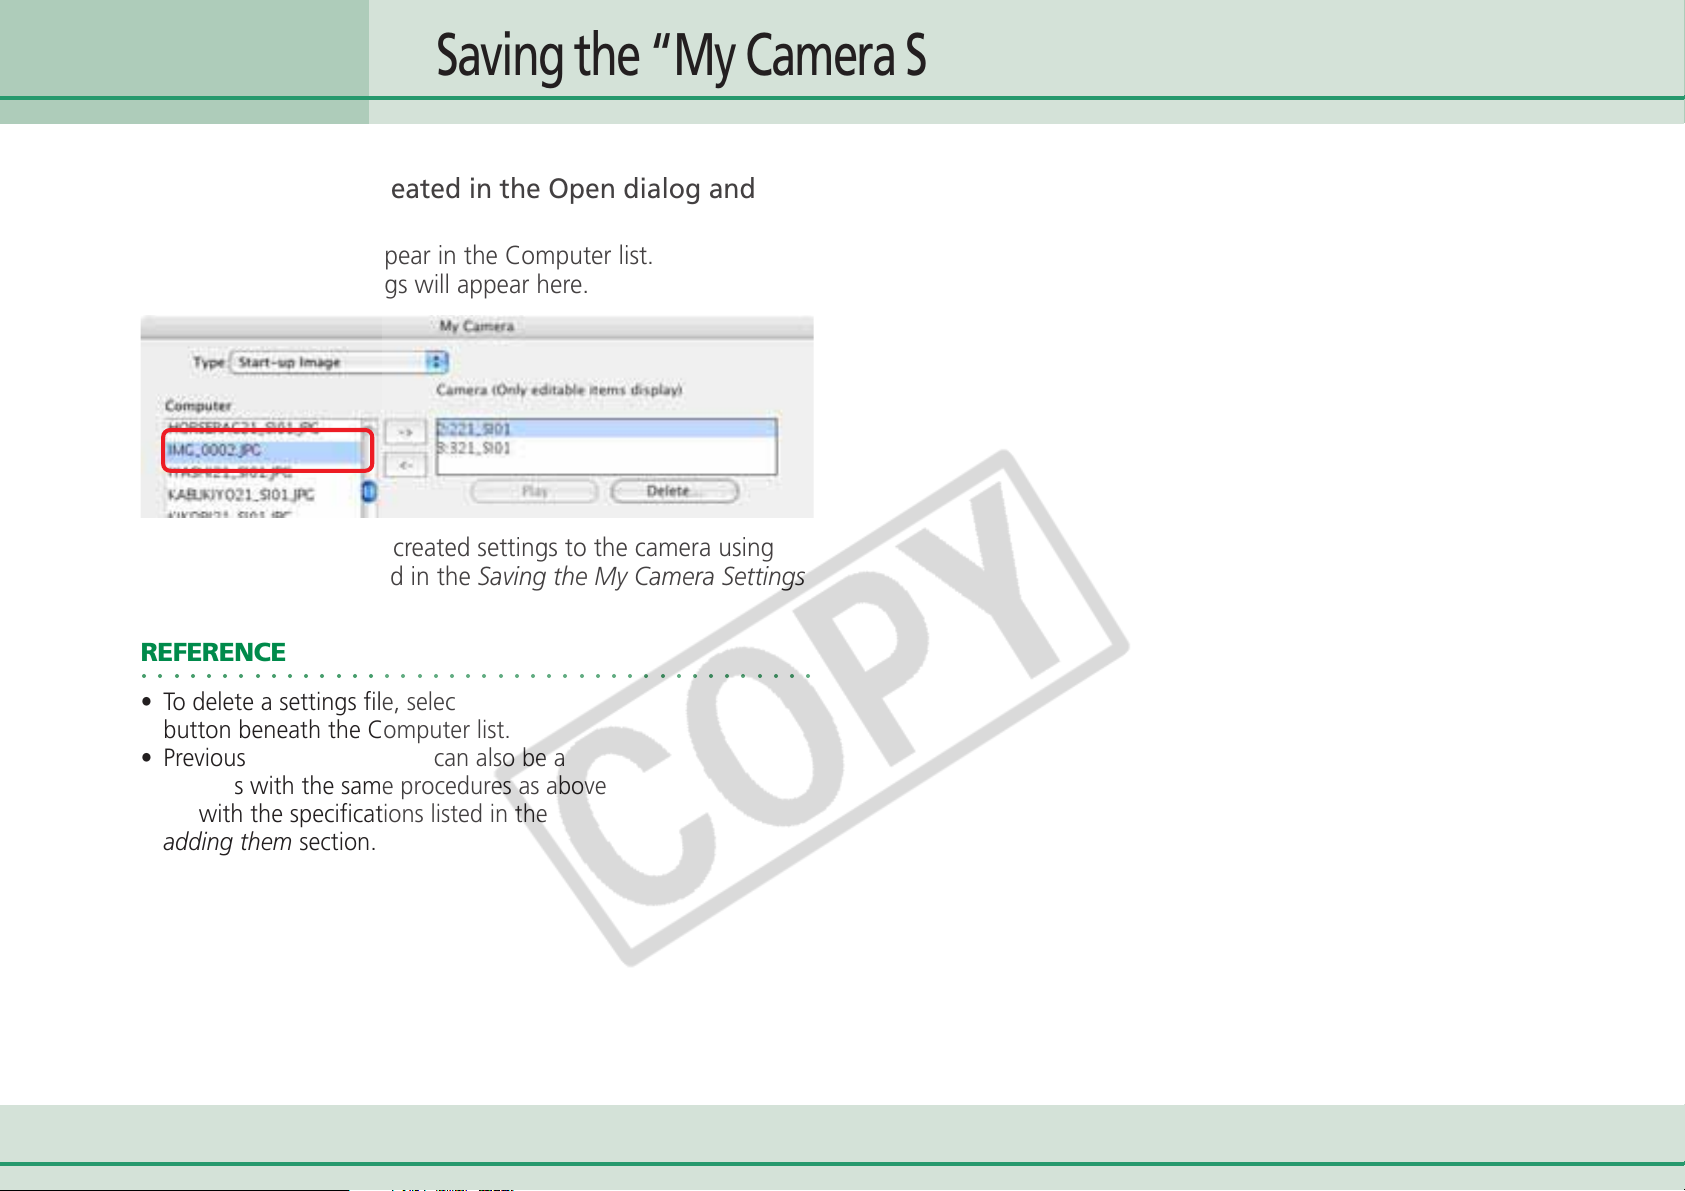
Select the file you created in the Open dialog and
click [Open].
The selected file will appear in the Computer list.
The newly added settings will appear here.
You can save the newly created settings to the camera using
the procedures described in the Saving the My Camera Settings
to the Camera section.
REFERENCE
○○○○○○○○○○○○○○○○○○○○○○○○○○○○○○○○○○○○○○○○○○
• To delete a settings file, select it and click the [Send to Trash]
button beneath the Computer list.
• Previously created settings can also be added as My Camera
Settings with the same procedures as above, but have to com-
ply with the specifications listed in the Create new files before
adding them section.
32 ImageBrowser Software User Guide
Page 33
Chapter 3
What You Can Do with a
Camera Connected
Saving the “My Camera Settings” to the Camera (8/8)
1.
2.
Saving the Settings to the Computer
You can copy the My Camera Settings from the camera to the
computer.
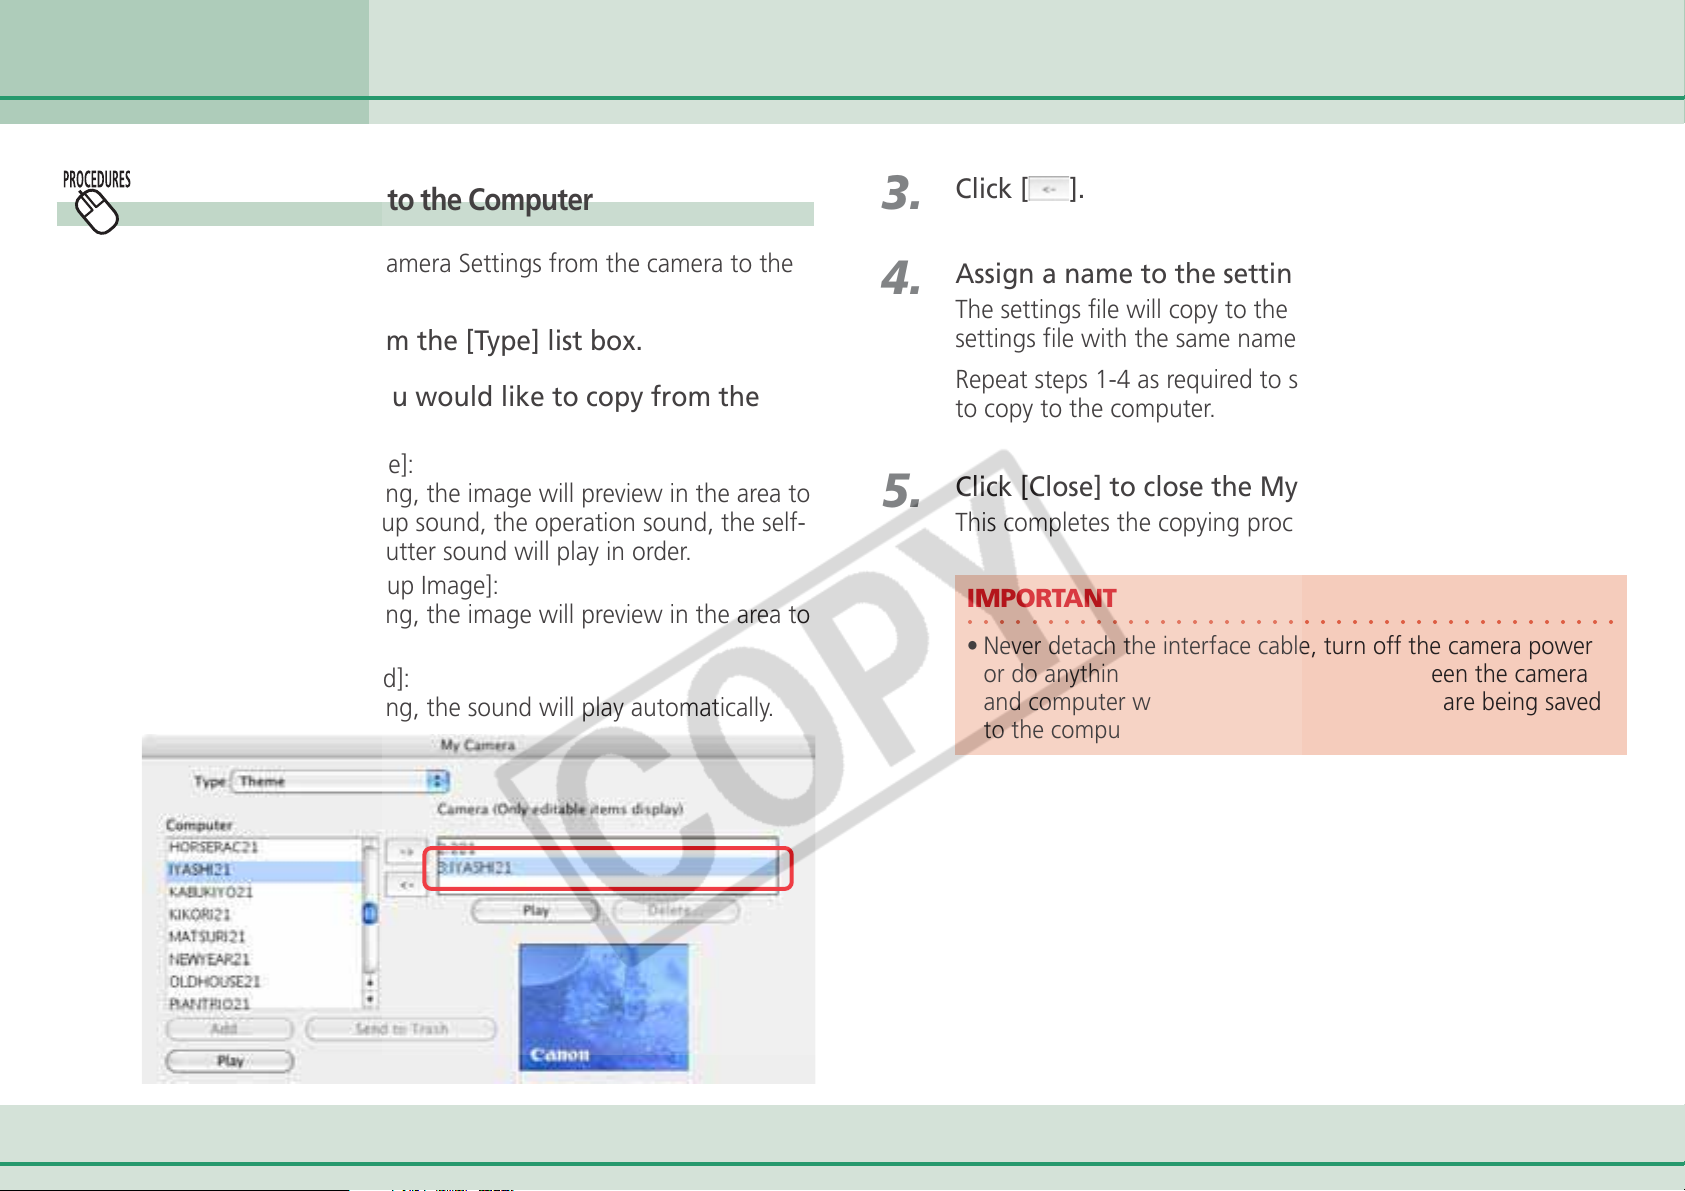
Select an option from the [Type] list box.
Select the setting you would like to copy from the
Camera list.
When you select [Theme]:
When you select a setting, the image will preview in the area to
the right and the start-up sound, the operation sound, the self-
timer sound and the shutter sound will play in order.
When you select [Start-up Image]:
When you select a setting, the image will preview in the area to
the right.
When you select [Sound]:
When you select a setting, the sound will play automatically.
3.
4.
5.
Click [ ].
Assign a name to the settings file and click [OK].
The settings file will copy to the computer disk. If there is a
settings file with the same name, it will be over-written.
Repeat steps 1-4 as required to save the settings files you wish
to copy to the computer.
Click [Close] to close the My Camera window.
This completes the copying process.
IMPORTANT
○○○○○○○○○○○○○○○○○○○○○○○○○○○○○○○○○○○○○○○○○
• Never detach the interface cable, turn off the camera power
or do anything to stop communication between the camera
and computer while the My Camera Settings are being saved
to the computer.
33 ImageBrowser Software User Guide
Page 34
Chapter 3
What You Can Do with a
Camera Connected
Setting up Slide Shows on the Camera
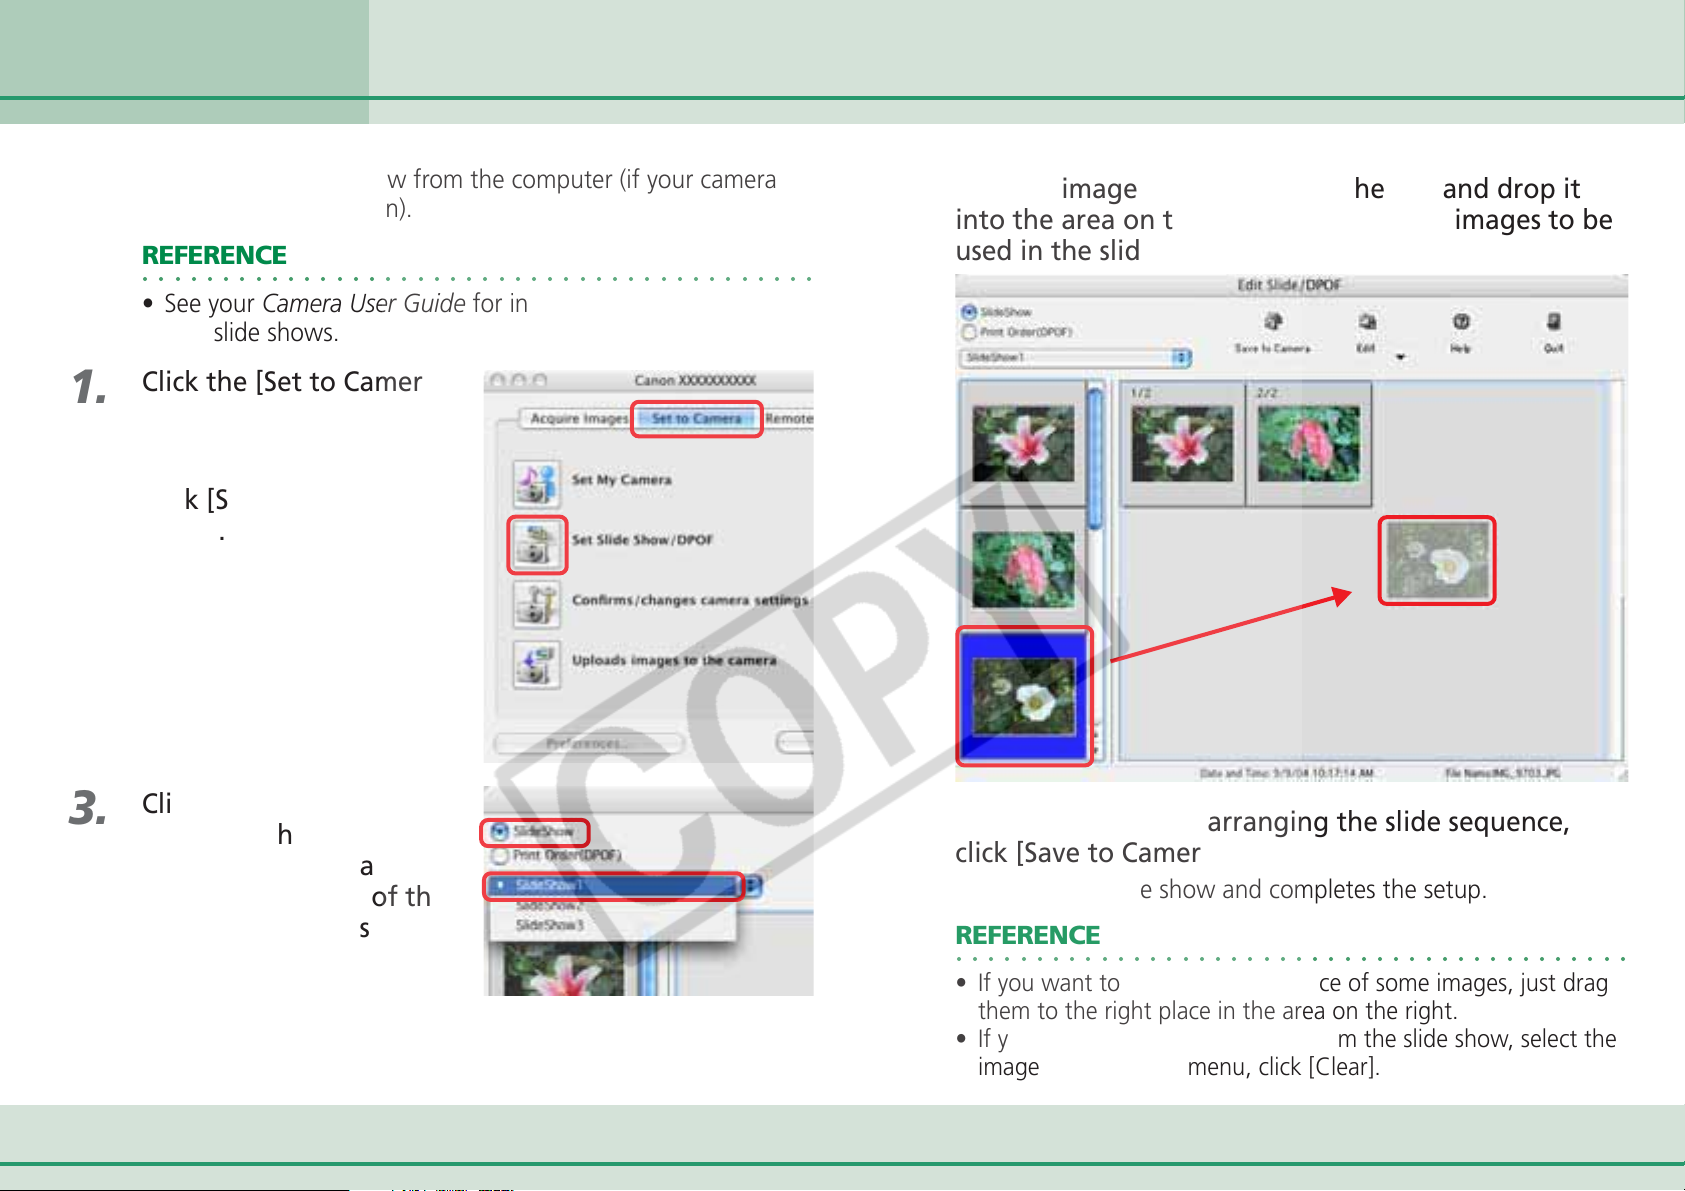
You can edit a camera slide show from the computer (if your camera
supports the slide show function).
REFERENCE
○○○○○○○○○○○○○○○○○○○○○○○○○○○○○○○○○○○○○○○○○○
• See your Camera User Guide for instructions how to use and
play slide shows.
1.
2.
Click the [Set to Camera]
tab in the Camera Control
Window.
Click [Set Slide Show/
DPOF].
4.
Drag an image from the list on the left and drop it
into the area on the right to line up the images to be
used in the slide show.
3.
Click the [Slide Show]
button at the top left of
the next window and
select the number of the
slide show you wish to
edit.
34 ImageBrowser Software User Guide
5.
When you are done arranging the slide sequence,
click [Save to Camera].
This saves the slide show and completes the setup.
REFERENCE
○○○○○○○○○○○○○○○○○○○○○○○○○○○○○○○○○○○○○○○○○○
• If you want to change the sequence of some images, just drag
them to the right place in the area on the right.
• If you want to remove an image from the slide show, select the
image. On the [Edit] menu, click [Clear].
Page 35
Chapter 3
What You Can Do with a
Camera Connected
Setting the DPOF Print Settings (1/2)
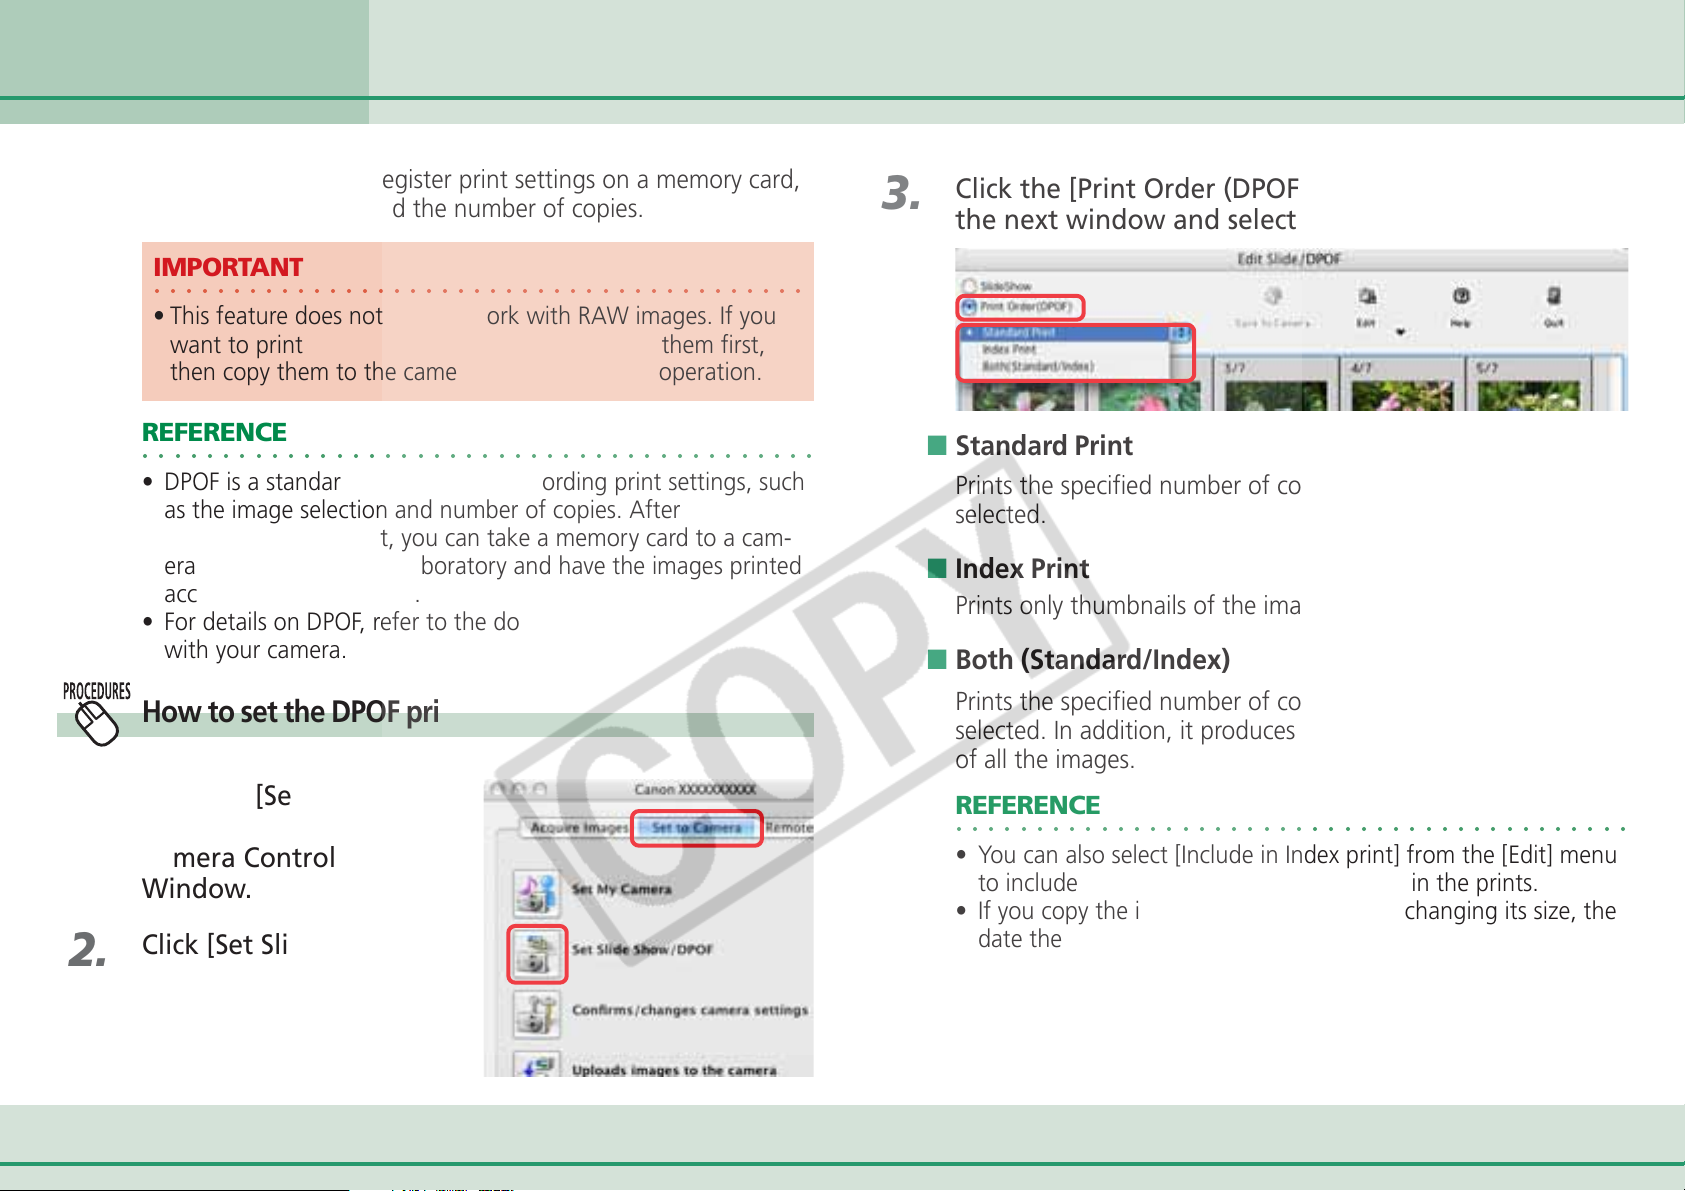
You can use ImageBrowser to register print settings on a memory card,
including the images to print and the number of copies.
IMPORTANT
○○○○○○○○○○○○○○○○○○○○○○○○○○○○○○○○○○○○○○○○○
• This feature does not directly work with RAW images. If you
want to print RAW images, you need to convert them first,
then copy them to the camera and perform this operation.
REFERENCE
○○○○○○○○○○○○○○○○○○○○○○○○○○○○○○○○○○○○○○○○○○
• DPOF is a standardized format for recording print settings, such
as the image selection and number of copies. After DPOF print
settings have been set, you can take a memory card to a cam-
era store or developing laboratory and have the images printed
according to the settings.
• For details on DPOF, refer to the documentation that comes
with your camera.
How to set the DPOF print settings
3.
Click the [Print Order (DPOF)] button at the top left of
the next window and select the print type.
■ Standard Print
Prints the specified number of copies of the images that you
selected.
■ Index Print
Prints only thumbnails of the images that you selected.
■ Both (Standard/Index)
Prints the specified number of copies of the images that you
selected. In addition, it produces an index print of small versions
of all the images.
1.
Click the [Set to
Camera] tab in the
Camera Control
Window.
2.
Click [Set Slide Show/
DPOF].
35 ImageBrowser Software User Guide
REFERENCE
○○○○○○○○○○○○○○○○○○○○○○○○○○○○○○○○○○○○○○○○○○
• You can also select [Include in Index print] from the [Edit] menu
to include the image date and file number in the prints.
• If you copy the image to the camera after changing its size, the
date the image was copied will be printed.
Page 36
Chapter 3
What You Can Do with a
Camera Connected
Setting the DPOF Print Settings (2/2)
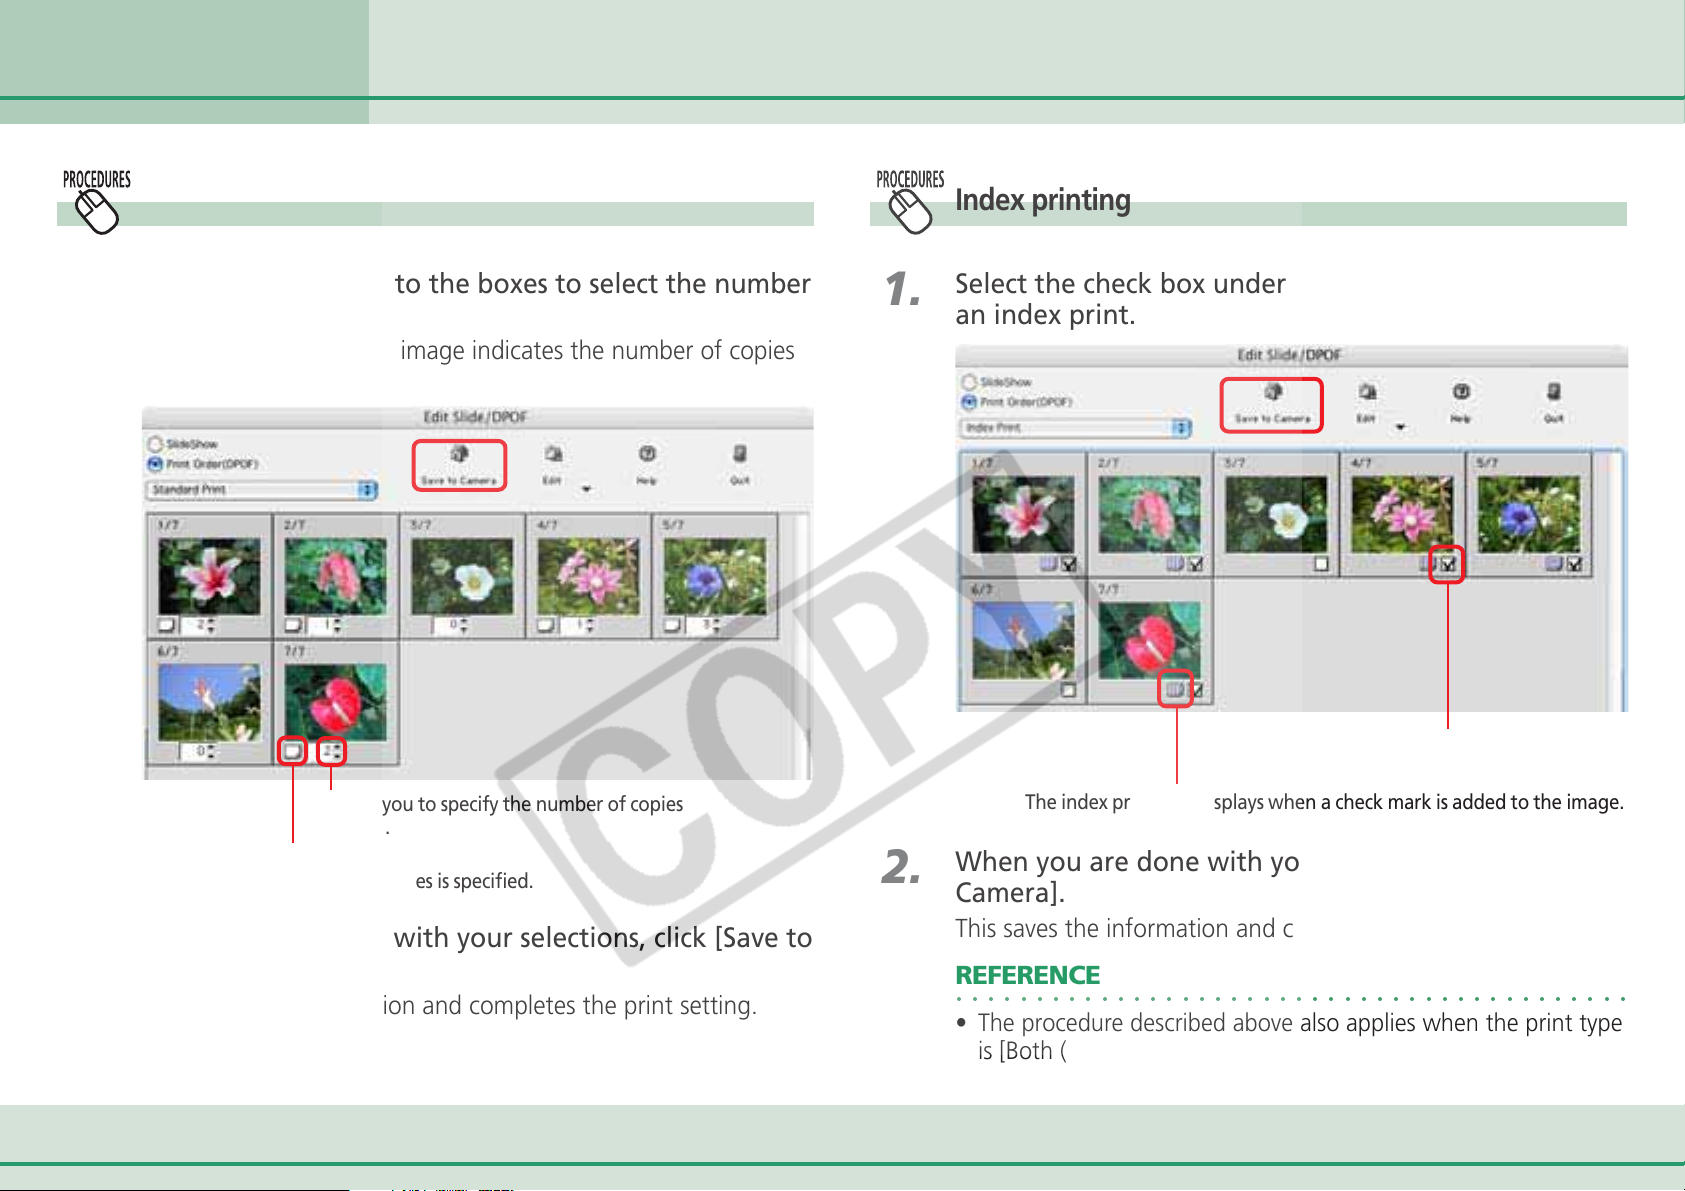
1.
Standard printing
Use the arrows next to the boxes to select the number
of copies you want.
The number under each image indicates the number of copies
to print.
1.
Index printing
Select the check box under the image to include it in
an index print.
Select the check box to include
the image in the index print.
Allows you to specify the number of copies
to print.
The standard print icon displays when a
number of copies is specified.
2.
When you are done with your selections, click [Save to
Camera].
This saves the information and completes the print setting.
36 ImageBrowser Software User Guide
2.
The index print icon displays when a check mark is added to the image.
When you are done with your selections, click [Save to
Camera].
This saves the information and completes the print setting.
REFERENCE
○○○○○○○○○○○○○○○○○○○○○○○○○○○○○○○○○○○○○○○○○○
• The procedure described above also applies when the print type
is [Both (Standard/Index)].
Page 37
Chapter 3
What You Can Do with a
Camera Connected
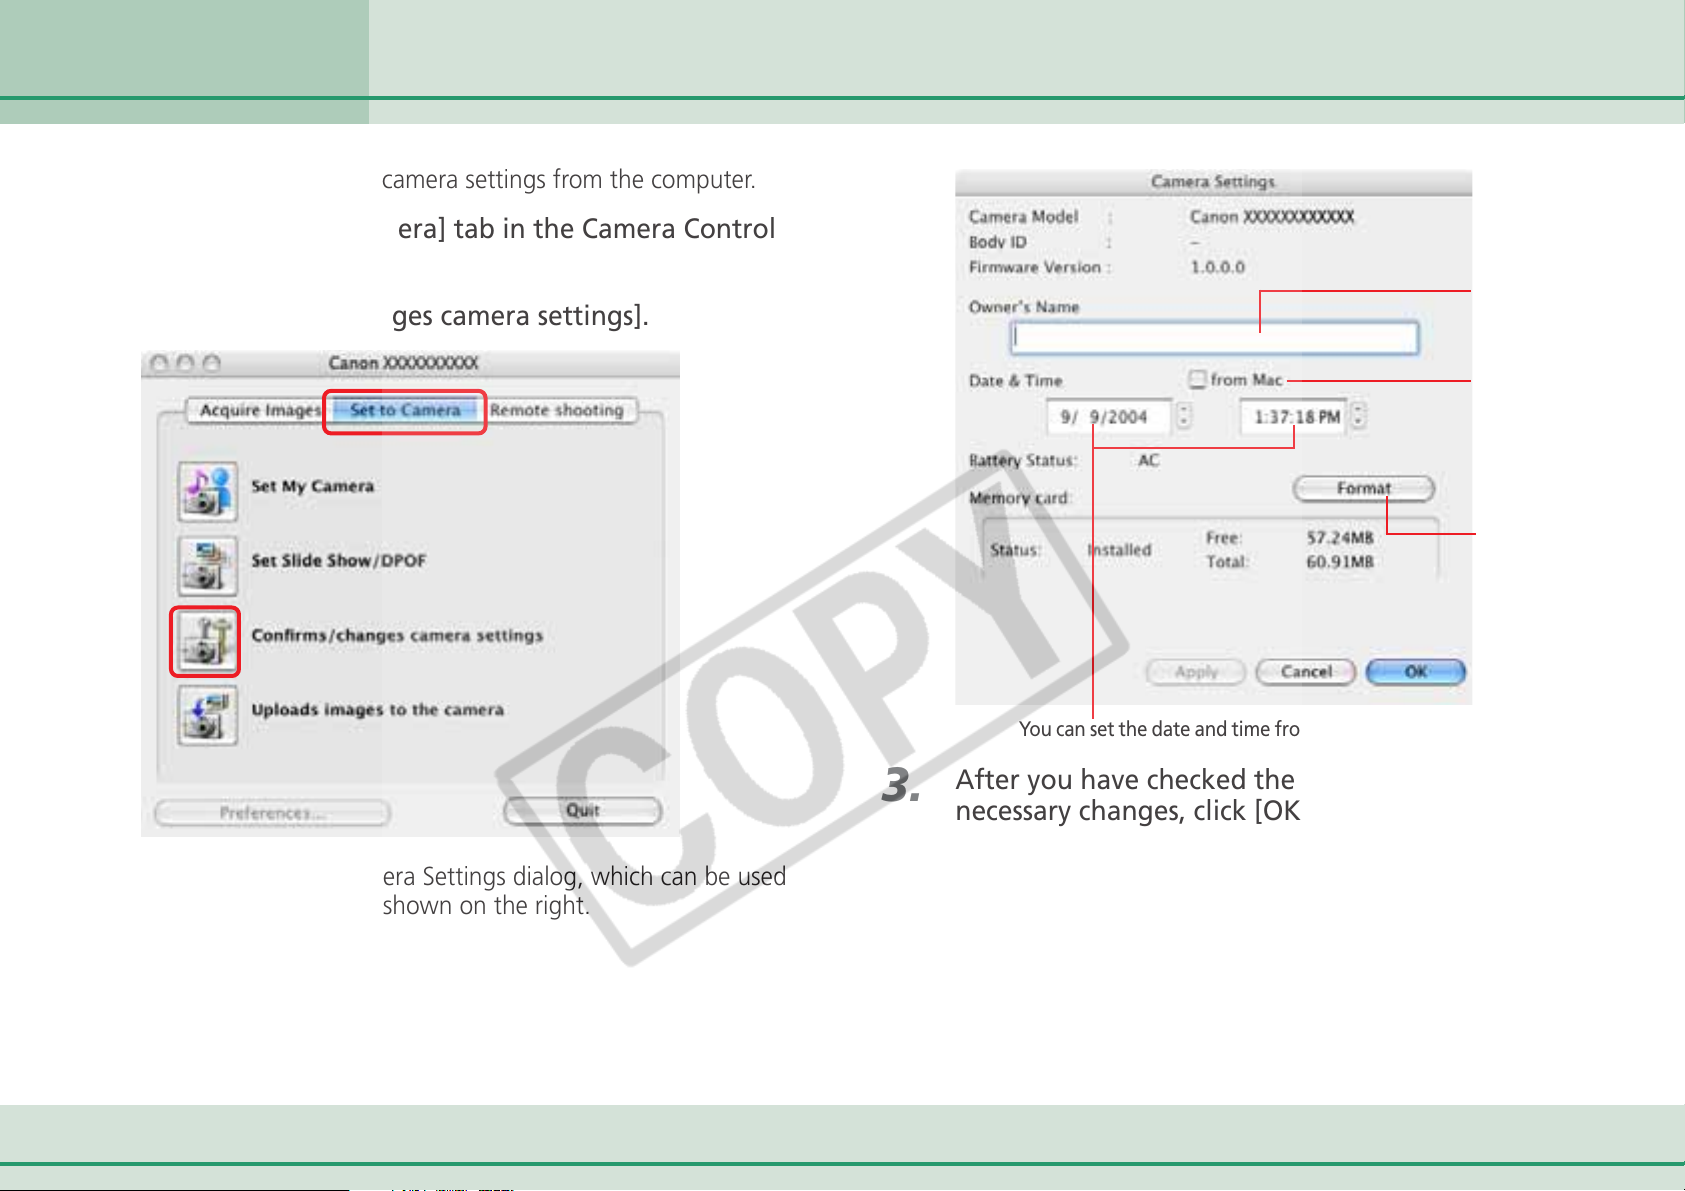
You can check and modify the camera settings from the computer.
Checking and Modifying the Camera Settings
1.
2.
Click the [Set to Camera] tab in the Camera Control
Window.
Click [Confirms/changes camera settings].
3.
Type the name of
the owner of the
camera here.
Click this button
to synchronize
the camera’s
date and time
settings with the
computer.
Click this button
to format the
camera’s memory
card (not
supported by
some camera
models).
You can set the date and time from here.
After you have checked the camera settings and made
necessary changes, click [OK].
This will open the Camera Settings dialog, which can be used
to change the settings shown on the right.
37 ImageBrowser Software User Guide
Page 38
Chapter 3
What You Can Do with a
Camera Connected
Adding Computer Images to the Camera
You can copy images (JPEG only) from the computer to the camera (or
memory card).
IMPORTANT
○○○○○○○○○○○○○○○○○○○○○○○○○○○○○○○○○○○○○○○○○
• If you are using a memory card reader, ensure that a memory
card is inserted in the reader.
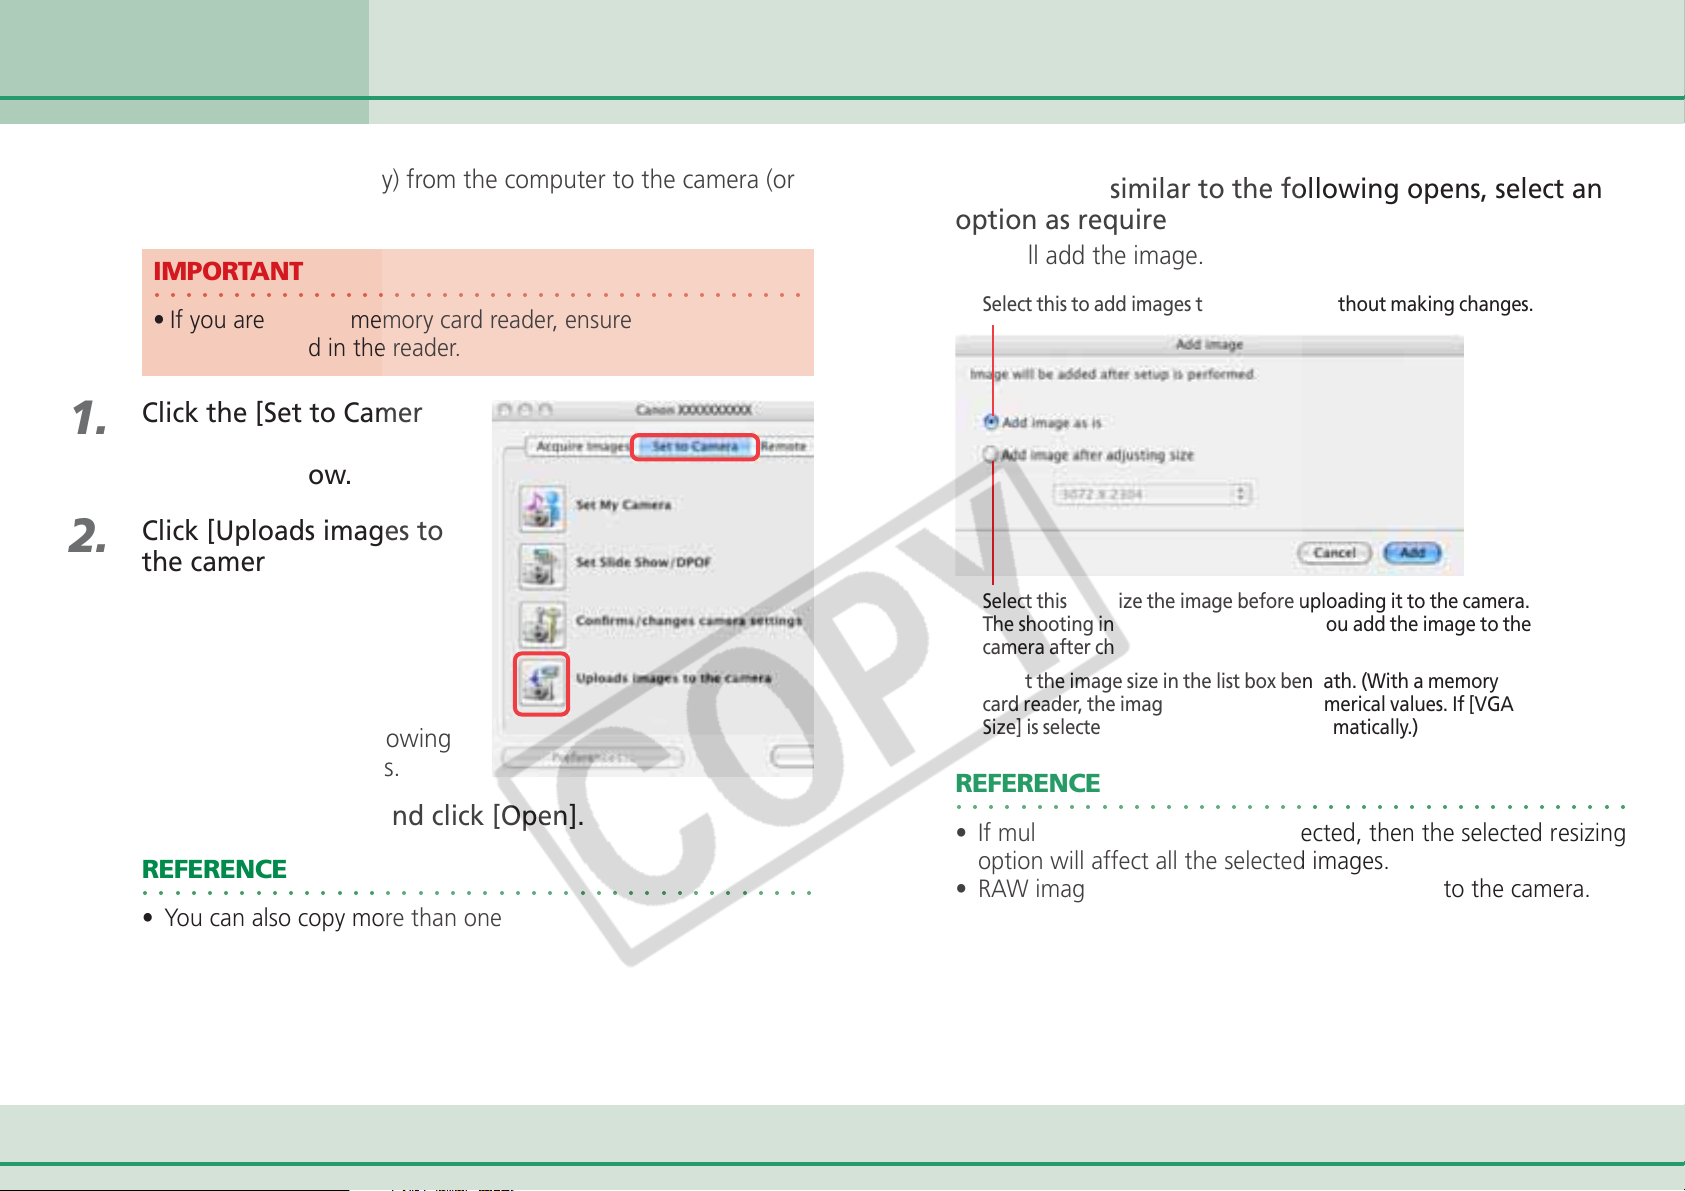
1.
Click the [Set to Camera]
tab in the Camera
Control Window.
2.
Click [Uploads images to
the camera].
A dialog will appear, allowing
you to select image files.
3.
Select files to copy and click [Open].
REFERENCE
○○○○○○○○○○○○○○○○○○○○○○○○○○○○○○○○○○○○○○○○○○
• You can also copy more than one image at a time.
4.
If a window similar to the following opens, select an
option as required and click [Add].
This will add the image.
Select this to add images to the camera without making changes.
Select this to resize the image before uploading it to the camera.
The shooting information will be lost if you add the image to the
camera after changing the image size.
Select the image size in the list box beneath. (With a memory
card reader, the image size is input as numerical values. If [VGA
Size] is selected, 640 and 480 appear automatically.)
REFERENCE
○○○○○○○○○○○○○○○○○○○○○○○○○○○○○○○○○○○○○○○○○○
• If multiple images have been selected, then the selected resizing
option will affect all the selected images.
• RAW images and movies cannot be uploaded to the camera.
38 ImageBrowser Software User Guide
Page 39
Chapter 3
What You Can Do with a
Camera Connected
This section explains the procedures for remote shooting, the process of
operating the camera shutter remotely from a connected computer.
Operating the Camera Shutter from a Computer ( 1 / 4)
Remote Shooting Procedures
IMPORTANT
○○○○○○○○○○○○○○○○○○○○○○○○○○○○○○○○○○○○○○○○○
• See your Camera User Guide to check whether your camera
supports the remote shooting function or not.
• On camera models with lens covers, open the lens cover
before remote shooting.
• Ensure that you turn off your computer’s sleep feature before
you begin remote shooting. The results cannot be guaranteed
if the computer goes to sleep while remote shooting.
• Except for the shutter button, the camera’s buttons and
switches, including the zoom, cannot be manually operated
while the camera is being remotely controlled.
• The time lag between pushing the shutter button and the
release of the shutter is slightly longer for remote shooting
compared with the normal mode of operation.
• Depending upon your camera model, a program different
from the one shown here may start up. Please refer to the
manual for the software supplied with your camera if this
occurs.
REFERENCE
○○○○○○○○○○○○○○○○○○○○○○○○○○○○○○○○○○○○○○○○○○
• See the Help menu (it can be opened from the [Help] menu in
the remote shooting window) for detailed operating procedures
for remote shooting.
1.
2.
3.
4.
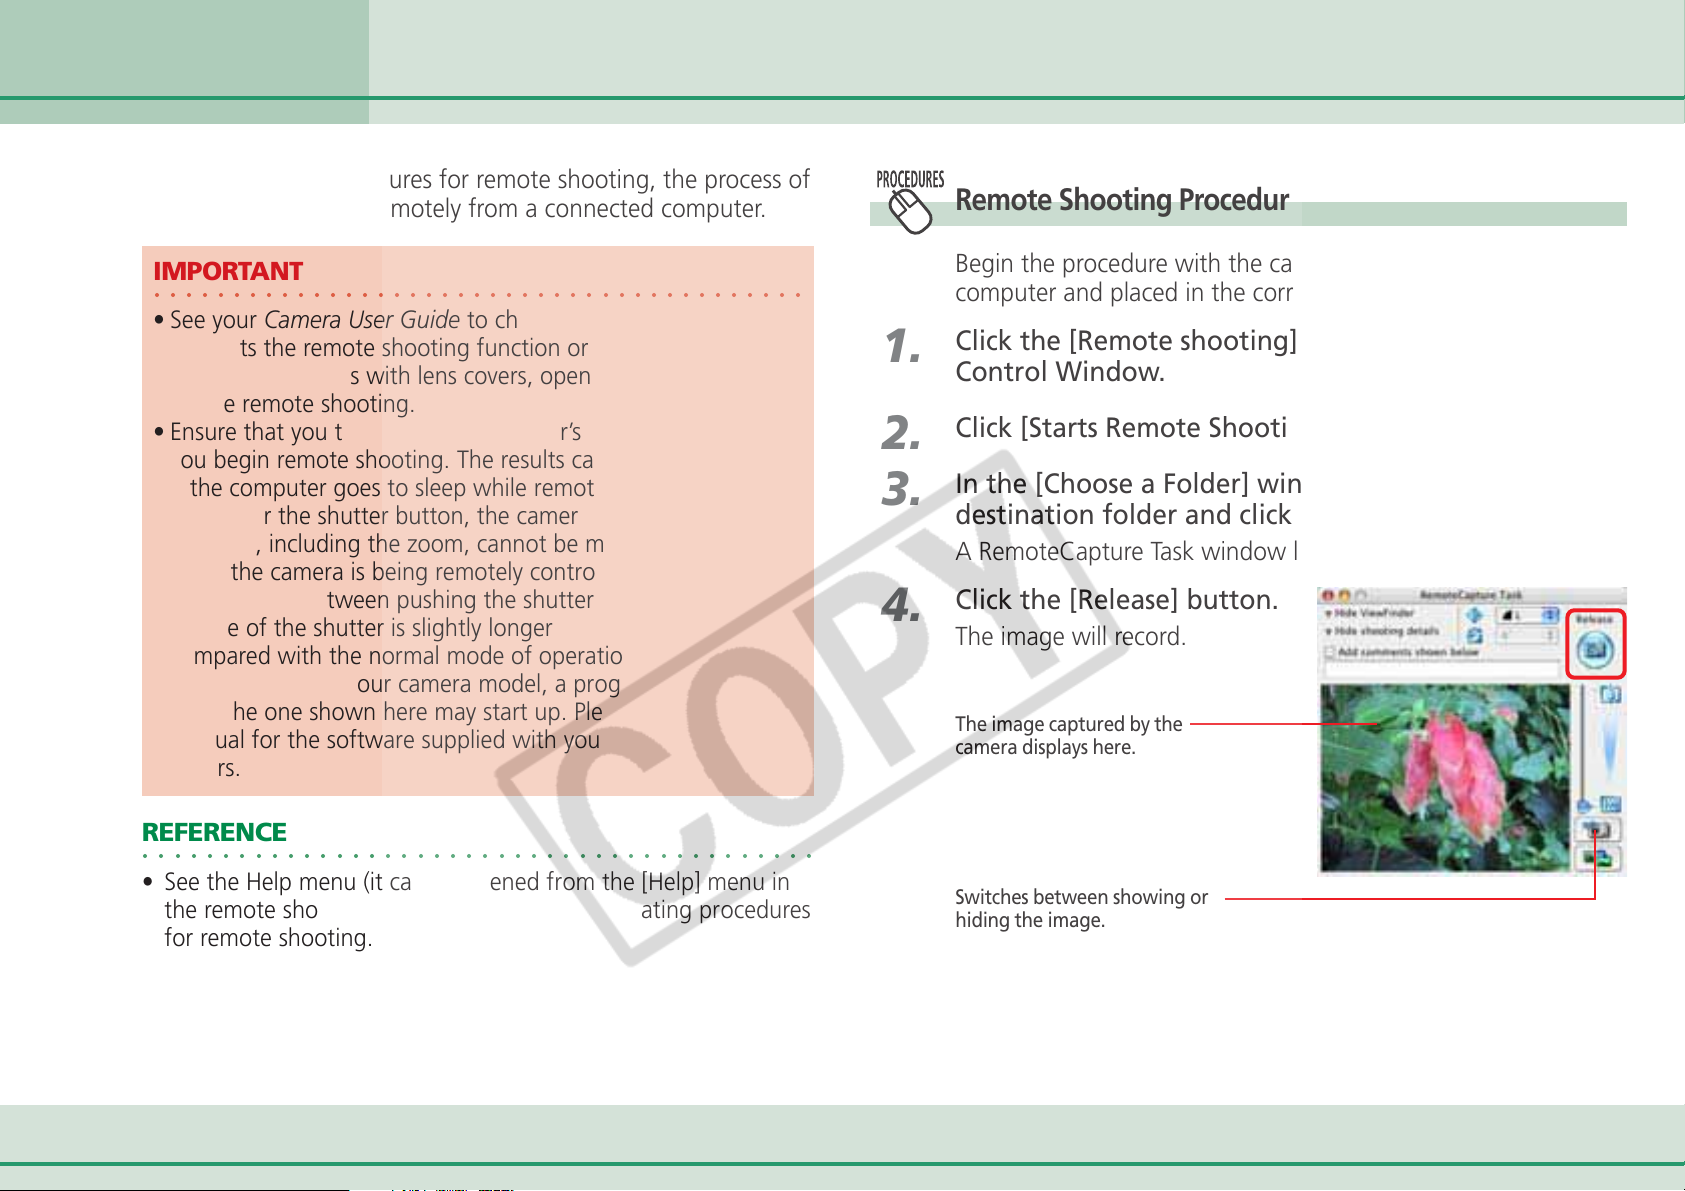
Begin the procedure with the camera connected to the
computer and placed in the correct mode for connection.
Click the [Remote shooting] tab in the Camera
Control Window.
Click [Starts Remote Shooting].
In the [Choose a Folder] window, select the
destination folder and click [Choose].
A RemoteCapture Task window like the one below will open.
Click the [Release] button.
The image will record.
The image captured by the
camera displays here.
Switches between showing or
hiding the image.
39 ImageBrowser Software User Guide
Page 40
Chapter 3
What You Can Do with a
Camera Connected
Features of the RemoteCapture Task Window
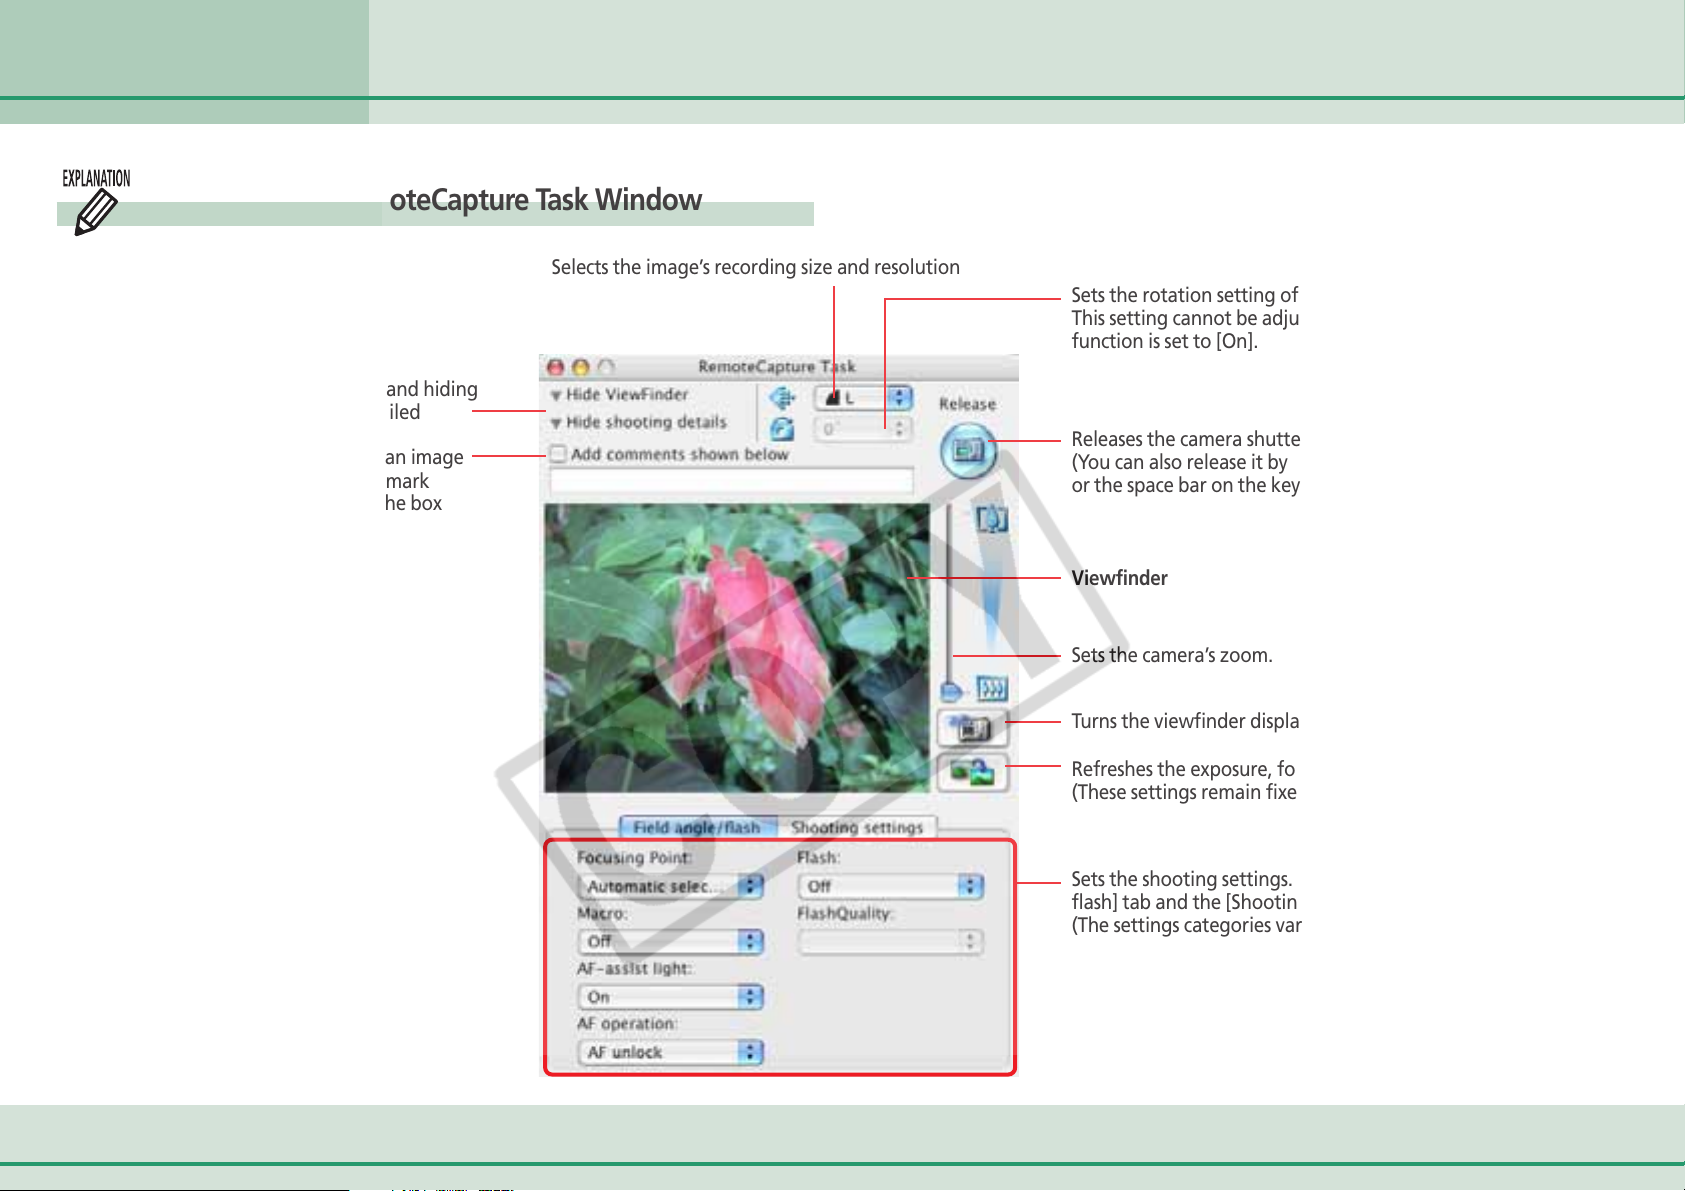
Switches between showing and hiding
the viewfinder and the detailed
settings sections.
You can add a comment to an image
by clicking to place a check mark
here and inputting text in the box
below.
Operating the Camera Shutter from a Computer ( 2 / 4)
Selects the image’s recording size and resolution
Sets the rotation setting of the image being recorded.
This setting cannot be adjusted if your camera’s Auto Rotate
function is set to [On].
Releases the camera shutter.
(You can also release it by pressing the camera’s shutter button
or the space bar on the keyboard.)
Viewfinder
40 ImageBrowser Software User Guide
Sets the camera’s zoom.
Turns the viewfinder display on or off.
Refreshes the exposure, focus and white balance settings.
(These settings remain fixed until this button is clicked.)
Sets the shooting settings. It is divided into the [Field angle/
flash] tab and the [Shooting settings] tab.
(The settings categories vary according to your camera model.)
Page 41
Chapter 3
What You Can Do with a
Camera Connected
Operating the Camera Shutter from a Computer ( 3 / 4)
Other Remote Shooting Features
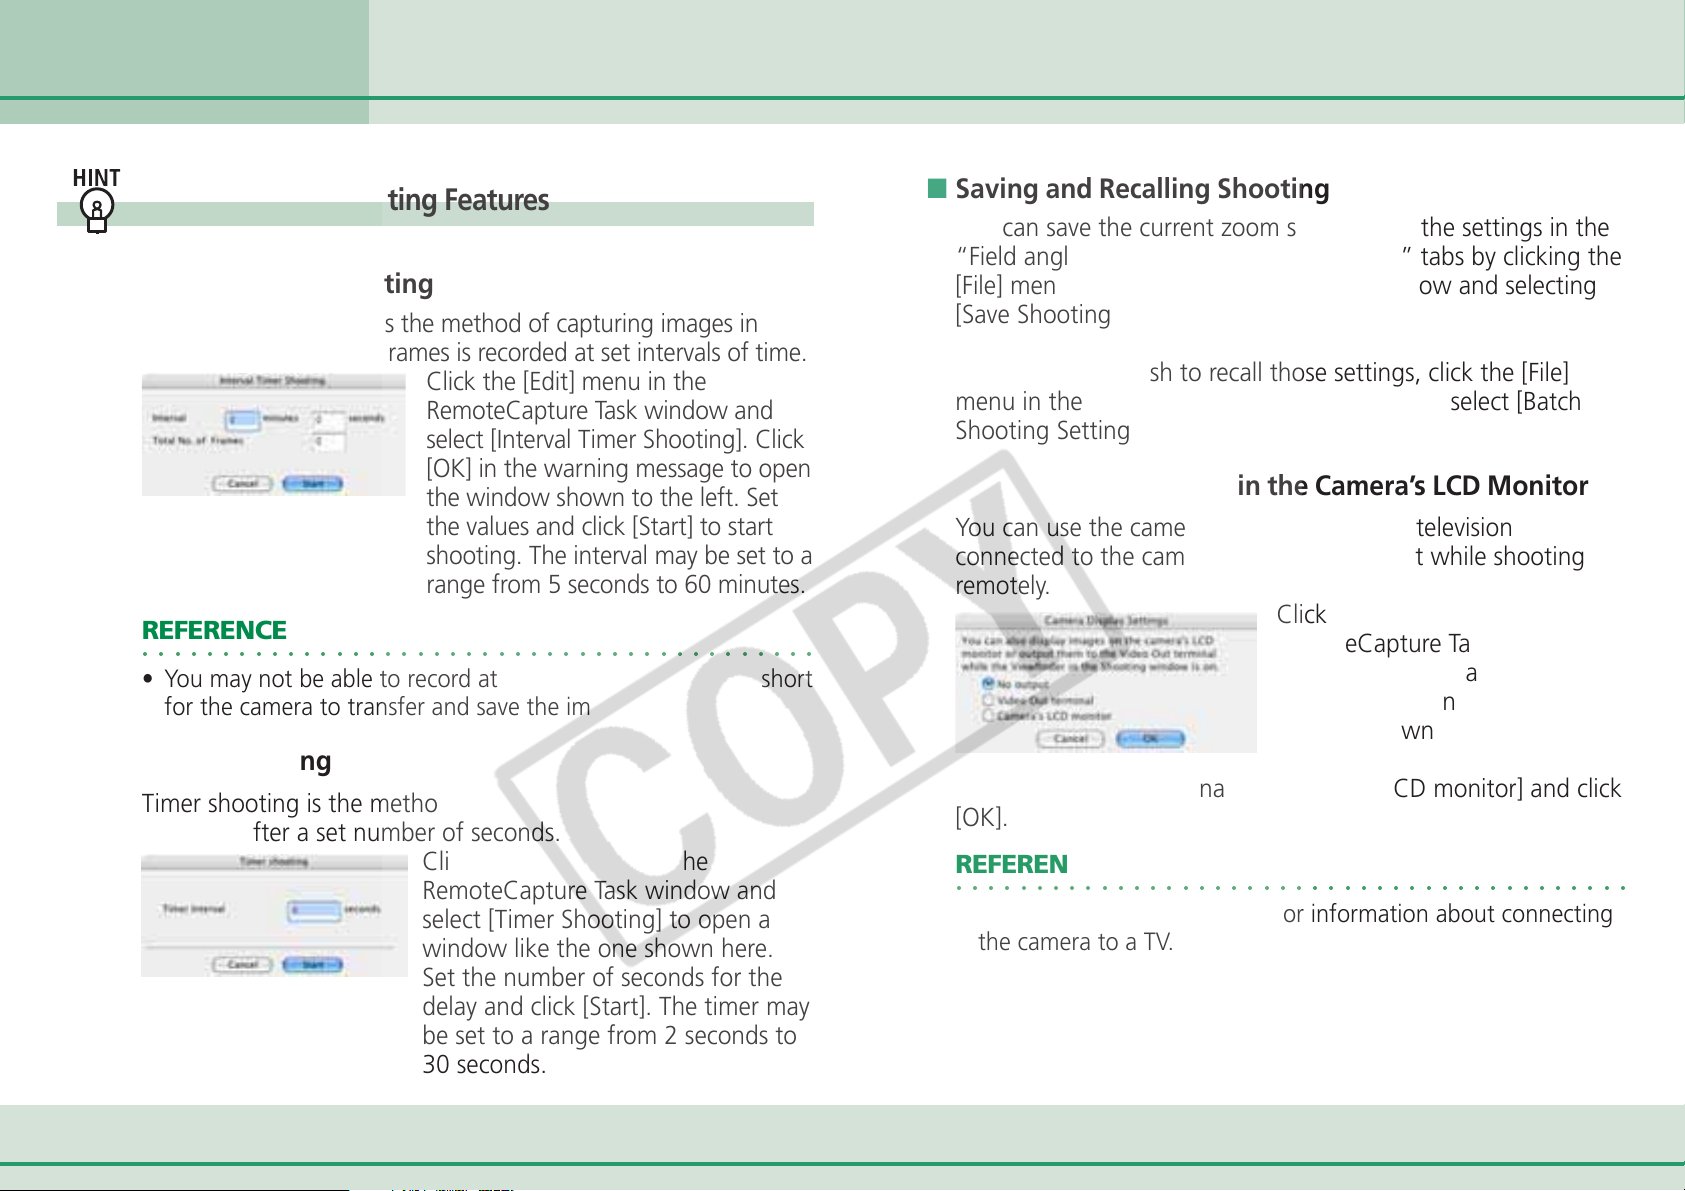
■ Interval Timer Shooting
Interval timer shooting is the method of capturing images in
which a set number of frames is recorded at set intervals of time.
Click the [Edit] menu in the
RemoteCapture Task window and
select [Interval Timer Shooting]. Click
[OK] in the warning message to open
the window shown to the left. Set
the values and click [Start] to start
shooting. The interval may be set to a
range from 5 seconds to 60 minutes.
REFERENCE
○○○○○○○○○○○○○○○○○○○○○○○○○○○○○○○○○○○○○○○○○○
• You may not be able to record at the set interval if it is too short
for the camera to transfer and save the image data.
■ Timer Shooting
Timer shooting is the method by which a single image is
recorded after a set number of seconds.
Click the [Edit] menu in the
RemoteCapture Task window and
select [Timer Shooting] to open a
window like the one shown here.
Set the number of seconds for the
delay and click [Start]. The timer may
be set to a range from 2 seconds to
30 seconds.
■ Saving and Recalling Shooting Settings
You can save the current zoom settings and the settings in the
“Field angle/flash” and “Shooting settings” tabs by clicking the
[File] menu in the RemoteCapture Task window and selecting
[Save Shooting Settings].
Later when you wish to recall those settings, click the [File]
menu in the RemoteCapture Task window and select [Batch
Shooting Settings].
■ Displaying the Subject in the Camera’s LCD Monitor
You can use the camera’s LCD monitor or a television
connected to the camera to view the subject while shooting
remotely.
Click the [File] menu in the
RemoteCapture Task window
and select [Camera Display
Settings] to open a window like
the one shown here.
Select [Video Out terminal] or [Camera’s LCD monitor] and click
[OK].
REFERENCE
○○○○○○○○○○○○○○○○○○○○○○○○○○○○○○○○○○○○○○○○○○
• See your Camera User Guide for information about connecting
the camera to a TV.
41 ImageBrowser Software User Guide
Page 42
Chapter 3
What You Can Do with a
Camera Connected
Operating the Camera Shutter from a Computer ( 4 / 4)
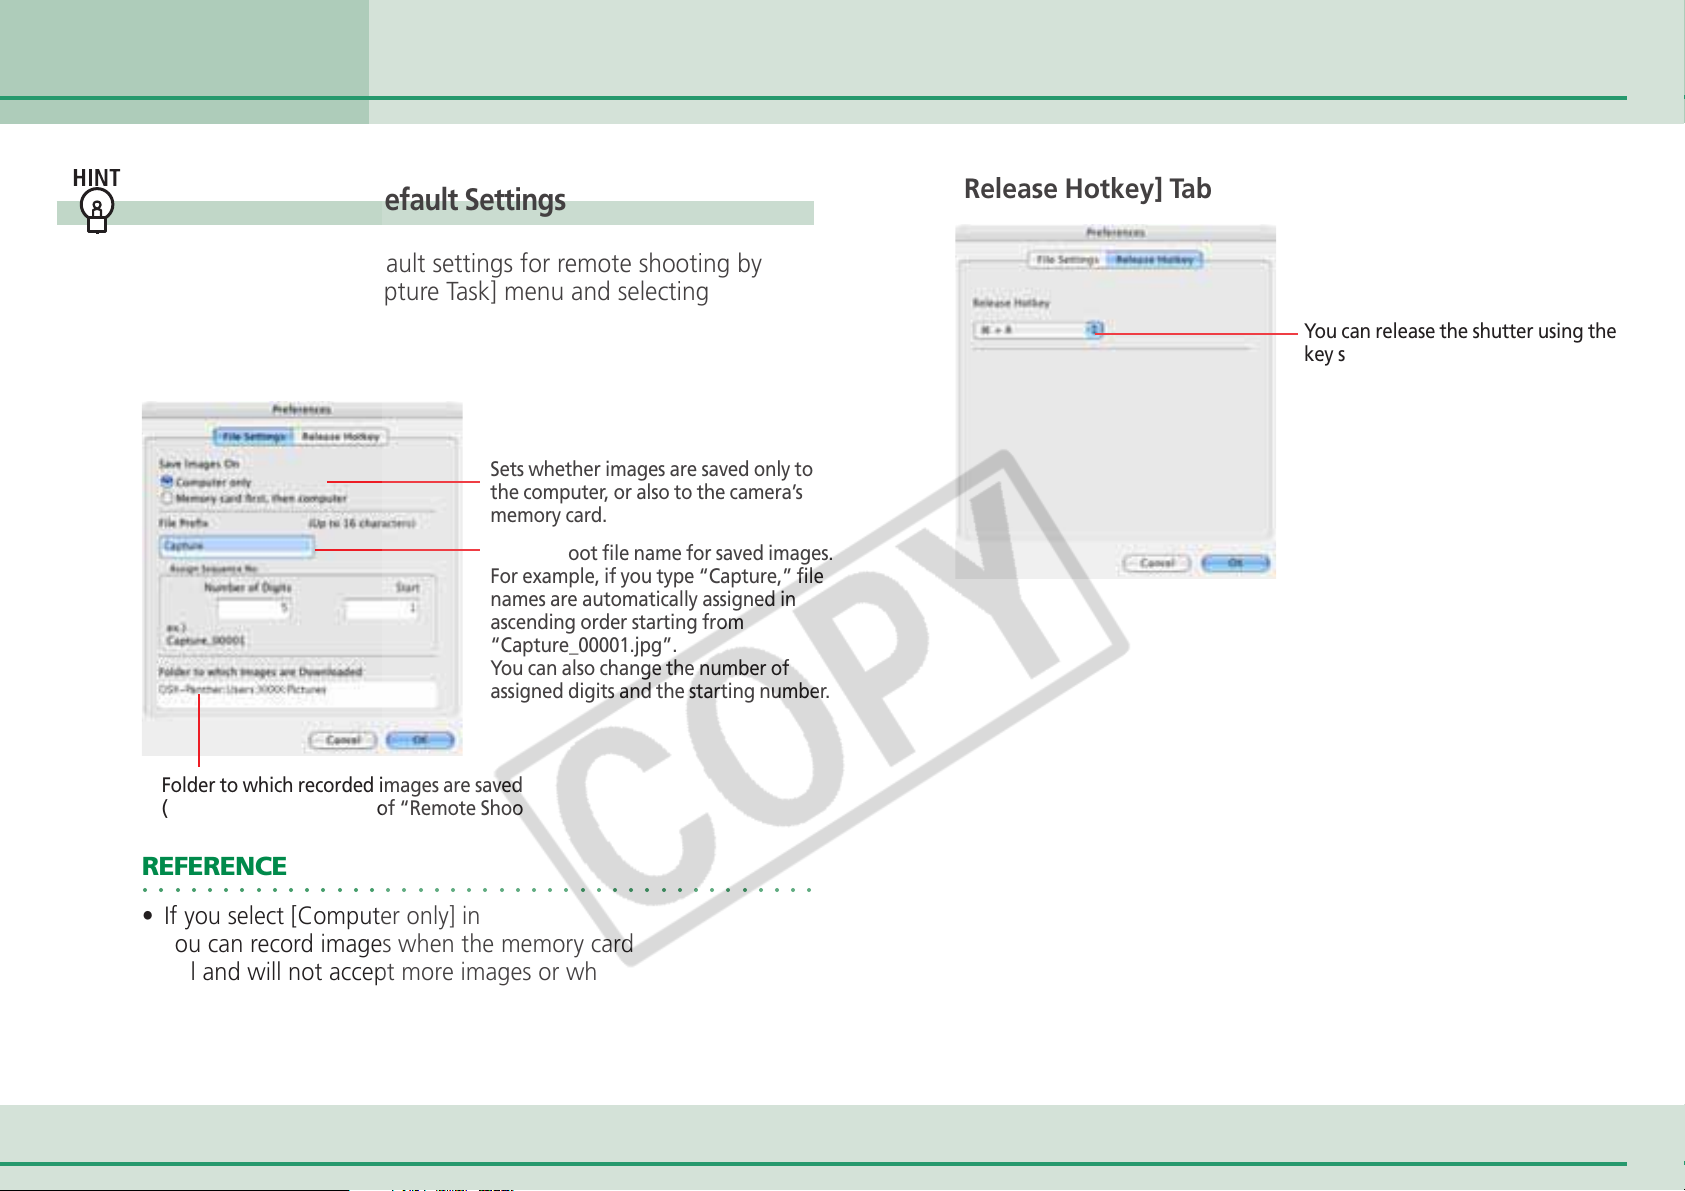
Remote Shooting Default Settings
You can display the default settings for remote shooting by
clicking the [RemoteCapture Task] menu and selecting
[Preferences].
■ [File Settings] Tab
Sets whether images are saved only to
the computer, or also to the camera’s
memory card.
Sets the root file name for saved images.
For example, if you type “Capture,” file
names are automatically assigned in
ascending order starting from
“Capture_00001.jpg”.
You can also change the number of
assigned digits and the starting number.
■ [Release Hotkey] Tab
You can release the shutter using the
key specified here.
Folder to which recorded images are saved
(Folder selected in Step 3 of “Remote Shooting Procedures.”)
REFERENCE
○○○○○○○○○○○○○○○○○○○○○○○○○○○○○○○○○○○○○○○○○○
• If you select [Computer only] in the [Save Images On] category,
you can record images when the memory card in the camera is
full and will not accept more images or when it is not present.
42 ImageBrowser Software User Guide
Page 43
Chapter 4
Viewing Images
This chapter explains the methods for displaying images in
ImageBrowser.
Starting ImageBrowser
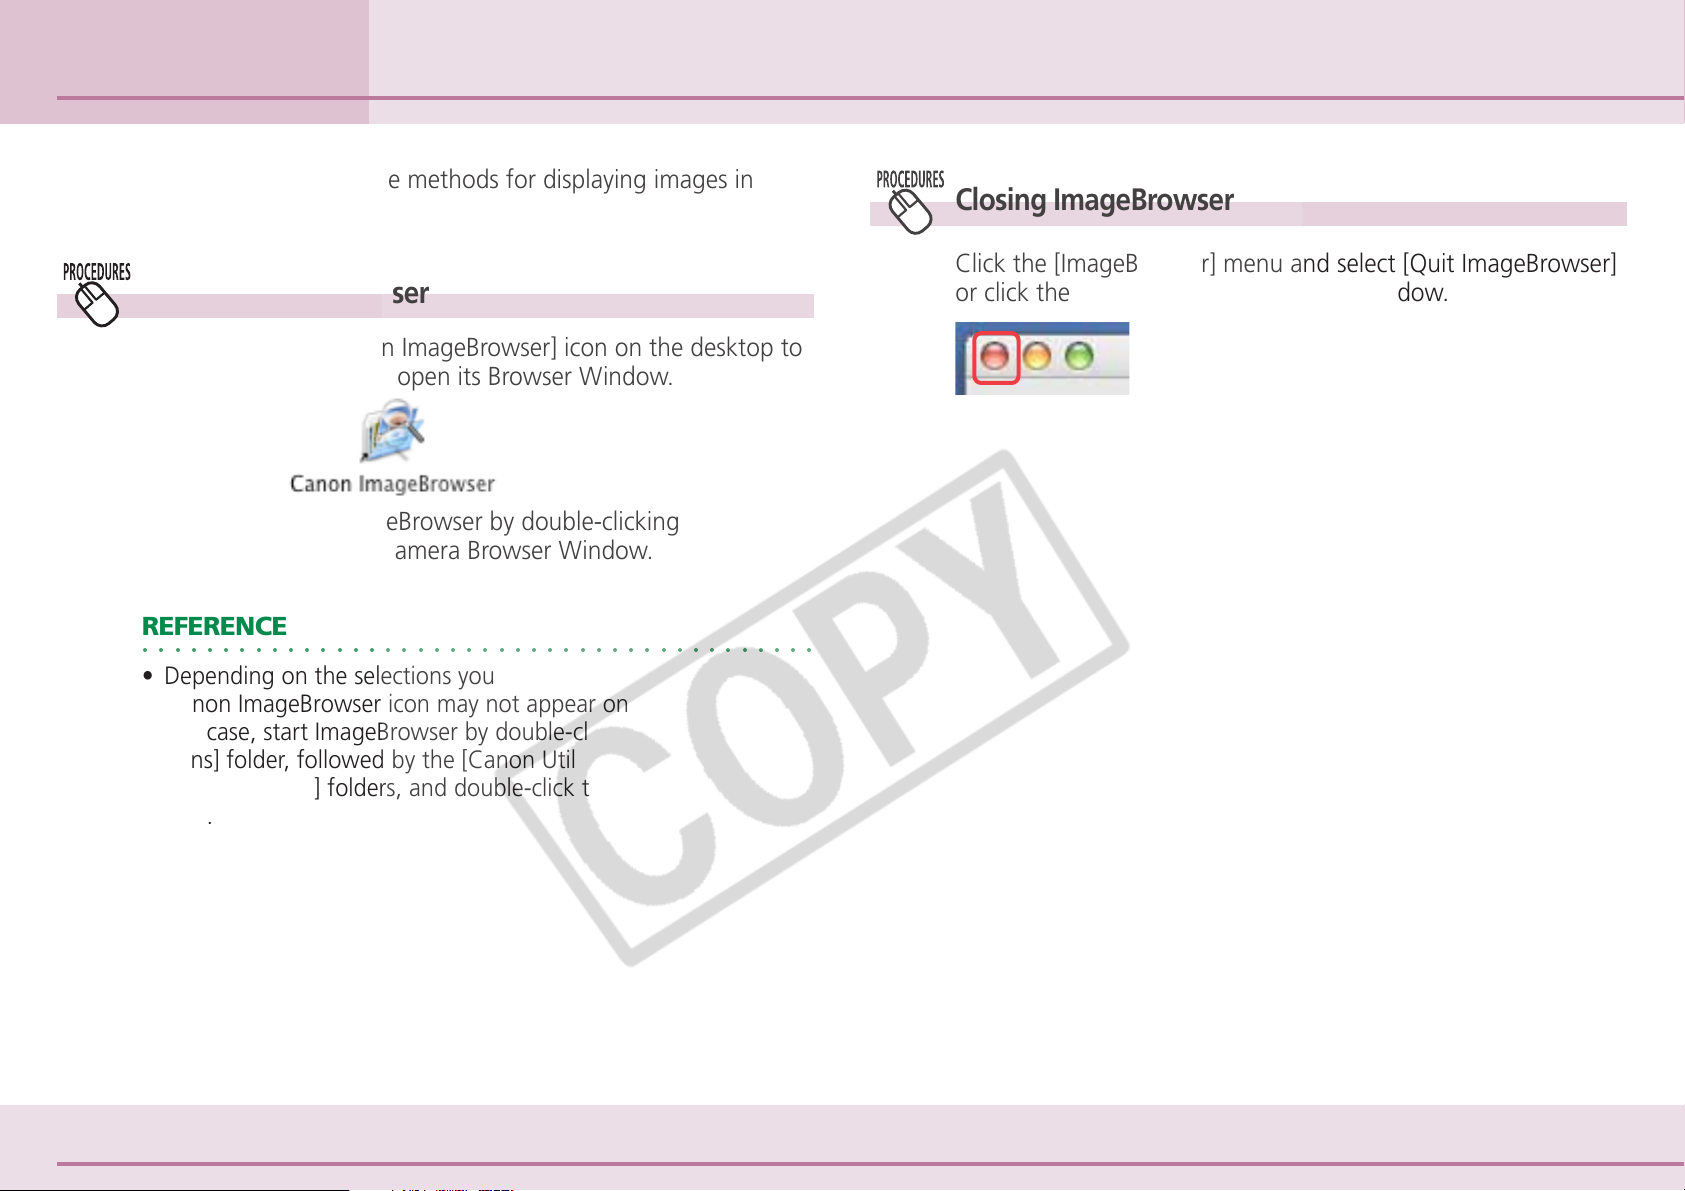
Double-click the [Canon ImageBrowser] icon on the desktop to
start ImageBrowser and open its Browser Window.
You can also start ImageBrowser by double-clicking
[ImageBrowser] in the Camera Browser Window.
Starting ImageBrowser
Closing ImageBrowser
Click the [ImageBrowser] menu and select [Quit ImageBrowser]
or click the red button in the Browser Window.
REFERENCE
○○○○○○○○○○○○○○○○○○○○○○○○○○○○○○○○○○○○○○○○○○
• Depending on the selections you make during installation, the
Canon ImageBrowser icon may not appear on the desktop. In
this case, start ImageBrowser by double-clicking the [Applica-
tions] folder, followed by the [Canon Utilities] and
[ImageBrowser] folders, and double-click the [ImageBrowser]
icon.
43 ImageBrowser Software User Guide
Page 44
Chapter 4
Viewing Images
In this section, you will learn how to use the Explorer Panel Section to
choose a folder containing the images that you want to see.
Selecting Folders (1/2)
How to select a folder
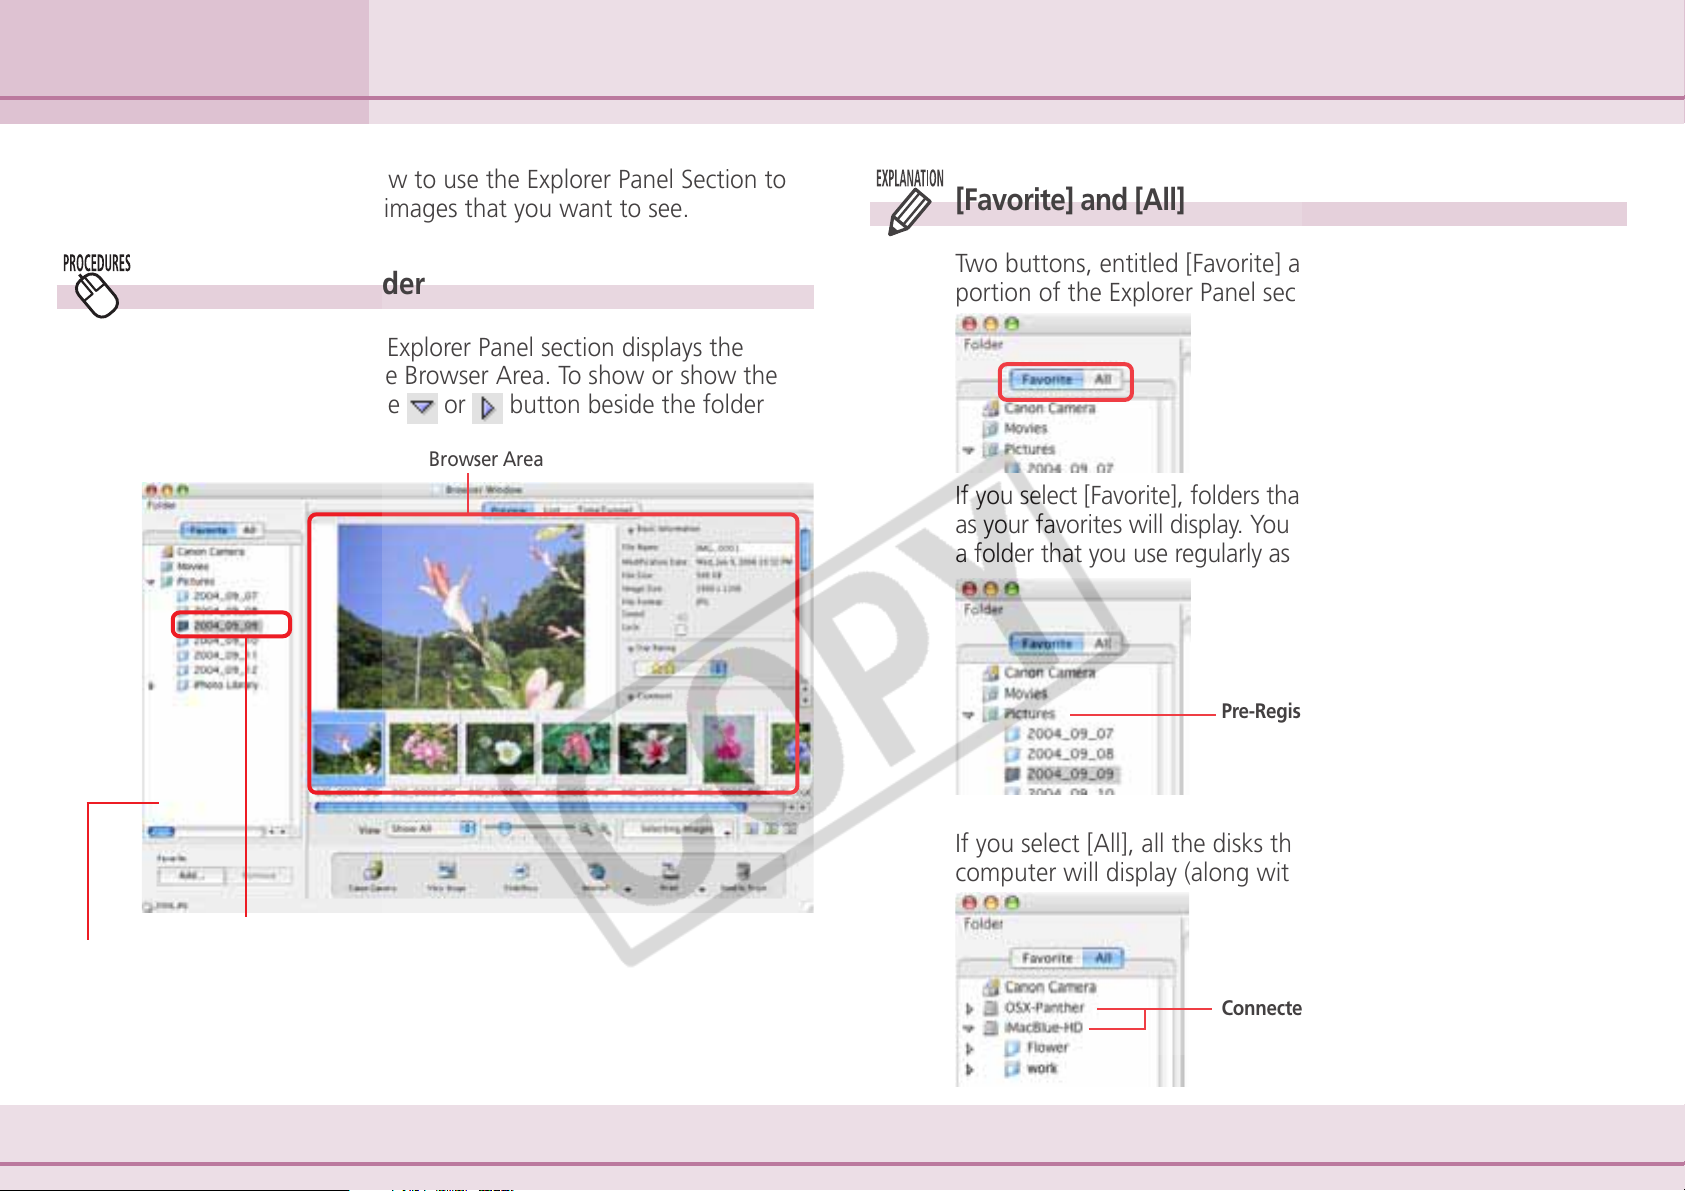
Clicking a folder in the Explorer Panel section displays the
images it contains in the Browser Area. To show or show the
folder contents, click the
or button beside the folder
Browser Area
[Favorite] and [All]
Two buttons, entitled [Favorite] and [All], display in the upper
portion of the Explorer Panel section.
If you select [Favorite], folders that have been already registered
as your favorites will display. You will find it convenient to register
a folder that you use regularly as a favorite.
Selected folder
Explorer Panel
44 ImageBrowser Software User Guide
Pre-Registered Folders
If you select [All], all the disks that are connected to your
computer will display (along with their folders).
Connected Drives
Page 45
Chapter 4
Viewing Images
Selecting Folders (2/2)
Registering a Folder as a Favorite Folder
■ Favorites Selected
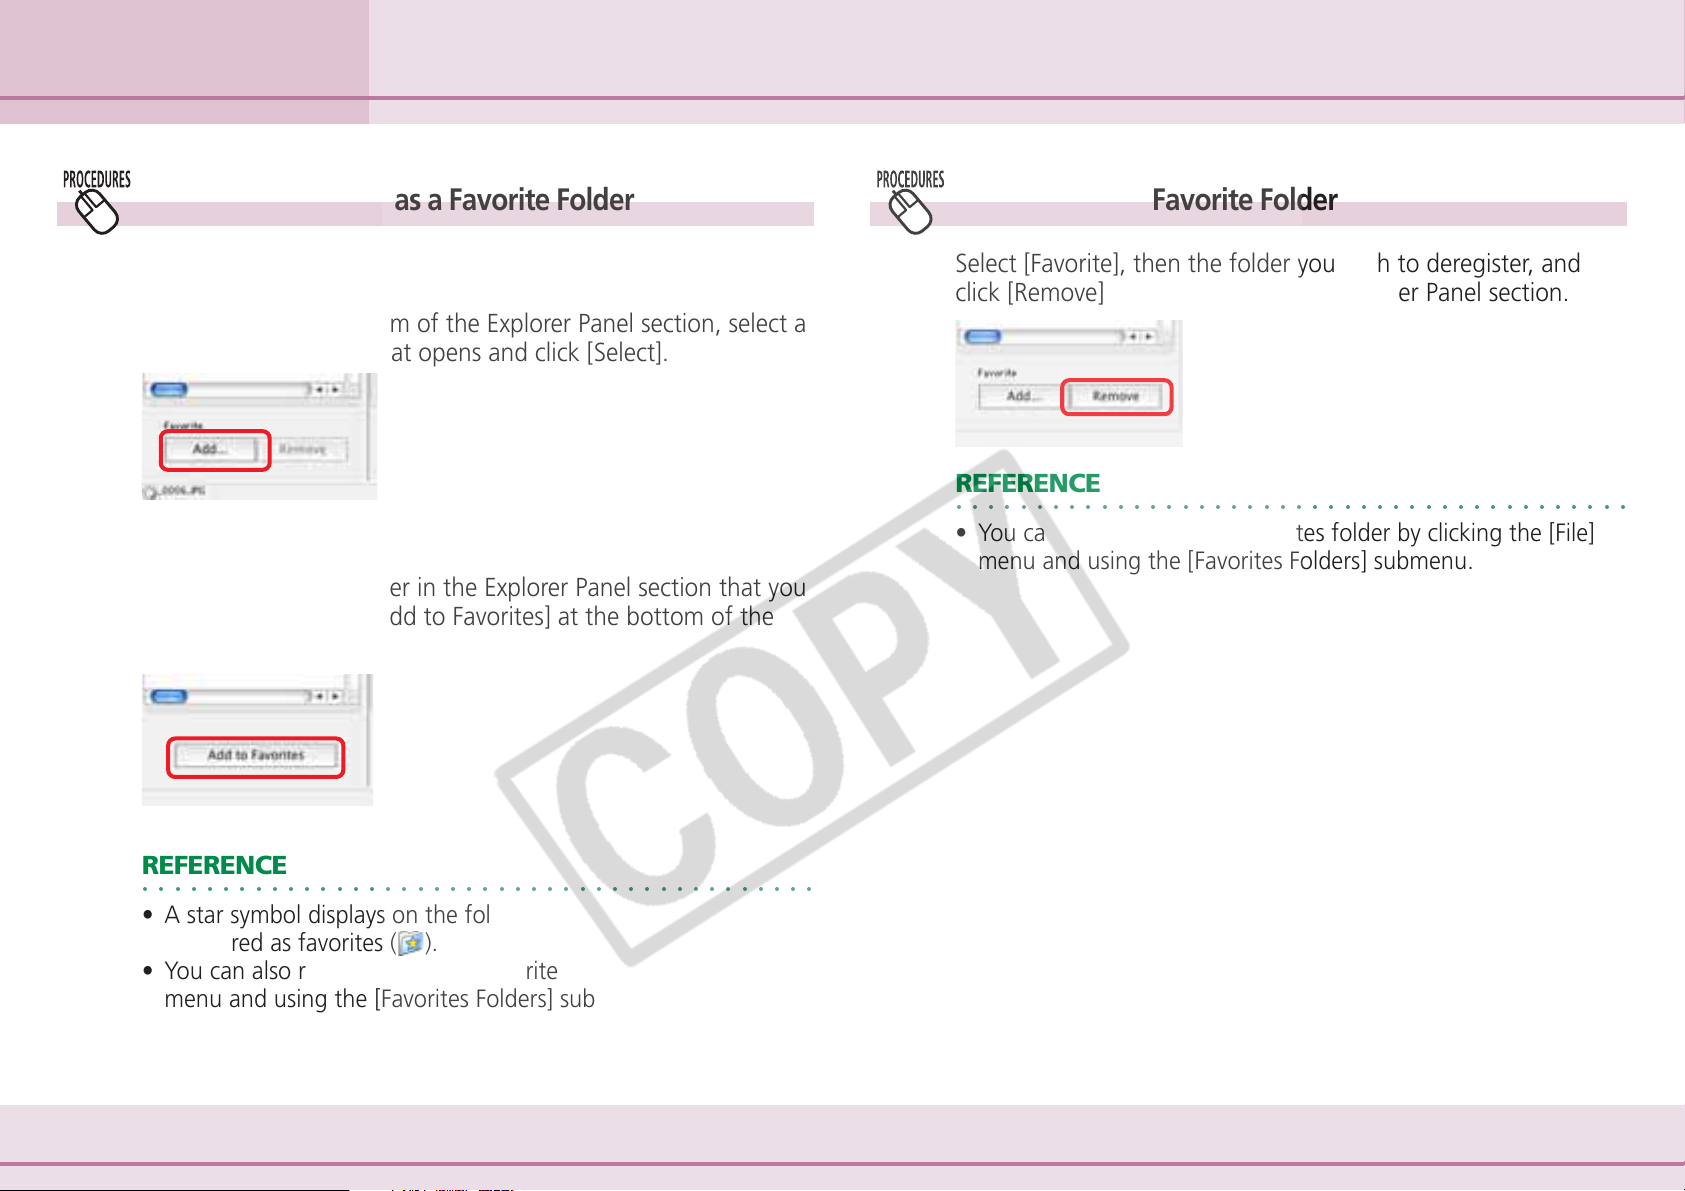
Click [Add] at the bottom of the Explorer Panel section, select a
folder in the window that opens and click [Select].
■ All Selected
After you open the folder in the Explorer Panel section that you
wish to register, click [Add to Favorites] at the bottom of the
Explorer Panel section.
Deregistering a Favorite Folder
Select [Favorite], then the folder you wish to deregister, and
click [Remove] at the bottom of the Explorer Panel section.
REFERENCE
○○○○○○○○○○○○○○○○○○○○○○○○○○○○○○○○○○○○○○○○○○
• You can also deregister a Favorites folder by clicking the [File]
menu and using the [Favorites Folders] submenu.
REFERENCE
○○○○○○○○○○○○○○○○○○○○○○○○○○○○○○○○○○○○○○○○○○
• A star symbol displays on the folder icons that have been
registered as favorites (
• You can also register folders as favorites by clicking the [File]
menu and using the [Favorites Folders] submenu.
).
45 ImageBrowser Software User Guide
Page 46
Chapter 4
Viewing Images
Changing the Display Mode (1/2)
You can change the display mode in the Browser Window and Browser
Area for ease of use.
Three Display Modes
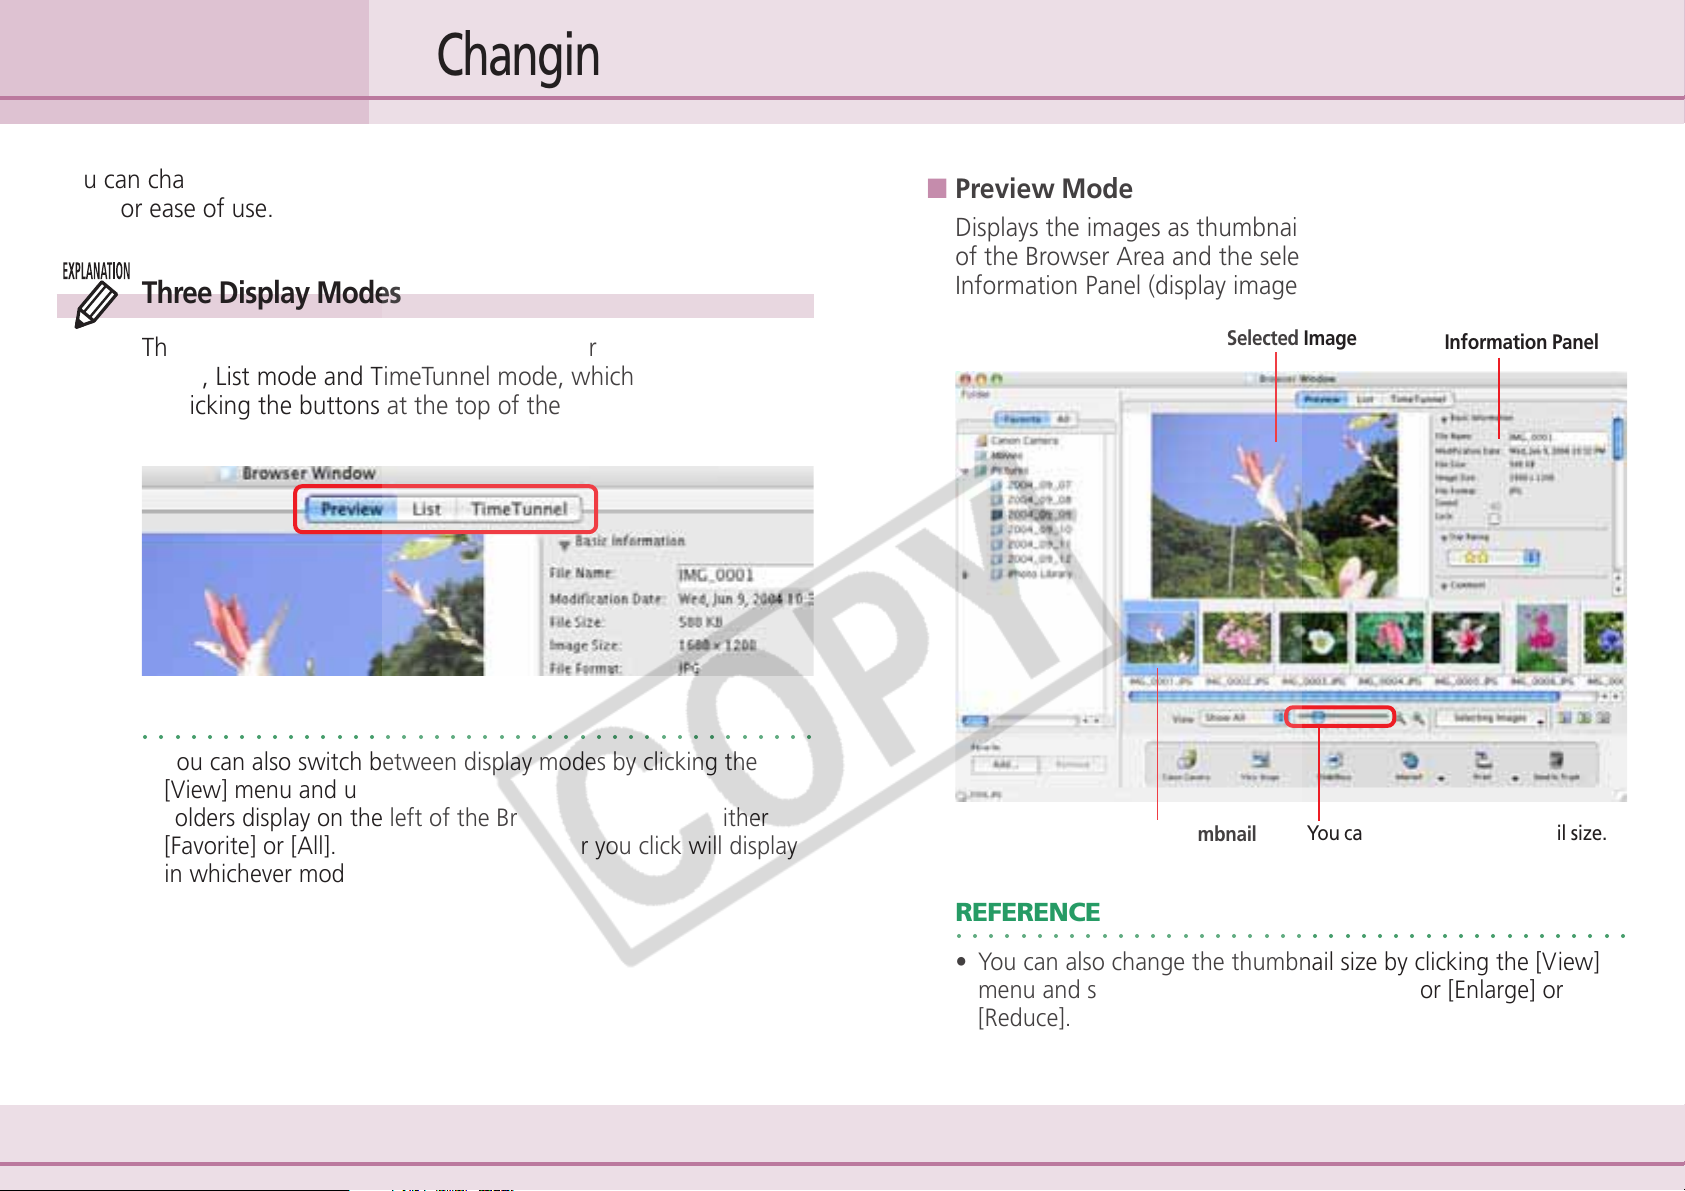
The three display modes for the Browser Area are the Preview
mode, List mode and TimeTunnel mode, which can be switched
by clicking the buttons at the top of the Browser Area.
REFERENCE
○○○○○○○○○○○○○○○○○○○○○○○○○○○○○○○○○○○○○○○○○○
• You can also switch between display modes by clicking the
[View] menu and using the [View Mode] submenu.
• Folders display on the left of the Browser Area. Select either
[Favorite] or [All]. The images in the folder you click will display
in whichever mode you select.
■ Preview Mode
Displays the images as thumbnails (tiny versions) at the bottom
of the Browser Area and the selected thumbnail and the
Information Panel (display image information) in the upper part.
Selected Image
Selected Thumbnail
You can change the thumbnail size.
Information Panel
46 ImageBrowser Software User Guide
REFERENCE
○○○○○○○○○○○○○○○○○○○○○○○○○○○○○○○○○○○○○○○○○○
• You can also change the thumbnail size by clicking the [View]
menu and selecting the [Display] submenu, or [Enlarge] or
[Reduce].
Page 47
Chapter 4
Viewing Images
Changing the Display Mode (2/2)
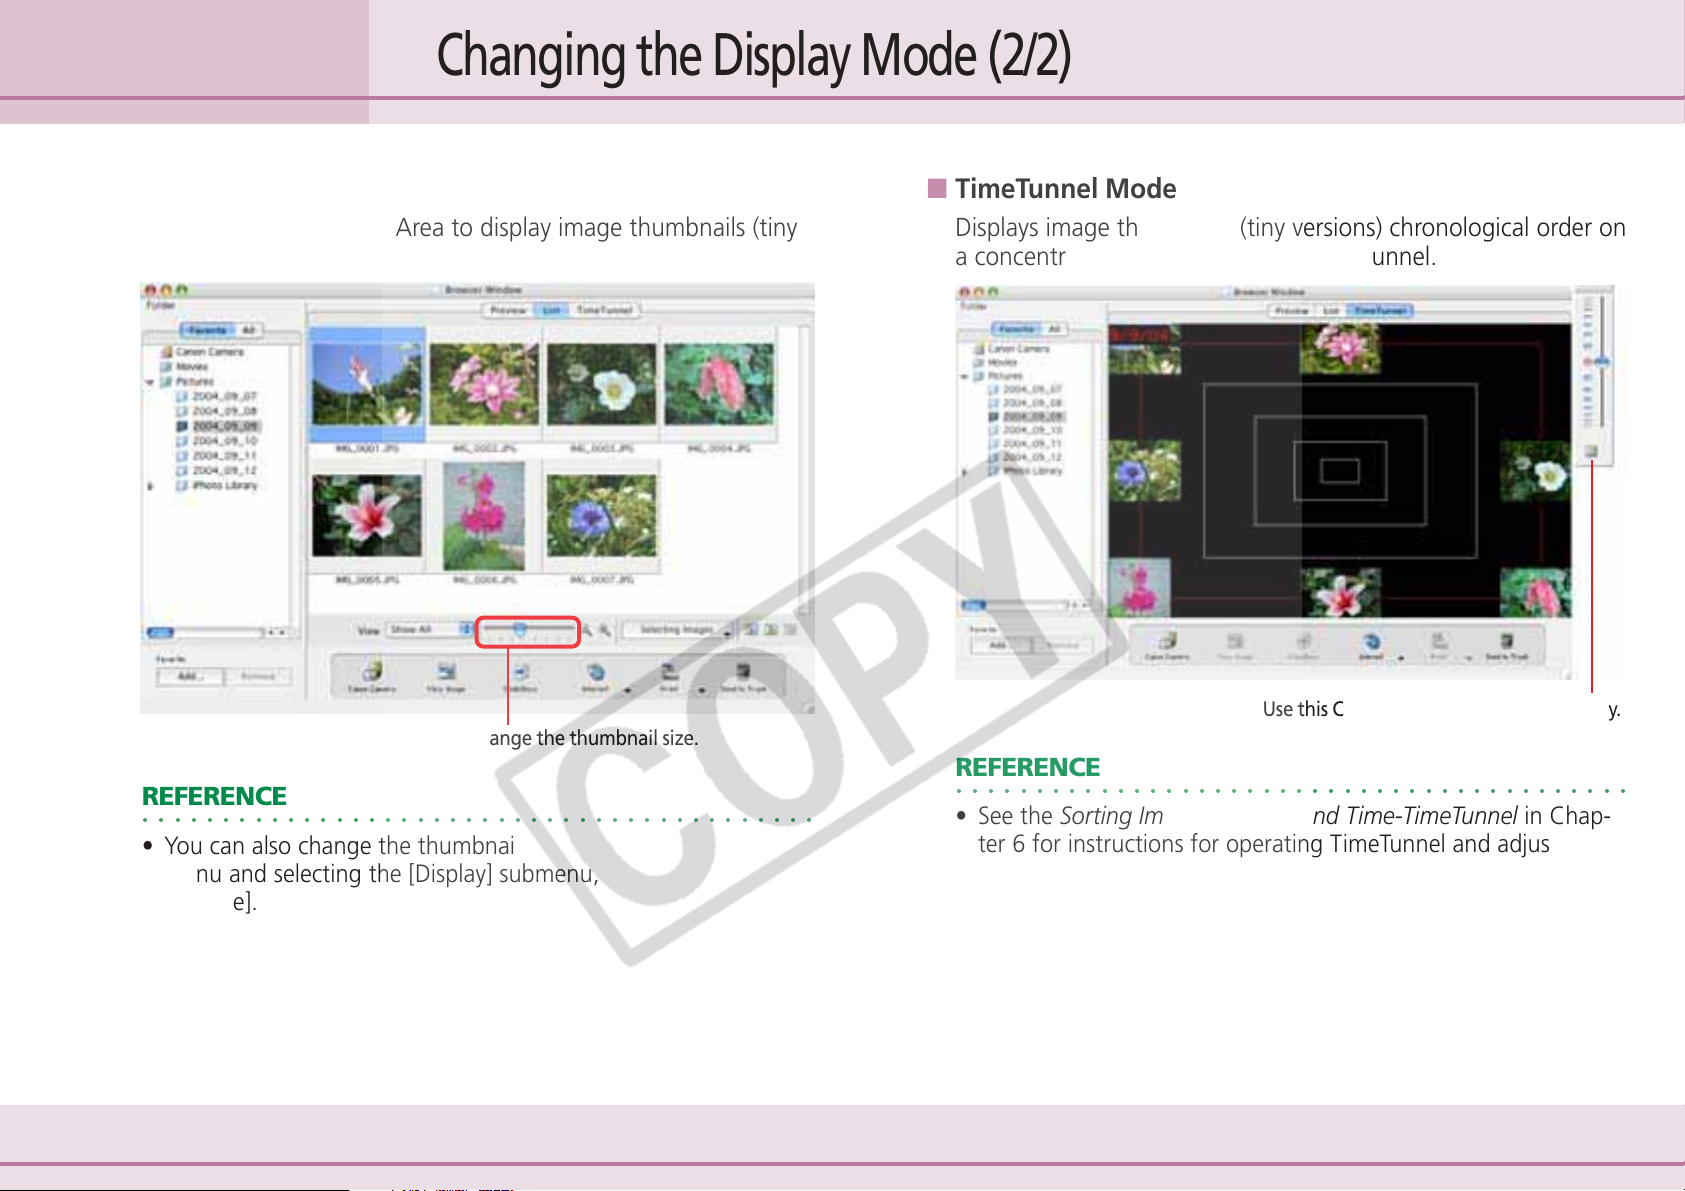
■ List Mode
Uses the entire Browser Area to display image thumbnails (tiny
versions).
You can change the thumbnail size.
REFERENCE
○○○○○○○○○○○○○○○○○○○○○○○○○○○○○○○○○○○○○○○○○○
• You can also change the thumbnail size by clicking the [View]
menu and selecting the [Display] submenu, or [Enlarge] or
[Reduce].
■ TimeTunnel Mode
Displays image thumbnails (tiny versions) chronological order on
a concentric grid that looks like a time tunnel.
Use this Control Panel to move the display.
REFERENCE
○○○○○○○○○○○○○○○○○○○○○○○○○○○○○○○○○○○○○○○○○○
• See the Sorting Images by Date and Time-TimeTunnel in Chapter 6 for instructions for operating TimeTunnel and adjusting its
settings.
47 ImageBrowser Software User Guide
Page 48
Chapter 4
Viewing Images
Changing the Browser Window Display (1/2)
This section explains how to switch between showing and
hiding each panel in the Browser Window and how to display
information other than file names by the thumbnails.
Switching between Showing/Hiding Panels
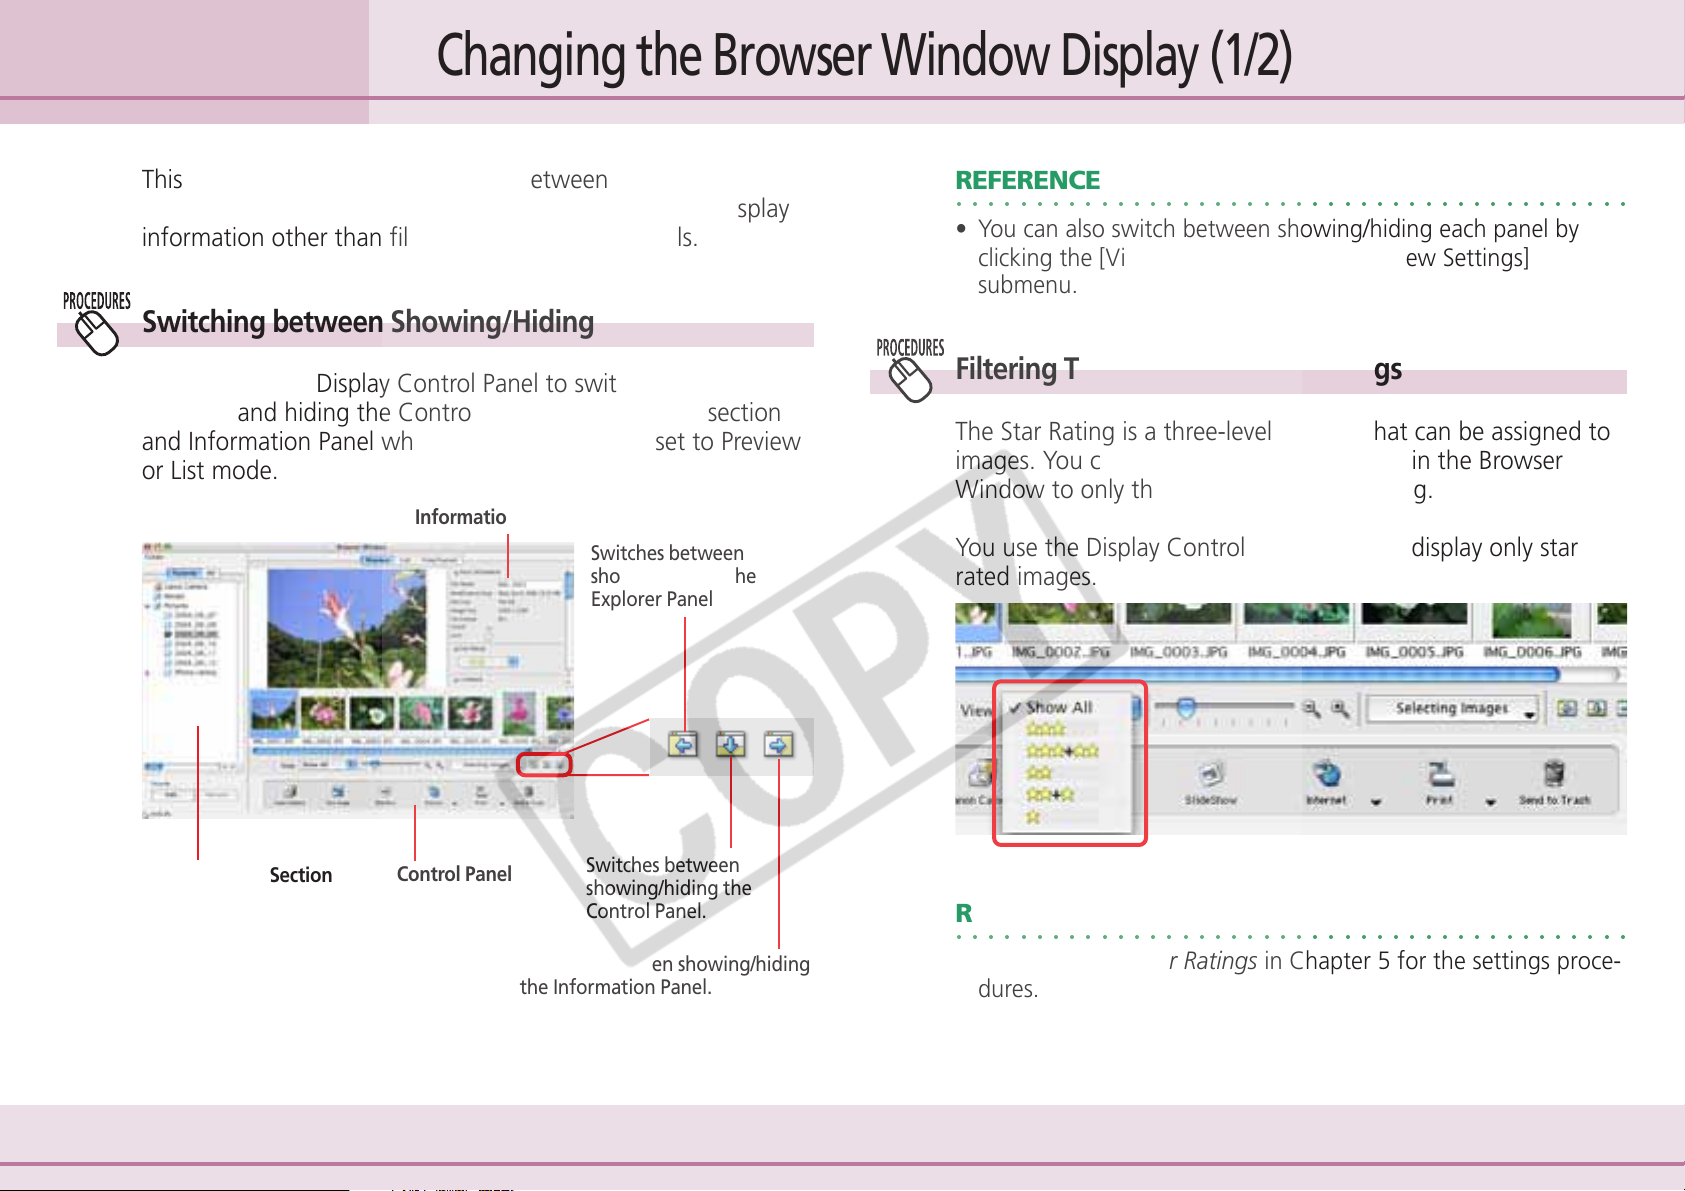
You can use the Display Control Panel to switch between
showing and hiding the Control Panel, Explorer Panel section
and Information Panel when the display mode is set to Preview
or List mode.
Information Panel
Switches between
showing/hiding the
Explorer Panel section.
REFERENCE
○○○○○○○○○○○○○○○○○○○○○○○○○○○○○○○○○○○○○○○○○○
• You can also switch between showing/hiding each panel by
clicking the [View] menu and using the [View Settings]
submenu.
Filtering Thumbnails by Star Ratings
The Star Rating is a three-level ranking that can be assigned to
images. You can limit the images displayed in the Browser
Window to only those assigned a Star Rating.
You use the Display Control Panel menu to display only star
rated images.
Explorer Panel Section
Control Panel
48 ImageBrowser Software User Guide
Switches between
showing/hiding the
Control Panel.
Switches between showing/hiding
the Information Panel.
REFERENCE
○○○○○○○○○○○○○○○○○○○○○○○○○○○○○○○○○○○○○○○○○○
• See the Setting Star Ratings in Chapter 5 for the settings procedures.
Page 49
Chapter 4
Viewing Images
Changing the Browser Window Display (2/2)
Setting the Information Displayed with Thumbnails
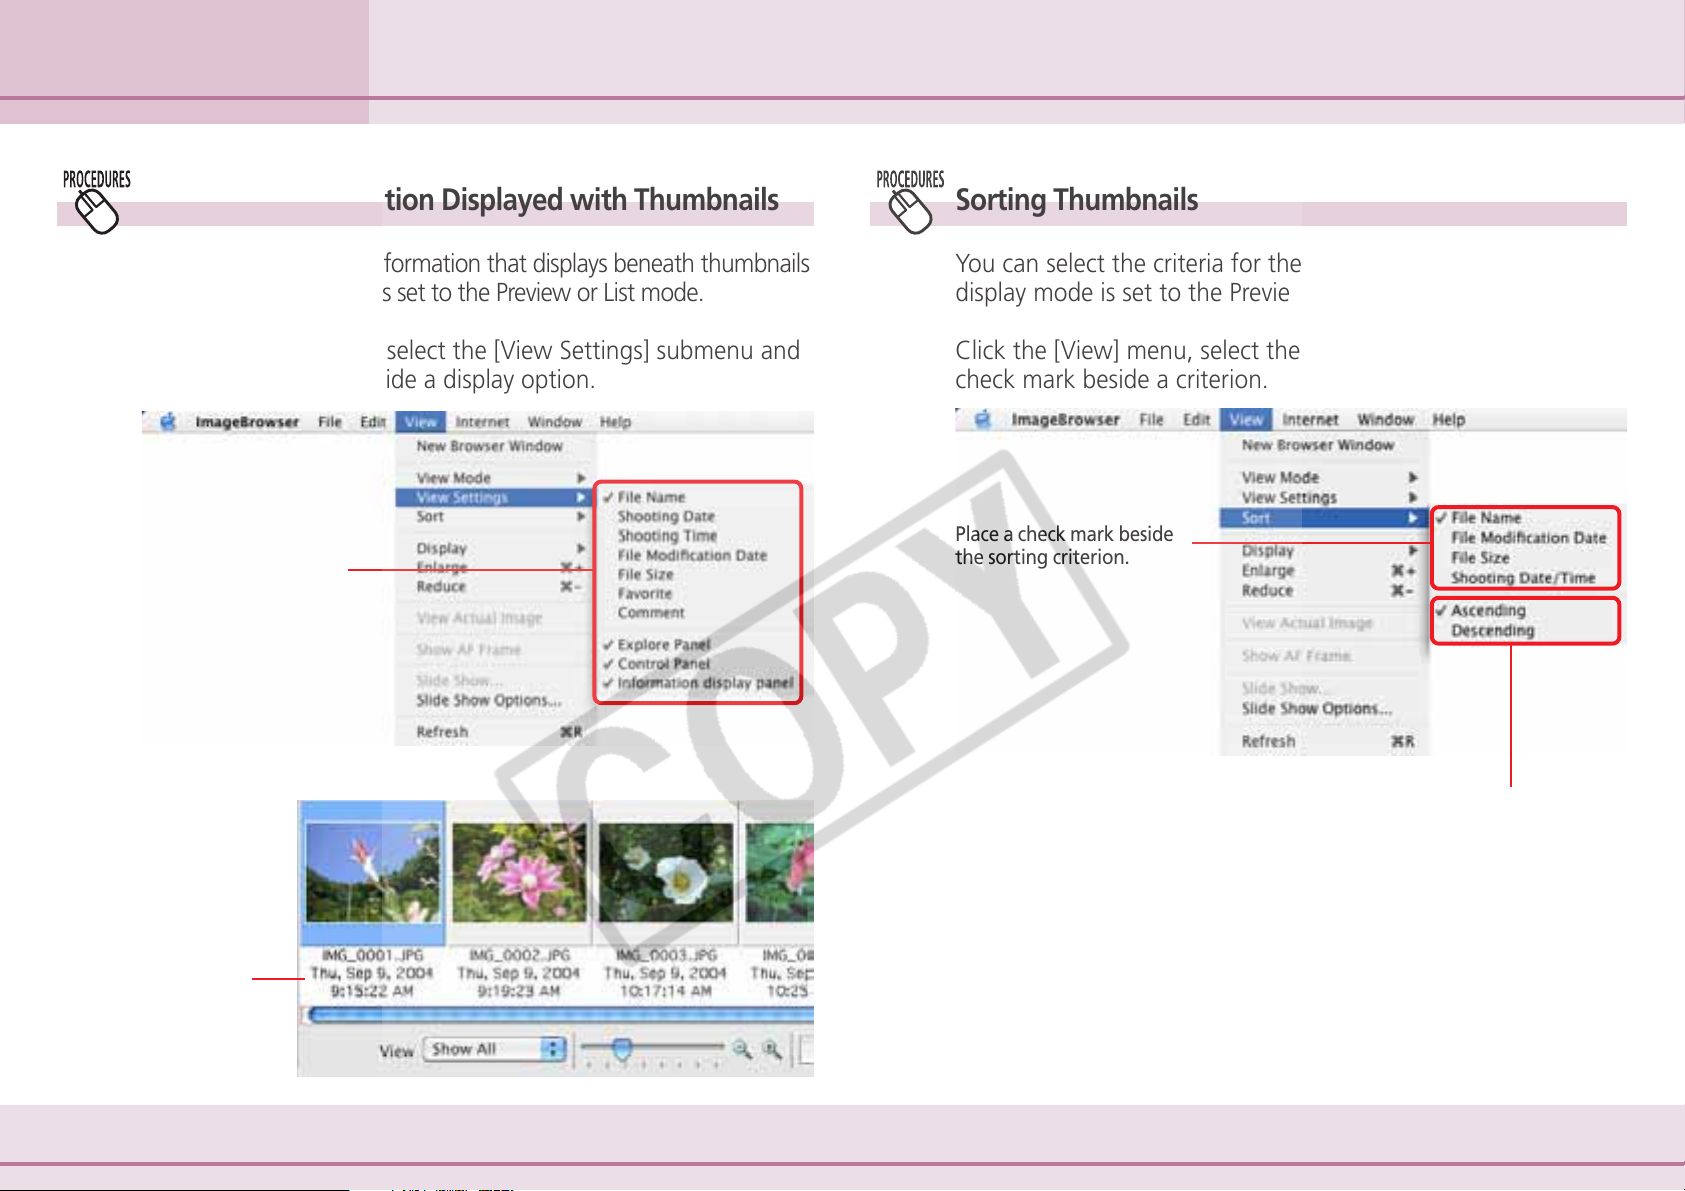
You can set the image information that displays beneath thumbnails
when the display mode is set to the Preview or List mode.
Click the [View] menu, select the [View Settings] submenu and
place a check mark beside a display option.
Place a check mark
beside a display option.
Sorting Thumbnails
You can select the criteria for the display order when the
display mode is set to the Preview or List mode.
Click the [View] menu, select the [Sort] submenu and place a
check mark beside a criterion.
Place a check mark beside
the sorting criterion.
Example showing the
“File Name”,
“Shooting Date” and
“Shooting Time”
selected.
49 ImageBrowser Software User Guide
Switch between ascending and
descending order.
Page 50
Chapter 4
Viewing Images
Opening Images
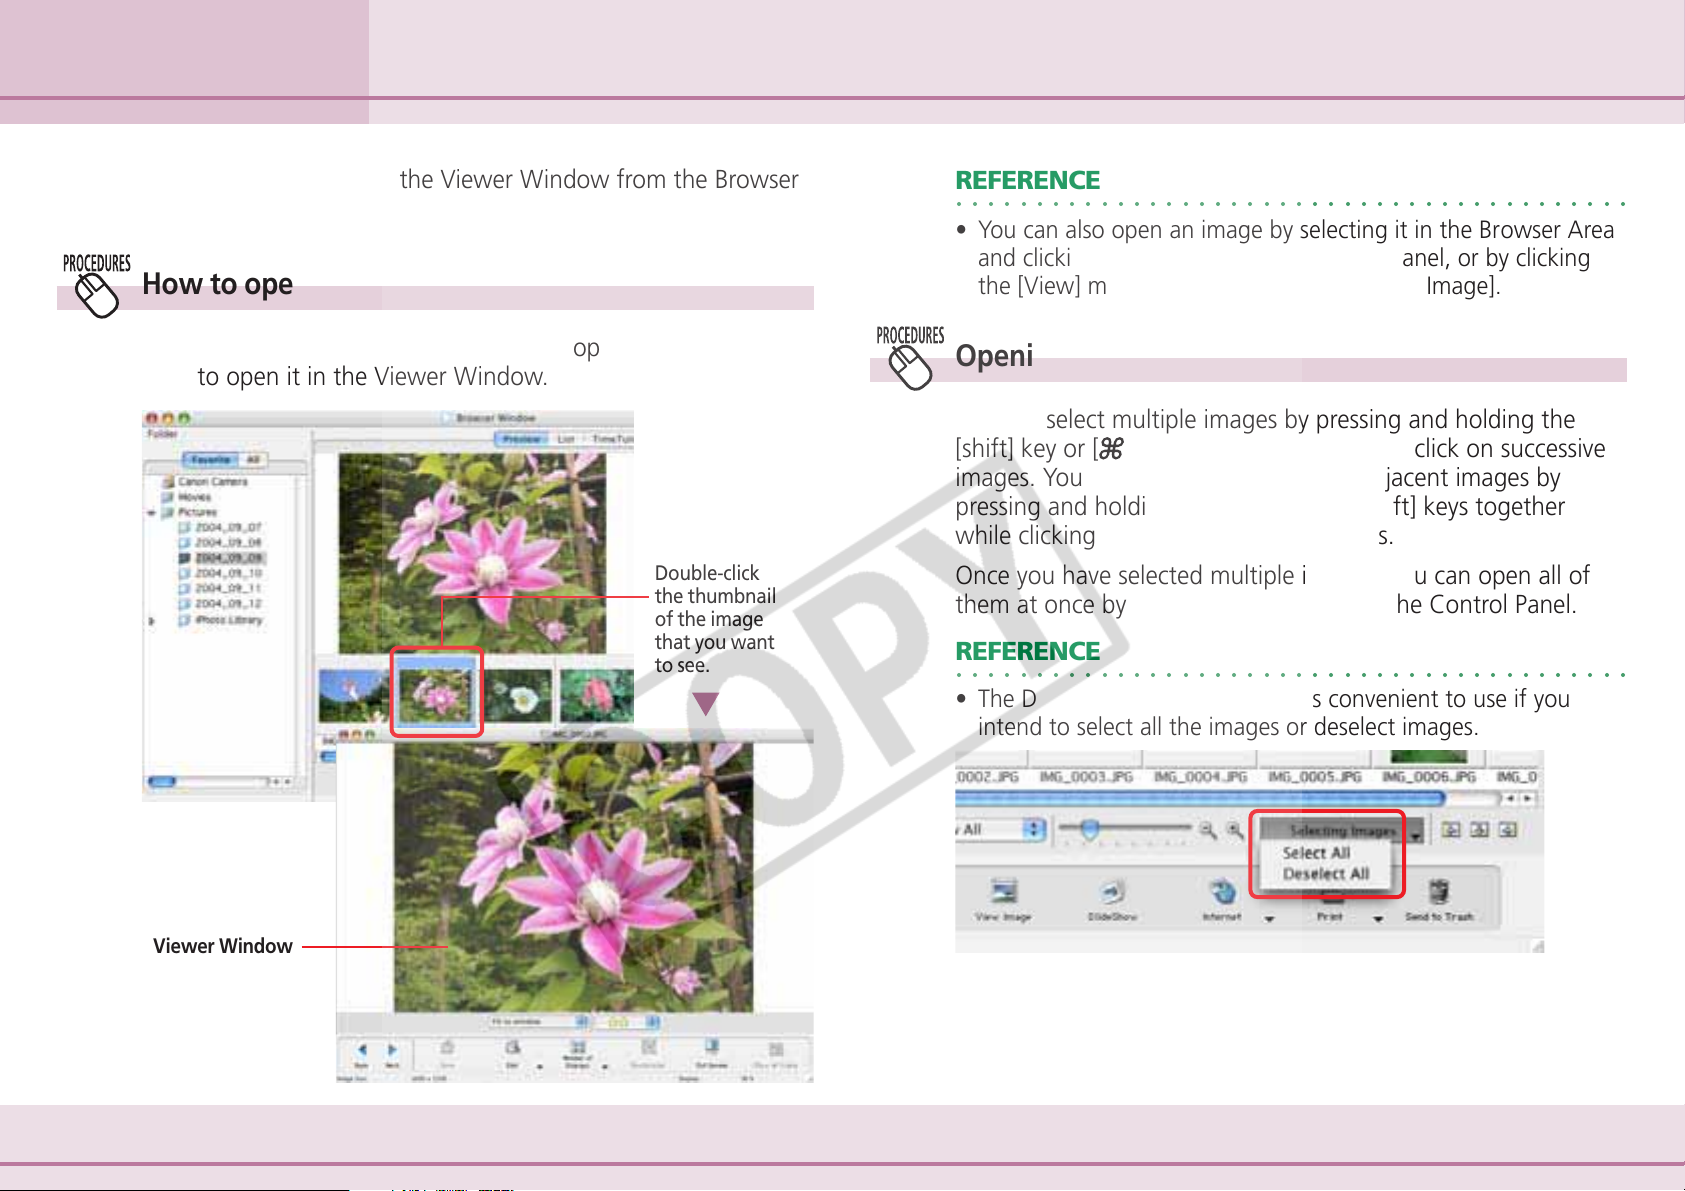
This procedure involves opening the Viewer Window from the Browser
Window to open images.
How to open an image
Double-click the image that you want to open in the Browser
Area to open it in the Viewer Window.
Double-click
the thumbnail
of the image
that you want
to see.
REFERENCE
○○○○○○○○○○○○○○○○○○○○○○○○○○○○○○○○○○○○○○○○○○
• You can also open an image by selecting it in the Browser Area
and clicking [View Image] in the Control Panel, or by clicking
the [View] menu and selecting [View Actual Image].
Opening several images
You can select multiple images by pressing and holding the
[shift] key or [
images. You can also select a series of adjacent images by
pressing and holding the [option] and [shift] keys together
while clicking on the first and last images.
Once you have selected multiple images, you can open all of
them at once by clicking [View Image] in the Control Panel.
REFERENCE
○○○○○○○○○○○○○○○○○○○○○○○○○○○○○○○○○○○○○○○○○○
• The Display Control Panel menu is convenient to use if you
intend to select all the images or deselect images.
] (command) key while you click on successive
Viewer Window
50 ImageBrowser Software User Guide
Page 51
Chapter 4
Viewing Images
Using the Viewer Window (1/4)
This section explains how to use the Viewer Window.
Using the Full Screen Display
Opening the Previous or Next Image
You can display the image ahead or behind the displayed image
by clicking [Back] or [Next] in the Viewer Window.
REFERENCE
○○○○○○○○○○○○○○○○○○○○○○○○○○○○○○○○○○○○○○○○○○
• If you select multiple images and display them in the Viewer
Window, you can click Back or Next to move the selection
between images.
Changing the Display Magnification
You can change the image display magnification using the
menu beneath the images.
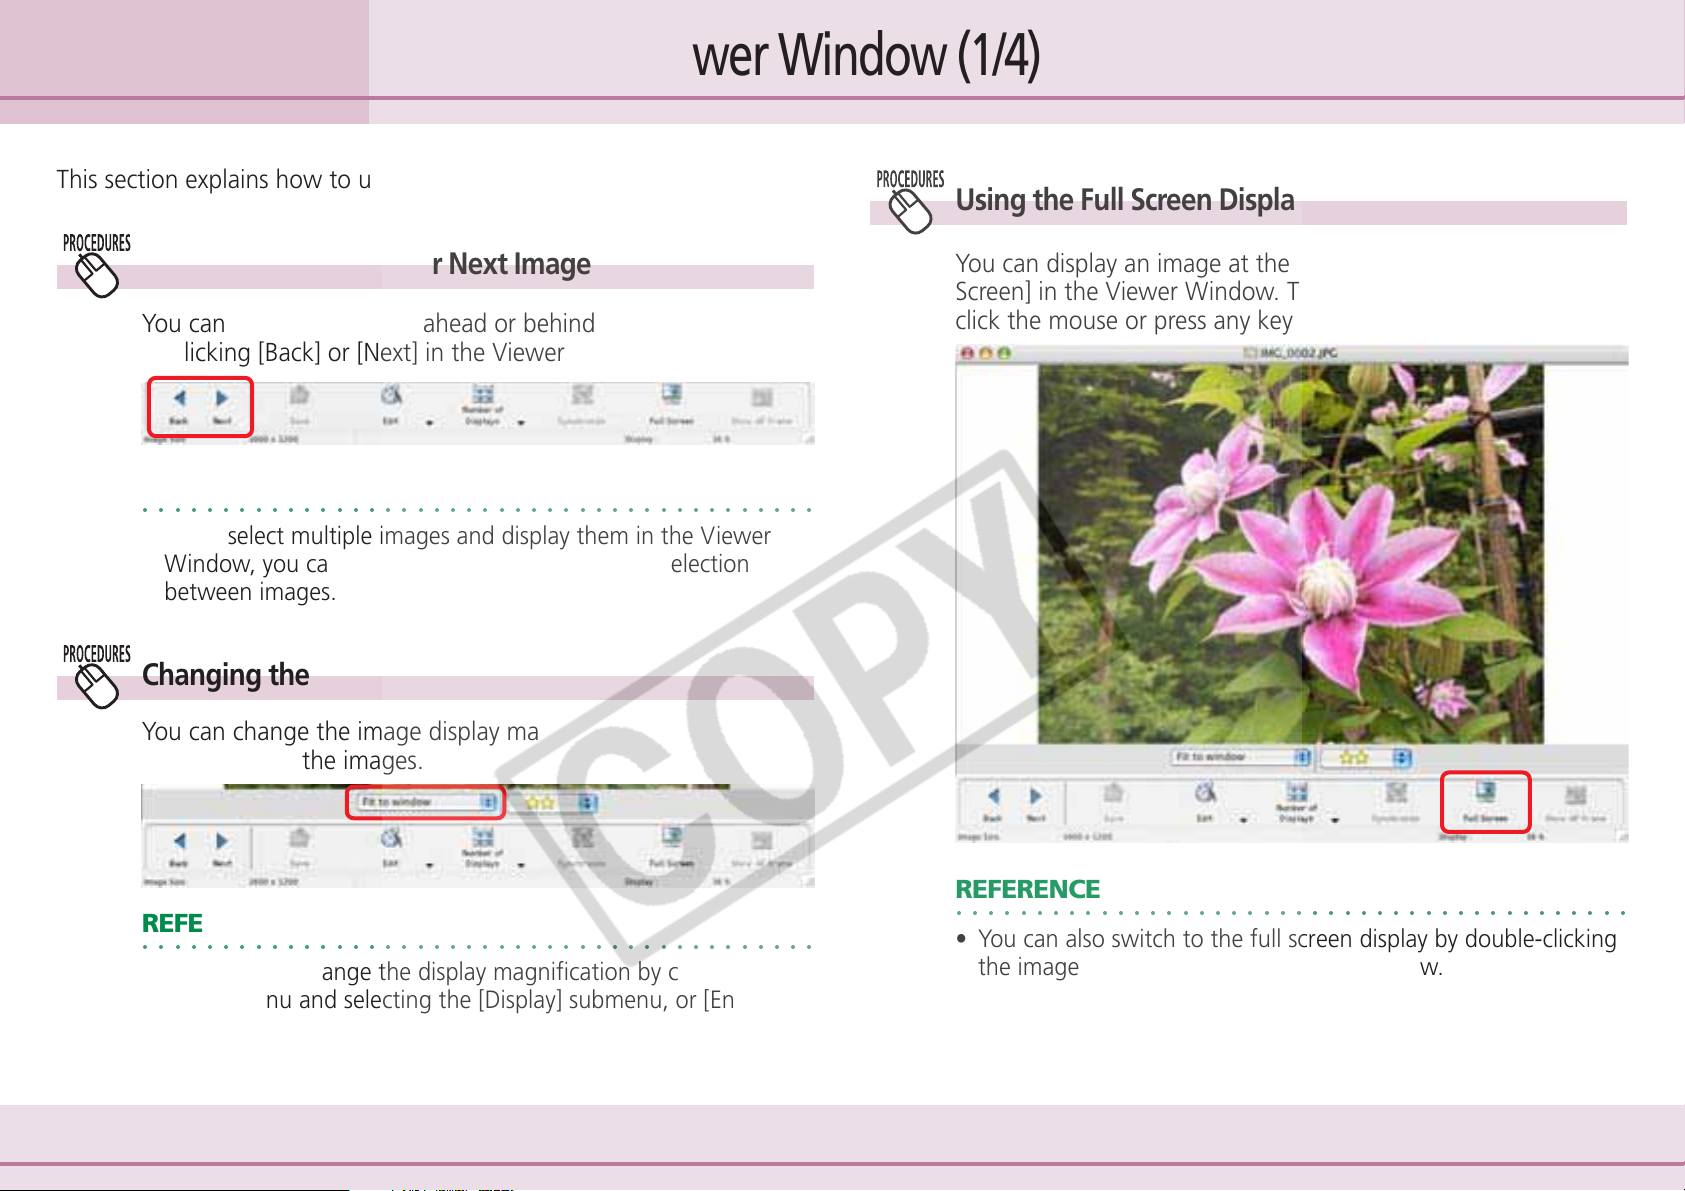
You can display an image at the full screen size by clicking [Full
Screen] in the Viewer Window. To restore the standard display,
click the mouse or press any key on the keyboard.
REFERENCE
○○○○○○○○○○○○○○○○○○○○○○○○○○○○○○○○○○○○○○○○○○
• You can also change the display magnification by clicking the
[View] menu and selecting the [Display] submenu, or [Enlarge]
or [Reduce].
51 ImageBrowser Software User Guide
REFERENCE
○○○○○○○○○○○○○○○○○○○○○○○○○○○○○○○○○○○○○○○○○○
• You can also switch to the full screen display by double-clicking
the image display area in the Viewer Window.
Page 52
Chapter 4
Viewing Images
Displaying Multiple Images
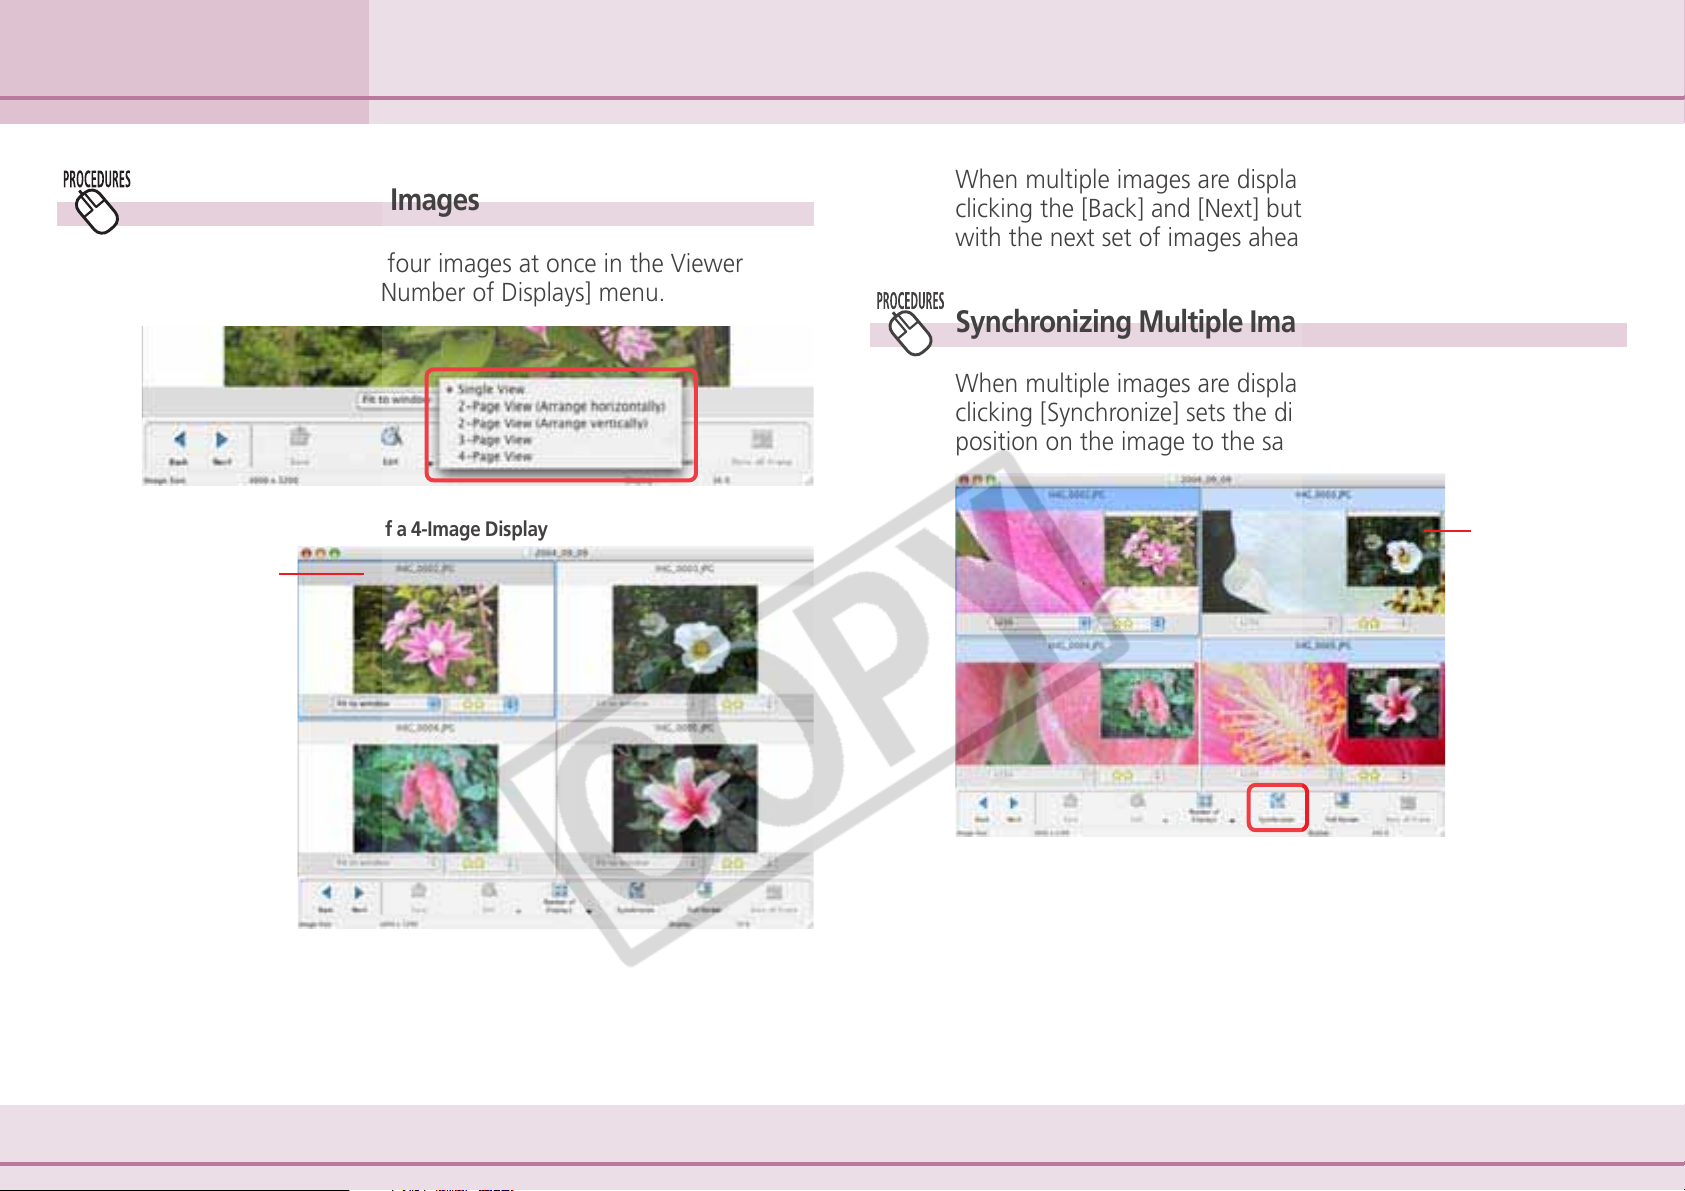
You can display two to four images at once in the Viewer
Window by using the [Number of Displays] menu.
Using the Viewer Window (2/4)
When multiple images are displayed in the Viewer Window,
clicking the [Back] and [Next] buttons replaces all the images
with the next set of images ahead or behind.
Synchronizing Multiple Images
When multiple images are displayed in the Viewer Window,
clicking [Synchronize] sets the display magnification and
position on the image to the same for all images.
Currently selected image.
Example of a 4-Image Display
Synchronizes the
display
magnification
and display
position.
52 ImageBrowser Software User Guide
Page 53
Chapter 4
Viewing Images
Using the Viewer Window (3/4)
Displaying the Autofocus Frame
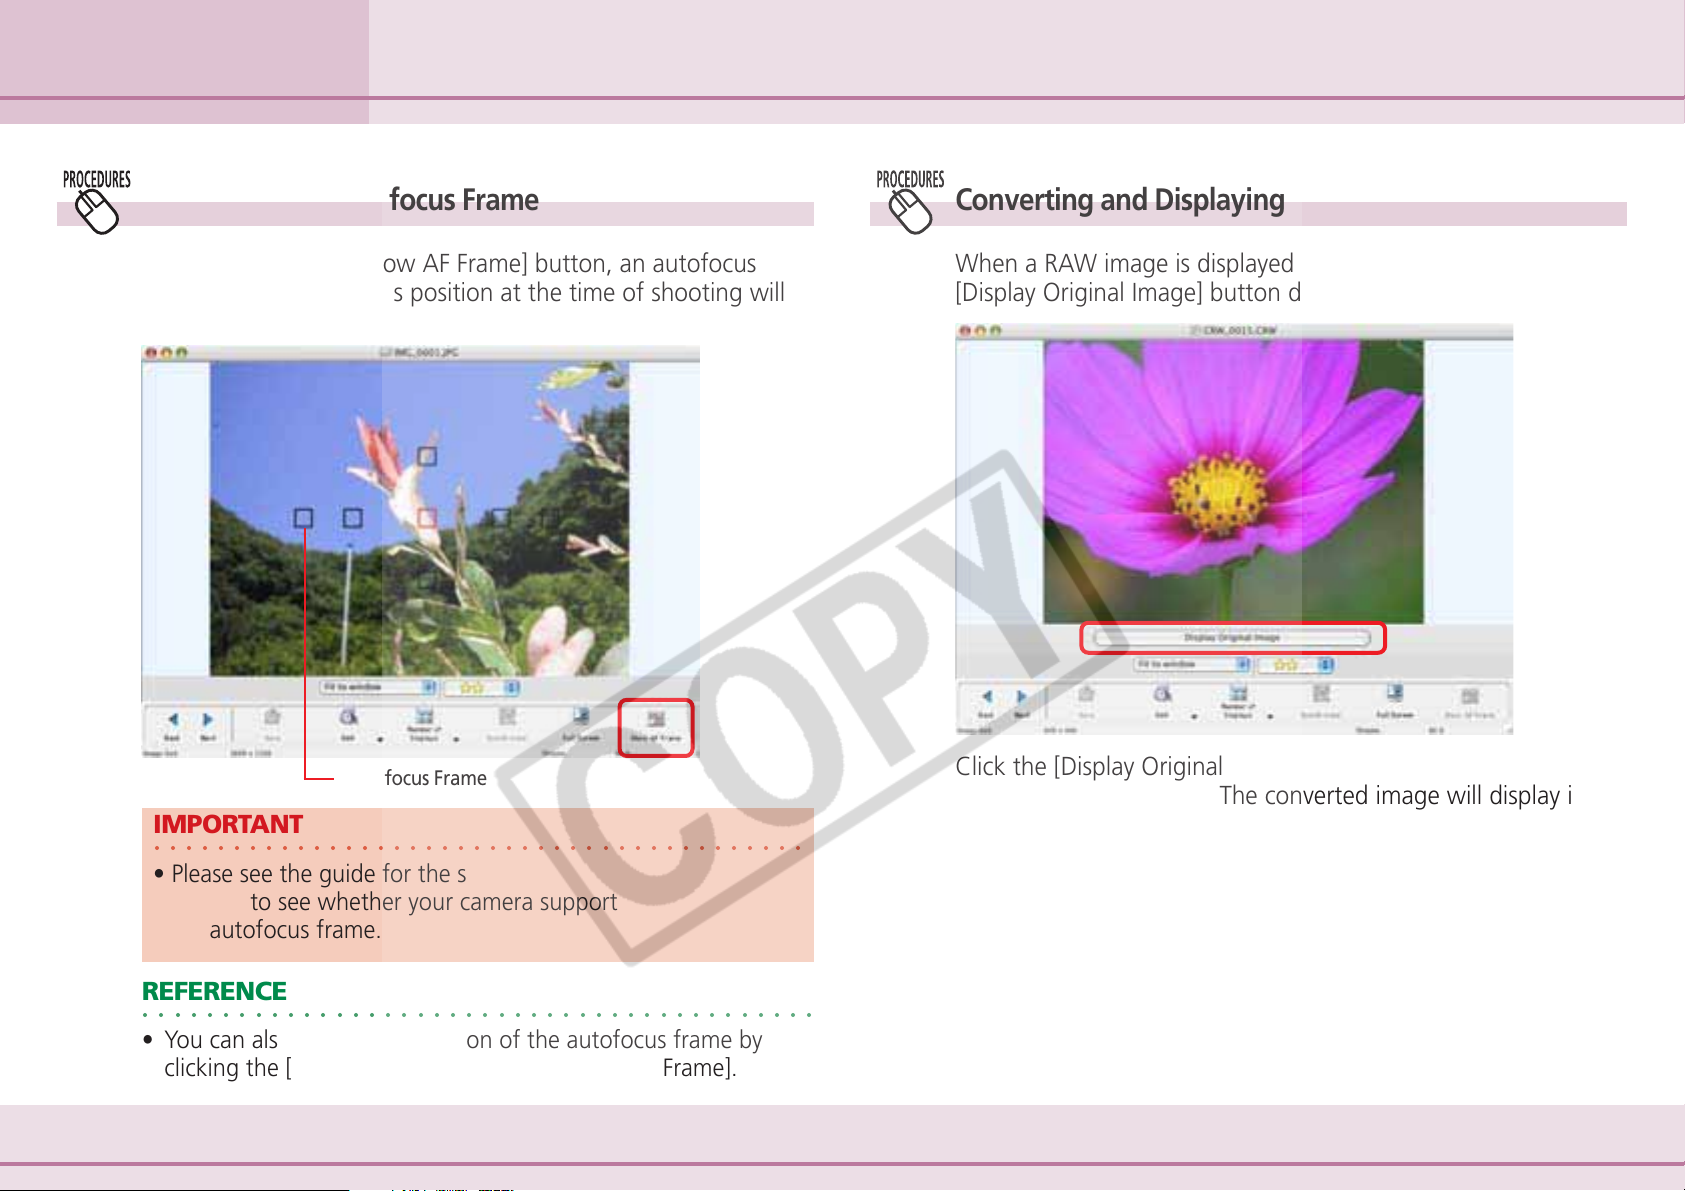
When you click the [Show AF Frame] button, an autofocus
frame showing the focus position at the time of shooting will
appear.
Autofocus Frame
IMPORTANT
○○○○○○○○○○○○○○○○○○○○○○○○○○○○○○○○○○○○○○○○○
• Please see the guide for the software bundled with your
camera to see whether your camera supports the display of
the autofocus frame.
Converting and Displaying RAW Images
When a RAW image is displayed in the Viewer Window, the
[Display Original Image] button displays beneath the image.
Click the [Display Original Image] button and [Yes] in the
confirmation dialog box. The converted image will display in
the Viewer Window.
REFERENCE
○○○○○○○○○○○○○○○○○○○○○○○○○○○○○○○○○○○○○○○○○○
• You can also display the position of the autofocus frame by
clicking the [View] menu and selecting [Show AF Frame].
53 ImageBrowser Software User Guide
Page 54
Chapter 4
Viewing Images
Using the Viewer Window (4/4)
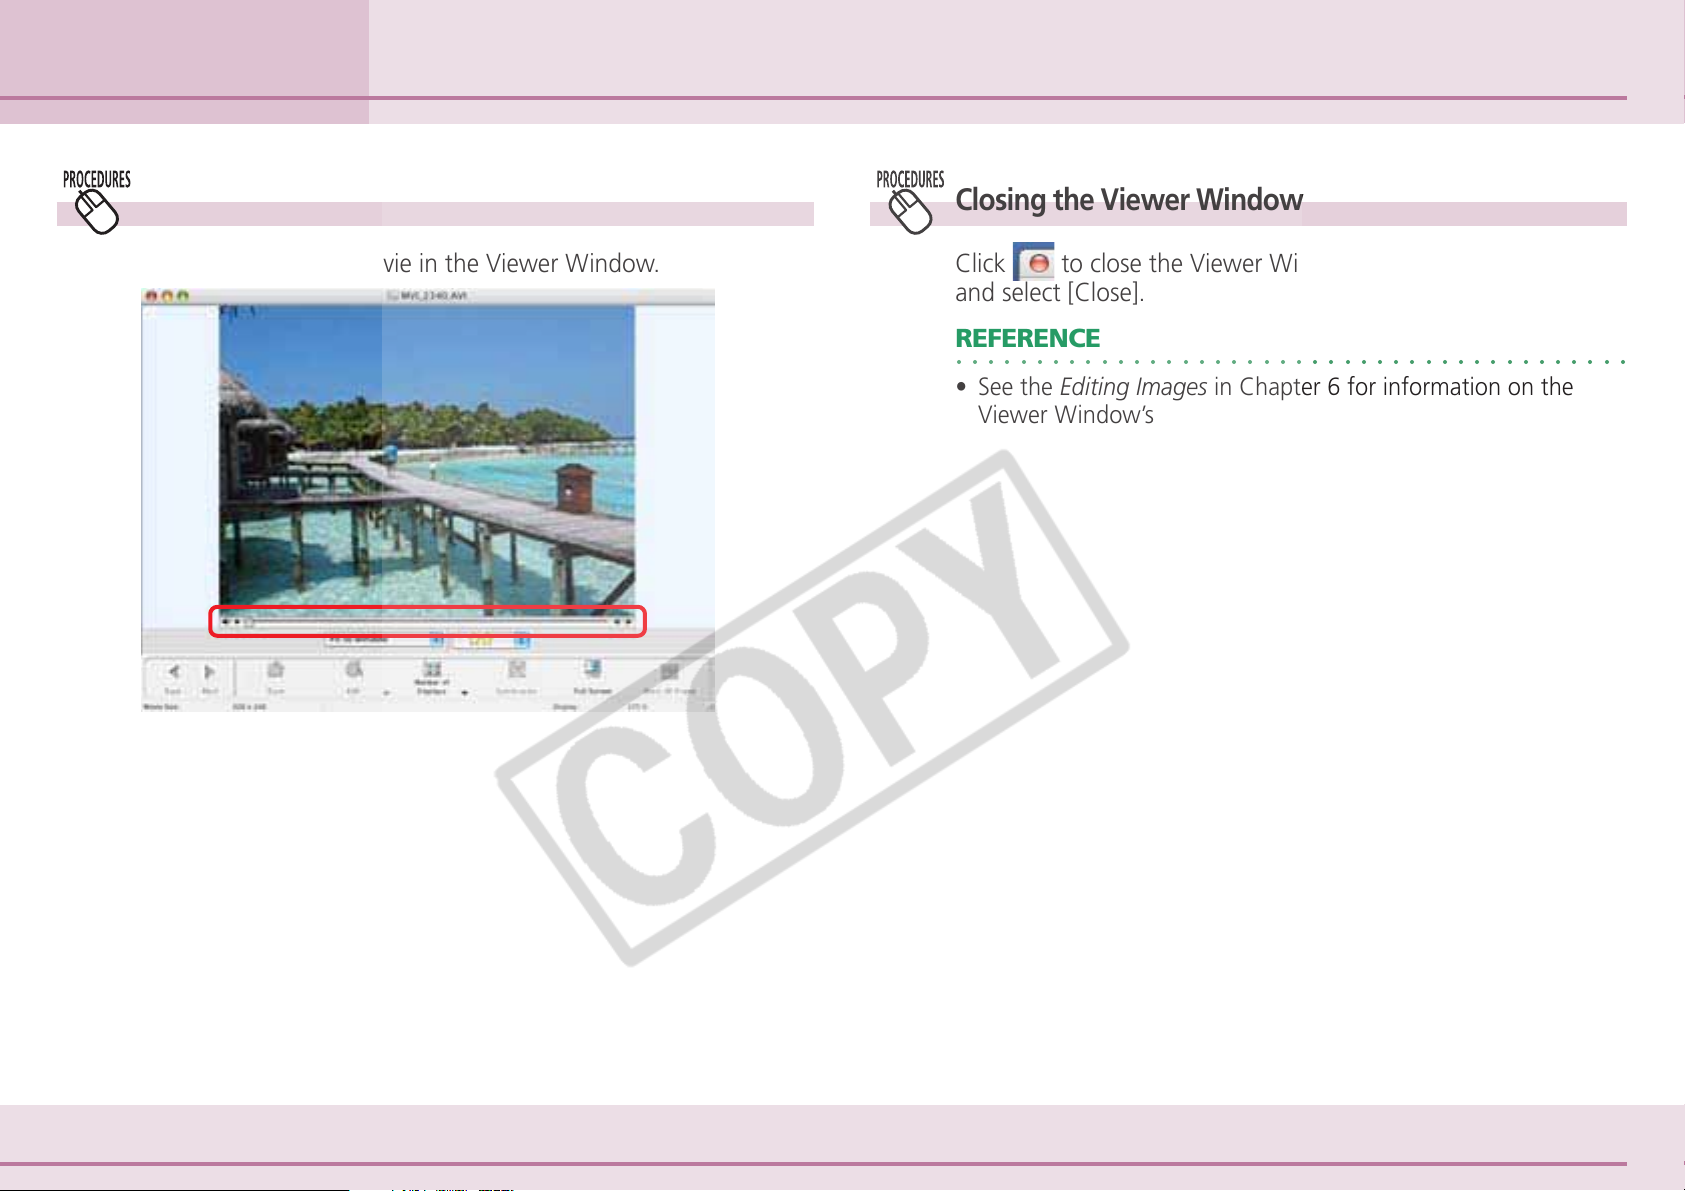
Playing Movies
You can also play a movie in the Viewer Window.
Closing the Viewer Window
Click to close the Viewer Window, or click the [File] menu
and select [Close].
REFERENCE
○○○○○○○○○○○○○○○○○○○○○○○○○○○○○○○○○○○○○○○○○○
• See the Editing Images in Chapter 6 for information on the
Viewer Window’s editing function.
54 ImageBrowser Software User Guide
Page 55
Chapter 5
Organizing Images
This chapter explains the features in ImageBrowser for managing
images.
Selecting Images
Selecting All the Images
In this section we reintroduce the methods for selecting images in the
Browser Area as one of the basic image management procedures.
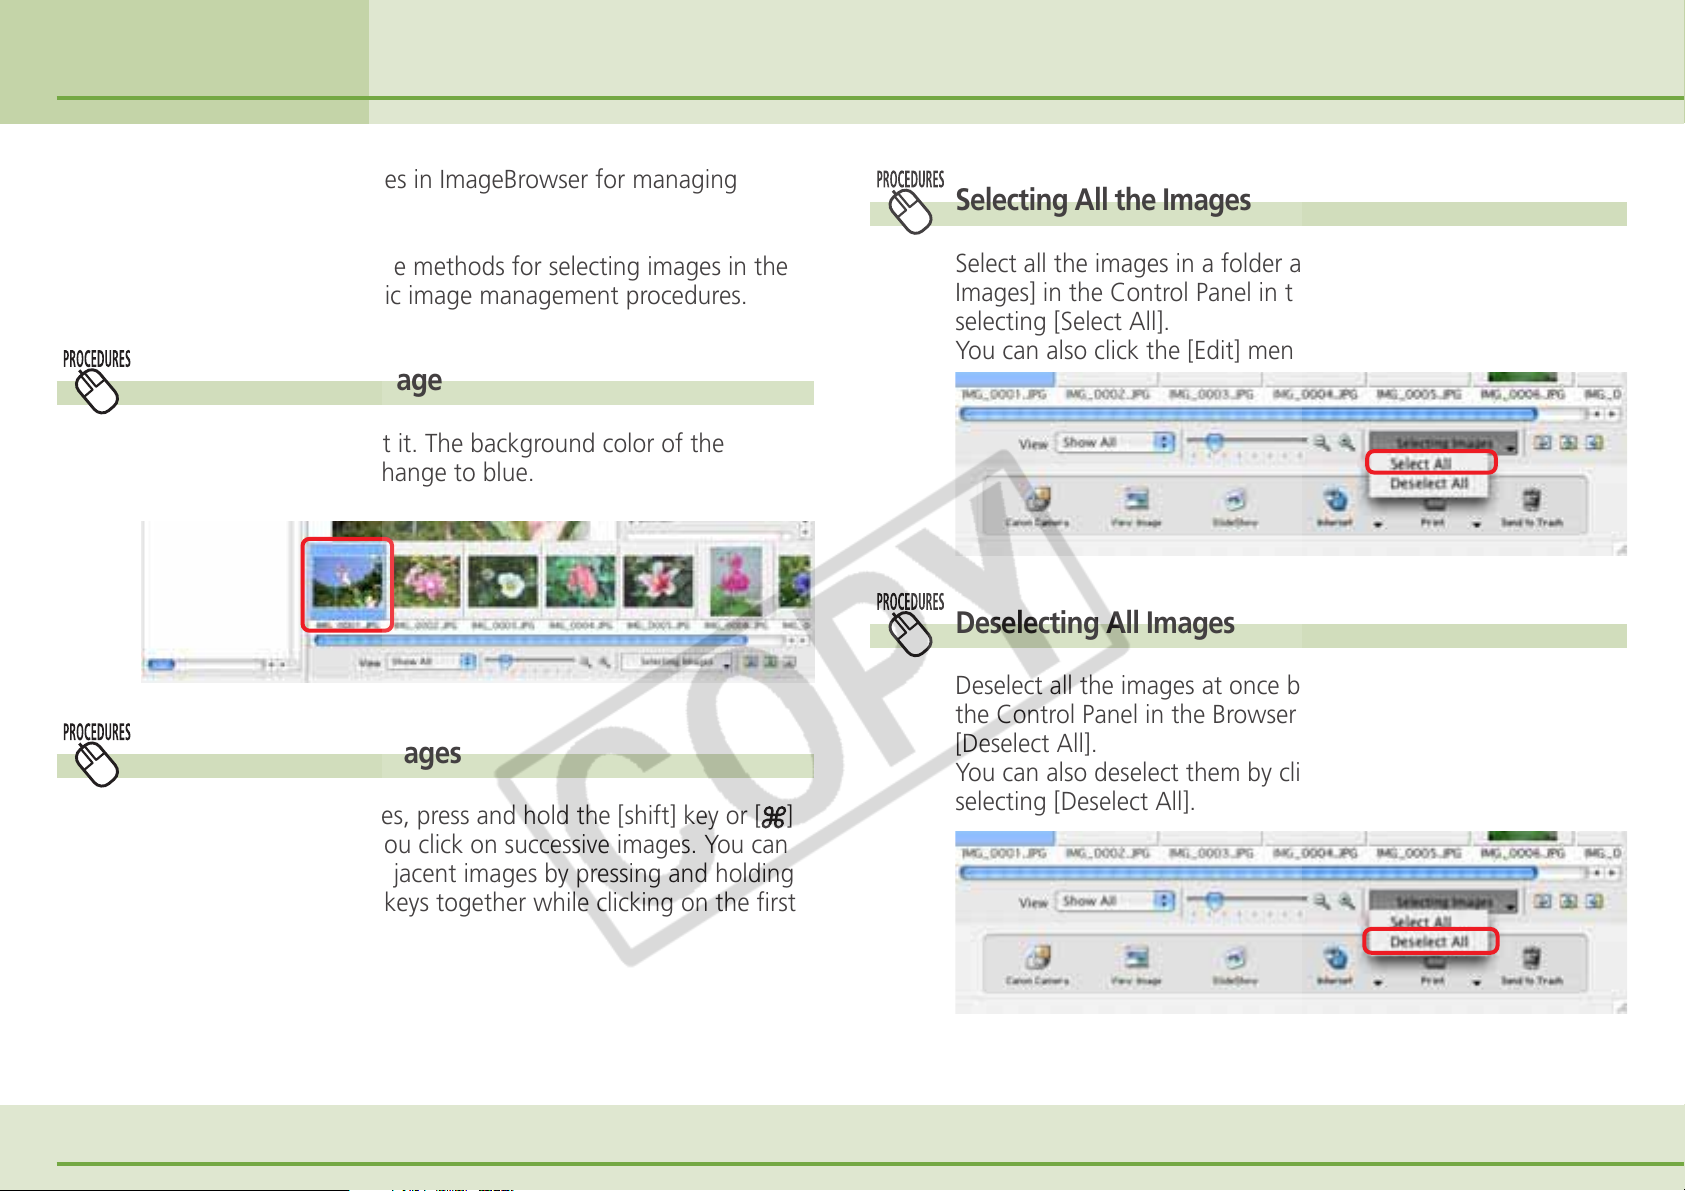
Selecting a Single Image
Click an image to select it. The background color of the
selected image(s) will change to blue.
Selecting Multiple Images
To select multiple images, press and hold the [shift] key or [ ]
(command) key while you click on successive images. You can
also select a series of adjacent images by pressing and holding
the [option] and [shift] keys together while clicking on the first
and last images.
Select all the images in a folder at once by clicking [Selecting
Images] in the Control Panel in the Browser Window and
selecting [Select All].
You can also click the [Edit] menu and choose [Select All].
Deselecting All Images
Deselect all the images at once by clicking [Selecting Images] in
the Control Panel in the Browser Window and selecting
[Deselect All].
You can also deselect them by clicking the [Edit] menu and
selecting [Deselect All].
55 ImageBrowser Software User Guide
Page 56
Chapter 5
Organizing Images
This section explains the procedures for setting Star Ratings used in
image searches and to display subsets of images.
Setting Star Ratings (1/2)
Other Settings Methods for Star Ratings
What is a Star Rating?
You can assign one of three ratings [✩✩✩], [✩✩], [✩] to an
image. When a camera image is downloaded to the computer
it is assigned a two-star [✩✩] rating.
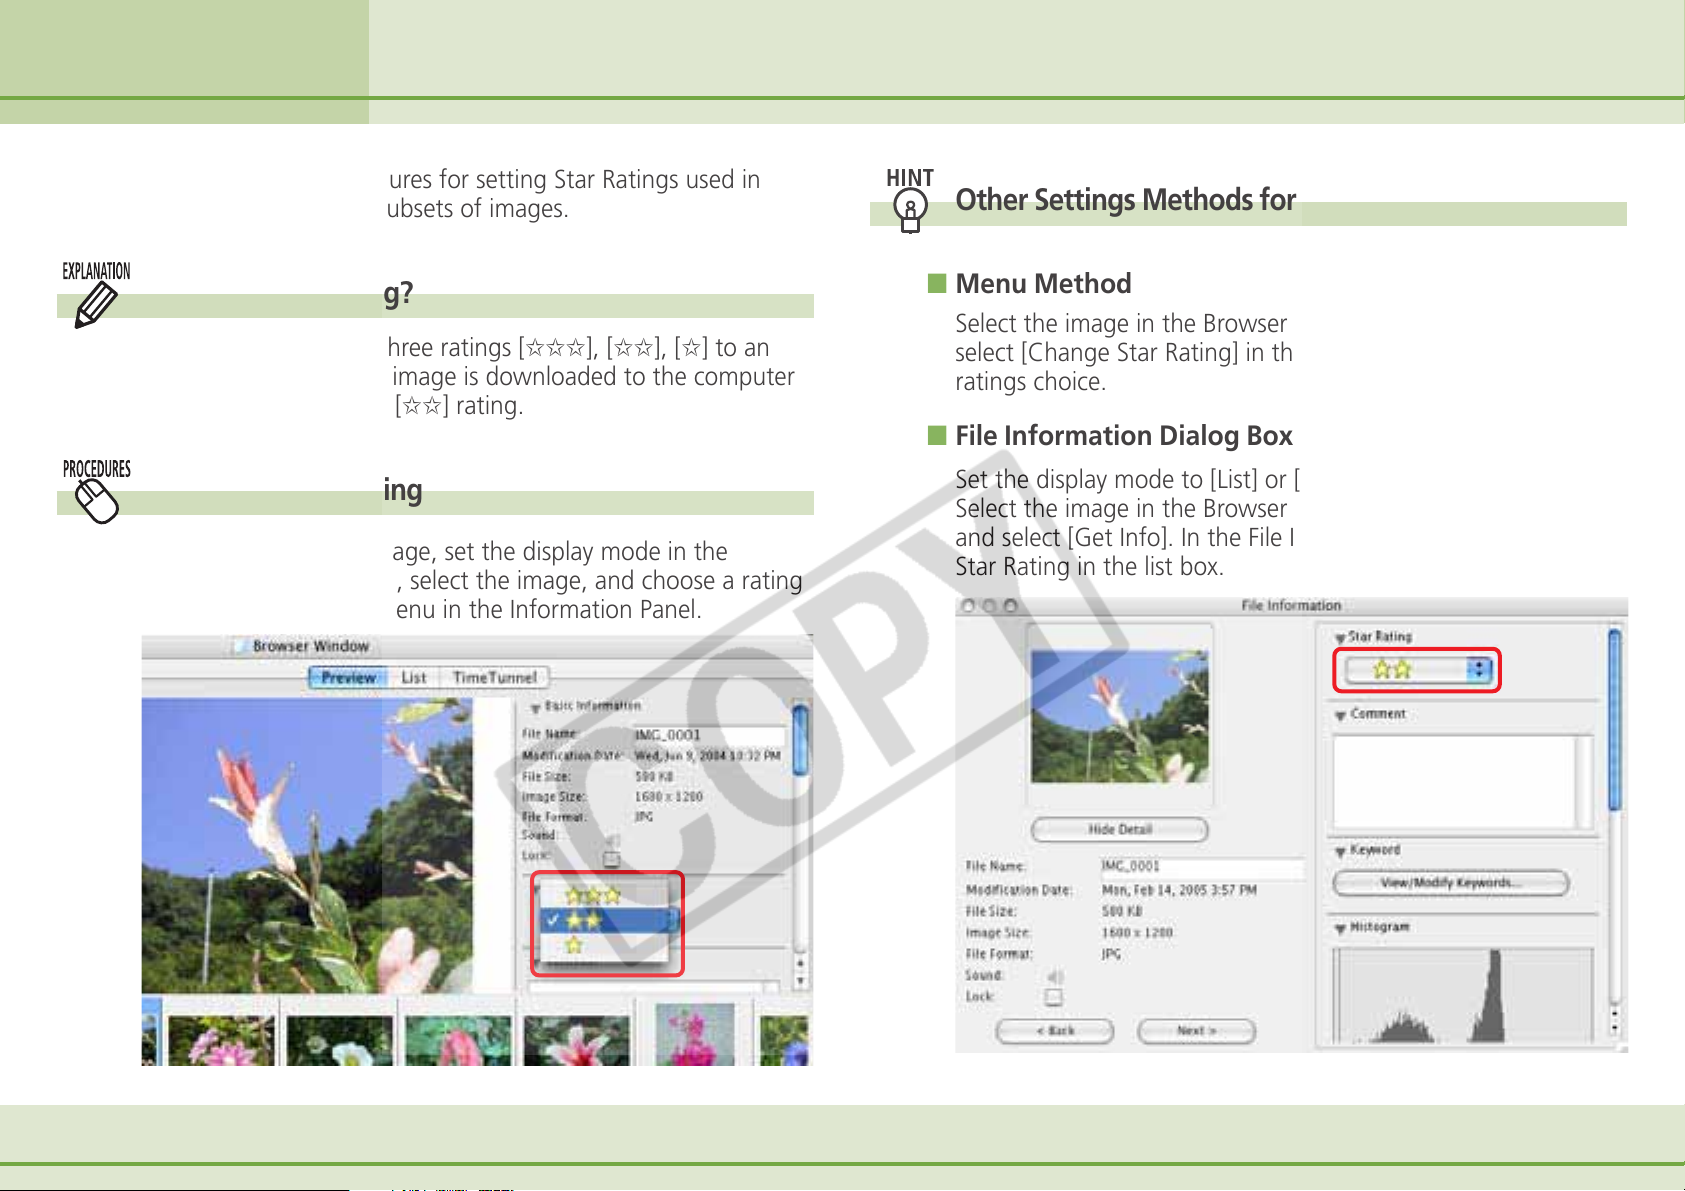
Setting the Star Rating
To set a rating for an image, set the display mode in the
Browser Area to Preview, select the image, and choose a rating
from the [Star Rating] menu in the Information Panel.
■ Menu Method
Select the image in the Browser Area, click the [Edit] menu and
select [Change Star Rating] in the submenu, followed by your
ratings choice.
■ File Information Dialog Box Method
Set the display mode to [List] or [TimeTunnel].
Select the image in the Browser Area and click the [File] menu
and select [Get Info]. In the File Information dialog box, set the
Star Rating in the list box.
56 ImageBrowser Software User Guide
Page 57
Chapter 5
Organizing Images
Setting Star Ratings (2/2)
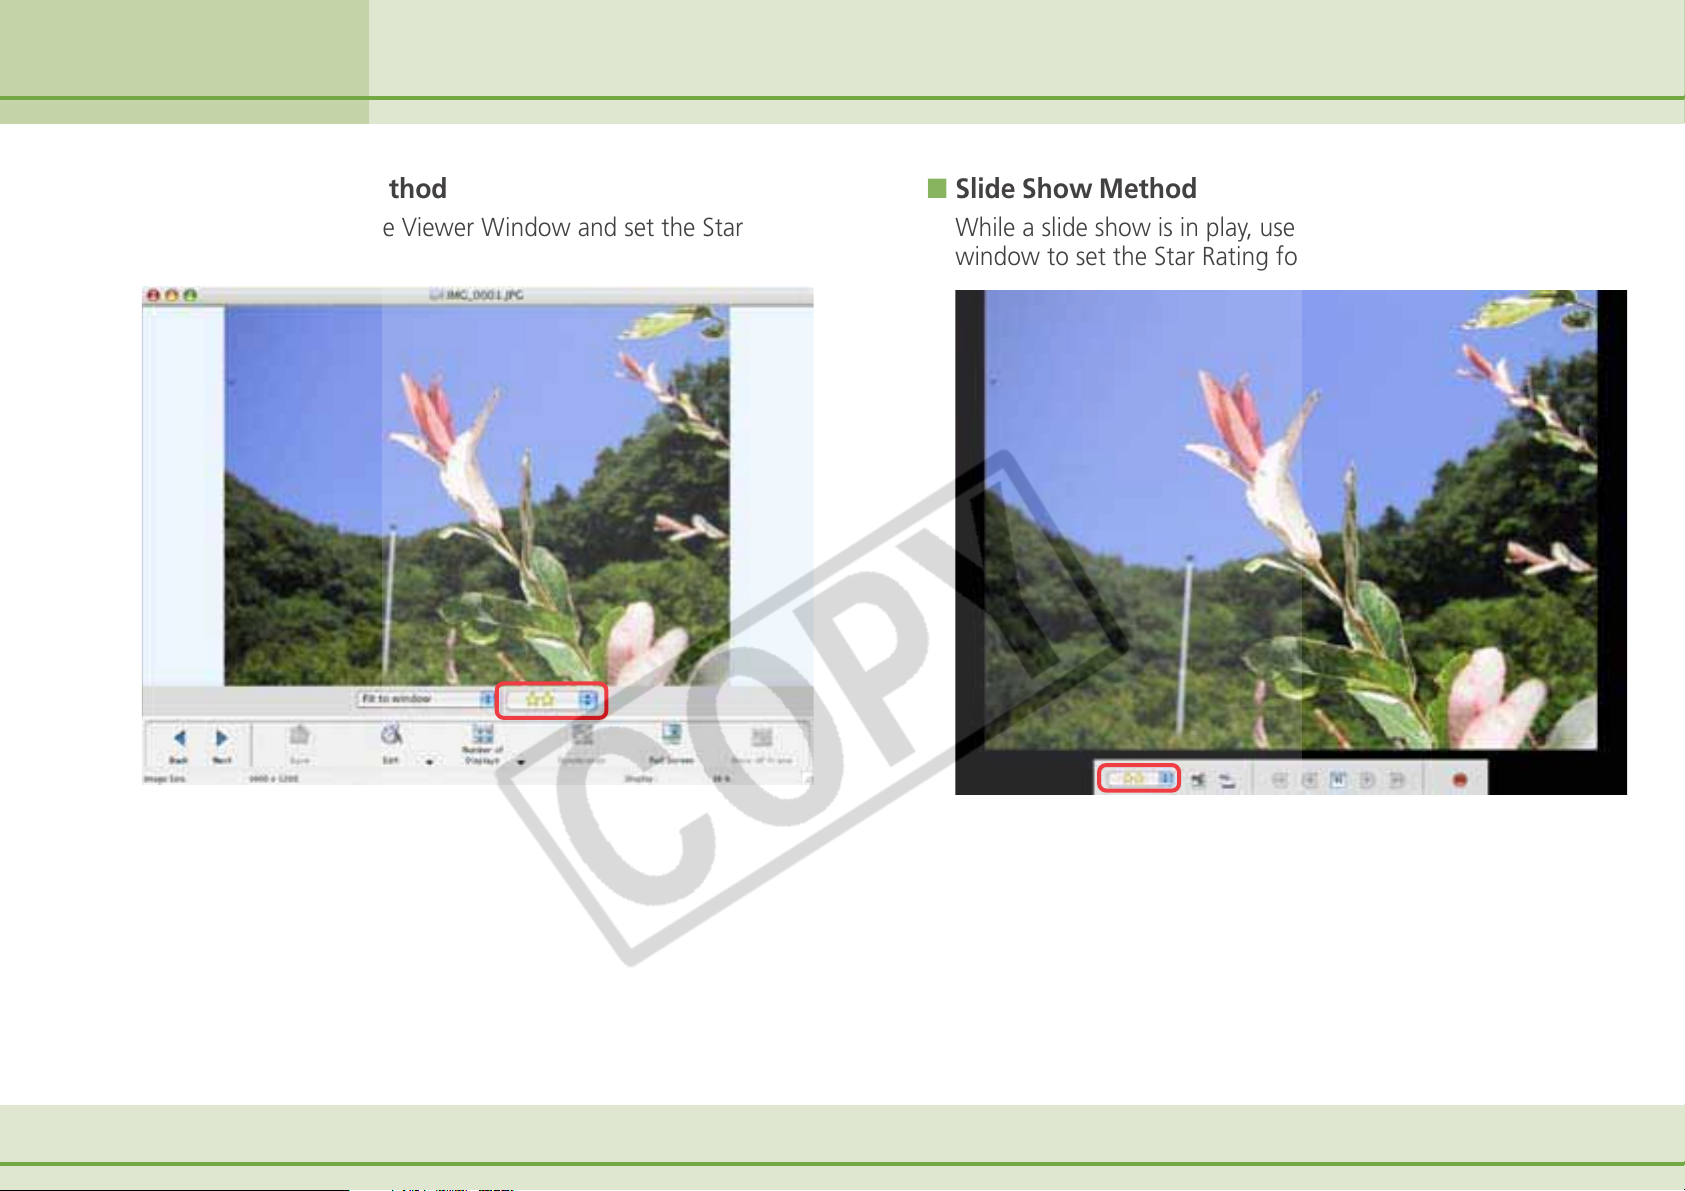
■ Viewer Window Method
Display the image in the Viewer Window and set the Star
Rating in the list box.
■ Slide Show Method
While a slide show is in play, use the menu at the bottom of the
window to set the Star Rating for the displayed image.
57 ImageBrowser Software User Guide
Page 58
Chapter 5
Organizing Images
Assigning Keywords (1/2)
This section explains the procedures for assigning keywords to images
for searches.
Keywords
A keyword is information used to perform searches on images.
Select a keyword that matches the image content from the
keywords in categories such as People, Places, or Events. For
example, if you have an image from a family holiday to the
ocean, you might assign keywords such as Family in the People
category, or Beach in the Places category or Holiday in the
Events category.
Assigning Keywords
1.
Set the Browser Area to the Preview mode and select
an image.
3.
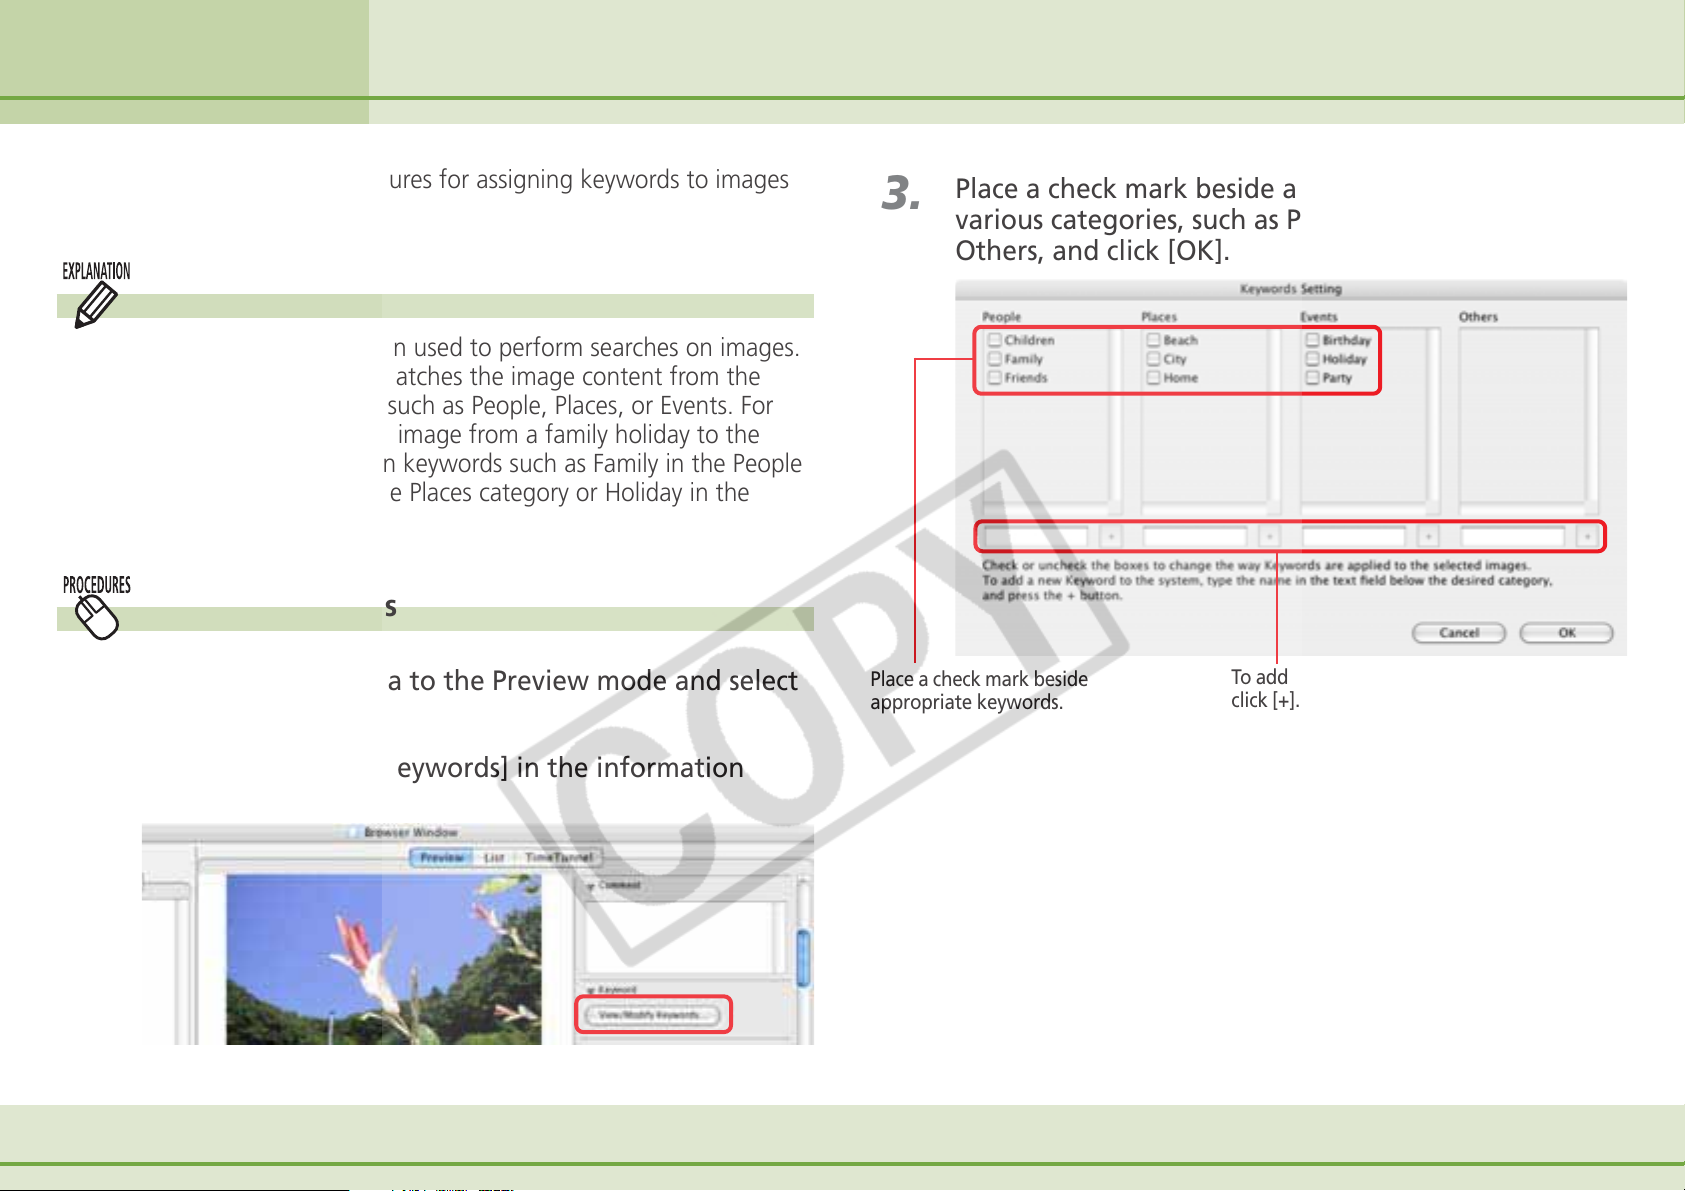
Place a check mark beside
appropriate keywords.
Place a check mark beside appropriate words in the
various categories, such as People, Places, Events or
Others, and click [OK].
To add a new keyword, type it in the box and
click [+].
2.
Click [View/Modify Keywords] in the information
display panel.
The View/Modify Keywords window will display.
58 ImageBrowser Software User Guide
Page 59
Chapter 5
Organizing Images
Assigning Keywords (2/2)
Other Ways to Assign Keywords
■ Menu Method
Select an image in the Browser Area, click the [Edit] menu and
select the [Keyword] submenu, followed by [Settings].
■ File Information Dialog Box Method
Set the display mode to List or TimeTunnel. Select an image in
the Browser Area, click the [File] menu and select [Get Info]. In
the File Information dialog box, click [View/Modify Keywords]
and assign keywords.
Managing Keywords
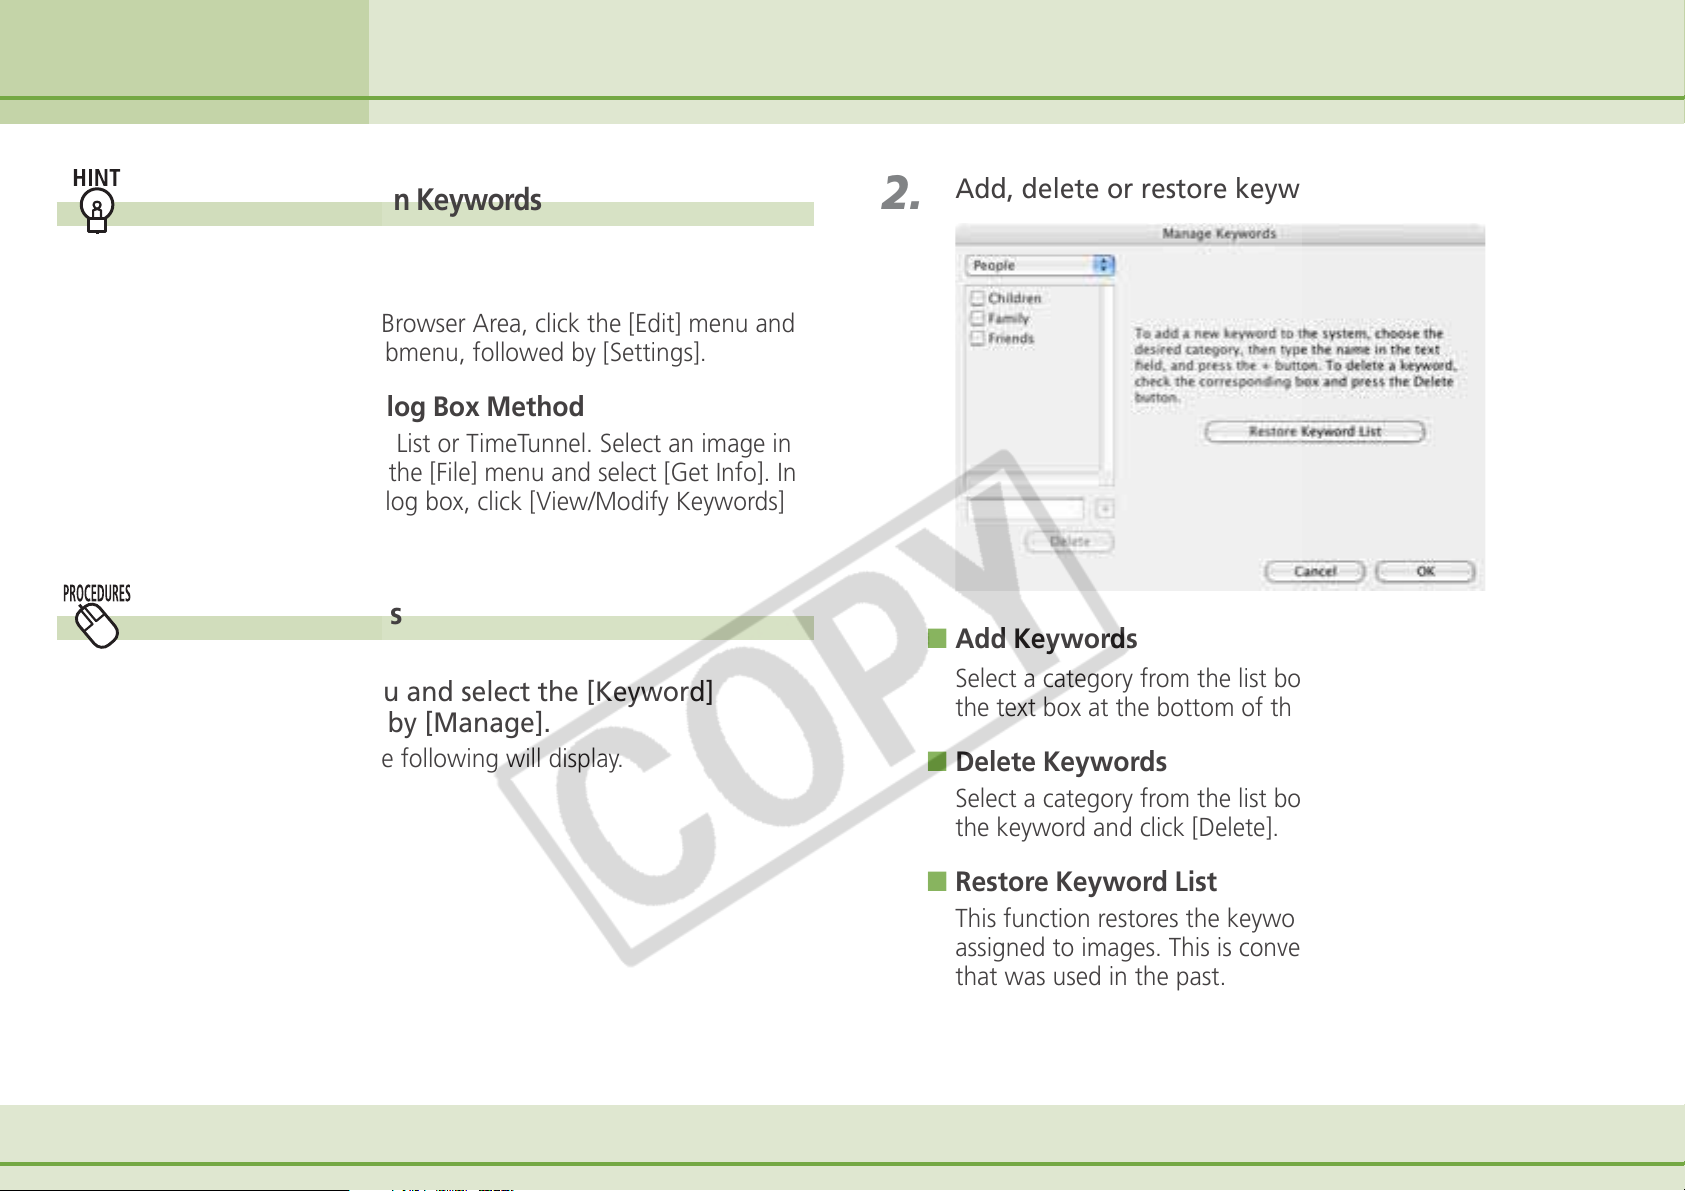
1.
Click the [Edit] menu and select the [Keyword]
submenu, followed by [Manage].
A window similar to the following will display.
2.
Add, delete or restore keywords.
■ Add Keywords
Select a category from the list box, type a new keyword into
the text box at the bottom of the list and click [+].
■ Delete Keywords
59 ImageBrowser Software User Guide
Select a category from the list box, place a check mark beside
the keyword and click [Delete].
■ Restore Keyword List
This function restores the keyword list based on the keywords
assigned to images. This is convenient if you deleted a keyword
that was used in the past.
Page 60
Chapter 5
Organizing Images
You can sort selected images into folders by the shooting dates or by
Star Ratings.
Sorting Images (1/2)
Sorting by Shooting Dates
1.
2.
3.
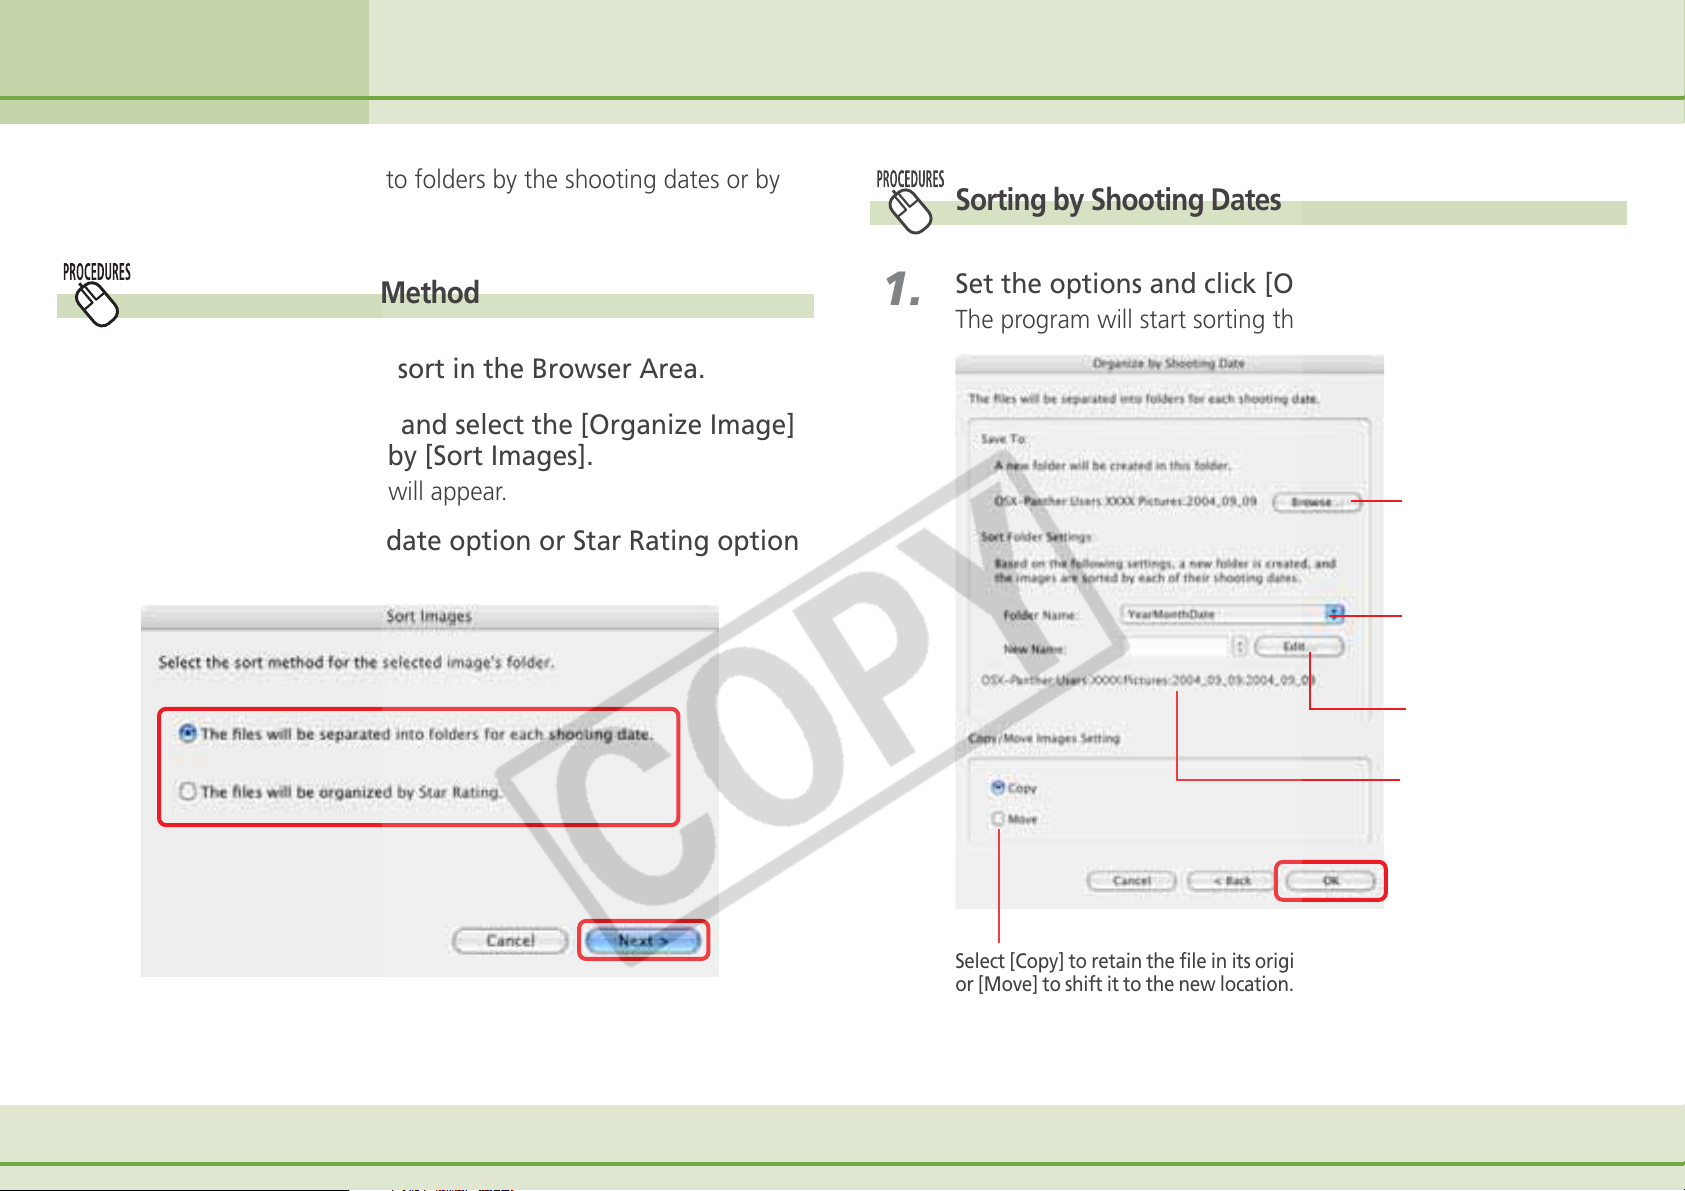
Selecting a Sorting Method
Select the images to sort in the Browser Area.
Click the [File] menu and select the [Organize Image]
submenu, followed by [Sort Images].
The Sort Images dialog will appear.
Select the shooting date option or Star Rating option
and click [Next].
1.
Set the options and click [OK].
The program will start sorting the images.
Select the destination
folder.
Select the name assigned
to the folder created
during sorting.
Use this to add a prefix to
the folder name.
Sample of the name of
the actual folder that will
be created.
60 ImageBrowser Software User Guide
Select [Copy] to retain the file in its original location
or [Move] to shift it to the new location.
Page 61
Chapter 5
Organizing Images
Sorting by Star Ratings
Sorting Images (2/2)
1.
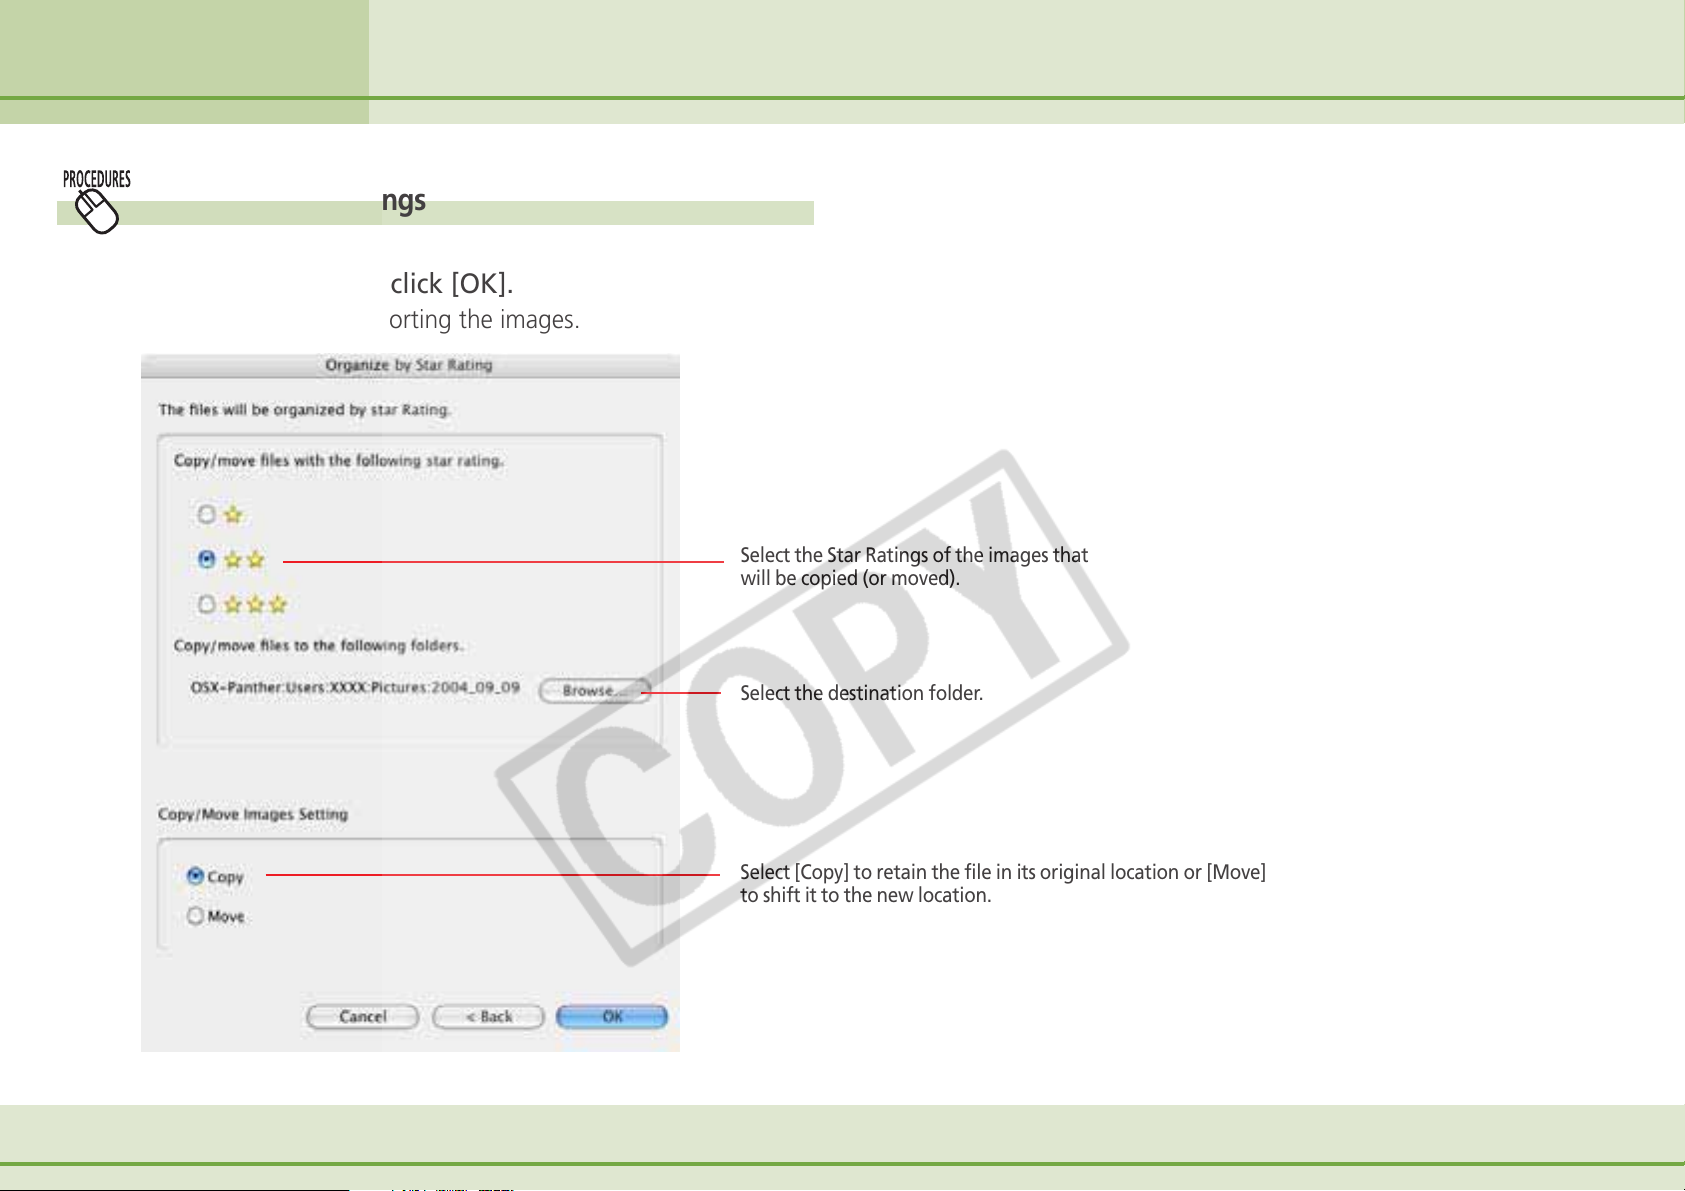
Set the options and click [OK].
The program will start sorting the images.
Select the Star Ratings of the images that
will be copied (or moved).
Select the destination folder.
61 ImageBrowser Software User Guide
Select [Copy] to retain the file in its original location or [Move]
to shift it to the new location.
Page 62
Chapter 5
Organizing Images
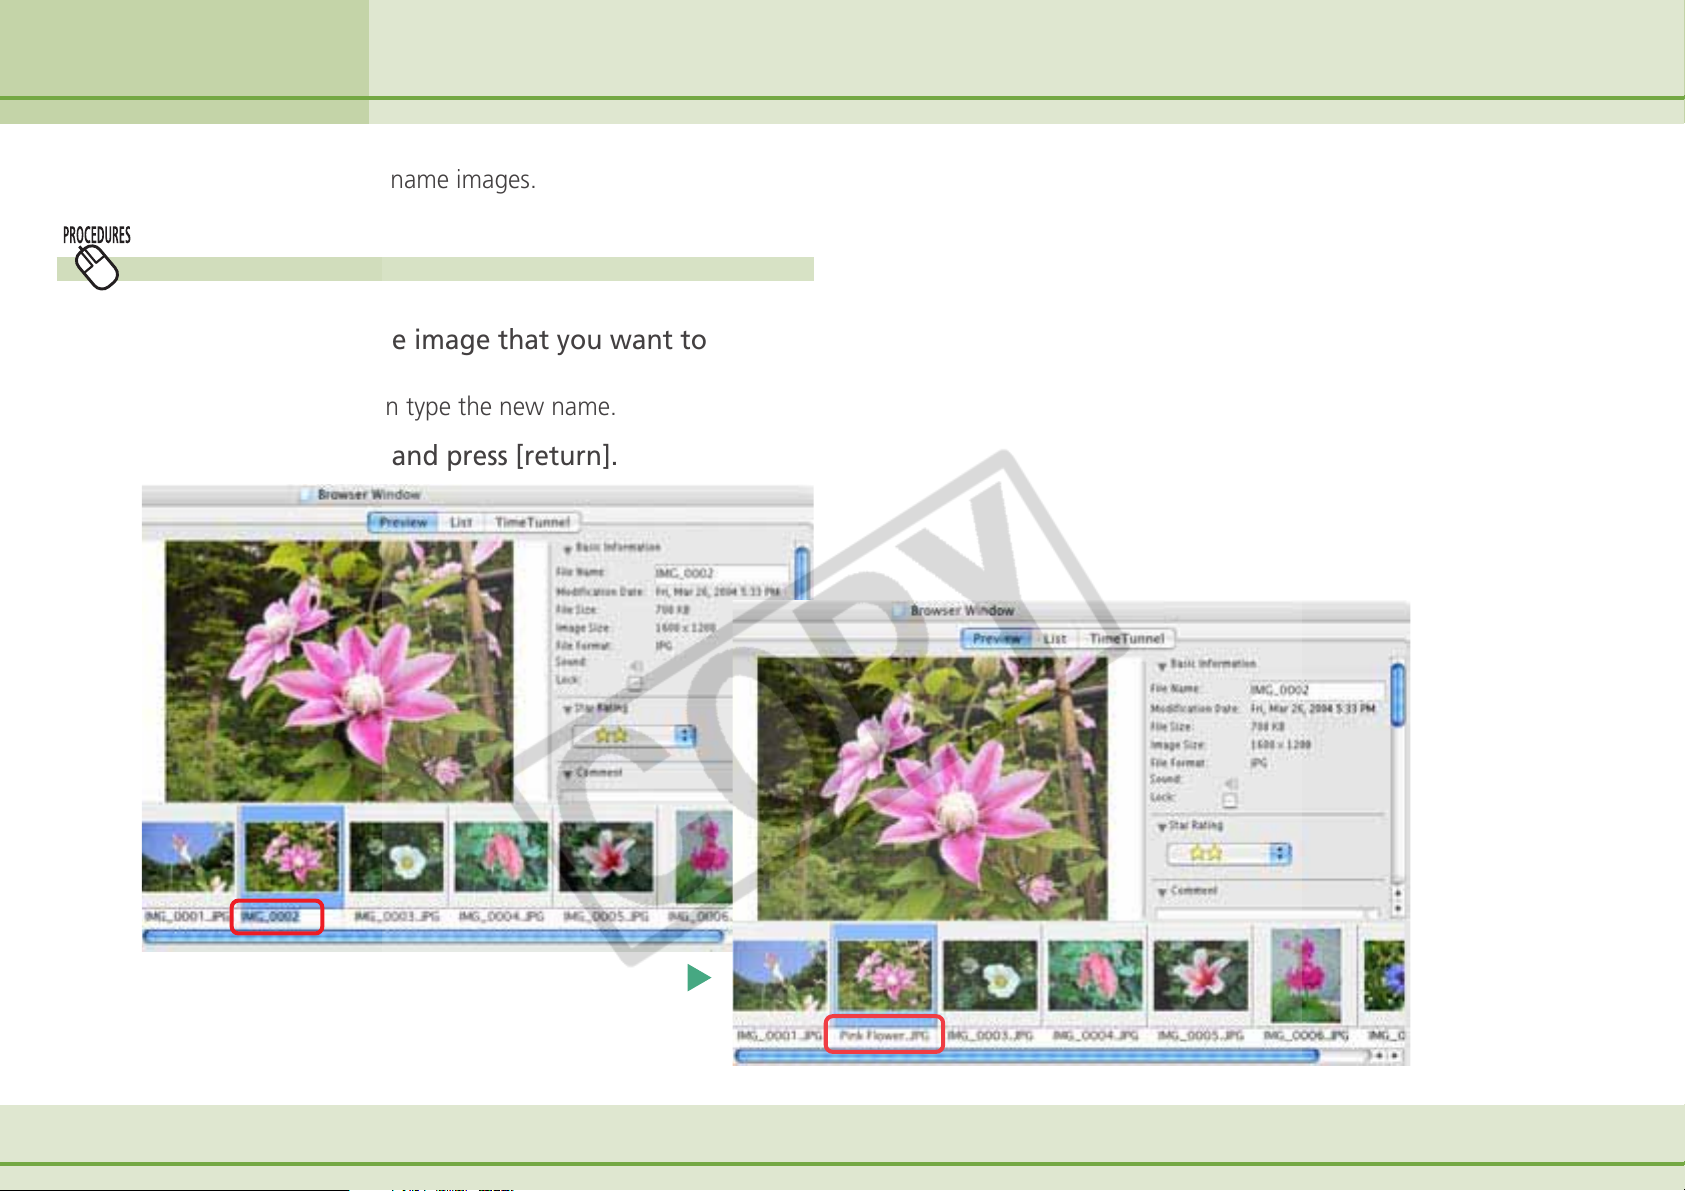
This section describes how to rename images.
Renaming Images
Renaming Images (1/2)
1.
2.
Click the name of the image that you want to
rename.
After a moment you can type the new name.
Type the new name and press [return].
62 ImageBrowser Software User Guide
Page 63
Chapter 5
Organizing Images
Renaming Images (2/2)
1.
2.
3.
Changing Multiple Image File Names
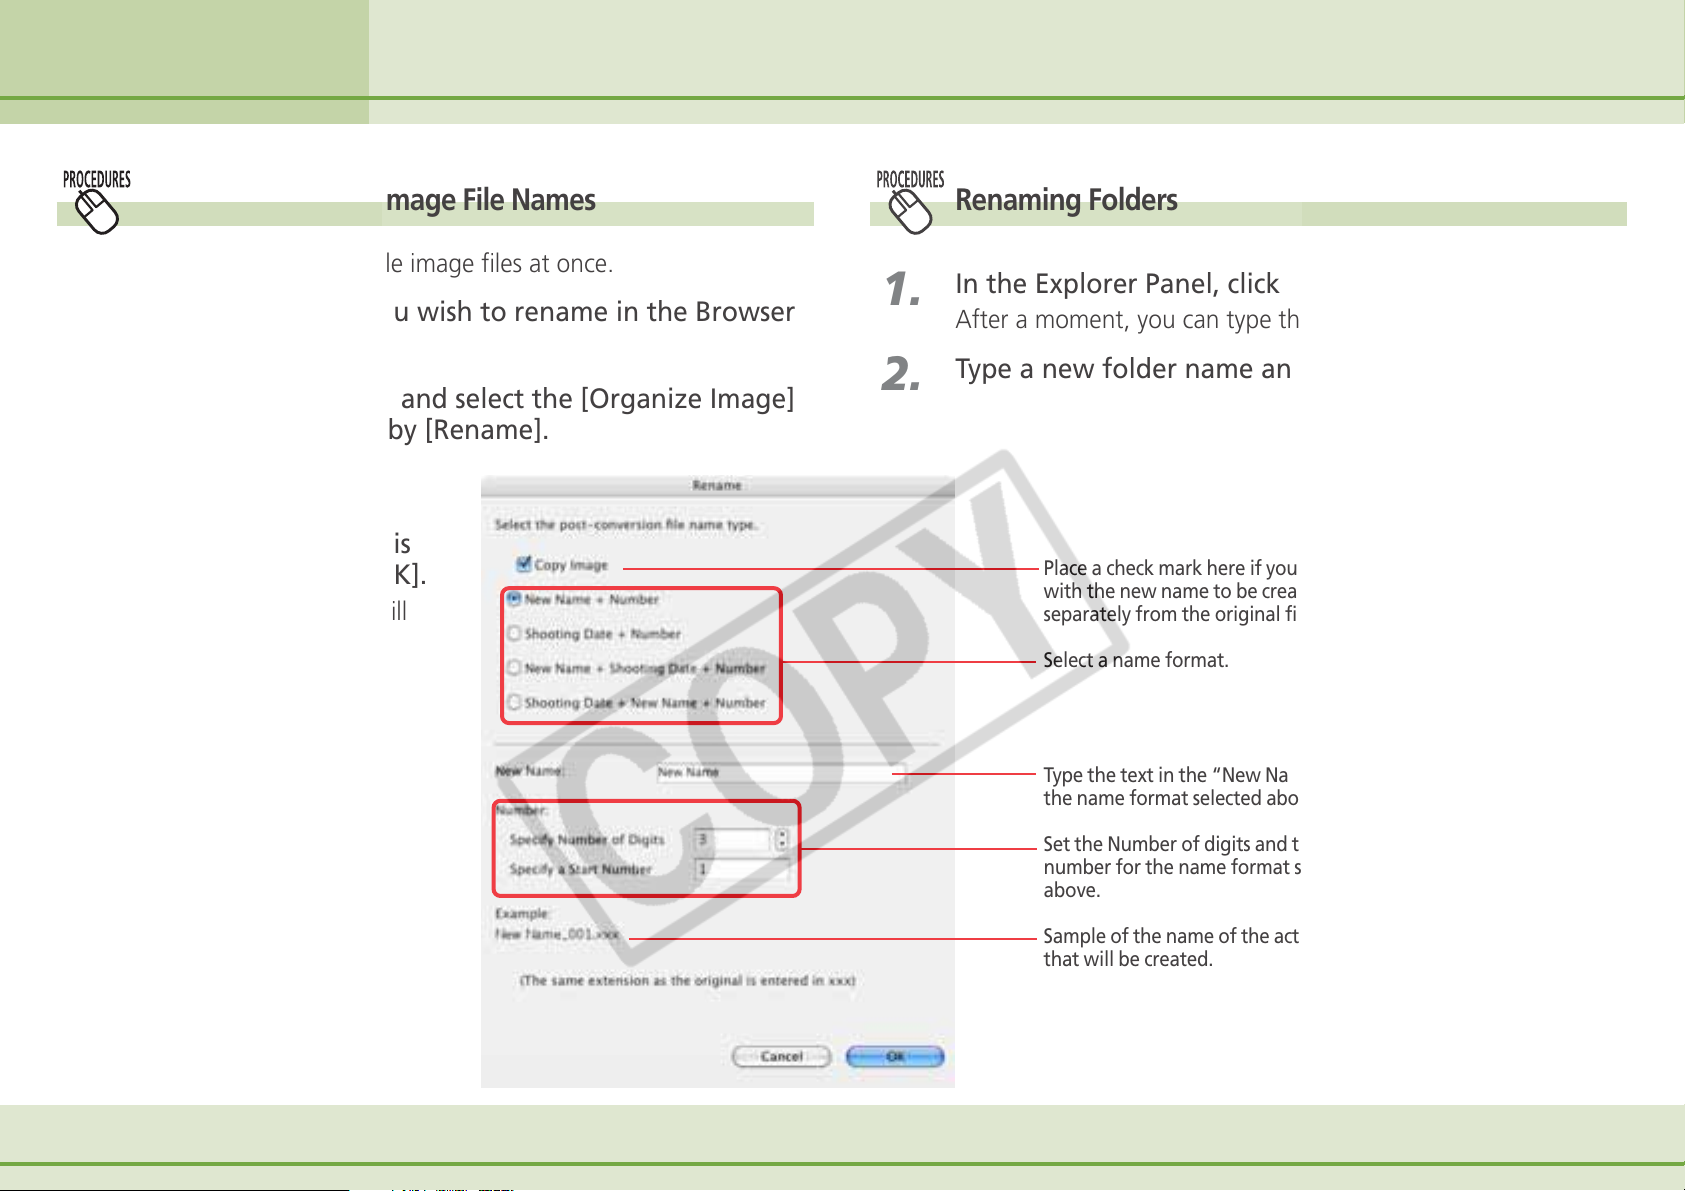
You can rename multiple image files at once.
Select the images you wish to rename in the Browser
Area.
Click the [File] menu and select the [Organize Image]
submenu, followed by [Rename].
The renaming settings
window will display.
Set the options in this
window and click [OK].
The image file names will
change.
1.
2.
Renaming Folders
In the Explorer Panel, click on the folder name.
After a moment, you can type the new name.
Type a new folder name and press the [return] key.
Place a check mark here if you wish a file
with the new name to be created
separately from the original file.
Select a name format.
Type the text in the “New Name” spot for
the name format selected above.
63 ImageBrowser Software User Guide
Set the Number of digits and the starting
number for the name format selected
above.
Sample of the name of the actual folder
that will be created.
Page 64
Chapter 5
Organizing Images
Searching Images (1/2)
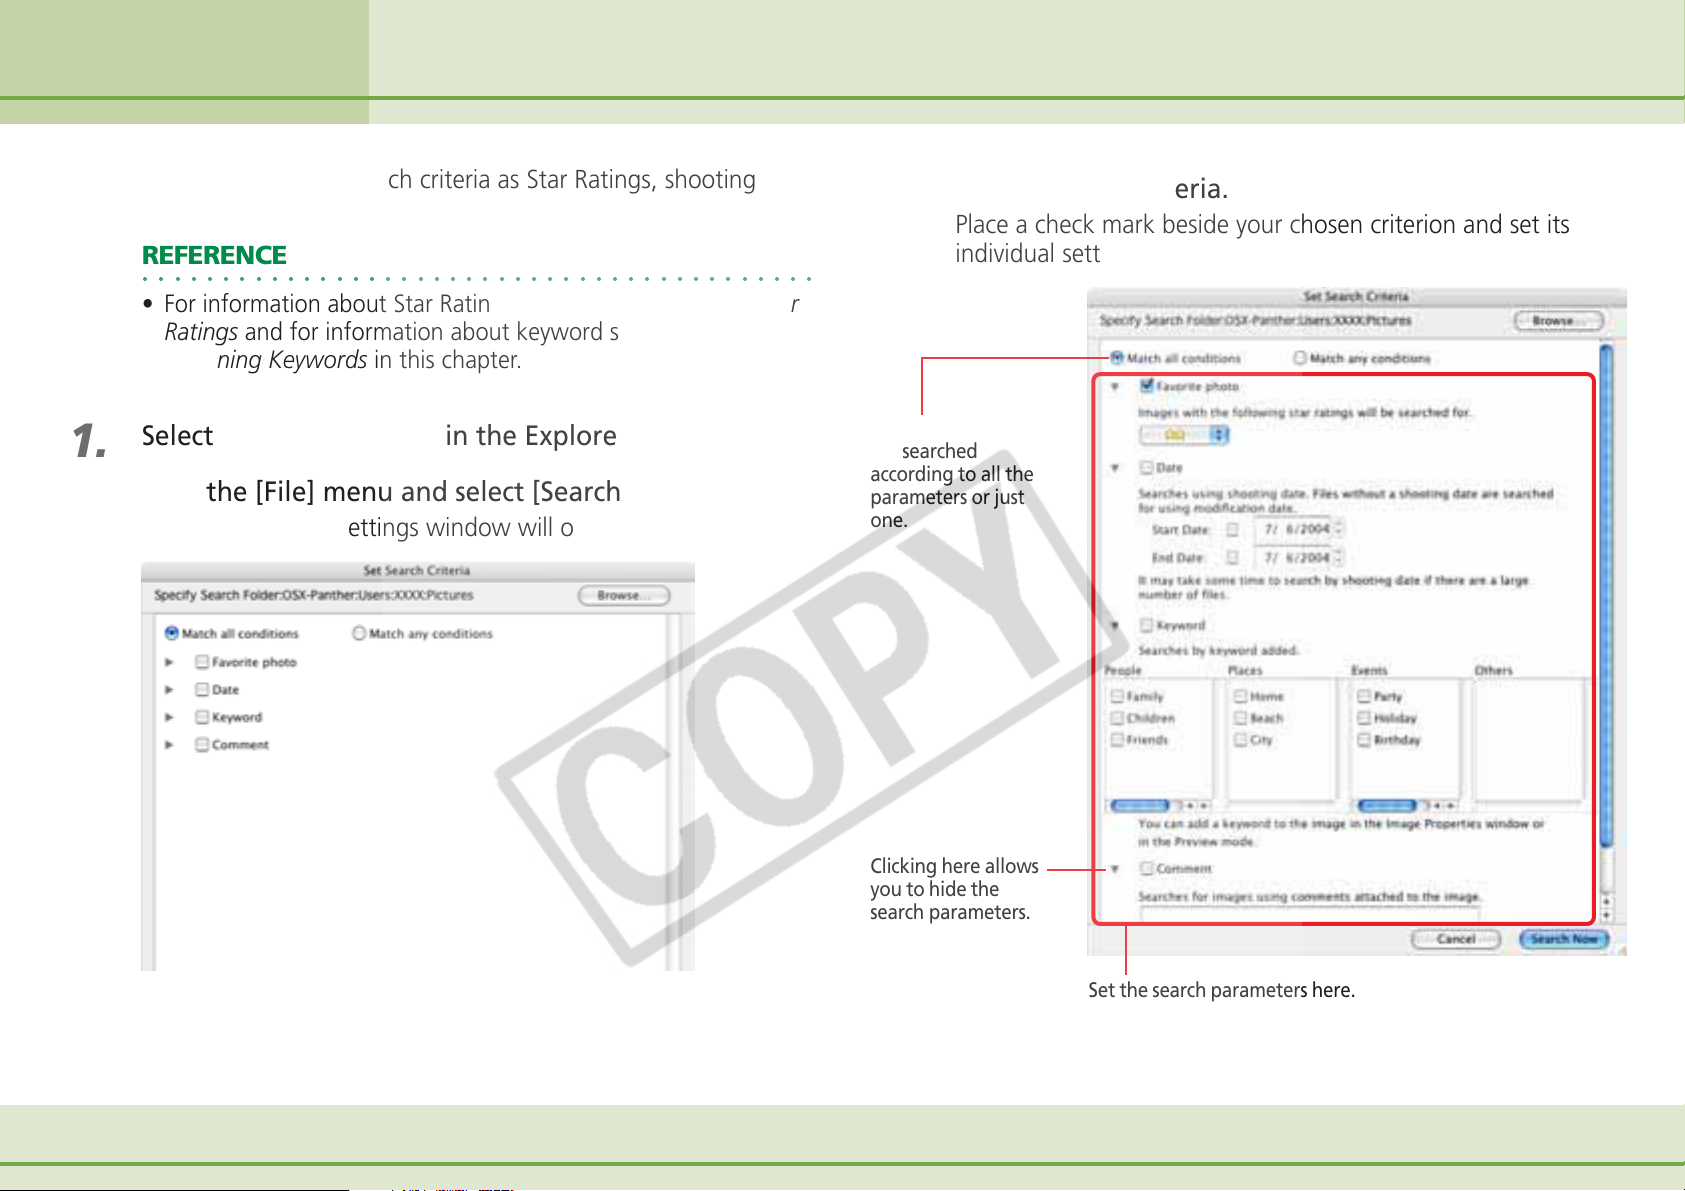
You can search images using such criteria as Star Ratings, shooting
dates, keywords or comments.
REFERENCE
○○○○○○○○○○○○○○○○○○○○○○○○○○○○○○○○○○○○○○○○○○
• For information about Star Rating settings, see the Setting Star
Ratings and for information about keyword settings, see the
Assigning Keywords in this chapter.
1.
2.
Select a folder to search in the Explorer Panel section.
Click the [File] menu and select [Search].
The search criteria settings window will open.
3.
Sets whether images
are searched
according to all the
parameters or just
one.
Set the search criteria.
Place a check mark beside your chosen criterion and set its
individual settings.
64 ImageBrowser Software User Guide
Clicking here allows
you to hide the
search parameters.
Set the search parameters here.
Page 65
Chapter 5
Organizing Images
Searching Images (2/2)
4.
5.
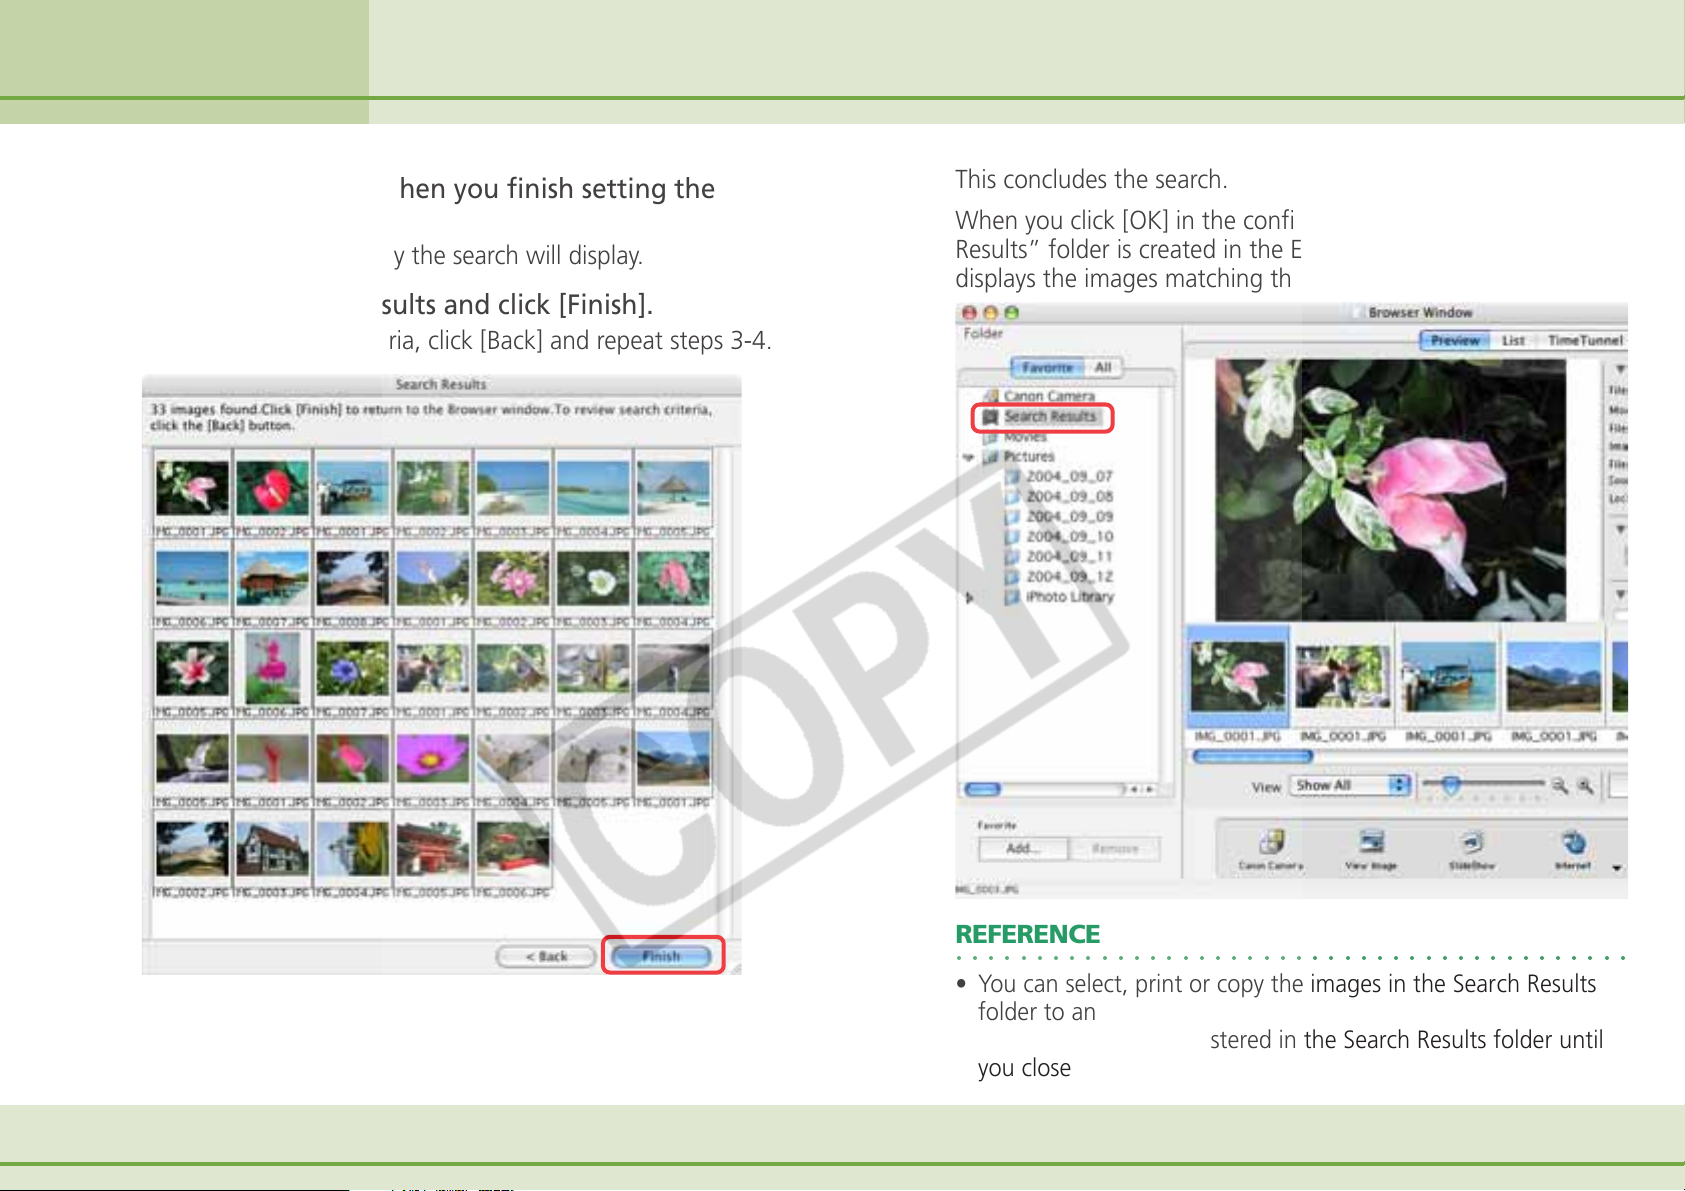
Click [Search Now] when you finish setting the
criteria.
A list of images found by the search will display.
Check the search results and click [Finish].
To reset the search criteria, click [Back] and repeat steps 3-4.
This concludes the search.
When you click [OK] in the confirmation dialog, the “Search
Results” folder is created in the Explorer Panel section and
displays the images matching the search criteria.
65 ImageBrowser Software User Guide
REFERENCE
○○○○○○○○○○○○○○○○○○○○○○○○○○○○○○○○○○○○○○○○○○
• You can select, print or copy the images in the Search Results
folder to another.
• Images will remain registered in the Search Results folder until
you close ImageBrowser or perform another search.
Page 66
Chapter 5
Organizing Images
This section describes how to move and copy images between folders.
REFERENCE
○○○○○○○○○○○○○○○○○○○○○○○○○○○○○○○○○○○○○○○○○○
• Moving or copying images in ImageBrowser affects the actual
location in which those images are stored on your computer.
• When you use the Finder to modify files or folders while
ImageBrowser is open, those changes might not be reflected in
the ImageBrowser window. To remedy this, click [Refresh] on
the [View] menu.
Moving and Copying Images (1/2)
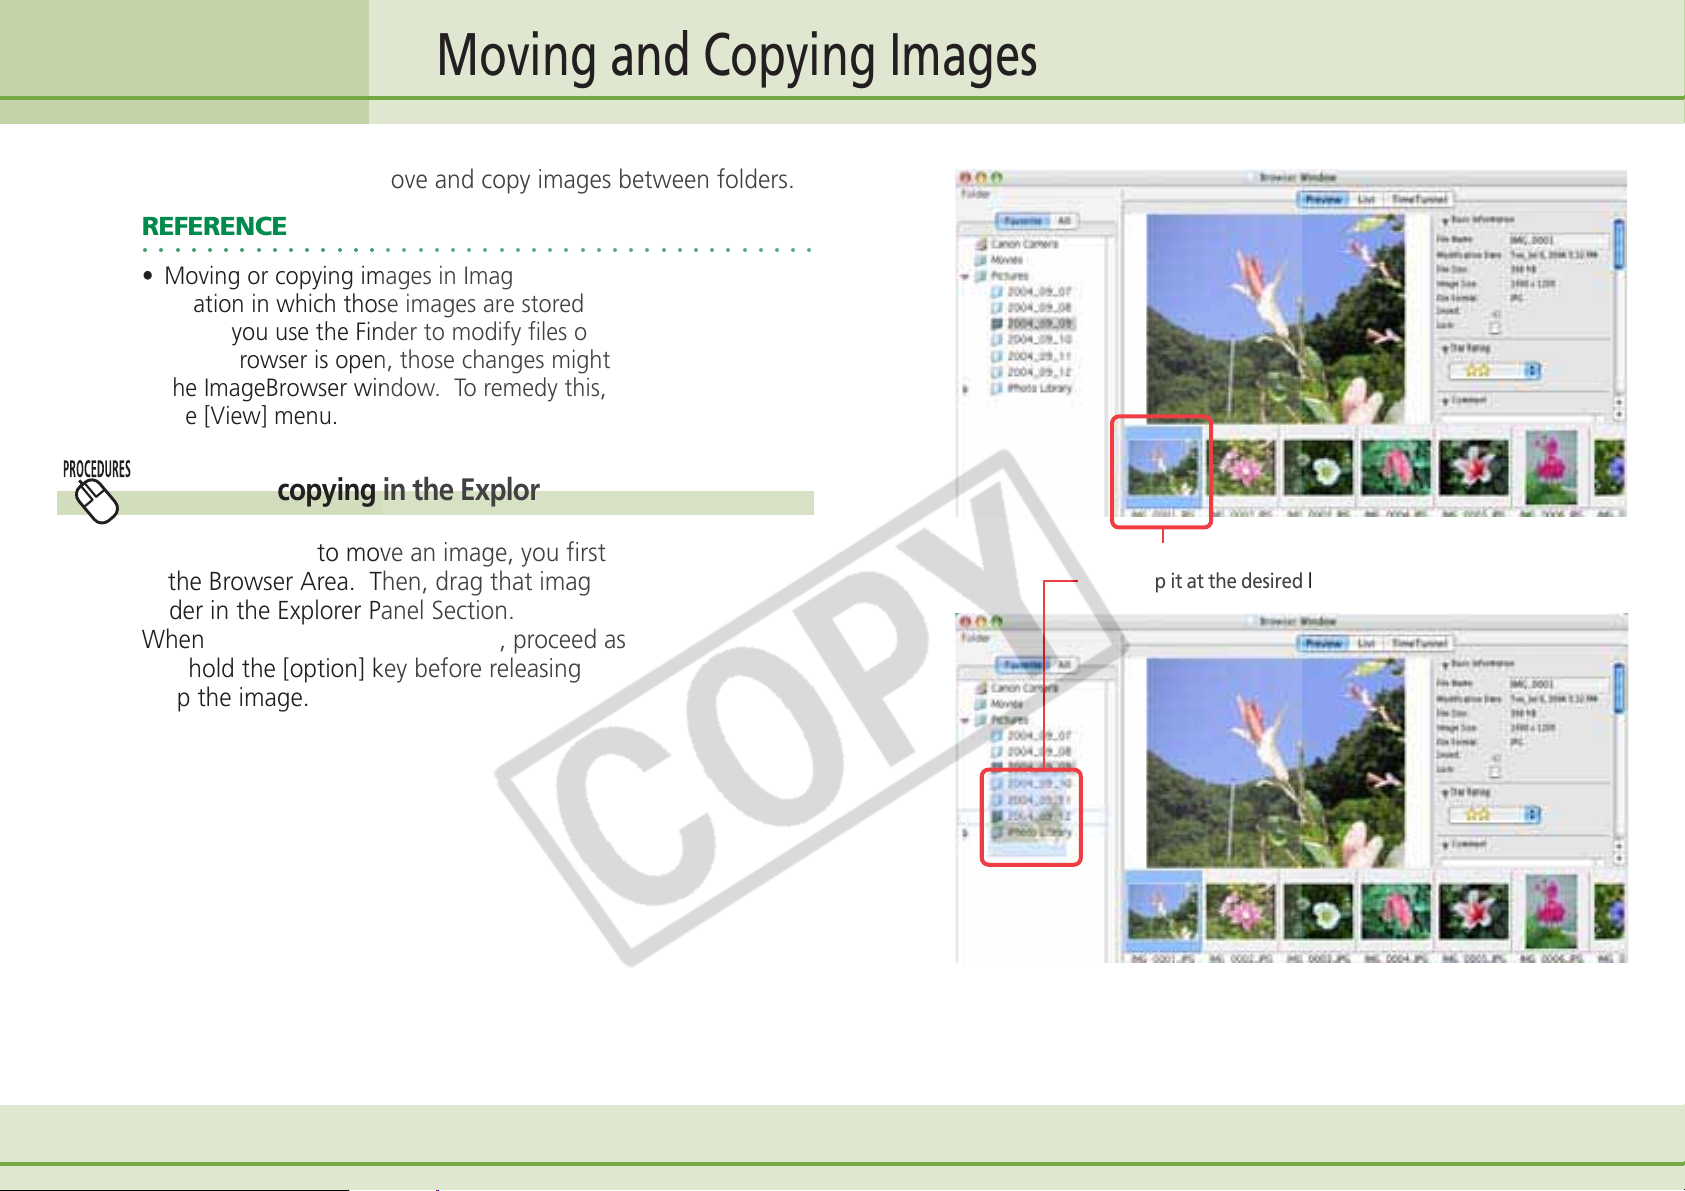
Moving or copying in the Explorer Panel Section
When you want to move an image, you first need to display it
in the Browser Area. Then, drag that image to the destination
folder in the Explorer Panel Section.
When you want to copy an image, proceed as above, but press
and hold the [option] key before releasing the mouse button to
drop the image.
A Drag the image that you want to move.
B Drop it at the desired location.
66 ImageBrowser Software User Guide
Page 67
Chapter 5
Organizing Images
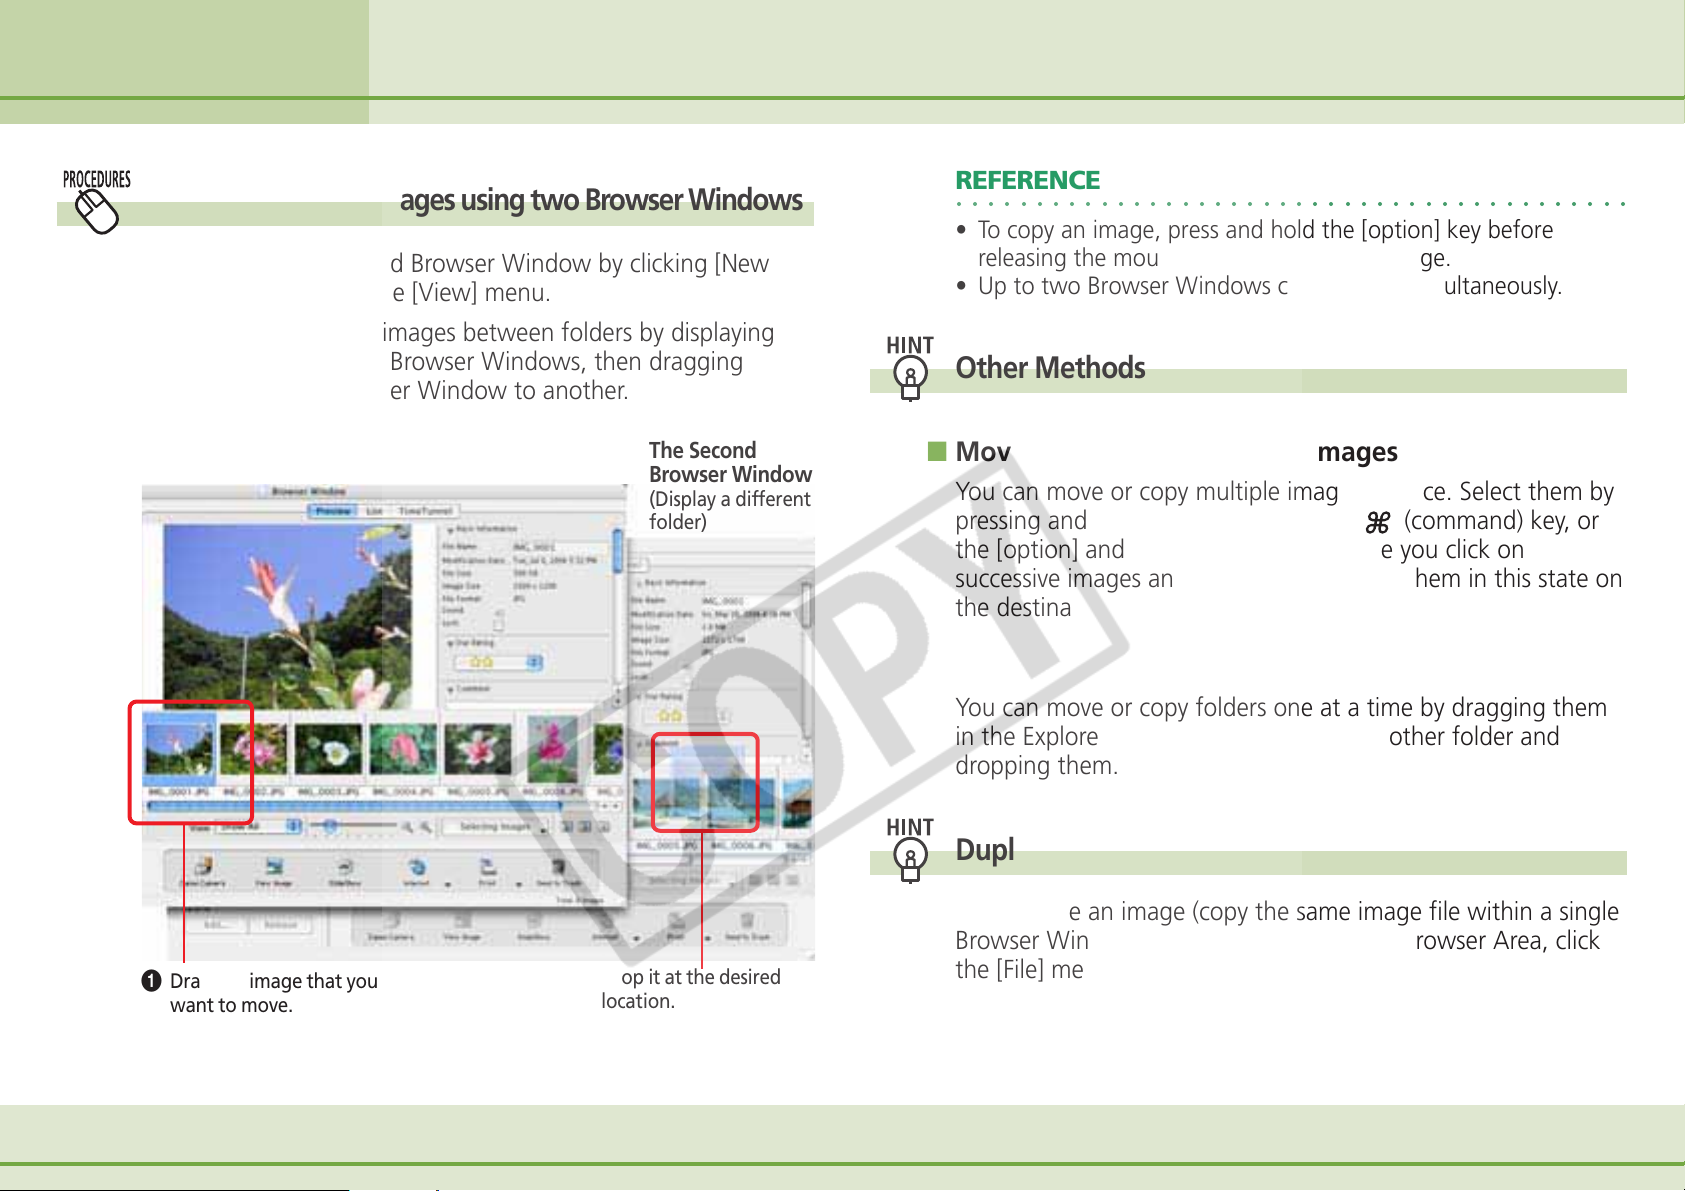
Moving or copying images using two Browser Windows
You can display a second Browser Window by clicking [New
Browser Window] on the [View] menu.
You can move or copy images between folders by displaying
different folders in two Browser Windows, then dragging
images from one Browser Window to another.
Moving and Copying Images (2/2)
REFERENCE
○○○○○○○○○○○○○○○○○○○○○○○○○○○○○○○○○○○○○○○○○○
• To copy an image, press and hold the [option] key before
releasing the mouse button to drop the image.
• Up to two Browser Windows can be open simultaneously.
Other Methods
The First Browser Window
A Drag the image that you
want to move.
The Second
Browser Window
(Display a different
folder)
B Drop it at the desired
location.
■ Moving or Copying Multiple Images
You can move or copy multiple images at once. Select them by
pressing and holding the [shift] key or [
] (command) key, or
the [option] and [shift] key together while you click on
successive images and then drag and drop them in this state on
the destination.
■ Moving or Copying Folders
You can move or copy folders one at a time by dragging them
in the Explorer Panel section on top of another folder and
dropping them.
Duplicating Images
To duplicate an image (copy the same image file within a single
Browser Window), select the image in the Browser Area, click
the [File] menu and select [Duplicate].
67 ImageBrowser Software User Guide
Page 68
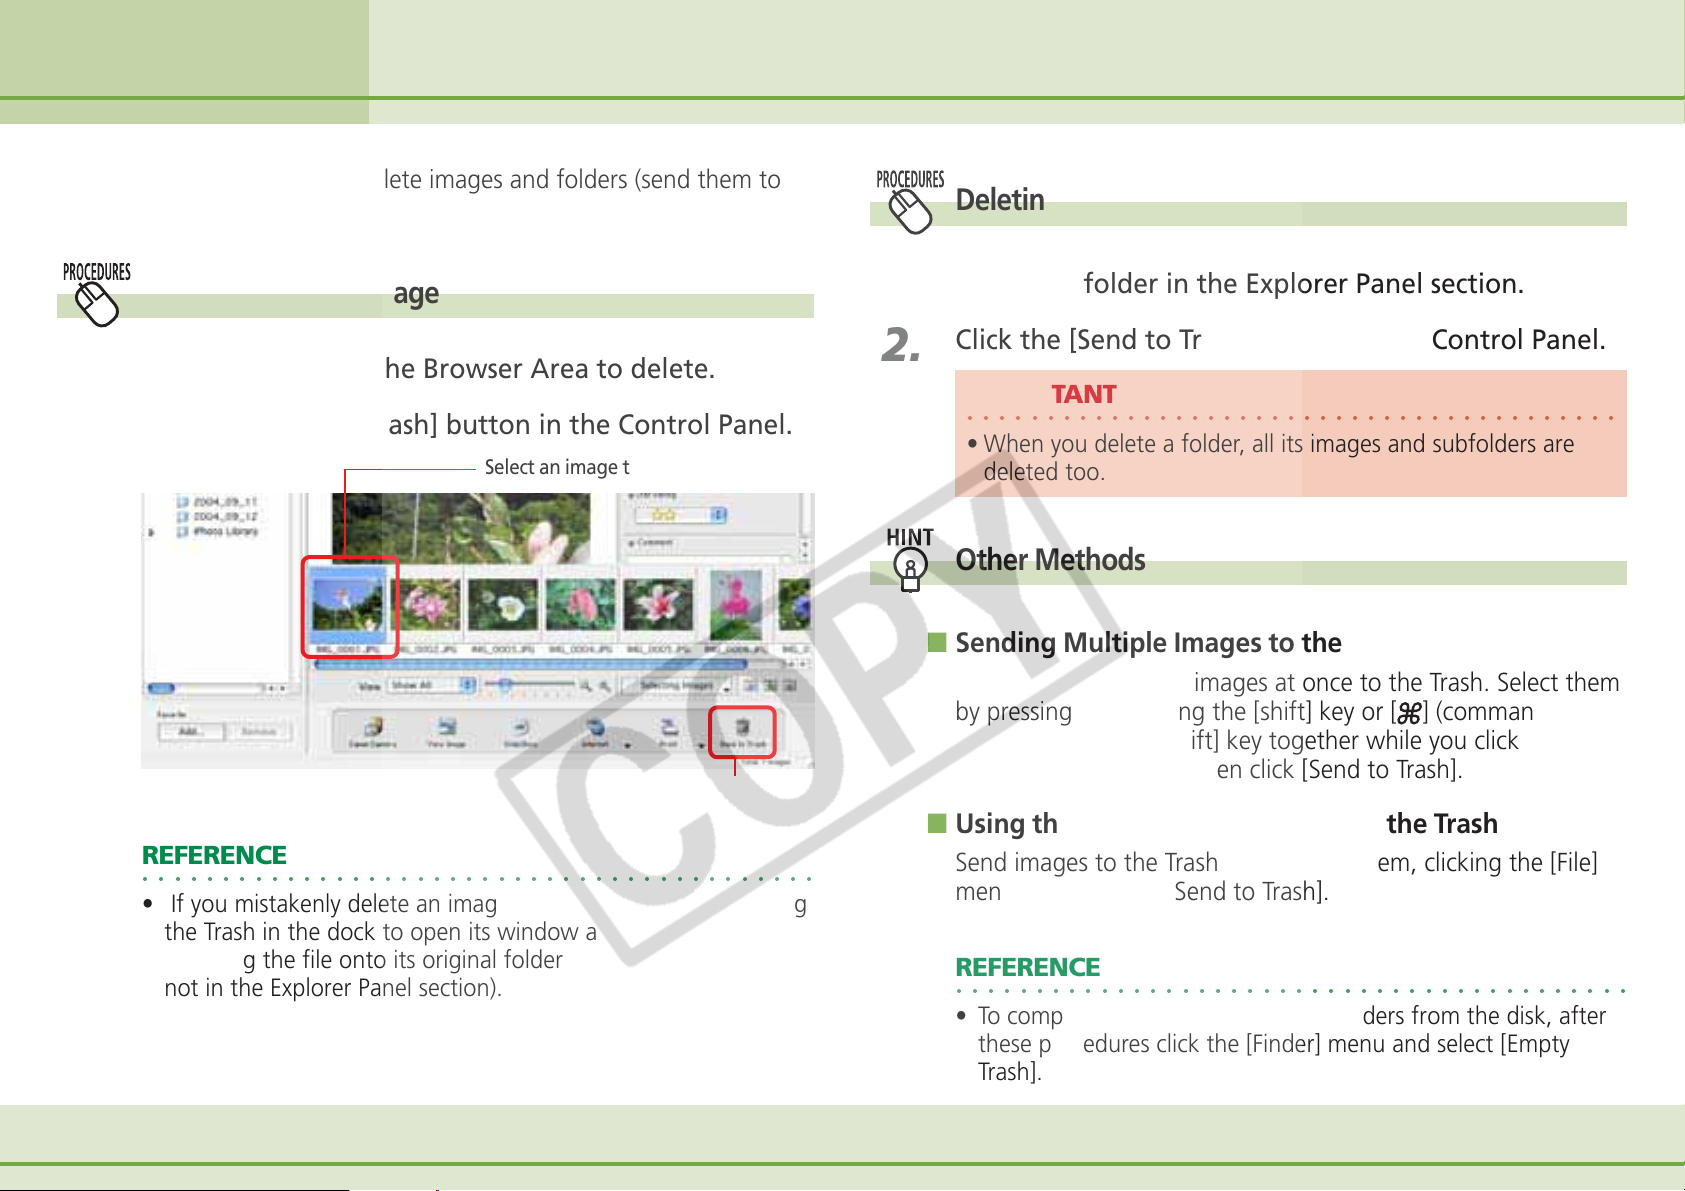
Chapter 5
Organizing Images
This section explains how to delete images and folders (send them to
the Trash).
Deleting Images
Deleting Folders
1.
2.
How to delete an image
Select an image in the Browser Area to delete.
Click the [Send to Trash] button in the Control Panel.
Select an image to delete.
Click here.
REFERENCE
○○○○○○○○○○○○○○○○○○○○○○○○○○○○○○○○○○○○○○○○○○
• If you mistakenly delete an image, retrieve it by double-clicking
the Trash in the dock to open its window and dragging and
dropping the file onto its original folder (in the Finder window
not in the Explorer Panel section).
1.
2.
Select the folder in the Explorer Panel section.
Click the [Send to Trash] button in the Control Panel.
IMPORTANT
○○○○○○○○○○○○○○○○○○○○○○○○○○○○○○○○○○○○○○○○○
• When you delete a folder, all its images and subfolders are
deleted too.
Other Methods
■ Sending Multiple Images to the Trash
You can send multiple images at once to the Trash. Select them
by pressing and holding the [shift] key or [
or the [option] and [shift] key together while you click on
successive images and then click [Send to Trash].
■ Using the Menu to Send Images to the Trash
Send images to the Trash by selecting them, clicking the [File]
menu and selecting [Send to Trash].
REFERENCE
○○○○○○○○○○○○○○○○○○○○○○○○○○○○○○○○○○○○○○○○○○
• To completely delete the images or folders from the disk, after
these procedures click the [Finder] menu and select [Empty
Trash].
] (command) key,
68 ImageBrowser Software User Guide
Page 69
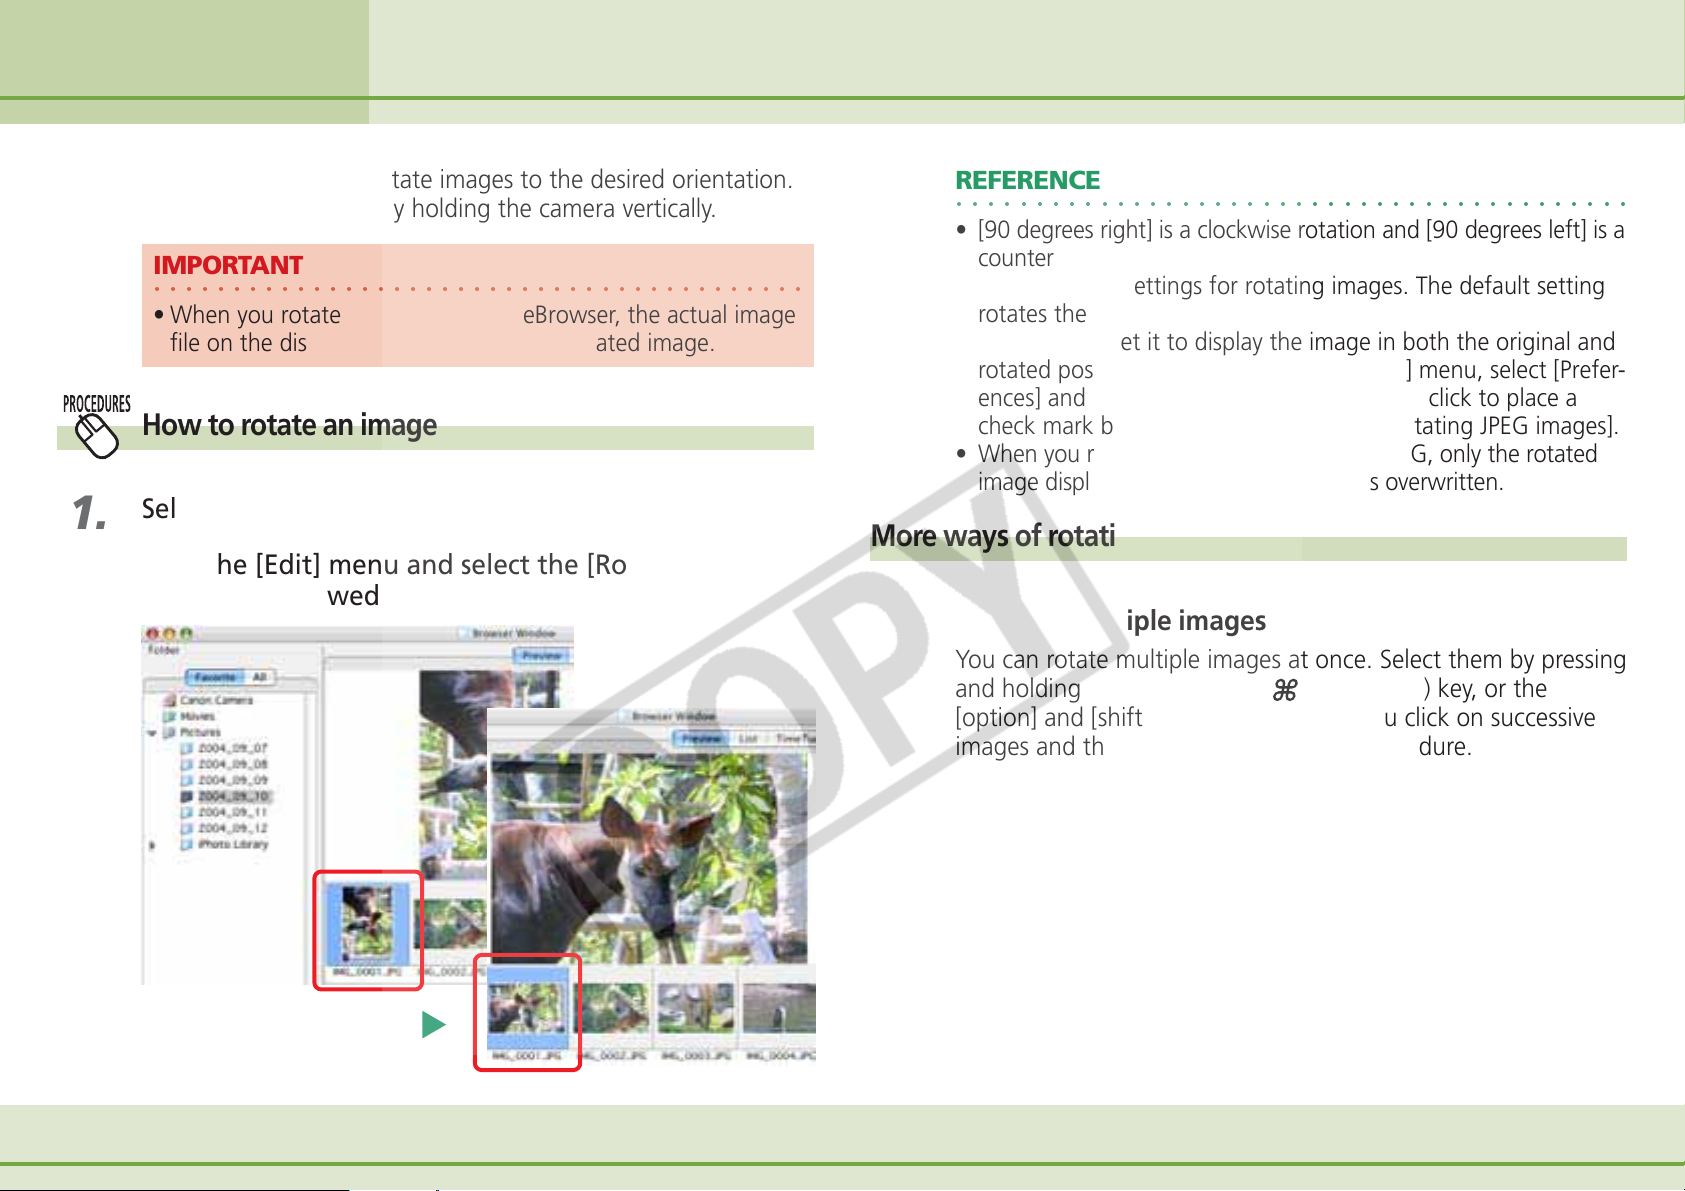
Chapter 5
Organizing Images
Rotating Images
This section describes how to rotate images to the desired orientation.
This is useful for images taken by holding the camera vertically.
IMPORTANT
○○○○○○○○○○○○○○○○○○○○○○○○○○○○○○○○○○○○○○○○○
• When you rotate an image in ImageBrowser, the actual image
file on the disk is over-written with the rotated image.
How to rotate an image
1.
2.
Select the image.
Click the [Edit] menu and select the [Rotate]
submenu, followed by your rotation option.
REFERENCE
○○○○○○○○○○○○○○○○○○○○○○○○○○○○○○○○○○○○○○○○○○
• [90 degrees right] is a clockwise rotation and [90 degrees left] is a
counterclockwise rotation.
• There are two settings for rotating images. The default setting
rotates the original image.
• You can also set it to display the image in both the original and
rotated positions. Click the [ImageBrowser] menu, select [Preferences] and [Processing When Rotating], and click to place a
check mark beside [Retain original when rotating JPEG images].
• When you rotate an image other than a JPEG, only the rotated
image displays. The original image file is overwritten.
More ways of rotating images
■ Rotating multiple images
You can rotate multiple images at once. Select them by pressing
and holding the [shift] key or [
[option] and [shift] key together while you click on successive
images and then perform the rotation procedure.
] (command) key, or the
69 ImageBrowser Software User Guide
Page 70
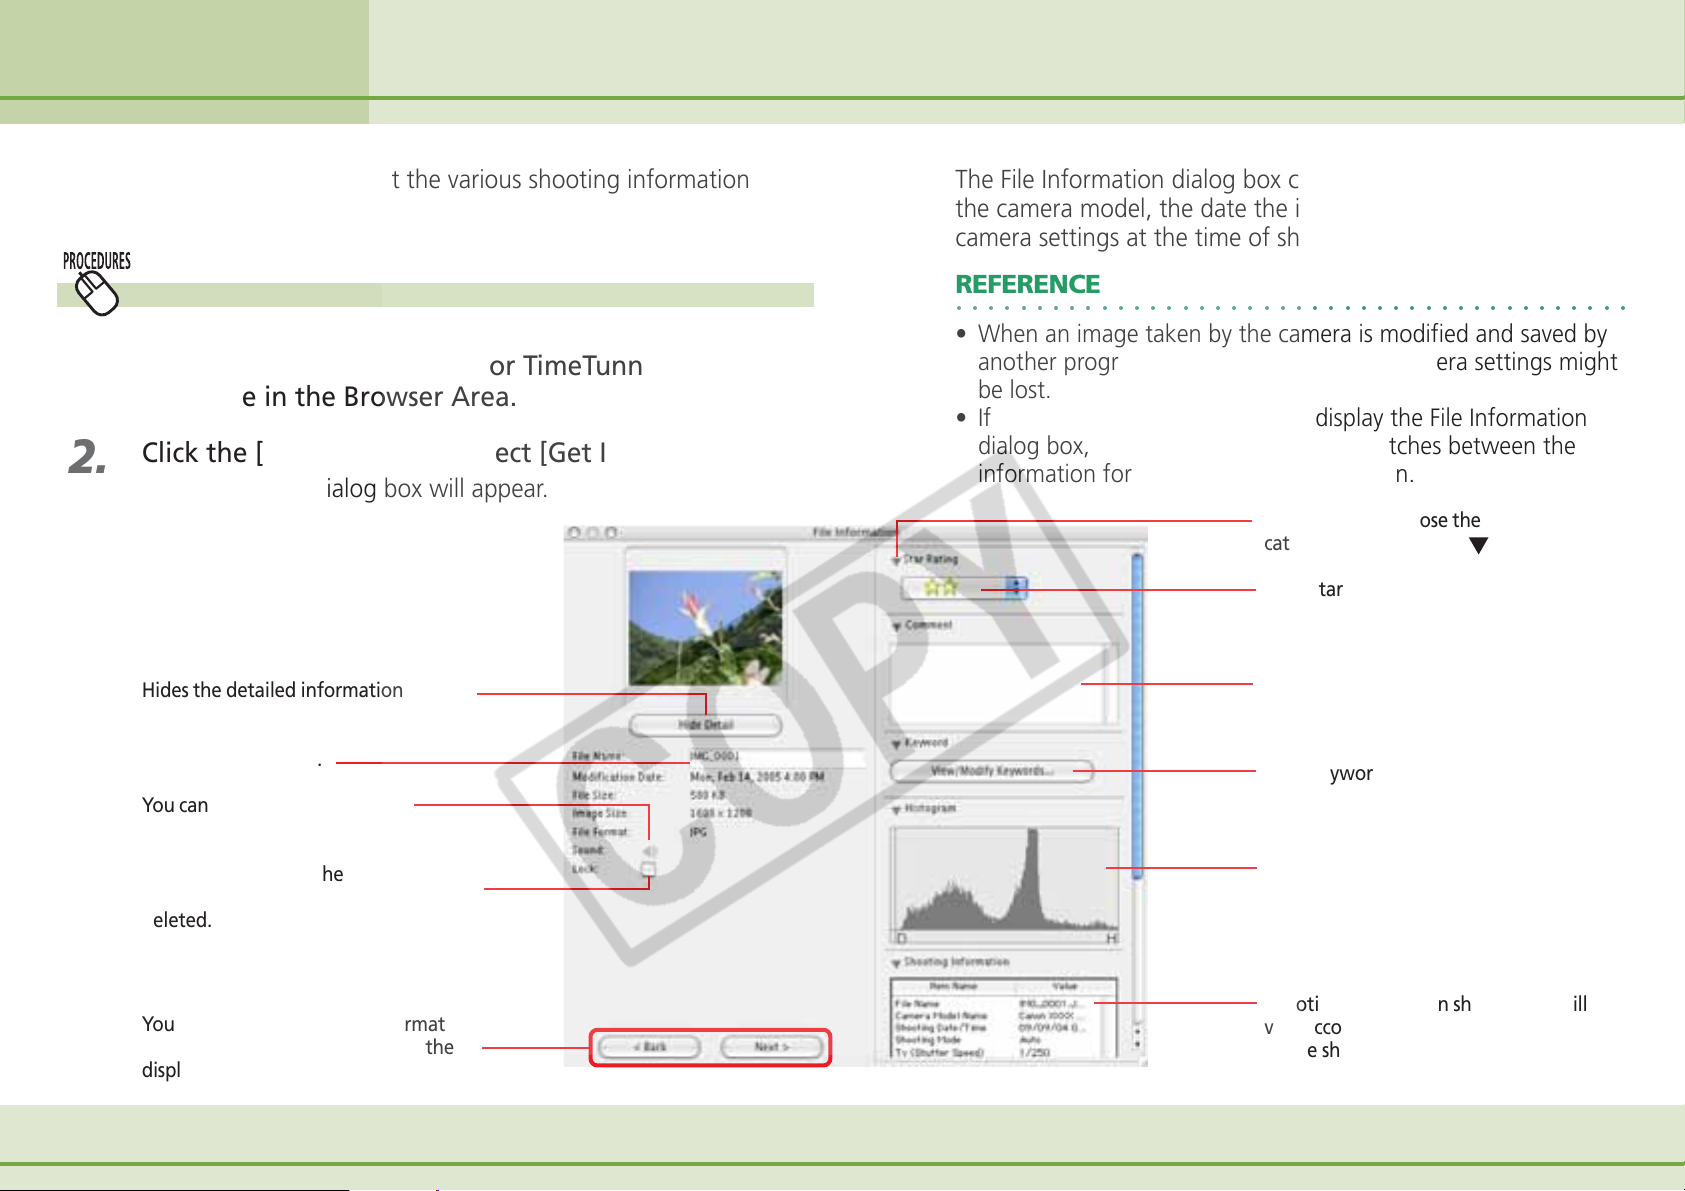
Chapter 5
Organizing Images
Viewing Image Information
You can click images and look at the various shooting information
about them.
How to view image information
1.
2.
Set the display mode to List or TimeTunnel, and select
an image in the Browser Area.
Click the [File] menu, and select [Get Info].
File Information dialog box will appear.
Hides the detailed information display
at the right.
You can rename files.
You can play sounds if they are
attached to images.
The File Information dialog box contains such information as
the camera model, the date the image was shot, and the
camera settings at the time of shooting.
REFERENCE
○○○○○○○○○○○○○○○○○○○○○○○○○○○○○○○○○○○○○○○○○○
• When an image taken by the camera is modified and saved by
another program, information about the camera settings might
be lost.
• If you select multiple images and display the File Information
dialog box, clicking [Back] and [Next] switches between the
information for the images in the selection.
You can open or close the details for each
category by clicking the
Set a Star Rating.
Input a comment.
Set a keyword.
beside it.
Placing a check mark here prevents the
image from being overwritten or
deleted.
You can view the shooting information
for the image next or previous to the
displayed image.
70 ImageBrowser Software User Guide
Histogram
Shooting information shown here will
vary according to the camera model and
image shooting settings.
Page 71
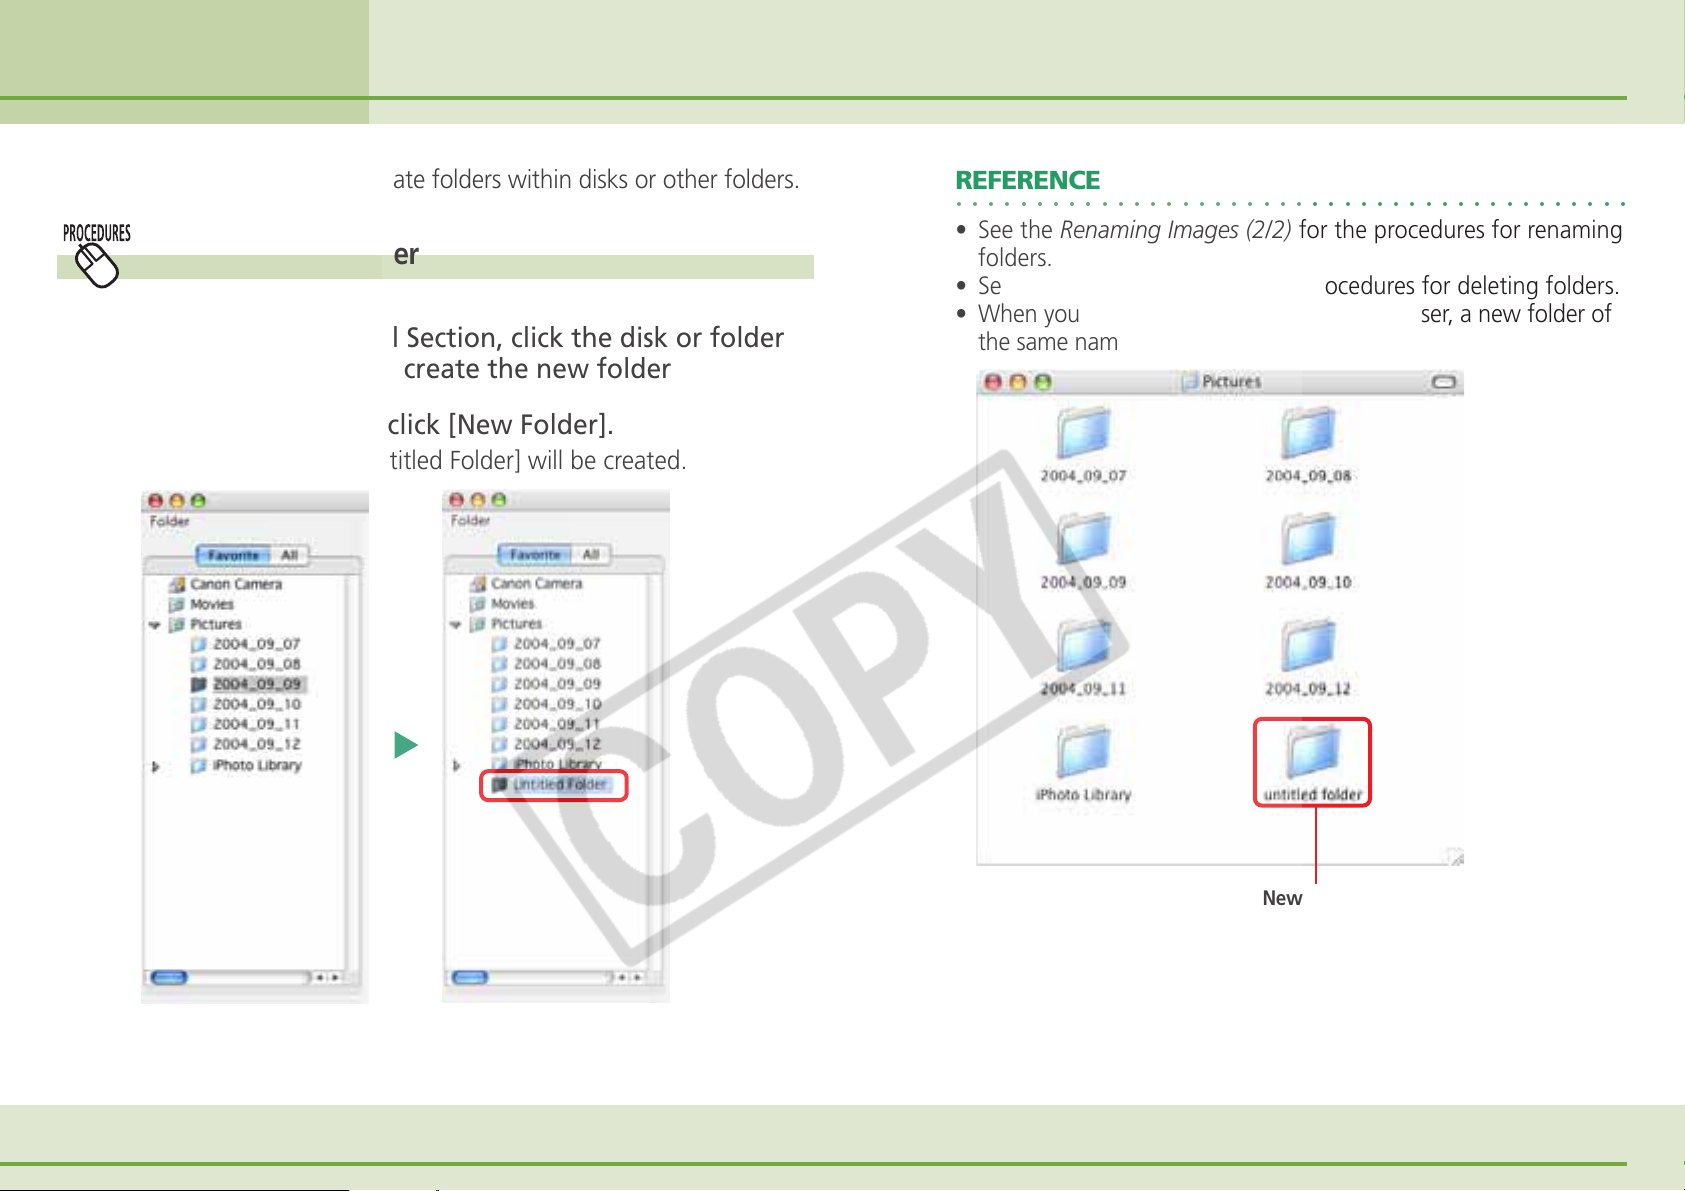
Chapter 5
Organizing Images
Creating Folders
This section describes how to create folders within disks or other folders.
How to create a folder
1.
2.
In the Explorer Panel Section, click the disk or folder
in which you wish to create the new folder
On the [File] menu, click [New Folder].
A new folder called [Untitled Folder] will be created.
REFERENCE
○○○○○○○○○○○○○○○○○○○○○○○○○○○○○○○○○○○○○○○○○○
• See the Renaming Images (2/2) for the procedures for renaming
folders.
• See the Deleting Images for the procedures for deleting folders.
• When you create a new folder in ImageBrowser, a new folder of
the same name appears in the Finder.
71 ImageBrowser Software User Guide
New Folder
Page 72
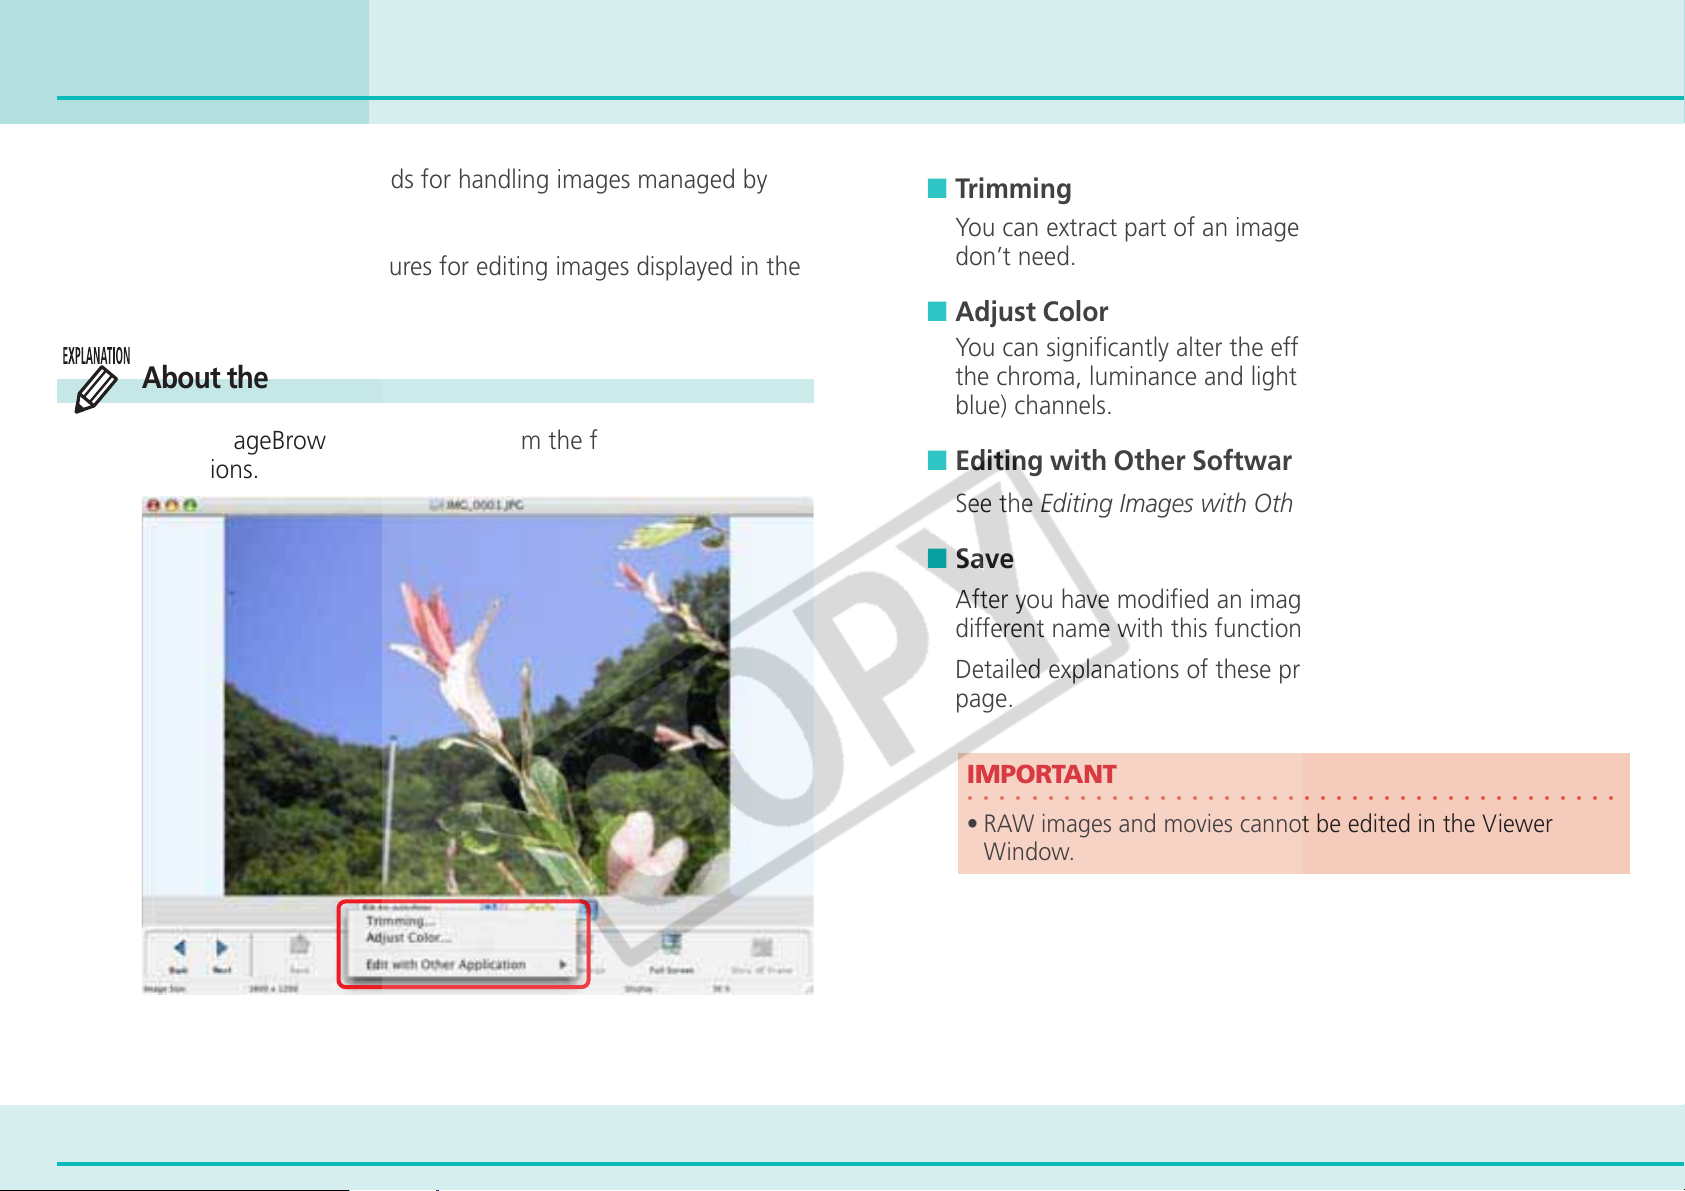
Chapter 6
Using Supplementary Features
Editing Images (1/4)
This chapter explains the methods for handling images managed by
ImageBrowser.
This section explains the procedures for editing images displayed in the
Viewer Window.
About the Editing Features
Using ImageBrowser, you can perform the following editing
operations.
■ Trimming
You can extract part of an image, leaving out parts that you
don’t need.
■ Adjust Color
You can significantly alter the effect of an image by adjusting
the chroma, luminance and lightness of the RGB (red, green,
blue) channels.
■ Editing with Other Software
See the Editing Images with Other Software.
■ Save
After you have modified an image, you can save it under a
different name with this function.
Detailed explanations of these procedures start on the next
page.
72 ImageBrowser Software User Guide
IMPORTANT
○○○○○○○○○○○○○○○○○○○○○○○○○○○○○○○○○○○○○○○○○
• RAW images and movies cannot be edited in the Viewer
Window.
Page 73
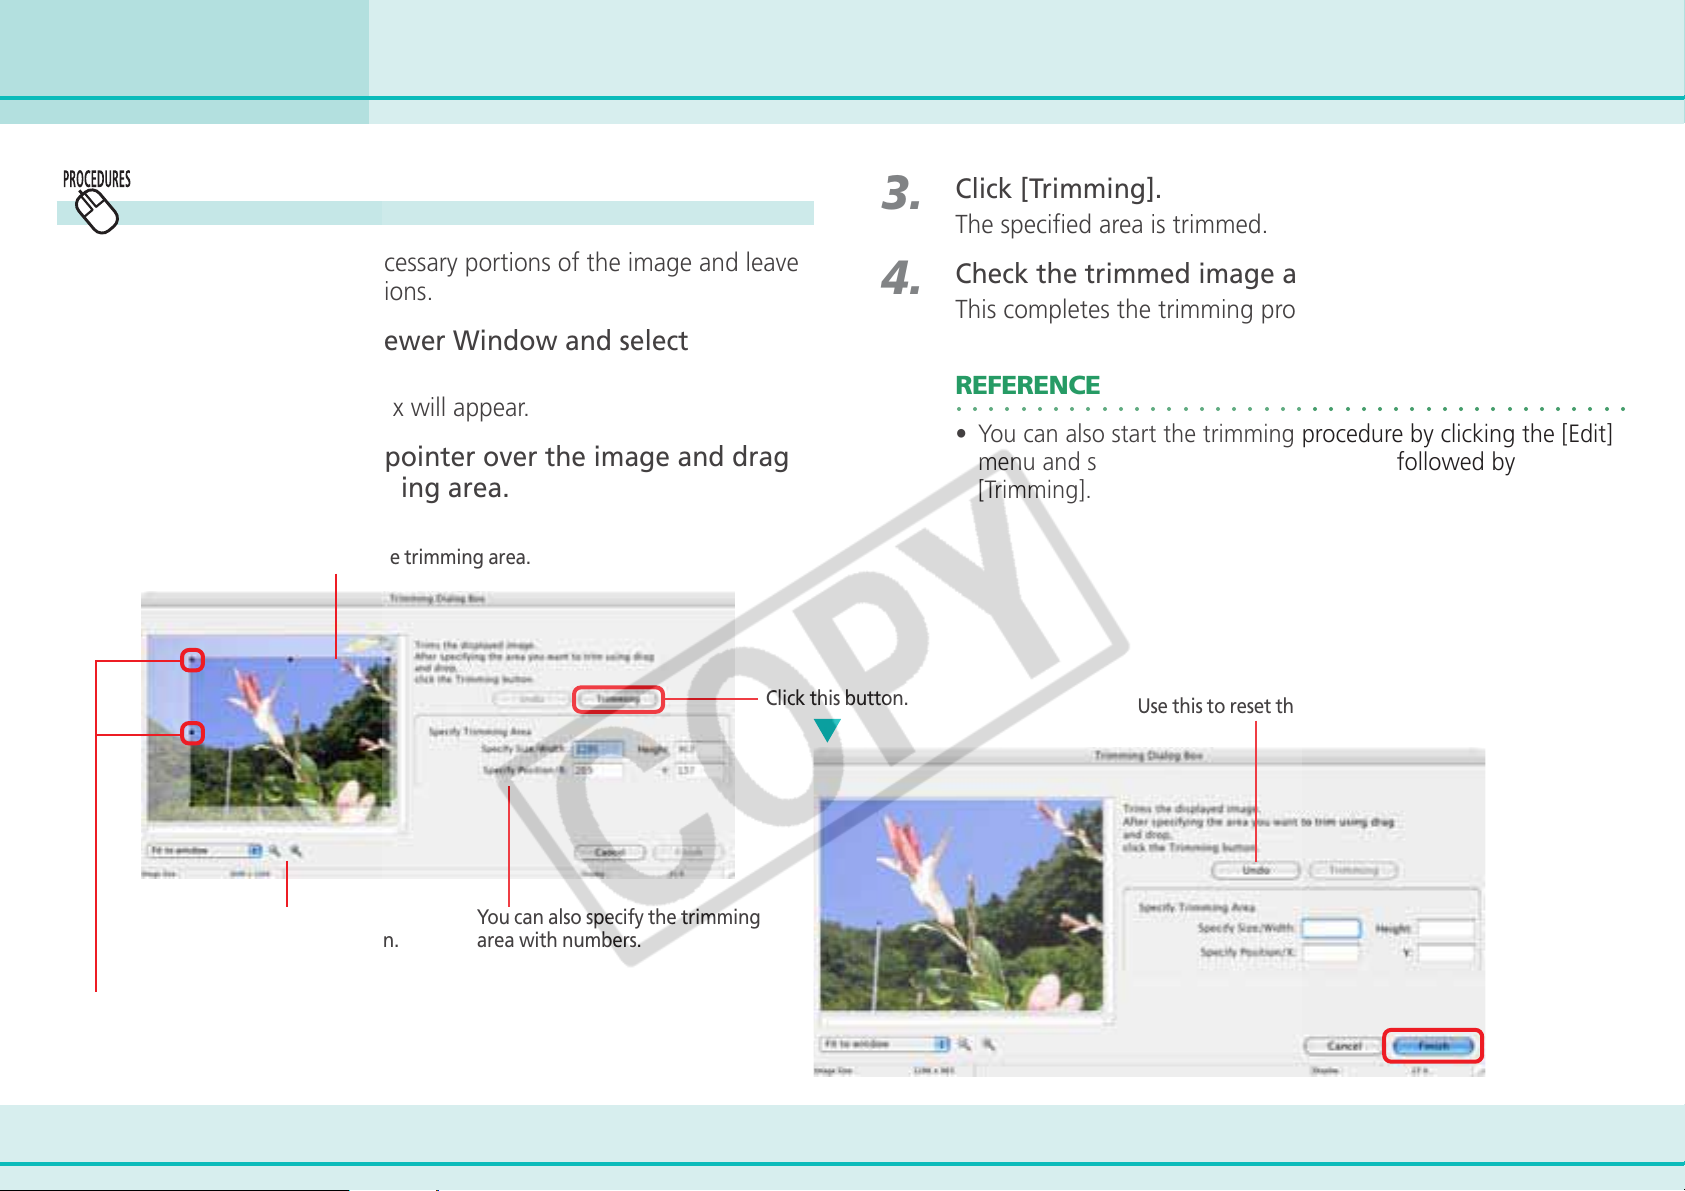
Chapter 6
Using Supplementary Features
Editing Images (2/4)
1.
2.
Trimming
Use this to delete unnecessary portions of the image and leave
only the necessary portions.
Click [Edit] in the Viewer Window and select
[Trimming].
The Trimming Dialog Box will appear.
Position the mouse pointer over the image and drag
it to select the trimming area.
Drag to specify the trimming area.
Click this button.
3.
4.
Click [Trimming].
The specified area is trimmed.
Check the trimmed image and click [Finish].
This completes the trimming procedure.
REFERENCE
○○○○○○○○○○○○○○○○○○○○○○○○○○○○○○○○○○○○○○○○○○
• You can also start the trimming procedure by clicking the [Edit]
menu and selecting the [Edit Still Image], followed by
[Trimming].
Use this to reset the specified area.
You can change the
display magnification.
You can adjust the trimming area by
dragging the corners or center points
of the sides.
73 ImageBrowser Software User Guide
You can also specify the trimming
area with numbers.
Page 74
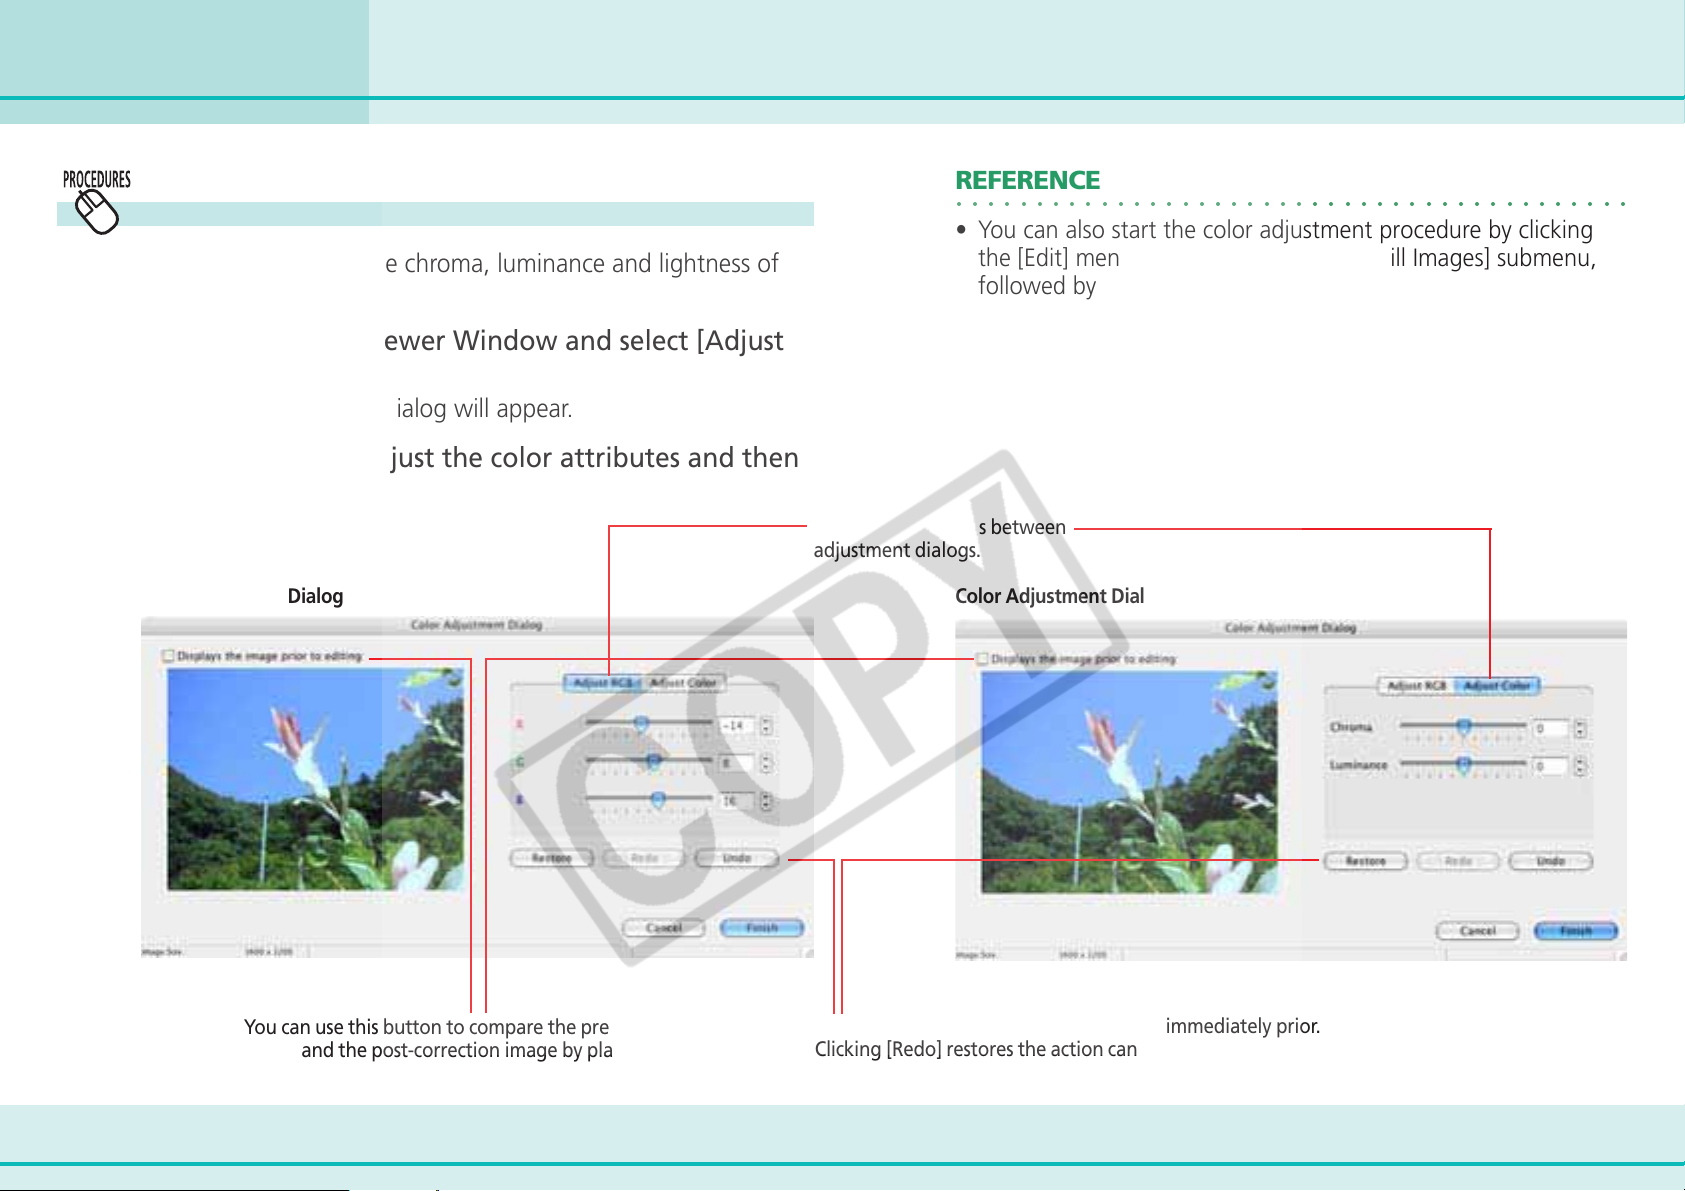
Chapter 6
Using Supplementary Features
Adjusting Color
This function adjusts the chroma, luminance and lightness of
the RGB channels.
Editing Images (3/4)
REFERENCE
○○○○○○○○○○○○○○○○○○○○○○○○○○○○○○○○○○○○○○○○○○
• You can also start the color adjustment procedure by clicking
the [Edit] menu and selecting the [Edit Still Images] submenu,
followed by [Adjust Color].
1.
2.
Click [Edit] in the Viewer Window and select [Adjust
Color].
The Color Adjustment Dialog will appear.
Use the sliders to adjust the color attributes and then
click [Finish].
This button switches between
adjustment dialogs.
RGB Adjustment Dialog Color Adjustment Dialog
You can use this button to compare the pre-correction
image and the post-correction image by placing a check
mark here.
74 ImageBrowser Software User Guide
Clicking [Undo] reverses the action taken immediately prior.
Clicking [Redo] restores the action cancelled by clicking Undo.
Clicking [Restore] restores the image to the state before the adjustments.
Page 75
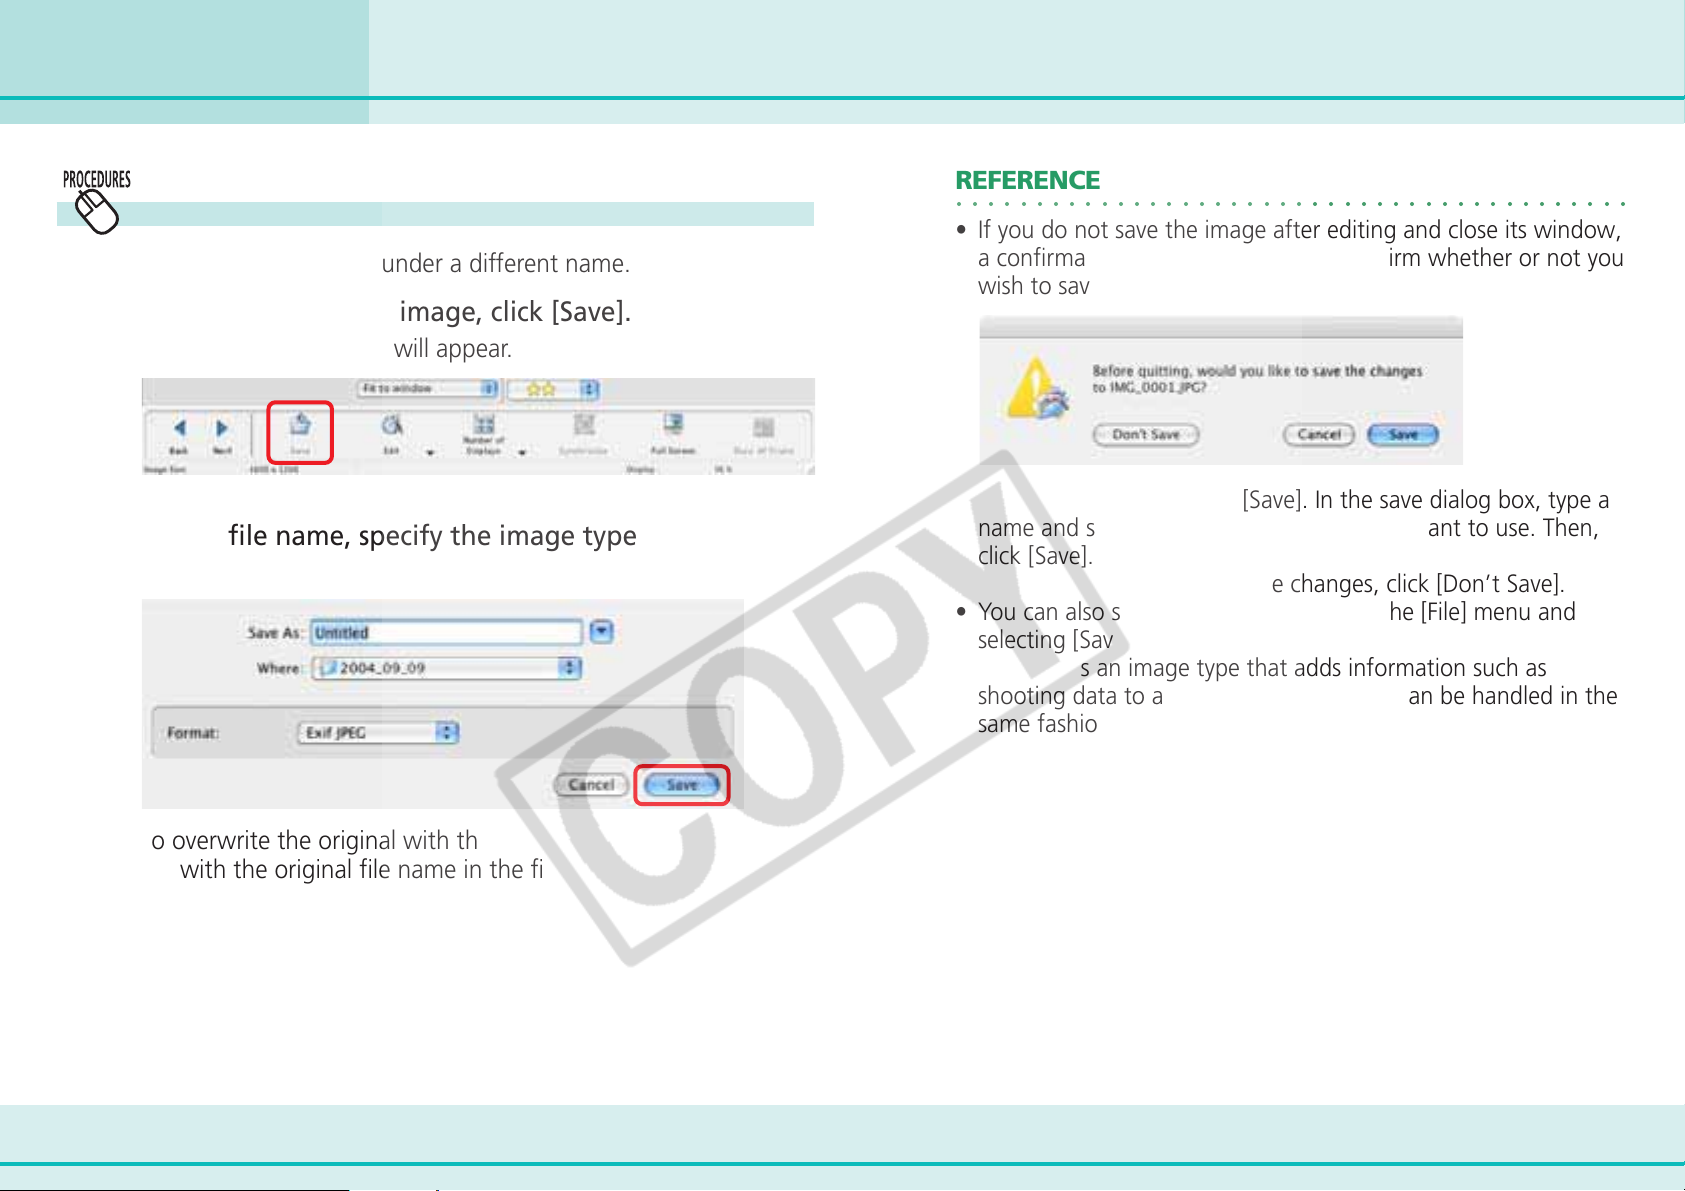
Chapter 6
Using Supplementary Features
Saving images
Save the edited image under a different name.
1.
2.
After you modify an image, click [Save].
The file save dialog box will appear.
Type a file name, specify the image type and click
[Save].
Editing Images (4/4)
REFERENCE
○○○○○○○○○○○○○○○○○○○○○○○○○○○○○○○○○○○○○○○○○○
• If you do not save the image after editing and close its window,
a confirmation dialog will display to confirm whether or not you
wish to save it.
To save the changes, click [Save]. In the save dialog box, type a
name and specify the image type that you want to use. Then,
click [Save].
If you do not want to save the changes, click [Don’t Save].
• You can also save the image by clicking the [File] menu and
selecting [Save] or [Save As].
• Exif JPEG is an image type that adds information such as
shooting data to a JPEG image. This data can be handled in the
same fashion as conventional JPEG images.
To overwrite the original with the edited image, save the new
file with the original file name in the file save dialog box.
75 ImageBrowser Software User Guide
Page 76
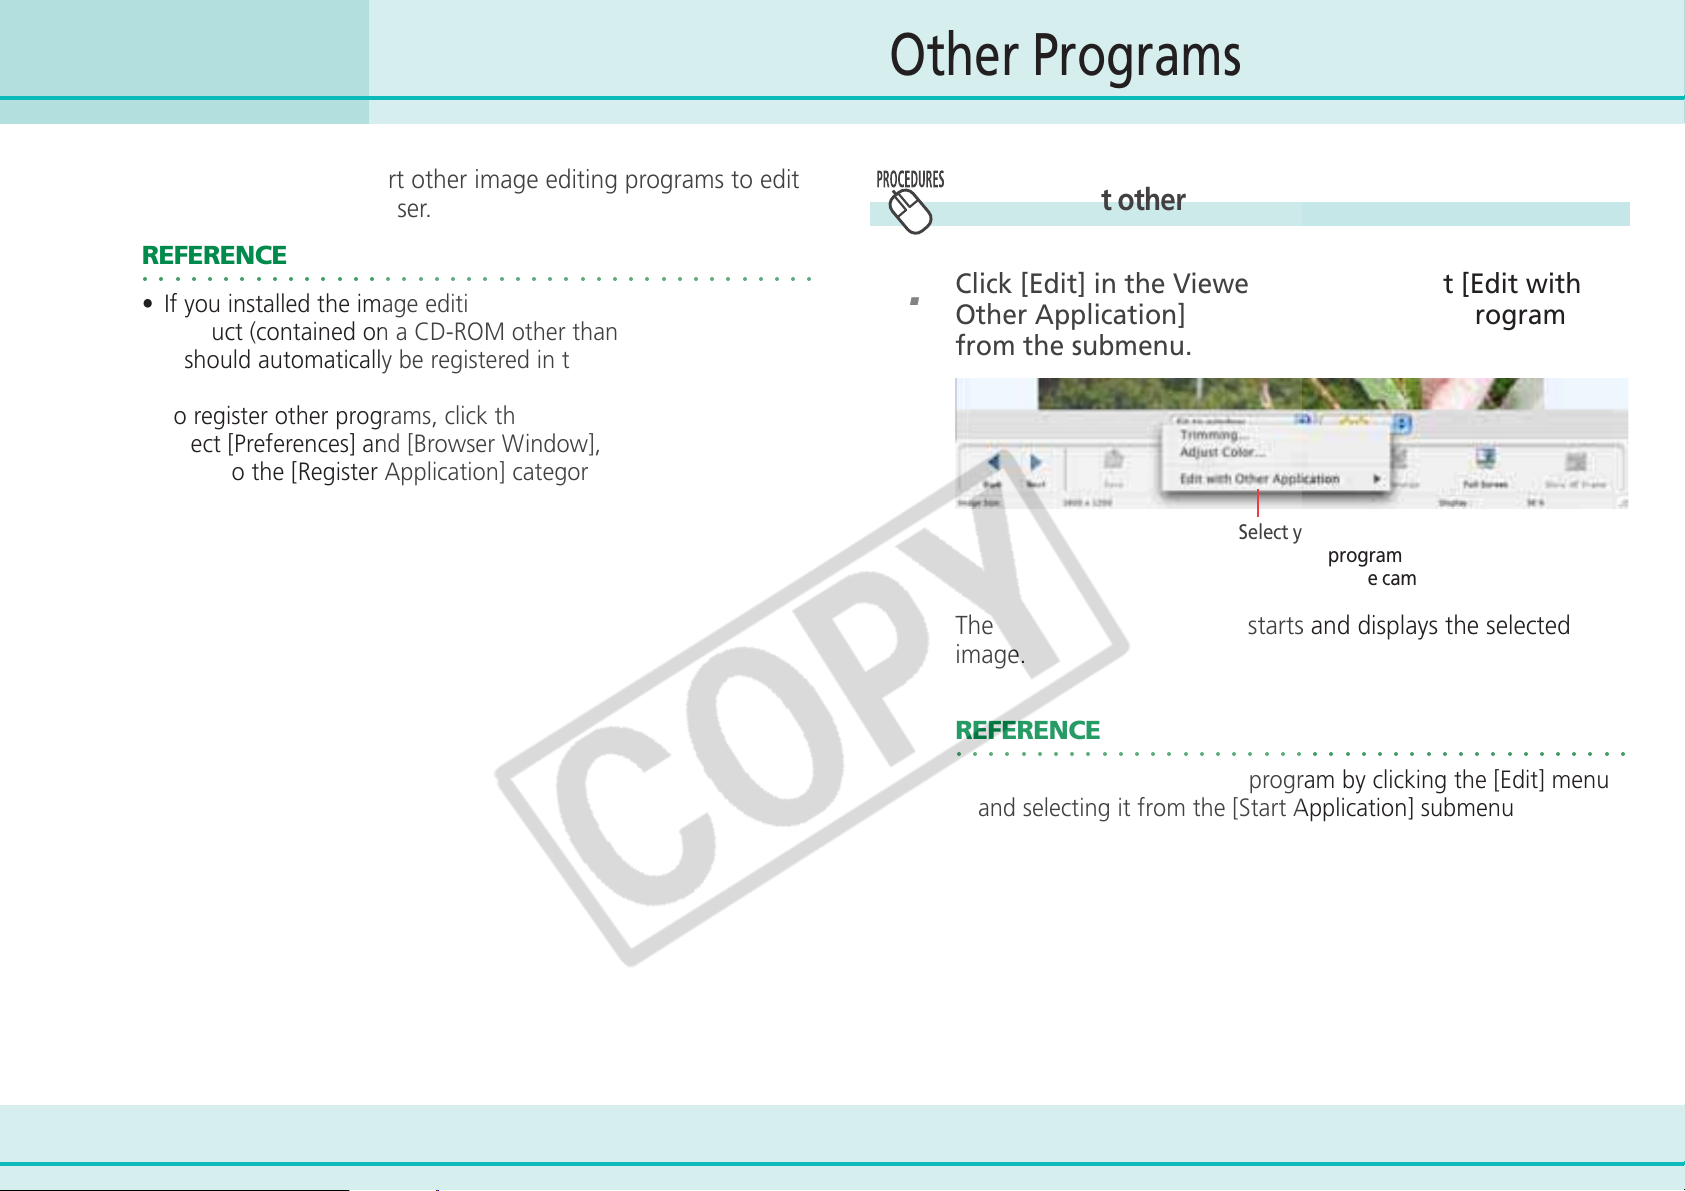
Chapter 6
Using Supplementary Features
Editing Images with Other Programs
This section explains how to start other image editing programs to edit
an image selected in ImageBrowser.
REFERENCE
○○○○○○○○○○○○○○○○○○○○○○○○○○○○○○○○○○○○○○○○○○
• If you installed the image editing program included with your
product (contained on a CD-ROM other than the Solution Disk),
it should automatically be registered in the ImageBrowser
menu.
• To register other programs, click the [ImageBrowser] menu and
select [Preferences] and [Browser Window], and add the pro-
gram to the [Register Application] category.
1.
How to start other image editing programs
Click [Edit] in the Viewer Window, select [Edit with
Other Application] and select an editing program
from the submenu.
Select your application from this
submenu (program names vary
according to the camera model).
76 ImageBrowser Software User Guide
The image editing program starts and displays the selected
image.
REFERENCE
○○○○○○○○○○○○○○○○○○○○○○○○○○○○○○○○○○○○○○○○○○
• You can also start another program by clicking the [Edit] menu
and selecting it from the [Start Application] submenu.
Page 77
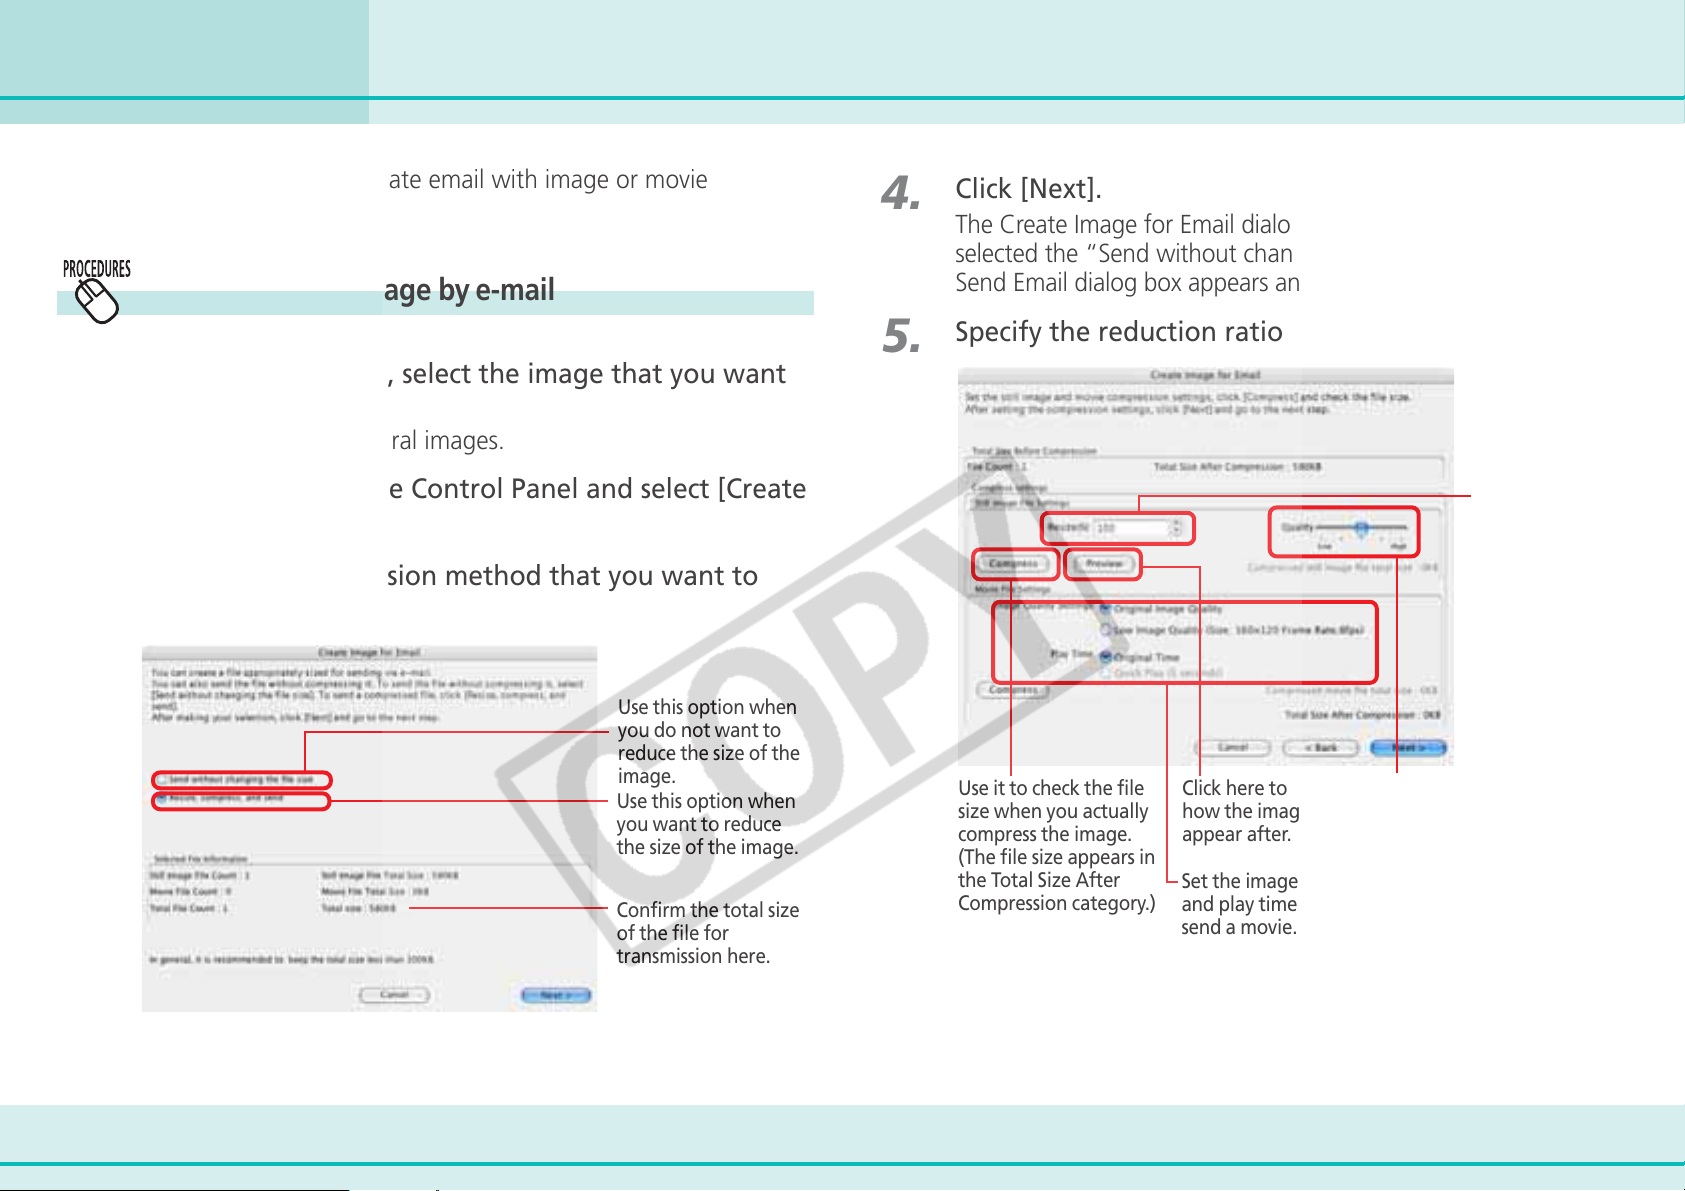
Chapter 6
Using Supplementary Features
Creating Images for E-mail (1/2)
This section explains how to create email with image or movie
attachments.
How to send an image by e-mail
1.
2.
3.
In the Browser Area, select the image that you want
to send.
You can also select several images.
Click [Internet] in the Control Panel and select [Create
Image for Email].
Specify the compression method that you want to
apply to the image.
Use this option when
you do not want to
reduce the size of the
image.
Use this option when
you want to reduce
the size of the image.
Confirm the total size
of the file for
transmission here.
4.
5.
Click [Next].
The Create Image for Email dialog box appears. (However, if you
selected the “Send without changing the file size” option, the
Send Email dialog box appears and you can proceed to step 7.)
Specify the reduction ratio and the image quality.
Specify the
reduction ratio
relative to the
original size of
the image.
Use it to check the file
size when you actually
compress the image.
(The file size appears in
the Total Size After
Compression category.)
Click here to preview
how the image will
appear after.
Set the image quality
and play time here to
send a movie.
Specify the image quality.
(The lower the quality,
the rougher the image
becomes, but the size of
the file also becomes
smaller.)
77 ImageBrowser Software User Guide
Page 78
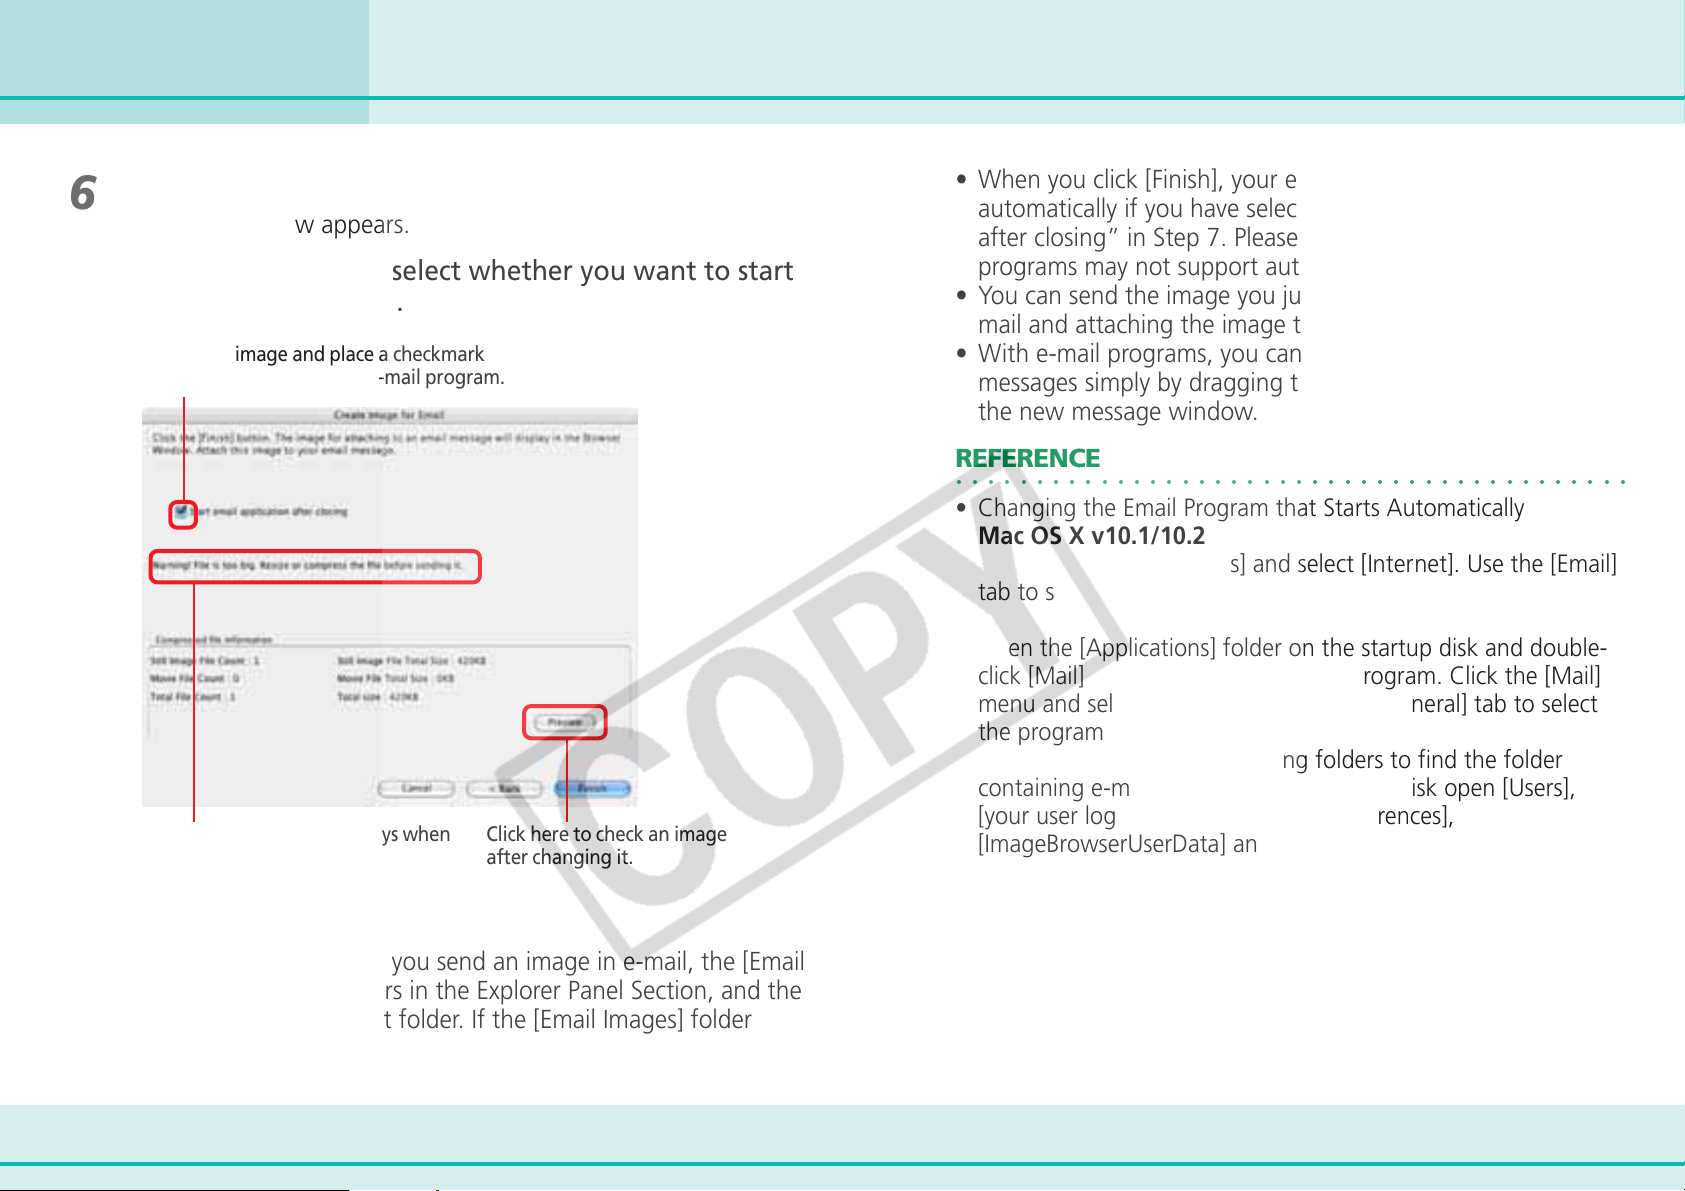
Chapter 6
Using Supplementary Features
Creating Images for E-mail (2/2)
6.
7.
Click [Next].
The last window appears.
Save the image and select whether you want to start
your e-mail program.
Save the image and place a checkmark here
if you want to start your e-mail program.
A warning message displays when
the file size is large.
Click here to check an image
after changing it.
• When you click [Finish], your e-mail program starts
automatically if you have selected “Start email application
after closing” in Step 7. Please note that some e-mail
programs may not support auto startup.
• You can send the image you just created by opening a new email and attaching the image to the e-mail message.
• With e-mail programs, you can attach images to e-mail
messages simply by dragging them from the Browser Area to
the new message window.
REFERENCE
○○○○○○○○○○○○○○○○○○○○○○○○○○○○○○○○○○○○○○○○○○
• Changing the Email Program that Starts Automatically
Mac OS X v10.1/10.2
Open [System Preferences] and select [Internet]. Use the [Email]
tab to select the program.
Mac OS X v10.3
Open the [Applications] folder on the startup disk and doubleclick [Mail] within it to start the Mail program. Click the [Mail]
menu and select [Preferences]. Use the [General] tab to select
the program.
• In Mac OS X, open the following folders to find the folder
containing e-mail images. On the startup disk open [Users],
[your user log-in name], [Library], [Preferences],
[ImageBrowserUserData] and [Mail].
8.
Click [Finish].
• If this is the first time you send an image in e-mail, the [Email
Images] folder appears in the Explorer Panel Section, and the
image is saved in that folder. If the [Email Images] folder
already exists, the image is saved in that folder.
78 ImageBrowser Software User Guide
Page 79
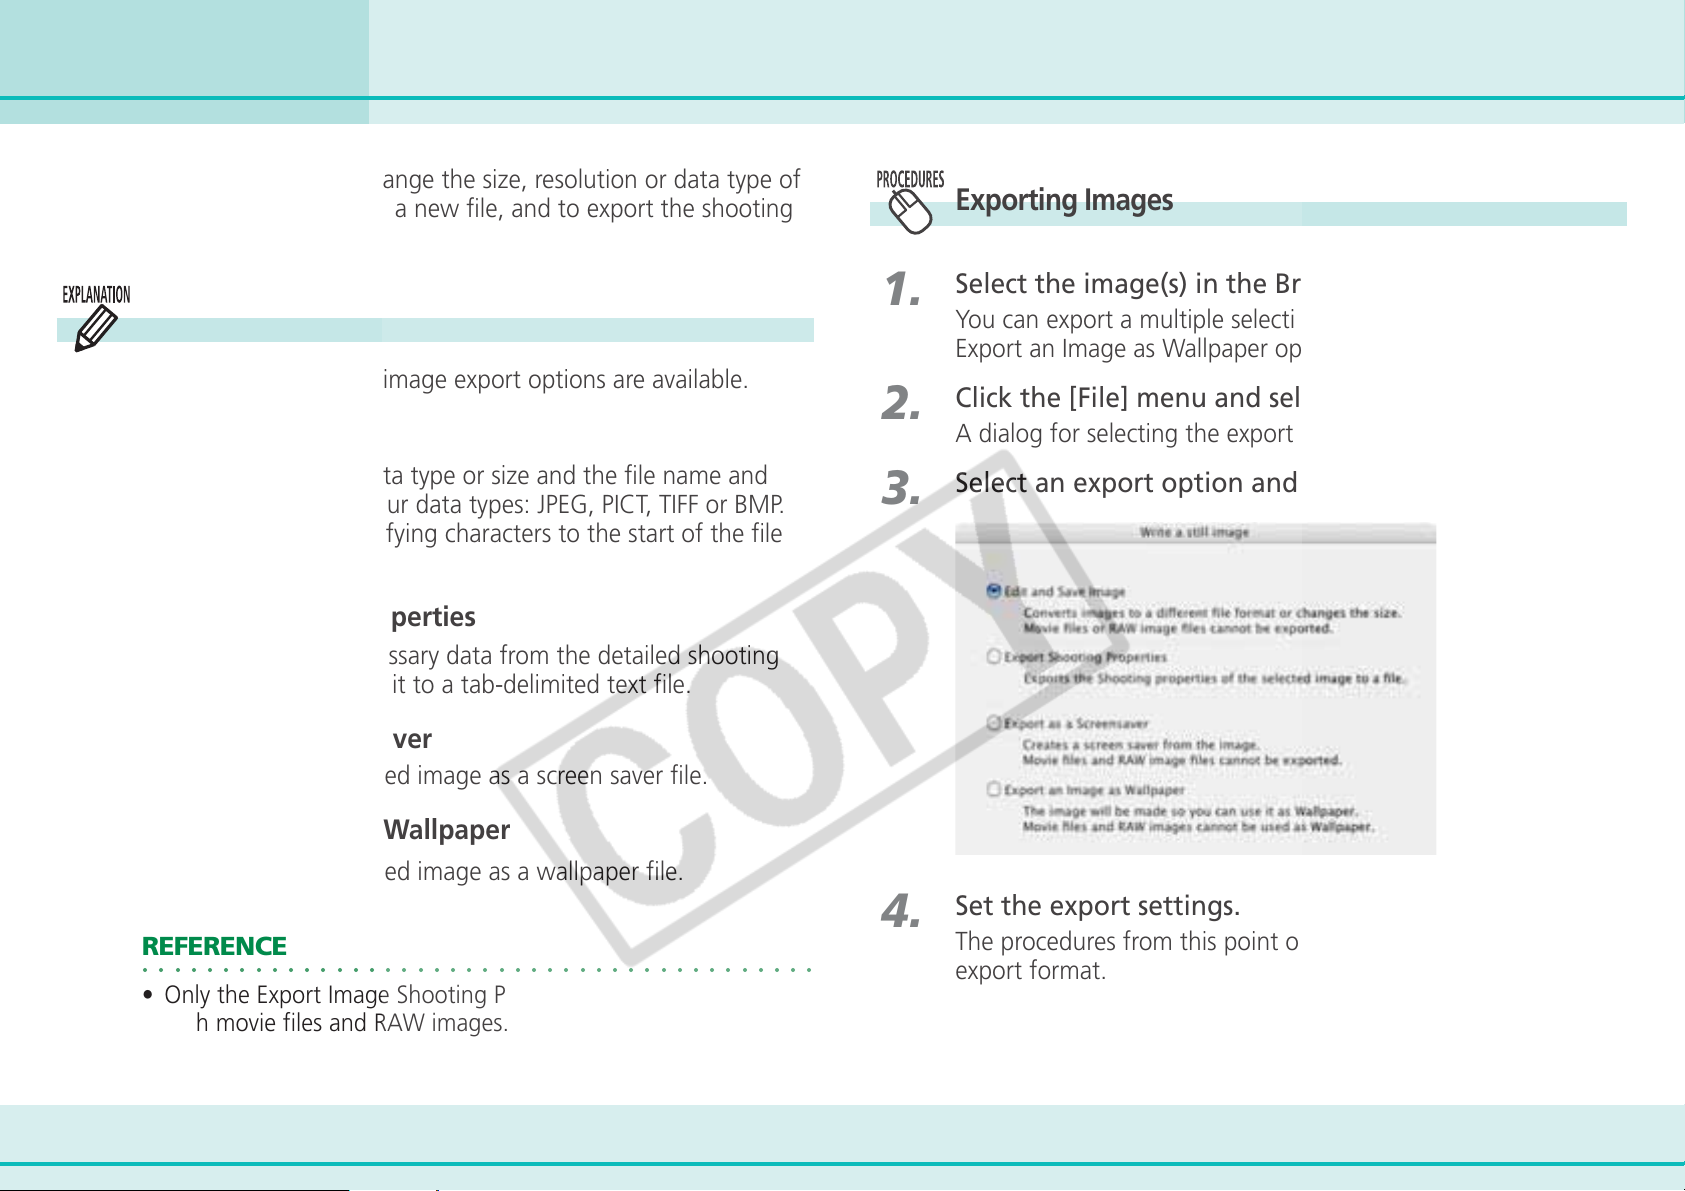
Chapter 6
Using Supplementary Features
This section explains how to change the size, resolution or data type of
a selected image and write it to a new file, and to export the shooting
information to a text file.
Exporting Images (1 / 3)
Exporting Images
Export Options
The following types of image export options are available.
■ Edit and Save Image
You can change the data type or size and the file name and
save it. Select one of four data types: JPEG, PICT, TIFF or BMP.
You can also add identifying characters to the start of the file
name.
■ Export Shooting Properties
You can select the necessary data from the detailed shooting
information and export it to a tab-delimited text file.
■ Export as a Screensaver
You can export a selected image as a screen saver file.
■ Export an Image as Wallpaper
1.
2.
3.
Select the image(s) in the Browser Area.
You can export a multiple selection of images except when the
Export an Image as Wallpaper option is selected.
Click the [File] menu and select [Export Images].
A dialog for selecting the export options will open.
Select an export option and click [Next].
You can export a selected image as a wallpaper file.
REFERENCE
○○○○○○○○○○○○○○○○○○○○○○○○○○○○○○○○○○○○○○○○○○
• Only the Export Image Shooting Properties option can be used
with movie files and RAW images.
79 ImageBrowser Software User Guide
4.
Set the export settings.
The procedures from this point onward vary according to the
export format.
Page 80
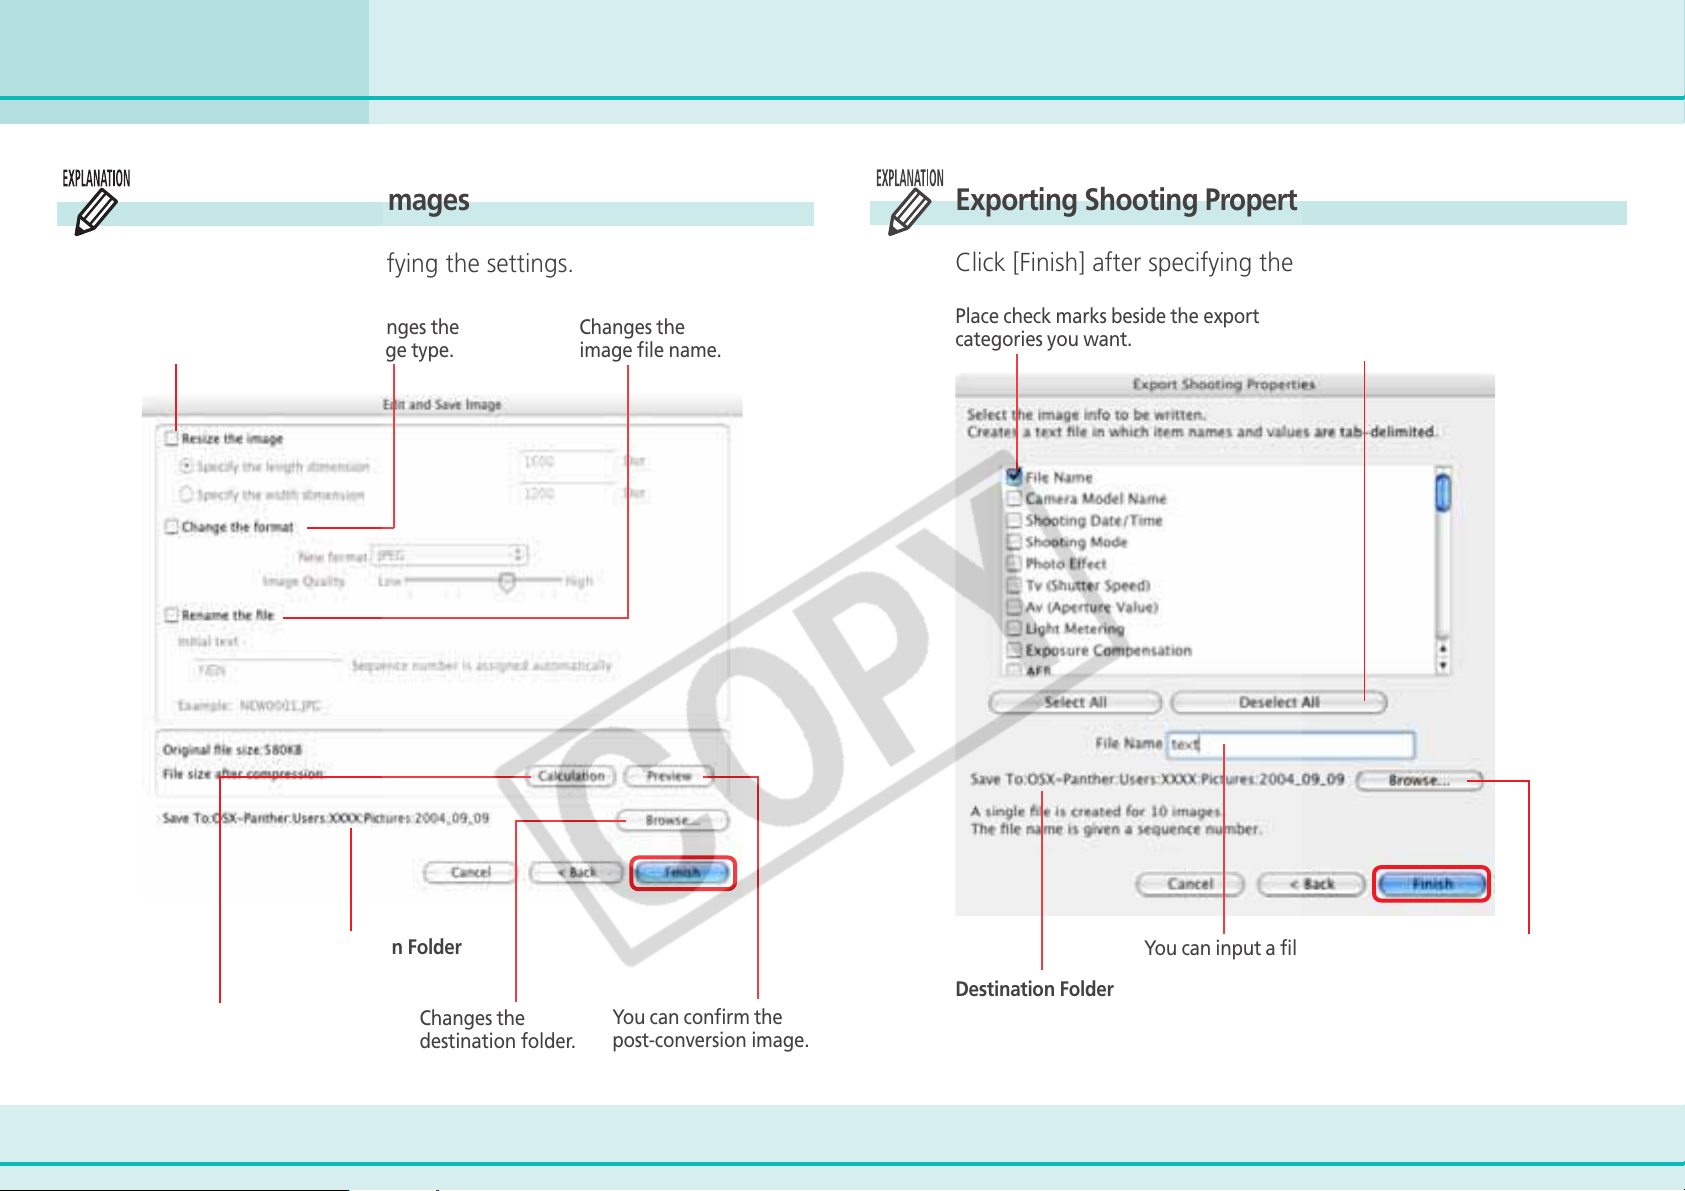
Chapter 6
Using Supplementary Features
Exporting Images (2/ 3)
Editing and Saving Images
Click [Finish] after specifying the settings.
Changes the
image size.
Changes the
image type.
Changes the
image file name.
Exporting Shooting Properties
Click [Finish] after specifying the settings.
Place check marks beside the export
categories you want.
You can insert or remove
all check marks at once.
Destination Folder
Calculates the postconversion file size.
Changes the
destination folder.
80 ImageBrowser Software User Guide
You can confirm the
post-conversion image.
Destination Folder
You can input a file name.
Changes the destination
folder.
Page 81
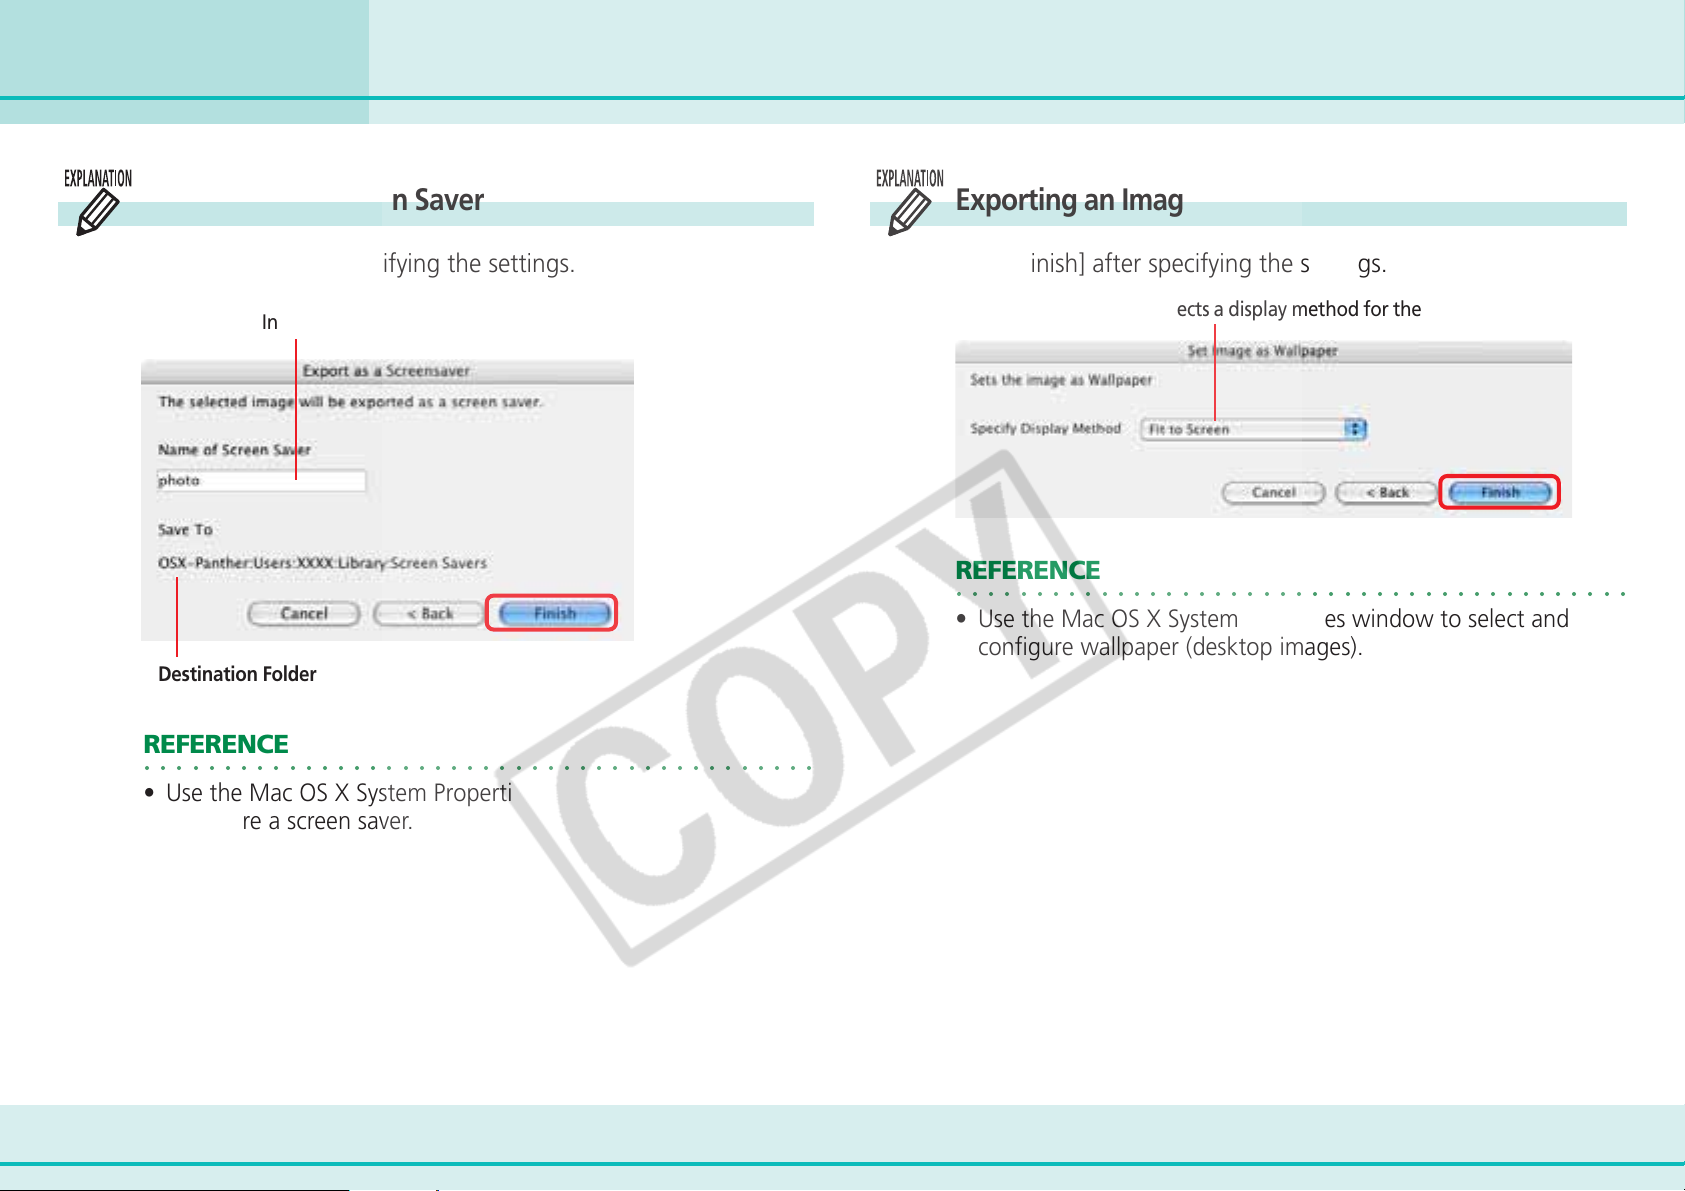
Chapter 6
Using Supplementary Features
Exporting Images (3/ 3)
Exporting as a Screen Saver
Click [Finish] after specifying the settings.
Input a screen saver name.
Destination Folder
REFERENCE
○○○○○○○○○○○○○○○○○○○○○○○○○○○○○○○○○○○○○○○○○○
• Use the Mac OS X System Properties window to select and
configure a screen saver.
Exporting an Image as Wallpaper
Click [Finish] after specifying the settings.
Selects a display method for the image.
REFERENCE
○○○○○○○○○○○○○○○○○○○○○○○○○○○○○○○○○○○○○○○○○○
• Use the Mac OS X System Properties window to select and
configure wallpaper (desktop images).
81 ImageBrowser Software User Guide
Page 82
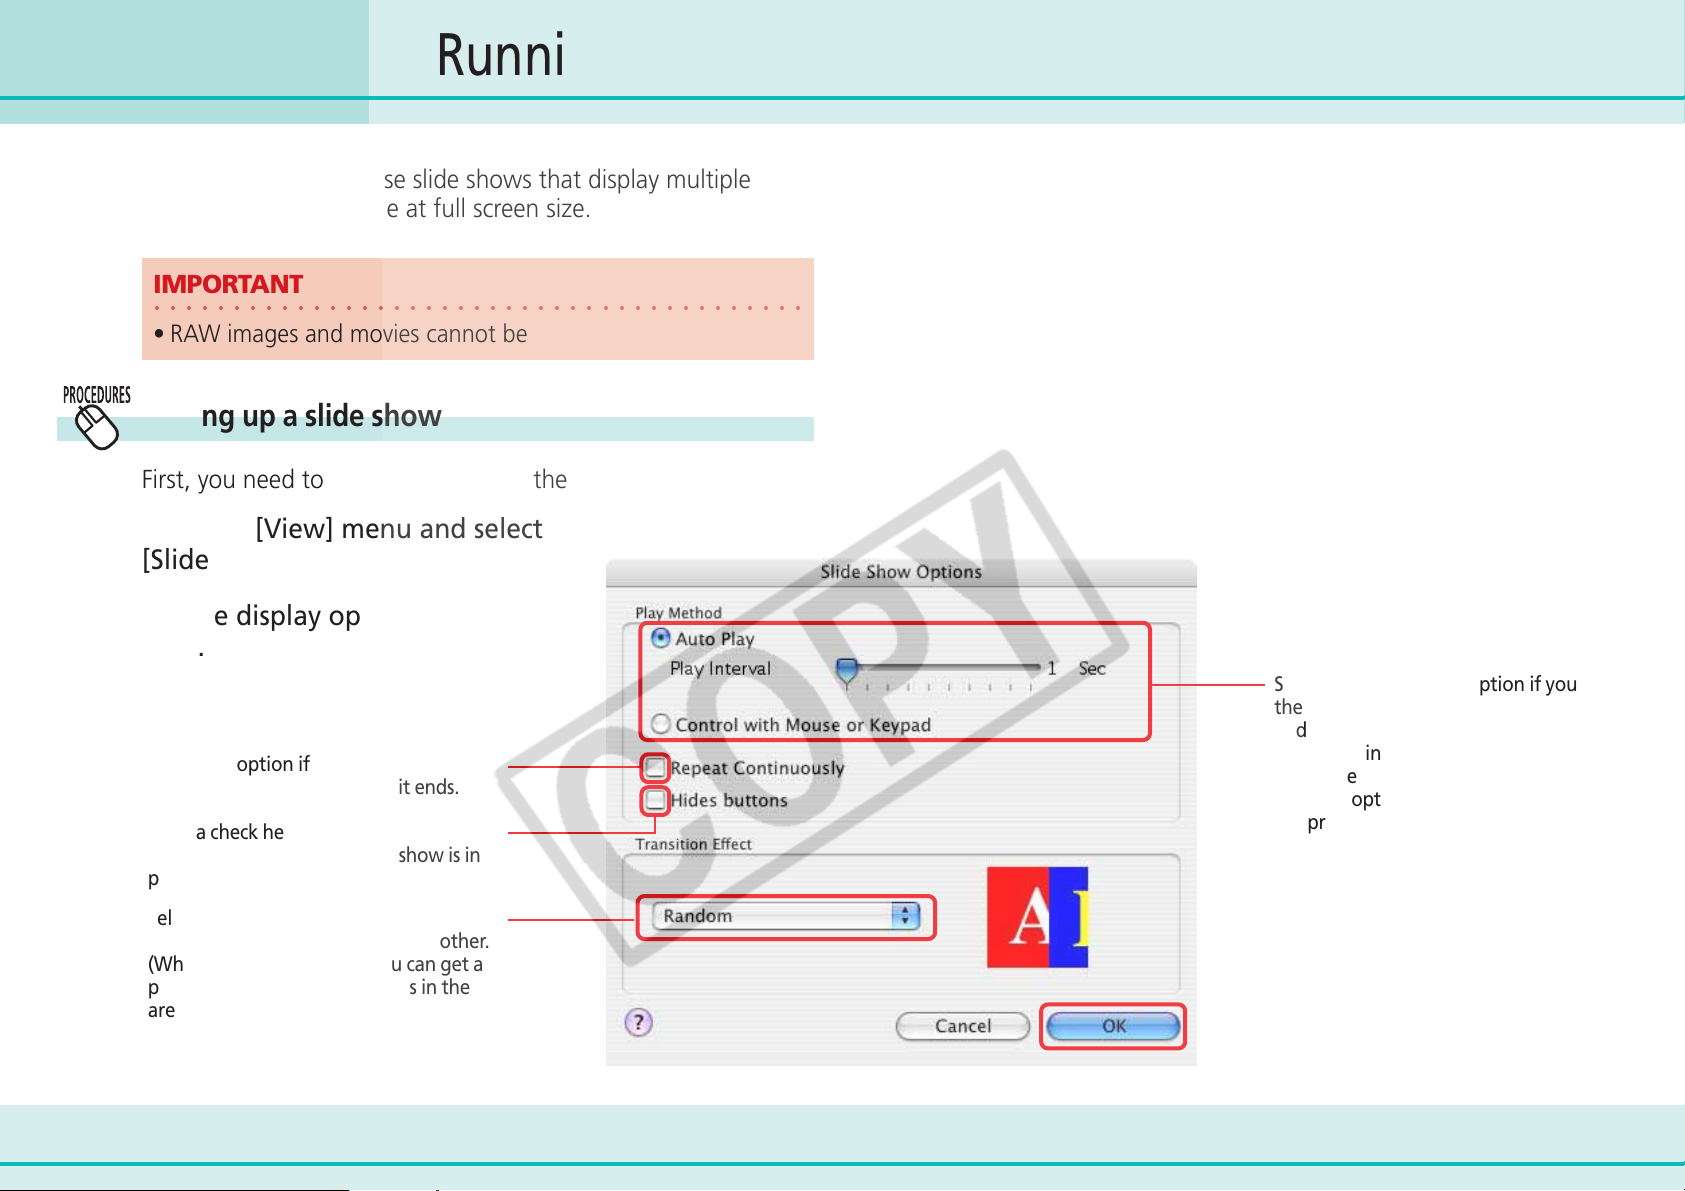
Chapter 6
Using Supplementary Features
Running Slide Shows (1/3)
This section describes how to use slide shows that display multiple
selections of images in sequence at full screen size.
IMPORTANT
○○○○○○○○○○○○○○○○○○○○○○○○○○○○○○○○○○○○○○○○○
• RAW images and movies cannot be shown in slide shows.
Setting up a slide show
First, you need to specify how to run the slide show.
1.
2.
Click the [View] menu and select
[Slide Show Options].
Set the display options and click
[OK].
Select this option if you want to continue
running the slide show when it ends.
Place a check here if you do not wish the
buttons to show while a slide show is in
progress.
Select the transition effect to be used
when moving from one slide to another.
(When you click an effect, you can get a
preview of how the effect looks in the
area to the right.)
Select the “Auto Play” option if you want
the slide show to proceed automatically
and go to the next slide after a
predetermined number of seconds.
Select the “Control with Mouse or
keypad” option if you want to control
the progress of the slide show manually.
82 ImageBrowser Software User Guide
Page 83
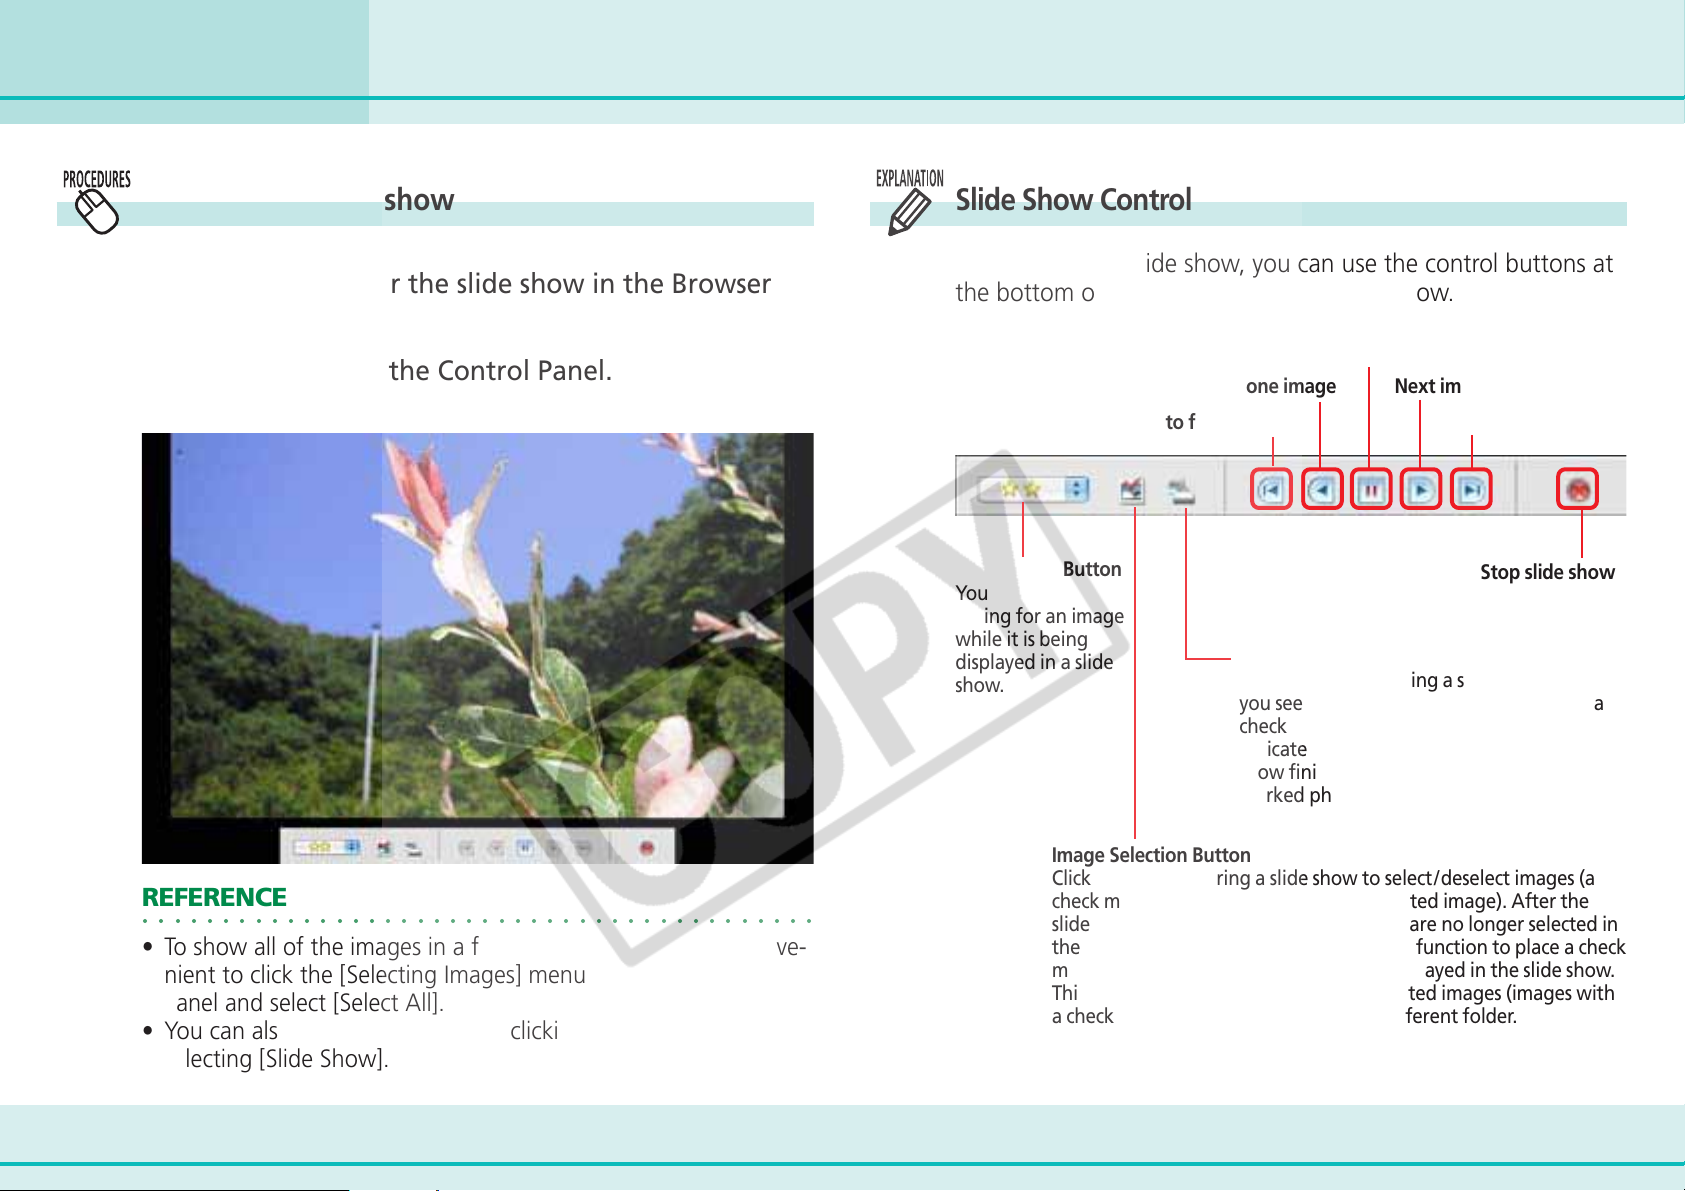
Chapter 6
Using Supplementary Features
Running Slide Shows (2/3)
1.
2.
How to run a slide show
Select the images for the slide show in the Browser
Area.
Click [SlideShow] in the Control Panel.
Slide show will start.
Slide Show Control Panel
While running a slide show, you can use the control buttons at
the bottom of the window to control the show.
Pause
Back one image Next image
Go to first image Advance to last image
Star Ratings Button
You can set the Star
Rating for an image
while it is being
displayed in a slide
show.
Print Settings Button
Click this button during a slide show when
you see an image you would like to print (a
check mark appears beside the button to
indicate marked images). After the slide
show finishes, a dialog for printing the
marked photos will automatically appear.
Stop slide show
REFERENCE
○○○○○○○○○○○○○○○○○○○○○○○○○○○○○○○○○○○○○○○○○○
• To show all of the images in a folder in a slide show, it is conve-
nient to click the [Selecting Images] menu in the Display Control
Panel and select [Select All].
• You can also start a slide show by clicking the [View] menu and
selecting [Slide Show].
83 ImageBrowser Software User Guide
Image Selection Button
Click this button during a slide show to select/ deselect images (a
check mark on the button indicates a selected image). After the
slide show finishes, the deselected images are no longer selected in
the Browser Window. You can also use this function to place a check
mark on needed images while they are displayed in the slide show.
This is useful when you wish to move selected images (images with
a check mark) in the Browser Area to a different folder.
Page 84
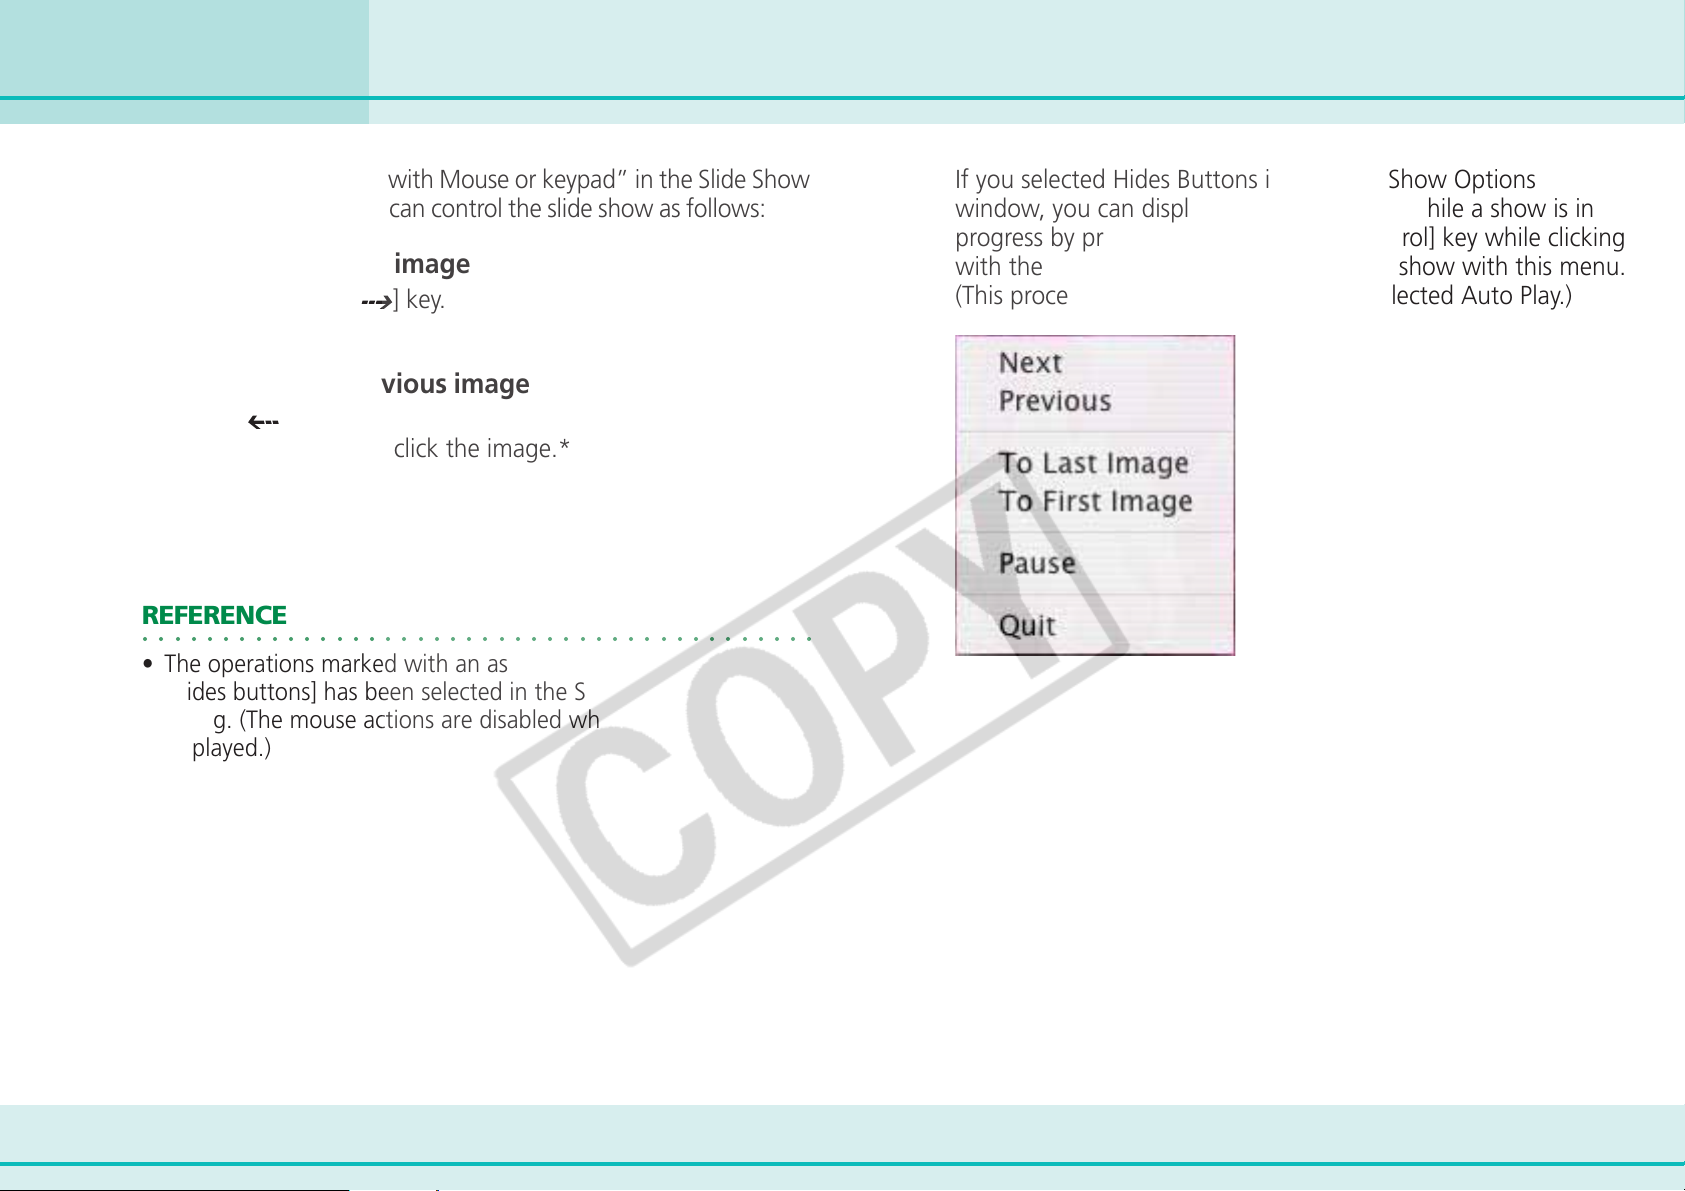
Chapter 6
Using Supplementary Features
Running Slide Shows (3/3)
If you selected “Control with Mouse or keypad” in the Slide Show
Options dialog box, you can control the slide show as follows:
■ To move to the next image
Press the [return] or [ ] key.
Click the image.*
■ To return to the previous image
Press the [ ] key.
Hold the [shift] key and click the image.*
■ To end the show
Press the [esc] key.
REFERENCE
○○○○○○○○○○○○○○○○○○○○○○○○○○○○○○○○○○○○○○○○○○
• The operations marked with an asterisk can only be used when
[Hides buttons] has been selected in the Slide Show Options
dialog. (The mouse actions are disabled when the buttons are
displayed.)
If you selected Hides Buttons in the Slide Show Options
window, you can display the control menu while a show is in
progress by pressing and holding the [control] key while clicking
with the mouse. You can control the slide show with this menu.
(This procedure can also be used if you selected Auto Play.)
84 ImageBrowser Software User Guide
Page 85
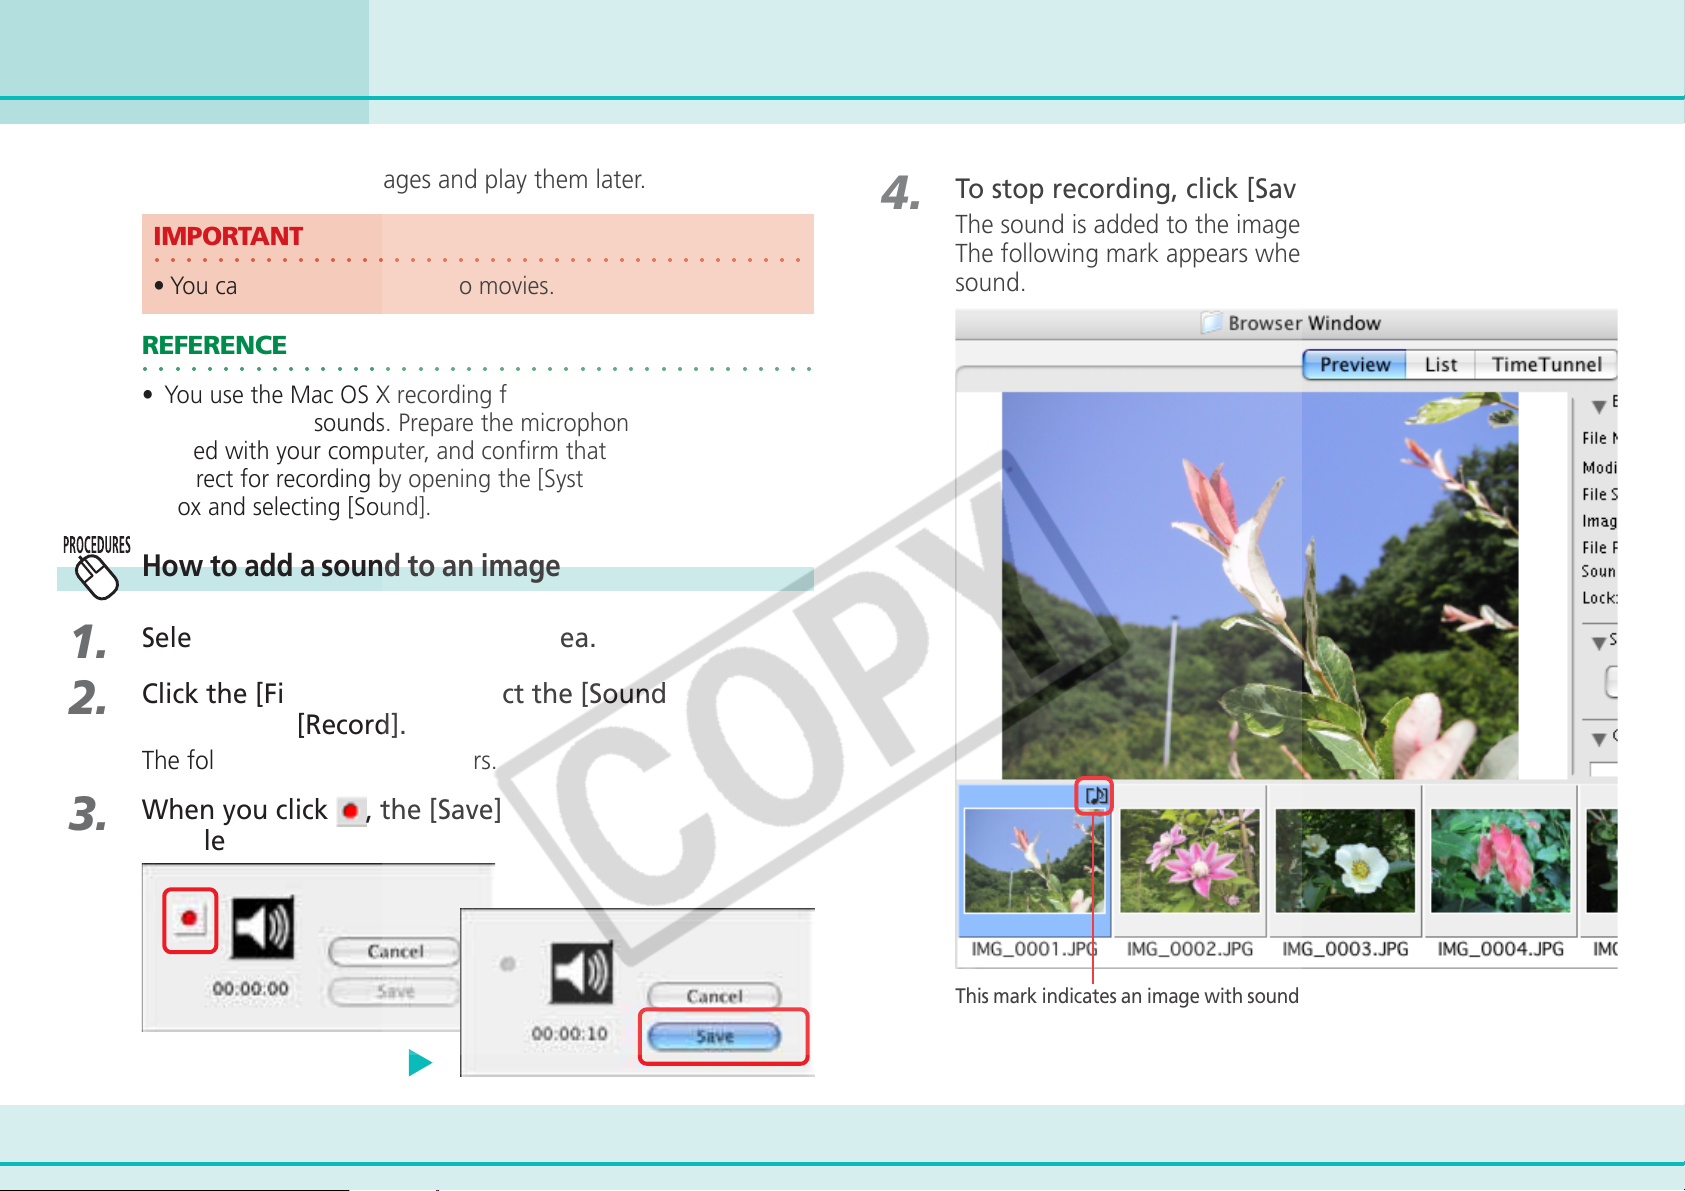
Chapter 6
Using Supplementary Features
Adding Sounds to Images (1/2)
You can add sounds to your images and play them later.
IMPORTANT
○○○○○○○○○○○○○○○○○○○○○○○○○○○○○○○○○○○○○○○○○
• You cannot add sound files to movies.
REFERENCE
○○○○○○○○○○○○○○○○○○○○○○○○○○○○○○○○○○○○○○○○○○
• You use the Mac OS X recording function to record
ImageBrowser sounds. Prepare the microphone if one is pro-
vided with your computer, and confirm that the settings are
correct for recording by opening the [System Preferences] dialog
box and selecting [Sound].
How to add a sound to an image
1.
2.
Select an image in the Browser Area.
Click the [File] menu and select the [Sound] submenu,
followed by [Record].
4.
To stop recording, click [Save].
The sound is added to the image.
The following mark appears when an image is accompanied by
sound.
The following dialog box appears.
3.
When you click , the [Save] button becomes
enabled and recording starts.
85 ImageBrowser Software User Guide
This mark indicates an image with sound.
Page 86
Chapter 6
Using Supplementary Features
How to play sound added to an image
1.
2.
Select an image with a sound attached.
Click the [File] menu and select the [Sound] submenu,
followed by [Play].
Sound will play.
You can control playback by clicking [Pause] or [Stop] on the
[Sound] menu.
Adding Sounds to Images (2/2)
REFERENCE
○○○○○○○○○○○○○○○○○○○○○○○○○○○○○○○○○○○○○○○○○○
• You can also play sounds by clicking in the Information
Panel when the display mode is set to Preview or in the File
Information dialog box.
• To delete a recorded sound, select the image to which it is
attached, click the [File] menu and select the [Sound] submenu,
followed by [Send to Trash].
• You can record a new sound by selecting an image that has a
sound attached already, clicking the [Sound] menu and selecting [Record].
• When you add a sound to an image, the sound file is created in
the same folder as the image file as an AIFF format file with the
[.AIF] file name extension.
86 ImageBrowser Software User Guide
Page 87
Chapter 6
Using Supplementary Features
This section explains the procedures for printing.
Printing Images (1/8)
Displaying the print layout
1.
2.
Select an image in the Browser Area.
Click [Print] in the Control Panel and select [Layout
Printing] from the displayed menu.
The Layout Options dialog and Print window will open.
The selected images will automatically be laid out in the Print
window. You can select a layout option in the Layout Options
dialog.
REFERENCE
○○○○○○○○○○○○○○○○○○○○○○○○○○○○○○○○○○○○○○○○○○
• When the Print window is open, the shooting date and file
name appear as captions under the image when the respective
options have check marks in the Preferences dialog. Click the
[ImageBrowser] menu and select [Preferences], and in the [Print]
category place a check mark in the [Shooting Date] and/or [File
Name] options.
Select images.
Print Window
Layout Options Dialog
Click here.
87 ImageBrowser Software User Guide
Page 88
Chapter 6
Using Supplementary Features
Selecting a layout
Printing Images (2/8)
1.
Select a layout type from among the following, and
click [Next].
Layout options will vary according to your printer model.
■ Custom layout printing
Allows you to specify the size and location of the images freely.
■ Index printing
Allows you to select between large, medium and small
thumbnails to print the index.
■ Fixed photo size printing
Allows you to squeeze images together to fit the specified
paper size. After printing, you can obtain photo-like prints by
separating the images with a cutter.
■ Tiled photo printing
Allows you to have the program lay out and print the specified
number of images per page with no gaps between images on
the page.
A print preview displays on the
right after you select a layout.
88 ImageBrowser Software User Guide
Page 89
Chapter 6
Using Supplementary Features
Printing Images (3/8)
2.
3.
In the following dialog, select more detailed settings.
The available settings will vary with the layout option selected.
Set settings here (the
available settings will
vary with the layout
option selected).
When you finish adjusting the settings, click [OK].
The Layout Options dialog closes and you can now change the
layout and print settings in the Print window.
REFERENCE
○○○○○○○○○○○○○○○○○○○○○○○○○○○○○○○○○○○○○○○○○○
• If you do not want the Layout Options dialog to appear while
the Print window is open, remove the check mark beside the
[Display this dialog when the Printing window displays] option.
REFERENCE
○○○○○○○○○○○○○○○○○○○○○○○○○○○○○○○○○○○○○○○○○○
• To open the Layout Options dialog again, click the (LAYOUT
OPTIONS) button in the Print window.
Click here.
Adding Images
You can add images by dragging them from the Browser Area
and dropping them into the Print window.
Deleting Images
You can clear images from the Print window by selecting them,
clicking the [Edit] menu and selecting [Clear].
89 ImageBrowser Software User Guide
Page 90
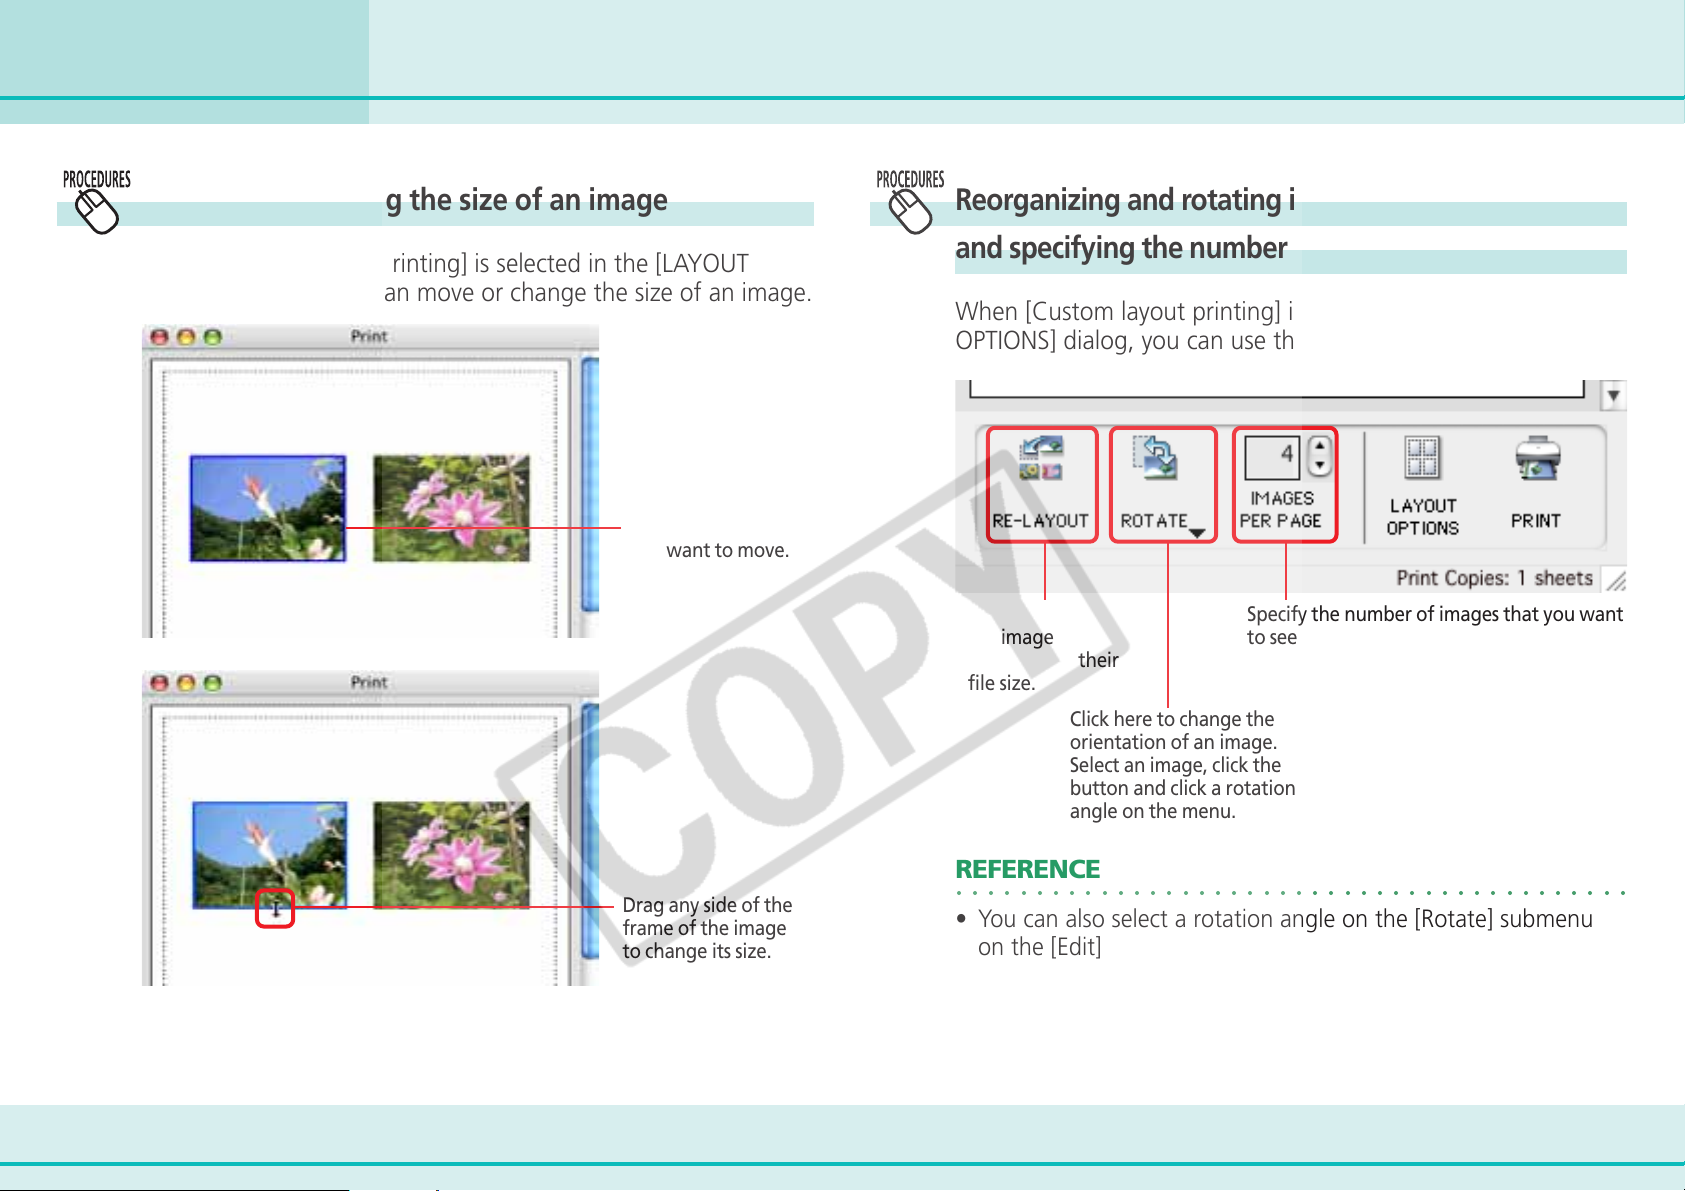
Chapter 6
Using Supplementary Features
Printing Images (4/8)
Moving or changing the size of an image
When [Custom layout printing] is selected in the [LAYOUT
OPTIONS] dialog, you can move or change the size of an image.
Drag the image that
you want to move.
Reorganizing and rotating images,
and specifying the number of images per page
When [Custom layout printing] is selected in the [LAYOUT
OPTIONS] dialog, you can use the following functions.
Click to reorganize
the images
according to their
file size.
Click here to change the
orientation of an image.
Select an image, click the
button and click a rotation
angle on the menu.
Specify the number of images that you want
to see on each page.
90 ImageBrowser Software User Guide
Drag any side of the
frame of the image
to change its size.
REFERENCE
○○○○○○○○○○○○○○○○○○○○○○○○○○○○○○○○○○○○○○○○○○
• You can also select a rotation angle on the [Rotate] submenu
on the [Edit] menu.
Page 91
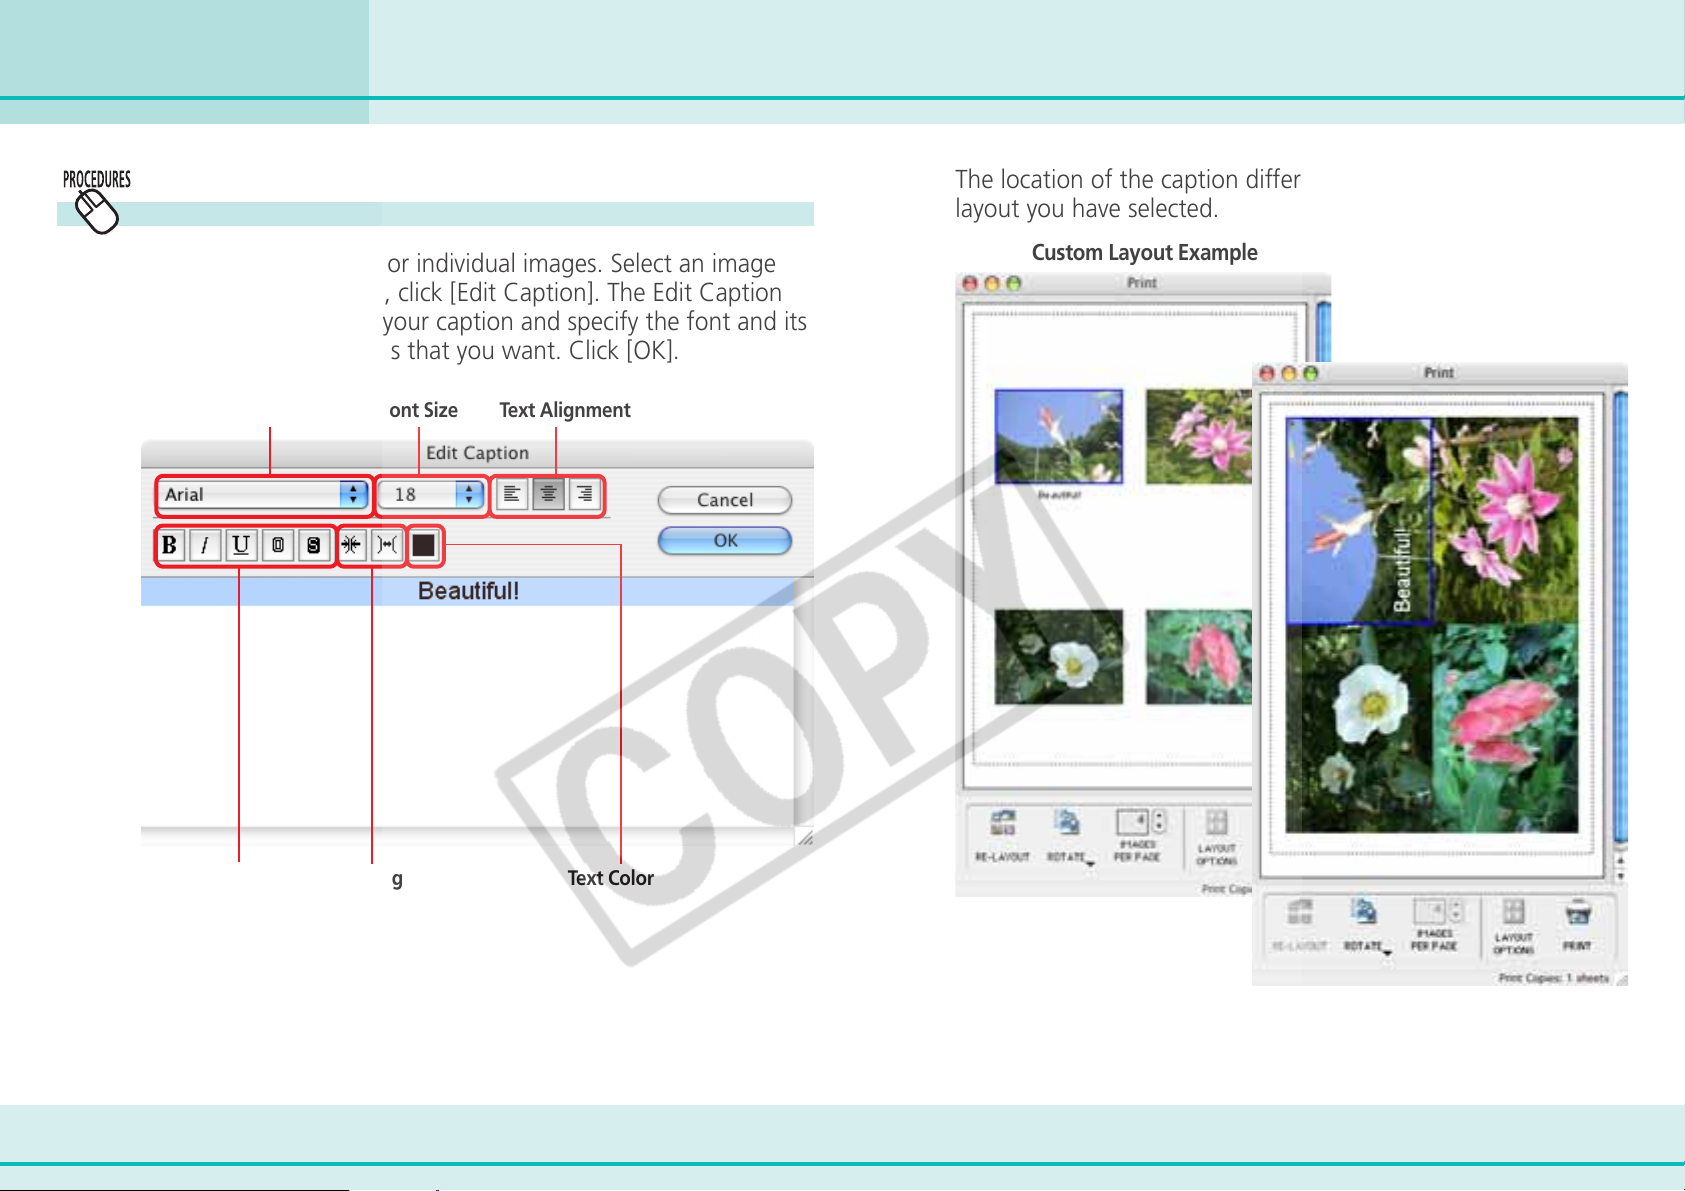
Chapter 6
Using Supplementary Features
Typing a caption
Printing Images (5/8)
The location of the caption differs depending on what kind of
layout you have selected.
You can type captions for individual images. Select an image
and on the [Edit] menu, click [Edit Caption]. The Edit Caption
window appears. Type your caption and specify the font and its
size, as well as any styles that you want. Click [OK].
Font (typeface) Font Size Text Alignment
Custom Layout Example
Fixed Photo Size Example
Font Style Tracking Text Color
91 ImageBrowser Software User Guide
Page 92
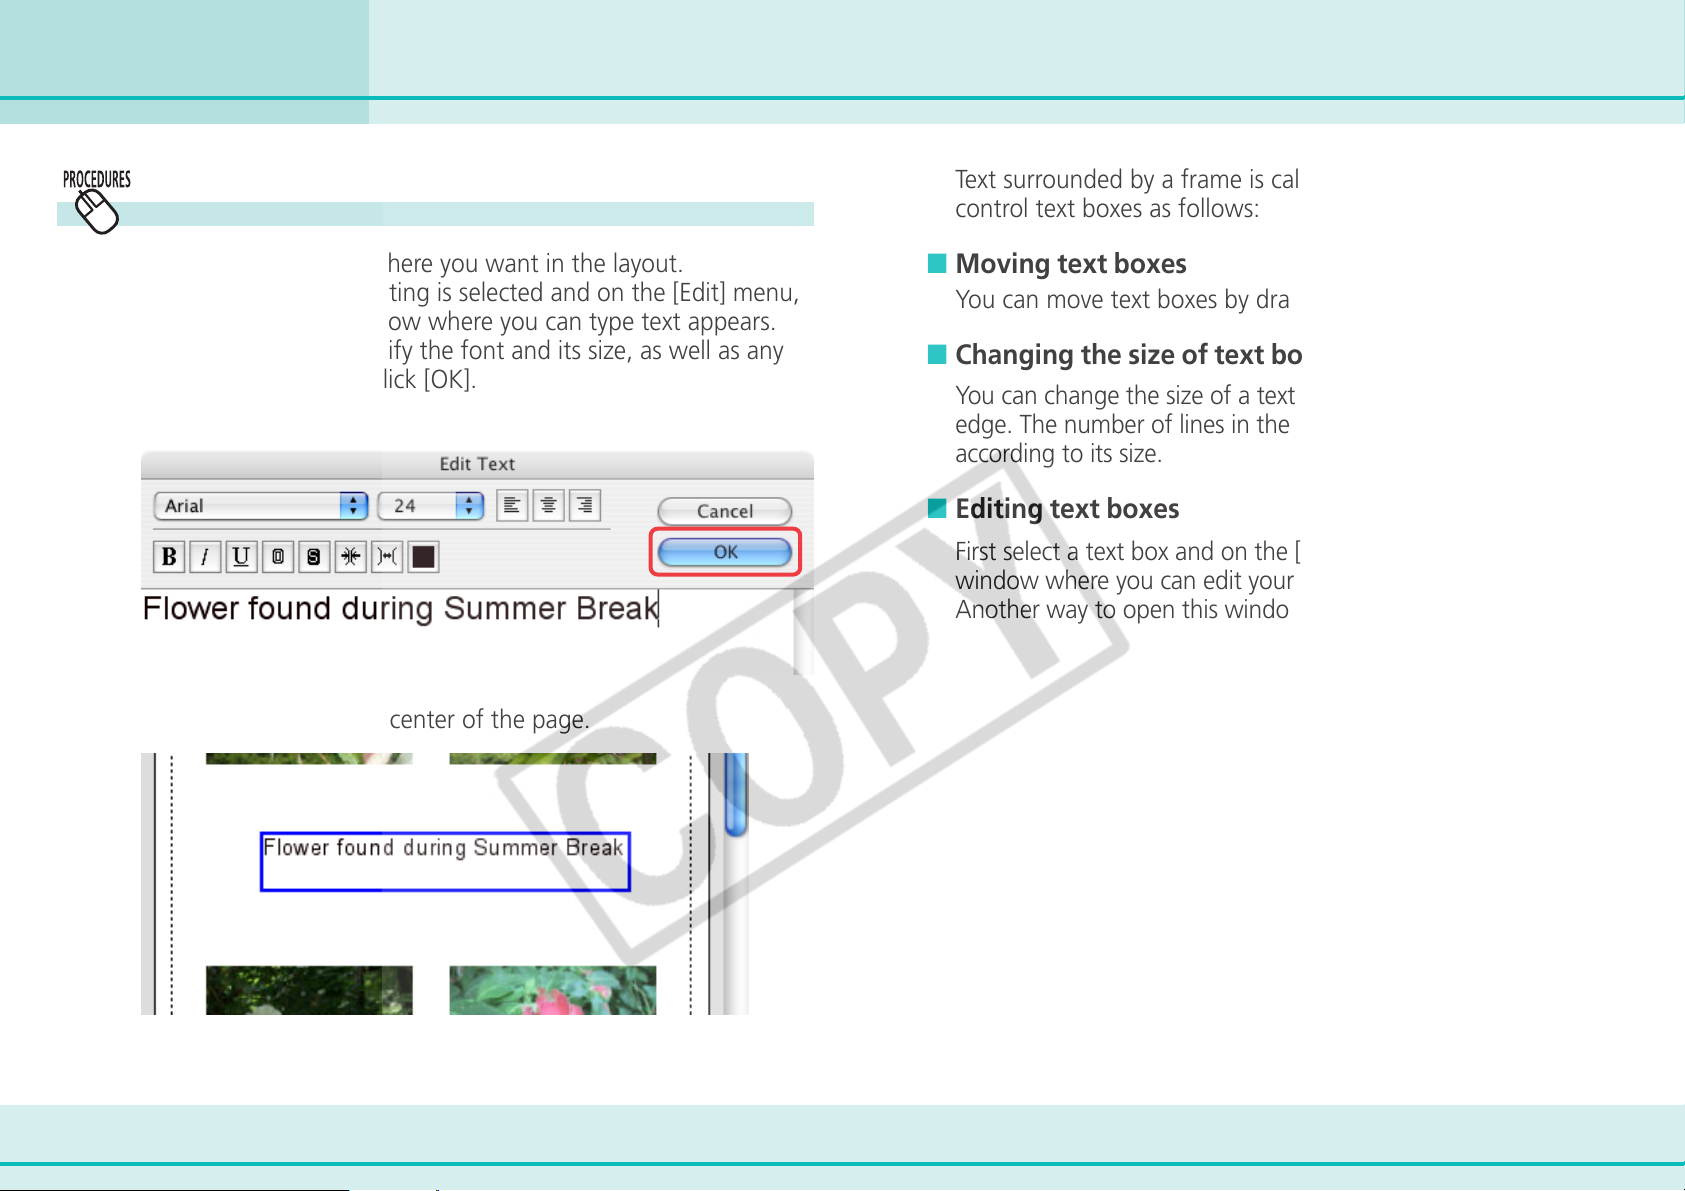
Chapter 6
Using Supplementary Features
Typing text
Printing Images (6/8)
Text surrounded by a frame is called a “text box.” You can
control text boxes as follows:
You can type text anywhere you want in the layout.
First, make sure that noting is selected and on the [Edit] menu,
click [Add Text]. A window where you can type text appears.
Type your text and specify the font and its size, as well as any
styles that you want. Click [OK].
The text appears in the center of the page.
■ Moving text boxes
You can move text boxes by dragging them.
■ Changing the size of text boxes
You can change the size of a text box by dragging its left or right
edge. The number of lines in the text box changes automatically
according to its size.
■ Editing text boxes
First select a text box and on the [Edit] menu, click [Edit Text]. A
window where you can edit your text appears. Edit your text.
Another way to open this window is to double-click the text box.
92 ImageBrowser Software User Guide
Page 93
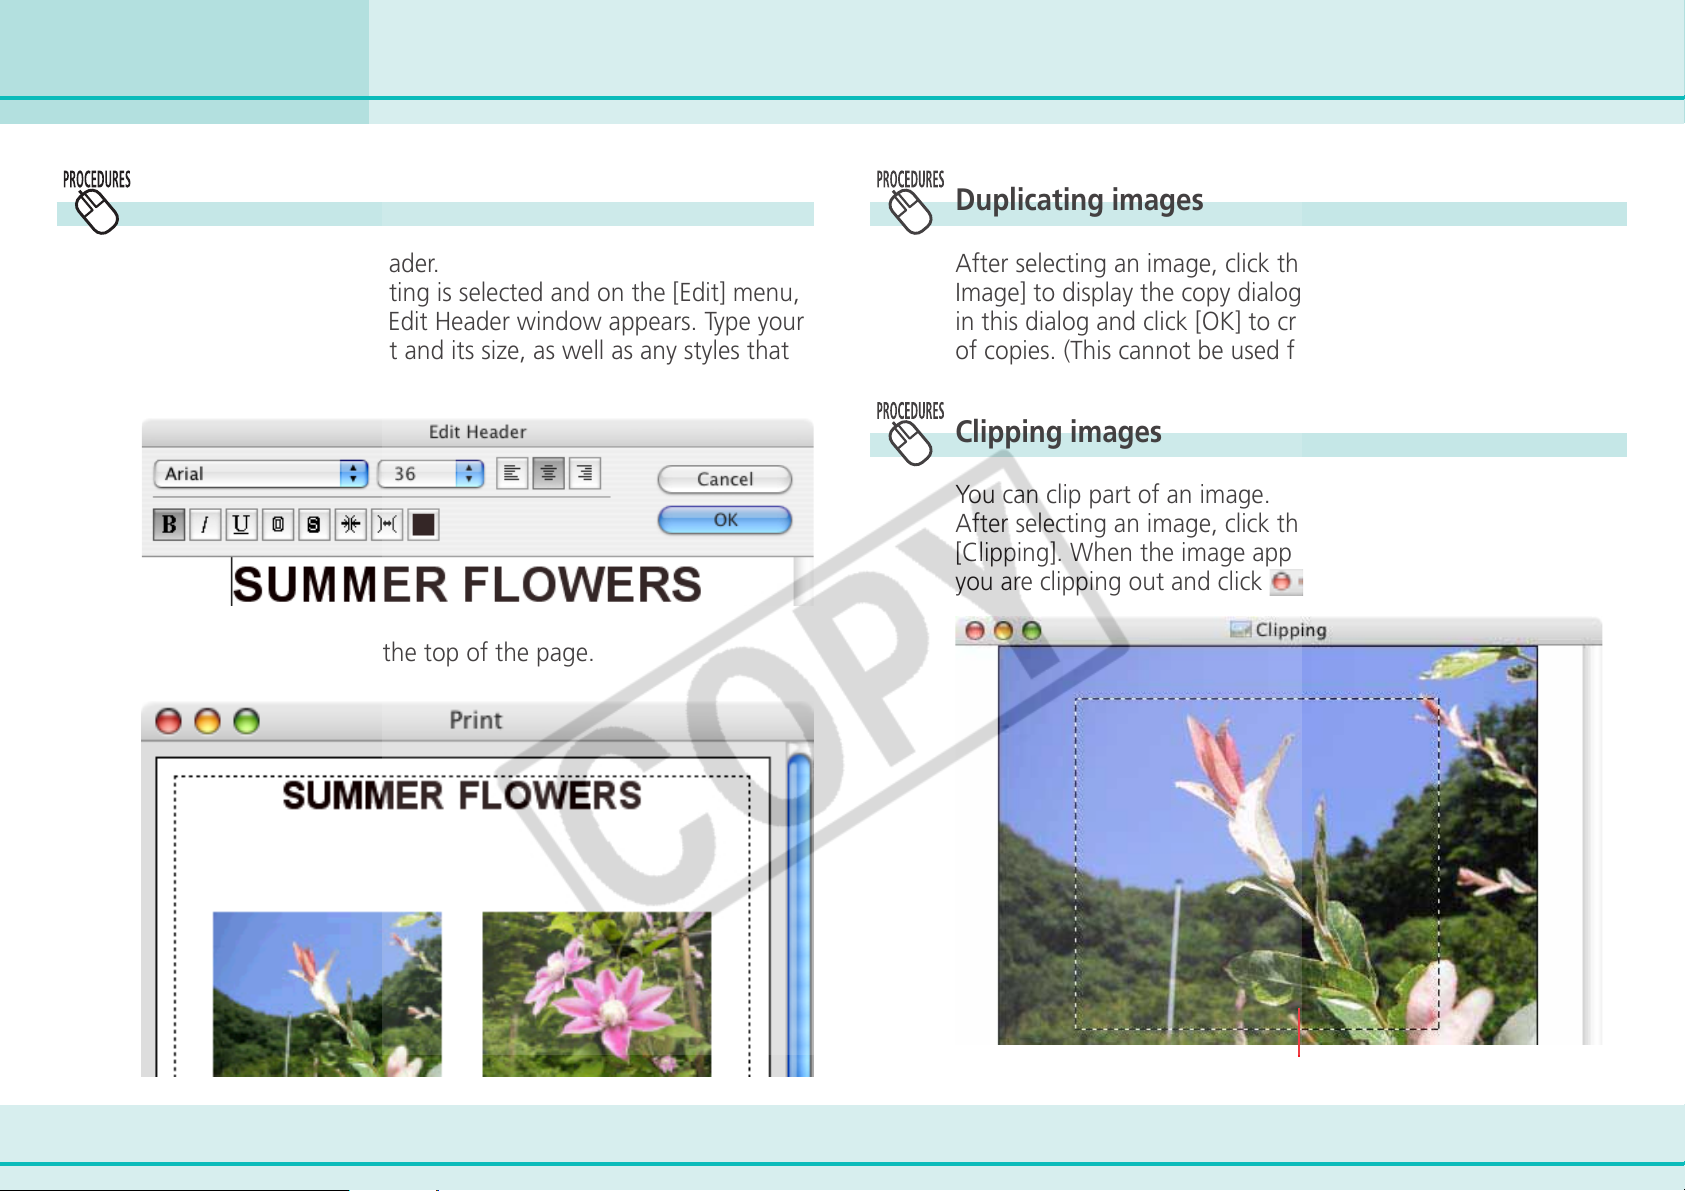
Chapter 6
Using Supplementary Features
Printing Images (7/8)
Typing a header
You can type a page header.
First, make sure that noting is selected and on the [Edit] menu,
click [Edit Header]. The Edit Header window appears. Type your
text and specify the font and its size, as well as any styles that
you want. Click [OK].
The header appears at the top of the page.
Duplicating images
After selecting an image, click the [Edit] menu and select [Copy
Image] to display the copy dialog. Specify the number of copies
in this dialog and click [OK] to create only the specified number
of copies. (This cannot be used for Index printing.)
Clipping images
You can clip part of an image.
After selecting an image, click the [Edit] menu and select
[Clipping]. When the image appears, drag to specify the area
you are clipping out and click
.
93 ImageBrowser Software User Guide
Clipping area
Page 94
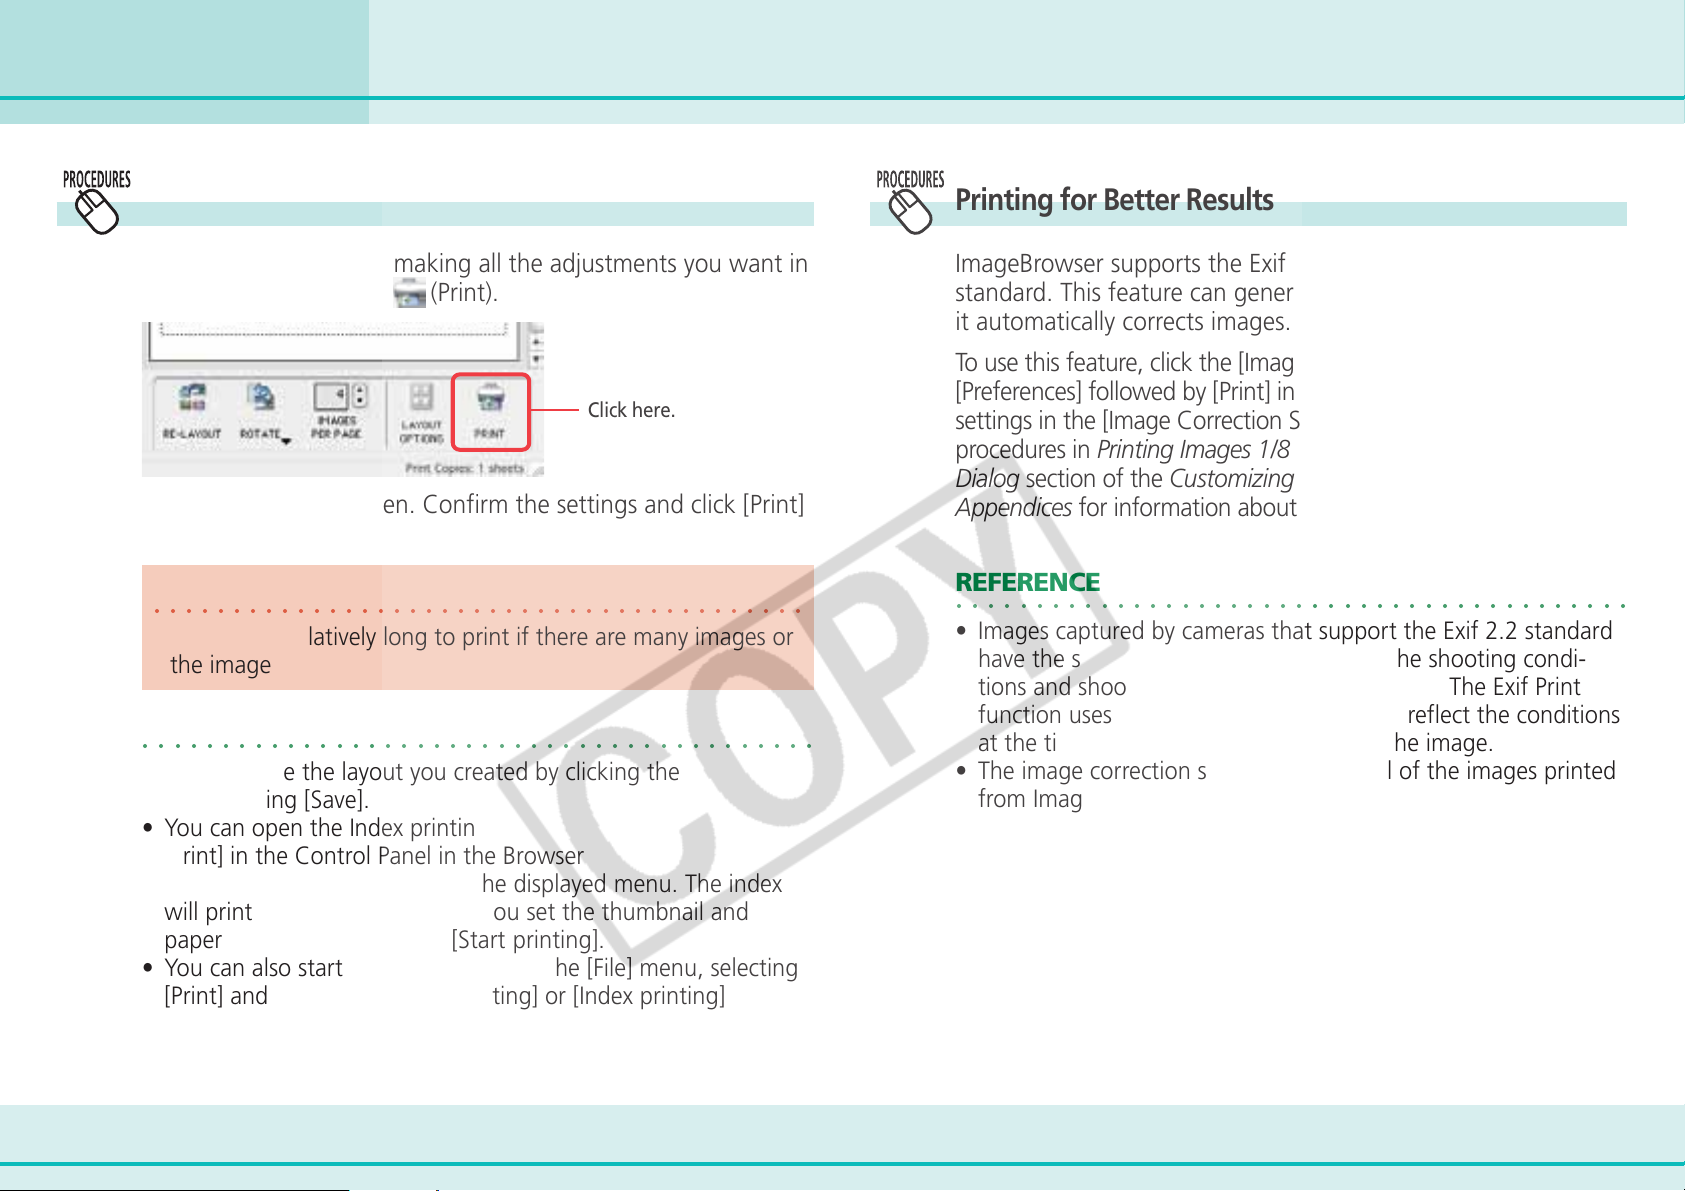
Chapter 6
Using Supplementary Features
Printing Images (8/8)
Initiating Printing
Once you have finished making all the adjustments you want in
the Print window, click
The Print dialog will open. Confirm the settings and click [Print]
to start printing.
IMPORTANT
○○○○○○○○○○○○○○○○○○○○○○○○○○○○○○○○○○○○○○○○○
• It may take relatively long to print if there are many images or
the images are large.
REFERENCE
○○○○○○○○○○○○○○○○○○○○○○○○○○○○○○○○○○○○○○○○○○
• You can save the layout you created by clicking the [File] menu
and selecting [Save].
• You can open the Index printing settings window by clicking
[Print] in the Control Panel in the Browser Window and
selecting [Index printing] from the displayed menu. The index
will print out immediately after you set the thumbnail and
paper size settings and click [Start printing].
• You can also start printing by clicking the [File] menu, selecting
[Print] and choosing [Layout printing] or [Index printing] from
the submenu.
(Print).
Click here.
Printing for Better Results
ImageBrowser supports the Exif 2.2 (nicknamed Exif Print)
standard. This feature can generate better print results because
it automatically corrects images.
To use this feature, click the [ImageBrowser] menu and select
[Preferences] followed by [Print] in the list box. Set the Exif 2.2
settings in the [Image Correction Settings] category. Then use the
procedures in Printing Images 1/8 to print the image. See the Print
Dialog section of the Customizing Preferences (3/3) topic in the
Appendices for information about Exif 2.2 settings.
REFERENCE
○○○○○○○○○○○○○○○○○○○○○○○○○○○○○○○○○○○○○○○○○○
• Images captured by cameras that support the Exif 2.2 standard
have the shooting settings data, such as the shooting conditions and shooting mode, embedded in them. The Exif Print
function uses this data to more accurately reflect the conditions
at the time of shooting when it corrects the image.
• The image correction settings apply to all of the images printed
from ImageBrowser.
94 ImageBrowser Software User Guide
Page 95
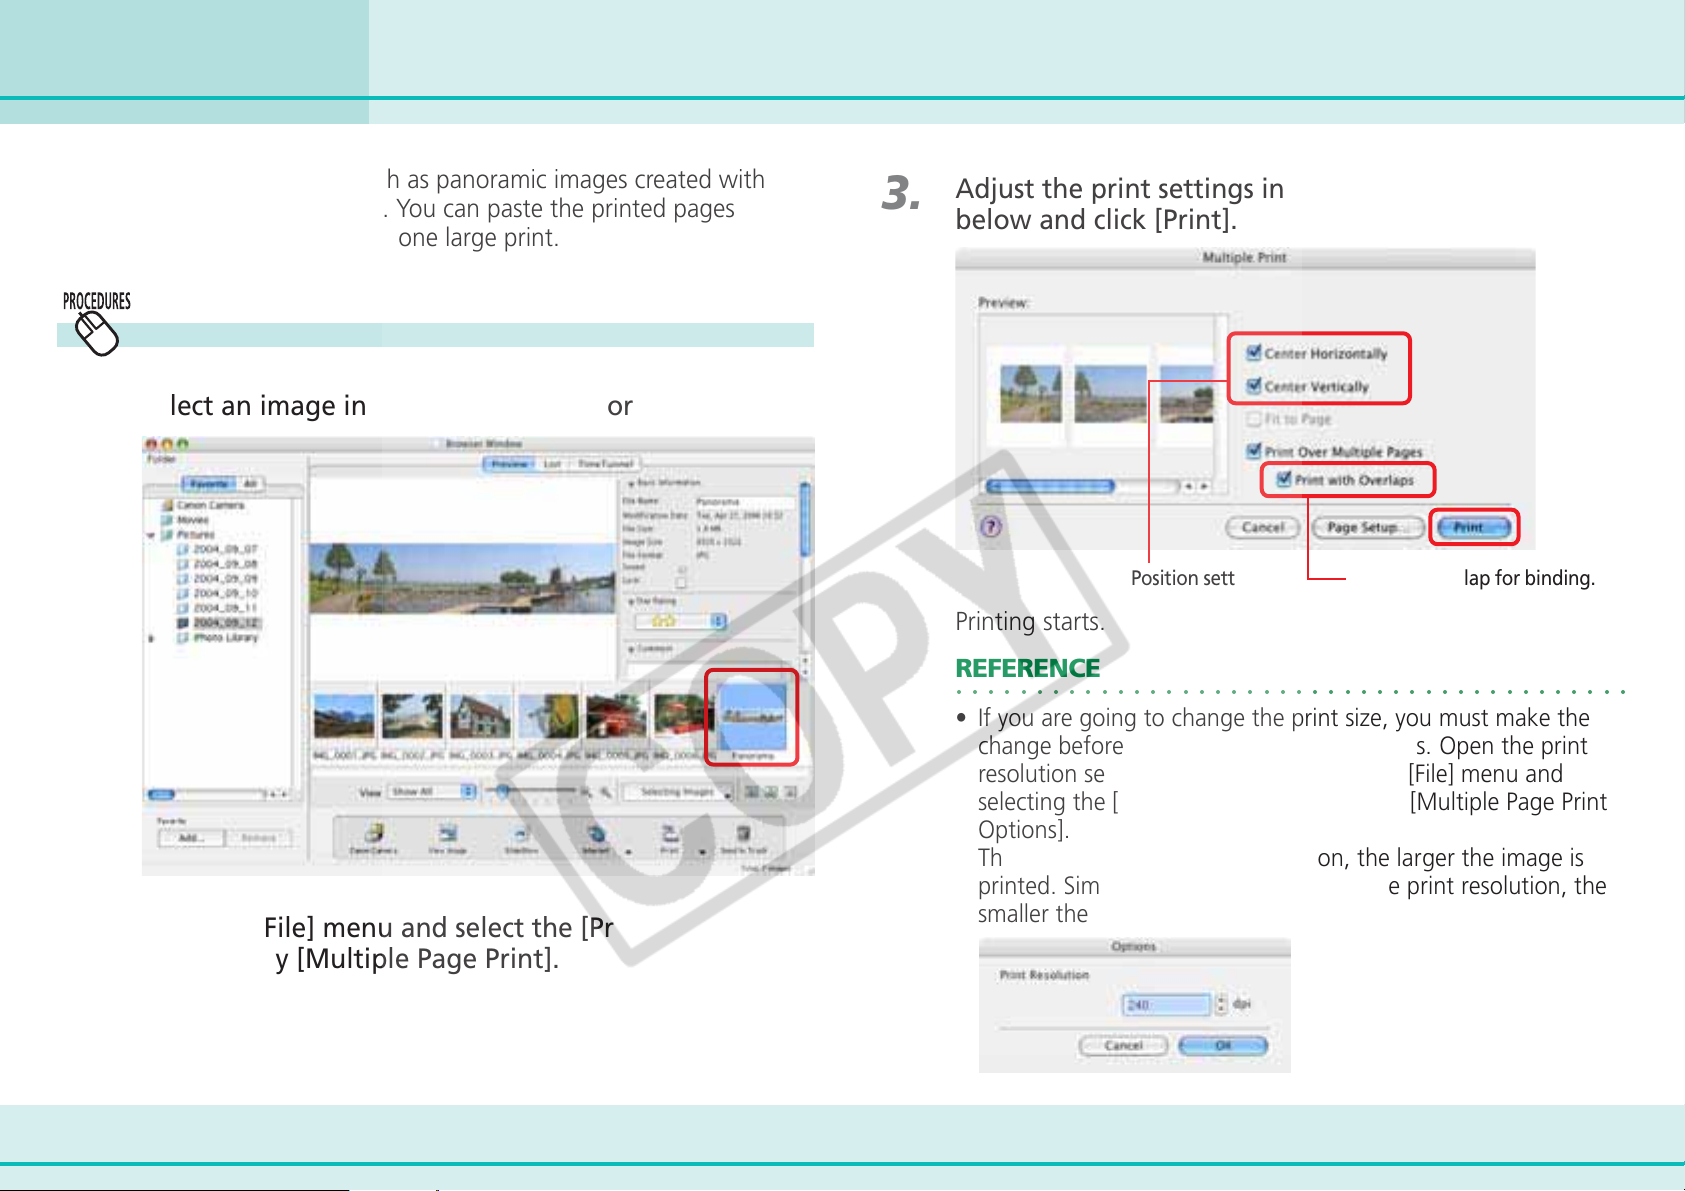
Chapter 6
Using Supplementary Features
Printing Images over Multiple Pages
This function prints images, such as panoramic images created with
PhotoStitch, over several pages. You can paste the printed pages
together after printing to create one large print.
Multiple page printing
1.
2.
Select an image in the Browser Area for printing.
Click the [File] menu and select the [Print] submenu,
followed by [Multiple Page Print].
3.
Adjust the print settings in the dialog box illustrated
below and click [Print].
Sets the overlap for binding.Position setting
Printing starts.
REFERENCE
○○○○○○○○○○○○○○○○○○○○○○○○○○○○○○○○○○○○○○○○○○
• If you are going to change the print size, you must make the
change before you print over multiple pages. Open the print
resolution settings window by clicking the [File] menu and
selecting the [Print] submenu, followed by [Multiple Page Print
Options].
The smaller you make the resolution, the larger the image is
printed. Similarly, the larger you make the print resolution, the
smaller the image is printed.
95 ImageBrowser Software User Guide
Page 96
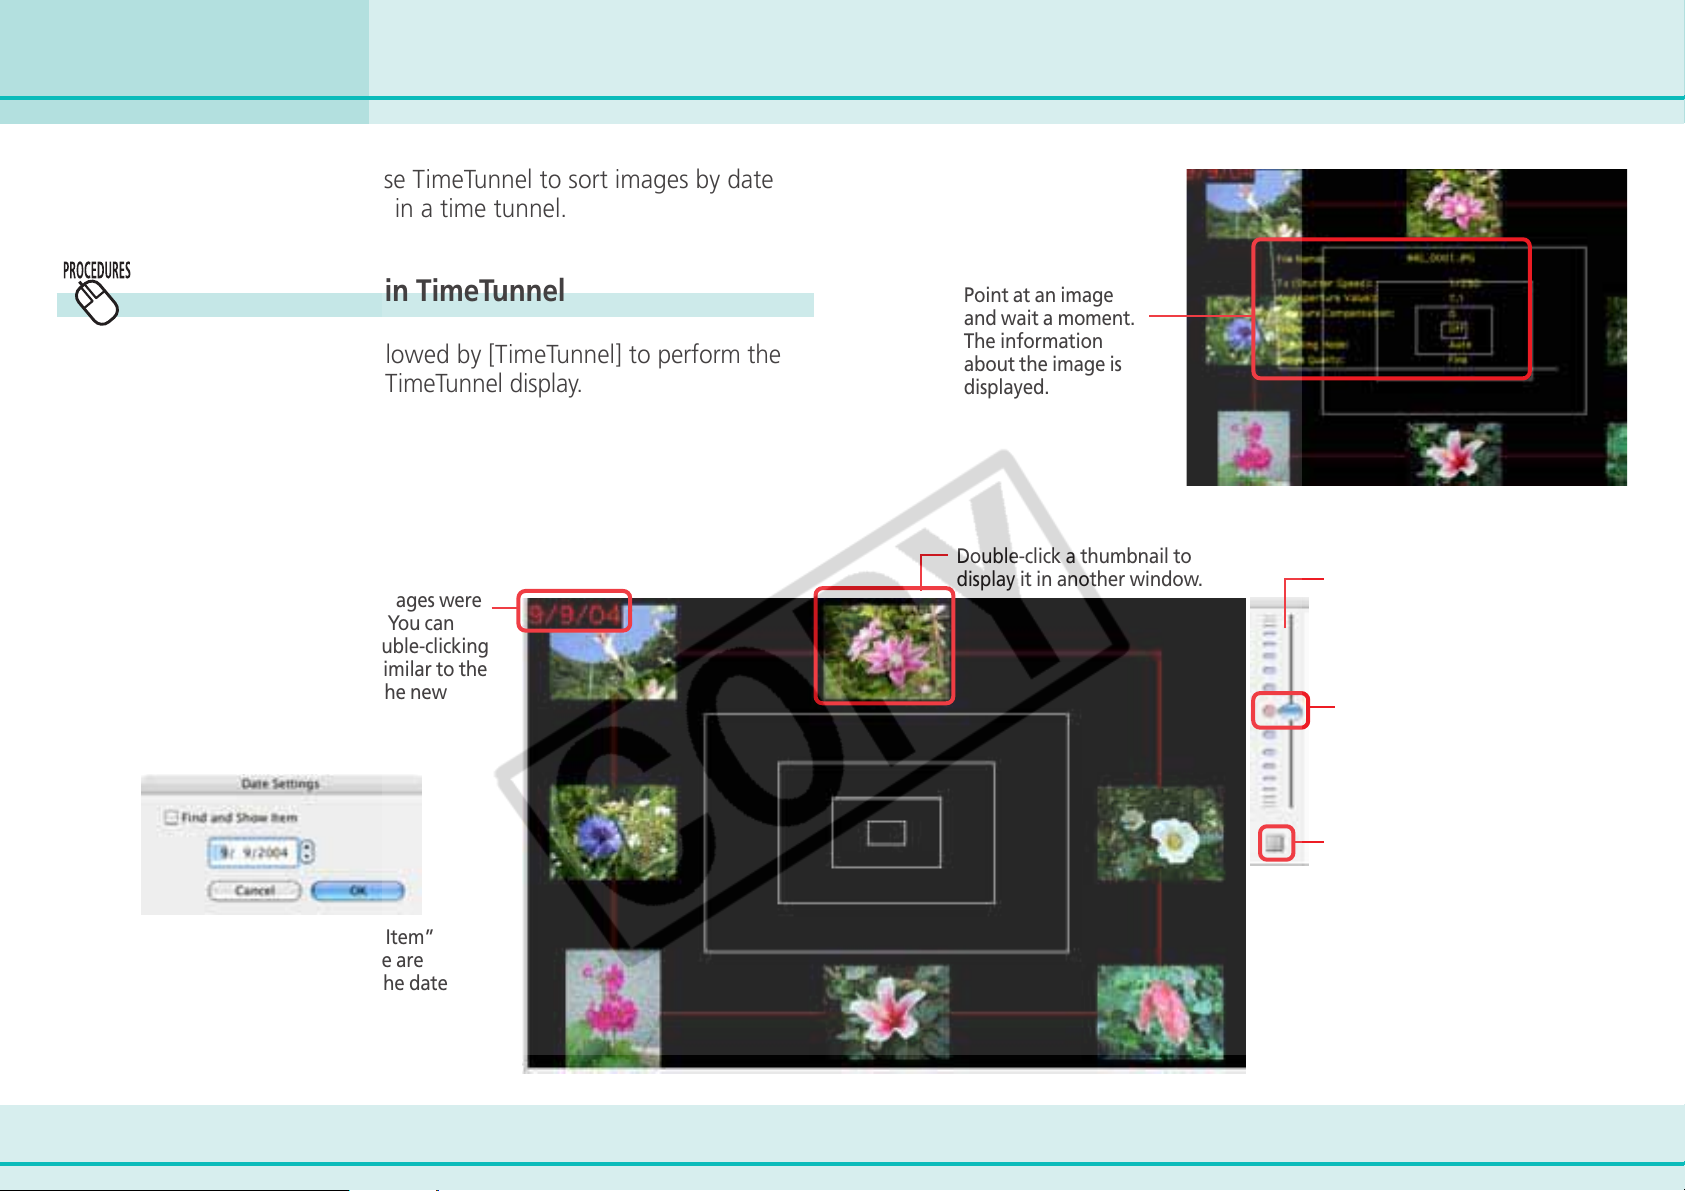
Chapter 6
Using Supplementary Features
Sorting Images by Date and Time - TimeTunnel (1/2)
This section describes how to use TimeTunnel to sort images by date
and time, like arranging images in a time tunnel.
Displaying images in TimeTunnel
Select [View Mode], followed by [TimeTunnel] to perform the
following operations in TimeTunnel display.
The date/time at which the images were
shot appears on the red line. You can
change this date/ time by double-clicking
it on the display. A window similar to the
one below appears. Specify the new
date/ time.
Point at an image
and wait a moment.
The information
about the image is
displayed.
Double-click a thumbnail to
display it in another window.
Control Panel
Drag this bar up or down to
shift the tunnel display.
Click to display the control
panel menu (the menu is
explained on the next page).
If you select “Find and Show Item”
and no images with that date are
found, the closest match to the date
is displayed instead.
96 ImageBrowser Software User Guide
Page 97
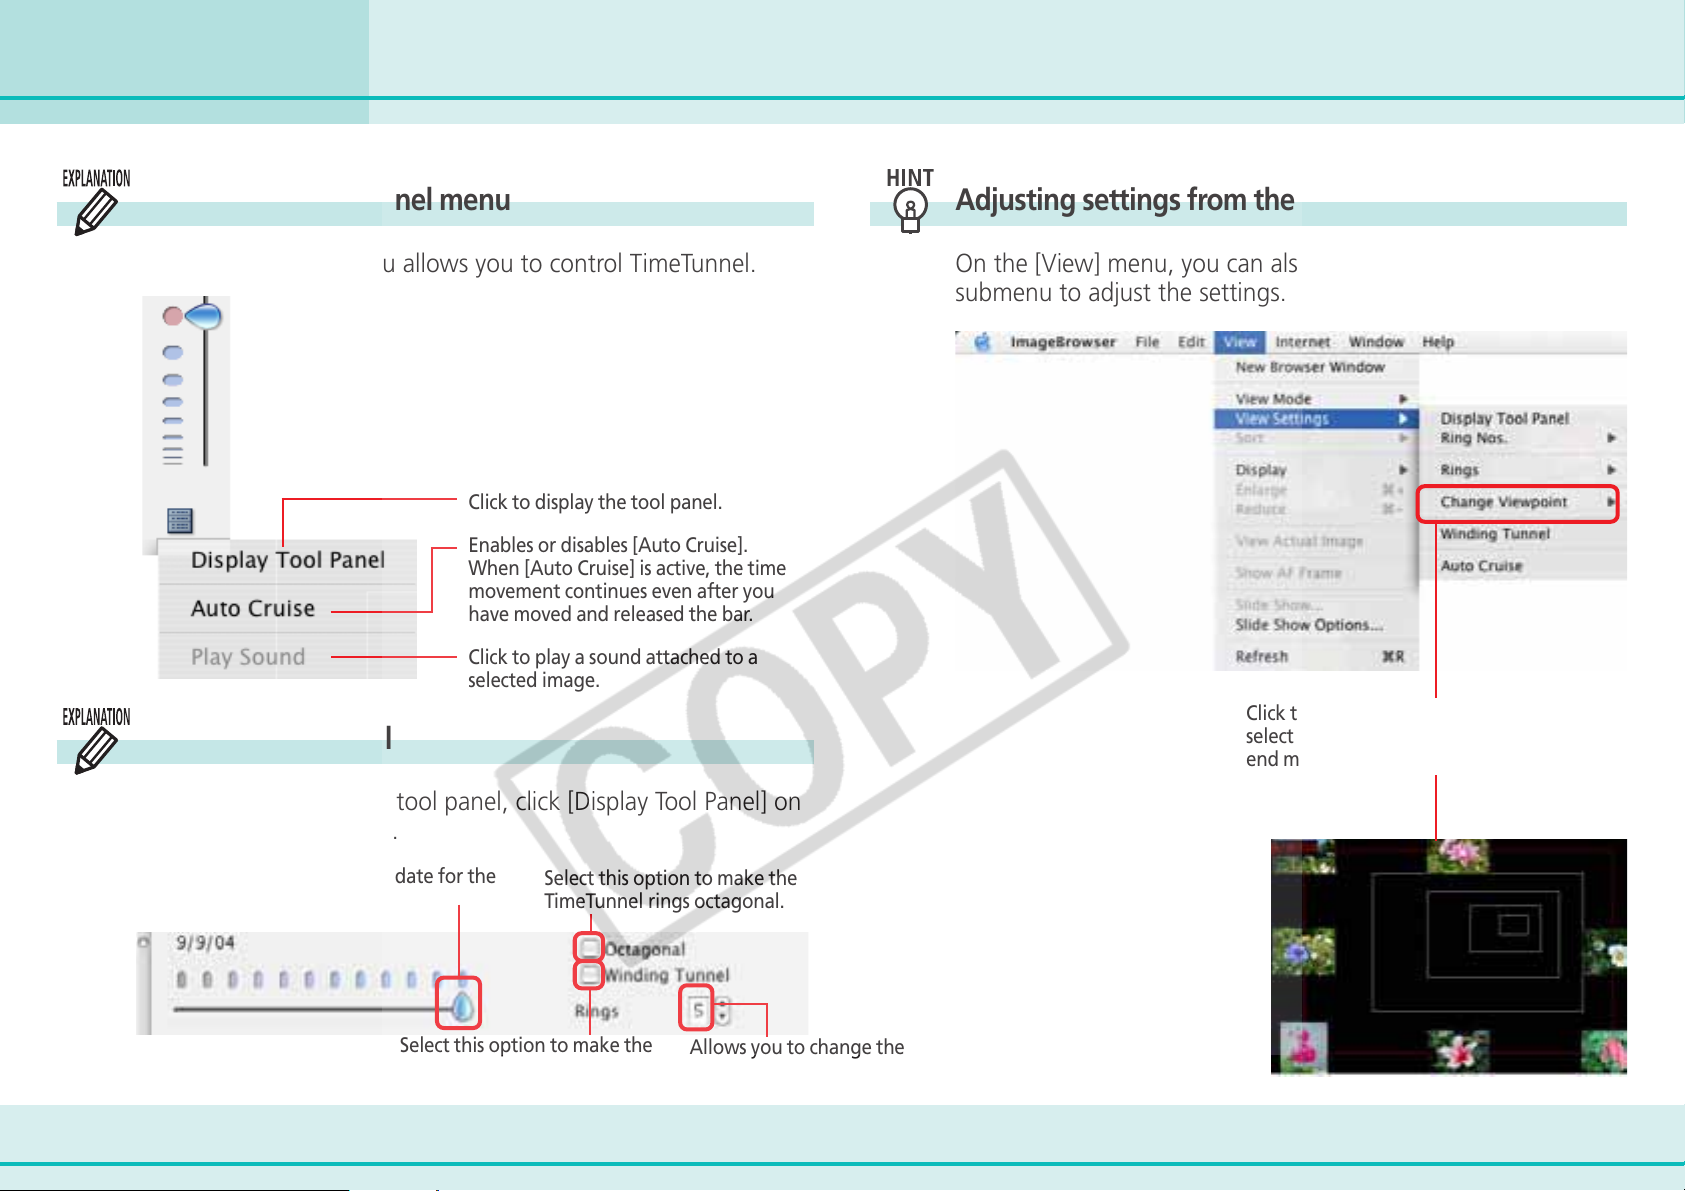
Chapter 6
Using Supplementary Features
Sorting Images by Date and Time - TimeTunnel (2/2)
Using the Control Panel menu
The Control Panel menu allows you to control TimeTunnel.
Click to display the tool panel.
Enables or disables [Auto Cruise].
When [Auto Cruise] is active, the time
movement continues even after you
have moved and released the bar.
Click to play a sound attached to a
selected image.
Using the Tool Panel
Adjusting settings from the Display menu
On the [View] menu, you can also select the [View Settings]
submenu to adjust the settings.
Click the [Change Viewpoint] menu and
select [Mouse Click Point] to have the tunnel
end move to the point where you click.
To display the following tool panel, click [Display Tool Panel] on
the Control Panel menu.
Allows you to specify the date for the
images displayed.
Select this option to make the
TimeTunnel look curved.
97 ImageBrowser Software User Guide
Select this option to make the
TimeTunnel rings octagonal.
Allows you to change the
number of TimeTunnel rings.
Page 98
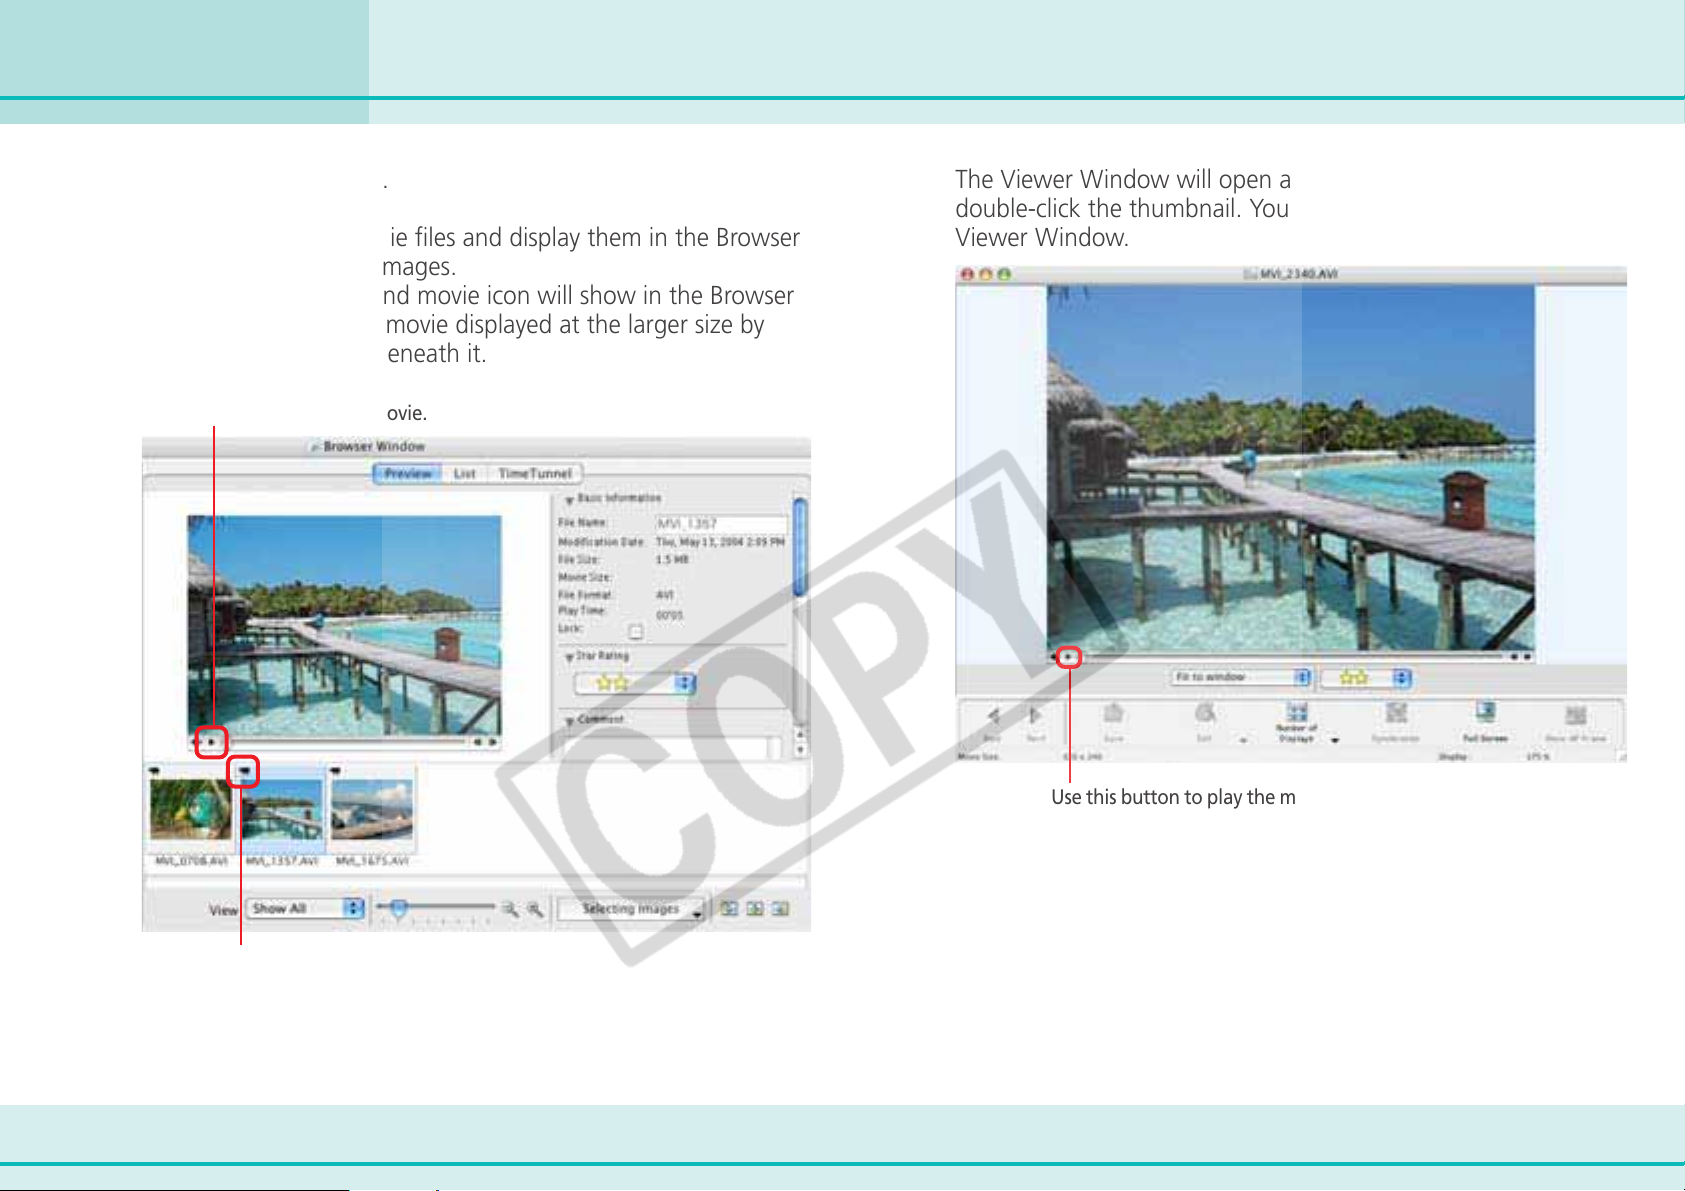
Chapter 6
Using Supplementary Features
Playing Movies
ImageBrowser supports movies.
You can download movie files and display them in the Browser
Area just like ordinary images.
The movie thumbnail and movie icon will show in the Browser
Area. You can play the movie displayed at the larger size by
clicking the controller beneath it.
Use this button to play the movie.
The Viewer Window will open and display the movie if you
double-click the thumbnail. You can also play the movie in the
Viewer Window.
Movie mark
98 ImageBrowser Software User Guide
Use this button to play the movie.
Page 99
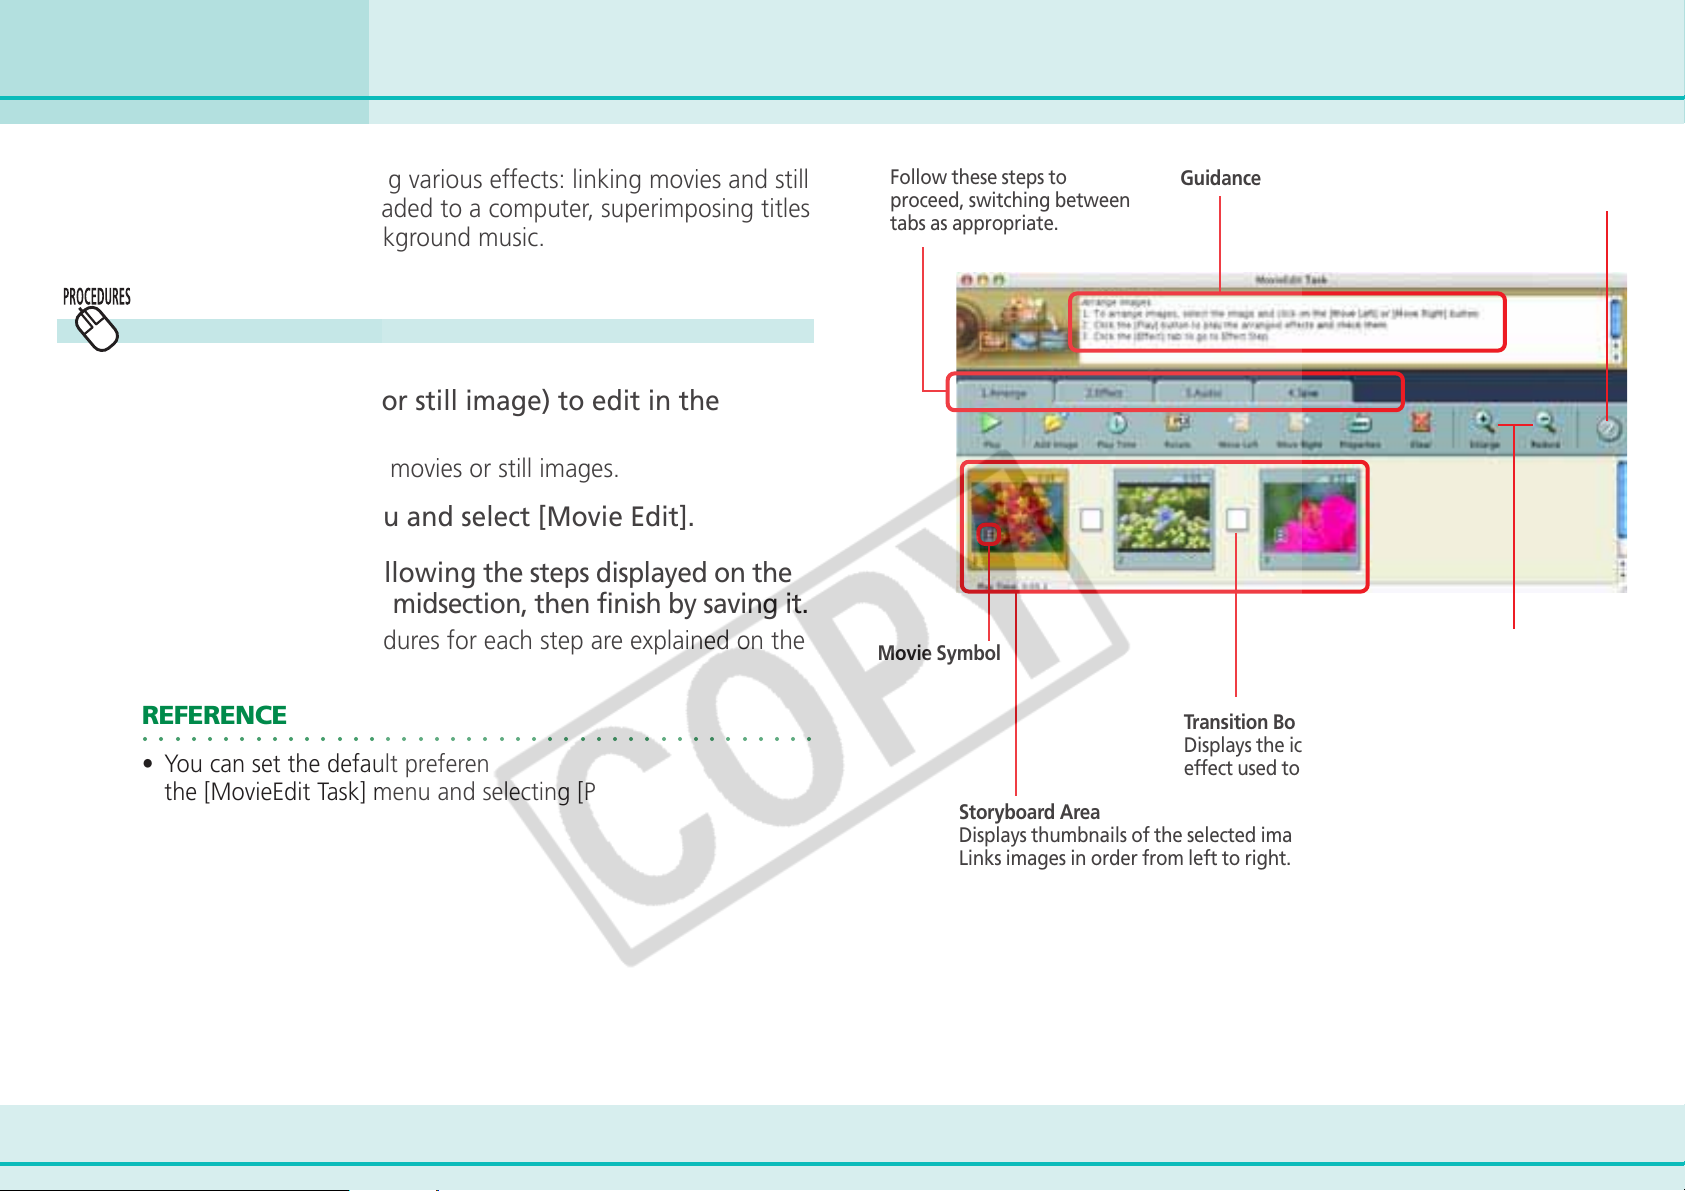
Chapter 6
Using Supplementary Features
Editing Movies (1/3)
You can create movies by adding various effects: linking movies and still
images that have been downloaded to a computer, superimposing titles
and other text, and adding background music.
Editing Movies
1.
2.
3.
Select a file (movie or still image) to edit in the
Browser Area.
You can select multiple movies or still images.
Click the [Edit] menu and select [Movie Edit].
Edit the movie by following the steps displayed on the
tabs in the window’s midsection, then finish by saving it.
The features and procedures for each step are explained on the
following pages.
REFERENCE
○○○○○○○○○○○○○○○○○○○○○○○○○○○○○○○○○○○○○○○○○○
• You can set the default preferences for movie edits by clicking
the [MovieEdit Task] menu and selecting [Preferences].
Follow these steps to
proceed, switching between
tabs as appropriate.
Movie Symbol
Storyboard Area
Displays thumbnails of the selected images.
Links images in order from left to right.
Guidance
Transition Box
Displays the icon of the transition
effect used to link adjacent images.
Click this button for detailed help
with operating procedures.
You can change thumbnail sizes
in the storyboard area.
99 ImageBrowser Software User Guide
Page 100
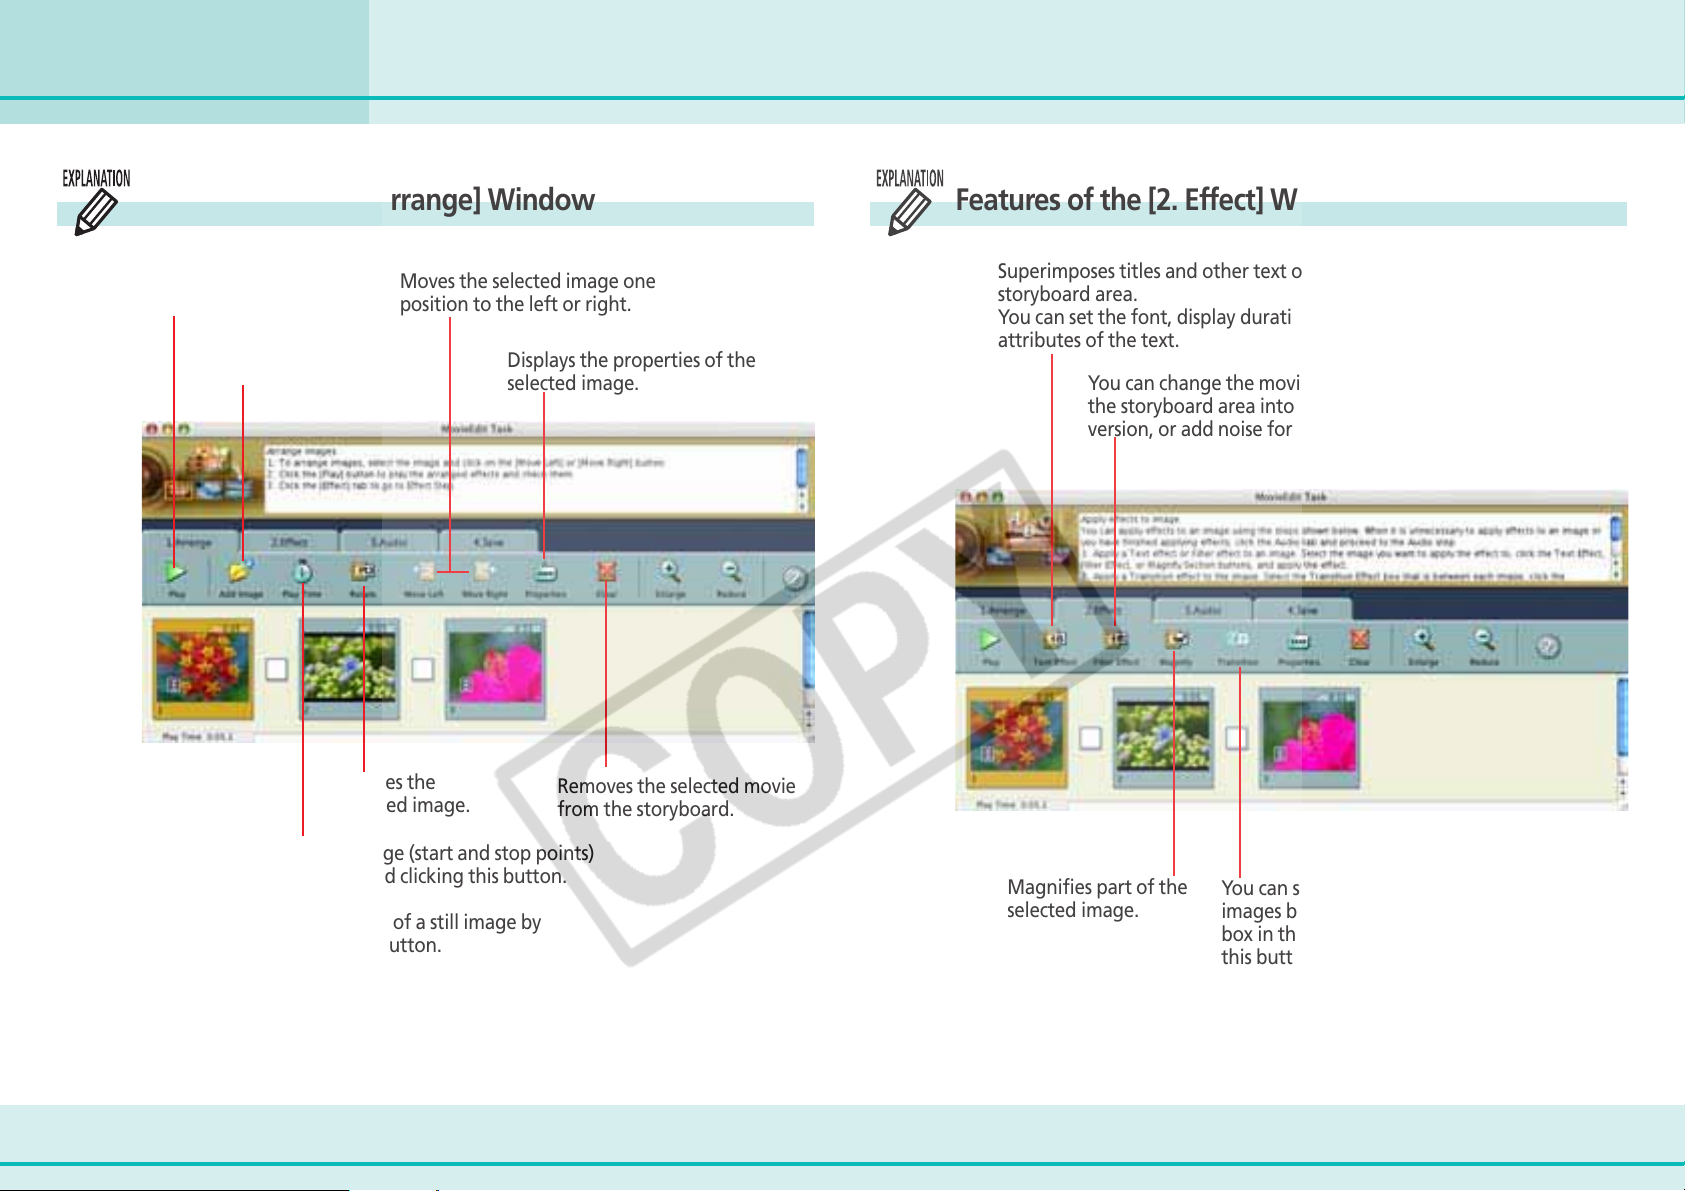
Chapter 6
Using Supplementary Features
Features of the [1. Arrange] Window Features of the [2. Effect] Window
Editing Movies (2/3)
Plays the entire movie
being edited.
Adds images
Moves the selected image one
position to the left or right.
Displays the properties of the
selected image.
Rotates the
selected image.
Superimposes titles and other text on the image selected in the
storyboard area.
You can set the font, display duration, display position and scrolling
attributes of the text.
You can change the movie or still image selected in
the storyboard area into a sepia or monochrome
version, or add noise for a film simulation.
Removes the selected movie
from the storyboard.
You can set the playback range (start and stop points)
for a movie by selecting it and clicking this button.
You can set the play duration of a still image by
selecting it and clicking this button.
100 ImageBrowser Software User Guide
Magnifies part of the
selected image.
You can set the transition effect between
images by selecting the transition effect
box in the storyboard area and clicking
this button.
 Loading...