

Page 1
The warranty information
for Australia and New Zealand
is at the end of this Quick Guide.
Quick Guide
PUB. DIE-0417-000
HD Camcorder
0
Page 2
Important Usage Instructions
COPYRIGHT WARNING:
Unauthorized recording of copyrighted materials may infringe on the rights of copyright
owners and be contrary to copyright laws.
To reduce the risk of electric shock, do not expose this product to dripping or splashing.
The Mains plug is used as the disconnect device. The Mains plug shall remain readily
operable to disconnect the plug in case of an accident.
While using the compact power adapter, do not wrap it or cover it with a piece of cloth, and
do not place it in confined narrow spaces.
CA-110E identification plate is located on the bottom.
European Union (and EEA) only.
This product should be handed over to a designated collection point, e.g., on an
authorized one-for-one basis when you buy a new similar product or to an authorized
collection site for recycling waste electrical and electronic equipment (EEE) and
batteries and accumulators. Improper handling of this type of waste could have a
possible impact on the environment and human health due to potentially hazardous
substances that are generally associated with EEE. Your cooperation in the correct
disposal of this product will contribute to the effective usage of natural resources.
For more information about the recycling of this product, please contact your local city
office, waste authority, approved scheme or your household waste disposal service or
visit www.canon-europe.com/environment.
(EEA: Norway, Iceland and Liechtenstein)
Complies with
IDA Standards
DB007671
These symbols indicate that this product is not to be disposed of
with your household waste, according to the WEEE Directive
(2002/96/EC), the Battery Directive (2006/66/EC) and/or your
national laws implementing those Directives.
2
Page 3
REGIONS OF USE
LEGRIA HF M56 is in compliance (as of January 2012) with the radio signal regulations
of the regions listed below. For details on other regions where it can be used, make
inquiries with the contacts listed on the back side of this instruction manual.
REGIONS
Australia, Austria, Belgium, Bulgaria, Cyprus, Czech Republic, Denmark, Estonia,
Finland, France*, Germany, Greece, Hong Kong S.A.R., Hungary, Iceland, Ireland, Italy,
Latvia, Liechtenstein, Lithuania, Luxembourg, Malta, Netherlands, New Zealand,
Norway, Poland, Portugal, Romania, Russia, Singapore, Slovakia, Slovenia, Spain,
Sweden, Switzerland, United Kingdom
* France: Cannot be used outdoors.
Statement on EC directive
Hereby, Canon Inc., declares that this WM217 is in compliance with the essential
requirements and other relevant provisions of Directive 1999/5/EC.
Please contact the following address for the original Declaration of Conformity:
CANON EUROPA N.V.
Bovenkerkerweg 59-61, 1158 XB Amstelveen, The Netherlands
CANON INC.
30-2, Shimomaruko 3-chome, Ohta-ku, Tokyo 146-8501, Japan
Model
ID0009: LEGRIA HF M56
3
Page 4

Important Note About the Memory
• Observe the following precautions while the ACCESS indicator is on or
flashing. Failing to do so may result in permanent data loss or damage to
the memory.
- Do not open the memory card slot cover.
- Do not disconnect the power source or turn off the camcorder.
- Do not change the camcorder’s operating mode.
Trademark Acknowledgements
• SD, SDHC and SDXC Logos are trademarks of SD-3C, LLC.
• Microsoft and Windows are trademarks or registered trademarks of Microsoft Corpora tion in the United
States and/or other countries.
• App Store, iPhone, iTunes, Mac OS and Macintosh are trademarks of Apple Inc., registered in the U.S. and
other countries.
• “x.v.Color” and the “x.v.Color” logo are trademarks.
• HDMI, the HDMI logo and High-Definition Multimedia Interface are trademarks or registered trademarks of
HDMI Licensing LLC in the United States and other countries.
• “AVCHD” and the “AVCHD” logo are trademarks of Panasonic Corporation
and Sony Corporation.
• Manufactured under license from Dolby Laboratories.
“Dolby” and the double-D symbol are trademarks of Dolby Laboratories.
• YouTube is a trademark of Google Inc.
• Facebook is a registered trademark of Facebook, Inc .
• Wi-Fi is a registered trademark of the Wi-Fi Alliance.
• Wi-Fi Certified, WPA, WPA2, and the Wi-Fi Certified logo are trademarks of the Wi-Fi Alliance.
• WPS as used on the camcorder’s settings, onscreen displays and in this manual signifies Wi-Fi Protected
Setup.
• DLNA, the DLNA Logo and DLNA CERTIFIED are trademarks, service marks, or certificati on marks of the
Digital Living Network Alliance.
• Other names and products not mentioned above may be trademarks or registered trademarks of their
respective companies.
• This device incorporates exFAT technology licensed from Microsoft.
• “Full HD 1080” refers to Canon camcorders compliant with high-definition video
composed of 1,080 vertical pixels (scanning lines).
• ANY USE OF THIS PRODUCT OTHER THAN CONSUMER PERSONAL USE IN ANY
MANNER THAT COMPLIES WITH THE MPEG-2 STANDARD FOR ENCODING VIDEO INFORMATION FOR
PACKAGED MEDIA IS EXPRESSLY PROHIBITED WITHOUT A LICENSE UNDER APPLICABLE PATENTS IN THE
MPEG-2 PATENT PORTFOLIO, WHICH LICENSE IS AVAILABLE FROM MPEG LA, L.L.C., 250 STEELE STREET,
SUITE 300, DENVER, COLORADO 80206.
• This product is licensed under AT&T patents for the MPEG-4 standard and may be used for encoding
MPEG-4 compliant video and/or decoding MPEG -4 compliant video that was encoded onl y (1) for a
personal and non-commercial purpose or (2) by a video provider licensed under the AT&T patents to
provide MPEG-4 compliant video. No license i s granted or implied for any other use for MPEG -4 standard.
4
Page 5

Package contents
1234
• CA-110E Compact Power Adapter (incl. power cord) [1]
• BP-718 Battery Pack
•Stylus pen [2]
• HTC-100/S HDMI Cable [3]
• IFC-300PCU/S USB Cable [4]
• 0 Wi-Fi Basic Setup Guide
•2 Software CD-ROMs
- PIXELA CD-ROM*
0 Contains VideoBrowser for managing, editing, and playing back
movies, and Network Utility for transferring recordings wirelessly to a
computer.
1 Contains Transfer Utility for saving and transferring movies and
music files you can use as background music.
- : LEGRIA CD-ROM
Contains the full-version Instruction Manual of the camcorder (PDF file).
See the explanation on next page.
* The CD-ROM includes the instruction manual of the software (PDF file). A
printed Startup Guide for PIXELA’s software is also supplied. Refer to this
Startup Guide for details about the supplied software.
5
Page 6

Table of Contents
5 Package contents
8 Onscreen Icons and Displays
13 Charging the Battery Pack
15 Basic Preparations
18 Setting the Date/Time and Language
20 Using a Memory Card
23 Shooting Video and Taking Photos
26 Playing Back Movies and Viewing Photos
29 Playback on a TV Screen
31 Saving and Sharing Your Recordings
32 Abridged Specifications
About the Camcorder’s Wi-Fi Functions (0 only)
You can make your camcorder an active part of your Wi-Fi network to fully
enjoy a variety of Wi-Fi functions. While these Wi-Fi functions are beyond the
scope of this Quick Guide, you can read the Wi-Fi Basic Setup Guide
supplied with the camcorder to complete the connection of the camcorder
to your home Wi-Fi network. And you have the complete information in the
full-version Instruction Manual (PDF file*).
About the Camcorder’s PDF Instruction Manual
This guide will get you started and show you how to use the most basic
functions of your camcorder to shoot video, take photos and play back your
recordings (using the camcorder or connecting it to your TV). To learn more
about the more advanced functions of your camcorder, to read important
handling precautions and to consult the troubleshooting section if an error
message is displayed, be sure to read the full-version Instruction Manual
(PDF file*). In this Quick Guide, the ; mark indicates reference page
numbers in the PDF file.
* Adobe® Reader® 6 or later is required to view the PDF Instruction Manual.
6
Page 7

Installing the Camcorder’s Instruction Manual (PDF file)
1 Turn on the computer.
2 Insert the LEGRIA CD-ROM into the computer’s disc drive.
3 Windows: Open the drive into which you inserted the CD-ROM
using Windows Explorer.
Mac OS: Use Finder and click on the CD-ROM icon.
4 Click/Double-click the Disc_Setup.exe icon.
5 In the installer panel, click [Instruction Manual of the
Camcorder] and select your language.
6 When the installation is complete, click [OK], then [Exit].
The installer will save the camcorder’s Instruction Manual (PDF file) on
the computer and will create a shortcut icon on the desktop for easy
access.
7
Page 8
introduction
Onscreen Icons and Displays
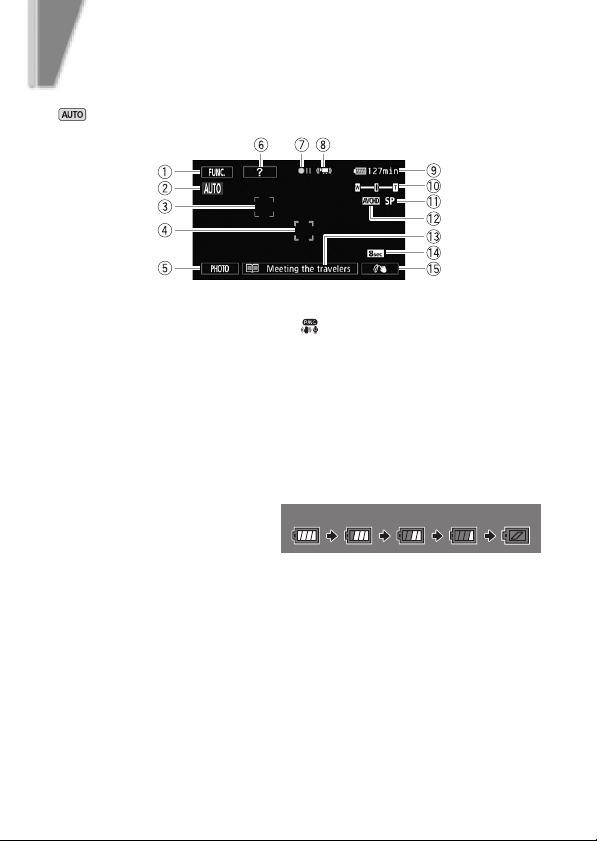
Recording movies (using Story Creator)
1 Control button [FUNC.]: Open the [ Main Functions] panel (; 28)
2 Smart AUTO (A 24)
3 Face detection frame (; 97)
4 Touch & Track frame: Touch a moving subject on the screen to keep it
clearly in focus at all times. (; 99)
5 Control button [PHOTO] - Take a photo (A 23)
6 Control button [?]: Displays a shooting tip for the current story scene
7 Memory operation (; 194)
8 Intelligent IS (; 48)
9 Remaining battery time
- If the icon appears in yellow
or red, the battery pack is
almost empty. Replace
with a fully charged battery pack.
Aq Zoom (A 23)
Aa Recording mode (A 22)
As Recording standard (A 17)
Ad Current story scene (; 67)
Af Recommended scene length (; 67)
Ag Decoration: Add a fun personal touch using stamps, drawings, image mix
and more. (; 71)
100% 75% 50% 25% 0%
8
Page 9
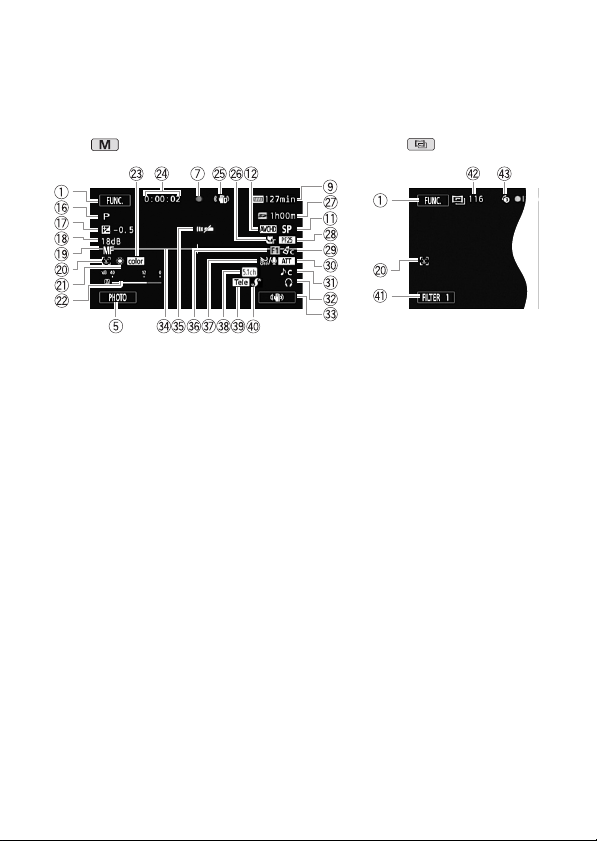
Onscreen Icons and Displays
Recording movies
Manual mode Cinema mode
Ah Recording program: Recording programs allow you to change various
picture-related settings to your preference, or to use a special scene
recording program to apply the camcorder settings most appropriate for
a variety of situations. (; 92)
Aj Manual exposure: Correct the exposure manually for a picture darker/
brighter than the one obtained using the automatic exposure set by the
camcorder. (; 103)
Ak AGC (automatic gain control) limit (; 104)
Al = Instant AF/@ Normal AF (; 179); MF Manual focus
(; 105)
Sq Face detection: You can have the camcorder automatically detect people’s
faces and use this information to adjust the focus and set the best
exposure and color control settings for beautiful videos and photos.
(; 97)
Sa White balance: Change the setting so different lighting conditions do not
affect the colors in your recordings and white objects look truly white.
(; 107)
Ss Audio level indicator: Manually adjust the audio recording level.
(; 115)
Sd x.v.Color: The camcorder uses a color space with an extended gamut to
achieve deeper colors, closer to real life. (; 183)
Sf While recording/during playback: Scene counter (hours : minutes :
seconds); < Self timer (; 110)
9
Page 10

Onscreen Icons and Displays
Sg Image stabilizer (; 95)
Sh Tele macro (; 106)
Sj Remaining recording time
* On the memory card; & In the built-in memory*
( Relay recording (; 39)*
- When there is no more free space on the memory, [& End] (built-in
memory*) or [* End] (memory card) will be displayed in red and
recording will stop.
* 0 only.
Sk Frame rate (; 91)
Sl Image effects: Fine-tune the brightness, sharpness, color and contrast of
your recordings. (; 109)
Dq Microphone attenuator: Use the attenuator to avoid audio distortions when
the sound is too loud. (; 180)
Da Audio scene select (; 111)
Ds Headphone output (; 116)
Dd Custom control button (; 187)
Df Level marker: Display onscreen markers to check your composition and
make sure horizontal or vertical lines do not appear crooked in your
recordings. (; 180)
Dg Remote sensor off (; 187)
Dh Fader (; 100)
Dj Auto wind screen: Wind screen removes the background sound of wind
when recording outdoors. You may want to turn it off when recording
indoors in very quiet surroundings. (; 112)
Dk Directionality of the optional SM-V1 Surround Microphone (; 119)
Dl Conversion lens (Tele-converter shown) (; 180)
Fq Mini advanced shoe (; 118)
Fa Control button [FILTER 1] - Cinema-look filters: Use cinema-look filters to
create unique movies with distinctive looks. (; 69)
Fs In record pause mode: Total number of scenes
Fd Pre-recording: The camcorder will start recording video 3 seconds before
you press Y, so you do not miss important shooting
opportunities. (; 96)
10
Page 11
Onscreen Icons and Displays
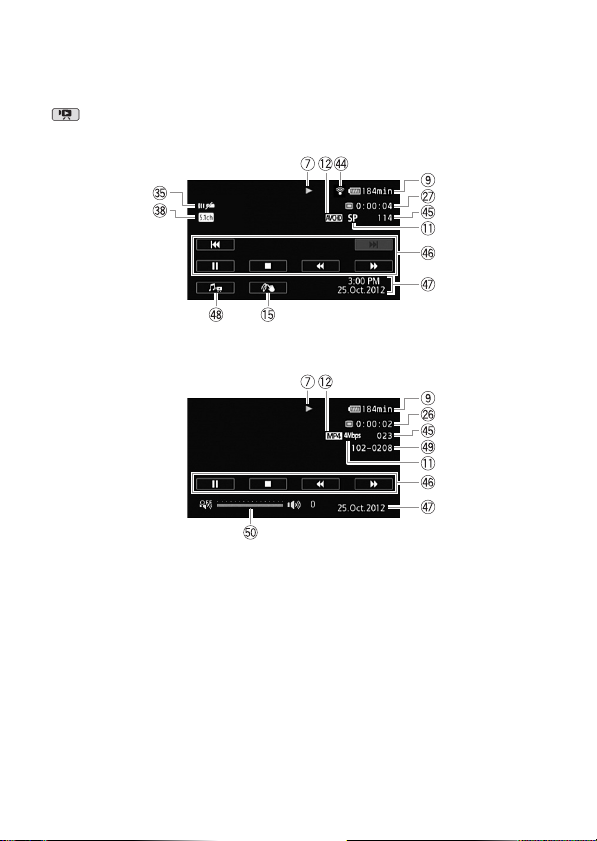
Playing movies (during playback)
AVCHD movies:
MP4 movies:
Ff Eye-Fi Wireless Communication: Using an Eye-Fi card you can upload you
recordings wirelessly. Important restrictions apply so be sure to refer to
Using an Eye-Fi card (; 152).
Fg Scene number
Fh Playback control buttons (A 27)
Fj Data code: Displays information depending on the type of recording.
(; 65, 181)
Fk Volume and background music balance controls (; 55, 81)
Fl File number (; 183)
Gq Volume controls (; 55)
11
Page 12
Onscreen Icons and Displays
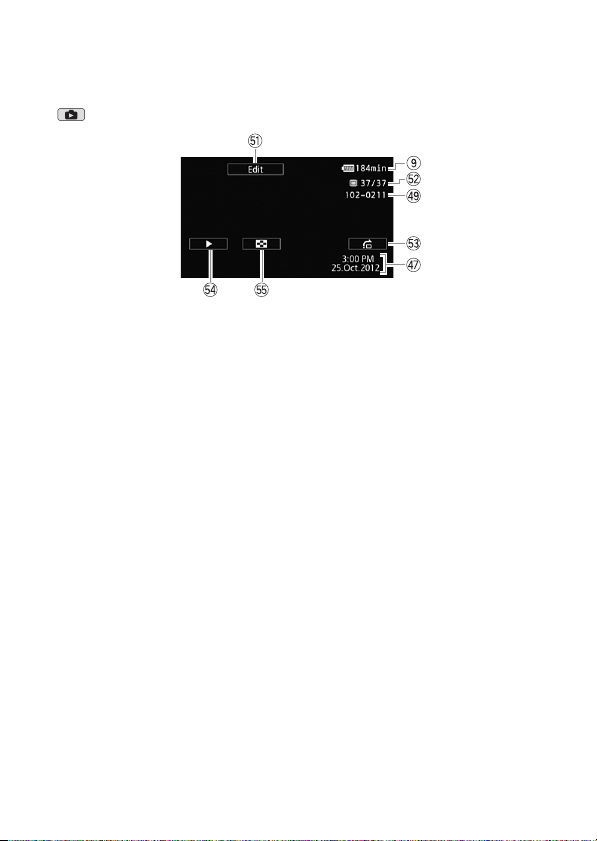
Viewing photos
Ga Control button [Edit] - Open the Edit panel (; 177)
Gs Current photo / Total number of photos
Gd Control button [h] - Photo jump (; 127)
Gf Control button
use your favorite background music. (; 129)
Gg Control button [f] - Return to the [Photos] index screen (; 125)
[Ð] - Slideshow: Play back a slideshow of your photos and
12
Page 13
step 1
Charging the Battery Pack
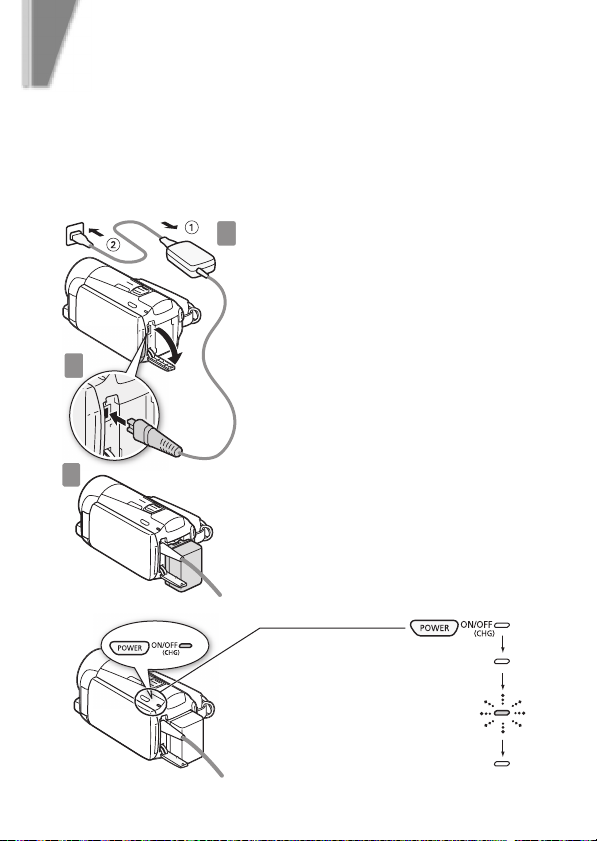
The camcorder can be powered with a battery pack or directly using the
compact power adapter. When you use the compact power adapter, the
power of the battery pack will not be consumed. Charge the battery pack
before use.
Connect the compact power
1
2
adapter.
1
1 Connect to the adapter.
2 Plug into a power outlet.
Connect the camcorder.
Plug into the DC IN terminal.
2
Insert the battery pack.
3
1 Press softly into the battery attachment
unit.
3
2 Slide up until it clicks in place.
Charging will start when the
camcorder is turned off.
Lamp off
(camcorder turned off)
Red lamp on
(charging)
Lamp off
(battery pack fully charged)
13
Page 14
Charging the Battery Pack
Charging times
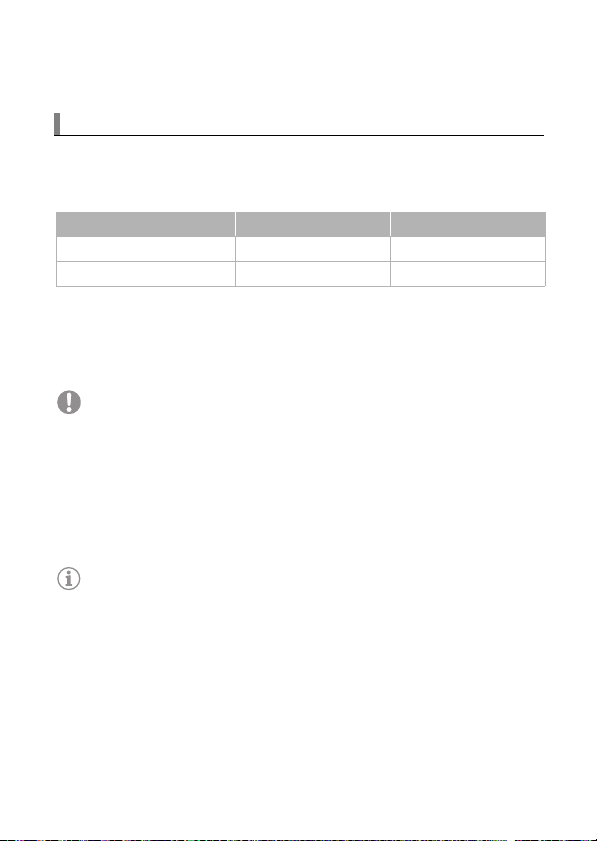
Charging the supplied BP-718 Battery Pack will take approximately
5 hours 10 minutes. A fully charged battery pack will allow for the
following operations (movies in FXP mode).
Typical recording Playback
Memory card 1 hr. 15 min. 3 hr. 5 min.
0Built-in memory 1 hr. 20 min. 3 hr. 10 min.
All given times are approximate and vary according to recording mode
and charging, recording or playback conditions.
See Charging, Recording and Playback Times (; 223) for details.
IMPORTANT
• The battery pack will be charged only when the camcorder is off.
• Do not connect to the camcorder’s DC IN terminal or to the compact power
adapter any electrical equipment that is not expressly recommended for
use with this camcorder.
• Do not connect the supplied compact power adapter to voltage converters
or special power sources such as those on aircraft, DC-AC inverters, etc.
NOTES
• We recommend charging the ba ttery pack in temperatures between 10 °C and
30 °C. If either the ambient temperature or the battery pack’s temperature is
outside the range of approx. 0 °C to 40 °C, charging will not start.
• If remaining battery time is an issue, you can power the camcorder using
the compact power adapter so the battery pack will not be consumed.
• Charged battery packs continue to discharge naturally. Therefore, charge
them on the day of use, or the day before, to ensure a full charge.
• We recommend that you prepare battery packs to last 2 to 3 times longer
than you think you might need.
14
Page 15
step 2
Basic Preparations
Before you begin, make basic adjustments and learn about a few of the
frequently-used parts.
See Grip Belt and Straps (; 23), Adjusting the LCD Screen
(; 25) for details.
1
2
3
See Handling Precautions (; 214), Cleaning ( ; 219) for important
information about how to take care of the touch screen.
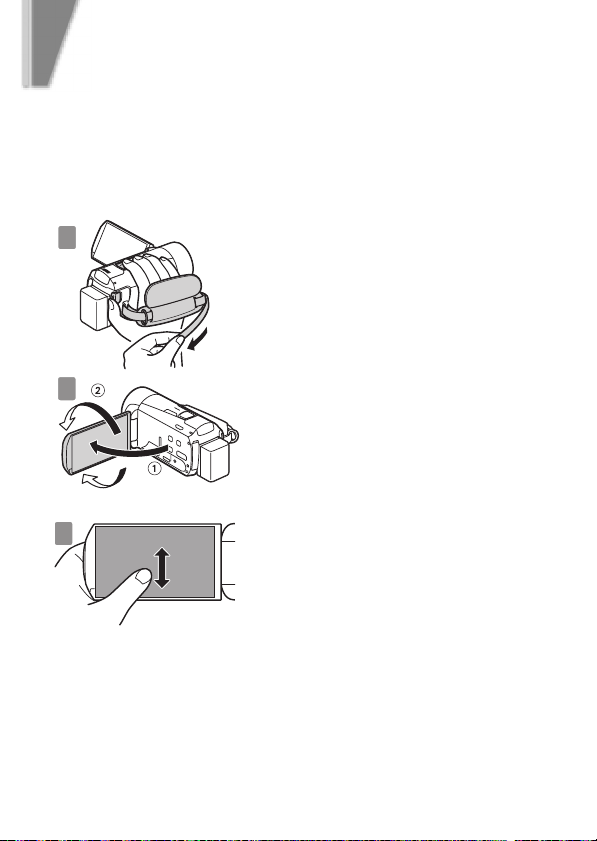
Fasten the grip belt.
Adjust it so you can reach the zoom
1
lever with your index finger, and
Y with your thumb. You can
use the grip belt together with an optional
shoulder strap.
Open the LCD panel and adjust
the angle.
2
1 Rotate it up to 90 degrees down (for
example, to record with your hand
extended above a crowd).
2 Rotate it up to 180 degrees toward the
lens (for example, to record video of
yourself).
Become familiar with the touch
screen.
3
In addition to touching buttons to select
items, you can also drag your finger
across the screen for operations such as
scrolling menus. While applying pressure,
swipe your finger across the screen.
You can also use the supplied stylus for
more precise operations.
15
Page 16
Basic Preparations
IMPORTANT
• The camcorder uses a pressure-sensitive touch screen. Press firmly
when using touch operations.
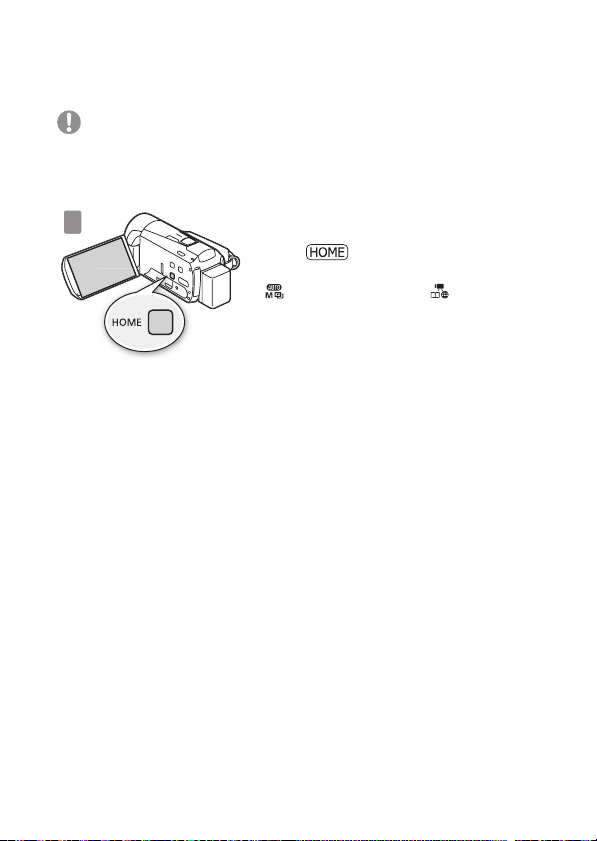
4
Set the camera mode and
recording standard.
4
Press to open the HOME menu.
From there, you can access the
[ Camera Mode] and [ Recording
Standard] menus.
16
Page 17
Camera mode
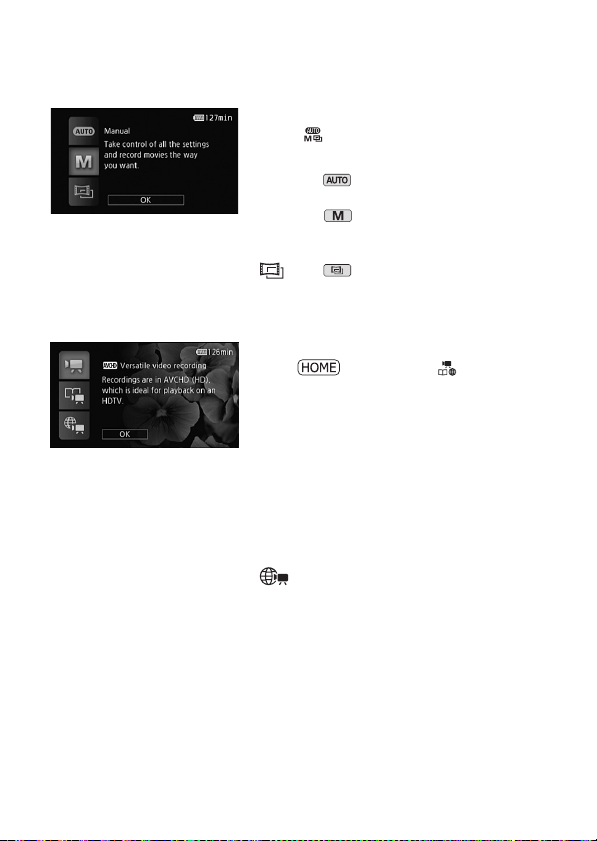
Touch [ Camera Mode] and then select
one of the following camera modes.
[N] In mode, the camcorder takes
care of most of the settings.
[n] In mode, you have access to
all the menus and can use a wide
array of advanced functions.
[ ] In mode, you can give your
recordings a cinematic look and still
have access to all the menus.
See Advanced Functions (; 86) for more details.
Recording standard
Press . Then, touch [ Recording
Standard] and choose to record AVCHD
movies or MP4 movies.
[v] If you plan on showing your movies
on an HDTV, then select this option
so you can play them back with
fantastic quality.
[é] Story Creator mode allows you to
create video stories by following a
story theme and receiving shooting
tips.
[ ] MP4 movies have smaller file sizes
so they are much easier to upload to
the Web and transfer to other
devices.
Basic Preparations
17
Page 18
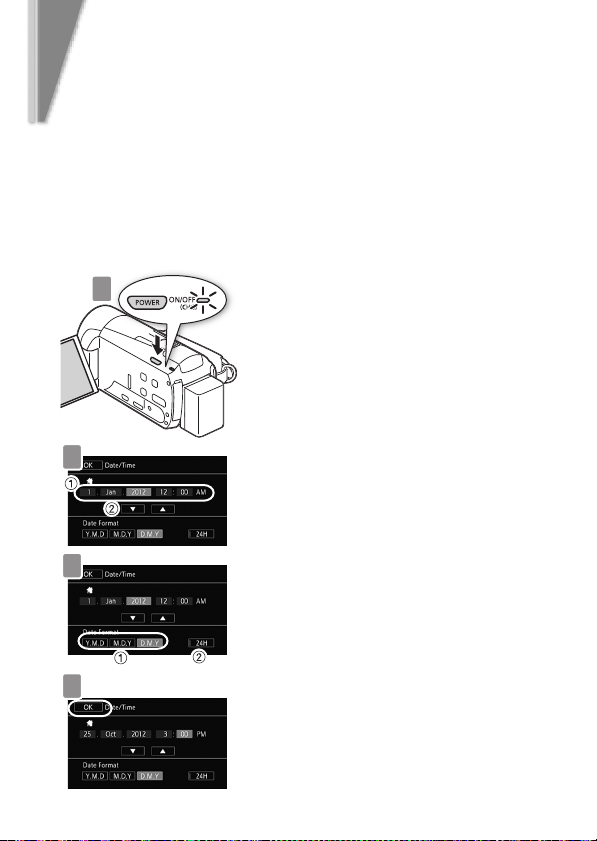
step 3
Setting the Date/Time and
Language
When you turn on the camcorder for the first time, you will need to set the
date and time before using the camcorder. You can also change the date
format and time zone. (For your convenience, you can do so after
changing the language to your preference.)
See Changing the Time Zone (; 35) for details.
18
1
Press P.
1
T
When the internal clock is not set, the
[Date/Time] screen will appear.
Change the date/time.
2
2
3
1 Touch a field you want to change.
2 Touch [Î] or [Í] to change the field.
Select your preferred date/time
format.
3
1 Touch one of the control buttons.
2 Touch to use 24-hour clock.
Touch [OK].
4
4
Page 19
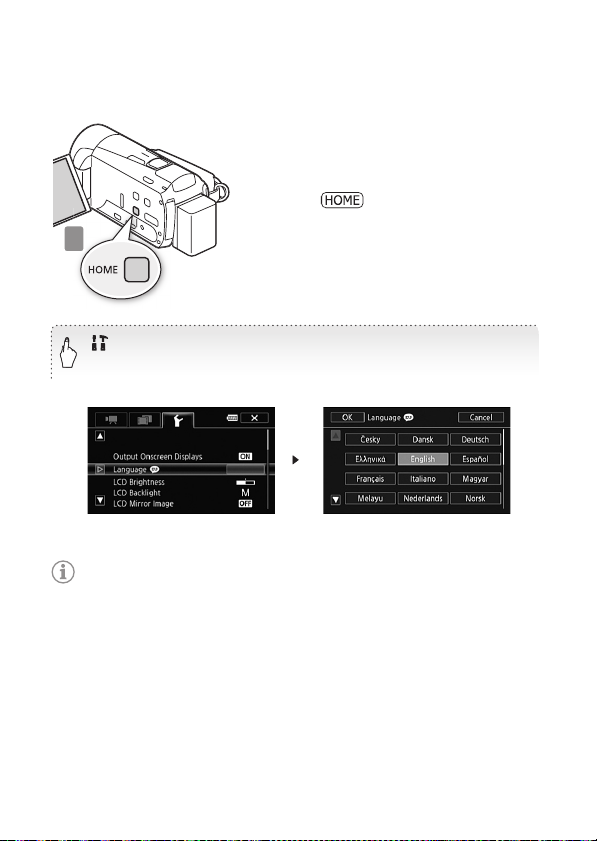
Setting the Date/Time and Language
Select the language used for
menus and onscreen displays.
5
See Using the Menus (; 27) for
details.
1 Press .
2 Select the desired language.
5
[ Other Settings] > q > [Language !] >
Desired language > [OK] > [X]
English is the default language
NOTES
• If you changed the language by mistake, look for the menu option with the
! mark.
19
Page 20
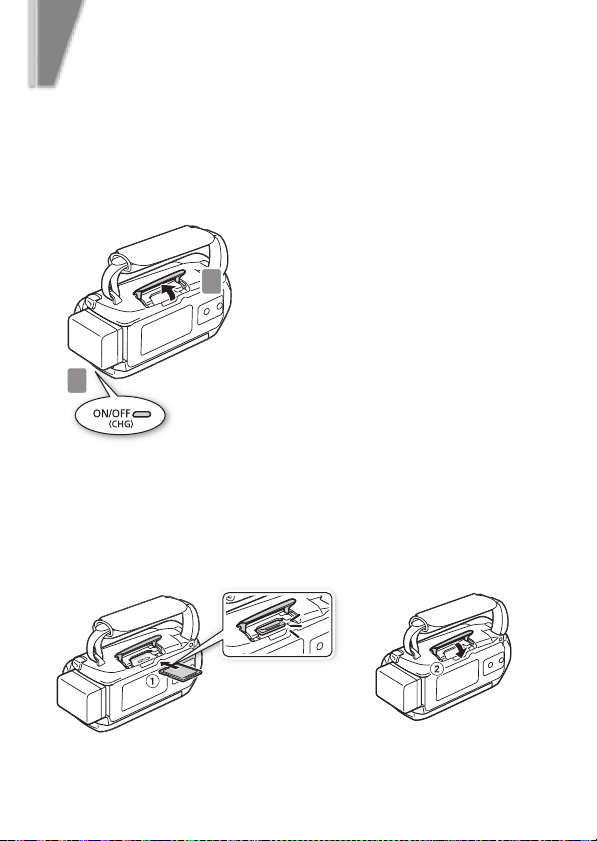
step 4
Using a Memory Card
Use commercially available . SD, / SDHC (SD High Capacity) or
0 SDXC (SD eXtended Capacity) memory cards. Make sure you use a
compatible memory card. See Memory Cards Compatible for Use with the
Camcorder (; 36) for memory cards that can be used. Before using
an Eye-Fi card be sure to refer to Using an Eye-Fi card (; 153).
Turn off the camcorder.
Make sure the indicator is off.
1
2
Open the memory card slot
cover.
2
1
Insert the memory card straight the memory card slot and
close the memory card slot cover.
3
1 Push the memory card into the memory card slot.
2 Securely close the cover. Do not force it closed if the memory card is
not correctly inserted.
click!
The label of the memory
card facing away from
the camcorder
20
Page 21

Using a Memory Card
0 Selecting the memory to use for recording
You can select to record your movies and photos in the built-in memory
or on a memory card. The default memory for recording both movies and
photos is the built-in memory but you can select the recording memory
independently for movies and for photos.
See Selecting the Memory (Built-in Memory/Memory Card) for the
Recordings (; 39) for details.
IMPORTANT
• Memory cards have front and back sides that are not interchangeable.
Inserting a memory card facing the wrong direction can cause a
malfunction of the camcorder.
• For important information regarding the use of SDXC memory cards be
sure to refer to SDXC Memory Cards (; 36).
• Initialize memory cards when you use them with this camcorder for the first
time.
See Initializing the Memory (; 40) for details.
NOTES
• To remove the memory card: Push the memory card once to release it. When
the memory card springs out, pull it all the way out.
21
Page 22
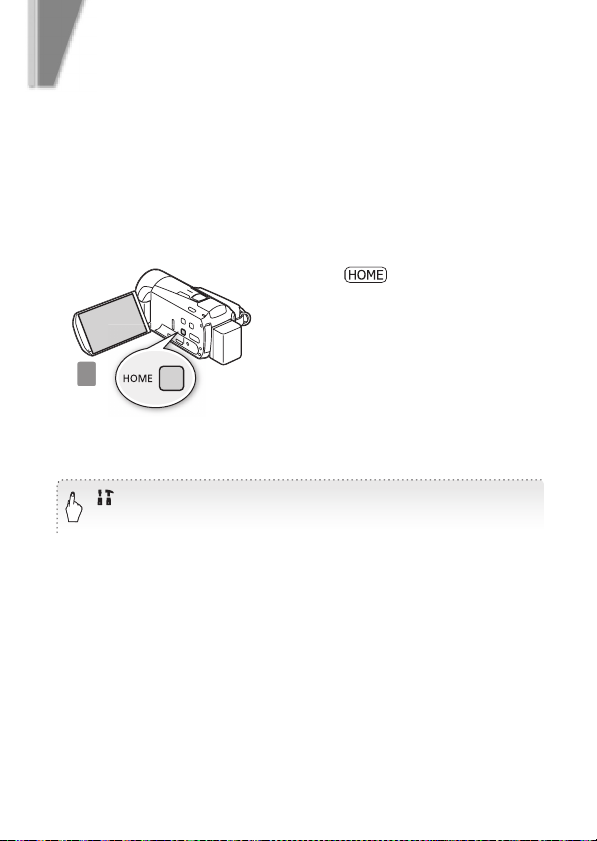
basic recording
Selecting the Quality of Video
After you choose to record movies in MP4 or AVCHD, you can set the
recording mode (level of video quality). Changing the recording mode will
change the recording time available on the memory. For AVCHD movies,
select MXP or FXP for better quality or LP for longer recording times. For
MP4 movies, select 4 Mbps for smaller file sizes and faster uploads.
See Selecting the Video Quality (Recording Mode) (; 88) for
approximate recording times.
Press .
1
1
Select the recording mode.
2
[ Other Settings] > r > [Recording Mode] >
Desired recording mode > [X]
22
Page 23
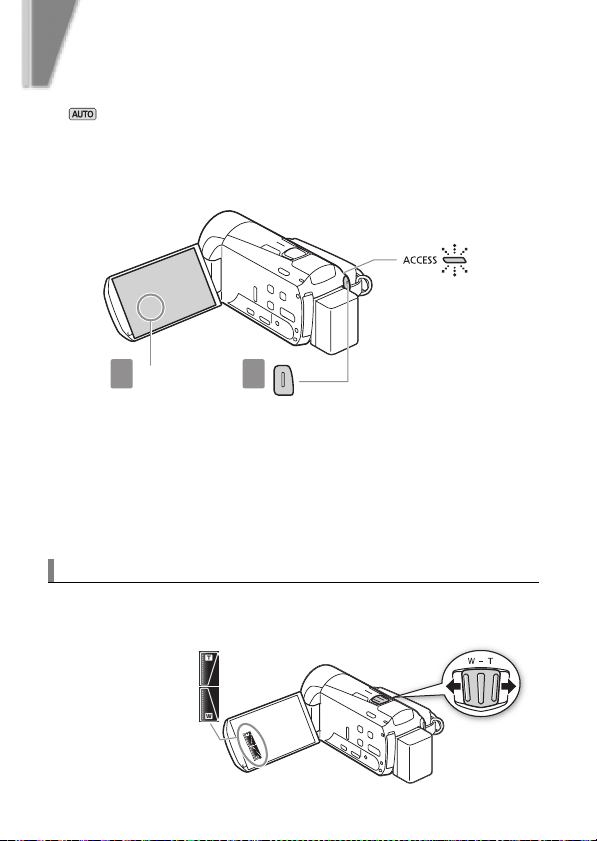
basic recording
Shooting Video and Taking Photos
In mode you can easily record movies and photos. You do not need
to worry about any settings or menu options - the camcorder will select
the most appropriate settings automatically.
Before using an Eye-Fi card be sure to refer to Using an Eye-Fi card
(; 153).
Flashes in red while
shooting video and
while a scene or photo
is being recorded on the
Z
2 1
START/STOP button
Start recording movies.
Press to start recording. Press again to pause the recording and
1
record the video on the memory as one scene.
Take a photo.
Touch [PHOTO] on the screen.
2
Use the zoom to frame the subject
Use the zoom lever or the onscreen zoom controls. To zoom out, zoom toward
T
(wide angle) end. To zoom in, zoom toward the S (telephoto) end.
the
Touch [FUNC.] >
[ZOOM] to display the
onscreen zoom controls
memory.
23
Page 24

Shooting Video and Taking Photos
NOTES
• Smart AUTO: In mode, just point the camcorder and Smart AUTO will
automatically select the best settings for your subject and the scene you
want to use. One of 38 icons will appear depending on the characteristics
of the subject, background, lighting conditions, etc.
See About the Smart AUTO function (; 46) for details.
• Intelligent IS: In mode, the camcorder will automatically select the best
IS setting for the situation.
See Intelligent IS (; 48) for details.
• Use or mode to access the menus and to change various
settings up to your preferences. In mode, you have limited access to
menus.
See Recording in Manual Mode (; 86), Cinema Mode and Cinema-
Look Filters (; 69) and all through Advanced Functions (; 86)
for details.
• Follow the suggestions of the Story Creator to transform casual and
random videos to interesting video stories. Story Creator offers easy-tofollow scripts optimized for various scenarios.
See Video Stories and Cinema Style (; 66) for details.
• About the zoom: The camcorder features 10x optical zoom. When recording
movies, you can also use the 200x digital zoom.
See [Digital Zoom] (; 179) for details.
• About the zoom speed:
- Onscreen zoom controls: depends on where you touch within the zoom
control.
- Zoom lever: variable speed. That is, the zoom speed depends on how
you press the lever: press gently for slower zooms; press harder for faster
zooms. You can also change the zoom speed to one of three constant
speeds.
See Zooming (; 49), [Zoom Speed] (; 178) for details.
24
Page 25
Shooting Video and Taking Photos
• In most situations, keep at least 1 m away from the subject. Using the tele
macro function you can reduce this distance to 40 cm at full telephoto. The
minimum focusing distance at full wide angle is 1 cm.
See Tele Macro (; 106) for details.
Quick Start
• While recording, you can simply close the LCD panel to set the camcorder
in standby mode, which consumes less power and allows the camcorder
to use the battery pack longer. During standby mode, the ON/OFF (CHG)
indicator will change from green to orange. Open the LCD panel to return
the camcorder to record pause mode.
See Quick Start (; 51) for details.
IMPORTANT
• Do not disconnect the power source during standby mode (while the ON/
OFF (CHG) indicator is lit in orange).
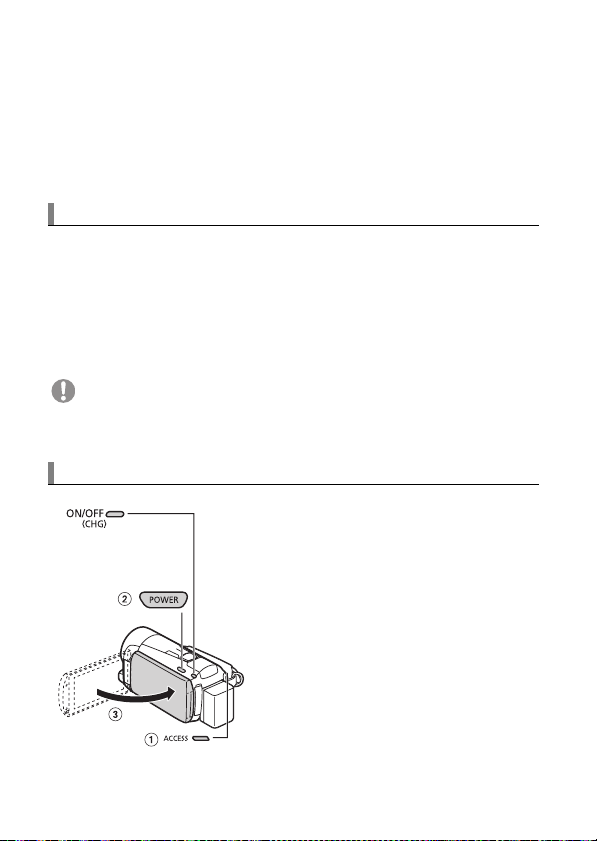
When you have finished recording
Make sure the camcorder has finished
Confirm that the
indicator goes out
writing the scenes or photos on the memory
before turning it off.
1 Check that the indicator is off.
P.
2 Press
3 Close the LCD panel.
25
Page 26
basic playback
Playing Back Movies and
Viewing Photos
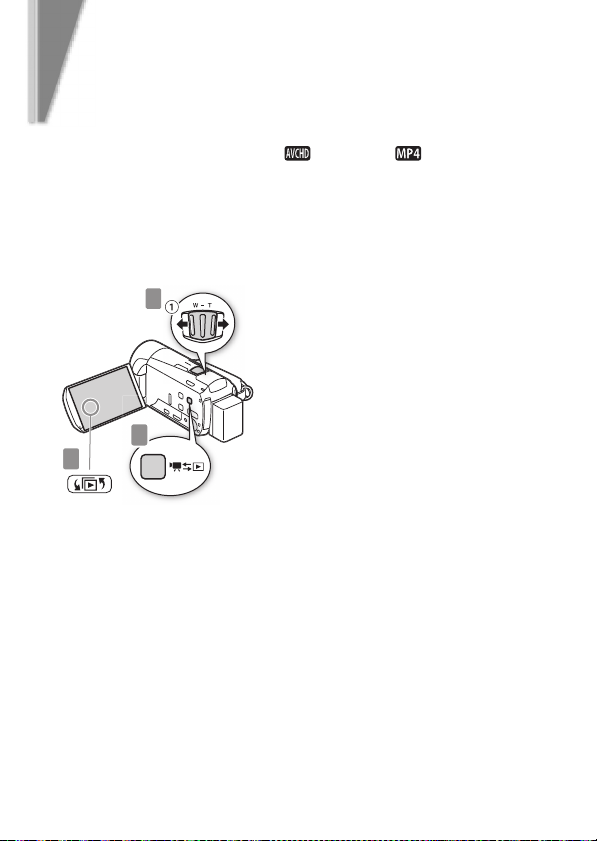
The basic playback screen is the [ Movies] or [ Movies] screen.
You can change the index screen displayed from the [G Index
Selection] screen. You can also play back complete stories from the
gallery.
See Playing Back Video (; 53), Playing Back Stories from the Gallery
(; 76), Viewing Photos (; 125) for details.
3
1
2
Change the index screen, if necessary.
Touch [G] to open the [G Index Selection] screen. Next, you
2
can touch the tabs at the top to select the memory*, and then touch the
control button of the desired index screen.
26
Press to set the camcorder to
playback mode.
1
Page 27
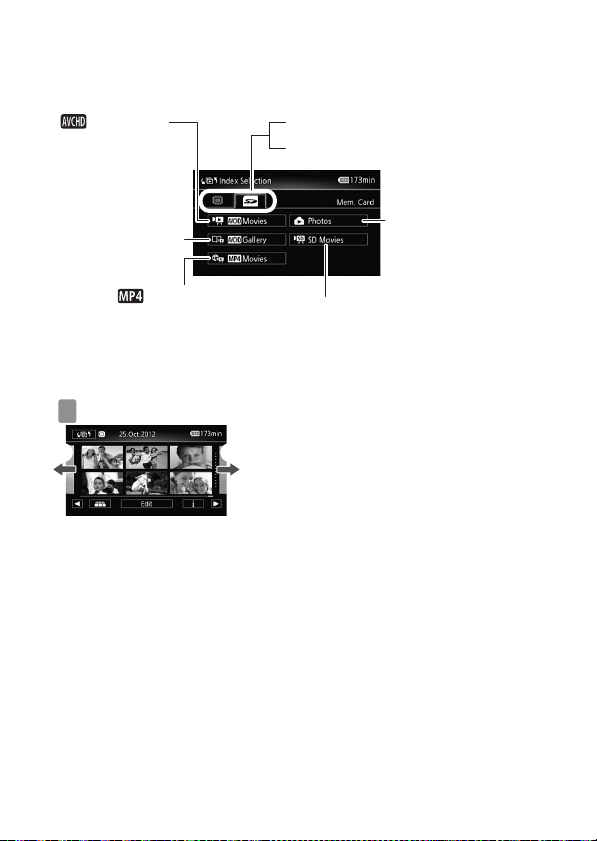
Playing Back Movies and Viewing Photos
[ Movies] index
screen: Scenes
organized by date
Gallery: Scenes
organized by stories
(; 76)
[ Movies]
index screen
(; 58)
* 0 only.
3
22
Touch the desired scene or photo to play back.
& Built in memory*
* memory card
Photo index screen
(; 125)
Scenes converted to standard definition (only when
the memory card is selected)* (; 148)
Look for the scene or photo you
want to play back.
3
1 Move toward T to show 15 scenes/
photos; move toward S to show 6
scenes/photos.
2 Drag your finger left or right for the
next/previous index page.
4
Movies: The selected scene is played back. Playback continues until
the end of the last scene in the index screen. Touch the screen during
playback to display the playback controls.
27
Page 28
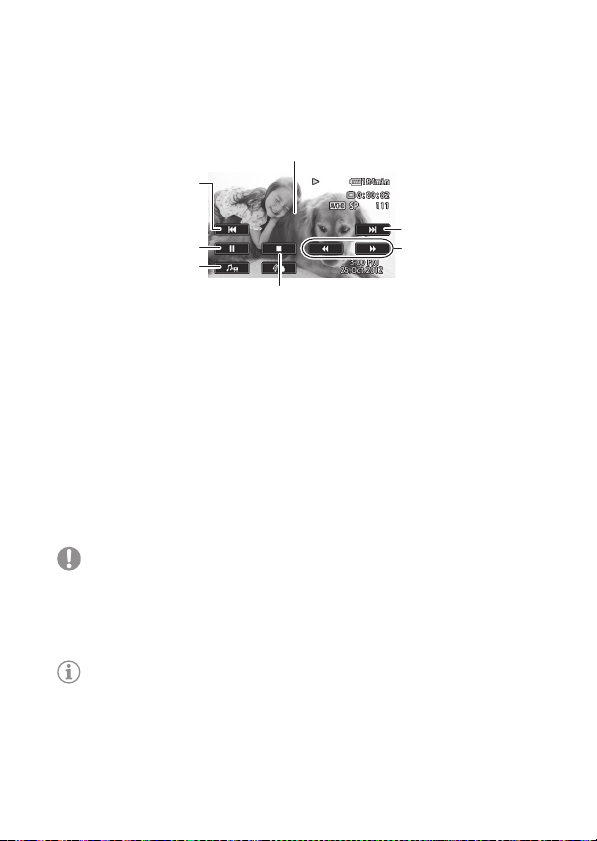
Playing Back Movies and Viewing Photos
AVCHD movies
1
7
2
6
5
4
3
1 Touch anywhere else to hide the playback controls
2 Next scene
3 Fast playback* (touch again to increase the speed)
4 Stop
5 Volume and background music controls
6 Pause (touch again to resume playback)
7 Beginning of the scene (double-tap to jump to the previous scene)
* In playback pause, these controls are replaced by the slow playback controls.
Photos: The selected photo is displayed in single photo view. Drag your
finger left/right to browse through the photos one by one. Touch the
screen to display the playback controls.
IMPORTANT
• You may not be able to play back with another device the movies you
recorded on the memory card with this camcorder. In such case, play back
the movies on the memory card using this camcorder.
NOTES
• When playing back movies, depending on the recording conditions, you
may notice brief stops in video or sound playback between scenes.
28
Page 29
basic playback
Playback on a TV Screen
Connect your camcorder to a TV to enjoy your recordings with family and
friends. Make sure the camcorder and TV are turned off before you start.
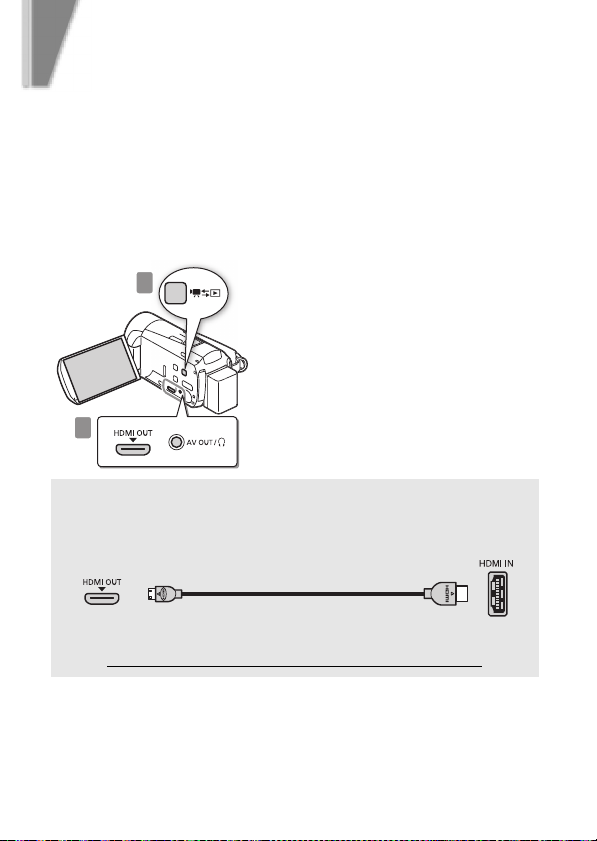
Connect the camcorder to the TV.
Select the most appropriate connection according to the input
1
terminals on your TV. The HDMI connection has higher picture quality
(HD) than the composite video connection (SD).
2
1
! HDMI connection: All digital, high-definition connection.
See Connection Diagrams - Connection ! (; 131) for details about
additional settings.
(HDMI mini-
connector)
Turn on the camcorder.
Press to turn on the camcorder
2
directly in playback mode.
Play back your movies or photos
as described in the previous
3
pages.
HTC-100/S HDMI Cable
(supplied)
(standard HDMI
connector)
29
Page 30
Playback on a TV Screen
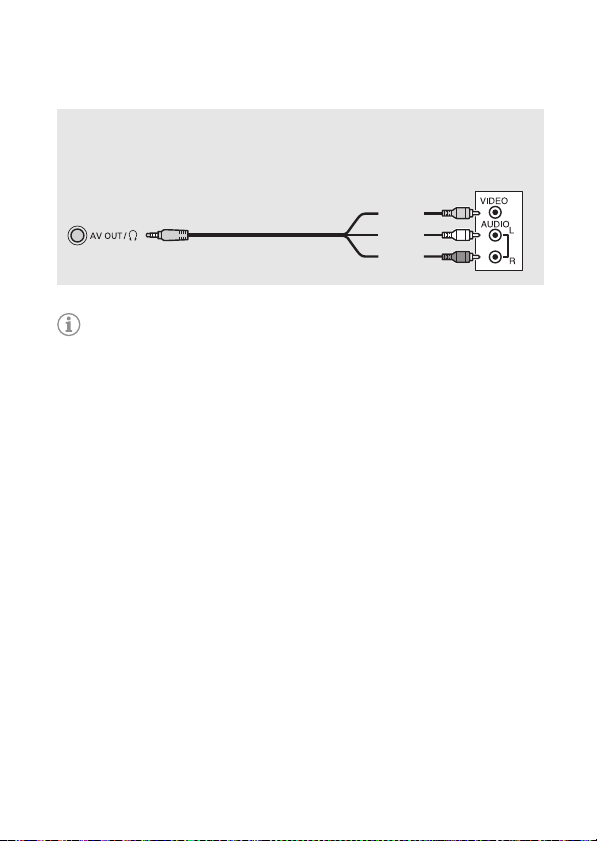
" Composite video connection: Analog, standard-definition connection.
See Connection Diagrams - Connection " (; 132) for details about
additional settings.
Yellow
STV-250N Stereo Video Cable
(optional)
White
Red
NOTES
• The illustrations are for reference only. The layout of terminals on your TV
may be different.
• We recommend powering the camcorder using the compact power
adapter.
• Adjust the volume using the TV.
• When you play back 16:9 movies on standard TV sets with a 4:3 aspect
ratio, the TV set will switch automatically to widescreen mode if it is
compatible with the WSS system. Otherwise, change the aspect ratio of the
TV manually.
See [TV Type] (; 181) for details.
• Using a SCART adapter, you can connect the camcorder also to the
SCART terminal on the TV.
See Connection Diagrams - Connection , (; 132) for details.
• 0 If your HDTV is DLNA Certified, you can play back your recordings
on your HDTV wirelessly, directly from the camcorder.
See Wi-Fi Functions (; 155) for details.
30
Page 31

external connections
Saving and Sharing Your
Recordings
It is recommended that you periodically save your recordings.
PIXELA’s software (Windows only)
- For AVCHD movies. Refer to the Startup Guide (supplied leaflet) and
Software Guide (PDF file) of the supplied PIXELA’s software for details
about installing and using the software.
ImageBrowser EX (Windows/Mac OS)
- For MP4 movies and photos. This software allows you to save and manage
MP4 movies and photos.
Refer to Saving MP4 Movies and Photos (Windows/Mac OS) (; 140)
for details about installing the software.
0 Wi-Fi Functions
- You can transfer files wirelessly, directly from the camcorder to your
computer or FTP server and upload videos wirelessly to the Web.
See Wi-Fi Functions (; 155) for details.
0 Memory Save: Saving Recordings without a Computer
- Easily save the whole content of the memory onto an external hard drive
connected directly to the camcorder. With no need for a computer, this is
a very convenient way to save backup copies of your recordings.
See Memory Save: Saving an Entire Memory onto an External Hard Drive
(; 143) for details.
31
Page 32

specifications
Abridged Specifications
The specifications given here are an abridged version of the full
specifications of the camcorder. Be sure to read the full version of the
instruction manual for the complete information.
See Specifications (; 228) for details.
Power supply (rated)
3.6 V DC (battery pack), 5.3 V DC (compact power adapter)
Power consumption
2.6 W (SP mode, AF on)
Battery Pack
DANGER!
Treat the battery pack with care.
• Keep it away from fire (or it might explode).
• Do not expose the battery pack to temperature higher than 60 °C. Do not
leave it near a heater or inside a car in hot weather.
• Do not try to disassemble or modify it.
• Do not drop it or subject it to shocks.
• Do not get it wet.
Optional Accessories
Canon offers a wide range of optional accessories for your camcorder.
See Optional Accessories (; 222) for details.
32
Page 33
Abridged Specifications
Use of genuine Canon accessories is recommended.
This product is designed to achieve excellent performance when used with
genuine Canon accessories. Canon shall not be liable for any damage to this
product and/or accidents such as fire, etc., caused by the malfunction of nongenuine Canon accessories (e.g., a leakage and/or explosion of a battery pack).
Please note that this warranty does not apply to repairs arising out of the
malfunction of non-genuine Canon accessories, although you may request such
repairs on a chargeable basis.
This mark identifies genuine Canon video accessories. When
you use Canon video equipment, we recommend Canon-brand
accessories or products bearing the same mark.
33
Page 34
Australia and New Zealand Only
WARRANTY CARD
For Canon products distributed by Canon Australia Pty Ltd or Canon New Zealand Ltd only.
Warranty does not cover Canon products purchased in other countries unless otherwise sta ted.
DEALER’S NAME & ADDRESS
PRODUCT NAME
SERIAL NO.
PURCHASE DATE / /
CANON AUSTRALIA PTY LTD
A.B.N. 66 005 002 951
1 Thomas Holt Drive, North Ryde, 2113
Canon Service Tel: 131383
Web: canon.com.au
PLEASE RETAIN YOUR SALES DOCKET AS PROOF OF PURCHASE
DATE IS REQUIRED FOR WARRANTY SERV ICE
“THANK YOU FOR PURCHASING CANON”
This card contains the terms of your Canon product warranty. To ensure access to warranty services, kindly complete the
details on the front of the card at the time of purchase.
You will need proof of purchase to claim warranty ser vice, therefore please ensure that you retain and store your receipt
and this card in a safe plac e, or you may be charged for repairs.
If and when you need warra nty service, please refer to the warranty terms.
Should you need to send your p roduct to us, please ensure that it is properly packed and insured. Canon Australia and
Canon New Zealand will not be liable for loss in transit or damage to goods s ent to us.
CANON NEW ZEALAND LTD
Tel: 0800 222 666
Akoranga Business Park
28 The Warehouse Way
Northcote, Auckland
Email: [email protected]
Web: canon.co.nz
WARRANTY TERMS AND CONDITIONS
1. Canon warrants that, during the Warranty Period, the Product will , with normal use and service, be free from faulty
parts, manufacture or workmanship.
2. The Warranty Period for:
(a) all projector Products (excluding projector lamps) and standard Canon accessories is 36 months from the date
of purchase;
(b) non-Image Stabiliser binocul ars is 60 months from date of purchase;
(c) projector lamps, is 90 days from the da te of purchase; and
(d) all other Products and their standard Cano n accessories is 12 months from the date of purchase.
3. This warranty is valid only for Products that are purchased new and unused
(a) in Australia or New Zealand; and
(b) sourced from Canon Australia Pty Ltd or Canon New Zealand Ltd (“ Canon”).
The Customer must provide t he original proof of purchase which demonstr ates compliance with the above
conditions to receive an y services under this warranty.
34
Page 35

4. Th is warranty only applies where a def ect has arisen, wholly or substantiall y, as a result of faulty manufacture, parts
or workmanship during the Warranty Period.
5. The w arranty does not apply where d amage is caused by other factors, including without limitation:
(a) normal wear and tear;
(b) abuse, mishandling, accident or failure to follow operating instructions;
(c) leaking batteries, exposure to l iquid or infiltration of foreign particles;
(d) servicing or mod ification of the Product o ther than by Canon, their authorised service agents or, where
applicable, another mem ber of the Canon Camera International Serv ice Network;
(e) use of the Product with un suitable ink or toner;
(f) use of the Product with other access ories, attachments, product supplies, parts or devices (including ba tteries,
tapes/cards, lenses and flash attachme nts) that do not conform to Canon Inc specifications; or
(g) shipment or other transit.
6. This warranty does not cov er:
(a) the replacement of any consum ables such as print heads, drums, lamps, film, ink and toner cartridges and
paper;
(b) rubber rollers in scanners;
(c) software included with scanners;
(d) repair or replacement of any Prod uct damaged during transit to or from Ca non; or
(e) any loss or consequential dama ge incurred while the Product is being repaired.
7. This warranty is to be read together with any benefits that Canon may provide to a consumer under statute.
8. This clause relates to goods supplied in Australia onl y: Our goods come with guarantees that cannot be excluded
under the Australian Consumer La w. You are entitled to a replacement or refund for a major failure and fo r
compensation for a ny other reasonably foreseeable loss or damage. You are also entitled to have the goods re paired
or replaced if the goods fail to be of acceptable quality and the failure does not amount to a major failure.
9. You have rights and benefits under the consumer laws in your jurisdiction. Wi thout detracting from these rights or
benefits, Canon excludes all liability in respect of the Product for any other los s which is not reason ably foreseeable
from a failure of this Produ ct, which may include liability for negligence, los s of tape/card, loss of images, loss of
expenditure associated with the Product and loss of enjoyment.
10. I nstructions for making a warranty claim are included in the e nclosed materials. I f the warranty claim is not
accepted:
(a) Canon will inform the Customer;
(b) if requested to do so by the Customer, Canon will repair the Pro duct provided you pay the usual charges for
such repair; and
(c) if applicable the C ustomer will be responsible for all costs as sociated with collection of the Product f rom
Canon.
MAKING A WARRANTY CLAIM - RETURN TO CANON FOR REPAIR
The process for a war ranty claim is as follows:
1. you must inform Canon or a Canon Authorised Service Provider as soon a s the warranty claim arises and provide a
written description of the fault;
2. you must send to Canon or a Canon Autho rised Service Provider your original proof of purchase and your written
description of the fault (including image samples and a ny other relevant material); and
3. subject to the applicable consumer law s in your jurisdiction, you must pay for all packing, fr eight and insurance
costs for transit of the Product to Canon.
If the warranty claim is accepted Canon wi ll, subject to the applicable consume r laws in your jurisdiction, at its cost:
(a) repair or replace any faulty parts or rectify any faulty workmanship; and
(b) return t he Product to you.
To make a warranty claim, please locate a service agent:
Australia: canon.com.au/support/service_agents.html or call Canon on 13 13 83
New Zealand: canon.co.nz/en-NZ/Support-Services/Dealer-Service-Locator or call Canon on 0800 222 666
35
Page 36
Canon Europa N.V.
Bovenkerkerweg 59-61, 1185 XB Amstelveen, The Netherlands
www.canon-europa.com
Canon UK Ltd
CCI Service Centre, Unit 130
Centennial Park, Borehamwood, Hertfordshire, WD6 3SE, United Kingdom
Telephone 0844-369-0100
Canon Australia Pty Ltd
Tel: 13-13-83 (within Australia only)
(61) 02-9805-2555
www.canon.com.au
Canon New Zealand Ltd
Tel: 0800-222-666 (within New Zealand only)
(64) 09-489-0300
www.canon.co.nz
Canon Singapore Pte. Ltd
1 HarbourFront Avenue, #04-01 Keppel Bay Tower,
Singapore 098632
Tel: (65) 6799 8888
Fax: (65) 6799 8882
Canon Hongkong Company Ltd
19/F, The Metropolis Tower, 10 Metropolis Drive,
Hunghom, Kowloon, Hong Kong
Tel: +852 3191 2333, Fax: +852 2428 3963
Canon Latin America, Inc.
Sales & Enquiries:
703 Waterford Way, Suite 400, Miami, FL 33126 USA
For support concerning the supplied PIXELA's software, please call
PIXELA customer support (see the back cover of the Startup Guide for
PIXELA's software).
© CANON INC. 2012 PUB. DIE-0417-000 0160W734
Canon Inc. 30-2, Shimomaruko 3-chome, Ohta-ku, Tokyo 146-8501, Japan
 Loading...