

Canon F-718SG, F-718SA User Instructions

F-718SG / F-718SA
SCIENTIFIC CALCULATOR
USER INSTRUCTIONS
E-IE-449
ENGLISH

CONTENTS
DISPLAY (4-line Dot Matrix DISPLAY)
GETTING STARTED
Power ON, OFF ........................................................................P. 4
Display Contrast Adjustment.....................................................P. 4
Mode Selection .........................................................................P. 4
Calculator Set-up Menu ............................................................P. 5
Before Using the Calculator......................................................P. 7
INPUTTING EXPRESSIONS AND VALUES
Input Capacity...........................................................................P. 8
Input Editing..............................................................................P. 8
Inputting and Display result in Maths Mode............................P. 11
INPUT RANGE AND ERROR MESSAGE...................................P. 11
Calculation Precision, Input Range.........................................P. 11
Order of Operations ................................................................P. 14
Calculation Stacks ..................................................................P. 16
Error Message and Error Locator ...........................................P. 16
BASIC CALCULATIONS.............................................................P. 17
Arithmetic Calculations ...........................................................P. 17
Memory Calculations ..............................................................P. 17
Fraction Calculations ..............................................................P. 19
Percentage Calculations.........................................................P. 20
Degree-Minutes-Seconds Calculations...................................P. 20
Reply & Multi-statements........................................................P. 21
FUNCTIONAL SCIENTIFIC CALCULATIONS
Square, Root, Cube, Cube Root, Power, Power Root,
Reciprocal and pi ....................................................................P. 22
Logarithm, Natural Logarithm, Antilogarithm and logab..........P. 22
Angle Unit Conversion ............................................................P. 22
Trigonometry Calculations ......................................................P. 23
Permutation, Combination, Factorials and Random
Number Generation ................................................................P. 24
Least Common Multiple and Greatest Common Divisor.........P. 25
Quotient and Remainder Calculations ....................................P. 26
Coordinate Conversion ...........................................................P. 26
Absolute Value Calculations ...................................................P. 27
Engineering Notation ..............................................................P. 27
Display Values Exchange .......................................................P. 28
STATISTICAL CALCULATIONS
Statistical Type Setection........................................................P. 29
Statistical Data Input...............................................................P. 29
Editing Statistical Sample Data...............................................P. 30
Statistical Calculation Screen .................................................P. 31
Statistical Menu.......................................................................P. 31
Statistical Calculation Example...............................................P. 33
FUNCTION (x, y) TABLE CALCULATION..................................P. 34
BATTERY REPLACEMENT
ADVICE AND PRECAUTIONS....................................................P. 37
SPECIFICATIONS .......................................................................P. 38
.....................................................................
........................................
................................
...........................
.................................................
........................................................
P. 3
P. 4
P. 8
P. 22
P. 29
P. 36
2
How to use the Slide Cover
Open or close the cover by sliding as shown in the figure.
OPEN CLOSE
DISPLAY (4-line Dot Matrix DISPLAY)
<Status Indicators>
S : Shift key
A : Alpha key
M : Independent memory
STO : Store memory
RCL : Recall memory
STAT : Statistics mode
D : Degree Mode
R : Radian Mode
G : Gradient Mode
FIX : Fixed-decimal setting.
SCI : Scientific Notation
LINE : Line Display mode
: Up Arrow
: Down Arrow
Disp : Multi-statements Display
3
GETTING STARTED
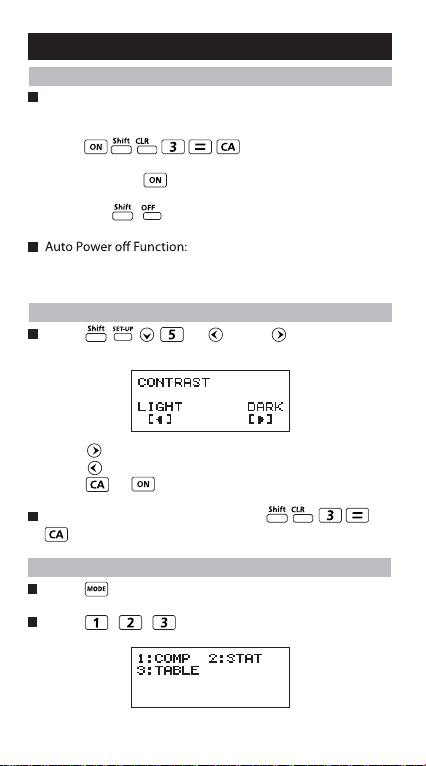
Power ON, OFF
First time operation:
1. Pull out the battery insulation sheet, then the battery will
be loaded.
2. Press to reset the calculator.
Power ON: When is pressed.
Power OFF: are pressed.
When the calculator is not used for about 7 minutes, it
will automatically power off.
Display Contrast Adjustment
Press (5: CONT ), enter the
Display Contrast Adjustment screen.
Press to make the display contrast darken.
Press to make the display contrast lighten.
Press or to confirm and clear the screen.
To initialize the LCD contrast, press
outside the Display Contrast Adjustment screen.
Mode Selection
Press to enter the Calculation Mode Selection
screen.
Press , , to select the calculation mode.
4

Operation
Mode
COMP Normal calculation
STAT Statistical calculation STAT
TABLE Function Table calculation
LCD
Indicator
Initial mode is COMP mode.
Calculator Set-up Menu
Press to enter the Calculator Set-up Menu;
press / for next / previous page.
Press
or key
To select the calculator input & output format [1]
Maths or [2] Line
[1] Maths – (Maths mode): The majority of calculation
input and output (e.g. Fraction, pi, square root
number) are shown in Mathematics textbook format.
[2] Line – (Line mode): The majority
Maths mode
of calculation input and output are
shown in the lines format. And
“LINE” icon will be shown.
For the STAT mode, the Input &
Display format will switch to Line
Line mode
LINE
mode automatically.
5

To select the angle unit [3] Deg, [4] Rad or [5] Gra
[3] Deg: Angle unit in Degree
[4] Rad: Angle unit in Radian
[5] Gra: Angle unit in Gradient
90º = radians = 100grads
To select display digit or notation [6] Fix, [7] Sci or
[8] Norm
[6] Fix: Fixed Decimal, [Fix 0~9?] appears, specify the
number of decimal places by pressing [0] – [9].
Example: 220 ÷ 7 = 31.4286 (FIX 4)
= 31.43 (FIX 2)
[7] Sci: Scientific Notation, [Sci 0~9?] appears, specify
the number of significant digits by pressing [0] – [9].
Example: 220 ÷ 7 = 3.1429 x 10
= 3.143 x 10
1
(SCI 5)
1
(SCI 4)
[8] Norm: Exponential Notation, [Norm 1~2?] appears,
specify the exponential notation format by pressing [1] or
[2].
Norm 1: Exponential notation is automatically used for
integer values with more than 10 digits and decimal
values with more than TWO decimal points.
Norm 2: Exponential notation is automatically used for
integer values with more than 10 digits and decimal
values with more than NINE decimal places.
Example: 1 ÷ 1000 = 1 x 10⁻³ (Norm 1)
= 0.001 (Norm 2)
To select the fraction format [1] a b/c or [2] d/c
[1] a b/c: specify Mixed fraction display
[2] d/c: specify Improper fraction display
6
To select the statistical display format [3] STAT
([1] ON or [2] OFF)
[1] ON: Show FREQ (Frequency) Column in Statistical
Data Input Screen
[2] OFF: Hide FREQ (Frequency) Column in Statistical
Data Input Screen
To select the decimal point display format [4] Disp
([1] Dot or [2] Comma)
[1] Dot: specify dot format for Decimal point result display
[2] Comma: specify comma format for Decimal point
result display
To Adjust Display contrast [5] CONT
See “Display Contrast Adjustment” section.
Before Using the Calculator
Check the current Calculation Mode
Be sure to check the status indicators that indicate the
current calculation mode (COMP, STAT, TABLE), display
formats setting and angle unit setting (Deg, Rad, Gra)
Return to initial setup
Pressing (YES) to return the
initial calculator setup
Calculation mode : COMP
Input/Output Format : Maths
Angle unit : Deg
Display Digits : Norm 1
Fraction Display Format : d/c
Statistical Data Input : OFF
Decimal Point format : Dot
This action will not clear the variable memories.
Initialize the calculator
When you are not sure of the current calculator setting, you
are recommended to initialize the calculator (calculation
mode “COMP”, angle unit “Degree”, and clear reply and
variable memories), and LCD contrast by pressing
(All) (YES) .
7
INPUTTING EXPRESSIONS AND VALUES
Input Capacity
F-718S allows you to input a single calculation up to 99
bytes. Normally, one byte is used as each time you press
one of the numeric keys, arithmetic keys, scientific function
keys or . Some functions require 4 – 13bytes.
, , and the direction keys will not use up any bytes.
When input capacity is less than 10bytes, the input cursor
will change from “ ” to “ ” that notifying the memory is
running now.
Input Editing
New Input begins on the left of display. If input data are
more than 15 characters, the line will scroll to the right
consecutively. You can scroll back to the left by using
and to review the input
In Line mode, press to let the cursor jump to the
beginning of inputting, while will jump to the end.
In Maths mode, press to let the cursor jump to the
beginning of inputting while it is at the end of the input
calculation. Or press to let the cursor jump to the end
of inputting while it is at the beginning of the input
calculation.
8
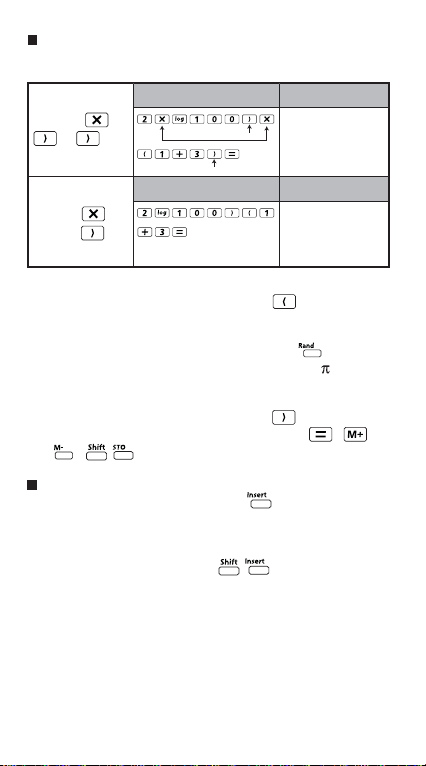
Omit the multiplication sign and final close parenthesis.
Example: 2 x log 100 x (1+3) = 16
Operation 1: Display 1
Including *1,
*2, *3
*1
*3
*2
2xlog(100) x (1+3)
16
Operation 2: Display 2
Omitting *1,
Omitting *3
2log(100)(1+3
16
*1. Omit multiplication sign (x)
- Input before an open parentheses : 1 x (2+3)
- Input before scientific functions that includes
parenthesis: 2 x cos(30)
- Input before Random number function
- Input before Variable (A, B, C, D, X, Y, M),
, е
*2. Scientific functions come with the open parenthesis.
Example: sin(, cos(, Pol(, LCM(…. You need to input the
argument and the close parenthesis .
*3. Omit the last close parenthesis before the , ,
, .
Insert and overwrite Input mode
In Line mode, you can use INSERT or overwrite mode
for inputting.
- In Insert mode (Default input mode), the cursor is a
vertical flashing line “ | ” for inserting a new character.
- In overwrite mode, press key to switch the
cursor to a flashing horizontal ( _ ) and replace the
character at the current cursor position.
In Maths mode, you can only use the insert mode.
Whenever the display format changes from Line mode to
Maths mode, it will automatically switch to the insert mode.
9
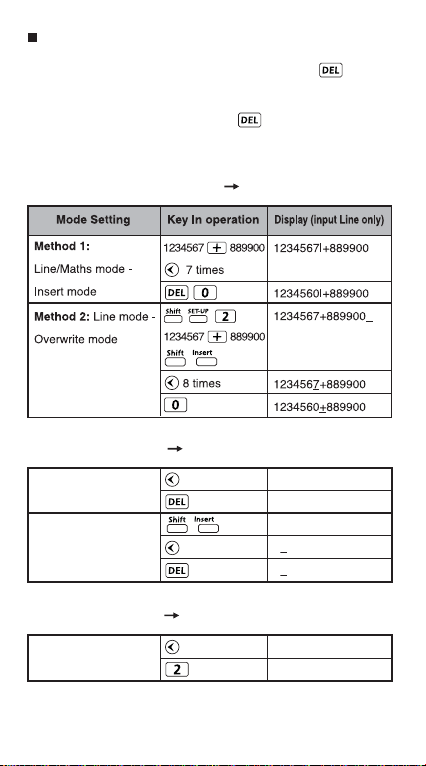
Deleting and Correcting an Expression
In insert mode: Move the cursor to the right of the character
or function that needs to be deleted, then press .
In overwrite mode: Move the cursor under the character or
function being deleted, then press .
Example: 1234567 + 889900
(1) Replace an entry (1234567 1234560)
(2) Deletion (1234567 134567)
Method 1: Line/Maths
mode - Insert mode
Method 2: Line mode Overwrite mode
12times
13times
12|34567+889900
134567+889900
1234567+889900_
1234567+889900
134567+889900
(3) Insertion (889900 2889900)
Line/Maths mode Insert mode
6times
1234567+|889900
1234567+2|889900
10
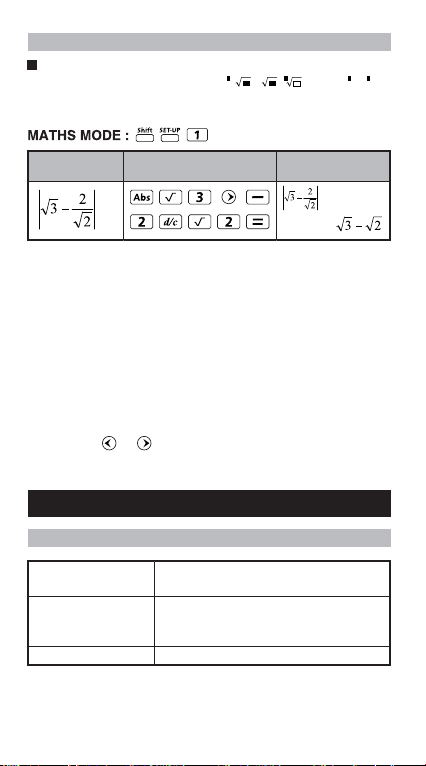
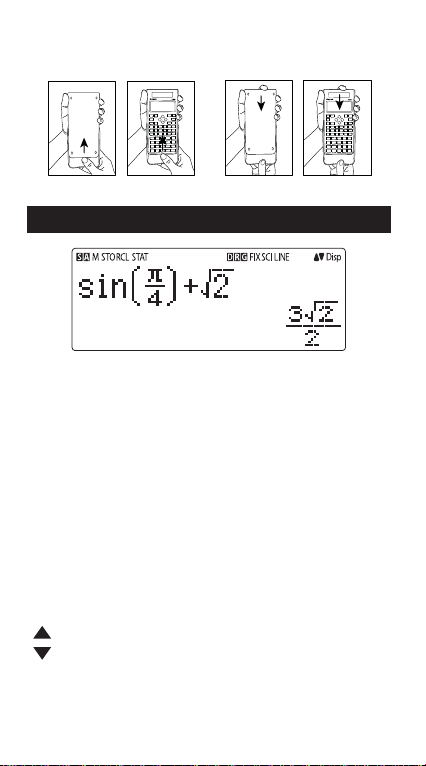
Inputting and Display result in Maths Mode
In Maths Mode, the Input and display result of fraction or
certain functions (log, x
2
, x3, x , , 3 , , x-1, 10 , e ,
Abs) is shown in Handwriting/Mathematics format.
Example in
Maths mode
DisplayKey in operation
Remark
(1) Some input expressions cause the height of a
calculation expression to be greater than one display
screen. Maximum input capacity: 2 display screen
(31 dots x 2).
(2) Calculator memory limits how many functions or
perentheses can be input in any single expression. In
this case divide the expression into multiple parts and
calculate separately.
(3) If part of the expression you input is cut off after
calculation and in the result display screen you can
press or to view the full expression.
INPUT RANGE AND ERROR MESSAGE
Calculation Precision, Input Range
Number of Digits for
Internal Calculation
Precision*
Calculation Range
Up to 18 digits
±1 at the 10th digit for a single calculation.
±1 at the least significant for exponential
display
–99
to ±9.999999999 × 1099 or 0
±1 × 10
11
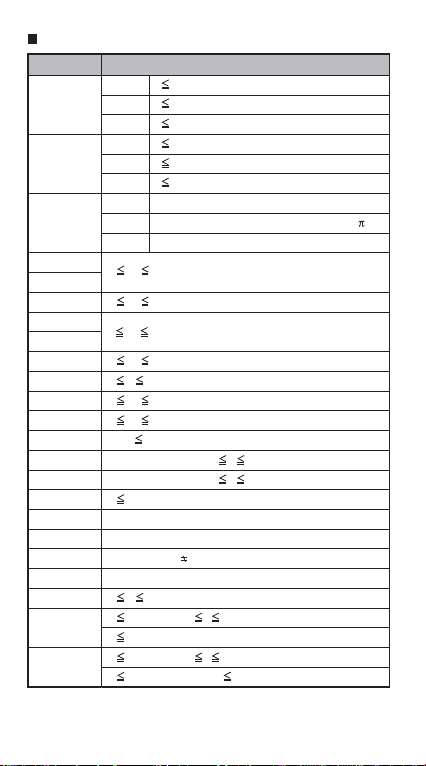
Function Calculation Input Ranges
Input RangeFunctions
9
10
9
10
99
99
99
99
-1
99
99
x 230.258 509 2
100
33
,x 0
10
, 0 r n (n,r are integers)
100
100
or 1 n!/(n-r)! < 1x10
sinx
cosx
tanx
-1
sin
-1
cos
-1
tan
sinhx
coshx
sinh
cosh
tanhx
tanh
logx/lnx
10
x
e
√x
2
x
3
x
-1
x
3
√x
x!
nPr
nCr
DEG 0 |x| <9×10
RAD 0 |x| <157 079 632.7
GRA 0 |x| <1x10
DEG 0 |x| <9×10
RAD 0 |x| <157 079 632.7
GRA 0 |x| <1x10
DEG Same as sinx, except when |x| =(2n-1)×90
RAD Same as sinx, except when |x| =(2n-1)× /2
GRA Same as sinx, except when |x| =(2n-1)×100
x
0 |x| 1
x
x
0 |x| 9.999 999 999x10
0 |x| 230 258 509 2
-1
0 |x| 4.999 999 999x10
x
-1
1 x 4.999 999 999x10
x
0 |x| 9.999 999 999x10
-1
0 |x| 9.999 999 999x10
x
0< x 9.999 999 999x10
x
-9.999 999 999 x1099 x 99.999 999 99
-9.999 999 999 x10
0 x <1x10
50
|x|<1x10
|x| 2.154 434 69x10
100
|x|<1x100
100
|x|<1x10
0 x 69 (x is an integer)
0 n < 1x10
1 {n!/((n-r)!) < 1x10
0 n < 1x10¹⁰, 0 r n (n,r are integers)
1 n!/r! < 1x10
100
12
 Loading...