

Page 1
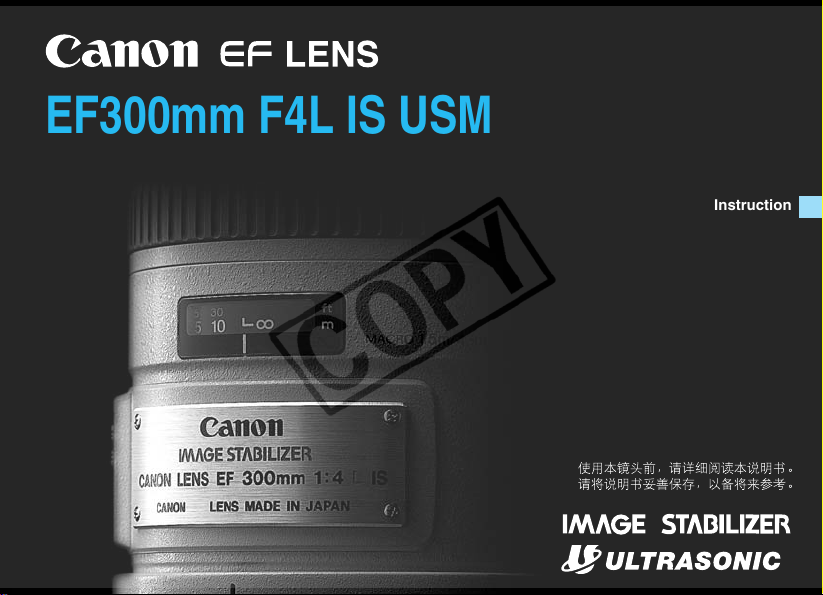
EF300mm F4L IS USM
Instruction
Page 2
ENG-1
Thank you for purchasing a Canon product.
Developed for Canon EOS cameras, the Canon EF 300mm f/4L IS Ultrasonic lens is an
interchangeable SLR lens equipped with a dual-mode Image Stabilizer (IS). The Image Stabilizer
reduces blur caused by camera shake approximately two full shutter speeds compared to normal
handheld shooting.
Features
1. The Image Stabilizer operates by moving optical elements inside the lens. Features include:
•A special mode provided to obtain steadier viewfinder images during panning etc.
•A switch turns the Image Stabilizer circuit on and off.
2. Two UD-glass elements suppress chromatic aberrations for sharp, high-contrast images expected of
an L-series lens.
3. Ultrasonic Motor (USM) for quiet autofocusing.
4. Wide focusing ring makes manual focusing easy.
5. Minimum focusing distance of 1.5 m / 4.9 ft.
6. Compatible with Extender EF 1.4× ll and EF 2× ll.
7. The Image Stabilizer can be used while an Extender is attached (except with certain EOS cameras).
: Warning to prevent malfunction or a flawed photo. : Helpful tips.
Page 3
ENG-2
a Safety Precautions
(1) Whether it is attached to the camera or not, do not leave the lens under the sun without the
lens cap attached.
This is to prevent the lens from concentrating the sun’s rays which can cause a fire.
(2) Do not look at the sun or a bright light source through the lens or camera.
Doing so can result in loss of vision. Looking at the sun through the detached lens is especially
hazardous.
Page 4
ENG-3
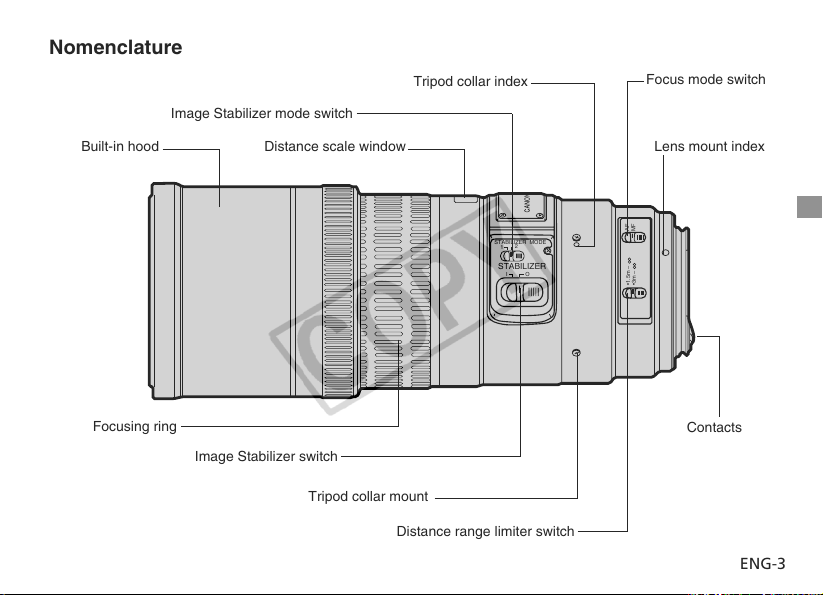
Nomenclature
STABILIZER MODE
1
2
STABILIZER
IO
AF
MF
•1.5m –
•3m –
Built-in hood
Focusing ring
Image Stabilizer switch
Image Stabilizer mode switch
Focus mode switch
Lens mount index
Distance range limiter switch
Contacts
Distance scale window
Tripod collar mount
Tripod collar index
Page 5
ENG-4
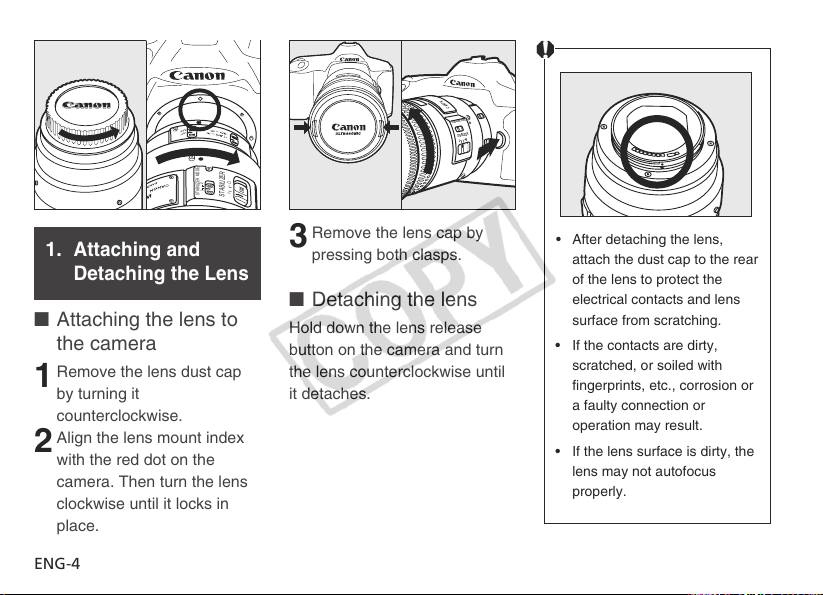
• After detaching the lens,
attach the dust cap to the rear
of the lens to protect the
electrical contacts and lens
surface from scratching.
• If the contacts are dirty,
scratched, or soiled with
fingerprints, etc., corrosion or
a faulty connection or
operation may result.
• If the lens surface is dirty, the
lens may not autofocus
properly.
■ Attaching the lens to
the camera
Remove the lens dust cap
by turning it
counterclockwise.
Align the lens mount index
with the red dot on the
camera. Then turn the lens
clockwise until it locks in
place.
Remove the lens cap by
pressing both clasps.
■ Detaching the lens
Hold down the lens release
button on the camera and turn
the lens counterclockwise until
it detaches.
1.
Attaching and
Detaching the Lens
1
2
3
MF
AF
STABILIZER MODE
2
1
IO
STABILIZER
CANON
STABILIZER MODE
STABILIZER
Page 6

ENG-5
To enable autofocus, set the
focus mode switch to AF. To
focus manually, set the focus
mode switch to MF and turn the
focusing ring.
One of two focusing distance
ranges can be set with the
focusing limiter switch: 1.5 m -
infinity or 3 m - infinity.
2. Setting the Focus
Mode
3. Switching the
Focusing Distance
Range
• Before switching the focusing
distance range from 1.5 m -
infinity to 3 m - infinity, first
turn the focusing ring so that
the distance scale index is
within 3 m - infinity.
• If the distance scale index is
within 1.5 - 3 m and the
focusing limiter switch is set
to 3 m - infinity, initial
autofocusing may cause the
lens to first stop at 3 m on the
distance scale. This is not a
malfunction. If this occurs,
press the shutter button again
to resume normal
autofocusing.
AF
MF
–
–
•3m –
•1.5m –
Page 7

ENG-6
Full-time manual focusing
enables you to focus manually
even in the autofocus mode.
Set the camera to One-Shot
AF. After focus is achieved,
hold down the shutter button
halfway and turn the focusing
ring to focus manually.
5. Full-time Manual
Focusing
4.
Macro Mechanism
This lens is equipped with a
macro mechanism for low
magnification close-up
photography. Autofocus
function is also possible in the
macro range as in normal
shooting.
If a picture with maximum
magnification and minimum
field of view coverage is
required in the macro range, set
the AF mode to manual, turn
the manual focusing ring to the
minimum focusing distance in
the macro range. Then while
looking through the viewfinder,
move the camera (or your body)
back and forth slowly until the
image becomes clear. For the
actual maximum magnification
and minimum field of view
values, please refer to the
specifications.
15 30
ft
510
m
Page 8

ENG-7
3) Using flash is undesirable.
Attachments
None
With EF 1.4× ll
With EF 2× ll
Shutter Speed
1/30 - 1/125 sec.
1/40 - 1/200 sec.
1/60 - 1/250 sec.
The Image Stabilizer is
effective with the following
shutter speeds:
■
Image Stabilizer Mode 2
Use this mode when panning a
shot. It helps to steady the
image in the viewfinder.
Turn on (|) the Image
Stabilizer switch.
Set the Image Stabilizer
Mode switch to 1 or 2. (For
normal use, set to 1.)
6. Using the Image
Stabilizer
1
2
Press the shutter button
halfway to activate the
Image Stabilizer.
■
Image Stabilizer Mode 1
Image Stabilizer Mode 1 is
especially effective in the
following situations:
1) The subject is still.
2) The scene is dark such as at
sunset or indoors.
3
STABILIZER MODE
1
2
STABILIZER
IO
Page 9

ENG-8
• If the camera’s Custom Function is used to alter the AF activation method, the Image Stabilizer will be activated
by the altered method.
• Before shooting, look through the viewfinder and check that the image has been stabilized.
• The Image Stabilizer operates normally even with Extender EF 1.4× ll attached.
• With Extender EF2× II attached to the lens, the Image Stabilizer will work with the following cameras:
EOS-1Ds Mark II, EOS-1Ds, EOS-1D Mark II N, EOS-1D Mark II, EOS-1D, EOS 5D, EOS 30D, 20D, 20Da, 10D,
DIGITAL REBEL XTi/400D DIGITAL, DIGITAL REBEL XT/350D DIGITAL, DIGITAL REBEL/300D DIGITAL,
D60, D30, EOS DCS1, DCS3, D2000, D6000, EOS-1V/HS, EOS-1N/DP/HS/RS, 3, ELAN 7E/ELAN 7/30/33,
ELAN 7NE/ELAN 7N/30V/33V, ELAN II/ELAN IIE/50/50E, REBEL X/REBEL XS/500, REBEL G/500N, REBEL
2000/300, REBEL Ti/300V, REBEL T2/300X, REBEL K2/3000V, IX, IX Lite/IX7, 3000/88, 5000/888
Notes for Image Stabilizer Mode 1
• The Image Stabilizer may not be effective in the following cases:
1 During camera movement such as panning.
2 During picture-taking on a moving boat, car, etc.
Note for Image Stabilizer Mode 2
• Use this mode only for panned shots, etc. Normally, use Image Stabilizer Mode 1.
Page 10

ENG-9
•Do not turn on (|) the Image Stabilizer switch when using the camera on a tripod. Doing so may cause Image
Stabilizer misoperation. Turn off the Image Stabilizer before using the camera on a tripod.
• For bulb exposures, turn off (○) the Image Stabilizer switch to prevent misoperation.
• With the EOS-1V/HS, 3, ELAN 7E/ELAN 7/30/33, ELAN 7NE/ELAN 7N/30V/33V, ELAN II/ELAN II E/50/50E,
REBEL2000/300, IX, and D30, the Image Stabilizer will not work during self-timer operation.
• If the tripod collar covers the Image Stabilizer switch or Image Stabilizer Mode switch, the switch will be
inaccessible. Loosen the tripod collar lock nut and turn the camera to expose the switches.
Page 11

ENG-10
Turn the tripod collar’s lock
nut to loosen.
Align the tripod collar’s red
dot with the lens mount
index, then pull the tripod
collar as shown by the
arrow.
To compensate for shifts in the
lens’ infinity position on the
distance scale due to temperature
changes, the focusing ring can be
turned slightly beyond the normal
infinity position. In room
temperature, the infinity position
on the distance scale is indicated
by the L symbol which should be
aligned with the distance scale
index.
To confirm accurate focus, look
through the viewfinder.
7.
Infinity Compensation Mark
8. Using the Tripod
Collar
Loosen the tripod collar’s lock
nut and turn the camera to
switch between horizontal and
vertical framing. When
detaching the tripod collar from
the lens, detach the camera
from the lens first.
■ Detaching the tripod
collar
Detach the lens from the
camera.
1
2
3
15
30
5
10
ft
m
STABILIZER
IO
15 30
510
∞
STABILIZER MODE
1
2
STABILIZER
IO
AF
MF
•1.5m –
•3m –
Page 12

ENG-11
■ Attaching the tripod
collar
Detach the lens from the
camera.
Turn the tripod collar’s lock
nut to loosen.
Align the tripod collar’s red
dot with the lens mount
index, then align the tripod
collar’s index mark with the
lens’ distance scale index.
1
2
3
4
9. Hood
The hood guards the front part
of the lens against rain, snow,
dust and stray light which may
cause flare and ghost images.
To use the hood, pull it out all
the way, then turn it as shown
by the arrow to lock it.
To collapse the hood, follow the
procedure in reverse.
Tighten the tripod collar’s
lock nut.
∞
510
15 30
STABILIZER MODE
1
2
STABILIZER
IO
ft
m
AF
MF
•3m –
•1.5m –
15 30
510
CANON LENS MADE IN JAPAN
CANON LENS EF 300mm 1:4 L IS
STABILIZER MODE
2
1
AF
MF
2
1
Page 13

ENG-12
With EF 1.4× ll With EF 2× ll
Focal Length 420mm 600mm
Diagonal Extent 6°10' 4°10'
Angle of View Vertical Extent 3°20' 2°20'
Horizontal Extent 5° 3°30'
Max. Magnification 0.33× 0.47×
Focus Mode AF enabled* Manual focus
Aperture Range f/5.6-f/45 f/8-f/64
• The polarizing filter cannot be
used together with a normal
filter.
•A polarizing filter attached to
the lens cannot be turned
while the built-in hood is
extended.
The lens accepts up to two
screw-on filters.
When a polarizing filter is
required, use Canon’s PL-C
77mm II polarizing filter.
10.
Filters
(Sold separately)
11. Extenders (Sold separately)
The lens can be used with Extender EF 1.4× ll and 2× ll. The lens
specifications when an Extender is attached are shown below.
* When an Extender EF 1.4× ll is attached, the AF speed
becomes slower to maintain adequate AF control.
• With Extender 2× ll attached to the lens, only manual focus will be
possible. The only exceptions are with the EOS-1V/HS, 3, 1Ds Mark
II, 1Ds, 1D Mark II N, 1D Mark II, and 1D which can still autofocus,
but only with the center focusing point.
Page 14

ENG-13
This device complies with Part 15 of the
FCC Rules. Operation is subject to the
following two conditions: (1) This device
may not cause harmful interference, and
(2) this device must accept any
interference received, including
interference that may cause undesired
operation.
Do not make any changes or modifications
to the equipment unless otherwise
specified in the instructions. If such
changes or modifications should be made,
you could be required to stop operation of
the equipmet.
This equipment has been tested and
found to comply with the limits for a Class
B digital device, pursuant to Part 15 of the
FCC Rules. These limits are designed to
provide reasonable protection against
harmful interference in a residential
installation. This equipment generates,
uses and can radiate radio frequency
energy and, if not installed and used in
accordance with the instructions, may
cause harmful interference to radio
communications. However, there is no
guarantee that interference will not occur
in a particular installation. If this
equipment does cause harmful
interference to radio or television
reception, which can be determined by
turning the equipment off and on, the user
is encouraged to try to correct the
interference by one or more of the
following measures:
• Reorient or relocate the receiving
antenna.
• Increase the separation between the
equipment and receiver.
• Connect the equipment into an outlet on
a circuit different from that to which the
receiver is conected.
• Consult the dealer or an experienced
radio/ TV technician for help.
Focal Length and Max. Aperture:
300mm, f/4
Construction:
15 elements in 11 groups
Angle of View (Diagonal, vertical,
horizontal extents):
8˚15’, 4˚35’, 6˚50’
Max. Magnification and Picture
Field:
0.24×, 101 mm × 150 mm (at 1.5 m)
Min. Focusing Distance:
1.5 m / 4.9 ft. (Macro)
Max. Diameter and Length:
90 mm×221 mm / 3.5×8.7inch
Weight: 1190 g / 2.6 lb.
* The lens length is measured from the
mount to the front of the lens. Add 21.5
mm when including the lens cap and
dust cap.
* The dimensions and weight are for the
lens only.
* With this lens, no compensation is
necessary for infrared film.
* Product specifications and the external
appearance may be changed without
notice.
12.
Major Specifications
"This digital apparatus does not
exceed the Class B limits for radio
noise emissions from digital
apparatus as set out in the
interference-causing equipment
standard entitled "Digital Apparatus",
ICES-003 of the Industry Canada."
Page 15

© CANON INC. 2002CT1-7514-006
2006.9.1
 Loading...