

Page 1

Canon
^00/ ^00
DATE
300/300DATE
The image was removed due to copyright restrictions.
English Edition
Instructions
m
Page 2

THE IMAGE WAS REMOVED DUE
TO COPYRIGHT RESTRICTIONS
Page 3

Thank you for purchasing a Canon product.
The EOS REBEL 2000/EOS 300 is a very compact autofocus, single-lens
reflex camera. It can be used for a wide variety of subjects and situations
with fully automatic and user-controlled picture-taking modes.
Read this Instructions booklet and familiarize yourself with your new
camera before taking pictures.
■Symbols
gk The Caution symbol alerts you to actions to prevent picture-taking
^ problems.
IS The Note symbol gives additional information for basic camera
operation.
The Lightbulb symbol offers helpful tips for operating your camera
'W' and taking pictures.
Page numbers in parentheses indicate where you can find more relevant
information.
Also read “Handling Precautions" on page 6 to prevent camera malfunction
and damage.
In this Instructions booklet, the EF 28-80mm f/3.5-5.6 II lens is shown in
illustrations for explanatory purposes.
Keep this Instructions booklet handy for easy reference.
IPrecautlons
Before using the camera for an important event, be sure to take test
shots to make sure the camera operates properly.
EOS cameras have a lens mount for dedicated operation
(autofocusing, exposure control, etc.) with EF lenses. Using a non-EF
lens with an EOS camera may not result in proper camera or lens
operation.
Note that the warranty does not cover any camera malfunction or
damage occurring with the use of non-Canon accessories.
Page 4

Contents
Handling Precautions........................................................................6
Quick Start Guide...............................................................................8
Nomenciature...................................................................................10
Attaching the Strap..........................................................................15
Installing the Batteries and Checking the Battery Level
Mounting and Detaching a Lens
How the Shutter Button Works
Loading and Unloading Film
Holding the Camera.........................................................................22
Camera-Controlled Automatic Shooting
O Full Auto Mode.........................................................................24
ik Landscape Mode......................................................................29
A Close-up Mode.........................................................................30
^ Sports Mode.............................................................................31
H Night Scene Mode....................................................................32
0 Self-timer Operation................................................................33
Imprinting the Date or Time (QD Model only)
....................................................
......................................................
0il Midroll Film Rewind
Automatic Flash Firing of the Built-in Flash
AF-Assist with the Built-in Flash............................................26
Single-frame and Continuous Shooting
<§> Using Red-eye Reduction................................................27
Portrait Mode
Using the Eyepiece Cover
Setting the Date and Time
Replacing the Quartz Date Back's Battery
............................................................................
..........................................................
...........................................................
................................
.......................................................
..............................
.......................................................
.............................
............
........
.........................
21
23
16
18
19
20
26
26
28
34
35
36
36
Focusing Point Selection................................................................38
Focusing Subjects not Covered by the Focusing Points
When Autofocus Fails (Switching to Manual Focus)
Metering Modes...............................................................................41
P Program AE
The Difference Between P and □
About Program Shift
..............................................................................
............................................
................................................................
...........
..................
39
40
42
43
43
Page 5

Tv Shutter-Speed Priority AE........................................................44
Av Aperture-Priority AE.................................................................46
Depth-of-field Preview
M Manual Exposure.........................................................................48
A-DEP Automatic Depth-of-Field AE.............................................50
* Partial Metering Using AE Lock..................................................51
Exposure Compensation
Auto Exposure Bracketing (AEB)
■II) Silencing the Beeper.................................................................54
Bulb Exposures................................................................................55
0 Multiple Exposures.......................................................................56
ISO Setting the ISO Film Speed
Using the Remote Switch (Sold separately)
4 Using the Built-In Flash
Using the Built-in Flash...................................................................60
Basic Photography Terms..............................................................62
Feature Availability Table
AF Modes and Film Advance Modes
Exposure Warnings.........................................................................65
Troubleshooting Guide....................................................................66
Major Accessories (Sold separately).............................................67
Specifications...................................................................................69
Index..................................................................................................72
.............................................................
................................................................
...........................................
.....................................................
.................................
.........................................
...............................................................
.............................................
Contents
47
52
53
57
58
59
64
64
Page 6

Handling Precautions
Camera Care
(1) This camera is not waterproof and cannot be used in rain or under
water. If the camera gets really wet, promptly consult your nearest
Canon Service Center. If there are any water droplets on the camera,
wipe off with a dry cloth. If the camera has been exposed to salt air,
wipe with a clean, well-wrung, damp cloth.
(2) Do not leave the camera in places prone to excessive heat such as in a
car on a sunny day. Excessive heat can cause the camera to
malfunction.
(3) Use only a blower brush to remove any dust on the lens or in the film
compartment. Do not use a cleaner containing organic solvent to clean
the camera body or lens. For stubborn dirt, consult your nearest Canon
Service Center.
(4) When you will not be using the camera for an extended period, remove
the batteries. Store the camera in a well-ventilated, cool, dry place.
Release the shutter a few times occasionally to make sure the camera
still works.
(5) Avoid storing the camera in a laboratory, cabinet, etc., where corrosive
chemicals are present.
(6) Before using the camera after an extended period of disuse, check that
all the camera controls function properly or take it to the nearest Canon
Service Center for inspection. Do this especially before shooting an
important event or going on a trip.
LCD Panel
In time, the camera’s LCD panel display may fade and become difficult to
read. If this happens, have it replaced (at cost) by a Canon Service Center.
At low temperatures, the LCD panel’s display response may become
slower. And at 60‘C or higher temperatures, the display may blacken. In
either case, the display will return to normal at room temperature.
Page 7
Handling Precautions
Lithium Batteries
(1) The camera operates on two CR2 lithium batteries. Check the battery
level in the following cases:
• After replacing the batteries.
• After not using the camera for an extended period.
• The shutter stops working.
• The camera is being used in a low-temperature environment.
• You will be shooting an important event.
(2) Before installing the batteries, wipe the battery contacts to remove any
fingerprints and smudges. This is to prevent faulty connections and
corrosion.
(3) Although the batteries work well even at low temperatures, battery
performance may decline slightly at freezing temperatures. In such a
case, keep spare batteries warm in a pocket, etc., and use and warm
the batteries alternately.
How Low Battery Levels Affect Camera Operation
Even when ijj'c blinks on the LCD panel, a proper exposure will be
obtained as long as the shutter releases. However, since the battery level
is low, film advance and auto rewind may not work. Replace the batteries
with new ones.
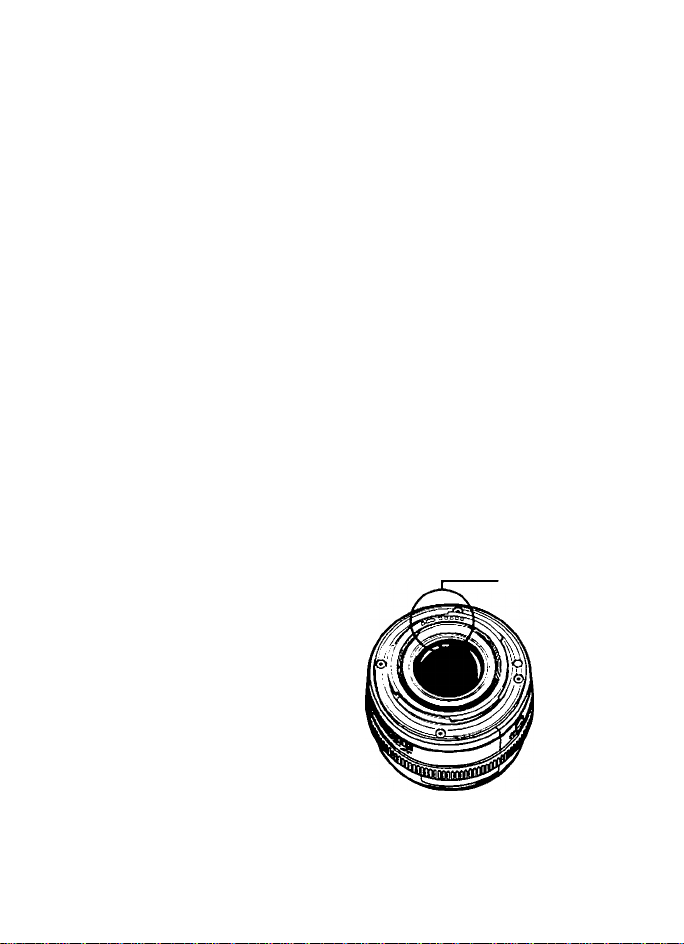
Lens
After detaching the lens from the camera,
put on the lens caps or put down the lens
with the rear end up to avoid scratching
the lens surface and electrical contacts.
electrical contacts
Page 8
Quick Start Guide
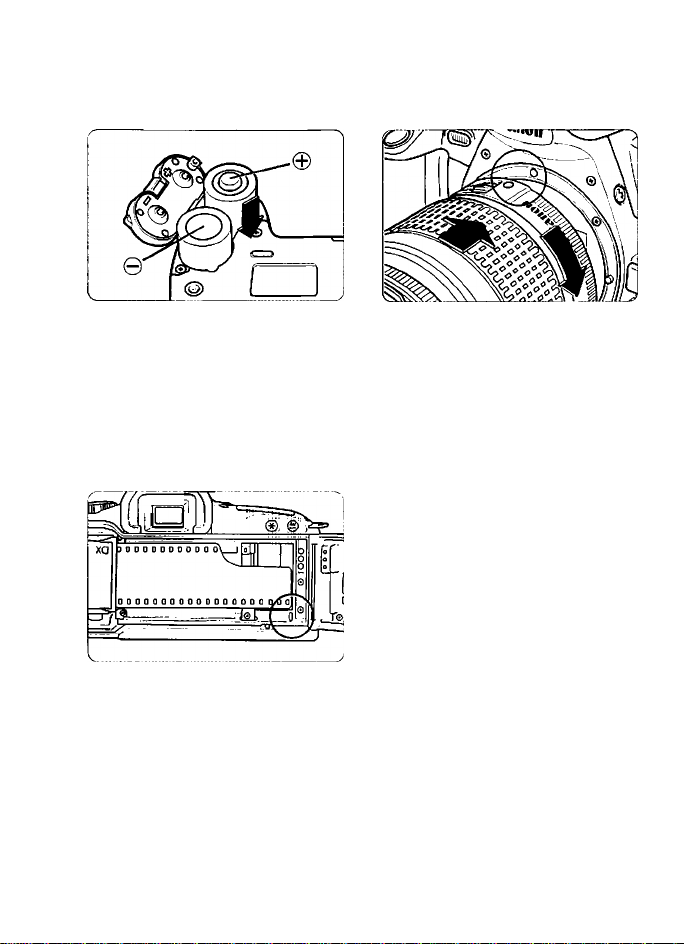
Install the batteries.
Insert two CR2 lithium batteries
1
as shown by the battery
orientation diagram on the
battery chamber cover. See
page 16.
Load the film.
Align the edge of the film leader
with the orange mark on the
5
camera and close the camera
back until it snaps shut. See
page 20.
• The film will then advance to
the first frame automatically.
Attach a lens.
Align the red dots on the lens
2
and camera and turn the lens
clockwise until it snaps in place.
See page 18.
THE IMAGE WAS REMOVED DUE
TO COPYRIGHT RESTRICTIONS
Focus the subject.
Aim the AF frame on the
subject and press the shutter
6
button halfway to autofocus.
See page 24.
• Under low-light or backlit
conditions, the built-in flash
will fire automatically. See
page 60.
Page 9
Quick Start Guide
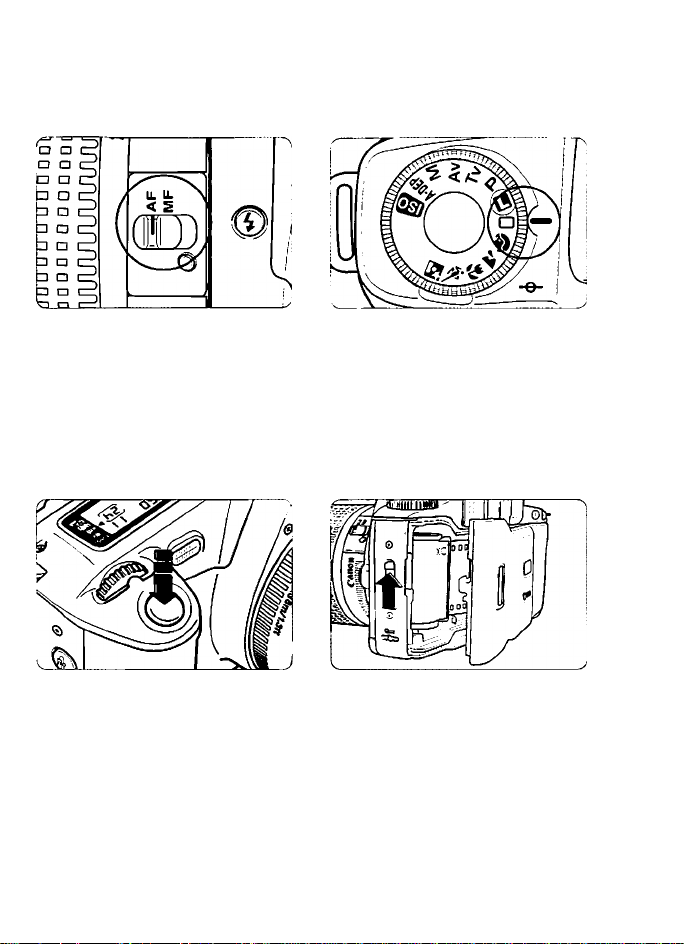
On the lens, set the
focus mode switch to
AF.
i
See page 18.
Take the picture.
Press the shutter button
completely to take the picture.
7
See page 19.
Turn the Command
Dial to <0> (Full Auto).
See page 24.
4
Unloading the film.
At the end of the roll, the film
rewinds automatically. Open
8
the camera back and remove
the film cartridge. See page 21.
Page 10
Nomenclature
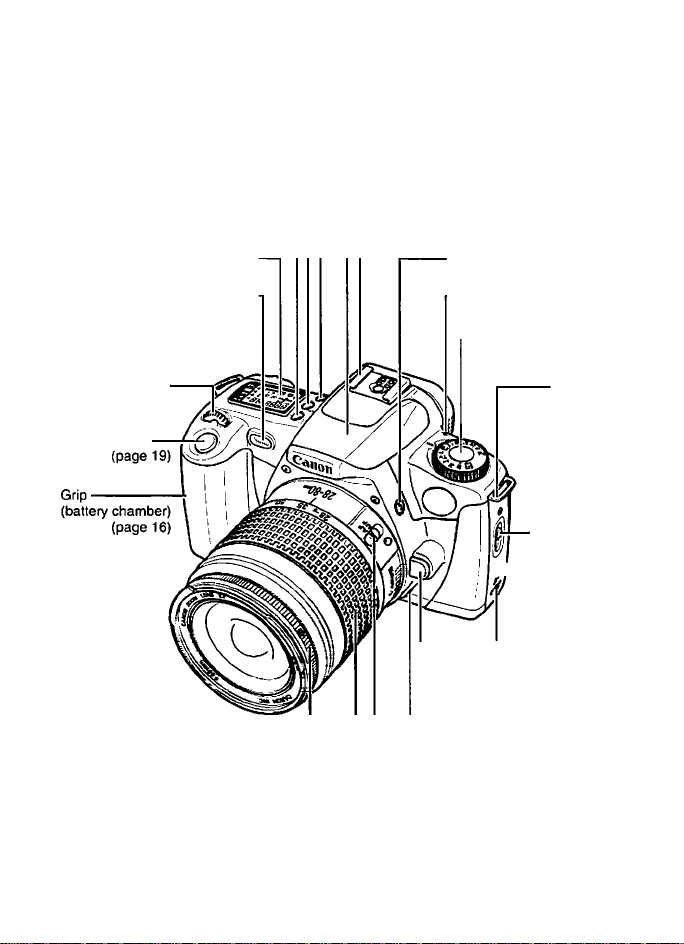
<ii)> Self-timer button (page 33) ■ - Built-in flash (page 60)
Function button (pages 27, 53, 54, 56) -
< E0 > Focusing p>oint selector
LCD panel (page 12)
Red-eye reduction lamp
Self-timer operation display
<i£Si> Main Dial
Shutter button
-------------
--------
(page 27)
(page 33)
(page 38)
--
<Qdl> Midroll film rewind button
AF-assist light (page 26)
■ Hot shoe (pages 59,68)
• For attaching EOS-dedicated
Speedlites and other accessories
< ^ > Flash button (page 60)
— Lens release button (page 18)
(sotd separately).
Film plane mark
-Command Dial (page 14)
Strap eyelet
(page 15)
Camera back
lock-release
01 lever (page 20)
(page 21)
Focusing ring (page 40) ■
10
- Depth-of-field preview button
■ Focus mode switch (page 18)
--------------------------
(page 47)
Zoom ring
Page 11
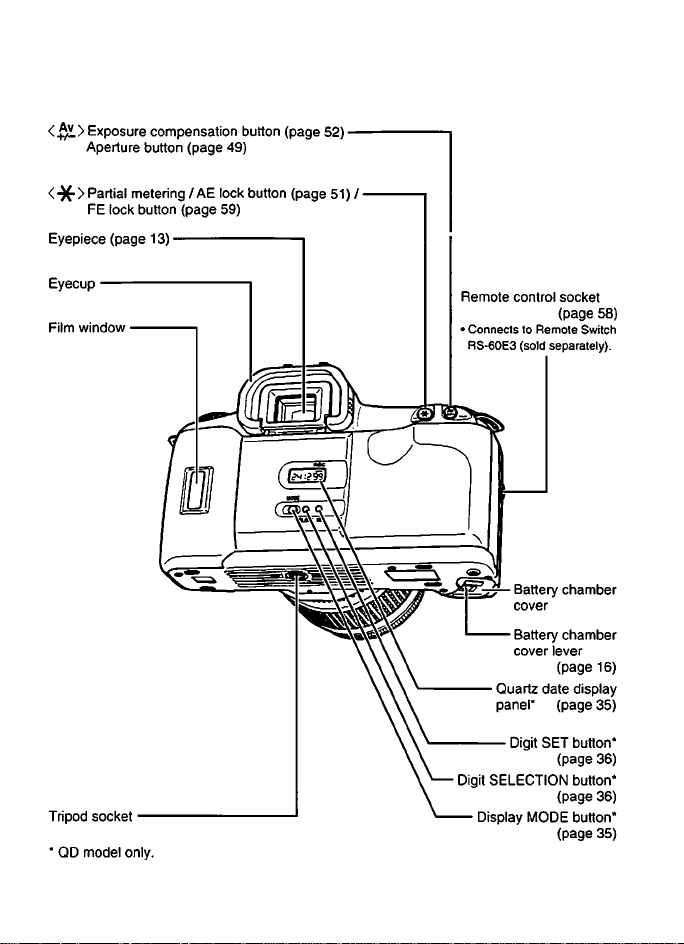
Nomenclature
11
Page 12
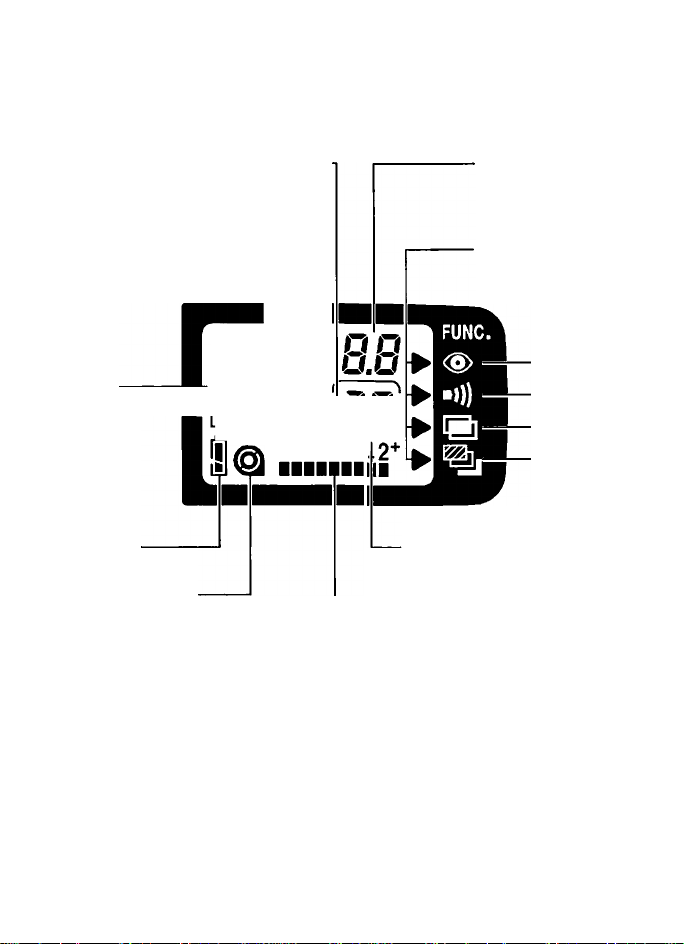
LCD Panel
Self-timer icon —
Shutter speed display ISO speed display
Manual focus icon •
o o o o
oooo
ISO icon
Focusing point
indicator
Battery icon
Battery level indicator
Film status icon
Film-loaded indicator
Film rewind-completed indicator
ISOGQ
■■■■I]
Aperture display
Red-eye reduction
setting display
Beeper setting display
AEB amount indicator
Function indicators
Red-eye
reduction icon
Beeper icon
Multiple
exposure icon
AEB icon
Frame counter
Multiple exposure setting
Multiple exposure count
Self-timer operation indicator
Exposure scale
Exposure compensation indicator
Exposure level scale
Exposure level index
Metered manual exposure display
AEB amount indicator
(counts down)
----------
Red-eye reduction ON indicator
The LCD panel is shown with all the information displayed. The actual
information displayed will vary depending on the camera settings and
shooting conditions.
12
Page 13
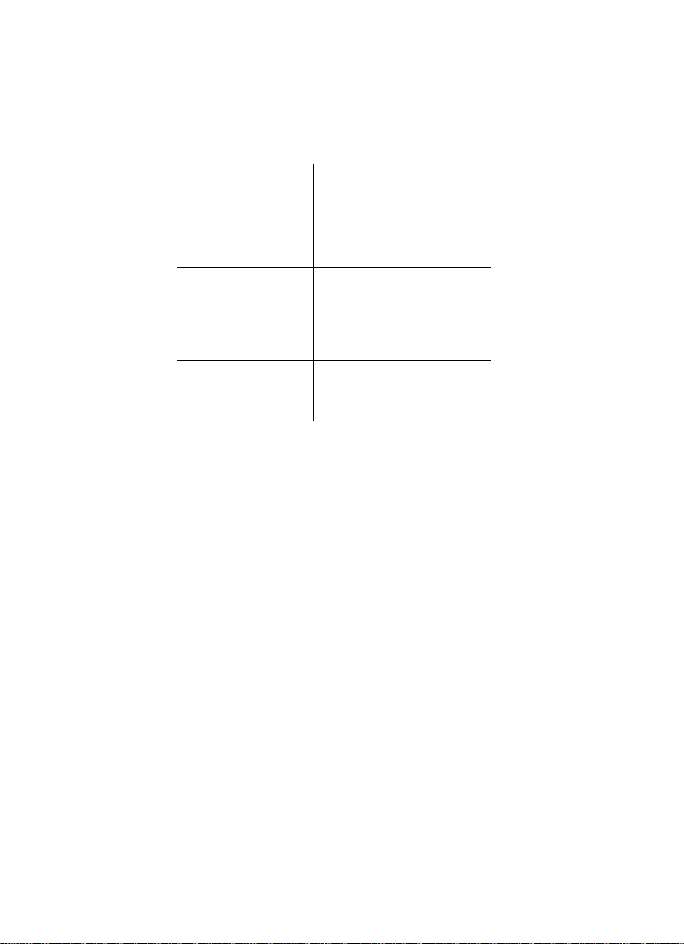
Viewfinder Information
Focusing
Nomenclature
— Focusing points
-a
r
6 i
6 6 i l l
-a
AE lock/FE lock indicator-
Flash-ready indicator
FE lock warning
High-speed sync (FP flash)
display
---------------------------
Shutter speed display —
Aperture display
Focusing point indicator -
The viewfinder is shown with all the information displayed. The actual
information displayed will vary depending on the camera settings and
shooting conditions.
-------
---------
— In-focus indicator
' Exposure scale
Exposure compensation
Exposure level scale
Exposure level display
Metered manual exposure
AEB amount indicator
Red-eye reduction light ON
amount indicator
indicator
display
13
Page 14
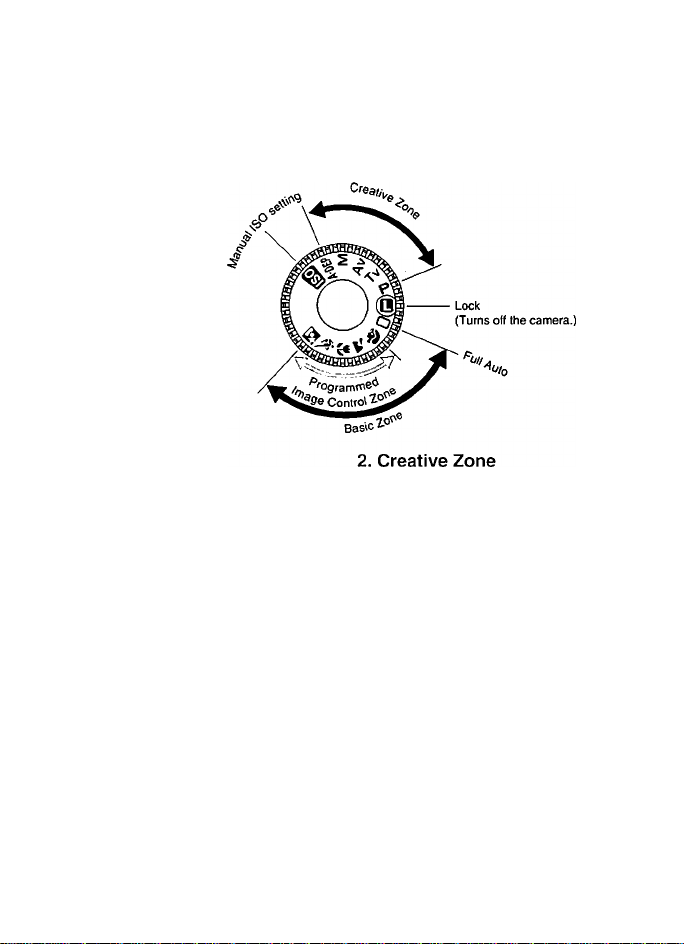
Command Dial
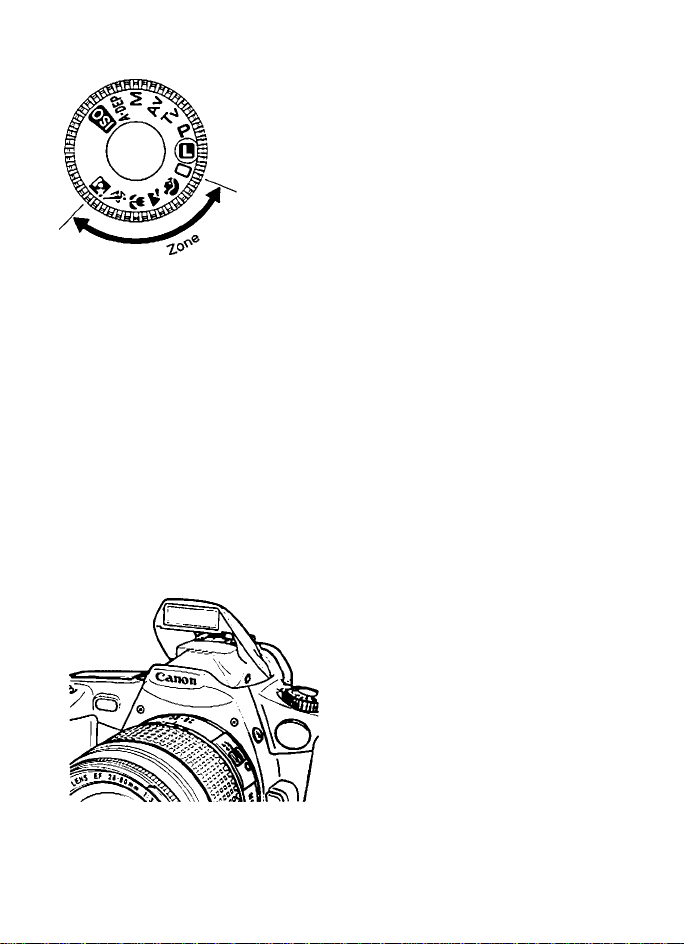
The Command Dial’s settings are divided into four zones.
1. Basic Zone
D : Full Auto (page 24)
For fully automatic picture-taking.
• All you do is point the camera and
press the shutter button.
Programmed Image Control
Zone
Fully automatic picture-taking to suit
the subject type.
• All you do is point the camera and
press the shutter button.
: Portrait (page 28)
iik : Landscape (page 29)
A : Close-up (page 30)
: Sports (page 31)
S : Night Scene (page 32)
Control the camera to obtain the
desired effect.
P : Program AE (page 42)
Tv : Shutter speed-priority AE (page 44)
Av : Aperture-priority AE (page 46)
M ; Manual exposure (page 48)
A'DEP : Deplh-of-field AE (page 50)
3. ISO : Manual ISO setting
4. B : Lock
Nomenclature
(page 57)
When not using the camera, turn the Command Dial to <[1> (Lock) to
prevent accidental operation.
0
14
Page 15
This chapter describes the things you
need to know and do before you start
using your camera.
Eyepiece cover
Before You Start
* •
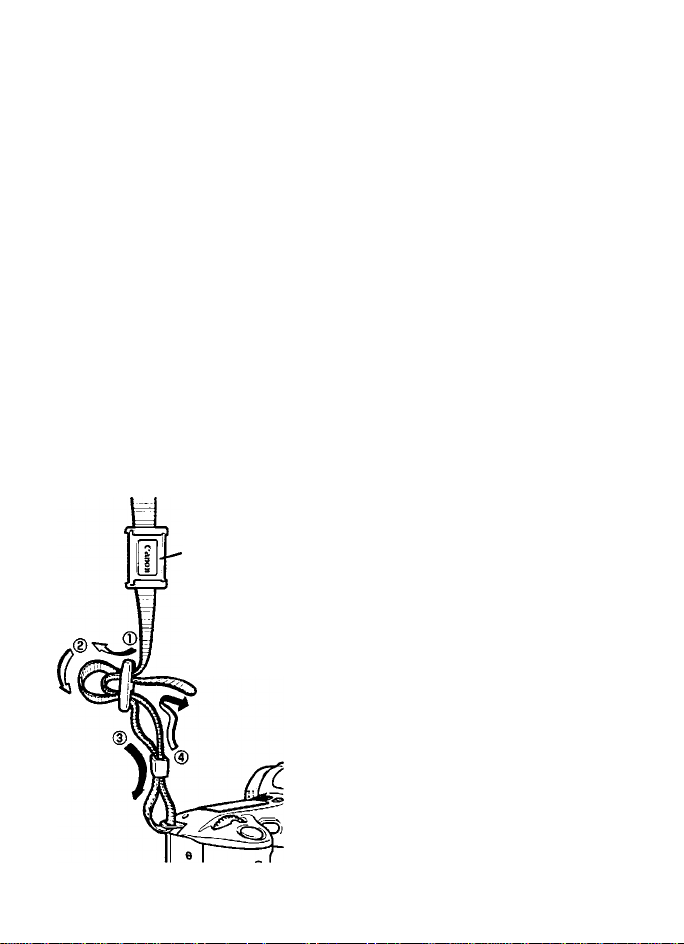
Attaching the Strap
Pass the end of the strap through the
camera’s strap eyeiet from the bottom.
Then pass it through the strap’s ciasps.
Puii the strap to make sure it does not siip
out of the ciasp.
• The eyepiece cover is aiso attached to
the strap. See page 34.
15
Page 16
Installing the Batteries and Checking the Battery Level
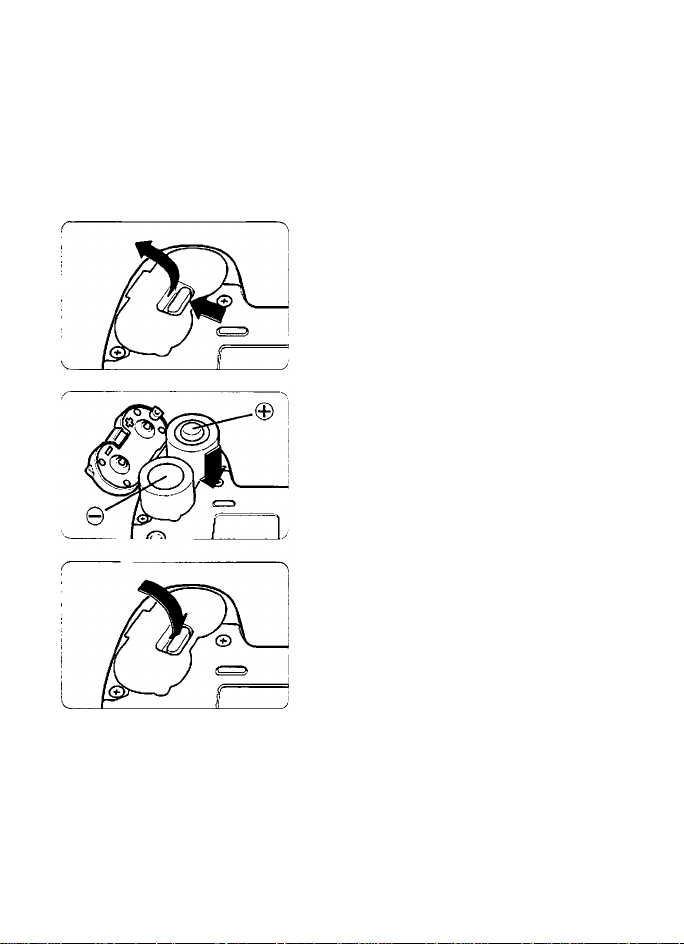
Installing the Batteries
The camera uses two lithium CR2 batteries.
Slide the battery chamber cover
lever as shown by the arrow and
1
open the battery chamber cover.
Insert the batteries with the
contacts (+ and -) oriented as
shown on the battery chamber
cover.
• Do not mix old and new batteries.
Close the battery chamber cover.
Press the cover until it snaps
shut.
16
Page 17
Installing the Batteries and Checking the Battery Level
Checking the Battery Level
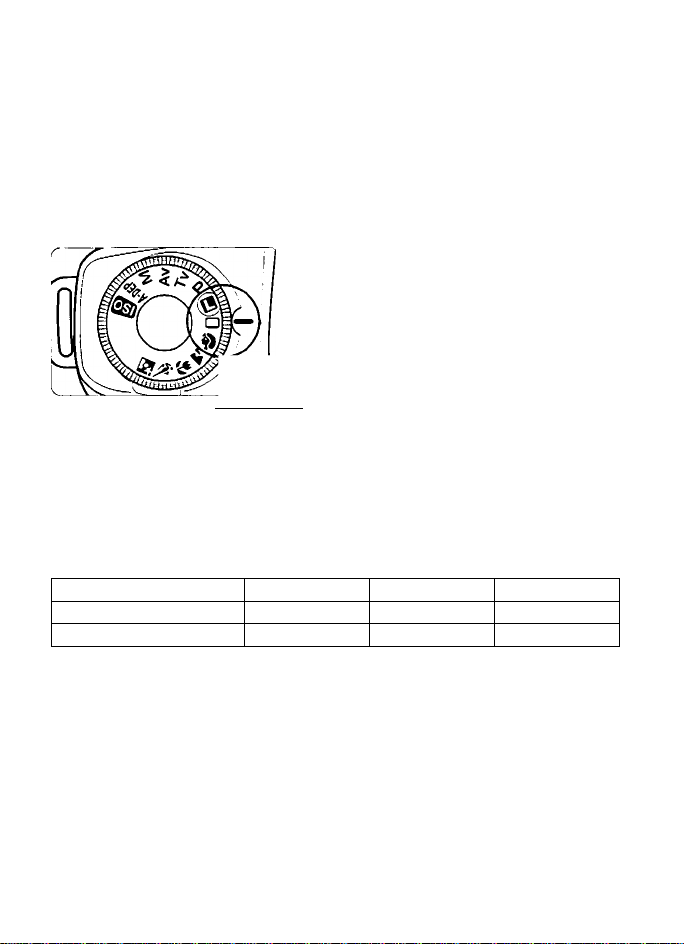
Check the battery level after replacing the batteries and before using the
camera.
Turn the Command Dial to any
setting except <B>.
• The camera will then turn on and the
LCD panel will display one of the
following battery level icons:
Battery level OK.
7 V
JmSm]
1 1
■ Battery level icon
Battery Service Life (With 24-ex. rolls)
Ambient Temperature 0% Flash Use 50% Flash Use 100% Flash Use
At 20 °C 60
At-10°C
' The Battery Service Life table above is based on Canon’s testing
conditions using an EF 28-80mm f/3.5-5.6 II lens and new batteries.
' Operating the camera without film will still consume battery power. It will
reduce the number of rolls that can be taken with the batteries.
s
The battery level is low. Keep
spare batteries handy.
Battery exhaustion is
\>/
-:o:-
40 16 8
imminent.
Replace the batteries. (See
page 7.) In this case, the
shutter button will not function.
24
12
if nothing is displayed on the LCD panel, the batteries may have been
41
installed incorrectly. Take out the batteries and install correctly (See page 16).
For places where CR2 batteries may not be easily available, take spare
batteries with you. Also carry spare batteries for extended shooting sessions.
S
17
Page 18
Mounting and Detaching a Lens
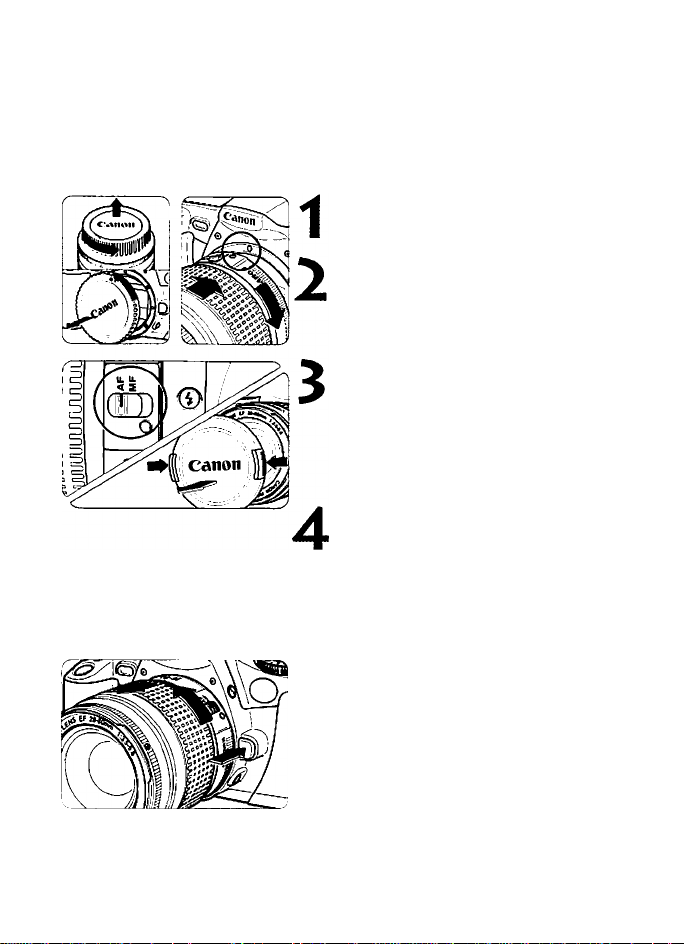
Mounting a Lens
Remove the rear lens cap and the
camera body cap.
Align the red dots on the lens and
camera and turn the lens as
shown by the arrow until it snaps
in place.
On the lens, set the focus mode
switch to AF.
• If the focus mode switch is set to MF
(or M on older lenses), autofocus will
not operate.
• While the lens autofocuses, do not
touch the lens where it rotates.
Remove the front lens cap.
• Be careful not to lose the front and
rear lens caps.
Detaching the Lens
* AF stands for Autofocus.
0
• MF stands for Manual Focus.
18
While pressing the lens release
button, turn the lens as shown by
the arrow until it stops. Then
remove the lens.
Page 19
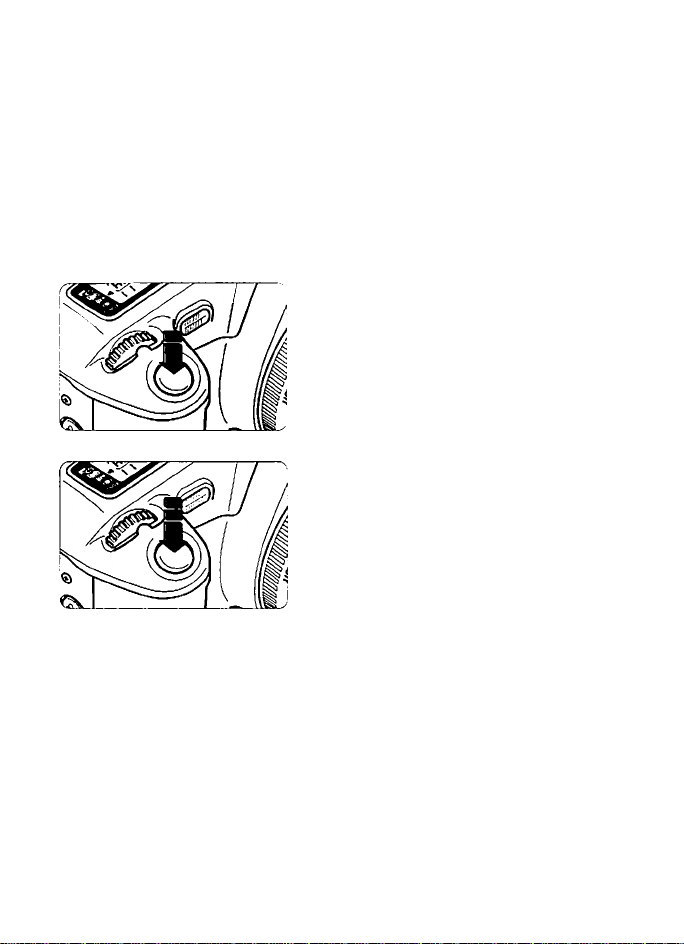
How the Shutter Button Works
The EOS camera’s shutter button can be depressed halfway or all the way.
There is a click stop at the halfway point.
Pressing the Shutter Button Halfway or Completely
The shutter button works as described below.
When it is pressed halfway:
• Autofocusing is activated, and when
focus is achieved, the beeper sounds
and the viewfinder’s in-focus indicator
lights in green.
• The shutter speed and aperture are
also set and displayed on the LCD
panel and in the viewfinder.
When it is pressed completely:
• The shutter is released to take the
picture and the film advances by one
frame.
Camera movement during the moment of exposure is called camera shake.
Camera shake can cause blurred pictures.
0
To prevent blurred pictures due to camera shake:
• Hold the camera steady (see page 22).
• Use the center of your finger to touch the shutter button, grasp the camera
with your entire right hand, then press the shutter button gently.
19
Page 20
Loading and Unloading Film
Loading Film
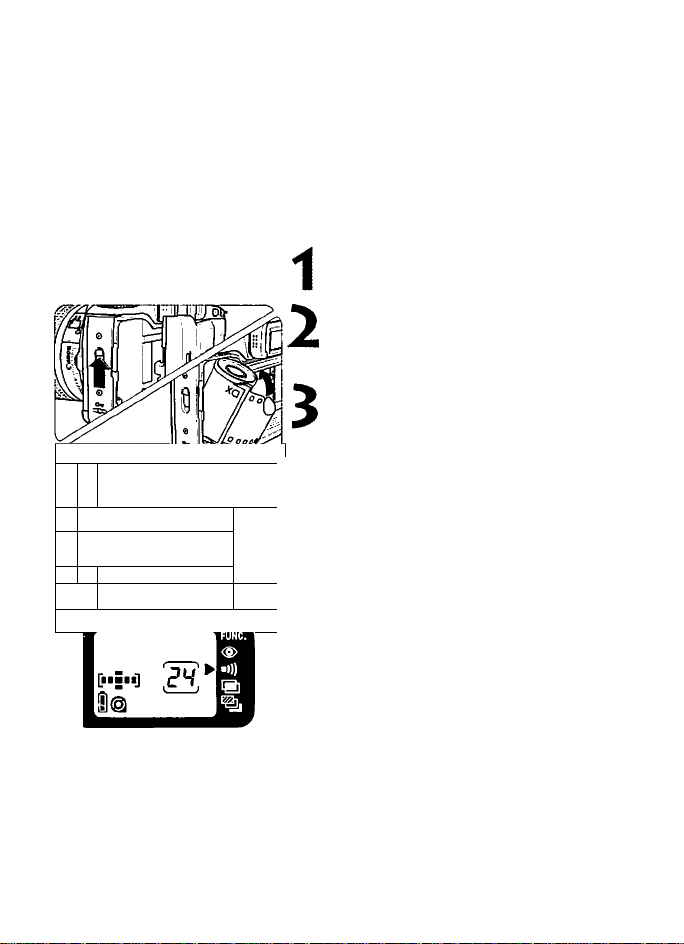
After you load the film, the camera first winds the entire roll onto the
camera’s take-up spool. Then each time a picture is taken, one frame of
film is rewound back into the film cartridge.
Turn the Command Dial to any
setting except <H>.
Slide up the camera back lock-
release lever to open the camera
back.
Insert the film cartridge at an
angle as shown in the figure.
C__________________: 3q-y
Hold down the film cartridge and
pull the edge of the film leader to
4
ioo DO D tiD a afl o^ _j jo| || |
xa
OO OO O O OO O O OO O O QO 0^0
=3^
_______________
____
hn—1
20
i
zr~— :
the orange mark on the camera.
Then close the camera back.
• Press down the film cartridge so that it is set
securely and the film does not slacken.
• If the edge of the film leader goes beyond
J
the orange mark, push some of the film
back into the cartridge.
• While the film is prewinding around the takeup spool, the ISO film speed will be
displayed on the LCD panel.
• While the film is prewinding around the takeup spool, the frame counter counts up.
When it stops, camera will make a shutterrelease sound and the <@> icon and total
frame count will be displayed.
• If the frame count is not displayed and the
<@> icon is blinking, it means that the film
was not properly loaded. Take out the film
cartridge and load it in the camera again.
Page 21
Loading and Unloading Film
» With DX-coded film, the camera automatically sets the film's ISO speed.
• If the film is not DX-coded, set the ISO speed manually. See page 57.
0
' Infrared film cannot be used with this camera.
II
'The shutter curtains are manufactured with very
high precision. To prevent damage, never touch the
shutter curtains. When loading or unloading film, be
careful not to touch the shutter curtain with your
fingers or the film.
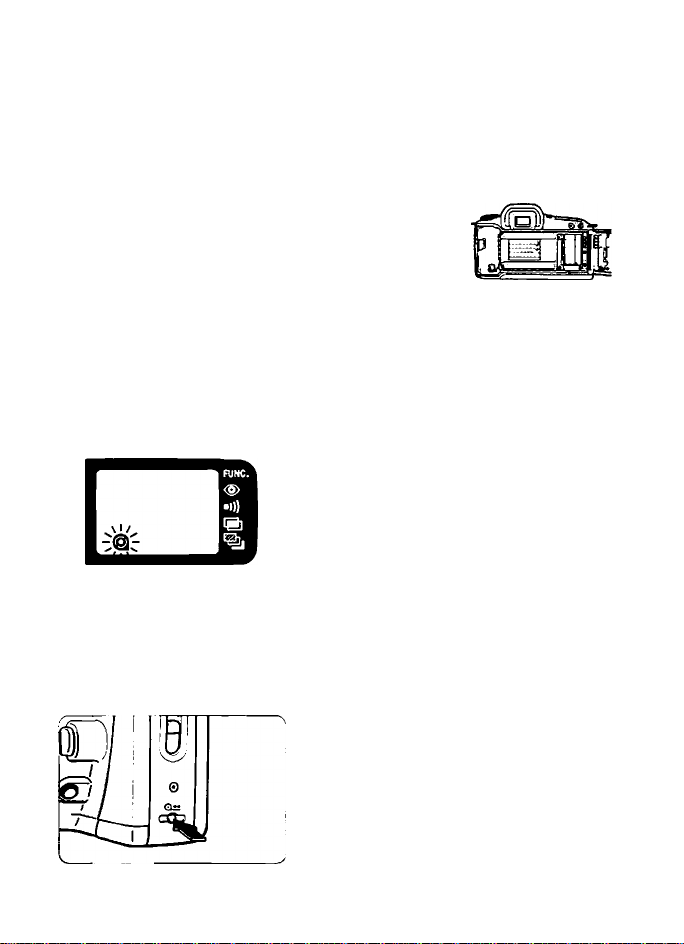
Unloading Film
After the film’s last frame is exposed, the camera rewinds the film
automatically.
When the film rewind ends, the camera
will make a shutter-release sound and
the <(§)> icon will blink on the LCD
panel. Before opening the camera
back to unload the exposed film, make
sure the icon is blinking.
QH Midroll Film Rewind
To rewind the film before reaching the last frame, follow the steps below.
Press the <Qii> button.
• The film will start rewinding. The
1
operation will then be the same as
normal film rewind.
Open the camera back and
remove the film.
2
21
Page 22
Holding the Camera
If you remove the film from the camera in midroll w/ithout rewinding and then
41
load a new roll of film, the new roll’s film leader will only be wound back into
the film cartridge. To prevent this, close the camera back and press the
shutter button completely before loading a new roll of film.
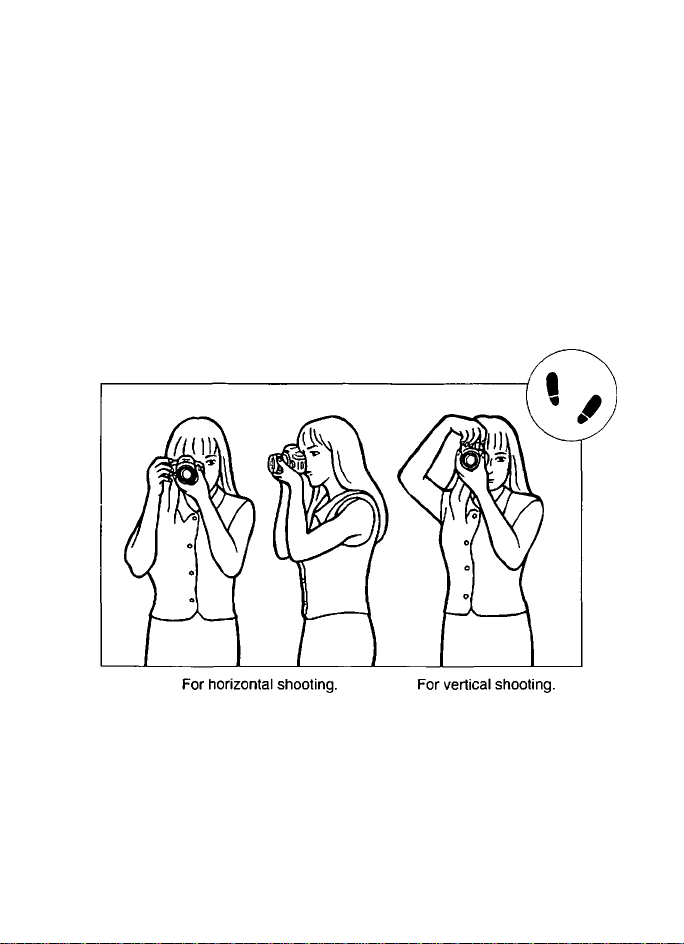
Holding the Camera
To avoid taking a blurred shot, hold the camera properly as described
•
below.
• Wrap your right hand around the camera grip and grasp firmly. Set your
elbow lightly against your body.
' Use your left hand to hold the lens from underneath.
■ Press the camera against your forehead and look through the viewfinder.
■ Keep one foot slightly ahead of the other tor better stability.
22
Page 23
Basic
For quick and easy picture-taking, this
section describes the Command Dial’s
Basic Zone modes: <0>, <^>, <Sfc>,
<fi>. <^>, and <S>.These modes
set all the camera settings automatically.
All you do is point the camera and press
the shutter button.
Also, these modes override the
camera’s Main Dial <iSi> and buttons
(except for <<§>>, < ••)) >, <(5)>, <Qsi>,
and the shutter button). This is to
prevent spoiled shots caused by
accidental operation of camera controls.
Camera-Controlled
Automatic Shooting
• In the <0>, <9>, <C6>, and <B>
modes, the built-in flash pops up
and fires automatically under lowlight or backlit conditions.
• The settings automatically set by
the Basic Zone modes are shown in
the “Feature Availability Table” on
page 64.
•
23
Page 24
O Full Auto Mode
In the <D> mode, all you do is point the camera and press the shutter
button. Photograph any type of subject automatically. Any of the seven
focusing points can focus the subject for easy picture-taking.
THE IMAGE WAS REMOVED DUE
TO COPYRIGHT RESTRICTIONS
• Focusing points
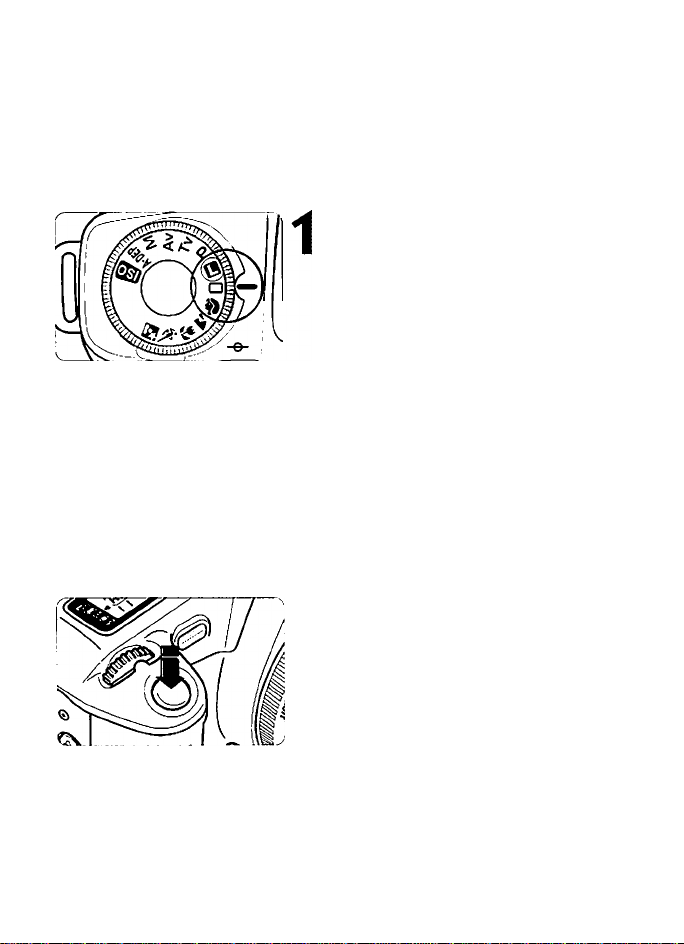
Turn the Command Dial to <0>.
•
Aim any of the focusing points on
the subject.
• One of the focusing points will focus
the subject as recognized by the
camera.
• To focus a subject not covered by
any of the focusing points, see page
39.
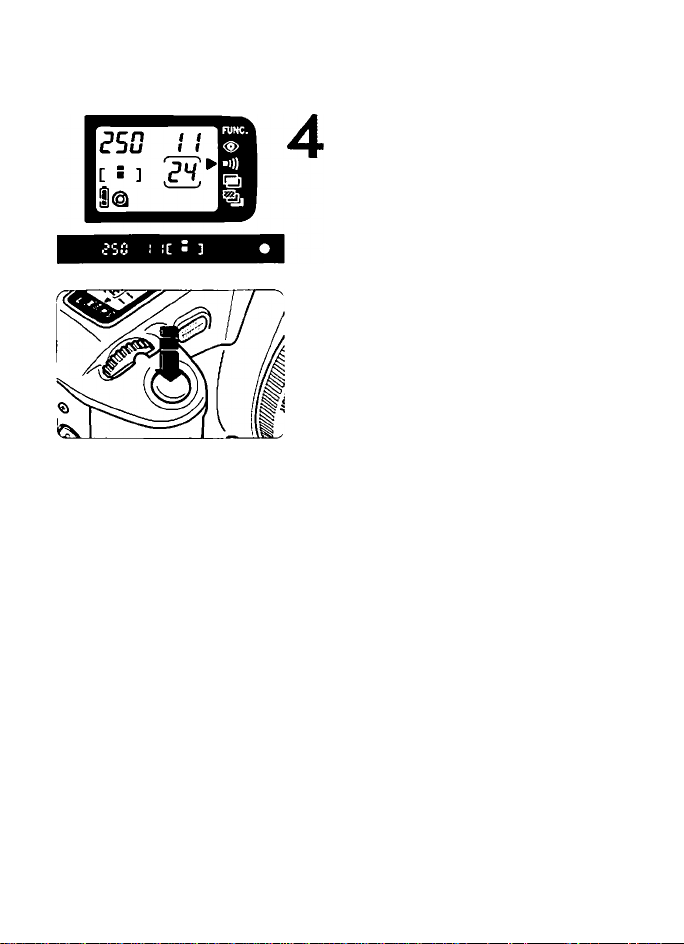
Press the shutter button halfway
to focus.
• When focus is achieved, the beeper
will sound and the in-focus indicator
(•) at the viewfinder’s lower right will
light.
• The focusing point which achieved
focus will light.
24
Page 25
D Full Auto Mode
Check the exposure settings.
• The shutter speed and aperture will
be set automatically and displayed in
the viewfinder and on the LCD panel.
Compose the shot and press the
shutter button completely to take
the picture.
» When focus is achieved, AF lock also takes effect at the same time. See
page 39.
0
• If the in-focus indicator blinks, the shutter cannot be released. See pages 40
and 66.
• Out of the seven focusing points, generally the one covering the closest
subject is selected automatically to achieve focus.
• Multiple focusing points may light simultaneously. This means that these
focusing points have all achieved focus.
•
• Under low-light or backlit conditions, the built-in flash will pop up and fire
automatically.
See page 60 for notes on using the built-in flash.
25
Page 26

Automatic Firing of the Built-in Flash
In the <a>, <■?>>, <A>, and <S> modes, the built-in flash pops up and
fires automatically under low-light or backlit conditions.
If the automatic pop-up of the built-in flash is obstructed accidentally, the
41
icon will blink on the LCD panel as a warning. If this happens, press
the shutter button halfway. The camera will then return to normal.
If using flash is prohibited or if you want to use existing light instead of flash,
use the <P> mode (see page 42).
AF-Assist with the Built-in Flash
In the Basic Zone modes and Creative Zone modes, the AF-assist lamp
lights automatically when necessary.
Under low-light conditions, the built-in flash flashes continuously when you
press the shutter button halfway. This is to illuminate the subject to enable
easier autofocusing.
« AF-assist does not function in the > and < 'ai, > modes.
• The AF-assist light is effective up to about 4 meters /13.2 feet.
0
• In a Creative Zone mode, press the flash button to pop up the flash. The
AF-assist light will then turn on when necessary.
• Even while an external EOS-dedicated Speedlite is attached to the camera,
the camera’s built-in AF-assist light will still function.
•The AF-assist light works in Basic Zone and Creative Zone modes.
Single-frame and Continuous Shooting
The film advance mode (single or continuous) when the shutter button is
held down is set automatically by the respective picture-taking mode.
To see which film advance mode is set by the picture-taking modes, see
the “Feature Availability Table” on page 64.
26
Page 27
□ Full Auto Mode
<§> Using Red-eye Reduction
When flash is used in a low-light environment, the subject’s eyes may look
red in the photograph. “Red eye” happens when the light from the flash
reflects off the pupils of the eyes.
The camera’s red-eye reduction feature uses a red-eye reduction lamp to
shine a gentle light into the subject’s eyes to narrow the pupil diameter or
iris. A smaller pupil reduces the chances of red eye from occurring. Red
eye reduction can be set in any picture-taking mode.
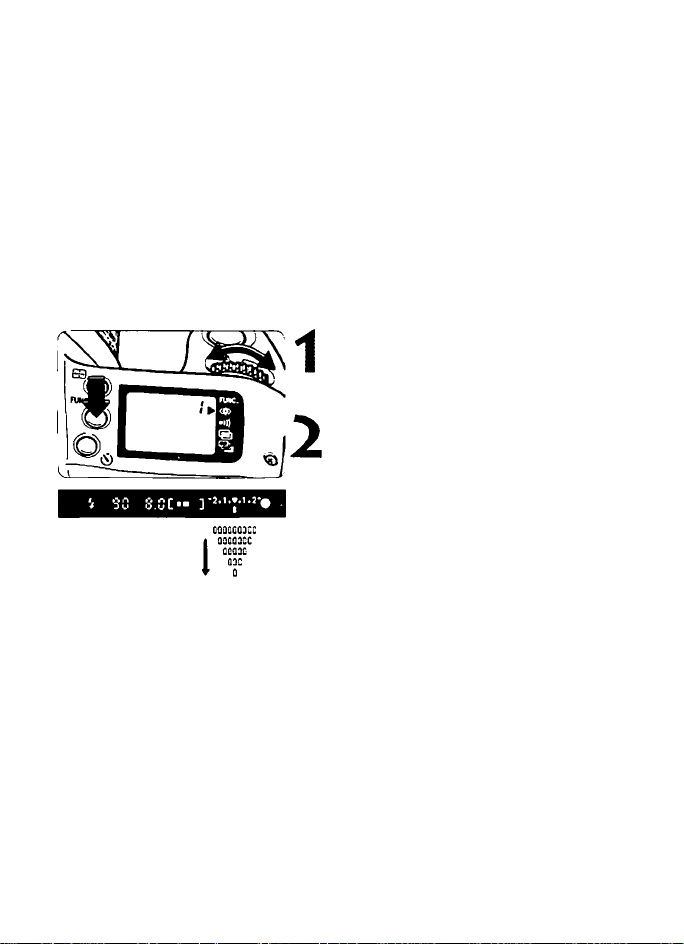
Press the Function button so that
the < ^ > arrotM points to the
<^> icon.
Turn the Main Dial to display “1”
on the LCD panel.
• To cancel red-eye reduction, turn the
Main Dial to display “0" on the LCD
panel.
• The setting takes effect after any of
the following actions:
• The shutter button is pressed halfway.
Red-eye reduction
lamp ON indicator
• When you press the shutter button halfway, the red-eye reduction lamp ON
indicator will be displayed in the viewfinder and on the LCD panel to indicate
that the red-eye reduction lamp is on.
• For maximum effectiveness, take the picture after the red-eye reduction
lamp ON indicator turns off after 1.5 sec.
• You can take a picture even while the red-eye reduction lamp is lit.
• The red-eye reduction lamp also works when an EOS-dedicated Speedlite
is attached to the camera.
•The effectiveness of red-eye reduction varies depending on the subject.
• The Command Dial is turned.
• Six seconds elapse.
•
• Red-eye reduction can be effective only when the subject looks at the red
eye reduction lamp. Encourage the subject to look at the lamp.
•To increase the effectiveness of red-eye reduction, make the room brighter
or move closer to the subject.
27
Page 28
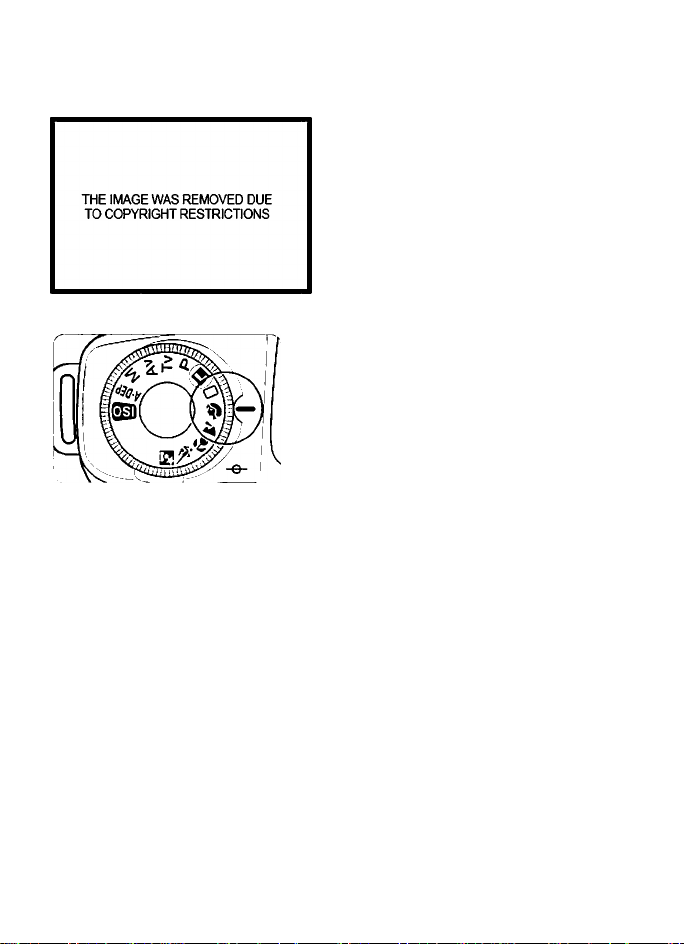
Portrait Mode
This mode blurs the background to
make the human subject stand out.
• Holding down the shutter button
executes continuous shooting.
Turn the Command Dial to <^>.
• The picture-taking procedure is the
same as with the Full Auto mode
<D> (page 24).
•
• Background blur is most effective when the subject fills the frame from the
waist up. Also, the further away the subject is from the background, the
more blurred the background will become.
■ Using a telephoto lens also increases background blur. If you have a zoom
lens, use the longest focal length. (For example, a 28-80mm zoom lens set
to 80 mm.)
• Under low-light or backlit conditions, the built-in flash will pop up and fire
automatically.
• See page 60 for notes on using the built-in flash.
28
Page 29
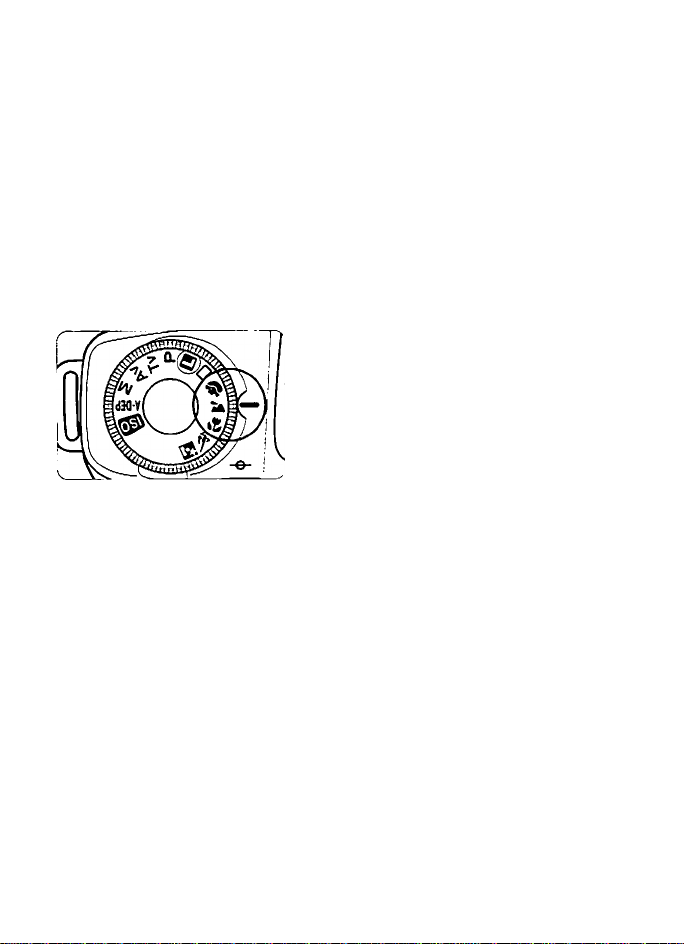
Landscape Mode
THE IMAGE WAS REMOVED DUE
TO COPYRIGHT RESTRICTIONS
This is for sweeping scenery,
night scenes, etc.
Turn the Command Dial to <^>.
• The picture-taking procedure is the
same as with the Full Auto mode
<a>(page24).
« If the shutter speed display blinks, the shutter speed may be too slow and a
blurred picture may occur due to camera shake. Using a tripod is
0
recommended. (The shutter speed will still blink even while a tripod is used.)
• Even if the built-in flash has been popped up, it wrill not fire.
Using a wide-angle lens will further enhance the depth and breadth of the
' w” picture. If you have a zoom lens, use the shortest focal length. (For example,
a 28-80mm zoom lens set to 28 mm.)
29
Page 30
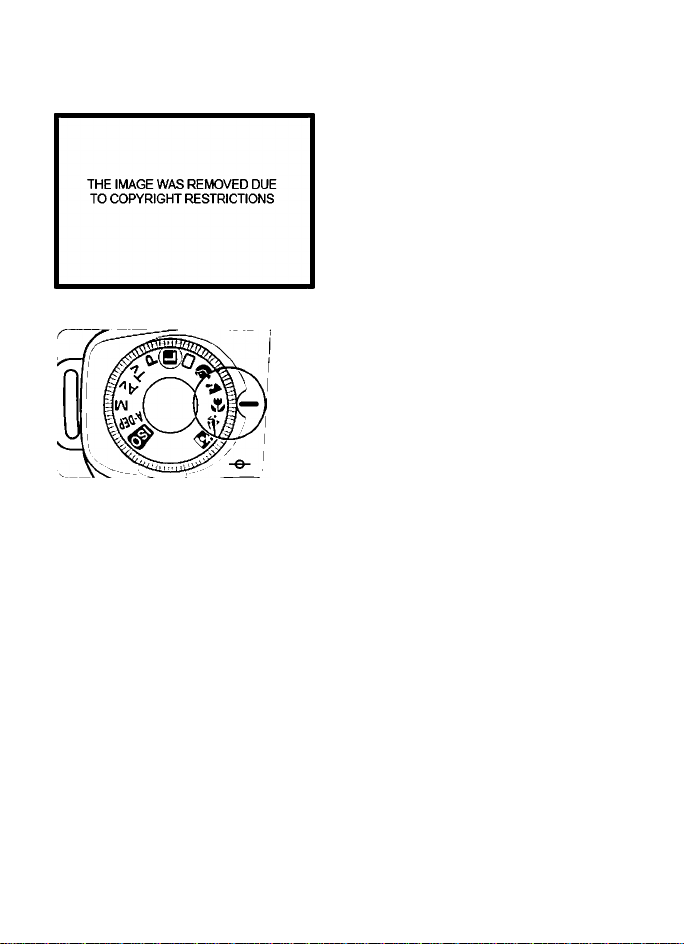
^ Close-up Mode
Use this mode to take close-up shots
of flowers, insects, etc.
Turn the Command Dial to <i!b>.
• The picture-taking procedure is the
same as with the Full Auto mode
<0> (page 24).
.„'JL/., • Focus the subject at the lens’ closest focusing distance.
• If you have a zoom lens, use the maximum focal length to obtain a larger
magnification.
• For belter close-ups, a macro lens and Macro Ring Lite ML-3 (both sold
separately) are recommended.
• Under low-light or backlit conditions, the built-in flash will pop up and fire
automatically.
• See page 60 for notes on using the built-in flash.
30
Page 31
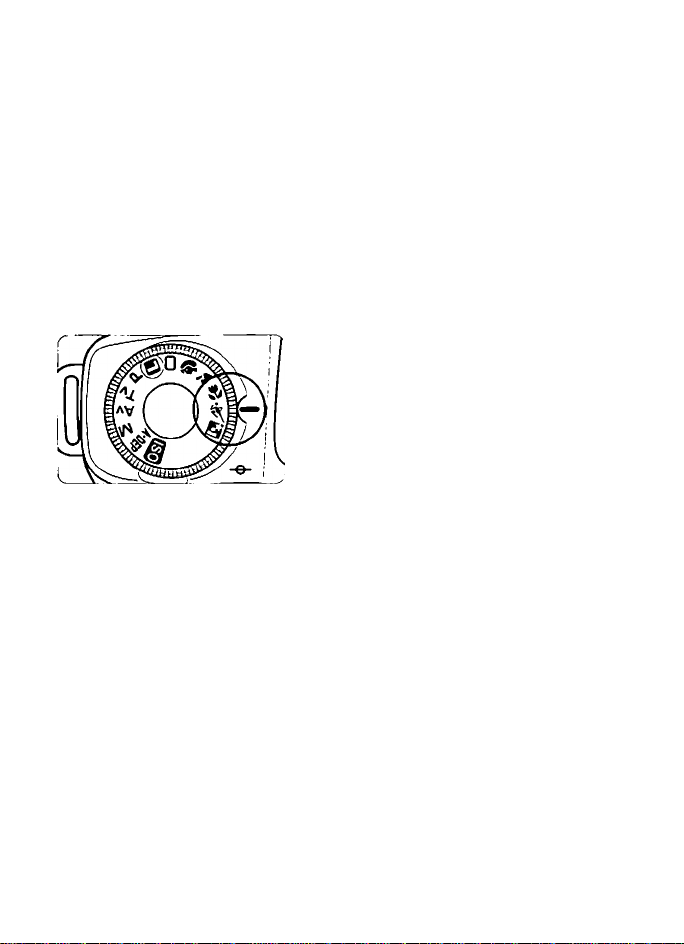
Sports Mode
THE IMAGE WAS REMOVED DUE
TO COPYRIGHT RESTRICTIONS
This mode is ideal for sports and fastmoving subjects when you want to
freeze the action on film.
• Holding down the shutter button
executes continuous focusing and
shooting.
Turn the Command Dial to <i^>.
• The picture-taking procedure is the
same as with the Full Auto mode
<D>(page 24).
*f the shutter speed display blinks, the shutter speed may be too slow and a
blurred picture may occur due to camera shake. Using a tripod is
S
recommended. (The shutter speed will still blink even while a tripod is used.)
• Even if the built-in flash has been popped up, it will not fire.
• Using ISO 400 or faster film is recommended.
t'iI'c . For sports photography, a telephoto lens with a focal length of 200 mm or
300 mm is recommended.
31
Page 32
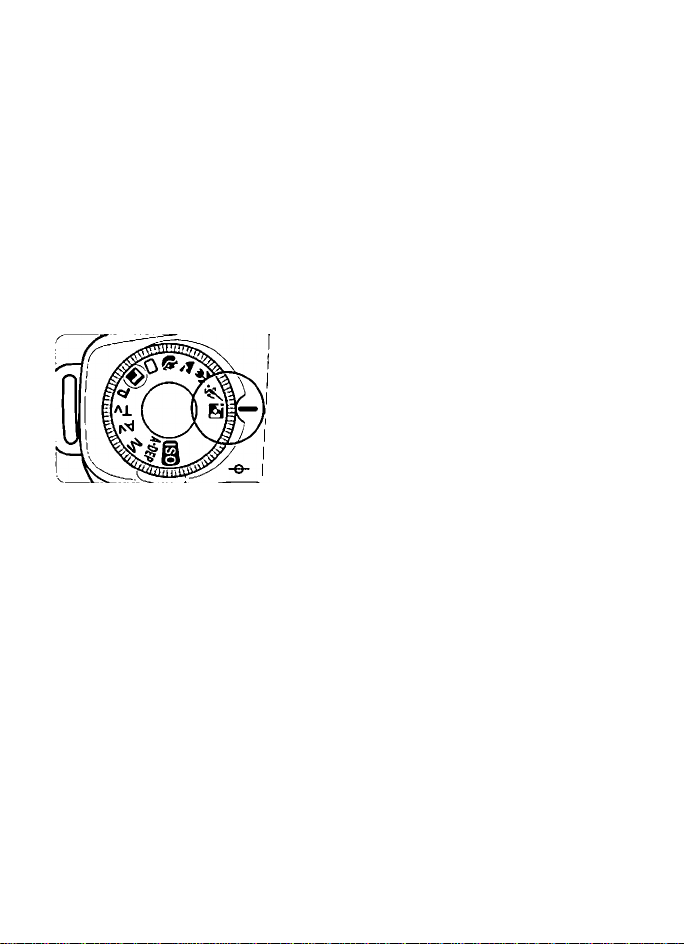
S Night Scene Mode
THE IMAGE WAS REMOVED DUE
TO COPYRIGHT RESTRICTIONS
This mode is for taking pictures of
peopie at dusk or at night.
The flash illuminates the subject
properly while a slow shutter speed
exposes the background to attain a
natural-looking, balanced exposure.
To prevent camera shake, using a
tripod is recommended.
Turn the Command Dial to <S>.
• The picture-taking procedure is the
same as with the Full Auto mode
<D> (page 24).
•
• Using ISO 400 or faster film is recommended.
• If only a night scene (without people) is to be photographed, use the <Sk>
mode instead.
•Tell the subject to keep still even after the flash fires.
• If the self-timer is also used in this mode, the red-eye reduction lamp will
flash for a moment to indicate that the exposure has been completed.
•The <S> mode can be used even while an EOS-dedicated Speedlite is
attached to the camera.
• In daylight, the <B> mode functions in the same way as the <[□> mode.
32
Page 33
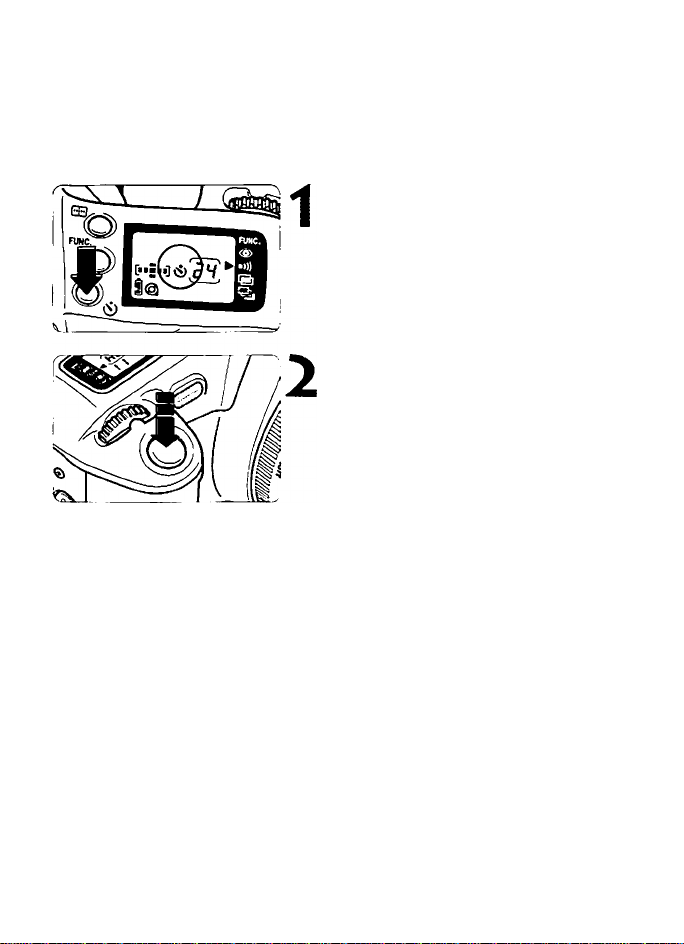
^ Self-timer
The self-timer is useful when you want to be in the picture. It can be used
in Basic Zone and Creative Zone modes. Use a tripod for self-timer shots.
Press the self-timer button «5».
• The <c5)> icon will be displayed on
the LCD panel.
• To cancel the self-timer, press the
self-timer button «¡)> again or turn
the Command Dial to <H>.
Look through the viewfinder and
press the shutter button
completely to start the self-timer.
• The picture-taking procedure is the
same as with the Full Auto mode
<a> (page 24).
• When you press the shutter button
completely, the beeper will sound
and the shutter will be released 10
sec. later.
During the first 8 seconds, the beeper
beeps slowly and the red-eye
reduction lamp flashes.
During the final 2 seconds, the
beeper beeps faster and the red-eye
reduction lamp stays lit.
• On the LCD panel, the self-timer
display counts down in seconds.
■ The self-timer beeper can be silenced. See page 54.
• The self-timer will be canceled automatically if you do not press the shutter
button within 4 minutes after pressing the self-timer button.
33
Page 34
(5) Self-timer
*To cancel the self-timer after it starts, press the self-timer button <c5)>
again.
0
•When using the self-timer to take a picture of only yourself, first lock the
focus (see page 39) on an object at the same distance where you will be in
the picture.
• With Remote Switch RS-60E3 (sold separately), you can press the shutter
button at a remote distance. See page 58.
Do not stand in front of the camera when you start the seif-timer. Doing so
41
will throw off the focus.
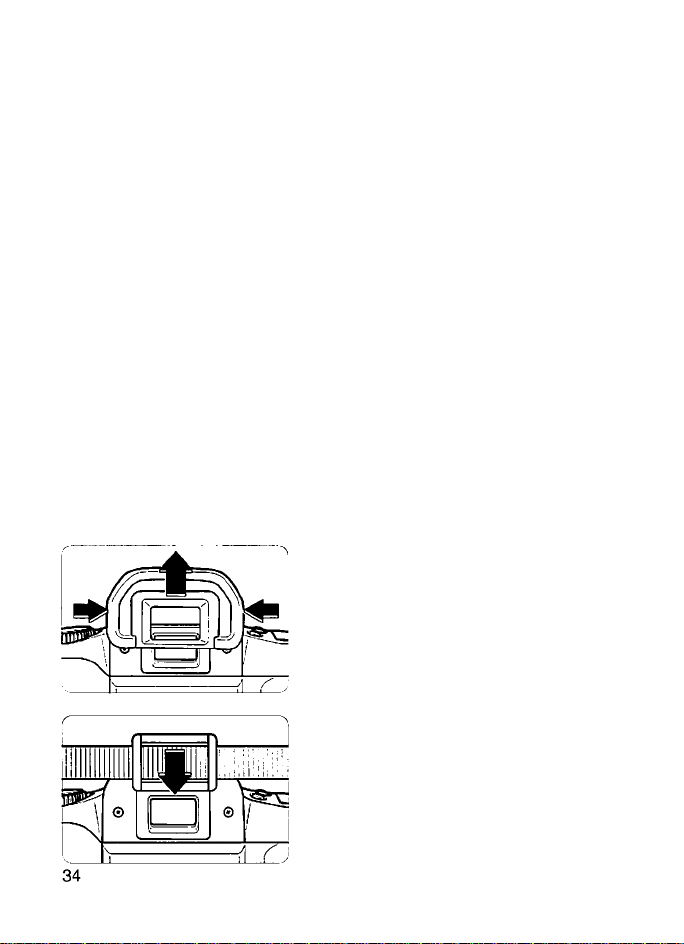
Using the Eyepiece Cover
If you use the self-timer and take a picture without looking through the
viewfinder, stray light may enter the eyepiece and affect the exposure. To
prevent this, attach the eyepiece cover on the eyepiece before taking the
picture.
Remove the eyecup from the
eyepiece.
1
Slip the eyepiece cover (attached
to the strap) onto the eyepiece.
Page 35
Imprinting the Date or Time (QD Model only)
The QD version of the camera has a
quartz date feature which maintains an
automatic calendar up to the year
THE IMAGE WAS REMOVED DUE
TO COPYRIGHT RESTRICTIONS
The date or time is imprinted on the
lower right comer of the picture as
shown above.
MODE
2019. It can imprint the date or time on
the photograph as shown in the left
photo. The imprinting can also be
disabled so nothing is imprinted.
The date or time can be imprinted in
any picture-taking mode.
To change the date/time
imprinting format, press the
<M0DE> button.
• Each time the button is pressed, the
imprinting format changes in the
following sequence as shown on the
quartz date display panel:
(24 Dec. 1999)
Year, month, day
i
Day, hour, minute
'00 >0 O'J
JJ *
Til tr.itr
C lO' ~*0
(1999 Dec. 24)
(24th 16:45)
i
Hyphens
4.
Month, day, year
I ~l Til TTiT
'C C ' Z'J
• “M” is displayed above the month.
• The bar above the last two digits is the imprint indicator. It blinks to
indicate that the date or time is being imprinted when the picture is taken.
(Blank)
(Dec. 24, 1999)
35
Page 36
Imprinting the Date or Time (QD Model only)
Setting the Date and Time
» II 1 ^ «
✓ »O'-
M
"ll 1 “i
1Г 1 1 »Г
_______
'Г| Г|
-1 J
________
'Г1Г1 1
.1 Ti
—
‘Г1Г1 1
Ti n
Ti Ti
MODE
..................
CM)o o f 11^
SELECT SET
MODE
СП)Ф о ^
MODE
MODE
SELECT SET
CD)0 #
SELECT SET
СП)» о
SELECT SET
vl/
/l\ 1
N, _
/|\
’
i
1
2
1
4
3
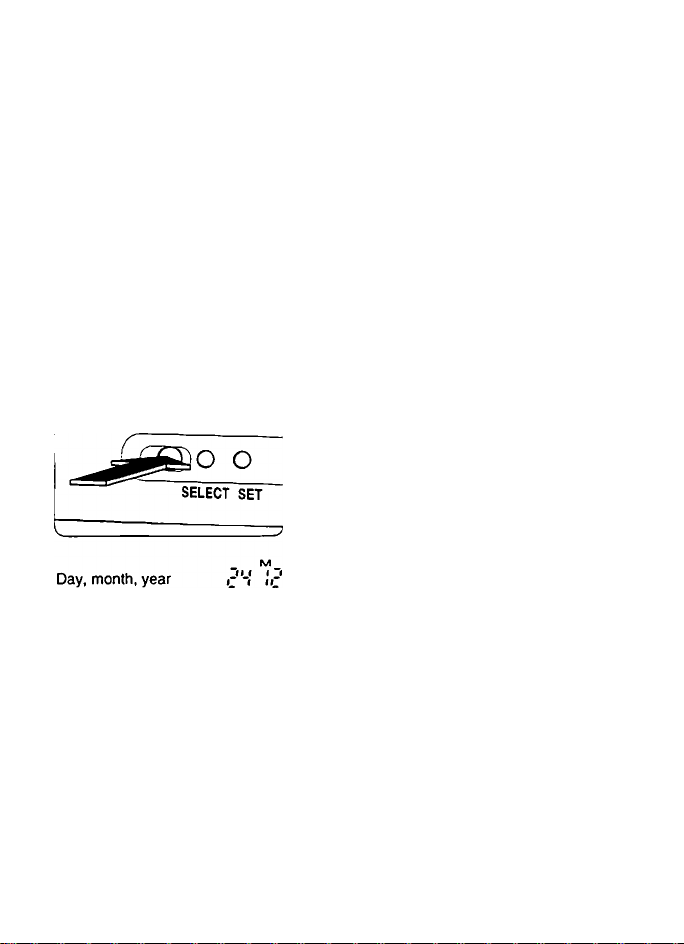
time, follow the procedure below.
Press the <MODE> button to
display the date or time to be set.
Press the <SELECT> button so that
the digit to be changed blinks.
Keep pressing the <SET> button
until the correct number appears.
Press the <SELECT> button until
none of the digits blink.
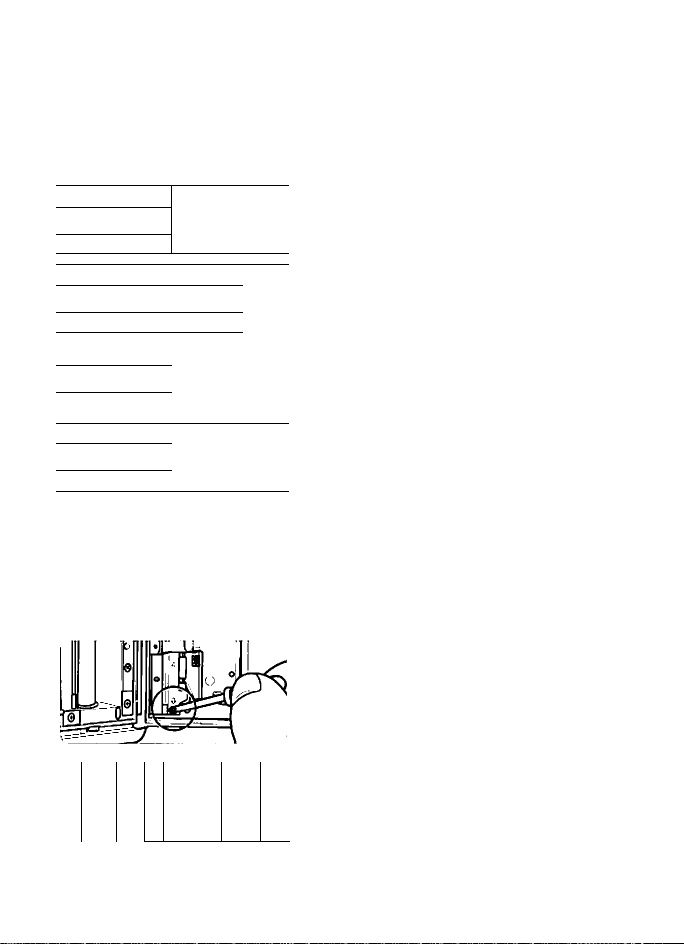
Replacing the Quartz Date Back’s Battery
When the date/time on the quartz date display panel or imprinted
photograph looks faded, replace the CR2025 lithium battery as follows.
Battery life is about 3 years.
To set or change the date and
Open the camera back and loosen the
screw to remove the battery chamber
f
cover as shown in the figure.
^ Take out the battery.
1
—'“il
V
9
fi—Jw
«1
0 °
1
L
Insert a new battery with the
positive contact (+) facing you. Then
reattach the battery chamber cover.
Close the camera back and set
I the correct date and time.
Page 37
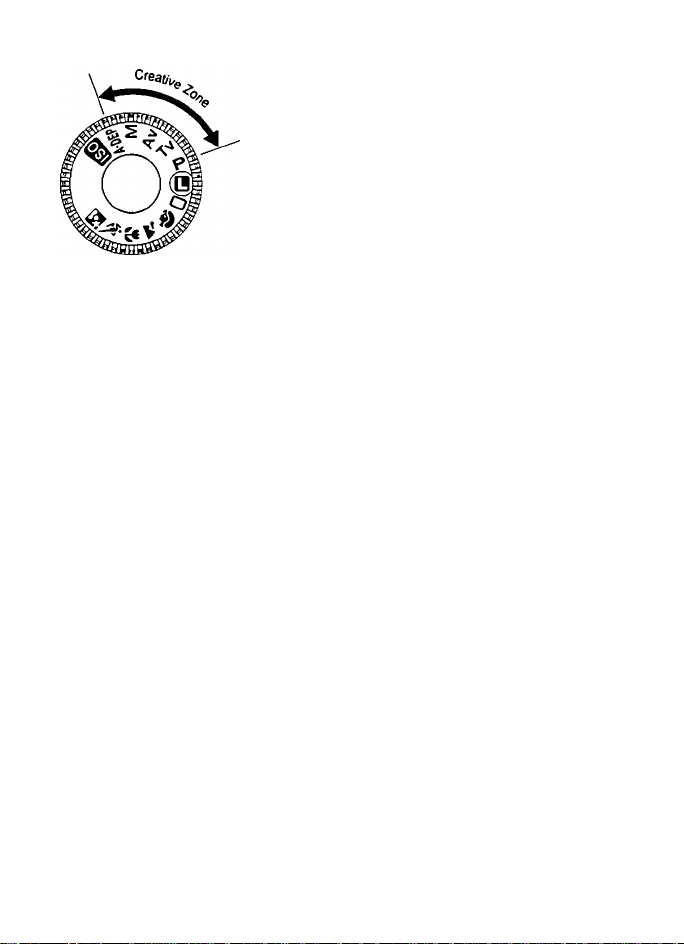
The Creative Zone modes enable you to
control the camera to obtain the effect
you want. Shutter speed-priority,
aperture-priority, and other usercontrollable modes are provided. The
Creative Zone modes (P, Tv, Av, M,
and A-DEP) are described here along
with other advanced operations.
User-Controlled
Shooting
' The < ¿Ss > icon indicates the Main Dial.
' Even after the shutter button is pressed and released, the shutter
speed and aperture will remain displayed on the LCD panel and in
the viewfinder for about 4 seconds.
’ Depth-of-field preview, AE lock, exposure compensation,
autoexposure bracketing, bulb exposures, and multiple exposures
can be used only in Creative Zone modes.
’ The settings automatically set by the Creative Zone modes are
shown in the “Feature Availability Table” on page 64.
37
Page 38
Focusing Point Seiection
The focusing point is shown as a little box. The focusing point can be
selected automatically or manually. In the Full Auto, Programmed Image
Control modes, and <A'DEP> mode, the focusing point is selected
automatically. In the <P>, <Tv>, < Av>, and <M> modes, the focusing
point can 'oe selected automatically or manually.
Automatic selection; The camera selects the focusing point automatically.
Manual selection: You can select any one of the seven focusing points
Suited for snapshots.
to achieve focus. It is convenient when you want to
make sure the target subject is focused or when you
want to retain the off-center framing of the subjeot.
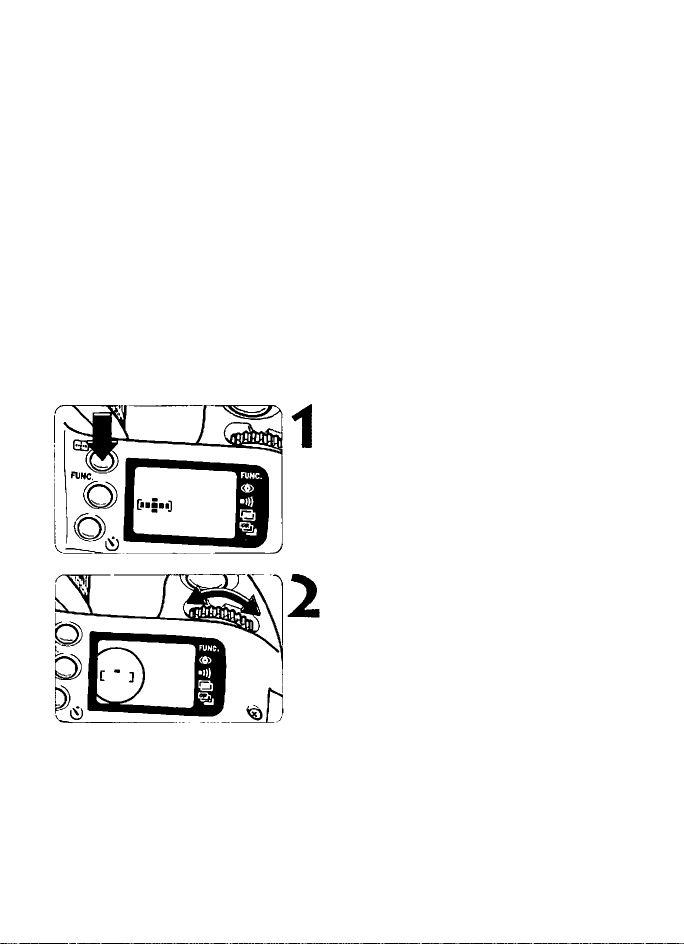
Press the <Ehl> button.
• The selected focusing point will be
displayed.
• The focusing point will be displayed
and effective for about 6 sec. after
the button is released.
Turn the <iSi> dial to select the
desired focusing point. When the
dial is turned, the focusing point
selection shifts in the ioop shown
below:
Automatic
selection
[..S..]-[. ]-[■ ]-[ " ]-[ . ]-[ _ ]-[ ■]-[ I]
L
38
’ Manual selection -
Page 39
Focusing Point Selection
Press the shutter button halfway.
3
• The camera will return to normal.
• Even if the shutter button is not
pressed halfway, the focusing point
selection mode will terminate after
about 6 sec.
If the focusing point has been selected manually and the Command Dial is
turned to Full Auto or a Programmed Image Control mode, the focusing point
seiection wiil switch to automatic.
Focusing Subjects not Covered by the Focusing Points i
If you want to focus a subject not covered by any of the focusing points,
use AF lock as described below.
Select the desired focusing point.
(See page 38.)
THE IMAGE WAS REMOVED DUE
TO COPYRIGHT RESTRICTIONS
Aim the focusing point on the
subject, then press the shutter
button halfway to focus.
Keep pressing the shutter button
haifway and recompose the
picture as desired.
THE IMAGE WAS REMOVED DUE
TO COPYRIGHT RESTRICTIONS
r AF lock can also be used in the Basic Zone modes.
-:'ф:
Press the shutter button
compietely to take the picture.
4
39
Page 40
When Autofocus Fails (Switching to Manual Focus)
The camera has a high-precision AF system which can focus almost all
subjects. However, it can fail to achieve focus (the in-focus indicator blinks)
with the subjects listed below.
Difficult Subjects for Autofocusing
(a) Low-contrast subjects.
Example: Blue sky, solid colors on a flat surface, etc.
(b) Extremely backlit or reflective subjects.
Example: Automobile with a highly reflective finish.
(c) Overlapping near and far objects.
Example: Animal behind bars in a cage.
In such cases, focus an object at the same distance as the subject and lock
the focus before recomposing. (See page 39) Or focus manually by
following the procedure below.
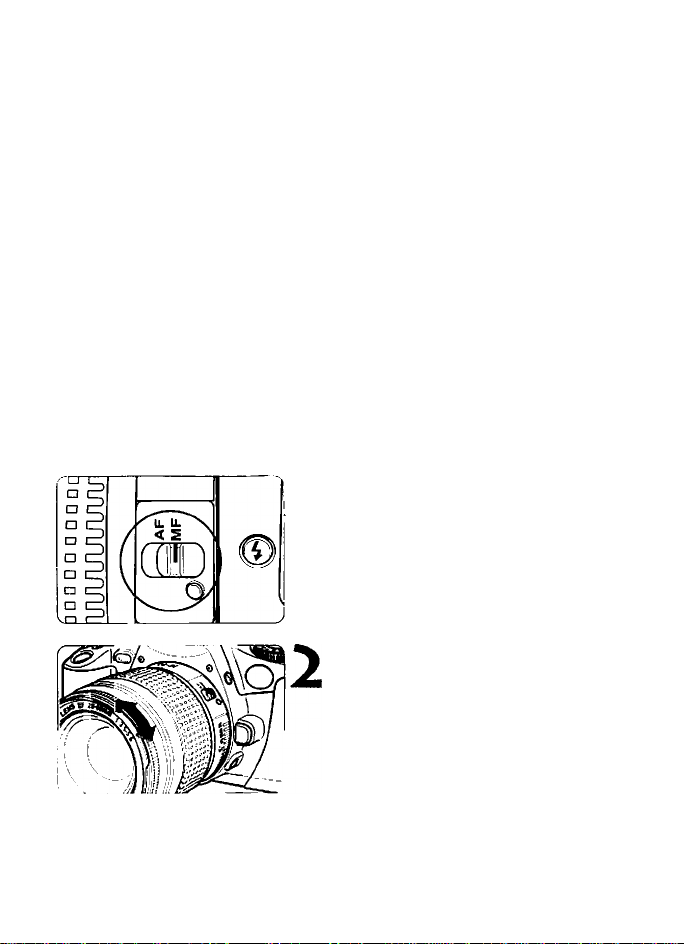
Manual Focusing
Set the lens focus mode switch to
MF (or M on older lenses).
1
Turn the lens focusing ring until
the subject is in focus in the
viewfinder.
„V-', The focusing point(s) which achieves focus lights in the viewfinder, and the
'W' in-focus indicator (•) also lights.
40
Page 41
Metering Modes
The camera has three metering modes: Evaluative, partial, and
centerweighted averaging metering. Evaluative metering is the standard
metering mode. Partial metering is set automatically \when AE lock Is used
(see page 51), and centenweighted averaging metering is set automatically
in the <M> mode (see page 48).
Evaluative metering
This is suited for most picture-taking
o
□ □ □ □ □
o
□ □ □ □ □
□
situations including backlit conditions.
The subject's position and brightness,
the background, the existing light,
backlight conditions, and the active
focusing points are taken into account
to obtain a suitable exposure.
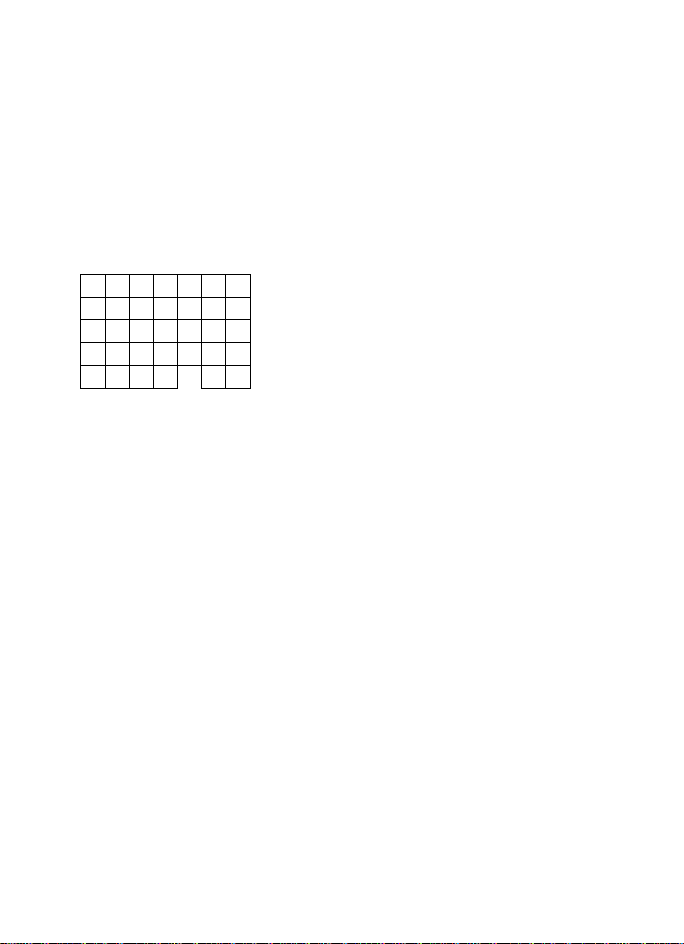
Partial metering
The exposure setting is based on the
brightness of an area 9.5% of the
viewfinder screen at the center. It is
effective for backlit subjects.
• The partial metering area (shaded) is
approximated by the diagram on the
left.
Centerweighted averaging
metering
The metering is weighted at the center
and then averaged for the entire
* •
scene.
ln the One-Shot AF and Al Focus AF modes (except Al Servo AF) (see page
64), AE lock takes effect automatically when you press the shutter button
0
halfway to focus.
• You cannot set or change the metering mode manually.
41
Page 42
Program AE
THE IMAGE WAS REMOVED DUE
TO COPYRIGHT RESTRICTIONS
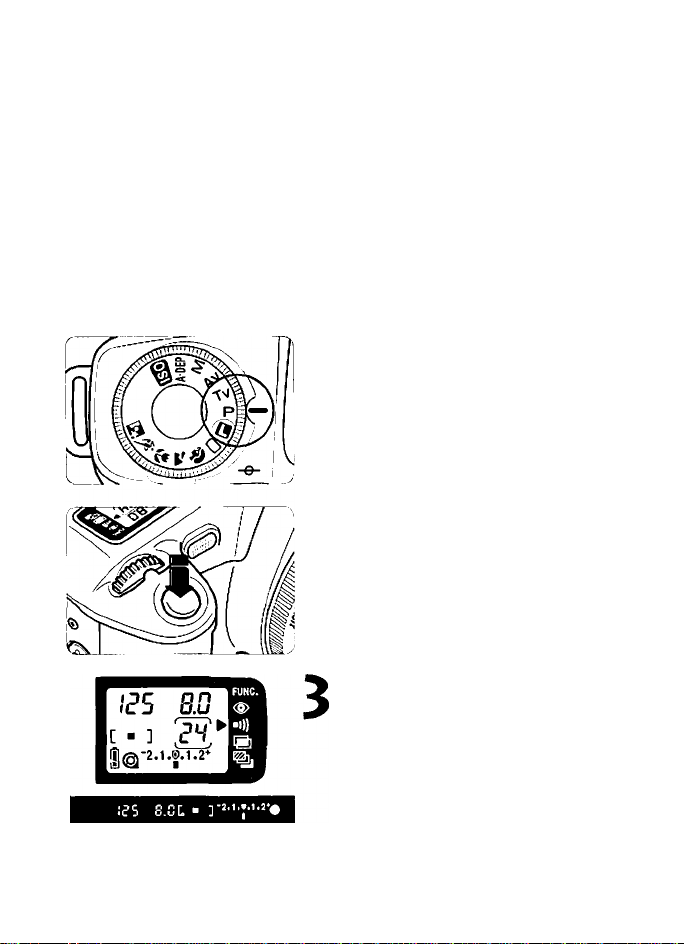
1
Like the <□> mode, this is a generalpurpose picture-taking mode for
snapshots. The camera automatically
sets the shutter speed and aperture to
suit the subject’s brightness.
Turn the Command Dial to <P>.
Press the shutter button halfway
to focus.
• When focus is achieved, the beeper
will sound and the in-focus indicator
(•) at the lower right will light.
42
Check the display.
• The shutter speed and aperture will
be set automatically and displayed in
the viewfinder and on the LCD panel.
• If the shutter speed and aperture do
not blink, a correct exposure will be
obtained.
• If the shutter speed and aperture
blink, see “Exposure Warnings” on
page 65.
Page 43
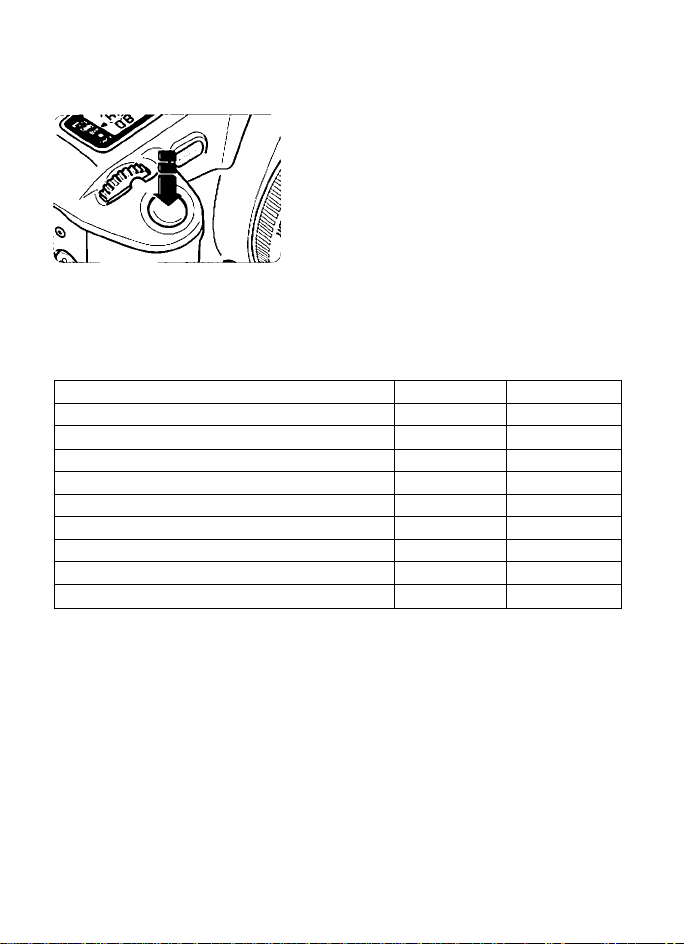
P Program AE
Compose the shot and press the
r shutter button completely to take
the picture.
The Difference Between P and D
The <P> and <0> modes set the same shutter speed and aperture
settings automatically for picture-taking. However, the available features
are different as shown below.
O: Settable by the user, x: Not settable by the user.
Feature
Continuous shooting
Program shift
Exposure compensation
Auto Exposure bracketing
Partiai metering/AE iock
Manuai focusing point selection
Built-in flash ON/OFF
High-speed sync with an EX-series Speedlite
FE lock with an EX-series Speedlite
P
o
0
o
o
o
o
o
o
o
r~l Full Auto
X
X
X
X
X
X
X
X
X
About Program Shift
In the Program AE mode, you can freely change the shutter speed and
aperture combination (program) set by the camera while the same
exposure value is maintained. This is called program shift.
To shift the program, press the shutter button halfway and turn the <iSi>
until the desired shutter speed or aperture is displayed.
• After the picture is taken with the shifted program, the shifted program is
canceled automatically and the original program is restored.
• If the built-in flash is used, the program cannot be shifted.
“AE" stands for auloexposure.
s
43
Page 44
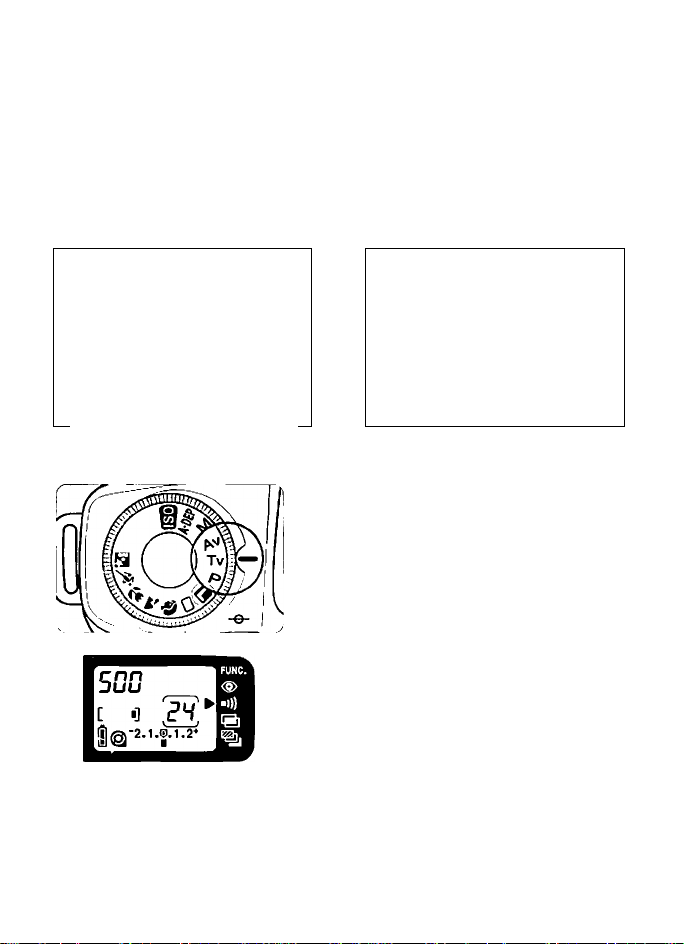
Tv Shutter-Speed Priority AE
In this mode, you set the shutter speed and the camera sets the aperture
automatically to suit the brightness of the scene.
A fast shutter speed can freeze the motion of a fast-moving subject. Or, a
slow shutter speed can blur the subject to give the impression of motion.
Set the desired shutter speed with the < >.
* Tv stands for Time value which is the shutter speed.
THE IMAGE WAS REMOVED DUE
TO COPYRIGHT RESTRICTIONS
Taken with a fast shutter speed.
44
THE IMAGE WAS REMOVED DUE
TO COPYRIGHT RESTRICTIONS
Taken with a slow shutter speed.
Turn the Command Dial to <Tv>.
1
Select the desired shutter speed
with the <i£5i>.
• Turn the <¿Si> until the desired
shutter speed is displayed.
Press the shutter button halfway
to focus the subject.
Page 45

Tv Shutter-Speed Priority AE
Check the viewfinder display.
Press the shutter button
completely to take the picture.
О
To photograph a scene on a TV screen, use a shutter speed of 1/15 sec. for
best results. Use a tripod to prevent blur.
Shutter Speed Display
И
The shutter speed can be set and displayed in full and half stops. Shutter
speeds from 2 to 2000 indicate the denominator of the fractional shutter
speed. For example, 125 is 1/125 second. For slower shutter speeds, the
numeral is appended with the seconds mark ("). For example, 0"7 is 0.7
second and 15” is 15 seconds.
2000 1500 1000 750 500 350 250 180 125 90 60 45 30 20
15 10 8 6 4 3 2 0"7 1” 1"5 2" 3” 4” 6” 8” 10” 15" 20” 30”
• If the maximum aperture (the smallest f-
number) blinks, the scene is too dark. In
such a case, turn the < > to set a
slower shutter speed until the aperture
display stops blinking.
• If the minimum aperture (the largest fnumber) blinks, the scene is too bright.
In such a case, turn the < /Ptk > to set a
taster shutter speed until the aperture
display stops blinking.
45
Page 46
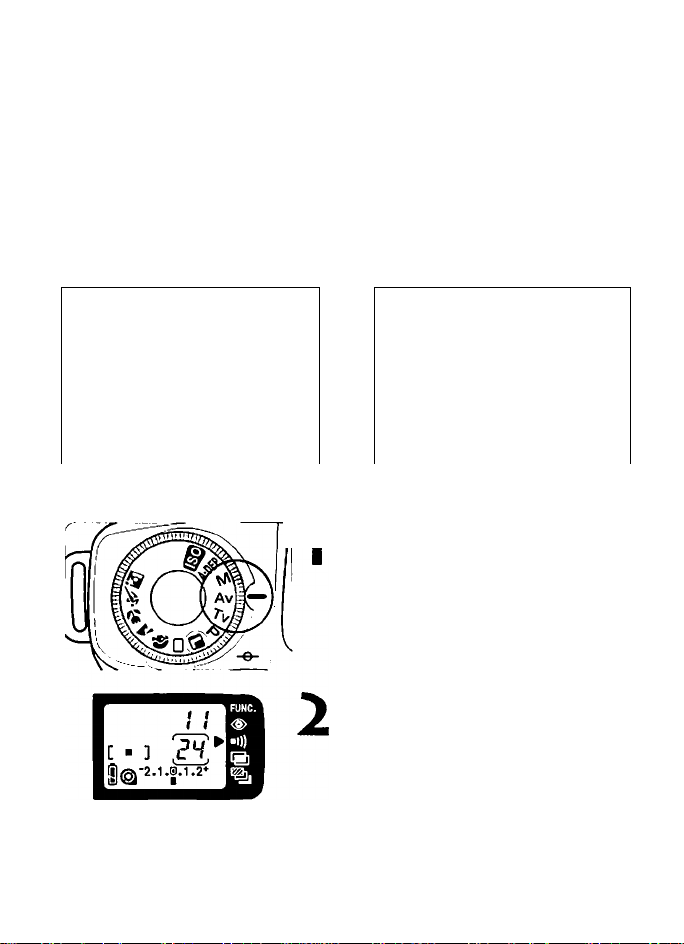
Av Aperture-Priority AE/Depth-of-fieid Preview I
In this mode, you set the aperture and the camera sets the shutter speed
automatically to suit the brightness of the scene.
A large aperture (small f-number) can blur the background and make the
subject stand out.
Or, a small aperture (large f-number) can increase the depth of field to
make both the foreground and background look sharp.
Set the desired aperture with the < ¿2i. >.
* Av stands for aperture value.
THE IMAGE WAS REMOVED DUE
TO COPYRIGHT RESTRICTIONS
Taken with a large aperture (such as f/3.5) Taken with a small aperture (such as f/22)
THE IMAGE WAS REMOVED DUE
TO COPYRIGHT RESTRICTIONS
]| Turn the Command Dial to <Av>.
Select the desired aperture with
the <iSi>.
• Turn the until the desired
aperture is displayed.
Press the shutter button halfway
to focus the subject.
46
Page 47
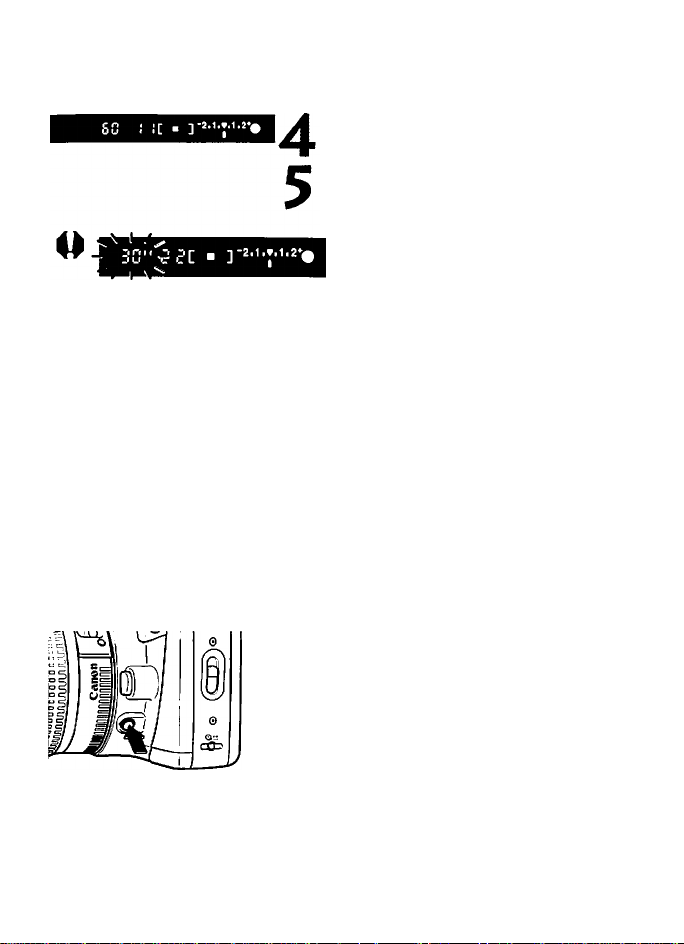
Av Aperture-Priority AE/Depth-of-field Preview
Check the viewfinder display.
Press the shutter button
completeiy to take the picture.
• If the 30” shutter speed blinks, the
scene is too dark. In such a case, turn
the < > to set a larger aperture
(smaller f-number) until the shutter
speed display stops blinking.
• If the 2000 shutter speed blinks, the
scene is too bright. In such a case, turn
the < > to set a smaller aperture (a
larger f-number) until the shutter speed
display stops blinking.
Aperture Display
0
The aperture can be set and displayed in full and half stops as shown below.
The larger the number, the smaller the aperture opening will be. The
displayable range of apertures depends on the lens mounted on the camera.
1.0 1.2 1.4 1.8 2.0 2.5 2.8 3.5 4.0 4.5 5.6 6.7 8.0 9.5 11 13
16 19 22 27 32 38 45 54 64 76 91
If no lens is mounted on the camera, “00" will be displayed for the aperture setting.
Depth-of-field Preview
To check the depth of field visually,
press the depth-of-field preview button.
The camera will stop down the
aperture and you can check the depth
of field in the viewfinder.
=] • Depth-of-field preview can be used only in Creative Zone modes.
•The<A-DEP > mode takes effect after you press the shutter button halfway.
•When you press the depth-of-field preview button, AE lock also takes effect.
47
Page 48
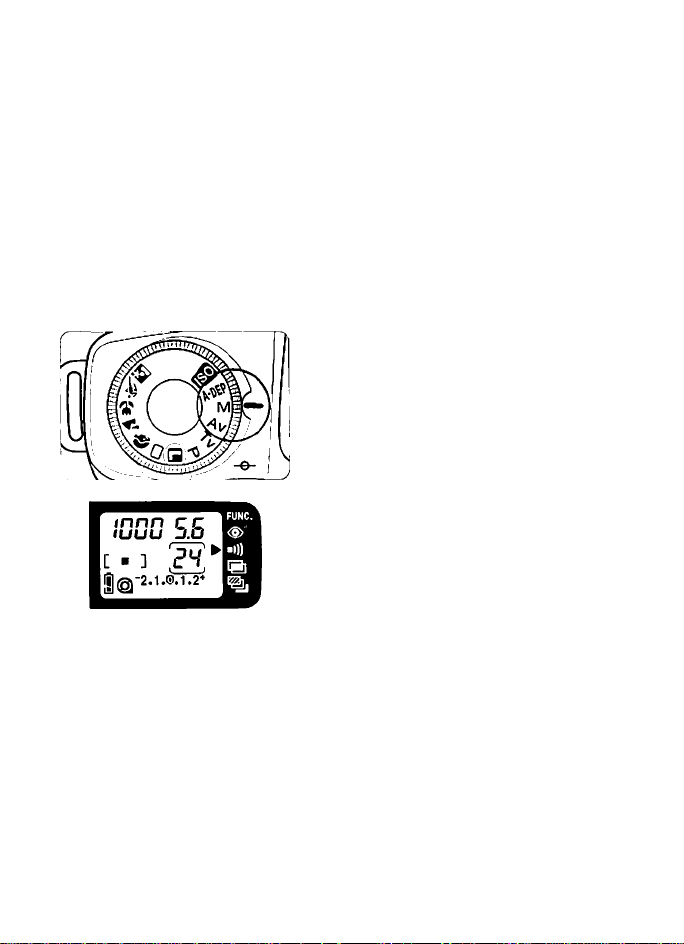
M Manual Exposure
THE IMAGE WAS REMOVED DUE
TO COPYRIGHT RESTRICTIONS
1
In this mode, you set the shutter
speed and the aperture for total
exposure control. The exposure level
of the shutter speed and aperture you
set is indicated on the exposure levei
scaie. You can check whether the
exposure will be suitable or not.
Turn the Command Dial to <M>.
Select the desired shutter speed
with the < £Ss >.
• Turn the <¿Эs> until the desired
shutter speed is dispiayed.
48
Page 49
Correct exposure
Overexposure
Underexposure
-2.1.».1.2+
I
-2.1
f.1.2^
M Manual Exposure
Select the desired aperture by
holding down the > button and
turning the <iSi>.
• Turn the <iSi> until the desired
aperture is displayed.
Press the shutter button halfway
to focus the subject.
4
Check the viewfinder display.
5
Look at the exposure level
indicator and adjust the exposure
6
level with the if necessary.
Correct exposure: This is the standard level
Overexposure: To achieve the correct
Underexposure: To achieve the correct
for a correct exposure.
exposure, set a faster
shutter speed or a
smaller aperture.
exposure, set a slower
shutter speed or a larger
aperture.
’ Press the shutter button
completely to take the picture.
49
Page 50
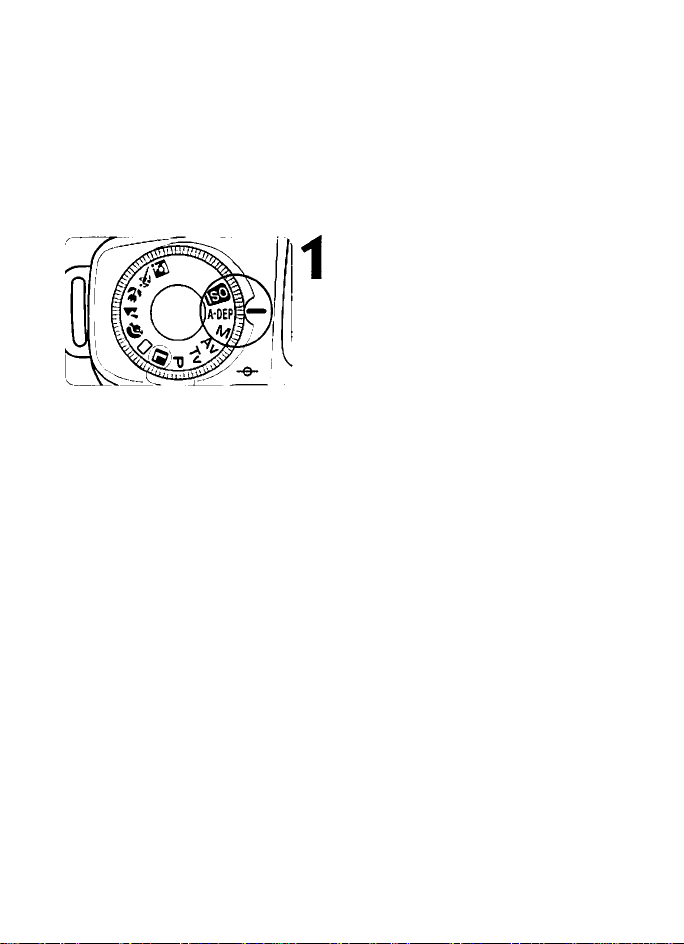
A'DEP
Automatic Depth-of-Field AE
This mode is for obtaining a wide depth of field automatically between a
near subject and far subject. It is effective for group photos and landscapes.
The camera uses the 7 focusing points to detect the nearest and farthest
subjects to be in focus.
*<A-DEP> stands for Auto Depth-of-fieid.
Turn the Command Dial to <A-DEP>.
Aim the focusing points over the
subjects and press the shutter
button halfway to focus.
THE IMAGE WAS REMOVED DUE
TO COPYRIGHT RESTRICTIONS
• The focusing points which achieve
focus will light on the display. Sharp
focus will be attained for the nearest
and farthest subjects covered by the
focusing points.
• While the exposure settings are
dispiayed in the viewfinder, you can
check the depth of field (see page 47).
Check the viewfinder information
and take the picture.
• In the sample photo, the focus will be
sharp from the left boy in the distance
to the right boy in the foreground.
• If the aperture blinks, it indicates that the exposure level is correct but the desired
depth of field cannot be achieved. Either use a wide-angle lens or move further away
from the subjects.
• In this picture-taking mode, you cannot freely change the shutter speed and aperture.
If the camera sets a slow shutter speed, hold the camera steady or use a tripod.
• If flash is used, the result will be the same as using flash in the < P > mode.
• The < A-DEP > mode cannot be used if the lens’ focus mode switch is set to MF (or M
on older lenses).
50
* •
Page 51
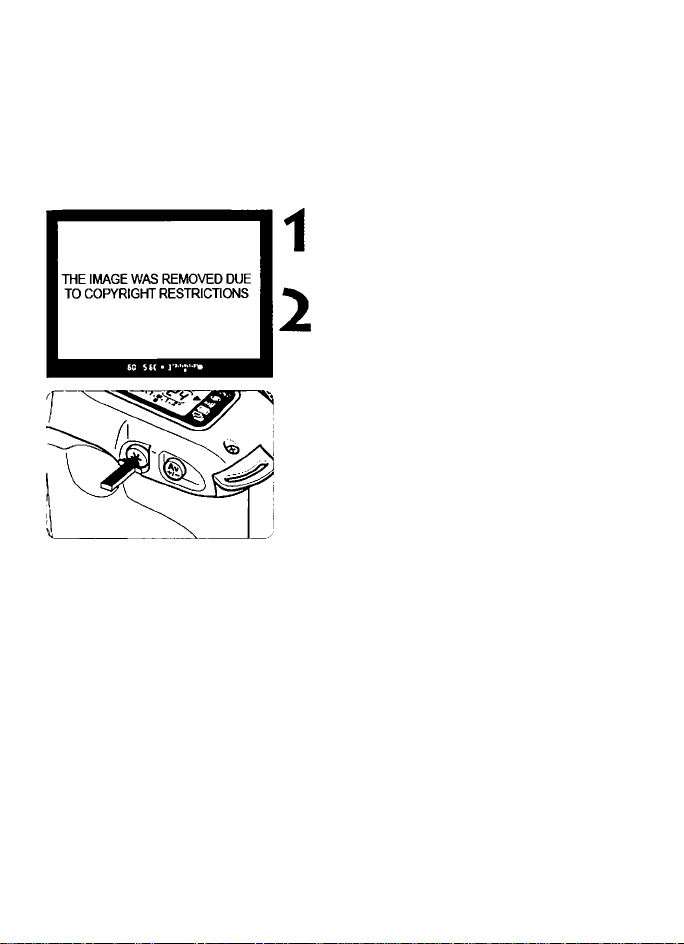
^ Partial Metering Using AE Lock
In high-contrast situations such as a person spotlighted against a dark
background, the exposure may turn out too bright or too dark in certain
areas of the photograph. To obtain a more accurate exposure in such
cases, use AE lock to lock the subject’s exposure level.
Aim the center of the viewfinder
over the area where you want to
iock the exposure. Then press the
shutter button haifway to focus.
Press the <*> button.
• The <*> indicator lights in the
viewfinder and the exposure level
locks (AE lock). The Indicator
remains displayed 4 sec. after you let
go of the <*> button.
• Each time you press the <-X-> button,
AE lock takes effect for the current
exposure level.
• AE lock is canceled 4 sec. after you
let go of the <*> button or if you
turn the Command Dial.
• If the Command Dial is set to <M>
(see page 48), the exposure level
index will show the difference
between the exposure level you have
set manually and the subject’s
brightness based on partial metering.
• If AE lock is to be executed again,
keep pressing the <*> button and
press the shutter button.
Compose the shot and take the
picture.
THE IMAGE WAS REMOVED DUE
TO COPYRIGHT RESTRICTIONS
51
Page 52
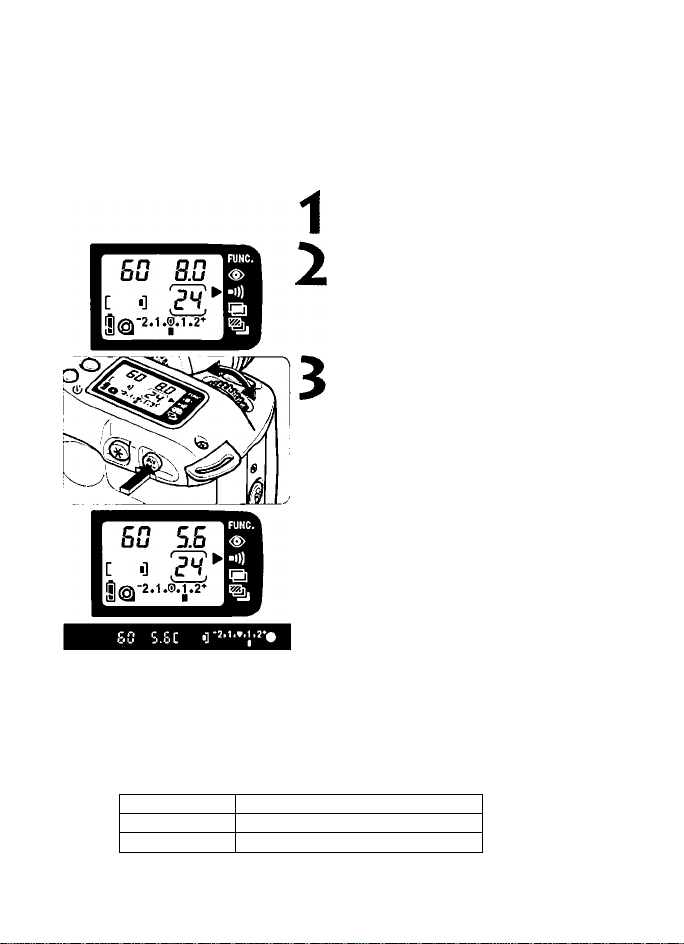
Exposure Compensation
Changing the exposure level set by the camera is called exposure compensation.
Exposure compensation can be used to make the picture darker or brighter
intentionally. Exposure compensation can be set up to ±2 stops In half-stop increments.
Turn the Command Dial to a
Creative Zone mode except <M>.
Press the shutter button halfway
and check the exposure display.
Press and hold down the <£!t> button
and turn the < > until the desired
exposure compensation amount is set.
• The plus side of the scale Indicates
overexposure and the minus side of the
scale Indicates underexposure.
Underexposure -*....................|
• To cancel the exposure compensation
setting, set the exposure level indicator
to tp. The exposure compensation
setting will not be canceled automatically
when the Command Dial is set to <[|>.
Take the picture.
-2.1.^.1.2+
...................
► Overexposure
•The exposure compensation setting will be canceled if the Command Dial is
set to a Basic Zone mode.
• Assuming that a shutter speed of 1/125 sec. and an aperture of f/5.6 will give a
correct exposure, setting the exposure compensation amount to plus or minus
1 stop on the exposure level scale will be equivalent to the following settings:
Shutter Speed 250 <- 125 ^ 60
Aperture 8.0 <- 5.6 ^ 4.0
-1 stop <- 0 -> +1 stop
52
Page 53
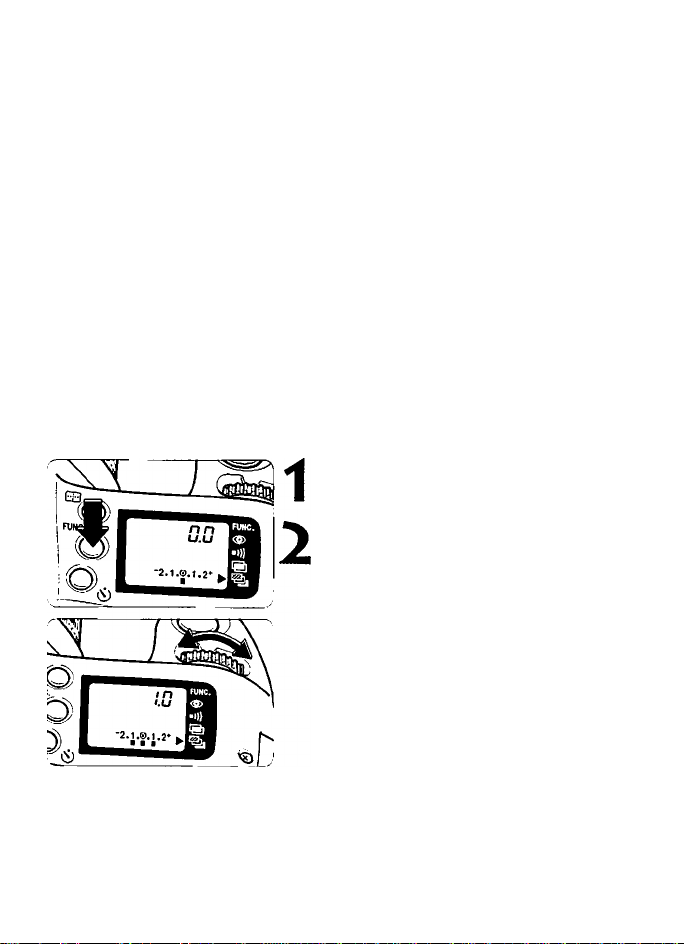
^ Auto Exposure Bracketing (AEB)l
With autoexposure bracketing, the camera automatically changes the
exposure level within the set range for three successive frames. The
bracketing amount centers on the correct exposure and the bracketed
exposures can be varied up to ±2 stops in 1/2-stop increments. The three
bracketed shots are exposed in the following sequence: Correct exposure,
underexposure, and overexposure. Auto Exposure bracketing is useful for
obtaining subtle lighting effects especially with slide film.
THE IIMSE WAS REMOVED DUE
TO COPYRIGHT RESTRICTIONS
Correct exposure
THE IMAGE WAS REMOVED DUE
TO COPYRIGHT RESTRICTIONS
Underexposure (-1.0 stop) Overexposure (+1.0 stop)
THE IMAGE WAS REMOVED DUE
TO COPYRIGHT RESTRICTIONS
Press the Function button and
point the <►> arrow to <‘^>.
Turn the <£Z2i> dial to set the
desired bracketing amount.
• For example, if 1.0 is set, the
underexposed and overexposed
frames will be exposed at -1.0 and
+1.0 stop respectively.
• To cancel autoexposure bracketing,
set the desired bracketing amount to
0.0. The bracketing amount will not
be canceled even if you turn the
Command Dial to <B>.
• The setting takes effect after any of
the following actions:
• The shutter button is pressed halfway.
• The Command Dial is turned.
• Six seconds elapse.
53
Page 54
'Щл Auto Exposure Bracketing (AEB)
-2i1i»i1i2*
-2i1i»i1i2*
I
-2,1.»,1.2*
I
: Correct exposure
: Underexposure
; Overexposure
Take the pictures.
• The viewfinder and LCD panei wiii
dispiay the respective exposure ievel for
each bracketed shot.
• During AEB shooting whiie the exposure
ievei is dispiayed, the arrow pointing to
the AEB icon on the LCD panel will blink
along with the exposure level index.
• AEB is not canceled automatically. To cancel AEB, set the bracketing amount to 0.0.
• If the self-timer is used, the three AEB shots wiil be taken in continuous succession
automaticaily.
• If the Command Dial is set to a Basic Zone mode, AEB will be canceled automatically.
• If flash is used, AEB cannot be executed.
• In the continuous shooting mode, holding down the shutter button will take all three
bracketed shots continuously. However, the respective exposure level will not be displayed.
• AEB can be used in combination with exposure -2,i.t.i.2-
compensation. If the bracketing range exceeds -2,'.J.!,2*
the displayable range, the display will be as '
shown on the right (with a sample AEB amount ::1аордЕв.т.|И1!реч>^е1сярвтаз1ол.
of ±1 stop). 'J't
: AEB amount o( ¿1 stop.
: :l sxpASKitf-Vstcpei^osu’ecompe'tsalm
: it step AEB s№-2-stcpeip»;reccmpens3tcn.
'!)) Silencing the Beeper
The beeper can be silenced in all of the picture-taking modes.
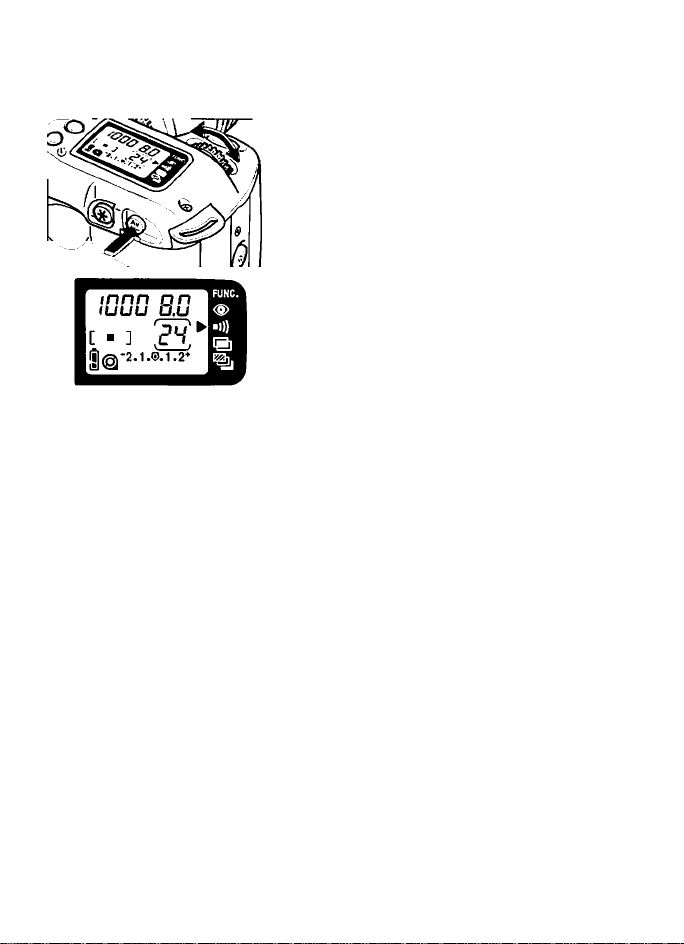
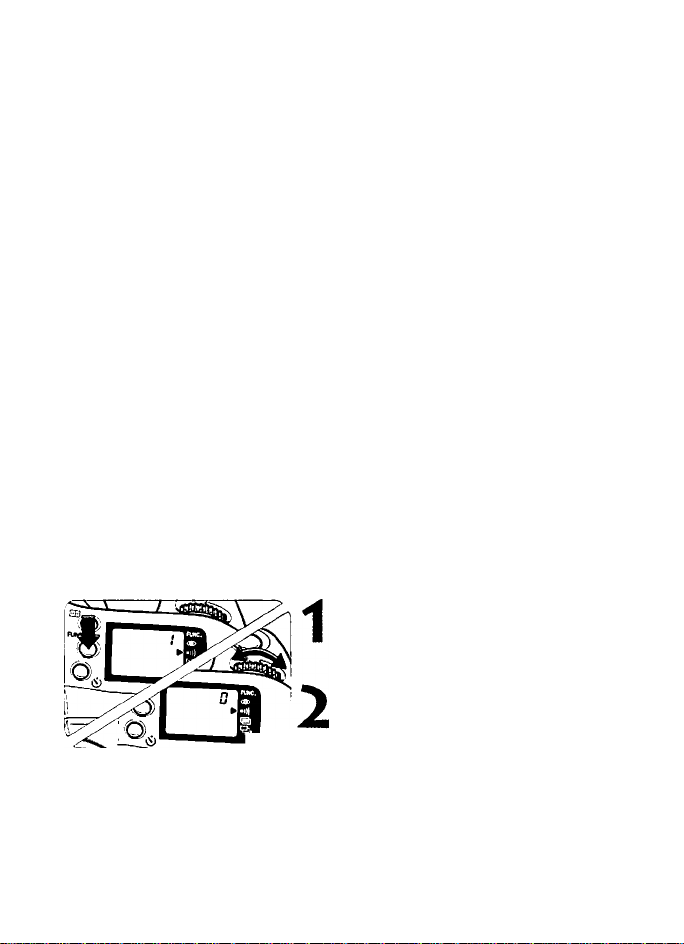
Press the Function button so that the
<►> arrow points to the <»il)> icon.
• The frame counter on the LCD panel
will display “1.”
Turn the < ¿Si > dial so that the LCD
panel displays “0.”
• To enable the beeper again, turn the
< ¿Si > dial so that “1 ” is displayed.
• The setting takes effect after any of
the following actions:
• The shutter button is pressed halfway.
• The Command Dial is turned.
• Six seconds elapse.
54
Page 55
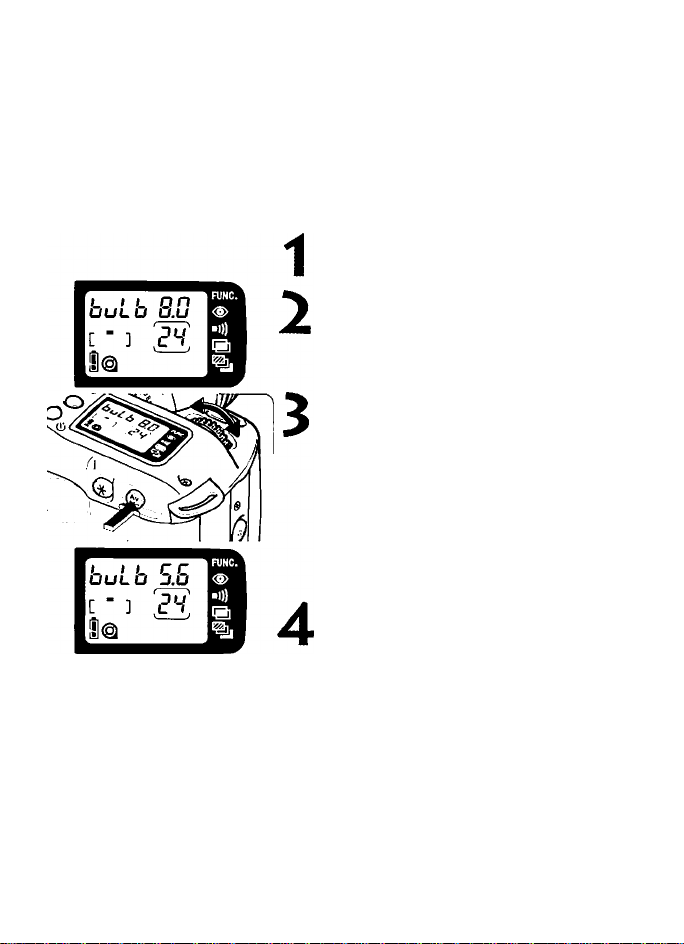
Bulb Exposures
A bulb exposure starts when you press the shutter button completely and
ends when you release the shutter button. Bulb exposures are useful when
long exposures are required for night scenes, fireworks, heavenly bodies,
etc. Remote Switch RS-60E3 (sold separately) is convenient since it frees
you from holding down the shutter button during bulb exposures.
Turn the Command Dial to <M>.
Turn the <£ ^> dial until buLb is
displayed for the shutter speed.
• bulb follows 30"-
Press and hold down the <^>
button and turn the <iSi> to set
the desired aperture.
Frame the shot, then press and
hold down the shutter button
completely for the duration of the
exposure.
• The shutter remains open while the
shutter button is pressed completely.
• During bulb exposures, <buib>
blinks on the LCD panel.
• With a new set of batteries, a bulb
exposure can be as long as about 4.5
hours at room temperature.
• A bulb exposure can be combined with
multiple exposures (see page 56).
55
Page 56
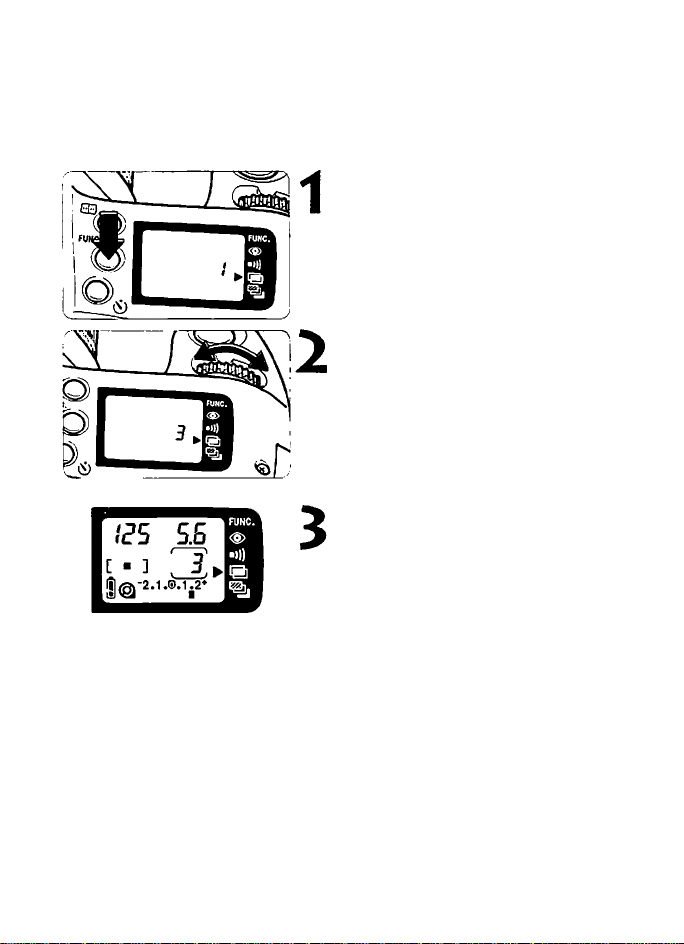
m Multiple Exposures
A single frame can be exposed multiple times to obtain a special effect.
This is possible in the Creative Zone modes.
Press the Function button to point
the <►> arrow to the <Si> icon
on the LCD panel.
• “1" will be displayed on the LCD
panel.
Turn the <£2i> dial to set the desired
number of multiple exposures.
• The LCD panel will show the number
of multiple exposures.
• Up to 9 multiple exposures can be set.
•To cancel the multiple-exposure
setting, set the number of multiple
exposures to 1.
Compose the shot and press the
shutter button completely to take
the picture.
• After the first exposure, pressing the
shutter button halfway will have the < ► >
arrow (pointing to <B>) blink on the
LCD panel.
• After the set number of multiple
exposures are taken, the film advances to
the next frame and the multiple-exposure
setting is canceled.
• To cancel the multiple-exposure setting
before completing all the multiple
exposures, follow steps 1 and 2 to set the
number of multiple exposures to blank.
• The setting takes effect after any of
the following actions:
• The shutter button is pressed halfway.
• The Command Dial is turned.
• Six seconds elapse.
56
Page 57
Multiple Exposures/Setting the ISO Film Speed
Before capturing multiple exposures on the same frame of film, exposure
compensation must be set. See “Exposure Compensation” on page 52.
As a general guide, you should set the exposure compensation amount
shown below for the respective number of multiple exposures.
No. of Multiple Exposures
Exposure Compensation Amount
•These are only suggested exposure compensation amounts. The optimum
amount depends on the scene. Experiment to find the optimum
compensation amount.
• If the Command Dial is turned to a Basic Zone mode, the multiple-exposure
setting will be canceled automatically.
2 3
-1.0 stop -1.5 stop -2.0 stops
4
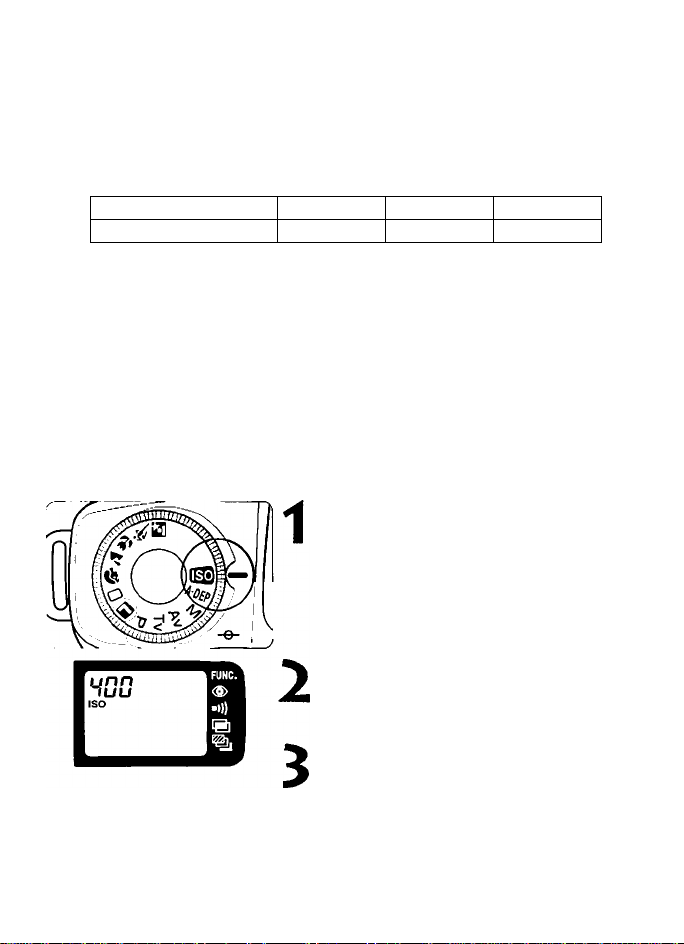
ISO Setting the ISO Film Speed
If the film is not DX-coded or if you want to set a different ISO film speed,
you can set the ISO film speed manually. The ISO film speed can be set
from 6 to 6400.
Turn the Command Dial to <ISO>.
• The ISO icon and the current ISO film
speed will be displayed on the LCD
panel.
Turn the <iSi> until the desired
ISO film speed appears on the
LCD panel.
Turn the Command Dial to the
desired mode.
The manually-set ISO film speed will be canceled if the film is taken out and
DX-coded film is loaded.
57
Page 58
Using the Remote Switch (Soid separately)
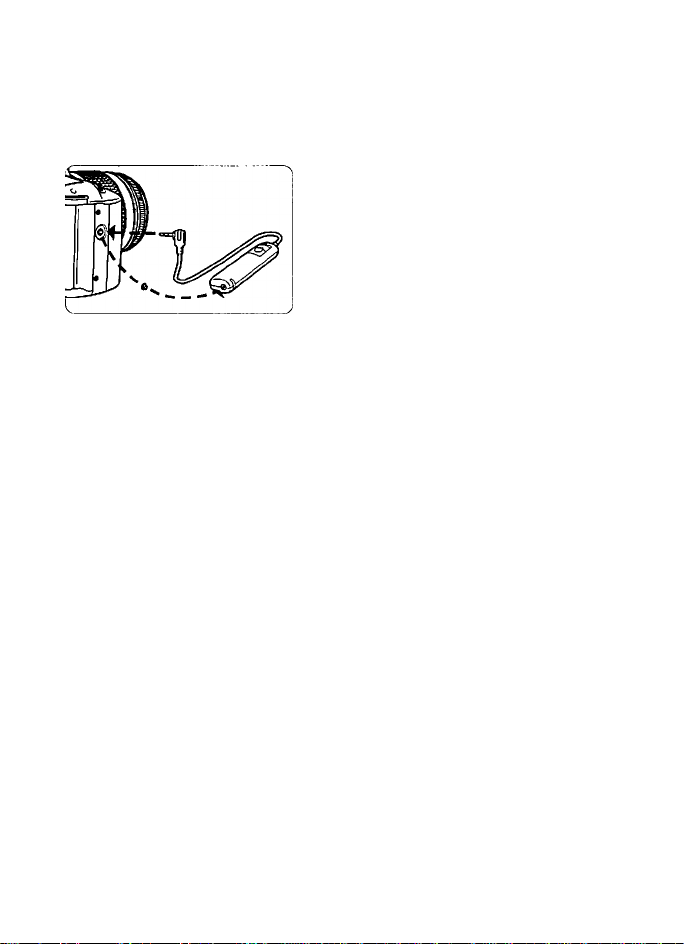
Wireless remote control can be used in all picture-taking modes.
Connect the Remote Switch RS60E3’s plug to the camera’s
remote control socket. Press the
release button to take the picture.
58
Page 59
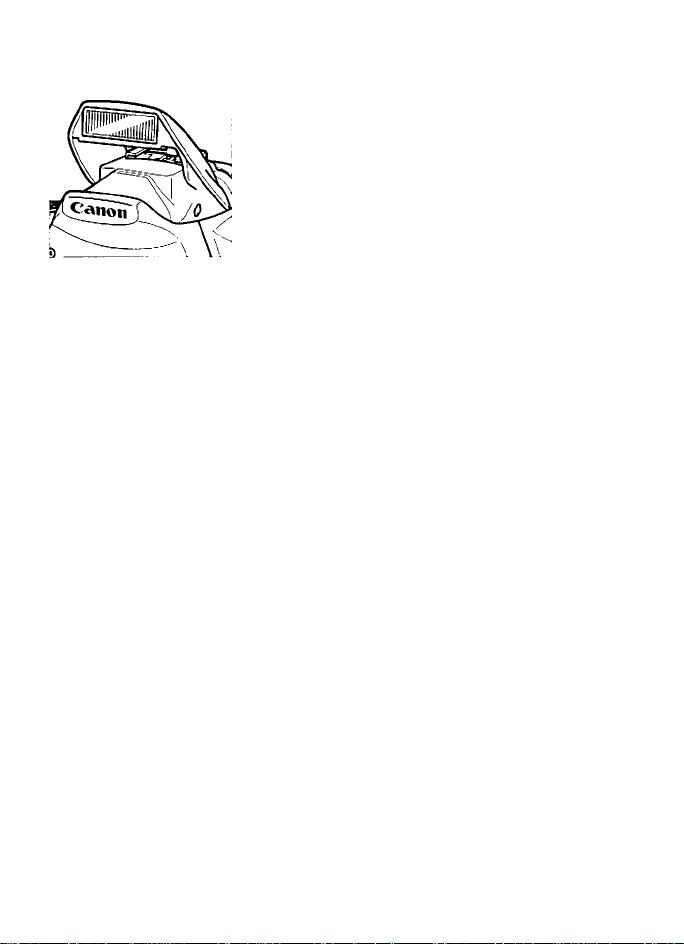
• In the Basic Zone modes (except
<Sk> and <‘s5v>), the built-in flash will
pop up and fire automatically when
necessary in low-light or backlit
conditions.
' In Creative Zone modes, flash
photography is possible at anytime by
pressing the <4> button.
You can also set the flash aperture
and sync speed (1/90 sec. or slower)
and the flash exposure will be
controlled automatically to suit the
flash aperture you have set.
Using
the Built-in Flash
Using an External EOS-Dedicated Speedlite
When an external EOS-dedicated, EX-series Speedlite like the 220 EX
or 380 EX is attached to the camera, flash photography is as easy as
with the built-in flash. E-TTL autoflash linked to the seven focusing
points, high-speed sync (FP flash) which enables flash synchronization
at all shutter speeds, and flash exposure (FE) lock (similar to AE lock)
also become possible. An external Speedlite is effective for large
group photos, portrait lighting effects, etc., when a high flash output is
required.
The features available with an EX-series Speedlite differ depending on
the camera. Since the EOS Rebel 2000/EOS 300 is a Type-A camera,
see the section in the Speedlite’s Instructions which applies to Type-A
cameras.
59
Page 60
Using the Built-in Flash
In a Basic Zone Mode
In a Basic Zone mode (except <Sk> and <*^>), the built-in flash will pop
up and fire automatically in low-light or backlit conditions.
In a Creative Zone Mode
When using a Creative Zone mode, press the <“*> button to use the built-in
flash.
P : Use this mode for automatic flash photography. The flash sync
speed and flash aperture will be set automatically as with the <D>
(Full Auto) mode.
Tv ; Use this mode if you want to use a flash sync speed slower than
1/90 sec. The camera will set the flash aperture automatically to
obtain a correct flash exposure.
Av : Use this mode if you want to set the flash aperture. With this mode,
you can obtain a balanced flash exposure between the subject and
background. The camera will set a slow sync speed automatically.
The flash illuminates the subject while the background is exposed
with a long shutter speed.
• Be sure to use a tripod when a slow sync speed is set.
M : This mode enables you to set both the flash sync speed and flash
aperture. The subject is properly exposed with the flash and the
background is exposed with the flash sync speed and aperture you
have set.
A’DEP : The result will be the same as using the <P> mode.
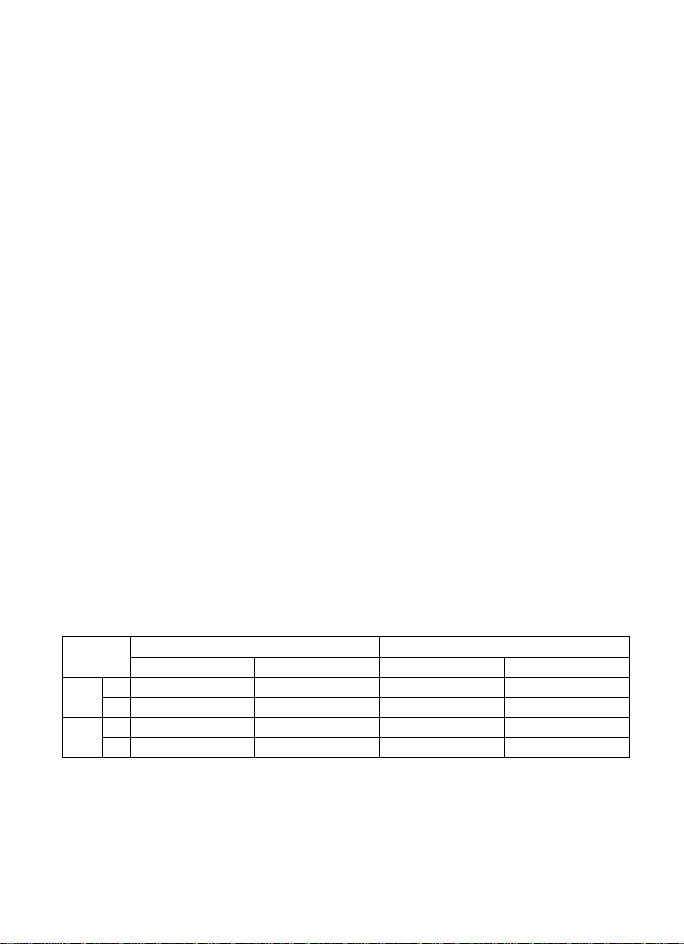
Built-in Fiash Range (With ef 28-80mm f/3.5-5.6ll lens)
ISO
too
400
Negative Film
m 1 -4.8
ft 3.3-15.9 3.3-11.2 3.3 - 9.9
m 1 -9.7 1.2-6.8
3.3-31.8 3.9 - 22.5 3.3-19.9
ft
28 mm
Reversal Film Negative Film
1 -3.4 1 -3
80 mm
Reversal Film
1 -2.1
3.3 - 7.0
1 -6 1 -4.3
3.3-14.0
60
Page 61
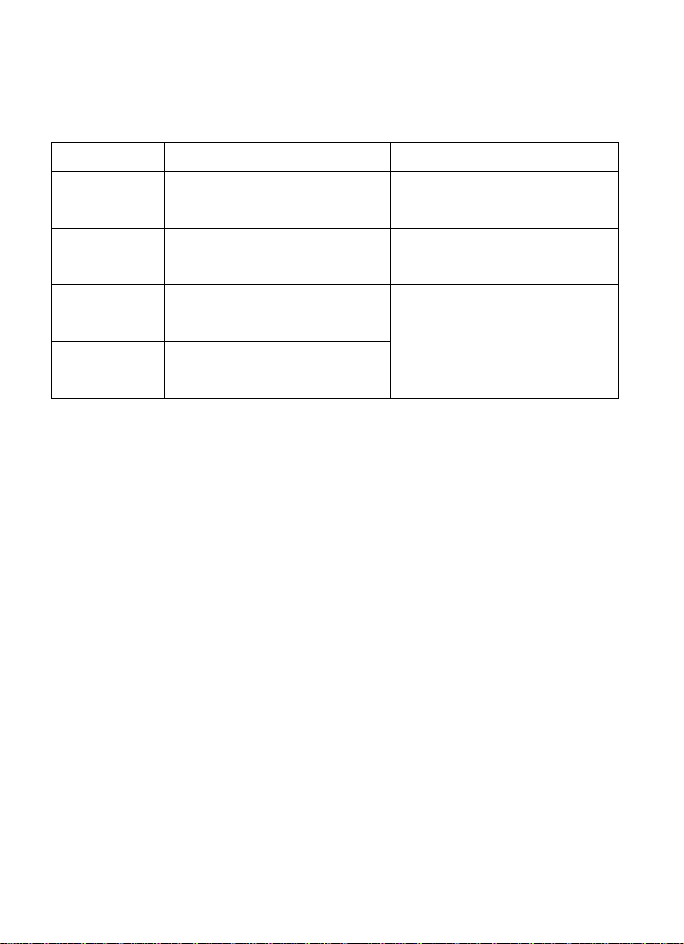
Using the Built-in Flash
Flash Sync Speeds and Flash Apertures
Mode
P
Tv
Av
M
' If the sync speed is set faster than 1/90 sec,, it will be reset automatically to 1/90 sec.
* If you set a sync speed faster than 1/90 sec. in the <Tv > and <M> modes,
the sync speed will be set automatically to 1/90 sec.
S
• An external, EOS-dedicated Speedlite and the built-in flash cannot be used
together.
• Before attaching an EOS-dedicated Speedlite to the camera, push down the
built-in flash if it is popped up.
■ When using the built-in flash, stay at least 1 meter away from the subject.
Otherwise, part of the photo will look dark.
' When using the built-in flash, detach any hood attached to the lens. A lens
hood will partially obstruct the flash coverage.
' If any of the following lenses attached to the camera, the flash coverage of
the built-in flash might be obstructed. Use an external EOS-dedicated
Speedlite with these lenses.
Fast lenses such as the EF 17-35mm f/2.8L USM and EF 28-70mm f/2.8L
USM.
Super telephoto lenses such as the EF 300mm f/2.8L USM and EF 600mm
f/4L USM.
■The built-in flash’s flash coverage is effective for lenses as short as 28mm.
With shorter lenses, the periphery of the photograph will look dark.
The sync speed is set
automatically to 1/90 sec.
Any sync speed 1/90 sec. or
slower can be set manually."
The sync speed is set automatically within a
range of 30" lo 1/90 sec. to match ihe flash
aperture you set and the subject brightness.
You set the flash aperture
manually.*
Sync Speed
Flash Aperture
The flash aperture is set
automatically according to the TTL
program.
The flash aperture is set
automatically lo match Ihe sync
speed you set.
You set the flash aperture
manually.
61
Page 62
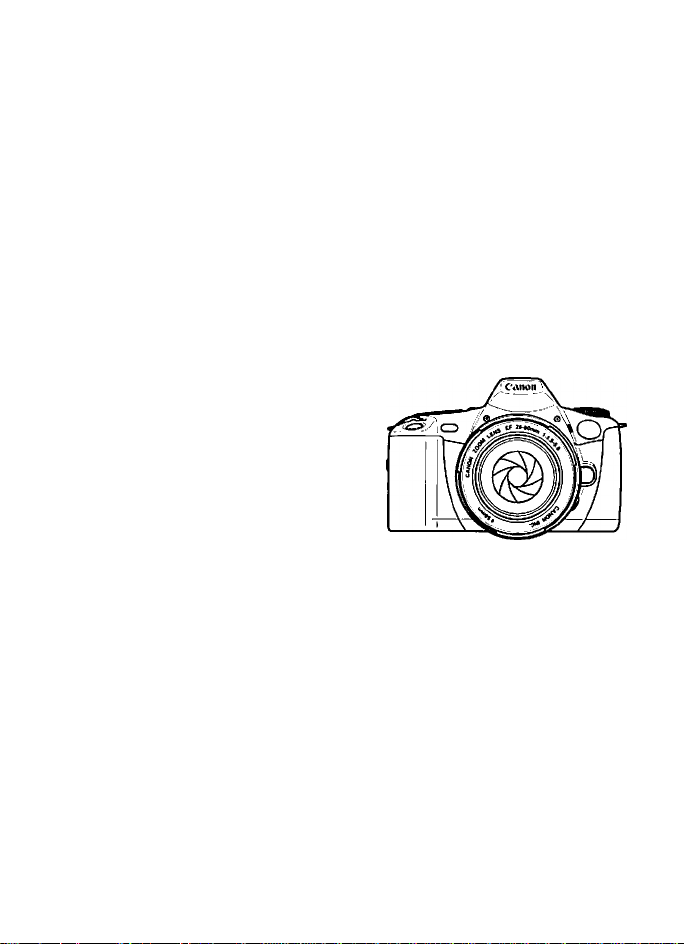
Reference Section
Basic Photography Terms Exposure
Exposure occurs when the film is exposed to light. Correct exposure is
attained when the film is exposed to a proper amount of light in accordance
with the film’s sensitivity to light. The correct exposure is adjusted with the
camera's shutter speed and aperture.
Shutter speed
The shutter speed is the length of time the camera's shutter opens to
expose the film to the light coming through the lens. The shutter speed is
displayed on the camera’s LCD panel and in the viewfinder. It ranges from
30 to 1/2000 sec. and bulb.
Aperture
The aperture setting (f-number) indicates
the size of the aperture opening in the
lens. It is used to adjust the amount of
light striking the film. The aperture setting
is displayed on the camera's LCD panel
and in the viewfinder. It can range
anywhere from 1.0 to 91, depending on
the lens attached to the camera.
ISO film speed
The ISO film speed indicates the film’s sensitivity to light. The higher the
film speed, the more sensitive the film Is. Therefore, ISO 400 and higher-
speed films are suited for low-light conditions. The ISO film speed is set in
accordance with standards set by the International Standards Organization
(ISO).
A film speed from 6 to 6400 can be set with the camera. The film speed is
displayed on the LCD panel and in the viewfinder.
62
Page 63
Reference Section
Depth of field
This is the range where acceptable focus can be achieved in front of and
behind the point of optimum focus. The smaller the aperture (the larger the
f-number), the deeper the depth of field. And the larger the aperture (the
smaller the f-number), the shallower the depth of field.
The depth of field is affected as described below:
(1) A smaller aperture (a larger f-number) increases the depth of field.
... For example, f/8 obtains a greater depth of field than f/4.5.
(2) A lens with a shorter focal length increases the depth of field.
... A wide-angle lens obtains a deeper depth of field than a telephoto lens
at the same shooting distance.
(3) A longer distance between the camera and subject increases the depth
of field.
(4) Generally, the depth of field behind the point of optimum focus is longer
than the depth of field in front of the point of optimum focus.
•---------------Depth of field Point of optimum focus
1
THE IMAGE WAS REMOVED DUE
TO COPYRIGHT RESTRICTIONS
Aperture set to f/2.
THE IMAGE WAS REMOVED DUE
TO COPYRIGHT RESTRICTIONS
Aperture set to f/22.
63
Page 64
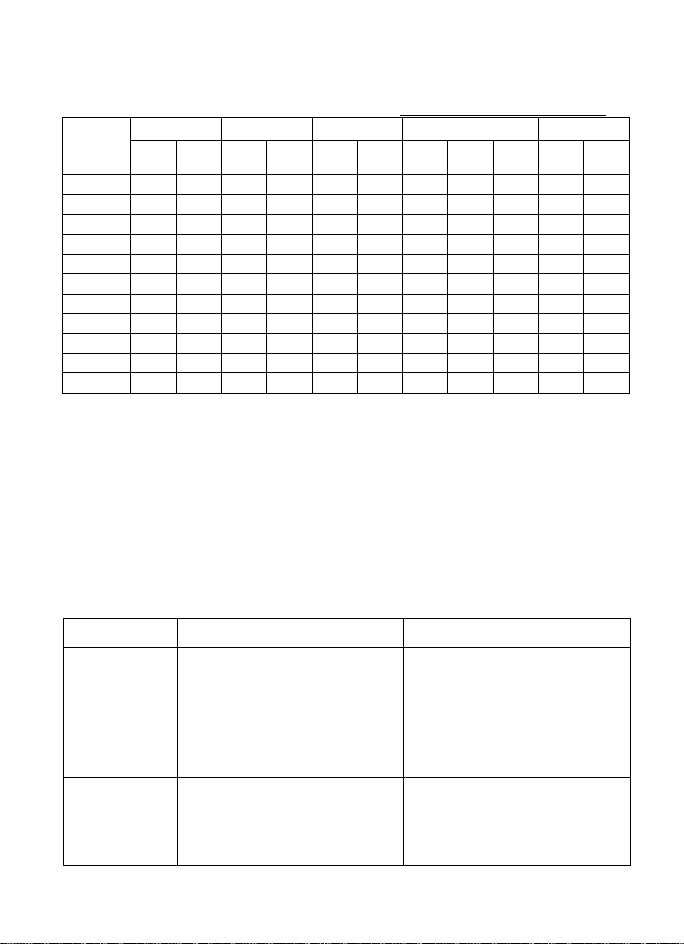
Reference Section
Feature Availability Table
Command
Dial Mode
a
AF Focusing Point SelectionFilm Advance Metering Mode Built-in Flash
On&SholAFAl
Focus
Auto Manual
• •
•
U
• • •
• •
• •
Single ContinuousEvaluative
• • •
• • •
: Set aulomalically. O: User selectable.
Center-
welghlod
Partial Auto Manual
BveraqeC
• •
•
•
•
•
• • • • •
P
Tv
Av
M
A-DEP
■ Available only while the partial metering button is pressed.
‘ In the < M > mode, centerweighted averaging metering is set.
■ Al stands for Artificial Intelligence.
One-Shot AF
Al Focus AF
•
• o o
• o o
•
• •
: The exposure setting (shutter speed and aperture) is set when focus is
achieved. The picture cannot be taken uniess the subject is focused.
: The AF mode is set automatically to suit the subject’s movement when
the shutter button is pressed.
If the subject is stiii, the focus is locked when focus is achieved (OneShot AF). If the subject is moving, focusing is continuous and predictive
AF is used so that the subject is in focus at the moment of exposure.
O
o
o
o
• •
•
•
•
• •
•
• •
•*
• •
AF Modes and Film Advance Modes
Film Advance Mode One-Shot AF Al Servo AF
Autofocusing continues to match
the subject’s movement. The
exposure setting is set at the
moment of exposure.
The same conditions as above
apply during continuous shooting,
Autofocusing continues during
continuous shooting (maximum
speed of 1.3 frame per second).
Continuous
64
Single
The picture cannot be taken until
focus is achieved. When focus is
achieved, AF lock also takes
effect at the same time. The
evaluative metering's exposure
reading is also locked. (The
exposure selling is retained before
the picture is taken.)
The same conditions as above
apply during continuous shooting
(maximum speed of 1.5 frame per
second).
•
•
•
Page 65
[
Exposure Warnings
Mode Sample Warning (Blinking)
P
Tv
Av
A-DEP
^ \ 1 / ^
-JO " I S-
^ \ 1 / ^
_ jn nn _
Cuuu LL^
^ / 1 \ ^
rnn
juu
,JU ^ L L
' 1 '
_On n n^ DC
LUU U ^ J.J
W 1
so
-iic
1
SO -jr-
* 1 >
' 1'
3 D
11'
^ \ 1 / ^
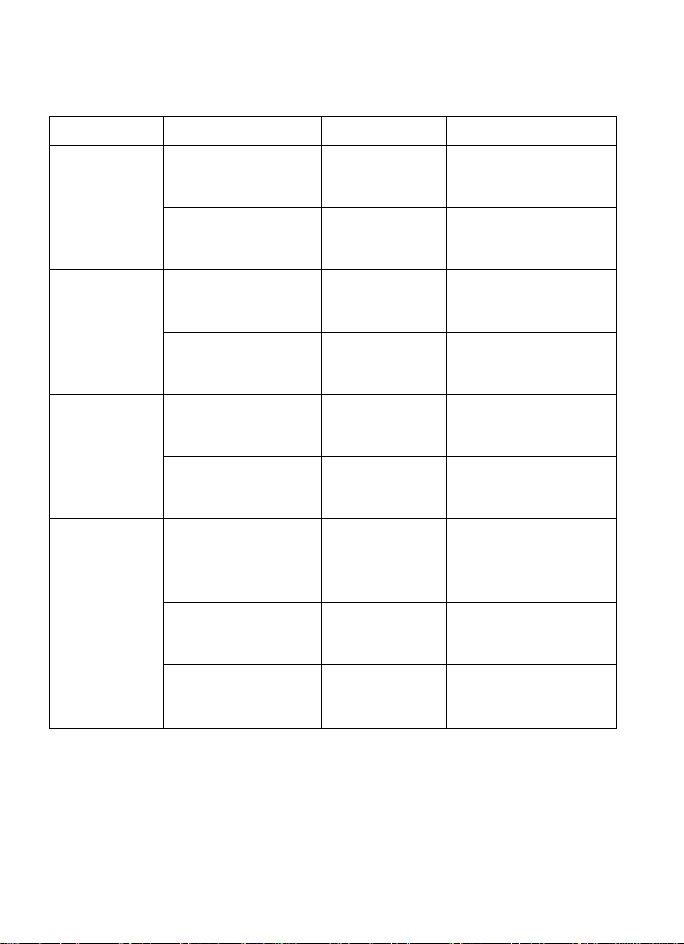
-JO" 3.Sz
_ unnn :? 3 _
\ 1 / ^
LUU U L C^
f 1 \ ^
Description
The subject is too
dark.
The subject is too
bright.
The picture will be
underexposed.
The picture will be
overexposed.
The picture will be
underexposed.
The picture will be
overexposed.
The desired depth
of field cannot be
obtained.
The subject is too
dark.
The subject is too
bright.
Reference Section
Countermeasures
Use flash.
Attach a neutral density
filter to the lens to reduce
the amount of light.
Turn the < > dial to
set a slower shutter
speed.
Turn the < > dial to
set a faster shutter
speed.
Turn the < > dial to
set a larger aperture.
Turn the < /Ttv > dial to
set a smaller aperture.
1) Move away from the
subject and try again.
2) If you are using a
zoom lens, use the
shortest focal length.
Use flash. The result will
be the same as using the
<P> mode.
Attach a neutral density
filter to the lens to reduce
the amount of light.
The sample warnings apply when a lens having a maximum aperture of f/3.5
and minimum aperture of f/22 is attached to the camera. The maximum and
minimum aperture warning displays will differ depending on the iens attached
to the camera.
65
Page 66
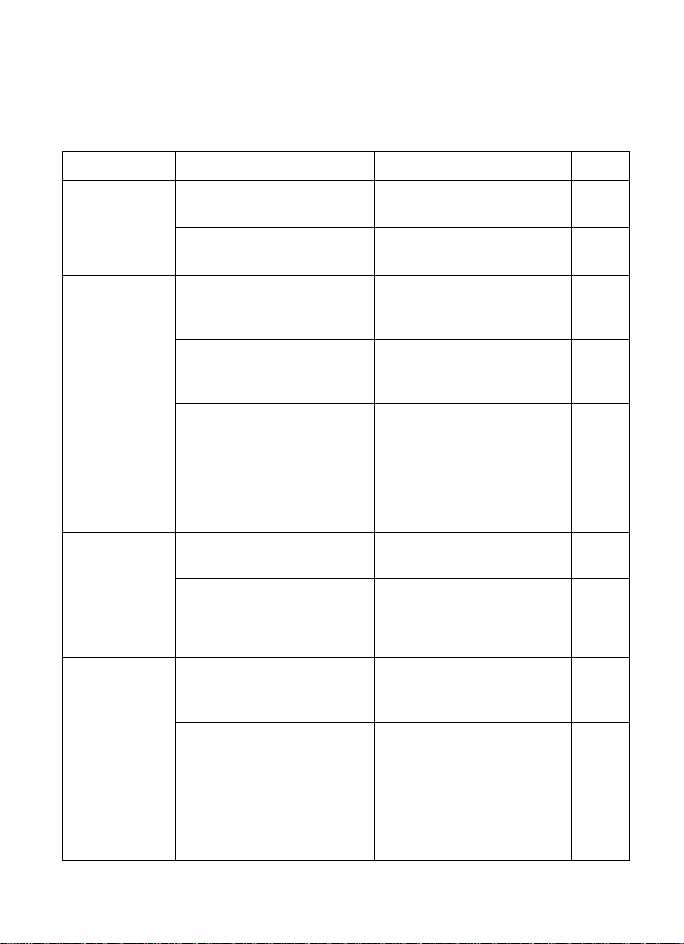
Reference Section
Troubleshooting Guide
If you have a problem with the camera, first refer to this Troubleshooting
Guide.
Problem Probable Cause
1. Nothing is
displayed
on the LCD
panel.
2. The shutter
does not
release.
3. The
photograph
is out of
focus.
4. Only G is
blinking on
the LCD
panel.
The batteries are exhausted. Replace the batteries with
The batteries have been
installed incorrectly.
The film has not been loaded
correctly. (The frame No. is not
displayed on the LCD panel.)
Rewound film Is still In the
camera. (The frame counter
on the LCD panel is blank.)
Focus has not been achieved.
(The in-focus indicator in the
viewfinder is blinking.)
The focus mode switch on the
lens was set to MF (or M).
The shutter speed was too
slow to prevent blur caused
by camera shake,
The battery level is very low.
For some reason, the camera
is not operating properly.
66
new ones.
Install the batteries correctly.
Load the film correctly.
Take out the film cartridge
and load a new roll of film.
Press the shutter button
halfway until focus is
achieved. If focus still cannot
be achieved, set the focus
mode switch on the lens to
MF (or M) and focus manually
wifh the focusing ring.
Set the focus mode switch on
the lens to AF.
Press the shutter button
gently while holding the
camera steady or use a faster
shutter speed.
Replace the batteries with
new ones and check that i is
displayed on the LCD panel.
Press the shutter button
halfway. The camera should
return to normal.
* If the [) icon is still displayed
after you execute the above
procedure, the camera needs
repair. Take it to the nearest
Canon Service Center.
Solution Page
16
16
20
20
19
40
18
19
17
17
Back
cover
Page 67
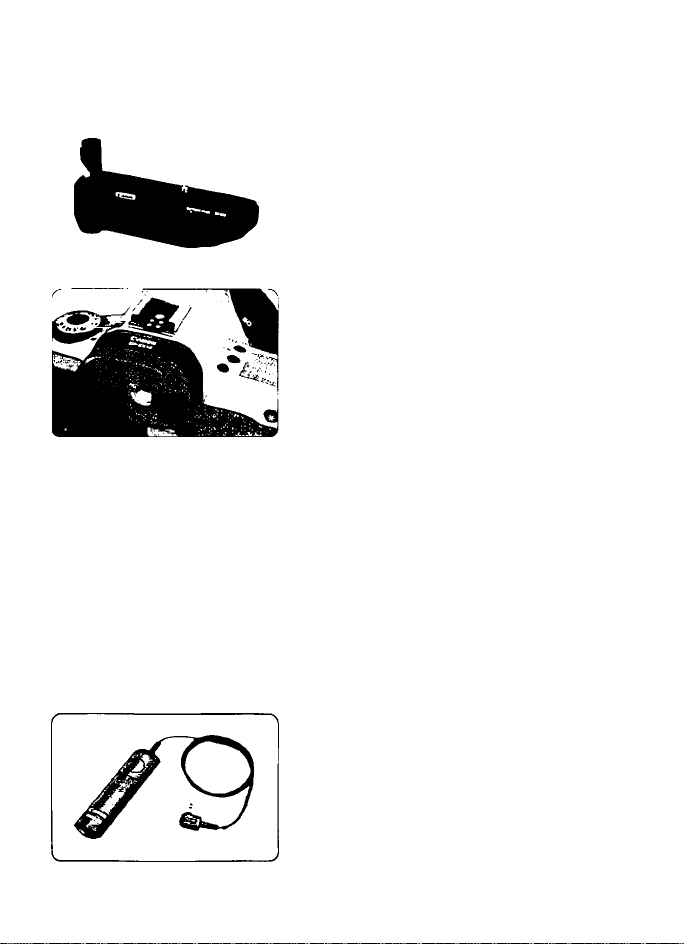
Major Accessories (Sold separately)
Battery Pack BP-200
An external battery pack housing widely-
available, size-AA batteries which can power
the camera in place of lithium CR2 batteries. It
also has a vertical-grip shutter button.
Eyepiece Extender EP-EX15
When attached to the camera, this eyepiece
extender extends the EOS camera’s eye reiief
by 15 mm. The viewfinder magnification also
becomes 0.5x.
Dioptric Correction Lens E
The camera's eyepiece lens is -1 diopter.
Attaching a dioptric correction lens E on the
n
eyepiece aliows near- or far-sighted users to
see the viewfinder cieariy without eyegiasses.
Ten dioptric correction lenses are available.
When choosing a dioptric correction iens,
attach it to the eyepiece and iook through the
viewfinder to see if it suits your vision.
• The number on the dioptric correction lenses
indicates the diopter when it is attached to
the camera’s eyepiece. It is not the diopter of
the dioptric correction lens itself.
Reference Section
* •
Remote Switch RS-60E3
Dedicated cable release for a tripod-mounted
camera. Ideal for close-up shots and bulb
exposures. Connects to the camera's remote
control jack.
67
Page 68
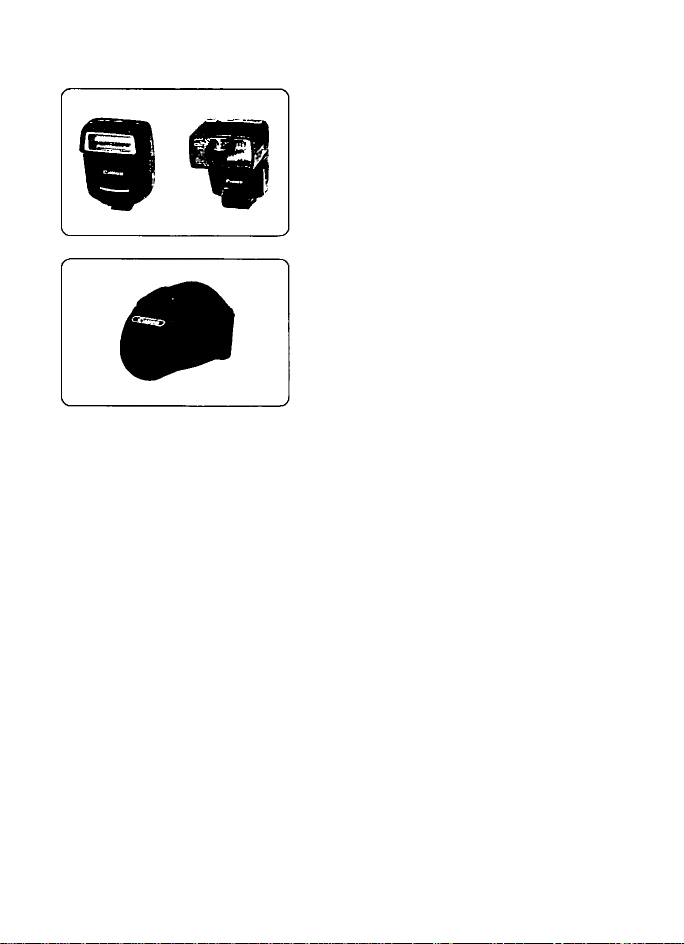
Reference Section
EOS-dedicated EX-Series
Speedlites
One example is the Speedlite 380EX (Guide
No. 38 at ISO 100 in meters) which attaches to
the camera’s hot shoe and can provide a large
flash output. Another is Speedlite 220EX
(Guide No. 22 at ISO 100 in meters) which is
more compact.
Camera Case EH13-L
This dedicated case protects the camera and
also accommodates either of the following
lenses:
EF 28-80mm f/3.5-5.6 II
EF 28-80mm f/3.5-5.6 V USM
When using an external flash unit, an EOS-dedicated Speedlite is
recommended. Using the camera with a flash unit (equipped with electrical
contacts on the hot shoe foot), high-voltage flash unit, or flash accessories
dedicated to a different brand may result in camera misoperation or
malfunction.
68
Page 69

Reference Section
Specifications
■Type
Type
.........................................
Picture size
Compatible lenses.................Canon EF lenses
Lens mount
.............................
.............................
■Viewfinder
Type
.........................................
Picture coverage
Magnification
Standard diopter.....................-1 diopter (18.5mm eye relief)
Focusing screen
Viewfinder information...........0 Within the viewfinder screen
Mirror
Deplh-of-field preview
..........................
....................
.......................................
■Exposure Control
Metering system
Picture-taking modes
Camera-shake warning
Metering range
ISO Film Speed Range
Exposure compensation ...0 AEB: Up to ±2 stops in 1/2-stop increments in the following
.....................
.......................
35mm AF/AE single-lens reflex camera with focal-plane shutter, built-in
winder, built-in flash, and auto date back.
24 mm x 36 mm
Canon EF mount (Fully-electronic control)
Eye-level pentaprism with roof mirror
....................
90% vertical & horizontal
0.7 x (with 50mm lens focused at infinity).
Fixed, New Laser-matte screen
Focusing points
(D Below viewfinder screen
Shutter speed, aperture, exposure level. AE/FE lock, flash-ready
indicator, high-speed sync (FP flash), red-eye reduction icon,
focusing point indicator, in-locus (AF or MF) indicator
Quick-return hall mirror (no vignetting with EF 600mm I/4L USM lens or
a shorter lens)
...........
Provided with depth-of-field preview button.
TTL metering at maximum aperture with a 35-zone SPC (silicon
photocell).
0 Evaluative metering (linked to 7 focusing points)
(f) Partial metering (Automatically set with AE lock, covering approx.
9.5% of viewfinder screen at the center.)
d) Centerweighted averaging metering (Automatically set in manual
exposure mode)
............
0 Program AE (shiftable)
(2) Shutter speed-priority AE
(D Apenure-priority AE
0 Deplh-of-lield AE
0 Full Auto
0 Five Programmed Image Control modes (Portrait, Landscape. Close-
up, Sports. Night Scene)
0 Auloflash exposure: E-TTL program flash AE with EX-series
Speedliles, TTL program flash AE with the built-in flash, and A-TTL
program flash AE with EZ-series Speedlites.
0 Manual
.........
In Basic Zone modes, the shutter speed display blinks (at 2 Hz) if it is
slower than the reciprocal of the lens focal length.
EV 2-20 (at 20 C and normal humidity with a 50mm f/1.4 lens. ISO 100)
.........
ISO 6-6400 (set automatically for DX-coded film within ISO 25-5000 in
1/3-slop increments)
sequence: Correct exposure, underexposure, and overexposure.
0 Manual exposure compensation: ±2 stops in 1/2-stop increments.
69
Page 70

Reference Section
AE lock
....................................
■Autofocus
AF control
...............................
Focusing points
AF working range
Focusing point selection ...(^ Automatic by the camera
Focusing modes ® One-Shot AF: AF locks when locus is achieved. Shutter can be
AF-assist beam
.....................
......................
■Shutter
Type
.........................................
Shutter speeds
Shutter release
Sell-timer
......................
......................
................................
■Film Transport
Film loading
Film advance
Film rewind
Film rewind noise level
...........................
..........................
............................
■Built-in flash
Type
.........................................
® Auto AE lock
Takes effect when focus Is achieved In fhe One-Shot AF and
evaluative metering modes.
@ With AE lock button
Partial metering mode is set automatically with the AE lock button.
Multiple exposures: Up to 9 multiple exposures.
TTL-SIR with CMOS sensor
7 (ll+M)
..................
EV 1-18 (at ISO 100)
d) Manual
released only when locus is achieved.
(D At Focus AF: If the subject focused in the One-Shot AF mode starts
moving fonvard or back, the mode switches to Al Servo AF
automatically.
® Manual focusing: Enabled by setting the lens’ locus mode switch to
MF (or M) and turning the focusing ring.
When necessary, the AF-assist light flashes intermittently automatically,
Vertical-travel, focal-plane shutter wilh all speeds electronically-
controlled.
30 to 1/2000 sec. (in hall-stop Increments) and bulb, X-sync at 1/90 sec.
Soft-touch, electro-magnetic release.
Electronically-controlled for 10-sec. delay.
Automatic with prewind system
Automatic. © Single-frame (D Continuous (Approx. 1.5 frame per sec.
maximum)
,® Automatic rewind at the end of the roll.
(f) Midroll rewind enabled wilh midroll rewind button.
.........
Approx. 60 dB
Retractable TTL automatic flash (serially controlled)
® Guide No. 12 (al ISO 100 in meters)
® Recycling lime: Approx. 2 sec.
(§) Flash coverage: 28mm lens covered.
® Flash metering: TTL aulollash
70
Page 71
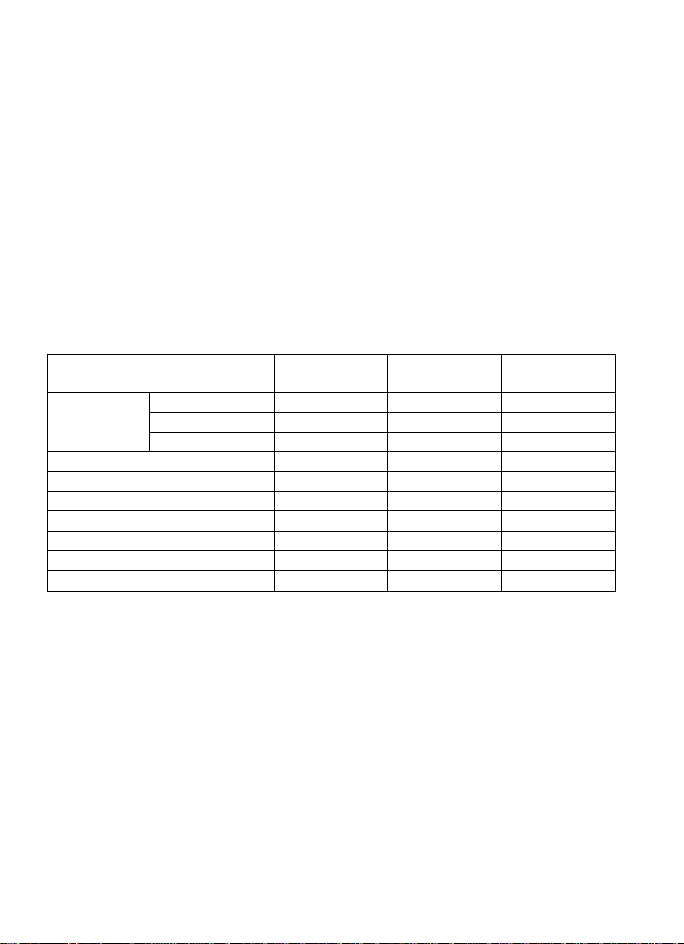
Reference Section
pother Specifications
Flash contacts
External Speedlile compatibility ...Compatible with E-TTL/A-TTL/TTL autotlash systems.
Red-eye reduction
Remote contro.....................................Socket provided lor optional Remote Switch RS-60E3.
Power source.......................................Two CR2 lithium batteries
Battery service life
Battery check.......................................One of four battery levels is displayed when the Command Dial
Dimensions
Weight (body only)
.....................................
..............................
..............................
..........................................
..............................
X-sync for direct connection on hot shoe.
Built-in lamp which can be enabled/disabled in all picture-taking
modes.
Number of 24-exposure rolls with 50% flash use:
Approx. 24 rolls at 20'C and approx. 16 rolls at -tO'C.
is released from L.
140 (W) x 90 (H) x 58.5 (D) mm / 5.51 (W) x 3.54 (H) x 2.30 (D) in.
335 g/11.82 oz (QD model: +15 g /-rO.53 oz)
Lens
Angle of view
Lens construction (elements/groups) 10/10
Min. aperture f/22-1/38 f/22-1/38
Focusing distance range 0.38 m - infinity 0.38 m • infinity
Max. magnification (Wide/Tete)
Filter size and attachable quantity
Max. diameter x length 66.4 X 71.2 mm
Weight 200 g
■ All specifications have been obtained through Canon's test methods.
• Product specifications and physical appearance are subject to change without notice.
Diagonal extent
Vertical extent
Horizontal extent 65' - 25° 65' - 25'
EF 28*80mm
F/3.5-5.6 V USM
75' - 30'
46' - 17*
0.10/0.26X
58mm, 1
EF 28-80mm
F/3.5-5.6 II
75' - 30' 63' - 30'
46' - 17' 38‘ -17'
10/10 8/8
0.10/0.26X 0.11/0.23X
58mm, 1 52mm, 1
66.4 X 71.2 mm
200 g 175 g
EF 35-80mm
F/4-5.6 III
54' - 25'
f/22-f/32
0.4 m • infinity
65 X 63.5 mm
71
Page 72

Index
Accessories..............................................................67
AEB
...........................................................................
AF Modes and Film Advance Modes
AF-AssisI Lamp
Al Servo AF..............................................................64
Al Focus AF
Aperture....................................................................62
Av Aperture-Priority AE
■З! Auto Exposure Bracketing (AEB)
Aulofocus failure (Switching to Manual Focus)
A'OEP Automatic Depth-of-Field AE
Basic Zone...............................................................14
Batteries
Installation.........................................................16
Level check.......................................................17
Replacement for quartz date back
Battery Service Life
Beeper, silencing
Built-in Flash Range
Built-in flash, using..................................................60
Bulb Exposures
Center-weighted averaged metering
a Close-up Mode
Command Dial.........................................................14
Continuous shooting...............................................64
Creative Zone..........................................................14
Da!e/time
Imprinting..........................................................35
Changing...........................................................36
Depth of field............................................................63
Deplh-oMleld Preview
Evaluative metering
External EOS-dedicated Speedlites
Exposure..................................................................62
Exposure Compensation
Exposure Warnings
Eyepiece Cover.......................................................34
Feature Availability Table
Film
Loading..............................................................20
Removing.........................................................21
Midroll Rewind.................................................21
Setting film speed
.......................................................
.............................................................
.........................................
................................................
....................................................
...............................................
.......................................................
....................................................
............................................
...............................................
................................................
............................................
....................
.................
...................
..............
..................
....................
.......................................
......................................
....
72
Film Speed
Flash, automatic firing of
Flash Sync Speeds and Flash Apertures
53
Focusing points
64
26
64
46
53
50
36
17
54
60
55
41
30
47
41
59
52
65
64
57
Focusing off-center subjects
Selection...........................................................38
O Full Auto Mode
Holding the Camera
40
Ik Landscape Mode................................................29
LCD Panel................................................................12
Lens
Specifications
Mounting...........................................................18
Detaching
M Manual Exposure
Manual Focusing.....................................................40
® Multiple Exposures.............................................56
Nomenclature..........................................................10
One-Shot AF............................................................64
P and □, Differences Between
Partial metering
* Partial Metering Using AE Lock........................51
Portrait Mode
P Program AE.........................................................42
Program Shift...........................................................43
Programmed Image Control Modes.....................14
Quick Start Guide......................................................8
<§> Red-eye Reduction
Remote Switch (Sold separately). Using
vS> Self-timer
R Shooting Night Scenes......................................32
Shutter button..........................................................19
Complete pressing
Shutter speed..........................................................62
Tv Shutter-Speed Priority AE
•>») Silencing the Beeper.....................................54
.......................................................
...................................................
...............................................
..................................................
.........................................................
...............................................
......................................................
....................................................
.........................................................
Halfway pressing
.............................................
..........................................
.......................................
.............................
........................................
...............................
.............
.........................
..............
62
26
61
39
24
22
71
18
48
43
41
28
27
58
33
19
19
44
Page 73

Index
Single and Continuous Shooting
Strap, how to attach
«, Sports Mode.......................................................31
Specifications
Troubleshooting Guide...........................................66
Viewfinder Information
This device complies with Part 15 of the FCC Rules. Operation is subject to the
following two conditions: (1) This device may not cause harmful interference, and
(2) this device must accept any interference received, including interference that
may cause undesired operation.
Do not make any changes or modifications to the equipment unless otherwise
specified in the instructions. If such changes or modifications should be made,
you could be required to stop operation of the equipment.
This equipment has been tested and found to comply with the limits for a class B
digital device, pursuant to part 15 of the FCC Rules. These limits are designed to
provide reasonable protection against harmful interference in a residential
installation. This equipment generates, uses and can radiate radio frequency
energy and, if not installed and used in accordance with the instructions, may
cause harmful interference to radio communications.
However, there is no guarantee that interference will not occur in a particular
installation. If this equipment does cause harmful interference to radio or
television reception, which can be determined by turning the equipment off and
on, the user is encouraged to try to correct the interference by one or more of the
following measures:
• Reorient or relocate the receiving antenna.
• Increase the separation between the equipment and receiver.
• Consuit the dealer or an experienced radio/TV technician for help.
...............................................
..........................................................
..........................
...........................................
26
15
69
13
This digital apparatus does not exceed the Class B limits for radio noise
emissions from digital apparatus as set out in the interference-causing equipment
standard entitied “Digital Apparatus”. ICES-003 of the Industry Canada,
The CE Mark is a Directive conformity mark of the European
C€
Community (EC)
73
Page 74

MEMO
74
Page 75

THE IMAGE WAS REMOVED DUE
TO COPYRIGHT RESTRICTIONS
75
Page 76

Canon
Company information that is no longer current has been removed.
If you have any questions regarding this model
and are calling from the USA, please call 1 800 OK CANON.
CT1 - 1121 - 000
©CANON INC. 1999
PRINTED IN TAIWAN
 Loading...