

Page 1
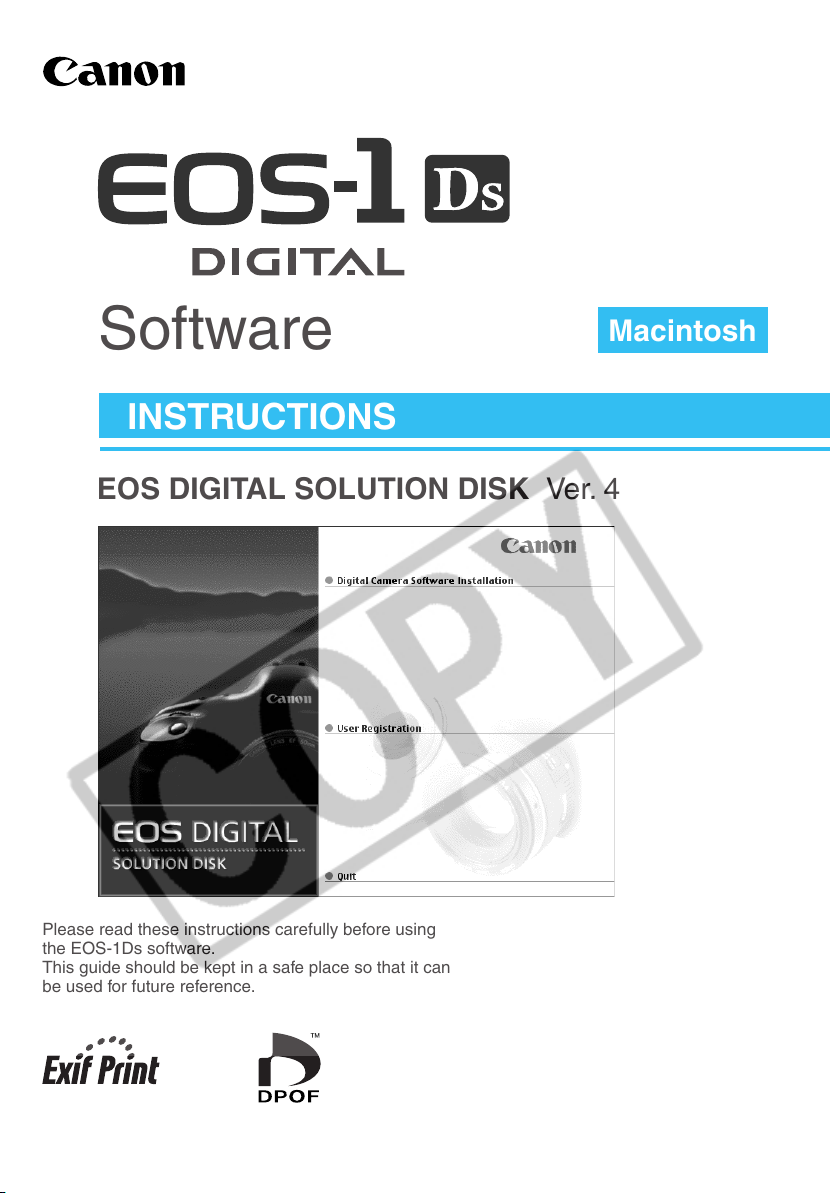
Software
INSTRUCTIONS
EOS DIGITAL SOLUTION DISK Ver. 4
Macintosh
Please read these instructions carefully before using
the EOS-1Ds software.
This guide should be kept in a safe place so that it can
be used for future reference.
´
English Edition
CT1-1238-000 © CANON INC. 2002 PRINTED IN JAPAN
Page 2
READ CAREFULLY BEFORE USING!
CANON SOFTWARE LICENSE AGREEMENT
IMPORTANT - READ THIS AGREEMENT BEFORE USING THE SOFTWARE ON THE
CD-ROM IN THIS BOX. BY USING THE SOFTWARE, YOU AGREE TO BE BOUND BY THE
TERMS OF THIS AGREEMENT.
This is a license agreement (the [Agreement]) between you and Canon Inc. ([Canon]).
IF YOU DO NOT AGREE TO THE TERMS AND CONDITIONS OF THIS AGREEMENT, DO
NOT USE THE SOFTWARE PROGRAM ON THE CD-ROM AND THE USER MANUAL IN
THIS BOX (COLLECTIVELY, THE [SOFTWARE]) AND RETURN THE SOFTWARE WITHIN
30 DAYS FROM THE DATE OF PURCHASE TO YOUR POINT OF PURCHASE FOR A
REFUND.
In consideration of the right to use the SOFTWARE, you agree to abide by the terms and
conditions of this Agreement.
1. LICENSE: Canon grants you the non-exclusive right to use the SOFTWARE only on a
single computer. You may physically transfer the SOFTWARE from one computer to
another provided that the SOFTWARE is used on only one computer at a time. You shall
not install or use the SOFTWARE on a network, multiple CPU, multiple site arrangement,
or any other hardware configuration where the SOFTWARE is accessible to more than one
CPU or to more than one user.
YOU SHALL NOT ASSIGN, SUBLICENSE, RENT, LEASE, LOAN, CONVEY OR
OTHERWISE USE, TRANSFER, COPY, TRANSLATE, CONVERT TO ANOTHER
PROGRAMMING LANGUAGE, ALTER, MODIFY, DECOMPILE OR DISASSEMBLE THE
SOFTWARE, IN WHOLE OR IN PART, EXCEPT AS EXPRESSLY PROVIDED IN THIS
AGREEMENT.
2. BACK-UP COPY: You may make one copy of the SOFTWARE solely for back-up
purposes, or copy the SOFTWARE onto the permanent storage device (e.g. a hard disk) of
your computer and retain the original for back-up purposes. Any other copying of the
SOFTWARE is a violation of this Agreement. You must reproduce and include the
copyright notice on the back-up copy.
3. SUPPORT AND UPDATES: Canon is not responsible for providing maintenance or
support for use of the SOFTWARE. No updates, fixes or support will be made available for
the SOFTWARE.
4. LIMITED WARRANTY AND LIMITATION OF LIABILITY: It is your responsibility to choose,
maintain and match the hardware and software components of your computer system.
Thus Canon does not guarantee uninterrupted service or correction of errors or that the
functions or performance of the SOFTWARE will meet your requirements. THE
SOFTWARE IS LICENSED ON AN [AS IS] BASIS AND WITHOUT WARRANTY OF ANY
KIND. The CD-ROM storing the SOFTWARE is warranted only against defective material
under normal use for a period of ninety (90) days after purchase from an authorized Canon
dealer as evidenced by your sales receipt. Your sole remedy for a defective CD-ROM shall
be replacement of the same without charge when returned by you at your expense to your
point of purchase and proven to be defective upon inspection. The replacement CD-ROM
will be warranted for the remainder of the original ninety (90) day warranty period of the
defective CD-ROM. The limited warranty does not apply if the failure of the CD-ROM
resulted from accident, abuse or misapplication of the SOFTWARE and shall not extend to
anyone other than the original user of the SOFTWARE.
EXCEPT AS SPECIFICALLY SET FORTH IN THIS PARAGRAPH 4, CANON, CANON’S
I
Page 3
READ CAREFULLY BEFORE USING!
SUBSIDIARIES, DISTRIBUTORS AND DEALERS DISCLAIM ALL WARRANTIES, EXPRESS
OR IMPLIED, INCLUDING ANY WARRANTY OF MERCHANTABILITY OR FITNESS FOR A
PARTICULAR PURPOSE, WITH RESPECT TO THE SOFTWARE.
NEITHER CANON NOR ANY OF CANON’S SUBSIDIARIES, DISTRIBUTORS OR DEALERS
IS LIABLE FOR ANY DAMAGES HOWSOEVER CAUSED, INCLUDING WITHOUT
LIMITATION, DIRECT, CONSEQUENTIAL OR INCIDENTAL LOSS OR DAMAGE INCLUDING
LOSS OF PROFITS, EXPENSE OR INCONVENIENCE HOWSOEVER CAUSED OR
ARISING OUT OF THE SOFTWARE OR THE USE THEREOF.
NEITHER CANON, NOR ANY OF CANON’S SUBSIDIARIES, DISTRIBUTORS OR DEALERS
SHALL HAVE ANY OBLIGATION TO INDEMNIFY YOU AGAINST ANY CLAIM OR SUIT
BROUGHT BY A THIRD PARTY ALLEGING THAT THE SOFTWARE OR THE USE THEREOF
INFRINGES ANY INTELLECTUAL PROPERTY OF SUCH THIRD PARTY.
5. TERM: This Agreement is effective upon your using the SOFTWARE and remains in effect
until expiration of all copyright interests in the SOFTWARE unless earlier terminated. You
may terminate this Agreement by destroying the SOFTWARE. This Agreement will also
terminate without notice to you if you fail to comply with any of the terms of this Agreement
and you must then promptly return the SOFTWARE. In addition, Canon may enforce its
other legal rights.
6. U.S. GOVERNMENT RESTRICTED RIGHTS NOTICE: The SOFTWARE is provided with
restricted rights. Use, duplication or disclosure is subject to restrictions as set forth in
either subparagraph (c) (1) (ii) of the Rights in Technical Data and Computer software
clause at DFARs 252.227-7013 or subparagraph (c) (1) and (2) of the Commercial
Computer Software Restricted Rights Clause at FAR 52.227-19, as applicable.
7. SEVERABILITY: In the event that any provision of this Agreement is declared or found to
be illegal by any court or tribunal of competent jurisdiction, such provision shall be null and
void with respect to the jurisdiction of that court or tribunal and all the remaining provisions
of this Agreement shall remain in full force and effect.
8. CONTROLLING LAW: The terms of this Agreement as it relates to purchases of the
Software in the United States of America shall be governed and construed in all respects in
accordance with the laws and regulations of the State of New York, without reference to
choice of law principles. The terms of this Agreement as it relates to purchases of the
Software in Canada shall be governed by the laws of the province of Ontario.
9. OWNERSHIP: All rights, including but not limited to copyrights and trade secret rights, to
the SOFTWARE belong to Canon, its affiliated corporations and third party licensors. Your
use of the SOFTWARE is subject to the United States, Canada and other applicable
copyright and trademark laws and nothing in this Agreement constitutes a waiver of the
rights of Canon, its affiliated corporations and third party licensors under such laws.
Nothing contained in Paragraph 1 shall be construed to give Canon any ownership rights in
any images, graphics or textual material that you save in connection with the Software.
10
. ACKNOWLEDGEMENT: BY USING THE SOFTWARE, YOU ACKNOWLEDGE THAT YOU
HAVE READ THIS AGREEMENT, UNDERSTOOD IT, AND AGREE TO BE BOUND BY ITS
TERMS AND CONDITIONS. YOU ALSO AGREE THAT THIS AGREEMENT IS THE
COMPLETE AND EXCLUSIVE STATEMENT OF AGREEMENT BETWEEN YOU AND
CANON CONCERNING THE SUBJECT MATTER HEREOF AND SUPERSEDES ALL
PROPOSALS OR PRIOR AGREEMENTS, VERBAL OR WRITTEN, AND ANY OTHER
COMMUNICATIONS BETWEEN THE PARTIES RELATING TO THE SUBJECT MATTER
HEREOF. NO AMENDMENT TO THIS AGREEMENT SHALL BE EFFECTIVE UNLESS
SIGNED BY A DULY AUTHORIZED OFFICER OF CANON.
Introduction
II
Page 4
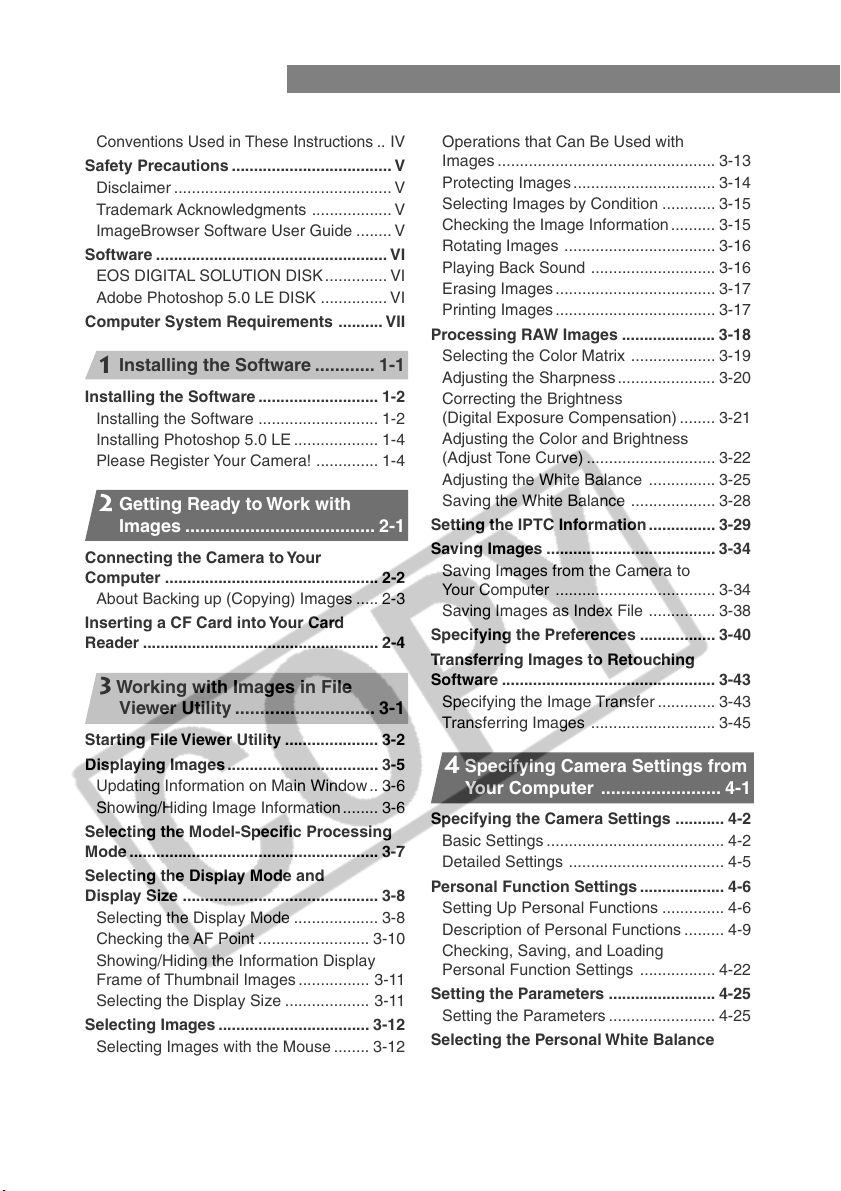
Contents
READ CAREFULLY BEFORE USING! ....... I
Conventions Used in These Instructions ..
Safety Precautions .................................... V
Disclaimer ................................................. V
Trademark Acknowledgments .................. V
ImageBrowser Software User Guide ........ V
Software .................................................... VI
EOS DIGITAL SOLUTION DISK .............. VI
Adobe Photoshop 5.0 LE DISK ............... VI
Computer System Requirements .......... VII
Installing the Software ............ 1-1
1
Installing the Software ........................... 1-2
Installing the Software ........................... 1-2
Installing Photoshop 5.0 LE ................... 1-4
Please Register Your Camera! .............. 1-4
Getting Ready to Work with
2
Images ...................................... 2-1
Connecting the Camera to Your
Computer ................................................ 2-2
About Backing up (Copying) Images ..... 2-3
Inserting a CF Card into Your Card
Reader ..................................................... 2-4
Working with Images in File
3
Viewer Utility ............................ 3-1
Starting File Viewer Utility ..................... 3-2
Displaying Images.................................. 3-5
Updating Information on Main Window .. 3-6
Showing/Hiding Image Information........ 3-6
Selecting the Model-Specific Processing
Mode ........................................................ 3-7
Selecting the Display Mode and
Display Size ............................................ 3-8
Selecting the Display Mode ................... 3-8
Checking the AF Point ......................... 3-10
Showing/Hiding the Information Display
Frame of Thumbnail Images ................ 3-11
Selecting the Display Size ................... 3-11
Selecting Images .................................. 3-12
Selecting Images with the Mouse ........ 3-12
Selecting Images from the Control Panel
............................................................. 3-12
Working with Selected Images ........... 3-13
IV
Operations that Can Be Used with
Images ................................................. 3-13
Protecting Images ................................ 3-14
Selecting Images by Condition ............ 3-15
Checking the Image Information .......... 3-15
Rotating Images .................................. 3-16
Playing Back Sound ............................ 3-16
Erasing Images .................................... 3-17
Printing Images .................................... 3-17
Processing RAW Images ..................... 3-18
Selecting the Color Matrix ................... 3-19
Adjusting the Sharpness ...................... 3-20
Correcting the Brightness
(Digital Exposure Compensation) ........ 3-21
Adjusting the Color and Brightness
(Adjust Tone Curve) ............................. 3-22
Adjusting the White Balance ............... 3-25
Saving the White Balance ................... 3-28
Setting the IPTC Information ............... 3-29
Saving Images ...................................... 3-34
Saving Images from the Camera to
Your Computer .................................... 3-34
Saving Images as Index File ............... 3-38
Specifying the Preferences ................. 3-40
Transferring Images to Retouching
Software ................................................ 3-43
Specifying the Image Transfer ............. 3-43
Transferring Images ............................ 3-45
Specifying Camera Settings from
4
Your Computer ........................ 4-1
Specifying the Camera Settings ........... 4-2
Basic Settings ........................................ 4-2
Detailed Settings ................................... 4-5
Personal Function Settings................... 4-6
Setting Up Personal Functions .............. 4-6
Description of Personal Functions ......... 4-9
Checking, Saving, and Loading
Personal Function Settings ................. 4-22
Setting the Parameters ........................ 4-25
Setting the Parameters ........................ 4-25
Selecting the Personal White Balance
............................................................... 4-30
Selecting the Personal White Balance
............................................................. 4-30
III
Page 5
Contents
Operating the Camera from Your
5
Computer ................................. 5-1
Starting RemoteCapture ........................ 5-2
Using RemoteCapture ........................... 5-5
Taking Shots from Your Computer ......... 5-5
Checking Shooting Settings .................. 5-6
Interval Timer Shooting.......................... 5-7
Timer Shooting ...................................... 5-8
Printing Images ...................................... 5-8
Setting RemoteCapture ......................... 5-9
Default Settings ..................................... 5-9
Detailed Settings ................................. 5-11
Working with Images in
6
Printing Images ...................................... 6-9
Adjusting Image Quality and Printing
(Exif 2.2 Compliant) ............................. 6-11
Troubleshooting and
7
Uninstallation........................... 7-1
Troubleshooting ..................................... 7-2
Uninstallation Procedure ....................... 7-3
Uninstalling the Software ....................... 7-3
Uninstalling ImageBrowser .................... 7-4
Uninstalling Photoshop 5.0 LE .............. 7-4
Index ........................................................ 7-5
Adobe Customer Support ..................... 7-7
ImageBrowser.......................... 6-1
Starting ImageBrowser .......................... 6-2
Downloading and Saving Images ......... 6-4
Processing RAW Images with
ImageBrowser ........................................ 6-7
Merging Panoramic Images with
PhotoStitch ............................................. 6-8
Conventions Used in These Instructions
● The information in these instructions is valid for the Mac OS 9.2 and Mac OS X (version
10.1) operating systems.
● When explanations are common to both the operating systems, the screens shown are
from Mac OS 9.2.
● Descriptions of camera operations assume that the reader is familiar with the information
in the instructions supplied with the camera. For detailed information on how to use the
software products and the restrictions that apply to those products, refer also to the Help
and Readme files for the respective products.
● In order to transfer images from File Viewer Utility, you will need the retouching software.
Explanations for transferring images from File Viewer Utility described in these
instructions all use examples from Adobe Photoshop 5.0 LE.
: Marks information that should be read before use to prevent damage to the camera,
camera malfunction, or problems that would interfere with the functioning of software
and computer.
: Marks additional information that you will find helpful when using the camera or
software.
: These sections provide brief descriptions of the Custom Function Settings for
the respective camera functions. For more details, refer to “Custom Function
Settings” in the EOS-1Ds Instructions.
Introduction
IV
Page 6
Safety Precautions
Please read the safety precautions carefully before using this product. Ensure that you use the
product correctly according to the procedures described in these instructions.
The following safety precautions are intended to instruct you in the safe and correct operation
of the product and its accessories to prevent injuries or damage to yourself, other persons and
property. Please read and ensure that you understand them before you proceed to the other
sections of these instructions.
Warning
Do not play the supplied CD-ROM(s) in any CD-ROM Player that does not support data
CD-ROMs. The extremely loud sound that may result from playing the CD-ROM(s) in an
audio CD player (music player) could damage the speakers. It is also possible to suffer
hearing losses from listening with headphones to the loud sounds of a data CD-ROM played
on a music CD player.
Disclaimer
• While every effort has been made to ensure that the information contained in these
instructions is accurate and complete, no liability can be accepted for any errors or omissions.
Canon reserves the right to change the specifications of the hardware and software
described herein at any time without prior notice.
• No part of these instructions may be reproduced, transmitted, transcribed, stored in a
retrieval system, or translated into any language in any form, by any means, without the
prior written permission of Canon.
• Canon makes no warranties for damages resulting from corrupted or lost data due to a
mistaken operation or malfunction of the camera, the software, the CompactFlash™ cards
(CF cards), personal computers, peripheral devices, or use of non-Canon CF cards.
Trademark Acknowledgments
• Canon and EOS are trademarks of Canon Inc.
• Adobe and Photoshop are trademarks of Adobe Systems Incorporated.
• CompactFlash is a trademark of SanDisk Corporation.
• iBook, iMac and QuickTime are trademarks of Apple Computer Inc.
• Macintosh, PowerBook, Power Macintosh and FireWire are trademarks of Apple Computer
Inc., registered in the United States and other countries.
• Windows is a registered trademark or trademark of Microsoft Corporation in the United
States and/or other countries.
• Other names and products not mentioned above may be registered trademarks or
trademarks of their respective companies.
ImageBrowser Software User Guide
A PDF format manual is available on the Canon website. Use your browser program to
download this manual from the web. For URL addresses*, please see the Canon Customer
Support contacts in the Canon Limited Warranty supplied with your camera.
* The PDF format manual is not available in some regions.
Adobe Acrobat Reader must be installed to read the PDF format manual.
V
Page 7
Software
This section briefly describes the main functions of the software provided on the bundled CDROM.
■ EOS DIGITAL SOLUTION DISK
File Viewer Utility
● When you connect the camera to your computer with the interface cable, images stored on
the CF card in the camera are displayed. It also allows you to display images stored on
your card reader or computer.
● Allows you to display, save and erase images.
● Allows you to perform image processing including processing RAW images.
● Allows you to change the settings of the camera.
RemoteCapture
● RemoteCapture allows you to operate the camera remotely and download images to your
computer. RemoteCapture also lets you take pictures using a timer shooting or interval
timer shooting function, in addition to single-frame shooting.
ImageBrowser
● When you connect the camera to your computer with the interface cable, images on the CF
card in the camera are displayed.
● This program displays downloaded images in lists and allow you to sort and organize them
by content.
● You can use ImageBrowser to change the size and compression rate of an image and then
save the modified image as an attachment for E-mail, etc.
PhotoStitch
● PhotoStitch provides an easy way to merge a series of overlapping images into a single,
seamless panorama by automatically arranging the frames in order. You can use this
feature to stitch your shots together into one complete 360° cylinder-shaped panorama
image.
Introduction
■ Adobe Photoshop 5.0 LE DISK
Photoshop 5.0 LE
● This is a full-featured image retouching program equipped with a complete range of image
processing functions.
● You can use this program to transfer images from File Viewer Utility.
* If you already have Photoshop 5.0 LE installed on your computer, you do not need to install it again.
* Explanations for transferring images from File Viewer Utility described in these instructions all use
examples from Photoshop 5.0 LE.
VI
Page 8
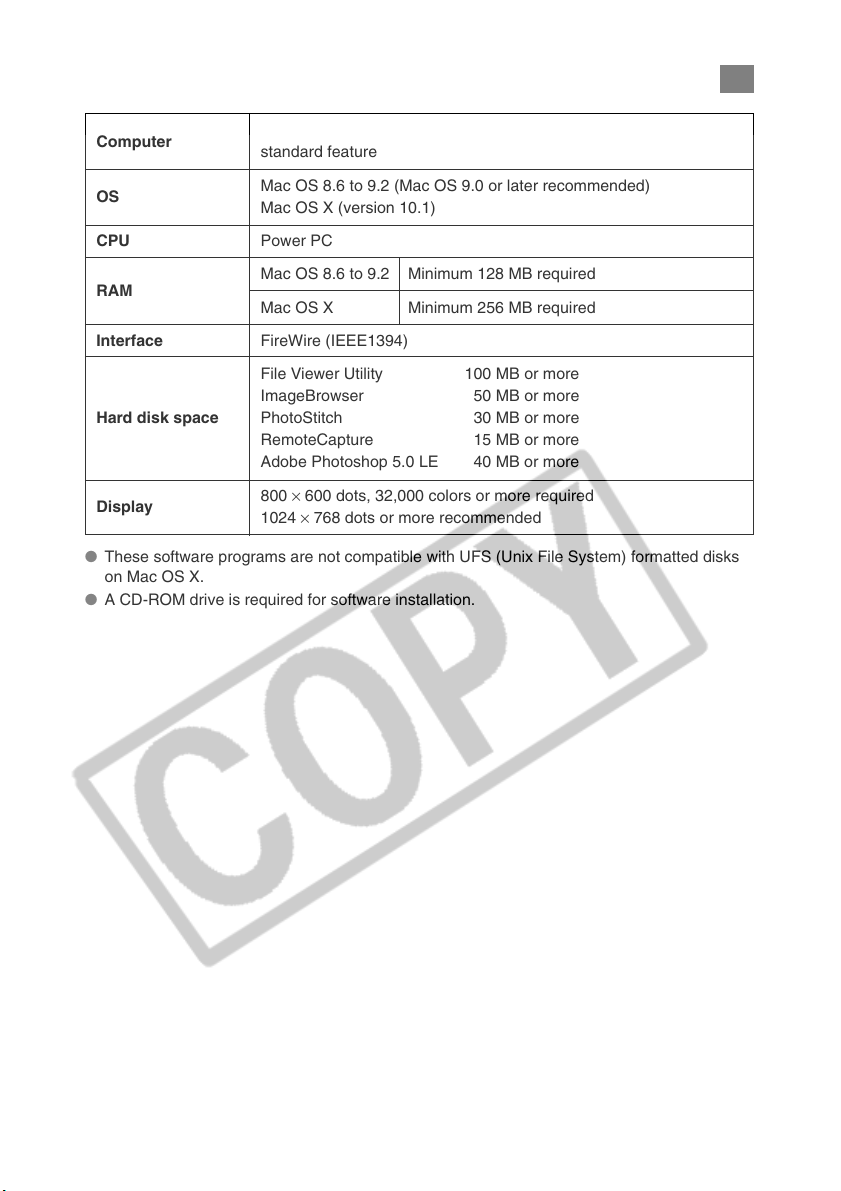
Computer System Requirements
Computer
OS
CPU
RAM
Interface
Hard disk space
Display
● These software programs are not compatible with UFS (Unix File System) formatted disks
on Mac OS X.
● A CD-ROM drive is required for software installation.
Macintosh computer equipped with a FireWire (IEEE1394) port as a
standard feature
Mac OS 8.6 to 9.2 (Mac OS 9.0 or later recommended)
Mac OS X (version 10.1)
Power PC
Mac OS 8.6 to 9.2 Minimum 128 MB required
Mac OS X Minimum 256 MB required
FireWire (IEEE1394)
File Viewer Utility 100 MB or more
ImageBrowser 50 MB or more
PhotoStitch 30 MB or more
RemoteCapture 15 MB or more
Adobe Photoshop 5.0 LE 40 MB or more
800 × 600 dots, 32,000 colors or more required
1024 × 768 dots or more recommended
VII
Page 9
1
Installing the Software
This chapter describes the procedure for installing the software for the
camera and Photoshop 5.0 LE.
Page 10
Installing the Software
● You must follow the procedure given below to install the software.
1. Install the software from the EOS DIGITAL SOLUTION DISK
2. Install Photoshop 5.0 LE
Do not connect the camera to your computer before you have installed the
software as this will prevent successful software installation.
Installing the Software
Start up your computer.
1
● Close any programs that are running before you begin installing the software.
Load the SOLUTION DISK into the CD-ROM drive.
2
\ The SOLUTION DISK icon appears on the desktop.
Start the installer.
3
● If you are using Mac OS 8.6 to 9.2, double-click the SOLUTION DISK icon s the
[Mac OS 8/9] folder s the [Canon EOS Digital Installer] icon to start.
● If you are using Mac OS X, double-click the SOLUTION DISK icon s the [Mac OS X]
folder s the [Canon EOS Digital Installer] icon to start.
\ The Installer panel appears.
Click [Digital Camera Software Installation].
4
1-2
Page 11
Installing the Software
Select the software to be installed.
5
● Click the checkboxes for the
software to be installed and then
click the [Install] button.
Read all of the Software User License Agreement carefully. If you
6
agree to the terms of the license, click the [Agree] button.
Select the folder in which the software will be installed and then
7
click the [Choose] button.
Proceed with the installation as directed by the on-screen
8
messages.
\ When installation ends, the installation completion dialog box appears.
\ If you are using Mac OS 8.6 to 9.2, clicking the [OK] button displays the restart dialog
box.
\ If you are using Mac X, clicking the [OK] button displays the installer panel again.
Installing the Software
Restart your computer.
9
● If you are using Mac OS 8.6 to 9.2, click the [Yes] button.
● If you are using Mac OS X, click [Quit] and then restart your computer.
1-3
Page 12
Installing the Software
Installing Photoshop 5.0 LE
● You are required to enter the serial number during Photoshop 5.0 LE installation. The serial
number is shown on the CD-ROM’s label.
Load the Adobe Photoshop 5.0 LE CD-ROM into the CD-ROM
1
drive.
\ The CD-ROM folder automatically opens.
● If the folder does not open automatically, double-click the CD-ROM icon on the
desktop.
Double-click the [English] folder and then the [Adobe Photoshop
2
5.0 LE] folder to open.
Double-click the [Install Photoshop LE] to start.
3
Proceed with the installation as directed by the on-screen
4
messages.
● For more information on the installation procedure, refer to the [Read Me] file inside
the [English] folder on the Photoshop 5.0 LE CD-ROM.
Please Register Your Camera!
We recommend you take a moment to register your camera, in order to receive further product
information.
To proceed to the online User Registration page, simply click the [User Registration] button
from the [EOS DIGITAL SOLUTION DISK].
If there is no response when you click the [User Registration] button, start your Internet
browser program (such as Microsoft Internet Explorer or Netscape Communicator), then go to
the [Html] folder on the SOLUTION DISK and open the [regist.html] file inside the [English]
folder.
1-4
Page 13
2
Getting Ready to Work with
Images
This chapter explains how to connect the camera to your computer and
how to use a card reader (third-party product).
Page 14
Connecting the Camera to Your Computer
Connect the camera to your computer with the interface cable so that they can communicate.
You can connect the camera while your computer is running.
● When you connect the camera to your computer, be sure to follow the
procedure below.
● Never perform the following operations while the software installed from the
SOLUTION DISK runs after connecting the camera to the computer as a
communications error may occur.
• Setting the camera’s main switch to <OFF>
• Opening the CF card slot cover
• Disconnecting the interface cable, the power cord, or the AC adapter’s plug
• Removing the DC coupler or the battery
Before you perform the operations above, be sure to end the software being
used.
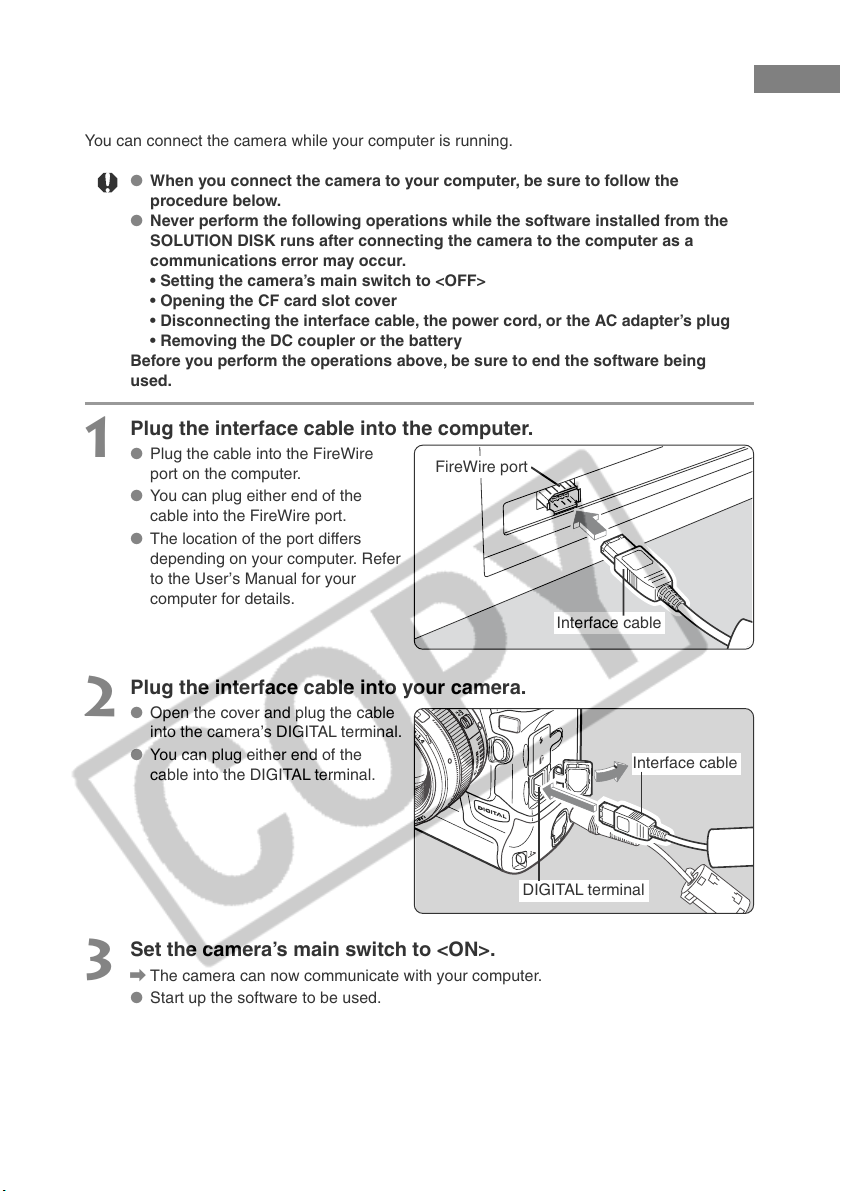
Plug the interface cable into the computer.
1
● Plug the cable into the FireWire
port on the computer.
● You can plug either end of the
cable into the FireWire port.
● The location of the port differs
depending on your computer. Refer
to the User’s Manual for your
computer for details.
FireWire port
Interface cable
Plug the interface cable into your camera.
2
● Open the cover and plug the cable
into the camera’s DIGITAL terminal.
● You can plug either end of the
cable into the DIGITAL terminal.
Set the camera’s main switch to <ON>.
3
\ The camera can now communicate with your computer.
● Start up the software to be used.
2-2
Interface cable
DIGITAL terminal
Page 15

Connecting the Camera to Your Computer
About Backing up (Copying) Images
● It is recommended that you should back up (copy) the captured images into the hard disk of
your computer, etc. before working with EOS DIGITAL SOLUTION DISK.
● Use only the interface cable bundled with the camera to connect the camera to your
computer.
● Push the plug firmly all the way into the socket. Loose connections can cause faults
or malfunctions.
● Connect the camera to the computer directly using the interface cable. The camera
and computer may not operate correctly if you connect them via a hub or if you
connect to multiple FireWire devices.
● Do not connect more than one camera to the same computer. The connections may
not operate correctly.
● While the camera and your computer are communicating, the camera’s LCD panel
may blink and, if you are using the LCD monitor, the image on the monitor may
flicker. This is not malfunction.
● If you do not perform any operation while the camera and computer are connected,
a confirmation message appears on the computer screen asking whether you wish
to continue communicating with the camera for some computer systems. If you do
not perform any operation even after this message appears, the communication
with the camera is terminated. (If you are using a household power source, no
message is displayed and the connection is not terminated.) To re-establish the
connection, press the shutter button down halfway or set the camera’s main switch
to <OFF> and then back to <ON>.
● Do not put your computer to sleep while it is connected to the camera.
If you do put your computer to sleep while it is connected to the camera, never
disconnect the interface cable while your computer is still in sleep mode. Always
wake your computer up before disconnecting the camera. On some types of
computer, disconnecting the interface cable while your computer is in sleep mode
could prevent the computer from waking up correctly. Refer to the computer User’s
Manual for more information on Sleep mode.
Getting Ready to Work with Images
When you connect your camera to a computer, you should use the DC Coupler Kit so
that you can continue to use your camera regardless of battery level. It is
recommended that you should set the camera’s Auto power off function to [Off].
2-3
Page 16
Inserting a CF Card into Your Card Reader
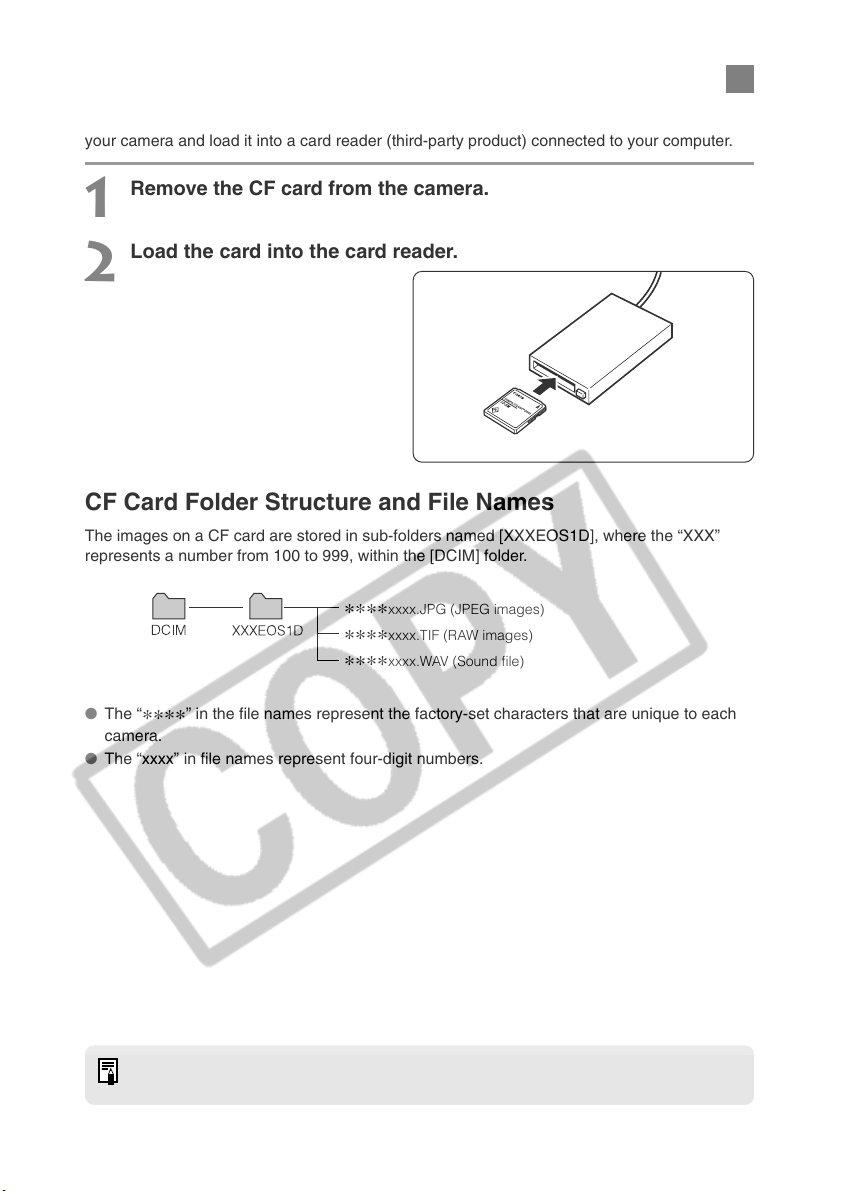
To download images from a CF card directly onto your computer, remove the CF card from
your camera and load it into a card reader (third-party product) connected to your computer.
Remove the CF card from the camera.
1
Load the card into the card reader.
2
CF Card Folder Structure and File Names
The images on a CF card are stored in sub-folders named [XXXEOS1D], where the “XXX”
represents a number from 100 to 999, within the [DCIM] folder.
xxxx.JPG (JPEG images)
****
xxxx.TIF (RAW images)
****
xxxx.WAV (Sound file)
****
● The “
camera.
● The “xxxx” in file names represent four-digit numbers.
2-4
” in the file names represent the factory-set characters that are unique to each
****
For information on connecting the card reader to your computer, refer to the User’s
Manual provided with the card reader.
Page 17
3
Working with Images in
File Viewer Utility
This chapter explains how to use File Viewer Utility to display and save
images stored on a CF card loaded in the camera, and also explains how
to perform image processing including processing RAW images and how
to transfer images to the retouching software.
Page 18
Starting File Viewer Utility
Double-click the [Canon File Viewer Utility] icon on the desktop to
1
start.
● You can also start File Viewer Utility by double-clicking the [Canon Utilities] folder s
the [File Viewer Utility] folder s the [File Viewer Utility] icon.
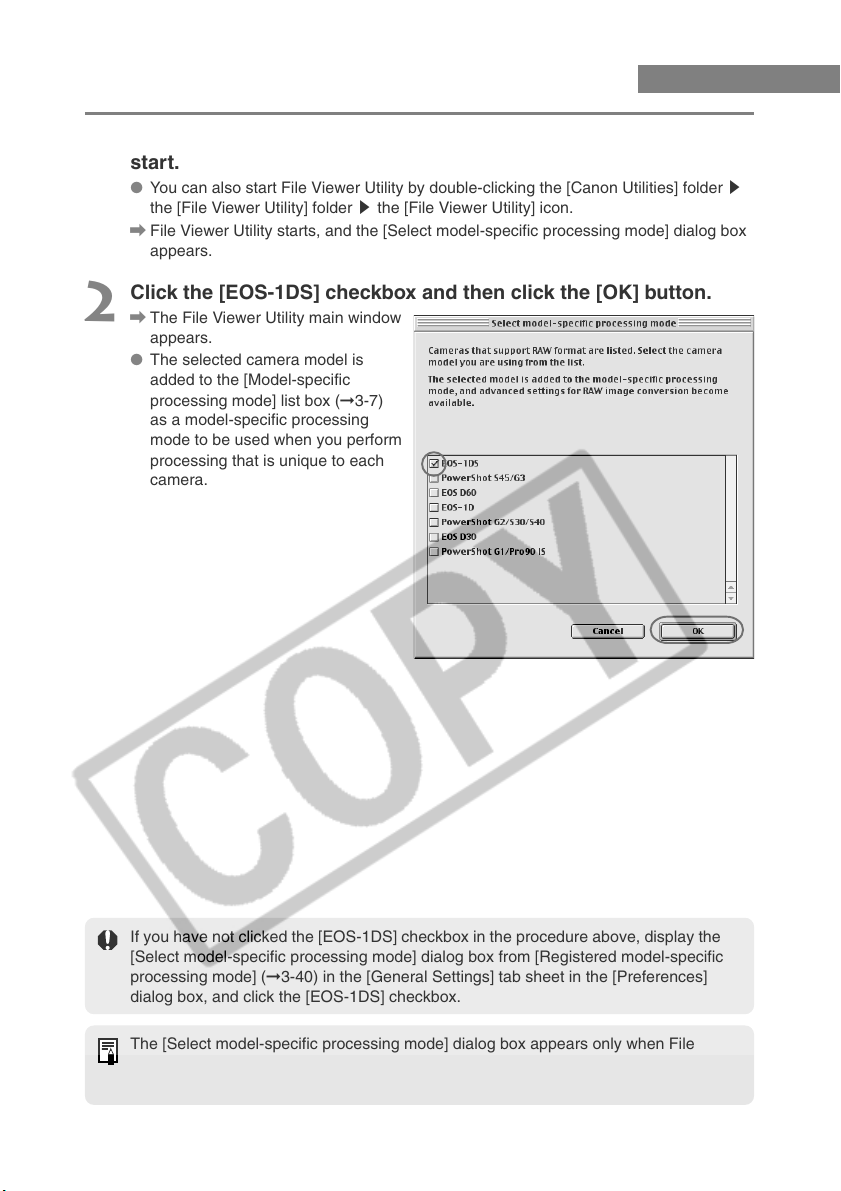
\ File Viewer Utility starts, and the [Select model-specific processing mode] dialog box
appears.
Click the [EOS-1DS] checkbox and then click the [OK] button.
2
\ The File Viewer Utility main window
appears.
● The selected camera model is
added to the [Model-specific
processing mode] list box (➞3-7)
as a model-specific processing
mode to be used when you perform
processing that is unique to each
camera.
If you have not clicked the [EOS-1DS] checkbox in the procedure above, display the
[Select model-specific processing mode] dialog box from [Registered model-specific
processing mode] (➞3-40) in the [General Settings] tab sheet in the [Preferences]
dialog box, and click the [EOS-1DS] checkbox.
The [Select model-specific processing mode] dialog box appears only when File
Viewer Utility starts for the first time after installation. It does not appear when File
Viewer Utility starts the second time or later.
3-2
Page 19
File Viewer Utility main window
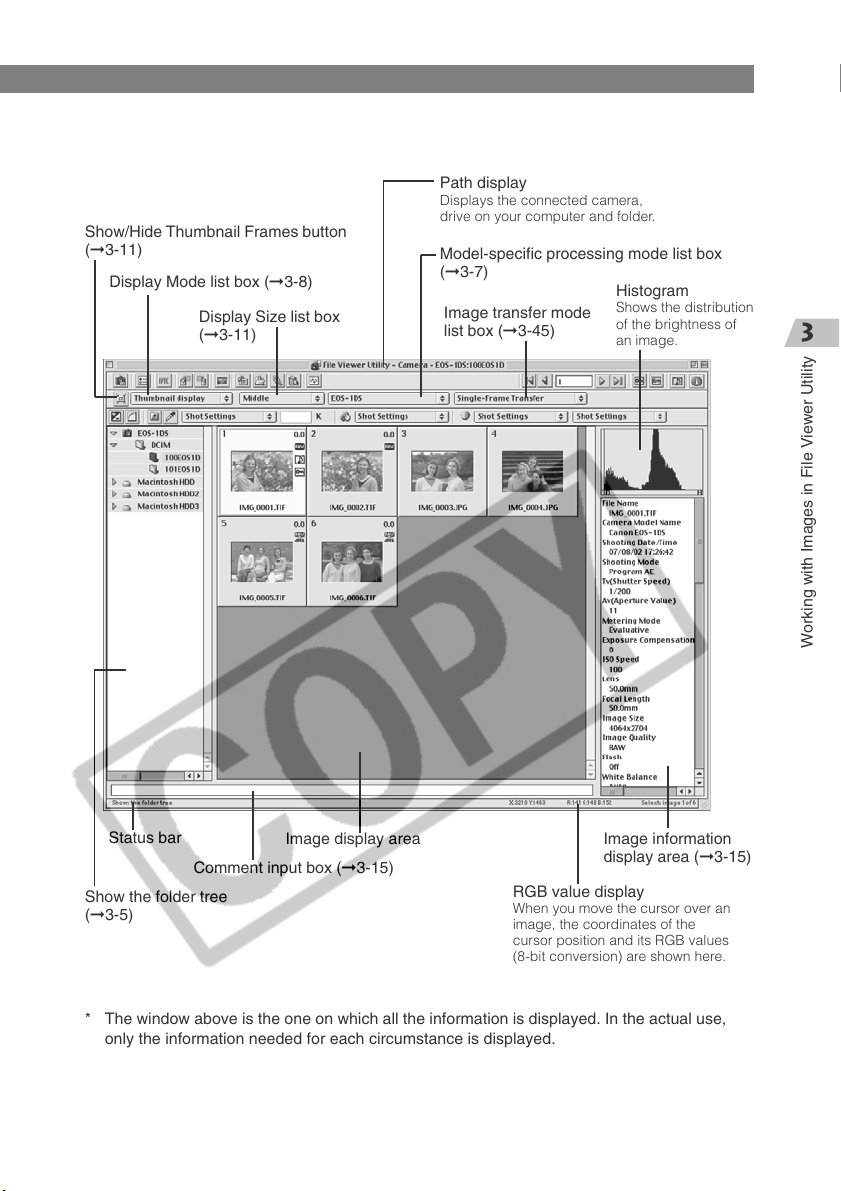
Show/Hide Thumbnail Frames button
(➞3-11)
Display Mode list box (➞3-8)
Display Size list box
(➞3-11)
Starting File Viewer Utility
Path display
Displays the connected camera,
drive on your computer and folder.
Model-specific processing mode list box
(➞3-7)
Histogram
Image transfer mode
list box (➞3-45)
Shows the distribution
of the brightness of
an image.
Status bar
Comment input box (➞3-15)
Show the folder tree
(➞3-5)
Image display area
RGB value display
When you move the cursor over an
image, the coordinates of the
cursor position and its RGB values
(8-bit conversion) are shown here.
Image information
display area (➞3-15)
* The window above is the one on which all the information is displayed. In the actual use,
only the information needed for each circumstance is displayed.
● To close File Viewer Utility, select [Exit] from the [File] menu.
Working with Images in File Viewer Utility
3-3
Page 20
Starting File Viewer Utility
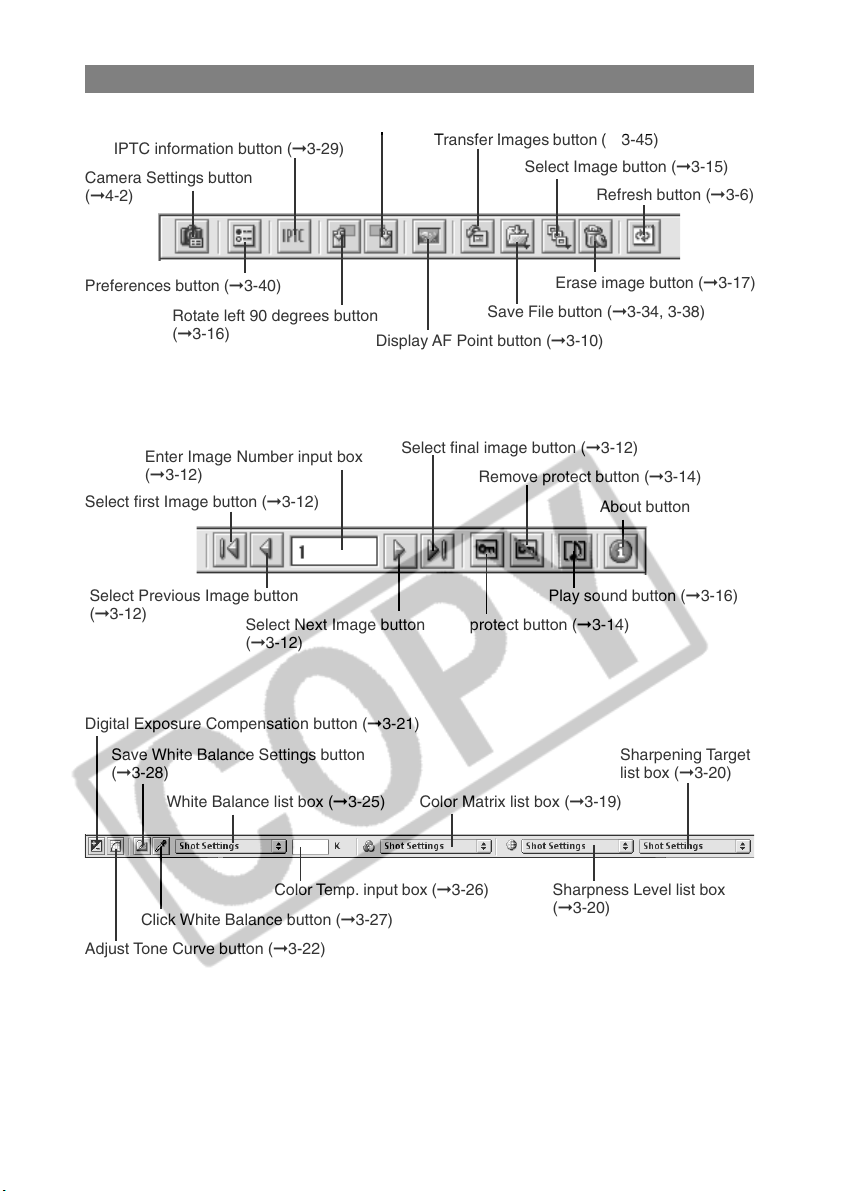
Rotate right 90 degrees button (➞3-16)
IPTC information button (➞3-29)
Camera Settings button
(➞4-2)
Transfer Images button (➞3-45)
Select Image button (➞3-15)
Refresh button (➞3-6)
Preferences button (➞3-40)
Rotate left 90 degrees button
(➞3-16)
Enter Image Number input box
(➞3-12)
Select first Image button (➞3-12)
Select Previous Image button
(➞3-12)
Digital Exposure Compensation button (➞3-21)
Save White Balance Settings button
(➞3-28)
White Balance list box (➞3-25) Color Matrix list box (➞3-19)
Select Next Image button
(➞3-12)
Display AF Point button (➞3-10)
Select final image button (➞3-12)
Erase image button (➞3-17)
Save File button (➞3-34, 3-38)
Remove protect button (➞3-14)
About button
Play sound button (➞3-16)
protect button (➞3-14)
Sharpening Target
list box (➞3-20)
Color Temp. input box (➞3-26)
Click White Balance button (➞3-27)
Adjust Tone Curve button (➞3-22)
* The window above is the one on which all the information is displayed. In the actual use,
only the information needed for each circumstance is displayed.
Sharpness Level list box
(➞3-20)
3-4
Page 21
Displaying Images
This section describes how to display images stored on a CF card in a camera or your
computer.
You can display images stored on a CF card via the interface cable while the CF card is still in
the camera. Or you can display images stored on a CF card using a third party card reader.
This section describes how to display images stored on a CF card in the camera.
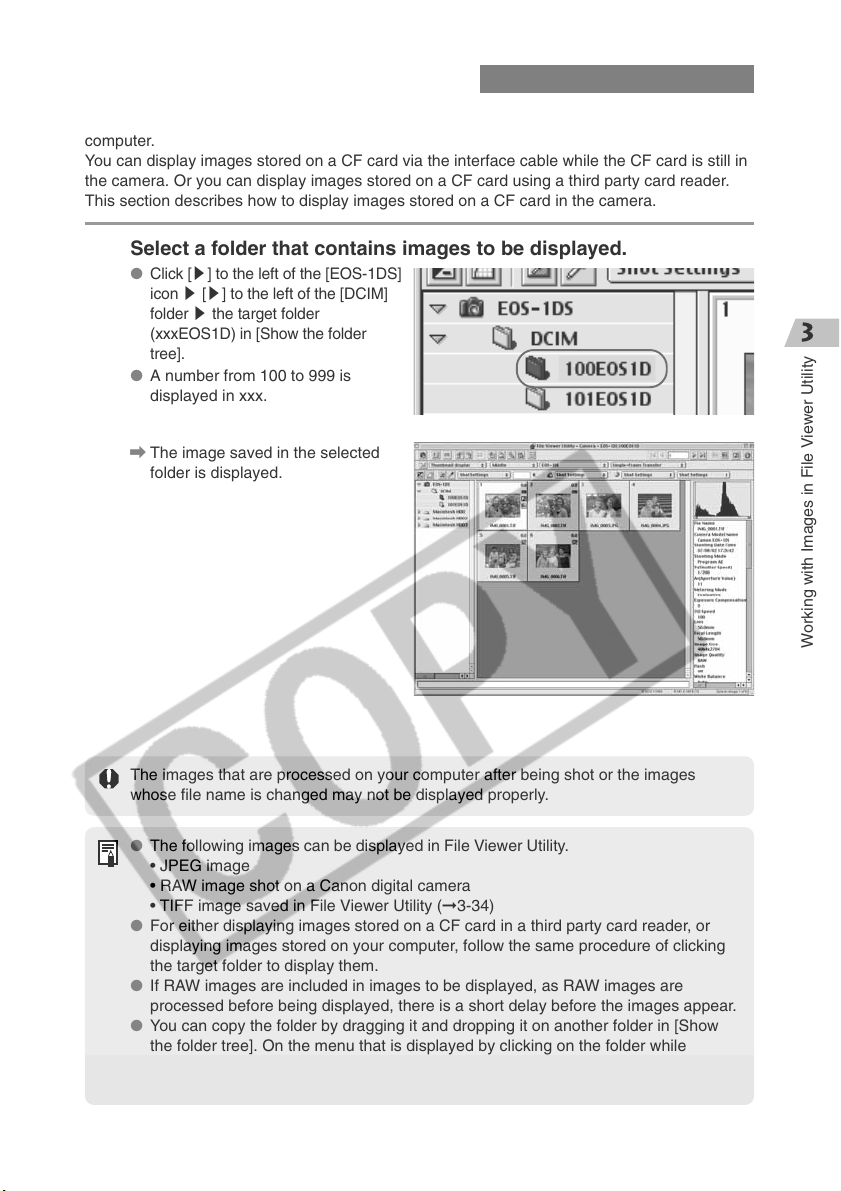
Select a folder that contains images to be displayed.
●
Click [s] to the left of the [EOS-1DS]
icon s [s] to the left of the [DCIM]
folder s the target folder
(xxxEOS1D) in [Show the folder
tree].
● A number from 100 to 999 is
displayed in xxx.
\ The image saved in the selected
folder is displayed.
Working with Images in File Viewer Utility
The images that are processed on your computer after being shot or the images
whose file name is changed may not be displayed properly.
● The following images can be displayed in File Viewer Utility.
• JPEG image
• RAW image shot on a Canon digital camera
• TIFF image saved in File Viewer Utility (➞3-34)
● For either displaying images stored on a CF card in a third party card reader, or
displaying images stored on your computer, follow the same procedure of clicking
the target folder to display them.
● If RAW images are included in images to be displayed, as RAW images are
processed before being displayed, there is a short delay before the images appear.
● You can copy the folder by dragging it and dropping it on another folder in [Show
the folder tree]. On the menu that is displayed by clicking on the folder while
pressing the <control> key, you can create and erase the folder, or change the
folder name.
3-5
Page 22
Displaying Images
Updating Information on Main Window
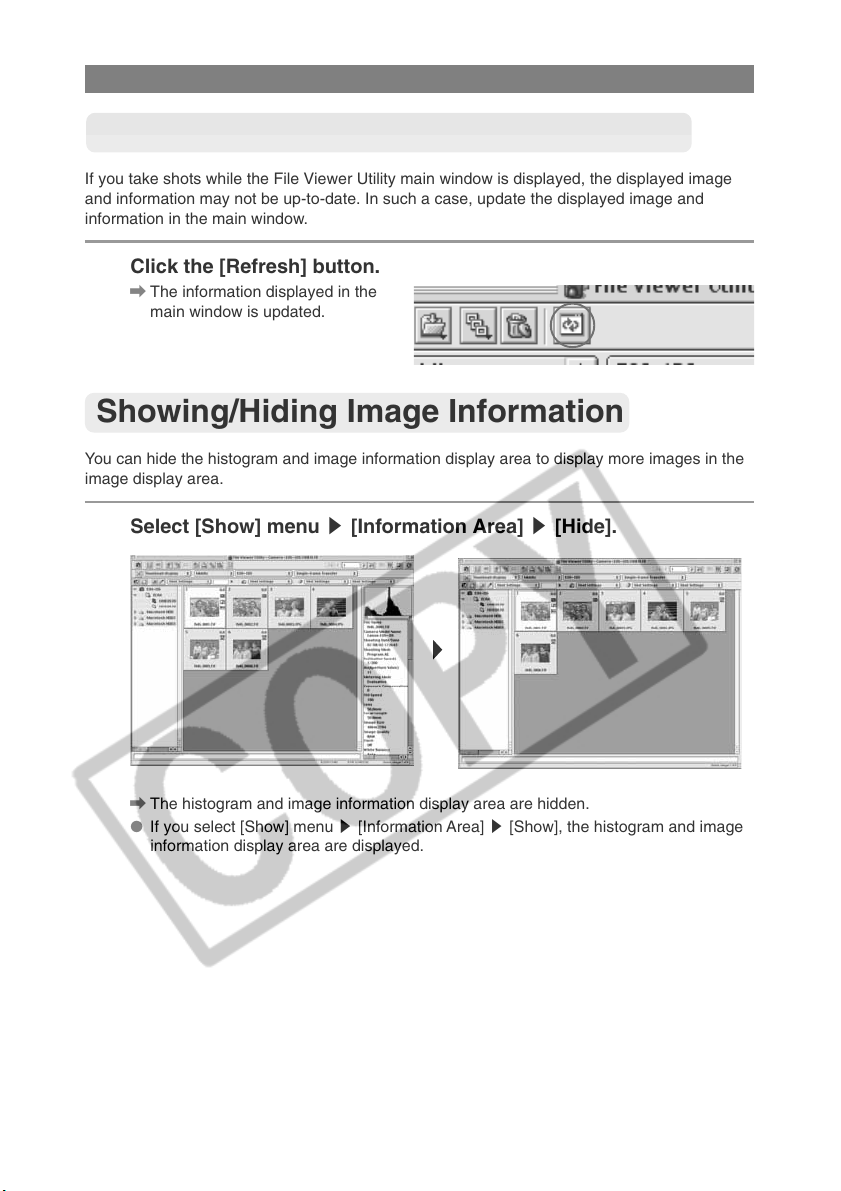
If you take shots while the File Viewer Utility main window is displayed, the displayed image
and information may not be up-to-date. In such a case, update the displayed image and
information in the main window.
Click the [Refresh] button.
\ The information displayed in the
main window is updated.
Showing/Hiding Image Information
You can hide the histogram and image information display area to display more images in the
image display area.
Select [Show] menu s [Information Area] s [Hide].
\ The histogram and image information display area are hidden.
● If you select [Show] menu s [Information Area] s [Show], the histogram and image
information display area are displayed.
3-6
Page 23
Selecting the Model-Specific Processing Mode
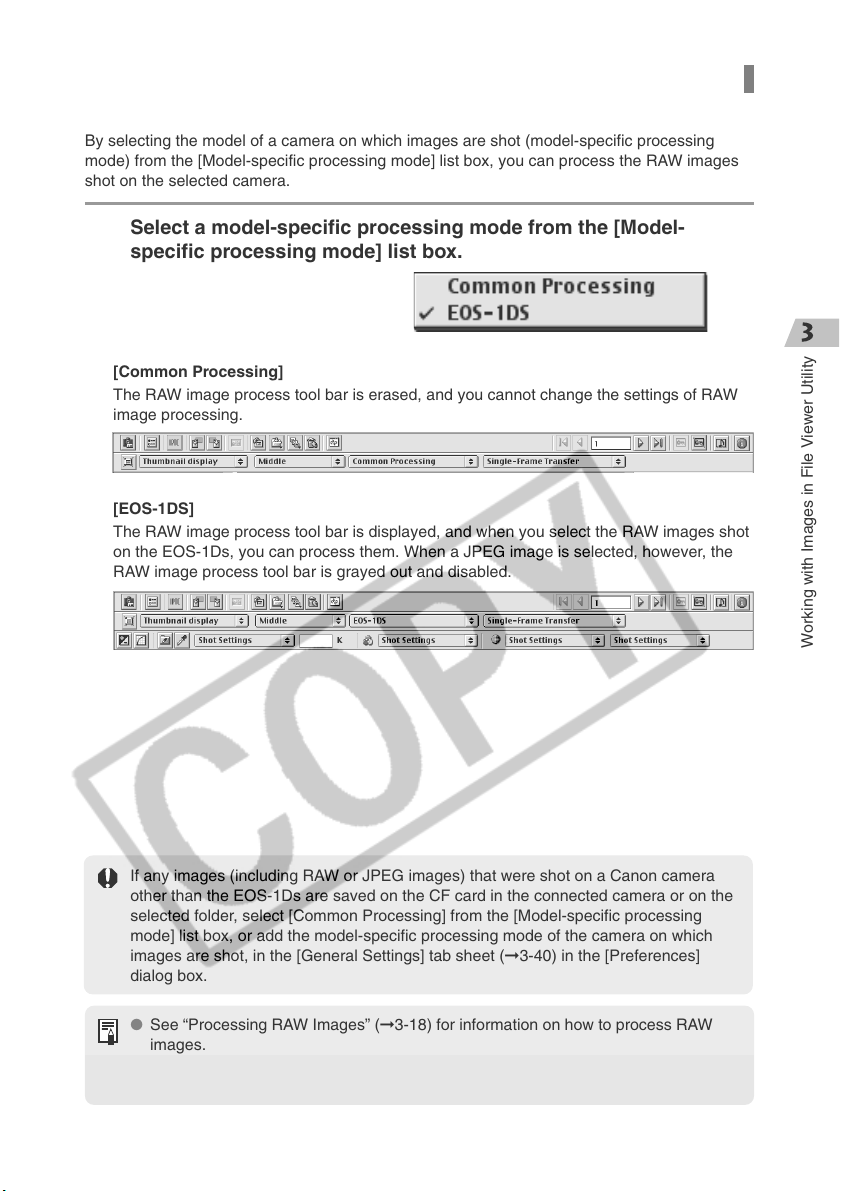
You can display the RAW image process tool bar for processing RAW images.
By selecting the model of a camera on which images are shot (model-specific processing
mode) from the [Model-specific processing mode] list box, you can process the RAW images
shot on the selected camera.
Select a model-specific processing mode from the [Model-
specific processing mode] list box.
[Common Processing]
The RAW image process tool bar is erased, and you cannot change the settings of RAW
image processing.
[EOS-1DS]
The RAW image process tool bar is displayed, and when you select the RAW images shot
on the EOS-1Ds, you can process them. When a JPEG image is selected, however, the
RAW image process tool bar is grayed out and disabled.
Working with Images in File Viewer Utility
If any images (including RAW or JPEG images) that were shot on a Canon camera
other than the EOS-1Ds are saved on the CF card in the connected camera or on the
selected folder, select [Common Processing] from the [Model-specific processing
mode] list box, or add the model-specific processing mode of the camera on which
images are shot, in the [General Settings] tab sheet (➞3-40) in the [Preferences]
dialog box.
● See “Processing RAW Images” (➞3-18) for information on how to process RAW
images.
● If you select any other camera from [Model-specific processing mode] list box, the
RAW image process tool bar for the selected camera is displayed.
3-7
Page 24
Selecting the Display Mode and Display Size
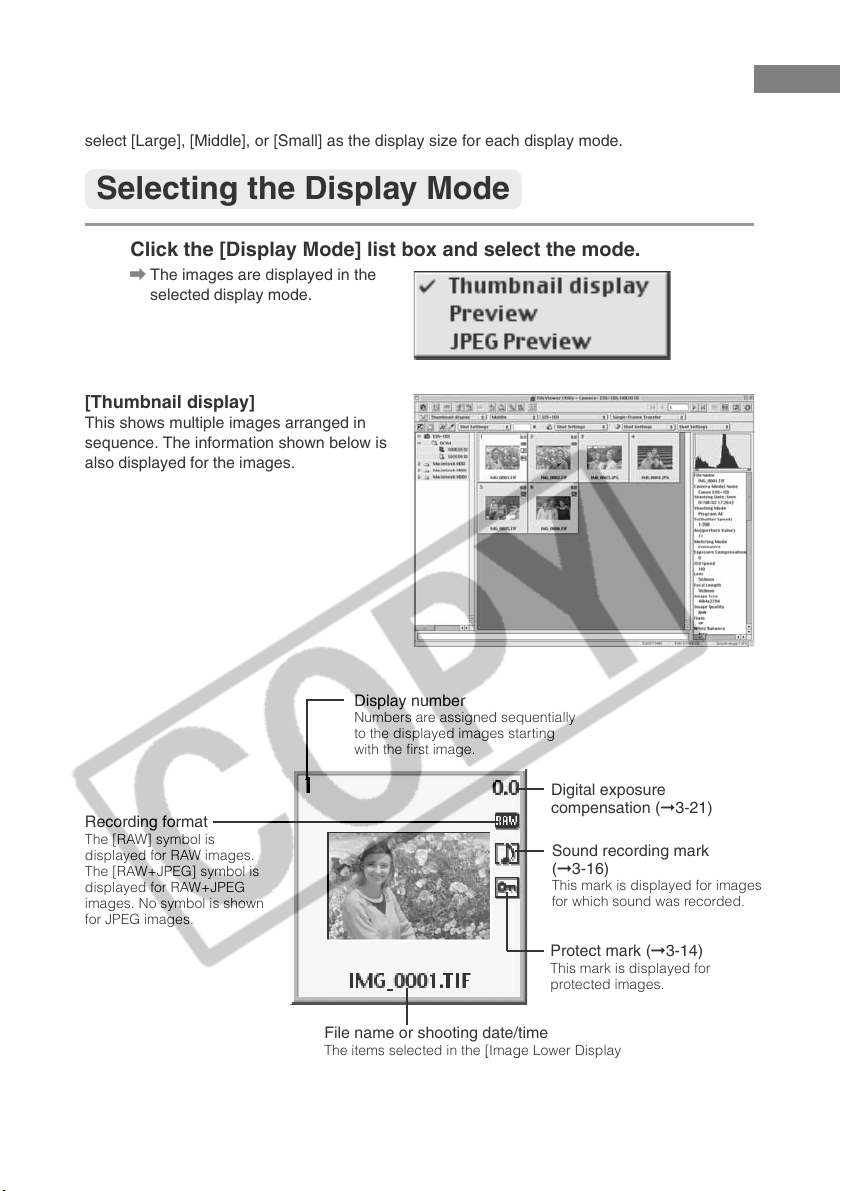
The available display modes are [Thumbnail display], [Preview] and [JPEG Preview]. You can
select [Large], [Middle], or [Small] as the display size for each display mode.
Selecting the Display Mode
Click the [Display Mode] list box and select the mode.
\ The images are displayed in the
selected display mode.
[Thumbnail display]
This shows multiple images arranged in
sequence. The information shown below is
also displayed for the images.
Recording format
The [RAW] symbol is
displayed for RAW images.
The [RAW+JPEG] symbol is
displayed for RAW+JPEG
images. No symbol is shown
for JPEG images.
3-8
Display number
Numbers are assigned sequentially
to the displayed images starting
with the first image.
Digital exposure
compensation (➞3-21)
Sound recording mark
(➞3-16)
This mark is displayed for images
for which sound was recorded.
Protect mark (➞3-14)
This mark is displayed for
protected images.
File name or shooting date/time
The items selected in the [Image Lower Display
Item] list box in the [General Settings] tab sheet of
the [Preferences] dialog box (➞3-40) are displayed.
Page 25

[Preview]
The selected image is displayed as a single
image.
When you select the RAW+JPEG image, the
RAW image is displayed.
[JPEG Preview]
When you select the RAW+JPEG image, the
JPEG image is displayed as a single image.
When you select the RAW image, the JPEG
image for the thumbnail display is shown.
When you select the JPEG image, it is
displayed as a single image as in the Preview
mode.
Selecting the Display Mode and Display Size
● When you start File Viewer Utility, images are always shown in the Thumbnail
display mode.
● If you double-click on the thumbnail-displayed image, it is displayed in the Preview
mode.
Working with Images in File Viewer Utility
3-9
Page 26
Selecting the Display Mode and Display Size
Checking the AF Point
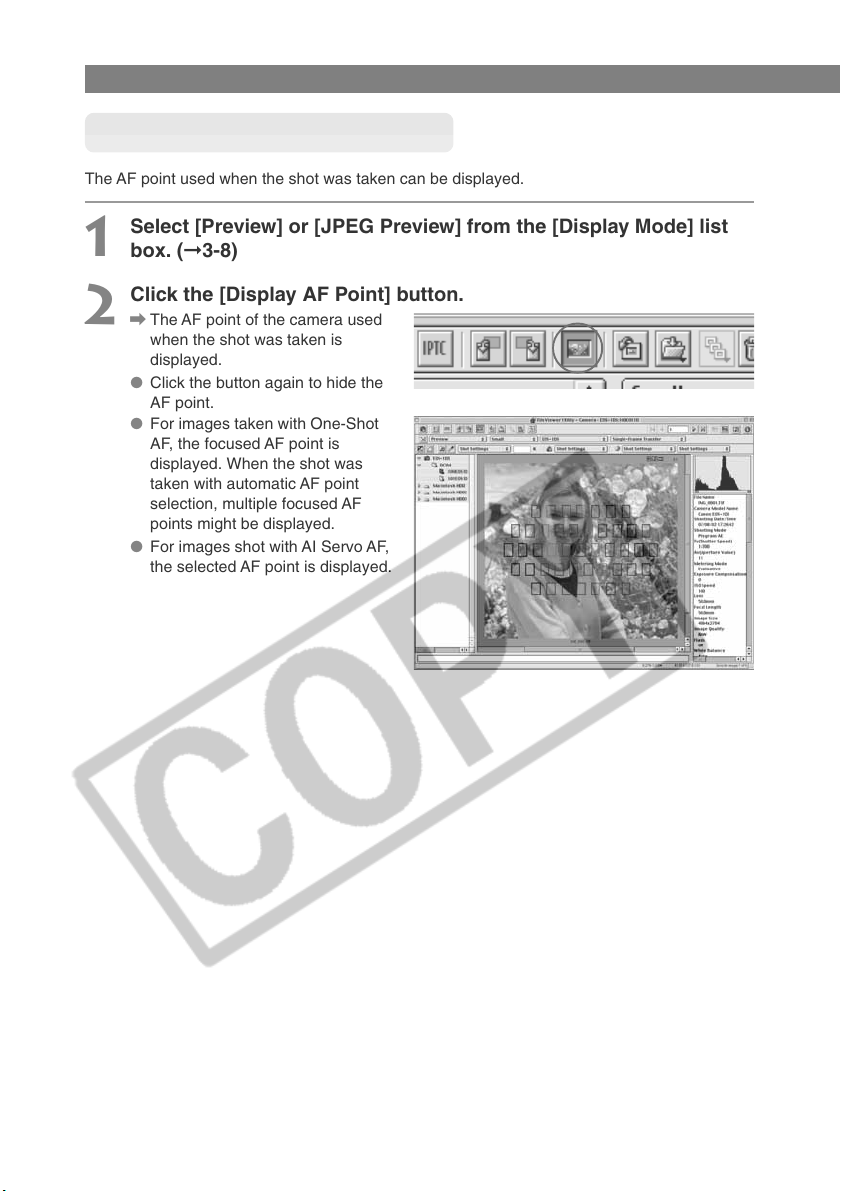
The AF point used when the shot was taken can be displayed.
Select [Preview] or [JPEG Preview] from the [Display Mode] list
1
box. (➞3-8)
Click the [Display AF Point] button.
2
\ The AF point of the camera used
when the shot was taken is
displayed.
● Click the button again to hide the
AF point.
● For images taken with One-Shot
AF, the focused AF point is
displayed. When the shot was
taken with automatic AF point
selection, multiple focused AF
points might be displayed.
● For images shot with AI Servo AF,
the selected AF point is displayed.
3-10
Page 27
Selecting the Display Mode and Display Size
Showing/Hiding the Information Display
Frame of Thumbnail Images
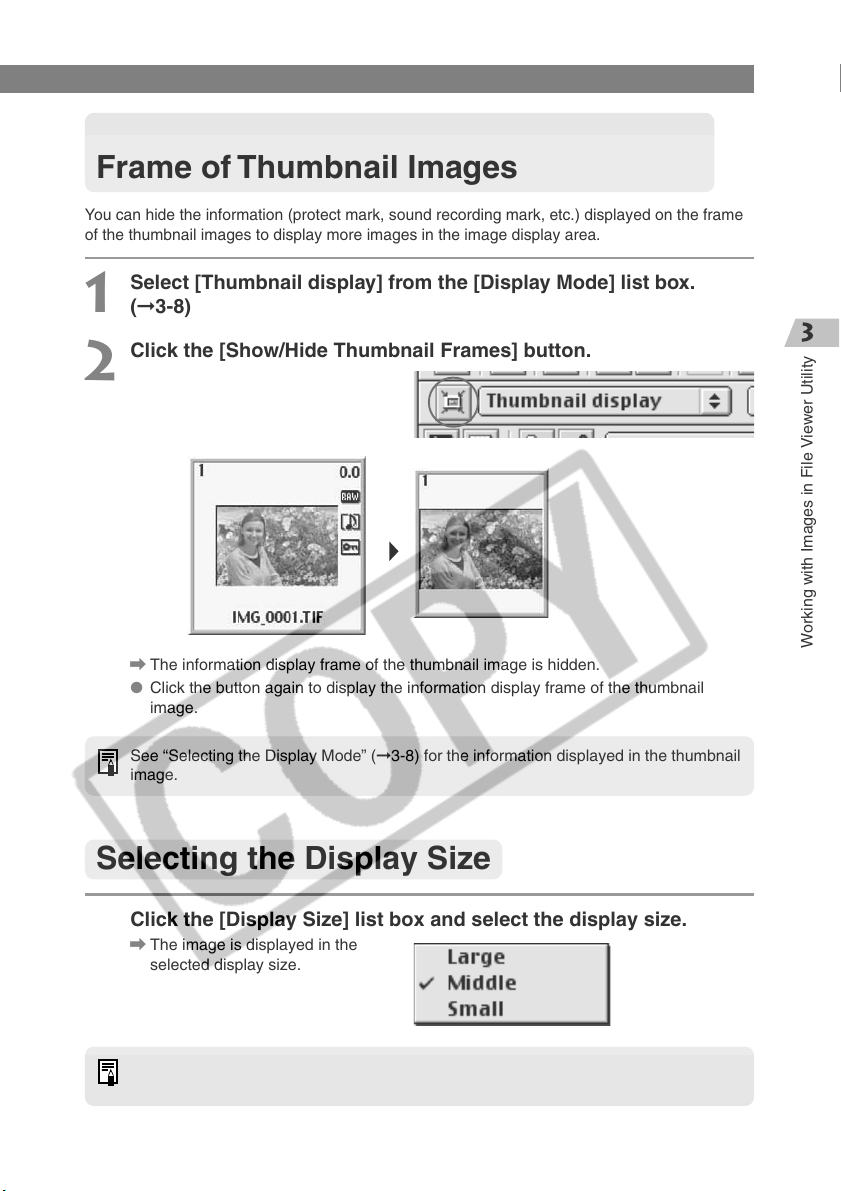
You can hide the information (protect mark, sound recording mark, etc.) displayed on the frame
of the thumbnail images to display more images in the image display area.
Select [Thumbnail display] from the [Display Mode] list box.
1
(➞3-8)
Click the [Show/Hide Thumbnail Frames] button.
2
\ The information display frame of the thumbnail image is hidden.
● Click the button again to display the information display frame of the thumbnail
image.
See “Selecting the Display Mode” (➞3-8) for the information displayed in the thumbnail
image.
Selecting the Display Size
Click the [Display Size] list box and select the display size.
\ The image is displayed in the
selected display size.
In the Preview mode, the available image sizes are [Large] (100%), [Middle] (50%) and
[Small] (25%).
Working with Images in File Viewer Utility
3-11
Page 28
Selecting Images
Selecting Images with the Mouse
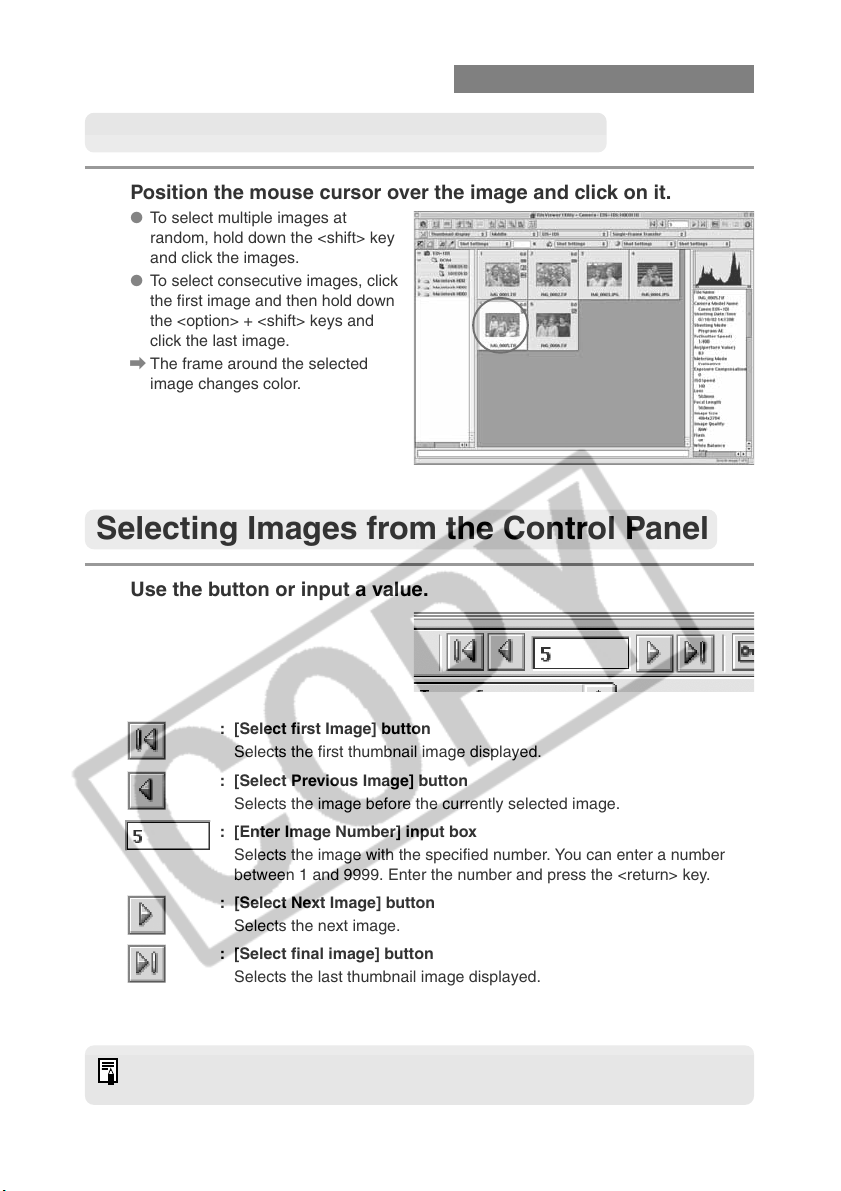
Position the mouse cursor over the image and click on it.
● To select multiple images at
random, hold down the <shift> key
and click the images.
● To select consecutive images, click
the first image and then hold down
the <option> + <shift> keys and
click the last image.
\ The frame around the selected
image changes color.
Selecting Images from the Control Panel
Use the button or input a value.
: [Select first Image] button
Selects the first thumbnail image displayed.
: [Select Previous Image] button
Selects the image before the currently selected image.
: [Enter Image Number] input box
Selects the image with the specified number. You can enter a number
between 1 and 9999. Enter the number and press the <return> key.
: [Select Next Image] button
Selects the next image.
: [Select final image] button
Selects the last thumbnail image displayed.
To select an image using the keyboard, use the arrow keys (↑ ← → ↓) to move to the
image.
3-12
Page 29
Working with Selected Images
Operations that Can Be Used with Images
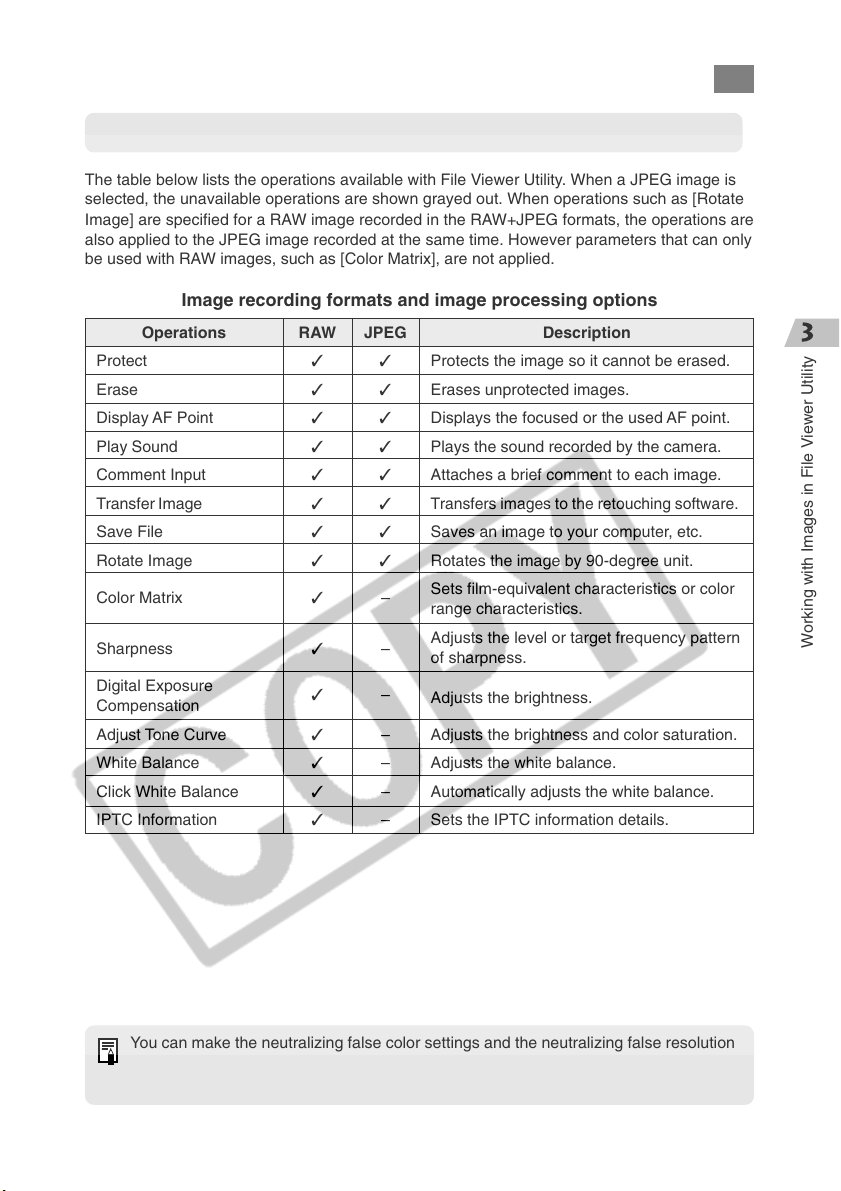
The table below lists the operations available with File Viewer Utility. When a JPEG image is
selected, the unavailable operations are shown grayed out. When operations such as [Rotate
Image] are specified for a RAW image recorded in the RAW+JPEG formats, the operations are
also applied to the JPEG image recorded at the same time. However parameters that can only
be used with RAW images, such as [Color Matrix], are not applied.
Image recording formats and image processing options
Operations
Protect
Erase
Display AF Point
Play Sound
Comment Input
Transfer Image
Save File
Rotate Image
Color Matrix
Sharpness
Digital Exposure
Compensation
Adjust Tone Curve
White Balance
Click White Balance
IPTC Information
RAW
✓
✓
✓
✓
✓
✓
✓
✓
✓
✓
✓
✓
✓
✓
✓
JPEG
✓
✓
✓
✓
✓
✓
✓
✓
–
–
–
–
–
–
–
Description
Protects the image so it cannot be erased.
Erases unprotected images.
Displays the focused or the used AF point.
Plays the sound recorded by the camera.
Attaches a brief comment to each image.
Transfers images to the retouching software.
Saves an image to your computer, etc.
Rotates the image by 90-degree unit.
Sets film-equivalent characteristics or color
range characteristics.
Adjusts the level or target frequency pattern
of sharpness.
Adjusts the brightness.
Adjusts the brightness and color saturation.
Adjusts the white balance.
Automatically adjusts the white balance.
Sets the IPTC information details.
Working with Images in File Viewer Utility
You can make the neutralizing false color settings and the neutralizing false resolution
settings of RAW images in the [RAW Image Processing settings] tab sheet (➞3-41) in
the [Preferences] dialog box.
3-13
Page 30
Working with Selected Images
Protecting Images
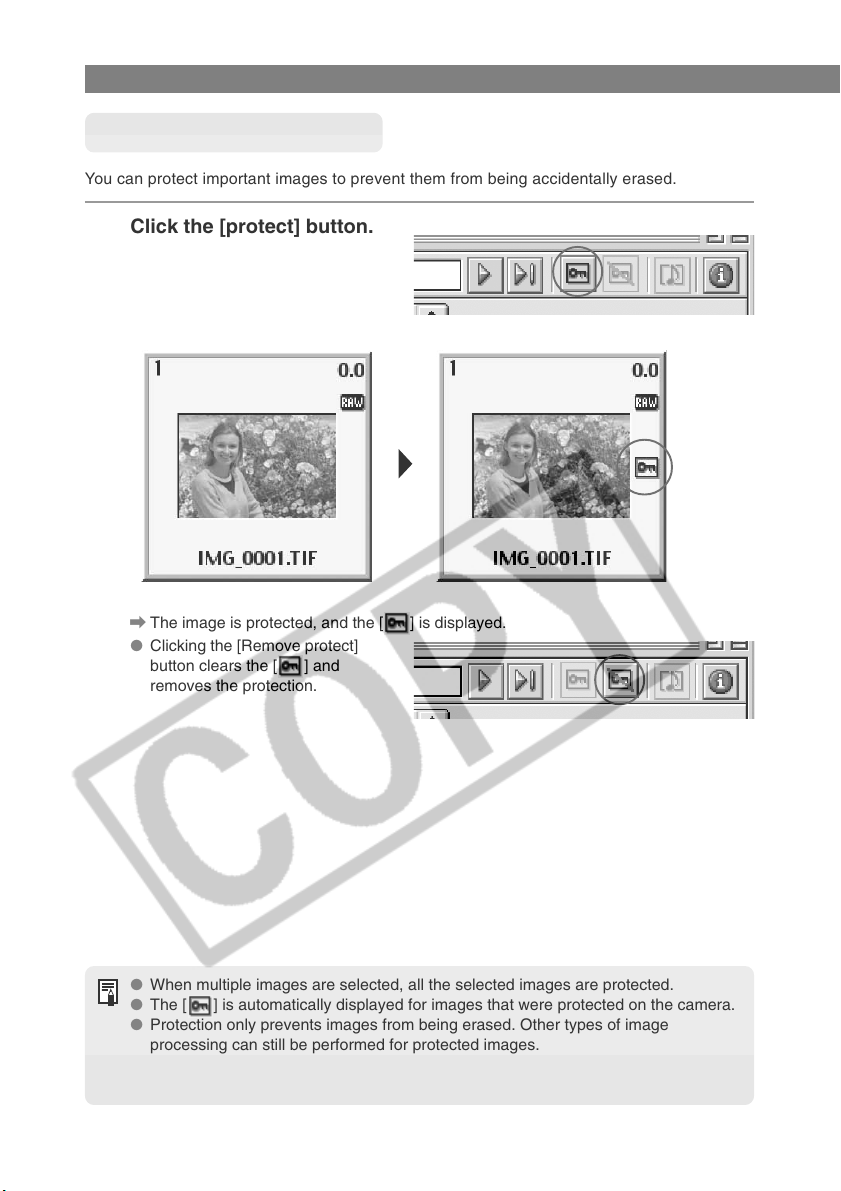
You can protect important images to prevent them from being accidentally erased.
Click the [protect] button.
\ The image is protected, and the [ ] is displayed.
● Clicking the [Remove protect]
button clears the [ ] and
removes the protection.
● When multiple images are selected, all the selected images are protected.
● The [ ] is automatically displayed for images that were protected on the camera.
● Protection only prevents images from being erased. Other types of image
processing can still be performed for protected images.
● A range of operations is also available by selecting the image, pressing the
<control> key + mouse button and selecting an option from the menu that appears.
3-14
Page 31
Working with Selected Images
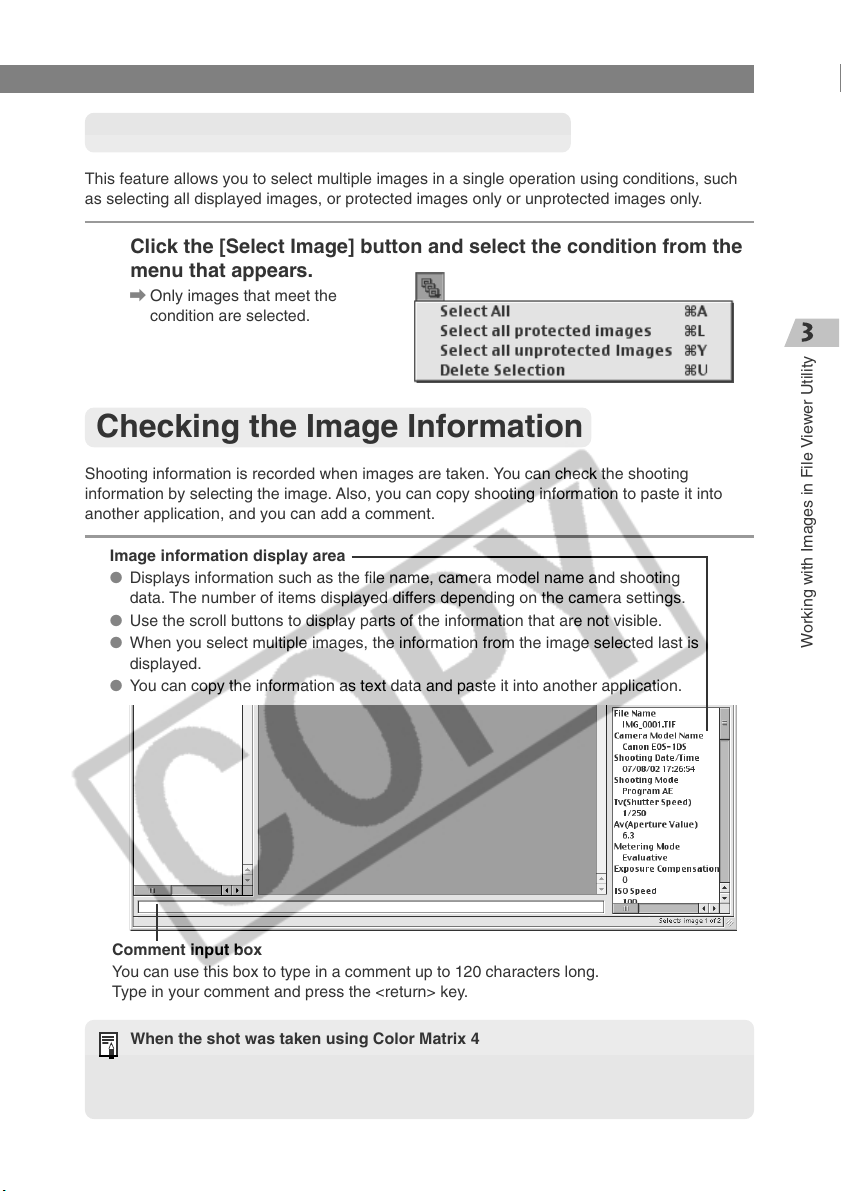
Selecting Images by Condition
This feature allows you to select multiple images in a single operation using conditions, such
as selecting all displayed images, or protected images only or unprotected images only.
Click the [Select Image] button and select the condition from the
menu that appears.
\ Only images that meet the
condition are selected.
Checking the Image Information
Shooting information is recorded when images are taken. You can check the shooting
information by selecting the image. Also, you can copy shooting information to paste it into
another application, and you can add a comment.
Image information display area
● Displays information such as the file name, camera model name and shooting
data. The number of items displayed differs depending on the camera settings.
● Use the scroll buttons to display parts of the information that are not visible.
● When you select multiple images, the information from the image selected last is
displayed.
● You can copy the information as text data and paste it into another application.
Working with Images in File Viewer Utility
Comment input box
You can use this box to type in a comment up to 120 characters long.
Type in your comment and press the <return> key.
When the shot was taken using Color Matrix 4
Images shot with color matrix 4 must be transferred to the retouching software (thirdparty product) (➞3-45) so that settings such as the chroma can be adjusted. The color
matrix information is shown in the Image information display area.
3-15
Page 32
Working with Selected Images
Rotating Images
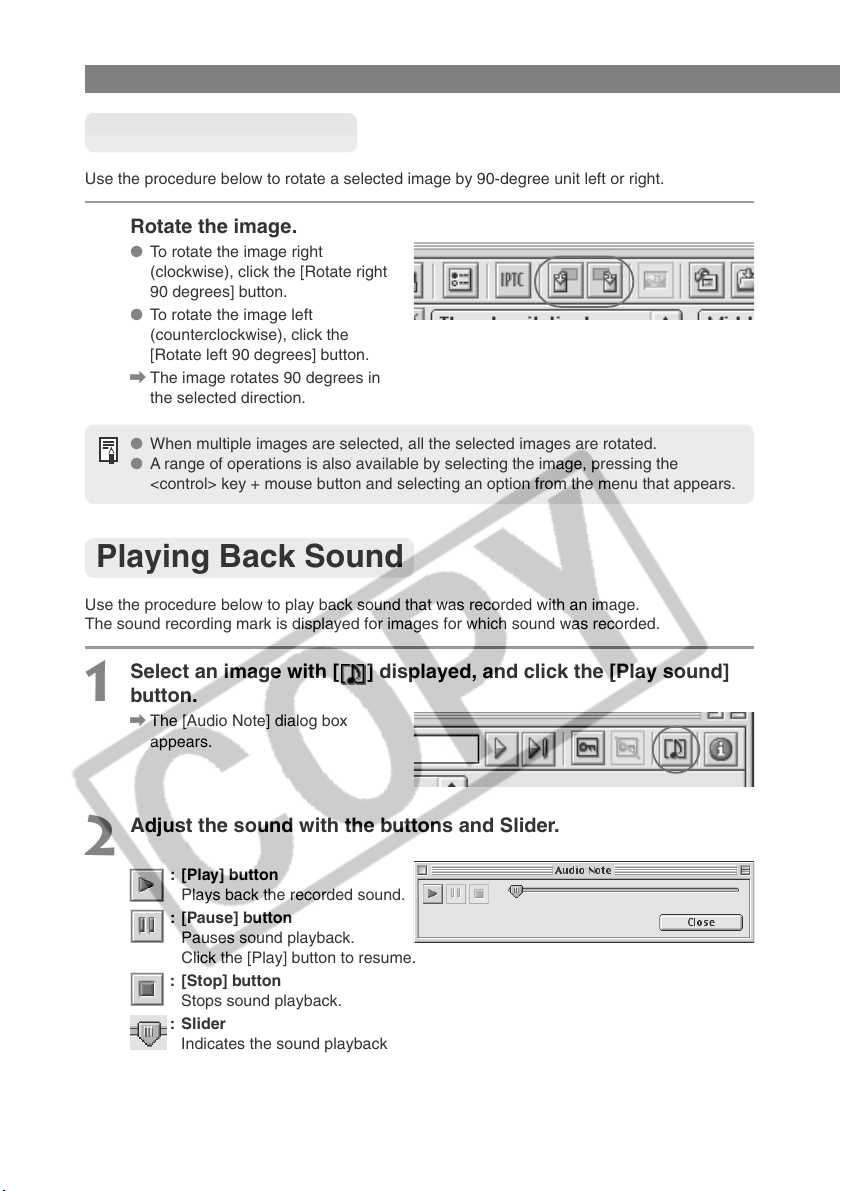
Use the procedure below to rotate a selected image by 90-degree unit left or right.
Rotate the image.
● To rotate the image right
(clockwise), click the [Rotate right
90 degrees] button.
● To rotate the image left
(counterclockwise), click the
[Rotate left 90 degrees] button.
\ The image rotates 90 degrees in
the selected direction.
● When multiple images are selected, all the selected images are rotated.
● A range of operations is also available by selecting the image, pressing the
<control> key + mouse button and selecting an option from the menu that appears.
Playing Back Sound
Use the procedure below to play back sound that was recorded with an image.
The sound recording mark is displayed for images for which sound was recorded.
Select an image with [ ] displayed, and click the [Play sound]
1
button.
\ The [Audio Note] dialog box
appears.
Adjust the sound with the buttons and Slider.
2
: [Play] button
Plays back the recorded sound.
: [Pause] button
Pauses sound playback.
Click the [Play] button to resume.
: [Stop] button
Stops sound playback.
: Slider
Indicates the sound playback
position.
● Clicking the [Close] button closes the [Audio Note] dialog box.
3-16
Page 33
Working with Selected Images
Erasing Images
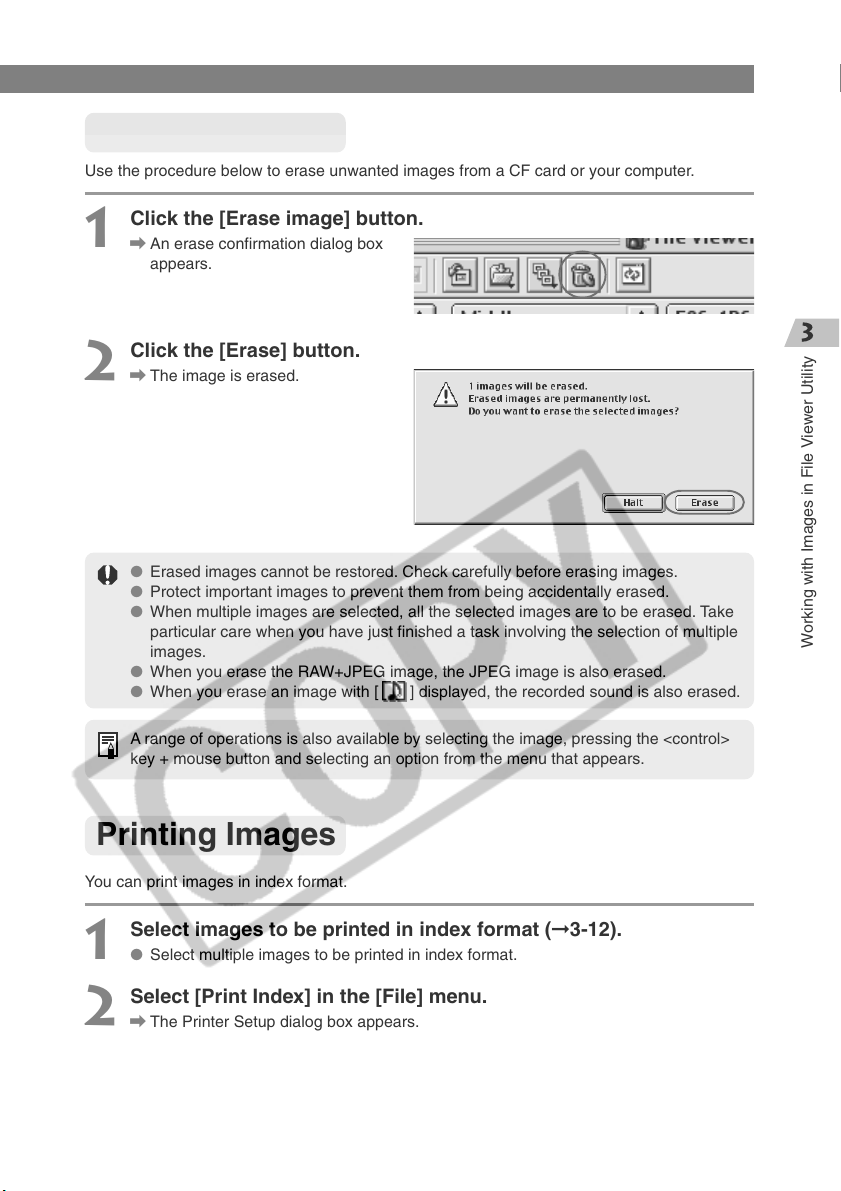
Use the procedure below to erase unwanted images from a CF card or your computer.
Click the [Erase image] button.
1
\ An erase confirmation dialog box
appears.
Click the [Erase] button.
2
\ The image is erased.
● Erased images cannot be restored. Check carefully before erasing images.
● Protect important images to prevent them from being accidentally erased.
● When multiple images are selected, all the selected images are to be erased. Take
particular care when you have just finished a task involving the selection of multiple
images.
● When you erase the RAW+JPEG image, the JPEG image is also erased.
● When you erase an image with [ ] displayed, the recorded sound is also erased.
Working with Images in File Viewer Utility
A range of operations is also available by selecting the image, pressing the <control>
key + mouse button and selecting an option from the menu that appears.
Printing Images
You can print images in index format.
Select images to be printed in index format (➞3-12).
1
● Select multiple images to be printed in index format.
Select [Print Index] in the [File] menu.
2
\ The Printer Setup dialog box appears.
Select the printer to be used, specify the print settings and print
3
images.
3-17
Page 34
Processing RAW Images
RAW images are processed so that they are optimized for their intended purpose. As well as
providing the same color matrix and white balance settings, etc. as the camera, File Viewer
Utility allows you to specify, digital exposure compensation, tone curve adjustment and white
balance adjustment using click white balance as additional processing parameters.
This processing does not involve working with the original RAW images. It applies virtual
parameters to RAW images temporarily downloaded to the computer. Accordingly, you can
redo the processing repeatedly with different parameters.
You can also change the modified parameters back to the settings used when the shot was
taken.
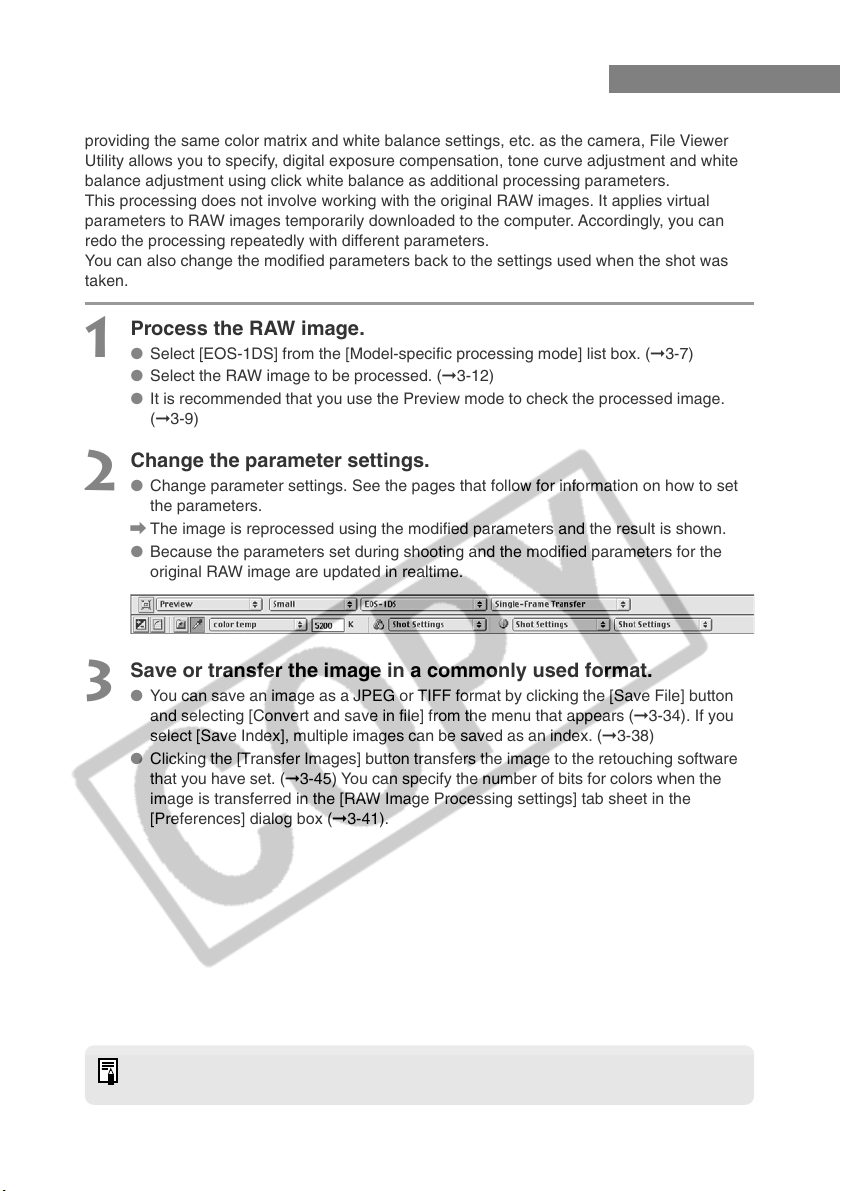
Process the RAW image.
1
● Select [EOS-1DS] from the [Model-specific processing mode] list box. (➞3-7)
● Select the RAW image to be processed. (➞3-12)
● It is recommended that you use the Preview mode to check the processed image.
(➞3-9)
Change the parameter settings.
2
● Change parameter settings. See the pages that follow for information on how to set
the parameters.
\ The image is reprocessed using the modified parameters and the result is shown.
● Because the parameters set during shooting and the modified parameters for the
original RAW image are updated in realtime.
Save or transfer the image in a commonly used format.
3
● You can save an image as a JPEG or TIFF format by clicking the [Save File] button
and selecting [Convert and save in file] from the menu that appears (➞3-34). If you
select [Save Index], multiple images can be saved as an index. (➞3-38)
● Clicking the [Transfer Images] button transfers the image to the retouching software
that you have set. (➞3-45) You can specify the number of bits for colors when the
image is transferred in the [RAW Image Processing settings] tab sheet in the
[Preferences] dialog box (➞3-41).
When multiple images are selected, the specified processing is applied to all the RAW
images selected.
3-18
Page 35
Processing RAW Images
Selecting the Color Matrix
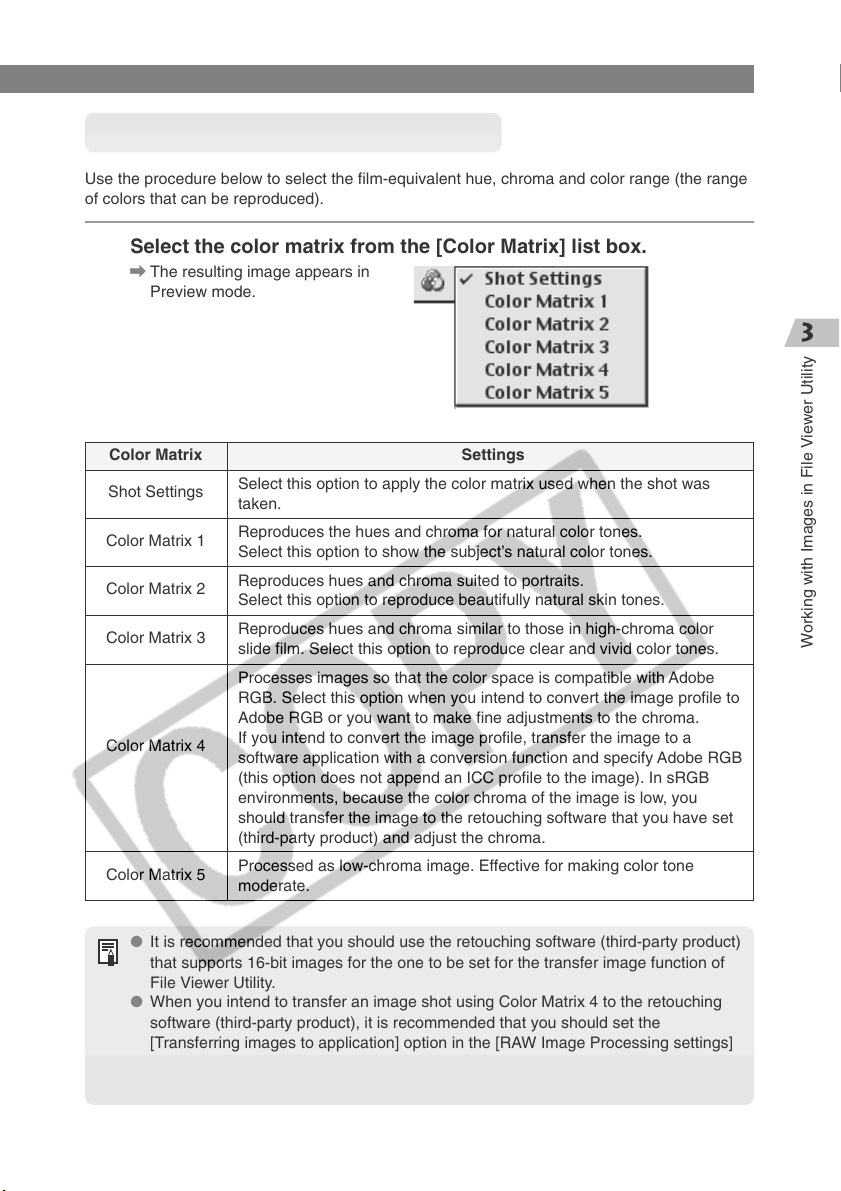
Use the procedure below to select the film-equivalent hue, chroma and color range (the range
of colors that can be reproduced).
Select the color matrix from the [Color Matrix] list box.
\ The resulting image appears in
Preview mode.
Color Matrix
Shot Settings
Color Matrix 1
Color Matrix 2
Color Matrix 3
Color Matrix 4
Color Matrix 5
● It is recommended that you should use the retouching software (third-party product)
that supports 16-bit images for the one to be set for the transfer image function of
File Viewer Utility.
● When you intend to transfer an image shot using Color Matrix 4 to the retouching
software (third-party product), it is recommended that you should set the
[Transferring images to application] option in the [RAW Image Processing settings]
tab sheet in the [Preferences] dialog box (➞3-41) to [16 bits per color channel] so
that the transferred image is suitable for image processing.
Select this option to apply the color matrix used when the shot was
taken.
Reproduces the hues and chroma for natural color tones.
Select this option to show the subject’s natural color tones.
Reproduces hues and chroma suited to portraits.
Select this option to reproduce beautifully natural skin tones.
Reproduces hues and chroma similar to those in high-chroma color
slide film. Select this option to reproduce clear and vivid color tones.
Processes images so that the color space is compatible with Adobe
RGB. Select this option when you intend to convert the image profile to
Adobe RGB or you want to make fine adjustments to the chroma.
If you intend to convert the image profile, transfer the image to a
software application with a conversion function and specify Adobe RGB
(this option does not append an ICC profile to the image). In sRGB
environments, because the color chroma of the image is low, you
should transfer the image to the retouching software that you have set
(third-party product) and adjust the chroma.
Processed as low-chroma image. Effective for making color tone
moderate.
Settings
Working with Images in File Viewer Utility
3-19
Page 36
Processing RAW Images
Adjusting the Sharpness
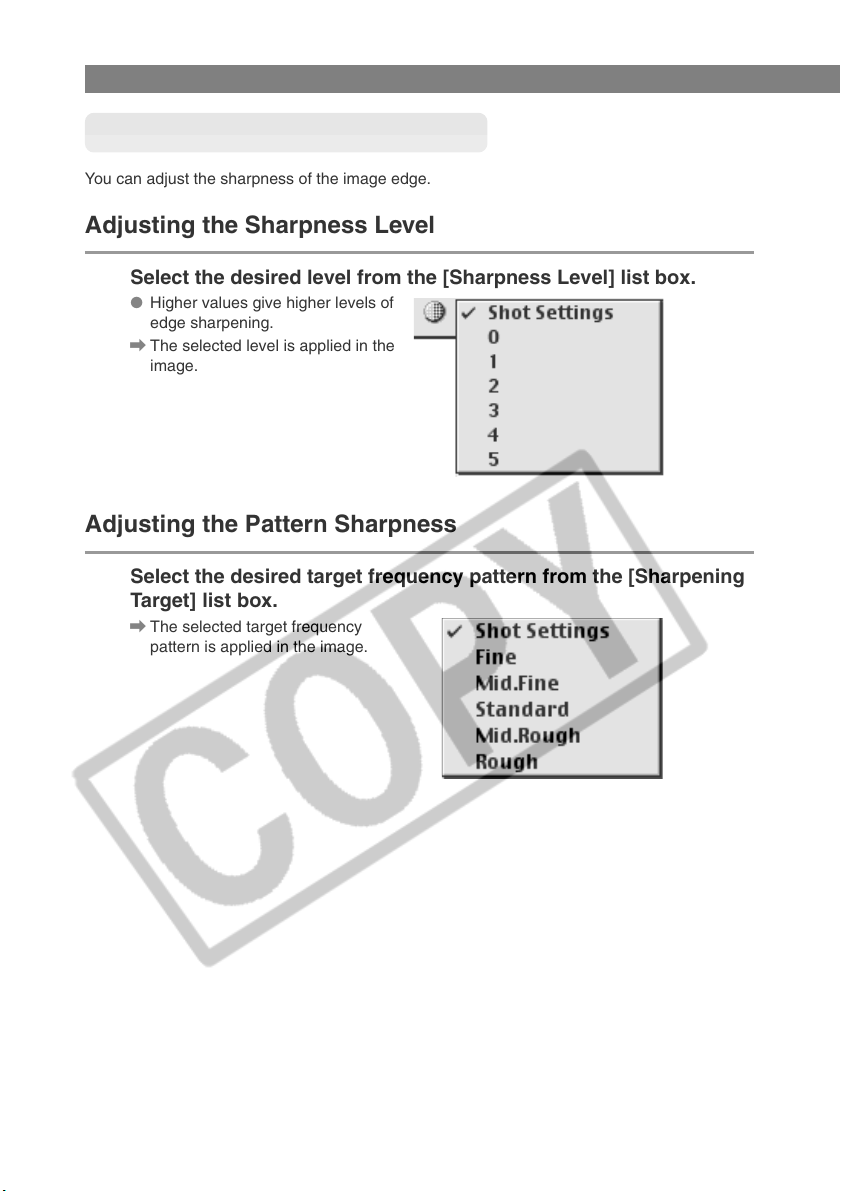
You can adjust the sharpness of the image edge.
Adjusting the Sharpness Level
Select the desired level from the [Sharpness Level] list box.
● Higher values give higher levels of
edge sharpening.
\ The selected level is applied in the
image.
Adjusting the Pattern Sharpness
Select the desired target frequency pattern from the [Sharpening
Target] list box.
\ The selected target frequency
pattern is applied in the image.
3-20
Page 37
Processing RAW Images
Correcting the Brightness (Digital Exposure Compensation)
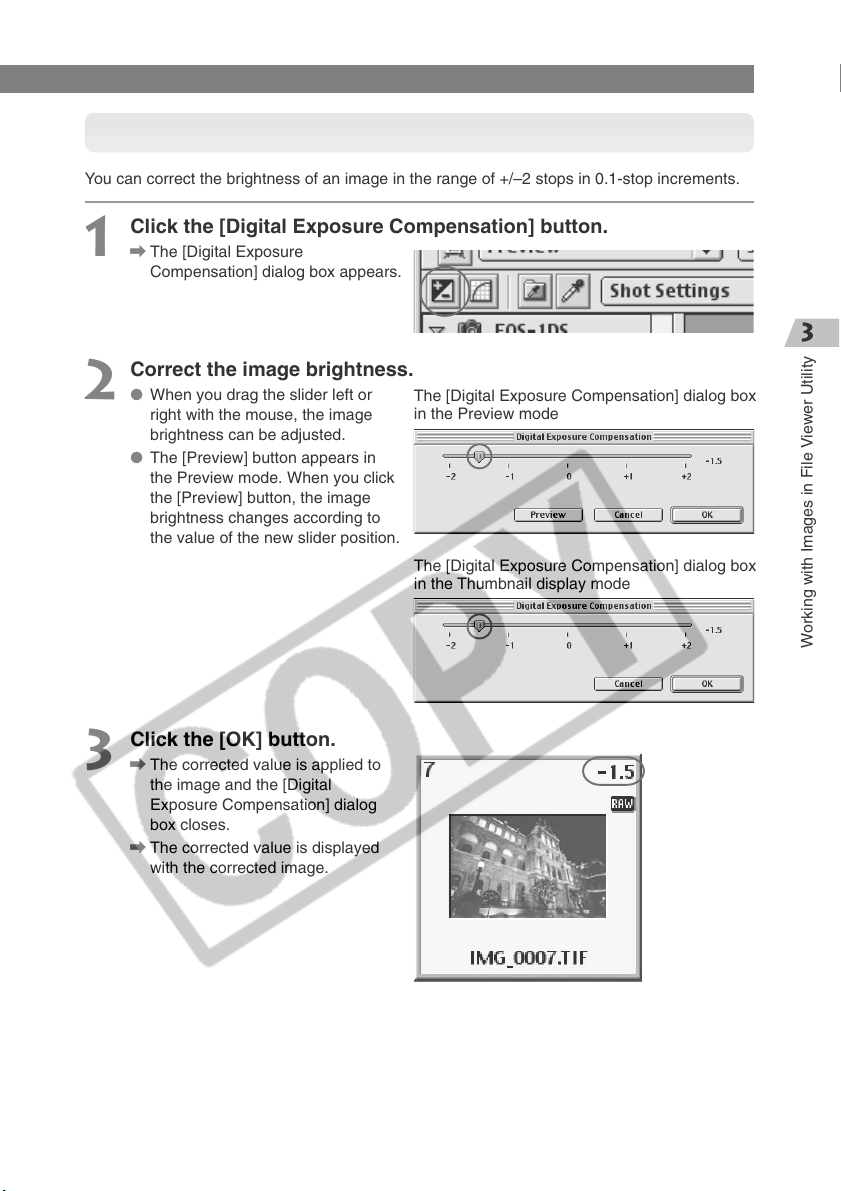
You can correct the brightness of an image in the range of +/–2 stops in 0.1-stop increments.
Click the [Digital Exposure Compensation] button.
1
\ The [Digital Exposure
Compensation] dialog box appears.
Correct the image brightness.
2
● When you drag the slider left or
right with the mouse, the image
brightness can be adjusted.
● The [Preview] button appears in
the Preview mode. When you click
the [Preview] button, the image
brightness changes according to
the value of the new slider position.
The [Digital Exposure Compensation] dialog box
in the Preview mode
The [Digital Exposure Compensation] dialog box
in the Thumbnail display mode
Click the [OK] button.
3
\ The corrected value is applied to
the image and the [Digital
Exposure Compensation] dialog
box closes.
\ The corrected value is displayed
with the corrected image.
Working with Images in File Viewer Utility
3-21
Page 38
Processing RAW Images
Adjusting the Color and Brightness (Adjust Tone Curve)
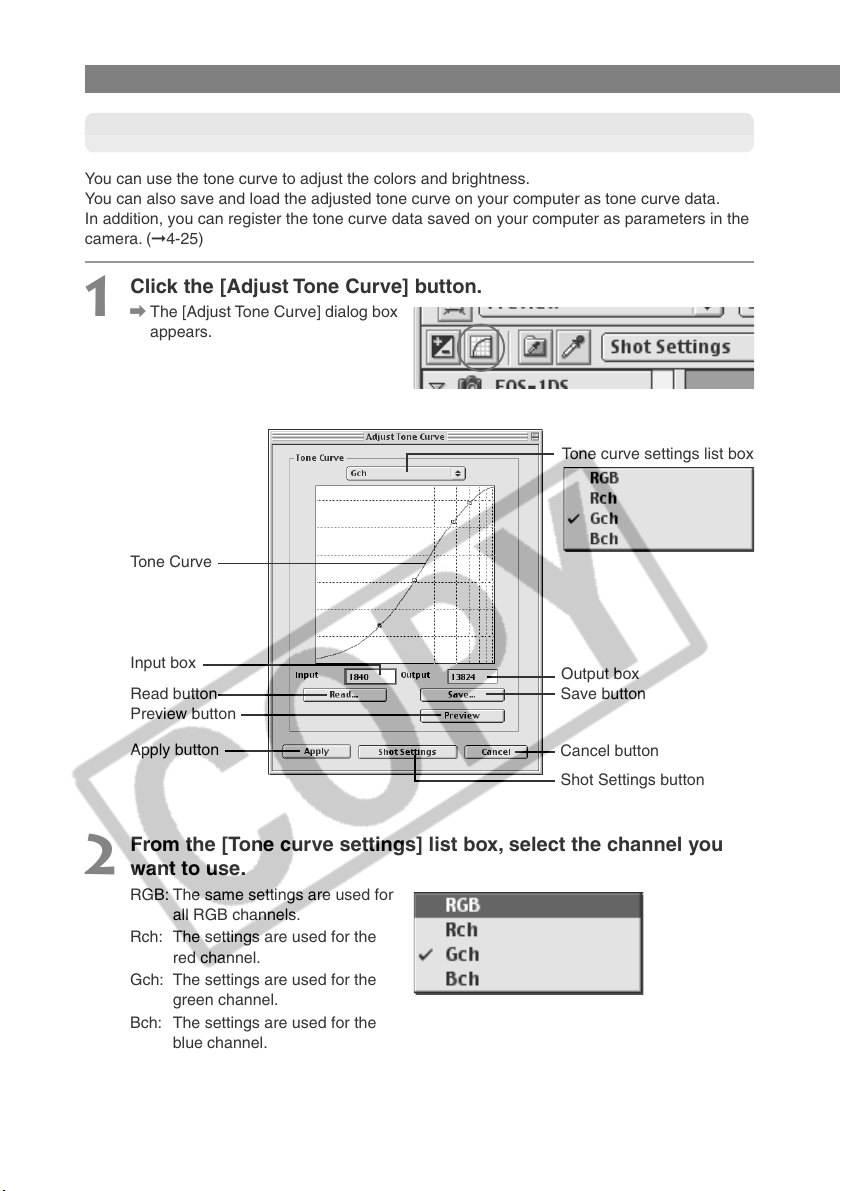
You can use the tone curve to adjust the colors and brightness.
You can also save and load the adjusted tone curve on your computer as tone curve data.
In addition, you can register the tone curve data saved on your computer as parameters in the
camera. (➞4-25)
Click the [Adjust Tone Curve] button.
1
\ The [Adjust Tone Curve] dialog box
appears.
Tone curve settings list box
Tone Curve
Input box
Read button
Preview button
Apply button
Output box
Save button
Cancel button
Shot Settings button
From the [Tone curve settings] list box, select the channel you
2
want to use.
RGB: The same settings are used for
all RGB channels.
Rch: The settings are used for the
red channel.
Gch: The settings are used for the
green channel.
Bch: The settings are used for the
blue channel.
3-22
Page 39
Processing RAW Images
Adjust the tone curve.
3
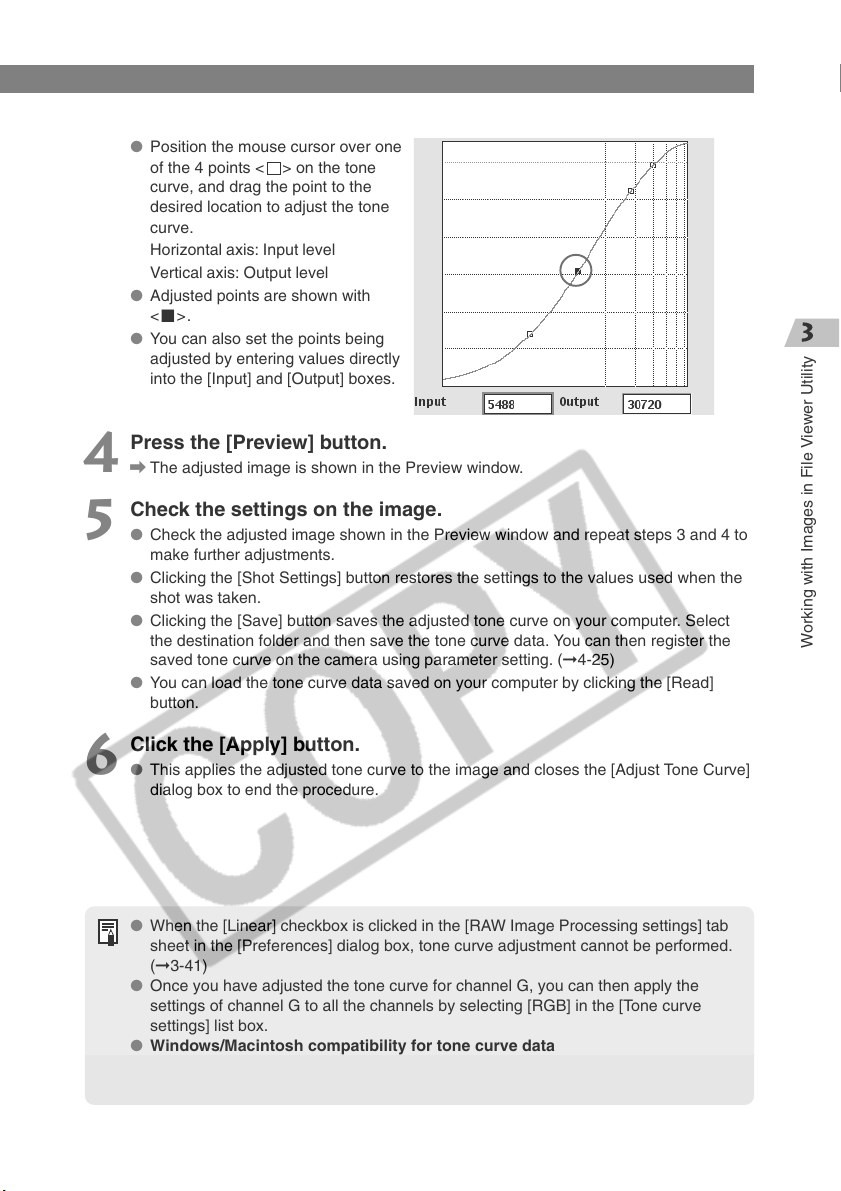
● Position the mouse cursor over one
of the 4 points < > on the tone
curve, and drag the point to the
desired location to adjust the tone
curve.
Horizontal axis: Input level
Vertical axis: Output level
● Adjusted points are shown with
<
>.
■
● You can also set the points being
adjusted by entering values directly
into the [Input] and [Output] boxes.
Press the [Preview] button.
4
\ The adjusted image is shown in the Preview window.
Check the settings on the image.
5
● Check the adjusted image shown in the Preview window and repeat steps 3 and 4 to
make further adjustments.
● Clicking the [Shot Settings] button restores the settings to the values used when the
shot was taken.
● Clicking the [Save] button saves the adjusted tone curve on your computer. Select
the destination folder and then save the tone curve data. You can then register the
saved tone curve on the camera using parameter setting. (➞4-25)
● You can load the tone curve data saved on your computer by clicking the [Read]
button.
Working with Images in File Viewer Utility
Click the [Apply] button.
6
● This applies the adjusted tone curve to the image and closes the [Adjust Tone Curve]
dialog box to end the procedure.
● When the [Linear] checkbox is clicked in the [RAW Image Processing settings] tab
sheet in the [Preferences] dialog box, tone curve adjustment cannot be performed.
(➞3-41)
● Once you have adjusted the tone curve for channel G, you can then apply the
settings of channel G to all the channels by selecting [RGB] in the [Tone curve
settings] list box.
● Windows/Macintosh compatibility for tone curve data
Tone curve data saved on your computer is compatible between Windows and
Macintosh.
3-23
Page 40
Processing RAW Images
Tone Curve
A tone curve shows the brightness and color saturation for the original image (input) and the
adjusted image (output) in the form of a line graph. You can use the tone curve to adjust the
image brightness and color saturation values that were set by the camera when the shot was
taken. Also, by using the tone curve to adjust an image, you can tailor the image to the
particular color reproduction characteristics of your monitor or printer so that you obtain the
most faithful color reproduction.
The tone curve adjustment options include [RGB], which adjusts the input and output for the
entire image in a single operation, as well as the [Rch], [Gch] and [Bch] settings that adjust
each color individually. You can use the [Tone curve settings] list box to switch between the
different channels as you make your adjustments.
The horizontal axis shows the brightness and color saturation for the unadjusted (input) image,
with the left-hand end indicating shadow (darker areas of the image) and the right-hand end
indicating highlights (brighter areas of the image).
The vertical axis shows the brightness and color saturation for the adjusted (output) image,
with the lower end indicating shadow and the upper end indicating highlights.
3-24
Page 41
Processing RAW Images
Adjusting the White Balance
You can adjust the white balance in your RAW images.
You can also save the adjusted white balance on your computer as white balance data.
(➞3-28) In addition, you can register the white balance data saved on your computer as
personal white balance data in the camera. (➞4-30)
Select the White Balance
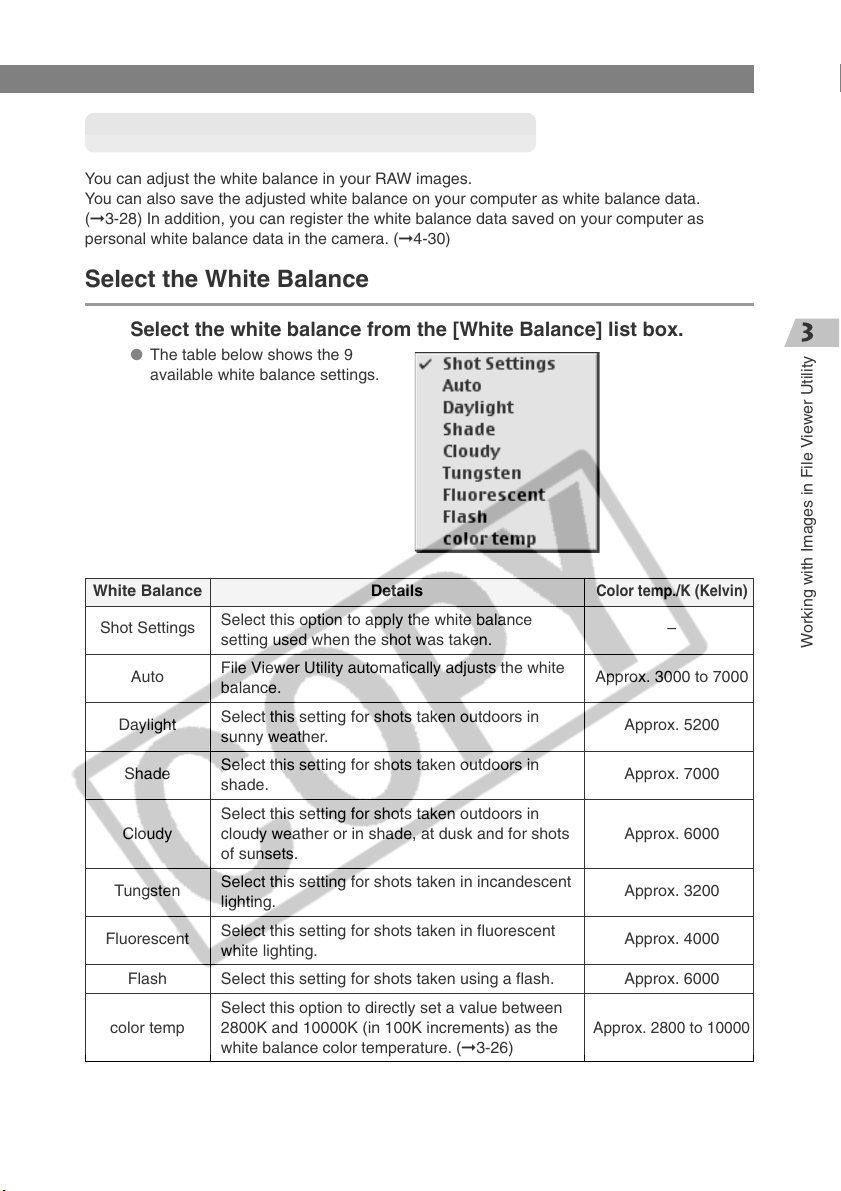
Select the white balance from the [White Balance] list box.
● The table below shows the 9
available white balance settings.
White Balance
Shot Settings
Auto
Daylight
Shade
Cloudy
Tungsten
Fluorescent
Flash
color temp
\ The adjusted image appears.
Select this option to apply the white balance
setting used when the shot was taken.
File Viewer Utility automatically adjusts the white
balance.
Select this setting for shots taken outdoors in
sunny weather.
Select this setting for shots taken outdoors in
shade.
Select this setting for shots taken outdoors in
cloudy weather or in shade, at dusk and for shots
of sunsets.
Select this setting for shots taken in incandescent
lighting.
Select this setting for shots taken in fluorescent
white lighting.
Select this setting for shots taken using a flash.
Select this option to directly set a value between
2800K and 10000K (in 100K increments) as the
white balance color temperature. (➞3-26)
Details
Color temp./K (Kelvin)
–
Approx. 3000 to 7000
Approx. 5200
Approx. 7000
Approx. 6000
Approx. 3200
Approx. 4000
Approx. 6000
Approx. 2800 to 10000
3-25
Working with Images in File Viewer Utility
Page 42
Processing RAW Images
Setting the Color Temperature
You can set the white balance color temperature to a value between 2800K and 10000K (in
100K increments).
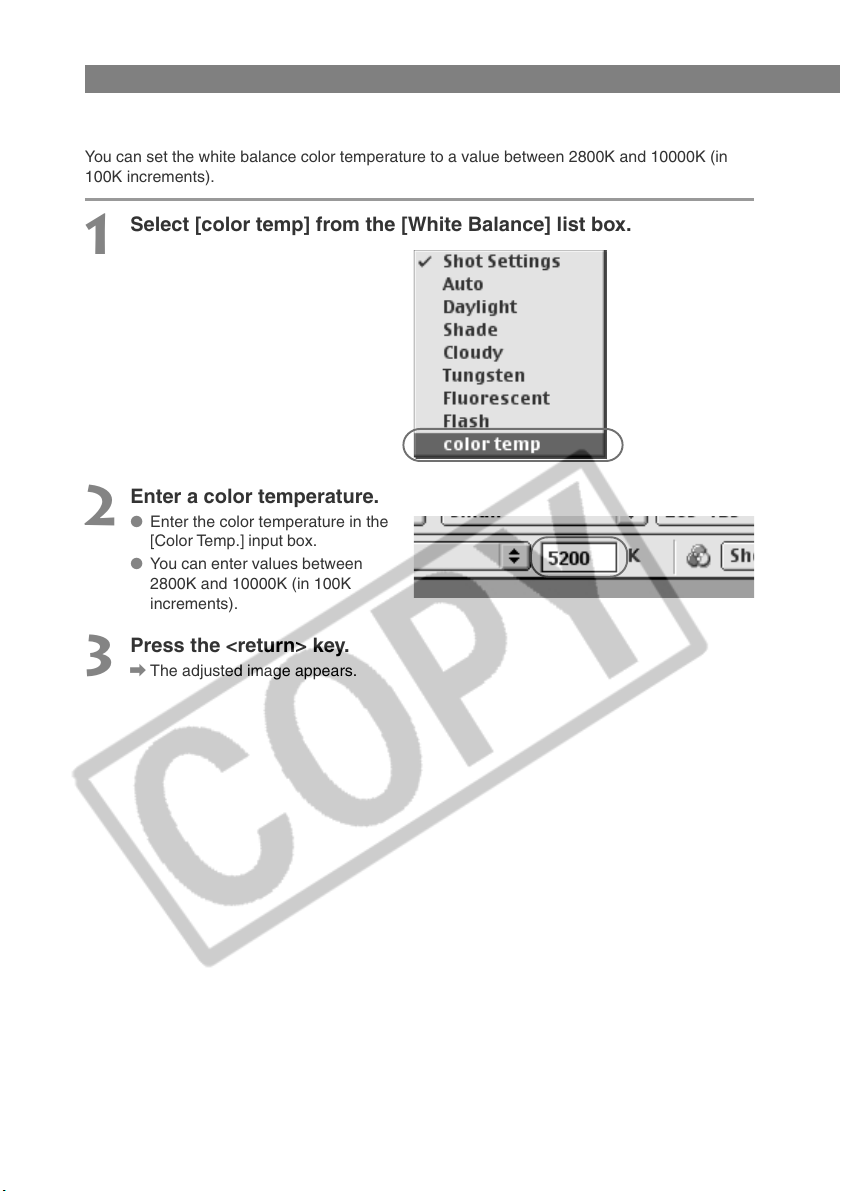
Select [color temp] from the [White Balance] list box.
1
Enter a color temperature.
2
● Enter the color temperature in the
[Color Temp.] input box.
● You can enter values between
2800K and 10000K (in 100K
increments).
Press the <return> key.
3
\ The adjusted image appears.
3-26
Page 43
Processing RAW Images
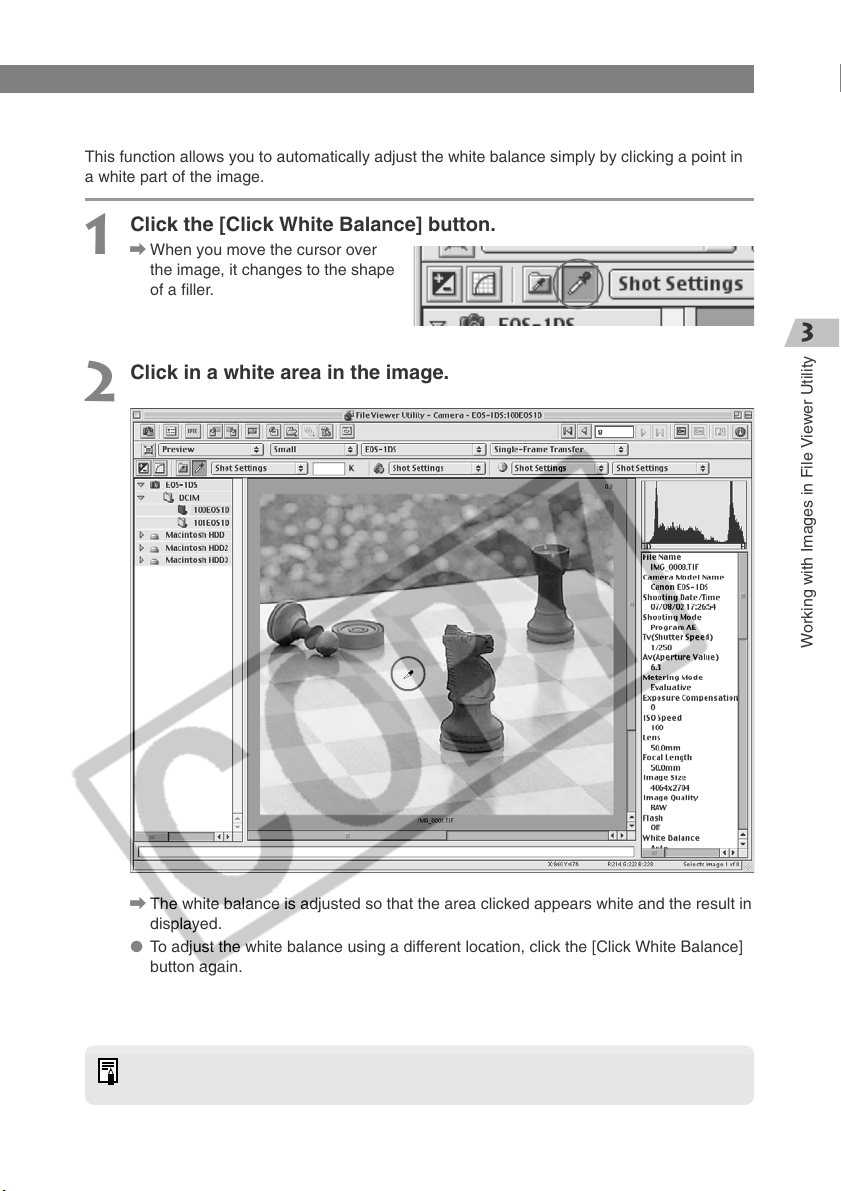
Click White Balance Function
This function allows you to automatically adjust the white balance simply by clicking a point in
a white part of the image.
Click the [Click White Balance] button.
1
\ When you move the cursor over
the image, it changes to the shape
of a filler.
Click in a white area in the image.
2
\ The white balance is adjusted so that the area clicked appears white and the result in
displayed.
● To adjust the white balance using a different location, click the [Click White Balance]
button again.
When you use Click White Balance Function, [White Point] is displayed in the [White
Balance] list box.
3-27
Working with Images in File Viewer Utility
Page 44
Processing RAW Images
Saving the White Balance
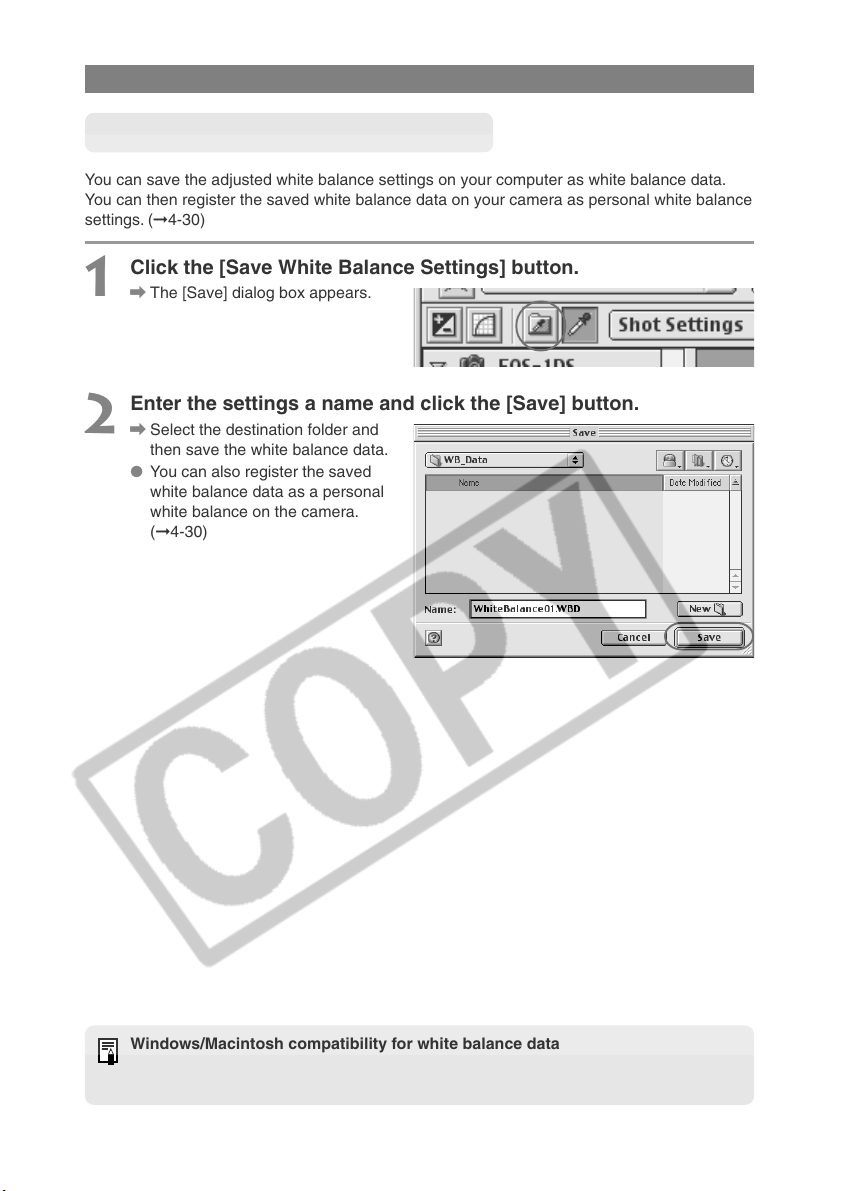
You can save the adjusted white balance settings on your computer as white balance data.
You can then register the saved white balance data on your camera as personal white balance
settings. (➞4-30)
Click the [Save White Balance Settings] button.
1
\ The [Save] dialog box appears.
Enter the settings a name and click the [Save] button.
2
\ Select the destination folder and
then save the white balance data.
● You can also register the saved
white balance data as a personal
white balance on the camera.
(➞4-30)
Windows/Macintosh compatibility for white balance data
White balance data saved on your computer is compatible between Windows and
Macintosh.
3-28
Page 45
Setting the IPTC Information
IPTC stands for International Press Telecommunications Council and refers to a standard for
communications and information exchange tags attached to images. The standard was
established by newspaper and communications companies to allow problem-free transmission
of images.
The IPTC tags can be attached to the RAW images taken with the camera. The owner’s name
and the date/time data is automatically included in the IPTC information as part of the data
specified in the camera setup functions settings in the [Basic Settings] tab sheet in the
[Camera Settings] dialog box. (➞4-3) The specified IPTC information can also be saved or
read on your computer.
Select a RAW image for which the IPTC information is set. (➞3-12)
1
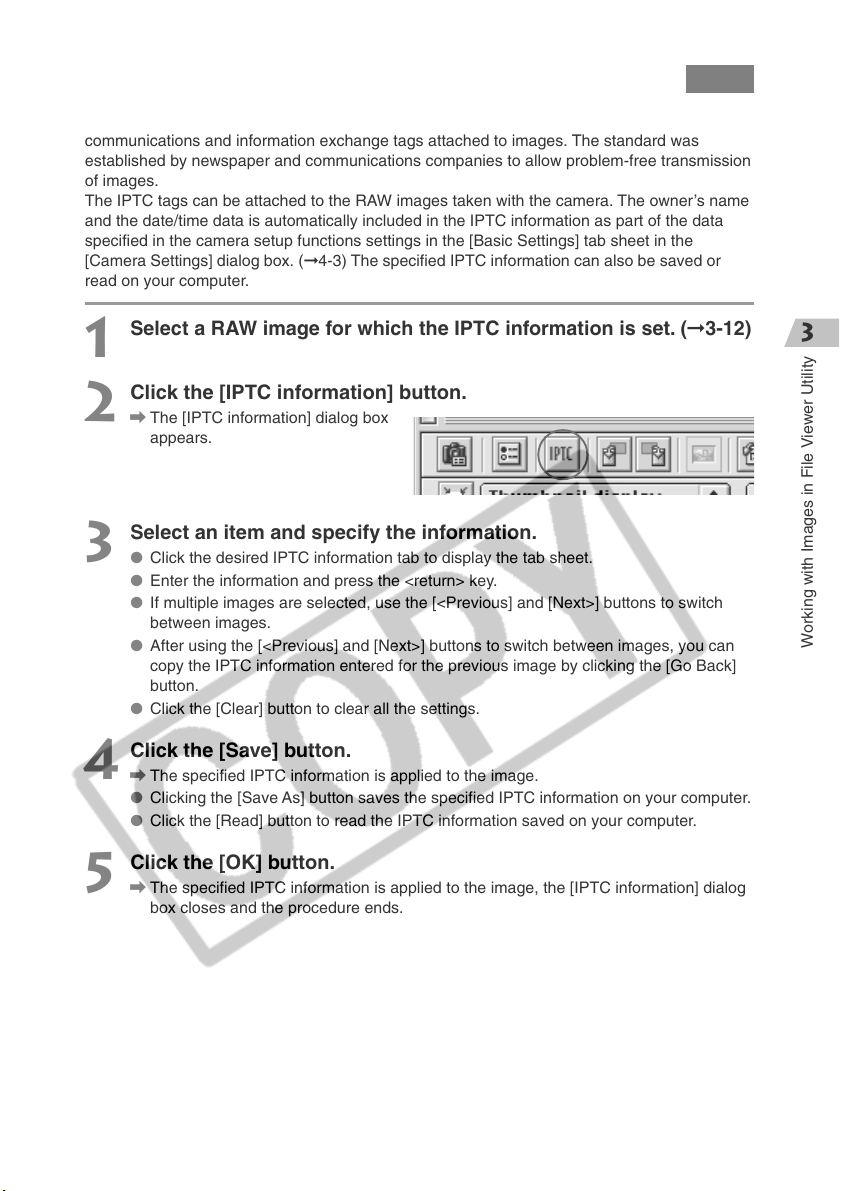
Click the [IPTC information] button.
2
\ The [IPTC information] dialog box
appears.
Select an item and specify the information.
3
● Click the desired IPTC information tab to display the tab sheet.
● Enter the information and press the <return> key.
● If multiple images are selected, use the [<Previous] and [Next>] buttons to switch
between images.
● After using the [<Previous] and [Next>] buttons to switch between images, you can
copy the IPTC information entered for the previous image by clicking the [Go Back]
button.
● Click the [Clear] button to clear all the settings.
Working with Images in File Viewer Utility
Click the [Save] button.
4
\ The specified IPTC information is applied to the image.
● Clicking the [Save As] button saves the specified IPTC information on your computer.
● Click the [Read] button to read the IPTC information saved on your computer.
Click the [OK] button.
5
\ The specified IPTC information is applied to the image, the [IPTC information] dialog
box closes and the procedure ends.
3-29
Page 46
Setting the IPTC Information
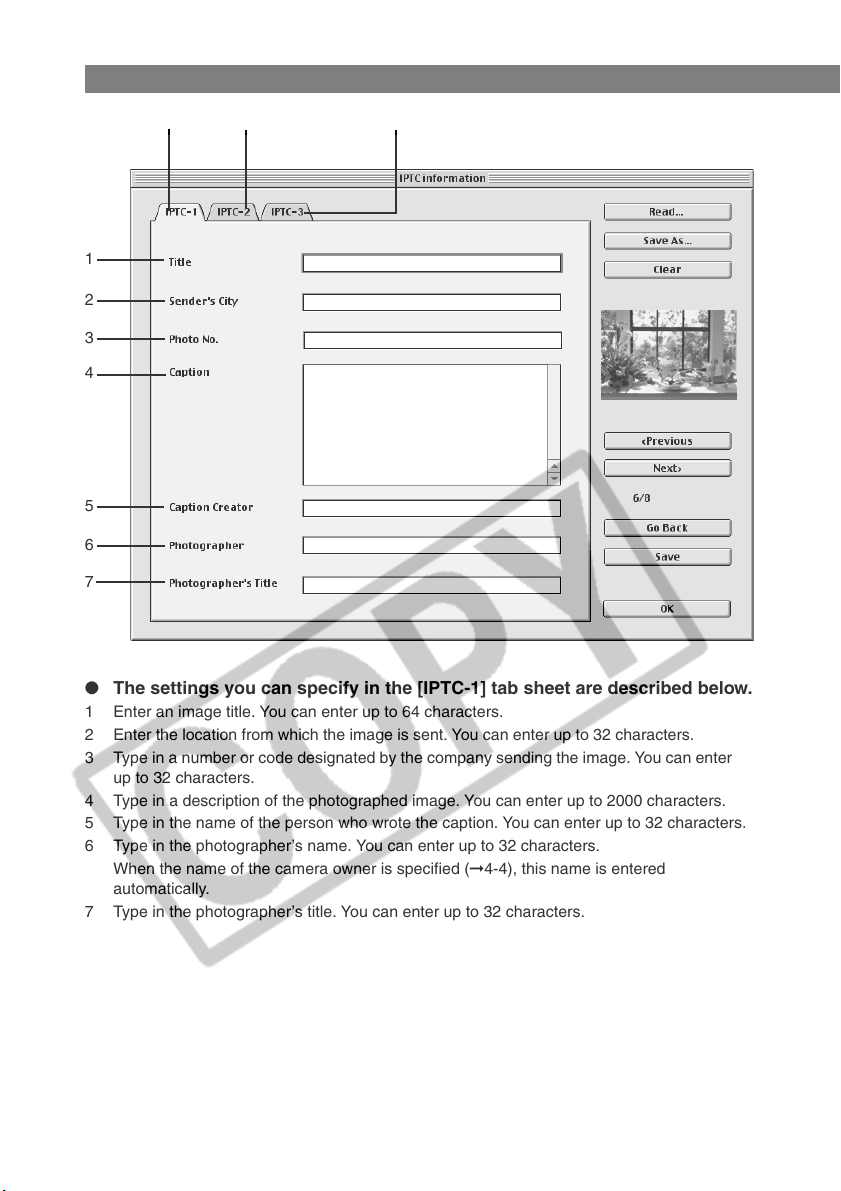
[IPTC-1] tab [IPTC-2] tab [IPTC-3] tab
1
2
3
4
5
6
7
● The settings you can specify in the [IPTC-1] tab sheet are described below.
1 Enter an image title. You can enter up to 64 characters.
2 Enter the location from which the image is sent. You can enter up to 32 characters.
3 Type in a number or code designated by the company sending the image. You can enter
up to 32 characters.
4 Type in a description of the photographed image. You can enter up to 2000 characters.
5 Type in the name of the person who wrote the caption. You can enter up to 32 characters.
6 Type in the photographer’s name. You can enter up to 32 characters.
When the name of the camera owner is specified (➞4-4), this name is entered
automatically.
7 Type in the photographer’s title. You can enter up to 32 characters.
3-30
Page 47
8
9
10
11
12
13
Setting the IPTC Information
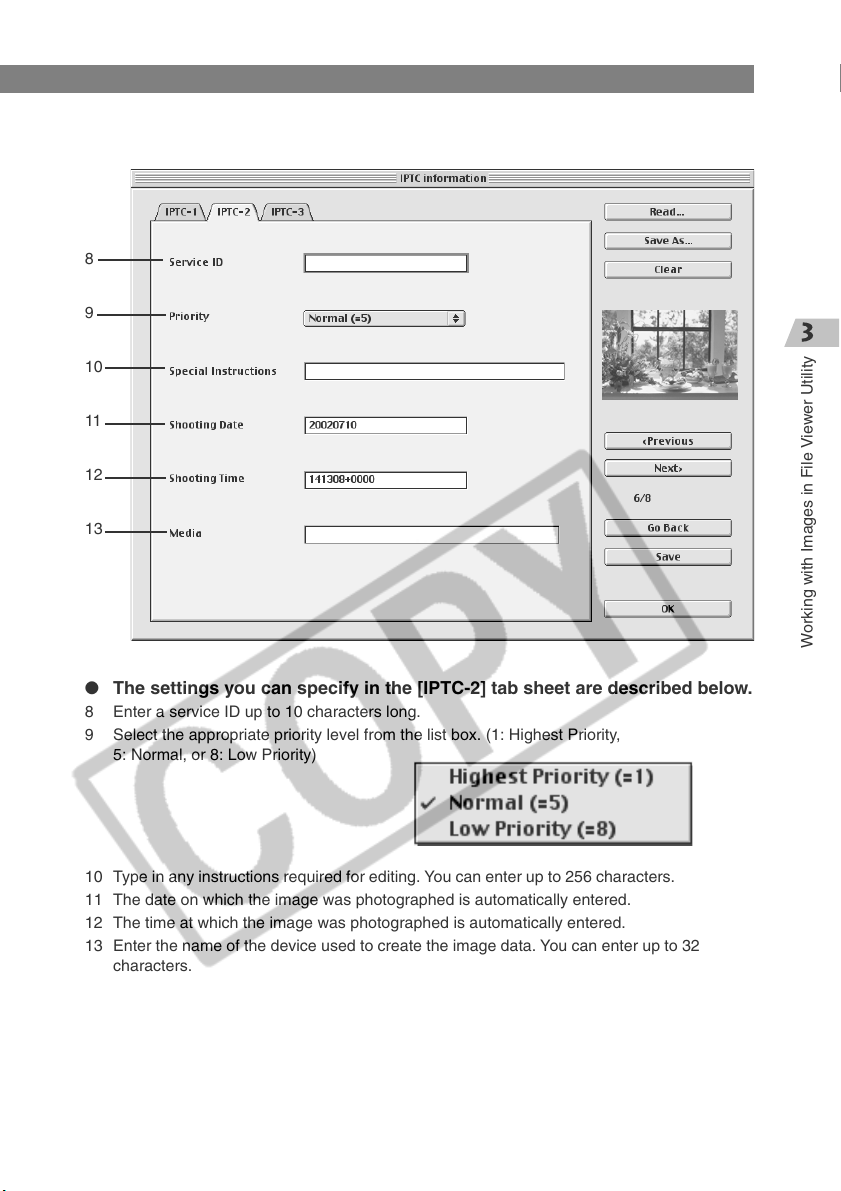
● The settings you can specify in the [IPTC-2] tab sheet are described below.
8 Enter a service ID up to 10 characters long.
9 Select the appropriate priority level from the list box. (1: Highest Priority,
5: Normal, or 8: Low Priority)
10 Type in any instructions required for editing. You can enter up to 256 characters.
11 The date on which the image was photographed is automatically entered.
12 The time at which the image was photographed is automatically entered.
13 Enter the name of the device used to create the image data. You can enter up to 32
characters.
3-31
Working with Images in File Viewer Utility
Page 48
Setting the IPTC Information
14
15
20
21
22
16
17
18
19
23
24
25
26
27
28
29
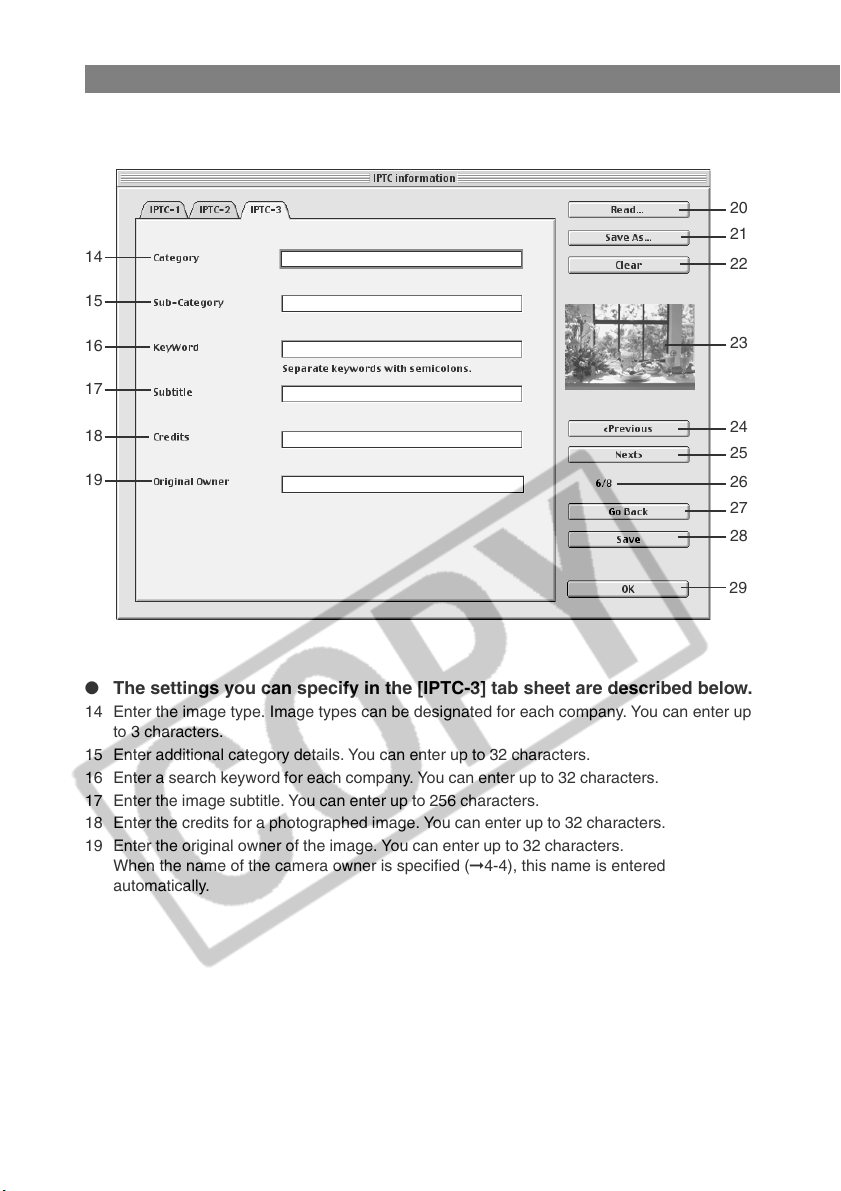
● The settings you can specify in the [IPTC-3] tab sheet are described below.
14 Enter the image type. Image types can be designated for each company. You can enter up
to 3 characters.
15 Enter additional category details. You can enter up to 32 characters.
16 Enter a search keyword for each company. You can enter up to 32 characters.
17 Enter the image subtitle. You can enter up to 256 characters.
18 Enter the credits for a photographed image. You can enter up to 32 characters.
19 Enter the original owner of the image. You can enter up to 32 characters.
When the name of the camera owner is specified (➞4-4), this name is entered
automatically.
3-32
Page 49
Setting the IPTC Information
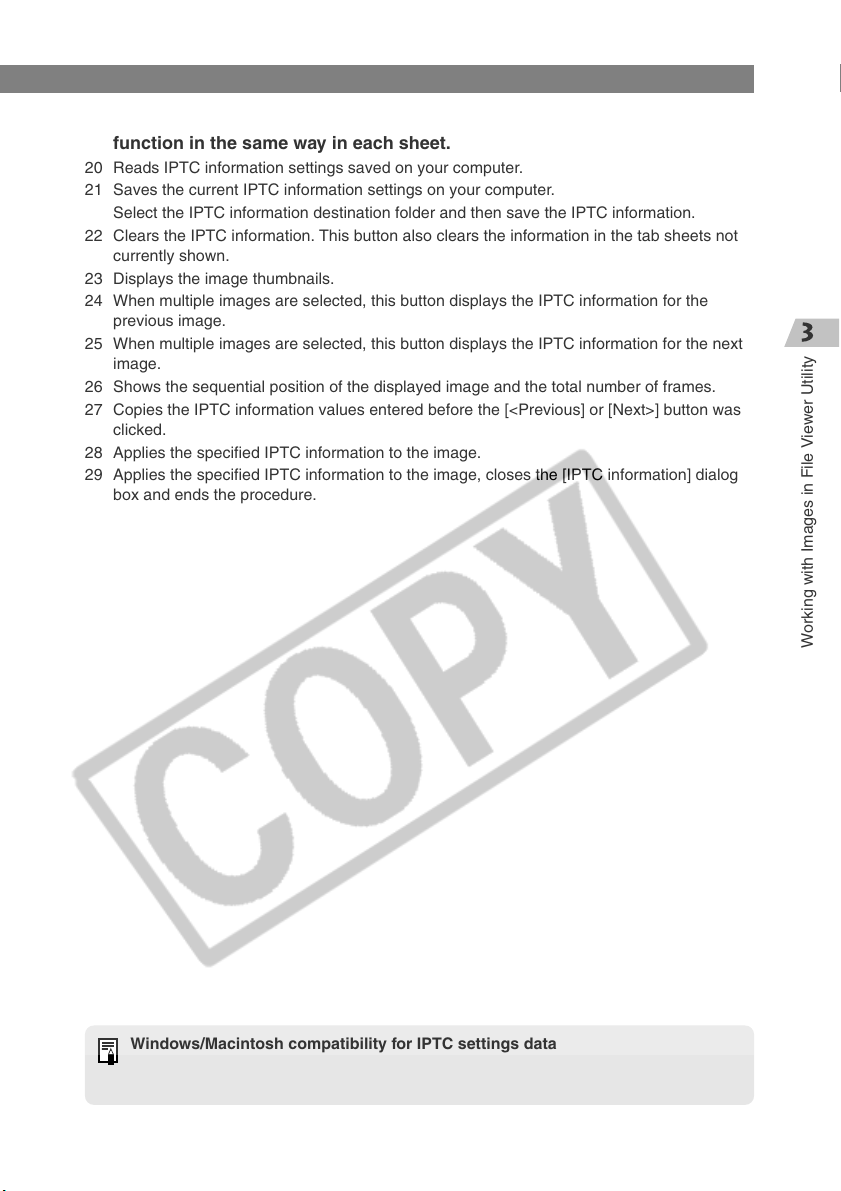
● The buttons listed below are displayed in each of the tab sheets. They
function in the same way in each sheet.
20 Reads IPTC information settings saved on your computer.
21 Saves the current IPTC information settings on your computer.
Select the IPTC information destination folder and then save the IPTC information.
22 Clears the IPTC information. This button also clears the information in the tab sheets not
currently shown.
23 Displays the image thumbnails.
24 When multiple images are selected, this button displays the IPTC information for the
previous image.
25 When multiple images are selected, this button displays the IPTC information for the next
image.
26 Shows the sequential position of the displayed image and the total number of frames.
27 Copies the IPTC information values entered before the [<Previous] or [Next>] button was
clicked.
28 Applies the specified IPTC information to the image.
29 Applies the specified IPTC information to the image, closes the [IPTC information] dialog
box and ends the procedure.
Windows/Macintosh compatibility for IPTC settings data
IPTC settings data saved on your computer is compatible between Windows and
Macintosh.
Working with Images in File Viewer Utility
3-33
Page 50
Saving Images
This section explains how to save images stored on a CF card in the camera via the interface
cable onto your computer and how to save multiple images as an index file on your computer.
Saving Images from the Camera to Your Computer
You should save the images you have shot on your computer.
Select images to be saved. (➞3-12)
1
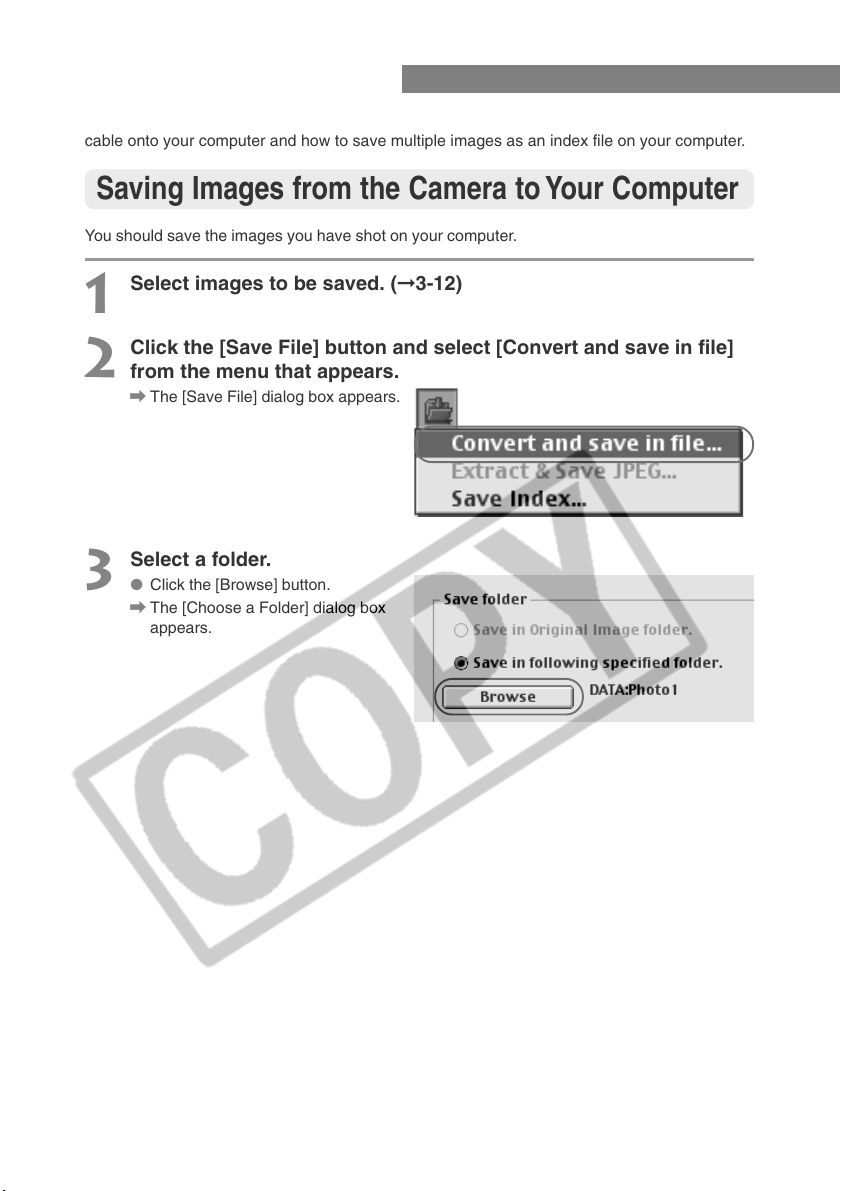
Click the [Save File] button and select [Convert and save in file]
2
from the menu that appears.
\ The [Save File] dialog box appears.
Select a folder.
3
● Click the [Browse] button.
\ The [Choose a Folder] dialog box
appears.
3-34
Page 51
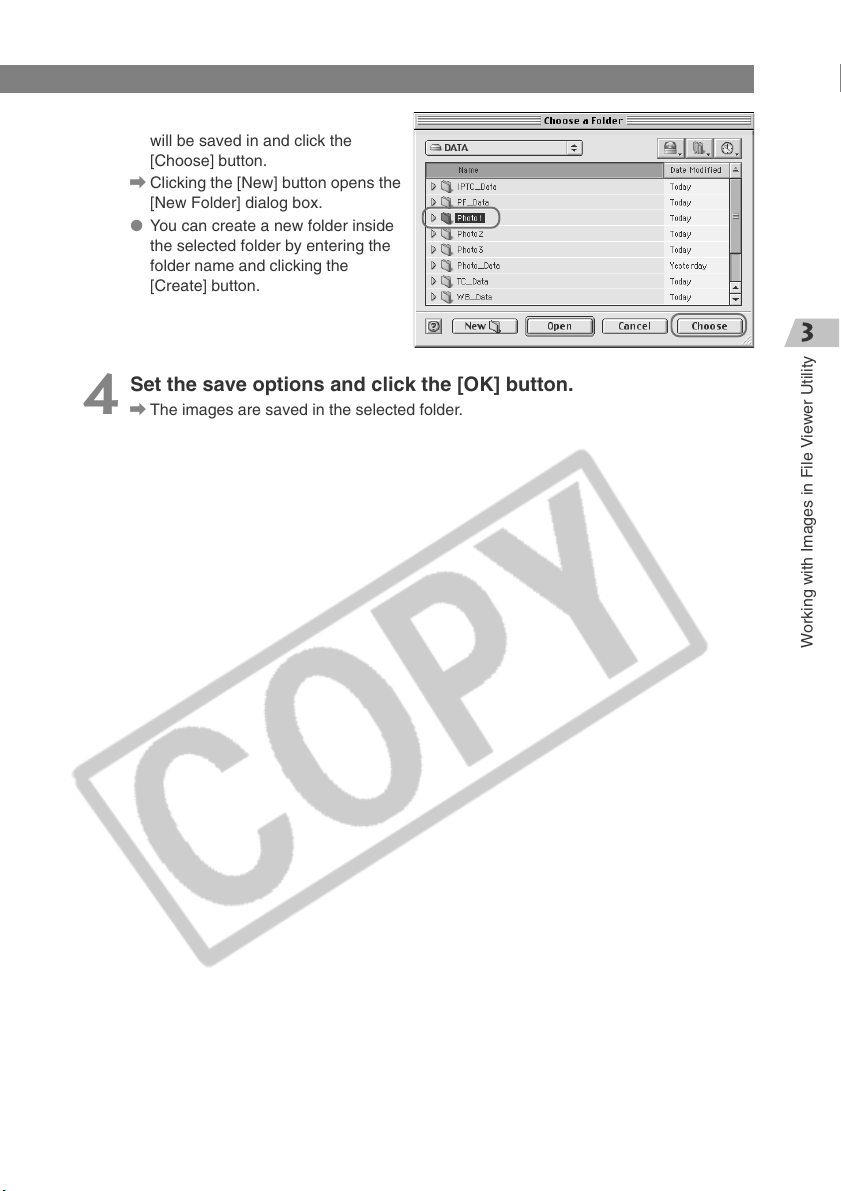
● Select the folder that the images
will be saved in and click the
[Choose] button.
\ Clicking the [New] button opens the
[New Folder] dialog box.
● You can create a new folder inside
the selected folder by entering the
folder name and clicking the
[Create] button.
Set the save options and click the [OK] button.
4
\ The images are saved in the selected folder.
Saving Images
3-35
Working with Images in File Viewer Utility
Page 52
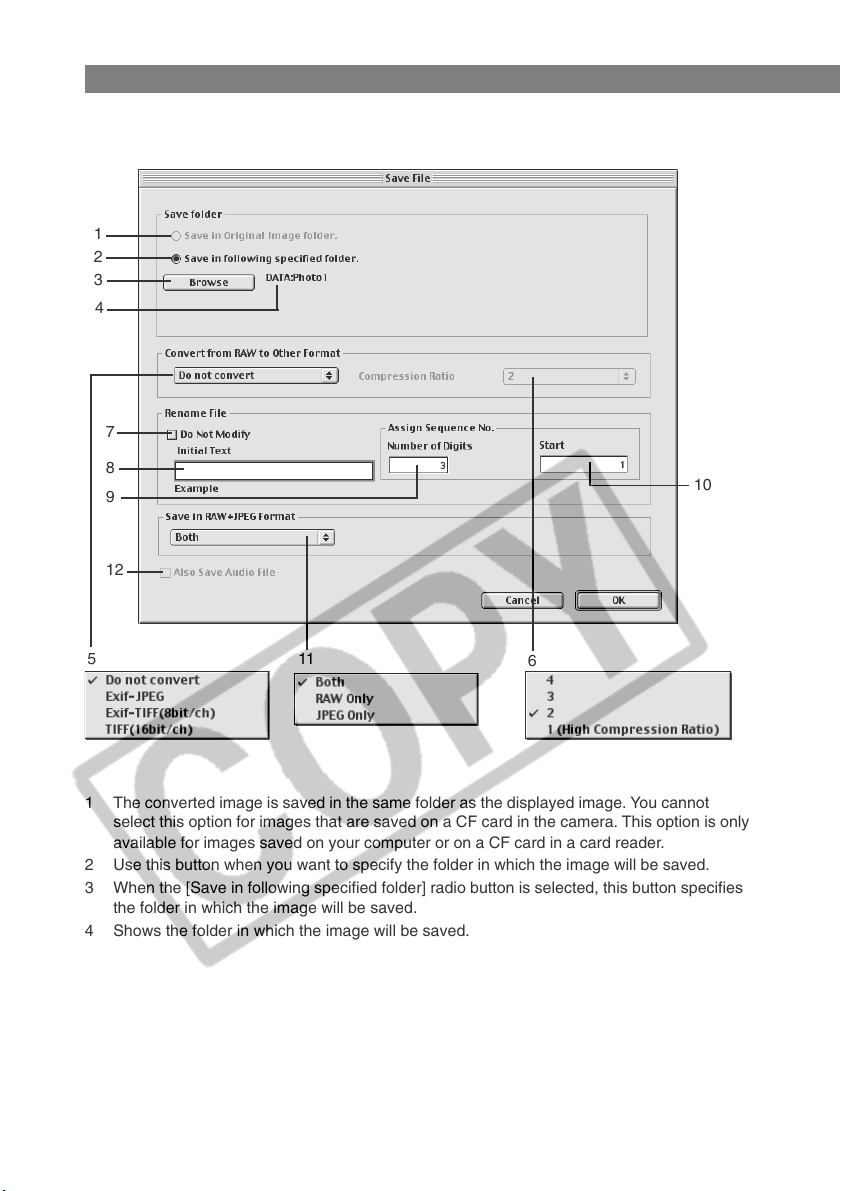
Saving Images
1
2
3
4
7
Save File dialog box
8
9
12
5
1 The converted image is saved in the same folder as the displayed image. You cannot
select this option for images that are saved on a CF card in the camera. This option is only
available for images saved on your computer or on a CF card in a card reader.
2 Use this button when you want to specify the folder in which the image will be saved.
3 When the [Save in following specified folder] radio button is selected, this button specifies
the folder in which the image will be saved.
4 Shows the folder in which the image will be saved.
11
6
10
3-36
Page 53
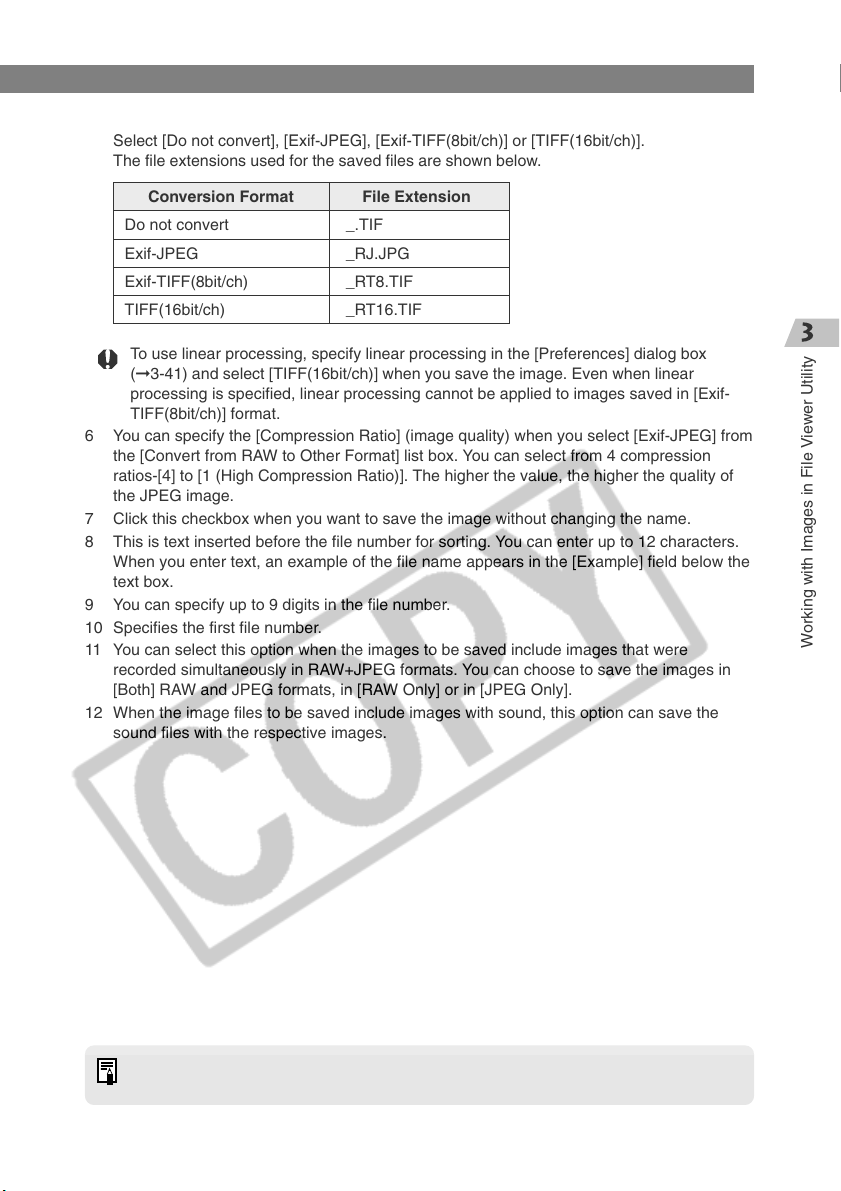
5 Select this option when the images to be saved include RAW images.
Select [Do not convert], [Exif-JPEG], [Exif-TIFF(8bit/ch)] or [TIFF(16bit/ch)].
The file extensions used for the saved files are shown below.
Saving Images
Conversion Format
Do not convert
Exif-JPEG
Exif-TIFF(8bit/ch)
TIFF(16bit/ch)
To use linear processing, specify linear processing in the [Preferences] dialog box
(➞3-41) and select [TIFF(16bit/ch)] when you save the image. Even when linear
processing is specified, linear processing cannot be applied to images saved in [Exif-
TIFF(8bit/ch)] format.
6 You can specify the [Compression Ratio] (image quality) when you select [Exif-JPEG] from
the [Convert from RAW to Other Format] list box. You can select from 4 compression
ratios-[4] to [1 (High Compression Ratio)]. The higher the value, the higher the quality of
the JPEG image.
7 Click this checkbox when you want to save the image without changing the name.
8 This is text inserted before the file number for sorting. You can enter up to 12 characters.
When you enter text, an example of the file name appears in the [Example] field below the
text box.
9 You can specify up to 9 digits in the file number.
10 Specifies the first file number.
11 You can select this option when the images to be saved include images that were
recorded simultaneously in RAW+JPEG formats. You can choose to save the images in
[Both] RAW and JPEG formats, in [RAW Only] or in [JPEG Only].
12 When the image files to be saved include images with sound, this option can save the
sound files with the respective images.
File Extension
_.TIF
_RJ.JPG
_RT8.TIF
_RT16.TIF
Working with Images in File Viewer Utility
A range of operations is also available by selecting the image, pressing the <control>
key + mouse button and selecting an option from the menu that appears.
3-37
Page 54
Saving Images
Saving Images as Index File
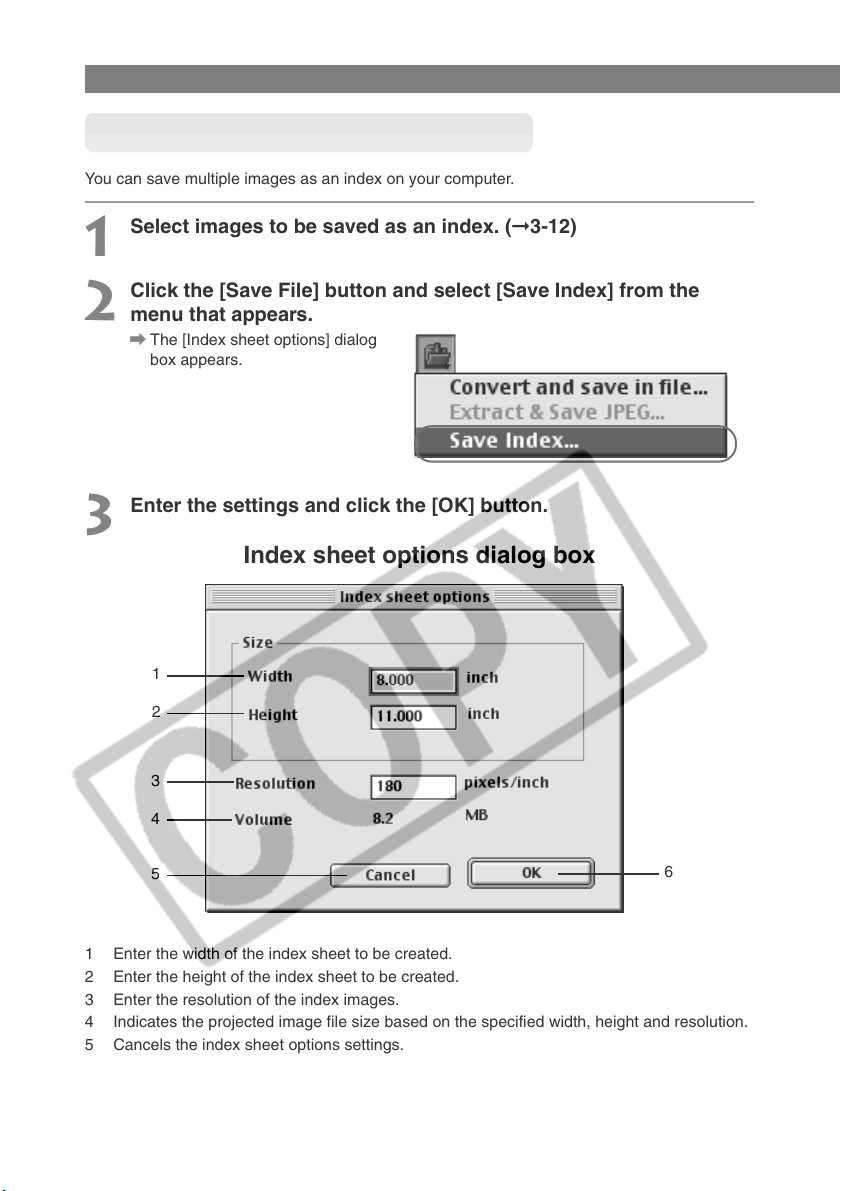
You can save multiple images as an index on your computer.
Select images to be saved as an index. (➞3-12)
1
Click the [Save File] button and select [Save Index] from the
2
menu that appears.
\ The [Index sheet options] dialog
box appears.
Enter the settings and click the [OK] button.
3
Index sheet options dialog box
1
2
3
4
5
1 Enter the width of the index sheet to be created.
2 Enter the height of the index sheet to be created.
3 Enter the resolution of the index images.
4 Indicates the projected image file size based on the specified width, height and resolution.
5 Cancels the index sheet options settings.
6 The settings are applied and the [Index sheet options] dialog box closes.
\ The [Save File] dialog box appears.
3-38
6
Page 55
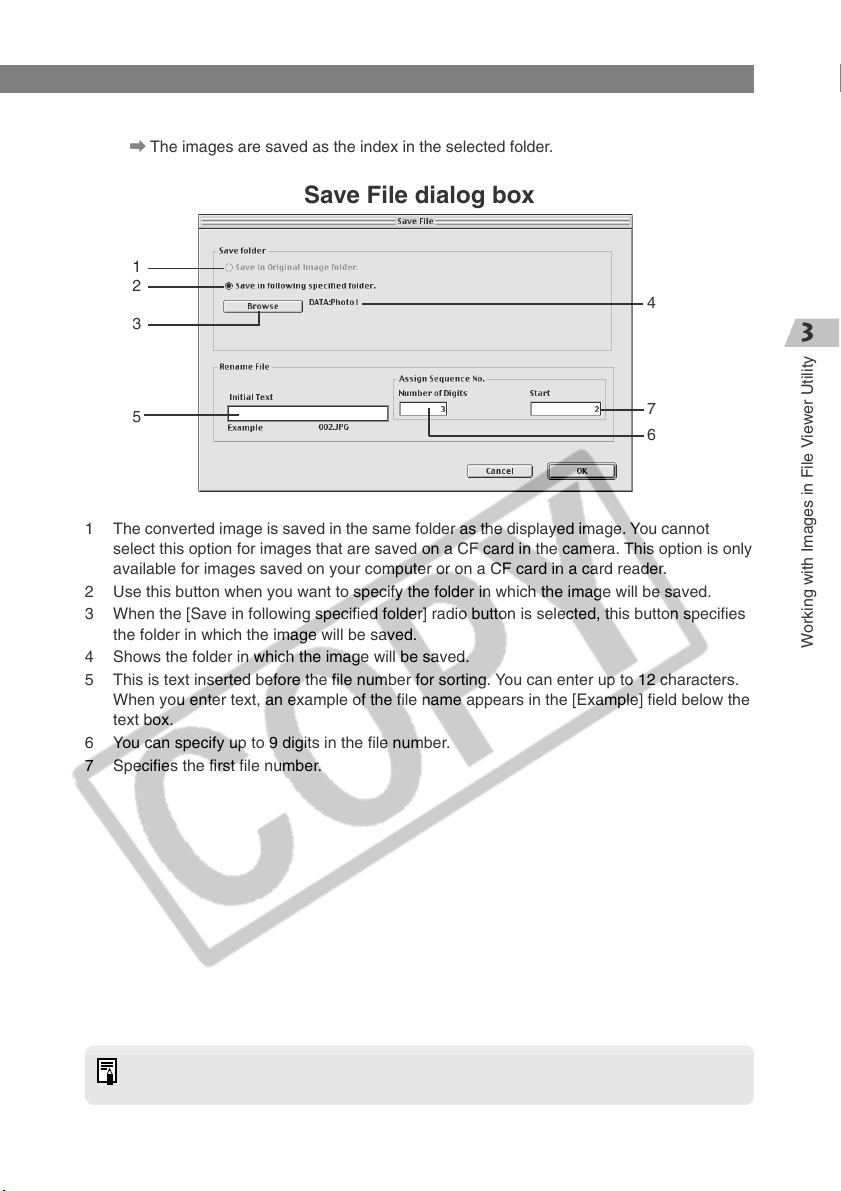
Specify the save options and click the [OK] button.
4
\ The images are saved as the index in the selected folder.
Save File dialog box
1
2
3
Saving Images
4
5
1 The converted image is saved in the same folder as the displayed image. You cannot
select this option for images that are saved on a CF card in the camera. This option is only
available for images saved on your computer or on a CF card in a card reader.
2 Use this button when you want to specify the folder in which the image will be saved.
3 When the [Save in following specified folder] radio button is selected, this button specifies
the folder in which the image will be saved.
4 Shows the folder in which the image will be saved.
5 This is text inserted before the file number for sorting. You can enter up to 12 characters.
When you enter text, an example of the file name appears in the [Example] field below the
text box.
6 You can specify up to 9 digits in the file number.
7 Specifies the first file number.
7
6
Working with Images in File Viewer Utility
A range of operations is also available by selecting the image, pressing the <control>
key + mouse button and selecting an option from the menu that appears.
3-39
Page 56
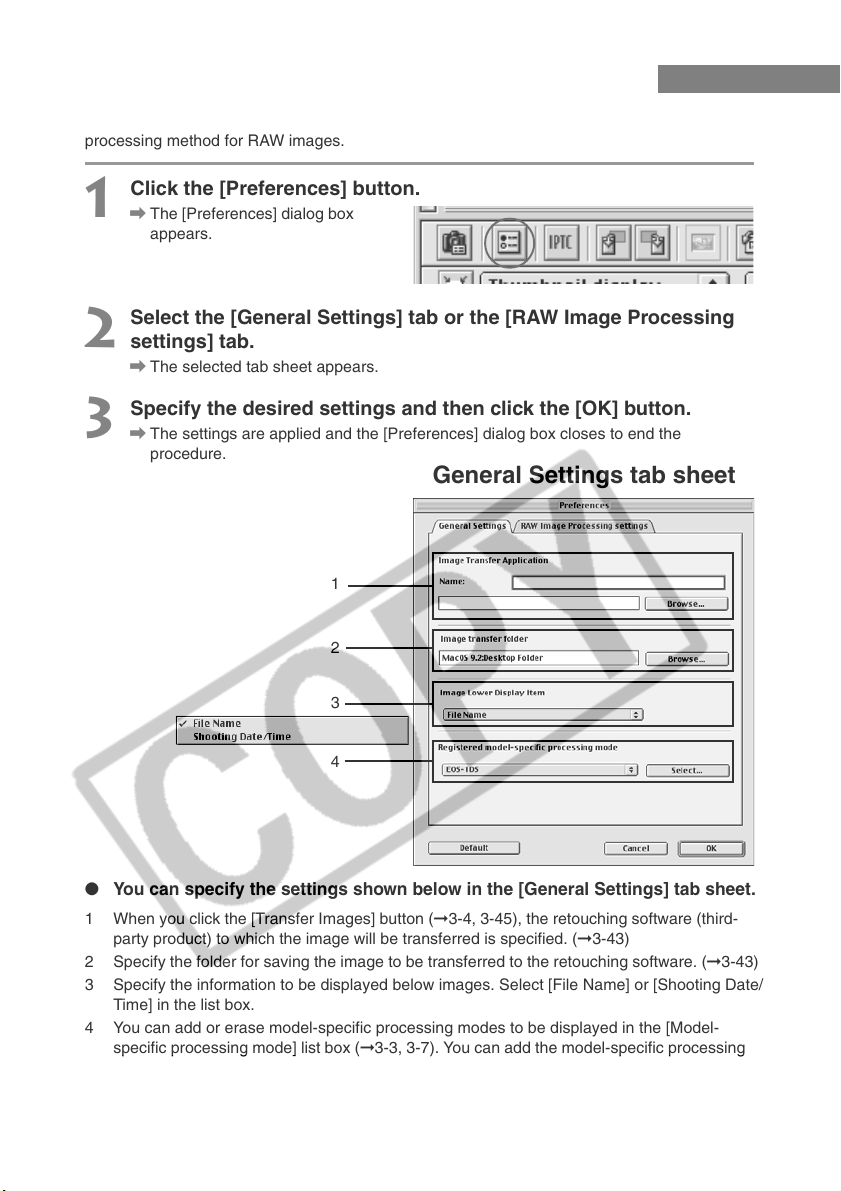
Specifying the Preferences
You can use the procedure below to specify the general settings for File Viewer Utility and the
processing method for RAW images.
Click the [Preferences] button.
1
\ The [Preferences] dialog box
appears.
Select the [General Settings] tab or the [RAW Image Processing
2
settings] tab.
\ The selected tab sheet appears.
Specify the desired settings and then click the [OK] button.
3
\ The settings are applied and the [Preferences] dialog box closes to end the
procedure.
General Settings tab sheet
1
2
3
4
●
You can specify the settings shown below in the [General Settings] tab sheet.
1 When you click the [Transfer Images] button (➞3-4, 3-45), the retouching software (third-
party product) to which the image will be transferred is specified. (➞3-43)
2 Specify the folder for saving the image to be transferred to the retouching software. (➞3-43)
3 Specify the information to be displayed below images. Select [File Name] or [Shooting Date/
Time] in the list box.
4 You can add or erase model-specific processing modes to be displayed in the [Model-
specific processing mode] list box (➞3-3, 3-7). You can add the model-specific processing
mode if you click the checkbox of the camera to be added and click the [OK] button on the
[Select model-specific processing mode] dialog box displayed by clicking the [Select] button.
If you clear the checkbox, the model-specific processing mode is erased.
3-40
Page 57
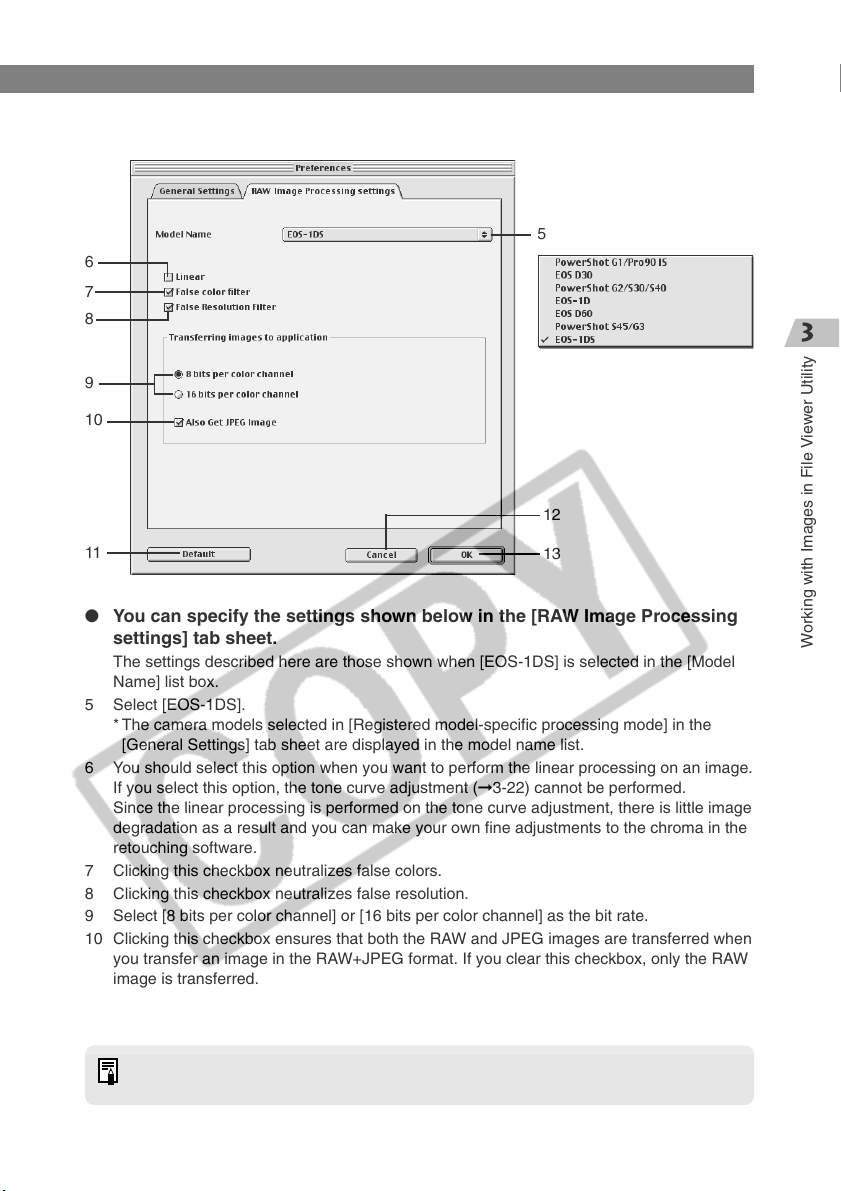
RAW Image Processing settings tab sheet
6
7
8
9
10
Specifying the Preferences
5
12
11
13
● You can specify the settings shown below in the [RAW Image Processing
settings] tab sheet.
The settings described here are those shown when [EOS-1DS] is selected in the [Model
Name] list box.
5 Select [EOS-1DS].
* The camera models selected in [Registered model-specific processing mode] in the
[General Settings] tab sheet are displayed in the model name list.
6 You should select this option when you want to perform the linear processing on an image.
If you select this option, the tone curve adjustment (➞3-22) cannot be performed.
Since the linear processing is performed on the tone curve adjustment, there is little image
degradation as a result and you can make your own fine adjustments to the chroma in the
retouching software.
7 Clicking this checkbox neutralizes false colors.
8 Clicking this checkbox neutralizes false resolution.
9 Select [8 bits per color channel] or [16 bits per color channel] as the bit rate.
10 Clicking this checkbox ensures that both the RAW and JPEG images are transferred when
you transfer an image in the RAW+JPEG format. If you clear this checkbox, only the RAW
image is transferred.
When you select any other camera in the [Model Name] list box, the available settings
for the respective camera model are displayed.
Working with Images in File Viewer Utility
3-41
Page 58

Specifying the Preferences
● The buttons listed below are displayed in each of the tab sheets. They
function in the same way in each sheet.
11 Restores the default settings for all the parameters in the currently displayed tab sheet.
12 Discards all the settings, restores the parameters to their original values and ends the
procedure.
13 Applies the specified parameters, closes the [Preferences] dialog box and ends the
procedure.
3-42
Page 59
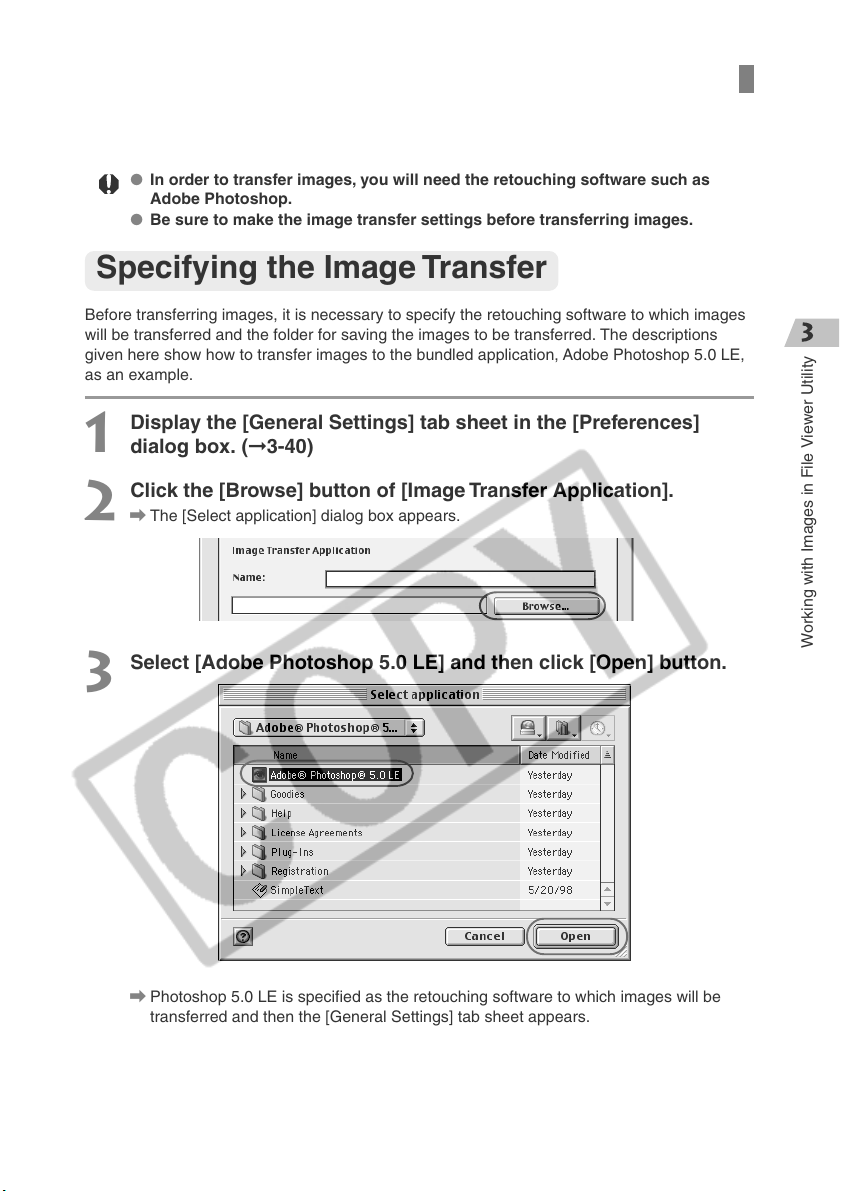
Transferring Images to Retouching Software
This section describes how to transfer images displayed in File Viewer Utility to the retouching
software and also describes how to make settings for image transfer.
● In order to transfer images, you will need the retouching software such as
Adobe Photoshop.
● Be sure to make the image transfer settings before transferring images.
Specifying the Image Transfer
Before transferring images, it is necessary to specify the retouching software to which images
will be transferred and the folder for saving the images to be transferred. The descriptions
given here show how to transfer images to the bundled application, Adobe Photoshop 5.0 LE,
as an example.
Display the [General Settings] tab sheet in the [Preferences]
1
dialog box. (➞3-40)
Click the [Browse] button of [Image Transfer Application].
2
\ The [Select application] dialog box appears.
Select [Adobe Photoshop 5.0 LE] and then click [Open] button.
3
Working with Images in File Viewer Utility
\ Photoshop 5.0 LE is specified as the retouching software to which images will be
transferred and then the [General Settings] tab sheet appears.
3-43
Page 60
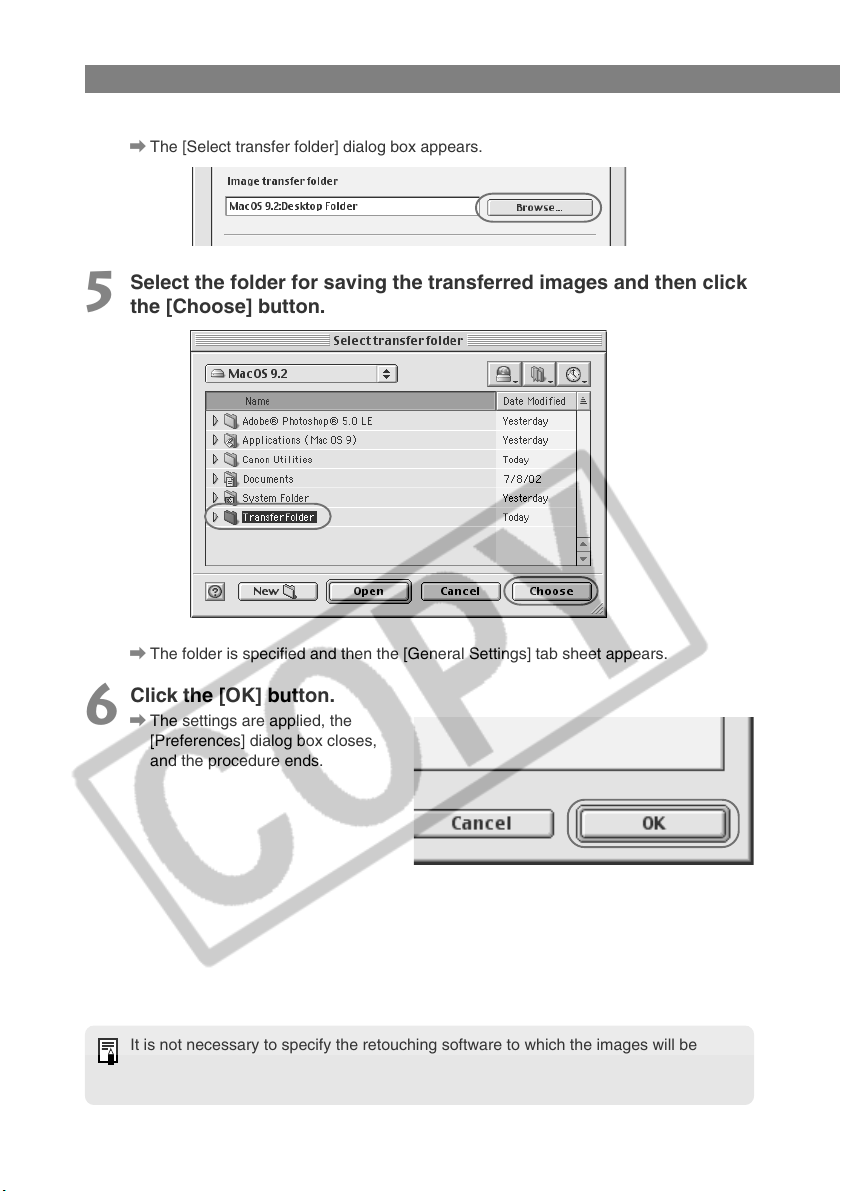
Transferring Images to Retouching Software
Click the [Browse] button of [Image transfer folder].
4
\ The [Select transfer folder] dialog box appears.
Select the folder for saving the transferred images and then click
5
the [Choose] button.
\ The folder is specified and then the [General Settings] tab sheet appears.
Click the [OK] button.
6
\ The settings are applied, the
[Preferences] dialog box closes,
and the procedure ends.
It is not necessary to specify the retouching software to which the images will be
transferred and the folder for saving the transferred image every time unless you wish
to change those settings.
3-44
Page 61
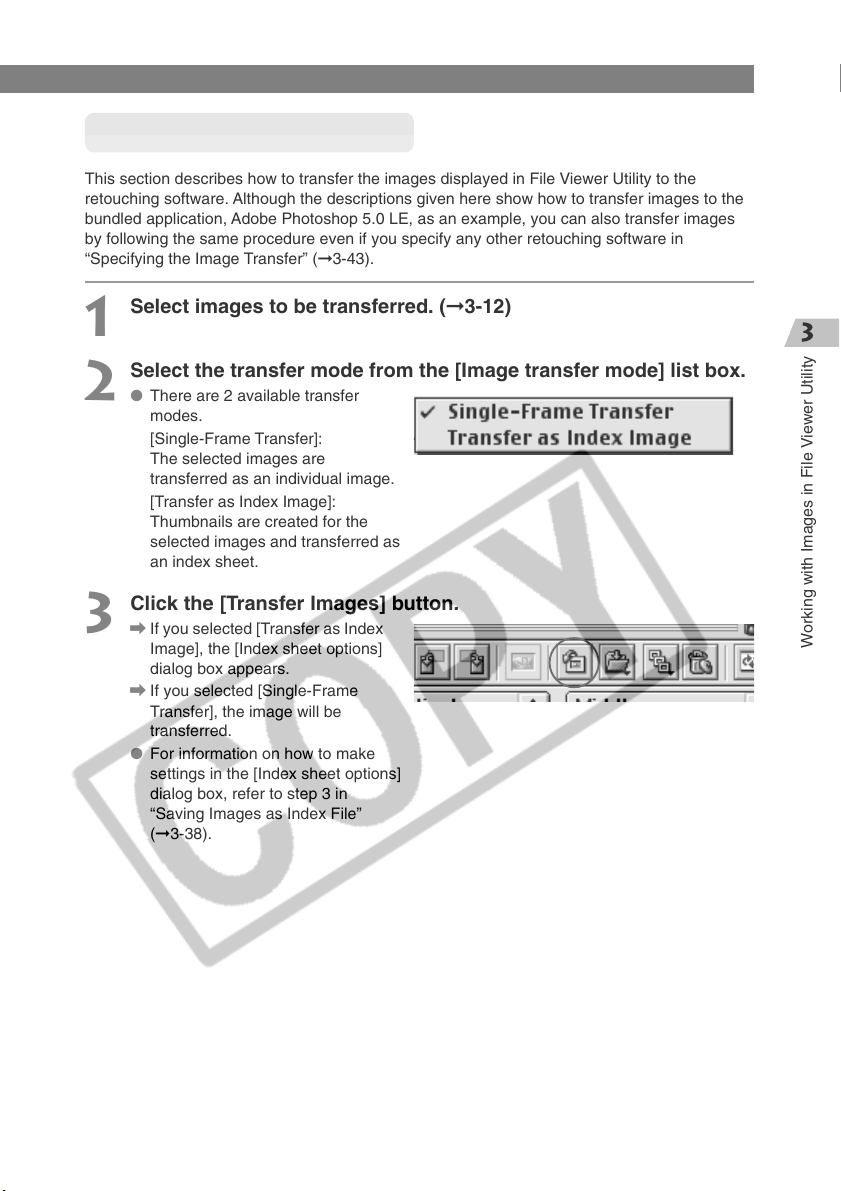
Transferring Images to Retouching Software
Transferring Images
This section describes how to transfer the images displayed in File Viewer Utility to the
retouching software. Although the descriptions given here show how to transfer images to the
bundled application, Adobe Photoshop 5.0 LE, as an example, you can also transfer images
by following the same procedure even if you specify any other retouching software in
“Specifying the Image Transfer” (➞3-43).
Select images to be transferred. (➞3-12)
1
Select the transfer mode from the [Image transfer mode] list box.
2
● There are 2 available transfer
modes.
[Single-Frame Transfer]:
The selected images are
transferred as an individual image.
[Transfer as Index Image]:
Thumbnails are created for the
selected images and transferred as
an index sheet.
Click the [Transfer Images] button.
3
\ If you selected [Transfer as Index
Image], the [Index sheet options]
dialog box appears.
\ If you selected [Single-Frame
Transfer], the image will be
transferred.
● For information on how to make
settings in the [Index sheet options]
dialog box, refer to step 3 in
“Saving Images as Index File”
(➞3-38).
Working with Images in File Viewer Utility
3-45
Page 62
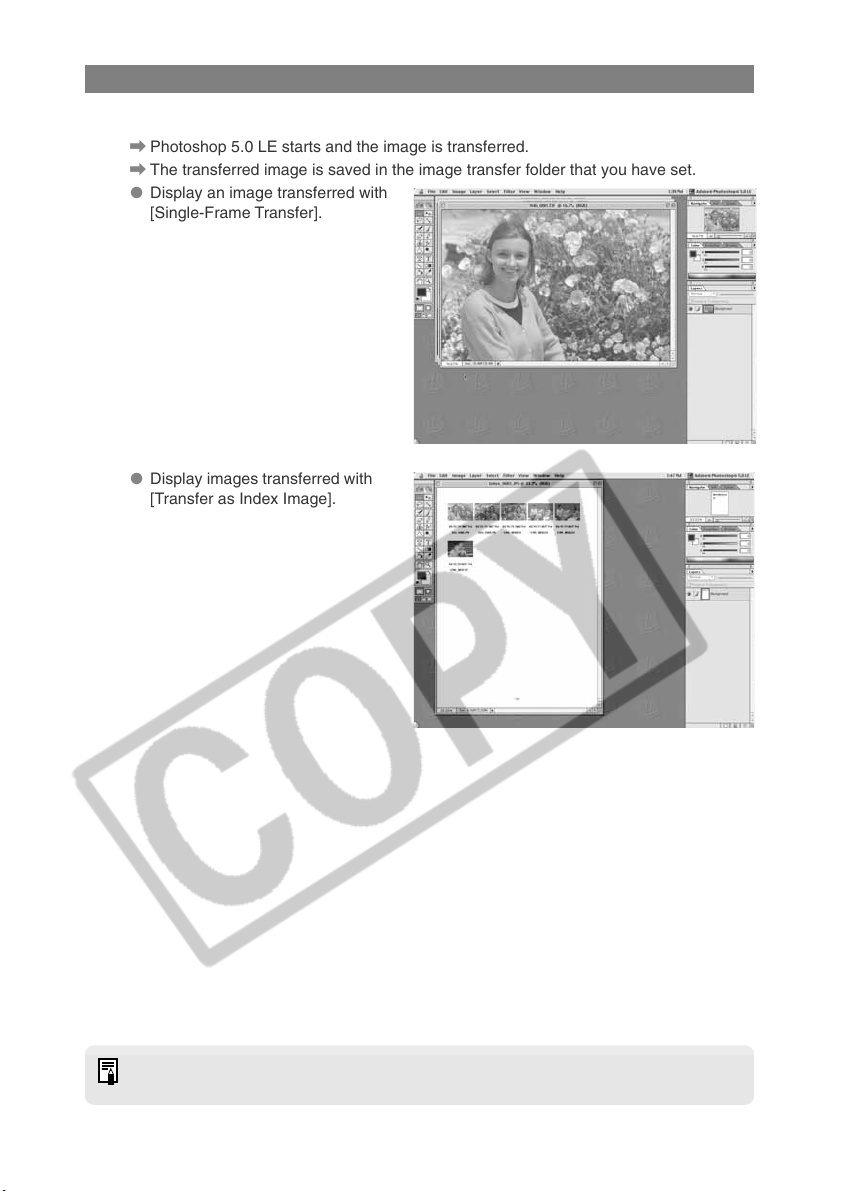
Transferring Images to Retouching Software
Enter the settings and click the [OK] button.
4
\ Photoshop 5.0 LE starts and the image is transferred.
\ The transferred image is saved in the image transfer folder that you have set.
● Display an image transferred with
[Single-Frame Transfer].
● Display images transferred with
[Transfer as Index Image].
A range of operations is also available by selecting the image, pressing the <control>
key + mouse button and selecting an option from the menu that appears.
3-46
Page 63
4
Specifying Camera Settings
from Your Computer
This chapter describes basic settings such as Owner’s Name and Date/
Time, as well as detailed settings such as the Personal Functions,
Parameters and Personal White Balance.
Page 64
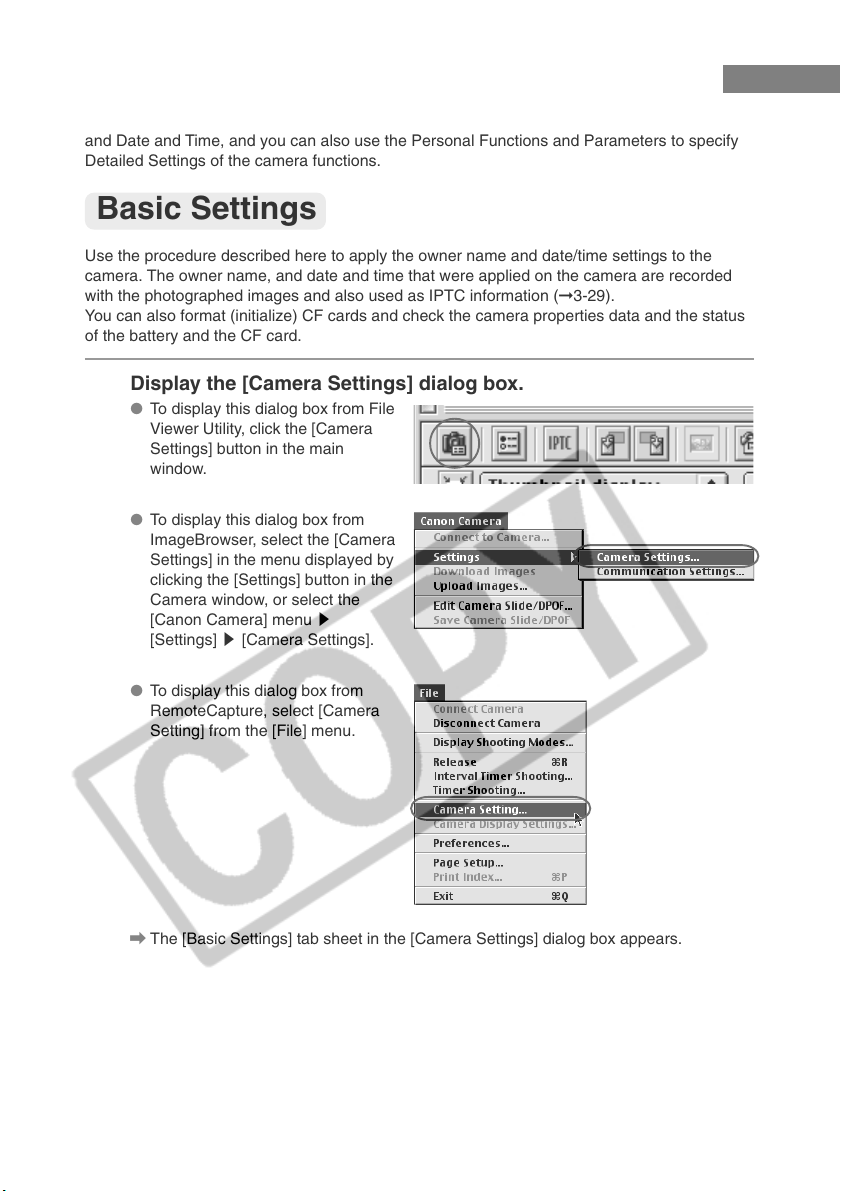
Specifying the Camera Settings
In the Camera Settings dialog box, you can specify Basic Settings such as Owner’s Name,
and Date and Time, and you can also use the Personal Functions and Parameters to specify
Detailed Settings of the camera functions.
Basic Settings
Use the procedure described here to apply the owner name and date/time settings to the
camera. The owner name, and date and time that were applied on the camera are recorded
with the photographed images and also used as IPTC information (➞3-29).
You can also format (initialize) CF cards and check the camera properties data and the status
of the battery and the CF card.
Display the [Camera Settings] dialog box.
● To display this dialog box from File
Viewer Utility, click the [Camera
Settings] button in the main
window.
● To display this dialog box from
ImageBrowser, select the [Camera
Settings] in the menu displayed by
clicking the [Settings] button in the
Camera window, or select the
[Canon Camera] menu s
[Settings] s [Camera Settings].
● To display this dialog box from
RemoteCapture, select [Camera
Setting] from the [File] menu.
\ The [Basic Settings] tab sheet in the [Camera Settings] dialog box appears.
4-2
Page 65
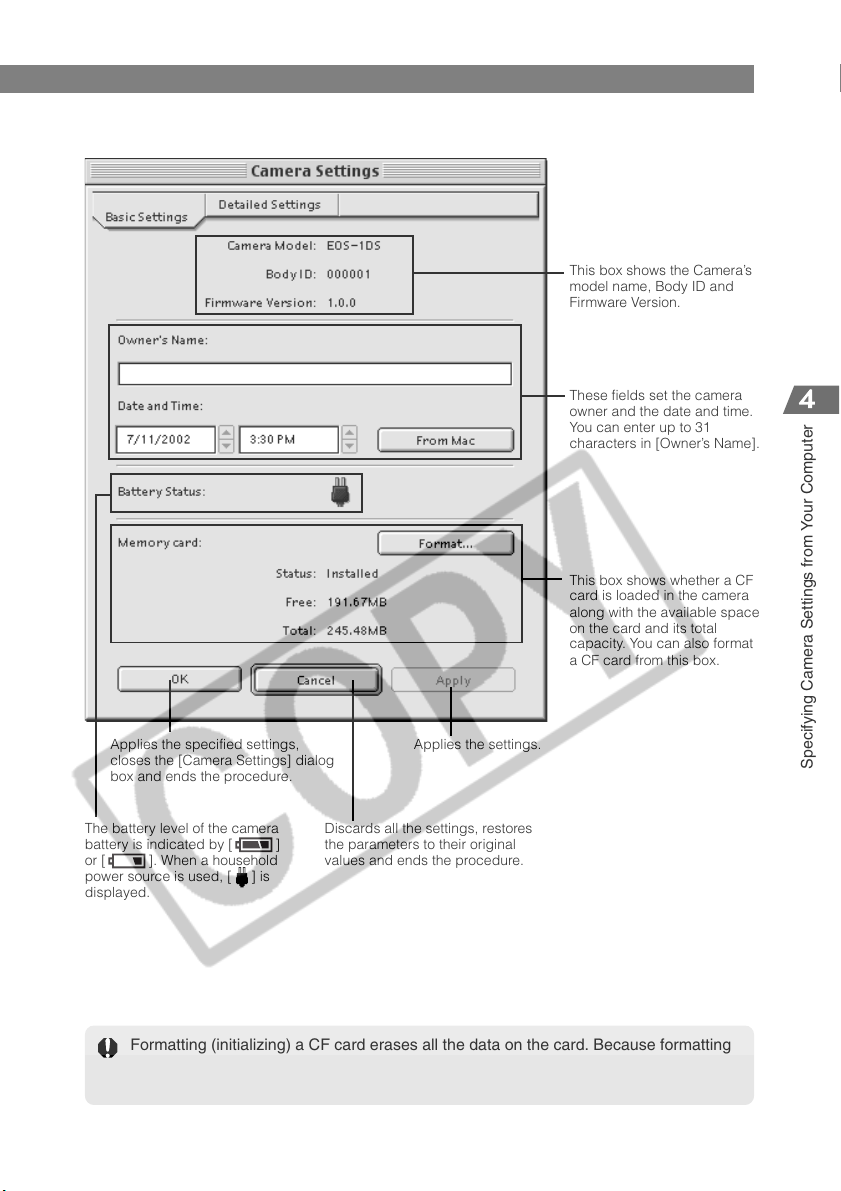
Basic Settings tab sheet
Basic Settings tab sheet
Specifying the Camera Settings
This box shows the Camera’s
model name, Body ID and
Firmware Version.
These fields set the camera
owner and the date and time.
You can enter up to 31
characters in [Owner’s Name].
This box shows whether a CF
card is loaded in the camera
along with the available space
on the card and its total
capacity. You can also format
a CF card from this box.
Applies the specified settings,
closes the [Camera Settings] dialog
box and ends the procedure.
The battery level of the camera
battery is indicated by [ ]
or [ ]. When a household
power source is used, [ ] is
displayed.
Discards all the settings, restores
the parameters to their original
values and ends the procedure.
Applies the settings.
Formatting (initializing) a CF card erases all the data on the card. Because formatting
also erases protected images, you should check the data recorded on the card
carefully before proceeding.
Specifying Camera Settings from Your Computer
4-3
Page 66
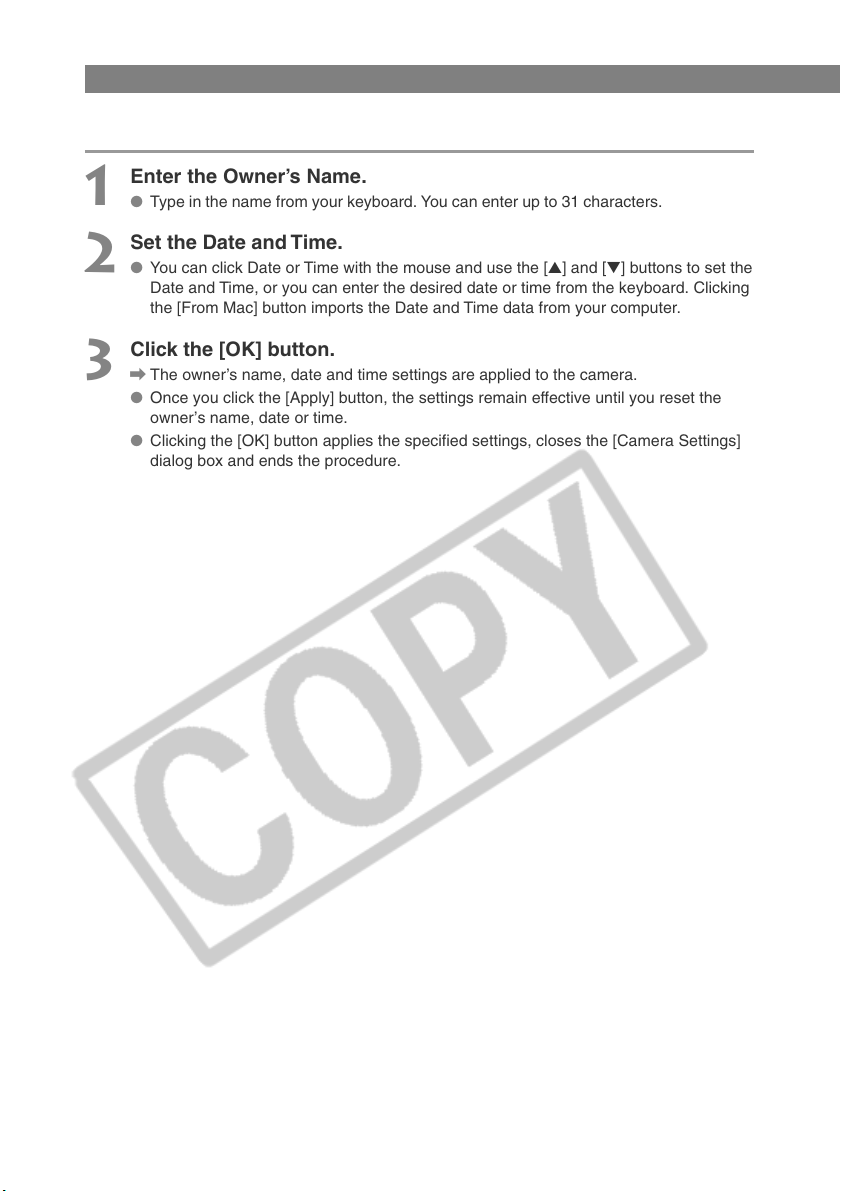
Specifying the Camera Settings
Setting the Owner’s Name, Date and Time
Enter the Owner’s Name.
1
● Type in the name from your keyboard. You can enter up to 31 characters.
Set the Date and Time.
2
● You can click Date or Time with the mouse and use the [▲] and [▼] buttons to set the
Date and Time, or you can enter the desired date or time from the keyboard. Clicking
the [From Mac] button imports the Date and Time data from your computer.
Click the [OK] button.
3
\ The owner’s name, date and time settings are applied to the camera.
● Once you click the [Apply] button, the settings remain effective until you reset the
owner’s name, date or time.
● Clicking the [OK] button applies the specified settings, closes the [Camera Settings]
dialog box and ends the procedure.
4-4
Page 67
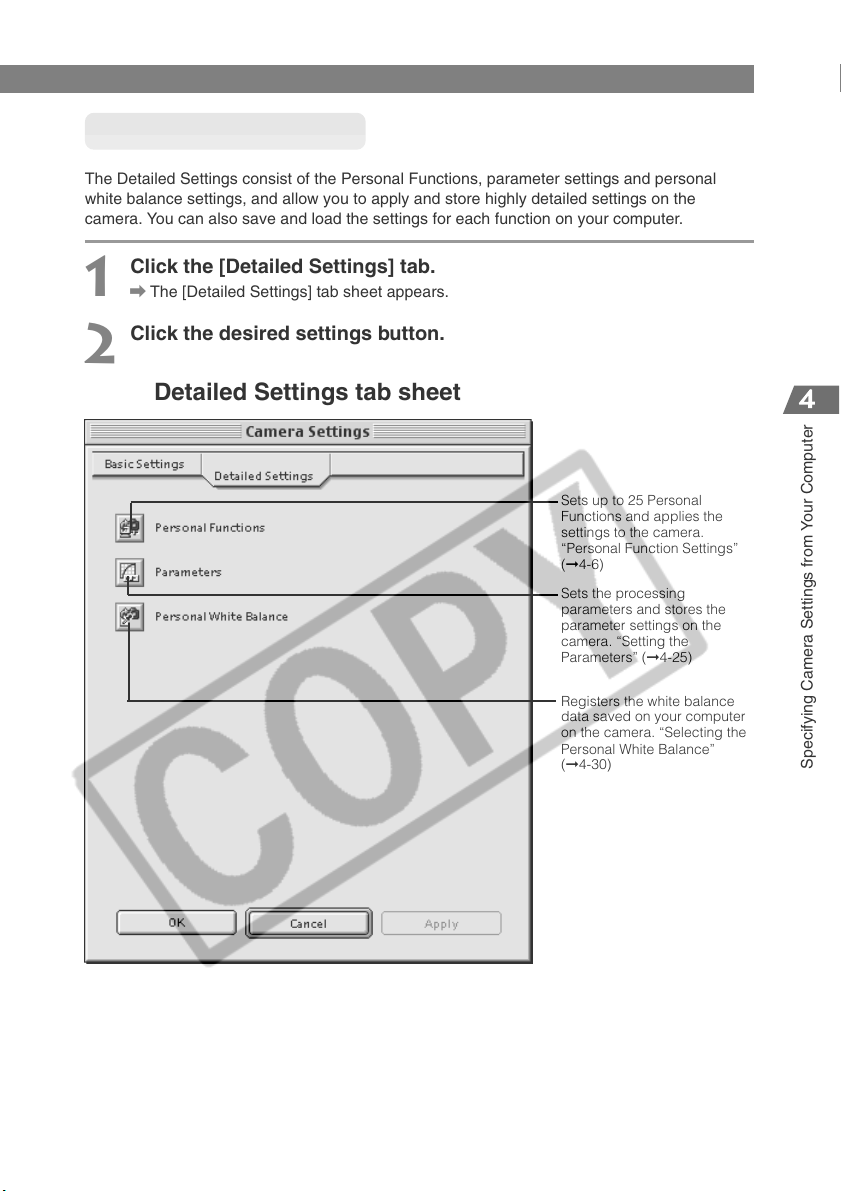
Specifying the Camera Settings
Detailed Settings
The Detailed Settings consist of the Personal Functions, parameter settings and personal
white balance settings, and allow you to apply and store highly detailed settings on the
camera. You can also save and load the settings for each function on your computer.
Click the [Detailed Settings] tab.
1
\ The [Detailed Settings] tab sheet appears.
Click the desired settings button.
2
Detailed Settings tab sheet
Sets up to 25 Personal
Functions and applies the
settings to the camera.
“Personal Function Settings”
(➞4-6)
Sets the processing
parameters and stores the
parameter settings on the
camera. “Setting the
Parameters” (➞4-25)
Registers the white balance
data saved on your computer
on the camera. “Selecting the
Personal White Balance”
(➞4-30)
4-5
Specifying Camera Settings from Your Computer
Page 68
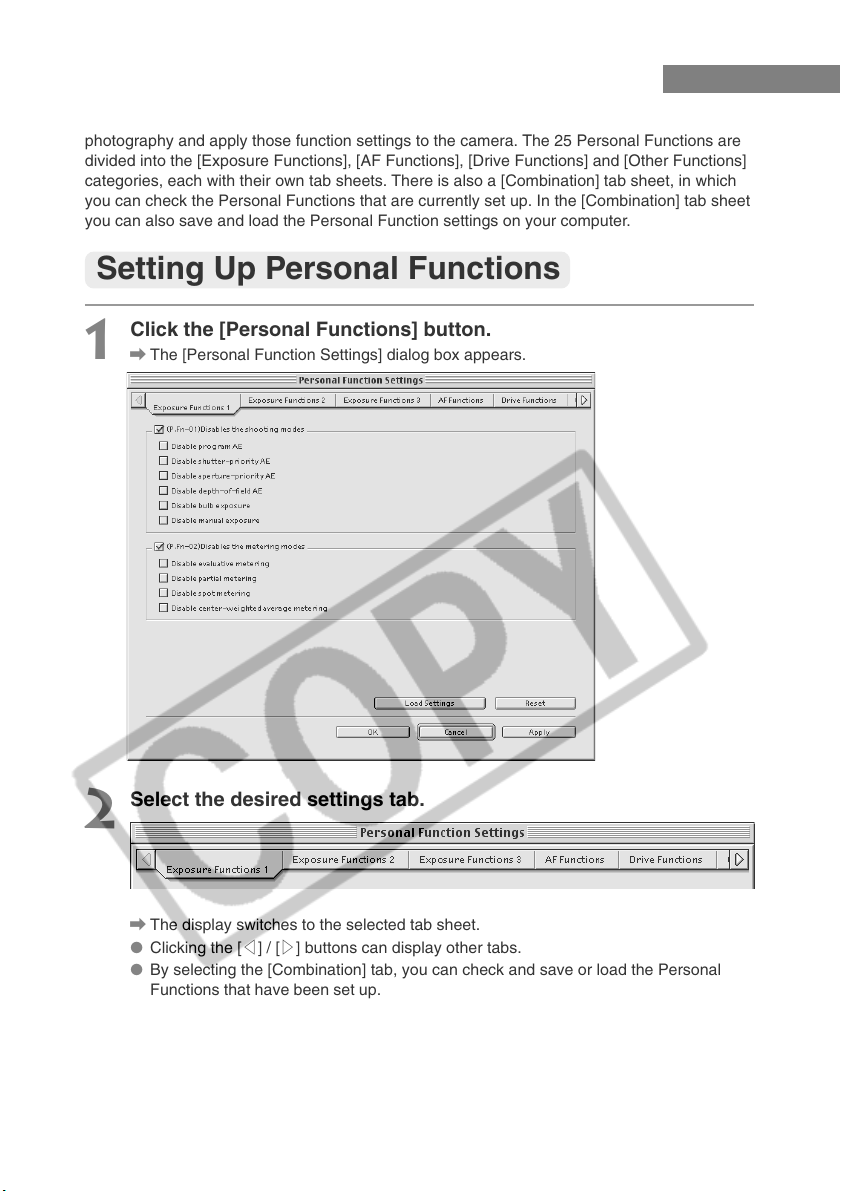
Personal Function Settings
For the EOS-1Ds, you can set up to 25 Personal Functions tailored to different types of
photography and apply those function settings to the camera. The 25 Personal Functions are
divided into the [Exposure Functions], [AF Functions], [Drive Functions] and [Other Functions]
categories, each with their own tab sheets. There is also a [Combination] tab sheet, in which
you can check the Personal Functions that are currently set up. In the [Combination] tab sheet
you can also save and load the Personal Function settings on your computer.
Setting Up Personal Functions
Click the [Personal Functions] button.
1
\ The [Personal Function Settings] dialog box appears.
Select the desired settings tab.
2
\ The display switches to the selected tab sheet.
● Clicking the [v] / [u] buttons can display other tabs.
● By selecting the [Combination] tab, you can check and save or load the Personal
Functions that have been set up.
4-6
Page 69
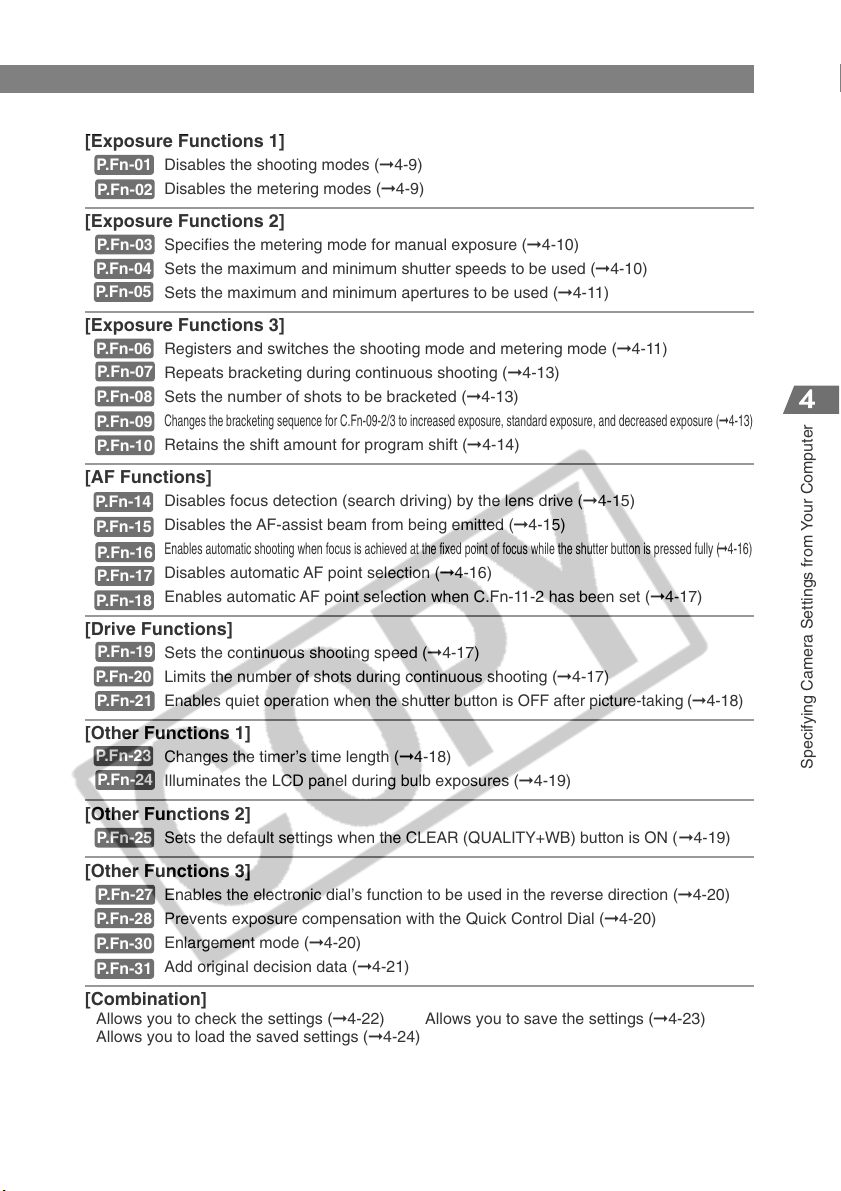
Personal Function Settings
You can specify the Personal Function settings listed below in the different tab sheets.
[Exposure Functions 1]
P.Fn-01
P.Fn-02
Disables the shooting modes (➞4-9)
Disables the metering modes (➞4-9)
[Exposure Functions 2]
P.Fn-03
P.Fn-04
P.Fn-05
Specifies the metering mode for manual exposure (➞4-10)
Sets the maximum and minimum shutter speeds to be used (➞4-10)
Sets the maximum and minimum apertures to be used (➞4-11)
[Exposure Functions 3]
P.Fn-06
P.Fn-07
P.Fn-08
P.Fn-09
P.Fn-10
Registers and switches the shooting mode and metering mode (➞4-11)
Repeats bracketing during continuous shooting (➞4-13)
Sets the number of shots to be bracketed (➞4-13)
Changes the bracketing sequence for C.Fn-09-2/3 to increased exposure, standard exposure, and decreased exposure (➞4-13)
Retains the shift amount for program shift (➞4-14)
[AF Functions]
P.Fn-14
P.Fn-15
P.Fn-16
P.Fn-17
P.Fn-18
Disables focus detection (search driving) by the lens drive (➞4-15)
Disables the AF-assist beam from being emitted (➞4-15)
Enables automatic shooting when focus is achieved at the fixed point of focus while the shutter button is pressed fully (➞4-16)
Disables automatic AF point selection (➞4-16)
Enables automatic AF point selection when C.Fn-11-2 has been set (➞4-17)
[Drive Functions]
P.Fn-19
P.Fn-20
P.Fn-21
Sets the continuous shooting speed (➞4-17)
Limits the number of shots during continuous shooting (➞4-17)
Enables quiet operation when the shutter button is OFF after picture-taking
(➞
4-18
[Other Functions 1]
P.Fn-23
P.Fn-24
Changes the timer’s time length (➞4-18)
Illuminates the LCD panel during bulb exposures (➞4-19)
[Other Functions 2]
P.Fn-25
Sets the default settings when the CLEAR (QUALITY+WB) button is ON (➞
4-19
[Other Functions 3]
P.Fn-27
P.Fn-28
P.Fn-30
P.Fn-31
Enables the electronic dial’s function to be used in the reverse direction (➞4-20)
Prevents exposure compensation with the Quick Control Dial (➞4-20)
Enlargement mode (➞4-20)
Add original decision data (➞4-21)
[Combination]
Allows you to check the settings (➞4-22) Allows you to save the settings (➞4-23)
Allows you to load the saved settings (➞4-24)
* Omission of P.Fn-11, 12, 13, 22, 26 and 29
The numbers and descriptions for the Personal Functions contain some omissions due to the
fact that some functions on the EOS-1V and EOS-1D are omitted on the EOS-1Ds, but the
same Personal Function numbers are used on each model.
)
Specifying Camera Settings from Your Computer
)
4-7
Page 70
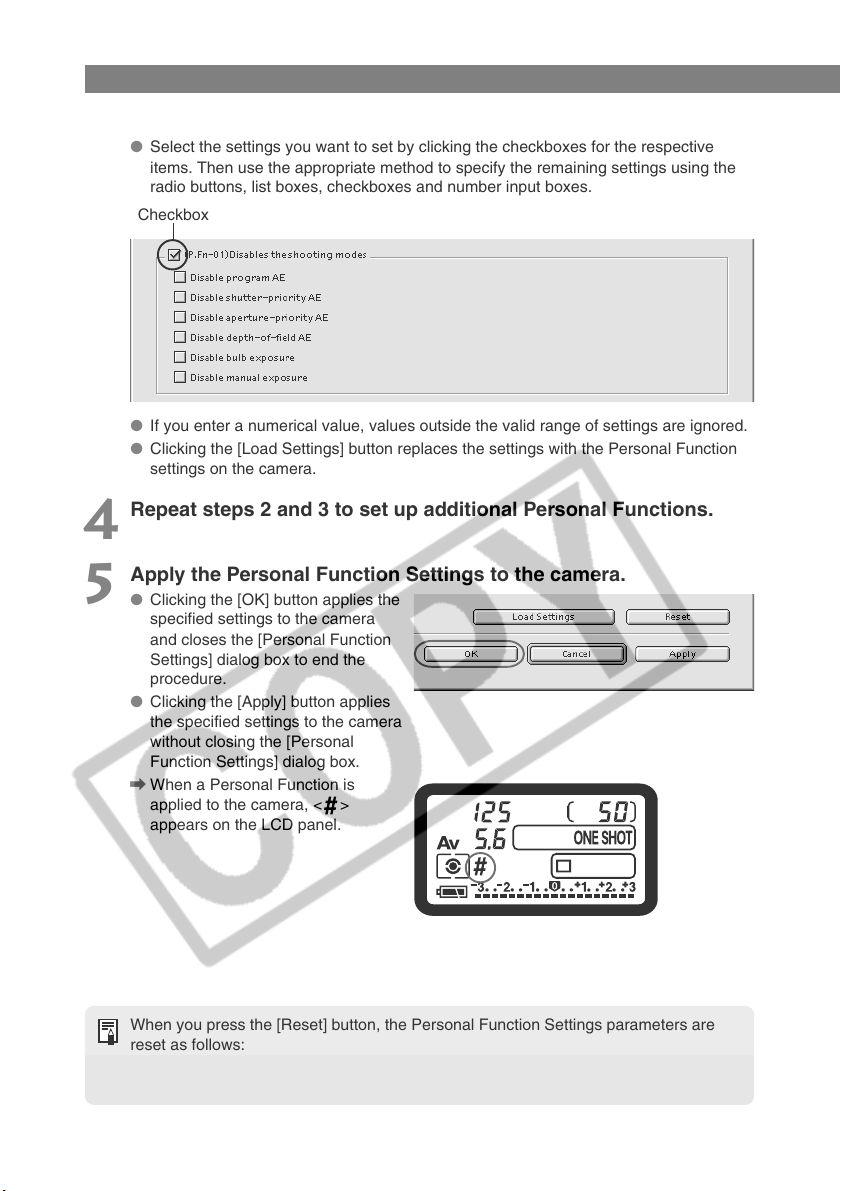
Personal Function Settings
Set up the Personal Function.
3
● Select the settings you want to set by clicking the checkboxes for the respective
items. Then use the appropriate method to specify the remaining settings using the
radio buttons, list boxes, checkboxes and number input boxes.
Checkbox
● If you enter a numerical value, values outside the valid range of settings are ignored.
● Clicking the [Load Settings] button replaces the settings with the Personal Function
settings on the camera.
Repeat steps 2 and 3 to set up additional Personal Functions.
4
Apply the Personal Function Settings to the camera.
5
● Clicking the [OK] button applies the
specified settings to the camera
and closes the [Personal Function
Settings] dialog box to end the
procedure.
● Clicking the [Apply] button applies
the specified settings to the camera
without closing the [Personal
Function Settings] dialog box.
\ When a Personal Function is
applied to the camera, < >
appears on the LCD panel.
When you press the [Reset] button, the Personal Function Settings parameters are
reset as follows:
• The checkboxes are cleared.
• The radio buttons, list boxes and number input boxes revert to the default values.
4-8
Page 71
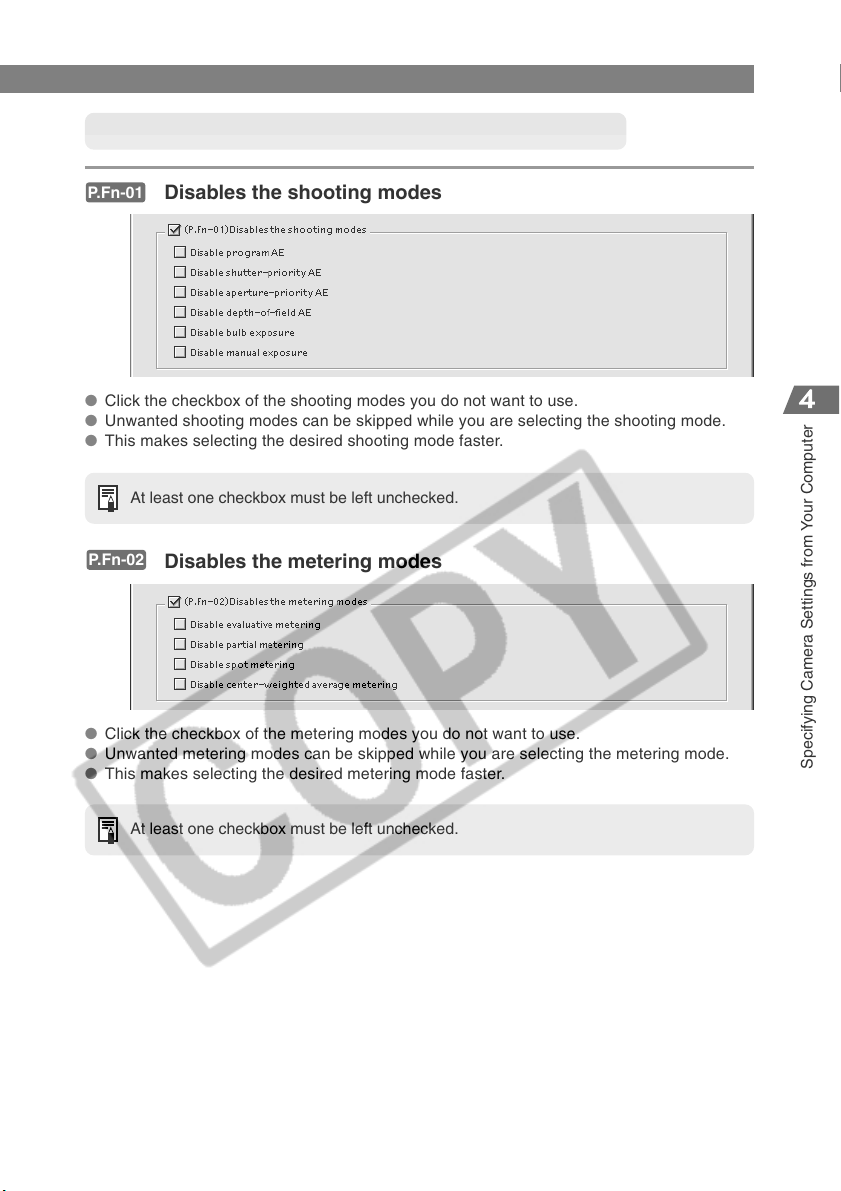
Personal Function Settings
Description of Personal Functions
P.Fn-01
● Click the checkbox of the shooting modes you do not want to use.
● Unwanted shooting modes can be skipped while you are selecting the shooting mode.
● This makes selecting the desired shooting mode faster.
P.Fn-02
● Click the checkbox of the metering modes you do not want to use.
● Unwanted metering modes can be skipped while you are selecting the metering mode.
● This makes selecting the desired metering mode faster.
Disables the shooting modes
At least one checkbox must be left unchecked.
Disables the metering modes
Specifying Camera Settings from Your Computer
At least one checkbox must be left unchecked.
4-9
Page 72
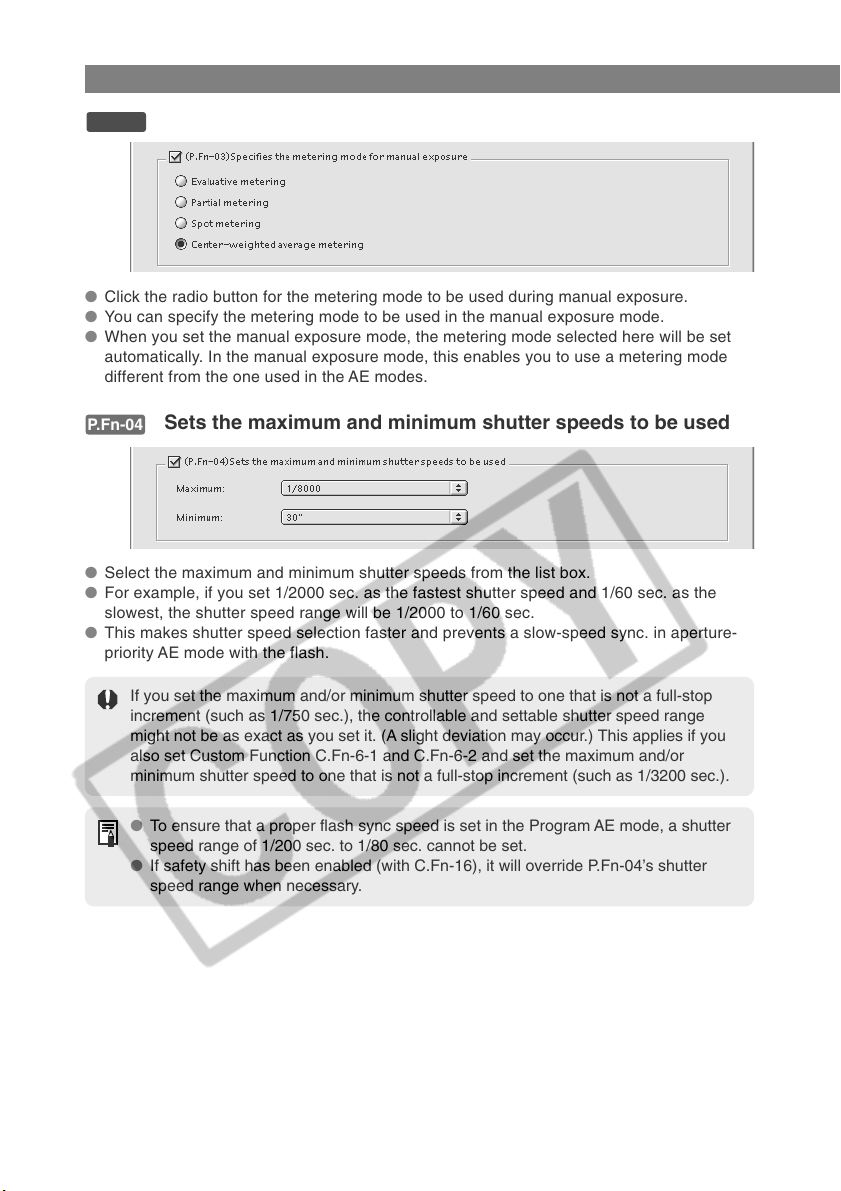
Personal Function Settings
P.Fn-03
● Click the radio button for the metering mode to be used during manual exposure.
● You can specify the metering mode to be used in the manual exposure mode.
● When you set the manual exposure mode, the metering mode selected here will be set
P.Fn-04
● Select the maximum and minimum shutter speeds from the list box.
● For example, if you set 1/2000 sec. as the fastest shutter speed and 1/60 sec. as the
● This makes shutter speed selection faster and prevents a slow-speed sync. in aperture-
Specifies the metering mode for manual exposure
automatically. In the manual exposure mode, this enables you to use a metering mode
different from the one used in the AE modes.
Sets the maximum and minimum shutter speeds to be used
slowest, the shutter speed range will be 1/2000 to 1/60 sec.
priority AE mode with the flash.
If you set the maximum and/or minimum shutter speed to one that is not a full-stop
increment (such as 1/750 sec.), the controllable and settable shutter speed range
might not be as exact as you set it. (A slight deviation may occur.) This applies if you
also set Custom Function C.Fn-6-1 and C.Fn-6-2 and set the maximum and/or
minimum shutter speed to one that is not a full-stop increment (such as 1/3200 sec.).
● To ensure that a proper flash sync speed is set in the Program AE mode, a shutter
speed range of 1/200 sec. to 1/80 sec. cannot be set.
● If safety shift has been enabled (with C.Fn-16), it will override P.Fn-04’s shutter
speed range when necessary.
4-10
Page 73
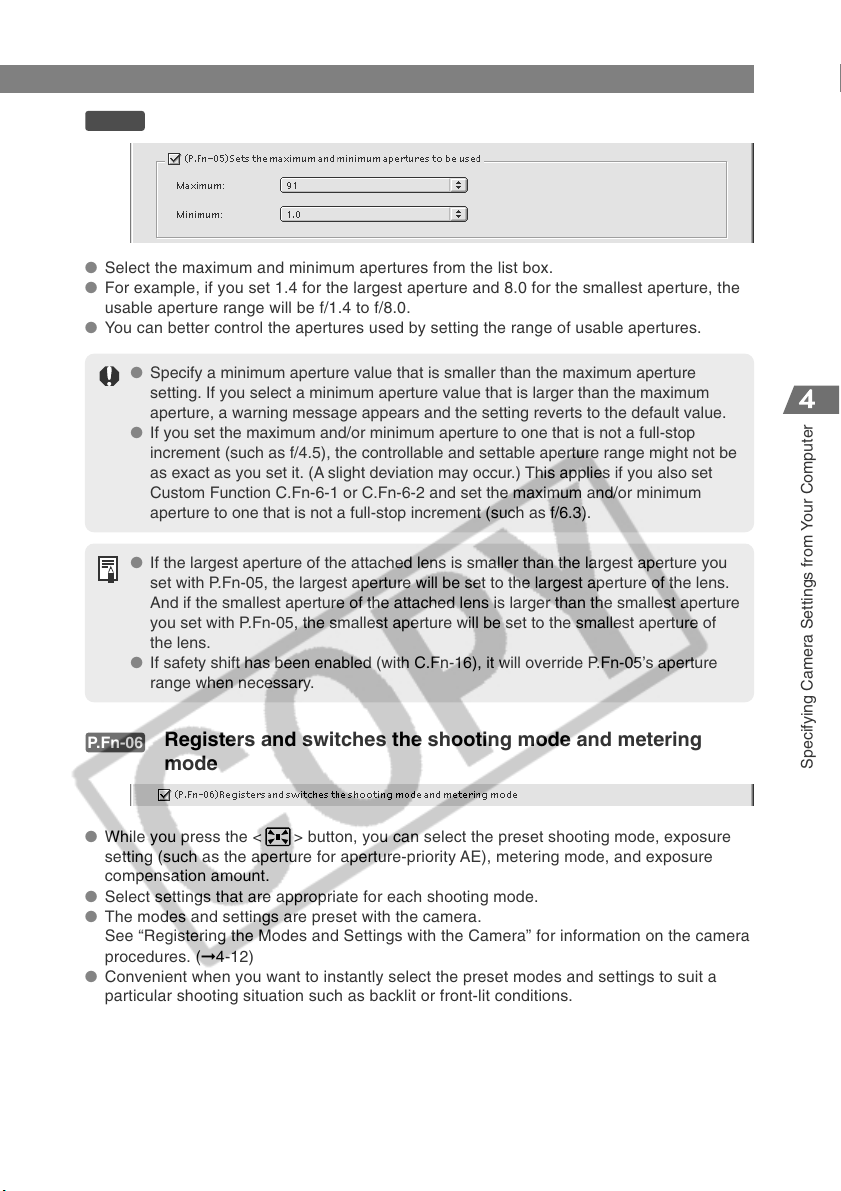
Personal Function Settings
P.Fn-05
● Select the maximum and minimum apertures from the list box.
● For example, if you set 1.4 for the largest aperture and 8.0 for the smallest aperture, the
● You can better control the apertures used by setting the range of usable apertures.
Sets the maximum and minimum apertures to be used
usable aperture range will be f/1.4 to f/8.0.
● Specify a minimum aperture value that is smaller than the maximum aperture
setting. If you select a minimum aperture value that is larger than the maximum
aperture, a warning message appears and the setting reverts to the default value.
● If you set the maximum and/or minimum aperture to one that is not a full-stop
increment (such as f/4.5), the controllable and settable aperture range might not be
as exact as you set it. (A slight deviation may occur.) This applies if you also set
Custom Function C.Fn-6-1 or C.Fn-6-2 and set the maximum and/or minimum
aperture to one that is not a full-stop increment (such as f/6.3).
● If the largest aperture of the attached lens is smaller than the largest aperture you
set with P.Fn-05, the largest aperture will be set to the largest aperture of the lens.
And if the smallest aperture of the attached lens is larger than the smallest aperture
you set with P.Fn-05, the smallest aperture will be set to the smallest aperture of
the lens.
● If safety shift has been enabled (with C.Fn-16), it will override P.Fn-05’s aperture
range when necessary.
P.Fn-06
Registers and switches the shooting mode and metering
mode
● While you press the < > button, you can select the preset shooting mode, exposure
setting (such as the aperture for aperture-priority AE), metering mode, and exposure
compensation amount.
● Select settings that are appropriate for each shooting mode.
● The modes and settings are preset with the camera.
See “Registering the Modes and Settings with the Camera” for information on the camera
procedures. (➞4-12)
● Convenient when you want to instantly select the preset modes and settings to suit a
particular shooting situation such as backlit or front-lit conditions.
4-11
Specifying Camera Settings from Your Computer
Page 74
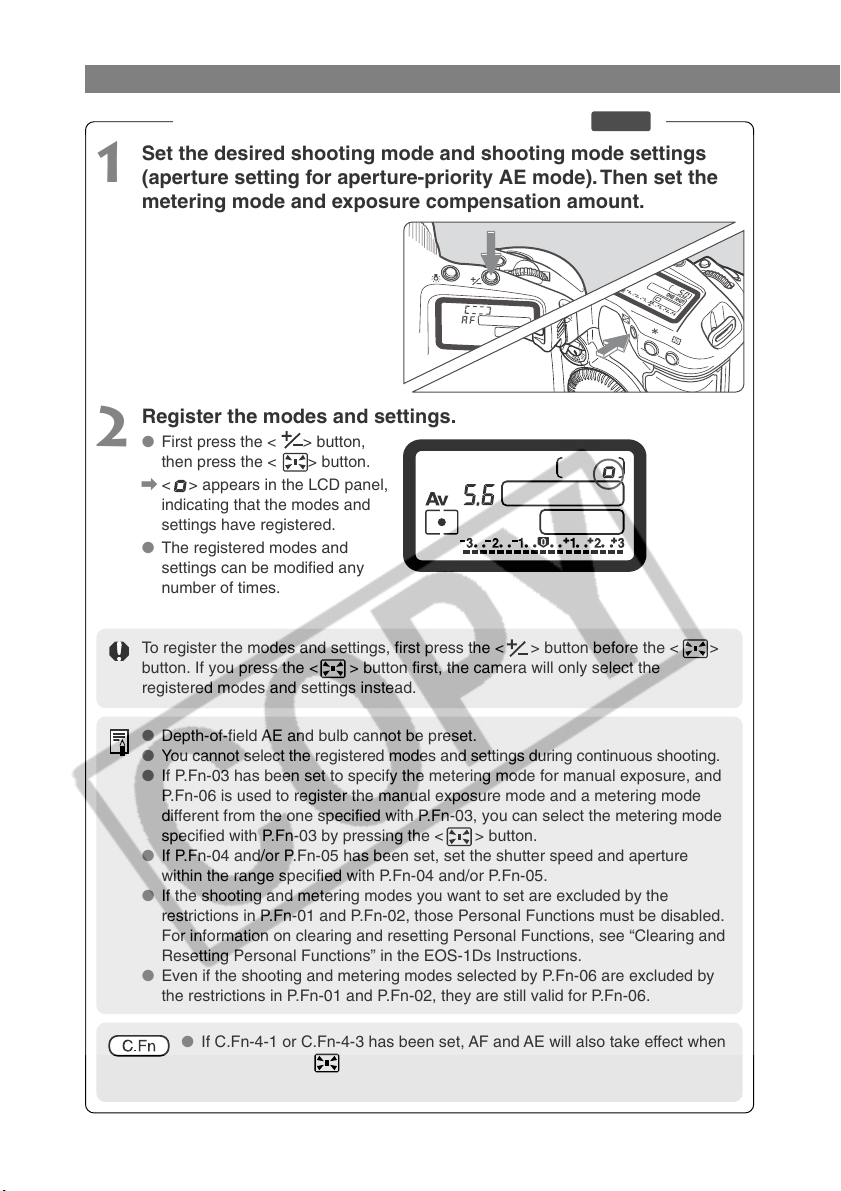
Personal Function Settings
Registering the Modes and Settings with the Camera ( )
P.Fn-06
Set the desired shooting mode and shooting mode settings
1
(aperture setting for aperture-priority AE mode). Then set the
metering mode and exposure compensation amount.
Register the modes and settings.
2
● First press the < > button,
then press the < > button.
\ < > appears in the LCD panel,
indicating that the modes and
settings have registered.
● The registered modes and
settings can be modified any
number of times.
To register the modes and settings, first press the < > button before the < >
button. If you press the < > button first, the camera will only select the
registered modes and settings instead.
● Depth-of-field AE and bulb cannot be preset.
● You cannot select the registered modes and settings during continuous shooting.
● If P.Fn-03 has been set to specify the metering mode for manual exposure, and
P.Fn-06 is used to register the manual exposure mode and a metering mode
different from the one specified with P.Fn-03, you can select the metering mode
specified with P.Fn-03 by pressing the < > button.
● If P.Fn-04 and/or P.Fn-05 has been set, set the shutter speed and aperture
within the range specified with P.Fn-04 and/or P.Fn-05.
● If the shooting and metering modes you want to set are excluded by the
restrictions in P.Fn-01 and P.Fn-02, those Personal Functions must be disabled.
For information on clearing and resetting Personal Functions, see “Clearing and
Resetting Personal Functions” in the EOS-1Ds Instructions.
● Even if the shooting and metering modes selected by P.Fn-06 are excluded by
the restrictions in P.Fn-01 and P.Fn-02, they are still valid for P.Fn-06.
● If C.Fn-4-1 or C.Fn-4-3 has been set, AF and AE will also take effect when
you press the < > button.
● When C.Fn-18 is set, P.Fn-06 is disabled.
4-12
Page 75
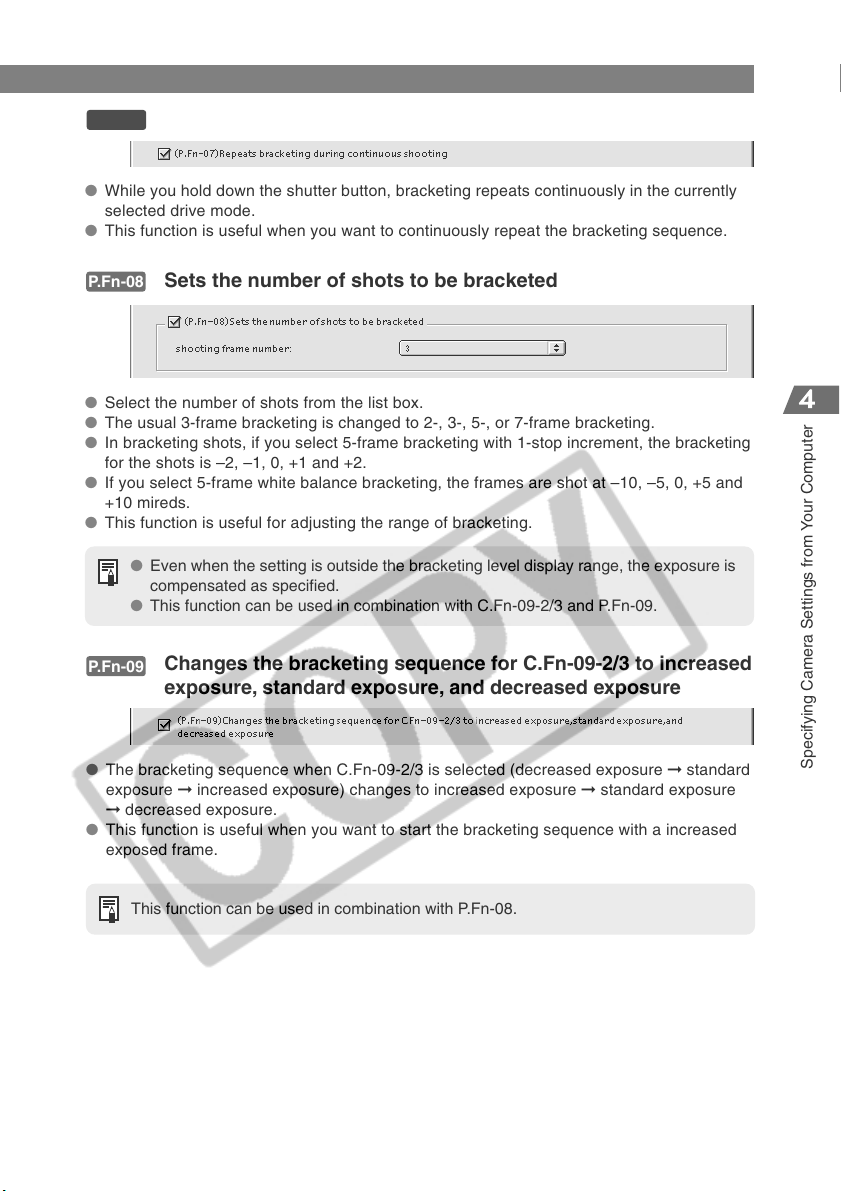
Personal Function Settings
P.Fn-07
● While you hold down the shutter button, bracketing repeats continuously in the currently
● This function is useful when you want to continuously repeat the bracketing sequence.
P.Fn-08
● Select the number of shots from the list box.
● The usual 3-frame bracketing is changed to 2-, 3-, 5-, or 7-frame bracketing.
● In bracketing shots, if you select 5-frame bracketing with 1-stop increment, the bracketing
● If you select 5-frame white balance bracketing, the frames are shot at –10, –5, 0, +5 and
● This function is useful for adjusting the range of bracketing.
P.Fn-09
Repeats bracketing during continuous shooting
selected drive mode.
Sets the number of shots to be bracketed
for the shots is –2, –1, 0, +1 and +2.
+10 mireds.
● Even when the setting is outside the bracketing level display range, the exposure is
compensated as specified.
● This function can be used in combination with C.Fn-09-2/3 and P.Fn-09.
Changes the bracketing sequence for C.Fn-09-2/3 to increased
exposure, standard exposure, and decreased exposure
● The bracketing sequence when C.Fn-09-2/3 is selected (decreased exposure ➞ standard
exposure ➞ increased exposure) changes to increased exposure ➞ standard exposure
➞ decreased exposure.
● This function is useful when you want to start the bracketing sequence with a increased
exposed frame.
This function can be used in combination with P.Fn-08.
4-13
Specifying Camera Settings from Your Computer
Page 76
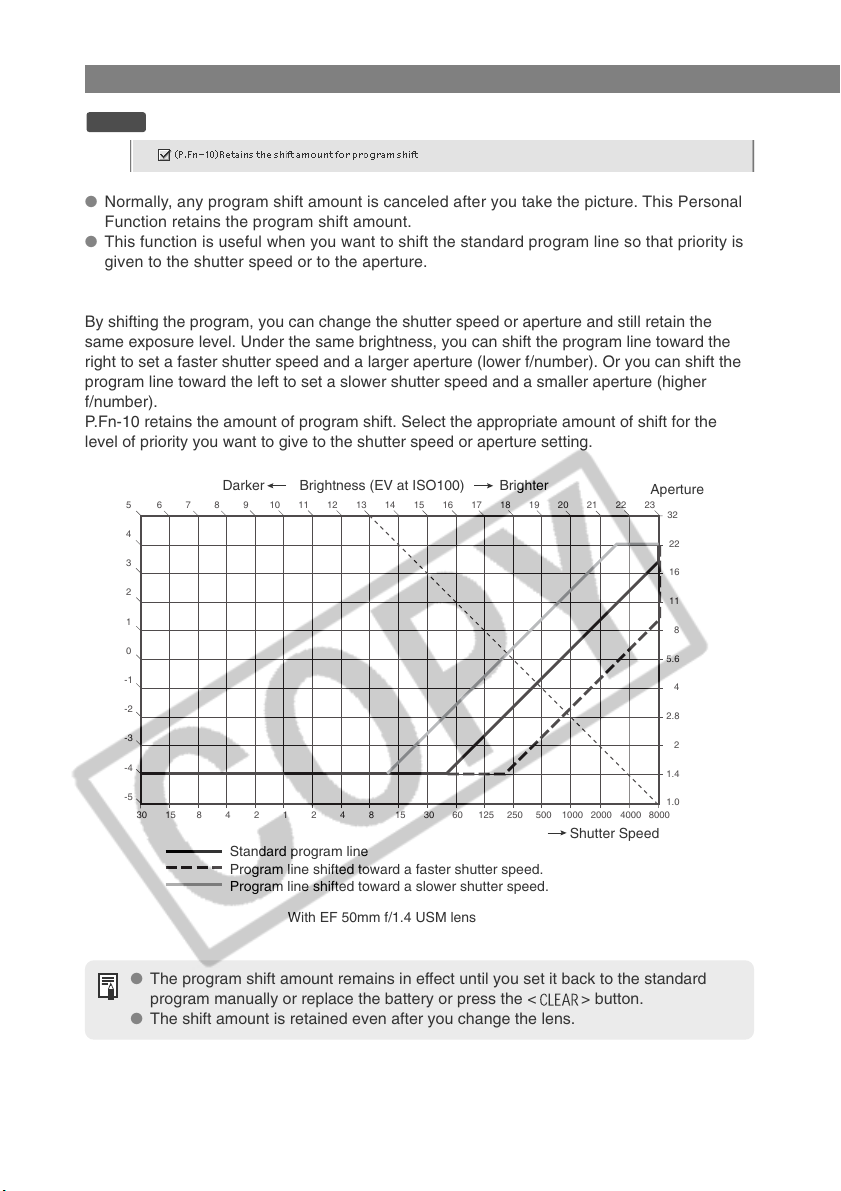
Personal Function Settings
P.Fn-10
Retains the shift amount for program shift
● Normally, any program shift amount is canceled after you take the picture. This Personal
Function retains the program shift amount.
● This function is useful when you want to shift the standard program line so that priority is
given to the shutter speed or to the aperture.
By shifting the program, you can change the shutter speed or aperture and still retain the
same exposure level. Under the same brightness, you can shift the program line toward the
right to set a faster shutter speed and a larger aperture (lower f/number). Or you can shift the
program line toward the left to set a slower shutter speed and a smaller aperture (higher
f/number).
P.Fn-10 retains the amount of program shift. Select the appropriate amount of shift for the
level of priority you want to give to the shutter speed or aperture setting.
567
4
3
2
1
0
-1
-2
-3
-4
-5
8
Darker Brightness (EV at ISO100) Brighter
9 1011121314151617181920 21
8
4
2
8 15 30 60 125 250
421
Standard program line
Program line shifted toward a faster shutter speed.
Program line shifted toward a slower shutter speed.
With EF 50mm f/1.4 USM lens
500
Shutter Speed
Aperture
2322
32
22
16
11
8
5.6
4
2.8
2
1.4
2000100030 15
1.0
80004000
● The program shift amount remains in effect until you set it back to the standard
program manually or replace the battery or press the < > button.
● The shift amount is retained even after you change the lens.
4-14
Page 77
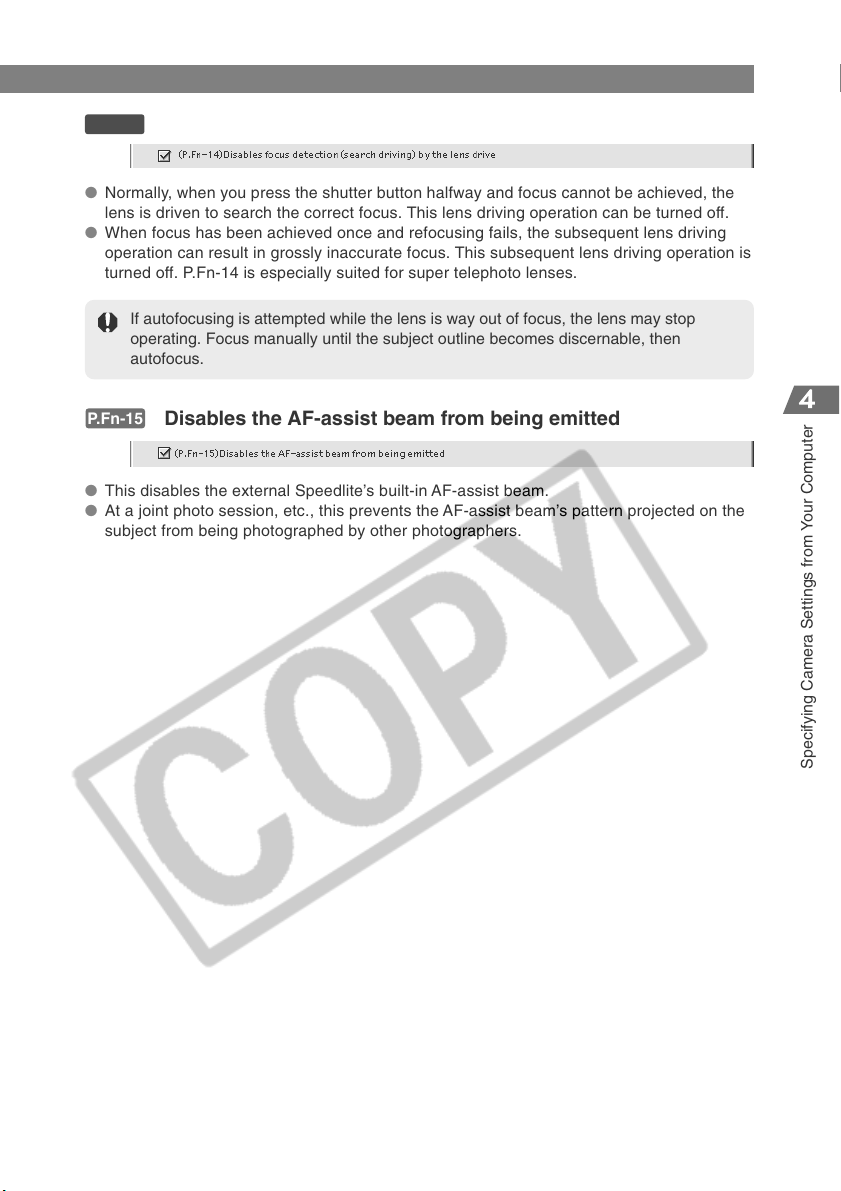
Personal Function Settings
P.Fn-14
● Normally, when you press the shutter button halfway and focus cannot be achieved, the
● When focus has been achieved once and refocusing fails, the subsequent lens driving
P.Fn-15
● This disables the external Speedlite’s built-in AF-assist beam.
● At a joint photo session, etc., this prevents the AF-assist beam’s pattern projected on the
Disables focus detection (search driving) by the lens drive
lens is driven to search the correct focus. This lens driving operation can be turned off.
operation can result in grossly inaccurate focus. This subsequent lens driving operation is
turned off. P.Fn-14 is especially suited for super telephoto lenses.
If autofocusing is attempted while the lens is way out of focus, the lens may stop
operating. Focus manually until the subject outline becomes discernable, then
autofocus.
Disables the AF-assist beam from being emitted
subject from being photographed by other photographers.
4-15
Specifying Camera Settings from Your Computer
Page 78
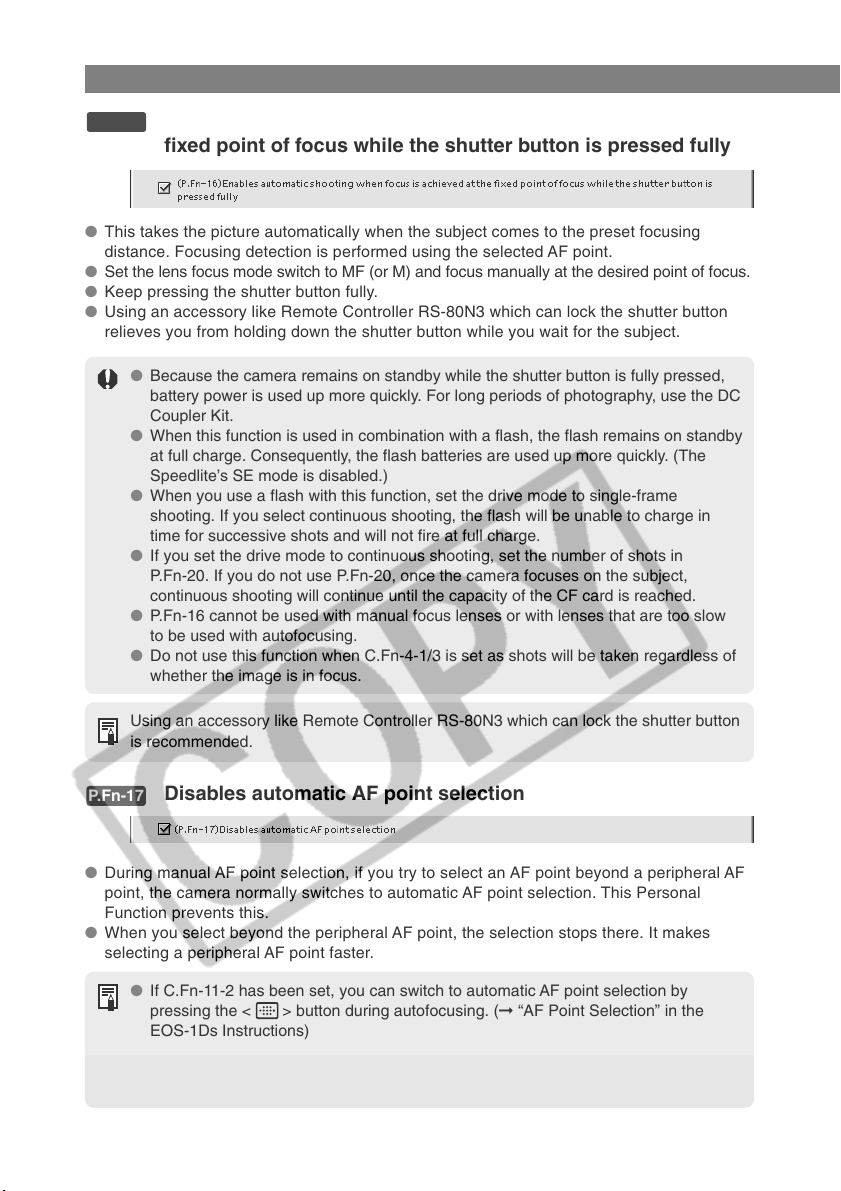
Personal Function Settings
P.Fn-16
Enables automatic shooting when focus is achieved at the
fixed point of focus while the shutter button is pressed fully
● This takes the picture automatically when the subject comes to the preset focusing
distance. Focusing detection is performed using the selected AF point.
● Set the lens focus mode switch to MF (or M) and focus manually at the desired point of focus.
● Keep pressing the shutter button fully.
● Using an accessory like Remote Controller RS-80N3 which can lock the shutter button
relieves you from holding down the shutter button while you wait for the subject.
● Because the camera remains on standby while the shutter button is fully pressed,
battery power is used up more quickly. For long periods of photography, use the DC
Coupler Kit.
● When this function is used in combination with a flash, the flash remains on standby
at full charge. Consequently, the flash batteries are used up more quickly. (The
Speedlite’s SE mode is disabled.)
● When you use a flash with this function, set the drive mode to single-frame
shooting. If you select continuous shooting, the flash will be unable to charge in
time for successive shots and will not fire at full charge.
● If you set the drive mode to continuous shooting, set the number of shots in
P.Fn-20. If you do not use P.Fn-20, once the camera focuses on the subject,
continuous shooting will continue until the capacity of the CF card is reached.
● P.Fn-16 cannot be used with manual focus lenses or with lenses that are too slow
to be used with autofocusing.
● Do not use this function when C.Fn-4-1/3 is set as shots will be taken regardless of
whether the image is in focus.
Using an accessory like Remote Controller RS-80N3 which can lock the shutter button
is recommended.
P.Fn-17
● During manual AF point selection, if you try to select an AF point beyond a peripheral AF
● When you select beyond the peripheral AF point, the selection stops there. It makes
Disables automatic AF point selection
point, the camera normally switches to automatic AF point selection. This Personal
Function prevents this.
selecting a peripheral AF point faster.
● If C.Fn-11-2 has been set, you can switch to automatic AF point selection by
pressing the < > button during autofocusing. (➞ “AF Point Selection” in the
EOS-1Ds Instructions)
● If automatic AF point selection has been preset at [AF frame registration] setting,
the preset setting remains valid. (➞ “AF Point Registration and Switching” in the
EOS-1Ds Instructions)
4-16
Page 79
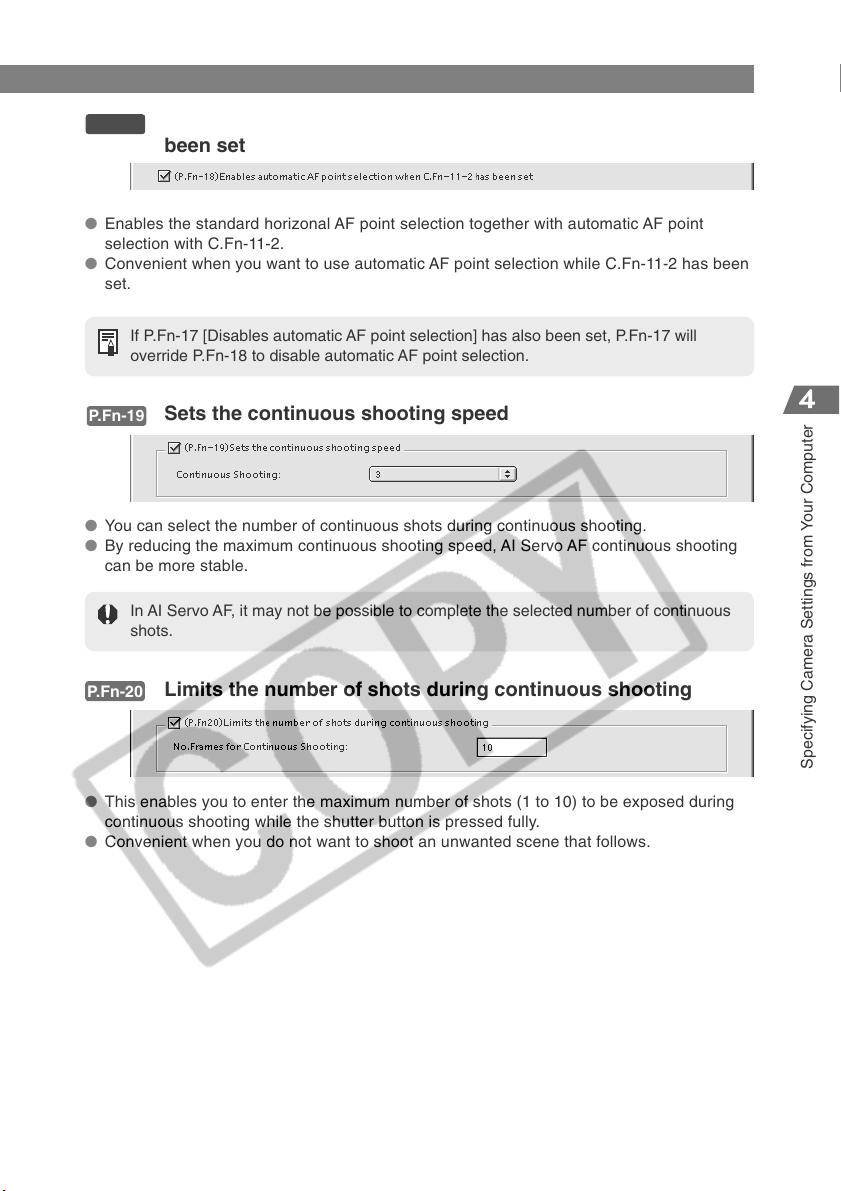
Personal Function Settings
P.Fn-18
Enables automatic AF point selection when C.Fn-11-2 has
been set
● Enables the standard horizonal AF point selection together with automatic AF point
selection with C.Fn-11-2.
● Convenient when you want to use automatic AF point selection while C.Fn-11-2 has been
set.
If P.Fn-17 [Disables automatic AF point selection] has also been set, P.Fn-17 will
override P.Fn-18 to disable automatic AF point selection.
P.Fn-19
● You can select the number of continuous shots during continuous shooting.
● By reducing the maximum continuous shooting speed, AI Servo AF continuous shooting
P.Fn-20
Sets the continuous shooting speed
can be more stable.
In AI Servo AF, it may not be possible to complete the selected number of continuous
shots.
Limits the number of shots during continuous shooting
● This enables you to enter the maximum number of shots (1 to 10) to be exposed during
continuous shooting while the shutter button is pressed fully.
● Convenient when you do not want to shoot an unwanted scene that follows.
4-17
Specifying Camera Settings from Your Computer
Page 80
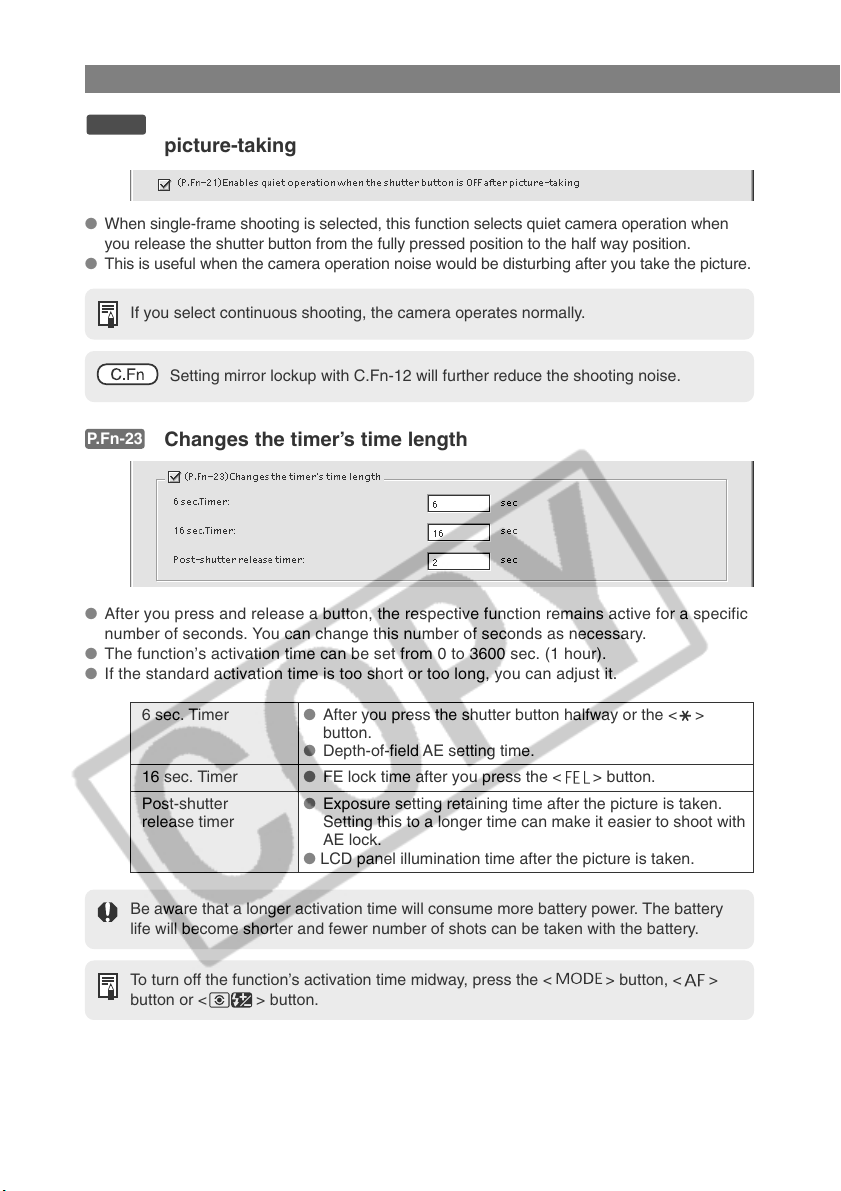
Personal Function Settings
P.Fn-21
Enables quiet operation when the shutter button is OFF after
picture-taking
● When single-frame shooting is selected, this function selects quiet camera operation when
you release the shutter button from the fully pressed position to the half way position.
● This is useful when the camera operation noise would be disturbing after you take the picture.
If you select continuous shooting, the camera operates normally.
Setting mirror lockup with C.Fn-12 will further reduce the shooting noise.
P.Fn-23
● After you press and release a button, the respective function remains active for a specific
● The function’s activation time can be set from 0 to 3600 sec. (1 hour).
● If the standard activation time is too short or too long, you can adjust it.
Changes the timer’s time length
number of seconds. You can change this number of seconds as necessary.
6 sec. Timer
16 sec. Timer
Post-shutter
release timer
Be aware that a longer activation time will consume more battery power. The battery
life will become shorter and fewer number of shots can be taken with the battery.
To turn off the function’s activation time midway, press the < > button, < >
button or < > button.
● After you press the shutter button halfway or the < >
button.
● Depth-of-field AE setting time.
● FE lock time after you press the < > button.
● Exposure setting retaining time after the picture is taken.
Setting this to a longer time can make it easier to shoot with
AE lock.
● LCD panel illumination time after the picture is taken.
4-18
Page 81
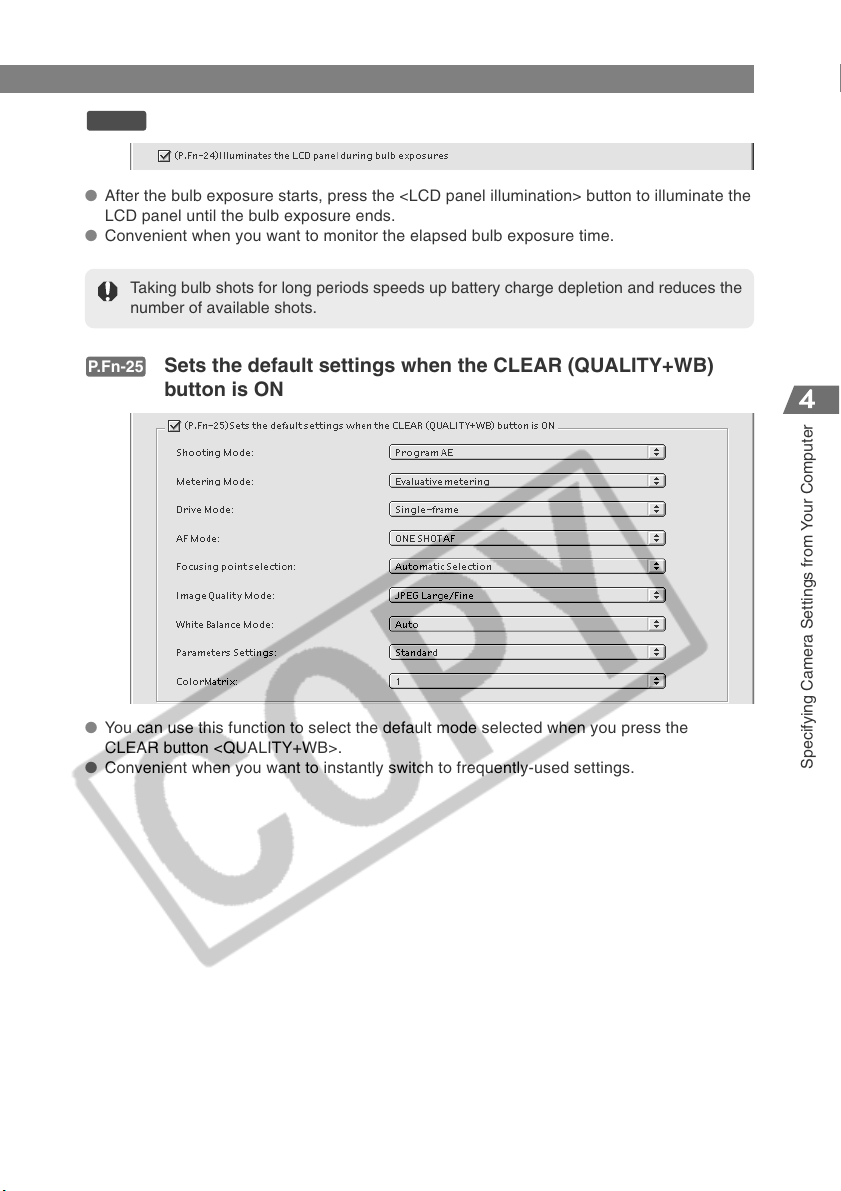
Personal Function Settings
P.Fn-24
● After the bulb exposure starts, press the <LCD panel illumination> button to illuminate the
● Convenient when you want to monitor the elapsed bulb exposure time.
P.Fn-25
Illuminates the LCD panel during bulb exposures
LCD panel until the bulb exposure ends.
Taking bulb shots for long periods speeds up battery charge depletion and reduces the
number of available shots.
Sets the default settings when the CLEAR (QUALITY+WB)
button is ON
● You can use this function to select the default mode selected when you press the
CLEAR button <QUALITY+WB>.
● Convenient when you want to instantly switch to frequently-used settings.
Specifying Camera Settings from Your Computer
4-19
Page 82
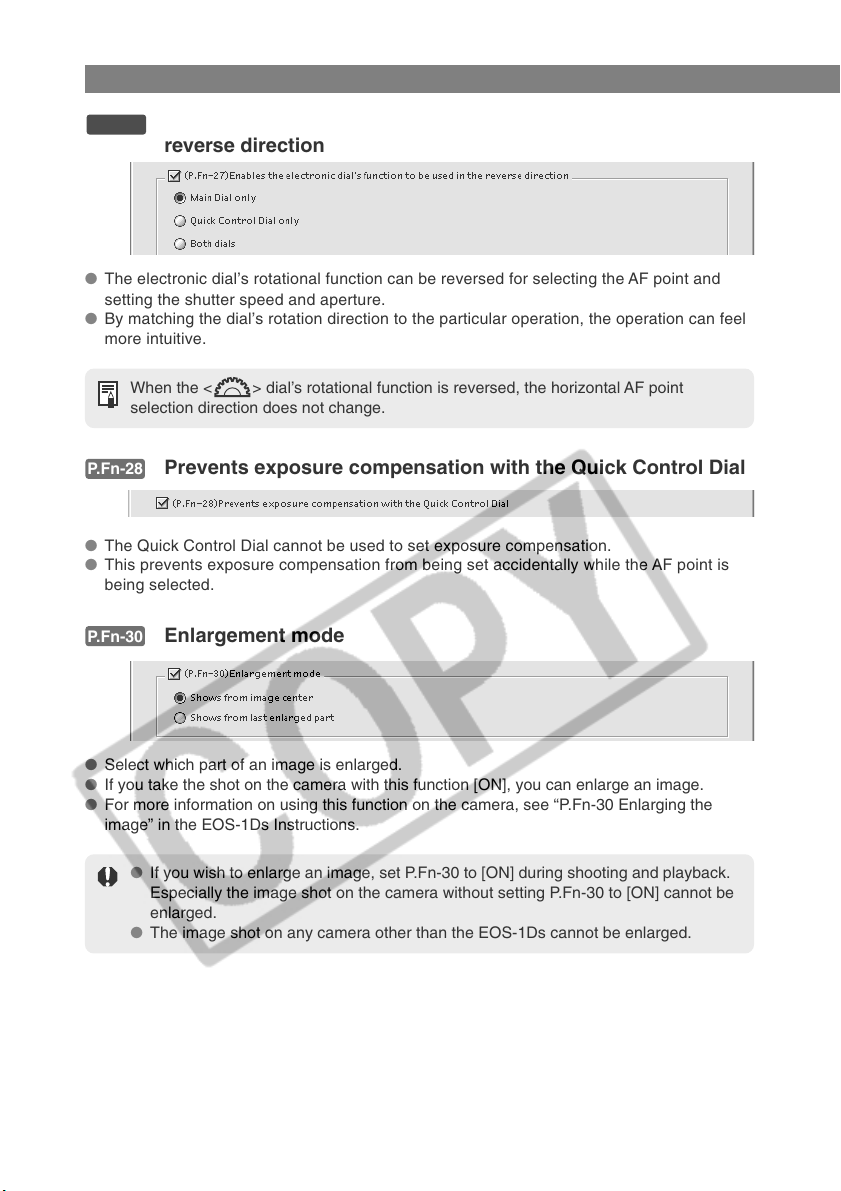
Personal Function Settings
P.Fn-27
Enables the electronic dial’s function to be used in the
reverse direction
● The electronic dial’s rotational function can be reversed for selecting the AF point and
setting the shutter speed and aperture.
● By matching the dial’s rotation direction to the particular operation, the operation can feel
more intuitive.
When the < > dial’s rotational function is reversed, the horizontal AF point
selection direction does not change.
P.Fn-28
● The Quick Control Dial cannot be used to set exposure compensation.
● This prevents exposure compensation from being set accidentally while the AF point is
P.Fn-30
Prevents exposure compensation with the Quick Control Dial
being selected.
Enlargement mode
● Select which part of an image is enlarged.
● If you take the shot on the camera with this function [ON], you can enlarge an image.
● For more information on using this function on the camera, see “P.Fn-30 Enlarging the
image” in the EOS-1Ds Instructions.
● If you wish to enlarge an image, set P.Fn-30 to [ON] during shooting and playback.
Especially the image shot on the camera without setting P.Fn-30 to [ON] cannot be
enlarged.
● The image shot on any camera other than the EOS-1Ds cannot be enlarged.
4-20
Page 83
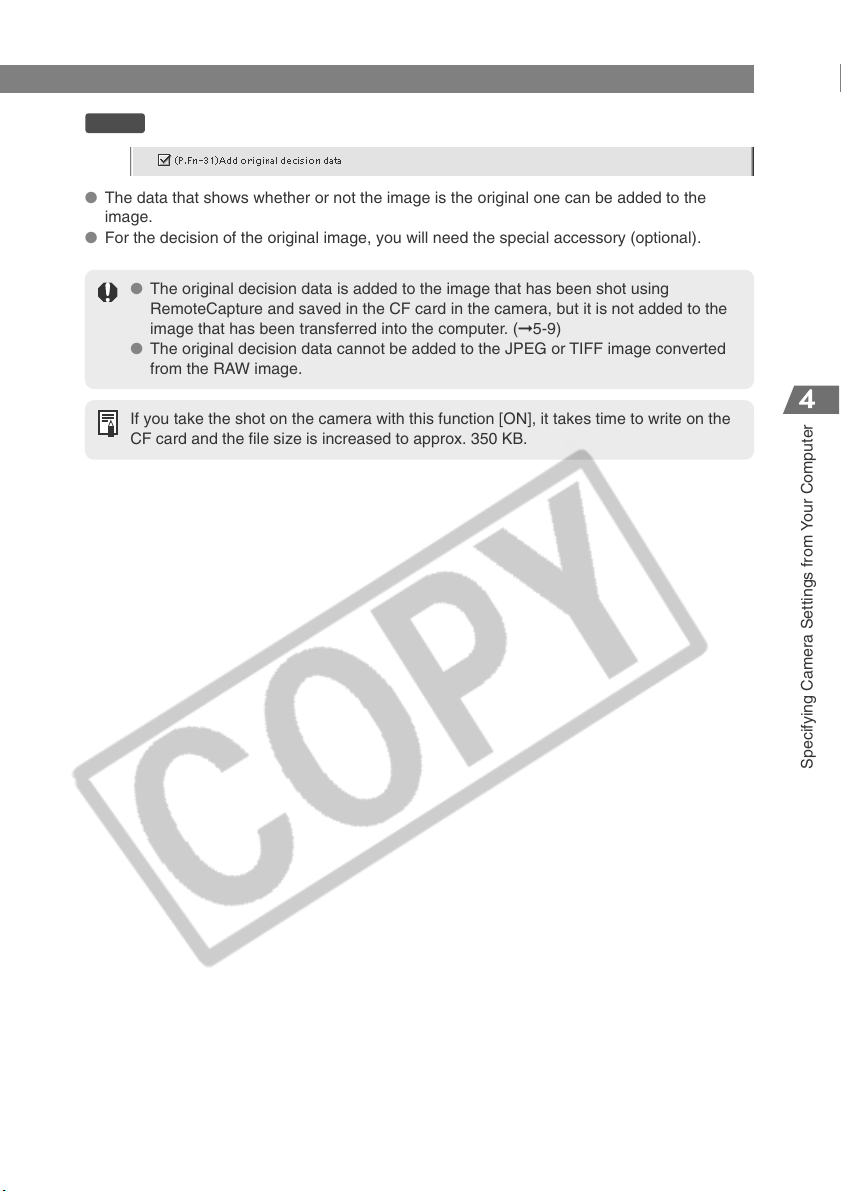
Personal Function Settings
P.Fn-31
● The data that shows whether or not the image is the original one can be added to the
● For the decision of the original image, you will need the special accessory (optional).
Add original decision data
image.
● The original decision data is added to the image that has been shot using
RemoteCapture and saved in the CF card in the camera, but it is not added to the
image that has been transferred into the computer. (➞5-9)
● The original decision data cannot be added to the JPEG or TIFF image converted
from the RAW image.
If you take the shot on the camera with this function [ON], it takes time to write on the
CF card and the file size is increased to approx. 350 KB.
4-21
Specifying Camera Settings from Your Computer
Page 84
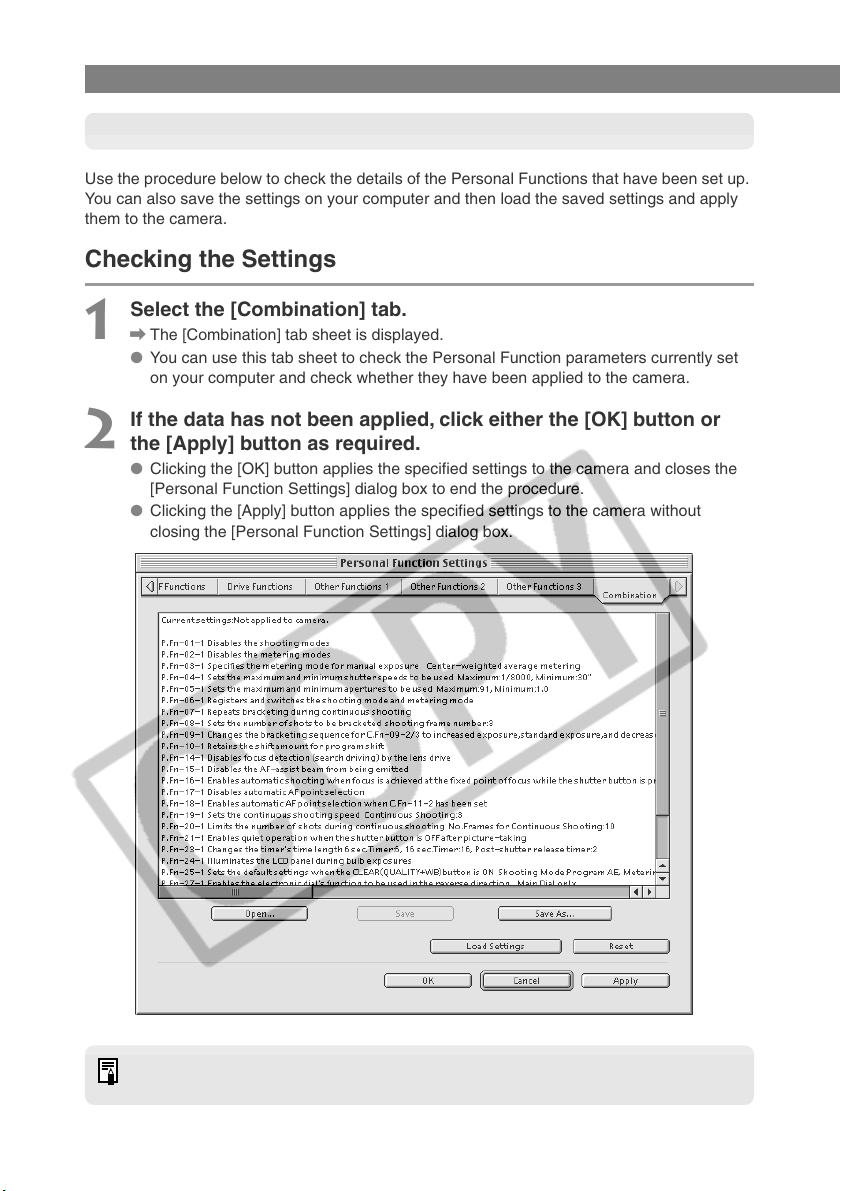
Personal Function Settings
Checking, Saving, and Loading Personal Function Settings
Use the procedure below to check the details of the Personal Functions that have been set up.
You can also save the settings on your computer and then load the saved settings and apply
them to the camera.
Checking the Settings
Select the [Combination] tab.
1
\ The [Combination] tab sheet is displayed.
● You can use this tab sheet to check the Personal Function parameters currently set
on your computer and check whether they have been applied to the camera.
If the data has not been applied, click either the [OK] button or
2
the [Apply] button as required.
● Clicking the [OK] button applies the specified settings to the camera and closes the
[Personal Function Settings] dialog box to end the procedure.
● Clicking the [Apply] button applies the specified settings to the camera without
closing the [Personal Function Settings] dialog box.
Clicking the [Load Settings] button replaces the settings with the Personal Function
settings on the camera.
4-22
Page 85
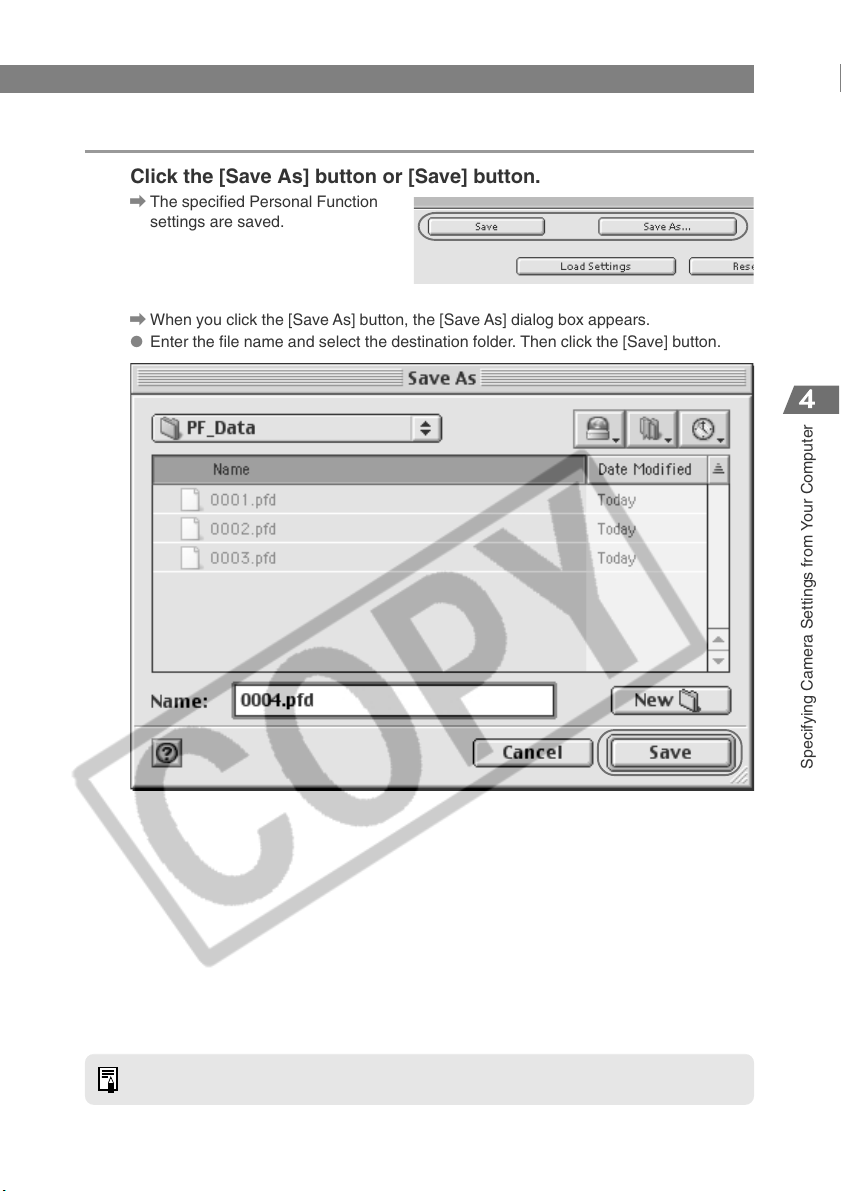
Personal Function Settings
Saving the Settings
Click the [Save As] button or [Save] button.
\ The specified Personal Function
settings are saved.
\ When you click the [Save As] button, the [Save As] dialog box appears.
● Enter the file name and select the destination folder. Then click the [Save] button.
To update an existing file, click the [Save] button.
Specifying Camera Settings from Your Computer
4-23
Page 86
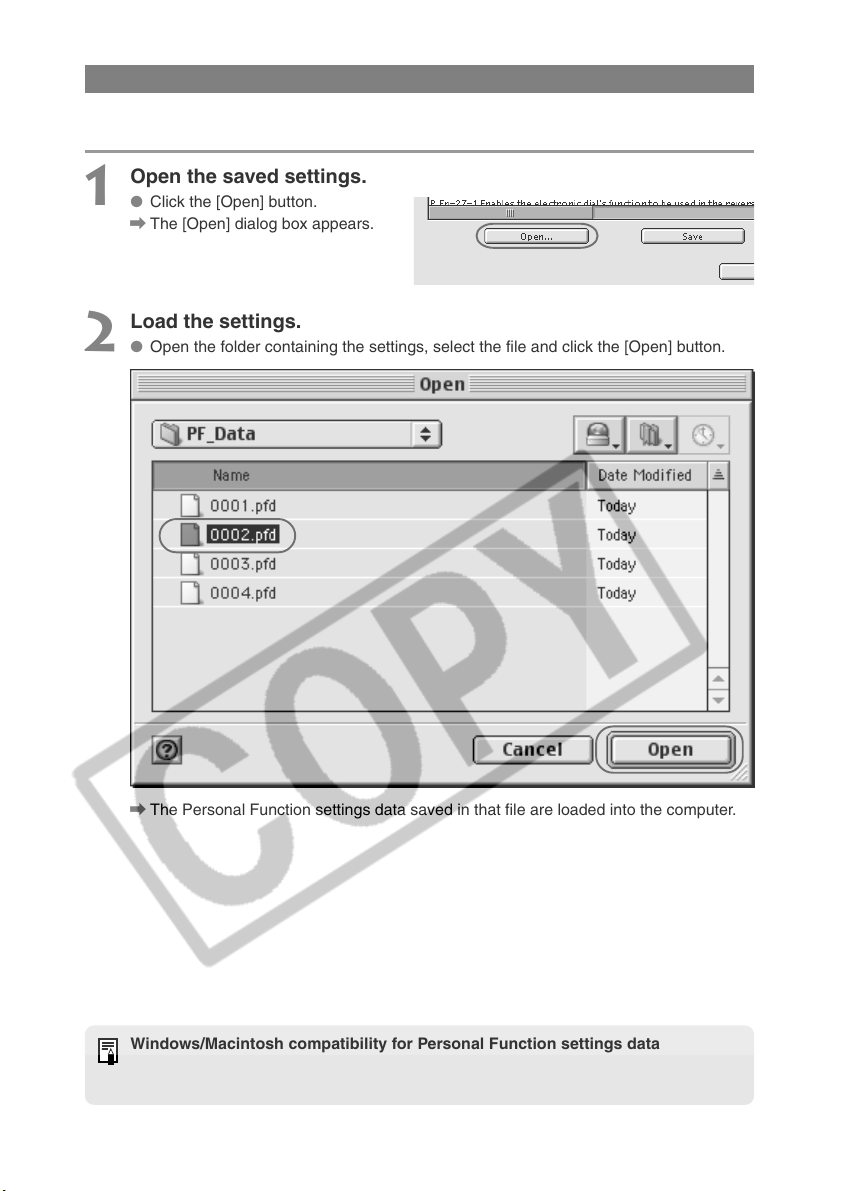
Personal Function Settings
Loading Saved Settings
Open the saved settings.
1
● Click the [Open] button.
\ The [Open] dialog box appears.
Load the settings.
2
● Open the folder containing the settings, select the file and click the [Open] button.
\ The Personal Function settings data saved in that file are loaded into the computer.
Windows/Macintosh compatibility for Personal Function settings data
Personal Function settings data saved on your computer is compatible between
Windows and Macintosh.
4-24
Page 87
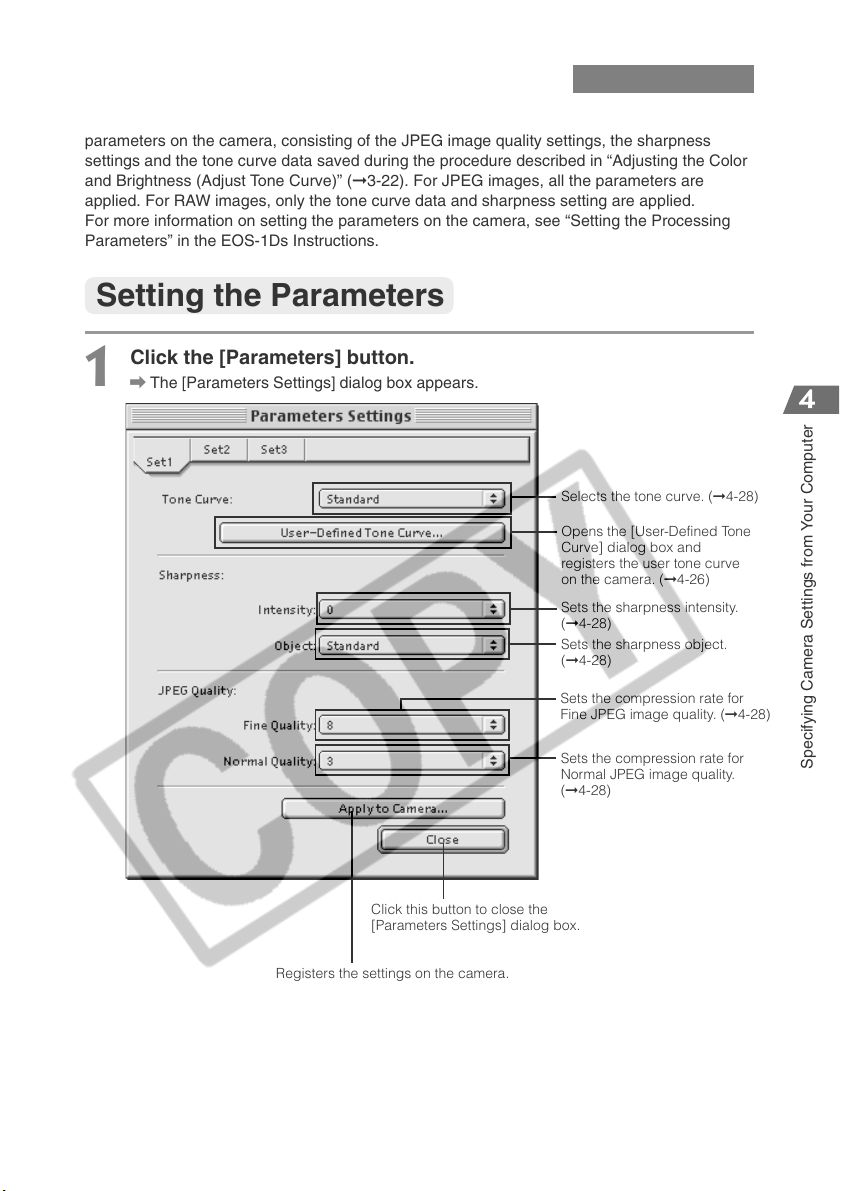
Setting the Parameters
You can set the parameters for captured images on the camera. You can register up to 3
parameters on the camera, consisting of the JPEG image quality settings, the sharpness
settings and the tone curve data saved during the procedure described in “Adjusting the Color
and Brightness (Adjust Tone Curve)” (➞3-22). For JPEG images, all the parameters are
applied. For RAW images, only the tone curve data and sharpness setting are applied.
For more information on setting the parameters on the camera, see “Setting the Processing
Parameters” in the EOS-1Ds Instructions.
Setting the Parameters
Click the [Parameters] button.
1
\ The [Parameters Settings] dialog box appears.
Selects the tone curve. (➞4-28)
Opens the [User-Defined Tone
Curve] dialog box and
registers the user tone curve
on the camera. (➞4-26)
Sets the sharpness intensity.
(➞4-28)
Sets the sharpness object.
(➞4-28)
Click this button to close the
[Parameters Settings] dialog box.
Registers the settings on the camera.
Sets the compression rate for
Fine JPEG image quality. (➞4-28)
Sets the compression rate for
Normal JPEG image quality.
(➞4-28)
4-25
Specifying Camera Settings from Your Computer
Page 88
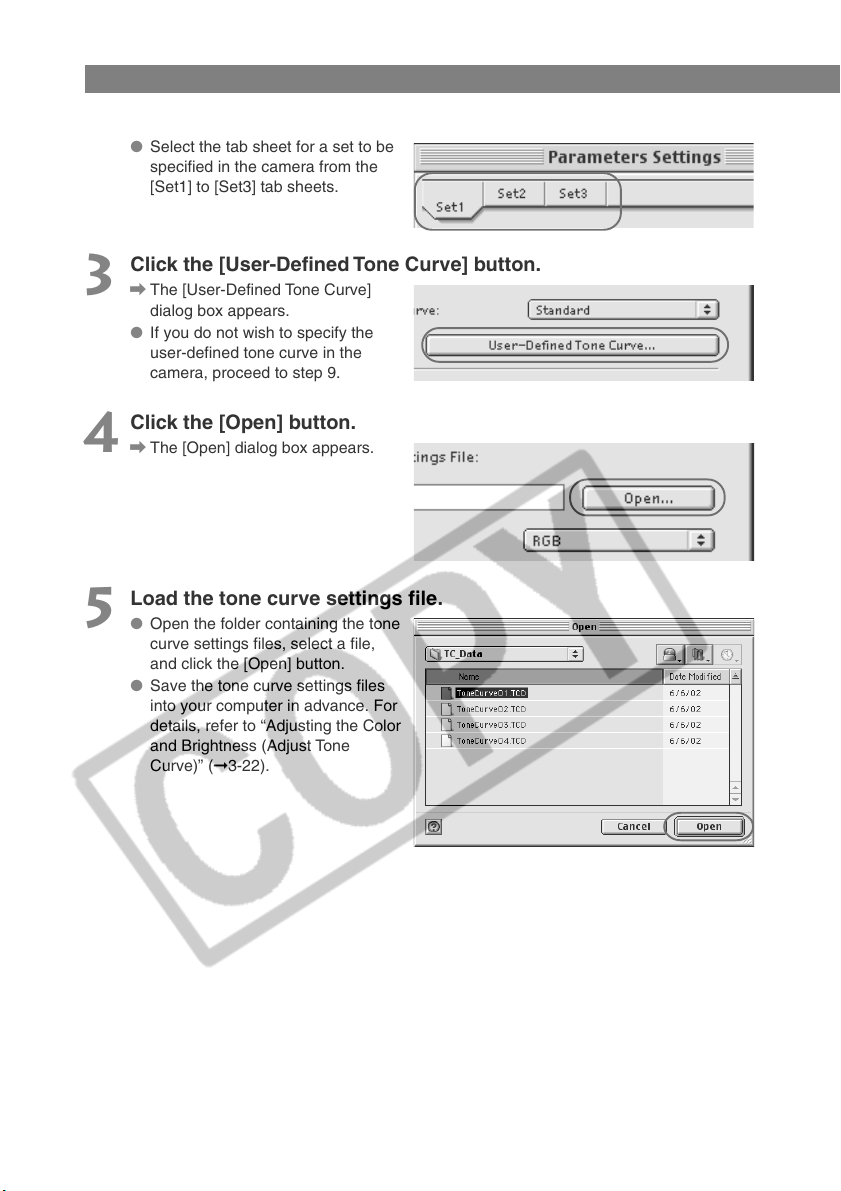
Setting the Parameters
Select a set to be specified in the camera.
2
● Select the tab sheet for a set to be
specified in the camera from the
[Set1] to [Set3] tab sheets.
Click the [User-Defined Tone Curve] button.
3
\ The [User-Defined Tone Curve]
dialog box appears.
● If you do not wish to specify the
user-defined tone curve in the
camera, proceed to step 9.
Click the [Open] button.
4
\ The [Open] dialog box appears.
Load the tone curve settings file.
5
● Open the folder containing the tone
curve settings files, select a file,
and click the [Open] button.
● Save the tone curve settings files
into your computer in advance. For
details, refer to “Adjusting the Color
and Brightness (Adjust Tone
Curve)” (➞3-22).
4-26
Page 89
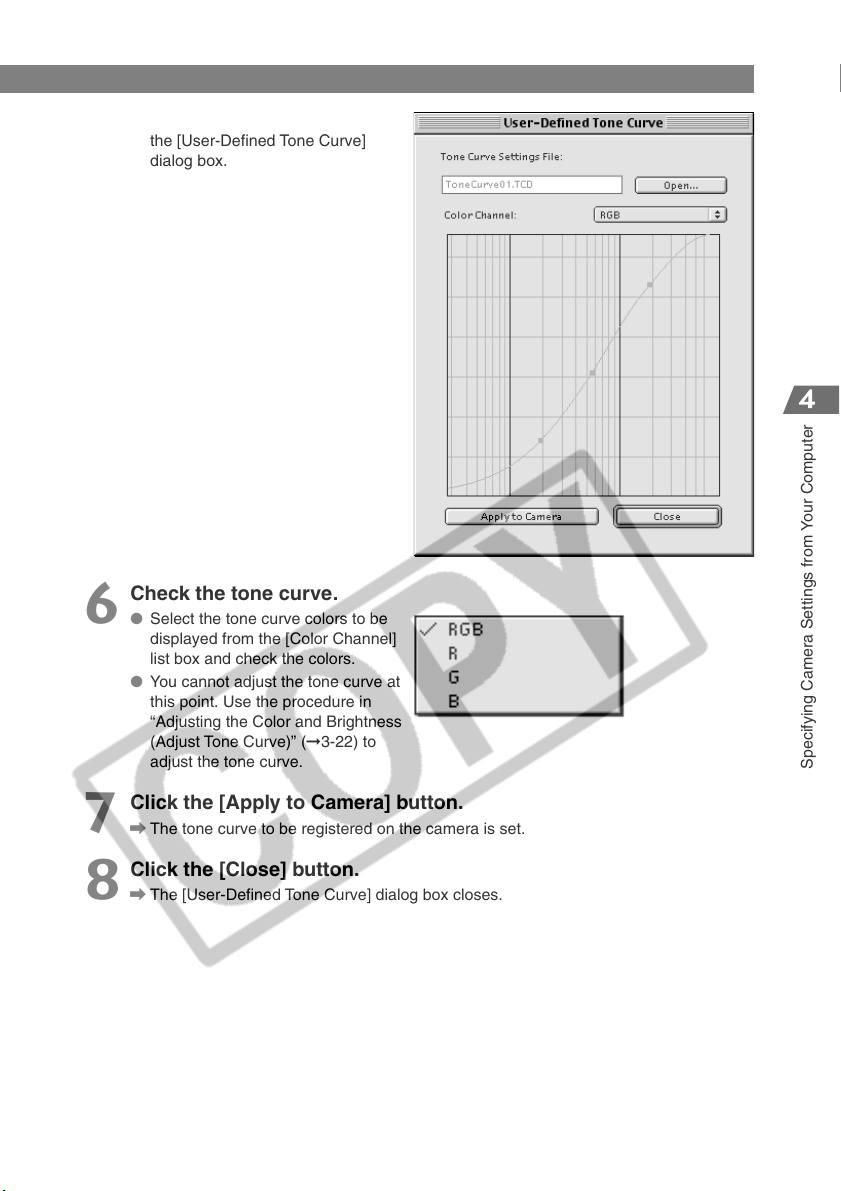
\ The tone curve data is loaded into
the [User-Defined Tone Curve]
dialog box.
Check the tone curve.
6
● Select the tone curve colors to be
displayed from the [Color Channel]
list box and check the colors.
● You cannot adjust the tone curve at
this point. Use the procedure in
“Adjusting the Color and Brightness
(Adjust Tone Curve)” (➞3-22) to
adjust the tone curve.
Setting the Parameters
Specifying Camera Settings from Your Computer
Click the [Apply to Camera] button.
7
\ The tone curve to be registered on the camera is set.
Click the [Close] button.
8
\ The [User-Defined Tone Curve] dialog box closes.
4-27
Page 90
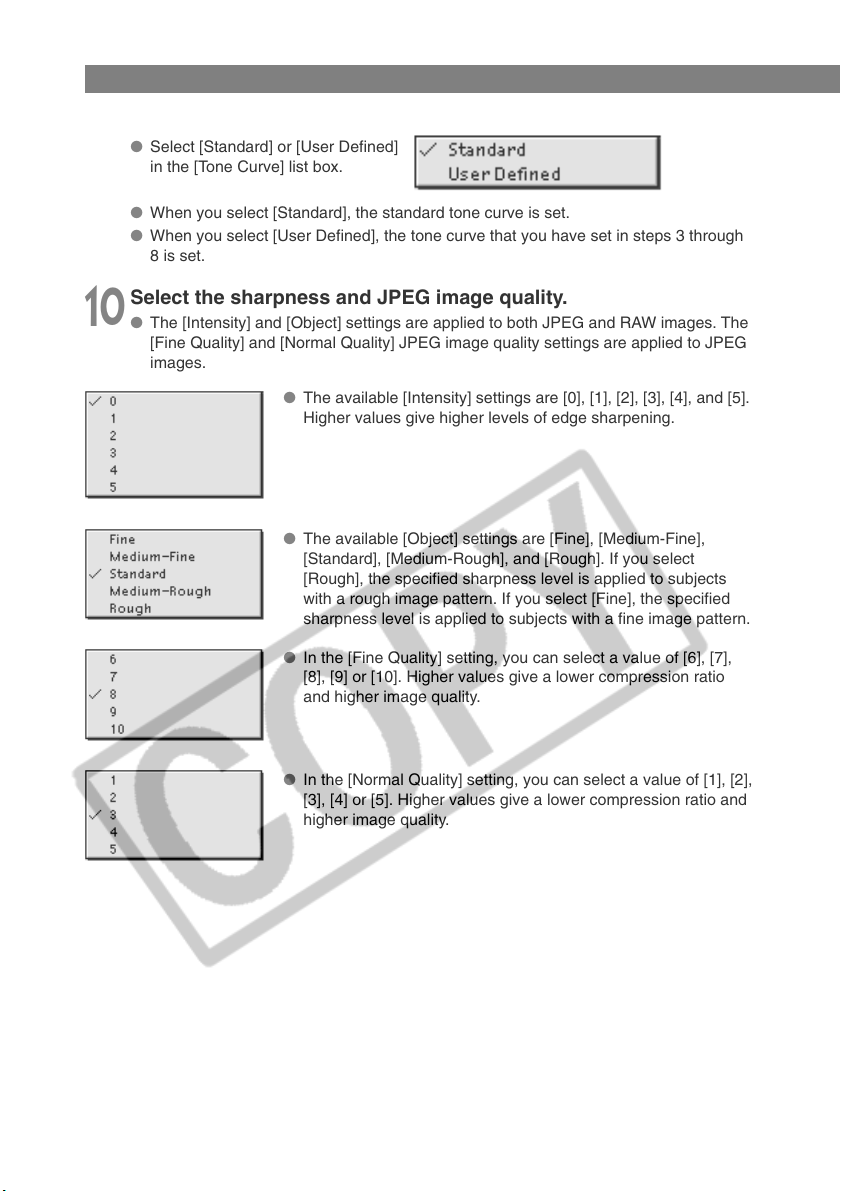
Setting the Parameters
Select a tone curve.
9
● Select [Standard] or [User Defined]
in the [Tone Curve] list box.
● When you select [Standard], the standard tone curve is set.
● When you select [User Defined], the tone curve that you have set in steps 3 through
8 is set.
Select the sharpness and JPEG image quality.
10
● The [Intensity] and [Object] settings are applied to both JPEG and RAW images. The
[Fine Quality] and [Normal Quality] JPEG image quality settings are applied to JPEG
images.
● The available [Intensity] settings are [0], [1], [2], [3], [4], and [5].
Higher values give higher levels of edge sharpening.
● The available [Object] settings are [Fine], [Medium-Fine],
[Standard], [Medium-Rough], and [Rough]. If you select
[Rough], the specified sharpness level is applied to subjects
with a rough image pattern. If you select [Fine], the specified
sharpness level is applied to subjects with a fine image pattern.
4-28
● In the [Fine Quality] setting, you can select a value of [6], [7],
[8], [9] or [10]. Higher values give a lower compression ratio
and higher image quality.
● In the [Normal Quality] setting, you can select a value of [1], [2],
[3], [4] or [5]. Higher values give a lower compression ratio and
higher image quality.
Page 91
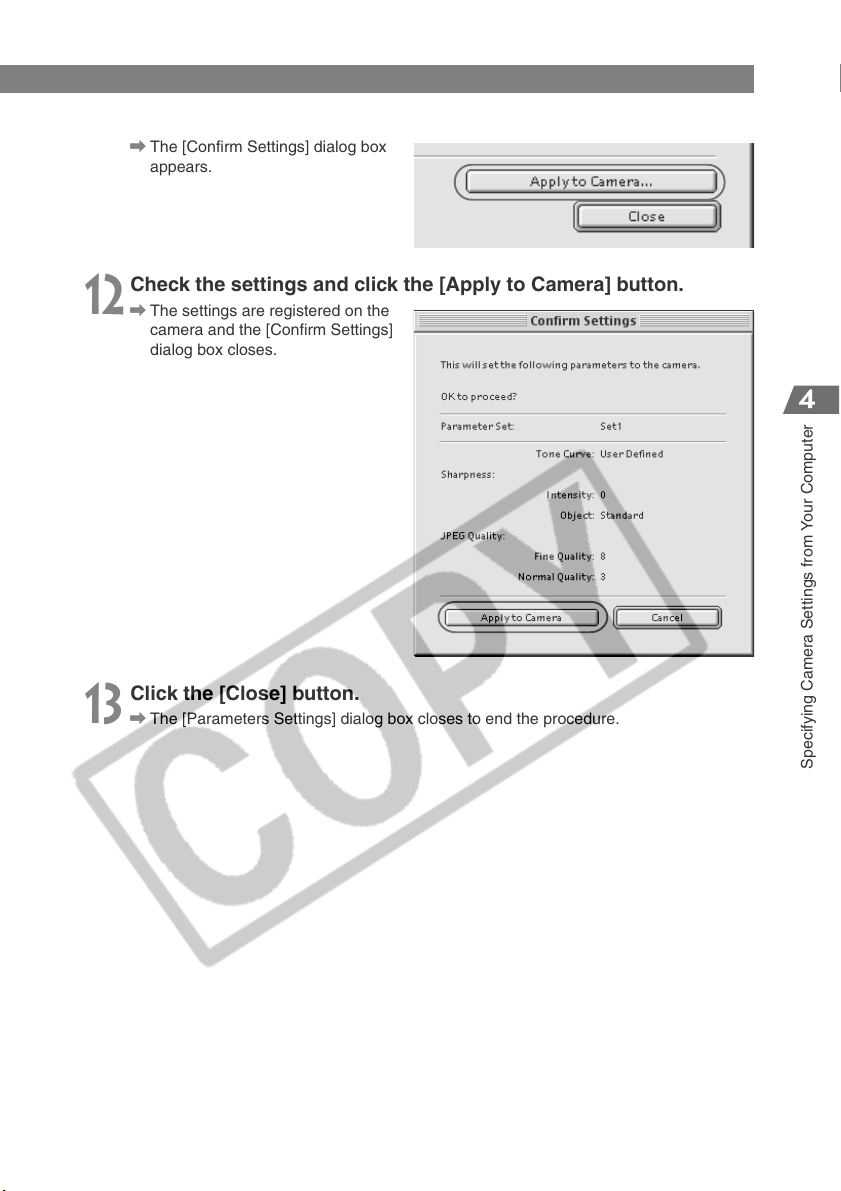
Click the [Apply to Camera] button.
11
\ The [Confirm Settings] dialog box
appears.
Check the settings and click the [Apply to Camera] button.
12
\ The settings are registered on the
camera and the [Confirm Settings]
dialog box closes.
Setting the Parameters
Click the [Close] button.
13
\ The [Parameters Settings] dialog box closes to end the procedure.
Specifying Camera Settings from Your Computer
4-29
Page 92
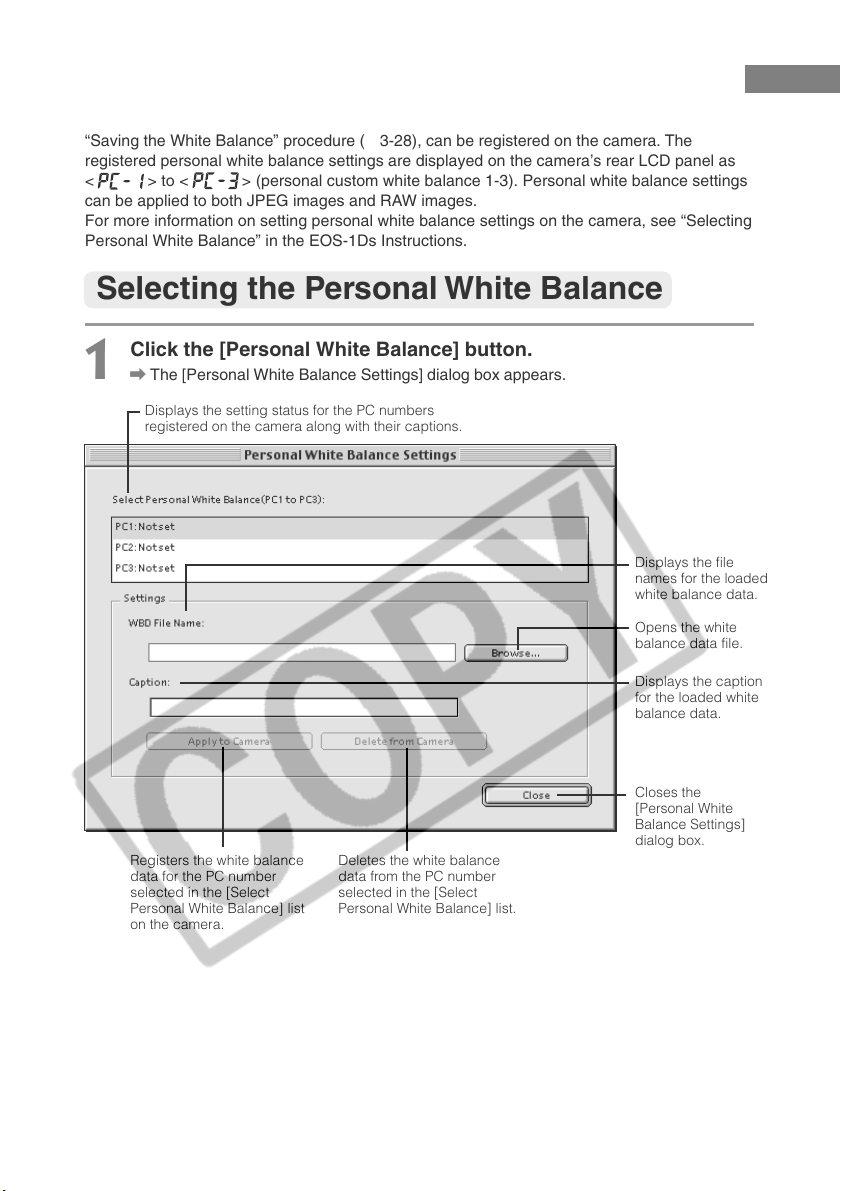
Selecting the Personal White Balance
Up to 3 personal white balance settings, consisting of the white balance data saved in the
“Saving the White Balance” procedure (➞3-28), can be registered on the camera. The
registered personal white balance settings are displayed on the camera’s rear LCD panel as
< > to < > (personal custom white balance 1-3). Personal white balance settings
can be applied to both JPEG images and RAW images.
For more information on setting personal white balance settings on the camera, see “Selecting
Personal White Balance” in the EOS-1Ds Instructions.
Selecting the Personal White Balance
Click the [Personal White Balance] button.
1
\ The [Personal White Balance Settings] dialog box appears.
Displays the setting status for the PC numbers
registered on the camera along with their captions.
Displays the file
names for the loaded
white balance data.
Opens the white
balance data file.
Registers the white balance
data for the PC number
selected in the [Select
Personal White Balance] list
on the camera.
4-30
Deletes the white balance
data from the PC number
selected in the [Select
Personal White Balance] list.
Displays the caption
for the loaded white
balance data.
Closes the
[Personal White
Balance Settings]
dialog box.
Page 93
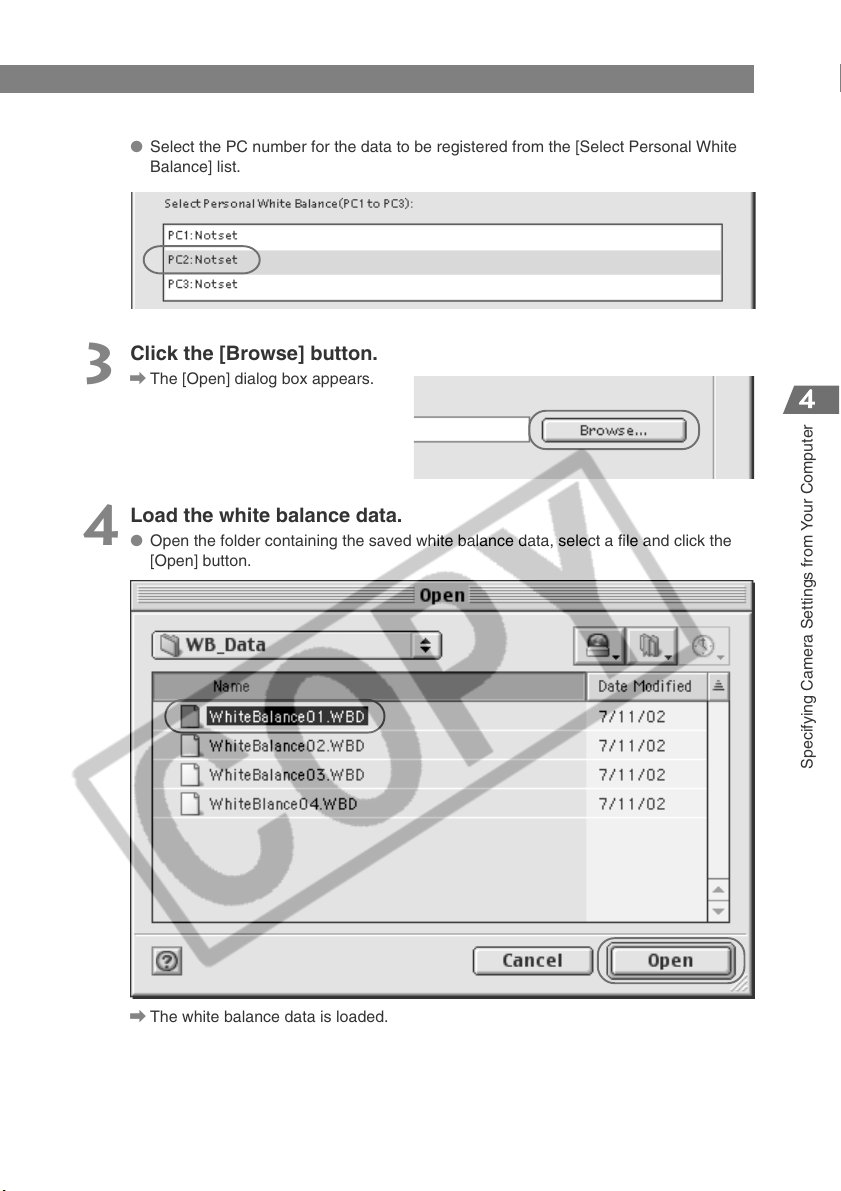
Selecting the Personal White Balance
Select PC number.
2
● Select the PC number for the data to be registered from the [Select Personal White
Balance] list.
Click the [Browse] button.
3
\ The [Open] dialog box appears.
Load the white balance data.
4
● Open the folder containing the saved white balance data, select a file and click the
[Open] button.
\ The white balance data is loaded.
Specifying Camera Settings from Your Computer
4-31
Page 94

Selecting the Personal White Balance
Click the [Apply to Camera] button.
5
\ The white balance data is registered on the camera.
● To register another personal white balance setting, repeat steps 2 to 5. You can
register up to 3 settings (PC1, PC2 and PC3).
● To delete a registered PC setting, select the PC number from the [Select Personal
White Balance] list and click the [Delete from Camera] button.
Click the [Close] button.
6
\ The [Personal White Balance Settings] dialog box closes to end the procedure.
4-32
Page 95
5
Operating the Camera from
Your Computer
This chapter describes the operations using the RemoteCapture software,
such as remote shooting, timer shooting and interval timer shooting.
Page 96
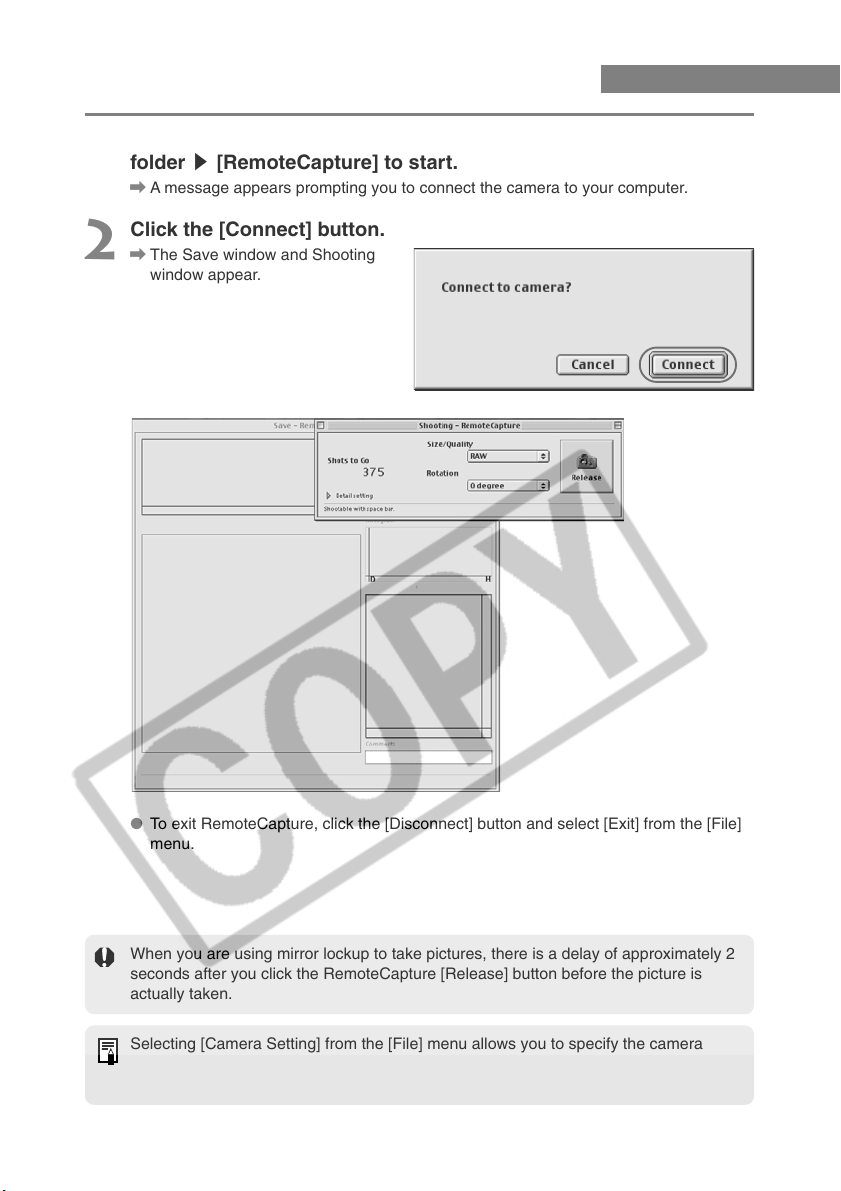
Starting RemoteCapture
Double-click the [Canon Utilities] folder s the [RemoteCapture]
1
folder s [RemoteCapture] to start.
\ A message appears prompting you to connect the camera to your computer.
Click the [Connect] button.
2
\ The Save window and Shooting
window appear.
● To exit RemoteCapture, click the [Disconnect] button and select [Exit] from the [File]
menu.
When you are using mirror lockup to take pictures, there is a delay of approximately 2
seconds after you click the RemoteCapture [Release] button before the picture is
actually taken.
Selecting [Camera Setting] from the [File] menu allows you to specify the camera
settings. For information on how to specify the camera settings, see Chapter 4
“Specifying Camera Settings from Your Computer”.
5-2
Page 97
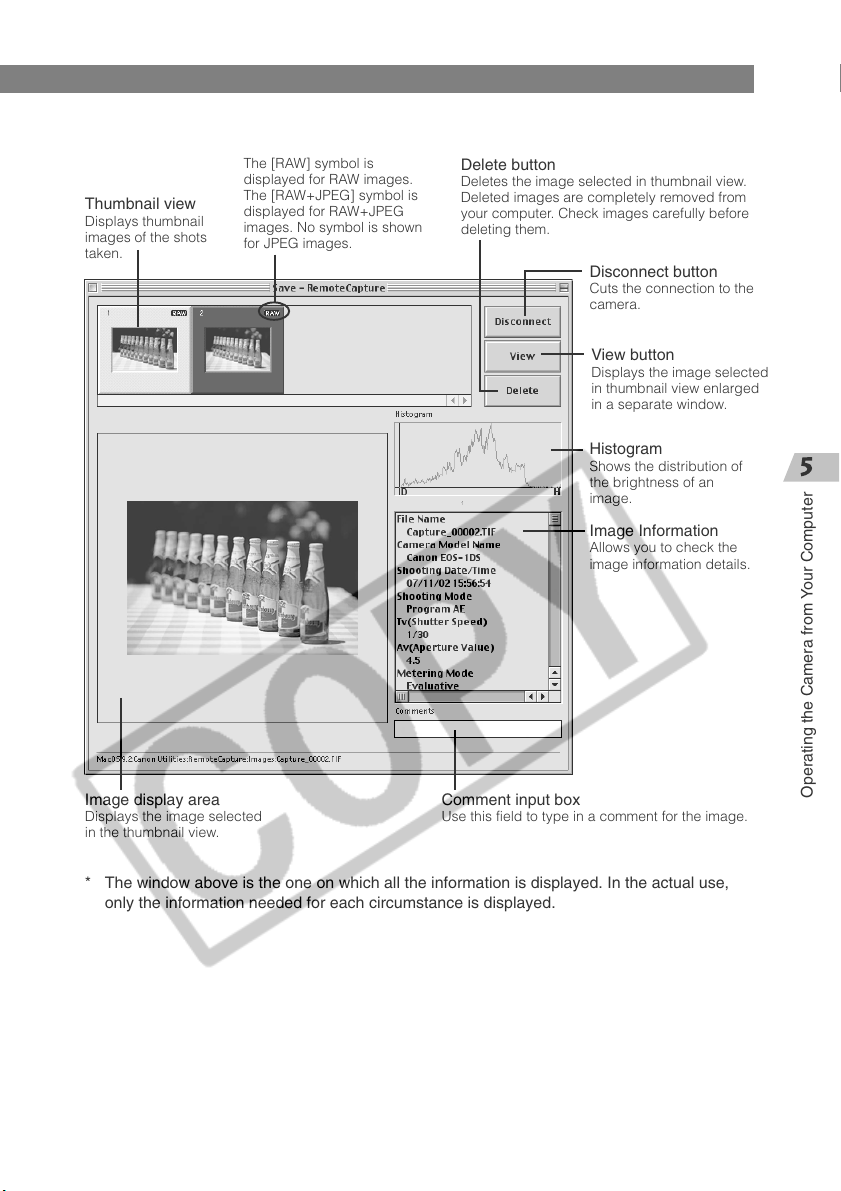
Save window
Starting RemoteCapture
Thumbnail view
Displays thumbnail
images of the shots
taken.
The [RAW] symbol is
displayed for RAW images.
The [RAW+JPEG] symbol is
displayed for RAW+JPEG
images. No symbol is shown
for JPEG images.
Delete button
Deletes the image selected in thumbnail view.
Deleted images are completely removed from
your computer. Check images carefully before
deleting them.
Disconnect button
Cuts the connection to the
camera.
View button
Displays the image selected
in thumbnail view enlarged
in a separate window.
Histogram
Shows the distribution of
the brightness of an
image.
Image Information
Allows you to check the
image information details.
Image display area
Displays the image selected
in the thumbnail view.
Comment input box
Use this field to type in a comment for the image.
* The window above is the one on which all the information is displayed. In the actual use,
only the information needed for each circumstance is displayed.
Operating the Camera from Your Computer
5-3
Page 98
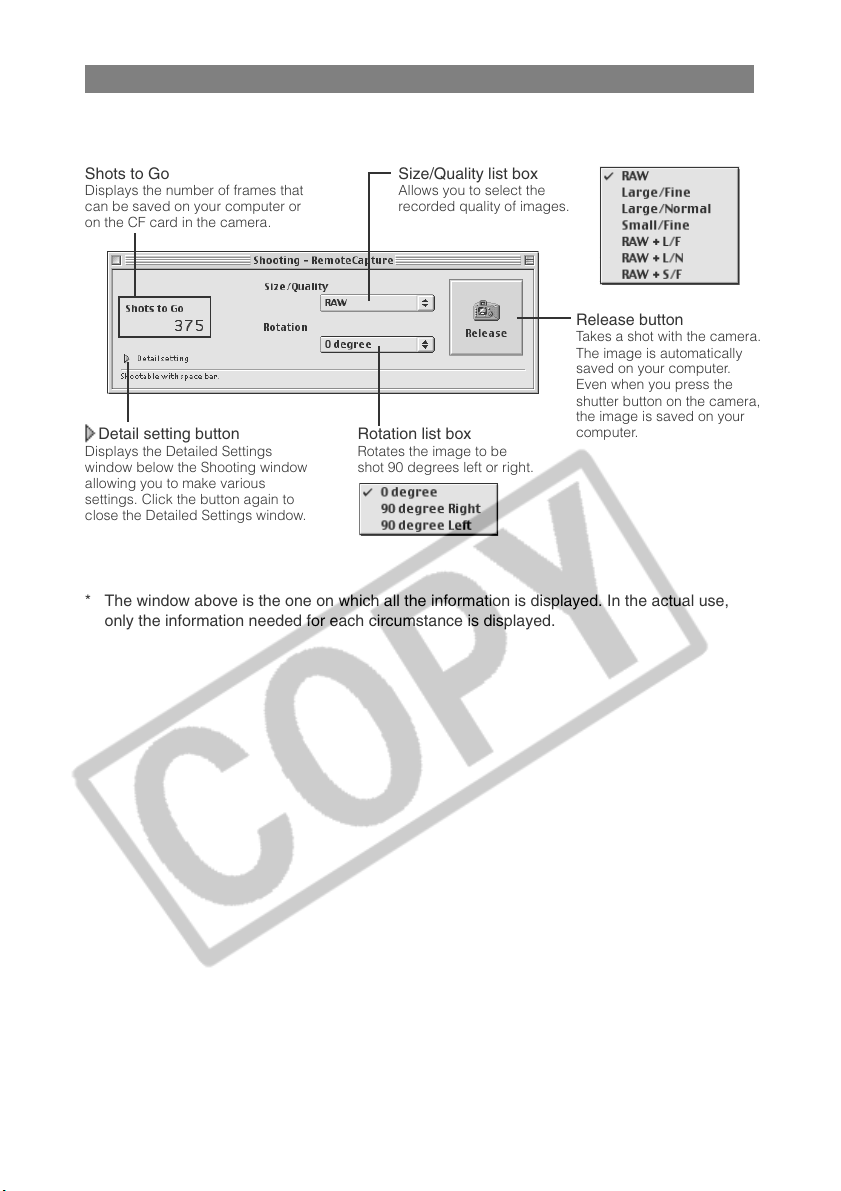
Starting RemoteCapture
Shooting window
Shots to Go
Displays the number of frames that
can be saved on your computer or
on the CF card in the camera.
Size/Quality list box
Allows you to select the
recorded quality of images.
Release button
Takes a shot with the camera.
The image is automatically
saved on your computer.
Even when you press the
shutter button on the camera,
the image is saved on your
Detail setting button
Displays the Detailed Settings
window below the Shooting window
allowing you to make various
settings. Click the button again to
close the Detailed Settings window.
Rotation list box
Rotates the image to be
shot 90 degrees left or right.
computer.
* The window above is the one on which all the information is displayed. In the actual use,
only the information needed for each circumstance is displayed.
5-4
Page 99
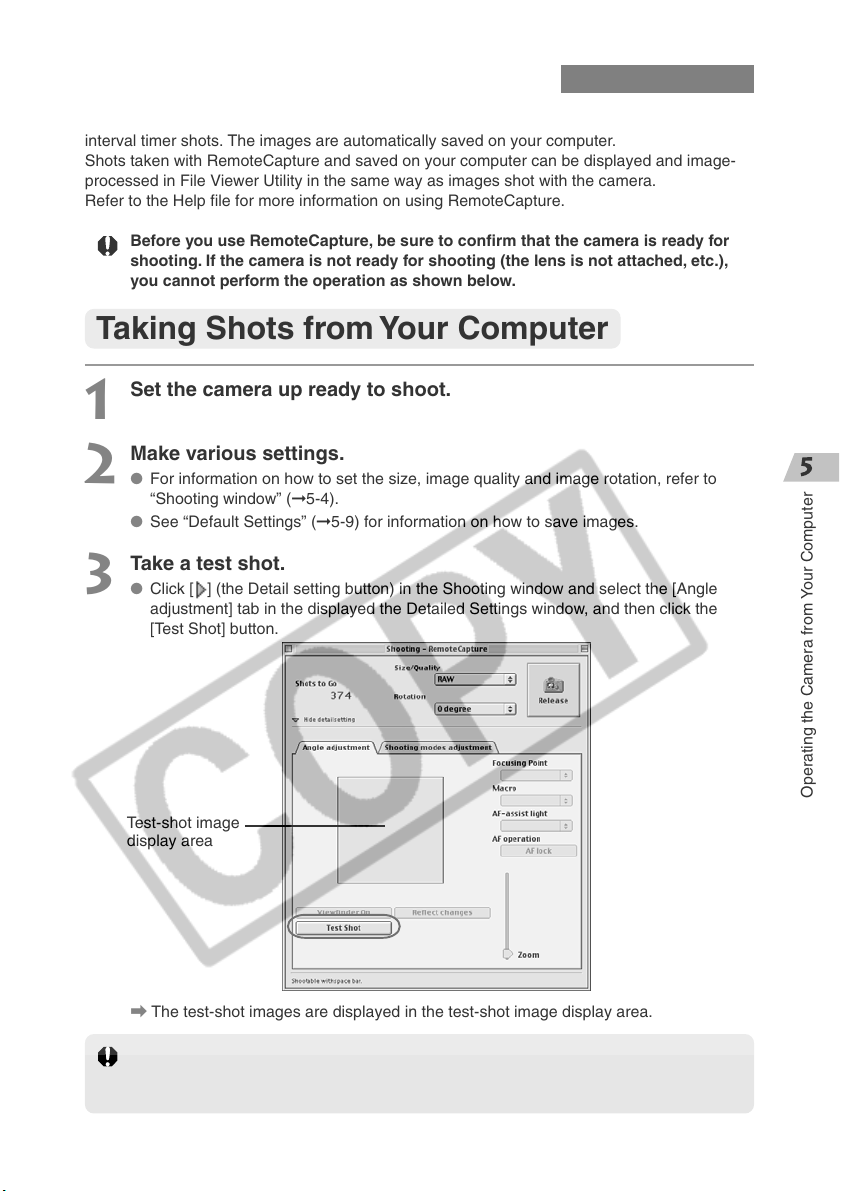
Using RemoteCapture
You can control the camera from your computer and take single-frame shots, timer shots and
interval timer shots. The images are automatically saved on your computer.
Shots taken with RemoteCapture and saved on your computer can be displayed and image-
processed in File Viewer Utility in the same way as images shot with the camera.
Refer to the Help file for more information on using RemoteCapture.
Before you use RemoteCapture, be sure to confirm that the camera is ready for
shooting. If the camera is not ready for shooting (the lens is not attached, etc.),
you cannot perform the operation as shown below.
Taking Shots from Your Computer
Set the camera up ready to shoot.
1
Make various settings.
2
● For information on how to set the size, image quality and image rotation, refer to
“Shooting window” (➞5-4).
● See “Default Settings” (➞5-9) for information on how to save images.
Take a test shot.
3
● Click [ ] (the Detail setting button) in the Shooting window and select the [Angle
adjustment] tab in the displayed the Detailed Settings window, and then click the
[Test Shot] button.
Test-shot image
display area
\ The test-shot images are displayed in the test-shot image display area.
With the auto focus function, if the camera is not focused, you cannot take pictures.
If you cannot take pictures with the auto focus function, focus the camera manually
and then take a picture.
Operating the Camera from Your Computer
5-5
Page 100
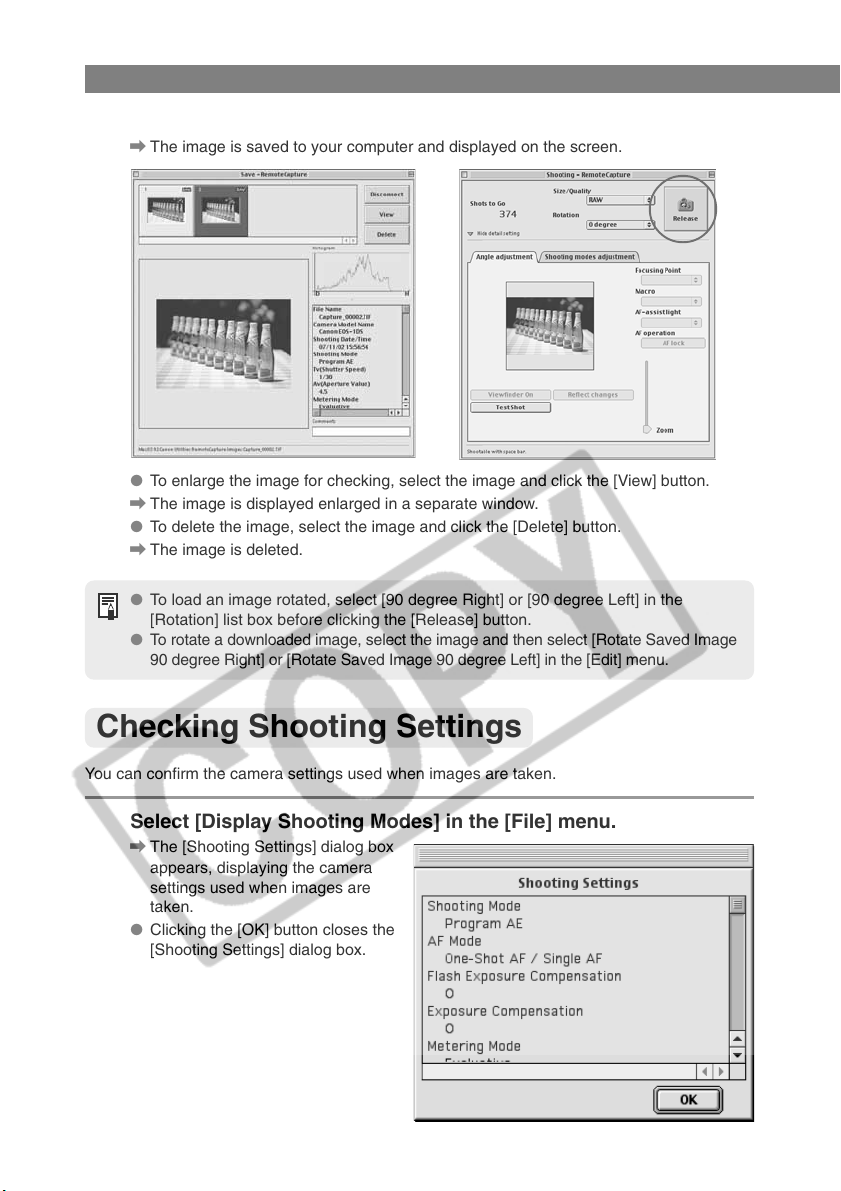
Using RemoteCapture
Click the [Release] button.
4
\ The image is saved to your computer and displayed on the screen.
● To enlarge the image for checking, select the image and click the [View] button.
\ The image is displayed enlarged in a separate window.
● To delete the image, select the image and click the [Delete] button.
\ The image is deleted.
● To load an image rotated, select [90 degree Right] or [90 degree Left] in the
[Rotation] list box before clicking the [Release] button.
●
To rotate a downloaded image, select the image and then select [Rotate Saved Image
90 degree Right] or [Rotate Saved Image 90 degree Left] in the [Edit] menu.
Checking Shooting Settings
You can confirm the camera settings used when images are taken.
Select [Display Shooting Modes] in the [File] menu.
\ The [Shooting Settings] dialog box
appears, displaying the camera
settings used when images are
taken.
● Clicking the [OK] button closes the
[Shooting Settings] dialog box.
5-6
 Loading...