

Page 1

ENGLISH
Before Using the Camera
Shooting
Playback/Erasing
Print/Transfer Settings
Viewing Images on a TV set
Customizing the Camera
Wireless Connection
Troubleshooting
List of Messages
Advanced
Appendix
Camera User Guide
This guide explains camera features and procedures in detail.
Page 2

Main Features
Shooting
Automatically adjusts shooting settings to match particular
conditions (Scene mode)
Automatically detects camera orientation with an Intelligent
Orientation sensor
Changes image colors to create special effects (My Colors
modes)
Playback
Plays movies with sound
Auto plays slideshows
Editing
Records sound memos for
still images
Edits movies
Printing via a wireless connection
Prints images easily by attaching the supplied
wireless print adapter to a Canon PictBridge
compliant printer
Transfer ring images to a co mputer* via a wir eless connection
Transfers all images stored on a camera to the computer at the
same time
Shoots images and transfers them to a computer immediately
* Connecting wirelessly between the camera and a computer is
only possible with the Windows XP SP2 operating system.
Page 3

Conventions Used in this Guide
Icons appearing below titles indicate the modes in which the
procedure can be used.
Mode Switch
Continuous Shooting
Shooting Mode
See Functions Available in Each Shooting Mode (p. 138).
In this guide, the Basic Camera User Guide is referred to as the
Basic Guide, and the Advanced Camera User Guide is referred to
as the Advanced Guide.
This mark denotes issues th at may affect t he camera’s operation.
This mark denotes additional topics tha t complement the basi c
operating procedures.
You can use SD* memory cards and MultiMediaCards with this camera.
These cards are collectively called memory cards in this guide.
* SD stands for Secure Digital, a copyright protection system.
Use of genuine Canon accessories is recommended.
This product is designed to achieve excellent performance when
used with genuine Canon accessories. Canon shall not be liable
for any damage to this product and/or accidents such as fire, etc.,
caused by the malfunction of non-genuine Canon accessories
(e.g., a leakage and/or explosion of a battery pack). Please note
that this warranty does not apply to repairs arising out of the
malfunction of non-genuine Canon accessories, although you
may request such repairs on a chargeable basis.
1
Page 4

Table of Contents
Items marked with a are lists or charts that summarize camera
functions or procedures.
Conventions Used in this Guide . . . . . . . . . . . . . . . . . . . . . . .1
Handling Precautions . . . . . . . . . . . . . . . . . . . . . . . . . . . . . . .5
Please Read. . . . . . . . . . . . . . . . . . . . . . . . . . . . . . . . . . . . . . . 5
Operation Restrictions . . . . . . . . . . . . . . . . . . . . . . . . . . . . . . . 6
Safety Precautions . . . . . . . . . . . . . . . . . . . . . . . . . . . . . . . . . . 9
Preventing Malfunctions . . . . . . . . . . . . . . . . . . . . . . . . . . . . . 14
Before Using the Camera—The Components Guide . . . . . .15
Before Using the Camera—Basic Operations . . . . . . . . . . .19
Using the LCD Monitor . . . . . . . . . . . . . . . . . . . . . . . . . . . . . . 19
LCD Monitor Brightness . . . . . . . . . . . . . . . . . . . . . . . . . . . . . 21
Information Displayed on the LCD Monitor . . . . . . . . . . . . . . 22
Using the Viewfinder . . . . . . . . . . . . . . . . . . . . . . . . . . . . . . . 25
Indicators . . . . . . . . . . . . . . . . . . . . . . . . . . . . . . . . . . . . . . . . 26
Power Saving Function . . . . . . . . . . . . . . . . . . . . . . . . . . . . . 27
Formatting Memory Cards . . . . . . . . . . . . . . . . . . . . . . . . . . . 28
Setting the World Clock . . . . . . . . . . . . . . . . . . . . . . . . . . . . . 29
Menus and Settings . . . . . . . . . . . . . . . . . . . . . . . . . . . . . . . . 31
Menu List . . . . . . . . . . . . . . . . . . . . . . . . . . . . . . . . . . . . . . . . 33
Resetting Settings to Their Default Values. . . . . . . . . . . . . . . 37
Shooting . . . . . . . . . . . . . . . . . . . . . . . . . . . . . . . . . . . . . . . .38
Changing the Recording Pixels and Compression (Still Images) . . 38
Changing Recording Pixels and Frame Rates (Movies)
Magnified Close-Up Shooting (Digital Macro) . . . . . . . . . . . . 41
Using the Digital Zoom
Continuous Shooting . . . . . . . . . . . . . . . . . . . . . . . . . . . . 43
Postcard Date Imprint Mode . . . . . . . . . . . . . . . . . . . . . . . . . . 44
Using the Self-Timer . . . . . . . . . . . . . . . . . . . . . . . . . . . . . 45
Movie Shooting. . . . . . . . . . . . . . . . . . . . . . . . . . . . . . . . . 47
Shooting Panoramic Images (Stitch Assist)
Switching between Focusing Modes . . . . . . . . . . . . . . . . . . . 51
2
. . . . . . . . . . . . . . . . . . . . . . . . . . . . . . . 42
. . . . . . . . . . . . . . . . 49
. . . . . . . 40
Page 5

Shooting Hard-to-Focus Subjects (Focus Lock, AF Lock) . . .52
Locking the Exposure Setting (AE Lock). . . . . . . . . . . . . . . . .53
Locking the Flash Exposure Setting (FE Lock) . . . . . . . . . . . .54
Switching between Metering Modes . . . . . . . . . . . . . . . . . . . . 55
Adjusting the Exposure Compensation . . . . . . . . . . . . . . . . . .56
Shooting in Long Shutter Mode
Adjusting the Tone (White Balance)
Changing the Photo Effect
Shooting in a My Colors Mode
Adjusting the ISO Speed
Setting the Auto Rotate Function
Creating an Image Destination (Folder) . . . . . . . . . . . . . . . . .71
Resetting the File Number
. . . . . . . . . . . . . . . . . . . . . . . . .57
. . . . . . . . . . . . . . . . . . . . .59
. . . . . . . . . . . . . . . . . . . . . . . . . . . .62
. . . . . . . . . . . . . . . . . . . . . . . . .63
. . . . . . . . . . . . . . . . . . . . . . . . . .69
. . . . . . . . . . . . . . . . . . . . . . . .70
. . . . . . . . . . . . . . . . . . . . . . . . . . . .72
Playback/Erasing. . . . . . . . . . . . . . . . . . . . . . . . . . . . . . . . . 74
Magnifying Images . . . . . . . . . . . . . . . . . . . . . . . . . . . . . . .74
Viewing Images in Sets of Nine (Index Playback)
Jumping to Images
Viewing Movies . . . . . . . . . . . . . . . . . . . . . . . . . . . . . . . . . . . . 77
Editing Movies. . . . . . . . . . . . . . . . . . . . . . . . . . . . . . . . . . . . . 78
Rotating Images in the Display . . . . . . . . . . . . . . . . . . . . . . . .80
Playback with Transition Effects
Attaching Sound Memos to Images . . . . . . . . . . . . . . . . . . . . 81
Automated Playback (Slide Shows) . . . . . . . . . . . . . . . . . . . .83
Protecting Images . . . . . . . . . . . . . . . . . . . . . . . . . . . . . . . . . .87
Erasing All Images . . . . . . . . . . . . . . . . . . . . . . . . . . . . . . . . .87
. . . . . . . . . . . . . . . . . . . . . . . . . . . . . . . 76
. . . . . . . . . . . . . . . . . . . . . . . .81
. . . . . . . . .75
Print Settings/Transfer Settings. . . . . . . . . . . . . . . . . . . . . . 88
Setting the DPOF Print Settings . . . . . . . . . . . . . . . . . . . . . . .88
Setting the DPOF Transfer Settings . . . . . . . . . . . . . . . . . . . .91
Viewing Images on a TV set . . . . . . . . . . . . . . . . . . . . . . . . 93
Customizing the Camera (My Camera Settings). . . . . . . . . 94
Changing My Camera Settings
Registering My Camera Settings
. . . . . . . . . . . . . . . . . . . . . . . . .94
. . . . . . . . . . . . . . . . . . . . . . . .95
3
Page 6

Using Wireless Connection (Connecting to Printer) . . . . . . .97
Connecting to a Printer. . . . . . . . . . . . . . . . . . . . . . . . . . . . . . 98
Deleting target devices . . . . . . . . . . . . . . . . . . . . . . . . . . . . . 104
Troubleshooting . . . . . . . . . . . . . . . . . . . . . . . . . . . . . . . . .105
Camera. . . . . . . . . . . . . . . . . . . . . . . . . . . . . . . . . . . . . . . . . 105
When the power is turned on . . . . . . . . . . . . . . . . . . . . . . . . 105
LCD monitor . . . . . . . . . . . . . . . . . . . . . . . . . . . . . . . . . . . . . 106
Shooting . . . . . . . . . . . . . . . . . . . . . . . . . . . . . . . . . . . . . . . . 107
Shooting Movies . . . . . . . . . . . . . . . . . . . . . . . . . . . . . . . . . . 111
Playback . . . . . . . . . . . . . . . . . . . . . . . . . . . . . . . . . . . . . . . . 112
Battery/Battery Charger . . . . . . . . . . . . . . . . . . . . . . . . . . . . 113
TV monitor output . . . . . . . . . . . . . . . . . . . . . . . . . . . . . . . . . 113
Wireless connection to a printer . . . . . . . . . . . . . . . . . . . . . . 114
List of Messages. . . . . . . . . . . . . . . . . . . . . . . . . . . . . . . . .115
Appendix. . . . . . . . . . . . . . . . . . . . . . . . . . . . . . . . . . . . . . .119
Battery Handling . . . . . . . . . . . . . . . . . . . . . . . . . . . . . . . . . . 119
Handling the Memory Card . . . . . . . . . . . . . . . . . . . . . . . . . 121
Using an AC Adapter Kit (Sold Separately) . . . . . . . . . . . . . 123
Using an Externally Mounted Flash (Sold Separately) . . . . . 124
Camera Care and Maintenance . . . . . . . . . . . . . . . . . . . . . . 126
Specifications . . . . . . . . . . . . . . . . . . . . . . . . . . . . . . . . . . . . 127
INDEX. . . . . . . . . . . . . . . . . . . . . . . . . . . . . . . . . . . . . . . . .135
Functions Available in Each Shooting Mode . . . . . . . . . . .138
4
Page 7

Handling Precautions
Please Read
Tes t Shot s
Before you try to photograph important subjects, we highly
recommend that you shoot several trial images to confirm that the
camera is operating and being operated correctly.
Please note that Canon Inc., its subsidiaries and affiliates, and its
distributors are not liable for any consequential damages arising
from any malfunction of a camera or accessory, including memory
cards, that results in the failure of an image to be recorded or to be
recorded in a way that is machine readable.
Warning Against Copyright Infringement
Please note that Canon digital cameras are intended for personal
use and should never be used in a manner that infringes upon or
contravenes international or domestic copyright laws and
regulat ions. Please be advised that in certain cases the copying of
images f rom performances, exhibitions, or commercial properties
by means of a camera or other device may contravene copyright or
other legal rights even if the image was shot for personal use.
Warranty Limitations
For information on your camera's warranty, please refer to the
Canon European Warranty System (EWS) Booklet supplied with
your camera.
For Canon Customer Support contacts, please see rear of this
booklet or the European Warranty System (EWS) Booklet.
Camera Body Temperature
If your camera is used for prolonged periods, the camera body
may become warm. Please be aware of this and take care when
operating the camera for an extended period.
About the LCD Monitor
The LCD monitor is produced with extremely high-precision
manufacturing techniques. More than 99.99% of the pixels
operate to specification. Less than 0.01% of the pixels may
occasionally misfire or appear as red or black dots. This has no
effect on the recorded image and does not constitute a
malfunction.
5
Page 8

Video Format
Please set the camera’s video signal format to the one used in your
region before using it with a TV monitor (p. 93).
Language Setting
Please see the Basic Guide (p. 4) to change the language setting.
Operation Restrictions
The wireless function used in this equipment has been approved
for domestic use. For use of this function in other countries,
please inquire through Canon's Customer Service Center.
France: Using the wireless function outdoors is prohibited.
Italy: If used outside of own premises, general authorization is
required.
Latvia: If used outside of own premises, general authorization is
required.
This device may experience signal interference caused by other
devices emitting radio waves (microwave ovens, Bluetooth
appliances, cordless telephones, etc.). Keep the device away
from such devices or do not use the devices at the same time.
6
Page 9

Statement on EC directive
Contains already Notified Transmitter Module :CM13264
7
Page 10

8
Page 11

MADE IN JAPAN
Safety Precautions
zBefore using the camera, please ensure that you read the safety
precautions described below and in the “Safety Precautions”
section of the Basic Guide. Always ensure that the camera is
operated correctly.
zThe safety precautions noted on the following pages are intended
to instruct you in the safe and correct operation of the camera and
its accessories to prevent injuries or damage to yourself, other
persons and equipment. Be sure you fully understand them before
reading the rest of the manual.
9
Page 12
Equipment refers to the camera, battery charger, wireless print
adapter or separately sold compact power adapter.
Battery refers to the battery pack.
Warnings
Equipment
Do not aim the camera directly into the sun or at other
intense light sources that could damage your eyesight.
Store this equipment out of the reach of children and
infants.
• Wrist strap: P lacement of the strap around the child’s neck could
result in asphyxiation.
• Memory card: Dangerous if accidentally swallowed. If this
occurs, contact a doctor immediately.
Do not attempt to disassemble or alter any part of the
equipment that is not expressly described in this guide.
To avoid the risk of high-voltage electrical shock, do not
touch the flash portion of the camera if it has been damaged.
Stop operating the equipment immediately if it emits smoke
or noxious fumes.
Do not allow the equipment to come into contact with, or
become immersed in, water or other liquids. If the exterior
comes into contact with liquids or salt air, wipe it dry with a
soft, absorbent cloth.
Continued use of the equipment may result in fire or electrical
shock. Immediately turn the camera power off and remove the
camera battery or unplug the power cord from the power outlet.
Please consult your camera distributor or the closest Canon
Customer Support Help Desk.
10
Page 13

z Do not use substances containing alcohol, benzine,
thinners or other flammable substances to clean or
maintain the equipment.
z Do not cut, damage, alter or place heavy items on the power
cord.
z Use only recommended power accessories.
z Remove the power cord on a regular periodic basis and
wipe away the dust and dirt that collects on the plug, the
exterior of the power outlet and the surrounding area.
z Do not handle the power cord if your hands are wet.
Continued use of the equipment may result in fire or electrical
shock.
Battery
z Do not place the battery near a heat source or expose it to
direct flame or heat.
z The battery should not be immersed in water or sea water.
z Do not attempt to disassemble, alter or apply heat to the
battery.
z Avoid dropping or subjecting the battery to severe impacts
that could damage the casing.
z Use only recommended battery and accessories.
Use of battery not expressly recommended for this equipment
may cause explosions or leaks, resulting in fire, injury and
damage to the surroundings. In the event that a battery leaks and
the eyes, mouth, skin or clothing contact these substances,
immediately flush with water and seek medical assistance.
z Disconnect the battery charger and compact power adapter
from the camera or the wireless print adapter and the power
outlet after recharging or when they are not in use to avoid
fire and other hazards.
z Do not place anything, such as tablecloths, carpets,
bedding or cushions, on top of the battery charg er while it
is charging.
Continued use over a long period may cause the units to overheat
and distort, resulting in fire.
11
Page 14
z Use only the specified battery charger to charge the battery.
z The battery charger and compact power adapter are
designed for exclusive use with your camera. Do not use it
with other products or batteries.
There is a risk of overheating and distortion which could result in
fire or electrical shock.
z Before you discard a battery, cover the terminals with tape
or other insulators to prevent direct contact with other
objects.
Contact with the metallic components of other materials in waste
containers may lead to fire or explosions.
Others
z Do not trigger the flash in close proximity to human or
animal eyes. Exposure to the intense light produced by the
flash may damage eyesight.
In particular, remain at least one meter (39 inches) away fr om
infants when using the flash.
z Keep objects that are sensitive to magnetic fields (such as
credit cards) away from the speaker of the camera.
Such items may lose data or stop working.
z If you wish to use a wireless connection inside an aircraft or
hospital, always follow the instructions of the airline or
hospital staff.
The camera emits electromagnetic waves which may affect
instruments, medical devices and other sensitive equipment.
Cautions
Equipment
z Be careful not to bang the camera or subject it to strong
impacts or shocks that could lead to injury or damage the
equipment when wearing or holding it by the strap.
12
Page 15

Do not store the equipment in humid or dusty areas.
Do not allow metal objects (such as pins or keys) or dirt to
contact the charger terminals or plug.
Such conditions could lead to fire, electrical shock or other
damage.
Avoid using, placing or storing the equipment in places
subject to stron g sunlight or high temperatures, such as the
dashboard or trunk (boot) of a car.
Ensure that the battery charger or t he compact power
adapter are plugged into a power outlet of the specified
rating, not over the specified rating. Do not use if the power
cord or plug are damaged, or if not fully plugged into the
outlet.
Do not use in locations with poor ventilation.
The above-mentioned can cause leakage, overheating or
explosion, resulting in fire, burns or other injuries. High
temperatures may also cause deformation of the casing.
When not using the camera for extended periods of time,
remove the battery from the camera or battery charger and
store the equipment in a safe place.
The battery can run down.
If the AC adapter kit or battery charger is connected to, for
example, an electronic transformer for travel abroad,
trouble with the camera may result, so please do not use
such a device.
Flash
Do not operate the flash with dirt, dust or other items stuck
to the surface of the flash.
Be careful not to cover the flash with your fingers or
clothing when shooting.
The flash may be damaged and emit smoke or noise. The
resulting heat build-up could damage the flash.
Do not touch the surface of the flash after taking several
pictures in rapid succession.
Doing so could result in burns.
13
Page 16

Preventing Malfunctions
Avoid Strong Magnetic Fields
Never place the camera in close proximity to electric motors
or other equipment generating strong electromagnetic
fields.
Exposure to strong magnetic fields may cause malfunctions or
corrupt image data.
Avoid Condensation Related Problems
When moving the equipment rapidly between hot and cold
temperatures, you can avoid condensation by placing the
equipment in an airtight, resealable plastic bag and letting it
adjust to temperature changes slowly before removing it
from the bag.
Moving the equipment rapidly between hot and cold temperatures
may cause condensation (water droplets) to form on its external
and internal surfaces.
If Condensation Forms Inside the Camera
Stop using the camera immediately.
Continued use may damage the equipment. Remove the memory
card and battery or compact power adapter from the camera and
wait until the moisture evaporates completely before resuming
use.
14
Page 17

Before Using the Camera—The Components Guide
Front View
A/V OUT (Audio/Video output) Terminal (p. 93)
DIGITAL Terminal
Te r m i n a l C ov e r
Wrist Strap Mount
Microphone (p. 81)
AF-assist Beam (p. 33)
Red-Eye Reduction Lamp (Basic Guide p. 9)
Self-Timer Lamp (p. 45)
Viewfinder Window (p. 25)
Flash (Basic Guide p. 9)
Lens
Wireless Lamp (p. 26)
The interface cable and AV cable cannot be connected
simultaneously.
Before Using the Camera
15
Page 18

How to Attach the Wrist Strap* How to Open the Terminal Cover
* When carrying the camera by the strap, be careful not to swing the camera
or catch it on other items.
Back View
LCD Monitor (p. 19)
Viewfinder (p. 25)
Tripod Socket
DC Coupler Terminal Cover (p. 123)
Memory Card Slot/Battery Cover (Basic Guide p. 2)
Speaker
Battery Compartment (Memory Card/Battery Compartment)
16
Page 19
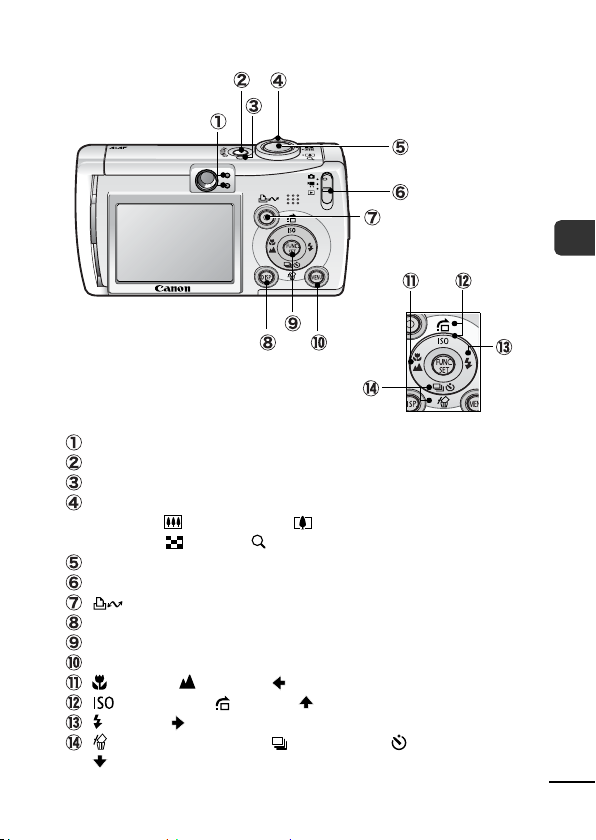
Operation Panel
Indicators (p. 26)
Power Button (Basic Guide p. 5)
Power Lamp
Zoom Lever (p. 74, Basic Guide p.8)
Shooting: (Wide Angle)/ (Telephoto)
Playback: (Index)/ (Magnify)
Shutter Button (Basic Guide p. 5)
Mode Switch (Basic Guide pp. 5, 6)
(Print/Share) Button (Basic Guide p. 14)
DISP. (Display) Button (p. 19)
FUNC./SET (Function/Set) Button (p. 31)
MENU Button (p. 32)
(Macro)/ (Infinity)/ Button (Basic Guide p. 10)
(ISO Speed)/ (Jump)/ Button (pp. 69, 76)
(Flash)/ Button (Basic Guide p. 9)
(Single Image Erase)/ (Continuous)/ (Self-timer)/
Button (pp. 43, 45, Basic Guide p. 11)
Before Using the Camera
17
Page 20
Wireless Print Adapter
W
I
P
R
R
E
I
L
N
E
T
S
A
S
D
A
P
T
E
R
S
E
T
U
P
D
C
I
N
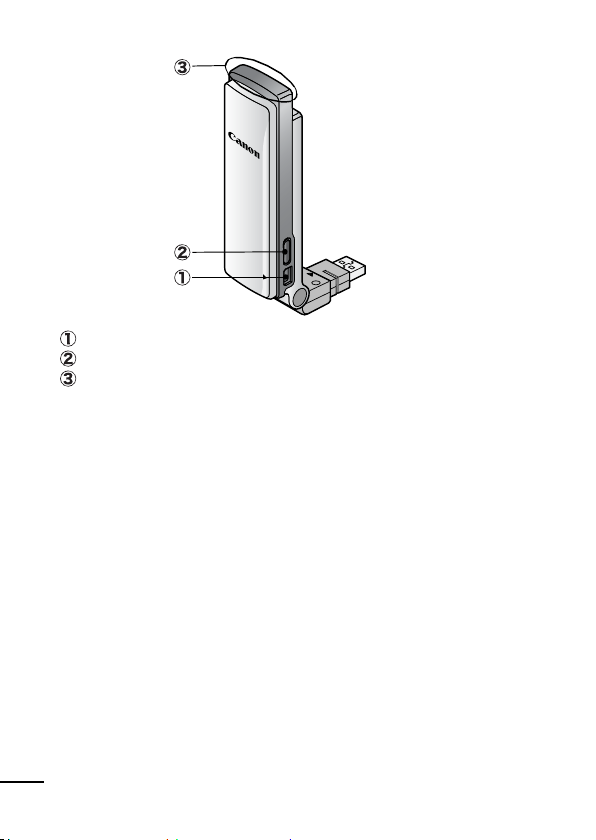
DC IN (power) Terminal (p. 99)
SETUP button (p. 103)
Wireless Lamp (p. 26)
18
Page 21

Before Using the Camera—Basic Operations
Using the LCD Monitor
1 Press .
The display mode changes as follows with each press.
Shooting Mode Playback Mode
( or ) ( )
Standard Standard
(No Information)
Detailed Detailed
(Information View)
Off No Information
In the shooting modes, the shooting information displays for
approximately 6 sec. when a setting is changed, regardless
of the selected display mode.
The LCD monitor on or off setting is retained even after the
camera power is turned off.
The LCD monitor does not shut off in the , , or
mode.
The LCD monitor will not switch to the detailed display in
the index playback mode (p. 75).
Before Using the Camera
19
Page 22

Using the Clock
You can display the current date and time
for a 5-second* interval using the
following two methods.
* Default setting
Method 1
Hold the FUNC./SET button down while turning on the power.
Method 2
In a shooting mode, hold the
If you hold the camera horizontally, it displays the time. If you
hold it vertically, the time and date display.
However, if you hold the camera vertically and use method 1 to
display the date and time, the time will be initially displayed in
the same way as when the camera is held horizontally.
You can change the display color by pressing the or
button.
The clock display will cease when the display interval is over or
when you operate the FUNC./SET, MENU or shutter button or
the mode switch.
The clock’s display interval can be changed in the (Set up)
menu (p. 35).
FUNC./SET
button down.
20
Page 23

LCD Monitor Brightness
LCD Monitor Brightness Settings
The brightness of the LCD monitor can be changed in the following
two ways.
Changing Settings Using the Set up Menu (p. 35)
Changing Settings Using the DISP. Button (Quick-bright LCD
Function)
You can set the LCD monitor to the brightest setting regardless of
the option selected in the Set up menu by pressing the DISP.
button for more than one second*.
- To restore the previous brightness setting, press the DISP.
button for more than one second again.
- The next time you turn on the camera, the LCD monitor will be at
the brightness setting selected in the Set up menu.
* You cannot change the brightness of the LCD monitor with this function if
you have already set it to its highest setting in the Set up men u.
Night Display
When shooting in dark conditions, the camera automatically
brightens the LCD monitor to suit the brightness of the subject*,
making it easier to frame the subject.
* Noise will appear, and the movements of the subject will appear irregular on
the LCD monitor. The recorded image will not be affected. The brightn ess of
the image displayed in the monitor, and the brightness of the actual image
recorded will be different.
Before Using the Camera
21
Page 24

Information Displayed on the LCD Monitor
Shooting Information (Shooting mode)
* Spot Frame
* AF Frame (p. 51)
* Low Battery (p. 119)
Zoom Magnification* (p. 42)
Grid Lines* (p. 33)
ISO Speed (p. 69)
Shooting Method (pp. 43, 45)
Macro/Infinity (Basic Guide p. 10)
Flash (Basic Guide p. 9)
Auto Rotate (p. 70)
(Red)*
Movie Recording (p. 47)
Wireless Connection
(p. 101)
• Stills: Recordable Shots
• Movies (Sec.): Remaining Elapsed Time
* * * *
Shooting Mode (pp. 41, 47,
49, 63, Basic Guide pp. 7, 8)
Exposure Compensation (p. 56)
Long Shutter Mode (p. 57)
White Balance
Photo Effect (p. 62)
My Colors
22
* Appears even if the LCD monitor is set to Standard display.
(p. 59)
(p. 63)
Compression (p. 39)
Frame Rate (Movie) (p. 40)
Recording Pixels (pp. 38, 40)
(The shutter speed will also display when
the displays.)
Exposure Shift Bar (Movie) (p. 49)
Metering Mode (p. 55)
(Red)* Camera Shake Warning (p. 106)
* AE Lock (p. 53)
* FE Lock (p. 54)
* AF Lock (p. 52)
Time Zone (p. 29)
* Create Folder (p. 71)
Page 25
If the indicator blinks orange and the camera shake icon
displays, it indicates there is insufficient illumination and a
slow shutter speed will be selected. Raise the ISO speed
(p. 69) or select a setting other than (flash off), or attach
the camera to a tripod or other device.
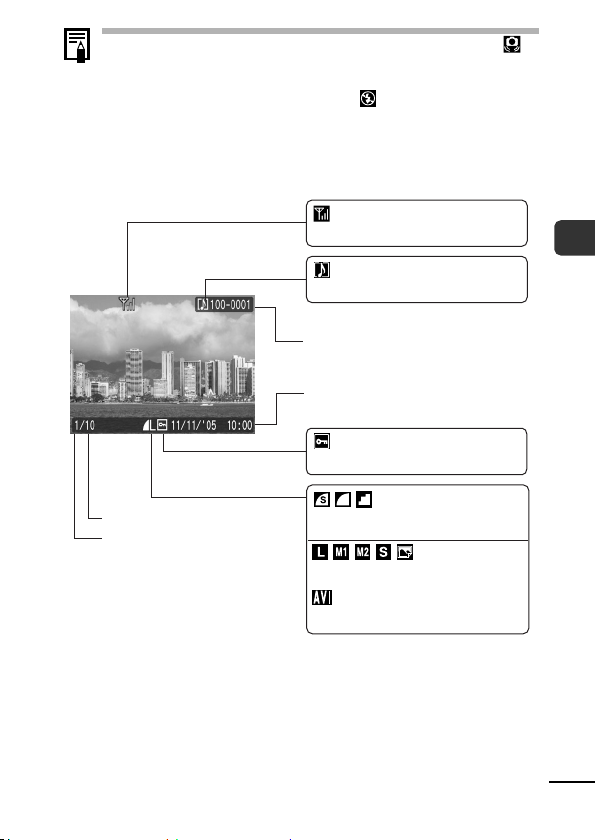
Playback Information (Playback Mode)
Standard
Wireless Connection (p. 101)
WAVE Format Sound (p. 81)
Folder Number -File Number
Shooting Date/Time
Protection Status (p. 87)
Before Using the Camera
Total number of images
Displayed image number
Compression (Still Images) (p. 39)
Recording Pixels (Still Images) (p. 38)
(p. 40)
Movie
23
Page 26

Detailed
Histogram
Exposure Compensation (p. 56)
Basic Guide p. 9)
Flash (
Macro/Infinity (Basic Guide p. 10)
Photo Effect (p. 62)
My Colors (p. 63)
Shooting Mode (pp. 41, 47, 49, 63,
Basic Guide pp. 7, 8)
*
Long Shutter Mode (p. 57)
ISO Speed (p. 69)
Recording Pixels (Movies) (p. 40)
Frame Rate (Movies) (p. 40)
Metering Mode (p. 55)
White Balan ce
File Size
Transfer to computer
complete
Recording Pixels (Still Images) (p. 38)
Movie Length (Movies) (p. 47)
(p. 59)
The following information may also be displayed with some images.
A sound file in a format other than the WAVE format is attached or the
file format is not recognized.
JPEG image not conforming to Design rule for Camera File System
Standards
RAW image
Unrecognized data type
Information for images shot on other cameras may not display
correctly.
24
Page 27

Histogram Function
The histogram is a graph that allows you to judge the brightness
of the shot image. The greater the bias toward the left in the
graph, the darker the image. The greater the bias toward the
right, the brighter the image.
If the image is too dark, adjust the exposure compensation to a
positive value. Similarly, adjust the exposure compensation to a
negative value if the image is too bright (p. 56).
Sample Histograms
Balanced ImageDark Image Bright Image
Using the Viewfinder
The viewfinder can be used to conserve power by turning the LCD
monitor off (p. 19) while shooting.
Shows the center of the imag e
Viewfin der
Before Using the Camera
25
Page 28

Indicators
The indicators of the camera and the wireless print adapter light or
blink in the following situations.
Never do the following while an indicator is blinking. These
actions may corrupt image data.
- Shake or jolt the camera
- Shut off the power, or open the memory card slot/battery
cover
Camera
Upper Indicator
Green: Ready to shoot
Blinking Green: Image recording/reading/erasing/transferring
Orange: Ready to shoot (flash on)
Blinking Orange: Ready to shoot (camera shake warning)
Lower Indicator
Yellow: Macro mode/ infi ni ty mode/AF lock mode
Blinking Yellow: Focusing difficulty (camera beeps once)
Wireless Lamp
Blue: Standing by for printing or transfer*
Blinking Blue (slowly): Wireless connection active/Currently
Blinking Blue (rapidly): Data transfer underway
* When the wireless connection is extremely weak, the wireless lamp
blinks, as does the icon on the LCD monitor. (p. 95).
Wireless Print Adapter
Blue: Wirel ess connecti on active
Bli nking Blue (slowly): Wireless connection on standby
Blinking Blue (rapidly): Data transfer underway
Blinking Blue and Orange: Currently registering target device
Orange: Registration failed.
Blinking Orange: Error*
* An irregularity occurred in the wireless print adapter. Disconnect the
wireless print adapter from the printer, then reconnect it. When using the
compact power adapter, pull out the power cord, d isconnect the wireless
print adapter from the printer, reconnect it, then reinsert the power cord. If
the lamp blinks orange frequently, bring the camera to a Canon Customer
Support Help Desk.
26
(when connected to a computer)
registering target device
Page 29

Power Saving Function
This camera is equipped with a power saving function. The power
will shut off in the following circumstances. Press the power button
again to restore pow er.
Shooting Mode
Playback Mode
Connected to a Printer
*1
This time can be changed.
*2
When connecting to a printer using th e interface cable provided.
Under the conditions below, the power saving function
cannot be used.
- During automatic slideshow playback
- During wireless connection (Playback Mode)
- When connecting to a computer using the interface cable
provided
The power saving function settings can be changed (p. 35).
Powers down approximately 3 minutes aft er the
last control is accessed on the camer a. The LCD
monitor aut omatically turns off 1 minute
last cont rol is accessed even if [Auto Power Down]
is set to [Off]. Press an y button othe r than the
power button or change the camera orient ation to
turn the LCD monitor back on.
Powers down approximately 5 minutes after the
*2
last control is accessed on the camera.
*1
after the
Before Using the Camera
27
Page 30

Formatting Memory Cards
You should always format a new memory card or one from which
you wish to erase all images and other data.
Please note that formatting (initializing) a memory card
erases all data, including protected images and other file
types.
1 (Set up) Menu [Format].
See Menus and Settings (p. 32).
2
Select [OK] and press .
To perform a low level format, use
the button to select [Low Level
Format] and the or button
to add a check mark.
You can stop formatting a card
when [Low Level Format] is
selected by pressing the FUNC./SET button. You can still
use a card without problem when formatting is halted, but its
data will be erased.
Low Level Format
We recommend you select [Low Level Format] when you think
that the recording/reading speed of a memory card has
dropped. A low level format may require 2 to 3 minutes with
some memory cards.
28
Page 31
Setting the World Clock
When traveling abroad, you can record images w ith local dates and
times simply by switching the time zone setting if you pre-register
the destination time zones. You can enjoy the convenience of not
having to switch the Date/Time settings.
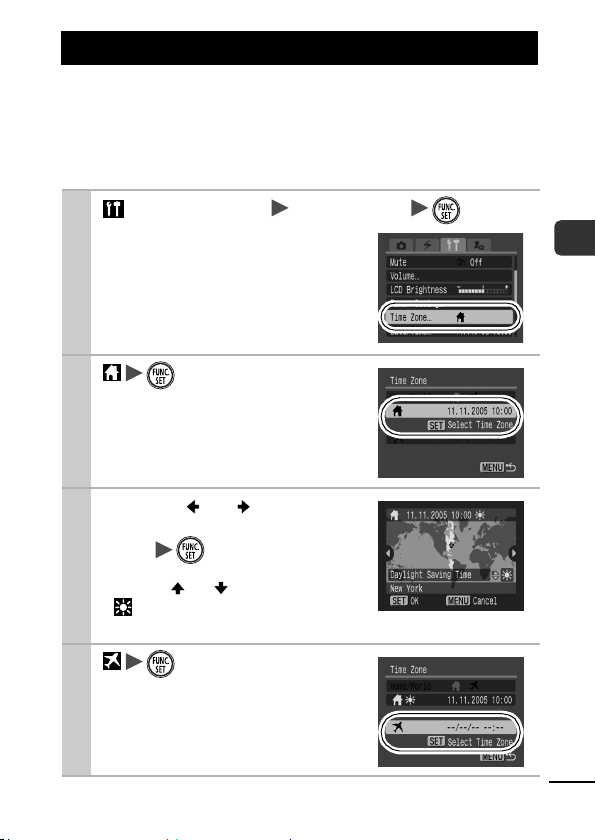
Setting the Home/World Time Zones
1 (Set up) Menu [Time Zone] .
See Menus and Settings (p. 32).
Before Using the Camera
2
.
3 Use the or button to
select a home time
zone .
To set the daylight saving option,
use the or button to display
. The time will advance by
1hour.
4
.
29
Page 32
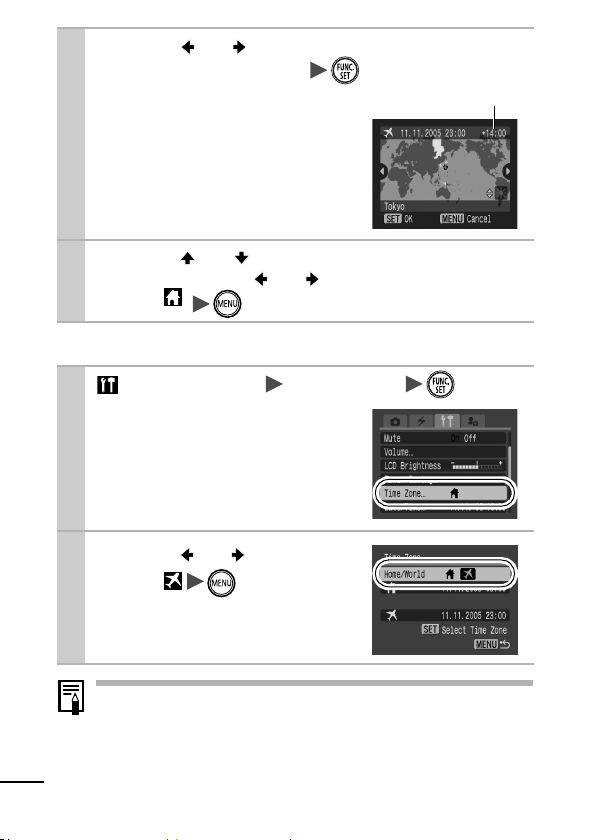
5 Use the or button to select a
destination time zone .
As in Step 3, you can set the
daylight saving option.
Time Difference from the
Home Time Zone
6 Use the or button to select [Home/
World], and the or button to
select .
Switching to the Destination Time Zone
1 (Set up) Menu [Time Zone] .
See Menus and Settings (p. 32).
2
Use the or button to
select
To change the destination time
zone, use the FUNC./SET button.
.
30
If you change the date and time when the World option is
selected, the Home date and time will also change
automatically.
Page 33
Menus and Settings
Menus are used to set the shooting and playback settings as well
as such camera settings as the date/time, electronic beep and
wireless connection. The following menus are available.
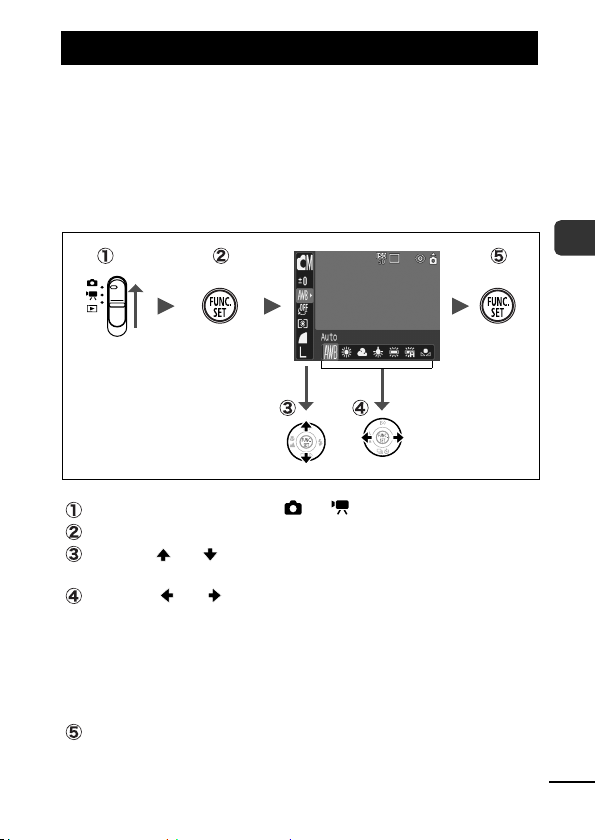
zFUNC. Menu
zRec., Play, Wireless, Set up and My Camera Menus
FUNC. Menu
This menu sets many of the common shooting functions.
Slide the mode switch to or .
Press the FUNC ./SET button.
Use the or button to select a menu item.
Some items may not be selectable in some shooting modes.
Use the or button to select an option for the menu
item.
You can select further options with the MENU button for some
options.
After selecting an option, you can press the shutter button to
shoot immediately. After shooting, this menu will appear again,
allowing you to adjust the settings easily.
Press the FUNC ./SET button.
Before Using the Camera
31
Page 34
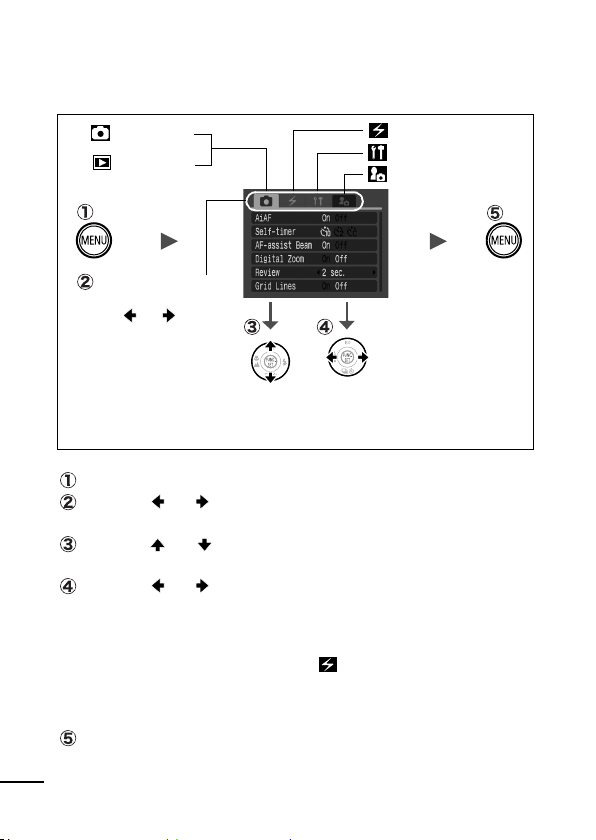
Rec., Play, Wireless, Set up and My Camera
Menus
Convenient settings for shooting or playback can be set with these
menus.
(Rec.) Menu
(Play) Menu
You can switch
between menus with
the or button
when this part is
selected.
• This example shows the Rec. menu.
• In playback mode, t he Play menu displays.
Press the MENU button.
Use the or button to switch between menus.
You can also use the zoom lever to switch between menus.
Use the or button to select menu items.
Some items may not be selectable in some shooting modes.
Use the or button to select an option.
• Menu items followed by an ellipsis (...) can only be set after
pressing the FUNC./SET button to display the next menu.
Press the FUNC./SET button again to confirm the setting.
• When selecting items from the (Wireless) menu, the
method of operation depends on the menu item. Please
confirm precise instructions on the appropriate operational
procedure page.
Press the MENU button.
(Wireless) Menu
(Set up) Menu
(My Camera) Menu
32
Page 35
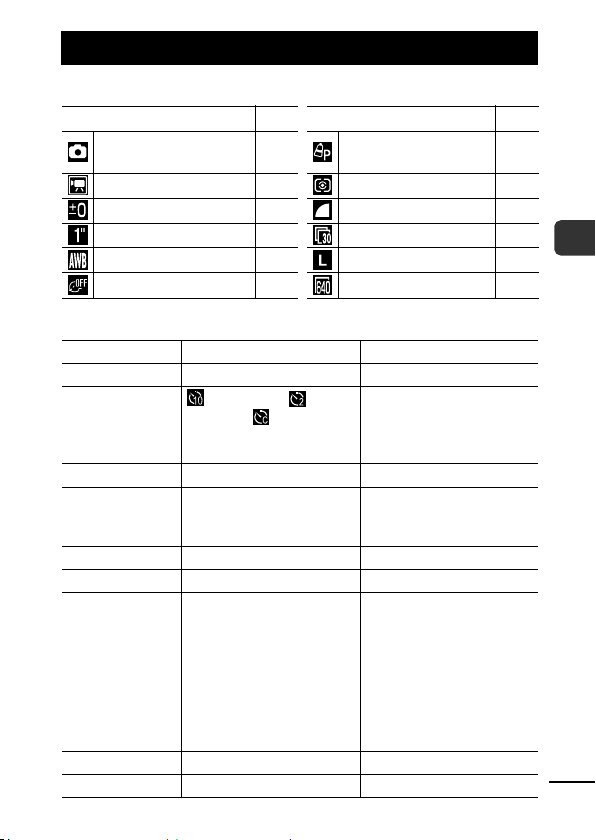
Menu List
FUNC. Menu
Menu Item Page Menu Item Page
Shooting Mode
Movie Mode
Exposure Compensation
Long Shutter Mode
White Balance
Photo Effect
Rec. Menu
Menu Item Options Page/Topic
AiAF On*/Off p. 51
Self-timer
The icons shown below are the default settings.
Basic
p. 5
p. 47
p. 56
p. 57
p. 59
p. 62
My Colors
Metering Mode
Compression
Frame Rate (Movie)
Recording Pixels (Still Image)
Recording Pixels (Movie)
10 seconds*/
2 seconds/ Custom
Timer (Delay: 0–10*, 15, 20,
* Default setting
p. 45
30 sec.) (Shots: 1–3*–10)
AF-assist Beam On*/Off –
Digital Zoom On/Off*
(On in standard movie
mode. )
Review Off/2*–10 seconds/Hold Basic Guide p. 6
Save Original On/Off* p. 65
Grid Lines On/Off* You can display grid lines
(splits screen into nine
areas) to make it easier to
judge the horizontal and
vertical ali gnment of a
photographic subject and t o
make composition easier.
The lines will not be
recorded in the images.
Date Stamp Off*/Date/Date & Time p. 44
Long Shutter On/Off* p. 57
p. 42
p. 63
p. 55
p. 39
p. 40
p. 38
p. 40
Before Using the Camera
33
Page 36
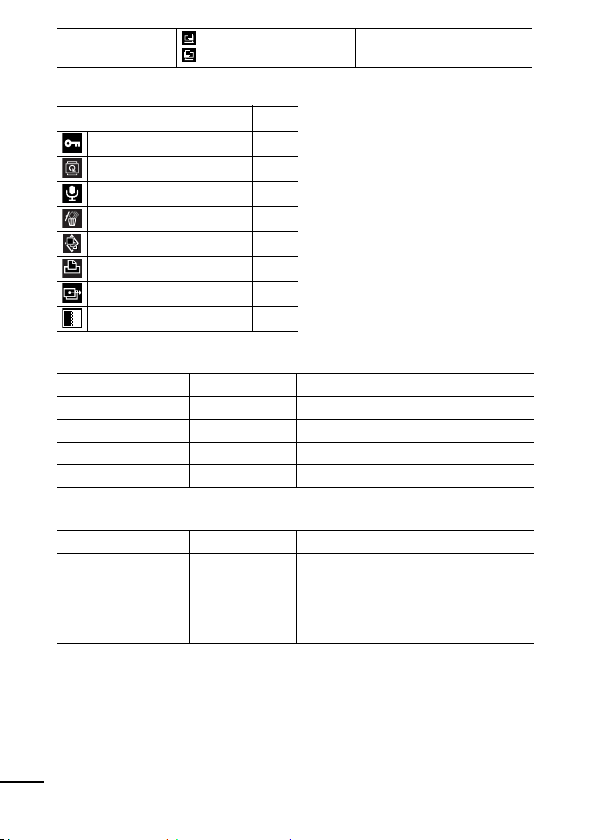
Stitch Assist Left to right*/
Right to left
Play Menu
Menu Item Page
Protect p. 87
Rotate p. 80
Sound Memo p. 81
Erase All p. 87
Slide Show p. 83
Print Order p. 88
Transfer Order p. 91
Transition p. 81
p. 49
Wireless Menu
Menu Item Options Page/Topic
Connect/Disconnect p. 100, Softwar e & Wir eless Gui de
Reg. Target Device p. 102, Software & Wireless Guide
Delete Registration p. 104, Software & Wireless Gui de
Auto Transfer On*/Off Software & Wireless Guide
Set up Menu
Menu Item Options Page/Topic
Mute On/Off* Set to [On] to silence the start-up,
operation, self-timer and shutter
sounds all at once. However, warnings
still sound even when the mute is set
to [On]. (Basic Guide p. 5)
34
* Default setting
* Default setting
Page 37
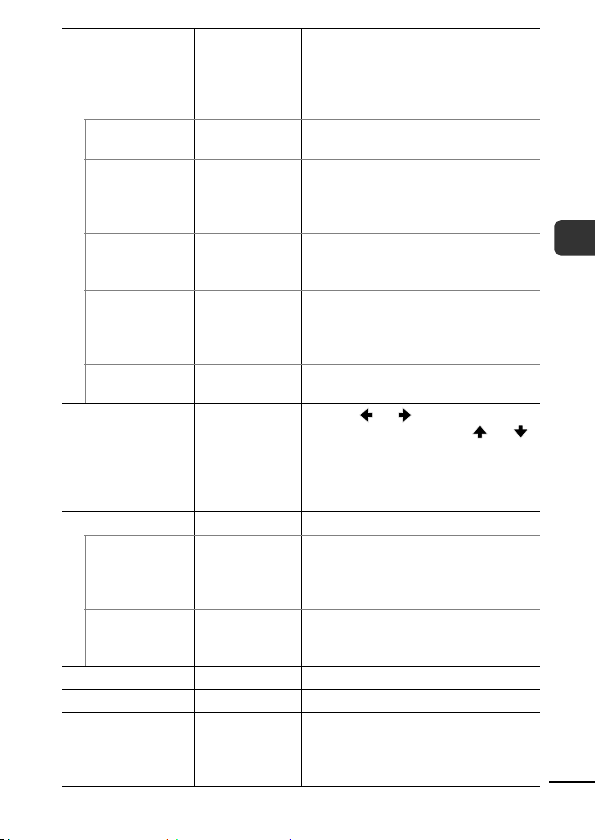
Volume Off/1/2*/3/4/5 Adjusts the volume of the start-up
Start-up Vol. Adjusts the volume of the start-up
Operation Vol. Adjusts the volume of the operation
Selftimer Vol. Adjusts the volume of the self-timer
Shutter Volume Adjusts the volume of the sound
Playback Vol. Adjusts the volume of movie sounds
LCD Brightness -7–0*–+7 Use the or button to adjust the
Power Saving p. 27
Auto Power
Down
Display Off 10 sec./20 sec./
Time Zone Home*/World p. 29
Date/Time Basic Guide p. 4
Clock Display
On*/Off Sets whether or not the camera
30 sec./1 min.*/
2 min./3min.
0–5*–10 sec./20
sec./30 sec./1
min./2 min./3
min.
sound, operation sound, self-timer
sound, shutter sound and p layback
sound. The volume cannot be
adjust ed if [Mute] is set to [On] .
sound when the camera is turned on.
sound t hat plays when any button
other than the shutter button is
pressed.
sound played 2 se c. befor e the shut ter
is released.
played when the shutter releases. The
shutter sound does not play when a
movie is recording.
and sound memos.
brightness. If you press the or
button, the display returns to the Set
up menu. You can check the
brightness on the LCD monitor while
you are adjusting the settin g.
automatically powers down after a set
period of time elapses wi thout the
camera being oper ated.
Sets the length of time before the LCD
monitor turns off when no camera
operation is performed.
p. 20
Before Using the Camera
35
Page 38
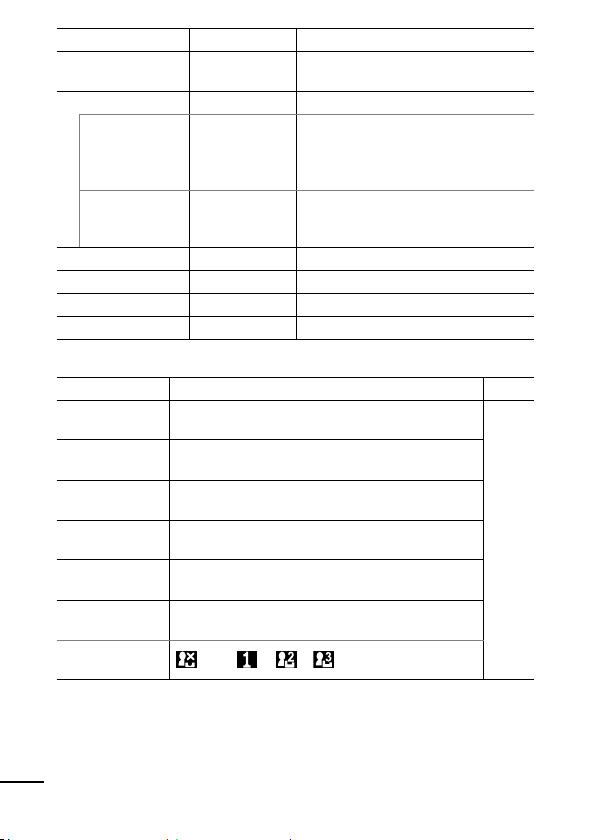
Format p. 28
File Numbering Auto Reset/
Creat e Folder p. 71
Create New F older
Auto Create
Auto Rotate On*/Off p. 70
Language Basic Guide p. 4
Video System NTSC/PAL p. 93
Reset All p. 37
Continuous*
Check mark
(On)/
No check mark
(Off)
Off*/Daily/
Monday–Sunday/
Monthly
Creates a folder for the next shooting
session.
You can also set a creation time.
My Camera Menu
Menu Item Available Settings Page
Theme Selects a common theme for each My Camera
Star t-up Image Sets the image displayed when the camera power
Start-up Sound Sets th e soun d pla yed wh en the camera powe r is
Operation Sound Sets the sound played when any button other than
Selftimer Sound Sets the sound played 2 seconds before the shutter
Shutter Sound Sets the sound played when th e shut ter button is
My Camera
Menu Contents
settings item.
is t urn ed on.
turned on.
the shutter button is pressed.
releases in self-timer mode.
pressed. There is no shutter sound for movies.
/ /
(Off)/ *
p. 72
* Default setting
p. 94
36
Page 39
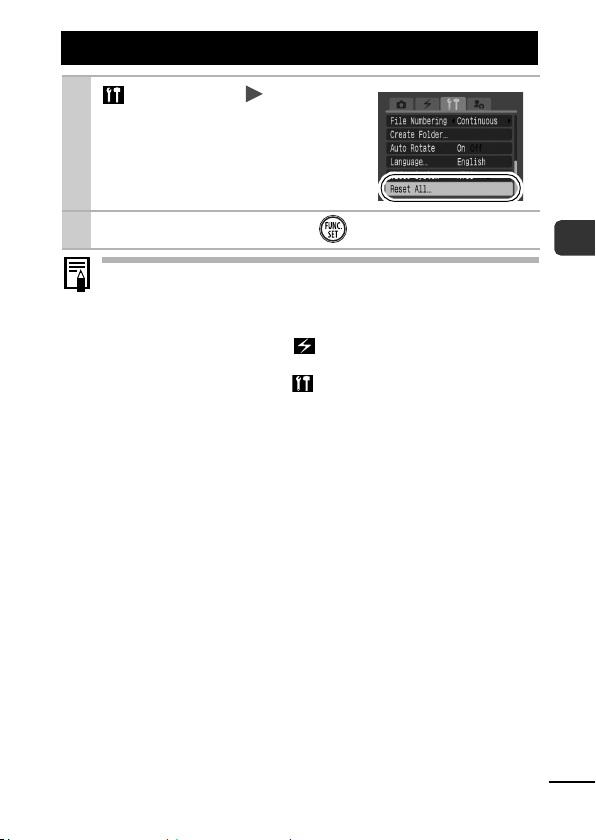
Resetting Settings to Their Default Values
1
(Set up) Menu [Reset All].
See Menus and Settings (p. 32).
2
Select [OK] and press .
Settings cannot be reset when the camera is connected to a
computer or to a printer.
The following cannot be reset.
- Shooting mode
- Item chosen from the (Wireless) menu
- The [Time Zone], [Date/Time], [Language] and [Video
System] options in the (Set up) menu (pp. 35, 36)
- White balance data recorded with the custom white
balance function (p. 60)
- Colors specified in the [Color Accent] (p. 66) or [Color
Swap] (p. 67) modes of My Colors.
- Newly added My Camera settings (p. 95)
Before Using the Camera
37
Page 40
Shooting
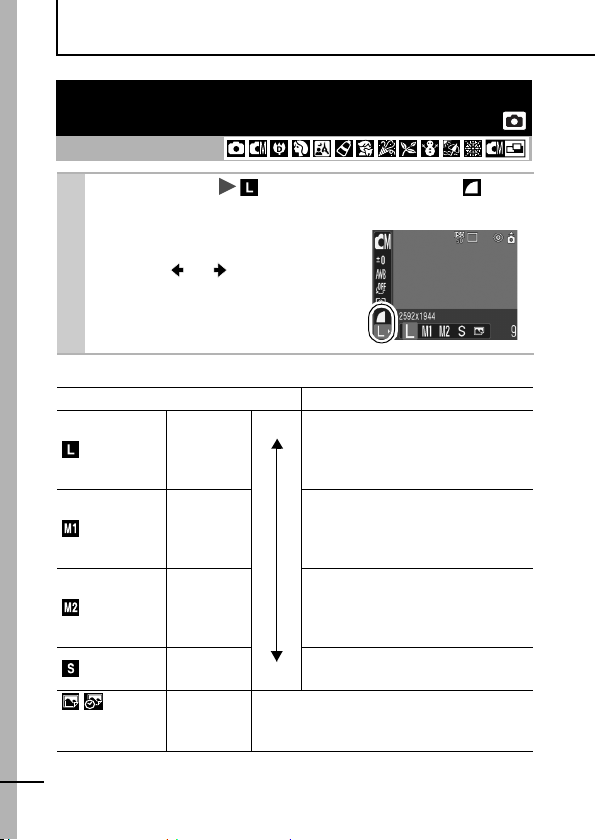
Changing the Recording Pixels and Compression
(Still Images)
Shooting Mode
FUNC. Menu * (Recording Pixels)/ *
1
(Compression).
See Menus and Settings (p. 31).
* Default setting.
Use the or button to select
recording pixels/compression
settings and press the FUNC./
SET button.
Approximate Values for Recording Pixels
Recording Pixel s Purpose
(Large)
(Medium 1)
(Medium 2)
(Small)
(Postcard Date
Imprint Mode)
* Paper sizes vary according to region.
2592 × 1944
pixels
2048 × 1536
pixels
1600 × 1200
pixels
640 × 480
pixels
1600 × 1200
pixels
High Print larger than A4-size prints*
210 × 297 mm (8.3 × 11.7 in.)
Print larger than Letter-size prints*
216 × 279 mm (8.5 × 11 in.)
Print up to A4-size prints* 210 ×
297 mm (8.3 × 11.7 in.)
Print up to Letter-size prints*
216 × 279 mm (8.5 × 11 in.)
Print postcard-size prints
148×100mm (6 × 4 in.)
Print L-size prints 119 × 89 mm
(4.7 × 3.5 in.)
Send images as e-mai l attachments
Low
Shoot more images
When printing to postcards (p. 44).
38
Page 41
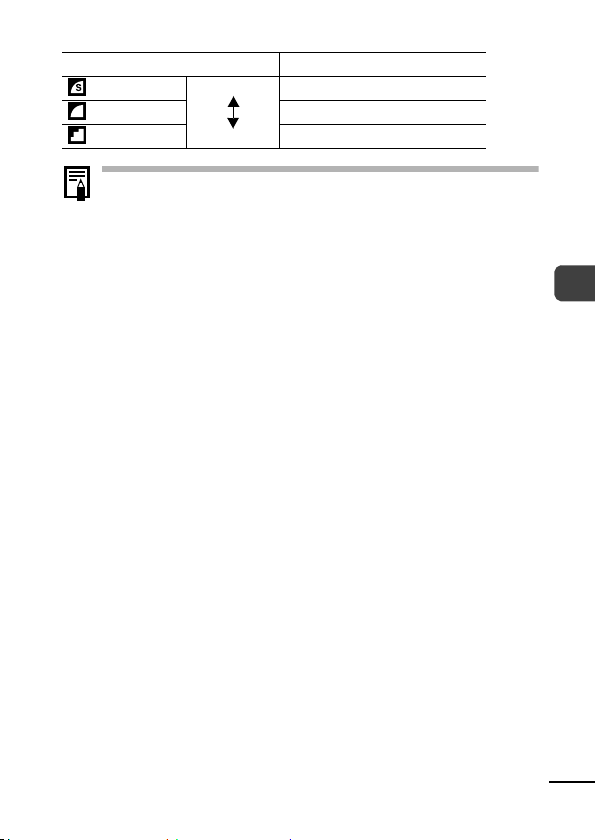
Approximate Values for Compression Settings
Compression Purpose
Superfine
Fine
Normal
See Image Data Sizes (Estimated) (p. 132).
See Memory Cards and Estimated Capacities (p. 131).
High Qualit y Shoot higher quality images
Shoot normal quality images
Normal Shoot more images
Shooting
39
Page 42
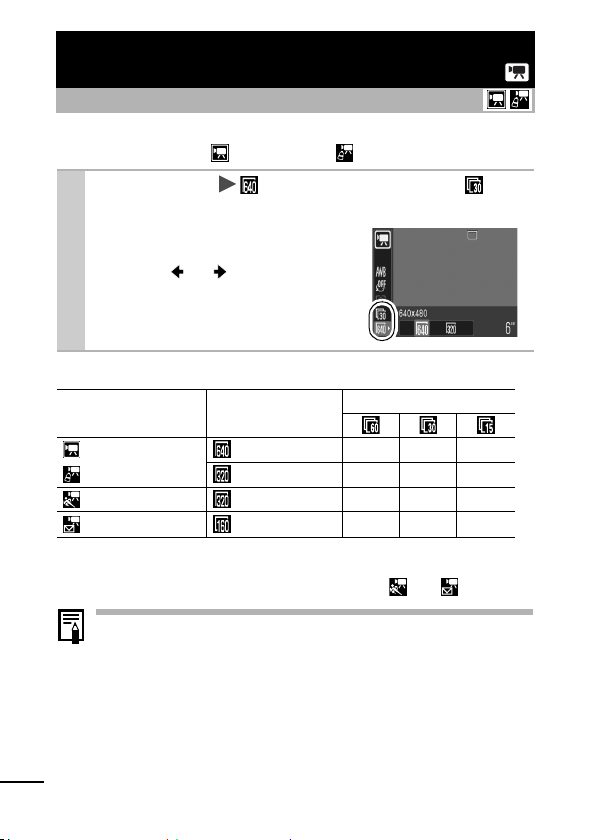
Changing Recording Pixels and Frame Rates
(Movies)
Shooting Mode
You can change the recording pixels and frame rate when the
movie mode is set to (Standard) or (My Colors).
FUNC. Menu * (Recording Pixels)/ *
1
(Frame Rate).
See Menus and Settings (p. 31).
*Default setting.
Use the or button to select
a recording pixels/frame rate and
press the FUNC./SET button.
Recording Pixels and Frame Rates
Recording Pixel s
Frame Rate (frames/sec.)
Standard
My Colors
Fast Frame Rate
Compact
* Frame rates indicate the number of frames recorded or played back each
second. The higher the frame rate, the smoother the appearance of motion.
* The recording pixels and frame rate are fixed in the and mod es.
See Image Data Sizes (Estimated) (p. 132).
See Memory Cards and Estimated Capacities (p. 131).
640 × 480 pixels
320 × 240 pixels
320 × 240 pixels
160 × 120 pix els
–
–
––
––
40
Page 43
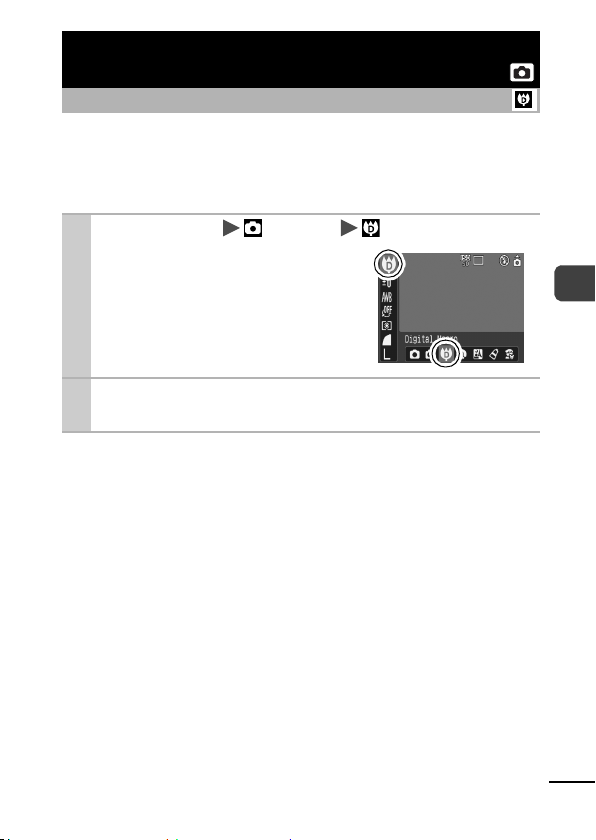
Magnified Close-Up Shooting
(Digital Macro)
Shooting Mode
You can shoot a subject 3 – 10 cm (1.2 – 3.9 in.) from the end of the
lens at the maximum wide angle setting. With the digital zoom, the
image area is 9 × 7 mm (0.36 × 0.27 in.) at maximum zoom
(approximately 4 times).
FUNC. Menu * (Auto) (Digital Macro).
1
2
See Menus and Settings (p. 31).
*Default setting.
Choose the angle of view with the zoom
lever and shoot.
Shooting
41
Page 44
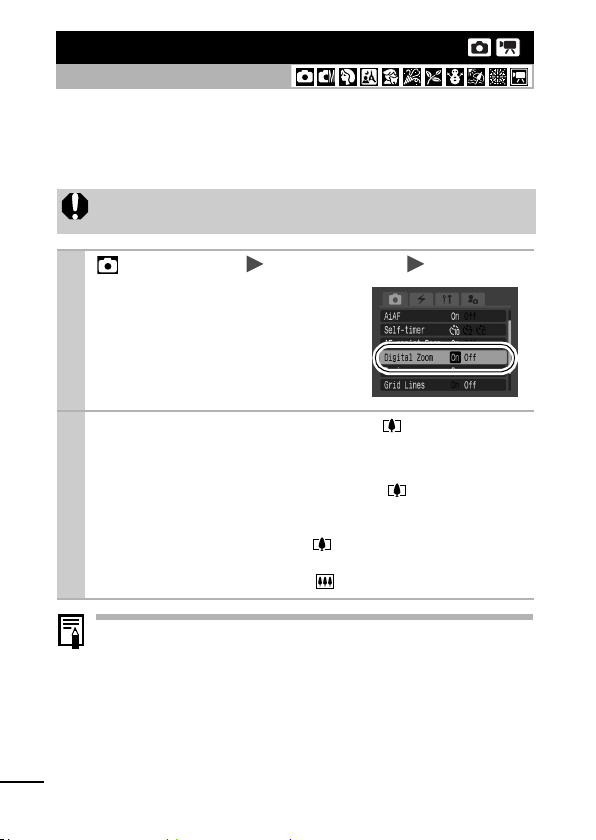
Using the Digital Zoom
Shooting Mode
You can shoot zoomed images using the combined digital and
optical zooms.
Stills: zoom up to approximately 12 times
Movies (Standard): zoom up to approximately 12 times
The digital zoom cannot be used when the LCD monitor is
turned off.
42
1
2
(Rec.) Menu [Digital Zoom] [On].
See Menus and Settings (p. 32).
Press the zoom lever toward and shoot.
The combined digital and optical zoom setting will display
on the LCD monitor.
When you press the zoom lever toward , the zoom stops
when the lens reaches the maximum optical telephoto
setting (when shooting still images).
Press the zoom lever toward again to activate the digital
zoom and further zoom the image digitally.
Press the zoom lever toward to zoom out.
Images become coarser the more they are digitally zoomed.
Page 45
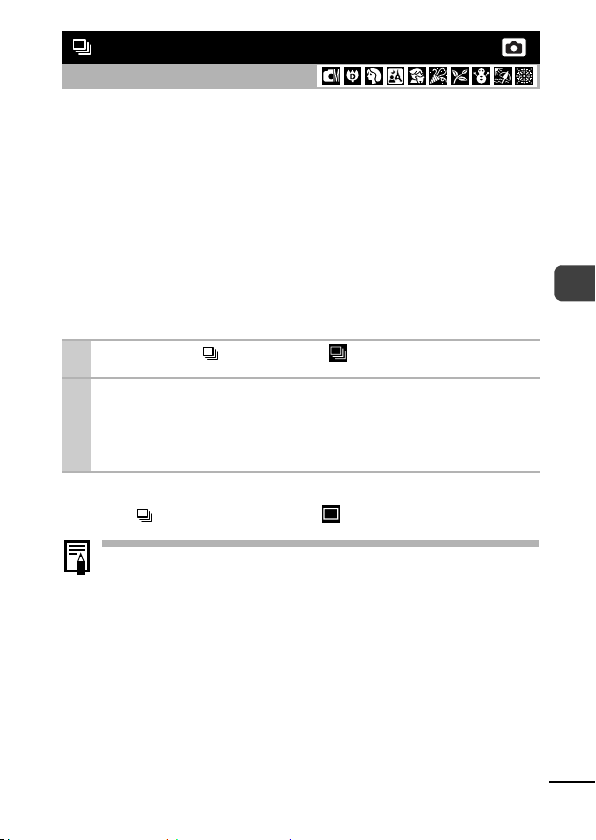
Continuous Shooting
Shooting Mode
In this mode, the camera shoots continuously while the shutter
button is held down.
If you use the recommended memory card*, you can shoot
continuously (smooth continuous shooting) at a set shooting
interval until the memory card is full (p. 131).
*Recommended Memory Card
Super high speed SDC-512 MSH memory card (sold separately)
immediately after a low level format (p. 28).
• This reflects standard shooting criteria established by Canon. Actual results
may vary according to the subject an d shooting conditions.
• Even if continuou s shooting suddenly stops, the memory card may
not be full.
Press the to display .
1
Shoot.
2
The camera will continue to record successive images while
the shutter button is fully pressed. Recording will cease
when the shutter button is released.
To Cancel Continuous Shooting
Press the button twice to display .
The interval between shots lengthens when the built-in
memory of the camera fills.
If the flash is used, the interval between shots lengthens
because the flash must charge.
Shooting
43
Page 46
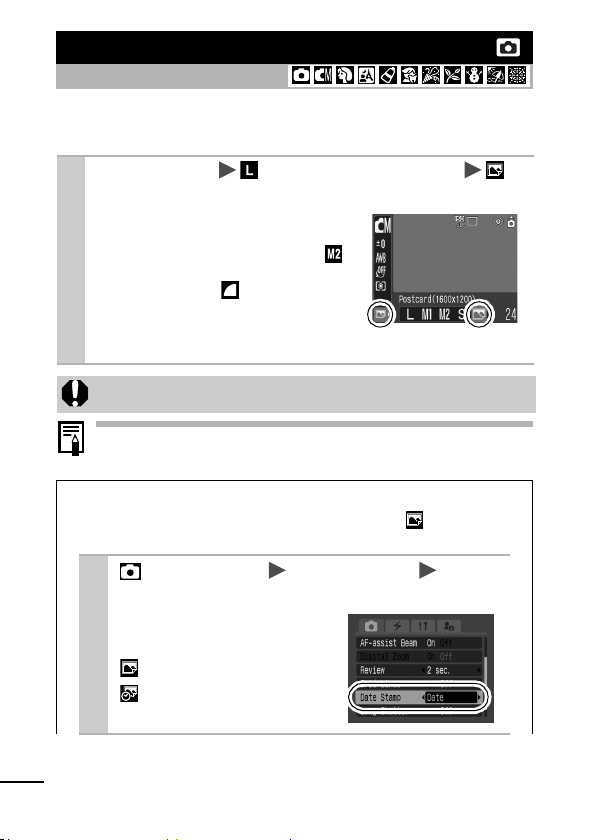
Postcard Date Imprint Mode
Shooting Mode
You can shoot images with the optimal settings for postcards by
composing them inside the print area (width-to-height ratio of
approximately 3:2) shown on the LCD monitor.
FUNC. Menu * (Recording Pixels)
1
(Post Card Date Imprint).
See Menus and Settings (p. 31).
*Default setting.
The recording pixels are set to
(1600 × 1200) and the
compression to (Fine).
When you press the shutter
button halfway, the area that will
not get printed grays out.
The digital zoom cannot be used in this mode.
For printing instructions, refer to the Direct Print User Guide.
Embedding the Date in the Image Data
You can embed the date in image data when (Postcard
Date Imprint Mode) is selected.
(Rec.) Menu [Date Stamp] [Date]/
1
[Date & Time].
See Menus and Settings (p. 32).
LCD Monitor Display
: [Off]
: [Date]/[Date & Time]
44
Page 47
Ensure that the camera’s date/time is set
beforehand (p. 35).
The date stamp cannot be deleted from the image
data once it has been set.
Using the Self-Timer
Shooting Mode
You can set a 10 sec. ( ) or 2 sec. ( ) delay, or a custom delay
time and the number of shots ( Custom Timer), for shooting after
the shutter button is pressed.
1
2
To Cancel the Self-Timer
Press the button to display .
Press the button to display , or .
Shoot.
When the shutter button is pressed fully, the self-timer will
activate and the self-timer lamp will blink. When using redeye reduction, the self-timer lamp will blink and then stay lit
for the last 2 seconds.
You can change the self-timer sound (p. 36).
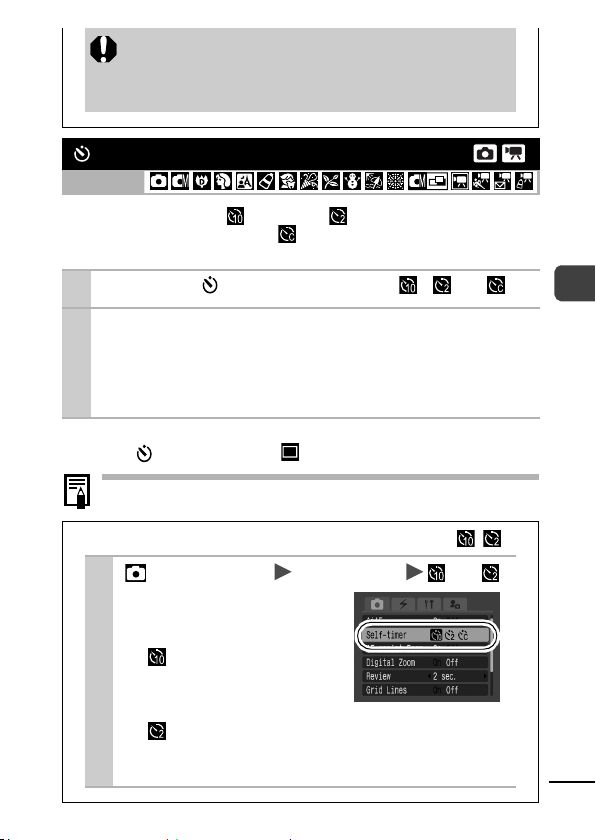
Changing the Self-Timer Countdown Time ( / )
Shooting
1
(Rec.) Menu [Self-timer] or .
See Menus and Settings (p. 32).
The following occurs with
each option.
- : 2 seconds before the
shutter releases, the selftimer sound and lamp will
speed up.
- :The self-timer sound will play when the shutter
button is pressed and the shutter will release
2 seconds later.
45
Page 48
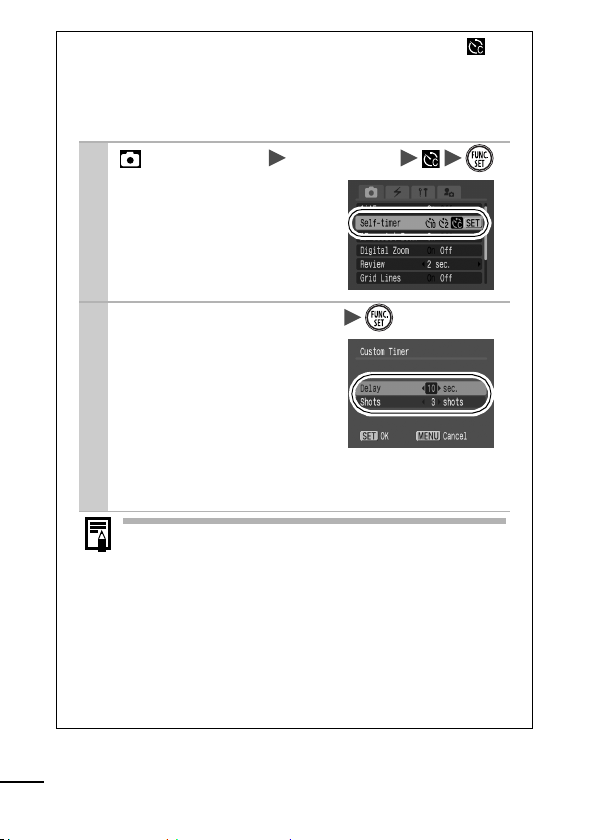
Changing the Delay Time and Number of Shots (
You can change the delay time (0–10, 15, 20, 30 sec.) and
number of shots (1–10). These settings, however, cannot be
set for the Stitch Assist mode, movie mode or My Colors
modes.
(Rec.) Menu [Self-timer] .
1
See Menus and Settings (p. 32).
Change [Delay]/[Shots] .
2
The self-timer sound will
behave as follows.
- The self-timer sound will
start 2 seconds before the
specified delay for
shooting is over.
- If multiple shots have
been specified for the [Shots] option, the sound will
play for the first shot only.
If the [Shots] option is set to 2 or more shots, the
following occurs.
- The exposure and white balance are locked at the
settings selected for the first shot.
- If the flash is used, the interval between shots
lengthens because the flash must charge.
- The interval between shots lengthens when the builtin memory of the camera fills.
- Shooting will automatically cease if the memory card
becomes full.
).
46
Page 49
Movie Shooting
Shooting Mode
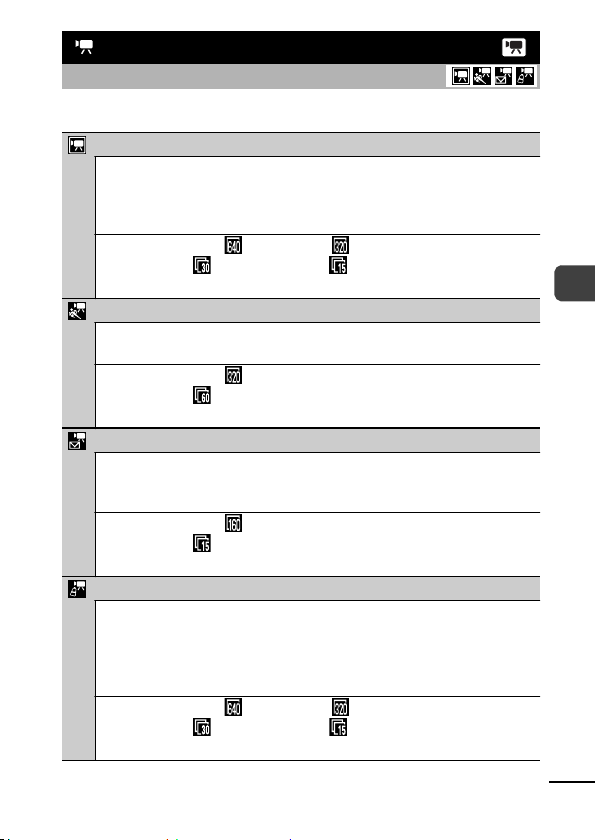
The following four movie modes are available.
Standard
You can select the recording pixels and frame r ate an d record until the
memory card is full (when a super high-speed memory card is used,
such as the recommen ded SDC-512MSH). The digi tal zoom can be
used while shooting in this mode (p. 42).
• Recording Pixels: (640 × 480), (320 × 240)
• Frame Rate: (30 frames/sec.), (15 frames/sec.)
• Maximum Size: 1 GB/movie
Fast Fr ame Rate
Use this mode to record fast moving subjects, such as in sports
photog raphy.
• Recording Pixels: (320 × 240)
• Frame Rate: (60 frames/sec.)
• Maximum Cli p Lengt h: 1 minute
Compact
Since the recording pixels are low, this mode is convenient for
sending movi es as e-mail attachments or when the memory car d
capacity is low.
• Recording Pixels: (160 × 120)
• Frame Rate: (15 frames/sec.)
• Maximum Clip Lengt h: 3 minut es
My Colors
You can change image colors and then shoot (p. 63). As with the
Standard mode, you can also select the recording pixels and frame
rate and record until the memory card is full (when a super highspeed memory card is used, such as the recommended SDC512MSH).
• Recording Pixels: (640 × 480), (320 × 240)
• Frame Rate: (30 frames/sec.), (15 frames/sec.)
• Maximum Size: 1 GB/movie
• The maximum recording time will vary according to the capacity of the
memory card you u se (p. 131).
Shooting
47
Page 50
48
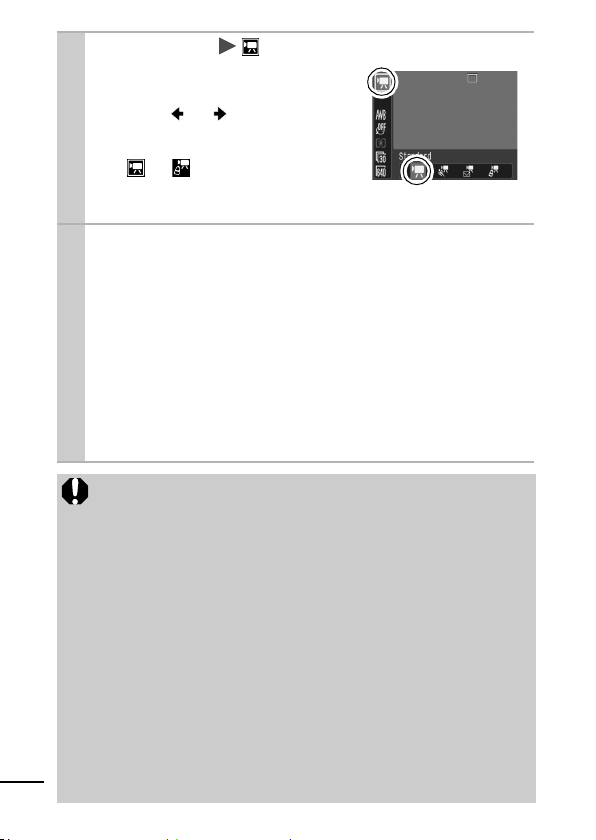
FUNC. Menu * (Standard).
1
2
See Menus and Settings (p. 31).
*Default setting.
Use the or button to select
a movie mode and press the
FUNC./SET button.
In or mode, you can
change the recording pixels and
frame rate (p. 40).
Shoot.
Pressing the shutter button halfway automatically sets the
exposure, focus and white balance settings.
Pressing the shut ter button fully starts recording video and
sound simultaneously.
During shooting the recording time (in seconds) and [Rec]
appear on the LCD monitor.
Pressing the shut ter button fully again stops recording.
Recording will stop automatically under the following
circumstances.
- When the maximum recording time elapses
- When the built-in memory or memory card become full
You are recommended to use a memory card that has
been formatted in your camera to shoot movies (p. 28).
The card supplied with the camera may be used without
further formatting.
Be careful of the following while recording.
- Try not to touch the microphone.
- Do not press any buttons other than the shutter button.
The sound that buttons make will be recorded in the
movie.
- The camera will automatically adjust the exposure and
white balance to suit the shooting conditions during
recording. Please note, however, that the sounds made
by the camera automatically adjusting the exposure may
also be recorded.
The focus and optical zoom settings remain fixed for
subsequent frames at the values selected for the first
frame.
With a wireless connection, movies cannot be shot.
Page 51
Before recording, you can set the AE lock (p. 53) and
exposure shift.
1. Press the button.
The exposure will lock (AE lock) and the exposure shift
bar will appear on the LCD monitor.
2. Use the or button to adjust the exposure.
Press the button again to release the setting. Also,
the setting will be canceled if you press the MENU button
or change the white balance, photo effect or shooting
mode settings.
QuickTime 3.0 or later is required to play back movies
(Data type: AVI/Compression method: Motion JPEG) on a
computer. QuickTime (for Windows) is included on the
Canon Digital Camera Solution Disk. On the Macintosh
platform, this program is standard with Mac OS X or later.
Shooting Panoramic Images
(Stitch Assist)
Shooting Mode
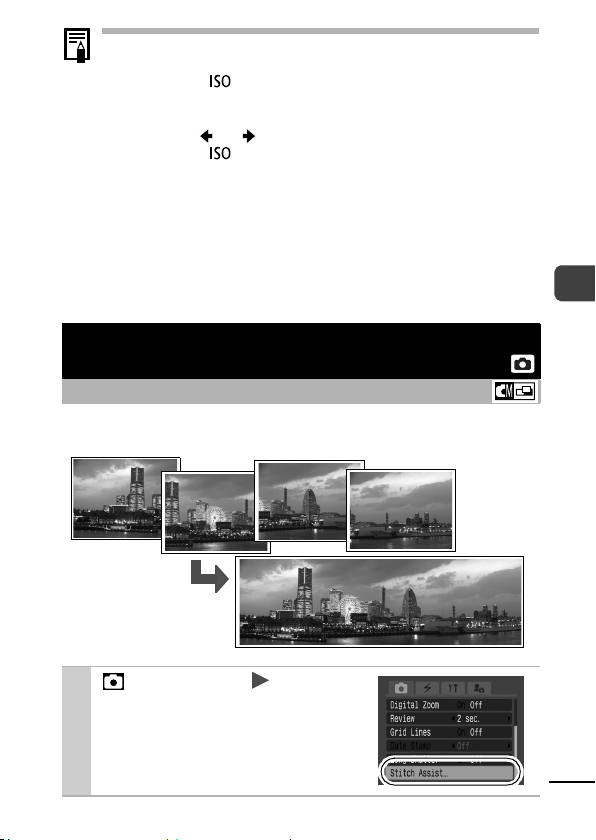
Stitch Assist can be used to shoot overlapping images that can later be
merged (stitched) to create one panorami c image on a computer.
The
overlapping seams
of several adjacent
images can be
joined into a single
panoramic image.
Shooting
(Rec.) Menu [Stitch
1
Assist].
See Menus and Settings (p. 32).
49
Page 52
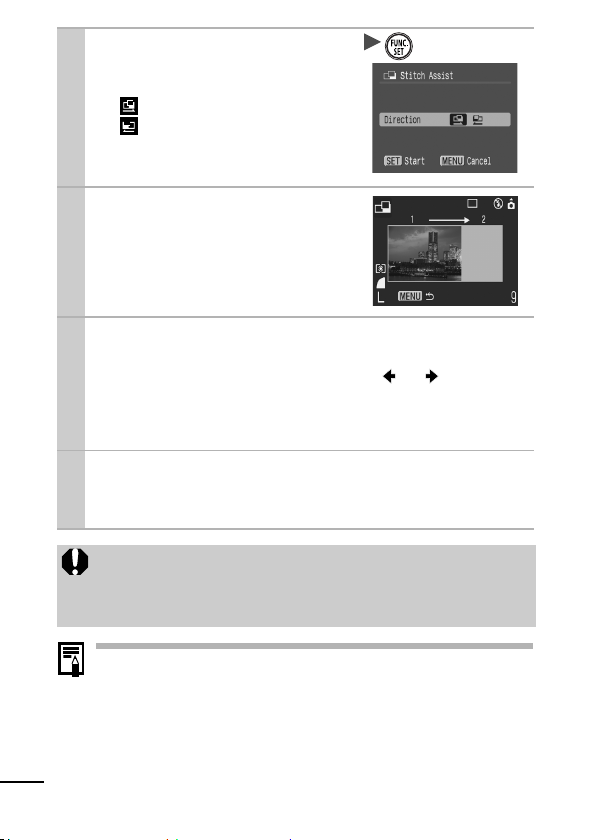
Select a shooting direction .
2
You can select from the following
two shooting directions.
- Left to right horizontally
- Right to left horizontally
Shoot the first image in
3
the sequence.
The exposure and white balance
are set and locked with the first
image.
Compose the second image so that it
4
overlaps a portion of the first and shoot.
You can retake a shot by pressing the or button and
returning to the previously recorded image screen.
Minor discrepancies in the overlapping portions can be
correct ed when the images are stitched together.
Repeat the procedure for additional images.
5
A sequence may contain up to 26 images.
Press the MENU button after the last shot.
You cannot display the images on a TV when shooting in
Stitch Assist mode.
The settings for the first image are applied to the second
image onward.
50
Use PhotoStitch, a supplied software program, to merge the
images on a computer.
Page 53
Switching between Focusing Modes
Shooting Mode
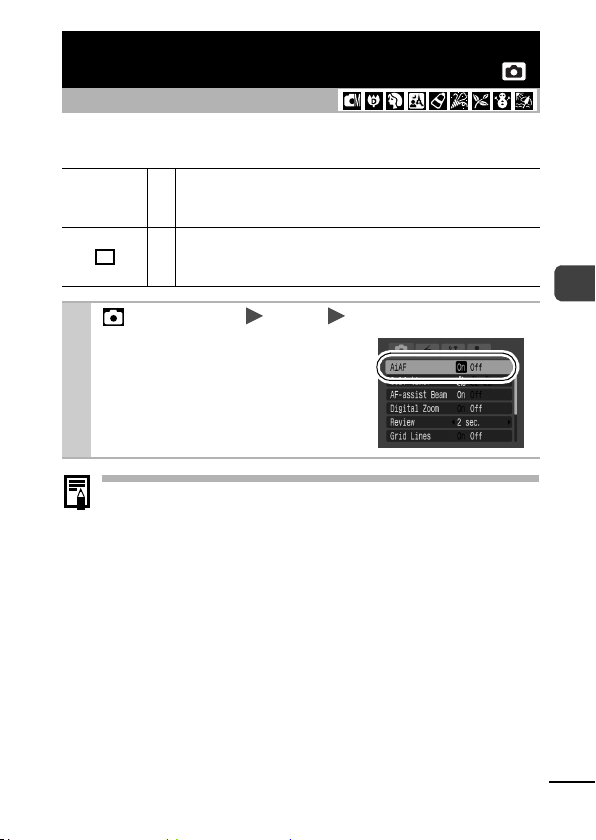
You can select between the following two focusing modes
according to the AiAF setting.
(No frame) On
1
The focus is locked to the center AF frame when the digital
zoom is used.
The AF frame appears as follows (when the LCD monitor is
on) when the shutter button is pressed halfway.
- Green: Shooting preparations complete
- Yellow: Focusing difficulty (AiAF set to [Off])
The camera det ects the subject and highlights the AF
frames, from 9 available points, that it will use to
determine the focus.
The camera focuses using the center AF frame. This is
Off
convenient for focusing on a specific pa rt of a subject
with greater certainty.
(Rec.) Menu [AiAF] [On]/[Off].
See Menus and Settings (p. 32).
Shooting
51
Page 54
Shooting Hard-to-Focus Subjects
(Focus Lock, AF Lock)
Shooting Mode
It may be difficult to focus on the following types of subjects.
Subjects with extremely low contrast to the surroundings
Scenes with a mixture of near and far subjects.
Subject s wit h extremely bright objects at the cent er of the composition
Subjects that are moving quickly
Subjects through glass: Try to shoot as close to the glass as
possible to reduce the chances of light reflecting back off the
glass.
Shooting with the Focus Lock
The focus lock can be used in any shooting mode.
1
2
3
Shooting with the AF Lock
The AF lock can be used in the , , or mode.
1
Aim the camera so that an object at the
same focal distance as the main subject is
centered in the viewfinder or in the AF
frame displayed on the LCD monitor.
Press the shutter button halfway.
Re-aim the camera to compose the shot as
desired and press the shutter button fully.
Turn on the LCD monitor.
52
Aim the camera so that an object at the
2
same focal distance as the main subject is
centered in the AF frame.
Press the shutter button halfway and press
3
the / button.
The icon will display and the lower indicator will light yellow.
Page 55
Re-aim the camera to compose the shot as
4
desired and shoot.
To Release the AF Lock
Press the / button.
When shooting with the focus lock or AF lock using the LCD
monitor, setting [AiAF] to [Off] (p. 33) makes shooting easier
since the camera focuses using the center AF frame only.
The AF lock is convenient because you can let go of the
shutter button to compose the image. Moreover, the AF
lock is still effective after the picture is taken, allowing you
to capture a second image with the same focus.
Locking the Exposure Setting (AE Lock)
Shooting
Shooting Mode
You can set the exposure and focus separately. This is effective
when the contrast is too strong between the subject and
background or when a subject is backlit.
You must set the flash to [ ]. The AE lock cannot be set if
the flash fires.
Turn on the LCD monitor.
1
Focus on the part of the subject on which
2
you wish to lock the exposure setting.
Press the shutter button halfway and press
3
the button.
The icon will display.
Re-aim the camera to compose the shot as
4
desired and press the shutter button fully.
To Release the AE L ock
Press the button.
53
Page 56
AE lock can also be set and released in mode (p. 49).
You can use the FE lock when using the flash.
Locking the Flash Exposure Setting
(FE Lock)
Shooting Mode
You can lock the flash exposure so that the exposure settings are
correctly set regardless of the composition of your subject.
Turn on the LCD monitor.
1
Press the button and set it to
2
3
4
5
To Release the FE Lock
Press the button.
(flash on).
Focus on the part of the subject on which
you wish to lock the flash exposure setting.
Press the shutter button halfway and press
the button.
The flash will pre-fire and will display.
Re-aim the camera to compose the shot as
desired and press the shutter button fully.
54
Page 57
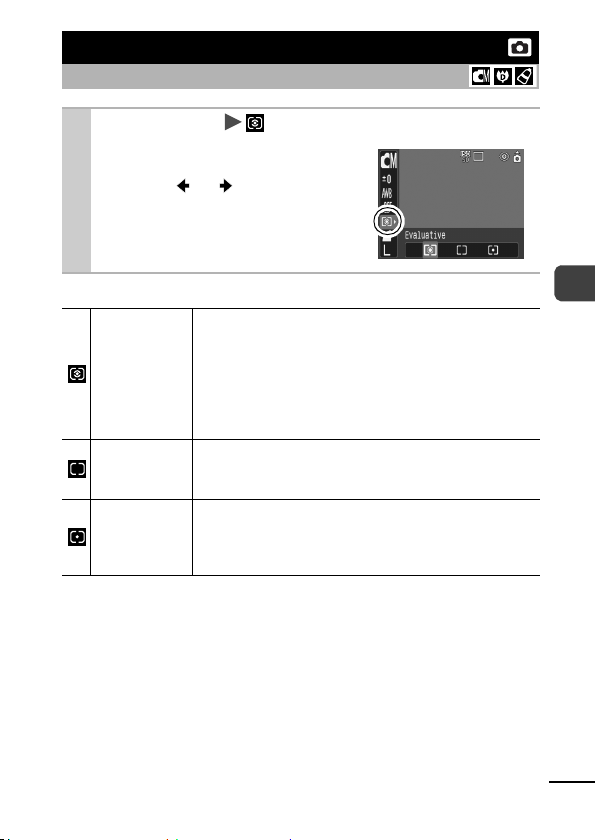
Switching between Metering Modes
FUNC. Menu * (Evaluative).
1
See Menus and Settings (p. 31).
*Default setting.
Use the or button to select
the metering mode and press the
FUNC./SET button.
Shooting Mode
Metering Methods
Appropriate for standard shooting conditions,
including backlit scenes. The camera divides images
Evaluative
Center
Weighted
Average
Spot
into several zones for metering. It evaluates complex
lightin g conditions, such as the posit ion of the subject,
the br ightness, the dir ect light, and the backlighting,
and adjusts the settings to the correct exposure for the
main subj ect .
Averages the light metered from the entire frame,
but gives greater weight to the subject matter at
the center.
Meters the area within the spot AE point at the center
of the LCD monitor. Use this setting when you want to
set the exposure on the subject in the center of the
monitor.
Shooting
55
Page 58
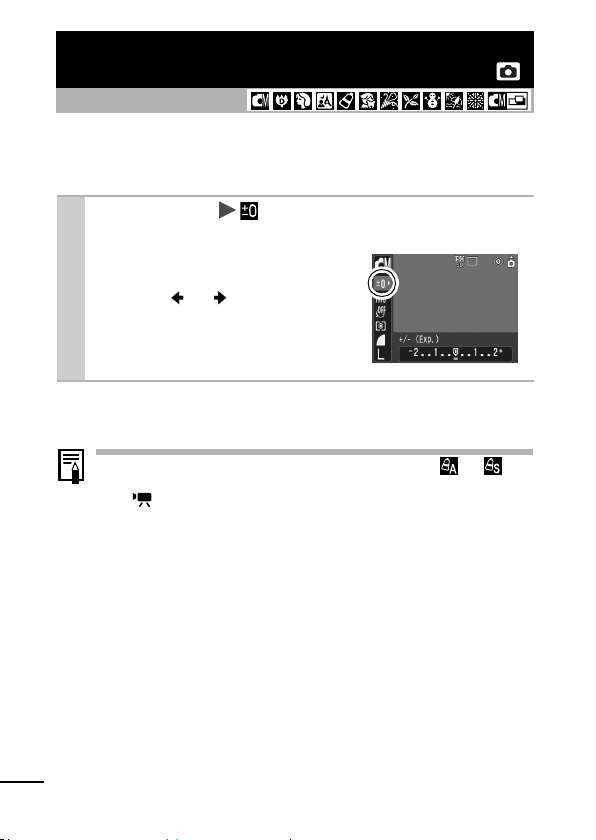
Adjusting the Exposure Compensation
Shooting Mode
Adjust the exposure compensation setting to avoid making the
subject too dark when it is backlit or shot against a bright background
or to avoid making lights appear too bright in night shots.
FUNC. Menu * (Exposure
1
Compensation).
See Menus and Settings (p. 31).
*Default setting.
Use the or button to adjust
the exposure compensation and
press the FUNC./SET button.
To Cancel the Exposure Compensation
Restore the compensation value to [0].
Exposure compensation is not available in the or My
Colors mode.
In mode, the exposure shift can be set/canceled (p. 49).
56
Page 59
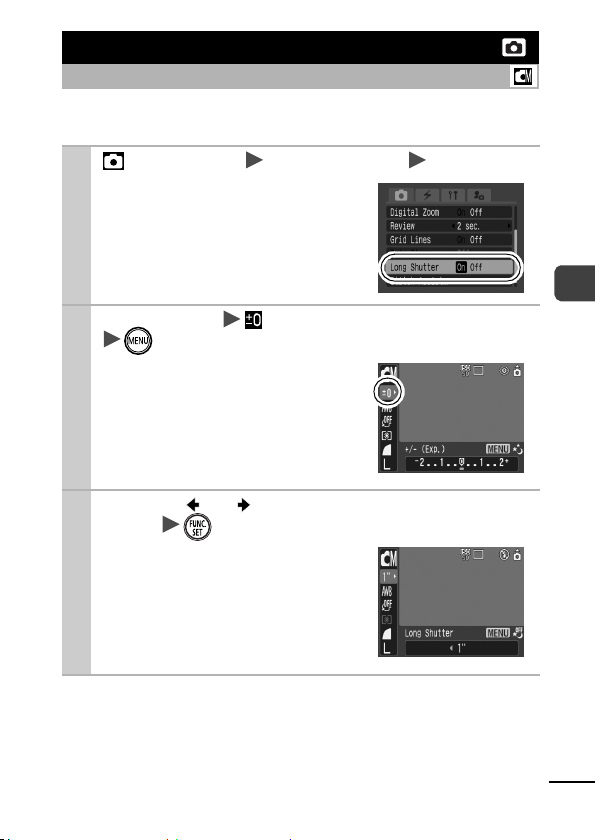
Shooting in Long Shutter Mode
Shooting Mode
You can set the shutter speed to a slow setting to make dark
subjects appear brighter.
(Rec.) Menu [Long Shutter] [On].
1
See Menus and Settings (p. 32).
FUNC. Menu * (Exposure Compensation)
2
3
To Cancel the Long Shutter Mode
Press the ME NU button when the Long Shutter FUNC. menu is
displayed.
.
See Menus and Settings (p. 31).
*Default setting.
Use the or button to select the shutter
speed .
zThe higher the value, the brighter
the image and the lower the value,
the darker the image.
Shooting
57
Page 60

The nature of CCD image sensors is such that noise in the
recorded image increases at long shutter speeds. This
camera, however, applies special processing to images shot
at shutter speeds slower than 1.3 seconds to eliminate the
noise, thereby producing high-quality images. A certain
amount of processing time, however, may be required before
the next image can be shot.
Use the LCD monitor to confirm that the image was
recorded at the desired brightness.
Please note that camer a shake becomes a factor at low
shutter speeds. Secure the camera to a tripod before
shooting.
Use of the flash may result in an over-exposed image. If
this occurs, shoot with the flash set to .
The following are unavailable:
- Exposure Compensation
-Metering
-AE Lock
-FE Lock
- ISO speed: Auto
- Flash: Auto, Auto with Red-Eye Reduction
58
Page 61
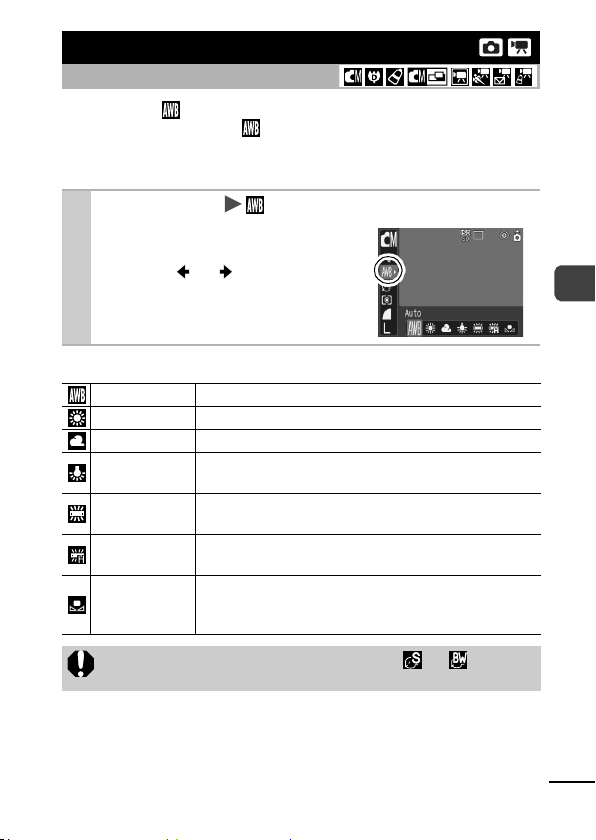
Adjusting the Tone (White Balance)
Shooting Mode
Normally, the (Auto) white balance setting selects an optimal
white balance. When the setting cannot produce natural looking
colors, change the white balance using a setting appropriate for the
light source.
FUNC. Menu * (Auto).
1
See Menus and Settings (p. 31).
*Default setting.
Use the or button to select
a white balance setting and press
the FUNC./SET button.
White Balance Settings
Auto
Day Light
Cloudy
Tungsten
Fluorescent
Fluorescent H
Custom
Settings are automatically set by the camera
For recording outdoors on a bright day
For recording under overcast, shady or twilight skies
For recording under tungsten and bulb-type 3wavelength fluorescent lighting
For recording under warm-white, cool-white or warmwhite (3-wavelength) fluorescent lighting
For recording under daylight fluorescent, or dayli ght
fluorescent-type 3-wavelength fluorescent lighting
For recording with t he optimal white balance data
retained i n the camera from a white-color ed object,
such as white paper or cloth
Shooting
This setting cannot be adjusted when the or photo
effect is selected.
59
Page 62
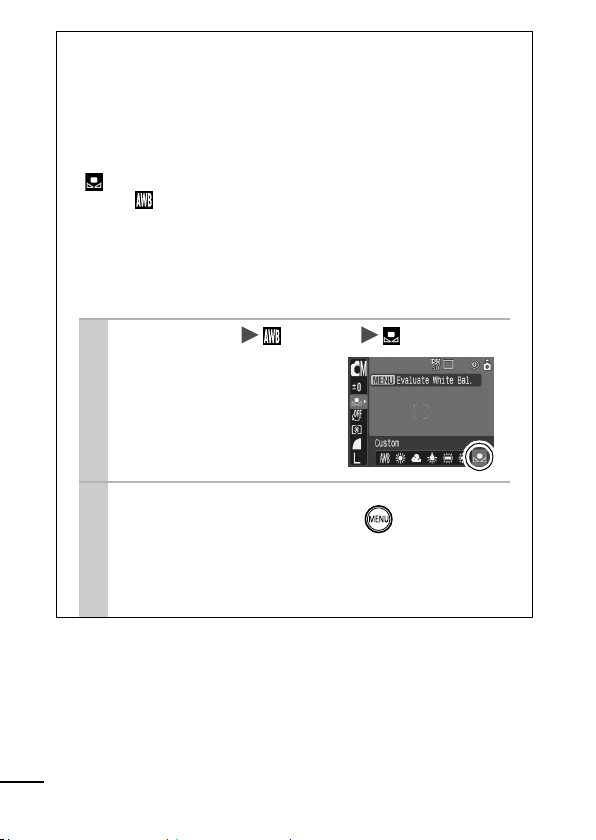
Using the Custom White Balance
You can set a custom white balance to obtain the optimal
setting for the shooting conditions by having the camera
evaluate an object, such as a piece of white paper or cloth,
or a photo-quality gray card that you wish to establish as the
standard white color.
In particular, take a custom white balance reading in
(Custom)
for the
Shooting close-ups
Shooting subjects of monotone color (such as sky, sea
or forest)
Shooting with a peculiar source of light (such as a
mercury-vapor lamp)
1
2
for the following situations that are difficult
(Auto) setting to detect corr ectly.
FUNC. Menu * (Auto) (Custom).
See Menus and Settings (p. 31).
* Default setting.
Aim the camera at a piece of white
paper or cloth and press .
If you are viewing it with the LCD monitor, ensure that
the center frame is completely filled with the white
image. If you are using the optical viewfinder, ensure
that the entire field is filled.
60
Page 63
You are recommended to set the shooting mode to
and the exposure compensation setting to [±0]
before setting a custom white balance.
The correct white balance may not be obtained
when the exposure setting is incorrect (image
appears completely black or white).
Shoot with the same settings as when reading the
white balance data. If the settings differ, the optimal
white balance may not be set.
In particular, the following should not be changed.
-ISO Speed
-Flash
Setting the flash to on or off is recommended.
If the flash fires when reading the white balance
data with the flash set to (auto) or (auto
with red-eye reduction), make sure that you also
use the flash when you shoot.
Since the white balance data cannot be read in
Stitch Assist mode, preset the white balance in
another shooting mode beforehand.
The camera will retain the custom white balance
setting that you record even if you reset the camera
to the default settings (p. 37).
Shooting
61
Page 64
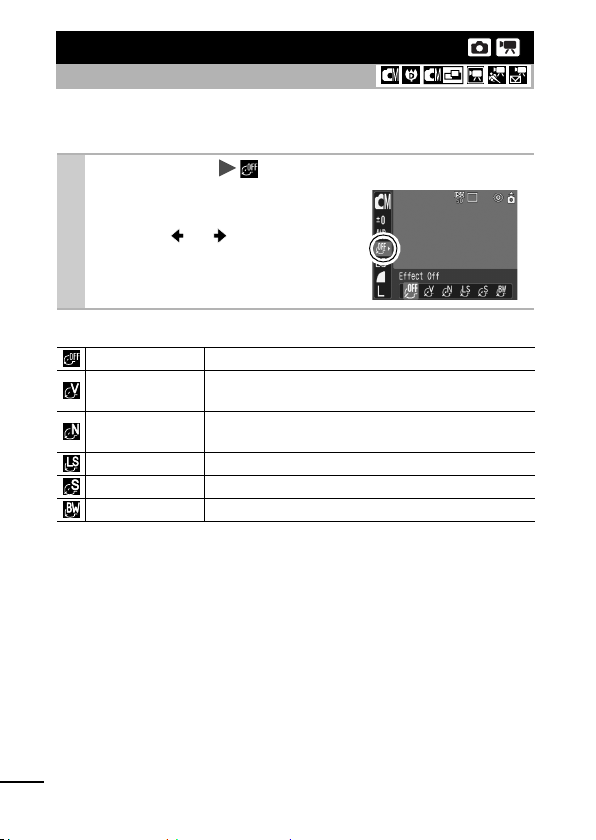
Changing the Photo Effect
Shooting Mode
By setting a photo effect before you shoot, you can change the look
and feel of the pictures you take.
FUNC. Menu * (Effect Off).
1
See Menus and Settings (p. 31).
*Default setting.
Use the or button to select
a photo effect and press the
FUNC./SET button.
Photo Effect Settings
Effect Off
Vivi d
Neutral
Low Sharpening
Sepia
B/W
Records normally with this setting.
Emphasi zes the contrast and col or saturation to
record bold colors.
Tones down the contrast and color satu rat ion t o
record neutral hue s.
Records subjects with softened outlines.
Records in sepia tones.
Records in black and white.
62
Page 65
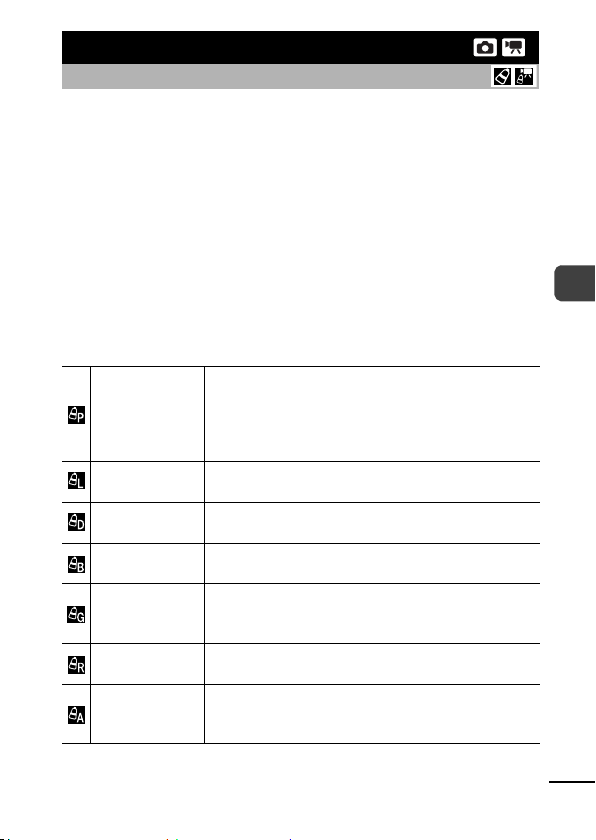
Shooting in a My Colors Mode
Shooting Mode
A My Colors mode easily changes the colors in an image when it is
shot, allowing you to alter the balance between red, green and blue,
transform pale or tanned skin or change a color specified on the
LCD monitor into a different color. Since they work with both stills
and movies, these modes let you enjoy producing various image or
movie effects.
However, depending on the shooting conditions, the images may
appear rough or you may not get the expected color. Before you try
to photograph important subjects, we highly recommend that you
shoot trial images and check the results.
Moreover, the camera will record both the My Colors image and the
original unaltered image if you set [Save Original] (p. 65) to [On].
My Colors Settings
Use thi s option to make red, green or blue colors
more intense l ike the Vivid Red, Vivid Green o r Vivid
Positi ve Film
Lighter Skin
Tone*
Darker Ski n
Tone*
Vivid Blue
Vivi d Green
Vivi d Red
Color Accent
Blue effects. It can produce intense naturalappearing colors like those obtained with positi ve
film.
Use this option to make skin tones lighter.
Use this option to make skin tones darker.
Use this option to emphasize blue tints. It makes
blue subjects, such as the sky or ocean, more vivid.
Use thi s option to emphasize green tints. It makes
green subjects, such as mountains, new g rowth,
flowers and lawns, more vivid.
Use thi s option to emphasize red tints. It makes red
subjects, such as flowers or cars, more vivid.
Use this option to have only the color specified on
the LCD monitor remain and to transform all others
to black and white.
Shooting
63
Page 66
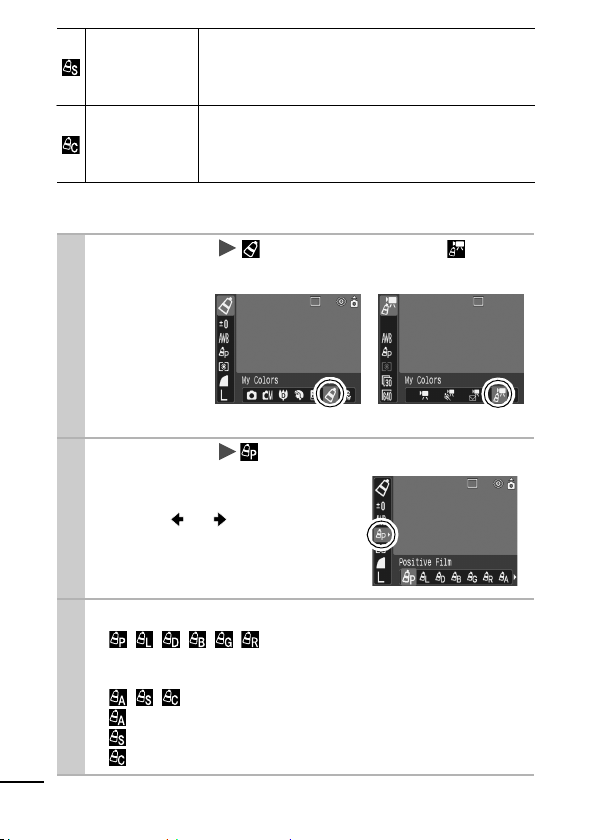
Use this option to transform a color specified on the
Color Swap
Custom Color
* The skin colors of non-human subjects may also be altered.
* You may not obtain the expected results depending on the skin color.
FUNC. Menu (My Colors: Stills)/ (My
1
LCD monitor into another. The specified color can
only be swapped into one other col or, mul tiple co lors
cannot be chosen.
Use this option to freely adjust the color balance
between red, green, blue and ski n ton es*. It can be
used to make subtle adjustments, such as making
blue colors more vivi d or face colors brighter.
Colors: Movies).
See Menus and
Settings (p. 31).
Stills Movies
FUNC. Menu * (Positive Film).
2
3
See Menus and Settings (p. 31).
*Default setting.
Use the or button to select
a My Colors mode.
Shoot.
Modes
Press the FUNC./SET button. The display will return to the
shooting screen and you can shoot.
Modes
:
See Setting the Camera to the Color Accent Mode
:
See Setting the Camera to the Color Swap Mode
:
See Setting the Camera to a Custom Color Mode
(p. 67).
(p. 68).
(p. 66).
64
Page 67
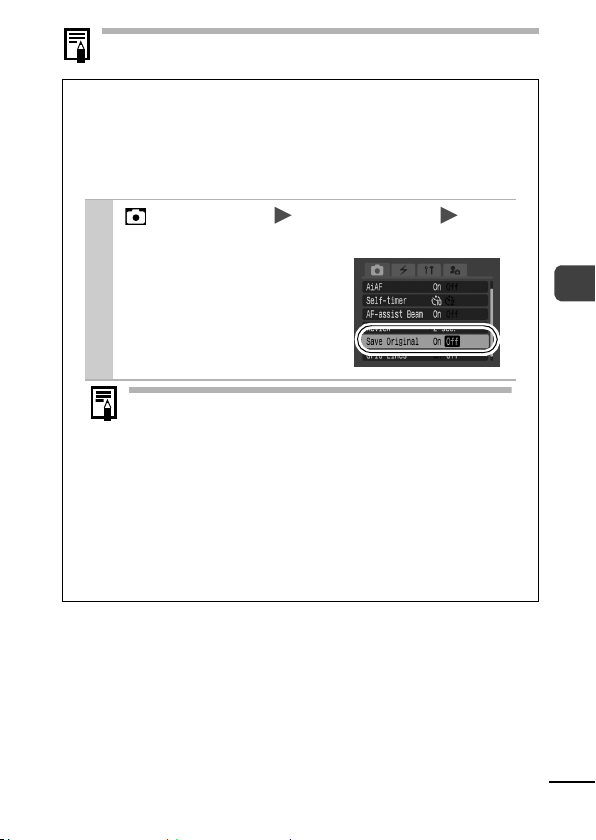
The ISO speed will rise with some settings, which may
increase the “noise” in the image.
Changing the Save Method for the
Original Image
When you are shooting still images in a My Colors mode,
you can specify whether or not both the altered image and
the original image are recorded.
1
(Rec.) Menu [Save Original]
[On]/[Off].
See Menus and Settings (p. 32).
If [On] is selected, the two
images will be numbered
consecutively with the
altered image following the
original.
When [Save Original] is Set to [On]
- Only the altered image is shown on the LCD monitor
during shooting.
- The image that appears on the LCD monitor
immediately after recording is the altered image. If
you erase the image at this point, the original image
is erased along with the altered image.
Exercise adequate caution before deleting a file.
- Since two images are recorded with each shot, the
number of shots remaining is approximately half the
number displayed when this function is set to [Off].
Shooting
65
Page 68
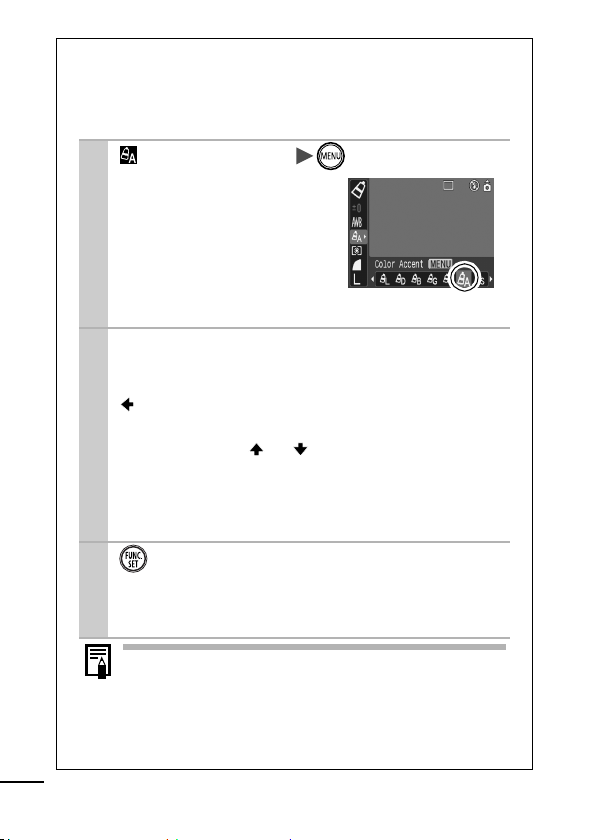
Setting the Camera to the Color
Accent Mode
Colors other than the color specified on the LCD monitor are
shot in black and white.
(Color Accent) .
1
See Menus and Settings (p. 31).
The camera will switch to
color input mode and the
display will alternate
between the original image
and the color accent image
(using the previously set
color).
Aim the camera so that the color you
2
wish to retain appears at the center
of the LCD monitor and press the
button.
Only one color can be specified.
You can use the or button to specify the range
of colors that are retained.
- -5: Only takes the color that you want to retain
- +5: Also takes colors close to the one that you want
to retain
3
.
This completes the setting.
If you press t he
to the screen where you can select a My Col ors mode.
MENU
button at this point, you will ret urn
66
The default color accent is green.
You may not obtain the expected results after color
input mode if you use the flash, or change the white
balance or metering settings.
The specified color accent is retained even if the
camera’s power is turned off.
Page 69
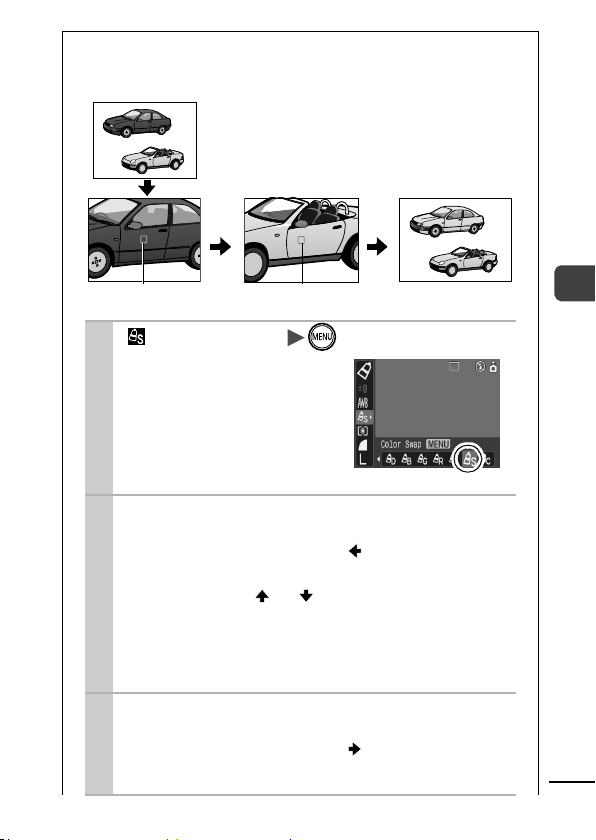
Setting the Camera to the Color Swap Mode
(
g)
This mode allows you to transform a color specified on the
LCD monitor into another.
Original Color
Before Swappin
(Color Swap) .
1
See Menus and Settings (p. 31).
The camera will switch to color
input mode and the display will
alternate between the original
image and the color swap
image (using the previously
set color).
Aim the camera so that the original
2
Desired Color
(After Swapping)
Shooting
color appears at the center of the LCD
monitor and press the button.
Only one color can be specified.
You can use the or button to specify the range
of colors that are swapped.
• -5: Only takes the color that you want to swap
• +5: Also takes colors close to the one that you want
to swap
Aim the camera so that the desired
3
color appears at the center of the LCD
monitor and press the button.
Only one color can be specified.
67
Page 70
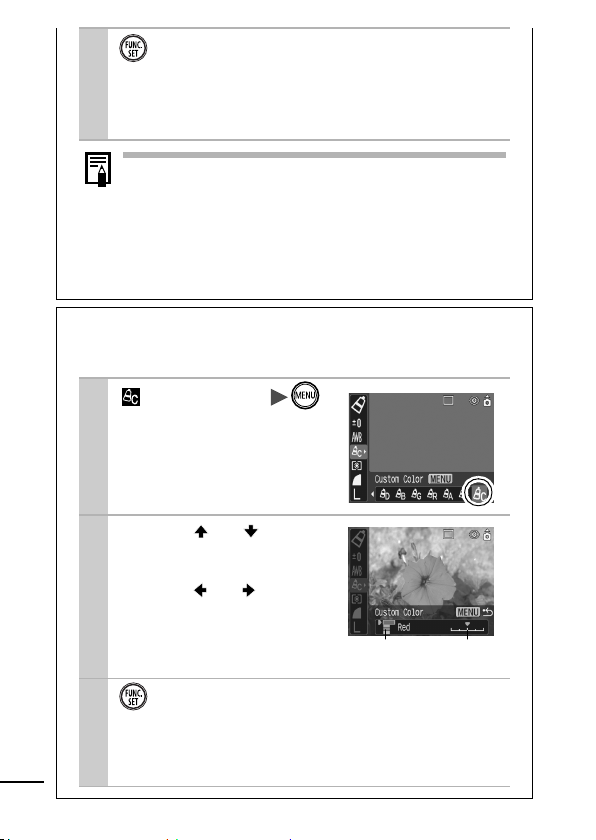
4 .
This completes the setting.
If you press the MENU button at this point, you will return
to the screen where you can select a My Colors mode.
The default setting for color swap mode changes
green into white.
You may not obtain the expected results after color
input mode if you use the flash, or change the white
balance or metering settings.
The colors specified in the color swap mode are
retained even if the camera’s power is turned off.
Setting the Camera to a Custom Color Mode
This mode allows you to adjust the color balance for red,
green, blue and skin tones.
1
(Custom Color) .
See Menus and Settings (p. 31).
Use the or button
2
to select [Red], [Green],
[Blue] or [Skin Tone]
and the or button
to adjust the color
balance.
The altered color will display.
Select
a color.
Adjust the
color balance.
68
3 .
This completes the setting.
If you press the
to the screen where you can select a My Colors mode.
MENU
button at this point, you will return
Page 71
Adjusting the ISO Speed
Shooting Mode
Raise the ISO speed when you wish to reduce the effects of camera
shake, turn the flash off when shooting in a dark area, or use a fast
shutter speed.
Press the button and switch settings.
1
Cycle through the / / / /[Auto] with each press of
the button.
Selecting [Auto] sets the sensitivity to produce the optimal
image quality.
Shooting
69
Page 72
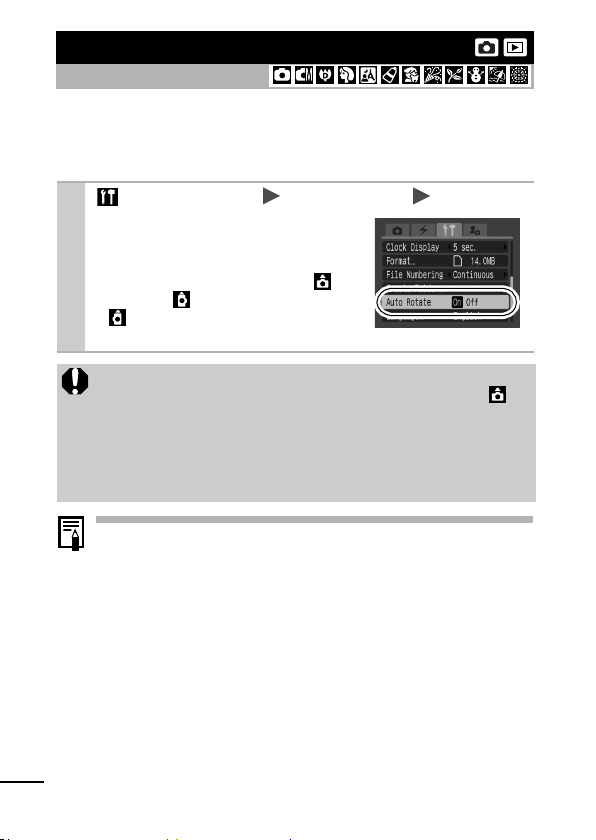
Setting the Auto Rotate Function
Shooting Mode
Your camera is equipped with an Intelligent Orientation sensor that
detects the orientation of an image shot with the camera held
vertically and automatically rotates it to the correct orientation when
viewing it on the LCD monitor.
1
(Set up) Menu [Auto Rotate] [On]/[Off].
See Menus and Settings (p. 32).
When the Auto Rotate function is set
to [On] and the LCD monitor is set to
the detailed di splay mode, the
(normal), (right end is down) or
(left end is down) will appear in
the display.
This function may not operate correctly when the camera
is pointed straight up or down. Check that the arrow is
pointing in the right direction and if it is not, then set the
Auto Rotate function to [Off].
Even if the Auto Rotate function is set to [On], the orientation of
images downloaded to a computer will depend upon the
software used to download the images.
When the camera is held vertically to shoot, the Intelligent
Orientation sensor judges the upper end to be “up” and the
lower end to be “down”. It then regulates the optimal white
balance, exposure and focus for vertical photography. This
function operates regardless of the on/off status of the Auto
Rotate function.
When the Auto Rotate function is set to [On] in shooting
mode, the orientation of the camera is recorded when the
shot is taken.
When the Auto Rotate function is set to [On] in playback
mode, images will be rotated to their correct orientation on
the LCD monitor as needed when the camera’s orientation
is changed (only applies to images shot when the Auto
Rotate function was set to [On]).
70
Page 73
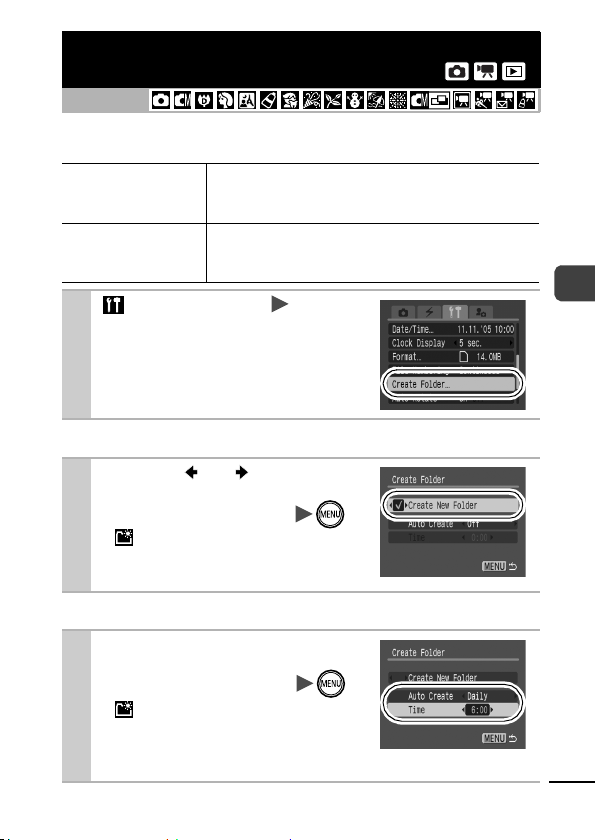
Creating an Image Destination (Folder)
Shooting Mode
You can create a new folder at any time and the recorded images
will be automatically saved to that folder.
Create New Folder
1
Creates a new folder the next ti me you shoot
images. To create an additional folder, insert
anothe r check mark.
Auto Create
You can also specify a date and time if you wish to
create a new folder using a shooting time after the
specified date and time (p. 36).
(Set up) Menu
[Create Folder].
See Menus and Settings (p. 32).
Creating a folder the next time you shoot
Use the or button to
2
place a check mar k beside
[Create New Folder] .
displays on the LCD monitor.
The symbol will cease to display
after the new folder is created.
Setting the Day or Time for Automatic Folder Creation
Select a day for the [Auto
2
Create] option and a time
in the [Time] option .
displays when the specified
time arrives. The symbol will cease
to display after the new folder is
created.
Shooting
71
Page 74
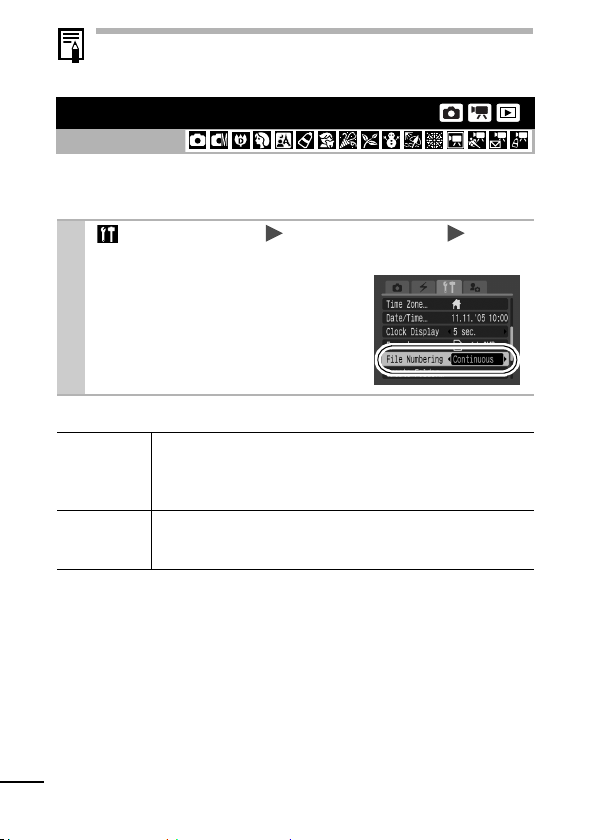
Up to 2000 images can be saved into one folder. A new folder
will automatically be created when you record more than that
number even if you are not creating new folders.
Resetting the File Number
Shooting Mode
The images you shoot are automatically assigned file numbers. You
can select how the file number is assigned.
1
(Set up) Menu [File numbering] [Auto
reset]/[Continuous].
See Menus and Settings (p. 32).
File Number Reset Function
A number o ne higher than the last one recorded i s assigned
Continuous
Auto reset
*When a blank memory card is used. If a memory card with recorded data is used,
the 7-digit number for the last recorded folder and image is compared with the last
one on the card, and the larger of the two is utilized as the basis for new images.
to the next image. This is convenient for managing all your
images together on a comput er because you avoid file
name duplication when changi ng folders or memory cards*.
The folder and image number are reset to the starting value
(100-0001)*. This is convenient for managing images on a
folder-by-folder basis.
72
Page 75
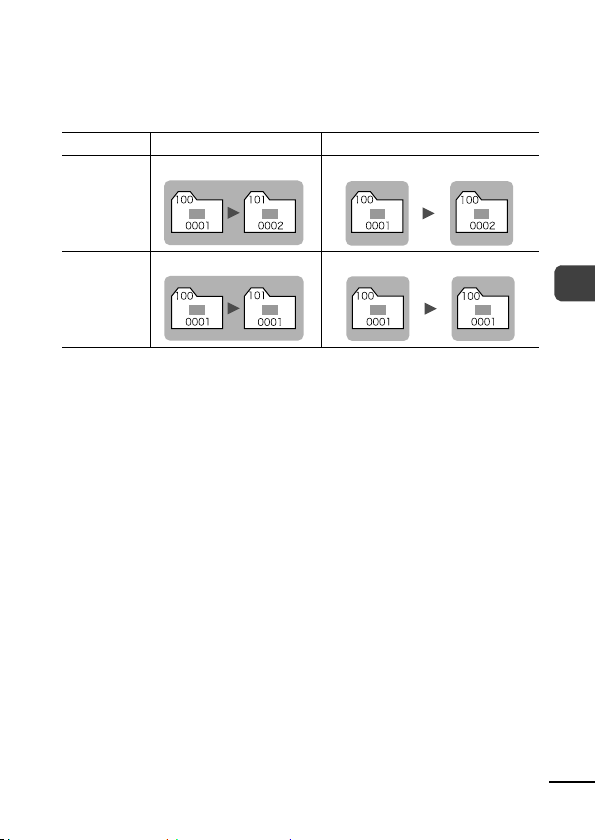
File and Folder Numbers
Recorded images are assigned consecutive file numbers starting
with 0001 and ranging up to 9999, while folders are assigned
numbers starting with 100 and ranging up to 999. Up to 2,000
images can be saved into a single folder.
New Folder Created
Memory Card 1 Memory Card 1 Memory Card 2
Continuous
Memory Card 1 Memory Card 1 Memory Card 2
Memory Card Exchanged for Another
Auto Reset
Images may be saved to a new folder when there is insufficient
free space even if the total number of images in a folder is less
than 2,000 because the following types of image are always
saved together into the same folder.
- Images from continuous shooting
- Self-timer images (custom)
- Stitch Assist mode images
- My Colors images ([Save Original] set to [On])
Images cannot be played back when the folder numbers are
duplicated or image numbers are duplicated within folders.
Please refer to the Software & Wireless Guide for information
regarding folder structures or image types.
Shooting
73
Page 76
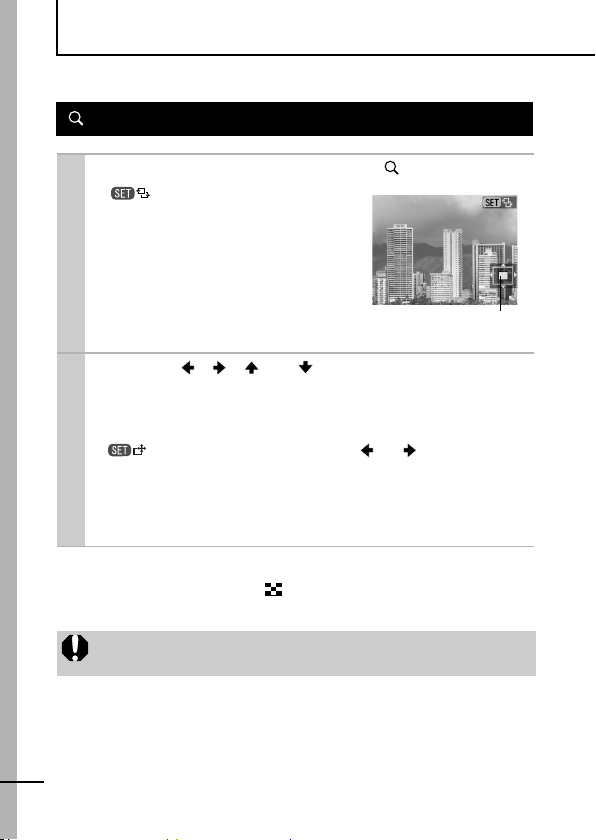
Playback/Erasing
Please also see the Basic Guide (p. 11).
Magnifying Images
Press the zoom lever toward .
1
will display and a
magnified portion of the image will
display.
Images can be magnified up to a
factor of approximately 10x.
Approximate Location of
the Displayed Area
Use the , , or button to move
2
around the image.
If you press the FUNC./SET button while in magnified
display, the camera switches to image advance mode and
will display. You can use the or button to
advance to the next or previous image at the same level of
magnification. The image advance mode is canceled when
you press the FUNC./SET button again.
You can change the magnification level with the zoom lever.
To Cancel the Magnified Display
Press the zoom lever toward . (You can also cancel it
immediately by pressing the MENU button.)
74
Movie frames and index playback images cannot be
magnified.
Page 77
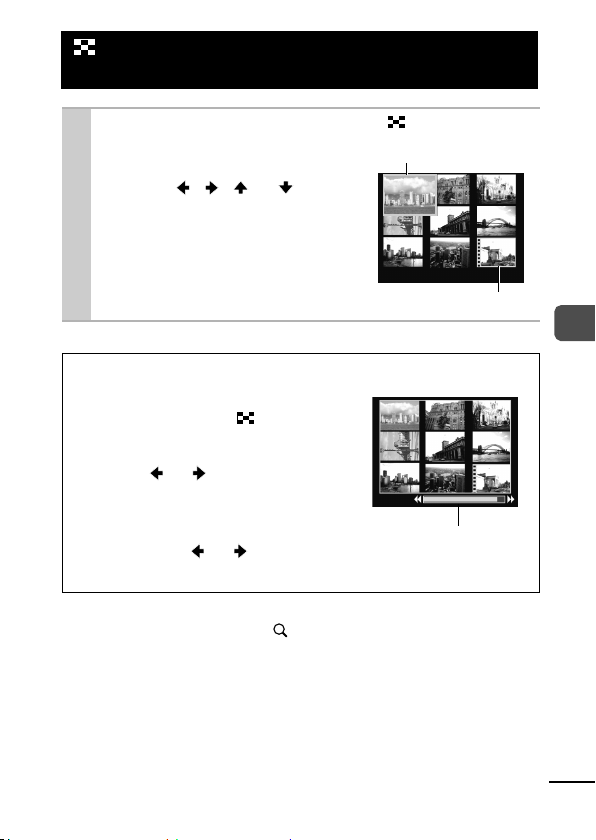
Viewing Images in Sets of Nine
(Index Playback)
Press the zoom lever toward .
1
Up to nine images can be viewed
at once.
Use the , , or button
to change the image selection.
Switching between Sets of Nine Images
The jump bar will display if you press
the zoom lever toward while in
index playback and you can switch the
display between sets of nine images.
Use the or button to move to
the previous or next set of nine
images.
Hold the FUNC./SET button down
and press the or button to
jump to the first or last set.
To Return to Single Image Playback
Press the zoom lever toward .
Selected Image
Jump Bar
Movie
Playback/Erasing
75
Page 78
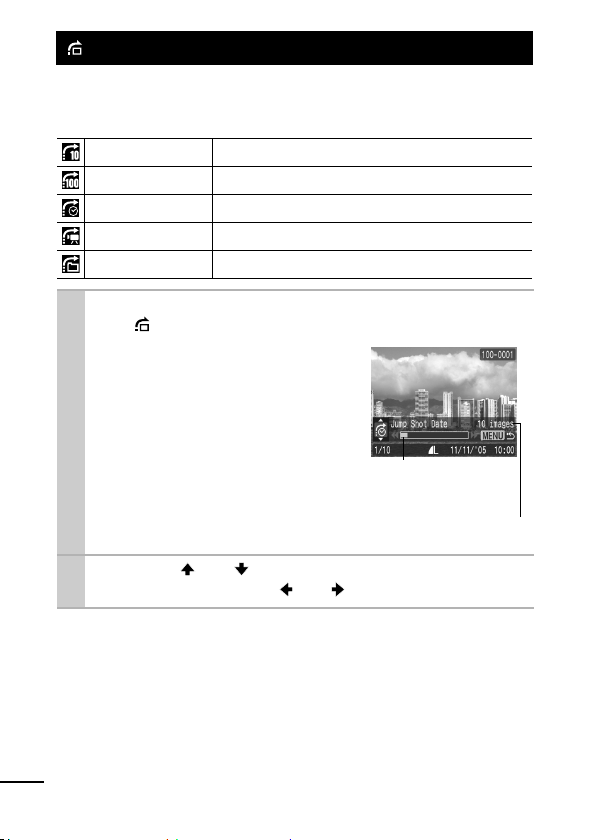
Jumping to Images
When you have many images recorded onto a memory card, it is
handy to use the five search keys below to jump over images to find
the object of your search.
Jump 10 Images
Jump 100 Image s
Jump Shot Date
Jump to Movie
Jump to Folder
In single image playback mode, press
1
the button.
The camera will switch to jump
search mode.
The screen sample will vary
slightly according to the
search key.
Use the or button to select a search
2
key and press the or button.
Jumps over 10 images at a time.
Jumps over 100 images at a time.
Jumps to the first image of each shooting date.
Jumps to a movie.
Displays the first image in each folder
Location of image
currently being
displayed.
.
Number of images
matching search key.
To Return to Single Image Playback
Press the MENU button.
76
Page 79
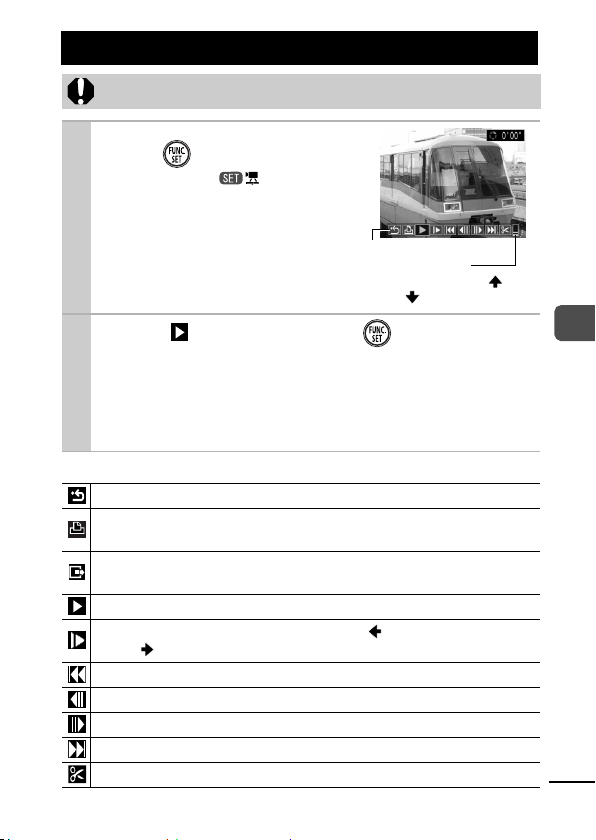
Viewing Movies
Movies cannot be played in the index playback mode.
Display a movie and
1
press .
Images with a icon are
movies.
Movie Control Panel
Volume Level
(Adjust with the
or button)
2 Select (Play) and press .
The movie will pause if you press the
playback. It will resume when you press the button again.
When playback ends, the movie stops at the last frame
displayed. Press the FUNC./SET button to display the
movie control panel.
Operating the Movie Control Panel
Ends pl ayback and returns to single image playback
Print (An icon will display when a printer is connected. See the Direct
Print User Guide for details.)
Transfer (An icon will display when a computer is conn ected. See
Software & Wireless Guide for details.)
Play
Slow Motion Playback (You can use the button to slow down
or the button to speed up playback.)
Displays the first frame
Previous Frame (Rewinds if the
Next Frame (Fast Forwards if the
Displays the last frame
Edit (Switches to movie editi ng mode) (p. 78)
FUNC./SET
FUNC./SET
button is held down)
FUNC./SET
button duri ng
button is held down)
Playback/Erasing
77
Page 80
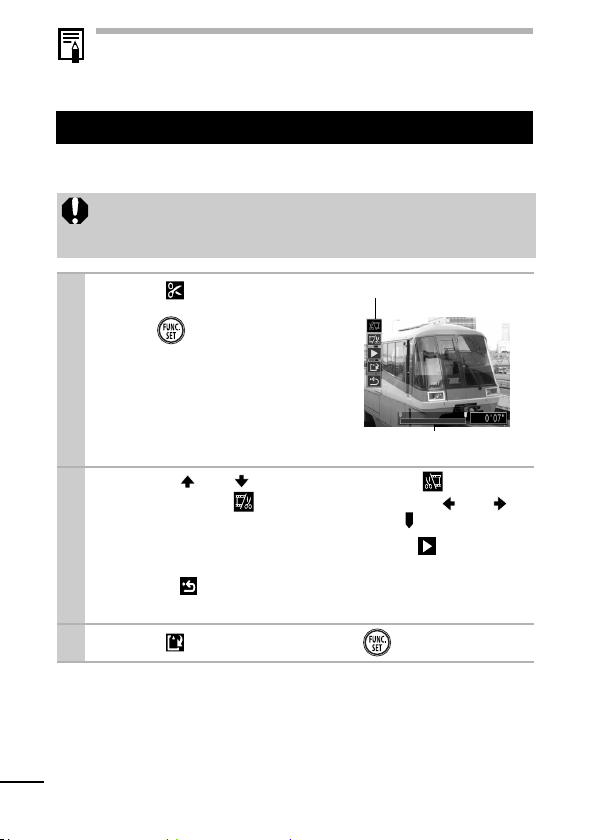
Use the television’s controls to adjust the volume when
playing a movie on a TV set (p. 93).
The sound cannot be played in slow motion playback.
Editing Movies
You can delete portions of recorded movies.
Movies 1 second or longer before editing can be edited, but
those that are protected or less than 1 second long cannot be
edited.
Select (Edit) in the
1
movie control panel and
press .
The movie editing panel and the
movie editing bar will display.
Use the or button to select (Cut
2
Beginning) or (Cut End) and the or
button to specify the cut point( ).
To check a temporarily edited movie, select (Play) and
press the FUNC./SET button.
Selecting (Exit) cancels the edit and restores the movie
control panel.
3 Select (Save) and press .
78
Movie Editing Panel
Movie Editing Bar
Page 81
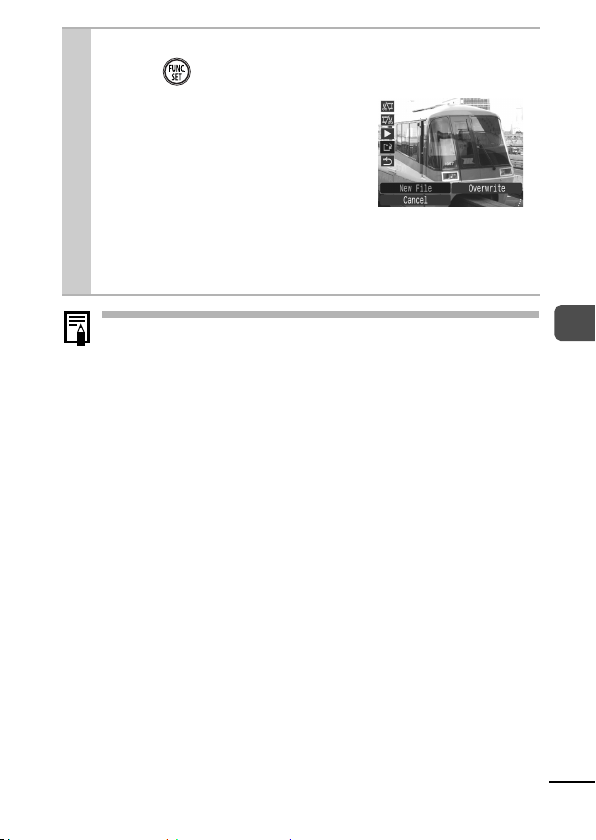
Select [New File] or [Overwrite] and
4
press .
[New File] saves the edited movie
under a new file name. The preedit data is left unchanged.
Note, if you press the FUNC./SET
button while saving the movie,
saving is canceled.
[Overwrite] saves the edited
movie with its original name. The pre-edit data is lost.
When there is not enough space left on the memory card,
only [Over write] can be selected.
It may take approximately 3 minutes to save an edited movie.
If the battery runs out of charge partway through, edited movie
clips cannot be saved. When editing movies, it is
recommended to use a fully charged battery or the separately
sold AC Adapter Kit ACK-DC10 (p. 123).
Playback/Erasing
79
Page 82
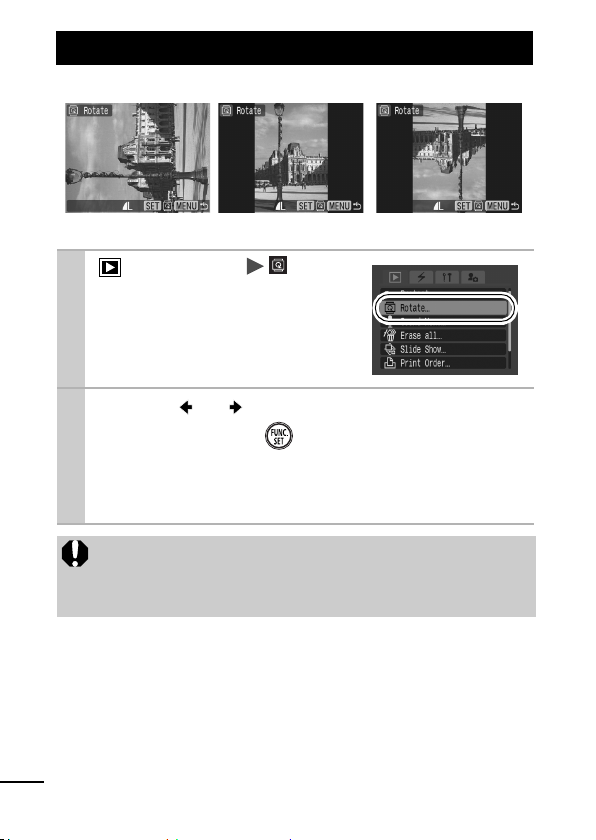
Rotating Images in the Display
Images can be rotated clockwise 90° or 270° in the display.
Original 90° 270°
80
1
2
(Play) Menu .
See Menus and Settings (p. 32).
Use the or button to select an image to
rotate and press to rotate it.
Cycle through the 90°/270°/original orientations with each
press of the FUNC./SET button.
This also can be set in the index playback mode.
Movies cannot be rotated.
When images are downloaded to a computer, the
orientation of images rotated by the camera will depend
upon the software used to download the images.
Page 83
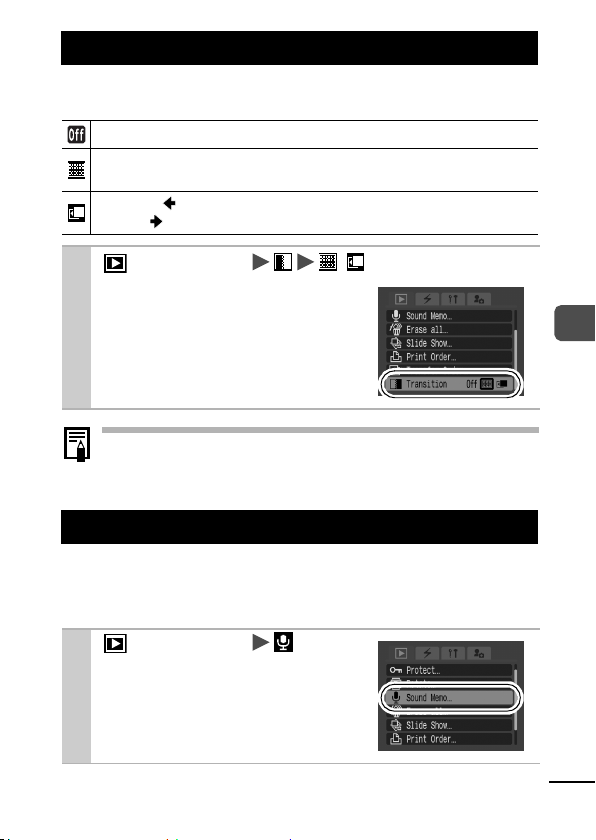
Playback with Transition Effects
You can select the transition effect displayed when switching
between images.
Usual display
The displayed image darkens and the next image gradually bri ghtens
until it is displayed.
Press the button to have the previous image display from the left
and the button to have the next image di splay from the right.
1
(Play) Menu / .
See Menus and Settings (p. 32).
The transition effect will not display when an image is
switched while the camera is reading an image from the
memory card.
Attaching Sound Memos to Images
In playback mode (including single image playback and index
playback), you can attach sound memos (up to 60 seconds) to an
image. The sound data is saved in the WAVE format.
1
(Play) Menu .
See Menus and Settings (p. 32).
Playback/Erasing
81
Page 84
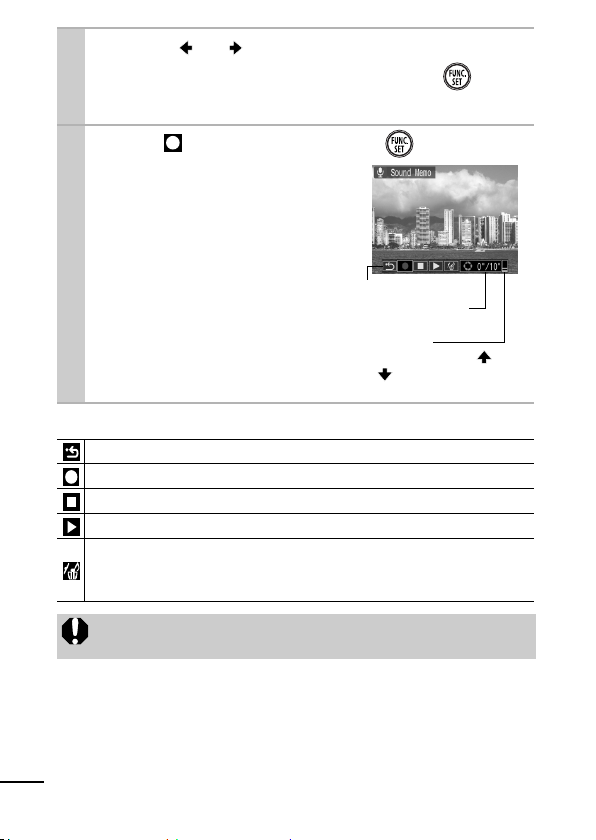
2
Use the or button to select an image to
attach a sound memo to and press .
zThe sound memo panel will display.
3 Select (Record) and press .
zThe elapsed time and the
remaining time display.
zPressing the FUNC./SET button
pauses the recording. Pressing it
again resumes recording.
zUp to 60 seconds of recordings
can be added to any one image.
Sound Memo Panel
Exit
Record
Pause
Play
Erase
Select [Erase] in the confirmation screen and press the
button.
z You cannot attach sound memos to movies.
z Sound memos for protected images cannot be erased.
Sound Memo Panel
Elapsed Time/
Remaining Time
Vo lum e
(Adjust with the or
button)
FUNC. /SET
82
Page 85
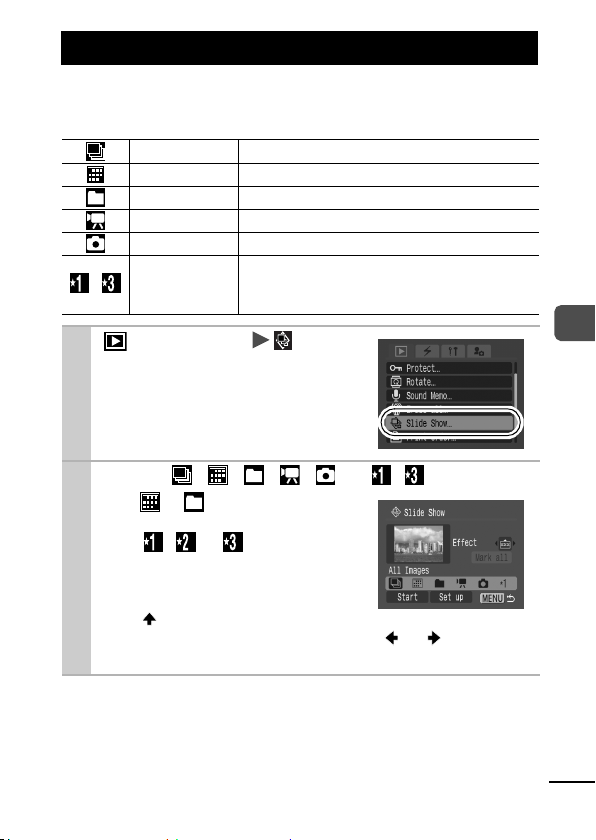
Automated Playback (Slide Shows)
Automated Playback of Memory Card Images.
Image settings for slide shows are based on the Digital Print Order
Format (DPOF) standard (p. 88).
–
All Images
Date
Folder
Movie
Stills
Custom 1–3
Plays all images on a memory card i n order.
Plays images bearing a specified date in order.
Plays images in a specifi ed folder in order.
Plays movie files only, in order.
Plays still images only, i n order.
Plays the images selected for each slide show,
Custom 1, Custom 2 or Custom 3, in
order (p. 85).
1
2
(Play) Menu .
See Menus and Settings (p. 32).
Select , , , , or – .
For or , select the image date
or folder to be played back (p. 85).
For , or , select the
images t o be
If you want to add a transition
effect to play back images, use
the button to select [Effect]
and choose the type of effect with the or button (See
the next page).
played back (p. 85)
.
Playback/Erasing
83
Page 86
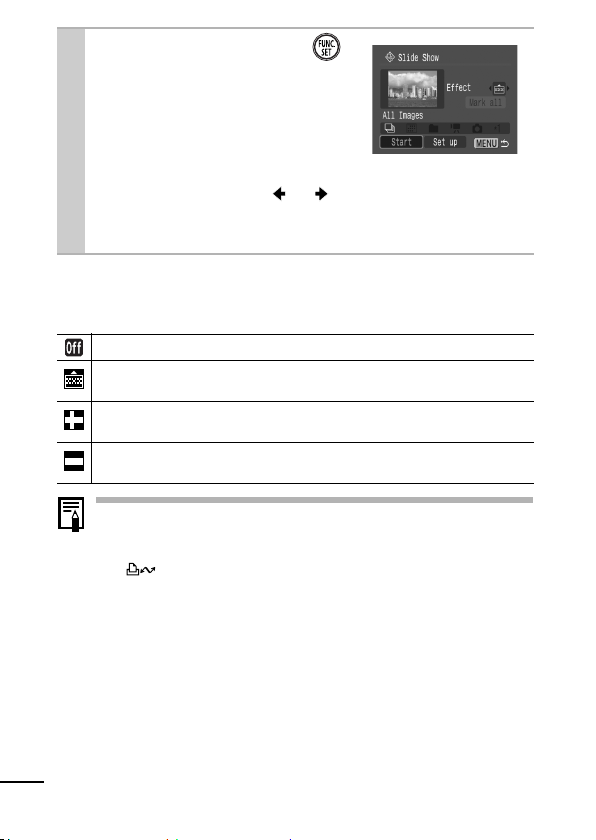
3
Select [Start] and press .
zThe following functions are
available during slide shows.
- Pausing/resuming the slide
show: press the FU NC./SET
button
- Fast forwarding/rewinding the
slide show: press the or button (continue to hold the
button to switch between images more rapidly)
- Stopping the slide show: press the MENU button.
Transition Effects
You can select the transition effect used when one image is
replaced by another.
Usual di splay
The new image gradually brightens as it moves upward from the
bottom.
The new image first appears in a cross shape and gradually expands
to display the full image.
Portions of the n ew image move horizontal ly, then the image expands
to display the full image.
In single image playback mode (when displaying a still
image), you can start a slide show from the current image
displayed by holding the FUNC./SET button while you press
the button. Please note that if you do this while the last
image shot is displayed, t he slide show will start from the first
image using the same date.
84
Page 87
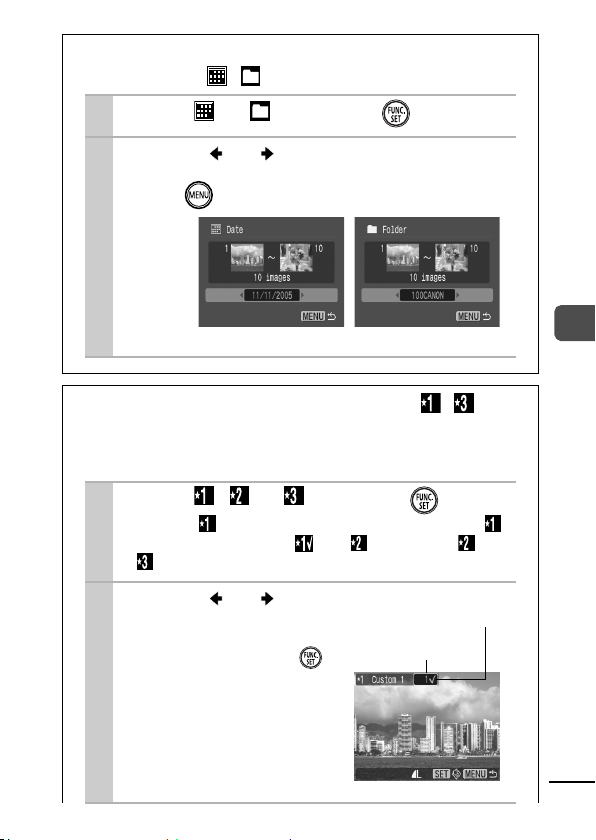
Selecting an Image Date or Folder for
Playback (
Select or and press .
1
Use the or button to select the
2
date or folder to be played back and
press .
/
)
Date Folder
Selecting Images for Playback ( – )
Select only the images that you wish to play back and save
them as a slide show ( Custom 1, 2 or 3) . Up to 998 images can
be selected. They will be played back in their order of selection.
Select
1
Only the icon will display at first. When you set ,
the icon will change to and will display. and
will change in the same way when they are set.
Use the or
2
button to move
between images for
playback and the
button to select or
deselect them.
You can also select images
in the index playback mode.
Pressing the MENU button
cancels the setting.
, or and press .
Check mark
indicating selection
Number indicating
the selection order
Playback/Erasing
85
Page 88
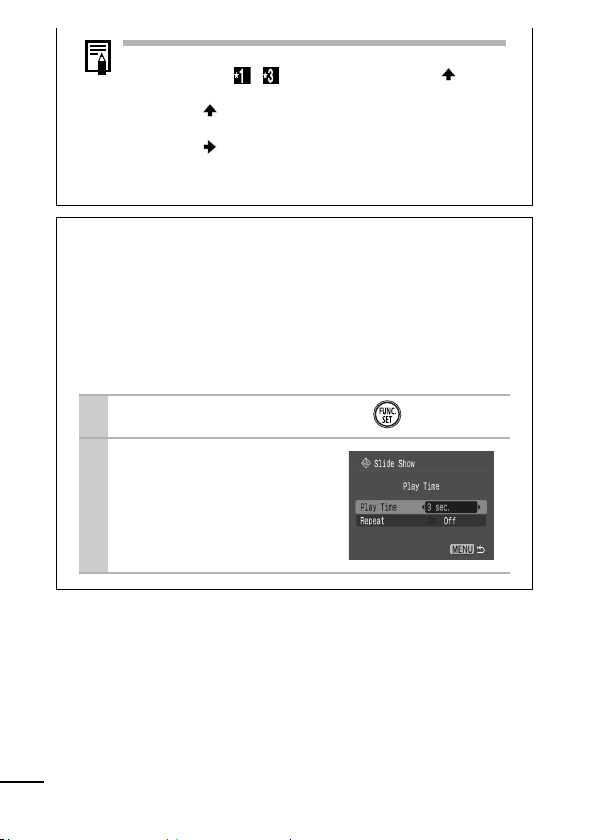
Selecting All Images
1. After selecting – in step 1 (p. 85), use the button
to select [Mark all] and press the
2. Use the button to select [Mark all], press the
FUNC./SET button.
3. Use the button to select [OK] and press the
FUNC./SET button.
To deselect all images, select [Reset].
FUNC./SET
button.
Adjusting the Play Time and Repeat Settings
Play Time
Sets the duration that each image displays. Choose between
3–10 seconds, 15 seconds and 30 seconds. Displaying time
can var y slightly depending on the image.
Repeat
Sets whether the slide show stops when all the slides have
been displayed or continues until stopped.
1 Select [Set up] and press .
Select [Play Time] or
2
[Repeat] and then
the desired option.
Pressing the MENU button
cancels the setting.
86
Page 89
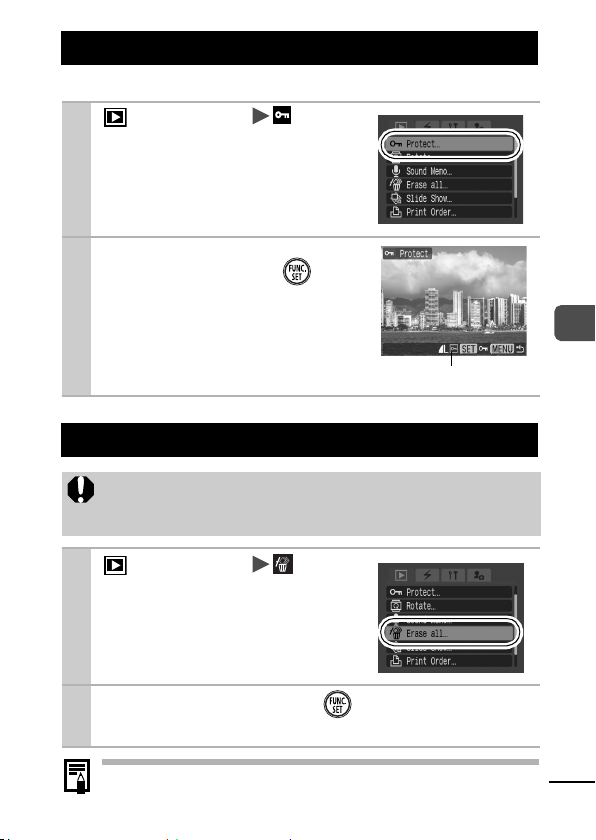
Protecting Images
You can protect important images and movies from accidental erasure.
1
2
(Play) Menu .
See Menus and Settings (p. 32).
Select an image to
protect and press .
Pressing the FUNC./SET button
again cancels the setting.
You can also protect images in the
index playback mode.
Protection Icon
Erasing All Images
Note that erased images cannot be recovered. Exercise
adequate caution before erasing an image.
Protected images cannot be erased with this function.
Playback/Erasing
1
(Play) Menu .
See Menus and Settings (p. 32).
2 Select [OK] and press .
To exit instead of erasing, select [Cancel].
Please format the memory card when you want to erase not only
image data but also all the data contained on the card (p. 28).
87
Page 90
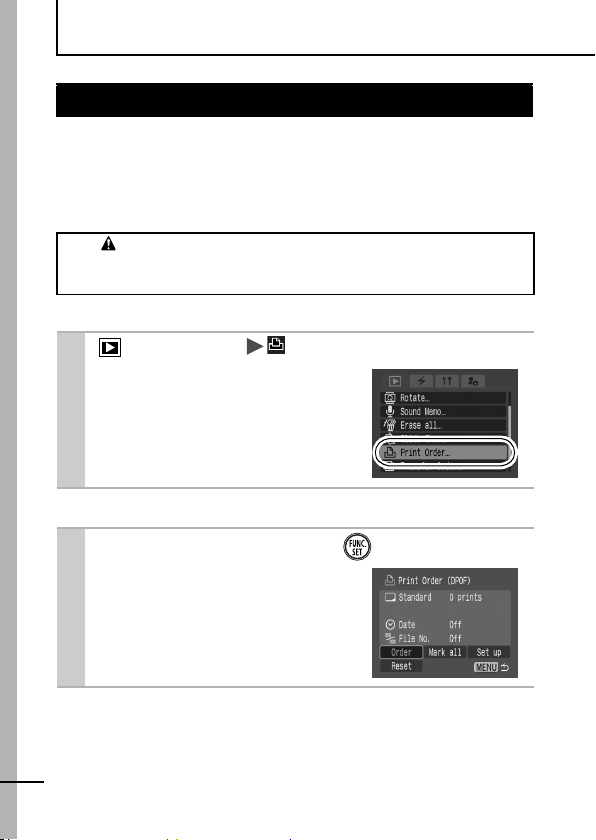
Print Settings/Transfer Settings
Setting the DPOF Print Settings
You can select images on a memory card for printing and specify
the number of print copies in advance using the camera. This is
extremely convenient for printing on a direct print compatible
printer, or for sending the images to a photo developing service that
supports DPOF.
The icon may display for a memory card with print
settings set by a dif ferent DPOF-compliant camera. These
settings will be overwritten by those set by your camera.
1
Single Images
(Play) Menu .
See Menus and Settings (p. 32).
2 Select [Order] and press .
Selecting [Reset] cancels all print
settings for the images.
88
Page 91
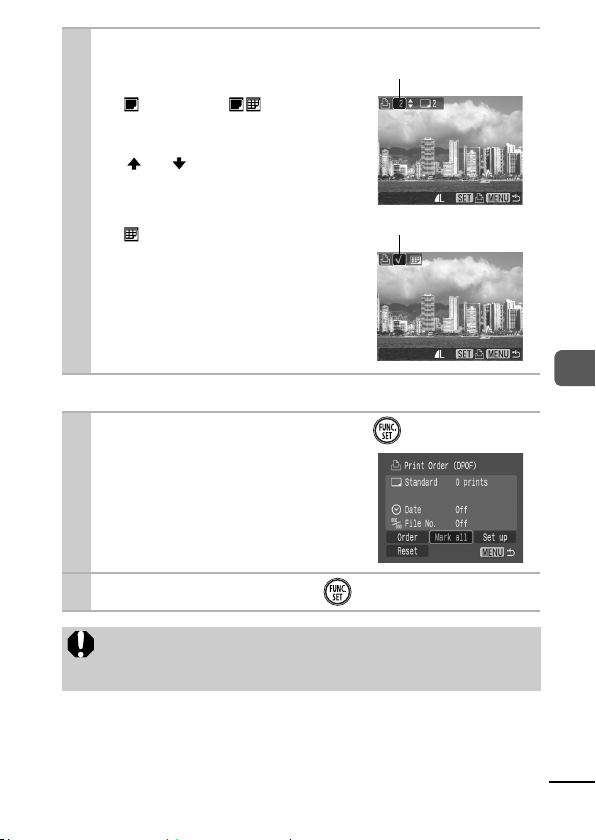
Select images for printin
3
Selection methods differ for the
Print Type settings (p. 90).
- (Standard)/ (Both)
Select an image, press the
FUNC./SET button and use the
or button to select
the number of print copies
(upto99).
- (Index)
Select an image and the press
FUNC./SET button to select or
deselect it.
You can also select images in the
index playback mode.
g.
Number of Print Copies
Index Print Selection
All the Images on a Memor y Card
2
Select [Mark all] and press .
Select ing [Reset] cancels all print
settings for the images.
One copy of every image will be
set to print.
3 Select [OK] and press .
Print/Transfer Settings
The output of some printers or photo developing services
may not reflect the specified print settings.
Print settings cannot be set for movies.
89
Page 92
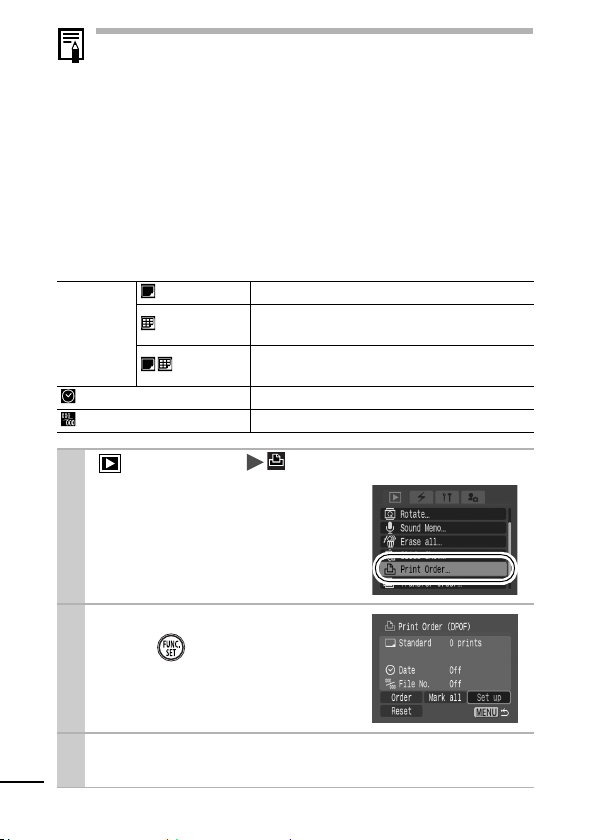
Images are printed in order according to the file number.
A maximum of 998 images can be selected.
When [Print Type] is set to [Both], the number of copies can
be set. When it is set to [Index], the number of copies
cannot be set (only one copy will be printed).
Do not set the date in the DPOF print settings when printing
images that have had the date embedded with the
[Date Stamp] function. This may cause the date to be
printed twice.
Setting the Print Style
The following print styles can be selected.
Print Type
Date
File No.
Standard
Index
Both
Prints one image per page.
Prints the selected images toge ther at a
reduced size in an index format.
Prints the images in both the standard and
index formats.
Adds the date to the print.
Adds the file number to the print.
90
1
2
(Play) Menu .
See Menus and Settings (p. 32).
Select [Set up] and
press .
Select [Print Type], [Date] or [File No.] and
3
then specify the settings.
Page 93
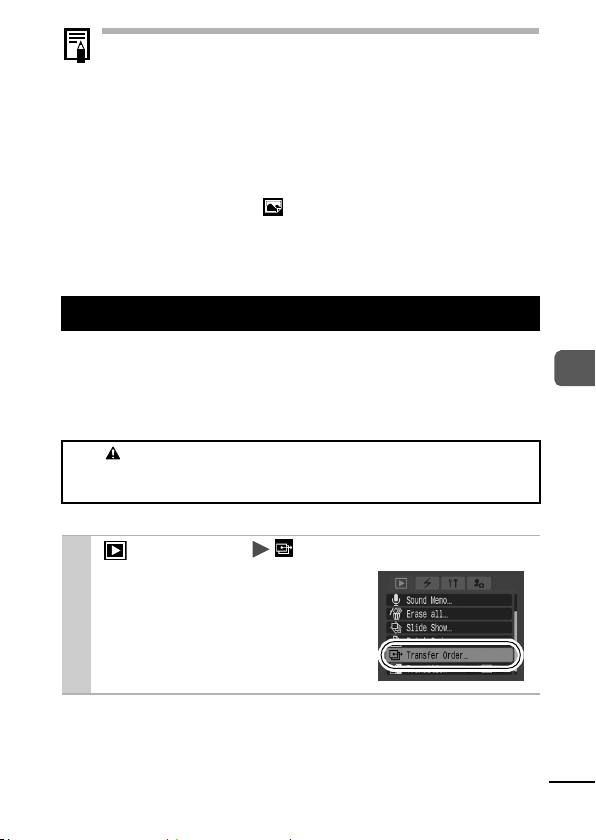
The Date and File No. settings change according to the
Print Type as follows.
- Index
[Date] and [File No.] cannot be set to [On] at the
same time.
- Standard or Both
[Date] and [File No.] can be set to [On] at the same time.
However, the printable information may vary between
printers.
Embedded dates in (Postcard Date Imprint
mode) (p. 44) print out even when [Date] is set to [Off].
Dates print in the style specified in the [Date/Time]
menu (p. 35).
Setting the DPOF Transfer Settings
You can use the camera to specify settings for images before
downloading to a computer. Refer to the Software & Wireless Guide
for instructions on how to transfer images to your computer.
The settings used on the camera comply with the Digital Print Order
Format (DPOF) standards.
The icon may display for a memory card with transfer
settings set by a different DPOF-compliant camera. These
settings will be overwritten by those set by your camera.
Print/Transfer Settings
1
(Play) Menu .
See Menus and Settings (p. 32).
91
Page 94
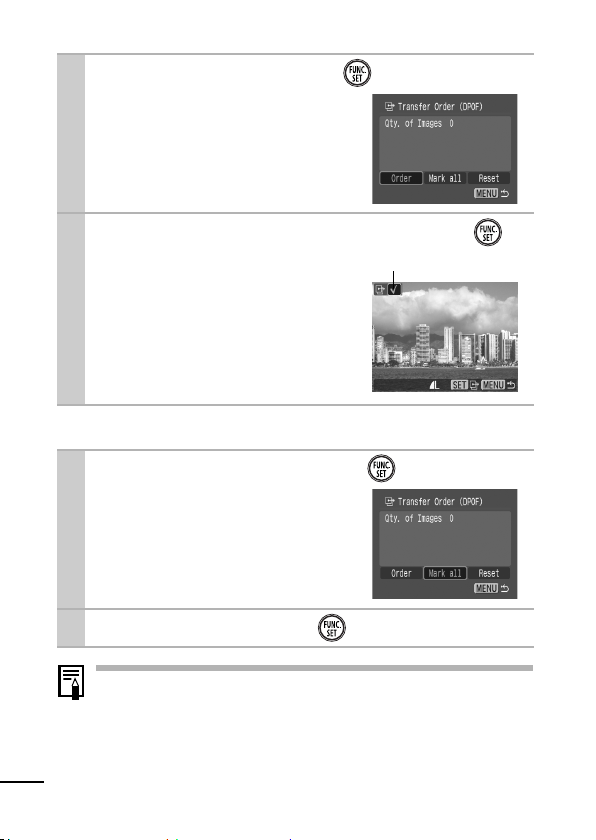
Single Images
2 Select [Order] and press .
Selecting [Reset] cancels all
transfer order settings.
3 Select an image to transfer and press .
Pressing the FUNC./SET button
again deselects the setting.
You can also select images in the
index playback mode.
All the Images on a Memory Card
Transfer Selection
2 Select [Mark all] and press .
Selecting [Reset] cancels all
transfer order settings.
3 Select [OK] and press .
Images are transferred in order according to the file
number.
A maximum of 998 images can be selected.
92
Page 95
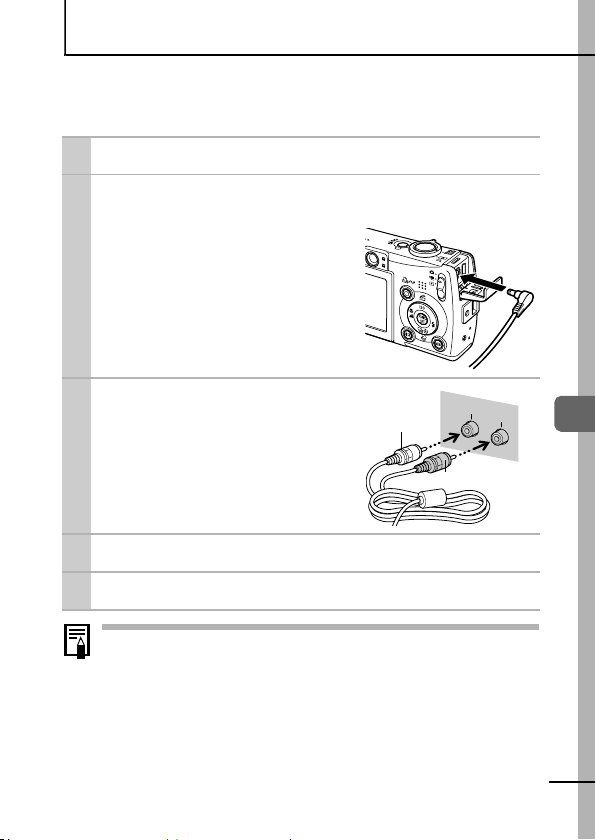
Viewing Images on a TV set
You can use a video-compatible television as a monitor to shoot or
play back images when it is connected t o the camera with the
supplied AV Cable.
Turn off the Camera and the TV.
1
Connect the AV cable to the camera’s A/V
2
OUT terminal.
Slide the terminal cover open and
firmly insert the AV cable.
Plug the other ends of the
3
AV cable to the VIDEO IN
and AUDIO IN jacks on
the TV.
Turn on the TV and switch it to video mode.
4
Turn on the camera.
5
Yel lo w
IN
VIDEO
Black
AUDIO
Viewing Images on a TV set
The video output signal can be switched (NT SC or PAL) to
accommodate different regional standards (p. 36). The default
setting varies between regions.
- NTSC: Japan, U.S.A., Canada, Taiwan and others
- PAL: Europe, Asia (excluding Taiwan), Oceania and others
If the video system is set incorrectly, the camera output may
not display properly.
93
Page 96
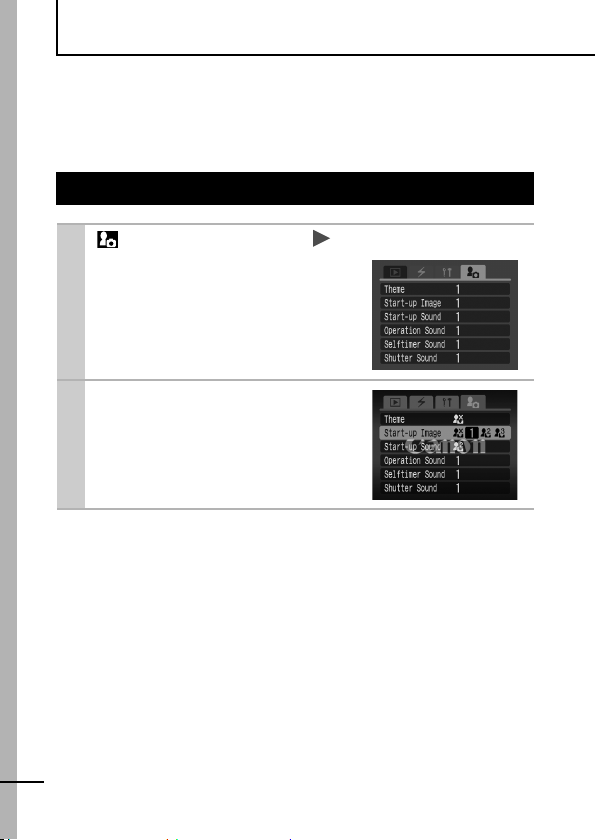
Customizing the Camera (My Camera Settings)
My Camera allows you to customize the start-up image and startup, operation, self-timer and shutter sounds. You can change and
register these settings, enabling you to customize the camera to
suit your own tastes.
Changing My Camera Settings
94
1
2
(My Camera) Menu Menu Item.
See Menus and Settings (p. 32).
Select the contents you
wish to set.
Select [Theme] to set all to the
same settings.
Page 97
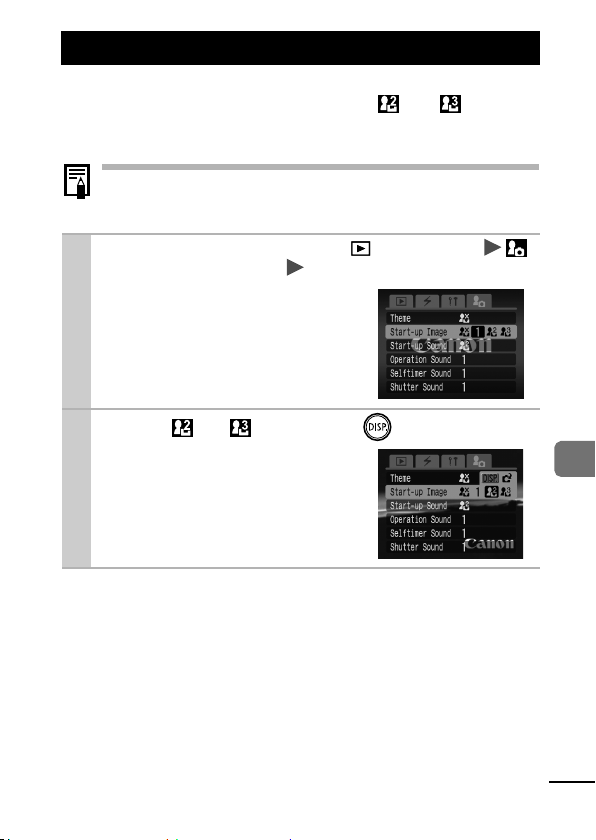
Registering My Camera Settings
Images recorded onto the memory card and newly recorded sounds
can be added as My Camera settings to the and menu
items. You can also use the supplied software to upload your
computer’s images and sounds to the camera.
A computer is required to restore the My Camera settings to
the defaults. Use the supplied software (ZoomBrowser EX/
ImageBrowser) to restore the default settings to the camera.
Slide the mode switch to (playback)
1
(My Camera) Menu Menu Item to register.
See Menus and Settings (p. 32).
2 Select or and press .
Customizing the Camera
95
Page 98
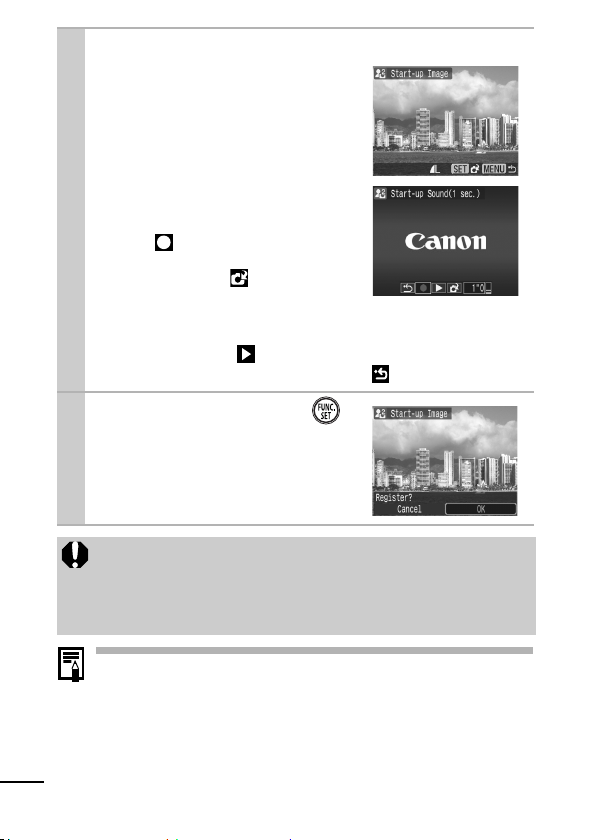
Select an image or record a sound.
3
Start-up Image
Select the image you wish to
register and press the FUNC./SET
button.
Start-up, Operation, Self-timer
and Shutter Sounds
Select (Record) and press the
FUNC./SET button. After
recording, select (Register)
and press the FUNC./SET button.
- Recording will automatically
stop when the recording time elapses.
- To play it, select (Play).
- To exit instead of registering, press (Exit).
4
Select [OK] and press .
To cancel registering, select
[Cancel].
The following cannot be registered as My Camera settings.
-Movies
- Sounds recorded with the sound memo function (p. 81)
The prior setting is erased when a new My Camera setting
is added.
96
See the supplied Software & Wireless Guide for more
information on creating and adding to the My Camera data.
Page 99
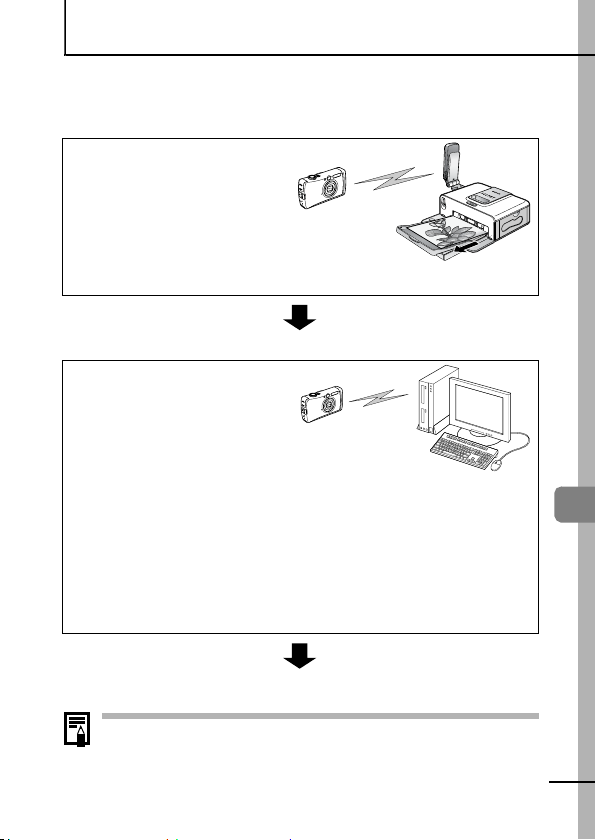
Using Wireless Connection (Connecting to Printer)
When you want to save or print your images, this camera lets you
transfer them to a personal computer or printer wirelessly, without
the need for cables.
Connecting to a
Printer
If you attach the supplied
wireless print adapter to a
Canon PictBridge compliant
printer, you can print images
taken with the camera after
transferring them to the printer over a wireless connection. (p. 98)
See the instructions, beginning on the next page.
Connecting to a
Computer
If you install the software
included on the Canon Digital
Camera Solution Disk on a
wireless capable computer*,
you can establish a wireless
connection between the camera and the computer.
If you set up a wireless connection to a computer, you can transfer
images you have already taken to the computer, but you can also
shoot images and transfer them to the computer immediately
(Auto Transfer), automatically print out transferred images, and
even shoot images by operating the computer.
* Connecting wirelessly between the camera and a computer is only possible
with the Windows XP SP2 operating system.
Wireless Connection
Please refer to the Software & Wireless Guide.
If your pr inter is not a Canon PictBridge compliant printer, you
can still print your images easily by using the cable to connect
the camera and printer. Please see the Direct Print User
Guide for more details.
97
Page 100
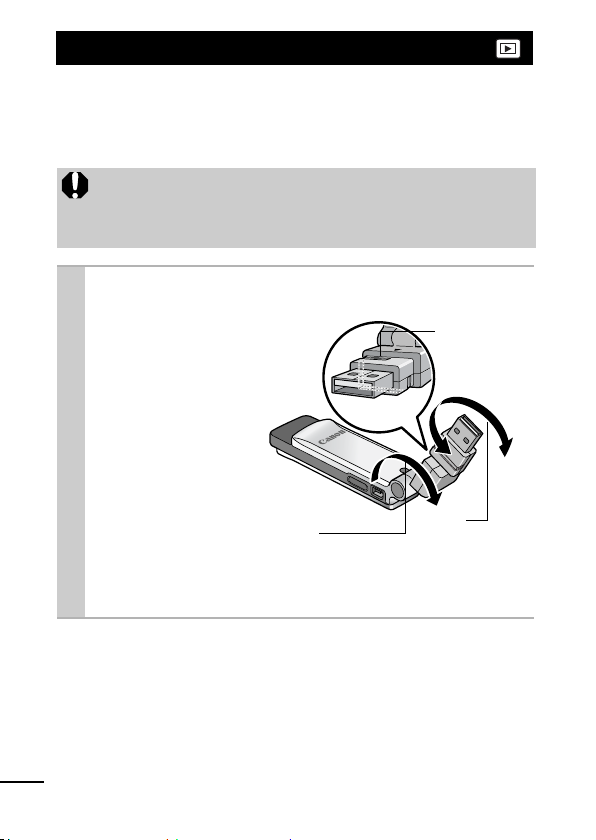
Connecting to a Printer
Attaching the wireless print adapter to a printer
If you attach the supplied Wireless Print Adapter WA-1 to a Canon
PictBridge compliant printer, you can print the images stored on
your camera’s memory card via a wireless connection.
Do not connect the wireless print adapter to a computer as
doing so may cause the computer to malfunction. The
wireless print adapter is only intended for Canon PictBridge
compliant printers.
Adjust the angle and direction of the
1
wireless print adapter.
The wireless print
adapter can be turned
or rotated as shown
in the illustration.
Set the orientation of
the wireless print
adapter’s USB
terminal so that it can
be inserted into your
printer ’s USB port.
Do not use
unnecessary force
when adjusting the
angle and direction of
the wireless print
adapter.
USB
terminal
Bend
(Open and close within 180 degrees)
Line showing
possible turni ng
range (270
degrees)
Turn
98
 Loading...