

Page 1
Canon
For sales, service, and support:
Richard J Kinch, PhD
http://www.truetex.com/
Palm Beach County, Florida USA
+1 (561) 966-8400
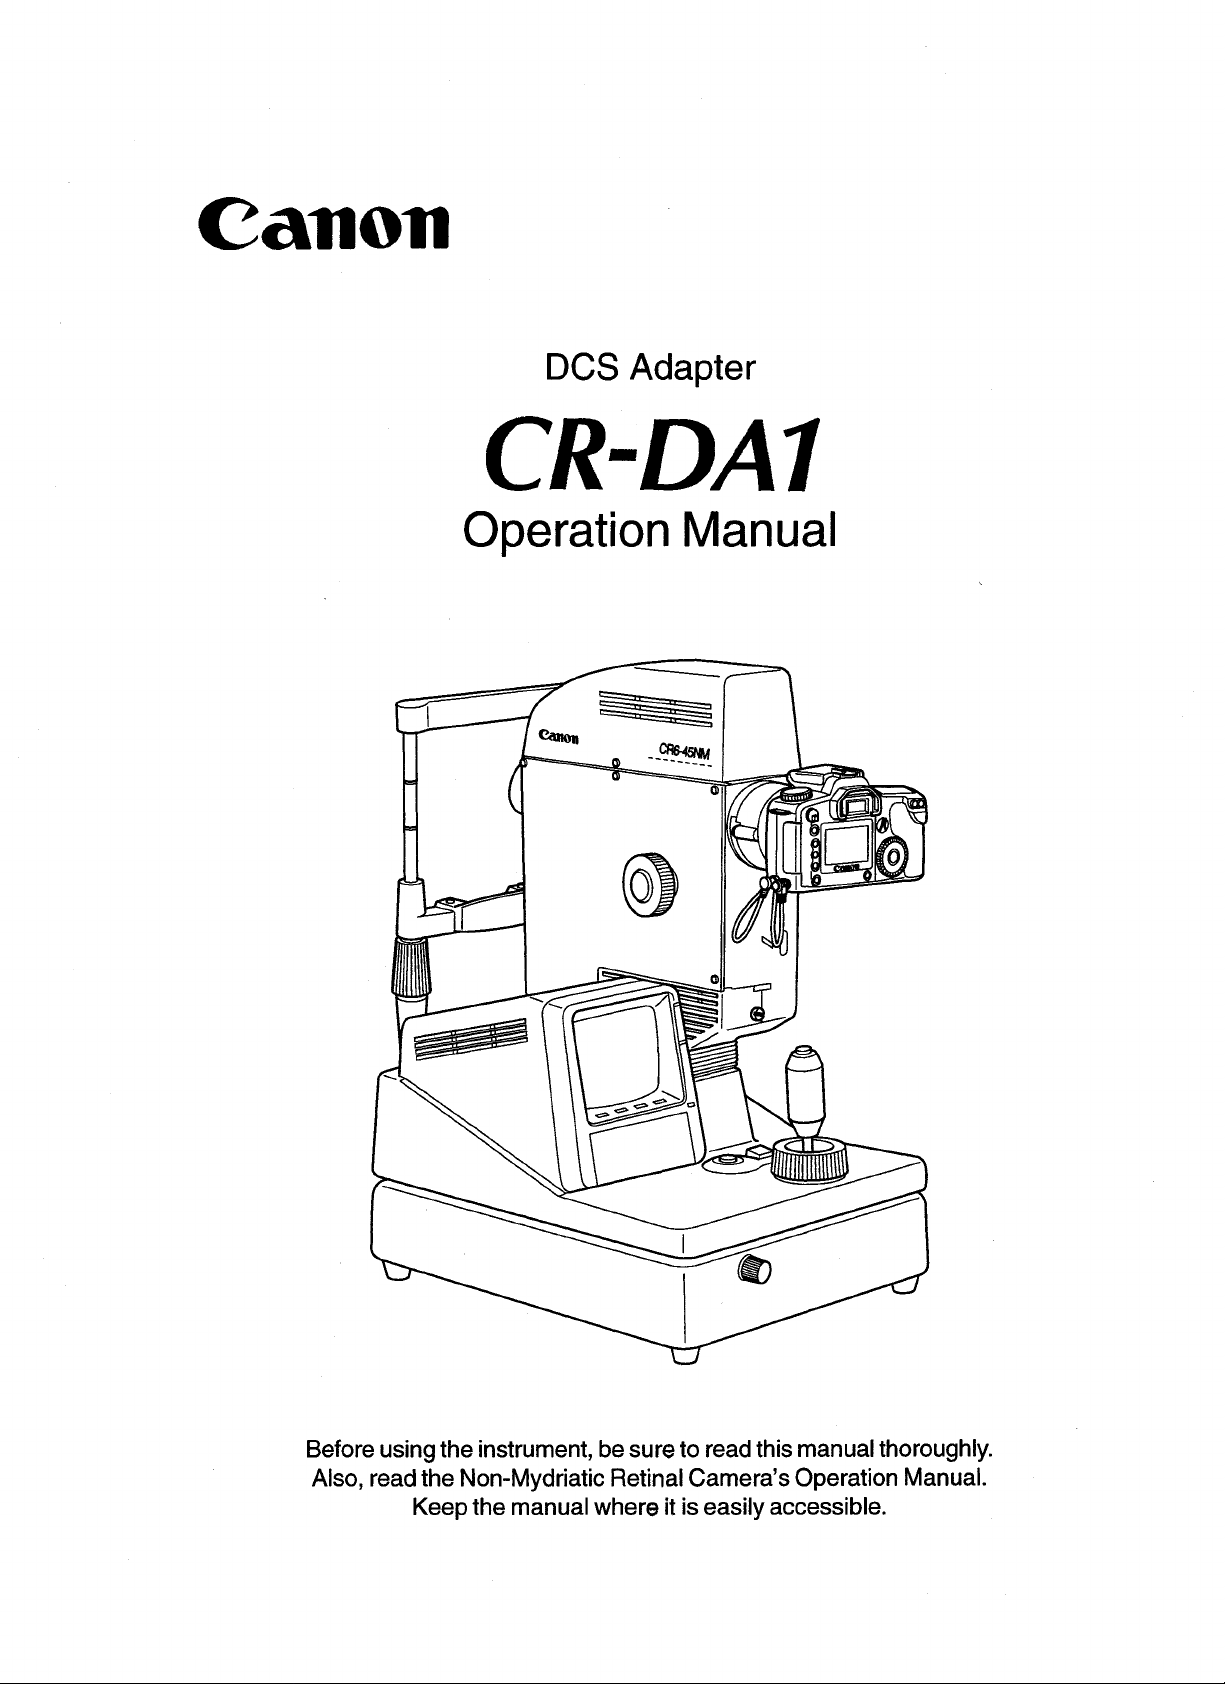
Des
Adapter
CR-DA1
Operation
Manual
Before usingtheinstrument, be sureto read this manual thoroughly.
Also, read the Non-Mydriatic Retinal Camera'sOperation Manual.
Keepthe manual where it iseasily accessible.
Page 2
PLEASE NOTE
1. In no eventwill Canon be liable
this product.
2. The
3. Do not use the built-in strobe tube flashing function of the digital camerawhen using thedigital
4. Canon reservesthe rightto change the specifications, configuration and appearance of the product
CR-DA
a battery. If you wishtoinstead useACpowerto operate thedigital camera, please consult Canon
representative
camerawith the retinal camera.
without prior notice .
.&.
Follow all warnings and cautions in the CR6-45NM/CR6-45NMf operation manual
1 system has been approvedbyUL
or
distributor.
for
directorindirectconsequential damagearising
and
GM
with the EOS
030
out
ofthe use of
digital camerapowered
for
safety.
by
© 2001 Canon Inc.
All rights reserved.
Undercopyright laws, this manual may not be copied, in whole or in part, without the written
consent
of
Canon.
Page 3
CONTENTS
1. Outline............................................................................ 1
2. Notes for Using the Instrument.............................. 1
3. Description 2
4. Photography 3
5. Installation 5
6. Before Calling a Service Person 7
7. Specifications 8
8. Components 8
Page 4
1.
Outline
The Canon DCS (Digital Camera System) Adapter CR-DAIisfor converting the sizeofthe image
taken with our Non-Mydriatic Retinal Camera CR6-45NMlCR6-45NMfinto a size to allow the image
to be taken with a Canon's EOS digital camera.
Please contact Canon representative or distributor for installation, preparation and adjustment
system using the CR-DAI.
2.
(1)
1)
(2)
1)
Notes
Before Photography
Sudden heatingofthe room in cold areas will cause condensation to form on the objective lens or
optical parts inside the instrument. In this case, wait until condensation disappears before performing measurement.
During Photography
Qualityofimage obtained with this system varies according to the general performanceofthe
instruments that are used.
Please consult Canon representative or distributor regarding the instrument to be used.
Also, please refer to the manuals
for
Using
of
respective instruments for the procedure for operating them.
the
Instrument
of
the
(3)
After Photography
1)
Tum OFF the powerofthe retinal camera and digital camera, and disconnect the cables prior to
removing the adapter from the retinal camera.
2) Dust will enter the adapter and the retinal camera when the adapter is left detached.
Also, dust on contact may cause contact failure.
toput
Be sure
not going to be used for a long time.
(4)
During Cleaning
1)
Use a neutral detergent when you clean the coverofthe adapter.
Never use a solvent such as alcohol, thinner or benzine. Otherwise, the cover may be corroded.
(5)
During Installation
1)
Handle the adapter carefully, as preadjustment may be alteredifthe instrument receives a strong
jolt.
the dust caps on both mounts and put the adapter in a vinyl bag or the like when it is
-1-
Page 5

3.
Description
r-----G)
CD
Retinal
This mount is for attaching the adapter to the
retinal camera.
®
Lock
This button releases the adapter from the retinal
camera.
®
Digital
This mountisfor attaching the digital camera to
the adapter.
camera
release
camera
mount
button
mount
@
Strobe
Connected to the digital camera, the adapter
receives the strobe timing signal from the
digital camera.
@ Release
Connected to the digital camera, the adapter
sends release signal to the digital camera.
timing
signal
signal
cable
cable
-2-
Page 6

4.
Operationofthe retinal camera in the system using this adapter is basically the same as in the general
retinal photography.
Please also refer to the manuals
Photography
of
the CR6-45NM1CR6-45NMf and the digital camera.
NOTE: FCD (Flash CompensationbyDiopter) does
Also, fluorescentphotographycannotbeperformedwith the CR6-45NMf.
not
operate in the photographyusing this adapter.
Step 1 Turn ON the power
(I)
Be sure to turn
ON
the power in the orderofdigital camera and then the retinal camera.
Step 2 Adjust the flash intensity of retinal camera.
(1) When the adapter is attached,
monitor. Press the switch under it.
"DA"
is displayed on the lower right sideofthe retinal camera
C 123456
<01-06-20> R
SET 6
DA
000.
(2) The display changes as shown below.
Adjust the flash intensity as required using the switches under
<FLASH SET>
0
RTN
••
+
0
DA
6
--+--
"-"
and "+" signs.
Flash intensity
-3-
Page 7

Flash intensity can be changedin11
steps (increments:
1/3
steps).
DA 1
Dark
DA2 DA3
DA4
DA5
DA6 DA7
Equival-
ent to
E08
-
D30
180400
DA8 DA9
(3) After changing the setting, press the switch under "RTN".
Now the changed flash intensity is valid.
Step 3 Setting the digital camera
By referring to the manualofthe digital camera, set it as indicated below.
(1) With the retinal camera
Digital camera cannot be set when the retinal camera is
NOTES:
1.
The settings beloware for Canon EOS 030. Display
model
2. Picture cannot
in
eye front observation mode, set the digital camera as indicated below.
of
the digitalcamera.
be
taken unless the digital camera is
in
retinal image observation mode.
may
set
DA10
~
~
differaccording to the
properly.
DA
11
Bright
• Shooting mode:
• Focus mode:
• Shooting mode:
• Auto power off:
• White balance:
• ISO speed:
• Shutter speed:
M (manual)
MF (Manual Focus) or M
Single exposure
OFF
Daylight
ISO
400
1160
(2) Insert theCF(compact flash) card.
Step 4 Positioning and Focusing on the retina
(1) Position the examinee's eye and focus onto the retina by referring to the operation manualofthe
retinal camera.
Digital camera will not be able to be operated as all the displays on the LDC panels will disappear in retinal image observation mode.
Step 5 Photography
(1) Press the shutter release button.
NOTE: It
may
take 1to 2 seconds forthe strobe tube to flash afterpressing the shutter release
button when photography is performedcontinusouly.
-4-
Page 8

5.
Step 1 Attaching the adapter to the retinal camera
(I)
(2) Remove the brush from the accessory blow brush
(3) Align the guide mark on the retinal camera and
Installation
Be sure to turn OFF the power of respective equipments before
&
WARNING
Remove the cap from the retinal camera mount
on the adapter.
of
the retinal camera, and blow off the dust on
the adapter lens with the blower in order to
obtain a clear image.
the guide pin
connecting
wet hands.
of
the adapter.
or
disconnecting the cables. Also,donot handle them with
(4) Rotate the adapter in clockwise direction until a
click
is
heard.
(5) Press the lock release button on the adapter and
rotate the adapter
when removing the adapter from the retinal
camera.
in
counterclockwise direction
-5-
Page 9

Step 2 Attaching the digital camera to the adapter
(1) Remove the caps from the lens mount on the
digital camera and from the digital camera mount
on the adapter.
(2) Align the guide mark on the adapter and the lens
attachment mark on the digital camera.
(3) Rotate the digital camera in clockwise direction
until a click
is
heard.
~
(4) When removing the digital camera from the
adapter, press the lens release button
of
the
digital camera, and rotate the digital camera
counterclockwise direction.
in
-6-
Page 10

Step 3 Connecting the signal cables
(1) Connect the strobe timing signal cable to the PC
terminal for flash syncronization on the side
the digital camera.
Rotate the screw on the connector
of
the cable in
clockwise direction to lock the cable.
Rotate the screw in counterclockwise direction
when disconnecting the cable.
(2) Connect the release signal cable to the remote
of
port on side
Pull the metal part
the digital camera.
of
the connector to unlock the
connector when disconnecting the cable.
of
6. Before Calling a Service Person
Whenever a problem occurs in the system using this adapter or when there is a mistake in operation,
error will be indicated by message on the retinal camera.
In this case, take the countermeasures indicated below according to the cause.
For details and other errors, please also refer to the operation manuals
NOTE:Iffunction is still
sentative
Message on Retinal Camera Cause
FILM UNIT ERROR
or
distributor.
not
restoredorwhen errordisplay does not disappear, contact Canon repre-
Digital camera is not ON.
CF
card has ran out of free
space.
Signal cables between the
adapter and digital camera are
not connected properly.
of
the respective instruments.
Remedy
Turn
it ON.
CF
Replace with a
has enough space.
Disconnect the cables and reconnect them properly.
card which
-7-
Page 11

7.
Specifications
Attachable digital cameras:
Mounts:
Magnification:
Dimensions:
Mass:
8.
Adapter 1
Components
Canon digital camera (such as EOS D30)
Retinal camera side: Canon
Digital camera side: Canon
22
(on 35mm film surface) :17(on imaging element)
~
85 x
Approx. 0.5 kg
70mm
EF
EF
mount
mount
-8-
 Loading...