

Canon Color ImageRunner C3380, Color ImageRunner C2880, Color ImageRunner C3380i, Color ImageRunner C2880i Reference Manual
Page 1
Reference Guide
Reference Guide
Read this guide first.
Please read this guide before operating this product.
After you finish reading this guide, store it in a safe place for future reference.
ENG
Page 2

Page 3

Ot¯
0
Color imageRUNNER
C3380/C3380i
C2880/C2880i
Reference Guide
Page 4
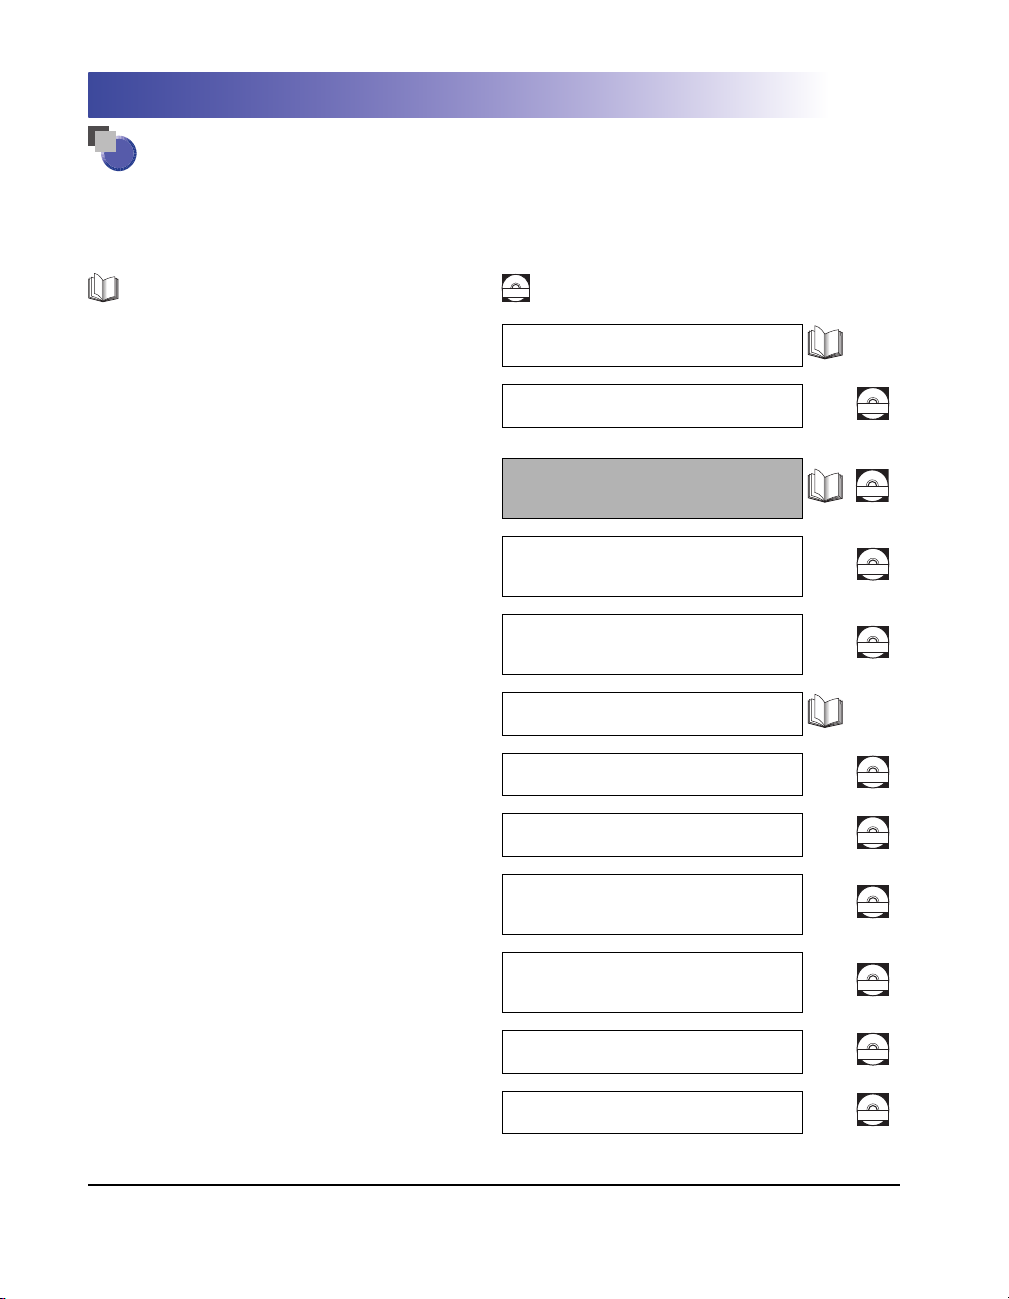
Manuals for the Machine
The manuals for this machine are divided as follows. Please refer to them for detailed information.
The manuals supplied with optional equipment are included in the list below. Depending on the system
configuration and product purchased, some manuals may not be needed.
Guides with this symbol are printed manuals.
Guides with this symbol are included on the accompanying
CD-ROM
CD-ROM. (See footnote on the next page.)
• Quick Reference for Basic Operations
• Learn How to Use Your Machine
The Tutorial CD is a teaching aid, designed to help you learn the various
functions of the machine.
• Basic Operations
• Troubleshooting
• Copying and Mail Box Instructions
• Sending and Fax Instructions
• Setting Up the Network Connection and
Installing the CD-ROM Software
• Remote User Interface Instructions
• Network Connectivity and Setup Instructions
• Color Network ScanGear Installation and
Instructions
Easy Operation Guide
Tutorial CD
Reference Guide
(This Document)
Copying and Mail Box
Guide
Sending and Facsimile
Guide
Network Quick Start Guide
Remote UI Guide
Network Guide
Color Network ScanGear
User's Guide
CD-ROM
CD-ROM
CD-ROM
CD-ROM
CD-ROM
CD-ROM
CD-ROM
• PS/PCL/UFR II Printer Instructions
• PCL Printer Driver Installation and
Instructions
• PS Printer Driver Installation and
Instructions
PS/PCL/UFR II Printer
Guide
PCL Driver Guide
PS Driver Guide
CD-ROM
CD-ROM
CD-ROM
Page 5
• UFR II Printer Driver Installation and
Instructions
UFR II Driver Guide
CD-ROM
• Mac OS X PS Printer Driver Installation and
Instructions
• Mac OS X UFR II Printer Driver Installation
and Instructions
• Fax Driver Installation and Instructions
• Installing MEAP Applications and Using the
Login Service
Mac PS Driver Guide
Mac UFR II Driver Guide
Fax Driver Guide
MEAP SMS Administrator
Guide
CD-ROM
CD-ROM
CD-ROM
CD-ROM
• To view the manual in PDF format, Adobe Reader/Acrobat Reader/Acrobat is required. If Adobe Reader/Acrobat Reader/Acrobat is not installed on
your system, please download it from the Adobe Systems Incorporated website (http://www.adobe.com).
• The machine illustration on the cover may differ slightly from your machine.
Page 6

How This Manual Is Organized
Chapter 1 Before You Start Using This Machine
Chapter 2 Basic Operations
Chapter 3
Chapter 4 Customizing Settings
Chapter 5 Checking Job and Device Status
Chapter 6 System Manager Settings
Chapter 7 Routine Maintenance
Chapter 8 Troubleshooting
Chapter 9 Appendix
Optional Equipment
Includes the specifications of the main unit and optional equipment, Sample
Reports, the Relationship between Original Orientation and Preprinted Paper
Output Chart, and index.
Considerable effort has been made to ensure that this manual is free of inaccuracies and omissions. However, as we are constantly improving our
products, if you need an exact specification, please contact Canon.
Page 7

Contents
Preface . . . . . . . . . . . . . . . . . . . . . . . . . . . . . . . . . . . . . . . . . . . . . . . . . . . . . . . . . xv
How To Use This Manual. . . . . . . . . . . . . . . . . . . . . . . . . . . . . . . . . . . . . . . . . . . xv
Symbols Used in This Manual . . . . . . . . . . . . . . . . . . . . . . . . . . . . . . . . . . . . . .xv
Keys Used in This Manual . . . . . . . . . . . . . . . . . . . . . . . . . . . . . . . . . . . . . . . . xvi
Displays Used in This Manual . . . . . . . . . . . . . . . . . . . . . . . . . . . . . . . . . . . . . xvi
Illustrations Used in This Manual. . . . . . . . . . . . . . . . . . . . . . . . . . . . . . . . . . . xvii
Operations and Terms Used in This Manual. . . . . . . . . . . . . . . . . . . . . . . . . . xviii
Legal Notices . . . . . . . . . . . . . . . . . . . . . . . . . . . . . . . . . . . . . . . . . . . . . . . . . . . . xx
Product Name . . . . . . . . . . . . . . . . . . . . . . . . . . . . . . . . . . . . . . . . . . . . . . . . . .xx
Preventing Counterfeit Documents . . . . . . . . . . . . . . . . . . . . . . . . . . . . . . . . . .xx
FCC (Federal Communications Commission) . . . . . . . . . . . . . . . . . . . . . . . . . xxi
Laser Safety. . . . . . . . . . . . . . . . . . . . . . . . . . . . . . . . . . . . . . . . . . . . . . . . . . . xxii
Abbreviations Used in This Manual . . . . . . . . . . . . . . . . . . . . . . . . . . . . . . . . xxiii
IPv6 Ready Logo . . . . . . . . . . . . . . . . . . . . . . . . . . . . . . . . . . . . . . . . . . . . . . xxiii
International Energy Star Program . . . . . . . . . . . . . . . . . . . . . . . . . . . . . . . . xxiii
Trademarks . . . . . . . . . . . . . . . . . . . . . . . . . . . . . . . . . . . . . . . . . . . . . . . . . . xxiv
Copyright . . . . . . . . . . . . . . . . . . . . . . . . . . . . . . . . . . . . . . . . . . . . . . . . . . . . .xxv
Disclaimers . . . . . . . . . . . . . . . . . . . . . . . . . . . . . . . . . . . . . . . . . . . . . . . . . xxviii
Legal Limitations on the Usage of Your Product and the Use of Images. . . . xxix
Important Safety Instructions. . . . . . . . . . . . . . . . . . . . . . . . . . . . . . . . . . . . . . xxx
Installation . . . . . . . . . . . . . . . . . . . . . . . . . . . . . . . . . . . . . . . . . . . . . . . . . . . . xxx
Power Supply . . . . . . . . . . . . . . . . . . . . . . . . . . . . . . . . . . . . . . . . . . . . . . . . . xxxii
Handling. . . . . . . . . . . . . . . . . . . . . . . . . . . . . . . . . . . . . . . . . . . . . . . . . . . . xxxiii
Maintenance and Inspections . . . . . . . . . . . . . . . . . . . . . . . . . . . . . . . . . . . xxxvi
Consumables. . . . . . . . . . . . . . . . . . . . . . . . . . . . . . . . . . . . . . . . . . . . . . . .xxxviii
Other Warnings . . . . . . . . . . . . . . . . . . . . . . . . . . . . . . . . . . . . . . . . . . . . . .xxxviii
Periodic Inspection of the Breaker . . . . . . . . . . . . . . . . . . . . . . . . . . . . . . . . xxxix
Checking the Breaker . . . . . . . . . . . . . . . . . . . . . . . . . . . . . . . . . . . . . . . . . xxxix
Check Sheet for the Periodic Inspection of the Breaker . . . . . . . . . . . . . . . . . xlii
Chapter 1 Before You Start Using This Machine
Installation Location and Handling . . . . . . . . . . . . . . . . . . . . . . . . . . . . . . . . . .1-2
Installation Precautions . . . . . . . . . . . . . . . . . . . . . . . . . . . . . . . . . . . . . . . . . . 1-2
Avoid Installing the Machine in the Following Locations . . . . . . . . . . . . . .1-2
Select a Safe Power Supply. . . . . . . . . . . . . . . . . . . . . . . . . . . . . . . . . . . .1-5
v
Page 8

Provide Adequate Installation Space . . . . . . . . . . . . . . . . . . . . . . . . . . . . .1-6
Moving the Machine . . . . . . . . . . . . . . . . . . . . . . . . . . . . . . . . . . . . . . . . . .1-7
Handling Precautions . . . . . . . . . . . . . . . . . . . . . . . . . . . . . . . . . . . . . . . . . . . .1-7
Backing Up Data . . . . . . . . . . . . . . . . . . . . . . . . . . . . . . . . . . . . . . . . . . . . . . . .1-10
Parts and Their Functions. . . . . . . . . . . . . . . . . . . . . . . . . . . . . . . . . . . . . . . . .1-11
External View . . . . . . . . . . . . . . . . . . . . . . . . . . . . . . . . . . . . . . . . . . . . . . . . .1-11
Internal View . . . . . . . . . . . . . . . . . . . . . . . . . . . . . . . . . . . . . . . . . . . . . . . . .1-13
Control Panel Parts and Functions. . . . . . . . . . . . . . . . . . . . . . . . . . . . . . . . .1-14
Main Power and Control Panel Power . . . . . . . . . . . . . . . . . . . . . . . . . . . . . . .1-15
How to Turn ON the Main Power . . . . . . . . . . . . . . . . . . . . . . . . . . . . . . . . . .1-15
Control Panel Power Switch . . . . . . . . . . . . . . . . . . . . . . . . . . . . . . . . . . . . . .1-20
Shutting Down the Machine . . . . . . . . . . . . . . . . . . . . . . . . . . . . . . . . . . . . . .1-21
System Settings . . . . . . . . . . . . . . . . . . . . . . . . . . . . . . . . . . . . . . . . . . . . . . . . .1-26
Chapter 2 Basic Operations
What This Machine Can Do. . . . . . . . . . . . . . . . . . . . . . . . . . . . . . . . . . . . . . . . .2-2
Overview of the Color imageRUNNER C3380/C3380i/C2880/C2880i. . . . . . . .2-5
The Touch Panel Display . . . . . . . . . . . . . . . . . . . . . . . . . . . . . . . . . . . . . . . . .2-5
Switching the Functions Indicated on the Touch Panel Display. . . . . . . . .2-5
Various Touch Panel Display Screens . . . . . . . . . . . . . . . . . . . . . . . . . . . .2-8
Adding New Functions . . . . . . . . . . . . . . . . . . . . . . . . . . . . . . . . . . . . . . . . . . .2-8
Specifying Settings. . . . . . . . . . . . . . . . . . . . . . . . . . . . . . . . . . . . . . . . . . . . .2-10
Functions That Conserve Power . . . . . . . . . . . . . . . . . . . . . . . . . . . . . . . . . .2-11
Checking, Changing, and Canceling Print Jobs. . . . . . . . . . . . . . . . . . . . . . .2-13
Displaying a Help Screen. . . . . . . . . . . . . . . . . . . . . . . . . . . . . . . . . . . . . . . .2-15
Reading Messages from the System Manager . . . . . . . . . . . . . . . . . . . . . . .2-17
Types of Message Boards . . . . . . . . . . . . . . . . . . . . . . . . . . . . . . . . . . . .2-17
Other Useful Functions . . . . . . . . . . . . . . . . . . . . . . . . . . . . . . . . . . . . . . . . .2-18
Using the Touch Panel Display. . . . . . . . . . . . . . . . . . . . . . . . . . . . . . . . . . . . .2-21
Frequently Used Keys . . . . . . . . . . . . . . . . . . . . . . . . . . . . . . . . . . . . . . . . . .2-21
Touch Panel Key Display . . . . . . . . . . . . . . . . . . . . . . . . . . . . . . . . . . . . . . . .2-22
Adjusting the Brightness . . . . . . . . . . . . . . . . . . . . . . . . . . . . . . . . . . . . . . . .2-23
Entering Characters from the Touch Panel Display . . . . . . . . . . . . . . . . . . . .2-24
Entering Characters . . . . . . . . . . . . . . . . . . . . . . . . . . . . . . . . . . . . . . . . . . . .2-24
Values in Inches. . . . . . . . . . . . . . . . . . . . . . . . . . . . . . . . . . . . . . . . . . . . . . .2-25
Entering the Department ID and Password . . . . . . . . . . . . . . . . . . . . . . . . . . .2-26
Using a Login Service . . . . . . . . . . . . . . . . . . . . . . . . . . . . . . . . . . . . . . . . . . . .2-29
Placing Originals . . . . . . . . . . . . . . . . . . . . . . . . . . . . . . . . . . . . . . . . . . . . . . . .2-33
Document Sizes . . . . . . . . . . . . . . . . . . . . . . . . . . . . . . . . . . . . . . . . . . . . . . .2-33
vi
Page 9

Orientation . . . . . . . . . . . . . . . . . . . . . . . . . . . . . . . . . . . . . . . . . . . . . . . . . . .2-34
Platen Glass . . . . . . . . . . . . . . . . . . . . . . . . . . . . . . . . . . . . . . . . . . . . . . . . . 2-35
Feeder . . . . . . . . . . . . . . . . . . . . . . . . . . . . . . . . . . . . . . . . . . . . . . . . . . . . . . 2-38
Making Prints Using the Stack Bypass . . . . . . . . . . . . . . . . . . . . . . . . . . . . . .2-41
Multifunctional Operations . . . . . . . . . . . . . . . . . . . . . . . . . . . . . . . . . . . . . . . . 2-54
Available Paper Stock . . . . . . . . . . . . . . . . . . . . . . . . . . . . . . . . . . . . . . . . . . . . 2-56
Chapter 3 Optional Equipment
System Configuration . . . . . . . . . . . . . . . . . . . . . . . . . . . . . . . . . . . . . . . . . . . . .3-2
Optional Equipment . . . . . . . . . . . . . . . . . . . . . . . . . . . . . . . . . . . . . . . . . . . . .3-2
Sample System Configurations . . . . . . . . . . . . . . . . . . . . . . . . . . . . . . . . . . . . 3-4
System Options . . . . . . . . . . . . . . . . . . . . . . . . . . . . . . . . . . . . . . . . . . . . . . . . 3-5
Available Combinations of Options . . . . . . . . . . . . . . . . . . . . . . . . . . . . . . . . .3-8
Utilities . . . . . . . . . . . . . . . . . . . . . . . . . . . . . . . . . . . . . . . . . . . . . . . . . . . . . .3-10
Cassette Feeding Unit-Y3 . . . . . . . . . . . . . . . . . . . . . . . . . . . . . . . . . . . . . . . . .3-11
Parts and Their Functions . . . . . . . . . . . . . . . . . . . . . . . . . . . . . . . . . . . . . . . 3-11
Optional Accessories . . . . . . . . . . . . . . . . . . . . . . . . . . . . . . . . . . . . . . . . . . . 3-12
Paper Deck-Z1 . . . . . . . . . . . . . . . . . . . . . . . . . . . . . . . . . . . . . . . . . . . . . . . . . . 3-13
Parts and Their Functions . . . . . . . . . . . . . . . . . . . . . . . . . . . . . . . . . . . . . . . 3-13
Envelope Feeder Attachment-C2 . . . . . . . . . . . . . . . . . . . . . . . . . . . . . . . . . . .3-14
Parts and Their Functions . . . . . . . . . . . . . . . . . . . . . . . . . . . . . . . . . . . . . . . 3-15
Feeder (DADF-L1) . . . . . . . . . . . . . . . . . . . . . . . . . . . . . . . . . . . . . . . . . . . . . . . 3-16
Parts and Their Functions . . . . . . . . . . . . . . . . . . . . . . . . . . . . . . . . . . . . . . . 3-17
Finisher-Z1 . . . . . . . . . . . . . . . . . . . . . . . . . . . . . . . . . . . . . . . . . . . . . . . . . . . . .3-18
Parts and Their Functions . . . . . . . . . . . . . . . . . . . . . . . . . . . . . . . . . . . . . . . 3-18
Finishing Modes. . . . . . . . . . . . . . . . . . . . . . . . . . . . . . . . . . . . . . . . . . . . . . . 3-19
Finisher-Y1, Saddle Finisher-Y2, and Puncher Unit-M1. . . . . . . . . . . . . . . . . 3-23
Parts and Their Functions . . . . . . . . . . . . . . . . . . . . . . . . . . . . . . . . . . . . . . . 3-24
Finishing Modes. . . . . . . . . . . . . . . . . . . . . . . . . . . . . . . . . . . . . . . . . . . . . . . 3-25
Inner 2way Tray-D1 . . . . . . . . . . . . . . . . . . . . . . . . . . . . . . . . . . . . . . . . . . . . . . 3-32
Parts and Their Functions . . . . . . . . . . . . . . . . . . . . . . . . . . . . . . . . . . . . . . . 3-33
Copy Tray-J1 . . . . . . . . . . . . . . . . . . . . . . . . . . . . . . . . . . . . . . . . . . . . . . . . . . .3-35
Parts and Their Functions . . . . . . . . . . . . . . . . . . . . . . . . . . . . . . . . . . . . . . . 3-35
Card Reader-C1 . . . . . . . . . . . . . . . . . . . . . . . . . . . . . . . . . . . . . . . . . . . . . . . . .3-37
Procedure before Using the Machine . . . . . . . . . . . . . . . . . . . . . . . . . . . . . .3-38
Procedure after Using the Machine . . . . . . . . . . . . . . . . . . . . . . . . . . . . . . . .3-38
Department ID Management . . . . . . . . . . . . . . . . . . . . . . . . . . . . . . . . . . . . . 3-39
Flow of Additional Functions Operations . . . . . . . . . . . . . . . . . . . . . . . . . 3-39
Changing the Password and Page Limit . . . . . . . . . . . . . . . . . . . . . . . . .3-41
vii
Page 10

Checking the Page Counts on a Control Card. . . . . . . . . . . . . . . . . . . . .3-46
Checking and Printing Counter Information . . . . . . . . . . . . . . . . . . . . . . .3-47
Clearing Page Totals . . . . . . . . . . . . . . . . . . . . . . . . . . . . . . . . . . . . . . . .3-48
Accepting Print and Scan Jobs with Unknown IDs . . . . . . . . . . . . . . . . .3-49
Accepting B&W Copy and Print Jobs without a Control Card . . . . . . . . .3-50
Chapter 4 Customizing Settings
What Are Additional Functions? . . . . . . . . . . . . . . . . . . . . . . . . . . . . . . . . . . . .4-3
Additional Functions Settings Table . . . . . . . . . . . . . . . . . . . . . . . . . . . . . . . . .4-6
Specifying Common Settings . . . . . . . . . . . . . . . . . . . . . . . . . . . . . . . . . . . . . .4-27
Initial Function at Power ON. . . . . . . . . . . . . . . . . . . . . . . . . . . . . . . . . . . . . .4-27
Default Display after Auto Clear . . . . . . . . . . . . . . . . . . . . . . . . . . . . . . . . . . .4-30
Tone Settings . . . . . . . . . . . . . . . . . . . . . . . . . . . . . . . . . . . . . . . . . . . . . . . . .4-31
Display the Remaining Paper Message . . . . . . . . . . . . . . . . . . . . . . . . . . . . .4-31
Text/Photo Priority in a Black-and-White Original. . . . . . . . . . . . . . . . . . . . . .4-32
Display the Black Mode Shortcut Key . . . . . . . . . . . . . . . . . . . . . . . . . . . . . .4-32
Inch Entry . . . . . . . . . . . . . . . . . . . . . . . . . . . . . . . . . . . . . . . . . . . . . . . . . . . .4-33
Auto Paper Selection/Auto Drawer Switching. . . . . . . . . . . . . . . . . . . . . . . . .4-33
Designating the Envelope Type . . . . . . . . . . . . . . . . . . . . . . . . . . . . . . . . . . .4-35
Identifying the Type of Paper in a Paper Source . . . . . . . . . . . . . . . . . . . . . .4-35
Paper Select Screen Priority . . . . . . . . . . . . . . . . . . . . . . . . . . . . . . . . . . . . .4-37
Energy Consumption in the Sleep Mode . . . . . . . . . . . . . . . . . . . . . . . . . . . .4-38
Distinguishing LTRR and STMT Originals . . . . . . . . . . . . . . . . . . . . . . . . . . .4-39
Output Tray Designation. . . . . . . . . . . . . . . . . . . . . . . . . . . . . . . . . . . . . . . . .4-40
Setting the Printing Priority. . . . . . . . . . . . . . . . . . . . . . . . . . . . . . . . . . . . . . .4-42
Image Form . . . . . . . . . . . . . . . . . . . . . . . . . . . . . . . . . . . . . . . . . . . . . . . . . .4-43
Storing an Image Form. . . . . . . . . . . . . . . . . . . . . . . . . . . . . . . . . . . . . . .4-43
Checking Image Form Details . . . . . . . . . . . . . . . . . . . . . . . . . . . . . . . . .4-44
Erasing an Image Form . . . . . . . . . . . . . . . . . . . . . . . . . . . . . . . . . . . . . .4-45
Setting the Image Priority. . . . . . . . . . . . . . . . . . . . . . . . . . . . . . . . . . . . . . . .4-45
User-Defined Text for Page Numbers and Watermarks . . . . . . . . . . . . . . . . .4-46
Registering User-Defined Text . . . . . . . . . . . . . . . . . . . . . . . . . . . . . . . . .4-46
Editing User-Defined Text. . . . . . . . . . . . . . . . . . . . . . . . . . . . . . . . . . . . .4-46
Erasing User-Defined Text . . . . . . . . . . . . . . . . . . . . . . . . . . . . . . . . . . . .4-47
Standard Paper for the Stack Bypass . . . . . . . . . . . . . . . . . . . . . . . . . . . . . .4-47
Irregular Paper Size Settings for the Stack Bypass . . . . . . . . . . . . . . . . . . . .4-49
Registering and Editing Irregular Paper Sizes . . . . . . . . . . . . . . . . . . . . .4-49
Naming a Size Key . . . . . . . . . . . . . . . . . . . . . . . . . . . . . . . . . . . . . . . . . .4-50
Erasing Irregular Paper Sizes. . . . . . . . . . . . . . . . . . . . . . . . . . . . . . . . . .4-51
viii
Page 11

Setting the Speed or Print Side Priority . . . . . . . . . . . . . . . . . . . . . . . . . . . . .4-51
Standard Local Print Settings . . . . . . . . . . . . . . . . . . . . . . . . . . . . . . . . . . . .4-53
Changing the Language Shown on the Touch Panel Display . . . . . . . . . . . . 4-54
Reversing the Contrast of the Touch Panel Display . . . . . . . . . . . . . . . . . . . .4-55
Alternating the Print Output (Offset Jobs) . . . . . . . . . . . . . . . . . . . . . . . . . . . 4-55
Inserting a Job Separation Sheet between Print Jobs. . . . . . . . . . . . . . . . . . 4-56
Inserting a Job Separation Sheet between Copy Sets . . . . . . . . . . . . . . . . .4-57
Job Duration Display . . . . . . . . . . . . . . . . . . . . . . . . . . . . . . . . . . . . . . . . . . . 4-58
Number of Copies/Wait Time Status Display. . . . . . . . . . . . . . . . . . . . . . . . . 4-58
Clean the Original Scanning Area Prompt. . . . . . . . . . . . . . . . . . . . . . . . . . . 4-59
Data Compression Ratio for Remote Scans . . . . . . . . . . . . . . . . . . . . . . . . . 4-59
Setting the Gamma Value for Remote Scans . . . . . . . . . . . . . . . . . . . . . . . . 4-60
Limiting Functions . . . . . . . . . . . . . . . . . . . . . . . . . . . . . . . . . . . . . . . . . . . . . 4-61
Erasing the Remaining Toner Error Message . . . . . . . . . . . . . . . . . . . . . . . . 4-62
Returning the Common Settings to Their Defaults . . . . . . . . . . . . . . . . . . . .4-62
Timer Settings . . . . . . . . . . . . . . . . . . . . . . . . . . . . . . . . . . . . . . . . . . . . . . . . . . 4-63
Current Time Adjustment. . . . . . . . . . . . . . . . . . . . . . . . . . . . . . . . . . . . . . . . 4-63
Auto Sleep Time . . . . . . . . . . . . . . . . . . . . . . . . . . . . . . . . . . . . . . . . . . . . . .4-63
Auto Clear Time. . . . . . . . . . . . . . . . . . . . . . . . . . . . . . . . . . . . . . . . . . . . . . . 4-64
Daily Timer Settings. . . . . . . . . . . . . . . . . . . . . . . . . . . . . . . . . . . . . . . . . . . . 4-64
Low-Power Mode Time . . . . . . . . . . . . . . . . . . . . . . . . . . . . . . . . . . . . . . . . .4-65
Adjusting the Machine . . . . . . . . . . . . . . . . . . . . . . . . . . . . . . . . . . . . . . . . . . .4-66
Zoom Fine Adjustment. . . . . . . . . . . . . . . . . . . . . . . . . . . . . . . . . . . . . . . . . . 4-66
Saddle Stitch Staple Repositioning . . . . . . . . . . . . . . . . . . . . . . . . . . . . . . . . 4-66
Saddle Stitch Position Adjustment. . . . . . . . . . . . . . . . . . . . . . . . . . . . . . . . . 4-67
Adjusting Creep (Displacement) Correction. . . . . . . . . . . . . . . . . . . . . . . . . . 4-68
Automatic Gradation Adjustment . . . . . . . . . . . . . . . . . . . . . . . . . . . . . . . . . . 4-68
Quick Adjustment. . . . . . . . . . . . . . . . . . . . . . . . . . . . . . . . . . . . . . . . . . . 4-69
Full Adjustment . . . . . . . . . . . . . . . . . . . . . . . . . . . . . . . . . . . . . . . . . . . .4-69
Exposure Recalibration . . . . . . . . . . . . . . . . . . . . . . . . . . . . . . . . . . . . . . . . . 4-71
Character/Background Contrast Adjustment . . . . . . . . . . . . . . . . . . . . . . . . .4-71
Cleaning the Inside of the Main Unit . . . . . . . . . . . . . . . . . . . . . . . . . . . . . . . 4-74
Automatic Feeder Cleaning . . . . . . . . . . . . . . . . . . . . . . . . . . . . . . . . . . . . . .4-74
Chapter 5 Checking Job and Device Status
Checking the Counter and Controller Version . . . . . . . . . . . . . . . . . . . . . . . . . 5-2
Checking Job Status . . . . . . . . . . . . . . . . . . . . . . . . . . . . . . . . . . . . . . . . . . . . . . 5-4
Checking Job Status from the System Monitor Screen . . . . . . . . . . . . . . . . . .5-6
Checking Job Status from the Print Job Screen . . . . . . . . . . . . . . . . . . . . . . . 5-8
ix
Page 12

Job Details . . . . . . . . . . . . . . . . . . . . . . . . . . . . . . . . . . . . . . . . . . . . . . . . . . . . .5-10
Checking Copy/Print Job Details . . . . . . . . . . . . . . . . . . . . . . . . . . . . . . . . . .5-10
Checking Copy/Print Job Details from the System Monitor Screen . . . . .5-10
Checking Copy/Print Job Details from the Print Job Screen . . . . . . . . . .5-11
Printing the Copy/Print Log . . . . . . . . . . . . . . . . . . . . . . . . . . . . . . . . . . . . . .5-12
Printing Copy/Print Log from the System Monitor Screen . . . . . . . . . . . .5-12
Printing the Copy/Print Log from the Print Job Screen. . . . . . . . . . . . . . .5-13
Priority Printing . . . . . . . . . . . . . . . . . . . . . . . . . . . . . . . . . . . . . . . . . . . . . . . . .5-14
Selecting the Job for Priority Printing from the System Monitor Screen . . . .5-14
Selecting the Job for Priority Printing from the Print Job Screen . . . . . . . . . .5-15
Chapter 6 System Manager Settings
Specifying the System Manager Settings . . . . . . . . . . . . . . . . . . . . . . . . . . . . .6-3
Department ID Management . . . . . . . . . . . . . . . . . . . . . . . . . . . . . . . . . . . . . . . .6-5
Registering the Department ID, Password, and Page Limit . . . . . . . . . . . . . . .6-7
Changing the Password and Page Limit. . . . . . . . . . . . . . . . . . . . . . . . . . . . .6-11
Erasing the Department ID and Password. . . . . . . . . . . . . . . . . . . . . . . . . . .6-13
Checking and Printing Counter Information . . . . . . . . . . . . . . . . . . . . . . . . . .6-14
Clearing Page Totals . . . . . . . . . . . . . . . . . . . . . . . . . . . . . . . . . . . . . . . . . . .6-15
Accepting Print and Scan Jobs with Unknown IDs . . . . . . . . . . . . . . . . . . . .6-16
Accepting B&W Copy and Print Jobs without Entering a Department ID. . . .6-17
Remote UI . . . . . . . . . . . . . . . . . . . . . . . . . . . . . . . . . . . . . . . . . . . . . . . . . . . . . .6-19
Device Information Settings . . . . . . . . . . . . . . . . . . . . . . . . . . . . . . . . . . . . . . .6-21
Clearing the Message Board. . . . . . . . . . . . . . . . . . . . . . . . . . . . . . . . . . . . . . .6-22
Auto Online/Offline . . . . . . . . . . . . . . . . . . . . . . . . . . . . . . . . . . . . . . . . . . . . . .6-23
Auto Online. . . . . . . . . . . . . . . . . . . . . . . . . . . . . . . . . . . . . . . . . . . . . . . . . . .6-23
Auto Offline. . . . . . . . . . . . . . . . . . . . . . . . . . . . . . . . . . . . . . . . . . . . . . . . . . .6-24
Current Date and Time . . . . . . . . . . . . . . . . . . . . . . . . . . . . . . . . . . . . . . . . . . .6-25
Limiting Functions When the Optional Security Key Is Turned OFF . . . . . .6-28
License Registration . . . . . . . . . . . . . . . . . . . . . . . . . . . . . . . . . . . . . . . . . . . . .6-29
Setting System Monitor Screen Restrictions . . . . . . . . . . . . . . . . . . . . . . . . .6-32
Restricting Access to the System Monitor Screen . . . . . . . . . . . . . . . . . . . . .6-32
Setting to Allow Secured Printing from the System Monitor Screen . . . . . . .6-33
Setting to Display Job Logs from the System Monitor Screen . . . . . . . . . . . .6-33
MEAP Settings . . . . . . . . . . . . . . . . . . . . . . . . . . . . . . . . . . . . . . . . . . . . . . . . . .6-35
Use HTTP Server. . . . . . . . . . . . . . . . . . . . . . . . . . . . . . . . . . . . . . . . . . . . . .6-35
Printing Installed Application Information . . . . . . . . . . . . . . . . . . . . . . . . . . . .6-36
Copy Set Numbering Options. . . . . . . . . . . . . . . . . . . . . . . . . . . . . . . . . . . . . .6-39
Displaying the Remaining Toner Error Message . . . . . . . . . . . . . . . . . . . . . .6-41
x
Page 13

Displaying the Current Department ID/User Name. . . . . . . . . . . . . . . . . . . . . 6-42
USB Settings . . . . . . . . . . . . . . . . . . . . . . . . . . . . . . . . . . . . . . . . . . . . . . . . . . .6-43
Using a USB Device . . . . . . . . . . . . . . . . . . . . . . . . . . . . . . . . . . . . . . . . . . .6-43
Using a USB Host . . . . . . . . . . . . . . . . . . . . . . . . . . . . . . . . . . . . . . . . . . . . . 6-43
Specifying Device Information Delivery Settings. . . . . . . . . . . . . . . . . . . . . .6-44
Registering/Deleting/Printing Delivery Destinations . . . . . . . . . . . . . . . . . . . 6-47
Registering Delivery Destinations . . . . . . . . . . . . . . . . . . . . . . . . . . . . . . 6-47
Confirming Delivery Destination Settings. . . . . . . . . . . . . . . . . . . . . . . . . 6-49
Deleting a Delivery Destination . . . . . . . . . . . . . . . . . . . . . . . . . . . . . . . .6-50
Printing the Delivery Destinations . . . . . . . . . . . . . . . . . . . . . . . . . . . . . .6-51
Setting Automatic Delivery. . . . . . . . . . . . . . . . . . . . . . . . . . . . . . . . . . . . . . . 6-52
Setting Manual Delivery. . . . . . . . . . . . . . . . . . . . . . . . . . . . . . . . . . . . . . . . . 6-55
Restricting the Reception of Device Information . . . . . . . . . . . . . . . . . . . . . . 6-56
Restoring Device Information. . . . . . . . . . . . . . . . . . . . . . . . . . . . . . . . . . . . . 6-57
Restricting the Type of Information That Is Updated . . . . . . . . . . . . . . . . . . . 6-58
Checking/Printing the Communication Log . . . . . . . . . . . . . . . . . . . . . . . . . . 6-59
Checking the Communication Log . . . . . . . . . . . . . . . . . . . . . . . . . . . . . 6-59
Printing the Communication Log . . . . . . . . . . . . . . . . . . . . . . . . . . . . . . . 6-59
Initializing All Data/Settings . . . . . . . . . . . . . . . . . . . . . . . . . . . . . . . . . . . . . . .6-61
Setting the Display Method When Entering a Password . . . . . . . . . . . . . . . .6-63
Setting the Secure Watermark Mode . . . . . . . . . . . . . . . . . . . . . . . . . . . . . . . . 6-64
Forced Secure Watermark . . . . . . . . . . . . . . . . . . . . . . . . . . . . . . . . . . . . . . . 6-64
Printer Driver Secure Watermark. . . . . . . . . . . . . . . . . . . . . . . . . . . . . . . . . . 6-67
Specifying Encrypted Secured Printing Settings. . . . . . . . . . . . . . . . . . . . . .6-71
Setting to Receive Only Encrypted Secured Print Jobs. . . . . . . . . . . . . . . . . 6-71
Storing/Editing Irregular Paper Types . . . . . . . . . . . . . . . . . . . . . . . . . . . . . . . 6-72
Storing Irregular Paper Types . . . . . . . . . . . . . . . . . . . . . . . . . . . . . . . . . . . .6-72
Editing Irregular Paper Types. . . . . . . . . . . . . . . . . . . . . . . . . . . . . . . . . . . . . 6-73
Erasing Irregular Paper Types . . . . . . . . . . . . . . . . . . . . . . . . . . . . . . . . . . . . 6-74
Detecting and Installing Drivers that Support Functions Specified on
the Machine into Your Computer . . . . . . . . . . . . . . . . . . . . . . . . . . . . . . . . . . . 6-75
Specifying Settings for All User Inboxes . . . . . . . . . . . . . . . . . . . . . . . . . . . .6-76
Setting the Time until Documents Are Automatically Erased. . . . . . . . . . . . . 6-76
Printing upon Storing from the Printer Driver . . . . . . . . . . . . . . . . . . . . . . . . . 6-77
Restricting Printer Jobs . . . . . . . . . . . . . . . . . . . . . . . . . . . . . . . . . . . . . . . . . .6-78
Restricting the Color Mode of Copy Jobs. . . . . . . . . . . . . . . . . . . . . . . . . . . .6-79
Restricting Use of Auto-Color Select . . . . . . . . . . . . . . . . . . . . . . . . . . . . . . .6-79
Restricting the Use of Full Color . . . . . . . . . . . . . . . . . . . . . . . . . . . . . . . . . . 6-79
xi
Page 14

Chapter 7 Routine Maintenance
Paper Drawers . . . . . . . . . . . . . . . . . . . . . . . . . . . . . . . . . . . . . . . . . . . . . . . . . . .7-2
Loading Paper . . . . . . . . . . . . . . . . . . . . . . . . . . . . . . . . . . . . . . . . . . . . . . . . .7-2
Adjusting a Paper Drawer to Hold a Different Paper Size . . . . . . . . . . . . . . . .7-7
Paper Deck-Z1 (Optional) . . . . . . . . . . . . . . . . . . . . . . . . . . . . . . . . . . . . . . . . .7-10
Loading Paper . . . . . . . . . . . . . . . . . . . . . . . . . . . . . . . . . . . . . . . . . . . . . . . .7-10
Envelope Feeder Attachment-C2 (Optional) . . . . . . . . . . . . . . . . . . . . . . . . . .7-14
How to Use the Envelope Feeder Attachment . . . . . . . . . . . . . . . . . . . . . . . .7-14
Preparing the Envelopes . . . . . . . . . . . . . . . . . . . . . . . . . . . . . . . . . . . . . . . .7-16
Loading Envelopes. . . . . . . . . . . . . . . . . . . . . . . . . . . . . . . . . . . . . . . . . . . . .7-18
Changing Envelope Sizes . . . . . . . . . . . . . . . . . . . . . . . . . . . . . . . . . . . . . . .7-21
Feeder (DADF-L1) (Optional). . . . . . . . . . . . . . . . . . . . . . . . . . . . . . . . . . . . . . .7-27
Replacing the Stamp Cartridge . . . . . . . . . . . . . . . . . . . . . . . . . . . . . . . . . . .7-27
Finisher-Z1 (Optional) . . . . . . . . . . . . . . . . . . . . . . . . . . . . . . . . . . . . . . . . . . . .7-29
Replacing the Staple Cartridge . . . . . . . . . . . . . . . . . . . . . . . . . . . . . . . . . . .7-29
Finisher-Y1/Saddle Finisher-Y2/Puncher Unit-M1 (Optional). . . . . . . . . . . . .7-33
Replacing the Staple Cartridge in the Stapler Unit . . . . . . . . . . . . . . . . . . . .7-33
Replacing the Staple Cartridge in the Saddle Stitcher Unit . . . . . . . . . . . . . .7-37
Removing Punch Waste. . . . . . . . . . . . . . . . . . . . . . . . . . . . . . . . . . . . . . . . .7-40
Replacing the Toner Cartridge . . . . . . . . . . . . . . . . . . . . . . . . . . . . . . . . . . . . .7-43
Replacing the Waste Toner Container . . . . . . . . . . . . . . . . . . . . . . . . . . . . . . .7-51
Routine Cleaning . . . . . . . . . . . . . . . . . . . . . . . . . . . . . . . . . . . . . . . . . . . . . . . .7-55
Platen Glass and Underside of the Platen Cover. . . . . . . . . . . . . . . . . . . . . .7-55
Manual Feeder Cleaning . . . . . . . . . . . . . . . . . . . . . . . . . . . . . . . . . . . . . . . .7-56
Cleaning the Inside of the Main Unit . . . . . . . . . . . . . . . . . . . . . . . . . . . . . . .7-61
Cleaning the Dust Proof Glass. . . . . . . . . . . . . . . . . . . . . . . . . . . . . . . . . . . .7-61
Automatic Feeder Cleaning . . . . . . . . . . . . . . . . . . . . . . . . . . . . . . . . . . . . . .7-63
Consumables . . . . . . . . . . . . . . . . . . . . . . . . . . . . . . . . . . . . . . . . . . . . . . . . . . .7-64
Chapter 8 Troubleshooting
Reducing the Frequency of Paper Jams . . . . . . . . . . . . . . . . . . . . . . . . . . . . . .8-3
Clearing Paper Jams . . . . . . . . . . . . . . . . . . . . . . . . . . . . . . . . . . . . . . . . . . . . . .8-4
Screens Indicating the Locations of Paper Jams . . . . . . . . . . . . . . . . . . . . . . .8-4
Fixing Unit (Inside the Main Unit) . . . . . . . . . . . . . . . . . . . . . . . . . . . . . . . . . .8-11
Entrance of Duplexing Unit (Inside the Main Unit) . . . . . . . . . . . . . . . . . . . . .8-13
Duplexing Unit (Inside the Main Unit). . . . . . . . . . . . . . . . . . . . . . . . . . . . . . .8-16
Stack Bypass . . . . . . . . . . . . . . . . . . . . . . . . . . . . . . . . . . . . . . . . . . . . . . . . .8-18
Paper Drawer 1 . . . . . . . . . . . . . . . . . . . . . . . . . . . . . . . . . . . . . . . . . . . . . . .8-21
xii
Page 15

Paper Drawer 2 . . . . . . . . . . . . . . . . . . . . . . . . . . . . . . . . . . . . . . . . . . . . . . . 8-26
Cassette Feeding Unit-Y3 (Optional). . . . . . . . . . . . . . . . . . . . . . . . . . . . . . . 8-29
Paper Deck-Z1 (Optional) . . . . . . . . . . . . . . . . . . . . . . . . . . . . . . . . . . . . . . . 8-33
Feeder (DADF-L1) (Optional). . . . . . . . . . . . . . . . . . . . . . . . . . . . . . . . . . . . . 8-36
Finisher-Z1 (Optional) . . . . . . . . . . . . . . . . . . . . . . . . . . . . . . . . . . . . . . . . . . 8-40
Inside the Top Cover of the Finisher-Y1 or Saddle Finisher-Y2
(Optional) . . . . . . . . . . . . . . . . . . . . . . . . . . . . . . . . . . . . . . . . . . . . . . . . . . . . 8-44
Inside the Buffer Pass Unit-E2 of the Finisher-Y1 or Saddle Finisher-Y2
(Optional) . . . . . . . . . . . . . . . . . . . . . . . . . . . . . . . . . . . . . . . . . . . . . . . . . . . . 8-47
Inside the Front Cover of the Saddle Finisher-Y2 (Optional) . . . . . . . . . . . . .8-49
Saddle Stitcher Unit (Optional) . . . . . . . . . . . . . . . . . . . . . . . . . . . . . . . . . . .8-52
Puncher Unit-M1 (Optional) . . . . . . . . . . . . . . . . . . . . . . . . . . . . . . . . . . . . . . 8-56
Inner 2way Tray-D1 (Optional) . . . . . . . . . . . . . . . . . . . . . . . . . . . . . . . . . . . . 8-59
Copy Tray-J1 (Optional) . . . . . . . . . . . . . . . . . . . . . . . . . . . . . . . . . . . . . . . . . 8-62
Clearing Staple Jams . . . . . . . . . . . . . . . . . . . . . . . . . . . . . . . . . . . . . . . . . . . .8-65
Finisher-Z1 (Optional) . . . . . . . . . . . . . . . . . . . . . . . . . . . . . . . . . . . . . . . . . . 8-65
Finisher-Y1/Saddle Finisher-Y2 (Optional) . . . . . . . . . . . . . . . . . . . . . . . . . . 8-68
Saddle Stitcher Unit (Optional) . . . . . . . . . . . . . . . . . . . . . . . . . . . . . . . . . . .8-71
List of Error Messages . . . . . . . . . . . . . . . . . . . . . . . . . . . . . . . . . . . . . . . . . . . 8-76
Self-Diagnostic Display . . . . . . . . . . . . . . . . . . . . . . . . . . . . . . . . . . . . . . . . . 8-76
List of Error Codes without Messages . . . . . . . . . . . . . . . . . . . . . . . . . . . . . . 8-80
If Memory Becomes Full during Scanning . . . . . . . . . . . . . . . . . . . . . . . . . . .8-87
Service Call Message . . . . . . . . . . . . . . . . . . . . . . . . . . . . . . . . . . . . . . . . . . . . 8-89
Contacting Your Local Authorized Canon Dealer. . . . . . . . . . . . . . . . . . . . . . 8-89
Setting the Limited Functions Mode from the Service Call Message
Screen . . . . . . . . . . . . . . . . . . . . . . . . . . . . . . . . . . . . . . . . . . . . . . . . . . . . . . 8-91
When the Power Does Not Turn ON . . . . . . . . . . . . . . . . . . . . . . . . . . . . . . . . . 8-93
Chapter 9 Appendix
Sample Reports . . . . . . . . . . . . . . . . . . . . . . . . . . . . . . . . . . . . . . . . . . . . . . . . . .9-2
Copy Log List. . . . . . . . . . . . . . . . . . . . . . . . . . . . . . . . . . . . . . . . . . . . . . . . . . 9-2
Print Log List . . . . . . . . . . . . . . . . . . . . . . . . . . . . . . . . . . . . . . . . . . . . . . . . . . 9-3
Device Information Delivery Destination List . . . . . . . . . . . . . . . . . . . . . . . . . .9-4
Device Information Communication Log Report . . . . . . . . . . . . . . . . . . . . . . .9-5
Specifications . . . . . . . . . . . . . . . . . . . . . . . . . . . . . . . . . . . . . . . . . . . . . . . . . . .9-6
Main Unit . . . . . . . . . . . . . . . . . . . . . . . . . . . . . . . . . . . . . . . . . . . . . . . . . . . . . 9-6
Feeder (DADF-L1) . . . . . . . . . . . . . . . . . . . . . . . . . . . . . . . . . . . . . . . . . . . . . .9-9
Cassette Feeding Unit-Y3 . . . . . . . . . . . . . . . . . . . . . . . . . . . . . . . . . . . . . . . . 9-9
Paper Deck-Z1. . . . . . . . . . . . . . . . . . . . . . . . . . . . . . . . . . . . . . . . . . . . . . . . . 9-9
xiii
Page 16

Envelope Feeder Attachment-C2. . . . . . . . . . . . . . . . . . . . . . . . . . . . . . . . . .9-10
Finisher-Z1 . . . . . . . . . . . . . . . . . . . . . . . . . . . . . . . . . . . . . . . . . . . . . . . . . . .9-10
Finisher-Y1. . . . . . . . . . . . . . . . . . . . . . . . . . . . . . . . . . . . . . . . . . . . . . . . . . .9-11
Saddle Finisher-Y2. . . . . . . . . . . . . . . . . . . . . . . . . . . . . . . . . . . . . . . . . . . . .9-13
Puncher Unit-M1 . . . . . . . . . . . . . . . . . . . . . . . . . . . . . . . . . . . . . . . . . . . . . .9-14
Inner 2way Tray-D1 . . . . . . . . . . . . . . . . . . . . . . . . . . . . . . . . . . . . . . . . . . . .9-15
Copy Tray-J1 . . . . . . . . . . . . . . . . . . . . . . . . . . . . . . . . . . . . . . . . . . . . . . . . .9-15
Card Reader-C1. . . . . . . . . . . . . . . . . . . . . . . . . . . . . . . . . . . . . . . . . . . . . . .9-16
Number of Enterable Characters and Capacity of Various Functions . . . . .9-17
Number of Enterable Characters . . . . . . . . . . . . . . . . . . . . . . . . . . . . . . . . . .9-17
Capacity of Various Functions . . . . . . . . . . . . . . . . . . . . . . . . . . . . . . . . . . . .9-19
Relationship between Original Orientation and Preprinted Paper
Output Chart. . . . . . . . . . . . . . . . . . . . . . . . . . . . . . . . . . . . . . . . . . . . . . . . . . . .9-21
Index . . . . . . . . . . . . . . . . . . . . . . . . . . . . . . . . . . . . . . . . . . . . . . . . . . . . . . . . . .9-24
System Management of the Color imageRUNNER
C3380/C3380i/C2880/C2880i . . . . . . . . . . . . . . . . . . . . . . . . . . . . . . . . . . . . . . .9-33
Entering the System Management Mode. . . . . . . . . . . . . . . . . . . . . . . . . . . .9-33
If Department ID Management Is Enabled. . . . . . . . . . . . . . . . . . . . . . . .9-34
If Department ID Management Is Not Enabled . . . . . . . . . . . . . . . . . . . .9-34
Canceling the System Management Mode . . . . . . . . . . . . . . . . . . . . . . . . . .9-36
Managing Inboxes in the System Management Mode . . . . . . . . . . . . . . . . . .9-36
Changing the Mail Box Settings in the System Management Mode . . . . . . .9-37
xiv
Page 17

Preface
Thank you for purchasing the Canon Color imageRUNNER C3380/C3380i/C2880/C2880i.
Please read this manual thoroughly before operating the machine to familiarize yourself with
its capabilities, and to make the most of its many functions. After reading this manual, store it
in a safe place for future reference.
How To Use This Manual
Symbols Used in This Manual
The following symbols are used in this manual to explain procedures, restrictions,
handling precautions, and instructions that should be observed for safety.
.
WAR NING
CAUTION
IMPORTANT
NOTE
Indicates a warning concerning operations that may lead to death or
injury to persons if not performed correctly. To use the machine safely,
always pay attention to these warnings.
.
Indicates a caution concerning operations that may lead to injury to
persons, or damage to property if not performed correctly. To use the
machine safely, always pay attention to these cautions.
.
Indicates operational requirements and restrictions. Be sure to read
these items carefully to operate the machine correctly, and avoid
damage to the machine.
.
Indicates a clarification of an operation, or contains additional
explanations for a procedure. Reading these notes is highly
recommended.
xv
Page 18

Keys Used in This Manual
The following symbols and key names are a few examples of how keys to be
pressed are expressed in this manual:
• Touch Panel Display Keys: [Key Name]
Examples: [Cancel]
[Done]
• Control Panel Keys: Key Icon (Key Name)
Examples: (Start)
(Stop)
Displays Used in This Manual
Screen shots of the touch panel display used in this manual are those taken when
the following optional equipment is attached to the Color imageRUNNER C3380i:
the Super G3 FAX Board, Finisher-Z1, and Cassette Feeding Unit-Y3.
Note that functions that cannot be used depending on the model or options, are not
displayed on the touch panel display.
xvi
The keys which you should press are marked with a , as shown below.
When multiple keys can be pressed on the touch panel display, all keys are marked.
Select the keys which suit your needs.
Place your originals ➞ press [Special Features].
Press this key for operation.
Page 19

Illustrations Used in This Manual
Illustrations used in this manual are those displayed when the Color
imageRUNNER C3380i has the following optional equipment attached to it: the
Finisher-Z1 and Cassette Feeding Unit-Y3.
xvii
Page 20
Operations and Terms Used in This Manual
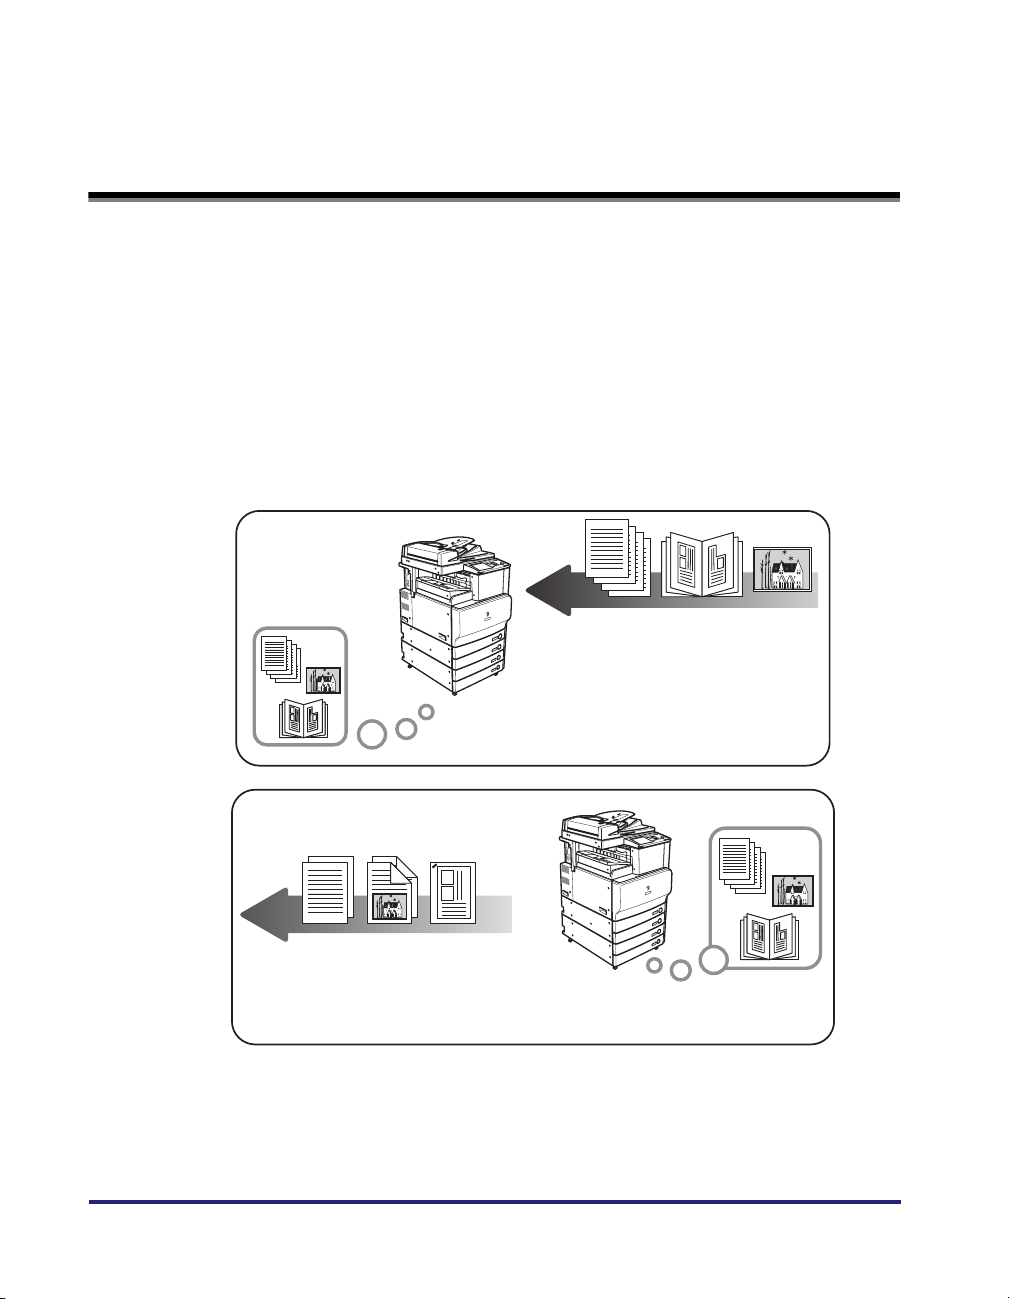
This machine makes effective use of memory to perform print operations efficiently.
For example, as soon as the machine has scanned the original that you want to
copy, it can immediately scan the next person's original. You can also print from this
machine, using a function other than the Copy function. In this machine, these
operations take place in a complex way, so that not only copies, but also various
kinds of prints may sometimes have to wait their turn before they can be printed.
To avoid confusion when reading this manual, the terms "scanning," "printing," and
"copying," used throughout this manual are defined below. When making a copy,
the process of scanning originals and printing copies may be described as separate
functions.
Scanning
Scanning an original to be copied, or
scanning an original to be stored as
data in an inbox.
xviii
Printing
Outputting a copy, outputting data stored in an inbox,
or outputting data sent from a personal computer
to the machine.
Page 21
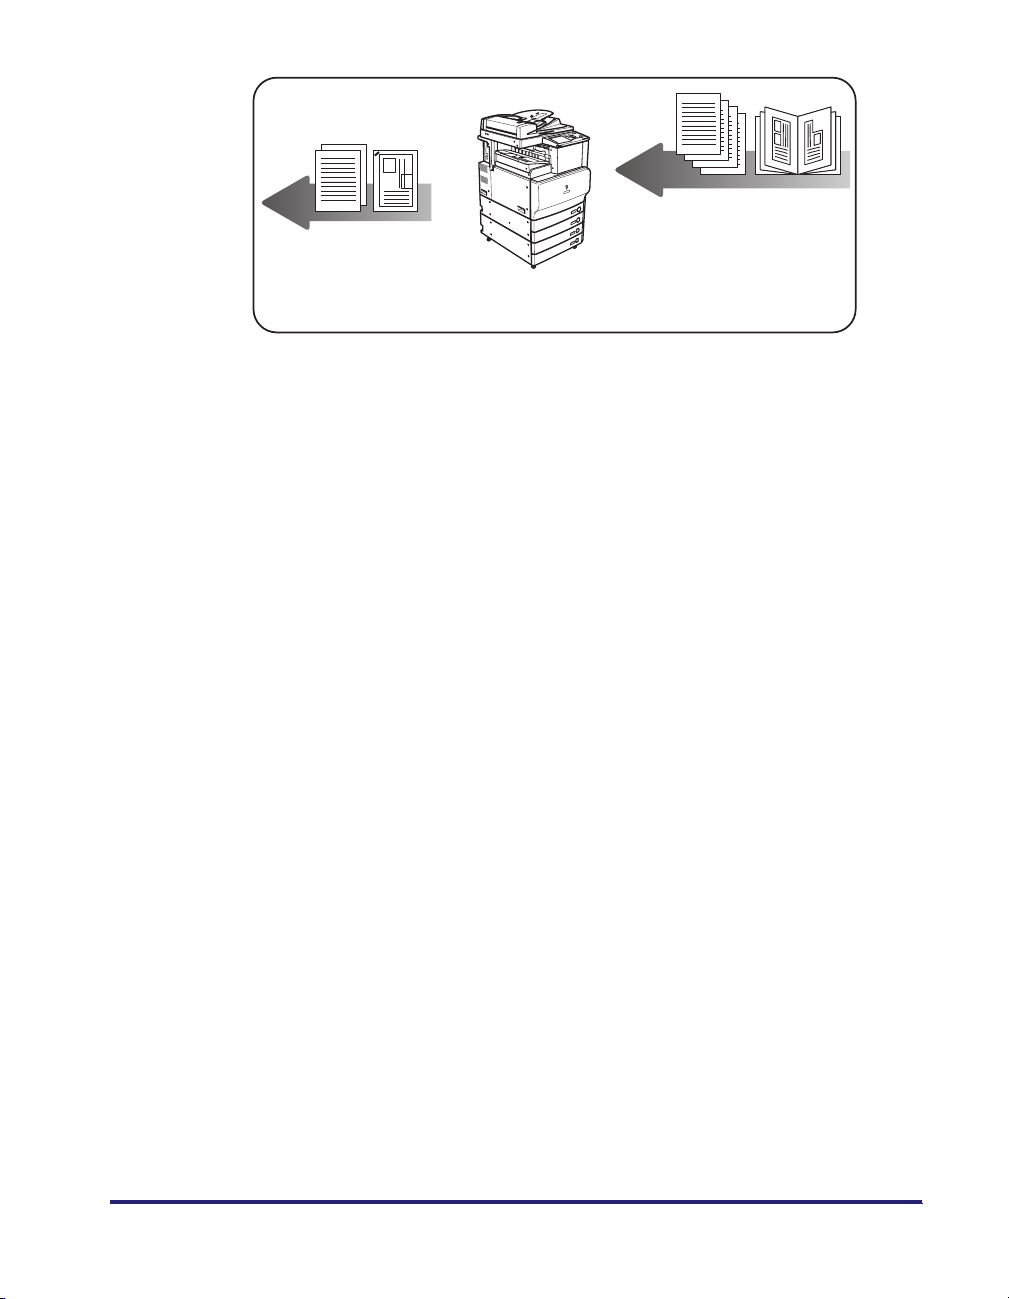
Copying
Printing data scanned from an original,
followed by finishing options, such as
stapling.
xix
Page 22

Legal Notices
Product Name
Safety regulations require the product's name to be registered. In some regions
where this product is sold, the following name(s) in ( ) may be registered instead.
Color imageRUNNER C3380/C3380i/C2880/C2880i (F147700)
Preventing Counterfeit Documents
This machine includes a function for aiding in the prevention of counterfeit
documents. If you are copying documents that resemble paper money closely, you
may be unable to get an appropriate image.
xx
Page 23

FCC (Federal Communications Commission)
Note: This equipment has been tested and found to comply with the limits for a
Class A digital device, pursuant to Part 15 of the FCC Rules. These limits are
designed to provide reasonable protection against harmful interference when the
equipment is operated in a commercial environment. This equipment generates,
uses, and can radiate, radio frequency energy and, if not installed and used in
accordance with the Operator's Manual, may cause harmful interference to radio
communications. Operation of this equipment in a residential area is likely to cause
harmful interference in which case the user will be required to correct the
interference at his own expense.
Use of shielded cables are required to comply with Class A limits in Subpart B of
Part 15 of the FCC Rules.
Do not make any changes or modifications to the equipment unless otherwise
specified in the manual. If you make such changes or modifications, you could be
required to stop operation of the equipment.
If your equipment malfunctions, please contact your local authorized Canon dealer
from whom you purchased the equipment (if under warranty), or with whom you
have a servicing contract. If you are not sure who to contact, and have both
purchased and are using the equipment in the U.S.A., please refer to the
"SUPPORT" page on Canon U.S.A.'s Web site (http://www.usa.canon.com).
xxi
Page 24
Laser Safety
This product complies with 21 CFR Chapter 1 Subchapter J as a Class I laser
product under the U.S. Department of Health and Human Services (DHHS)
Radiation Performance Standard according to the Radiation Control for Health and
Safety Act of 1968. Also, this product is certified as a Class
IEC60825-1: 1993 and EN60825-1: 1994. This means that the product does not
produce hazardous laser radiation.
Since radiation emitted inside the product is completely confined within protective
housings and external covers, the laser beam cannot escape from the machine
during any phase of user operation. Do not remove protective housings or external
covers, except as directed by the equipment's Reference Guide.
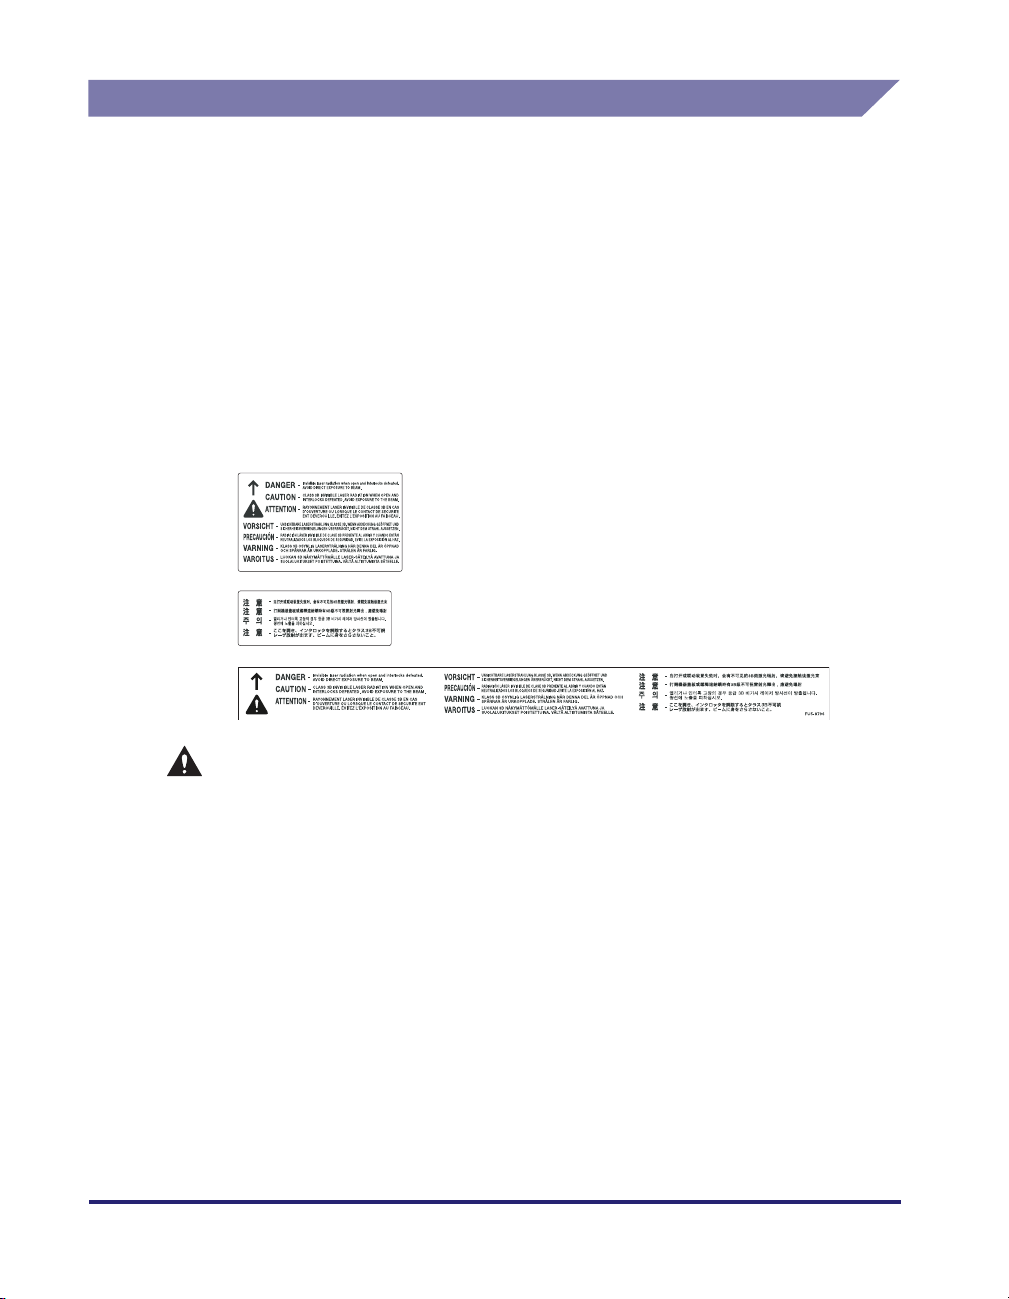
The labels shown below are attached to the main unit, inside the front cover and the
transport unit.
I
laser product under
xxii
CAUTION
Use of controls, adjustments, or performance of procedures other than those
specified in this manual may result in hazardous radiation exposure.
Page 25

Abbreviations Used in This Manual
In this manual, product names and model names are abbreviated as follows:
Novell NetWare®:
NetWare
IPv6 Ready Logo
This machine has acquired IPv6 Ready Logo Phase-1, as
established by the IPv6 Forum.
International Energy Star Program
As an
ENERGY STA R
that this machine meets the
for energy efficiency.
The International
an international program that promotes energy saving through
the use of computers and other office equipment. The program
backs the development and dissemination of products with
functions that effectively reduce energy consumption. It is an
open system in which business proprietors can participate
voluntarily. The targeted products are office equipment, such as
computers, displays, printers, facsimiles, and copiers. The
standards and logos are uniform among participating nations.
®
Partner, Canon USA, Inc. has determined
®
ENERGY STA R
ENERGY STA R
®
Office Equipment Program is
Program guidelines
xxiii
Page 26

Trademarks
Canon, the Canon logo, Color imageRUNNER, MEAP, and NetSpot are registered
trademarks, and the MEAP logo and imageWARE are trademarks of Canon Inc. in
the United States and may also be trademarks or registered trademarks in other
countries.
Adobe, Adobe Acrobat, PostScript, and PostScript 3 are trademarks of Adobe
Systems Incorporated.
Mac OS and AppleTalk are trademarks of Apple Computer, Inc.
Windows and Active Directory are registered trademarks of Microsoft Corporation
in the United States and other countries.
NetWare
Java and all Java-based trademarks and logos are trademarks or registered
trademarks of Sun Microsystems, Inc. in the United States and other countries.
The following fonts are licensed from Bitstream Technologies, Inc.
Dutch 801 Bold, Dutch 801 Roman, Fixed Pitch 810 Courier 10 Pitch/Text.
The following font is a trademark of Bitstream Inc.
Dutch 801
© Copyright 1987, Bitstream Inc., Cambridge Massachusetts USA.
®
is a registered trademark of Novell, Inc.
xxiv
All rights reserved.
Other product and company names herein may be the trademarks of their
respective owners.
Page 27

Copyright
Copyright 2007 by Canon Inc. All rights reserved.
No part of this publication may be reproduced or transmitted in any form or by any
means, electronic or mechanical, including photocopying and recording, or by any
information storage or retrieval system without the prior written permission of
Canon Inc.
This product includes free software and/or software modules that are licensed by
Canon Inc. or its licensors from third parties. Use and distribution of this software
and/or software modules are subject to each of the conditions (a) through (e) below.
Copyright (c) 1992, 1993
The Regents of the University of California. All rights reserved.
This code is derived from software contributed to Berkeley by Ralph Campbell.
Redistribution and use in source and binary forms, with or without modification, are
permitted provided that the following conditions are met:
1.Redistributions of source code must retain the above copyright notice, this list of
(a)
conditions and the following disclaimer.
2.Redistributions in binary form must reproduce the above copyright notice, this list
of conditions and the following disclaimer in the documentation and/or other
materials provided with the distribution.
3.All advertising materials mentioning features or use of this software must display
the following acknowledgement:
This product includes software developed by the University of California,
Berkeley and its contributors.
4.Neither the name of the University nor the names of its contributors may be used
to endorse or promote products derived from this software without specific prior
written permission.
xxv
Page 28

THIS SOFTWARE IS PROVIDED BY THE REGENTS AND CONTRIBUTORS "AS
IS" AND ANY EXPRESS OR IMPLIED WARRANTIES, INCLUDING, BUT NOT
LIMITED TO, THE IMPLIED WARRANTIES OF MERCHANTABILITY AND
FITNESS FOR A PARTICULAR PURPOSE ARE DISCLAIMED. IN NO EVENT
SHALL THE REGENTS OR CONTRIBUTORS BE LIABLE FOR ANY DIRECT,
INDIRECT, INCIDENTAL, SPECIAL, EXEMPLARY, OR CONSEQUENTIAL
DAMAGES (INCLUDING, BUT NOT LIMITED TO, PROCUREMENT OF
SUBSTITUTE GOODS OR SERVICES; LOSS OF USE, DATA, OR PROFITS; OR
BUSINESS INTERRUPTION) HOWEVER CAUSED AND ON ANY THEORY OF
LIABILITY, WHETHER IN CONTRACT, STRICT LIABILITY, OR TORT
(INCLUDING NEGLIGENCE OR OTHERWISE) ARISING IN ANY WAY OUT OF
THE USE OF THIS SOFTWARE, EVEN IF ADVISED OF THE POSSIBILITY OF
SUCH DAMAGE.
(b)
Copyright (c) 1990 The Regents of the University of California.
All rights reserved.
Redistribution and use in source and binary forms are permitted provided that the
above copyright notice and this paragraph are duplicated in all such forms and that
any documentation, advertising materials, and other materials related to such
distribution and use acknowledge that the software was developed by the University
of California, Berkeley. The name of the University may not be used to endorse or
promote products derived from this software without specific prior written
permission.
xxvi
THIS SOFTWARE IS PROVIDED "AS IS" AND WITHOUT ANY EXPRESS OR
IMPLIED WARRANTIES, INCLUDING, WITHOUT LIMITATION, THE IMPLIED
WARRANTIES OF MERCHANTABILITY AND FITNESS FOR A PARTICULAR
PURPOSE.
(c)
The author of this software is David M. Gay.
Copyright (c) 1991 by AT&T.
Permission to use, copy, modify, and distribute this software for any purpose without
fee is hereby granted, provided that this entire notice is included in all copies of any
software which is or includes a copy or modification of this software and in all copies
of the supporting documentation for such software.
Page 29

THIS SOFTWARE IS BEING PROVIDED "AS IS", WITHOUT ANY EXPRESS OR
IMPLIED WARRANTY. IN PARTICULAR, NEITHER THE AUTHOR NOR AT&T
MAKES ANY REPRESENTATION OR WARRANTY OF ANY KIND CONCERNING
THE MERCHANTABILITY OF THIS SOFTWARE OR ITS FITNESS FOR ANY
PARTICULAR PURPOSE.
(d)
Copyright (C) 1993 by Sun Microsystems, Inc. All rights reserved.
Developed at SunPro, a Sun Microsystems, Inc. business. Permission to use, copy,
modify, and distribute this software is freely granted, provided that this notice is
preserved.
(e)
Copyright (c) 1994, 1997 Cygnus Solutions.
All rights reserved.
Redistribution and use in source and binary forms are permitted provided that the
above copyright notice and this paragraph are duplicated in all such forms and that
any documentation, advertising materials, and other materials related to such
distribution and use acknowledge that the software was developed at Cygnus
Solutions. Cygnus Solutions may not be used to endorse or promote products
derived from this software without specific prior written permission.
THIS SOFTWARE IS PROVIDED "AS IS" AND WITHOUT ANY EXPRESS OR
IMPLIED WARRANTIES, INCLUDING, WITHOUT LIMITATION, THE IMPLIED
WARRANTIES OF MERCHANTABILITY AND FITNESS FOR A PARTICULAR
PURPOSE.
xxvii
Page 30

Disclaimers
The information in this document is subject to change without notice.
CANON INC. MAKES NO WARRANTY OF ANY KIND WITH REGARD TO THIS
MATERIAL, EITHER EXPRESS OR IMPLIED, EXCEPT AS PROVIDED HEREIN,
INCLUDING WITHOUT LIMITATION, THEREOF, WARRANTIES AS TO
MARKETABILITY, MERCHANTABILITY, FITNESS FOR A PARTICULAR
PURPOSE OF USE OR NON-INFRINGEMENT. CANON INC. SHALL NOT BE
LIABLE FOR ANY DIRECT, INCIDENTAL, OR CONSEQUENTIAL DAMAGES OF
ANY NATURE, OR LOSSES OR EXPENSES RESULTING FROM THE USE OF
THIS MATERIAL.
LAMP(S) INSIDE THIS PRODUCT CONTAIN MERCURY AND MUST BE
RECYCLED OR DISPOSED OF ACCORDING TO LOCAL, STATE OR FEDERAL
LAWS.
For CA, USA only
Included battery contains Perchlorate Material - special handling may apply.
See http://www.dtsc.ca.gov/hazardouswaste/perchlorate/ for details.
xxviii
Page 31
Legal Limitations on the Usage of Your Product and the Use of Images
Using your product to scan, print or otherwise reproduce certain documents, and
the use of such images as scanned, printed or otherwise reproduced by your
product, may be prohibited by law and may result in criminal and/or civil liability. A
non-exhaustive list of these documents is set forth below. This list is intended to be
a guide only. If you are uncertain about the legality of using your product to scan,
print or otherwise reproduce any particular document, and/or of the use of the
images scanned, printed or otherwise reproduced, you should consult in advance
with your legal advisor for guidance.
• Paper Money • Travelers Checks
• Money Orders • Food Stamps
• Certificates of Deposit • Passports
• Postage Stamps
(canceled or uncanceled)
• Identifying Badges or Insignias • Internal Revenue Stamps
• Selective Service or Draft Papers • Bonds or Other Certificates of
• Checks or Drafts Issued by
Governmental Agencies
• Motor Vehicle Licenses and
Certificates of Title
• Immigration Papers
(canceled or uncanceled)
Indebtedness
• Stock Certificates
• Copyrighted Works/Works of Art without
Permission of Copyright Owner
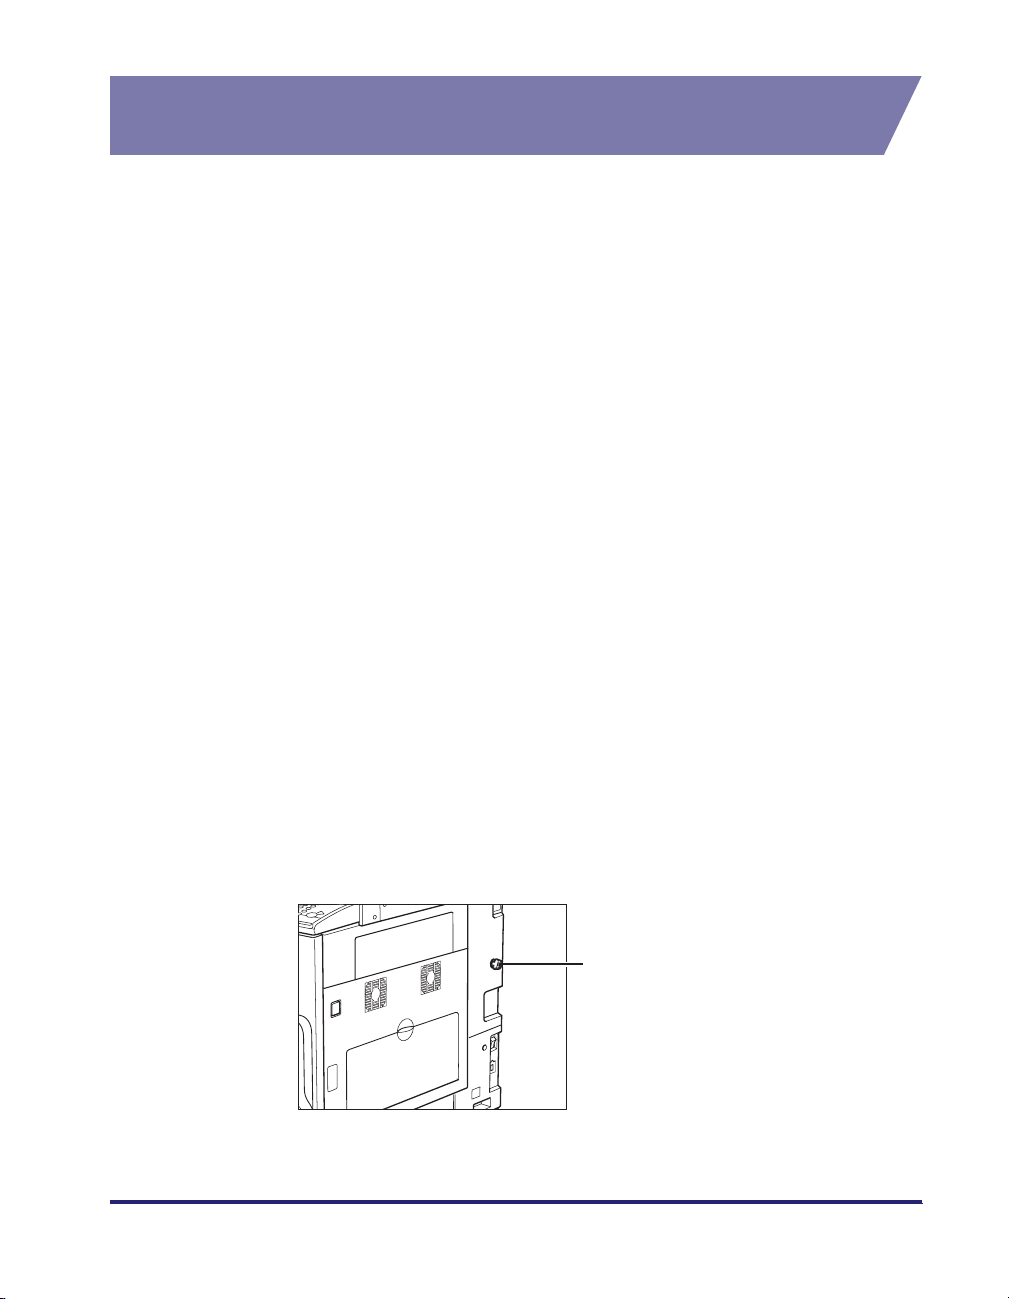
■ In Order to Avoid Unauthorized Use of the Machine
Unauthorized copies can be prevented by using the optional Key Switch Unit to manage
the operation of the Color imageRUNNER C3380/C3380i/C2880/C2880i. The use of this
key should be strictly supervised.
Security Key
When using the machine, insert the
security key into the main unit, and
then turn it to the right.
xxix
Page 32
Important Safety Instructions
Please read these "Important Safety Instructions" thoroughly before operating the
machine. As these instructions are intended to prevent injury to the user or other
persons or destruction of property, always pay attention to these instructions. Also,
since it may result in unexpected accidents or injuries, do not perform any operation
unless otherwise specified in the manual. Improper operation or use of this
machine could result in personal injury and/or damage requiring extensive repair
that may not be covered under your Limited Warranty.
Installation
WARNING
• Do not install the machine near alcohol, paint thinner, or other flammable
substances. If flammable substances come into contact with electrical parts inside
the machine, it may result in a fire or electrical shock.
• Do not place the following items on the machine. If these items come into contact
with a high-voltage area inside the machine, it may result in a fire or electrical shock.
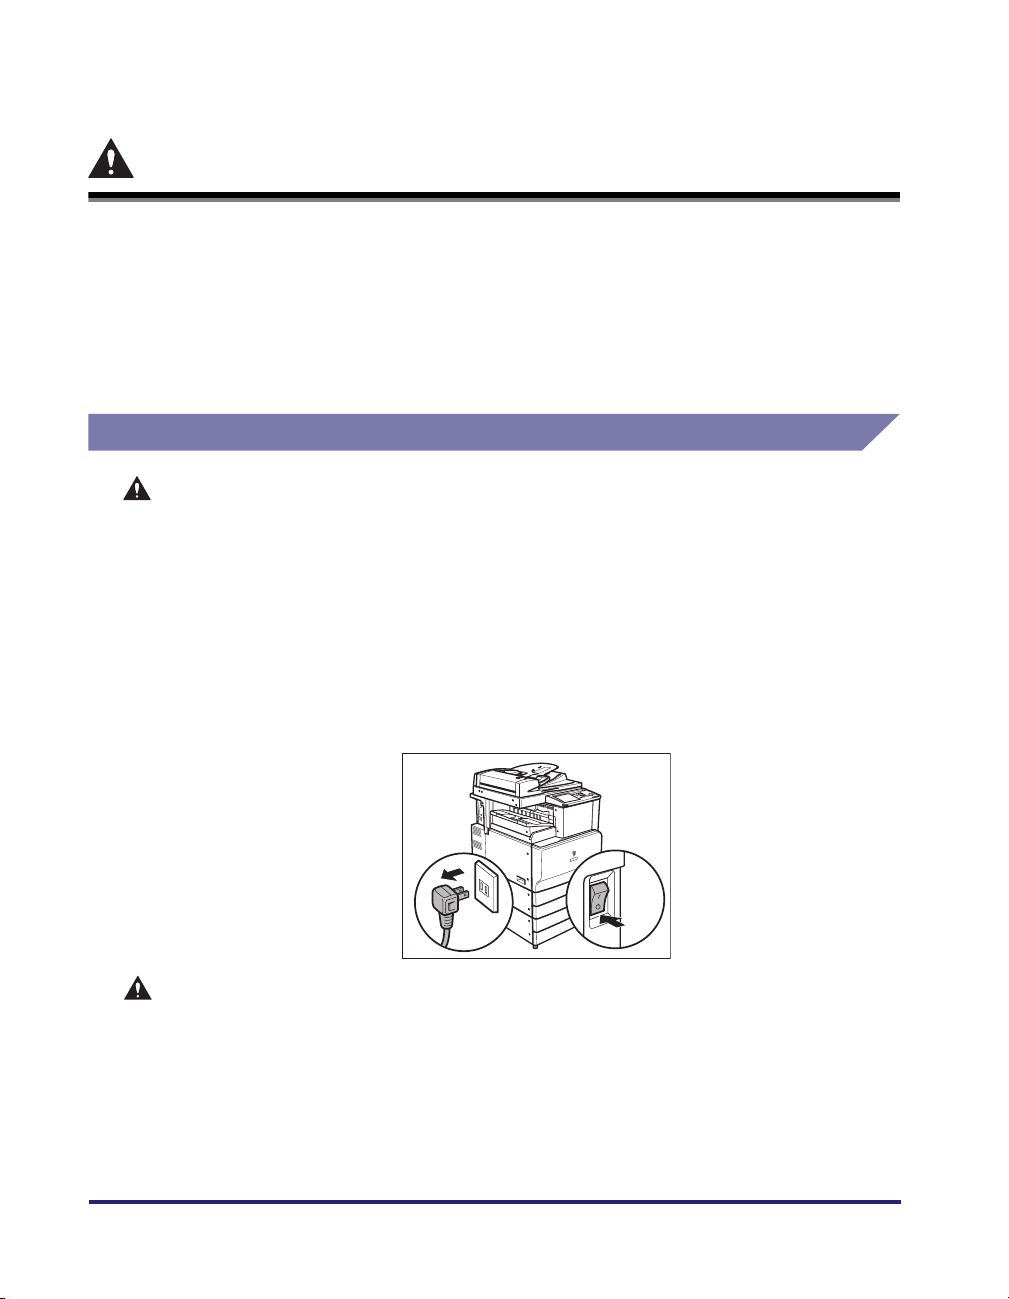
If these items are dropped or spilled inside the machine, immediately turn OFF the
main power switch, and disconnect the power cord from the power outlet. Then,
contact your local authorized Canon dealer.
- Necklaces and other metal objects
- Cups, vases, flowerpots, and other containers filled with water or liquids
xxx
CAUTION
• Do not install the machine in unstable locations, such as unsteady platforms or
inclined floors, or in locations subject to excessive vibrations, as this may cause the
machine to fall or tip over, resulting in personal injury.
• Never block the ventilation slots and louvers on the machine. These openings are
provided for proper ventilation of working parts inside the machine. Blocking these
openings can cause the machine to overheat. Never place the machine on a soft
surface, such as a sofa or rug.
Page 33
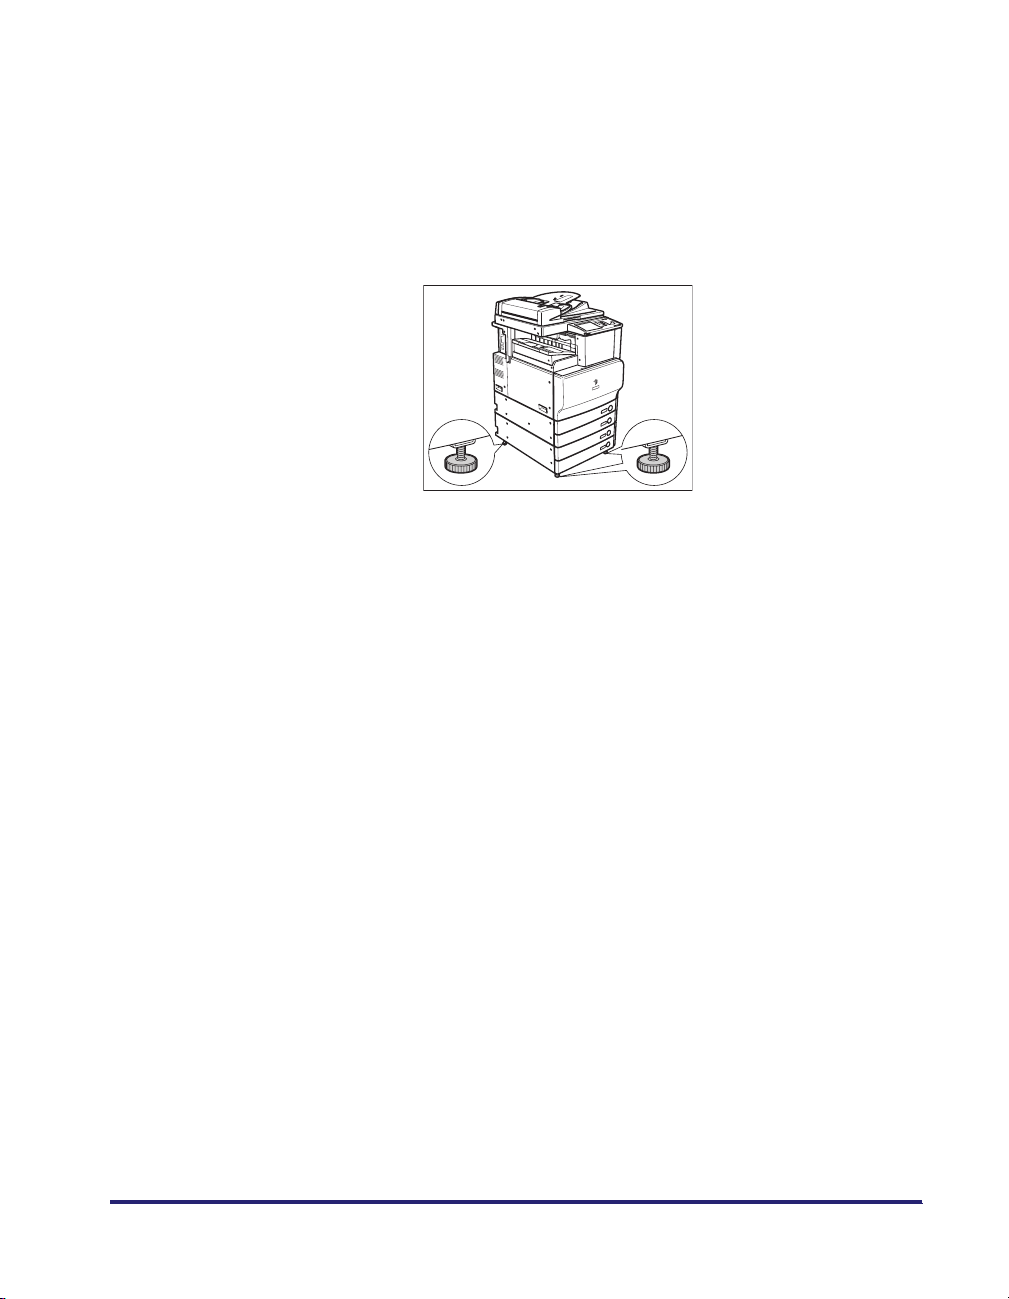
• Do not install the machine in the following locations:
- A damp or dusty location
- A location near water faucets or water
- A location exposed to direct sunlight
- A location subject to high temperatures
- A location near open flames
• Do not remove the machine's leveling feet after the machine has been installed, as
this may cause the machine to fall or tip over, resulting in personal injury.
xxxi
Page 34

Power Supply
WARNING
• Do not damage or modify the power cord. Also, do not place heavy objects on the
power cord, or pull on or excessively bend it, as this could cause electrical damage
and result in a fire or electrical shock.
• Keep the power cord away from a heat source; failure to do this may cause the power
cord coating to melt, resulting in a fire or electrical shock.
• Do not connect or disconnect the power cord with wet hands, as this may result in
electrical shock.
• Do not connect the power cord to a multiplug power strip, as this may cause a fire or
electrical shock.
• Do not bundle up or tie the power cord in a knot, as this may result in a fire or
electrical shock.
• Insert the power plug completely into the power outlet, as failure to do so may result
in a fire or electrical shock.
• Do not use power cords other than the power cord provided, as this may result in a
fire or electrical shock.
• As a general rule, do not use extension cords. Using an extension cord may result in
a fire or electrical shock. If an extension cord must be used, however, use one rated
for voltages of 120V AC and over, untie the cord binding, and insert the power plug
completely into the extension cord outlet to ensure a firm connection between the
power cord and the extension cord.
xxxii
CAUTION
• Do not use power supplies with voltages other than those specified herein, as this
may result in a fire or electrical shock.
• Always grasp the power plug when disconnecting the power cord. Pulling on the
power cord may expose or snap the core wire, or otherwise damage the power cord. If
the power cord is damaged, this could cause current to leak, resulting in a fire or
electrical shock.
• Leave sufficient space around the power plug so that it can be unplugged easily. If
objects are placed around the power plug, you will be unable to unplug it in an
emergency.
Page 35
Handling
WARNING
• Do not attempt to disassemble or modify the machine. There are high-temperature
• If the machine makes strange noises, or gives off smoke, heat, or strange smells,
• Do not use highly flammable sprays near the machine. If gas from these sprays
• To avoid damage to the power cord and creating a fire hazard, always turn OFF the
• Do not drop paper clips, staples, or other metal objects inside the machine. Also, do
and high-voltage components inside the machine which may result in a fire or
electrical shock.
immediately turn OFF the main power switch, and disconnect the power cord from
the power outlet. Then, contact your local authorized Canon dealer. Continued use of
the machine in this condition may result in a fire or electrical shock.
comes into contact with the electrical components inside the machine, it may result
in a fire or electrical shock.
main power switch, and unplug the interface cable when moving the machine.
Otherwise, the power cord or interface cable may be damaged, resulting in a fire or
electrical shock.
not spill water, liquids, or flammable substances (alcohol, benzene, paint thinner,
etc.) inside the machine. If these items come into contact with a high-voltage area
inside the machine, it may result in a fire or electrical shock. If these items are
dropped or spilled inside the machine, immediately turn OFF the main power switch,
and disconnect the power cord from the power outlet. Then, contact your local
authorized Canon dealer.
CAUTION
• Do not place heavy objects on the machine, as they may tip over or fall resulting in
personal injury.
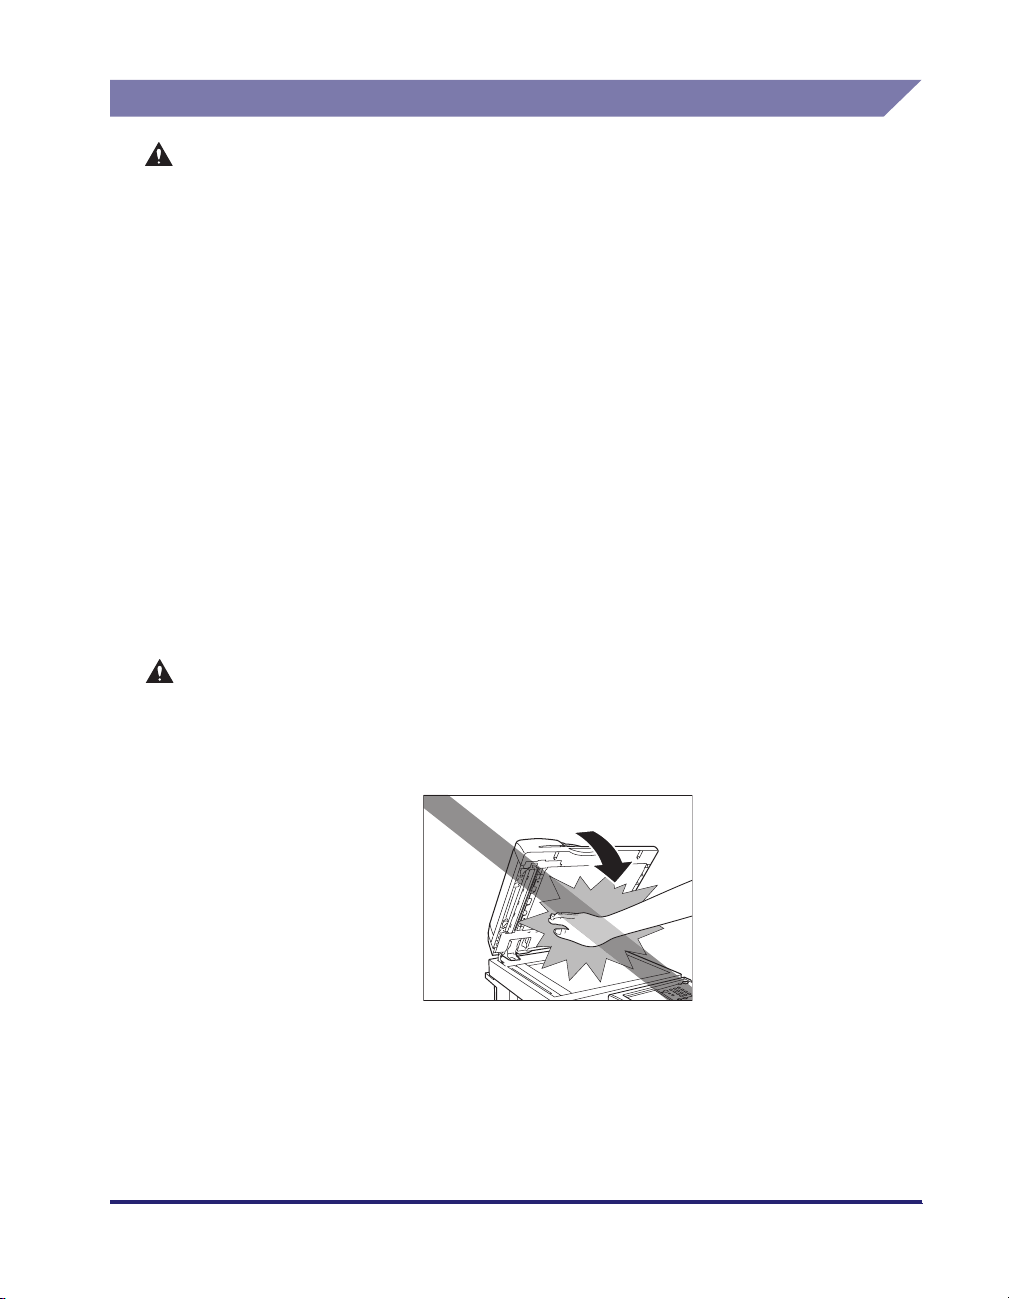
• Close the feeder/platen cover gently to avoid catching your hands, as this may result
in personal injury.
• Do not press down hard on the feeder/platen cover when using the platen glass to
make copies of thick books. Doing so may damage the platen glass and result in
personal injury.
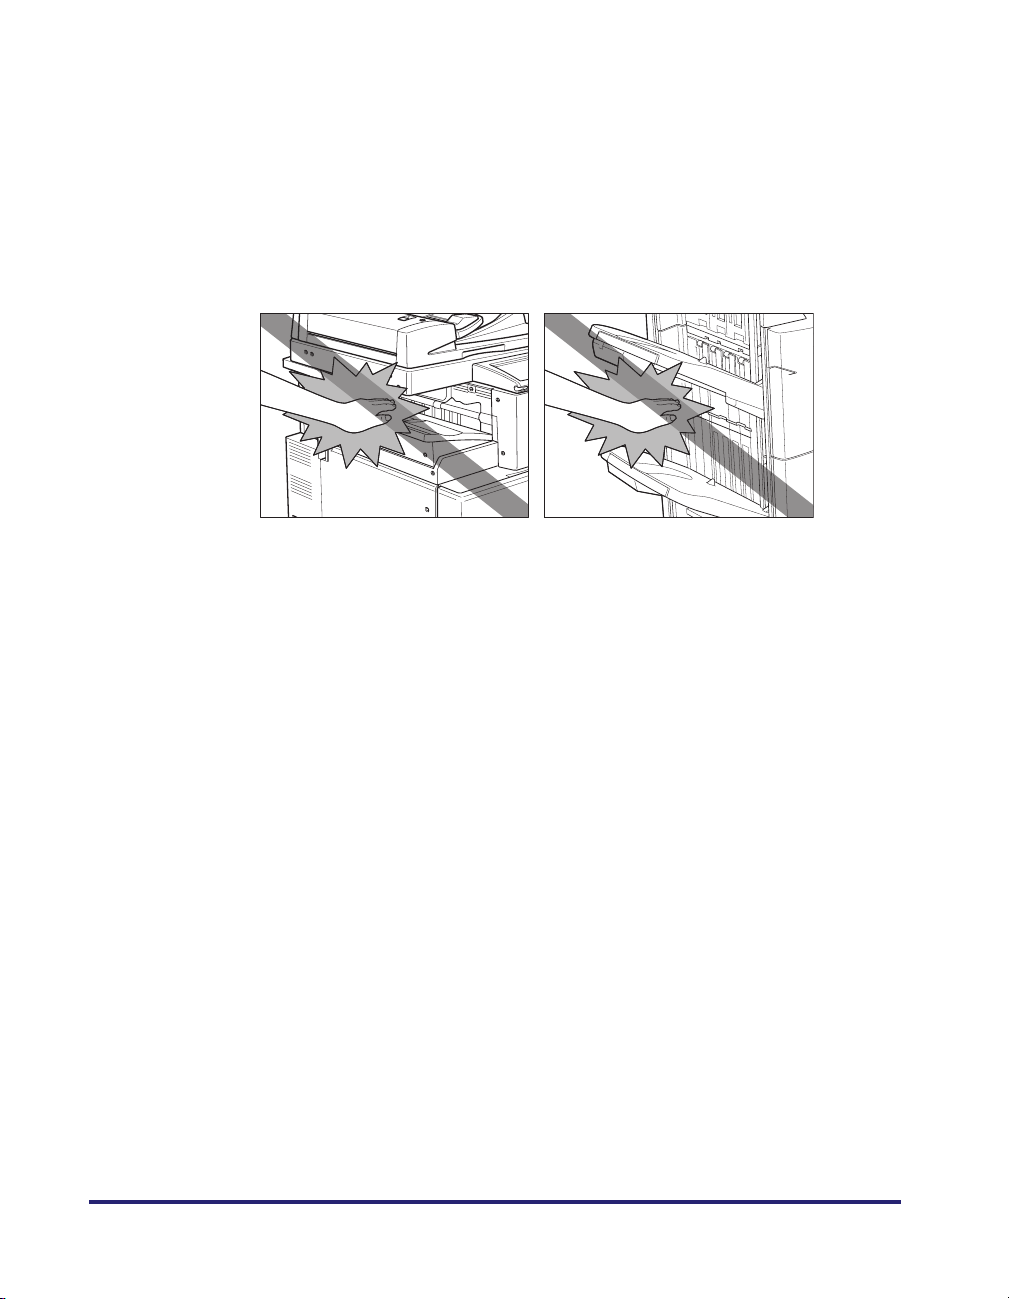
• Do not touch the finisher while the machine is printing, as this may result in personal
injury.
xxxiii
Page 36
• Turn OFF the control panel power switch for safety when the machine will not be used
for a long period of time, such as overnight. Also, turn OFF the main power switch,
and disconnect the power cord for safety when the machine will not be used for an
extended period of time, such as during consecutive holidays.
• Do not place your hands, hair, clothing, etc., near the exit and feed rollers. Even if the
machine is not in operation, your hands, hair, or clothing may get caught in the
rollers, which may result in personal injury or damage if the machine suddenly starts
printing.
• Do not place your hands in the part of the tray where stapling is performed (near the
rollers) when a finisher is attached, as this may result in personal injury.
Finisher-Y1/Saddle Finisher-Y2Finisher-Z1
xxxiv
Page 37
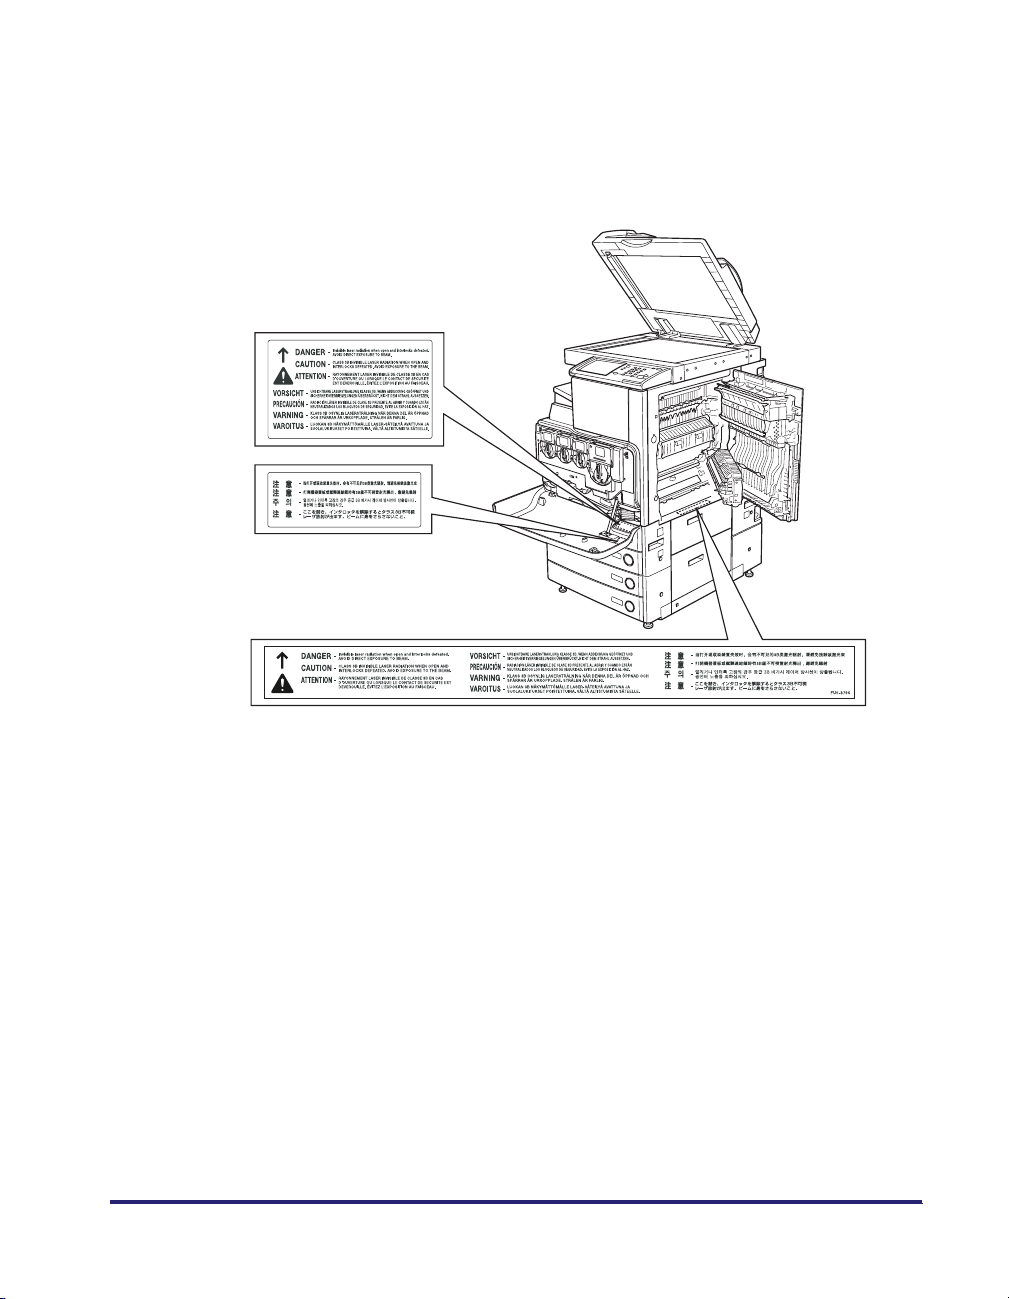
• The laser beam can be harmful to human bodies. Since radiation emitted inside the
product is completely confined within protective housings and external covers, the
laser beam cannot escape from the machine during any phase of user operation.
Read the following remarks and instructions for safety.
• Never open covers other than those instructed in this manual.
• Do not remove the following caution labels which are attached to the machine.
• If the laser beam escapes from the machine, exposure may cause serious damage to
your eyes.
xxxv
Page 38

Maintenance and Inspections
WARNING
• When cleaning the machine, first turn OFF the main power switch, then disconnect
the power cord. Failure to observe these steps may result in a fire or electrical shock.
• Disconnect the power cord from the power outlet regularly, and clean the area around
the base of the power plug's metal pins and the power outlet with a dry cloth to
ensure that all dust and grime is removed. If the power cord is connected for a long
period of time in a damp, dusty, or smoky location, dust can build up around the
power plug and become damp. This may cause a short circuit and result in a fire.
• Clean the machine using a slightly dampened cloth with a mild detergent mixed with
water. Do not use alcohol, benzene, paint thinner, or other flammable substances.
Check detergent for flammability prior to use. If flammable substances come into
contact with a high-voltage area inside the machine, it may result in a fire or electrical
shock.
• There are some areas inside the machine which are subject to high-voltages. When
removing jammed paper or when inspecting the inside of the machine, do not allow
necklaces, bracelets, or other metal objects to touch the inside of the machine, as
this may result in burns or electrical shock.
• Do not burn or throw used toner cartridges into open flames, as this may cause the
toner remaining inside the cartridges to ignite, resulting in burns or a fire.
xxxvi
Page 39
CAUTION
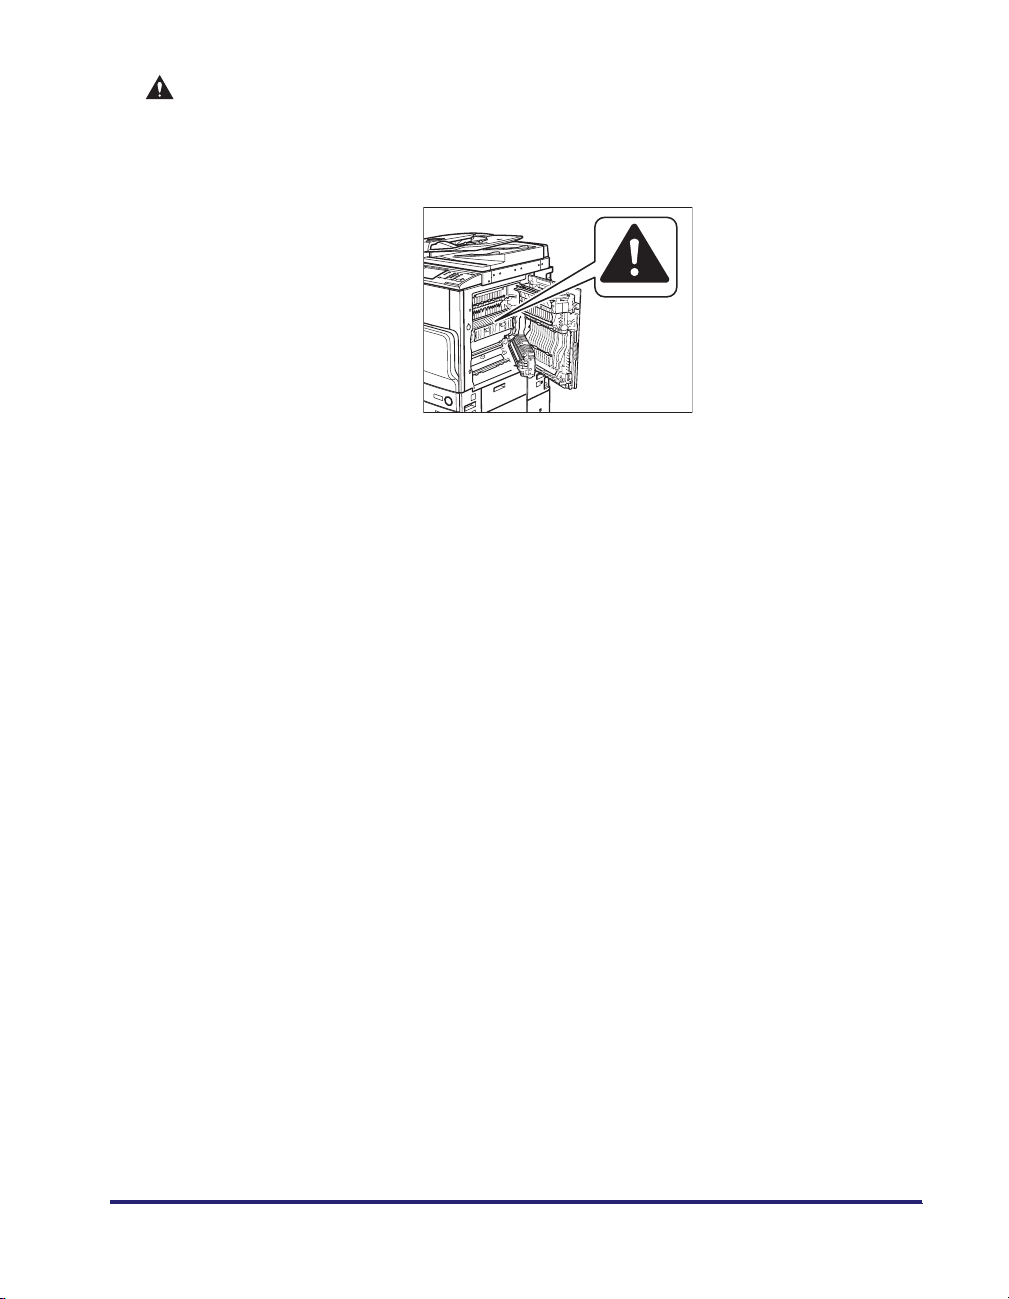
• The fixing unit and its surroundings inside the machine may become hot during use.
When removing jammed paper or when inspecting the inside of the machine, do not
touch the fixing unit and its surroundings, as doing so may result in burns or
electrical shock.
• When removing jammed paper or replacing the toner cartridge, take care not to allow
the toner to come into contact with your hands or clothing, as this will dirty your
hands or clothing. If they become dirty, wash them immediately with cold water.
Washing them with warm water will set the toner, and make it impossible to remove
the toner stains.
• When removing paper which has become jammed inside the machine, remove the
jammed paper gently to prevent the toner on the paper from scattering and getting
into your eyes or mouth. If the toner gets into your eyes or mouth, wash them
immediately with cold water and immediately consult a physician.
• When loading paper or removing jammed originals or paper, take care not to cut your
hands on the edges of the originals or paper.
• When removing a used toner cartridge, remove the cartridge carefully to prevent the
toner from scattering and getting into your eyes or mouth. If the toner gets into your
eyes or mouth, wash them immediately with cold water and immediately consult a
physician.
• Do not dismantle the toner cartridge, as doing so may cause toner to fly out and enter
your eyes or mouth. If the toner gets into your eyes or mouth, wash them immediately
with cold water and immediately consult a physician.
• If toner escapes from the toner cartridge, make sure not to ingest the toner or allow it
to directly touch your skin. If toner touches your skin, wash it away with soap and
water. If your skin still feels irritated after washing it, or you ingest toner, consult a
doctor immediately.
xxxvii
Page 40

Consumables
WARNING
• Do not burn or throw used toner cartridges into open flames, as this may cause the
toner remaining inside the cartridges to ignite, resulting in burns or a fire.
• Do not store toner cartridges or copy paper in places exposed to open flames, as this
may cause the toner or paper to ignite, resulting in burns or a fire.
• When discarding used toner cartridges, put the cartridges in a bag to prevent the
toner remaining inside the cartridges from scattering, and dispose of them in a
location away from open flames.
CAUTION
• Keep toner and other consumables out of the reach of small children. If these items
are ingested, consult a physician immediately.
• Do not dismantle the toner cartridge, as doing so may cause toner to fly out and enter
your eyes or mouth. If the toner gets into your eyes or mouth, wash them immediately
with cold water and immediately consult a physician.
• If toner escapes from the toner cartridge, make sure not to ingest the toner or allow it
to directly touch your skin. If toner touches your skin, wash it away with soap and
water. If your skin still feels irritated after washing it, or you ingest toner, consult a
doctor immediately.
Other Warnings
xxxviii
WARNING
For cardiac pacemaker users:
This product generates a low level magnetic field. If you use a cardiac pacemaker and
feel abnormalities, please move away from the product and consult your doctor.
Page 41
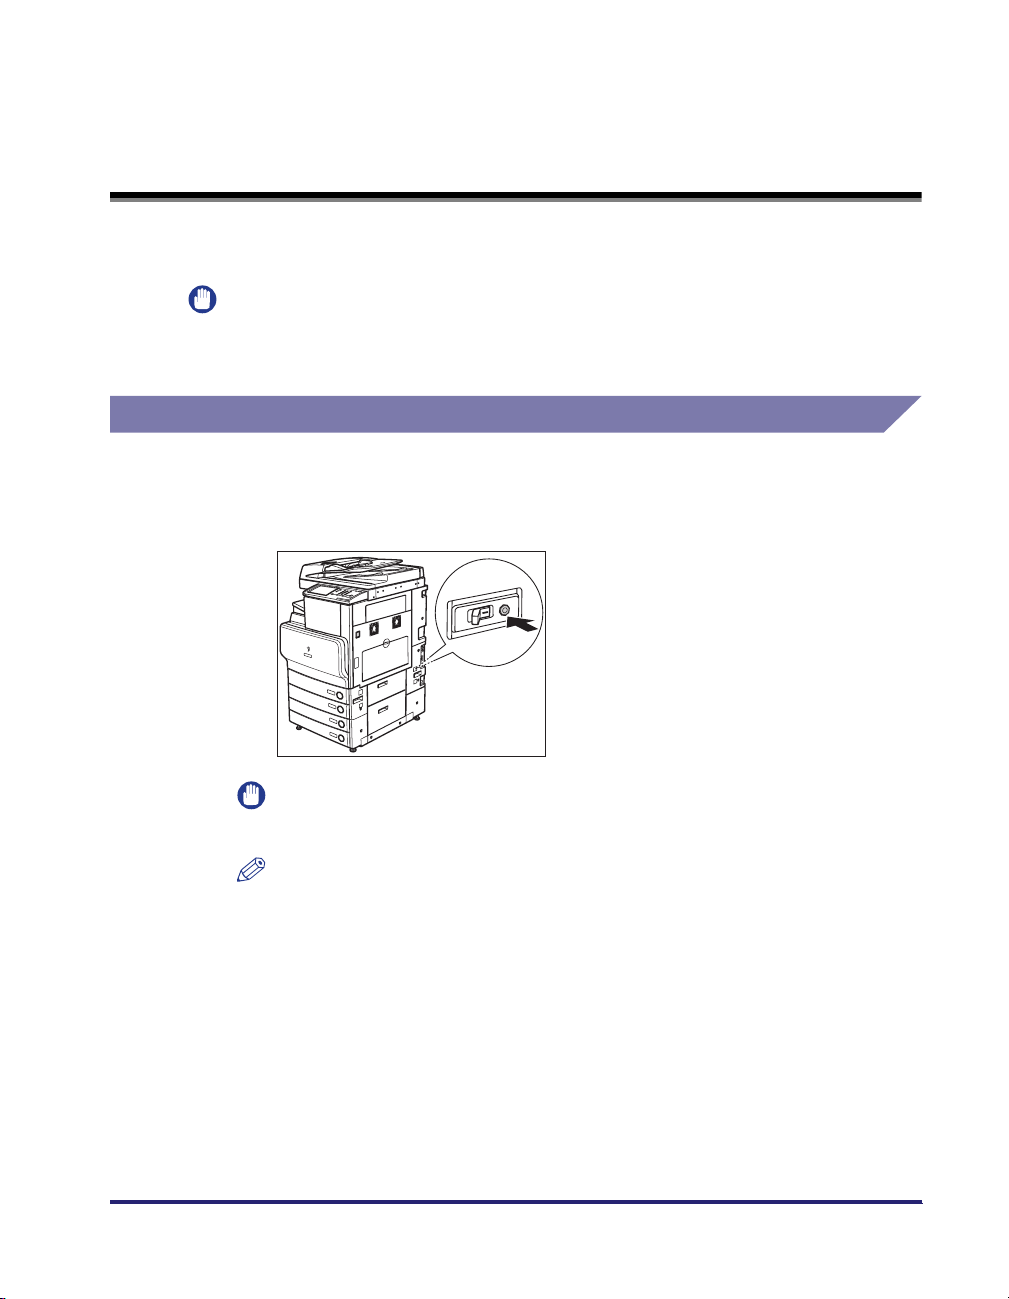
Periodic Inspection of the Breaker
This machine has a breaker that detects excess current or leakage current. Be sure
to test the breaker once or twice a month using the following procedure.
IMPORTANT
•
Make sure that the main power is turned OFF, before inspecting the breaker.
•
If a malfunction occurs after an inspection, contact your local authorized Canon dealer.
Checking the Breaker
1
Push the test button with the tip of a ball-point pen, or a
similar object.
IMPORTANT
Briefly push the test button.
NOTE
•
The breaker is located on the back side of the machine.
•
For more information on the location of the breaker, see "External View," on p.
1-11.
xxxix
Page 42
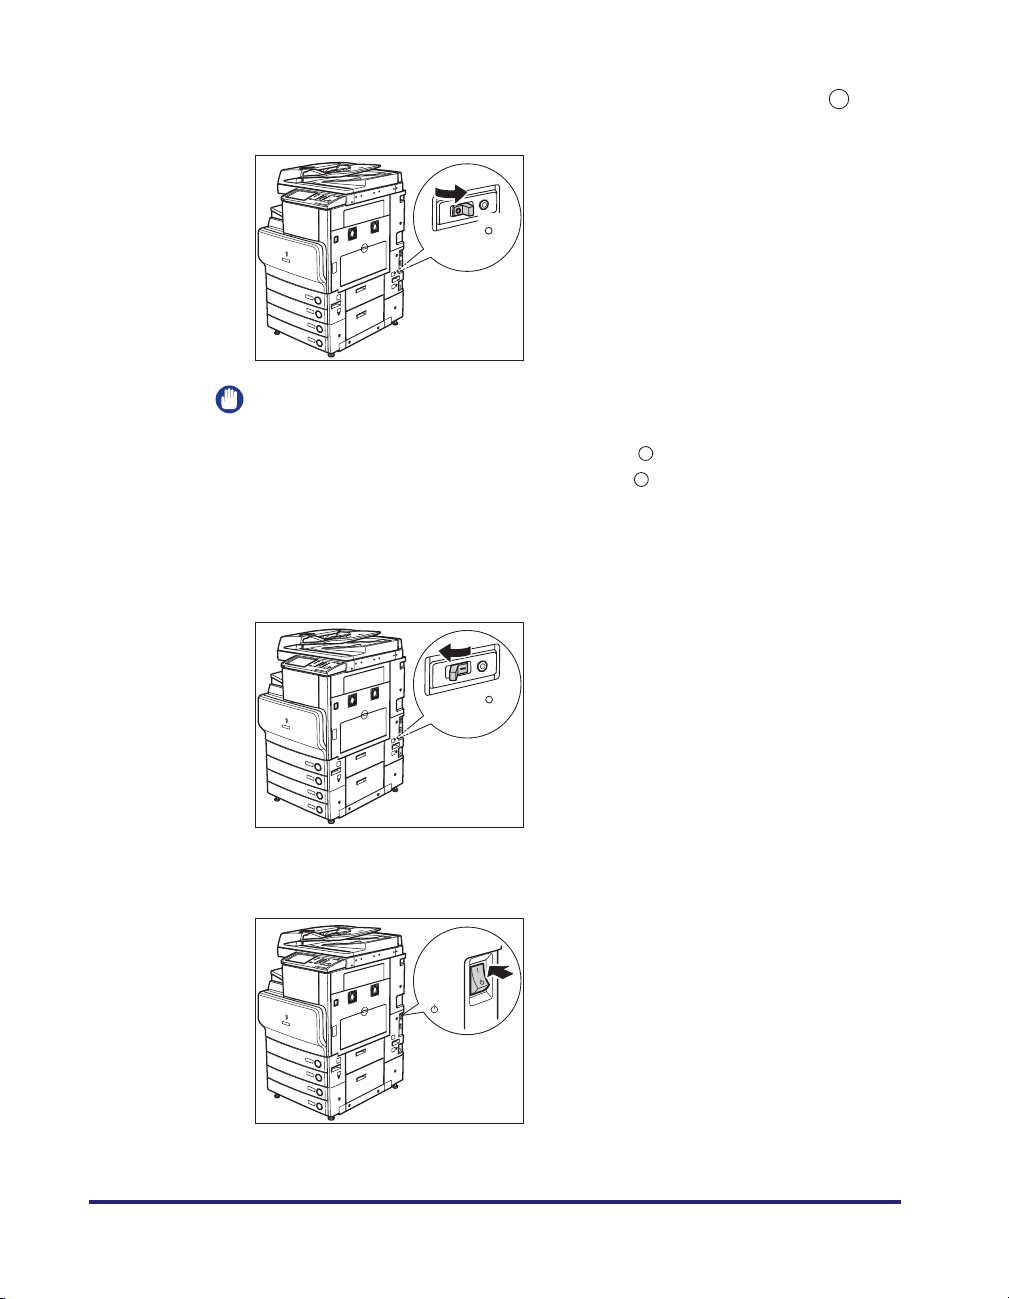
2
Confirm that the breaker lever is switched to the OFF (" "
side) position.
OFF
( side)
ON
( I side)
IMPORTANT
•
Do not use the test button to turn the power ON and OFF.
•
If the breaker lever does not switch to the OFF (" " side) position, repeat step 1.
•
If the breaker lever does not switch to the OFF (" " side) position, despite carrying
out the above procedure two or three times, contact your local authorized Canon
dealer.
3
Switch the breaker lever to ON ("I" side).
OFF
( side)
ON
( I side)
4
Press the main power switch to the "I" side.
( I side)
( side)
xl
Page 43

5
Fill in the check sheet, located on the next page, to document
your periodic inspections of the breaker.
xli
Page 44

Check Sheet for the Periodic Inspection of the Breaker
Copy this page for future use, and store it in a safe place near the machine to
document your periodic inspections of the breaker.
■ How to Inspect the Breaker Periodically
Follow the procedure described in "Periodic Inspection of the Breaker," on p. xxxix, once
or twice a month.
■ How to Fill in This Check Sheet
Fill in the date of inspection and the name of the inspector.
When the inspection is completed successfully, write a check mark under "OK."
If not, contact your local authorized Canon dealer. (Also, write a check mark under "NG"
(No Good).)
Date of
Inspection
Inspector Inspector
Result Result
OK NG OK NG
Date of
Inspection
xlii
Page 45

Before You Start Using This Machine
This chapter describes what you should know before using this machine, such as parts and
their functions, and how to turn ON the main power.
Installation Location and Handling . . . . . . . . . . . . . . . . . . . . . . . . . . . . . . . . . . . . . . . . . . 1-2
Installation Precautions . . . . . . . . . . . . . . . . . . . . . . . . . . . . . . . . . . . . . . . . . . . . . . . . . . . . . . . .1-2
Handling Precautions . . . . . . . . . . . . . . . . . . . . . . . . . . . . . . . . . . . . . . . . . . . . . . . . . . . . . . . . . .1-7
Backing Up Data. . . . . . . . . . . . . . . . . . . . . . . . . . . . . . . . . . . . . . . . . . . . . . . . . . . . . . . 1-10
Parts and Their Functions. . . . . . . . . . . . . . . . . . . . . . . . . . . . . . . . . . . . . . . . . . . . . . . . 1-11
External View . . . . . . . . . . . . . . . . . . . . . . . . . . . . . . . . . . . . . . . . . . . . . . . . . . . . . . . . . . . . . . .1-11
Internal View. . . . . . . . . . . . . . . . . . . . . . . . . . . . . . . . . . . . . . . . . . . . . . . . . . . . . . . . . . . . . . . . 1-13
Control Panel Parts and Functions. . . . . . . . . . . . . . . . . . . . . . . . . . . . . . . . . . . . . . . . . . . . . . . 1-14
Main Power and Control Panel Power . . . . . . . . . . . . . . . . . . . . . . . . . . . . . . . . . . . . . . 1-15
How to Turn ON the Main Power . . . . . . . . . . . . . . . . . . . . . . . . . . . . . . . . . . . . . . . . . . . . . . . .1-15
Control Panel Power Switch . . . . . . . . . . . . . . . . . . . . . . . . . . . . . . . . . . . . . . . . . . . . . . . . . . . .1-20
Shutting Down the Machine . . . . . . . . . . . . . . . . . . . . . . . . . . . . . . . . . . . . . . . . . . . . . . . . . . . .1-21
System Settings . . . . . . . . . . . . . . . . . . . . . . . . . . . . . . . . . . . . . . . . . . . . . . . . . . . . . . . 1-26
CHAPTER
1-1
Page 46
Installation Location and Handling
1
This section describes precautions for installation location and handling. We
recommend that you read this section prior to using this machine.
Installation Precautions
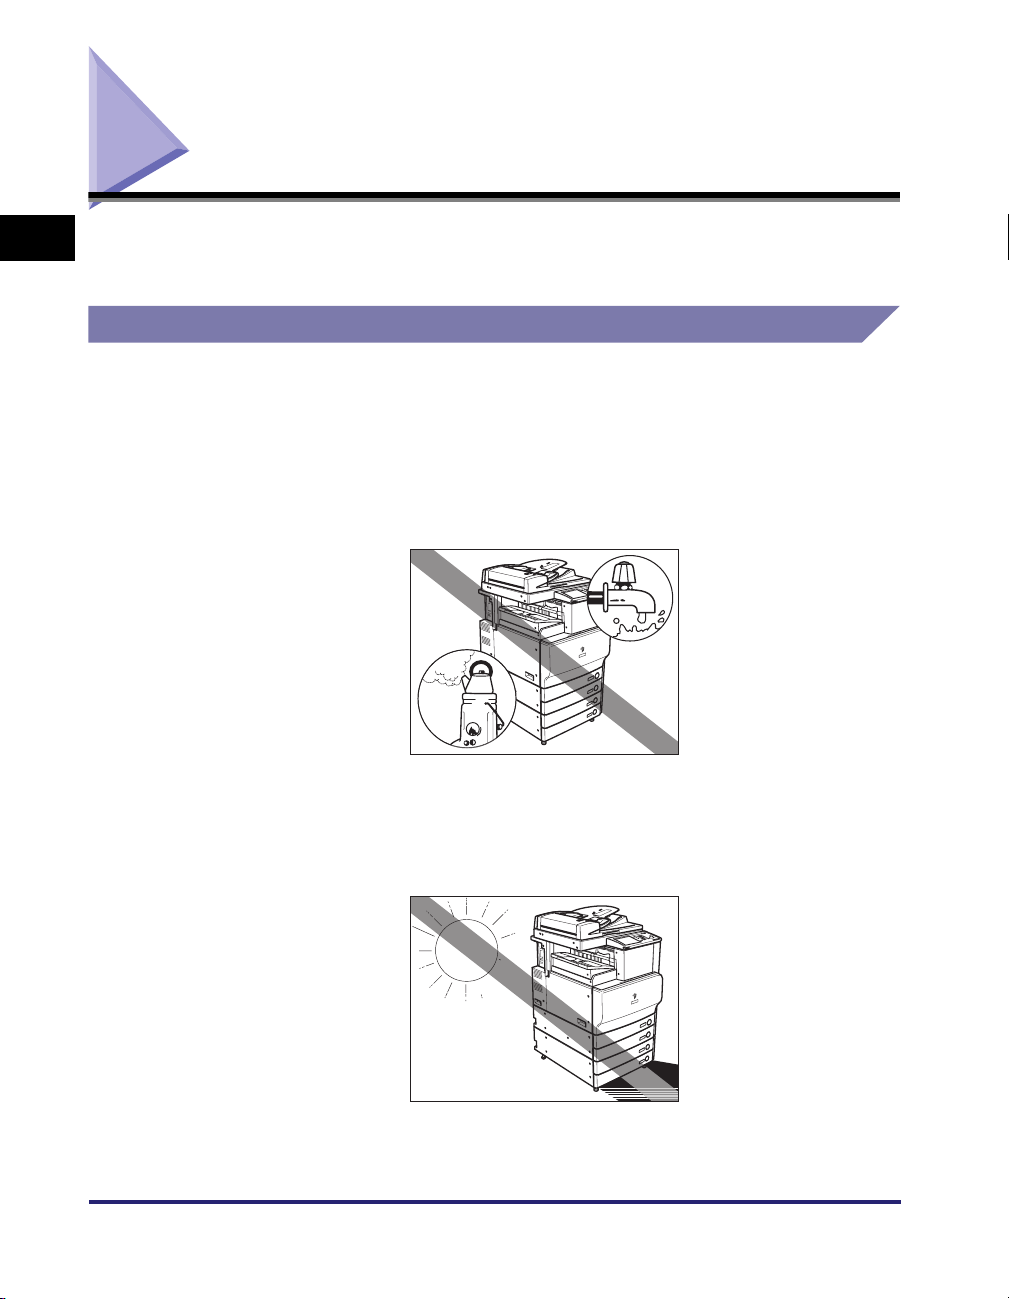
Avoid Installing the Machine in the Following Locations
■ Avoid locations subject to temperature and humidity extremes, whether
Before You Start Using This Machine
■ Avoid installing the machine in direct sunlight.
low or high.
For example, avoid installing the machine near water faucets, hot water heaters,
humidifiers, air conditioners, heaters, or stoves.
If this is unavoidable, use curtains to shade the machine. Be sure that the curtains do not
block the machine's ventilation slots or louvers, or interfere with the electrical cord or
power supply.
1-2
Installation Location and Handling
Page 47
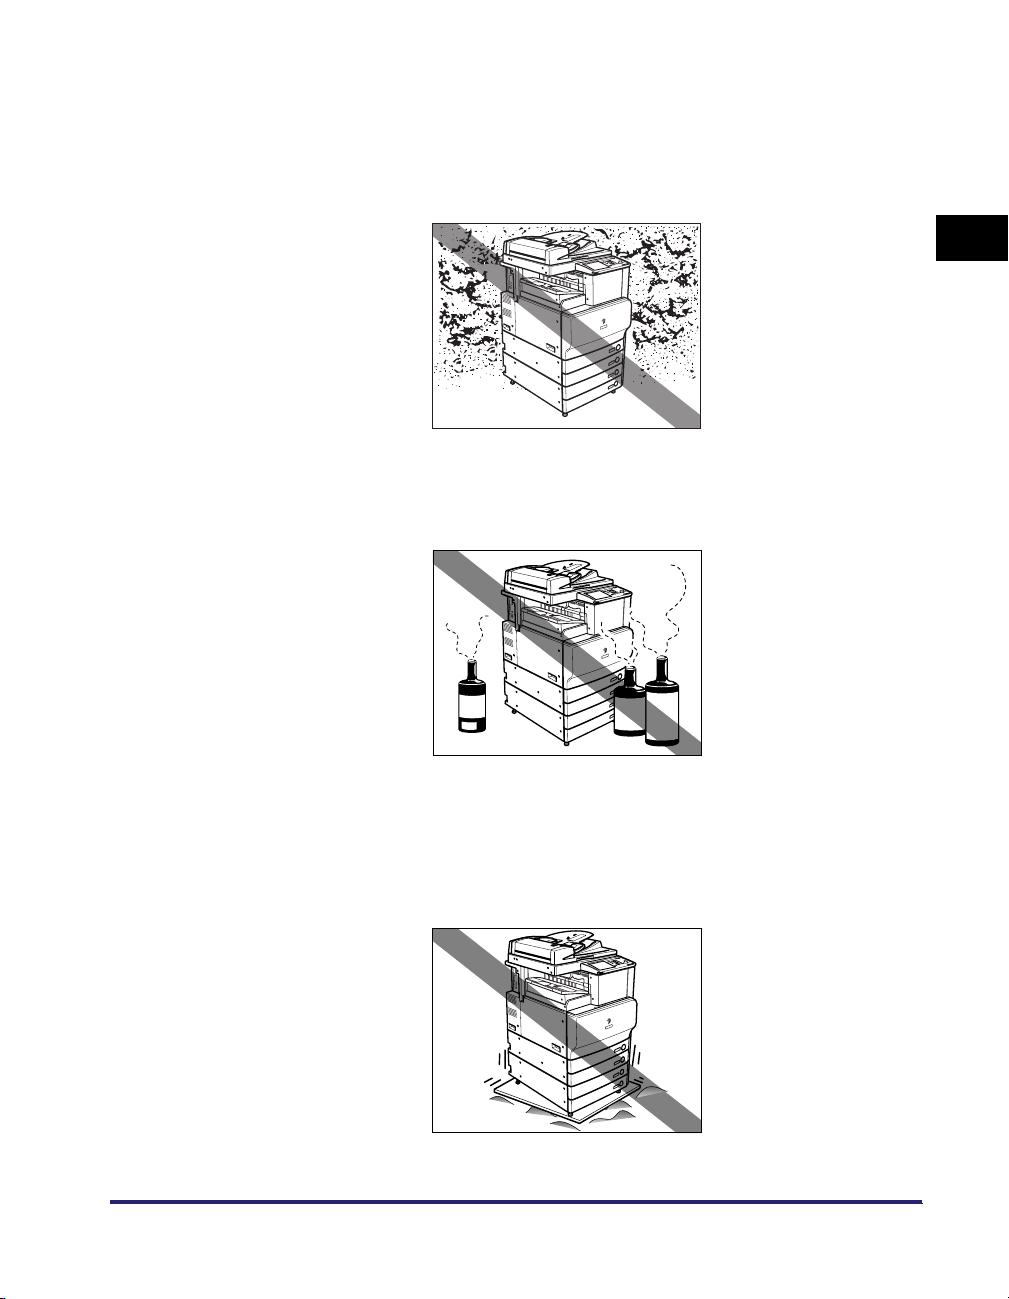
■ Avoid poorly ventilated locations.
This machine generates a slight amount of ozone during normal use. Although sensitivity
to ozone may vary, this amount is not harmful. Ozone may be more noticeable during
extended use or long production runs, especially in poorly ventilated rooms. It is
recommended that the room be appropriately ventilated, sufficient to maintain a
comfortable working environment, in areas of machine operation.
■ Avoid locations where a considerable amount of dust accumulates.
■ Avoid locations where ammonia gas is emitted.
1
Before You Start Using This Machine
■ Avoid locations near volatile or flammable materials, such as alcohol or
paint thinner.
■ Avoid locations that are subject to vibration.
For example, avoid installing the machine on unstable floors or stands.
Installation Location and Handling
1-3
Page 48
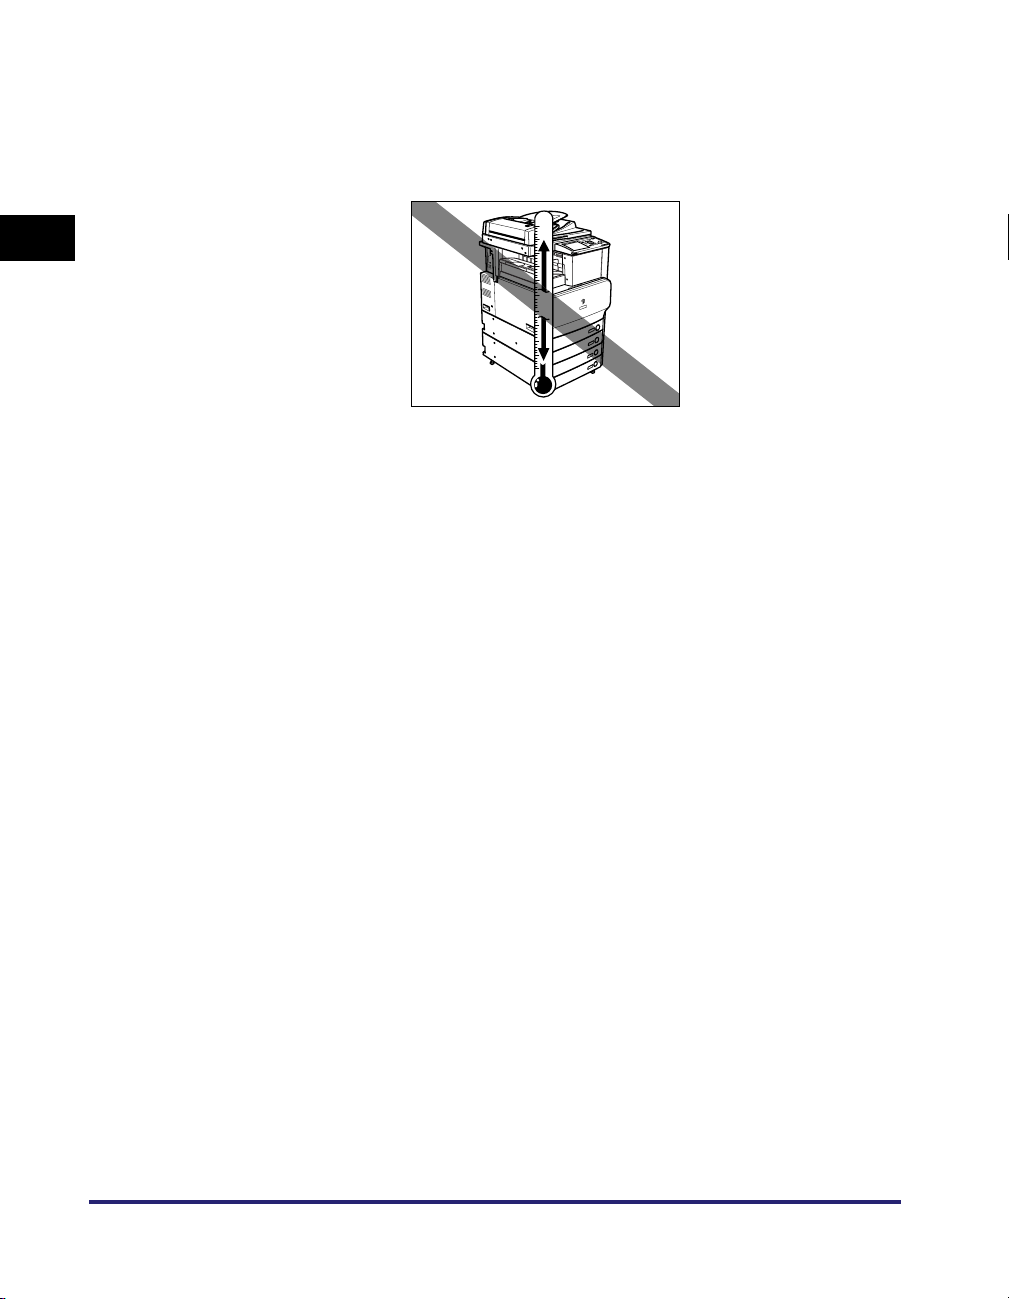
■ Avoid exposing the machine to rapid changes in temperature.
If the room in which the machine is installed is cold but rapidly heated, water droplets
(condensation) may form inside the machine. This may result in a noticeable degradation
in the quality of the copied image, the inability to properly scan an original, or the copies
having no printed image at all.
1
■ Avoid installing the machine near computers or other precision electronic
equipment.
Electrical interference and vibrations generated by the machine during printing can
adversely affect the operation of such equipment.
Before You Start Using This Machine
■ Avoid installing the machine near televisions, radios, or similar electronic
equipment.
The machine might interfere with sound and picture signal reception. Insert the power
plug into a dedicated power outlet, and maintain as much space as possible between the
machine and other electronic equipment.
■ Do not remove the machine's leveling feet.
Do not remove the machine's leveling feet after the machine has been installed. If you put
weight on the front of the machine while the drawers or units within the machine are pulled
out, the machine may fall forward. To prevent this from happening, make sure that the
machine's leveling feet are in place.
1-4
Installation Location and Handling
Page 49
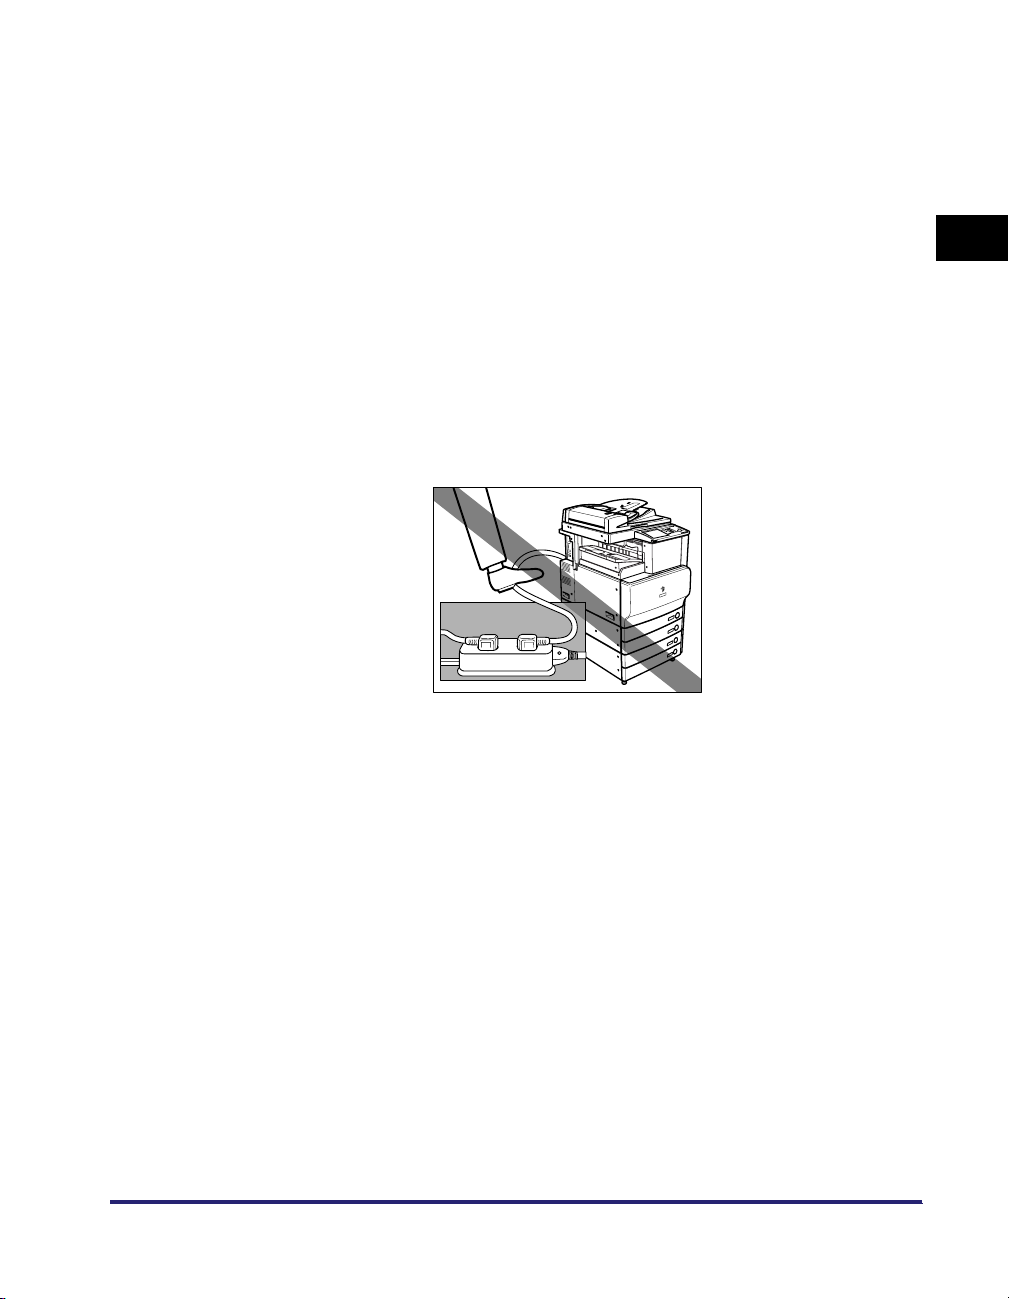
Select a Safe Power Supply
■ Plug the machine into a 120 V AC outlet.
■ Make sure that the power supply for the machine is safe, and has a steady
voltage.
■ Do not connect other electrical equipment to the same power outlet to
which the machine is connected.
■ Do not connect the power cord to a multiplug power strip, as this may
cause a fire or electrical shock.
■ The power cord may become damaged if it is often stepped on or if heavy
objects are placed on it. Continued use of a damaged power cord can lead
to an accident, such as a fire or electrical shock.
1
Before You Start Using This Machine
Installation Location and Handling
1-5
Page 50
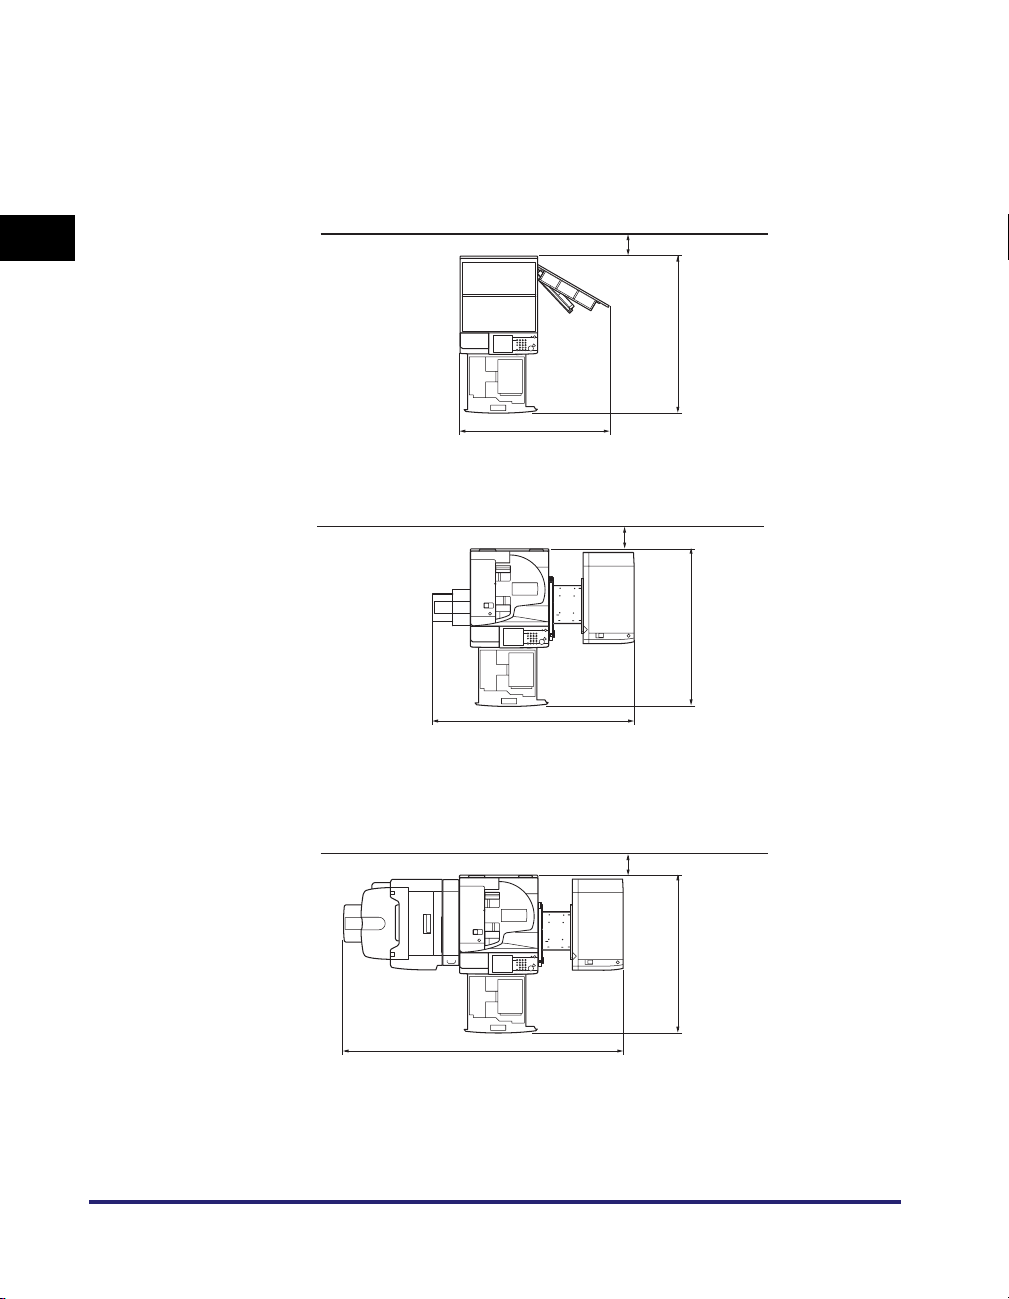
Provide Adequate Installation Space
■ Provide enough space on each side of the machine for unrestricted
operation.
No option is attached.
1
Before You Start Using This Machine
3 15/16" (100 mm) or more
52" (1,320 mm)
40 3/4" (1,035 mm)
The optional Feeder (DADF-L1), Finisher-Z1, and
Paper Deck-Z1 are attached.
3 15/16" (100 mm) or more
52" (1,320 mm)
63 3/8" (1,610 mm)
The optional Feeder (DADF-L1), Saddle Finisher-Y2,
Puncher Unit-M1, Buffer Pass Unit-E2, and Paper
Deck-Z1 are attached.
1-6
3 15/16" (100 mm) or more
52" (1,320 mm)
89 1/4" (2,268 mm)
Installation Location and Handling
Page 51
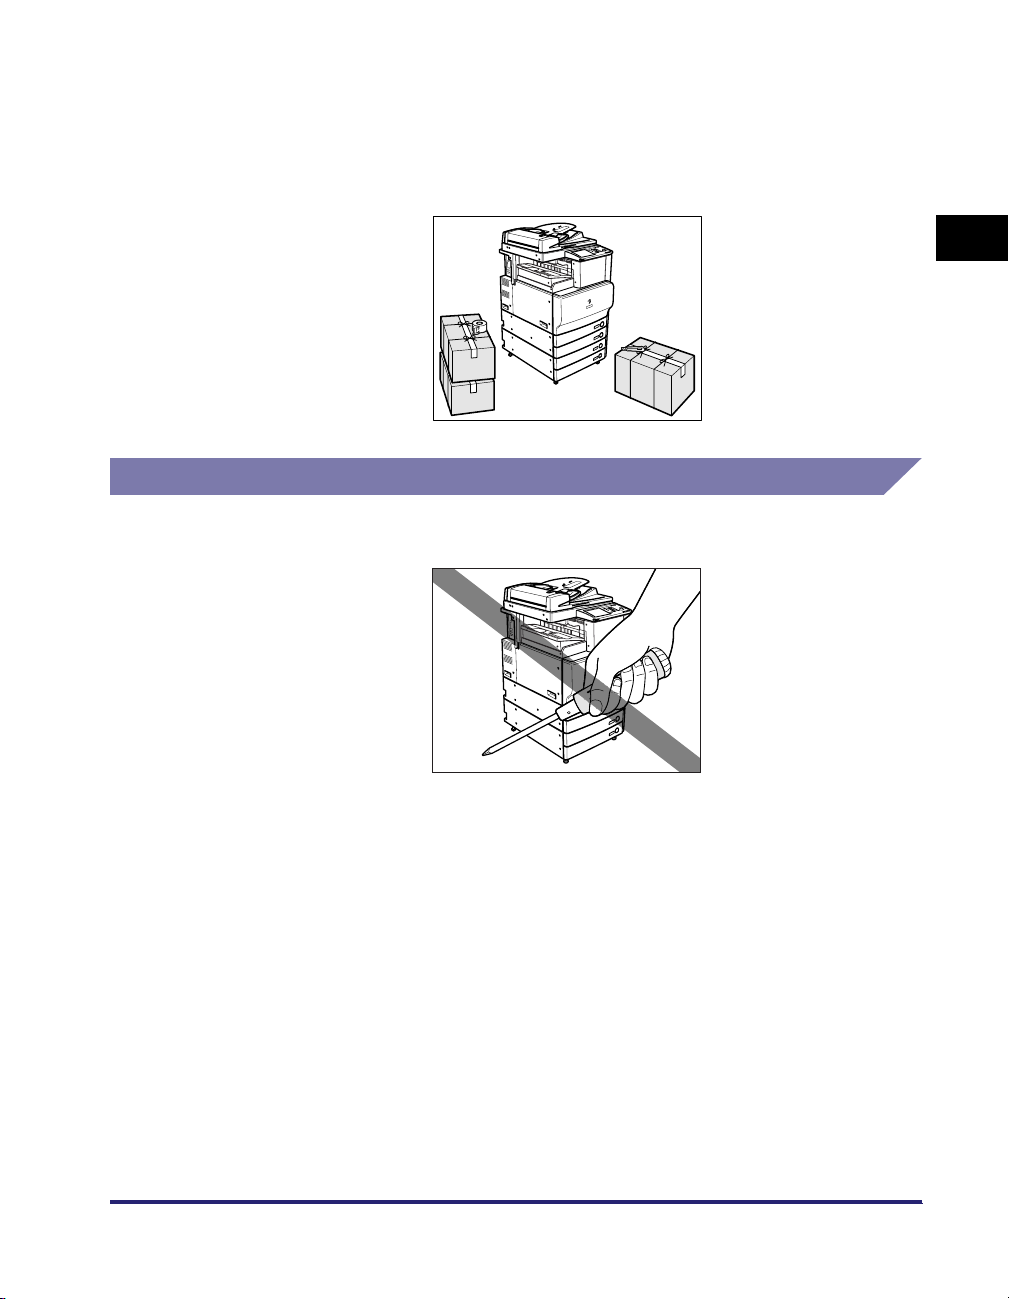
Moving the Machine
■ If you intend to move the machine, even to a location on the same floor of
your building, contact your local authorized Canon dealer beforehand. Do
not attempt to move the machine yourself.
Handling Precautions
1
■ Do not attempt to disassemble or modify the machine.
Before You Start Using This Machine
Installation Location and Handling
1-7
Page 52
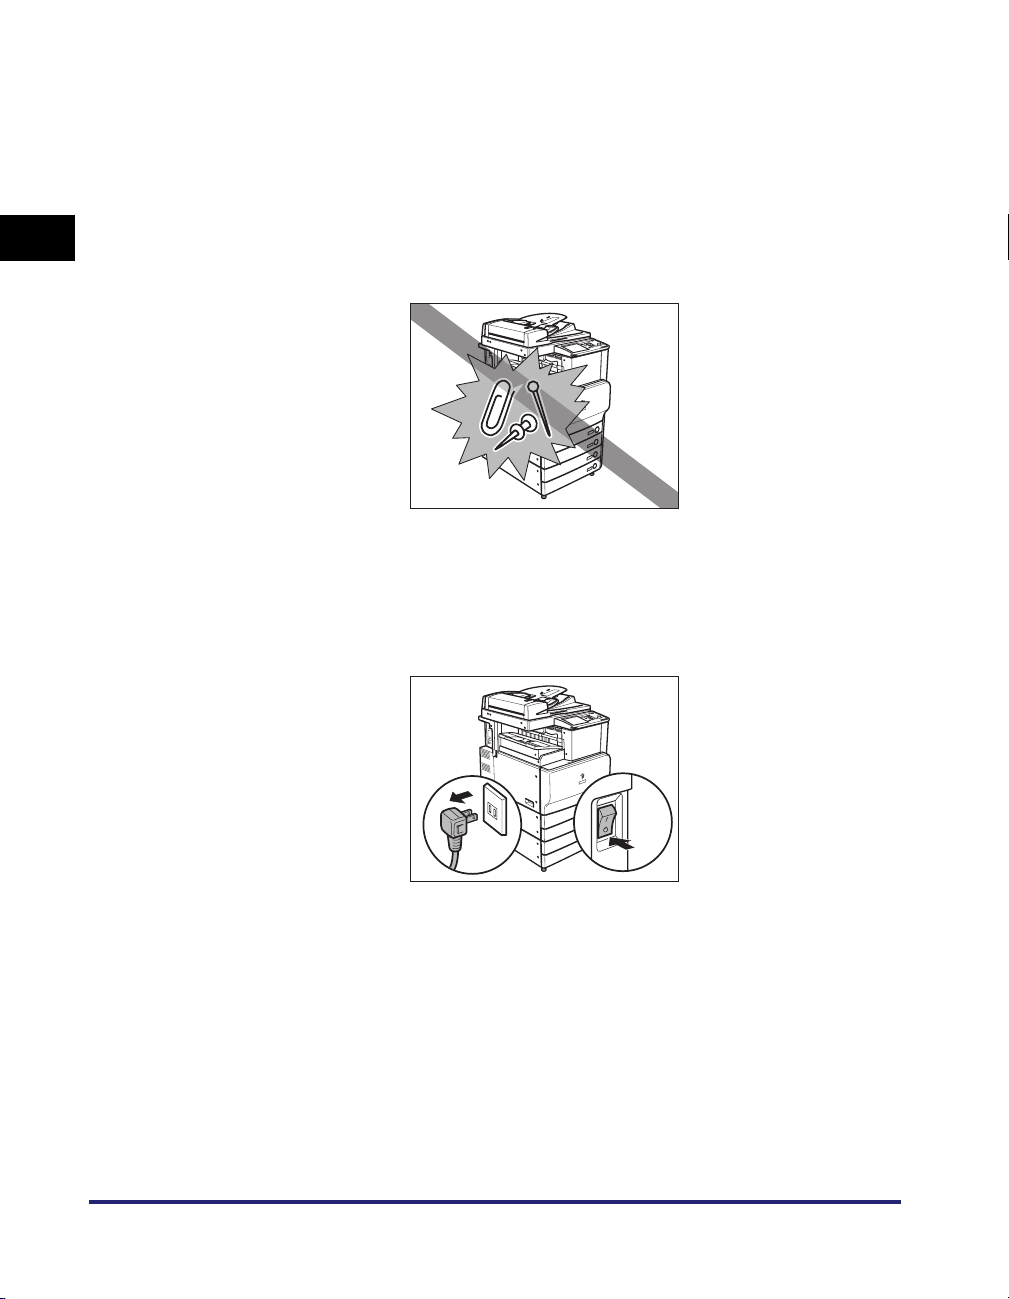
■ Some parts inside the machine are subject to high-voltages and
temperatures. Take adequate precautions when inspecting the inside of
the machine. Do not carry out any inspections not described in this
manual.
■ Be careful not to spill liquid or drop any foreign objects, such as paper
1
clips or staples inside the machine. If a foreign object comes into contact
with electrical parts inside the machine, it might cause a short circuit and
result in a fire or electrical shock.
Before You Start Using This Machine
■ If there is smoke, or unusual noise, immediately turn the main power
switch OFF, disconnect the power cord from the outlet, and call your local
authorized Canon dealer. Using the machine in this state may cause a fire
or electrical shock. Also, avoid placing objects around the power plug so
that the machine can be disconnected whenever necessary.
1-8
Installation Location and Handling
Page 53
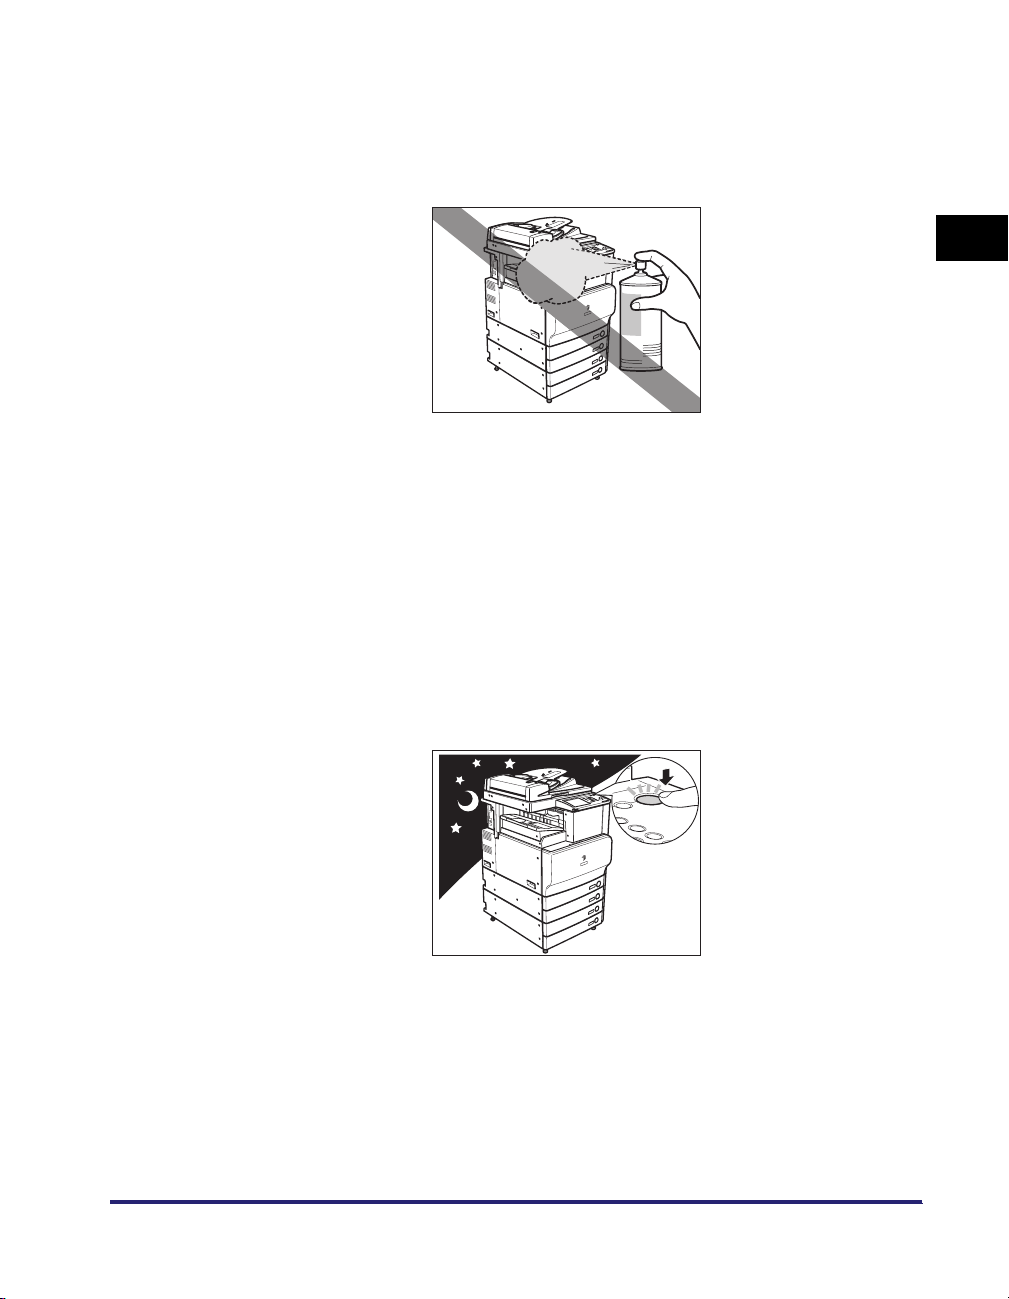
■ Do not turn the main power switch OFF or open the front covers while the
machine is in operation. This might result in paper jams.
■ Do not use flammable sprays, such as spray glue, near the machine. There
is a danger of ignition.
■ This machine generates a slight amount of ozone during normal use.
Although sensitivity to ozone may vary, this amount is not harmful. Ozone
may be more noticeable during extended use or long production runs,
especially in poorly ventilated rooms. It is recommended that the room be
appropriately ventilated, sufficient to maintain a comfortable working
environment, in areas of machine operation.
■ For safety reasons, turn OFF the control panel power switch of the
machine when it will not be used for a long period of time, such as
overnight. As an added safety measure, turn OFF the main power switch,
and disconnect the power cord when the machine will not be used for an
extended period of time, such as during consecutive holidays.
1
Before You Start Using This Machine
OFF
Installation Location and Handling
1-9
Page 54

Backing Up Data
1
Data such as the Address Book and Additional Functions settings are stored on the
internal hard disk of the machine.
Please regularly back up your important data, as it is possible that a malfunction in
the hard disk may cause received data and stored data to be lost.
Please note that Canon will not be held responsible for any damages caused by the
loss of data.
The data that can be backed up is indicated below.
■ Address Book, Additional Functions settings, forwarding settings, Mail
Before You Start Using This Machine
■ Data that can be backed up using the Device Information Delivery Settings
■ Data relating to MEAP
Box function data (User Inbox data, forms for the Form Composition mode)
For information on backing up (exporting) this data, see Chapter 3, "Customizing
Settings," in the Remote UI Guide.
mode
You can perform temporary backing up of your data by delivering data registered in the
machine to other client machines. For information on the Device Information Delivery
Settings mode, see "Specifying Device Information Delivery Settings," on p. 6-44.
• License files for MEAP applications
For information on backing up (downloading) license files, see the MEAP SMS
Administrator Guide.
• User authentication information registered for the Local Device Authentication system of
SDL (Simple Device Login)/SSO (Single Sign-On)
For information on backing up (exporting) user authentication information, see the MEAP
SMS Administrator Guide.
• Data stored by MEAP applications
You may be able to back up data stored by MEAP applications, depending on the
application. For more information, see the documentation for each MEAP application.
NOTE
If your machine is not connected to a network. it is recommended you print and store
important information such as the Address Book. See Chapter 12, "Printing
Communication Reports," in the Sending and Facsimile Guide.
1-10
Backing Up Data
Page 55
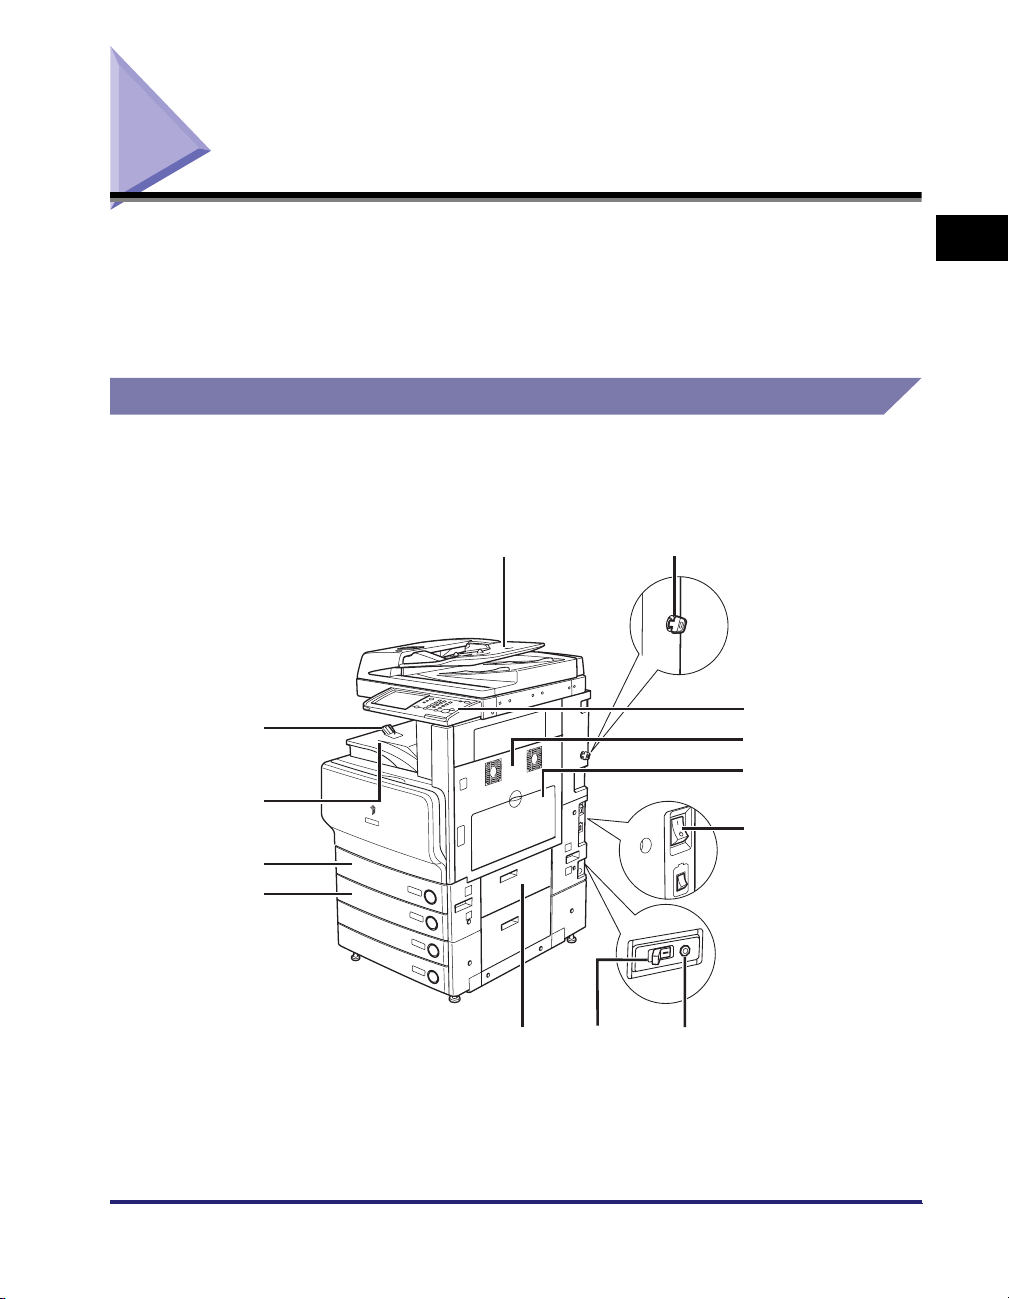
Parts and Their Functions
i
This section provides you with the names and functions of all the parts on the
outside and inside of the main unit, control panel, and the touch panel display. An
illustration of the machine with some optional equipment attached to it is also
provided. For more information on optional equipment, parts and their functions,
see Chapter 3, "Optional Equipment."
External View
The optional Feeder (DADF-L1) (standard-equipped for the Color
imageRUNNER C3380i/C2880i) and Cassette Feeding Unit-Y3
are attached.
m
l
a
b
1
Before You Start Using This Machine
c
d
e
f
k
j
h
g
Parts and Their Functions
1-11
Page 56

a Feeder (DADF-L1) (Optional)
Originals placed in the feeder are automatically
fed sheet by sheet to the platen glass for
scanning. The feeder also automatically turns
over two-sided originals to make two or one
sided copies. The feeder is standard-equipped
for the Color imageRUNNER C3380i/C2880i.
1
b Security Key (Optional)
For managing the use of the machine and
preventing unauthorized copies. (See "Legal
Limitations on the Usage of Your Product and
the Use of Images," on p. xxix.)
c Control Panel
Includes the keys, touch panel display, and
indicators required for operating the machine.
(See "Control Panel Parts and Functions," on p.
1-14.)
d Main Unit's Upper Right Cover, Main
Unit's Lower Right Cover
Open this cover when clearing a paper jam
inside the main unit. (See "Screens Indicating
Before You Start Using This Machine
the Locations of Paper Jams," on p. 8-4.)
e Stack Bypass
Use the stack bypass to feed paper manually,
and for loading nonstandard paper stock, such
as envelopes. (See "Making Prints Using the
Stack Bypass," on p. 2-41.)
f Main Power Switch
Press to the "I" side to turn the power ON. (See
"Main Power and Control Panel Power," on p.
1-15.)
g Test Button
Press this button to periodically test the circuit
breaker. (See "Periodic Inspection of the
Breaker," on p. xxxix.)
h Breaker
Detects excess current or leakage current. (See
"Periodic Inspection of the Breaker," on p. xxxix.)
i Paper Drawer's Right Cover
Open this cover when clearing a paper jam in
Paper Drawers 1 and 2.
j Paper Drawer 2
Holds up to 550 sheets of paper (20 lb bond
2
(80 g/m
)).
k Paper Drawer 1
Holds up to 550 sheets of paper (20 lb bond
2
(80 g/m
)).
l Output Tray
Prints and copies are output to this tray.
m Output Paper Tray Guide
Tilt the output paper tray guide up to prevent
output papers from falling down.
NOTE
For more information on the optional equipment that can be attached to the machine, see
Chapter 3, "Optional Equipment."
1-12
Parts and Their Functions
Page 57
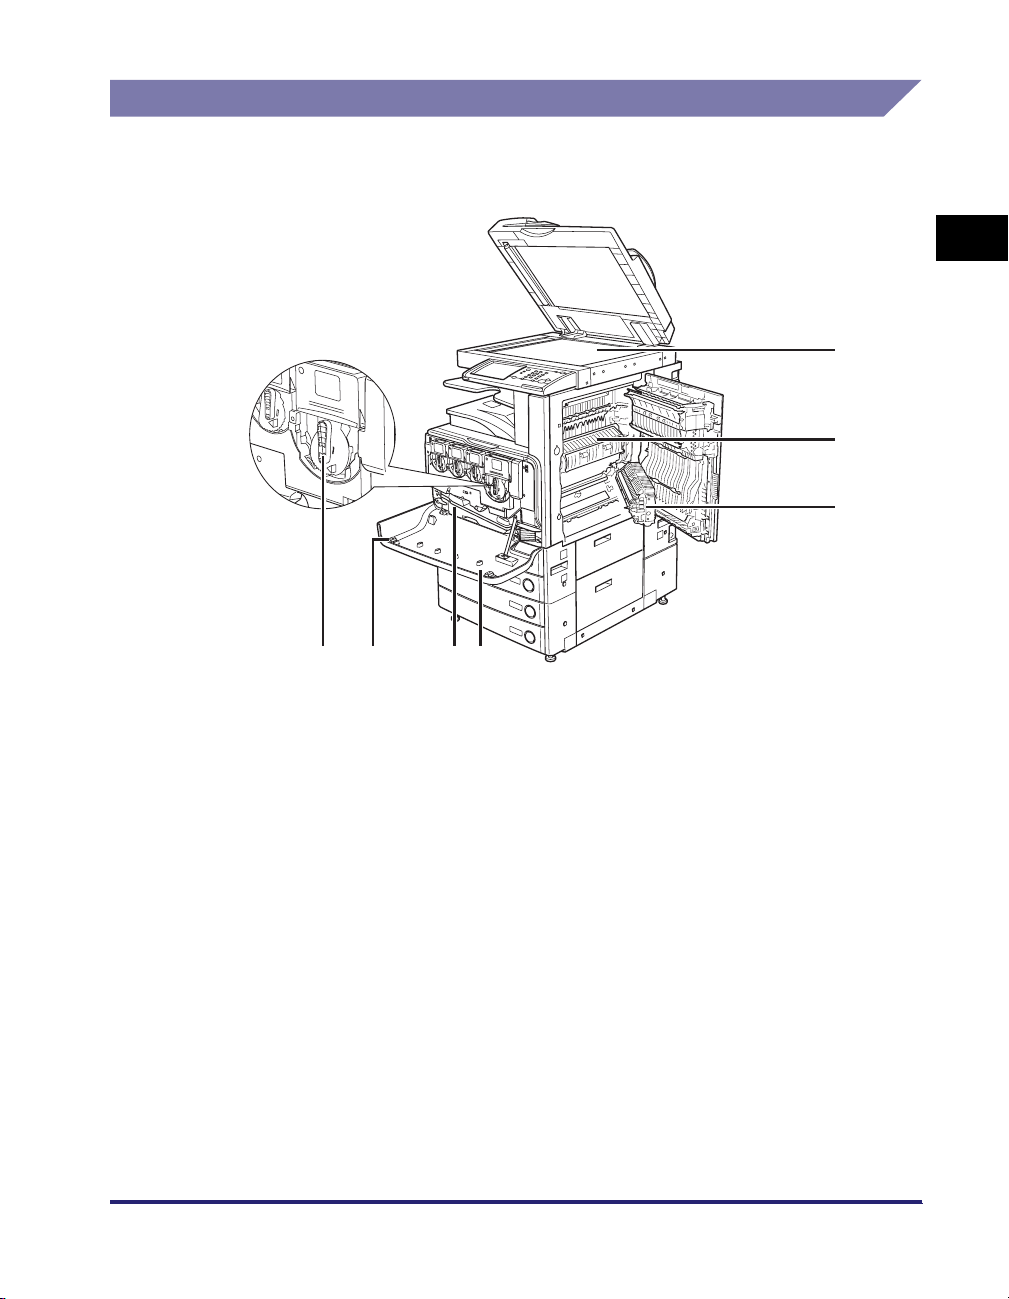
Internal View
The optional Feeder (DADF-L1) (standard-equipped for the Color
imageRUNNER C3380i/C2880i) and Cassette Feeding Unit-Y3 are attached.
1
a
b
c
Before You Start Using This Machine
g
f
a Platen Glass
Use the platen glass when scanning books, thick
originals, thin originals, transparencies, etc.
b Fixing Unit's Upper Cover
Open this cover to clear a paper jam in the fixing
unit. (See "Fixing Unit (Inside the Main Unit)," on
p. 8-11.)
c Duplexing Unit
Pull out the duplexing unit to clear a paper jam.
(See "Duplexing Unit (Inside the Main Unit)," on
p. 8-16.)
d Front Cover
Open this cover to replace the toner cartridges
or to clean the dust proof glass.
de
e Waste Toner Container
Collects the waste toner.
f Dust Proof Glass Cleaner
Place the tool for cleaning the dust proof glass
here.
g Toner Cartridge
When toner of a specific color runs out, pull out
the toner cartridge, and replace it with a new
one. Toner cartridges are sold separately (not
standard equipment). (See "Consumables," on
p. 7-64.)
Parts and Their Functions
1-13
Page 58
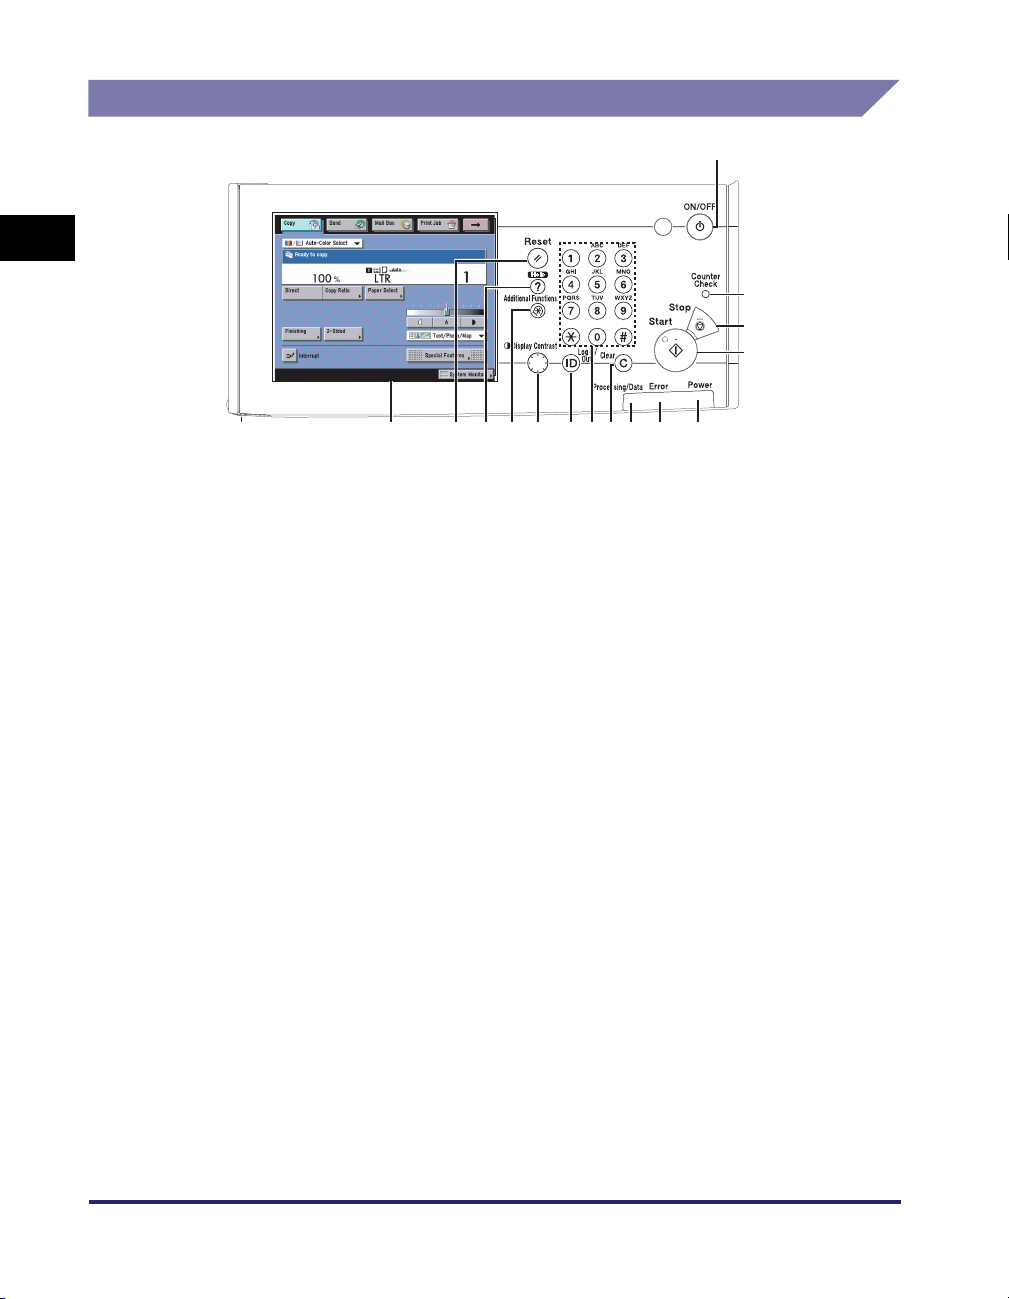
efghijklmnpo
Control Panel Parts and Functions
a
1
b
c
d
a Control Panel Power Switch (Sub Power
Supply)
Press to turn the control panel ON or OFF. When
Before You Start Using This Machine
the control panel power switch is held for more
than three seconds, it initiates the Shutdown
mode. (See "Shutting Down the Machine," on p.
1-21.) When turned OFF, the machine is in the
Sleep mode.
b Counter Check key
Press to display the copy and print count totals
on the touch panel display.
c Stop key
Press to stop a job in progress, such as a scan,
copy, or fax (scanning only) job.
d Start key
Press to start an operation.
e Main Power Indicator
Lights when the main power is turned ON.
f Error Indicator
Flashes or lights if there is an error in the
machine. When the Error indicator flashes,
follow the instructions that appear on the touch
panel display. When the Error indicator
maintains a steady red light, contact your local
authorized Canon dealer.
g Processing/Data Indicator
Flashes or blinks green when the machine is
performing operations, and maintains a steady
green light when fax data is stored in memory.
h Clear key
Press to clear entered values or characters.
i Numeric keys
Press to enter numerical values.
j ID (Log in/Out) key
Press when setting or enabling Department ID
Management.
k Display Contrast Dial
Use to adjust the brightness of the touch panel
display.
l Additional Functions key
Press to specify additional functions.
m Help key
Press to display explanations and instructions of
modes or functions on the touch panel display.
n Reset key
Press to restore the standard settings of the
machine.
o Touch Panel Display
The settings screen for each function is shown
on this display.
p Edit Pen
Use to designate areas on the original to copy or
scan. If you lose the edit pen, contact your local
authorized Canon dealer. Do not use an object
with a sharp end on the control panel, such as a
pencil or ballpoint pen, in place of the edit pen.
1-14
Parts and Their Functions
Page 59
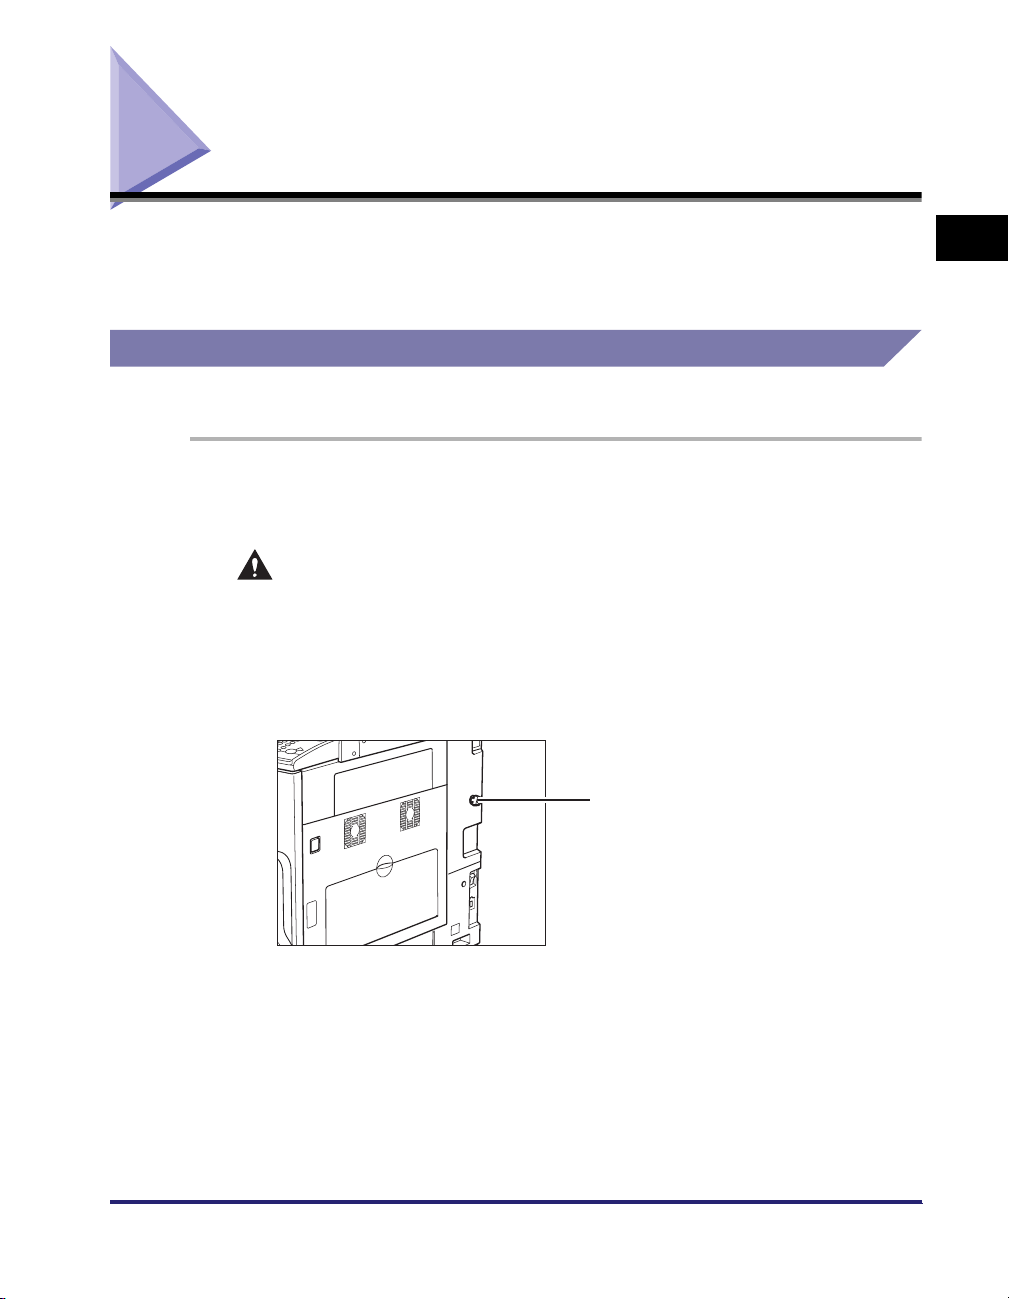
Main Power and Control Panel Power
The machine is provided with two power switches, a main power switch and a
control panel power switch, as well as a breaker that detects excess current or
leakage current.
How to Turn ON the Main Power
This section explains how to turn ON the main power.
1
Make sure that the power plug is firmly inserted into the
power outlet.
WAR NING
Do not connect or disconnect the power cord with wet hands, as this may
result in electrical shock.
2
If the optional security key is inserted into the machine, make
sure that it is in the ON position (turn it to the right).
1
Before You Start Using This Machine
Security Key
Main Power and Control Panel Power
1-15
Page 60
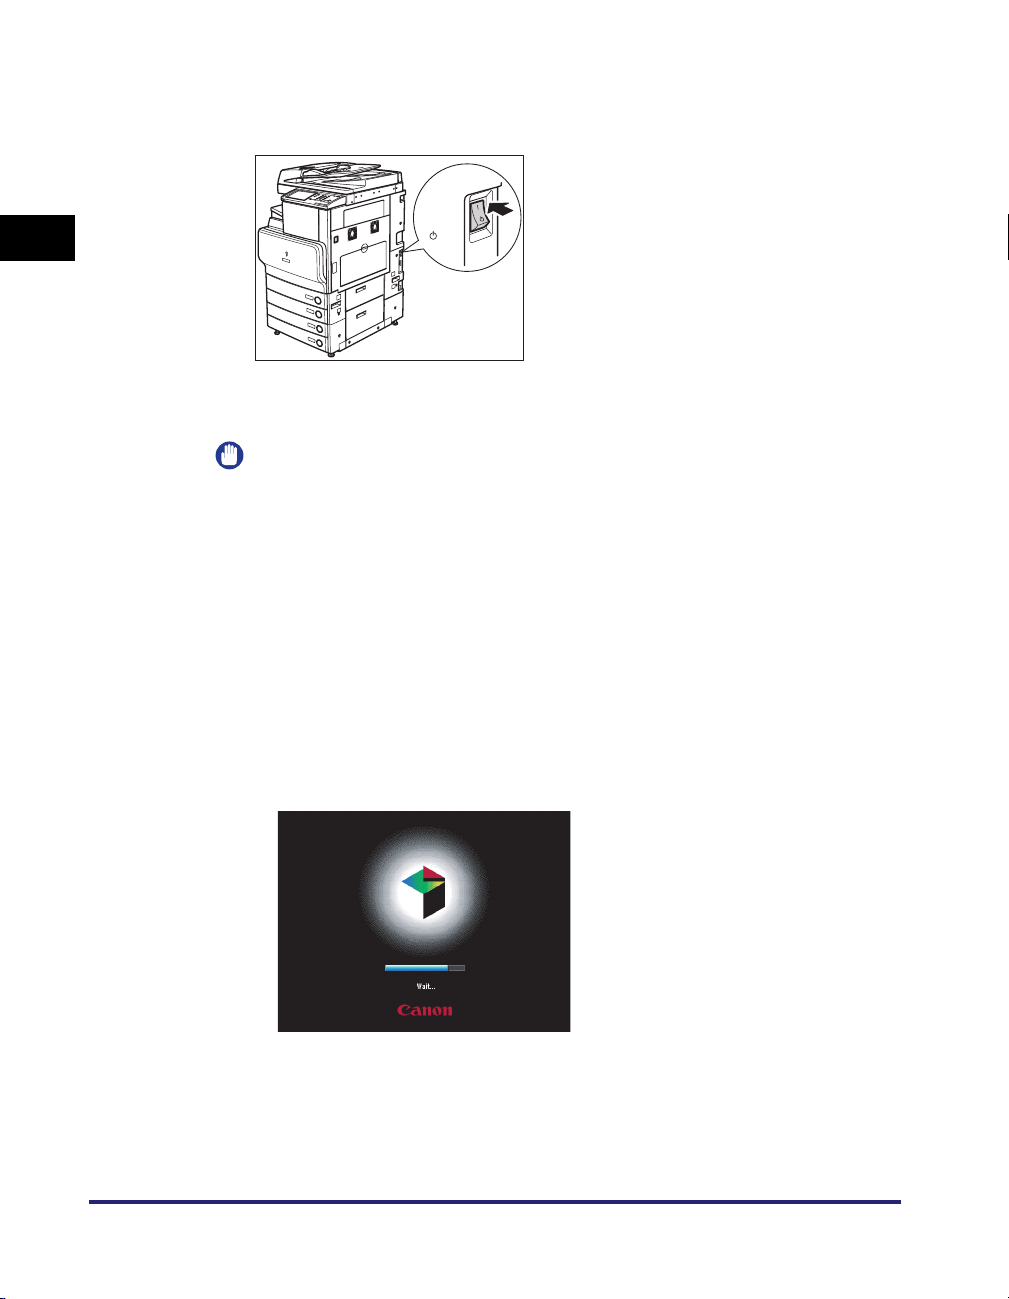
3
Press the main power switch to the "I" side. The main power
switch is located on the right side of the machine.
( I side)
1
Before You Start Using This Machine
( side)
The main power indicator on the control panel lights when the main power switch
is turned ON.
IMPORTANT
If the main power indicator on the control panel does not light even though the main
power switch is ON, be sure to check the breaker to see if it is OFF. (See "When the
Power Does Not Turn ON," on p. 8-93.)
4
The screens shown below are displayed while the system
software is loading.
● If login authentication by a login service (SDL (Simple Device Login)
or SSO (Single Sign-On)) is not set, and an application other than
MEAP is selected as the initial function in Common Settings (from
the Additional Functions screen):
❑
The Start Up screen is displayed until the machine is ready to scan.
1-16
If a message is displayed on the touch panel display, proceed to step 5.
Main Power and Control Panel Power
Page 61
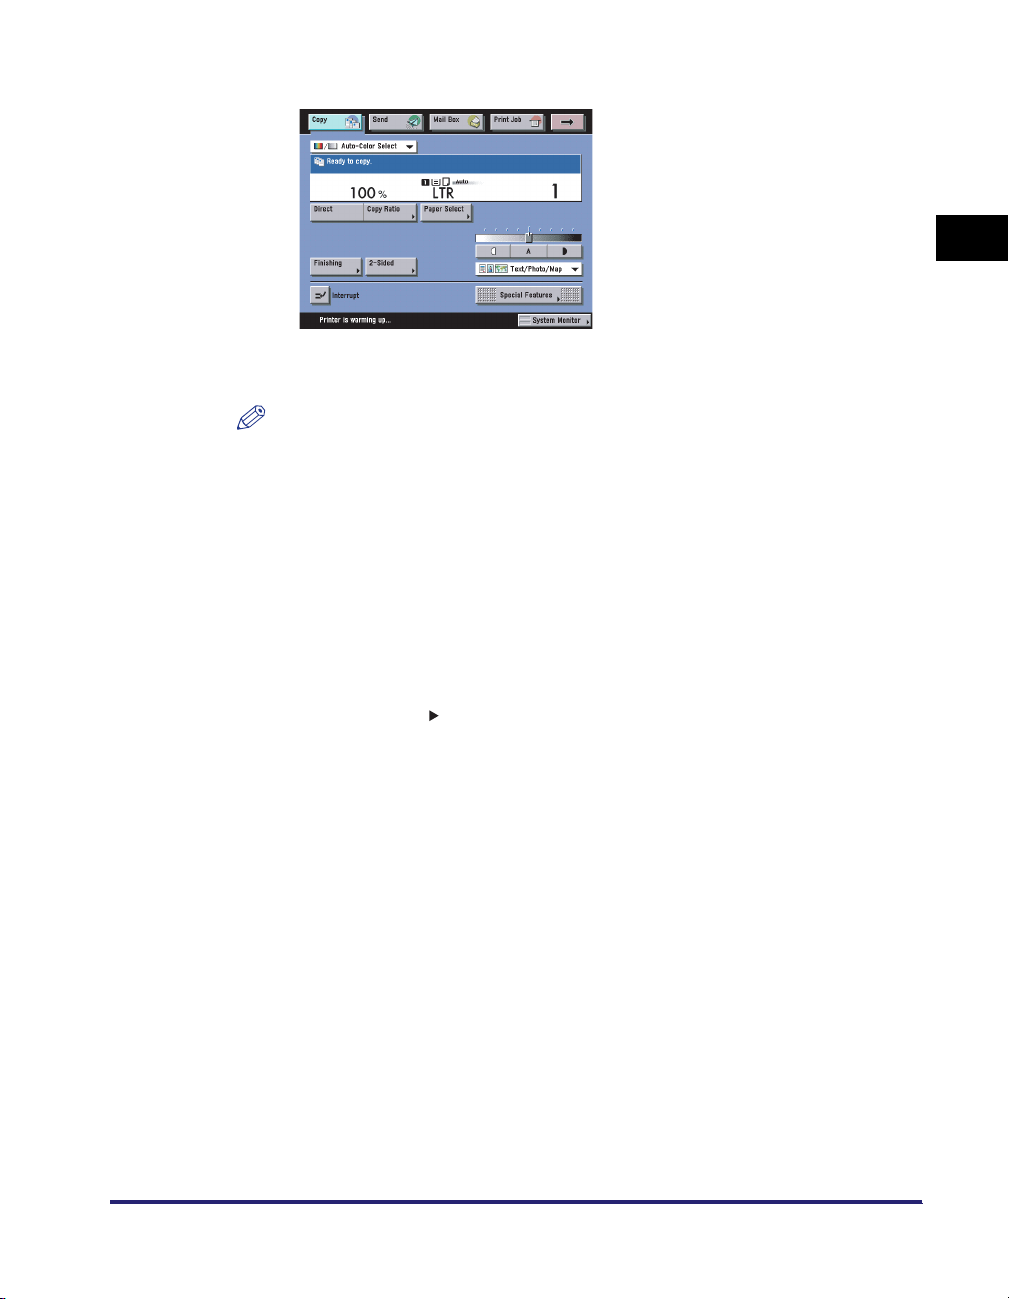
❑ The screen below is displayed when the machine is ready to scan.
The machine is ready to scan in approximately 38 seconds after the screen
above appears.
NOTE
•
Once the message <Reservation copies can be made.> appears on the touch
panel display, you can specify settings, and copying or printing begins
automatically as soon as the machine finishes warming up. (See Chapter 1,
"Introduction to the Copy Functions," in the Copying and Mail Box Guide.)
•
In the case above, the standard settings are selected.
•
The standard copy settings are:
- Copy Ratio: Direct (100%)
- Paper Selection: Auto Paper Selection
- Copy Exposure: Manual Exposure Adjustment
- Copy Quantity: 1
- Color Mode: Auto-Color Select
- Copy Function: 1 1-sided copy
•
The standard settings for each function of the machine (Copy, Mail Box, Send, and
Fax) are already set at the factory, but you can change them to suit your needs.
(See Chapter 8, "Customizing Settings," in the Copying and Mail Box Guide, and
Chapter 9, "Customizing Communications Settings," in the Sending and Facsimile
Guide.)
•
You can select which functions to display on the Basic Features screen when
turning ON the main power, according to the Additional Functions settings. (See
"Initial Function at Power ON," on p. 4-27.)
•
If you press [➞] on the Basic Features screen right after the machine is activated,
the screen will be blank. Wait for a moment, and then press [
•
If a Macintosh, which has been shut down, is connected to the machine via a USB
cable, when you turn the machine ON, the Macintosh may also turn ON. In this
case, disconnect the Macintosh from the machine. (You may also be able to solve
this problem by using a USB hub between the machine and the Macintosh).
➞
] again.
1
Before You Start Using This Machine
Main Power and Control Panel Power
1-17
Page 62
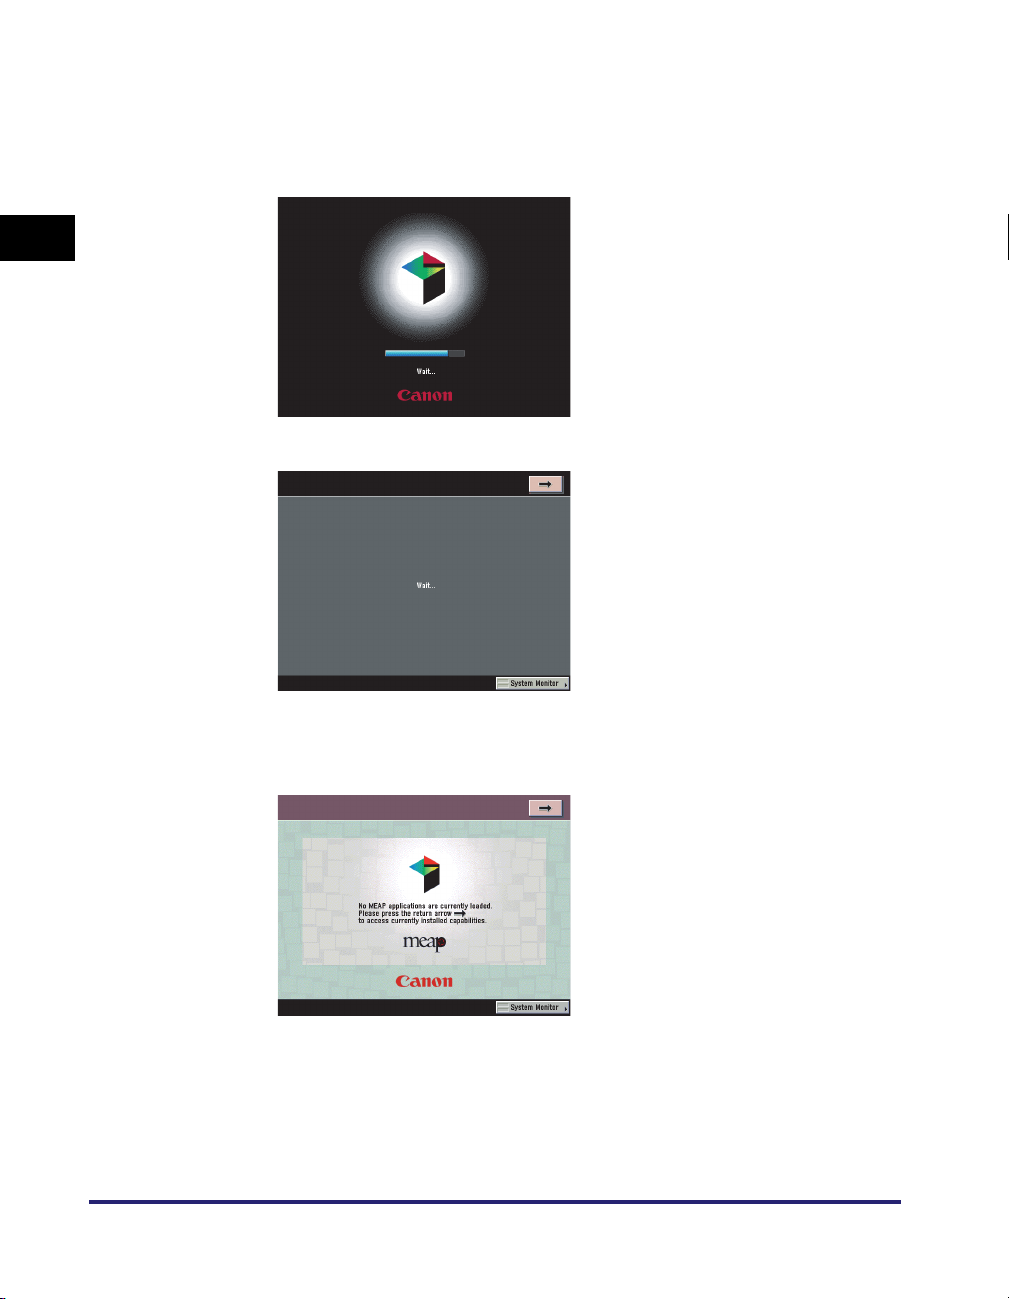
1
Before You Start Using This Machine
● If login authentication by a login service (SDL or SSO) is not set, and
MEAP is selected as the initial function in Common Settings (from
the Additional Functions screen):
❑
The Start Up screen is displayed until the machine is ready to scan.
❑ After the Start Up screen disappears, the MEAP Start Up screen is displayed.
1-18
You can press [➞] to switch to the Basic Features screen to use the Copy, Mail
Box, etc. functions even if the MEAP Start Up screen is still displayed.
❑ The MEAP Application screen is displayed.
Main Power and Control Panel Power
Page 63
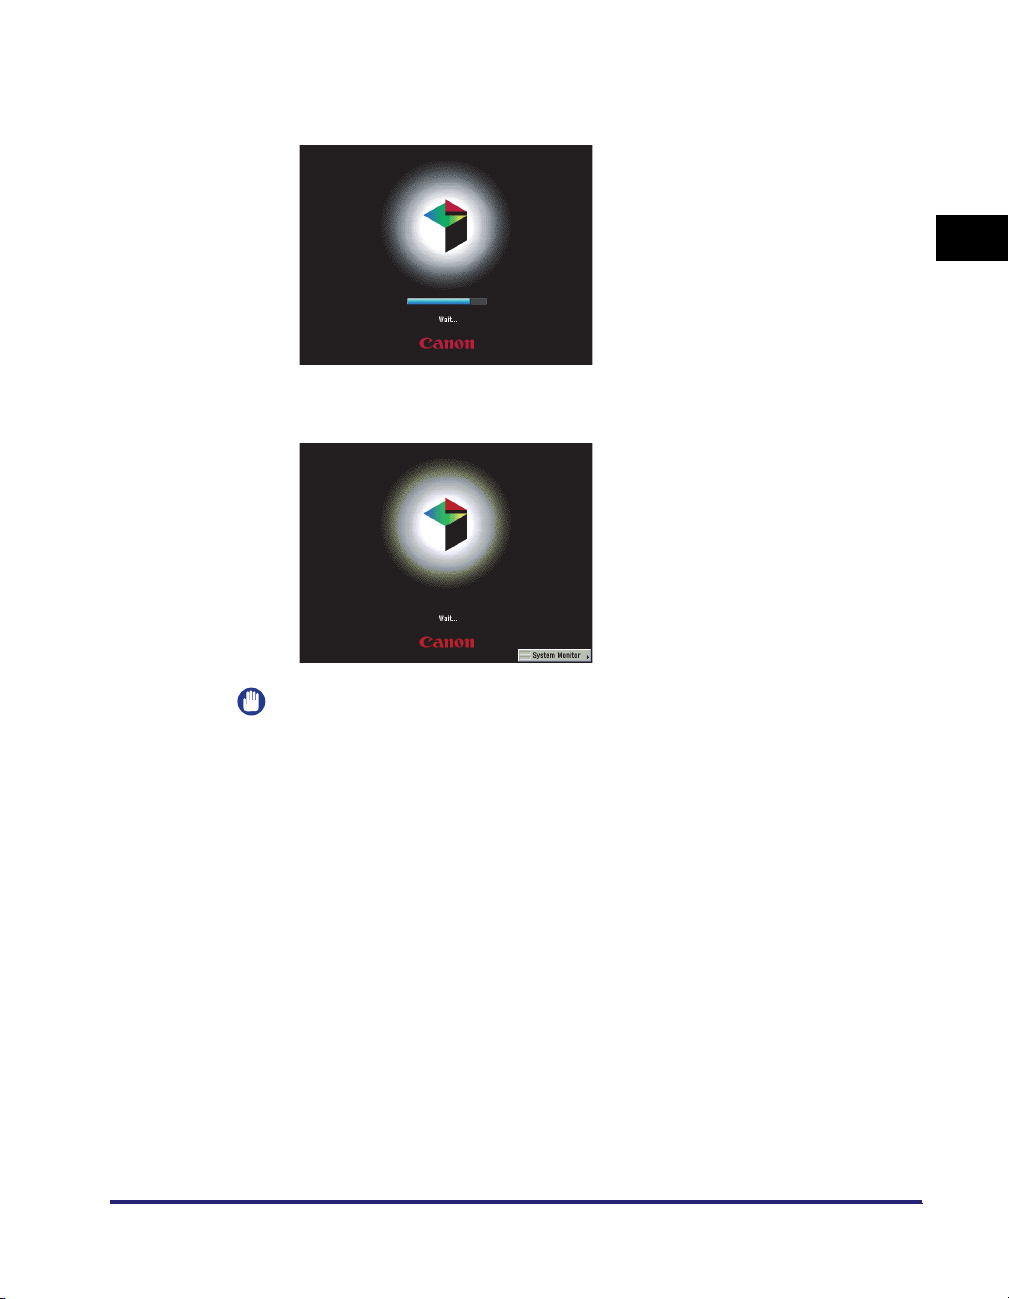
● If login authentication by a login service (SDL or SSO) is set:
❑
The Start Up screen is displayed until the machine is ready to scan.
❑ After the Start Up screen disappears, the MEAP Start Up screen is displayed
regardless of the Set as Initial Function settings.
1
Before You Start Using This Machine
IMPORTANT
•
If you turn OFF the main power, wait at least 10 seconds before turning the main
power back ON. For instructions on restarting (turning the main power switch OFF
and then ON) the machine, see "Main Power and Control Panel Power," on p. 1-15.
•
Do not turn the main power OFF, if you want to send or receive I-fax documents.
Also, do not turn the main power OFF, if the optional Super G3 FAX Board or Super
G3 Multi-Line Fax Board is installed, and you want to be able to send or receive fax
documents. Sending or receiving I-fax or fax documents cannot be done when the
main power is turned OFF.
•
If SSO or SDL is set as the login service, the machine will take longer to become
ready to scan.
Main Power and Control Panel Power
1-19
Page 64
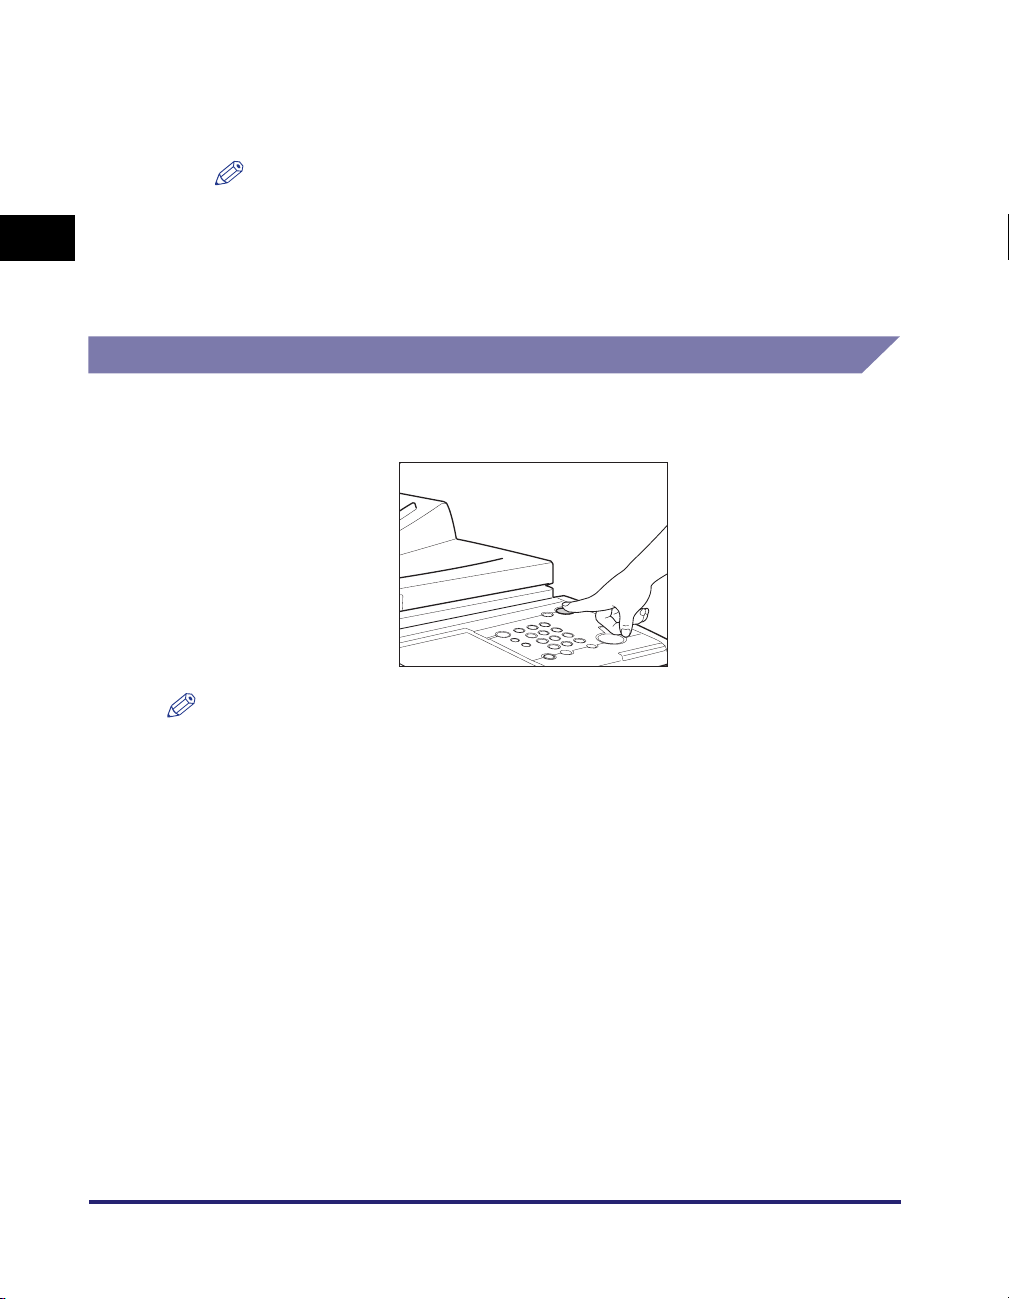
1
Control Panel Power Switch
Press the control panel power switch to cancel the Sleep mode and resume normal
machine operations.
Before You Start Using This Machine
5
If you are using a login service, log in using the procedure for
the login service you are using.
NOTE
•
If you are using Department ID Management with the optional Card Reader-C1,
see "Procedure before Using the Machine," on p 3-38.
•
If you are using Department ID Management, see "Entering the Department ID and
Password," on p. 2-26.
•
If you are using SDL or SSO, see "Using a Login Service," on p. 2-29.
1-20
NOTE
•
The machine can receive and print documents from a personal computer when it is in the
Sleep mode. I-fax and fax documents can also be received while the machine is in the
Sleep mode.
•
It takes 15 to 30 seconds to recover after the Sleep mode is deactivated.
•
If Energy Consumption in Sleep Mode is set to 'Low', it may take more than 10 seconds
for the touch panel display to be displayed after pressing the control panel power switch.
Main Power and Control Panel Power
Page 65

Shutting Down the Machine
If there are any jobs currently being processed, or a MEAP application is running
when the Shutdown mode is activated, the machine asks you to confirm and cancel
any existing jobs, and then access to the hard disk is restricted. This procedure
protects the hard disk from access errors the next time the machine is turned ON.
When the machine shuts down, it also performs an internal cooling down process,
which enables the machine to be shut down safely. Follow the instructions below to
safely shutdown the machine.
CAUTION
If you turn the main power of the machine OFF without following the procedure
below, copies output the next time the machine is turned ON may not be printed
correctly. In this case, printing will return to normal after a certain number of
copies are output.
1
Press and hold the control panel power switch for more than
three seconds.
If the machine is in the Sleep mode, press the control panel power switch one
time to cancel the Sleep mode, and then press and hold the control panel power
switch again for more than three seconds.
1
Before You Start Using This Machine
The job confirmation screen is displayed.
IMPORTANT
Do not initiate the Shutdown mode while fonts are being downloaded.
NOTE
•
You can also force the machine into the Shutdown mode by pressing
(Additional Functions)
•
You cannot force the machine into the Shutdown mode in the following cases:
- When the machine is receiving and updating device information
- When the machine is importing or exporting data using the Remote UI function
•
In a rare instance, the machine may not go into the Shutdown mode even if you
press and hold the control panel power switch for more than three seconds. In this
case, follow the instructions on the touch panel display to turn OFF the main power.
•
If print data is sent while the machine is in the Shutdown mode, the machine may
receive the data, depending on the print data's size. However, the print data is not
printed.
➞
[Common Settings] ➞ [Shutdown Mode].
Main Power and Control Panel Power
1-21
Page 66
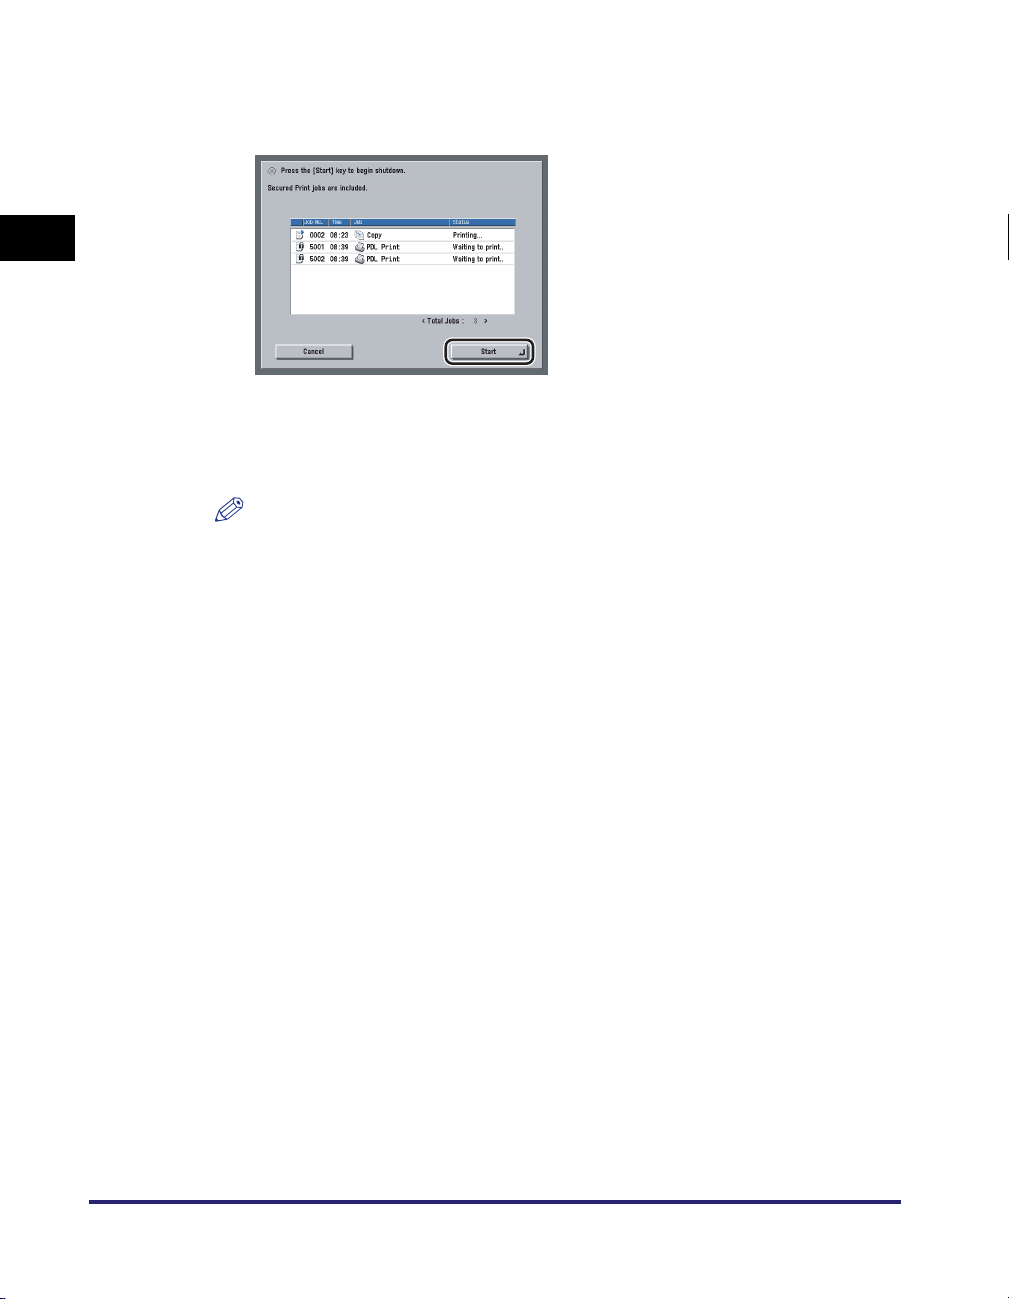
1
Before You Start Using This Machine
2
Confirm the jobs currently being processed or waiting to be
processed ➞ press [Start].
Jobs continue to be processed until [Start] is pressed.
To cancel the Shutdown mode, press [Cancel].
If there are no current jobs, proceed to step 4.
NOTE
•
Jobs that are displayed on the job confirmation screen are:
- Current copy, fax, and print jobs (including secured print jobs)
- Copy and print jobs (including secured print jobs) that are waiting to be processed
•
On the job confirmation screen, the current job is displayed on the first line, and the
other jobs are processed in the order in which they were reserved (up to seven
jobs).
1-22
Main Power and Control Panel Power
Page 67
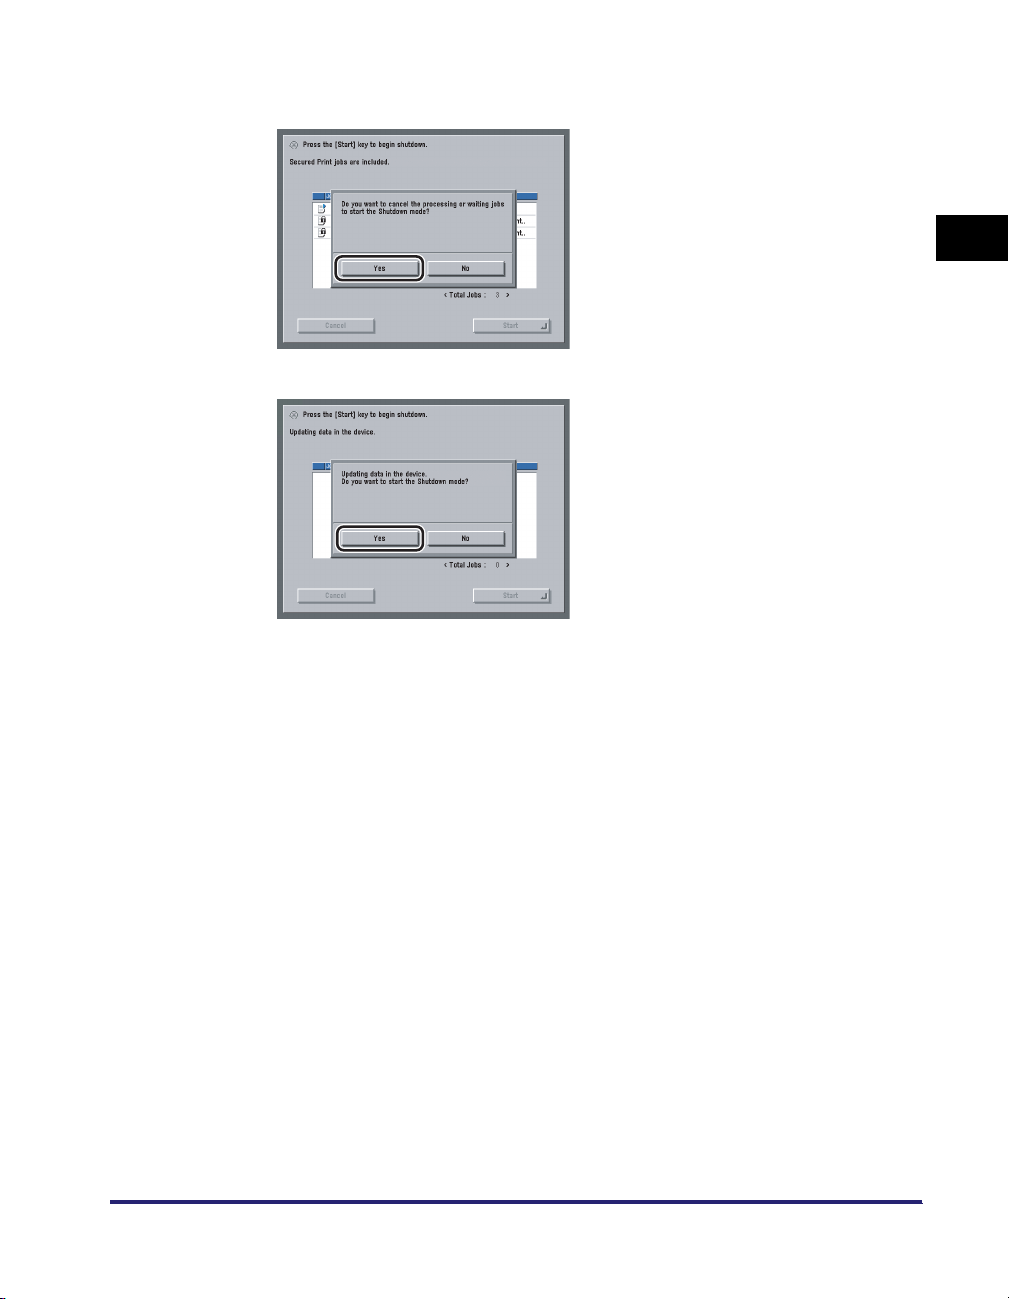
3
Confirm the message displayed ➞ press [Yes].
If There Are Jobs Currently Being Processed or Waiting to Be Processed
If the Device Information Is Being Delivered
All of the jobs on the confirmation screen being processed or waiting to be
processed are canceled. The machine and any network communication
processes also start to shut down.
The Performing Shutdown screen appears.
1
Before You Start Using This Machine
Main Power and Control Panel Power
1-23
Page 68
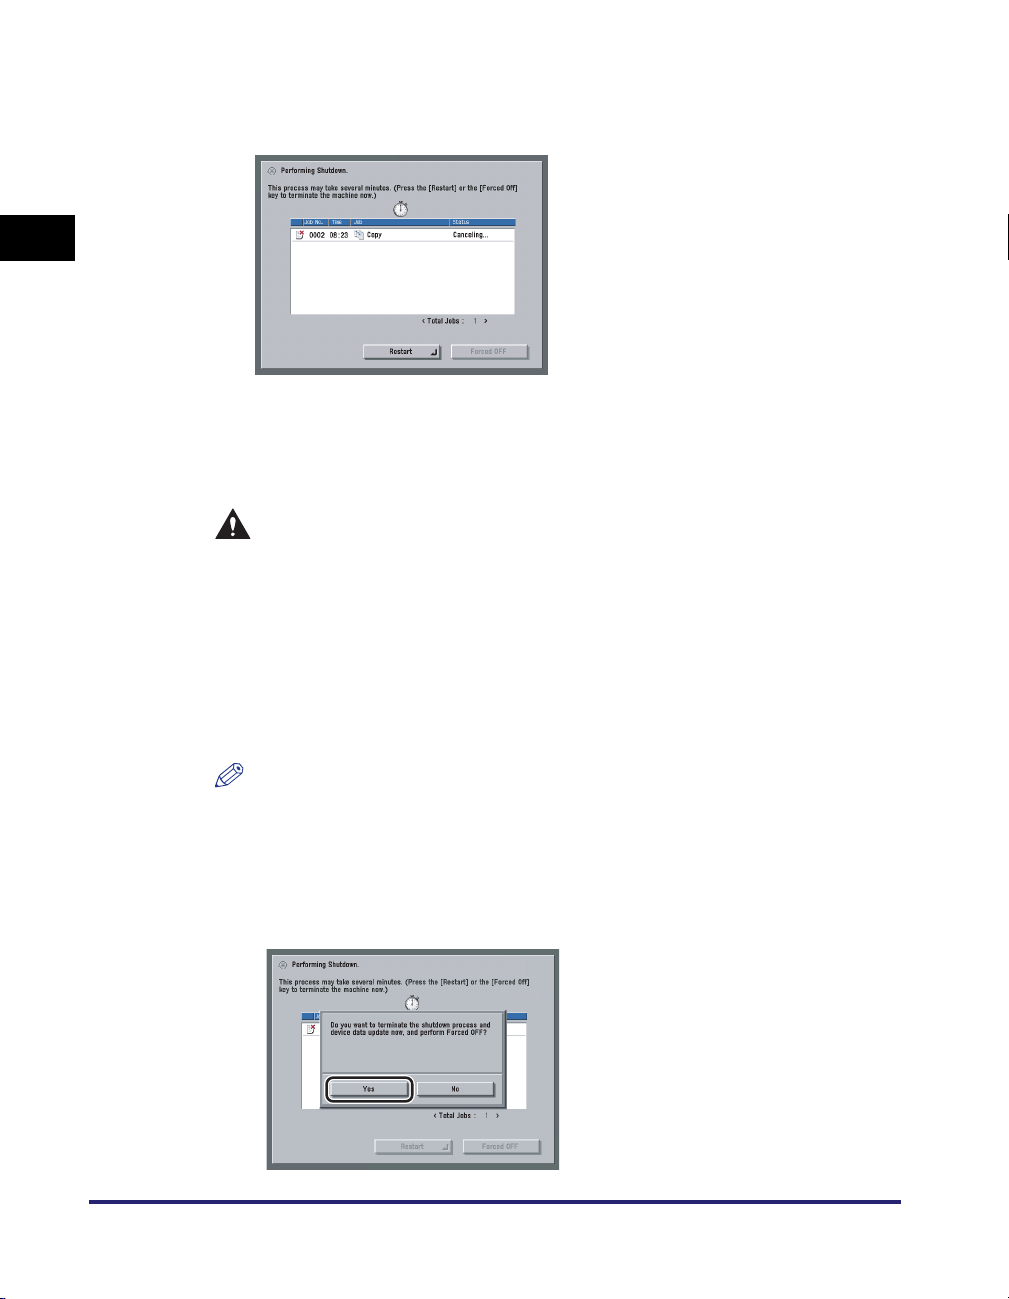
1
Before You Start Using This Machine
4
When the following screen appears, wait for the machine to
complete the shutdown process.
If you need to immediately operate the machine after starting the shutdown
process, press [Restart] ➞ [Yes].
If you press [Restart] when device information is being updated, a message
asking for your confirmation to continue appears on the screen. Press [Yes].
CAUTION
You can also force the shutdown of the machine (omitting the normal job
cancellation process) by pressing [Forced Off]. If you press [Forced Off]
while data is being processed or the machine is shutting down, a message
asking for your confirmation to continue appears on the screen. Press
[Yes]. However, as it is possible that this will destroy data which is being
processed or cause damage to the machine, it is not recommended. Note
that Canon will not be liable for any damages resulting from the loss of
data on the hard disk drive. For more information, contact your local
authorized Canon dealer.
NOTE
•
It may take some time for the machine to completely shut down depending on the
application you are using.
•
The screen below is displayed when you press [Forced Off] in any of the following
cases.
- When the hardware is in finishing process
- When device information is being updated
1-24
Main Power and Control Panel Power
Page 69
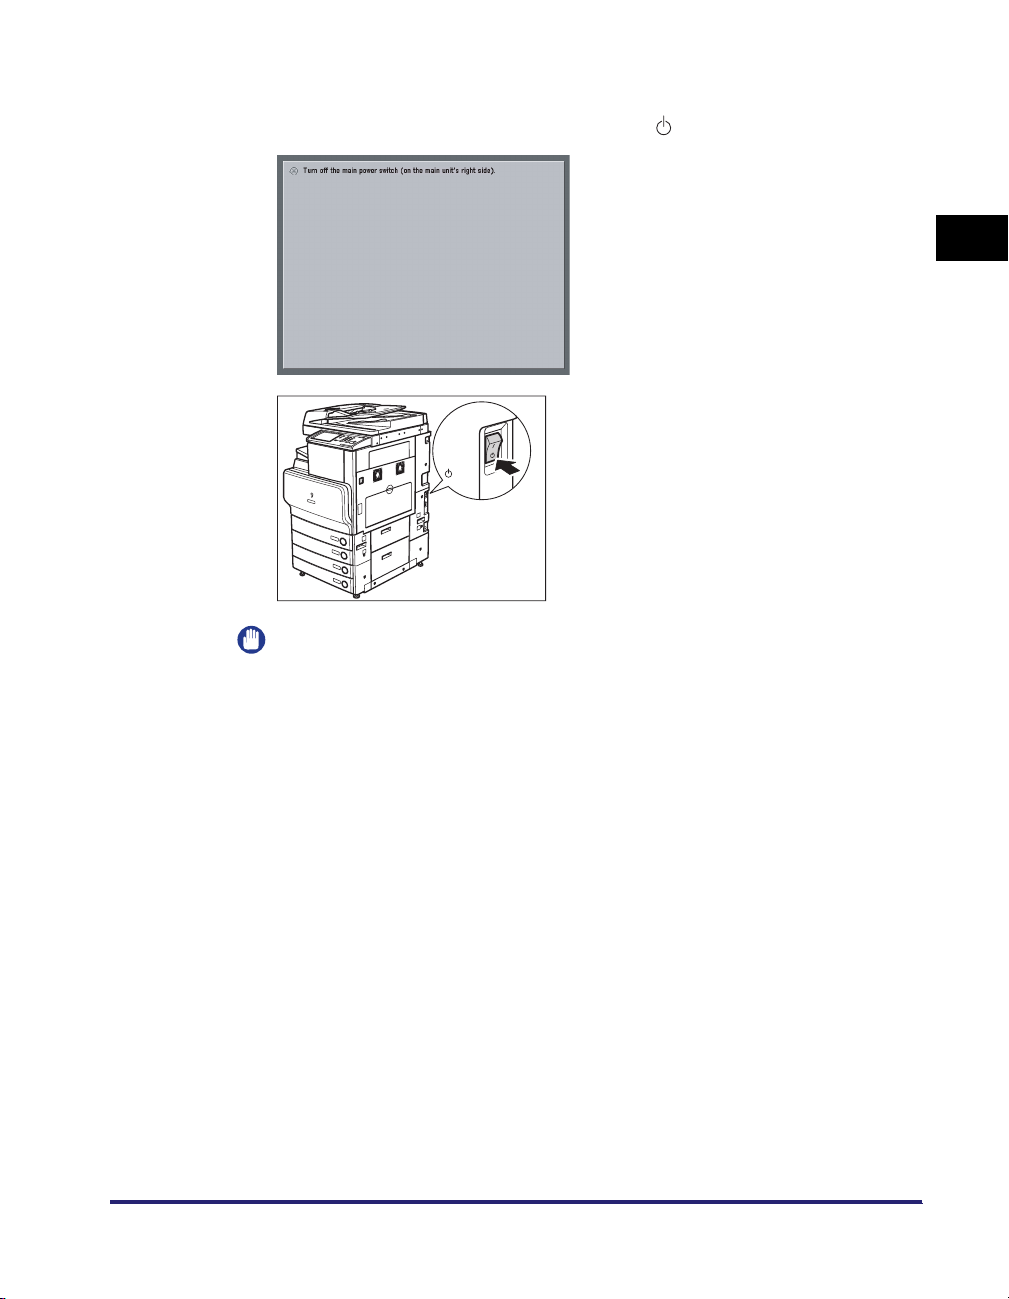
5
Confirm the contents of the shutdown screen ➞ turn the main
power switch of the machine to the " " side.
( I side)
( side)
IMPORTANT
The machine may continue to operate during or after the shutdown process. Do not
unplug the power cord until the device sounds stop.
1
Before You Start Using This Machine
Main Power and Control Panel Power
1-25
Page 70

System Settings
1
Before You Start Using This Machine
It is necessary to set up the machine before using it on a network, as a printer, or
with the Fax function.
To set up the machine, refer to the following guides or sections for instructions:
■ Connecting the Machine to the Network
■ Setting Up the Network
■ Installing the Printer Driver
■ Using the Send Function
■ Using the Fax Function
■ Date and Time Settings
■ System Manager Settings
See the Network Quick Start Guide.
See the Network Guide.
See the PS Driver Guide, PCL Driver Guide, UFR II Driver Guide, Mac PS Driver Guide,
or Mac UFR II Driver Guide.
See the Sending and Facsimile Guide.
See the Sending and Facsimile Guide.
See "Current Date and Time," on p. 6-25.
See "Specifying the System Manager Settings," on p. 6-3.
1-26
System Settings
Page 71

Basic Operations
This chapter describes the main features and basic operations of the machine.
What This Machine Can Do . . . . . . . . . . . . . . . . . . . . . . . . . . . . . . . . . . . . . . . . . . . . . . . 2-2
Overview of the Color imageRUNNER C3380/C3380i/C2880/C2880i . . . . . . . . . . . . . . . 2-5
The Touch Panel Display . . . . . . . . . . . . . . . . . . . . . . . . . . . . . . . . . . . . . . . . . . . . . . . . . . . . . . .2-5
Adding New Functions . . . . . . . . . . . . . . . . . . . . . . . . . . . . . . . . . . . . . . . . . . . . . . . . . . . . . . . . .2-8
Specifying Settings. . . . . . . . . . . . . . . . . . . . . . . . . . . . . . . . . . . . . . . . . . . . . . . . . . . . . . . . . . .2-10
Functions That Conserve Power . . . . . . . . . . . . . . . . . . . . . . . . . . . . . . . . . . . . . . . . . . . . . . . . 2-11
Checking, Changing, and Canceling Print Jobs . . . . . . . . . . . . . . . . . . . . . . . . . . . . . . . . . . . . . 2-13
Displaying a Help Screen . . . . . . . . . . . . . . . . . . . . . . . . . . . . . . . . . . . . . . . . . . . . . . . . . . . . . . 2-15
Reading Messages from the System Manager . . . . . . . . . . . . . . . . . . . . . . . . . . . . . . . . . . . . .2-17
Other Useful Functions. . . . . . . . . . . . . . . . . . . . . . . . . . . . . . . . . . . . . . . . . . . . . . . . . . . . . . . . 2-18
Using the Touch Panel Display . . . . . . . . . . . . . . . . . . . . . . . . . . . . . . . . . . . . . . . . . . . . 2-21
Frequently Used Keys. . . . . . . . . . . . . . . . . . . . . . . . . . . . . . . . . . . . . . . . . . . . . . . . . . . . . . . . .2-21
Touch Panel Key Display . . . . . . . . . . . . . . . . . . . . . . . . . . . . . . . . . . . . . . . . . . . . . . . . . . . . . .2-22
Adjusting the Brightness. . . . . . . . . . . . . . . . . . . . . . . . . . . . . . . . . . . . . . . . . . . . . . . . . . . . . . . 2-23
Entering Characters from the Touch Panel Display . . . . . . . . . . . . . . . . . . . . . . . . . . . . 2-24
Entering Characters . . . . . . . . . . . . . . . . . . . . . . . . . . . . . . . . . . . . . . . . . . . . . . . . . . . . . . . . . .2-24
Values in Inches . . . . . . . . . . . . . . . . . . . . . . . . . . . . . . . . . . . . . . . . . . . . . . . . . . . . . . . . . . . . . 2-25
Entering the Department ID and Password . . . . . . . . . . . . . . . . . . . . . . . . . . . . . . . . . .2-26
CHAPTER
Using a Login Service. . . . . . . . . . . . . . . . . . . . . . . . . . . . . . . . . . . . . . . . . . . . . . . . . . . 2-29
Placing Originals. . . . . . . . . . . . . . . . . . . . . . . . . . . . . . . . . . . . . . . . . . . . . . . . . . . . . . . 2-33
Document Sizes . . . . . . . . . . . . . . . . . . . . . . . . . . . . . . . . . . . . . . . . . . . . . . . . . . . . . . . . . . . . .2-33
Orientation . . . . . . . . . . . . . . . . . . . . . . . . . . . . . . . . . . . . . . . . . . . . . . . . . . . . . . . . . . . . . . . . .2-34
Platen Glass . . . . . . . . . . . . . . . . . . . . . . . . . . . . . . . . . . . . . . . . . . . . . . . . . . . . . . . . . . . . . . . . 2-35
Feeder . . . . . . . . . . . . . . . . . . . . . . . . . . . . . . . . . . . . . . . . . . . . . . . . . . . . . . . . . . . . . . . . . . . . 2-38
Making Prints Using the Stack Bypass . . . . . . . . . . . . . . . . . . . . . . . . . . . . . . . . . . . . . . 2-41
Multifunctional Operations . . . . . . . . . . . . . . . . . . . . . . . . . . . . . . . . . . . . . . . . . . . . . . . 2-54
Available Paper Stock. . . . . . . . . . . . . . . . . . . . . . . . . . . . . . . . . . . . . . . . . . . . . . . . . . . 2-56
2-1
Page 72
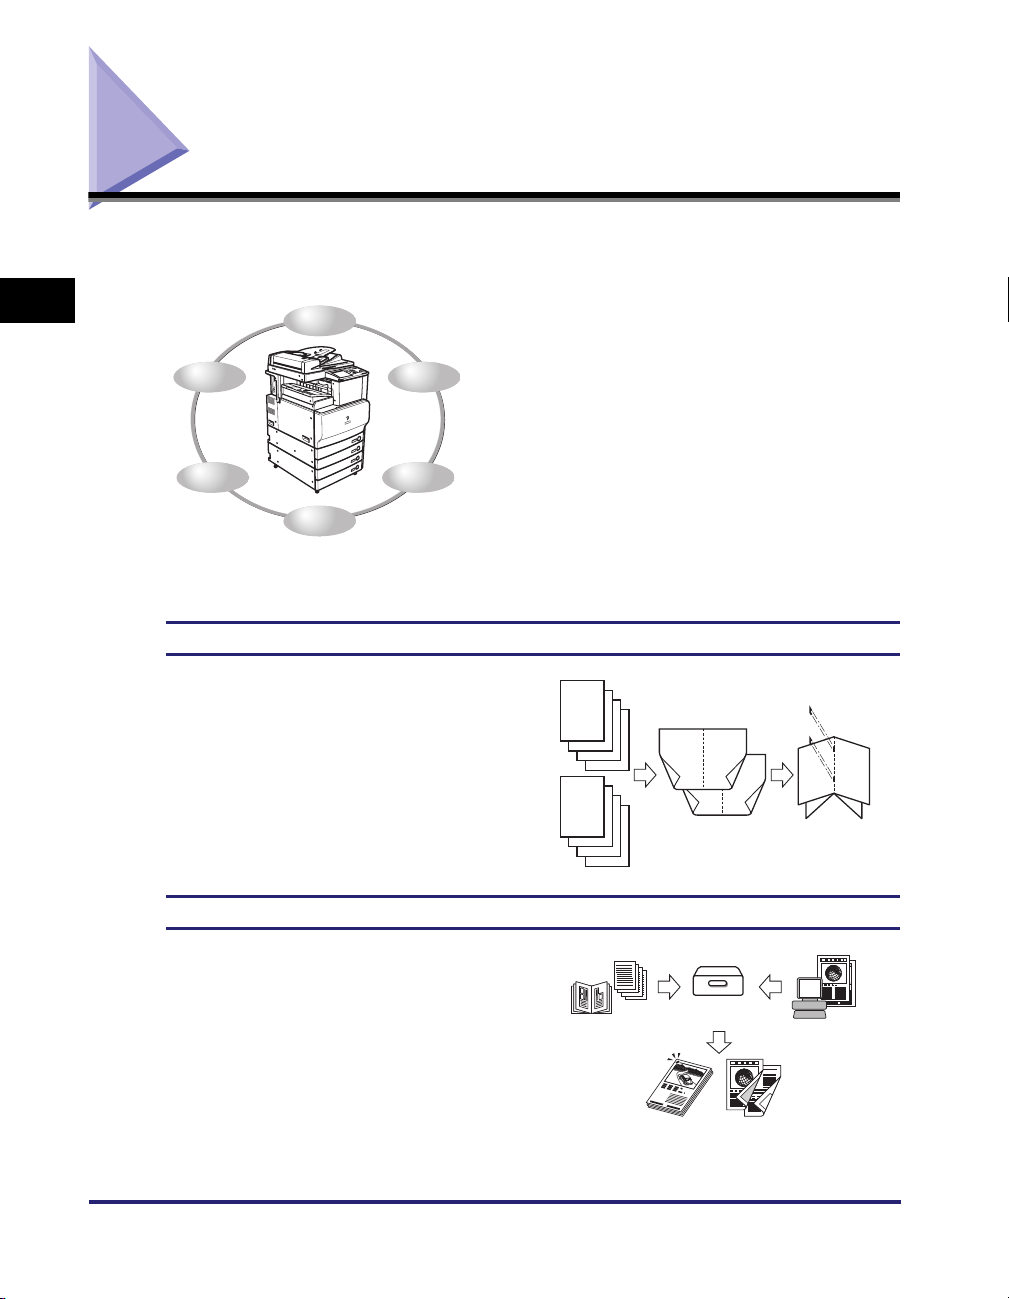
What This Machine Can Do
All the elements you will ever need in a color digital
multitasking machine.
2
Copy
Scan
Basic Operations
Send
Remote UI
Copying See the Copying and Mail Box Guide
In addition to normal copying functions,
convenient new functions, such as "Sample
Set," which helps to avoid copy errors,
"Booklet" for making copies into booklets,
and "Different Size Originals" for copying
originals of different sizes together in one
copy operation, are provided to increase
your productivity.
Print
Fax
The Color imageRUNNER C3380/C3380i/C2880/
C2880i incorporates a rich array of input and output
features that can greatly enhance your efficiency.
Equipped with features that meet the needs of
document work in a digitized office, the Color
imageRUNNER C3380/C3380i/C2880/C2880i
represents the ultimate in digital multitasking
machines.
An asterisk (*) indicates functions which require
optional equipment. For information on the optional
equipment required to use each function, and the
available combinations of optional equipment, see
"Available Combinations of Options," on p. 3-8.
1
2
3
4
5
6
7
8
2
7
8
1
5
6
3
8
4
1
3
6
2-2
Mail Box Function See the Copying and Mail Box Guide
The Mail Box function enables you to save
image or document data that has been
scanned from the scanner unit, or created
on a PC and sent to the machine's internal
hard disk. The saved data can be printed at
a specified time, or merged with separately
saved data, or data created on a PC for
simultaneous processing.
What This Machine Can Do
Scanning
various
originals
Printing merged
documents
1
Sending
data from
computers
Page 73
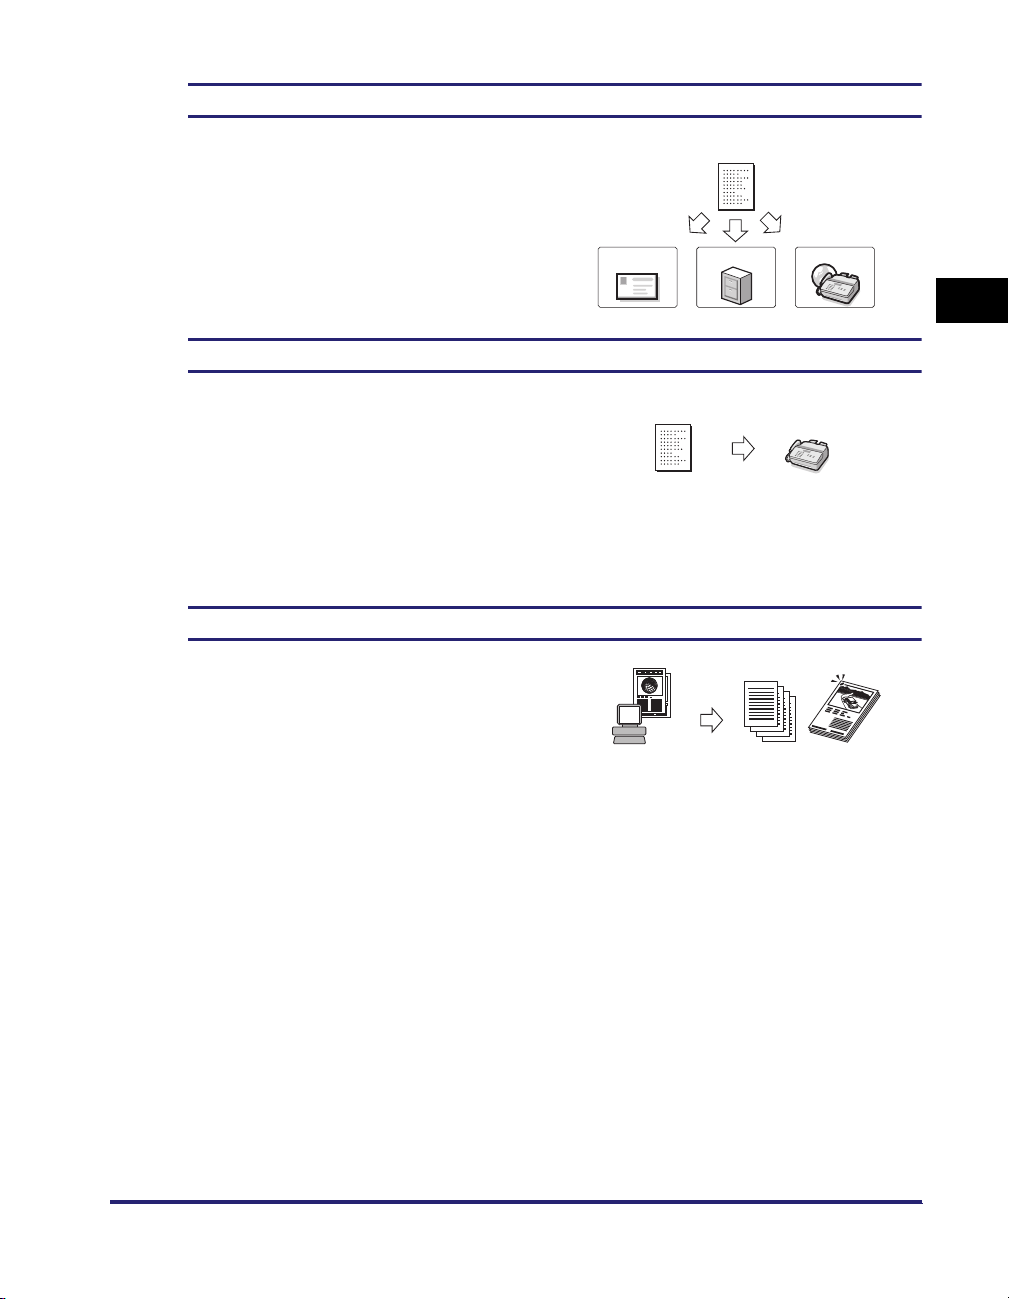
Sending Function See the Sending and Facsimile Guide
The Send function enables you to send
scanned image or document data to file
Original
servers, or send it by e-mail or I-fax. A
variety of file formats are supported (PDF,
TIFF, JPEG), which offer you greater
flexibility in accommodating digital
E-mail File I-Fax
workplace environments.
Faxing* See the Sending and Facsimile Guide
In addition to normal facsimile functions,
the machine offers you Super G3
compatibility. This enables you to transmit
documents at high speeds, greatly reducing
transmission costs as compared to
conventional facsimile machines. Installing
the Super G3 Multi-Line Fax Board enables
you to use two lines to send and receive fax
documents.
Original Fax
Printing See the PS/PCL/UFR II Printer Guide
If the Color PCL Printer Kit is available for
use, you can upgrade this machine to a
high-speed network printer. This kit
supports PCL at maximized speed.
The optional Color PS Printer Kit enables
the machine to support PostScript 3
emulation printing function.
Alternatively, installing the optional
imagePASS (PS controller) enables you to
use the machine, not only as a PostScript
printer when loaded with Adobe PostScript
3 software, but also as an emulation printer
of PCL5c.
imagePASS is an optional PS (PostScript)
controller that is attached to the back of the
machine. It can efficiently output various
data types, such as large and complex files
(which combine graphics, photos, and text),
Adobe PostScript 3 files, detailed graphics,
etc.
Sending data
from computers
1
Printing
2
Basic Operations
What This Machine Can Do
2-3
Page 74
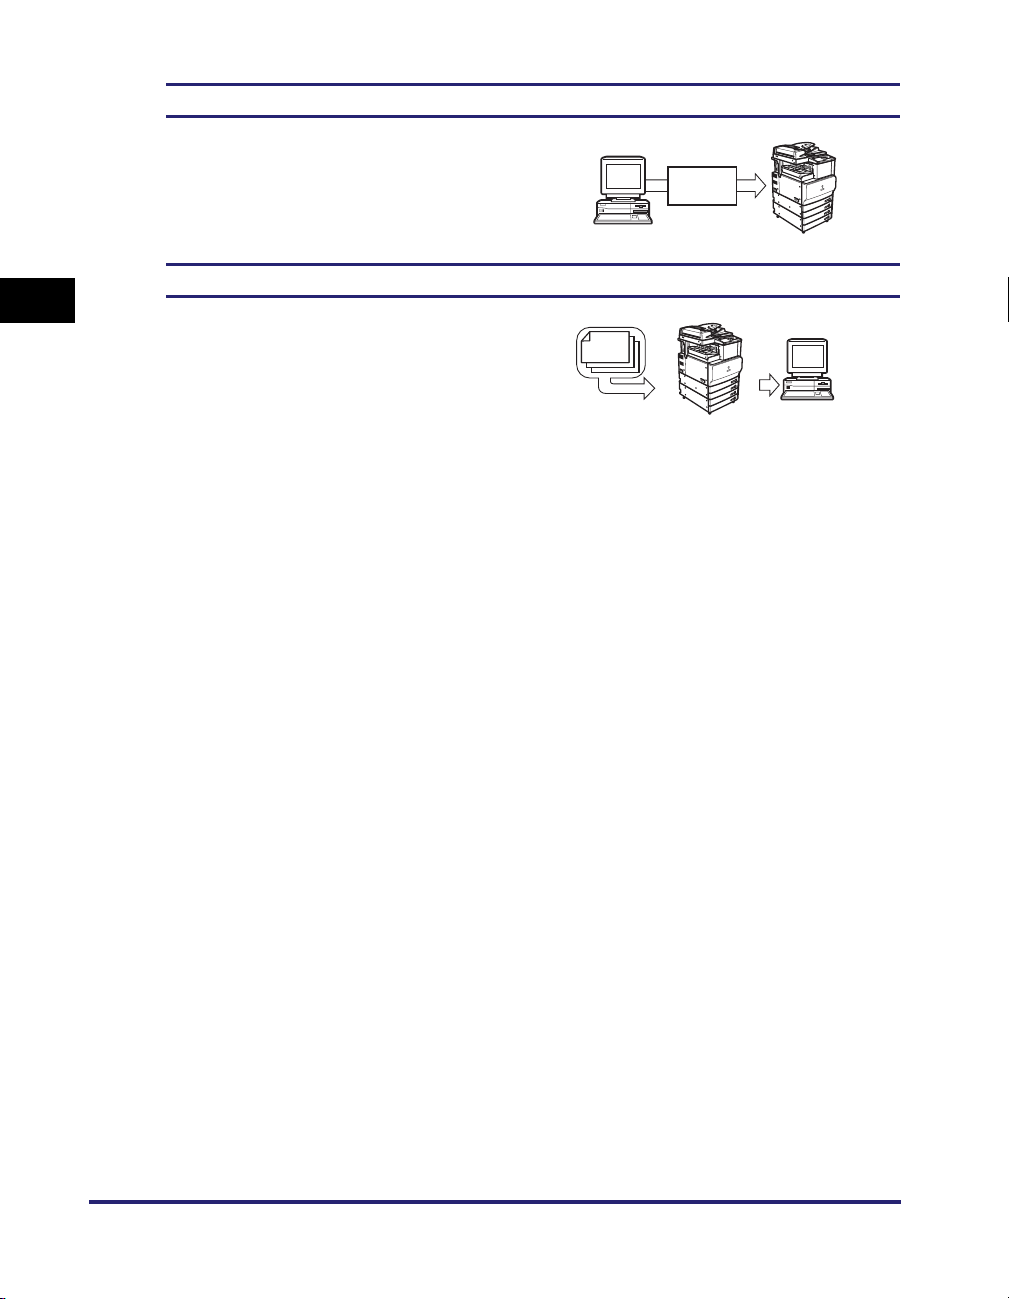
2
Basic Operations
Using the Remote User Interface See the Remote UI Guide
You can control functions, such as
confirming the status of the machine, job
operations, and printing instructions for
Web
Browser
data saved in inboxes, all from your PC's
Web browser.
Network Scanning See the Color Network ScanGear User's Guide
The Network Scan function enables you to
use the machine as a conventional scanner.
You can scan a document using the
machine, and read the data in an
application you are using on your computer.
To use this function, the machine is
required to be connected to a network, and
the Color Network ScanGear software*
installed at your computer. You can scan
images of up to 11" x 17" in size at a
resolution of 600 x 600 dpi.
* The Color Network ScanGear software is
supplied on the accompanying CD-ROM. For
more information on the Network Scan function,
Color Network ScanGear User's Guide
see the
.
Original
Scanning
image data
Exporting data
to a computer
2-4
What This Machine Can Do
Page 75

Overview of the Color imageRUNNER C3380/C3380i/ C2880/C2880i
Most operations on this machine are executed from the touch panel display. By
pressing the keys according to the instructions on the touch panel display, you can
utilize almost all of the functions of this machine.
CAUTION
Press the touch panel display keys gently with your fingers or the edit pen. Do
not press the touch panel display with a pencil, ballpoint pen, or other sharp
objects that can scratch the surface of the touch panel display or break it.
NOTE
Before using the touch panel display, peel off the protective film from the display.
The Touch Panel Display
Keys for using the machine's main functions are located on the top of the touch
panel display. To use any of the desired function's features, you must first press the
key for the desired function. The area on the bottom of the touch panel display is
used for messages that indicate the status of the machine.
2
Basic Operations
Switching the Functions Indicated on the Touch Panel Display
After the power is turned ON, the following screen appears on the touch panel
display. You can press [Copy], [Send], [Mail Box], [Print Job], [Scan], or [System
Monitor] to change functions. (See "Initial Function at Power ON," on p. 4-27.)
To display other functions, such as an installed MEAP (Multifunctional Embedded
Application Platform) application, press [➞].
NOTE
•
For information on the various keys displayed on the touch panel display, see "Various
Touch Panel Display Screens," on p. 2-8.
•
You can set the initial screen (the first screen that appears when the machine is turned
ON) from the Additional Functions screen. The initial screen can be the Copy, Send or
Fax, Mail Box, Print Job, MEAP, or System Monitor screen.
Overview of the Color imageRUNNER C3380/C3380i/C2880/C2880i
2-5
Page 76
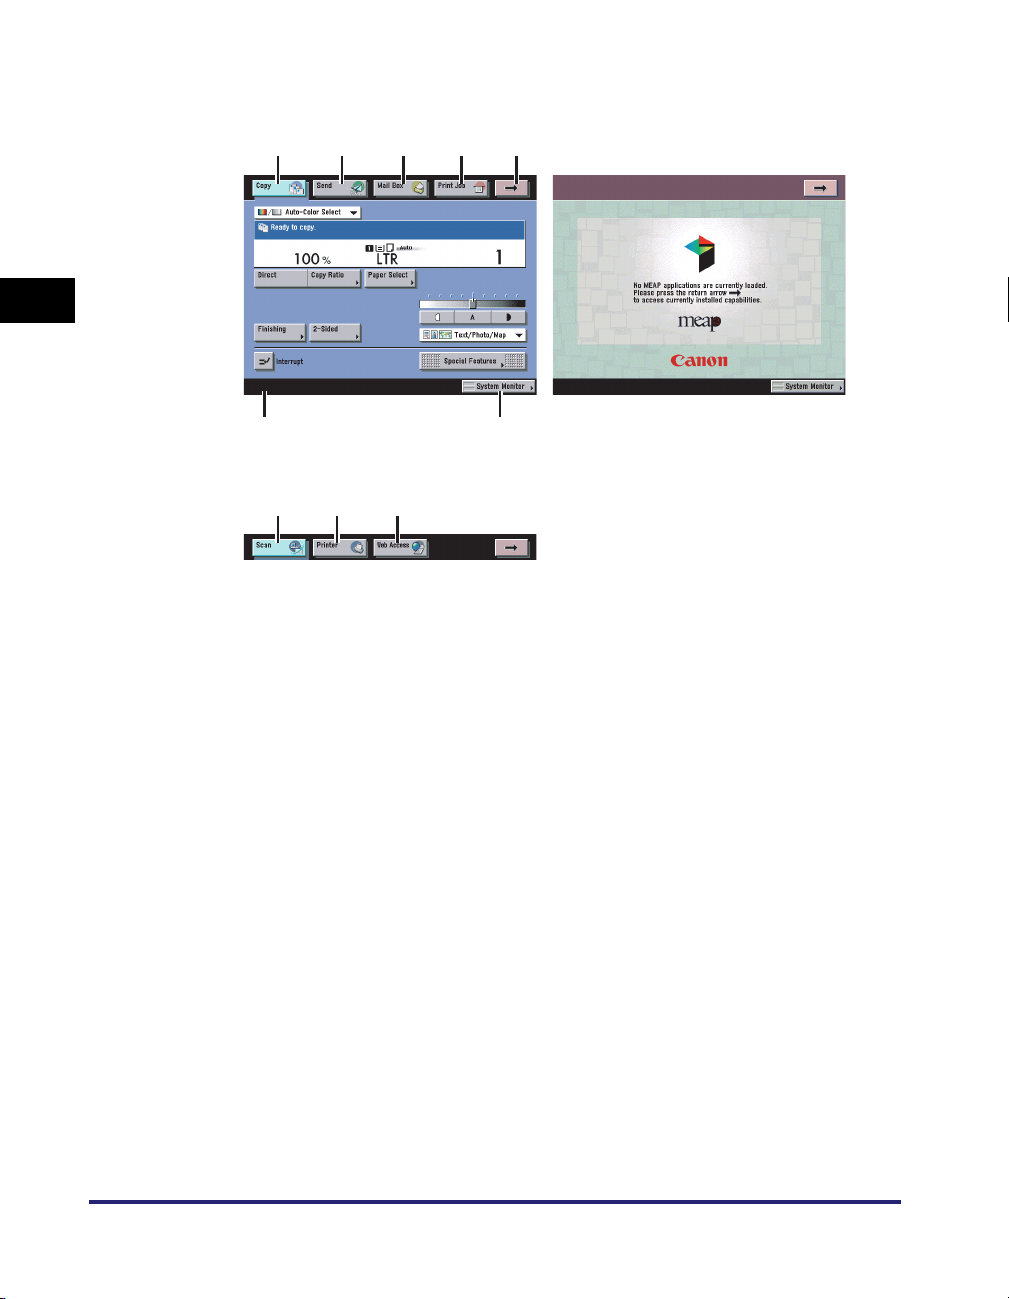
■ Keys Displayed on the Touch Panel Display
The Copy Basic Features screen is shown as an example below.
2
Basic Operations
a
gf
Page 1 of the Basic Features Screen
h i j
Page 2 of the Basic Features Screen
bcde
MEAP Application Screen
(Group A)
(Group B)
2-6
Overview of the Color imageRUNNER C3380/C3380i/C2880/C2880i
Page 77

a Copy
Press this key to access the machine's copying
functions. (See Chapter 1, "Introduction to the
Copy Functions," in the Copying and Mail Box
Guide.)
b Send
Press this key to access the machine's sending
functions, and facsimile functions. (See Chapter
1, "Introduction to Sending and Fax Functions,"
in the Sending and Facsimile Guide.)
c Mail Box
Press this key to access the machine's mailbox
functions. (See Chapter 2, "Introduction to the
Mail Box Functions," in the Copying and Mail
Box Guide.)
d Print Job
Press this key to check or cancel print jobs, and
to check or print the print job log. (See Chapter
5, "Checking Job and Device Status.")
e ➞
Press this key to gain access to hidden function
keys. The function keys are displayed on two
screens. You can also customize the order of the
function keys in Function Display Settings in
Common Settings (from the Additional Functions
screen). (See "Initial Function at Power ON," on
p. 4-27.)
f System Monitor
Press this key to change, check, or cancel jobs,
and to check or print the job log. (See Chapter 5,
"Checking Job and Device Status.")
g Job/Print Status Display Area
The progress of jobs and copy operations, and
the status of devices and consumables are
displayed here. Also, depending on the login
service you are using, the current ID or user
name can be displayed here. (See "Displaying
the Current Department ID/User Name," on p.
6-42.)
h Scan
Press this key to use the Network Scan function.
(See the Color Network ScanGear User's
Guide.)
i Printer
Press this key to access the machine's printing
functions.
j Web Access
Press this key to view Web pages.
2
Basic Operations
Overview of the Color imageRUNNER C3380/C3380i/C2880/C2880i
2-7
Page 78
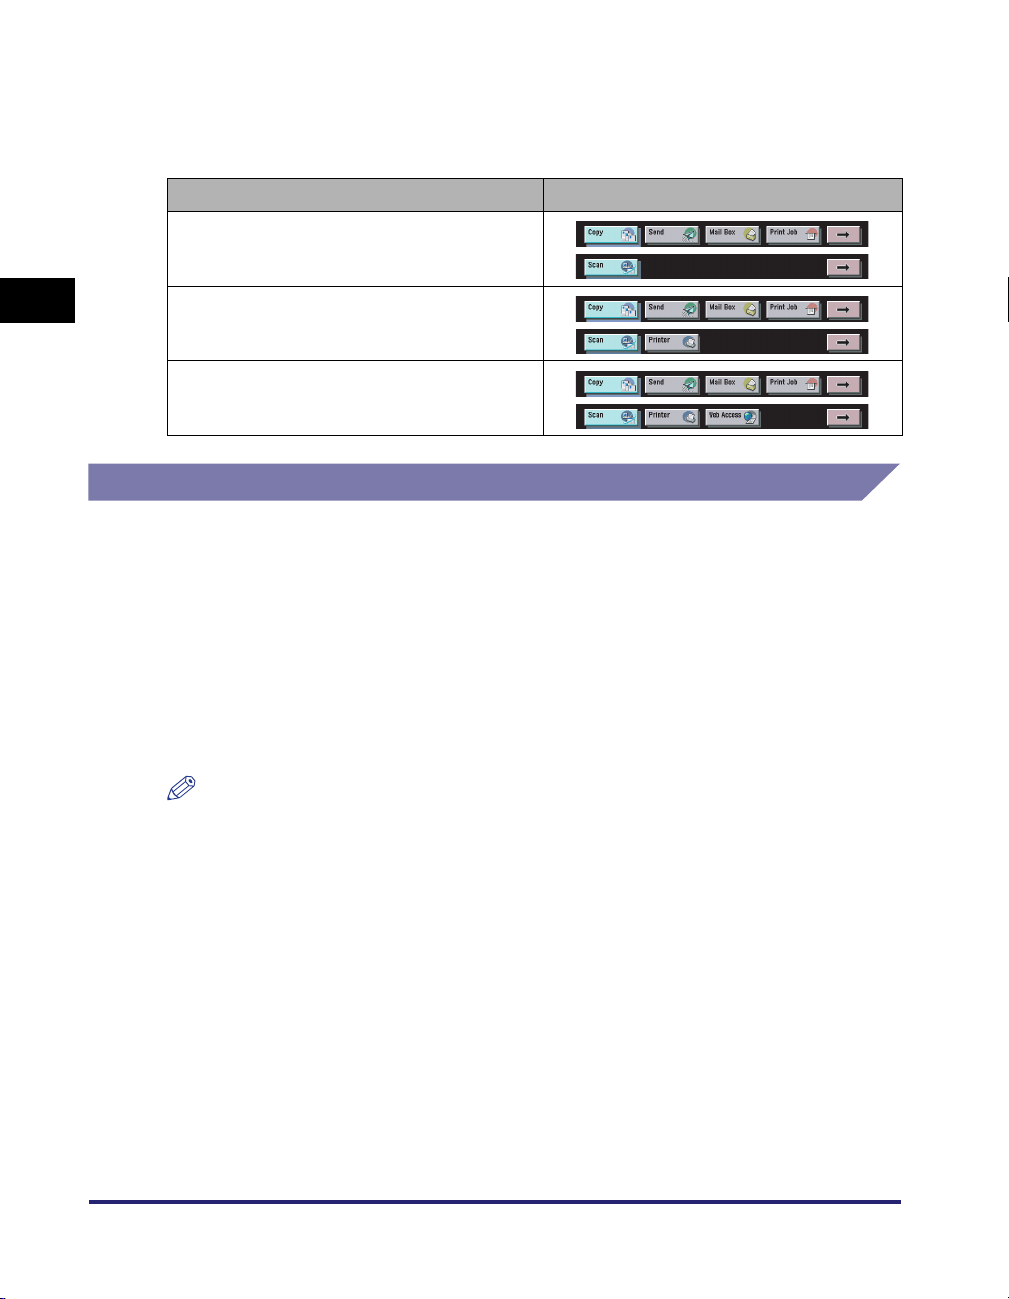
2
Basic Operations
Various Touch Panel Display Screens
The top of the touch panel display may differ according to the optional equipment
attached to the machine.
Attached Optional Equipment Displayed Function Keys
None
imagePASS
imagePASS and Web Access Software
Adding New Functions
This machine is compliant with MEAP (Multifunctional Embedded Application
Platform). MEAP is a software platform that enables the development of custom
applications based on Sun Microsystems' Java and Java 2 Platform Micro Edition
(J2ME) Technology.
MEAP enables you to do the following:
2-8
■ Install/Uninstall Customized Applications
Installing MEAP applications enables you to utilize new customizable functions for the
machine. You can also uninstall these applications.
NOTE
For instructions on installing and uninstalling MEAP applications, see the MEAP SMS
Administrator Guide.
Overview of the Color imageRUNNER C3380/C3380i/C2880/C2880i
Page 79

■ User Management and Restriction Using a Login Service
A login service manages data relating to users using the machine. The following three
login services are available:
• Default Authentication
Use the authentication method set on the machine, such as Department ID
Management or System Manager Settings, as the login service.
• SDL (Simple Device Login)
A login service that is linked to the Department ID Management function of this machine.
You can register user information from a Web browser, such as user and login names
corresponding to a specific Department ID. (See the MEAP SMS Administrator Guide.)
• SSO (Single Sign-On)
A login service which can be used in an Active Directory environment or in the machine.
It contains the following user authentication systems. (See the MEAP SMS Administrator
Guide.)
- 'Domain Authentication'
- 'Local Device Authentication'
- 'Domain Authentication + Local Device Authentication'
IMPORTANT
To use the Domain Authentication system of SSO (including when performing domain
authentication with the 'Domain Authentication + Local Device Authentication' system), a
Windows server in which Active Directory is installed and Security Agent are necessary.
Security Agent is supplied on the accompanying CD-ROM. For instructions on installing
Security Agent, see the Readme.pdf file on the CD-ROM.
NOTE
Default Authentication is selected as the default login service. For instructions on
selecting and setting a login service other than default authentication, see the MEAP
SMS Administrator Guide.
2
Basic Operations
Overview of the Color imageRUNNER C3380/C3380i/C2880/C2880i
2-9
Page 80
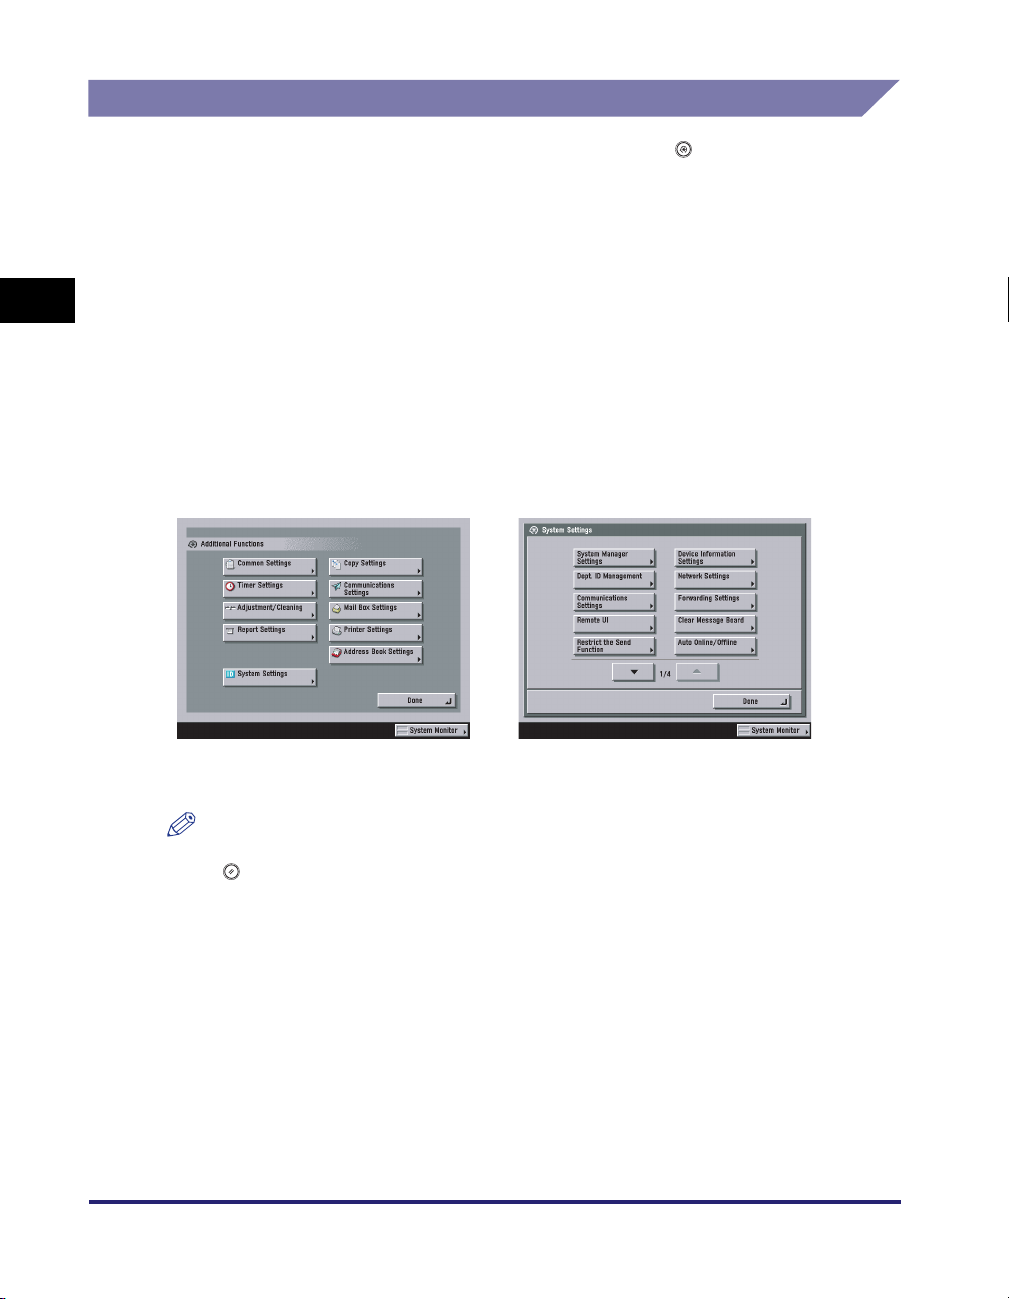
Specifying Settings
The Additional Functions screen appears when you press (Additional Functions).
The Additional Functions screen enables you to make common settings related to
many functions of the machine, as well as customize specific functions to suit your
needs. For more information on the settings not explained in this manual, see the
following manuals:
2
Basic Operations
• Copy Settings: The Copying and Mail Box Guide
• Communications Settings and
Address Book Settings: The Sending and Facsimile Guide
• Mail Box Settings: The Copying and Mail Box Guide
• Printer Settings: The PS/PCL/UFR II Printer Guide
• Network Settings: The Network Guide
The Additional Functions Screen The System Functions Screen
NOTE
•
Settings made from the Additional Functions screen are not changed even if you press
(Reset).
•
For instructions on customizing settings, see Chapter 4, "Customizing Settings."
•
For instructions on specifying System Settings, see Chapter 6, "System Manager
Settings."
•
For instructions on specifying Printer Settings, see the PS/PCL/UFR II Printer Guide.
•
For instructions on specifying Network Settings, see the Network Guide.
2-10
Overview of the Color imageRUNNER C3380/C3380i/C2880/C2880i
Page 81

Functions That Conserve Power
You can conserve power efficiently when the machine is not being used by using
the following modes.
IMPORTANT
Even if the main power switch is turned OFF, a small amount of energy is consumed if the
power plug is left inserted into the power outlet. If you do not want any energy consumed,
remove the power plug from the power outlet.
NOTE
•
The touch panel display turns OFF when the machine enters one of the energy saving
modes.
•
The machine can continue to receive I-fax or fax documents, and process or print data
sent from computers even if it is in one of the energy saving modes described below.
■ Auto Sleep Mode
You can set the machine to enter the Sleep mode whenever you desire, by pressing the
control panel power switch. To reactivate the machine, press the control panel power
switch again.
NOTE
•
The machine may not enter the Sleep mode completely depending on certain conditions.
(For more information, see "Energy Consumption in the Sleep Mode," on p. 4-38.)
•
The Auto Sleep mode enables you to conserve more energy than the Low-Power mode.
•
Turn the control panel power switch OFF when not using the machine for a prolonged
period of time, for example, at night.
•
If a Macintosh, which has been shut down, is connected to the machine via a USB cable,
when the machine returns from the Sleep mode, the Macintosh may turn ON. In this
case, disconnect the Macintosh from the machine. (You may also be able to solve this
problem by using a USB hub between the machine and the Macintosh).
•
The time it takes for the machine to automatically enter the Sleep mode can be set from
10 minutes to 4 hours. The default setting is '20' minutes. (See "Auto Sleep Time," on p.
4-63.)
•
If Energy Consumption in Sleep Mode is set to 'Low', it may take more than 10 seconds
for the touch panel to be displayed after pressing the control panel power switch.
2
Basic Operations
Overview of the Color imageRUNNER C3380/C3380i/C2880/C2880i
2-11
Page 82

2
Basic Operations
■ Low-Power Mode
The Low-Power mode conserves energy by turning OFF the control panel, and reducing
the power consumption of the fixing unit when the machine is idle for a certain period of
time (after the last print job or key operation is performed). To reactivate the machine,
press the control panel power switch.
NOTE
The time it takes for the machine to automatically enter the Low-Power mode can be set
from five minutes to 4 hours. The default setting is '5' minutes. (See "Low-Power Mode
Time," on p. 4-65.)
■ Daily Timer
The machine automatically enters the Sleep mode at the specified time and day of the
week set with the daily timer. To reactivate the machine, press the control panel power
switch.
NOTE
The Daily Timer settings can be set from Sunday to Saturday and 00:00 to 23:59. (See
"Daily Timer Settings," on p. 4-64.)
2-12
Overview of the Color imageRUNNER C3380/C3380i/C2880/C2880i
Page 83
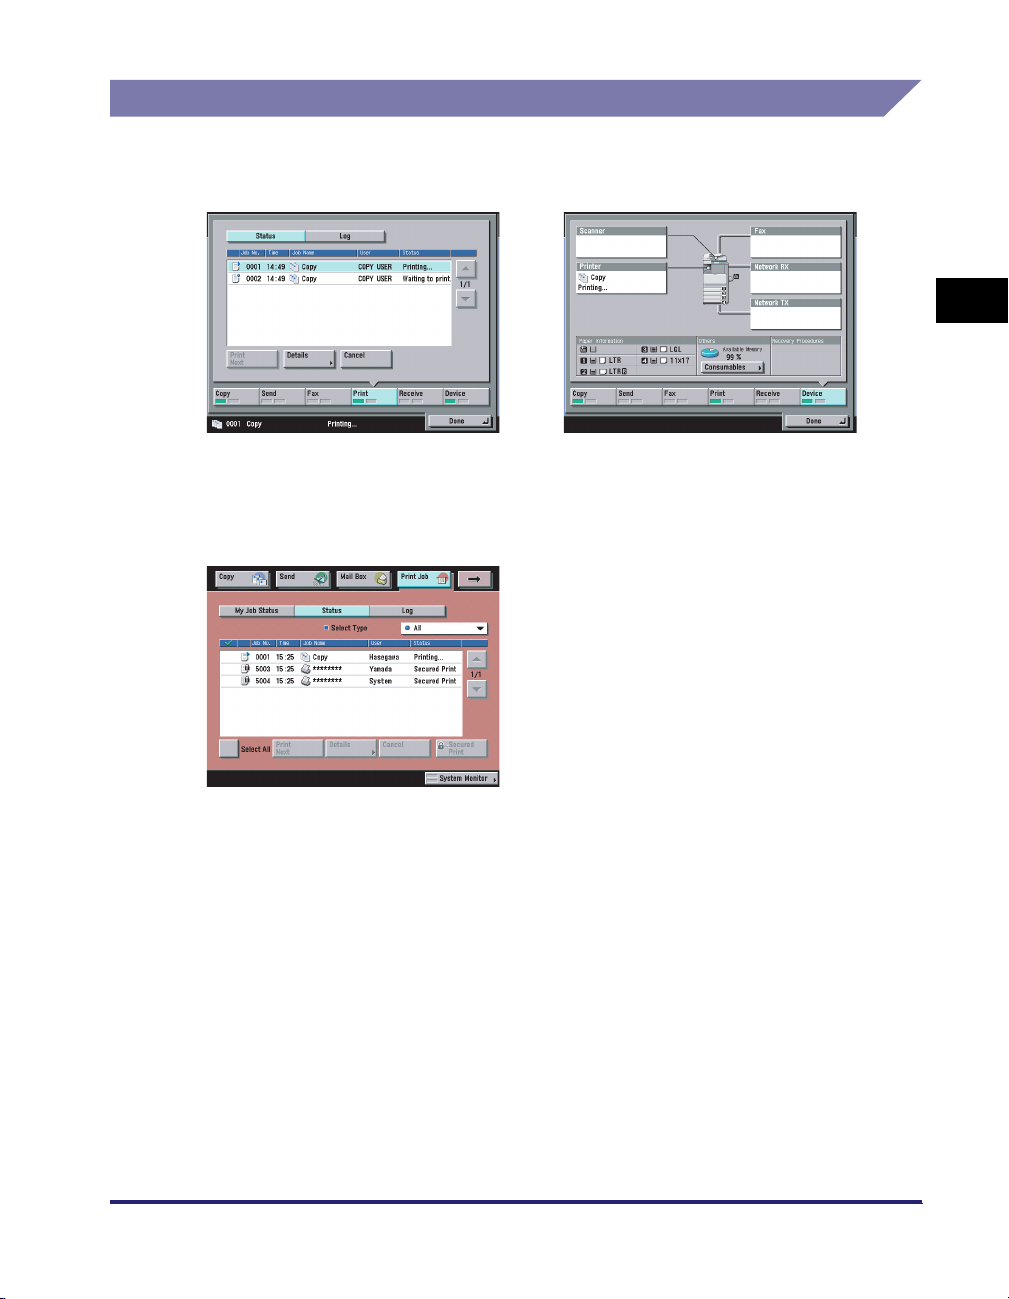
Checking, Changing, and Canceling Print Jobs
The System Monitor screen enables you to check the status of the machine, cancel
print jobs, or specify the printing priority.
2
The System Monitor Screen (Print) The System Monitor Screen (Device)
On the Print Job screen, you can confirm, cancel, or change the priority of print
jobs.
The Print Job Screen
Basic Operations
Overview of the Color imageRUNNER C3380/C3380i/C2880/C2880i
2-13
Page 84
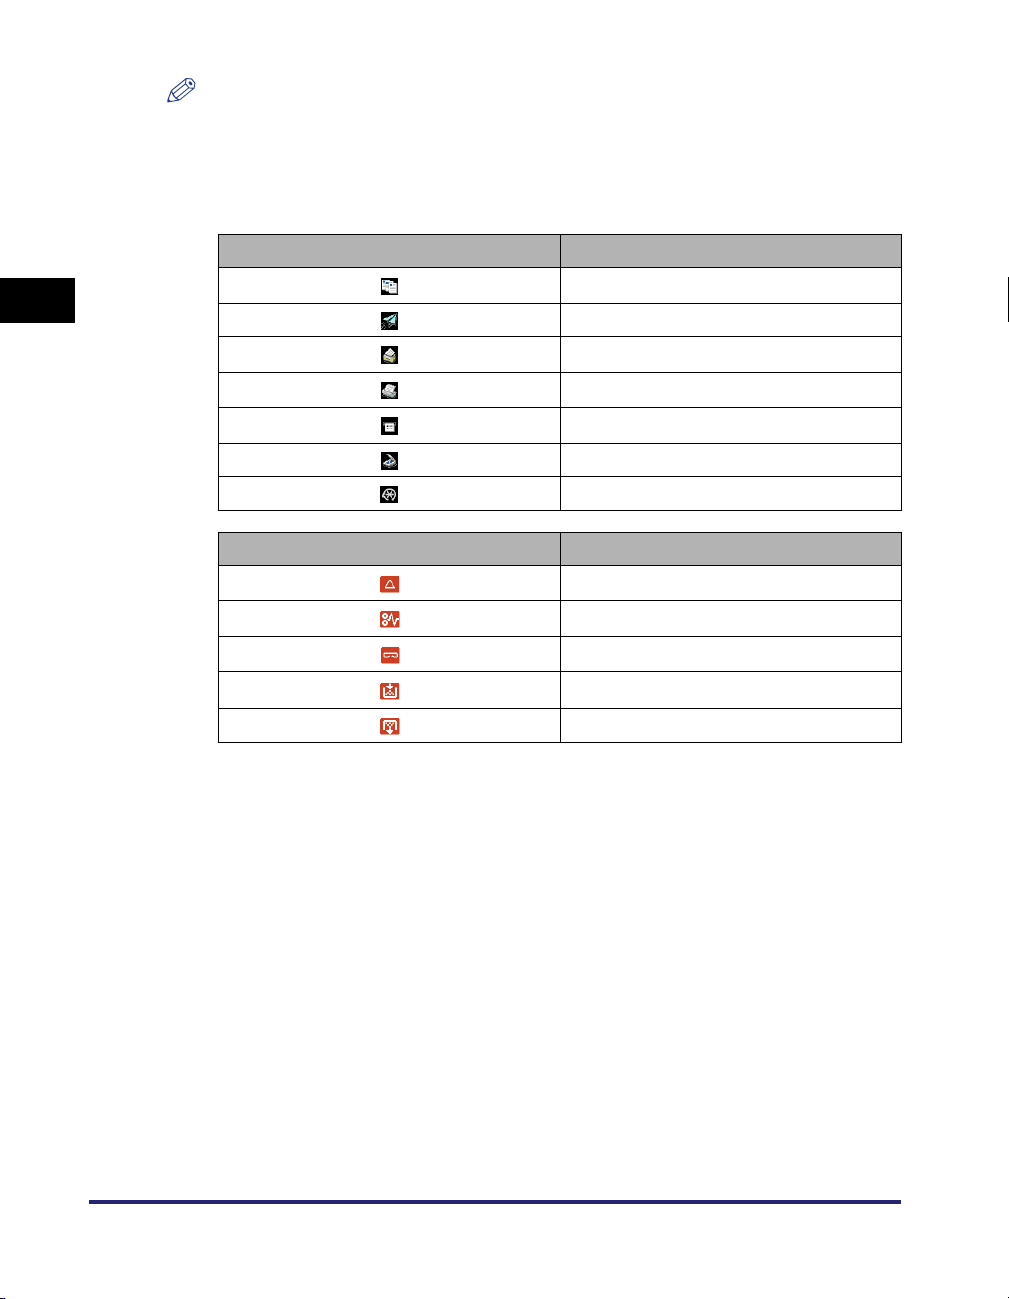
NOTE
•
For instructions on checking the status of each job, see Chapter 6, "Checking Job and
Device Status," in this manual, and Chapter 8, "Checking/Changing the Send/Receive
Status," in the Sending and Facsimile Guide.
•
The meanings of the icons that appear in the Job/Print Status Display Area (on the
bottom left of the screen) are described below:
Icon (Type of Job) Description
Copy Job
2
Send/Fax Job
Mail Box Job
Printer Job
Report Job
Basic Operations
Network Scan Job
Additional Functions Job
Icon (Machine Status) Description
Error
Paper Jam
Staple Jam
Replace Toner Cartridge
Replace Waste Toner Container
2-14
Overview of the Color imageRUNNER C3380/C3380i/C2880/C2880i
Page 85
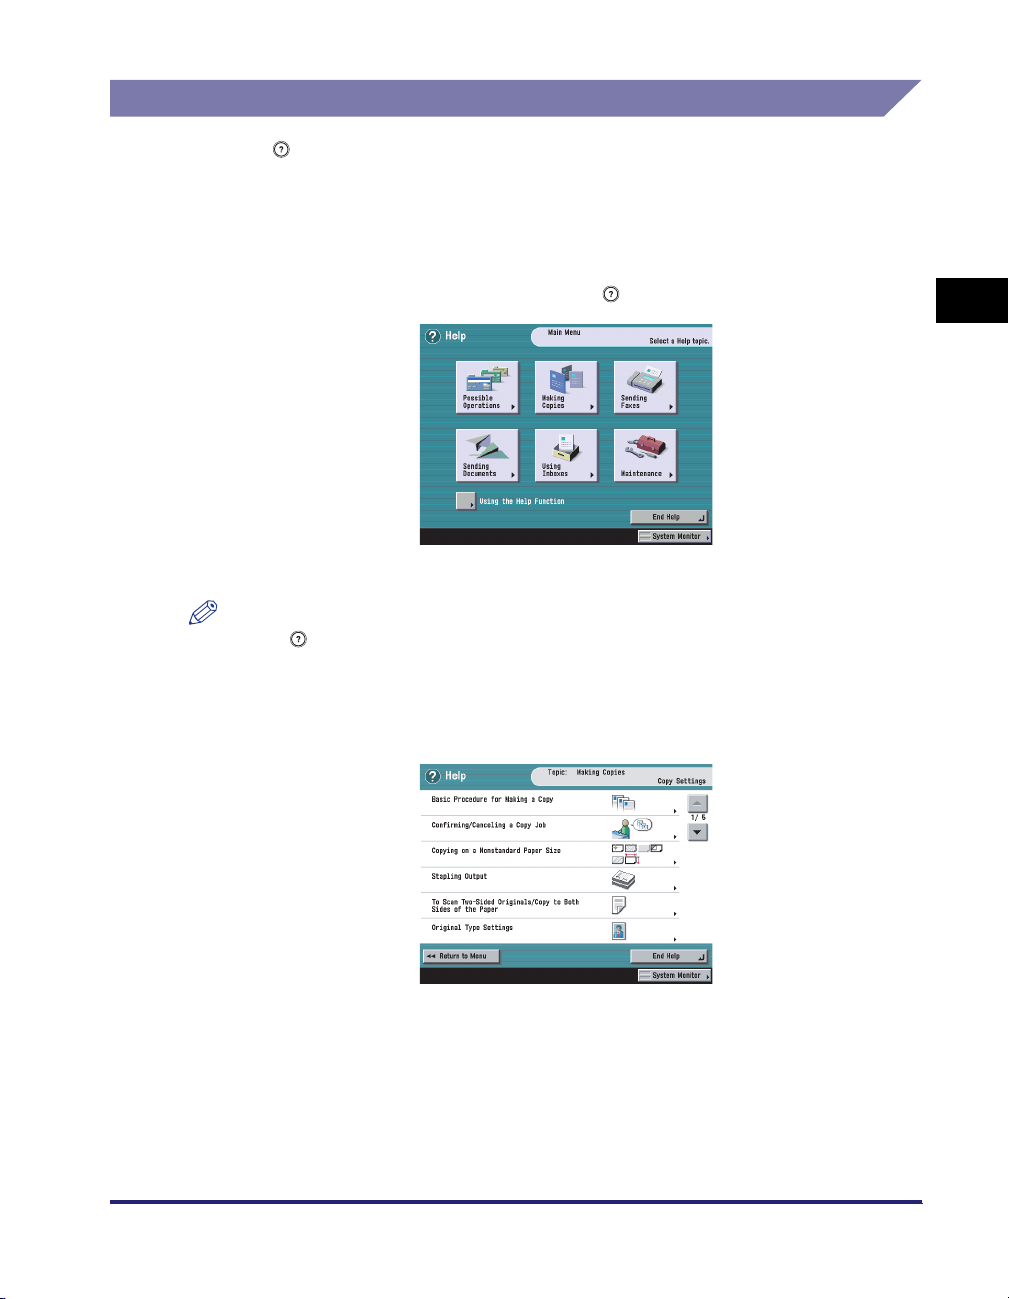
Displaying a Help Screen
Pressing (Help) brings up a guidance screen with information about the various
features that are available with your machine. Follow the instructions on the screen
to select the operation you want to perform. An explanation of the function and how
to set it is displayed.
■ Main Menu
This is the first screen displayed when you press (Help).
Press [Using the Help Function] to display an explanation of how to use the Help function.
NOTE
Press (Help) after selecting a mode of the Copying, Sending, or Mail Box function to
bring up a guidance screen with an explanation of that mode.
2
Basic Operations
■ List Screen
Displays a list of the functions selected on the main menu.
Overview of the Color imageRUNNER C3380/C3380i/C2880/C2880i
2-15
Page 86
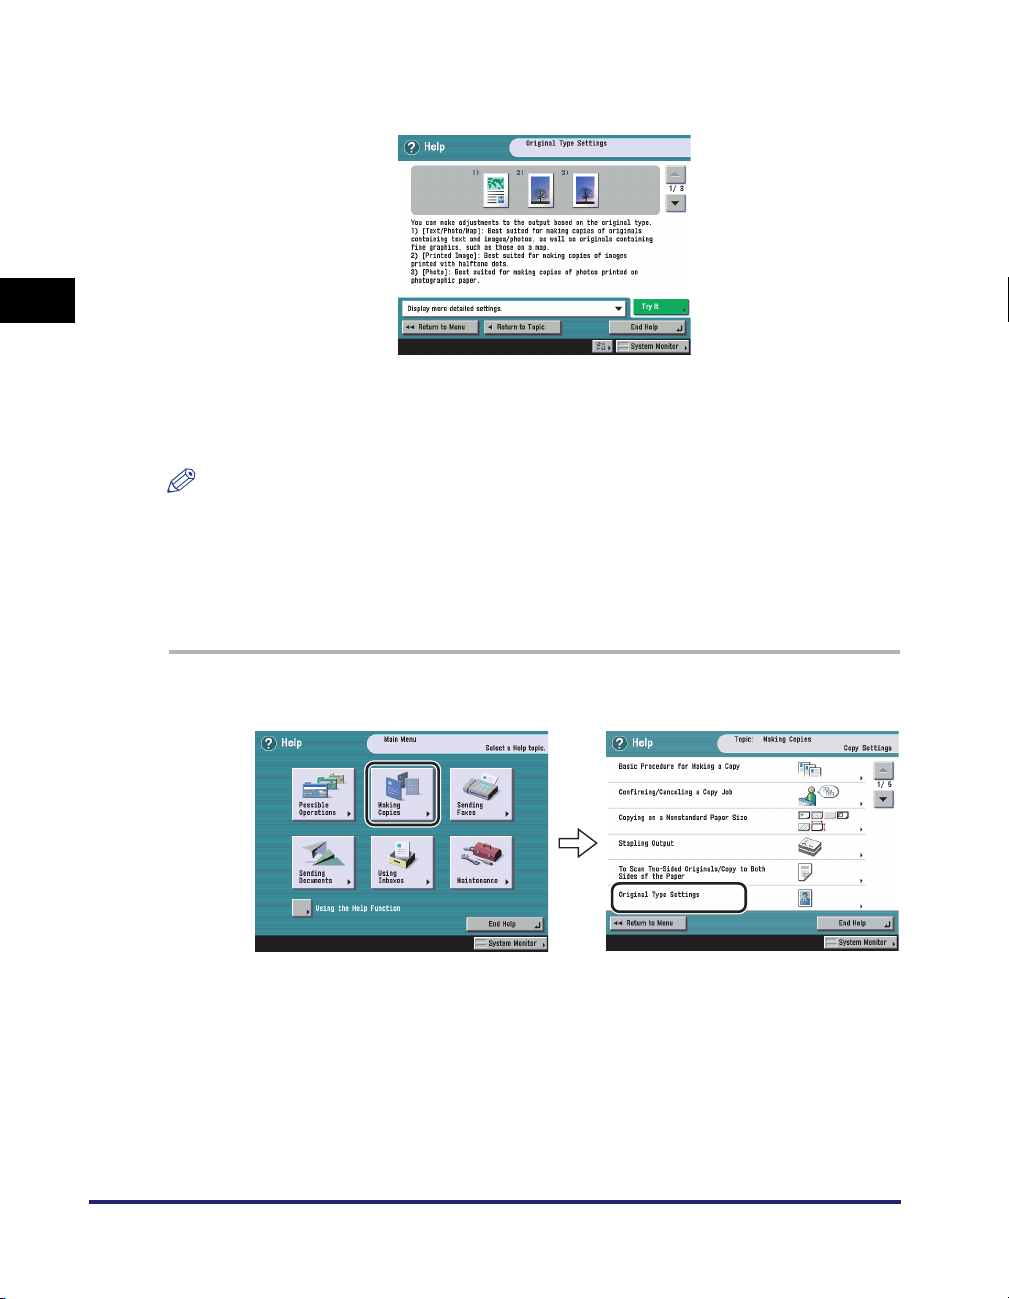
2
Basic Operations
■ Explanation Screen
Displays a detailed explanation of the function selected on the list screen.
Press [Try It] to jump to the screen for setting the selected function.
Press [Display more detailed settings.] to display more detailed information and related
topics.
NOTE
The [Try It] key is only displayed on the Explanation Screen for some Copy and Send
functions.
Example:
The procedure for making a copy of a photo.
2-16
1
Press [Making Copies] ➞ [Original Type Settings].
2
Check the detailed information for the function.
Press [Try It] ➞ [Yes] to try using the function.
Overview of the Color imageRUNNER C3380/C3380i/C2880/C2880i
Page 87
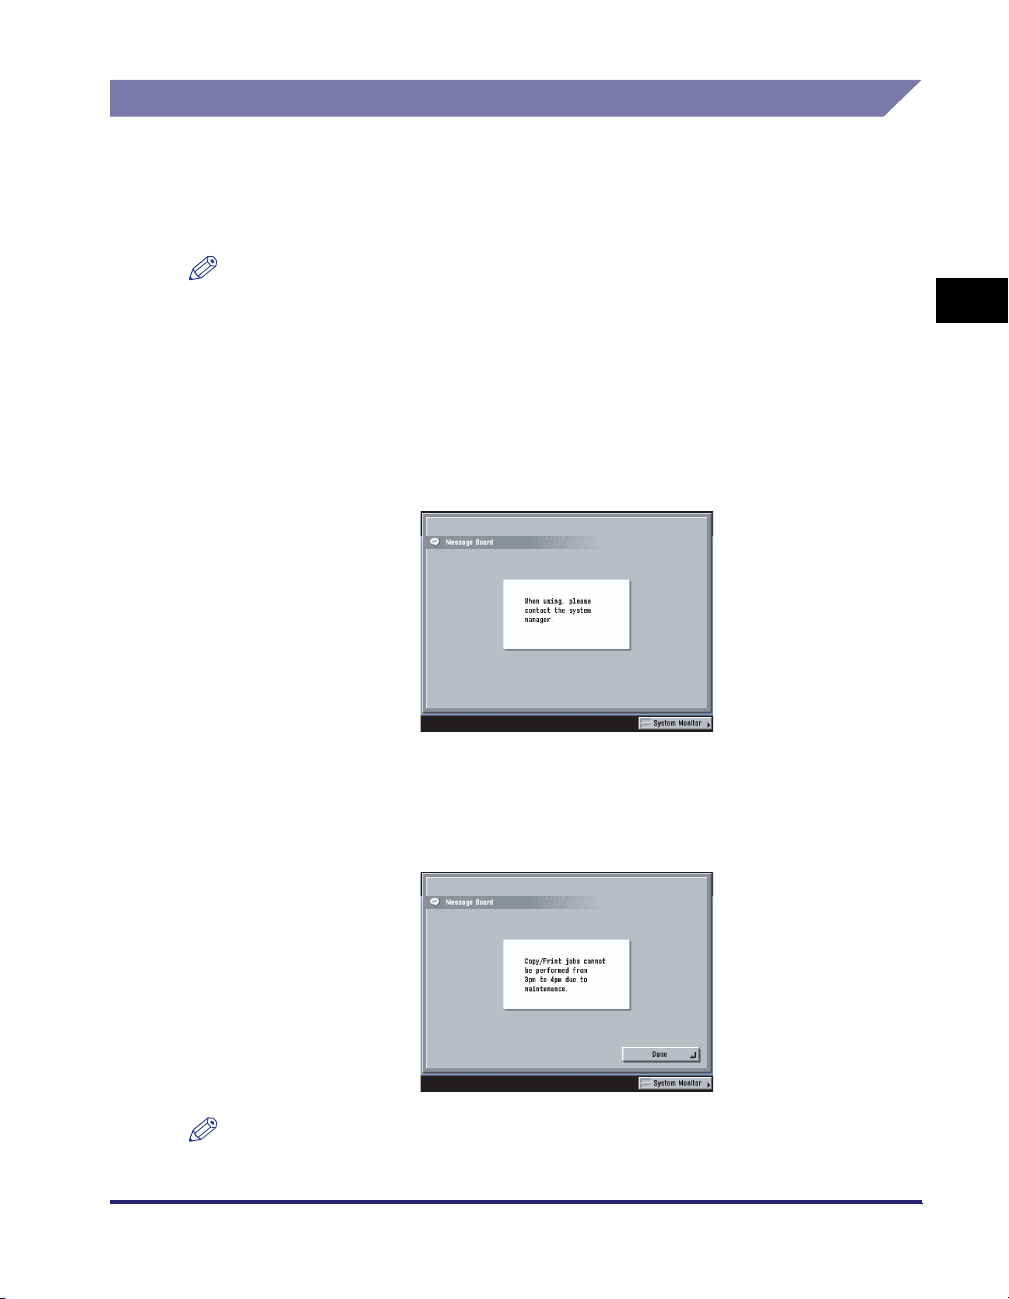
Reading Messages from the System Manager
The System Manager uses the Message Board feature to convey messages to the
users of this machine. The messages are sent through the Remote User Interface
and displayed on the touch panel display. (See Chapter 3, "Customizing Settings,"
in the Remote UI Guide.)
NOTE
•
The message board can be used only if the machine is connected to a network.
•
For instructions on erasing the message board, see "Clearing the Message Board," on p.
6-22.
Types of Message Boards
The following three types of message boards are available:
■ A Message Board without [Done]
2
Basic Operations
■ A Message Board with [Done]
If you press [Done] and close the message board, you can perform normal operations.
The message appears again when the main power is turned OFF, and then turned back
ON again, or after the Auto Clear mode has initiated.
NOTE
The Auto Clear mode does not activate if Auto Clear Time is set to '0'.
Overview of the Color imageRUNNER C3380/C3380i/C2880/C2880i
2-17
Page 88
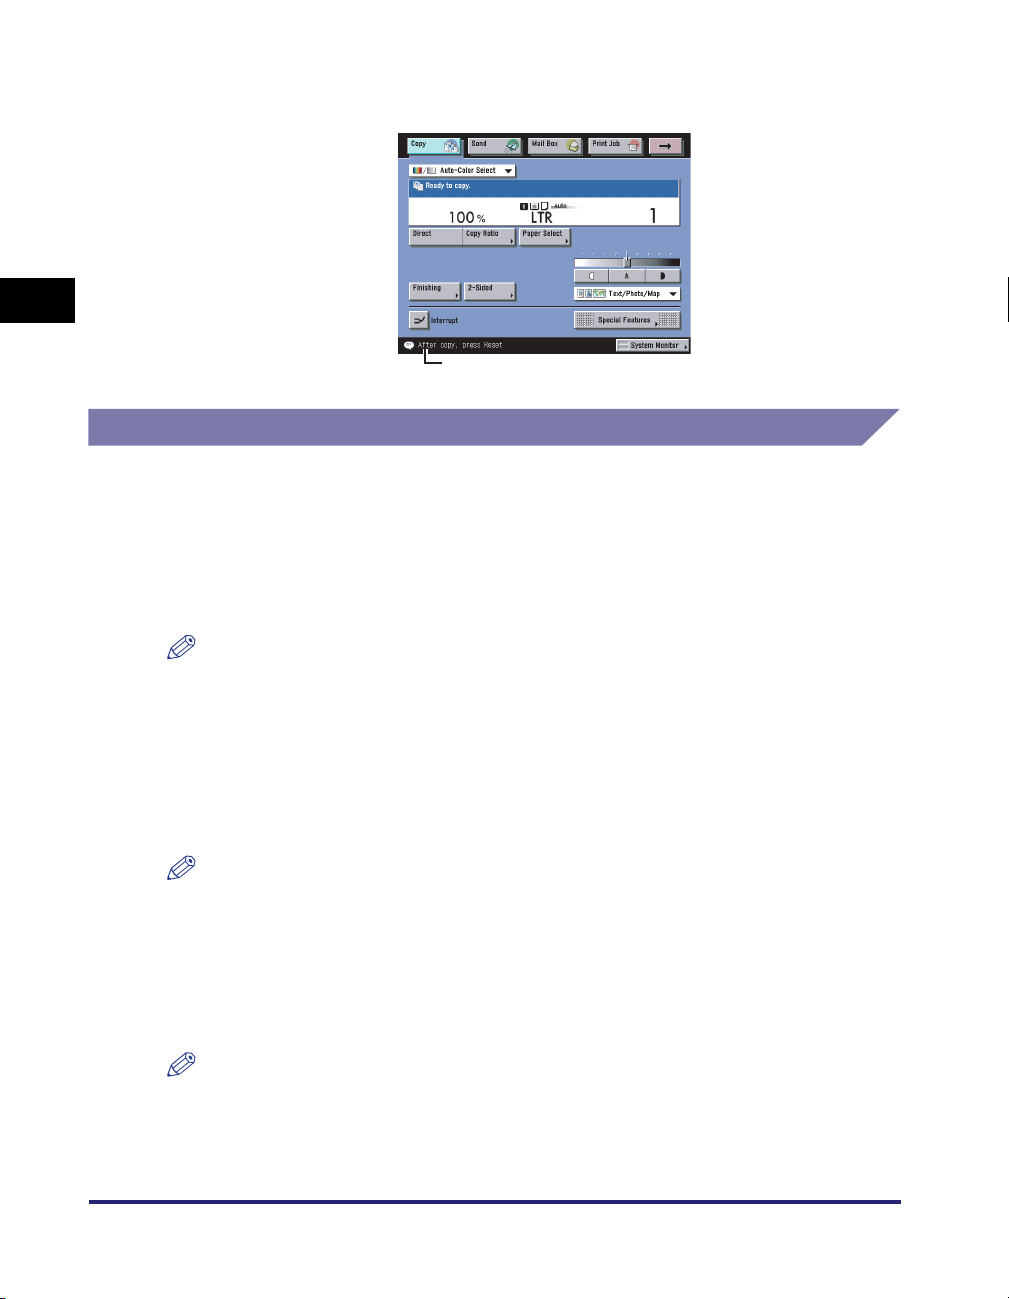
2
Basic Operations
■ A Message Board Where the Message Appears in the Job/Print Status
Display Area
Job/Print Status Display Area
Other Useful Functions
Other useful functions are:
■ Auto Drawer Switching
If a paper drawer runs out of paper during printing, the machine automatically locates
another paper drawer loaded with the same size paper, and begins feeding paper from
that paper drawer.
NOTE
You can set whether a paper drawer is subject to automatic paper drawer switching for
each function. The default setting is 'Off' for the stack bypass, and 'On' for the other paper
drawers. (See "Auto Paper Selection/Auto Drawer Switching," on p. 4-33.)
2-18
■ Auto Clear
If the machine is not used for a period of approximately two minutes after the last print job
or key operation is performed, the machine automatically restores the standard settings.
NOTE
You can set the Auto Clear Time from 0 to 9 minutes in one minute increments. The
default setting is '2' minutes. (See "Auto Clear Time," on p. 4-64.)
■ Job Duration Display
If you set Job Duration Display to 'On' in Common Settings (from the Additional Functions
screen), the display shows the time duration before a copy job completes.
NOTE
Even if Job Duration Display is set to 'On', the job duration time is not displayed when the
wait time is less than one minute. (See "Job Duration Display," on p. 4-58.)
Overview of the Color imageRUNNER C3380/C3380i/C2880/C2880i
Page 89
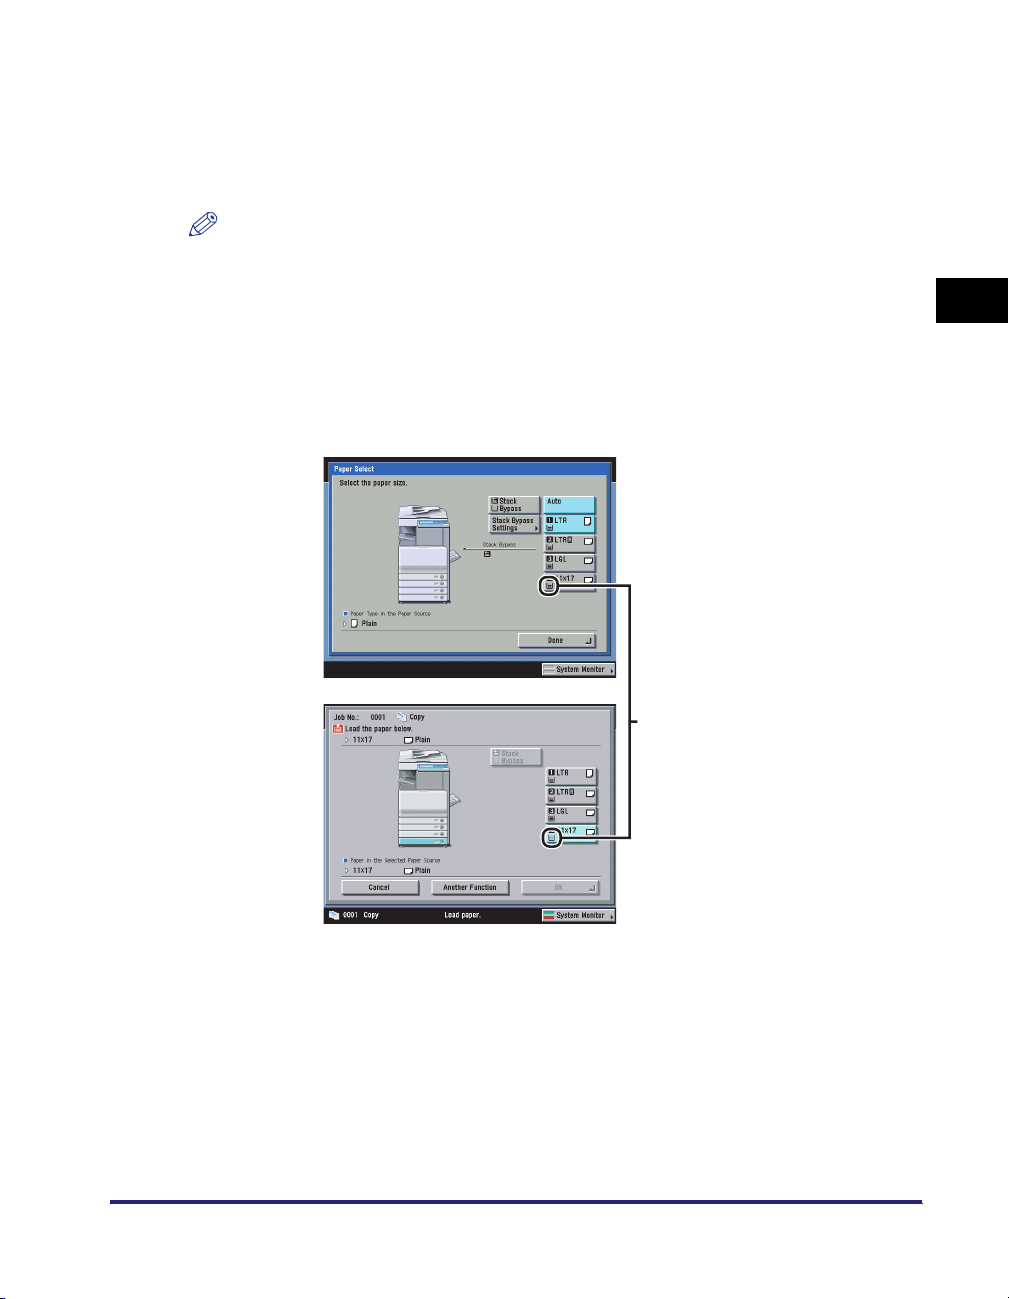
■ Number of Copies/Job Duration Status Display
If you set Number of Copies/Job Duration Status Display to 'On' in Common Settings
(from the Additional Functions screen), the number of copies specified and the
approximate time before the current job completes is displayed in the Job/Print Status
Display Area.
NOTE
The approximate time is not displayed when the wait time is less than one minute. (See
"Number of Copies/Wait Time Status Display," on p. 4-58.)
■ Paper Supply Indicator
The paper supply indicator shows the remaining amount of paper in each paper drawer on
the Paper Select screen, and on the screen that appears when paper in a paper drawer
has run out during printing. (See Chapter 3, "Basic Copying and Mail Box Features," in the
Copying and Mail Box Guide.)
2
Basic Operations
The Paper Select Screen
Paper Supply Indicator
Display When Paper Has Run Out
Overview of the Color imageRUNNER C3380/C3380i/C2880/C2880i
2-19
Page 90
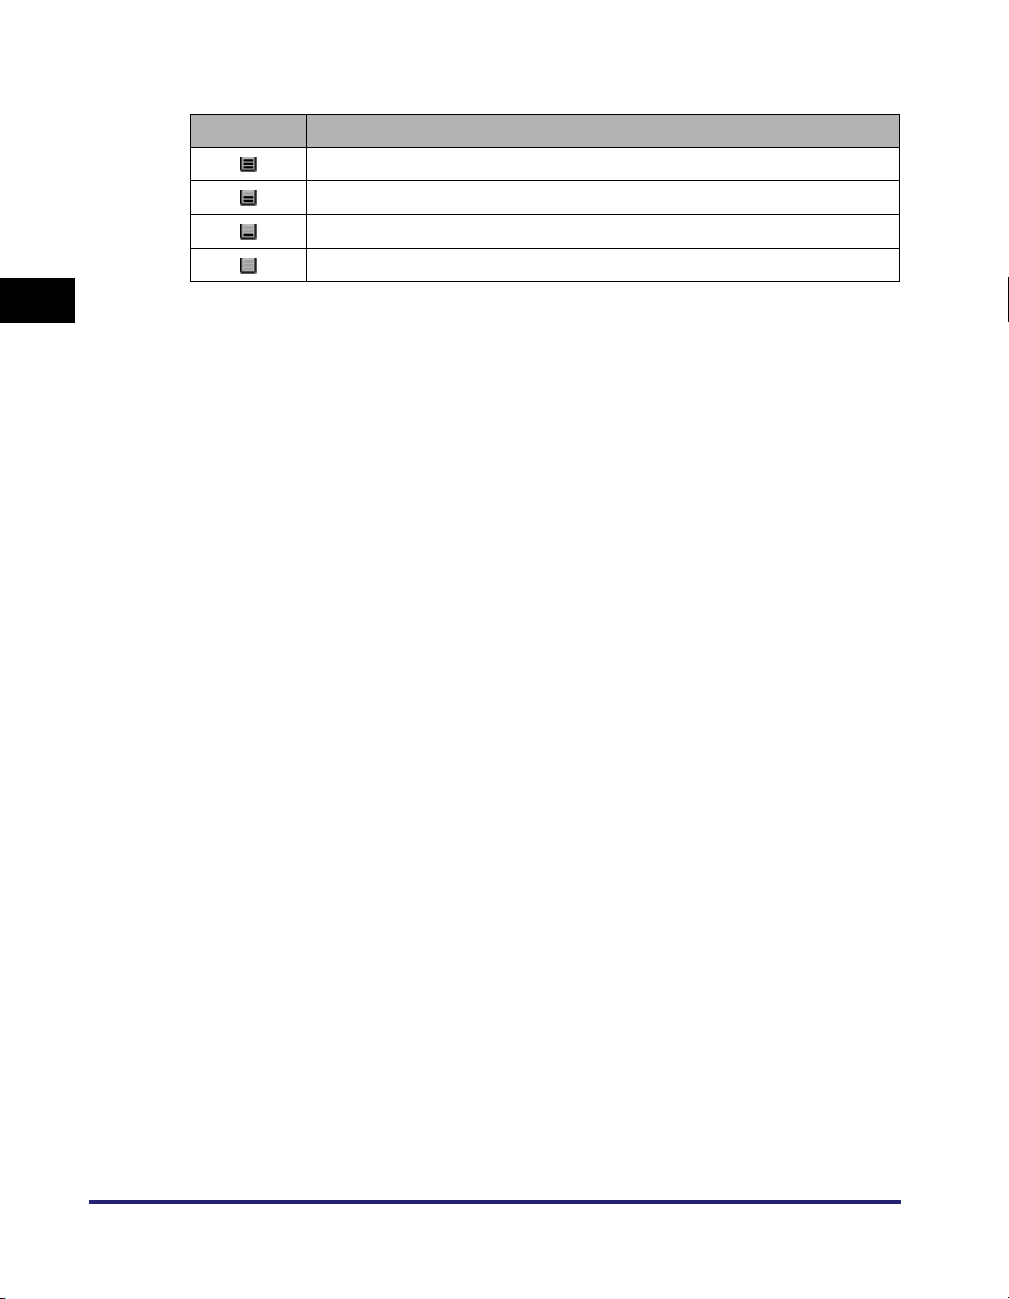
There are four different paper supply indicators, as shown below:
Display Remaining Paper
Paper drawer is approximately 50% - 100% full.
Paper drawer is approximately 10% - 50% full.
Paper drawer is less than 10% full.
Paper drawer is empty.
2
Basic Operations
■ Auto Orientation
Using information, such as the size of the original and zoom ratio, the machine
automatically rotates the image to the most suitable orientation for the selected paper
size.
If the image does not fit onto the paper after it is rotated, the machine will not rotate the
image, and will print it as is, with part of the image cut off.
Even if Auto Orientation is set to 'On', the image is not rotated if the Different Size
Originals, Cover/Sheet Insertion, Staple (Double), Transparency Interleaving, Framing,
XY Zoom, Shift, or Image Repeat mode is set, or a nonstandard paper size is specified.
(See Chapter 8, "Customizing Settings," in the Copying and Mail Box Guide.)
2-20
Overview of the Color imageRUNNER C3380/C3380i/C2880/C2880i
Page 91
Using the Touch Panel Display
This section describes the keys that are frequently used on the touch panel display.
Information on how to adjust the brightness of the touch panel display is also
provided.
CAUTION
Press the touch panel display keys gently with your fingers or the edit pen. Do
not press the touch panel display with a pencil, ballpoint pen, or other sharp
objects that can scratch the surface of the touch panel display or break it.
NOTE
Before using the touch panel display, peel off the protective film from the display.
Frequently Used Keys
The following keys on the touch panel display are used frequently:
Press to cancel the mode that you are currently setting, or a mode
that has already been set, on screens other than the Additional
Functions screen. Also, press to close the current mode's setting
screen, and keep the original settings set from the Additional
Functions screen.
2
Basic Operations
Press to confirm the current settings and proceed to the next step in
the procedure.
Press to go back to the previous step in the procedure, without
saving the current settings.
Press to close the current screen.
Press to confirm the current settings of a mode.
Using the Touch Panel Display
2-21
Page 92
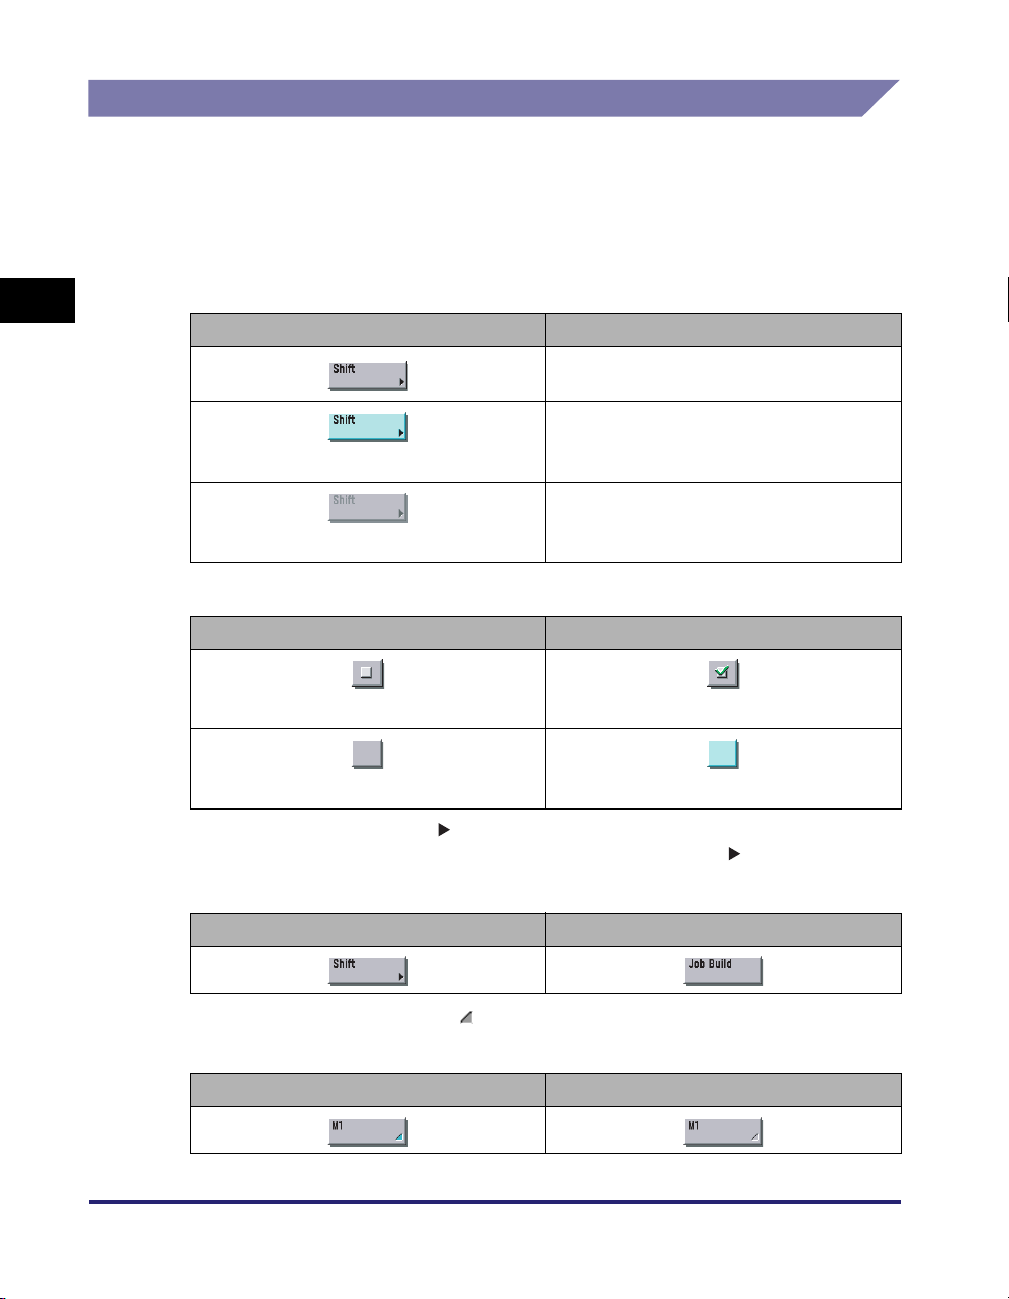
Touch Panel Key Display
When you press a key on the touch panel display, that key is highlighted, and the
corresponding mode is set. When you set certain modes, the characters on some
keys may become grayed out. You cannot press keys that are grayed out. This
means that you cannot set these modes in combination with the presently set
mode.
2
Basic Operations
■ Mode Setting Keys
State of Keys Description
The Shift mode is not set, and can be
selected.
The Shift mode is set, and can be selected.
(The key is highlighted)
The Shift mode cannot be set in
(The characters on the key are grayed out.)
combination with the presently set mode.
■ Keys That Indicate When a Mode Is Turned On or Off
Mode Is Turned Off Mode Is Turned On
(Checked)
(Highlighted)
Keys that have a right triangle ( ) indicate that those keys have additional screens to set
their functions. If you press a key that does not have a right triangle ( ), it turns that mode
on or off.
2-22
Keys That Display Additional Settings Keys That Turn Modes On/Off
Keys that have a colored triangle ( ) in the lower right corner and that appear on screens
for storing settings, are keys that already have settings stored in them.
Settings Are Stored No Settings Are Stored
Using the Touch Panel Display
Page 93
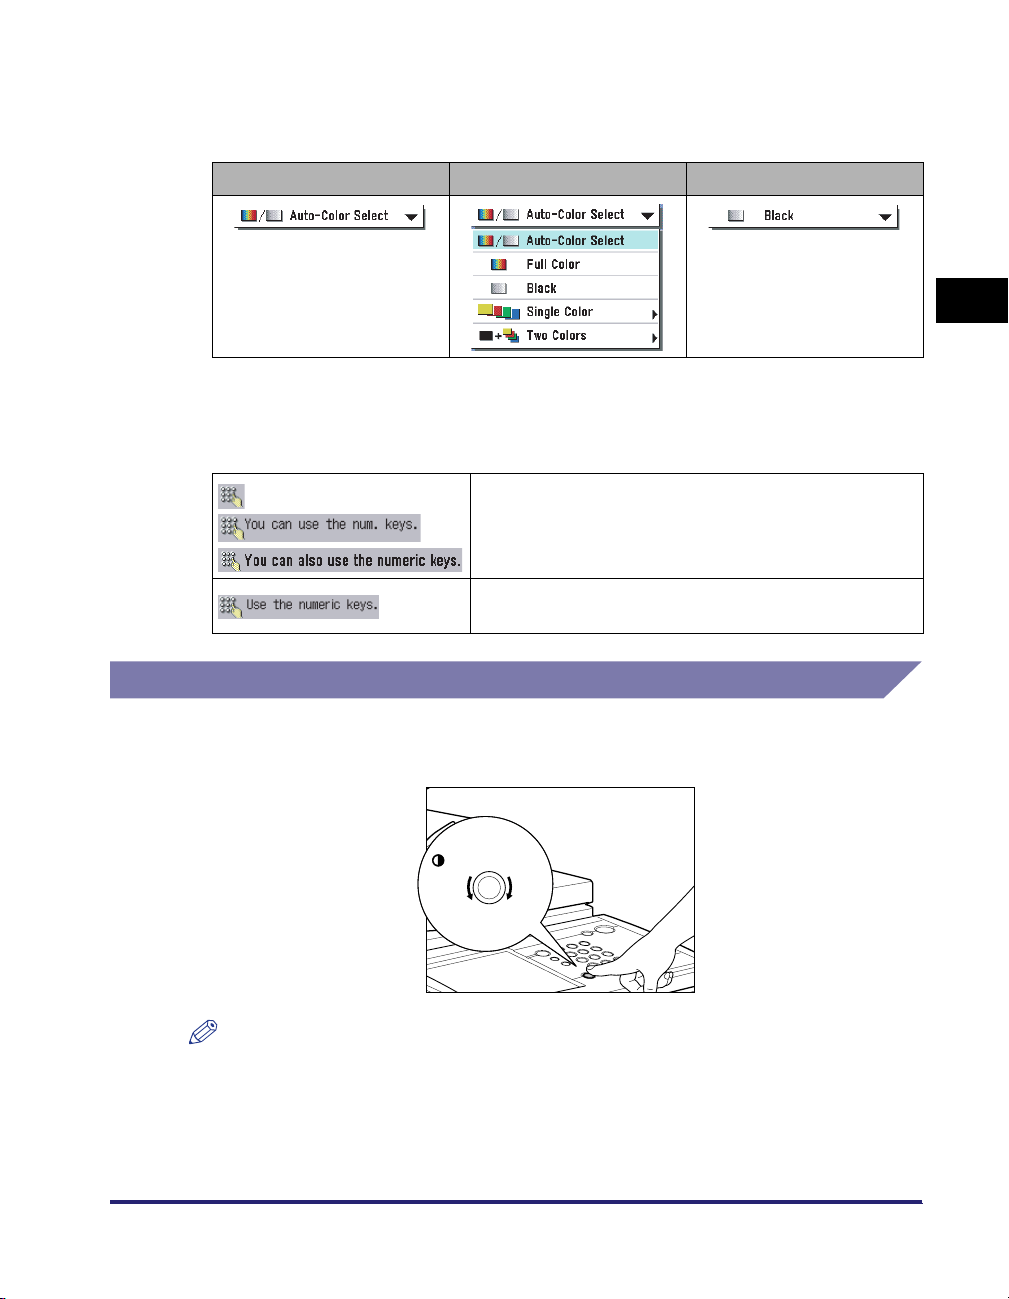
■ Keys That Display a Drop-Down List
Pressing a key that has a down triangle (▼) to the right of the name of the selection,
displays a drop-down list containing other setting options.
Before Selection Drop-Down List After Selection
2
■ Numeric Keys
Anytime the numeric keys icon is displayed on the screen, you can use the numeric keys
on the control panel to enter values.
Basic Operations
You can enter values using the numeric keys on the
touch panel display or on the control panel.
You can only enter values using the numeric keys on
the control panel.
Adjusting the Brightness
If the touch panel display is difficult to view, use the display contrast dial on the
control panel to adjust its brightness.
Display Contrast
DarkerLighter
NOTE
To make the touch panel display brighter, turn the dial counterclockwise. To make it
darker, turn the dial clockwise.
Using the Touch Panel Display
2-23
Page 94
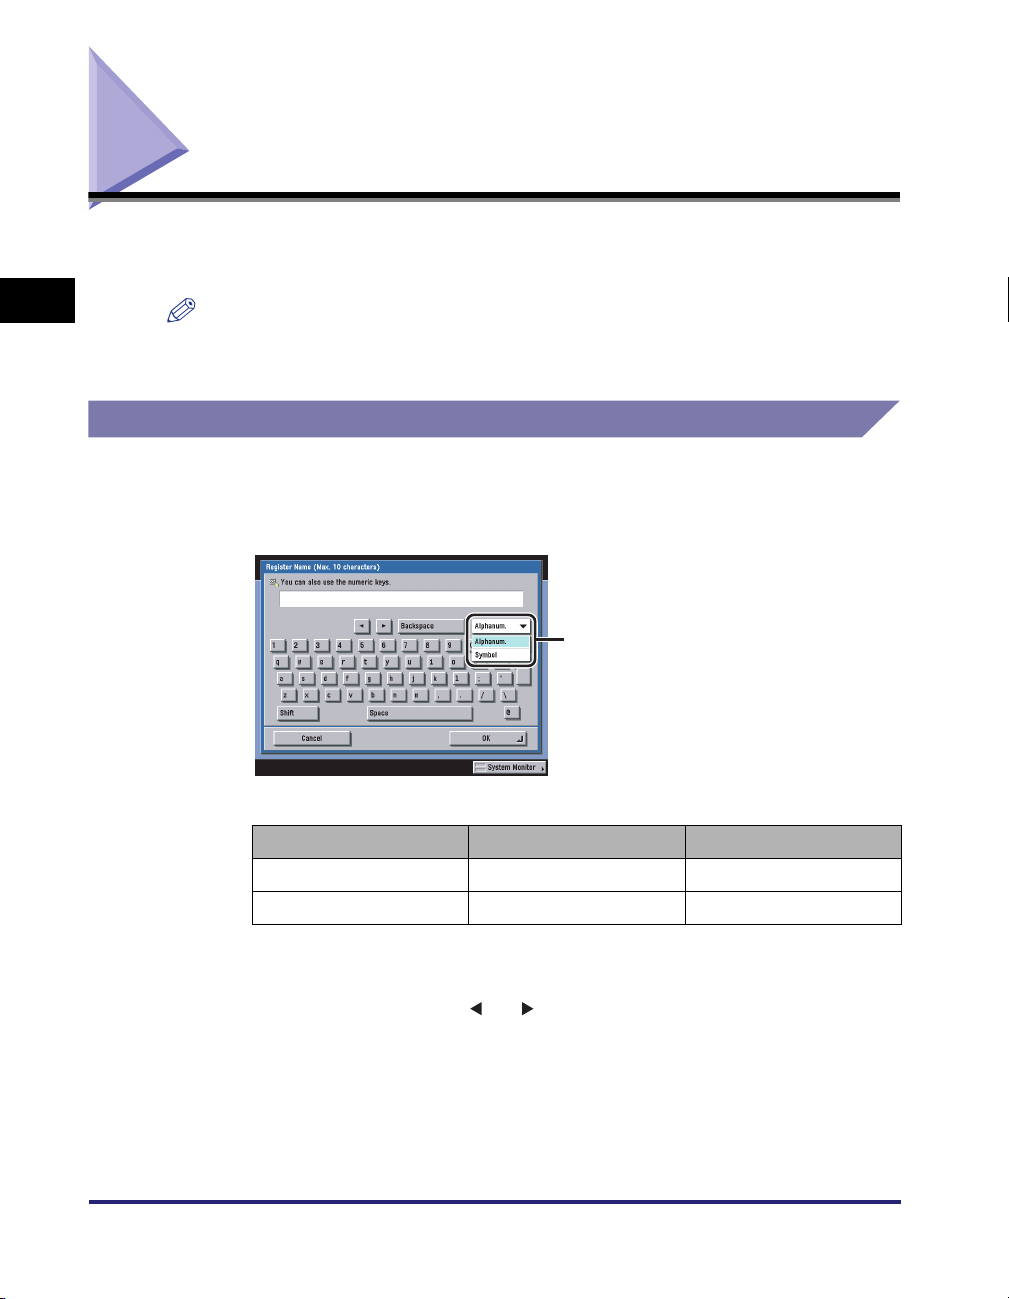
Entering Characters from the Touch Panel Display
For screens that require alphanumeric entries, enter characters using the keys
displayed on the touch panel display, as shown below.
2
Entering Characters
Basic Operations
NOTE
When entering characters on the SDL or SSO authentication screen or in MEAP
application functions, the screen you actually see may be different.
1
Press the entry mode drop-down list ➞ select the entry mode
➞ enter characters.
Entry Mode
2-24
The procedure for entering characters with the entry mode is as follows.
Entry Mode Example Procedure
Alphanum. Canon Enter 'Canon'.
Symbol é Press [é].
To enter uppercase letters, press [Shift].
To enter a space, press [Space].
To move the cursor, press [ ] or [ ].
To switch the entry mode, press the entry mode drop-down list ➞ select the entry
mode ➞ enter the desired characters or symbols.
Entering Characters from the Touch Panel Display
Page 95
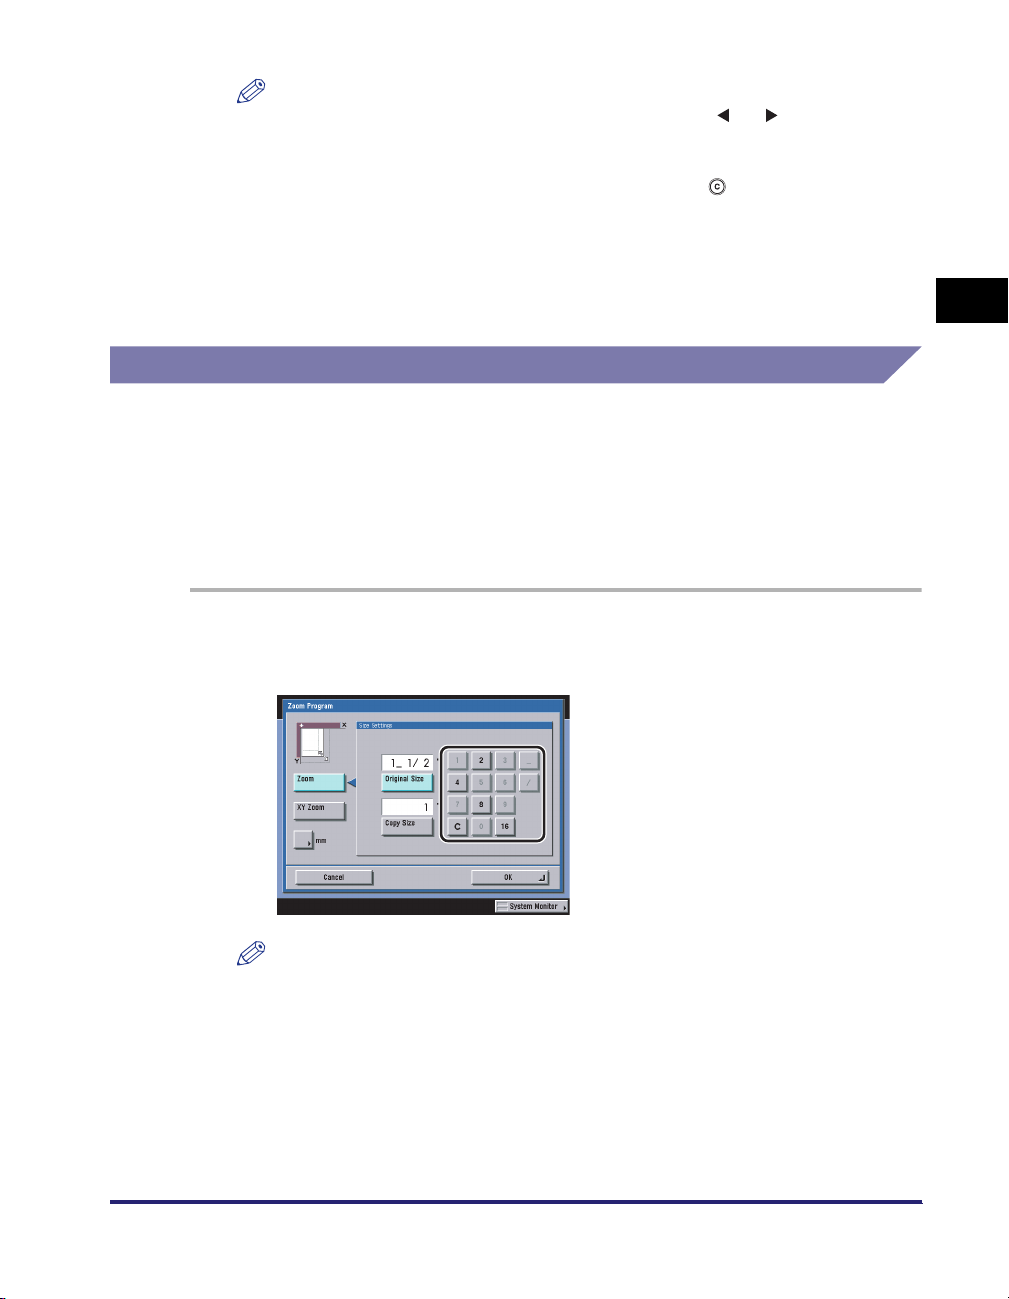
NOTE
•
•
•
2
When you have entered all characters, press [OK].
Values in Inches
If you want to enter values in inches in all modes which require a numeric entry, set
Inch Entry to 'On' in Common Settings (from the Additional Functions screen). (See
"Inch Entry," on p. 4-33.) This enables you to enter values in inches when you press
[Inch] on a screen requiring a numeric entry or measurement.
The following example shows you how to enter 1 1/2" for Original Size in the Zoom
Program mode.
1
Press [1] ➞ [_] ➞ [1] ➞ [/] ➞ [2] using the numeric keys on the
touch panel display.
If you make a mistake when entering characters, press [ ] or [ ] to position the
cursor
➞
press [Backspace] to delete the characters ➞ enter the correct
characters.
To delete all of the characters you have entered, press (Clear).
The available entry modes, and the maximum number of characters that you can
enter vary, depending on the type of entries you are making.
2
Basic Operations
NOTE
•
If you make a mistake when entering values, press [C] on the touch panel display
➞
enter the correct values.
•
You can enter only 2, 4, 8, or 16 as the denominator.
•
The value entered in inches is converted to millimeters by the machine each time it
is entered. Thus, there may be a slight difference between the value calculated and
the actual value entered.
•
To enter values in millimeters, press [mm].
Entering Characters from the Touch Panel Display
2-25
Page 96
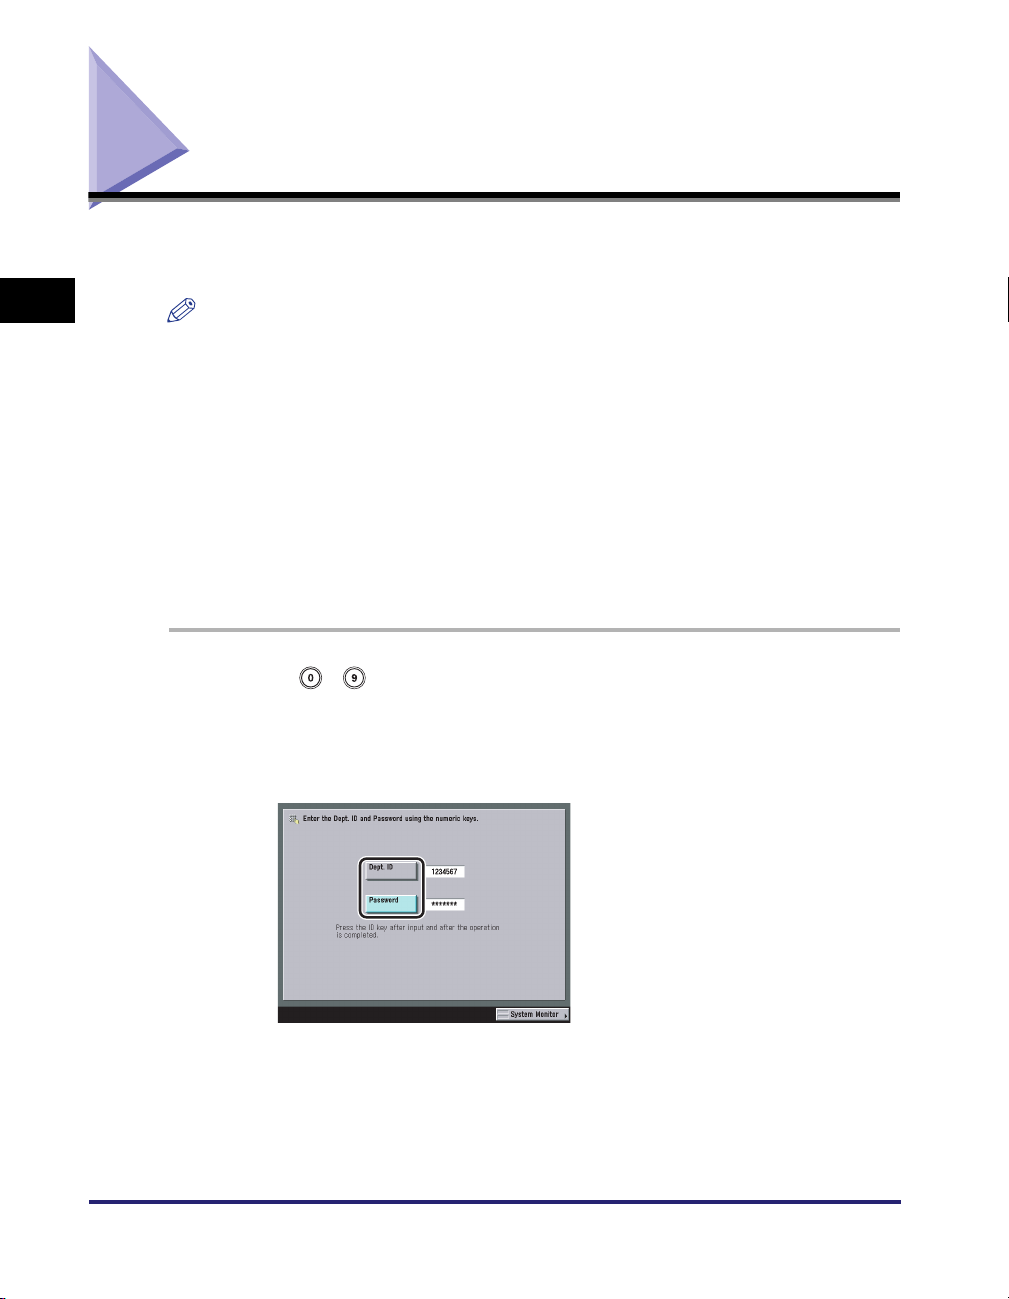
Entering the Department ID and Password
If Department ID Management has been set, the Department ID and password
must be entered before using this machine.
2
Basic Operations
NOTE
•
For instructions on setting the Department ID and password, see "Department ID
Management," on p. 6-5.
•
If you are using a control card for Department ID management, the message <You must
insert a control card.> appears on the touch panel display. Insert the control card into the
card slot. (See "Card Reader-C1," on p. 3-37.)
•
The use of some functions may be restricted, and a screen asking you to enter your
Department ID and password or insert your control card may appear while you are using
the machine. Follow the instructions on the touch panel display to continue using the
selected function.
•
If you are using a MEAP application to manage user authentication, and SDL or SSO is
set as the login service, the following procedure is not necessary. (See "Using a Login
Service," on p. 2-29.)
1
Use - (numeric keys) to enter your Department ID and
password.
❑ Press [Dept. ID] ➞ enter your Department ID.
2-26
❑ Press [Password] ➞ enter the password.
If no password has been set, proceed to step 2.
The numbers that you enter for the password are displayed as asterisks
(*******).
Entering the Department ID and Password
Page 97
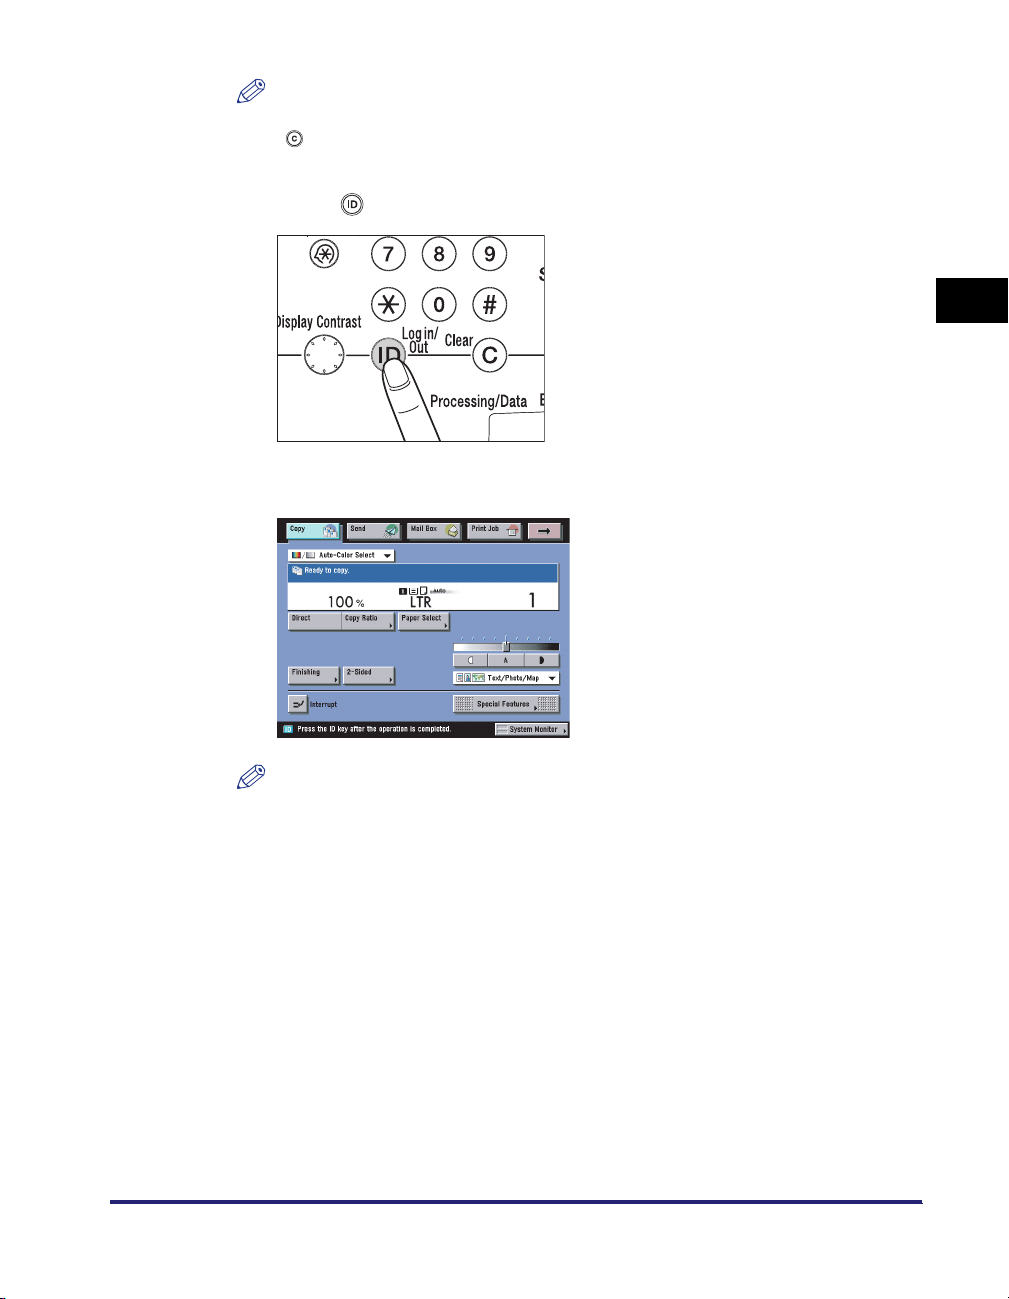
NOTE
If you make a mistake when entering the Department ID or password, press
(Clear)
2
Press (Log in/Out).
➞
enter the correct values.
2
The Basic Features screen of the selected function appears on the touch panel
display.
NOTE
If the Department ID or password that you entered is incorrect, the message <This
number has not been stored. Enter the number again.> appears. Repeat this
procedure from step 1.
Basic Operations
Entering the Department ID and Password
2-27
Page 98
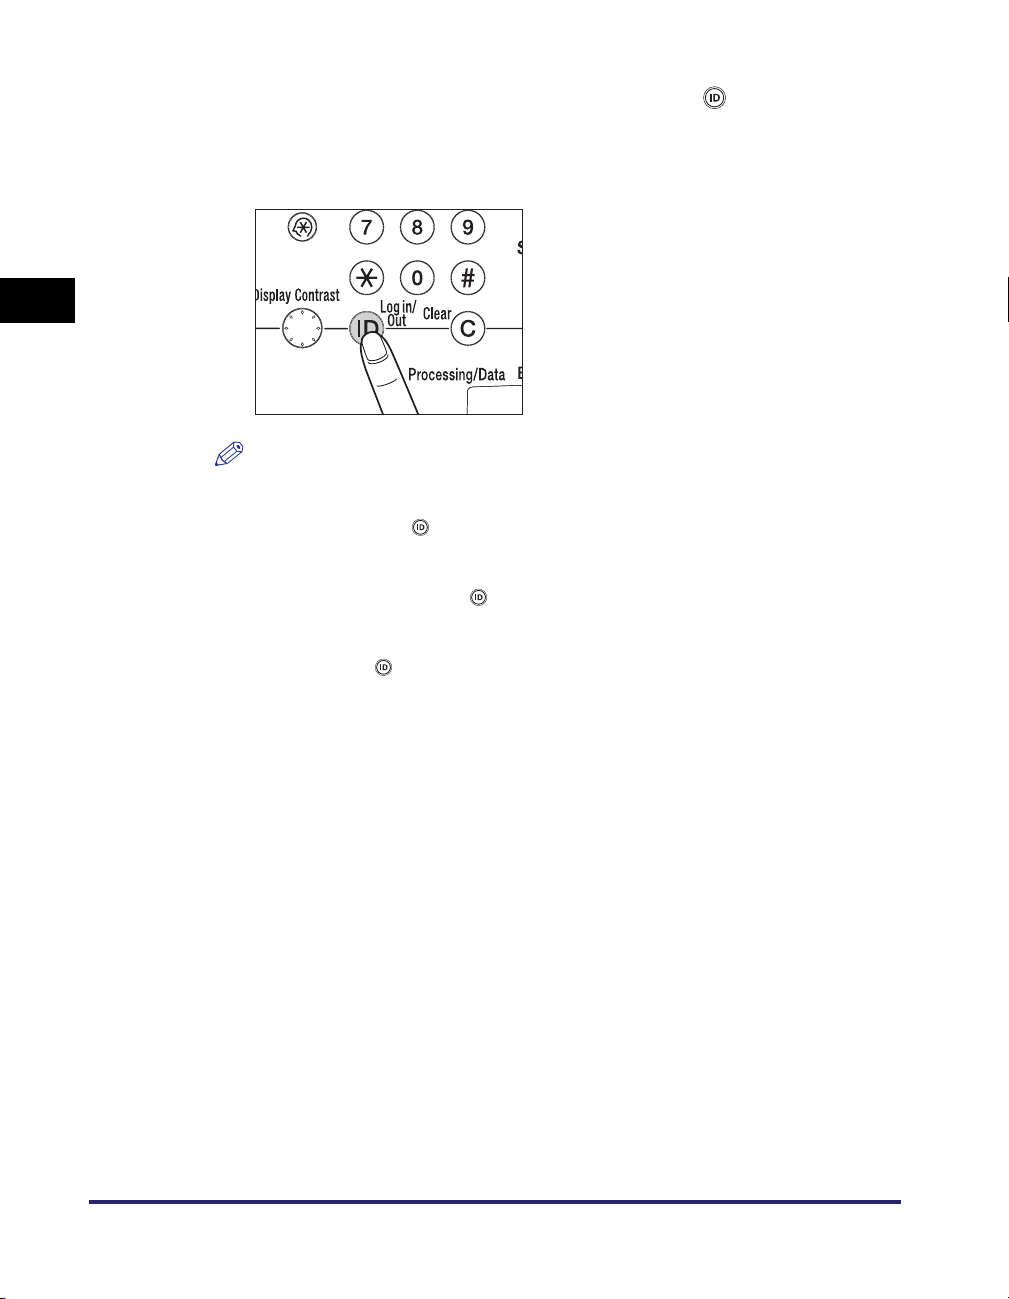
2
Basic Operations
3
When your operations are complete, press (Log in/Out) on
the control panel.
If you are using a control card, remove the control card, and take it with you. (See
"Card Reader-C1," on p. 3-37.)
NOTE
•
To perform operations again, you have to re-enter your Department ID and
password.
•
If you do not press (Log in/Out) after you are finished operating the machine,
any subsequent copies made are added to the total of the Department ID you
previously entered.
•
Even if you forget to press (Log in/Out) after you are finished operating the
machine, the screen for entering the Department ID and password automatically
appears after the set Auto Clear Time elapses. (See "Auto Clear Time," on p. 4-64.)
•
After pressing (Log in/Out), all settings are canceled, and the machine returns to
the Standard mode.
2-28
Entering the Department ID and Password
Page 99
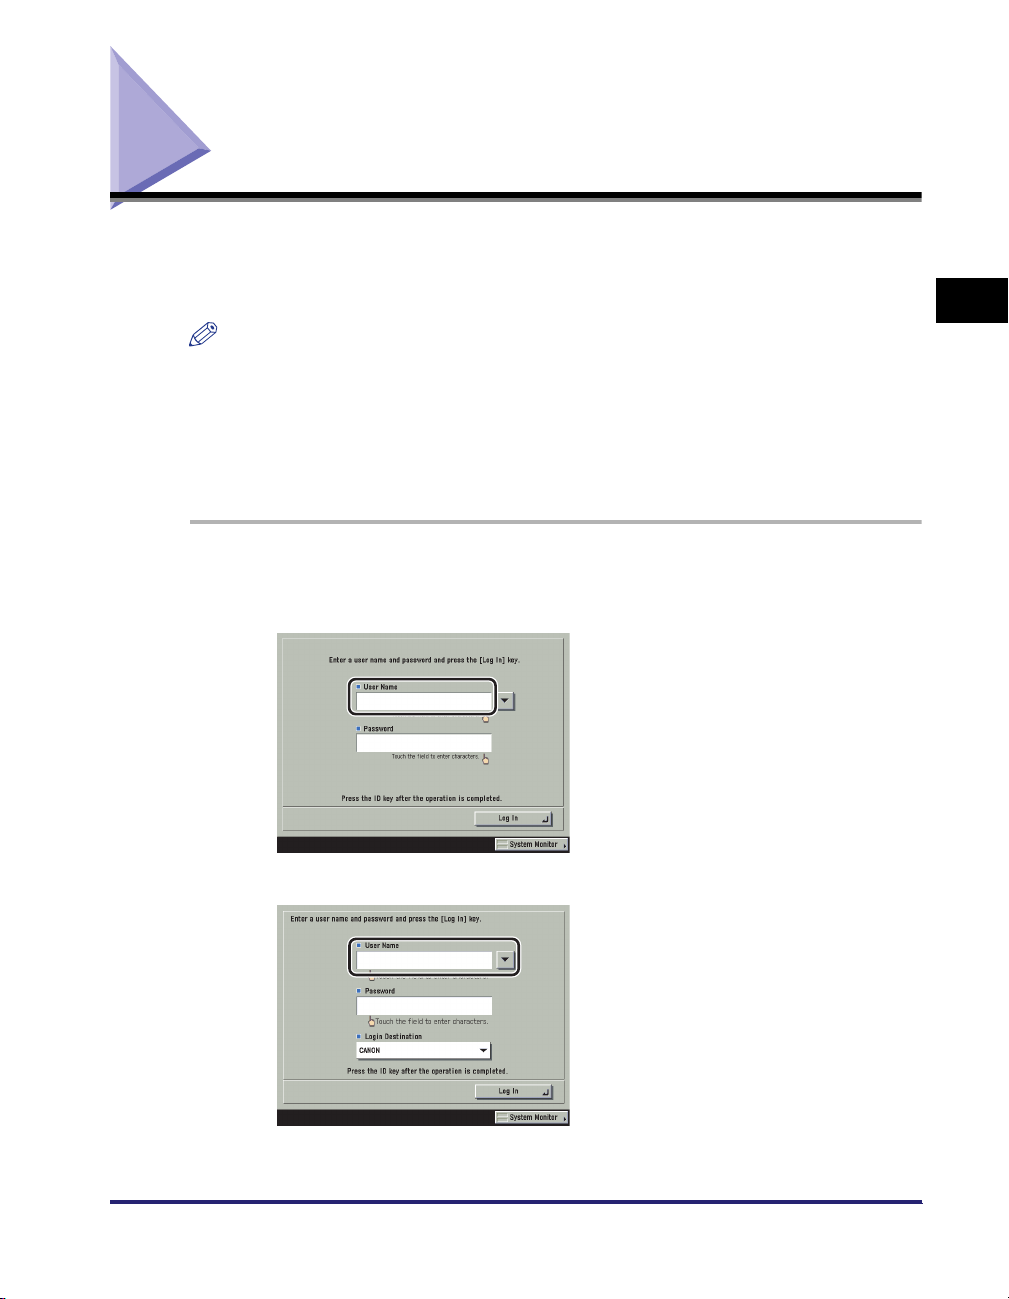
Using a Login Service
If you are managing the machine with a login service, such as SDL (Simple Device
Login) or SSO (Single Sign-On), enter the user name and password before using
this machine.
NOTE
•
SDL and SSO are used as examples to explain the procedure. However, if you are using
a different login service, the login procedure may vary.
•
For instructions on selecting and setting a login service, see the MEAP SMS
Administrator Guide.
•
For instructions on registering an SDL user, see the MEAP SMS Administrator Guide.
•
For instructions on registering an SSO user, contact your network administrator.
1
Press [User Name].
If SDL is set as login service, a screen similar to the following is displayed.
2
Basic Operations
If SSO is set as a login service, the login destination is also displayed.
Using a Login Service
2-29
Page 100
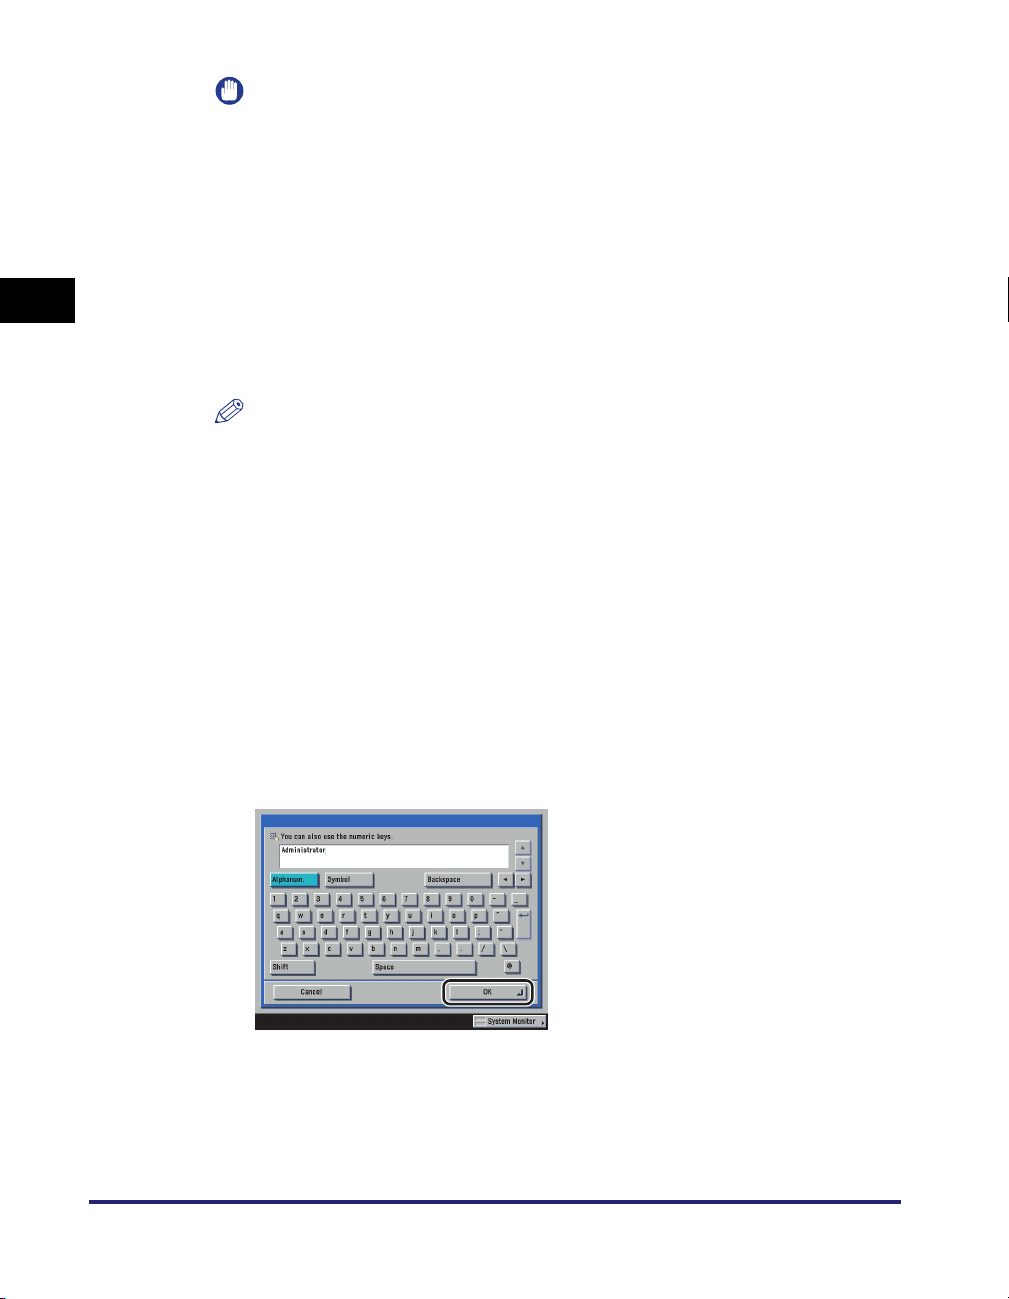
2
Basic Operations
IMPORTANT
•
To use the Domain Authentication system of SSO (including when performing
domain authentication with the 'Domain Authentication + Local Device
Authentication' system), a Windows server in which Active Directory is installed
and Security Agent are necessary.
•
If there is more than a 30 minute time difference between the current time set in the
computer's registry using Windows Active Directory and the time set on the
machine, an error will occur if you log on using the Domain Authentication system
of SSO (including when performing domain authentication with the 'Domain
Authentication + Local Device Authentication' system). To be able to log on using
SSO, the current time on both the computer and the machine must match. For
instructions on setting the current date and time on the machine, see "Current Date
and Time," on p. 6-25.
NOTE
•
You can also specify the number of user's logs displayed on the touch panel display
when logging in. (For more information, see the MEAP SMS Administrator Guide.)
•
When using SDL, you can use only alphanumeric characters for user names and
passwords.
•
When using the Domain Authentication system of SSO (including when performing
domain authentication with the 'Domain Authentication + Local Device
Authentication' system), you can use only alphanumeric characters, . (period), (hyphen), _ (underscore), or % (percent) for a user name. You can log in only if you
use valid characters.
•
When using the Local Device system of SSO (including when performing local
device authentication with the 'Domain Authentication + Local Device
Authentication' system), you can set only alphanumeric characters for user names
and passwords.
2-30
2
Enter the user name ➞ press [OK].
Using a Login Service
 Loading...