

Page 1

Basic Operation Guide
Quick View- Perform Useful Tasks
Next
Page
Network Setting Procedure
Security Functions
Searching in Detail
See the e-Manual.
User Software CD-ROM
1
2
3
4
5
6
7
8
9
Before Using the Machine
Document and Paper Handling
Copying
Printing from a Computer
Regi st er in g De st in at io ns
in t he Ad dr es s Bo ok
Using the Fax Functions
Using the Scan Functions
Maintenance
Tro u b l e s h o o t i n g
P.1-1
P.2-1
P.3-1
P.4-1
P.5-1
P.6-1
P.7-1
P.8-1
P.9-1
Searching the Installation and
Connection Procedure
See the Starter Guide.
Be sure to read the manual before using
the machine.
Keep the manual for future reference.
10
11
Reg i ste r ing /
Set t ing the Va rio u s F u nct i ons
Appendix
P.
10
-1
P.11-1
Page 2

Quick View- Perform Useful Tasks
Copy
Print Fax Scan
Network Settings & Remote UI
There are a variety of copy functions that are explained in later pages of this manual as well as in the e-Manual. You
can enlarge or reduce copies as well as copy multiple documents onto one sheet. Additionally, you can erase the
background of the document or adjust the density and image quality before copying.
Below is a quick overview of highlighted copy features that you can utilize in your everyday use.
Adjusting the Image Quality According to the Document
Image Quality Adjustment
You can adjust the image quality according to the types of
documents.
A correct selection is necessary for the optimal
reproduction of the document.
<Text/Photo> <Photo> <Text>
Sharpness Adjustment
You can emphasize the outline of the image in the
document or decrease the contrast.
Density Adjustment
You can adjust the density of copies according to the
document.
Background Adjustment
You can copy with the background color of the document
erased.
You can also adjust the background for each color.
<Light> <Dark>
For details, see "Copying" from p. 3-1.
Set <−> Set <+>
Various Copy Functions
Enlarged/Reduced Copies Reduced Layout
You can enlarge or reduce standard size documents to copy
on standard size paper or specify the copy ratio in
percentage.
2-Sided Copying
You can copy 1-sided documents on both sides of paper.
Collating
You can sort copies into sets arranged in page order.
1
1
1
2
3
1
2
2
1
3
2
1
2
3
2
3
3
3
1
2
3
You can reduce multiple documents to copy them onto one
sheet.
2 on 1
4 on 1
Copying ID Card
You can make a copy of a 2-sided card onto one side of
paper.
Paper Save Copy
Press the [Paper Save Copy] key, and you can select from
some types of copying.
For details, see "Copying" from p. 3-1.
Page 3

Quick View- Perform Useful Tasks
Copy Print Fax Scan
There are a variety of print functions that are explained in later pages of this manual as well as in the e-Manual. You
can enlarge or reduce documents, print multiple-page data onto one sheet, and perform 2-sided printing. Also you
can print from a USB memory connected to the machine as well as from a computer.
Below is a quick overview of highlighted print features that you can utilize in your everyday use.
Printing documents from a computer
Various Printing Functions
Enlarged/Reduced Printing
You can enlarge or reduce standard size documents to
copy on standard size paper or specify the copy ratio in
percentage.
2-Sided Printing
You can print on both sides of paper.
For details, see "Printing from a Computer" from p. 4-1.
Reduced Layout
You can reduce multiple documents to print them onto one
sheet.
Network Settings & Remote UI
Miscellaneous Printing Functions
Booklet Printing
Booklet printing allows you to make a booklet by folding
printouts in half.
Poster Printing
You can magnify and divide a single page image to print it out
on multiple sheets of paper. You can make one large poster
by joining these printouts together.
Printing documents from a USB memory (Media printing)
Watermark Printing
You can superimpose watermarks (such as [COPY] and
[DRAFT]) over the documents created by an application.
Displaying a Preview before Printing
You can check the printout result on a computer display.
Selecting a "Profile"
Some printer driver settings are provided as "Profiles"
beforehand.
You can perform printing which suits your needs only by
selecting a "Profile."
For details, see "Printing" in the e-Manual.
You can directly print the data loaded into the USB memory which has been connected to the machine.
Data
Print
Page 4
Quick View- Perform Useful Tasks
Copy Print Fax Scan
There are a variety of fax functions that are explained in later pages of this manual as well as in the e-Manual. The
machine is equipped with a Super G3 fax, with high transmission speeds as well as the PC function which can send
a document from a computer directly, which reduces paper costs.
Below is a quick overview of highlighted fax features that you can utilize in your everyday use.
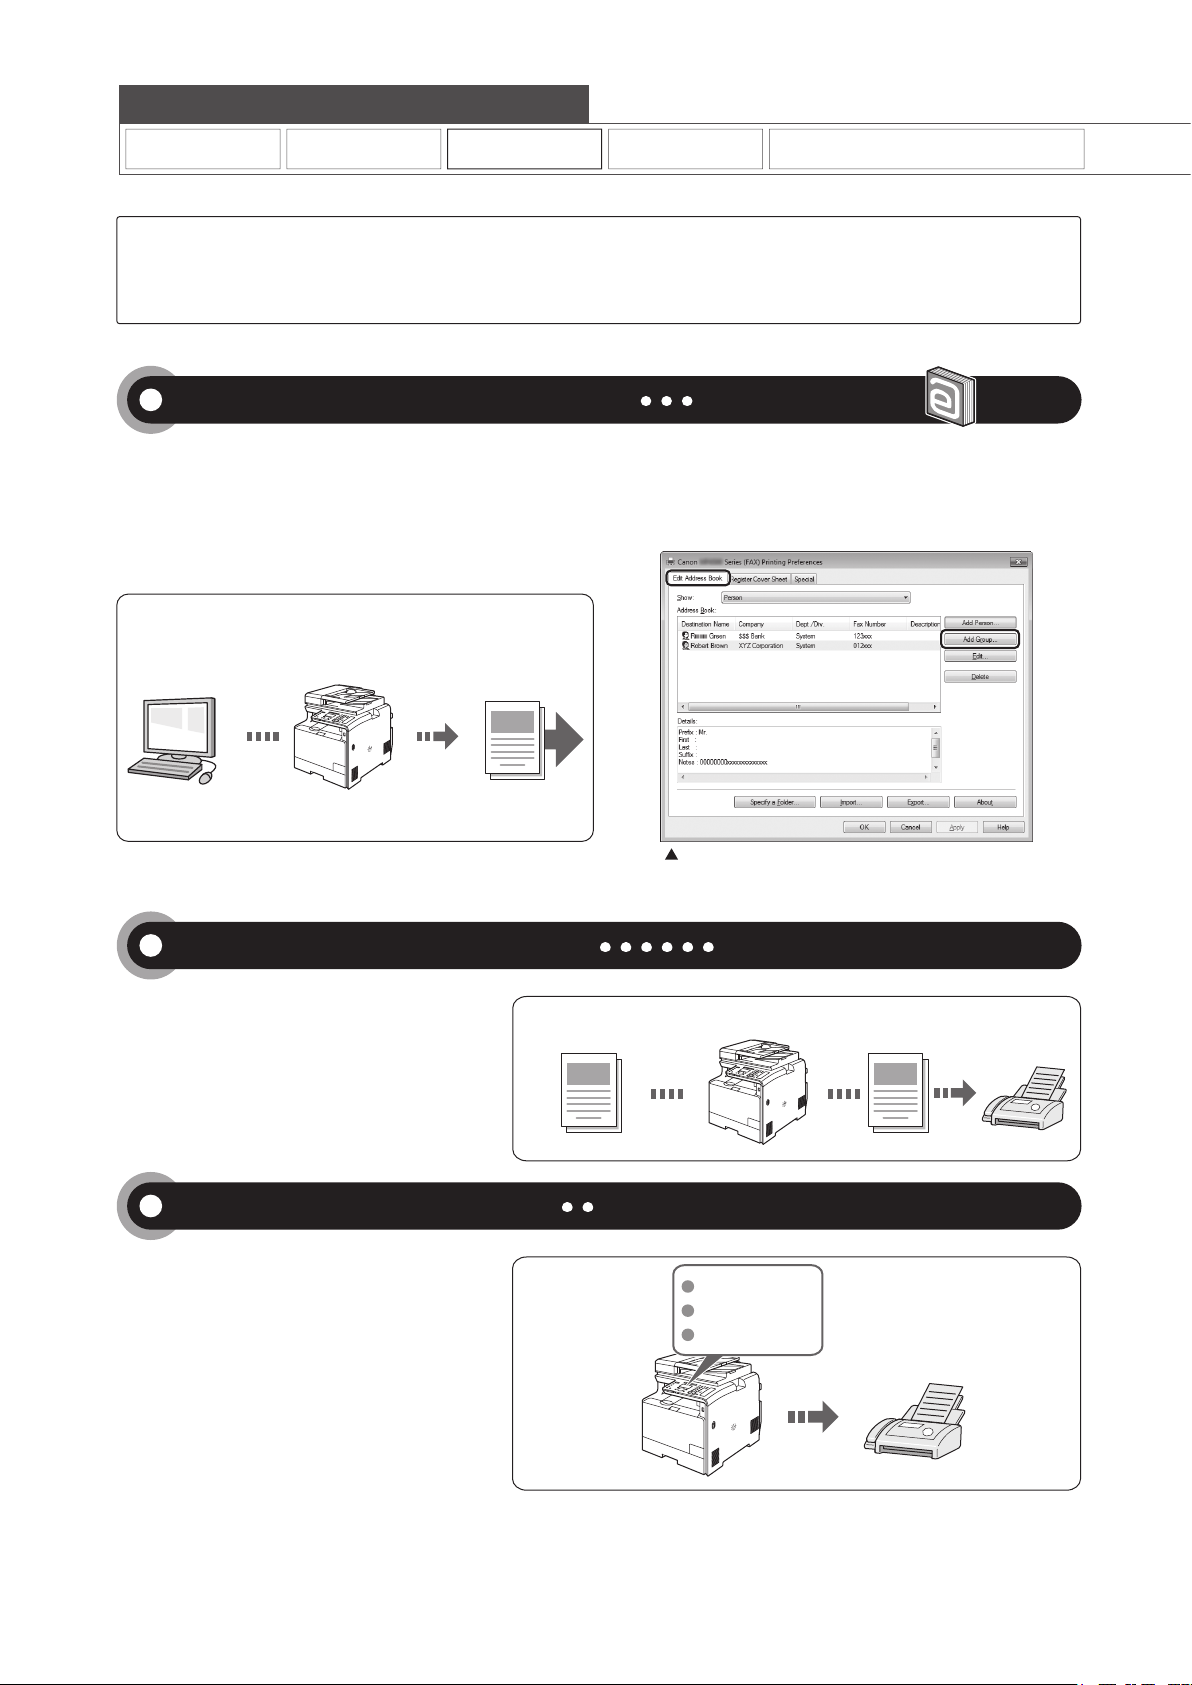
Sending a Document Directly from a Computer (PC Fax)
You can send a document or image created in an application
as a fax directly using the fax driver from a computer on a
network. Because you do not need to print the document, you
can reduce the paper cost as well as send a clear document
which has little dirt or blur.
Data is created
in a computer
Send
You can import the address book using the fax driver,
enabling you to send a fax to a destination easily without
mistakes.
You can also create a cover sheet for when sending a fax.
For details, see "Fax" in the e-Manual.
Network Settings & Remote UI
Fax driver screen
Forwarding the Received Fax (Manual Forwarding)
You can forward received faxes stored in the
memory to a specified destination.
Registering Destinations in the Address Book
By registering destinations for sending faxes
beforehand, you can save many steps to enter
the destinations when sending the documents.
Received Fax Forward
For details, see "Registering Destinations in the Address Book" from p. 5-1.
Favorites
Coded dialing
Group dialing
For details, see "Using the Fax Functions" from p. 6-1.
Page 5

Quick View- Perform Useful Tasks
Copy Print Fax Scan
Various Sending/Receiving Functions
Various Sending Functions
Various Methods for Specifying a Destination
You can register fax destinations in the address book. You can
specify the destinations using various methods, enabling you to
send documents quickly and easily.
Destination search
A A A AA
B B B BB
C C C CC
Favorites
You can register up to 19 destinations in the Favorites list.
The destinations registered in the Favorites list are displayed
in the Favorites list by selecting the <Fav.> tab in the address
book display and can be found easily when you specify the
destination.
A A A A A
B B B B B
C C C C C
Fav.
Network Settings & Remote UI
For details, see "Using the Fax Functions" from p. 6-1.
Group dialing
You can specify up to 199 registered destinations as a group
address in the Favorites list and coded dial codes. Group
addresses need to be registered in unused Favorites or
coded dial codes. All you
need to do is to select a key or code to specify group
addresses.
A A AA
BBB B
CCCC
Specifying from the sending history
The previous setting
The second previous setting
The third previous setting
Coded dial
You can register up to 181 destinations in coded dial codes.
Once the destinations have been registered, you can press
the appropriate coded dial code to select the destination.
# # #
Dial Code
BBB
Sequential broadcast
By scanning a document once, you can send the same
document to multiple destinations.
Various Receiving Functions
Receiving in the Memory Remote Receiving
Received documents are normally printed immediately.
However, you can store the documents temporarily in the
memory without printing.
You can print the stored documents at any time. If you do not
need them, you can delete them, saving paper to be used.
If an external telephone is connected, you can switch to the
fax receiving mode immediately by dialing the ID number for
fax receiving using the dial buttons of the telephone during a
phone call.
A A A
C C C
M M M
S S S
Page 6

Quick View- Perform Useful Tasks
Copy Print Fax Scan
There are a variety of scan functions that are explained in later pages of this manual as well as in the e-Manual. You
can easily save scanned documents into your computer or a USB memory, and also send them to your e-mail
application or a file server directly from the machine.
Below is a quick overview of highlighted scan features that you can utilize in your everyday use.
Network Settings & Remote UI
Saving in a Computer
There are two methods for saving scanned documents in a computer.
Saving the Documents Using the Operation Panel of the Machine
You can easily save scanned documents in a computer only by operating the
operation panel of the machine.
Various scanning settings have been prepared for your purposes. Therefore,
you can create a "Searchable PDF*" file, which can be used for text retrieval
or as text data, without specifying special settings.
* If you are using Macintosh, you may not create "Searchable PDF."
Use the [Scan] key for scanning
For quicker selection of destinations and/or settings, register them beforehand into the key on the operation panel.
Saving the Documents Using Operations from a Computer
Scanning with the MF Toolbox*
Scanning is performed by operating the
software supplied with the machine.
* MF Toolbox for Macintosh and MF Toolbox for Windows
may be different in some features.
For details, see the Scanner Driver Guide.
Scanning from an Application
Scanning is performed using
your application.
This allows you to open the
scanned data as is in your
application.
Scanning with the WIA Driver (Windows XP/Vista/7 Only)
Scanning is performed using the driver system supplied with Windows operating systems.
There are various scanning methods.
・Scanning from the [Scanner and Camera Wizard] dialog box
・Scanning from the [Windows Fax and Scan] dialog box
・Scanning from Windows Photo Gallery
・Scanning from an Application
For details, see "Using the Scan Functions" from p. 7-1.
Documents
1
2
For details, see "Scan" in the e-Manual.
2 3
Data
Data
Documents
1
3
Saving in a USB Memory
You can save scanned documents in a
USB memory connected to the
machine.
Emailing scanned documents
You can send scanned documents to
your e-mail application.
(MF8380Cdw Only)
Documents
Sending scanned documents to a file server
You can send scanned documents to a
file server.
For details, see "Using the Scan Functions" from p. 7-1.
Documents
(MF8380Cdw Only)
Documents
Data
For details, see “Scanning” in the e-Manual.
+
Data E-mail
For details, see “Scanning” in the e-Manual.
Data File server
Page 7

Quick View- Perform Useful Tasks
Copy Print Fax Scan
Network Settings & Remote UI
There are a variety of network settings that are explained in the e-Manual. Since the machine has a built-in network
board, you can print, fax, and scan from a computer via a network. You can also perform efficient management by
configuring the machine using the Remote UI. If you use the MF8380Cdw/MF8080Cw, you can connect to the
network using the wireless LAN.
Below is a quick overview of highlighted network settings that you can utilize in your everyday use.
Various Network Settings
Basic Network Settings
Setting the IP address (IPv4)
- IP address
- Subnet mask
- Gateway address
As needed
Setting the IP address (IPv6)
Configuration for communicating
For details, see "Network Settings" in the e-Manual.
with a computer
Configuring the machine Communication mode/
- LPD, RAW, WSD
As needed
Configuring a computer
- Port settings
- Sharing settings for the printer
Miscellaneous Settings
Communication speed
Waiting time for connection
DNS
WINS server
Security Settings
Administration Settings
System administrator settings
- Manager ID/PIN
Device information
- Device name/Installation site
Dept. ID management
- Department ID/PIN/
Function restriction
- Unknown ID job management
Remote UI On/Off
Configuring Using the Remote UI
Remote UI Functions
Checking the status and information
of the machine
Job Management
Preferences
Function settings
System settings
Address book management
How to start the Remote UI
Start the web browser.
1
Enter "http://<the IP address of the
2
machine>/" in the address field, and
then press the [ENTER] key on your
keyboard.
For details, see "Security" in the e-Manual.
Restricting Connection
to a Network or Computer
IP address filtering
MAC address filtering
SNMP settings
Allowing the HTTP communication
Setting a port number
Dedicated port settings
Restricting USB connection
Restricting job operations
Printing Functions/Restricting Destination
Operations/Sending Functions
Secure printing
Address book PIN
Restricting new destinations
Restricting the PC fax
Restricting sending from history
Fax number confirmation re-entry
Restricting sequential broadcast
Restricting displaying the job history
For details, see "Setting and Managing from Computer" in the e-Manual.
e-Manual → Starting the Remote UI
Log on to the Remote UI.
3
(1) Select [System Manager Mode] or [End-User Mode].
(2) For [System Manager Mode], enter [System
Manager ID] and [System Manager PIN].
For [End-User Mode], enter [User Name].
(3) Click [Log in].
(1)
(1)
(2)
(2)
(3)
Page 8
C o n t e n t s
Contents viii
Manuals for the Machine xi
Available Features xii
How to Use This Manual xii
Important Safety Instructions xiii
Installation Requirements and Handling xvii
Legal Notices xix
Laser Safety xxiii
Before Using the Machine 1-1
Names and Functions on Each Part of the Machine 1-2
Front Side 1-2
Back Side 1-3
Interior 1-4
Multi-purpose Tray (Manual Feed Slot) 1-5
Paper Cassette 1-6
Operation Panel 1-7
LCD (Standby Mode) 1-9
Copy Mode 1-9
Fax Mode 1-9
Scan Mode 1-9
USB Direct Print mode 1-9
Navigating the Menu 1-10
Entering the Menu Screen 1-10
Scrolling Through Menu Items 1-10
Selecting a Menu Item 1-10
Configuring menus using the navigation keys 1-11
Returning to the Default Screen 1-11
Entering Text 1-12
Entering Text Except for IP Address 1-12
Changing the Entry Mode 1-12
Entering Text, Symbols, and Numbers 1-12
Moving the Cursor (Entering a Space) 1-12
Deleting text, symbols, or numbers 1-12
Setting the Sleep Timer 1-14
Setting the Current Date and Time 1-15
Document and Paper Handling 2-1
Document Type 2-2
Supported Document Types 2-2
Scan Area 2-2
Copy 2-2
FAX 2-3
Scan (Saving in a Computer) 2-3
Scan (Saving in a USB Memory/Sending by E-mail/
Sending to a File Server) 2-3
Placing Documents 2-4
Placing Documents on the Platen Glass 2-4
Placing Documents in the Feeder 2-4
Paper Requirements 2-6
Paper Size 2-6
Paper Type 2-7
Printable Area 2-8
Loading Paper 2-9
In the Paper Cassette 2-9
When loading Legal size paper 2-9
When loading envelopes 2-10
When loading Legal size paper 2-11
In the Multi-Purpose Tray (MF8380Cdw Only) 2-12
When loading envelopes 2-12
In the Manual Feed Slot (MF8080Cw Only) 2-13
When loading envelopes 2-14
Precautions when Loading Paper 2-14
Paper Loading Capacity 2-15
Paper Loading Orientation 2-15
Paper cassette 2-16
Multi-purpose tray (MF8380Cdw Only) 2-16
Manual feed slot (MF8080Cw Only) 2-16
Paper cassette 2-16
The multi-purpose tray (MF8380Cdw Only) 2-16
Manual feed slot (MF8080Cw Only) 2-17
Setting the Paper Size and Type 2-18
For the Paper Cassette 2-18
Registering the Default Paper Settings for the Multi-purpose Tray
(Manual Feed Slot) 2-18
Registering a Custom Paper Size 2-19
Selecting the Print Side (MF8380Cdw Only) 2-21
When <Print Speed Priority> is selected (the default setting) 2-21
When <Print Side Priority> is selected 2-21
Copying 3-1
Basic Copying Method 3-2
Checking and Canceling Copy Jobs 3-3
Canceling a copy job using [
Checking and canceling a copy job using [ ] (Status Monitor/Cancel)
Copy Settings 3-4
Combination of Copy Settings 3-4
Selecting Copy Papers 3-4
Adjusting the Density 3-5
Selecting Image Quality (Copy) 3-6
Copy Settings 3-7
2-Sided Copying (MF8380Cdw Only) 3-7
Enlarging/Reducing Copies 3-8
Multiple Documents onto One Sheet (N on 1) 3-8
Collating Copies 3-9
] (Stop) 3-3
3-3
viii
Page 9

Erase Dark Borders and Frame Lines (Frame Erase) 3-9
Emphasize the Outline of an Image (Sharpness) 3-9
Copying an ID Card 3-10
Specifying destinations using coded dial codes 6-5
Specifying destinations using group addresses 6-6
Canceling Fax Jobs 6-7
Copying by Saving Paper 3-11
Registering and Using Combination of Copy Settings
(Mode Memory) 3-12
Registering Mode Memory 3-12
Deleting Mode Memory 3-12
Calling and Copying Mode Memory 3-13
Changing the Default Values 3-14
Viewing Copy Settings 3-14
Printing from a Computer 4-1
Preparing to Print from Your Computer 4-2
Printing from a Computer 4-3
Scaling Documents 4-3
Printing Multiple Pages on One Sheet 4-3
1-sided Printing and 2-sided Printing (MF8380Cdw Only) 4-4
Checking and Canceling Print Jobs 4-5
Registering Destinations in the
Address
Registering Destinations in the Address Book 5-2
Favorites 5-2
Coded dial 5-2
Group dialing 5-2
Registering and Editing Destinations in the Favorites List 5-3
Registering and Editing from the Operation Panel 5-3
Registering and Editing a destination in the Favorites list Using the
Remote UI 5-5
Registering and Editing Coded Dial Codes 5-6
Registering and Editing from the Operation Panel 5-6
Registering and Editing a Coded Dial Code Using the Remote UI 5-8
Registering and Editing Destinations for Group Dialing 5-9
Registering and Editing a Destination Group from the Operation
Panel 5-9
Registering and Editing a Destination Group Using the Remote UI 5-12
Book 5-1
Using the Fax Functions 6-1
Basic Procedures for Sending Faxes 6-2
Changing the Scan Settings (Fax) 6-3
Resolution Settings 6-3
Density Settings 6-3
2-Sided Original Settings (MF8380Cdw only) 6-3
Sharpness Settings 6-4
Specifying Destinations 6-5
Specifying destinations by entering the fax number 6-5
Specifying destinations using the address book 6-5
Redialing (Manual Redialing) 6-8
Useful Features 6-9
Notifying the Recipient of an Incoming Fax by Telephone
(Manual Sending) 6-9
Push-button Telephone for Tone Dialing 6-9
Sending a Fax Abroad (Adding Pauses) 6-10
Sending to Multiple Destinations at a Time (Sequential Broadcast)
6-11
RX Mode 6-12
RX Mode 6-12
Auto mode 6-12
Fax/Tel mode 6-13
Answer mode 6-14
Manual mode 6-14
DRPD (Distinctive Ring Pattern Detection) mode 6-14
Changing the Receive Mode 6-15
Advanced Settings for the Fax/Tel Auto Switch Mode 6-15
Forwarding Fax Documents 6-16
Setting Document Transfer (Automatic Forwarding) 6-16
Forwarding Received Faxes Stored in Memory to Other
Destinations (Manual Forwarding) 6-16
Configurating Operations for Transfer Errors 6-17
Re-fowarding/Printing/Deleting Documents in Which
Transfer Is Failed 6-18
Managing Faxes Stored in Memory 6-19
Checking and Canceling Fax Jobs 6-19
Combining and Printing the Received Documents You Saved 6-19
Checking and Deleting Received Faxes 6-20
Checking the History of Received/Sent Faxes 6-21
Changing the Default Fax Settings 6-22
Changing Fax Settings (Settings that Can Be Specified
Using the [Menu] Button) 6-23
The steps to take for configuring the send settings 6-23
Options 6-23
Register Unit Telephone Number 6-24
Select Line Type 6-24
Off-Hook Alarm 6-24
Change Defaults 6-24
Register Unit Name (Fax) 6-24
ECM TX 6-24
Pause Time 6-24
Auto Redial 6-24
Sender ID 6-25
Check Dial Tone Before Sending 6-25
The steps to take for configuring the receiving settings 6-25
Options 6-26
ECM RX 6-26
Incoming Ring 6-26
Remote RX 6-26
Auto RX Switch 6-26
2-Sided Printing (MF8380Cdw Only) 6-26
Reduce RX Size 6-26
RX Page Footer 6-27
Continue Printing When Toner Is Low 6-27
The steps to take for configuring the system settings 6-27
ix
Page 10
Options 6-28
TX Start Speed 6-28
RX Start Speed 6-28
Memory Lock Settings 6-28
Select Country/Region 6-28
Address Book PIN 6-28
Restrict New Destinations 6-29
Allow Fax Driver TX 6-29
Restrict History TX 6-29
Fax No. Confirmation Re-Entry 6-29
Restrict Sequential Broadcast 6-29
Using the Scan Functions 7-1
Basic Operation Methods for Scanning 7-2
Scanning Using Keys on the Operation Panel 7-2
Performing a Scan Using a Shortcut Key 7-3
Registering a Shortcut Key/Confirming the Destination Registered
in the Shortcut Key 7-3
Performing a Scan Using a Shortcut Key 7-4
Saving Scanned Documents to USB Memory Device 7-5
E-mailing Scanned Documents (MF8380Cdw Only) 7-6
Sending Scanned Documents to a File Server (MF8380Cdw Only) 7-7
Maintenance 8-1
Cleaning the Machine 8-2
Cleaning the Exterior 8-2
Cleaning the Fixing Unit 8-2
Cleaning the ITB 8-2
Cleaning the Platen Glass 8-3
Cleaning the Feeder Automatically (MF8380Cdw/MF8080Cw Only)
Precautions When Cleaning the Machine 8-4
8-4
Replacing Toner Cartridges 8-5
About the Supplied Toner Cartridge 8-5
About Replacement Toner Cartridges 8-5
Handling Toner Cartridges 8-6
Storing Toner Cartridges 8-6
Checking the Toner Level 8-7
When a Message Appears 8-7
Replacing the Toner Cartridges 8-7
Purchase Consumables 8-10
Recycling Used Cartridges 8-11
The Clean Earth Campaign 8-11
U.S.A. PROGRAM 8-11
Packaging 8-11
Shipping 8-12
CANADA PROGRAM-CANADA PROGRAMME 8-13
Relocating the Machine 8-14
Precautions when Relocating the Machine 8-15
Troubleshooting 9-1
Paper Jams in the Output Area (MF8380Cdw Only) 9-4
Paper Jams in the Output Area and Rear Cover (MF8080Cw Only) 9-5
Paper Jams in the Paper Cassette (Cassette 1 or 2) 9-5
Paper Jams in the Multi-purpose Tray (MF8380Cdw Only) 9-6
Paper Jams in the Manual Feed Slot (MF8080Cw Only) 9-7
Onscreen Message 9-9
Error Codes 9-9
When <Incorrect Size/Setting> Appears 9-13
Troubleshooting 9-14
Check the Following First 9-14
Is the power switched ON? 9-14
Has the power switch been just turned ON? 9-14
Is the machine in the sleep mode? 9-14
Are the settings properly configured? 9-14
Is the Error indicator on or blinking? 9-14
Does a message appear on the screen? 9-15
Is the telephone line connected or configured properly? 9-15
If You Cannot Solve a Problem 9-15
When a Power Failure Occurs 9-16
Printing Results Are Not Good 9-17
Paper Curls 9-17
Paper Creases 9-18
Vertical Streaks Appear on the Output 9-18
Toner Smudges and Spatters Appear around Text and Images 9-19
The Bottom Edge of Paper or Following Paper Has Smudge Marks
Printing Is Faded 9-19
A Portion of the Page Is Not Printed 9-20
9-19
When a Problem Cannot Be Resolved 9-21
Customer Support (U.S.A.) 9-21
Customer Support (Canada) 9-21
Registering/Setting the Various
Functions
Setting Menu List 10-2
Printing a User Data List 10-2
Contents of the Setting Menu 10-2
10-1
Appendix 11-1
Main Specifications 11-2
Machine Specifications 11-2
Wireless LAN Specification 11-2
Copy Specifications 11-2
Printer Specifications 11-3
Scanner Specifications 11-3
Fax Specifications 11-3
Telephone Specifications 11-4
Transmission Specifications (MF8380Cdw Only) 11-4
Cassette Feeding Unit-V1 (optional) (MF8380Cdw Only) 11-4
Index 11-5
Clearing Jams 9-2
Document Jams in the Feeder 9-2
Paper Jams in the Rear Cover and Duplex Unit (MF8380Cdw Only)
9-3
x
Page 11

Manuals for the Machine
Preface
Next Page
2
Installing the Machine
P. 6
3
Conguring and
Connecting the Fax
P. 16
4
Appendix
P. A-1
Connecting to a Computer
and Installing the Drivers
P. 20
Read this guide rst.
Please read this guide before operating this
product.
The remarks for important safety
instructions are described in “Basic
Operation Guide.” Read the guide also.
After you nish reading this guide, store it in
a safe place for future reference.
Starter Guide
1
Quick Vi ew- Pe rfo rm Us efu l Ta sk s
Next
Page
Befor e U sin g t he Ma chi ne
P.1-1
1
Docum ent an d P ape r Han dli ng
P.2-1
2
Copyi ng
P.3-1
3
Print ing fr om a C om put er
P.4-1
4
Registe rin g Des tin ati ons
in the Add res s B oo k
P.5-1
5
Using th e F ax Fun ct ion s
P.6-1
6
Using th e S can Fu nc tio ns
P.7-1
7
Maint ena nce
P.8-1
8
Troubl esh oot in g
P.9-1
9
Register ing /
Setting the Va rio us Fu nct ion s
P.10-1
10
Appen dix
P.11-1
11
Be sure to read the manual before using
the machine.
Keep the manual for future reference.
Network Setting Procedure
Security Functions
Searching the Installation and
Connection Procedure
See the Starter Guide.
See the e-Manual.
User Software CD-ROM
Searching in Detail
Basic Operation Guide
Starter Guide
Read this manual first.
This manual describes the settings for
setting up the machine and installing
the software. Be sure to read this
manual before using the machine.
• Preface
• Installing the Machine
• Configuring and Connecting the Fax
• Connecting to a Computer and Installing the Drivers
• Appendix
Read this manual with
Starter Guide.
This manual describes Wireless LAN
setup procedures and causes and
countermeasures for troubles you
might face during the setup. Be sure
to read this manual before using the
machine.
Read this manual next.
This manual describes the basic use of
the machine.
Read this manual for how
to set Send features.
This manual describes setting for
sending scanned data to E-mail and/or
file servers.
Wireless LAN Setting Guide
• Setting the wireless LAN
W
ireless LAN Setting Guide
XXXXXX
Setting the
Troubleshooting
XXXXXXXXX
wireless LAN
?
P.2-1P.1-1
Starter Guide
For procedures other
than printer installation
and wireless LAN setup,
please refer to the
[Starter Guide].
Read this guide before setting up the wireless LAN
This guide describes problems and countermeasures for troubles
of the wireless LAN setup procedure and problems encountered
during the configuration.
After you finish reading this guide, store it in a safe place for
future reference.
Basic Operation Guide
• Troubleshooting
• Appendix
• Before Using the Machine
• Document and Paper Handling
• Copying
• Printing from a Computer
• Registering Destinations in the
Address Book
This manual
• Using the Scan Functions
• Maintenance
• Troubleshooting
• Registering/Setting
• Functions
• Appendix
• Using the Fax Functions
Send Setting Guide (MF8380Cdw Only)
• Send to E-mail Function
• Store to Shared Folder Function
Read the desired chapter
to suit your needs.
The e-Manual is categorized by subject
to find desired information easily.
e-Manual
* The e-Manual is included in the User Software CD-ROM.
• Basic Operation
• Copy
*1
• Fax
*1
• Print
*1
• Scan
• Network Settings
• Setting and Managing
from Computer
• Troubleshooting
• Maintenance
• Setting Menu List
• Specifications
• Security
*1
If you are using Macintosh, see the following Driver Guides or Help for more details on
these functions.
You can find the driver guides in the following locations on the User Software CD-ROM.
• Fax: User Software CD-ROM → [Manuals] → [GUIDE-FAX-US.pdf]
• Print: User Software CD-ROM → [Manuals] → [GUIDE-UFR II-US.pdf]
• Scan: User Software CD-ROM → [Manuals] → [GUIDE-SCAN-US.pdf ]
xi
Page 12

Available Features
The machine offers the following features.
○ : available
— : not available
2-sided
Printing
—
MF8380Cdw
MF8080Cw
Copy Print
○ ○ ○ ○ ○ ○ ○ ○ ○ ○
○ ○
How to Use This Manual
Symbols Used in This Manual
Indicates a warning concerning operations that may lead to death or injury to persons if not performed correctly. To
WARNING
CAUTION
IMPORTANT
NOTE
use the machine safely, always pay attention to these warnings.
Indicates a caution concerning operations that may lead to injury to persons if not performed correctly. To use the
machine safely, always pay attention to these cautions.
Indicates operational requirements and restrictions. Be sure to read these items carefully to operate the machine
correctly, and avoid damage to the machine or property.
Indicates a clarification of an operation, or contains additional explanations for a procedure. Reading these notes is
highly recommended.
Indicates an operation that must not be performed. Read these items carefully, and make sure not to perform the
described operations.
Fax
(PC Fax)
○ ○
Scan
Send to
E-mail/
Store to
Shared
Folder
—
Remote
UI
○ ○
ADF
(1-sided)
ADF
(2-sided)
—
Wireless
LAN
○
Keys and Buttons Used in This Manual
The following symbols and key names are a few examples of how keys to be pressed are expressed in this manual.
• Operation panel keys: [Key icon] + (Key name)
Example: [
• Display: <Specify destination.>
• Buttons and items on the computer display: [Preferences]
] (Stop)
Illustrations Used in This Manual
Illustrations used in this manual
Illustrations of the model MF8380Cdw are used in this manual. When there is any difference among
the machines, it is clearly indicated in the text, e.g., “MF8080Cw.”
For information on the standard features for each model, see the followings.
“Available Features” (→P.xii)
Displays used in this manual
The display used in this manual is the factory preset display for the MF8380Cdw. Depending on the system configuration and
product purchased, the appearance of the display may differ.
xii
Page 13

Important Safety Instructions
Please read these “Important Safety Instructions” thoroughly before operating the machine.
As these instructions are intended to prevent injury to the user and other persons or to prevent destruction of property, always pay
attention to these instructions and operational requirements.
Also, as it may result in unexpected accidents or injuries, do not perform any operation unless otherwise specified in the manual.
Installation
WARNING
• Do not install the machine in a location near alcohol, paint
thinner, or other flammable substances. If flammable
substances come into contact with electrical parts inside
the machine, this may result in a fire or electrical shock.
• Do not place the following items on the machine.
- Necklaces and other metal objects
- Cups, vases, flowerpots, and other containers filled with
water or liquids
If these items come into contact with a high-voltage area
inside the machine, this may result in a fire or electrical
shock. If these items are dropped or spilled inside the
machine, immediately turn OFF the power switches of the
machine and computer (1) and disconnect the interface
cable if it is connected (2). Then, unplug the power plug
from the AC power outlet (3) and contact your local
authorized Canon dealer.
(2)
(2)
(1)
(1)
(3)
CAUTION
• Do not install the machine in unstable locations, such as on
unsteady platforms or inclined floors, or in locations subject
to excessive vibrations, as this may cause the machine to fall
or tip over, resulting in personal injury.
• The ventilation slots are provided for proper ventilation of
working parts inside the machine. Never place the machine
on a soft surface, such as a bed, sofa, or rug. Blocking the
slots can cause the machine to overheat, resulting in a fire.
• Do not install the machine in the following locations, as this
may result in a fire or electrical shock.
- A damp or dusty location
- A location exposed to smoke and steam, such as near a
cookery or humidifier
- A location exposed to rain or snow
- A location near a water faucet or water
- A location exposed to direct sunlight
- A location subject to high temperatures
- A location near open flames
• When installing the machine, gently lower the machine to
the installation site so as not to catch your hands between
the machine and the floor or between the machine and
other equipment, as this may result in personal injury.
• When connecting the interface cable, connect it properly by
following the instructions in this manual. If not connected
properly, this may result in malfunction or electrical shock.
• When moving the machine, follow the instructions in this
manual to hold it correctly. Failure to do so may cause you
to drop the machine, resulting in personal injury.
“Relocating the Machine” (→P.8-14)
(2)
(2)
(1)
(3)
(1)
• When installing and removing the optional accessories, be
sure to turn the machine off, unplug the power plug, and
then disconnect all the interface cables and power cord
from the machine. Otherwise, the power cord or interface
cables may be damaged, resulting in a fire or electrical
shock.
• Do not use this product near any medical electric
equipment. Radiowave emitted from this product may
influence those medical electric equipments. This may
result in accidents caused by malfunction.
Power Supply
WARNING
• Do not damage or modify the power cord. Also, do not
place heavy objects on the power cord or pull on or
excessively bend it. This can cause electrical damage,
resulting in fire or electrical shock.
• Keep the power cord away from all heat sources. Failure to
do so can cause the power cord insulation to melt, resulting
in a fire or electrical shock.
• The power cord should not be taut, as this may lead to a
loose connection and cause overheating, which could result
in a fire.
• The power cord may become damaged if it is stepped on,
fixed with staples, or if heavy objects are placed on it.
Continued use of a damaged power cord can lead to an
accident, such as a fire or electrical shock.
• Do not plug or unplug the power plug with wet hands, as
this can result in electrical shock.
• Do not plug the power cord into a multiplug power strip, as
this can result in a fire or electrical shock.
• Do not bundle up or tie up the power cord in a knot, as this
can result in a fire or electrical shock.
xiii
Page 14

• Insert the power plug completely into the AC power outlet.
Failure to do so can result in a fire or electrical shock.
• If excessive stress is applied to the connection part of the
power cord, it may damage the power cord or the wires
inside the machine may disconnect. This could result in a
fire. Avoid the following situations:
- Connecting and disconnecting the power cord
frequently.
- Tripping over the power cord.
- The power cord is bent near the connection part, and
continuous stress is being applied to the power outlet or
the connection part.
- Applying a shock to the power connector.
• Do not use power cords other than the one provided, as
this can result in a fire or electrical shock.
• As a general rule, do not use extension cords. Using an
extension cord may result in a fire or electrical shock.
• Remove the power plug from the AC power outlet and
refrain from using the machine during a thunder storm.
Lightning can result in a fire, electrical shock or malfunction.
CAUTION
• Do not use a power supply voltage other than that listed
herein, as this may result in a fire or electrical shock.
• Always grasp the power plug when unplugging the power
plug. Do not pull on the power cord, as this may expose the
core wire of the power cord or damage the cord insulation,
causing electricity to leak, resulting in a fire or electrical
shock.
• Leave sufficient space around the power plug so that it can
be unplugged easily. If objects are placed around the power
plug, you may be unable to unplug it in an emergency.
Handling
WARNING
• Do not disassemble or modify the machine. There are
high-temperature and high-voltage components inside the
machine which may result in a fire or electrical shock.
• Electrical equipment can be hazardous if not used properly.
Do not allow children to touch the power cord, cables,
internal gears, or electrical parts.
• If the machine makes an unusual noise or emits smoke,
heat, or an unusual smell, immediately turn OFF the power
switches of the machine and computer and disconnect the
interface cable if it is connected. Then, unplug the power
plug from the AC power outlet and contact your local
authorized Canon dealer. Continued use can result in a fire
or electrical shock.
• Do not use flammable sprays near the machine. If
flammable substances come into contact with electrical
parts inside the machine, this may result in a fire or
electrical shock.
• Always turn OFF the power switches of the machine and
computer, and then unplug the power plug and interface
cables before moving the machine. Failure to do so can
damage the cables or cords, resulting in a fire or electrical
shock.
• Confirm that the power plug or power connector is inserted
completely after moving the machine. Failure to do so can
result in an overheating and fire.
• Do not drop paper clips, staples, or other metal objects
inside the machine. Also, do not spill water, liquids, or other
flammable substances (alcohol, benzene, paint thinner,
etc.) inside the machine. If these items come into contact
with a high-voltage area inside the machine, this may result
in a fire or electrical shock. If these items are dropped or
spilled inside the machine, immediately turn OFF the power
switches of the machine and computer and disconnect the
interface cable if it is connected. Then, unplug the power
plug from the AC power outlet and contact your local
authorized Canon dealer.
• When plugging or unplugging a USB cable when the power
plug is plugged into an AC power outlet, do not touch the
metal part of the connector, as this can result in electrical
shock.
CAUTION
• Do not place heavy objects on the machine. The object or
the machine may fall, resulting in personal injury.
• Turn OFF the power switch when the machine will not be
used for a long period of time, such as overnight. Turn OFF
the machine and unplug the power plug if the machine
will not be used for an extended period of time, such as for
several days.
• Open or close covers and install or remove cassettes gently
and carefully. Be careful not to hurt your fingers.
• Keep your hands and clothing away from the roller in the
output area. Even if the machine is not printing, the roller
may suddenly rotate and catch your hands or clothing,
resulting in personal injury.
• The output slot is hot during and immediately after
printing. Do not touch the area surrounding the output slot,
as this may result in burns.
• Printed paper may be hot immediately after being output.
Be careful when removing the paper and aligning the
removed paper, especially after continuous printing. Failure
to do so may result in burns.
• When performing copy with a thick book placed on the
platen glass, do not press the feeder or the platen glass
cover forcefully. This may damage the platen glass and
cause personal injury.
• Be careful not to drop a heavy object, such as a dictionary,
on the platen glass. This may damage the platen glass and
cause personal injury.
• Close the feeder or the platen glass cover gently so as not
to catch your hand. This may result in personal injury.
• The laser beam can be harmful to the human body. The
laser beam is confined in the laser scanner unit by a cover,
so there is no danger of the laser beam escaping during
normal machine operation. Read the following remarks and
instructions for safety.
- Never open covers other than those indicated in this
manual.
- Do not remove the caution label attached to the cover of
the laser scanner unit.
- If the laser beam should escape and enter your eyes,
exposure may cause damage to your eyes.
xiv
Page 15

- If you operate this machine in manners other than
the control, adjustment, and operating procedures
prescribed in this manual, this may result in hazardous
radiation exposure.
• This machine is confirmed as the class 1 laser product in
IEC60825-1:2007.
Maintenance and Inspections
WARNING
• When cleaning the machine, turn OFF the machine and
computer, and unplug the interface cables and power plug.
Failure to do so can result in a fire or electrical shock.
• Unplug the power plug from the AC power outlet
periodically and clean the area around the base of the
power plug’s metal pins and the AC power outlet with a
dry cloth to remove all dust and grime. In damp, dusty,
or smoky locations, dust can build up around the power
plug and become damp, which can cause a short circuit,
resulting in a fire.
• Clean the machine with a well wrung out cloth dampened
with water or mild detergent diluted with water. Do not
use alcohol, benzene, paint thinner, or other flammable
substances. If flammable substances come into contact
with electrical parts inside the machine, this may result in a
fire or electrical shock.
• Some areas inside the machine are subject to high voltage.
When removing jammed paper or when inspecting inside
of the machine, be careful not to allow necklaces, bracelets,
or other metal objects to touch the inside of the machine,
as this can result in burns or electrical shock.
• Do not dispose of used toner cartridges in open flames.
This may cause the toner remaining inside the cartridges to
ignite, resulting in burns or fire.
• Confirm that the power plug or power connector is inserted
completely after cleaning the machine. Failure to do so can
result in an overheating and fire.
• Check the power cord and plug regularly. The following
conditions may result in fire, so please contact your local
authorized Canon dealer or the Canon help line.
- There are burn marks on the power plug.
- The blade on the power plug is deformed or broken.
- The power is turned OFF or ON when bending the power
cord.
- The coating of the power cord is damaged, cracked, or
dented.
- A part of the power cord becomes hot.
• Check regularly that the power cord and plug are not
handled in the following manner. Failure to do so can result
in a fire or electrical shock.
- The power connector is loosened.
- Stress is being applied to the power cord by a heavy
object or by fixing it with staples.
- The power plug is loosened.
- The power cord is tied in a bundle.
- A part of the power cord is put in an aisle.
- The power cord is put in front of the heating appliance.
CAUTION
• The fixing unit and its surroundings inside the machine
become hot during use. When removing jammed paper or
when inspecting the inside of the machine, do not touch
the fixing unit and its surroundings, as this may result in
burns.
• When removing jammed paper or when inspecting the
inside of the machine, do not expose yourself to the heat
emitted from the fixing unit and its surroundings for a
prolonged period of time. Doing so may result in low
temperature burns, even though you did not touch the
fixing unit and its surroundings directly, as this may result
in burns.
• If paper is jammed, remove the jammed paper so that
any pieces of paper do not remain inside the machine
according to the displayed message. Also, do not put your
hand in an area other than indicated areas, as this may
result in personal injuries or burns.
• When removing jammed paper or replacing a toner
cartridge, be careful not to get any toner on your hands or
clothing, as this will dirty your hands or clothing. If toner
gets on your hands or clothing, wash them immediately
with cold water. Washing with warm water sets the toner,
making it impossible to remove the toner stains.
• When removing jammed paper, be careful not to allow the
toner on the paper to scatter. The toner may get into your
eyes or mouth. If toner gets into your eyes or mouth, wash
them immediately with cold water and consult a physician.
• When loading paper or removing jammed documents or
paper, be careful not to cut your hands with the edges of
the paper.
• When removing a toner cartridge, remove the toner
cartridge carefully so as to prevent the toner from
scattering and getting into your eyes or mouth. If toner gets
into your eyes or mouth, wash them immediately with cold
water and consult a physician.
• Do not attempt to disassemble the toner cartridge. The
toner may scatter and get into your eyes or mouth. If toner
gets into your eyes or mouth, wash them immediately with
cold water and consult a physician.
• If toner leaks from the toner cartridge, be careful not to
inhale the toner or allow it to come into direct contact with
your skin. If the toner comes into contact with your skin,
wash with soap. If the skin becomes irritated or you inhale
the toner, consult a physician immediately.
xv
Page 16
Consumables
WARNING
• Do not dispose of used toner cartridges in open flames. This
may cause the toner to ignite, resulting in burns or fire.
• Do not store toner cartridges or paper in a location exposed
to open flames. This may cause the toner or paper to ignite,
resulting in burns or fire.
• When disposing of a toner cartridge, place the toner
cartridge into a bag to prevent the toner from scattering,
and then dispose of the toner cartridge according to local
regulations.
CAUTION
• Keep the toner cartridges and other consumables out of
the reach of small children. If the toner or other parts are
ingested, consult a physician immediately.
• Do not attempt to disassemble the toner cartridge. The
toner may scatter and get into your eyes or mouth. If toner
gets into your eyes or mouth, wash them immediately with
cold water and consult a physician.
• If toner leaks from the toner cartridge, be careful not to
inhale the toner or allow it to come into direct contact with
your skin. If the toner comes into contact with your skin,
wash with soap. If the skin becomes irritated or you inhale
the toner, consult a physician immediately.
• Do not pull out the sealing tape forcefully or stop at
midpoint, as this may cause toner to spill out. If toner gets
into your eyes or mouth, wash them immediately with cold
water and consult a physician.
Others
WARNING
• If you are using a cardiac pacemaker
This machine generates a low level magnetic flux. If you
use a cardiac pacemaker and feel abnormalities, please
move away from this machine and consult your physician
immediately.
Telephone Equipment
When using telephone equipment, basic safety precautions
should always be followed to reduce the risk of fire, electric
shock, and injury to persons, including the following:
1. Do not use this machine near water (i.e., near a bathtub,
kitchen sink, or laundry tub), or in a wet basement or near a
swimming pool.
2. Avoid using the telephone during an electrical storm, as
there may be a remote risk of electric shock from lightning.
3. Do not use the telephone to report a gas leak in the vicinity
of the leak.
xvi
Page 17
Installation Requirements and Handling
In order to use this machine in a safe and trouble-free manner, install the machine in a place that fulfills the following conditions.
Also, read the remarks carefully.
Temperature and Humidity Conditions
• Temperature range: 50 to 86°F (10 to 30°C)
• Humidity range: 20 to 80 % RH (no condensation)
IMPORTANT
Protecting the machine from condensation
• To prevent condensation from forming inside the machine
in the following cases, let the machine adjust to the
ambient temperature and humidity for at least two hours
before use.
- When the room where the machine is installed is heated
rapidly
- When the machine is moved from a cool or dry location
to a hot or humid location
• If water droplets (condensation) form inside the machine,
this can result in paper jams or poor print quality.
When using an ultrasonic humidifier
When you are using an ultrasonic humidifier, it is therefore
recommended that you use purified water or other water that
is free of impurities.
If you use tap water or well water, impurities in the water will
be dispersed through the air. This can be trapped inside the
machine, causing degradation in print quality.
Power Supply Requirements
120 to 127 V, 60 Hz
IMPORTANT
Precautions when connecting the power cord
• Do not connect this machine to an uninterruptible power
source.
• Use an AC power outlet exclusively for the machine. Do not
use the other sockets of the AC power outlet.
• Do not plug the power plug into the auxiliary outlet on a
computer.
Do not use the same AC power outlet for both the machine
and any of the following equipment.
- Copy machine
- Air conditioner
- Shredder
- Equipment that consumes a large amount of electricity
- Equipment that generates electrical noise
• When unplugging the power cord, keep interval of 5
seconds or more before plugging it again.
Miscellaneous precautions
• The maximum power consumption of the machine is as
follows.
- MF8380Cdw: 1,200 W or less
- MF8080Cw: 900 W or less
• Electrical noise or a dramatic drop in supplied voltage may
cause the machine or computer to operate incorrectly or
lose data.
Installation Requirements
• A location with sufficient space
• A location with good ventilation
• A location with a flat, even surface
• A location able to fully support the weight of the machine
IMPORTANT
Do not install the machine in the following locations, as
this may result in damage to the machine.
• A location subject to dramatic changes in temperature or
humidity
• A location subject to condensation
• A poorly ventilated location
(If you use the machine for a long time or to perform a large
amount of printing in a poorly ventilated room, the ozone
or other odors generated by the machine may create an
uncomfortable working environment. In addition, chemical
particles are dispersed during printing; therefore, it is
important to provide adequate ventilation.)
• A location near equipment that generates magnetic or
electromagnetic waves
• A laboratory or location where chemical reactions occur
• A location exposed to salt air, corrosive gases, or toxic gases
• A location, such as on a carpet or mat, that may warp from
the weight of the machine or where the machine is liable
to sink.
Notes on wireless LAN
• This product is designed for indoor use at a distance of
164'(50 m) or less from an access point (the distance
may vary depending on the communication speed or
environmental conditions). Keep it at an appropriate
distance.
• Check whether or not anything is blocking communication.
The signal may be degraded when passing through walls or
floors. Install accordingly.
• Radio wave interference may occur if any radio wave
emitting equipment (i.e. microwave oven) is located near
the product and its radio waves are in the same frequency
band as the radio waves used by the wireless LAN. Keep
the product as far as possible from sources of radio wave
interference.
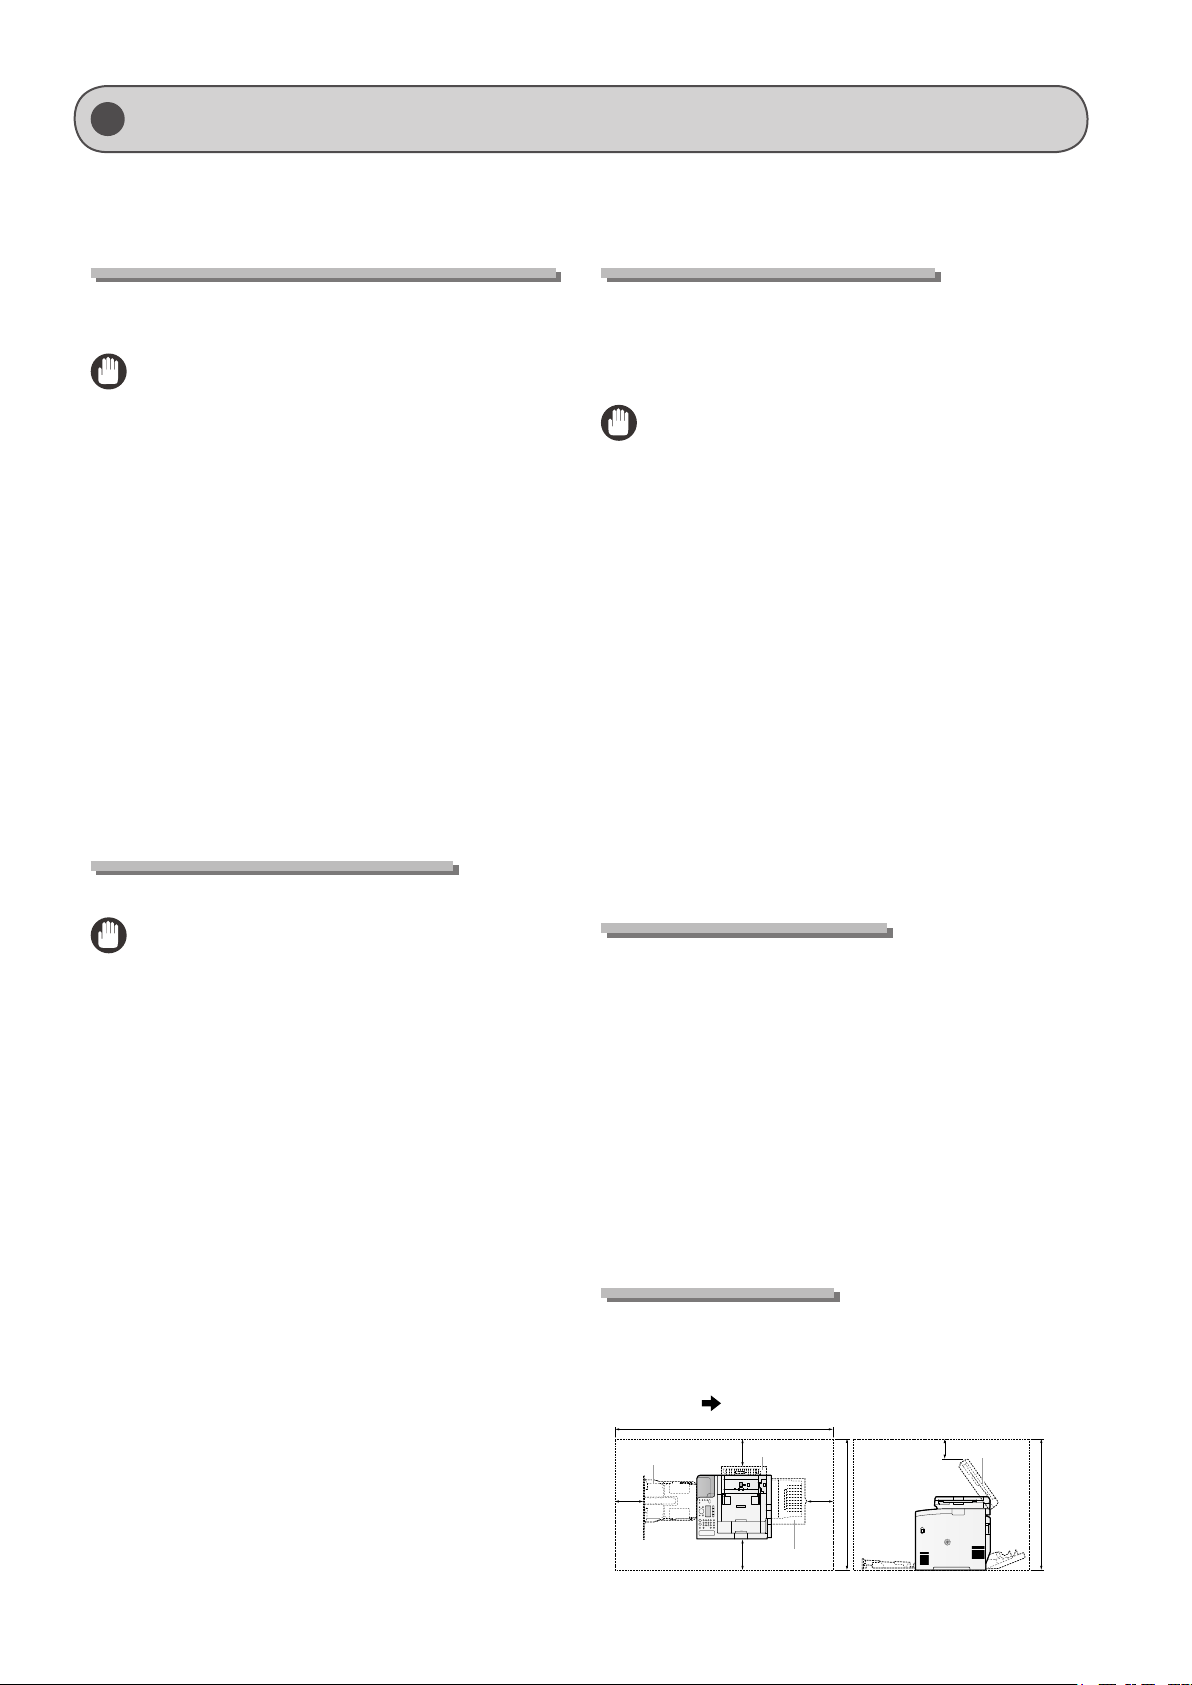
Installation Space
Required installation space
MF8380Cdw
Front View
Paper
cassette
4
(100)
52 1/4 (1327)
Feeder cover Feeder
4
(100)
4
(100)
Rear cover
(100)
4
26 1/2 (674)
4
(100)
in. (mm)
33 1/2 (851)
xvii
Page 18
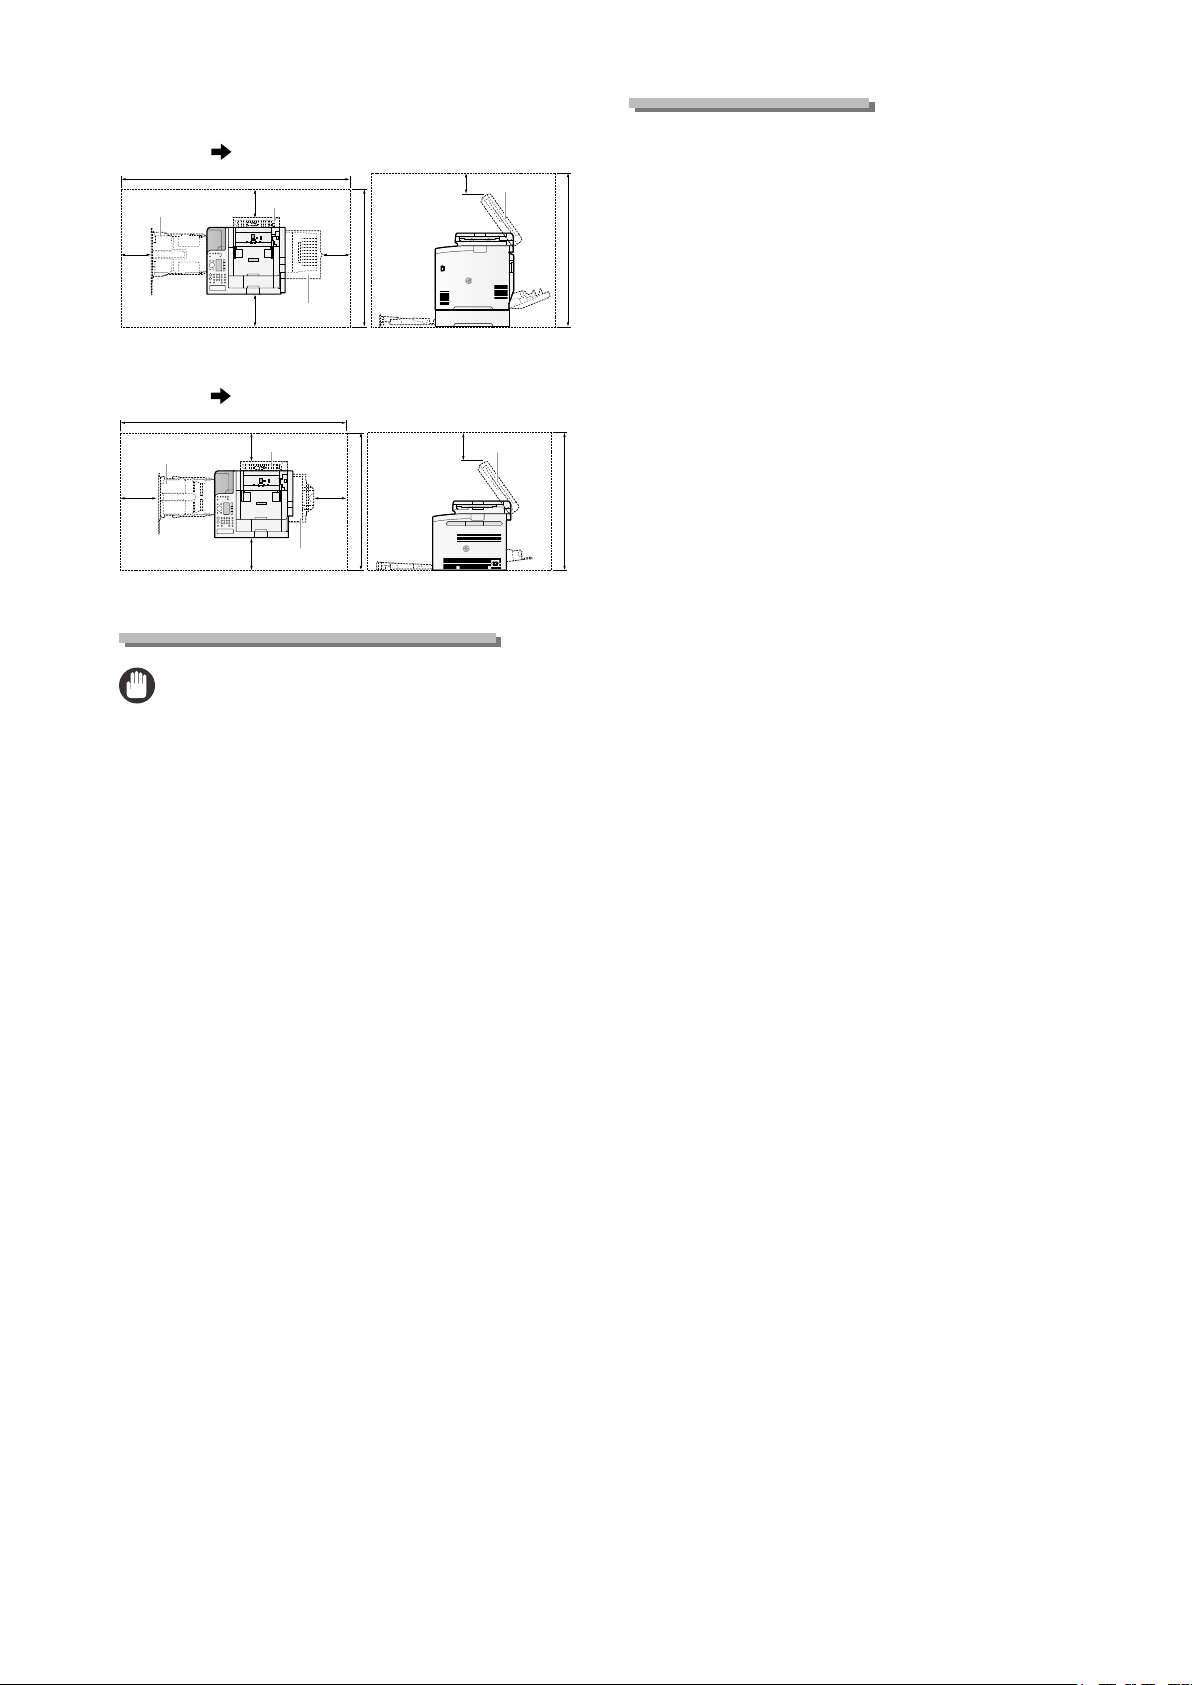
MF8380Cdw (When the Cassette Feeding Unit-V1 (optional) is
installed)
Front View
Paper
cassette
4
(100)
52 1/4 (1327)
Feeder cover
4
(100)
4
(100)
Rear cover
4
(100)
26 3/4 (679)
4
(100)
in. (mm)
Feeder
37 1/2 (951)
MF8080Cw
Front View
Paper
cassette
4
(100)
48 3/8 (1229)
Feeder cover Feeder
4
(100)
4
(100)
Rear cover
4
(100)
26 1/2 (674)
4
(100)
in. (mm)
31 1/2 (801)
Maintenance and Inspections
IMPORTANT
• Follow the instructions in the caution label attached to this
machine.
• Avoid shaking or applying a shock to this machine.
• To prevent a paper jam, do not turn the power ON/OFF,
open/close the operation panel or rear cover, and load/
unload paper in the middle of printing operation.
• Be sure to remove the toner cartridge from the machine
when transporting the machine to a distance.
• To avoid exposing the toner cartridge to light, place it in the
protective bag included with this machine or wrap it in a
thick cloth.
• Clean this machine regularly. If this machine becomes
dusty, it may operate improperly.
• Use a modular cable of 118" (3 m) or shorter in length.
• Depending on your locale or your telephone connection,
you may be unable to perform data communication. In this
case, contact your local authorized Canon dealer or the
Canon help line.
• The repairing parts and toner cartridges for the machine
will be available for at least seven (7) years after production
of this machine model has been discontinued.
Customer Support
Customer Support (U.S.A.)
Your machine is designed with the latest technology to
provide trouble-free operation. If you encounter a problem
with the machine’s operation, try to solve it by using the
information in Chapter 9. If you cannot solve the problem
or if you think your machine needs servicing, contact Canon
Customer Care Center at 1-800-OK-CANON between the hours
of 8:00 A.M. to 8:00 P.M. EST Monday through Friday. On-line
support for 24 hours is also available at the website.
http://www.canontechsupport.com/
Customer Support (Canada)
Canon Canada Inc., offers a full range of customer technical
support options*:
• For step-by-step troubleshooting, e-mail technical support,
the latest driver or document downloads, and answers to
frequently asked questions, visit http://www.canon.ca/
• Free live technical support 9 A.M. to 8 P.M. EST Monday
through Friday (excluding holidays) for products still under
warranty 1-800-OK-CANON
• For the location of the authorized service facility nearest
you, visit http://www.canon.ca/ or 1-800-OK-CANON
• If the problem cannot be corrected by using one of the
above technical support options, repair options are
available at the time of your call to the live technical
support number above or via the website at
http://www.canon.ca/
* Support program specifics are subject to change without notice.
xviii
Page 19

Legal Notices
International ENERGY STAR Program
As an ENERGY STAR® Partner, Canon U.S.A., Inc. has
determined that this product meets the ENERGY
STAR Program for energy efficiency.
The International ENERGY STAR Office Equipment
Program is an international program that promotes
energy saving through the use of computers and
other office equipment.
The program backs the development and
dissemination of products with functions that
effectively reduce energy consumption. It is an
open system in which business proprietors can
participate voluntarily.
The targeted products are office equipment, such
as computers, displays, printers, facsimiles, and
copiers. The standards and logos are uniform
among participating nations.
IPv6 Ready Logo
The protocol stack included in this machine has
obtained the IPv6 Ready Logo Phase-1 established
by the IPv6 Forum.
Trademarks
Canon, the Canon logo, and Color imageCLASS are registered
trademarks of Canon Inc. in the United States and may also be
trademarks or registered trademarks in other countries.
Apple, Mac OS, and Macintosh are trademarks or registered
trademarks of Apple Inc. in the U.S. and/or other countries.
Microsoft, Windows and Windows Vista are either trademarks
or registered trademarks of Microsoft Corporation in the
United States and/or other countries.
All other product and brand names are registered trademarks,
trademarks or service marks of their respective owners.
Copyright
© 2011 by Canon Inc. All rights reserved.
No part of this publication may be reproduced, transmitted,
transcribed, stored in a retrieval system, or translated into any
language or computer language in any form or by any means,
electronic, mechanical, magnetic, optical, chemical, manual, or
otherwise, without the prior written permission of Canon Inc.
(2) Rights holders of the SOFTWARE retain in all respects the
title, ownership and intellectual property rights in and to
the SOFTWARE. Except as expressly provided herein, no
license or right, expressed or implied, is hereby conveyed or
granted by rights holders of the SOFTWARE to you for any
intellectual property of rights holders of the SOFTWARE.
(3) You may use the SOFTWARE solely for use with the
PRODUCT.
(4) You may not assign, sublicense, market, distribute, or
transfer the SOFTWARE to any third party without prior
written consent of rights holders of the SOFTWARE.
(5) Notwithstanding the foregoing, you may transfer the
SOFTWARE only when (a) you assign to a transferee all of
your rights to the PRODUCT and all rights and obligations
under the conditions governing the SOFTWARE and
PRODUCT and (b) such transferee agrees in writing to be
bound by all these conditions.
(6) You may not decrypt, decompile, reverse engineer,
disassemble or otherwise reduce the code of the
SOFTWARE to human readable form.
(7) You may not modify, adapt, translate, rent, lease or loan
the SOFTWARE or create derivative works based on the
SOFTWARE.
(8) You are not entitled to remove or make separate copies of
the SOFTWARE from the PRODUCT.
(9) The human-readable portion (the source code) of the
SOFTWARE is not licensed to you.
Notwithstanding (1) through (9) above, in case any other
license conditions accompany third-party software modules,
these software modules are subject to these other conditions,
as well.
ACCEPTANCE
THE TERMS OF THIS THIRD PARTY SOFTWARE STATED HERE
OR IN RELATED WARRANTY PROVISIONS SHALL BE DEEMED
ACCEPTED UPON YOUR USE OF THE PRODUCT FOR ONE OR
MORE OF ITS NORMAL PURPOSES, IF THERE HAS BEEN NO
OTHER PRIOR EXPRESS ACCEPTANCE.
THE TERMS OF THIS THIRD PARTY SOFTWARE GOVERN THE
THIRD PARTY SOFTWARE AS DELIVERED WITH THE PRODUCT
AND ALL UPDATED VERSIONS OF THE THIRD PARTY SOFTWARE
PROVIDED UNDER MAINTENANCE AGREEMENTS OR OTHER
SERVICE ARRANGEMENTS FOR THE PRODUCT WITH CANON
USA OR CANON CANADA OR THEIR RESPECTIVE AUTHORIZED
SERVICE ORGANIZATIONS.
Third Party Software
This Canon product (the “PRODUCT”) includes third-party
software modules. Use and distribution of these software
modules (the “SOFTWARE”) are subject to the conditions
below.
(1) You agree that you will comply with any applicable export
control laws, restrictions or regulations of the countries
involved in the event that this product including the
SOFTWARE is shipped, transferred or exported into any
country.
The Software Subjected to Other Conditions
Please refer to the eManual on a CD-ROM bundled with this
product, for more detail and corresponding license conditions.
xix
Page 20

Disclaimers
The information in this document is subject to change without
notice.
CANON INC. MAKES NO WARRANTY OF ANY KIND WITH
REGARD TO THIS MATERIAL, EITHER EXPRESS OR IMPLIED,
EXCEPT AS PROVIDED HEREIN, INCLUDING WITHOUT
LIMITATION, THEREOF, WARRANTIES AS TO MARKETABILITY,
MERCHANTABILITY, FITNESS FOR A PARTICULAR PURPOSE
OF USE OR NON-INFRINGEMENT. CANON INC. SHALL NOT BE
LIABLE FOR ANY DIRECT, INCIDENTAL, OR CONSEQUENTIAL
DAMAGES OF ANY NATURE, OR LOSSES OR EXPENSES
RESULTING FROM THE USE OF THIS MATERIAL.
For CA, USA only
Included battery contains Perchlorate Material - special
handling may apply.
See http://www.dtsc.ca.gov/hazardouswaste/perchlorate/ for
details.
Legal Limitations on the Usage of Your Product and the Use of Images
Using your product to scan, print or otherwise reproduce
certain documents, and the use of such images as scanned,
printed or otherwise reproduced by your product, may be
prohibited by law and may result in criminal and/or civil
liability.
A non-exhaustive list of these documents is set forth below.
This list is intended to be a guide only. If you are uncertain
about the legality of using your product to scan, print or
otherwise reproduce any particular document, and/or of the
use of the images scanned, printed or otherwise reproduced,
you should consult in advance with your legal advisor for
guidance.
• Paper Money
• Money Orders
• Certificates of Deposit
• Postage Stamps (canceled or uncanceled)
• Identifying Badges or Insignias
• Selective Service or Draft Papers
• Checks or Drafts Issued by Governmental Agencies
• Motor Vehicle Licenses and Certificates of Title
• Travelers Checks
• Food Stamps
• Passports
• Immigration Papers
• Internal Revenue Stamps (canceled or uncanceled)
• Bonds or Other Certificates of Indebtedness
• Stock Certificates
• Copyrighted Works/Works of Art without Permission of
Copyright Owner
FCC (Federal Communications Commission)
Color imageCLASS MF8380Cdw: F157902
Color imageCLASS MF8080Cw: F157802
Contains Transmitter Module FCC ID: AZDFM48944
This device complies with Part 15 of the FCC Rules. Operation
is subject to the following two conditions:
(1) This device may not cause harmful interference, and
(2) This device must accept any interference received,
including interference that may cause undesired operation.
FCC WARNING
Changes or modifications not expressly approved by the party
responsible for compliance could void the user’s authority to
operate the equipment.
• Properly shielded and grounded cables and connectors
must be used for connection to host computers and / or
peripherals in order to meet FCC emission limits.
• AC adaptor with ferrite core must be used for RF
interference suppression.
NOTE
This equipment has been tested and found to comply
with the limits for a class B digital device, pursuant to Part
15 of the FCC Rules. These limits are designed to provide
reasonable protection against harmful interference in a
residential installation. This equipment generates, uses and
can radiate radio frequency energy and, if not installed and
used in accordance with the instructions, may cause harmful
interference to radio communications. However, there is
no guarantee that interference will not occur in a particular
installation. If this equipment does cause harmful interference
to radio or television reception, which can be determined by
turning the equipment off and on, the user is encouraged to
try to correct the interference by one or more of the following
measures:
• Reorient or relocate the receiving antenna.
• Increase the separation between the equipment and
receiver.
• Connect the equipment to an outlet on a circuit different
from that to which the receiver is connected.
• Consult the dealer or an experienced radio/TV technician
for help.
This transmitter must not be co-located or operated in
conjunction with any other antenna or transmitter.
This equipment complies with FCC radiation exposure limits
set forth for an uncontrolled environment and meets the FCC
radio frequency (RF) Exposure Guidelines in Supplement C
to OET65. This equipment should be installed and operated
keeping the radiator at least 20cm or more away from person’s
body (excluding extremities: hands, wrists, feet and ankles).
Use of shielded cable is required to comply with class B limits
in Subpart B of Part 15 of the FCC Rules. Do not make any
changes or modifications to the equipment unless otherwise
specified in this manual. If you make such changes or
modifications, you could be required to stop operation of the
equipment.
Canon U.S.A., Inc.
One Canon Plaza, Lake Success, NY 11042, U.S.A.
TEL No. 1-800-OK-CANON
Users in the U.S.A.
Pre-Installation Requirements for Canon Facsimile Equipment
A. Location
Supply a suitable table, cabinet, or desk for the machine.
See Chapter 11, “Appendix,” for specific dimensions and
weight.
B. Order Information
1. A single telephone line (touch-tone or rotary) should be
used.
2. Order an RJ11-C telephone wall jack (USOC), which
should be installed by the telephone company. If the
RJ11-C wall jack is not present, telephone/facsimile
operation is not possible.
xx
Page 21

3. Order a normal business line from your telephone
company’s business representative. The line should be
a regular voice grade line or an equivalent one. Use one
line per unit.
DDD (Direct Distance Dial) line
-orIDDD (International Direct Distance Dial) line if you
communicate overseas
NOTE
Canon recommends an individual line following industry
standards, i.e., 2,500 (touch-tone) or 500 (rotary/pulse dial)
telephones. A dedicated extension off a PBX (Private Branch
eXchange) unit without “Call Waiting” can be used with your
facsimile unit. Key telephone systems are not recommended
because they send nonstandard signals to individual
telephones for ringing and special codes, which may cause a
facsimile error.
C. Power Requirements
The machine should be connected to a standard 120 volt
AC, three-wire grounded outlet only.
Do not connect this machine to an outlet or power line
shared with other appliances that cause “electrical noise.” Air
conditioners, electric typewriters, copiers, and machines of
this sort generate electrical noise that often interferes with
communications equipment and the sending and receiving
of documents.
Connection of the Equipment
This equipment complies with Part 68 of the FCC rules and the
requirements adopted by the ACTA. On the rear panel of this
equipment is a label that contains, among other information,
a product identifier in the format of US:AAAEQ##TXXXX. If
requested, this number must be provided to the telephone
company.
The REN (Ringer Equivalence Number) is used to determine the
number of devices that may be connected to a telephone line.
Excessive RENs on a telephone line may result in the devices
not ringing in response to an incoming call. In most, but not all
areas, the sum of the RENs should not exceed five (5.0).
To be certain of the number of devices that may be connected
to a line, as determined by the total RENs, contact the local
telephone company. The REN for this product is part of the
product identifier that has the format US: AAAEQ##TXXXX. The
digits represented by ## are the REN without a decimal point
(e.g., 10 is a REN of 1.0).
An FCC compliant telephone line cable and modular plug is
provided with this equipment. This equipment is designed
to be connected to the telephone network or premise wiring
using a compatible modular jack that is Part 68 compliant.
This equipment may not be used on coin service provided by
the telephone company. Connection to party lines is subjected
to state tariffs.
Rights of the Telephone Company
If this equipment (Color imageCLASS MF8380Cdw/MF8080Cw)
causes harm to the telephone network, the telephone
company may temporarily disconnect service. The telephone
company also retains the right to make changes in facilities
and services that may affect the operation of this equipment.
When such changes are necessary, the telephone company is
required to give adequate prior notice to the user.
However, if advance notice is not possible, the telephone
company will notify the customer as soon as possible. Also,
the customer will be advised of his/her right to file a complaint
with the FCC if he/she believes it is necessary.
WARNING
The Telephone Consumer Protection Act of 1991 makes it
unlawful for any person to use a computer or other electronic
device, including FAX machines, to send any message unless
such message clearly contains in a margin at the top or
bottom of each transmitted page or on the first page of the
transmission, the date and time it is sent and an identification
of the business or other entity, or other individual sending the
message and the telephone number of the sending machine
or such business, other entity, or individual.
(The telephone number provided may not be a 900 number
or any other number for which charges exceed local or longdistance transmission charges.)
NOTE
In order to program this information into your machine, you
should complete the procedure for registering your name,
unit’s telephone number, time, and date in the Starter Guide.
Users in Canada
Pre-Installation Requirements for Canon Facsimile Equipment
A. Location
Supply a suitable table, cabinet, or desk for the machine.
See Chapter 11, “Appendix,” for specific dimensions and
weight.
B. Order Information
1. A single telephone line (touch-tone or rotary) should be
used.
2. Order a CA11A modular jack, which should be installed
by the telephone company. If the CA11A jack is not
present, installation cannot occur.
3. Order a normal business line from your telephone
company’s business representative. The line should be
a regular voice grade line or an equivalent one. Use one
line per unit.
DDD (Direct Distance Dial) line
-orIDDD (International Direct Distance Dial) line if you
communicate overseas
In Case of Equipment Malfunction
Should any malfunction occur which cannot be corrected
by the procedures described in this guide or the e-Manual,
disconnect the equipment from the telephone line cable and
disconnect the power cord.
The telephone line cable should not be reconnected or the
power switch turned ON until the problem is completely
resolved. Users should contact Canon Authorized Service
Facilities for servicing of equipment, Information regarding
Authorized Service Facility locations can be obtained by calling
Canon Customer Care Center (1-800-OK-CANON).
NOTE
Canon recommends an individual line following industry
standards, i.e., 2,500 (touch-tone) or 500 (rotary/pulse dial)
telephones. A dedicated extension off a PBX (Private Branch
eXchange) unit without “Call Waiting” can be used with your
facsimile unit. Key telephone systems are not recommended
because they send nonstandard signals to individual
telephones for ringing and special codes, which may cause a
facsimile error.
xxi
Page 22

C. Power Requirements
The power outlet should be a three-prong grounded
receptacle (Single or Duplex). It should be independent
from copiers, heaters, air conditioners, or any electric
equipment that is thermostatically controlled. The rated
value is 115 volts and 15 amperes. The CA11A modular jack
should be relatively close to the power outlet to facilitate
installation.
Notice
• This product meets the applicable Industry Canada
technical specifications.
• The Ringer Equivalence Number is an indication of the
maximum number of devices allowed to be connected to
a telephone interface. The termination of an interface may
consist of any combination of devices subject only to the
requirement that the sum of the RENs of all the devices
does not exceed five.
• The REN of this product is 1.0.
• Before installing this equipment, users should ensure that
it is permissible to be connected to the facilities of the local
telecommunications company. The equipment must also
be installed using an acceptable method of connection. In
some cases, the company’s inside wiring associated with a
single line individual service may be extended by means of
a certified connector assembly (telephone extension cord).
The customer should be aware that compliance with the
above conditions may not prevent deterioration of service
in some situations.
• Repairs to certified equipment should be made by an
authorized Canadian maintenance facility designated by
the supplier. Any repairs or alterations made by the user to
this equipment, or equipment malfunctions, may give the
telecommunications company cause to request the user to
disconnect the equipment.
• Users should ensure for their own protection that the
electrical ground connections of the power utility,
telephone lines, and internal metallic water pipe system, if
present, are connected together. This precaution may be
particularly important in rural areas.
CAUTION
Users should not attempt to make such connections
themselves, but should contact the appropriate electric
inspection authority, or electrician, as appropriate.
NOTE
This equipment complies with the Canadian ICES-003 Class B
limits.
Utilisation au Canada
Conditions à Remplir Préalablement à L’installation d’un
Télécopieur Canon
A. Emplacement
Prévoir une table, un meuble, ou un bureau suffisamment
solide et de taille appropriée (voir le chapitre 11, Annexe
(Appendix), pour les indications de poids et dimensions).
B. Installation téléphonique
1. Une seule ligne téléphonique (tonalités ou impulsions)
doit être utilisée.
2. Il faut commander un jack modulaire CA11A qui sera
installé par la compagnie téléphonique. Sans ce jack, la
mise en place serait impossible.
3. Si vous vous abonnez à une nouvelle ligne, demandez
une ligne d’affaires normale de qualité téléphonique
courante ou équivalente. Prenez un abonnement d’une
ligne par appareil.
Ligne automatique interurbaine
ou
Ligne automatique internationale (si vous communiquez
avec les pays étrangers)
NOTE
Canon vous conseille d’utiliser une ligne individuelle conforme
aux normes industrielles, à savoir:
ligne téléphonique 2,500 (pour appareil à clavier) ou 500
(pour appareil à cadran/impulsions). Il est également possible
de raccorder ce télécopieur à un système téléphonique à
poussoirs car la plupart de ces systèmes émettent des signaux
d’appel non normalisés ou des codes spéciaux qui risquent de
perturber le fonctionnement du télécopieur.
C. Condition d’alimentation
Raccordez le télécopieur à une prise de courant plus terre
à trois branches, du type simple ou double, et qui ne sert
pas à alimenter un copieur, un appareil de chauffage, un
climatiseur ou tout autre appareil électrique à thermostat.
L’alimentation doit être de 115 volts et 15 ampères. Pour
faciliter l’installation, le jack CA11A doit être assez proche
de la prise de courant.
Remarques
• Le présent matériel est conforme aux spécifications
techniques applicables d’Industrie Canada.
• Avant d’installer cet appareil, l’utilisateur doit s’assurer qu’il
est permis de le connecter à l’équipement de la compagnie
de télécommunication locale et doit installer cet appareil
en utilisant une méthode de connexion autorisée. Il se
peut qu’il faille étendre la circuiterie intérieure de la ligne
individuelle d’abonné, qui a été installée par la compagnie,
au moyen d’un jeu de connecteurs homologués (rallonge
téléphonique).
• L’attention de l’utilisateur est attirée sur le fait que le respect
des conditions mentionnées ci-dessus ne constitue pas une
garantie contre les dégradations de qualité du service dans
certaines circonstances.
• L’indice d’équivalence de la sonnerie (IES) sert à indiquer le
nombre maximal de terminaux qui peuvent être raccordés
à une interface téléphonique. La terminaison d’une
interface peut consister en une combinaison quelconque
de dispositifs, à la seule condition que la somme d’indices
d’équivalence de la sonnerie de tous les dispositifs n’excède
pas 5.
• Le nombre d’équivalents sonnerie (REN) de ce produit est
1,0.
• Les réparations sur un appareil certifié doivent être
faites par une société d’entretien canadienne autorisée
par le Gouvernement canadien et désignée par le
fournisseur. Toute réparation ou modification que
pourrait faire l’utilisateur de cet appareil, ou tout
mauvais fonctionnement, donne à la compagnie de
télécommunication le droit de débrancher l’appareil.
• Pour sa propre protection, l’utilisateur doit s’assurer que
les prises de terre de l’appareil d’alimentation, les lignes
téléphoniques et les tuyaux métalliques internes, s’il y
en a, sont bien connectés entre eux. Cette précaution est
particulièrement importante dans les zones rurales
CAUTION
Au lieu d’essayer de faire ces branchements eux-mêmes, les
utilisateurs sont invités à faire appel à un service d’inspection
faisant autorité en matière d’électricité ou à un électricien,
selon le cas.
NOTE
Respecte les limites de la classe B de la NMB-003 du Canada.
xxii
Page 23

Laser Safety
This machine complies with 21 CFR Chapter 1 Subchapter J as
a Class 1 laser product under the U.S. Department of Health
and Human Services (DHHS) Radiation Performance Standard
according to the Radiation Control for Health and Safety
Act of 1968. This means that the machine does not produce
hazardous radiation.
Since radiation emitted inside the machine is completely
confined within protective housings and external covers, the
laser beam cannot escape from the machine during any phase
of user operation.
CDRH Regulations
The Center for Devices and Radiological Health (CDRH) of the
U.S. Food and Drug Administration implemented regulations
for laser products on August 2, 1976. These regulations
apply to laser products manufactured from August 1, 1976.
Compliance is mandatory for products marketed in the United
States.
CAUTION
Use of controls, adjustments, or performance of procedures
other than those specified in this manual may result in
hazardous radiation exposure.
The label is attached to the laser scanner machine inside the
machine and is not in a user access area.
xxiii
Page 24

xxiv
Page 25

Before Using the Machine
This category describes the features of the machine and its useful functions.
Names and Functions on Each Part of the Machine 1-2
Front Side 1-2
Back Side 1-3
Interior 1-4
Multi-purpose Tray (Manual Feed Slot) 1-5
Paper Cassette 1-6
Operation Panel 1-7
LCD (Standby Mode) 1-9
Copy Mode 1-9
Fax Mode 1-9
Scan Mode 1-9
USB Direct Print mode 1-9
Chapter
1
Navigating the Menu 1-10
Entering the Menu Screen 1-10
Scrolling Through Menu Items 1-10
Selecting a Menu Item 1-10
Configuring menus using the navigation keys 1-11
Returning to the Default Screen 1-11
Entering Text 1-12
Entering Text Except for IP Address 1-12
Changing the Entry Mode 1-12
Entering Text, Symbols, and Numbers 1-12
Moving the Cursor (Entering a Space) 1-12
Deleting text, symbols, or numbers 1-12
Setting the Sleep Timer 1-14
Setting the Current Date and Time 1-15
1-1
Page 26

Names and Functions on Each Part of the Machine
This section describes the parts and functions of the machine.
Front Side
Before Using the Machine
● MF8380Cdw
● MF8080Cw
(1)
(2)
(3)
(4)
(5)
(6)
(1)
(2)
(3)
(4)
(5)
(6)
(7)
(8)
(9)
(10)
(11)
(12)
(13)
(7)
(8)
(9)
(13)
(11)
(12)
(10)
(14)
(15)
(13)
(14)
(13)
(15)
(16)
(17)
(18)
(16)
(17)
(18)
1-2
(1) Document guides
Adjust to the width of the document.
(2) Feeder
The feeder can automatically scan documents continuously.
(3) Operation panel
Controls the machine.
“Operation Panel” (→P.1-7)
(4) Front cover
(5) Multi-purpose tray (manual feed slot)
Use the tray when printing from the tray.
“Multi-purpose Tray (Manual Feed Slot)” (→P.1-5)
(6) Paper cassette
Load the paper supply.
“Paper Cassette” (→P.1-6)
(7) Document feeder tray
Place document.
(8) Tray extension
Pull out the tray extension when the paper is hanging out of the
document feeder tray such as Legal size paper.
(9) Document delivery tray
Documents are output.
(10) Power switch
Turns the power ON or OFF.
(11) Ventilation slots
(12) Speaker
(13) Lift handles
(14) Scanning area
Scans documents from the feeder.
(15) Output tray
Printed paper such as copies, prints and faxes come out from
the output tray.
(16) Platen glass
Place document.
(17) USB memory port
Used to save scanned documents in a USB memory.
(18) Manual feed transport guide
Page 27
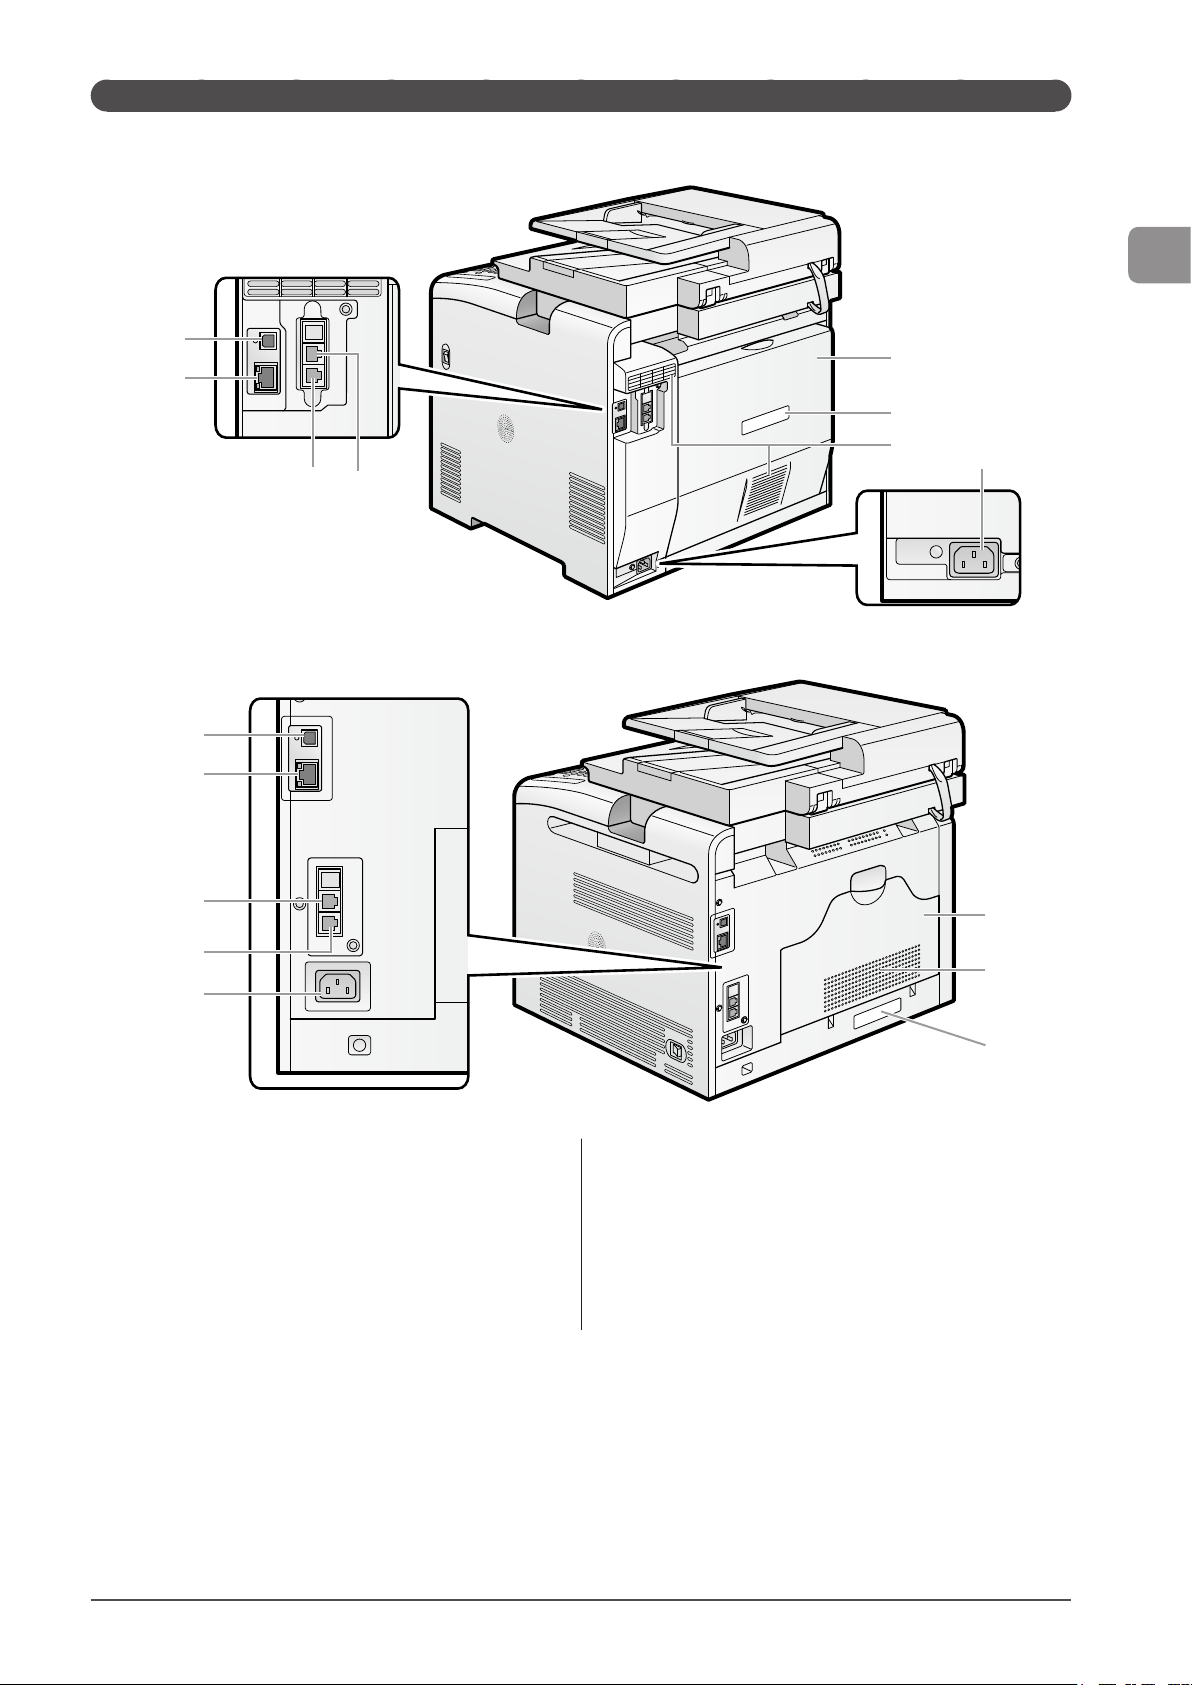
Back Side
● MF8380Cdw
(1)
(2)
Before Using the Machine
(5)
(6)
● MF8080Cw
(1)
(2)
(4)
(3)
(8)
(3) (4)
(7)
(8)
(5)
(7)
(1) USB port
Connect the USB cable.
(2) LAN port
Connect the LAN cable.
(3) Telephone line jack
Connect the telephone cable.
(4) External telephone jack
Connect the external telephone.
(6)
(5) Rear cover
Open this cover when clearing paper jams.
(6) Rating label
The current value indicated in this rating label shows the
average power current consumption.
(7) Ventilation slots
(8) Power socket
Connect the power cord.
1-3
Page 28
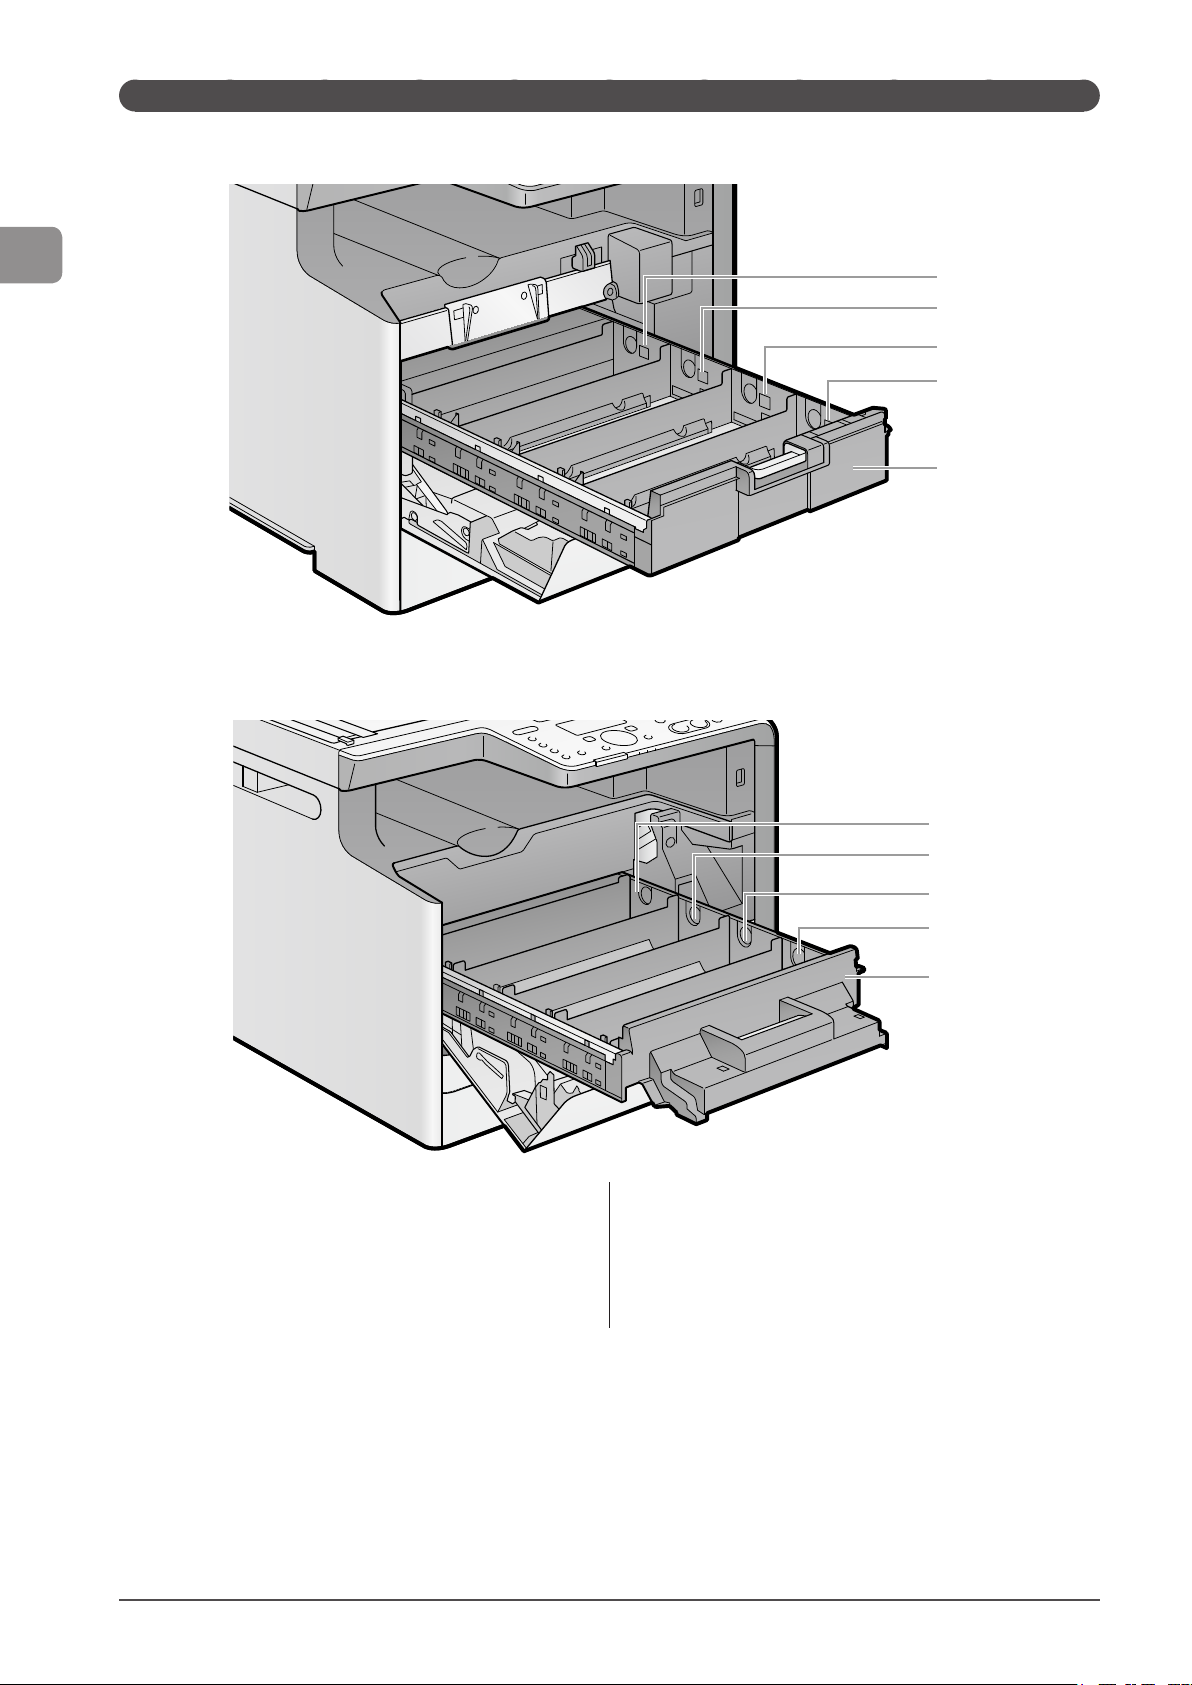
Interior
● MF8380Cdw
Before Using the Machine
(1)
(2)
(3)
(4)
(5)
● MF8080Cw
(1)
(1) Y (Yellow) toner cartridge slot
The Y (yellow) toner cartridge is installed in this slot.
(2) M (Magenta) toner cartridge slot
The M (magenta) toner cartridge is installed in this slot.
(3) C (Cyan) toner cartridge slot
The C (cyan) toner cartridge is installed in this slot.
(2)
(3)
(4)
(5)
(4) K (Black) toner cartridge slot
The K (black) toner cartridge is installed in this slot.
(5) Toner cartridge tray
Tray for installing the toner cartridges.
1-4
Page 29
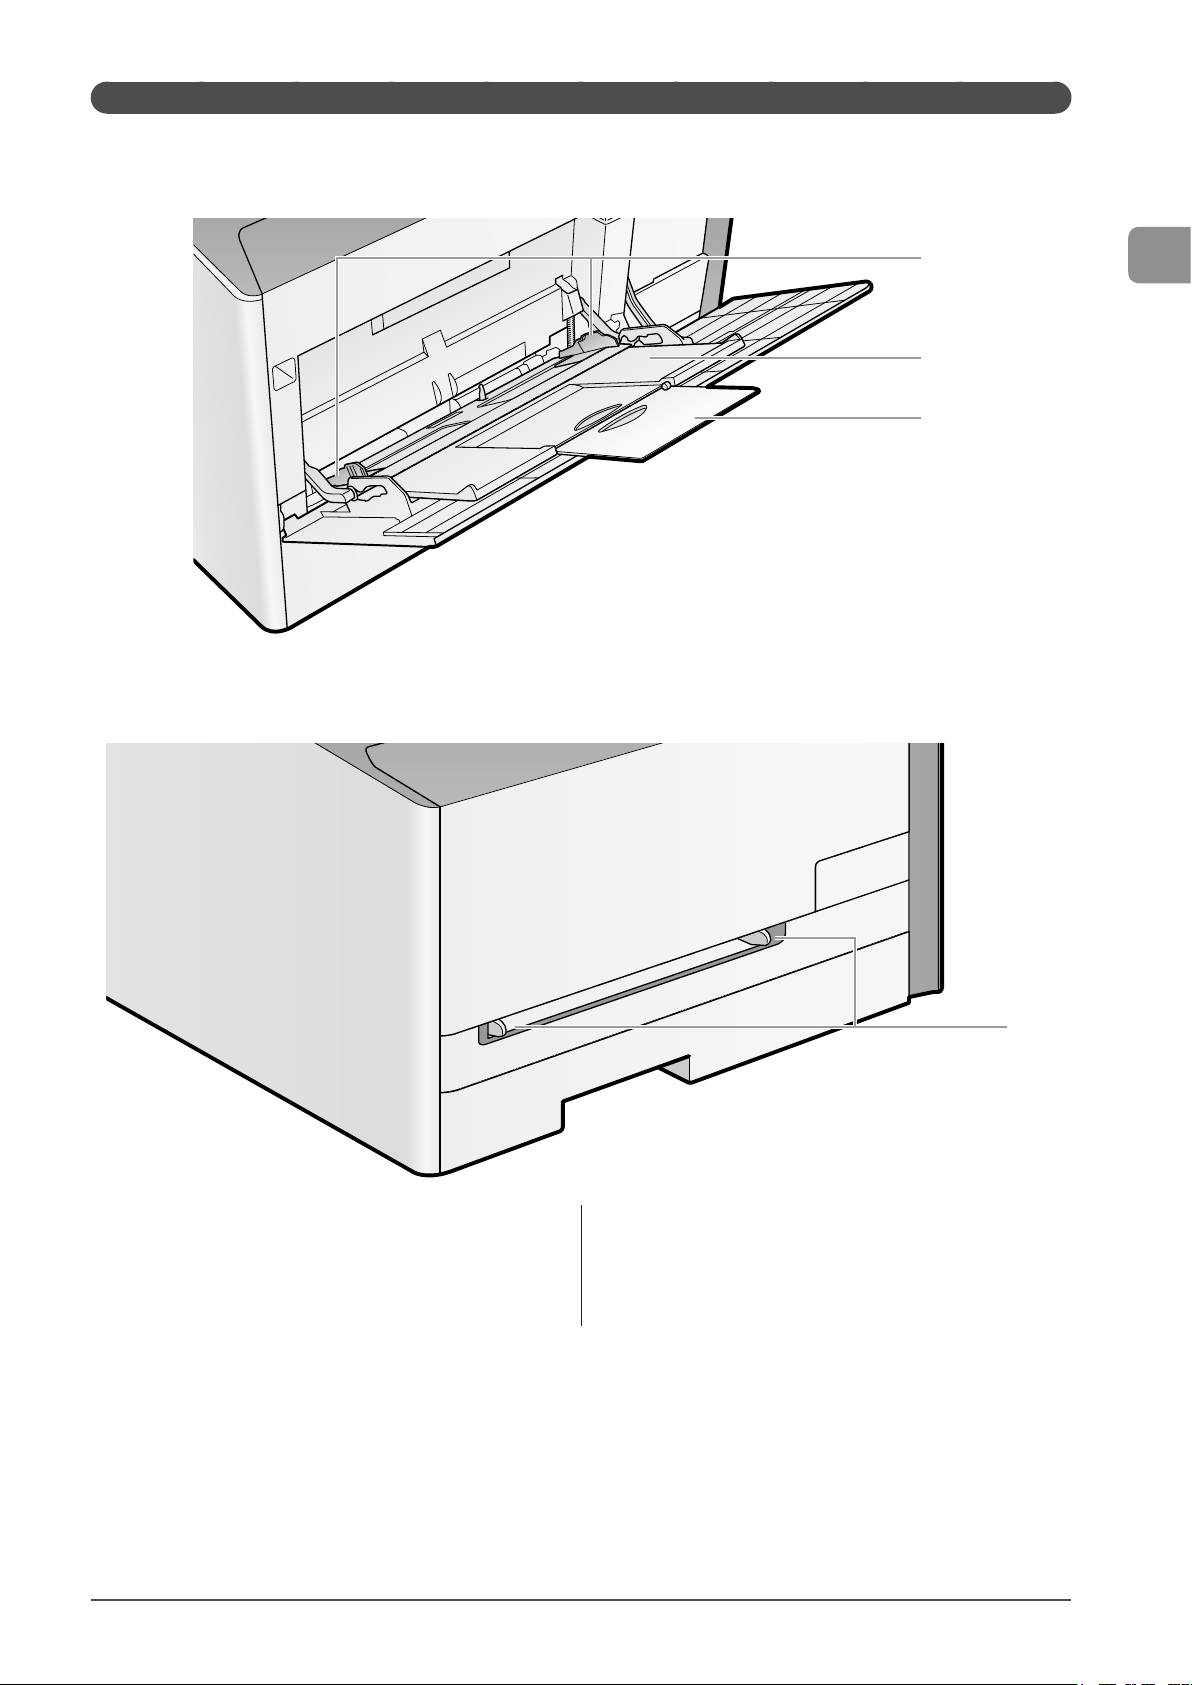
Multi-purpose Tray (Manual Feed Slot)
● MF8380Cdw
● MF8080Cw
(1)
Before Using the Machine
(2)
(3)
(1) Paper guides
Adjust to the width of the paper.
(2) The auxiliary tray (MF8380Cdw only)
Be sure to pull out this tray when loading paper in the multipurpose tray.
(1)
(3) Tray extension (MF8380Cdw only)
Open to prevent the paper from hanging out of the multipurpose tray when loading long-size paper such as Letter.
1-5
Page 30

Paper Cassette
● MF8380Cdw
Before Using the Machine
● MF8080Cw
(1)
(2)
(2)
(2)
(3) (1)
(2)
(3)
(1) Lock release lever
Hold this lever to slide the paper guides.
(2) Paper guide
Adjust the position of the paper guides to the paper.
(1)
(3) Lock release lever (changing cassette size)
When loading paper that is longer than A4 size, pull out the
paper cassette while holding this lever.
When the paper cassette is inserted with it extended, the front
side of the paper cassette is not flush with the front surface of
the machine as shown in the figure.
1-6
Set the legal dust cover on the paper cassette.
Page 31
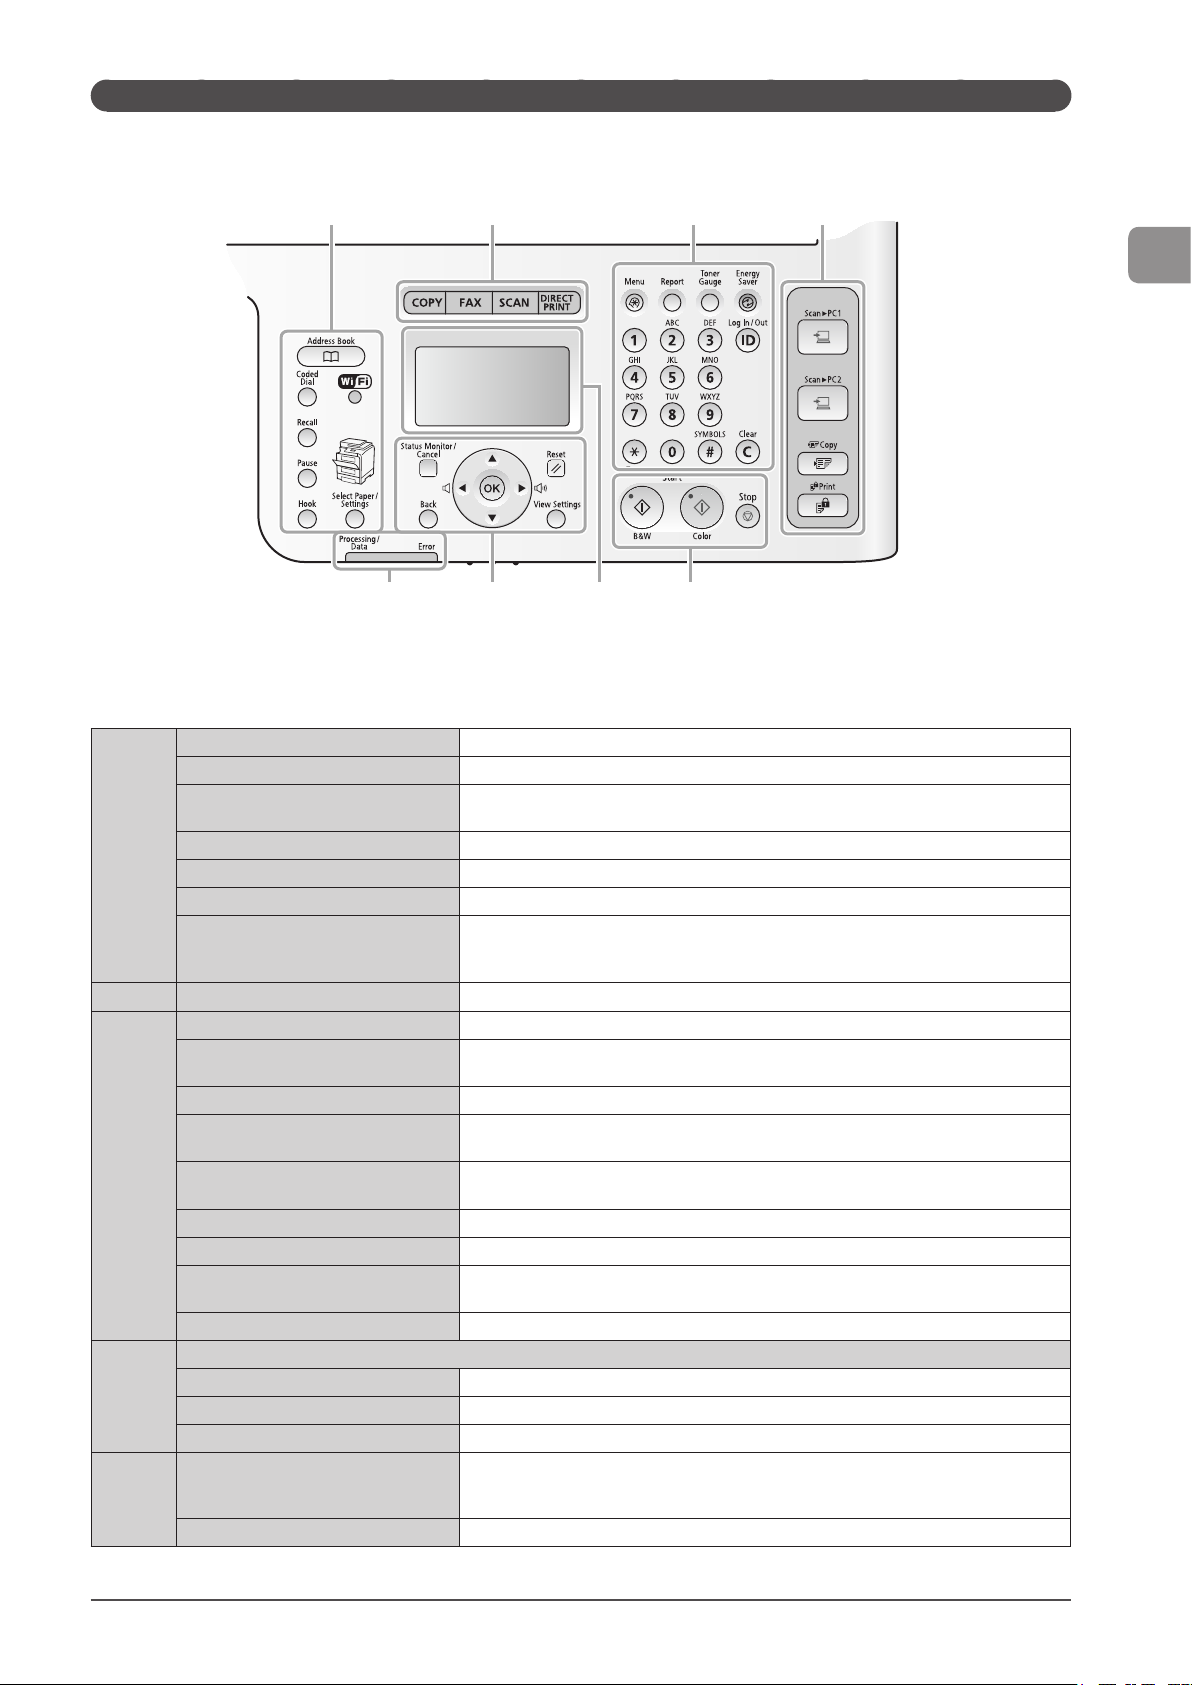
Operation Panel
MF8380Cdw
(1) (2) (3)
(4)
(5)(6)(7)(8)
* The availability of the keys vary depending on the model. See the descriptions for each key in the table below.
[Address Book] key Searches recipients registered in the Favorites list or coded dial codes.
[Coded Dial] key Specifies recipients registered under coded dial codes.
Redial the last number called. (Only enabled when the mode screens for fax, e-mail or file
server operations are displayed.)
Press to select the paper source to use (The indicator for the selected paper source is lit
up above the key.). Also press to specify the paper size and type to load in each paper
source.
Press to switch the character entry mode. Press to switch between pulse and tone dialing
to send a fax.
Press to manually set or cancel the Sleep mode. The Energy Saver indicator lights green
while in the sleep mode.
Press to log in/out of the machine when the machine is managed by Department ID
management.
Press to manually print reports and lists. You can also specify whether to print a report
automatically.
Press to start copying, scanning, sending a fax or USB direct print in black and white.
Press to start copying, scanning or USB direct print in color.
(1)
(2)
(3)
(4)
(5)
[Recall] key
[Pause] key Press to insert a pause in the fax number.
[Hook] key Press when you want to dial without lifting up the handset of the external telephone.
[Wi-Fi] indicator Turns on when the machine is connected to Wireless LAN.
[Select Paper/Settings] key
Mode switch keys Press to switch the mode to copy, fax, scan or USB direct print.
[Menu] key Press to specify or register various settings.
[*] key
[Toner Gauge] key Press to check the remaining amount of toner.
[Energy Saver] key
[ID] key
Numeric keys ([0]-[9] keys) Enter characters and numbers.
[#] key Press to enter symbols.
[Report] key
[Clear] key Deletes characters and numbers entered.
Shortcut Keys
[Scan > PC1] key/[Scan > PC2] key Press to send your scans to the computer registered in each key.
[Secure Print] key (MF8380Cdw only) Press to use the Secure Print function. You can print your secure print jobs using this key.
[Paper Save Copy] key Press to make copies with the preset modes to reduce paper consumption.
[Start] keys
• [B&W] key
• [Color] key
[Stop] key Press to cancel jobs.
Before Using the Machine
1-7
Page 32
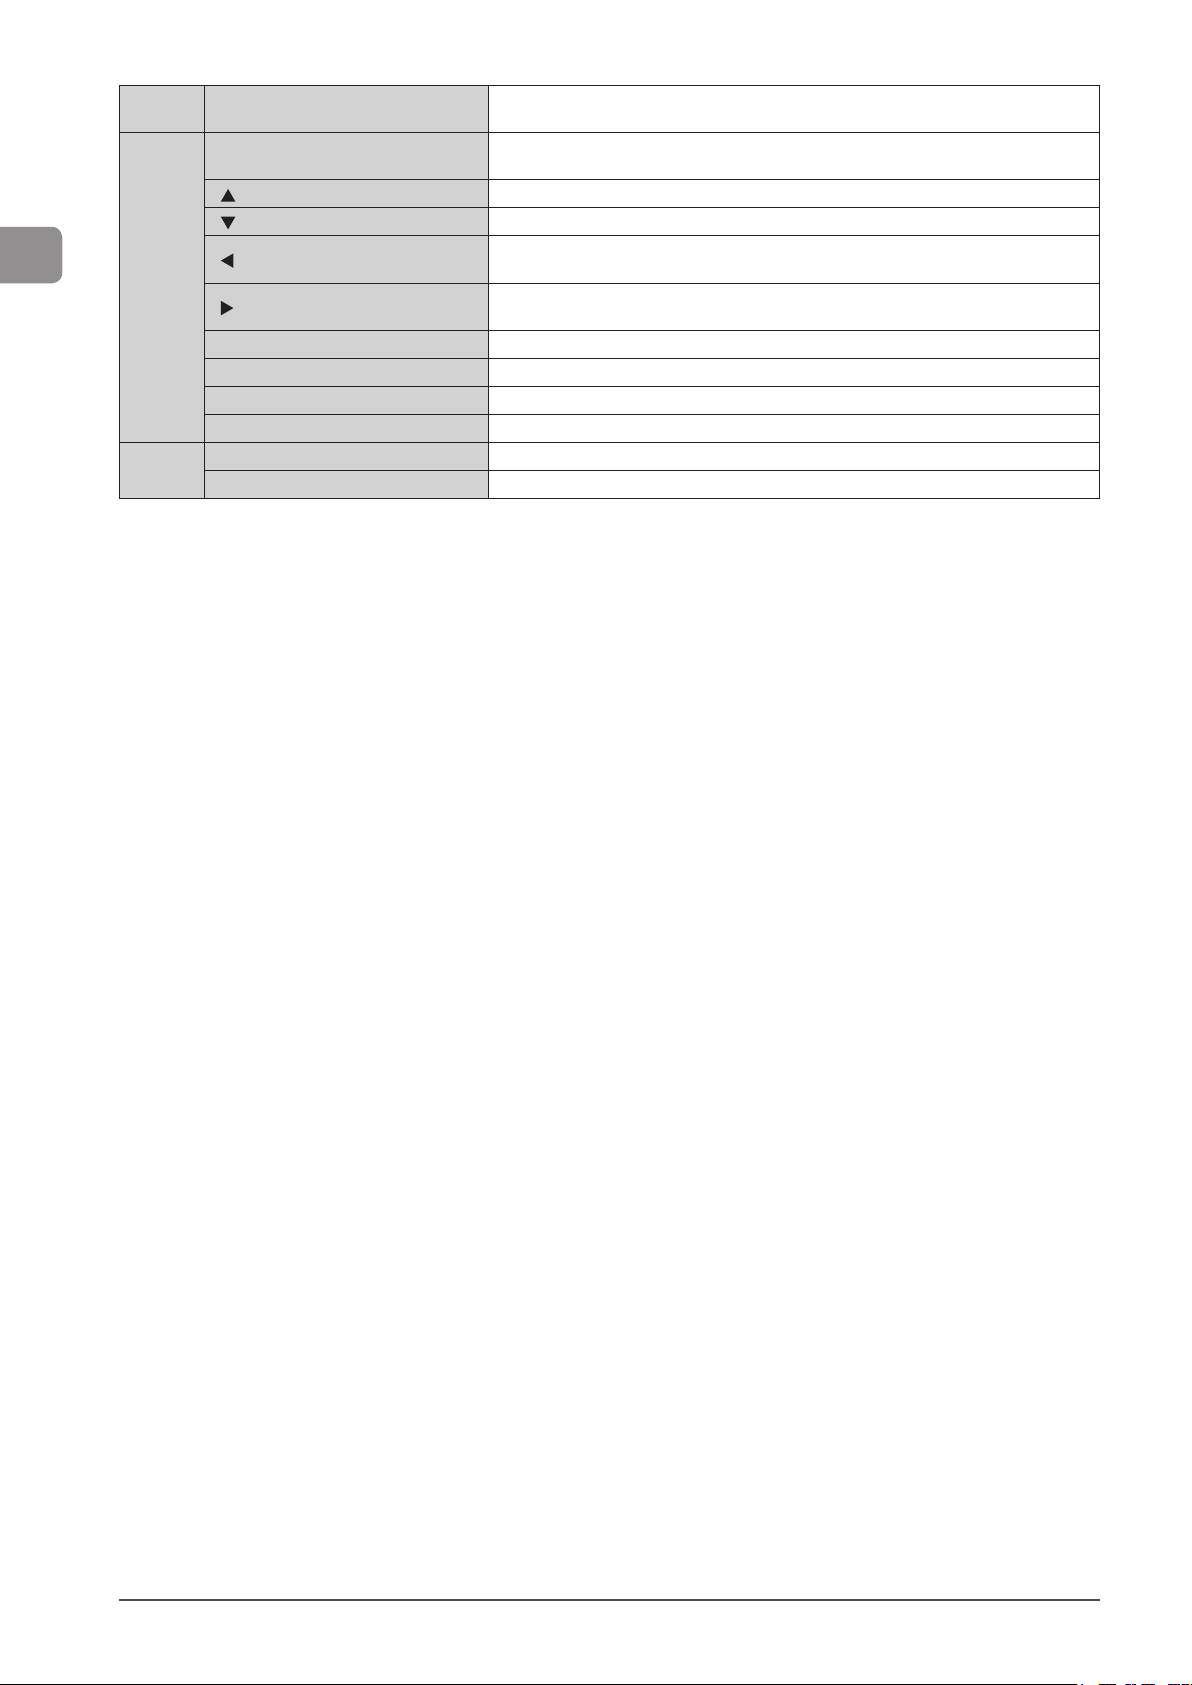
Before Using the Machine
(6)
(7)
(8)
LCD
[Status Monitor/Cancel] key
[ ] Key Press to scroll up or to increase the value.
[ ] Key Press to scroll down or to decrease the value.
[ ] Key
[ ] Key
[OK] key Confirms specified or registered settings.
[Reset] key Resets the specified settings for the copy/fax/scan/USB direct print mode to their default.
[View Settings] key You can check the settings.
[Back] key Press to return to the previous screen.
[Processing/Data] indicator Blinks during transmission and lights up when the machine has waiting jobs.
[Error] indicator Blinks when an error occurs.
Displays messages and operation status. Displays items, texts, and numbers when you are
specifying settings.
Press to check the status of jobs or cancel jobs. You can also check the status of the
network and machine.
Press to return to the previous screen or move the cursor to the left.
Press to decrease the sound volume of fax communications.
Press to proceed to the next screen or move the cursor to the right.
Press to increase the sound volume of fax communications.
1-8
Page 33
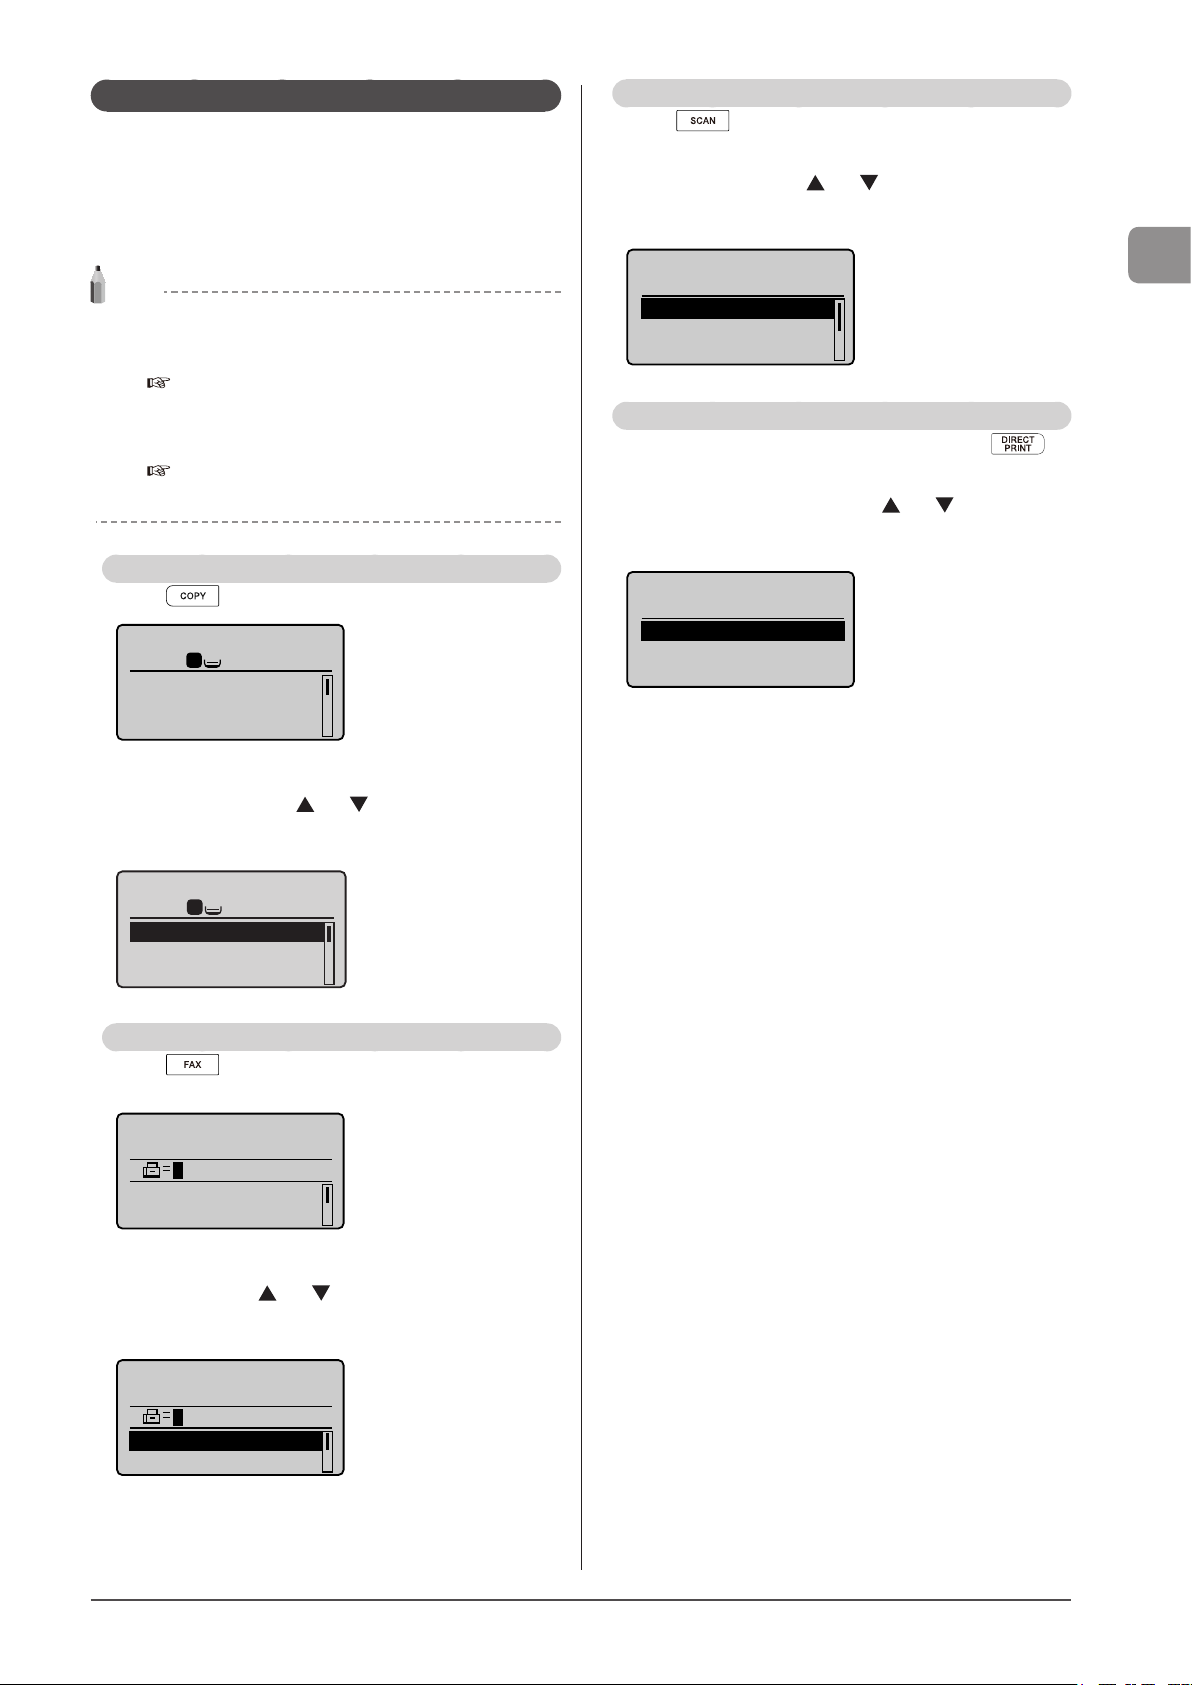
LCD (Standby Mode)
01/01/2011 12:52AM
01/01/2011 12:52AM
Select File(s) to pri
This section describes the following screens.
• Copy Mode
• Fax Mode
• Scan Mode
• USB Direct Print Mode
NOTE
Display of the standby mode
• You can change the standby display which appears when the
power switch is turned ON.
e-Manual → Basic Operation → Customizing Display
Settings → Setting the Default Screen
• When the machine is idle for the specified period of time the
display returns to standby mode.
e-Manual → Basic Operation → Customizing Timer Settings
→ Setting the Auto Reset Timer
Copy Mode
Press [ ] to switch to the copy mode screen.
Copy: Press Start
1
100% LTR
Density: 0
Original Type: Text
2-Sided: Off
+
-
1
...
Scan Mode
Press [ ] to scan mode screen to use the scan
function.
When the scan mode screen is displayed, you can make
your selection by using [
] or [ ].
The currently selected menu item is highlighted. Press [OK]
to proceed to the next screen.
Select the scan type.
Computer
Remote Scanner
Memory Media
USB Direct Print mode
When using the USB direct print function, press [ ]
to switch to the mode screen display.
When the USB direct print mode screen is displayed, yout
can make your selection by using [
The currently selected menu item is highlighted. Press [OK]
to proceed to the next screen.
Select printing
method.
Index print
Sort Files; File Nam
...
] or [ ].
Before Using the Machine
When the copy mode screen is displayed, you can make
your selection by using [
] or [ ].
The currently selected menu item is highlighted. Press [OK]
to proceed to the next screen.
Copy: Press Start
1
100% LTR
Density: 0
Original Type: Text
2-Sided: Off
+
-
1
...
Fax Mode
Press [ ] to switch to fax mode screen to use the
copy function.
Specify destination.
RX Mode: Auto
Resolution: 200 x 1
When the fax mode screen is displayed, you can make your
selection by using [
The currently selected menu item is highlighted. Press [OK]
to proceed to the next screen.
...
] or [ ].
Specify destination.
RX Mode: Auto
Resolution: 200 x 1
...
1-9
Page 34
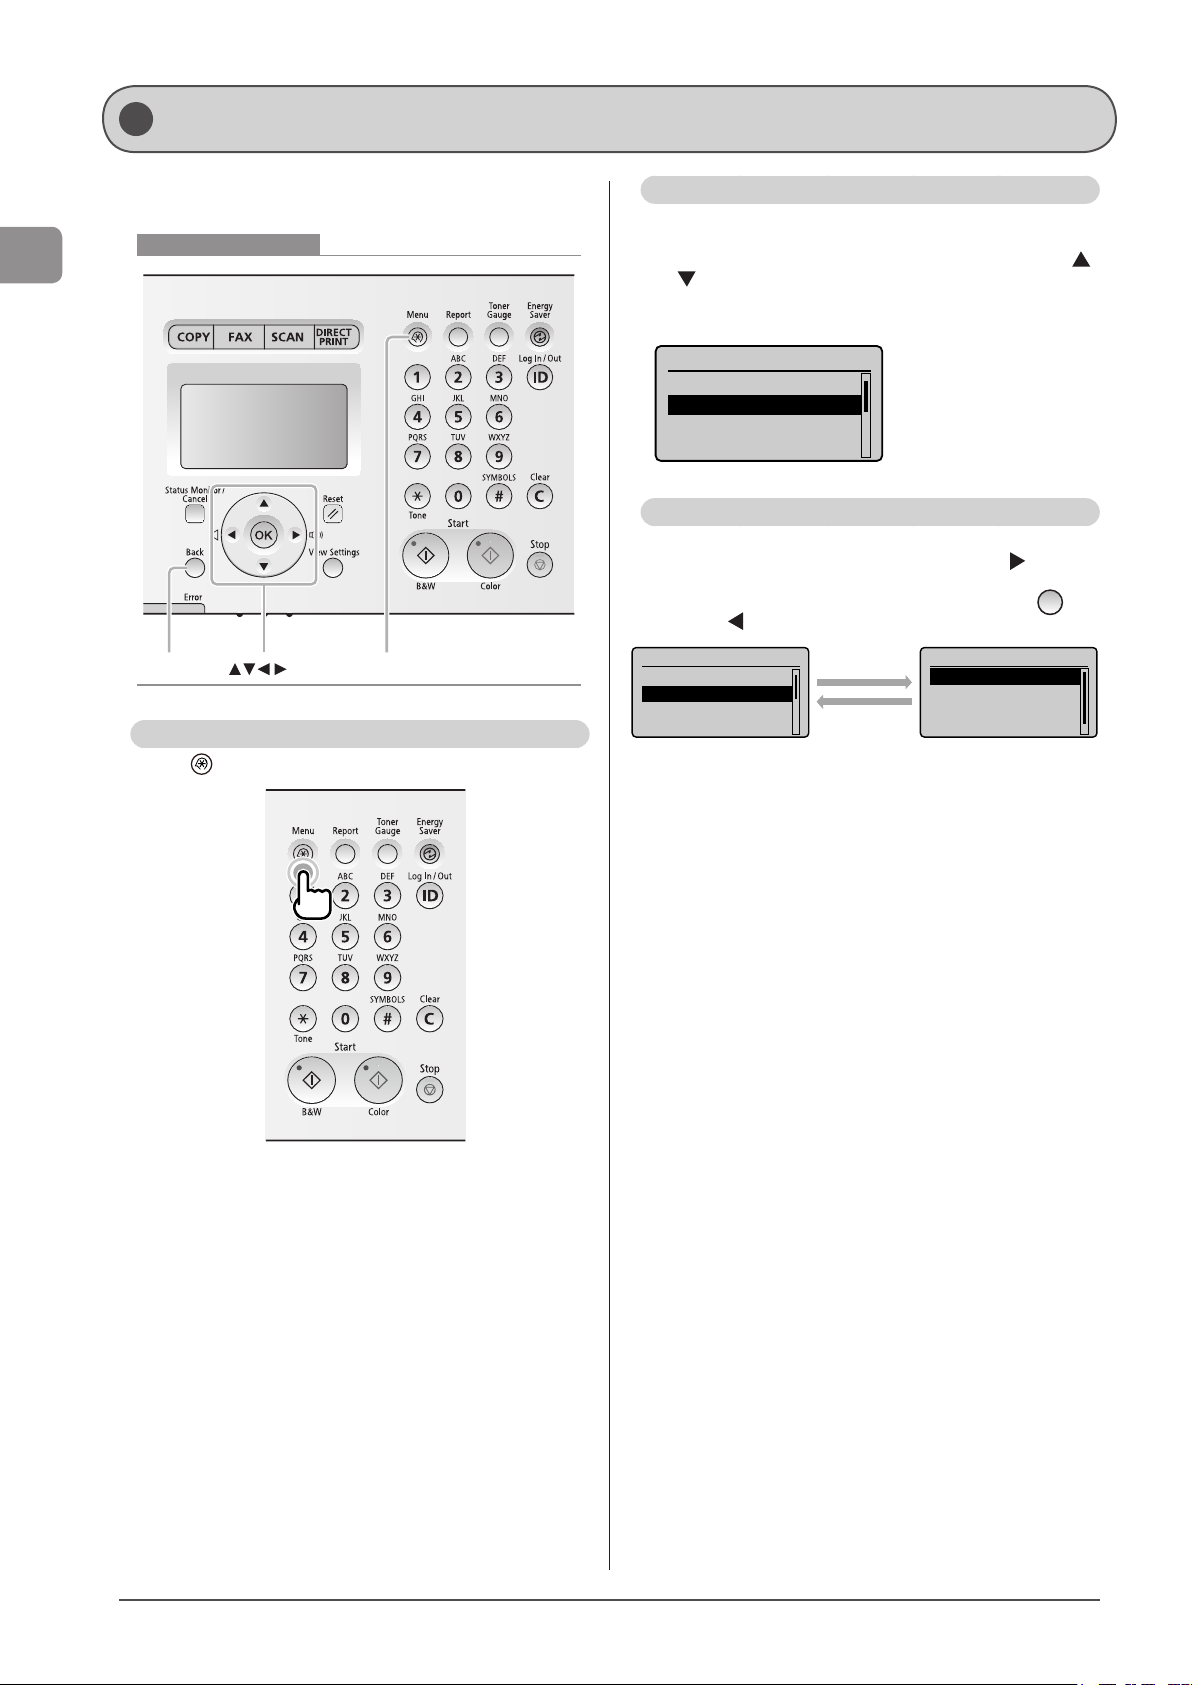
Navigating the Menu
Before Using the Machine
This section describes how to navigate the menu and specify
values on the menu screen.
Keys to be used for this operation
Back MenuOK
Entering the Menu Screen
Press [ ] (Menu) to enter the menu screen.
Scrolling Through Menu Items
The scrollbar at the right side of the screen indicates that
more items are available in the menu.
To select an item that is not shown on the screen, press [
or [
] to scroll up and down the menu.
The currently selected item is highlighted with a black
background.
Menu
Preferences
Timer Settings
Common Settings
Copy Settings
Selecting a Menu Item
Press [OK] to select the highlighted menu.
When the menu has a submenu, you can press [
the item and proceed to the next screen.
You can return to the previous screen by pressing [
(Back) or [
Menu
Preferences
Timer Settings
Common Settings
Copy Settings
].
[OK] or [►]
[Back] or [◄]
Timer Settings
Time & Date Settings
Sleep Timer
Auto Reset Timer
Screen After Auto R
]
] to select
]
...
1-10
Page 35
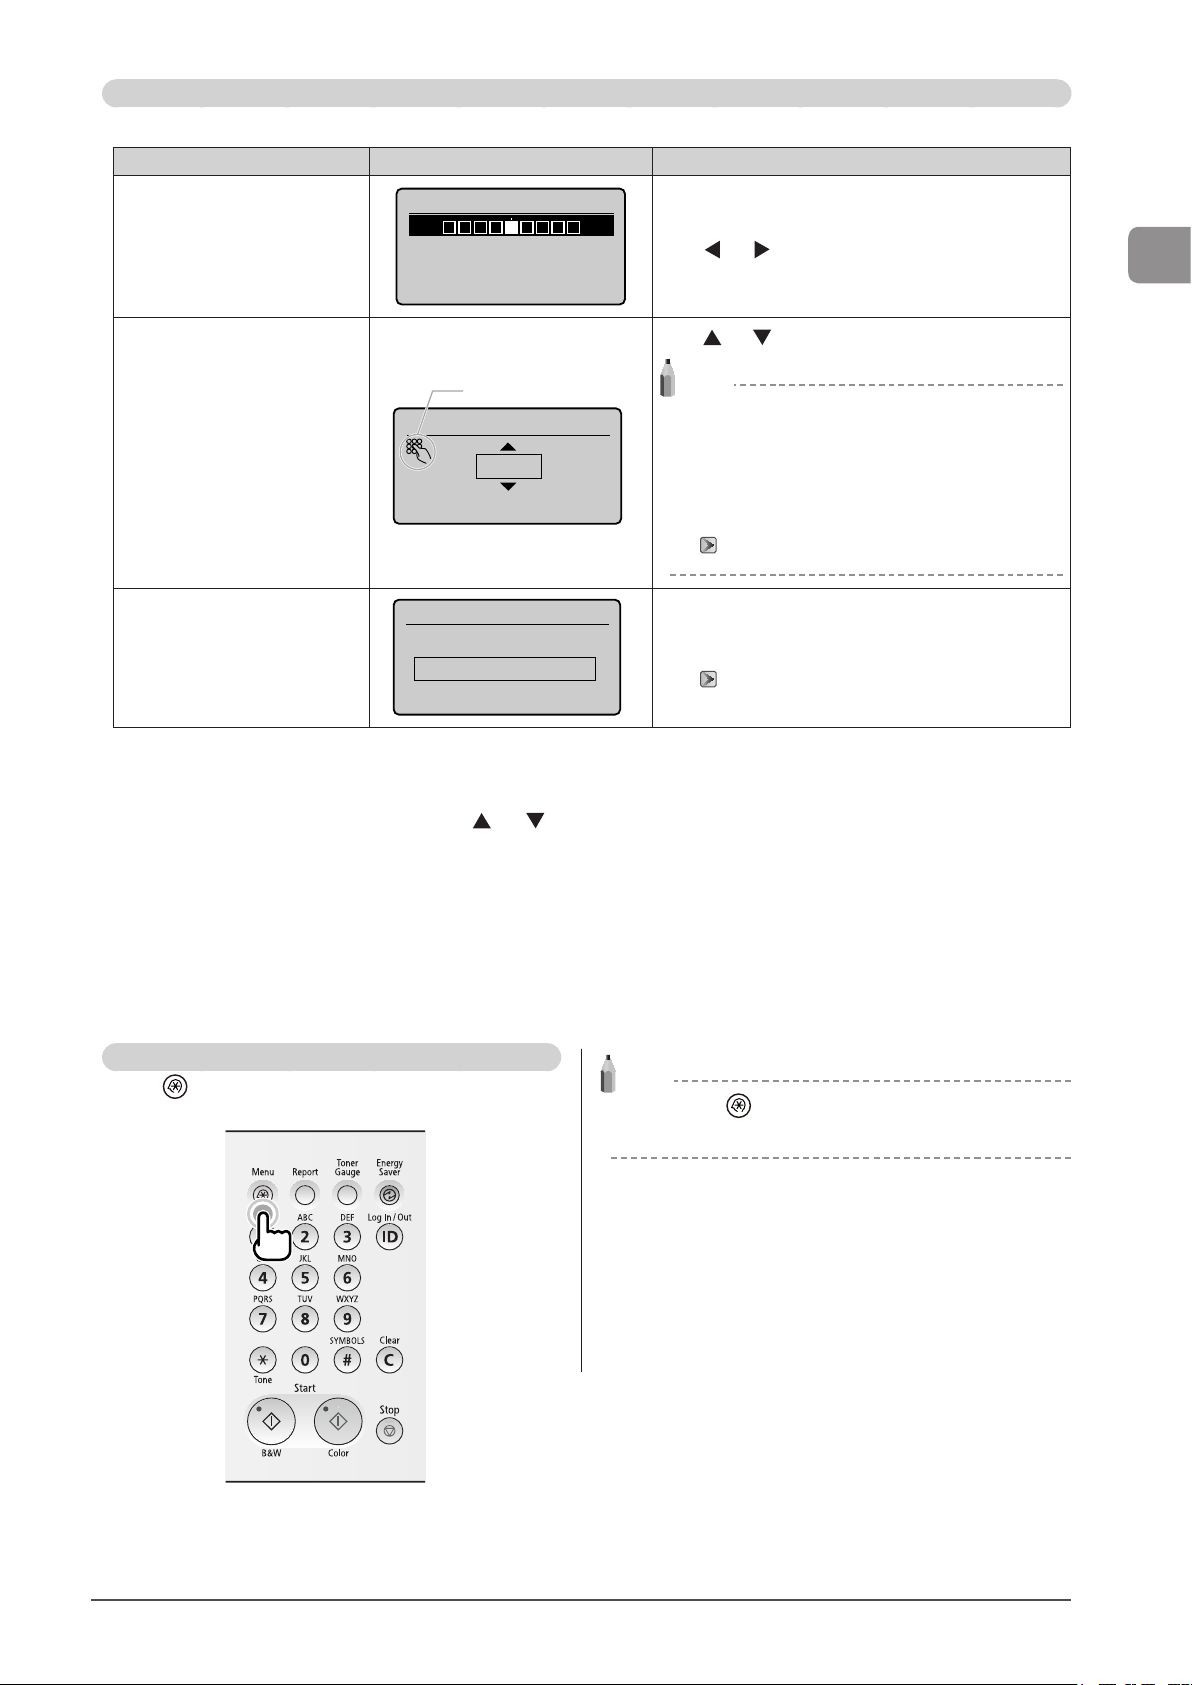
Configuring menus using the navigation keys
How to configure menus
What you want to do Screen example Procedure
Density
Adjust levels such as density on
the scale
- +
Background: Default
Color Balance: Defau...
Press [ ] or [ ] to adjust the level.
Press [ ] or [ ] to specify the value.
Before Using the Machine
Auto Reset Timer
Set the timer
(0=Off, 1-9)
System Manager PIN
Enter numbers or characters such
as a PIN.
*******
(Apply: Press OK)
Confirming the input
To confirm the input:
• Press [OK].
• When <Apply> appears on the display, press [
Numeric key icon
NOTE
Values that you can specify
You can specify any value shown in the parentheses at
2 min.
the bottom of the screen.
When the numeric key icon is displayed on the
screen
You can enter it using the numeric keys.
“Entering Text” (→P.1-12)
You can enter numbers or characters using the numeric
keys.
“Entering Text” (→P.1-12)
] or [ ] to select <Apply>, and then press [OK].
Returning to the Default Screen
Press [ ] (Menu) to exit the menu screen and return to
the default screen.
NOTE
If you press [ ] (Menu) before you press [OK]
The changes made to the settings will not be saved.
1-11
Page 36
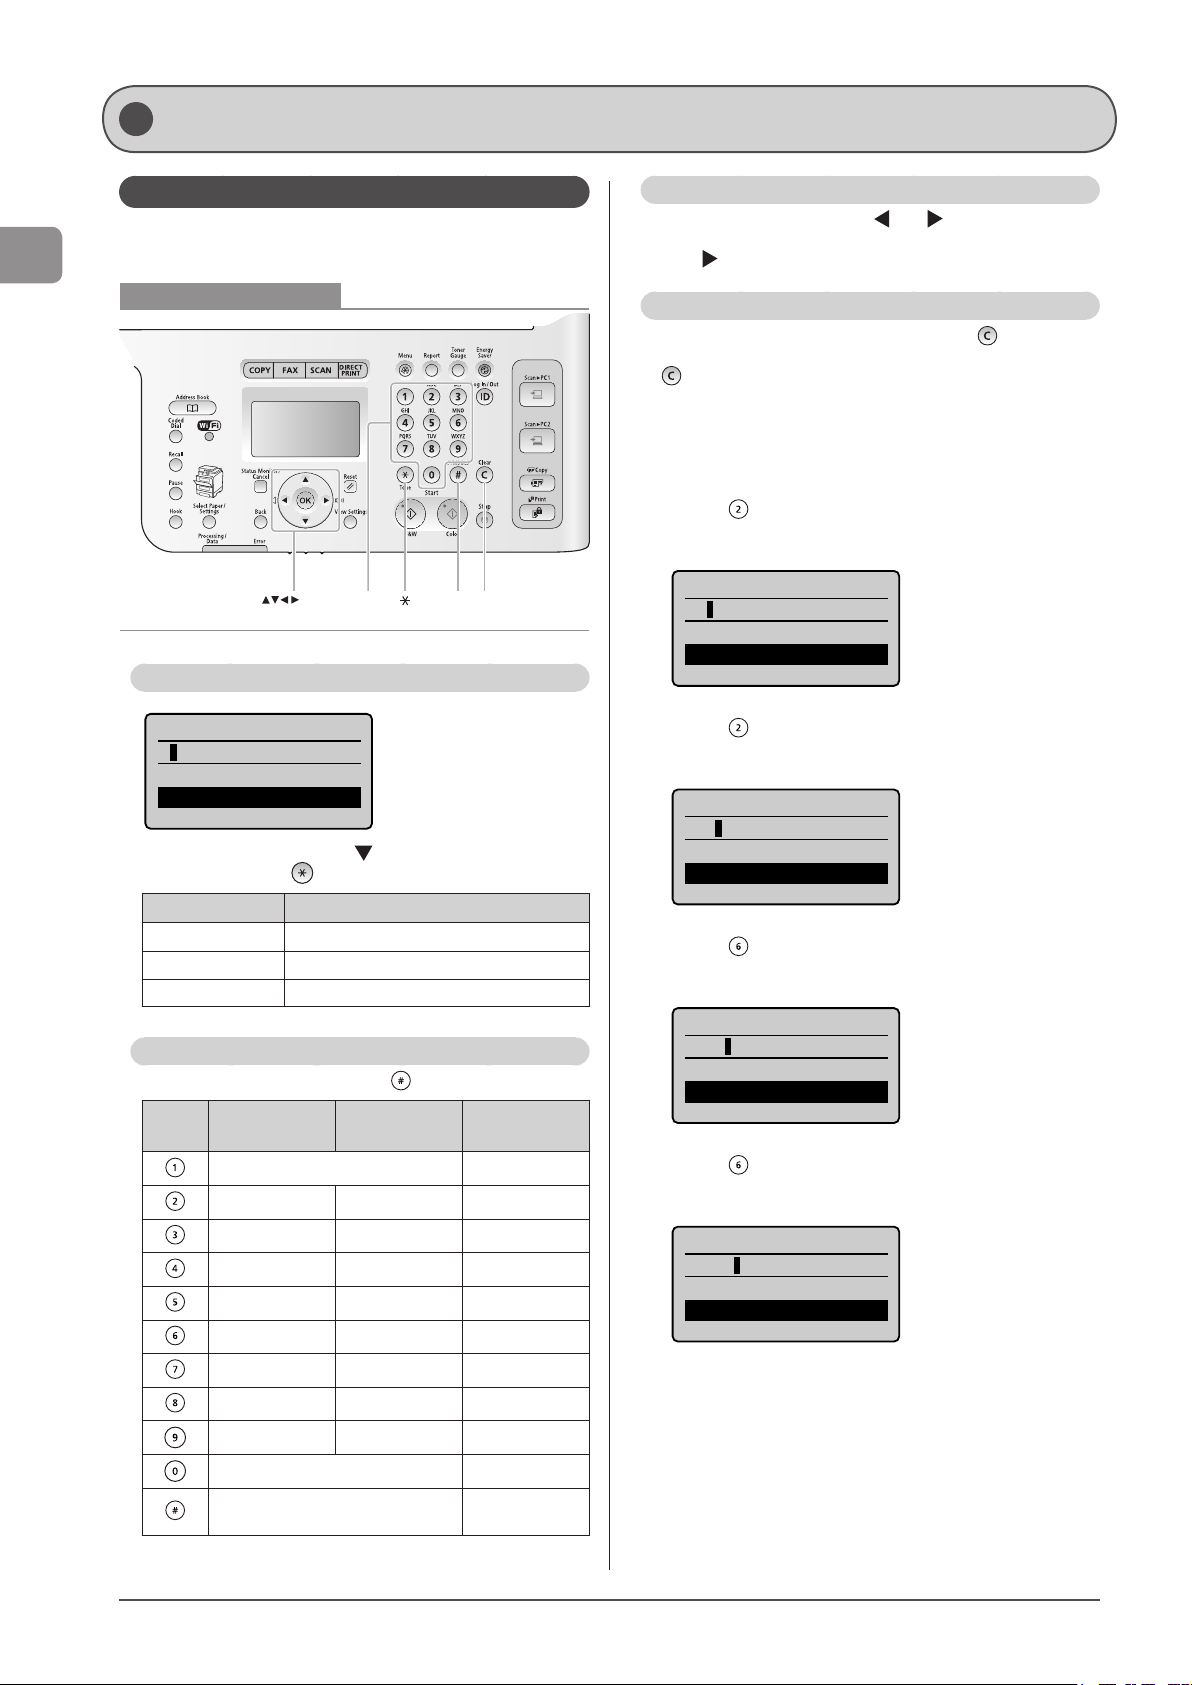
Entering Text
Before Using the Machine
Entering Text Except for IP Address
Enter information (text, symbols, and numbers) into the
machine using the following keys.
Keys to be used for this operation
Numeric
OK
keys
Changing the Entry Mode
Register Unit Name
<Apply>
Entry Mode: A
Select <Entry Mode> using [ ] and press [OK].
You can also press [
Entry mode Text that can be entered
<A> Alphabet (capital letters) and symbols
<a> Alphabet (small letters) and symbols
<12> Numbers
] (Tone) to change the entry mode.
Entering Text, Symbols, and Numbers
Enter using the numeric keys or [ ] (SYMBOLS).
Keys
used
Entry mode:
<A>
ABC abc 2
DEF def 3
GHI ghi 4
JKL jkl 5
MNO mno 6
PQRS pqrs 7
TUV tuv 8
WXYZ wxyz 9
(Not available) 0
(space) @ . / - _ ! ? & $ % # ( ) [ ]{ } < >
* + = “ , ; : ‘ ^ ` | \ ˜
Entry mode:
<a>
@ . - _ / 1
# C
Entry mode:
<12>
(Not available)
Moving the Cursor (Entering a Space)
Move the cursor by pressing [ ] or [ ].
To enter a space, move the cursor to the end of the text and
press [
].
Deleting text, symbols, or numbers
To delete text, numbers, or symbols, press [ ] (Clear).
To delete all text, numbers, or symbols, press and hold
[
] (Clear).
Example: Enter <CANON>.
1 Make sure that the entry mode is set to <A>.
2 Press [ ] until the letter “C” appears on the
screen.
Register Unit Name
C
<Apply>
Entry Mode: A
3 Press [ ] until the letter “A” appears on the
screen.
Register Unit Name
CA
<Apply>
Entry Mode: A
4 Press [ ] until the letter “N” appears on the
screen.
Register Unit Name
CAN
<Apply>
Entry Mode: A
5 Press [ ] until the letter “O” appears on the
screen.
Register Unit Name
CANO
<Apply>
Entry Mode: A
1-12
Page 37
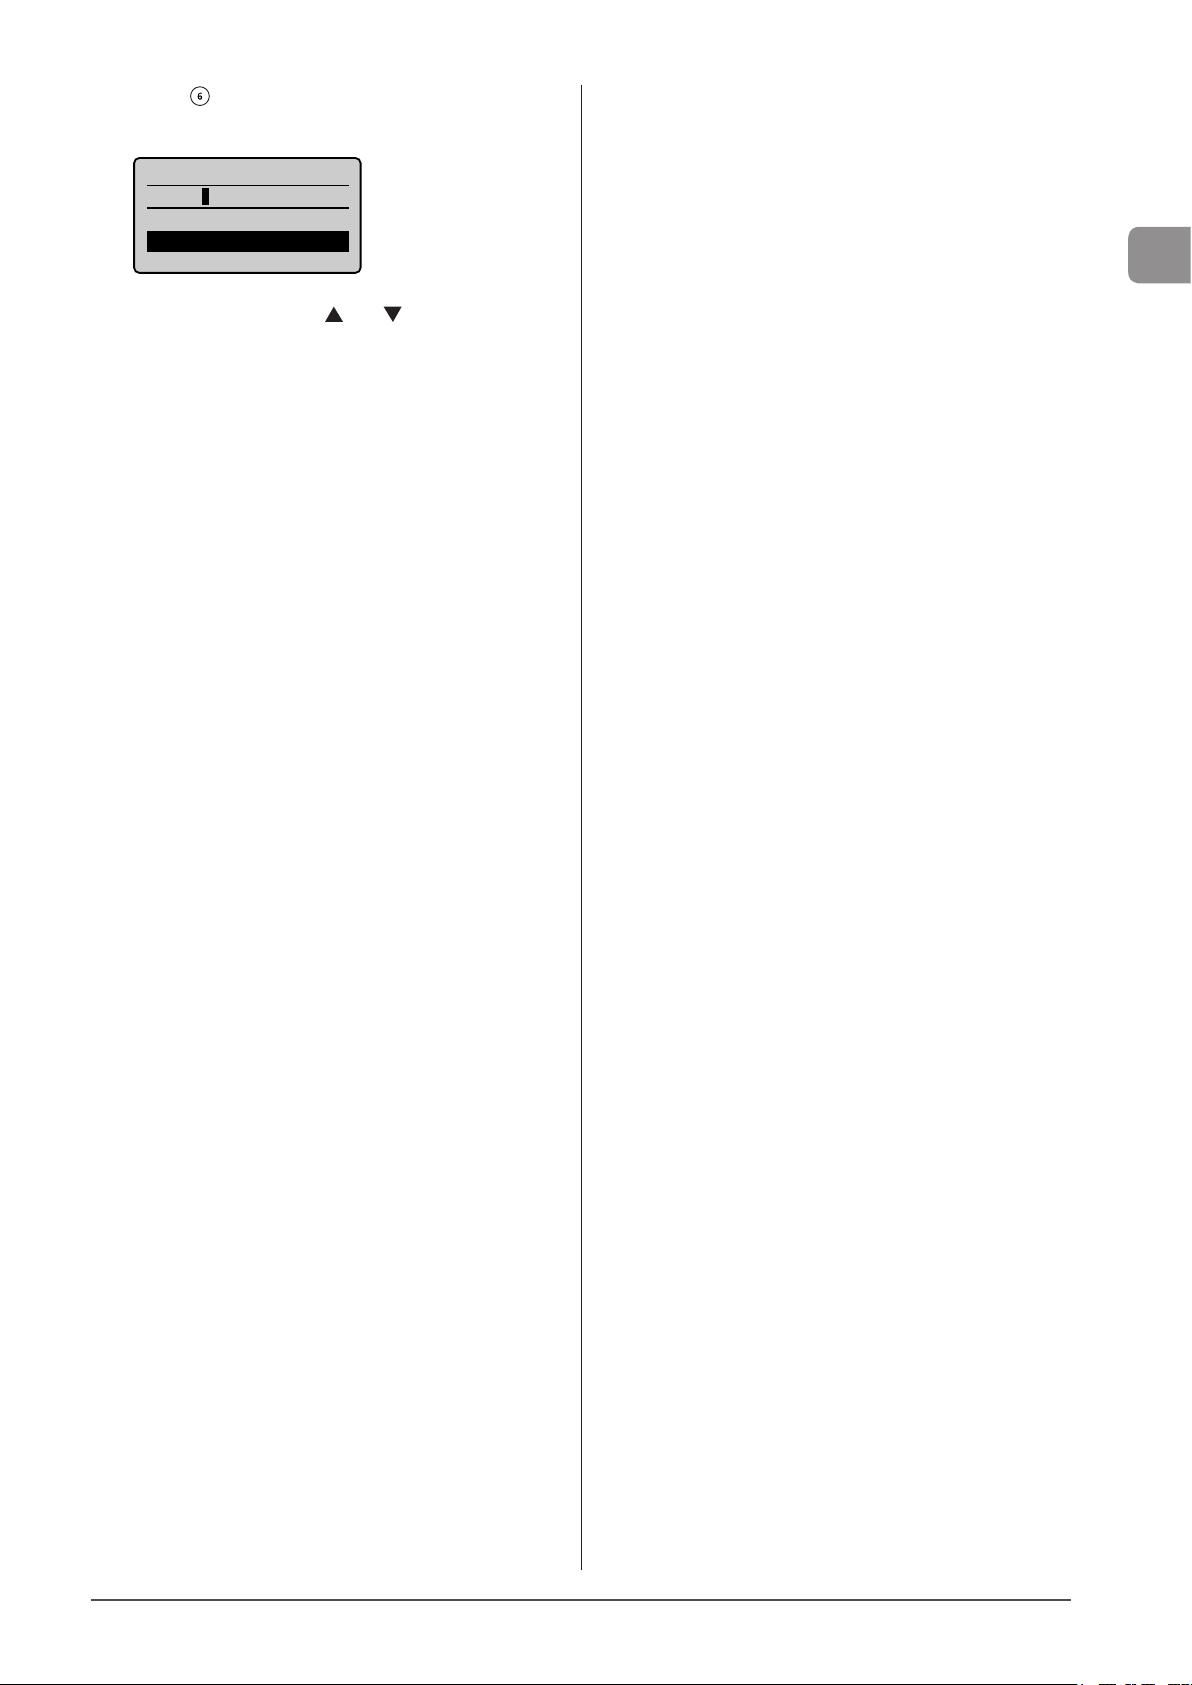
6 Press [ ] until the letter “N” appears on the
screen.
Register Unit Name
CANON
<Apply>
Entry Mode: A
7 Select <Apply> using [ ] or [ ] and press [OK].
The entry is complete.
Before Using the Machine
1-13
Page 38
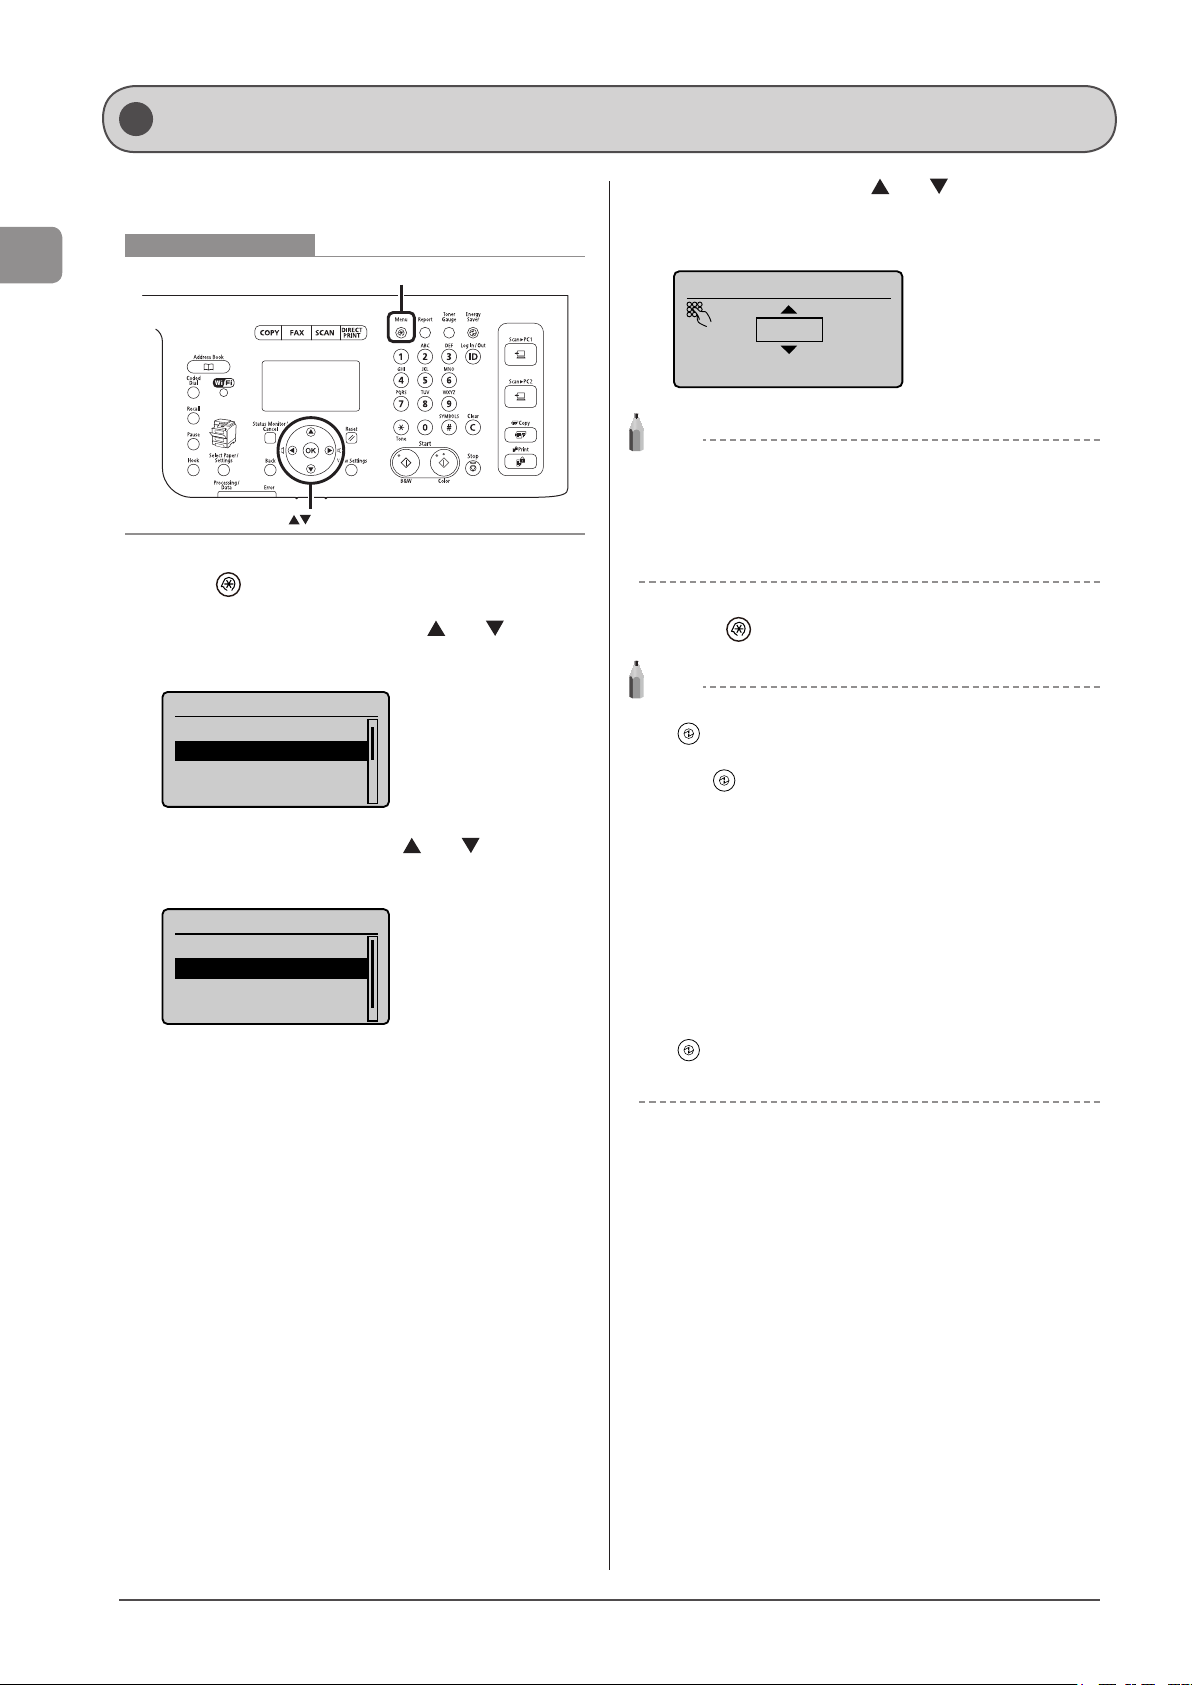
Setting the Sleep Timer
Before Using the Machine
The machine returns to sleep mode automatically when it is
idle for a specified length of time.
Keys to be used for this operation
Menu
OK
1 Press [ ] (Menu).
2 Select <Timer Settings> using [ ] or [ ] and
press [OK].
Menu
Preferences
Timer Settings
Common Settings
Copy Settings
3 Select <Sleep Timer> using [ ] or [ ] and press
[OK].
Timer Settings
Time & Date Settings
Sleep Timer
Auto Reset Timer
Screen After Auto R
...
4 Specify the time using [ ] or [ ] and press [OK].
* You can also enter values using the numeric keys.
* We recommend that you use the default timer setting.
Sleep Timer
10 min.
(10-240)
NOTE
To set the auto sleep timer
You can set the auto sleep timer in one minute interval within the
range below:
MF8380Cdw: 10 to 240 minutes (The default is <10> minutes.)
MF8080Cw: 20 to 240 minutes (The default is <20> minutes.)
5 Press [ ] (Menu) to close the menu screen.
NOTE
When the machine enters the sleep mode
[ ] (Energy Saver) lights green.
To enter the sleep mode manually
Press [ ] (Energy Saver).
The machine does not enter the sleep mode when
• the machine is in the middle of operation
• the Processing/Data indicator lights or is blinking
• a message appears on the screen and the Error indicator is
blinking (except when a message such as <Prepare toner
cartridge.> is displayed, indicating the machine continues
printing with a small amount of toner left)
• the machine is in the middle of adjustment or cleaning
• a paper jam occurs
• the handset of the external telephone is left unhooked
The machine returns from sleep mode when
[ ] (Energy Saver) is pressed
the external telephone is taken off the hook
1-14
Page 39
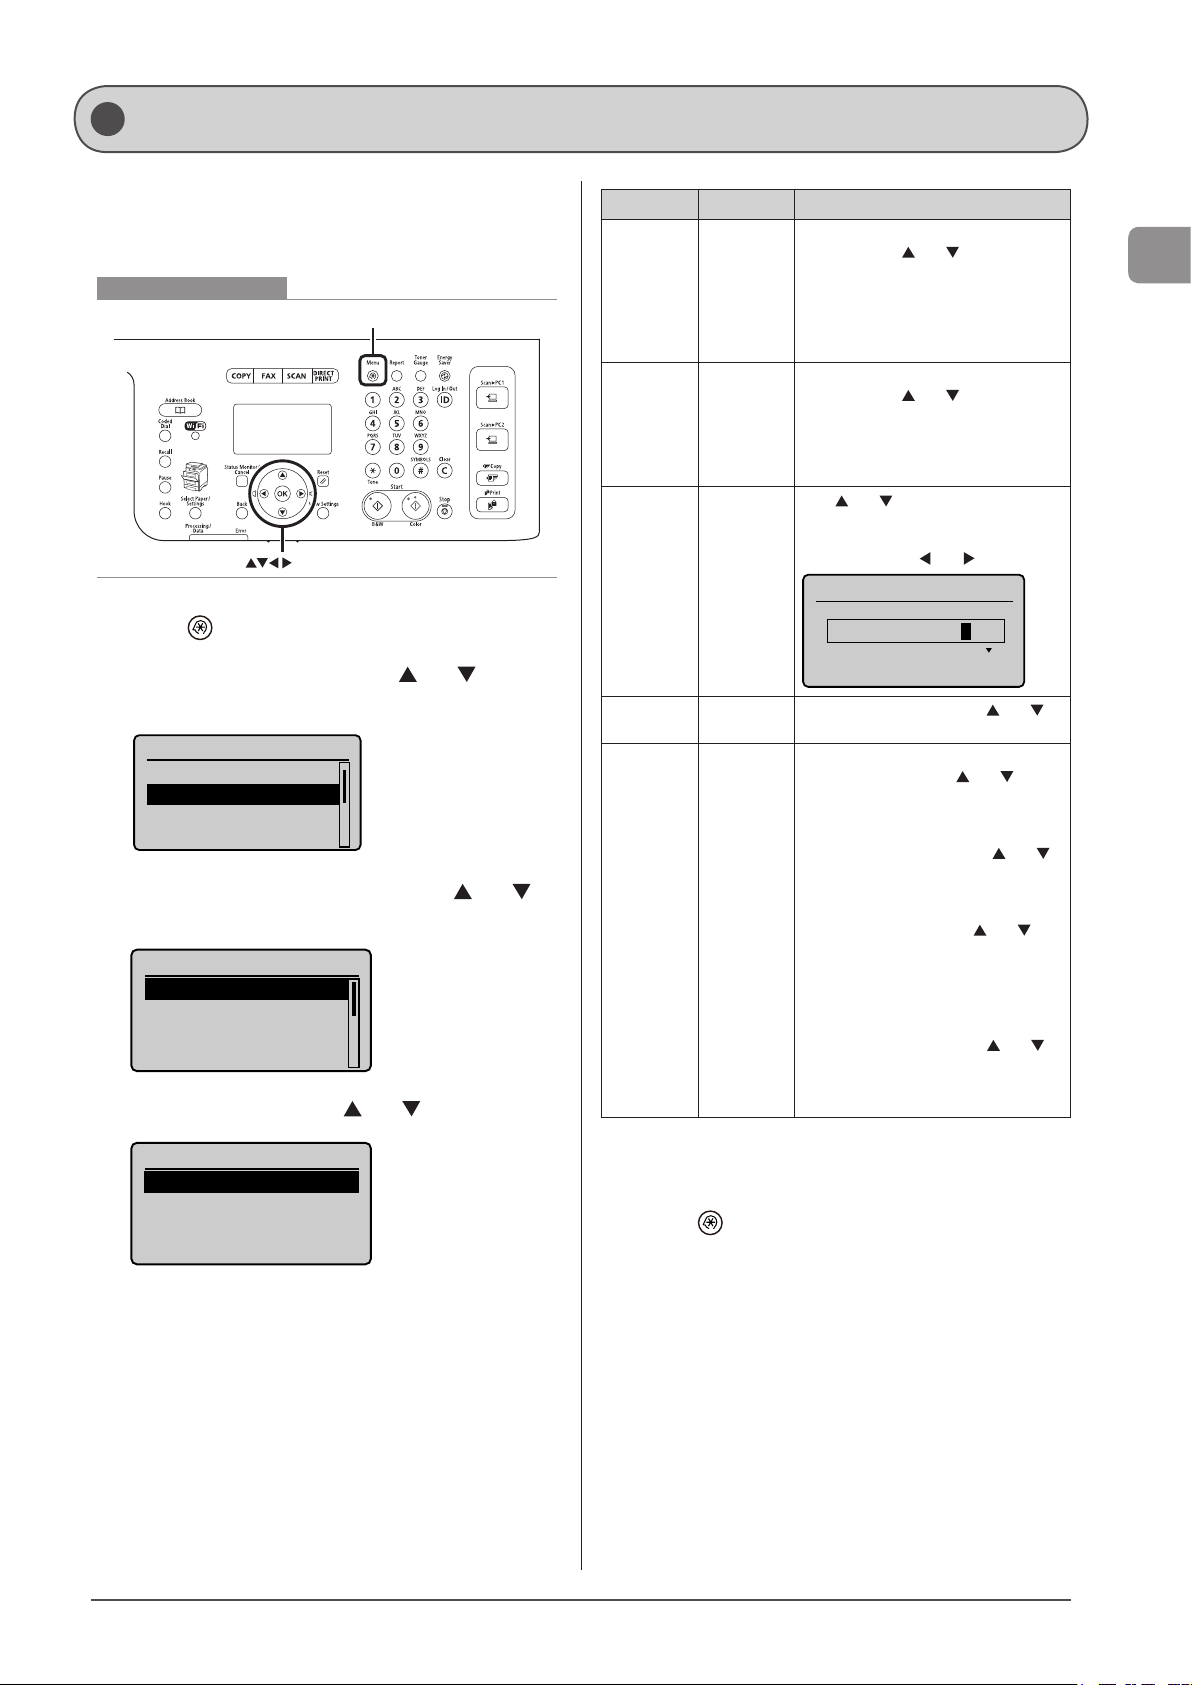
Setting the Current Date and Time
Time & Date Settings
Current Time Settings
Current Time Settings
Specify a display format for the date and time and set the
current date and time.
The specified date and time are used for some fax functions
and reports.
Keys to be used for this operation
Menu
OK
1 Press [ ] (Menu).
2 Select <Timer Settings> using [ ] or [ ] and
press [OK].
Menu
Preferences
Timer Settings
Common Settings
Copy Settings
3 Select <Time & Date Settings> using [ ] or [ ]
and press [OK].
Timer Settings
Sleep Timer
Auto Reset Timer
Screen After Auto R
...
4 Select the setting using [ ] or [ ] and press [OK].
Time & Date Settings
Date Display Type
12/24 Hour Clock
Daylight Savings
Settings Purpose What to do
Select one of the following display
formats using [
<Date
Display
Type>
<12/24
Hour
Clock>
<Current
Time
Settings>
<Time Zone
Settings>
<Daylight
Savings>*
* Make sure to configure <Time Zone Settings> before setting in
this section (If you change <Time Zone Settings>, <Current Time
Settings> will be changed accordingly).
Specify the
date display
format.
Specify the
time display
format.
Specify the
current
time and
date.
Specify the
time zone.
Specify
whether
to use the
daylight
saving time.
[OK].
The formats include the following.
• MM/DD YYYY
• DD/MM YYYY
• YYYY MM/DD
Select one of the following display
formats using [ ] or [ ] and press
[OK].
The formats include the following.
• 12 Hour (AM/PM)
• 24 Hour
Use [
] or [ ] to enter time and date,
or to switch
between <AM> and <PM>. To move
the cursor, press [ ] or [ ].
01/01 2011 12:52 AM
Select the time zone using [
and press [OK].
To use daylight saving time,
1. Select <On> using [ ] or [ ] and
press [OK].
2. Specify the starting date of the
daylight saving time.
- Select <Month> using [ ] or [ ]
and press [OK].
- Select the starting month and
press [OK].
- Select <Day> using [ ] or [ ]
and press [OK].
- Select the starting week and
press [OK].
- Select the starting day and press
[OK].
- Select <Apply> using [ ] or [ ]
and press [OK].
3. Repeat Step 2 to specify the ending
date.
] or [ ] and press
] or [ ]
5 Press [ ] (Menu) to close the menu screen.
Before Using the Machine
1-15
Page 40

Before Using the Machine
1-16
Page 41

Chapter
Document and Paper Handling
2
Document Type 2-2
Supported Document Types 2-2
Scan Area 2-2
Copy 2-2
FAX 2-3
Scan (Saving in a Computer) 2-3
Scan (Saving in a USB Memory/Sending by E-mail/
Sending to a File Server) 2-3
Placing Documents 2-4
Placing Documents on the Platen Glass 2-4
Placing Documents in the Feeder 2-4
Paper Requirements 2-6
Paper Size 2-6
Paper Type 2-7
Printable Area 2-8
Loading Paper 2-9
In the Paper Cassette 2-9
When loading Legal size paper 2-9
When loading envelopes 2-10
When loading Legal size paper 2-11
In the Multi-Purpose Tray (MF8380Cdw Only) 2-12
When loading envelopes 2-12
In the Manual Feed Slot (MF8080Cw Only) 2-13
When loading envelopes 2-14
Precautions when Loading Paper 2-14
Paper Loading Capacity 2-15
Paper Loading Orientation 2-15
Paper cassette 2-16
Multi-purpose tray (MF8380Cdw Only) 2-16
Manual feed slot (MF8080Cw Only) 2-16
Paper cassette 2-16
The multi-purpose tray (MF8380Cdw Only) 2-16
Manual feed slot (MF8080Cw Only) 2-17
Setting the Paper Size and Type 2-18
For the Paper Cassette 2-18
Registering the Default Paper Settings for the Multi-purpose Tray
(Manual Feed Slot) 2-18
Registering a Custom Paper Size 2-19
Selecting the Print Side (MF8380Cdw Only) 2-21
When <Print Speed Priority> is selected (the default setting) 2-21
When <Print Side Priority> is selected 2-21
2-1
Page 42
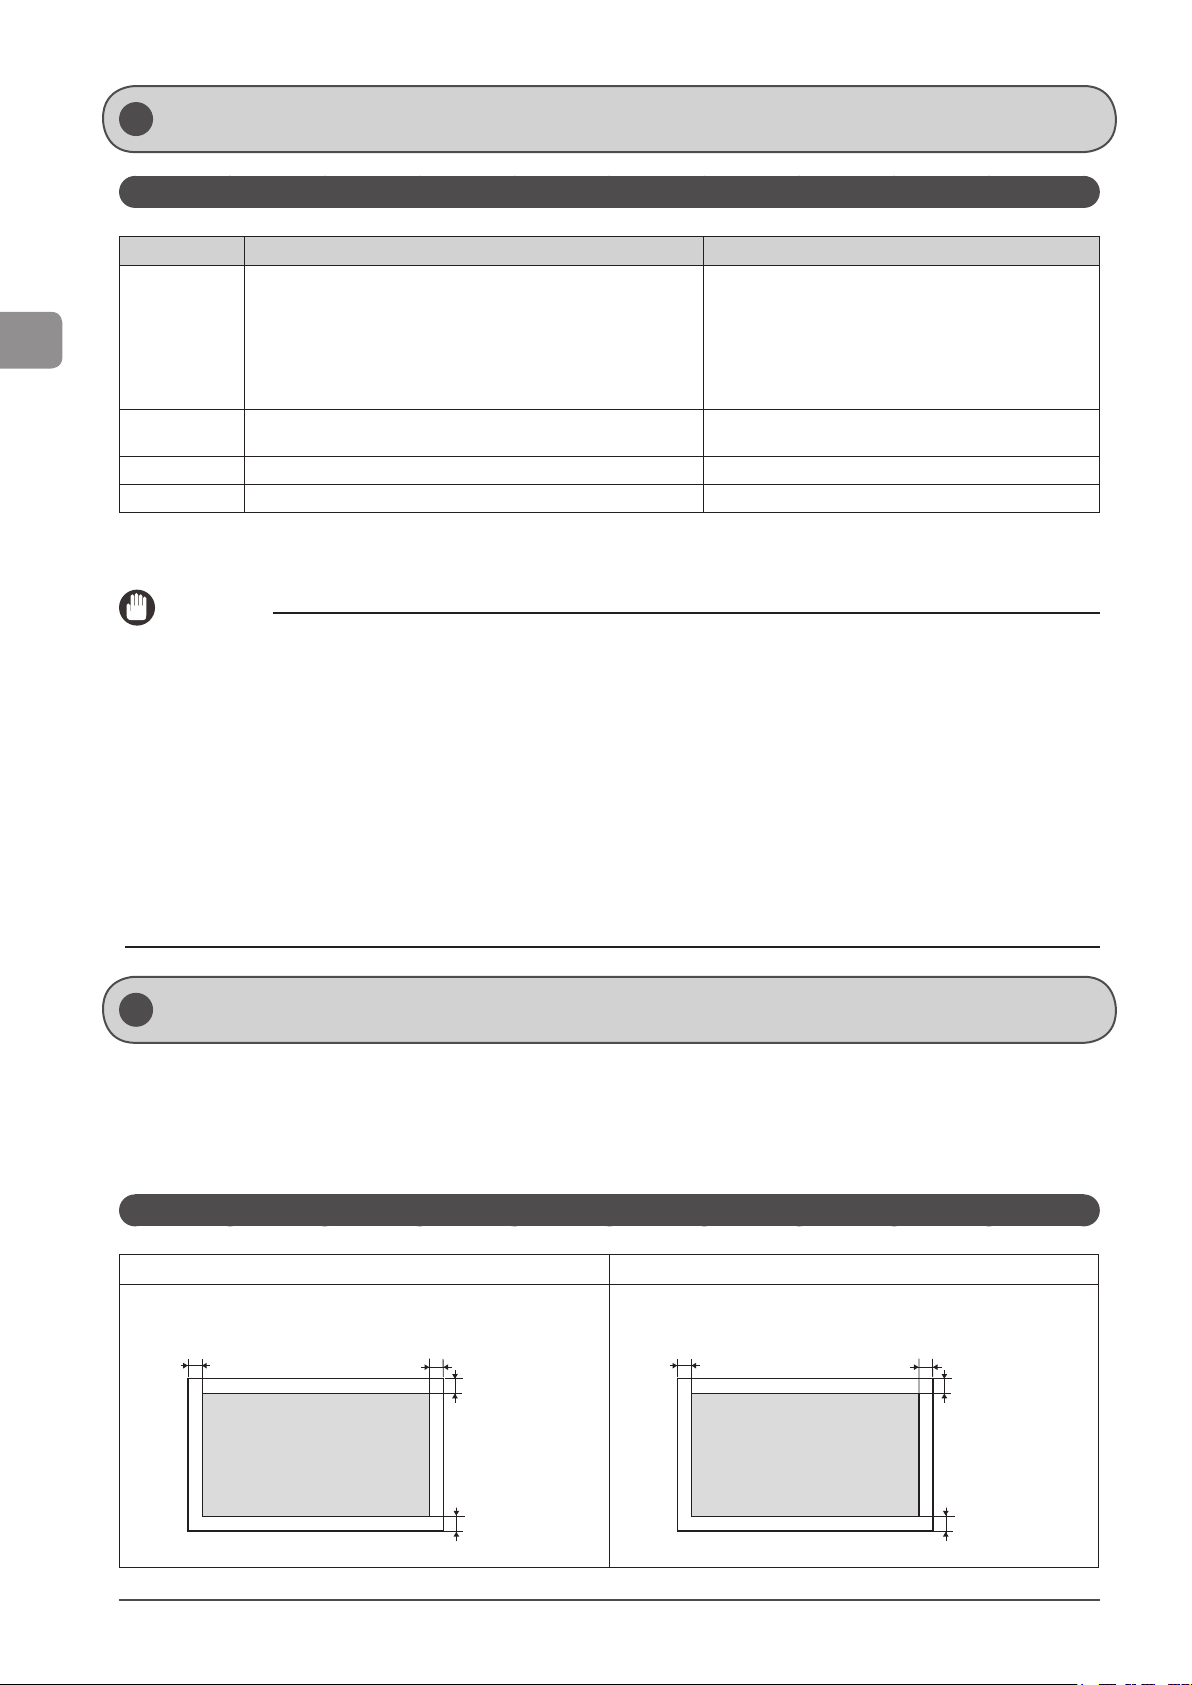
Document and Paper Handling
Document Type
Supported Document Types
Platen Glass Feeder
• Plain paper
• Heavy paper
Type
Size (W x L) Up to 8 1/2" x 11 3/4" (215.9 mm x 297 mm)
Weight Up to 4.4 lb (2 kg) 12 to 28 lb Bond (50 to 105 g/m
Paper Capacity 1 sheet Up to 50 sheets (Letter)*
*1
To copy transparent documents (for example, tracing paper or transparencies), make sure to place the documents face down on the platen glass
and cover them with plain white paper.
*2
21 lb Bond (80 g/m2)
• Photograph
• Small documents (for example, index cards)
• Special types of paper (for example, tracing paper,
transparencies, etc.)*
• Booklet (Up to 3/4" (20 mm) thickness)
1
IMPORTANT
To place your document
Make sure any glue, ink, or correction fluid on the document is completely dry before placing it on the platen glass or into the feeder.
To prevent paper jams in the feeder
Do not use any of the following.
• Wrinkled or creased paper
• Carbon paper or carbon-backed paper
• Curled or rolled paper
• Coated paper
• Torn paper
• Onion skin or thin paper
• Stapled or clipped documents
• Paper printed by a thermal transfer printer
• Transparencies
Plain paper
(Multi-page documents of the same size, thickness and
weight/one-page documents)
• Maximum size: 8 1/2" x 14" (215.9 mm x 355.6 mm)
• Minimum size: 5 1/2" x 5" (139.7 mm x 128 mm)
2
)
2
Scan Area
Ensure your document’s text and graphics fall within the area specified in the following diagram.
* Note that the margin widths listed below are rough standards and there may be slight variations in actual use.
* The loading orientation of documents is as follows.
- Platen glass: With the document facing down
- Feeder: With the document loaded in the document feeder tray
Copy
Platen Glass Feeder
1/8 in.
(3 mm)
1/8 in.
(3 mm)
1/8 in.
(3 mm)
1/8 in.
(3 mm)
1/8 in.
(3 mm)
1/8 in.
(3 mm)
1/8 in.
(3 mm)
1/8 in.
(3 mm)
2-2
Page 43
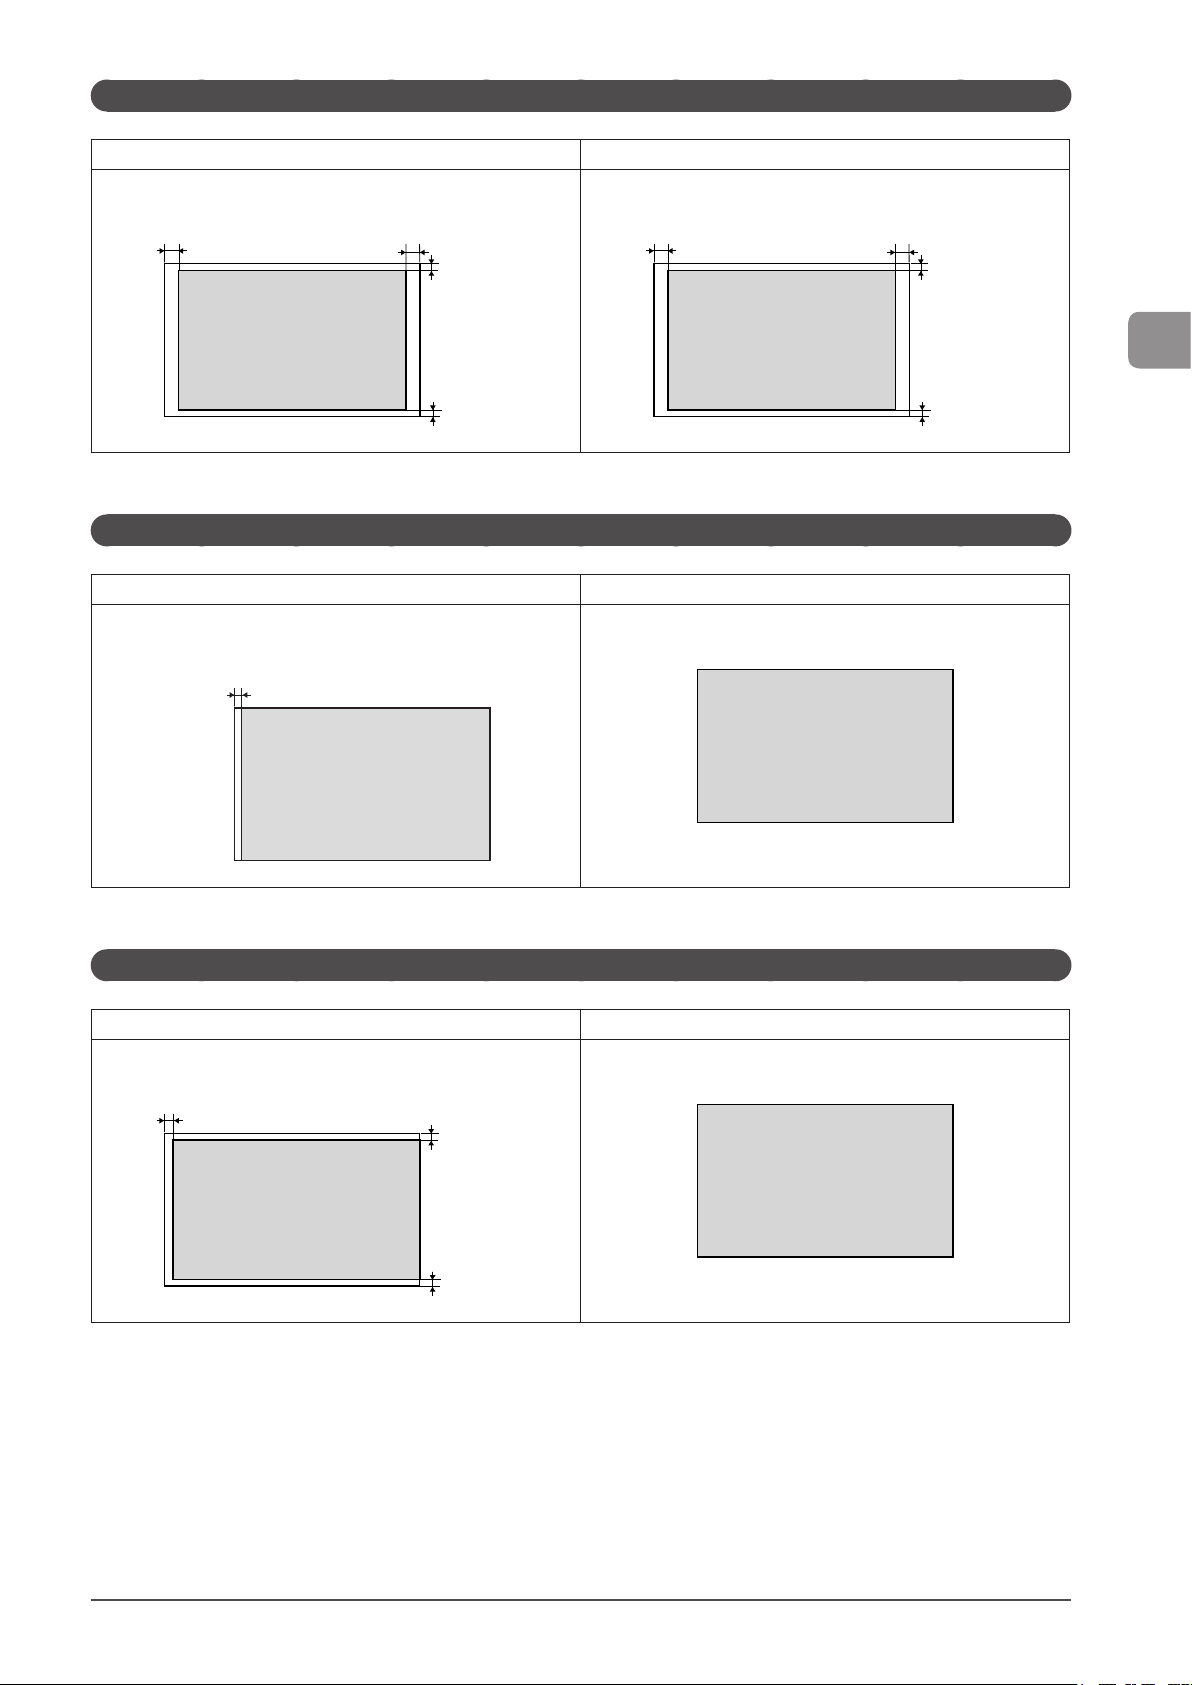
FAX
Platen Glass Feeder
1/8 in.
(3 mm)
1/8 in.
(3 mm)
Scan (Saving in a Computer)
Platen Glass Feeder
1/64 in.
(0.5 mm)
3/64 in.
(1 mm)
3/64 in.
(1 mm)
1/8 in.
(3 mm)
1/8 in.
(3 mm)
3/64 in.
(1 mm)
Document and Paper Handling
3/64 in.
(1 mm)
Scan (Saving in a USB Memory/Sending by E-mail/Sending to a File Server)
Platen Glass Feeder
1/16 in.
(1.5 mm)
1/64 in.
(0.5 mm)
1/64 in.
(0.5 mm)
2-3
Page 44
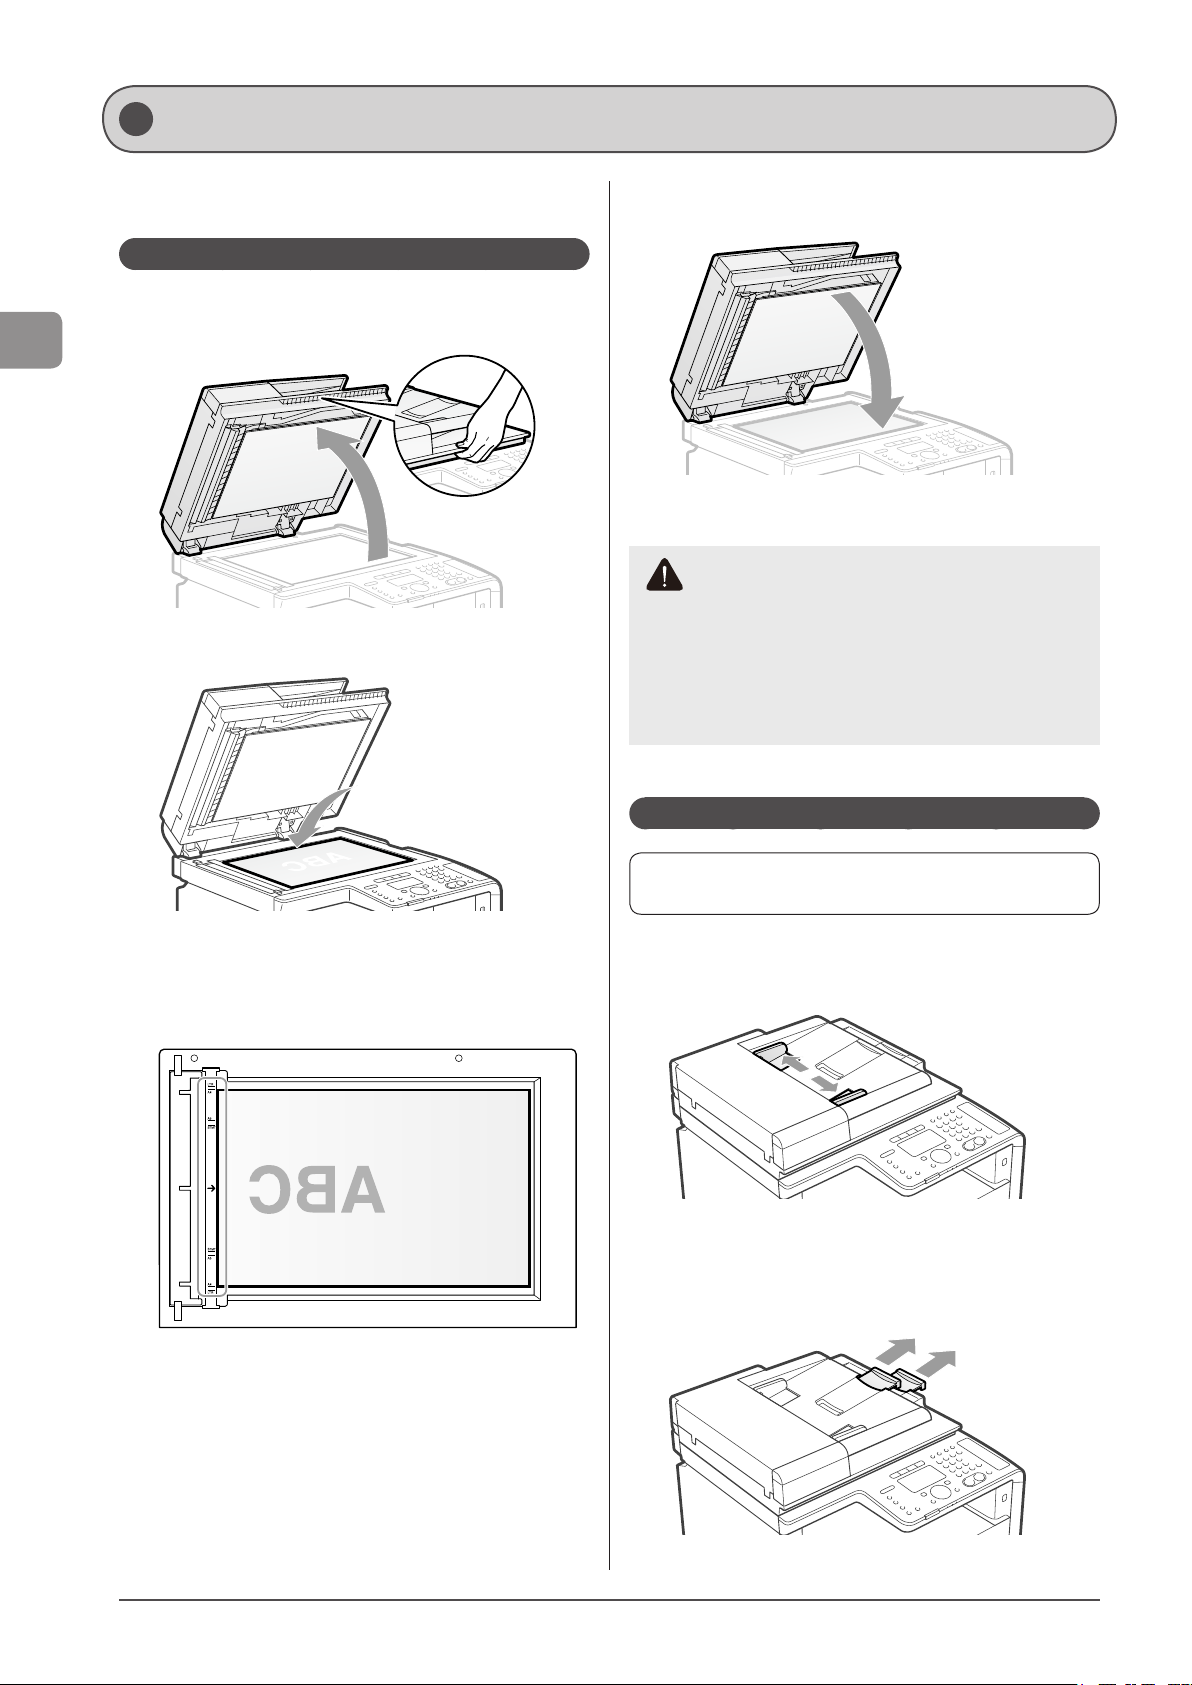
Placing Documents
Document and Paper Handling
This section describes placing the documents on the platen
glass or loading them in the feeder.
Placing Documents on the Platen Glass
1 Open the feeder.
2 Place your document face down.
4 Close the feeder or the platen glass cover gently.
The machine is ready to scan or copy the document.
When scanning or copying is complete, remove the document
from the platen glass.
CAUTION
Precautions when closing the feeder or the platen
glass cover
Be careful not to get your fingers caught.
This may cause personal injury. Do not press down the
feeder or the platen glass cover forcefully. This may
damage the platen glass and cause personal injury.
3 Align the document with the appropriate paper
size marks.
If the document does not match any of the paper size marks, align
the center of your document with the arrow mark.
Placing Documents in the Feeder
Before loading the documents in the feeder, see “IMPORTANT
(Placing Documents in the Feeder).”
1 Spread the document guides a little wider than
the actual document width.
2 Pull out the tray extension before loading the
large size document.
Pull out the tray extension when the document is hanging out of
the document feeder tray.
2-4
Page 45
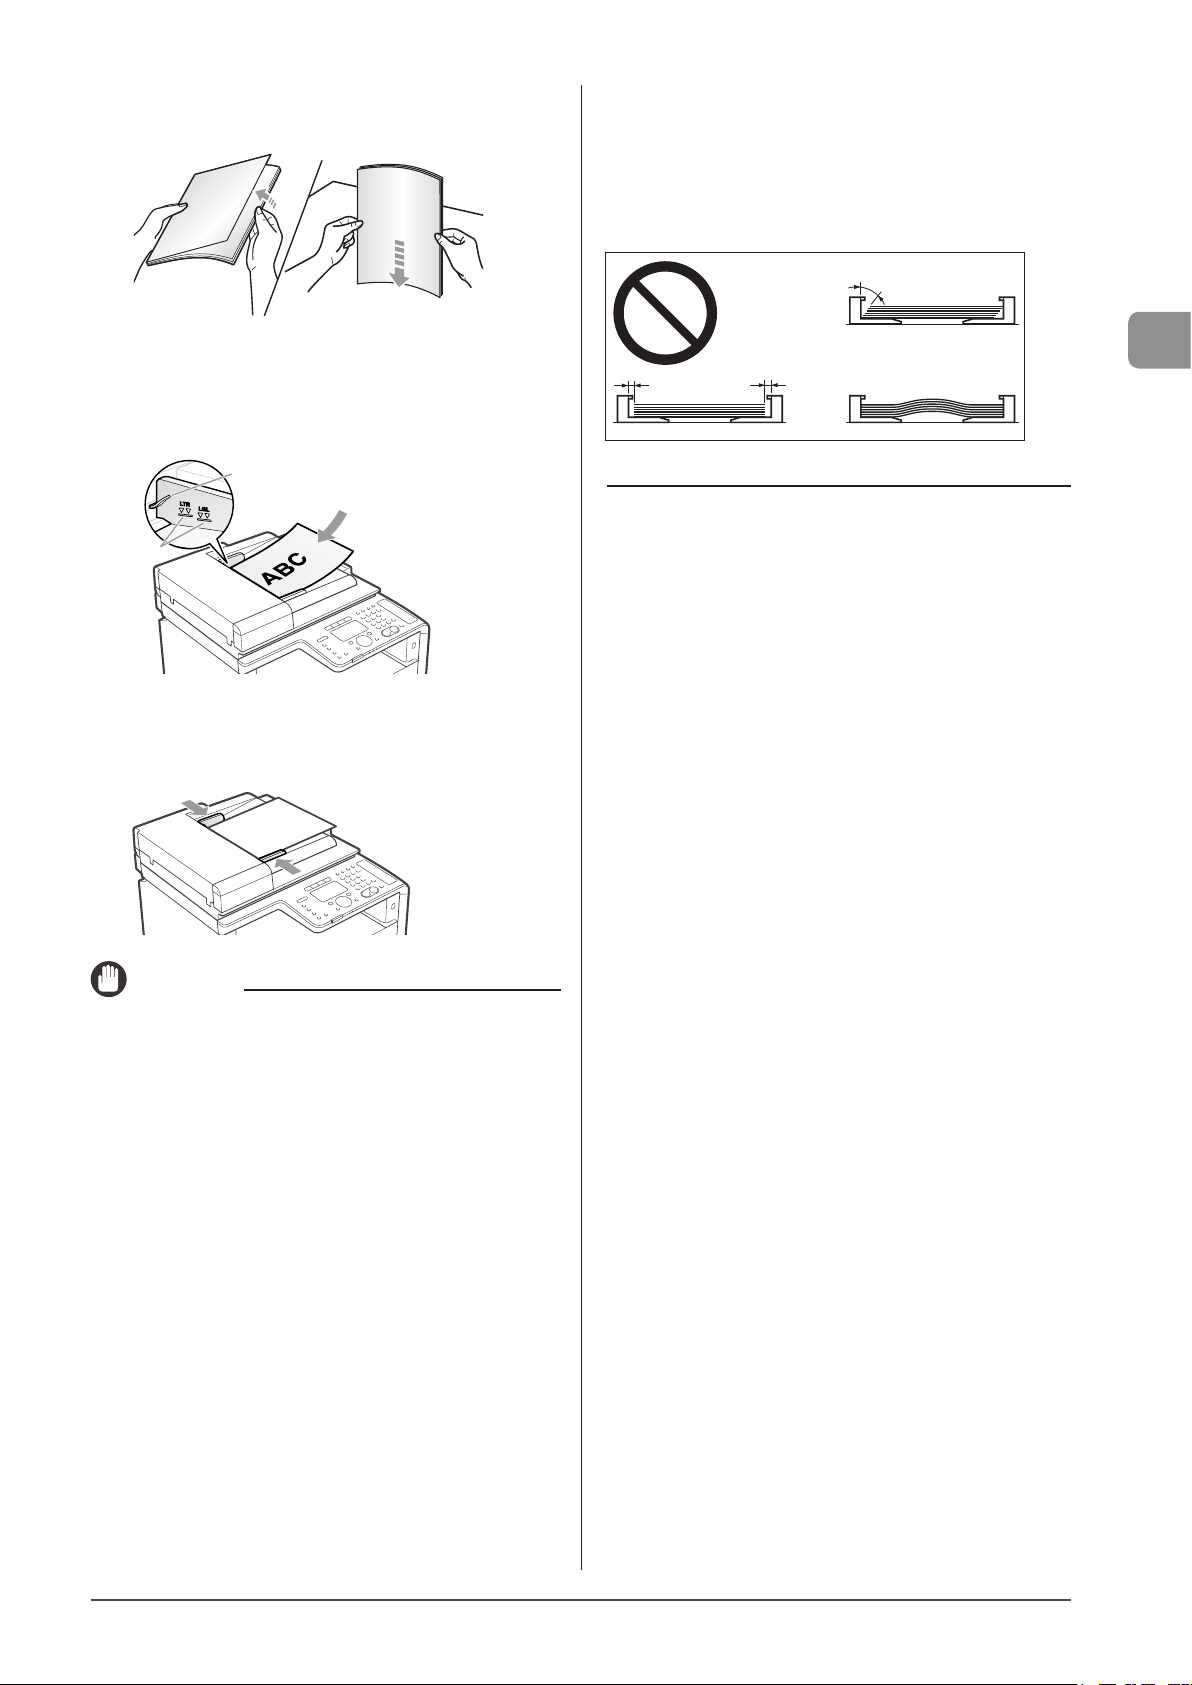
3 Fan the document stack and even the edges.
Thoroughly fan in
small batches.
Tap the edges on a flat
surface a few times.
Be sure to align the document guides securely against
the edges of the document.
• If the document guides are too loose or too tight, this may result
in misfeeds or paper jams.
• Printouts may be askew depending on the printing
environment. Loading the document properly sometimes
relieves the problem.
4 Neatly place the documents face up.
• Place the document under the load limit guides (A).
• Make sure that the paper stack does not exceed the load limit
marks (B).
(A)
(B)
5 Align the document guides securely against the
edges of the document.
The machine is ready to scan the document.
Document and Paper Handling
IMPORTANT
Up to 50 documents can be loaded.
If 51 or more documents are loaded, paper jams may occur, or the
documents may not be scanned.
While scanning a document
Do not add or remove documents.
When scanning documents is complete
Remove the documents from the document delivery tray to avoid
paper jams.
Avoid scanning the same document more than 30 times.
When scanned repeatedly, documents can become folded or torn,
which may cause paper jams.
2-5
Page 46
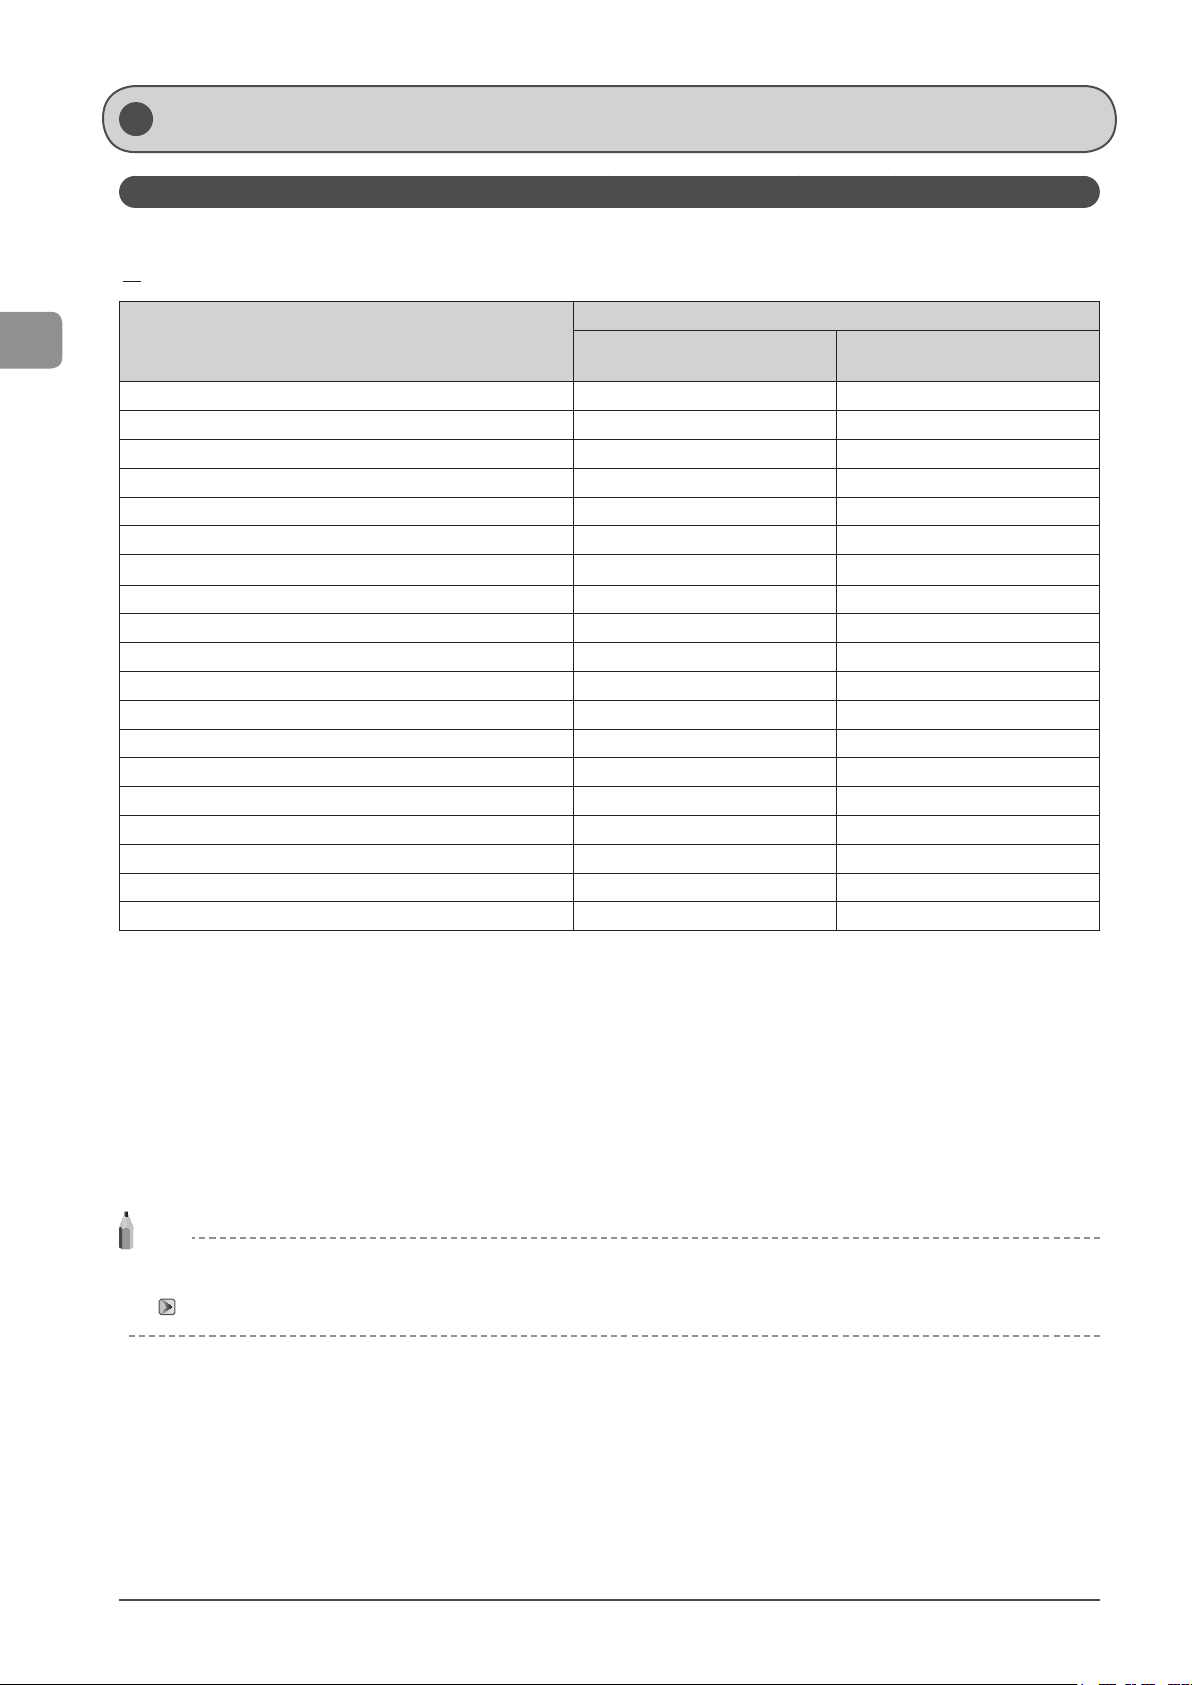
Document and Paper Handling
Paper Requirements
Paper Size
The following paper types are supported.
: Unavailable
Paper size
A4 (8 1/4" x 11 3/4") (210.0 mm x 297.0 mm)*2*
B5 (7 1/8" x 10 1/8") (182.0 mm x 257.0 mm)*
A5 (5 7/8" x 8 1/4") (148.0 mm x 210.0 mm)
Legal (8 1/2" x 14") (215.9 mm x 355.6 mm)*
Letter (8 1/2" x 11") (215.9 mm x 279.4 mm)*2*
Statement (5 1/2" x 8 1/2") (139.7 mm x 215.9 mm)
Executive (7 1/4" x 10 1/2") (184.0 mm x 266.7 mm)*
Officio (8 1/2" x 12 1/2") (215.9 mm x 317.5 mm)
B-officio (8 1/2" x 14") (215.9 mm x 355.6 mm)
M-officio (8 1/2" x 13 3/8") (215.9 mm x 341 mm)
Government - Letter (8" x 10 1/2") (203.2 mm x 266.7 mm)
Government - Legal (8" x 13") (203.2 mm x 330.2 mm)
Foolscap (8 1/2" x 13") (215.9 mm x 330.2 mm)*
Envelope COM10 (4 1/8" x 9 1/2") (104.7 mm x 241.3 mm)*
Envelope Monarch (3 7/8" x 7 1/2") (98.4 mm x 190.5 mm)*
Envelope C5 (6 3/8" x 9") (162 mm x 229 mm)*
Envelope B5 (6 7/8" x 9 7/8") (176 mm x 250 mm)*
Envelope DL (4 3/8" x 8 5/8") (110 mm x 220 mm)*
Custom Paper Size
3
2
2
3
2
2
4
4
4
4
4
Paper cassette*
○ ○
○ ○
○ ○
○ ○
○ ○
○ ○
○ ○
○ ○
○ ○
○ ○
○ ○
○ ○
○ ○
○ ○
○*
○ ○
○ ○
○ ○
○*
*1 Only in MF8380Cdw, this type of paper can be loaded also in the optional paper cassette (Cassette 2).
*2 Only in MF8380Cdw, auto 2-sided print is available.
*3 Received documents, reports, or lists can be printed.
*4 Use envelopes with the flap closed.
*5 You can load Envelope Monarch in the paper cassette only for MF8080Cw.
*6 You can load paper of the following custom paper sizes.
* MF8380Cdw
Width 4" to 8 1/2" (100 to 215.9 mm); Length 5 7/8" to 14" (148 to 355.6 mm)
* MF8080Cw
Width 3" to 8 1/2" (76.2 to 215.9 mm); Length 5" to 14" (127 to 355.6 mm)
*7 You can load paper of the following custom paper sizes.
* Width 3" to 8 1/2" (76.2 to 215.9 mm); Length 5" to 14" (127 to 355.6 mm)
1
5
6
Paper Source
Multi-purpose tray
Manual feed slot
○
7
○*
2-6
NOTE
Default paper size
The default paper size is Letter. If you use a different paper size, change the paper size settings.
“Setting the Paper Size and Type” (→P.2-18)
Page 47
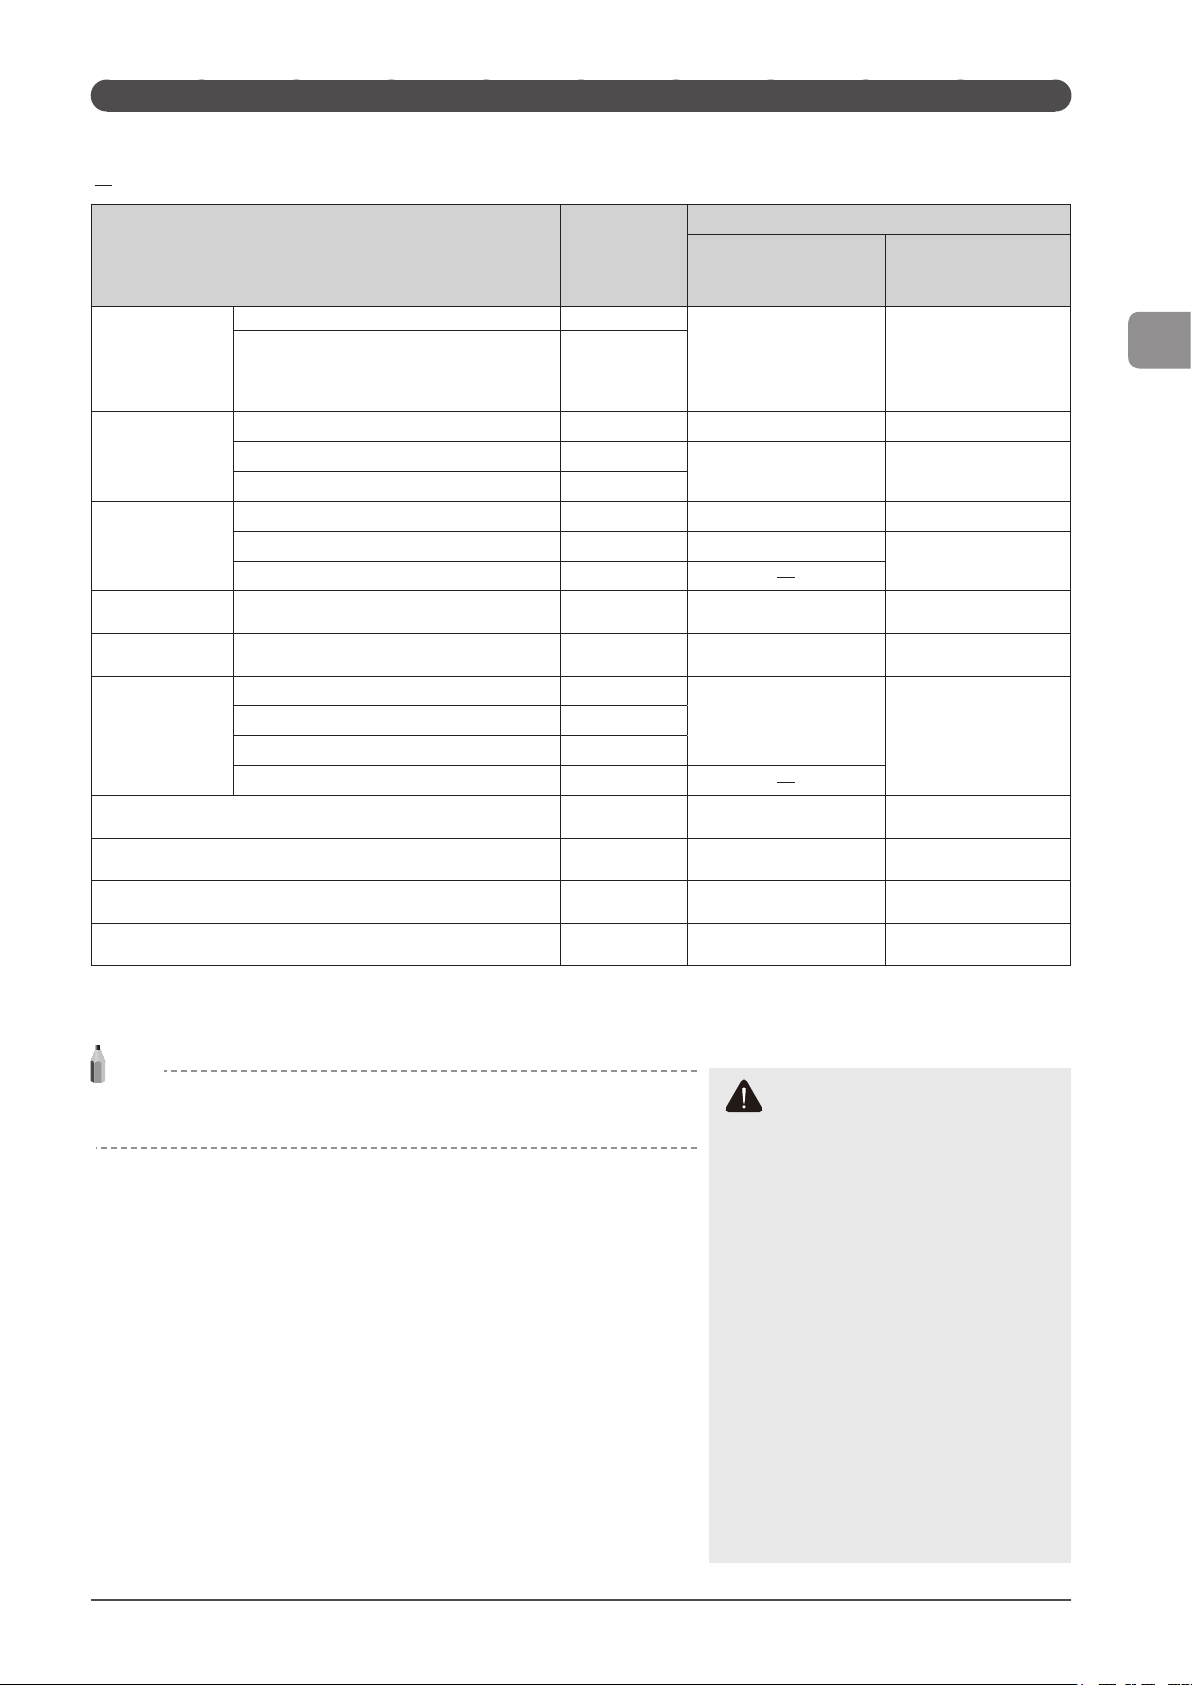
Paper Type
The following paper types are supported.
: Unavailable
Paper Type
16 to 19 lb Bond (60 to 74 g/m2) [Plain 1]
• MF8380Cdw:
Plain paper*
1
19 to 24 lb Bond (70 to 90 g/m
• MF8080Cw:
20 to 24 lb Bond (75 to 90 g/m
24 to 32 lb Bond (86 to 119 g/m
Heavy Paper*
(MF8380Cdw)
1
32 to 34 lb Bond (120 to 128 g/m
34 lb Bond to 60 lb Cover (129 to 163 g/m
25 lb Bond to 45 lb Cover (91 to 120 g/m
Heavy Paper
(MF8080Cw)
32 lb Bond to 60 lb Cover (121 to 163 g/m
61 to 65 lb Cover (164 to 176 g/m
Recycled Paper*116 to 19 lb Bond (60 to 74 g/m2) [Recycled]
1
Color Paper*
16 to 19 lb Bond (60 to 74 g/m2) [Color]
28 to 29 lb Bond (100 to 110 g/m
Coated Paper
32 to 35 lb Bond (120 to 130 g/m2) [Glossy 2]*
40 lb Bond to 60 lb Cover (155 to 165 g/m2) [Glossy 3]*
77 to 80 lb Cover (210 to 220 g/m2) [Glossy 4]
Transparency*
3
Label [Labels]
Index Card [Heavy 2]
Envelope [Envelope]
1
Only in MF8380Cdw, auto 2-sided print is available.
*
*2 Only in MF8080Cw, auto 2-sided print in A4 or LETTER size is available.
*3 Use only the transparencies designed for laser printers.
2
)
2
)
2
) [Heavy 1] 200 sheets 30 sheets
2
) [Heavy 2]
2
2
) [Heavy 3]
2
) [Glossy 1]*
Printer Driver
Setting
[Plain 2]
2
) [Heavy 3]
) [Heavy 1] 120 sheets 1 sheet
2
) [Heavy 2] 100 sheets
[Transparency]
Paper Capacity
(Paper Cassette)
• MF8380Cdw: 250 sheets
• MF8080Cw: 150 sheets
150 sheets 20 sheets
• MF8380Cdw: 250 sheets
• MF8080Cw: 150 sheets
• MF8380Cdw: 250 sheets
• MF8080Cw: 150 sheets
2
• MF8380Cdw: 50 sheets
2
• MF8080Cw: 100 sheets
2
• MF8380Cdw: 50 sheets
• MF8080Cw: 50 sheets
• MF8380Cdw: 50 sheets
• MF8080Cw: 50 sheets
• MF8380Cdw: 50 sheets
• MF8080Cw: 15 sheets
• MF8380Cdw: 10 sheets
• MF8080Cw: 10 sheets
Paper Source
(Multi-purpose Tray)
(Manual Feed Slot)
• MF8380Cdw: 50 sheets
• MF8080Cw: 1 sheet
1 sheet
• MF8380Cdw: 50 sheets
• MF8080Cw: 1 sheet
• MF8380Cdw: 50 sheets
• MF8080Cw: 1 sheet
• MF8380Cdw: 20 sheets
• MF8080Cw: 1 sheet
• MF8380Cdw: 20 sheets
• MF8080Cw: 1 sheet
• MF8380Cdw: 20 sheets
• MF8080Cw: 1 sheet
• MF8380Cdw: 10 sheets
• MF8080Cw: 1 sheet
• MF8380Cdw: 5 sheets
• MF8080Cw: 1 sheet
Paper Capacity
Document and Paper Handling
NOTE
About Chlorine-free paper
Chlorine-free paper can be used with this machine.
To prevent paper jams, do not use the following paper types.
• Wrinkled or creased paper
• Curled or rolled paper
• Torn paper
• Damp paper
• Very thin paper
• Paper printed by a thermal transfer printer (Do not copy on the reverse side.)
The following paper types do not print well:
• Highly textured paper
• Very smooth paper
• Glossy paper
Make sure that the paper is free of dust, lint, and oil stains.
Make sure to test print before purchasing large quantities of copy paper.
Keep the paper wrapped in its original package (unopened or opened) and stored
in a cool, dry place until ready to use. Make sure to keep it on a flat surface.
Store paper stacks in a place where temperatures are somewhere between 64.4
to 75.2°F (18 to 24°C) and humidity is somewhere between 40 % to 60% RH.
CAUTION
If you print on damp paper
The following problems may occur.
• Steam is emitted from the machine’s
output area.
• Water droplets form on the back side of
the operation panel and in the output
area.
Moisture evaporates from damp paper
due to the heat generated inside the fixing
unit (it is most likely to occur at low room
temperatures). This is not a malfunction, but
you can prevent this by using a stack of new
unopened paper.
Should you smell something burning,
immediately turn OFF the machine, unplug
the power plug from the AC power outlet,
and contact your local authorized Canon
dealer or the Canon help line. Continued use
may lead to a fire or electrical shock.
2-7
Page 48
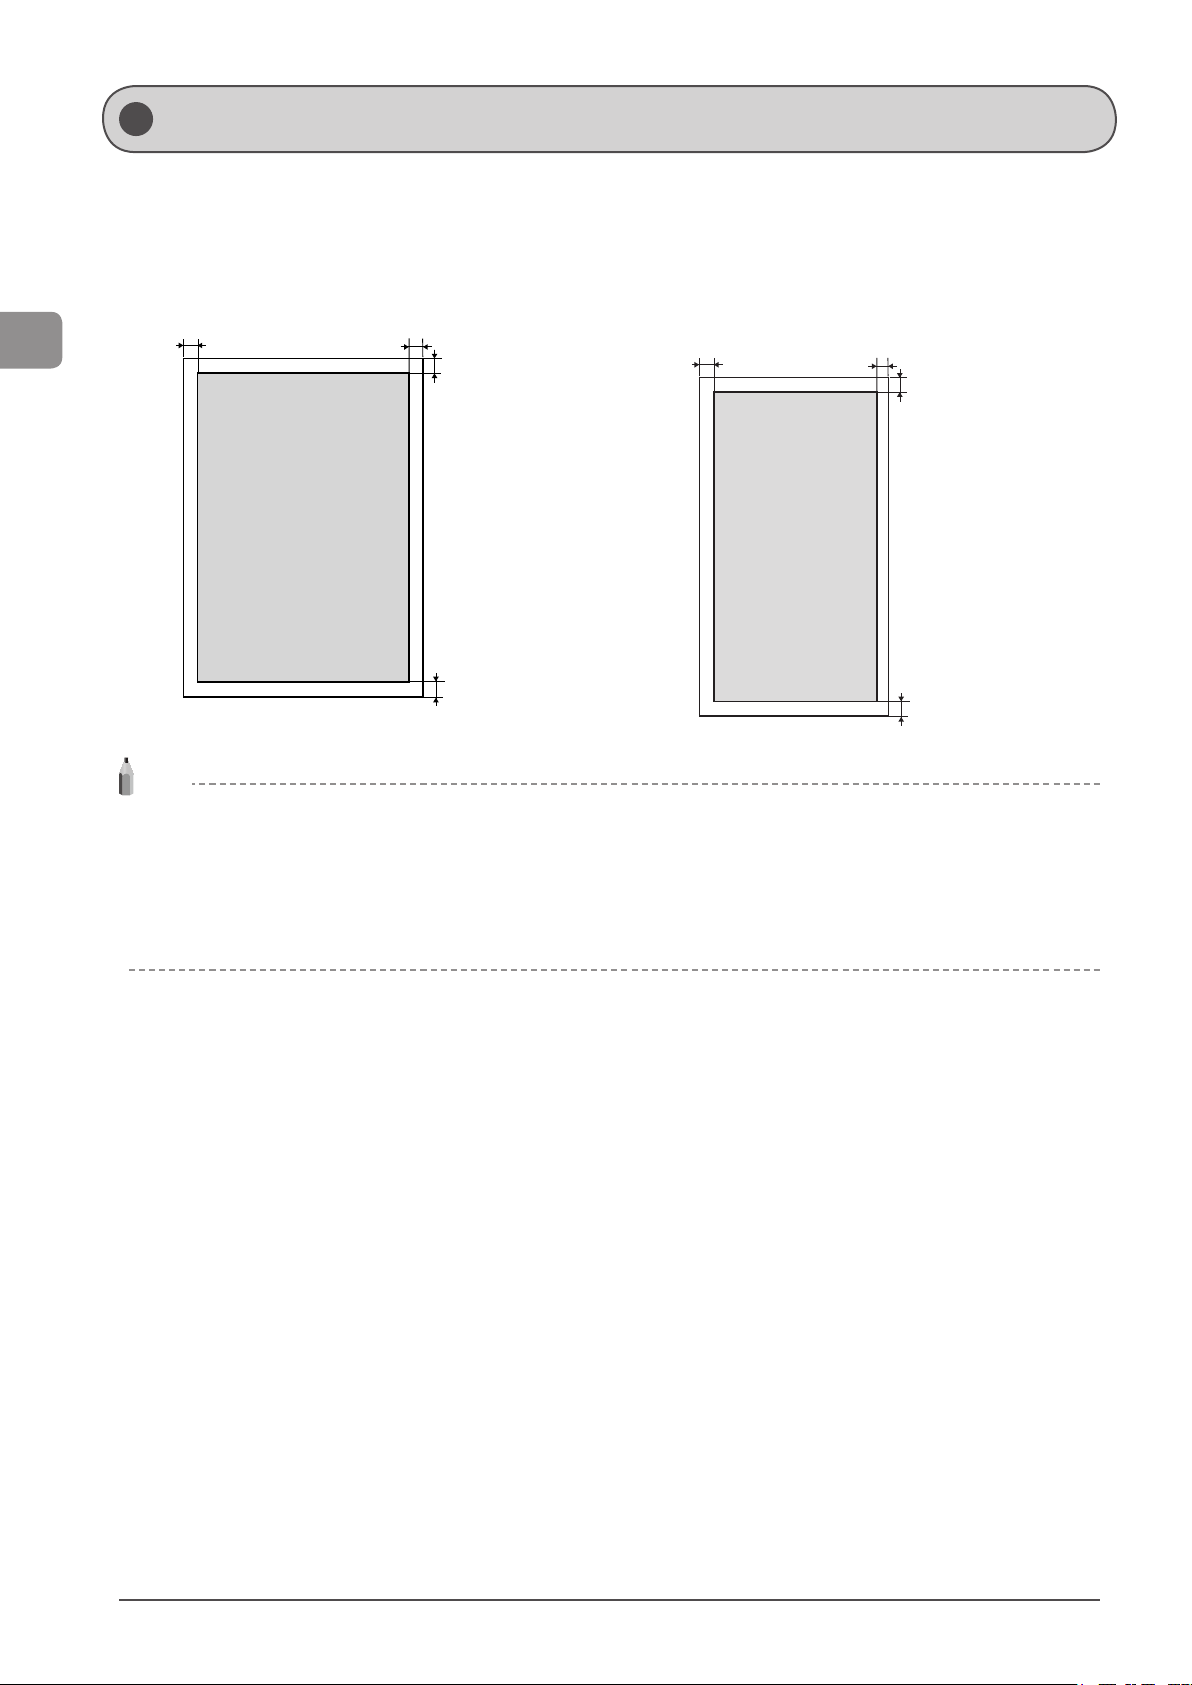
Document and Paper Handling
Printable Area
The shaded area in the illustration on the following page represents the printable area.
Note that the margins indicated in the illustration are for your reference. Actual margins can vary.
* When an envelope is printed, the margin is 3/8" (10 mm) on top,
bottom, right, and left.
1/4 in.
(5 mm)
1/4 in.
(5 mm)
1/4 in.
(5 mm)
1/4 in.
(5 mm)
3/8"
(10 mm)
3/8"
(10 mm)
3/8"
(10 mm)
3/8"
(10 mm)
NOTE
To enlarge the printable area
Apply the following setting from the printer driver.
1. Click [Advanced Setting] in the [Finishing] page of printer driver.
2. Set [Expand Print Region and Print] to [ON].
* Depending on the job, the data may not be printed in a part of document edge, or the bottom edge of paper or the following paper may be
tainted.
* This setting is valid only when the job is printed from the printer driver.
2-8
Page 49
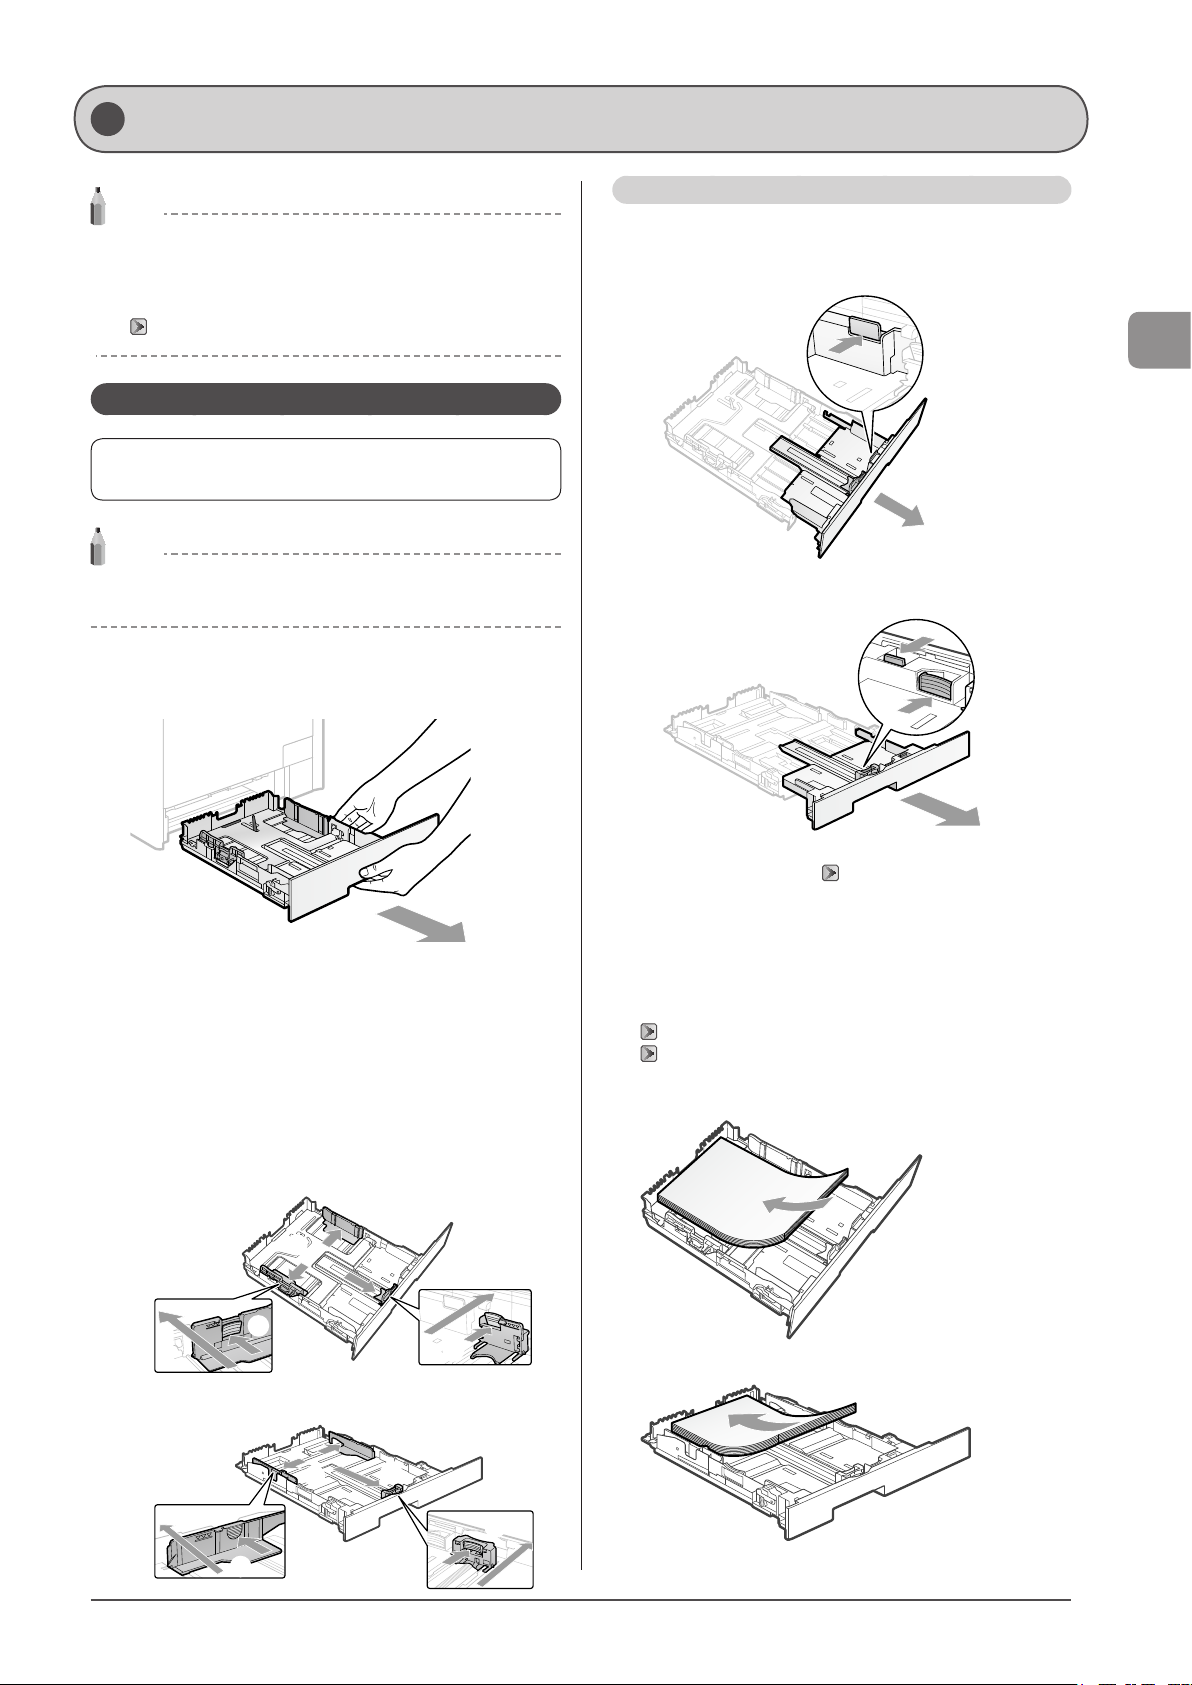
Loading Paper
NOTE
If you use paper of a different size or type
The default paper size/type is set to <Letter> and <Plain 2> in the
setting menu. If you use a different paper size or paper type, you
need to change the paper settings.
“Setting the Paper Size and Type” (→P.2-18)
In the Paper Cassette
Before loading paper in the paper cassette, see “Precautions
when Loading Paper” (→P.2-14).
When loading Legal size paper
Holding the lock release lever at the front right, adjust the length of
the paper cassette.
● MF8380Cdw
Document and Paper Handling
NOTE
How to load the paper in the optional paper cassette (Cassette 2)
(MF8380Cdw only): Same as in Cassette 1.
1 Pull out the paper cassette.
Hold the paper cassette with both hands.
2 Spread the paper guides a little wider than the
actual paper width.
(1) Slide the side paper guides.
Holding the lock release lever, slide the paper guides.
The side paper guides move together.
The lock release lever is not installed in MF8080Cw.
(2) Slide the paper guide at the front center.
Holding the lock release lever, slide the paper guides.
● MF8380Cdw
● MF8080Cw
* If you want to change the size of the paper to be loaded, be sure
to register the paper size in
“Setting the Paper Size and Type”
(→P.2-18).
3 Load the custom size paper so that the edges of
the paper stack are aligned with the rear side of
the paper cassette.
Load the paper in portrait orientation.
“Paper Loading Capacity” (→P.2-15)
“Paper Loading Orientation” (→P.2-15)
MF8380Cdw
● MF8080Cw
(1)
(1)
(1)
(1)
(2)
(2)
(2)
(2)
MF8080Cw
2-9
Page 50
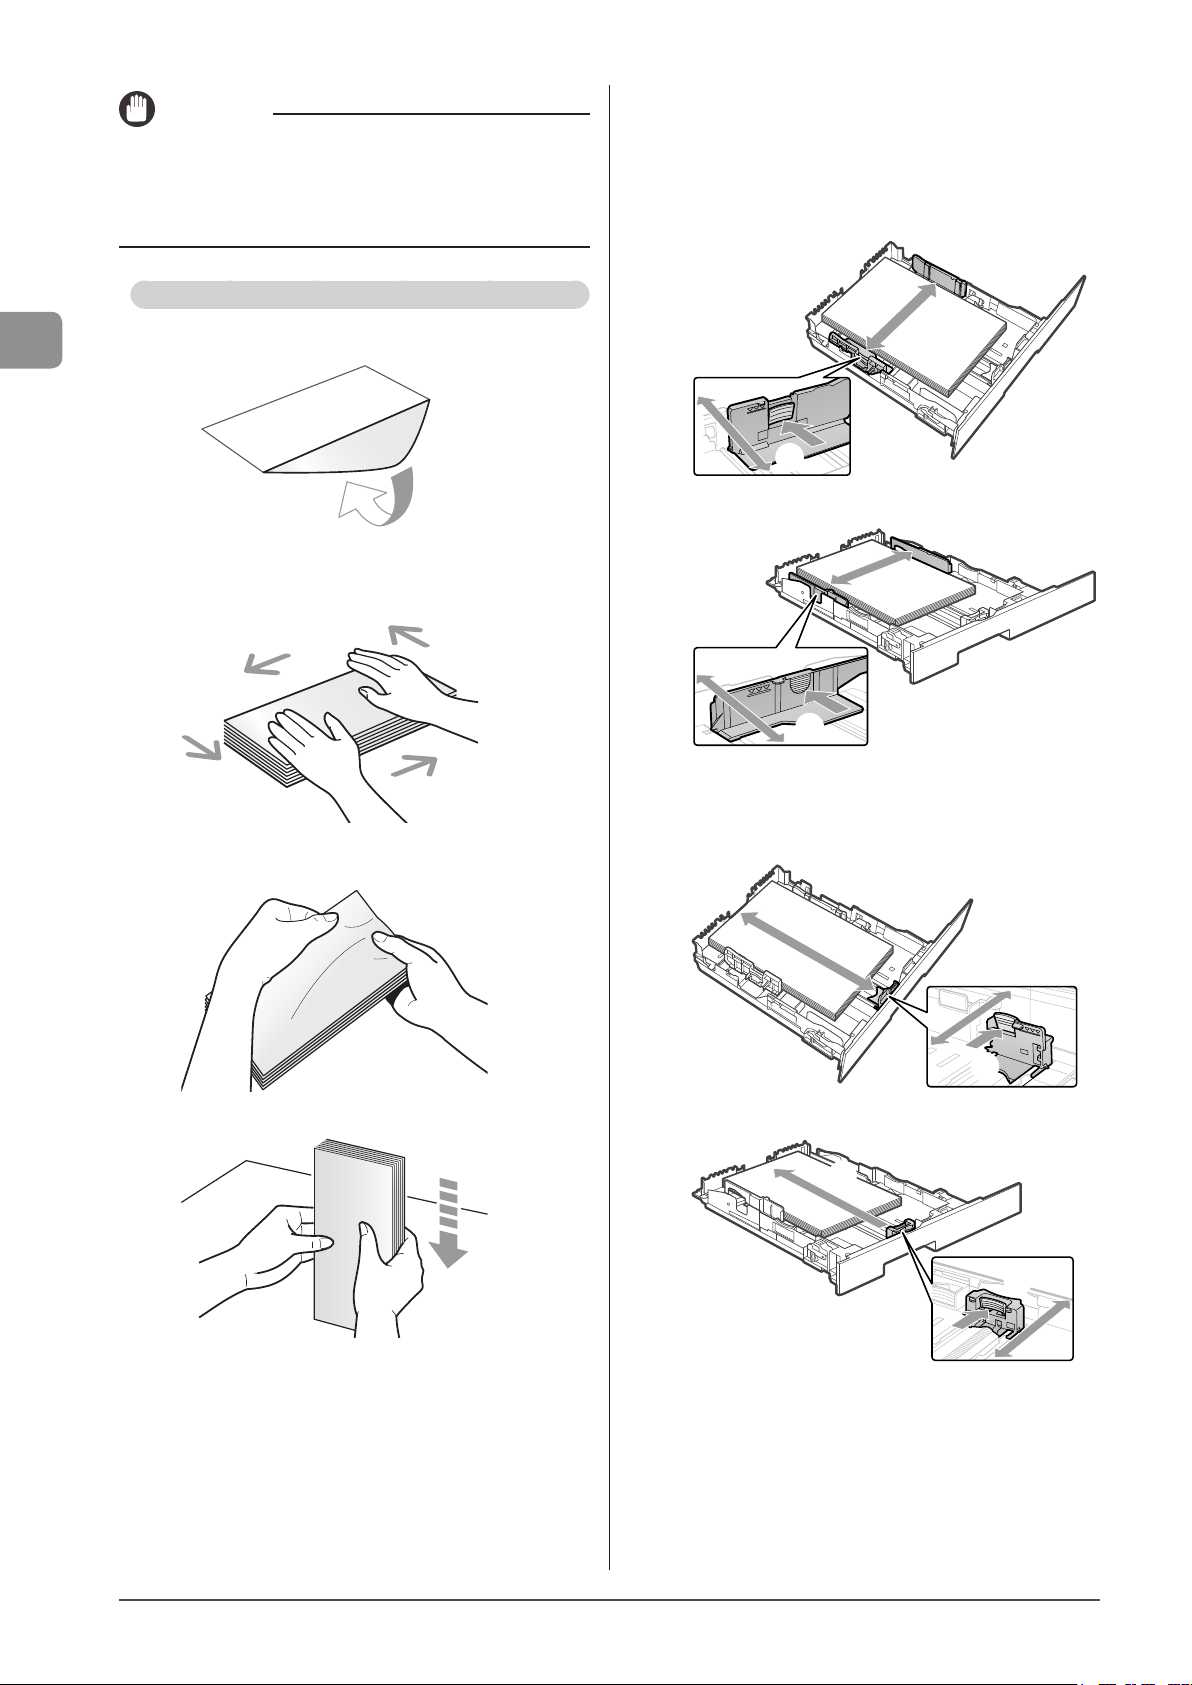
Document and Paper Handling
IMPORTANT
<Precautions when loading small size paper>
If the paper is curled, flatten the paper and load it. If you do not
flatten the paper, the printout may be printed askew or the images
may be printed skewed.
When loading envelopes
(1) Close the envelope flap.
4 Align the paper guides securely against the edges
of the paper.
(1) Slide the side paper guides.
Holding the lock release lever, slide the paper guides to be
aligned with the width of the loaded paper.
● MF8380Cdw
(1)
(2) Place the stack of envelopes on a flat surface, flatten them
to release any remaining air, and be sure that the edges are
pressed tightly.
(3) Loosen any stiff corners of the envelopes and flatten curls as
shown in the figure.
(1)
● MF8080Cw
(1)
(2) Slide the paper guide at the front center.
Holding the lock release lever, slide the paper guides to be
aligned with the length of the loaded paper.
● MF8380Cdw
(2)
(1)
(4) Align the edges of the envelopes on a flat surface.
(5) Load the envelopes into the paper cassette with the print side
up.
(2)
● MF8080Cw
(2)
(2)
2-10
Page 51
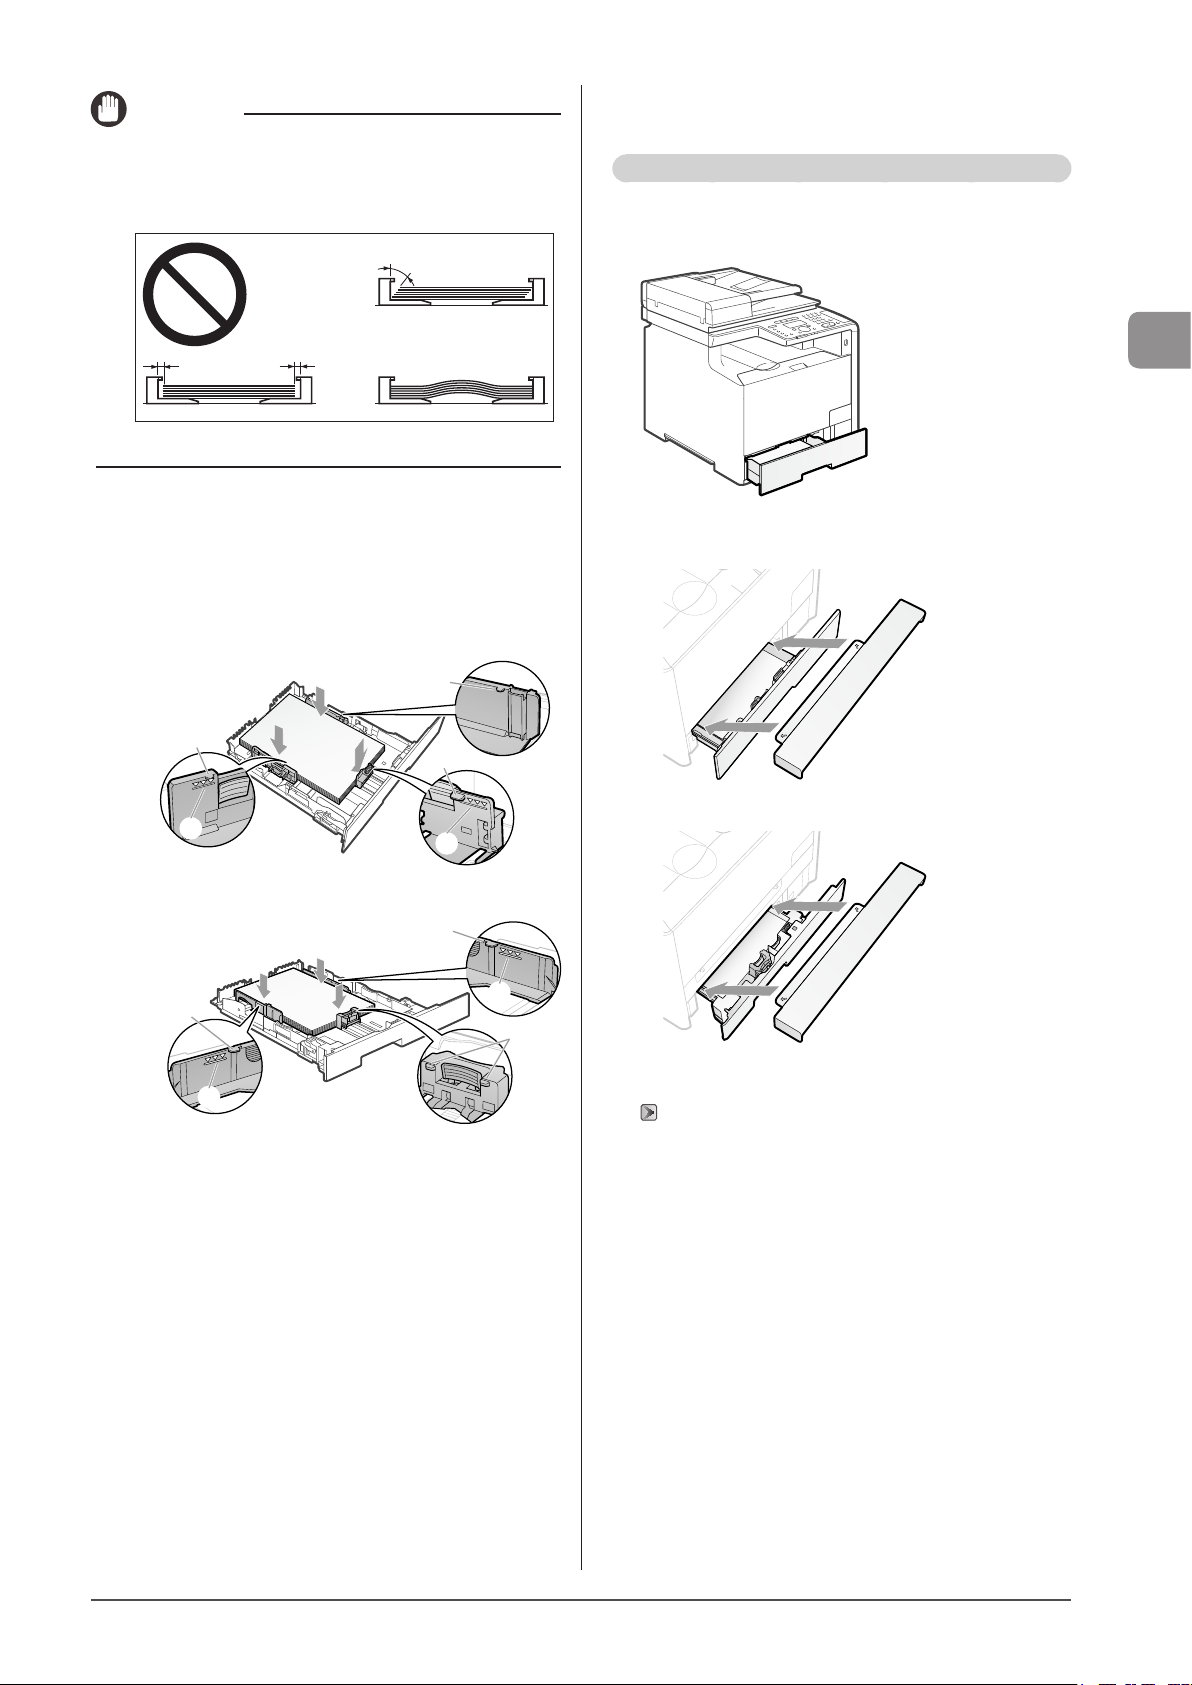
IMPORTANT
Be sure to align the paper guides securely against the
edges of the paper.
If the paper guides are too loose or too tight, this may result in
misfeeds or paper jams.
5 Hold down the paper, then set it under the hooks
(A) on the paper guides.
Make sure that the paper stack does not exceed the line of the load
limit mark (B).
● MF8380Cdw
6 Insert the paper cassette into the machine.
Push it into the printer firmly.
When loading Legal size paper
When the paper cassette is inserted with it extended, the front
side of the paper cassette is not flush with the front surface of the
machine as shown in the figure.
Document and Paper Handling
Set the legal dust cover on the paper cassette.
● MF8380Cdw
(A)
(B)
● MF8080Cw
(A)
(B)
(A)
(A)
(A)
(B)
(B)
(A)
● MF8080Cw
7 Specify the loaded paper size and type.
“Setting the Paper Size and Type” (→P.2-18)
2-11
Page 52
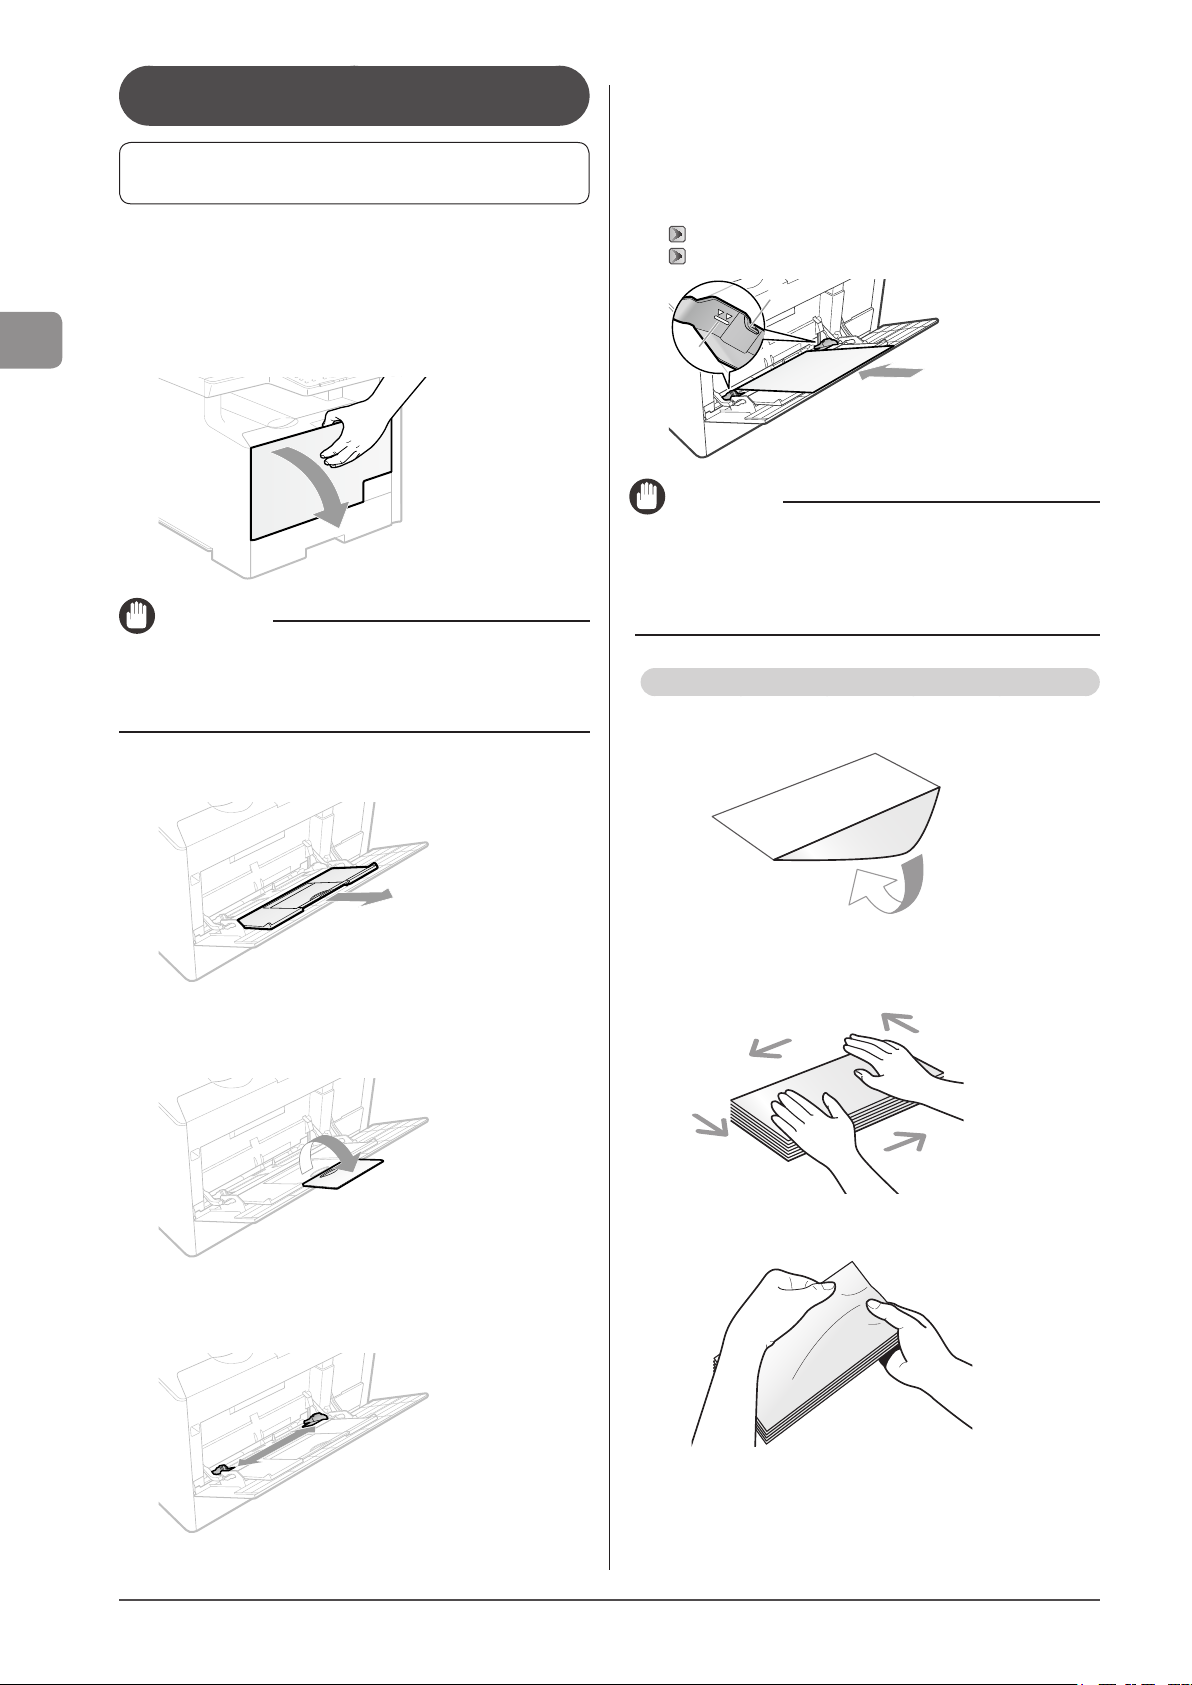
In the Multi-Purpose Tray (MF8380Cdw Only)
Before loading paper in the multi-purpose tray, see
“Precautions when Loading Paper” (→P.2-14).
Use the multi-purpose tray when you want to copy or print on
a paper that is different from what is in the paper cassette.
5 Gently insert the paper into the multi-purpose
tray until it stops with the print side up.
• Load the paper under the load limit guides (A).
• Make sure that the paper stack does not exceed the load limit
mark (B).
• Load the paper in portrait orientation.
“Paper Loading Capacity” (→P.2-15)
“Paper Loading Orientation” (→P.2-15)
Document and Paper Handling
1 Open the multi-purpose tray.
Hold the handle at the center of the tray to open the multi-purpose
tray.
IMPORTANT
Be sure to insert the paper cassette.
If the paper cassette is not inserted, you cannot print from the
multi-purpose tray.
2 Pull out the auxiliary tray.
(A)
(B)
IMPORTANT
<Precautions when loading small size paper>
If the paper is curled, flatten the paper and load it. If you do not
flatten the paper, the printout may be printed askew or the images
may be printed skewed.
When loading envelopes
(1) Close the envelope flap.
3 When loading long-size paper, open the tray
extension.
4 Spread the paper guides a little wider than the
actual paper width.
(2) Place the stack of envelopes on a flat surface. Flatten the
envelopes by releasing any remaining air and creasing the
edges.
(3) Loosen any stiff corners of the envelopes and flatten curls as
shown in the figure.
2-12
Page 53
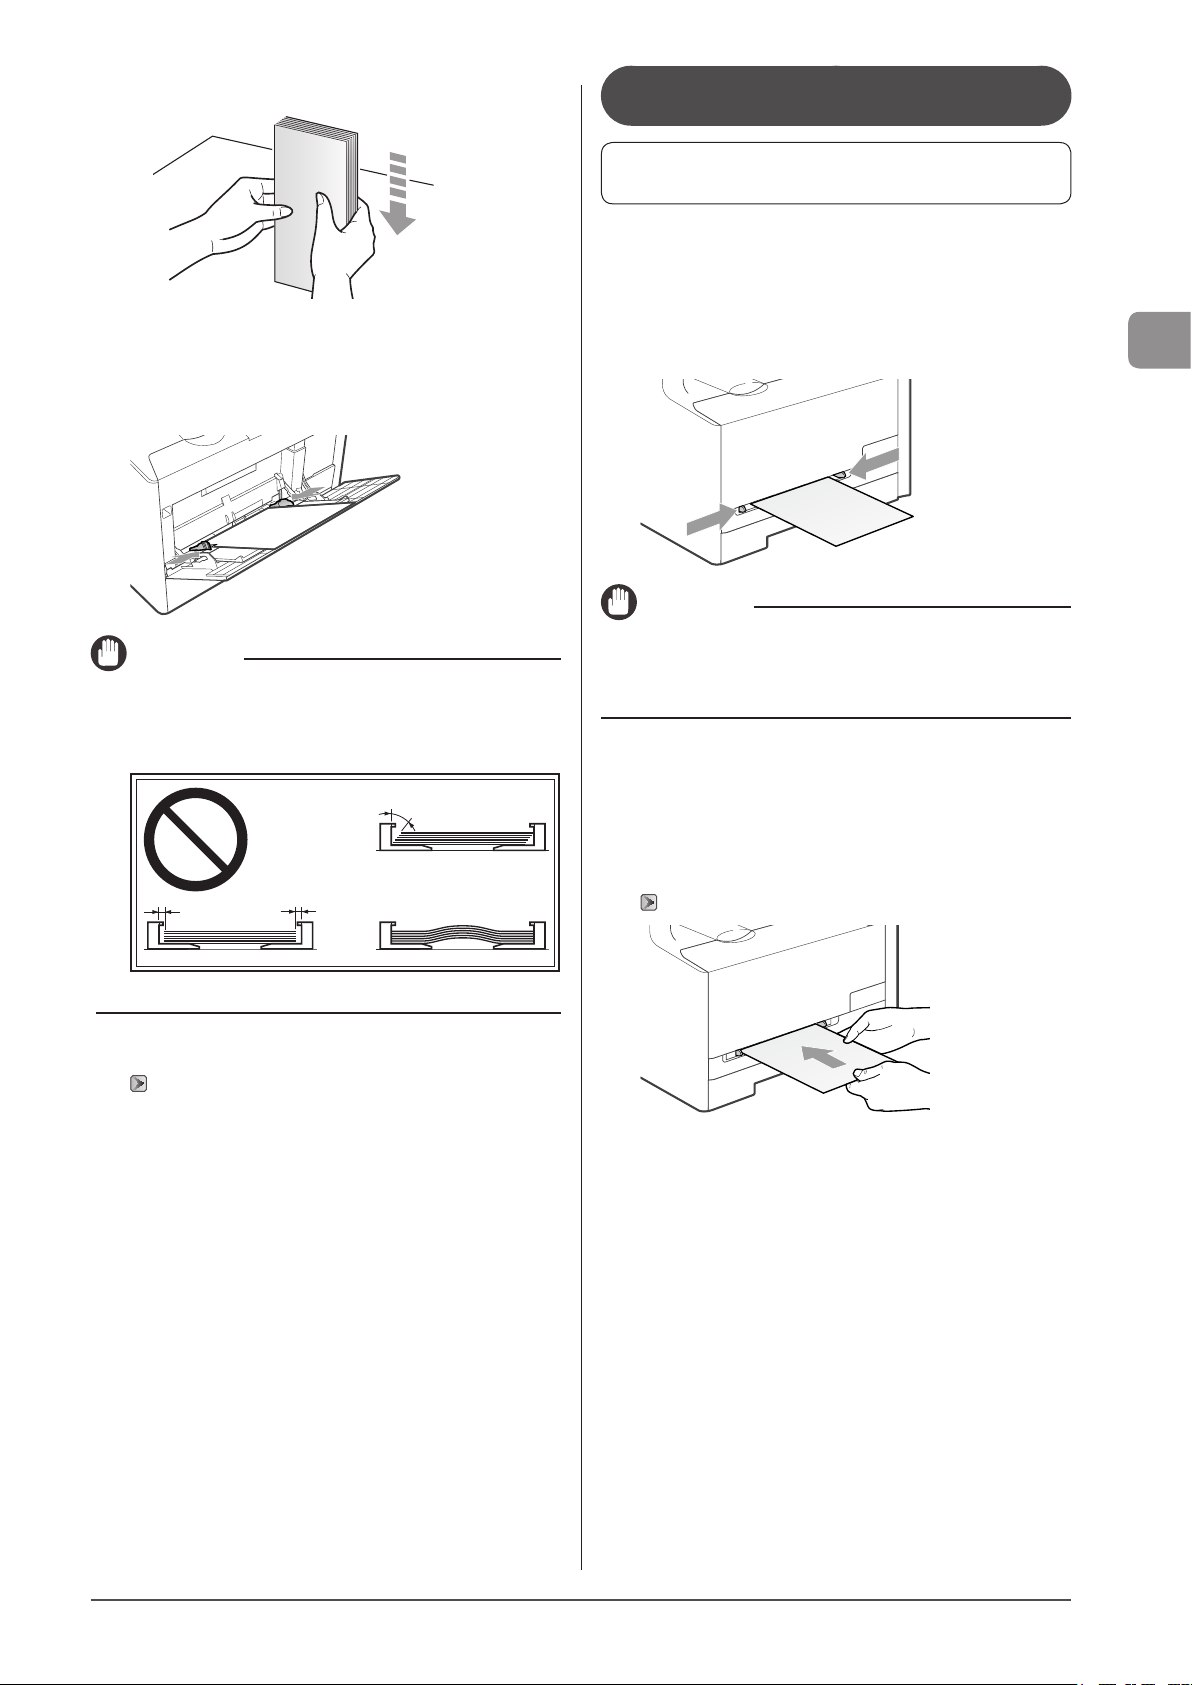
(4) Align the edges of the envelopes on a flat surface.
In the Manual Feed Slot (MF8080Cw Only)
Before loading paper in the manual feed slot, see
“Precautions when Loading Paper” (→P.2-14).
Use the manual feed slot when you want to copy or print on a
paper that is different from what is in the paper cassette.
(5) Gently insert the paper into the multi-purpose tray with the
print side up.
6 Align the paper guides securely against the edges
of the paper.
IMPORTANT
Be sure to align the paper guides securely against the
edges of the paper.
If the paper guides are too loose or too tight, this may result in
misfeeds or paper jams.
1 Slide the paper guides so they align with the
width of the loaded paper as shown in the figure.
Adjust the paper guides to the size of the paper, then load the
paper deeply to back of the tray.
IMPORTANT
Be sure to insert the paper cassette.
If the paper cassette is not inserted, you cannot print from the
manual feed slot.
2 Support the paper with your hands as shown in
the figure, and insert the paper until it touches
the back of the tray.
When the paper touches the back of the tray, it is caught by the
slot.
Only one sheet of the paper can be loaded in the manual feed slot.
“Paper Loading Orientation” (→P.2-15)
Document and Paper Handling
7 Specify the loaded paper size and type.
“Setting the Paper Size and Type” (→P.2-18)
2-13
Page 54
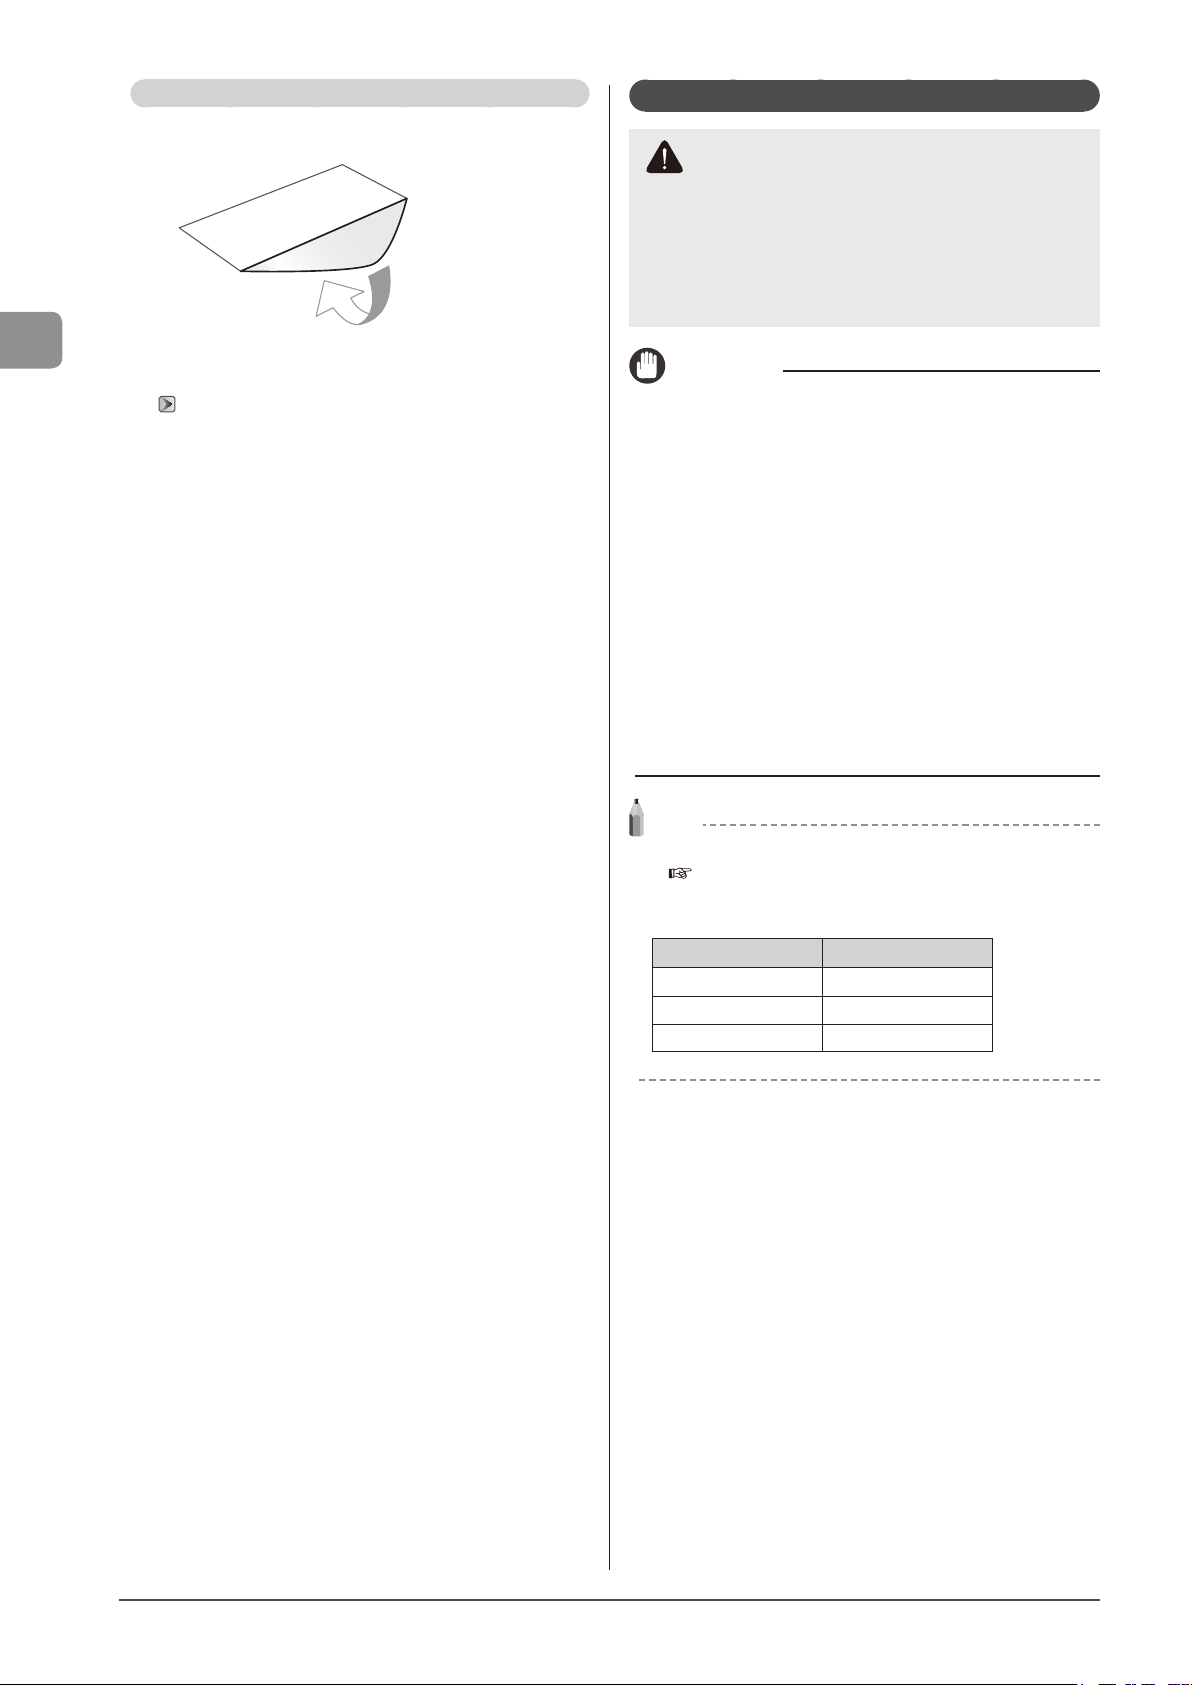
When loading envelopes
Close the envelope flap.
Precautions when Loading Paper
CAUTION
Be careful when handling paper.
Handle paper carefully not to cut your hands with the edges
of the paper.
Precautions when inserting the paper cassette
Be careful not to catch your fingers.
Document and Paper Handling
3 Specify the loaded paper size and type.
“Setting the Paper Size and Type” (→P.2-18)
IMPORTANT
Be sure to align the paper guides with the width of the
paper.
If the paper guides are too loose or too tight, this may result in
misfeeds or paper jams.
When using paper that has been poorly cut
If you use paper that has been poorly cut, multiple sheets of paper
may be fed at once. In this case, fan the paper thoroughly, and then
align the edges of the stack properly on a hard, flat surface.
Do not exceed the load limit mark when loading paper.
Make sure that the paper stack does not exceed the line of the load
limit mark. If the paper stack exceeds the load limit mark lines, this
may result in misfeeds.
When printing on envelopes
Load envelopes with the front side (non-glued side) facing up. You
cannot print on the reverse side of envelopes.
Also, be sure to close the flap before loading envelopes.
NOTE
For more information on supported paper types
e-Manual → Specifications → Paper → Supported Paper Types
Abbreviations on the paper guides inside the paper
cassette
Paper size Paper guide
Legal LGL
Letter LTR
Executive EXEC
2-14
Page 55
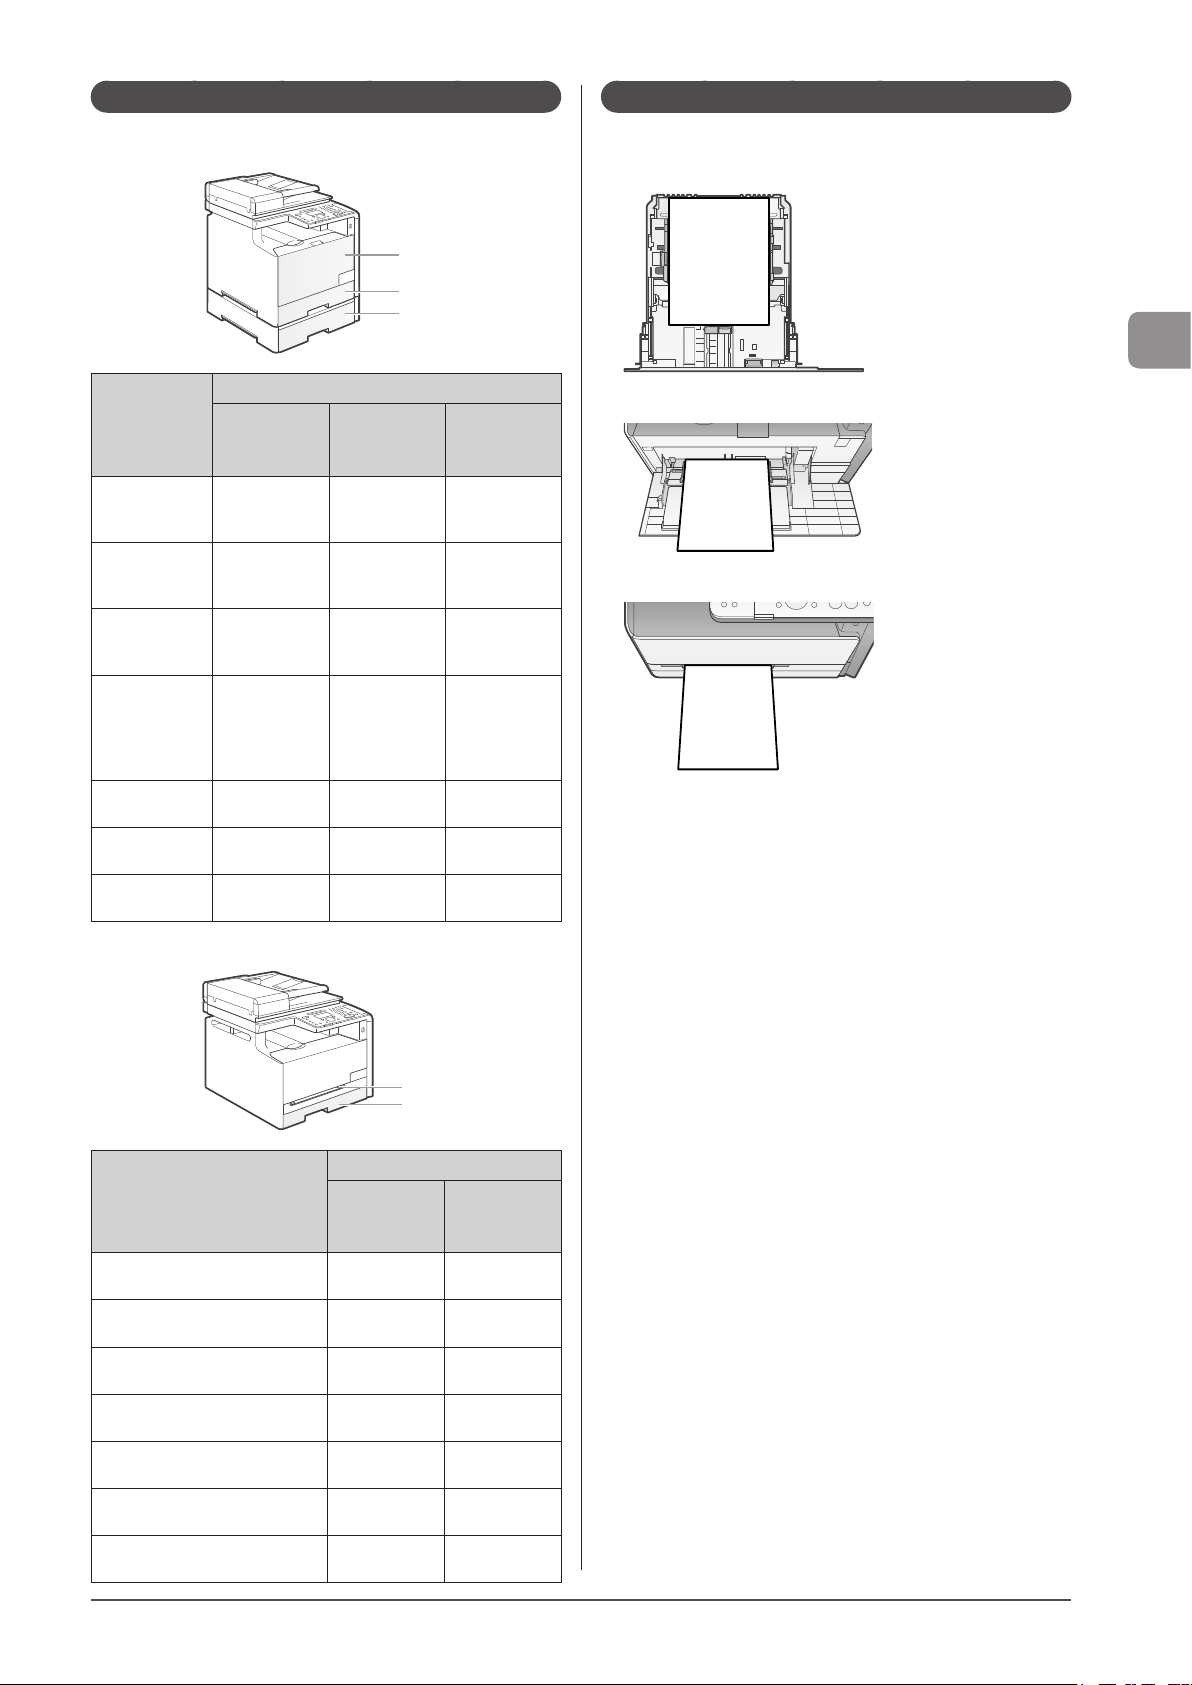
Paper Loading Capacity
Paper Loading Orientation
● MF8380Cdw
Paper Type
Plain paper
(Ex. 21 lb Bond
(80 g/m²))
Heavy paper
(Ex. 25 lb Bond
(91 g/m²))
Heavy paper
(Ex. 34 lb Bond
(128 g/m²))
Transparency
(Transparencies
can only be
printed in black
and white.)
Label
Coated paper
Envelope
(A)
Multi-
purpose tray
Approx. 50
sheets
Approx. 30
sheets
Approx. 20
sheets
Approx. 20
sheets
Approx. 20
sheets
Approx. 20
sheets
Approx. 5
sheets
(A)
(B)
(C)
Paper source
(B)
Cassette 1
Approx. 250
sheets
Approx. 200
sheets
Approx. 150
sheets
Approx. 50
sheets
Approx. 50
sheets
Approx. 50
sheets
Approx. 10
sheets
(C)
Cassette 2
(optional)
Approx. 250
sheets
Approx. 200
sheets
Approx. 150
sheets
Approx. 50
sheets
Approx. 50
sheets
Approx. 50
sheets
Approx. 10
sheets
Be sure to load paper in portrait orientation.
● Paper cassette
● Multi-purpose tray (MF8380Cdw only)
● Manual feed slot (MF8080Cw only)
Document and Paper Handling
● MF8080Cw
Paper type
(A)
Manual feed
slot
Plain paper
(Ex. 21 lb Bond (80 g/m²))
Heavy paper
(Ex. 25 lb Bond (91 g/m²))
Heavy paper
(Ex. 34 lb Bond (128 g/m²)
Transparency
(black-and-white printing only)
Label 1 sheet
Coated paper 1 sheet
Envelope 1 sheet
1 sheet
1 sheet
1 sheet
1 sheet
(A)
(B)
Paper source
(B)
Cassette 1
Approx. 150
sheets
Approx. 120
sheets
Approx. 100
sheets
Approx. 50
sheets
Approx. 50
sheets
Approx. 100
sheets
Approx. 10
sheets
2-15
Page 56
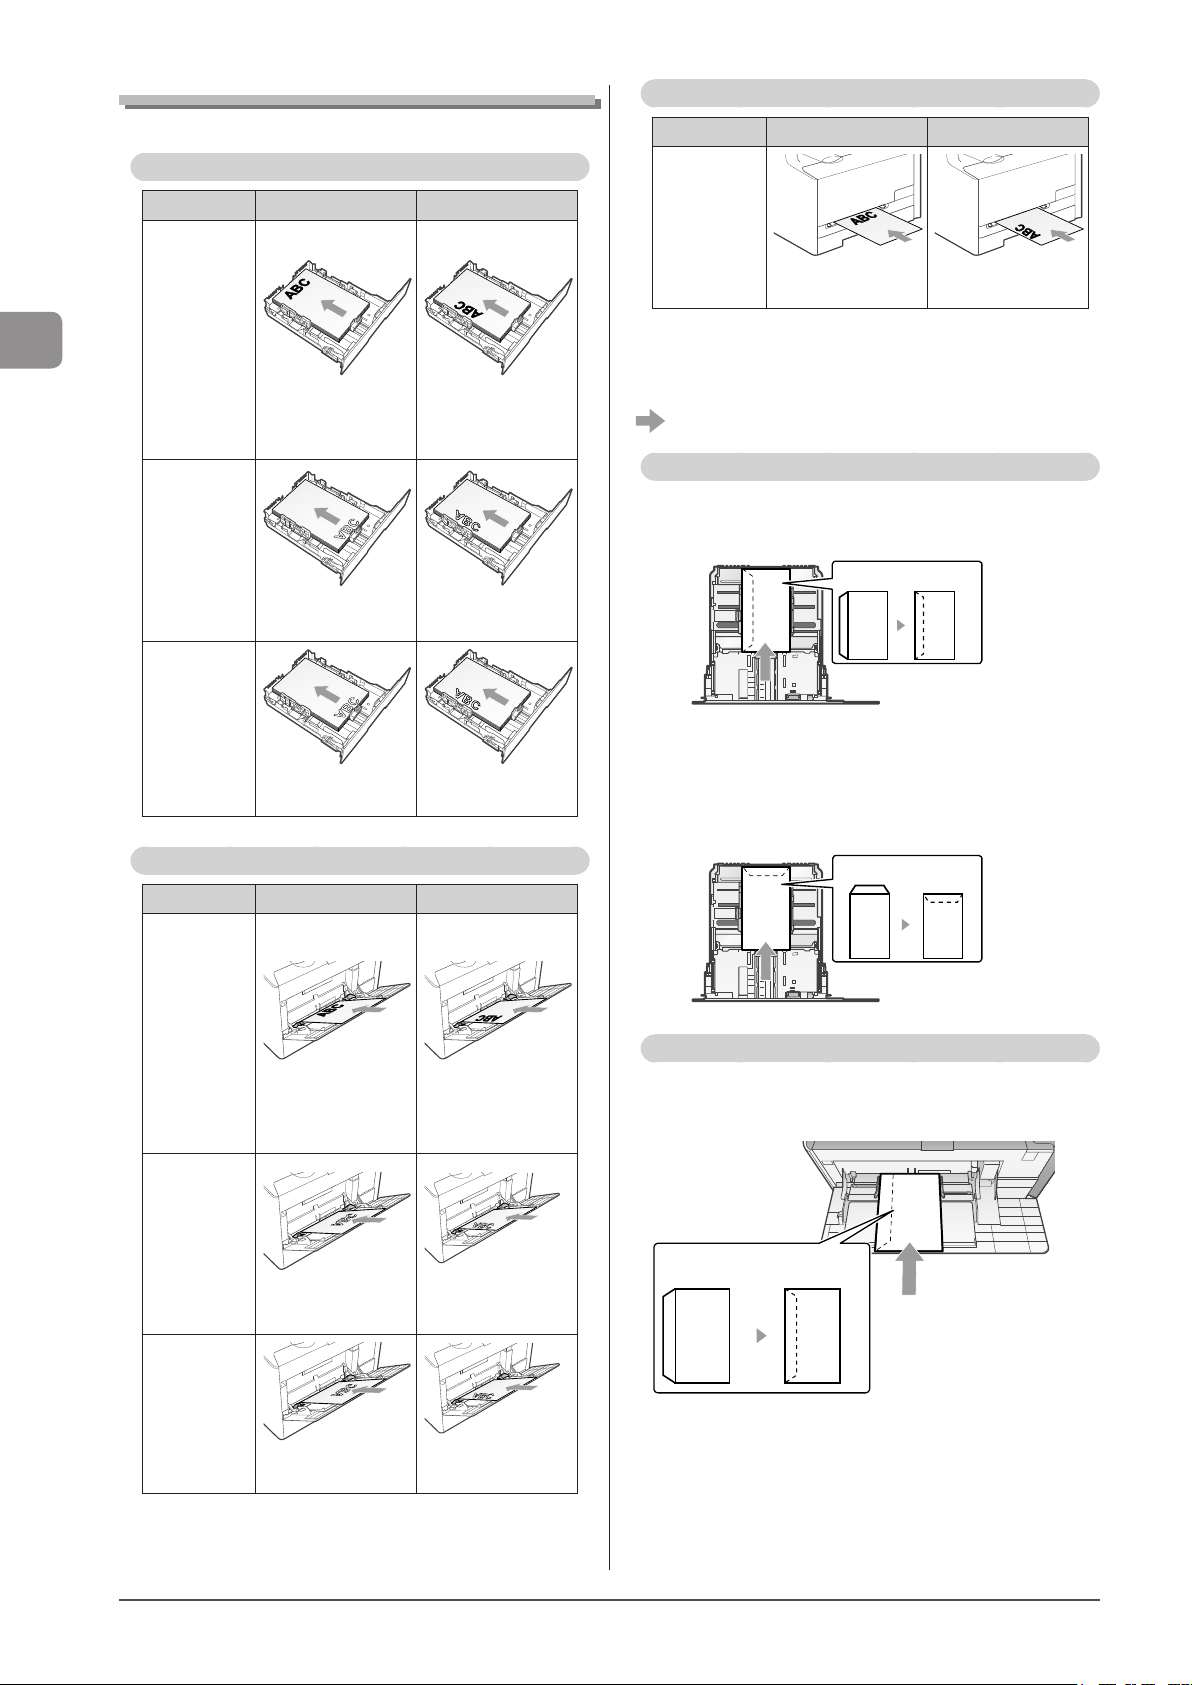
When printing paper with a letterhead or logo (previously printed paper)
Load the paper in the proper orientation as follows.
Paper cassette
Manual feed slot (MF8080Cw Only)
Portrait layout Landscape layout
Document and Paper Handling
Portrait layout Landscape layout
1-sided
printing
(When
“Selecting
the Print Side
(MF8380Cdw
Only)” (→P.2-21)
is set to
<Print Speed
Priority>
(the default
setting))
1-sided
printing
(When
“Selecting
the Print Side
(MF8380Cdw
Only)” (→P.2-21)
is set to <Print
Side Priority>)
Automatic
1-sided
Printing
and 2-sided
Printing
(MF8380Cdw
Only)
(with the printing
side facing up)
(with the printing
side facing down)
(with the front side
facing down)
(with the printing
side facing up)
(with the printing
side facing down)
(with the front side
facing down)
Multi-purpose tray (MF8380Cdw Only)
Portrait layout Landscape layout
1-sided
printing
(When
“Selecting
the Print Side
(MF8380Cdw
Only)” (→P.2-21)
is set to
<Print Speed
Priority>
(the default
setting))
1-sided
printing
(When
“Selecting
the Print Side
(MF8380Cdw
Only)” (→P.2-21)
is set to <Print
Side Priority>)
(with the printing
side facing up)
(with the printing
side facing down)
(with the printing
side facing up)
(with the printing
side facing down)
1-sided
printing
(with the printing
side facing up)
(with the printing
side facing up)
Printing on Envelopes
Load envelopes with the front side (non-glued side) facing up
as follows.
: Feeding direction)
(
Paper cassette
Envelope Monarch*, No.10, DL, ISO-C5
Load the envelopes so that the flap is toward the left of the
paper cassette when they are viewed from the front.
Close the flap and load
the envelope.
* You can load Envelope Monarch in the paper cassette only for
MF8080Cw.
Envelope B5
Load the envelopes so that the flap is toward the back of
the paper cassette when they are viewed from the front.
Close the flap and load
the envelope.
The multi-purpose tray (MF8380Cdw Only)
Envelope COM10
Load the envelopes so that the flap is toward the left of the
machine when it is viewed from the front.
Close the flap and load
the envelope.
2-16
Automatic
1-sided
Printing
and 2-sided
Printing
(MF8380Cdw
Only)
(with the front side
facing down)
(with the front side
facing down)
Page 57
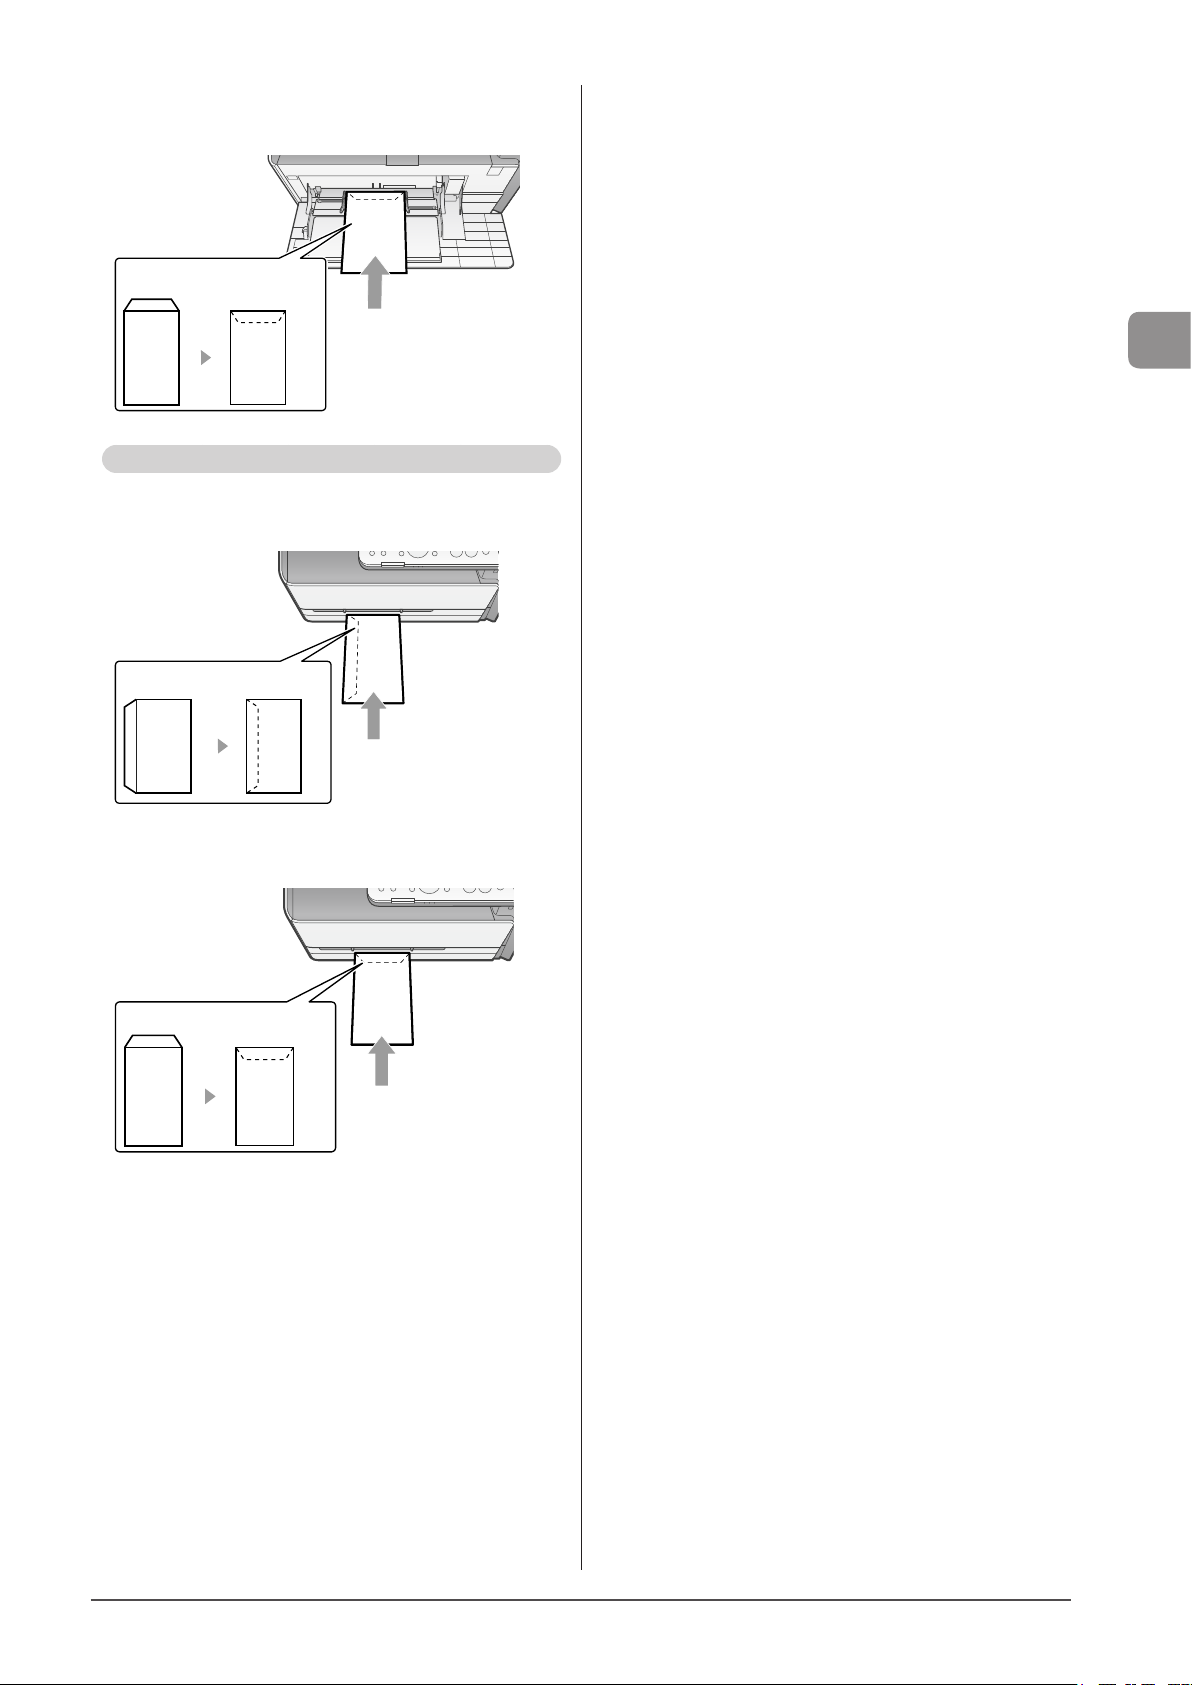
Envelope B5
Load the envelopes so that the flap is toward the back of
the machine when it is viewed from the front.
Close the flap and load
the envelope.
Manual feed slot (MF8080Cw Only)
Envelope COM10
Load the envelopes so that the flap is toward the left of the
machine when it is viewed from the front.
Close the flap and load
the envelope.
Document and Paper Handling
Envelope B5
Load the envelopes so that the flap is toward the back of
the machine when it is viewed from the front.
Close the flap and load
the envelope.
2-17
Page 58
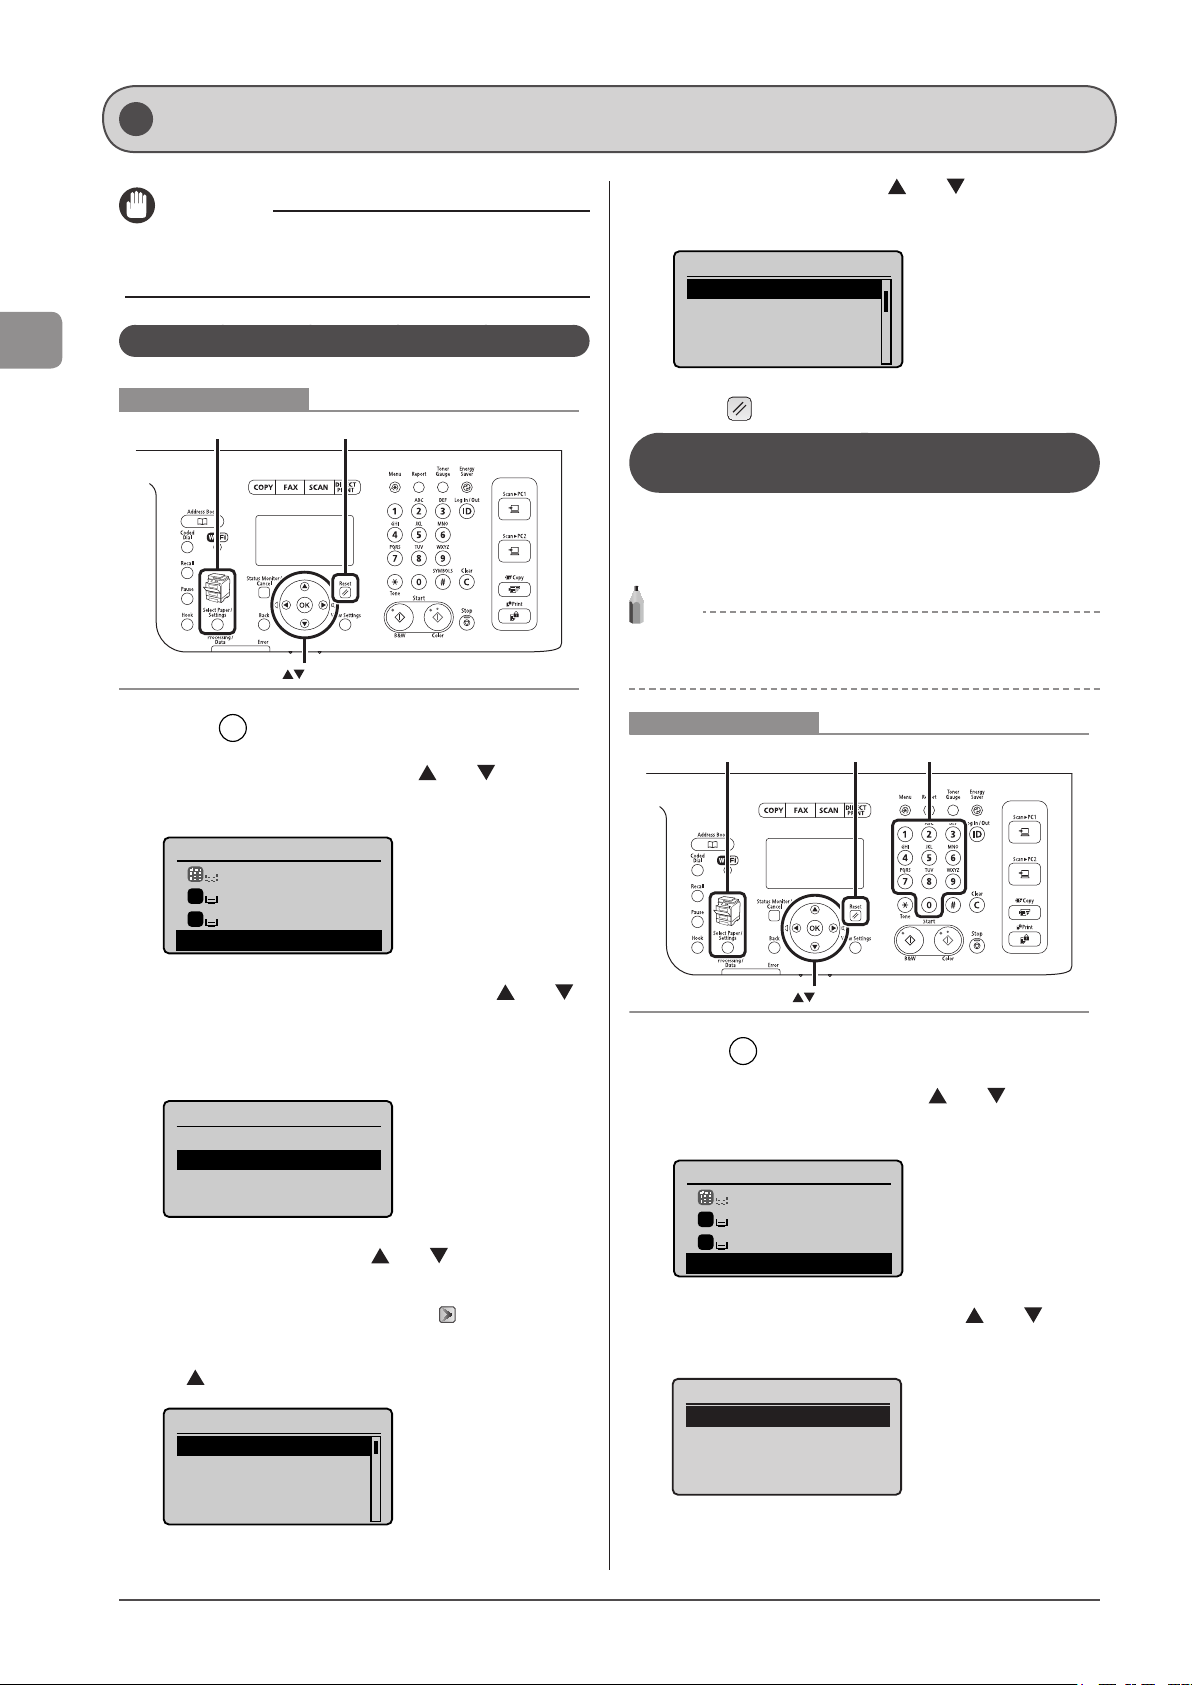
Document and Paper Handling
Register Custom Paper
Register Custom Paper
Setting the Paper Size and Type
IMPORTANT
If the setting is different from the size of the loaded paper, an error
message appears, or printing is not performed correctly
For the Paper Cassette
Keys to be used for this operation
Select Paper/Settings
Reset
OK
Follow the procedure in this section to adjust the paper
size and type settings for the cassette and the tray.
5 Select a paper type with [ ] or [ ], and then
press [OK].
Paper Type
Plain 2 (19 lb Bond-
Recycled
Color
Heavy 1 (24 lb Bond...
6 Press [ ] (Reset) to return to standby mode.
Registering the Default Paper Settings for the Multi-purpose Tray (Manual Feed Slot)
If you want to always load the same paper in the multipurpose tray (manual feed slot), register the default paper
using the following procedure.
NOTE
If the default paper is registered
The setting screen is not displayed when paper is loaded.
1 Press [ ] (Select Paper/Settings).
2 Select <Paper Settings> with [ ] or [ ], and then
press [OK].
Select Paper
MP Tray
1
LTR:Plain 2
LTR:Plain 2
2
Paper Settings
3 Select <Drawer 1> or <Drawer 2> with [ ] or [ ],
and then press [OK].
<Drawer 2> is displayed only when the optional paper cassette
(Cassete 2) is installed in MF8380Cdw.
Paper Settings
Multi-Purpose Tray
Drawer 1
Drawer 2
4 Select a paper size with [ ] or [ ], and then
press [OK].
* When registering the custom paper, see “Registering a
Custom Paper Size” (→P.2-19).
* The registered custom paper is listed at the top. Select it with
[ ].
Paper Size
LTR
LGL
STMT
EXEC
Keys to be used for this operation
Select Paper/Settings
Reset Numeric keys
OK
1 Press [ ] (Select Paper/Settings).
2 Select <Paper Settings> with [ ] or [ ], and then
press [OK].
Select Paper
MP Tray
1
LTR:Plain 2
LTR:Plain 2
2
Paper Settings
3 Select <Multi-Purpose Tray> with [ ] or [ ], and
then press [OK].
Paper Settings
Multi-Purpose Tray
Drawer 1
Drawer 2
2-18
Page 59
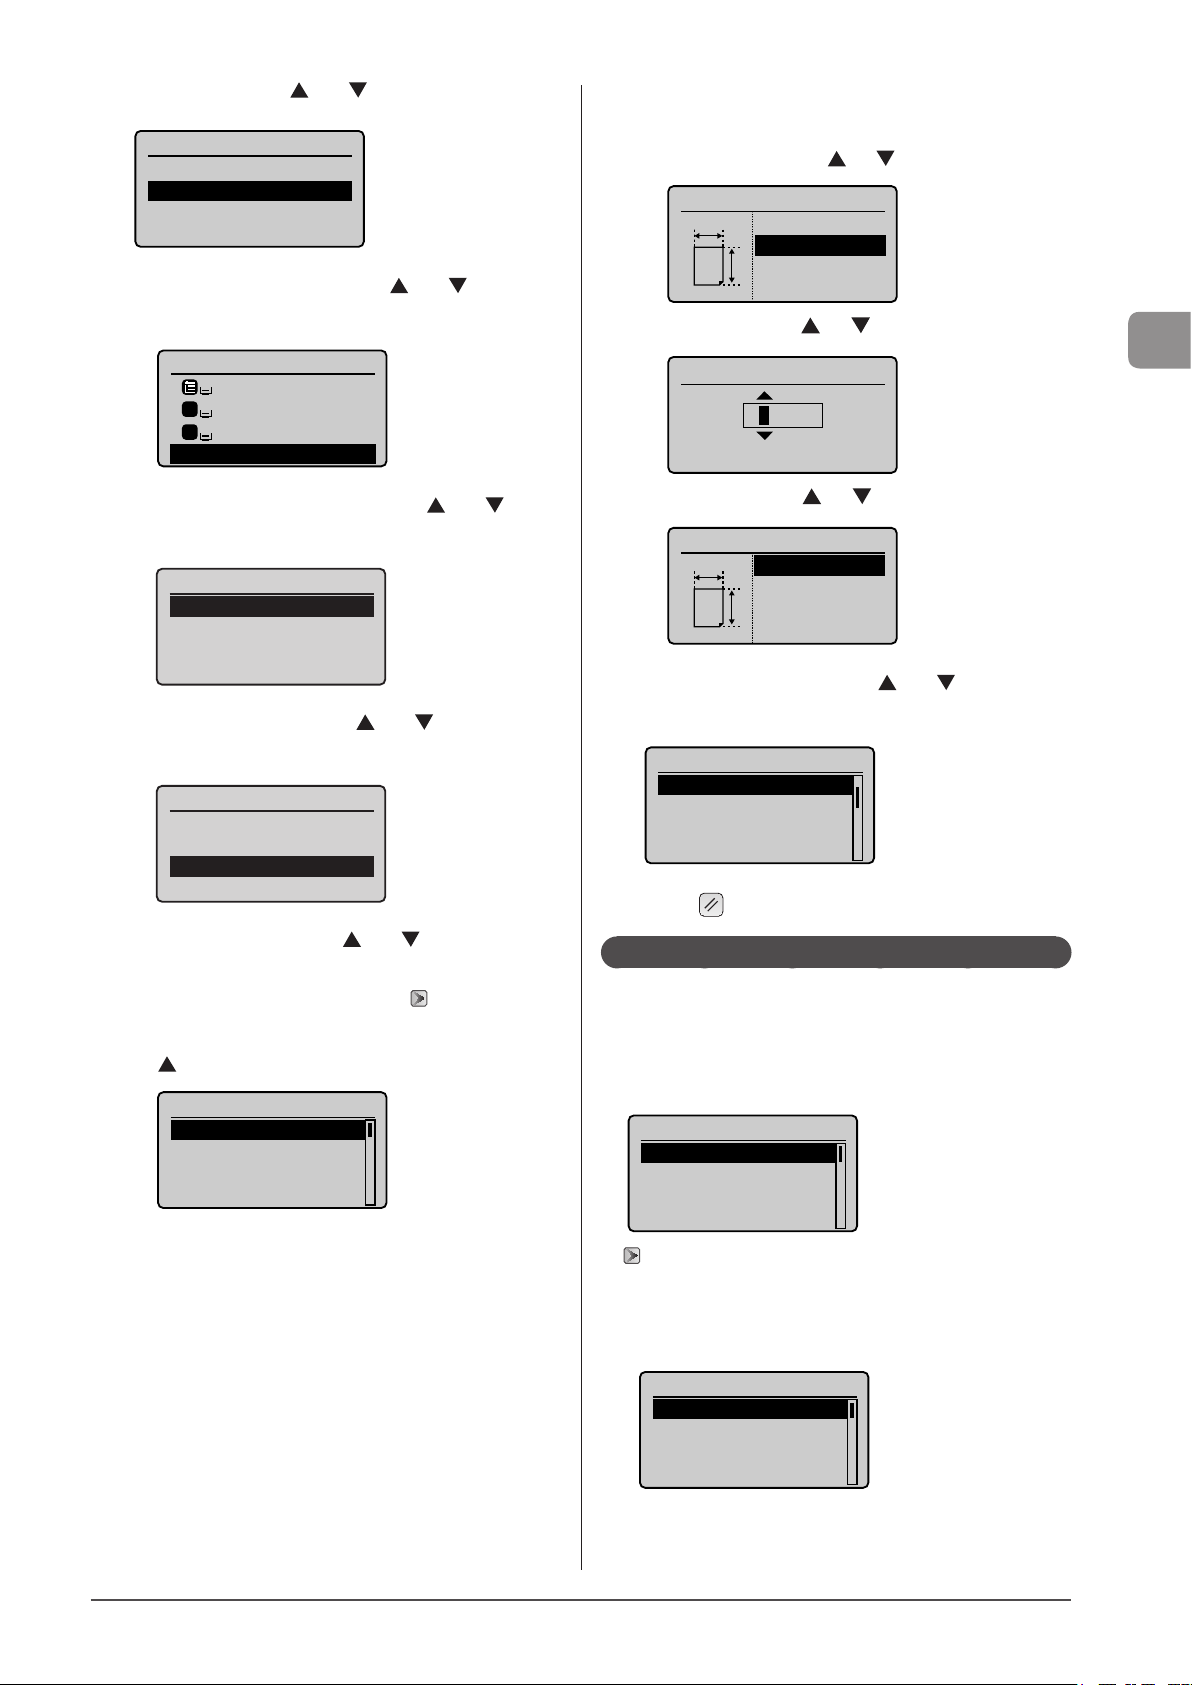
4 Select <On> with [ ] or [ ], and then press [OK].
Register Custom Paper
Register Default Set.
Off
On
Set Details
5 Select <Paper Settings> with [ ] or [ ], and then
press [OK].
If you select <Custom Size>
Specifies the size of <X> direction and <Y> direction of the
custom paper.
(1) Select the direction with [ ] or [ ], and then press [OK].
Specify Size
<Apply>
X
X: 0 "
Y
Y: 0 "
(2) Specify the size with [ ] or [ ], and then press [OK].
Select Paper
LTR:Plain 2
1
LTR:Plain 2
LTR:Plain 2
2
Paper Settings
6 Select <Multi-Purpose Tray> with [ ] or [ ], and
then press [OK].
Paper Settings
Multi-Purpose Tray
Drawer 1
Drawer 2
7 Select <Set Details> with [ ] or [ ], and then
press [OK].
Register Default Set.
Off
On
Set Details
8 Select a paper size with [ ] or [ ], and then
press [OK].
* When registering the custom paper, see “Registering a
Custom Paper Size” (→P.2-19).
* The registered custom paper is listed at the top. Select it with
[ ].
Paper Size
LTR
LGL
STMT
EXEC
Set Length for X
3_0/0 "
(3-8_1/2)
(3) Select <Apply> with [ ] or [ ], and then press [OK].
Specify Size
<Apply>
X
X: 3 "
Y
Y: 5 "
9 Select the paper type with [ ] or [ ], and then
press [OK].
Paper Type
Plain 2 (19 lb Bond-
Recycled
Color
Heavy 1 (24 lb Bond...
10
Press [ ] (Reset) to return to standby mode.
Registering a Custom Paper Size
You can register sizes and types of frequently used paper.
Registered paper is displayed when paper settings are
specified for each paper source.
• Paper cassette
Paper size setting screen
Paper Size
1. 7 x 9 "
LTR
LGL
STMT
“For the Paper Cassette” (→P.2-18)
• Multi-purpose tray (manual feed slot)
- When <Register Default Set.> is set to <Off> (default)
The screen to be displayed when paper is loaded in the
multi-purpose tray (manual feed slot)
Document and Paper Handling
Paper Size (MP Tray)
1. 7 x 9 "
LTR
LGL
STMT
2-19
Page 60
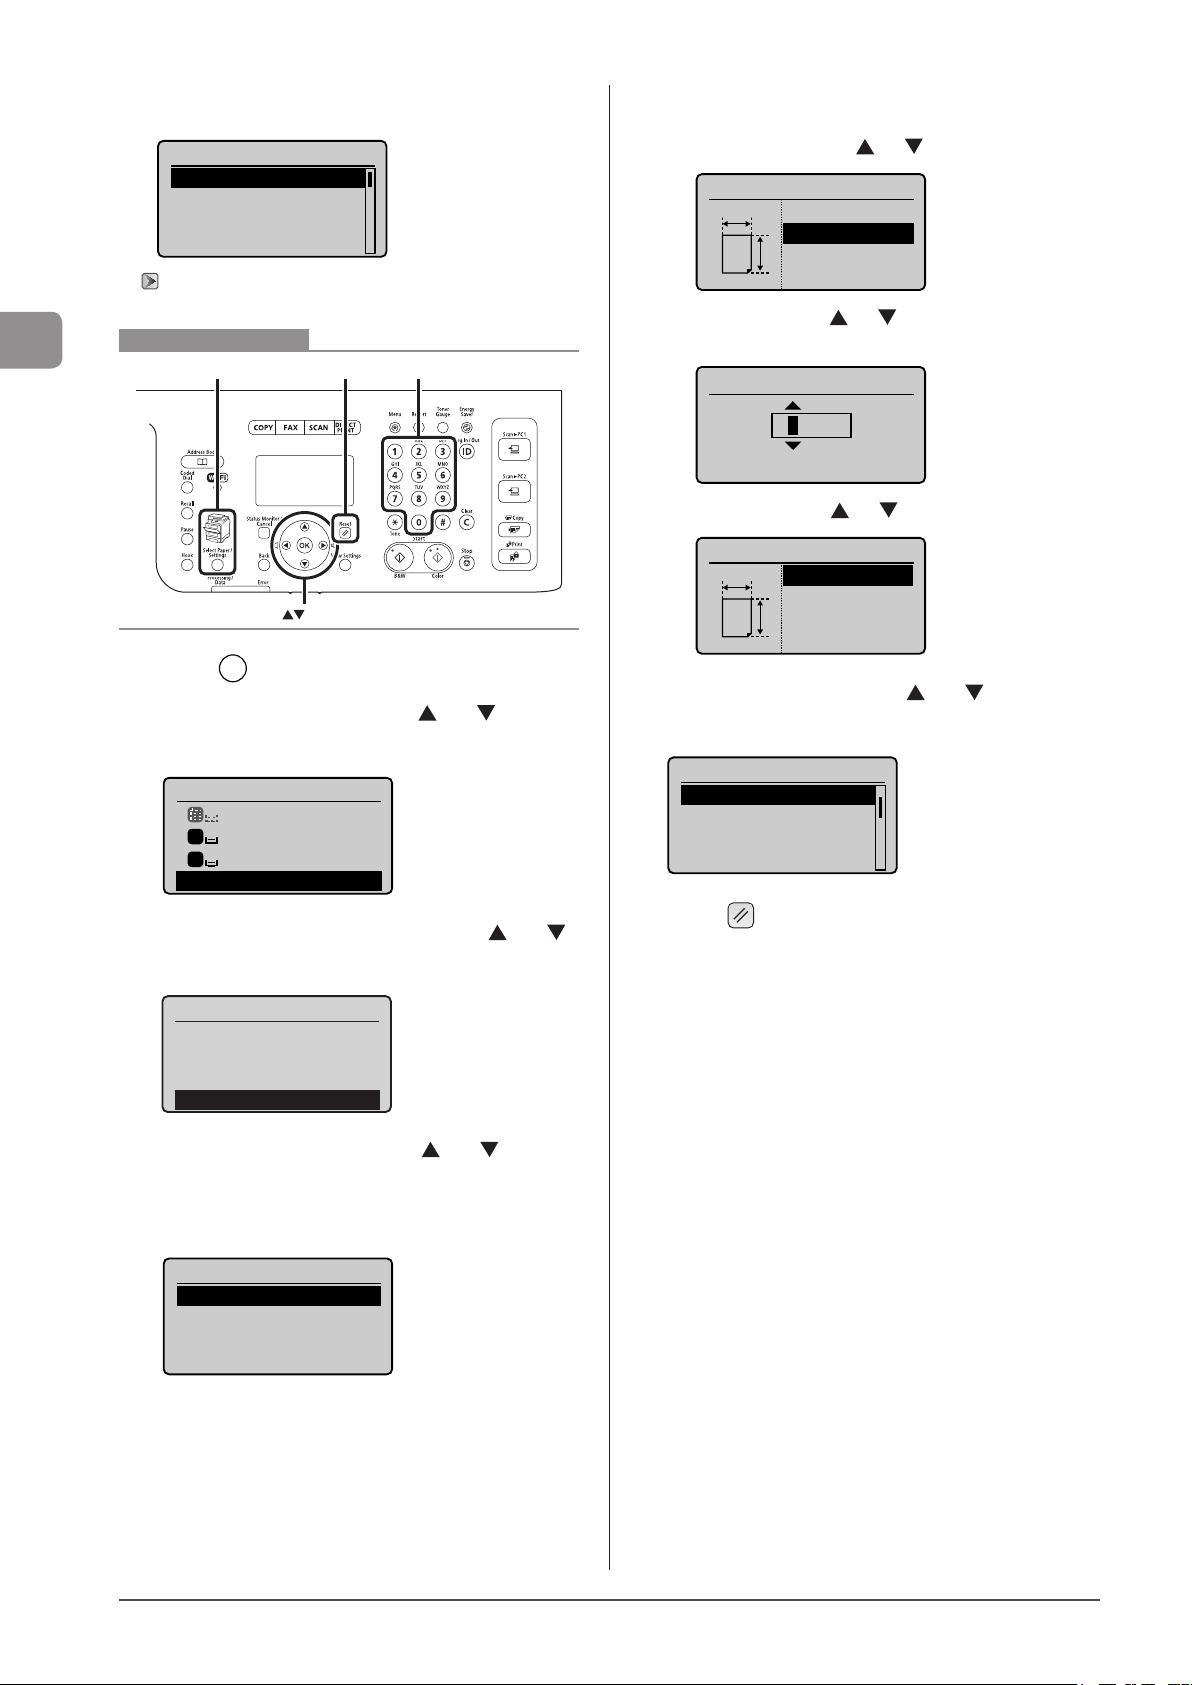
Document and Paper Handling
Register Custom Paper
- When < Register Default Set.> is set to <On>
Paper size setting screen
Paper Size (MP Tray)
1. 7 x 9 "
LTR
LGL
STMT
“Registering the Default Paper Settings for the Multi-purpose Tray
(Manual Feed Slot)” (→P.2-18)
Keys to be used for this operation
Select Paper/Settings
Reset Numeric keys
5 Specifies the size of <X> direction and <Y>
direction.
(1) Select the direction with [ ] or [ ], and then press [OK].
Specify Size
<Apply>
X
X: 0 "
Y
Y: 0 "
(2) Specify the size with [ ] or [ ], and then press [OK].
You can also enter values using the numeric keys.
Set Length for X
3_0/0 "
OK
1 Press [ ] (Select Paper/Settings).
2 Select <Paper Settings> with [ ] or [ ], and then
press [OK].
Select Paper
MP Tray
1
LTR:Plain 2
LTR:Plain 2
2
Paper Settings
3 Select <Register Custom Paper> with [ ] or [ ],
and then press [OK].
Paper Settings
Multi-Purpose Tray
Drawer 1
Drawer 2
(3) Select <Apply> with [ ] or [ ], and then press [OK].
Specify Size
(3-8_1/2)
<Apply>
X
X: 3 "
Y
Y: 5 "
6 Select the paper type with [ ] or [ ], and then
press [OK].
Paper Type
Plain 2 (19 lb Bond-
Recycled
Color
Heavy 1 (24 lb Bond...
7 Press [ ] (Reset) to return to standby mode.
4 Select <Not Registered> with [ ] or [ ], and
then press [OK].
When selecting the registered custom paper, you can edit and
delete the custom paper.
Register Custom Paper
1. Not Registered
2. Not Registered
3. Not Registered
2-20
Page 61
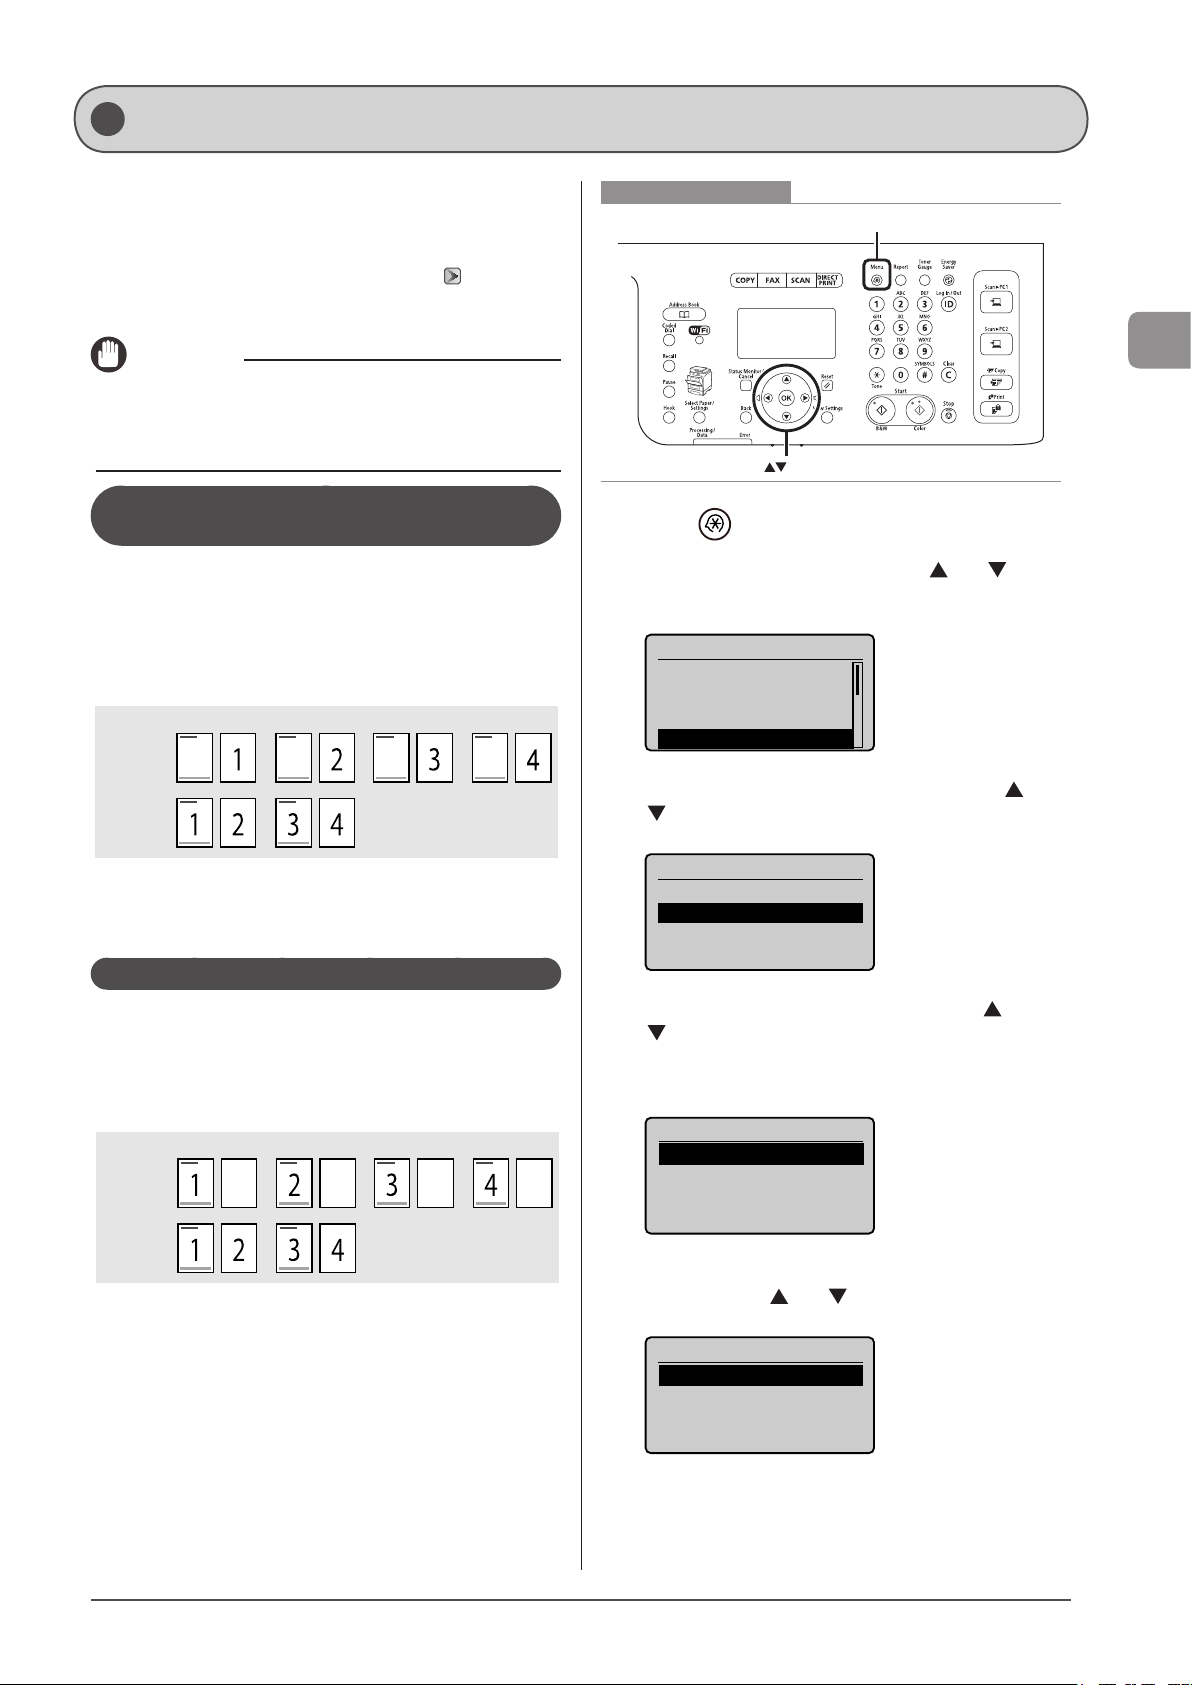
Drawer Auto Selection
Selecting the Print Side (MF8380Cdw Only)
Specify whether to print only on the front side of paper for
1-sided printing so that the odd pages are always printed on
the front side for both 1-sided and 2-sided printing.
The print side for 1-sided printing varies depending on the
setting specified. To use preprinted paper, read “Paper
Loading Orientation” (→P.2-15) carefully to place the paper stack in
the correct orientation.
IMPORTANT
Paper Size and Paper Type
If you select unsupported paper size or paper type for 2-sided
printing, the settings applied in this section will be invalid.
When <Print Speed Priority> is selected (the default setting)
All pages (odd and even) are printed on the back side for
1-sided printing while the odd pages are printed on the first
side for 2-sided printing, as shown below.
* Make sure to place the stack correctly to use preprinted
paper, as the side to be placed face up varies between
1-sided and 2-sided printing.
Front Back
1-sided
printing
2-sided
printing
Keys to be used for this operation
Menu
OK
1 Press [ ] (Menu).
2 Select <Common Settings> with [ ] or [ ], and
then press [OK].
Menu
Network Settings
Preferences
Timer Settings
Common Settings
3 Select <Paper Feed Method Switch> with [ ] or
[ ], and then press [OK].
Document and Paper Handling
Select this setting when
• using paper types other than preprinted paper
• using preprinted paper only for 1-sided printing
When <Print Side Priority> is selected
All pages are printed on the first side for 1-sided printing so
the odd pages are always printed on the first side for both
1-sided and 2-sided printing, as shown below.
and 2-sided printing, even when using preprinted paper.
Front Back
1-sided
printing
2-sided
printing
Select this setting when
• using preprinted paper for both 1-sided and 2-sided
printing
Common Settings
Switch Paper Feed Me..
4 Select the paper source to specify with [ ] or
[ ], and then press [OK].
<Drawer 2> is displayed only when the optional paper cassette
(Cassette 2) is installed in MF8380Cdw.
Paper Feed Method
Multi-Purpose Tray
Drawer 1
Drawer 2
5 Select <Print Speed Priority> or <Print Side
Priority> with [ ] or [ ], and then press [OK].
Multi-Purpose Tray
Print Speed Priority
Print Side Priority
2-21
Page 62
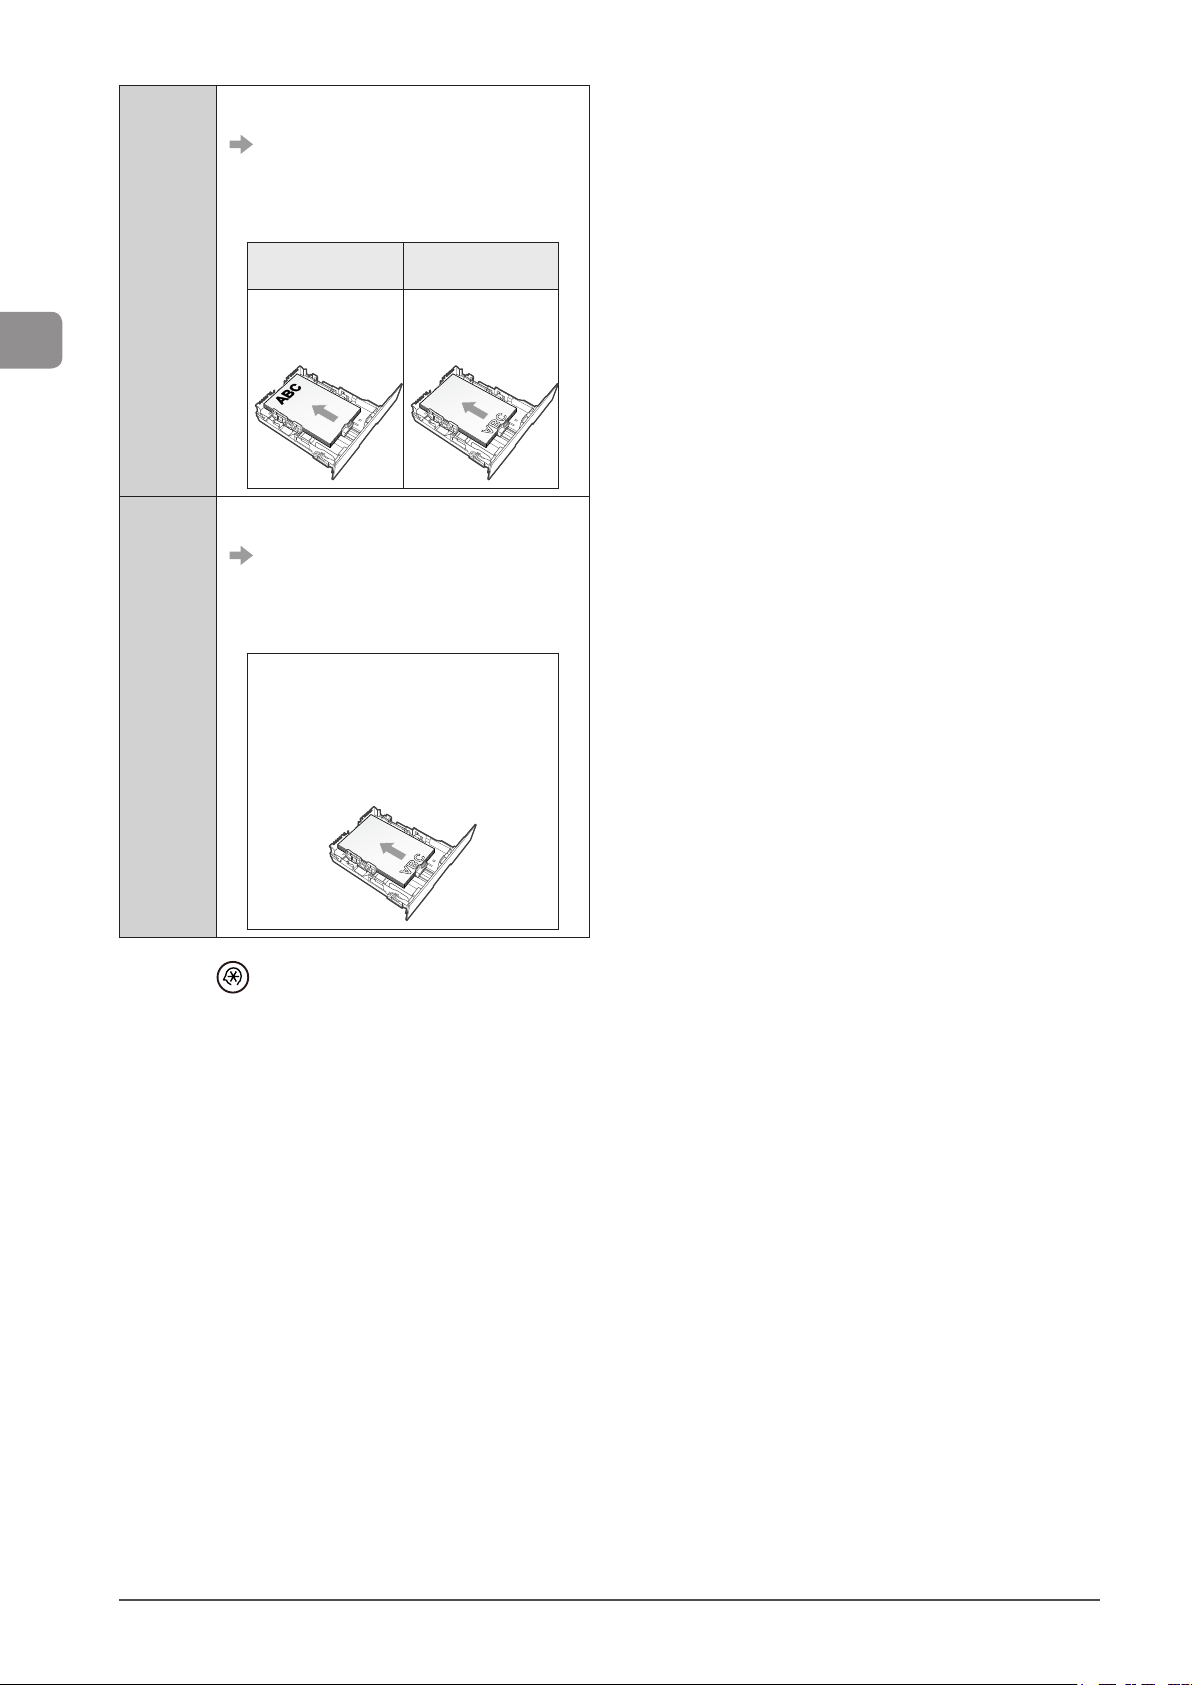
Document and Paper Handling
<Print
Speed
Priority>
<Print Side
Priority>
When specifying <Print Speed Priority>, load paper
as follows.
: Feeding direction)
(
* For details on the procedure for loading paper
when using multi-purpose tray or when printing
pages of the landscape layout, see “Paper Loading
Orientation” (→P.2-15).
When performing
1-sided printing
Load paper with the
printing side facing
up.
When specifying <Print Side Priority>, load paper as
follows.
: Feeding direction)
(
* For details on the procedure for loading paper
when using multi-purpose tray or when printing
pages of the landscape layout, see “Paper Loading
Orientation” (→P.2-15).
The procedure for loading paper is the same
for 2-sided printing and 1-sided printing.
• When performing 1-sided printing, load
paper with the printing side facing down.
• When performing 2-sided printing, load
paper with the front side (first page) facing
down.
When performing
2-sided printing
Load paper with the
front side (first page)
facing down.
6 Press [ ] (Menu) to close the menu screen.
2-22
Page 63
Copying
This category describes the copying features.
Basic Copying Method 3-2
Checking and Canceling Copy Jobs 3-3
Canceling a copy job using [
Checking and canceling a copy job using [ ] (Status Monitor/Cancel)
Copy Settings 3-4
Combination of Copy Settings 3-4
Selecting Copy Papers 3-4
Adjusting the Density 3-5
Selecting Image Quality (Copy) 3-6
] (Stop) 3-3
3-3
Chapter
3
Copy Settings 3-7
2-Sided Copying (MF8380Cdw Only) 3-7
Enlarging/Reducing Copies 3-8
Multiple Documents onto One Sheet (N on 1) 3-8
Collating Copies 3-9
Erase Dark Borders and Frame Lines (Frame Erase) 3-9
Emphasize the Outline of an Image (Sharpness) 3-9
Copying an ID Card 3-10
Copying by Saving Paper 3-11
Registering and Using Combination of
Copy Settings (Mode Memory) 3-12
Registering Mode Memory 3-12
Deleting Mode Memory 3-12
Calling and Copying Mode Memory 3-13
Changing the Default Values 3-14
Viewing Copy Settings 3-14
3-1
Page 64
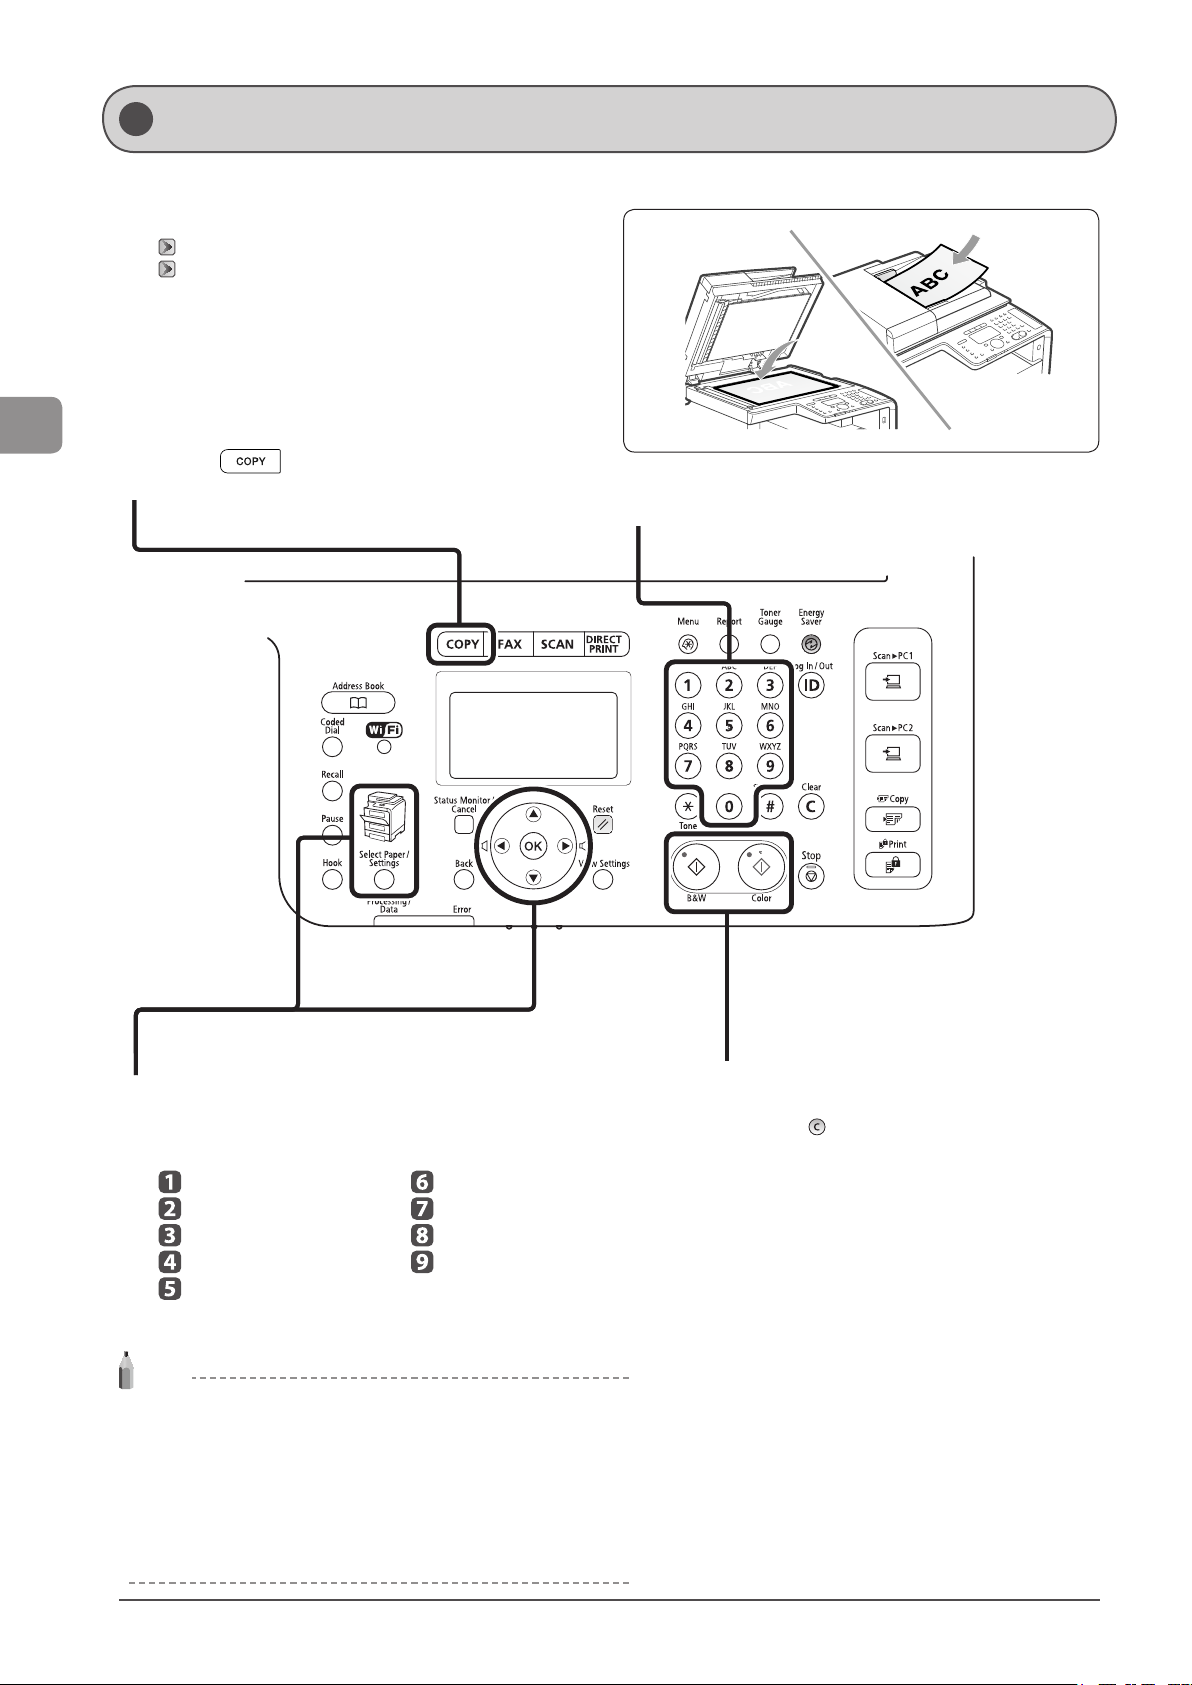
Basic Copying Method
This section describes the basic procedure for copying.
Place your documents.
1
“Selecting the Print Side (MF8380Cdw Only)” (→P.2-21)
“Supported Document Types” (→P.2-2)
* Up to 50 documents can be loaded into the feeder.
Copying
Press [ ].
2
3-2
Specify the copy settings as needed.
3
You can specify up to 9 items.
(for details, see P.3-3 to P.3-6.)
Paper select
Density
Image quality
2-Sided
Enlarging/Reducing
NOTE
• When you combine multiple settings for use, see “Combination of
Copy Settings” (→P.3-4).
• The settings specified here are effective only for the current operation.
To make the settings effective for all the copy operations, see
“Changing the Default Values” (→P.3-14).
• Register your frequently used settings into the Mode Memory. It is
useful. See “Registering and Using Combination of Copy Settings
(Mode Memory)” (→P.3-12).
N on 1
Collating
Frame erase
Sharpness
Enter the copy quantity (1 to 99) using
4
numeric keys.
* Press [ ] (Clear) to cancel the entered quantity.
Page 65
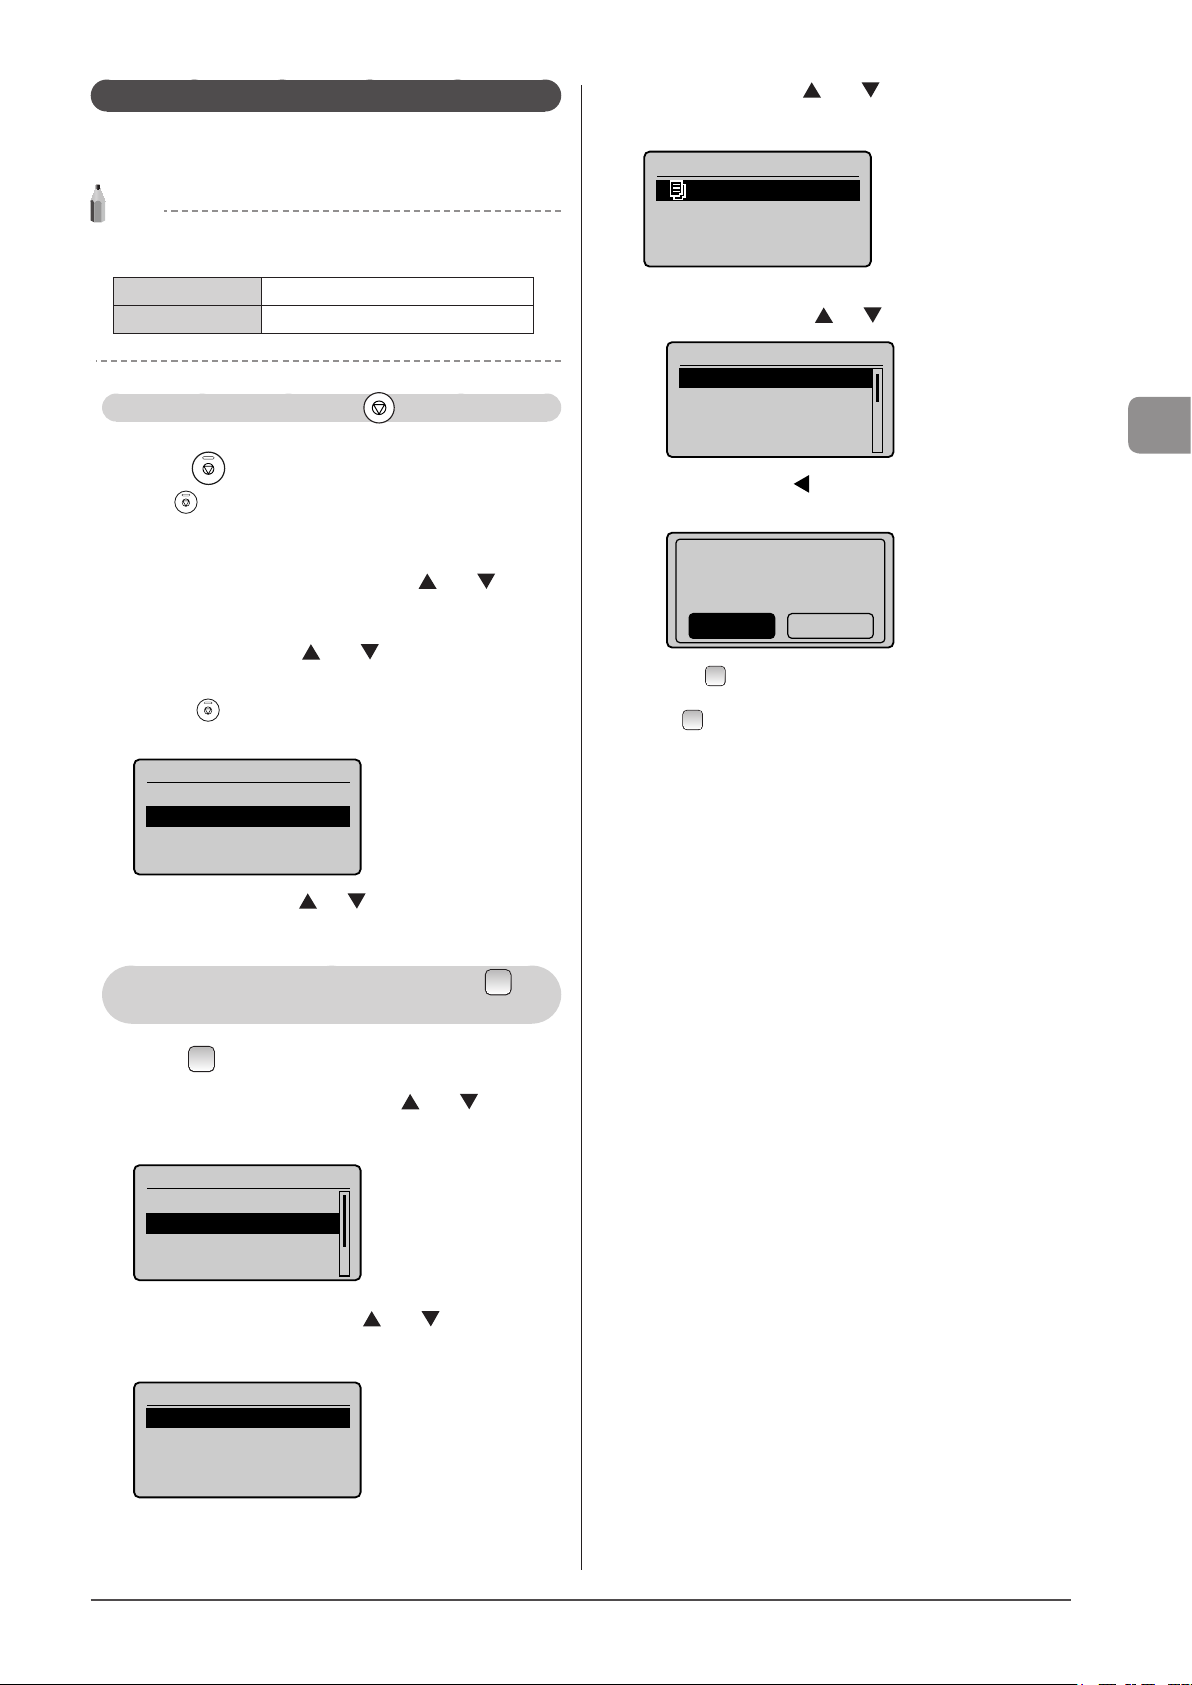
Checking and Canceling Copy Jobs
Check the details of copy jobs. Cancel copy jobs that you
decide not to perform while the jobs are processing.
NOTE
When the processing/Data indicator on the operation
panel is:
Turned on/blinking A job is currently processing.
Turned off No jobs are waiting in memory.
Canceling a copy job using [ ] (Stop)
1 Press [ ] (Stop).
Press [ ] (Stop) twice to cancel the job when the machine holds
one job only.
2 Select the job that you want to cancel when more
than one job is processing using [ ] or [ ] and
press [OK].
3 Select <Yes> using [ ] or [ ] when <Cancel?>
appears and press [OK].
Or, press [ ] (Stop) to cancel the job.
The job is canceled.
Cancel?
<No>
<Yes>
Details
4 Select a job using [ ] or [ ] and press [OK].
The details of the selected job are displayed.
Copy/Print Job Status
04:49AM Copying
To cancel the job
(1) Select <Cancel> using [ ] or [ ] and press [OK].
Details
<Cancel>
Job Number: 0001
Status: Copying
Time: 01/01 12:52AM
(2) Select <Yes> using [ ] and press [OK].
The job is canceled.
Cancel?
NoYes
(3) Press [ ] (Status Monitor/Cancel) to close the screen.
To only check the details of the selected job
Press [ ] (Status Monitor/Cancel) after you have checked the
details of the selected job to close the screen.
Copying
* Select <Details> using [ ] or [ ] to check the details of the
job that you want to cancel and press [OK].
Checking and canceling a copy job using [ ]
(Status Monitor/Cancel)
1 Press [ ] (Status Monitor/Cancel).
2 Select <Copy/Print Job> using [ ] or [ ] and
press [OK].
Status Monitor/Cancel
Device Status
Copy/Print Job
TX Job
RX Job
3 Select <Job Status> using [ ] or [ ] and press
[OK].
Copy/Print Job
Job Status
Copy Job History
Print Job History
3-3
Page 66
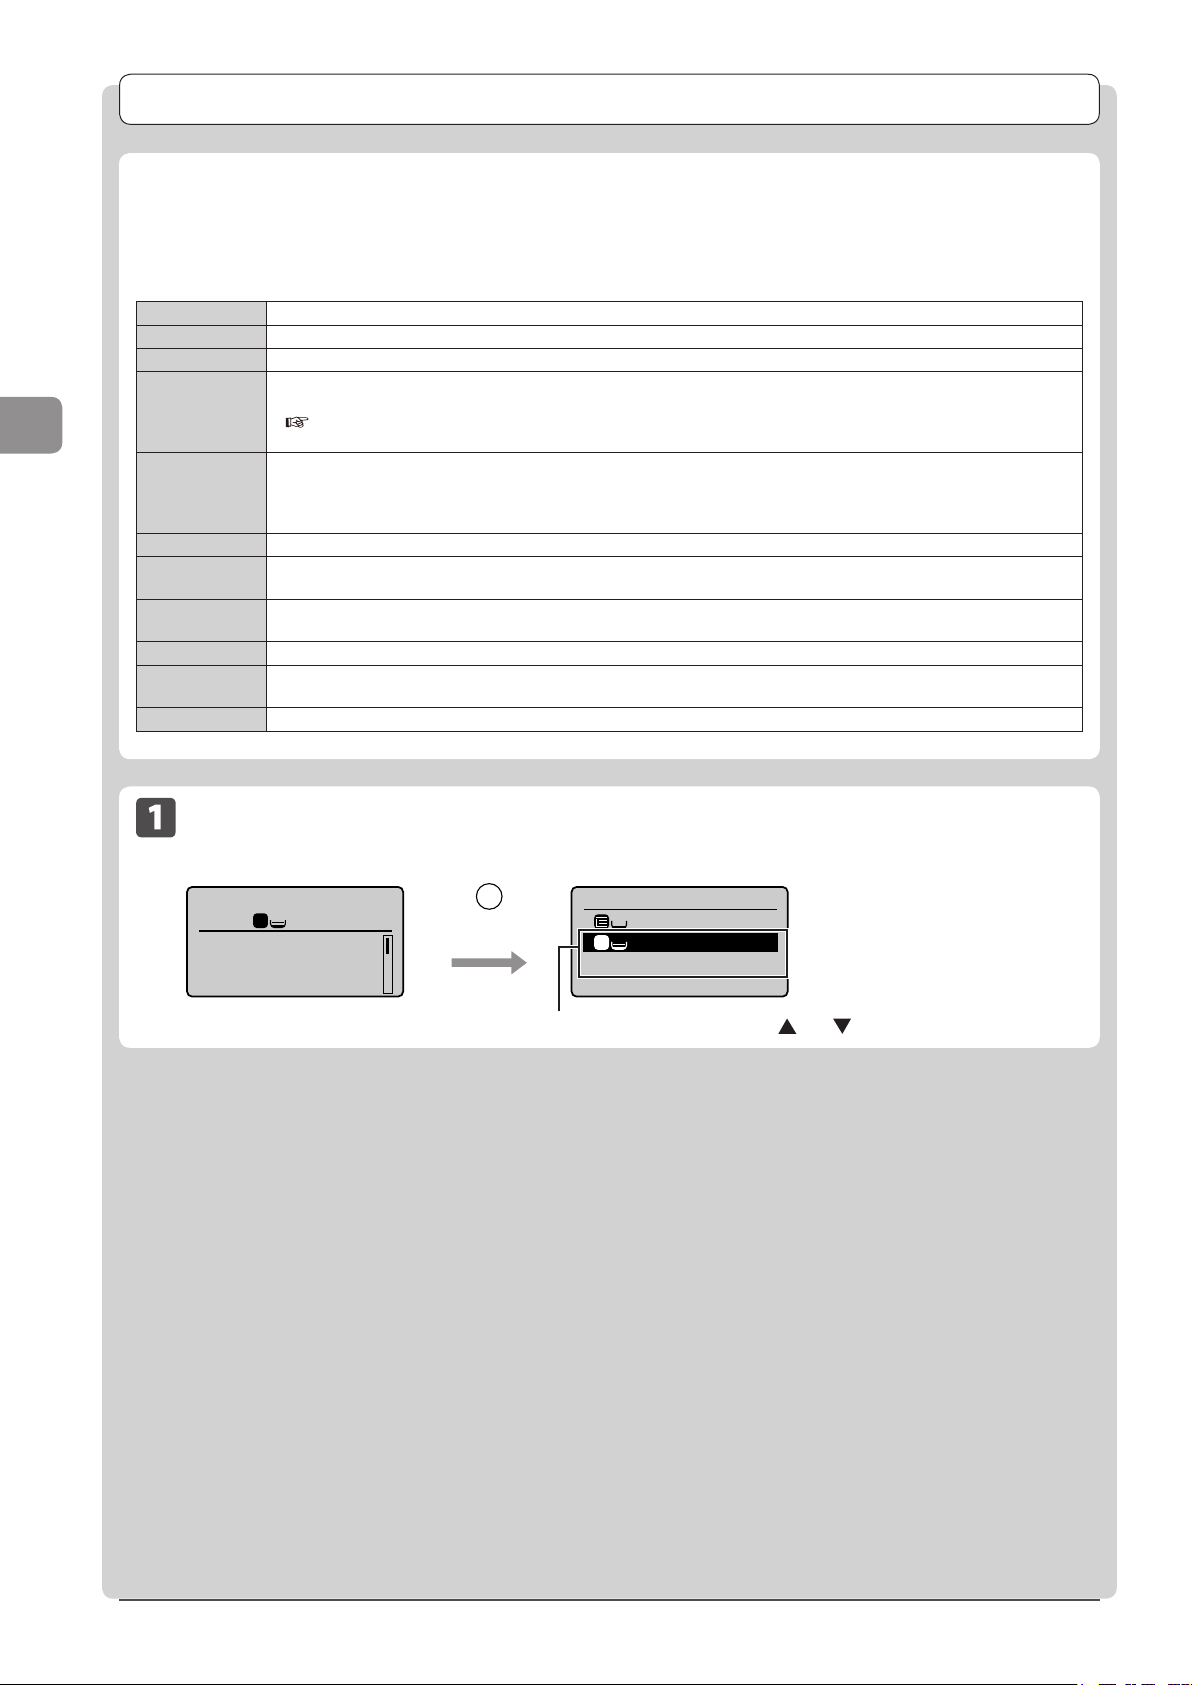
Copying
Copy Settings
Combination of Copy Settings
You can combine and use various copy settings.
This applies to Mode Memory registration and default value settings (→P. 3-14) as well.
However, the following limitation is found in the setting combination.
<No. of Copies> Nothing special.
<Density> Nothing special.
<Original Type> Nothing special.
<2-Sided>
(MF8380Cdw
Only)
<Copy Ratio>
<Paper> Depending on its document size (selected paper source), 2-sided copy is not available.
<4 on 1>/
<2 on 1>
<ID Card Copy>
<Collate> Nothing special.
<Erase Frame>
<Sharpness> Nothing special.
• Depending on its paper size (selected paper drawer), 2-sided copy is not available.
• Depending on its paper size or paper type in the selected paper cassette, 2-sided copy is not available.
e-Manual → Specifications → Paper → Supported Paper Types
• This feature cannot be combined with <ID Card Copy>.
• When you want to copy documents in a reduction ratio different from its default value for <4 on 1>/<2 on 1>, secify
the <Copy Ratio> later.
• <Copy Ratio> is fixed at 100 % for <ID Card Copy>.
• The frame width specified at <Erase Frame> increases/decreases according to the <Copy Ratio> setting.
• If you want to copy a document in a copy ratio different from its default reduction ratio, specify the <Copy Ratio> later.
• This feature cannot be combined with <Erase Frame>.
• <Copy Ratio> is fixed at 100%.
• This feature cannot be combined with either 2-Sided Copy or <Erase Frame>.
• This feature cannot be combined with N on 1 (<4 on 1>/<2 on 1>, <ID Card Copy>).
• The specified erase frame width increases/decreases according to the <Copy Ratio> setting.
Selecting Copy Papers
Copy mode screen Setting screen*
Copy: Press Start
1
100% LTR
Density: 0
+
-
Original Type: Text
2-Sided: Off
1
...
Select Paper/
Setting
Select the paper drawer using [ ] or [ ] → [OK]
Select Paper
LTR:Plain
1
LTR:Plain
Paper Settings
* You can display the setting
screen also by selecting
<Paper> in the copy mode
screen.
3-4
Page 67
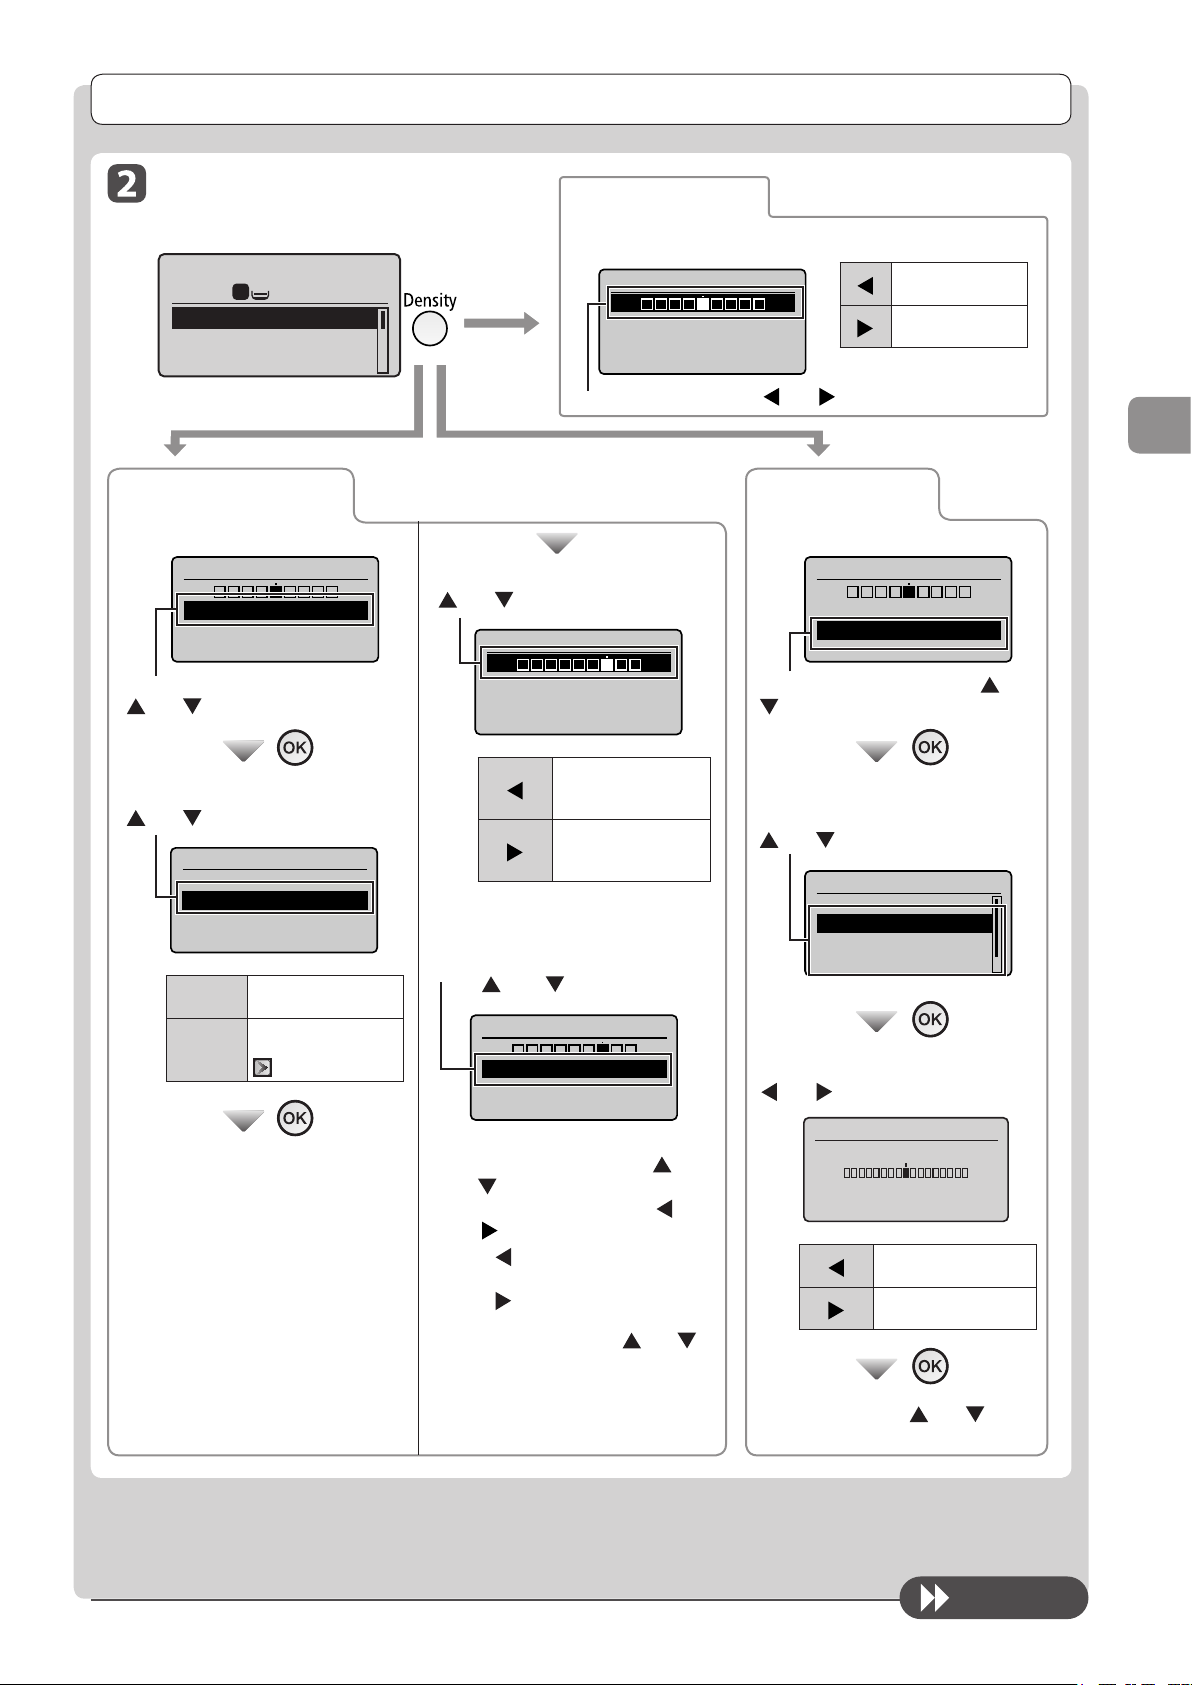
Copy Settings
Color Balance: Defaul
Adjusting the Density
Copy mode screen
Copy: Press Start
100% LTR
Density: 0
Original Type: Text
2-Sided: Off
● Background Adjustment
Setting screen
Select <Background> with
] or [ ]
[
Select <Adjustment> with
] or [ ]
[
<Adjustment>
1
+
-
Density
- +
Background: Default
Color Balance: Defau...
Background
Off
Adjustment
<Off>
Does not adjust the
background density.
Adjusts the
background density.
The next step
● Density adjustment
Setting screen*
1
Density
- +
Background: Default
...
Color Balance: Defau...
Adjust the density with [ ] or [ ] → [OK]
* You can display the setting screen also by selecting
<Density> in the copy mode screen.
Adjust the density with
[
] or [ ] → [OK]
Adjustment
- +
Adjust by Color
Makes the
[ ]
[ ]
background density
lighter.
Makes the
background density
darker.
If adjusting the density for each
color
(1) Select [Adjust by Color] with
] or [ ] → [OK]
[
Adjustment
- +
Adjust by Color
(2) Select the color you want to
adjust the density with [
] → [OK]
[
(3) Adjust the density with [
] → [OK]
[
• [ ] Makes the background color
density lighter.
• [ ] To make the background color
density darker.
] or
] or
(4) Select [Apply] with [ ] or [ ]
→ [OK]
Makes the copy
[ ]
density lighter.
Makes the copy
[ ]
density darker.
● Adjusting the color
Setting screen*
Density
- +
Background: Default
Select <Color Balance> with [ ] or
]
[
Select a color for which you want to
adjust the color balance with
] or [ ]
[
Color Balance
<Apply>
Yellow: 0
Magenta: 0
Cyan: 0
+
-
+
-
+
-
Adjust the color balance with
[ ] or [ ]
Yellow
- +
[ ]
[ ]
Makes the color
lighter.
Makes the color
darker.
Copying
Select [Apply] with [ ] or [ ] →
[OK]
To next page
3-5
Page 68
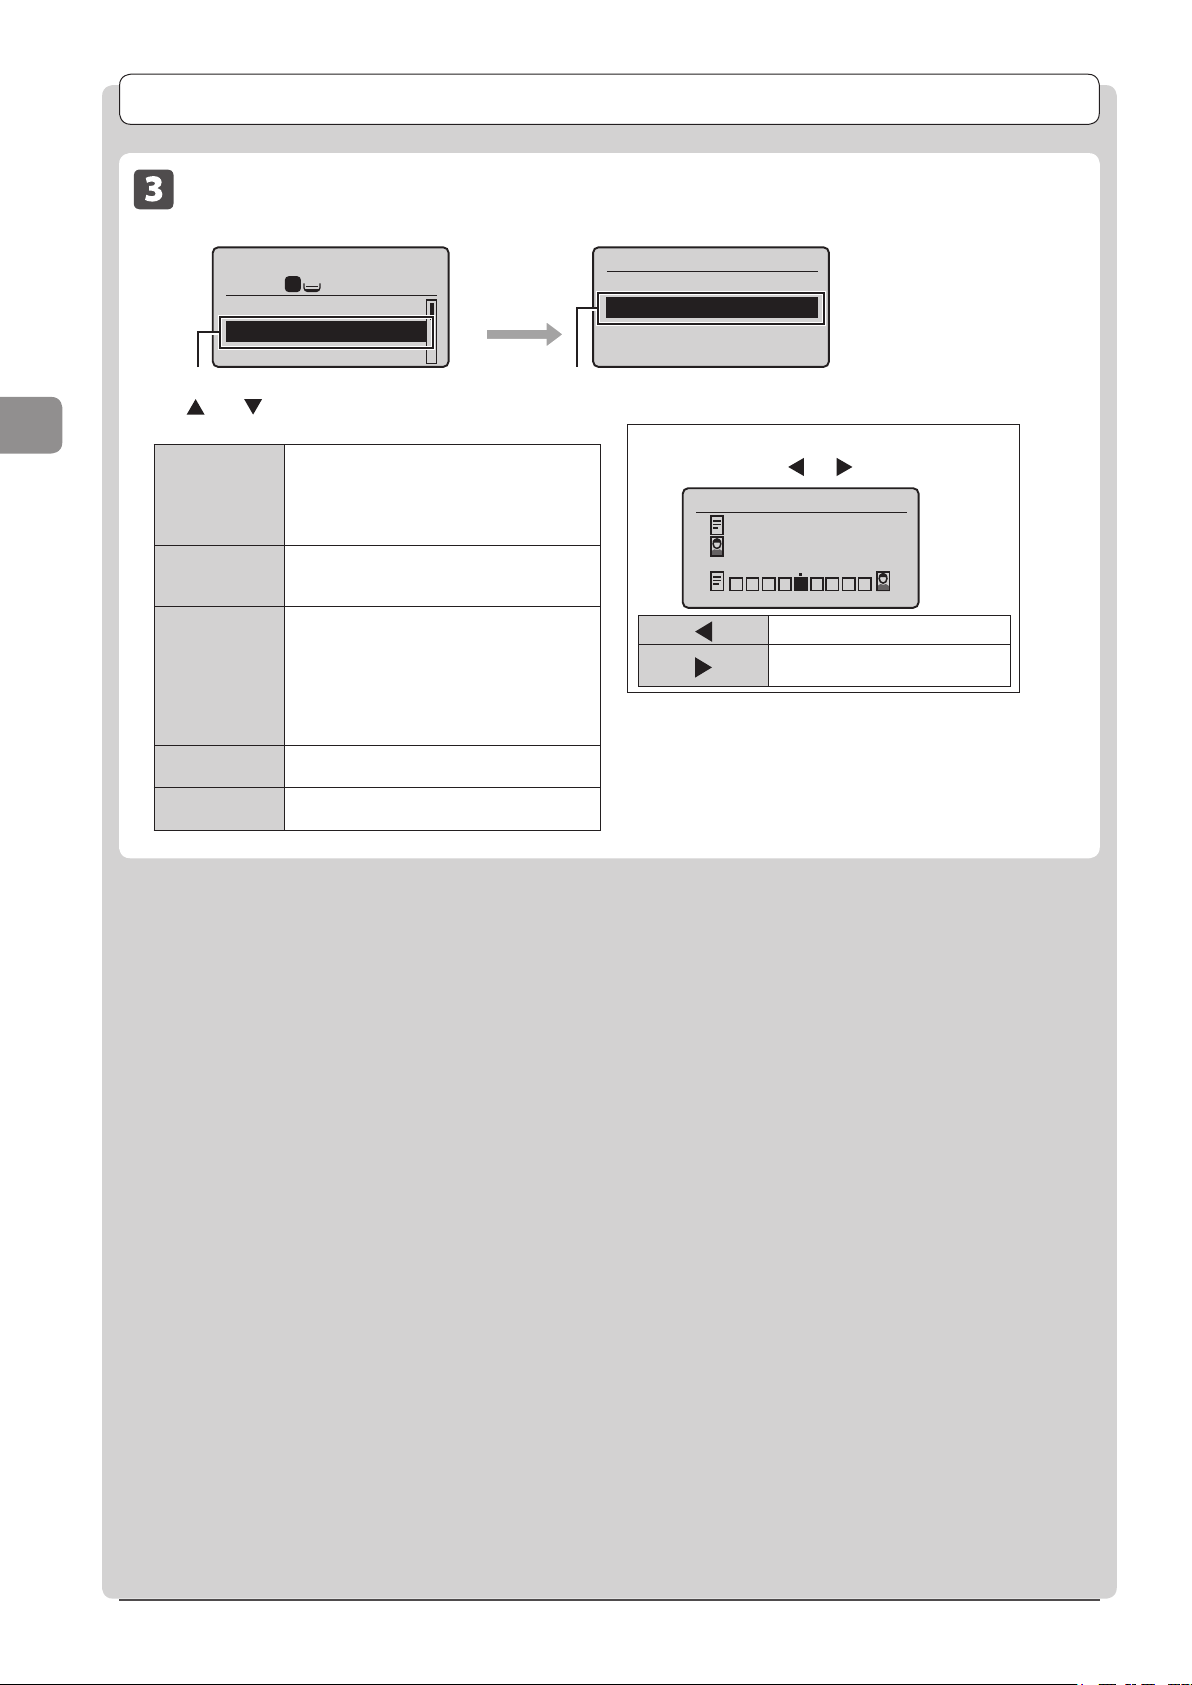
Copy Settings
Selecting Image Quality (Copy)
Copy mode screen Setting screen
Copy: Press Start
100% LTR
Density: 0
1
+
-
Original Type: Text/
2-Sided: Off
Select <Original Type> using
[] or [] → [OK]
1
Original Type
Text
Text/Photo
Text/Photo (Quality)
Photo
Select the appropriate document type
using [▲] or [▼]→[OK]
Copying
<Text/Photo/
Map (Speed)>
<Text/Photo/
Map>
<Text/Photo/
Map (Quality)>
<Printed
Image>
<Text>
This option is suitable for documents that
contain text and photos or fine diagrams and
text such as maps.
This option scans the document at a low
resolution for color copy.
This option is suitable for documents that
contain text and photos or fine diagrams and
text such as maps.
This option is suitable for documents that
contain text and photos or fine diagrams and
text such as maps.
This option scans the document at a high
resolution.
You can set the image quality priority to text
or photos.
This option is suitable for documents that
contain photos printed in a magazine.
This option is suitable for documents that
contain text without photos or illustrations.
When selecting <Text/Photo/Map (Quality)>
Adjust priority using [ ] or [ ]→[OK]
Adjust Level
Text Priority
Photo Priority
[ ]
[
]
Prioritize character readability.
Prioritize illustration readability
such as photos.
3-6
Page 69
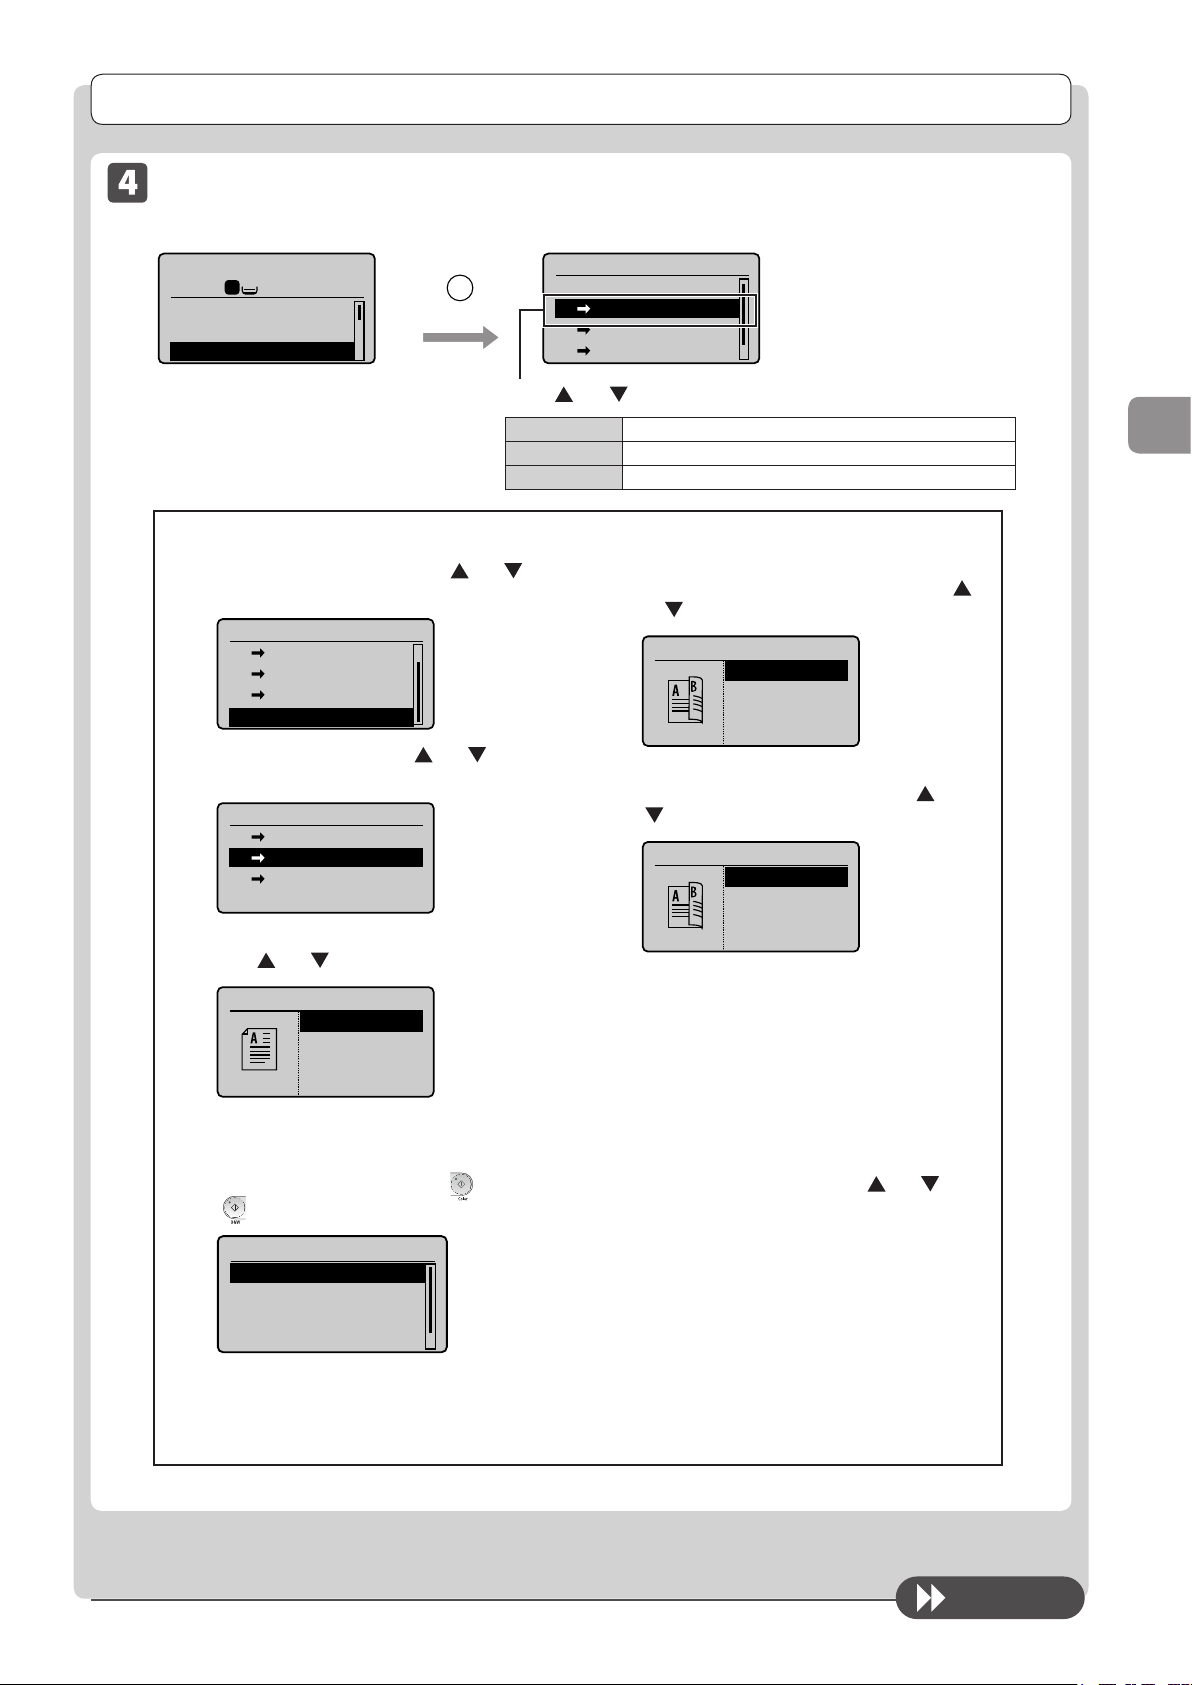
Copy Settings
Calendar Type
Calendar Type
Scan Next: Press Start
2-Sided Copying (MF8380Cdw Only)
Copy mode screen Setting screen*
2-Sided
Press [ ] or [ ] to select the 2-Sided copy format → [OK]
Copy: Press Start
1
100% LTR
Density: 0
+
-
Original Type: Text/
2-Sided: Off
1
2-Sided
Off
1 2-Sided
2 2-Sided
2 1-Sided
<1→2-sided>
<2→2-sided>
<2→1-sided>
If you want to specify how to open original or copy
(1) Select <Format Settings> with [
] or [ ] and
press [OK].
2-Sided
1 2-Sided
2 2-Sided
2 1-Sided
Format Settings
(2) Select <2->2-Sided> with [ ] or [ ] and press
[OK].
Format Settings
1 2-Sided
2 2-Sided
2 1-Sided
(3) Select the orientation of the original document
with [ ] or [ ] and press [OK].
Original Orientation
Portrait
Landscape
Copy a 1-sided document onto both sides of the output.
You can make 2-sided copies from 2-sided documents.
You can make 1-sided copies from 2-sided documents.
(4) When the next screenn is displayed,select
how to open the original document with [
or [ ] and press [OK].
Original Format
Book Type
(5) When the next screen is displayed,select how
to open the original document with [ ] or
[ ] and press [OK].
Finishing Format
Book Type
Copying
]
To copy a document by placing on the platen glass
(1) Place the next page and press [
[
] (B & W).
<Start Copying>
<Cancel>
SheetxCopy:1x1
Density: 0
+
-
] (Color) or
(2) Select <Start Copying> using [ ] or [ ] and
press [OK].
* Repeat this step until all pages are scanned.
To next page
3-7
Page 70
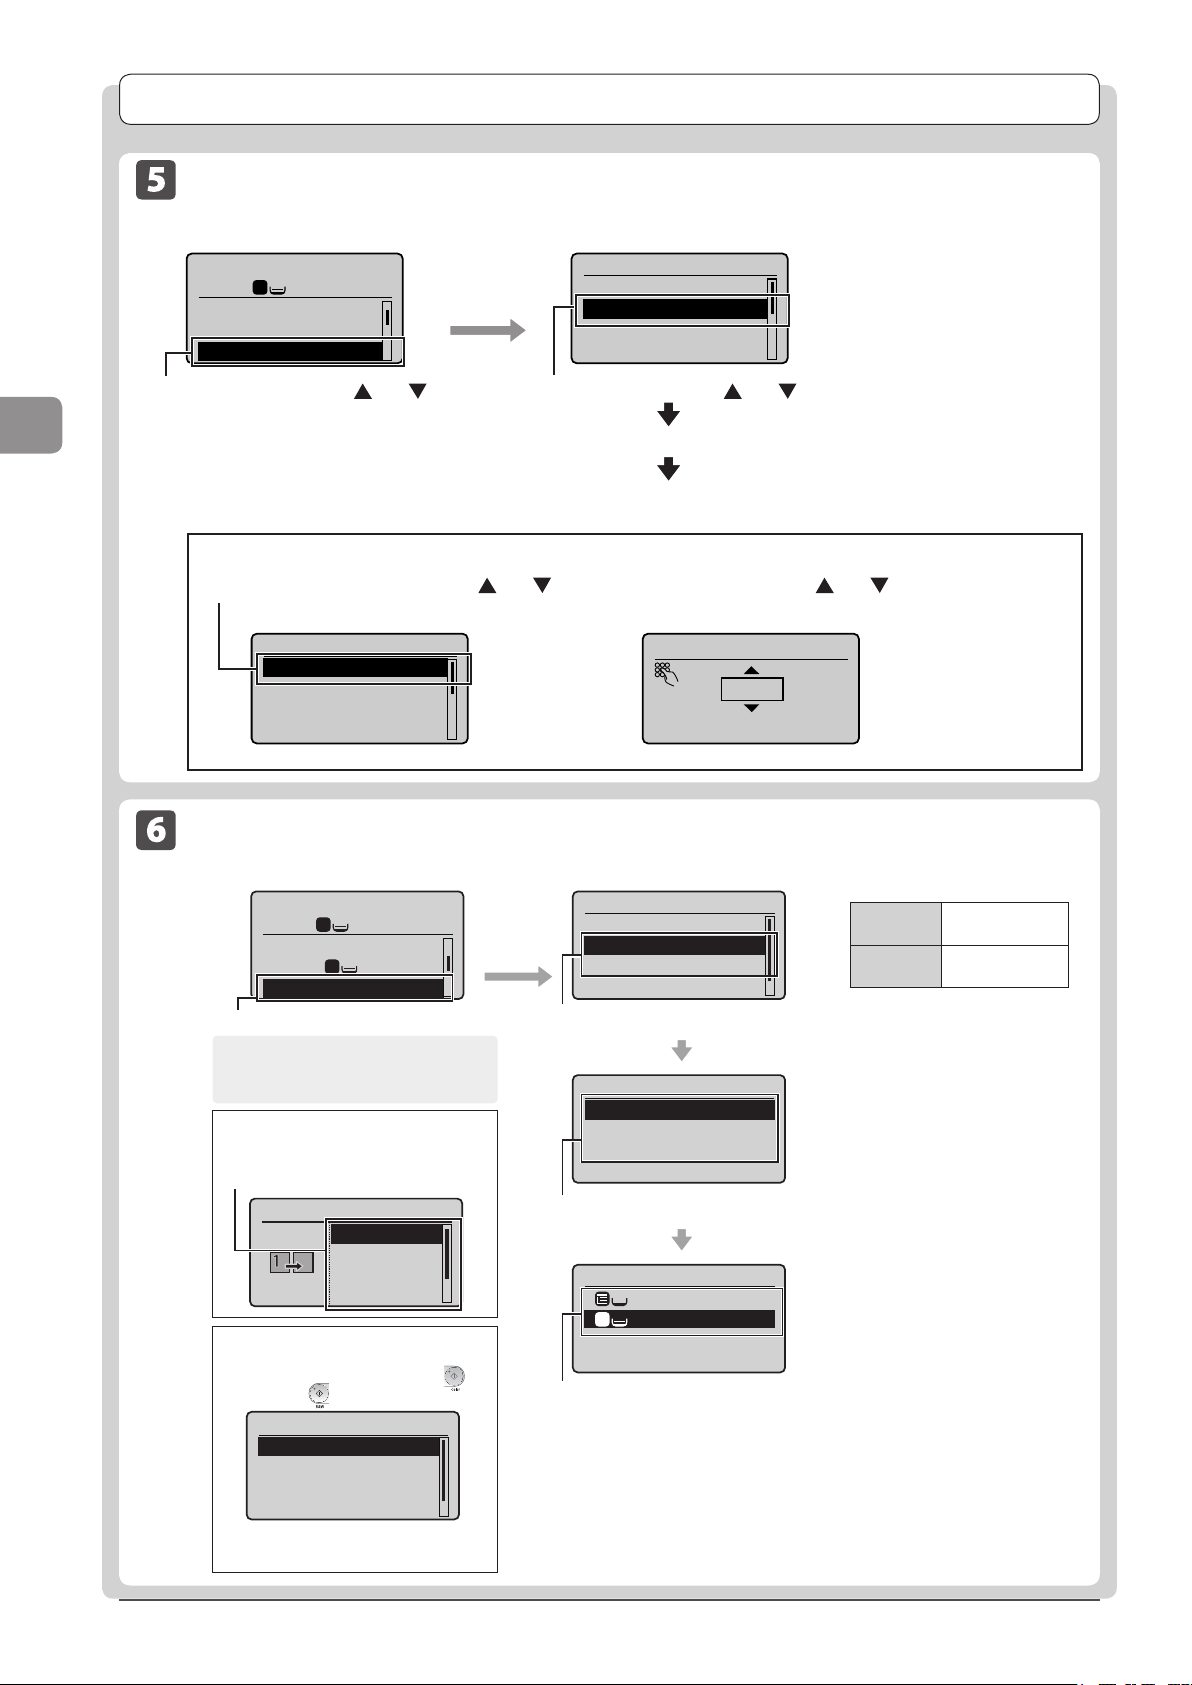
Copying
Copy Settings
Enlarging/Reducing Copies
Copy mode screen Setting screen
Copy: Press Start
1
100% LTR
Original Type: Text
2-Sided: Off
Copy Ratio: 100% Dir
Select <Copy Ratio> using [ ] or [ ]
→ [OK]
To set a copy ratio in 1% increments
(1) Select <Custom Ratio> using [
[OK]
1
...
Select the copy ratio using [ ] or [ ] → [OK]
Load paper of the output size (→P. 2-9)
Register the output paper size (→P. 2-18)
] or [ ] →
Enlarge or reduce copies using
preset copy ratios or custom copy
Copy Ratio
Custom Ratio
100% Direct
400% Max
200%
ratios. For example, you can copy a
Statement size document on Letter
size paper using a preset ratio, or set
any copy ratio from 25% to 400% in
1% increments.
(2) Specify the ratio using [ ] or [ ] → [OK]
You can also enter the copy ratio using the numeric keys.
Copy Ratio
Custom Ratio
Custom Ratio
100% Direct
100 %
400% Max
200%
(25-400)
Multiple Documents onto One Sheet (N on 1)
Setting screenneercsedomypoC
Copy: Press Start
1
100% LTR
Copy Ratio: 100% Di
Paper: LTR:Plain
1
1
...
N on 1: Off
Select <N on 1> using [▲] or [▼]→[OK]
About margins on the document
To copy in the N on 1 mode, margins are
created on the output.
To specify the layout
(1) Select <Select Layout> using [▲] or [▼]
→ [OK]
(2) Select the layout using [
▲] or [▼] → [OK]
Select Layout
2 on 1 (1)
2 on 1 (2)
4 on 1 (1)
4 on 1 (2)
When your document is placed on
the platen glass
(1) Set the next document and press [ ]
(Color) or [ ] (B & W).
Scan Next: Press Start
<Start Copying>
<Cancel>
SheetxCopy:1x1/1
Density: 0
(2) Select <Start Copying> using [▲] or [▼]
and press [OK].
* Repeat these steps until all documents are scanned.
+
-
N on 1
Off
2 on 1
4 on 1
ID Card Copy
Select <2 on 1> or <4 on 1> using [▲] or [▼]→[OK]
Scan Size
LTR
LGL
STMT
Select the size of the document using [▲] or [▼]→[OK]
Output Size
LTR:Plain
1
LTR:Plain
Select an output size using [▲] or [▼]→[OK]
<2 on 1>
<4 on 1>
Copy two pages
onto one sheet.
Copy four pages
onto one sheet.
3-8
Page 71
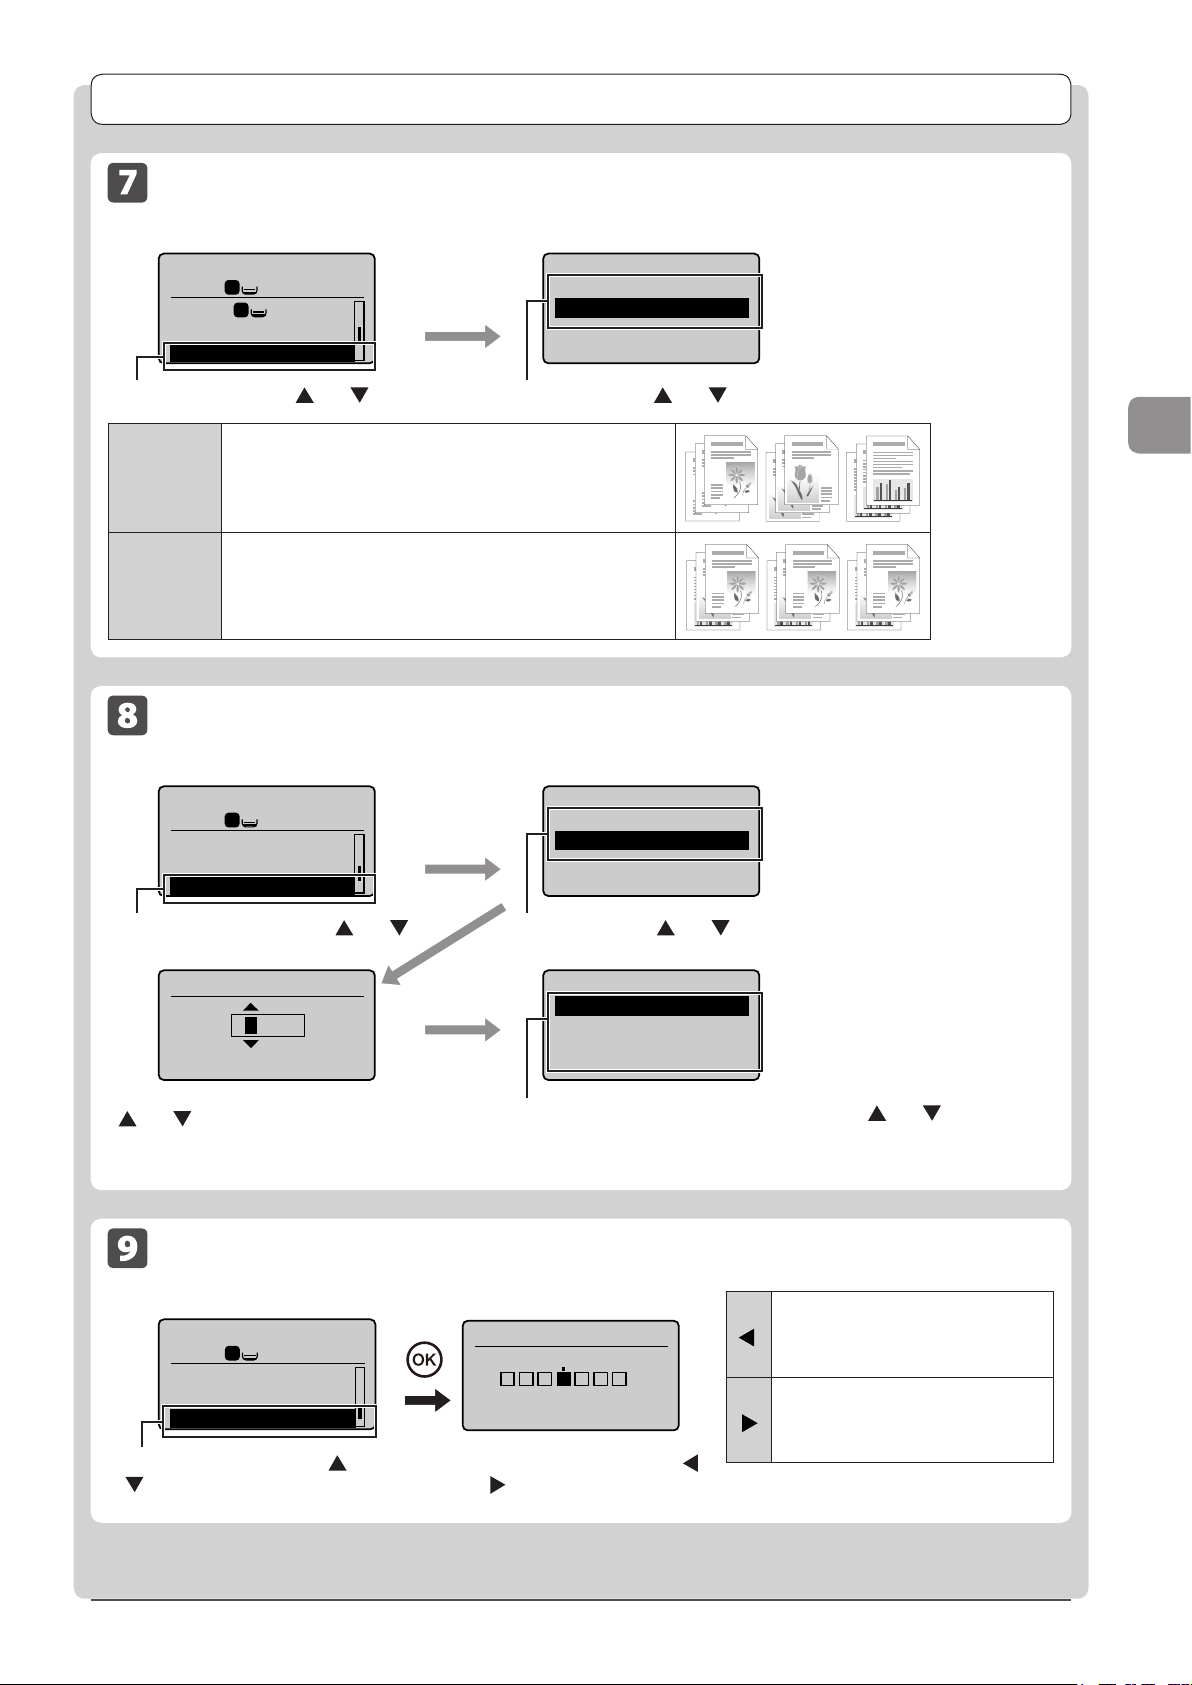
Copy Settings
Collating Copies
Copy mode screen Setting screen
Copy: Press Start
1
100% LTR
Paper: LTR:Plain
1
1
Collate
Off
On
N on 1: Off
Collate: Off
Select <On> using [ ] or [ ] → [OK]Select <Collate> using [ ] or [ ] → [OK]
Printouts of a complete job are grouped.
<Off>
<On>
For example, if you are copying three copies of a three-page
document, printouts of a complete job are grouped and arranged
in this page order: “1, 1, 1”, “2, 2, 2”, “3, 3, 3.”
Printouts of a complete job are collated.
For example, if you are copying three copies of a three-page
document, printouts of a complete job are grouped and arranged
in this page order: “1, 2, 3”, “1, 2, 3”, “1, 2, 3.”
Erase Dark Borders and Frame Lines (Frame Erase)
Copy mode screen Setting screen
Copy: Press Start
1
100% LTR
1
N on 1: Off
Collate: On
Erase Frame: Off
Select <Erase Frame> using [ ] or [ ] →
[OK]
Erase Frame
Off
On
Select <On> using [ ] or [ ] → [OK]
Copying
Specify Frame Width
Scan Size
LTR
0_1/8 "
(1/16-1_15/16)
Select the frame width to be erased using
[
] or [ ] → [OK] You can also enter the
LGL
STMT
Select the size of the original document using [
frame width to be erased using the numeric
keys.
Emphasize the Outline of an Image (Sharpness)
Copy mode screen Setting screen
Copy: Press Start
1
100% LTR
Collate: On
Erase Frame: Off
Sharpness: 0
+
-
Select <Sharpness> using [ ] or
[ ] → [OK]
1
Sharpness
- +
Adjust the sharpness using [
or [
] → [OK]
] or [ ] → [OK]
Reduces distorted pattern (moire).
It is appropriate for documents that
[
]
contain halftone such as printed
photos.
Raise the sharpness and emphasize the
outline of text or lines.
]
[
It is appropriate for documents which
]
are blueprints or thinly penciled.
3-9
Page 72
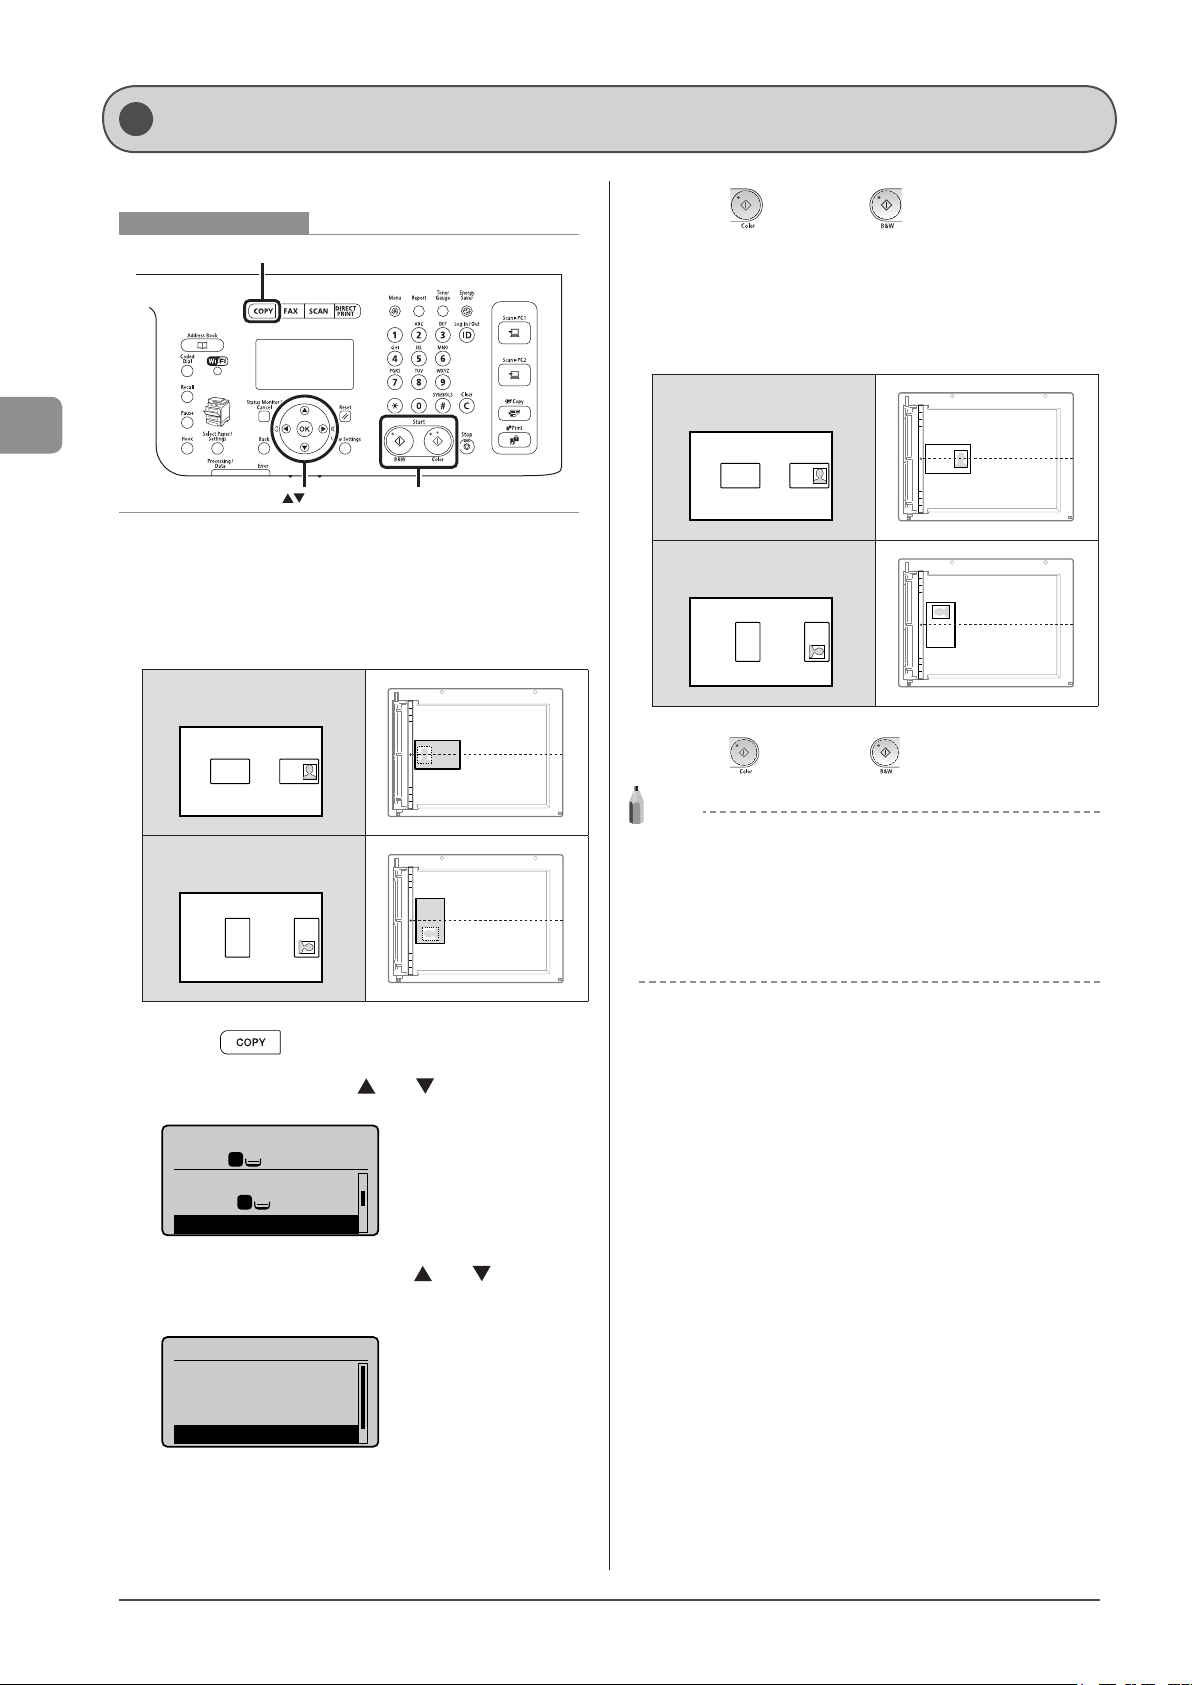
Copying an ID Card
Copy a 2-sided card onto one side of paper.
Keys to be used for this operation
COPY
5 Press [ ] (Color) or [ ] (B & W).
Proceed to the next step when the scan is complete.
6 Turn sides.
Place the card with spacing of 1/4” (5 mm) from the left edge of the
platen glass.
Align the center of the card with the arrow mark, as shown below.
Copying
OK Start
1 Place a card on the platen glass and close the
feeder or the platen glass cover.
Place the card with spacing of 1/4” (5 mm) from the left edge of the
platen glass.
Align the center of the card with the arrow mark, as shown below.
To place the card
horizontally
If you want to arrange the
cards vertically
A4
B4
A5
A5
B4
A4
To place the card
horizontally
To place the card
vertically
A4
B4
A5
A5
B4
A4
A4
B4
A5
A5
B4
A4
7 Press [ ] (Color) or [ ] (B & W).
NOTE
To place your document (card) on the platen glass
Place the card on the left half of the platen glass.
Copy ratio
The copy ratio is automatically set to <100%>.
Supported paper sizes
Sizes larger than A4/Letterg
2 Press [ ].
3 Select <N on 1> using [ ] or [ ] and press [OK].
Copy: Press Start
100% LTR
Copy Ratio: 100% Di
Paper: LTR:Plain
N on 1: Off
1
1
1
...
4 Select <ID Card Copy> using [ ] or [ ] and press
[OK].
N on 1
Off
2 on 1
4 on 1
ID Card Copy
3-10
Page 73
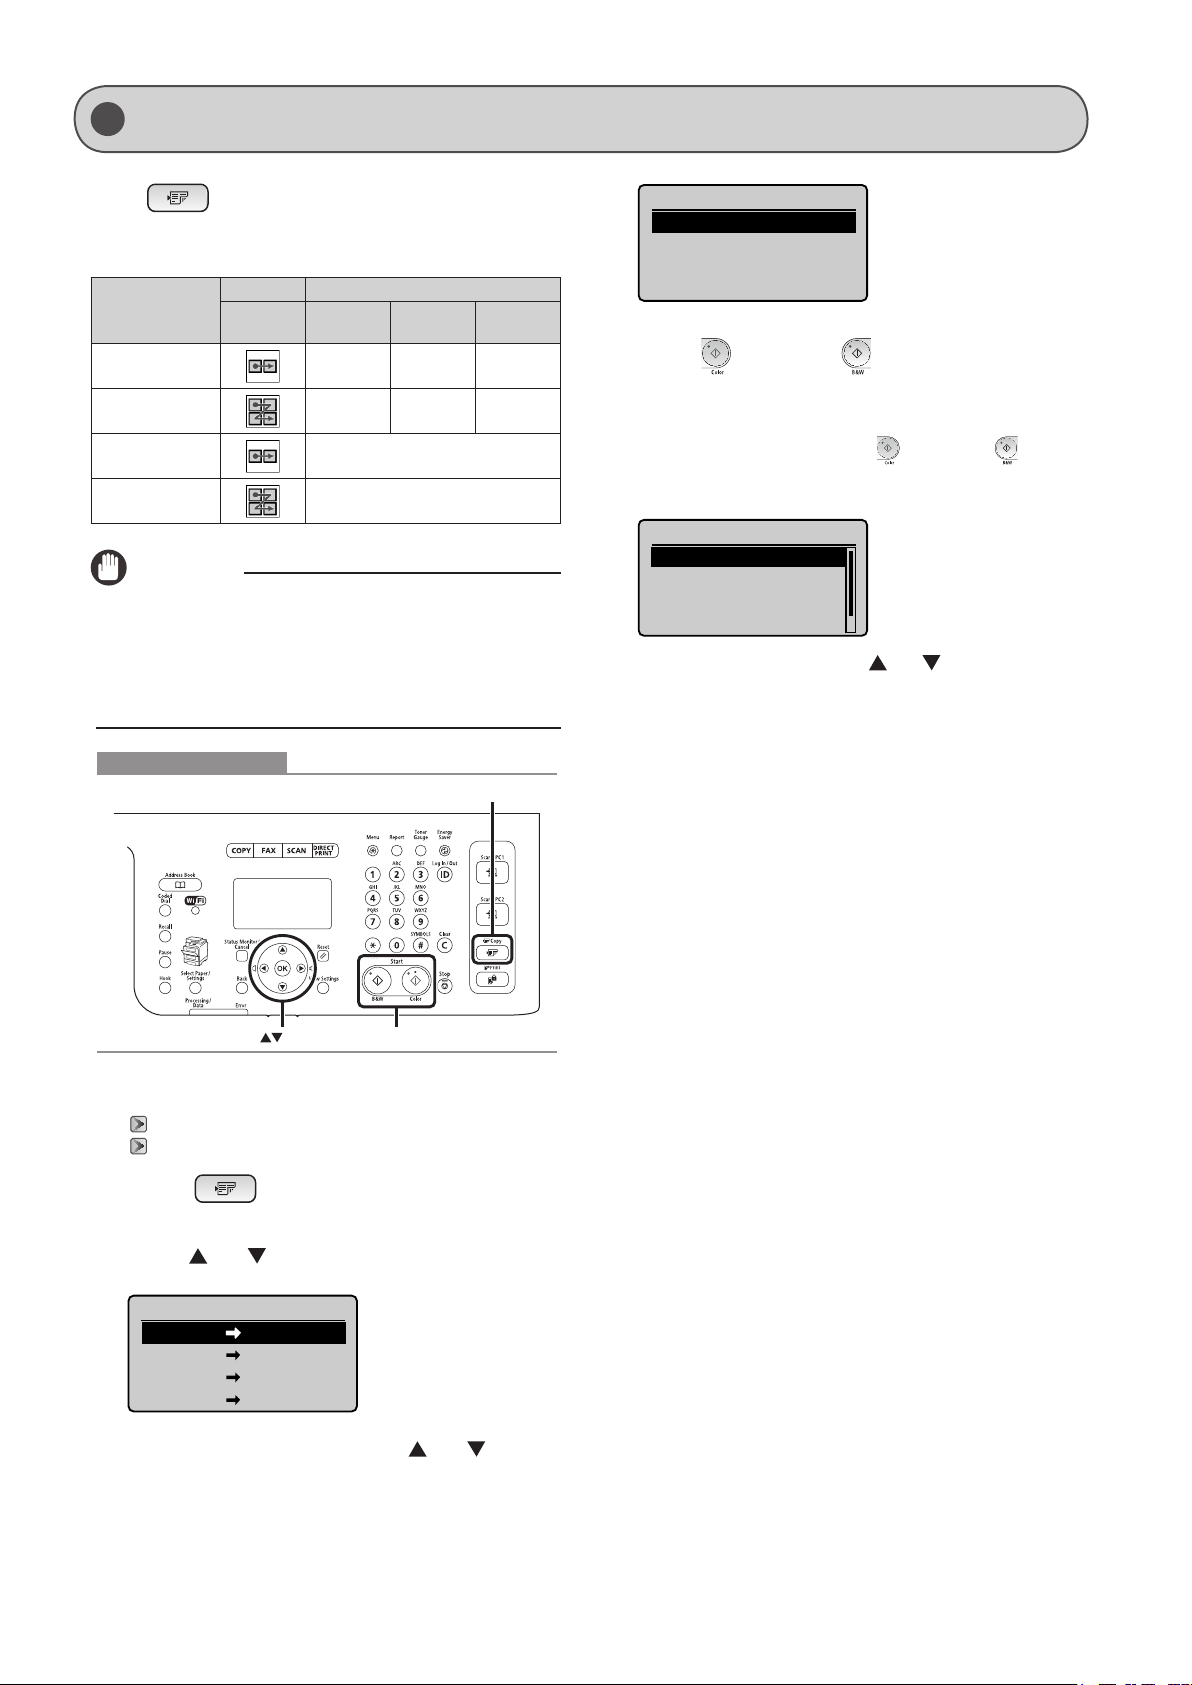
Copying by Saving Paper
Scan Next: Press Start
Press [ ] (Paper Save Copy) to save paper when
making a copy.
Choose one of the following four combinations of 2 on 1/4 on
1 and 2-Sided copy settings, as shown in the table below.
N on 1 2-Sided
2 on 1 1->2-Sided
(MF8380 only)
4 on 1 1->2-Sided
(MF8380 only)
2 on 1 1->1-Sided
4 on 1 1->1-Sided
Select
Layout
Format
Settings
1->2-Sided Portrait Book Type
1->2-Sided Portrait Book Type
Original
Orientation
OFF
OFF
Original
Format
IMPORTANT
Precautions on 2-Sided Copying
Do not touch your document when making 2-sided copying
until the process is complete. After copying on the front side is
complete, the document is partially output, reserved, and fed into
the machine again for copying on the back side.
Keys to be used for this operation
Paper Save Copy
Scan Size
LTR
LGL
STMT
5 Press [ ] (Color) or [ ] (B & W).
When the document is placed on the platen glass
(1) Place the next page and press [
W).
* Repeat this step until all pages are scanned.
<Start Copying>
<Cancel>
SheetxCopy:1x1/1
Density: 0
(2) Select <Start Copying> using [ ] or [ ] and press [OK].
+
-
] (Color) or [ ] (B &
1 Place your document.
“Placing Documents” (→P. 2-4)
“Supported Document Types” (→P. 2-2)
2 Press [ ] (Paper Save Copy).
3 Select the combination that you want to use
using [ ] or [ ] and press [OK].
Paper Save Copy
2 on 1 1 2-Sided
4 on 1 1 2-Sided
2 on 1 1 1-Sided
4 on 1 1 1-Sided
4 Select the document size using [ ] or [ ] and
press [OK].
OK Start
3-11
Page 74
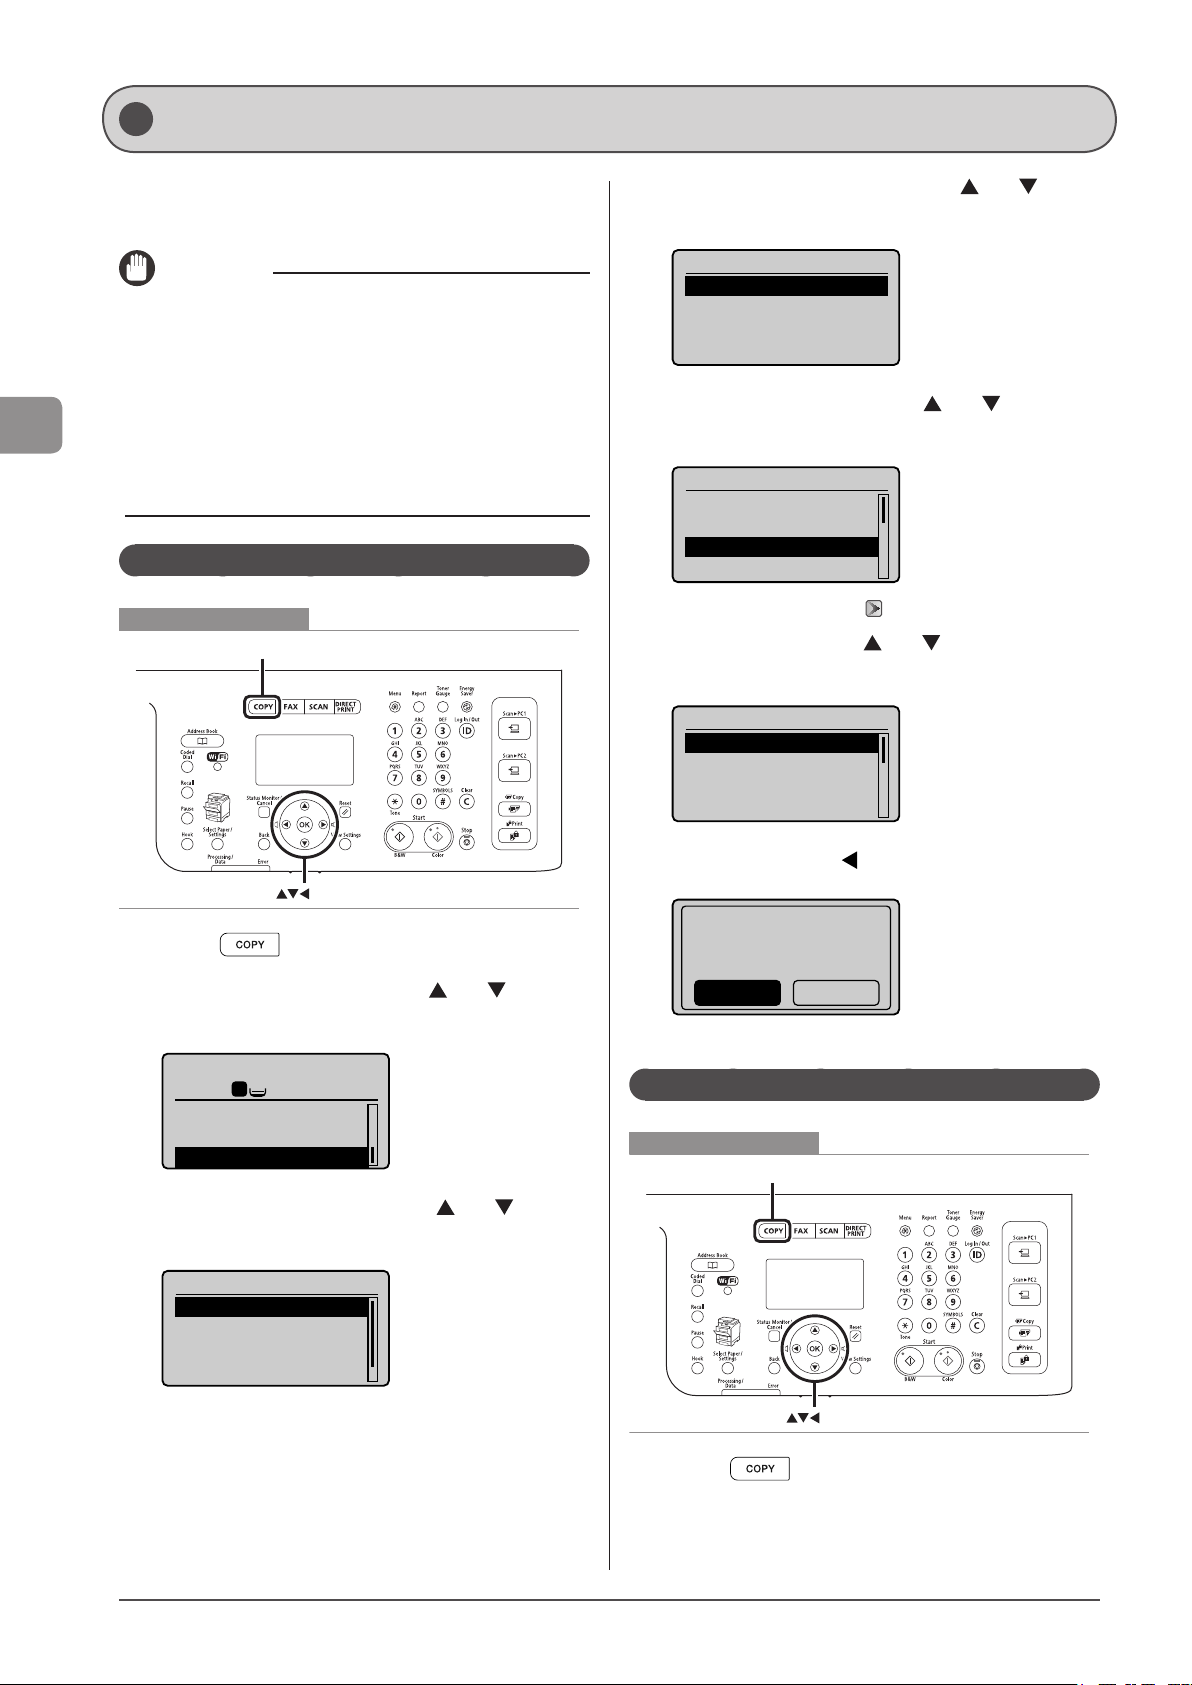
Registering and Using Combination of Copy Settings (Mode Memory)
Copying
You can register up to four combinations of frequently used
copy settings to the “Mode memory” in advance.
IMPORTANT
Registered settings of Mode Memory
• Registered settings in the Mode Memory are saved even during
power OFF.
• When settings which require optional products are registered
in a Mode Memory, the memory becomes unavailable if that
optional product is removed, but its settings remain saved.
• When an optional drawer usage is registered in a Mode Memory,
the paper feeding setting is changed to Drawer 1 if that optional
drawer is removed. (MF8380Cdw Only)
Registering Mode Memory
Keys to be used for this operation
COPY
4 Select the place to register using [ ] or [ ] and
press [OK].
Register/Delete
Mode 1
Mode 2
Mode 3
Mode 4
5 Select items to specify using [ ] or [ ] and press
[OK].
Mode 1
<Apply>
<Delete>
No. of Copies: 1
Density: 0
For details on the settings, see “Copy Settings” (→P.3-7).
+
-
6 Select <Apply> using [ ] or [ ] after you have
specified the setting and press [OK].
Mode 1
<Apply>
<Delete>
No. of Copies: 1
Density: 0
+
-
OK
1 Press [ ].
2 Select <Mode Memory> using [ ] or [ ] and
press [OK].
Copy: Press Start
100% LTR
Erase Frame: Off
Sharpness: 0
Mode Memory: Off
1
+
-
1
3 Select <Register/Delete> using [ ] or [ ] and
press [OK].
Mode Memory
Register/Delete
Mode 1
Mode 2
Mode 3
7 Select <Yes> using [ ] and press [OK].
Register?
NoYes
* Follow the same steps for overwriting settings as well.
Deleting Mode Memory
Keys to be used for this operation
COPY
OK
3-12
1 Press [ ].
Page 75
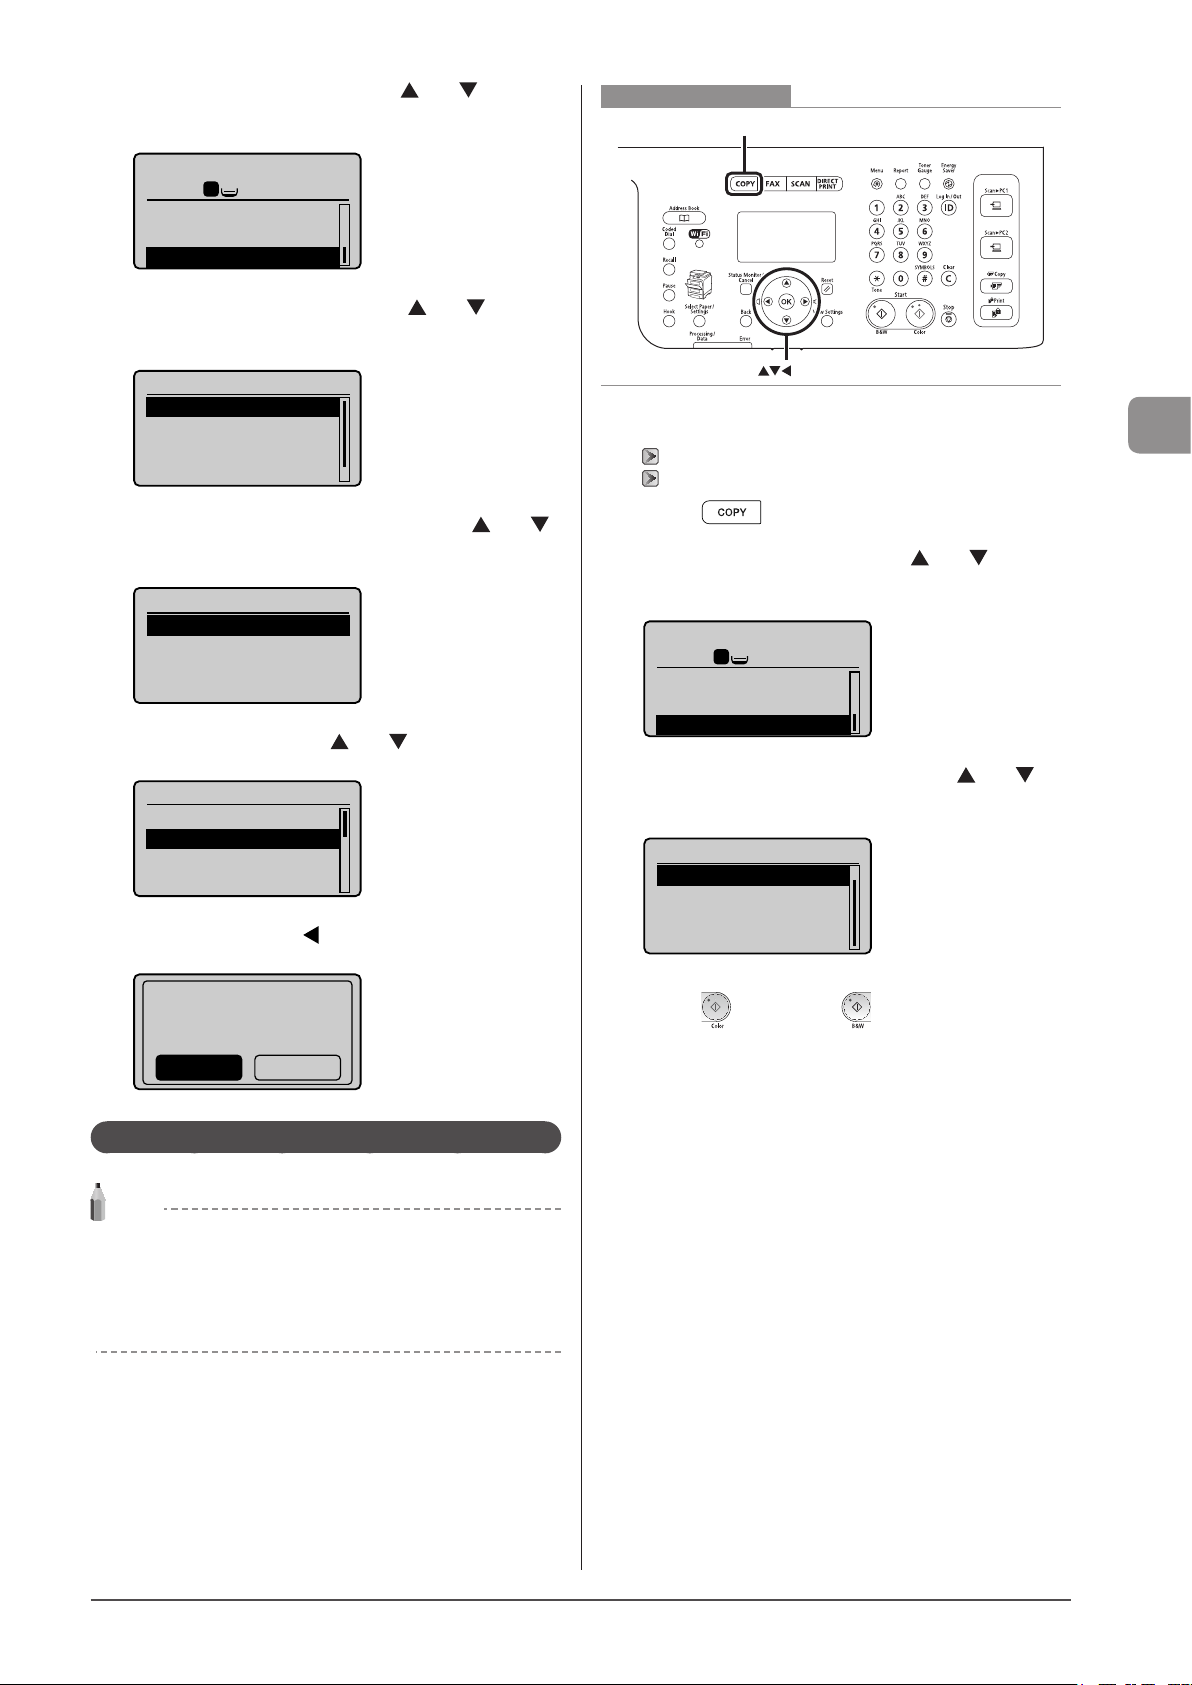
2 Select <Mode Memory> using [ ] or [ ] and
press [OK].
Copy: Press Start
100% LTR
Erase Frame: Off
Sharpness: 0
Mode Memory: Off
1
+
-
1
3 Select <Register/Delete> using [ ] or [ ] and
press [OK].
Keys to be used for this operation
COPY
Mode Memory
Register/Delete
Mode 1
Mode 2
Mode 3
4 Select a Mode Memory to delete using [ ] or [ ]
and press [OK].
Register/Delete
Mode 1
Mode 2
Mode 3
Mode 4
5 Select <Delete> using [ ] or [ ] and press [OK].
Mode 1
<Apply>
<Delete>
No. of Copies: 1
Density: 0
+
-
6 Select <Yes> using [ ] and press [OK].
OK
1 Place your document.
“Placing Documents” (→P.2-4)
“Supported Document Types” (→P.2-2)
2 Press [ ].
3 Select <Mode Memory> using [ ] or [ ] and
press [OK].
Copy: Press Start
100% LTR
Erase Frame: Off
Sharpness: 0
Mode Memory: Off
1
+
-
1
4 Select a Mode Memory to call using [ ] or [ ]
and press [OK].
Mode Memory
Mode 1
Mode 2
Mode 3
Mode 4
Copying
Delete?
NoYes
Calling and Copying Mode Memory
NOTE
Calling Mode Memory
• When a new Mode Memory is called, all copy settings are
replaced with that Mode Memory settings.
• After the Mode Memory is called, you can change and copy the
settings as you like.
5 Press [ ] (Color) or [ ] (B & W).
3-13
Page 76
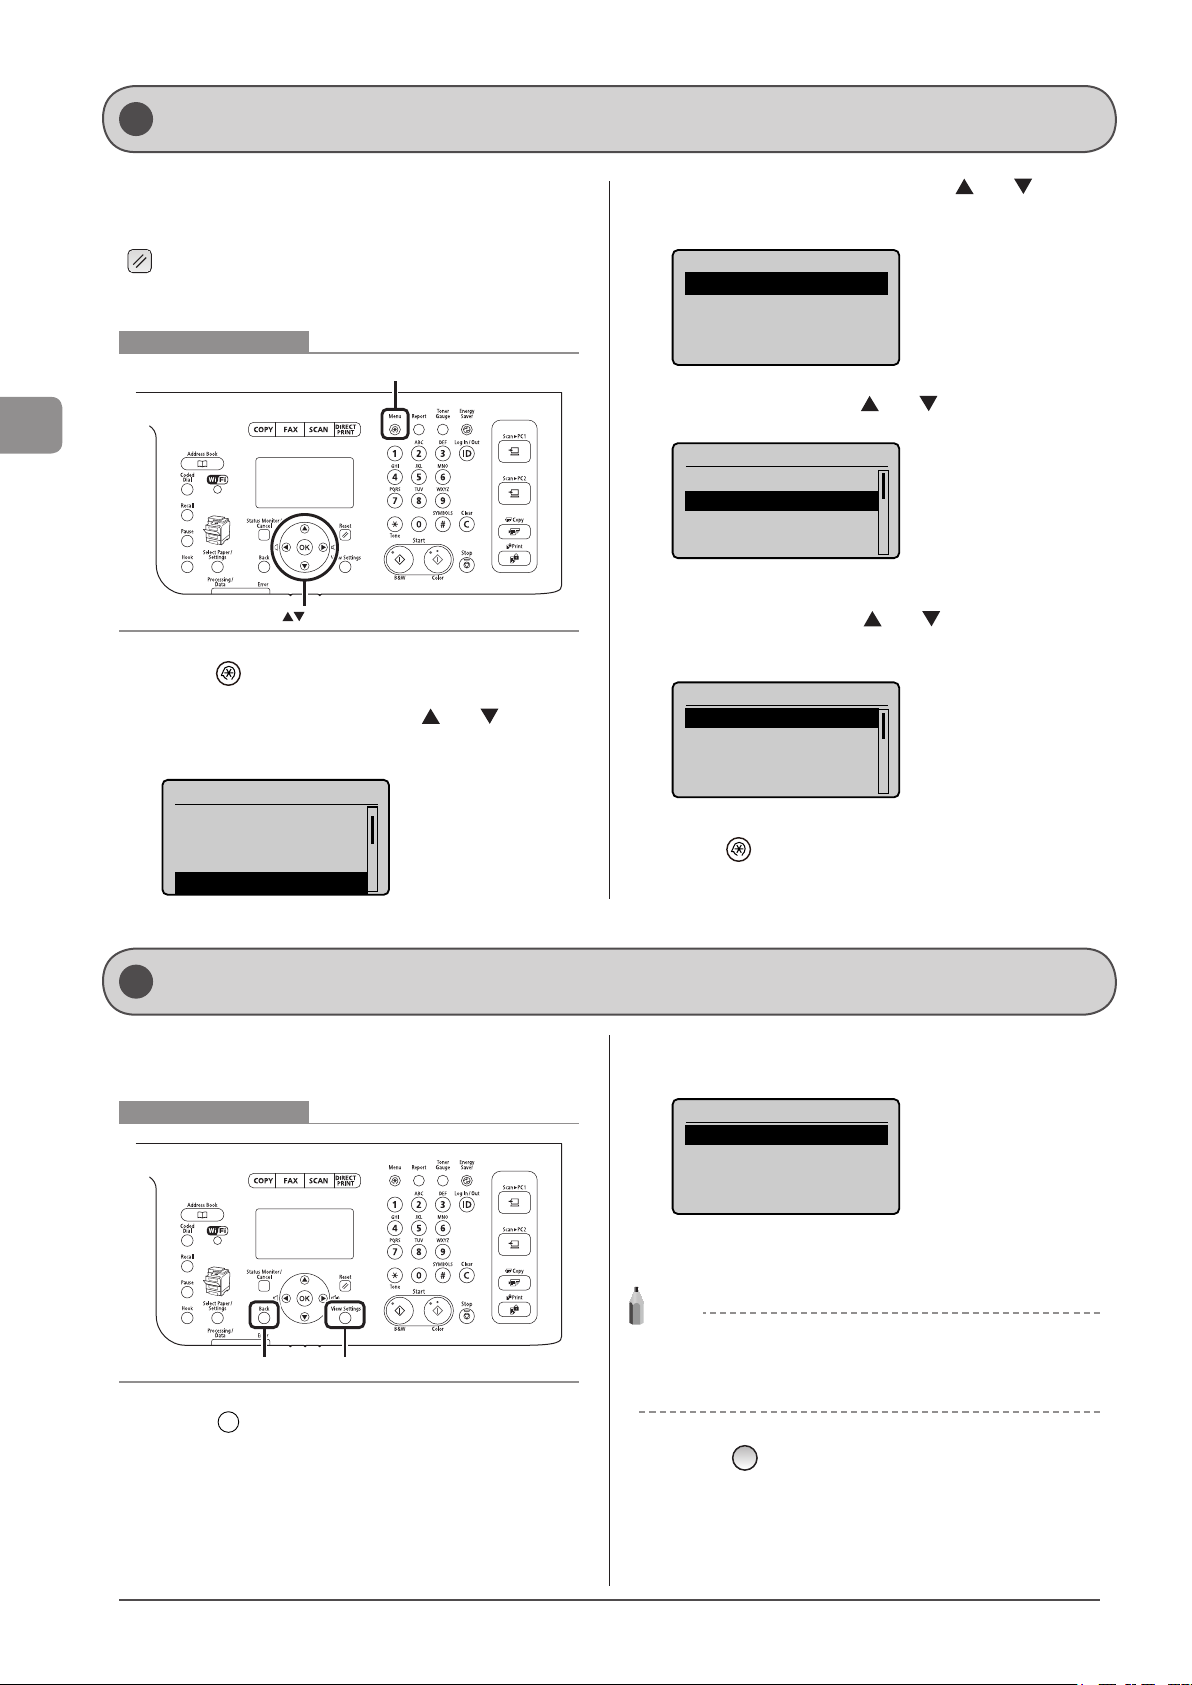
Changing the Default Values
Copying
The default settings are a set of standard settings
predetermined by the machine. These settings become
effective when the machine is turned OFF and ON, or when
] (Reset) is pressed to revert to the default settings. You
[
can change the following default settings based on your
needs.
Keys to be used for this operation
Menu
OK
1 Press [ ] (Menu).
2 Select <Copy Settings> using [ ] or [ ] and
press [OK].
Menu
Preferences
Timer Settings
Common Settings
Copy Settings
3 Select <Change Defaults> using [ ] or [ ] and
press [OK].
Copy Settings
Change Defaults
4 Select the item using [ ] or [ ] and press [OK].
Change Defaults
<Apply>
No. of Copies: 1
Density: 0
Original Type: Text
For more information, see “Copy Settings” (→P.3-7).
+
-
...
5 Select <Apply> using [ ] or [ ] after you have
specified the setting and press [OK].
Change Defaults
<Apply>
No. of Copies: 1
Density: 0
Original Type: Text
+
-
...
6 Press [ ] (Menu) to close the menu screen.
Viewing Copy Settings
You can confirm the settings of copy function which have been
changed from the default setting.
Keys to be used for this operation
View SettingsBack
1 Press [ ] (View Settings).
The current settings in the machine are displayed.
* If you have not changed the default settings, the message <No
settings have been changed.> is displayed.
View Settings
Density: +1
Original Type: Text/
Sharpness: +1
...
2 Check your settings.
NOTE
You can change those settings
Select items and press [OK] to display a setting screen for those
items, where you can change those settings.
3 Press [ ] (Back) to return to the standby
display.
3-14
Page 77

Printing from a Computer
This category describes how to print from computers.
Preparing to Print from Your Computer 4-2
Printing from a Computer 4-3
Scaling Documents 4-3
Printing Multiple Pages on One Sheet 4-3
1-sided Printing and 2-sided Printing (MF8380Cdw Only) 4-4
Checking and Canceling Print Jobs 4-5
Chapter
4
4-1
Page 78
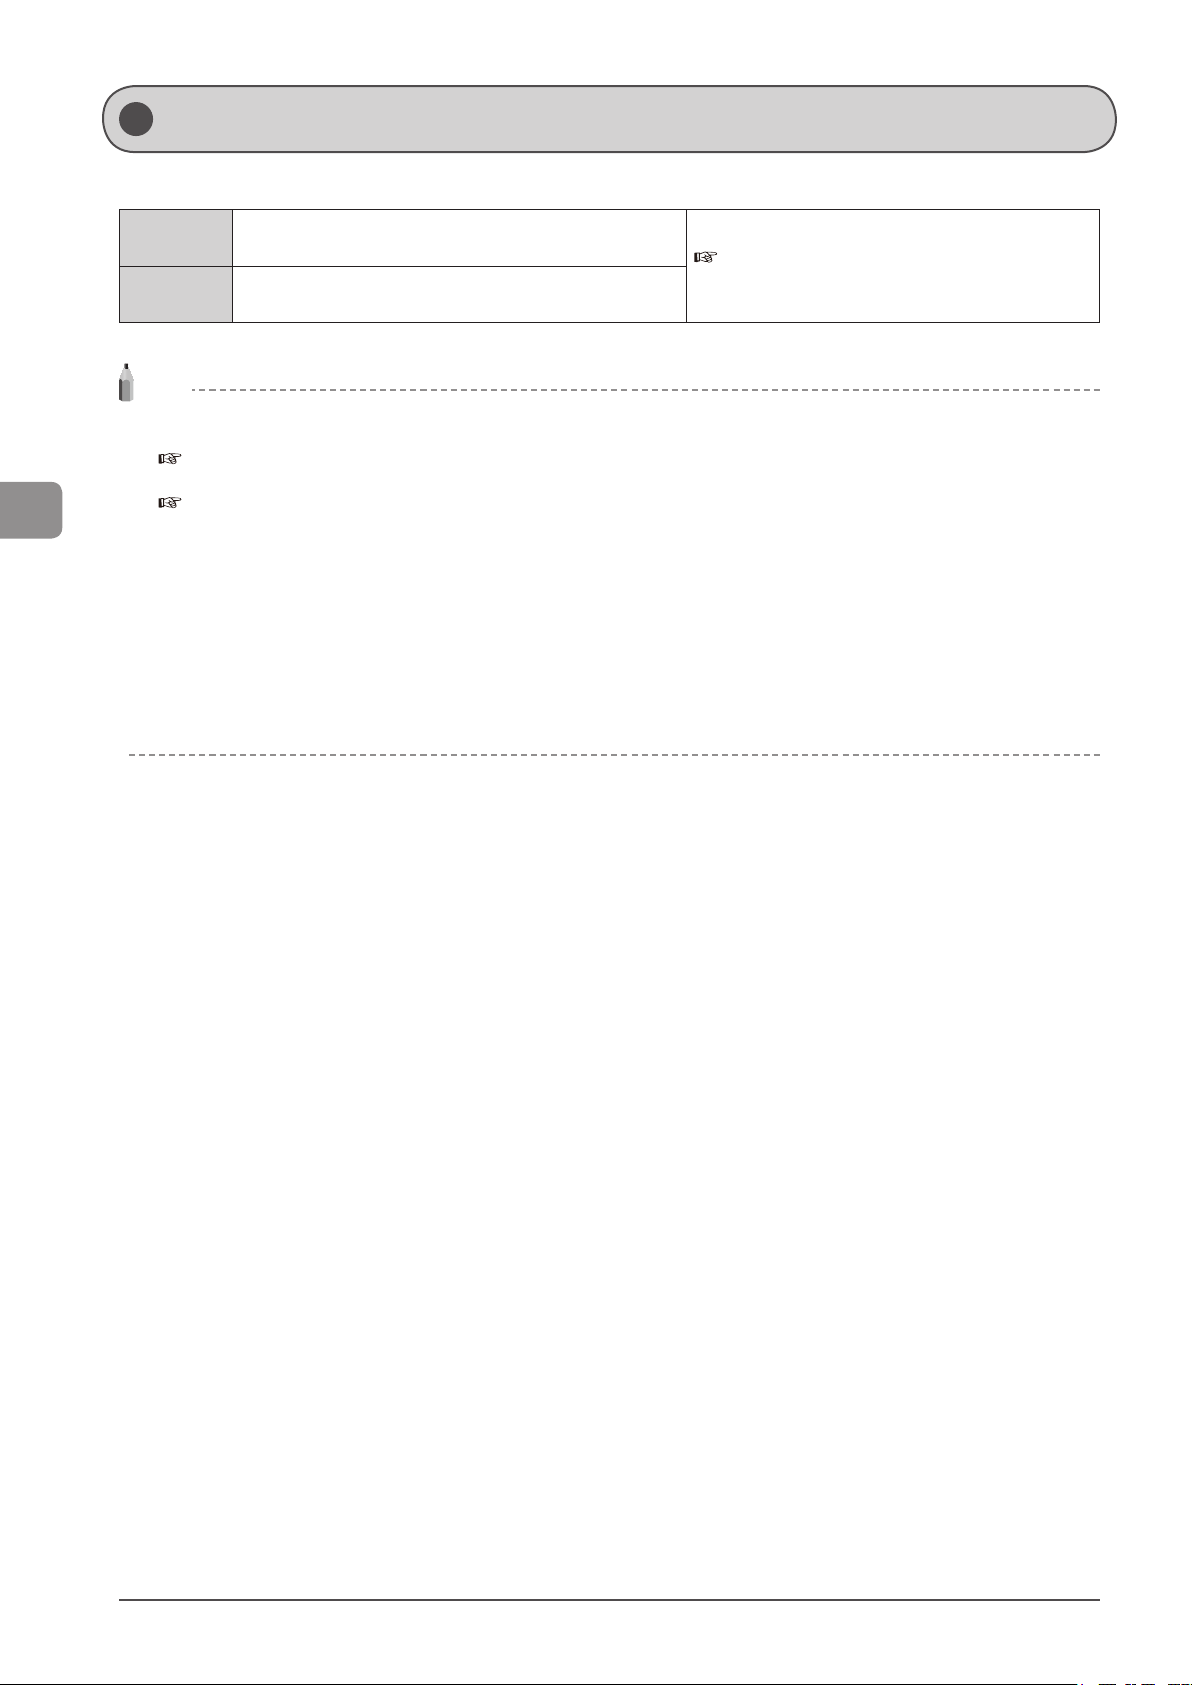
Preparing to Print from Your Computer
To print your documents files from your computer, perform the following steps.
Printing from a Computer
Step 1
Step 2
Choose between USB and network connections.
Starter Guide → 4 Connecting to a Computer and
Installing the Drivers
Install the printer driver.
NOTE
To change the port number of the machine
See the following section.
e-Manual → Security → Restricting network connections → Setting Protocol Port Numbers
Change printer settings on your computer when changing the port number of the machine.
e-Manual → Network Settings → Setting Up Your Computer to Print and Send Faxes (Windows Only) → Configuring Printer Settings on Your
Computer
About the printer driver
The printer driver is software required for printing from an application. The printer driver will convert application software’s print data to print data
for the printer.
The printer driver for this machine has the following features.
• The printer driver for this machine enables you to output print data at an optimum speed by dividing the workload using a computer and the
printer.
• As well as providing faster and more stable printing than conventional models, the printer driver for this machine uses less memory to operate.
• In addition to the conversion of print data, the printer driver for this machine is equipped with the functions capable of spooling print data and
configuring the print condition, and various types of print finishing can be set such as scaling or gutter adjustment.
4-2
Page 79
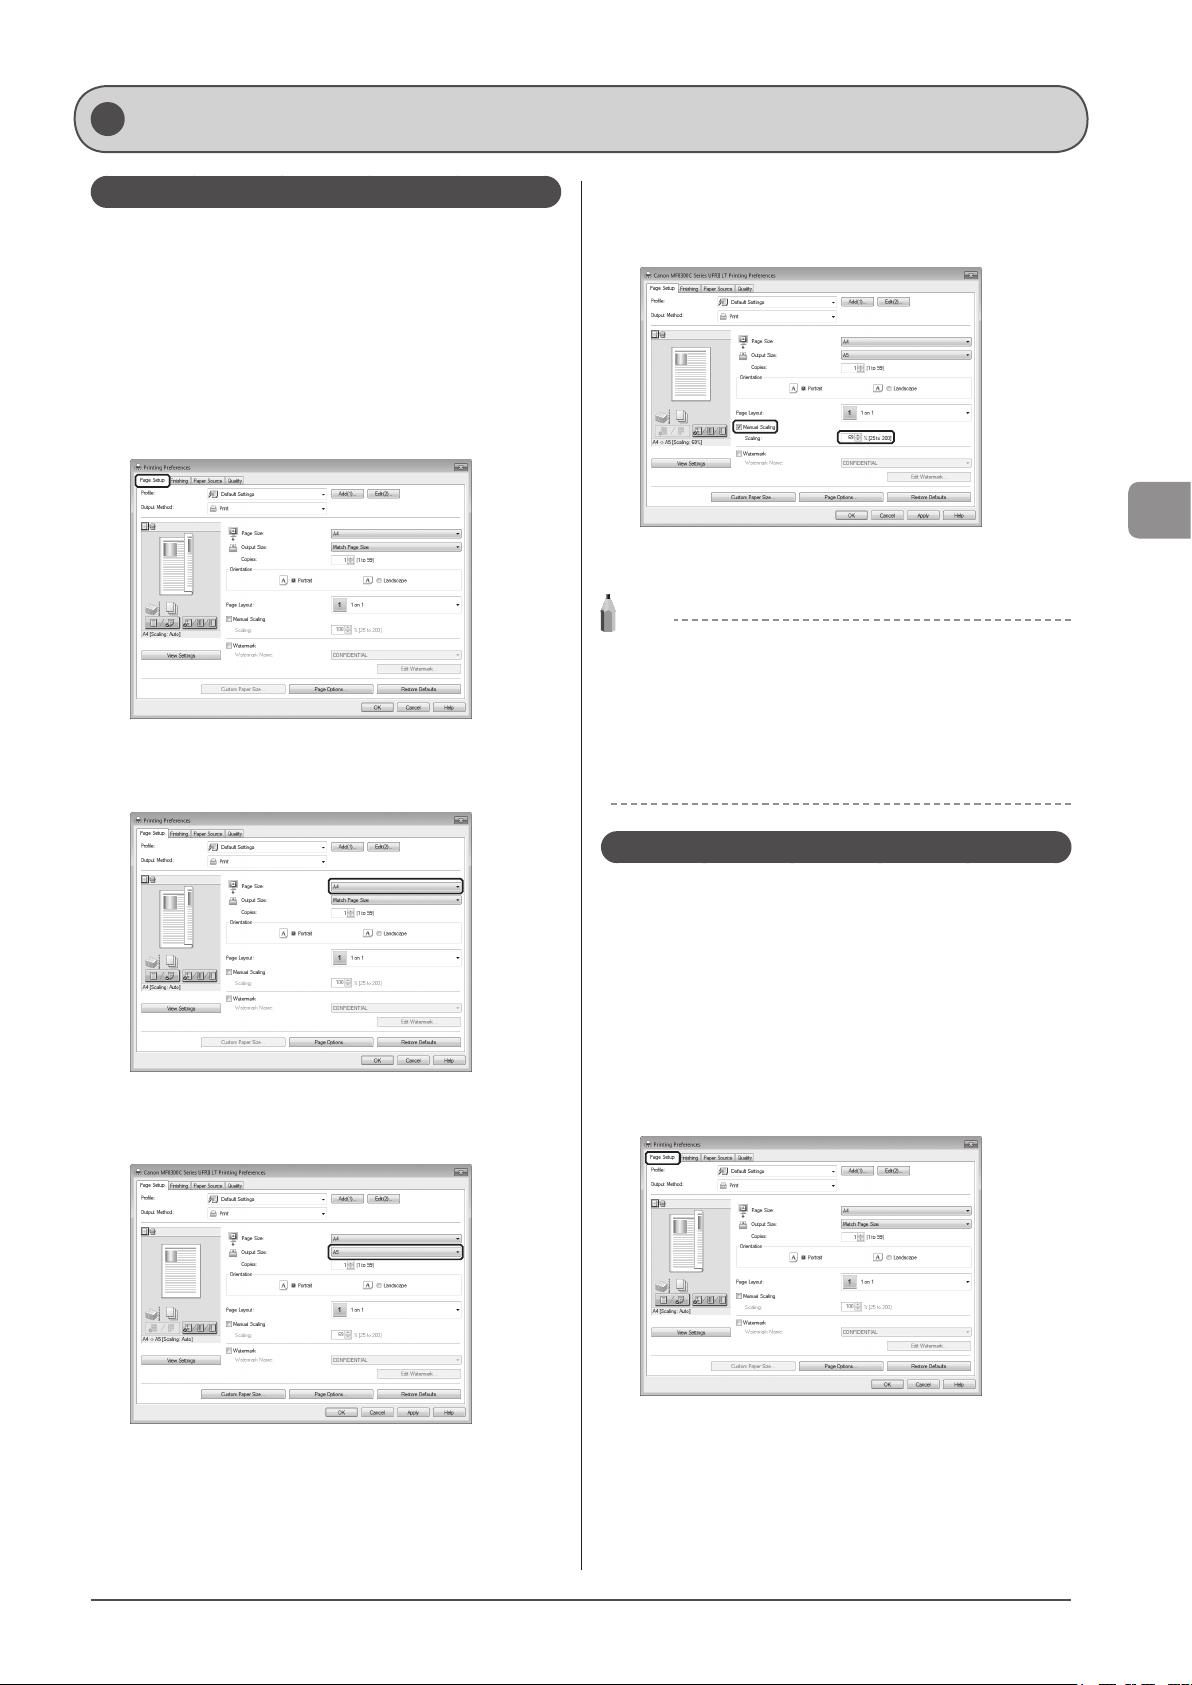
Printing from a Computer
Scaling Documents
You can enlarge or reduce documents to match the output
paper size.
There are two methods for scaling a document: select the
output size of the document to scale it automatically, or
specify the scaling value manually.
1 Click [Page Setup].
For instructions on how to display the printer driver screen, see
“Printing” or “Configuring the Default Print Settings” in the e-Manual.
2 Select paper size of the document you created in
the application from [Page Size].
4 If you want to increase or decrease the
magnification manually, select [Manual Scaling]
→ specify the scaling ratio for [Scaling].
Printing from a Computer
5 Click [OK].
NOTE
• Depending on the selected page size and printer model you are
using, you may not be able to magnify the document.
• Depending on the printer model you are using, you may not
be able to magnify the document to the optimum ratio for the
selected page size.
• The display may differ according to the operating system, as well
as the type and version of the printer driver.
3 Select output size of the document from [Output
Size].
The document is scaled automatically according to the settings
made in [Page Size] and [Output Size].
Printing Multiple Pages on One Sheet
Multiple pages can be printed on one sheet of paper.
You can reduce and print multiple pages on a single sheet of
paper. You can place 2, 4, 6, 8, 9, and 16 pages of documents
on a single sheet of paper. Using this feature, you can make
materials that are easy to view. Also, this feature helps you to
save paper, and save space when storing.
1 Click [Page Setup].
For instructions on how to display the printer driver screen, see
“Printing” or “Configuring the Default Print Settings” in the e-Manual.
4-3
Page 80
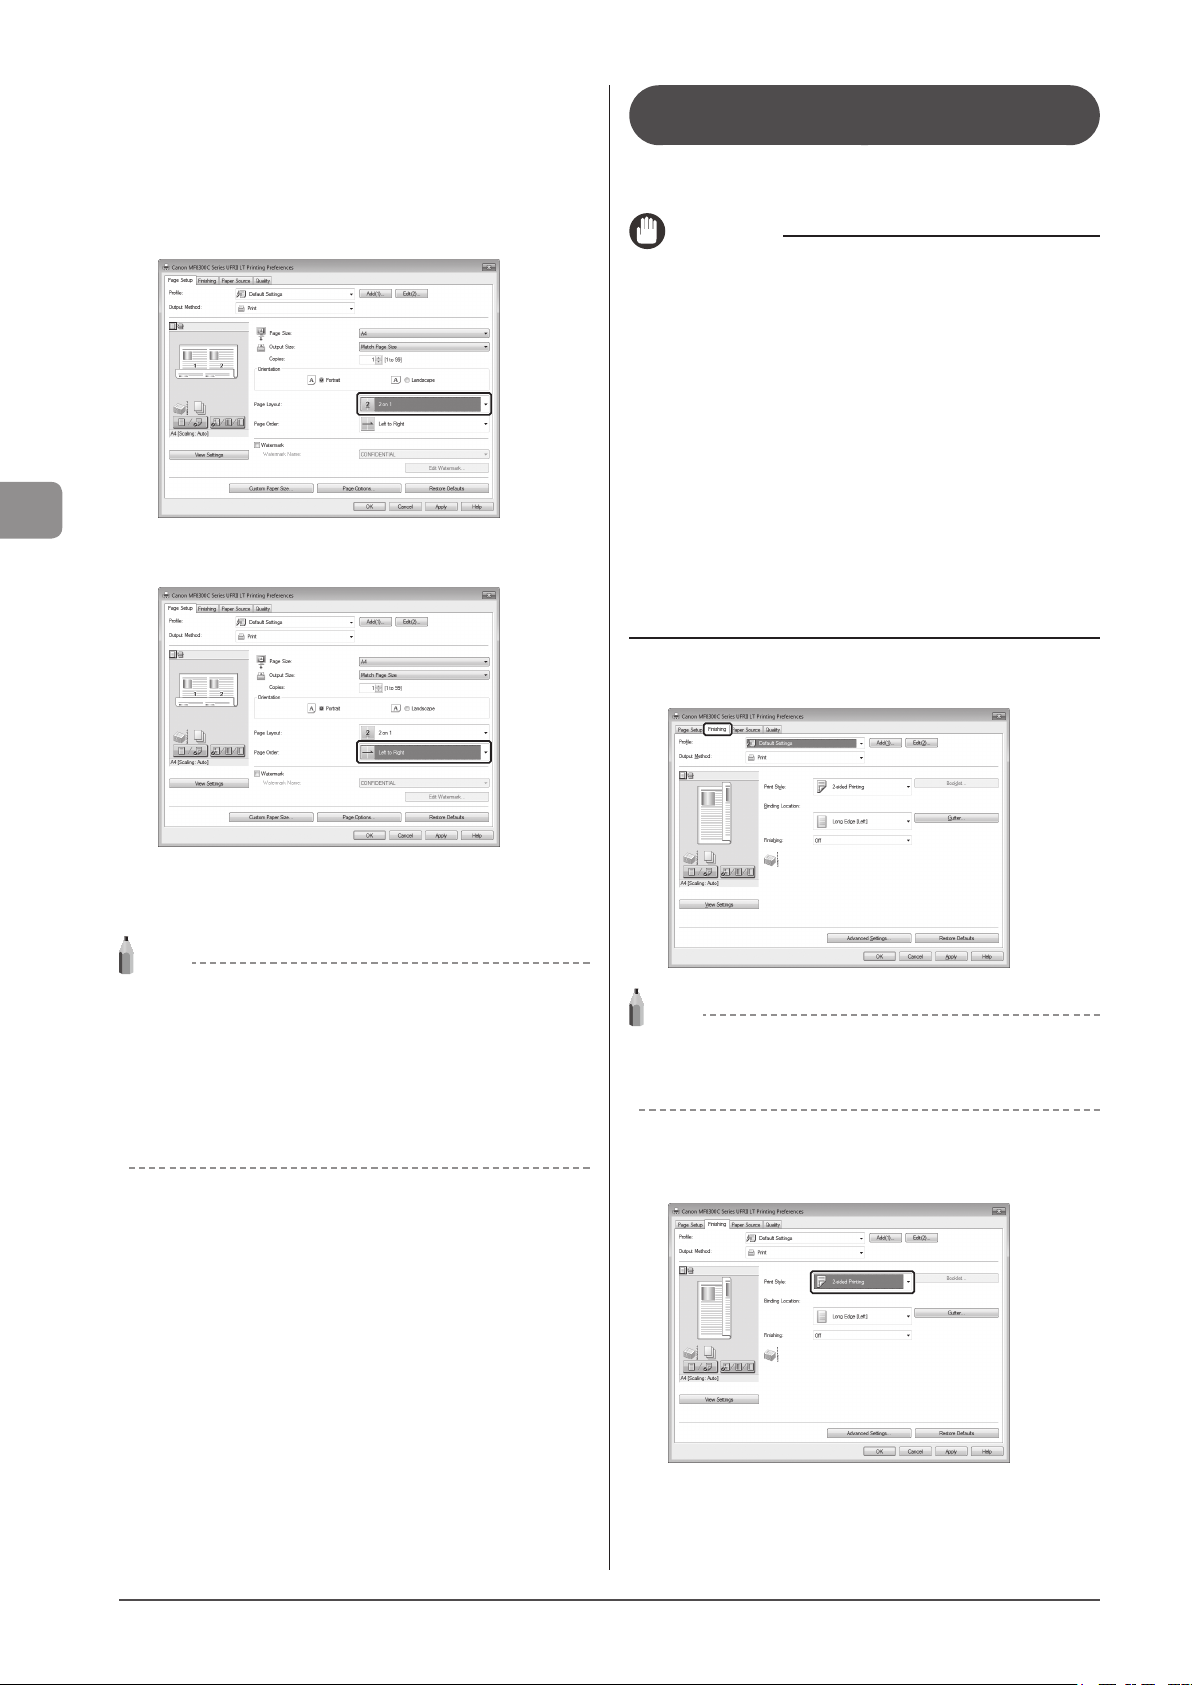
Printing from a Computer
2 Select [N on 1] from [Page Layout] (where “N” is
the number of pages you want to print on the
sheet).
If you cannot select the options for [Page Layout], display the
[Device Settings] sheet, and then select [Auto] or [Enabled] from
[Spooling at Host]. For instructions on how to display the [Device
Settings] sheet, see “Setting the Printer Options”in the e-Manual.
3 Select the page order from [Page Order].
1-sided Printing and 2-sided Printing (MF8380Cdw Only)
You can select whether to print on one side or both sides of
each sheet of paper. The default setting is 2-sided printing.
IMPORTANT
Notes on 2-Sided Copying
Do not touch your document when making 2-sided copying
until the process is complete. After copying on the front side is
complete, the document is partially output, reserved, and fed into
the machine again for copying on the back side.
Copying on the back side of a printed document
(Manual 2-sided copying)
Two-sided copying can be performed manually using a printed
document. Place a printed document in the multi-purpose tray to
copy on the back side*.
To copy on the back side of a printed document, smooth out the
curling edges of the sheets and place them one by one in the
multi-purpose tray.
* This feature is supported only for sheets printed from this
machine. You cannot make a copy on the printed side.
* If you are using A5 paper, the reverse side may not be printed
correctly.
The output image is displayed in the preview area.
4 Click [OK].
NOTE
• You cannot enlarge and reduce manually when using this
function.
• Although there may be a function for printing multiple copies
depending on the application you are using, do not use it
together with this function. If you do, printing may not be
executed correctly.
• The display may differ according to the operating system, as well
as the type and version of the printer driver.
1 Click [Finishing].
NOTE
• For instructions on how to display the printer driver screen,
see “Printing” or “Configuring the Default Print Settings” in the
e-Manual.
2 Select [1-sided Printing] or [2-sided Printing] from
[Print Style].
4-4
Page 81
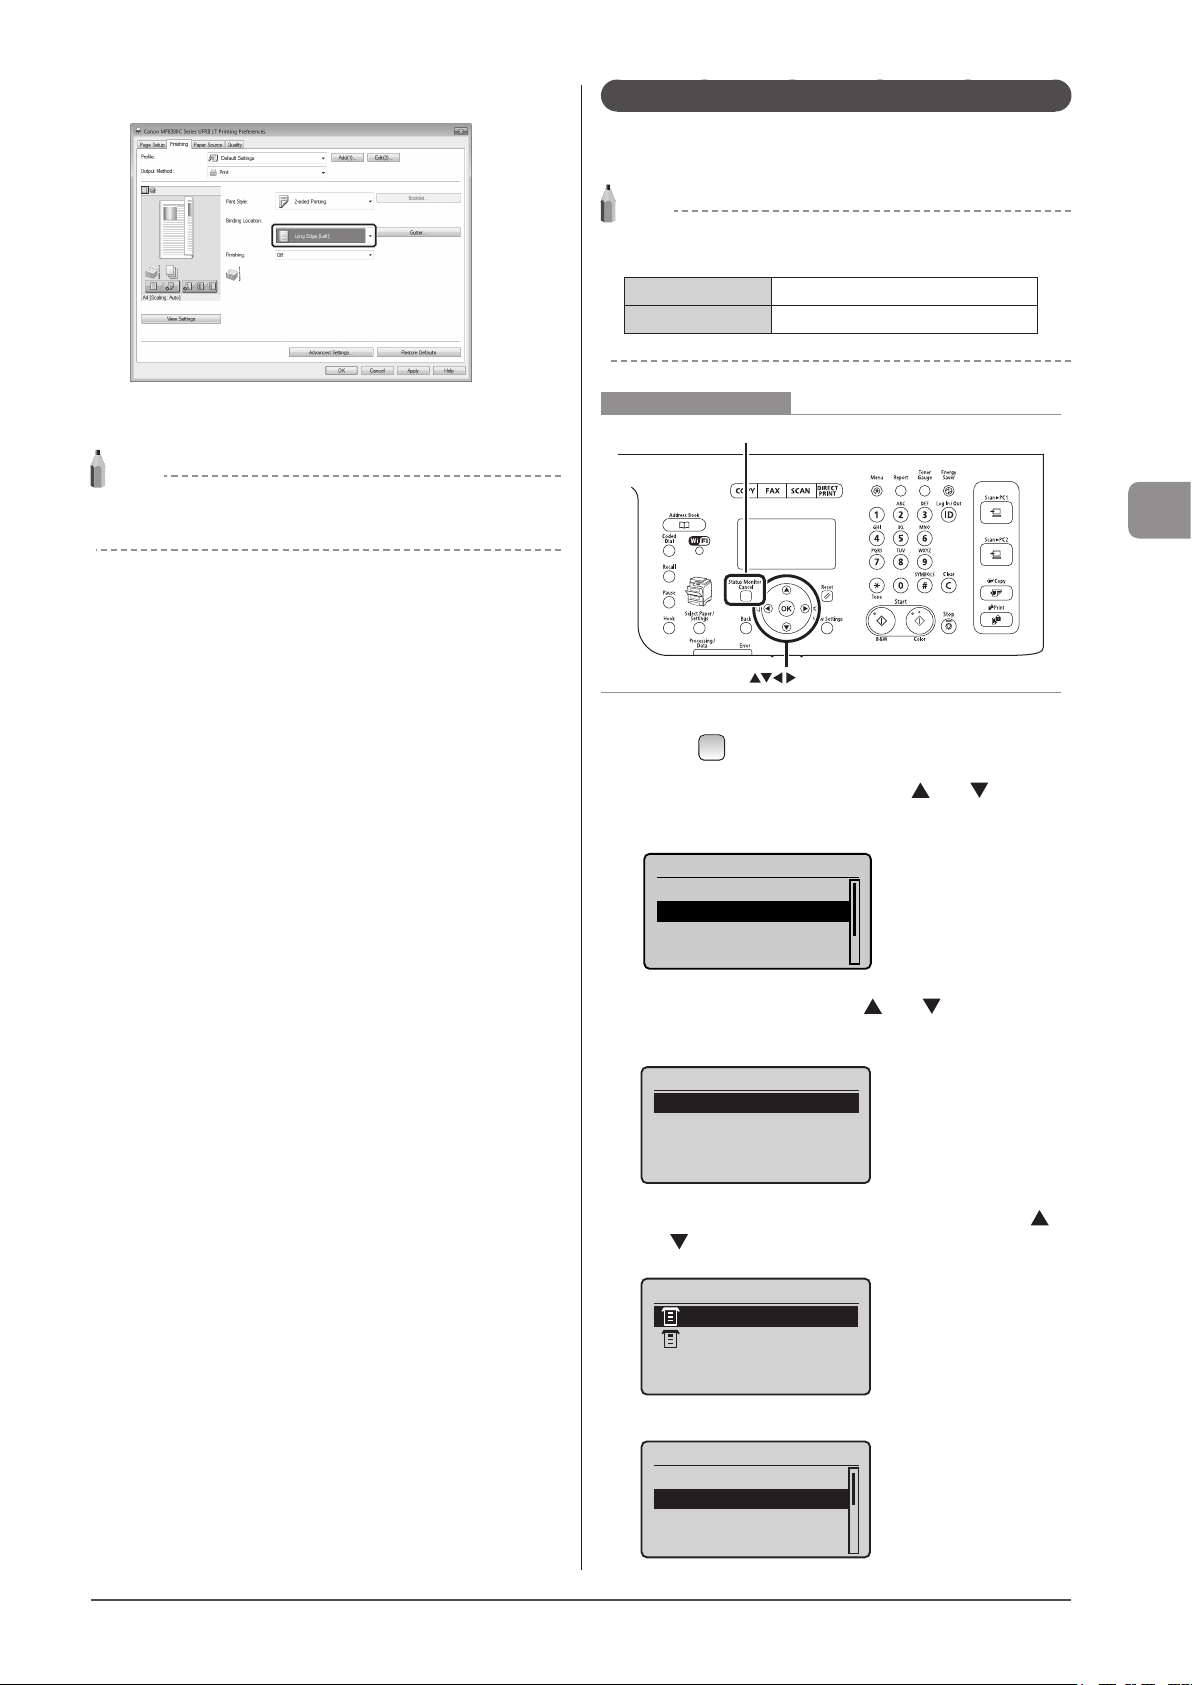
3 Select the binding edge from [Binding Location].
Copy/Print Job Status
4 Click [OK].
NOTE
The display may differ according to the operating system, as well as
the type and version of the printer driver.
Checking and Canceling Print Jobs
You can check detailed information about print jobs in the
middle of currently printing or waiting.
NOTE
If the Processing/Data Indicator on the operation panel
is:
Turned on/blinking A job is being processed.
Turned off No jobs are in the memory.
Keys to be used for this operation
Status Monitor/Cancel
Printing from a Computer
OK
1 Press [ ] (Status Monitor/Cancel).
2 Select <Copy/Print Job> using [ ] or [ ] and
press [OK].
Status Monitor/Cancel
Device Status
Copy/Print Job
TX Job
RX Job
3 Select <Job Status> with [ ] or [ ], and the
press [OK].
Copy/Print Job
Job Status
Copy Job History
Print Job History
4 Select a job to be checked or canceled using [ ]
or [ ] and press [OK].
09:42AM Printing
09:43AM Waiting
The detailed information is displayed.
Details
<Cancel>
Job Number: 0020
Status: Printing
Time: 01/01 09:42AM
4-5
Page 82
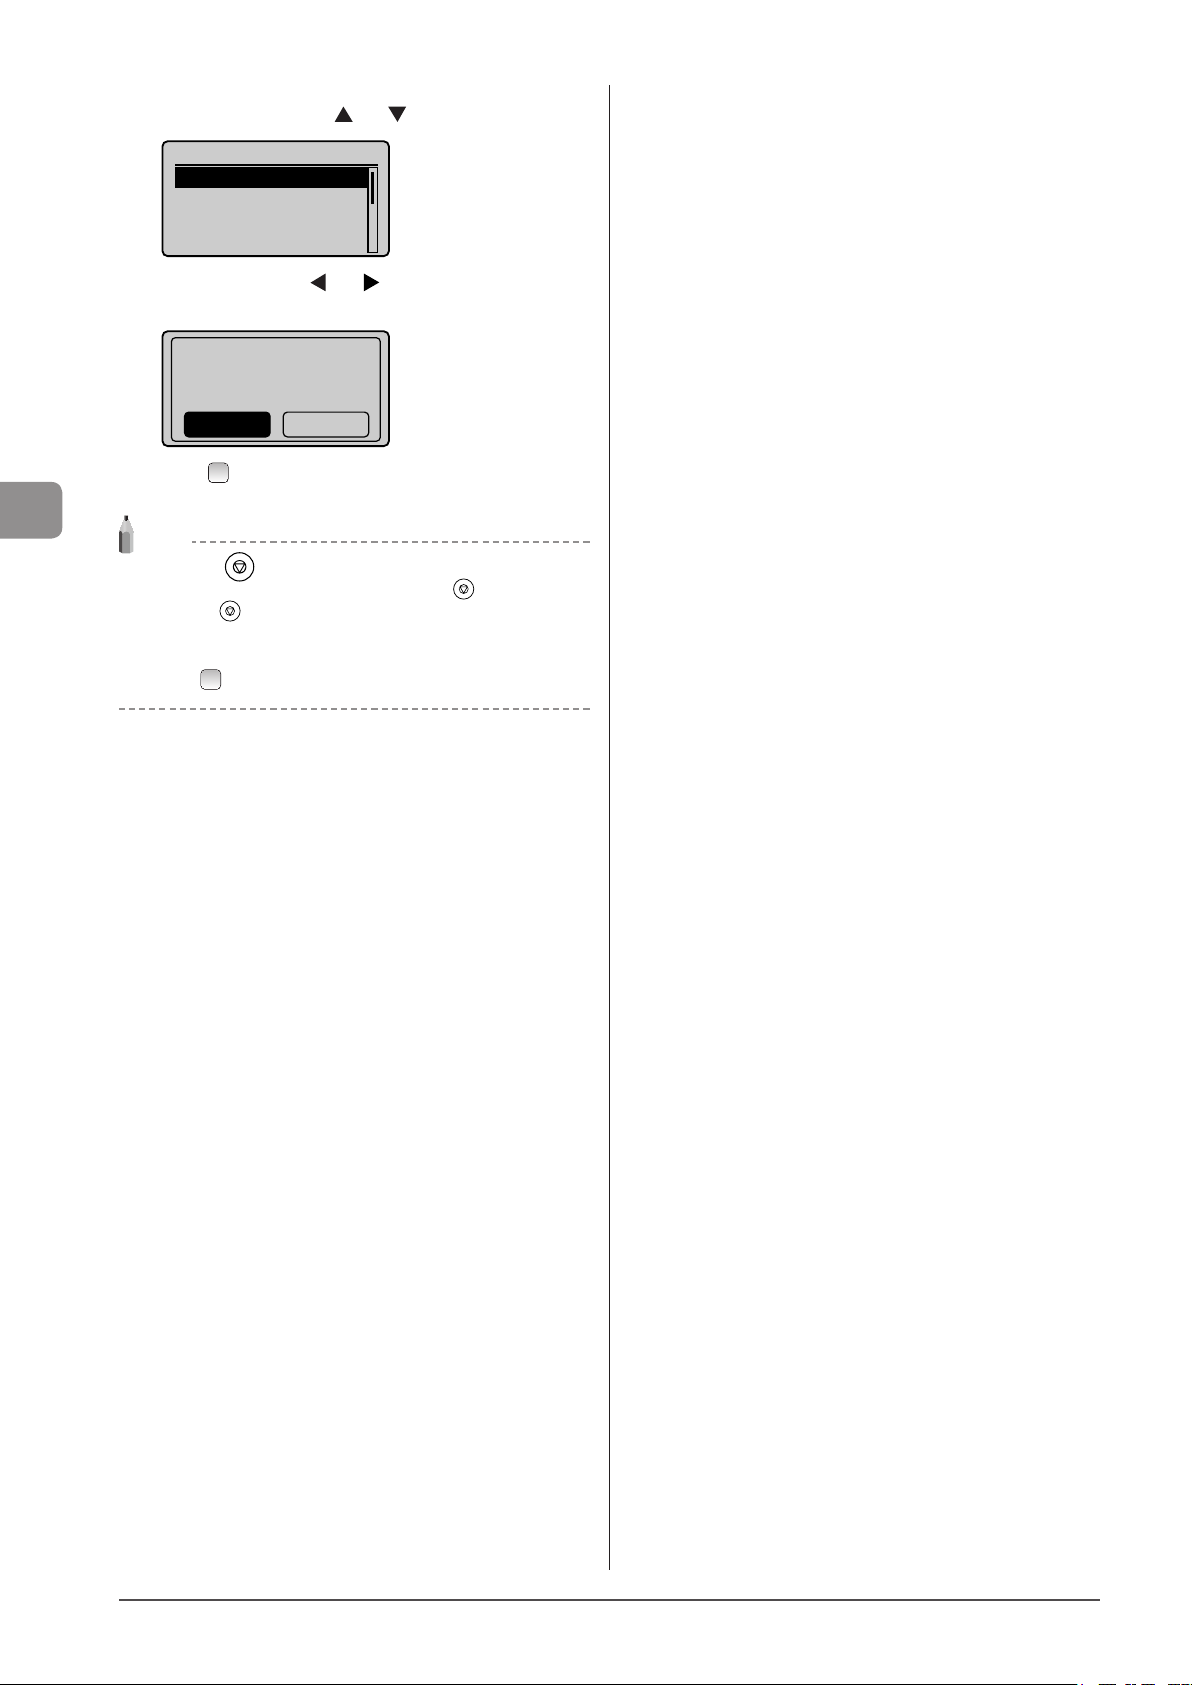
● For canceling
(1) Select <Cancel> using [ ] or [ ] and press [OK].
Details
<Cancel>
Job Number: 0020
Status: Printing
Time: 01/01 09:42AM
(2) Select <Yes> using [ ] or [ ] and press [OK].
The print job is canceled.
Cancel?
NoYes
(3) Press [ ] (Status Monitor/Cancel) to close the screen.
Printing from a Computer
NOTE
Pressing [ ] (Stop) can also delete the print jobs
You can delete the print job also by pressing [ ] (Stop).
* Press [ ] (Stop) twice to cancel the job when the machine
holds one job only.
For checking only
Press [ ] (Status Monitor/Cancel) to close the screen.
4-6
Page 83

Registering Destinations in the Address Book
This section describes the procedures for registering destinations in the address book and
changing or deleting the registered settings.
Registering Destinations in the Address Book 5-2
Favorites 5-2
Coded dial 5-2
Group dialing 5-2
Registering and Editing Destinations in the
Favorites List 5-3
Registering and Editing from the Operation Panel 5-3
Registering and Editing a destination in the Favorites list
Using the Remote UI 5-5
Chapter
5
Registering and Editing Coded Dial Codes 5-6
Registering and Editing from the Operation Panel 5-6
Registering and Editing a Coded Dial Code Using the
Remote UI 5-8
Registering and Editing Destinations for Group
Dialing 5-9
Registering and Editing a Destination Group from the
Operation Panel 5-9
Registering and Editing a Destination Group Using the
Remote UI 5-12
5-1
Page 84
Registering Destinations in the Address Book
Registering Destinations in the Address Book
Specify a destination by manually entering characters/
numbers using the numeric keys or selecting from the address
book to fax or send a document.
You can register frequently used destinations in the Favorites
list and coded dial codes.
You can also save destinations in the Favorites list and coded
dial codes as a group.
You can register destinations from the operation panel or
Remote UI.
Favorites
You can register up to 19 destinations in the Favorites list.
The destinations registered in the Favorites list are displayed
in the Favorites list by selecting the <Fav.> tab in the address
book display and can be found easily when you specify the
destination.
“Registering and Editing Destinations in the Favorites List”
(→P.5-3)
Coded dial
You can register up to 181 destinations in coded dial codes.
Once the destinations have been registered, you can press the
appropriate coded dial code to select the destination.
“Registering and Editing Coded Dial Codes” (→P.5-6)
Group dialing
You can specify up to 199 registered destinations as a group
address in the Favorites list and coded dial codes. Group
addresses need to be registered in unused Favorites or coded
dial codes. All you need to do is to select a key or code to
specify group addresses.
“Registering and Editing Destinations for Group Dialing”
(→P.5-9)
NOTE
Saving/Reading the address book
The address book can be saved as a file to your computer using the
Remote UI. The machine can read the file saved to your computer.
e-Manual → Setting and Managing from Computer →
Import/Export the Settings
You cannot edit the address book saved as a file.
Viewing destinations registered in the address book
You can view destinations by printing destination lists.
e-Manual → Basic Operation → Printing the List → Printing
the Address Book List
5-2
Page 85
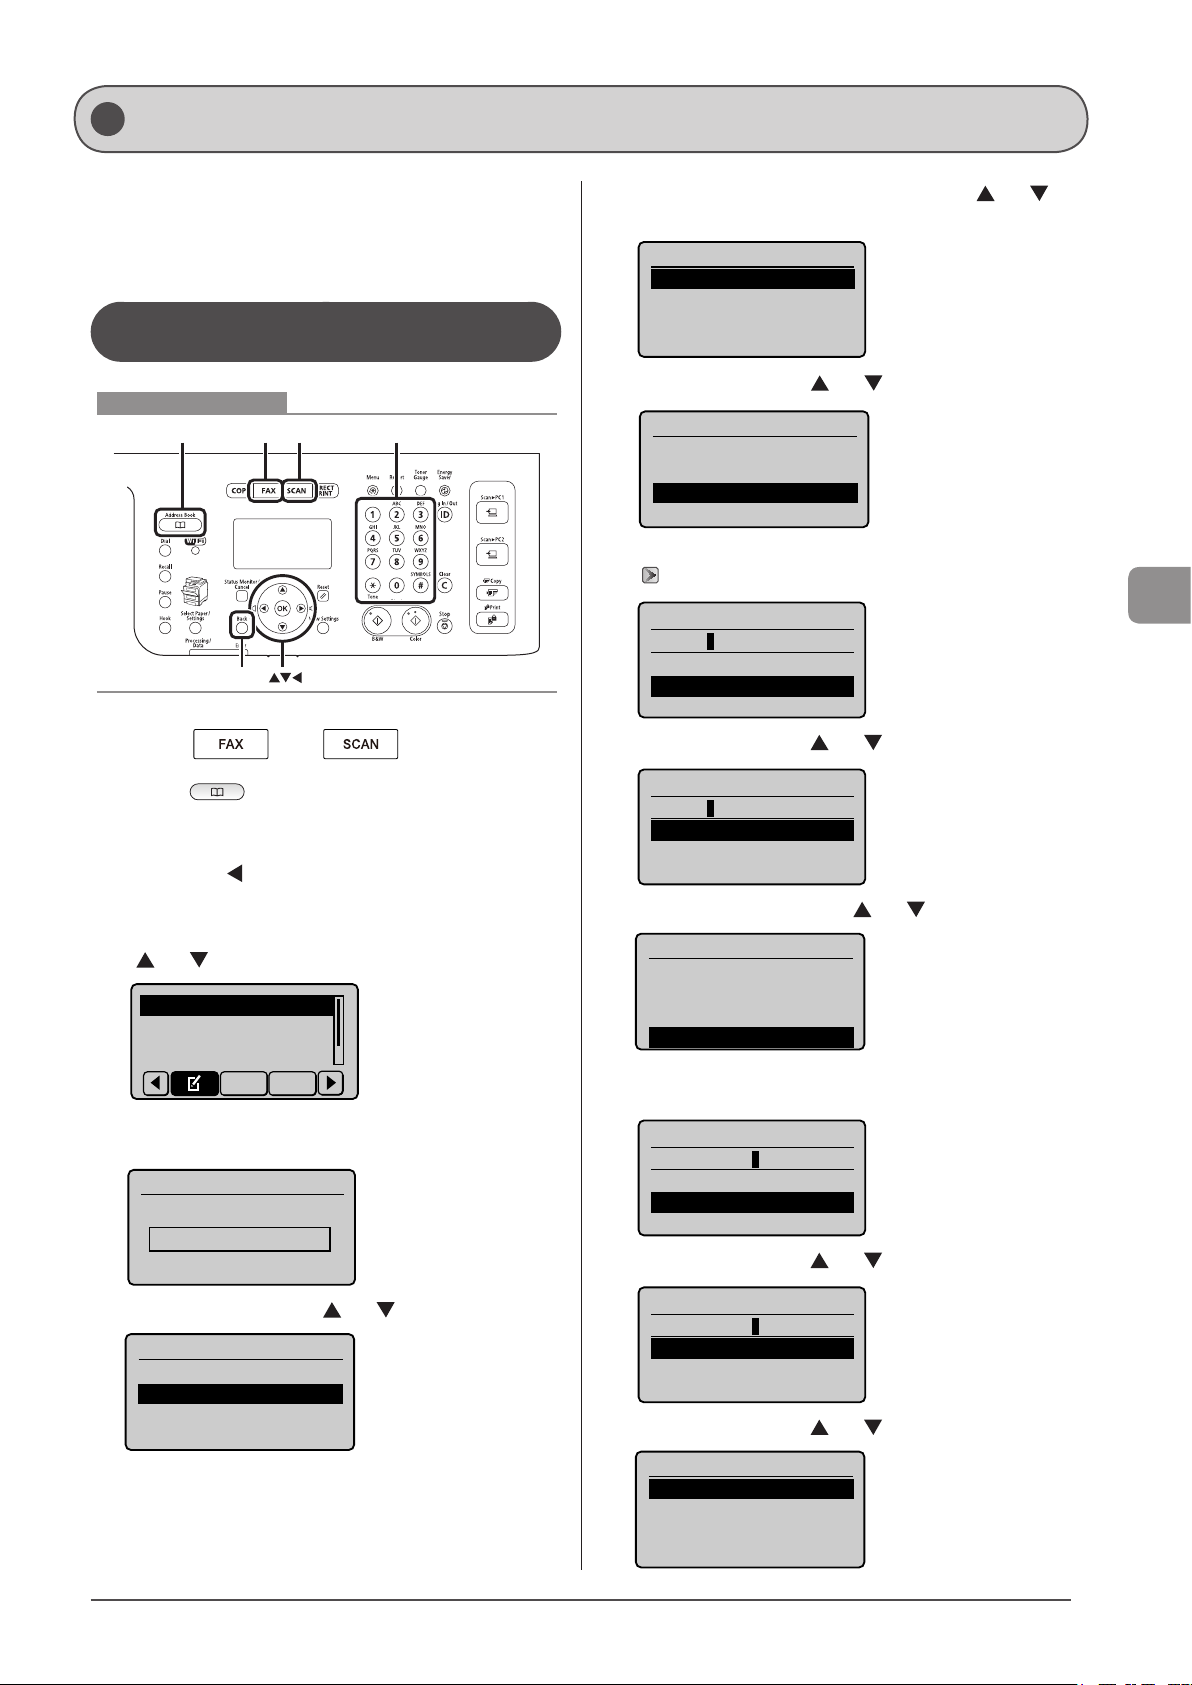
Registering and Editing Destinations in the Favorites List
You can perform the following tasks.
• Storing destinations in the Favorites list
• Editing destinations in the Favorites list
• Deleting destinations in the Favorites list
Registering and Editing from the Operation Panel
Keys to be used for this operation
Address Book FAX SCAN Tone, Numeric keys
Back
OK
1 Press [ ] or [ ].
(4) Select the destination type to register using [ ] or [ ]
and press [OK].
Destination Type
Fax
E-Mail
Group
(5) Select <Name> using [ ] or [ ] and press [OK].
Fax
<Apply>
Type: Fax
Name:
Destination:
(6) Use the numeric keys to specify <Name>.
“Entering Text” (→P.1-12)
Name (Max 16 char.)
CANON
<Apply>
Entry Mode: A
(7) Select <Apply> using [ ] or [ ] and press [OK].
Registering Destinations in the Address Book
2 Press [ ] (Address Book).
● To store a new destination in the Favorites list
(1) When destinations are already registered in the address
book, press [
To register a destination for the first time, proceed to Step
(2).
(2) Select <Register New Destination to Address Book> using
[ ] or [ ] and press [OK].
Register New Destina
Edit Address Book
Address Book Details
When the address book PIN is selected
Use the numeric keys to enter the PIN and press [OK].
Address Book PIN
*******
(Apply: Press OK)
(3) Select <Favorites> using [ ] or [ ] and press [OK].
Register Location
Coded Dial
Favorites
].
All Fav.
Name (Max 16 char.)
CANON
<Apply>
Entry Mode: A
(8) Select <Destination> using [ ] or [ ] and press [OK].
Fax
<Apply>
Type: Fax
Name: CANON
Destination:
(9) Use the numeric keys to specify <Destination>.
Press [OK] to specify <Set Details> if necessary.
Destination (Max 40)
0123456789
<Apply>
Set Details
(10) Select <Apply> using [ ] or [ ] and press [OK].
Destination (Max 40)
0123456789
<Apply>
Set Details
(11) Select <Apply> using [ ] or [ ] and press [OK].
Fax
<Apply>
Type: Fax
Name: CANON
Destination: 012345...
5-3
Page 86
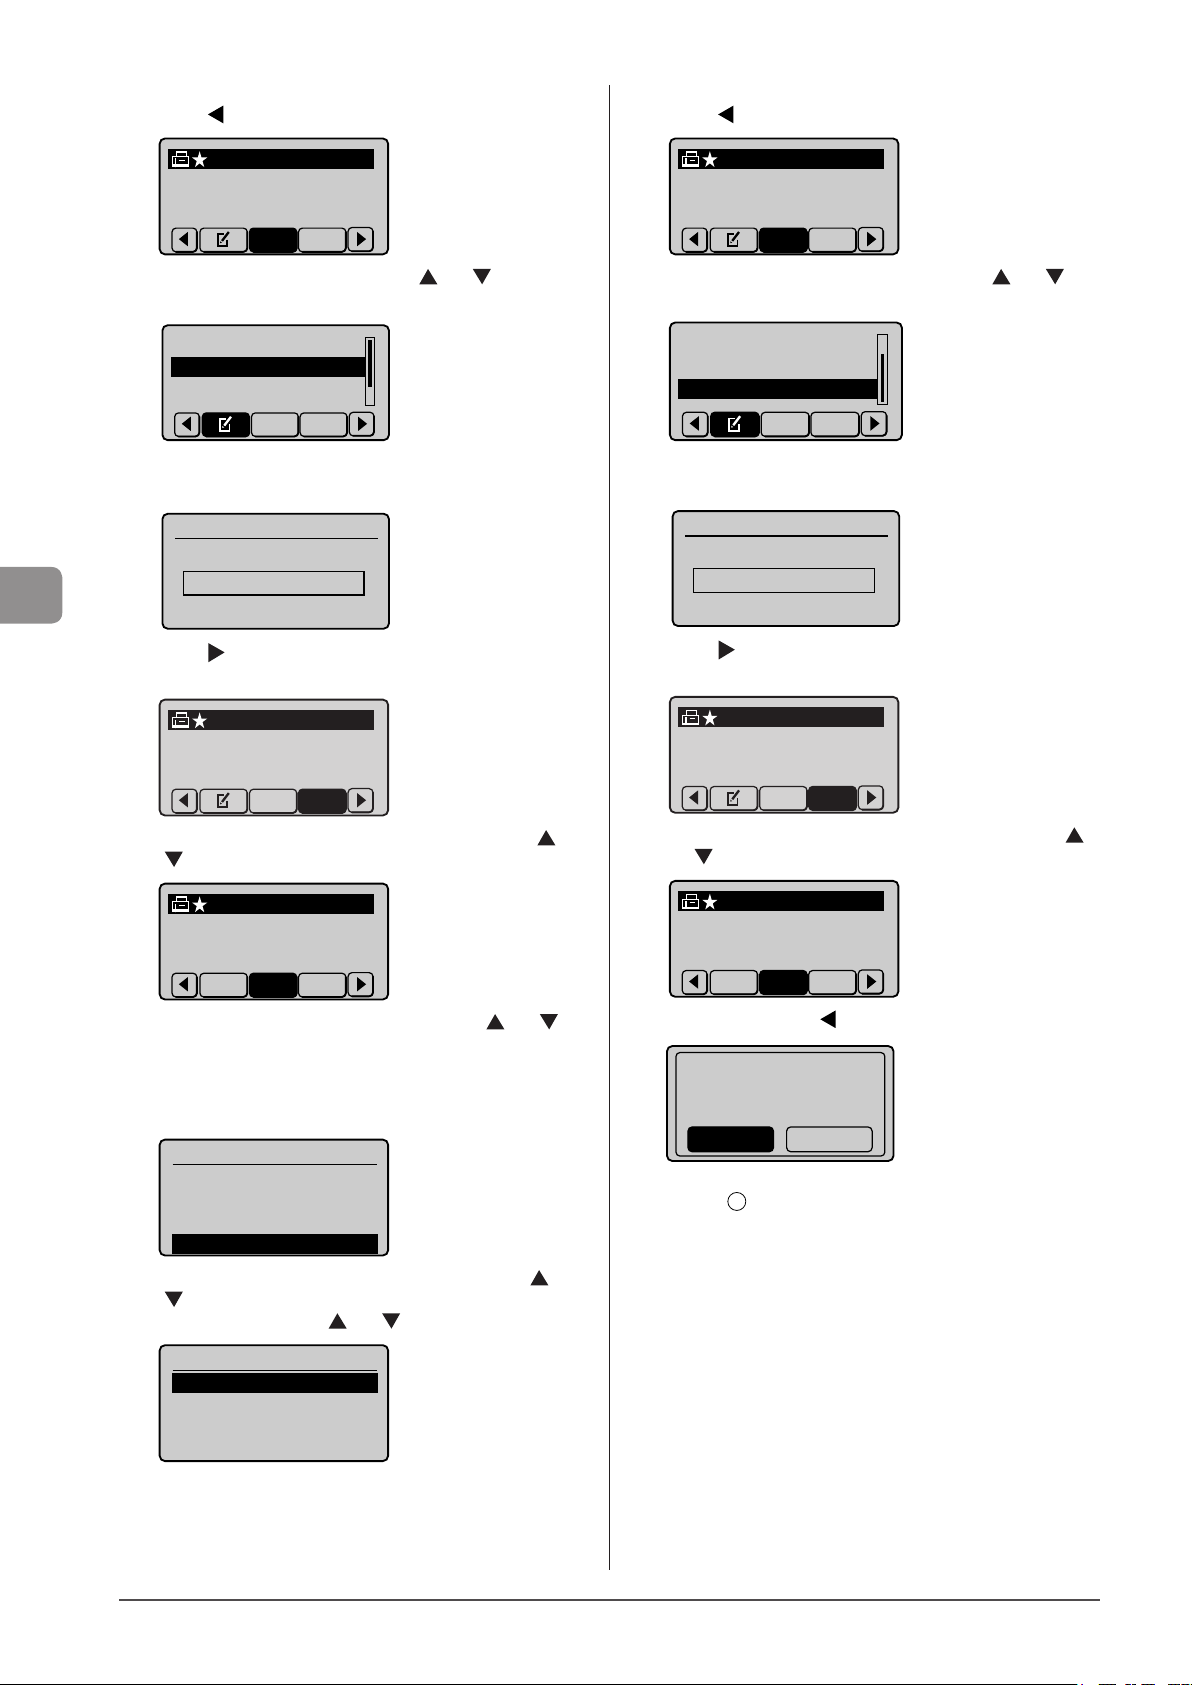
● To edit a destination registered as Farorites
(1) Press [ ].
● To delete a destination registered as Farorites
(1) Press [ ].
Registering Destinations in the Address Book
CANON 0123456789
All Fav.
(2) Select <Edit Address Book> using [ ] or [ ] and press
[OK].
Register New Destin
...
Edit Address Book
Address Book Details
All A-Z
When the address book PIN is selected
Use the numeric keys to enter the PIN and press [OK].
Address Book PIN
*******
(Apply: Press OK)
(3) Press [ ] to select <Fav.> to display the destinations
registered in the Favorites list.
CANON 0123456789
CANON 0123456789
All Fav.
(2) Select <Delete From Address Book> using [ ] or [ ]
and press [OK].
Edit Address Book
Address Book Details
Delete From Address
All Fav.
When the address book PIN is selected
Use the numeric keys to enter the PIN and press [OK].
Address Book PIN
*******
(Apply: Press OK)
(3) Press [ ] to select <Fav.> to display the destinations
registered in the Favorites list.
CANON 0123456789
All Fav.
(4) Select the destination that you want to edit using [ ] or
[ ] and press [OK].
CANON 0123456789
All Fav. A-Z
(5) Select the item that you want to edit using [ ] or [ ]
and press [OK].
• Type
• Name
• Destination
Fax
<Apply>
Type: Fax
Name: CANON
Destination: 0123456
(6) When the edit is complete, select <Apply> using [ ] or
[ ] and press [OK].
(7) Select <Apply> using [ ] or [ ] and press [OK].
Fax
<Apply>
Type: Fax
Name: CANON
Destination: 012345...
All Fav.
(4) Select the destination that you want to delete using [ ]
or [ ] and press [OK].
CANON 0123456789
All Fav. A-Z
(5) Select <Yes> using [ ] and press [OK].
Delete from
Address Book?
NoYes
3 Press [ ] (Back) to close the menu screen.
5-4
Page 87
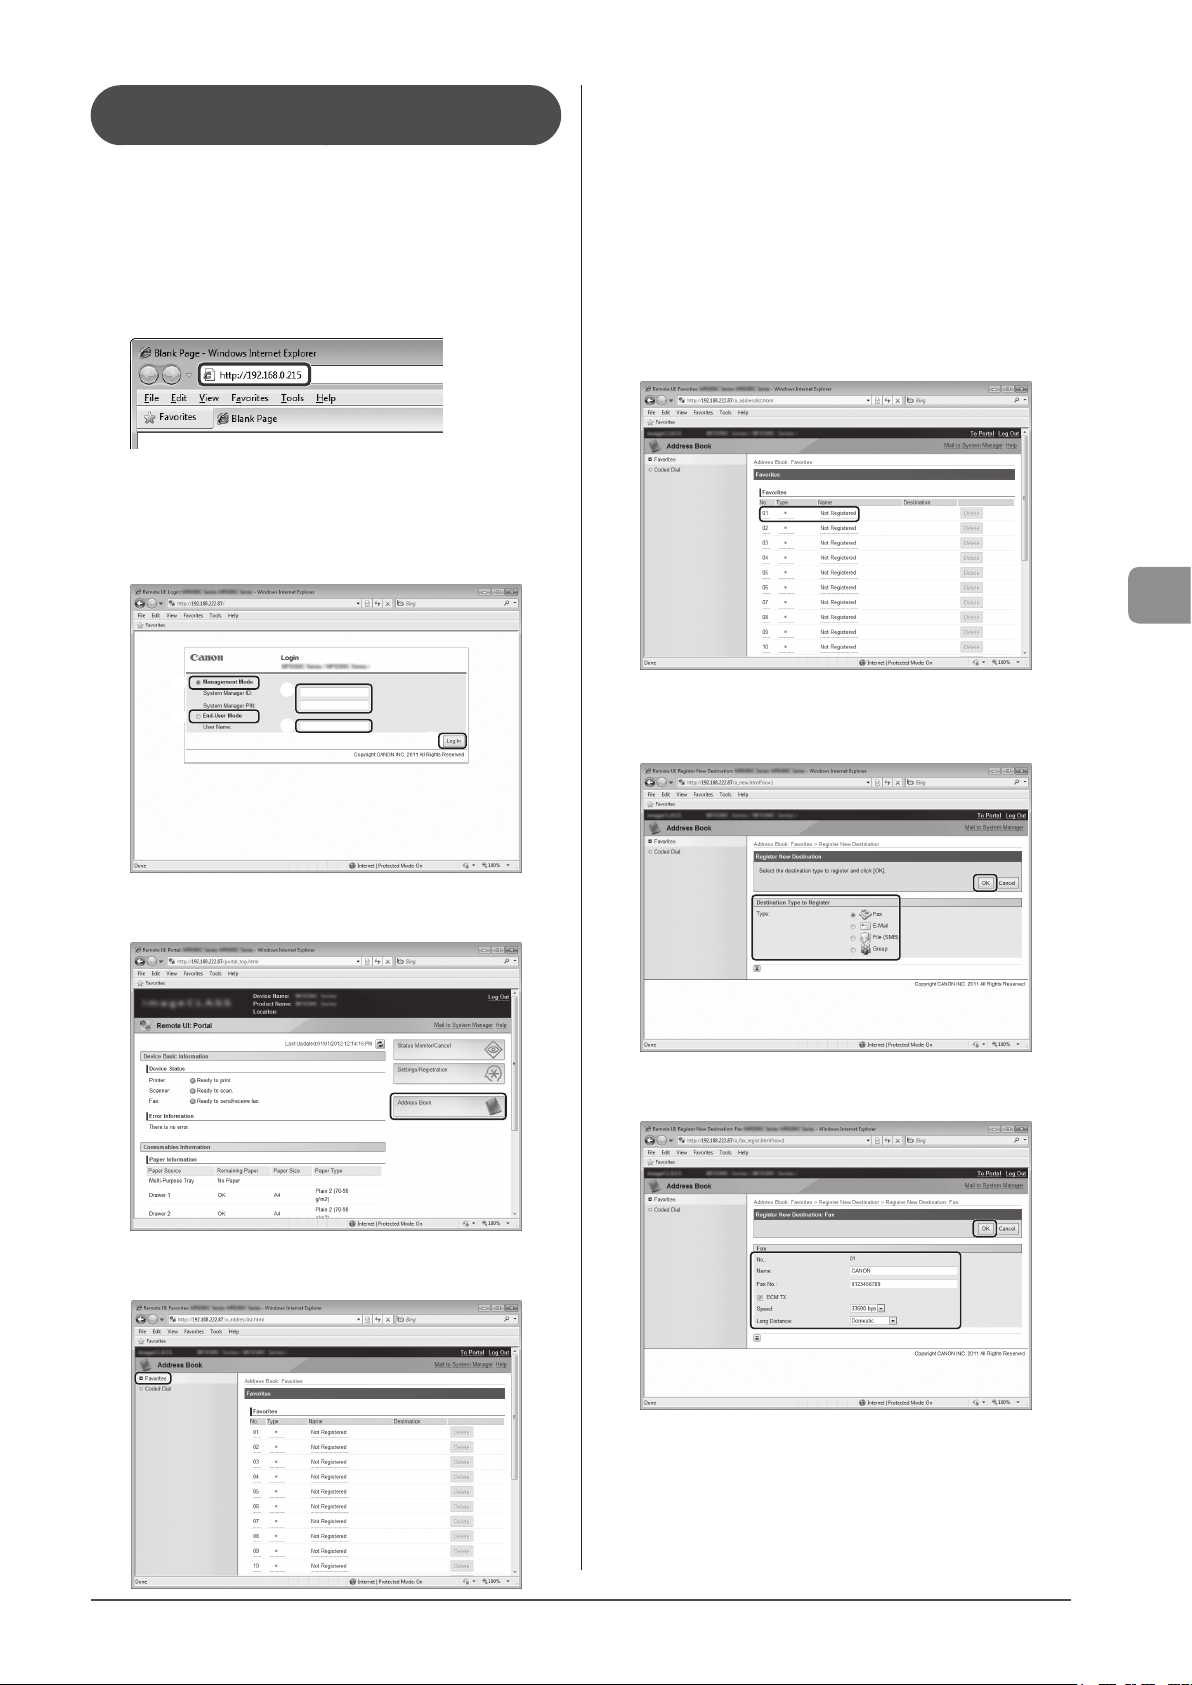
Registering and Editing a destination in the Favorites list Using the Remote UI
1 Start the Web browser.
2 Enter “http://<the IP address of the machine>/”
in the address field and press the [ENTER] key on
your keyboard.
Input Example: “http://192.168.0.215/”
3 Log on to the Remote UI.
(1) Select [Management Mode].
(2) Enter [System Manager ID] and [System Manager PIN].
(3) Click [Log In].
To register a new destination in the Favorites list
Proceed to Step 4.
To edit destination registered in the Favorites list
(1) Click [No.], [Type] or [Name].
(2) Click [Edit].
(3) Specify the required settings in the edit screen and click [OK].
To delete destination registered in the Favorites list
(1) Click [Delete] of the destination which you want to delete.
6 Click the unregistered [No.], [Type] or [Name].
Registering Destinations in the Address Book
(1)
(1)
(2)
(2)
4 Click [Address Book].
7 Select [Destination Type to Register] and click
(3)
[OK].
8 Specify the required settings and click [OK].
5 Click [Favorites].
5-5
Page 88
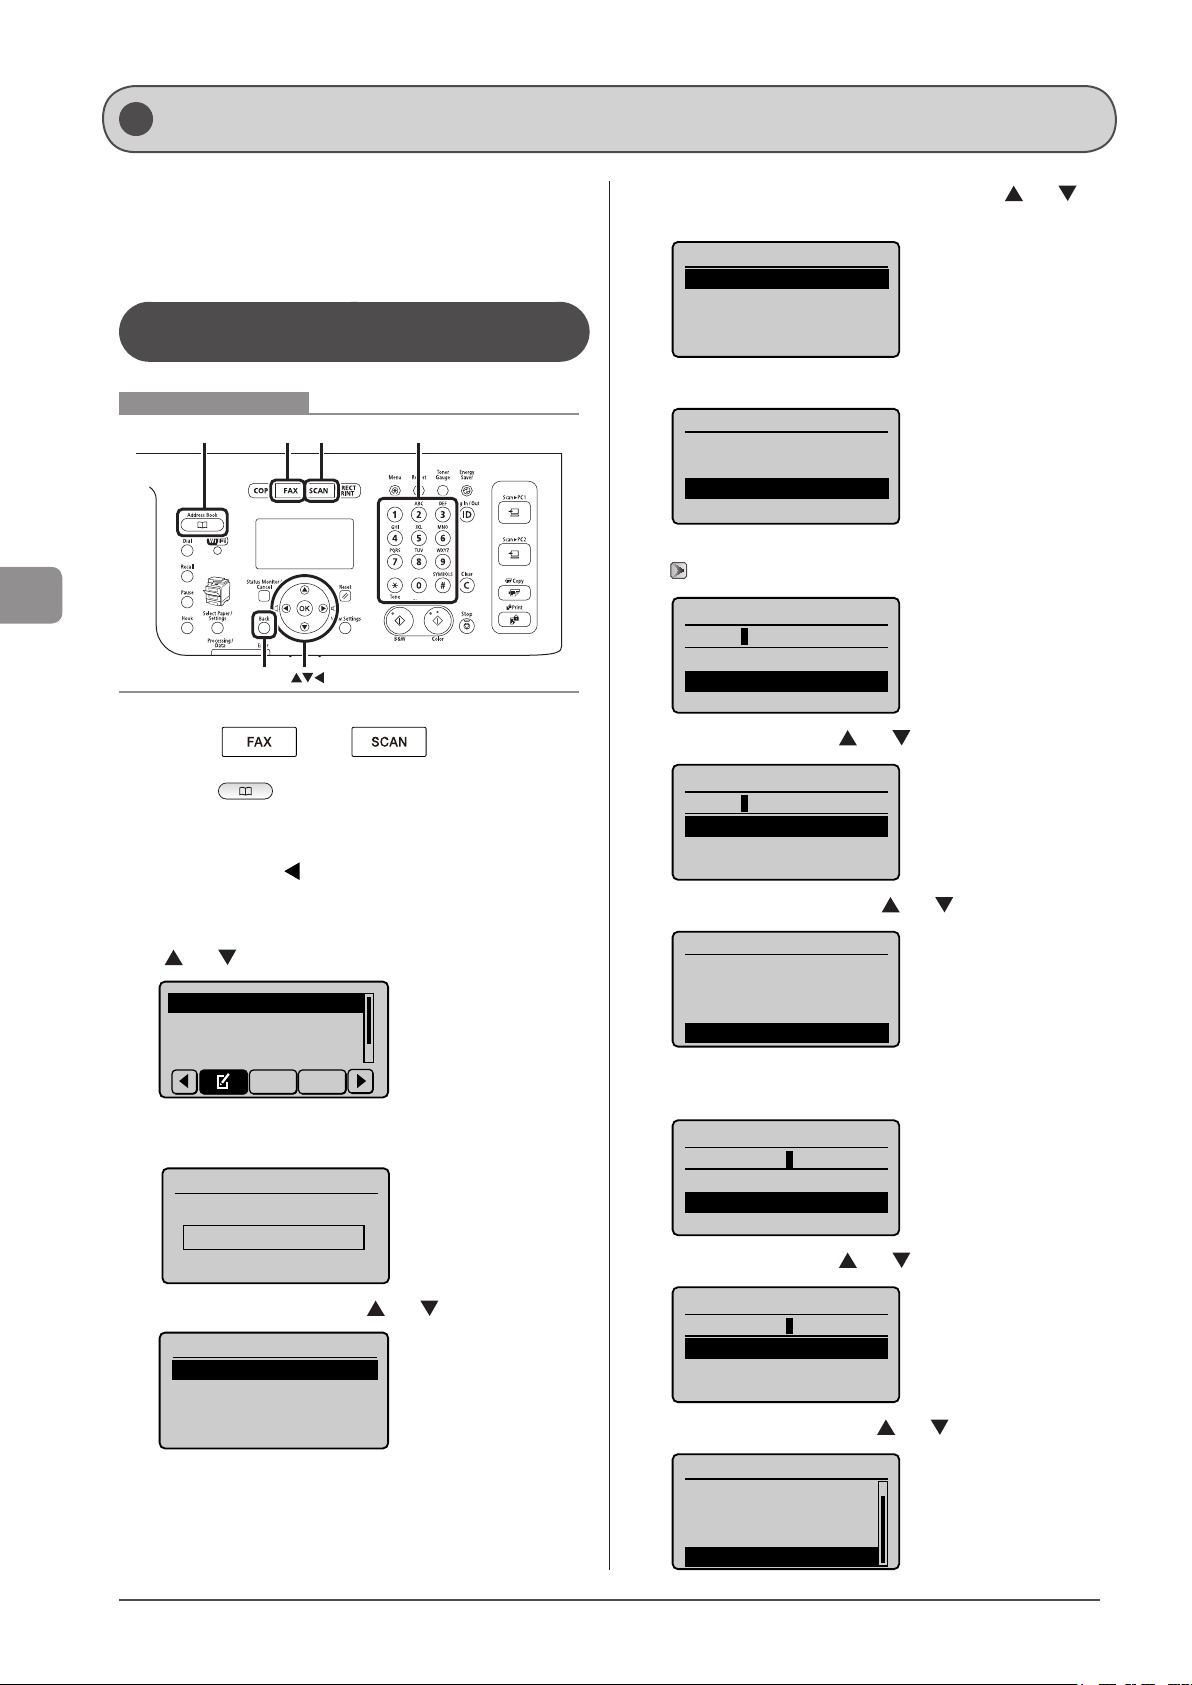
Registering and Editing Coded Dial Codes
Registering Destinations in the Address Book
You can perform the following tasks.
• Storing coded dial codes
• Editing coded dial codes
• Deleting coded dial codes
Registering and Editing from the Operation Panel
Keys to be used for this operation
Address Book FAX SCAN Tone, Numeric keys
Back
OK
1 Press [ ] or [ ].
(4) Select the destination type to register using [ ] or [ ]
and press [OK].
Destination Type
Fax
E-Mail
Group
(5) Select <Name> using [ ] or [ ] and press [OK].
Fax
<Apply>
Type: Fax
Name:
Destination:
(6) Use the numeric keys to specify <Name>.
“Entering Text” (→P.1-12)
Name (Max 16 char.)
CANON
<Apply>
Entry Mode: A
(7) Select <Apply> using [ ] or [ ] and press [OK].
2 Press [ ] (Address Book).
● To store a new coded dial code
(1) When destinations are already registered in the coded
dial code, press [ ].
To register a destination for the first time, proceed to Step
(2).
(2) Select <Register New Destination to Address Book> using
[ ] or [ ] and press [OK].
Register New Destina
Edit Address Book
Address Book Details
When the address book PIN is selected
Use the numeric keys to enter the PIN and press [OK].
Address Book PIN
*******
(Apply: Press OK)
(3) Select <Coded Dial> using [ ] or [ ] and press [OK].
Register Location
Coded Dial
Favorites
All Fav.
Name (Max 16 char.)
CANON
<Apply>
Entry Mode: A
(8) Select <Destination> using [ ] or [ ] and press [OK].
Fax
<Apply>
Type: Fax
Name: CANON
Destination:
(9) Use the numeric keys to specify <Destination>.
Press [OK] to specify <Set Details> if necessary.
Destination (Max 40)
0123456789
<Apply>
Set Details
(10) Select <Apply> using [ ] or [ ] and press [OK].
Destination (Max 40)
0123456789
<Apply>
Set Details
(11) Select <Coded Dial> using [ ] or [ ] and press [OK].
Fax
Type: Fax
Name: CANON
Destination: 012345
Coded Dial: 001
...
5-6
Page 89
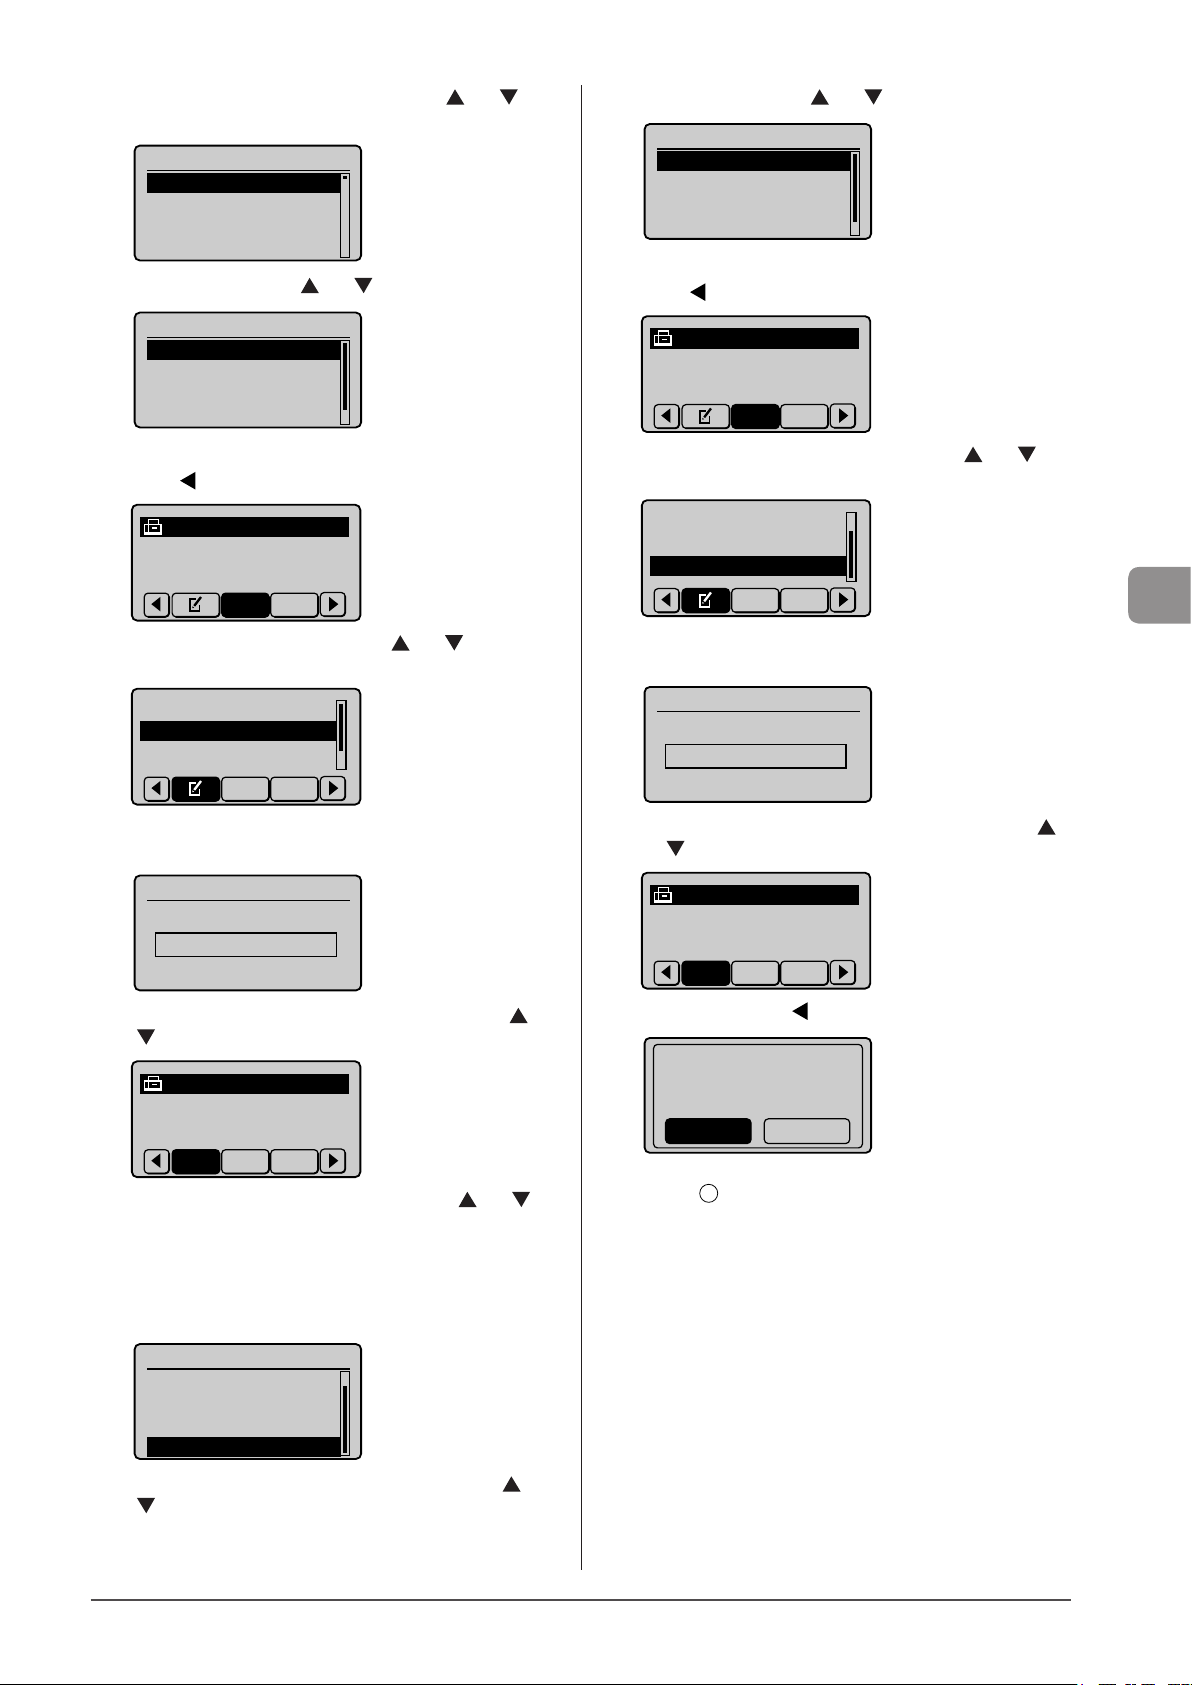
(12) Select the number to be registered using [ ] or [ ] and
Enter Registration No.
CANON 0123456789
CANON 0123456789
CANON 0123456789
CANON 0123456789
press [OK].
001 Not Registered
002 Not Registered
003 Not Registered
004 Not Registered
(13) Select <Apply> using [ ] or [ ] and press [OK].
Fax
<Apply>
Type: Fax
Name: CANON
Destination: 012345
...
● To edit a coded dial code
(1) Press [ ].
(6) Select <Apply> using [
] or [ ]and press [OK].
Fax
<Apply>
Type: Fax
Name: CANON02
Destination: 987654
...
● To delete a coded dial code
(1) Press [
].
All Fav.
(2) Select <Delete From Address Book> using [ ] or [ ]
and press [OK].
Edit Address Book
Address Book Details
Delete From Address
All Fav.
(2) Select <Edit Address Book> using [ ] or [ ] and press
[OK].
Register New Destin...
Edit Address Book
Address Book Details
All Fav.
When the address book PIN is selected
Use the numeric keys to enter the PIN and press [OK].
Address Book PIN
*******
(Apply: Press OK)
(3) Select the destination that you want to edit using [ ] or
[ ] and press [OK].
All Fav. A-Z
(4) Select the item that you want to edit using [ ] or [ ]
and press [OK].
• Type
• Name
• Destination
• Coded Dial
All Fav.
When the address book PIN is selected
Use the numeric keys to enter the PIN and press [OK].
Address Book PIN
*******
(Apply: Press OK)
(3) Select the destination that you want to delete using [ ]
or [
] and press [OK].
All Fav. A-Z
(4) Select <Yes> using [ ] and press [OK].
Delete from
Address Book?
NoYes
3 Press [ ](Back) to close the menu screen.
Registering Destinations in the Address Book
Fax
Type: Fax
Name: CANON02
Destination: 987654
Coded Dial: 002
(5) When the edit is complete, select <Apply> using [ ] or
[ ] and press [OK].
...
5-7
Page 90
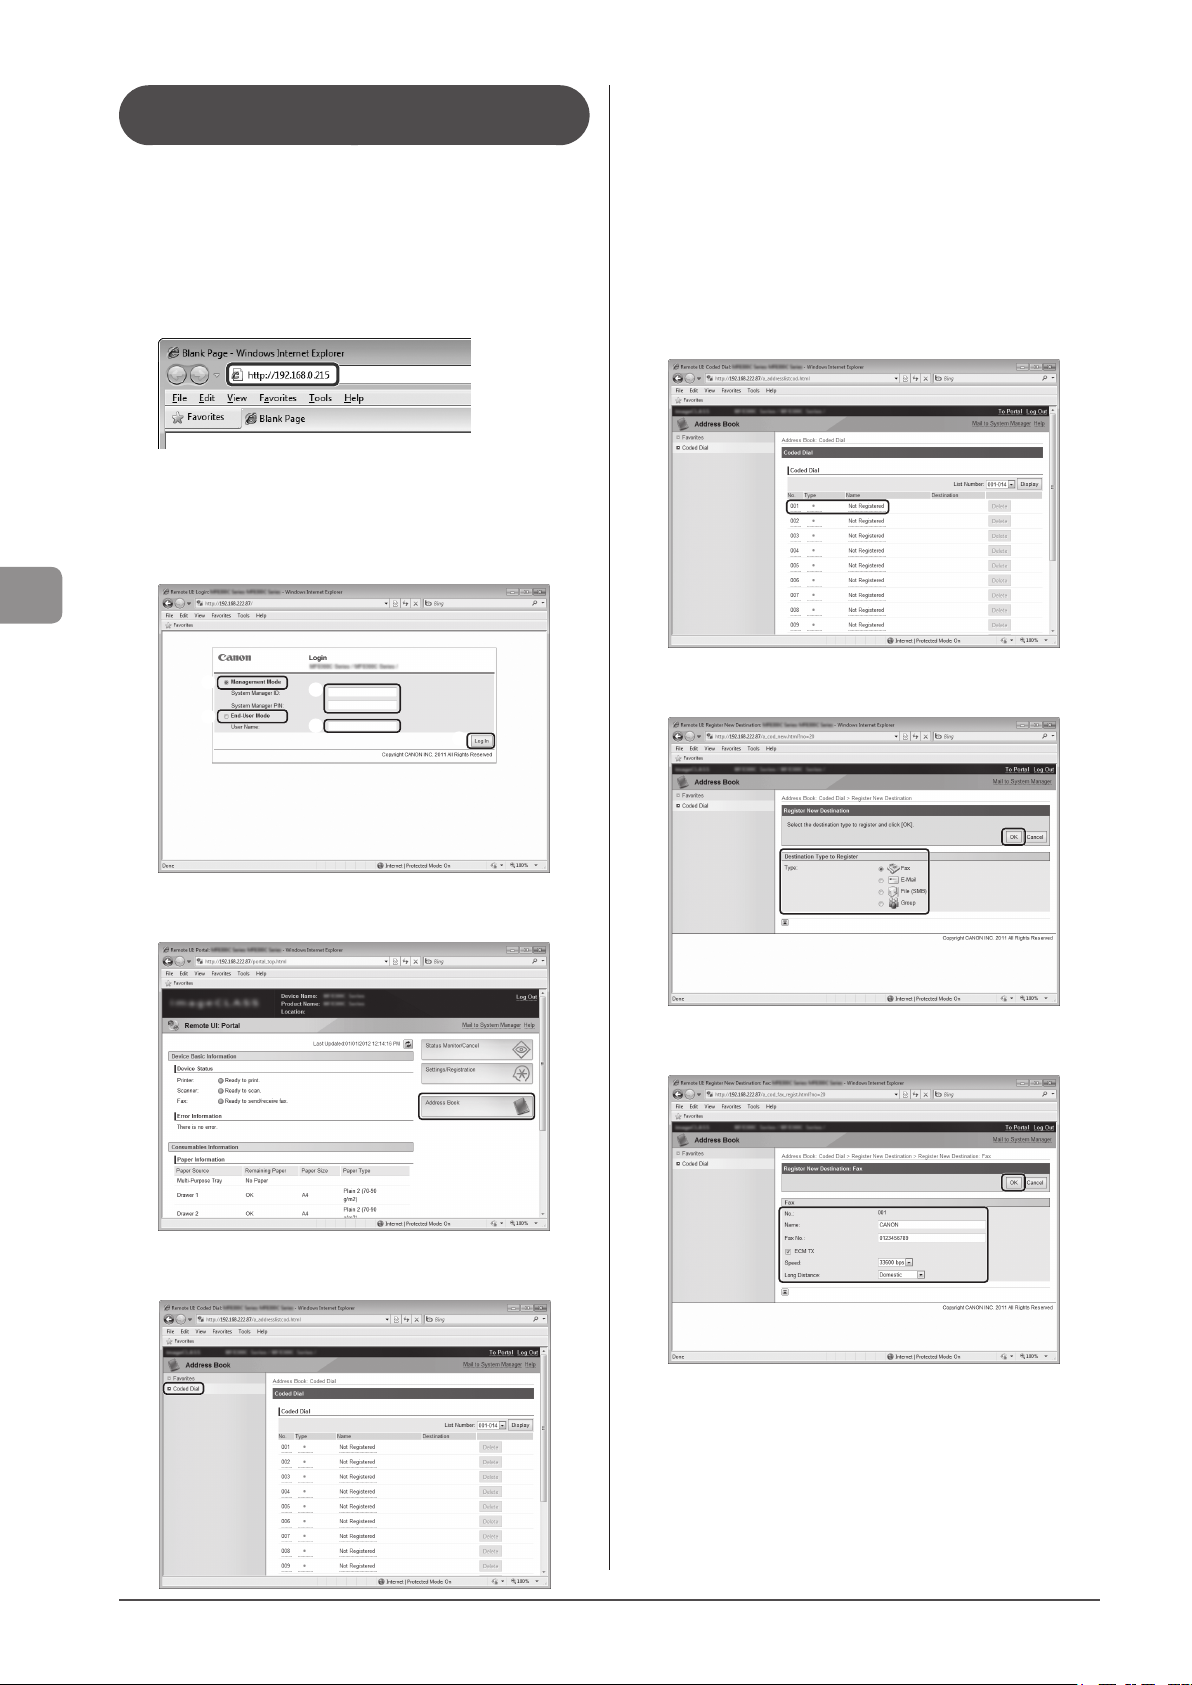
Registering and Editing a Coded Dial Code Using the Remote UI
1 Start the Web browser.
2 Enter “http://<the IP address of the machine>/”
in the address field and press the [ENTER] key on
your keyboard.
Input Example: “http://192.168.0.215/”
3 Log on to the Remote UI.
(1) Select [Management Mode].
(2) Enter [System Manager ID] and [System Manager PIN].
(3) Click [Log In].
To register a coded dial newly
Proceed to Step 4.
To edit the registered coded dial
(1) Click [No.], [Type] or [Name].
(2) Click [Edit].
(3) Specify the required settings in the edit screen and click [OK].
To delete the registered coded dial
(1) Click [Delete] of the destination which you want to delete.
6 Click the unregistered [No.], [Type] or [Name].
Registering Destinations in the Address Book
(1)
(1)
(2)
(2)
4 Click [Address Book].
7 Select [destination type to register] and click [OK].
(3)
8 Specify the required settings and click [OK].
5-8
5 Click [Coded Dial].
Page 91
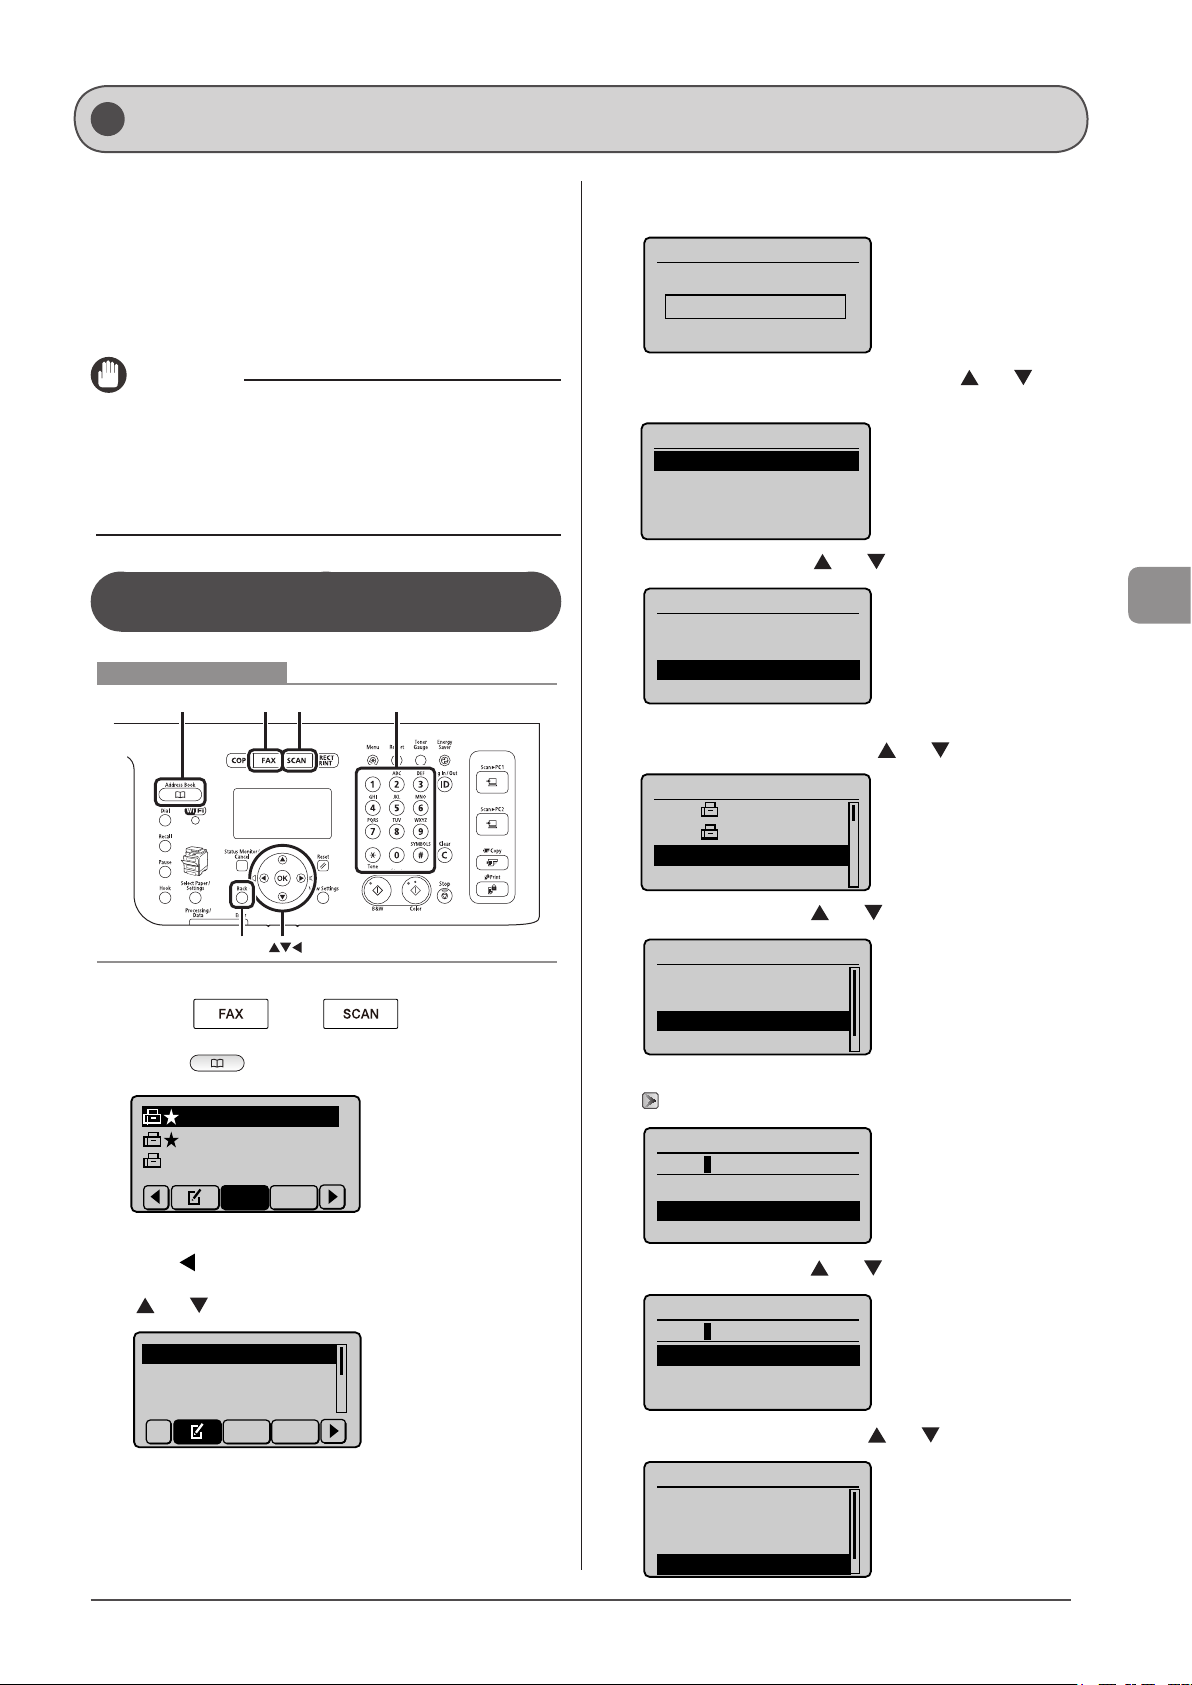
CANON01 012345678
Enter Registration No.
Registering and Editing Destinations for Group Dialing
You can perform the following tasks.
• Registering group addresses
• Adding destination(s) to a group
• Deleting destination(s) from a group
• Changing the group name
• Deleting group(s)
IMPORTANT
Before registering group addresses
• Register group addresses in the unused Favorites list or coded
dial codes.
• Destinations must be registered in the Favorites list or coded dial
codes before they are added to a group.
Registering and Editing a Destination Group from the Operation Panel
Keys to be used for this operation
Address Book FAX SCAN Tone, Numeric keys
When the address book PIN is selected
Use the numeric keys to enter the PIN and press [OK].
Address Book PIN
*******
(Apply: Press OK)
(3) Select <Favorites> or <Coded Dial> using [ ] or [ ] and
press [OK].
Register Location
Coded Dial
Favorites
(4) Select <Group> using [ ] or [ ] and press [OK].
Destination Type
Fax
E-Mail
Group
(5) If you selected <Coded Dial> in Step (3), select the
number to be registered using [ ] or [ ] and press [OK].
Registering Destinations in the Address Book
1 Press [ ] or [ ].
2 Press [ ] (Address Book).
CANON02 98765432
CANON03 00112233
● To register new group addresses
(1) Press [ ].
(2) Select <Register New Destination to Address Book> using
[
] or [ ] and press [OK].
Register New Destina
Edit Address Book
Address Book Details
Back
All Fav.
All A-Z
OK
001 CANON01 012...
002 CANON02 987...
003 Not Registered
004 Not Registered
(6) Select <Name> using [ ] or [ ] and press [OK].
Group
<Apply>
Type: Group
Name:
Destinations: 0
(7) Use the numeric keys to specify <Name>.
“Entering Text” (→P.1-12)
...
...
Name (Max 16 char.)
CANON
<Apply>
Entry Mode: A
(8) Select <Apply> using [ ] or [ ] and press [OK].
Name (Max 16 char.)
CANON
<Apply>
Entry Mode: A
(9) Select <Destinations: > using [ ] or [ ] and press [OK].
Group
<Apply>
Type: Group
Name: CANON
Destinations: 0
5-9
Page 92
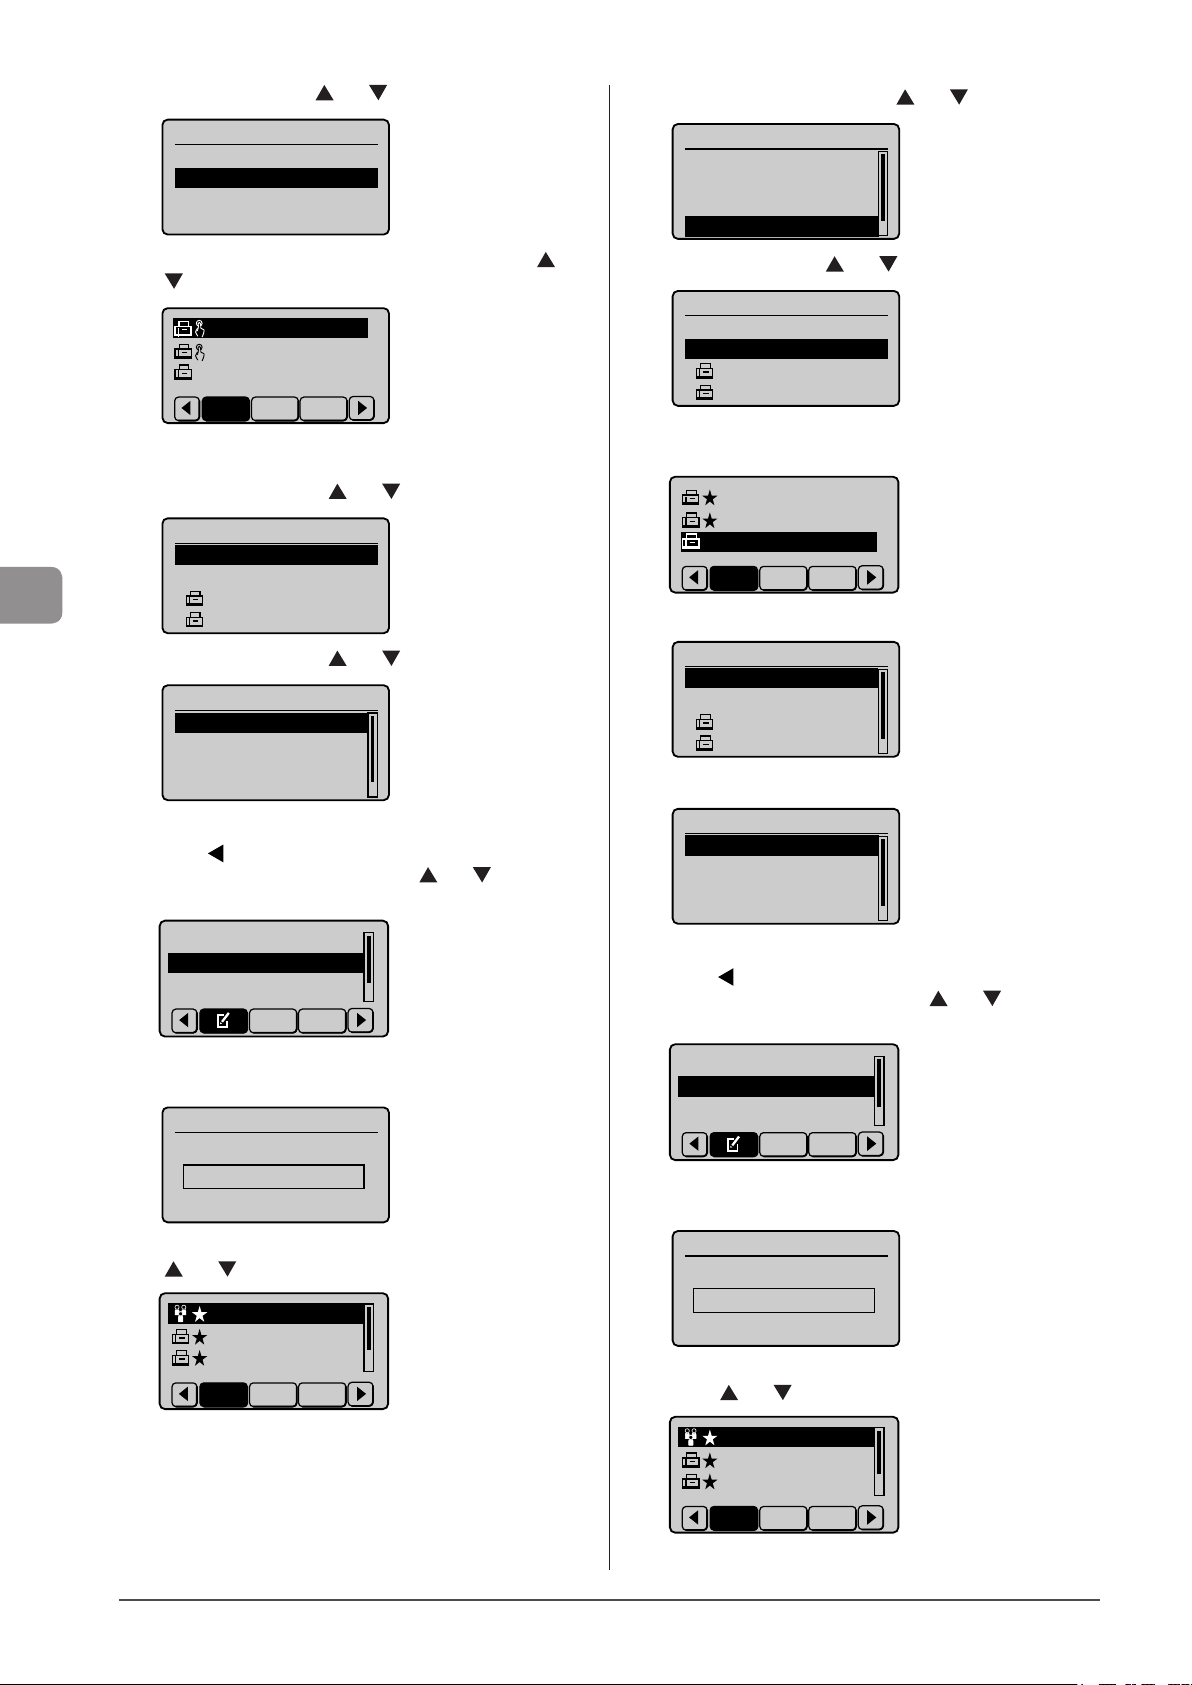
(10) Select <Add> using [ ] or [ ] and press [OK].
CANON01 012345678
CANON01 0123456789
CANON02 9876543210
CANON01 0123456789
CANON02 9876543210
CANON03 001122334
(4) Select <Destinations: > using [ ] or [ ] and press [OK].
Registering Destinations in the Address Book
Destination(s)
<Apply>
<Add>
(11) Select the destination that you want to add using [ ] or
[ ] and press [OK].
CANON02 98765432
CANON03 00112233
A-Z 0-9All
...
...
(12) Repeat Steps (10) and (11) to select the destinations to be
added.
(13) Select <Apply> using [ ] or [ ] and press [OK].
Destination(s)
<Apply>
<Add>
(14) Select <Apply> using [ ] or [ ] and press [OK].
Group
<Apply>
Type: Group
Name: CANON
Destinations: 2
● To add destination(s) to a group
(1) Press [ ].
(2) Select <Edit Address Book> using [ ] or [ ] and press
[OK].
Register New Destin...
Edit Address Book
Address Book Details
All Fav.
When the address book PIN is selected
Use the numeric keys to enter the PIN and press [OK].
Address Book PIN
*******
(Apply: Press OK)
(3) Select the group to which destinations are added using
[ ] or [ ] and press [OK].
CANON 2 Destinat
CANON01 0123456
CANON02 9876543
Fav. A-ZAll
...
...
Group
<Apply>
Type: Group
Name: CANON
Destinations: 2
(5) Select <Add> using [ ] or [ ] and press [OK].
Destination(s)
<Apply>
<Add>
(6) Select the destination to be added using [ ] or [ ] and
press [OK].
CANON01 01234567
CANON02 98765432
Fav. A-ZAll
...
...
(7) Select <Apply> using [ ] or [ ] and press [OK].
Destination(s)
<Apply>
<Add>
CANON01 01234567
CANON02 98765432
...
...
(8) Select <Apply> using [ ] or [ ] and press [OK].
Group
<Apply>
Type: Group
Name: CANON
Destinations: 3
● To delete destination(s) from a group
(1) Press [ ].
(2) Select <Edit Address Book> using [ ] or [ ] and press
[OK].
Register New Destin...
Edit Address Book
Address Book Details
All Fav.
When the address book PIN is selected
Use the numeric keys to enter the PIN and press [OK].
Address Book PIN
*******
(Apply: Press OK)
(3) Select the group from which destinations are deleted
using [ ] or [ ] and press [OK].
CANON 3 Destinat
CANON01 0123456
CANON02 9876543
...
...
5-10
Fav. A-ZAll
Page 93
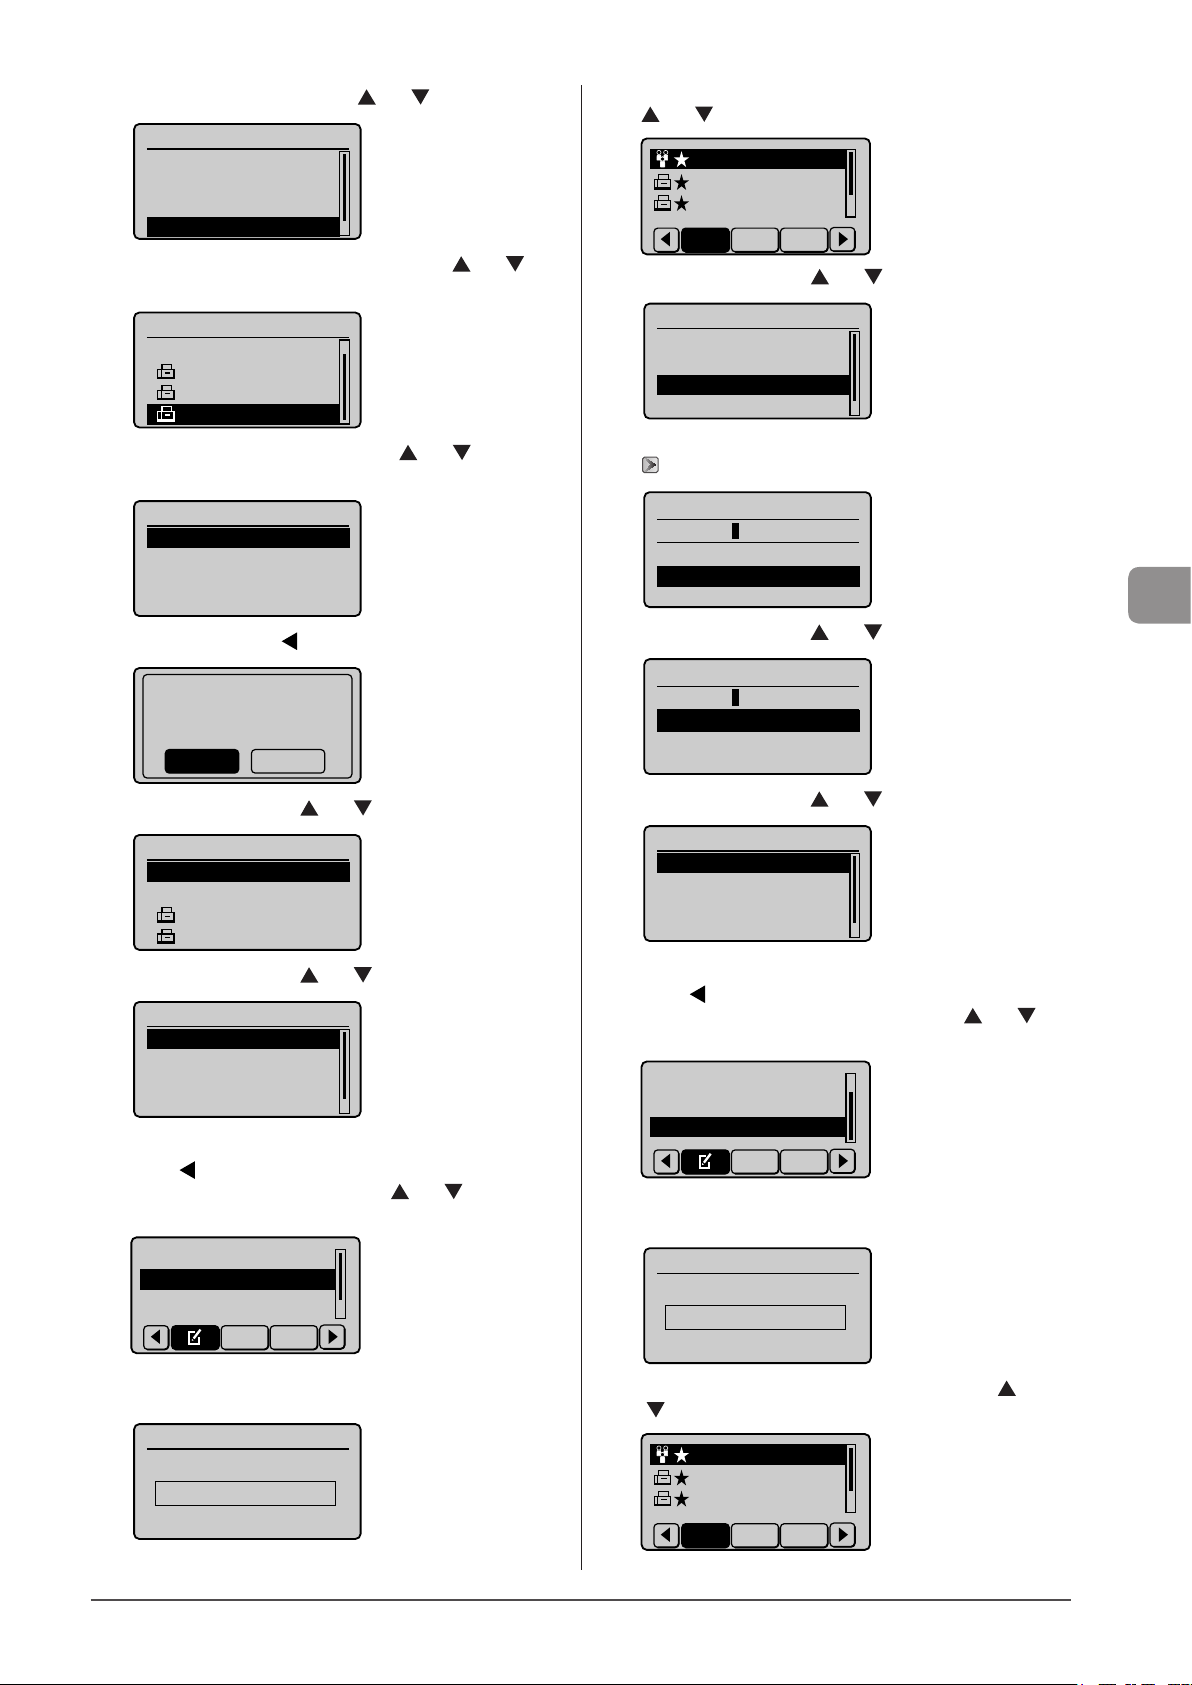
(4) Select <Destinations: > using [ ] or [ ] and press [OK].
CANON01 0123456789
CANON02 9876543210
Group
<Apply>
Type: Group
Name: CANON
Destinations: 3
(5) Select the destination to be deleted using [ ] or [ ]
and press [OK].
Destination(s)
<Add>
CANON01 01234567
CANON02 98765432
CANON03 001122334
...
...
(6) Select <Delete From Group> using [ ] or [ ] and press
[OK].
Fax
<Delete From Group>
Name: CANON03
Destination: 0011223
Coded Dial: 001
...
(7) Select <Yes> using [ ] and press [OK].
Delete from group?
NoYes
(8) Select <Apply> using [ ] or [ ] and press [OK].
Destination(s)
<Apply>
<Add>
(9) Select <Apply> using [ ] or [ ]and press [OK].
Group
<Apply>
Type: Group
Name: CANON
Destinations: 2
● To change the name of a group
(1) Press [
].
(2) Select <Edit Address Book> using [ ] or [ ] and press
[OK].
(3) Select the group of which name will be changed using [
] or [ ] and press [OK].
CANON 2 Destinat
CANON01 0123456
CANON02 9876543
Fav. A-ZAll
...
...
(4) Select <Name> using [ ] or [ ] and press [OK].
Group
<Apply>
Type: Group
Name: CANON
Destinations: 2
(5) Change <Name>.
“Entering Text” (→P.1-12)
Name (Max 16 char.)
CANON A
<Apply>
Entry Mode: A
(6) Select <Apply> using [ ] or [ ] and press [OK].
Name (Max 16 char.)
CANON A
<Apply>
Entry Mode: A
(7) Select <Apply> using [ ] or [ ] and press [OK].
Group
<Apply>
Type: Group
Name: CANON A
Destinations: 2
● To delete group(s)
(1) Press [ ].
(2) Select <Delete From Address Book> using [ ] or [ ]
and press [OK].
Edit Address Book
Address Book Details
Delete From Address
All Fav.
When the address book PIN is selected
Use the numeric keys to enter the PIN and press [OK].
Registering Destinations in the Address Book
Register New Destin...
Edit Address Book
Address Book Details
When the address book PIN is selected
Use the numeric keys to enter the PIN and press [OK].
Address Book PIN
*******
(Apply: Press OK)
All Fav.
Address Book PIN
*******
(Apply: Press OK)
(3) Select the group that you want to delete using [ ] or
[ ] and press [OK].
CANON 3 Destinat
CANON01 0123456
CANON02 9876543
Fav. A-ZAll
...
...
5-11
Page 94
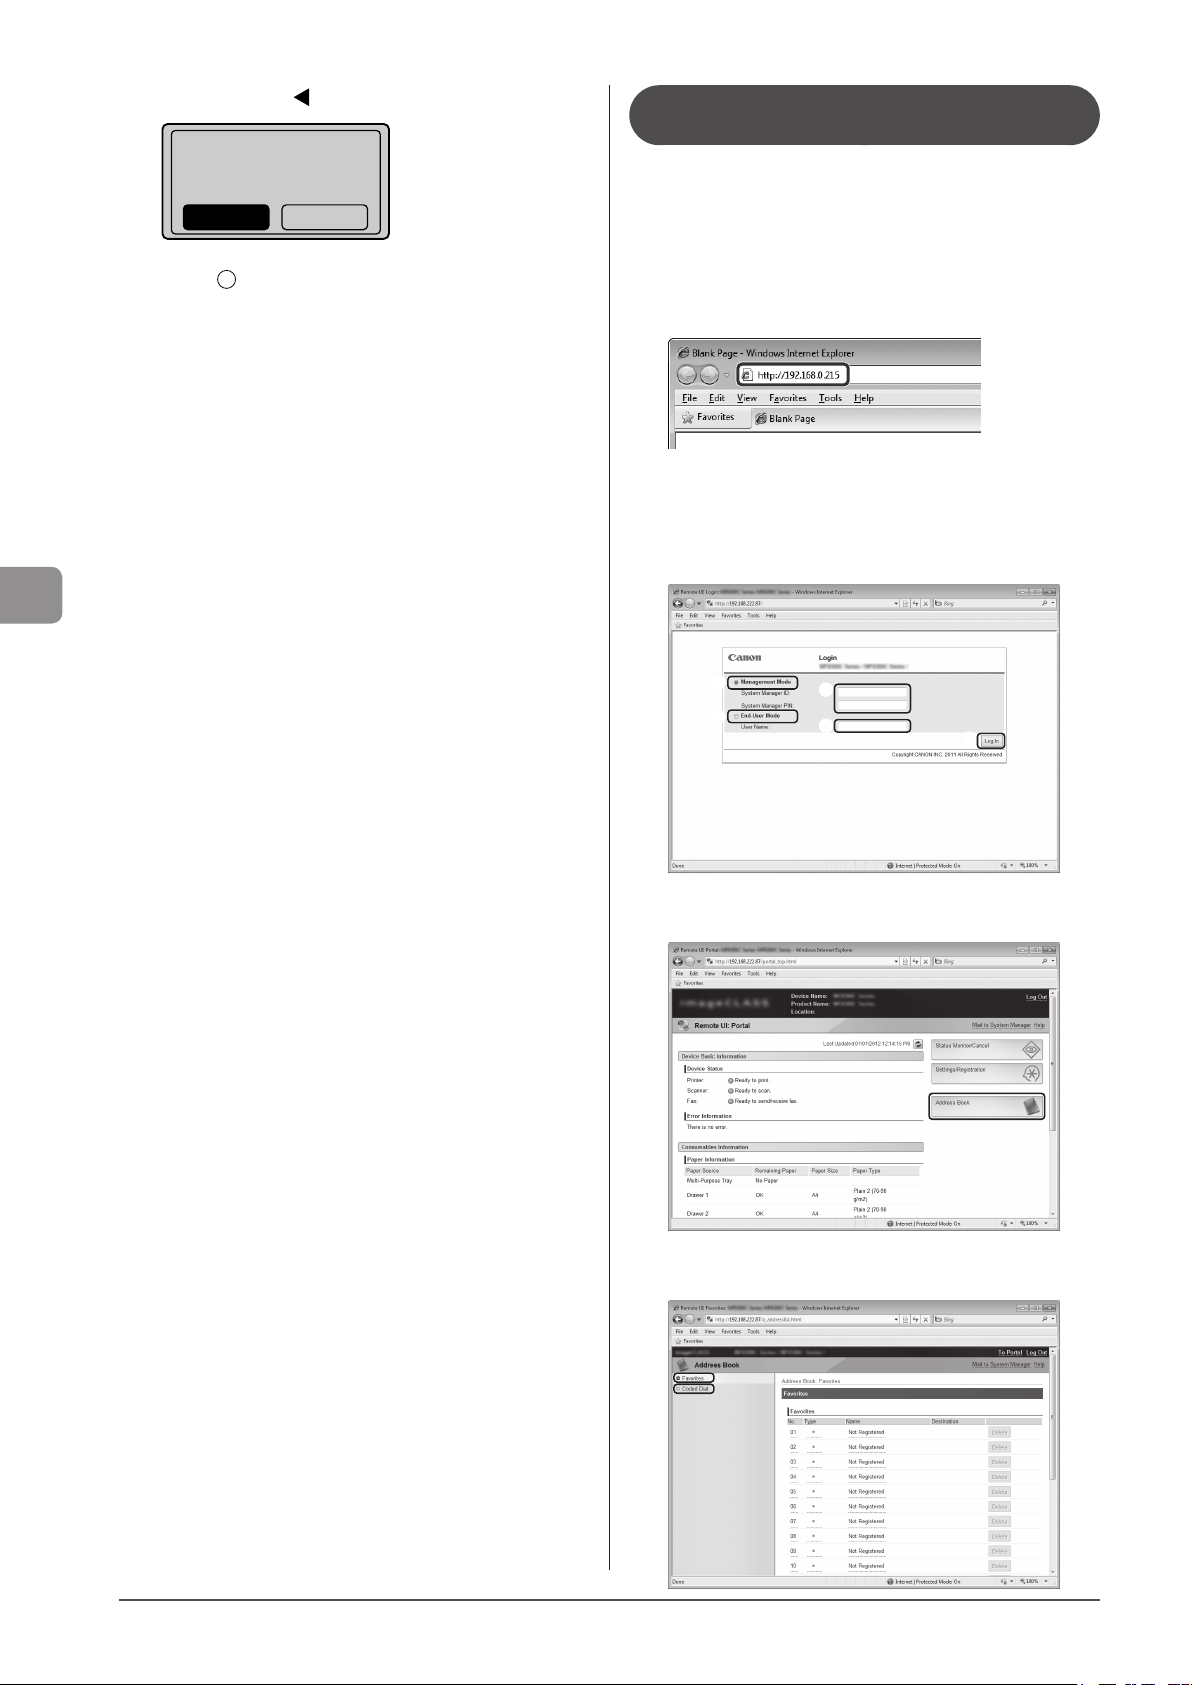
Registering Destinations in the Address Book
(4) Select <Yes> using [ ] and press [OK].
Delete from
Address Book?
NoYes
3 Press [ ] (Back) to close the menu screen.
Registering and Editing a Destination Group Using the Remote UI
1 Start the Web browser.
2 Enter “http://<the IP address of the machine>/”
in the address field and press the [ENTER] key on
your keyboard.
Input Example: “http://192.168.0.215/”
3 Log on to the Remote UI.
(1) Select [Management Mode].
(2) Enter [System Manager ID] and [System Manager PIN].
(3) Click [Log In].
(1)
(1)
(2)
(2)
4 Click [Address Book].
(3)
5-12
5 Click [Favorites] or [Coded Dial].
Page 95
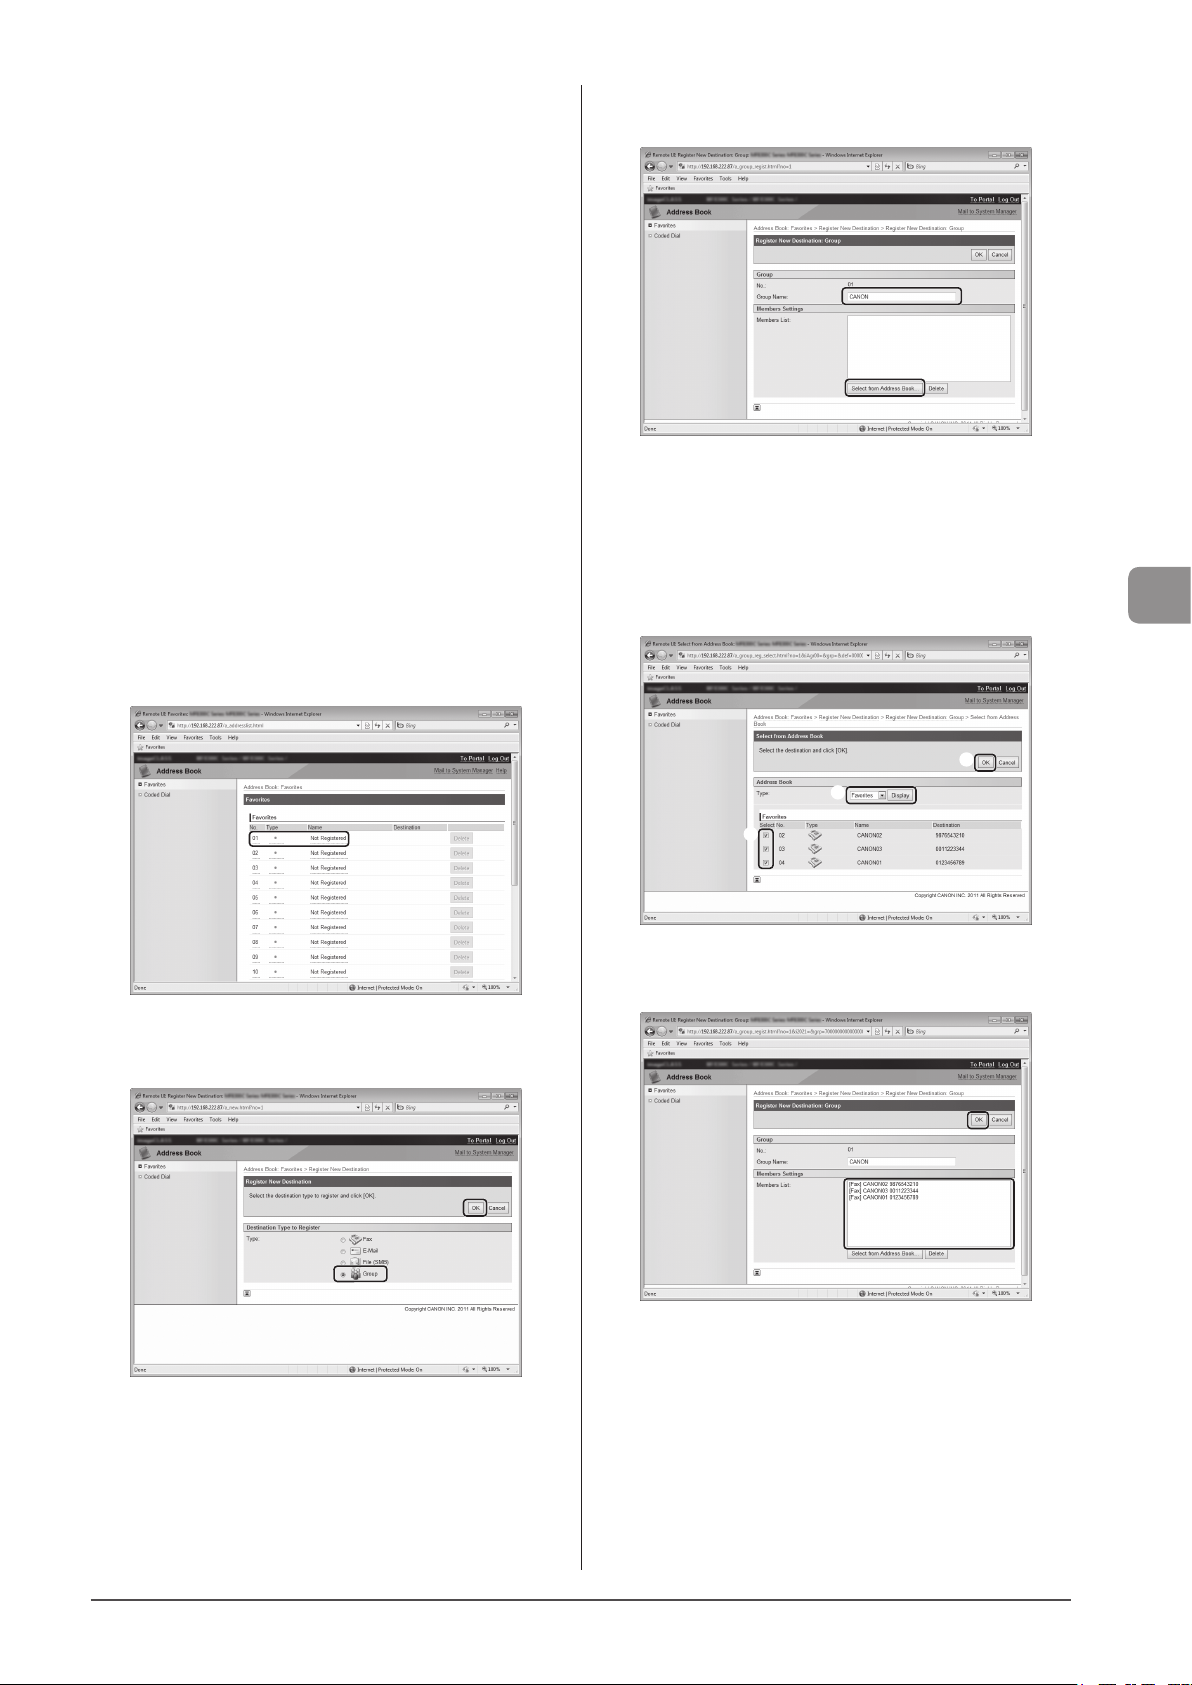
● To register a group dial newly
Proceed to Step 4.
● To add destination(s) to the registered group dial
(1) Click [No.], [Type] or [Name].
(2) Click [Edit].
(3) Click [Select from Address Book].
(4) Click [Favorites] or [Coded Dial] from the drop-down list
and click [Display].
(5) Select the check box of the destination which you want
to add to the group and click [OK].
(6) Make sure the destination you registered is displayed in
[Members List] and click [OK].
● To delete destination(s) from the registered group dial
(1) Click [No.], [Type] or [Name].
(2) Click [Edit].
(3) Select the destination to be deleted from [Members List]
and click [Delete].
(4) Click [OK].
● To change the name of the registered group dial
(1) Click [No.], [Type] or [Name].
(2) Click [Edit].
(3) Change the name of [Group Name] and click [OK].
● To delete the registered group dial
(1) Click [Delete] of the group dial which you want to delete.
8 Enter the group name in [Group Name] and click
[Select from Address Book].
9 Select the destination(s) to be registered in this
group.
(1) Select [Favorites] or [Coded Dial] from the drop-down list
and click [Display].
(2) Select the check box of the destination which you want
to register in the group.
(3) Click [OK].
Registering Destinations in the Address Book
6 Click the unregistered [No.], [Type] or [Name].
7 Select [Group] in [Destination Type to Register]
and click [OK].
(3)
(1)
(2)
10
Make sure that the destination you registered is
displayed in [Members List] and click [OK].
5-13
Page 96

Registering Destinations in the Address Book
5-14
Page 97

Using the Fax Functions
This section describes the procedure for using the fax functions.
Chapter
6
Basic Procedures for Sending Faxes 6-2
Changing the Scan Settings (Fax) 6-3
Resolution Settings 6-3
Density Settings 6-3
2-Sided Original Settings (MF8380Cdw only) 6-3
Changing the Scan Settings (Fax) 6-4
Sharpness Settings 6-4
Specifying Destinations 6-5
Specifying destinations by entering the fax number 6-5
Specifying destinations using the address book 6-5
Specifying destinations using coded dial codes 6-5
Specifying destinations using group addresses 6-6
Canceling Fax Jobs 6-7
Redialing (Manual Redialing) 6-8
Useful Features 6-9
Notifying the Recipient of an Incoming Fax by Telephone
(Manual Sending) 6-9
Push-button Telephone for Tone Dialing 6-9
Sending a Fax Abroad (Adding Pauses) 6-10
Sending to Multiple Destinations at a Time (Sequential Broadcast)
6-11
RX Mode 6-12
RX Mode 6-12
Auto mode 6-12
Fax/Tel mode 6-13
Answer mode 6-14
Manual mode 6-14
DRPD (Distinctive Ring Pattern Detection) mode 6-14
Changing the Receive Mode 6-15
Advanced Settings for the Fax/Tel Auto Switch Mode 6-15
Forwarding Fax Documents 6-16
Setting Document Transfer (Automatic Forwarding) 6-16
Forwarding Received Faxes Stored in Memory to Other
Destinations (Manual Forwarding) 6-16
Configurating Operations for Transfer Errors 6-17
Re-fowarding/Printing/Deleting Documents in
Which Transfer Is Failed 6-18
Managing Faxes Stored in Memory 6-19
Checking and Canceling Fax Jobs 6-19
Combining and Printing the Received Documents You Saved 6-19
Checking and Deleting Received Faxes 6-20
Checking the History of Received/Sent Faxes 6-21
Changing the Default Fax Settings 6-22
Changing Fax Settings (Settings that Can Be
Specified Using the [Menu] Button) 6-23
The steps to take for configuring the send settings 6-23
Options 6-23
Register Unit Telephone Number 6-24
Select Line Type 6-24
Off-Hook Alarm 6-24
Change Defaults 6-24
Register Unit Name (Fax) 6-24
ECM TX 6-24
Pause Time 6-24
Auto Redial 6-24
Sender ID 6-25
Check Dial Tone Before Sending 6-25
The steps to take for configuring the receiving settings 6-25
Options 6-26
ECM RX 6-26
Incoming Ring 6-26
Remote RX 6-26
Auto RX Switch 6-26
2-Sided Printing (MF8380Cdw Only) 6-26
Reduce RX Size 6-26
RX Page Footer 6-27
Continue Printing When Toner Is Low 6-27
The steps to take for configuring the system settings 6-27
Options 6-28
TX Start Speed 6-28
RX Start Speed 6-28
Memory Lock Settings 6-28
Select Country/Region 6-28
Address Book PIN 6-28
Restrict New Destinations 6-29
Allow Fax Driver TX 6-29
Restrict History TX 6-29
Fax No. Confirmation Re-Entry 6-29
Restrict Sequential Broadcast 6-29
6-1
Page 98
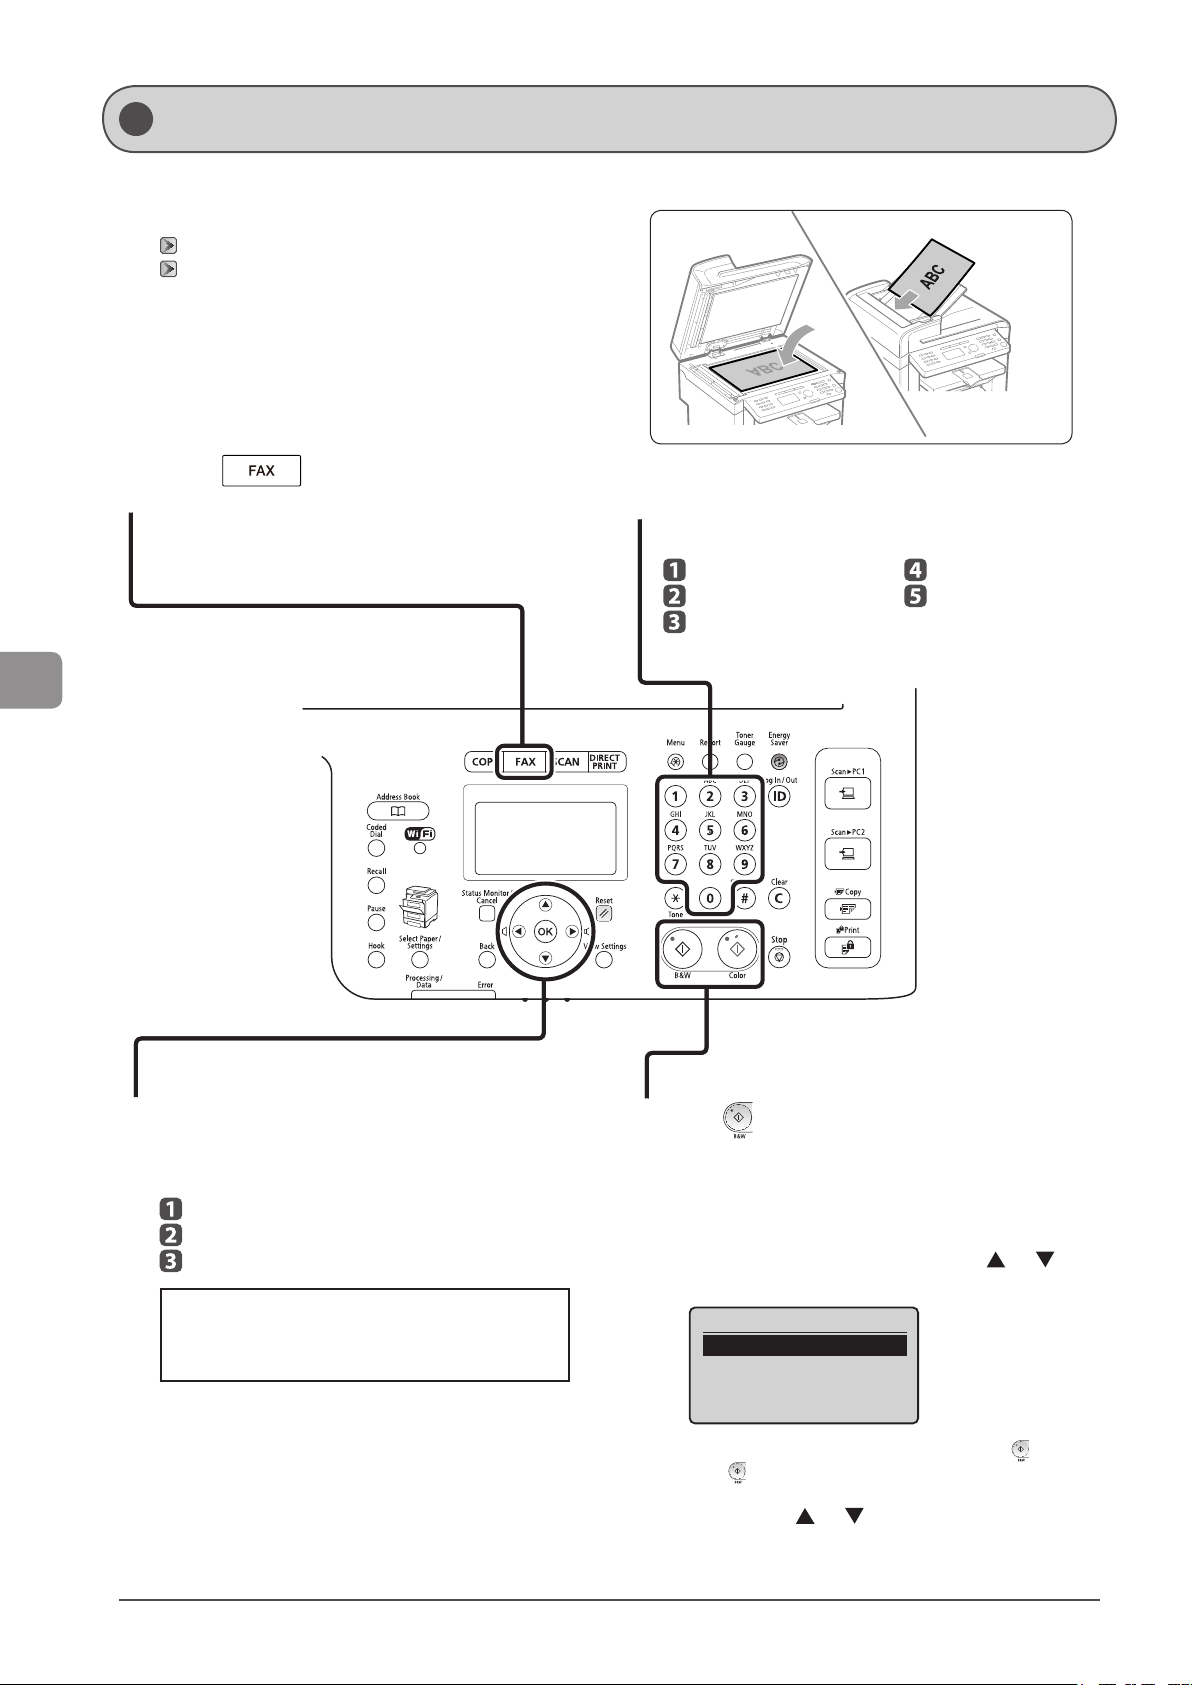
Basic Procedures for Sending Faxes
This section describes the basic procedure for sending a fax.
Place your fax.
1
“Placing Documents” (→P.2-4)
“Supported Document Types” (→P.2-2)
Using the Fax Functions
Press [ ].
2
Specify the destination.
4
These are the following methods to specify a destination.
(For details, see P.6-4 to 6-5.)
Entering the fax number
Favorites list
Coded dial codes
Group dialing
Address book
- Sequential broadcast
(→P.6-11)
6-2
Specify the scanning settings as needed.
3
There are the three items you can specify.
(For details, see P.6-3.)
Resolution Settings
Density Settings
Sharpness Settings
The settings specified here are effective only for the
current sending operation. To make the settings
effective for all the fax operations, see “Changing the
Default Fax Settings” (→P.6-22).
Press [ ] (B & W).
5
When your fax is placed in the feeder
The scan starts. Your fax is sent to the destination when the scan is
complete.
When your fax is placed on the platen glass
Perform the following procedure.
(1) Select the size of the original document using [ ] or [ ] and
press [OK].
Scan Size
LTR
LGL
STMT
(2) Place the next page on the platen glass and press [ ] (B & W).
Press [ ] (B & W) for each page.
(3) When all documents are scanned completely, select <Start
Sending> using [ ] or [ ] and press [OK].
Your fax is sent to your fax destination.
Page 99
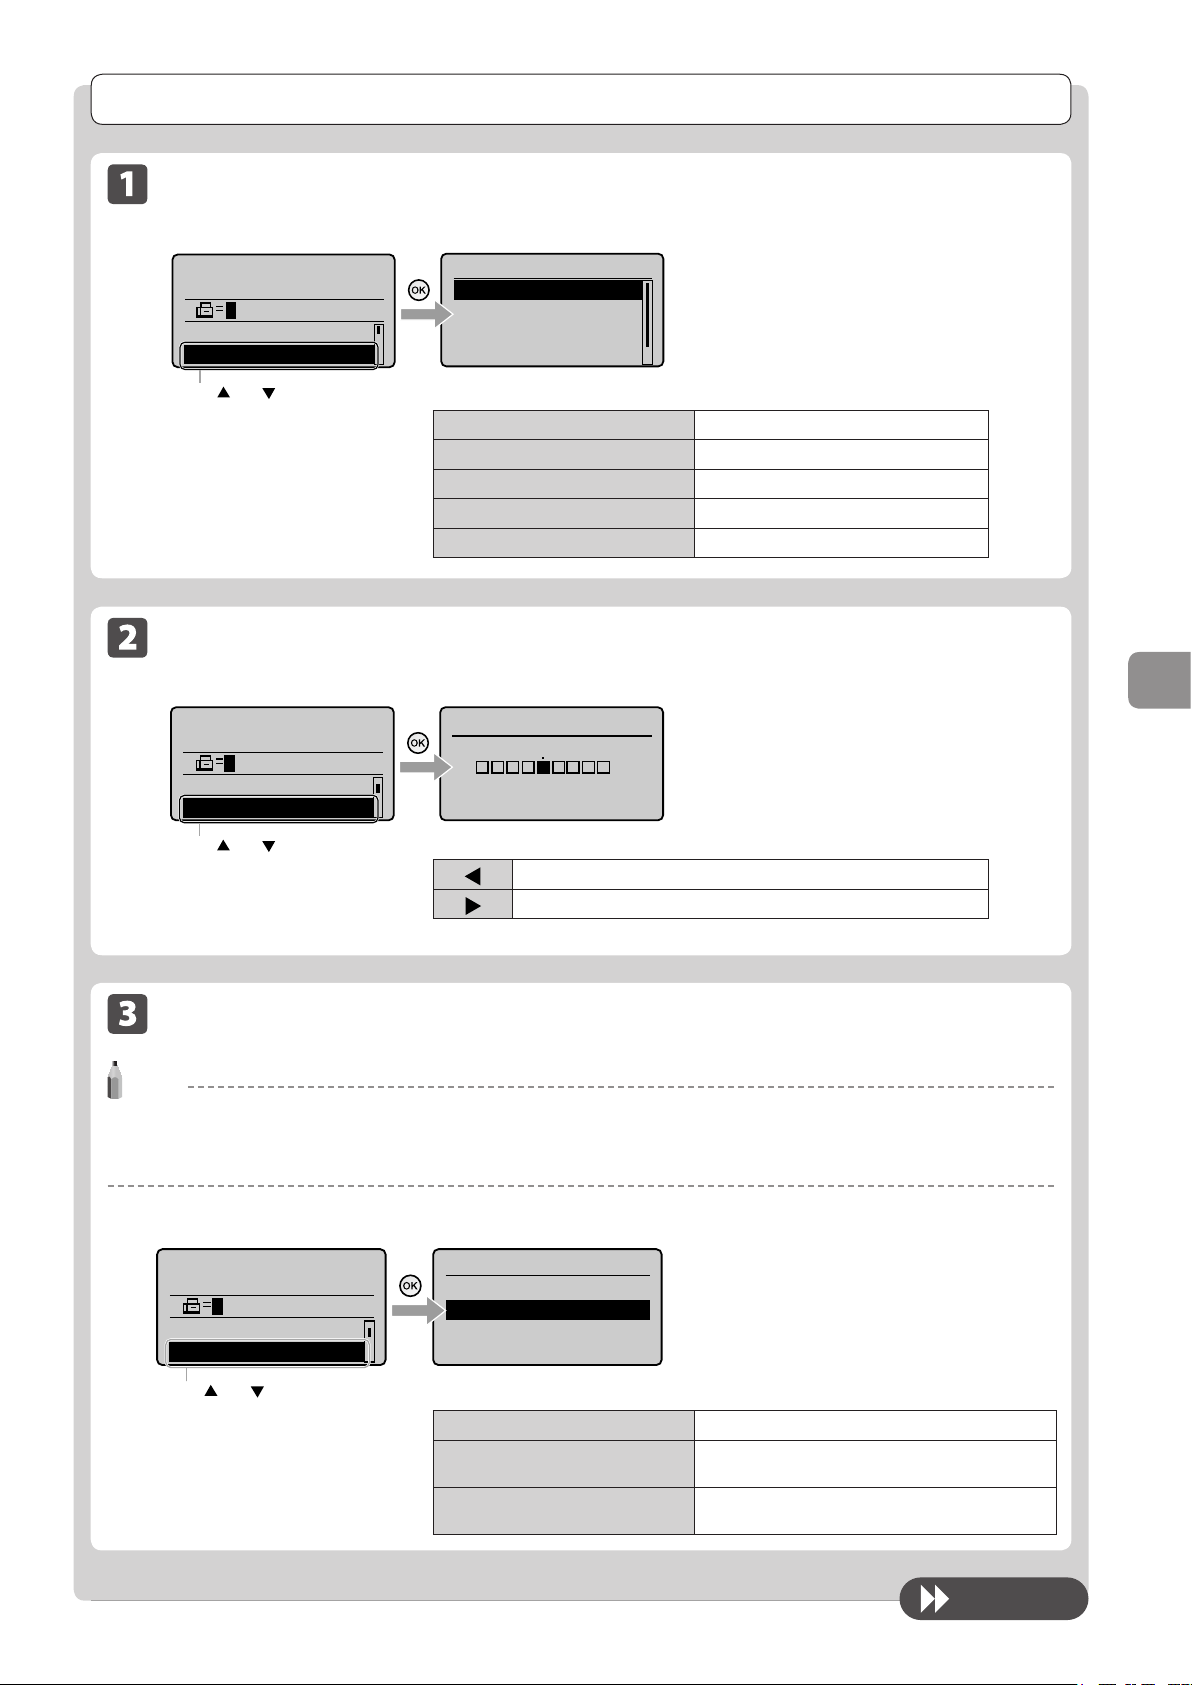
Changing the Scan Settings (Fax)
Resolution Settings
Fax mode screen Setting screen
Specify destination.
01/01/2011 12:52AM
RX Mode: Auto
Resolution: 200 x 10
Press [ ] or [ ] to select <Resolution>.
Density Settings
Fax mode screen Setting screen
Specify destination.
01/01/2011 12:52AM
Resolution: 200 x 1
Density: 0
Press [ ] or [ ] to select <Density>.
+
-
...
Resolution
200 x 100 dpi (Norma
200 x 200 dpi (Fine)
200 x 200 dpi (Phot
200 x 400 dpi (Supe
...
...
<200 x 100 dpi (Normal)>
<200 x 200 dpi (Fine)>
<200 x 200 dpi (Photo)>
<200 x 400 dpi (Superfine)>
<400 x 400 dpi (Ultrafine)>
Density
- +
[ ]
[ ]
Decrease the density.
Increase the density.
Specify the resolution.
Higher resolutions result in better image quality
but require longer transmission times.
For faxes that contain text
For faxes that contain fine text
For faxes that contain photographs
For faxes that contain fine text
For faxes that contain photographs
Using the Fax Functions
Specify the density.
2-Sided Original Settings (MF8380Cdw only)
NOTE
The <2-Sided Original> mode is not available when
• scanning original using the platen glass
• scanning with the manual sending mode
Fax mode screen Setting screen
Specify destination.
01/01/2011 12:52AM
2-Sided Original
Off
Book Type
Resolution: 200 x 1
...
Calendar Type
ided Original: O...
Press [ ] or [ ] to specify the <2-Sided Original> setting.
<Book Type>
<Calendar Type>
<Off>
Specify whether to use the 2-Sided Original mode
or select the type of the originals.
Booklet setting for 2-sided documents is not set.
Select when the orientation (top-to-bottom) of the
images on the front and back sides is the same.
Select when the orientation (top-to-bottom) of the
images on the front and back sides is different.
To next page
6-3
Page 100
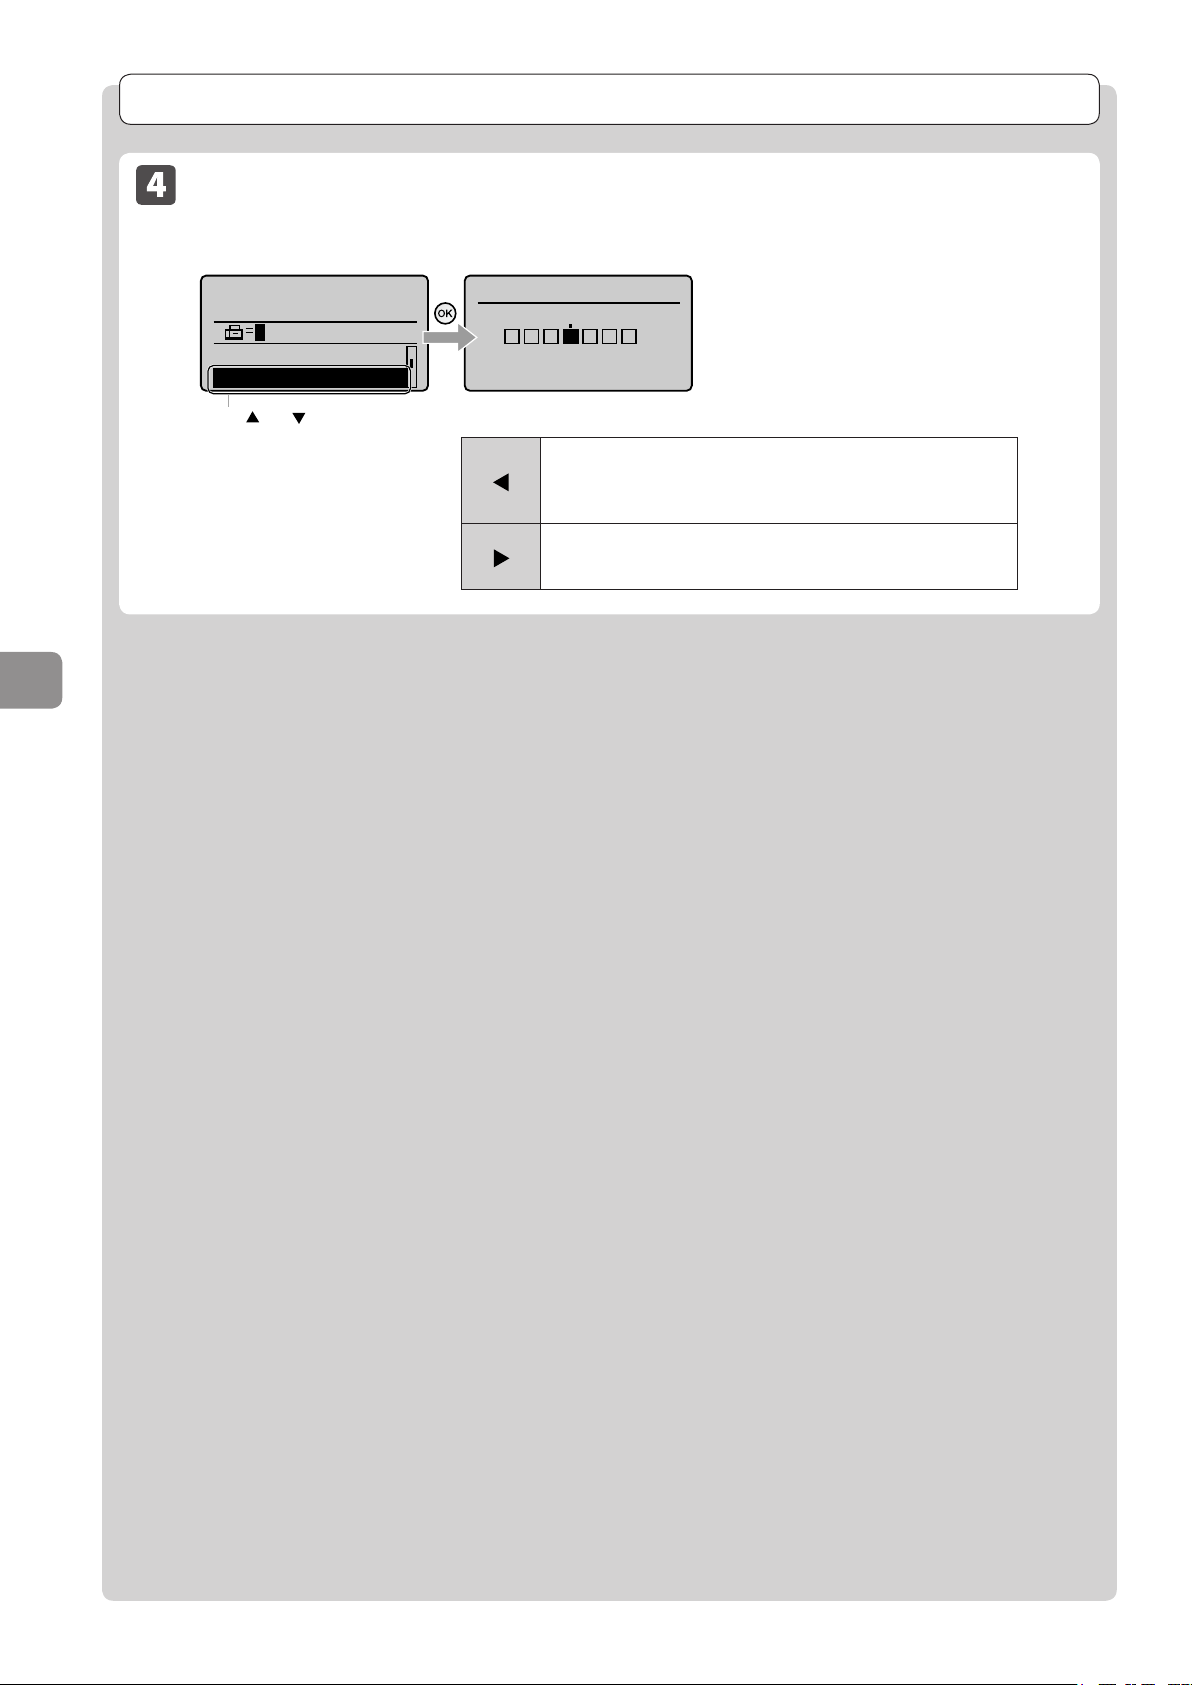
Changing the Scan Settings (Fax)
Sharpness Settings
Fax mode screen Setting screen
Specify destination.
01/01/2011 12:52AM
2-Sided Original: O
Sharpness: 0
Press [ ] or [ ] to select <Sharpness>.
+
-
...
Sharpness
- +
To clearly capture halftone photos, adjust this setting to the
[ ]
[ ]
appropriate level on the <-> scale.
This can counteract the effect of moiré patterns (uneven gradation
and striped patterns).
To clearly capture text or lines, adjust this setting to the appropriate
level on the <+> scale. It is best suited for scanning blueprints and
very weak pencil manuscripts.
Adjust this setting to emphasize the outline of
the image or decrease the contrast.
Using the Fax Functions
6-4
 Loading...