

Page 1

Practical Guide
for Advanced Printing
This document provides useful explanations about
procedures for printing documents and solutions to
common printing problems. We recommend you read
this document and the User
s Guide.
You can access
canon.com/oip-manual to
read the User’s Guide that describes
all functions of this machine.
USRMA-0684-00 Copyright CANON INC. 2016
Page 2

Page 3

Contents
Recommended Types of Calibration � � � � � � � � � � � � � � � 2
Simple Calibration � � � � � � � � � � � � � � � � � � � � � � � � � � � � � � � � � � � � � � � � � � �4
Enhanced Calibration � � � � � � � � � � � � � � � � � � � � � � � � � � � � � � � � � � � � � � � �5
Getting the Best Colors from Your Machine � � � � � � � 16
Calibration after Purchase � � � � � � � � � � � � � � � � � � � � � � � � � � � � � � � � � � 19
Calibration After the Machine Is in Operation � � � � � � � � � � � � � � 37
Calibration As Needed � � � � � � � � � � � � � � � � � � � � � � � � � � � � � � � � � � � � � 38
How to Get the Most Accurate Colors
Possible for Your Printouts � � � � � � � � � � � � � � � � � � � � � � � � 44
Step 1 Eliminating the Basic Causes � � � � � � � � � � � � � � � � � � � � � � � 44
Step 2 Changing Print Settings for a Job with the
imagePRESS Server � � � � � � � � � � � � � � � � � � � � � � � � � � � � � � � � � � � � � � � � 46
Smoothing Colors in Photographs, Figures,
Lines, and Text � � � � � � � � � � � � � � � � � � � � � � � � � � � � � � � � � � � 53
How to Print Clear Photos � � � � � � � � � � � � � � � � � � � � � � � � 55
Getting Clear Texts and Lines from Your
Machine � � � � � � � � � � � � � � � � � � � � � � � � � � � � � � � � � � � � � � � � �60
Step 1 Eliminating the Basic Causes � � � � � � � � � � � � � � � � � � � � � � � 60
Step 2 Changing Print Settings for a Job with the
imagePRESS Server � � � � � � � � � � � � � � � � � � � � � � � � � � � � � � � � � � � � � � � � 61
How to Make Transparency Effects Work As
Expected � � � � � � � � � � � � � � � � � � � � � � � � � � � � � � � � � � � � � � � � 68
For RGB Color Mode � � � � � � � � � � � � � � � � � � � � � � � � � � � � � � � � � � � � � � � 68
For CMYK Color Mode � � � � � � � � � � � � � � � � � � � � � � � � � � � � � � � � � � � � � 69
How to Solve the Overprint Problems � � � � � � � � � � � � �72
How to Fix Misalignment of Images � � � � � � � � � � � � � � � 75
Step 1 Eliminating the Basic Causes of Misalignment � � � � � � 76
Step 2
Changing Settings on the Machine According to
Paper Characteristics � � � � � � � � � � � � � � � � � � � � � � � � � � � � � � � � � � � � � � � � � � � � � � 78
Step 3 Changing Print Settings on the Printer Driver � � � � � � � 86
How to Adjust the Saddle Stitch Position � � � � � � � � � �95
Step 1
Adjusting the Saddle Stitch Position to the
Center of the Booklet � � � � � � � � � � � � � � � � � � � � � � � � � � � � � � � � � � � � � � � �95
Step 2
Adjusting the Saddle Stitch Fold Position to the
Center of the Booklet � � � � � � � � � � � � � � � � � � � � � � � � � � � � � � � � � � � � � � � � � � � � 97
Improving the Finish of Booklets � � � � � � � � � � � � � � � � �98
Step 1 Confirming the Basic Settings � � � � � � � � � � � � � � � � � � � � � � 98
Step 2 Confirming the Position of Text and Images
on the Page � � � � � � � � � � � � � � � � � � � � � � � � � � � � � � � � � � � � � � � � � � � � � � 100
Step 3 Adjusting Margins with Creep Compensation � � � � � 102
Step 4 Checking the Cover Settings � � � � � � � � � � � � � � � � � � � � � � 103
How to Align Printouts � � � � � � � � � � � � � � � � � � � � � � � � � �108
Repeated Paper Jams Caused by Paper
Wrapping around the Fixing Belt � � � � � � � � � � � � � � � �110
Step 1
Understanding What Causes Paper to Wrap
around the Fixing Belt � � � � � � � � � � � � � � � � � � � � � � � � � � � � � � � � � � � � � � � 111
Step 2 Keeping the Paper’s Moisture Content at an
Appropriate Level � � � � � � � � � � � � � � � � � � � � � � � � � � � � � � � � � � � � � � � � 112
Step 3 Changing the Machine’s Settings � � � � � � � � � � � � � � � � � � 112
Step 4 Try This If You Still Have the Same Problems � � � � � � �115
Improving Productivity � � � � � � � � � � � � � � � � � � � � � � � � � �116
Choosing Paper Wisely � � � � � � � � � � � � � � � � � � � � � � � � � � � � � � � � � � � �116
Speeding Up a Print Job by Using Thin Paper First � � � � � � � � � 117
Replacing a Toner Cartridge without Stopping the
Print Job � � � � � � � � � � � � � � � � � � � � � � � � � � � � � � � � � � � � � � � � � � � � � � � � � � 118
Increasing a Paper Loading Capacity by Giving
Priority to the Lower Tray � � � � � � � � � � � � � � � � � � � � � � � � � � � � � � � � � 119
Using Auto Drawer Switching to Its Fullest � � � � � � � � � � � � � � � � 120
Increasing Print Speed by Giving Priority to Either
Thin Paper or Heavy Paper � � � � � � � � � � � � � � � � � � � � � � � � � � � � � � � � 125
Speeding Up a Print Job Manually When Printing on
Heavy 5/Heavy 6 Paper � � � � � � � � � � � � � � � � � � � � � � � � � � � � � � � � � � � 126
Speeding Up a Print Job by Giving Priority to
Productivity Rather Than Gloss � � � � � � � � � � � � � � � � � � � � � � � � � � � � 127
How to Fix Curled Printouts � � � � � � � � � � � � � � � � � � � � � � 90
Step 1 Eliminating the Basic Causes of Curled Paper � � � � � � � 90
Step 2
Changing Settings on the Machine According to
Paper Characteristics � � � � � � � � � � � � � � � � � � � � � � � � � � � � � � � � � � � � � � � � � � � � � � 91
Problems with Printouts That Look Like the
Following Images � � � � � � � � � � � � � � � � � � � � � � � � � � � � � � �128
Types of Paper You Can Use for Calibration
How to Align and Staple Printouts � � � � � � � � � � � � � � � �93
•
The shape of the machine and available functions may vary, depending on the machine you are using� Unauthorized
reproduction of the contents of this document is prohibited�
•
The information in this document is subject to change without notice�
•
Available models differ depending on your region and product release dates�
Page 4
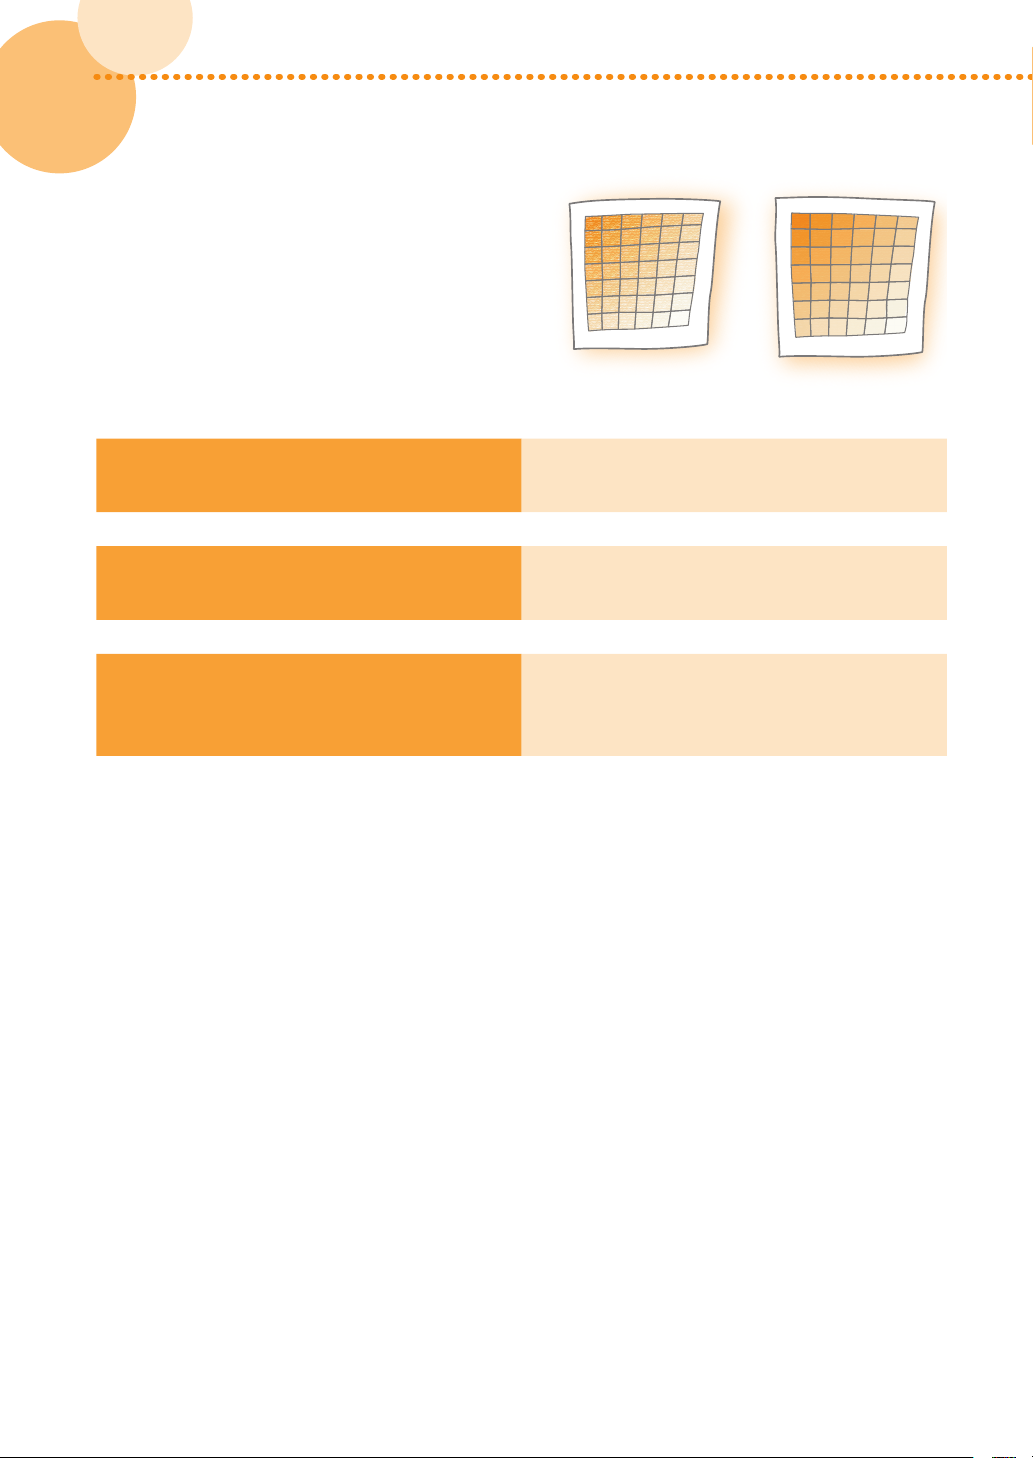
Recommended Types of Calibration
The density and tone of colors may change as you print
large volumes of pages� Even if you are printing the same
image, slight variations in the shades of colors may become
apparent� This is characteristic to this machine� You need
to calibrate the colors periodically to compensate for the
difference in colors� The following two types of calibration
can be done periodically� Refer to the following and select
the type of calibration that meets your needs�
Simple Calibration Enhanced Calibration
or
If you want to calibrate the colors quickly and
1
easily*
If you want to calibrate the colors as precisely
as possible even if it takes time and effort
If the environment of the location in which
you have installed the machine is outside the
recommended range*
*1 You can select this type of calibration only if the environment in which the machine is installed is within the recommended range*2�
*2 For information on the environment (temperature and humidity) for installing the machine and storing paper, see the
Installation and Operating Environment Guidelines or the Specialty Media Handling Guide�
2
Simple Calibration (p� 4)
Enhanced Calibration (p� 5)
Enhanced Calibration (p� 5)
2
2
imagePRESS C850/C750/C650/C65
Page 5
Recommended Types of Calibration
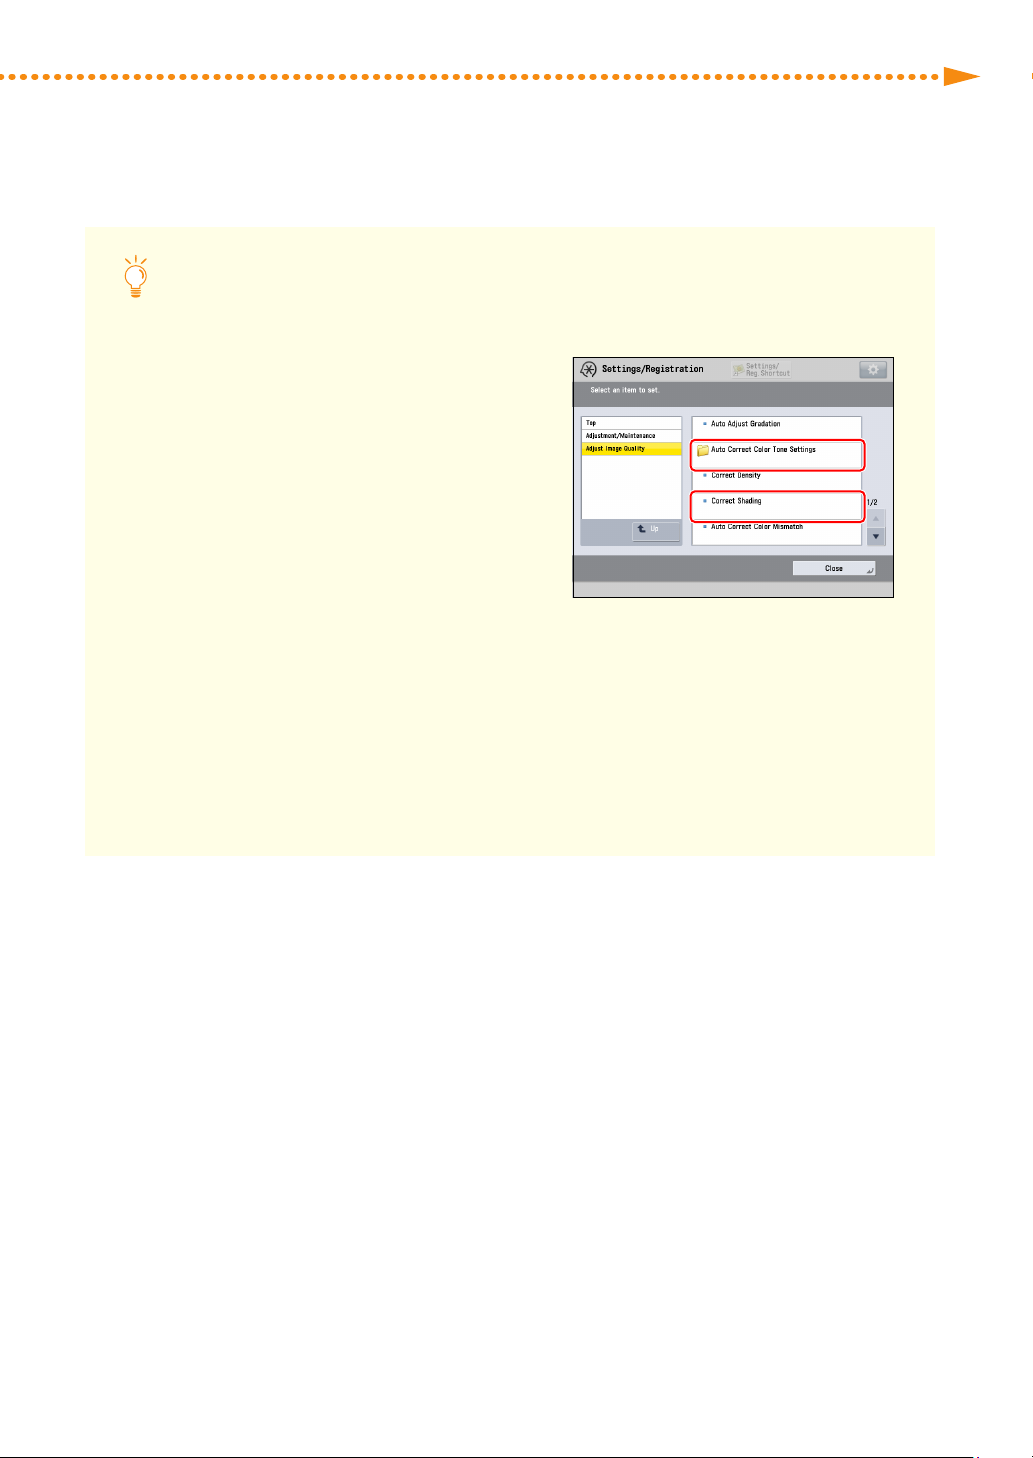
Other Types of Calibration You Can Do When You Notice Variations in the
Shades and Tones of Colors
The following calibrations can be made in addition to
Simple Calibration and Enhanced Calibration� Calibrate
the machine only if you notice irregularities in the
colors� (You do not need to calibrate the machine on a
regular schedule�) Make sure to do automatic gradation
calibration prior to doing either one of the following
calibrations� If you are using the imagePRESS Server and
a spectrophotometer, such as an X-Rite i1 Pro, you can
make more precise corrections by doing both Shading
Correction and Automatic Color Tone Correction� In
this case, do these corrections in the following order:
Automatic Gradation Calibration → Shading Correction
→ Automatic Color Tone Correction�
Shading Correction
Do this if the color densities become uneven�
Automatic Color Tone Correction
Do this if you notice differences in the color tones�
imagePRESS C850/C750/C650/C65
3
Page 6
Simple Calibration
If you want to correct the printed colors quickly and easily, this type of calibration is recommended� Do steps 1 to
3 in "Calibration After the Machine Is in Operation" once a day� (p� 37) This is, however, done on the premise that the
environment (temperature and humidity) in which the machine is installed satisfies the recommended range� If the
environment does not satisfy this range, do "Enhanced Calibration�" (p� 5)
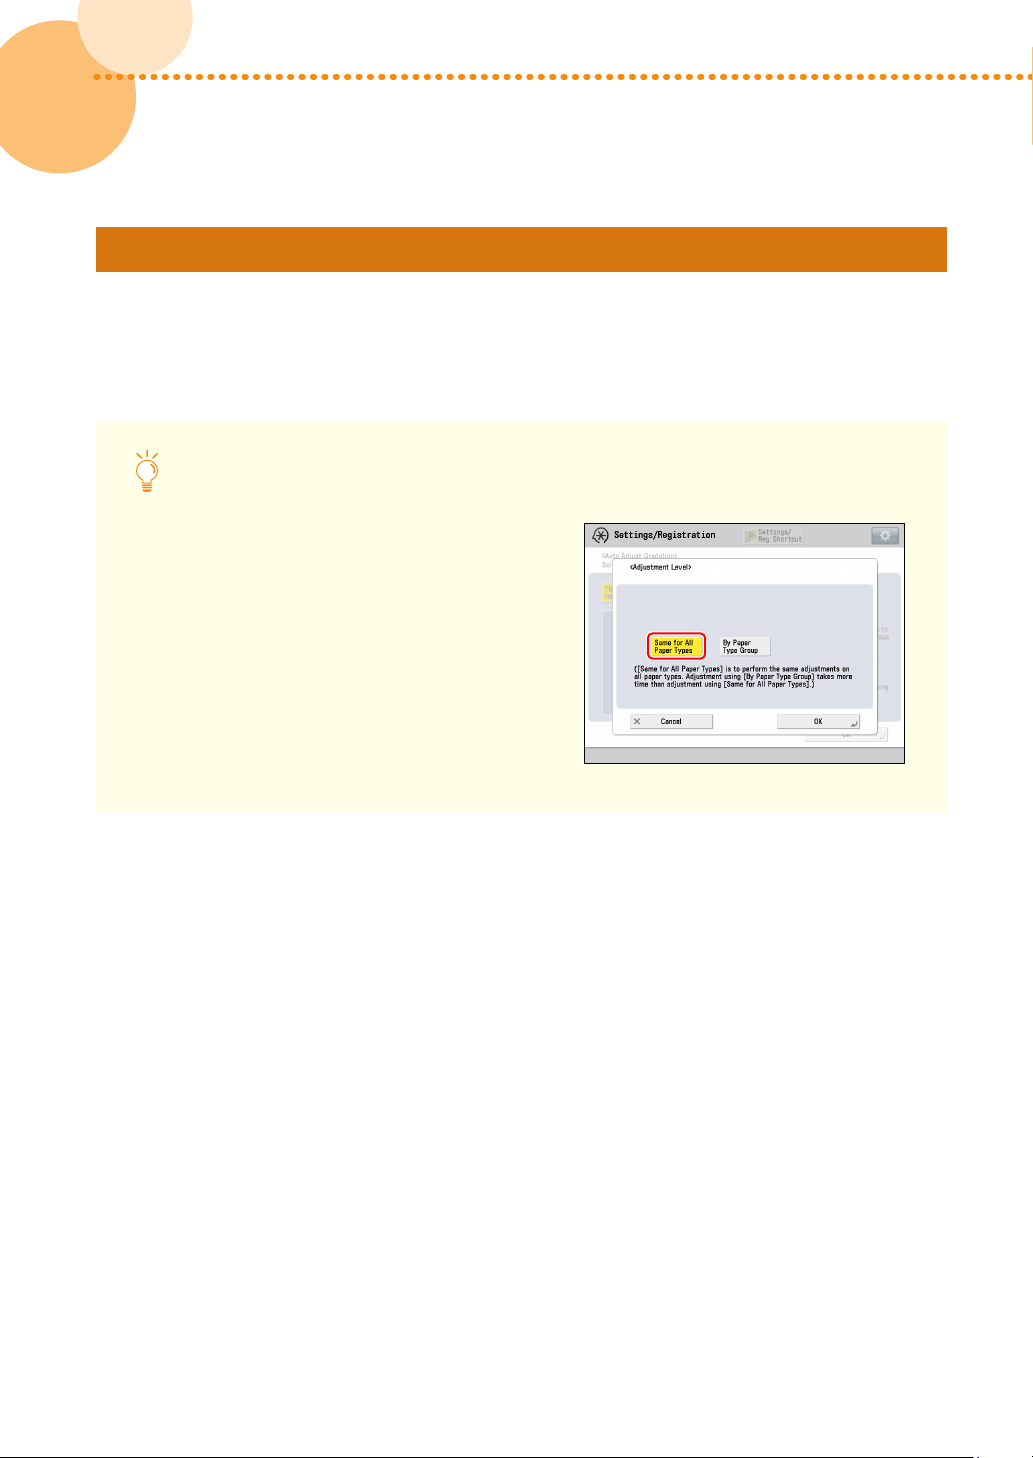
Prior to Starting Simple Calibration
See "Adjustment for Image Quality and Finishing
(Calibration)" > "Automatic Gradation Adjustment"
> "Changing Adjustment Level" in the User's Guide,
and set [Adjustment Level] for automatic gradation
adjustment to 'Same for All Paper Types'�
4
4
imagePRESS C850/C750/C650/C65
Page 7
Recommended Types of Calibration
Enhanced Calibration
This type of calibration is recommended if you want to correct the shades and tones of colors as precisely as possible,
even if it takes more time and effort� This is also suitable if the environment (temperature and humidity) in which the
machine is installed does not satisfy the recommended range for some reason� This type of calibration uses specific
types of paper, which correspond to the types of paper you want to print on, so that more precise corrections can be
achieved� The paper is categorized in three groups, group A, B, and C, for the purpose of more precise calibration� See
the list in "Types of Paper You Can Use for Calibration" at the end of this document� Find out in which group the paper
you want to print on is categorized, and then select the corresponding type of paper you can use for calibration� To
keep making corrections precisely, calibrate the machine for the paper you are printing on whenever you print on
paper of a different group� For example, if you print on plain paper, which is listed in group A, in the morning, and print
on Heavy 5, which is listed in group B, in the afternoon, calibrate the machine for paper in group A (p� 6) before starting
printing jobs in the morning and calibrate the machine for paper in group B (p� 7) before starting printing jobs in the
afternoon�
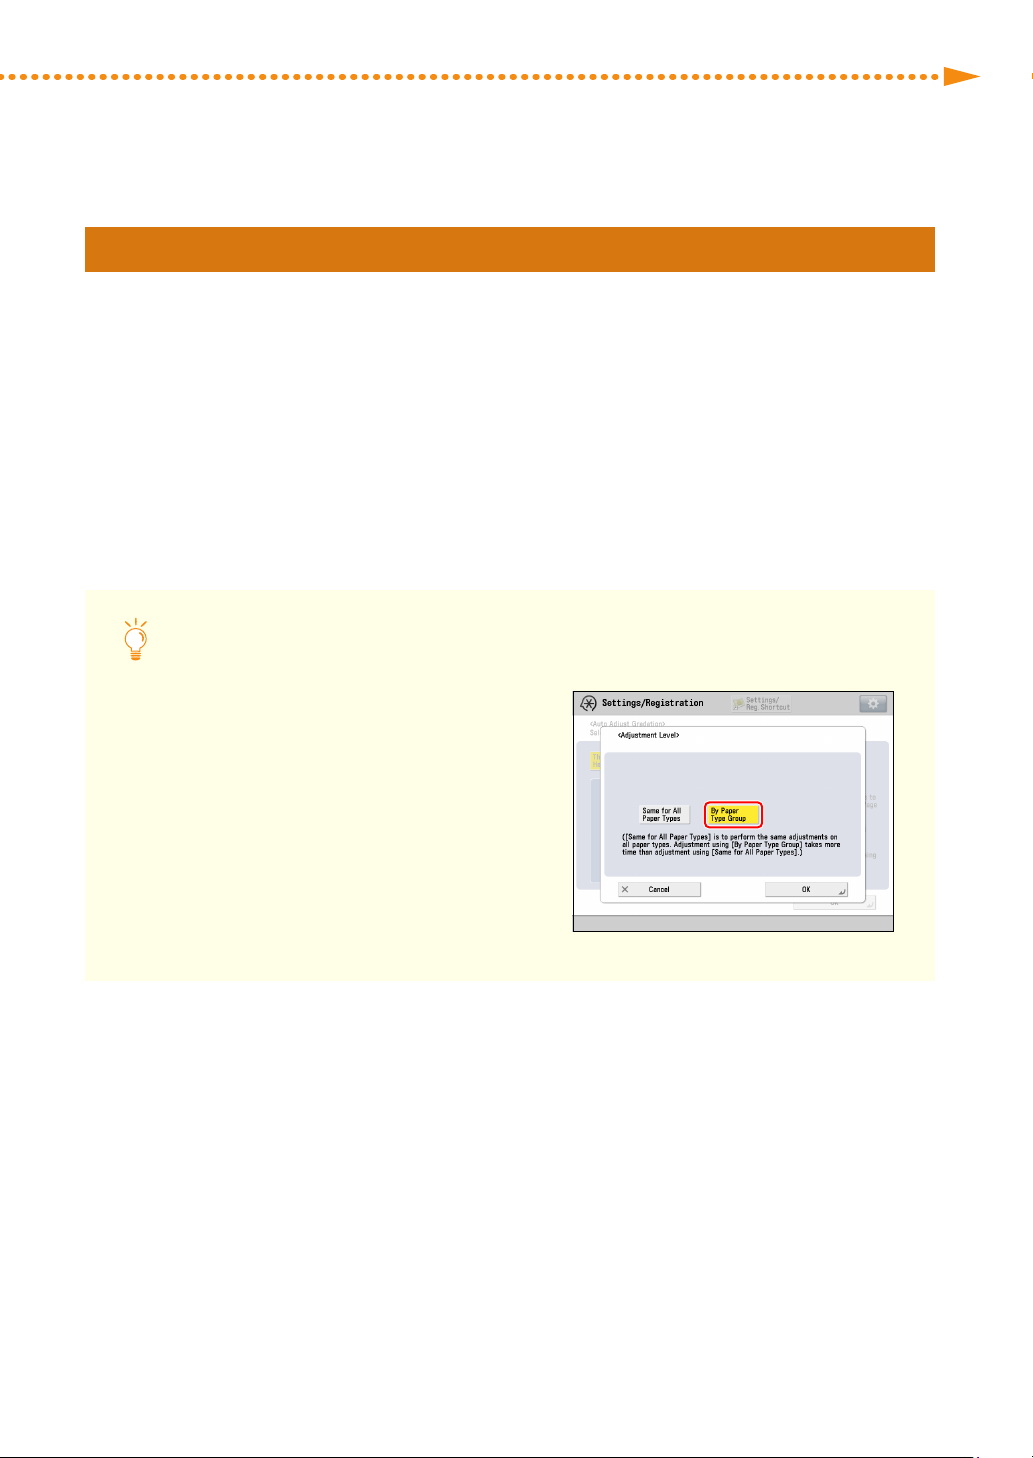
Prior to Starting Enhanced Calibration
See "Adjustment for Image Quality and Finish
(Calibration)" > "Automatic Gradation Adjustment"
> "Changing Adjustment Level" in the User's Guide,
and set [Adjustment Level] for automatic gradation
adjustment to 'By Paper Type Group'� If you are not sure
of the name of the paper to use for calibration, contact
your local authorized Canon dealer�
imagePRESS C850/C750/C650/C65
5
Page 8

Calibrating for Paper in Group A
▀
Load the paper for calibration for group A into the paper drawer�
1
•
You can use the following type of paper to calibrate for paper in group A� You can also use the other type of
paper if you registered it to use for calibration in advance�
For the European and Asia-Pacific Regions
Canon Océ Top Colour Paper (100 g/m
For the American Region
Hammermill Color Copy Digital (28 lb� (105 g/m
Press → [Adjustment/Maintenance] → [Adjust Image Quality] → [Auto Adjust Gradation] →
2
[Thin 1/Plain/Heavy 1-4]�
Select the paper you loaded in step 1 for [Select Paper to Adjust]�
3
"Adjustment for Image Quality and Finishing (Calibration)" > "Automatic Gradation Adjustment" >
"Selecting Paper for Calibration" in the User's Guide
Do automatic gradation calibration (full calibration)�
4
"Adjustment for Image Quality and Finishing (Calibration)" > "Automatic Gradation Adjustment" > "Full
Adjustment" in the User's Guide
2
)
2
))
6
6
If you are using the imagePRESS Server, do steps 1 to 8 in "Calibrations on the imagePRESS
5
Server" in "Required Calibrations�" (p� 22)
•
Do calibration on the imagePRESS Server using the following type of paper� You can also use the type of
paper that you want to use for printing if you registered it in advance�
For the European and Asia-Pacific Regions
Canon Océ Top Colour Paper (100 g/m
For the American Region
Hammermill Color Copy Digital (28 lb� (105 g/m
imagePRESS C850/C750/C650/C65
2
)
2
))
Page 9

Recommended Types of Calibration
Calibrating for Paper in Group B
▀
Load the paper for calibration for group B into the paper drawer�
1
•
You can use the following type of paper to calibrate for paper in group B� You can also use the other type of
paper if you registered it to use for calibration in advance�
For the European and Asia-Pacific Regions
Canon Océ Top Colour Paper (250 g/m
For the American Region
Mohawk Options Navajo Smooth Brilliant White (90 lb� Cover (243 g/m
Press → [Adjustment/Maintenance] → [Adjust Image Quality] → [Auto Adjust Gradation] →
2
2
)
2
))
[Heavy 5]�
Select the paper you loaded in step 1 for [Select Paper to Adjust]�
3
"Adjustment for Image Quality and Finishing (Calibration)" > "Automatic Gradation Adjustment" >
"Selecting Paper for Calibration" in the User's Guide
Do automatic gradation calibration (full calibration)�
4
"Adjustment for Image Quality and Finishing (Calibration)" > "Automatic Gradation Adjustment" > "Full
Adjustment" in the User's Guide
If you are using the imagePRESS Server, do steps 1 to 8 in "Calibrations on the imagePRESS
5
Server" in "Required Calibrations�" (p� 22)
•
Do calibration on the imagePRESS Server using one of the following types of paper� You can also use the
type of paper that you want to use for printing if you registered it in advance�
For the European and Asia-Pacific Regions
Type of paper you want to print on is Thick (221-256 gm2):
Canon Océ Top Colour Paper (250 g/m
Type of paper you want to print on is Coated (106-180 gm2):
OK Top Coat Plus (127�9 g/m
For the American Region
Type of paper you want to print on is Thick (221-256 gm2):
Mohawk Options Navajo Smooth Brilliant White (90 lb� Cover (243 g/m
Type of paper you want to print on is Coated (106-180 gm2):
OK Top Coat Plus (34 lb� (127�9 g/m
2
)
2
)
2
))
2
))
imagePRESS C850/C750/C650/C65
7
Page 10

Calibrating for Paper in Group C
▀
Load the paper for calibration for group C into the paper drawer�
1
•
You can use the following type of paper to calibrate for paper in group C� You can also use the other type of
paper if you registered it to use for calibration in advance�
For the European and Asia-Pacific Regions
Canon Océ Top Colour Paper (300 g/m
For the American Region
Hammermill Color Copy Digital Cover (100 lb� (271 g/m
Press → [Adjustment/Maintenance] → [Adjust Image Quality] → [Auto Adjust Gradation] →
2
2
)
2
))
[Heavy 6]�
Select the paper you loaded in step 1 for [Select Paper to Adjust]�
3
"Adjustment for Image Quality and Finishing (Calibration)" > "Automatic Gradation Adjustment" >
"Selecting Paper for Calibration" in the User's Guide
Do automatic gradation calibration (full calibration)�
4
"Adjustment for Image Quality and Finishing (Calibration)" > "Automatic Gradation Adjustment" > "Full
Adjustment" in the User's Guide
8
8
If you are using the imagePRESS Server, do steps 1 to 8 in "Calibrations on the imagePRESS
5
Server" in "Required Calibrations�" (p� 22)
•
Do calibration on the imagePRESS Server using one of the following types of paper� You can also use the
type of paper that you want to use for printing if you registered it in advance�
For the European and Asia-Pacific Regions
Type of paper you want to print on is Heavy Thick (257-300 gm2):
Canon Océ Top Colour Paper (300 g/m
Type of paper you want to print on is Heavy Coated (181-300 gm2):
Futura Gloss Cover (271 g/m
For the American Region
Type of paper you want to print on is Heavy Thick (257-300 gm2):
Hammermill Color Copy Digital Cover (100 lb� (271 g/m
Type of paper you want to print on is Heavy Coated (181-300 gm2):
Futura Gloss Cover (100 lb� (271 g/m
2
)
2
)
2
))
2
))
imagePRESS C850/C750/C650/C65
Page 11

Recommended Types of Calibration
Calibrating for Paper in Group A and B
▀
Load the paper for calibration for group A and B into different paper drawers�
1
•
You can use the following type of paper to calibrate for paper in each group� You can also use the other type
of paper if you registered it to use for calibration in advance�
For the European and Asia-Pacific Regions
For paper in group A: Canon Océ Top Colour Paper (100 g/m
For paper in group B: Canon Océ Top Colour Paper (250 g/m
For the American Region
For paper in group A: Hammermill Color Copy Digital (28 lb� (105 g/m
For paper in group B: Mohawk Options Navajo Smooth Brilliant White (90 lb� Cover (243 g/m
Press → [Adjustment/Maintenance] → [Adjust Image Quality] → [Auto Adjust Gradation] →
2
[Thin 1/Plain/Heavy 1-4]�
Select the paper you loaded for calibration for group A for [Select Paper to Adjust]�
3
2
)
2
)
2
))
2
))
"Adjustment for Image Quality and Finishing (Calibration)" > "Automatic Gradation Adjustment" >
"Selecting Paper for Calibration" in the User's Guide
Do automatic gradation calibration (full calibration)�
4
"Adjustment for Image Quality and Finishing (Calibration)" > "Automatic Gradation Adjustment" > "Full
Adjustment" in the User's Guide
Press [Heavy 5]�
5
Select the paper you loaded for calibration for group B for [Select Paper to Adjust]�
6
"Adjustment for Image Quality and Finishing (Calibration)" > "Automatic Gradation Adjustment" >
"Selecting Paper for Calibration" in the User's Guide
Do automatic gradation calibration (full calibration)�
7
"Adjustment for Image Quality and Finishing (Calibration)" > "Automatic Gradation Adjustment" > "Full
Adjustment" in the User's Guide
imagePRESS C850/C750/C650/C65
9
Page 12

If you are using the imagePRESS Server, do steps 1 to 8 in "Calibrations on the imagePRESS
8
Server" in "Required Calibrations�" (p� 22)
•
Do calibration on the imagePRESS Server using one of the following types of paper� You can also use the
type of paper that you want to use for printing if you registered it in advance�
For the European and Asia-Pacific Regions
Type of paper you want to print on is Plain (52-220 gm2):
Canon Océ Top Colour Paper (100 g/m
Type of paper you want to print on is Thick (221-256 gm2):
Canon Océ Top Colour Paper (250 g/m
Type of paper you want to print on is Coated (106-180 gm2):
OK Top Coat Plus (127�9 g/m
For the American Region
Type of paper you want to print on is Plain (52-220 gm2):
Hammermill Color Copy Digital (28 lb� (105 g/m
Type of paper you want to print on is Thick (221-256 gm2):
Mohawk Options Navajo Smooth Brilliant White (90 lb� Cover (243 g/m
Type of paper you want to print on is Coated (106-180 gm2):
OK Top Coat Plus (34 lb� (127�9 g/m
Calibrating for Paper in Group A and C
▀
2
)
2
)
2
)
2
))
2
))
2
))
10
10
Load the paper for calibration for group A and C into different paper drawers�
1
•
You can use the following type of paper to calibrate for paper in each group� You can also use the other type
of paper if you registered it to use for calibration in advance�
For the European and Asia-Pacific Regions
For paper in group A: Canon Océ Top Colour Paper (100 g/m
For paper in group C: Canon Océ Top Colour Paper (300 g/m
For the American Region
For paper in group A: Hammermill Color Copy Digital (28 lb� (105 g/m
For paper in group C: Hammermill Color Copy Digital Cover (100 lb� (271 g/m
Press → [Adjustment/Maintenance] → [Adjust Image Quality] → [Auto Adjust Gradation] →
2
2
)
2
)
2
))
2
))
[Thin 1/Plain/Heavy 1-4]�
imagePRESS C850/C750/C650/C65
Page 13

Recommended Types of Calibration
Select the paper you loaded for calibration for group A for [Select Paper to Adjust]�
3
"Adjustment for Image Quality and Finishing (Calibration)" > "Automatic Gradation Adjustment" >
"Selecting Paper for Calibration" in the User's Guide
Do automatic gradation calibration (full calibration)�
4
"Adjustment for Image Quality and Finishing (Calibration)" > "Automatic Gradation Adjustment" > "Full
Adjustment" in the User's Guide
Press [Heavy 6]�
5
Select the paper you loaded for calibration for group C for [Select Paper to Adjust]�
6
"Adjustment for Image Quality and Finishing (Calibration)" > "Automatic Gradation Adjustment" >
"Selecting Paper for Calibration" in the User's Guide
Do automatic gradation calibration (full calibration)�
7
"Adjustment for Image Quality and Finishing (Calibration)" > "Automatic Gradation Adjustment" > "Full
Adjustment" in the User's Guide
If you are using the imagePRESS Server, do steps 1 to 8 in "Calibrations on the imagePRESS
8
Server" in "Required Calibrations�" (p� 22)
•
Do calibration on the imagePRESS Server using one of the following types of paper� You can also use the
type of paper that you want to use for printing if you registered it in advance�
For the European and Asia-Pacific Regions
Type of paper you want to print on is Plain (52-220 gm2):
Canon Océ Top Colour Paper (100 g/m
Type of paper you want to print on is Heavy Thick (257-300 gm2):
Canon Océ Top Colour Paper (300 g/m
Type of paper you want to print on is Heavy Coated (181-300 gm2):
Futura Gloss Cover (271 g/m
For the American Region
Type of paper you want to print on is Plain (52-220 gm2):
Hammermill Color Copy Digital (28 lb� (105 g/m
Type of paper you want to print on is Heavy Thick (257-300 gm2):
Hammermill Color Copy Digital Cover (100 lb� (271 g/m
Type of paper you want to print on is Heavy Coated (181-300 gm2):
Futura Gloss Cover (100 lb� (271 g/m
2
)
2
)
2
)
2
))
2
))
2
))
imagePRESS C850/C750/C650/C65
11
Page 14

Calibrating for Paper in Group B and C
▀
Load the paper for calibration for group B and C into different paper drawers�
1
•
You can use the following type of paper to calibrate for paper in each group� You can also use the other type
of paper if you registered it to use for calibration in advance�
For the European and Asia-Pacific Regions
For paper in group B: Canon Océ Top Colour Paper (250 g/m
For paper in group C: Canon Océ Top Colour Paper (300 g/m
For the American Region
For paper in group B: Mohawk Options Navajo Smooth Brilliant White (90 lb� Cover (243 g/m
For paper in group C: Hammermill Color Copy Digital Cover (100 lb� (271 g/m
Press → [Adjustment/Maintenance] → [Adjust Image Quality] → [Auto Adjust Gradation] →
2
[Heavy 5]�
Select the paper you loaded for calibration for group B for [Select Paper to Adjust]�
3
"Adjustment for Image Quality and Finishing (Calibration)" > "Automatic Gradation Adjustment" >
"Selecting Paper for Calibration" in the User's Guide
Do automatic gradation calibration (full calibration)�
4
2
)
2
)
2
))
2
))
12
12
"Adjustment for Image Quality and Finishing (Calibration)" > "Automatic Gradation Adjustment" > "Full
Adjustment" in the User's Guide
Press [Heavy 6]�
5
Select the paper you loaded for calibration for group C for [Select Paper to Adjust]�
6
"Adjustment for Image Quality and Finishing (Calibration)" > "Automatic Gradation Adjustment" >
"Selecting Paper for Calibration" in the User's Guide
Do automatic gradation calibration (full calibration)�
7
"Adjustment for Image Quality and Finishing (Calibration)" > "Automatic Gradation Adjustment" > "Full
Adjustment" in the User's Guide
imagePRESS C850/C750/C650/C65
Page 15

Recommended Types of Calibration
If you are using the imagePRESS Server, do steps 1 to 8 in "Calibrations on the imagePRESS
8
Server" in "Required Calibrations�" (p� 22)
•
Do calibration on the imagePRESS Server using one of the following types of paper� You can also use the
type of paper that you want to use for printing if you registered it in advance�
For the European and Asia-Pacific Regions
Type of paper you want to print on is Thick (221-256 gm2):
Canon Océ Top Colour Paper (250 g/m
Type of paper you want to print on is Heavy Thick (257-300 gm2):
Canon Océ Top Colour Paper (300 g/m
Type of paper you want to print on is Coated (106-180 gm2):
OK Top Coat Plus (127�9 g/m
Type of paper you want to print on is Heavy Coated (181-300 gm2):
Futura Gloss Cover (271 g/m
2
)
2
)
For the American Region
Type of paper you want to print on is Thick (221-256 gm2):
Mohawk Options Navajo Smooth Brilliant White (90 lb� Cover (243 g/m
Type of paper you want to print on is Heavy Thick (257-300 gm2):
Hammermill Color Copy Digital Cover (100 lb� (271 g/m
Type of paper you want to print on is Coated (106-180 gm2):
OK Top Coat Plus (34 lb� (127�9 g/m
Type of paper you want to print on is Heavy Coated (181-300 gm2):
Futura Gloss Cover (100 lb� (271 g/m
2
)
2
)
2
))
2
))
2
))
2
))
imagePRESS C850/C750/C650/C65
13
Page 16

Calibrating for Paper in Group A, B, and C
▀
Load the paper for calibration for group A, B, and C into different paper drawers�
1
•
You can use the following type of paper to calibrate for paper in each group� You can also use the other type
of paper if you registered it to use for calibration in advance�
For the European and Asia-Pacific Regions
For paper in group A: Canon Océ Top Colour Paper (100 g/m
For paper in group B: Canon Océ Top Colour Paper (250 g/m
For paper in group C: Canon Océ Top Colour Paper (300 g/m
For the American Region
For paper in group A: Hammermill Color Copy Digital (28 lb� (105 g/m
For paper in group B: Mohawk Options Navajo Smooth Brilliant White (90 lb� Cover (243 g/m
For paper in group C: Hammermill Color Copy Digital Cover (100 lb� (271 g/m
Press → [Adjustment/Maintenance] → [Adjust Image Quality] → [Auto Adjust Gradation] →
2
[Thin 1/Plain/Heavy 1-4]�
Select the paper you loaded for calibration for group A for [Select Paper to Adjust]�
3
"Adjustment for Image Quality and Finishing (Calibration)" > "Automatic Gradation Adjustment" >
"Selecting Paper for Calibration" in the User's Guide
2
)
2
)
2
)
2
))
2
))
2
))
14
14
Do automatic gradation calibration (full calibration)�
4
"Adjustment for Image Quality and Finishing (Calibration)" > "Automatic Gradation Adjustment" > "Full
Adjustment" in the User's Guide
Press [Heavy 5]�
5
Select the paper you loaded for calibration for group B for [Select Paper to Adjust]�
6
"Adjustment for Image Quality and Finishing (Calibration)" > "Automatic Gradation Adjustment" >
"Selecting Paper for Calibration" in the User's Guide
Do automatic gradation calibration (full calibration)�
7
"Adjustment for Image Quality and Finishing (Calibration)" > "Automatic Gradation Adjustment" > "Full
Adjustment" in the User's Guide
imagePRESS C850/C750/C650/C65
Page 17

Recommended Types of Calibration
Press [Heavy 6]�
8
Select the paper you loaded for calibration for group C for [Select Paper to Adjust]�
9
"Adjustment for Image Quality and Finishing (Calibration)" > "Automatic Gradation Adjustment" >
"Selecting Paper for Calibration" in the User's Guide
Do automatic gradation calibration (full calibration)�
10
"Adjustment for Image Quality and Finishing (Calibration)" > "Automatic Gradation Adjustment" > "Full
Adjustment" in the User's Guide
If you are using the imagePRESS Server, do steps 1 to 8 in "Calibrations on the imagePRESS
11
Server" in "Required Calibrations�" (p� 22)
•
Do calibration on the imagePRESS Server using one of the following types of paper� You can also use the
type of paper that you want to use for printing if you registered it in advance�
For the European and Asia-Pacific Regions
Type of paper you want to print on is Plain (52-220 gm2):
Canon Océ Top Colour Paper (100 g/m
Type of paper you want to print on is Thick (221-256 gm2):
Canon Océ Top Colour Paper (250 g/m
Type of paper you want to print on is Heavy Thick (257-300 gm2):
Canon Océ Top Colour Paper (300 g/m
Type of paper you want to print on is Coated (106-180 gm2):
OK Top Coat Plus (127�9 g/m
Type of paper you want to print on is Heavy Coated (181-300 gm2):
Futura Gloss Cover (271 g/m
For the American Region
Type of paper you want to print on is Plain (52-220 gm2):
Hammermill Color Copy Digital (28 lb� (105 g/m
Type of paper you want to print on is Thick (221-256 gm2):
Mohawk Options Navajo Smooth Brilliant White (90 lb� Cover (243 g/m
Type of paper you want to print on is Heavy Thick (257-300 gm2):
Hammermill Color Copy Digital Cover (100 lb� (271 g/m
Type of paper you want to print on is Coated (106-180 gm2):
OK Top Coat Plus (34 lb� (127�9 g/m
Type of paper you want to print on is Heavy Coated (181-300 gm2):
Futura Gloss Cover (100 lb� (271 g/m
2
)
2
)
2
)
2
)
2
)
2
))
2
))
2
))
2
))
2
))
imagePRESS C850/C750/C650/C65
15
Page 18
Getting the Best Colors from Your Machine
NOTE
The density and tone of colors may change as you print large
volumes of the same pages, even if you are printing the same image,
slight variations in the shades of colors may become apparent� This
is characteristic to this machine� You need to calibrate the colors
periodically to compensate for the difference in colors�
This section explains how to perform calibration using [Adjustment
Level] with 'Same for All Paper Types' for automatic gradation
calibration� For more information on [Adjustment Level] for
automatic gradation calibration, see "Adjustment for Image Quality
and Finishing (Calibration)" > "Automatic Gradation Adjustment" >
"Changing Adjustment Level" in the User's Guide�
Calibration after Purchase
The machine must be calibrated after you install it on your site� Use the following procedure to do the calibration�
Step 1
Step 2
Step 3
Step 4
Required Calibrations (Calibrations on the Machine) (p� 19)
Required Calibrations (Calibrations on the imagePRESS Server) (p� 22)
Calibrating for Paper You Want to Use for Printing (Calibrations on the Machine) (p� 26)
Calibrating for Paper You Want to Use for Printing (Calibrations on the imagePRESS Server) (p� 29)
16
16
imagePRESS C850/C750/C650/C65
Page 19
Getting the Best Colors from Your Machine
NOTE
Calibration After the Machine Is in Operation
After the activation, you need to perform calibration with the following frequency�
Every Day
Calibration After the Machine Is in Operation (p� 37)
Calibration As Needed
If any of the following symptoms appear, perform calibration as needed�
Wrong Colors on Printouts
Calibration As Needed (p� 38)
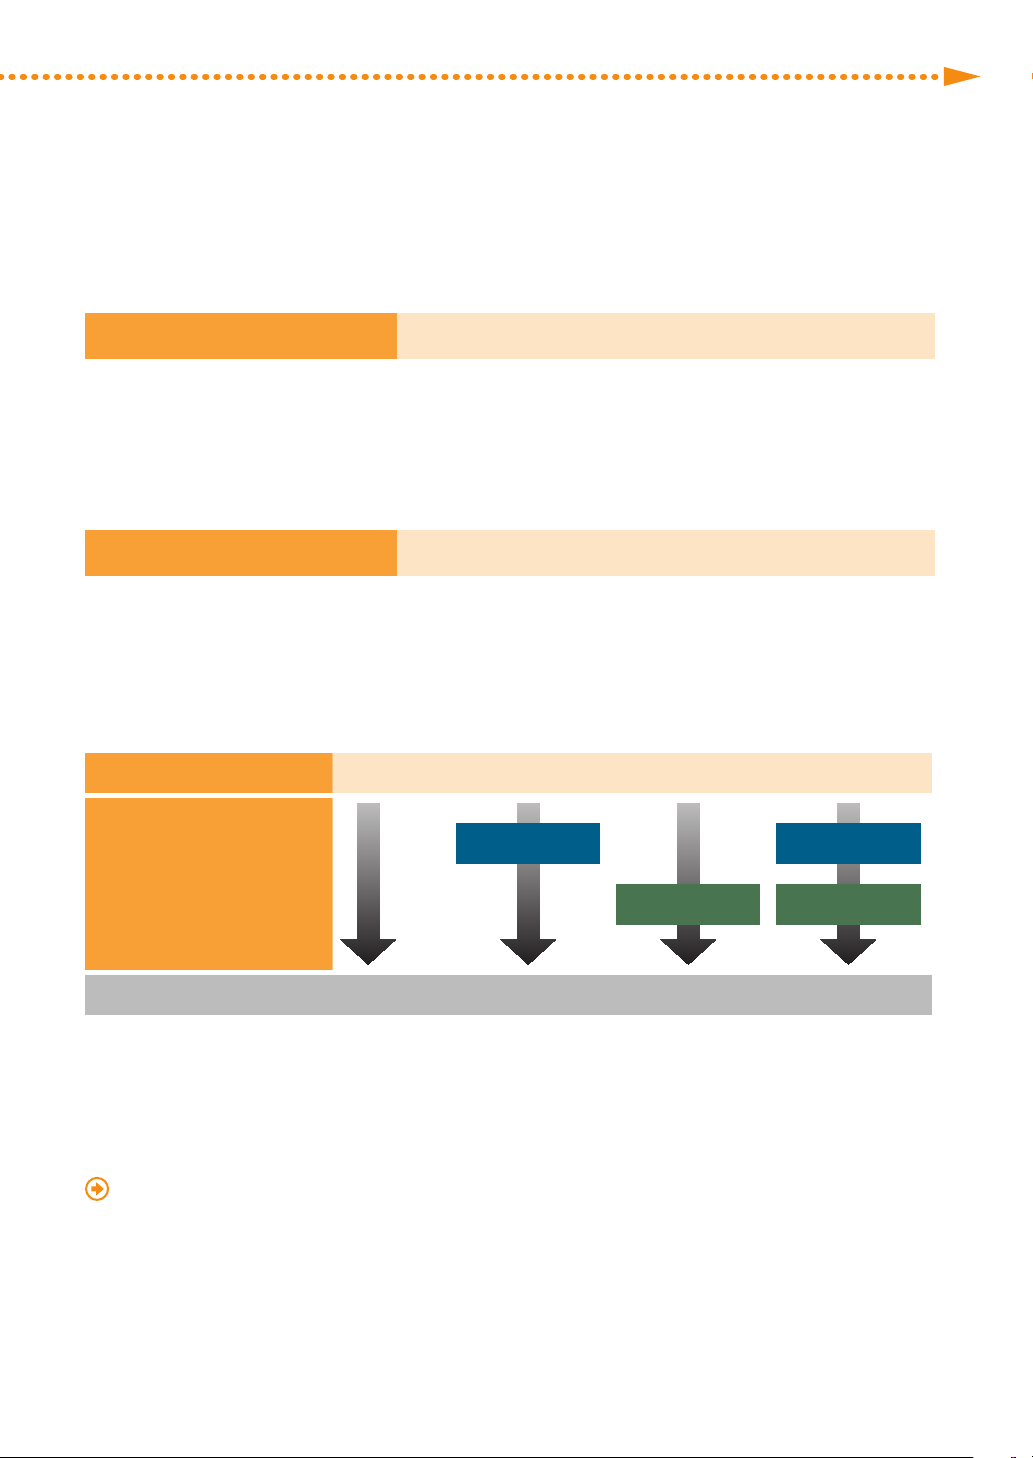
Calibration Order
If you perform multiple calibrations, perform in order as follows�
Every day
As necessary
Auto Gradation Adjustment
Shading
Correction
Auto Color
Tone Correction
Shading
Correction
Auto Color
Tone Correction
Calibration on imagePRESS Server
The machine automatically corrects the color density every time it prints a certain number of pages to maintain stable
gradations, densities, and shades of printed colors� When you print a large number of pages, you can increase the
frequency of density corrections to minimize changes in colors�
"Adjustment for Image Quality and Finishing (Calibration)" > "Gradation Adjustment During Printing" in the User's
Guide
imagePRESS C850/C750/C650/C65
17
Page 20

Types of Paper You Can Use for Calibrating
You can use the following types of paper for calibration� If you want to use a different type of paper, you
need to register the paper on the machine and the imagePRESS Server before performing a calibration� See
"Calibrating for Paper You Want to Use for Printing" (p� 26) for the procedure�
For the European and Asia-Pacific Regions
Calibrating from the Machine
Canon Océ Top Colour Paper (100 g/m
Calibrating from the imagePRESS Server
•
Type of paper you want to print on is Plain (52-220 gm2):
Canon Océ Top Colour Paper (100 g/m
•
Type of paper you want to print on is Thick (221-256 gm2):
Canon Océ Top Colour Paper (250 g/m
•
Type of paper you want to print on is Heavy Thick (257-300 gm2):
Canon Océ Top Colour Paper (300 g/m
•
Type of paper you want to print on is Coated (106-180 gm2):
OK Top Coat Plus (127�9 g/m
•
Type of paper you want to print on is Heavy Coated (181-300 gm2):
Futura Gloss Cover (271 g/m
For the American Region
Calibrating from the Machine
Hammermill Color Copy Digital (28 lb� (105 g/m
2
)
2
)
2
)
2
)
2
)
2
)
2
))
18
18
Calibrating from the imagePRESS Server
•
Type of paper you want to print on is Plain (52-220 gm2):
Hammermill Color Copy Digital (28 lb� (105 g/m
•
Type of paper you want to print on is Thick (221-256 gm2):
Mohawk Options Navajo Smooth Brilliant White (90 lb� Cover (243 g/m
•
Type of paper you want to print on is Heavy Thick (257-300 gm2):
Hammermill Color Copy Digital Cover (100 lb� (271 g/m
•
Type of paper you want to print on is Coated (106-180 gm2):
OK Top Coat Plus (34 lb� (127�9 g/m
•
Type of paper you want to print on is Heavy Coated (181-300 gm2):
Futura Gloss Cover (100 lb� (271 g/m
* The names of the types of paper are subject to change� For more information, contact your local authorized Canon dealer�
2
))
2
))
2
))
2
))
2
))
imagePRESS C850/C750/C650/C65
Page 21
Getting the Best Colors from Your Machine
Calibration after Purchase
Required Calibrations
▀
There are two types of calibration� One is on the machine, the other is on the imagePRESS Server� You need to perform
both types of calibration�
Creating New Standard Values for Calibration
Standard values for calibration are already registered in the machine and the imagePRESS Server by default�
If you notice a change in color, you can restore these default settings� Note that this value is a general value�
However, you can create new standard values for your usage environment that allow you to calibrate the
machine with greater accuracy�
Calibrations on the Machine
This section explains how to create new standard values for calibration�
•
Set [Adjustment Level] of Automatic Gradation Adjustment to [By Paper Type
Groupe]�
"Adjustment for Image Quality and Finishing (Calibration)" > "Adjust Image
Quality" > "Automatic Gradation Adjustment" > "Changing Adjustment Level"
in the User's Guide
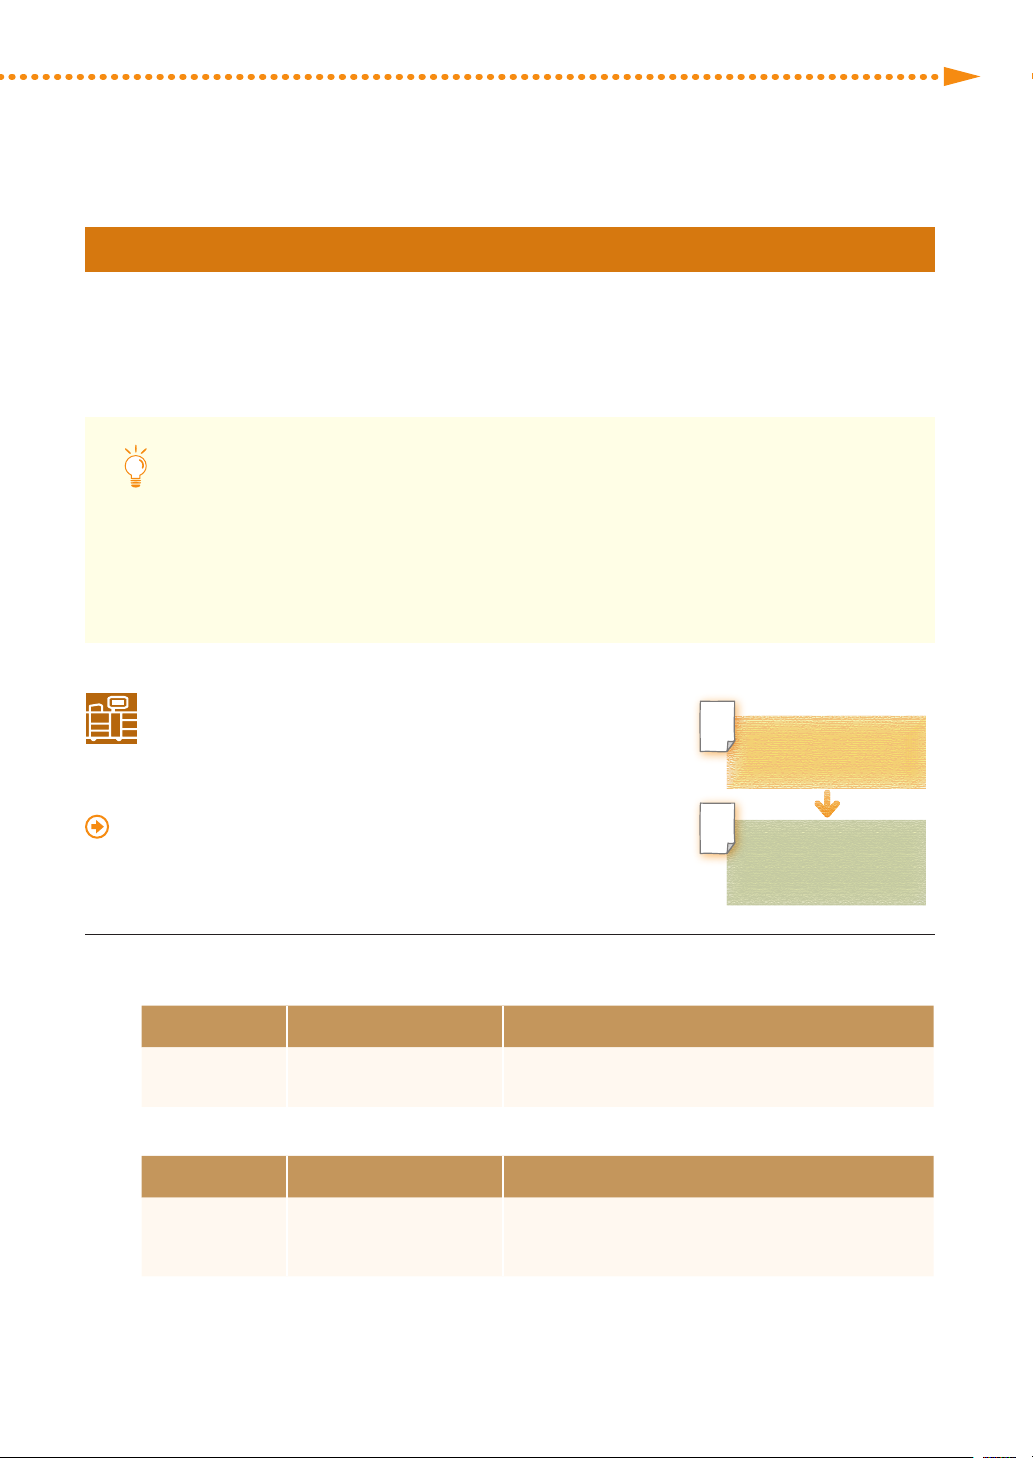
Load the paper into the paper drawer�
1
For the European and Asia-Pacific Regions
[Thin 1/Plain/Heavy 1-4] [Heaby 5] [Heaby 6]
Loaded paper
For the American Region*
Loaded paper
Canon Océ Top Colour Paper
(100 g/m2)
[Thin 1/Plain/Heavy 1-4] [Heaby 5] [Heaby 6]
Hammermill Color Copy
Digital (28 lbŁ (105 g/m2))
Canon Océ Top Colour Paper
(250 g/m2)
Mohawk Options Navajo
Smooth Brilliant White (90
lbŁ Cover (243 g/m2))
Auto Adjust Gradation
(Full Adjust)
Auto Correct Color
Tone Settings
(Register Correction Pattern)
Canon Océ Top Colour Paper
(300 g/m2)
Hammermill Color Copy
Digital Cover (100 lbŁ (271
g/m2))
* If the paper name is described for the European and Asia-Pacific regions in the following pages, see the corresponding paper name
described in the table above�
imagePRESS C850/C750/C650/C65
19
Page 22
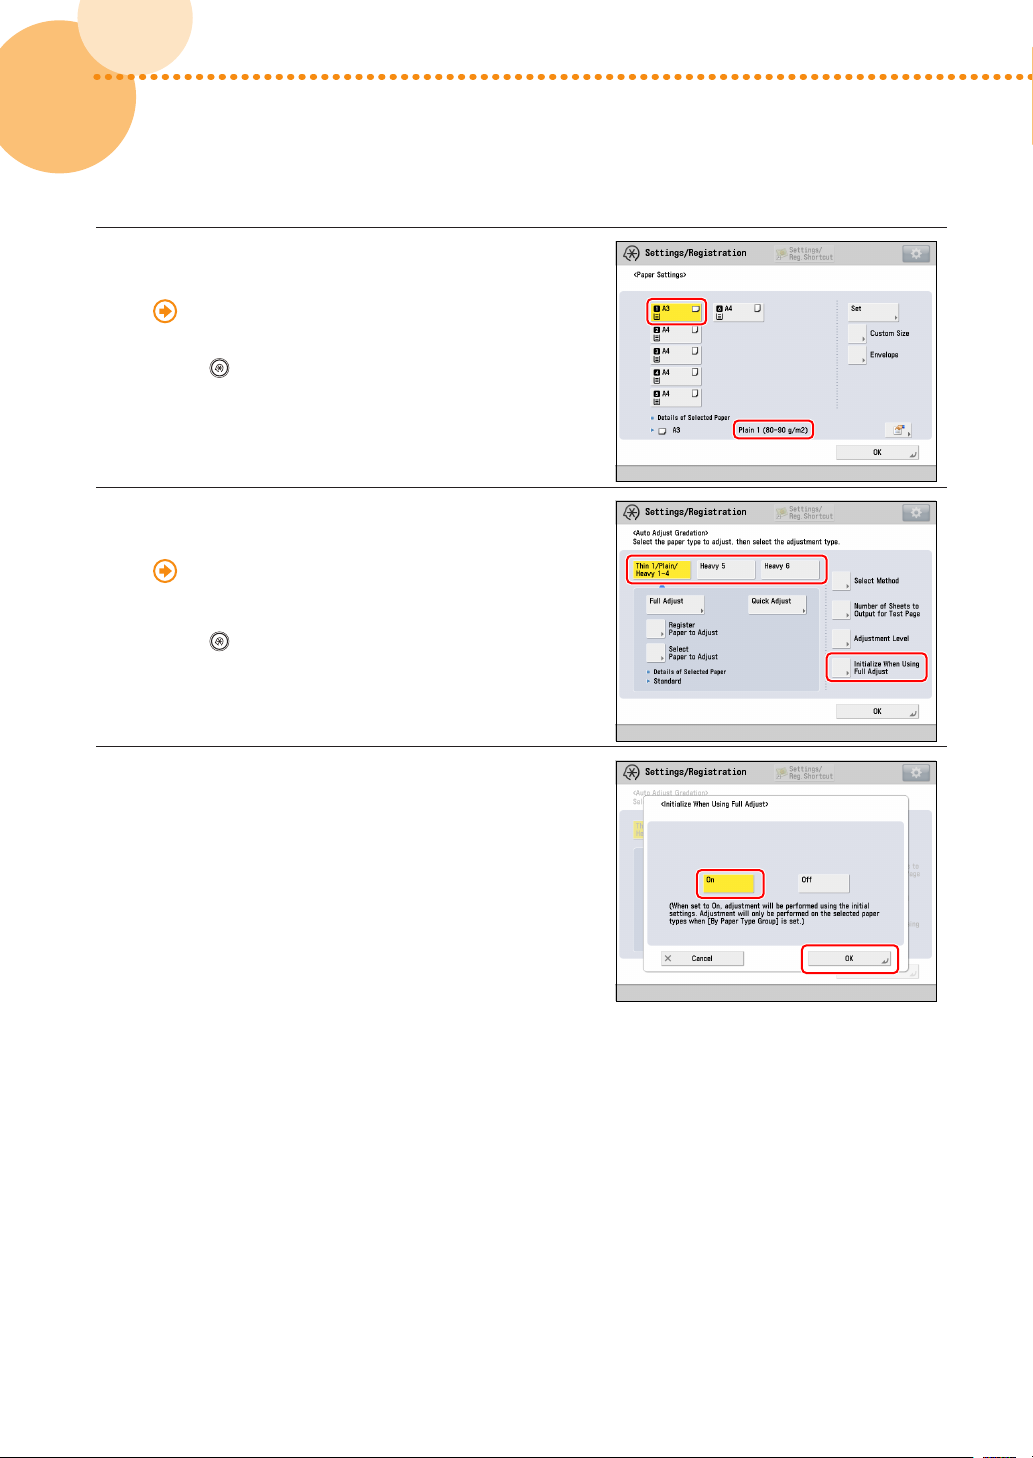
Make sure that the paper type in the paper drawer
2
is same as the loaded paper�
"Settings/Registration" > "Registering the Paper Size
and Type for a Paper Source" in the User's Guide
•
Press
Settings] to check the paper type�
Select the paper that you want to correct, then
3
press [Initialize When Using Full Adjust]�
•
Press
Quality] → [Auto Adjust Gradation] to select the paper�
•
The selected paper is displayed in yellow�
Press [On] → press [OK]�
4
→ [Preferences] → [Paper Settings] → [Paper
"Adjustment for Image Quality and Finishing
(Calibration)" > "Automatic Gradation Adjustment" >
"Selecting Paper for Calibration" in the User's Guide
→ [Adjustment/Maintenance] → [Adjust Image
20
20
imagePRESS C850/C750/C650/C65
Page 23
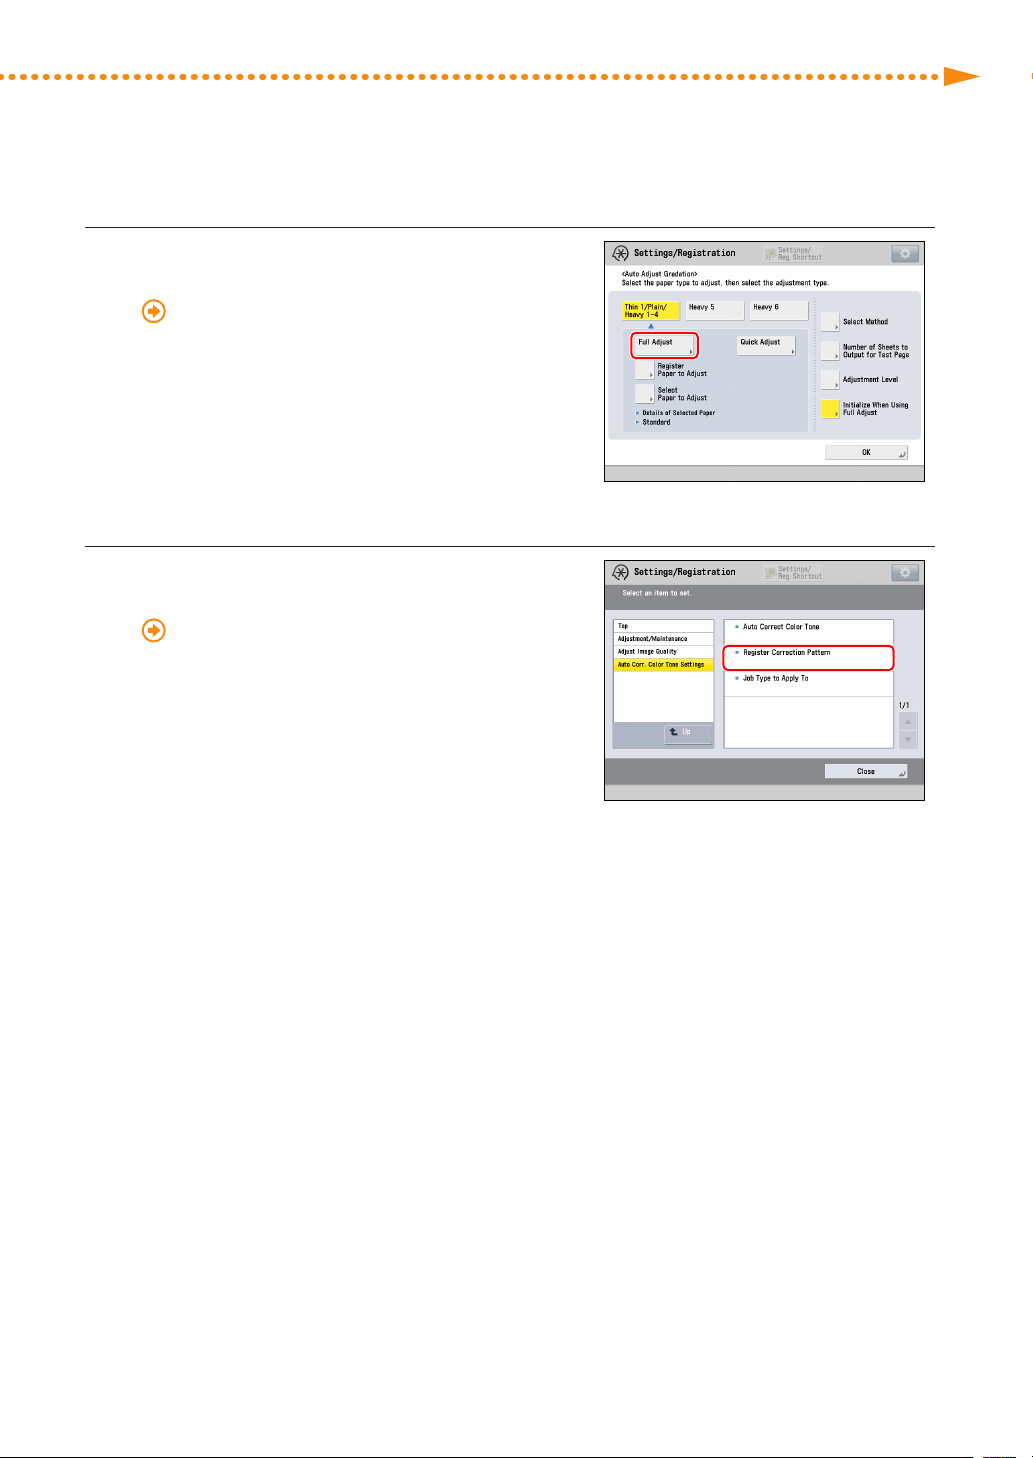
Perform automatic gradation calibration (full
5
calibration)�
"Adjustment for Image Quality and Finishing
(Calibration)" > "Automatic Gradation Adjustment" >
"Full Adjustment" in the User's Guide
•
Select the paper drawer where you loaded the paper in
step 1 as the paper source for test printing�
•
Repeat steps 1 to 5 until automatic gradation calibration
(full calibration) is finished for all paper types�
•
Return [Adjustment Level] to [Same for All Paper Types]
after adjustment for all paper types is finished�
Create and register a new standard for automatic
6
color tone correction�
"Adjustment for Image Quality and Finishing
(Calibration)" > "Automatic Color Tone Correction" >
"Registering Correction Pattern" in the User's Guide
•
Select "Plain 1 (80-90 g/m
use for test printing�
•
Select the paper drawer where you have loaded "Canon
Océ Top Colour Paper (100 g/m
test printing�
2
)" for the paper type that you
2
)" as the paper source for
Getting the Best Colors from Your Machine
imagePRESS C850/C750/C650/C65
21
Page 24
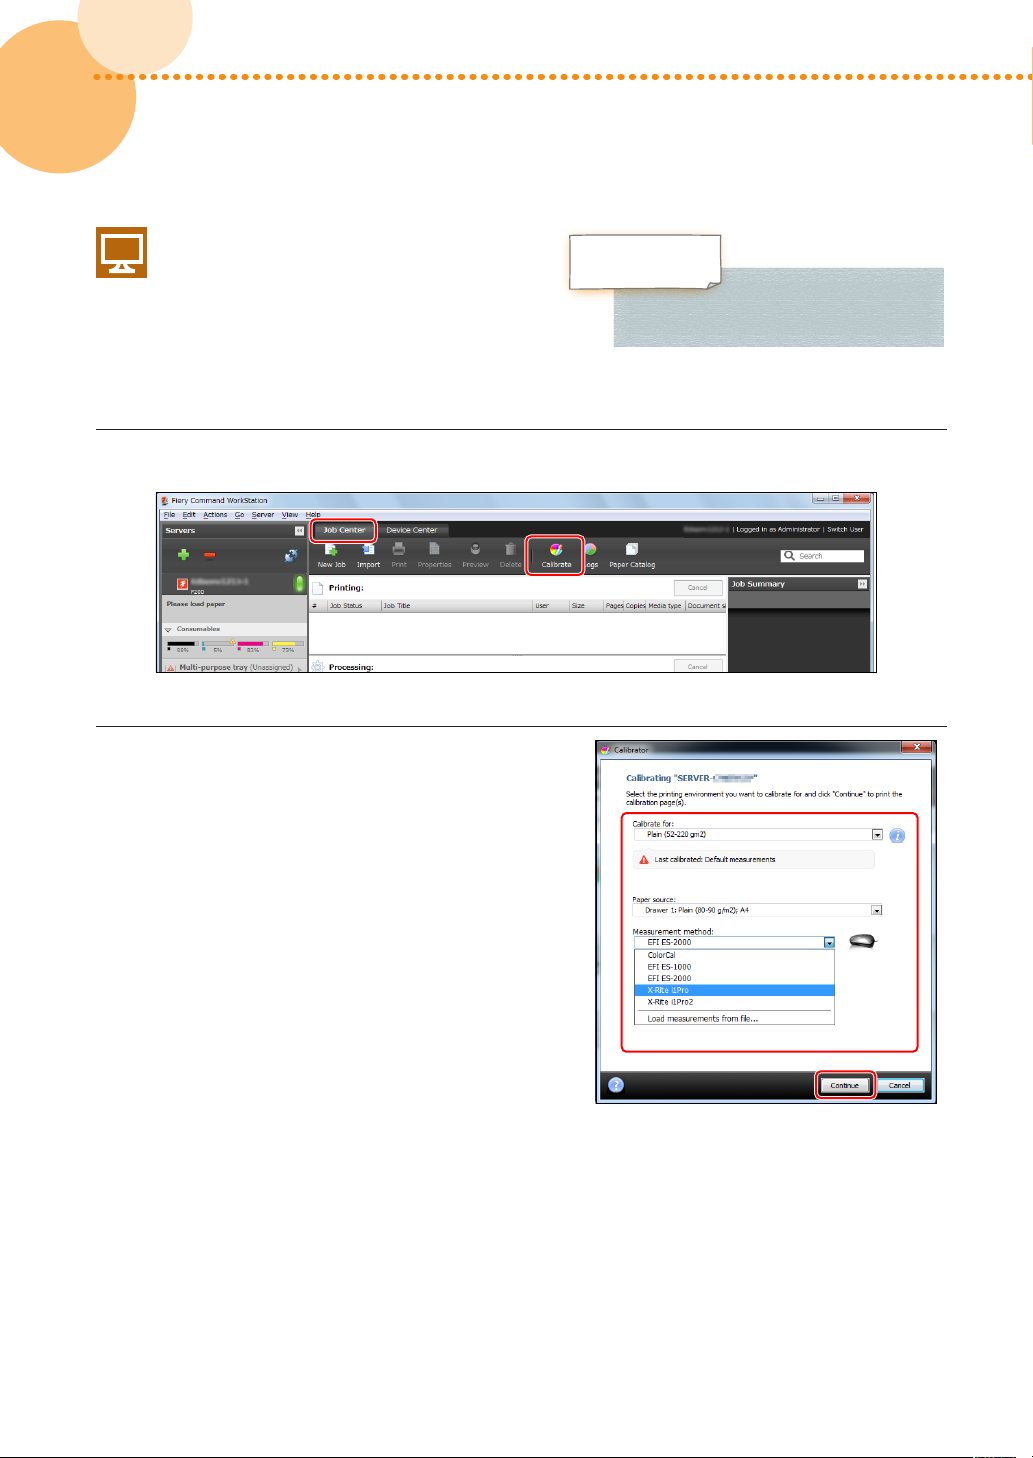
Calibrations on the imagePRESS Server
This section explains how to calibrate for "Canon
Océ Top Colour Paper (100 g/m2)" by using a manual
spectrophotometer (X-Rite i1 Pro)� You need to
connect the spectrophotometer to a machine on
which Command WorkStation is installed� Note that
doing these operations overwrites any calibration
values that you have registered�
Click [Job Center] → [Calibrate] in Command WorkStation�
1
Select each item as follows and click [Continue]�
2
[Calibrate for:]
Select the paper you use for the calibration�
(Select "Plain (52-220 gm2)" here�)
Canon Océ Top
Colour Paper (100 g/m
Calibrations on the imagePRESS Server
2
)
22
22
[Paper source:]
Select the paper drawer where you have loaded the paper�
(Select the paper drawer where "Canon Océ Top Colour
Paper (100 g/m
[Measurement method:]
Select the calibration method� (Select "X-Rite i1Pro" here�)
•
A calibration page is printed�
2
)" is loaded here�)
imagePRESS C850/C750/C650/C65
Page 25

Place the spectrophotometer, X-Rite i1 Pro, on the
3
cradle and click [Continue]�
Place the sensor of the spectrophotometer on the
4
calibration page�
•
Place several sheets of blank paper on a flat surface and
place the calibration paper on the top�
•
Focus the sensor of the spectrophotometer on the white
area indicated by the red frame in the image�
Getting the Best Colors from Your Machine
Hold the spectrophotometer button and scan the
5
cyan strip�
•
Hold the spectrophotometer button until you see
<Scanning the Cyan strip���>� Keep holding the button
and move the spectrophotometer from the top to the
bottom to scan the cyan strip�
•
Release the button after you have finished scanning�
Scan the magenta, yellow, and black strips in the same way�
6
imagePRESS C850/C750/C650/C65
23
Page 26
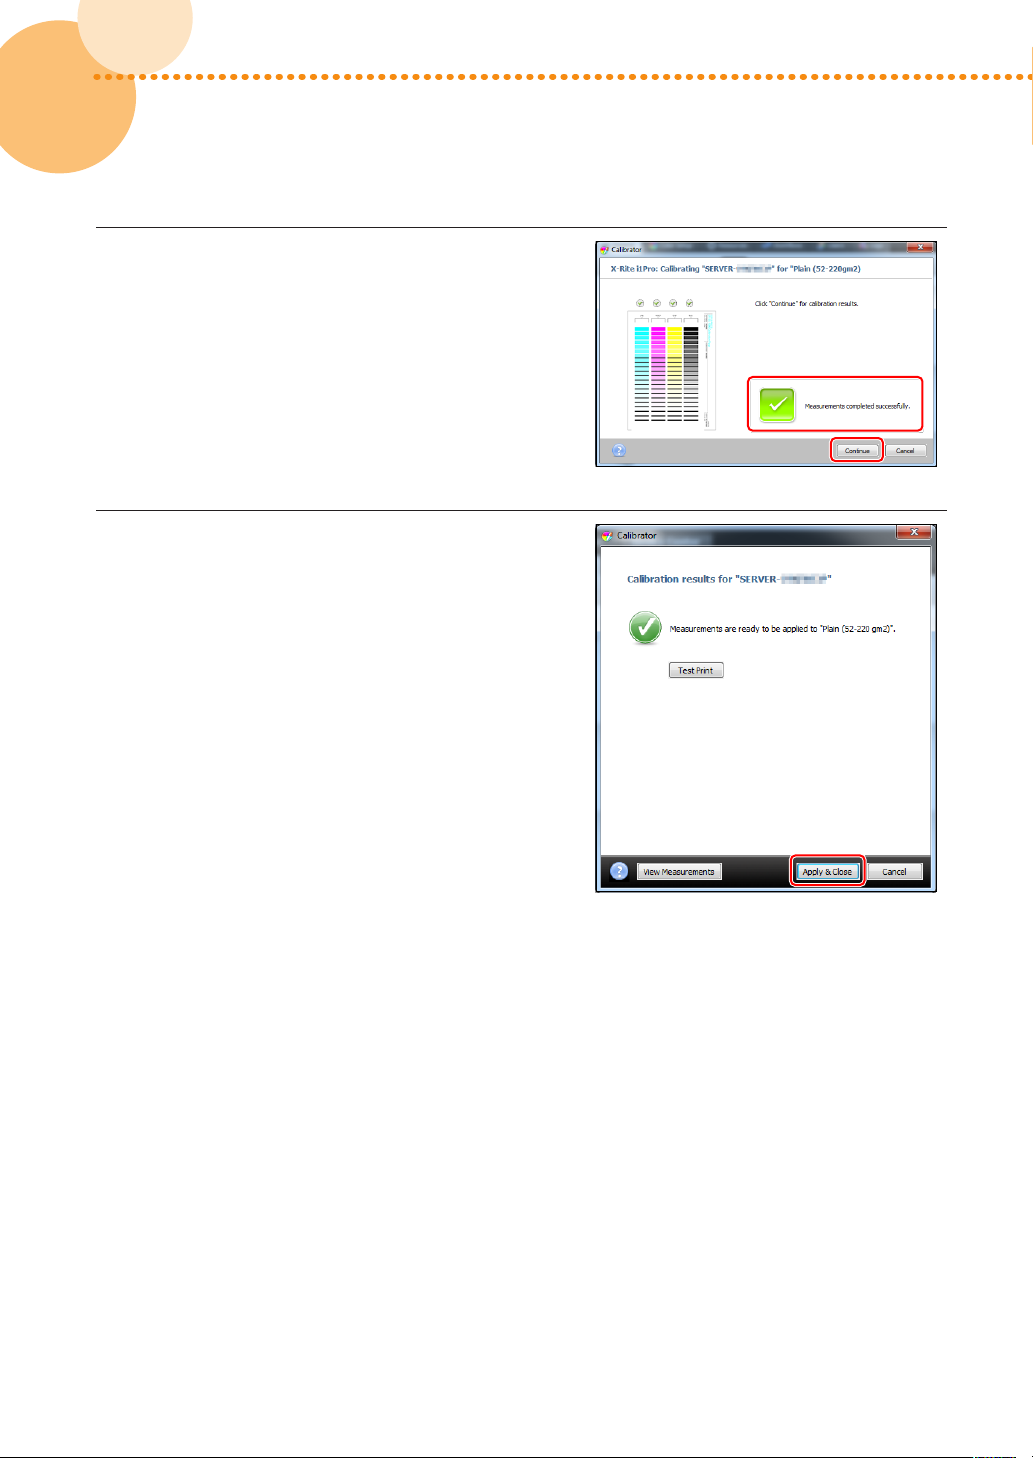
After <Measurements completed successfully�>
7
appears, click [Continue]�
Click [Apply & Close]�
8
24
24
imagePRESS C850/C750/C650/C65
Page 27

If necessary, calibrate for the following papers in the same way�
9
Getting the Best Colors from Your Machine
For the European and Asia-Pacific Regions
Canon Océ Top Colour Paper (250 g/m
Canon Océ Top Colour Paper (300 g/m2)
OK Top Coat Plus (127�9 g/m2)
Futura Gloss Cover (271 g/m2)
For the American Region
Mohawk Options Navajo Smooth Brilliant White (90 lb� Cover (243 g/m
Hammermill Color Copy Digital Cover (100 lb� (271 g/m2))
OK Top Coat Plus (34 lb� (127�9 g/m2))
Futura Gloss Cover (100 lb� (271 g/m2))
•
In step 2, select one of the following types of paper for [Calibrate for:]�
For the European and Asia-Pacific Regions
Canon Océ Top Colour Paper (100 g/m
Canon Océ Top Colour Paper (250 g/m2): Thick (221-256 gm2)
Canon Océ Top Colour Paper (300 g/m2): Heavy Thick (257-300 gm2)
OK Top Coat Plus (127�9 g/m2): Coated (106-180 gm2)
Futura Gloss Cover (271 g/m2): Heavy Coated (181-300 gm2)
For the American Region
Hammermill Color Copy Digital (28 lb� (105 g/m
Mohawk Options Navajo Smooth Brilliant White (90 lb� Cover (243 g/m2)): Thick (221-256 gm2)
Hammermill Color Copy Digital Cover (100 lb� (271 g/m2)): Heavy Thick (257-300 gm2)
OK Top Coat Plus (34 lb� (127�9 g/m2)): Coated (106-180 gm2)
Futura Gloss Cover (100 lb� (271 g/m2)): Heavy Coated (181-300 gm2)
2
)
2
): Plain (52-220 gm2)
2
)): Plain (52-220 gm2)
2
))
imagePRESS C850/C750/C650/C65
25
Page 28
Calibrating for Paper You Want to Use for Printing
▀
You need to calibrate the machine for the paper you are actually using� Make sure you complete the procedure in
"Calibrations on the Machine" (p� 19) in "Required Calibrations," even if you are not going to use "Canon Océ Top Colour
Paper (100 g/m
2
)�"
Calibrations on the Machine
This section explains how to create new standard values
for calibration� You must use uncoated paper for the
calibration even if you are using some type of paper other
than uncoated paper for printing� If this is the case, use
an uncoated paper that is as close as possible to the basis
weight of the paper you are using for printing� For more
information, see "Types of Paper You Can Use for Calibration"
at the end of this document�
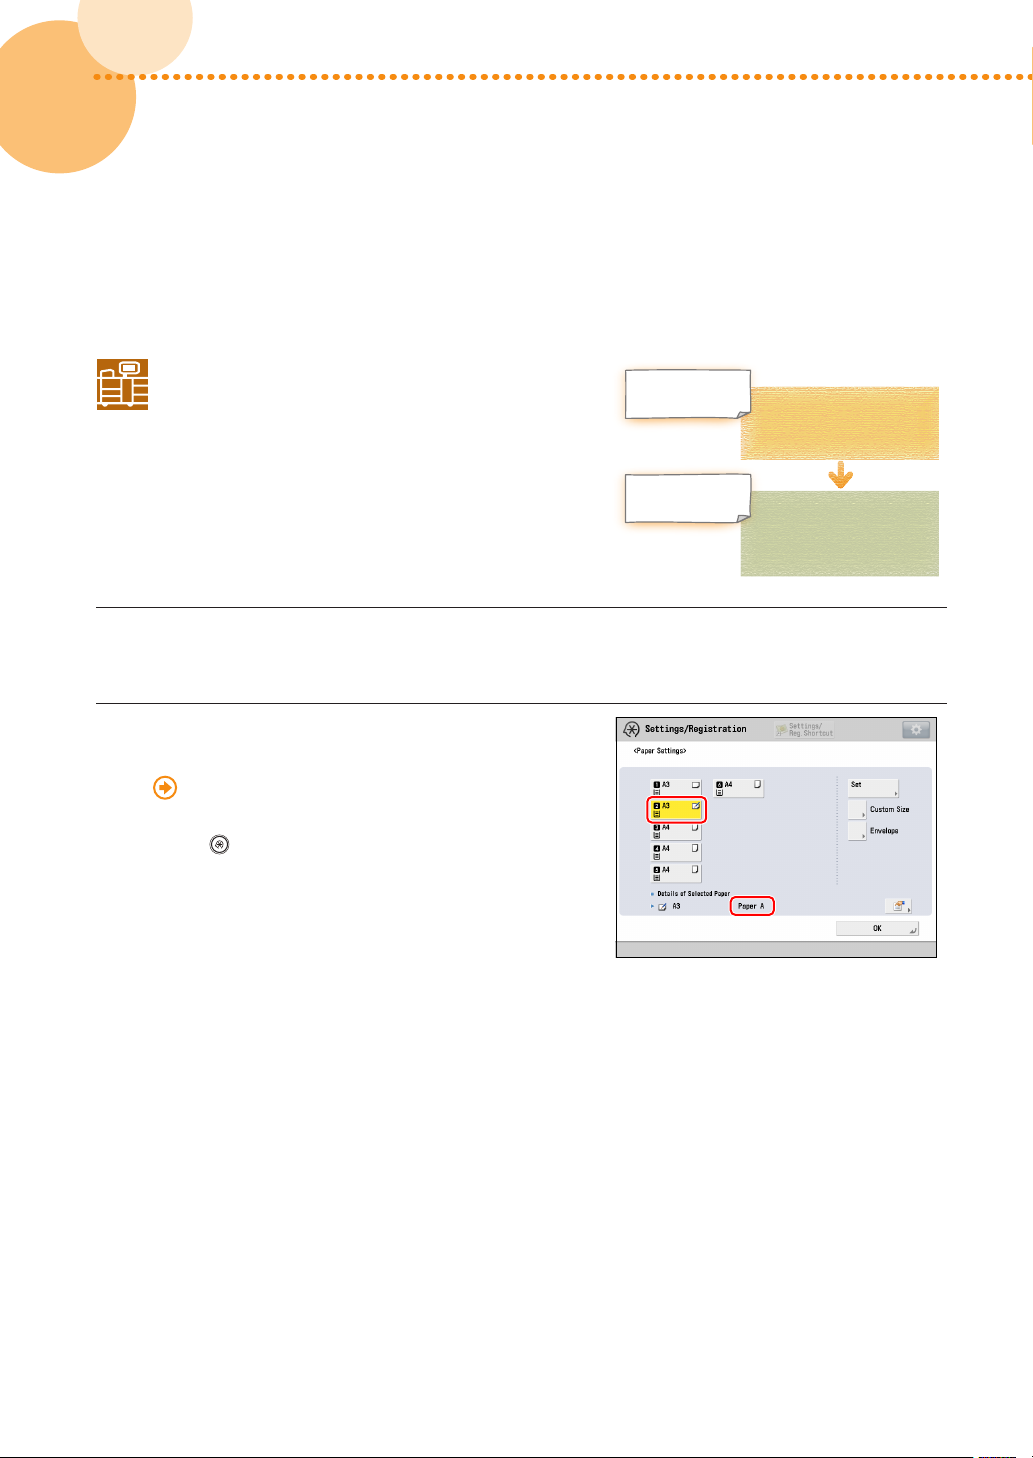
Load the paper you want to use for calibration�
1
•
Make sure that "Canon Océ Top Colour Paper (100 g/m
Change the paper type of the paper drawer to
2
2
)" is also loaded properly for use�
Paper for Calibration
Paper for Calibration
Auto Adjust Gradation
(Full Adjust)
Auto Correct Color
Tone Settings
(Register Correction Pattern)
match the paper type loaded in step 1�
"Settings/Registration" > "Registering the Paper Size
and Type for a Paper Source" in the User's Guide
•
Press
Settings] to set the paper type�
→ [Preferences] → [Paper Settings] → [Paper
26
26
imagePRESS C850/C750/C650/C65
Page 29
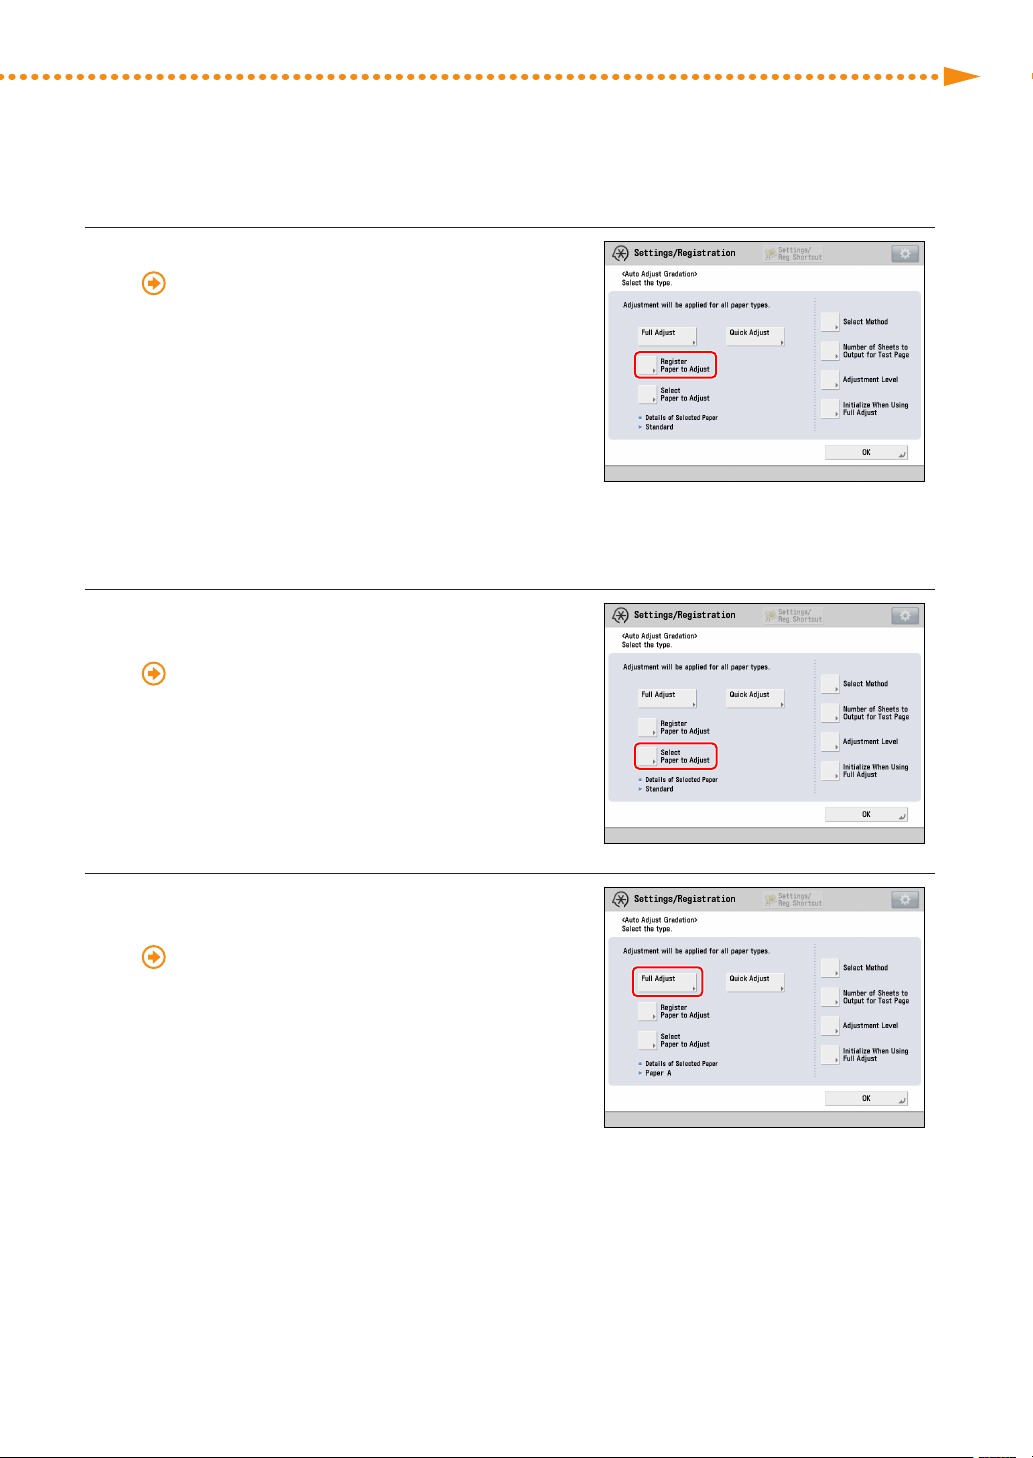
Register the paper you want to use for calibration�
3
"Adjustment for Image Quality and Finishing
(Calibration)" > "Automatic Gradation Adjustment" >
"Registering Paper for Calibration" in the User's Guide
•
Select <Standard> for the type for the paper to use as a
basis�
•
Select the paper drawer where you have loaded "Canon
Océ Top Colour Paper (100 g/m
contains the type of paper to use as a basis�
•
Select the paper drawer in which the paper you can use
for calibration has been loaded as the paper source that
is loaded with custom paper to be used as the paper
type to adjust�
Select the paper you registered in step 3 for [Select
4
2
)" as the paper source
Paper to Adjust]�
"Adjustment for Image Quality and Finishing
(Calibration)" > "Automatic Gradation Adjustment" >
"Selecting Paper for Calibration" in the User's Guide
Getting the Best Colors from Your Machine
Perform automatic gradation calibration (full
5
calibration)�
"Adjustment for Image Quality and Finishing
(Calibration)" > "Automatic Gradation Adjustment" >
"Full Adjustment" in the User's Guide
•
Select the paper drawer in which the paper you can use
for calibration has been loaded as the paper source for
test printing�
imagePRESS C850/C750/C650/C65
27
Page 30
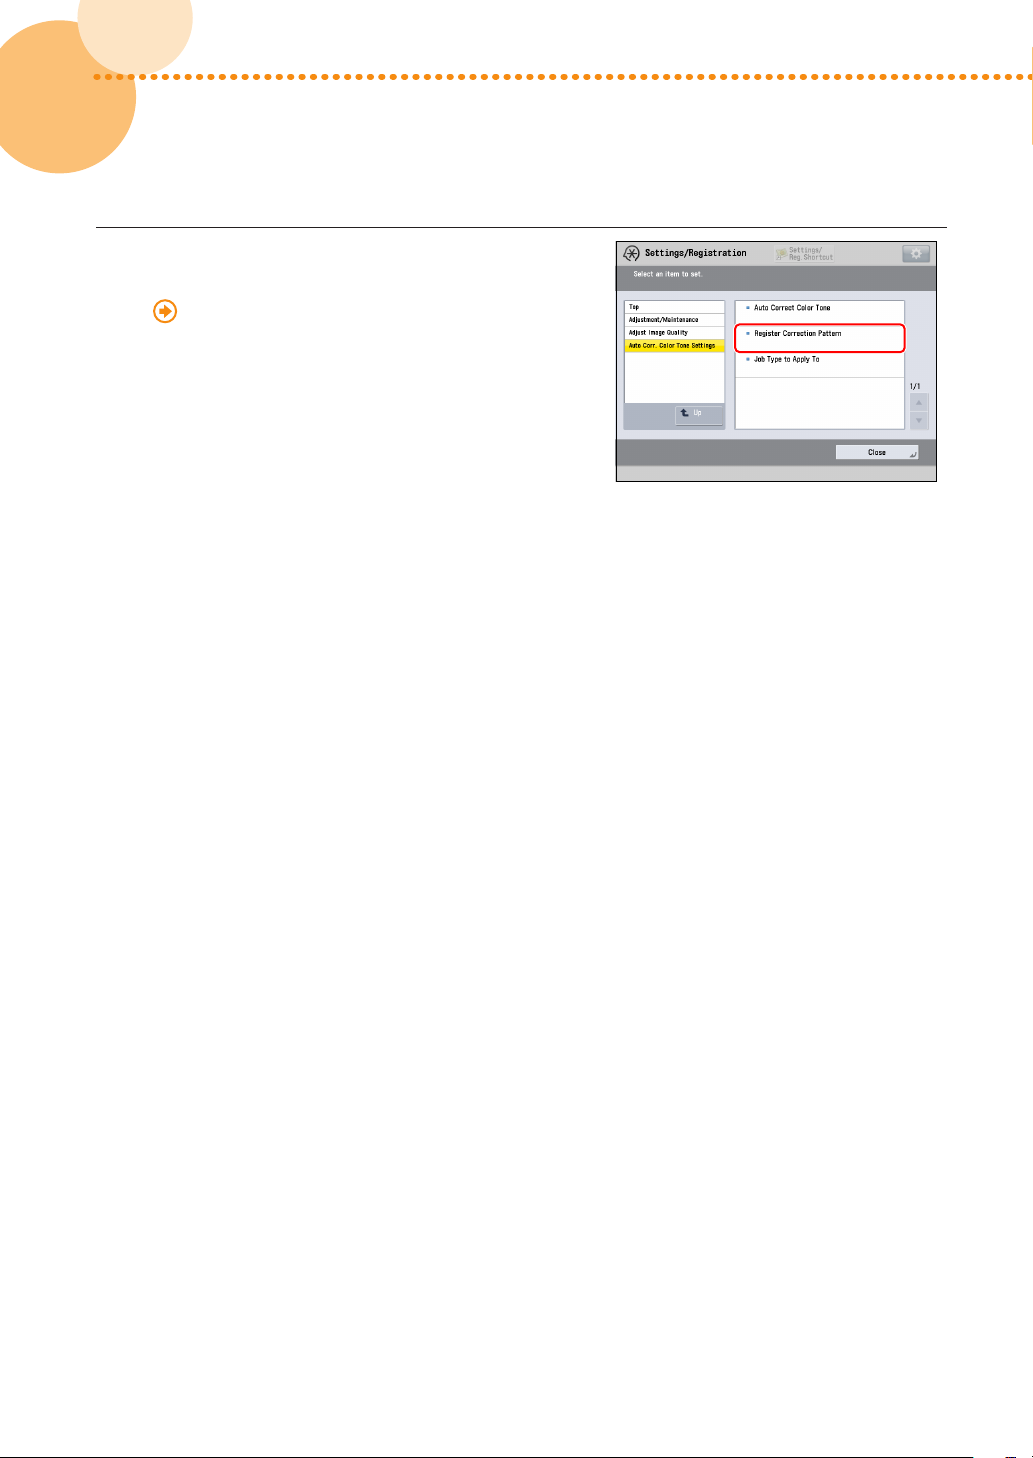
Create and register a new standard for calibration
IMPORTANT
6
for automatic color tone correction�
"Adjustment for Image Quality and Finishing
(Calibration)" > "Automatic Color Tone Correction" >
"Registering Correction Pattern" in the User's Guide
•
Select the type of paper you can use for calibration as
the paper type that you use for test printing�
•
Select the paper drawer in which the paper you can use
for calibration has been loaded as the paper source for
test printing�
When standards for calibration are overwritten, the data is lost� Be careful not to overwrite the standard for
calibration for "Canon Océ Top Colour Paper (100 g/m2)" when you register a new standard of calibration for
the paper you can use for calibration�
28
28
imagePRESS C850/C750/C650/C65
Page 31
Getting the Best Colors from Your Machine
Calibrations on the imagePRESS Server
This section explains how to use a manual
spectrophotometer (X-Rite i1 Pro) to calibrate the machine
for the paper you want to print on� You need to connect
the spectrophotometer to a machine on which Command
WorkStation is installed�
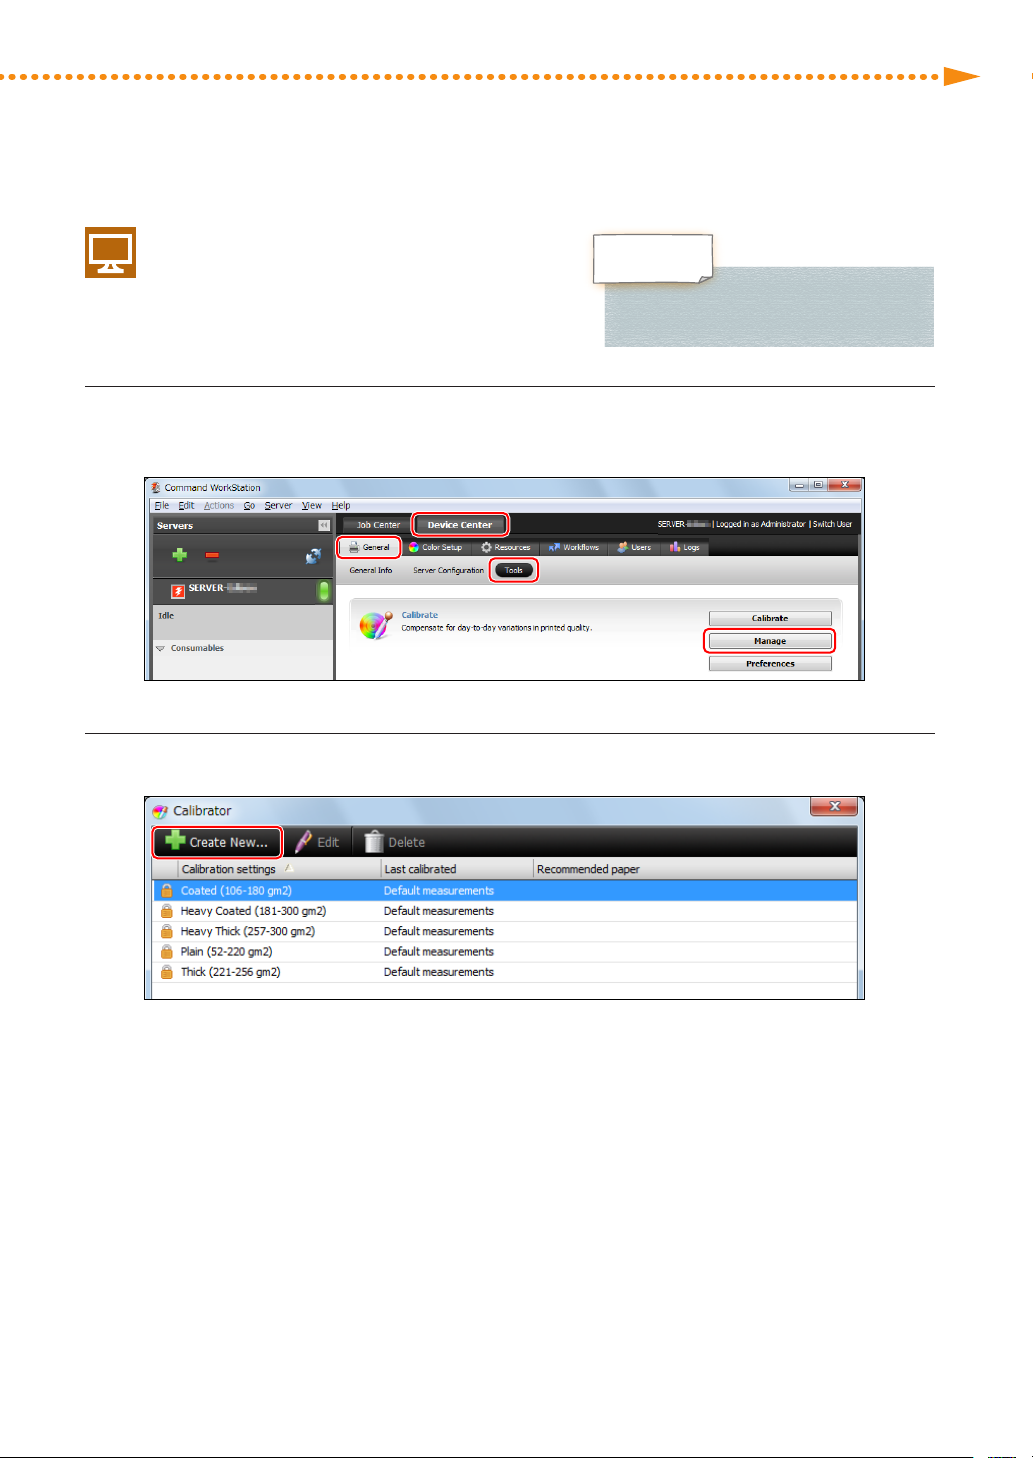
Click the [Device Center] tab in Command WorkStation → [General] → [Tools] → [Manage] for
1
<Calibrate>�
Paper to Print on
Calibrations on the imagePRESS Server
Click [Create New]�
2
imagePRESS C850/C750/C650/C65
29
Page 32
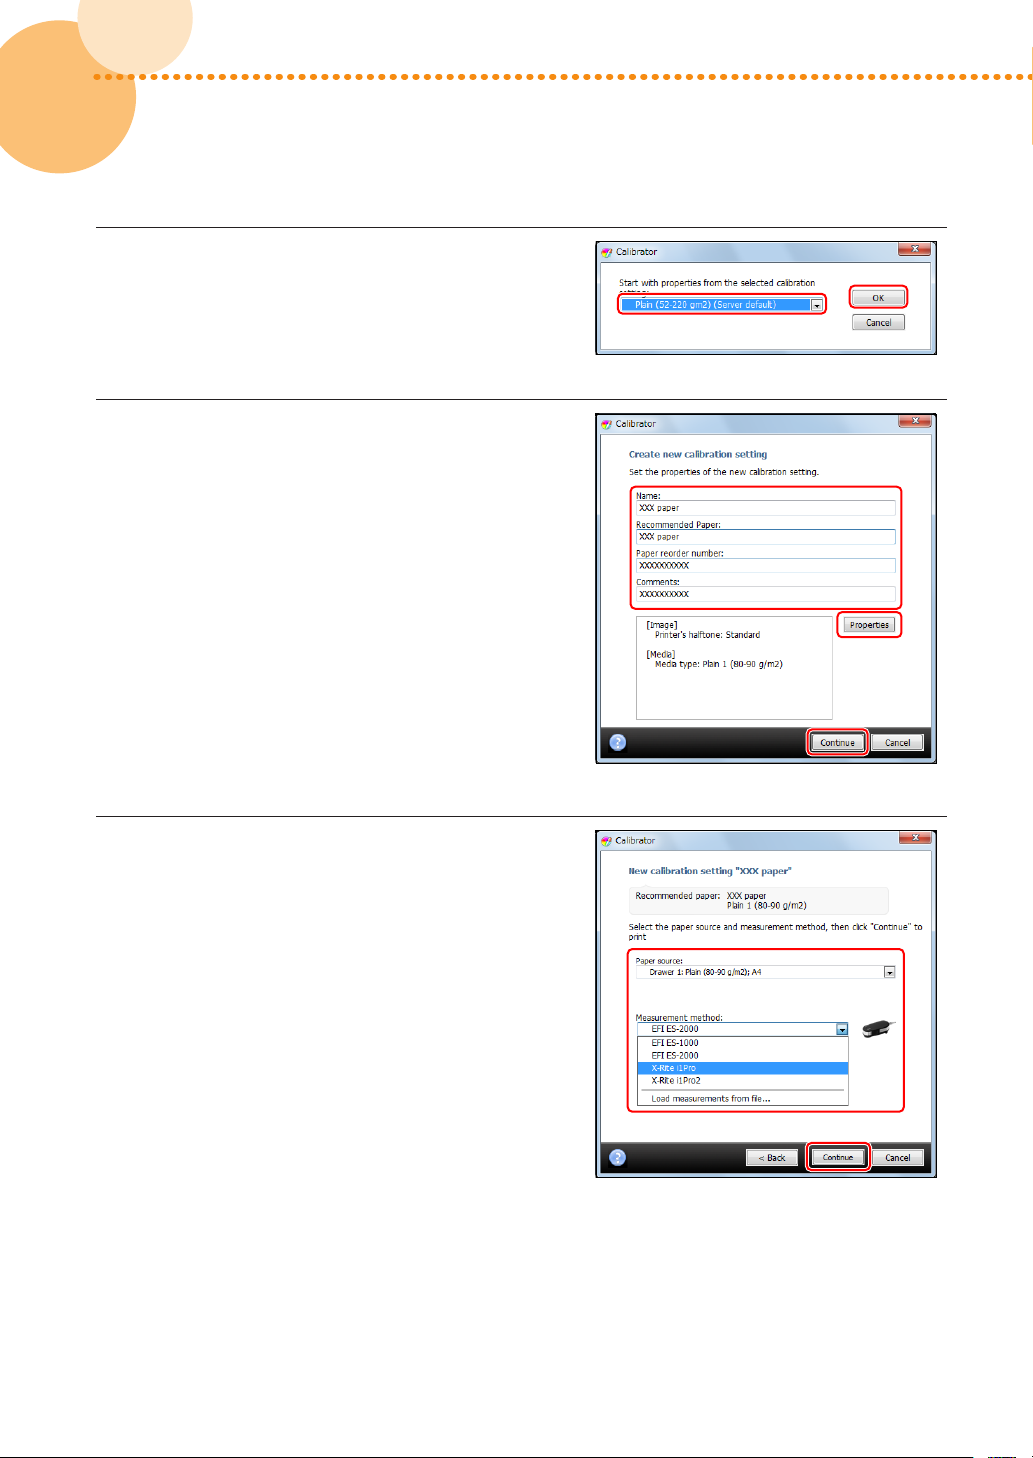
Select the paper type which is closest to the paper
3
you want to print on, and click [OK]�
•
If there is no appropriate paper type, select <Server
default>�
Enter the required information and click
4
[Continue]�
•
It will be easier to find the calibration settings if you
enter specific characteristics of the paper you are
calibrating, such as gloss value, in addition to basis
weight and paper type�
•
You can check the print settings by clicking [Properties]�
30
30
Select the items as described below and click
5
[Continue]�
[Paper source:]
Select the paper drawer in which the paper you want to
print on is loaded�
[Measurement method:]
Select the calibration method� (Select "X-Rite i1Pro" here�)
•
A calibration page is printed�
imagePRESS C850/C750/C650/C65
Page 33
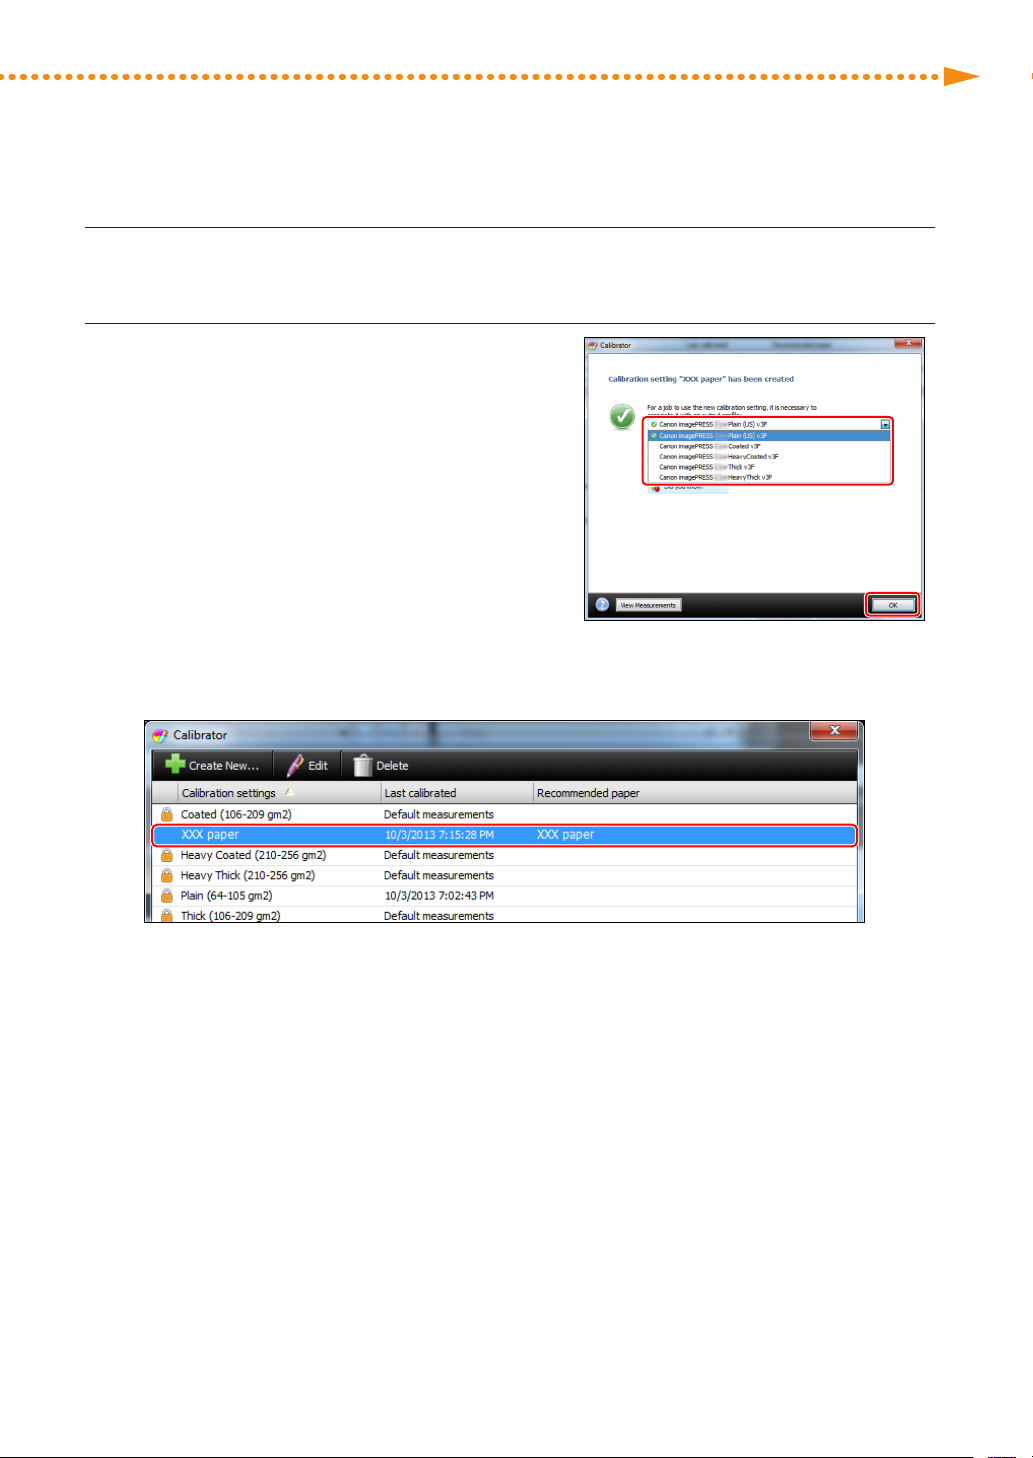
Getting the Best Colors from Your Machine
Follow steps 3 to 7 in "Calibrations on the imagePRESS Server" (p� 22) in "Required Calibrations�"
6
Link the calibration setting with the output profile
7
and click [OK]�
•
The calibration setting for the paper you want to print on is added to the list�
imagePRESS C850/C750/C650/C65
31
Page 34
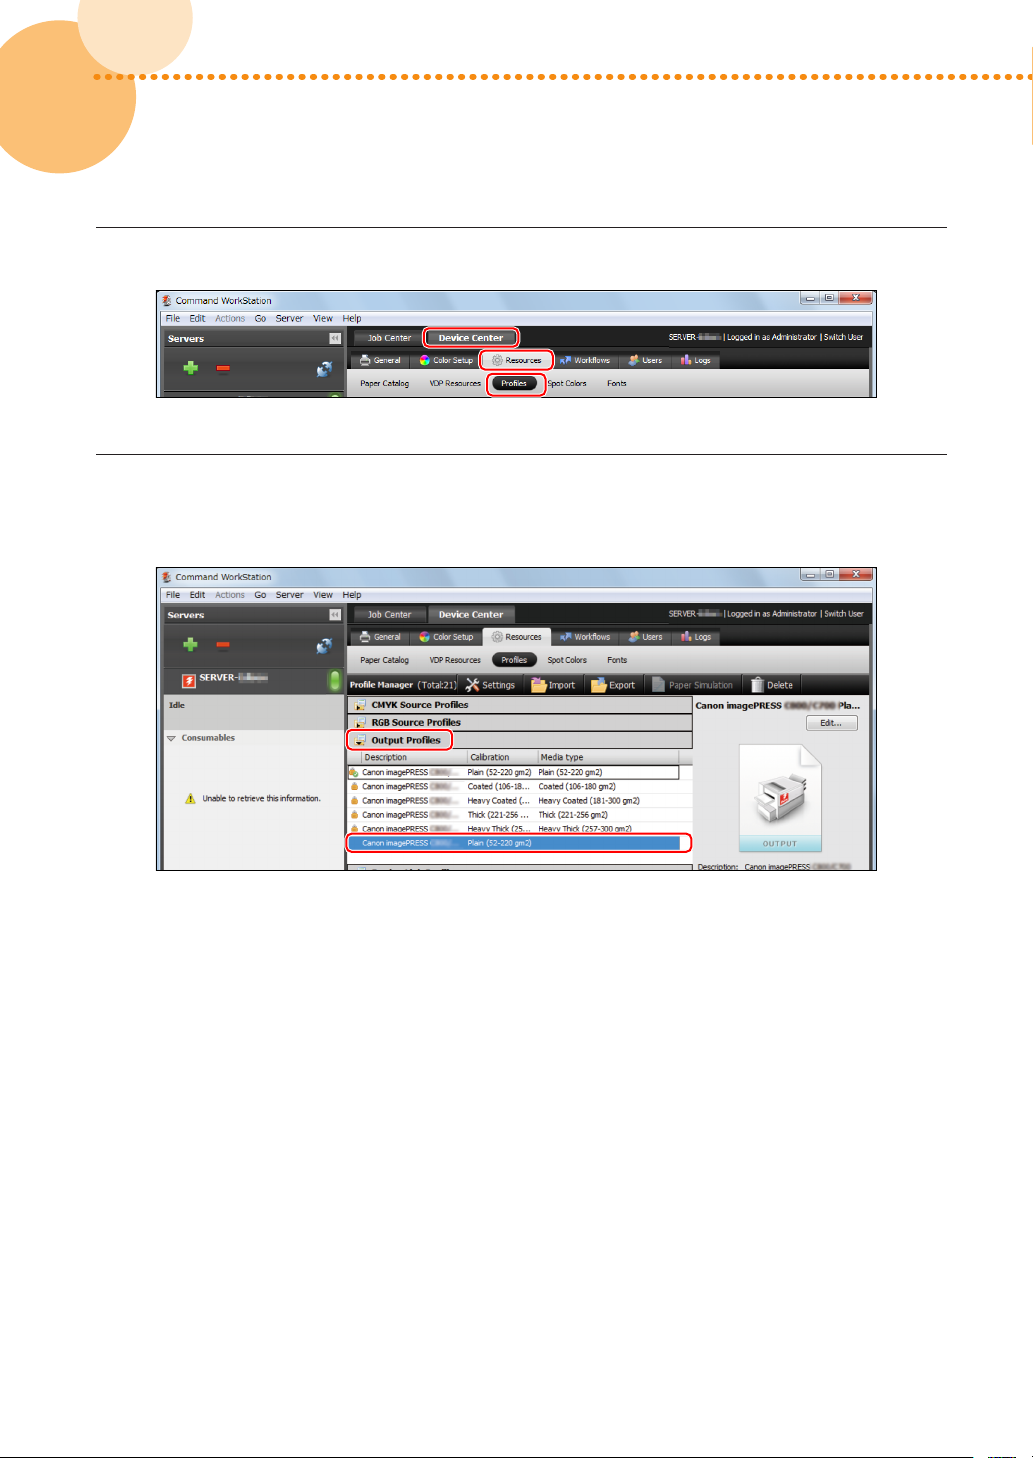
Click the [Device Center] tab in Command WorkStation → [Resources] → [Profiles]�
8
Click [Output Profiles] to display a list of profiles�
9
•
An output profile with "Copy" appended to the name appears in the list as the output profile for the paper
you want to print on�
32
32
imagePRESS C850/C750/C650/C65
Page 35
Getting the Best Colors from Your Machine
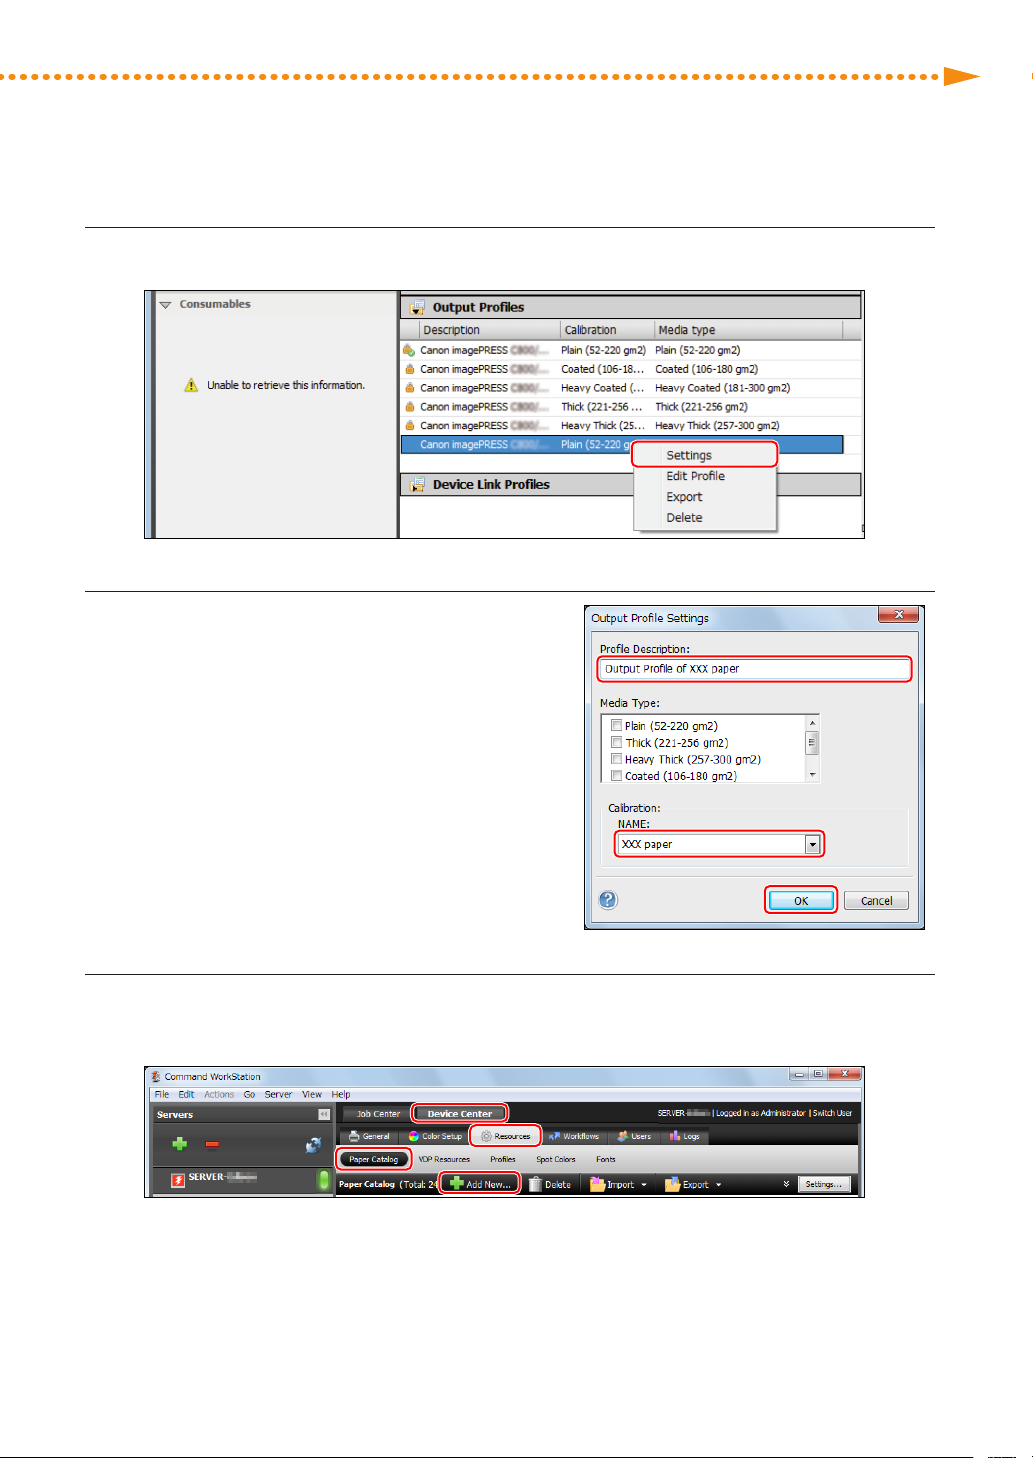
Right-click the output profile for the paper you are using, and click [Settings]�
10
Select or enter the items as shown below, and click
11
[OK]�
[Profile Description:]
Enter a simple description to distinguish this profile from
other profiles�
[Media Type:]
Nothing needs to be selected�
[Calibration:]
Select the calibration setting you created in steps 1 to 7 for
the paper you want to print on�
Click the [Device Center] tab in Command WorkStation → [Resources] → [Paper Catalog] →
12
[Add New]�
imagePRESS C850/C750/C650/C65
33
Page 36
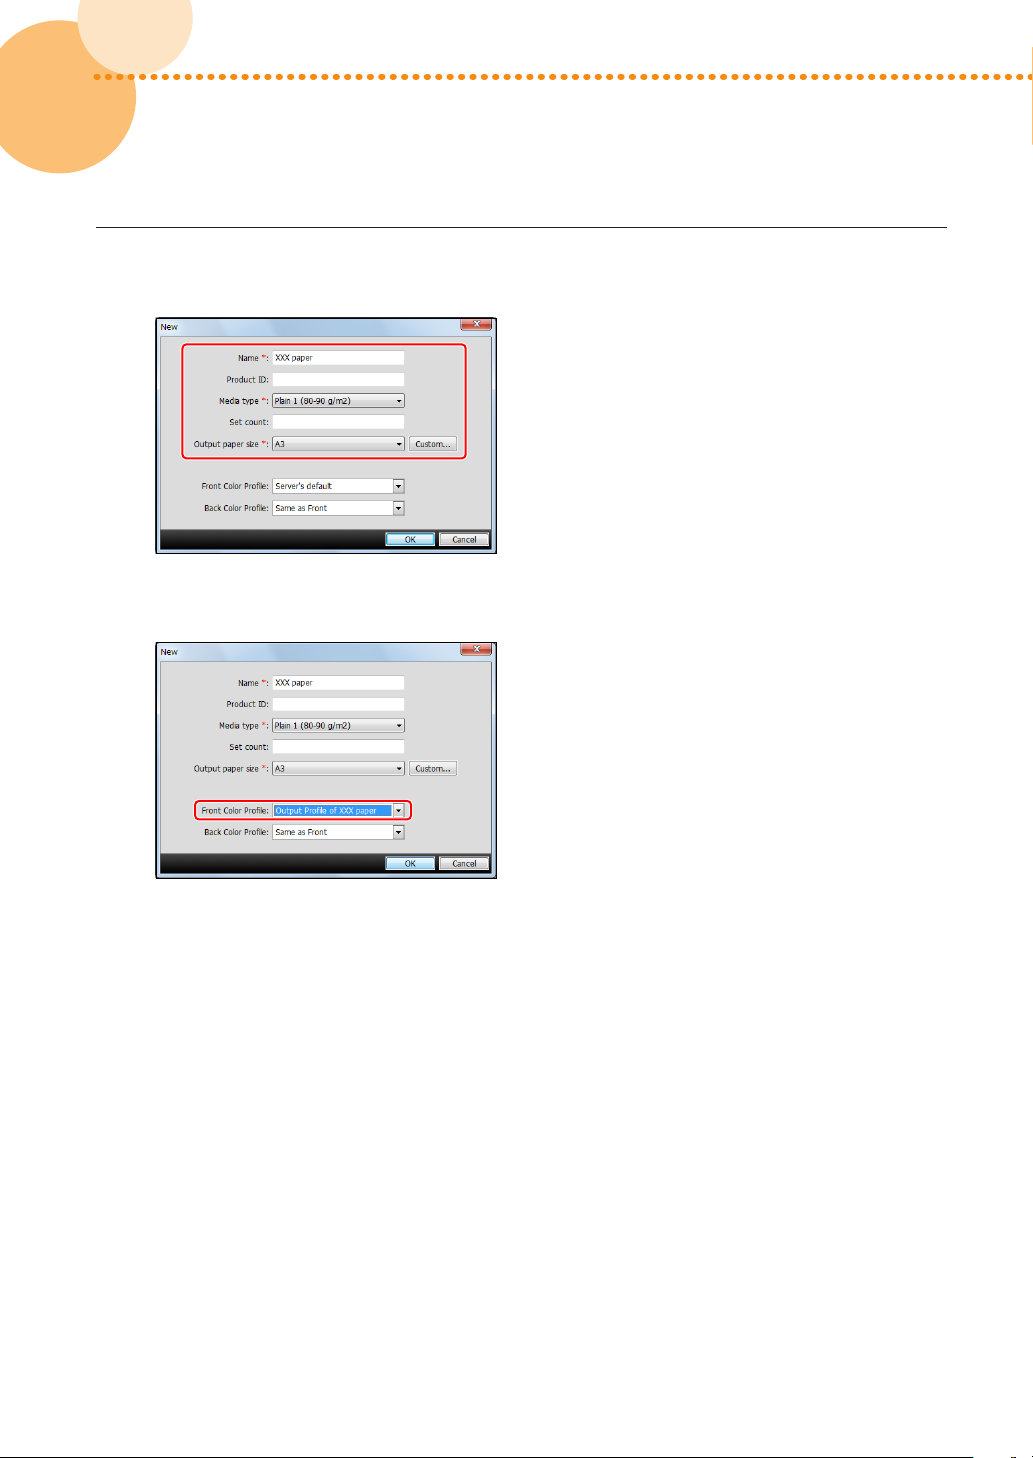
Register attributes of the paper you want to print on in the imagePRESS Server�
NOTE
13
•
Set a name, type or size of the paper�
•
Select the output profile you set in step 11 in <Front Color Profile>�
34
34
•
If the front and back surfaces of the paper are different, you can select <Back Color Profile> and <Front Color
Profile> separately�
•
For detailed information on the setting items, see the user manual or the Help for the imagePRESS Server�
imagePRESS C850/C750/C650/C65
Page 37
Getting the Best Colors from Your Machine
NOTE
Possible
Not Possible
Click [OK]�
14
See the following reference for information about how to use profile creation software to create output profiles�
"When Creating a Custom Output Profile, How Do I Do?" (p� 41)
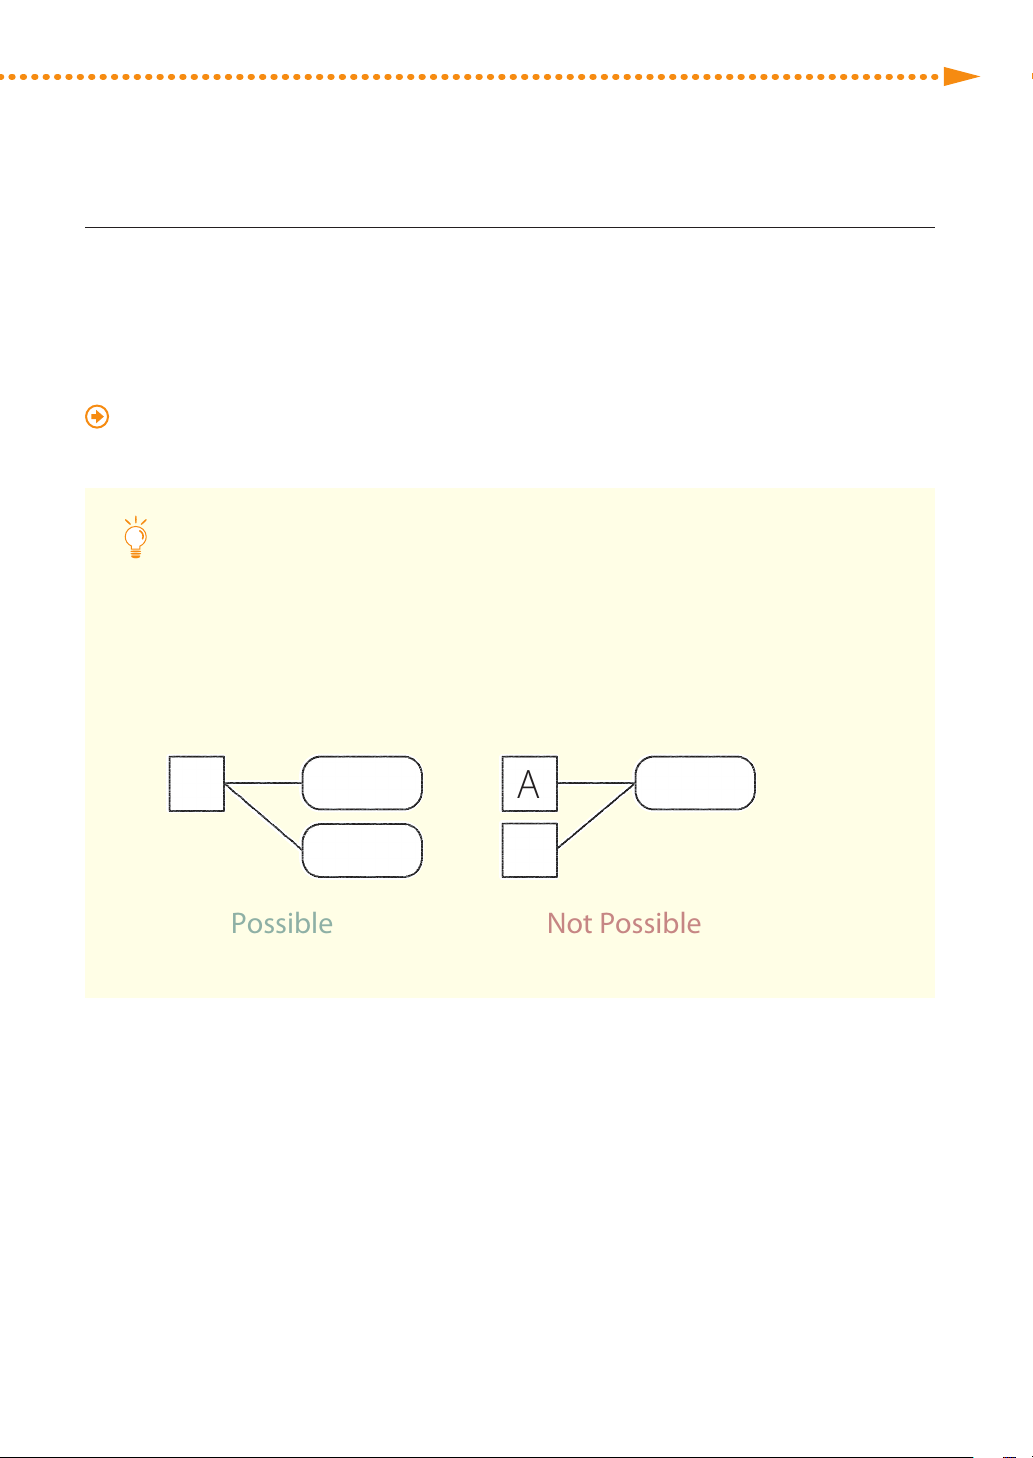
Calibration Settings and Output Profiles
You need to link the output profile to the calibration settings to use them for the paper you want to print
on� You can use a calibration setting with several output profiles, but each output profile must be linked
with only a single calibration setting�
Calibration
Setting
A
Output Proles
1
2
Calibration
Settings
A
B
Output Prole
1
imagePRESS C850/C750/C650/C65
35
Page 38
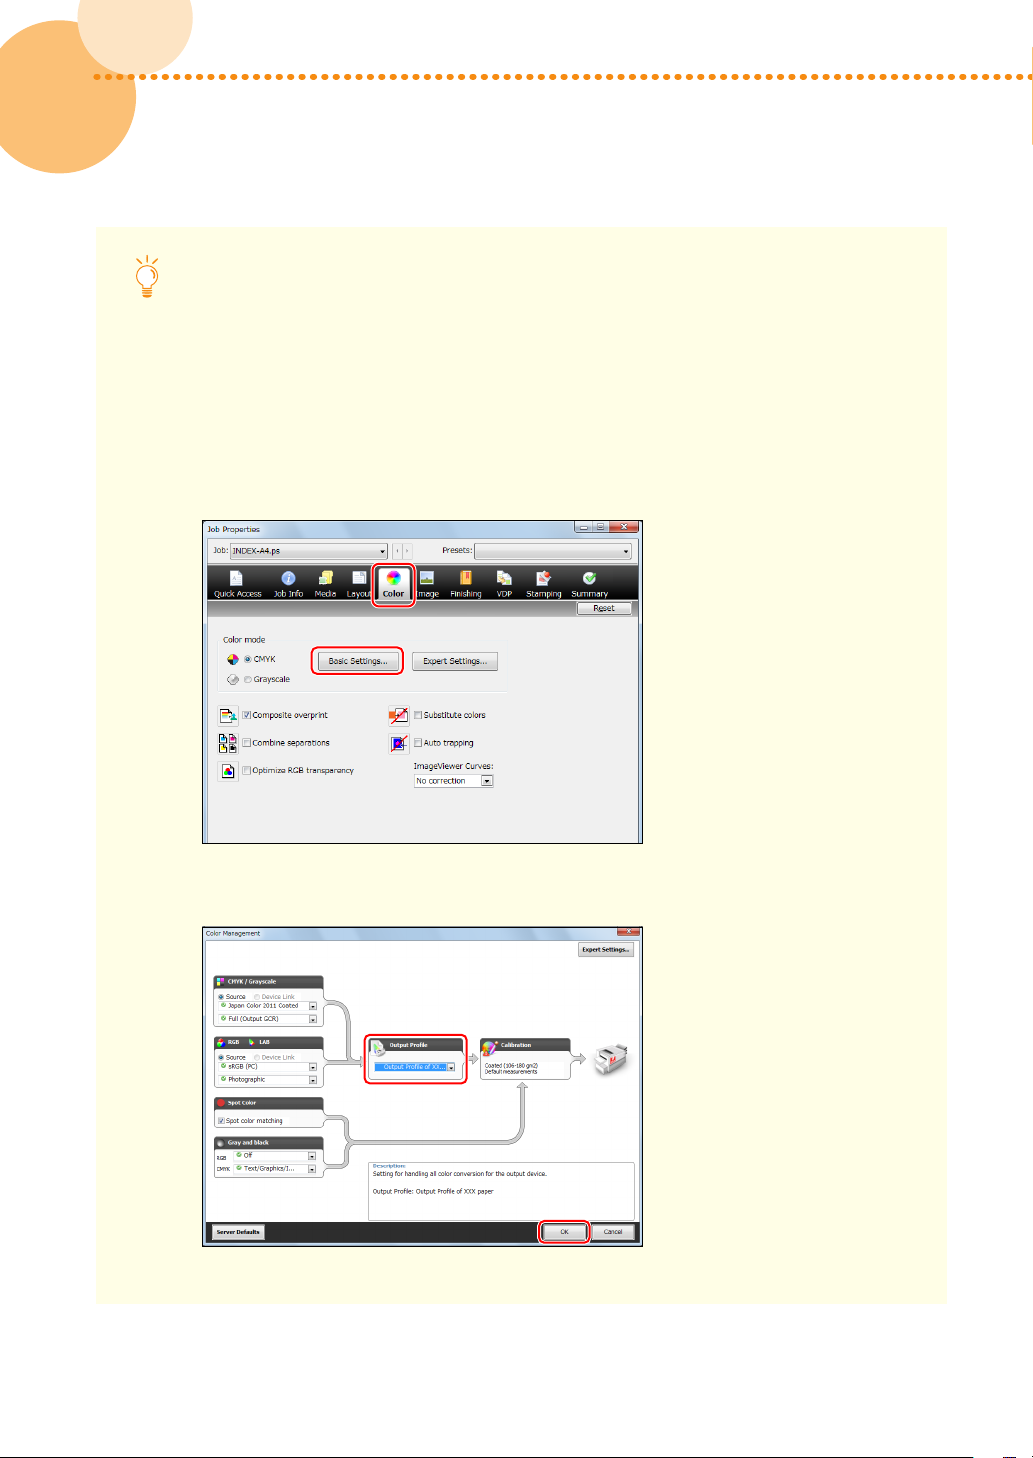
Setting Output Profiles to a Job
You can set output profiles to each job in the imagePRESS Server� Follow the procedure below to use an
arbitrary profile temporarily�
1 Double-click the job in Command WorkStation�
•
[Job Properties] is displayed�
2 Select the [Color] tab, and then click [Basic Settings]�
36
36
3 Select any profiles in [Output Profile] on the <Color Management> screen and click [OK]�
imagePRESS C850/C750/C650/C65
Page 39
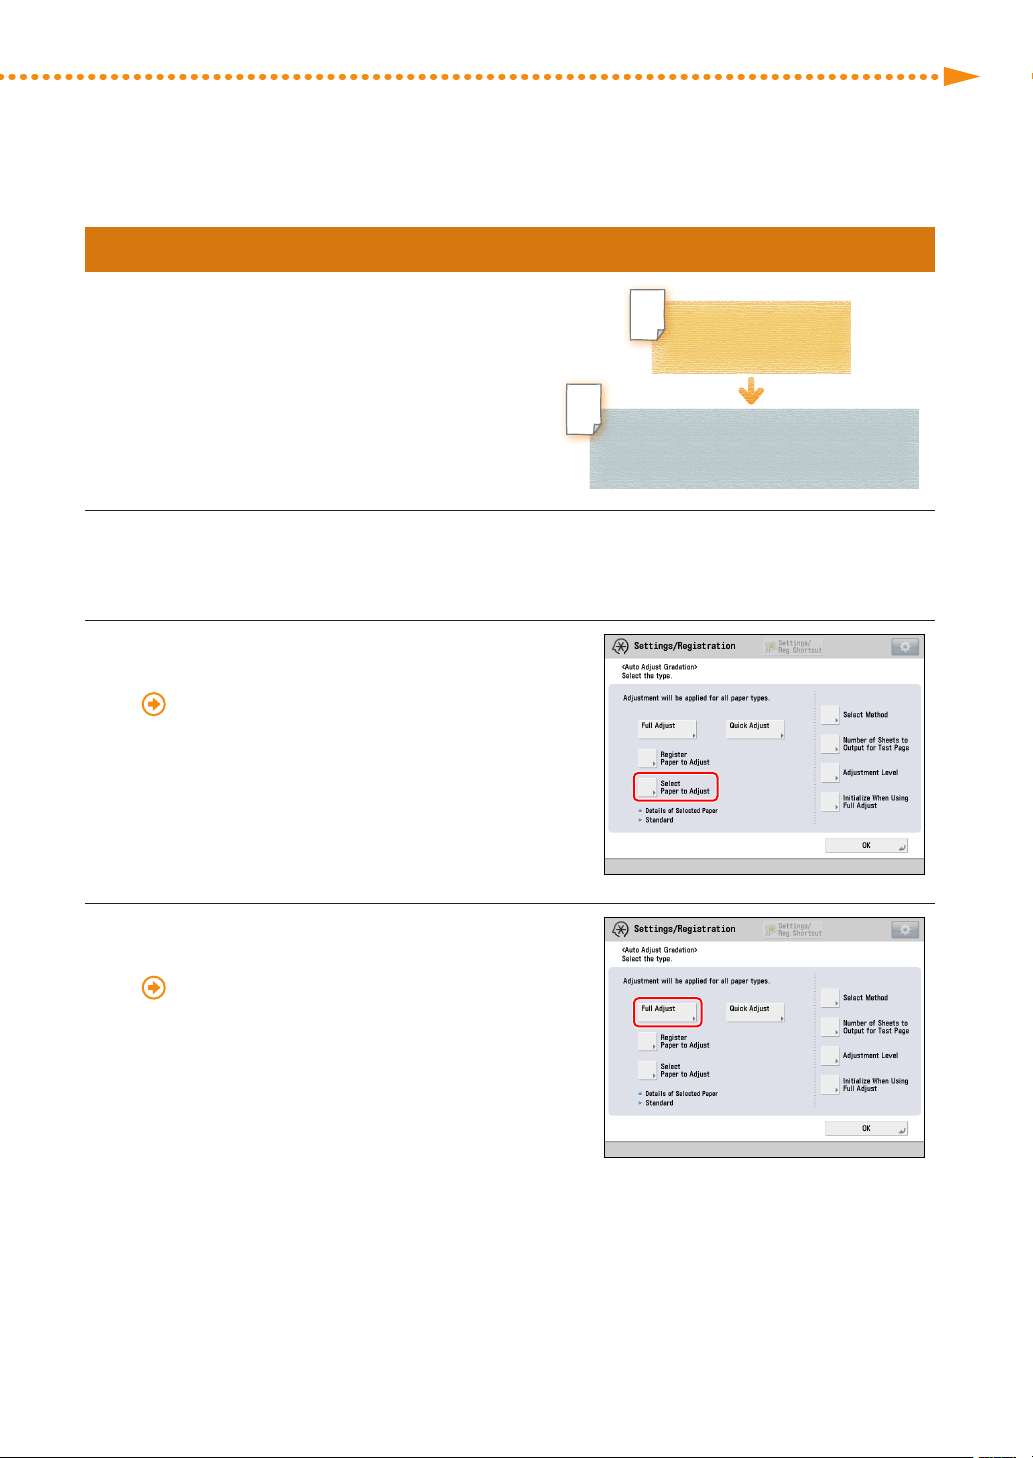
Calibration After the Machine Is in Operation
Perform automatic gradation calibration (full calibration)
once a day to output CMYK properly� If you use the
imagePRESS Server, perform automatic gradation
calibration (full calibration) on the machine, and then
perform calibration on the imagePRESS Server�
Load the paper into the paper drawer�
1
•
Load "Canon Océ Top Colour Paper (100 g/m
registered�
Select the paper type you loaded in step 1 for
2
[Select Paper to Adjust]�
2
)" or the paper you want to use for calibration which has been
Getting the Best Colors from Your Machine
Auto Adjust Gradation
(Full Adjust)
Calibrations on the imagePRESS Server
"Adjustment for Image Quality and Finishing
(Calibration)" > "Automatic Gradation Adjustment" >
"Selecting Paper for Calibration" in the User's Guide
Perform automatic gradation calibration (full
3
calibration)�
"Adjustment for Image Quality and Finishing
(Calibration)" > "Automatic Gradation Adjustment" >
"Full Adjustment" in the User's Guide
•
Select the paper drawer where you loaded the paper in
step 1 as the paper source for test printing�
imagePRESS C850/C750/C650/C65
37
Page 40
If you use the imagePRESS Server, perform steps 1 to 8 in "Calibrations on the imagePRESS
4
Server" in "Required Calibrations�" (p� 22)
•
Do calibration on the imagePRESS Server using the paper on the list in "Types of Paper You Can Use for
Calibration" at the end of this document� You can also use the type of paper that you want to use for printing
if you registered it in advance�
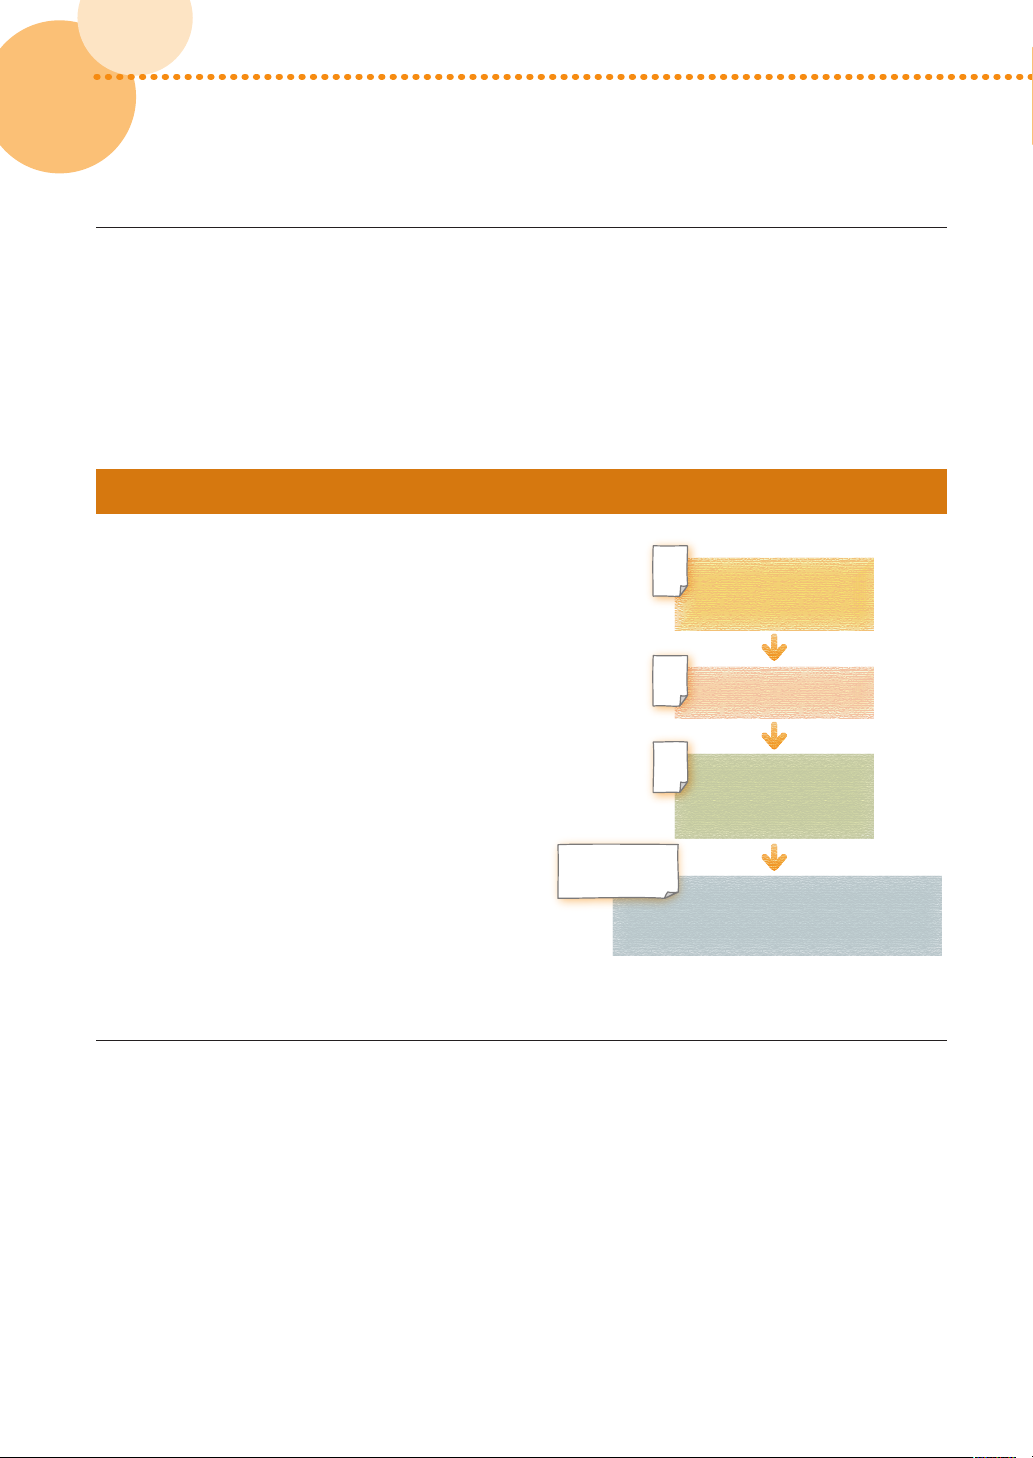
Calibration As Needed
If the wrong flesh tone or incorrect gray scale appears on
printouts, perform automatic gradation calibration (full
calibration), and then perform shading correction and
automatic color tone correction on the machine� Doing
so may improve the shades of colors� If the wrong color
appears on heavy paper or coated paper, proceed to perform
calibration on the imagePRESS Server� Doing so may improve
the shades of colors more effectively�
Auto Adjust Gradation
(Full Adjust)
Shading Correction
Auto Correct Color
Tone Settings
(Auto Correct Color Tone)
Automatic Gradation Calibration
▀
Load the paper into the paper drawer�
1
•
Load "Canon Océ Top Colour Paper (100 g/m
registered�
38
38
imagePRESS C850/C750/C650/C65
Heavy or Coated
Paper
Calibrations on the imagePRESS Server
2
)" or the paper you want to use for calibration which has been
Page 41
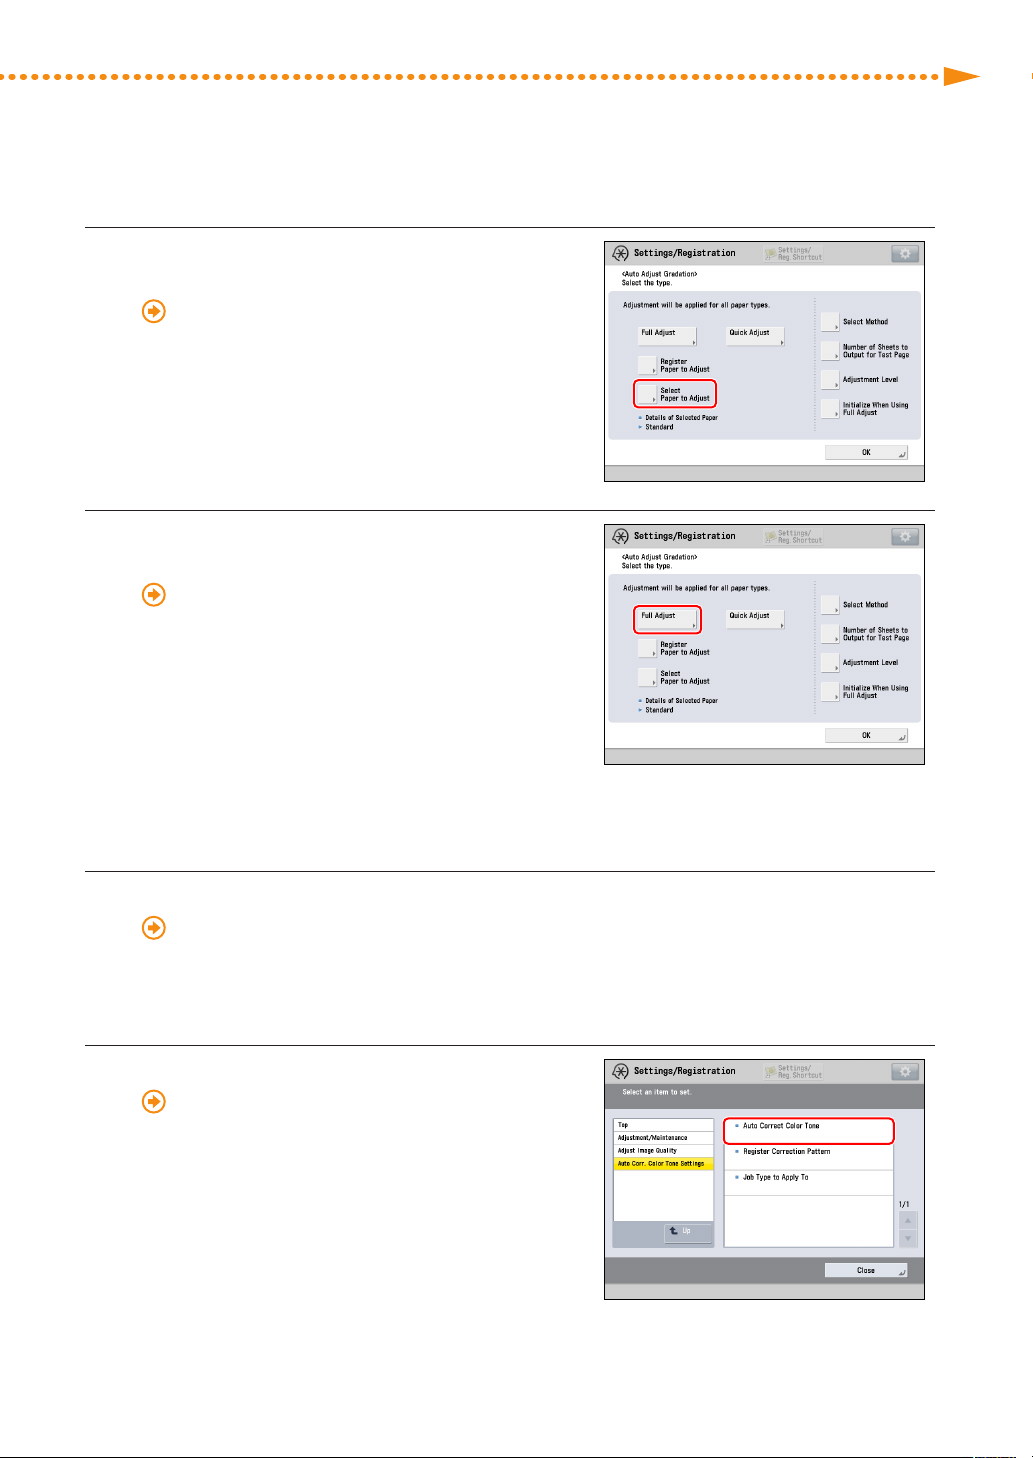
Select the paper type you loaded in step 1 for
2
[Select Paper to Adjust]�
"Adjustment for Image Quality and Finishing
(Calibration)" > "Automatic Gradation Adjustment" >
"Selecting Paper for Calibration" in the User's Guide
Perform automatic gradation calibration (full
3
calibration)�
"Adjustment for Image Quality and Finishing
(Calibration)" > "Automatic Gradation Adjustment" >
"Full Adjustment" in the User's Guide
•
Select the paper drawer where you loaded the paper in
step 1 as the paper source for test printing�
Getting the Best Colors from Your Machine
Shading Correction
▀
Perform shading correction�
4
"Adjustment for Image Quality and Finishing (Calibration)" > "Shading Correction" in the User's Guide
Automatic Color Tone Correction
▀
Perform automatic color tone correction�
5
"Adjustment for Image Quality and Finishing
(Calibration)" > "Automatic Color Tone Correction" >
"Automatic Color Tone Correction" in the User's Guide
•
Press [Change Corr� Pattern], and select the calibration
standard you created in "Calibration after Purchase�" (p� 19)
•
Select the paper drawer where you loaded the paper in
step 1 as the paper source for the paper for which you
are calibrating the machine�
imagePRESS C850/C750/C650/C65
39
Page 42

If the wrong color appears on heavy paper or coated paper, do steps 1 to 8 in "Calibrations on
6
the imagePRESS Server" in "Required Calibrations�" (p� 22)
•
Do calibration on the imagePRESS Server using one of the following types of paper� You can also use the
type of paper that you want to use for printing if you registered it in advance�
For the European and Asia-Pacific Regions
Type of paper you want to print on is Thick (221-256 gm2):
Canon Océ Top Colour Paper (250 g/m
Type of paper you want to print on is Heavy Thick (257-300 gm2):
Canon Océ Top Colour Paper (300 g/m
Type of paper you want to print on is Coated (106-180 gm2):
OK Top Coat Plus (127�9 g/m
Type of paper you want to print on is Heavy Coated (181-300 gm2):
Futura Gloss Cover (271 g/m
For the American Region
Type of paper you want to print on is Thick (221-256 gm2):
Mohawk Options Navajo Smooth Brilliant White (90 lb� Cover (243 g/m
Type of paper you want to print on is Heavy Thick (257-300 gm2):
Hammermill Color Copy Digital Cover (100 lb� (271 g/m
Type of paper you want to print on is Coated (106-180 gm2):
OK Top Coat Plus (34 lb� (127�9 g/m
Type of paper you want to print on is Heavy Coated (181-300 gm2):
Futura Gloss Cover (100 lb� (271 g/m
2
)
2
)
2
)
2
)
2
))
2
))
2
))
2
))
40
40
imagePRESS C850/C750/C650/C65
Page 43
Getting the Best Colors from Your Machine
IMPORTANT
NOTE
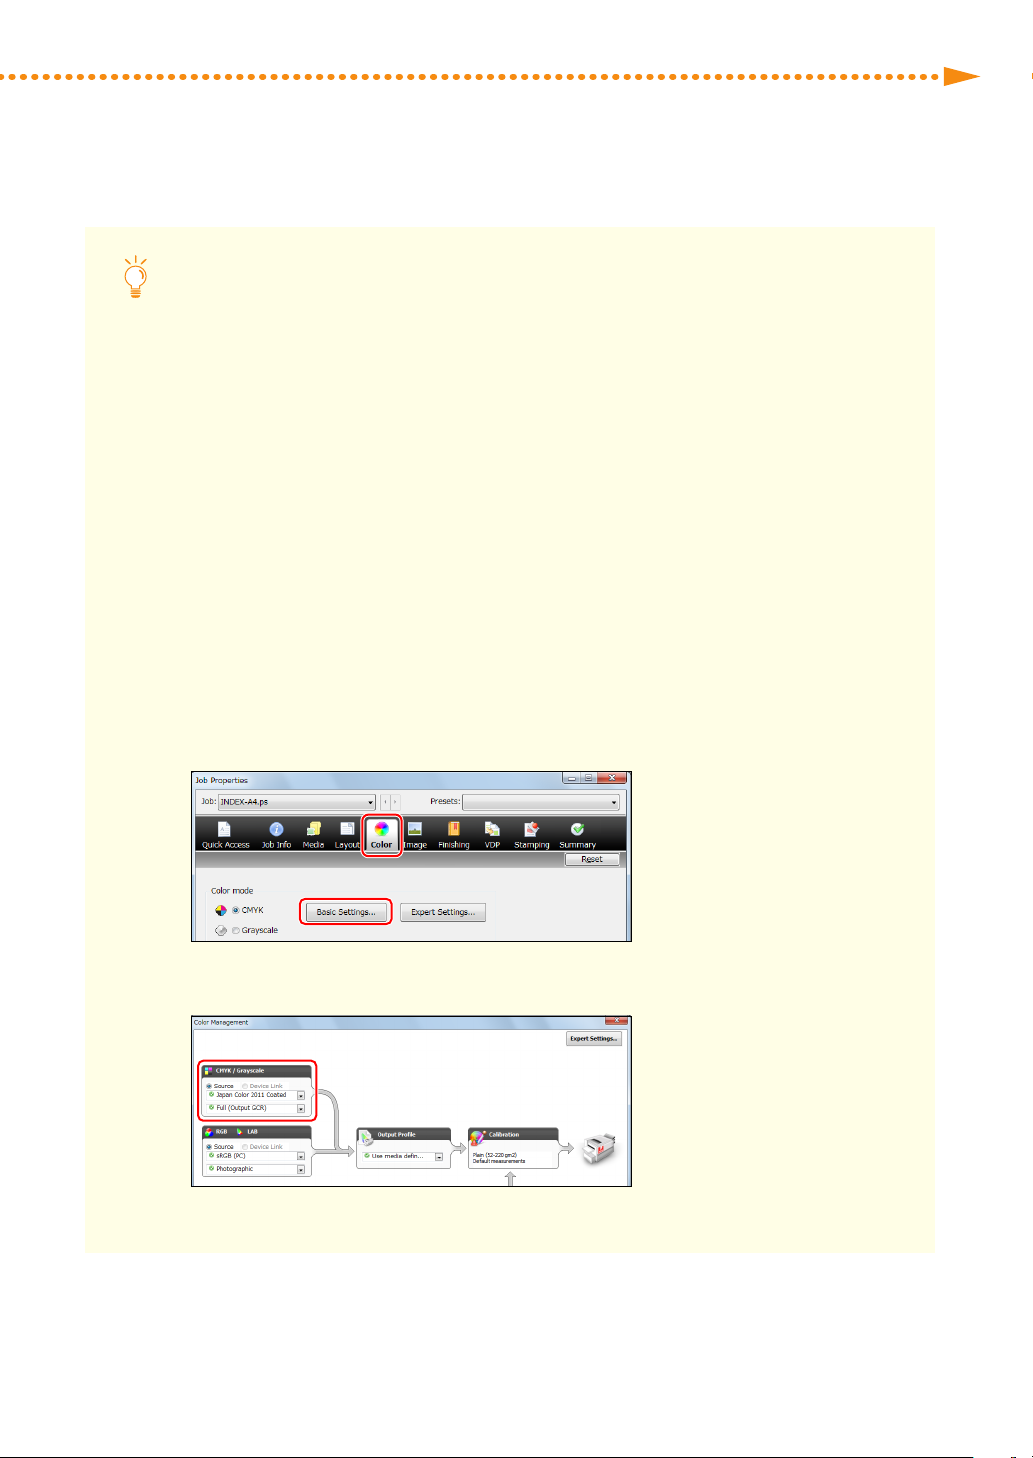
When Creating a Custom Output Profile, How Do I Do?
If you create a custom output profile using profile creation software, you need to output the chart for
color measurement from the imagePRESS Server� Specify the job properties for the outputting chart in the
Command WorkStation as follows�
Make sure to do the following procedure� If the job properties are not specified properly, the chart for color
measurement may not be output correctly�
For information on how to create a custom output profile, see the user manual or the Help for the profile
creation software you are using�
1 Double-click the job for which you want to output a chart�
•
[Job Properties] is displayed�
2 Select the [Color] tab, and then click [Basic Settings]�
3 Select [Bypass conversion] in [CMYK/Grayscale] on the <Color Management> screen�
imagePRESS C850/C750/C650/C65
41
Page 44
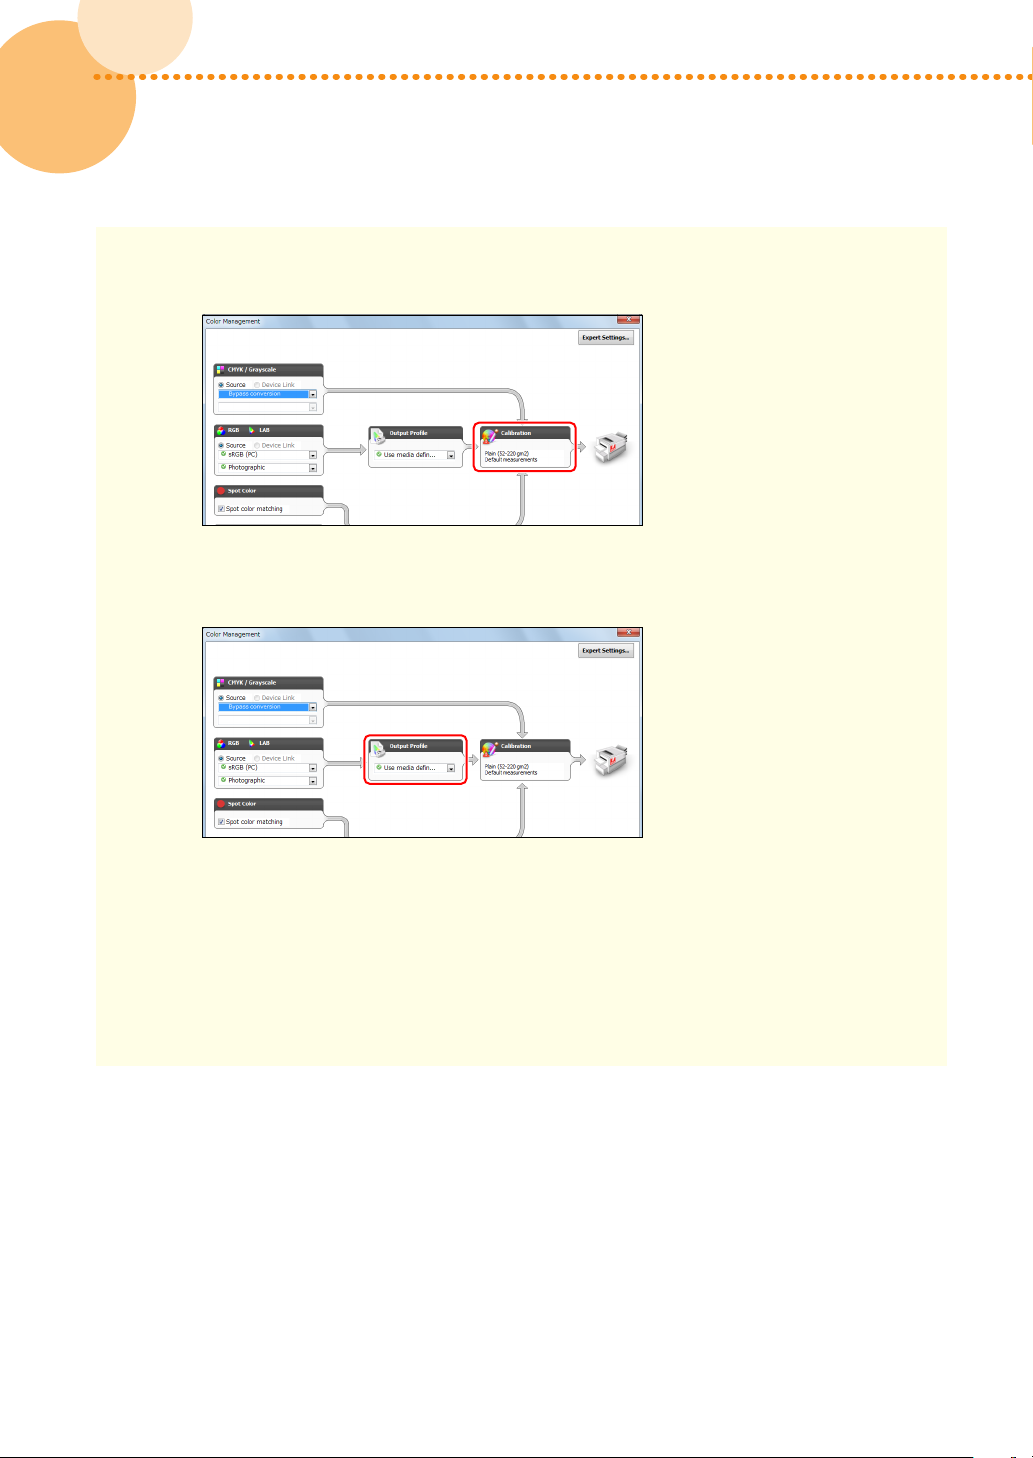
4 Confirm that the appropriate calibration setting is displayed in [Calibration]�
NOTE
•
If you want to change a calibration setting, select the output profile, which is linked with your
desired calibration setting, in [Output Profile]�
42
42
If you select [Bypass conversion] in [CMYK/Grayscale], the output profile is not used� Only a
calibration setting linked with the selected output profile is applied�
5 Click [OK]�
imagePRESS C850/C750/C650/C65
Page 45
Getting the Best Colors from Your Machine
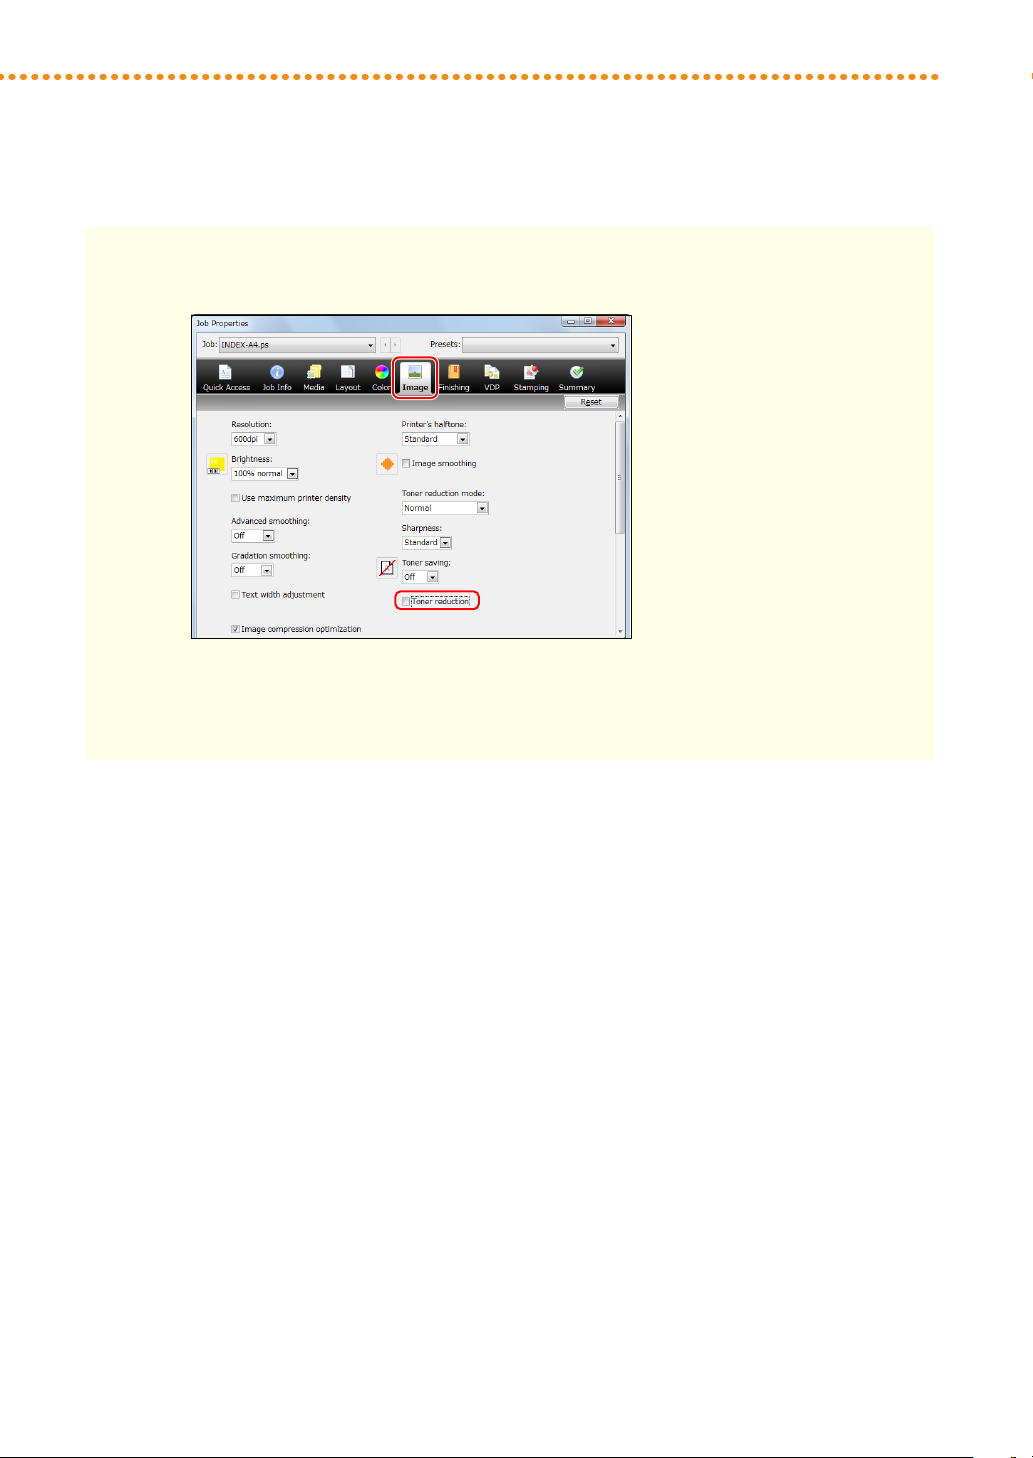
6 Select the [Image] tab on the <Job Properties> screen, clear the check box for [Toner reduction]�
7 Click [OK]�
imagePRESS C850/C750/C650/C65
43
Page 46

How to Get the Most Accurate Colors Possible for Your Printouts
Use the following procedures to adjust colors if a spot color in a
logo is not exactly reproduced, or if the colors on your printouts
are not acceptable, for example�
Step 1
Step 2
Eliminating the Basic Causes (p� 44)
Changing Print Settings for a Job with the imagePRESS Server (p� 46)
Step 1 Eliminating the Basic Causes
Find the answers to your questions about how to solve your problems�
Q� Do you calibrate the colors periodically?
A� The density and tone of colors may change gradually as you print large volumes of pages, which
means you cannot reproduce accurate colors� You need to calibrate the colors to solve the problem�
Solution
See the following references to calibrate the colors periodically�
"Recommended Types of Calibration" (p� 2)
"Getting the Best Colors from Your Machine" (p� 16)
44
44
imagePRESS C850/C750/C650/C65
Page 47
How to Get the Most Accurate Colors Possible for Your Printouts
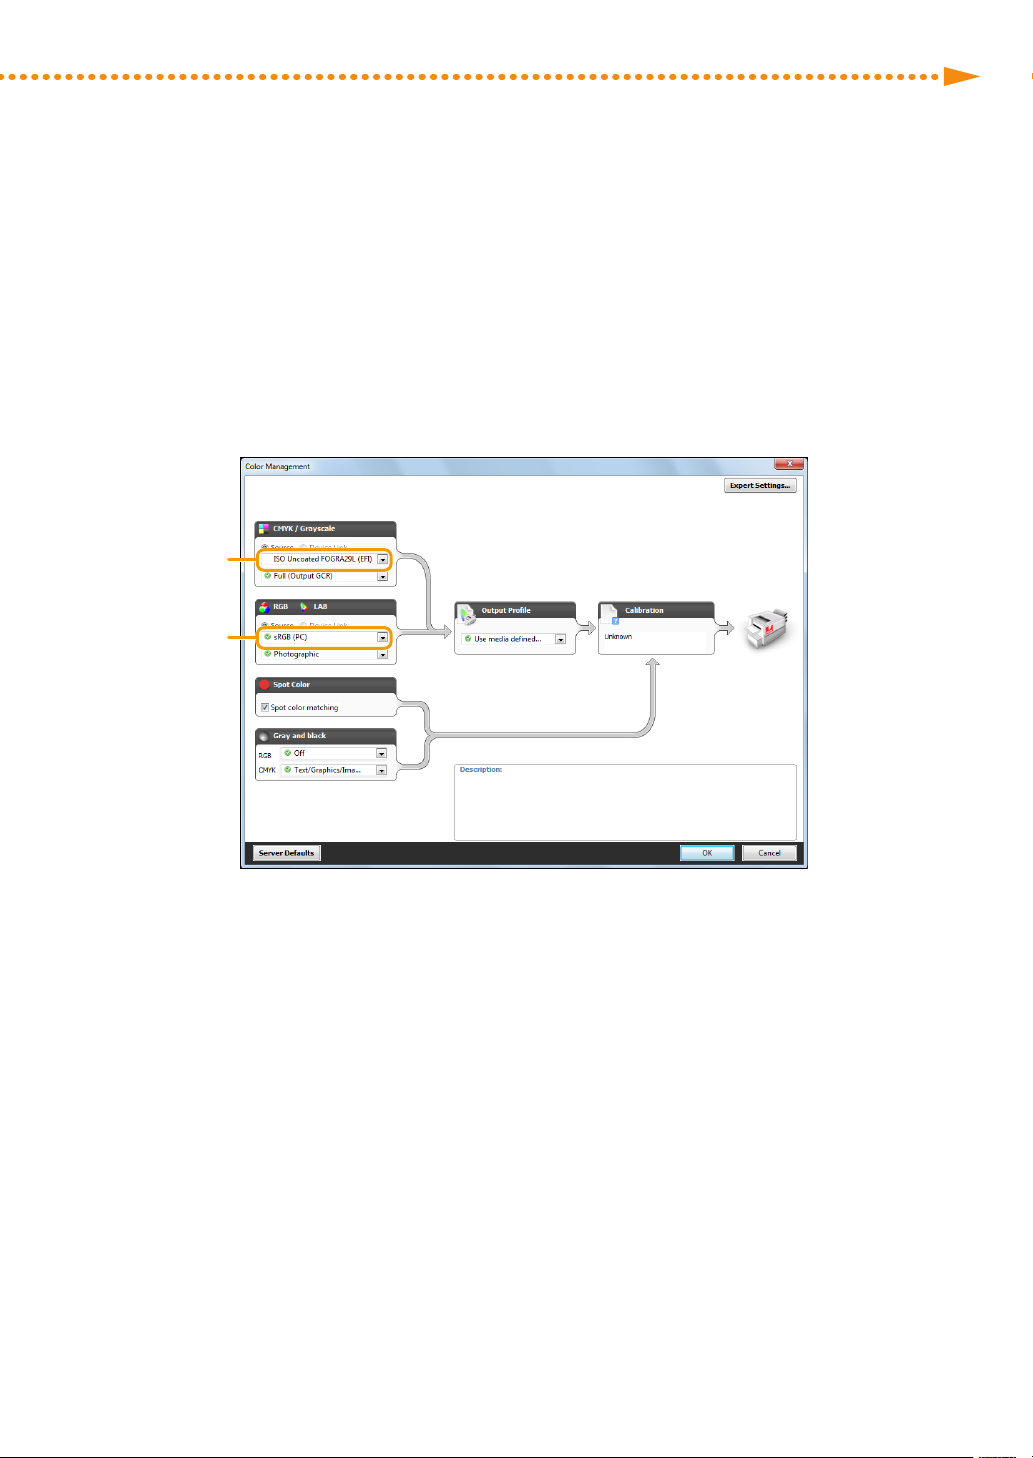
Q. Are you using an appropriate simulation profile?
A. Use either the default simulation profile on your machine or the simulation profile designated by
your customer. If you use some other simulation profile, colors may change.
Solution
Double-click the job in Command WorkStation, and click [Color] → [Basic Settings]. The simulation profile currently set
is displayed. Specify the appropriate simulation profile, if necessary.
Simulation Prole for
CMYK/Grayscale
Simulation Prole for
RGB/LAB
imagePRESS C850/C750/C650/C65
45
Page 48
Step 2 Changing Print Settings for a Job with the imagePRESS Server
If you still have the same problem after you follow the procedures in step 1 "Eliminating the Basic Causes," change the
print settings in Command WorkStation on the imagePRESS Server as follows� However, the adjustments described in
this section change overall colors� If you want to change the colors of photos only, see the following�
"How to Print Clear Photos" (p� 55)
•
Printing a Spot Color Accurately (p� 46)
•
Changing the Colors of an Entire Page (p� 48)
Printing a Spot Color Accurately
▀
Try this procedure if you cannot reproduce a specified spot color� Registering spot colors in Command WorkStation
ensures consistency and accuracy in color reproduction�
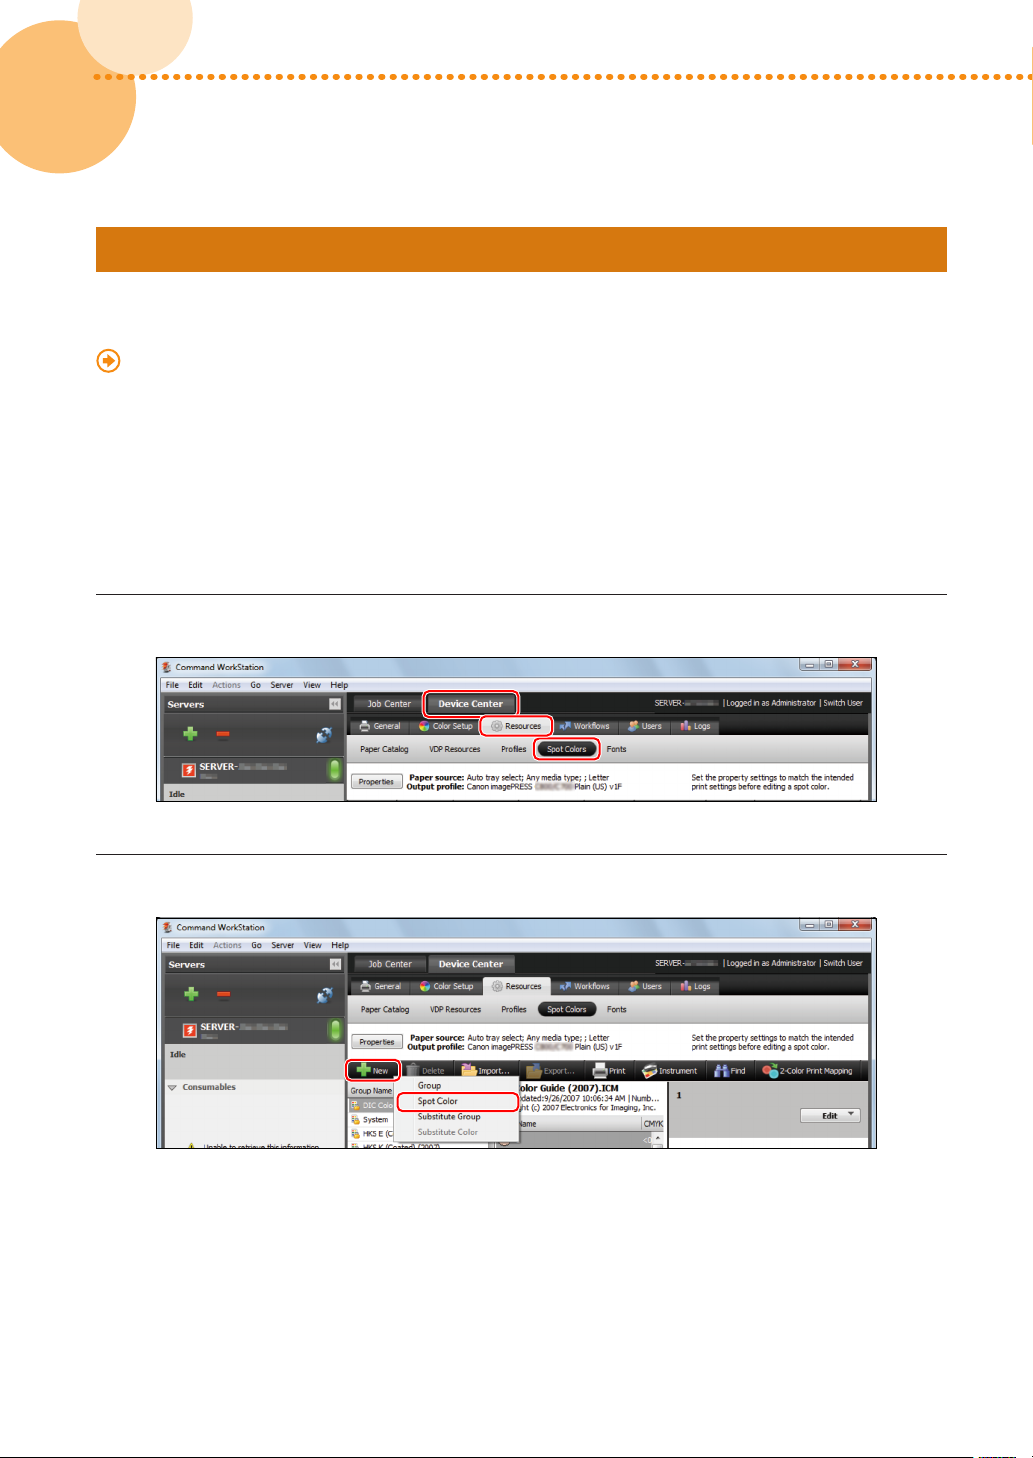
Click the [Device Center] tab in Command WorkStation → [Resources] → [Spot Colors]�
1
46
46
Click [New] → [Spot Color]�
2
imagePRESS C850/C750/C650/C65
Page 49
How to Get the Most Accurate Colors Possible for Your Printouts
Register a spot color�
3
•
For detailed instructions for registration, see the following help�
Command WorkStation > Help > Spot Colors > About Spot Colors > Creating a new spot color
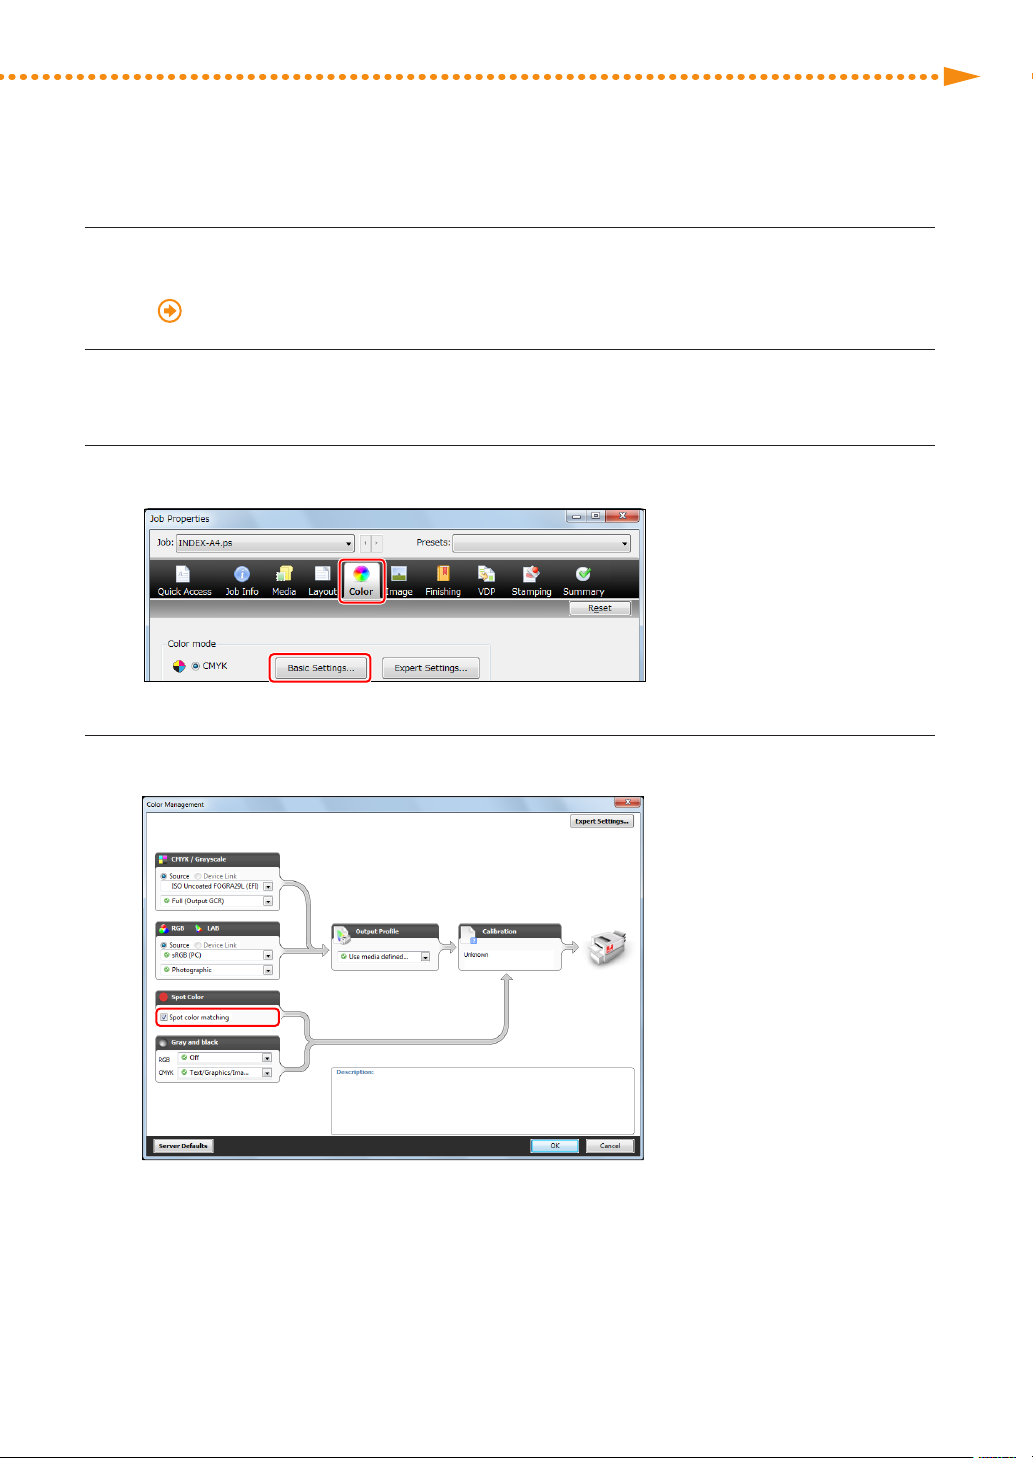
Double-click the job in Command WorkStation�
4
•
[Job Properties] is displayed�
Select the [Color] tab, and then click [Basic Settings]�
5
Select the check box for [Spot color matching]�
6
imagePRESS C850/C750/C650/C65
47
Page 50
Click [OK] → [OK]�
NOTE
7
•
Print a test sheet to check the finished result� If you are satisfied with the result, you can print the job�
Changing the Colors of an Entire Page
▀
If you think that the colors are somewhat dark overall, and you want to change the colors so they are just a little bit
lighter, try the following procedure to adjust the entire palette of colors on the page�
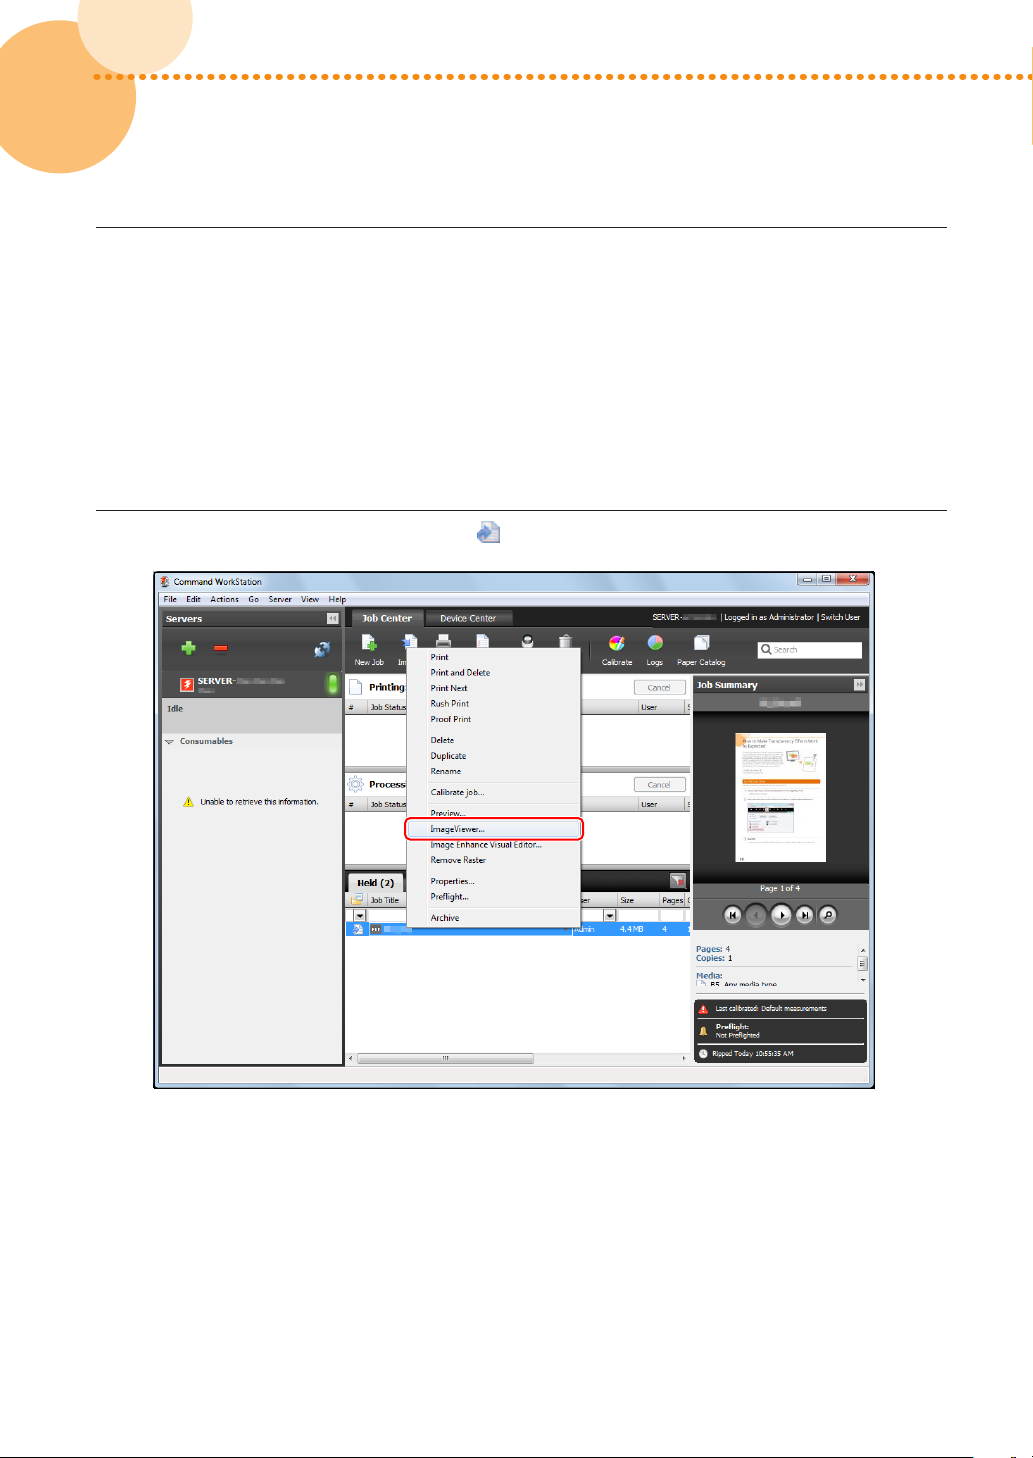
Right-click the ripped job marked with in Command WorkStation → click [ImageViewer]�
1
48
48
•
You can only edit ripped jobs�
•
If you perform rasterization processing after editing a job, the edits are canceled�
•
[ImageViewer] is only compatible with the imagePRESS Server F200, and the optional GA premium package
web activate for imagePRESS Server F200 is required�
imagePRESS C850/C750/C650/C65
Page 51
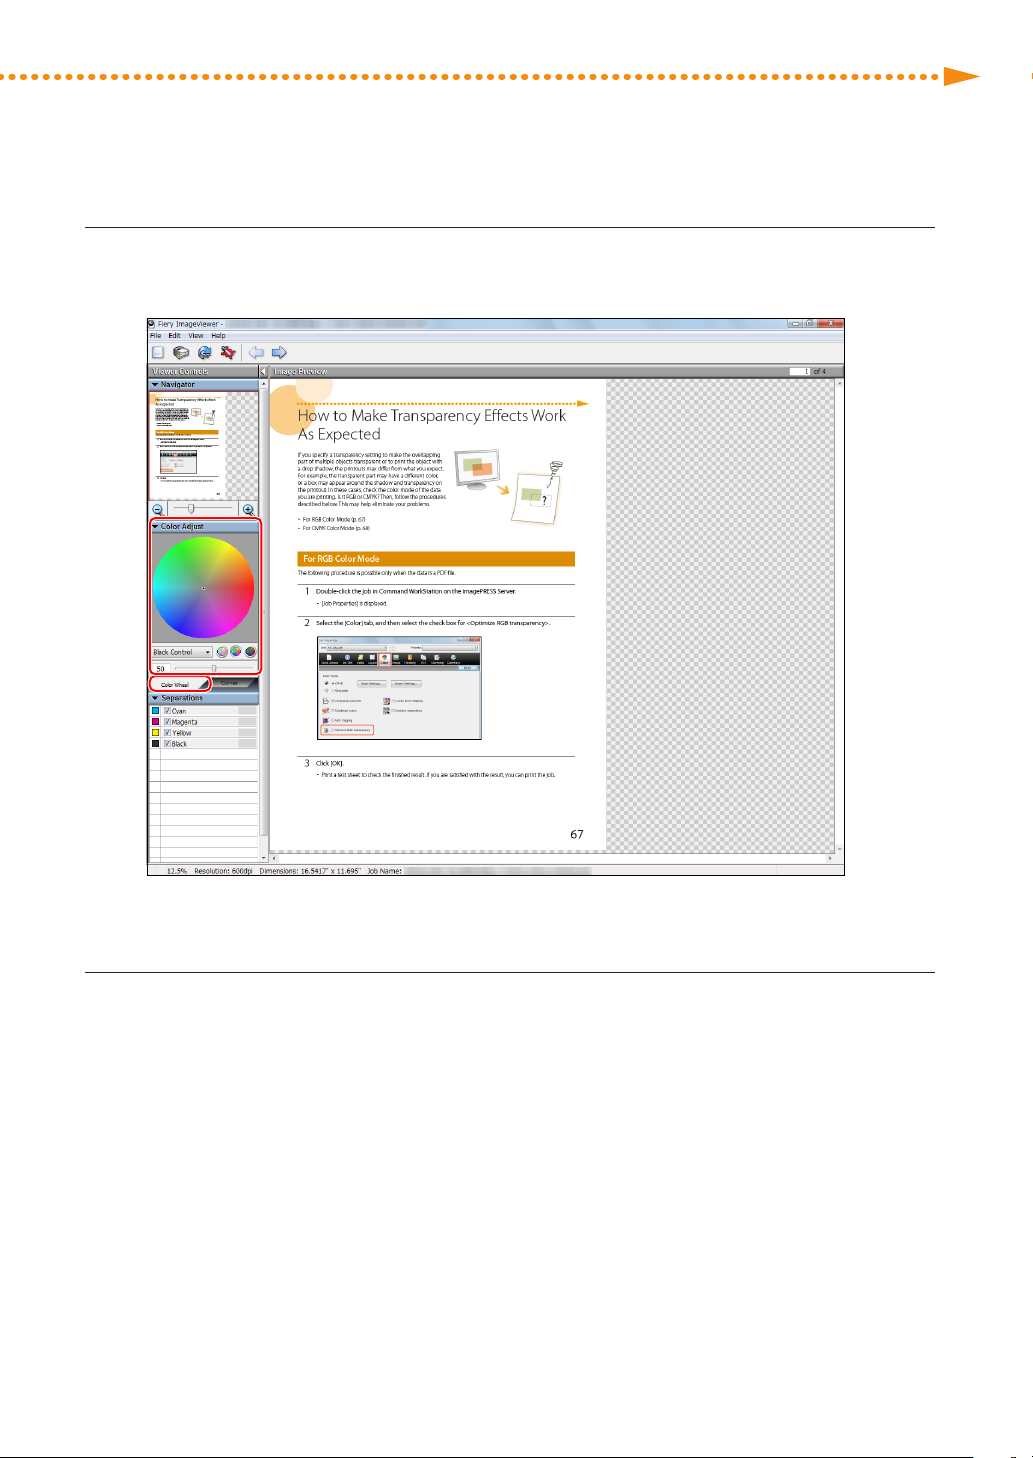
How to Get the Most Accurate Colors Possible for Your Printouts
Select the [Color Wheel] tab on the <Color Adjust> panel, and then move the slider to change
2
all the colors on the page so they appear the way you want�
•
For detailed instructions about adjusting colors, see the help files for ImageViewer�
To confirm if the colors are acceptable, click [File] → [Print] and do a test print�
3
•
If you are satisfied with the result, save the adjusted settings by clicking [File] → [Save As], then print the job
that you just saved with the adjusted settings�
imagePRESS C850/C750/C650/C65
49
Page 52
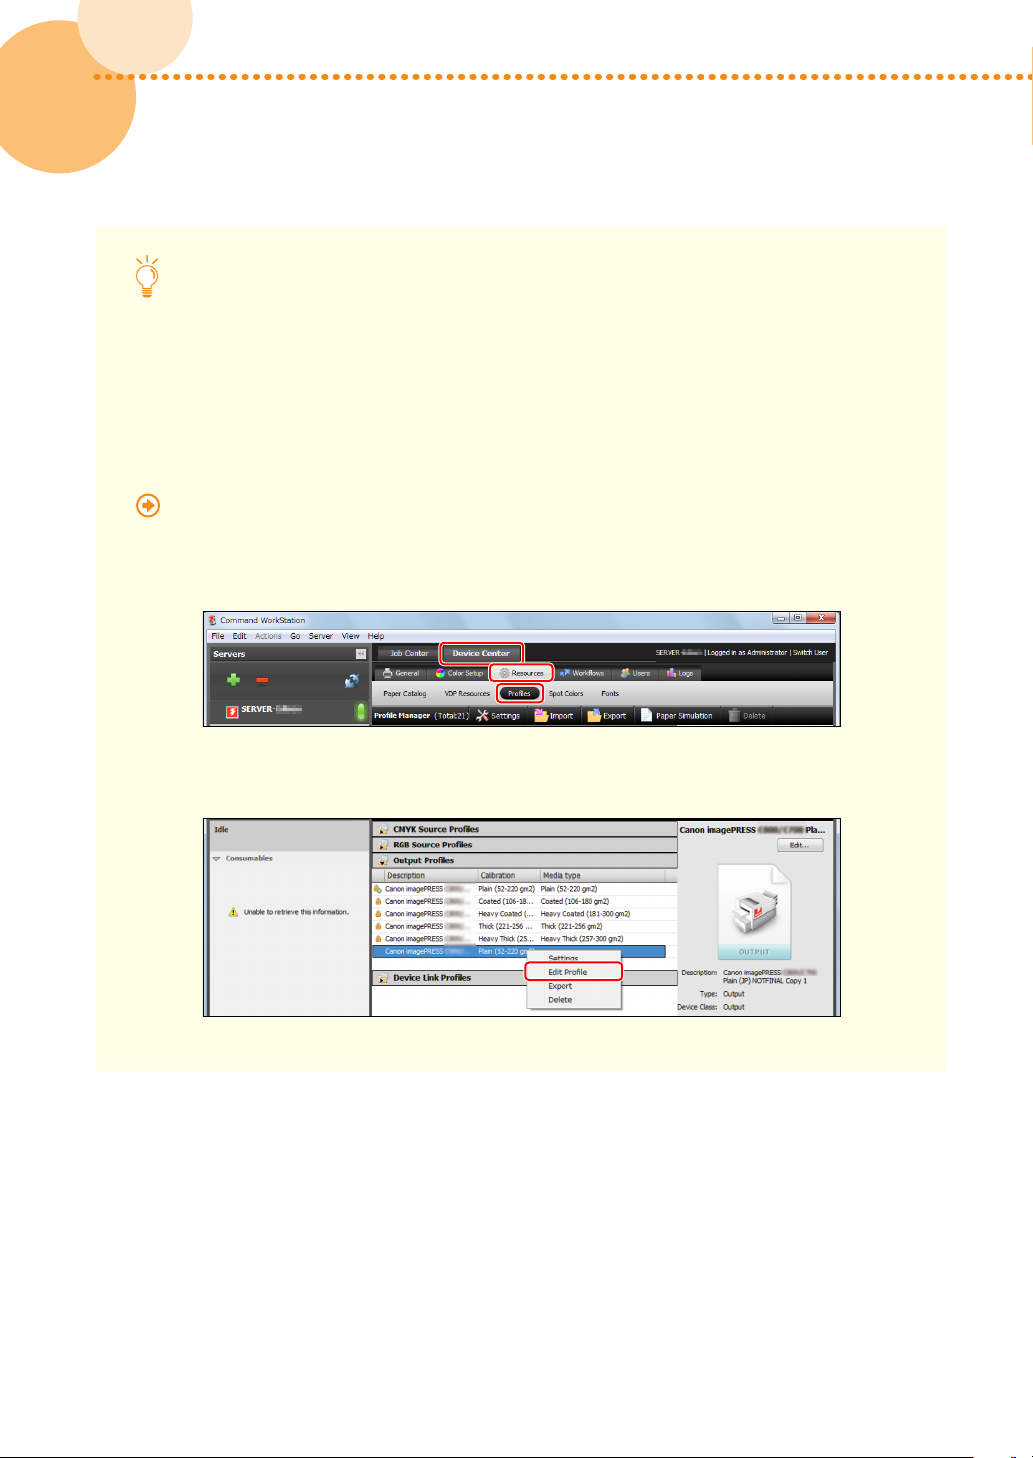
Using a Custom Profile to Improve the Accuracy of Color Reproduction
NOTE
If the color on printouts is not the same as you get when you print using preset profiles, you can create a
custom profile and use it to print a job� This column explains how to create a new custom profile by making
fine adjustments to the CMYK tone curves in an existing profile�
If you use profile creation software instead of Command WorkStation to create custom profiles, see the
following reference and output the chart for color measurement from the imagePRESS Server�
"When Creating a Custom Output Profile, How Do I Do?" (p� 41)
1
Click the [Device Center] tab in Command WorkStation → [Resources] → [Profiles]�
2
Right-click the profile you want to use as a base to create a custom profile → click [Edit Profile]�
50
50
imagePRESS C850/C750/C650/C65
Page 53
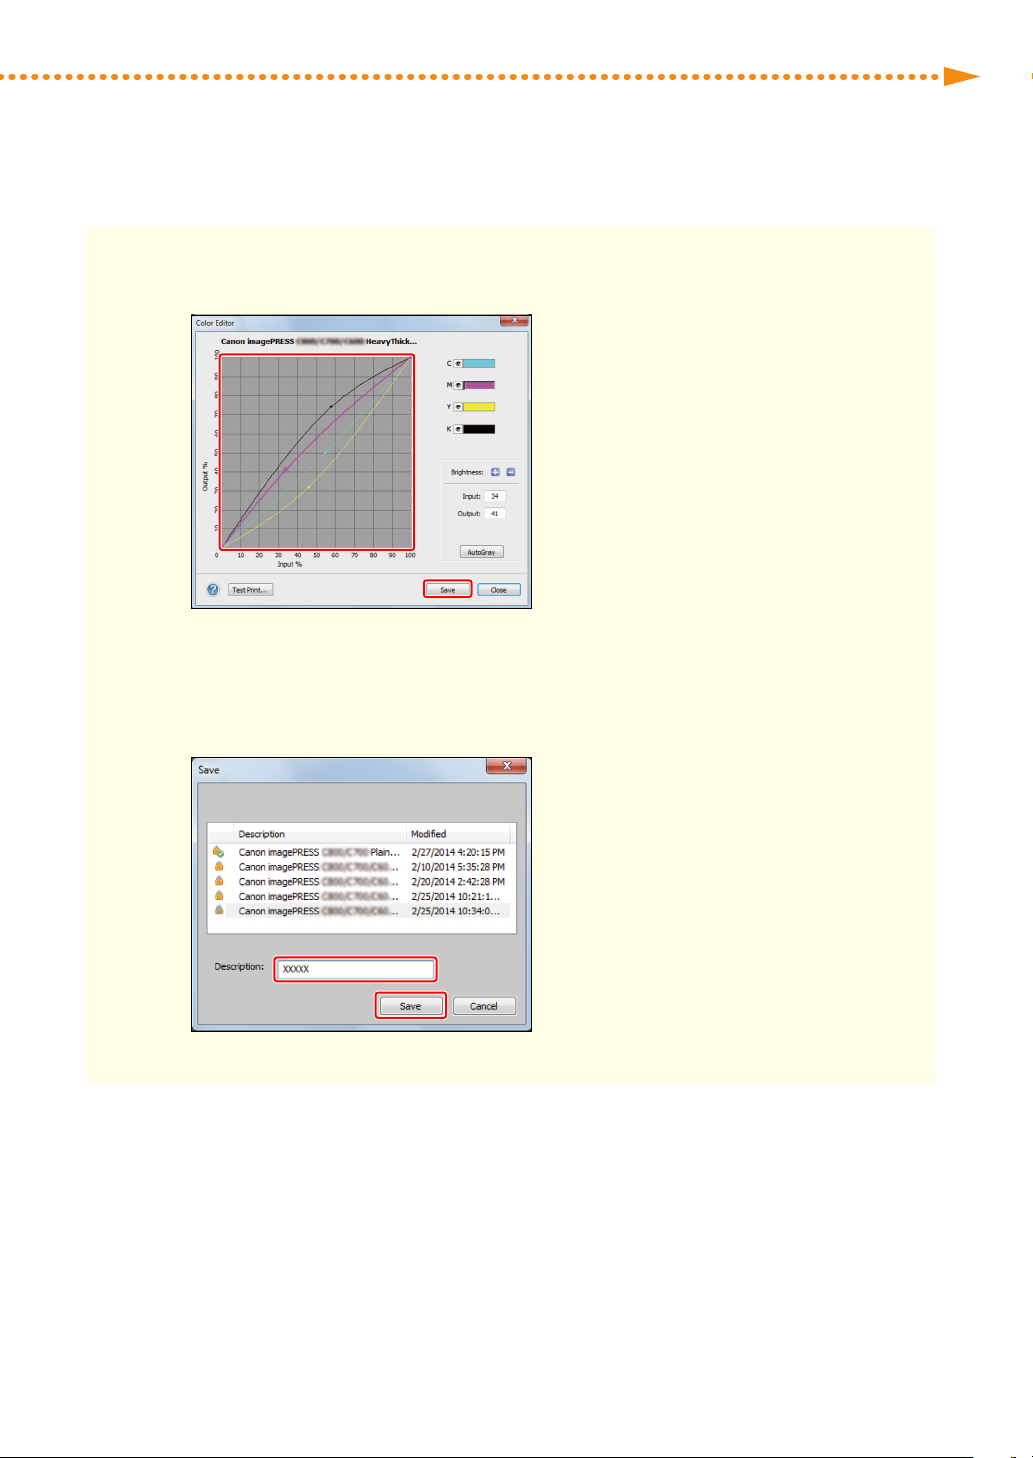
How to Get the Most Accurate Colors Possible for Your Printouts
3 Adjust the CMYK tone curves, and then click [Save]�
•
For detailed instructions on adjustments, see the help files on the <Color Editor> screen�
4 Enter an easy to understand description in <Description> so that you can easily tell the difference
between profiles, and then click [Save]�
imagePRESS C850/C750/C650/C65
51
Page 54
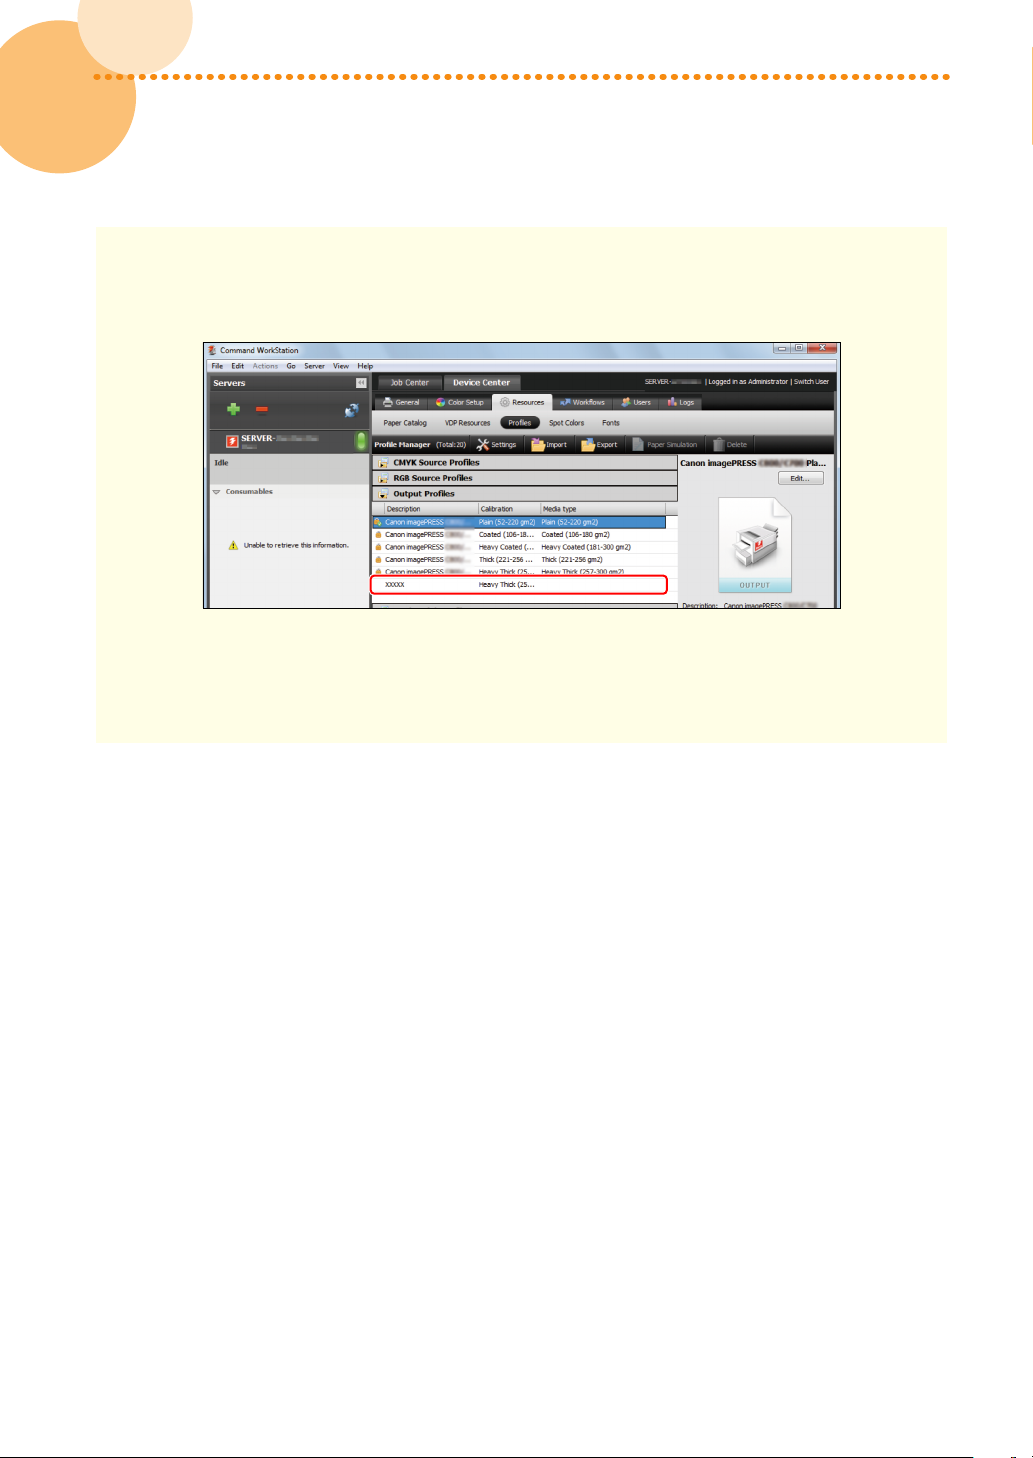
5 Click [Close] to close the <Color Editor> screen�
•
The created custom profile is added to the list�
6 Print a test sheet using the custom profile you created to check the result� If you are satisfied with
the result, you can print the job�
52
52
imagePRESS C850/C750/C650/C65
Page 55
Smoothing Colors in Photographs, Figures, Lines, and Text
If you specify the same color for a part of a photograph and a figure,
differences may appear in the printout as shown on the right, follow the
procedure below to solve the problem�
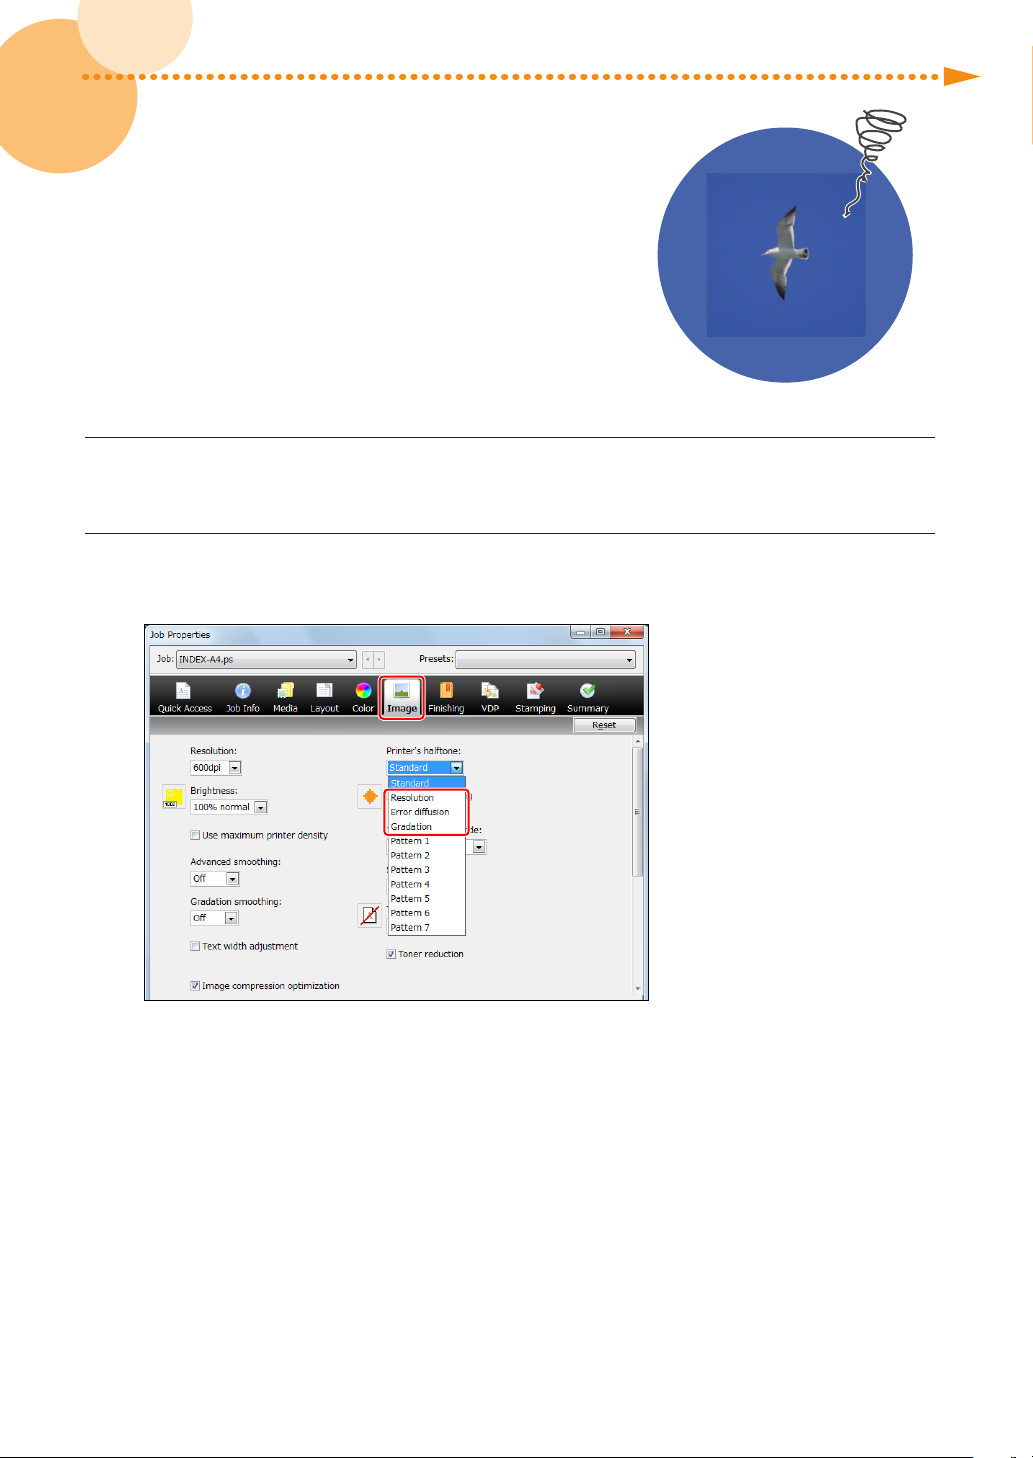
Double-click the job in Command WorkStation on the imagePRESS Server�
1
•
[Job Properties] is displayed�
Click the [Image] tab → select [Resolution], [Error diffusion], or [Gradation] for the print settings
2
in <Printer’s halftone>, as necessary�
imagePRESS C850/C750/C650/C65
53
Page 56

Smoothing colors while keeping the gradation of photographs
We recommend [Gradation] for <Printer’s halftone>� The gradation setting is applied to photographs, figures,
lines, and text� As a result, you can reduce the differences in colors�
•
[Gradation] is appropriate for producing gradations in images� For this reason, if you apply [Gradation] to text
and lines, jagged edges (rough edges in an image) may appear in the printout�
Smoothing colors while keeping both the gradation of photographs and the sharpness of text and lines
We recommend [Resolution] for <Printer’s halftone>� The resolution setting is applied to photographs, figures,
lines, and text� As a result, you can reduce the differences in colors�
Smoothing colors while reducing jagged edges on text and lines
We recommend [Error diffusion] for <Printer’s halftone>� This error diffusion setting is applied to photographs,
figures, lines, and text� As a result, you can reduce the differences in colors�
•
[Error diffusion] is appropriate for producing text and thin lines� For this reason, if you apply [Error diffusion]
to photographs, jagged outlines may appear in the printout�
Click [OK]�
3
•
Print a test sheet to check the colors� If you are satisfied with the result, you can print the job�
54
54
imagePRESS C850/C750/C650/C65
Page 57
How to Print Clear Photos
NOTE
If the characteristics of photos, such as the brightness, contrast, color, and
sharpness, are different from what you expected, follow the procedure
below to print better photos�
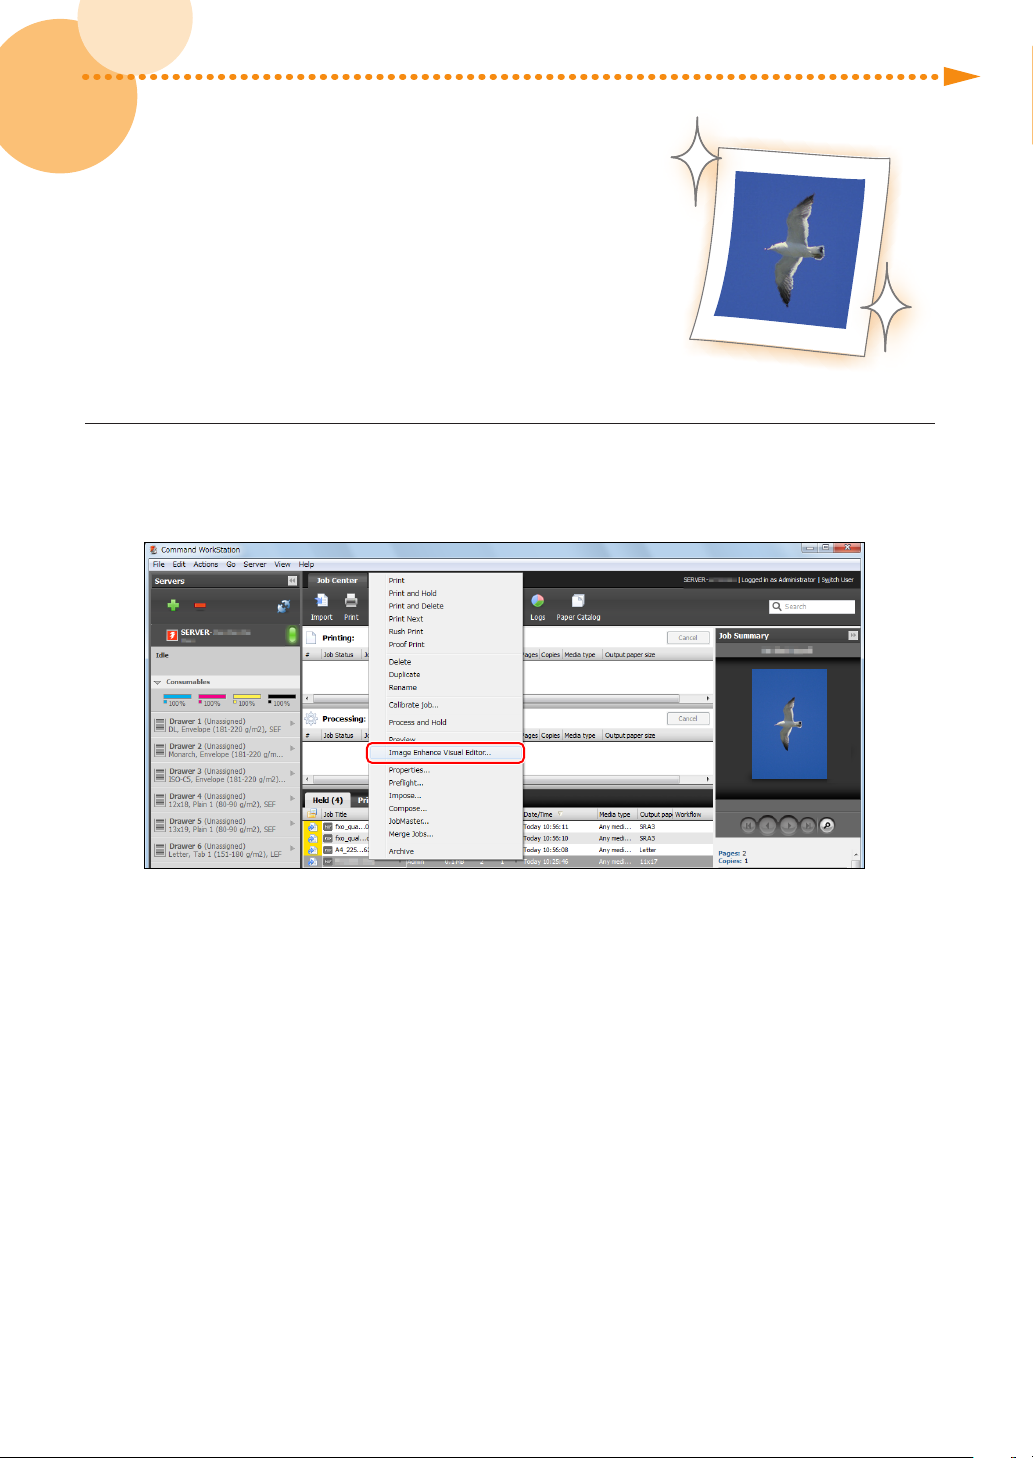
Right-click the job in Command WorkStation on the imagePRESS Server → click [Image
1
Enhance Visual Editor]�
•
If [Image Enhance Visual Editor] is not displayed, see "When Image Enhance Visual Editor Is Unavailable�" (p� 58)
•
You can only edit processed jobs�
•
If you perform rasterization processing after editing a job, the edits are canceled�
•
[ImageEnhance Visual Editor] is only compatible with the imagePRESS Server F200�
imagePRESS C850/C750/C650/C65
55
Page 58
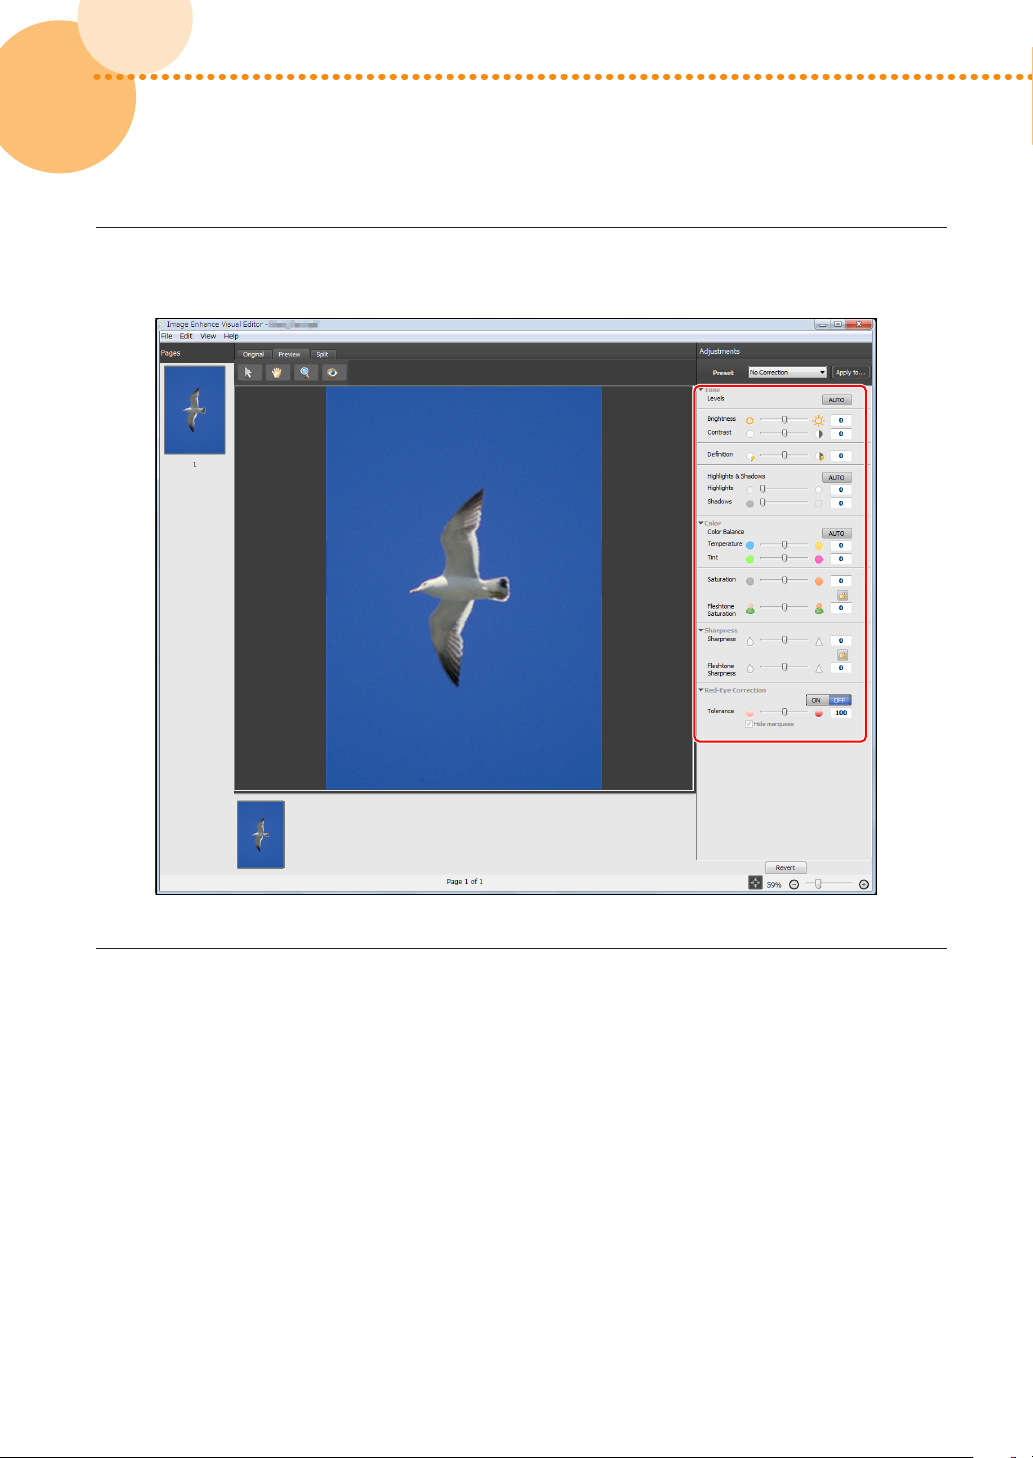
Adjust the values for <Tone>, <Color>, <Sharpness>, and <Red-Eye Correction> on the <Image
2
Enhance Visual Editor> screen�
56
56
Click [File] → [Proof Print] to check the finished result�
3
•
If you are satisfied with the result, click [File] → [Save] to save the adjusted values, and then you can print the
job�
imagePRESS C850/C750/C650/C65
Page 59
How to Print Clear Photos
Reducing Jagged Edges and Emphasizing Edges
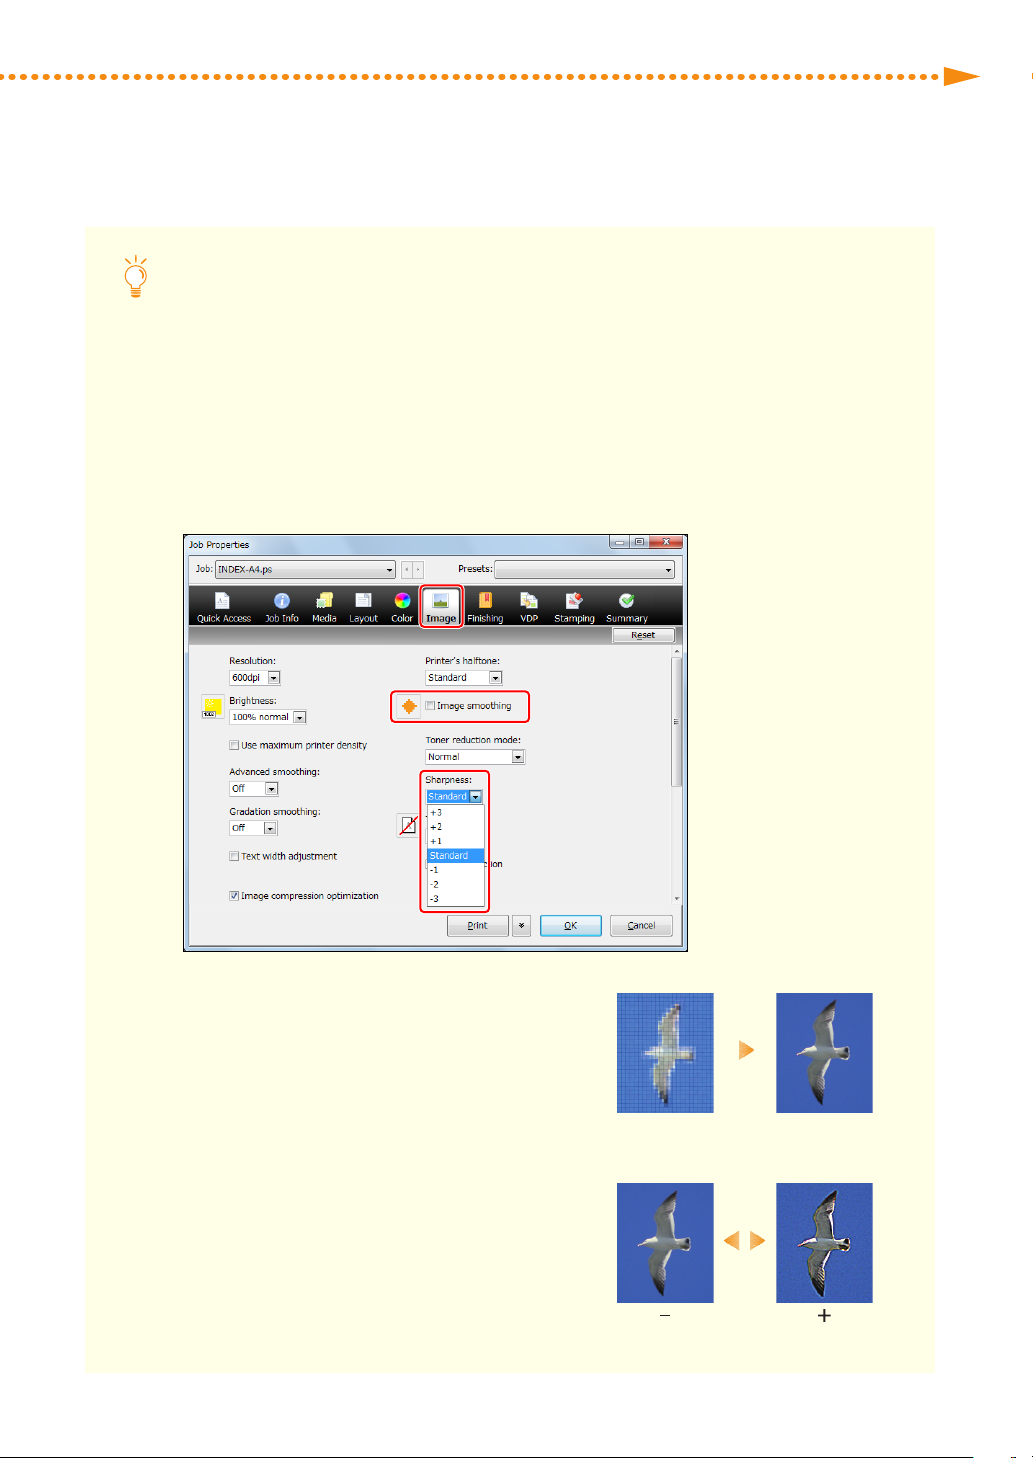
If you want to reduce jagged edges and reduce noise, or if you want to emphasize edges and smooth
images, try the following procedure to improve the printed image�
Double-click the job in Command WorkStation on the imagePRESS Server�
1
•
[Job Properties] is displayed�
Click the [Image] tab and change the print settings for <Image smoothing> or <Sharpness>, as
2
necessary�
Reducing jagged edges and reducing noise
Select the check box for <Image smoothing>�
•
This function performs complementary processing
to smooth low resolution images� The effects of
insufficient resolution are reduced by smoothing
jagged edges in images with resolutions of less than
150 dpi from sources such as the Internet�
Emphasizing edges and smoothing images
To emphasize edges, select a positive value�
To smooth images, select a negative value�
imagePRESS C850/C750/C650/C65
57
Page 60
Click [OK]�
3
•
Print a test sheet to check the finished result� If you are satisfied with the result, you can print the
job�
When Image Enhance Visual Editor Is Unavailable
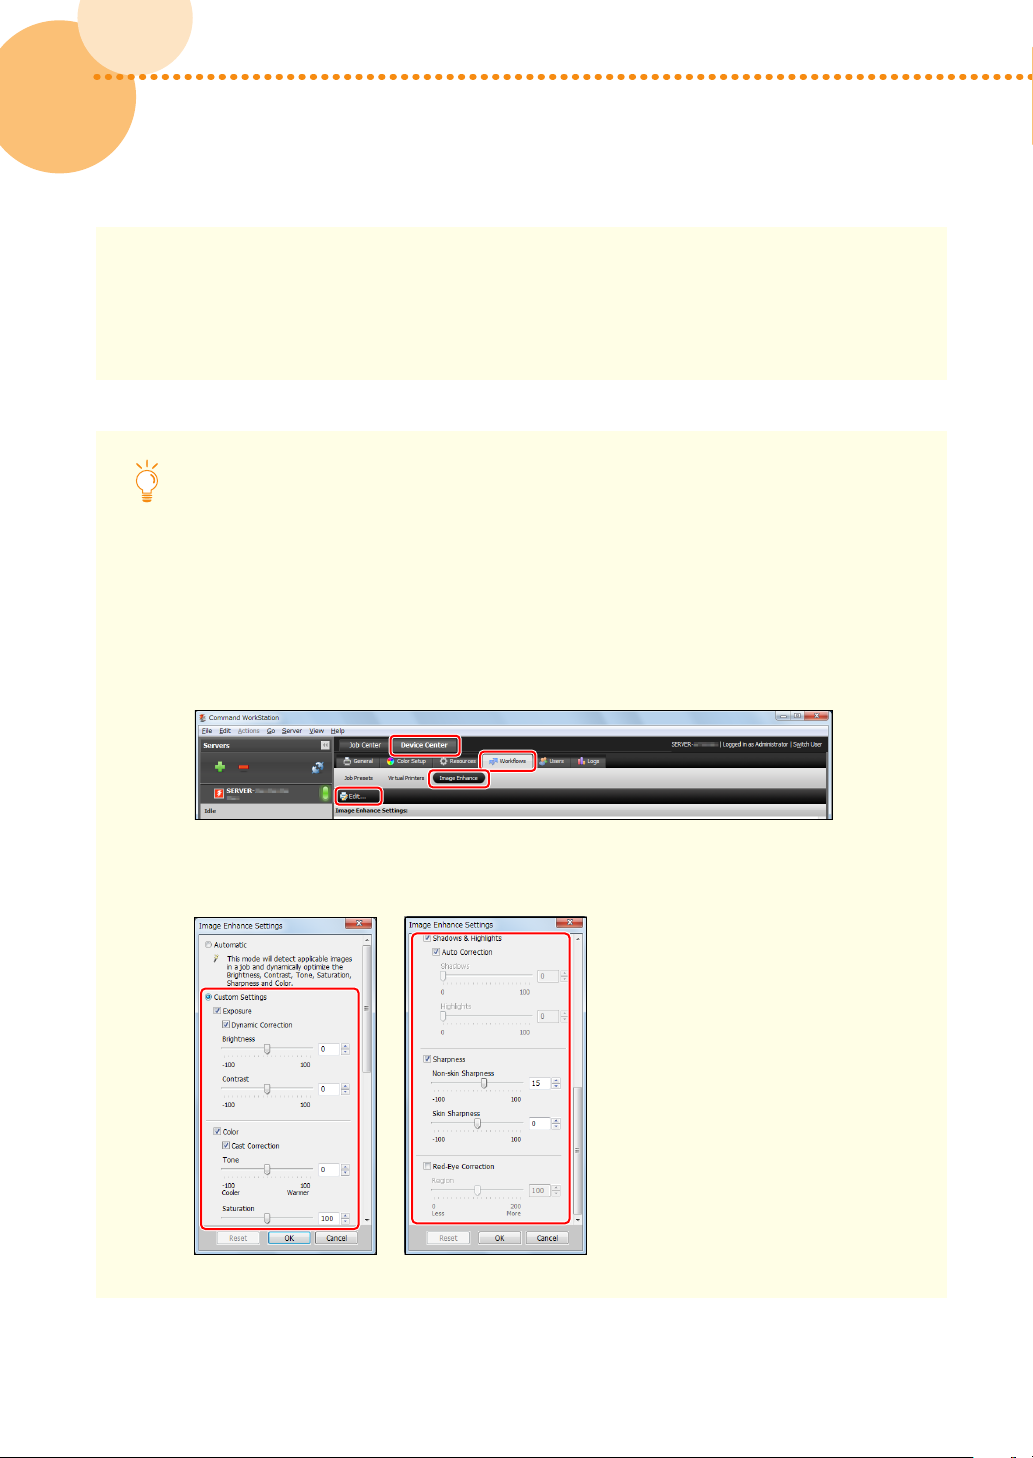
When Image Enhance Visual Editor is unavailable, you can select [Image Enhance] and adjust the
brightness, contrast, color, and sharpness of photos� However, if you make these adjustments, the adjusted
values are applied to future jobs as well as the current job� Be sure to restore the settings to their defaults
when you finish the job�
C
lick the [Device Center] tab in Command WorkStation → [Workflows] → [Image Enhance] →
1
[Edit]�
58
58
Select <Custom Settings> on the <Image Enhance Settings> screen, and adjust the values for
2
<Exposure>, <Color>, <Shadows & Highlights>, <Sharpness>, and <Red-Eye Correction>�
imagePRESS C850/C750/C650/C65
Page 61
How to Print Clear Photos
Click [OK]�
3
•
Print a test sheet to check the finished result� If you are satisfied with the result, you can print the
job�
•
To restore the values to their defaults after printing the job, return to the <Image Enhance
Settings> screen, select <Automatic>, and click [OK]�
What to Do If, After Printing Large Volumes of Text Documents, Colors in
Photos Are Inconsistent
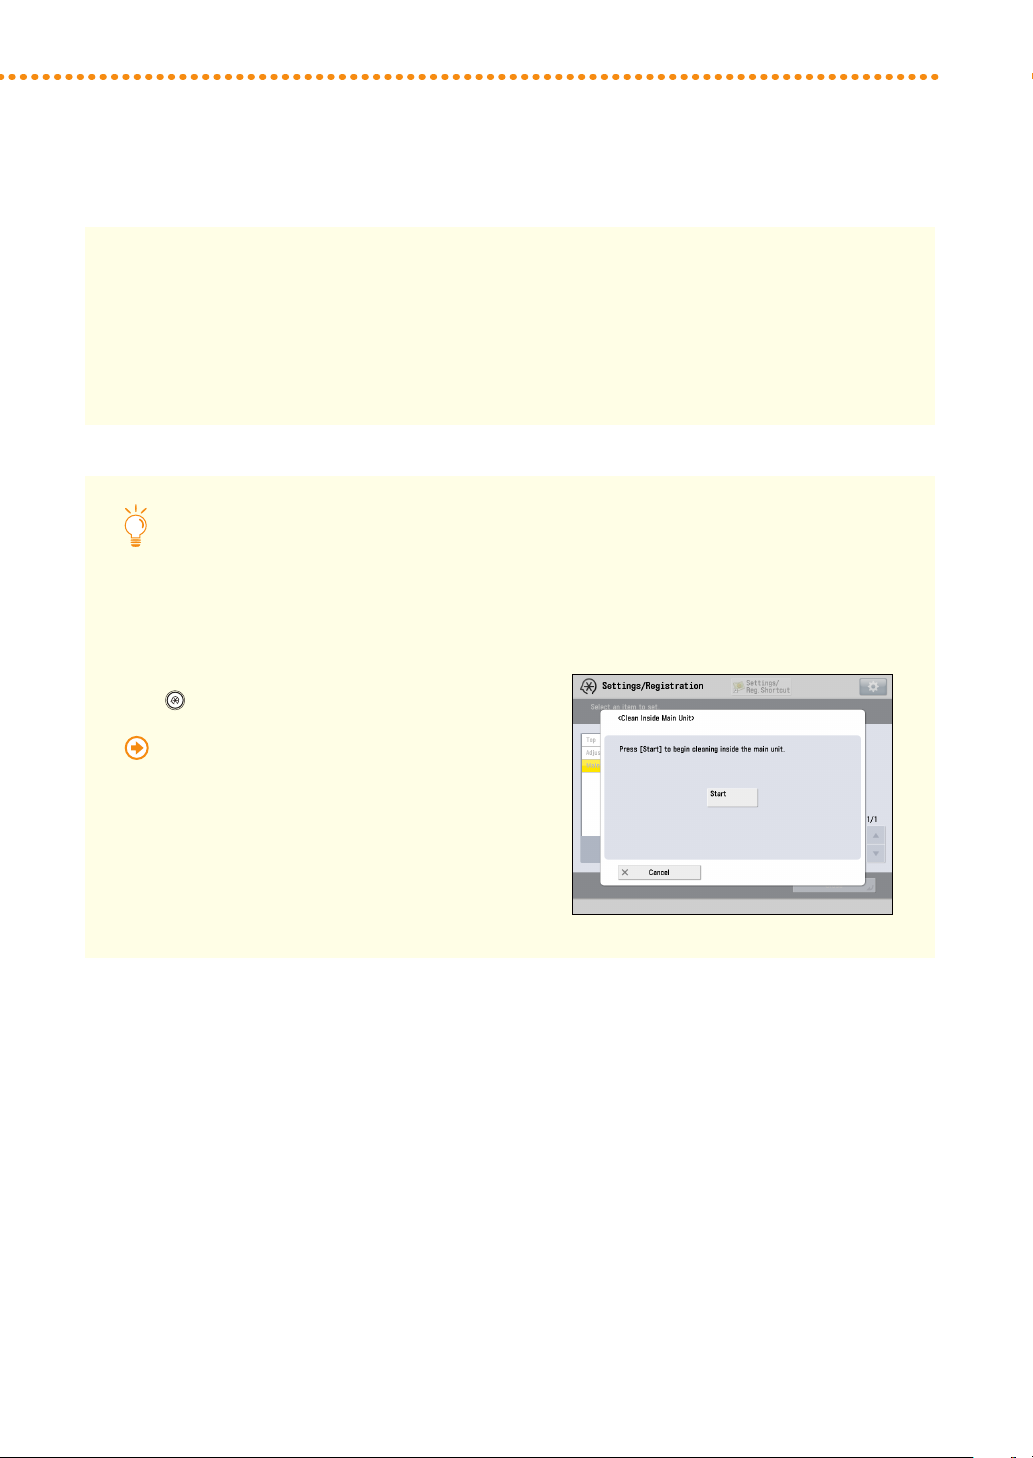
If you clean inside the main unit after printing large volumes of text documents, you can reduce the
inconsistency of colors in the photos that you print�
Clean inside the main unit�
→ [Adjustment/Maintenance] →
Press
[Maintenance] → [Clean Inside Main Unit]�
"Maintenance" > "Output Paper Becomes Dirty
(Cleaning Inside of the Main Unit)" in the User's
Guide
imagePRESS C850/C750/C650/C65
59
Page 62

Getting Clear Texts and Lines from Your Machine
If you are not satisfied with printouts because of faint, blurry, or rough
edges on text and lines, follow the procedures below to solve the
problems�
Step 1
Step 2
Eliminating the Basic Causes (p� 60)
Changing Print Settings for a Job with the imagePRESS Server (p� 61)
Step 1 Eliminating the Basic Causes
Find the answers to your questions about how to solve your problems�
Q� Are the letters or lines too small or too thin?
A� If the letters or lines in the data you are printing are too small or too thin, the printed letters and lines
may appear faint�
Solution
If possible, modify the data you are printing to enlarge the text and make the lines thicker�
Q� Are you using an outline font?
A� Outline fonts become thicker when they are printed, and they look different from their images on
your computer screen�
Solution
•
If you set [1200dpi] for <Resolution>, it may reduce the thickness of fonts� For detailed procedure, see "Reducing the
thickness of outline fonts�" (p� 62)
•
If possible, print the image using a non-outline font�
60
60
imagePRESS C850/C750/C650/C65
Page 63
Getting Clear Texts and Lines from Your Machine
Step 2 Changing Print Settings for a Job with the imagePRESS Server
If printed text or lines are still faint or blurry after you follow the procedures in step 1 "Eliminating the Basic Causes,"
change the print settings in Command WorkStation on the imagePRESS Server� Note that if you change the following
print settings, it may affect the print results, such as when printing photos� If possible, we recommend you change the
settings gradually, so you can judge the effect of the changes that you make�
•
Printing figures, lines, and text with vivid clarity while keeping the smooth gradation of photographs
•
Printing text with vivid clarity while keeping the smooth gradation of photographs, figures, and lines
•
Reducing jagged edges on text and lines
•
Printing text thicker because the thin lines of Roman fonts appear faint
•
Reducing the thickness of outline fonts
"Changing Settings in the Image Tab" (p� 61)
•
Printing black text and lines clearly
"Changing Settings in the Color Tab" (p� 66)
Changing Settings in the Image Tab
▀
Double-click the job in Command WorkStation�
1
•
[Job Properties] is displayed�
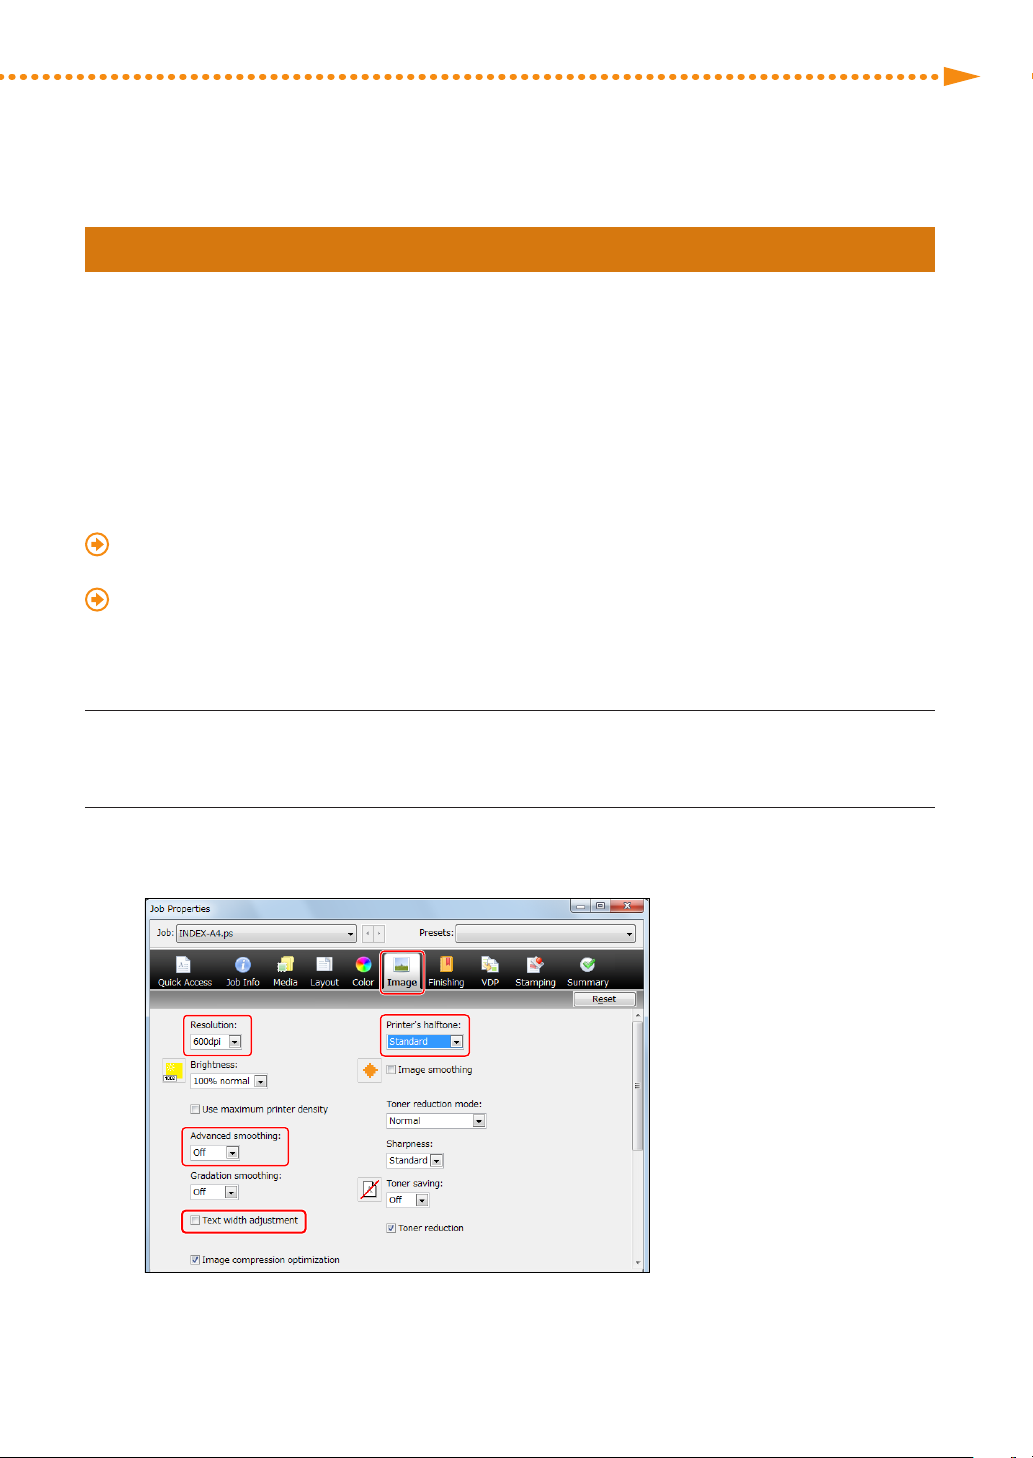
Click the [Image] tab → change the print settings for <Printer's halftone>, <Advanced
2
smoothing>, <Text width adjustment>, <Resolution> if necessary�
imagePRESS C850/C750/C650/C65
61
Page 64
Printing figures, lines, and text with vivid clarity while
keeping the smooth gradation of photographs
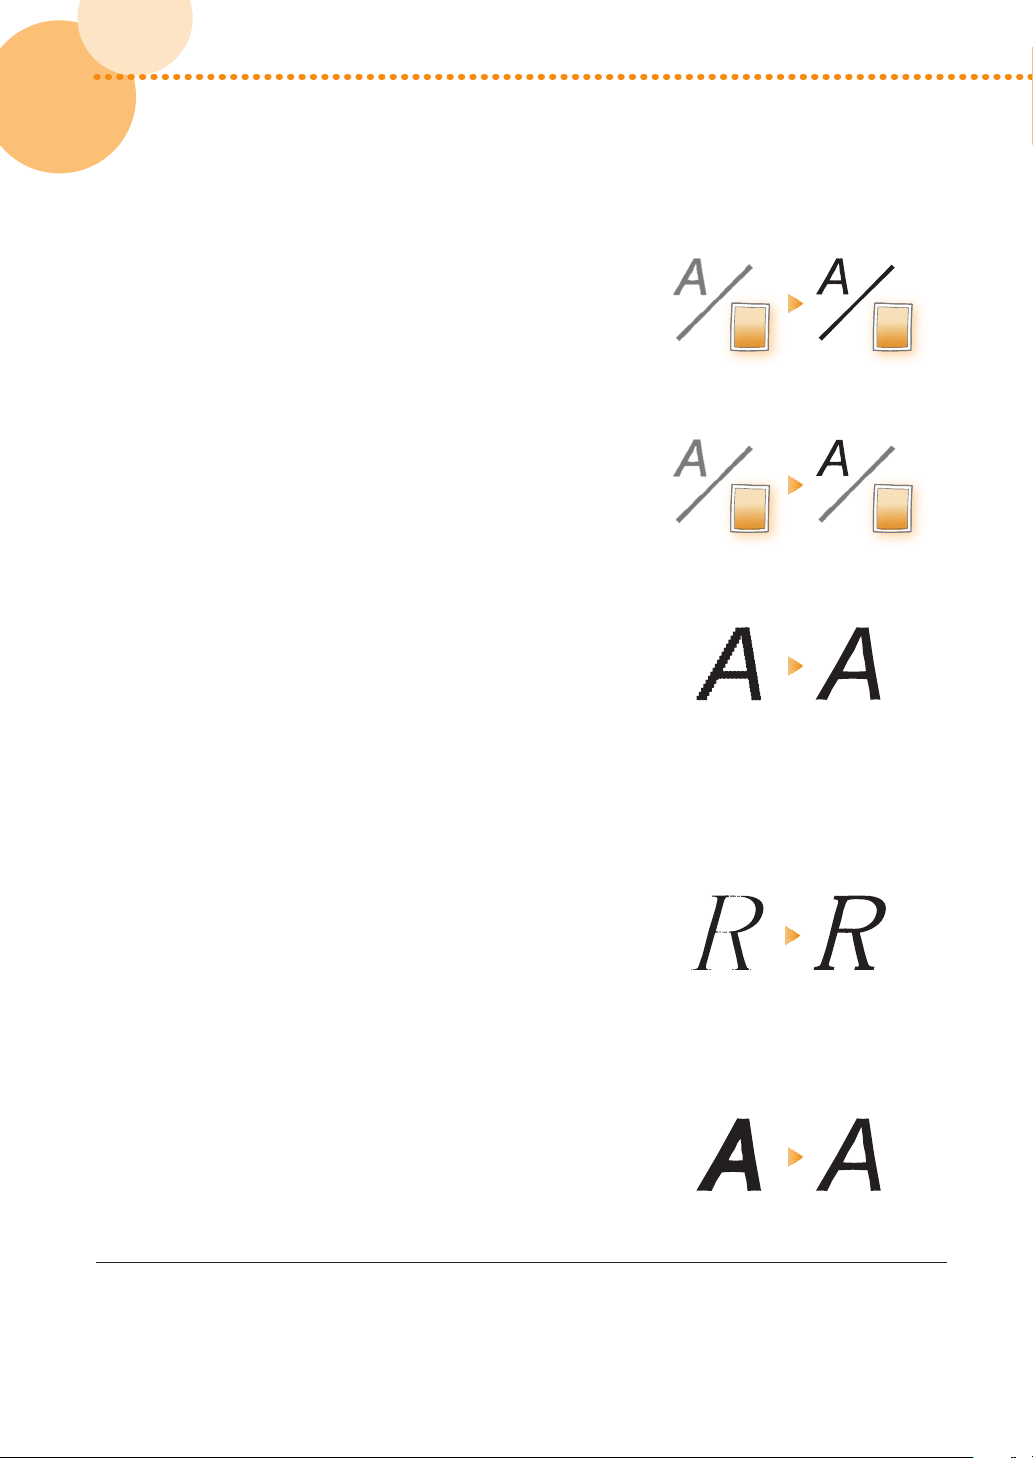
We recommend you select [Pattern 2] or [Pattern 7] for
<Printer's halftone>�
•
If you want to keep the gradation of figures and lines, we
recommend you select [Pattern 7]�
Printing text with vivid clarity while keeping the smooth
gradation of photographs, figures, and lines
We recommend you select [Pattern 4] for <Printer's
halftone>�
Reducing jagged edges on text and lines
We recommend you select [Level 1] or [Level 2] for
<Advanced smoothing>�
•
To use this function, you need to specify the settings
for advanced smoothing in advance� For detailed
information, see "Specifying the Settings for the
Printout's Finish�" (p� 64)
•
If you use this function, colors of the edges on text and
lines and colors of the text and lines themselves may
look darker�
62
62
Printing text thicker because the thin lines of Roman
fonts appear faint
We recommend you select the check box for <Text width
adjustment>�
•
To use this function, you need to specify the thickness
and font color for the target text in advance� For
detailed information, see "Specifying the Settings for the
Printout's Finish�" (p� 64)
Reducing the thickness of outline fonts
We recommend you select [1200dpi] for <Resolution>�
•
In some cases, this may make lines too thin and faint
because it prints text and lines exactly as they are in the
data�
Click [OK]�
3
•
Print a test sheet to check the sharpness of text and lines� If you are satisfied with the result, you can print a
job�
imagePRESS C850/C750/C650/C65
Page 65

Getting Clear Texts and Lines from Your Machine
Patterns for <Printer's halftone>
Each of the following dither patterns, [Gradation], [Resolution], and [Error diffusion], has been set in this
machine by default�
Dither Pattern Name Features
Gradation This pattern is appropriate for producing an
image, such as a picture, for which the gradation is
important�
Resolution This pattern is appropriate for producing text and
thin lines�
Error diffusion This pattern is appropriate for producing text and
thin lines because no jagged edges (rough edges in
an image) appear on it�
If you select [Pattern 2], [Pattern 4], and [Pattern 7] for <Printer's halftone>, these patterns above are
automatically set to the output image�
Pattern Images
(Photographs)
Pattern 2 Gradation Error diffusion Error diffusion
Pattern 4 Gradation Gradation Error diffusion
Pattern 7 Gradation Resolution Error diffusion
Graphics
(Figures and Lines)
Text
(Letters)
imagePRESS C850/C750/C650/C65
63
Page 66
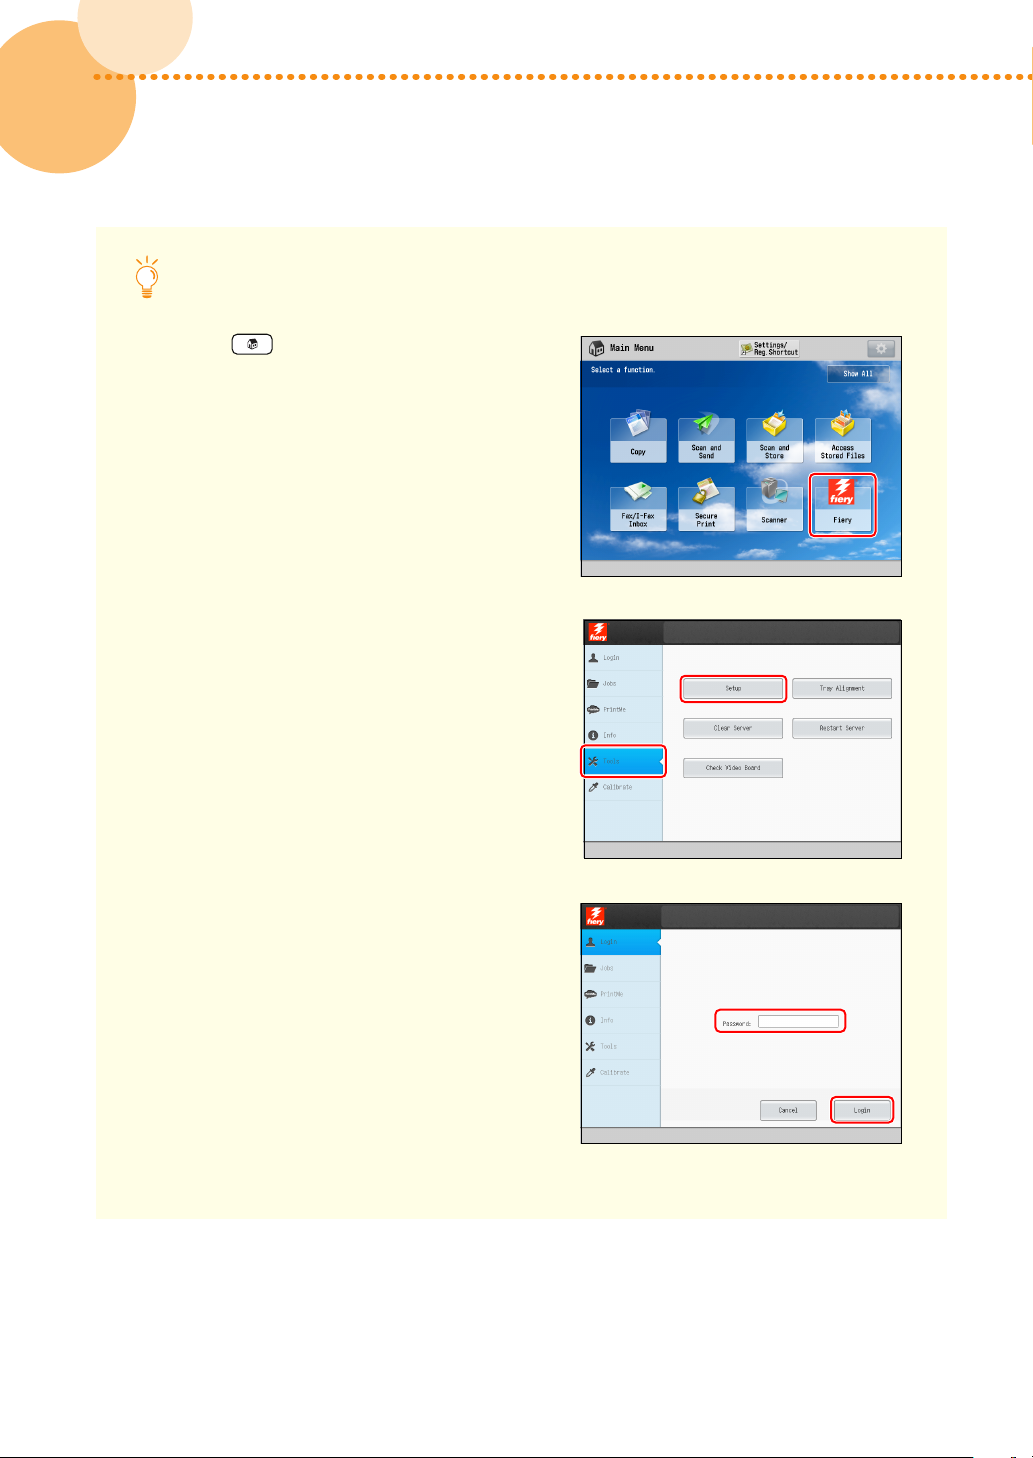
Specifying the Settings for the Printout's Finish
1
Press → [Fiery]�
2 Press [Tools] → [Setup]�
64
64
3 Enter the password → press [Login]�
imagePRESS C850/C750/C650/C65
Page 67
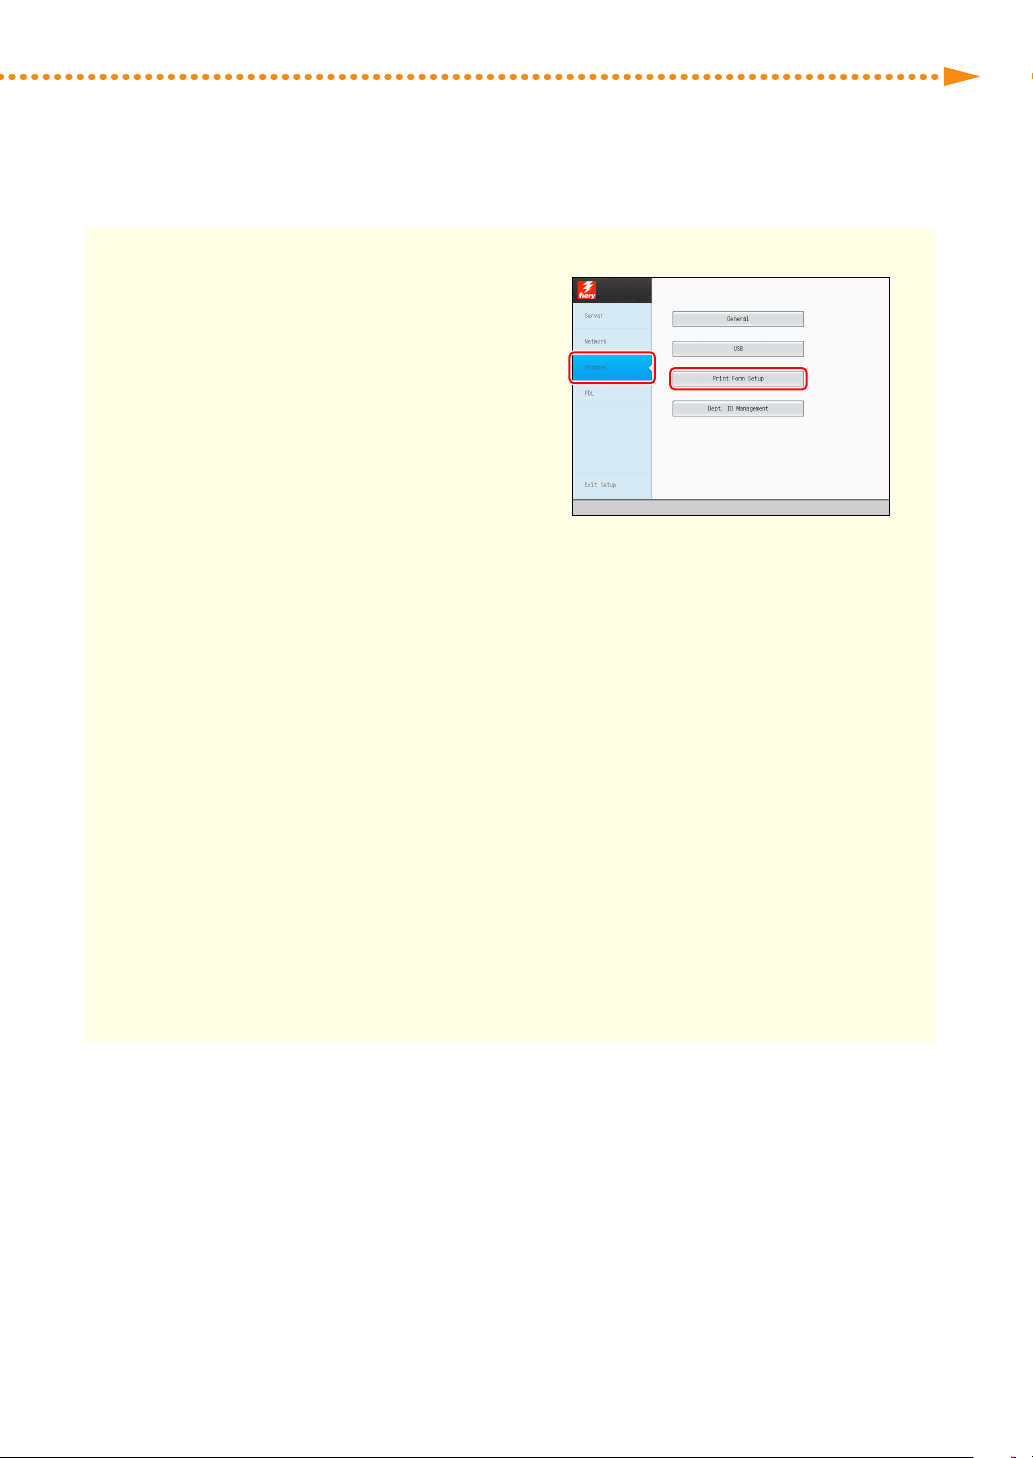
Getting Clear Texts and Lines from Your Machine
4 Press [Printer] → [Print Form Setup]�
5 Specify the settings for Advanced smoothing�
•
If you want to reduce jagged edges on lines, select [On] for <Advanced smoothing for graphics>�
•
If you want to reduce jagged edges on text, select [On] for <Advanced smoothing for text>�
•
If you want to apply the advanced smoothing settings to direct printing, such as PDF printing,
select [Level 1] or [Level 2] for <Advanced smoothing>� ([Level 2] is more effective�)
6 Specify the settings for the text element�
•
If you want to make horizontal lines on the text thicker, select [Level 1] or [Level 2] for <Horizontal
text width adjustment>� ([Level 2] is more effective�)
•
If you want to make vertical lines in the text thicker, select [Level 1] or [Level 2] for <Vertical text
width adjustment>� ([Level 2] is more effective�)
•
If you want to specify the settings for the text element for black text only, select [Black only] for
<Text width adjustment color>�
•
If you want to apply the settings for the text element for direct printing, such as PDF printing,
select [On] for <Text width adjustment>�
7 Press [Save Changes]�
imagePRESS C850/C750/C650/C65
65
Page 68
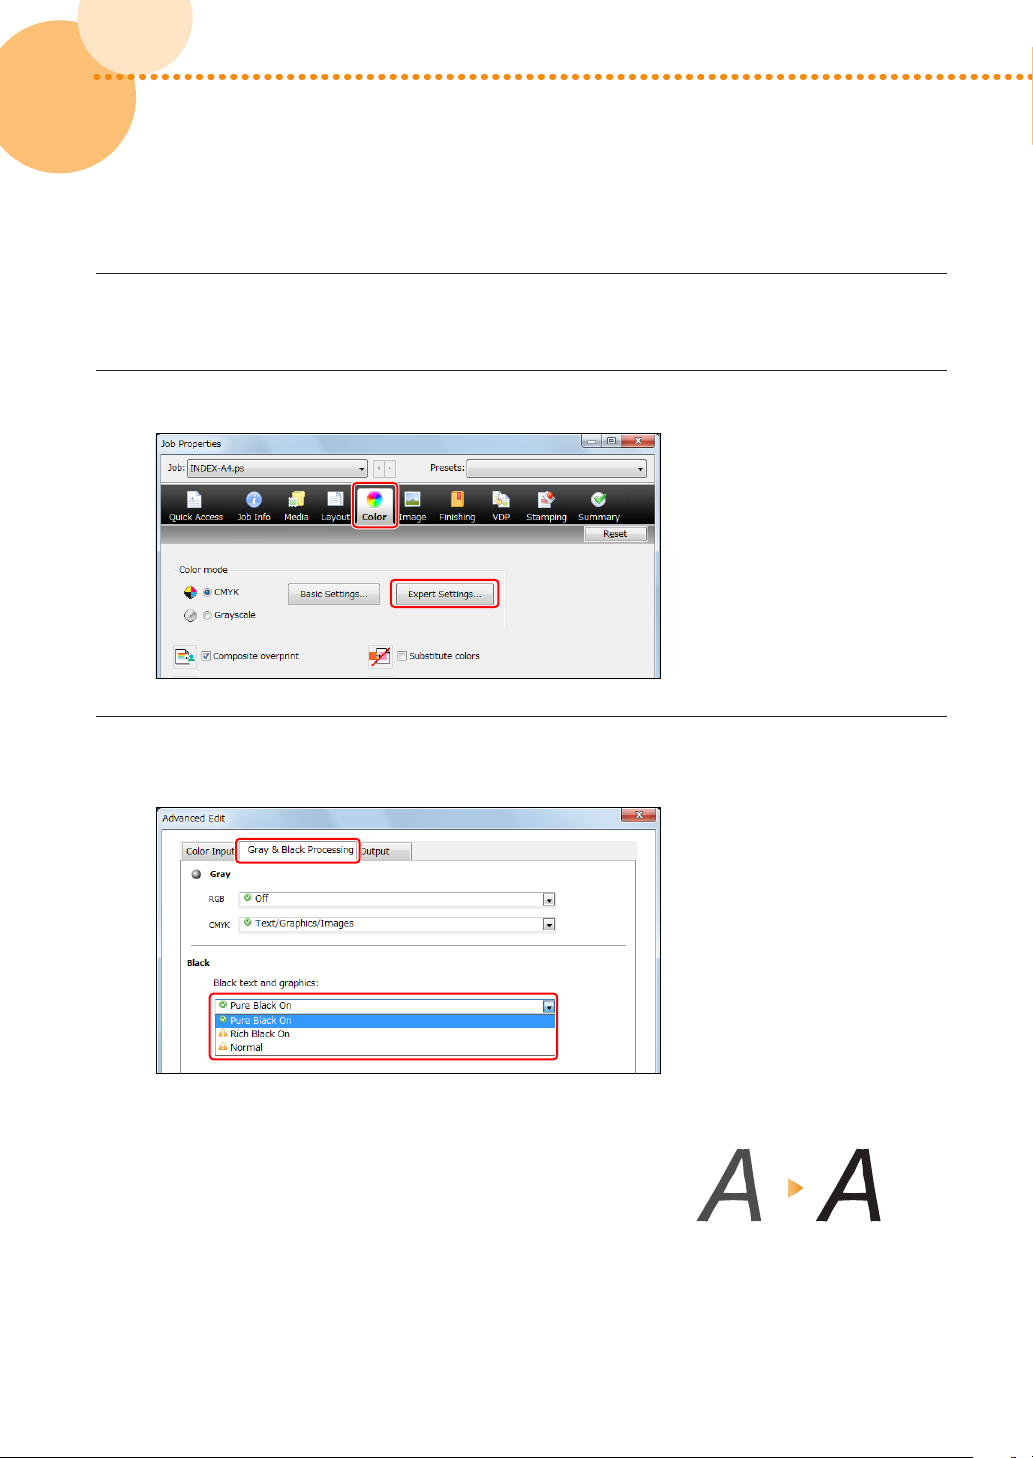
Changing Settings in the Color Tab
▀
Double-click the job in Command WorkStation�
1
•
[Job Properties] is displayed�
Click the [Color] tab → [Expert Settings]�
2
Click the [Gray & Black Processing] tab, and change the print settings in <Black text and
3
graphics> according to what you are printing and how you want the printouts to appear�
66
66
Printing black text and lines clearly
We recommend you select [Pure Black On] or [Rich Black
On] for <Black text and graphics>�
•
You can make black elements in printouts more vivid if
you select [Rich Black On] rather than [Pure Black On],
because [Rich Black On] produces black by adding cyan
to black�
imagePRESS C850/C750/C650/C65
Page 69

Getting Clear Texts and Lines from Your Machine
Click [OK] → [OK]�
4
•
Print a test sheet to check the sharpness of text and lines� If you are satisfied with the result, you can print a
job�
imagePRESS C850/C750/C650/C65
67
Page 70
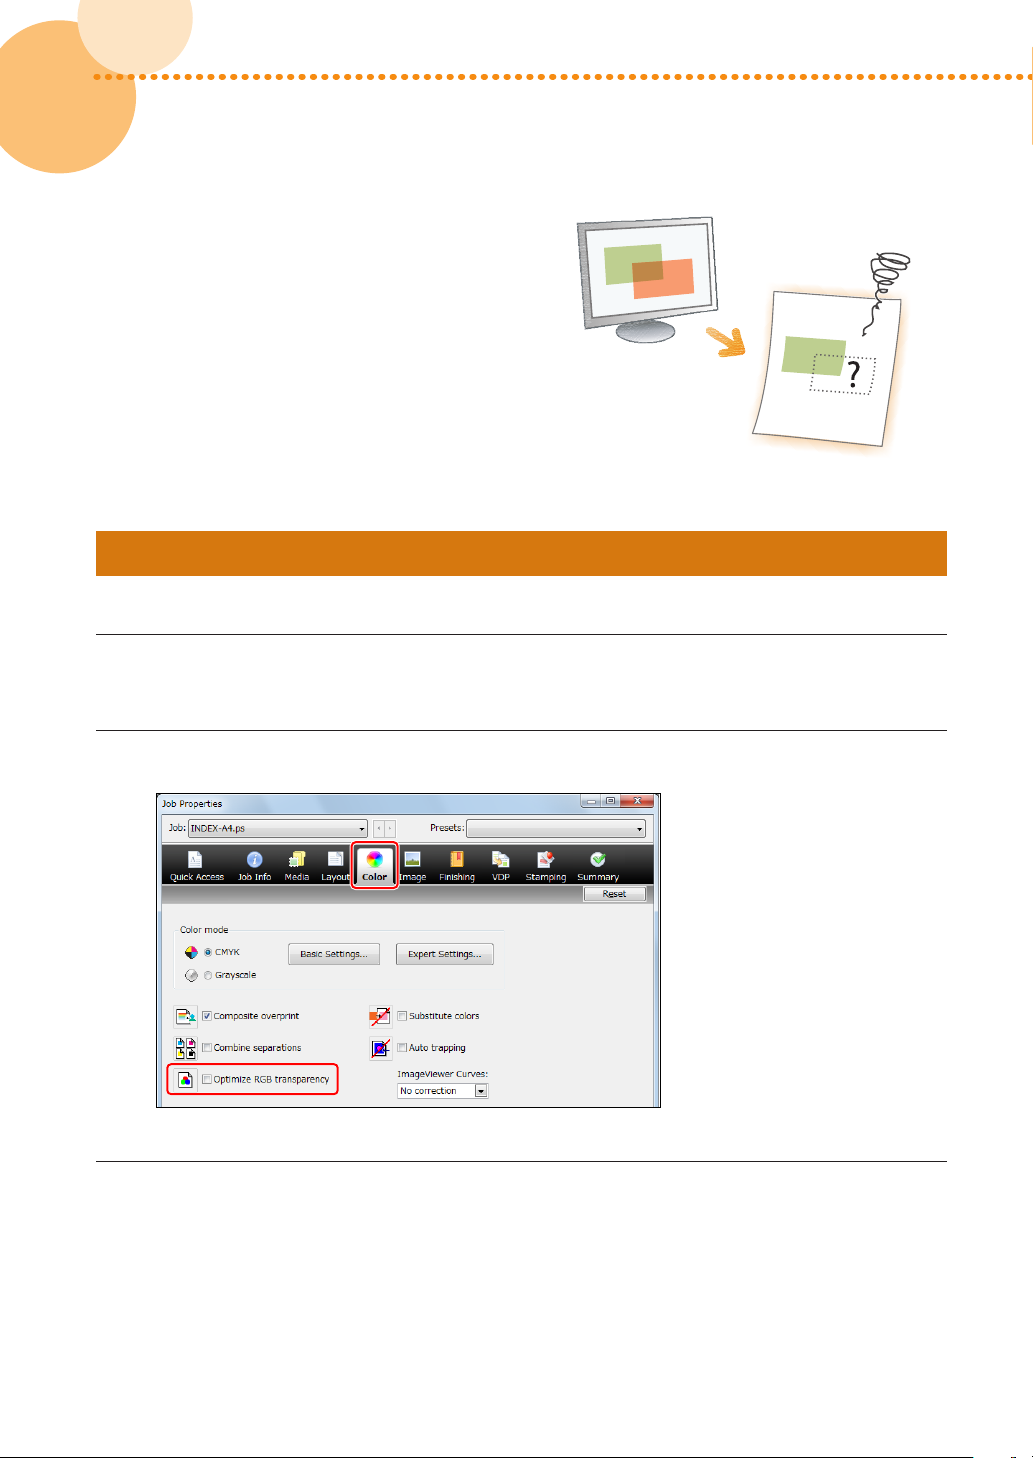
How to Make Transparency Effects Work As Expected
If you specify a transparency setting to make the overlapping
part of multiple objects transparent or to print the object with
a drop shadow, the printouts may differ from what you expect�
For example, the transparent part may have a different color,
or a box may appear around the shadow and transparency on
the printout� In these cases, check the color mode of the data
you are printing� Is it RGB or CMYK? Then, follow the procedures
described below� This may help eliminate your problems�
•
For RGB Color Mode (p� 68)
•
For CMYK Color Mode (p� 69)
For RGB Color Mode
The following procedure is possible only when the data is a PDF file�
Double-click the job in Command WorkStation on the imagePRESS Server�
1
•
[Job Properties] is displayed�
Select the [Color] tab, and then select the check box for <Optimize RGB transparency>�
2
Click [OK]�
3
•
Print a test sheet to check the finished result� If you are satisfied with the result, you can print the job�
68
68
imagePRESS C850/C750/C650/C65
Page 71
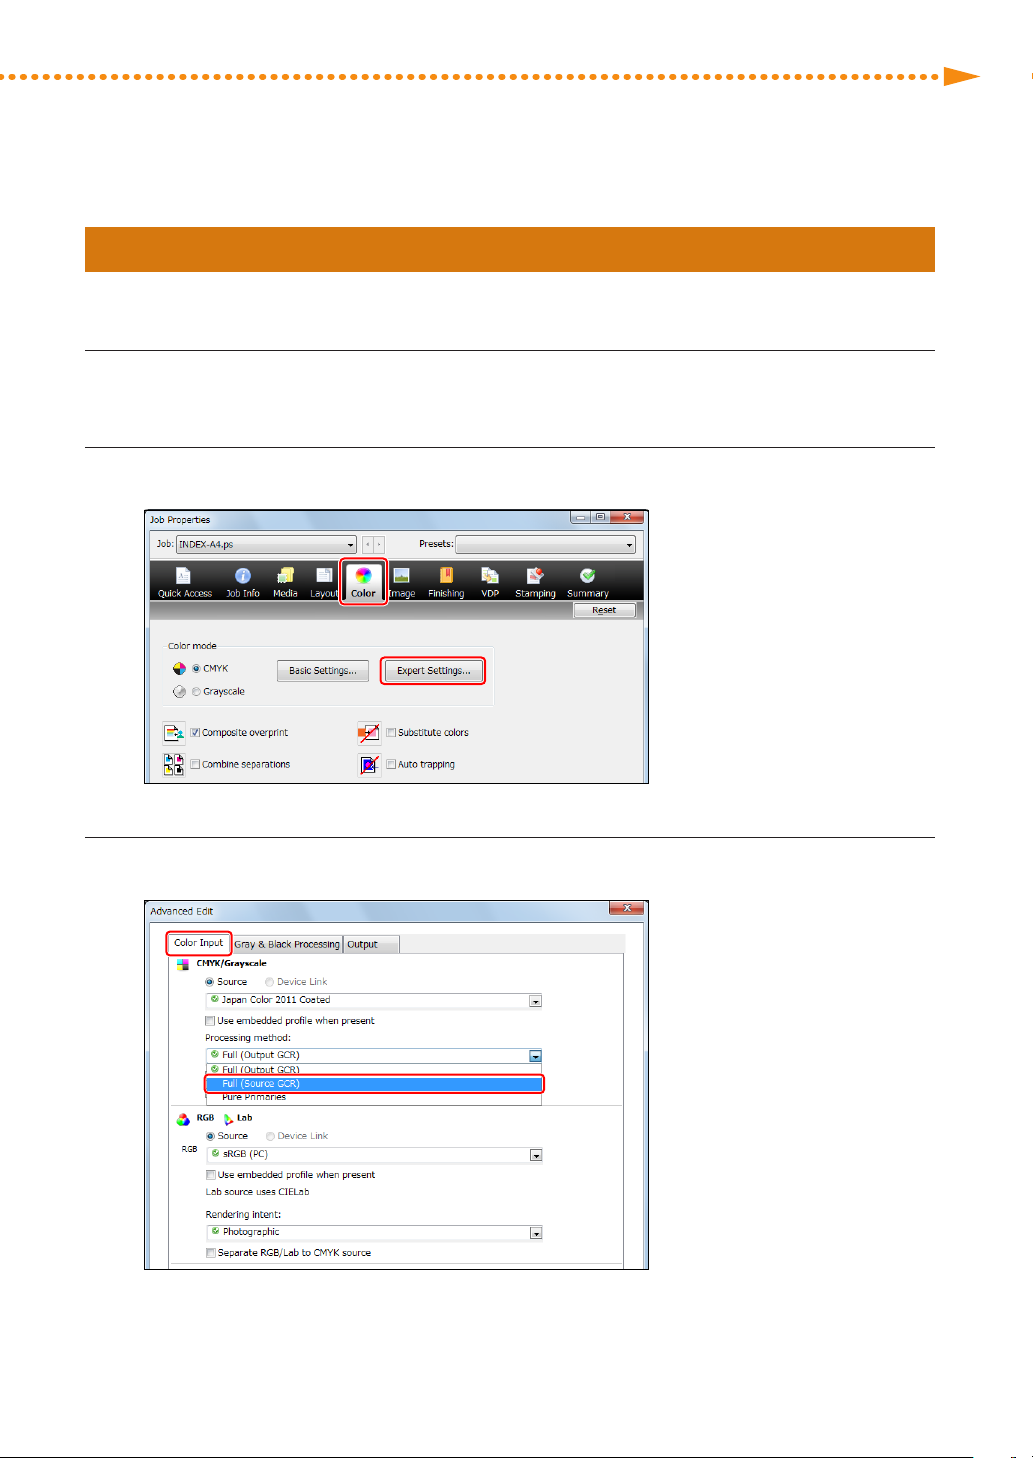
How to Make Transparency Effects Work As Expected
For CMYK Color Mode
If you change the settings as described below, the troubles of the transparency setting may be reduced� However, the
colors may change and the image may become more dense overall� Print a test sheet to check the finished result�
Double-click the job in Command WorkStation on the imagePRESS Server�
1
•
[Job Properties] is displayed�
Click the [Color] tab → [Expert Settings]�
2
Click the [Color Input] tab, and select [Full (Source GCR)] in <Processing method>�
3
imagePRESS C850/C750/C650/C65
69
Page 72
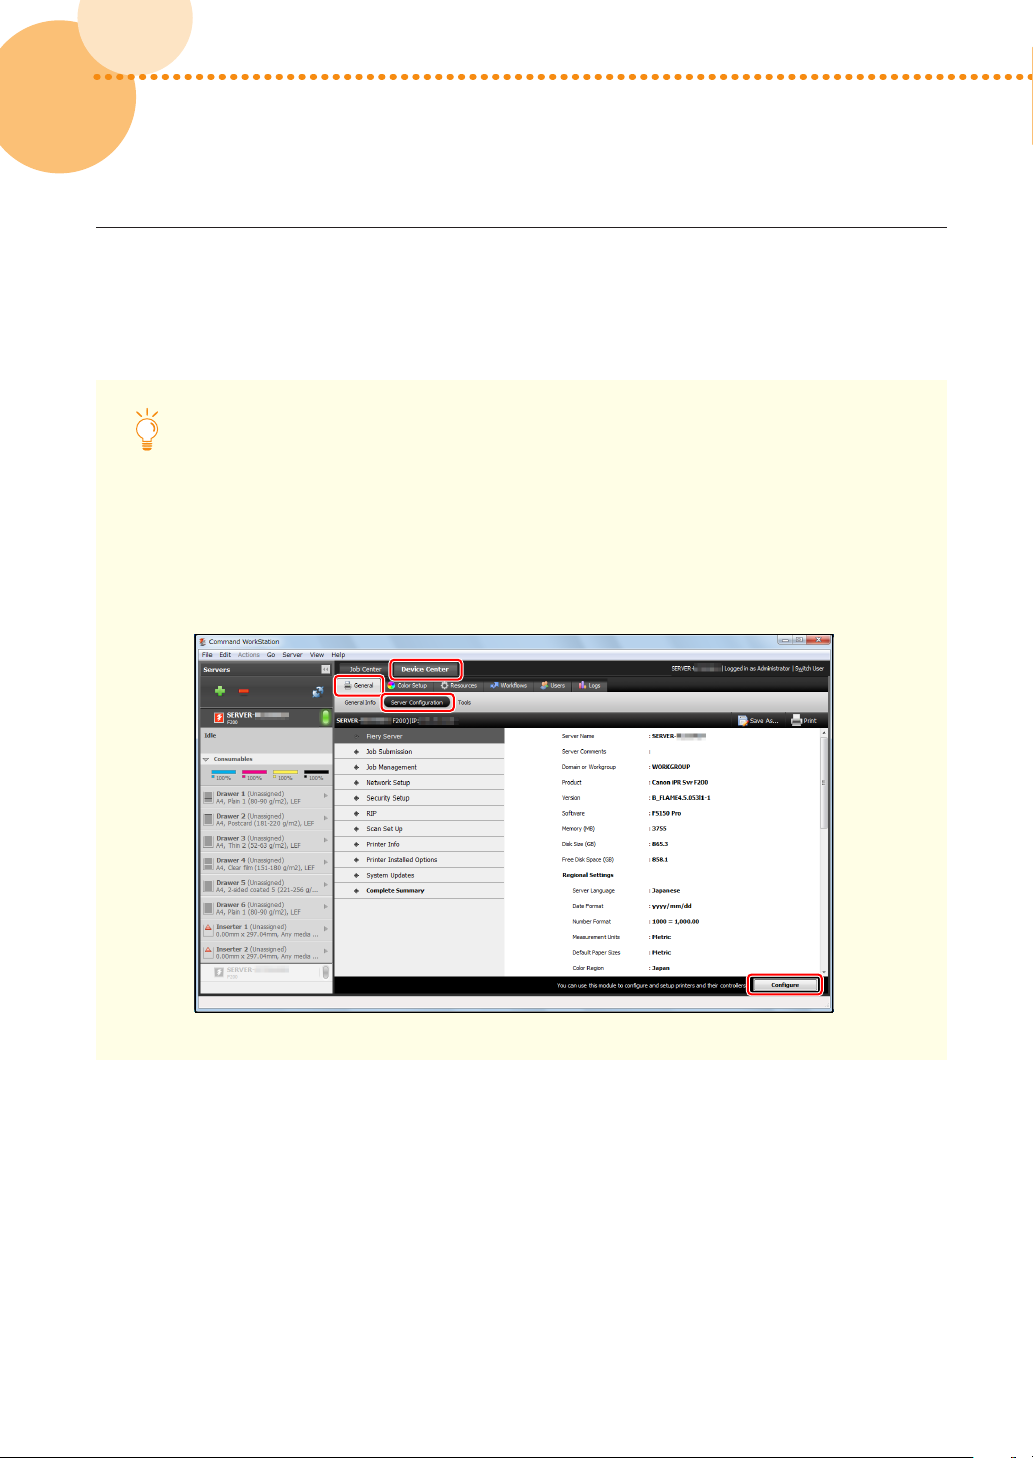
Click [OK] → [OK]�
4
•
Print a test sheet to check the finished result� If you are satisfied with the result, you can print the job�
Another Remedy
If you are using the imagePRESS Server F200, Adobe PDF Print Engine is also available for direct printing of
PDF files without using a printer driver� You can avoid many problems by using an Adobe PDF Print Engine,
which does not convert data to PostScript so transparent objects are not flattened during printing�
1 Click the [Device Center] tab in Command WorkStation → [General] → [Server Configuration] →
[Configure]�
70
70
imagePRESS C850/C750/C650/C65
Page 73
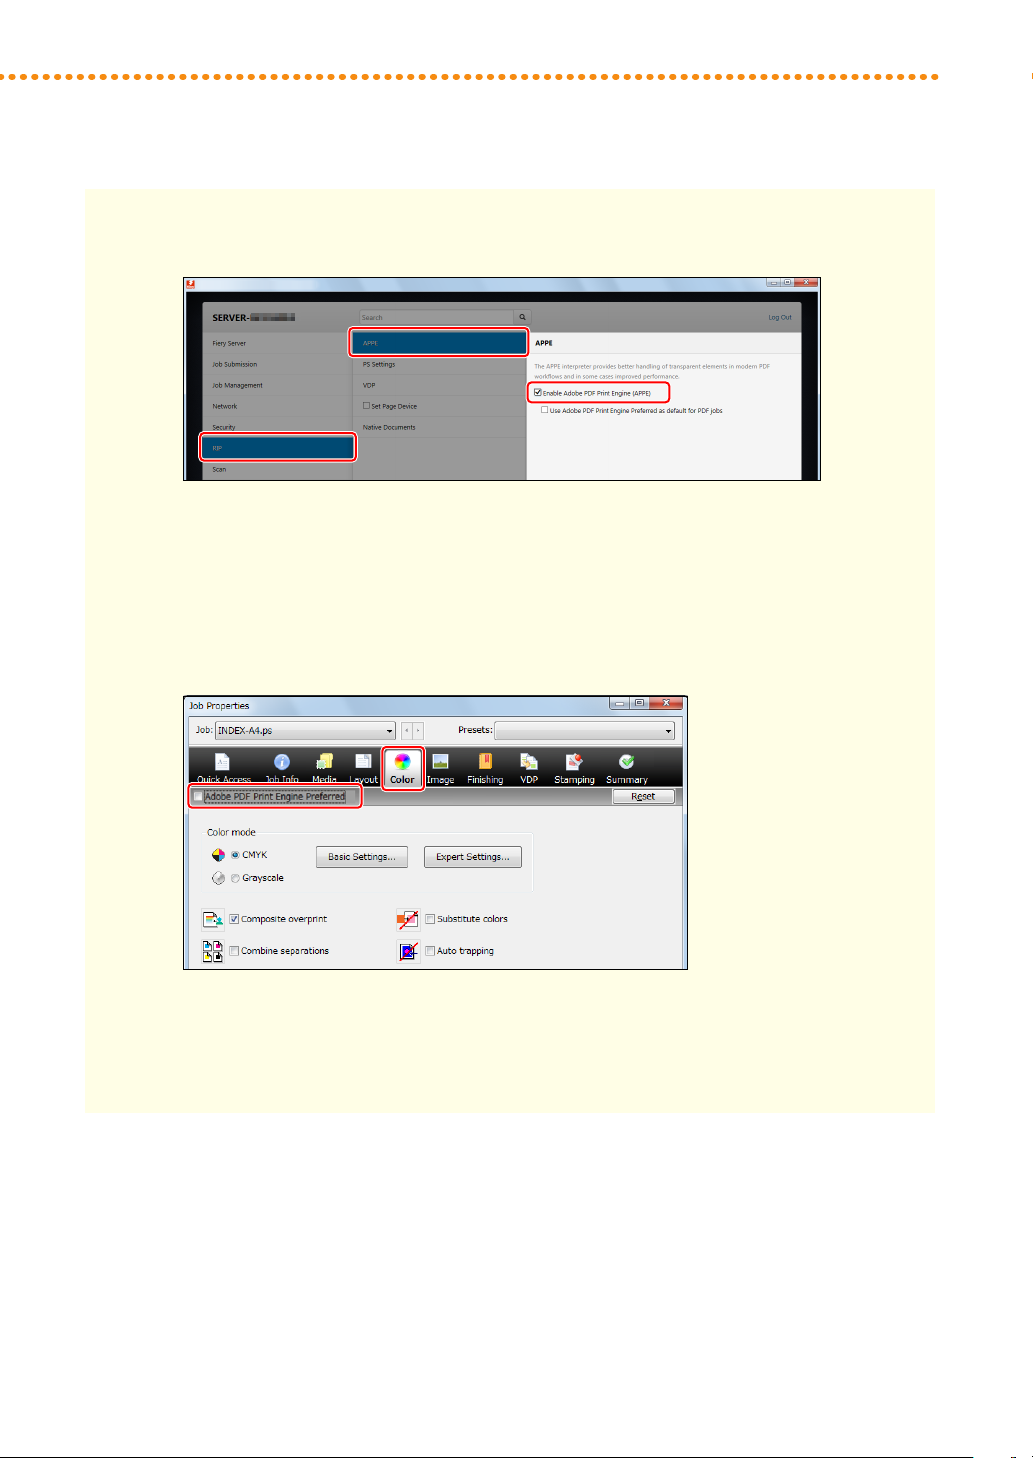
How to Make Transparency Effects Work As Expected
2 Click [RIP] → [APPE], and select the check box for <Enable Adobe PDF Print Engine (APPE)>�
3 Click [Save], and close the [Configure] window�
4 Click the [Job Center] tab in Command WorkStation, and double-click the job�
•
[Job Properties] is displayed�
5 Click the [Color] tab, and select the check box for <Adobe PDF Print Engine Preferred>�
6 Click [OK]�
•
Print a test sheet to check the finished result� If you are satisfied with the result, you can print the
job�
imagePRESS C850/C750/C650/C65
71
Page 74
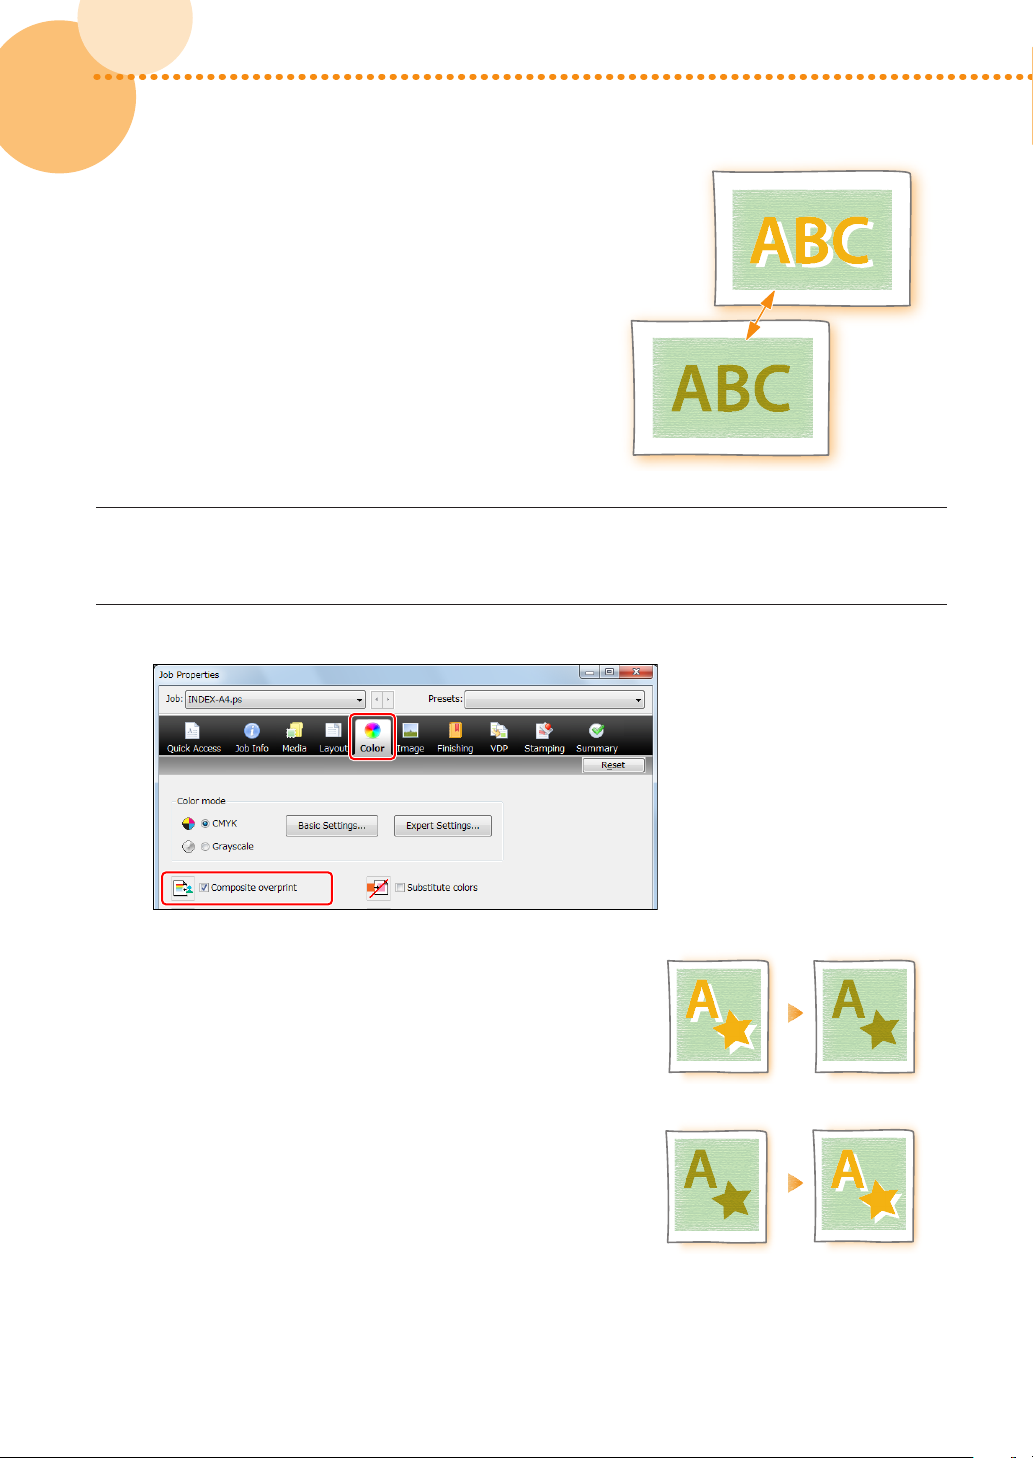
How to Solve the Overprint Problems
Does the color on printouts differ from what you expected because
the top color knocks out the area underneath even though you set
overprinting in the application? In other cases, does the color on
printouts differ from what you expected because the top color does
not knock out the area underneath because you set overprinting in
the application by mistake? Follow the procedure below to solve the
problems�
Double-click the job in Command WorkStation on the imagePRESS Server�
1
•
[Job Properties] is displayed�
Click the [Color] tab → change the print settings for <Composite overprint>, as necessary�
2
72
72
Overprinting
Select the check box for <Composite overprint>�
Canceling overprinting
Clear the check box for <Composite overprint>�
imagePRESS C850/C750/C650/C65
Page 75
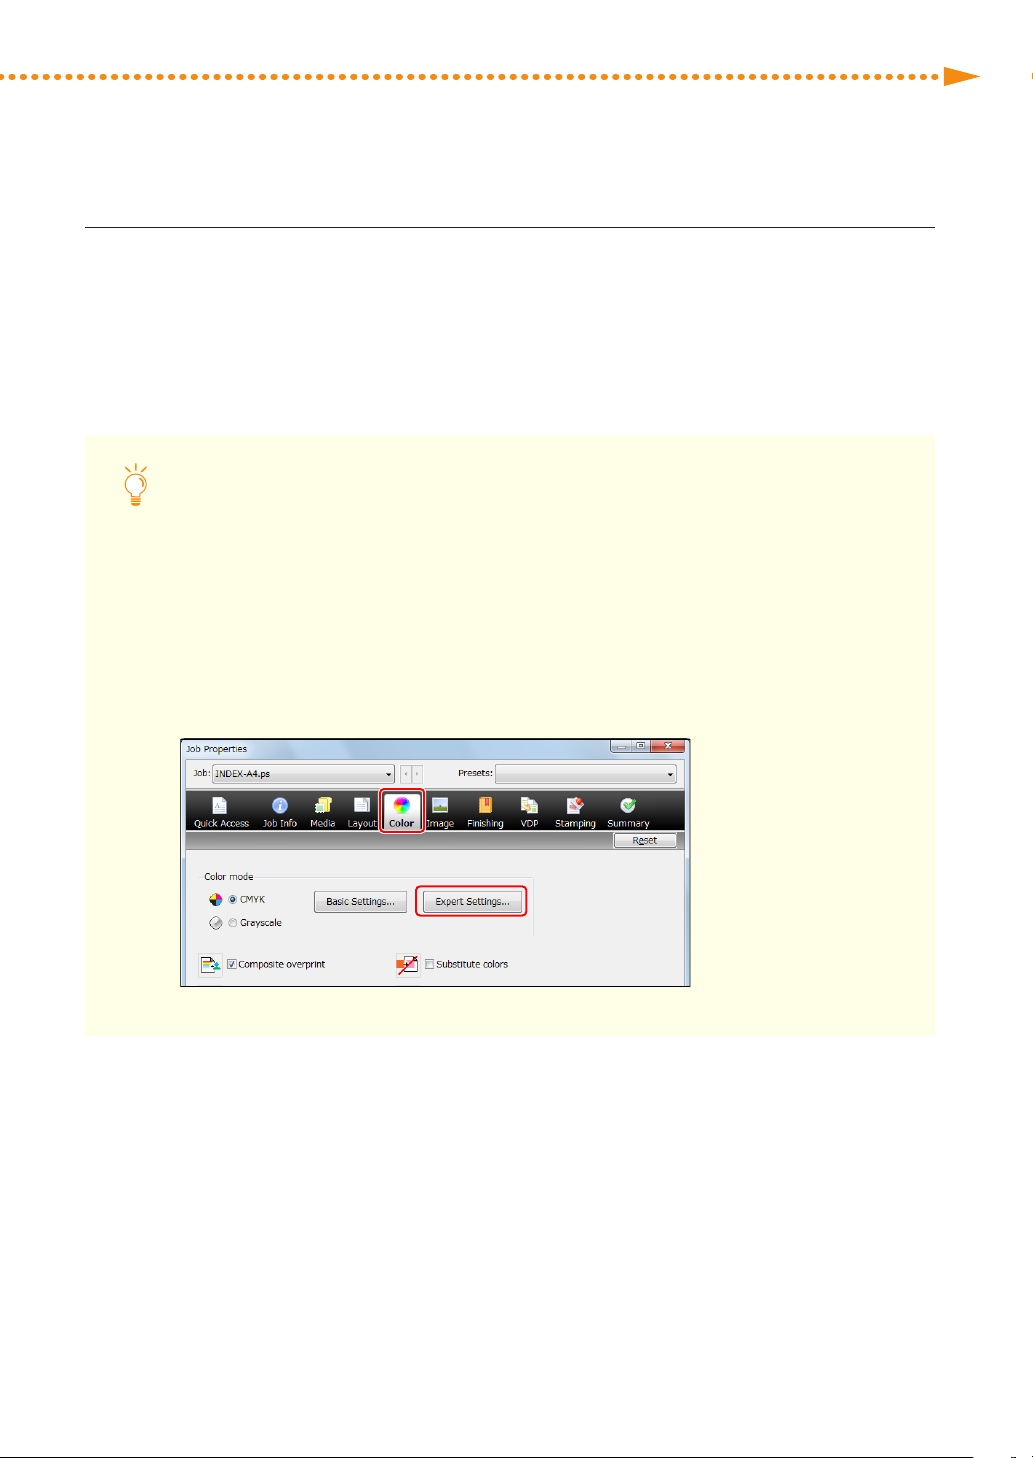
How to Solve the Overprint Problems
Click [OK]�
3
•
Print a test sheet to check the finished result� If you are satisfied with the result, you can print the job� If you
are not satisfied with the result, check the job and application settings�
Black Overprint
You can specify the overprint setting for an object (K (black)=100%) on the imagePRESS Server without
specifying it in the application�
1 Double-click the job in Command WorkStation on the imagePRESS Server�
•
[Job Properties] is displayed�
2 Click the [Color] tab → [Expert Settings]�
imagePRESS C850/C750/C650/C65
73
Page 76
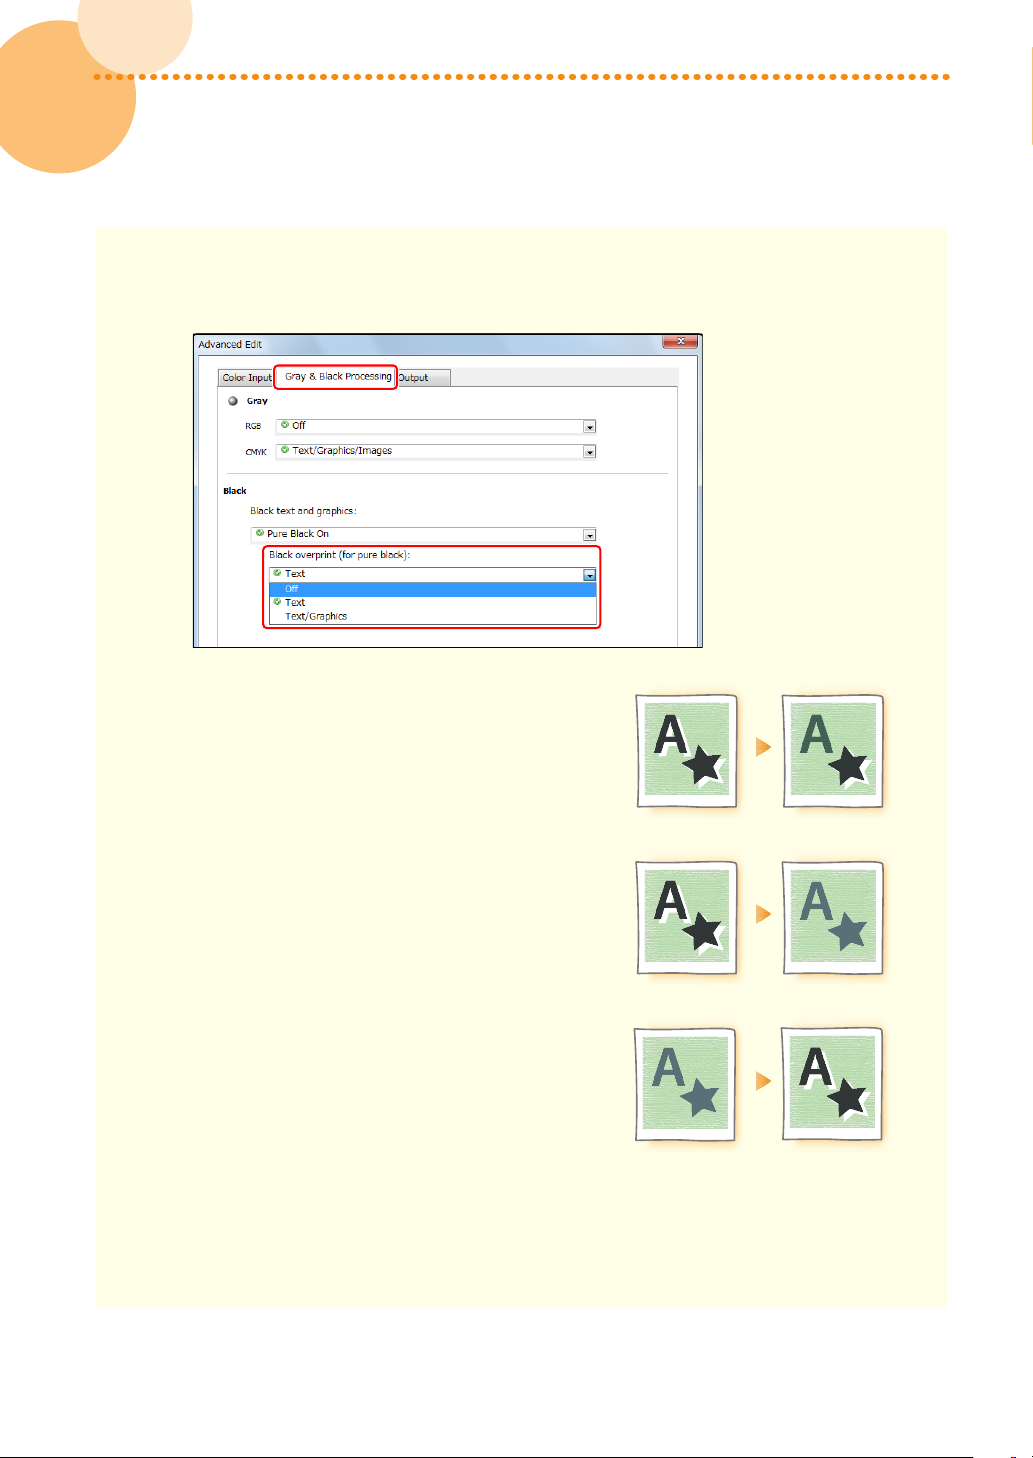
3 Click the [Gray & Black Processing] tab, and change the print settings in <Black overprint (for pure
black)> according to what you are printing and how you want the printouts to appear�
Overprinting text only
Select [Text]�
Overprinting text, figures, and lines
Select [Text/Graphics]�
74
74
Not using overprint
Select [Off ]�
4 Click [OK] → [OK]�
•
Print a test sheet to check the finished result� If you are satisfied with the result, you can print the
job� If you are not satisfied with the result, check the job and application settings�
imagePRESS C850/C750/C650/C65
Page 77
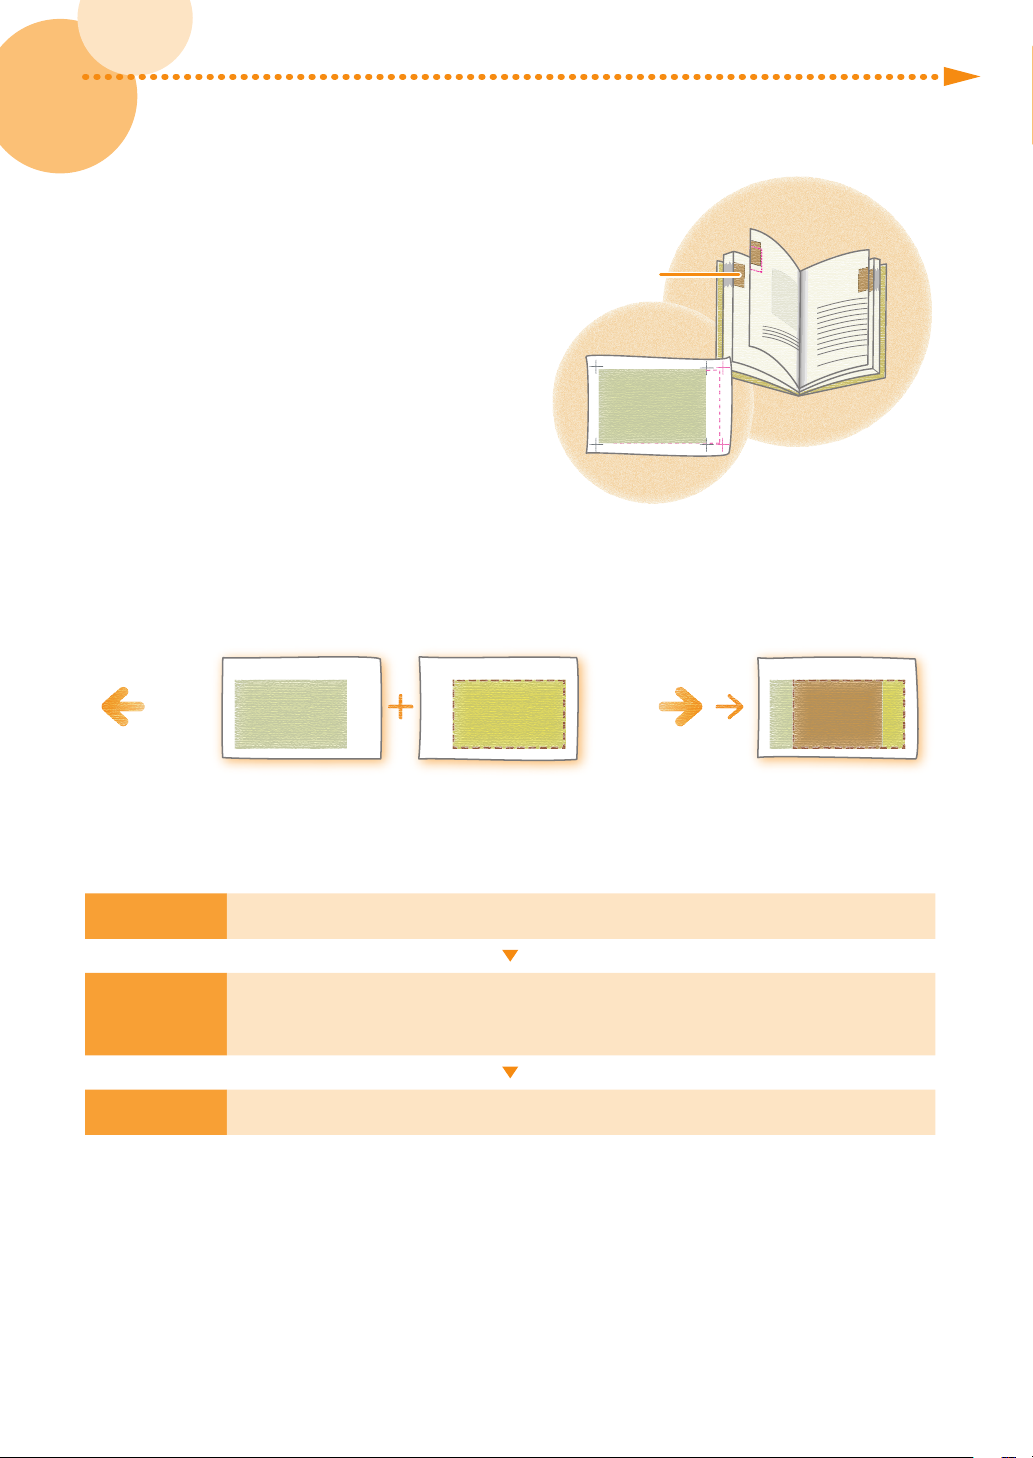
How to Fix Misalignment of Images
NOTE
If the following troubles often occur, the machine may have
alignment problems� Follow the procedures described in this
section to solve such problems�
•
The register marks on one side of a printed sheet do not
match those on the other side�
•
The thumb indexes on the printed pages are not aligned�
•
The image is not printed within the register marks�
•
You may not be able to correct misalignment that is less
than 1�0 mm (1/25")�
•
The machine decides the printing start position based on
the leading edge of the paper� After the front side of the
paper is printed, the paper is reversed and the back side of the paper is printed from the trailing edge� Because of
this, the position where printing starts may be slightly different on opposite sides of the paper�
Thumb Index
Feeding
Direction
Step 1
Step 2
Step 3
Leading
Edge
Front
Left Edge Left Edge
Eliminating the Basic Causes of Misalignment (p� 76)
Changing Settings on the Machine According to Paper Characteristics (p� 78)
•
If Using the scanner (p� 78)
•
If Not using the scanner (p� 82)
Changing Print Settings on the Printer Driver (p� 86)
Back
Leading
Edge
Feeding
Direction
Images are misaligned on
both sides of the paper.
imagePRESS C850/C750/C650/C65
75
Page 78
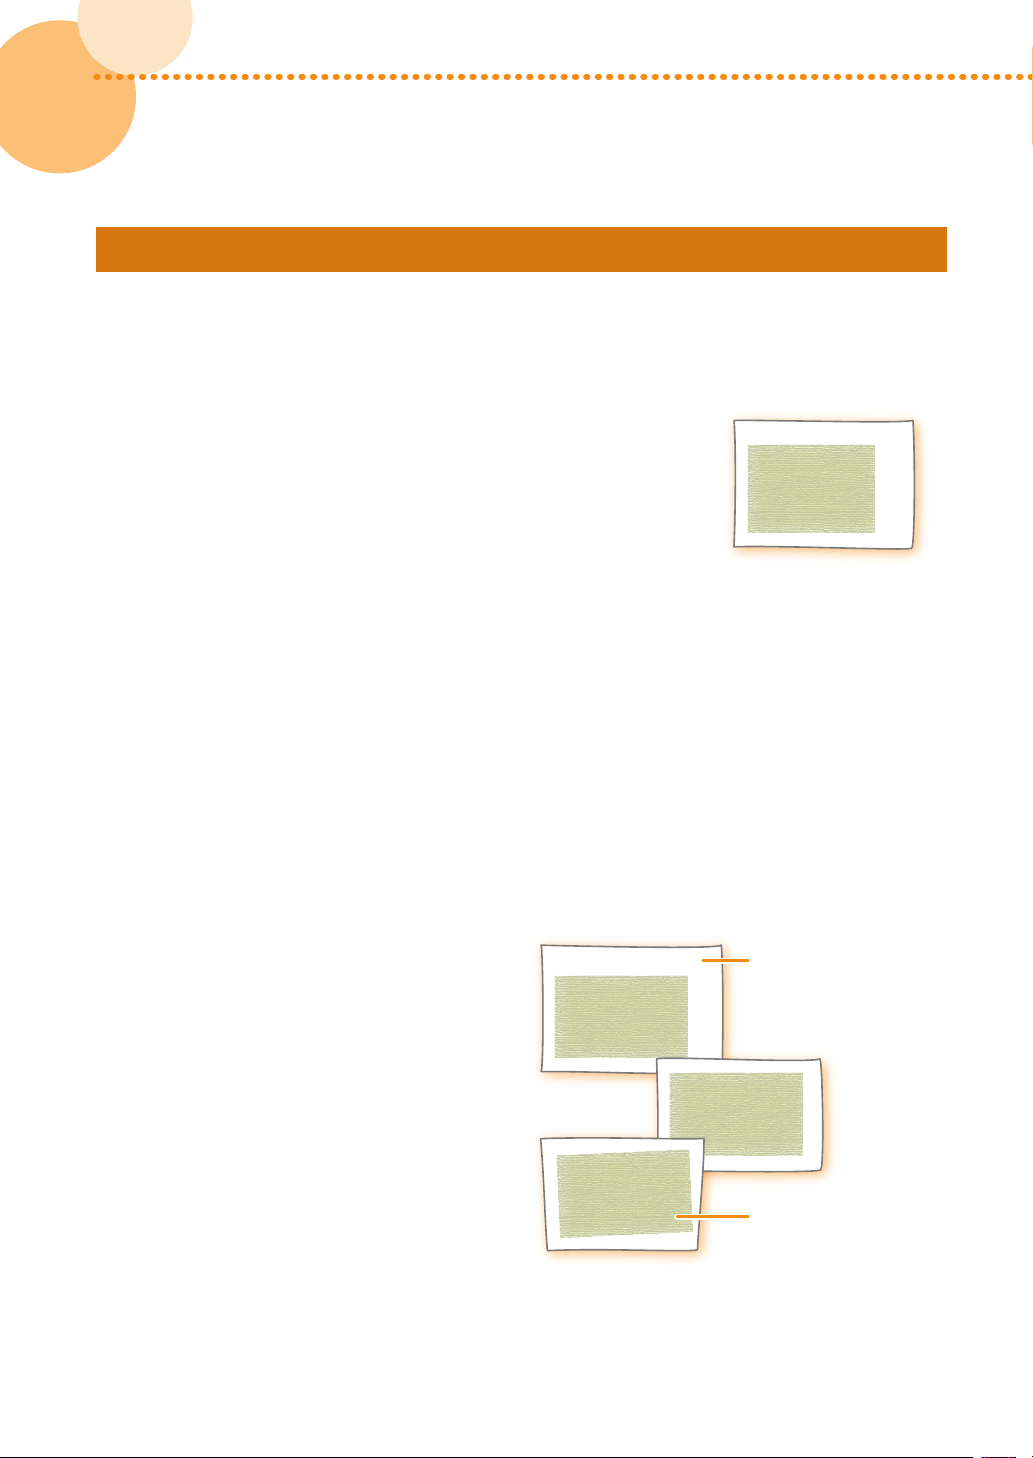
Step 1 Eliminating the Basic Causes of Misalignment
Find the answers to your questions about how to solve your problems�
Q� Is the machine or paper located in a high humidity environment?
A� Paper tends to expand when it absorbs moisture from a highly
humid environment� If this happens, the images may be printed in the
wrong position� For example, the image may be printed in the lower left
corner, rather than in the center as expected� Or, images printed on the
front and back of the paper may be misaligned�
Solution
•
Keep the machine and paper in a room with a steady temperature and
humidity� If the temperature and humidity are unstable, it may cause the paper
to expand or shrink, resulting in misalignment of printed images�
•
For the appropriate temperature and humidity, see the
Installation and Operating Environment Guidelines or the Specialty Media Handling Guide�
•
Before you load paper, place the package of paper near the machine so it can fully acclimatize to the temperature
and humidity�
•
Unwrap the paper immediately before you load the paper into the machine�
Image is printed near the
edge of the paper because
the paper is larger than the
set paper size.
Q� Is the paper cut correctly?
A� If the paper is not uniform in size and
shape, the margins around the image may be
different on each page� If the paper is not cut
square, the images may be skewed when they
are printed�
Solution
•
Use a different batch of paper that has been cut
correctly�
•
If you cut the paper yourself, measure it and confirm
it is the correct size�
Image is printed near the
edge of the paper because
the paper size was not set in
advance.
Printed image is skewed
because the edges of the
paper are not square.
76
76
imagePRESS C850/C750/C650/C65
Page 79
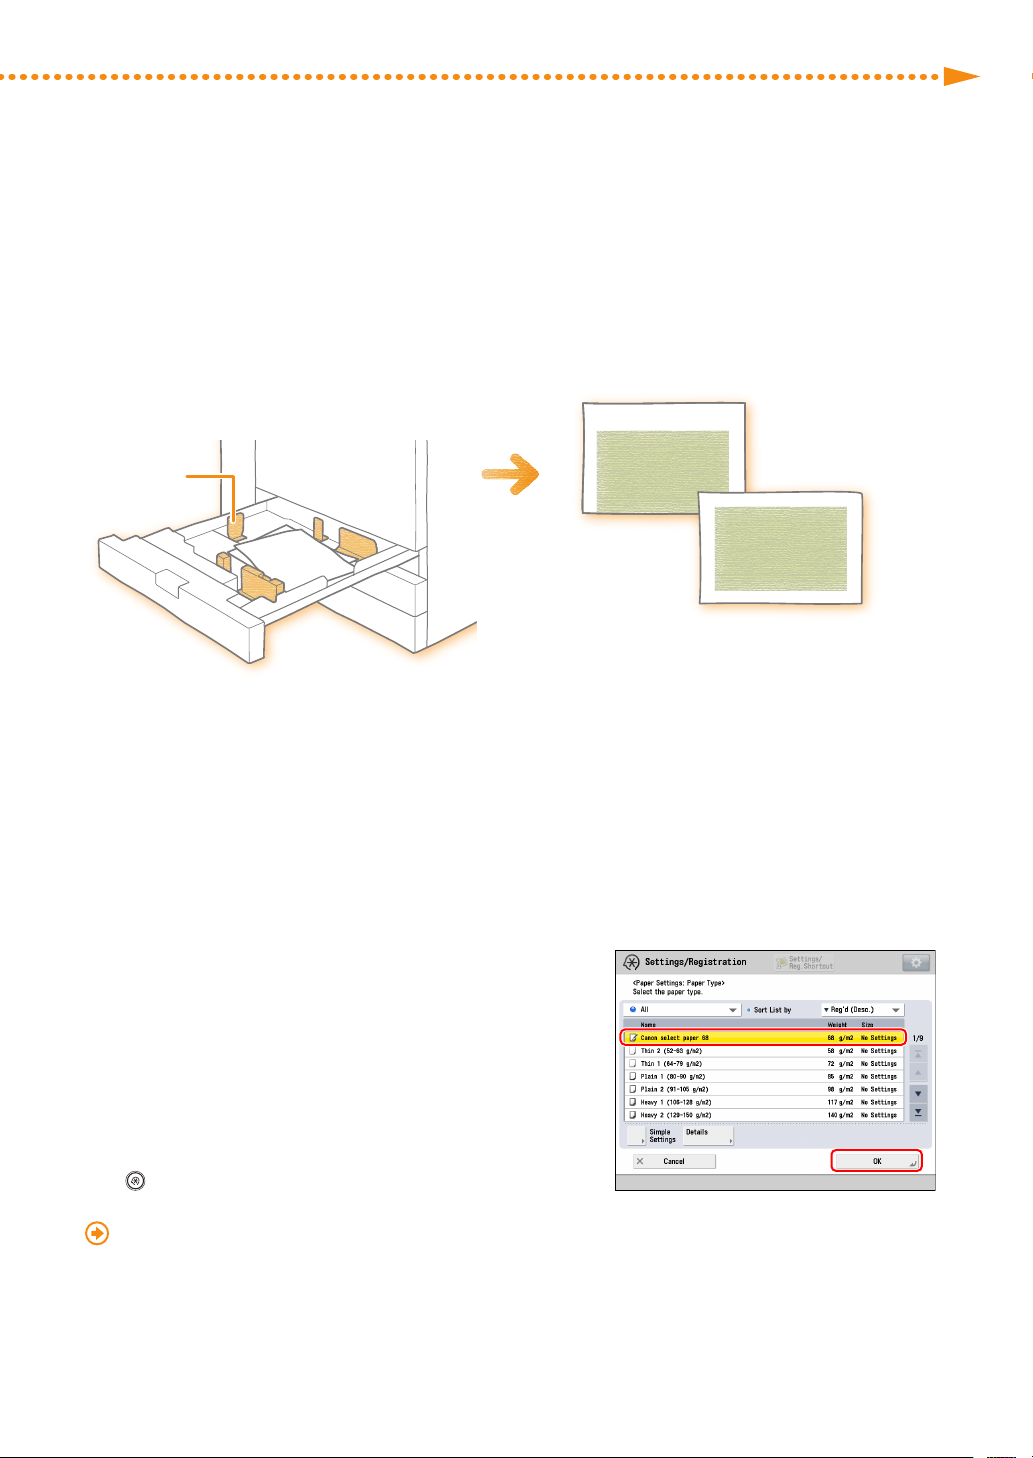
How to Fix Misalignment of Images
Q� Did you load paper in the correct position?
A� If you place the paper guide in the wrong position or do not align the edges of the paper before you
load it, the printed images may be misaligned on every page�
Paper Guide
Position in which image is printed is
misaligned because the paper guide is in the
wrong position.
Solution
•
Align the edges of the paper and load it again�
•
Make sure that the paper guide is placed in the correct position�
Q� Did you register the paper type correctly?
A� If you load a different brand of paper, different from the
one you have used before, you need to change the settings
for the paper in the machine� If you start printing without
changing the settings, the machine applies the previous
settings to the new paper type, which causes misalignment of
the images on every page�
Solution
Press → [Preferences] → [Paper Settings] → [Paper Settings] →
select the brand of paper that you have loaded�
"Settings/Registration" > "Registering the Paper Size and Type for a Paper Source" in the User's Guide
imagePRESS C850/C750/C650/C65
77
Page 80
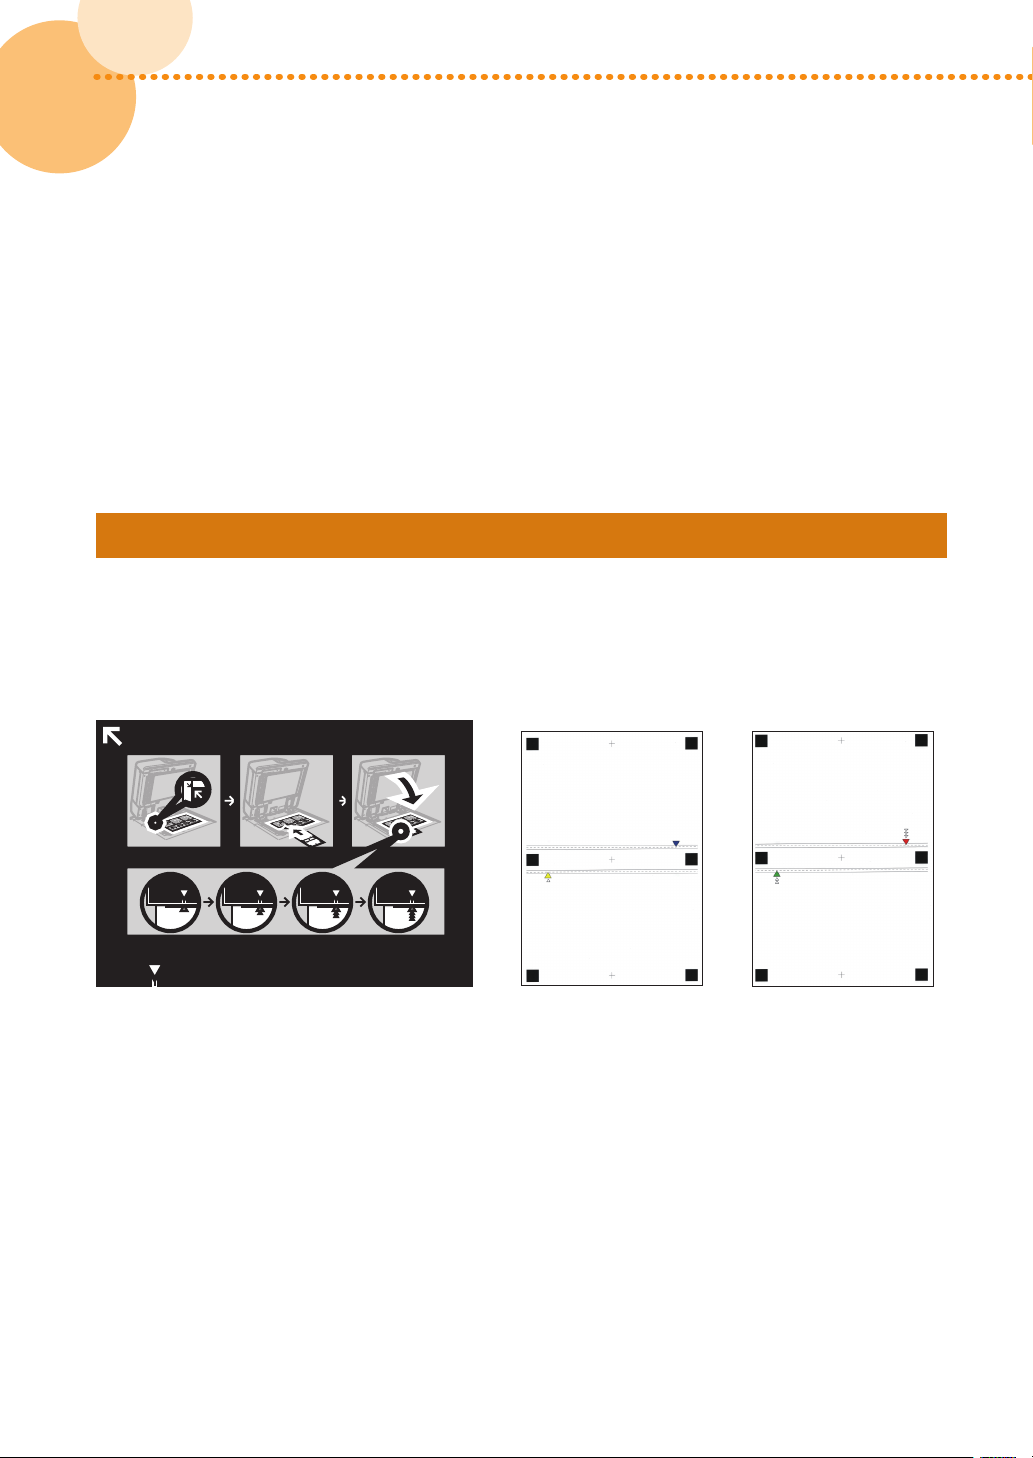
Q� Have the machine got warmed up enough to obtain proper printing results?
A� If you start printing before the machine gets warmed up enough, such as just after turned ON, the
printed images may be misaligned�
Solution
Before you start a print job, warm up the machine by printing 10 to 30 copies of a test page�
Step 2
If Using the Scanner
▀
If the images on the front and back sides are misaligned with each other and you want to adjust easily, you can adjust
the alignment of the images by scanning the test pages with the guide sheet�
Changing Settings on the Machine According to Paper Characteristics
Guide Sheet
(Front Side) (Back Side)
1 2 3 4
Test Page
78
78
imagePRESS C850/C750/C650/C65
Page 81

How to Fix Misalignment of Images
NOTE
Before adjustment with the guide sheet
•
Clean the platen glass and the underside of the feeder�
"Maintenance" > "Routine Cleaning" > "Originals Cannot Be Scanned Properly (Cleaning the Platen
Glass)" in the User's Guide
•
In order to use this function, the guide sheet is required� For more information, contact your local
authorized Canon dealer�
•
Before adjustment, print the guide sheet (A3 or 11" x 17") under the following conditions� Accurate
adjustment may not be possible if the guide sheet is not printed correctly�
- Select the same size as the guide sheet�
- Use paper with a weight of more than 200 g/m
- Set the zoom ratio as 100%�
•
We recommend that the test page is printed to the recommended paper The adjustment may not be
performed correctly on the paper that has ruggedness on surface (such as a textured paper, etc�)�
•
If the position of the image cannot be adjusted correctly by [Use Scanner], adjust the position of the
image by [Do Not Use Scanner]�
•
The Duplex Color Image Reader Unit-H1 (optional) is required for this adjustment�
2
(74 lb cover)�
Press → [Preferences] → [Paper Settings] → [Paper Type Management Settings] → Select
1
the paper type that you want to edit from the list → press [Details/Edit] → [Change] for <Adjust
Image Position>�
Press [Use Scanner]�
2
Enter the number of test page to make → press [Next]�
3
•
The larger the number of output test pages, the more accurate the adjustment is�
•
If specifying multiple output test pages, make sure that all of the test pages are scanned in the order they are
output� If the order is changed or the scanning process is not performed successively, the adjustment may
not be made correctly�
•
To obtain a highly precise correction result easily, set the number of output test pages to one, complete
the adjustment, and then adjust [Front Side] and [Back Side] of <Lead Edge (e) Align>� These settings and
adjustments allow you to obtain a correction result similar to that obtained by scanning multiple test pages�
•
To align the position of the front and back surfaces for the user image, press [Do Not Use Scanner] to adjust
additionaly the position of the image�
imagePRESS C850/C750/C650/C65
79
Page 82
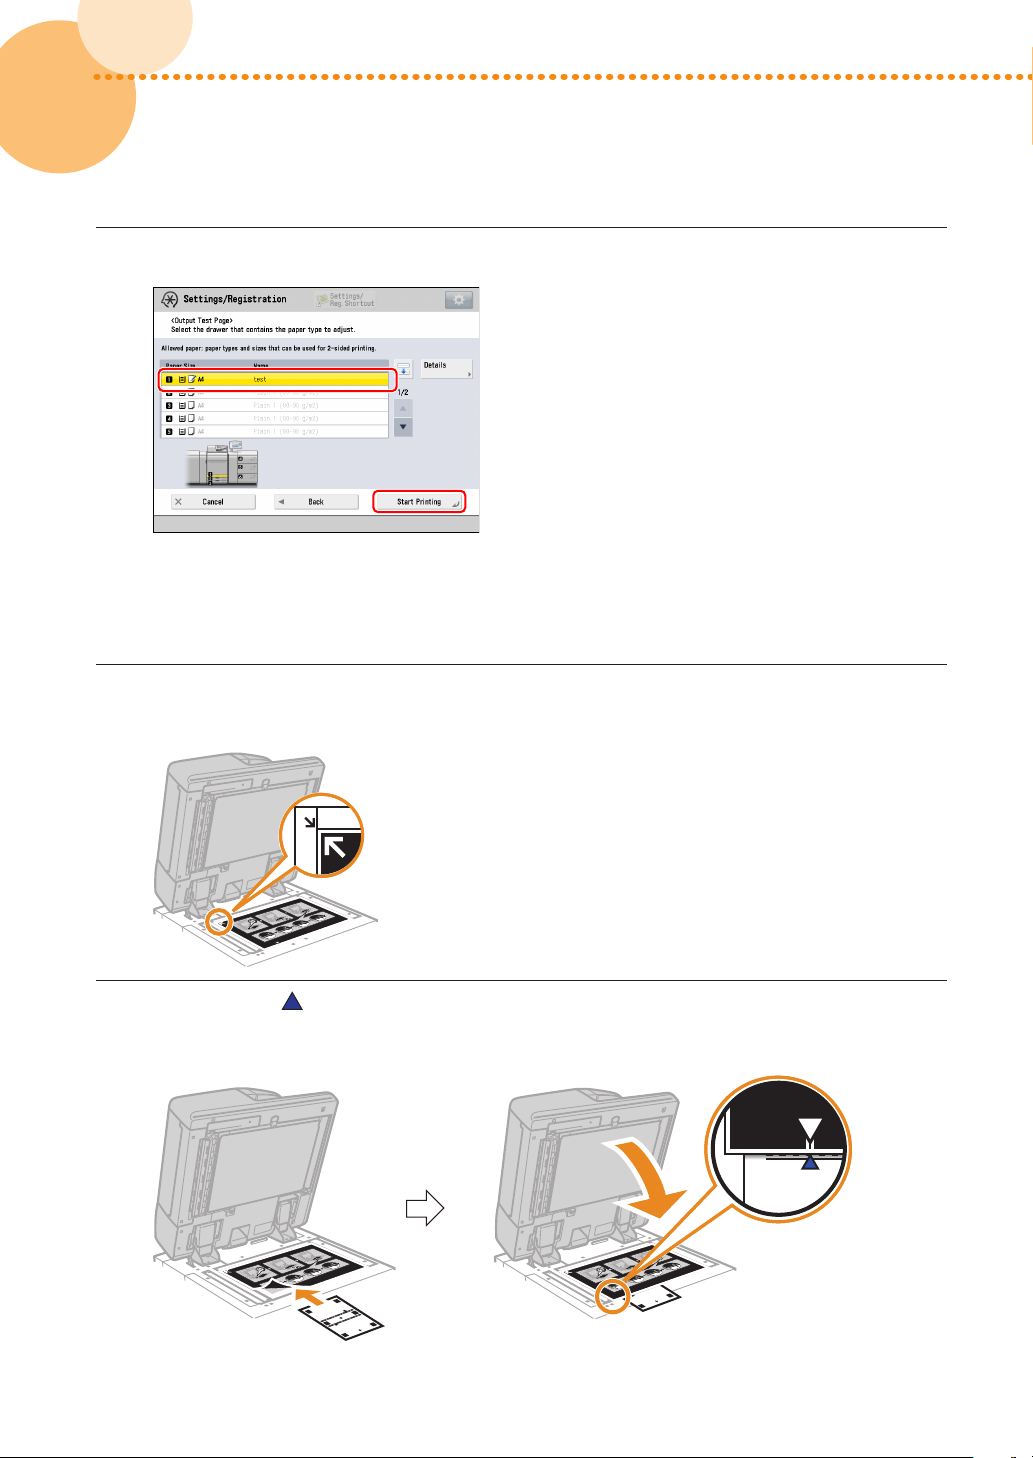
Select the paper source that contains the paper type to adjust → press [Start Printing]�
NOTE
4
The test page is printed�
Place the guide sheet on the platen glass with the arrows of the sheet and on the platen glass
5
aligned�
80
80
6
Align the mark on the test page for the first scan operation with the mark on the guide
sheet�
imagePRESS C850/C750/C650/C65
Page 83
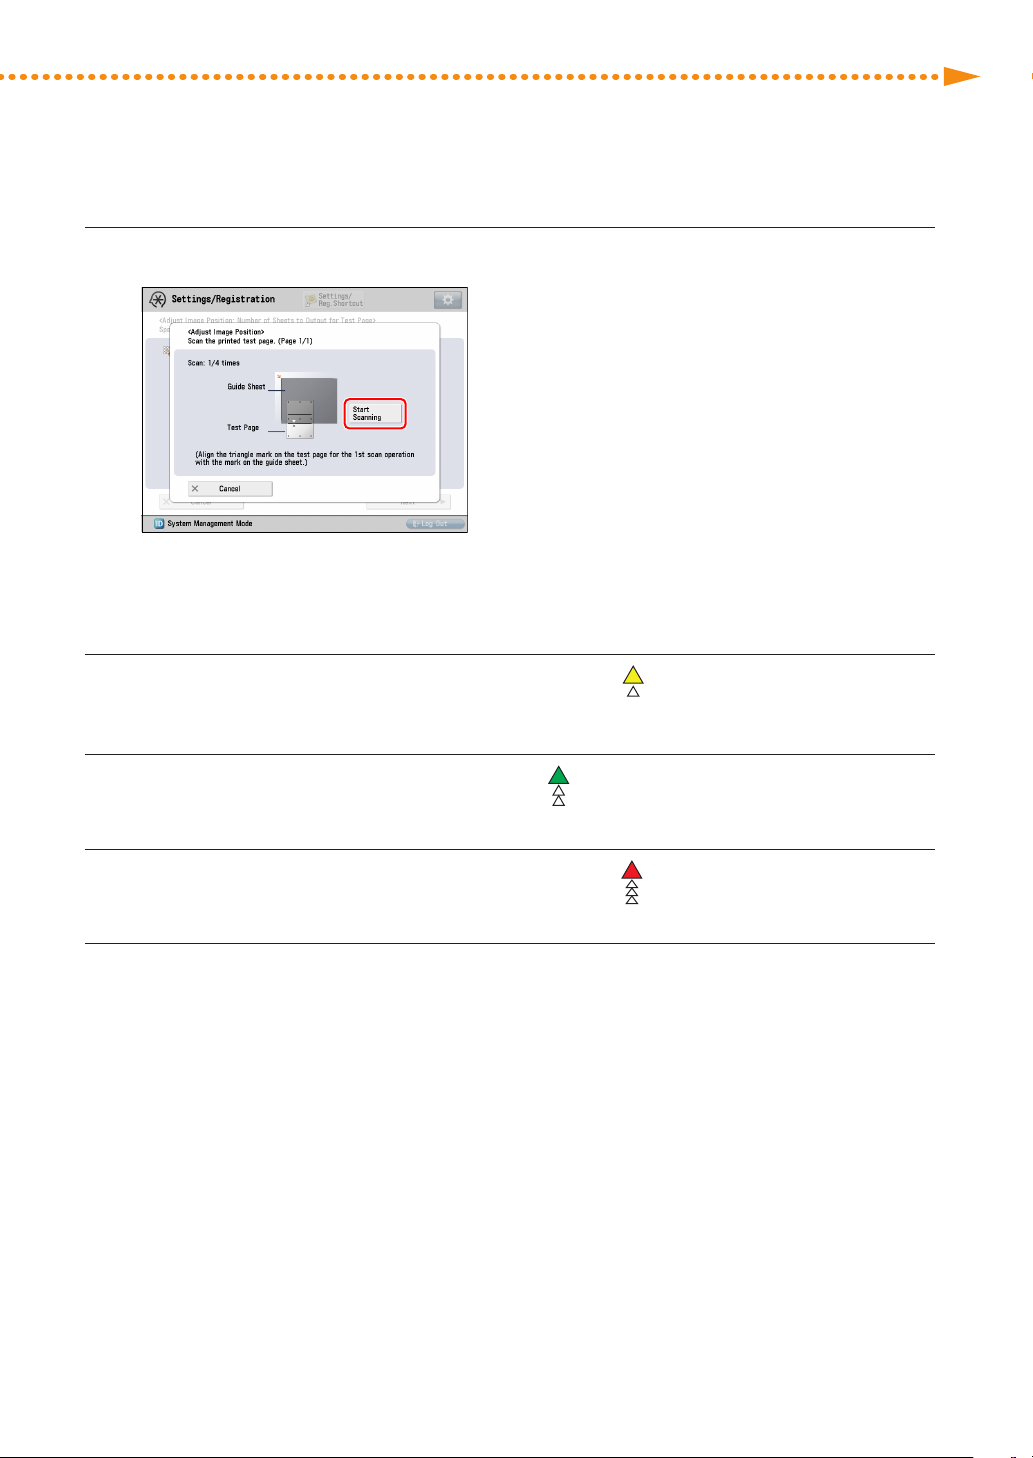
How to Fix Misalignment of Images
NOTE
Close the feeder → press [Start Scanning]�
7
Open and close the feeder gently� Make sure that the guide sheet remains aligned when closing the feeder�
8
Turn the test page upside down, and then align the mark on the test page for the second
scan operation with the mark on the guide sheet → press [Start Scanning]�
9
Turn the test page over, and then align the mark on the test page for the third scan
operation with the mark on the guide sheet → press [Start Scanning]�
10
Turn the test page upside down, and then align the mark on the test page for the fourth
scan operation with the mark on the guide sheet → press [Start Scanning]�
Adjustment is complete�
11
If you have specified multiple output test pages, repeat steps 6 to 10 for all of the output test pages� In this
case, adjustment is complete when all of the test pages have been scanned�
Make sure that the test pages are scanned in the order they are output�
imagePRESS C850/C750/C650/C65
81
Page 84
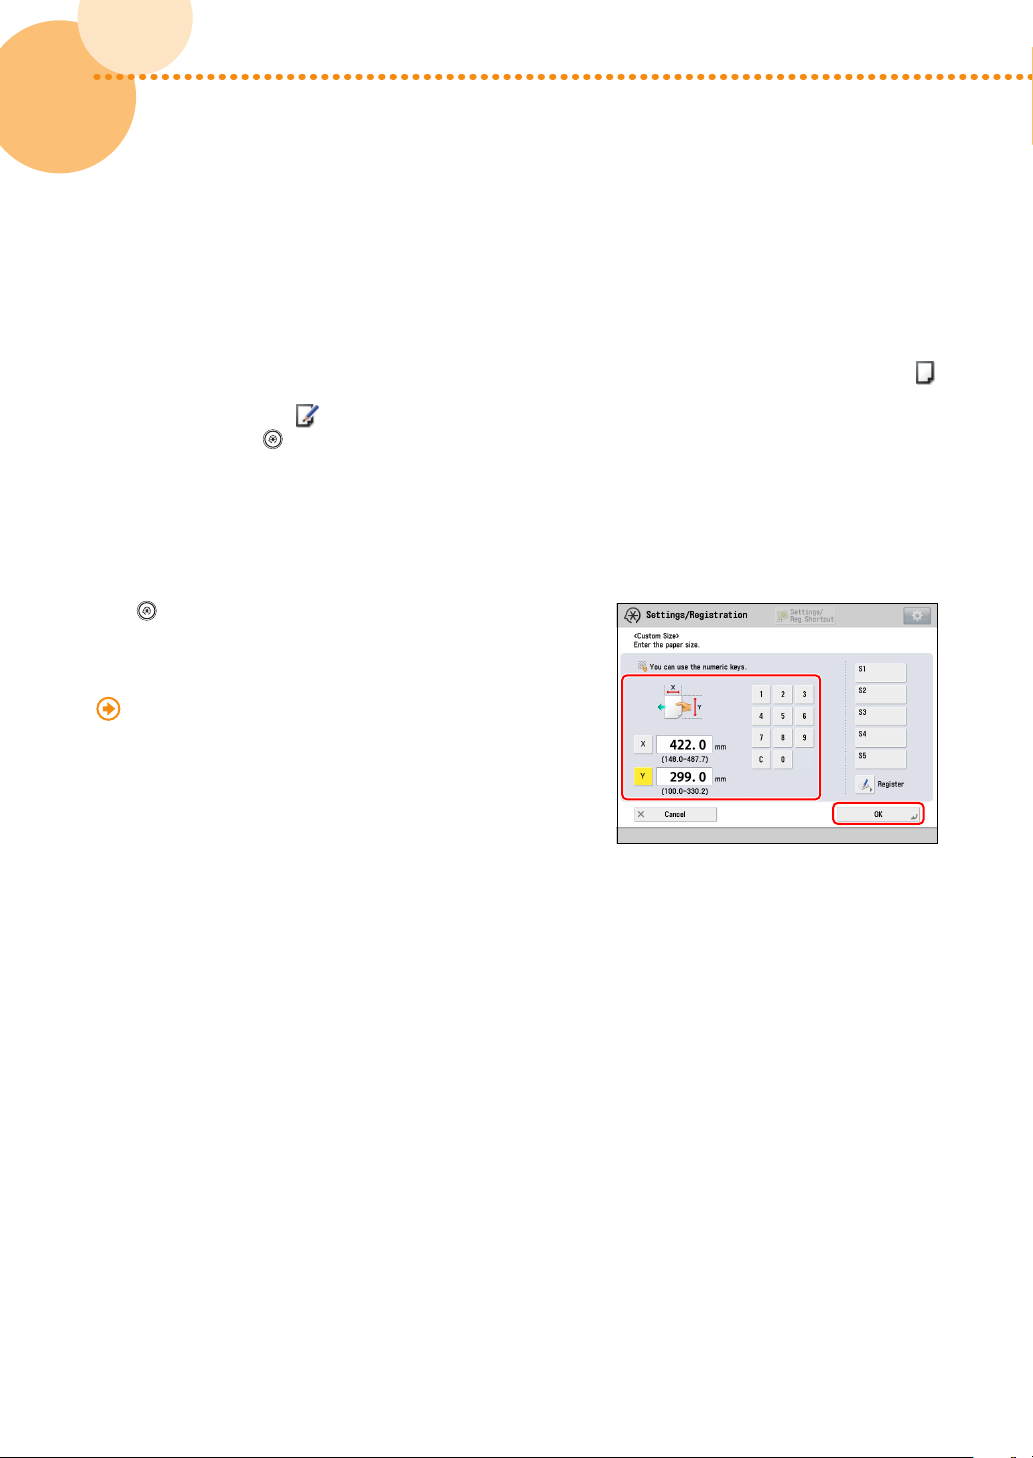
If Not Using the Scanner
NOTE
▀
If you still have the same problem after you follow the procedures in step 1 "Eliminating the Basic Causes of
Misalignment," change the settings to meet paper characteristics�
You cannot change the settings for a 'standard' type of paper that is indicated with the paper-without-pencil icon ( )
on the screen� In this case, duplicate a 'standard' type of paper to make a 'custom' type of paper that is indicated with
the paper- and-pencil icon ( ), and change the settings for it� After specifying the settings for the custom type of
paper you made, press → [Preferences] → [Paper Settings] → [Paper Settings], and change a type of paper for the
paper source to that paper�
Registering the Measured Value of the Paper
If you want to print the image within a specified area, you need to register the correct paper size in advance�
Measure the paper size and register the value�
Press
Management Settings] → select the brand of paper in which the
image is misaligned → press [Details/Edit] → [Change] for <Size>
→ [Custom Size] → enter the measured value�
→ [Preferences] → [Paper Settings] → [Paper Type
"Paper Type Management" > "Changing the Size" in the User's
Guide
82
82
imagePRESS C850/C750/C650/C65
Page 85
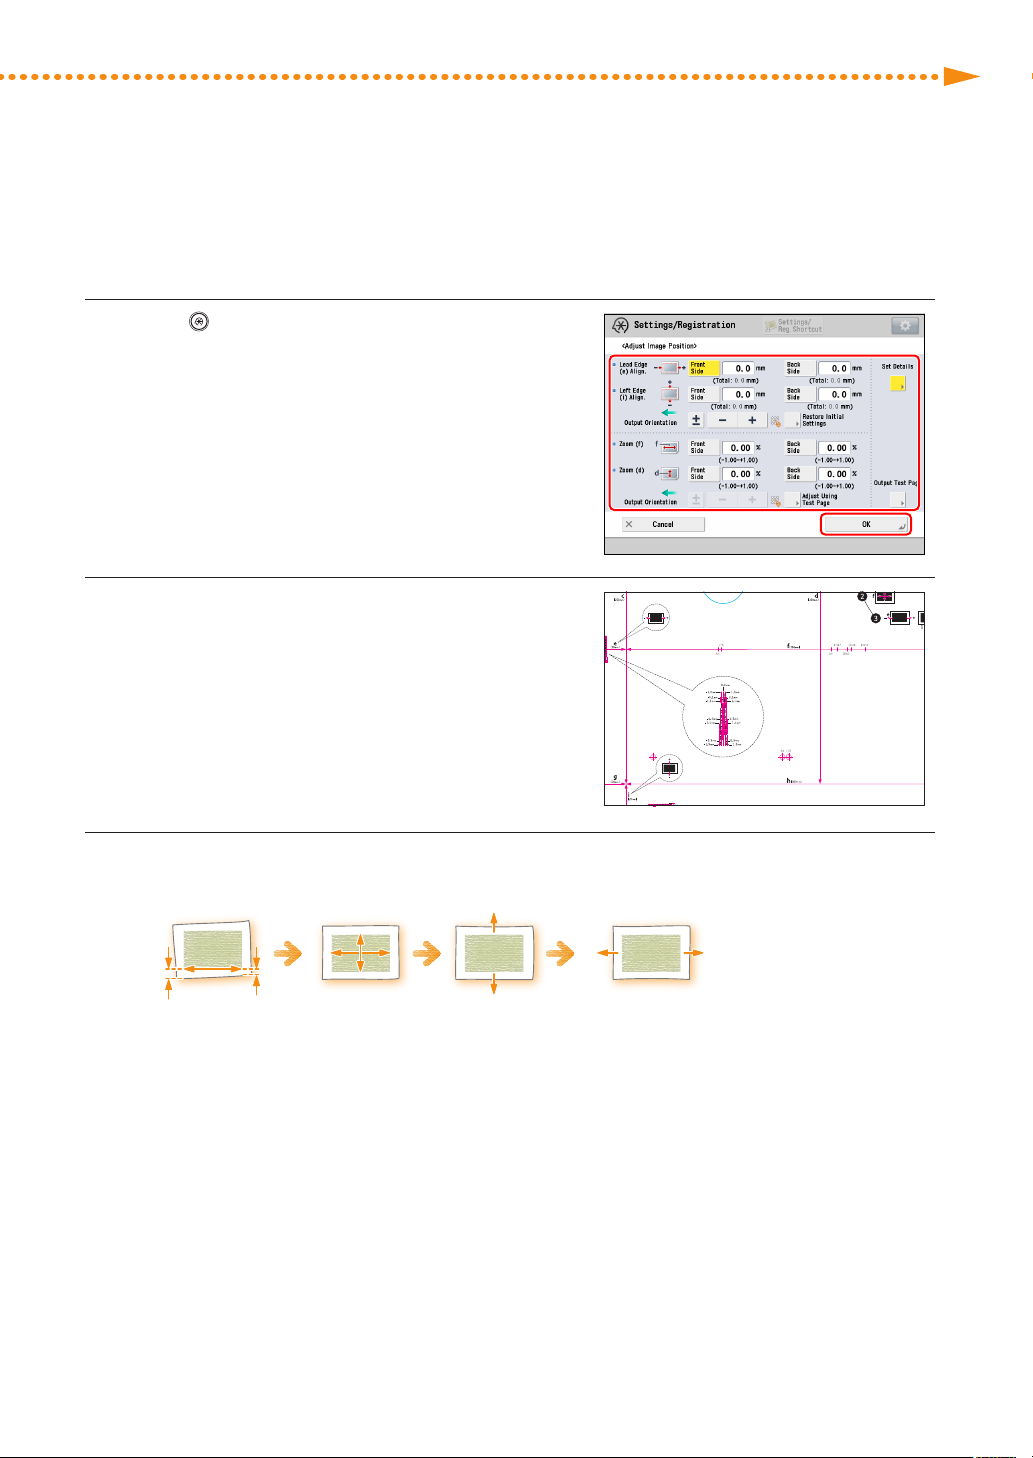
Adjusting the Position of the Image
+
You can adjust the position in which the image is actually printed�
Press → [Preferences] → [Paper Settings] →
1
[Paper Type Management Settings] → select the
brand of paper in which the image is misaligned →
press [Details/Edit] → [Change] for <Adjust Image
Position>�
Print a test page�
2
How to Fix Misalignment of Images
Adjust the position of the image in the sequence shown below�
3
d
f
i
Correct Image
Skew
j
h
Adjust Zoom
Ratio
i
-
Adjust Position
of Left Edge
Register
e
-
Adjust Position
of Leading Edge
Register
imagePRESS C850/C750/C650/C65
+
83
Page 86
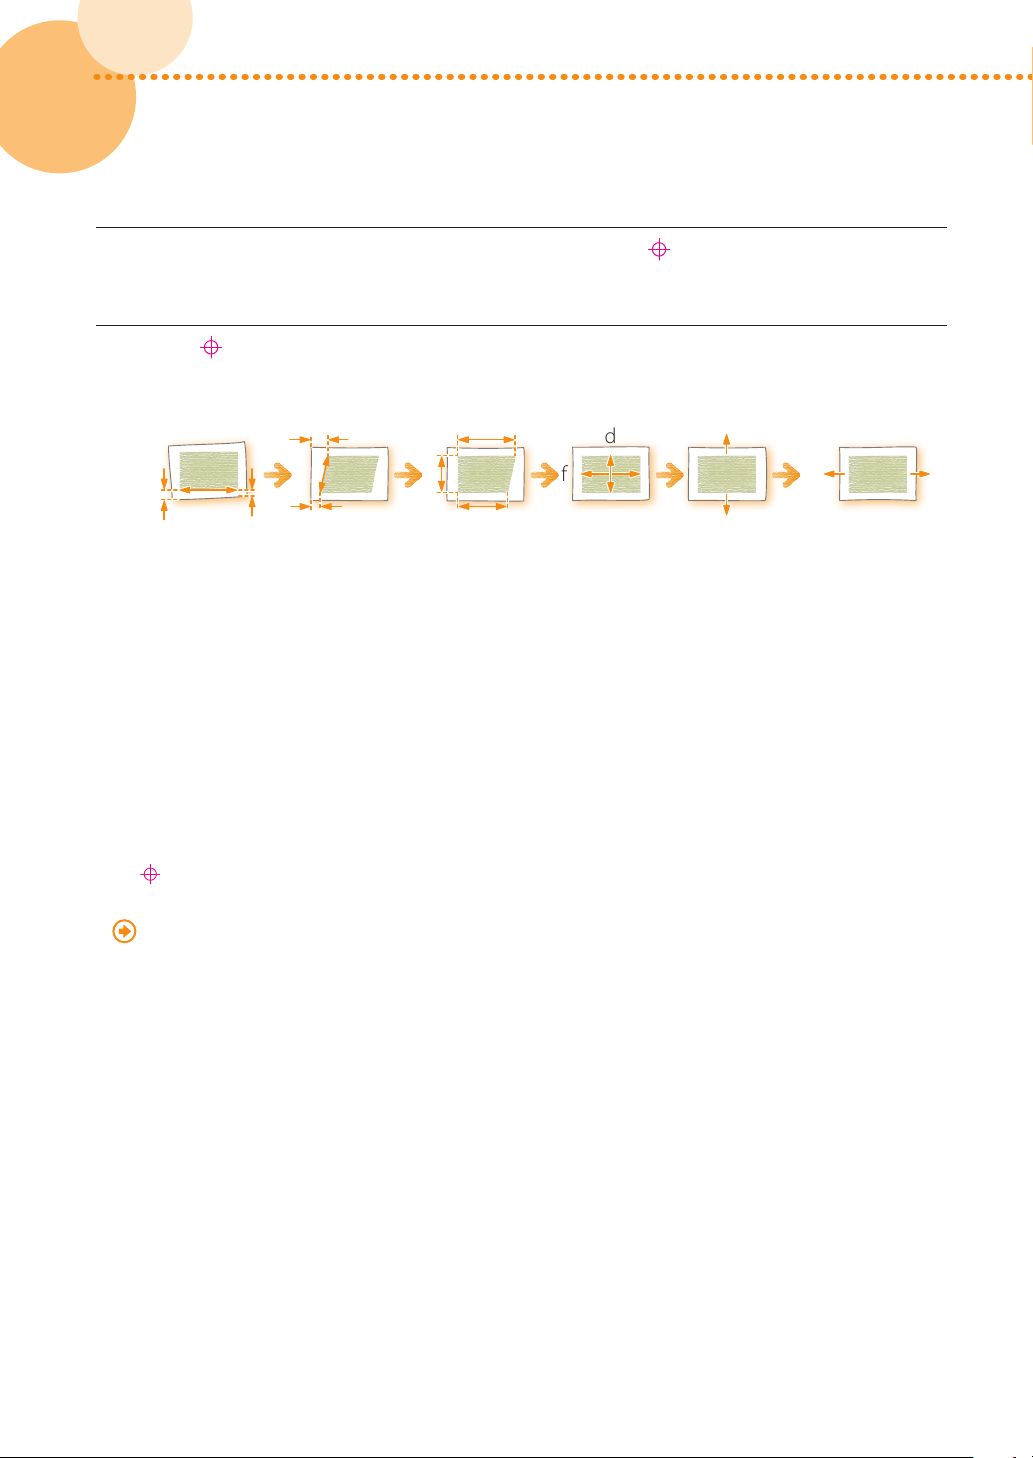
Print another test page and hold it up to a light to see if the (register marks) are in the same
+
NOTE
4
position on both sides of the paper�
If the (register marks) are not aligned, adjust the position of the image again in the sequence
5
shown below�
c
b
h
Correct
Trapezoid
Distortion
d
f
Adjust Zoom
Ratio
i
-
Adjust Position
of Left Edge
Register
e
-
Adjust Position
of Leading Edge
Register
2
(66 lb
a
c
i
Correct Image
Skew
•
Print about ten copies of the test page, and then measure the final page that is printed� This is done to improve
accuracy, because the position of the images that are printed first is inconsistent� If the humidity is high, print about
30 copies of the test page and measure the final page�
•
If you are adjusting the position of the image on coated paper or heavy paper that is more than 250 g/m
bond), print three to five test pages and use the average value� This is done because the position of the image on
heavy or coated paper is inconsistent�
•
Use the marks for each paper size when checking for misalignment of images� For example, if the test page is A3, use
register mark to check for misalignment�
the
A3
•
If you change the value in [Adj� Secondary Transfer Volt�], be sure to adjust the zoom ratio of the image�
"Paper Type Management" > "Adjusting the Image Position" in the User's Guide
j
h
g
Correct
Parallelogram
Distortion
+
84
84
imagePRESS C850/C750/C650/C65
Page 87
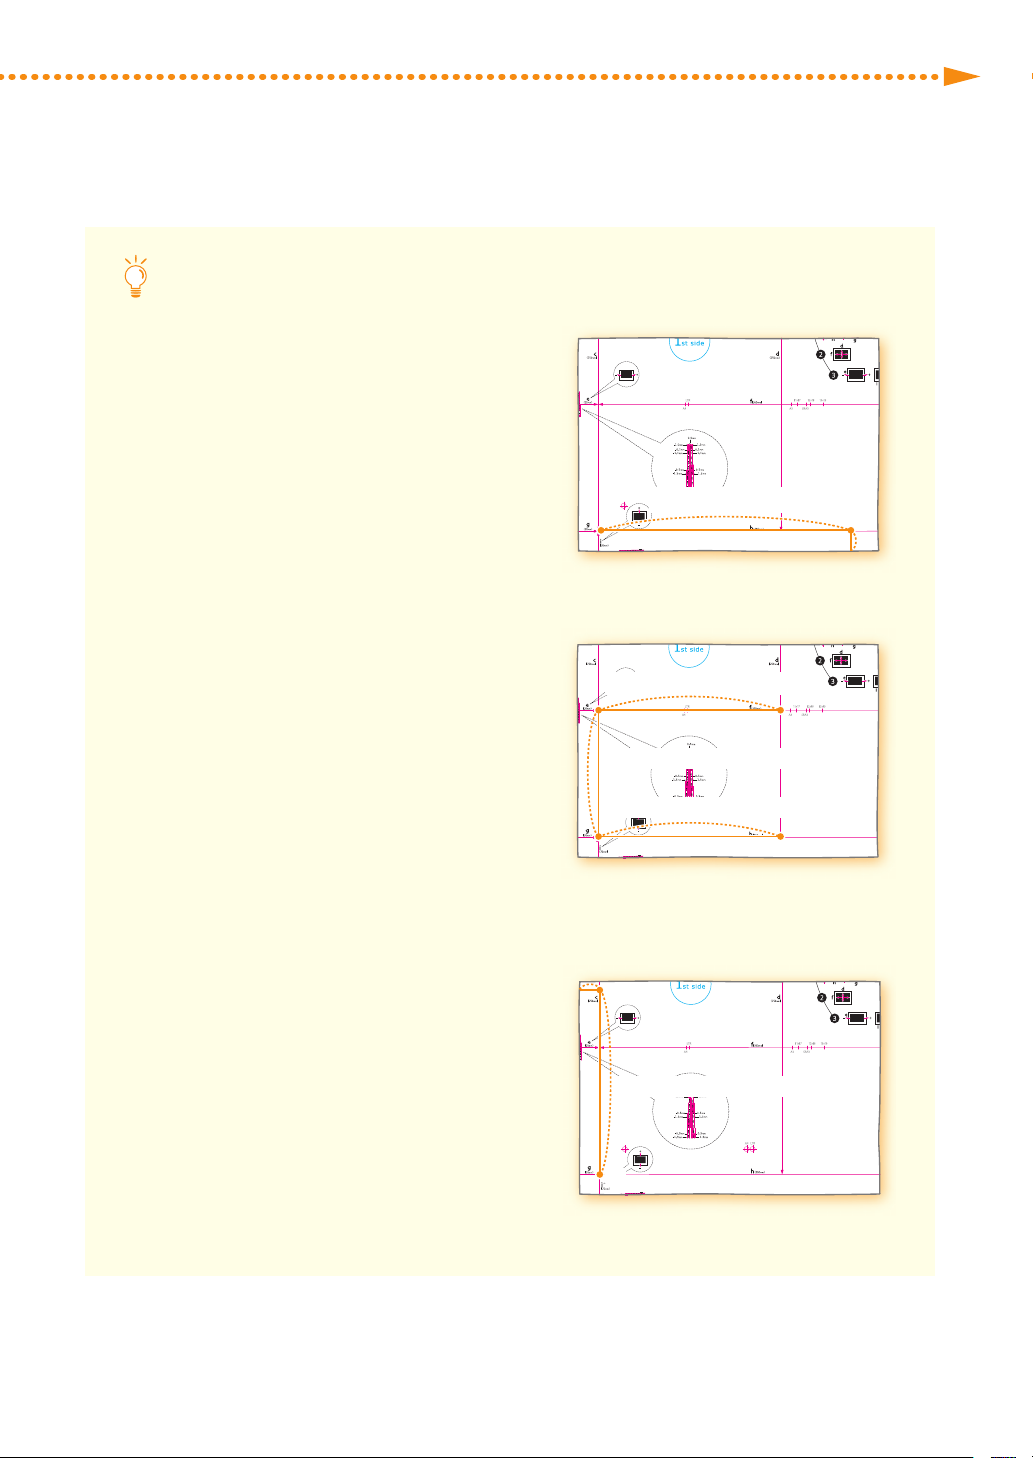
How to Fix Misalignment of Images
How to Correct Skew and Parallelogram/Trapezoid Distortion on a Small Test Page
Skew Correction
If the test page is so small that <j> is not
on the page, add an arbitrary mark <j'>
anywhere on the red line <h>� Then, enter
the distance from <j'> to the left edge of
the paper in [j]� Enter the distance from <i>
to <j'> in [h]�
Leading
Edge
Enter this distance in [h].
i
j'
Trapezoid Distortion Correction
If the test page is so small that the distances
b and h cannot be measured, add <c'>,
<b'> and <h'> as shown in the illustration
on the right� Enter these distances in [c], [b]
and [h] respectively�
Parallelogram Distortion Correction
If the test page is so small that <a> is not on
the page, add an arbitrary mark <a'> on the
red line <c>� Enter the distance from <a'>
to the leading edge of the paper in [a]� Enter
the distance from <g> to <a'> in [c]�
Leading
Edge
Leading
Edge
Left Edge
b' : Enter this distance in [b].
c': Enter this distance in [c].
h': Enter this distance in [h].
Left Edge
Enter this
distance in [a].
a'
Enter this distance in [c].
Enter this
distance in [j].
g
Left Edge
imagePRESS C850/C750/C650/C65
85
Page 88
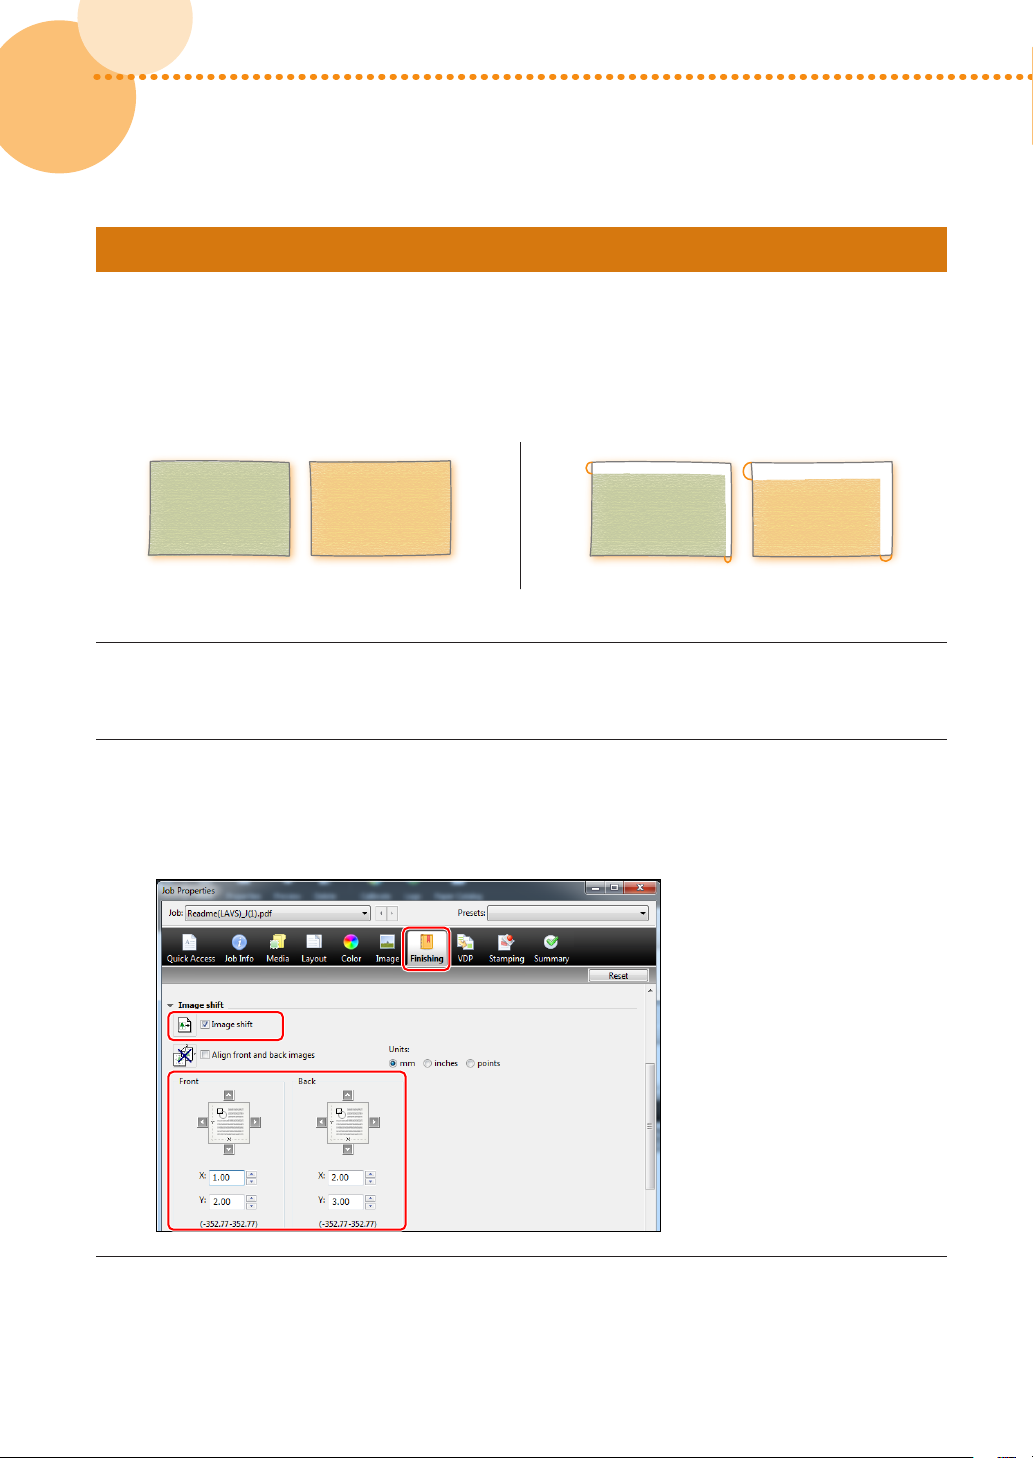
Step 3 Changing Print Settings on the Printer Driver
If you still have misalignment problems after you follow the procedures in steps 1 and 2, you can adjust the image
position by changing the print job settings on the printer driver� The procedure below is for imagePRESS Server�
Printing One Page on One or Each Side of Paper
▀
For example, if the printing results are different from what you expected as shown below, use the following procedure
to change the settings� These settings can be changed for each job�
2 mm 3 mm
Front Back
What you wanted to print What actually was printed
Double-click the job in Command WorkStation on the imagePRESS Server�
1
•
[Job Properties] is displayed�
Click the [Finishing] tab → select [Image shift] and enter the value in millimeters (inches) to
2
move the image horizontally (X direction) and vertically (Y direction)�
•
In this case, enter the value for each direction as shown below�
[Front] X: 1�00 mm, Y: 2�00 mm [Back] X: 2�00 mm, Y: 3�00 mm
Front
1 mm Back 2 mm
86
86
Click [Print]�
3
•
The machine starts printing� Check the printed page and confirm that the misalignment problem is solved,
and then start printing�
imagePRESS C850/C750/C650/C65
Page 89
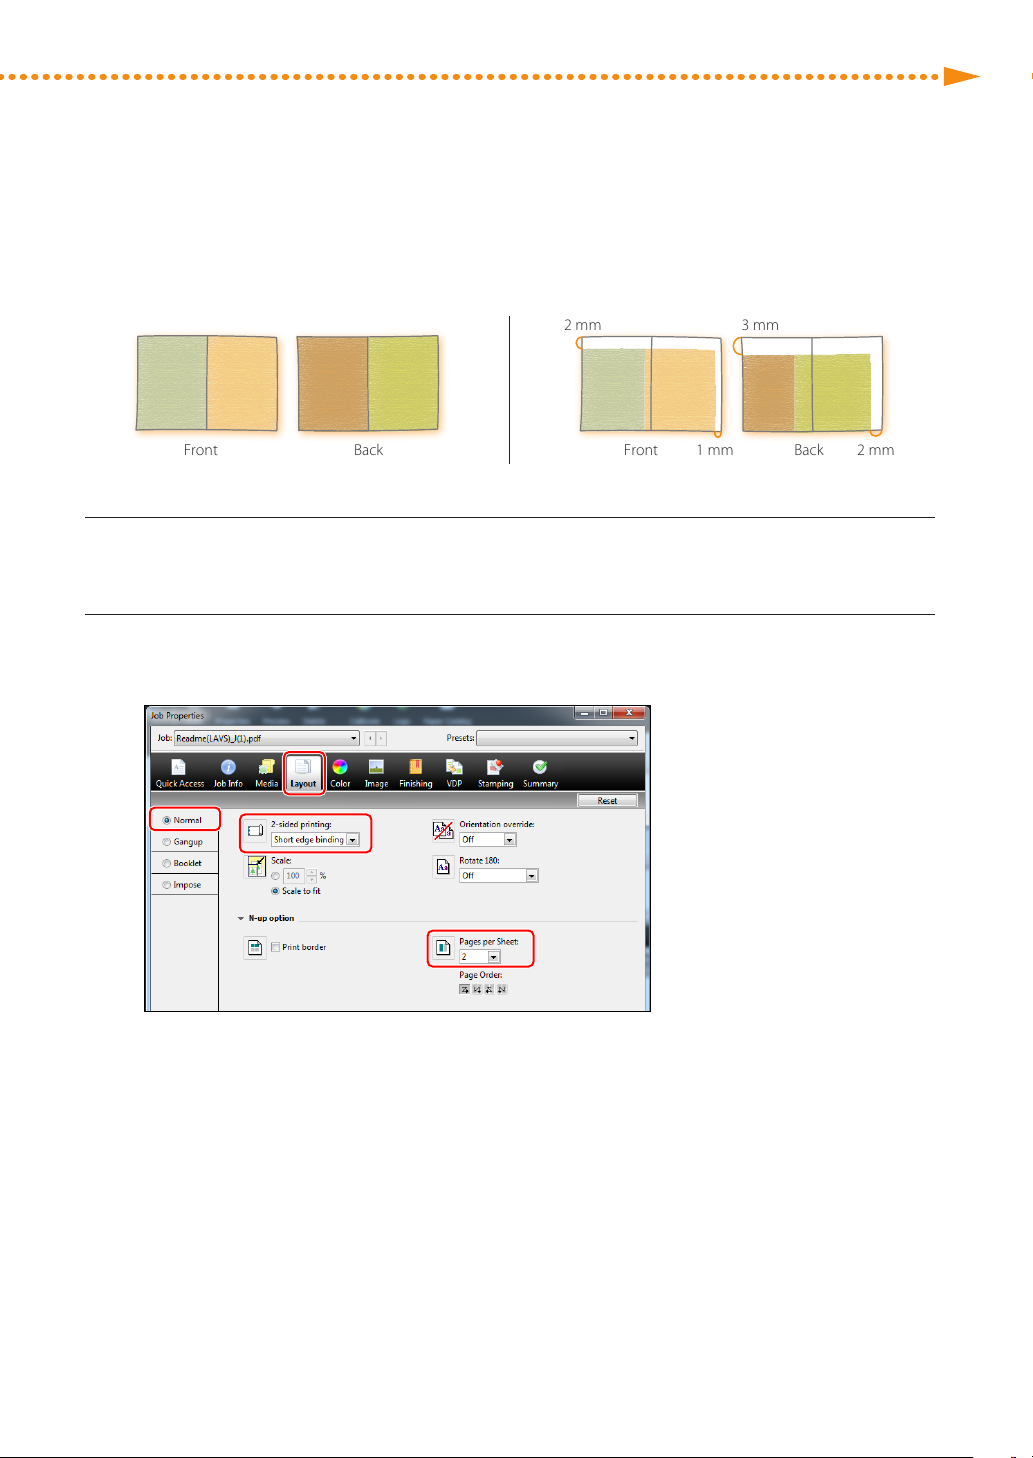
How to Fix Misalignment of Images
Front Back
Front
1 mm Back 2 mm
NOTE
Printing Multiple Pages on One or Each Side of Paper
▀
For example, if the printing results are different from what you expected as shown below, use the following procedure
to change the settings� These settings can be changed for each job�
2 mm 3 mm
What you wanted to print What actually was printed
Double-click the job in Command WorkStation on the imagePRESS Server�
1
•
[Job Properties] is displayed�
Click the [Layout] tab → select [Normal] → <Short edge binding> for [2-sided printing] and
2
<2> for [Pages per Sheet]�
If you select [Booklet], not [Normal], you cannot select [Image shift] in step 3� If you want to make a booklet,
you need to print the job and then saddle stitch it separately�
imagePRESS C850/C750/C650/C65
87
Page 90
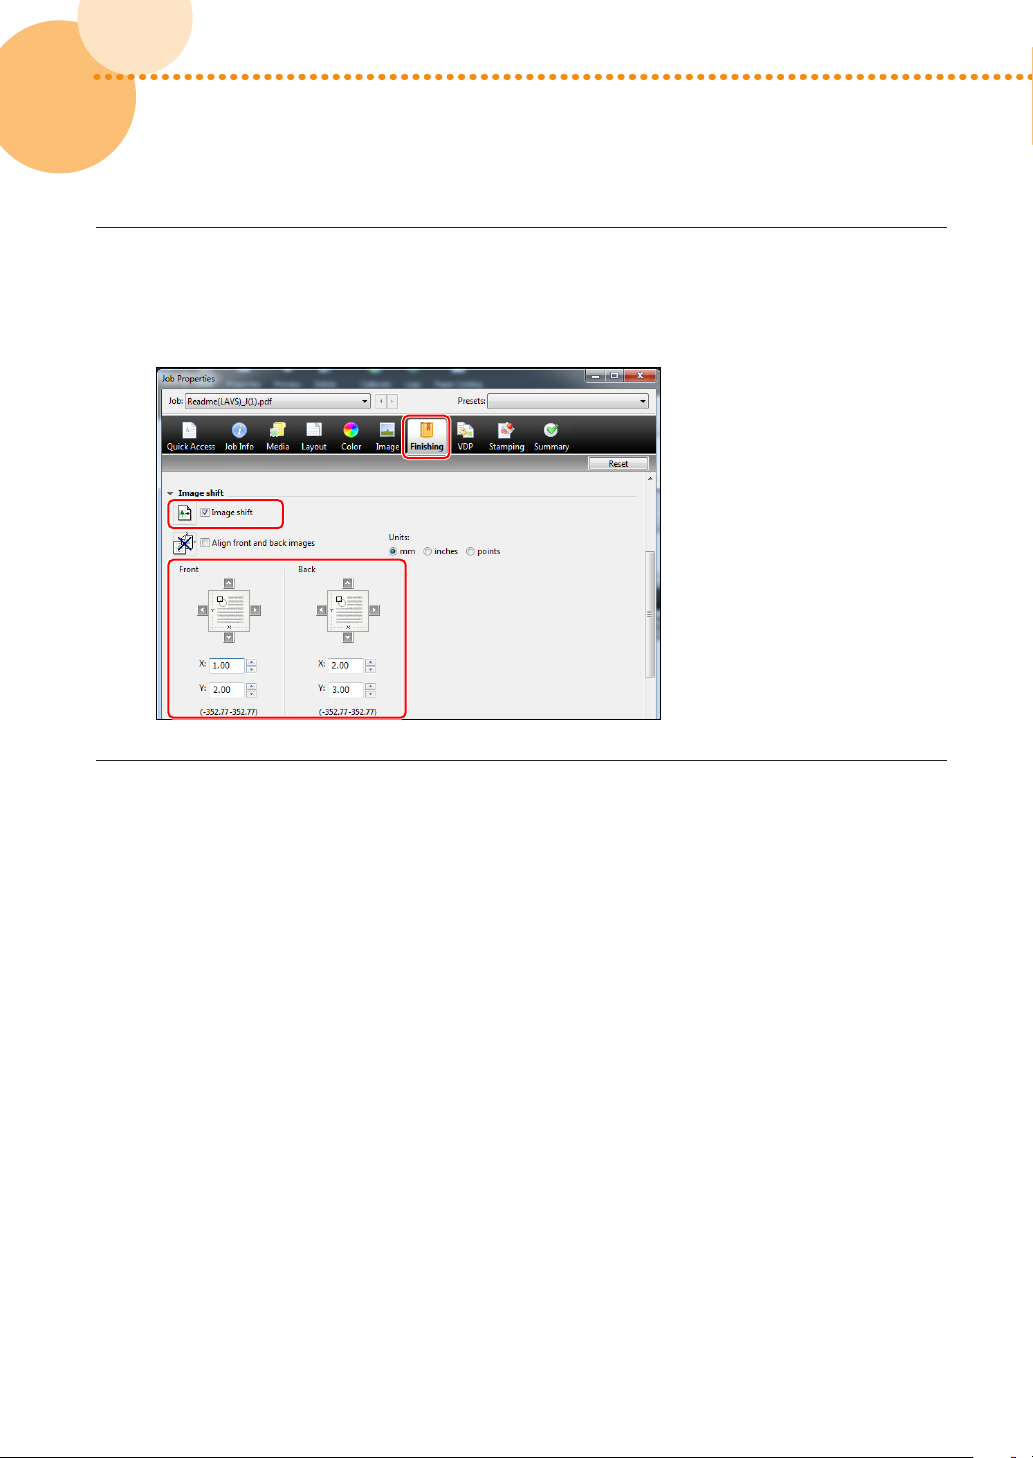
Click the [Finishing] tab → select [Image shift] and enter the value in millimeters (inches) to
3
move the image horizontally (X direction) and vertically (Y direction)�
•
In this case, enter the value for each direction as shown below�
[Front] X: 1�00 mm, Y: 2�00 mm [Back] X: 2�00 mm, Y: 3�00 mm
Click [Print]�
4
•
The machine starts printing� Check the printed page and confirm that the misalignment problem is solved,
and then saddle stitch the booklet separately if you want to make a booklet�
88
88
imagePRESS C850/C750/C650/C65
Page 91
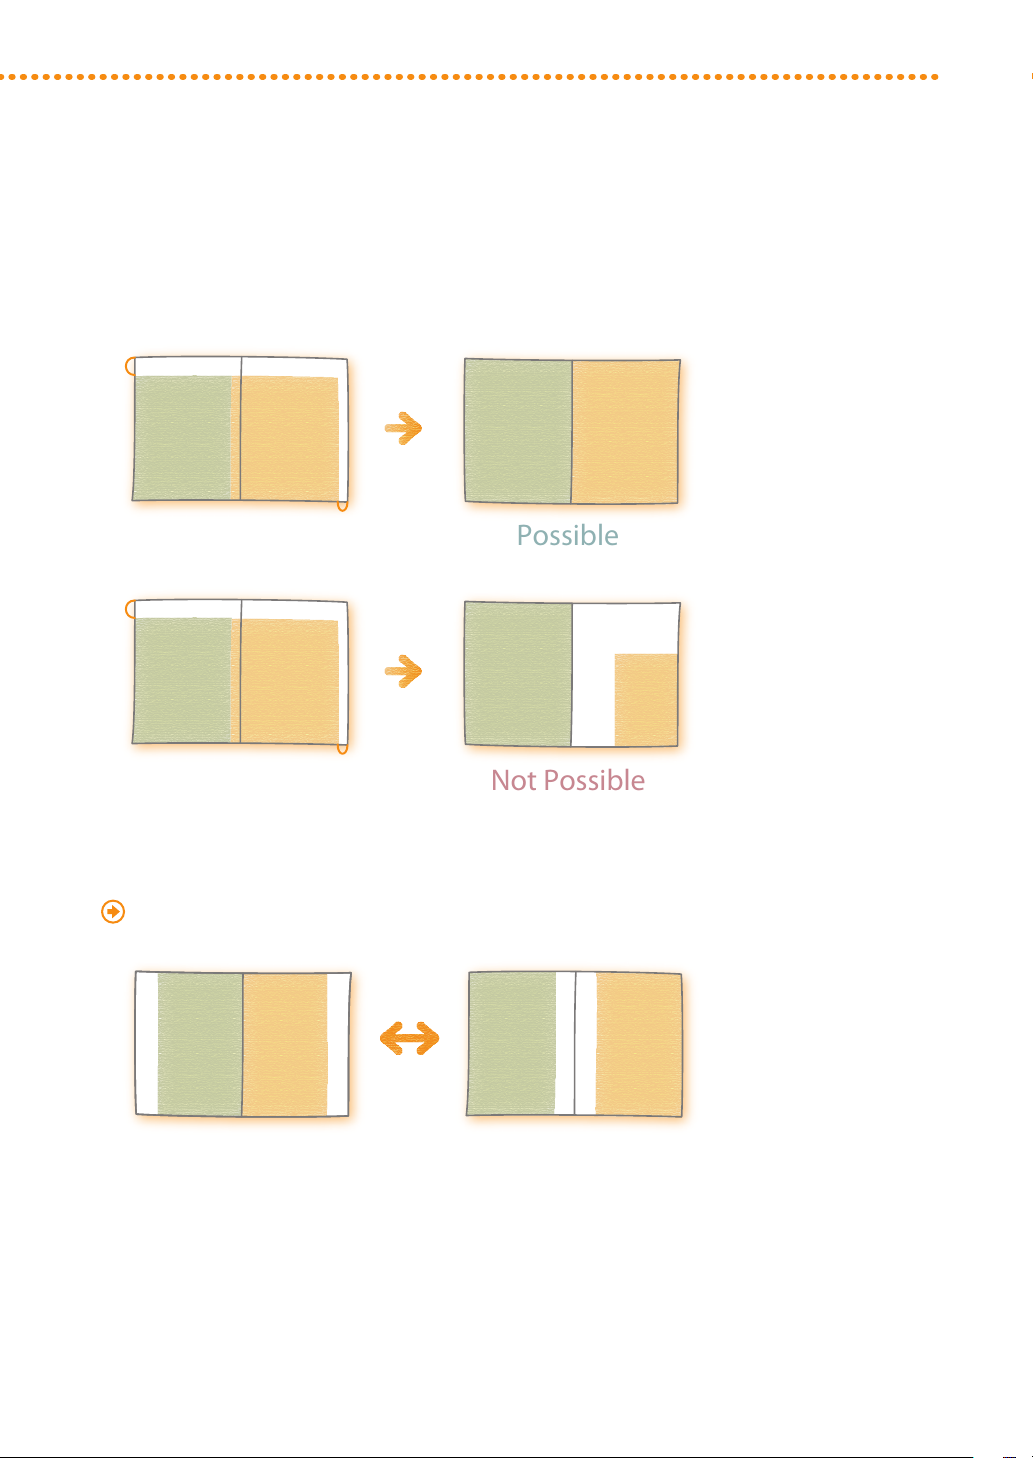
How to Fix Misalignment of Images
NOTE
Possible
Not Possible
•
You cannot move the image on each page after the imposition of images is completed� The laid out images on the
two pages move together as a single image�
2 mm
1 mm
2 mm
1 mm
•
If you select [Booklet] in step 2, you can move the image toward the fore-edge or the gutter of the page as shown in
the illustration below� For more information, see the following�
"Improving the Finish of Booklets" (p� 98)
imagePRESS C850/C750/C650/C65
89
Page 92

How to Fix Curled Printouts
If printouts are curled, follow the procedures described in this section to solve the
problems�
Step 1
Step 2
Eliminating the Basic Causes of Curled Paper (p� 90)
Changing Settings on the Machine According to Paper Characteristics (p� 91)
Step 1 Eliminating the Basic Causes of Curled Paper
Find the answers to your questions about how to solve your problems�
Q� Is the machine or paper located in a high or low humidity environment?
A� The humidity may cause the paper to expand or shrink� If you store the paper in an extremely high or
low humidity environment, the paper may curl before printing�
Solution
•
Keep the machine and paper in a room with steady temperature and humidity� If the temperature and humidity are
unstable, it may cause the paper to expand or shrink, resulting in curled paper�
•
For the appropriate temperature and humidity, see the Installation and Operating Environment Guidelines or the
Specialty Media Handling Guide�
•
Before you load paper, place the package of paper near the machine so it can fully acclimatize to the temperature
and humidity�
•
Unwrap the paper immediately before you load it into the machine�
Q� Are the edges of the image extremely dark?
A� If the edges of the image are extremely dark, the paper may tend
to curl during printing�
Solution
•
Use heavier paper�
•
Decrease the density in the very dark areas to reduce the difference in the
density between the dark and light areas�
90
90
imagePRESS C850/C750/C650/C65
Page 93
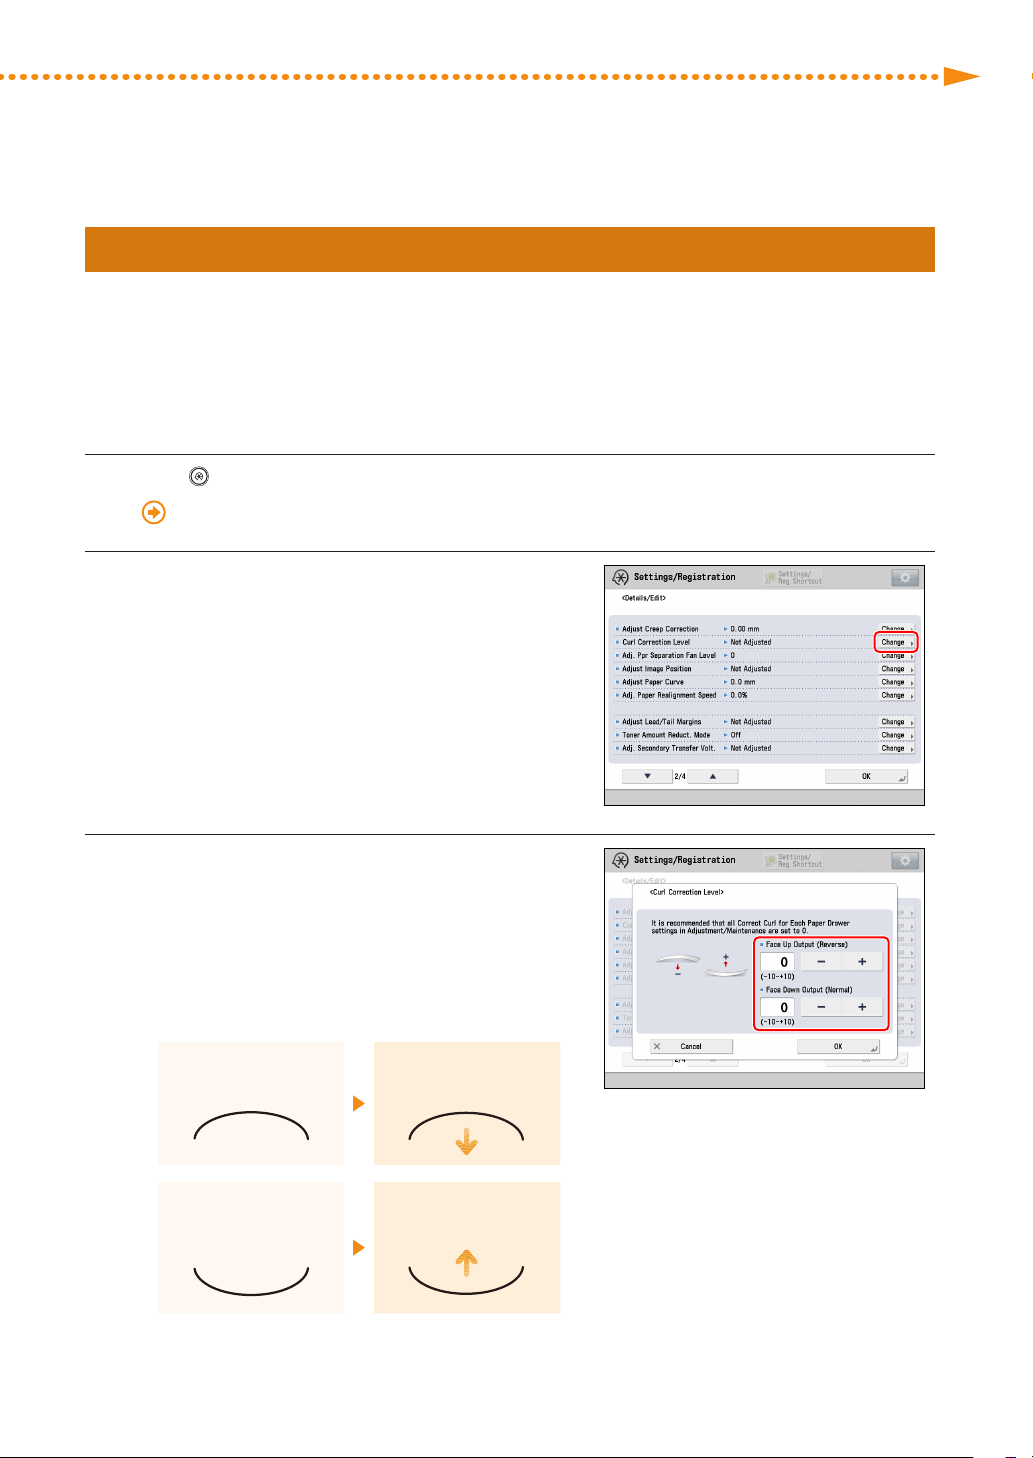
How to Fix Curled Printouts
IMPORTANT
Step 2
If you still have the same problem after you follow the procedures in step 1 "Eliminating the Basic Causes of Curled
Paper," change the settings to meet characteristics of the paper you are using�
This function may affect how paper is fed� Since increasing the value to a great extent may cause paper jams, we
recommend adjusting the values in small increments�
1
2
Changing Settings on the Machine According to Paper Characteristics
Press → [Preferences] → [Paper Settings] → [Paper Type Management Settings]�
"Paper Type Management" > "Adjusting the Level of Curl Correction" in the User's Guide
Select the paper type that you want to edit from
the list → press [Details/Edit] → [Change] for <Curl
Correction Level>�
Press [-] or [+] under [Face Up Output (Reverse)] or
3
[Face Down Output (Normal)] to correct the curl
correction level�
•
To determine the curl direction, watch the paper as it is
output to the output tray�
•
Adjust the curl correction level in the direction opposite
to the direction that the output paper is curled�
When the paper curls
downward
When the paper curls
upward
Press [-]�
Press [+]�
imagePRESS C850/C750/C650/C65
91
Page 94

Make test copies or prints on the paper for which you have adjusted the machine and check the
NOTE
4
condition of the printouts�
•
Repeat steps 1 to 4 to adjust the curl correction level until the paper does not curl when it is output�
The regular procedure is to set the level of curl correction in advance to suit the characteristics of each type of paper�
This is because the curl in the paper depends on the paper's materials and basis weight� However, if significant
changes in the environment, such as temperature and humidity, occur for some reason, and the changes temporarily
affect the condition of the paper, such as moisture content, the curl may not be corrected to your satisfaction� If this
happens, see the following and adjust the level of the curl correction for the paper source in which you have loaded
the paper for which you want to calibrate the machine�
"Adjustment for Image Quality and Finishing (Calibration)" > "Curl Correction for Each Paper Drawer" in the User's
Guide
How to Fix a Curl That Is Perpendicular to the Direction of Paper Feed
Printouts may not curl if you print on the back side of the paper� However, be careful of the paper's finish,
because the finish of the front and back sides of the paper may differ, depending on the type of paper� If
the printouts are still curled even if you print on the back side of the paper, follow the procedures described
above to adjust the curl correction level�
92
92
Feeding Direction
imagePRESS C850/C750/C650/C65
Page 95
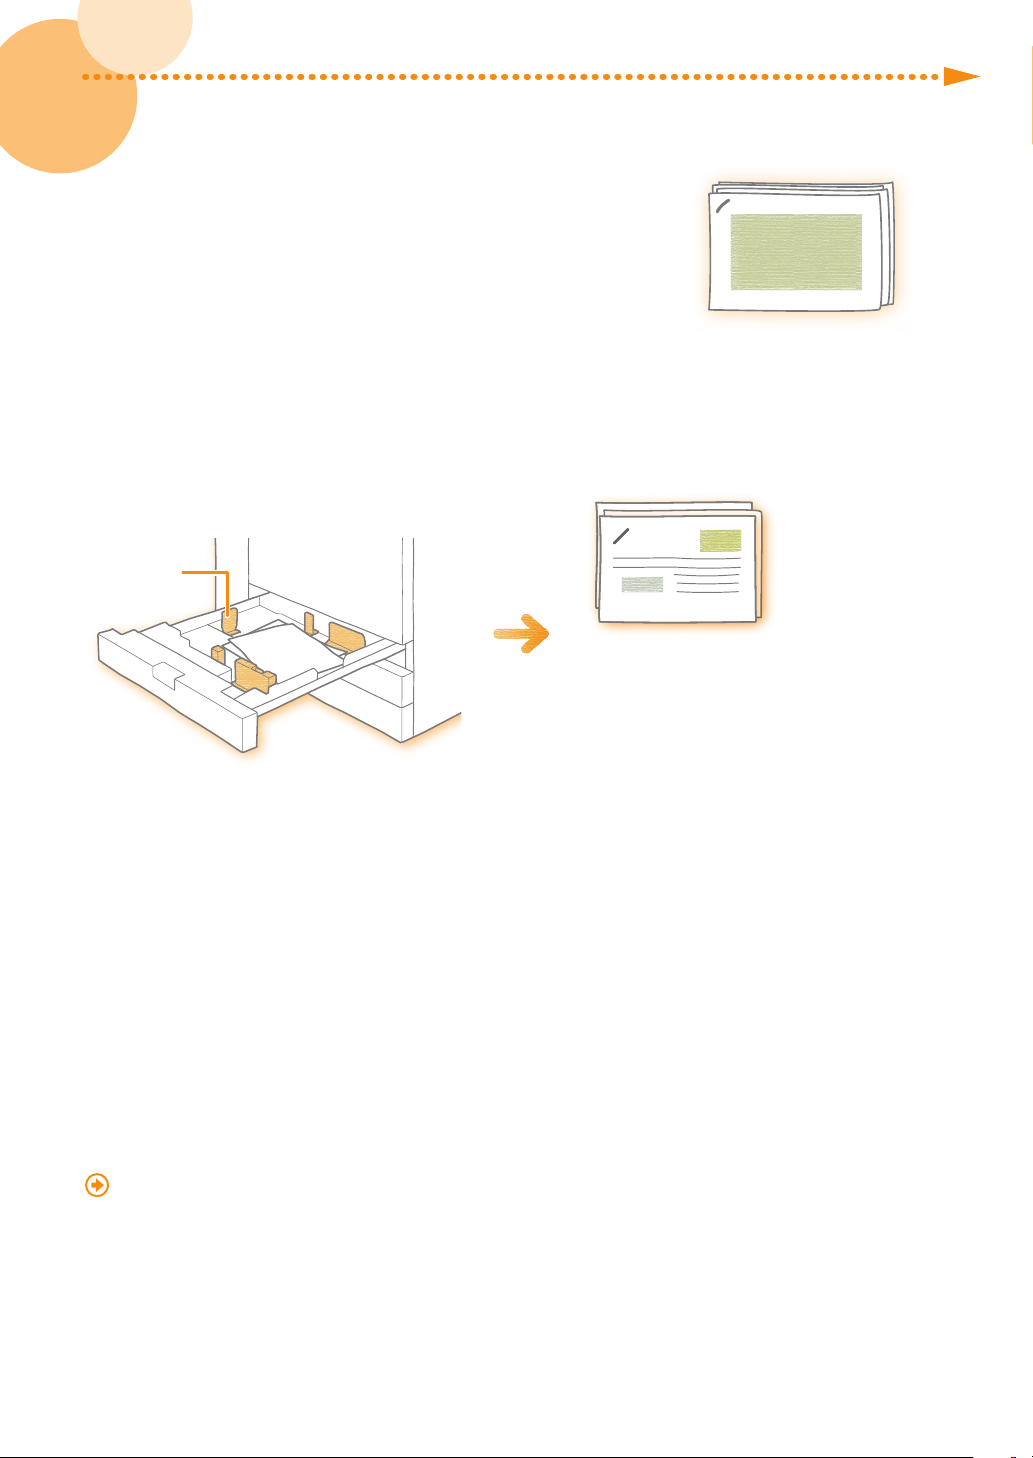
How to Align and Staple Printouts
NOTE
If the stapled papers are misaligned, follow the procedures below to solve the
problem�
Q� Did you load paper in the correct position?
A� If you place the paper guides in the wrong position or do not
align the edges of the paper before you load it, stapled papers may be misaligned�
Paper Guide
If you place the paper guides
in the wrong position, stapled
papers may be misaligned.
Solution
•
Align the edges of the paper and load it again�
•
Make sure that the paper guides are placed in the correct position�
Q� Does the paper shrink when it is output?
A� Depending on the paper, printed paper may shrink� As a result, the saddle stitch position may be
misaligned�
Solution
See the following and adjust the position to align the paper�
"Adjustment for Image Quality and Finishing (Calibration)" > "Paper Alignment When Stapling" in the User's Guide
Depending on the finisher you are using, the function mentioned above may not be available�
imagePRESS C850/C750/C650/C65
93
Page 96

Q� Is [Speed Priority] set to the mode for double stapling?
NOTE
A� You can set whether to give priority to speed or precision for double stapling� If you select speed
priority, the precision for double stapling may fall�
Solution
See the following and change the mode to [Precision Priority]�
"Adjustment for Image Quality and Finishing (Calibration)" > "Speed/Precision Priority for Double Staple" in the
User's Guide
Depending on the finisher you are using, the function mentioned above may not be available�
94
94
imagePRESS C850/C750/C650/C65
Page 97

How to Adjust the Saddle Stitch Position
NOTE
NOTE
When you make a saddle stitch booklet, if you notice the
following phenomena, you need to adjust the saddle stitch
position� Follow the procedures below to solve the problem�
•
The saddle stitch fold position is not aligned with the saddle
stitch position�
•
The saddle stitch fold and saddle stitch positions are not in the
center of the booklet�
Step 1
Step 2
Depending on the finisher you are using, the functions mentioned in this section may not be available�
Step 1
If the saddle stitch position is exactly in the center of the booklet but the saddle stitch fold position is not, skip this
step, go to the procedures in step 2 "Adjusting the Saddle Stitch Fold Position to the Center of the Booklet�"
1
Adjusting the Saddle Stitch Position to the Center of the Booklet
Press → [Preferences] → [Paper Settings] → [Paper Type Management Settings]�
"Paper Type Management" > "Adjusting the Saddle Stitch Position" in the User's Guide
Adjusting the Saddle Stitch Position to the Center of the Booklet (p� 95)
Adjusting the Saddle Stitch Fold Position to the Center of the Booklet (p� 97)
imagePRESS C850/C750/C650/C65
95
Page 98
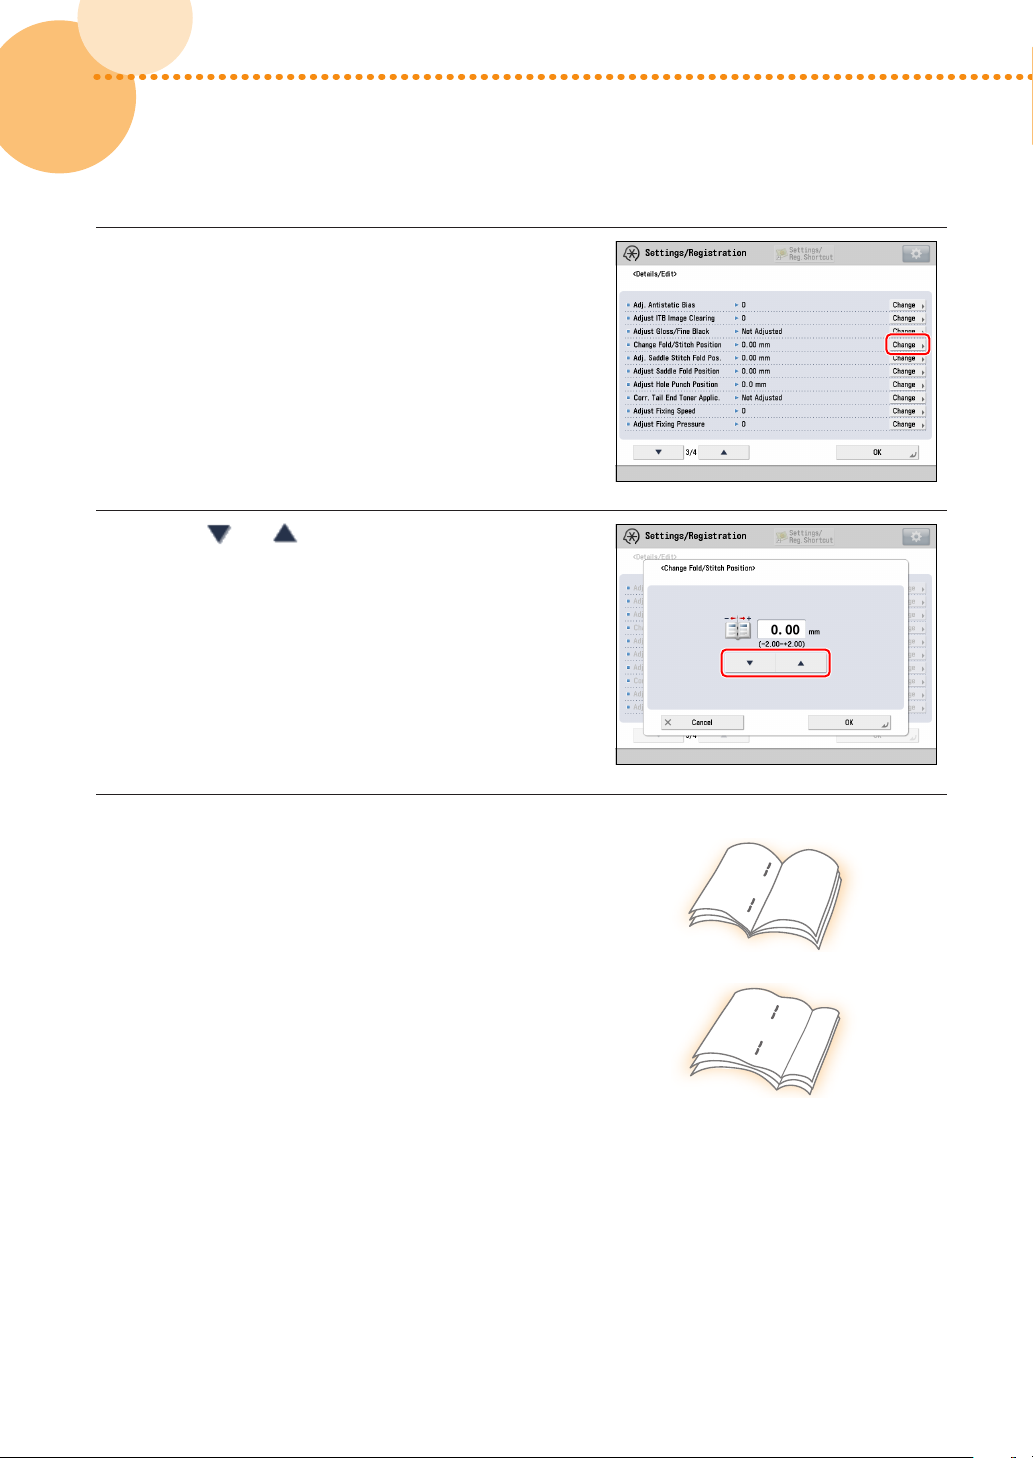
Select the paper type that you want to edit from
2
the list → press [Details/Edit] → [Change] for
<Change Fold/Stitch Position>�
3
Press [ ] or [ ] to adjust the saddle stitch
position�
•
If you want the saddle stitch position to shift to the right
while facing the printed side of the printout, increase the
setting value�
•
If you want the saddle stitch position to shift to the left
while facing the printed side of the printout, decrease
the setting value�
Make test prints and check the finish�
4
•
If the saddle stitch position is still not exactly in the
center of the booklet, repeat steps 1 to 4 until the saddle
stitch position is shifted exactly to the center of the
booklet�
96
96
•
If the saddle stitch position has shifted exactly to the
center of the booklet, but the saddle stitch fold position
is not, go to the procedures in step 2 "Adjusting the
Saddle Stitch Fold Position to the Center of the Booklet�"
imagePRESS C850/C750/C650/C65
Page 99
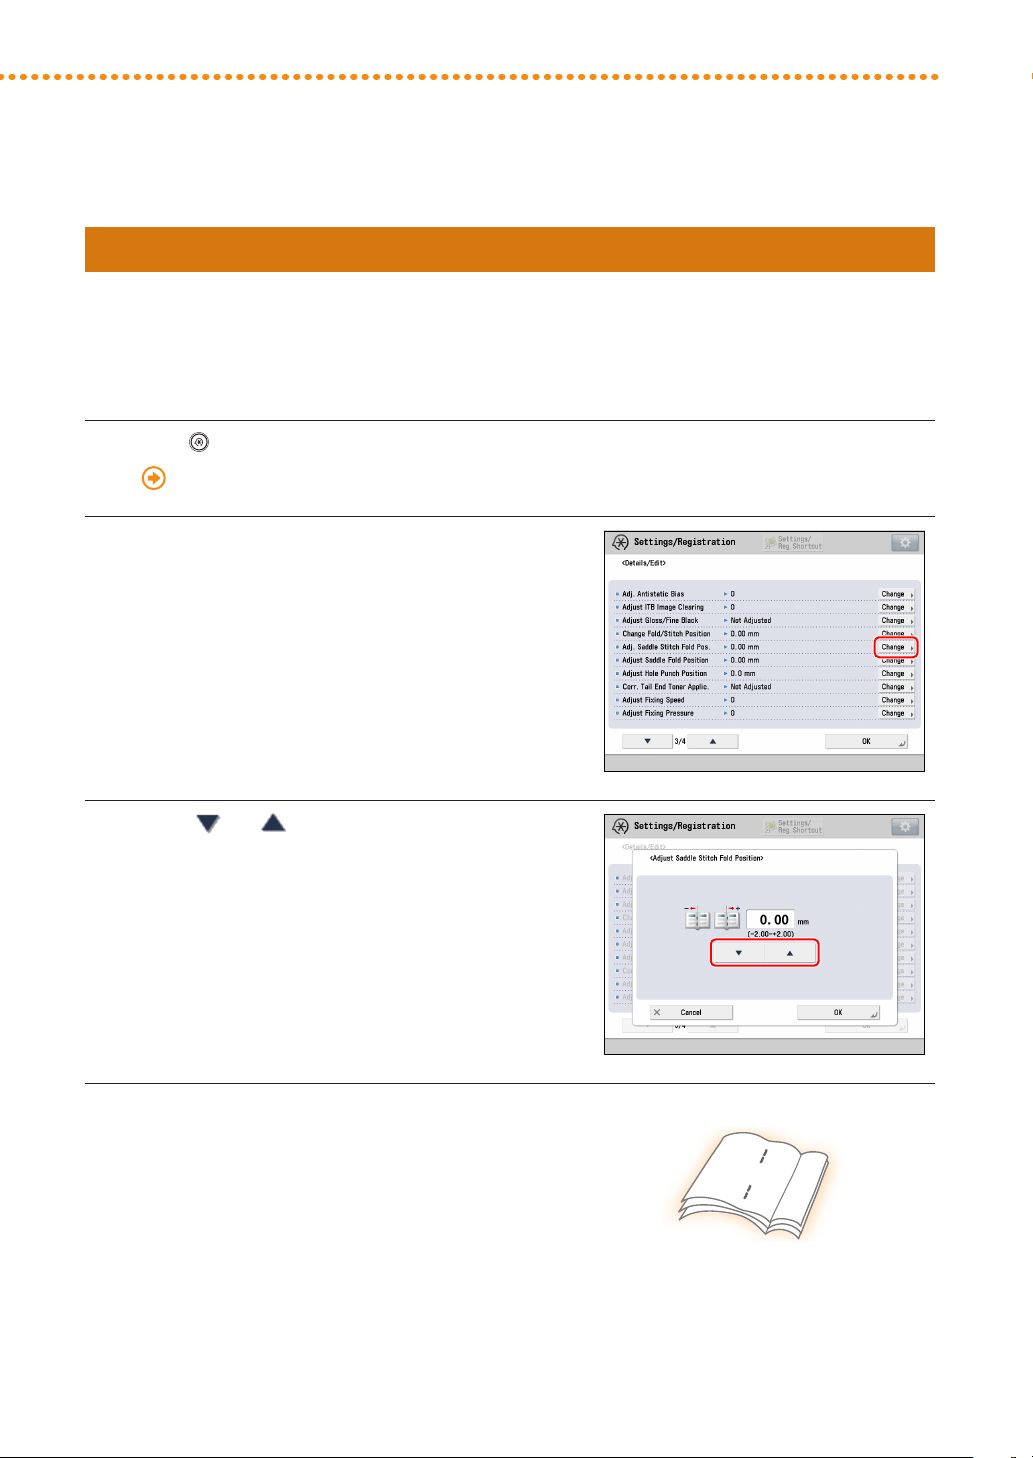
How to Adjust the Saddle Stitch Position
NOTE
Step 2
If the saddle stitch position is not exactly in the center of the booklet, follow the procedures in step 1 "Adjusting the
Saddle Stitch Position to the Center of the Booklet�"
1
2
3
Adjusting the Saddle Stitch Fold Position to the Center of the Booklet
Press → [Preferences] → [Paper Settings] → [Paper Type Management Settings]�
"Paper Type Management" > "Adjusting the Saddle Stitch Fold Placement" in the User's Guide
Select the paper type that you want to edit from
the list → press [Details/Edit] → [Change] for <Adj�
Saddle Stitch Fold Pos�>�
Press [ ] or [ ] to adjust the saddle stitch fold
position�
•
If you want the saddle stitch fold position to shift to
the right while facing the printed side of the printout,
increase the setting value�
•
If you want the saddle stitch fold position to shift to
the left while facing the printed side of the printout,
decrease the setting value�
Make test prints and check the finish�
4
•
If the saddle stitch position is exactly in the center of the
booklet, but the saddle stitch fold position is not, repeat
steps 1 to 4 until the saddle stitch fold position is shifted
exactly to the center of the booklet�
imagePRESS C850/C750/C650/C65
97
Page 100
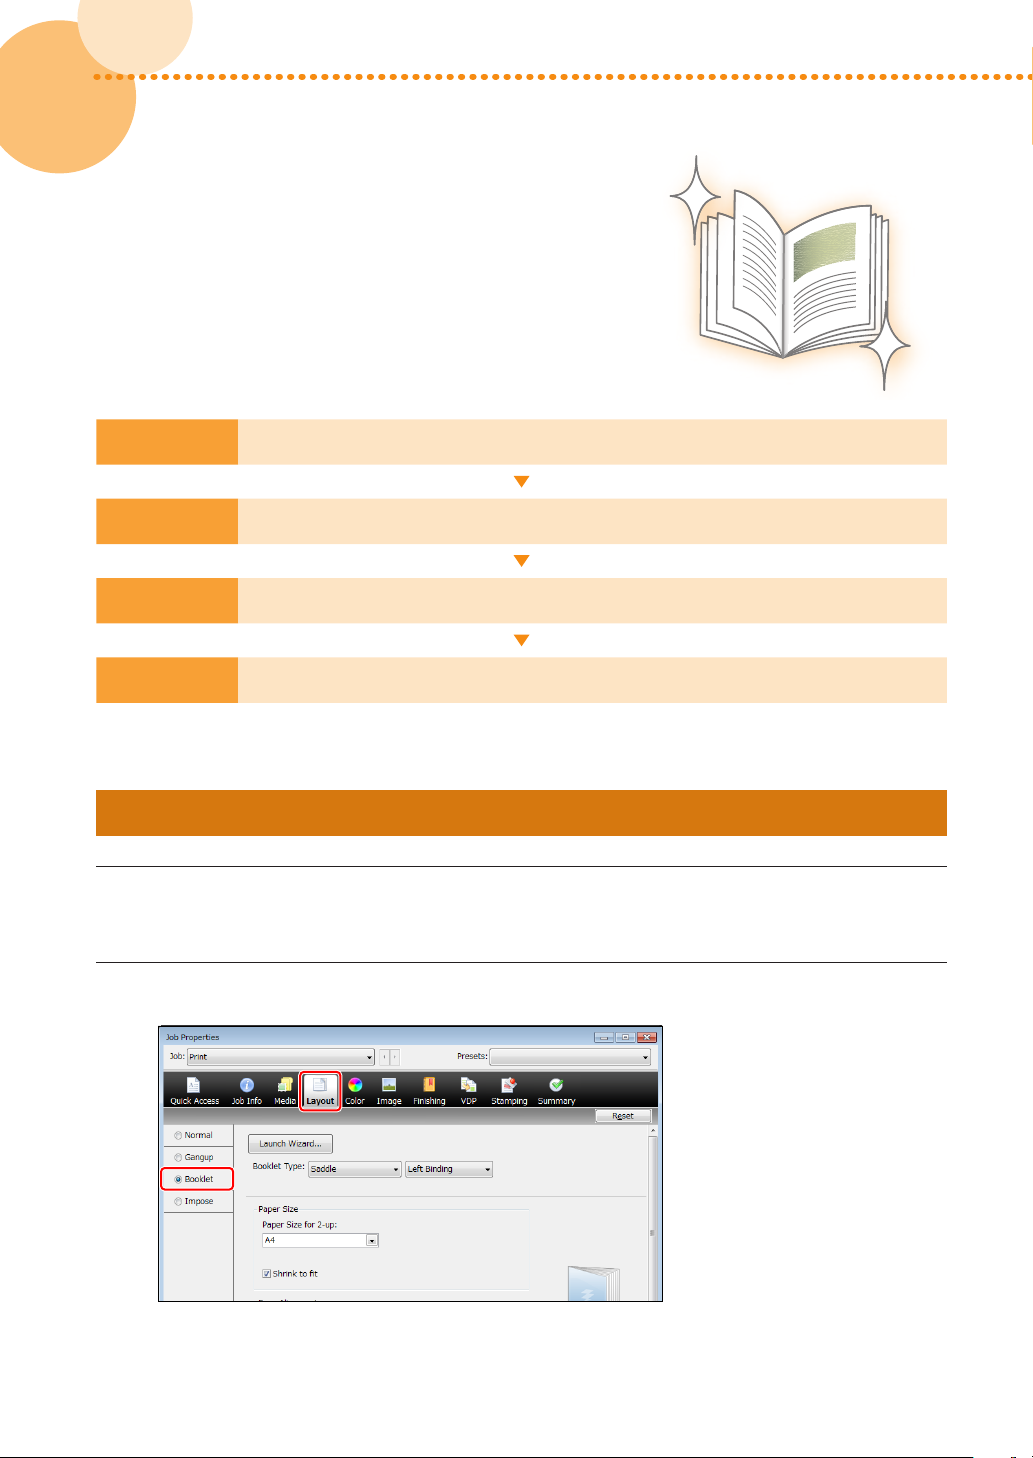
Improving the Finish of Booklets
If you are not satisfied with how your booklets are finished, such as the
page layout being different from what you expected, or the starting and/
or ending page of the main document not being printed on the pages
you expected, follow the procedures described in this section to specify
settings� This section explains how to specify each setting to make a saddle
stitch booklet that opens to the left (left binding) as an example�
Step 1
Step 2
Step 3
Step 4
Confirming the Basic Settings (p� 98)
Confirming the Position of Text and Images on the Page (p� 100)
Adjusting Margins with Creep Compensation (p� 102)
Checking the Cover Settings (p� 103)
Step 1 Confirming the Basic Settings
Double-click a job in Command WorkStation on the imagePRESS Server�
1
•
[Job Properties] is displayed�
Select the [Layout] tab, and then click [Booklet]�
2
98
98
imagePRESS C850/C750/C650/C65
 Loading...