

Page 1

Bubble Jet Direct
Reference Guide
Page 2

Canon Bubble Jet Direct Reference Guide.
Copyright
This guide is copyrighted by Canon U.S.A., Inc. with all rights reserved. Under the copyright laws,
this guide may not be reproduced in any form, in whole or in part, without the prior written consent
of Canon U.S.A., Inc.
© 2002 Canon U.S.A., Inc.
Disclaimer
The purpose of this guide is to aid end users by summarizing pertinent information about
Bubble Jet Direct. All statements, technical information and recommendations in this guide are
believed reliable, but the accuracy and completeness thereof are not guaranteed or warranted,
and they are not intended to be, nor should they be understood to be, representations or warranties
concerning the products described.
Specifications are subject to change without notice.
NERGY STAR
As an E
the E
NERGY STAR
partner, Canon U.S.A. Inc., has determined that this product meets
guidelines for energy efficiency.
All information regarding non-Canon products was compiled from publicly available information.
No representation is made regarding the accuracy thereof.
Trademarks
Canon is a registered trademark of Canon Inc. All other product and brand names are trademarks
of their respective owners.
Canon U.S.A., Inc.
One Canon Plaza
Lake Success, NY 11042
Printed in Thailand
Page 3

Contents
Chapter 1: Getting Started
What is Bubble Jet Direct? . . . . . . . . . . . . . . . . . . . . . . . . . . . . . . . . . 1
Connecting the Camera to the Printer . . . . . . . . . . . . . . . . . . . . . . . 1
Disconnecting the Camera from the Printer . . . . . . . . . . . . . . . . . . . 2
Chapter 2: Camera Overview
PowerShot S30/S40 Camera Front View . . . . . . . . . . . . . . . . . . . . . 4
PowerShot S30/S40 Camera Back/Bottom View . . . . . . . . . . . . . . 5
PowerShot S30/S40 Camera Controls . . . . . . . . . . . . . . . . . . . . . . . 6
PowerShot S200/S330 Camera Front View . . . . . . . . . . . . . . . . . . . 7
PowerShot S200/S330 Camera Back/Bottom View . . . . . . . . . . . . 8
PowerShot S200/S330 Camera Controls . . . . . . . . . . . . . . . . . . . . 9
PowerShot G2 Black Camera Front View . . . . . . . . . . . . . . . . . . . . 10
PowerShot G2 Black Camera Back/Bottom View . . . . . . . . . . . . . 11
PowerShot G2 Black Camera Controls . . . . . . . . . . . . . . . . . . . . . . 12
Chapter 3: Printing Your Photos
Printing a Photo . . . . . . . . . . . . . . . . . . . . . . . . . . . . . . . . . . . . . . . . 13
Cropping the Photo . . . . . . . . . . . . . . . . . . . . . . . . . . . . . . . . . . . . . 16
Printing Errors . . . . . . . . . . . . . . . . . . . . . . . . . . . . . . . . . . . . . . . . . 19
Chapter 4: Media Types for Digital Cameras
Index
. . . . . . . . . . . . . . . . . . . . . . . . . . . . . . . . . . . . . . . . . . . . . . . . . . . . . . . . . . . . . 23
iii
Page 4

Contents
iv
Page 5
Chapter 1: Getting Started
What is Bubble Jet Direct?
Bubble Jet Direct is a product feature that allows you to print photos directly from
a compatible Canon camera without the use of a computer.
The PowerShot cameras connect to the Bubble Jet printer through the cable
supplied with the printer.
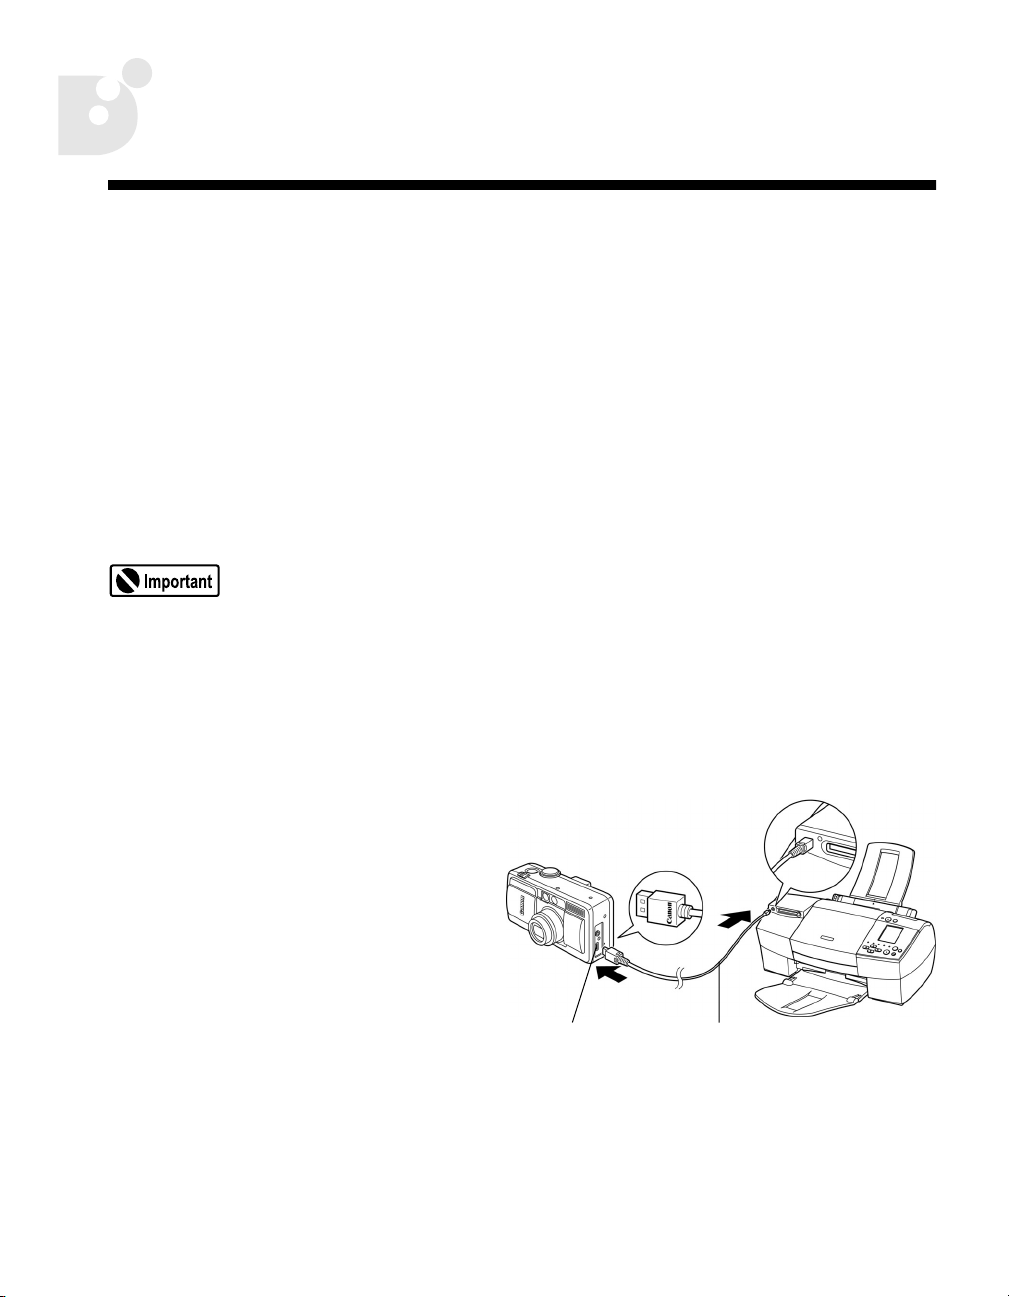
Connecting the Camera to the Printer
When printing photos from your camera on your Bubble Jet
printer, using the camera’s optional AC adapter to power the
camera is preferred. If you choose to use the battery pack, always
make sure it is fully charged, or the printing may stop when the
charge on the camera battery diminishes.
1.
Turn on the printer.
2.
Make sure the digital camera is turned off.
3.
Open the protective terminal
cover on the side of the
camera to locate the cable
jack. Then connect the camera
to the printer as shown,
making sure the “Canon” logo
on the cable faces the front of
the camera (lens side).
DIGITAL
Terminal
Digital Camera
Connection Cable
1
Page 6

Getting Started
Direct Interface
Cable DIF-B250
4.
S200/S330/G2 Black Users Only:
Turn on the digital camera.
5.
When connecting the PowerShot S30/S40/
S330 camera to a Bubble Jet printer:
•
Use the DIF-B100 direct interface cable
provided with the printer. When you insert
the cable, make sure the symbol on the
cable connector faces the rear of the camera.
When connecting the PowerShot S200/
G2 Black camera:
Use the DIF-B250 direct interface cable
•
provided with the printer. When you insert
the cable, make sure the symbol on the
cable connector faces the rear of the camera.
Set the camera’s Mode dial to .
Direct Interface
Cable DIF-B100
6.
The symbol appears on the camera LCD monitor, and the power/mode
indicator is lit (green) when the printer is properly connected to the camera.
See the
on installing paper and ink cartridges in the printer.
Quick Start Guide
for your Bubble Jet printer for instructions
Disconnecting the Camera from the Printer
1.
To remove the camera cable, disconnect the cable on the printer side and turn
off the digital camera.
When you detach the cable from the camera, hold the plug, and
do not pull by the cable.
When the printer is disconnected, the symbol disappears from the LCD
2.
monitor, and the camera reverts to standard replay mode.
2
Page 7

Chapter 2:
Camera Overview
The following digital cameras are shown and described in this chapter:
•
Canon PowerShot S30/S40 digital camera
Canon PowerShot S200/S330 Digital Elph camera
•
•
Canon PowerShot G2 Black digital camera
3
Page 8
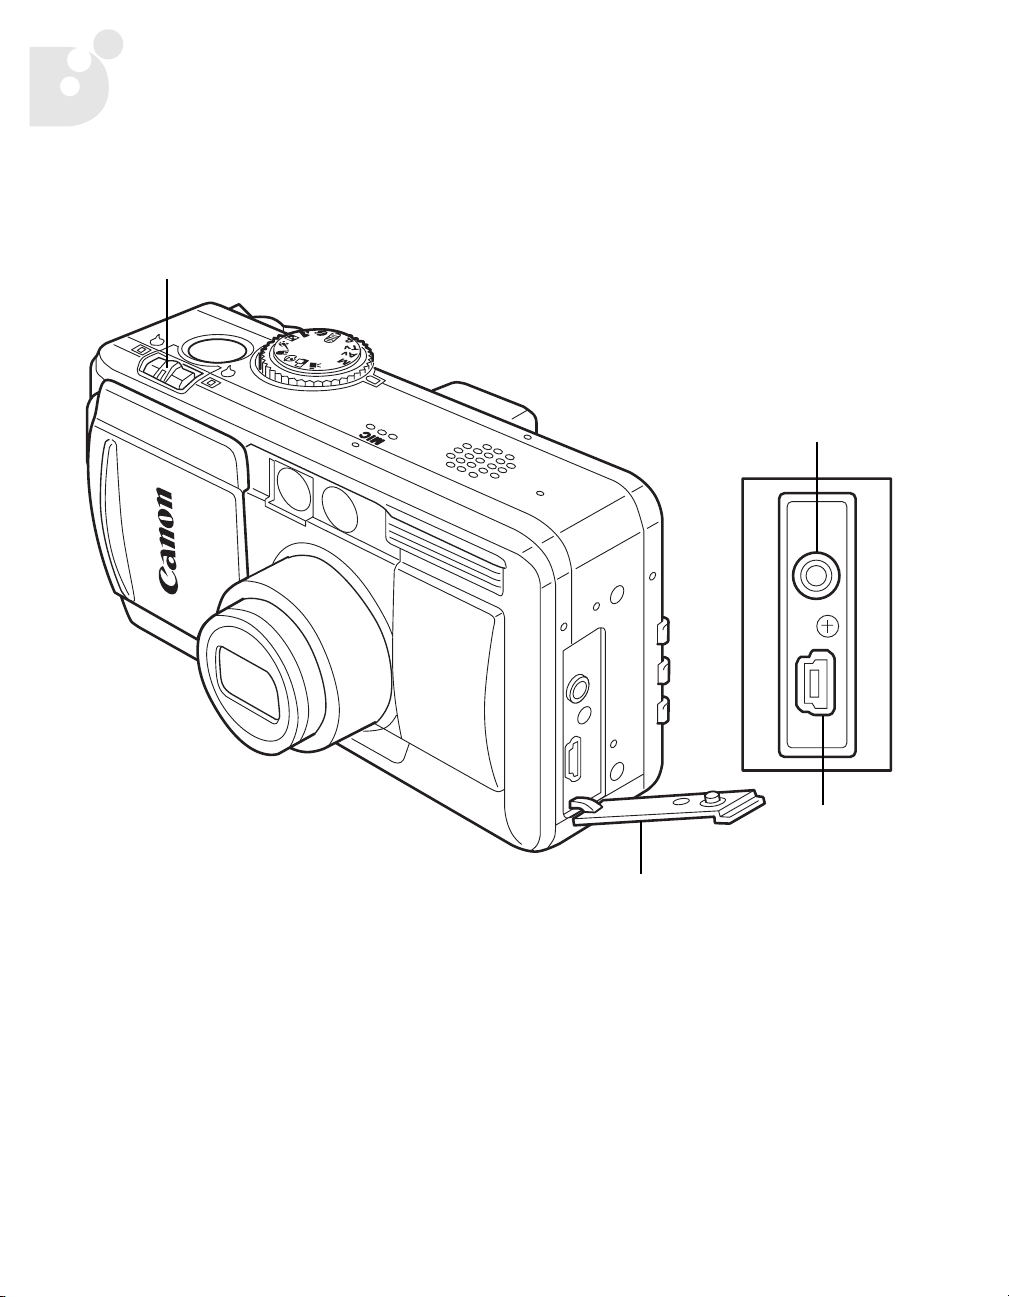
Camera Overview
PowerShot S30/S40 Camera Front View
See the
PowerShot S30/S40 Camera User Guide
ZOOM Lever
for more information.
A/V OUT
(Audio/Video Out)
Terminal
DIGITAL
Terminal
Terminal Cover
4
Page 9

Camera Overview
PowerShot S30/S40 Camera Back/Bottom View
See the
PowerShot S30/S40 Camera User Guide
for more information.
LCD Monitor
5
Page 10

Camera Overview
PowerShot S30/S40 Camera Controls
See the
PowerShot S30/S40 Camera User Guide
JUMP Button
for more information.
Multicontroller
LCD Monitor
6
MENU Button
DISPLAY Button
Page 11

Camera Overview
PowerShot S200/S330 Camera Front View
See the
PowerShot S200/S330 Camera User’s Guide
for more information.
S330 A/V OUT
Terminal
S330
DIGITAL
Terminal
Terminal Cover
S200 DIGITAL
Terminal
7
Page 12

Camera Overview
PowerShot S200/S330 Camera Back/Bottom View
See the
PowerShot S200/S330 Camera User’s Guide
for more information.
LCD Monitor
8
Page 13

PowerShot S200/S330 Camera Controls
Camera Overview
See the
PowerShot S200/S330 Camera User’s Guide
ON/OFF Button
ZOOM Lever
for more information.
MENU Button
SET Button
Mode Switch
9
Page 14

Camera Overview
PowerShot G2 Black Camera Front View
See the
PowerShot G2 Black Camera User’s Guide
for more information.
Terminal Cover
DIGITAL
Terminal
DIGITAL
DC IN 9.5V
10
DC IN Terminal
Page 15

Camera Overview
PowerShot G2 Black Camera Back/Bottom View
See the
PowerShot G2 Black Camera User’s Guide
JUMP
SET
WB
DISPLAY
BATT.OPEN
for more information.
CF OPEN
MENU
MENU Button
LCD Cover
SET Button
DISPLAY Button
11
Page 16

Camera Overview
PowerShot G2 Black Camera Controls
See the
PowerShot G2 Black Camera User’s Guide
JUMP
for more information.
Mode Dial
ZOOM Lever
MENU
SET
WB
DISPLAY
12
LCD Monitor
Page 17

Chapter 3:
Printing Your Photos
Use these procedures to print your photos from the PowerShot camera.
For the PowerShot S200/S330 cameras:
In the procedures in this chapter, the buttons on the
back of the camera are represented with these symbols:
Printing a Photo
Depending on the camera you are using, images may appear
slightly different than those shown in this section.
A photo can be printed when displayed in single replay mode or selected in index
replay mode.
Choose a photo using the (left) or (right)
1.
arrow on the camera, then press
Select the number of copies to print:
2.
a. In replay mode, press
[
Copies
arrow on the camera.
] option using the (up) or (down)
///.
SET
SET
.
and select the
b. Specify the desired number of copies
(from 1 to 99) using the (left) or (right)
arrow on the camera.
13
Page 18

Printing Your Photos
You can select from among the following print styles while your PowerShot
3.
camera is in replay mode and connected to a Bubble Jet printer:
Paper
Borders
Date
Borderless
Bordered
a. In the Print Setting menu, choose [
/ / / and press
b. Choose [
Paper
], [
Select the paper size from the following:
[Card #1], [Card #2], [Card #3], [LTR] or [A4].
For the usable paper type, refer to “Chapter 4: Media Types
for Digital Cameras” on page 21.
Prints right to the edges of the paper.
Prints with a border.
Prints the photo’s creation date.
Style
SET
.
Borders
] or [
using the (up) or (down) arrow.
c. Set the selection using the (left) or
(right) arrow.
] using
Date
]
14
Page 19

Printing Your Photos
d. Set the [
Paper
Choose [Card #1],
[Card #2], [Card #3],
[LTR] or [A4].
e. Press the
The setting is complete, and the Print Order
menu resumes.
If [
Borderless
print style, the center portion of the recorded
photo (the photo displayed on the LCD monitor)
is printed at an enlarged size. As a result, the
photo’s top, bottom and sides may be cropped
slightly. If you have not specified a trimming
setting, a frame appears around the area of the
photo to be printed, allowing you to check the
portion to be cropped.
Paper
MENU
button.
] or [
], [
Borders
Borders
Choose [Borderless] or
[Bordered].
Multiple
] or [
] is selected as the
Date
] settings.
Date
Choose [On] or [Off].
Print Area Frame
For the PowerShot S30/S40/G2 Black cameras:
•
Set the trimming (see page 16).
For the PowerShot S200/S330 cameras:
Set the printing area (see page 18).
•
If desired, you can crop your photo. See “Cropping the Photo” below, then
6.
continue with Step 7 below.
15
Page 20

Printing Your Photos
7. Choose [Print] using / / / and press SET.
8. The photo starts printing, and when it is completely
finished, the display reverts to standard replay mode.
You cannot print movies or photos
recorded in the RAW format.
Cancelling Printing
To cancel printing:
To cancel printing, press SET. A confirmation message appears.
1.
2. Select [OK] using the (left) or (right) arrow and press SET.
Cropping the Photo
You can specify the portion of a photo that gets printed.
Trimming the Photo with the PowerShot S30/S40/G2 Black
Cameras
Prior to trimming:
Set the print style (Paper, Borders and Date) before choosing the
trimming area.
1. In replay mode, press SET and choose [Trimming]
using the (up) or (down) arrow. Press SET.
The trimming frame appears at the center of the
photo. If a trimming setting has already been
selected, the frame appears around the previously
selected portion.
16
Page 21

2. Trim the photo.
To change the size of the trimming frame:
• Move the zoom lever toward or . The
trimming frame can be changed to a minimum
size of approximately half of the displayed photo
or to a maximum size that is virtually the same
size as the photo.
• You can cancel the trimming setting by moving
the zoom lever toward again when the
trimming frame is already set to the maximum
size.
To set the portion of the trimming frame:
• Move the trimming frame using / / / .
To rotate the trimming frame:
• You can rotate the trimming frame by pressing
the DISPLAY button.
Printing Your Photos
3. Press the MENU button to close the Print Setting menu.
The trimming setting applies only to one photo.
The trimming setting is cancelled when you do one of the following:
• Set the trimming settings for another photo.
• Close the print mode (when you turn the camera power off,
change the camera mode or detach the cable).
• Try to expand the trimming frame beyond its maximum size.
The selected [Paper] and [Borders] settings determine the shape
of the trimming frame.
Use the LCD monitor to set the trimming settings. The trimming
frame may not display correctly on a TV monitor.
Trimming Frame
17
Page 22

Printing Your Photos
Setting the Printing Area with the PowerShot S200/S330 Cameras
You can specify the portion of a photo that gets printed by setting the printing area.
Set the print style (Image, Paper, Borders and Date) before
choosing the printing area settings. The printing area can be set
when you have selected the [Borderless] and [Multiple] options.
1. In replay mode, press SET, and choose [Printing Area] using the (up) or
(down) button.
2. Select the area of the photo to be printed by using the desired setting:
• Prints the top section of the photo.
• Prints the center section of the photo.
• Prints the bottom section of the photo.
The actual printing area will shift right or left if you have set the
[Paper] size to [L], or if you have selected the [Multiple] print style.
The printing area setting applies only to one photo.
18
The printing area setting is cancelled when you do one of the following:
• Set the printing area for another photo.
• Close the print mode (when you turn the camera power off, change the camera
mode, cancel printing, or detach the cable).
Page 23

Printing Errors
An error message appears if an error occurs during the printing process. The
printing resumes automatically after you correct the error. If the error persists,
press SET and stop printing.
Printing Your Photos
For the PowerShot S30/S40/G2 Black Cameras:
• The [Continue] and [Stop] options may appear with some
error messages. The error number displays on the Operation
Panel of the printer. See the Quick Start Guide for your
Bubble Jet printer for the remedies corresponding to the
error numbers.
For the PowerShot S200/S330 Cameras:
• The [Resume] and [Stop] options may appear with some error
messages. The type of error and the type of printer will
determine whether the [Resume] and [Stop] options appear.
See your printer’s user’s guide for the remedies corresponding
to the error type.
19
Page 24

Printing Your Photos
20
Page 25

Chapter 4: Media Types for
Digital Cameras
Your Bubble Jet printer generates spectacular results for printing photographs,
especially when used with Canon specialty media. Print your photos with any of
the papers or cards listed in the table below.
Paper Type Digital Camera Setting
Photo Paper Pro (4 x 6 in / 101 x 152 mm) Card #1
Photo Paper Plus Glossy (4 x 6 in / 101 x 152 mm) Card #2
Photo Paper Pro Perforated (4 x 6 in / 101 x 152 mm) Card #3
Photo Paper Pro Letter Size (8.5 x 11 in) LTR
Photo Paper Pro A4 Size (223 x 355 mm, international letter size) A4
Canon Photo Paper Pro (4" x 6"): Made of the same material as Photo Paper Pro,
this borderless photo-size paper is intended for printing images that cover the
entire surface of the card.
Canon Photo Paper Plus Glossy (4" x 6"): This is a thick paper with a glossy
water-resistant coating and provides superior color reproduction. It is ideal for
printing high quality photographs.
Canon Photo Paper Pro Perforated (4" x 6"): Made of the same material as
Photo Paper Pro, this perforated photo-size paper is intended for printing images
that cover the entire surface of the card, without a white border.
21
Page 26

Media Types for Digital Cameras
22
Page 27

Index
A
A/V Out Terminal .............................................4
B
border print style .......................................... 15
borderless print style..................................... 15
borders print style....................................14, 15
Bubble Jet Direct ..............................................1
Bubble Jet printer
borders print style
date print style........................................... 15
disconnecting from camera .............................2
installing cartridges.......................................2
installing paper.............................................2
paper print style......................................... 15
print styles available................................... 14
print styles for ........................................... 15
...................................... 15
C
cables
DIF-B100
DIF-B250......................................................2
camera
disconnecting from printer
power when printing ......................................1
camera back view
PowerShot G2 Black
PowerShot S200/S330...................................8
PowerShot S30/S40 ......................................5
camera controls
PowerShot G2 Black
PowerShot S200/S330...................................9
PowerShot S30/S40 ......................................6
camera front view
PowerShot G2 Black
PowerShot S200/S330...................................7
PowerShot S30/S40 ......................................4
......................................................2
..............................2
.................................... 11
.................................... 12
.................................... 10
cancelling
printing
printing area.............................................. 18
trimming................................................... 17
copies, printing multiples............................... 13
.................................................... 16
D
date print style ........................................14, 15
DC In Terminal .............................................. 10
DIF-B100 cable ................................................2
DIF-B250 cable ................................................2
Digital Terminal .....................................1, 4, 10
disconnecting from printer ................................2
DISPLAY button....................................6, 11, 17
E
errors, printing ............................................. 19
F
frame .......................................................... 16
rotating .................................................... 17
setting the size .......................................... 17
shape....................................................... 17
I
indexed replay.............................................. 13
indicator, power/mode .....................................2
J
JUMP button....................................................6
L
LCD cover .................................................... 11
LCD monitor ..........................................5, 8, 12
23
Page 28

Index
M
media, supported ..........................................21
MENU button ............................ 6, 9, 11, 15, 17
Mode dial............................................. 2, 9, 12
movies......................................................... 16
Multicontroller ................................................6
multiple copies ............................................. 13
O
On/Off button .................................................9
P
paper
Photo Paper Plus Glossy (4" x 6")
Photo Paper Pro (4" x 6").............................. 21
Photo Paper Pro A4 ..................................... 21
Photo Paper Pro Letter .................................21
Photo Paper Pro Perforated (4" x 6")............... 21
paper print style...................................... 14, 15
power, when printing ....................................... 1
power/mode indicator...................................... 2
Print Setting menu.........................................15
print styles ...................................................14
border....................................................... 15
borderless .................................................15
borders ............................................... 14, 15
date.................................................... 14, 15
paper.................................................. 14, 15
printing
cancelling
errors........................................................ 19
printing area.................................................18
cancelling..................................................18
selecting ................................................... 18
.................................................. 16
.................. 21
S
SET button................................................ 9, 11
single image replay........................................ 13
standard replay mode ................................ 2, 16
T
Terminal Cover ...................................... 4, 7, 10
trimming ...................................................... 16
cancelling..................................................17
frame shape............................................... 17
rotating the frame ....................................... 17
setting frame size ....................................... 17
trimming frame, moving ................................. 17
Z
Zoom lever ........................................... 4, 9, 12
R
RAW format .................................................. 16
replay
indexed
single image .............................................. 13
24
..................................................... 13
 Loading...