

Page 1

Photo Printer
series
Getting Started
Read Me First
Make sure to read this manual before using the printer. Please keep it in hand for future reference.
Page 2
Contents
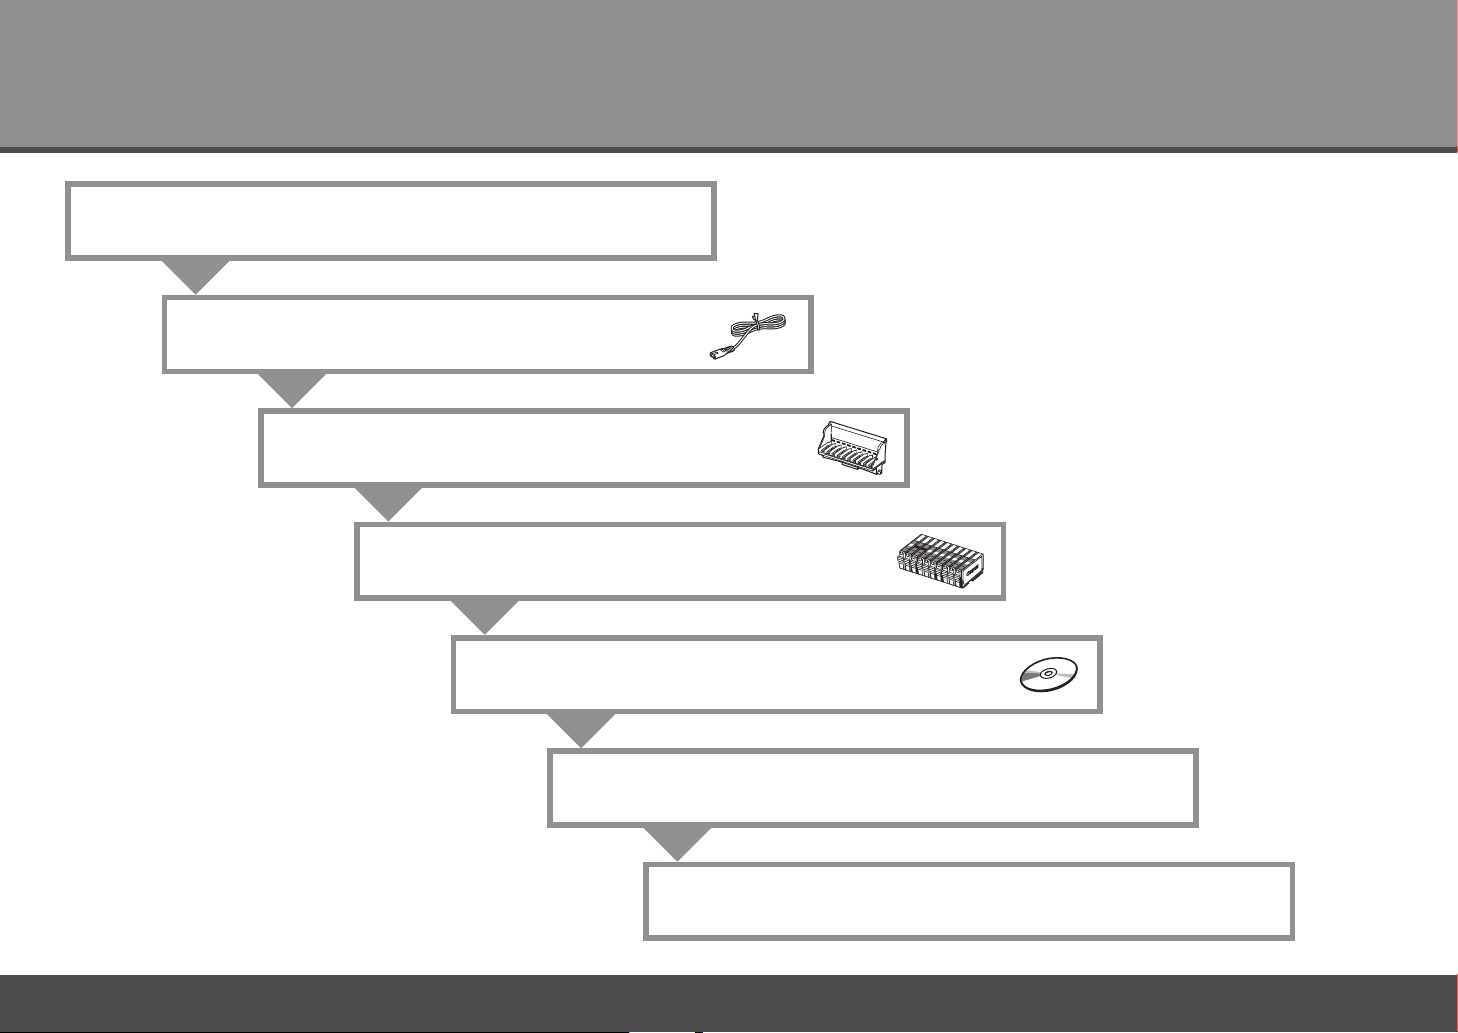
Preparation
1
2
Turn the Power On
Install the Print Head
3
Install the Ink Tanks
4
Install the Software
5
Loading Paper
6
After Installing the Printer
Page 3

Sy mb ol s■
The following symbols are used to mark important instructions. Observe these instructions.
Caution
Instructions that, if ignored, could result in personal injury or material damage.
Instructions that must be observed for safe operation.
Additional explanations.
Descriptions for operations that take some time to complete.
Microsoft is a registered trademark of Microsoft Corporation.•
Windows is a trademark or registered trademark of Microsoft Corporation in the U.S. and/or other countries.•
Windows Vista is a trademark or registered trademark of Microsoft Corporation in the U.S. and/or other countries.•
Macintosh and Mac are trademarks of Apple Inc., registered in the U.S. and other countries.•
Adobe, Adobe Photoshop, Adobe RGB and Adobe RGB (1998) are either registered trademarks or trademarks of Adobe Systems Incorporated in the United States and or other countries.•
Model Number: K10336 (Pro9500 Mark II)
1
Page 4
Preparation
1
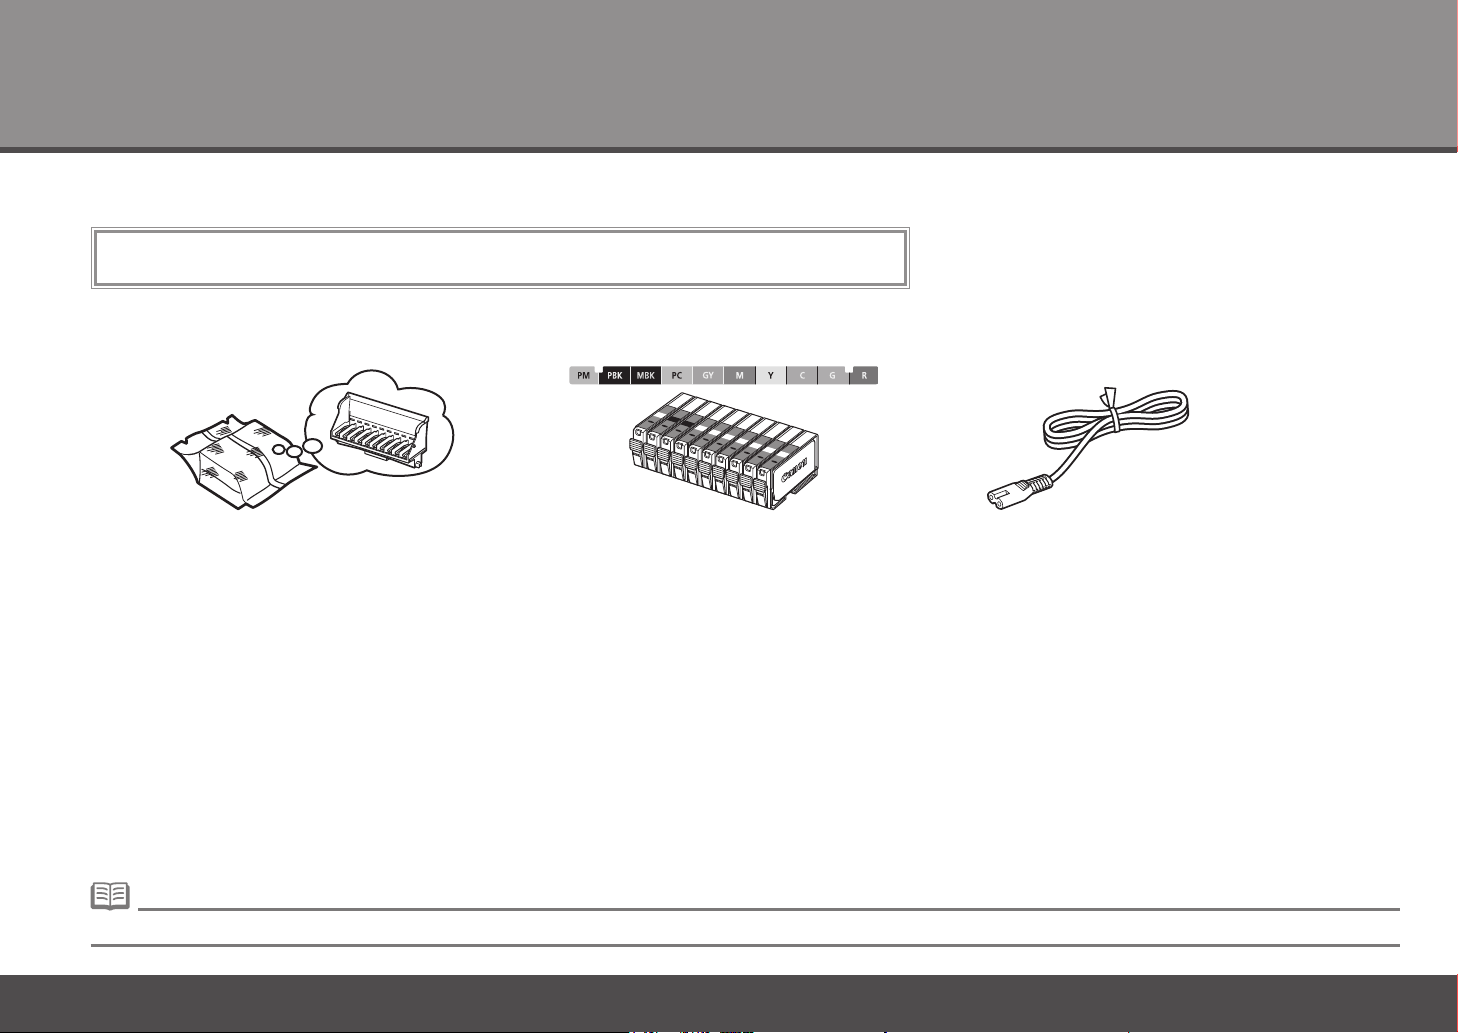
Ch ec k th e In cl ud ed I te ms■
Before turning on the printer, remove all the orange tapes and the protective sheets.
Print Head ink tanks
Manuals•
Setup CD-ROM (containing the drivers, applications and on-screen manuals)•
Warranty•
A USB cable is necessary to connect the printer with your computer.•
2
power cord
Page 5
61 2 3 4 5
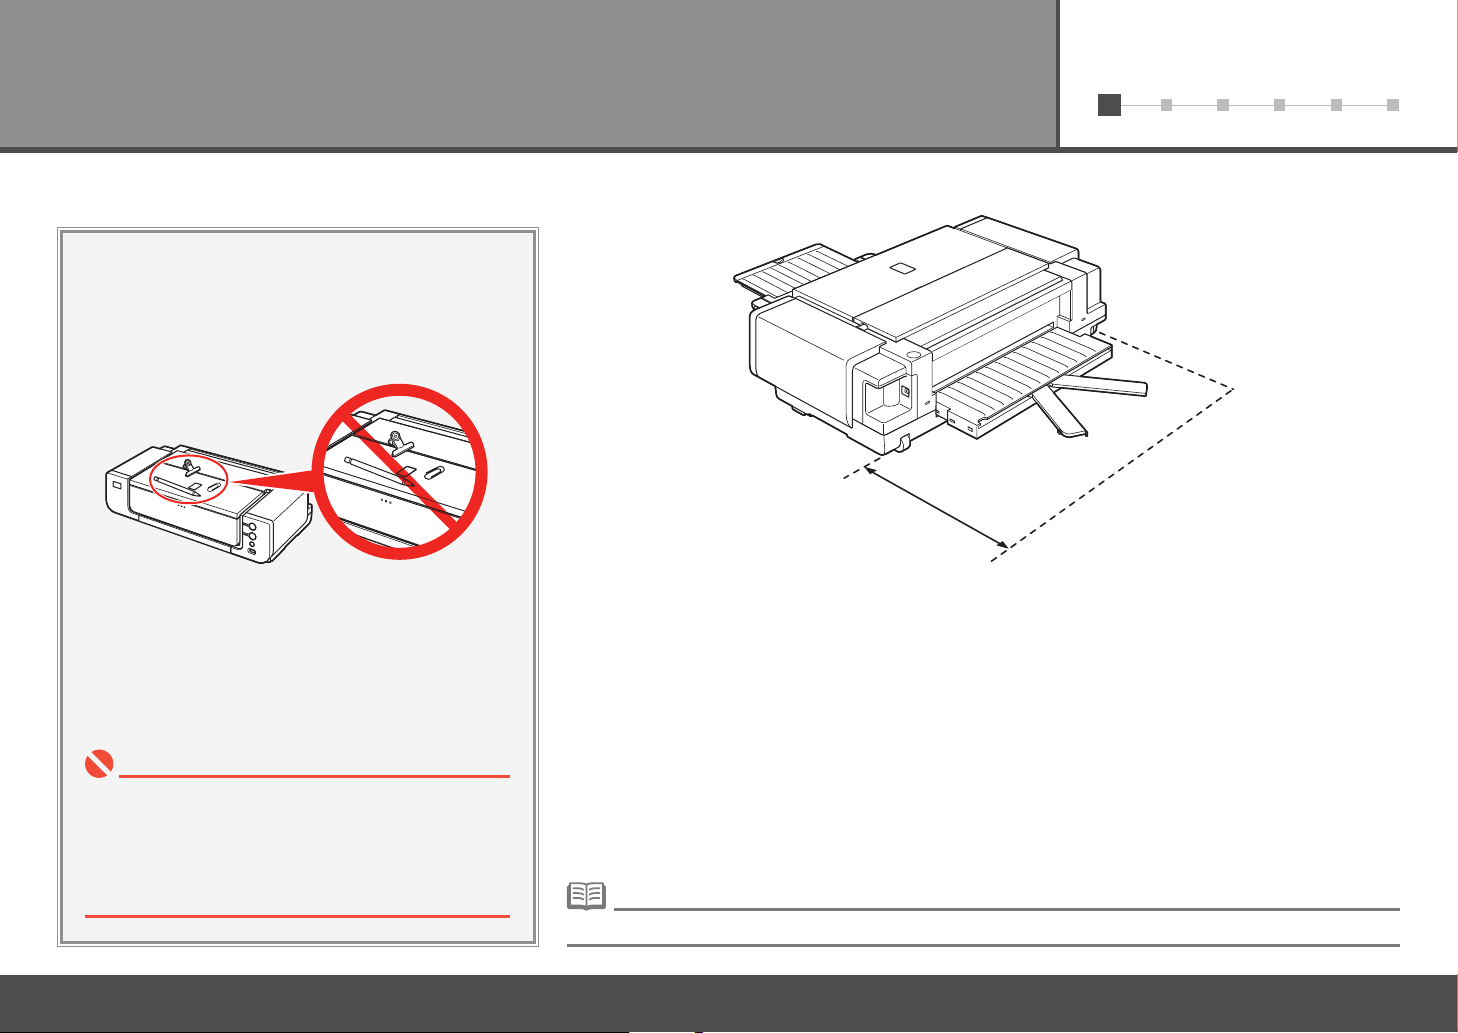
Ch oo si ng a L oc at io n■
15.7"/40 cm behind the printer
Place the printer on a flat surface.•
Do not place any object in front of the printer.•
You can print on large size paper such as 14" x 17"/355.6 x 431.8 mm or thick paper by loading the
•
paper in the Front Tray. In that case, keep a space of 15.7"/40 cm behind the printer.
Do not install the printer where an object may fall on
•
it. The object may fall inside the printer, resulting in
malfunction.
Do not place any object on top of the printer. It may
•
fall into the printer when opening covers, resulting in
malfunction.
There are wheels on the back corners of the printer. Lift the front of the printer to move it back and forth easily.•
3
Page 6
61 2 3 4 5
1
2
A
B
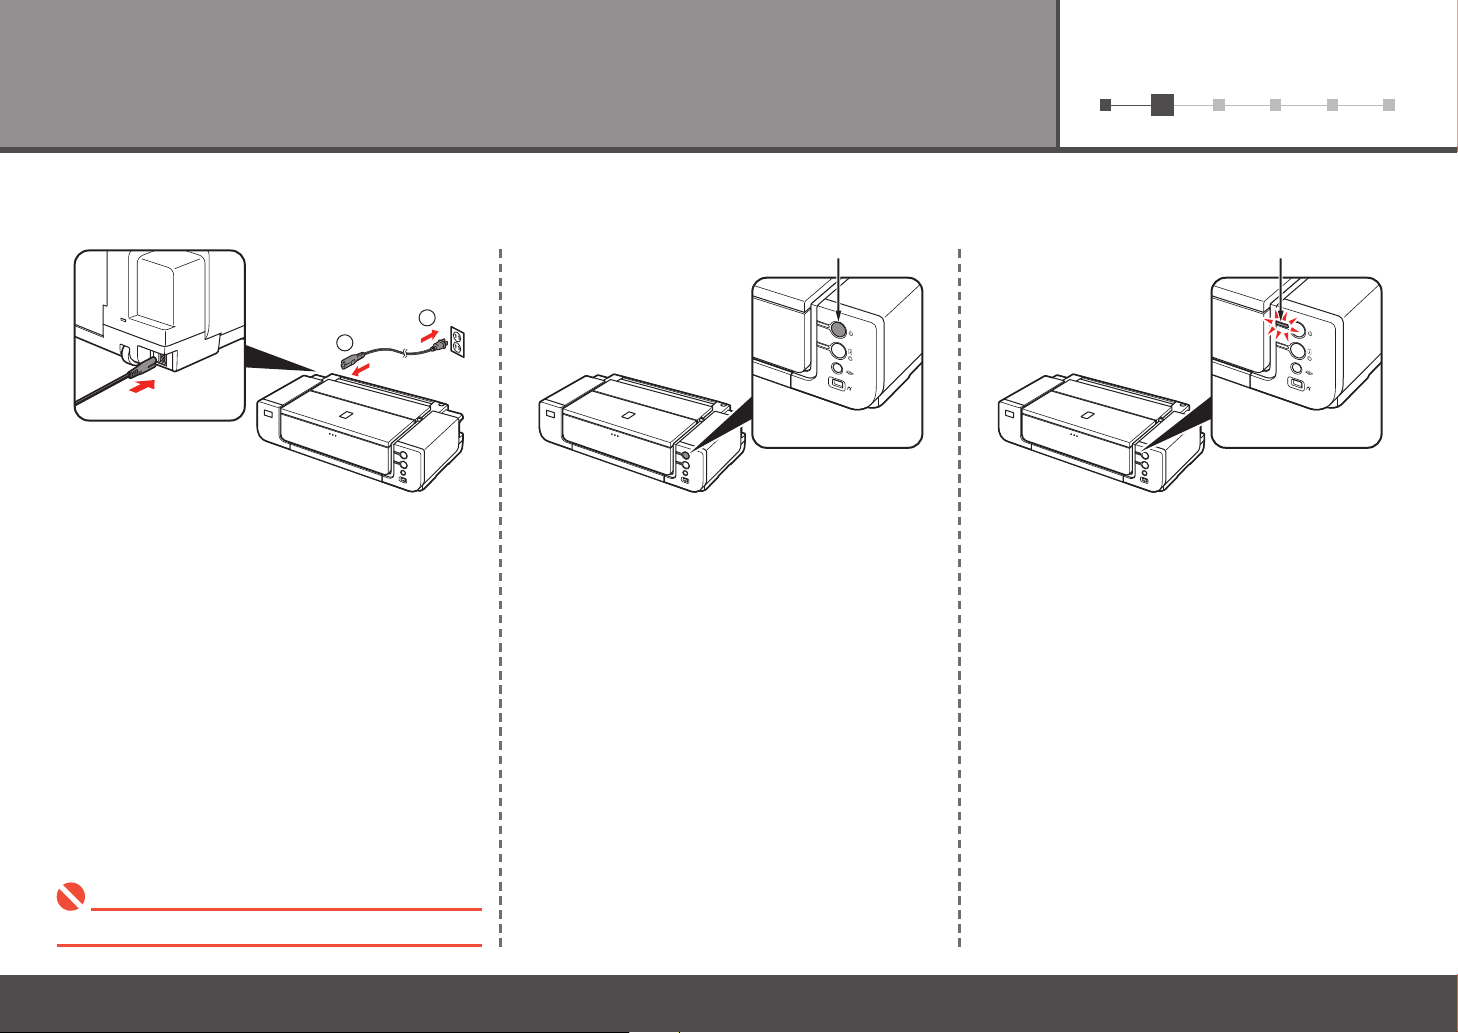
Turn the Power On
2
printer, then connect the other end to the wall
outlet.
21 3
Conrm that the POWER lamp (B) lights blue.Turn on the printer (A).Plug the power cord into the back left of the
Do NOT connect the USB cable at this stage.•
4
Page 7
61 2 3 4 5
3
C
D
A
B
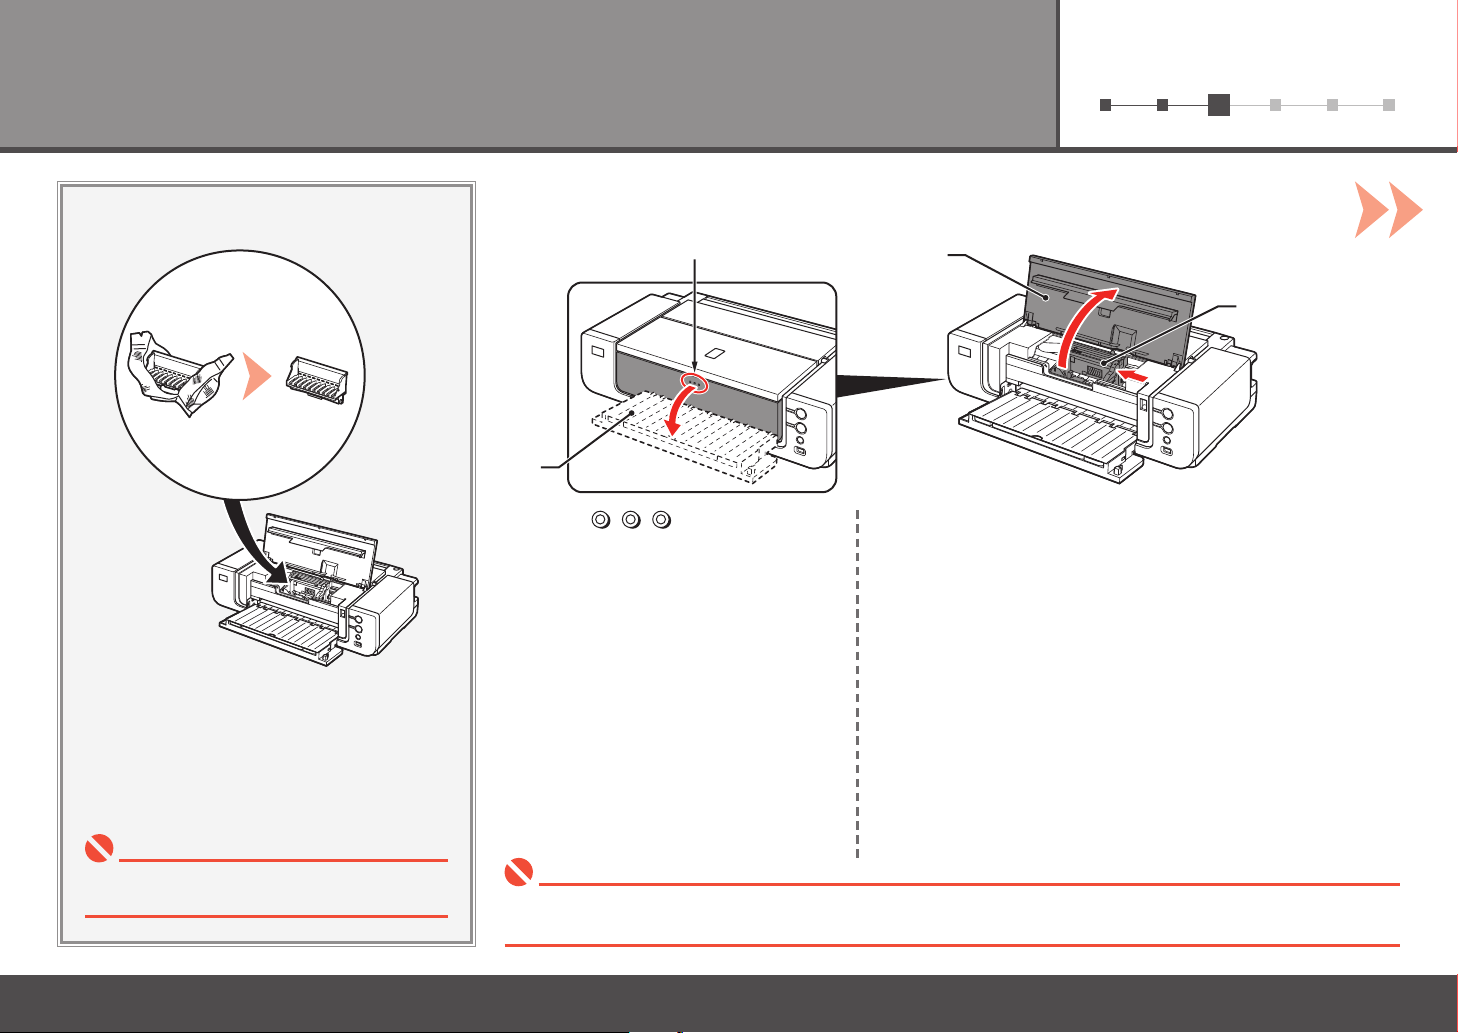
Install the Print Head
1
Press the button (A).
The Front Tray (B) opens.
2
Open the Top Cover (C).
The Print Head Holder (D) comes out. (This is where you install the
Print Head.)
Handle the Print Head carefully. Do not drop or
•
apply excessive pressure to it.
The Print Head Holder makes a noise as it moves. This is normal operation.•
If the Print Head Holder does not move, make sure that the printer is turned on.•
5
Page 8
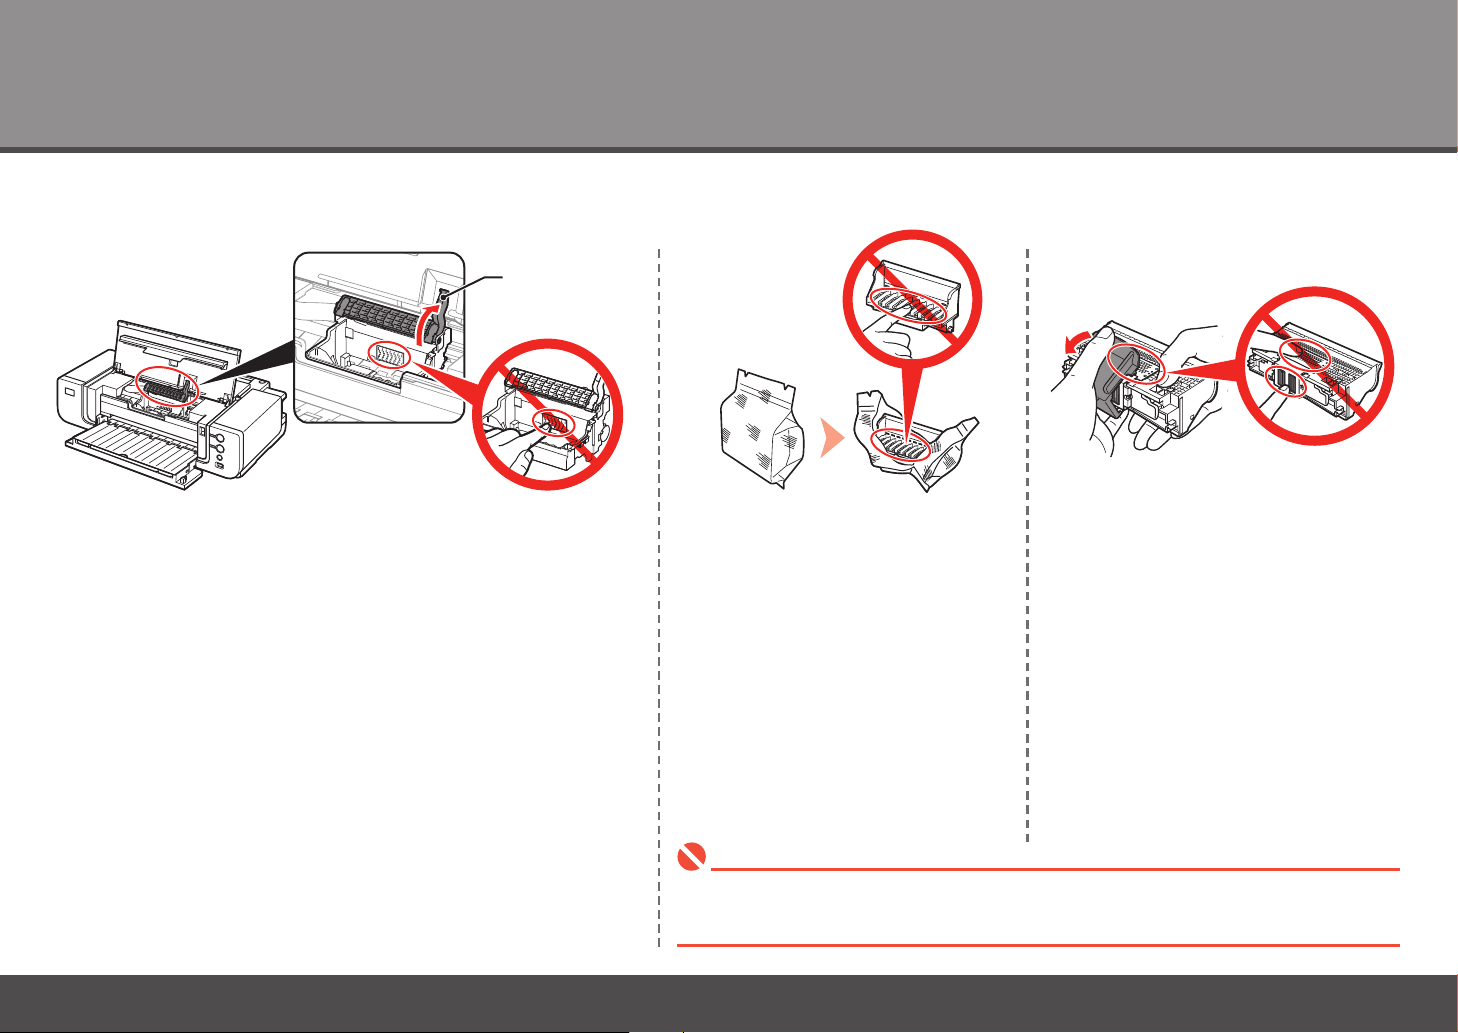
3
E
3 54
Firmly raise the Print Head Lock Lever (E) until it stops.
6
Remove the orange protective cap.Remove the Print Head from the silver
package.
There may be some transparent or light color ink on the inside of the bag the Print Head comes in,
•
or the inside of the protective cap - this has no effect on print quality. Be careful not to get ink on
yourself when handling these items. Be careful not to stain your hands.
Page 9
61 2 3 4 5
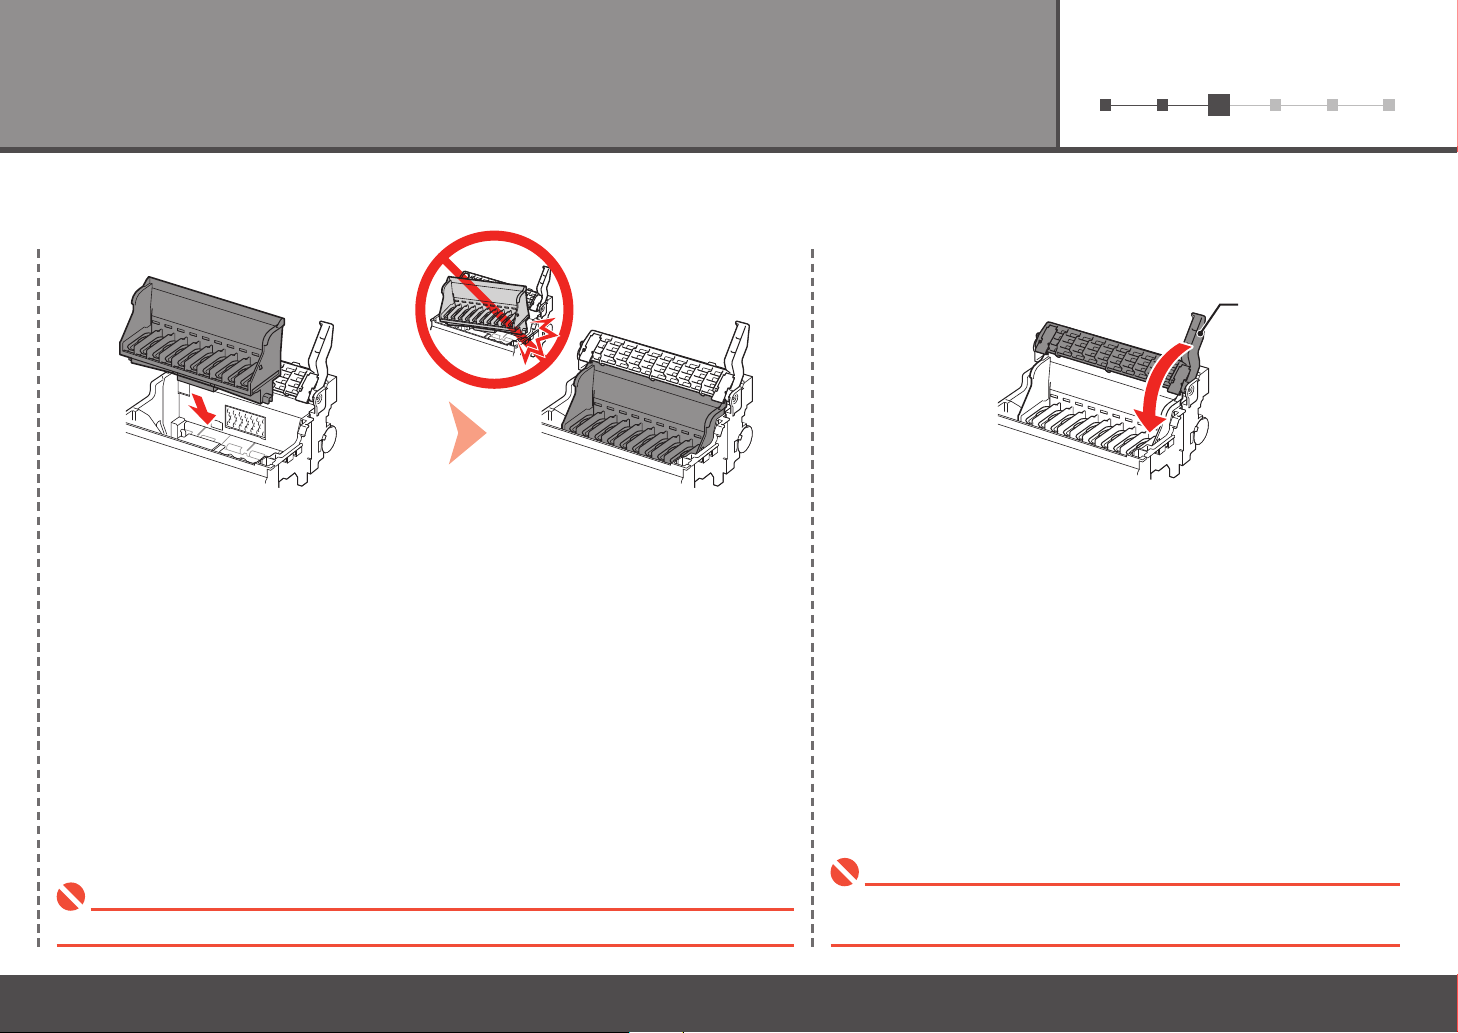
6 7
E
Lower the Print Head Lock Lever (E) completely.Set the Print Head in place.
Do not knock the Print Head against the sides of the holder.• Once you have installed the Print Head, do not remove it unnecessarily.•
Pinch the Print Head Lock Lever rmly and lower it gently.•
7
Page 10
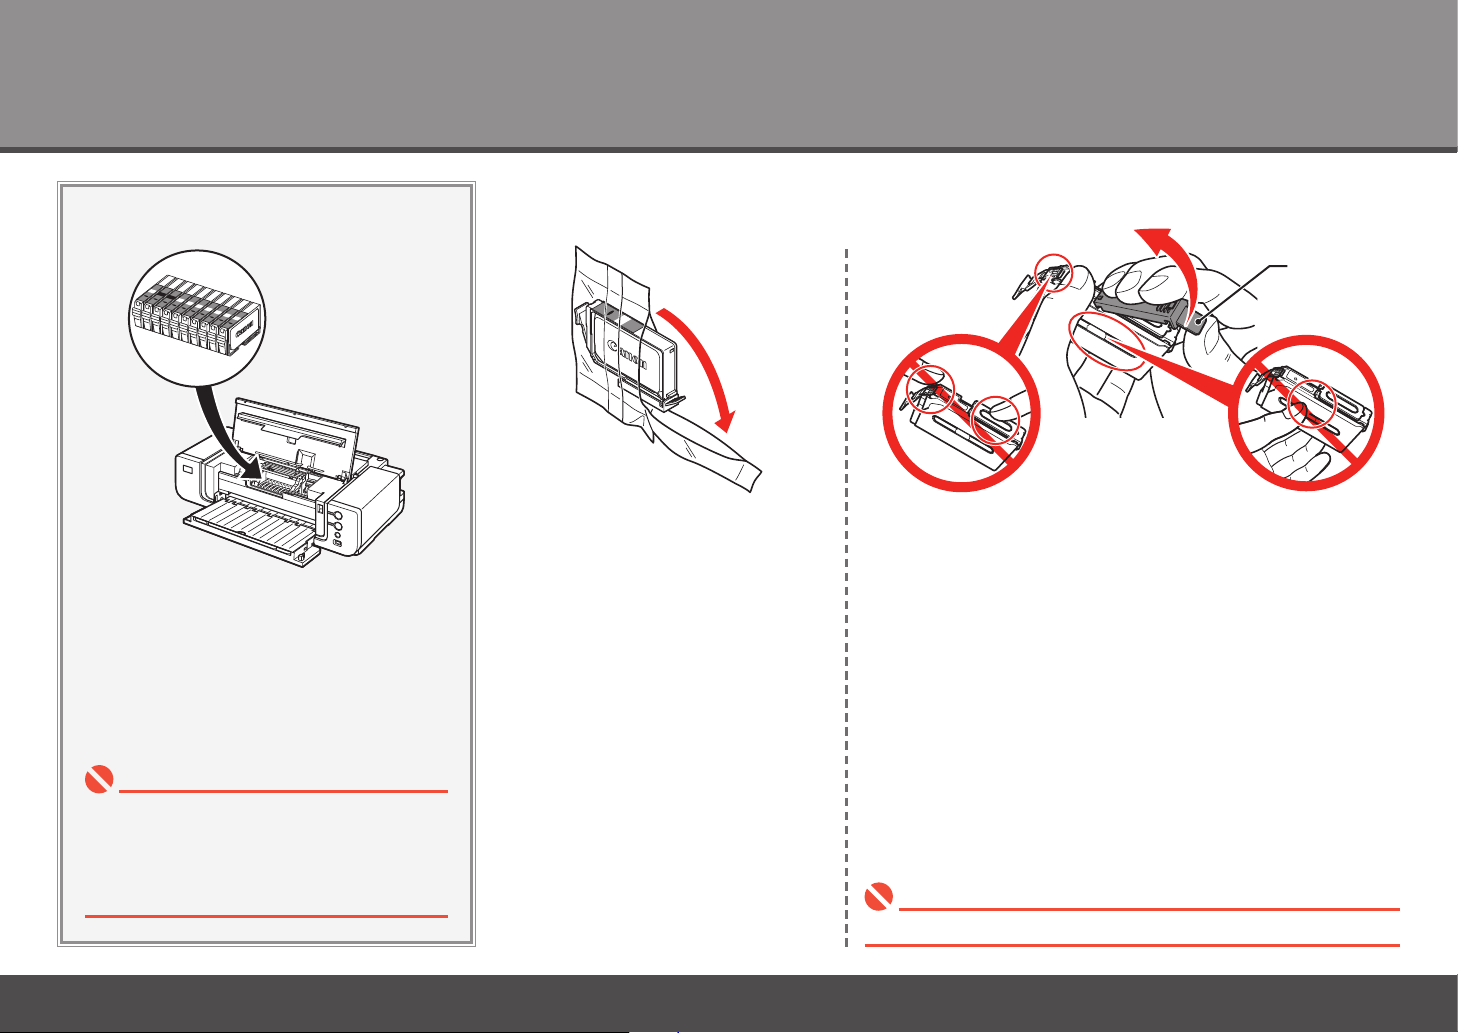
4
A
4
Install the Ink Tanks
21
Handle the ink tanks carefully. Do not drop or
•
apply excessive pressure to them.
If the Print Head Holder moves to the right, close
•
and reopen the Top Cover.
Be sure to use the supplied ink tanks.•
8
Remove the ink tank from its package.
Remove and discard the orange protective cap (A) located on
the bottom of the ink tank.
Do not hold the sides of the ink tank; ink may splash.•
Page 11
61 2 3 4 5
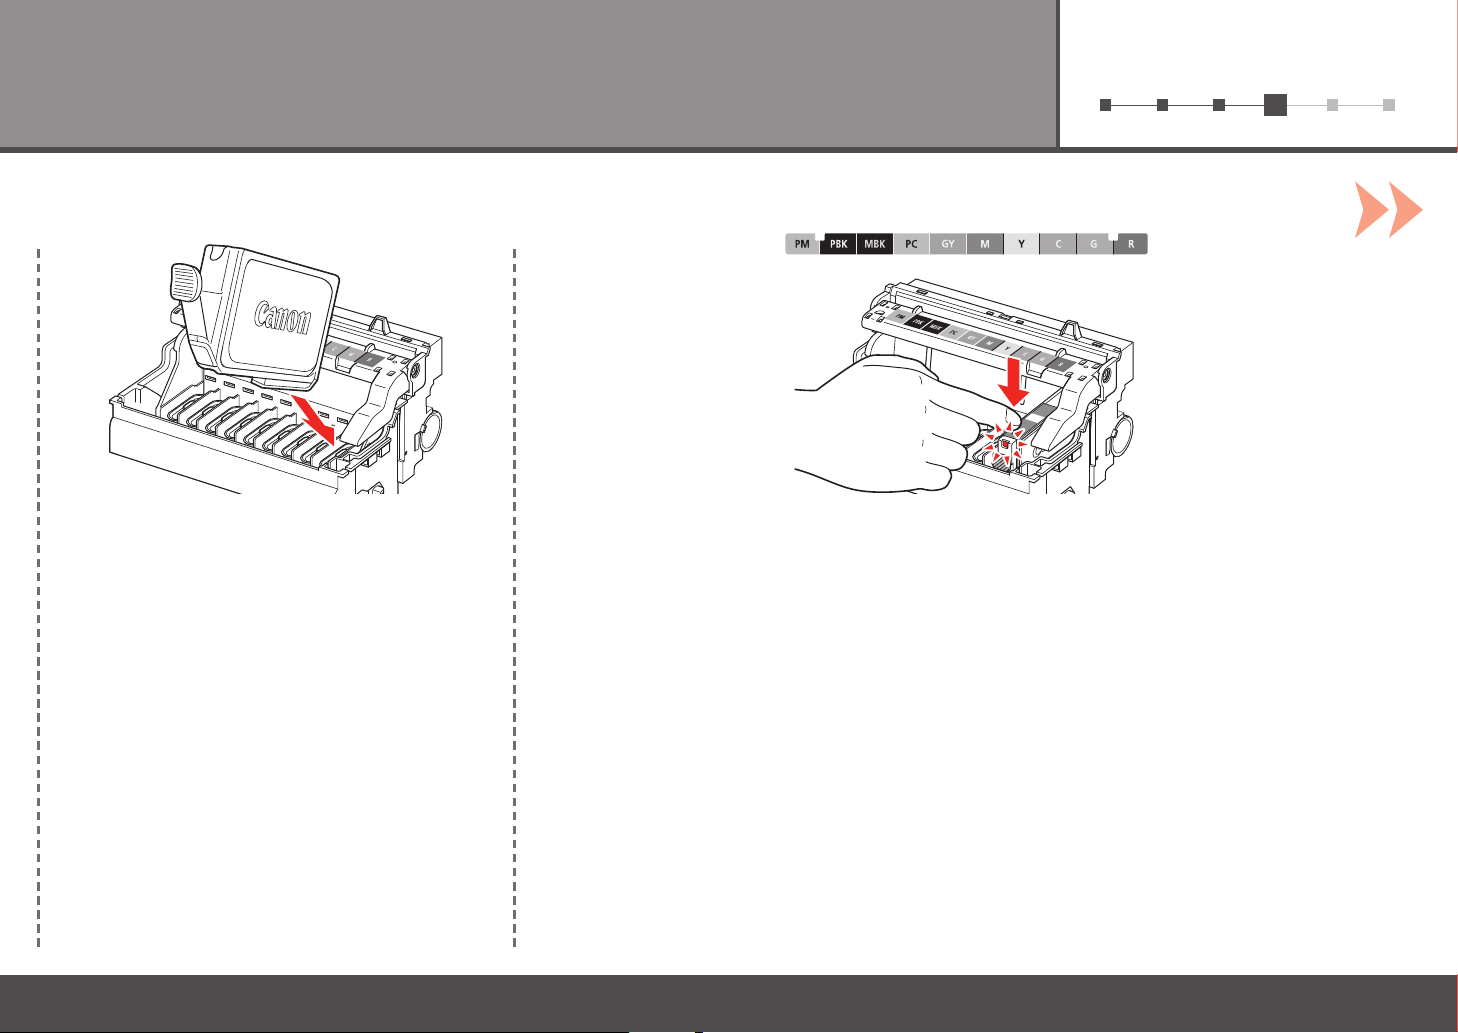
Install the ink tank
3 4
Insert the ink tank. Press the PUSH mark on the ink tank until it clicks into place.
Make sure the Ink lamp lights red.
9
Page 12
61 2 3 4 5
4
D
B
C
E
65
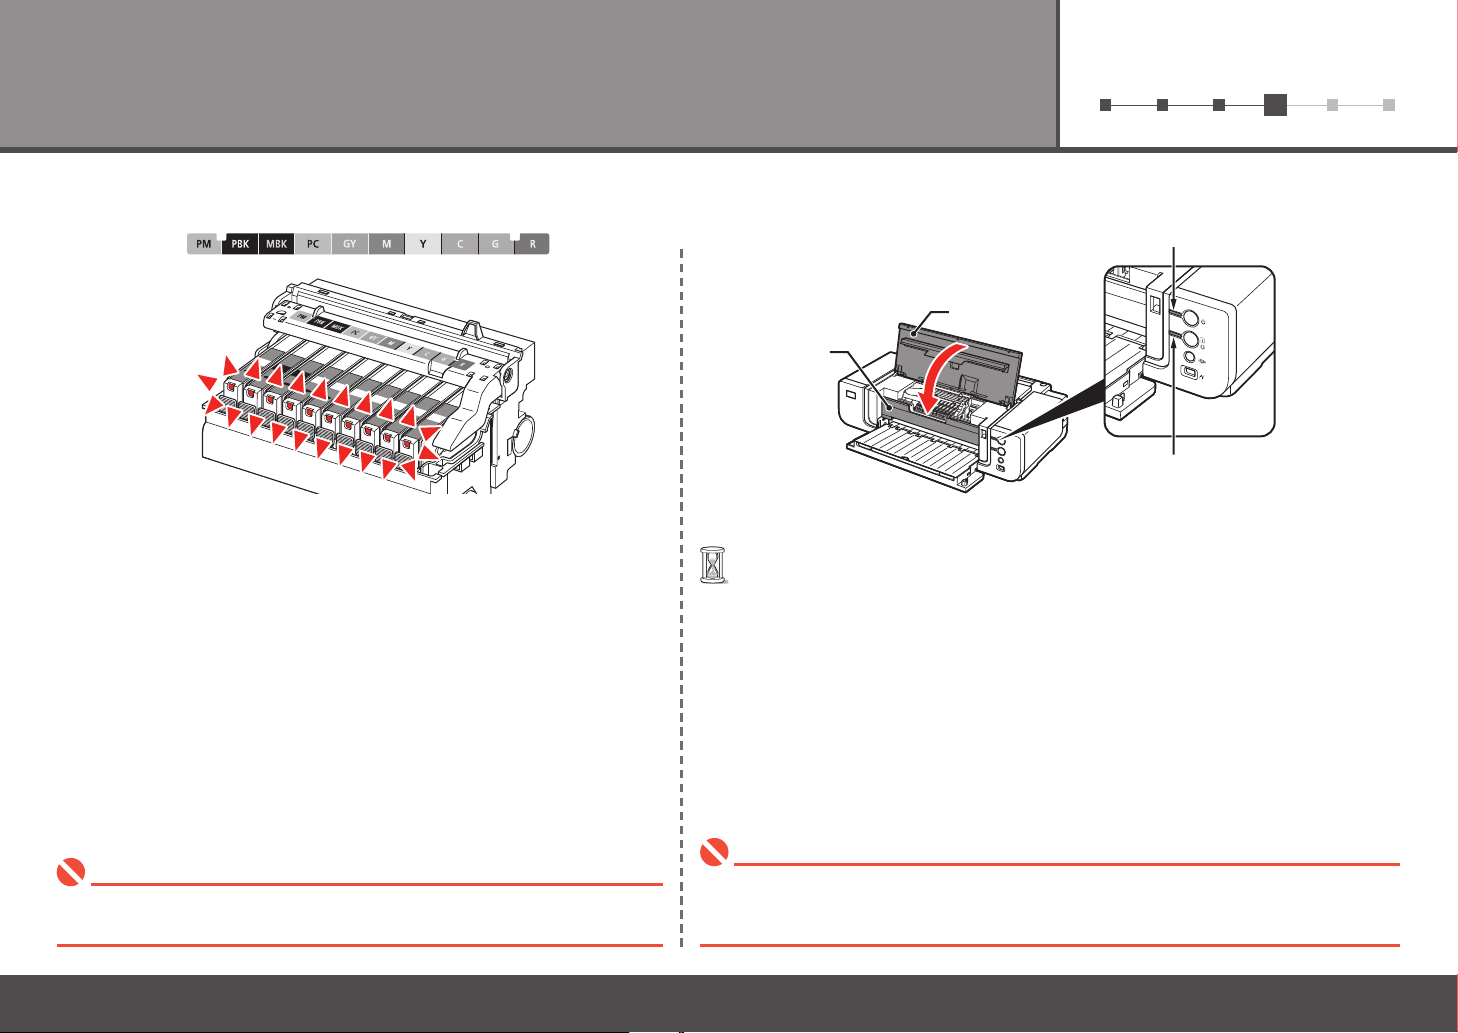
Install all the other ink tanks in the same way.
Install all the ink tanks.
Make sure all the Ink lamps light red.
Match the labels when installing.•
Once you have installed the ink tanks, do not remove them unnecessarily.•
10
Close the Top Cover (B).
Wait for about 3 minutes until the POWER lamp (blue) (C) stops flashing and
•
stays lit then operating noise stops, and go to the next step.
Do not open the Top Cover while the lamp is flashing.
The printer vibrates while the lamp is flashing because ink is stirred inside the
printer.
Make sure the Inner Cover (D) is closed.•
If an Alarm lamp (E) ashes orange, make sure that the Print Head and the ink tanks are
•
correctly installed.
Page 13
61 2 3 4 5
Install the Software
5
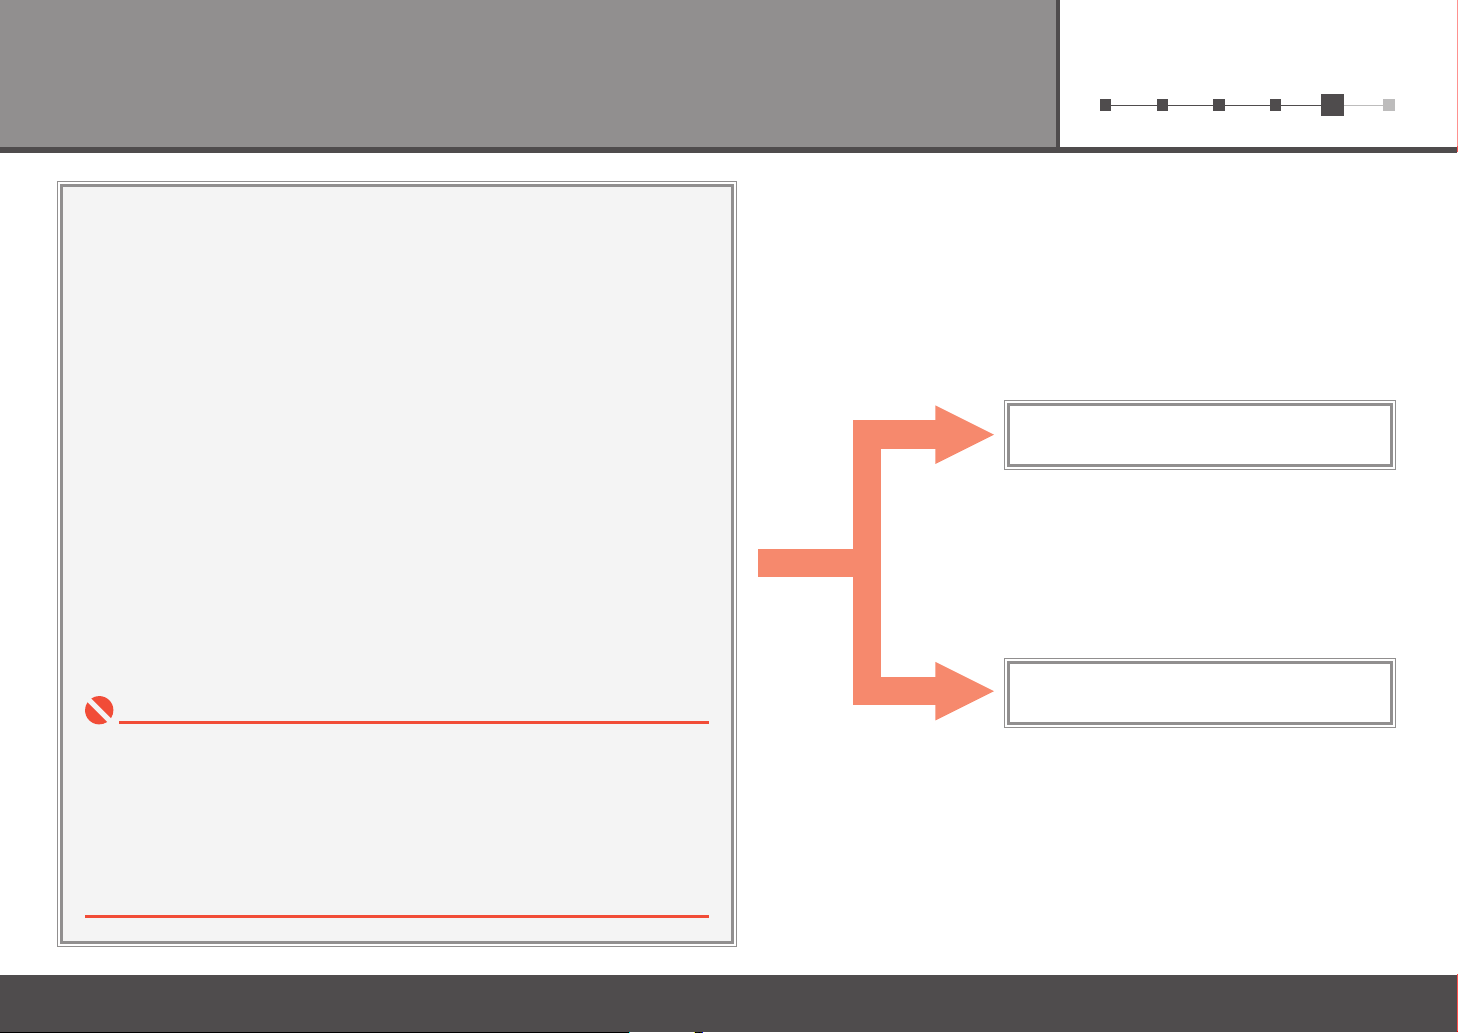
To use the printer by connecting it to a computer, software including the
drivers needs to be copied (installed) to the computer's hard disk.
The screens below are based on Windows Vista operating system
Ultimate Edition (hereafter referred to as "Windows Vista") and Mac OS X
v.10.5.x.
Windows (P.12)
Quit all running applications before installation.•
You need to log on as the administrator (or a member of the Administrators group).•
Do not switch users during the installation process.•
It may be necessary to restart your computer during the installation process. Follow
•
the on-screen instructions and do not remove the Setup CD-ROM during restarting.
The installation resumes from where it left off when your computer has been restarted.
Mac OS 9, Mac OS X Classic environments, or Mac OS X v.10.3.8 or earlier are not
•
supported.
Macintosh (P.21)
11
Page 14
5
A
B
Windows Macintosh
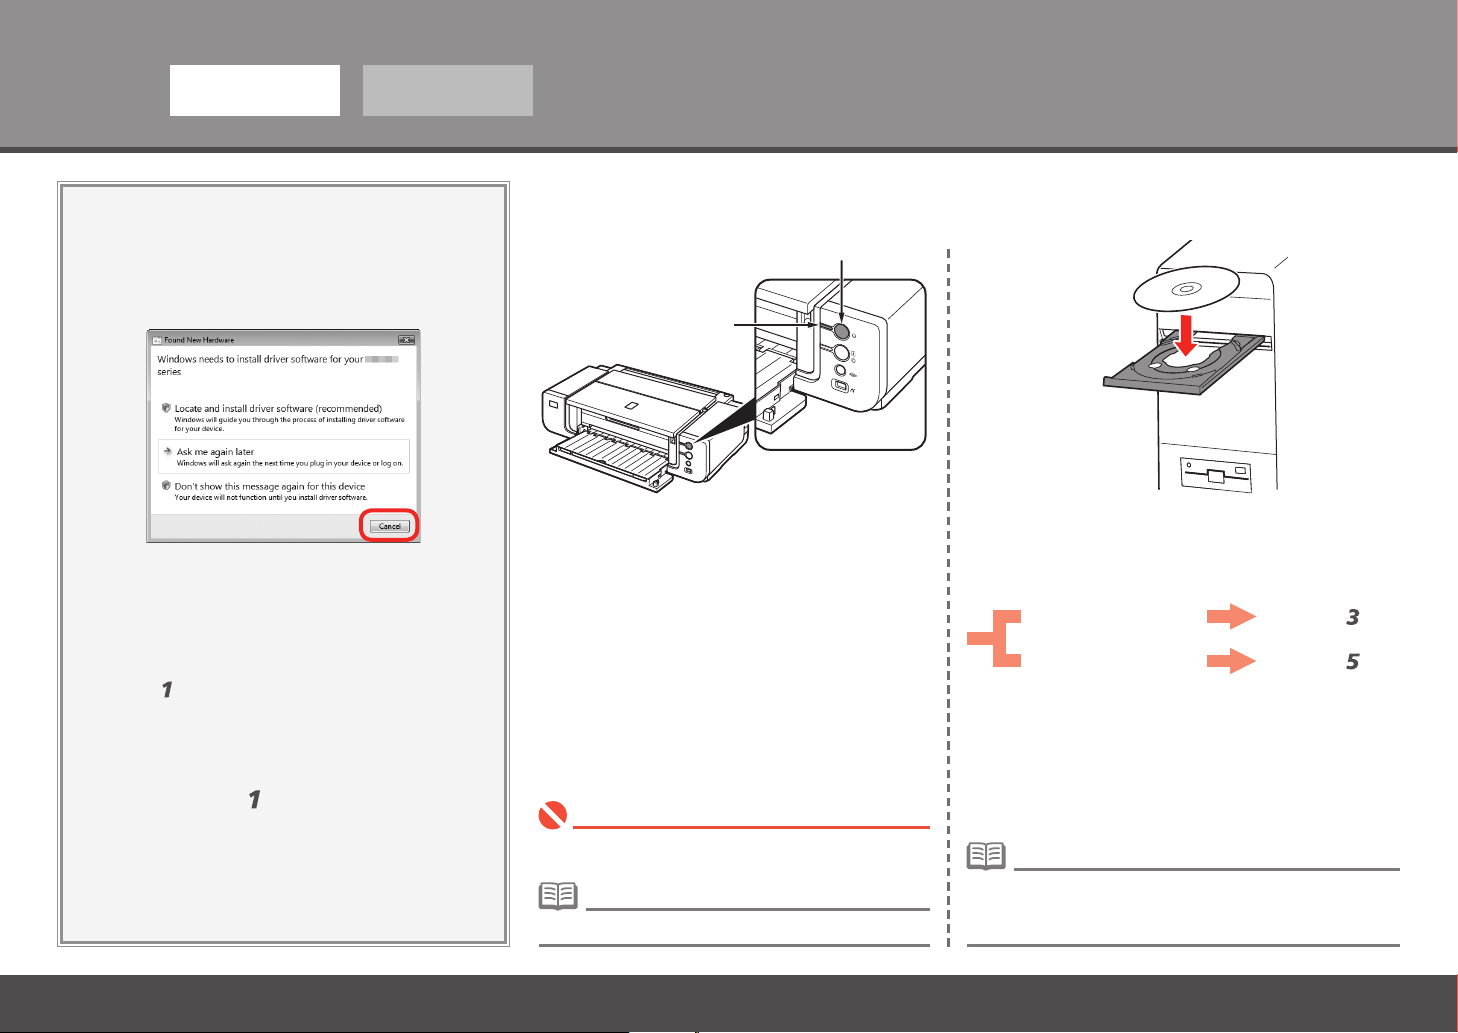
If the Found New Hardware or Found New
Hardware Wizard dialog box appears:
Remove the USB cable connected to
1
your computer.
The dialog box may close. In this case, proceed
.
from
Click Cancel to quit the dialog box.
2
Proceed from
3
.
TURN OFF THE PRINTER (A).
21
Turn on the computer, then insert the Setup CDROM into the CD-ROM drive.
The setup program should start automatically.
Windows Vista
Windows XP/2000
Go to Step
Go to Step
.
.
12
Make sure that the POWER lamp (B) has stopped
•
ashing and is off.
It takes about 1 minute until the printer turns off.•
If the program does not start automatically, double-click
•
the CD-ROM icon on the computer. When the CD-ROM
contents appear, double-click MSETUP4.EXE.
Page 15
61 2 3 4 5
Windows
Windows Vista Windows Vista
3 4
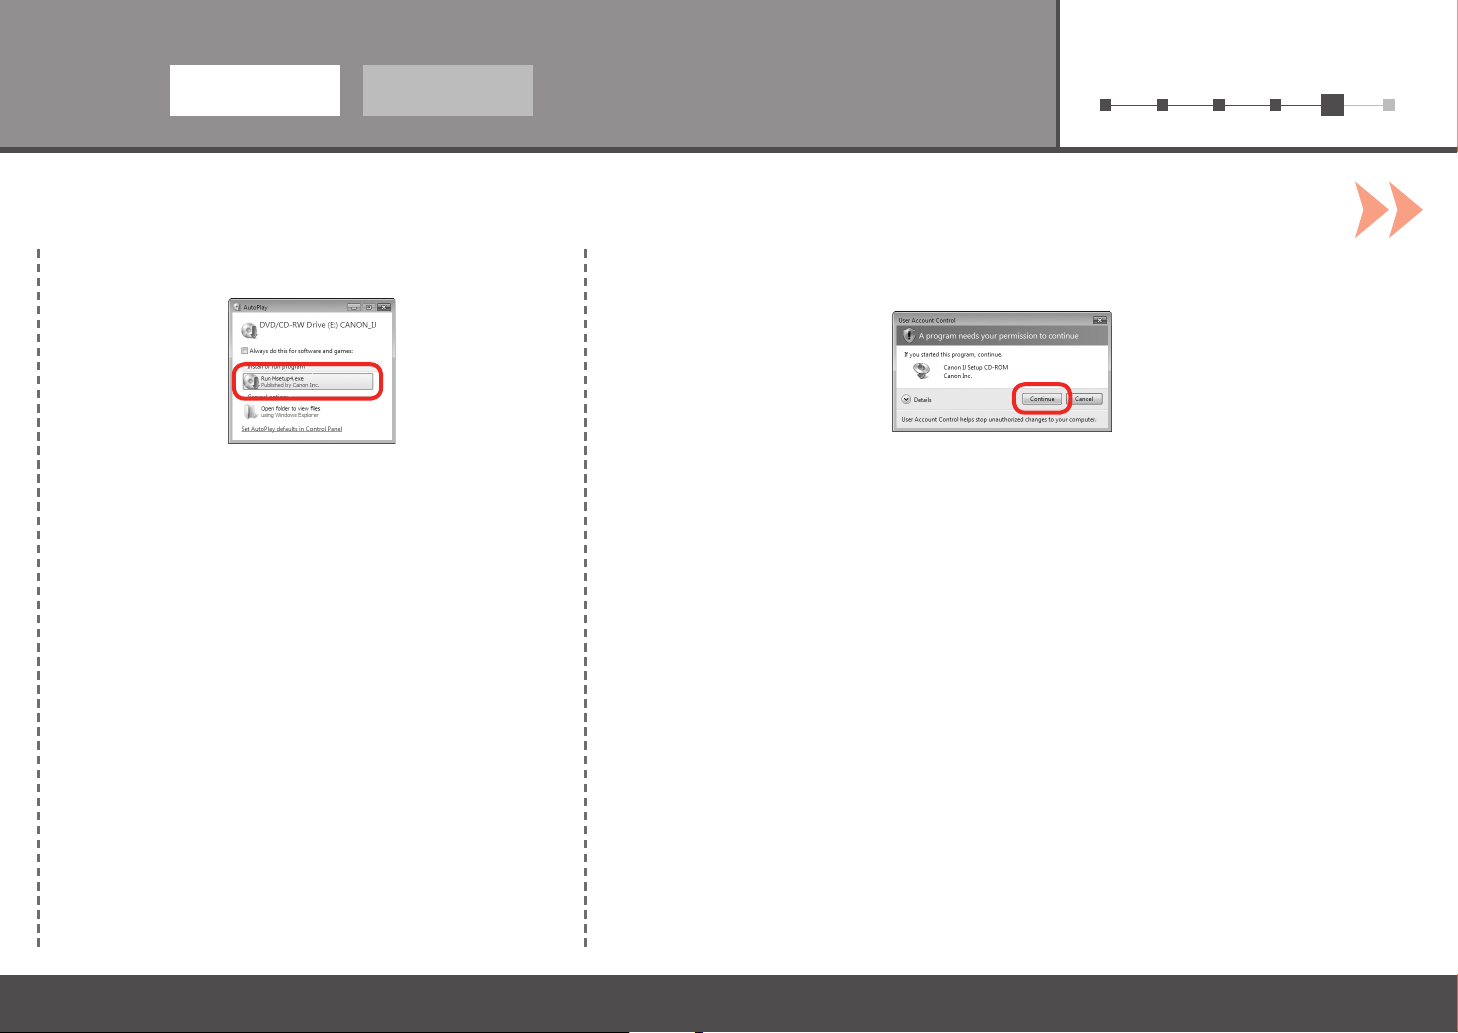
AutoPlay screen appears, click Run Msetup4.exe. User Account Control dialog box appears, click Continue.
Macintosh
If the same dialog box reappears in subsequent steps, click Continue.
13
Page 16
5
Windows Macintosh
65
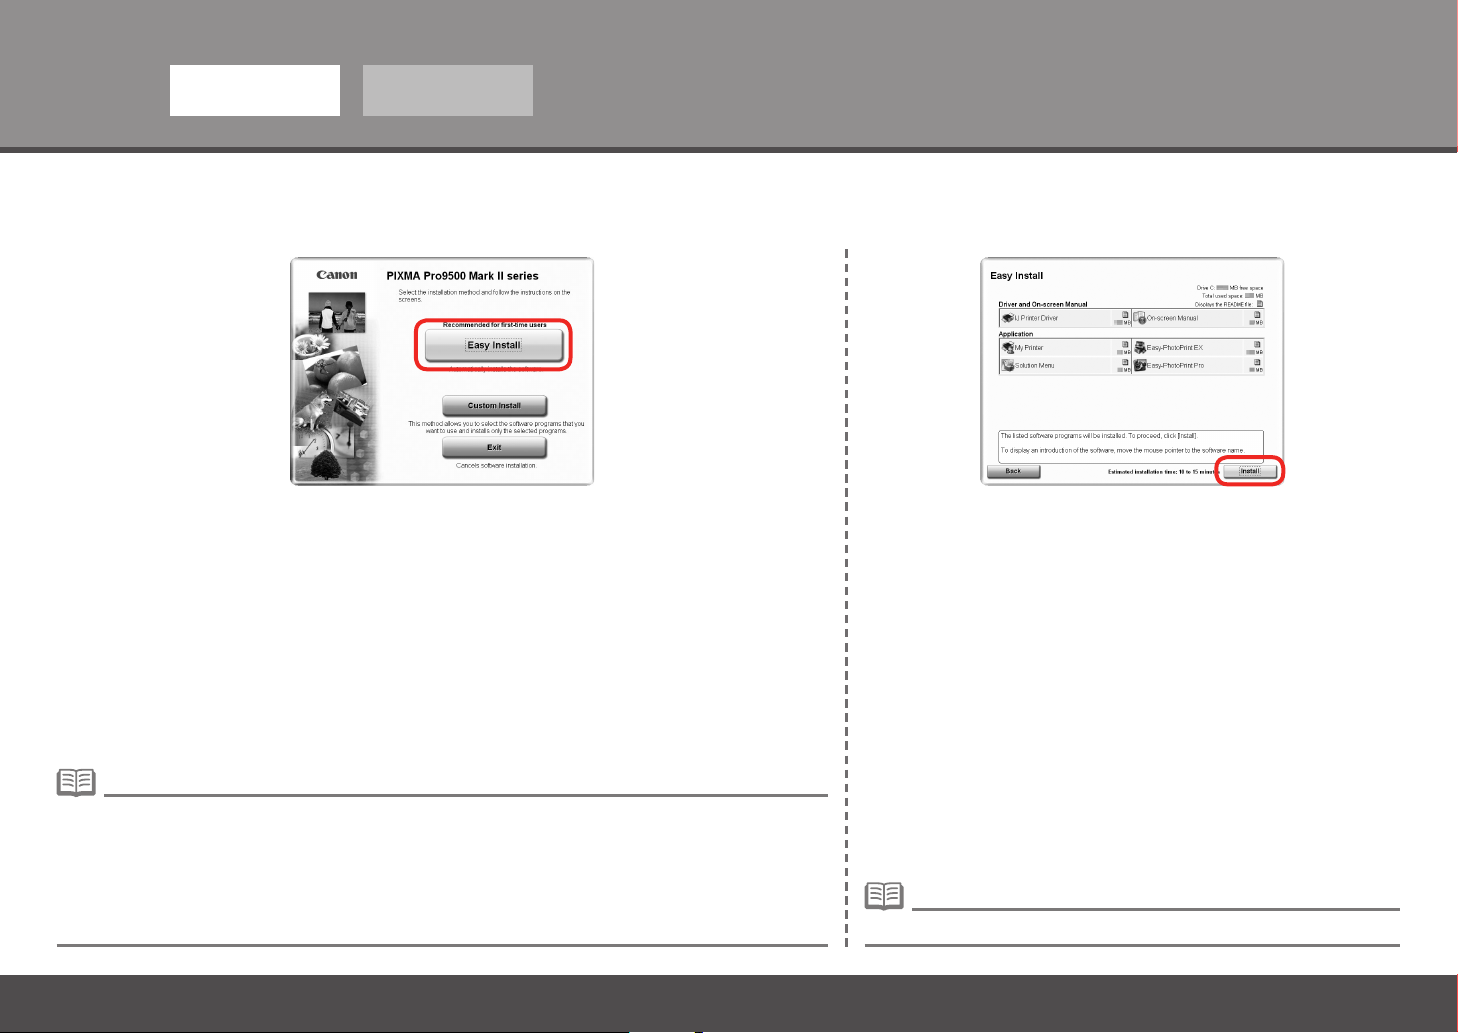
Click Easy Install.
Drivers, application software, and on-screen manuals are installed automatically.
If you want to select particular items to install, click Custom Install and follow the on-screen instructions to
•
proceed with the installation.
You can install the XPS Printer Driver from Custom Install. (Windows Vista SP1 or later.)•
The XPS Printer Driver is a printer driver suitable for printing High Dynamic Range images (full 16-bit
•
workow) using Easy-PhotoPrint Pro.
When installing the XPS Printer Driver, select the IJ Printer Driver at the same time.•
14
Click Install.
Move the cursor over items to display explanations.•
Page 17
61 2 3 4 5
Windows
Macintosh
7 8
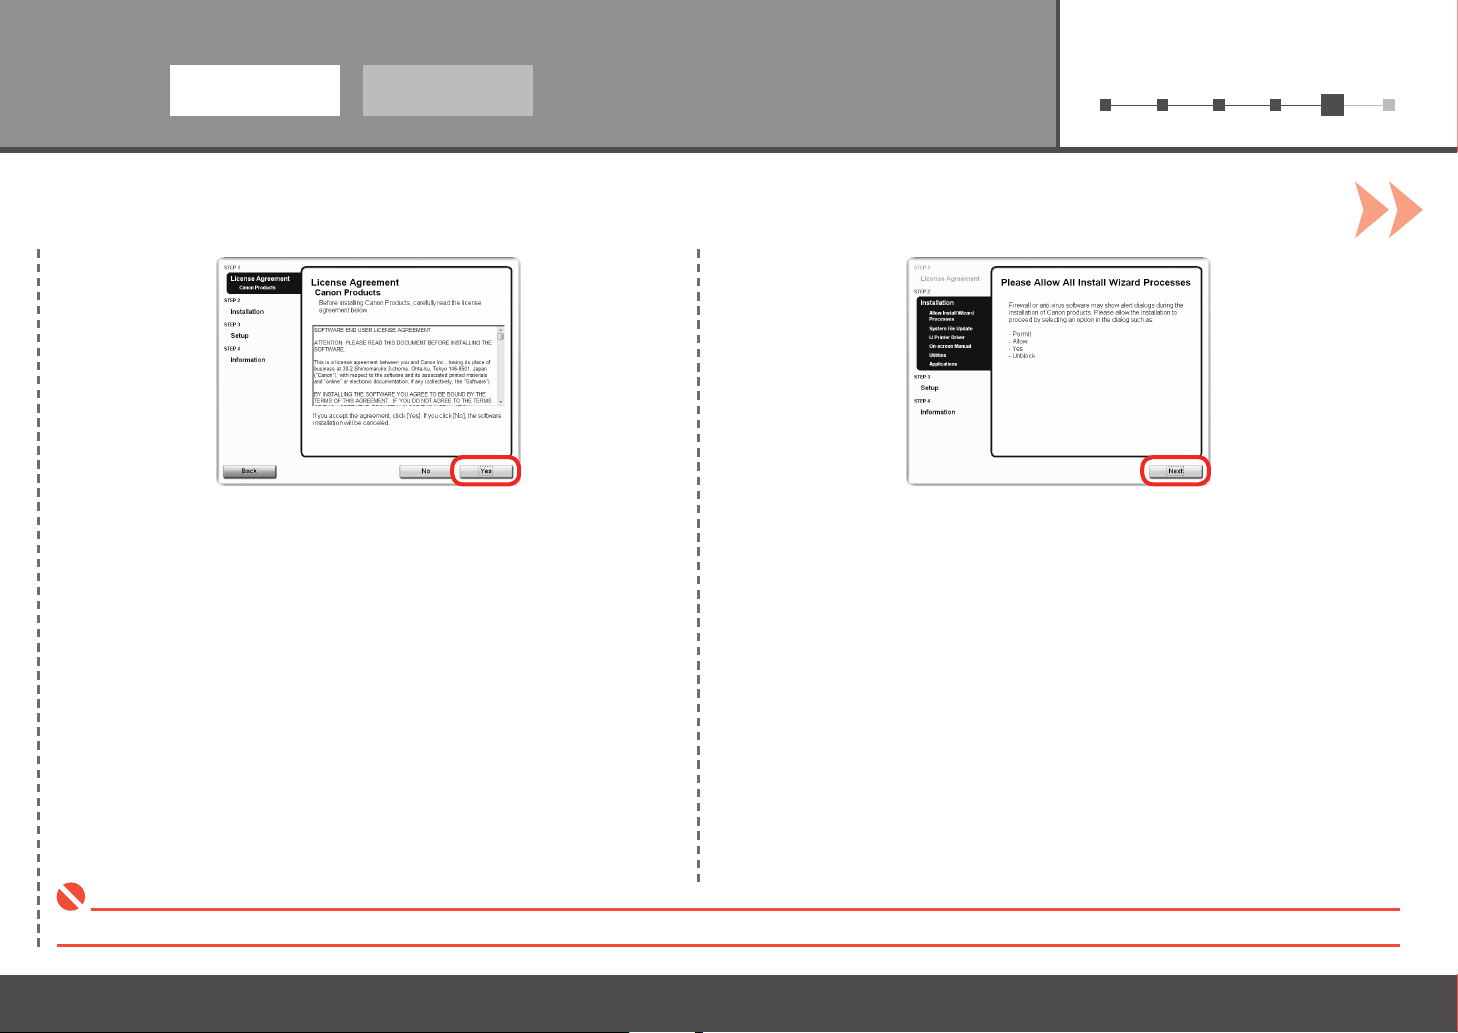
Read the License Agreement screen carefully and click Yes.
During installation, follow any on-screen instructions to install the software.•
When the Please Allow All Install Wizard Processes screen appears, click
Next.
Installation starts.
15
Page 18
A
Windows Macintosh
5
9 10
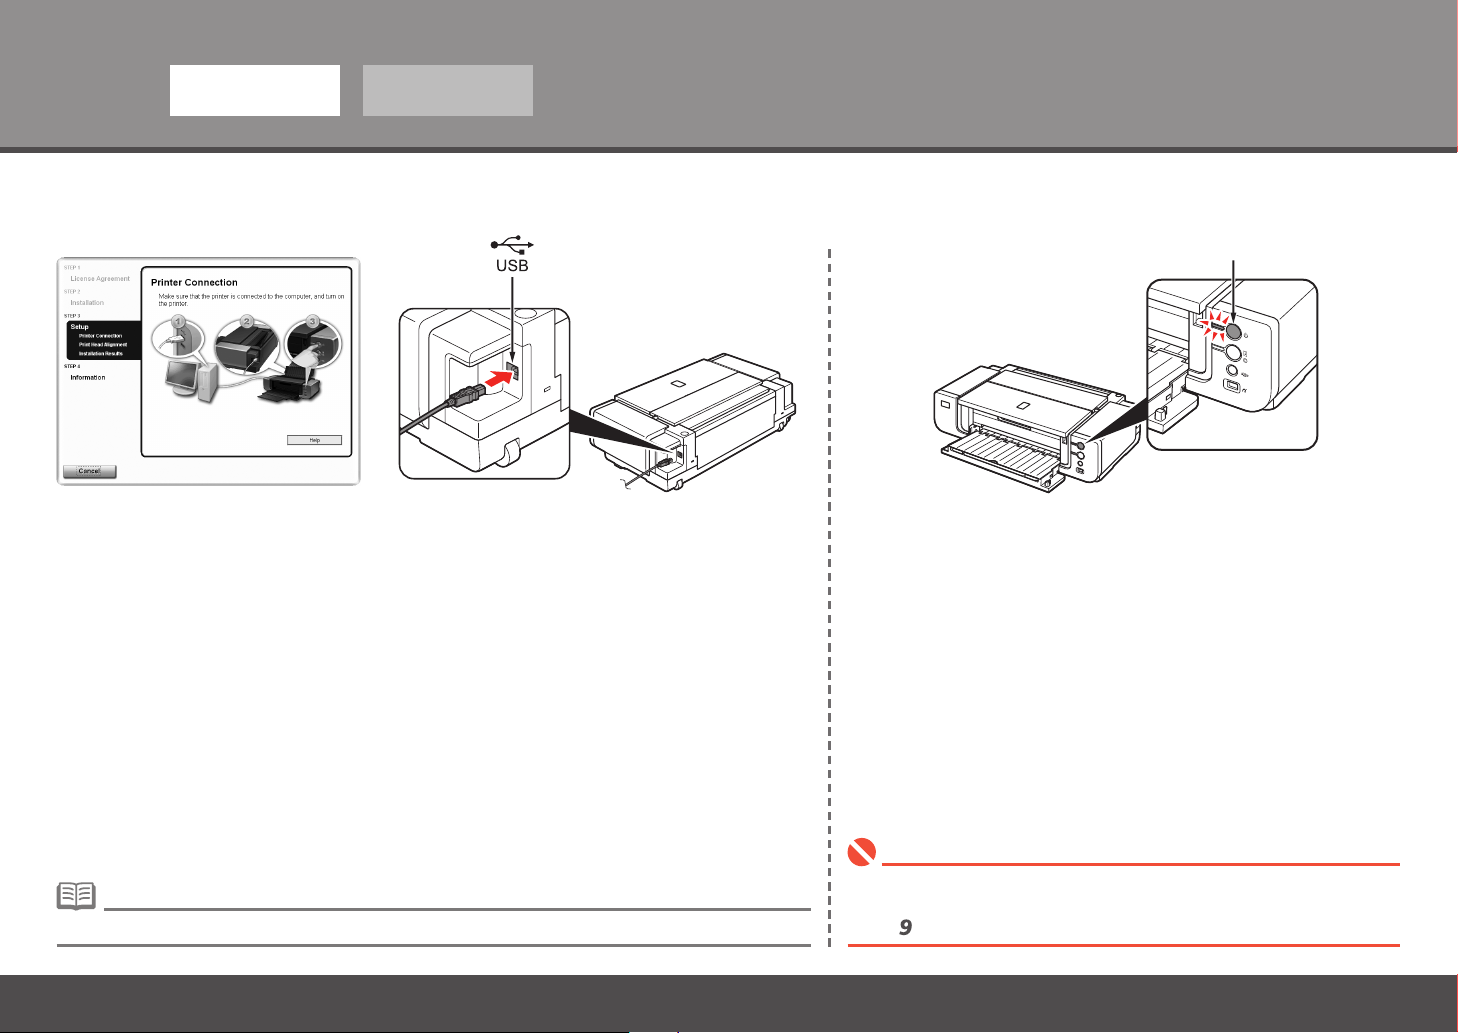
When the Printer Connection screen appears, connect the printer to the computer with a
USB cable.
The USB port is located on the right side of the printer.•
16
Turn on the printer (A).
When the printer is recognized by the computer, a message appears on
the screen.
It takes about 30 seconds for the POWER lamp to light blue.•
If installation does not continue after 10 minutes, click Help on the screen in
•
step , then conrm the message.
Page 19
61 2 3 4 5
C
D
Windows
Macintosh
11 12
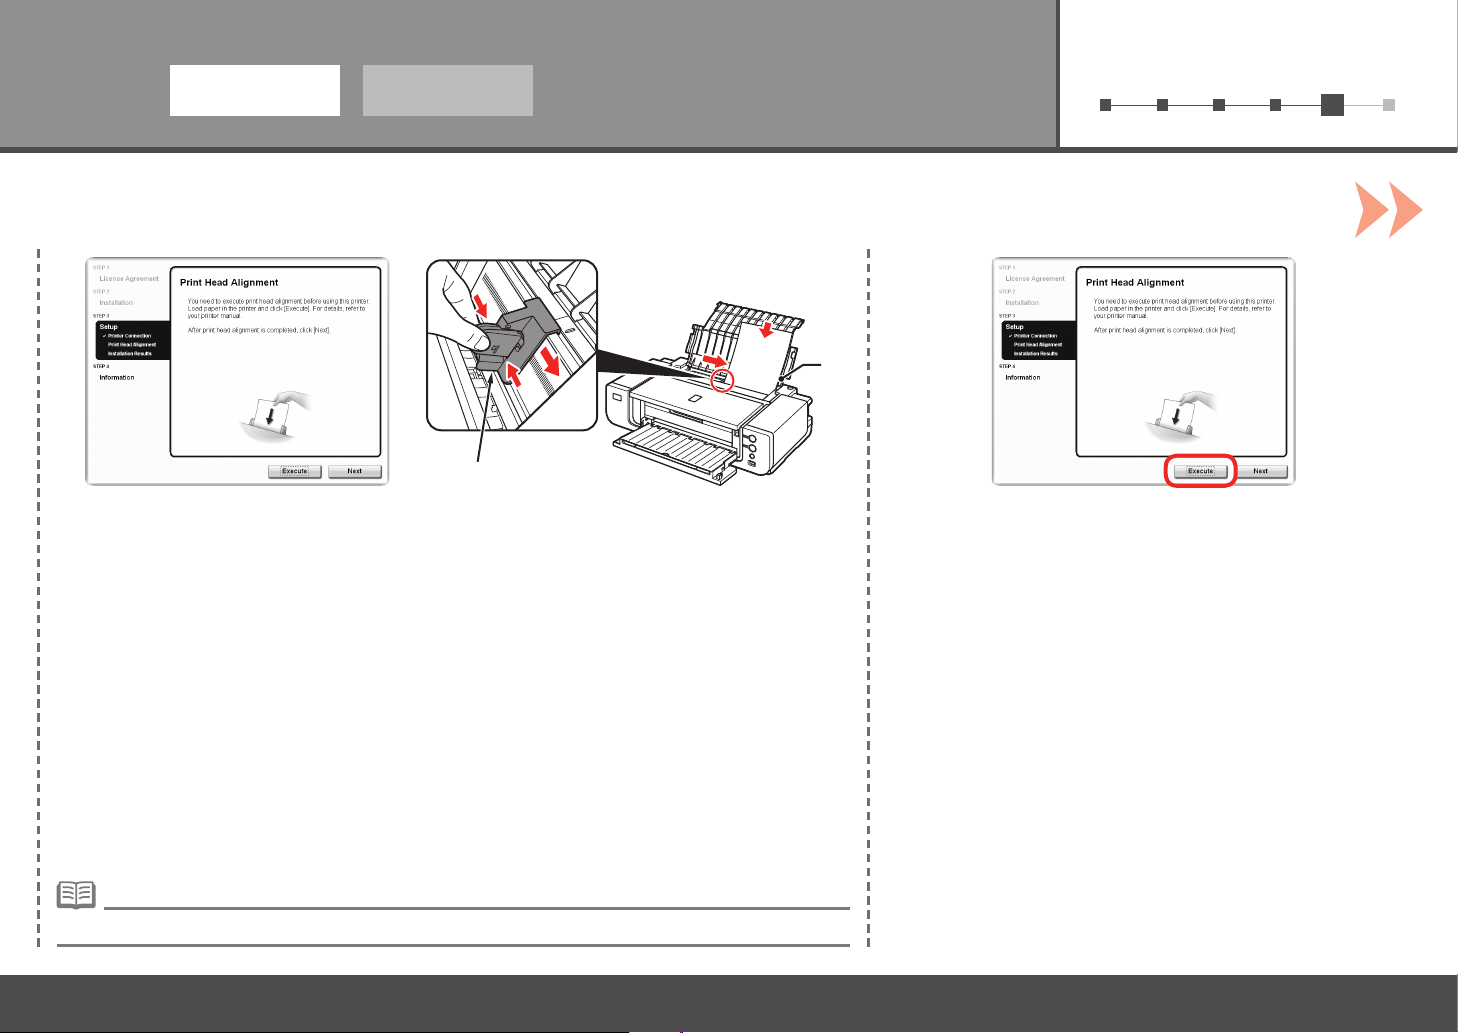
When the Print Head Alignment screen appears, load two sheets of A4 or Letter-sized plain
paper in the Rear Tray (C) as shown.
Pinch and slide the Paper Guide (D) against the left edge of the paper.
Align the Print Head
Click Execute.
For details, refer to "6 Loading Paper" on page 28.•
17
Page 20
5
F
E
G
Windows Macintosh
1413
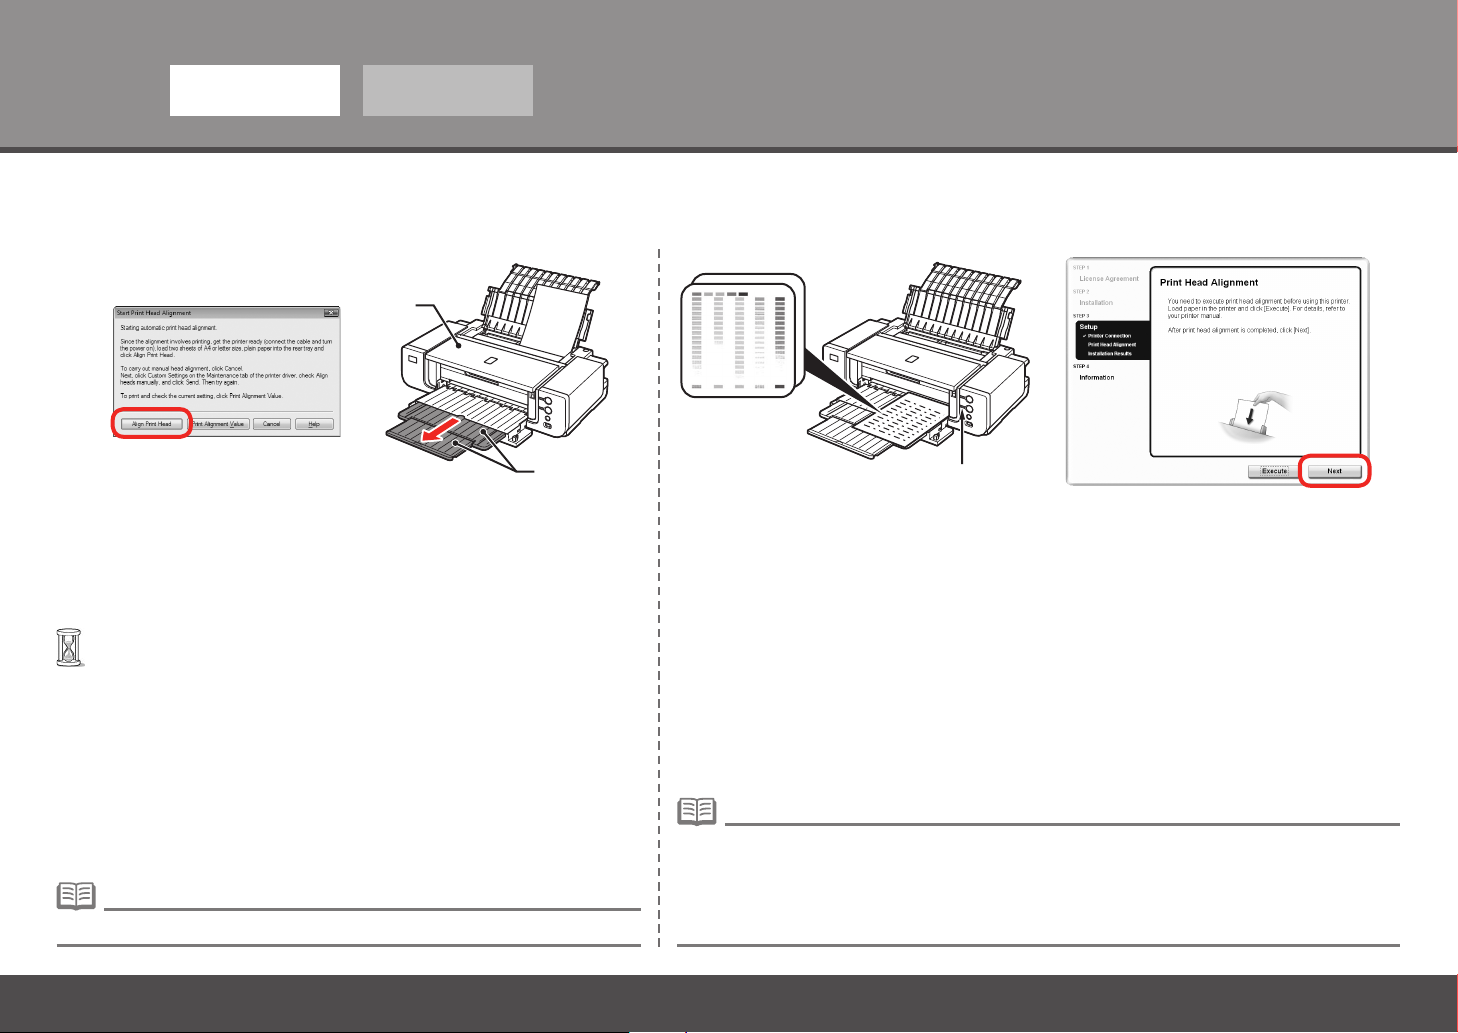
When the Start Print Head Alignment dialog box appears, click
Align Print Head.
Click OK in the subsequent message.
Printing of the pattern starts.
Wait until the pattern printing ends (about 10 minutes), and go to
•
the next step.
Do not open the Top Cover (E) while printing.•
Pull out the Front Tray Extension (F) beforehand.•
18
Make sure that the pattern shown is printed, then click Next on the Print Head
Alignment screen.
Some parts of patterns printed on the rst page are faint.
If you align the Print Head automatically again, patterns different from those shown above may be
•
printed.
When Print Head Alignment cannot be executed properly, the Alarm lamp (G) will ash orange 11
•
times. In this case, refer to "When Printing Becomes Faint or Colors Are Incorrect" in the on-screen
manual: Basic Guide.
Page 21
61 2 3 4 5
Windows
Macintosh
1615
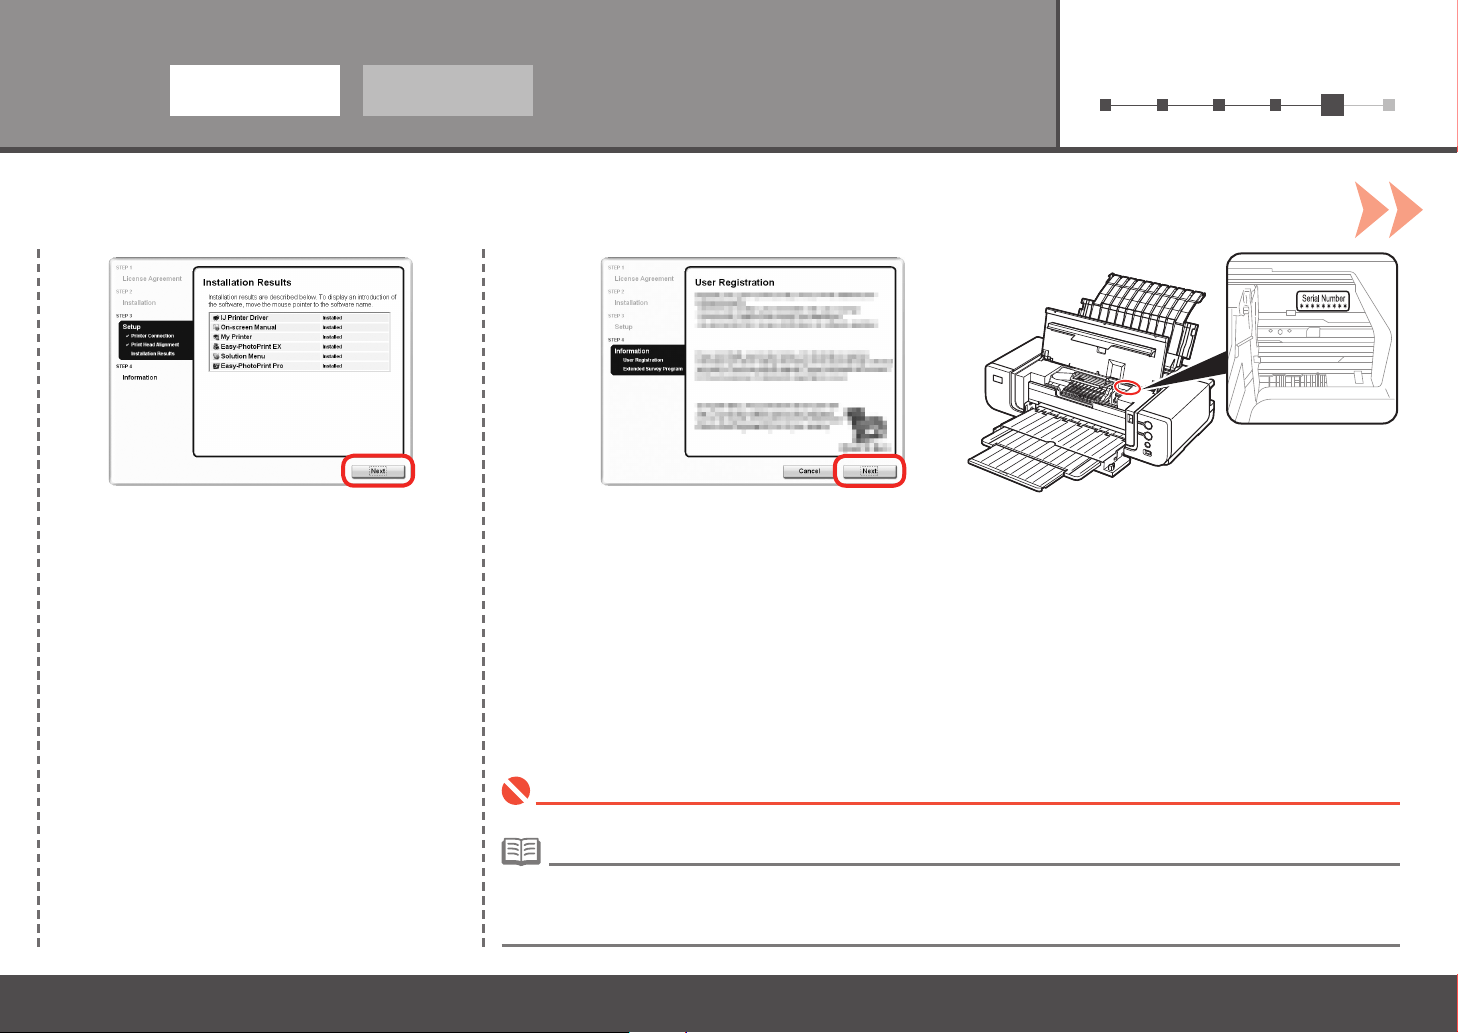
Click Next.
It may take a while for the next screen to appear. Click
Next only once.
Click Next.
If connected to the Internet, the user registration page appears. Follow the on-screen instructions to register your
printer. You will need your product serial number, which is located on the inside of the printer.
Internet connection is required. (Connection fees apply.)•
To register later, click Cancel. User registration can be started from the Canon Solution Menu icon. For details, refer to
•
"Solution Menu" on page 31.
If you are already registered, the Product Registration screen appears.•
19
Page 22
Windows Macintosh
5
17 18
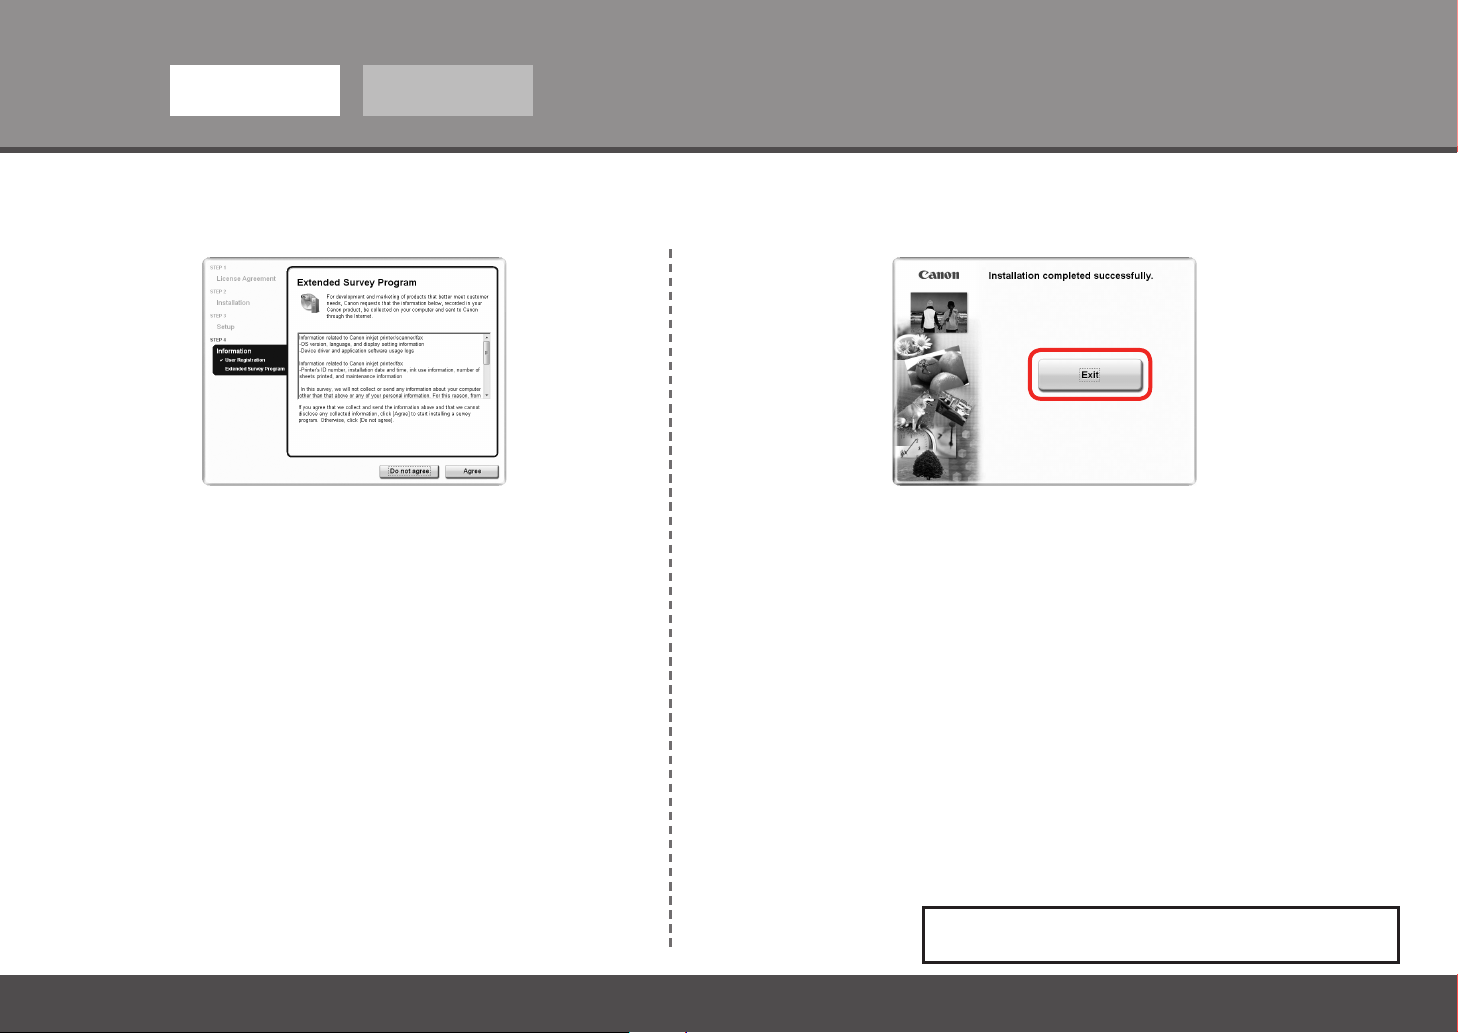
When the Extended Survey Program screen appears, conrm the
message.
If you can agree, click Agree. If you click Do not agree, the Extended Survey
Program will not be installed.
(This has no effect on the printer's functionality.)
20
Click Exit.
If Restart is displayed, make sure that the Restart the system now (recommended) check
box is selected, then click Restart.
After restarting the computer, remove the Setup CD-ROM and keep it in a safe place.
Next, read "6 Loading Paper" on page 28!
Page 23
61 2 3 4 5
5
Windows Macintosh
321
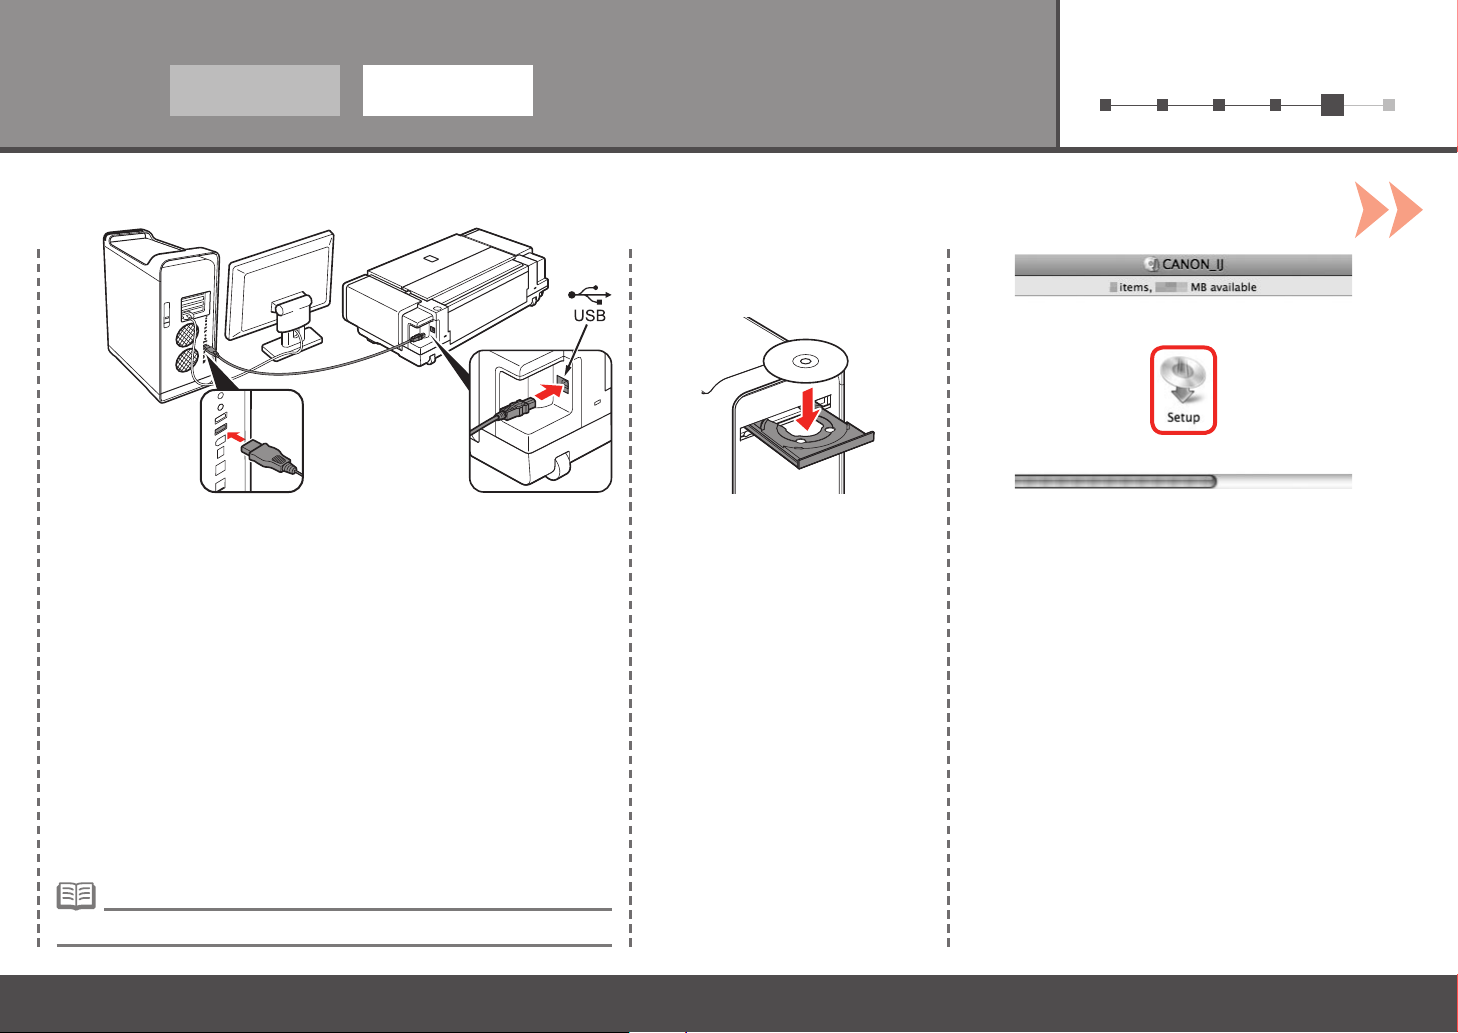
Connect the printer to the computer with a USB cable.
Make sure the printer is turned on.
The USB port is located on the right side of the printer.•
the Setup CD-ROM into the CDROM drive.
Double-click the Setup icon.Turn on the computer, then insert
If the CD-ROM folder does not open automatically,
double-click the CANON_IJ icon on the desktop.
21
Page 24
5
Windows Macintosh
64 5
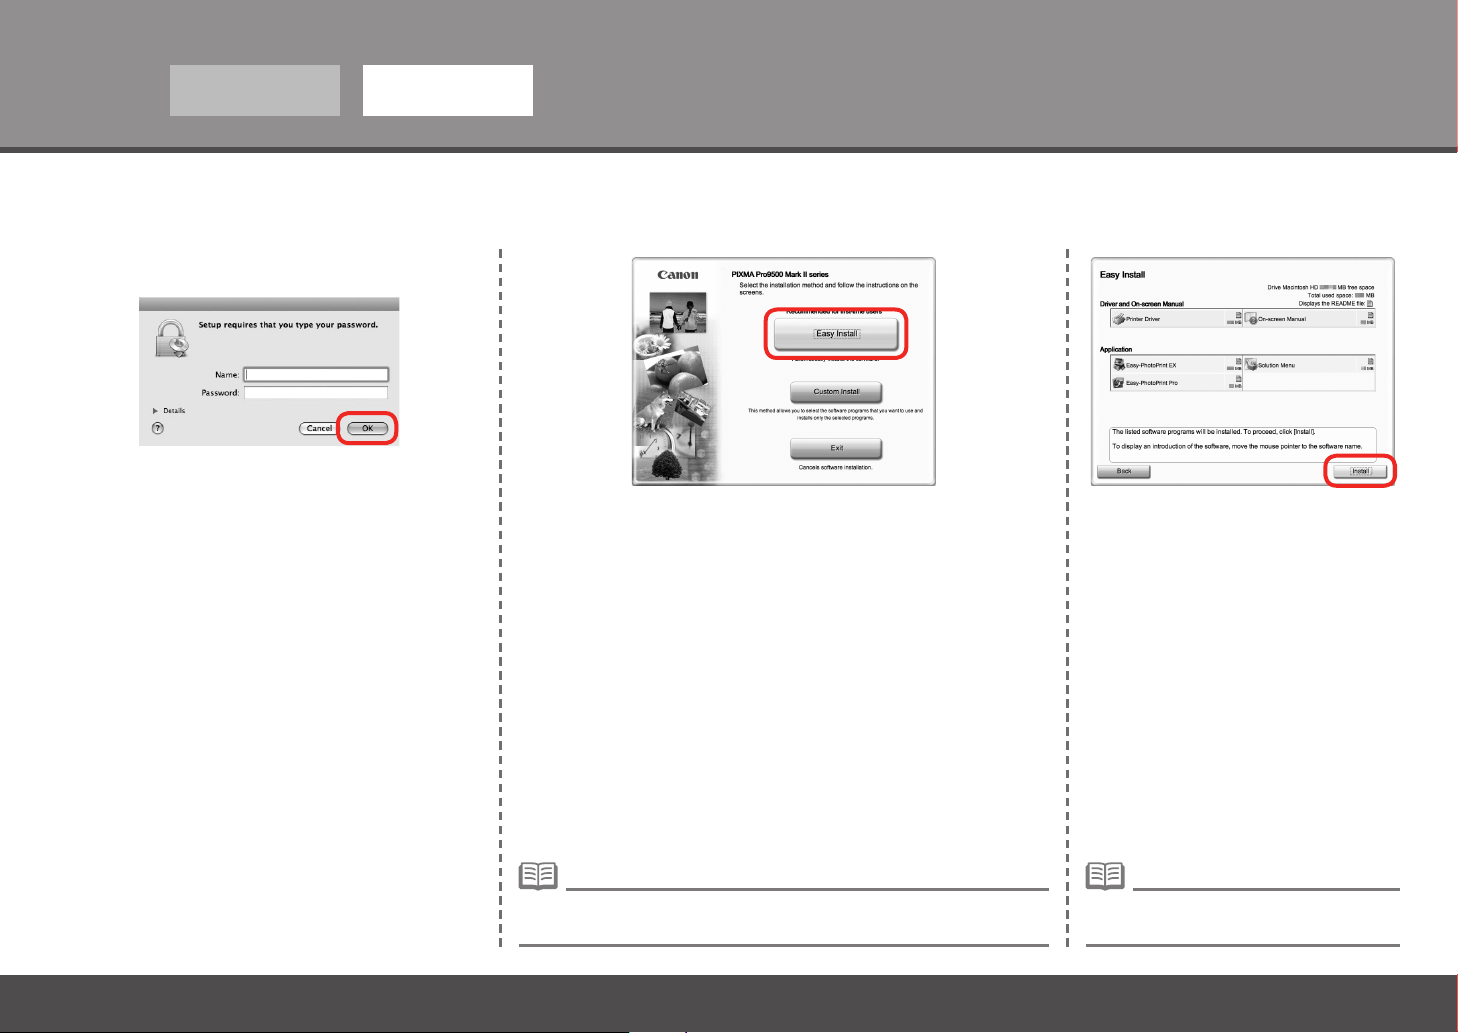
Enter your administrator name and password.
Click OK.
If you do not know your administrator name or password,
click Help, then follow the on-screen instructions.
22
Click Easy Install.
Drivers, application software, and on-screen manuals are installed
automatically.
If you want to select particular items to install, click Custom Install and
•
follow the on-screen instructions to proceed with the installation.
Click Install.
Move the cursor over items to display
•
explanations.
Page 25
61 2 3 4 5
Windows Macintosh
87 9
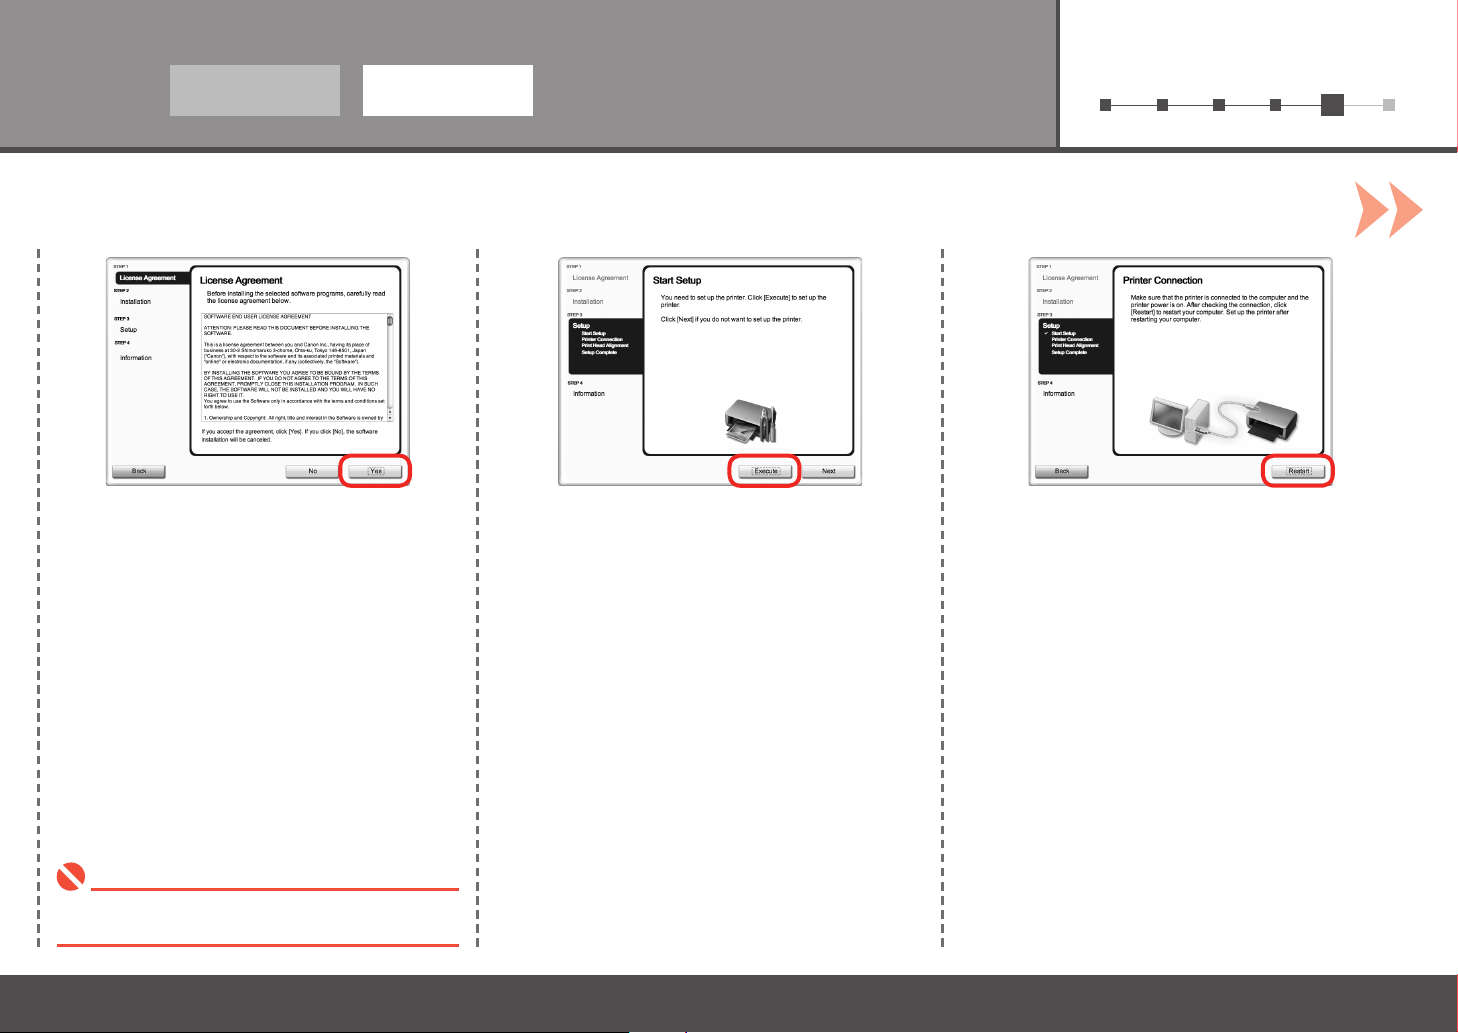
Read the License Agreement screen carefully
and click Yes.
Installation starts.
During installation, follow any on-screen instructions to
•
install the software.
Execute.
Click Restart.When the Start Setup screen appears, click
The Print Head Alignment screen appears after the
computer has been restarted.
23
Page 26
5
A
B
Windows Macintosh
10 11
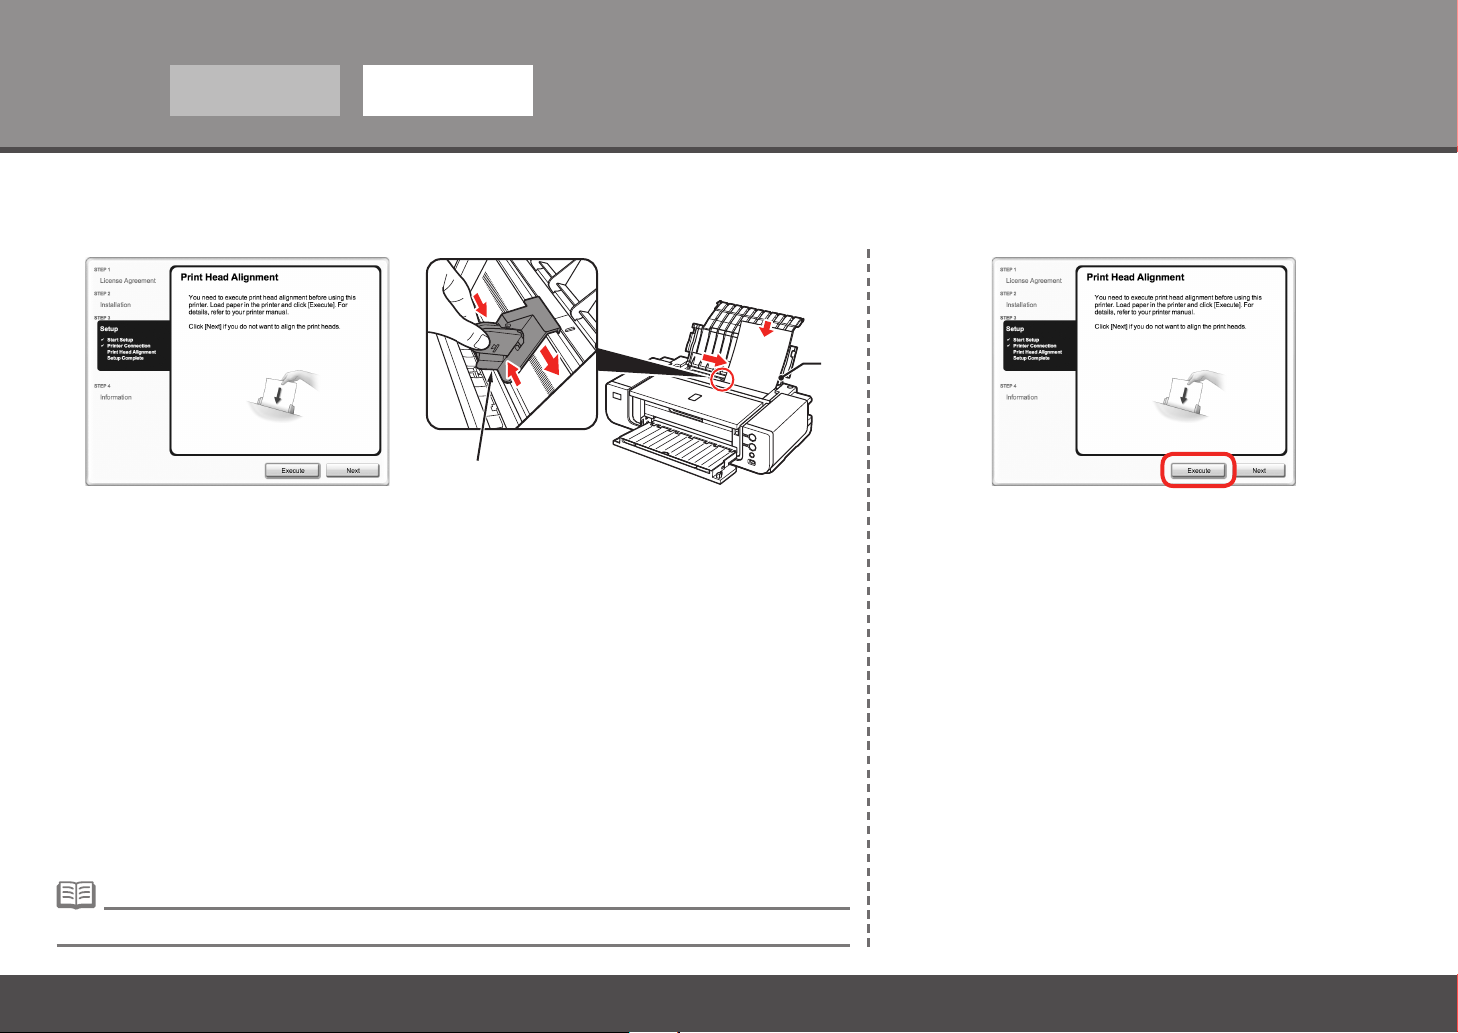
paper in the Rear Tray (A) as shown.
Pinch and slide the Paper Guide (B) against the left edge of the paper.
Align the Print Head
Click Execute.When the Print Head Alignment screen appears, load two sheets of A4 or Letter-sized plain
For details, refer to "6 Loading Paper" on page 28.•
24
Page 27
61 2 3 4 5
D
C
E
Windows Macintosh
1312
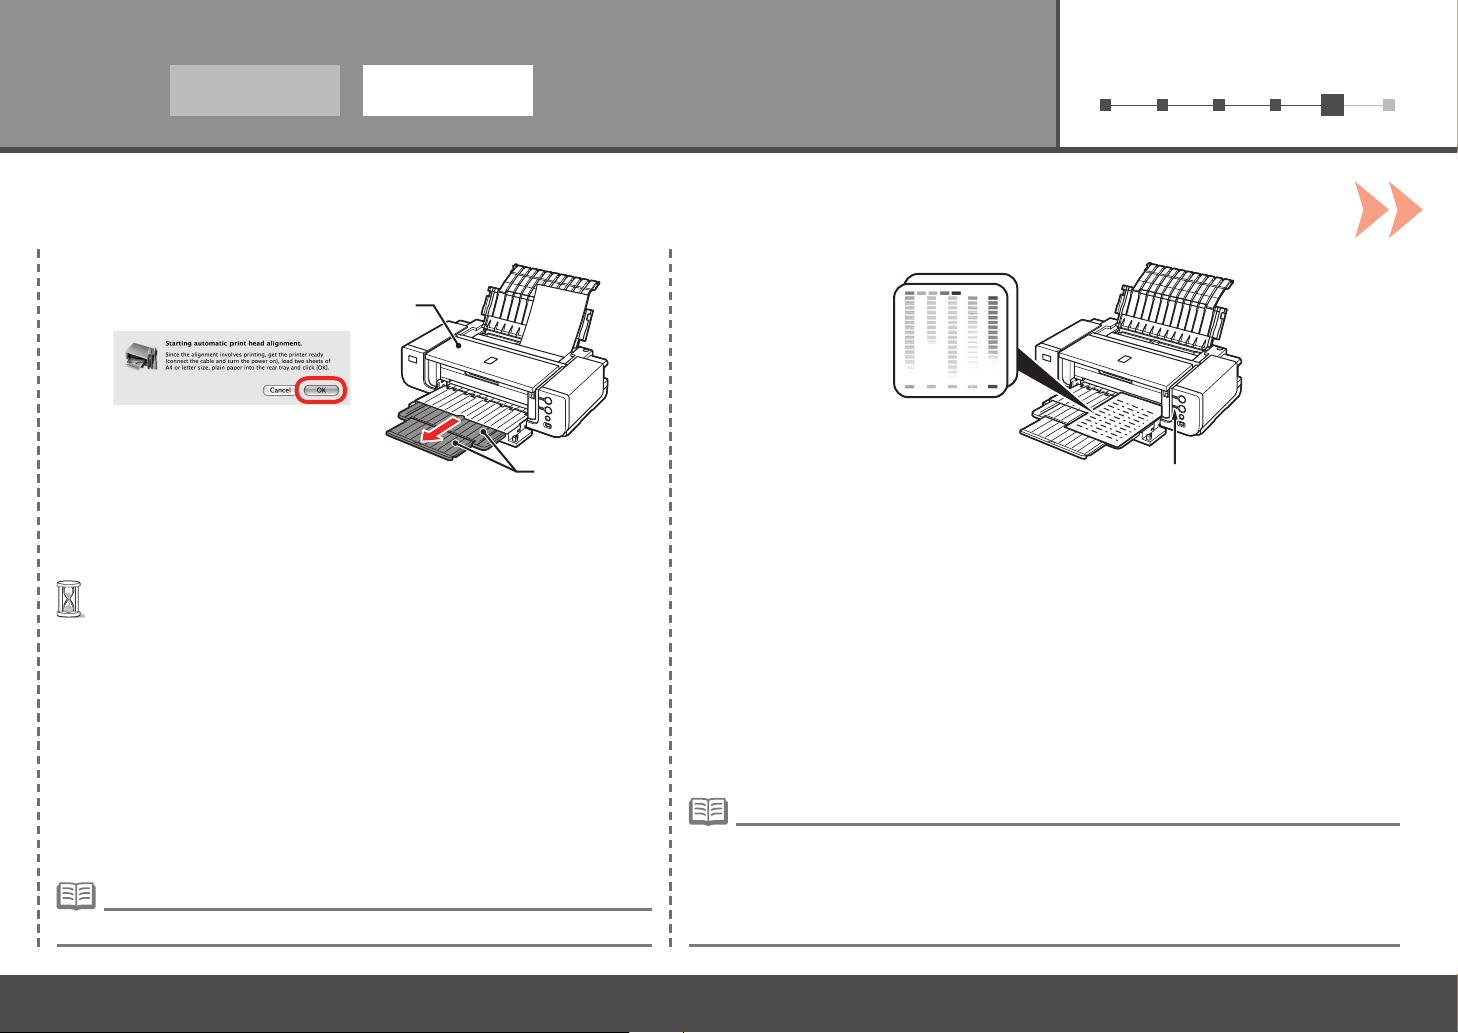
When this screen appears, click OK.
Printing of the pattern starts.
Wait until the pattern printing ends (about 10 minutes), and go to
•
the next step.
Do not open the Top Cover (C) while printing.•
Pull out the Front Tray Extension (D) beforehand.•
Make sure that the pattern shown is printed.
Some parts of patterns printed on the rst page are faint.
If you align the Print Head automatically again, patterns different from those shown above may be
•
printed.
When Print Head Alignment cannot be executed properly, the Alarm lamp (E) will ash orange
•
11 times. In this case, refer to "When Printing Becomes Faint or Colors Are Incorrect" in the onscreen manual: Basic Guide.
25
Page 28
Windows Macintosh
5
14 15
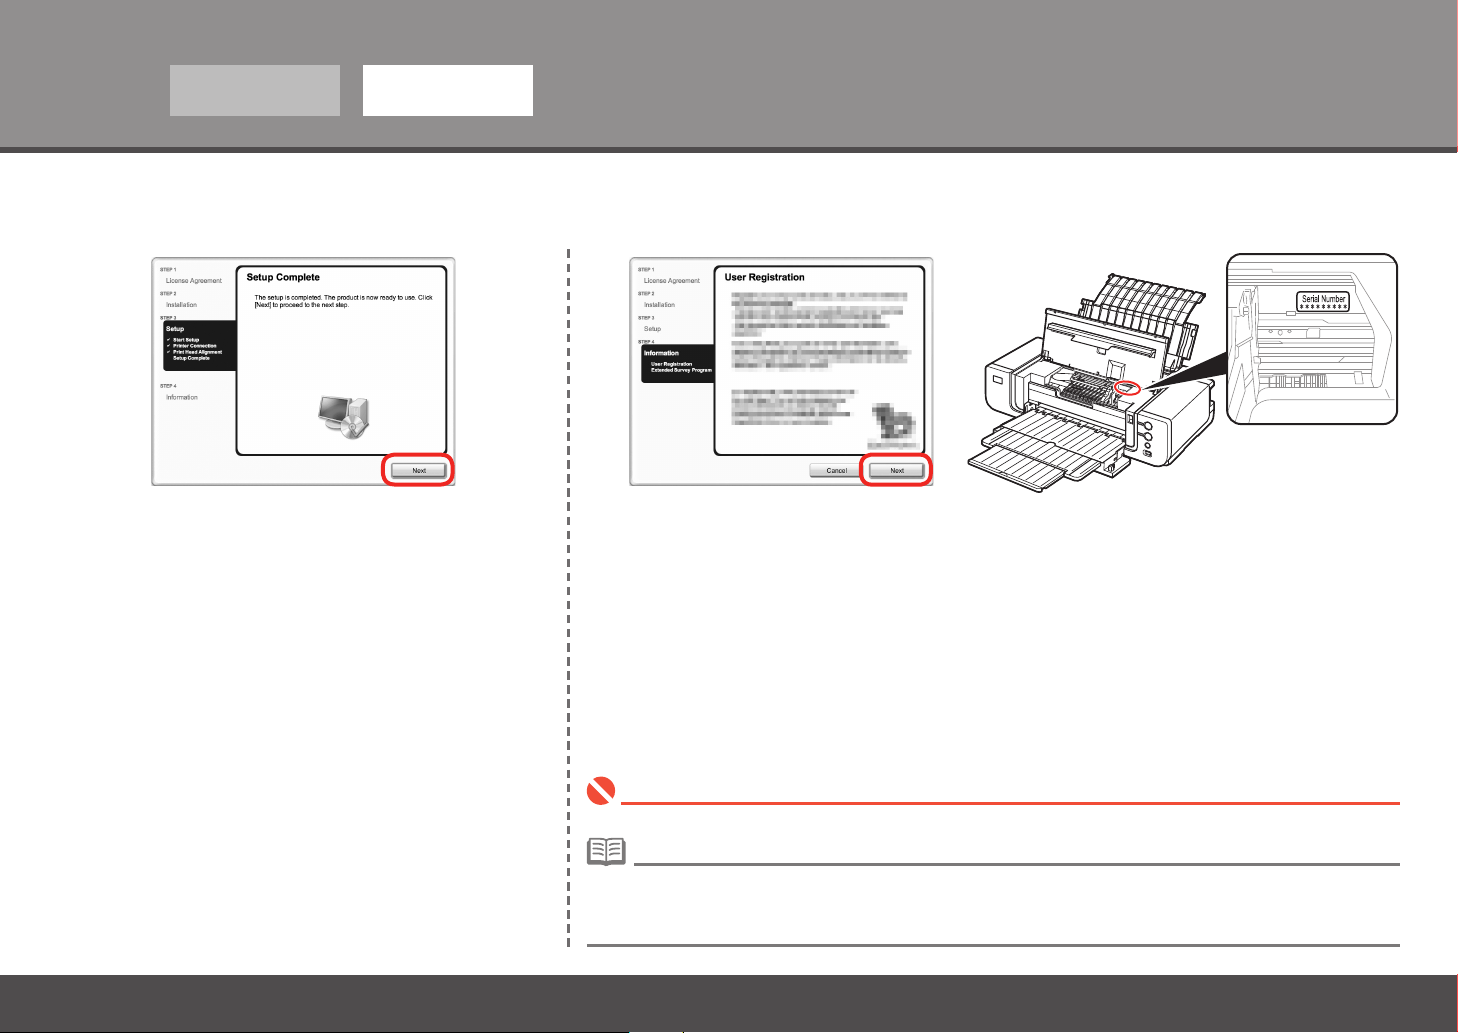
Click Next.
26
Click Next.
If connected to the Internet, the user registration page appears. Follow the on-screen instructions to register
your printer. You will need your product serial number, which is located on the inside of the printer.
Internet connection is required. (Connection fees apply.)•
To register later, click Cancel. User registration can be started from the Solution Menu icon. For details, refer to
•
"Solution Menu" on page 31.
If you are already registered, the Product Registration screen appears.•
Page 29
61 2 3 4 5
Windows Macintosh
1716
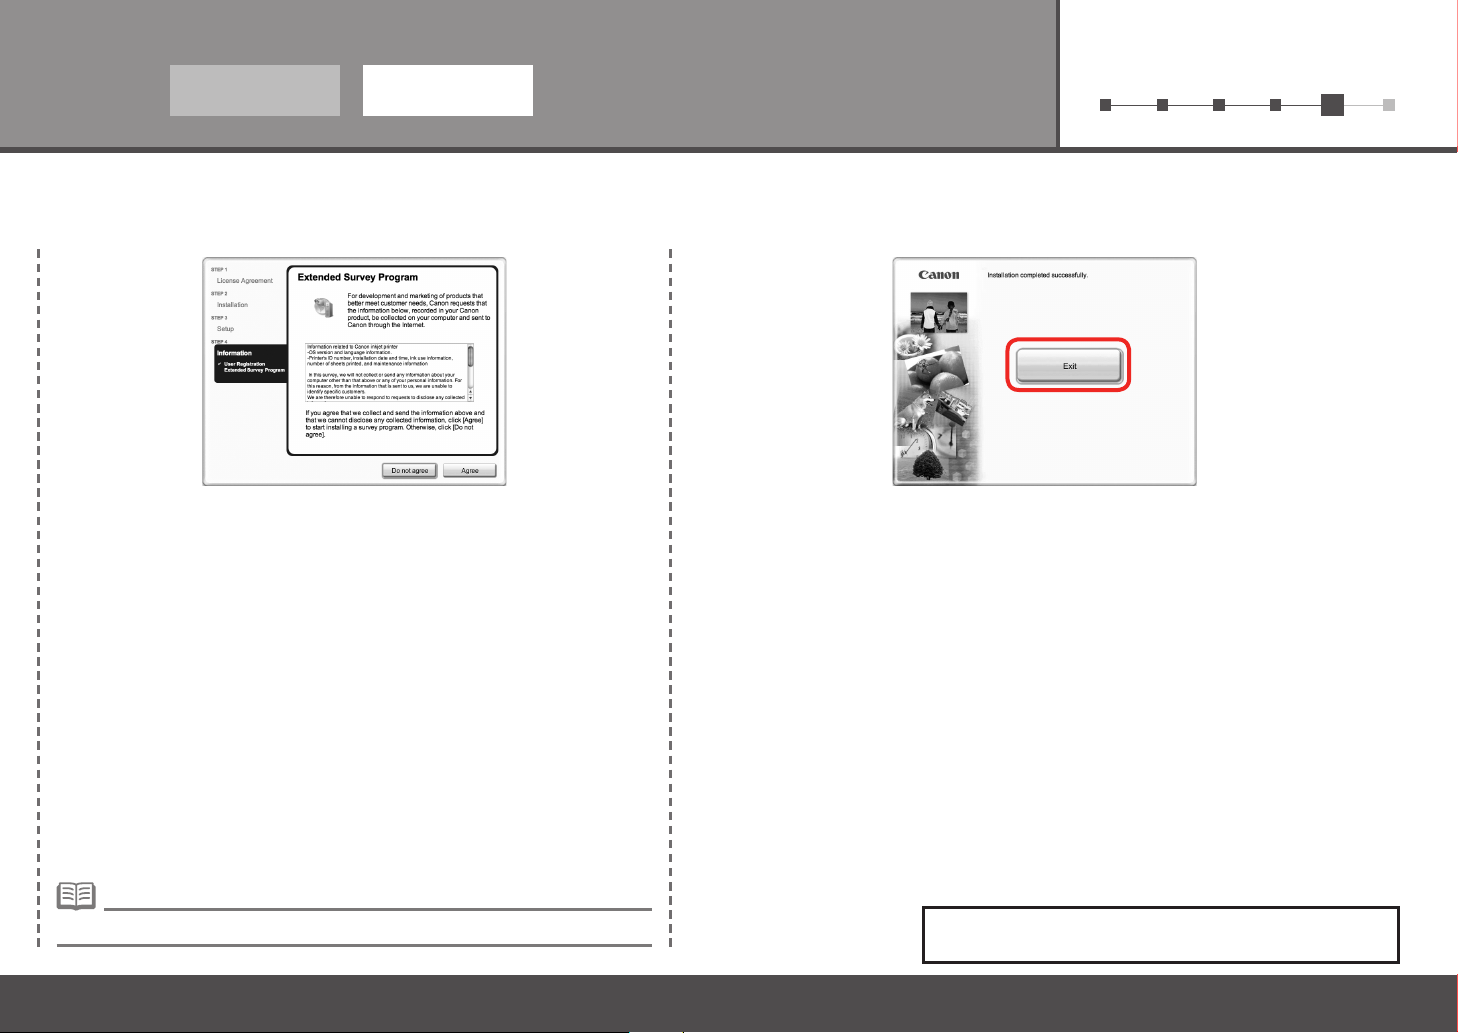
When the Extended Survey Program screen appears, conrm the
message.
If you can agree, click Agree. If you click Do not agree, the Extended Survey
Program will not be installed.
(This has no effect on the printer's functionality.)
The screen does not appear on Mac OS X v.10.3.9.•
Click Exit.
Remove the Setup CD-ROM and keep it in a safe place.
Next, read "6 Loading Paper" on page 28!
27
Page 30
6
C
A
B
E
D
Loading Paper
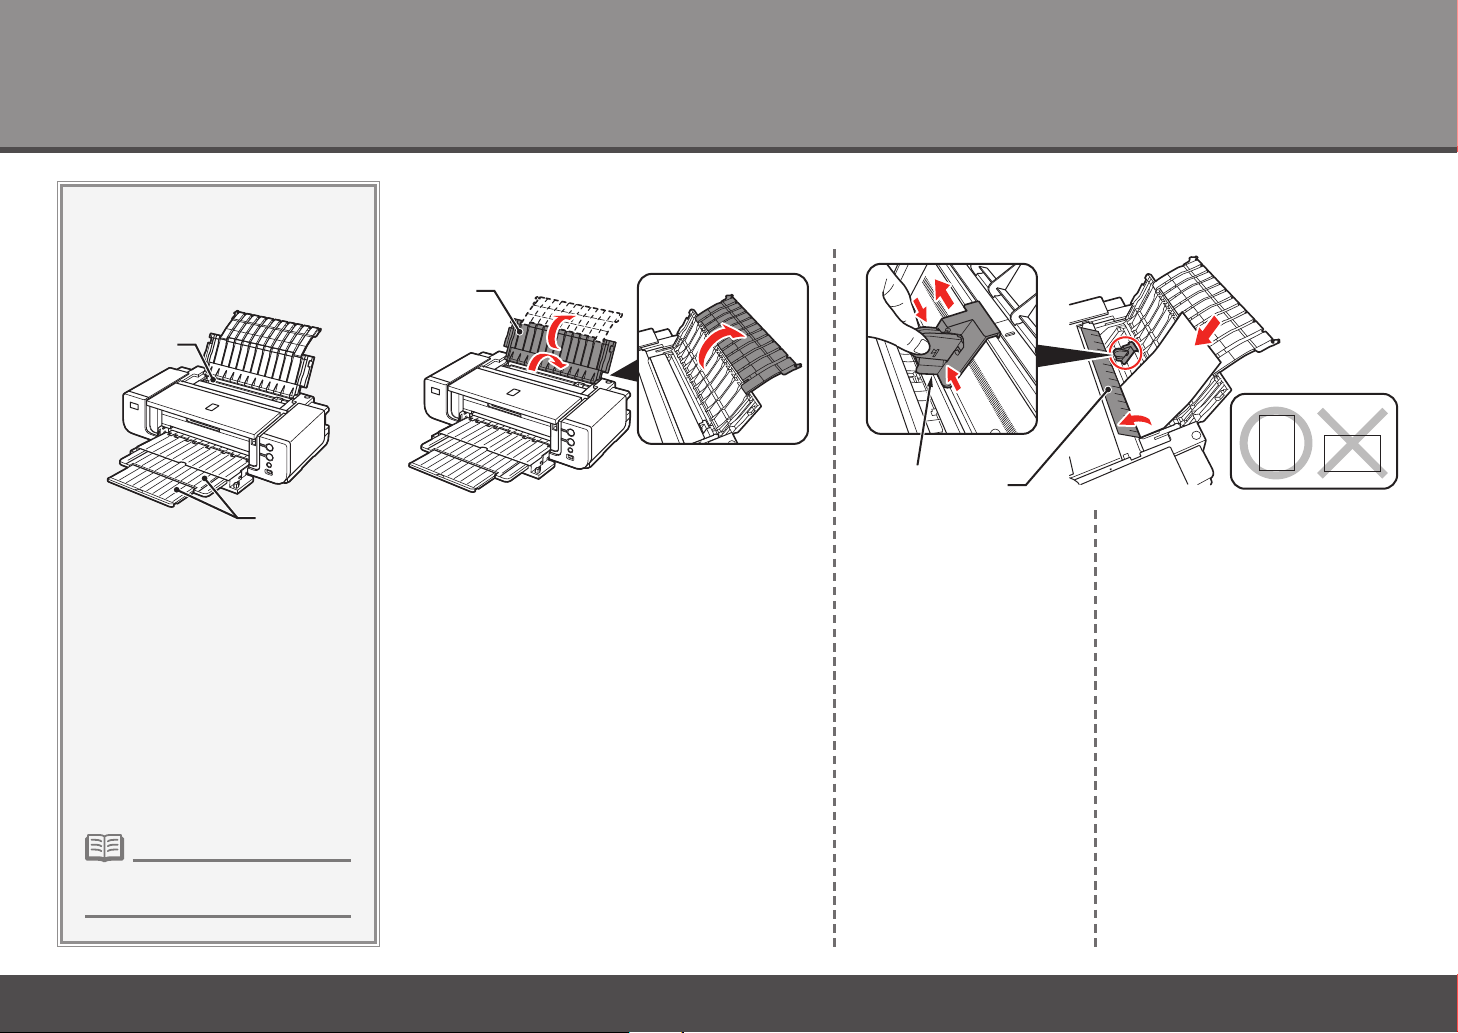
This section explains how to
load paper in the Rear Tray (A).
1
Open the Paper Support (C).
2 3
Open the Feed Slot Cover
(D), then pinch and slide
the Paper Guide (E).
Load paper straight along the
right edge of the Rear Tray.
Load paper in portrait orientation with
the printing side facing up.
Pull out the Front Tray Extension
•
(B) beforehand.
28
Page 31
1 2 3 4 5
6
4
D
E F
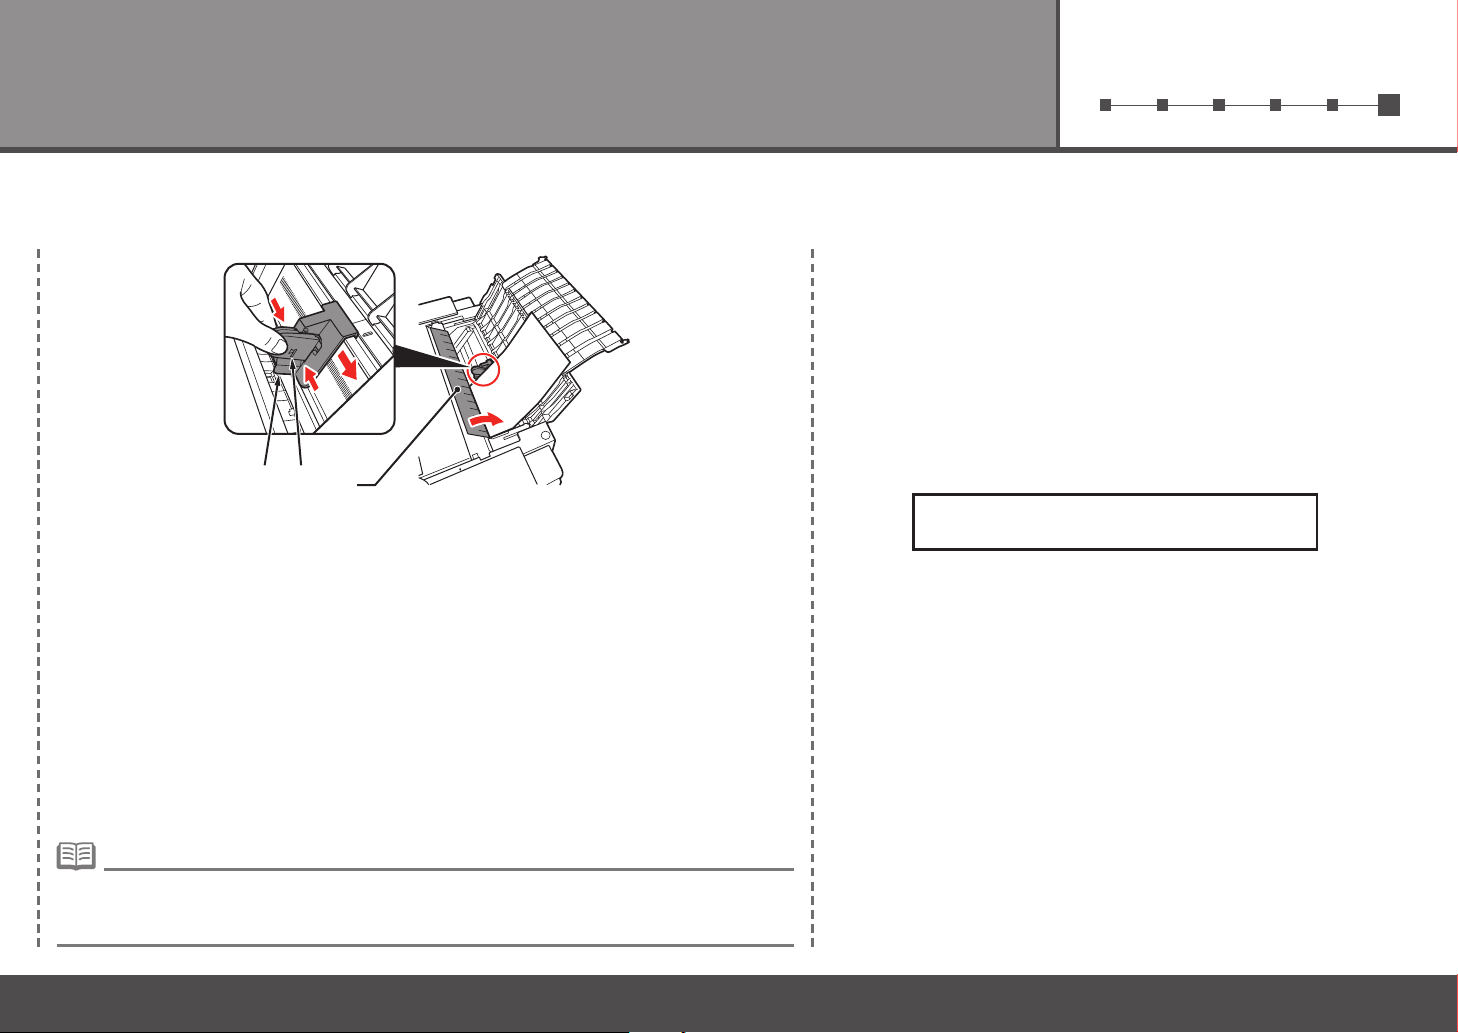
Pinch and slide the Paper Guide (E) against the left edge of the paper, then close the
Feed Slot Cover (D).
Conrm that the loaded paper does not exceed the line (F).
You can print on large size paper such as 14" x 17"/355.6 x 431.8 mm or thick paper by loading the
•
paper in the Front Tray. For details on how to load paper in the Front Tray, refer to "Loading Paper" in
the on-screen manual: Basic Guide.
Printer installation is now complete!
29
Page 32
After Installing the Printer
Ma nu al s■
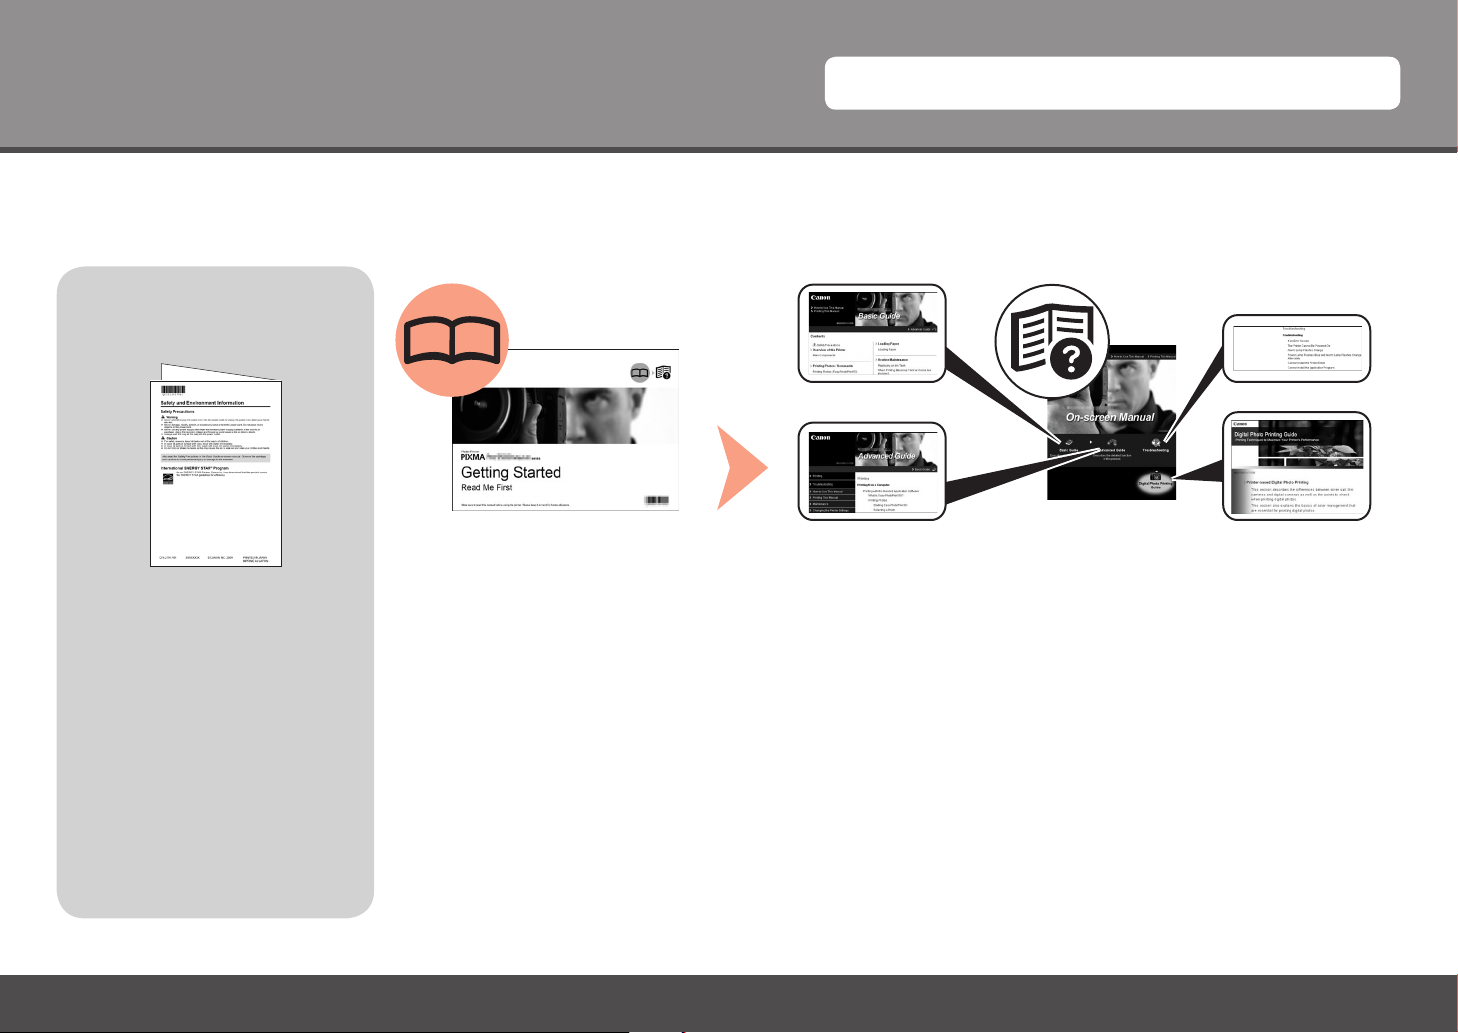
Safety Precautions
For details on opening the on-screen manuals, refer to page 31.
Sa f ety an d
En v iro nme nt
In f orm ati on
For proper use, read safety
precautions before using the
printer.
30
Ge t tin g S tar t ed
(t h is man ual )
Describes how to set up and use
your printer. Introduces the printer
and its functions, the included
manuals and application software.
on - scr een ma n ual s
Ba s ic Gui de Ad v anc ed Gui d e
Di g ita l P hot o Pr int ing
Gu i de
Describes the basic operations
and gives an introduction to
other functions available.
Describes various operating
procedures to make full use
of printer. Also includes
"Troubleshooting" information for
your printer.
Page 33
So lu ti on M en u■
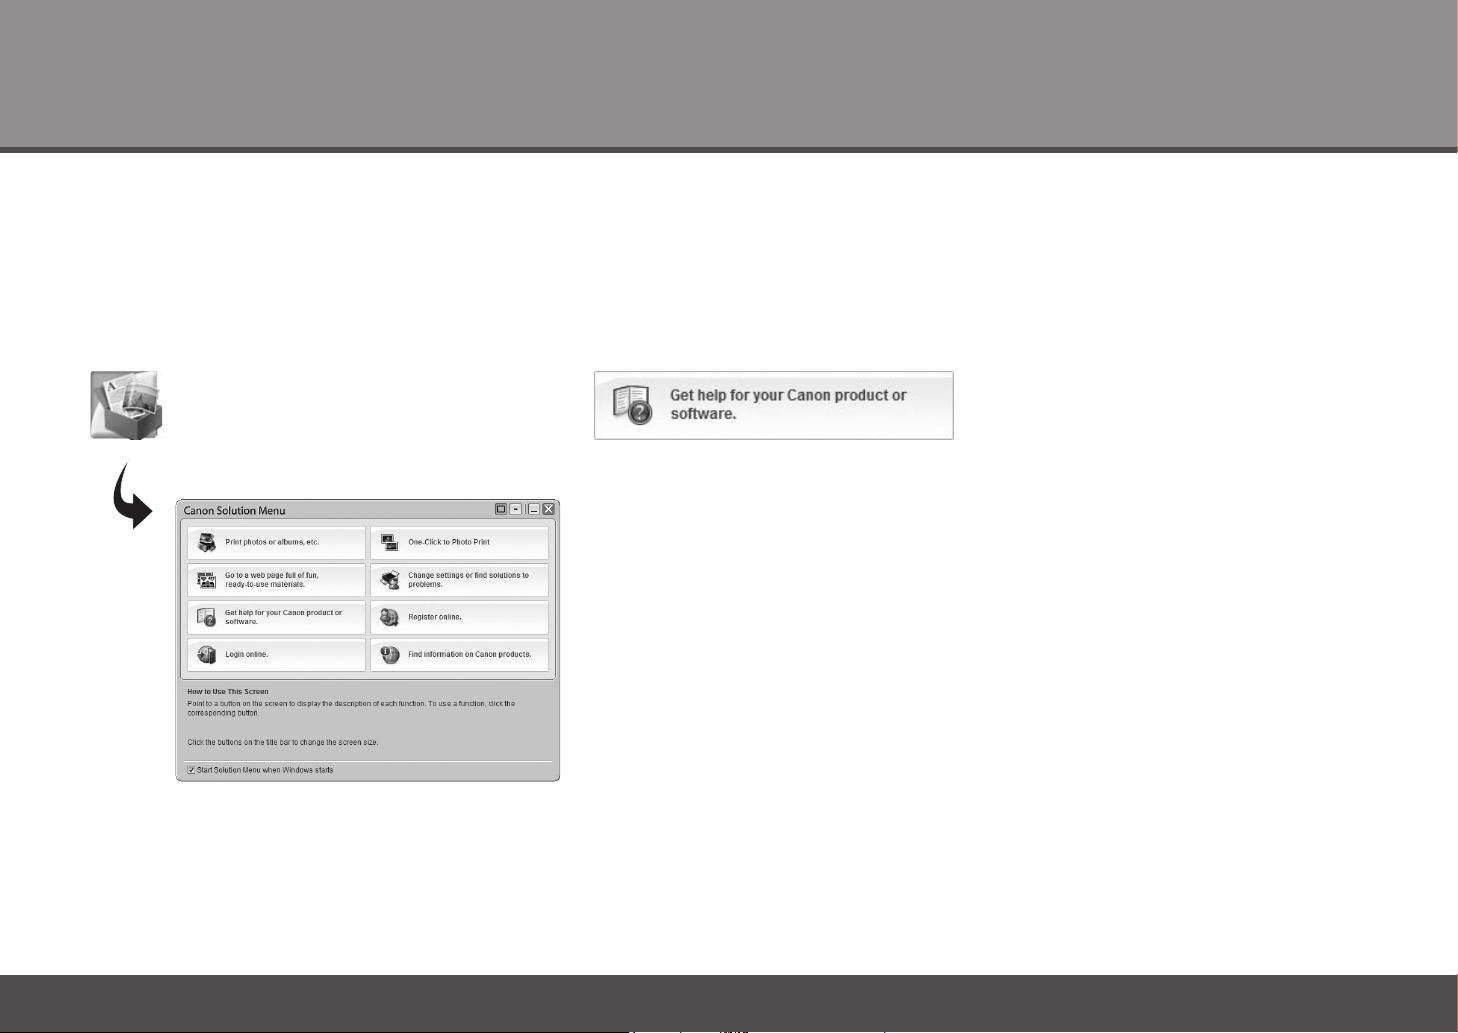
Sol u t ion M e n u is a gate w a y to f u ncti o n s and i nfor m a t ion t h at al l o w yo u t o ma k e full u se o f t he p r i nter!
To open the on-screen manual, click the button
shown to the left in Solution Menu.
Example: Windows Vista
Open various applications and on-screen manuals with a single click.
You can start Solution Menu from the Canon Solution Menu icon on the desktop (Windows) or
on the Dock (Macintosh).
If you have a problem with printer settings, click the Change settings or nd solutions to
problems. in Solution Menu to open My Printer (Windows only).
*The buttons displayed vary depending on the
country or region of purchase.
31
Page 34
Ut il iz in g th e Pr in te r■
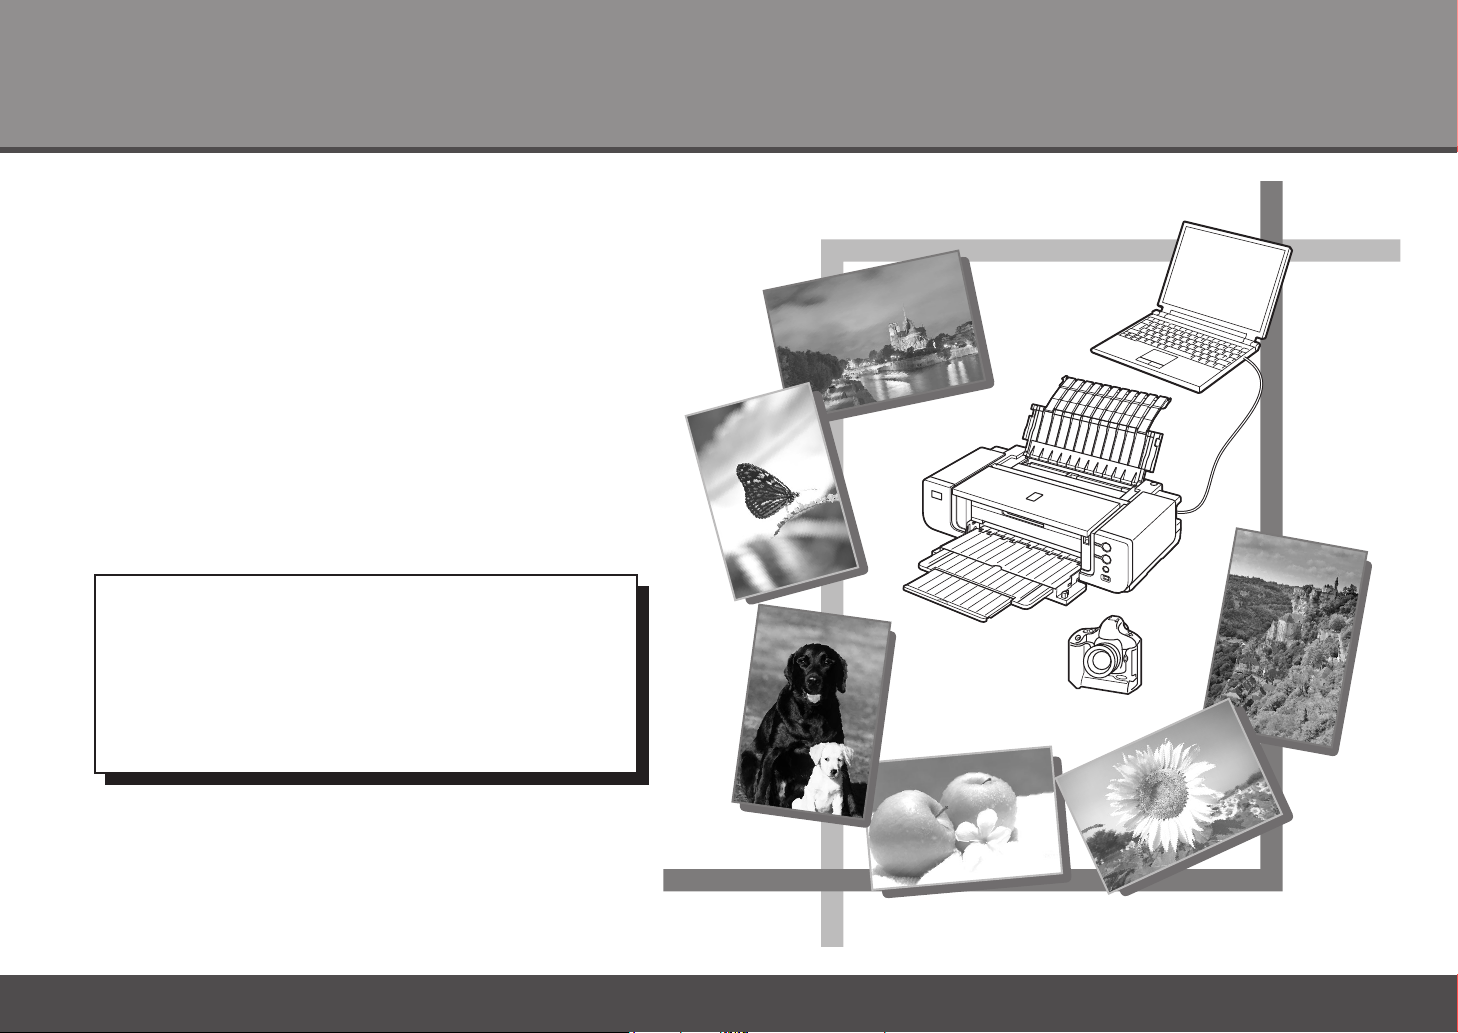
Eas y - Phot o P r int P r o is o n e of t h e ap p l icati o n
sof t w are. E a sy-P h o toPri n t Pro a l lows y ou to
pri n t hig h q uali t y phot o s eas i l y by u t ilizi n g the
dig i t al p h o t o co l o rs.
Sin c e ICC p r ofil e s are a l so a v a i labl e , you c a n
pri n t pho t o s in c o lors t h at a r e clos e r to y o u r
ide a l col o r s usi n g colo r mana g e m ent.
For d etai l s on h o w to u s e the a p plic a t ion
sof t w are a n d the p rinte r, r e f er t o the o n scr e e n ma n u a ls: B a sic G u i de a n d Adva n c ed
Gui d e .
For p hoto p r inti n g and c o lor m a n agem e n t,
ref e r to t h e on- s c reen m a nual : D igit a l Phot o
Pri n t ing G u i de a s well.
32
Page 35
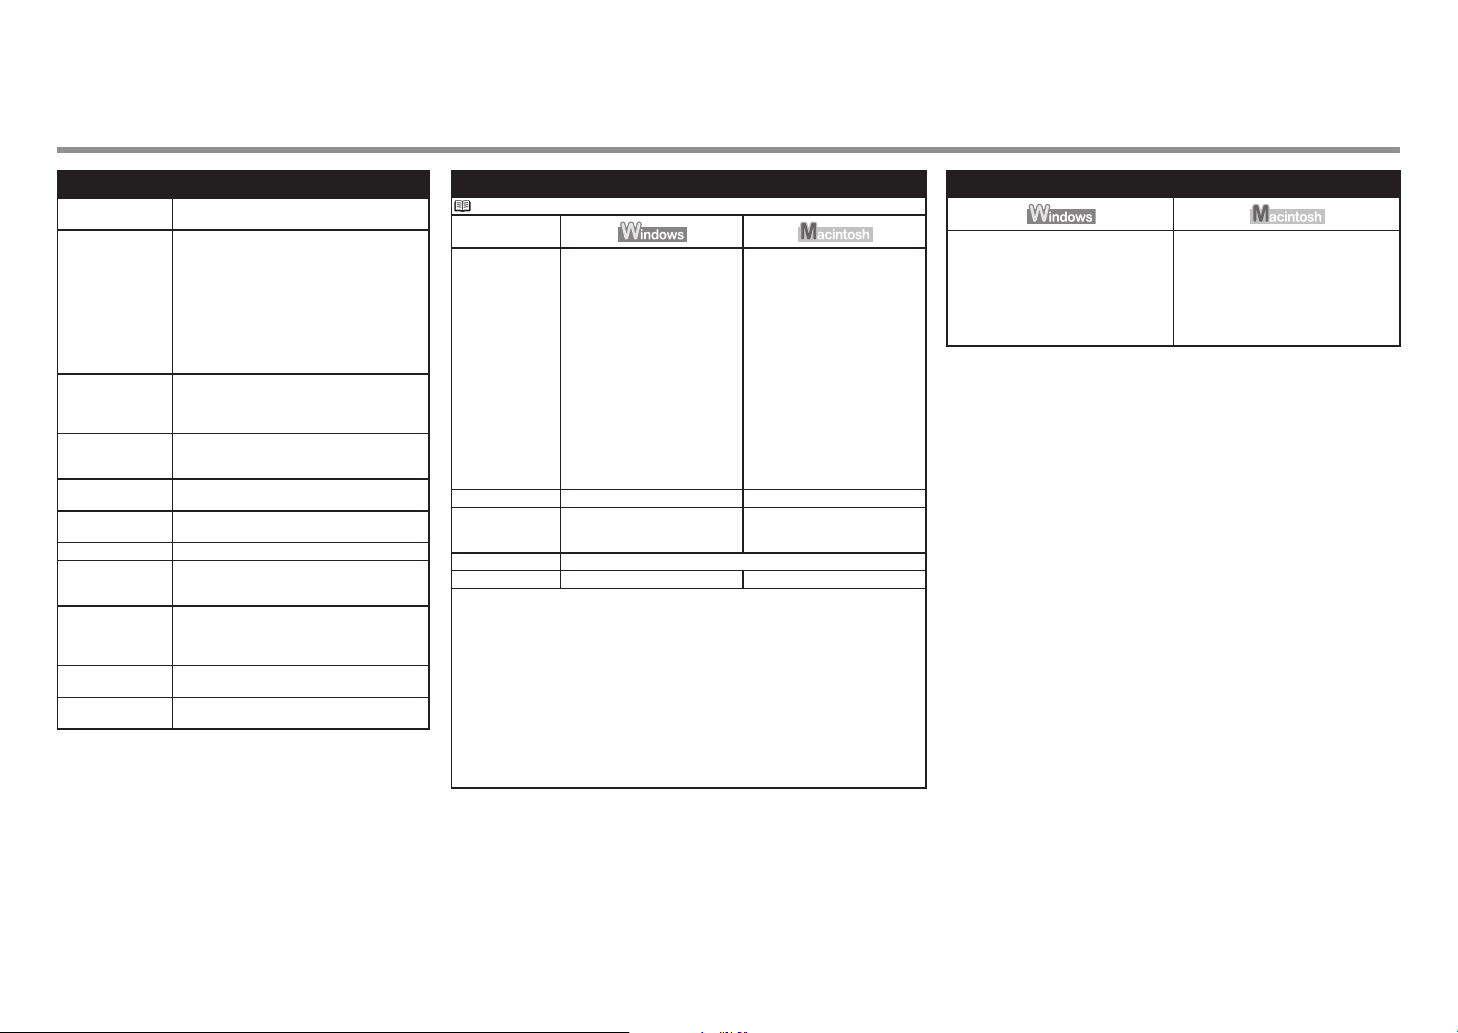
Specifications
General Specications
Printing resolution
(dpi)
Interface USB Port:
Print width Rear Tray: 12.7 inches max. (322.2 mm) (for
Acoustic noise level Approx. 36.0 db (A)
Operating
environment
Storage
environment
Power supply AC 100-240 V, 50/60 Hz
Power consumption Printing: Approx. 14W
External dimensions Approx. 26.0 (W) x 14.0 (D) x 7.6 (H) inches
Weight Approx. 15.2 kg (Approx. 33.4 lb)
Print Head/Ink Total 7,680 nozzles (PM/PBK/MBK/PC/GY/M/
4800 (horizontal) x 2400 (vertical)
Hi-Speed USB*
Direct Print Port:
PictBridge
computer that complies with Hi-Speed USB
* A
standard is required. Since the Hi-Speed
USB interface is fully upwardly compatible
with USB 1.1, it can be used at USB 1.1.
Borderless Printing: 13 inches/329 mm)
Front Tray: 13.7 inches max. (348.8 mm) (for
Borderless Printing: 14 inches/356 mm)
* When printing in the high print quality mode
on Photo Paper Plus Glossy II.
Temperature: 5 to 35°C (41 to 95°F)
Humidity: 10 to 90% RH (no condensation)
Temperature: 0 to 40°C (32 to 104°F)
Humidity: 5 to 95% RH (no condensation)
Standby (minimum): Approx. 1.2W
OFF: Approx. 0.9W
Approx. 660 (W) x 355 (D) x 193 (H) mm
* With the Paper Support, Front Tray and Front
Feed Support retracted.
* With the print head and ink tanks installed.
Y/C/G/R each 768 nozzles)
Minimum System Requirements
Conform to the operating system’s requirements when higher than those given here.
Operating System
Processor
RAM
Browser Internet Explorer 6.0 or later Safari
Hard Disk Space 450 MB
CD-ROM Drive Required
Display SVGA 800 x 600 XGA 1024 x 768
Windows: Note: Operation can only be guaranteed on a PC with Windows Vista, XP
•
or 2000 pre-installed.
Easy-PhotoPrint Pro is a software plug-in for Canon Digital Photo Professional Ver. 2.1
•
or later, Adobe Photoshop CS/CS2/CS3/CS4 and Adobe Photoshop Elements 6.
Adobe Photoshop Elements 6: DVD Drive is required for installation.
•
Windows: XP, Vista only
Macintosh: Mac OS X v10.4.8 - 10.5.2
Following additional hard disk space is required
Windows: 1.5 GB
Macintosh: 1 GB
To upgrade from Windows XP to Windows Vista, rst uninstall software bundled with
•
the Canon inkjet printer.
•
Macintosh: Hard Disk must be formatted as Mac OS Extended (Journaled) or Mac OS
Extended.
Windows Vista, Vista SP1
1 GHz processor
512 MB
Windows XP SP2, SP3
300 MHz processor
128 MB
Windows 2000 Professional SP4
300 MHz processor
128 MB
Note: For bundled software
installation.
Mac OS X v.10.5
Intel processor, PowerPC G5,
PowerPC G4
(867 MHz or faster)
512 MB
Mac OS X v.10.4
Intel processor, PowerPC G5,
PowerPC G4, PowerPC G3
256 MB
Mac OS X v.10.3.9
PowerPC G5, PowerPC G4,
PowerPC G3
128 MB
600 MB
Note: For bundled software
installation.
Additional System Requirements for the on-screen manuals
Browser: Easy Guide Viewer
Note: Microsoft Internet Explorer 6.0 or
later must be installed. The on-screen
manual may not be displayed properly
depending on your operating system or
Internet Explorer version. We recommend
that you keep your system up to date with
Windows Update.
Browser: Help Viewer
Note: The on-screen manual may not be
displayed properly depending on your
operating system. We recommend that
you keep your system up to date.
Specications are subject to change without notice.
About Consumables
Consumables (ink tanks / FINE Cartridges) are available for
5 years after production has stopped.
33
Page 36
Getting Help from Canon
Email Tech Support — www.canontechsupport.com
Toll-Free Live Tech Support— (1-800-828-4040) under warranty
This option provides live telephone technical support, free of service charges,
Monday-Friday (excluding holidays), during the warranty period.
Telephone Device for the Deaf (TDD) support is available at (1-866-251-3752).
Ordering Information
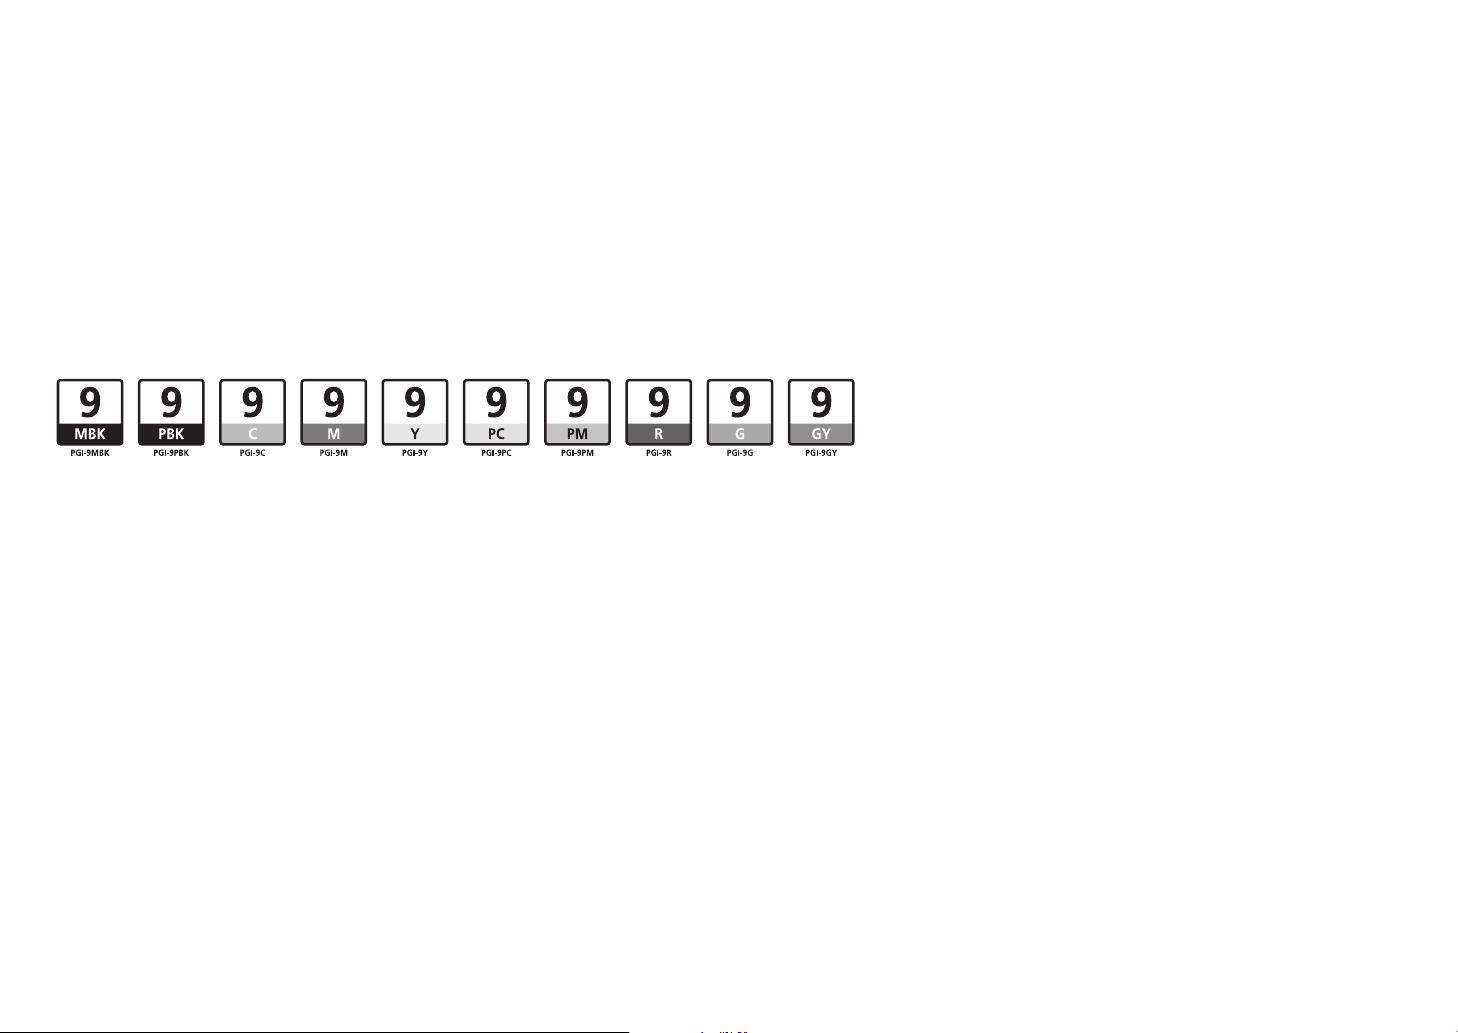
The following ink tanks are compatible with this printer.
Order #
PGI-9 Matte Black
PGI-9 Photo Black
PGI-9 Cyan
PGI-9 Magenta
PGI-9 Yellow
PGI-9 Photo Cyan
PGI-9 Photo Magenta
PGI-9 Red
PGI-9 Green
PGI-9 Gray
1033B002
1034B002
1035B002
1036B002
1037B002
1038B002
1039B002
1040B002
1041B002
1042B002
Call 1-800-OK-CANON to locate a dealer near you, or visit the Canon eStore at
www.canonestore.com
CANON U.S.A. INC.
One Canon Plaza, Lake Success, NY 11042 U.S.A.
www.usa.canon.com
QT5-2161-V02 XXXXXXXX ©CANON INC.2009 PRINTED IN JAPAN
 Loading...