

Page 1
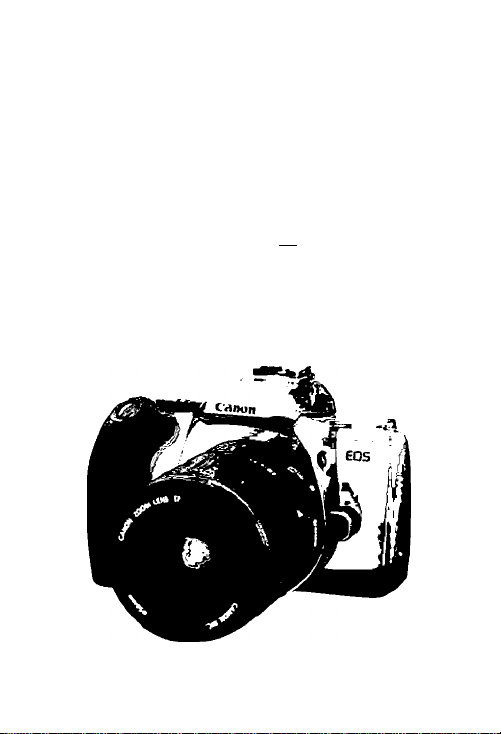
Canon f
[D^
3000D / 3000Q DATE
INSTRUCTIONS
Page 2

Thank you for purchasing a c|non product.
The EOS REBEL K2 (DATE) / 3000V (DATE) is a very compact
autofocus, single-lens reflex camera. It can be used for a wide
variety of subjects and situations with fully automatic and usercontrolled shooting modes.
Read this Instructions and familiarize yourself with your new camera
before taking pictures.
Also read "Handling Cautions" on page 4 to prevent camera
malfunction and damage.
Keep this instruction bookiet handy for easy reference.
Before Using Your Camera
• Before shooting an important event, be sure to take test shots
to make sure the camera operates properly.
• EOS cameras have a lens mount tor dedicated operation
(autofocusing, exposure control, etc,) with Canon EF lenses.
Using a non-Canon EF lens with an EOS camera may not
result in proper camera or lens operation. Note that the
warranty does not cover any camera mallunction or damage
occurring with the use of non-Canon products.
Conventions Used in this instructions
• The <iS> icon indicates the Main Dial.
• All operation procedures described in this booklet assume that
the Mode Dial is set to a mode except <@D>. Before
proceeding with any operation, be sure that the Mode Dial is
set to a shooting mode.
• Reference page numbers are indicated by (p.*»).
• The camera control icons and markings used in this booklet
correspond to the actual icons and markings found on the
camera.
• The (ij)4) and (46) icons indicate that the respective function
remains in effect for 4 and 6 sec. respectively after the button
is released.
Page 3

Contents
Conventions Used in this Instructions
Handling Cautions.......................................................................................4
Nomenclature.............................................................................................6
Installing the Batteries.............................................................................11
Checking the Battery Level.......................................................................12
Mounting and Detaching a Lens
How the Shutter Button Works
©Loading and Unloading Film.................................................................15
Qsi Midroll Rewind
Since everything is automatic, all you do is press the
shutter button.
.............................................................................
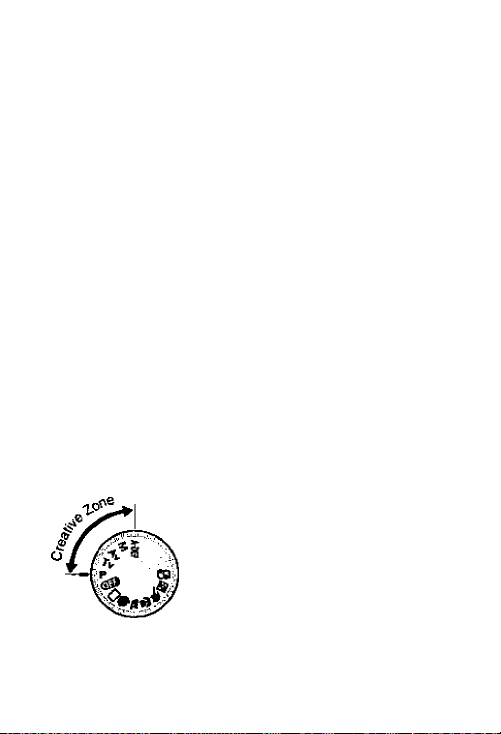
3 User-Controlled Shooting.................................................27
You can set the desired shutter speed or aperture value to
obtain the exposure you want. You take control of the
camera.
Reference........................................................................44
Symbols
The Caution symbol alerts you to actions to prevent
^ shooting problems.
The Note symbol gives supplemental information.
.......................................................
..............................................................
...............................................................
2
13
14
16
Page 4

Handling Cautions
Camera Care and Storage
• The camera is a precision instrument. Do not drop it or subject it to
physical shock.
• The camera is not waterproof and should not be used in wet
conditions or undenrvater. If the camera gets wet, take it to your
nearest Canon dealer as soon as possible. If small amounts of
water splash onto the camera, wipe it with a clean dry cloth. If fhe
camera is exposed to salty air, wipe it thoroughly with a slightly
damp cloth.
• Do not leave the camera in places prone to excessive heat such as
in a car on a sunny day. Excessive heat can cause the camera to
malfunction.
• The camera contains precision electronic circuitry. Never attempt to
disassemble the camera.
• Use only a blower brush to blow away any dust on the lens,
eyepiece, mirror, focusing screen, film compartmenf, etc. Do not
clean the camera bocfy or lens with any cleaner containing an
organic solvent. For stubborn dirt, consult your nearest Canon
dealer.
• The shutter curtains are extremely thin. Use only a blower to clean
them. Be careful not to blow air too forcefully on the shutter
curtains.The shutter curtains can be easily deformed or damaged.
Also, when loading and unloading film, be careful nof to touch the
shutter curtains.
• Do not touch the electrical contacts with your fingers. Otherwise
corrosion may develop on the contacts, resulting in improper
camera operation.
• If the camera is not to be used for an extended period, remove the
battery. Store the camera in a well-ventilated, cool, dry place.
During the storage period, press the shutter button to release the
shutter a few times once in a while.
• Avoid storing the camera in a laboratory, cabinet, etc,, where
corrosive chemicals are present.
Page 5
• If you have not used the camera for some time or are planning to
take shots you will not want to lose (overseas vacation, etc.), have
the camera checked by your Canon dealer beforehand, or check
for yourself that the camera components are working properly.
LCD Displays
By their nature, LCD displays react more slowly at low
temperatures, and may appear dark at high temperatures. The
display will return to normal at room temperature.
Batteries
• Before installing the batteries, wipe the battery contacts to remove
any fingerprints and smudges. This is to prevent faulty connections
and corrosion.
• Never disassemble or recharge the batteries. Also, never store a
battery in high-temperature places or short circuit the battery
contacts or toss a battery into a fire.
• Although the batteries work well even at low temperatures, battery
performance may decline slightly at freezing temperatures. In such
a case, keep spare batteries warm in a pocket, etc., and use and
warm the batteries alternately.
How Low Battery Levels Affect Camera Operation
On the LCD panel, if the <dl]> icon blinks or it is not displayed, a
. proper exposure can still be obtained as long as the shutter
releases However, when the battery level is low, film advance and
auto rewind might stop midway or not work at all and <'fZI]> icon
may blink on the LCD panel. After the batteries are replaced with
new ones, film advance will be possible and film rewind can resume
by pressing the <0£> button.
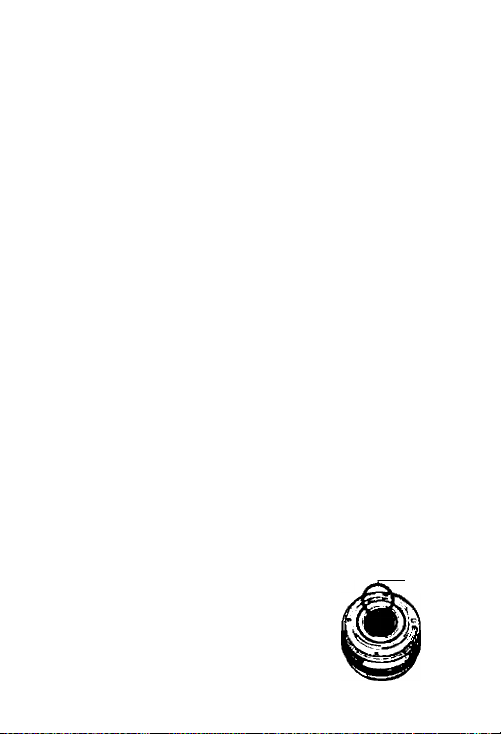
Lens Electrical Contacts
After detaching the lens from the camera, put
on the lens caps or put down the lens with
the rear end up to avoid scratching the lens
surface and electrical contacts.
Contacts
Page 6
Nomenclature
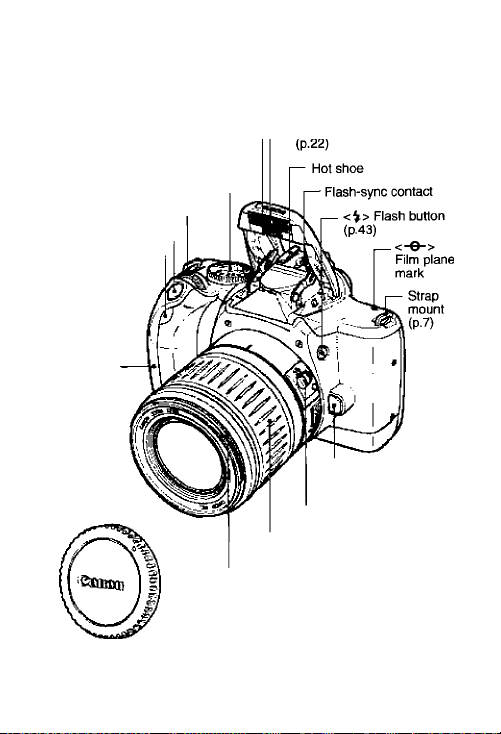
• Reference page numbers are indicated by {p.»*).
Buiit-in fiash / — f— Red-eye reduction iamp
AF-assist beam
(p.43/19)
Mode Diai (p.10) —
<iSs> Main Diai —
Shutter button (p.14) —
‘Remote control
sensor / Self-timer/
•Remote control
lamp (p.24/23/24)
Grip / Battery
compartment
— Zooming ring
Focusing ring (p.30)
—■ Lens release
button (p.13)
Focus mode switch
(p.13)
Body cap (p.13)
DATE Model only
‘With an EX-series Speedlite.
Page 7
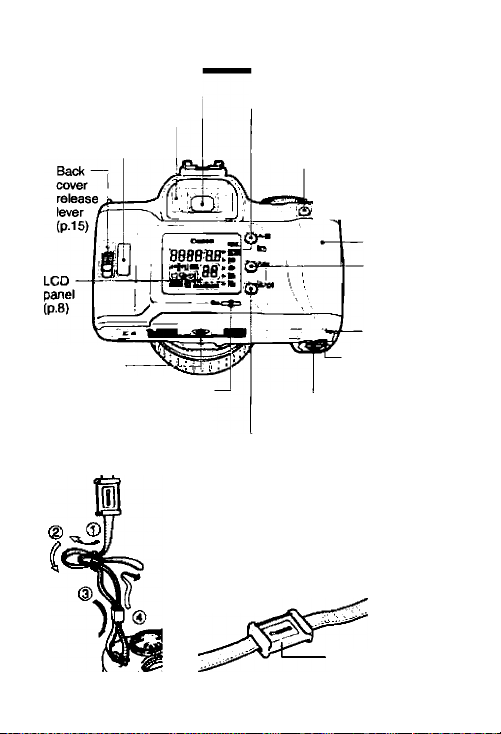
Viewfinder eyepiece
Eyecup (p.24) —|
Film check —^
window
Tripod socket
<0£> Midroll rewind button
(P-16)
Attaching the Strap
Pass the end ot the strap through the
camera's strap mount from the bottom. Then
pass it through the strap's buckle as shown
in the illustration. Pull the strap to make sure
it does not slip out of the buckle.
• The eyepiece cover is also attached to the
— <AvH> Aperture value setting /
Exposure compensation /
‘SET button (p.36/38/26)
—<*> AE lock (p.40)/
<^/Ci>l> Film advance mode /
Self'timer/*Remote control button
(p.31/23/24)
strap, (p.24)
**FE lock button
<EB> Appoint
selection button
(p.20)
Back cover
<FUNC>
Function button
(p.22, 25, 26,
39. 41,42)
Guide hole
Battery compartment
cover (p.11)
Battery compartment
cover release lever (p.11)
Eyepiece cover
Page 8

Nomenclature
LCD Panel
Shutter speed ■
ISO film speed
Date
**FE lock
DATE Model
AF point mark
Film advance
mode I
cO> Single frame I
<^>CQntimous
<0|> Self-timer/
4^ Cl -C1--CJ
Non-DATE Model
----------
shoolfcng
Remote control
Battery level mark —-
s'/ V • ^
' I ' ' , "
<@> Film mark -
8880 88»m
r
B8B
-¡iiaii] OB r
^
j
— <EQ> Manual focus
— Aperture value
Red-eye reduction setting
AEB amount
Date
mi
^ <B> Date
b:'bb:
"With an EX-series Speeditte.
^ T?ie actual display will show only the
IS6— <ISO> ISO film speed
<^> Red-eye reduction
<Bi> Multiple
exposures
<%> AEB
— <► > Function pointer
— Frame counter
Multiple-exposure setting
Self-timer operation
Remote control operation
Exposure level indicator
Exposure compensation amount
AEB level
Red-eye reductton farnp-on indicator
Frim transport indicator
applicable ilems.
Page 9
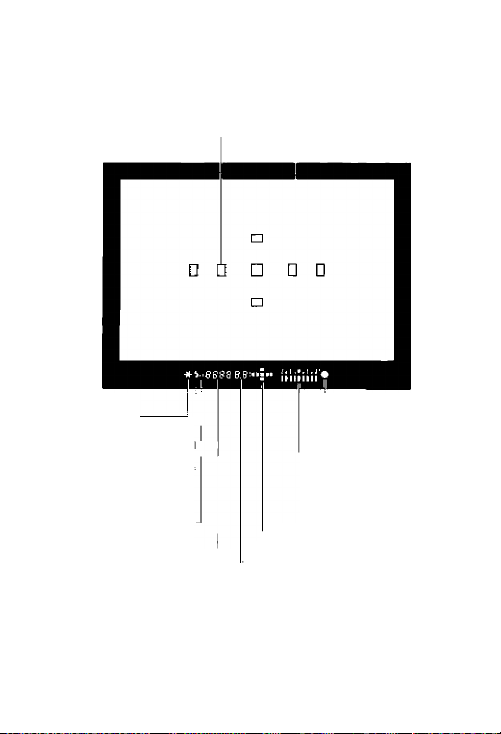
Viewfinder information
AF points (7)
------
1 Focusing screen
<*K*> AE lock /
“FE lock
AEB in progress
<V> Flash-ready
•'Improper FE lock
warning
<H> "High-speed sync
(FP flash)
Shutter speed —^
"FE lock
— <•> Focus
Exposure level indicator
Exposure compensation
amount
AEB level
Red-eye reduction
lamp-on indicator
— AF poinl mark
Aperture value
confirmation light
Page 10
Nomenclature
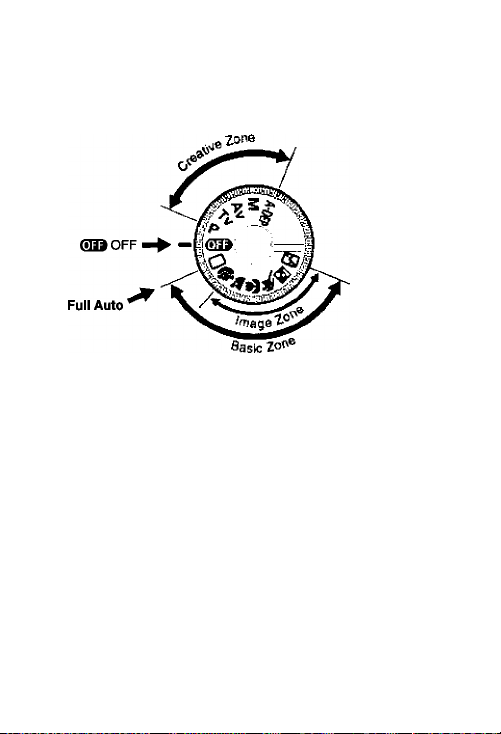
Mode Dial
The dial is divided into two zones.
0 Basic Zone
Fully automatic mode where
the camera takes care of
everything.
O : Full Auto (p.18)
Basically, all you do is point
and shoot.
Image Zone (p.20)
Fully automatic modes for a
particular subject.
® : Portrait
^ :Landscape
ft : Close-up
1*^ : Sports
H : Night Portrait
CD : Flash oft
10
) Creative Zone
Semi-automatic and manual
modes enable you to take
control of the camera to
obtain the desired result.
P : Program AE (p.32)
Tv : Shutter-priority AE
(p.34)
Av : Aperture-priority AE
(p.35)
M : Manual exposure
(p.36)
A-DEP : Automatic Depth-of-
field AE (p.37)
) €B9 : OFF
Page 11
Before You Start
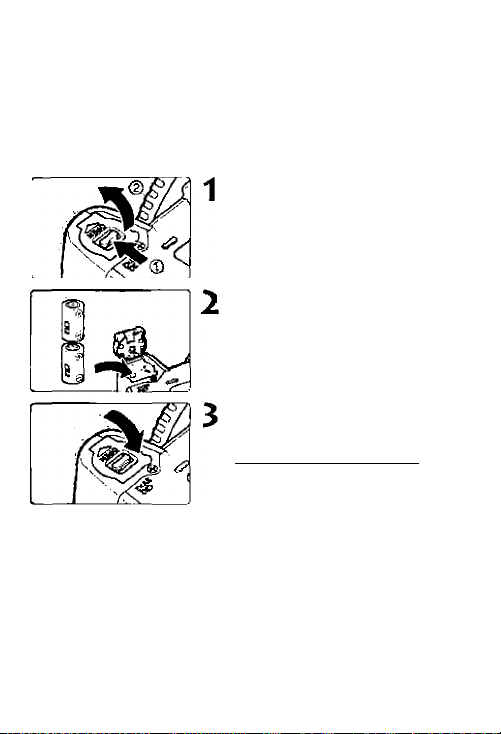
Installing the Batteries
* Batteries are not included in camera body only (not kit) sold in North
America. Obtain batteries separately.
The camera uses two CR2 lithium batteries.
For places where CR2 batteries may not be easily available, take
i
spare batteries with you. Also carry spare batteries Ibr extended
shooting sessions.
* •
Open the battery compartment
cover.
• Slide the release lever in the
direction shown by the arrow in the
diagram, and open the cover.
Install the batteries.
• Make sure the battery contacts {+
and -) are properly oriented as
shown.
• Do not mix old and new batteries.
Close the battery compartment
cover.
• Press the cover until it snaps shut.
• The dale and lime must be set. See
page 26. (DATE Model only)
11
Page 12
Checking the Battery Level
Check the battery level after replacing the batteries and before
using the camera.
_________________________________________________
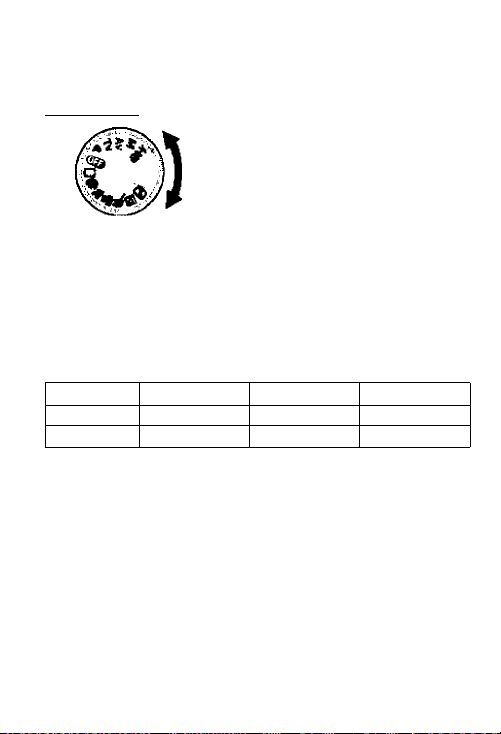
Turn the Mode Dial to a shooting mode.
• The camera will then turn on and the
LCD panel will display one of the
following battery level mark:
M : Battery level OK.
CD : The battery level is low. Keep
№
j spare batteries handy.
: The batteries will soon be
' completely exhausted.
s * /
: Replace the batteries.
Battery Life
Temperature
At 20'C
At-10'C 44 rolls
■ The battery life shown above is based on Canon's fesfing
condifions with new batteries.
' If nothing is displayed on the LCD panel, the batteries may have
a
been installed incorrectly. Take out the batteries and install
correctly.
' If you often press the shutter button halfway for a prolonged
period or just autofocus without taking a picture, the battery life
will be affected.
' When not using the camera, set the Mode Dial to <(!U9>.
0% Flash Use
67 rolls
50% Flash Use
30 rolls
20 rolls
12
(With 24-ex roils)
f00% Flash Use
22 rolls
15 rolls
Page 13
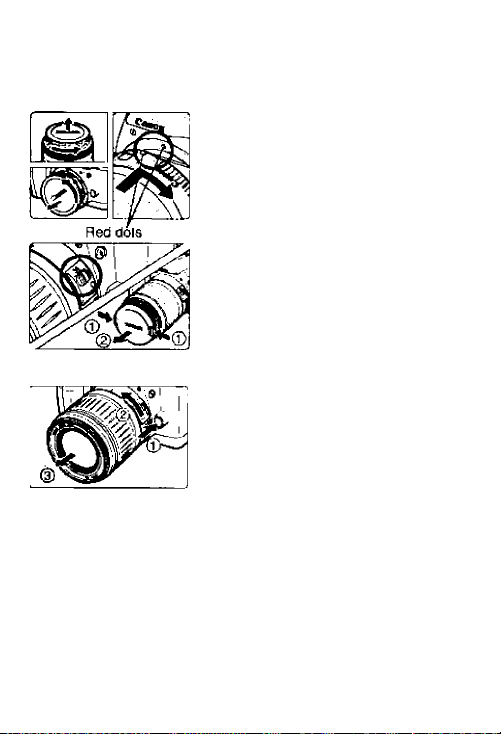
Mounting and Detaching a Lens
Mounting a Lens
Remove the caps.
Remove the rear lens cap and the
camera body cap.
Mount the lens.
•>
Align the red dots on the lens and
camera and turn the lens as shown
by the arrow until it snaps in place.
0n the lens, set the focus mode
3
switch to <AF>.
• If the focus mode switch is set to
<MF>, autofocus will not operate.
/j Remove the front lens cap.
Detaching the Lens
While pressing the lens release
button, turn the lens as shown
by the arrow.
• Turn the lens until it stops, then
ra • Keep the removed caps where you will not lose them.
• <AF> stands for "Auto Focus," and <MF> stands for “Manual
Focus."
• An EF-S lens cannot be attached to the camera.
detach it.
•
13
Page 14
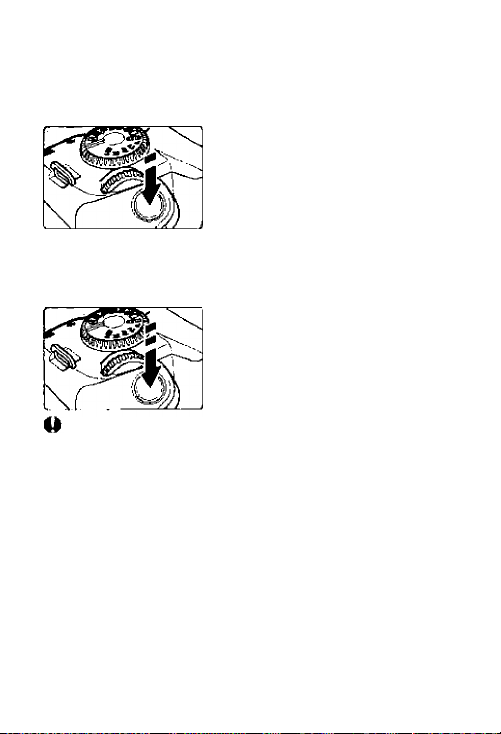
How the Shutter Button Works
The shutter button has two stages. You can press it down halfway or
fully. The two levels of shutter button operation are as follows:
When it is pressed halfway:
• Pressing the shutter button down
halfway activates autofocusing
(AF), and also activates the
automatic exposure (AE)
mechanism and sets the shutter
speed and aperture value.
• The exposure (the combination of
shutter speed and aperture value)
appears on the LCD panel and in
the viewfinder ((S4).
When it is pressed fully:
• The shutter is released to take the
picture and the film advances by
one frame.
If an Extender (optional) is used and the maximum aperture (the
lowest t/number) of the lens becomes smaller than f/5,6,
autofocusing will not operate.
1^ Camera movement during the moment of exposure is called
camera shake. Camera shake can cause blurred pictures. To
prevent blurred pictures due to camera shake:
• Hold the camera steady.
• Firmly grasp the camera grip with your right hand, and press
your both elbows lightly against your body.
• Hold the lens at the bottom with your left hand.
■ Press the camera against your face and look through the viewfinder.
• To maintain a stable stance, place one foot in front of the other
Instead of lining up both feel.
• Use your finger tip to touch the shutter button, grasp the camera
with your entire right hand, then press the shutter button gently.
14
Page 15

Loading and Unloading Film
Loading Film
After you load the film, the camera first winds the entire roll onto the
camera's take-up spool. With DX-coded film, the camera
automatically sets the film's ISO speed. Then each time a picture is m
taken, one frame of film is rewound back into the film cartridge. The |
frame counter shows always number of shots remaining.
Turn the Mode Dial to any
I
setting except <QU9>.
^ Open the back cover.
• Slide down the back cover release
lever and open the back.
Insert the film cartridge at a
3
slight angle.
Align the film leader edge with
the < A> mark.
4
• Hold down the film cartridge while
pulling out the film leader. If you
pull out the film leader loo much,
rewind it back into the film
cartridge.
^ Close the back cover.
Close the back cover until it snaps
shut.
► Film prewind will start and there will
be a shutter-release sound about
10 sec. later. The < @ > icon and
frame count will also be displayed
on the LCD panel.
► During the film prewind, the ISO
speed will be displayed oh the LCD
panel.
* •
15
Page 16
©Loading and Unloading Film
The shutter curtains have been manufactured with very high
precision. Never touch them with your fingers. When loading film,
do not touch or damage the curtains with your fingers or film.
• In hot and humid environments, do not remove the film packaging
until you are ready to load the film.
• Infrared film cannot be used with this camera.
If the film is not loaded properly, the <@> icon will blink on the LCD
i
panel and the shutter will not work. Reload the film cartridge
properly.
Unloading Film
After the film’s last frame is exposed, the camera rewinds the film
automatically.______________________________________________________
After the film is rewound, there will
I
be a shutter-release sound. Check
that the <@> icon is blinking on the
LCD panel, then open the back
cover and take out the film cartridge.
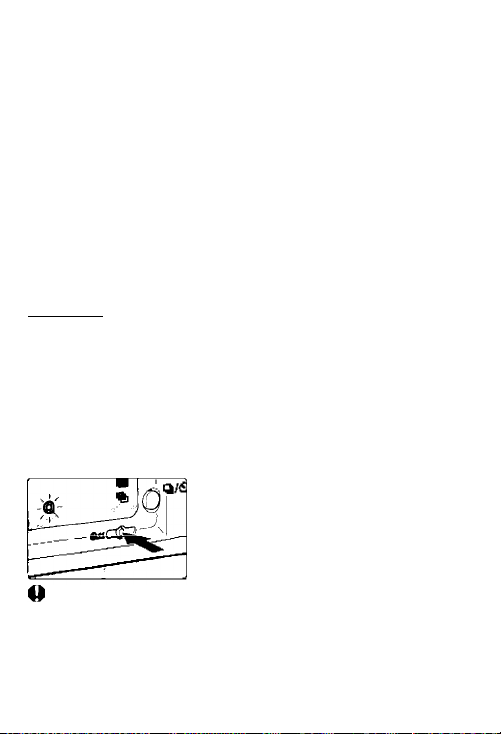
QSMidroll Rewind
To rewind the film in midroll, follow the procedure below.
Press the <Qs> button.
► Film rewind will begin.
• Make sure the <@> icon is
blinking, then take out film
cartridge.
If you take out the film cartridge in midroll without rewinding the film
and then load a new roll of film and press the shutter button
completely, the new film will only rewind into the cartridge. Before
loading a new roll of film in this case, close the camera back and
press the shutter button.
16
•
Page 17
Fully Automatic Shooting
OFull Auto Mode.......................................................................18
AF-Assist beam with the Built-in Flash
Programmed Image Control Modes
9 Portrait / Sk Landscape / ftClose-up/
Sports / HNight Portrait / CDFIash off
<D> Using Red-eye Reduction
® Self-timer Operation
’ Wireless Remote Control (DATE Model only)...........................24
Using the Eyepiece Cover..........................................................24
Blmprinting the Date or Time (date Model only)..........................25
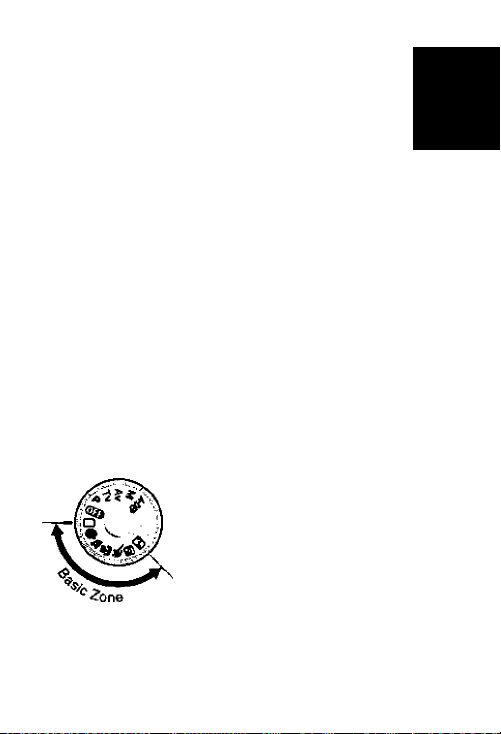
This chapter describes how to use the camera's Basic Zone modes
<0> <9> <Sfc> <&> <^> <H> <E> for quick and easy
shooting. In these modes, all you do is point and shoot. Also, to
prevent accidental operation, the <EB> <Q||> <-it> <%> <Hi>
<IS0> buttons are disabled.
..................................................
.............................................................
Turn the Mode Dial to <□>, <9>>
<^>, <A>, <^>, <S> or <Q>.
• The picture-taking procedure is the same
as with the “<Q> Full Auto mode” on
page 18.
...............................
......................................
...20
23
2
19
22
•
17
Page 18
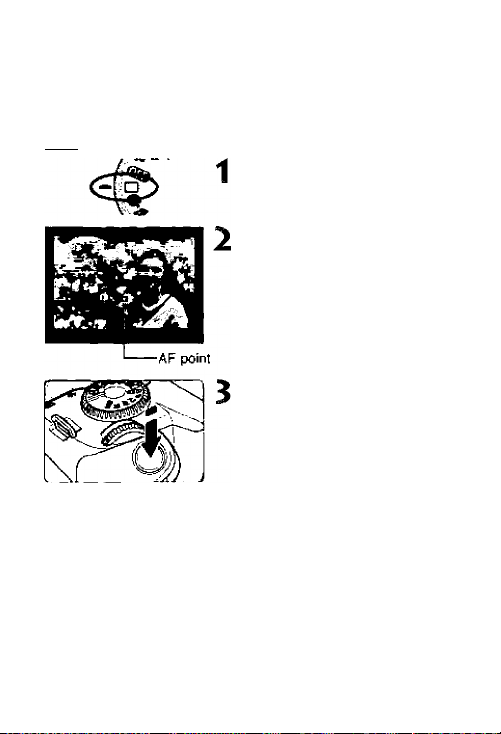
OFull Auto Mode
All you do Is point the camera and press the shutter button.
Everything is automatic so it is easy to photograph any subject. With
seven AF points to focus the subject, anyone can just point and
shoot.
____________________________________________________________
Turn the Mode Dial to <0>.
Aim any of the AF points on the
subject.
• The main subject, as determined
by the camera, will be focused by
one of the AF points.
• To focus a subject not covered by
any of the AF points, see "Focus
Lock” on page 29
Focus the subject.
• Press the shutter button halfway to
focus.
► When necessary, the built-in flash
will pop up automafically.
► When focus is achieved, the AF
Shutter speed
Aperture value
I AF point mark
T^-
l?5
n A Check the exposure setting.
““ y The shutter speed and aperture
point mark and focus confirmation
light <•> in the viewfinder will
flash.
value will be set automatically and
displayed in the viewfinder and on
the LCD panel.
18
Page 19

Take the picture.
• Compose the shot and press the
shutter button fully.
(I
If you want to zoom, do it before focusing, Turning the zooming
ring after achieving focus may throw off the focus,
• If the built-in flash’s pop-up operation is obstructed, the <«CD>
icon will blink on the LCD panel. Press the shutter button halfway
to resolve the problem.
• When focus is achieved, the autofocus and auto exposure setting
i
will also be locked,
• If the focus confirmation light < • > blinks, the picture cannot be
taken. (p.30)
• Out of the seven AF points, the one covering the closest subject is
selected automatically to achieve focus.
• If multiple AF point marks will light, it means that all of them have
achieved focus at the respective points.
• In the Basic Zone modes (except <^> <^> <GD> ), the built-in
flash will pop up and fire automatically in low-light or backlit
conditions. To retract the flash, push it back down.
AF-Assist beam with the Built-in Flash
Under low-light conditions, the buiit-in hash fires a brief burst of
fiashes when you press the shutter button haifway. This is to
iiluminate the subject to enabie easier autofocusing.
Q • The AF-assist beam does not function in the < Sk > < ^ > < S >
modes.
• The buiit-in hash's AF-assist beam is effective up to about 4
meters/13.1 feet.
• In the Creative Zone modes when the buiit-in fiash is popped up
with the <V> button, the AF-assist beam may be emitted.
19
Page 20
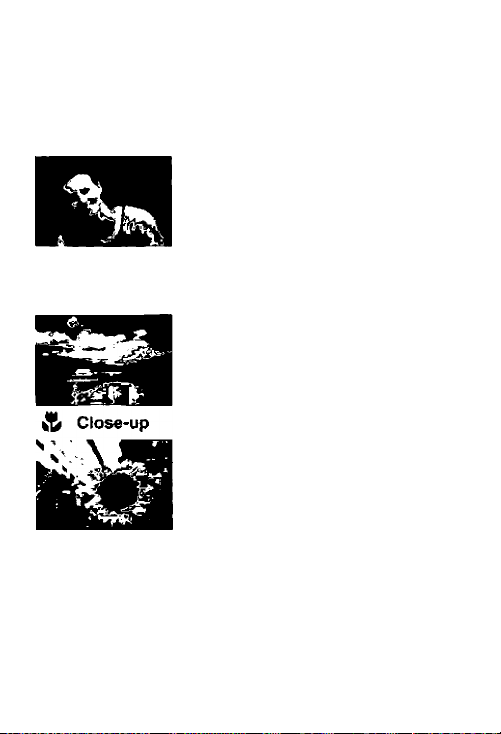
Programmed Image Control Modes
Select a shooting mode to suit the target subject, and the camera
will be set to obtain the best results.
This mode blurs the background to make the
human subject stand out.
• Holding down the shutter button executes
continuous shooting.
• To improve the background blur, use a
telephoto lens and fill the frame with the
subject or have the subject stand farther away
from the background.
Landscape
This is for wide scenic views, night scenes,
etc,
• Using a wide-angle lens will further enhance
the depth and breadth of the picture.
Use this mode to take close-up shots of
flowers, insects, etc
♦ As much as possible, focus the subject at the
lens' closest focusing distance.
♦ To obtain a larger magnification, use the
telephoto end of a zoom lens.
<1
A blinking shutter speed indicates that the shutter speed is too slow
to prevent a blurred picture due to camera shake. Be careful to hold
the camera steady and press the shutter button smoothly, or use a
tripod. (The shutter speed indicator still blinks when you use a
tripod, but camera shake will not be a problem.)
20
Page 21
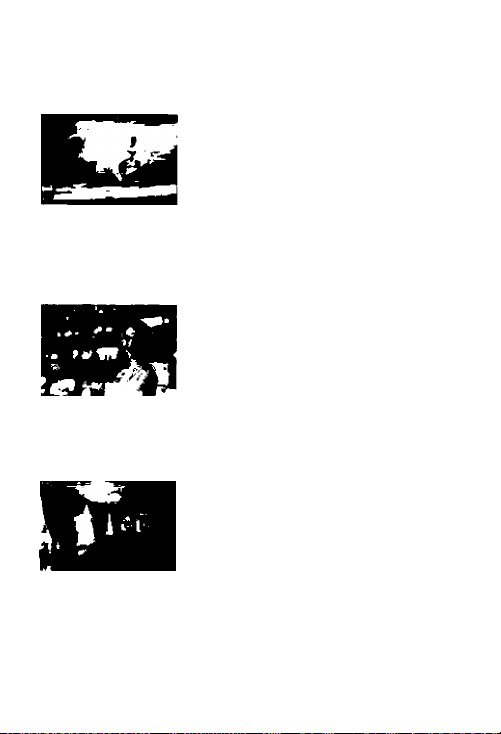
Sports
This is for fast-moving subjects when you
want to freeze the action.
• The camera will first track the subject with the
center AF point. Focus tracking will then
continue with any of the seven AF points
covering the subject.
• While you hold down the shutter button,
focusing will continue for continuous shooting.
• Using a telephoto lens and ISO 400 or higher
speed film is recommended.
S Night Portrait
This mode is for taking pictures of people at
twilight or at night. The flash illuminates the
subject while a slow sync speed obtains a
natural-looking exposure of the background.
• If you want to photograph only a night scene
(without people), use the <fi^> mode
instead.
• Tell the subject to keep still even after the
flash fires,
CD Flash off
You can disable the flash when you do not
want it to fire.
• The built-in flash or any external Speedlite will
not fire.
In the <S> mode, use a tripod to prevent camera shake.
21
Page 22
musing Red-eye Reduction (with the built-in flash) ■
When flash is used in a low-light environment, the subject's eyes
may come out red in the photograph. To reduce this "Red eye" the
red-eye reduction lamp shines a light into the subject's eyes before
the flash is fired. Red-eye reduction works in all shooting modes
except <^> <ED>
'
' When you press the Gutter bullon
' Red-eye reduction will not work urrless
■ For maximum effectiveness, press the shutter button fully after the
' You can take a picture even while the red-eye reduction lamp is lit.
’ The effectiveness of red-eye reduction varies depending on the
> To further increase the effectiveness of red-eye reduction, go to a
22
* •
or
_| SB
D F
•
1
halfway, the red-eye reduction lamp-on I
Indicator will appear in viewfindsr and
on the LCD panel.
Ihe subiect looks al the red-eye reduction
lamp. Tell the subject to ktok al the tamp.
red-eye reduction lamp turns off (after 1.5 sec,).
subject.
brighter environment or move closer to the subject.
Move the <►> arrow to the
1
<<S>> icon on the LCD panel.
• Look at the LCD panel and press
the <FUNC.> button to move the
arrow. (S6)
^ Turn the <|S!> dial to set “ I ”
■“ on the LCD panel.
• Press the shutter button halfway to
return to normal camera operation.
• To cancel red-eye reduction, set
“ 0 ” on the LCD panel.
Red-eye reducttorr
tamp-m Indicetor
Page 23
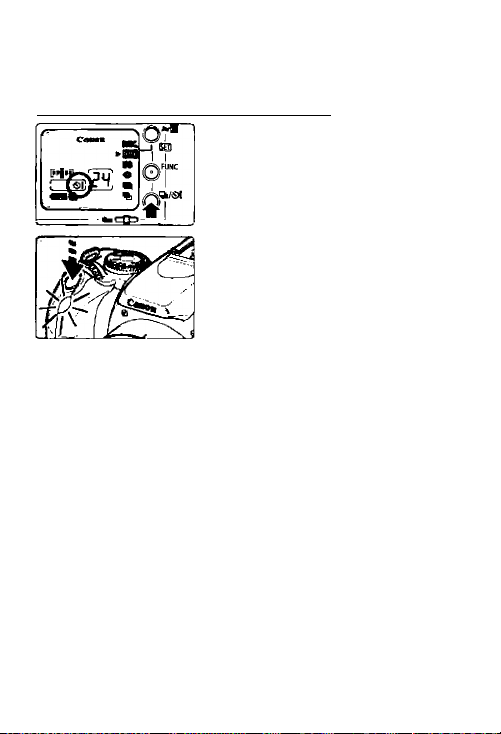
0 Self-timer Operation
You can use self-timer in any Basic mode or Creative mode. We
recommend using a tripod when you use the self-timer.____________________
Press the <Q!i/Ci)i> button.
• While looking at the LCD panel,
press the <Qi/iS)l> button to select
Take the picture.
I • The picture-taking procedure is the
same as with the <Q> Full Auto
mode on page 18.
• Look through the viewfinder and
press the shutter button fuily to
start the self-timer.
► The picture will be taken about 10
sec. later.
First 8 sec.: Self-timer lamp blinks
Final 2 sec : Self-timer lamp blinks
► During the self-timer operation, the
LCD panel counts down the
seconds until the picture is taken.
У
Do not stand in front of the camera when you press the shutter
button to start the self-timer. Doing so prevents the camera from
focusing on the subject.
• To cancel the self-timer after it starts, press the <^/^*> button.
i
• When using the self-timer to take a picture of only yourself, first
lock the focus (p.29) on an object at the same distance where you
will be in the picture.
•
slowly.
quickly.
23
Page 24
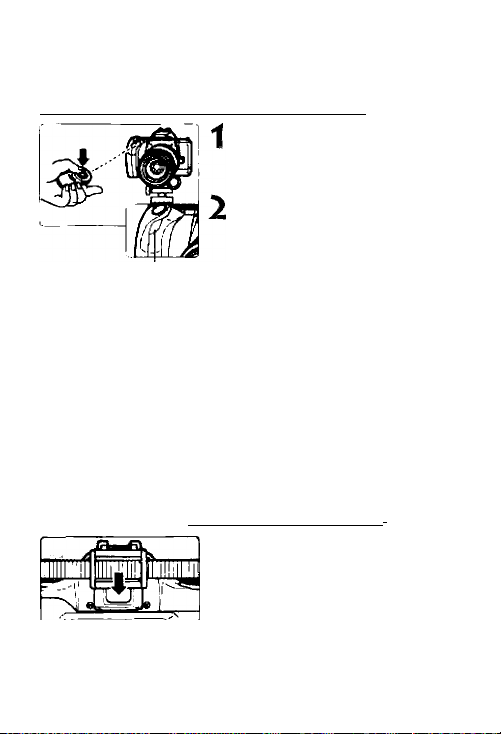
¡Wireless Remote Control (date Model only) ■
With Remote Controller RC-5 (optional), wireless operation is
possible up to 5 m/16.4 ft away from the front of the camera.
_______________
Press the button.
• While looking at the LCD panel,
press the <Qi/ci)i> button to select
Take the picture.
• Point the controller toward the
camera’s remote control sensor
and press the transmit button.
Remote control sensor
Certain types of fluorescent lights might cause the remote control
operation to work improperly. Place the camera away from any
fluorescent lights as far as possible.
If you set <C^i> and do nothing for four minutes, the remote control
s
mode will be canceled automatically to save battery power.
>■ Taken about 2 sec. later.
• The indicator will be the same as
during the last 2 sec. of the self-timer.
Using the Eyepiece Cover
During self-timer or remote control operation when your eye does
not cover the viewfinder eyepiece, stray light may enter the
eyepiece and affect the exposure when the picture is taken. To
prevent this, use the eyepiece cover to cover the eyepiece, (p.7)
Remove the eyecup from the
* eyepiece.
Attach the eyepiece cover.
• Slide the eyepiece cover down into
the eyepiece groove to attach it.
o When you reattach the eyecup, press it with your fingers so that it is
attached tightly to the camera.
24
•
Page 25
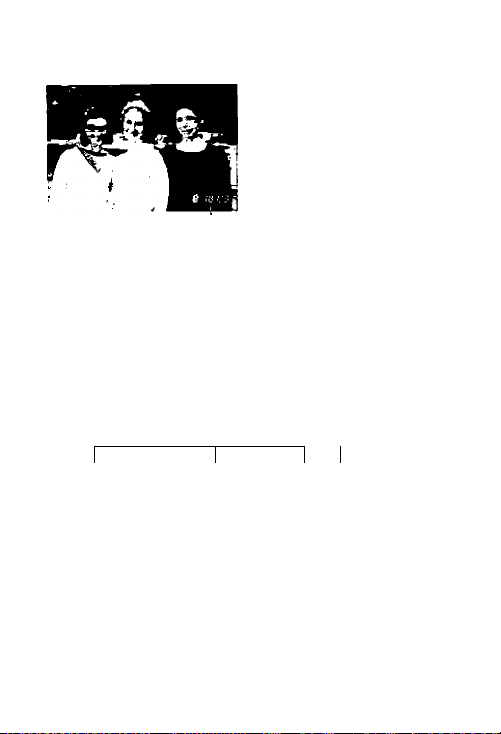
Imprinting the Date or Time (date Model only)
The camera has a date feature with
an automatic calendar to 2099. It
can imprint the date or time on the
photograph as shown in the left
photo.
The date or time can be imprinted in
any shooting mode.
Date position
Move the <^> arrow to <^B>.
• Look at the LCD panel and press
the <FUNC.> button. (2)6)
• If the date and time has not been
set, “
............
1=
________
— J
panel. See page 26 to set the date
and time.
Select the date format.
I «Turn the <iS> dial.
► The date format will change in the
following loop:
■ _ ^
B3 B SlBSrS*
Year, month, day Month, day, year Day, month, year
Blank
" will blink on the LCD
otmm ^
<
•
IB
Day. hour, minute
IB SDra-n
• ;
25
Page 26
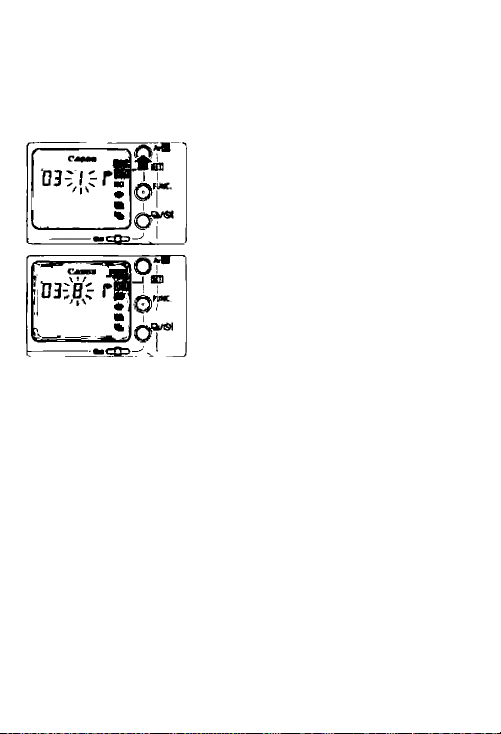
mmprinting the Date or Time (date Model only) ■
Setting the Date and Time
^ Move the <^> arrow to <BBB>.
Select the digit to be set.
' • Press the <E)> button.
• The digit seiection wiii chahge in
the foiiowing sequence: year,
month, day, hour, minute, “
Set the correct number.
• Turn the <iS> dial.
• Repeat steps 2 ahd 3 untii aii the
date and time digits are set correctiy.
iQi
S3 B IB-lsL"
Jor
if a picture is taken while the date and time are blinking, the date
arid time will not be imprinted on that picture.
The dale and time setting can be retained for about 10 min. after
the camera's batteries are removed.
26
Finaiize the date and time setting.
4
• Keep pressing the <imi> button
untii no digits are biinking.
• if you press the <SHi> buttoh whiie
"” is biinking, 0 sec. wili be set.
Page 27
User-Controlled Shooting
E3 Selecting an AF point
Focus Lock............................................................................29
When Autofocus Fails (Manual Focusing)
QjiSeiecting the Film Advance Mode........................................31
Metering Modes........................................................................31
P Program AE
Tv Shutter-Priority AE
Av Aperture-Priority AE
M Manual Exposure...................................................................36
A-DEP Automatic Depth-ot-Field AE
Av0 Exposure Compensation.....................................................38
%Auto Exposure Bracketing (AEB).............................................39
*AE Lock.....................................................................................40
Buib Exposures...........................................................................41
B Multiple Exposures.................................................................41
ISO Setting the ISO Film Speed..................................................42
Usihg the Built-in Flash
............................................................
.................................
.............................................................................
..............................................................
...........................................................
.........................................
..........................................................
With Creative Zone modes, you can set
the desired shutter speed or aperture
value to obtain the exposure you want. №0
lake control of the camera.
• In Creative Zone modes, you can select
Ihe desired AF point and set the film
advance mode, exposure compensation
amount. AES. AE lock, bulb exposures,
multiple exposures, and ISO speed.
43
28
30
32
34
35
37
* •
27
Page 28
EE D
Selecting an AF point
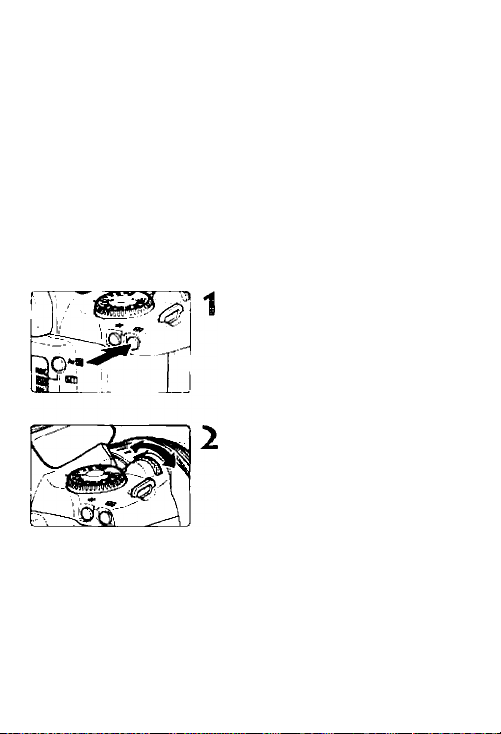
The AF point is used for focusing. The AF point can be selected
automatically by the camera or manually by you. In the Basic Zone
modes and <A-DEP> mode, the AF point selection is automatic only.
In the <P> <Tv> <Av> <M> modes, the AF point can be
selected either automatically or manually.
• Automatic AF point Selection
The camera selects the AF point automatically according to
situation.
• Manual AF point Selection
You can select any of the seven AF points manually. This is best
when you want to be sure to focus on a particular subject, or to
compose a particular shot quickly.
Automatic AF Manual AF
Point Selection r
-----------------------
•
Press the <EB> button. (S6)
► The current AF point will be
indicated on the LCD panel and in
the viewfinder.
Select the desired AF point.
• While looking at the LCD panel or
viewfinder, turn the <iSh> dial.
• After selecting the AF point, press
the shutter button halfway. The
camera will then be ready to take
pictures.
Point Selection
:«c ■ ¡i
-----------------------------------
Q
1
28
Page 29
Focus Lock
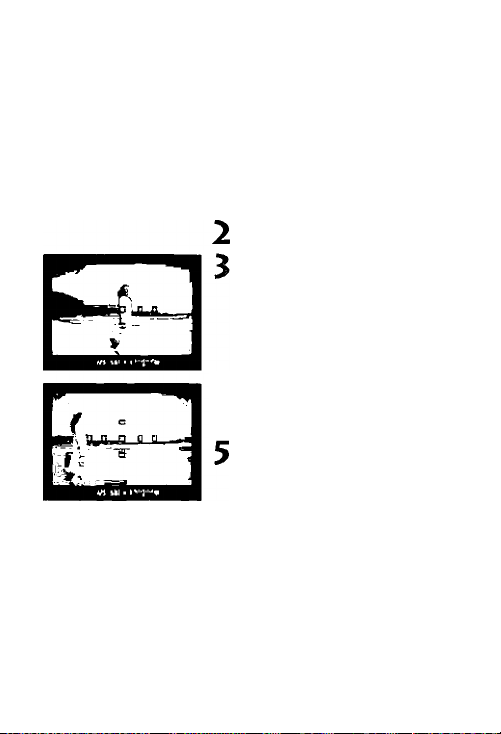
After achieving focus, you can lock the focus on a subject and
recompose the shot. This is called “focus lock."
Set the camera to a Creative
1
Zone mode.
• Set a Creative Zone mode except
<A-DEP>.
Select the desired AF point.
Focus the subject.
• Aim the AF point on the subject,
then press the shutter button
halfway.
Keep pressing the shutter
4
button haifway and recompose
the picture as desired.
Take the picture.
’ If focus has not been achieved, the focus confirmation light < A>
hi the viewfinder will blink. In this case, you cannot take a picture
even when you press the shutter button fully. Recompose the shot
and focus again or see “When Airtofocus Fails" (p.30).
' If you use an external, EOS-dedicated Speedlite and focus cannot
be achieved with the AF-assist light, seM the center AF point.
' Focus lock also works in the Basic Zone modes (except <%,>).
Just start from step 3 above.
29
Page 30
When Autofocus Fails (Manual Focusing)
Autofocus can fail to achieve focus (the focus confirmation light
<•> blinks) with certain subjects such as the following:
Difficult Subjects for Autofocusing
• Low-contrast subjects.
Example: Blue sky, flat surface with a solid color.
• Subjects in very low light.
• Extremely backlit or reflective subjects.
Example: Automobile with a strong reflection.
• Overlapping near and far objects.
Example: Animal behind bars in a cage.
In such cases, do one of the following:
(1) Focus lock an object at the same distance as the subject and
recompose,
(2) Set the lens focus mode switch to <MF> and focus manually.
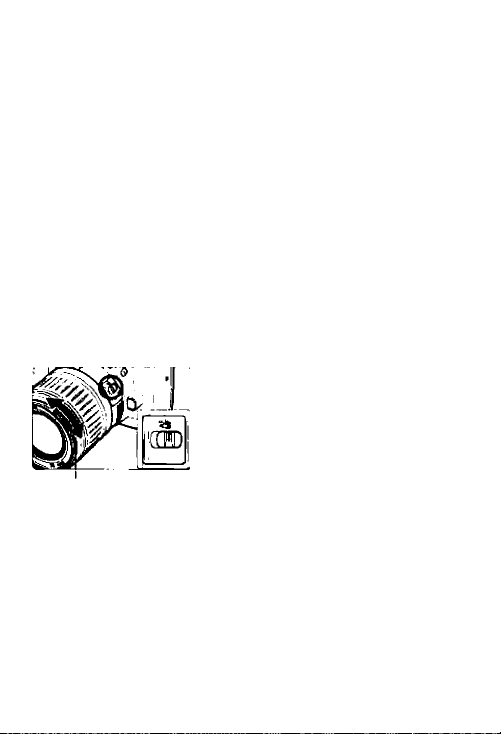
I3Q Manual Focusing
Set the lens focus mode switch
1
to <MF>.
Focus the subject.
• Focus by turning the lens focusing
ring until the subject is in focus in
the viewfinder.
Focus ring
aIf you hold down the shutter button halfway while focusing manually,
the active AF point mark and the focus confirmation light <#> will
light when focus is achieved.
30
Page 31
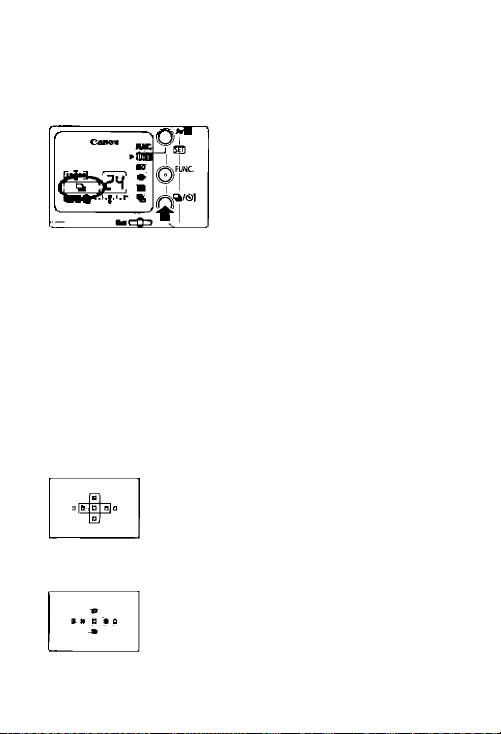
Qj] Selecting the Film Advance Mode
Two film advance modes are provided: single-frame and continuous
shooting (Max. 1.5 frames per sec.).
Press the <0!i/ci)l> button.
• Look at the LCD panel and press
the <Q|/Ci)l> button.
□ : Single frame
*
Qi : Continuous shooting
i
Ci)5: Self-timer/
—I Remote control
Metering Modes
The camera has three metering modes: Evaluative, partial, and
center-weighted average metering.
Evaluative metering
This is Ihe camera's standard metering mode suited for
most shooting including backlit conditions. Based on the
subject’s position in the viewfinder, brightness, background,
front or back lighting conditions, etc., the camera always
calculates the proper exposure for the subject.
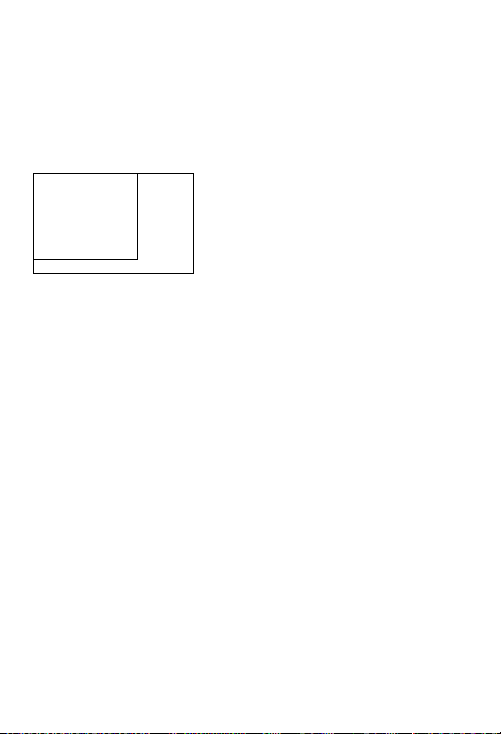
Partial metering
This mode is set automatically when AE lock is used in
a Creative Zone mode. It is effective for backlit subjects
when there is a strong light behind the subject. The
viewfinder center covering about 9.5% of the viewfinder
area is used for metering. The partial metering area is
shown on the left.
Center-weighted average metering
This is set automatically in the <M> mode. The
metering is weighted at the center and then averaged for
the entire scene,
I
31
Page 32
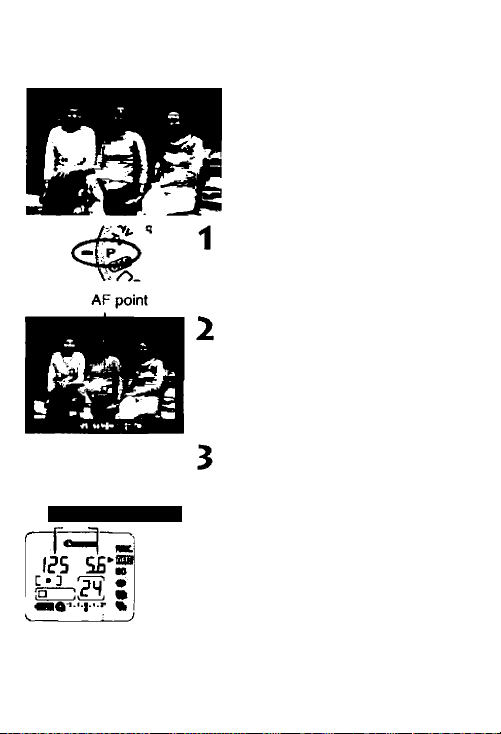
P Program AE
Like the <D> (Full Auto) mode,
this is a general-purpose mode to
make picture-taking easy. It sets the
shutter speed and aperture value
automatically to suit the subject's
brightness.
* <P> stands for Program.
• "AE” stands for auto exposure.
Turn the Mode Dial to <P>.
Focus the subject.
• Move the AF point over the subject
and press the shutter button
halfway.
Shutter speed
lгí MI ■
32
Aperture value
I AF point mark
Check the display.
► The shutter speed and aperture
value are set automatically and
displayed in the viewfinder and on
the LCD panel.
• If the shutter speed and aperture
value do not blink, a correct
exposure will be obtained.
Page 33
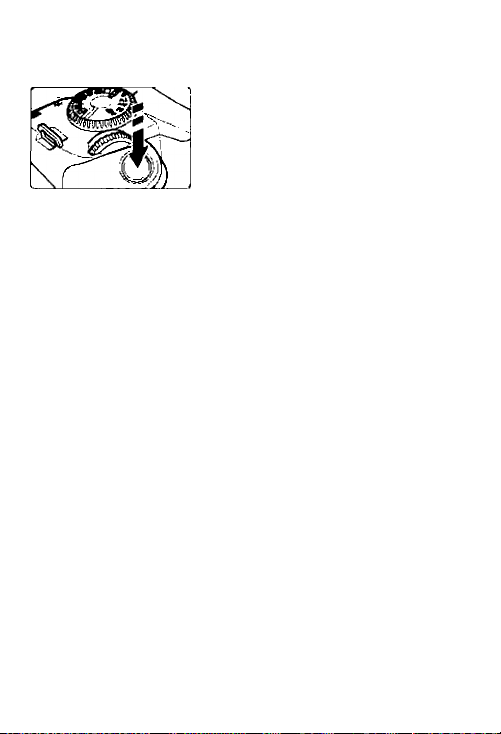
Take the picture.
4
Compose the shot and press the
shutter button fully.
•ir30"” and the maximum aperture value blink, it
indicates underexposure. Use flash.
•If" ?0DD ” and the minimum aperture value blink, it
indicates overexposure. Use an ND filter to reduce
the light entering the lens.
Ш
The Difference Between <P> and <0>
• The shutter speed and aperture value are set in the same way in
both modes.
• The following features can be used in the <P> mode, but not in
the <0> mode.
Manual AF point selection
Film advance mode selection
Program shift
Exposure compensation
AEB
About Program Shift
• In the Program AE mode, you can freely change the shutter speed
and aperture value combination (program) set by the camera while
retaining the same exposure. This is called program shift.
• To shift the program, press the shutter button halfway and turn the
<£Sa> dial until the desired shutter speed or aperture value is
displayed.
• Program shift is canceled automatically after the picture is taken.
• Program shift cannot be set when the built-in flash is used.
AE lock with the <■ )(■ > button
Multiple exposures
Built-in flash manual firing and
flash OFF
FE lock, high-speed sync
(with EX-sehes Speedlites)
33
Page 34
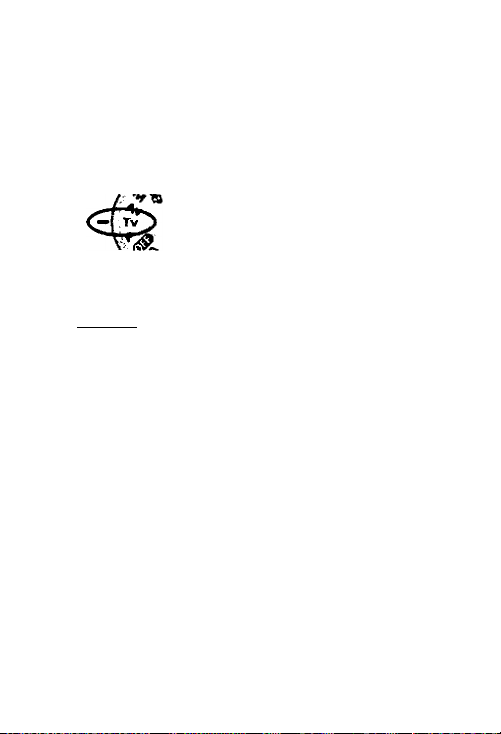
Tv Shutter-Priority AE
In this mode, you set the shutter speed and the camera sets the
aperture value automatically to suit the subject brightness A fast
shutter speed can freeze the motion of a fast-moving subject and a
slow shutter speed can blur the subject to give the impression of
motion.
* <Tv > stands for Time value which is the shutter speed.
^ Turn the Mode Dial to <Tv>.
Select the desired shutter
2
speed.
• Turn the <fSs> dial.
• The shutter speed can be set in
1000
C • D 'Til’
f5
--------
I.CT
half-stop increments.
Focus the subject.
3
► The aperture value is set
automatically.
Check the viewfinder display
4
and take the picture.
• If the aperture value display is not
blinking, a correct exposure wiii be
obtained.
* •
(I
Shutter Speed Display
Ш
The shutter speeds from “ SODD ” to “ i' indicate the denominator of
the fractional shutter speed. For example, “ liS " indicates 1/125
sec. Also, “0"T ” indicates 0.7 sec, and “ 15"" indicates 15 sec.
34
• If the maximum aperture value blinks, it indicates
underexposure. Turn the <^2l> dial to set a
slower shutter speed urrtil the blinking stops.
• If the minimum aperture value blinks, it indicates
overexposure. Turn the <iSt> dial to set a faster
shutter speed until the blinking stops.
Page 35
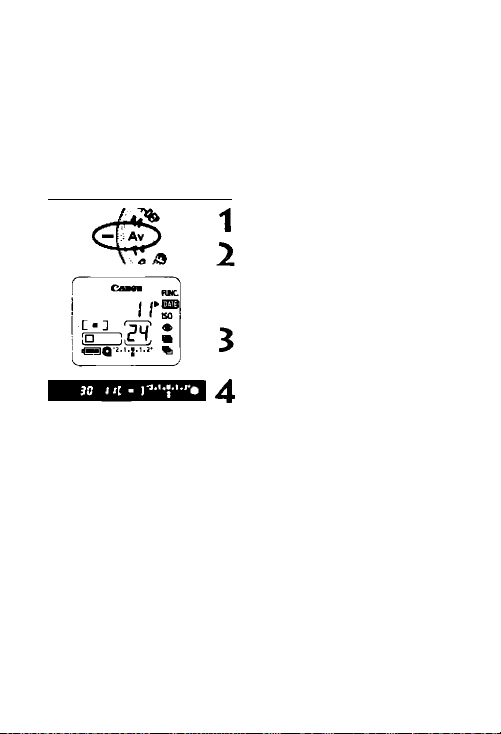
Av Aperture-Priority AE
In this mode, you set the desired aperture value and the camera sets
the shutter speed automatically to suit the subject brightness.
The larger or brighter the aperture value (lower f/number) the more
blurred the background will become. This effect is ideal for portraits.
The smaller or darker the aperture value (higher f/number), the clearer
the focus will be for both near and far objects (wider depth of field).
* <Av> stands for aperture value.
• If the slowest shutter speed blinks, it indicates
»II the fastest shutter speed blinks, it Indicates
Aperture Value Display
a
The larger the f/number, the smaller the diaphragm will be. The
aperture value display will differ depending on the lens. When no lens
is attached to the camera, “ 00" will be display for the aperture value.
_____________________________________
Turn the Mode Dial to < Av>Select the desired aperture
value.
• Turn the <£3i> dial.
• The aperture value can be set in
half-stop increments.
Focus the subject.
► The shutter speed is set
automatically.
Check the viewfinder display
and take the picture.
• If the shutter speed display does
not blink, a correct exposure will be
obtained.
underexposure. In such a case, turn the <^> dial
to set a larger aperture value (smaller f/number)
until the shutter speed display stops blinking.
overexposure. In sitch a case, turn the <£^> dial
to set a smaller aperture value (larg^ ^number)
until the shutter speed display stops blinking.
35
Page 36
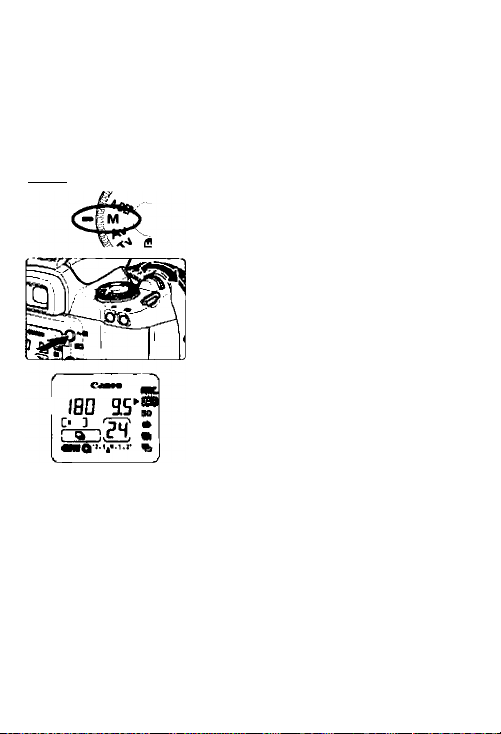
M Manual Exposure
In this mode, you set both the shutter speed and aperture value as
desired. To determine the exposure, refer to the exposure level
indicator in the viewfinder or use a handheld exposure meter. This
method is called manual exposure. In the <M> mode, the
center-weighted average metering will be set automatically.
» <M> stands for Manual.
Exposure level mark
3 If the exposure level mark <l> blinks at the or <~2> level, it
indicates that the difference between the standard exposure
exceeds +/-2 stops.
36
* •
Turn the Mode Dial to <M>.
Set the shutter speed and
aperture value.
• To set the shutter speed, turn the
<iSs> dial.
• To set the aperture value, hold
down the <AvI2> button and turn
the <iS> dial.
Focus the subject.
3
► The exposure setting will be
displayed.
• The exposure level mark <l>
indicates how close the exposure
level is to the correct exposure.
Determine the exposure.
4
• Look at the exposure level indicator
and set the shutter speed and
aperture value as desired.
Take the picture.
Page 37
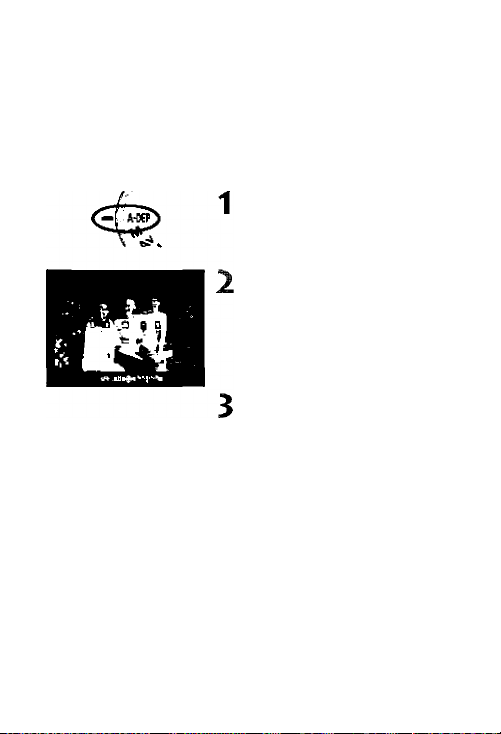
A-DEP Automatic Depth-of-Field AE
This mode is for obtaining a wide depth of fieid automaticaiiy
between a near subject and far subject. It is effective for group
photos and landscapes.
The camera uses the 7 AF points to detect the nearest and farthest
subjects to be in focus.
» <A-DEP> stands for Auto-depth of field.
Turn the Mode Dial to <A-DEP>.
Focus the subject.
• Move the AF point over the subject
and press the shutter button
halfway.
• Focus is achieved at all the AF
point marks that light.
Take the picture.
•
The <A*
DEP> mode cannot be used if the lens' focus mode switch is
set to <MF>.
‘ If the aperture value blinks, it indicates that the exposure level is
a
correct but the desired depth of field cannot be achieved. Either
use a wide-angle lens or move further away from the subjects.
‘ In this shooting mode, you cannot freely change the shutter speed
and aperture value. If the camera sets a slow shutter speed, hold
the camera steady or use a tripod.
> If flash is used, the result will be the same as using flash in the
<P> mode.
37
Page 38
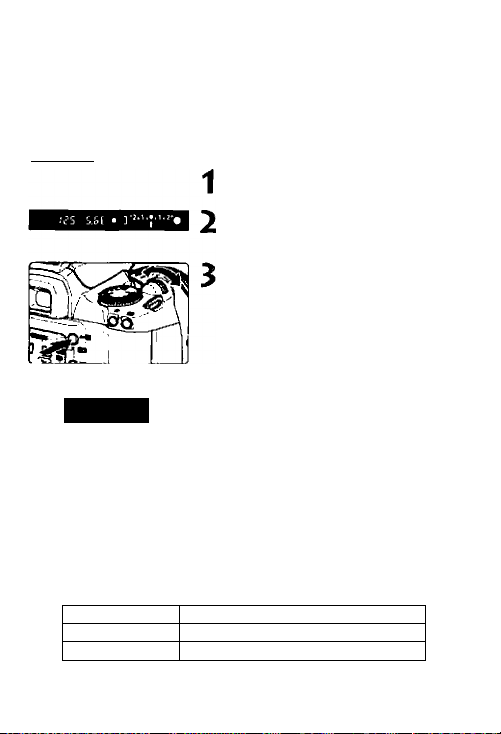
Avl2 Exposure Compensation
Exposure compensation is used to alter the camera's standard
exposure setting. You can make the picture look lighter (increased
exposure) or darker (decreased exposure). The exposure
compensation amount can be set up to +/-2 stops in half-stop
increments.________________________________________________________
Turn the Mode Dial to a Creative
Zone mode except <M>.
Check the exposure setting.
• Press the shutter buttoh halfway
and check the display.
Set the exposure compensation
amount.
• Hold down the <Av0> button and
turn the <^S^> dial.
• To cancel the exposure
compensation, set the exposure
Standard exposure index
-2.1 ,».l .2*
Decreased Increased
exposure exposure
Q • The exposure compensation amount set is retained even after the
38
I
Exposure level mark
Mode Dial is set to <€9^>.
* The exposure compensation amount is canceled automatically
when you turn the Mode Dial to a Basic Zone mode.
• Assuming that a shutter speed of 1/125 sec. and an aperture
value of f/5.6 will give a correct exposure, setting the exposure
compensation amount to plus or minus 1 stop will change the
shutter speed or aperture value as follows;
Shutter speed 250
Aperture value
compensation amount to <I>.
Take the picture.
“1 stop 0
8.0
125 60
<r- 5.6
—>
+1 stop
4.0
Page 39

%Auto Exposure Bracketing (AEB) mb
With AEB, the camera automatically changes the exposure within the set
range (up to +/-2 stops in 1/2-stop increments) for three successive frames
AEB amount
i ^
(0
AEB range -
standard exposure
decreased exposure
increased exposure
• During AEB shooting, the <^> arrow will appear next to the
Ш
<%> Icon and the AEB level <■ > will be displayed. In the
viewfinder, the <•)(■ > icon will blink.
• In the <Q!i> film advance mode, the camera stops shooting
automatically after taking the three AEB shots. In the <□> (single
frame) mode, press the shutter button completely three times to
take the three AEB shots.
• If you use the self-timer or remote control, the three AEB shots
will be taken continuously automatically.
• AEB can be combined with exposure compensation.
• AEB cannot be used with flash or bulb exposures.
Move the <^> arrow to the
<^> icon.
• Look at the LCD panel and press
the <FL)NC.> button ((56)
Set the desired AEB amount.
' • Turn the <fS> dial.
• Press the shutter button haltway to
return to normal camera operation.
Take the picture.
► The three bracketed shots will be
exposed in the following sequence:
standard exposure, decreased
exposure, and increased exposure.
► As shown on the left, the respective
bracketing amount will be displayed
as each bracketed shot is taken.
• The picture will be taken in the
current film advance mode.
• After the three AEB shots are
taken, the AEB will not be canceled
automatically. To cancel AEB, set
the AEB amount back to “ nO”.
39
Page 40
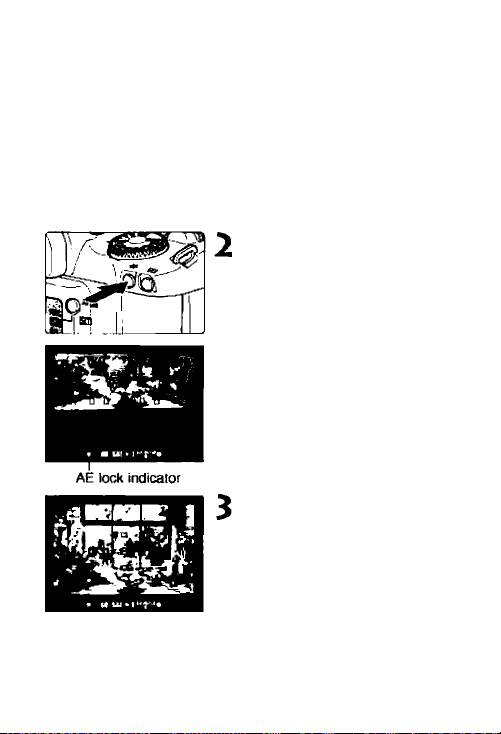
^AE Lock
AE lock enables you to lock the exposure at a different place from
the point of focus. After locking the exposure, you can recompose
the shot while maintaining the desired exposure level. This feature is
useful for backlit and spotlighted subjects. For AE lock, partial
metering Is used automatically,
Focus the subject.
1
>■ The exposure setting will be
displayed.
Press the <*> button. ((S4)
• Aim the center of the viewfinder
over the subject where the
exposure is to be locked, then
press the <■ )(•> button.
► The <*> icon will light in the
viewfinder to indicate that the
exposure setting has been locked
(AE lock).
• Each time you press the <■ )(•>
button, it locks the purrent exposure
setting.
Compose the shot and take the picture.
• If you want to maintain the AE lock
while taking more pictures, hold
down the <■ )(■ > button and press
the shutter button to take another
picture.
40
Page 41

Bulb Exposures I
When bulb is set, the shutter is open during the time you keep
pressing the shutter button fully. Bulb exposures are useful when
long exposures are required for night scenes, fireworks,
astronomical photography, etc.
Turn the Mode Dial to <M>.
1
Set the shutter speed to “ buLb
' • Look at the LCD panel and turn the <£S> dial to select" buLb"
•" buLb "follows “ 30" ”.
Select the desired aperture value.
• Hold down the < Av0> button and turn the <£S> dial.
Start the bulb exposure.
■ ► During the bulb exposure, “ buLb " blinks on the LCD panel.
• The bulb exposure continues as long as you hold down the
shutter button.
' Remote Controller RC-5 (optional) can also be used for bulb
exposures (p.24). When you press the transmit button, the
exposure will start 2 sec. later. To stop the exposure, press the
button again. (DATE Model only)
’ With a new set of batteries, the maximum bulb exposure time (at
20'C) will be about 4 hours.
_______________________________________
@]Multiple Exposures
Since the film is not advanced after each shot, you can expose
multiple shots on the same frame. You can expose up to nine shots
on a single frame.___________________________________________________
<1 Move the <►> arrow to the <IBh> icon.
* • Look at the LCD panel and press the <FUNC.> button. (S6)
►" I " will be displayed.
% Set the desired number of multiple exposures.
»Turnthe<¿S>dial.
• Press the shutter button halfway to return to normal camera
operation.
41
Page 42

Multiple Exposures
Take the picture.
► After you take all the multiple exposures, the film advances to
the next frame automatically and the multiple-exposure setting
is canceled.
If you shoot multiple exposures on the first few or last few frames of
a roll, the multiple exposures might not be precisely aligned due to
the film curling.
a
' During multiple-exposure shooting, the <► > arrow next to the <® >
icon on the LCD panel will blink.
' To cancel multiple exposures before shooting, set the number of multiple
exposures to" I
’ To cancel multiple exposures after shooting, follow steps 1 and 1 to
set the number of multiple exposures to blank.
ISO Setting the ISO Film Speed
If the film is not DX-coded or if you want to set a different film
speed, load the film in the camera and set the film speed manually
as follows. The settable film speed range is ISO 6 to 6400.
Move the <^> arrow to the
1
WOO
' I
■ ¡v
.'Jo'*'®'
The manually-set film speed will be canceled it the film is taken out
a
and DX-coded film is loaded.
42
<IS0> icon.
• Look at the LCD panel and press
the <FUNC.> button to move the
arrow. ((56)
► The current film speed is displayed
Set the desired film speed.
I • Turn the <^> dial to set the film
speed.
Page 43
Using the Built-in Flash
In a Basic Zone Mode
In low-light or backlit conditions, the built-in flash will pop up and fire
automatically (except in <Sa> <^> <CS> modes).
In a Creative Zone Mode
Press the <4> button to pop up the built-in flash.
P : Use this mode tor automatic flash photography. The flash
sync speed (1/90 sec.) and aperture value will be set
automatically as with the <D> (Full Auto) mode.
Tv : Use this mode if you want to set the flash sync speed
manually (within 30 sec. -1/90 sec.). The camera will set
the flash aperture value automatically to obtain a correct
flash exposure.
Av : Use this mode if you want to set the flash aperture value.
The camera will set the flash sync speed (within 30 sec. -
1/90 sec.) automatically to obtain the best exposure for the
aperture you set. For portraits with a night scene or dark
background, a slow sync speed will be set to obtain a
proper exposure for both the subject and background. The
flash illuminates the subject, while the background is
properly exposed with a slow shutter speed.
• Because automatic slow-sync shooting uses a slow
shutter speed, always use a tripod.
M : You can manually set both the flash sync speed (within
Bulb -1/90 sec.) and aperture value. The subject is properly
exposed with the flash and the background is exposed with
the flash sync speed and aperture value you have set.
A-DEP : The result will be the same as using the <P> mode.
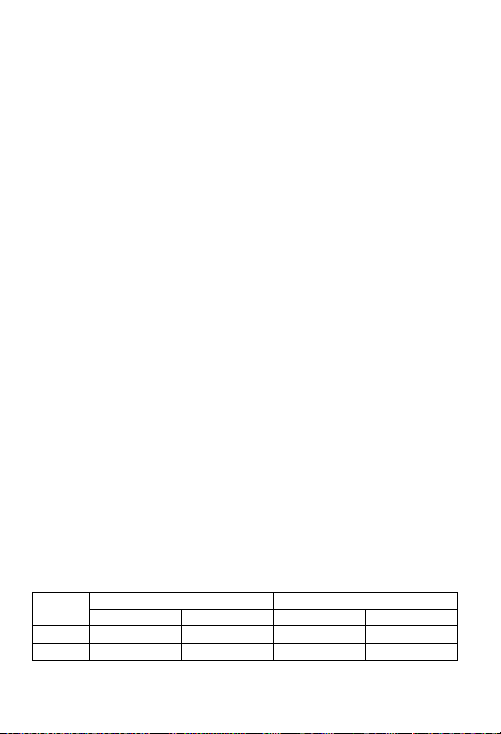
Flash Distance Range (With EF28-90mm f/4-5.6)
ISO
Negative Film Slide Film
100
1-4.2/3.3-13,9
400 1-0.5/3.3-27,8 1.2-60/3.9-19.7 1 -6.0/3.3-19.7
28mm
1 - 3.0 / 3.3 ■ 9.8
Negative Film Slide Film
1-30/3.3-9.8 1 -2.1 /3.3-70
90mm
1-4.2/3.3-13.9
[m/ft]
43
Page 44
Using the Built-in Flash
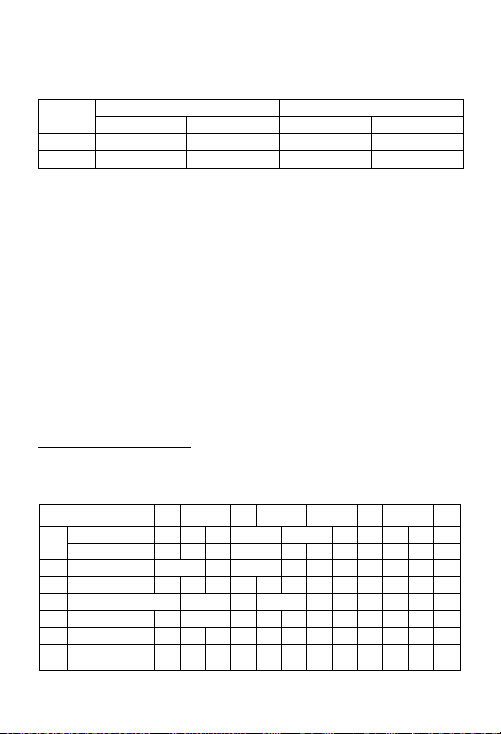
Flash Distance Range (With EF28-80mni t/3,5-5.6)
ISO
Negative Film Slide Film
100 1 -4.8/3.3-15.9
400 1-9.7/3.3-31,8 1.2-68/3.9-S25
When using the built-in flash, stay at least 1 meter/3.3 feet away
from the subject. Otherwise, part of the photo will look dark.
• When using the buill-in flash, detach any hood attached to the
lens. A lens hood will partially obstruct the flash coverage.
• When a super telephoto lens or a last, large-aperture lens is
attached, the built-in flash coverage might be obstructed.
• The built-in flash's flash coverage is ZBmm lens angle,
• If you use a flash unit (with multiple contacts) dedicated to another
camera brand or a high-voltage flash, the camera may not work
properly or malfunction may result.
a
• To retract the built-in flash, push it down.
• If more light is required, use an external, EOS-dedicated Speedlite
(optional).
zemm
1-3.4/3.3-112
Negative Film Slide Film
1-3.0/3.3-98
1-6.0/3.3-19.7
80mm
I Reference
Feature Availability Table i
#: Set automatically. ; User-selectable/settable
Mode Dial Mode
One Shot
Al Servo
LL
Al Focus
<
AFPoinI (Auto
SeieciKKi| Manual;
CD Single frame
c
Continuous
^■D
SelMimer/
U-<
Remote control
44
a
9^
•
• • •
• • o
o
6k :h ®i p Tv Av’ M A-CEP
•
•
• •
o
o
•
• o
o
o
•
•
o
o
oo0
ooo
1 -2,1/3.3-70
1-42/3.3-13,9
• •
•
o
o
V
o
o o
0
o
o
o
o o
[mm)
•
•
0
o
Page 45
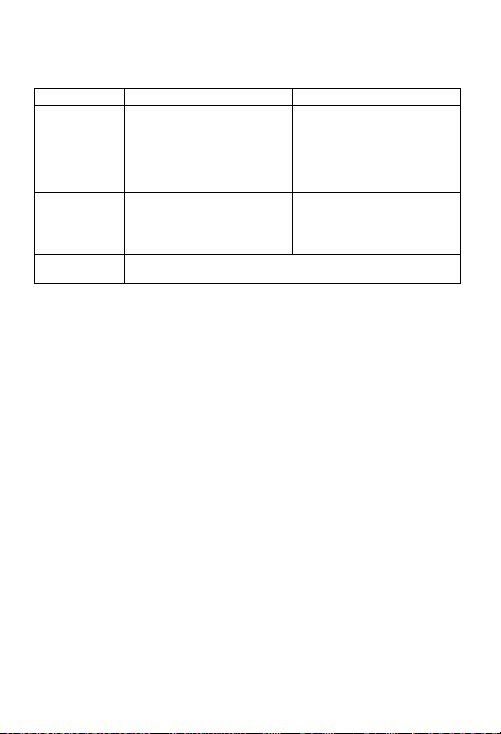
AF Mode and Film Advance Mode
AF Mode
One Shot AF
AI Servo AF
AI Focus AF
Sinale frame
The picture cannot be taken until
focus is achieved. When locus is
achieved, it also locks at the same
time The evaluative metering's
exposure setting is also locked.
(The exposure setting is retained
until the picture is taken.)
The suDject is focus-tracked for
continuous autofocus. The
exposure Is set when the picture
Ib taken
Aulomalicaily switches between One Shot AF and Al Servo AF
according to the subjecl status
Continuous
The same conditions explained
on the left apply during
continuous shooting. (Max 1.5
frames per sec.)
The same conditions explained on
the left apply during continuous
shooting. Autofocusing continues
during continuous shooting. (Max.
1.3 frames per sec )
Troubleshooting Guide
If there is a problem, first refer to this Troubleshooting Guide.
• Nothing is displayed on the LCD panel.
The batteries are exhausted. / The batteries have been installed incorrectly.
► Replace the batteries with new ones. / Install the batteries correctly. (p.11)
• The picture looks blurred.
The lens focus mode switch is set to <MF>.
► Set the lens focus mode switch to <AF> (p 13)
There was camera shake when the picture was taken.
► Hold the camera steady or use a faster shutter speed, (p 14)
• The shutter does not work.
On the LCD panel, the frame count is not displayed and the <@> icon blinks.
► Take out the film and load it correctly. (p.l5)
The focus confirmation light <•> in the viewfinder blinks and focus
cannot be achieved.
► Select another AF point, (p.28)
If focus still cannot be achieved, focus manualiy (p 30)
• The icon blinks on the LCD panel.
The battery level is very low.
► Replace Ihe batteries with new ones, (p 11)
A misoperation has occurred.
k
Press the shutter button halfway. (p.14) / Remove ihe batteries and reload
it- (p.11) If the blinking <C!3> icon does not turn off. consult your nearest
Canon dealer
45
Page 46

Major Specifications
• туре
Type
...........................
Recording media
Image size
.................
Compatible lenses..
Lens mounl...............
■ Viewfinder
Type
...........................
Coverage
...................
Magnification............
Eyepoint
....................
Focusing screen
Mirror.........................
Viewfinder information..
• Autofocus
Type- —.H
AF points___
AF working range
Focuamg modes...........
AF prolnl selectiofi
Selected AF point display.
AF-assifit team
« Exposure control
Exposure metenng modes..
Metenng range......................
Expcsunj control...—
FHm speeds „м..—.,.,...
Exposure componsatton ...
AE lock,
Mutt^le exposures........
____
__________
...............
k—
46
...35 mm AF/AE SLR camera with buiit-in flash
.....
...35 mm film
...24 X 36 mm
...Canon EF lenses
...Canon EF mount
....Eye-level pentamlrror
Approx. 90% vertically and horizontally
..,.0,7x (-1 diopter with 50mm lens at infinity)
......
19,5 mm
Fixed, all-matre screen
...Quidt-retum halt mirror (Transmission; reftecHon rate of
40:60. No minor cut-off with EF300mm f/2.8L plus
Extender gx or shorter tens)
...AF (AF pointfmark, focusconfirmBtlon
(shutter speed, aperture value, axpcsure level. AE kxA):
Flash (Dash ready, hl-speed sync, FE lock, red-eye reduction)
.-TTL-CT-SIH with a CMOS (CompterrMntary Metal Oxide
Sermcondudcrl sensor
...7 AF points
...EVl -18 (ISO too)
.
...OrJe Shot AF, Al Servo AF, Al Focus AF n«rniai focusing (MF)
.............
..Automalrc/manuaf
...AF point mark in the viewfinder and on LCD panel
...
...Iftlermfttent firing of the tjuift-tn flash
Working distarx»; Approx. 4 mM3.1 ft at center.
Approx.3.5 mi'tl.5 ft at outer edge
TTL full aperture motenng wth 35-2one SPC
• Evaluative rrtsierlng (linkable to any AF polrit)
• Partial metering (apprca, 9.5% of viewfinder al center]
• Canter-weighlM average metenng (automatically set irt
manual exposure mode)
.EV 1 20 (normat temperature, 50mrn if1.4, ISO 100)
.Program A£ (Full Auto, Portrarf. Landscape. Dose-up,
Sports, NIgtil Portrait, Flash off. Program), shuttor-^nty
AE. apertutB-priorily AE. depth-ot-field AE. manual
exposure, E-TTUA-TTl/rTL autollash
,1S06 ■ 6400 (Set automatlcafly for DX-coded him within
ISO 26 - 5000)
■Manual exposure compensation:
Increments (can be used with AEB)
Auto Exposure Srecketing (AEB)’ 4^ 2 stops m i/2-slcp increments
.Auto AE IcKlt Operates in One Shot AF made wild
evaluative metering when focus is achieved
Manual AE lock. By AE lock tenon in partial metering mode
.......
.
-Max. 9 exposures
ighl];
+f- 2
stops in 1/2-stop
Exposure
Page 47

• Shutter
Type
..........................................
Shutter speeds.........................1/2000 - 30 sec. In 1^2'Stop ifKraibeite, bulb, X sync at 1/90 sec.
Shutter release.........................Soft touch electrumsgnetic release
Self-timer..................................Shoot after 10 sec. delay
Remote control .............
• Flash
Built-in flash AF point-linked, 3-zone autoflash
External EOS-dedicated flash ,„E-TTL / A-TTL / TTL autoflash
• Film transport
Film loading .............................Automatic prewind
Film advance modes
Continuous shooting speeds...One Shot AF: Max. 1 5 fps
Film rewind
..............................
• Date imprinting (DATE Model only)
Automalic dating,....................Automatic calendar to 2099
• Power source
• Dimensions (W x Н x D) .130 x 88 x 64 mm/5.1 x 3 5 x 2.5 in
• Weight
..................................
• All the specifications above are based on Canon’s testing and measuring standards
• Specifications and physical appearance are subject to change without notice.
TNs device compiles wilh Pari 15 of me FCC Rufoa. Opaffllion is sub|eci lo ihe following two
conditions: (1) This device may nol cause harmful IntET^&nce, and (2) this device must
accept any interference received, including interference lhal rray cause undesired operation
Do nol make any changes or modifications to the equipment unless otherwise specified in
the instructions If such changes or modifications should be made, you coukJ be required to
slop operation of the equipment
This equipment has been tested and found to comply with the limits lor a class B digital
device, pursuant lo pari 15 of the FCC Rules These limKs are designed to provide
reasonable protection against harmful interference in a residential installation This equipment
generates, uses and can radiate radio frequency energy and, H not installed and used in
accordance with the instructions, may cause harmful interference to radio communications
However, there is no guarantee that interference will not occur in a particular installation If
this equipment does cause harmful interference lo radio or television reception, which can
be determined by turning the equipment off and on, the user is encouraged lo try lo correct
the interference by one or more of the following measures:
• Reorient or relocate the receiving antenna
• Increase the separation between Ihe equipment arKf receiver.
• Consult the dealer or an experienced radio/TV technician for help
This digital apparatus does nol nxceed Itis Ctisa B timila for radio noise emissions Irorr
digital apparatus as set out in the interference-causing equipment standard entitled “Digital
Apparatus”, ICES-003 of the Industry Canada
Electronically conlrglted hjcal-ptane shutter
..........
Remote Controller RC-1/RC-5 (DATE Model only)
Guide No. 12 (ISO 100, in meters), 39 (ISO 100, in feel)
Recycling time; Approx 2 sec.
Flash coverage: 26 mm lens angle covered
Red-eye reduction: Lamp
..............
Single-frame/conlinuous shooting
Al Servo AF: Max 1.3 fps
Automatic. Mid-roll rewind
...........
_.*._Two CR2 lithium batteries
340 g/12 0 oz (body only)
C€ The CE Mark is a Directive conformKy mark of the European Community (EC)
47
J
Page 48

Canon
CANON INC. 30-2, Shìmomaruko 3;Chome. Ohta-ku, Tokyo 146-B501, Japan
U S A.
------------------
CANADA
EUROPE,
AFRICAS
MIDDLE EAST
SOUTH AMERICA
\SIA---------------------CANON HONGKONG CO., LTD,
OCEANIA------------- CANON AUSTRALIA PTY. LTD.
lAPAN
-----------------
This Instruction booklet is currenl as of June 2003. For information on using
the camera wilh system accessories introduced after this date, contact your
nearest Canon Service Center.
CTM248-000 ) CANON INC. 2003
CANON U.S.A. INC.
For all inquiries concerning this camera, call toll (ree in the U S
1-800-OK-CANON or write to: Customer Relalions, Canon U S A , ine
Orte Canon Plaza, Lake Success. N Y. 11042-119B
--------------
CANON CANADA INC HEADQUARTERS
6390 Dixie Road, Mississauga, Ontario L5T 1P7, Canada
CANON CANADA INC. MONTREAL BRANCH
5990, Cdte-de-Liesse, Montréal Québec H4T 1V7, Canada
CANON CANADA INC. CALGARY OFFICE
2820, 16th Street, N.E. Calga^, Alberta T2E 7K7, Canada
For all inquiries concerning this camera, cali toll free in Canada
1-800-OK-CANON
-------
- CANON EUROPA N.V,
Bovenkerkerweg 59-61, P.O Box 2262, 1160 EG Amsielveen,
The Netherlands
CANON COMMUNICATION & IMAGE FRANCE S.A.
102. Avenue du Général de Gaulle 92257 La Garenne-Colombes Cedex. France
CANON UK LTD.
Woodhalch Heigate Surrey RH2 0BF United Kingdom
CANON DEUTSCHLAND GmbH
Europark Fichlenhain AIO. 47B07 Kreleld, Germany
CANON ITALIA S.p.A.
Via Miiano 8, San Donato M SE. Miiano, itaty
CANON Schweiz AG
Geschaflsbereich Wiederverkauf, Induslriestrasse 12. CH-8305 Diellikon,
Switzerland
CANON G.m.b. H.
Oberiaaerstrasse 233. 4th floor, 1100 Wien, Austria
CANON España, S. A.
C/Joaqufn Costa. 41.2S002 Medrrd, Spain
SEGUE So«. Nsc. de Equip.. Lde.,
Prafa da AfegrlH 2* t269-l4@ Liabaq, Pertugat
- CANON LATIN AMERICA, INC. DEPTO DE VENTAS
703 Walertord Way Suite 400 Miami R. 33128 U.8 A
CANON LATIN AMERICA, INC. CENTRO DE SERVICIO Y REPARACION
Apartado 2019, Zona Libre de Colón, República de Panamá
9/F, The Hong Kong Club Building, 3A Chater Road. Central. Hong Kong
CANON SINGAPORE PTE. LTD.
79 Anson Road #09-01/05 Singapore 079906
1 Thomas Holt Drive, North Ryde, NSW 2113, Australia
CANON NEW ZEALAND LTD.
Akoranga Business Park, Akoranga Drive, Norlhcote, Auckland, New Zealand
CANON SALES CO., INC.
16-6, Kohnan 2-chome, Minato-ku, Tokyo 108-8011, Japan
PRINTED IN TAIWAN
 Loading...