

Page 1
Facsimile Guide
Facsimile Guide
Please read this guide before operating this equipment.
After you finish reading this guide, store it in a safe place for future reference.
ENG
Page 2

Page 3

Ot¯
0
imageRUNNER
3530/2830/2230
Facsimile Guide
Page 4
Manuals for the Machine
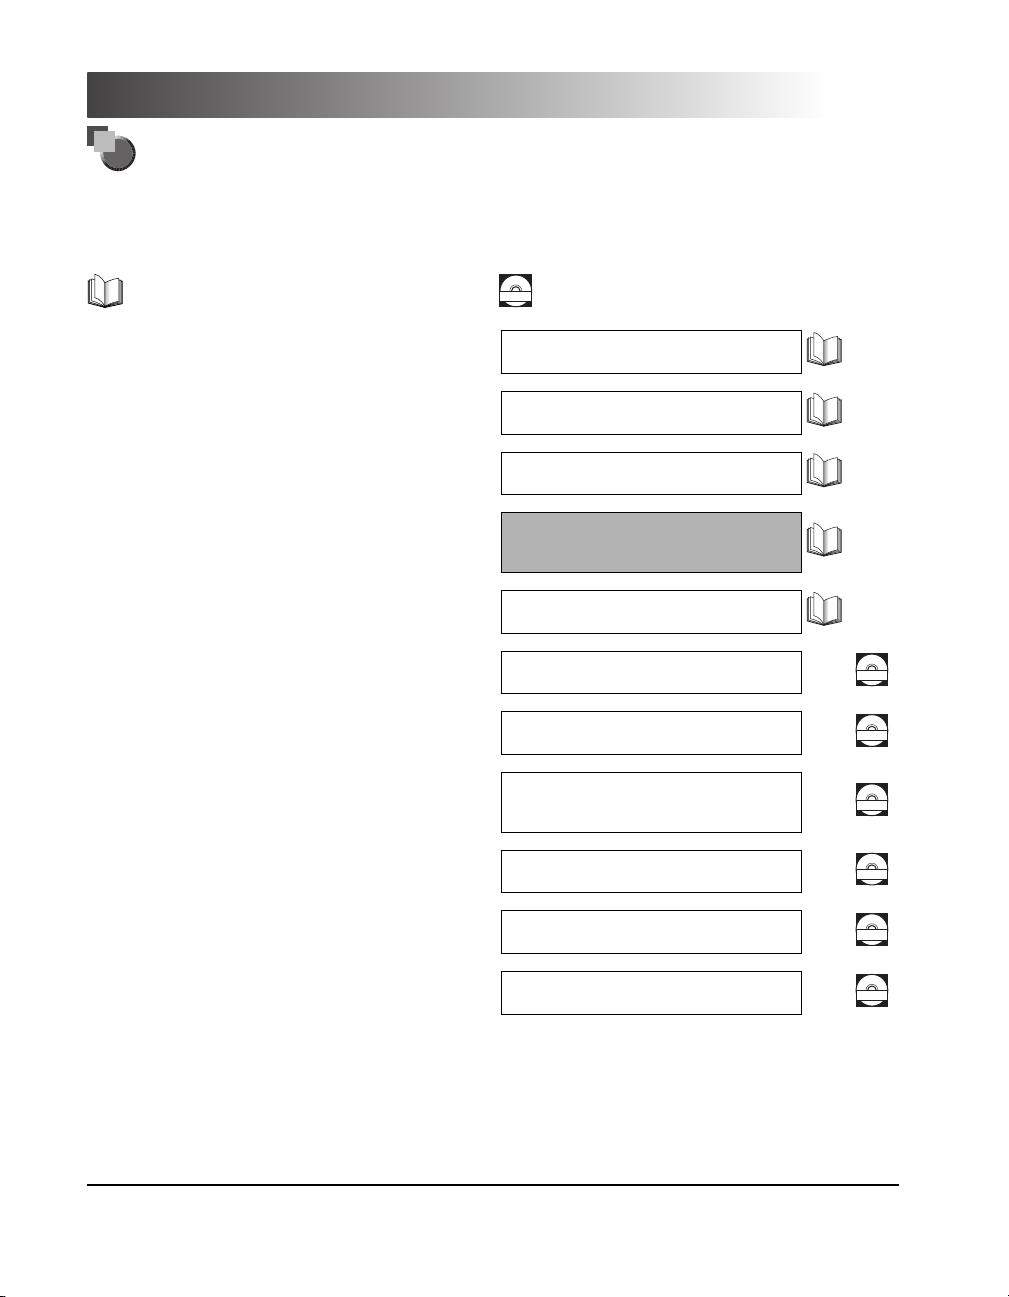
The manuals for this machine are divided as follows. Please refer to them for detailed information.
The manuals supplied with optional equipment are included in the list below. Depending on the system
configuration and product purchased, some manuals may not be needed.
Guides with this symbol are printed manuals.
• Basic Operations
• Troubleshooting
• Copying Instructions
• Mail Box Instructions
• Fax Instructions
• Setting Up the Network Connection and
Installing the CD-ROM Software
• Remote User Interface Instructions
• Network Connectivity and Setup Instructions
• Network ScanGear Installation and
Instructions
• UFR II Printer Instructions
Guides with this symbol are PDF manuals included on the
CD-ROM
accompanying CD-ROM. (See footnote on the next page.)
Reference Guide
Copying Guide
Mail Box Guide
Facsimile Guide
(This Document)
Network Quick Start Guide
Remote UI Guide
Network Guide
Network ScanGear
User's Guide
UFR II Printer Guide
CD-ROM
CD-ROM
CD-ROM
CD-ROM
• UFR II Printer Driver Installation and
Instructions
• Fax Driver Installation and Instructions
• To view the manual in PDF format, Adobe Reader/Acrobat Reader/Acrobat is required. If Adobe Reader/Acrobat Reader/Acrobat is not installed on
your system, please download it from the Adobe Systems Incorporated website (http://www.adobe.com).
• The machine illustration on the cover may differ slightly from your machine.
UFR II Driver Guide
Fax Driver Guide
CD-ROM
CD-ROM
Page 5

How This Manual Is Organized
Chapter 1 Introduction to Fax Functions
Chapter 2 Basic Send and Receive Methods
Chapter 3
Chapter 4 Checking/Changing the Fax Status
Chapter 5 Customizing Fax Settings
Chapter 6 System Manager Settings
Chapter 7 Printing Communication Reports
Chapter 8 Troubleshooting
Chapter 9 Appendix
Special Fax Functions
Includes the report samples, glossary, specifications, and index.
Considerable effort has been made to ensure that this manual is free of inaccuracies and omissions. However, as we are constantly improving our
products, if you need an exact specification, please contact Canon.
Page 6

Contents
Preface . . . . . . . . . . . . . . . . . . . . . . . . . . . . . . . . . . . . . . . . . . . . . . . . . . . . . . . . . .ix
How To Use This Manual. . . . . . . . . . . . . . . . . . . . . . . . . . . . . . . . . . . . . . . . . . . .ix
Symbols Used in This Manual . . . . . . . . . . . . . . . . . . . . . . . . . . . . . . . . . . . . . . ix
Keys Used in This Manual . . . . . . . . . . . . . . . . . . . . . . . . . . . . . . . . . . . . . . . . . x
Displays Used in This Manual . . . . . . . . . . . . . . . . . . . . . . . . . . . . . . . . . . . . . . xi
Illustrations Used in This Manual . . . . . . . . . . . . . . . . . . . . . . . . . . . . . . . . . . . xii
Abbreviations Used in This Manual . . . . . . . . . . . . . . . . . . . . . . . . . . . . . . . . . xii
Legal Notices . . . . . . . . . . . . . . . . . . . . . . . . . . . . . . . . . . . . . . . . . . . . . . . . . . . .xiii
FCC (Federal Communications Commission) . . . . . . . . . . . . . . . . . . . . . . . . . xiii
Users in the U.S.A.. . . . . . . . . . . . . . . . . . . . . . . . . . . . . . . . . . . . . . . . . . . . . . xiii
Users in Canada . . . . . . . . . . . . . . . . . . . . . . . . . . . . . . . . . . . . . . . . . . . . . . . xvi
Utilisation au Canada . . . . . . . . . . . . . . . . . . . . . . . . . . . . . . . . . . . . . . . . . . . xviii
Super G3 . . . . . . . . . . . . . . . . . . . . . . . . . . . . . . . . . . . . . . . . . . . . . . . . . . . . . xx
Trademarks . . . . . . . . . . . . . . . . . . . . . . . . . . . . . . . . . . . . . . . . . . . . . . . . . . . xx
Copyright . . . . . . . . . . . . . . . . . . . . . . . . . . . . . . . . . . . . . . . . . . . . . . . . . . . . . xx
Disclaimers. . . . . . . . . . . . . . . . . . . . . . . . . . . . . . . . . . . . . . . . . . . . . . . . . . . . xxi
Chapter 1 Introduction to Fax Functions
What This Machine Can Do. . . . . . . . . . . . . . . . . . . . . . . . . . . . . . . . . . . . . . . . .1-2
Overview of the imageRUNNER 3530/2830/2230 . . . . . . . . . . . . . . . . . . . . . . .1-5
Things You Must Do Before Using This Machine . . . . . . . . . . . . . . . . . . . . . .1-10
Setting the Display Language . . . . . . . . . . . . . . . . . . . . . . . . . . . . . . . . . . . .1-11
Selecting the Type of Telephone Line. . . . . . . . . . . . . . . . . . . . . . . . . . . . . . .1-12
Setting the Current Date and Time . . . . . . . . . . . . . . . . . . . . . . . . . . . . . . . .1-14
Registering Your Machine's Fax Number . . . . . . . . . . . . . . . . . . . . . . . . . . . .1-19
Registering Sender Names . . . . . . . . . . . . . . . . . . . . . . . . . . . . . . . . . . . . . .1-21
Registering the Unit's Name. . . . . . . . . . . . . . . . . . . . . . . . . . . . . . . . . . . . . .1-23
Flow of Sending Operations . . . . . . . . . . . . . . . . . . . . . . . . . . . . . . . . . . . . . . .1-26
Placing Originals . . . . . . . . . . . . . . . . . . . . . . . . . . . . . . . . . . . . . . . . . . . . . . . .1-34
Document Sizes . . . . . . . . . . . . . . . . . . . . . . . . . . . . . . . . . . . . . . . . . . . . . . .1-34
Orientation . . . . . . . . . . . . . . . . . . . . . . . . . . . . . . . . . . . . . . . . . . . . . . . . . . .1-35
Platen Glass. . . . . . . . . . . . . . . . . . . . . . . . . . . . . . . . . . . . . . . . . . . . . . . . . .1-36
Feeder (DADF-N1) (Optional) . . . . . . . . . . . . . . . . . . . . . . . . . . . . . . . . . . . .1-39
Canceling a Job . . . . . . . . . . . . . . . . . . . . . . . . . . . . . . . . . . . . . . . . . . . . . . . . .1-42
Using the Touch Panel Display. . . . . . . . . . . . . . . . . . . . . . . . . . . . . . . . . . . .1-42
iv
Page 7

Using the Stop Key . . . . . . . . . . . . . . . . . . . . . . . . . . . . . . . . . . . . . . . . . . . .1-43
Using the System Monitor Screen . . . . . . . . . . . . . . . . . . . . . . . . . . . . . . . . . 1-43
Chapter 2 Basic Send and Receive Methods
Resolution, Density, and Image Quality . . . . . . . . . . . . . . . . . . . . . . . . . . . . . . 2-2
Sending Methods. . . . . . . . . . . . . . . . . . . . . . . . . . . . . . . . . . . . . . . . . . . . . . . . .2-5
Memory Sending . . . . . . . . . . . . . . . . . . . . . . . . . . . . . . . . . . . . . . . . . . . . . . .2-5
Direct Sending . . . . . . . . . . . . . . . . . . . . . . . . . . . . . . . . . . . . . . . . . . . . . . . . .2-8
Sending Fax Documents Manually . . . . . . . . . . . . . . . . . . . . . . . . . . . . . . . . 2-10
Stamping Originals . . . . . . . . . . . . . . . . . . . . . . . . . . . . . . . . . . . . . . . . . . . .2-14
Dialing Methods. . . . . . . . . . . . . . . . . . . . . . . . . . . . . . . . . . . . . . . . . . . . . . . . .2-16
Numeric Keys. . . . . . . . . . . . . . . . . . . . . . . . . . . . . . . . . . . . . . . . . . . . . . . . . 2-16
Redialing . . . . . . . . . . . . . . . . . . . . . . . . . . . . . . . . . . . . . . . . . . . . . . . . . . . .2-18
Address Book . . . . . . . . . . . . . . . . . . . . . . . . . . . . . . . . . . . . . . . . . . . . . . . .2-19
Coded Speed Dialing. . . . . . . . . . . . . . . . . . . . . . . . . . . . . . . . . . . . . . . . . . .2-24
Group Dialing. . . . . . . . . . . . . . . . . . . . . . . . . . . . . . . . . . . . . . . . . . . . . . . . .2-26
Receiving Print Jobs and Fax Documents . . . . . . . . . . . . . . . . . . . . . . . . . . .2-29
Receiving Documents . . . . . . . . . . . . . . . . . . . . . . . . . . . . . . . . . . . . . . . . . .2-29
Receiving Documents into Memory . . . . . . . . . . . . . . . . . . . . . . . . . . . . . . . .2-31
Forwarding Received Documents . . . . . . . . . . . . . . . . . . . . . . . . . . . . . . . . .2-33
Available Paper Sizes . . . . . . . . . . . . . . . . . . . . . . . . . . . . . . . . . . . . . . . . . . . .2-35
Chapter 3 Special Fax Functions
Delaying a Send Job . . . . . . . . . . . . . . . . . . . . . . . . . . . . . . . . . . . . . . . . . . . . . .3-2
Memory Boxes. . . . . . . . . . . . . . . . . . . . . . . . . . . . . . . . . . . . . . . . . . . . . . . . . . .3-5
Using a Memory Box. . . . . . . . . . . . . . . . . . . . . . . . . . . . . . . . . . . . . . . . . . . . . .3-8
Scanning Originals. . . . . . . . . . . . . . . . . . . . . . . . . . . . . . . . . . . . . . . . . . . . . . 3-8
Printing and Erasing Documents . . . . . . . . . . . . . . . . . . . . . . . . . . . . . . . . . .3-11
Setting the Sender's Name as the Terminal ID . . . . . . . . . . . . . . . . . . . . . . . .3-15
Changing the Reception Mode. . . . . . . . . . . . . . . . . . . . . . . . . . . . . . . . . . . . . 3-17
Faxing Two-Sided Originals . . . . . . . . . . . . . . . . . . . . . . . . . . . . . . . . . . . . . . .3-19
Document Size. . . . . . . . . . . . . . . . . . . . . . . . . . . . . . . . . . . . . . . . . . . . . . . . . .3-21
Specifying the Document Size. . . . . . . . . . . . . . . . . . . . . . . . . . . . . . . . . . . . 3-22
Registering the Document Size . . . . . . . . . . . . . . . . . . . . . . . . . . . . . . . . . . .3-25
Changing the Zoom Ratio. . . . . . . . . . . . . . . . . . . . . . . . . . . . . . . . . . . . . . . . . 3-28
Preset Zoom . . . . . . . . . . . . . . . . . . . . . . . . . . . . . . . . . . . . . . . . . . . . . . . . . 3-29
Zoom by Percentage . . . . . . . . . . . . . . . . . . . . . . . . . . . . . . . . . . . . . . . . . . .3-31
Sending with a Subaddress . . . . . . . . . . . . . . . . . . . . . . . . . . . . . . . . . . . . . . .3-33
Using a PIN Code. . . . . . . . . . . . . . . . . . . . . . . . . . . . . . . . . . . . . . . . . . . . . . . . 3-35
v
Page 8

Setting PIN Code Access. . . . . . . . . . . . . . . . . . . . . . . . . . . . . . . . . . . . . . . .3-35
Setting the PIN Code Position . . . . . . . . . . . . . . . . . . . . . . . . . . . . . . . . . . . .3-38
Dialing with a PIN Code . . . . . . . . . . . . . . . . . . . . . . . . . . . . . . . . . . . . . . . . .3-39
Fax Information Services . . . . . . . . . . . . . . . . . . . . . . . . . . . . . . . . . . . . . . . . .3-41
Chapter 4 Checking/Changing the Fax Status
Checking/Changing the Status of Fax Jobs . . . . . . . . . . . . . . . . . . . . . . . . . . .4-2
Checking Fax Job Details. . . . . . . . . . . . . . . . . . . . . . . . . . . . . . . . . . . . . . . . .4-2
Printing the TX Job Status/Log . . . . . . . . . . . . . . . . . . . . . . . . . . . . . . . . . . . .4-6
Checking/Changing the Status of Receive Jobs . . . . . . . . . . . . . . . . . . . . . . .4-8
Checking Receive Job Details . . . . . . . . . . . . . . . . . . . . . . . . . . . . . . . . . . . . .4-8
Erasing Received Documents . . . . . . . . . . . . . . . . . . . . . . . . . . . . . . . . . . . .4-11
Forwarding Received Documents . . . . . . . . . . . . . . . . . . . . . . . . . . . . . . . . .4-12
Chapter 5 Customizing Fax Settings
Custom Fax Settings Table . . . . . . . . . . . . . . . . . . . . . . . . . . . . . . . . . . . . . . . . .5-2
User Settings . . . . . . . . . . . . . . . . . . . . . . . . . . . . . . . . . . . . . . . . . . . . . . . . . . . .5-4
Registering the Standard Key . . . . . . . . . . . . . . . . . . . . . . . . . . . . . . . . . . . . .5-4
Printing the TX Terminal ID . . . . . . . . . . . . . . . . . . . . . . . . . . . . . . . . . . . . . . .5-7
Setting the Standard Density . . . . . . . . . . . . . . . . . . . . . . . . . . . . . . . . . . . . .5-11
Adjusting the Alarm and Monitor Volume . . . . . . . . . . . . . . . . . . . . . . . . . . . .5-12
Changing the Standard Fax Settings . . . . . . . . . . . . . . . . . . . . . . . . . . . . . . .5-14
Storing the Standard Settings . . . . . . . . . . . . . . . . . . . . . . . . . . . . . . . . .5-14
Initializing the Standard Settings . . . . . . . . . . . . . . . . . . . . . . . . . . . . . . .5-16
Storing Destinations . . . . . . . . . . . . . . . . . . . . . . . . . . . . . . . . . . . . . . . . . . . . .5-19
Storing One-Touch Speed Dialing Keys . . . . . . . . . . . . . . . . . . . . . . . . . . . . .5-19
One-Touch Speed Dialing Settings . . . . . . . . . . . . . . . . . . . . . . . . . . . . . . . .5-26
Storing Group Destinations . . . . . . . . . . . . . . . . . . . . . . . . . . . . . . . . . . . . . .5-33
Storing the Index Name . . . . . . . . . . . . . . . . . . . . . . . . . . . . . . . . . . . . . . . . .5-39
Transmission Settings. . . . . . . . . . . . . . . . . . . . . . . . . . . . . . . . . . . . . . . . . . . .5-41
ECM Transmission . . . . . . . . . . . . . . . . . . . . . . . . . . . . . . . . . . . . . . . . . . . . .5-41
Pause Time . . . . . . . . . . . . . . . . . . . . . . . . . . . . . . . . . . . . . . . . . . . . . . . . . .5-43
Auto Redial. . . . . . . . . . . . . . . . . . . . . . . . . . . . . . . . . . . . . . . . . . . . . . . . . . .5-45
Reception Settings . . . . . . . . . . . . . . . . . . . . . . . . . . . . . . . . . . . . . . . . . . . . . .5-50
ECM Reception . . . . . . . . . . . . . . . . . . . . . . . . . . . . . . . . . . . . . . . . . . . . . . .5-50
Printing Footer Information on a Received Document . . . . . . . . . . . . . . . . . .5-52
Printing Received Documents . . . . . . . . . . . . . . . . . . . . . . . . . . . . . . . . . . . . .5-54
Paper Drawer Selection . . . . . . . . . . . . . . . . . . . . . . . . . . . . . . . . . . . . . . . . .5-54
Reducing a Received Document . . . . . . . . . . . . . . . . . . . . . . . . . . . . . . . . . .5-58
vi
Page 9

Two-Sided Printing . . . . . . . . . . . . . . . . . . . . . . . . . . . . . . . . . . . . . . . . . . . . .5-61
2 On 1 Log . . . . . . . . . . . . . . . . . . . . . . . . . . . . . . . . . . . . . . . . . . . . . . . . . . . 5-63
Setting Up Memory Boxes . . . . . . . . . . . . . . . . . . . . . . . . . . . . . . . . . . . . . . . . 5-65
Confidential Memory Box. . . . . . . . . . . . . . . . . . . . . . . . . . . . . . . . . . . . . . . .5-66
Relay Memory Box. . . . . . . . . . . . . . . . . . . . . . . . . . . . . . . . . . . . . . . . . . . . .5-71
Batch Sending Memory Box . . . . . . . . . . . . . . . . . . . . . . . . . . . . . . . . . . . . .5-82
Erasing a Memory Box. . . . . . . . . . . . . . . . . . . . . . . . . . . . . . . . . . . . . . . . . .5-89
Chapter 6 System Manager Settings
System Settings Table . . . . . . . . . . . . . . . . . . . . . . . . . . . . . . . . . . . . . . . . . . . .6-2
Communications Settings . . . . . . . . . . . . . . . . . . . . . . . . . . . . . . . . . . . . . . . . .6-3
Send Start Speed . . . . . . . . . . . . . . . . . . . . . . . . . . . . . . . . . . . . . . . . . . . . . . 6-3
Receive Start Speed . . . . . . . . . . . . . . . . . . . . . . . . . . . . . . . . . . . . . . . . . . . .6-6
Saving Received Documents in Memory. . . . . . . . . . . . . . . . . . . . . . . . . . . . . 6-7
Automatic Forwarding of Received Documents . . . . . . . . . . . . . . . . . . . . . . .6-16
PIN Code Access. . . . . . . . . . . . . . . . . . . . . . . . . . . . . . . . . . . . . . . . . . . . . . 6-28
Reception Password . . . . . . . . . . . . . . . . . . . . . . . . . . . . . . . . . . . . . . . . . . .6-30
Restricting New Addresses . . . . . . . . . . . . . . . . . . . . . . . . . . . . . . . . . . . . . . . 6-33
Chapter 7 Printing Communication Reports
Report Settings Table . . . . . . . . . . . . . . . . . . . . . . . . . . . . . . . . . . . . . . . . . . . . .7-2
Specifying Report Settings. . . . . . . . . . . . . . . . . . . . . . . . . . . . . . . . . . . . . . . . .7-3
TX Report . . . . . . . . . . . . . . . . . . . . . . . . . . . . . . . . . . . . . . . . . . . . . . . . . . . .7-3
Activity Report . . . . . . . . . . . . . . . . . . . . . . . . . . . . . . . . . . . . . . . . . . . . . . . . .7-6
RX Report . . . . . . . . . . . . . . . . . . . . . . . . . . . . . . . . . . . . . . . . . . . . . . . . . . . 7-10
Memory Inbox RX Report . . . . . . . . . . . . . . . . . . . . . . . . . . . . . . . . . . . . . . .7-12
Printing Lists . . . . . . . . . . . . . . . . . . . . . . . . . . . . . . . . . . . . . . . . . . . . . . . . . . .7-14
Address Book List . . . . . . . . . . . . . . . . . . . . . . . . . . . . . . . . . . . . . . . . . . . . . 7-14
User's Data List . . . . . . . . . . . . . . . . . . . . . . . . . . . . . . . . . . . . . . . . . . . . . . .7-16
Chapter 8 Troubleshooting
When Problems Occur . . . . . . . . . . . . . . . . . . . . . . . . . . . . . . . . . . . . . . . . . . . .8-2
Sending Documents . . . . . . . . . . . . . . . . . . . . . . . . . . . . . . . . . . . . . . . . . . . . 8-2
Receiving Documents . . . . . . . . . . . . . . . . . . . . . . . . . . . . . . . . . . . . . . . . . . .8-4
Other Situations . . . . . . . . . . . . . . . . . . . . . . . . . . . . . . . . . . . . . . . . . . . . . . . .8-5
Error Messages . . . . . . . . . . . . . . . . . . . . . . . . . . . . . . . . . . . . . . . . . . . . . . . . . .8-7
Self-Diagnostic Display . . . . . . . . . . . . . . . . . . . . . . . . . . . . . . . . . . . . . . . . . .8-7
List of Error Codes without Messages . . . . . . . . . . . . . . . . . . . . . . . . . . . . . . .8-8
vii
Page 10

Questions & Answers . . . . . . . . . . . . . . . . . . . . . . . . . . . . . . . . . . . . . . . . . . . .8-15
Chapter 9 Appendix
Report and List Samples. . . . . . . . . . . . . . . . . . . . . . . . . . . . . . . . . . . . . . . . . . .9-2
TX Report/Error TX Report . . . . . . . . . . . . . . . . . . . . . . . . . . . . . . . . . . . . . . .9-2
Multiple Communication Result Report . . . . . . . . . . . . . . . . . . . . . . . . . . . . . .9-4
RX Report . . . . . . . . . . . . . . . . . . . . . . . . . . . . . . . . . . . . . . . . . . . . . . . . . . . .9-5
Memory Inbox Reception Report . . . . . . . . . . . . . . . . . . . . . . . . . . . . . . . . . . .9-6
Activity Report . . . . . . . . . . . . . . . . . . . . . . . . . . . . . . . . . . . . . . . . . . . . . . . . .9-8
Address Book List . . . . . . . . . . . . . . . . . . . . . . . . . . . . . . . . . . . . . . . . . . . . .9-10
User's Data List . . . . . . . . . . . . . . . . . . . . . . . . . . . . . . . . . . . . . . . . . . . . . . .9-11
Specifications. . . . . . . . . . . . . . . . . . . . . . . . . . . . . . . . . . . . . . . . . . . . . . . . . . .9-12
Super G3 FAX Board . . . . . . . . . . . . . . . . . . . . . . . . . . . . . . . . . . . . . . . . . . .9-12
Glossary . . . . . . . . . . . . . . . . . . . . . . . . . . . . . . . . . . . . . . . . . . . . . . . . . . . . . . .9-13
Index . . . . . . . . . . . . . . . . . . . . . . . . . . . . . . . . . . . . . . . . . . . . . . . . . . . . . . . . . .9-22
viii
Page 11
Preface
Thank you for purchasing the Canon imageRUNNER 3530/2830/2230. Please read this
manual thoroughly before operating the machine in order to familiarize yourself with its
capabilities, and to make the most of its many functions. After reading this manual, store it in
a safe place for future reference.
How To Use This Manual
Symbols Used in This Manual
The following symbols are used in this manual to explain procedures, restrictions,
handling precautions, and instructions that should be observed for safety.
.
WARNING
CAUTION
IMPORTANT
NOTE
Indicates a warning concerning operations that may lead to death or
injury to persons if not performed correctly. In order to use the machine
safely, always pay attention to these warnings.
.
Indicates a caution concerning operations that may lead to injury to
persons, or damage to property if not performed correctly. In order to use
the machine safely, always pay attention to these cautions.
.
Indicates operational requirements and restrictions. Be sure to read
these items carefully in order to operate the machine correctly, and to
avoid damage to the machine.
.
Indicates a clarification of an operation, or contains additional
explanations for a procedure. Reading these notes is highly
recommended.
ix
Page 12

Keys Used in This Manual
The following symbols and key names are a few examples of how keys to be
pressed are expressed in this manual:
• Touch Panel Display Keys: [Key Name]
Examples: [Cancel]
• Control Panel Keys: <Key icon> + (Key Name)
[Done]
Examples:
(Start)
(Stop)
Hereafter, the following name substitutions take place:
• Transmission/Sending: TX
• Reception/Receiving: RX
x
Page 13
Displays Used in This Manual
Screen shots of the touch panel display used in this manual are those taken when
the following optional equipment is attached to the imageRUNNER 3530: the
Feeder (DADF-N1), Super G3 FAX Board, UFR II Printer Kit, Finisher-S1,
Additional Finisher Tray-B1, and Cassette Feeding Unit-Y2.
Note that functions that cannot be used depending on the model or options, are not
displayed on the touch panel display.
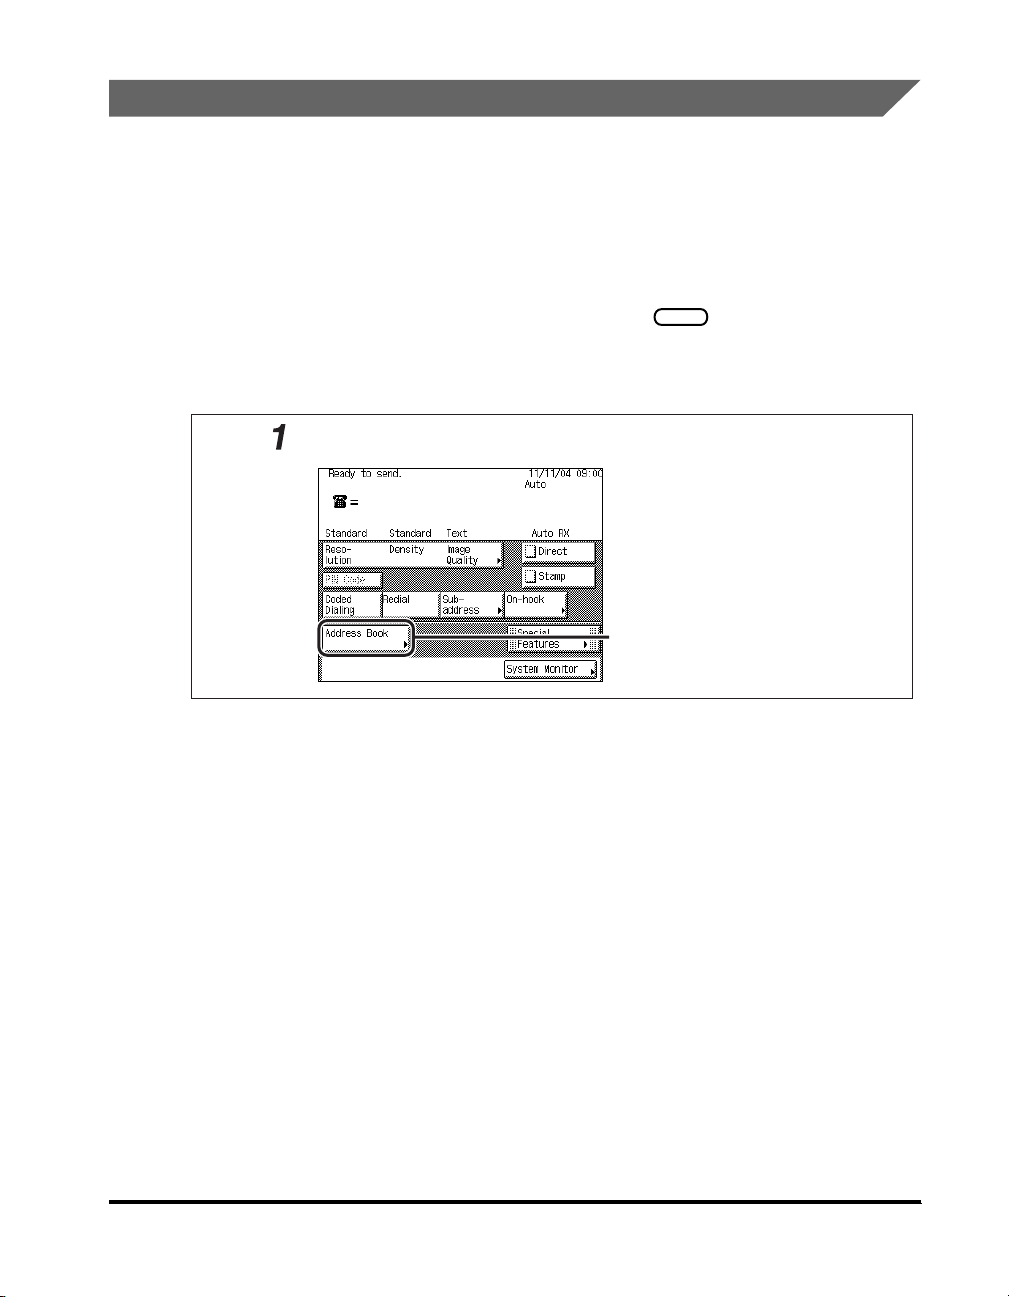
The keys which you should press are marked with a , as shown below.
When multiple keys can be pressed on the touch panel display, all keys are marked.
Select the keys which suit your needs.
Press [Address Book].
Press this key for operation.
xi
Page 14
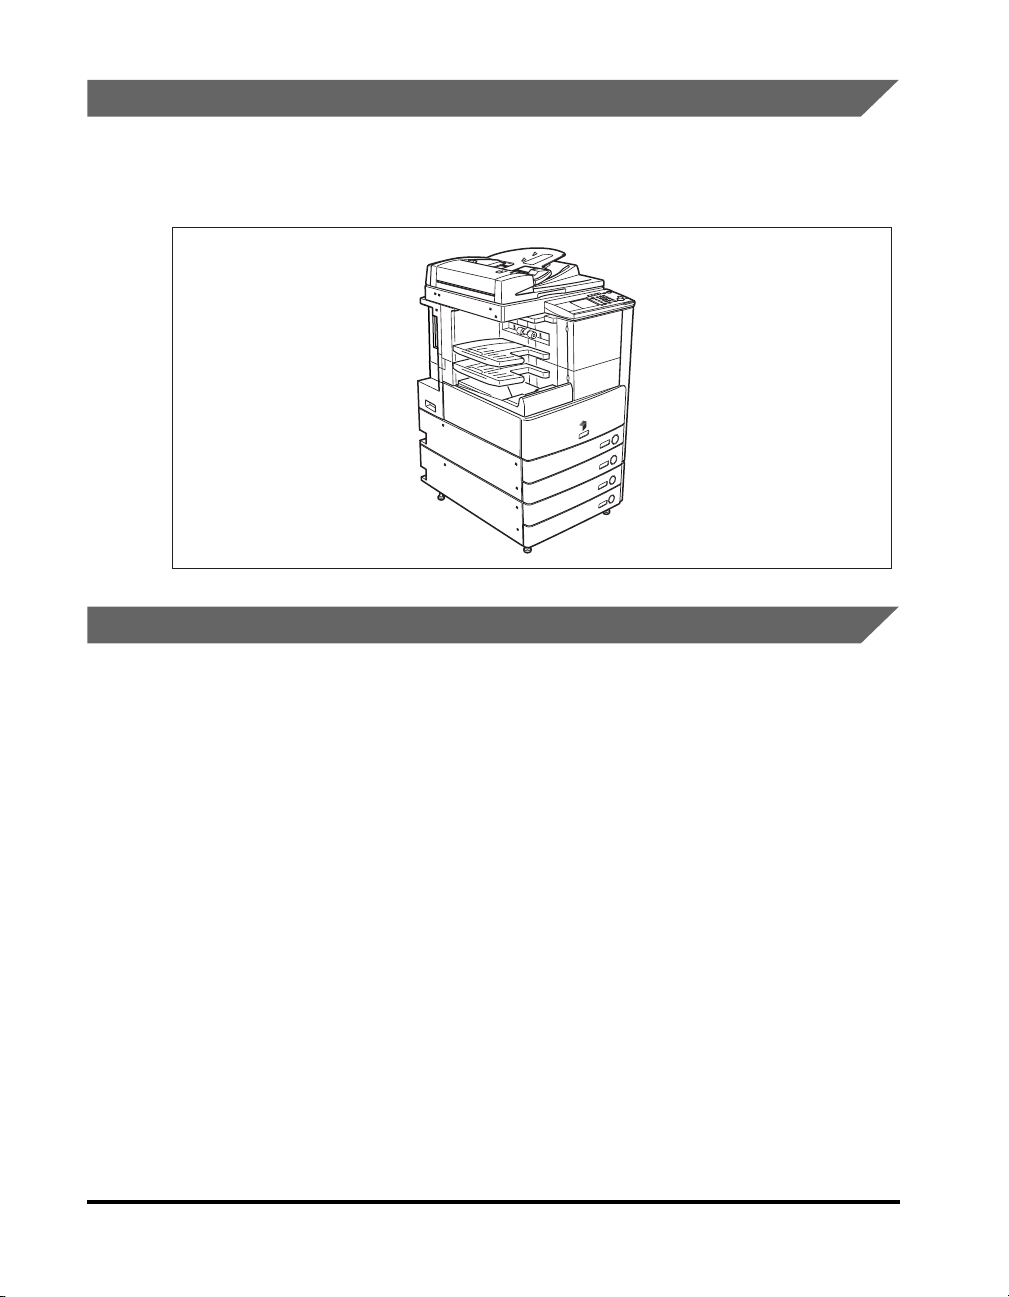
Illustrations Used in This Manual
Illustrations used in this manual are those displayed when the imageRUNNER 3530
has the following optional equipment attached to it: the Feeder (DADF-N1),
Finisher-S1, Additional Finisher Tray-B1, and Cassette Feeding Unit-Y2.
Abbreviations Used in This Manual
xii
In this manual, product names and model names are abbreviated as follows:
Microsoft
Microsoft
Microsoft
Microsoft
Novell NetWare
®
Windows NT® operating system:
®
Windows® 2000 operating system:
®
Windows® XP operating system:
®
Windows® operating system:
®
:
Windows NT
Windows 2000
Windows XP
Windows
NetWare
Page 15

Legal Notices
FCC (Federal Communications Commission)
This equipment has been tested and found to comply with the limits for a Class A
digital device, pursuant to Part 15 of the FCC Rules. These limits are designed to
provide reasonable protection against harmful interference when the equipment is
operated in a commercial environment. This equipment generates, uses, and can
radiate radio frequency energy and, if not installed and used in accordance with the
Operator's Manual, may cause harmful interference to radio communications.
Operation of this equipment in a residential area is likely to cause harmful
interference in which case the user will be required to correct the interference at his
own expense.
Use of shielded cables are required to comply with Class A limits in Subpart B of
Part 15 of the FCC Rules.
Do not make any changes or modifications to the equipment unless otherwise
specified in the manual. If such changes or modifications should be made, you
could be required to stop operation of the equipment.
Users in the U.S.A.
Preinstallation Requirements for Canon Facsimile Equipment
A. Location
Supply a suitable table, cabinet, or desk for the machine. See Chapter 9,
"Appendix," in the Reference Guide for specific dimensions and weight.
B. Order Information
1. A single telephone line (touch-tone or rotary) should be used.
2. Order an RJ11-C telephone wall jack (USOC), which should be installed by the
telephone company. If the RJ11-C wall jack is not present, telephone/facsimile
operation is not possible.
xiii
Page 16

3. Order a normal business line from your telephone company's business
representative. The line should be a regular voice grade line or an equivalent
one. Use one line per unit.
DDD (Direct Distance Dial) line
-or-
IDDD (International Direct Distance Dial) line if you communicate overseas
NOTE
Canon recommends an individual line following industry standards, i.e., 2500
(touch-tone) or 500 (rotary/pulse dial) telephones. A dedicated extension off a PBX
(Private Branch Exchange) unit without "Call Waiting" can be used with your facsimile
unit. Key telephone systems are not recommended because they send nonstandard
signals to individual telephones for ringing and special codes, which may cause a
facsimile error.
C. Power Requirements
The machine should be connected to a standard 120 volt AC, three-wire grounded
outlet only.
Do not connect this machine to an outlet or power line shared with other appliances
that cause "electrical noise." Air conditioners, electric typewriters, copiers, and
machines of this sort generate electrical noise that often interferes with
communications equipment and the sending and receiving of documents.
xiv
Connection of the Equipment
This equipment complies with Part 68 of the FCC rules and the requirements
adopted by the ACTA. On the rear panel of this equipment is a label that contains,
among other information, a product identifier in the format of US:AAAEQ##TXXXX.
If requested, this number must be provided to the telephone company.
The REN (Ringer Equivalence Number) is used to determine the number of devices
that may be connected to a telephone line. Excessive RENs on a telephone line
may result in the devices not ringing in response to an incoming call. In most, but
not all areas, the sum of the RENs should not exceed five (5.0). To be certain of the
number of devices that may be connected to a line, as determined by the total
RENs, contact the local telephone company. The REN for this product is part of the
product identifier that has the format US:AAAEQ##TXXXX. The digits represented
by ## are the REN without a decimal point (e.g., 03 is a REN of 0.3).
An FCC compliant telephone line cable and modular plug is provided with this
equipment. This equipment is designed to be connected to the telephone network
or premise wiring using a compatible modular jack that is Part 68 compliant.
This equipment may not be used on coin service provided by the telephone
company. Connection to party lines is subject to state tariffs.
Page 17

In Case of Equipment Malfunction
Should any malfunction occur which cannot be corrected by the procedures
described in this guide or the Reference Guide, disconnect the equipment from the
telephone line cable and disconnect the power cord. The telephone line cable
should not be reconnected or the main power switch turned ON until the problem is
completely resolved. Users should contact their local authorized Canon Facsimile
Service Dealer for the servicing of equipment.
Rights of the Telephone Company
If this equipment (imageRUNNER 3530/2830/2230) causes harm to the telephone
network, the telephone company may temporarily disconnect service. The
telephone company also retains the right to make changes in facilities and services
that may affect the operation of this equipment. When such changes are necessary,
the telephone company is required to give adequate prior notice to the user.
However, if advance notice is not possible, the telephone company will notify the
customer as soon as possible. Also, the customer will be advised of his/her right to
file a complaint with the FCC if he/she believes it is necessary.
WARNING
The Telephone Consumer Protection Act of 1991 makes it unlawful for any
person to use a computer or other electronic device to send any message via a
telephone facsimile machine unless such message clearly contains in a margin
at the top or bottom of each transmitted page, or on the first page of the
transmission, the date and time it is sent and an identification of the business or
other entity, or other individual sending the message and the telephone number
of the sending machine or such business, other entity, or individual.
NOTE
In order to program this information into your machine, you should complete the
procedure to register your name, unit's telephone number, time, and date in Chapter 1.
(For instructions on entering characters, see Chapter 2, "Basic Operations," in the
Reference Guide
.)
xv
Page 18

Users in Canada
Preinstallation Requirements for Canon Facsimile Equipment
A. Location
Supply a suitable table, cabinet, or desk for the machine. See Chapter 9,
"Appendix," in the Reference Guide for specific dimensions and weight.
B. Order Information
1. A single telephone line (touch-tone or rotary) should be used. (Touch-tone is
recommended if available in your area.)
2. Order a CA11A modular jack which should be installed by the telephone
company. If the CA11A jack is not present, installation cannot occur.
3. Order a normal business line from your telephone company's business
representative. The line should be a regular voice grade line or an equivalent
one. Use one line per unit.
DDD (Direct Distance Dial) line
or
IDDD (International Direct Distance Dial) line if you communicate overseas
NOTE
Canon recommends an individual line following industry standards, such as 2500
(touch-tone) or 500 (rotary/pulse dial) telephones. A dedicated extension off a PBX
(Private Branch Exchange) unit without "Call Waiting" can be used with your facsimile
unit. Key telephone systems are not recommended because they send nonstandard
signals to individual telephones for ringing and special codes, which may cause a
facsimile error.
xvi
C. Power Requirements
The power outlet should be a three-prong grounded receptacle (Single or Duplex).
It should be independent from copiers, heaters, air conditioners, or any electric
equipment that is thermostatically controlled. The rated value is 115 volts and 15
amperes. The CA11A modular jack should be relatively close to the power outlet to
facilitate installation.
Page 19

Notice
• This product meets the applicable Industry Canada technical specifications.
• Before installing this equipment, users should ensure that it is permissible to be
connected to the facilities of the local telecommunications company. The
equipment must also be installed using an acceptable method of connection. In
some cases, the company's inside wiring associated with a single line individual
service may be extended by means of a certified connector assembly (telephone
extension cord). The customer should be aware that compliance with the above
conditions may not prevent deterioration of service in some situations.
• The Ringer Equivalence Number is an indication of the maximum number of
devices allowed to be connected to a telephone interface. The termination of an
interface may consist of any combination of devices subject only to the
requirement that the sum of the RENs of all the devices does not exceed five.
• The REN of this product is 1.0.
• Repairs to certified equipment should be made by an authorized Canadian
maintenance facility designated by the supplier. Any repairs or alterations made
by the user to this equipment, or equipment malfunctions, may give the
telecommunications company cause to request the user to disconnect the
equipment.
• Users should ensure for their own protection that the electrical ground
connections of the power utility, telephone lines, and internal metallic water pipe
system, if present, are connected together. This precaution may be particularly
important in rural areas.
CAUTION
Users should not attempt to make such connections themselves, but should
contact the appropriate electric inspection authority, or electrician, as
appropriate.
NOTE
This equipment complies with the Canadian ICES-003 Class A limits.
xvii
Page 20

Utilisation au Canada
Conditions à Remplir Préalablement à L'installation d'un Télécopieur
Canon
A. Emplacement
Prévoir une table, un meuble, ou un bureau suffisamment solide et de taille
appropriée (voir le chapitre 9, Annexe (Appendix), du Guide de référence
(Reference Guide) pour les indications de poids et dimensions).
B. Installation téléphonique
1. Une seule ligne téléphonique (tonalités ou impulsions) doit être utilisée.
2. Il faut commander un jack modulaire CA11A qui sera installé par la compagnie
téléphonique. Sans ce jack, la mise en place serait impossible.
3. Si vous vous abonnez à une nouvelle ligne, demandez une ligne d'affaires
normale de qualité téléphonique courante ou équivalente. Prenez un
abonnement d'une ligne par appareil.
Ligne automatique interurbaine
ou
xviii
Ligne automatique internationale
(si vous communiquez avec les pays étrangers)
NOTE
Canon vous conseille d'utiliser une ligne individuelle conforme aux normes industrielles,
à savoir: ligne téléphonique 2500 (pour appareil à clavier) ou 500 (pour appareil à
cadran/impulsions). Il est également possible de raccorder ce télécopieur à un système
téléphonique à poussoirs car la plupart de ces systèmes émettent des signaux d'appel
non normalisés ou des codes spéciaux qui risquent de perturber le fonctionnement du
télécopieur.
C. Condition d'alimentation
Raccordez le télécopieur à une prise de courant plus terre à trois branches, du type
simple ou double, et qui ne sert pas à alimenter un copieur, un appareil de
chauffage, un climatiseur ou tout autre appareil électrique à thermostat.
L'alimentation doit être de 115 volts et 15 ampères. Pour faciliter l'installation, le
jack CA11A doit être assez proche de la prise de courant.
Page 21

Remarques
• Le présent matériel est conforme aux spécifications techniques applicables
d'Industrie Canada.
• Avant d'installer cet appareil, l'utilisateur doit s'assurer qu'il est permis de le
connecter à l'équipement de la compagnie de télécommunication locale et doit
installer cet appareil en utilisant une méthode de connexion autorisée. Il se peut
qu'il faille étendre la circuiterie intérieure de la ligne individuelle d'abonné, qui a
été installée par la compagnie, au moyen d'un jeu de connecteurs homologués
(rallonge téléphonique).
L'attention de l'utilisateur est attirée sur le fait que le respect des conditions
mentionnées ci-dessus ne constitue pas une garantie contre les dégradations de
qualité du service dans certaines circonstances.
• L'indice d'équivalence de la sonnerie (IES) sert à indiquer le nombre maximal de
terminaux qui peuvent être raccordés à une interface téléphonique. La
terminaison d'une interface peut consister en une combinaison quelconque de
dispositifs, à la seule condition que la somme d'indices d' équivalence de la
sonnerie de tous les dispositifs n'excède pas 5.
• Le nombre d'équivalents sonnerie (REN) de ce produit est 1,0.
• Les réparations sur un appareil certifié doivent être faites par une société
d'entretien canadienne autorisée par le Gouvernement canadien et désignée par
le fournisseur. Toute réparation ou modification que pourrait faire I'utilisateur de
cet appareil, ou tout mauvais fonctionnement, donne à la compagnie de
télécommunication le droit de débrancher I'appareil.
• Pour sa propre protection, I'utilisateur doit s'assurer que les prises de terre de
I'appareil d'alimentation, les lignes téléphoniques et les tuyaux métalliques
internes, s'il y en a, sont bien connectés entre eux. Cette précaution est
particulièrement importante dans les zones rurales.
CAUTION
Au lieu d'essayer de faire ces branchements eux-mêmes, les utilisateurs sont
invités à faire appel à un service d'inspection faisant autorité en matière
d'électricité ou à un électricien, selon le cas.
NOTE
Respecte les limites de la classe A de la NMB-003 du Canada.
xix
Page 22

Super G3
Trademarks
Canon, the Canon logo and imageRUNNER are trademarks of Canon Inc.
Adobe and Adobe Acrobat are trademarks of Adobe Systems Incorporated.
IBM and OS/2 are trademarks of International Business Machines Corporation.
Microsoft, MS-DOS, Windows, and Windows NT are registered trademarks of
Microsoft Corporation in the United States and other countries.
NetWare
NDS is a trademark of Novell, Inc.
Super G3 is a phrase used to describe the new generation of fax
machines that use ITU-T V.34 standard 33.6 Kbps* modems.
Super G3 High Speed Fax machines allow transmission times of
approximately 3 seconds* per page which results in reduced
telephone line charges.
* Approximately 3 seconds per page fax transmission time based
on CCITT/ITU-T No.1 Chart, (JBIG, Standard Mode) at 33.6
Kbps modem speed. The Public Switched Telephone Network
(PSTN) currently supports 28.8 Kbps modem speeds or slower,
depending on telephone line conditions.
®
and Novell are registered trademarks of Novell, Inc.
UNIX is a registered trademark of The Open Group in the United States and other
countries.
Ethernet is a trademark of Xerox Corporation.
Other product and company names herein may be the trademarks of their
respective owners.
Copyright
Copyright 2004 by Canon Inc. All rights reserved.
No part of this publication may be reproduced or transmitted in any form or by any
means, electronic or mechanical, including photocopying and recording, or by any
information storage or retrieval system without the prior written permission of
Canon Inc.
xx
Page 23

Disclaimers
The information in this document is subject to change without notice.
CANON INC. MAKES NO WARRANTY OF ANY KIND WITH REGARD TO THIS
MATERIAL, EITHER EXPRESS OR IMPLIED, EXCEPT AS PROVIDED HEREIN,
INCLUDING WITHOUT LIMITATION, THEREOF, WARRANTIES AS TO
MARKETABILITY, MERCHANTABILITY, FITNESS FOR A PARTICULAR
PURPOSE OF USE OR AGAINST INFRINGEMENT OF ANY PATENT. CANON
INC. SHALL NOT BE LIABLE FOR ANY DIRECT, INCIDENTAL, OR
CONSEQUENTIAL DAMAGES OF ANY NATURE, OR LOSSES OR EXPENSES
RESULTING FROM THE USE OF THIS MATERIAL.
xxi
Page 24

xxii
Page 25

Introduction to Fax Functions
This chapter is an introduction to the Fax function.
What This Machine Can Do . . . . . . . . . . . . . . . . . . . . . . . . . . . . . . . . . . . . . . . . . . . . . . . 1-2
Overview of the imageRUNNER 3530/2830/2230 . . . . . . . . . . . . . . . . . . . . . . . . . . . . . . 1-5
Things You Must Do Before Using This Machine . . . . . . . . . . . . . . . . . . . . . . . . . . . . . . 1-10
Setting the Display Language. . . . . . . . . . . . . . . . . . . . . . . . . . . . . . . . . . . . . . . . . . . . . . . . . . .1-11
Selecting the Type of Telephone Line. . . . . . . . . . . . . . . . . . . . . . . . . . . . . . . . . . . . . . . . . . . . .1-12
Setting the Current Date and Time. . . . . . . . . . . . . . . . . . . . . . . . . . . . . . . . . . . . . . . . . . . . . . .1-14
Registering Your Machine's Fax Number . . . . . . . . . . . . . . . . . . . . . . . . . . . . . . . . . . . . . . . . . .1-19
Registering Sender Names . . . . . . . . . . . . . . . . . . . . . . . . . . . . . . . . . . . . . . . . . . . . . . . . . . . .1-21
Registering the Unit's Name. . . . . . . . . . . . . . . . . . . . . . . . . . . . . . . . . . . . . . . . . . . . . . . . . . . . 1-23
Flow of Sending Operations . . . . . . . . . . . . . . . . . . . . . . . . . . . . . . . . . . . . . . . . . . . . . .1-26
Placing Originals. . . . . . . . . . . . . . . . . . . . . . . . . . . . . . . . . . . . . . . . . . . . . . . . . . . . . . .1-34
Document Sizes . . . . . . . . . . . . . . . . . . . . . . . . . . . . . . . . . . . . . . . . . . . . . . . . . . . . . . . . . . . . .1-34
Orientation . . . . . . . . . . . . . . . . . . . . . . . . . . . . . . . . . . . . . . . . . . . . . . . . . . . . . . . . . . . . . . . . . 1-35
Platen Glass . . . . . . . . . . . . . . . . . . . . . . . . . . . . . . . . . . . . . . . . . . . . . . . . . . . . . . . . . . . . . . . .1-36
Feeder (DADF-N1) (Optional). . . . . . . . . . . . . . . . . . . . . . . . . . . . . . . . . . . . . . . . . . . . . . . . . . .1-39
Canceling a Job . . . . . . . . . . . . . . . . . . . . . . . . . . . . . . . . . . . . . . . . . . . . . . . . . . . . . . . 1-42
Using the Touch Panel Display . . . . . . . . . . . . . . . . . . . . . . . . . . . . . . . . . . . . . . . . . . . . . . . . . .1-42
Using the Stop Key. . . . . . . . . . . . . . . . . . . . . . . . . . . . . . . . . . . . . . . . . . . . . . . . . . . . . . . . . . .1-43
Using the System Monitor Screen . . . . . . . . . . . . . . . . . . . . . . . . . . . . . . . . . . . . . . . . . . . . . . .1-43
1
CHAPTER
1-1
Page 26
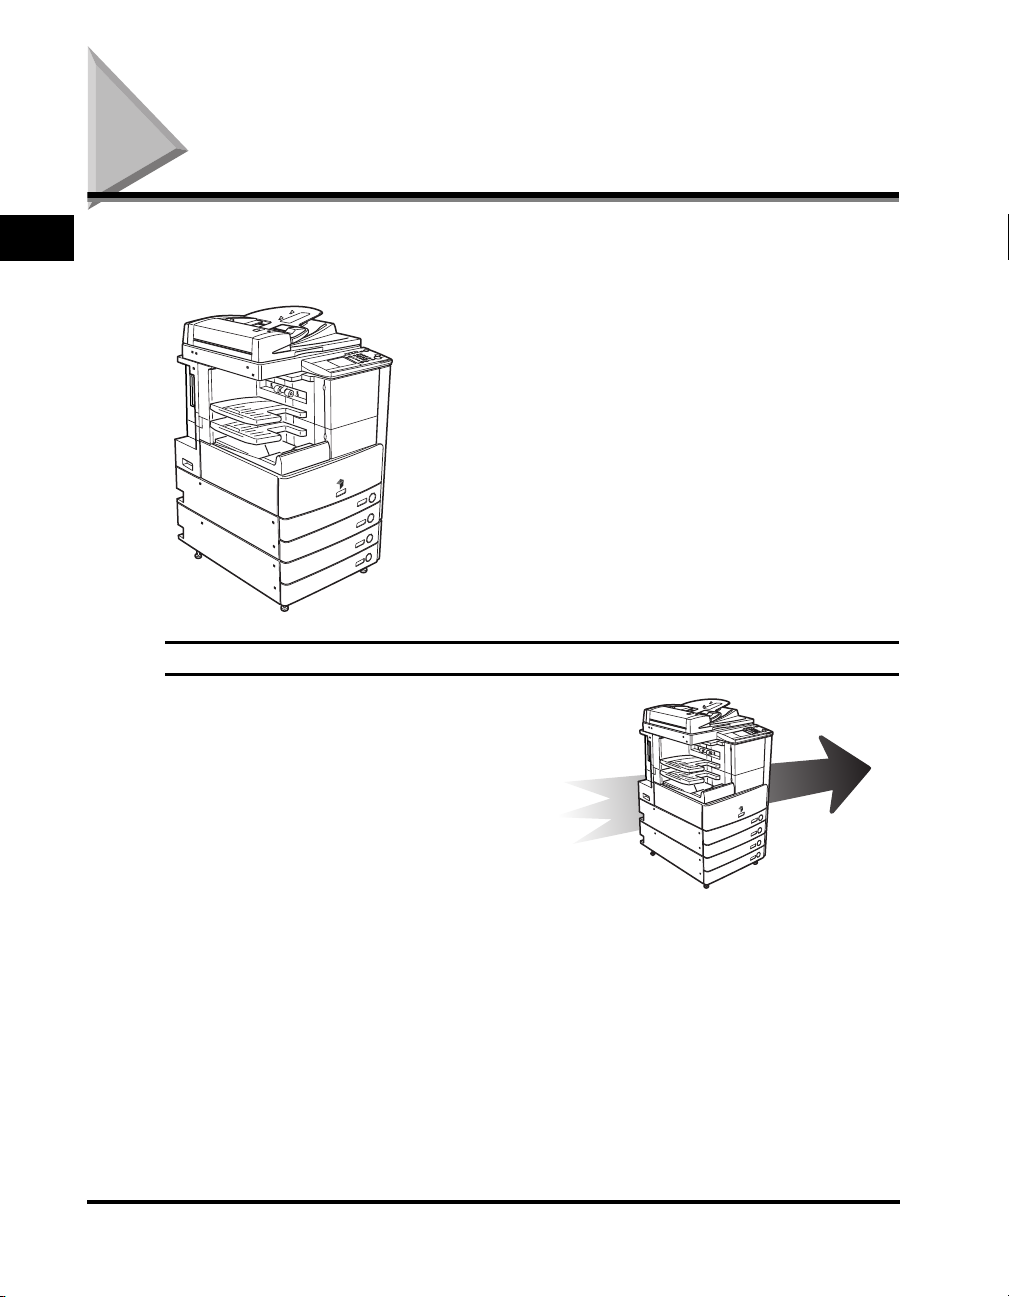
What This Machine Can Do
1
All the elements you will ever need in a digital
multitasking machine.
If the imageRUNNER 3530/2830/2230 is equipped with
the optional UFR II Printer Kit and Super G3 Fax Board,
you will be able to utilize the many Fax functions of the
machine.
Introduction to Fax Functions
Super G3 Fax Function
This machine's Super G3 fax function is
compatible with most Super G3 fax
machines used in office environments.
Compared to ordinary fax machines, Super
G3 enables high-speed fax transmissions,
which results in reduced transmission
costs.
Send
1-2
What This Machine Can Do
Page 27
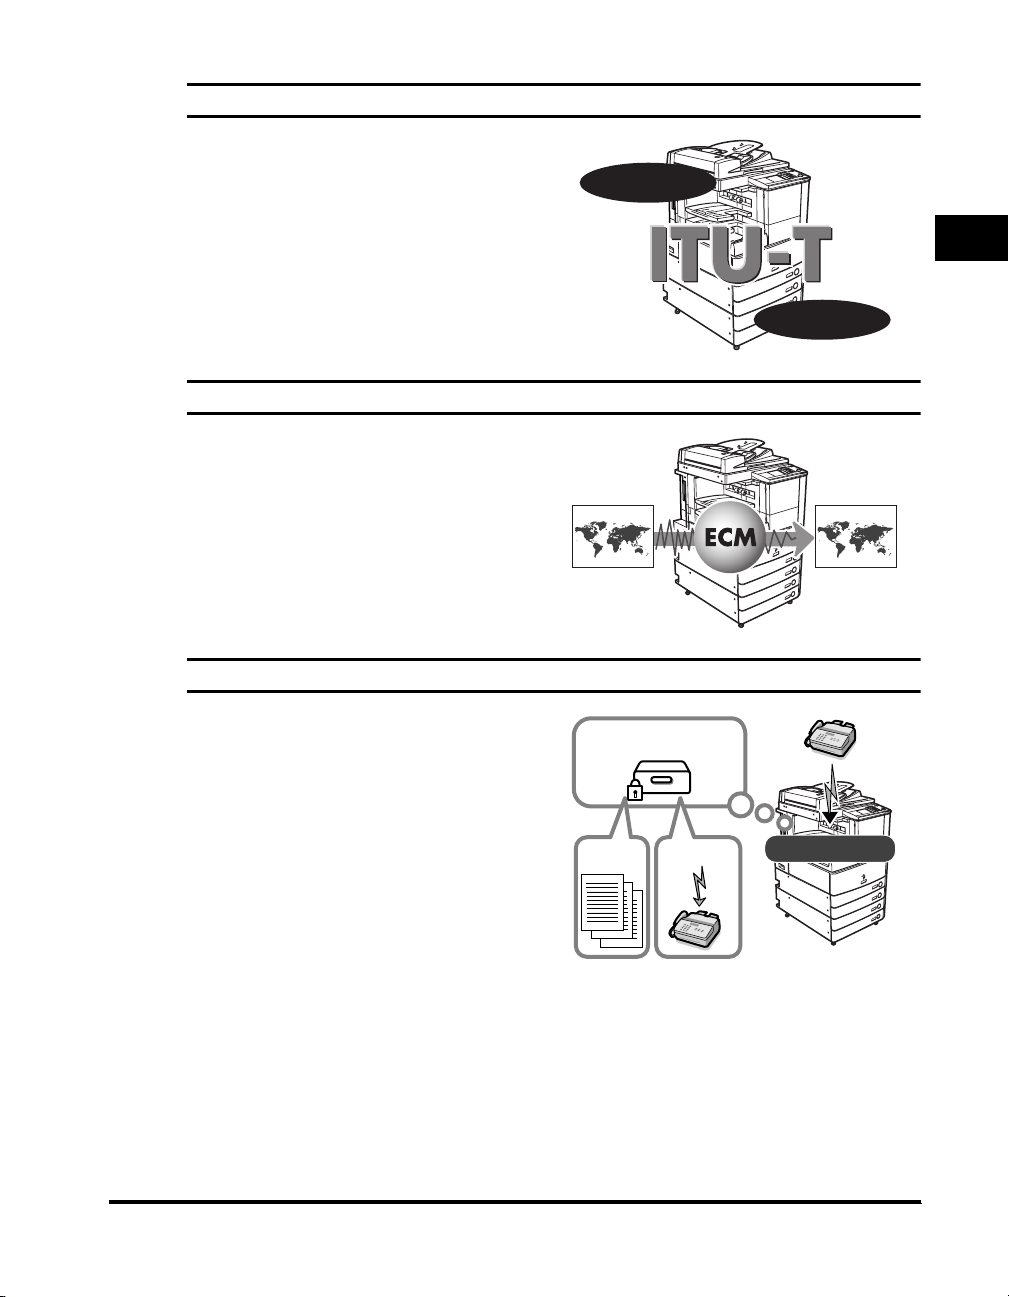
Increased Security with Subaddress Transmission
This machine's fax function is compatible
with ITU-T (International
Telecommunication Union Telecommunication Standardization Sector)
standard subaddress features. As long as
the remote party's fax machine supports
subaddress fax transmissions, you can
send or receive documents with increased
security by attaching a subaddress and
password to all of your fax transactions.
Subaddress
ECM Function for High Quality Images
This machine's fax function is compatible
with ECM (Error Correction Mode). ECM
corrects errors and distorted or poor quality
fax transmissions that arise from line noise.
It also enables you to send or receive
high-quality faxes even if the condition of
your telephone line is not ideal.
Receiving Faxes in Memory
1
Password
Introduction to Fax Functions
Received fax documents can be stored in a
Memory Box instead of being printed. You
can check the sender information and the
number of pages that each document
contains before printing or forwarding it to
another destination. You can also specify
the time when received documents are
stored in memory by specifying the timer
setting.
Print
Memory
Box
Send
What This Machine Can Do
Fax Reception
1-3
Page 28
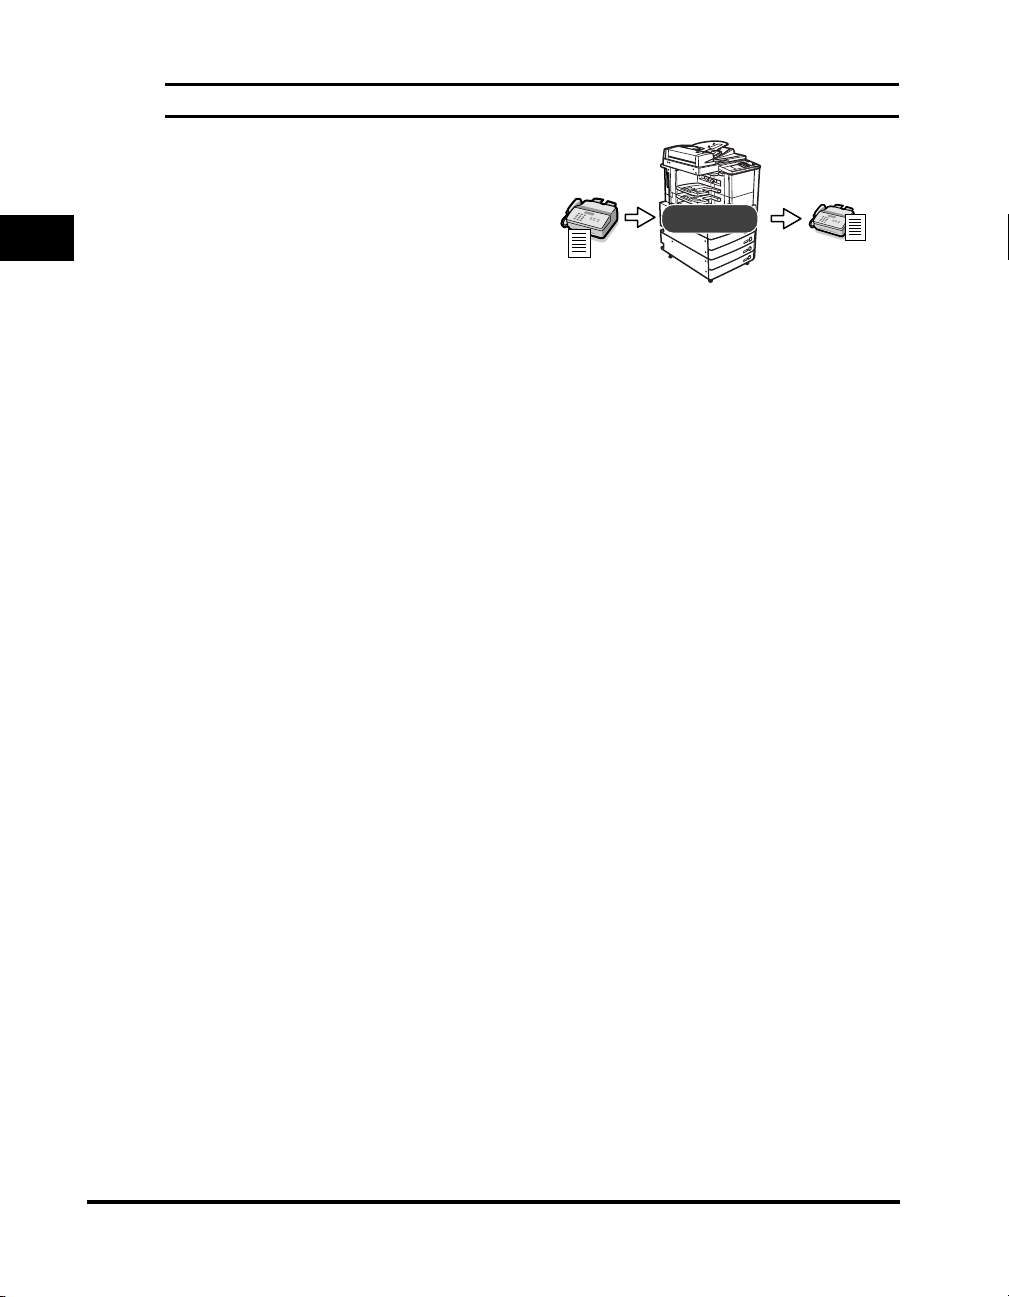
Automatic Forwarding
The machine can be set to automatically
forward received fax documents that match
the specified forwarding conditions to any
destination. Automatic forwarding can also
1
Introduction to Fax Functions
be set to activate at a specified time.
Forward
1-4
What This Machine Can Do
Page 29
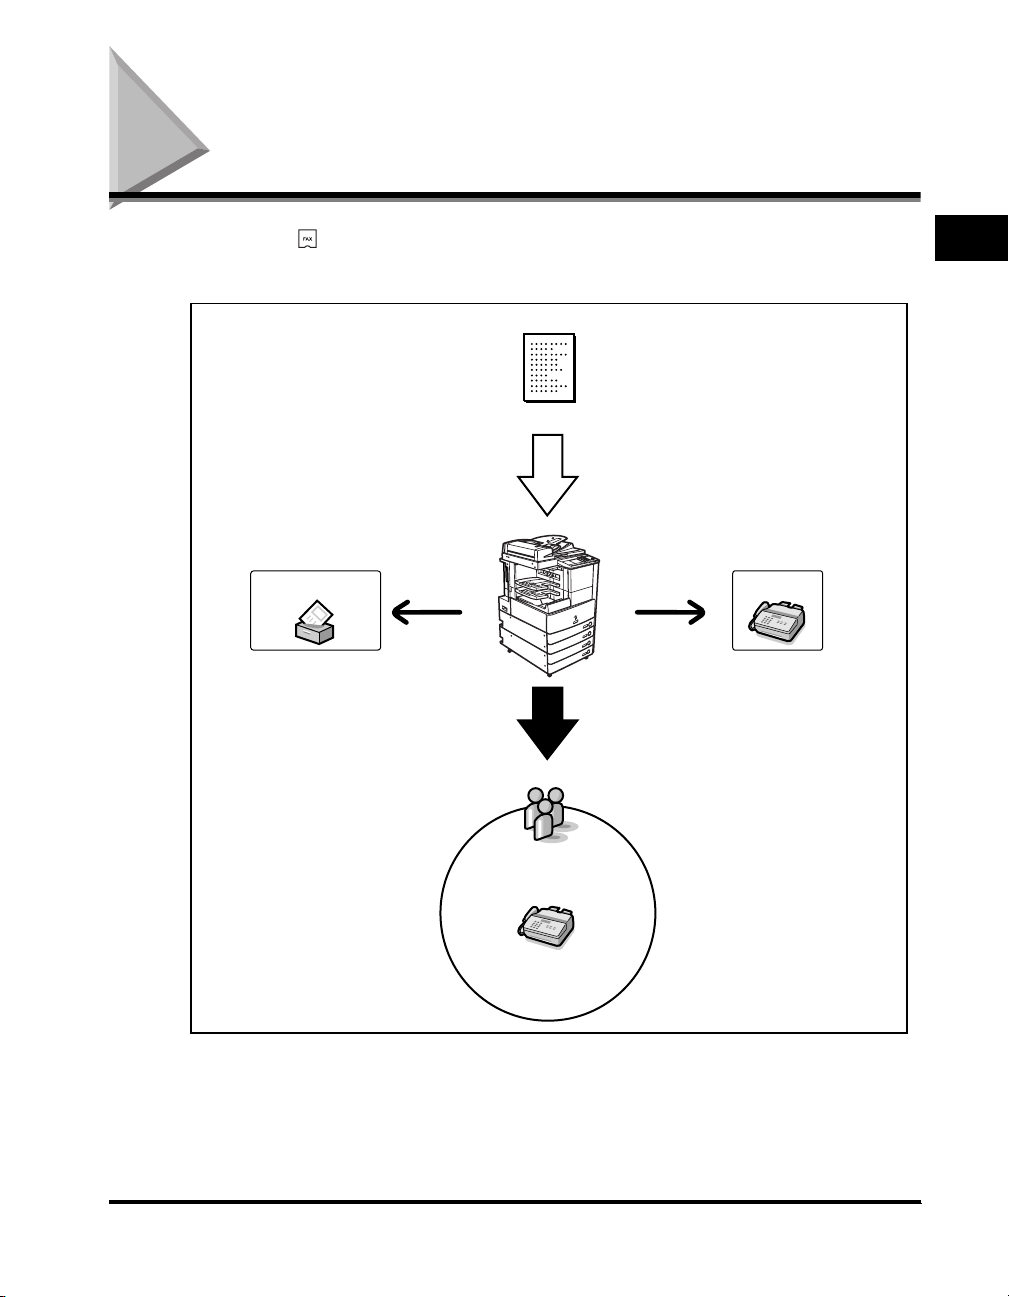
Overview of the imageRUNNER 3530/2830/2230
If you press (FAX), the Fax Basic Features screen appears. The Fax function
enables you to scan documents and send them to specified destinations via fax.
Original
Scan
FaxMemory Box
Group
1
Introduction to Fax Functions
Fax
Overview of the imageRUNNER 3530/2830/2230
1-5
Page 30
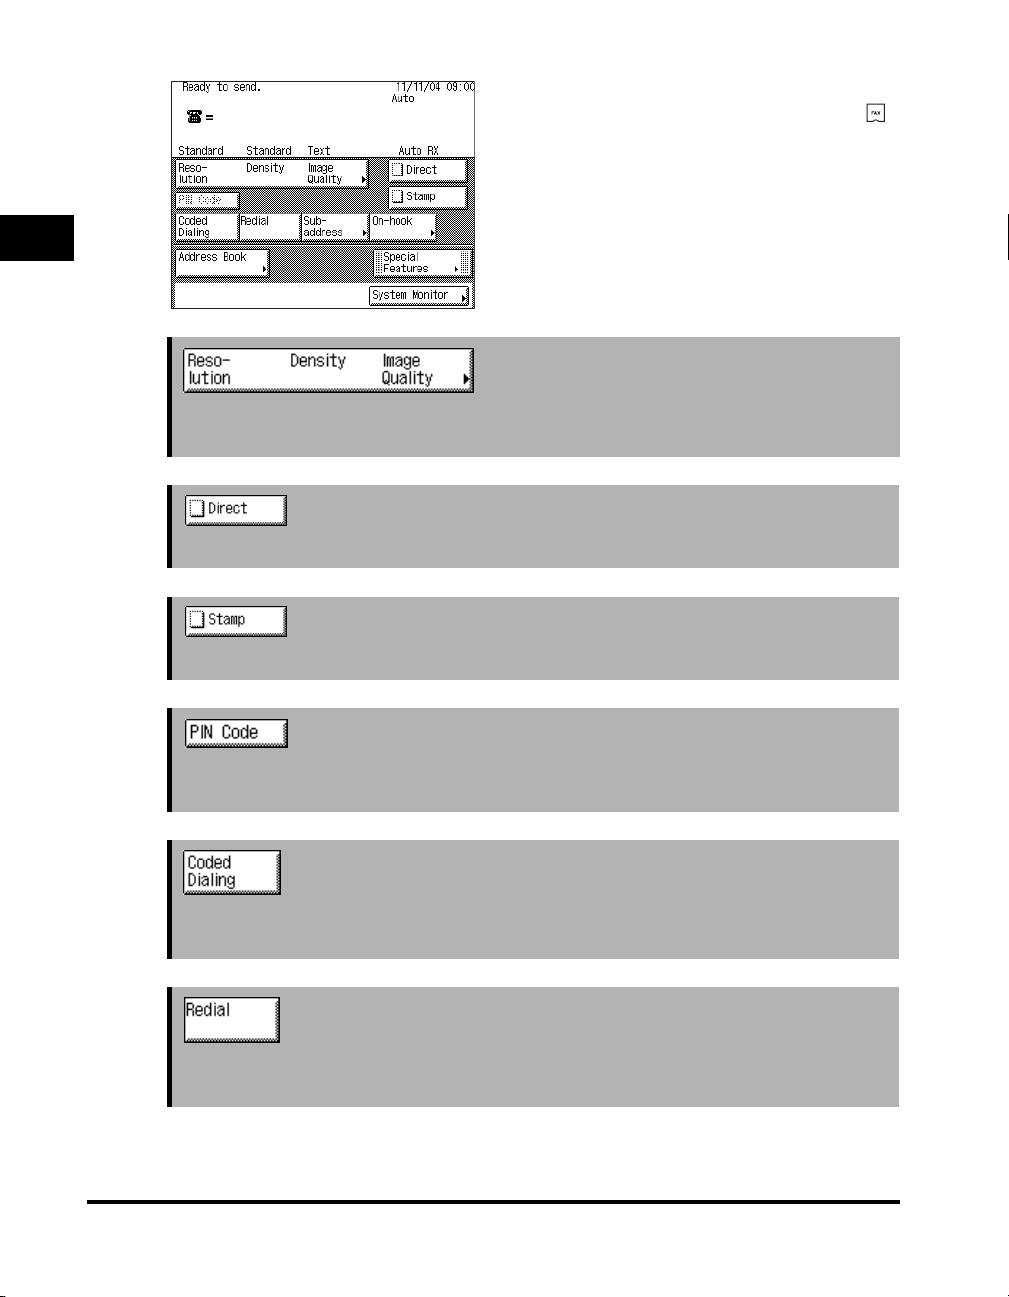
Fax Basic Features Screen
The screen on the left, which appears when
(FAX) is selected, is called the Fax Basic
Features screen.
1
➞ See p. 2-2
Press to set the resolution, density, and image quality of your document. (See
"Resolution, Density, and Image Quality," on p. 2-2.)
Introduction to Fax Functions
Press to send faxes directly, to the recipient. (See "Direct Sending," on p. 2-5.)
Press to stamp sent or scanned originals. (See "Stamping Originals," on p. 2-14.)
Press to send faxes using a PIN (Personal Identification Number) code. (See "Using a
PIN Code," on p. 3-35.)
Press [Coded Dialing], followed by a three digit code, to specify a destination that is
stored in memory. (See "Coded Speed Dialing," on p. 2-24.)
Press to redial the last number that was dialed with the numeric keys. (See "Redialing,"
on p. 2-18.)
➞ See p. 2-5
➞ See p. 2-14
➞ See p. 3-35
➞ See p. 2-24
➞ See p. 2-18
1-6
Overview of the imageRUNNER 3530/2830/2230
Page 31
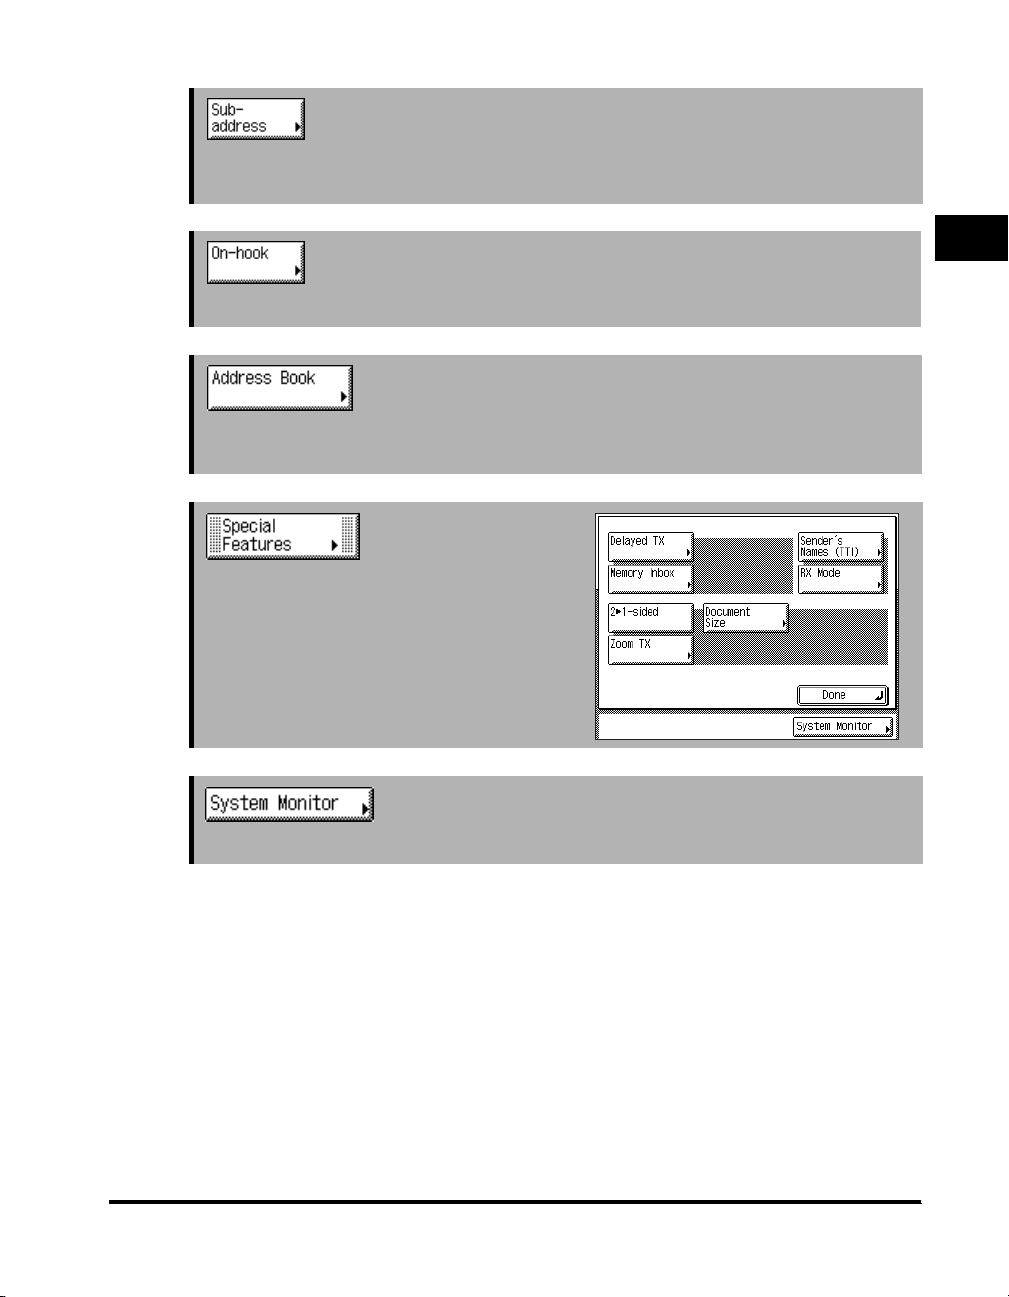
➞ See p. 3-33
Press to send an original or receive a document with an ITU-T standard subaddress and
password. (See "Sending with a Subaddress," on p. 3-33.)
➞ See p. 3-41
Press to dial fax information services. (See "Fax Information Services," on p. 3-41.)
➞ See p. 2-19
Press to select a destination from the Address Book, or to search for a number registered
in the Address Book. (See "Address Book," on p. 2-19.)
➞ See Chapter 3
Press to select and use the Special Features
modes.
➞ See Chapter 4
1
Introduction to Fax Functions
Press to check the status or details of a send or receive job, or to cancel a job.
Overview of the imageRUNNER 3530/2830/2230
1-7
Page 32
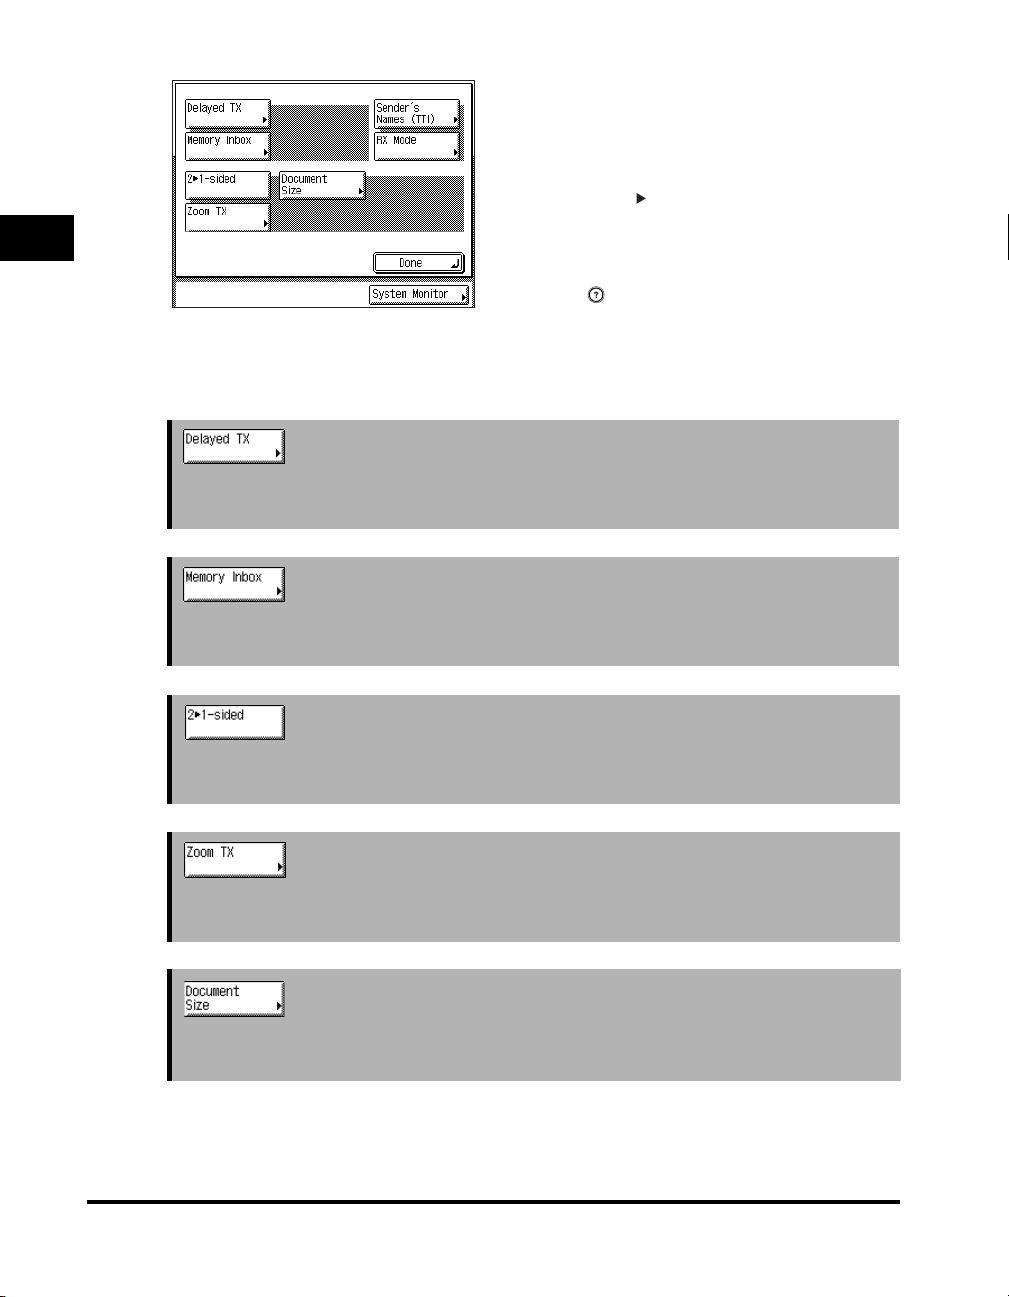
Special Features Screen
When you press [Special Features] on the Fax
Basic Features screen, the Special Features
screen appears, and displays special modes
available for facsimile processing. Keys which
have an arrow ( ) indicate that more modes can
be set when you press that key.
1
➞ See p. 3-2
To close the Special Features screen and return
to the Fax Basic Features screen, press [Done].
Pressing (Help) on the control panel after
selecting a Special Features mode, brings up a
help screen containing guidance information.
This is useful when you want to know more
about the mode.
Introduction to Fax Functions
Press to specify a time to automatically send your documents. (See "Delaying a Send
Job," on p. 3-2.)
➞ See p. 3-8
Press to manage sent and received documents using any kind of memory box:
Confidential, Relay, or Batch Sending. (See "Using a Memory Box," on p. 3-8.)
➞ See p. 3-19
Press to scan and fax two-sided documents. (See "Faxing Two-Sided Originals," on p.
3-19.)
➞ See p. 3-28
Press to scan originals at a different scan (zoom) ratio. (See "Changing the Zoom Ratio,"
on p. 3-28.)
➞ See p. 3-21
Press to select the size of the original you are sending. (See "Document Size," on p.
3-21.)
1-8
Overview of the imageRUNNER 3530/2830/2230
Page 33
➞ See p. 3-15
Press to select a sender's name, which will appear at the top of every document you
send, instead of the unit's name. (See "Setting the Sender's Name as the Terminal ID," on
p. 3-15.)
➞ See p. 3-17
Press to set the Receiving mode to 'Memory Receive' or 'Forward'. (See "Changing the
Reception Mode," on p. 3-17.)
1
Introduction to Fax Functions
Overview of the imageRUNNER 3530/2830/2230
1-9
Page 34
Things You Must Do Before Using This Machine
1
This section describes the important setting registrations and procedures that must
be done before the machine is used for sending operations.
According to recent amendments to the FCC (Federal Communications
Commission) rules governing the use of facsimile equipment in the United States,
the following sender information must be printed on every facsimile transmission:
• Your fax number
• Your personal name or company name
• Time and date of transmission
Introduction to Fax Functions
IMPORTANT
•
If you attempt to use the machine without registering the necessary information correctly,
the machine may not function properly.
•
Use phone lines with modular jacks measuring 9.7 feet (3 meters) or less to ensure
optimum connection and sending speeds.
■ Setting the Telephone Line Type
To set the type of telephone line connected to the machine with the optional Super G3
FAX Board installed, check whether it is a rotary dial (rotary pulse) or a touch-tone type,
and make the correct setting. (See "Selecting the Type of Telephone Line," on p. 1-12.)
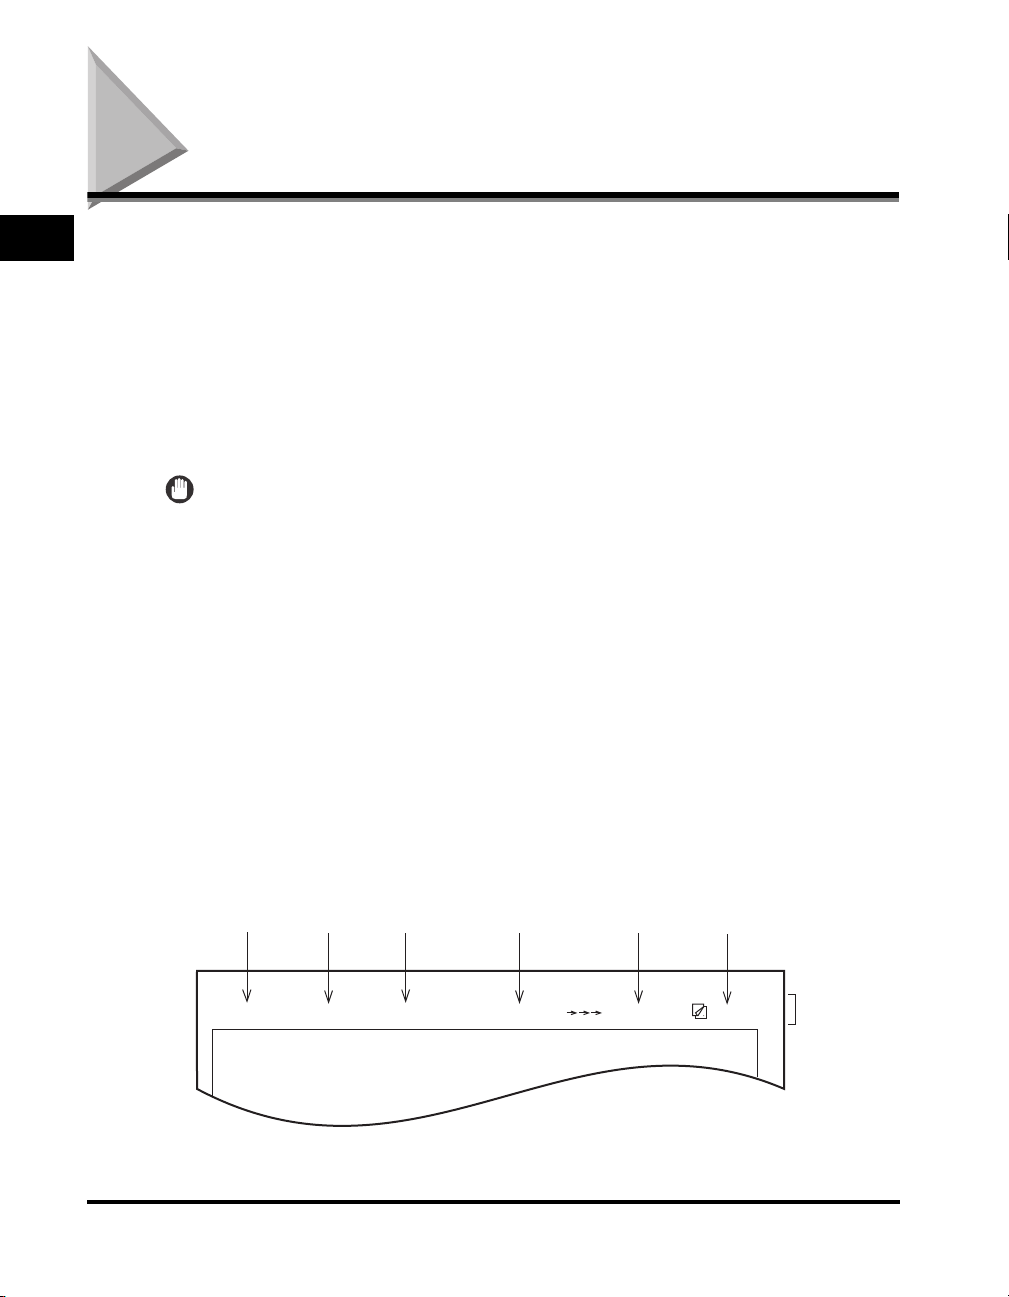
■ Registering the Sending Record
The sending record is printed at the top of the every document you send to the recipient.
The registered information is printed, as shown below. Depending upon the model of the
machine at the receiving side, this information may appear on the display while
communication is taking place.
1-10
Date Time
05/14/2004 FRI 15:00 Atlanta office 001/001
Things You Must Do Before Using This Machine
Fax Number
FAX (404)XXX-XXXX
Sender's
Name (TTI)
CANON SALES
Destination
Name
Page Number
Sender Information
Page 35

• Date and Time
- The date and time of the transmission are recorded.
• Fax Number
- Your machine's fax number is recorded.
• Sender's Name (TTI (Transmit Terminal Identification))
- The name registered as the sender's name is recorded.
• Destination Name
1
- If you send an original using Coded Speed Dialing or by selecting a destination from
the Address Book, the stored destination's name appears on the sending record. (See
"Storing Destinations," on p. 5-19.)
• Page Number
- The current page number out of the total number of pages of the original is recorded.
NOTE
•
You can set the machine so that the sending record is not printed. However, for users in
the United States, this information must be printed at the top of every fax document you
send. Therefore, the TX Terminal ID setting must always be set to 'On'. (See "Printing the
TX Terminal ID," on p. 5-7.)
•
If the machine is set so that the sending record is printed at the top of the recording
Introduction to Fax Functions
paper, and not all of the items are registered, only the required registered items and the
total number of original pages are printed. However, when using Direct Sending, the total
number of original pages are not printed.
•
If you do not want to print the destination name on the recipient's paper, set Display
Destination Name to 'Off' in TX Terminal ID in User Settings in Custom Fax Settings
(from the Additional Functions screen). (See "Printing the TX Terminal ID," on p. 5-7.)
Setting the Display Language
If you decide to switch the display language, set Language Switch in Common
Settings (from the Additional Functions screen) to 'On' before entering characters.
If Language Switch is set to 'Off', and then you set it to 'On' after entering
characters, the characters may not be displayed correctly. In this case, either
re-enter the characters after setting Language Switch to 'On', or enter characters
with Language Switch set to 'Off'.
Things You Must Do Before Using This Machine
1-11
Page 36
Selecting the Type of Telephone Line
Set the type of telephone line that is connected to the machine.
If you are not sure what type of telephone line you have, check with your local
telephone company. To operate the Fax function, you must know if the machine is
1
Introduction to Fax Functions
connected to a touch-tone or rotary pulse telephone line. The machine can be set
to operate with either type of telephone line.
Be sure to check the type of telephone line that you are using, and make the correct
setting. If this setting is incorrect, you will not be able to communicate with other
machines.
Follow the procedure below to switch the fax setup between tone and pulse dialing.
NOTE
The default setting is 'Tone'.
1
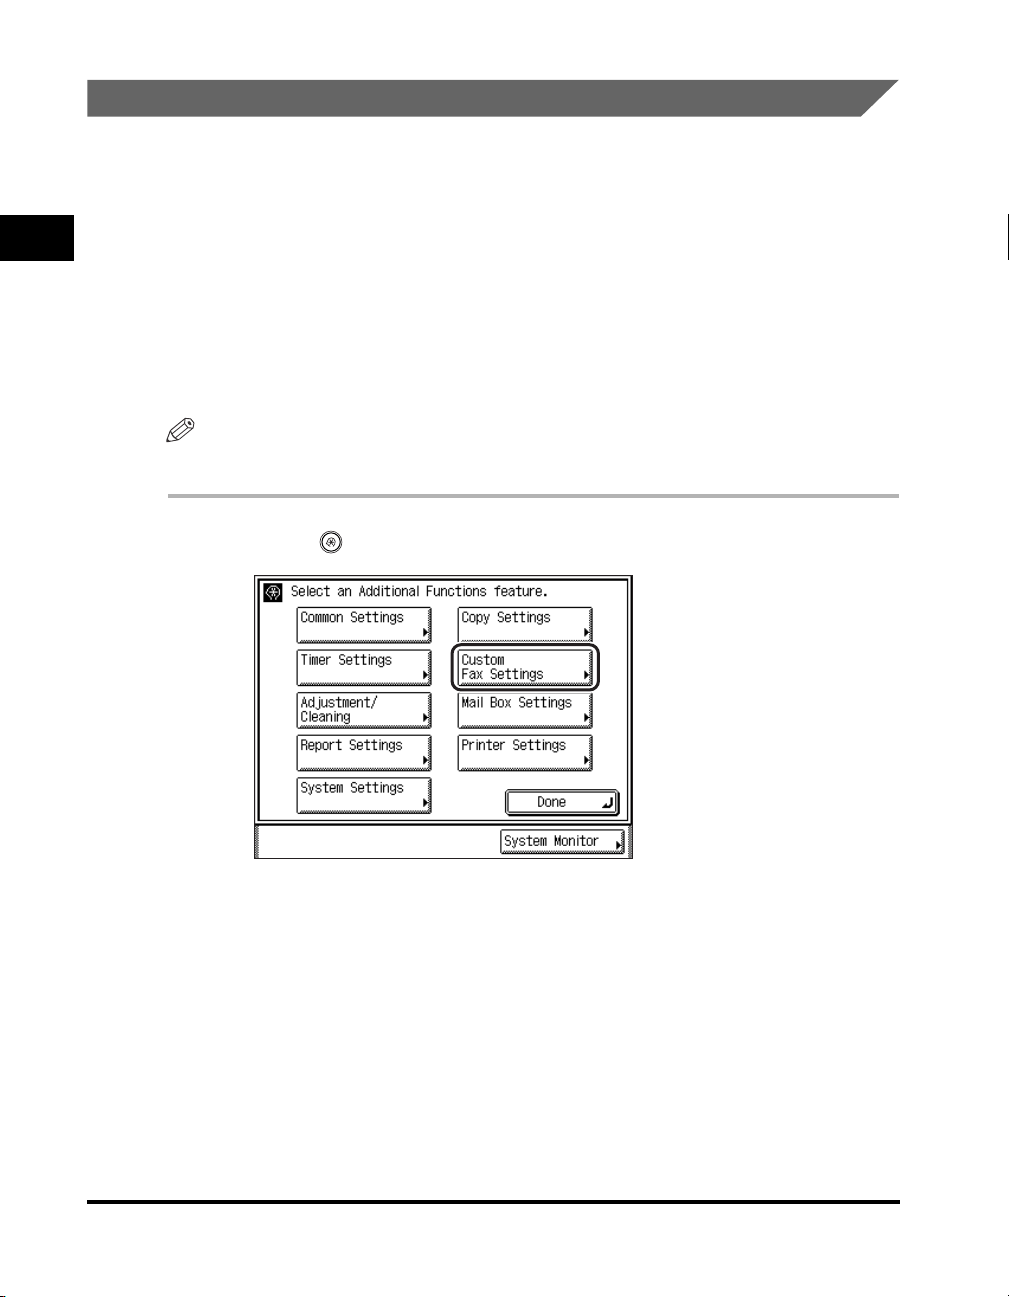
Press (Additional Functions) ➞ [Custom Fax Settings].
1-12
Things You Must Do Before Using This Machine
Page 37
2
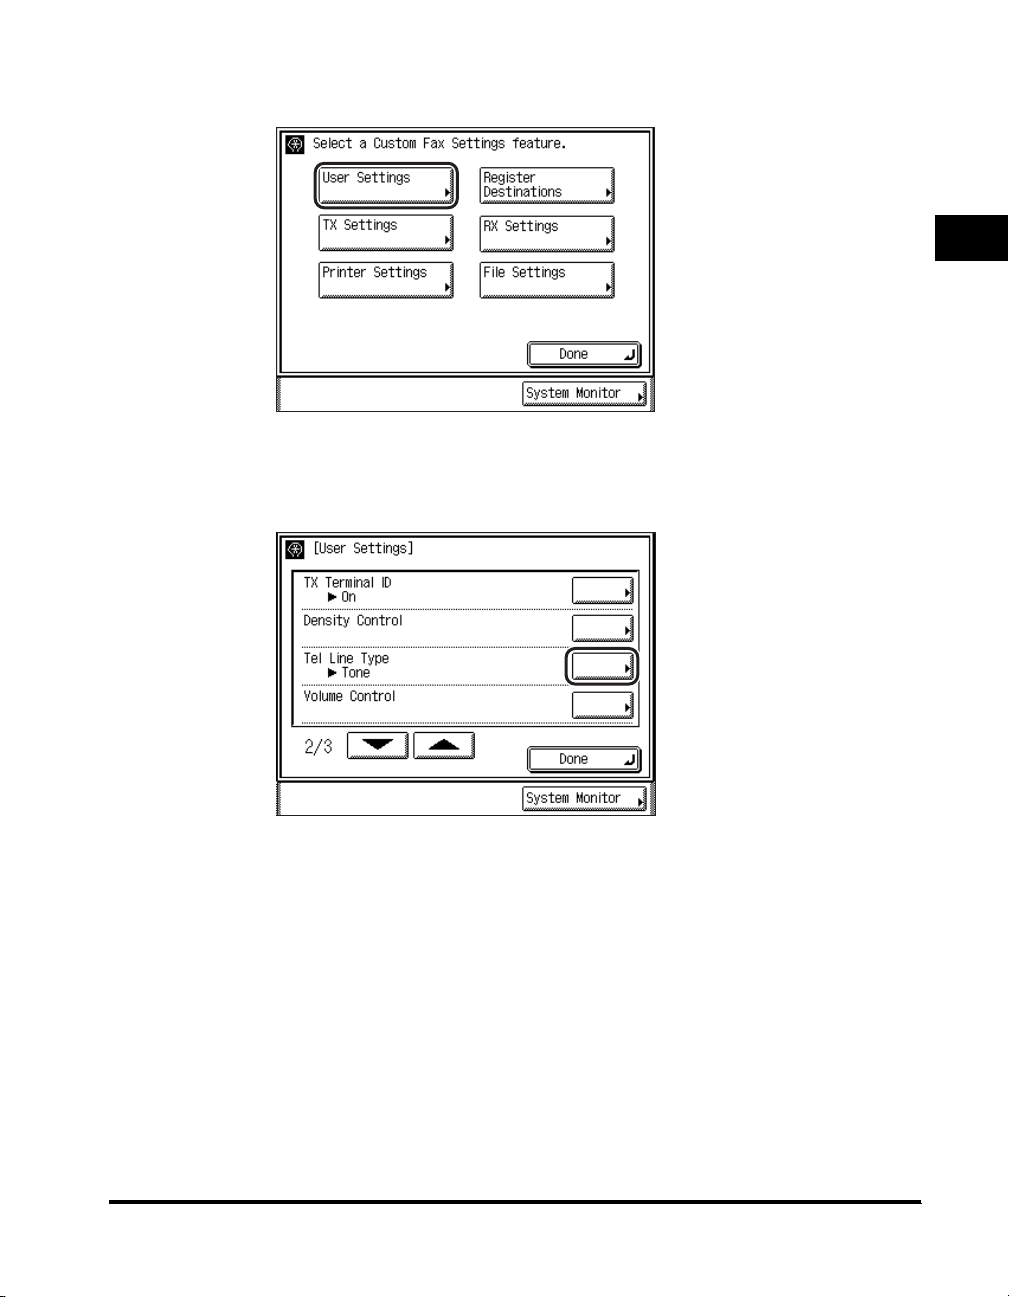
Press [User Settings].
3
Press [▼] or [▲] until [Tel Line Type] appears ➞ press [Tel Line
Type].
1
Introduction to Fax Functions
Things You Must Do Before Using This Machine
1-13
Page 38
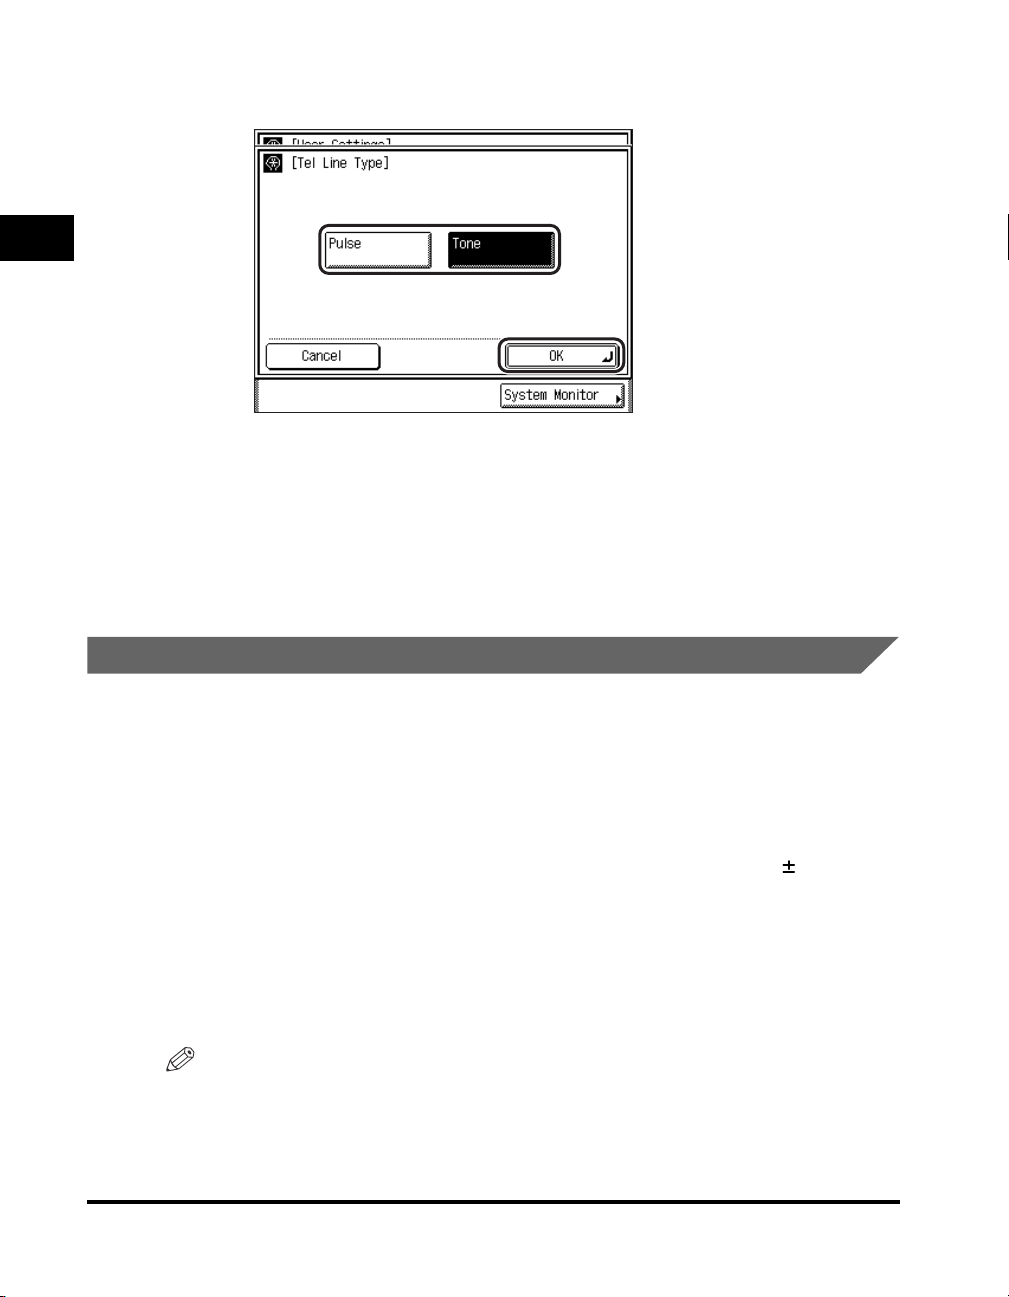
4
Select the type of telephone line ➞ press [OK].
1
If you do not know the telephone line type, call your local telephone service
provider for details.
Introduction to Fax Functions
The selected mode is set.
5
Press [Done] repeatedly until the Fax Basic Features screen
appears.
Setting the Current Date and Time
1-14
You can set the current date and time. The current date and time settings are used
as standard timer settings for functions that require them.
• GMT: The time at the Greenwich Observatory in England is
called GMT (Greenwich Mean Time).
• Time Zone: The standard time zones of the world are expressed
globally in terms of the difference in hours ( up to 12
hours) from GMT (0 hours). A time zone is a region
throughout which this time difference is the same.
• Daylight Saving Time: In some countries, time is advanced throughout the
summer season. The period in which this is applied is
called "Daylight Saving Time."
NOTE
You can also specify to automatically synchronize the date and time with a server on the
network from the Additional Functions screen. (See Chapter 3, "Using a TCP/IP
Network," in the
Things You Must Do Before Using This Machine
Network Guide
.)
Page 39
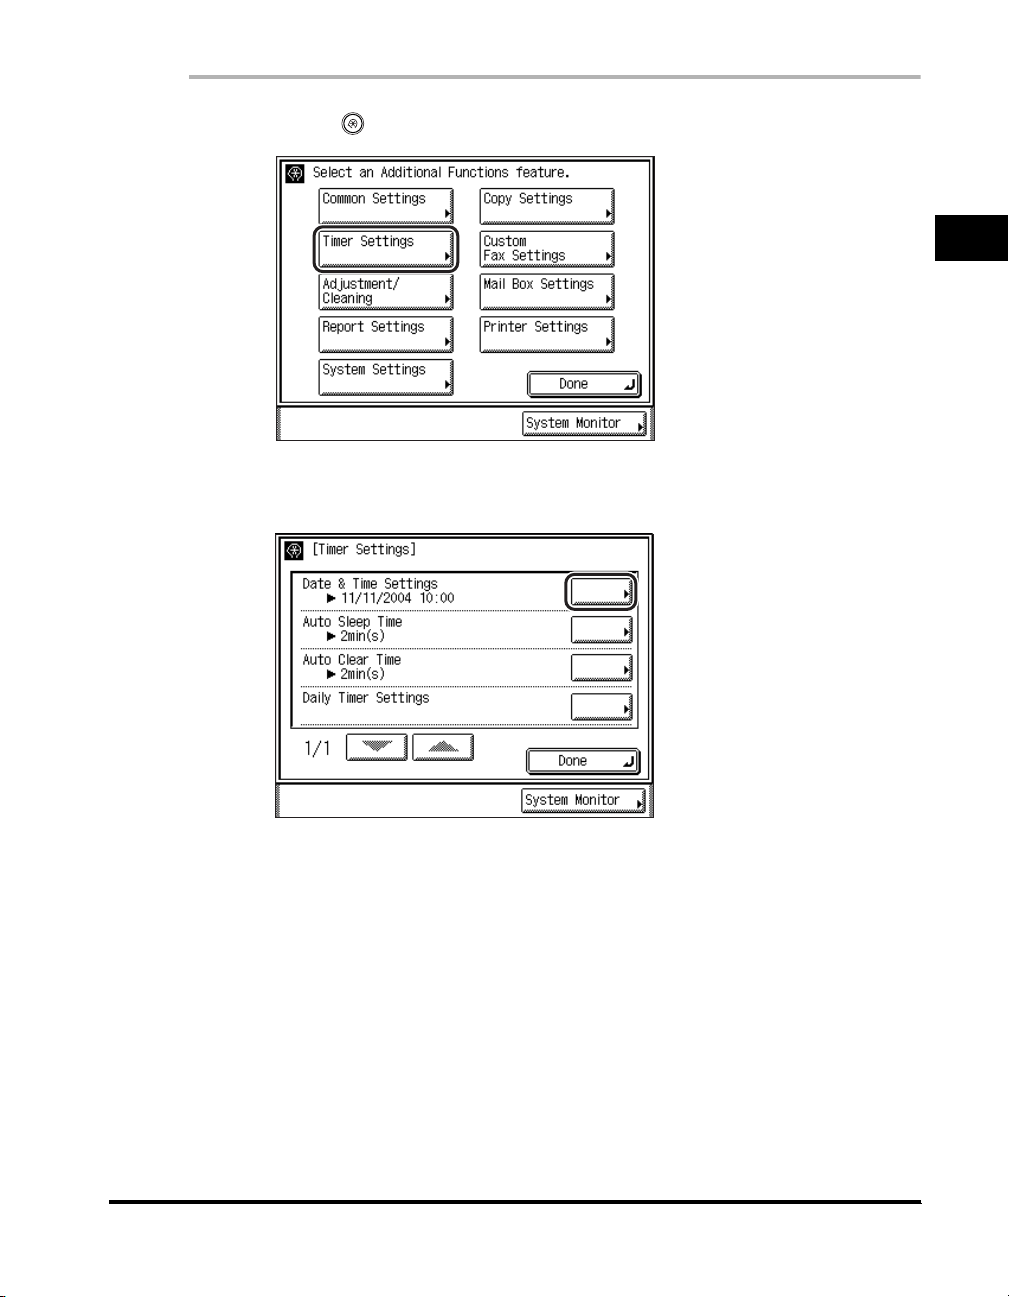
1
Press (Additional Functions) ➞ [Timer Settings].
1
2
Press [Date & Time Settings].
Introduction to Fax Functions
Things You Must Do Before Using This Machine
1-15
Page 40
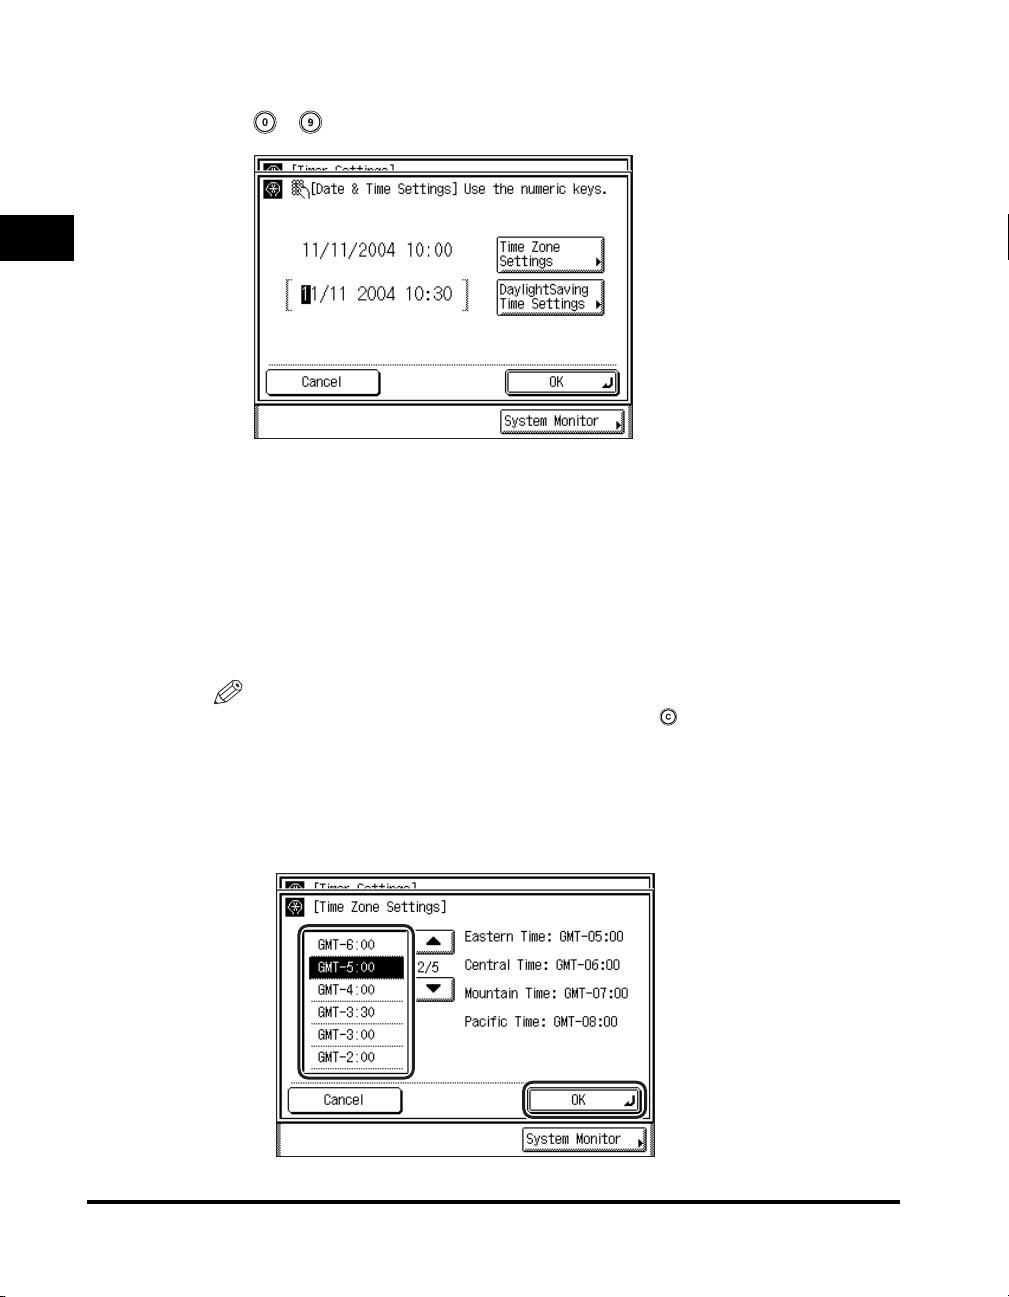
3
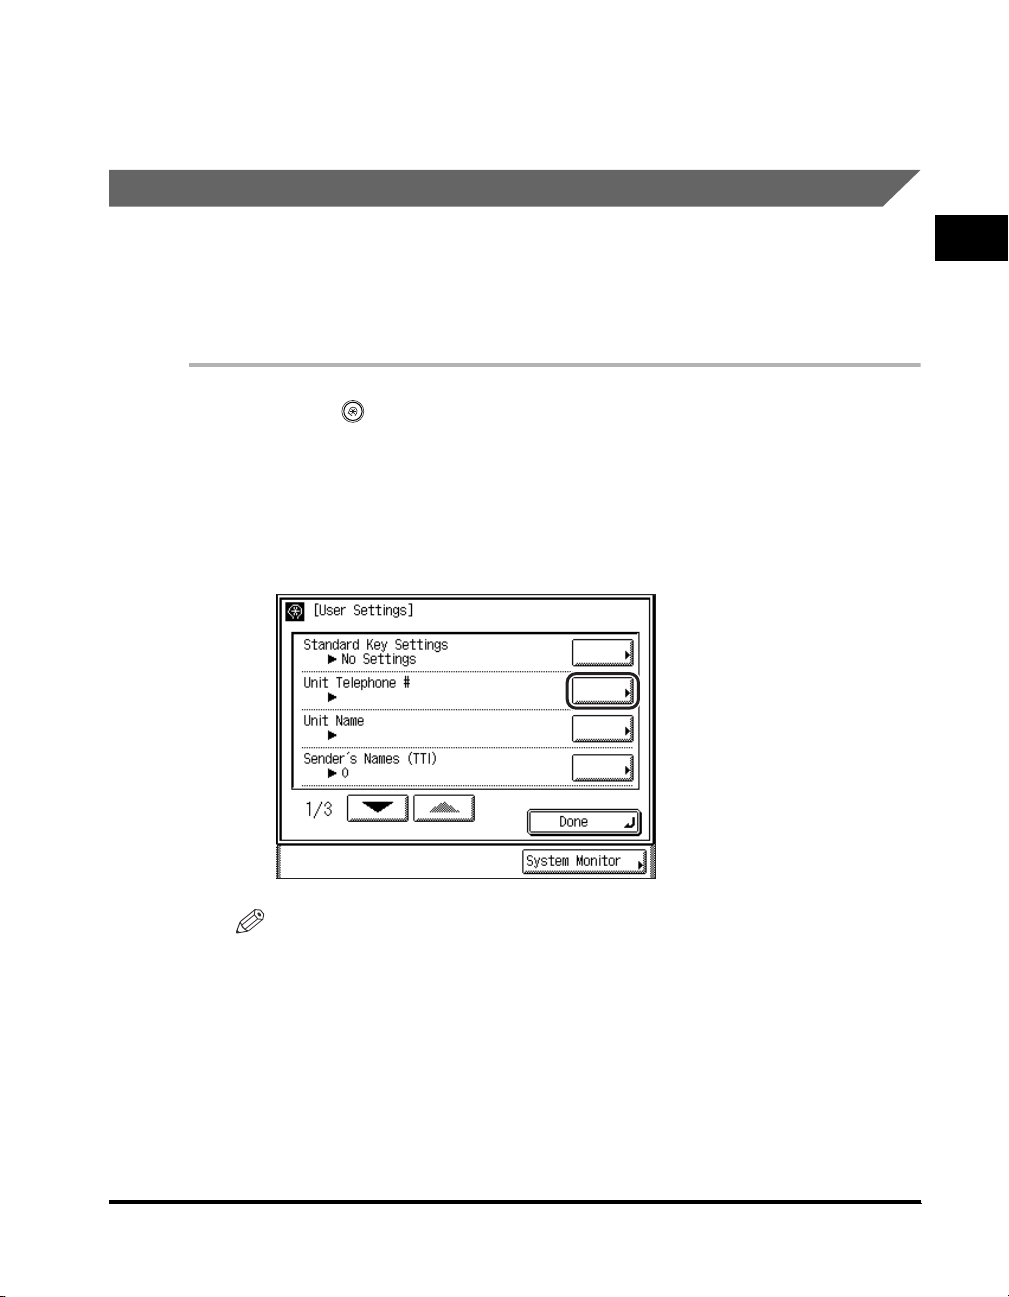
Enter the current date (month, day, year) and time using
- (numeric keys).
1
Enter the month and the day using four digits (including zeros).
Introduction to Fax Functions
Enter all four digits of the year, and the time in 24-hour notation, as four digits
(including zeros) without a space.
Examples: May 6 ➞ 0506
7:05 a.m. ➞ 0705
11:18 p.m. ➞ 2318
NOTE
If you make a mistake when entering values, press (Clear) ➞ enter the values
again, starting with the month.
1-16
● If you are setting the Time Zone:
Press [Time Zone Settings] ➞ select the time zone where the machine is
❑
located ➞ press [OK].
Things You Must Do Before Using This Machine
Page 41
NOTE
•
The default setting is 'GMT-5:00'.
Eastern Time (US/Canada): GMT-5:00
Central Time (US/Canada): GMT-6:00
Mountain Time (US/Canada): GMT-7:00
Pacific Time (US/Canada): GMT-8:00
•
If the desired time zone is not displayed, press [▼] or [▲] to scroll through the list.
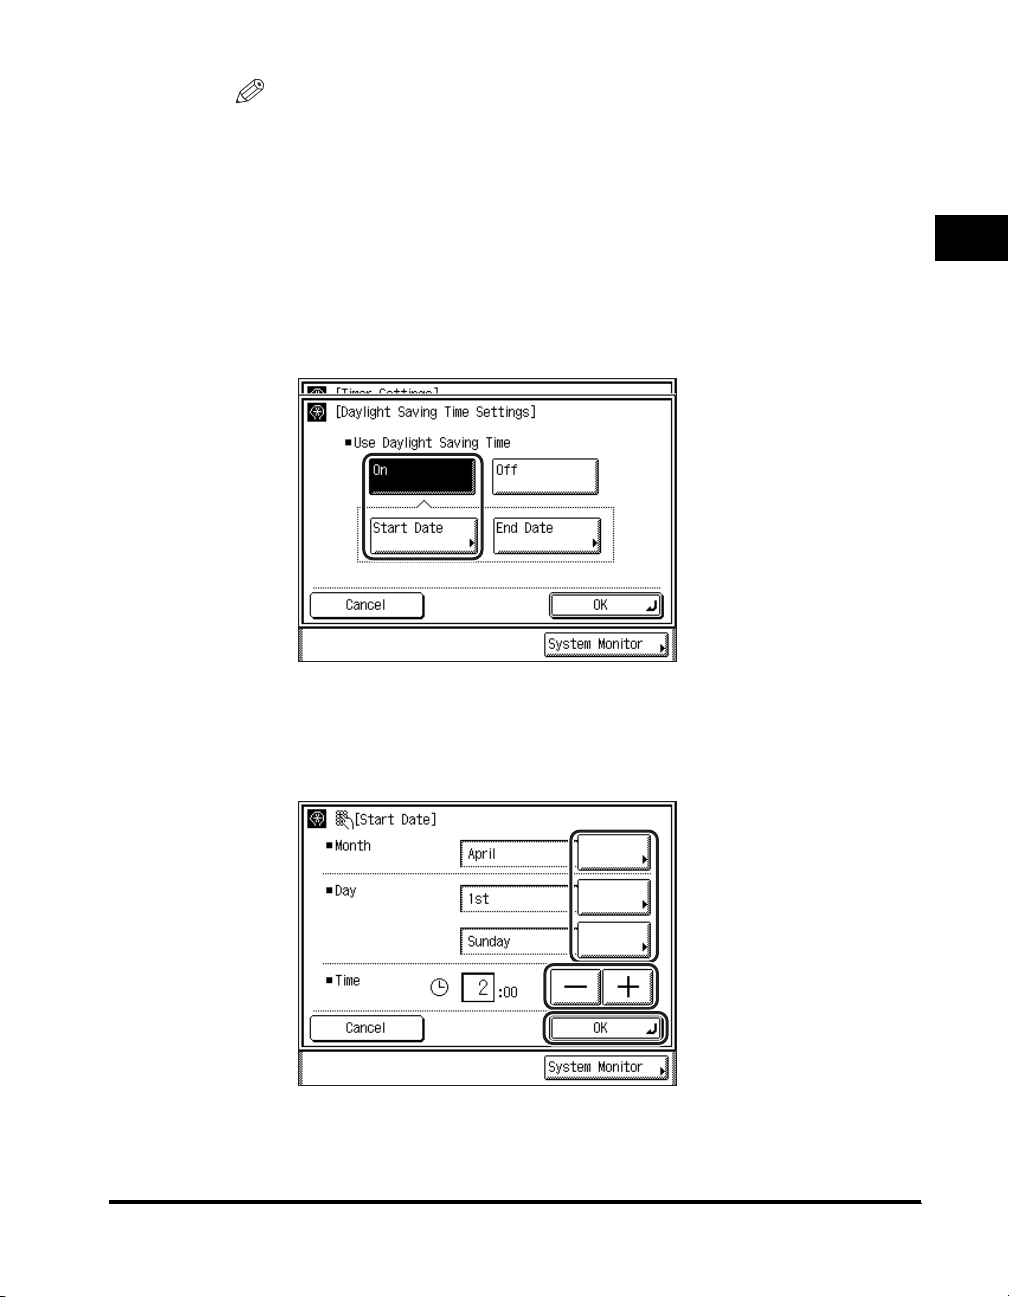
● If you are setting Daylight Saving Time:
Press [DaylightSaving Time Settings] ➞ [On] ➞ [Start Date].
❑
1
Introduction to Fax Functions
❑ Select the month and day from the Month and Day drop-down lists,
respectively.
❑ Press [-] or [+] to enter the time of day you want Daylight Saving Time to take
effect ➞ press [OK].
Things You Must Do Before Using This Machine
1-17
Page 42
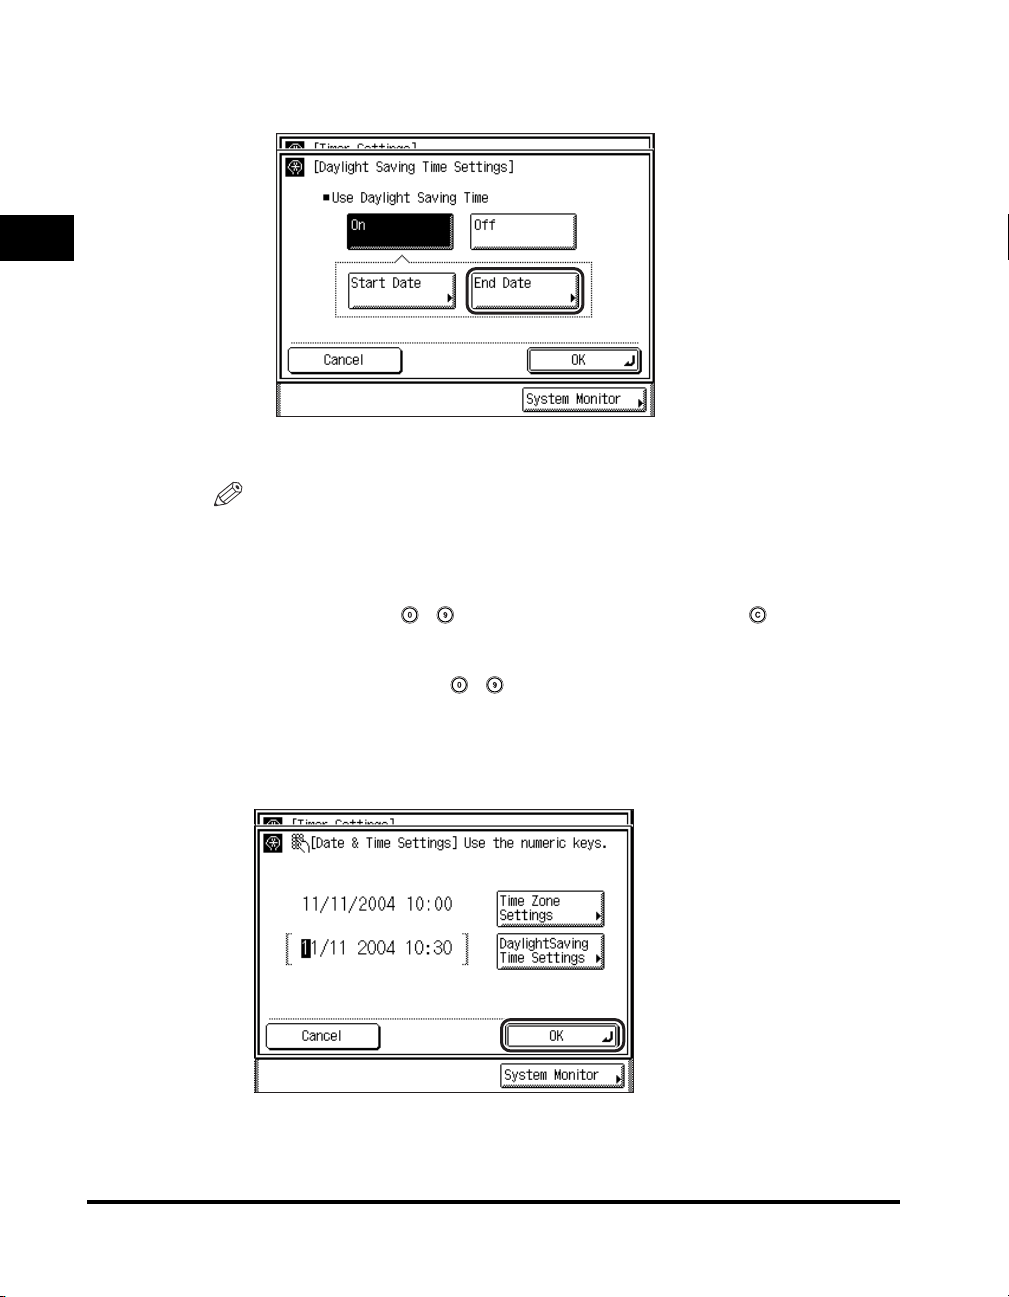
❑ Press [End Date] ➞ select the month, day, and time at which Daylight Saving
Time ends ➞ press [OK].
1
❑ Press [OK].
Introduction to Fax Functions
NOTE
•
If you set Daylight Saving Time, the machine automatically sets the standard time
of the machine one hour forward at the specified date and time.
•
The default setting is 'On'. (Between 2:00 a.m. on the first Sunday of April and 2:00
a.m. on the last Sunday of October.)
•
You can also use - (numeric keys) to enter the time, and (Clear) to clear
your entry.
•
You can change the value entered for <Time> by pressing [-] or [+], even if you
entered the value using - (numeric keys).
•
The time can be set in one hour increments, from 0 to 23 hours.
1-18
4
Press [OK].
The selected mode is set.
Things You Must Do Before Using This Machine
Page 43
5
Press [Done] repeatedly until the Fax Basic Features screen
appears.
Registering Your Machine's Fax Number
You must store your machine's fax number. This number is printed on the top of
every document you send to the recipient.
Your machine's telephone number may also be displayed on the touch panel
display of the recipient's machine, depending on the model of their machine.
1
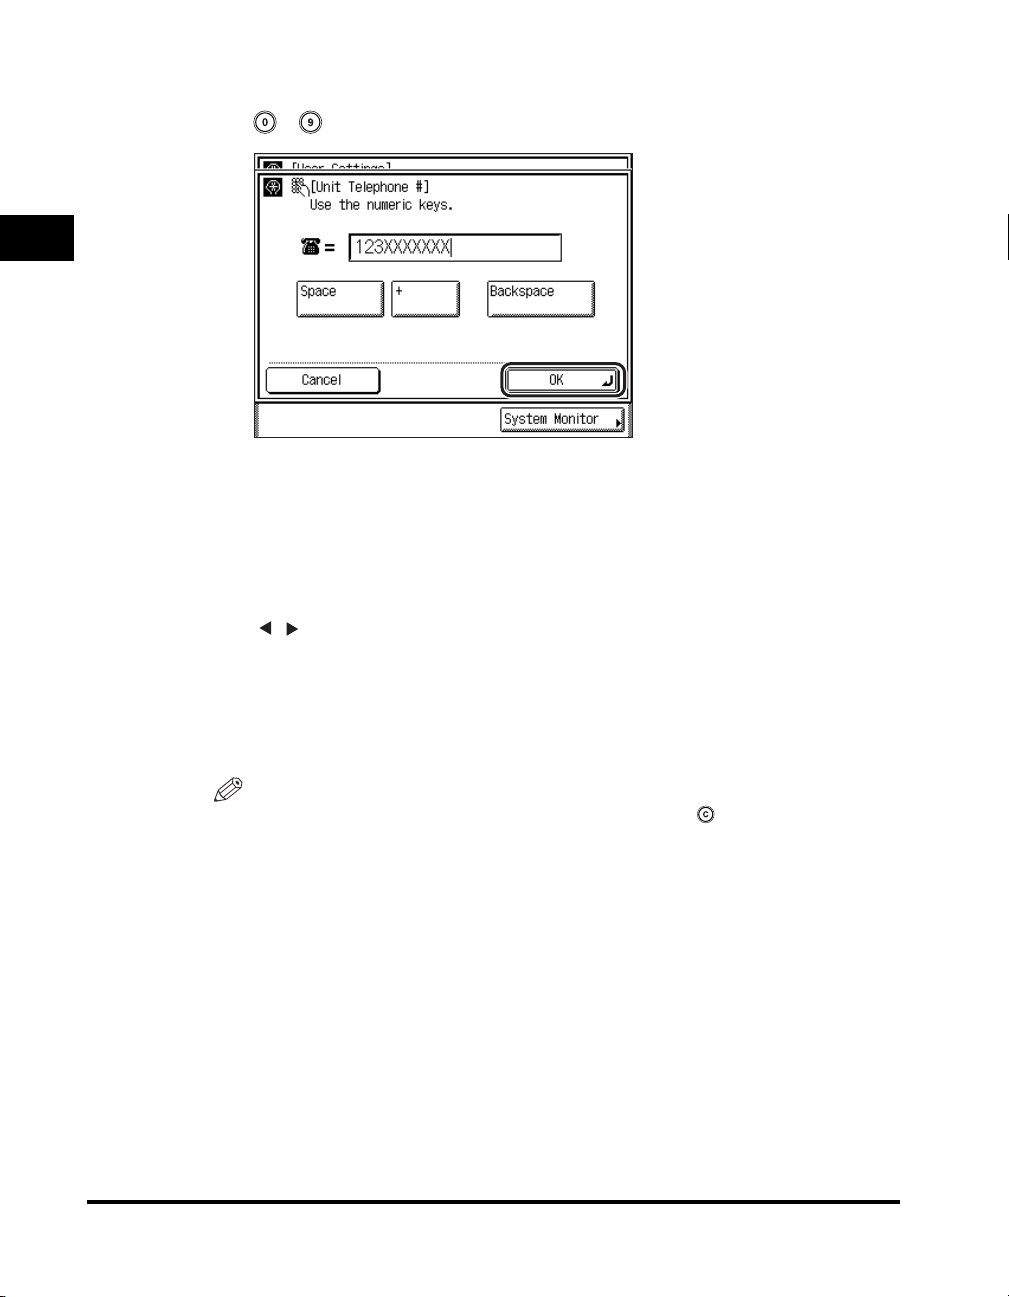
Press (Additional Functions) ➞ [Custom Fax Settings] ➞
[User Settings].
If necessary, see the screen shots in steps 1 and 2 of "Selecting the Type of
Telephone Line," on p. 1-12.
2
Press [Unit Telephone #].
1
Introduction to Fax Functions
NOTE
If the desired setting is not displayed, press [▼] or [▲] to scroll to the desired
setting.
Things You Must Do Before Using This Machine
1-19
Page 44
3
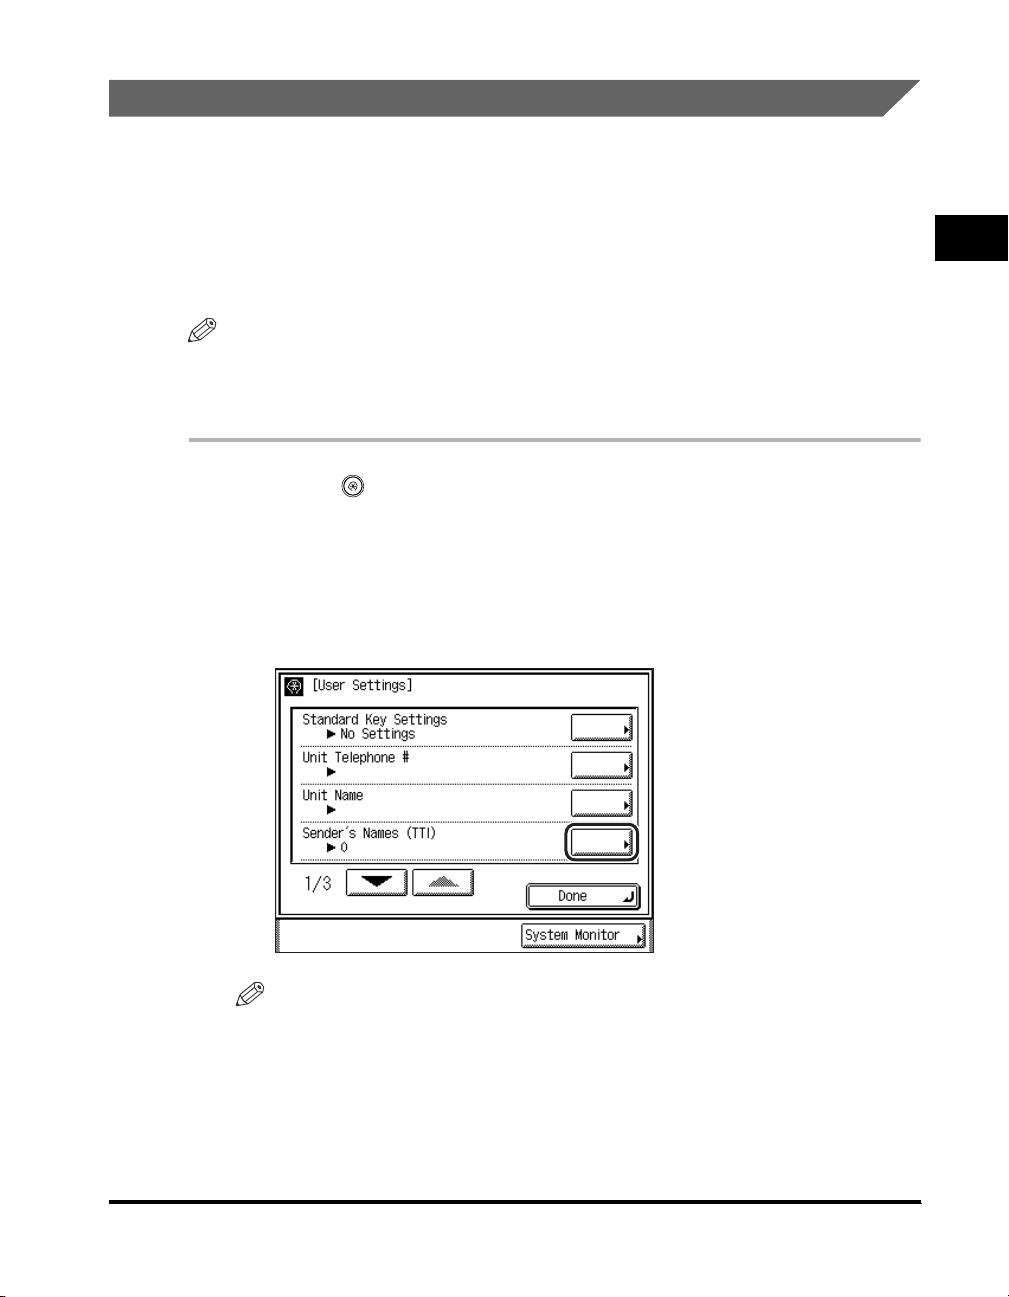
Enter the unit's telephone number using
- (numeric keys) ➞ press [OK].
1
Details of each item are shown below.
Introduction to Fax Functions
[Space]: Press to insert a space between the area code and the local fax
number (optional).
[+]: Use to insert a country code. Press [+] after the country code,
and before the fax number.
[][]:
[Backspace]: Press to delete the last number entered.
You can enter up to 20 digits for the fax number.
The selected mode is set.
NOTE
If you make a mistake when entering the number, press (Clear) ➞ enter the
correct number.
4
Press [Done] repeatedly until the Fax Basic Features screen
Press to move the position of the cursor.
appears.
1-20
Things You Must Do Before Using This Machine
Page 45
Registering Sender Names
You can register any name as the sender's name, such as the section or
department's name, or an individual's name.
If each user registers their personal name as a sender name, they can select their
sender name (to replace the unit's name), which is printed at the top of every
document they send. (However, depending on the model of the recipient's machine,
the sender's name may not be displayed.)
NOTE
You can set to display and print the sender's name instead of the name stored as the
unit's name in Sender's Names (TTI) from the Special Features screen. (See "Setting the
Sender's Name as the Terminal ID," on p. 3-15.)
1
Press (Additional Functions) ➞ [Custom Fax Settings] ➞
[User Settings].
If necessary, see the screen shots in steps 1 and 2 of "Selecting the Type of
Telephone Line," on p. 1-12.
2
Press [Sender's Names (TTI)].
1
Introduction to Fax Functions
NOTE
If the desired setting is not displayed, press [▼] or [▲] to scroll to the desired
setting.
Things You Must Do Before Using This Machine
1-21
Page 46
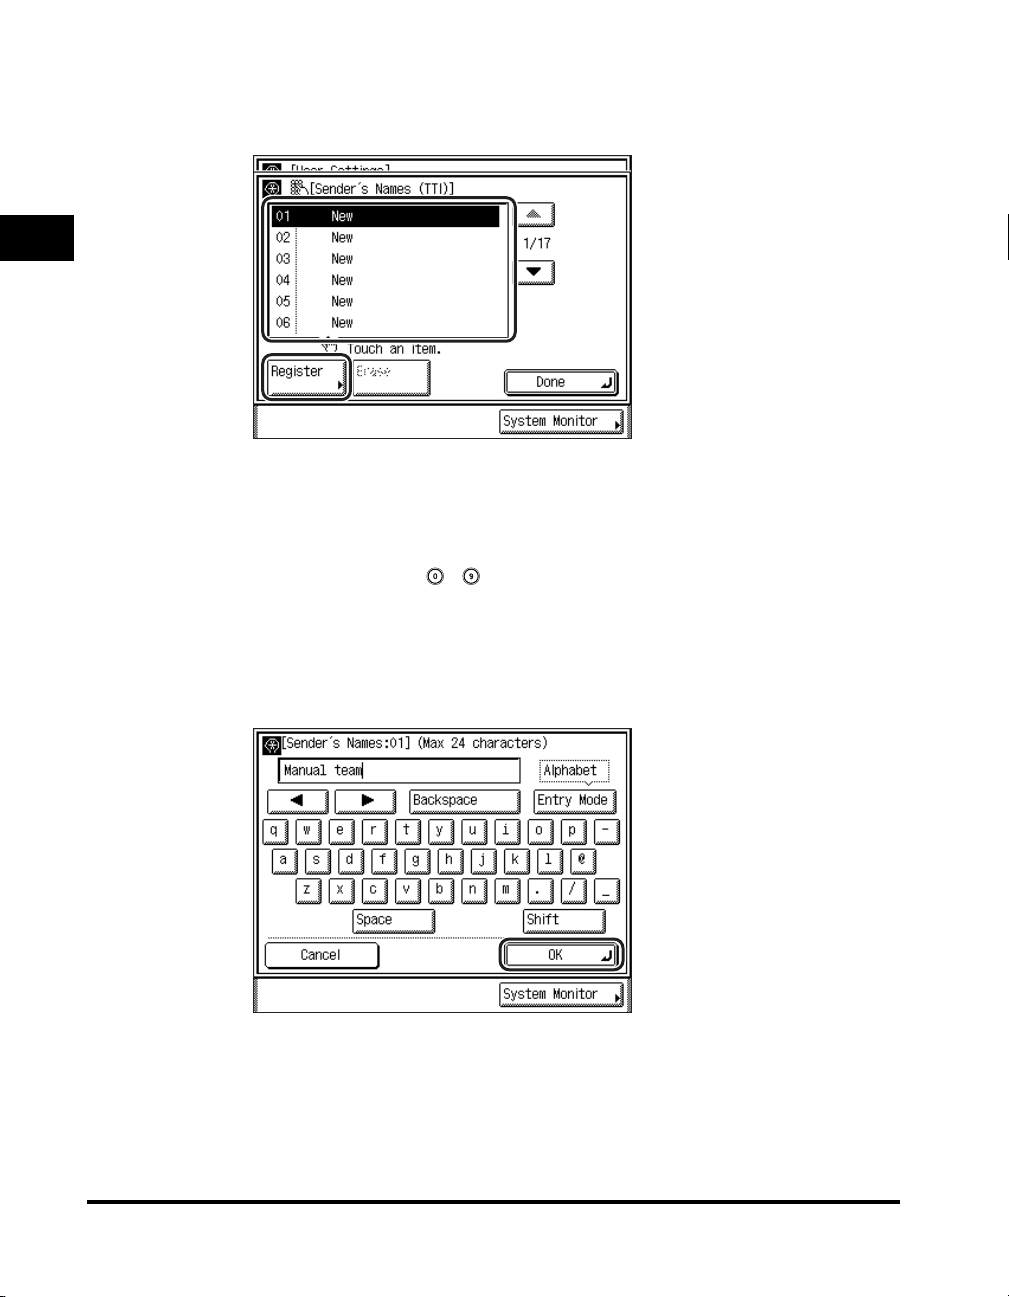
3
Select the number under which you want to register the
sender's name ➞ press [Register].
1
You can store up to 99 sender names (01 to 99).
Introduction to Fax Functions
If the desired number is not displayed, press [▼] or [▲] to scroll to the desired
number.
You can also enter and specify the number under which you want to register the
sender's name using - (numeric keys).
To delete a registered sender's name, select the number under which the name
is registered ➞ press [Erase]. Only one sender's name can be erased at a time.
1-22
4
Enter the sender's name ➞ press [OK].
You can enter up to 24 characters for the sender's name.
To cancel registering the sender's name, press [Cancel].
The selected mode is set.
Things You Must Do Before Using This Machine
Page 47

NOTE
•
For instructions on entering characters, see Chapter 2, "Basic Operations," in the
Reference Guide
•
To delete all of the entered characters, press (Clear).
5
Press [Done] repeatedly until the Fax Basic Features screen
.
appears.
Registering the Unit's Name
Your name or company's name must be registered as the unit's name (a
department name is optional).
For example:
1
• Your name: John Smith
• Company name: Canon
• Company name and department: Canon-Accounting Dept.
When you send a document, the recipient's machine displays or prints your name
or company's name (and department's name, if applicable) as the sender's
information on the recording paper.
Some fax models also display sender information on the touch panel display during
transmission.
1
Press (Additional Functions) ➞ [Custom Fax Settings] ➞
[User Settings].
If necessary, see the screen shots in steps 1 and 2 of "Selecting the Type of
Telephone Line," on p. 1-12.
Introduction to Fax Functions
Things You Must Do Before Using This Machine
1-23
Page 48
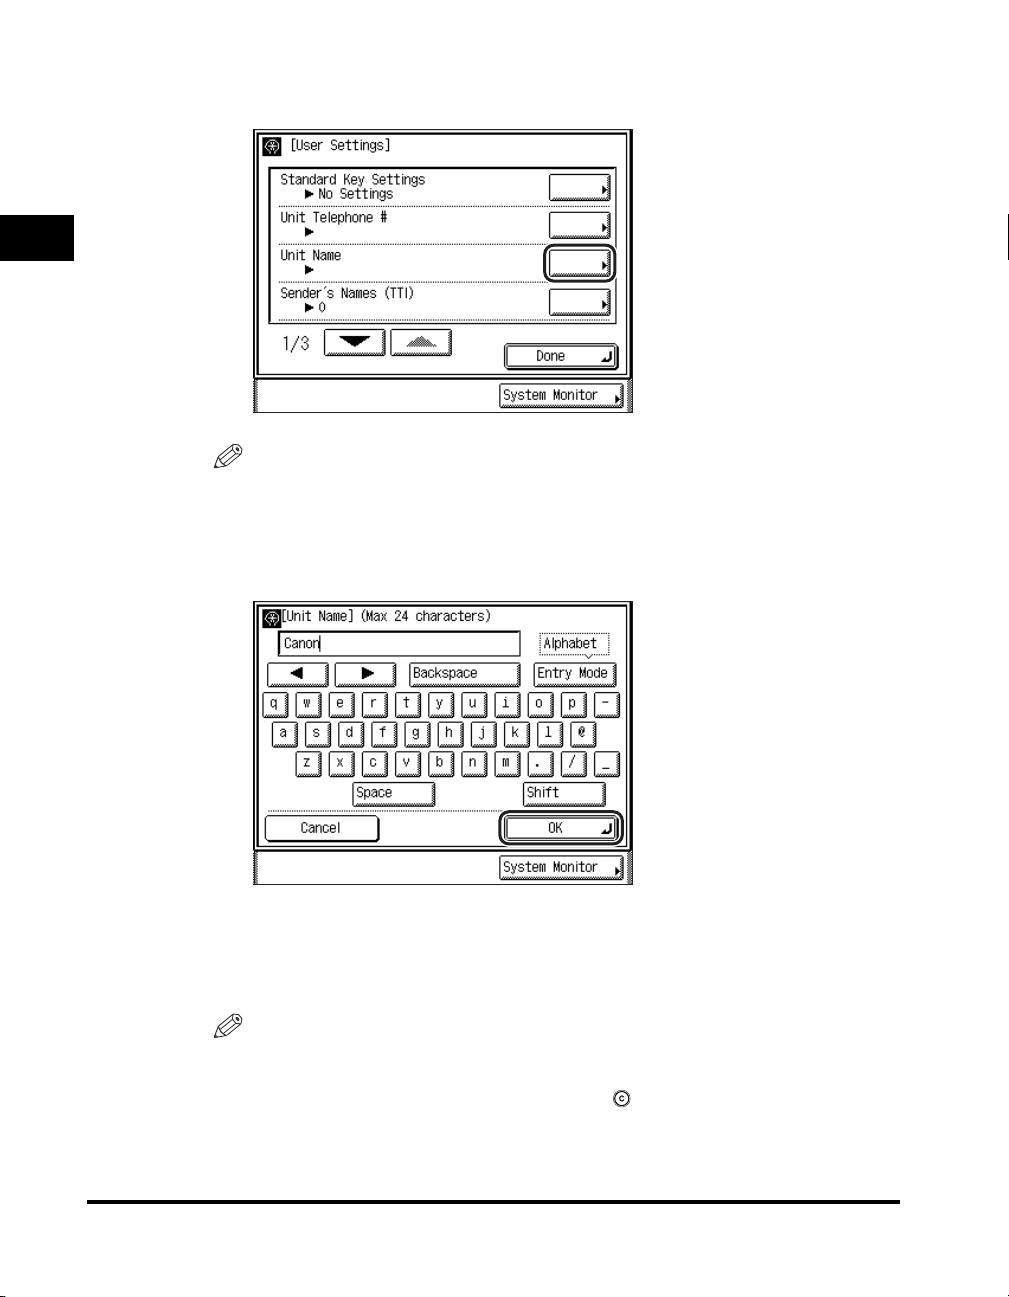
2
Press [Unit Name].
1
NOTE
Introduction to Fax Functions
If the desired setting is not displayed, press [▼] or [▲] to scroll to the desired
setting.
3
Enter a name ➞ press [OK].
1-24
You can enter up to 24 characters for the unit's name.
To cancel registering the unit's name, press [Cancel].
The selected mode is set.
NOTE
•
For instructions on entering characters, see Chapter 2, "Basic Operations," in the
Reference Guide
•
To delete all of the entered characters, press (Clear).
Things You Must Do Before Using This Machine
.
Page 49

4
Press [Done] repeatedly until the Fax Basic Features screen
appears.
1
Introduction to Fax Functions
Things You Must Do Before Using This Machine
1-25
Page 50
Flow of Sending Operations
1
Introduction to Fax Functions
This section describes the flow of basic sending operations.
NOTE
•
Before using the Fax function, it is useful to read the following topics:
- Main power and control panel power (See Chapter 1, "Before You Start Using This
Machine," in the
- Routine maintenance (See Chapter 7, "Routine Maintenance," in the
•
The maximum number of send jobs that the machine can handle is 64. However, the
actual number of send jobs that the machine can handle may be fewer than 64, if multiple
documents are being sent at the same time.
•
You can print a report that contains the results of all send jobs. (See "TX Report," on p.
7-3.)
1
Press the appropriate keys in accordance with the messages
Reference Guide
.)
Reference Guide
.)
displayed on the touch panel display.
If there are no messages displayed, proceed to step 2.
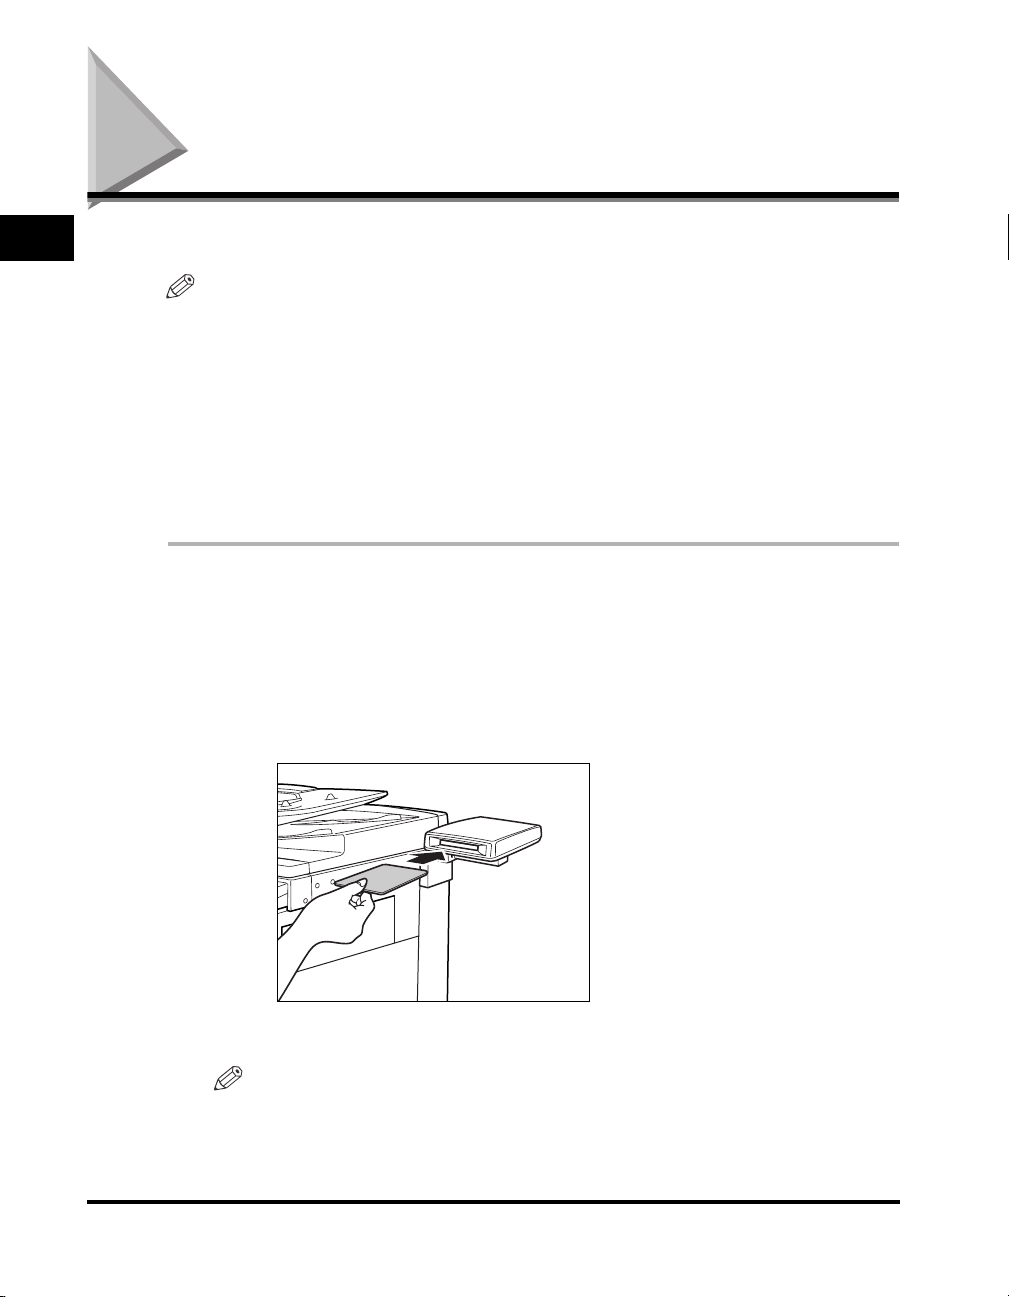
● If the message <You must insert a control card.> appears:
Insert a control card into the optional Card Reader-C1.
❑
1-26
The Basic Features screen is displayed.
NOTE
For instructions on using the optional Card Reader-C1, see Chapter 3, "Optional
Equipment," in the
Flow of Sending Operations
Reference Guide
.
Page 51
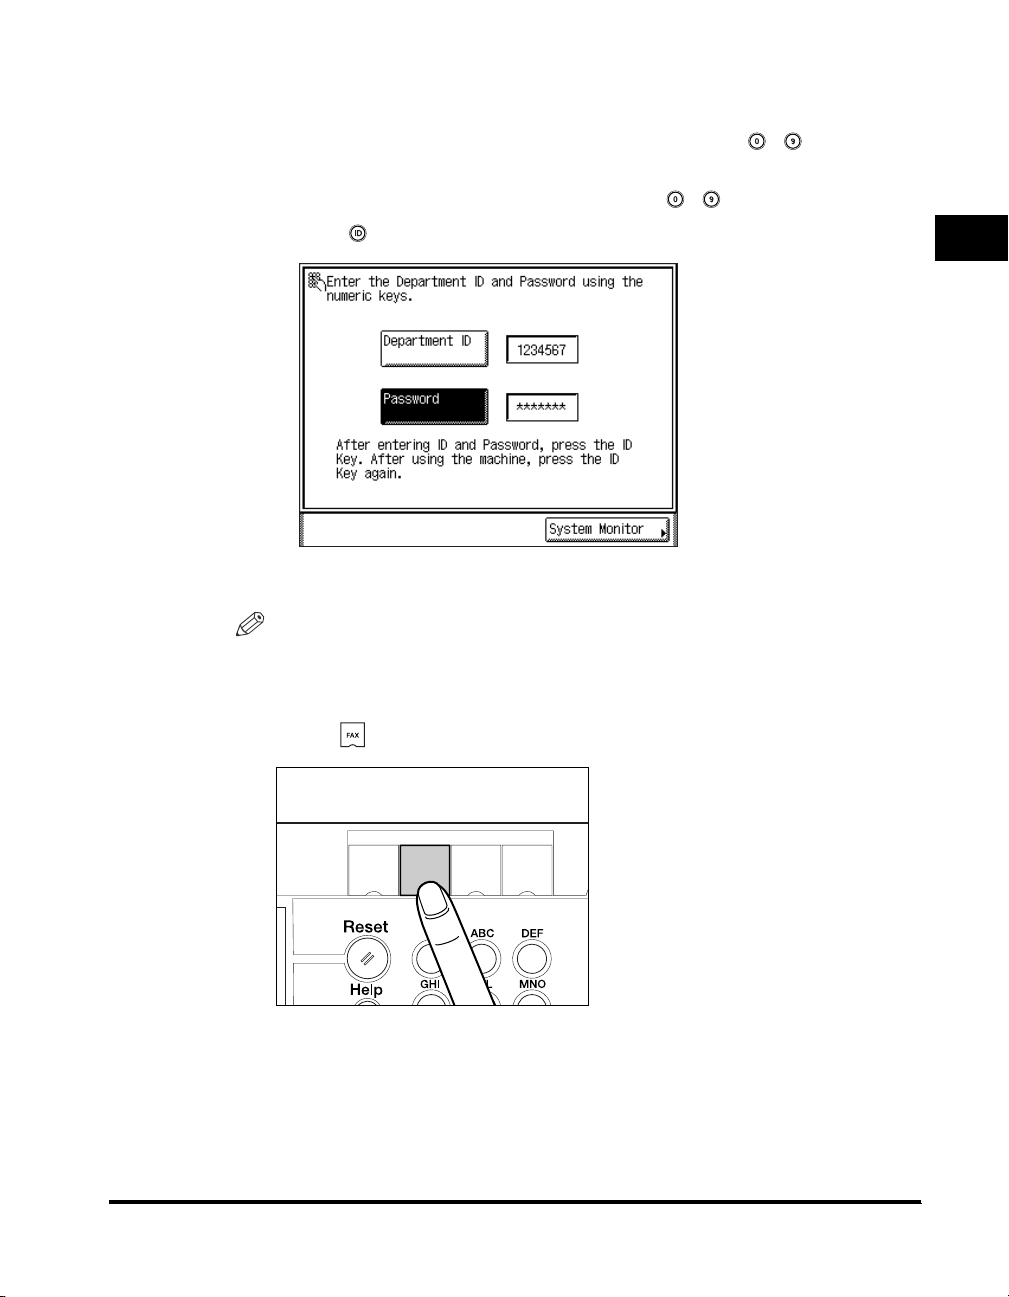
● If the message <Enter the Department ID and Password using the
numeric keys.> appears:
❑
Press [Department ID] ➞ enter the Department ID using - (numeric
keys).
❑ Press [Password] ➞ enter the password using - (numeric keys).
❑ Press (ID).
The Basic Features screen is displayed.
NOTE
For instructions on using Department ID Management, see Chapter 6, "System
Manager Settings," in the
Reference Guide
.
1
Introduction to Fax Functions
2
Press (FAX).
COPY
FAX
MAIL
SCAN
BOX
1
2
3
Flow of Sending Operations
1-27
Page 52
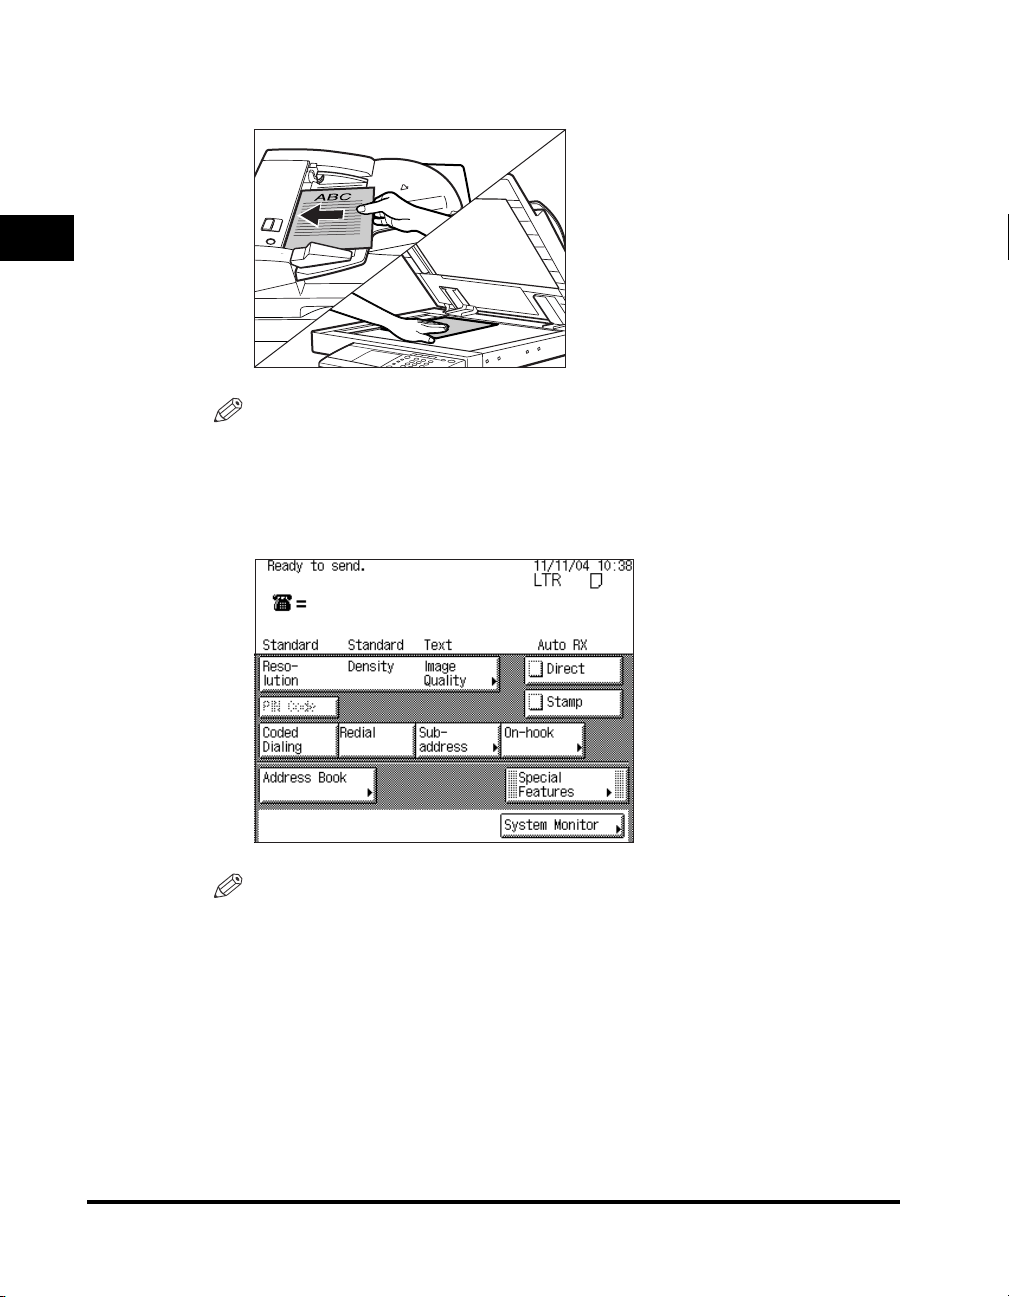
3
Place your originals.
1
NOTE
For instructions on placing your originals, see "Placing Originals," on p. 1-34.
Introduction to Fax Functions
4
Specify the basic fax settings on the Fax Basic Features
screen.
NOTE
From the Fax Basic Features screen, you can specify the sending method (Direct,
Speed Dialing or Redial), Resolution, Density, Image Quality, whether to stamp
your originals after sending, or specify a subaddress.
1-28
Flow of Sending Operations
Page 53
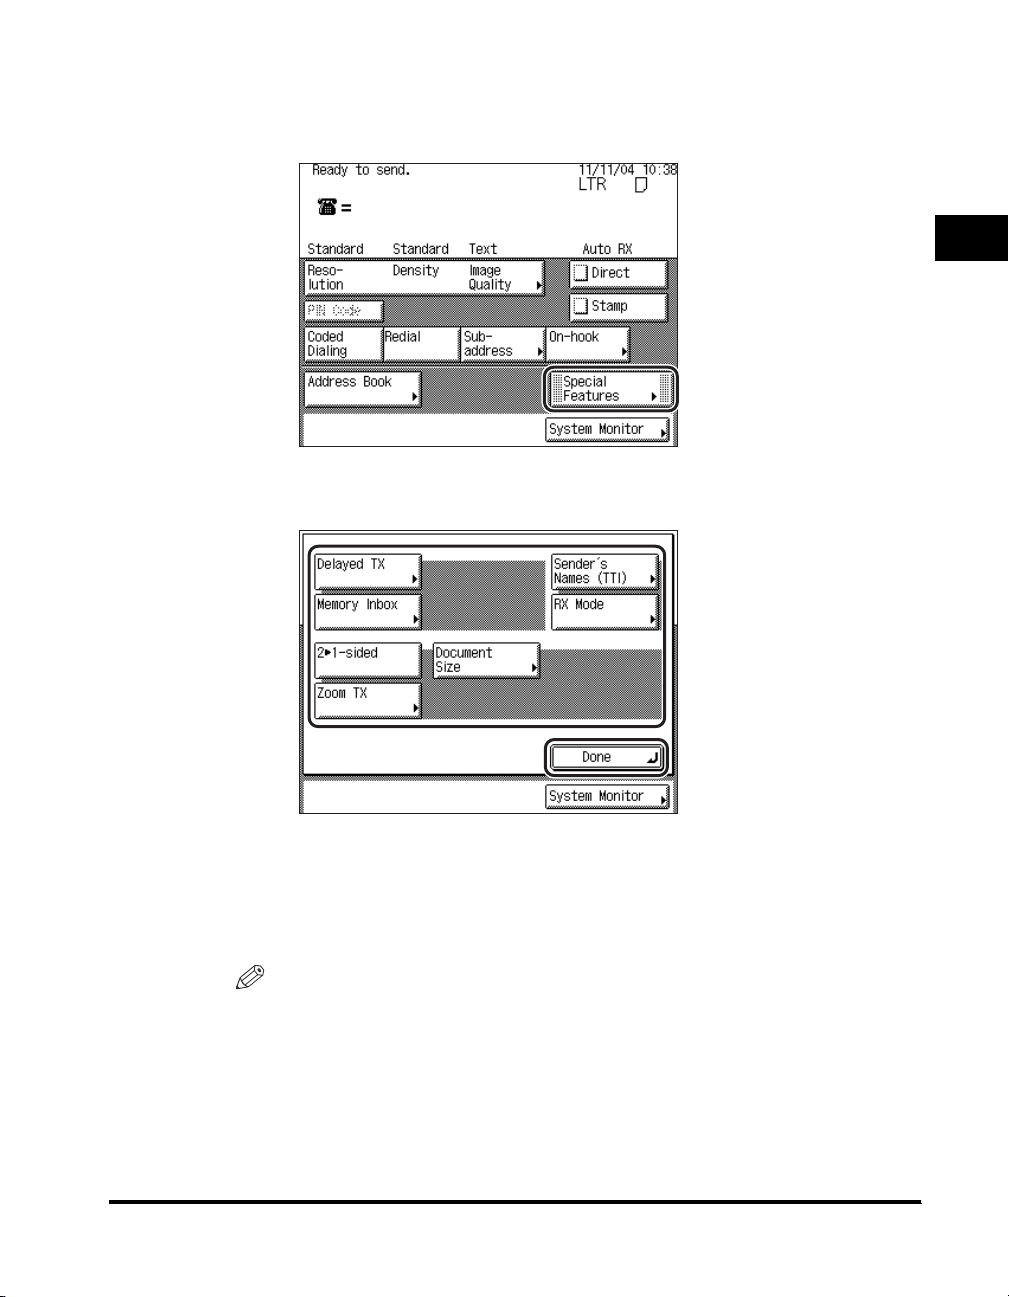
5
Specify the desired fax modes on the Special Features screen.
❑ Press [Special Features].
1
❑ Press the desired mode key to set the mode ➞ press [Done] repeatedly until
the Fax Basic Features screen appears.
For more information on the available functions on the Special Features
screen, see Chapter 3.
6
Specify the destinations.
NOTE
A maximum of 256 destinations can be specified at the same time. (Out of the 256
destinations, 64 new destinations can be specified.) If you specify a group, which is
made up of several destinations, each destination in the group is counted as a
separate address.
Introduction to Fax Functions
Flow of Sending Operations
1-29
Page 54
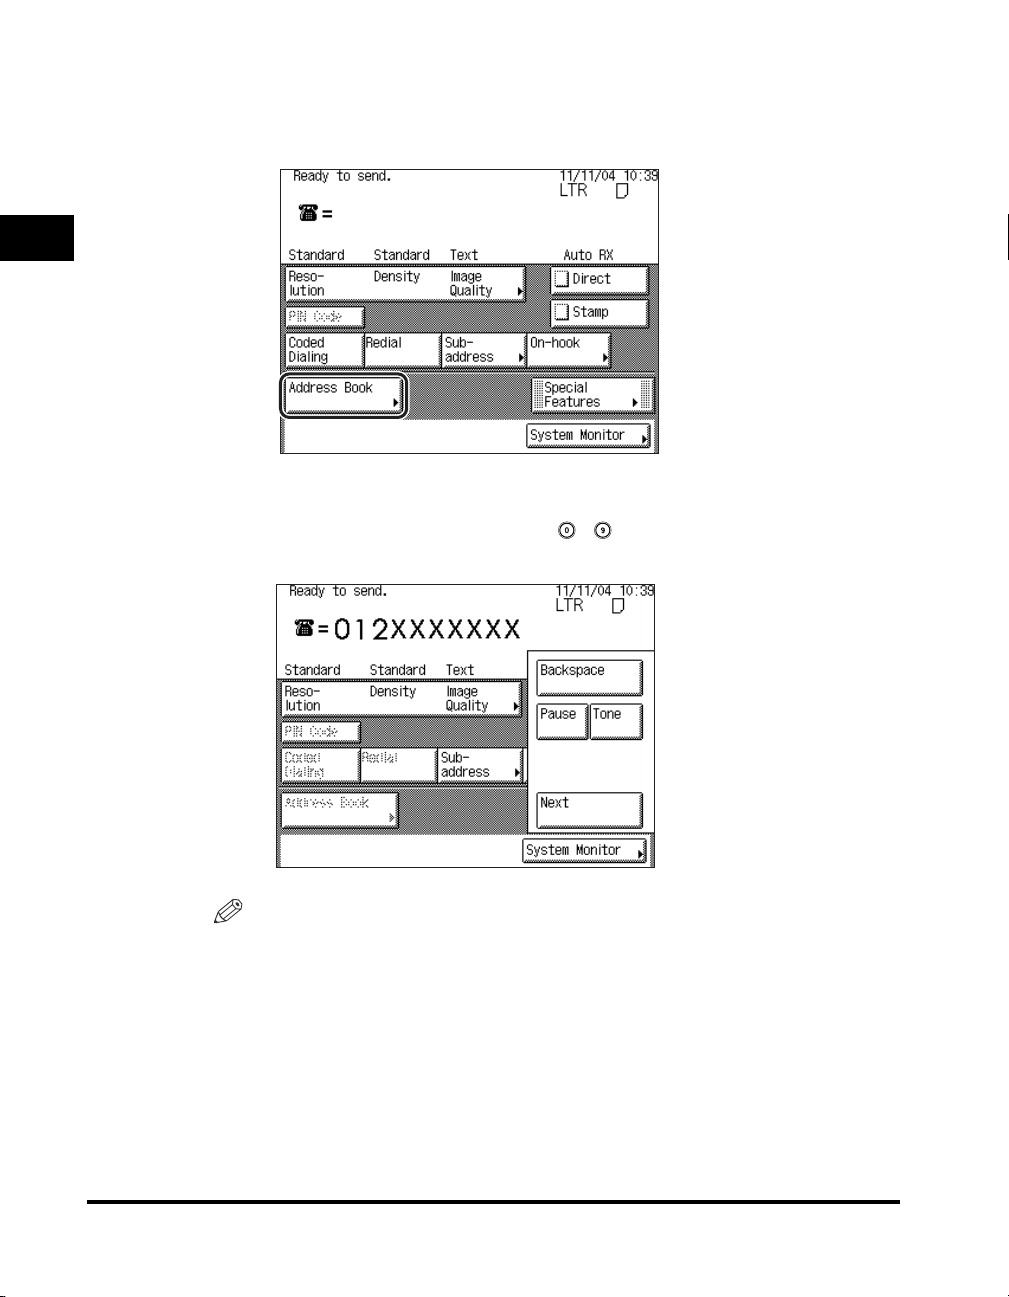
● If a destination is stored in the Address Book:
Press [Address Book] ➞ select the desired destination. (See "Address Book,"
❑
on p. 2-19.)
1
Introduction to Fax Functions
● If a destination is not stored in the Address Book:
Enter the desired destination using - (numeric keys). (See "Numeric
❑
Keys," on p. 2-16.)
NOTE
A maximum of 64 new destinations can be specified at the same time.
1-30
Flow of Sending Operations
Page 55
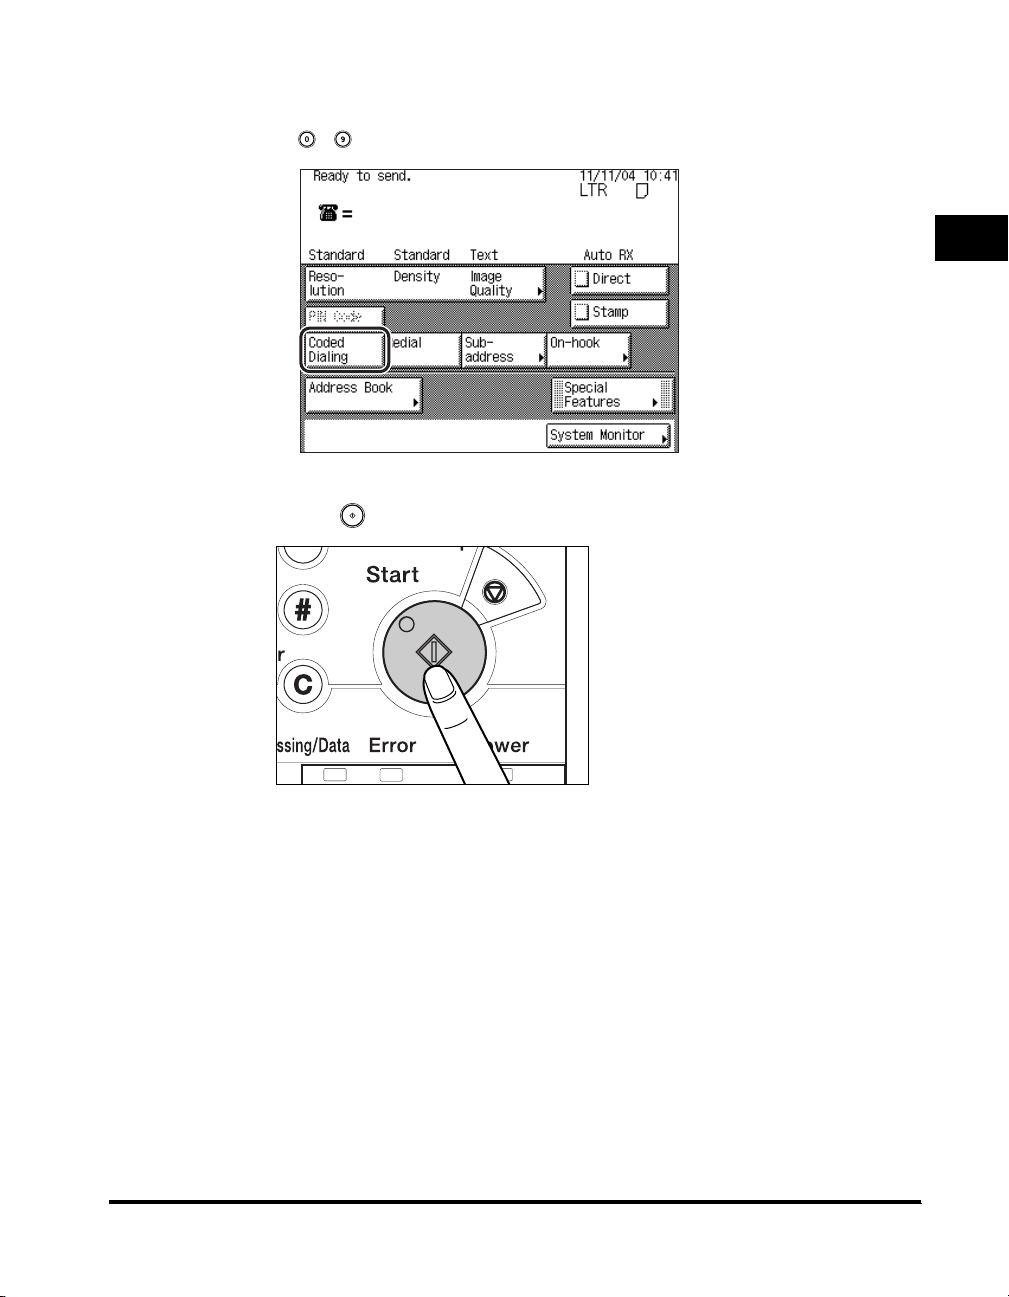
● If a destination is stored in the One-Touch Speed Dialing Directory:
3
6
Press [Coded Dialing] ➞ enter the three digit one-touch button code using
❑
- (numeric keys). (See "Coded Speed Dialing," on p. 2-24.)
7
Press (Start).
1
Introduction to Fax Functions
Flow of Sending Operations
1-31
Page 56
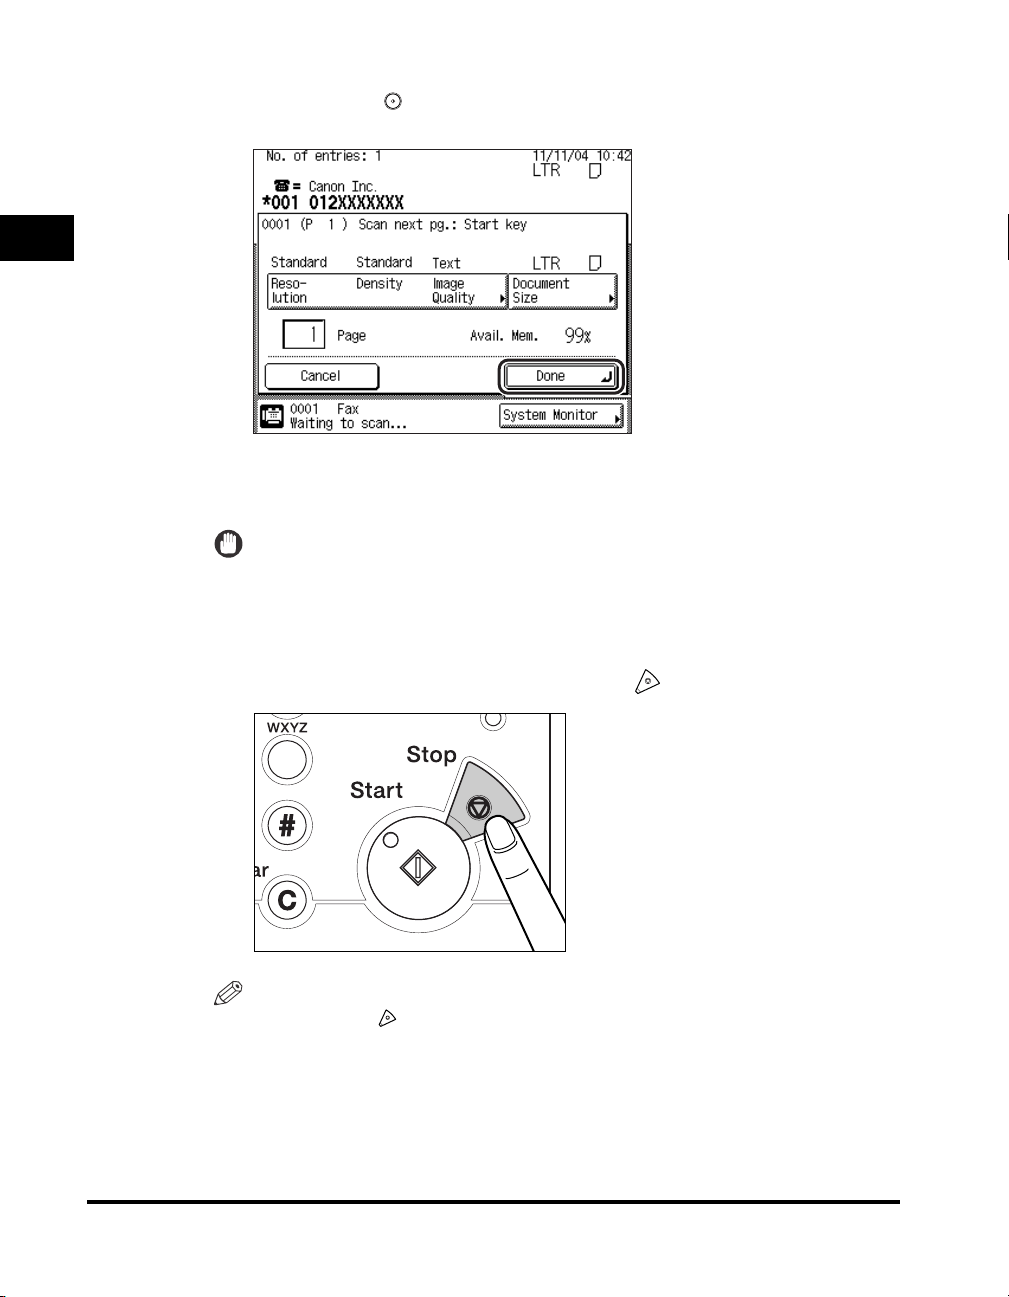
If the following screen is displayed, follow the instructions on the touch panel
3
6
display ➞ press (Start) once for each original. When scanning is complete,
press [Done].
1
Scanning starts.
Introduction to Fax Functions
The scanned data is sent to the specified destination when scanning is complete.
IMPORTANT
The size of the original is detected automatically. However, if the output paper in
the recipient's machine is not equal to the scanned document size, the original
image may be reduced in size to match it.
8
If you want to cancel sending, press (Stop).
9
1-32
Flow of Sending Operations
NOTE
•
You can press (Stop) to cancel a send job that is being scanned.
•
For instructions on canceling a send job, see "Canceling a Job," on p. 1-42.
•
You can also cancel a send job from the System Monitor screen. (See "Using the
System Monitor Screen," on p. 1-43.)
9
When scanning is complete, remove your originals.
Page 57
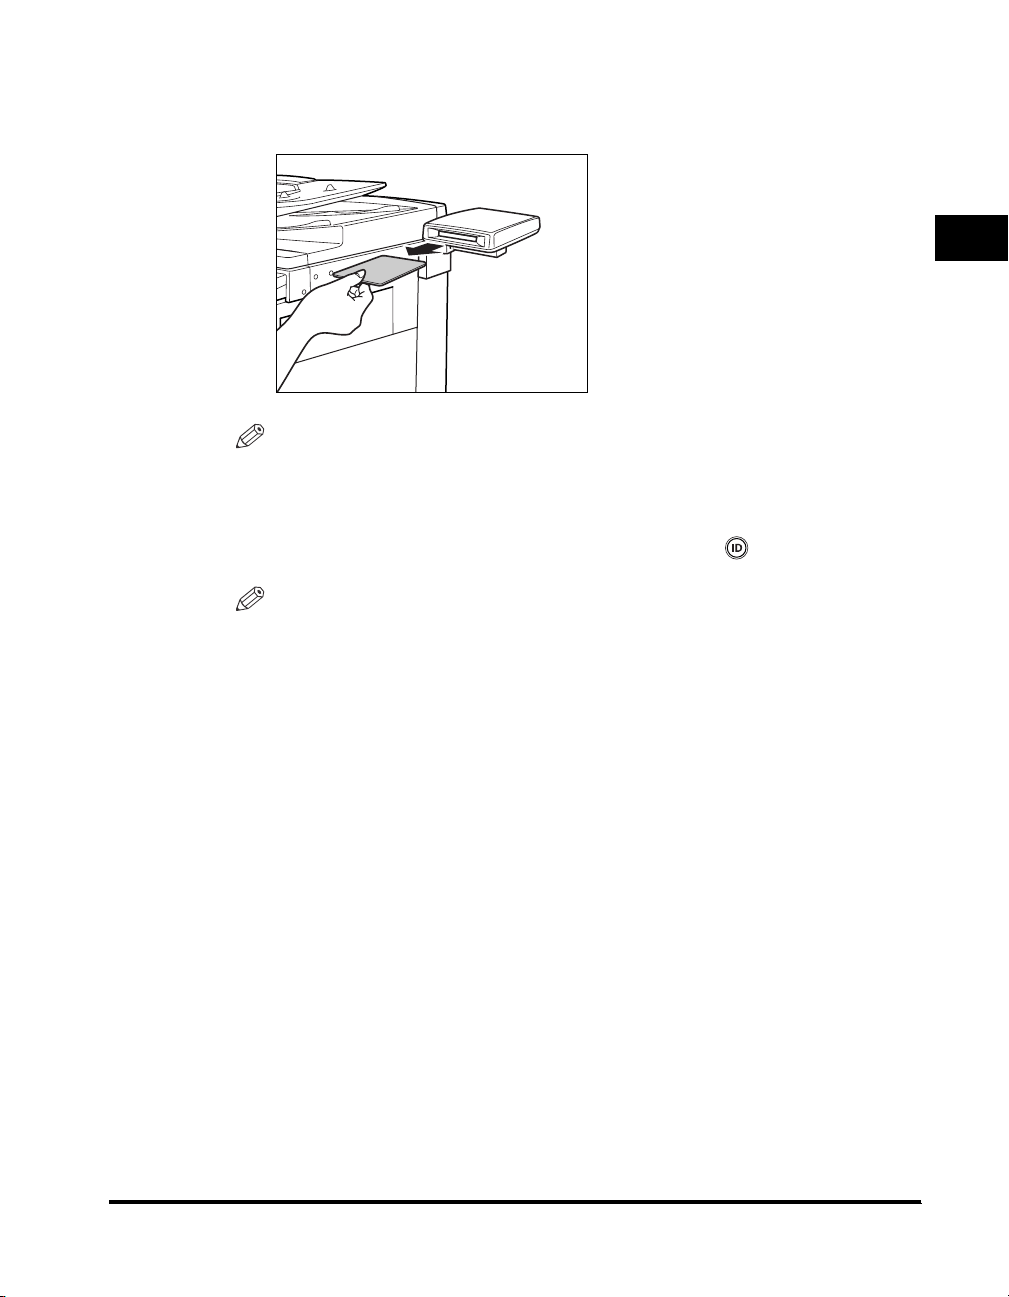
10
If the optional Card Reader-C1 is attached, remove the control
card.
NOTE
For instructions on using the optional Card Reader-C1, see Chapter 3, "Optional
Equipment," in the
11
If Department ID Management is set, press (ID).
NOTE
For instructions on using Department ID Management, see Chapter 6, "System
Manager Settings," in the
Reference Guide
Reference Guide
.
.
1
Introduction to Fax Functions
Flow of Sending Operations
1-33
Page 58
Placing Originals
1
Place your originals on the platen glass or into the optional feeder, depending on
the size and type of the original, and the send settings that you have specified.
■ Platen Glass
Place the originals on the platen glass when scanning bound originals (such as books and
magazines), heavy or lightweight originals, and transparencies.
■ Feeder
Place the originals into the feeder when you want to scan several originals at the same
time, and press (Start). The machine automatically feeds the originals to the platen
Introduction to Fax Functions
glass and scans them. Two-sided originals can also be automatically turned over and
scanned as two-sided documents.
IMPORTANT
You can scan originals in the feeder only if the optional Feeder (DADF-N1) is attached.
Document Sizes
The size of the original is automatically detected, and the document is scanned. If
the output paper in the recipient's machine is not equal to the scanned size, the
original image may be reduced in size or divided into smaller parts before it is sent.
The machine cannot always detect the size of the original if it is a nonstandard
paper size, such as a book. In this case, specify the size at which you want to scan
the original. (See "Document Size," on p. 3-21.)
1-34
Placing Originals
Page 59
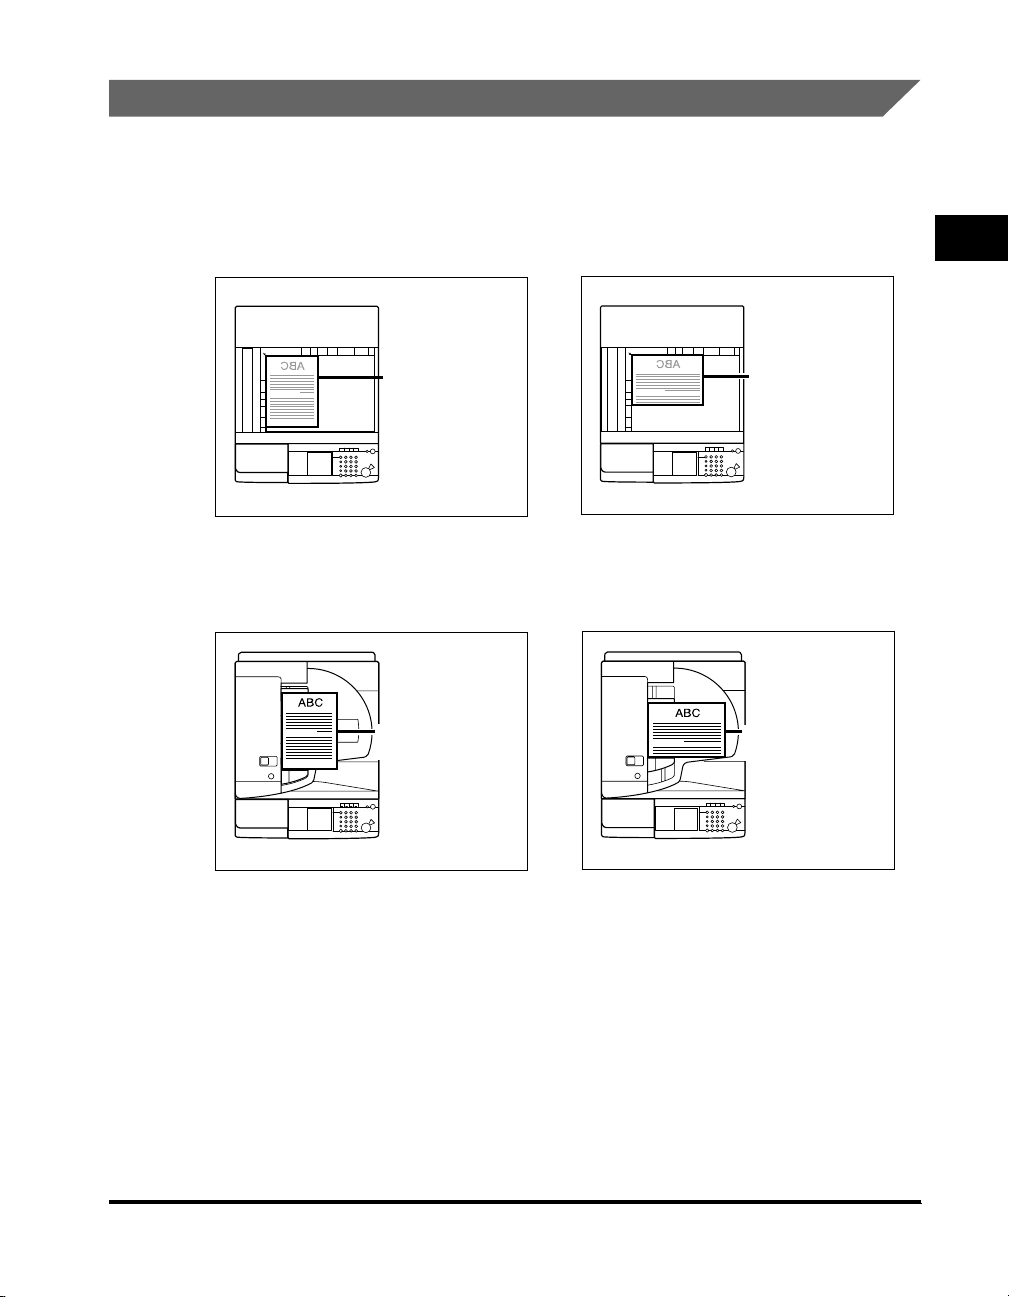
Orientation
You can place an original either vertically or horizontally. Always align the top edge
of your original with the back edge of the platen glass (by the arrow in the top left
corner) or the back edge of the feeder.
Platen Glass
Place the original
face down.
Place the original
face down.
Vertical Placement Horizontal Placement
Feeder
Place the original
face up.
Place the original
face up.
1
Introduction to Fax Functions
Vertical Placement Horizontal Placement
Placing Originals
1-35
Page 60
NOTE
•
If the top edge of the original is not aligned with the back edge of the platen glass (by the
arrow in the top left corner), your original may not be scanned correctly, depending on the
scan and send modes that you have set.
•
Originals of the following sizes can be placed either vertically or horizontally. However,
the scanning speed for horizontally placed originals is somewhat slower than vertically
1
placed originals. Place originals horizontally when scanning with a Preset Zoom, such as
when enlarging an LTR original onto 11" x 17" paper.
- Platen glass: LTR, STMT
- Feeder: LTR, STMT
•
Horizontally placed LTR and STMT originals are referred to as LTRR and STMTR.
•
11" x 17" and LGL originals must be placed horizontally.
Platen Glass
Introduction to Fax Functions
You should use the platen glass when scanning bound originals (such as books
and magazines), heavy or lightweight originals, and transparencies. (See
"Document Size," on p. 3-21.)
NOTE
The machine automatically detects the size of the following originals: 11" x 17", LGL,
LTR , an d LT RR .
1
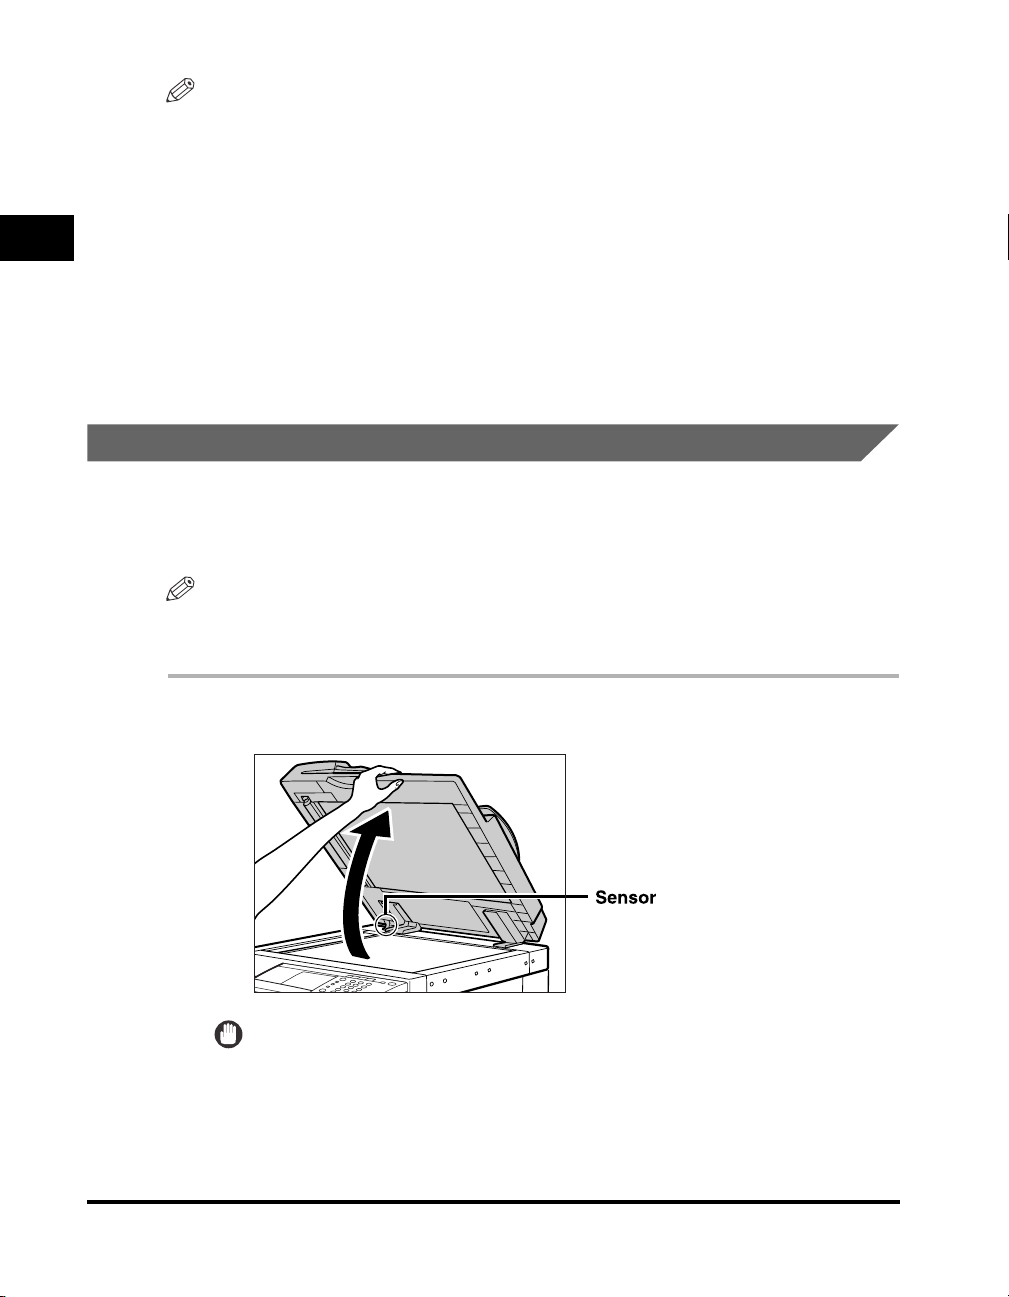
Lift the feeder/platen cover.
IMPORTANT
This machine is equipped with an open/close sensor on the feeder/platen cover
(see circled area in the above illustration). When placing originals on the platen
glass, lift the feeder/platen cover approximately 11 7/8" (300 mm) so that the
sensor detaches from the feeder/platen cover. If the sensor does not detach from
the feeder/platen cover, the size of the originals may not be detected correctly.
1-36
Placing Originals
Page 61
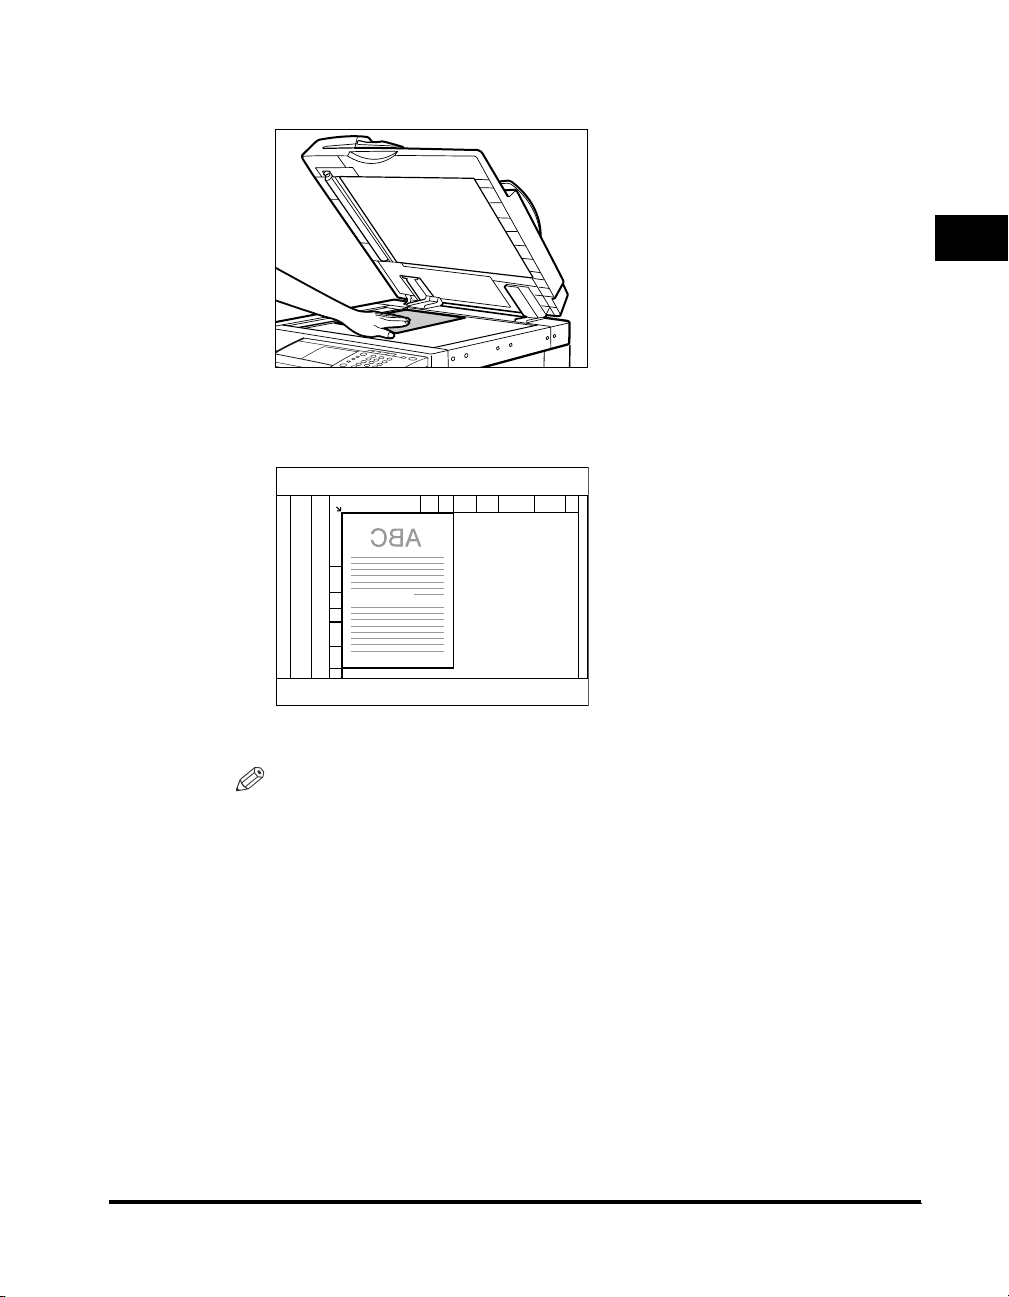
2
Place your originals face down.
The surface of the original that you want to scan must be placed face down.
Align the top edge of your original with the back edge of the platen glass (by the
arrow in the top left corner).
1
Introduction to Fax Functions
Place books and other bound originals on the platen glass in the same way.
NOTE
When you are enlarging an LTR or STMT original onto 11" x 17" or LGL paper,
place the original horizontally on the platen glass, and align it with the LTRR or
STMTR marks.
Placing Originals
1-37
Page 62
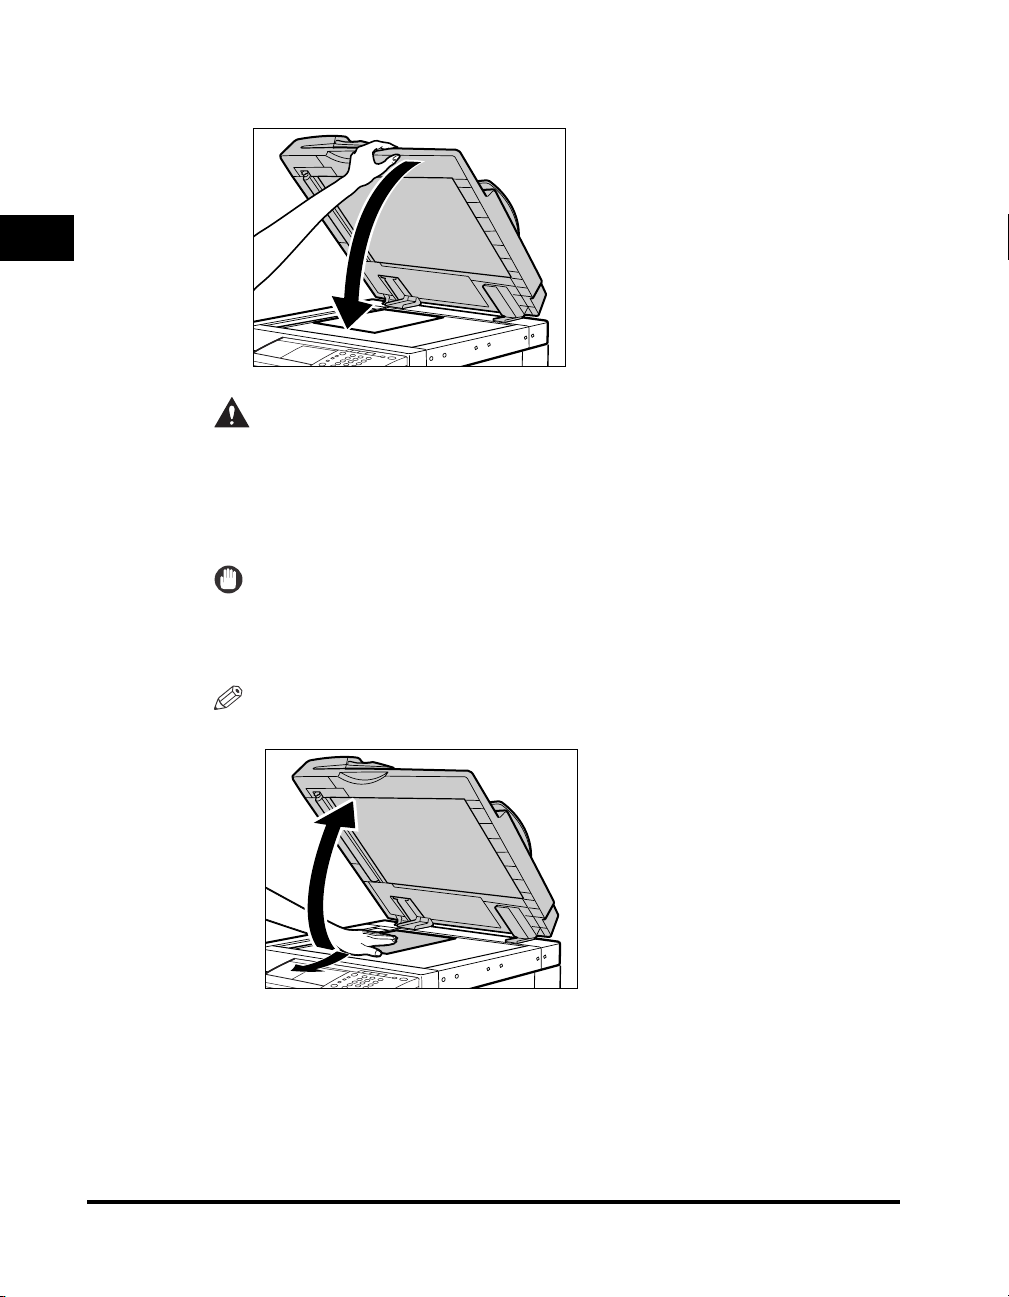
3
Gently close the feeder/platen cover.
1
CAUTION
• Close the feeder/platen cover gently to avoid catching your hands, as this
may result in personal injury.
Introduction to Fax Functions
• Do not press down hard on the feeder/platen cover when using the platen
glass to scan thick books. Doing so may damage the platen glass and
result in personal injury.
IMPORTANT
If you are placing the original on the platen glass, the size of the original is detected
after the feeder/platen cover is closed. Be sure to close the feeder/platen cover
before scanning.
NOTE
•
Remove the original from the platen glass when scanning is complete.
1-38
Placing Originals
Page 63
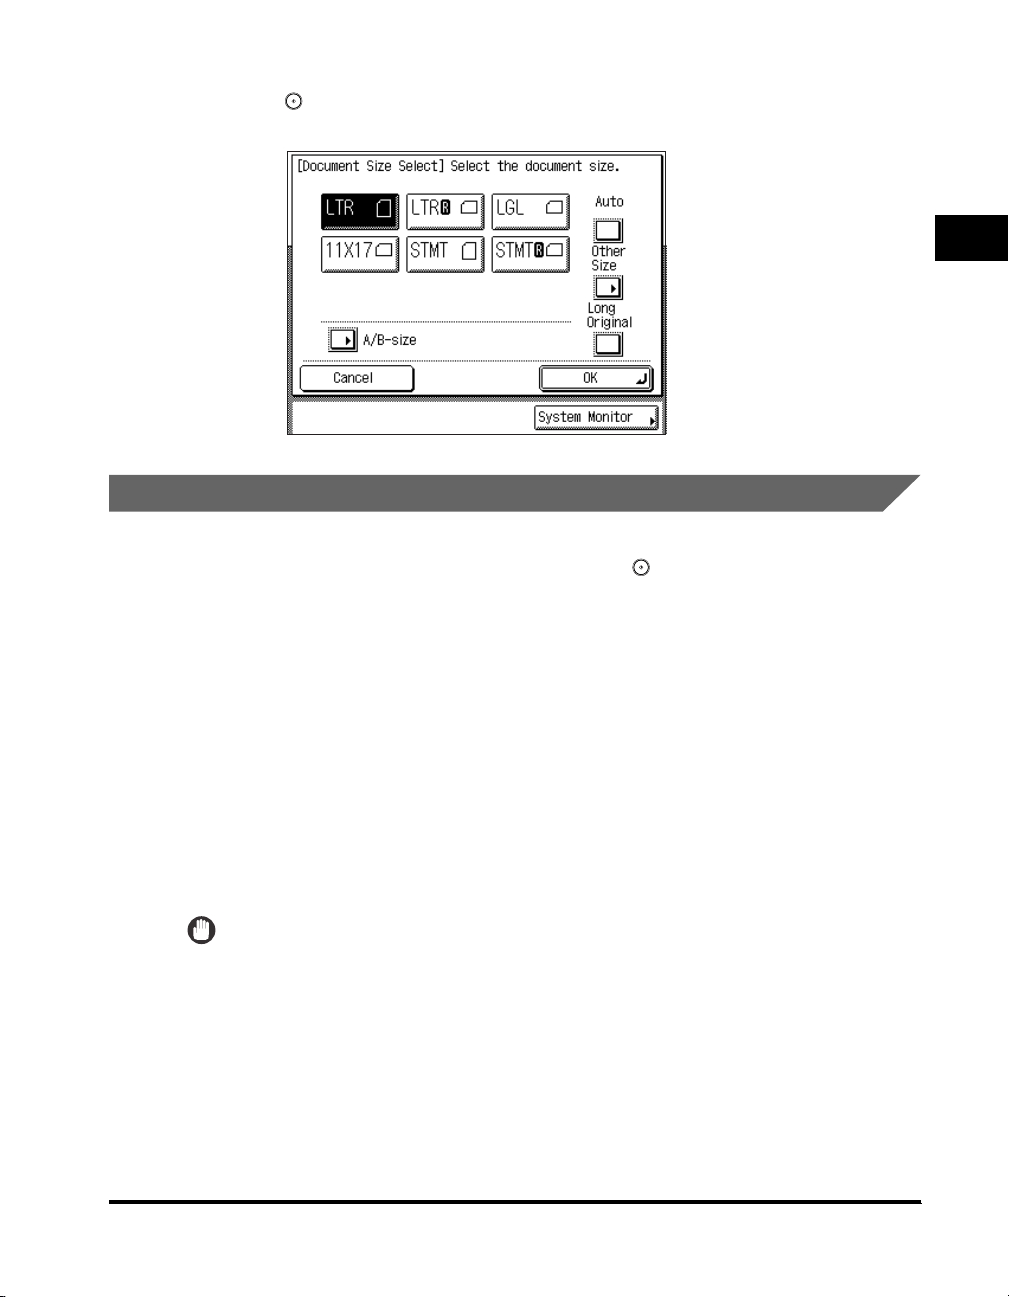
•
The size of STMT and STMTR originals cannot be detected. After pressing
(Start), follow the instructions on the screen to specify the original size. You can
also manually select the paper size.
Feeder (DADF-N1) (Optional)
You should use the feeder when you want to scan several originals at the same
time. Place the originals into the feeder and press (Start). The machine
automatically feeds the originals to the platen glass and scans them into memory.
Two-sided originals can also be automatically turned over and scanned as
two-sided documents.
1
Introduction to Fax Functions
You can place the following originals into the feeder's original supply tray:
• Weight:
- 13 to 32 lb bond (50 to 128 g/m
• Size:
2
)
- 11" x 17", LGL, LTR, LTRR, STMT or STMTR
• Tray Capacity:
- 50 sheets (20 lb bond (80 g/m
- 10 sheets (13 lb bond (50 g/m
IMPORTANT
•
Do not place the following types of originals into the feeder:
- Originals with tears or large binding holes
- Severely curled originals or originals with sharp folds
- Clipped or stapled originals
- Carbon backed paper or other originals which may not feed smoothly
- Transparencies and other highly transparent originals
2
))
2
))
Placing Originals
1-39
Page 64
•
If the same original is fed through the feeder repeatedly, the original may fold or become
creased, and make feeding impossible. Limit repeated feeding to a maximum of 30 times
(this number varies, depending on the type and quality of the original).
•
If the feeder rollers are dirty from scanning originals written in pencil, perform the feeder
cleaning procedure. (See Chapter 7, "Routine Maintenance," in the
•
Always smooth out any folds in your originals before placing them into the feeder.
Reference Guide
.)
1
1
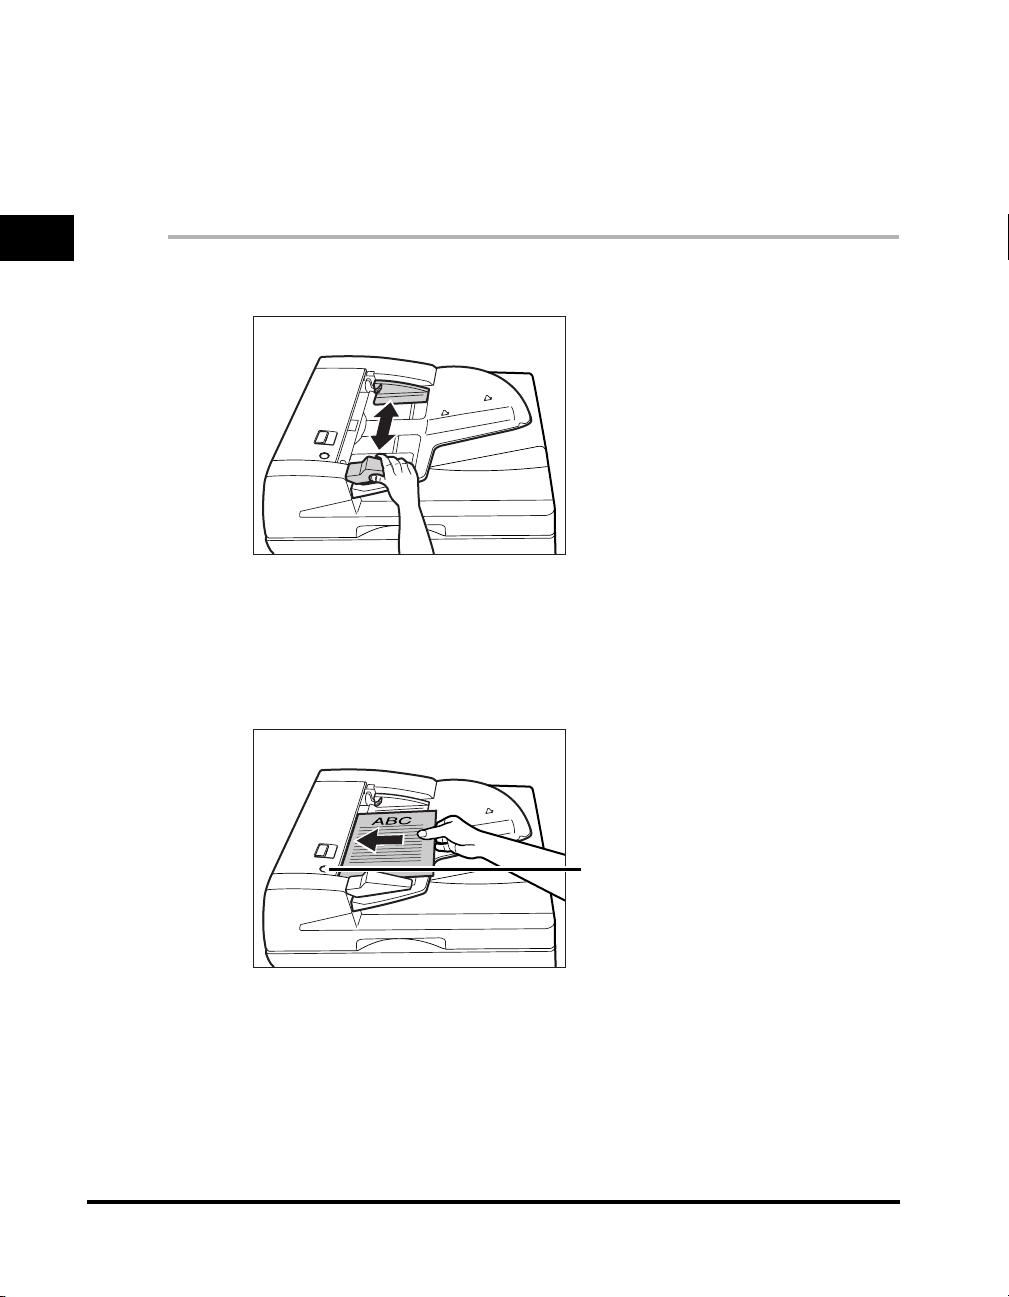
Adjust the slide guides to fit the size of your originals.
Introduction to Fax Functions
2
Neatly place your originals with the side to be scanned face
up in the original supply tray.
Place your originals as far into the feeder as they will go, until the Original Set
indicator is lit.
1-40
Original Set Indicator
If any dirt on the original scanning area is detected when the originals are placed
in the feeder, the following screen appears. Even though streaks may appear on
the scanned image, you can continue to scan your documents by pressing
[Done].
It is recommended, however, that you open the feeder, clean the scanning area,
and then close the feeder. The following screen will not appear once the
scanning area is clean.
Placing Originals
Page 65
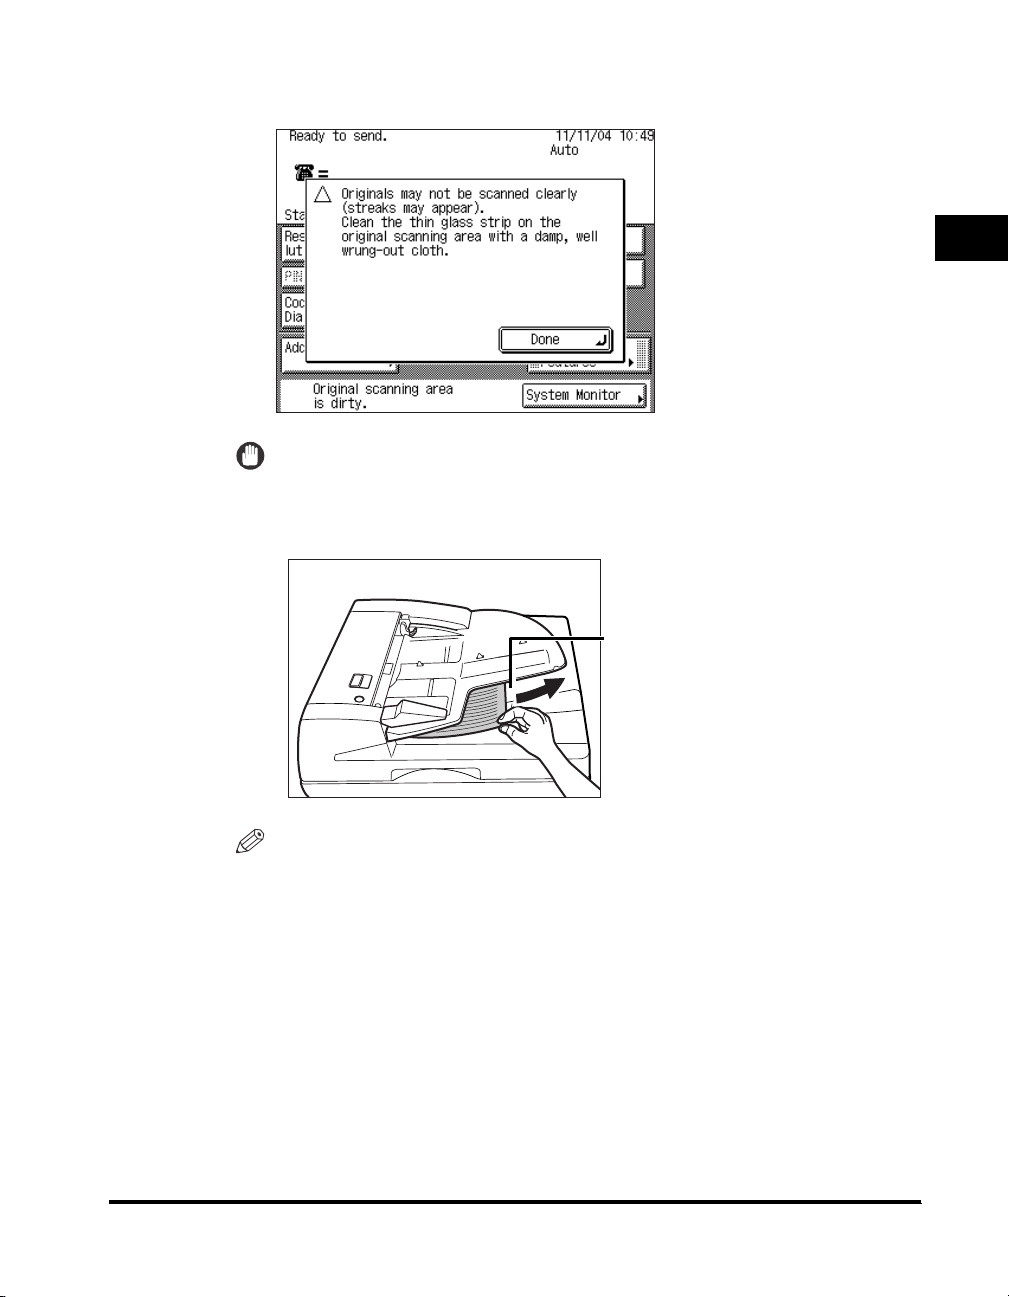
For instructions on cleaning the original scanning area, see Chapter 7, "Routine
Maintenance," in the
Reference Guide
.
IMPORTANT
•
Do not add or remove originals while they are being scanned.
•
When scanning is complete, remove the originals from the original output area to
avoid paper jams.
Original Output Area
1
Introduction to Fax Functions
NOTE
•
The scanned originals are output to the original output area in the order that they
are fed into the feeder.
•
When you are enlarging LTR or STMT originals onto 11" x 17" or LGL paper, place
the originals horizontally.
Placing Originals
1-41
Page 66
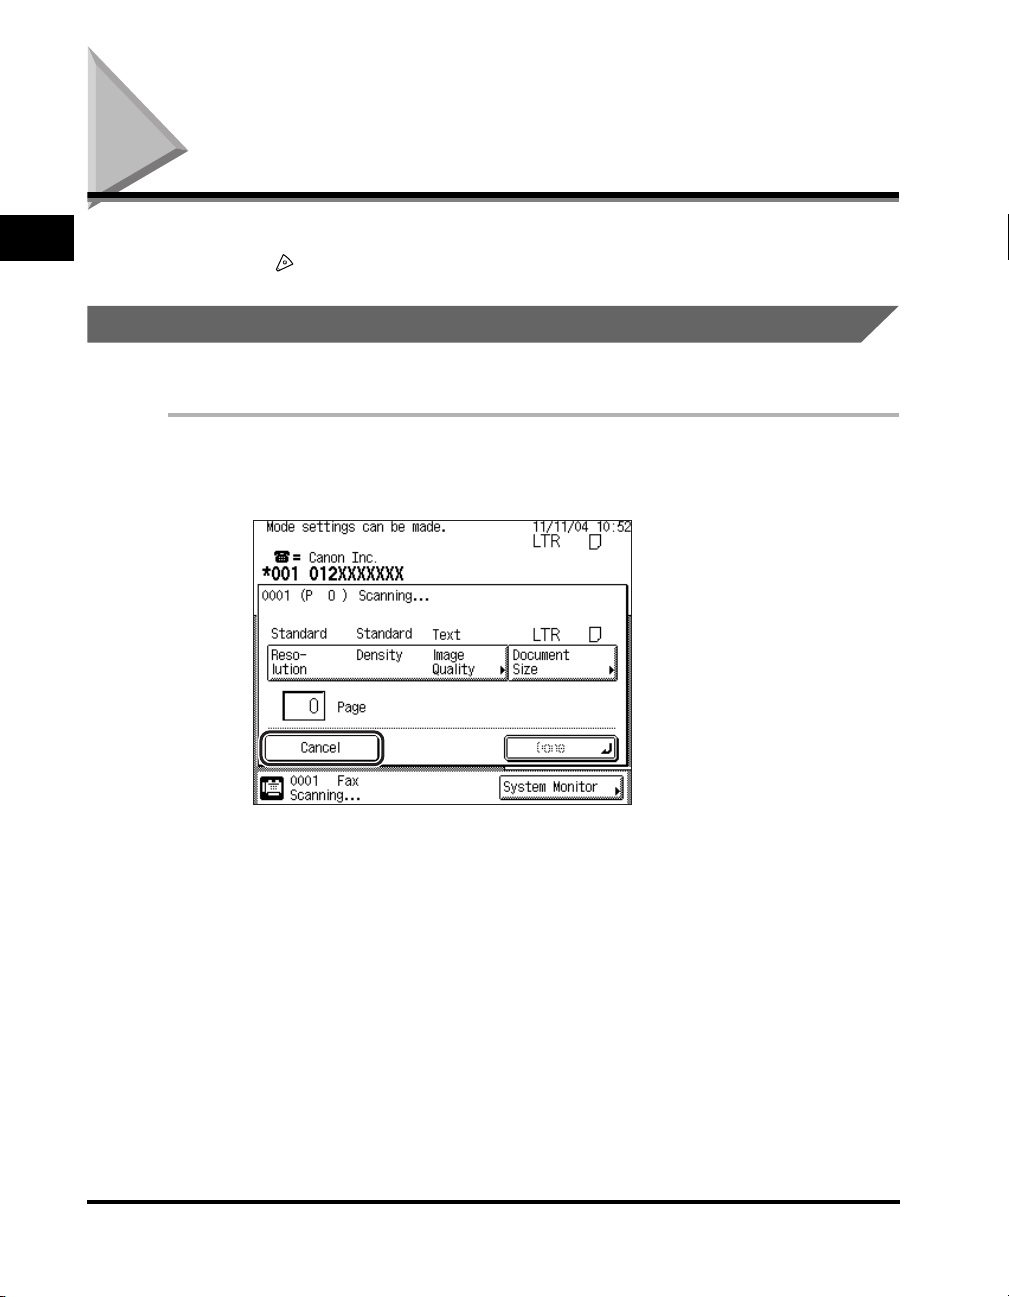
Canceling a Job
1
You can cancel a fax job using the touch panel display, System Monitor screen, or
by pressing (Stop) on the control panel.
Using the Touch Panel Display
You can cancel a fax job by pressing [Cancel], while the job is being scanned.
1
Press [Cancel] on the pop-up screen that appears while the
Introduction to Fax Functions
machine is scanning.
1-42
The send job is canceled.
2
Remove your originals.
Canceling a Job
Page 67
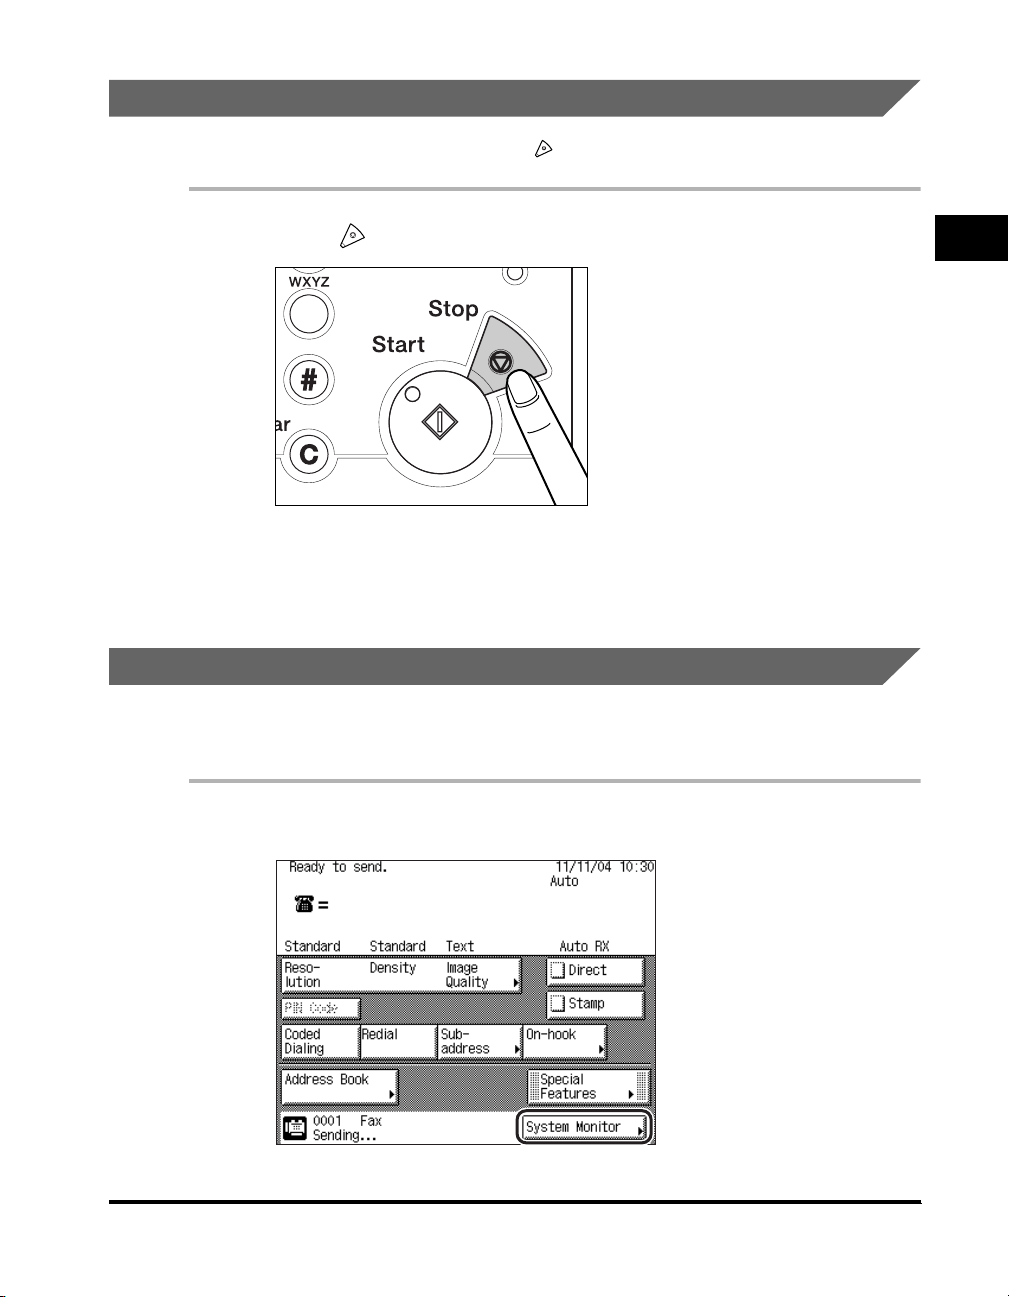
3
6
Using the Stop Key
You can cancel a send job by pressing (Stop), while the job is being scanned.
1
Press (Stop).
9
The send job is canceled.
2
Remove your originals.
1
Introduction to Fax Functions
Using the System Monitor Screen
You can cancel a send job while it is waiting to be processed, or while it is being
sent.
1
Press [System Monitor].
Canceling a Job
1-43
Page 68
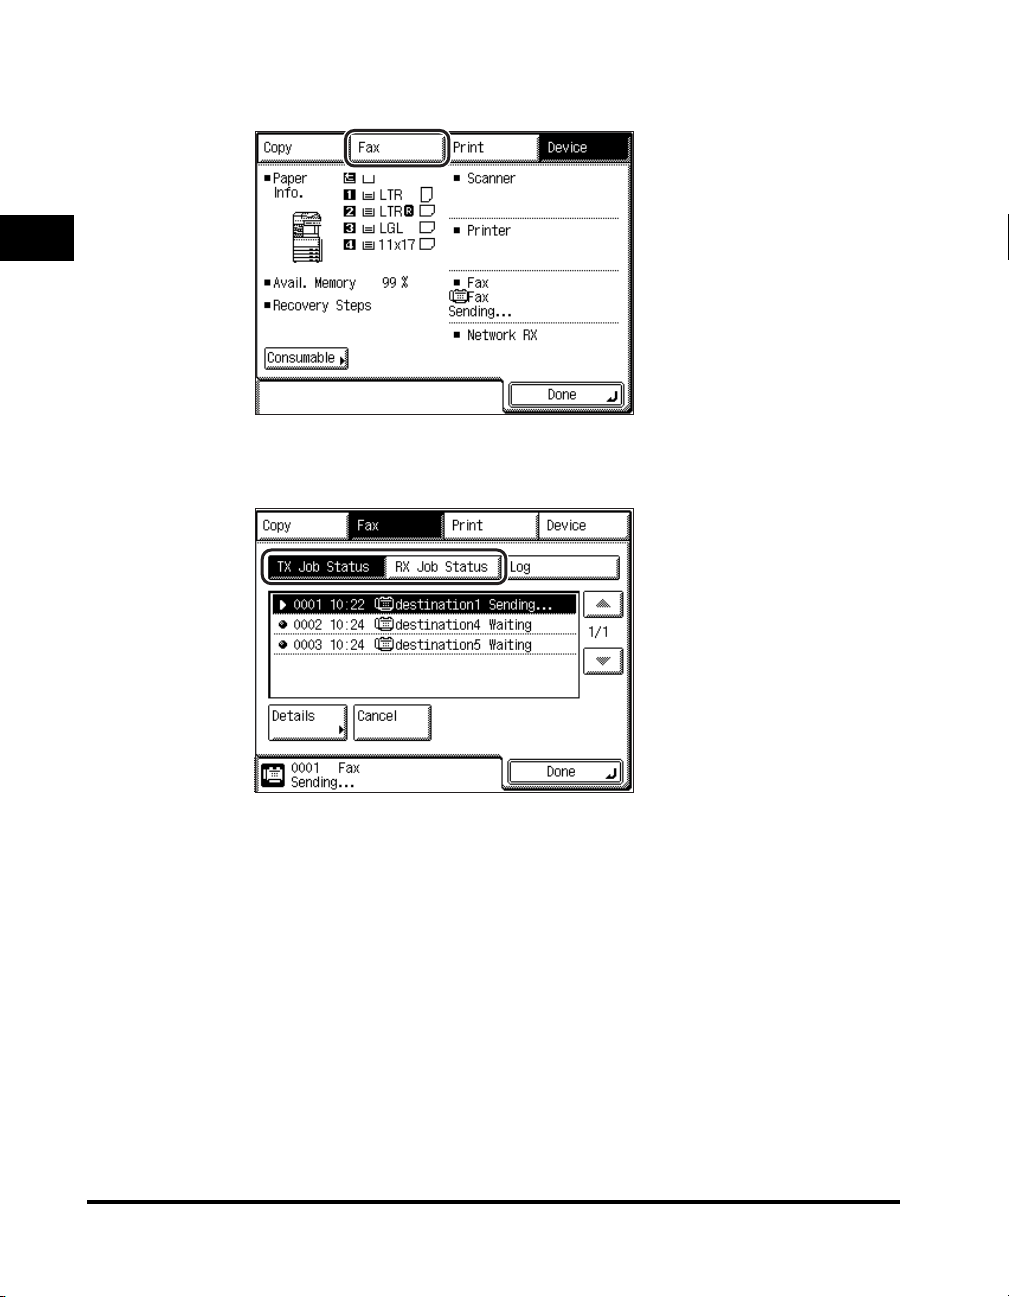
2
Press [Fax].
1
3
Introduction to Fax Functions
Select [TX Job Status] or [RX Job Status].
1-44
Canceling a Job
Page 69
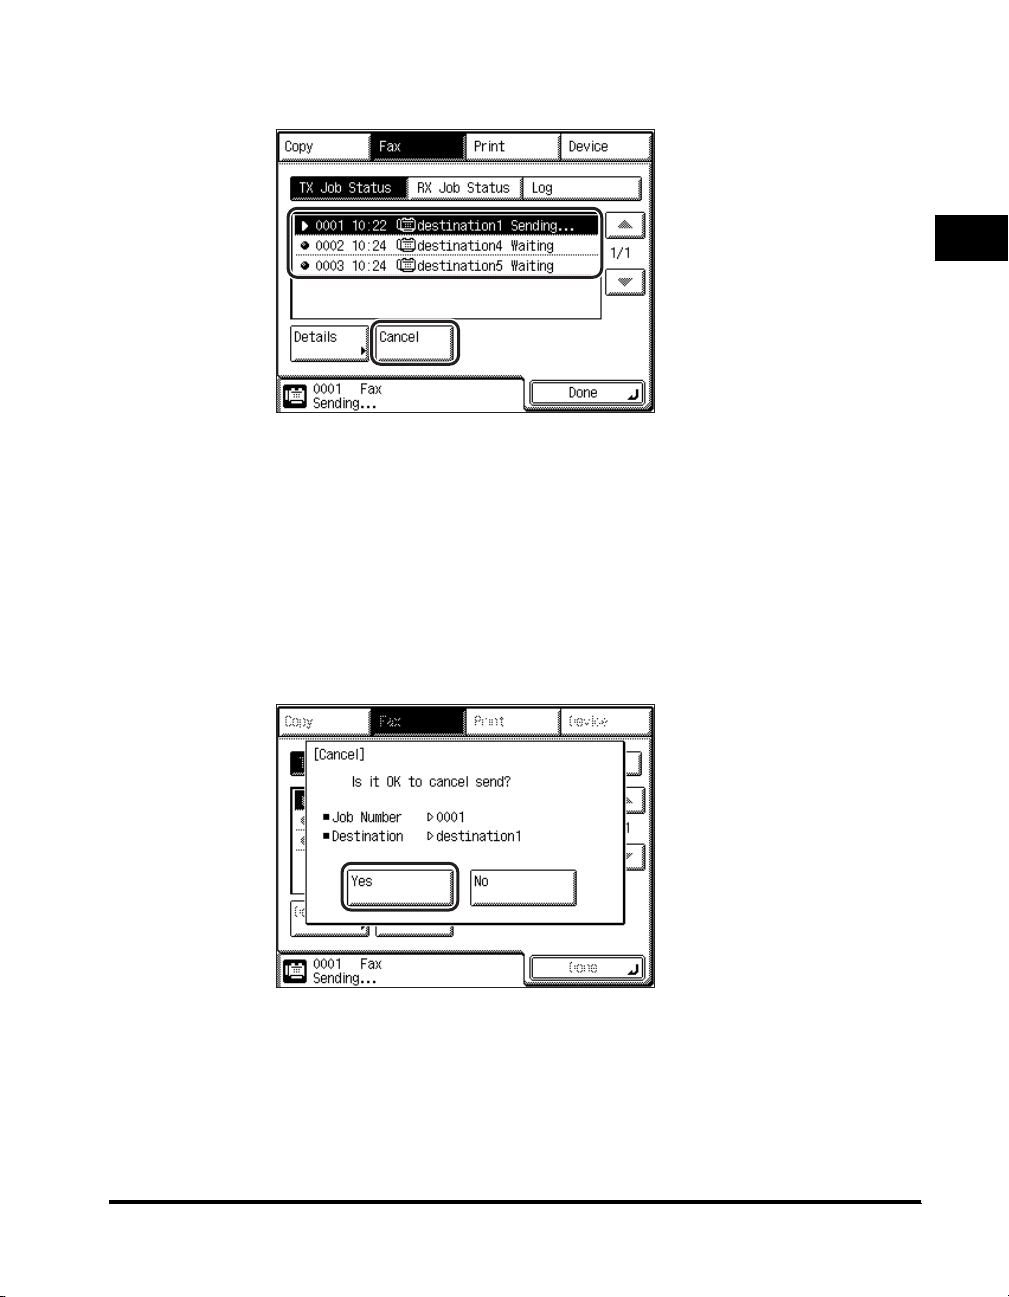
4
Select the fax job that you want to cancel ➞ press [Cancel].
If the job that you want to cancel is not displayed, press [▼] or [▲] to scroll
through the list.
You cannot select multiple jobs and cancel them all at once. Select and cancel
one job at a time.
If a job is in the process of being sent, it may not be canceled even if you press
[Cancel].
The message <Is it OK to cancel?> appears on the touch panel display.
5
Press [Yes].
1
Introduction to Fax Functions
If you do not want to cancel the job, press [No].
Canceling a Job
1-45
Page 70
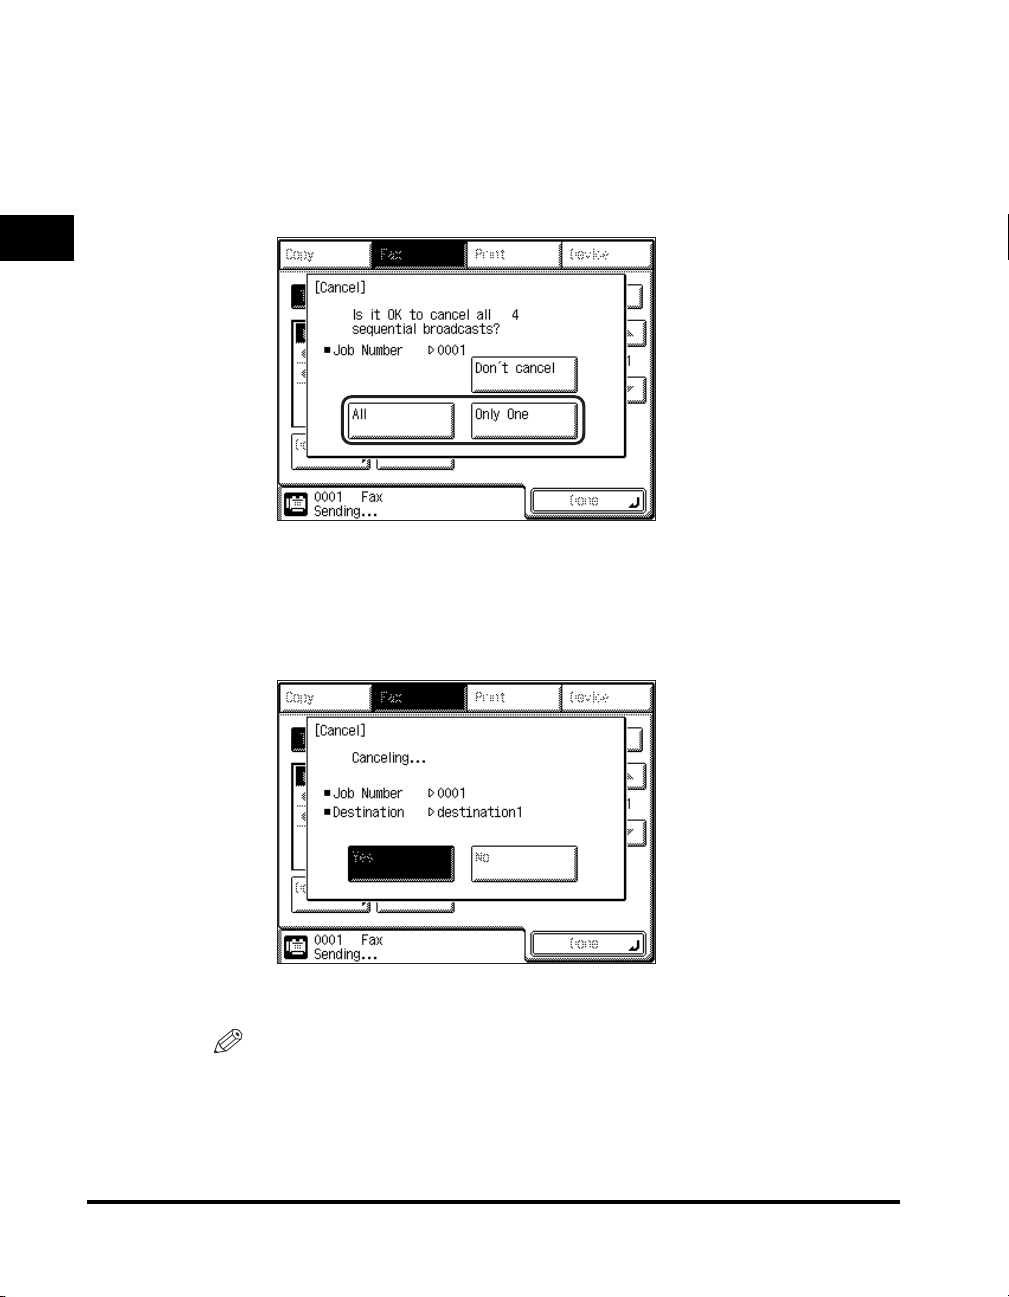
● To cancel a Sequential Broadcast:
Select the Sequential Broadcast job to be canceled ➞ press [Details] ➞
❑
[Broadcast List] to verify the destinations of the fax job.
❑ Press [Done] repeatedly until the Status screen appears ➞ press [Cancel].
❑ Press [All] or [Only One].
1
Introduction to Fax Functions
If you select [Only One], the job that is currently being sent is canceled.
If you do not want to cancel any job of the Sequential Broadcast, press [Don't
cancel].
The message <Canceling...> appears for approximately two seconds on the
touch panel display.
1-46
The fax job is canceled.
NOTE
The canceled job is displayed as <NG> (No Good) on the Log screen.
Canceling a Job
Page 71

6
Press [Done].
The display returns to the Fax Basic Features screen.
1
Introduction to Fax Functions
Canceling a Job
1-47
Page 72

1
Introduction to Fax Functions
1-48
Canceling a Job
Page 73

Basic Send and Receive Methods
This chapter describes the basic methods for sending and receiving documents.
Resolution, Density, and Image Quality . . . . . . . . . . . . . . . . . . . . . . . . . . . . . . . . . . . . . . 2-2
Sending Methods . . . . . . . . . . . . . . . . . . . . . . . . . . . . . . . . . . . . . . . . . . . . . . . . . . . . . . .2-5
Memory Sending . . . . . . . . . . . . . . . . . . . . . . . . . . . . . . . . . . . . . . . . . . . . . . . . . . . . . . . . . . . . .2-5
Direct Sending . . . . . . . . . . . . . . . . . . . . . . . . . . . . . . . . . . . . . . . . . . . . . . . . . . . . . . . . . . . . . . . 2-8
Sending Fax Documents Manually. . . . . . . . . . . . . . . . . . . . . . . . . . . . . . . . . . . . . . . . . . . . . . .2-10
Stamping Originals . . . . . . . . . . . . . . . . . . . . . . . . . . . . . . . . . . . . . . . . . . . . . . . . . . . . . . . . . . .2-14
Dialing Methods . . . . . . . . . . . . . . . . . . . . . . . . . . . . . . . . . . . . . . . . . . . . . . . . . . . . . . . 2-16
Numeric Keys . . . . . . . . . . . . . . . . . . . . . . . . . . . . . . . . . . . . . . . . . . . . . . . . . . . . . . . . . . . . . . .2-16
Redialing. . . . . . . . . . . . . . . . . . . . . . . . . . . . . . . . . . . . . . . . . . . . . . . . . . . . . . . . . . . . . . . . . . . 2-18
Address Book . . . . . . . . . . . . . . . . . . . . . . . . . . . . . . . . . . . . . . . . . . . . . . . . . . . . . . . . . . . . . . .2-19
Coded Speed Dialing . . . . . . . . . . . . . . . . . . . . . . . . . . . . . . . . . . . . . . . . . . . . . . . . . . . . . . . . . 2-24
Group Dialing . . . . . . . . . . . . . . . . . . . . . . . . . . . . . . . . . . . . . . . . . . . . . . . . . . . . . . . . . . . . . . . 2-26
Receiving Print Jobs and Fax Documents . . . . . . . . . . . . . . . . . . . . . . . . . . . . . . . . . . . 2-29
Receiving Documents. . . . . . . . . . . . . . . . . . . . . . . . . . . . . . . . . . . . . . . . . . . . . . . . . . . . . . . . . 2-29
Receiving Documents into Memory . . . . . . . . . . . . . . . . . . . . . . . . . . . . . . . . . . . . . . . . . . . . . .2-31
Forwarding Received Documents. . . . . . . . . . . . . . . . . . . . . . . . . . . . . . . . . . . . . . . . . . . . . . . .2-33
Available Paper Sizes . . . . . . . . . . . . . . . . . . . . . . . . . . . . . . . . . . . . . . . . . . . . . . . . . . . 2-35
2
CHAPTER
2-1
Page 74
Resolution, Density, and Image Quality
To ensure that a received fax document is easy to read, set the resolution, density,
and image quality to match the originals you are sending.
2
Basic Send and Receive Methods
NOTE
•
You can store the most frequently used resolution, density, and image quality settings.
(See "Changing the Standard Fax Settings," on p. 5-14.)
•
If you frequently scan dark, faint, or difficult to see originals, it is recommended that you
set the standard density in advance. (See "Setting the Standard Density," on p. 5-11.)
•
Modes that are specified before sending your originals return to their default settings
when scanning completes or the preset Auto Clear Time is reached.
•
Although originals sent in the Fine, Super Fine, Ultra Fine, Photo, or Text/Photo modes
enhance image clarity, transmission may take longer than if the originals are sent in the
Standard mode.
•
The default settings are:
- Resolution: Standard
- Density: Standard
- Image Quality: Text
■ Resolution
Adjusts the resolution for documents with fine text and thin lines. The higher the
resolution, the higher the output quality, but the scanning speed is slower. The following
settings are available:
2-2
Standard: Use when sending normal, typewritten, or printed documents containing
only text and no drawings, photographs, or illustrations.
Fine: Use for sending originals at twice the detail of the Standard resolution mode.
Super Fine: Use for sending originals at four times the detail of the Standard resolution
mode. If the recipient's machine does not support this mode, the document
is automatically sent in the Fine mode.
Ultra Fine: Use for sending originals at eight times the detail of the Standard resolution
mode. If the recipient's machine does not support this mode, the document
is automatically sent in the Super Fine or Fine mode.
Resolution, Density, and Image Quality
Page 75
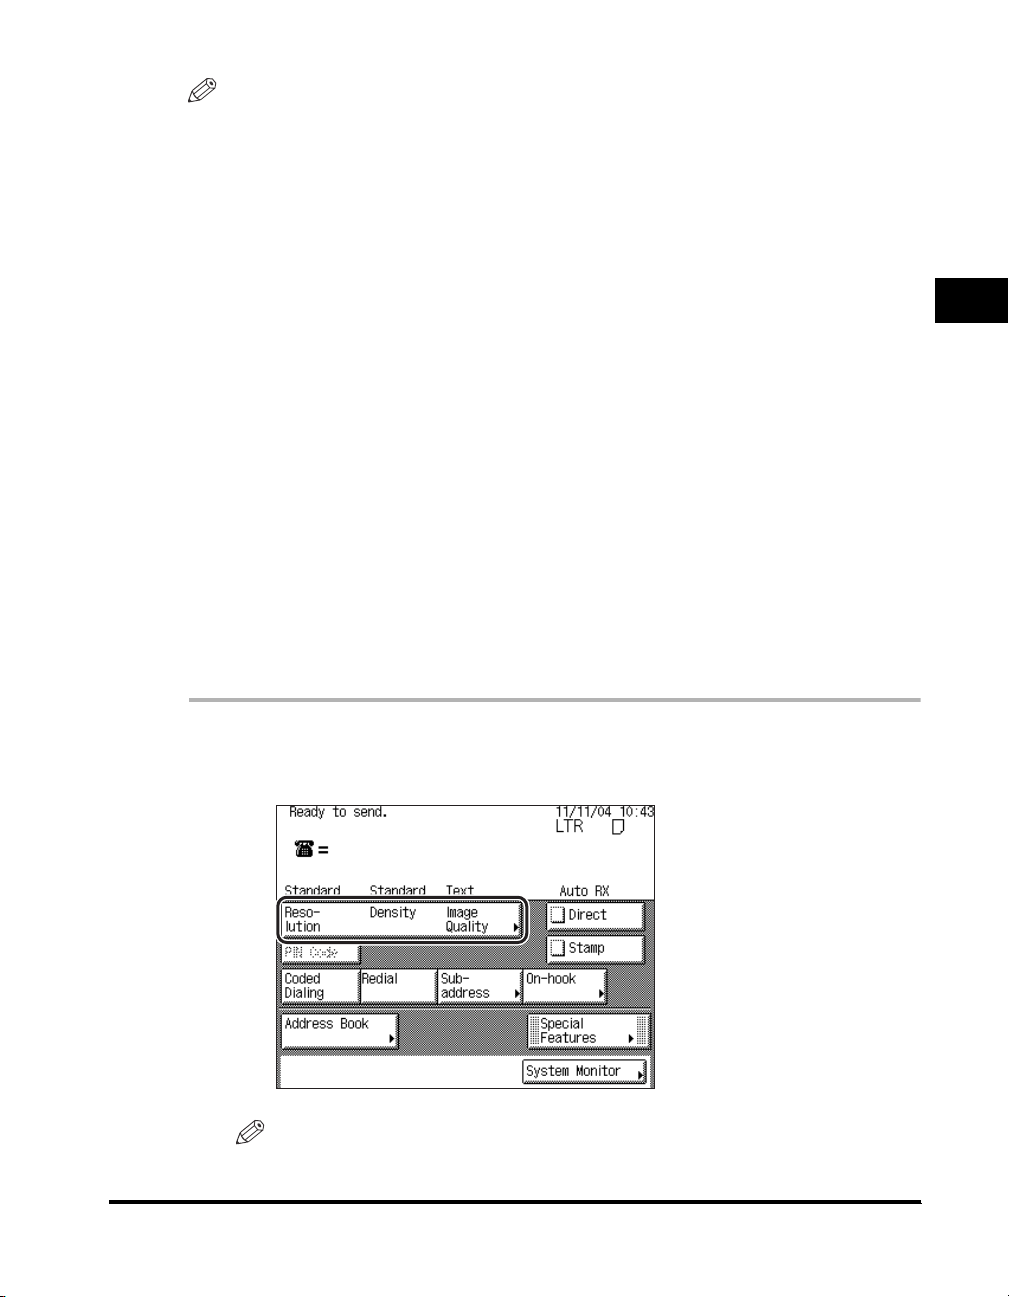
NOTE
•
If you are using the Ultra Fine mode with the Image Quality mode set to 'Photo',
transmission may be slow.
•
If the recipient's machine does not support the Super Fine or Ultra Fine mode, the
document is sent at the set resolution of the recipient's machine.
■ Density
Adjusts the lightness/darkness of originals scanned for sending:
Dark: Use for documents with light text or colors.
Standard: Use for documents with normal, printed, or typewritten text.
Light: Use for documents with dark text or colors.
■ Image Quality
You can manually select the image quality according to the type of original you are
scanning. The following three image quality modes are available:
Text: This mode is best suited for scanning text originals. Blueprints or pencil drawn
originals can also be scanned clearly.
Text/Photo: This mode is best suited for scanning originals containing both text and
images/photos, such as magazines or catalogues.
Photo: This mode is best suited for scanning images printed with halftone dots.
1
Place your originals ➞ press [Resolution/Density/Image
Quality].
2
Basic Send and Receive Methods
NOTE
For instructions on placing your originals, see "Placing Originals," on p. 1-34.
Resolution, Density, and Image Quality
2-3
Page 76
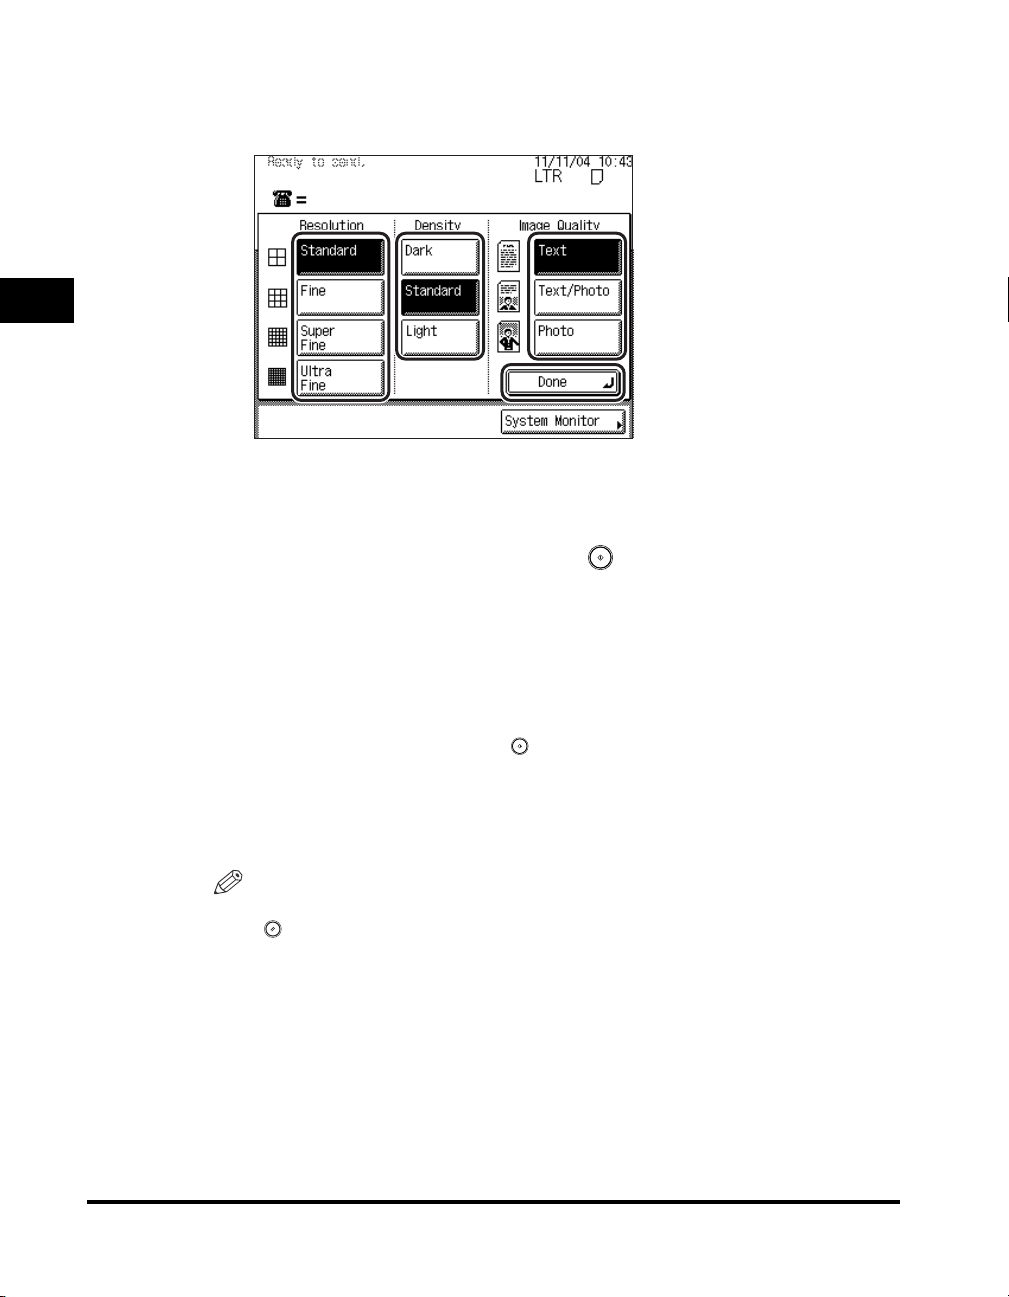
2
Basic Send and Receive Methods
2
Select the resolution, density, and image quality of the
document you are sending ➞ press [Done].
The selected mode is set, and the display returns to the Fax Basic Features
screen.
3
Specify the destination ➞ press (Start).
For more information on specifying the destination, see "Dialing Methods," on p.
2-16.
If you want to specify other sending conditions, set them before specifying the
destination. (See "Sending Methods," on p. 2-5, and Chapter 3, "Special Fax
Functions.")
If the original is placed on the platen glass, follow the instructions that appear on
the touch panel display ➞ press (Start) once for each original. When scanning
is complete, press [Done].
Scanning starts.
The scanned data is sent to the specified destination when scanning is complete.
NOTE
To cancel all settings and return the machine to the Standard mode, press
(Reset).
2-4
Resolution, Density, and Image Quality
Page 77
Sending Methods
This section describes the methods and advantages of Memory Sending and Direct
Sending. It also describes how to stamp sent or scanned originals.
NOTE
If a paper jam occurs in the optional feeder while the original is being scanned,
transmission is canceled. Try scanning again.
■ Memory Sending
Sends the documents after they have been scanned into the machine's memory.
Document scanning and sending is faster. You can start scanning a document for sending
even while the machine is busy performing other tasks.
■ Direct Sending
Sends the documents directly, without storing the data in the machine's memory. Direct
Sending is slower than Memory Sending, but since this method bypasses memory, you
can send a document ahead of other documents stored in memory.
Memory Sending
All of the originals to be sent are first scanned and read into memory, then sent.
This enables you to get your document back quickly so that you do not need to stay
near the machine once the originals have been scanned.
2
Basic Send and Receive Methods
Memory Sending takes place unless Direct Sending is specified.
IMPORTANT
Memory Sending is automatically set when using the Delayed Send mode, or when
multiple destinations are specified.
NOTE
•
The machine can hold a total of approximately 8,000 sent and received pages in
memory.
•
If the memory becomes full, delete unnecessary received documents using the System
Monitor screen. (See Chapter 4, "Checking/Changing the Fax Status.")
Sending Methods
2-5
Page 78
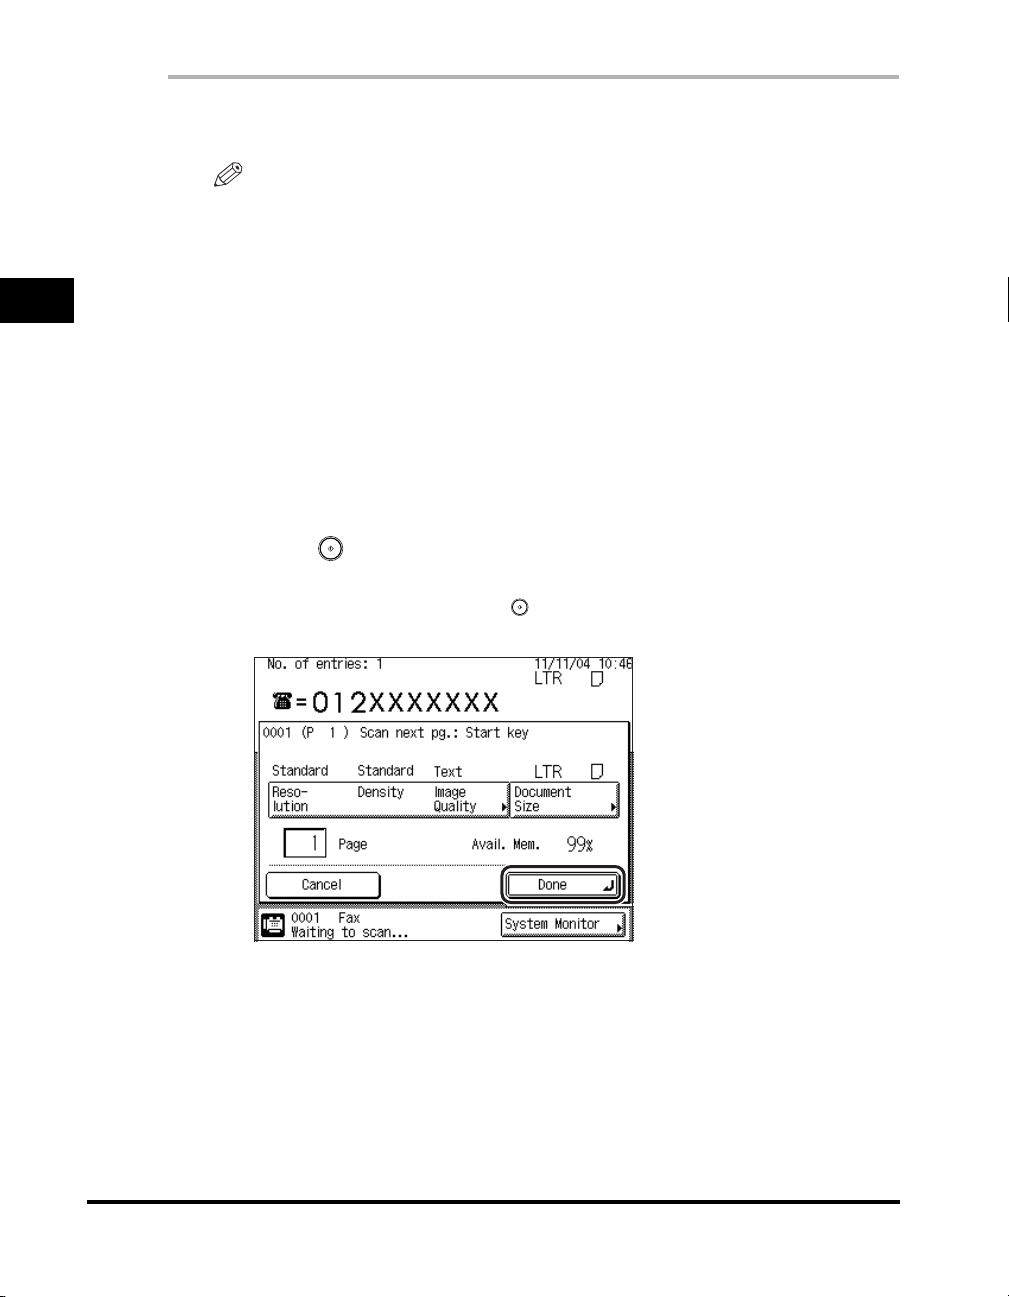
2
Basic Send and Receive Methods
1
Place your originals.
NOTE
For instructions on placing your originals, see "Placing Originals," on p. 1-34.
2
Select the desired send settings.
For instructions on selecting the send settings, see:
• "Resolution, Density, and Image Quality," on p. 2-2
• "Stamping Originals," on p. 2-14
• Chapter 3, "Special Fax Functions"
3
Specify the destination.
For instructions on specifying the destination, see "Dialing Methods," on p. 2-16.
4
Press (Start).
If the original is placed on the platen glass, follow the instructions that appear on
the touch panel display ➞ press (Start) once for each original. When scanning
is complete, press [Done].
2-6
Sending Methods
Page 79
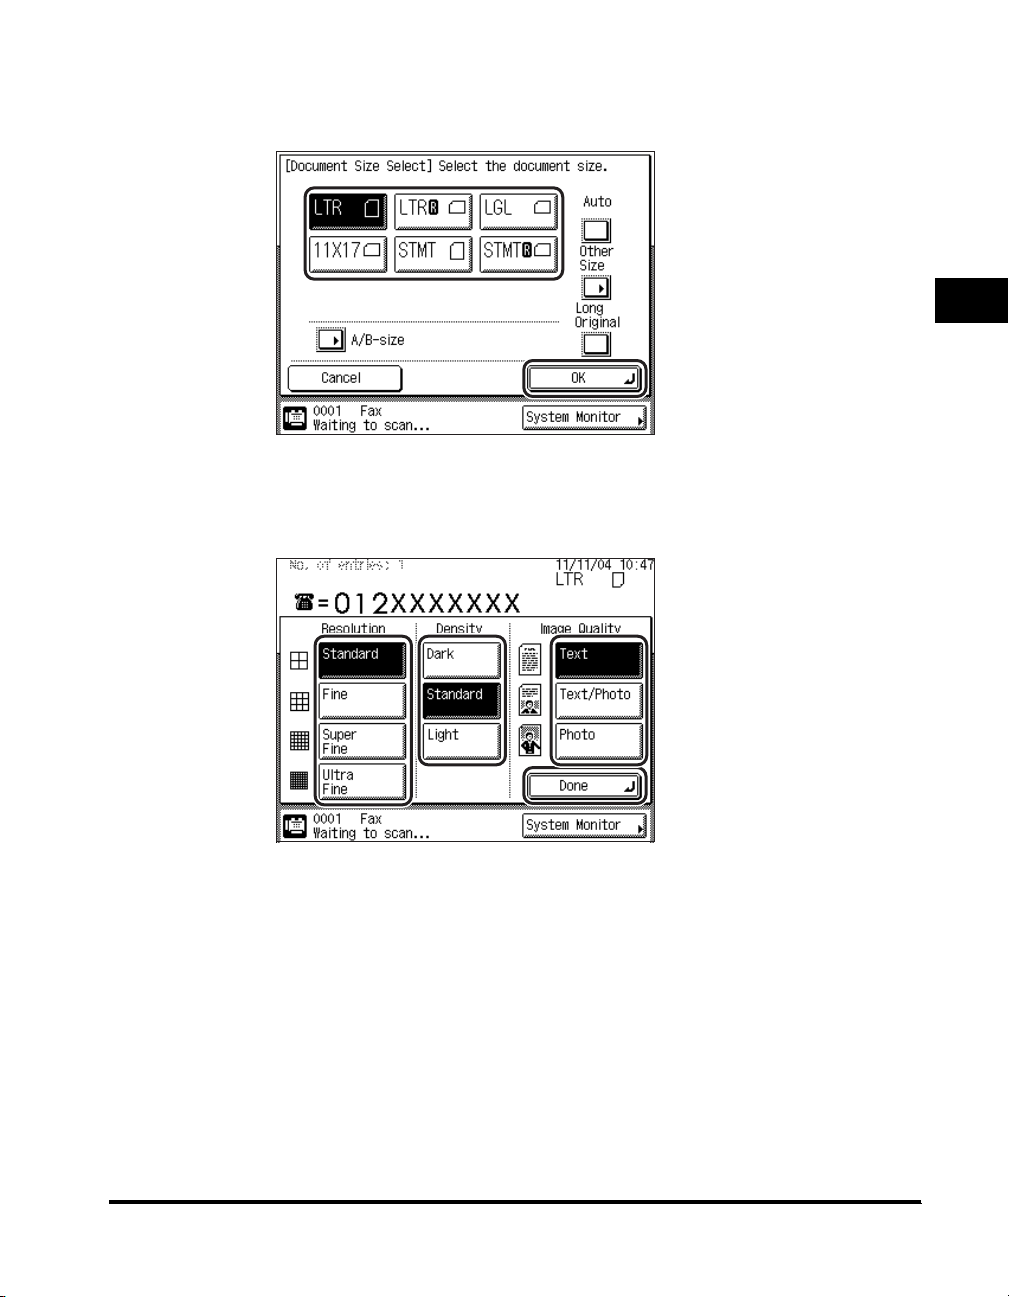
To change the document size from the pop-up screen that appears while the
machine is scanning, press [Document Size] ➞ select the document's size ➞
press [OK].
To change the resolution, density, and image quality of the document while the
machine is scanning, press [Resolution/Density/Image Quality] on the pop-up
screen that appears while the machine is scanning ➞ specify each setting ➞
press [Done].
2
Basic Send and Receive Methods
Scanning starts, and the documents are sent from memory.
The display returns to the Fax Basic Features screen after scanning is complete.
Sending Methods
2-7
Page 80
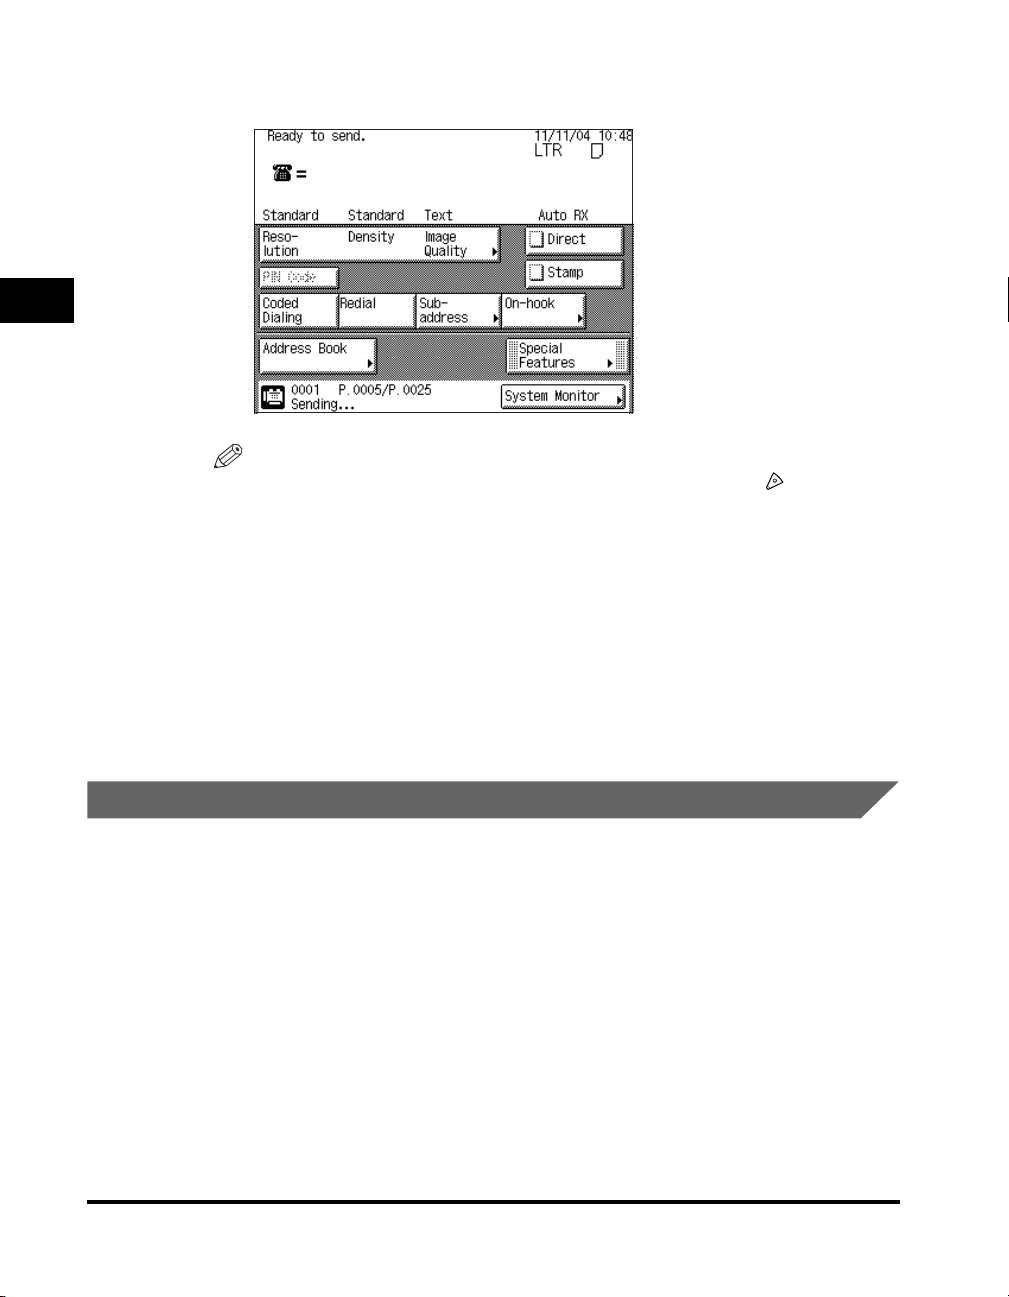
2
Basic Send and Receive Methods
During transmission, the transaction number, destination's telephone number, and
page number currently being sent, are displayed in the Job Monitor area.
NOTE
•
To cancel scanning, press [Cancel] on the touch panel display or (Stop) on the
control panel.
•
The available memory is displayed in the lower right corner of the screen.
•
The transaction number is used for reference when checking the transmission
results, changing the destination, or canceling the fax job. (See "Checking/
Changing the Status of Fax Jobs," on p. 4-2.)
•
If there is no response from the recipient's machine or if a transmission error
occurs, the machine automatically redials the number and attempts to send the
document again. Automatic redialing is carried out twice, at two minute intervals.
(See "Auto Redial," on p. 5-45.)
•
If you cannot send the document after redialing, check the destination's telephone
number. Replace the original, and try sending the document again.
Direct Sending
Direct Sending enables you to send your document directly to the recipient without
storing it in memory. The machine sends each page of the document to the
destination as it is scanned.
Although Direct Sending is slower than Memory Sending, you can use Direct
Sending when you need to send an urgent document ahead of other documents
stored in memory.
2-8
Sending Methods
Page 81
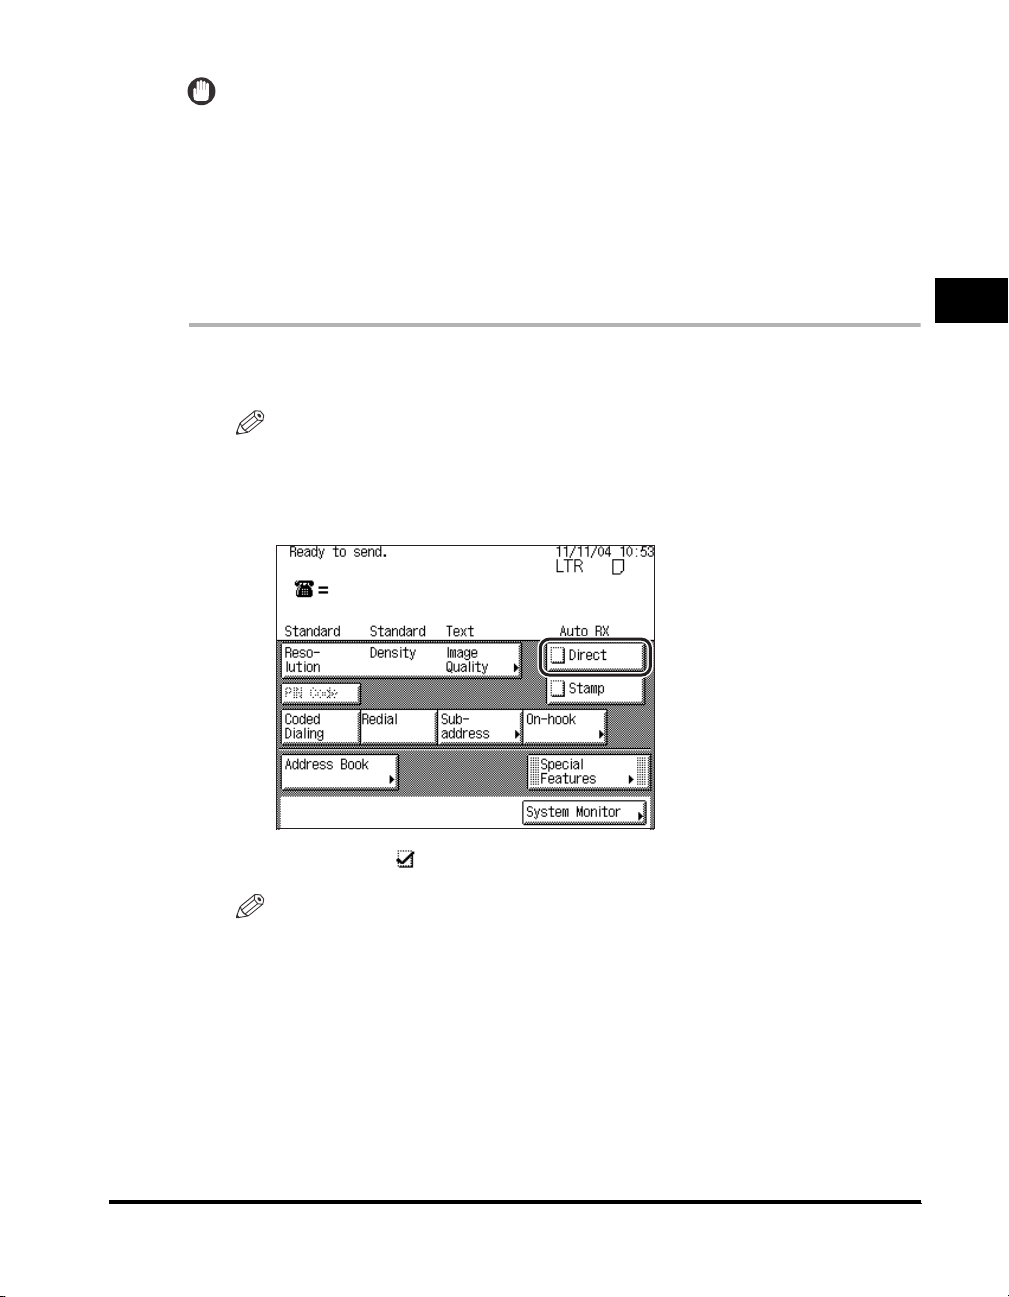
IMPORTANT
•
You can directly send a document of two or more pages only when using the feeder. You
can only send one page at a time when you place your original on the platen glass.
•
You can specify only one destination at a time when using Direct Sending.
•
If an error occurs or you cancel transmission in the Direct Sending mode, you can check
how many pages have been sent to the destination by printing an Activity Report, or on
the Log screen for Fax on the System Monitor screen.
•
If you cancel Direct Sending during transmission, the originals that have already been
scanned are sent.
1
Place your originals.
NOTE
For instructions on placing your originals, see "Placing Originals," on p. 1-34.
2
Make sure the machine is ready to send ➞ press [Direct].
2
Basic Send and Receive Methods
A check mark ( ) appears in the box to the left of [Direct].
NOTE
If you want to cancel Direct Sending, press [Direct] again.
3
Select the desired send settings.
For instructions on selecting the send settings, see:
• "Resolution, Density, and Image Quality," on p. 2-2
• "Stamping Originals," on p. 2-14
• Chapter 3, "Special Fax Functions"
Sending Methods
2-9
Page 82
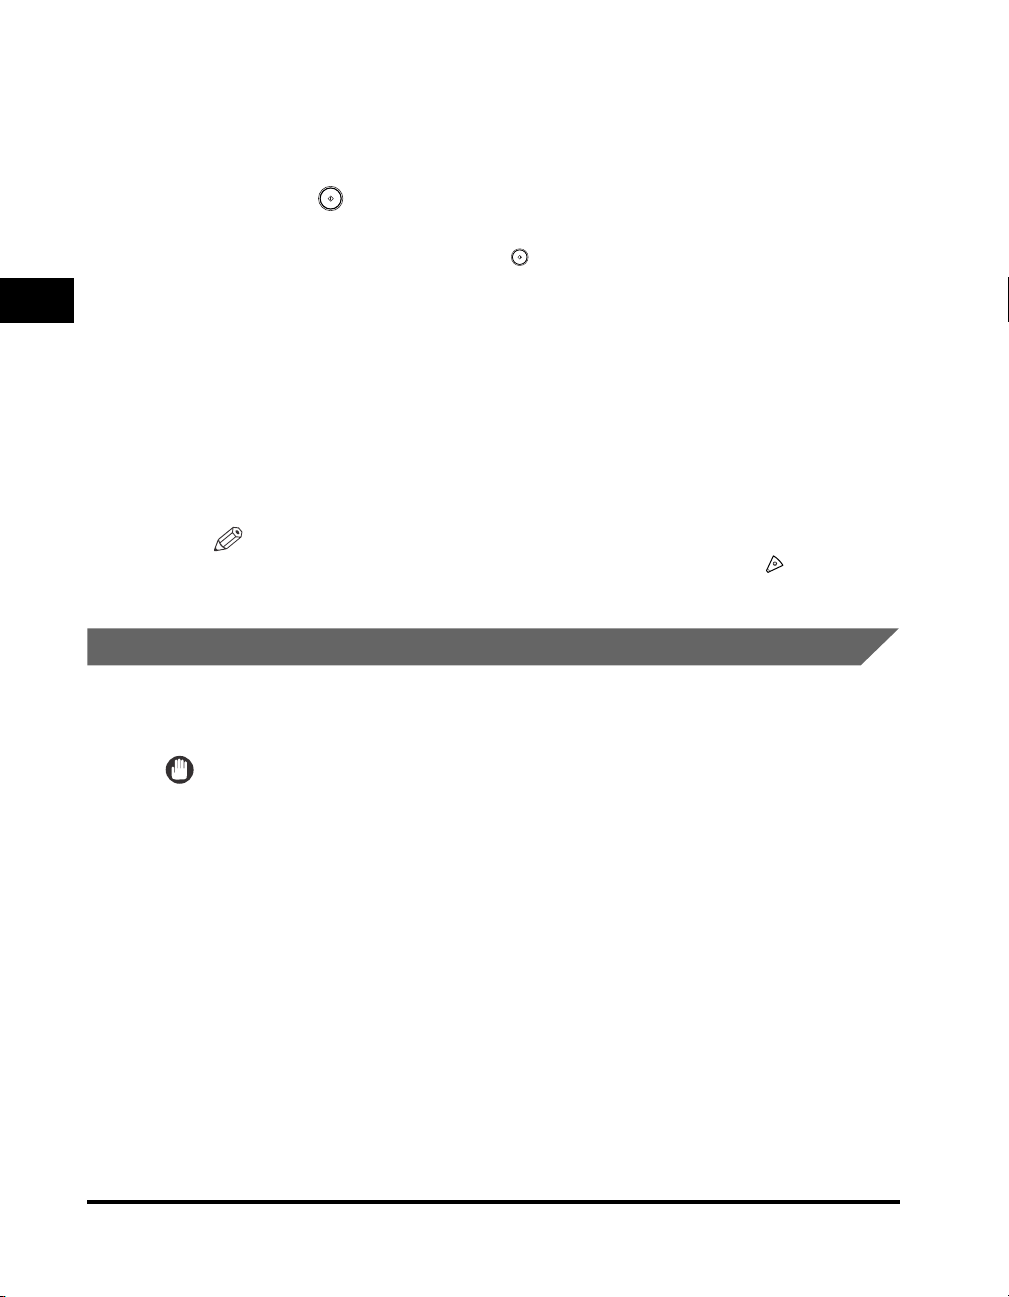
2
Basic Send and Receive Methods
4
Specify the destination.
For instructions on specifying the destination, see "Dialing Methods," on p. 2-16.
5
Press (Start).
If the original is placed on the platen glass, follow the instructions that appear on
the touch panel display ➞ press (Start) once for each original. When scanning
is complete, press [Done].
Scanning starts.
The display returns to the Fax Basic Features screen after your originals are sent.
During transmission, the transaction number, destination's telephone number, and
page number currently being sent are displayed in the Job Monitor area.
If the transmission completes successfully, the message <Transmission OK>
appears in the Job Monitor area for approximately two seconds.
After the original has been sent, Direct Sending is canceled automatically.
NOTE
To cancel scanning, press [Cancel] on the touch panel display or (Stop) on the
control panel.
Sending Fax Documents Manually
2-10
This mode enables you to manually send fax documents after checking that the
destination is ready to receive fax transmissions.
IMPORTANT
•
Manual Sending enables you to send a document consisting of two or more pages only if
you use the optional Feeder (DADF-N1). However, you can only send one page at a time
when you place your originals on the platen glass.
•
If you cancel Manual Sending during transmission, the pages that have already been
scanned are sent. You can check how many pages have been sent to the destination by
printing an Activity Report. See "Activity Report," on p. 7-6.
Sending Methods
Page 83
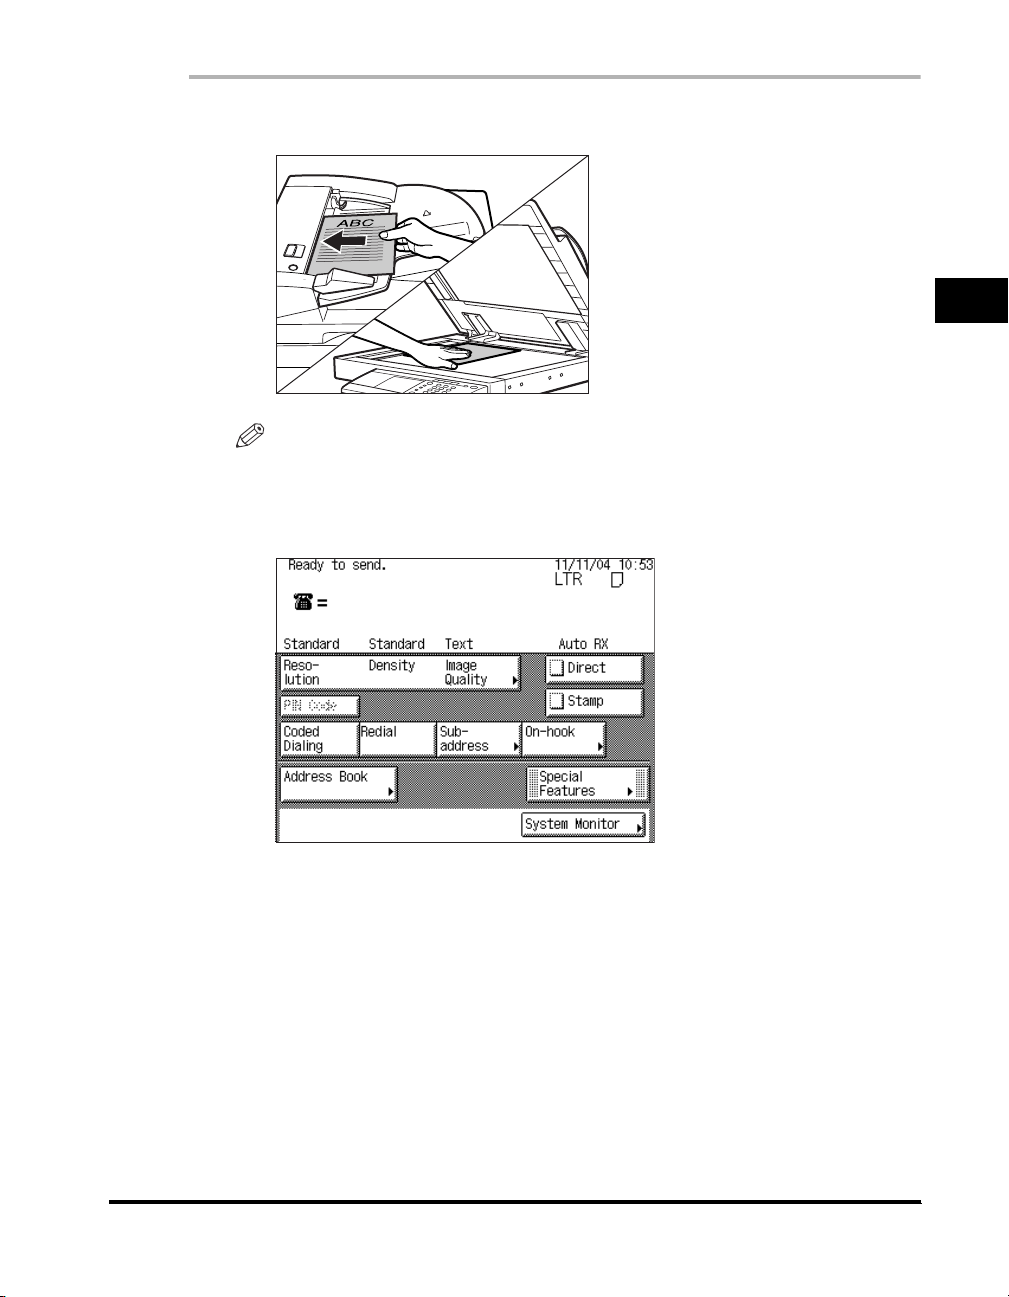
1
Place your originals.
NOTE
For instructions on placing your originals, see "Placing Originals," on p. 1-34.
2
Make sure that the machine is ready to send.
2
Basic Send and Receive Methods
Sending Methods
2-11
Page 84
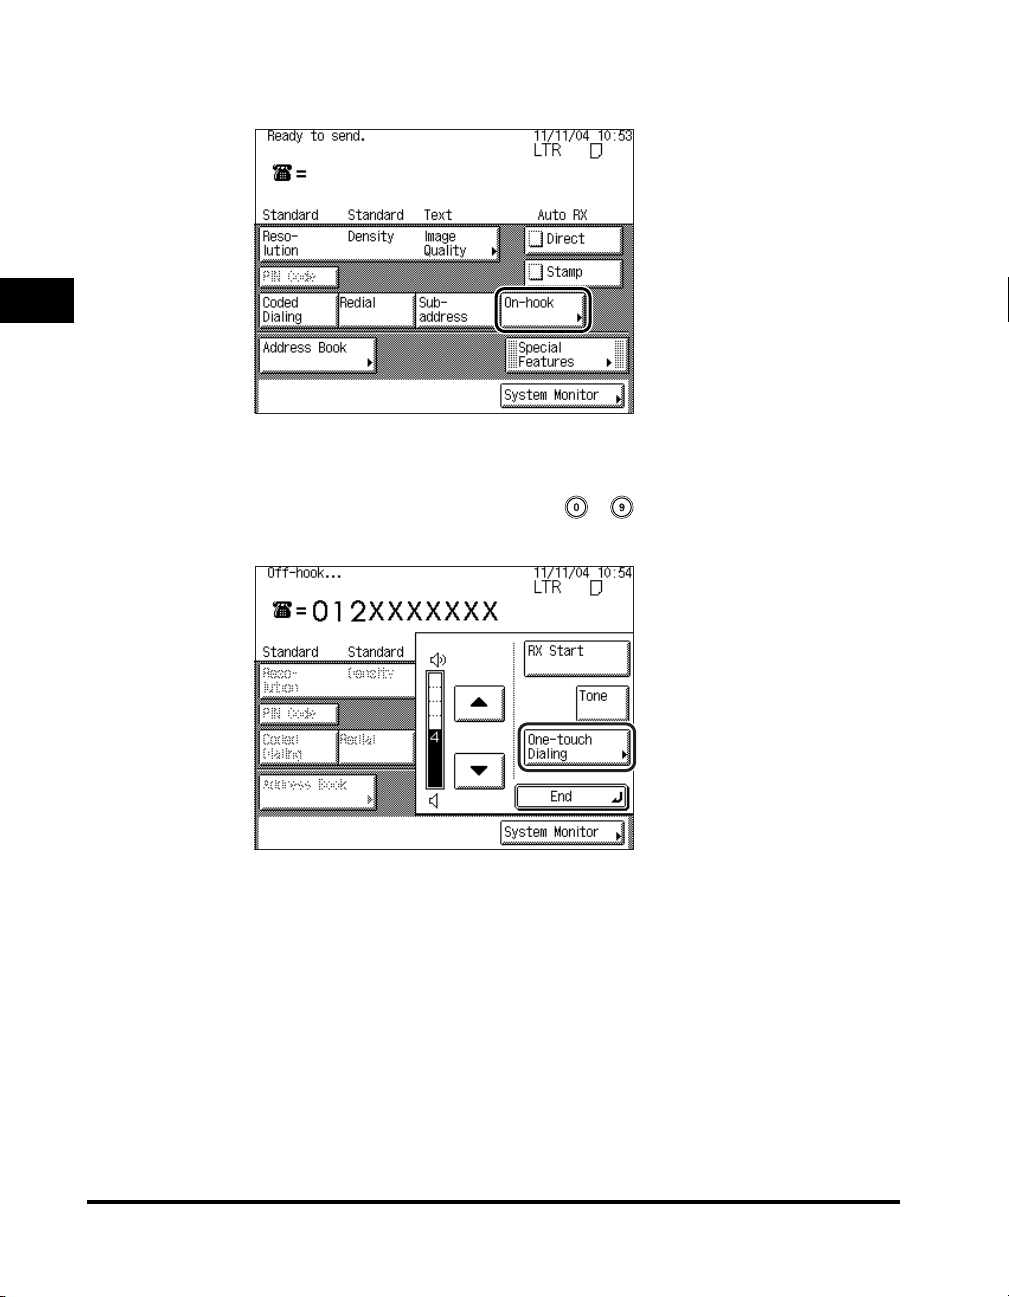
2
Basic Send and Receive Methods
3
Press [On-hook].
You should hear the dial tone.
4
Specify the destination using - (numeric keys) or by
pressing [One-touch Dialing].
2-12
You can enter an extension number after dialing the fax number.
Sending Methods
Page 85
Details of each item are shown below.
3
6
[RX Start]: This key is used only for receiving data from a fax
information service. It is not used when sending. (See
"Fax Information Services," on p. 3-41.)
[Tone]: Press when you want to directly call an extension line
that is connected to a PBX (Private Branch Exchange),
which accepts only tone signals. If you press [Tone], the
letter <T> appears. (See "Fax Information Services," on
p. 3-41.)
< > or < >:
[One-touch Dialing]: Press to specify destinations using the one-touch
NOTE
•
You can change settings for Resolution, Density, and Image Quality before you
start sending. (See "Resolution, Density, and Image Quality," on p. 2-2).
•
To cancel Manual Sending, press [End].
Press [▼] (reduce) or [▲] (increase) to adjust the
volume of the dial tone.
buttons. (See "Address Book," on p. 2-19.)
2
5
When you hear the other party or carrier signal (a high-pitched
Basic Send and Receive Methods
tone), press (Start).
Scanning starts and the document is sent.
During the transmission, the transaction number, destination's telephone number,
and page number are displayed in the Job Monitor area.
Sending Methods
2-13
Page 86
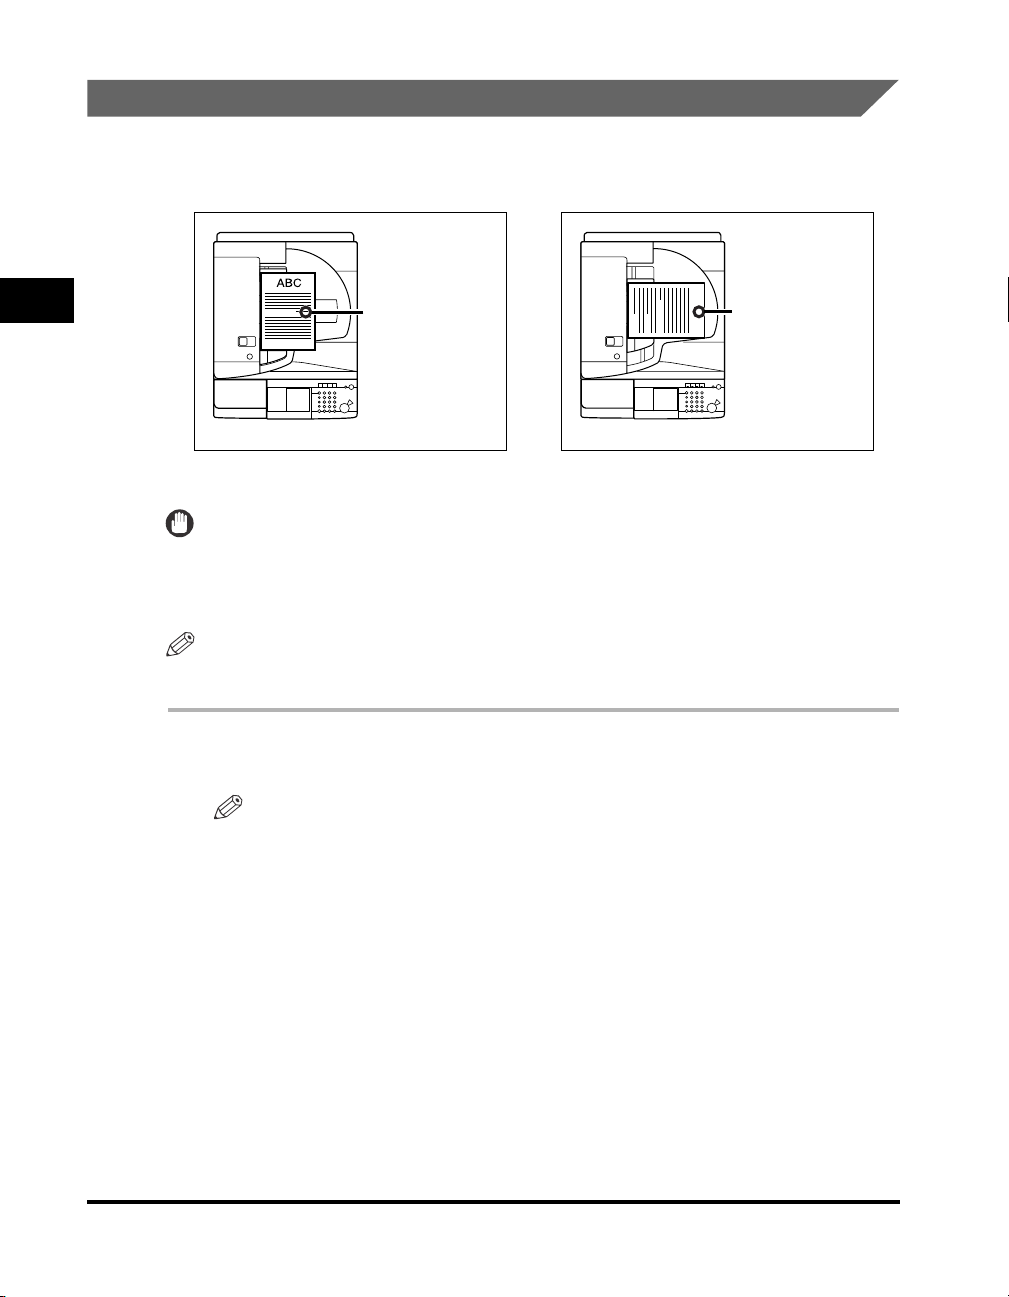
Stamping Originals
The machine can print a stamp (approximately 1/8" (3 mm) in diameter) on the front
side of scanned originals.
2
Basic Send and Receive Methods
ABC
Position at which
stamp is applied.
Vertical placement
Horizontal placement
Position at which
stamp is applied.
IMPORTANT
•
The Stamp mode cannot be used with the Document Size (Other Size) mode.
•
The Stamp mode cannot be used when sending a fax document in the Direct Sending
mode.
NOTE
The Stamp mode can be set only if the optional Feeder (DADF-N1) is attached.
1
Place your originals into the feeder.
NOTE
For instructions on placing your originals, see "Placing Originals," on p. 1-34.
2-14
Sending Methods
Page 87
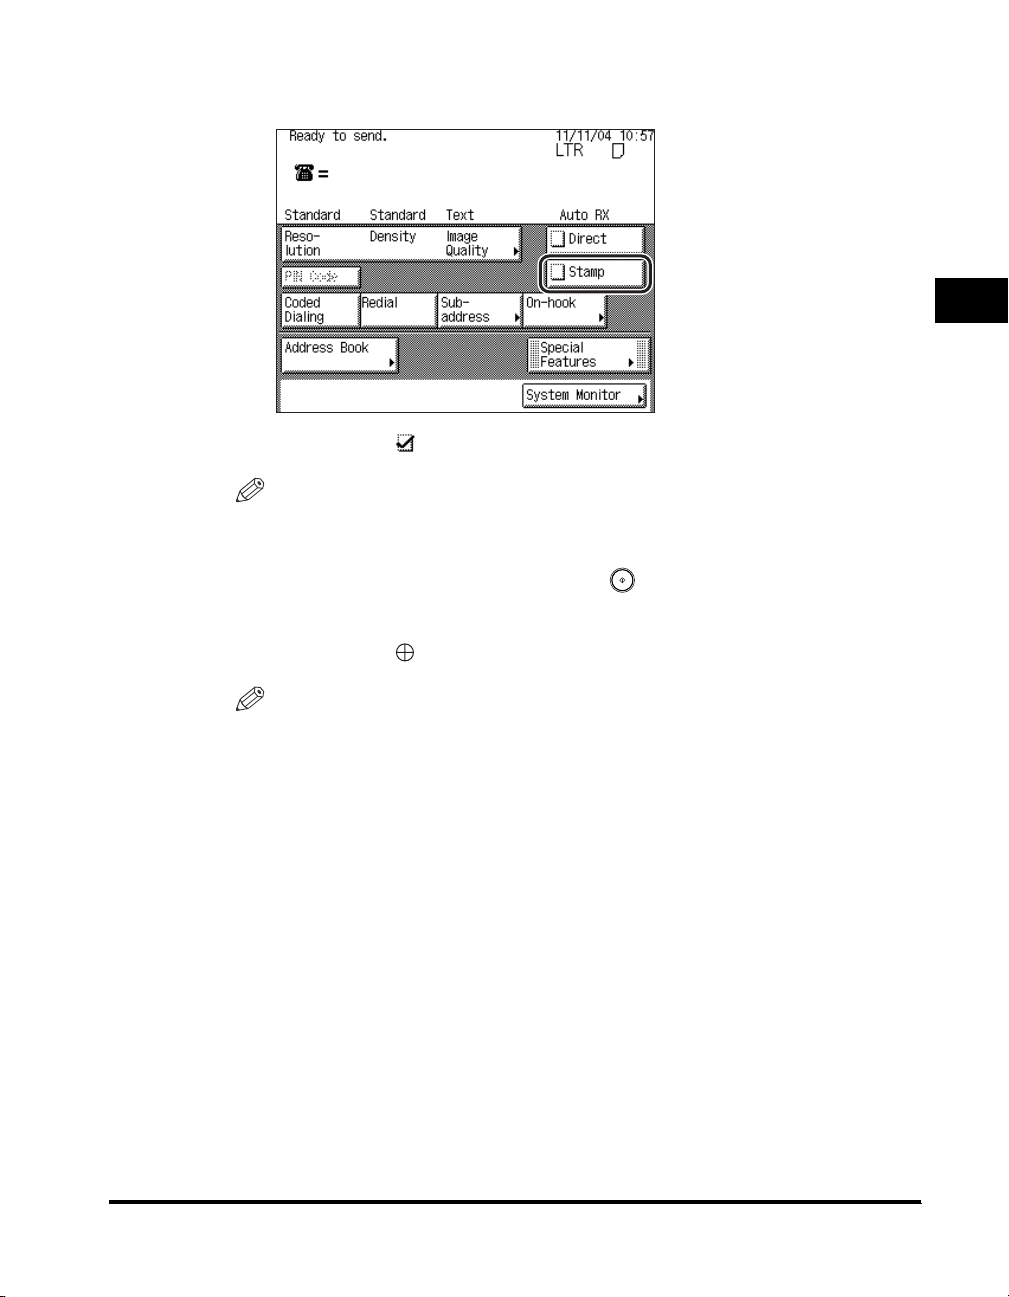
2
Make sure the machine is ready to send ➞ press [Stamp].
A check mark ( ) appears in the box to the left of [Stamp].
NOTE
To cancel the Stamp mode, press [Stamp] again.
3
Specify the destination ➞ press (Start).
Scanning starts.
A stamp mark ( ) appears on the original.
NOTE
•
For instructions on specifying the destination, see "Dialing Methods," on p. 2-16.
•
If the stamp is not marked clearly, see Chapter 7, "Routine Maintenance," in the
Reference Guide
.
2
Basic Send and Receive Methods
Sending Methods
2-15
Page 88
Dialing Methods
This machine provides you with four ways to specify the fax destination:
2
Basic Send and Receive Methods
■ Using the Numeric Keys
You can specify one or more destinations using - (numeric keys).
■ Redialing
You can specify the last destination that was dialed with - (numeric keys) by
pressing [Redial] on the Fax Basic Features screen.
■ Using Coded Speed Dialing
You can specify one or more destinations by pressing [Coded Dialing] on the Fax Basic
Features screen followed by a three digit code.
■ Using the Address Book
Specify the destination by pressing [Address Book] on the Fax Basic Features screen,
and select a destination from the Address Book.
Numeric Keys
You can dial the fax number of one or more recipients using - (numeric keys)
on the control panel.
IMPORTANT
If Restrict New Addresses in System Settings (from the Additional Functions screen) is
set to 'On' when the machine is in the System Management mode, you cannot specify a
destination using - (numeric keys).
2-16
1
Place your originals.
NOTE
Dialing Methods
For instructions on placing your originals, see "Placing Originals," on p. 1-34.
Page 89
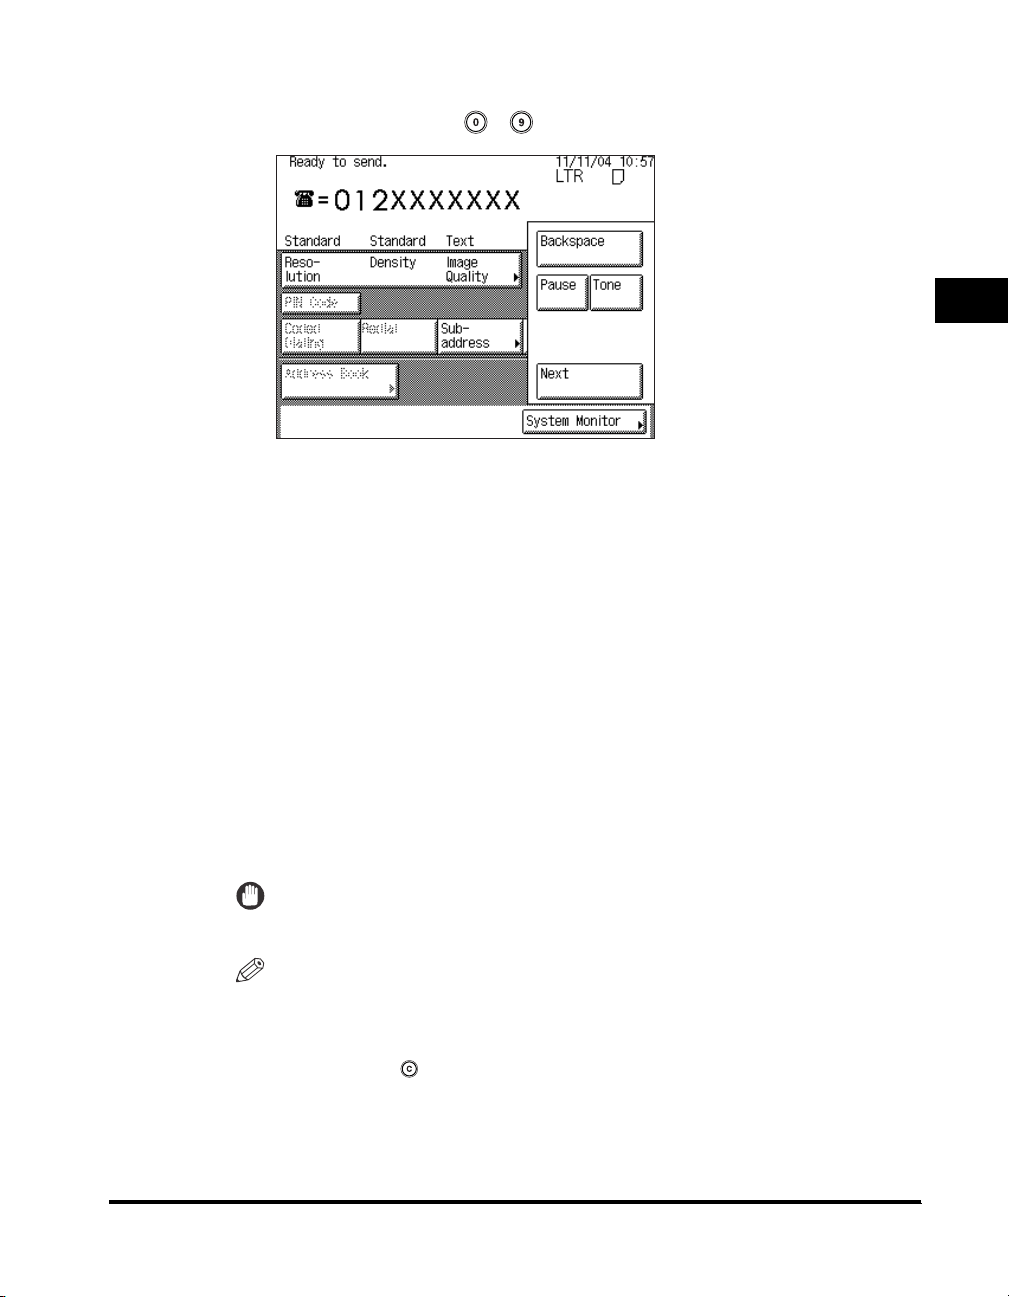
2
Make sure the machine is ready to send ➞ enter the recipient's
fax number using - (numeric keys).
Details of each item are shown below.
[Backspace]: Press to delete the last number entered.
[Pause]: Press to insert a pause of several seconds in the fax number that
you are dialing. If you insert a pause within the fax number, the
letter <p> is displayed between the numbers. If you insert a
pause at the end of the fax number, the letter <P> appears.
When dialing an overseas number, insert a pause after the
country code, and at the end of the fax number. (See "Pause
Time," on p. 5-43.)
2
Basic Send and Receive Methods
[Tone]: Press when you want to directly call an extension line that is
connected to a PBX (Private Branch Exchange), which accepts
only tone signals. If you press [Tone], the letter <T> appears.
(See "Fax Information Services," on p. 3-41.)
[Next]: Press to specify another destination after specifying the first
destination using the numeric keys.
IMPORTANT
You cannot insert a pause at the beginning of a number.
NOTE
•
You can enter a maximum of 120 characters for the fax number.
•
If you enter a pause at the end of the number, the pause is always 10 seconds
long.
•
You can press (Clear) to clear your entry.
Dialing Methods
2-17
Page 90
2
Basic Send and Receive Methods
Redialing
Redialing enables you to specify the last destination that was dialed using the
numeric keys. This mode is useful if you are sending several documents to the
same destination.
3
Press (Start).
If the original is placed on the platen glass, follow the instructions that appear on
the touch panel display ➞ press (Start) once for each original. When scanning
is complete, press [Done].
Scanning starts, and the document is sent to the specified destination.
IMPORTANT
If Restrict New Addresses in System Settings (from the Additional Functions screen) is
set to 'On' when the machine is in the System Management mode, you cannot use the
Automatic Redial mode.
NOTE
•
If you specify more than one destination using the numeric keys, you can only redial the
last destination specified.
•
You cannot redial a destination that you specified using One-Touch Speed Dialing or
Coded Speed Dialing.
•
You cannot redial a destination that you specified after pressing [On-hook].
2-18
1
Place your originals.
NOTE
Dialing Methods
For instructions on placing your originals, see "Placing Originals," on p. 1-34.
Page 91
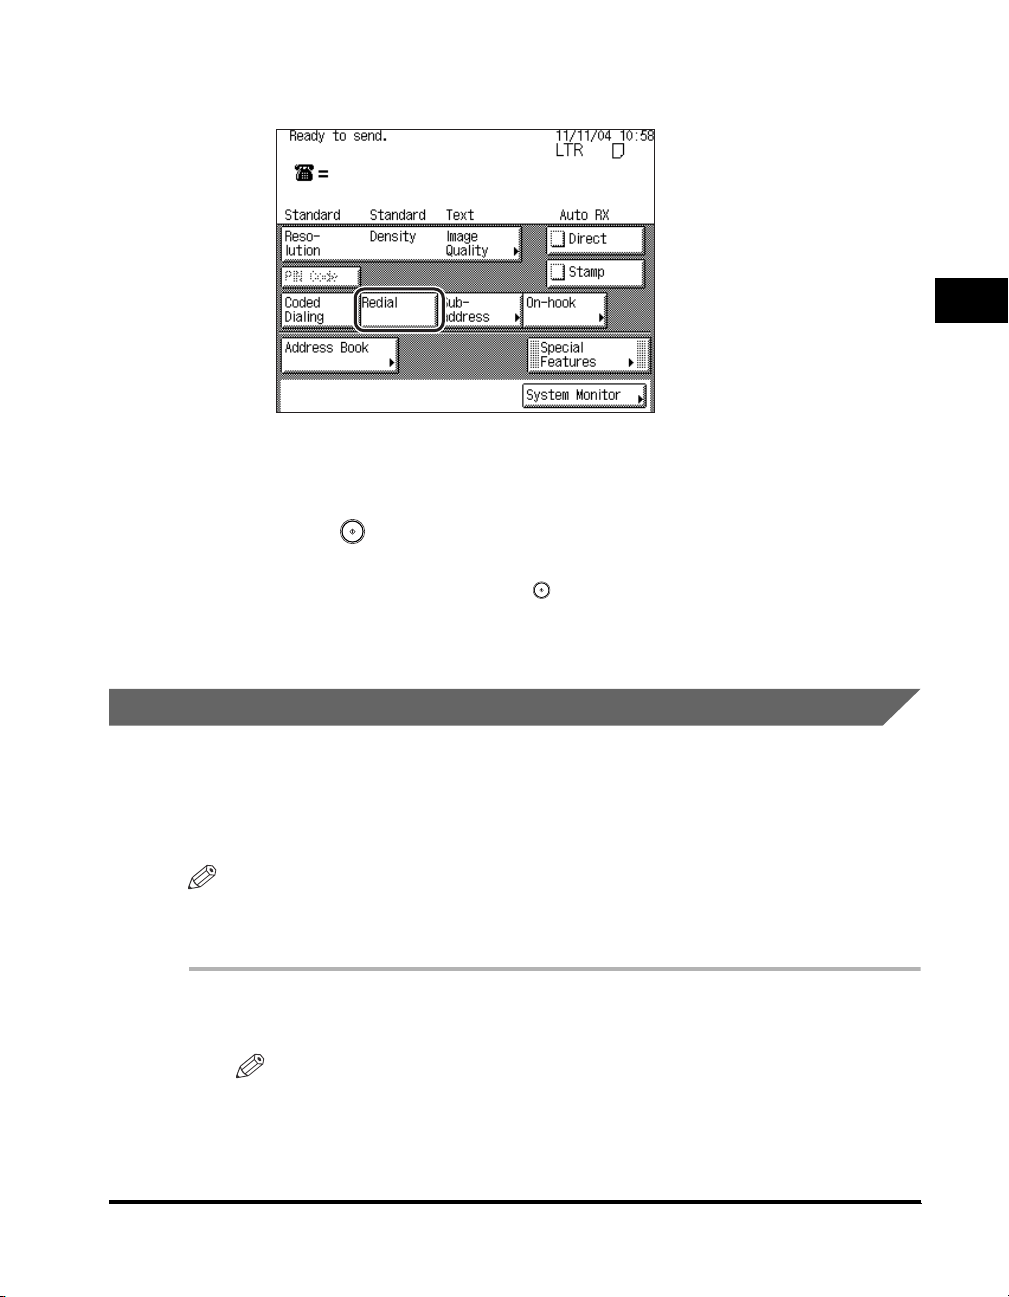
2
Make sure the machine is ready to send ➞ press [Redial].
2
The number that you last dialed using the numeric keys is displayed in the Job
Monitor area.
3
Press (Start).
If the original is placed on the platen glass, follow the instructions that appear on
the touch panel display ➞ press (Start) once for each original. When scanning
is complete, press [Done].
Scanning starts, and the document is sent to the specified destination.
Basic Send and Receive Methods
Address Book
The Address Book is a directory for storing fax destinations. A maximum of 200
destinations can be stored. Storing a destination in the Address Book saves you the
effort of entering frequently used destinations' fax numbers each time you send a
job.
NOTE
•
Destinations must be stored in the address book beforehand.
•
You cannot redial a destination that has been selected from the Address Book.
1
Place your originals.
NOTE
For instructions on placing your originals, see "Placing Originals," on p. 1-34.
Dialing Methods
2-19
Page 92
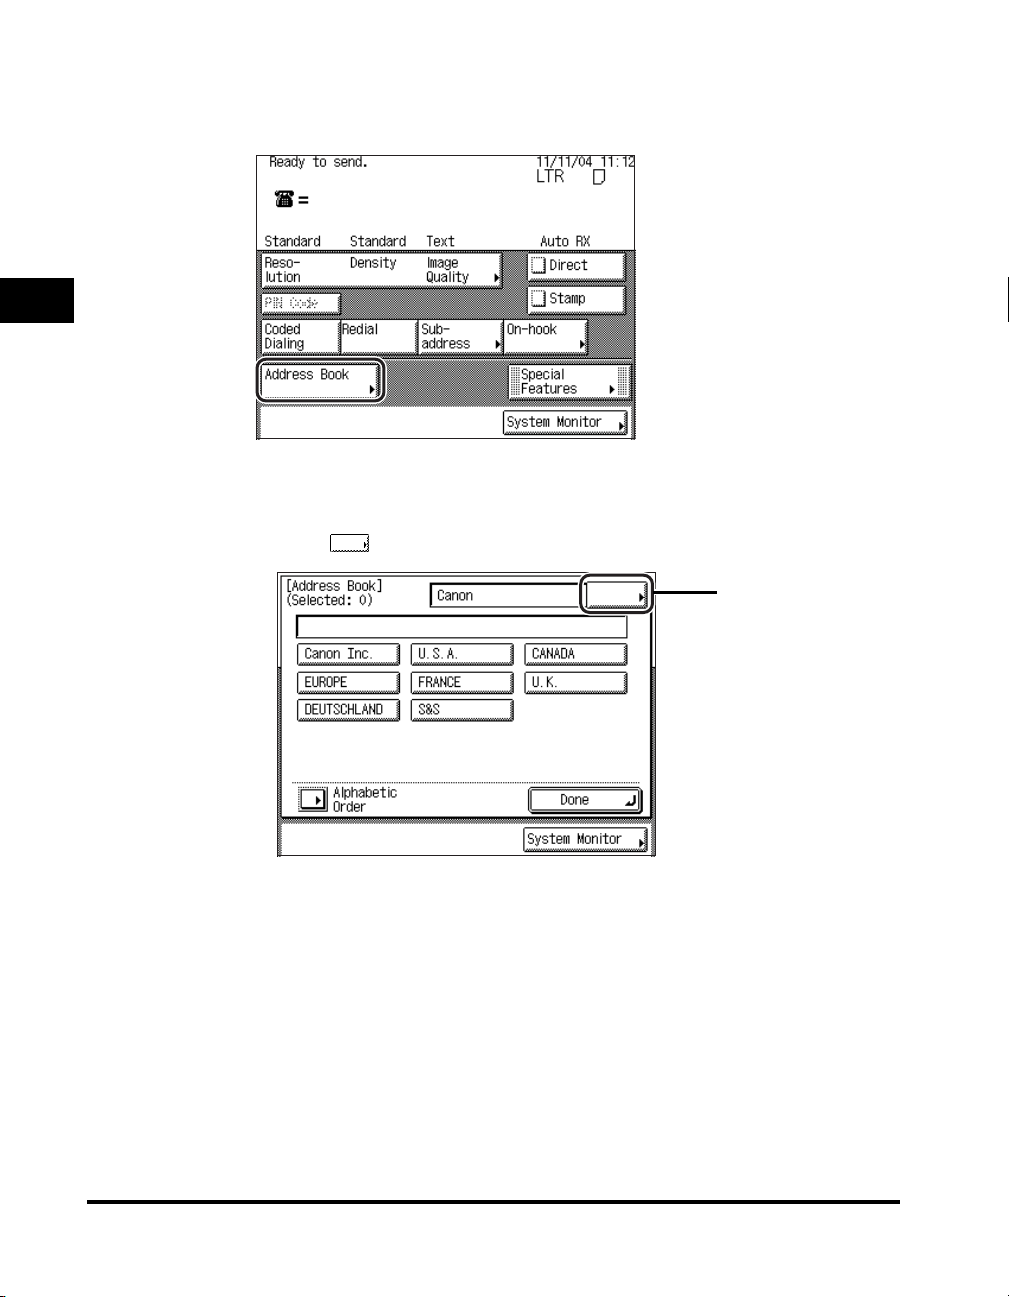
2
Make sure the machine is ready to send ➞ press [Address
Book] ➞ select the destination.
2
● If you want to select the destination using use the One-Touch Speed
Dialing keys:
Press [ ] (Index)
❑
Basic Send and Receive Methods
Index
2-20
Dialing Methods
Page 93
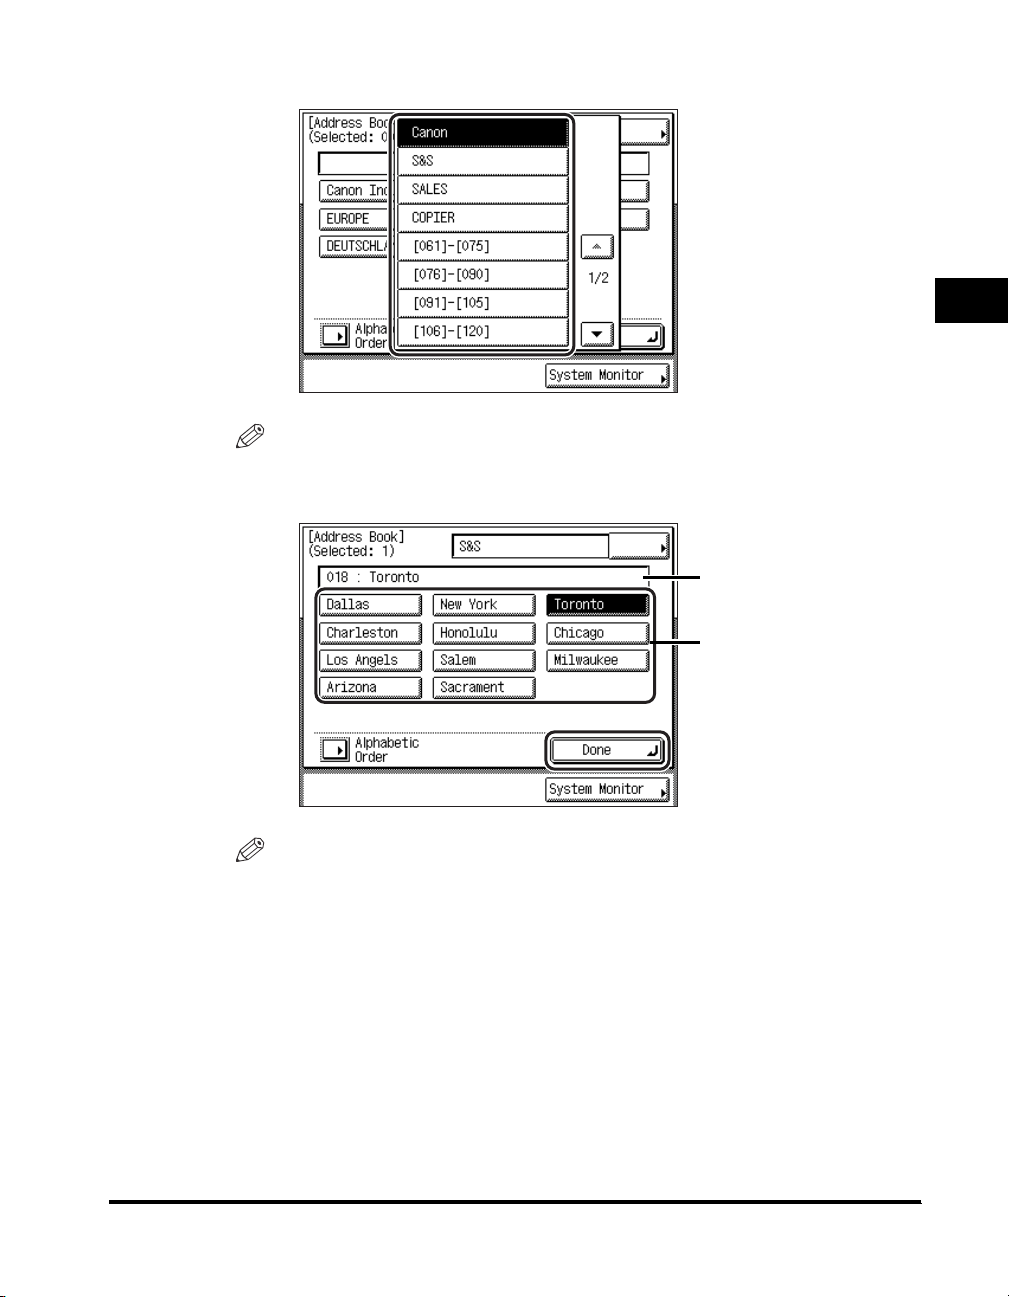
❑ Select the index where the desired destination is stored.
NOTE
If the desired destination is not displayed, press [▼] or [▲] to scroll through the list.
❑ Select the destination ➞ press [Done].
2
Speed Dialing Number
One-Touch Speed
Dialing Keys
NOTE
•
If you want to specify other destinations from the Address Book, repeat the above
procedure.
•
You can change the name of the index. (See "Storing the Index Name," on p. 5-39.)
•
Each index can store up to 15 destinations, except for the last index, which can
store only five destinations. Therefore, the Address Book can store a maximum of
200 destinations.
Basic Send and Receive Methods
Dialing Methods
2-21
Page 94
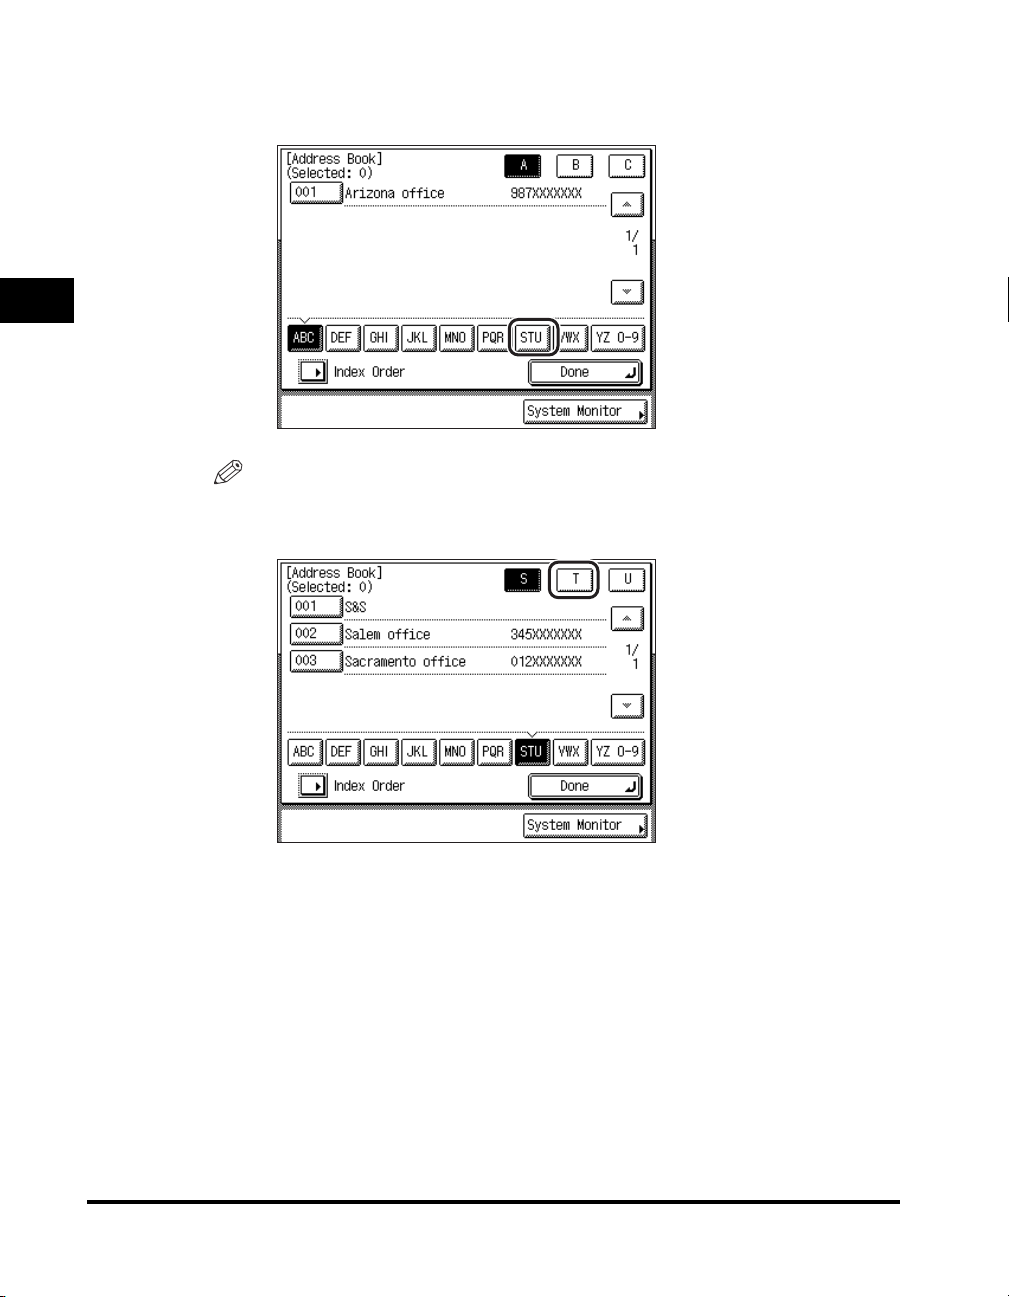
2
Basic Send and Receive Methods
● If you want to select a destination in alphabetical order:
Press [Alphabetic Order] ➞ [STU].
❑
NOTE
The Toronto Office is used as an example for this procedure.
❑ Press [T].
2-22
Dialing Methods
Page 95
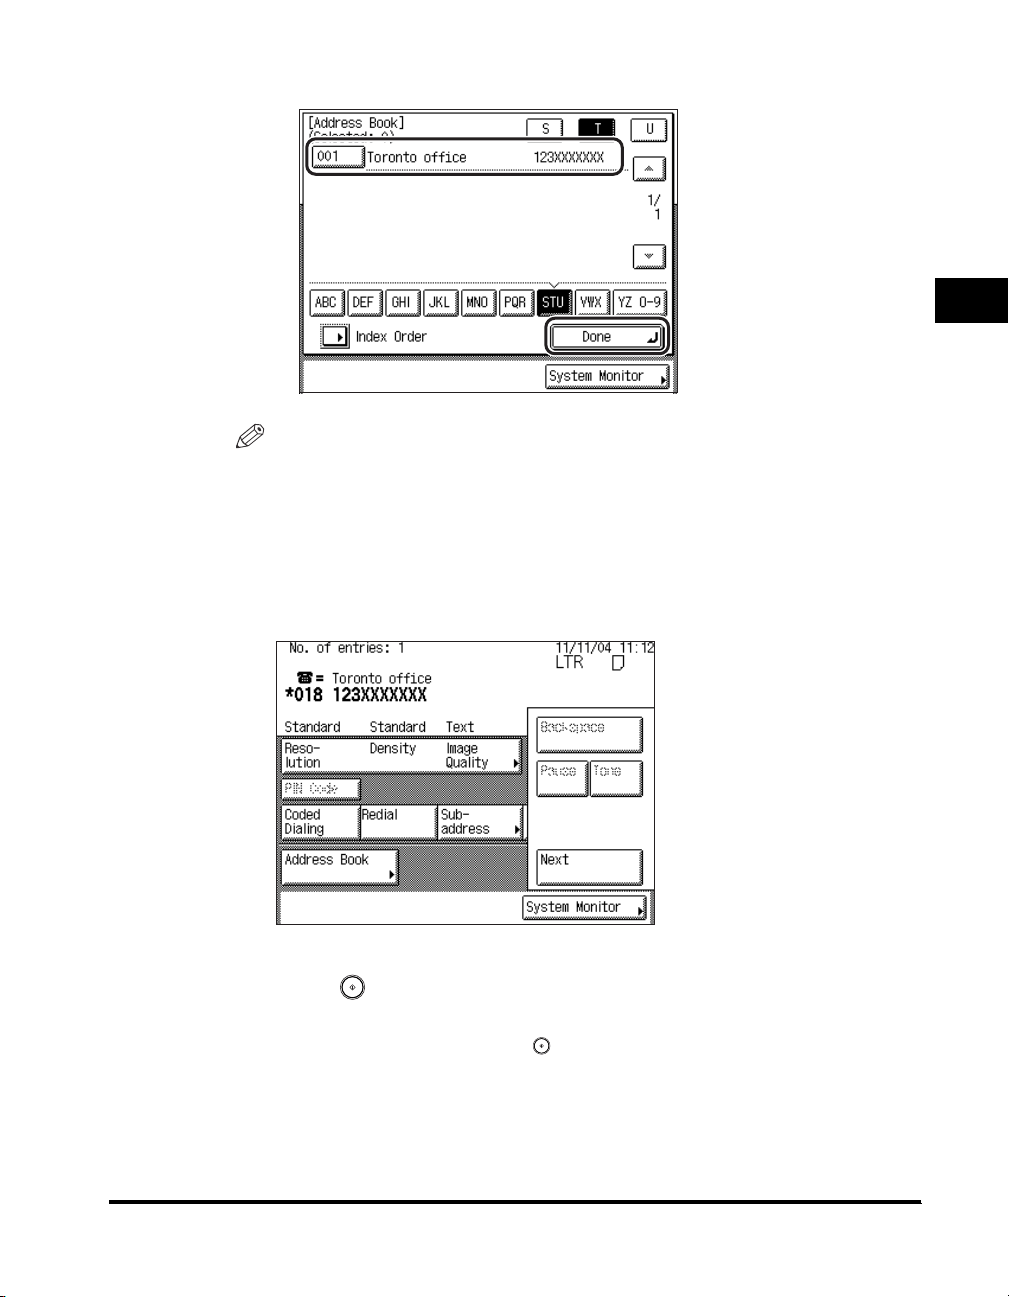
❑ Select the desired destination ➞ press [Done].
NOTE
•
If the desired destination is not displayed, press [▼] or [▲] to scroll to the desired
destination.
•
To display the One-Touch Speed Dialing keys, press [Index Order].
•
If you want to select other destinations in alphabetical order, repeat the above
procedure.
The Fax Basic Features screen appears, and the fax numbers and names of the
selected destinations are displayed.
2
Basic Send and Receive Methods
3
Press (Start).
If the original is placed on the platen glass, follow the instructions that appear on
the touch panel display ➞ press (Start) once for each original. When scanning
is complete, press [Done].
Scanning starts, and the document is sent to the specified destination.
Dialing Methods
2-23
Page 96
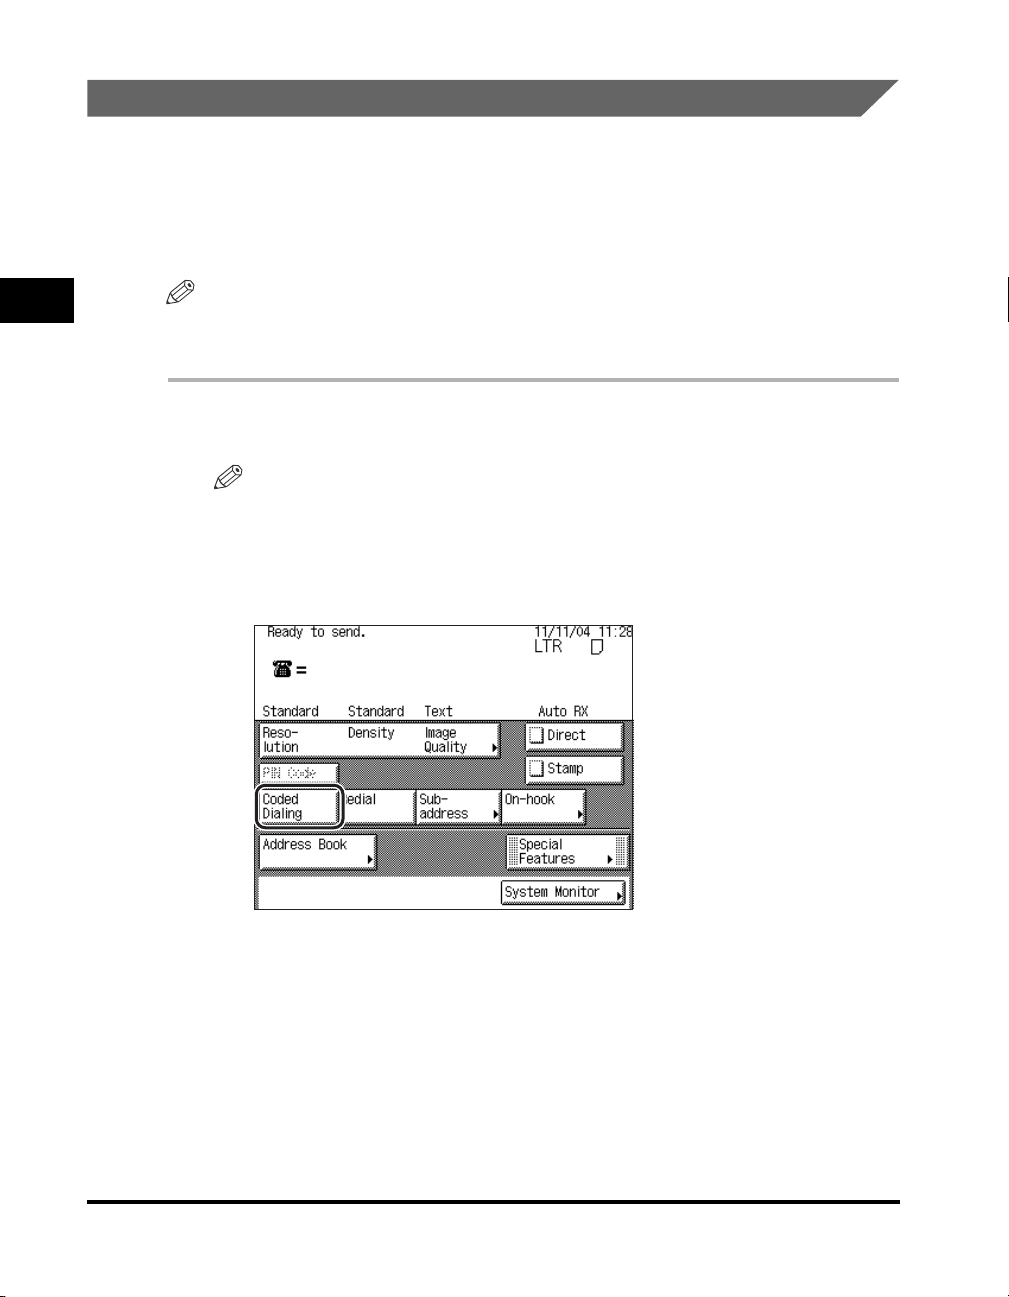
2
Basic Send and Receive Methods
Coded Speed Dialing
Coded speed dialing enables you to start a document transmission by pressing
[Coded Dialing] followed by a three digit code. All coded speed dialing numbers
must be stored in the Address Book beforehand. This enables you to dial other
coded speed dialing numbers, and send the document to a number of destinations
in a single operation.
NOTE
For instructions on storing coded speed dialing numbers, see "Storing Destinations," on
p. 5-19.
1
Place your originals.
NOTE
For instructions on placing your originals, see "Placing Originals," on p. 1-34.
2
Make sure the machine is ready to send ➞ press [Coded
Dialing].
2-24
Dialing Methods
Page 97
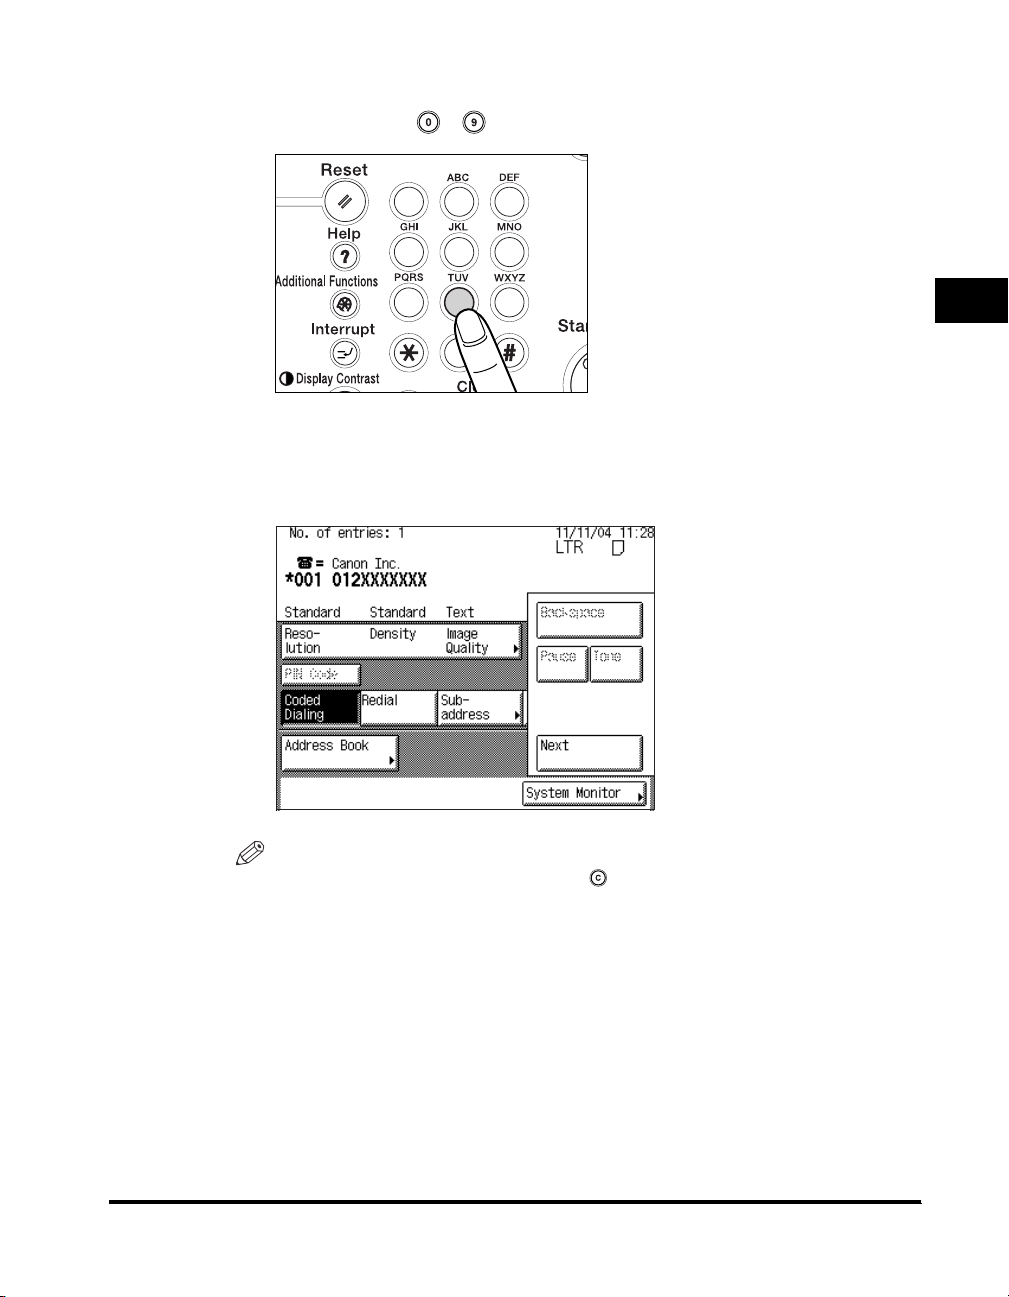
3
Enter the desired three digit coded speed dialing number (001
to 200) using - (numeric keys).
1
2
3
5
4
6
8 9
7
0
If you want to specify other coded speed dialing numbers, repeat steps 1 to 3.
(See "Group Dialing," on p. 2-26.)
The fax number and name of the selected destination appear on the touch panel
display.
NOTE
•
If you enter an incorrect number, press (Clear) ➞ [Coded Dialing] ➞ enter the
correct number.
•
If you do not know the coded speed dialing number under which the recipient's fax
number is stored, you can search for the recipient using the Address Book. (See
"Address Book," on p. 2-19.)
•
If you want to send the same original simultaneously to another destination, press
[Next] ➞ specify the destination.
2
Basic Send and Receive Methods
Dialing Methods
2-25
Page 98
2
Basic Send and Receive Methods
4
Group Dialing
Group Dialing enables you to dial a group of registered one-touch or coded speed
dialing fax numbers. This is useful if you want to send the same document to
several destinations. You can register up to 200 fax numbers in one group.
NOTE
•
Sending a document to a number of destinations at the same time is called "Sequential
Broadcast Sending."
•
A maximum of 256 destinations can be specified at the same time. (Out of the 256
destinations, 64 new destinations can be specified.) If you specify a group, which is made
up of several destinations, each destination in the group is counted as a separate
address.
•
For instructions on registering destinations for group dialing, see "Storing Group
Destinations," on p. 5-33.
Press (Start).
If the original is placed on the platen glass, follow the instructions that appear on
the touch panel display ➞ press (Start) once for each original. When scanning
is complete, press [Done].
Scanning starts, and the document is sent to the specified destination.
2-26
1
Place your originals.
NOTE
Dialing Methods
For instructions on placing your originals, see "Placing Originals," on p. 1-34.
Page 99
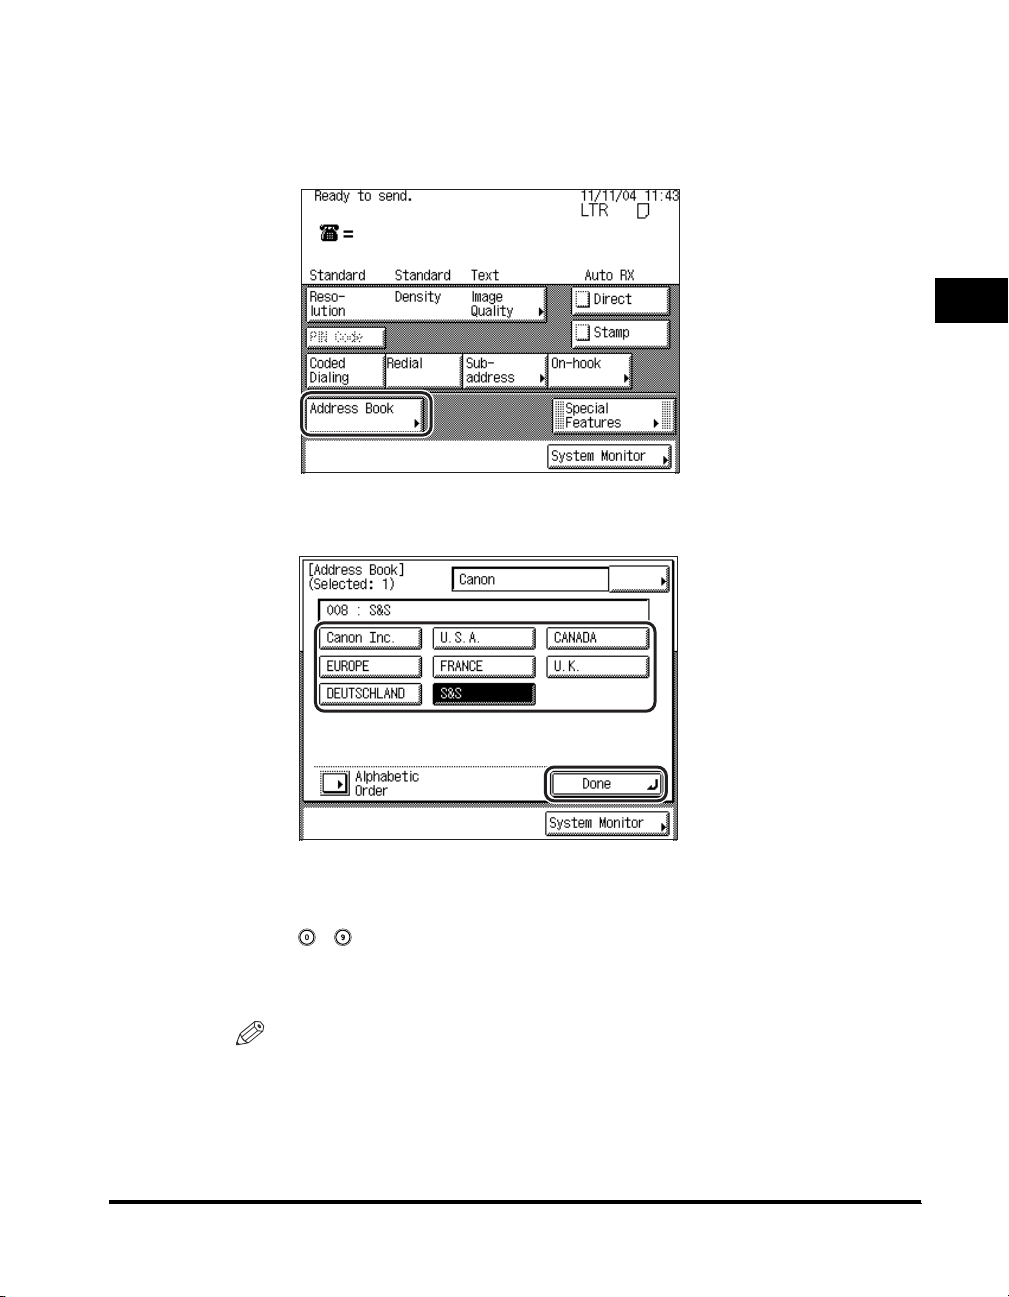
2
Make sure the machine is ready to send ➞ specify the group
destination.
❑ Press [Address Book].
❑ Press the one-touch speed dialing key containing the destinations for the group
dial ➞ press [Done].
2
Basic Send and Receive Methods
To specify two or more groups, select all of the desired one-touch speed
dialing keys containing the destinations for the group dial ➞ press [Done].
To specify two or more destinations using Redial, Coded Speed Dialing, or
- (numeric keys), press [Next] ➞ consecutively specify the destinations.
If you are using One-Touch Speed Dialing, press [Address Book] ➞ specify
the destination ➞ press [Done].
NOTE
•
To cancel a selected group destination, press the one-touch speed dialing
destination key again.
•
To use Group Dialing, you must register all the destinations for the group
beforehand. See "Storing Group Destinations," on p. 5-33.
Dialing Methods
2-27
Page 100

2
Basic Send and Receive Methods
3
Press (Start).
If the original is placed on the platen glass, follow the instructions that appear on
the touch panel display ➞ press (Start) once for each original. When scanning
is complete, press [Done].
Scanning starts, and the document is sent to the specified destination.
2-28
Dialing Methods
 Loading...