

Page 1
Please read this manual before using the device.
After you finish reading this manual, keep it in a safe place
for future reference.
Setup Guide
Read This First
Page 2

FCC REGULATIONS (For 120 V model)
Network Scanner, Model M11058/M11062
This device complies with Part 15 of the FCC Rules.
Operation is subject to the following two conditions: (1) This
device may not cause harmful interference, and (2) this device
must accept any interference received, including interference
that may cause undesired operation.
Note: This equipment has been tested and found to comply
with the limits for a Class B digital device, pursuant to Part 15
of the FCC Rules. These limits are designed to provide
reasonable protection against harmful interference in a
residential installation. This equipment generates, uses, and
can radiate radio frequency energy and, if not installed and
used in accordance with the instructions, may cause harmful
interference to radio communications. However, there is no
guarantee that interference will not occur in a particular
installation. If this equipment does cause harmful interference
to radio or television reception, which can be determined by
turning the equipment off and on, the user is encouraged to try
to correct the interference by one or more of the following
measures:
– Reorient or relocate the receiving antenna.
– Increase the separation between the equipment and
receiver.
– Connect the equipment into an outlet on a circuit different
from that to which the receiver is connected.
– Consult the dealer or an experienced radio/TV technician
for help.
Use of shielded cable is required to comply with class B limits
in Subpart B of Part 15 of FCC Rules.
Do not make any changes or modifications to the equipment
unless otherwise specified in the manual. If such changes or
modifications should be made, you could be required to stop
operation of the equipment.
Canon U.S.A. Inc.
One Canon Plaza, Lake Success NY 11042, U.S.A.
Tel. No. (516)328-5000
RADIO INTERFERENCE REGULATIONS (For 120 V
models)
This digital apparatus does not exceed the Class B limits for
radio noise emissions from digital apparatus as set out in the
Interference-causing equipment standard entitled “Digital
Apparatus”, ICES-003 of the Industry Canada.
RÈGLEMENT SUR LE BROUILLAGE
RADIOÉLECTRIQUE (For 120 V models)
Cet appareil numérique respecte les limites de bruits
radioélectriques applicables aux appareils numériques de
Classe B prescrites dans la norme sur le matériel brouilleur:
“Appareils Numériques”, NMB-003 édictée par l’Industrie
Canada.
European Union (and EEA) only.
This symbol indicates that this product is not to be
disposed of with your household waste, according
to the WEEE Directive (2002/96/EC) and your
national law. This product should be handed over
to a designated collection point, e.g., on an
authorized one-for-one basis when you buy a new similar
product or to an authorized collection site for recycling waste
electrical and electronic equipment (EEE). Improper handling
of this type of waste could have a possible negative impact on
the environment and human health due to potentially
hazardous substances that are generally associated with EEE.
At the same time, your cooperation in the correct disposal of
this product will contribute to the effective usage of natural
resources. For more information about where you can drop off
your waste equipment for recycling, please contact your local
city office, waste authority, approved WEEE scheme or your
household waste disposal service. For more information
regarding return and recycling of WEEE products, please visit
www.canon-europe.com/environment
(EEA: Norway, Iceland and Liechtenstein)
.
i
Page 3

Für EMVG
Dieses Produkt ist zum Gebrauch im Wohnbereich,
Geschäfts-und Gewerbebereich sowie in Kleinbetrieben
vorgesehen.
Für 3. GPSGV
„Maschinenlärminformations-Verordnung 3. GPSGV: Der
höchste Schalldruckpegel beträgt 70 dB(A) oder weniger
gemäß EN ISO 7779“
For CA, USA Only
Included battery contains Perchlorate Material - special
handling may apply.
See http://www.dtsc.ca.gov/hazardouswaste/perchlorate/ for
detail.
Model Names
The following names may be provided for the safety
regulations in each sales region of the Network Scanner.
ScanFront 220e: Model M11058
ScanFront 220eP: Model M11062
Hg LAMP(S) INSIDE THIS PRODUCT CONTAIN
MERCURY AND MUST BE RECYCLED OR DISPOSED
OF ACCORDING TO LOCAL, STATE OR FEDERAL
LAWS.
Trademarks
• Canon and the Canon logo are registered trademarks of
Canon Inc. in the United States and may also be trademarks
or registered trademarks in other countries.
®
•imageFORMULA
is a trademark of Canon Electronics Inc.
• eCopy, the eCopy logo, eCopy ScanStation, eCopy
Desktop, eCopy Quick Connect, and eCopy Xpert
Compression are trademarks of eCopy, Inc.
ShareScan is a registered trademarks of eCopy, Inc.
®
•Opera
or Opera SoftwareTM are registered trademarks of
Opera Software ASA in Norway or other countries.
• Microsoft, Windows, Internet Explorer, and Active
Directory are registered trademarks or trademarks of
Microsoft Corporation in the United States and other
countries.
• Adobe, Acrobat, and Adobe Reader are registered
trademarks or trademarks of Adobe Systems Incorporated in
the United States and other countries.
• Other product and company names herein may be the
trademarks of their respective owners.
ii
Page 4

Copyright
libtiff
Copyright (c) 1988-1996 Sam Leffler
Copyright (c) 1991-1996 Silicon Graphics, Inc.
Permission to use, copy, modify, distribute, and sell this
software and its documentation for any purpose is hereby
granted without fee, provided that (i) the above copyright
notices and this permission notice appear in all copies of the
software and related documentation, and (ii) the names of
Sam Leffler and Silicon Graphics may not be used in any
advertising or publicity relating to the software without the
specific, prior written permission of Sam Leffler and Silicon
Graphics.
THE SOFTWARE IS PROVIDED “AS-IS” AND
WITHOUT WARRANTY OF ANY KIND, EXPRESS,
IMPLIED OR OTHERWISE, INCLUDING WITHOUT
LIMITATION, ANY WARRANTY OF
MERCHANTABILITY OR FITNESS FOR A
PARTICULAR PURPOSE.
IN NO EVENT SHALL SAM LEFFLER OR SILICON
GRAPHICS BE LIABLE FOR ANY SPECIAL,
INCIDENTAL, INDIRECT OR CONSEQUENTIAL
DAMAGES OF ANY KIND, OR ANY DAMAGES
WHATSOEVER RESULTING FROM LOSS OF USE,
DATA OR PROFITS, WHETHER OR NOT ADVISED OF
THE POSSIBILITY OF DAMAGE, AND ON ANY
THEORY OF LIABILITY, ARISING OUT OF OR IN
CONNECTION WITH THE USE OR PERFORMANCE OF
THIS SOFTWARE.
Copyright 2008 by CANON ELECTRONICS INC. All rights
reserved.
No part of this publication may be reproduced or transmitted
in any form or by any means, electronic or mechanical,
including photocopying and recording, or by any information
storage or retrieval system without the prior written
permission of CANON ELECTRONICS INC.
Disclaimers
The information in this document is subject to change without
notice.
CANON ELECTRONICS INC. MAKES NO WARRANTY
OF ANY KIND WITH REGARD TO THIS MATERIAL,
EITHER EXPRESS OR IMPLIED, EXPECT AS
PROVIDED HERE IN, INCLUDING WITHOUT
LIMITATION, THERE OF, WARRANTIES AS TO
MARKETABILITY, MERCHANTABILITY, FITNESS
FOR A PARTICULAR PURPOSE OF USE OR NONINFRINGEMENT. CANON ELECTRONICS INC. SHALL
NOT BE LIABLE FOR ANY DIRECT, INCIDENTAL, OR
CONSEQUENTIAL DAMAGES OF ANY NATURE, OR
LOSSES OR EXPENSES RESULTING FROM THE USE
OF THIS MATERIAL.
libjpeg
Portions of this software are based in part on the work of the
Independent JPEG Group.
iii
Page 5
Introduction
Thank you for purchasing the Canon ScanFront 220e/220eP network scanner.
Please read this manual thoroughly before using the device to familiarize yourself with its capabilities, and to make the most of its
many functions. After reading this manual, store it in a safe place for future reference.
About ScanFront 220e/220eP
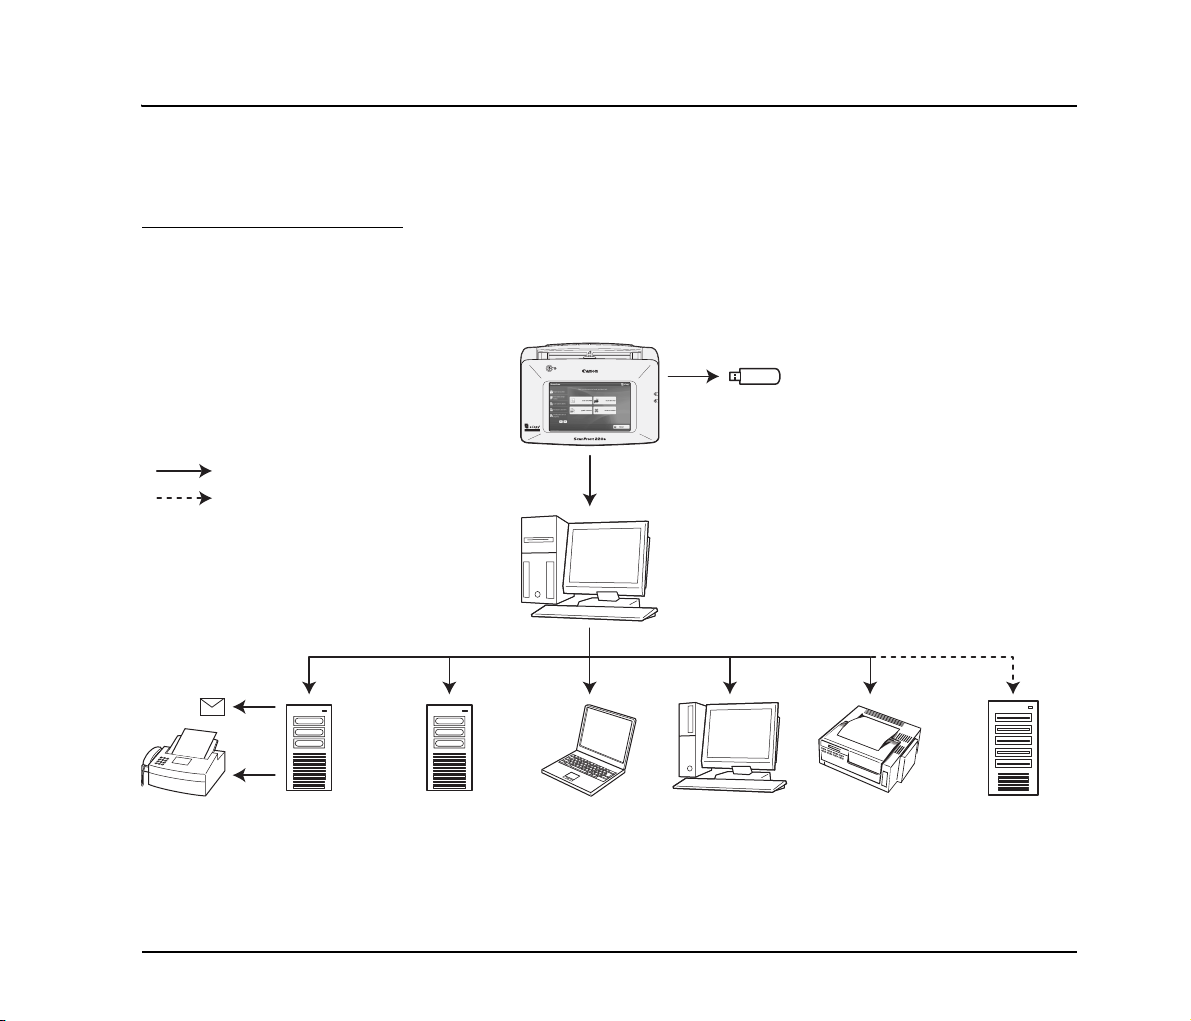
The ScanFront 220e/220eP is a network scanner that allows you to scan paper documents and send scanned images to eCopy
ShareScan Services Manager, which then forwards the scanned images to multiple destinations, such as the Shared Folder, Mail
Server (SMTP/Notes), FTP Server, Printer, Fax (via Email), or USB flash drive attached to the device.
ScanFront
USB flash drive
: Data route.
: Requires optional Connector.
eCopy ShareScan
• ShareScan Services Manager
• ShareScan Administrator console
• Connector (optional)
Mail
FAX
Mail Server
FTP Server PC
(Shared folder)PC(eCopy Desktop)
Printer Backend
System Server
1
Page 6

❏ Manuals for the Device
The following manuals are provided with the Canon
ScanFront 220e/220eP. Be sure to read these manuals
thoroughly before using the device.
❏ Symbols Used in This Manual
The following symbols are used in this manual to explain
procedures, restrictions, handling precautions, and
instructions that should be observed for safety.
Setup Guide (This Manual)
Describes the basic setup procedure for the device, and
provides information on establishing a connection
between the device and ShareScan Services Manager,
information on basic hardware operations, and
supplemental information including troubleshooting.
For details on configuring ShareScan Services Manager
and Quick Connect, please refer to the eCopy ShareScan
4.5 Installation and Setup Guide (electronic manual).
eCopy ShareScan 4.5 Installation and Setup
Guide/eCopy Quick Connect Administrator’s
Guide
Describes each functions of eCopy ShareScan 4.5, Quick
Connect and how to configure the each settings of those
software to work with the device. This manual is stored as
a PDF file on the eCopy ShareScan 4.5 Software
CD-ROM and requires Adobe Reader to open.
eCopy ShareScan 4.5 Launch Questions
Answers general questions about eCopy ShareScan 4.5.
This manual is stored as an HTML file on the eCopy
ShareScan 4.5 Software CD-ROM.
WARNING
Indicates a warning concerning operations that may lead to
death or injury to persons if not performed correctly. To
use the device safely, always pay attention to these
warnings.
CAUTION
Indicates a caution concerning operations that may lead to
injury to persons, or damage to property if not performed
correctly. To use the device safely, always pay attention to
these cautions.
IMPORTANT
Indicates operational requirements and restrictions. Be
sure to read these items carefully to operate the device
correctly, and avoid damage to the device.
Hint
Indicates a clarification of an operation, or contains
additional explanations for a procedure. Reading these
notes is highly recommended.
2
Page 7

Table of Contents
1. Important Safety Instructions..................................5
Installation Location.................................................... 5
Power ......................................................................... 5
Moving the Device...................................................... 6
Handling ..................................................................... 6
About the Fingerprint Sensor
(ScanFront 220eP only).............................................. 8
Disposal...................................................................... 8
2. Names and Functions of Parts ...............................9
Front and Document Feed and Eject Trays........... 9
Side and Rear...................................................... 10
3. Checking the Supplied Accessories .....................11
4. Removing the Packing Materials and
Attaching the Feed Roller.....................................13
5. Connecting the AC Adaptor and Connecting
to a Network .........................................................16
Connecting the AC Adapter................................. 16
Connecting the Network Cable............................ 16
6. Turning the Power ON and OFF ..........................17
Turning the Power ON.............................................. 17
Turning the Power OFF ............................................ 17
7. Establishing the Connection between the
Device and ShareScan Services Manager...........18
System Requirements .............................................. 18
Installing Services Manager ..................................... 18
Entering the Product Key Licensing the Device ....... 19
Configuring and Registering the Device................... 20
Installing Quick Connect........................................... 23
8. Configuring ShareScan Services Manager ..........24
9. Documents ...........................................................25
Plain Paper............................................................... 25
Business Card .......................................................... 25
Plastic Card .............................................................. 26
10. Preparing the Device............................................27
Preparing the Document Feed Tray and
Eject Tray ................................................................. 27
Feed Selection Lever................................................ 28
USB Port................................................................... 28
Using a PS/2 Keyboard and PS/2 Mouse................. 29
11. Placing Documents ..............................................30
Placing a Document ................................................. 30
Placing a Cards (Business Card, Plastic Card) ........ 31
12. Clearing a Paper Jam or Double Feed Error........32
Removing the Jammed Document ........................... 32
13. Fingerprint Sensor (ScanFront 220eP) ................ 34
Cautions for Handling the Fingerprint Sensor .......... 34
Fingerprint Authentication......................................... 35
14. Basic Scanning Procedure...................................36
Preparing for Scanning............................................. 36
Scanning Procedure................................................. 36
Preview Screen ........................................................ 38
On-Screen Keyboard................................................ 38
3
Page 8

ScanFront Setup Overview
Follow the procedures below to set up the ScanFront 220e/220eP.
1. Important Safety Instructions (See p. 5)
Read the safety warnings and precautions to ensure safe
operation of this device.
2. Names and Functions of Parts (See p. 9)
Learn the names and functions of the parts of this device.
3. Checking the Supplied Accessories (See p. 11)
Confirm that all of the supplied accessories are included.
4. Removing the Packing Materials and Attaching
the Feed Roller (See p. 13)
Remove the packing materials protecting the device, and
attach the supplied feed roller. (See p. 13.)
5. Connecting the AC Adaptor and Connecting to
a Network (See p. 16)
Move the device to the desired installation site, and
connect the AC adaptor and network cable.
6. Turning the Power ON and OFF (See p. 17)
Use the power switch to turn the device ON, and press
[Power off] on the touch panel to turn it OFF.
7. Establishing the Connection between the
Device and ShareScan Services Manager (See
p. 18)
In order to configure the various settings of eCopy
ShareScan and QuickConnect to suit your requirements,
you must first establish a connection between the
ScanFront 220e/220eP and eCopy ShareScan Services
Manager.
This section describes how to configure settings on the
ScanFront 220e/220eP and eCopy ShareScan Services
Manager to establish a connection.
8. Configuring ShareScan Services Manager
(See p. 24)
After connection is established, you can configure the
various settings of eCopy ShareScan and Quick Connect to
suit your requirements.
For details, please refer to the eCopy ShareScan 4.5
Installation and Setup Guide (electronic manual).
9. Documents (See p. 25)
This section describes the types of paper supported by the
device.
10. Preparing the Device (See p. 27)
Prepare the device for document loading.
11. Placing Documents (See p. 30)
This section describes how to place documents in the
device.
12. Clearing a Paper Jam or Double Feed Error
(See p. 32)
This section describes how to clear paper jams.
13. Fingerprint Sensor (ScanFront 220eP) (See
p. 34)
Register fingerprints on the device to enable use by
authenticated users only. (ScanFront 220eP only)
14. Basic Scanning Procedure (See p. 36)
This section gives an overview of the procedure for
scanning a document, using the example of scanning from
the Home screen.
4
Page 9
1. Important Safety Instructions
To ensure the safe operation of this device, be sure to read the safety warnings and precautions described below.
❏ Installation Location
The performance of this device is affected by the
environment in which it is installed. Make sure that the
location where the device is installed meets the following
environmental requirements.
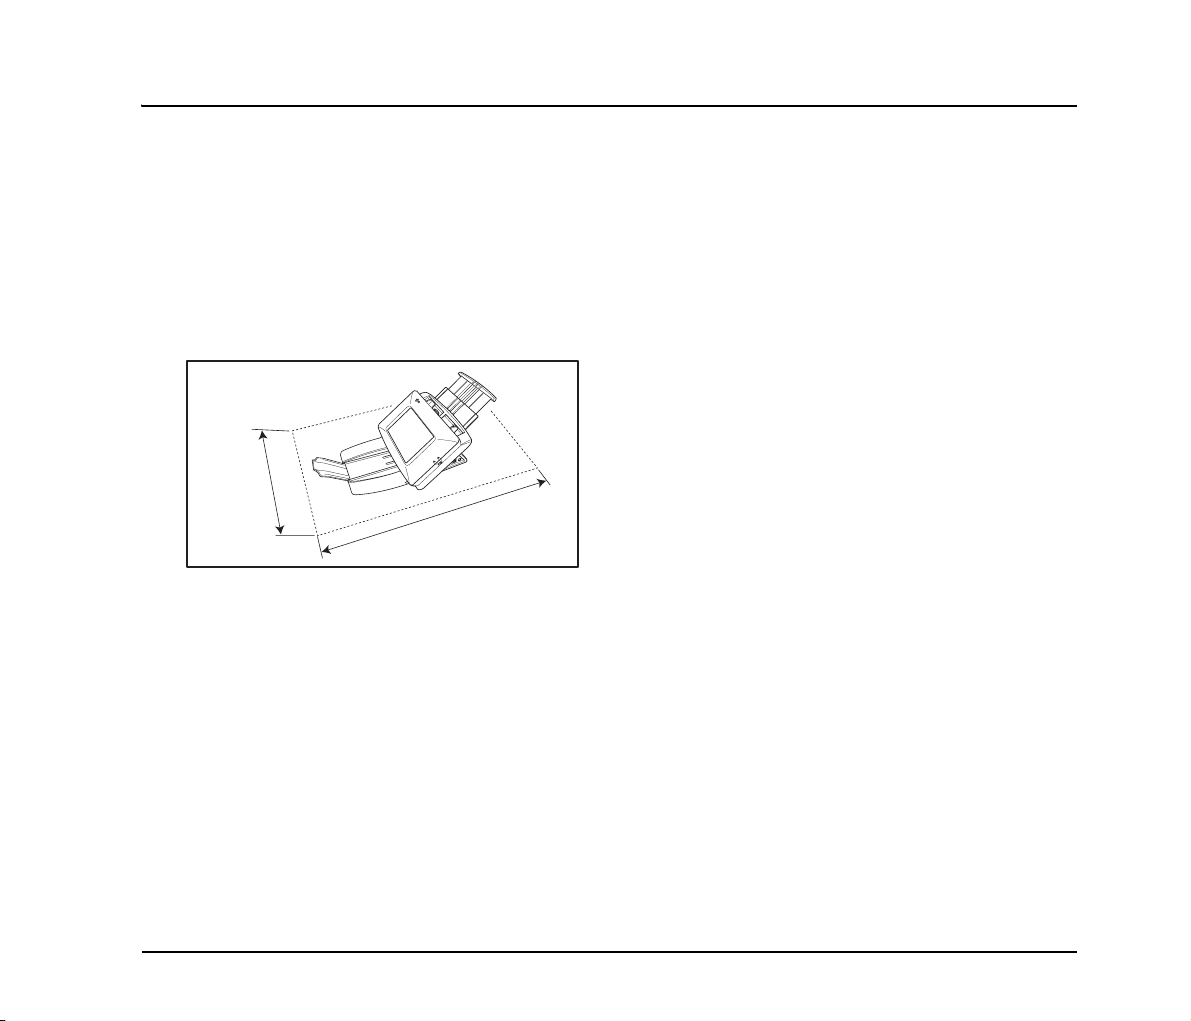
● Provide adequate space around the device for
operation, maintenance, and ventilation.
At least
15.75"
(400 mm)
At least
23.62" (600 mm)
● Avoid installing the machine in direct sunlight. If
this is unavoidable, use curtains to shade the
device.
● Avoid locations where a considerable amount of
dust accumulates.
● Avoid warm or humid locations, such as in the
vicinity of a water faucet, water heater, or
humidifier, and avoid locations where the fumes
from ammonia, paint thinner, or other volatile
chemicals may be present.
● Avoid locations that are subject to vibration.
● Avoid exposing the device to rapid changes in
temperature. If the room in which the device is
installed is cold but rapidly heated, water droplets
(condensation) may form inside the device. This
may result in a noticeable degradation in scanning
quality.
The following conditions are recommended for
optimal scanning quality:
Room temperature: 10 °C to 32.5 °C (50 °F to
90.5 °F)
Humidity: 20% to 80% RH
● Avoid installing the device near equipment that
generates a magnetic field (e.g. speakers,
televisions, or radios).
❏ Power
● Connect only to a power outlet of the rated voltage
and power supply frequency (either 120 V, 60 Hz
or 220-240 V, 50/60 Hz, depending on your
region).
● Do not connect other electrical equipment to the
same power outlet to which the device is
connected. Also, when using an extension cord,
make sure that the extension cord is rated for the
current requirements of the device.
● Never try to disassemble the AC adapter or modify
it in any way, as this is extremely dangerous.
● The power cord and AC adapter may become
damaged if they are often stepped on or if heavy
objects are placed on them. Continued use of a
damaged power cord and AC adapter can lead to
an accident, such as a fire or electrical shock.
● Do not use the power cord while it is coiled.
5
Page 10

● Do not pull directly on the power cord. When
disconnecting the power cord, grasp the plug and
remove it from the outlet.
● Keep the area around the power plug clear of
objects so that the power cord can be
disconnected easily in an emergency.
● Use only the AC adapter provided with this device.
Also, do not use the AC adapter provided with any
other electrical devices.
Model: MG1-3968
● If you have any questions regarding the power
supply, contact your local authorized Canon dealer
or service representative for further information.
❏ Moving the Device
● When moving the device, always hold it with both
hands to avoid dropping it. The weight of the
device unit is approximately 7.49 lbs (3.4 kg).
● Before moving the device, make sure the
document tray is closed and the network cable and
AC adapter are disconnected. If the device is
transported with these items connected, the plugs
and connectors may be damaged due to
excessive force applied to them during movement.
❏ Handling
WARNING
Note the following precautions whenever using the
device. Failure to do so may result in a fire or electric
shock.
■ Never use alcohol, benzene, paint thinner, aerosol
sprays, or any other highly flammable substance
near the device.
■ Do not cut, damage, or modify the power cord or
AC adapter. Do not place heavy objects on the
power cord or AC adapter, and do not pull or
excessively bend the power cord.
■ Never connect the power cord when your hands
are wet.
■ Do not connect the device to a multiplug power
strip.
■ Do not knot or coil the power cord, as this may
result in a fire or electric shock. When connecting
the power cord, make sure that the power plug is
securely and completely inserted into the power
outlet.
■ Do not use power cords and AC adapters other
than the power cord and AC adapter provided with
this device.
■ Never try to take the device apart or modify it in
any way.
■ Never try to take the AC adapter apart or modify it
in any way, as this is dangerous and may lead to a
fire or electric shock.
■ Do not use flammable aerosol sprays near the
device.
■ When cleaning the device, turn the power OFF and
disconnect the power cord from the power supply.
■ Clean the device using a slightly dampened cloth
which has been well wrung out. Never use alcohol,
benzene, paint thinner, or any other flammable
substances.
■ If the device makes strange noises, or gives off,
smoke, heat, or strange odors, or the device does
not function or other abnormalities occur when you
use the machine, immediately turn the power OFF,
and disconnect the power plug from the power
outlet. Then, contact your local authorized Canon
dealer or service representative for further
information.
6
Page 11

■ Do not drop the device, or subject it to impact or
strong shock. Should the device ever become
damaged, immediately turn the power OFF, and
disconnect the power plug from the power outlet.
Then, contact your local authorized Canon dealer
or service representative to have the unit serviced.
■ Before moving the device, make sure to turn the
power OFF, and disconnect the power plug from
the power outlet.
CAUTION
■ Do not install the device on a surface that is
unstable or tilted, or in an area subject to
excessive vibrations, as this may cause the device
to fall, resulting in personal injury or damage to the
device.
■ Do not block the ventilation openings. Doing so
could cause the device to overheat, creating a risk
of fire.
■ Never place small metal objects such as staples,
paper clips, or jewelry on the device. These items
may fall into the device, and cause a fire or electric
shock. Should such objects ever fall inside the
device, immediately turn the power OFF, and
disconnect the power plug from the power outlet.
Then, contact your local authorized Canon dealer
or service representative to have the unit serviced.
■ Do not install the device in a humid or dusty
location. Doing so may result in a fire or electric
shock.
■ Do not place objects on top of the device, as they
may tip over and fall, resulting in personal injury.
■ Do not use the device with a power supply voltage
other than 120 V AC and 220-240 V AC,
depending on the model in use. Doing so might
cause fire or electric shock.
■ When disconnecting the power cord, grasp it firmly
by its plug. Do not pull directly on the power cord,
as this may damage or expose the cord’s internal
wiring, resulting in a fire or electric shock.
■ Leave sufficient space around the power plug so
that it can be disconnected easily. If objects are
placed around the power plug, you will be unable
to disconnect it in an emergency.
■ Do not allow water or flammable substances
(alcohol, paint thinner, benzene, etc.) to spill into
the device, as this may result in a fire or electric
shock.
■ Turn OFF the power for safety when not using the
device for a long period of time, such as overnight.
Also, turn OFF the power, and disconnect the AC
adapter from the device and disconnect the power
cord from the power outlet for safety when the
machine will not be used for an extended period of
time, such as during consecutive holidays.
■ Do not wear loose clothing or jewelry that may get
caught in the device while you are using it. This
may result in personal injury. Be extra careful of
neckties and long hair. If anything becomes caught
in the device, immediately disconnect the power
cord to stop the device.
■ Be careful when placing paper in the device and
when removing jammed paper. It is possible to cut
your hand on the edge of a sheet of paper.
7
Page 12

❏ About the Fingerprint Sensor
(ScanFront 220eP only)
● The following actions may damage the sensor or
cause it to malfunction:
– Dropping an object on the fingerprint sensor, or
otherwise subjecting it to a strong impact
– Scratching the surface of the fingerprint sensor,
or poking it with a pointed object
– Pressing a hard object such as a fingernail or
metal item against the fingerprint sensor,
resulting in scratches being created on the
surface of the fingerprint sensor
– Touching the fingerprint sensor with dirty hands,
which might scratch or dirty the surface of the
fingerprint sensor
– Placing a sticker on the surface of the fingerprint
sensor, or covering the surface with ink or
another substance
● If fingerprint authentication fails frequently, clean
the surface of the fingerprint sensor regulary.
● When cleaning the fingerprint sensor, use a soft
dry cloth to wipe dirt off the surface.
● Do not use a pointed object to remove any dirt that
accumulates around the fingerprint sensor. Doing
so may cause the fingerprint sensor to
malfunction.
● Touching the fingerprint sensor while charged with
static electricity may cause the fingerprint sensor
or device unit to malfunction. Before touching the
fingerprint sensor, discharge any static electricity
by touching a piece of metal. Be especially careful
during dry periods, such as the winter season,
when the likelihood of being charged with static
electricity is high.
❏ Disposal
● Prior to disposing of the device, initialize the device
to ensure that the registered data is deleted.
● When disposing of the device, make sure to follow
all local ordinances and laws or consult with the
retailer who sold you the device.
8
Page 13
2. Names and Functions of Parts
The names and functions of the parts of the ScanFront 220e/220eP are shown below.
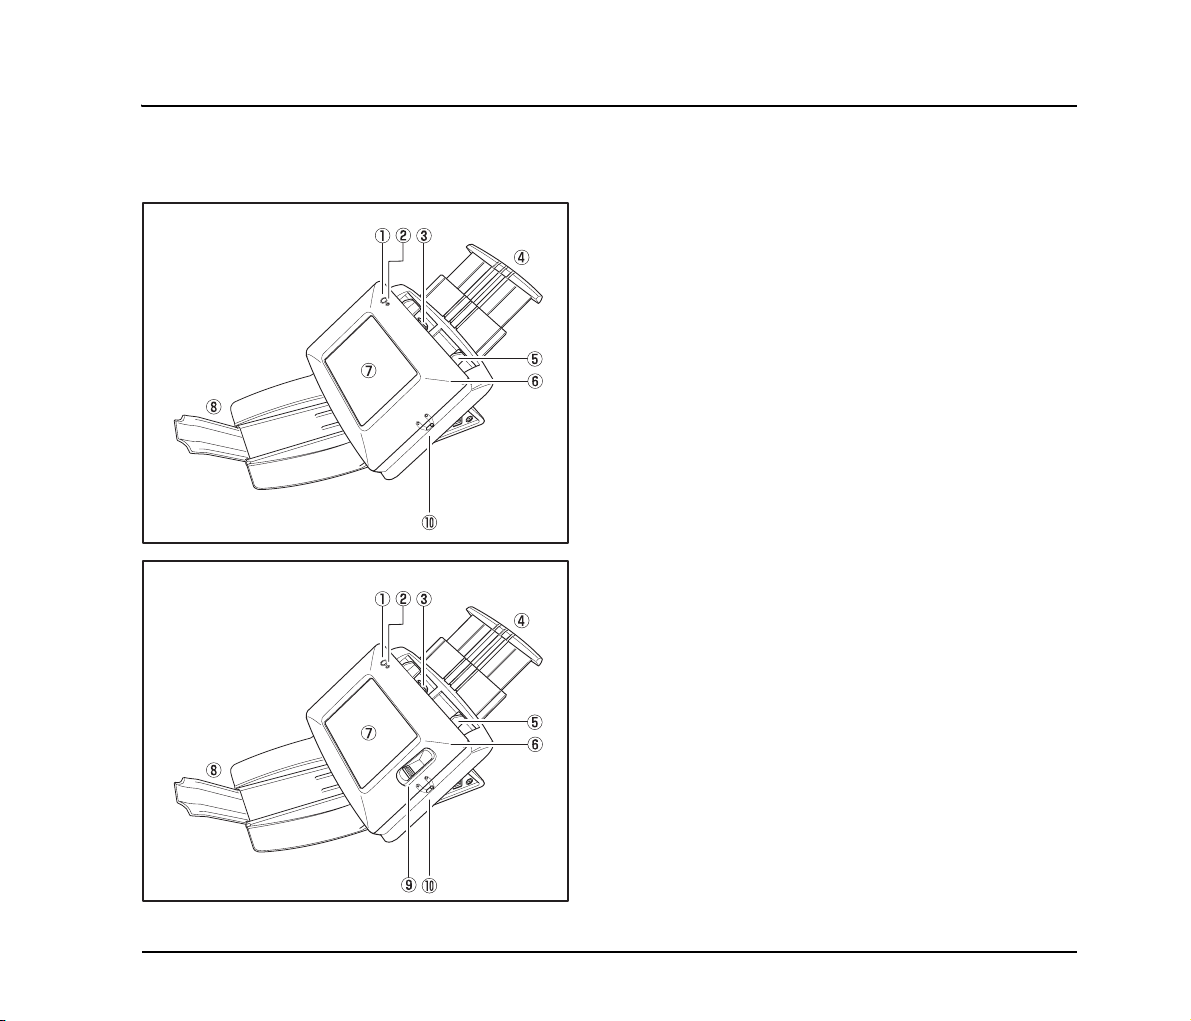
❏ Front and Document Feed and Eject Trays
a Power Switch
ScanFront 220e
ScanFront 220eP
Use this to turn the power ON/OFF.
b Power Indicator
Lights when the power is ON.
c Lock Lever
Locks the panel unit. Pull the lever toward you to unlock
the panel unit.
d Document Feed Tray
Pull out the feed tray to match the length of the document.
e Document Guides
Adjust these to match the width of the document.
f Panel Unit
Open this when there is a paper jam or to perform
maintenance.
g Touch Panel
Touch this screen to operate the ScanFront.
h Document Eject Tray
Open this tray when using the ScanFront. If scanned
documents are likely to fall out of the tray, open the tray
extension. If scanned documents curl in the document
eject tray, remove the entire tray.
i Fingerprint Authentication Sensor (Only Available
with the ScanFront 220eP)
This fingerprint sensor is for fingerprint registration and
authentication.
j Feed Selection Lever
Use this lever to change the feed method for documents.
9
Page 14
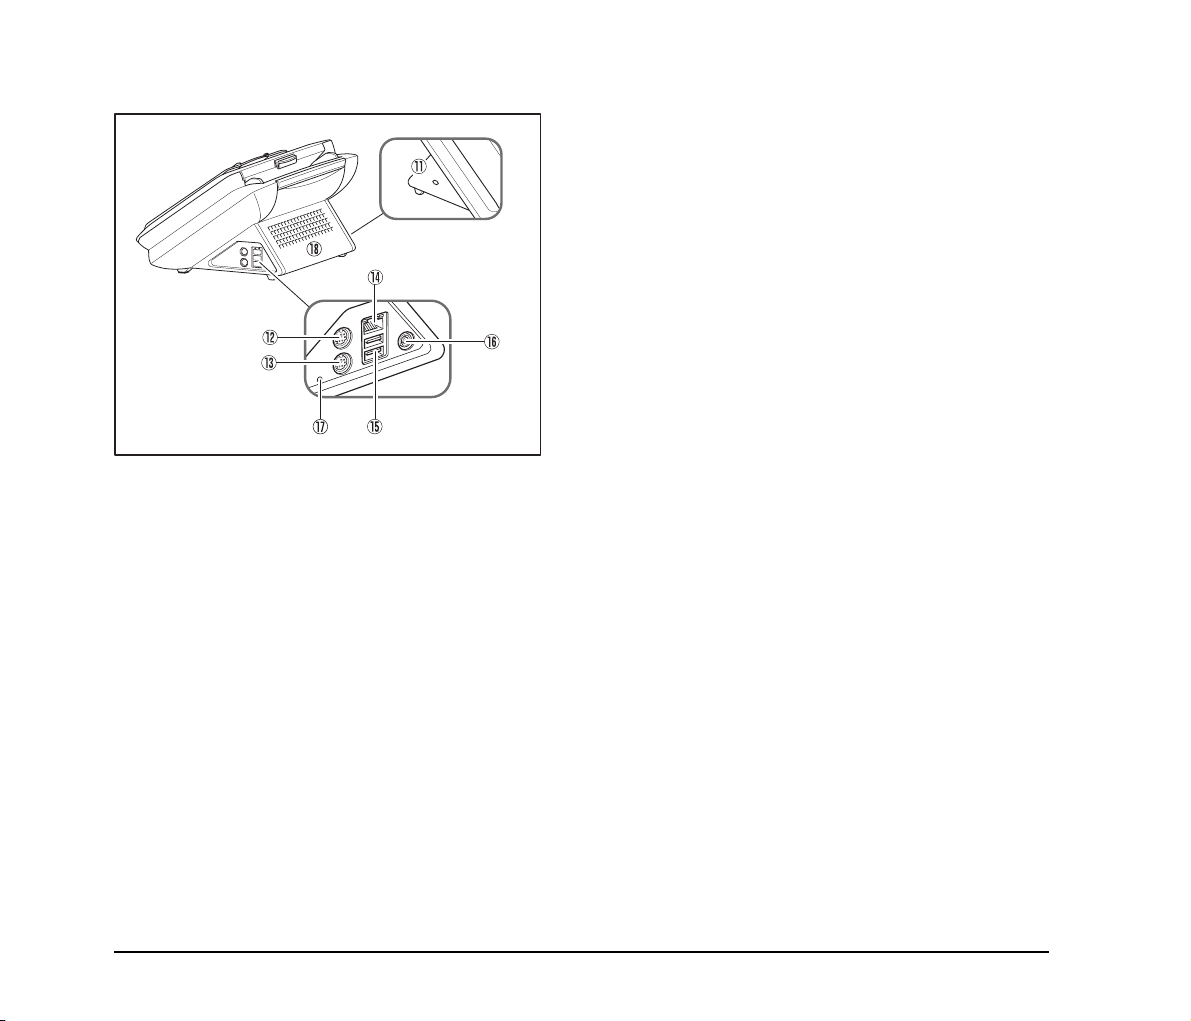
❏ Side and Rear
k Kensington Slot
This is an anti-theft slot that enables a key chain or lock to
be connected to prevent theft.
l PS/2 Connector (Green)
Connect a PS/2 mouse.
m PS/2 Connector (Purple)
Connect a PS/2 keyboard.
n LAN Port (RJ-45)
Connect an RJ-45 (10Base-T/100Base-TX) compatible
network cable.
o USB Ports
Connect a USB1.1/Hi-Speed USB2.0 compatible USB
flash drive, USB keyboard, or USB mouse.
p Power Connector (16 V DC)
Connect the plug of the supplied AC adapter.
q Service Switch
This is a service switch. Do not insert any object into this
hole.
r Ventilation Holes
10
Page 15
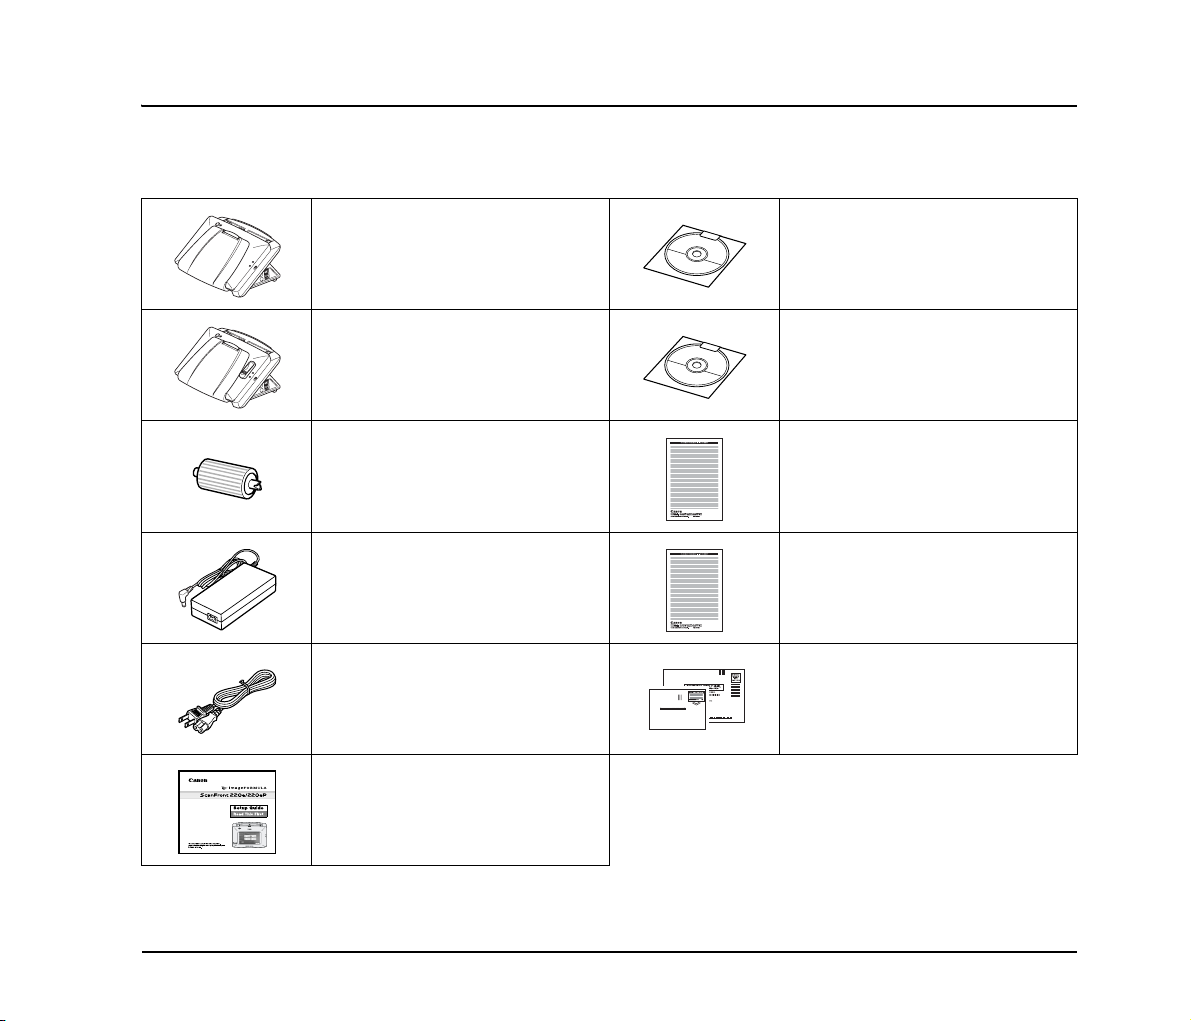
3. Checking the Supplied Accessories
When opening the package, please confirm that all of the following items are included. In the event that any of these items are
missing or damaged, contact your local authorized Canon dealer.
ScanFront 220e
(standard model)
ScanFront 220eP
(model with fingerprint sensor)
Feed Roller
The feed roller must be attached to the
device during installation. (See p. 13.)
AC Adapte r*
(Cord length: 4.9 ft. (1.5 m))
Power Cord*
(Cord length: 3.3 ft. (1 m))
Setup Guide (this manual)
0880281099-L5T1P7-BR01
CANON CANADA INC.
6390 DIXIE RD
MISSISSAUGA ON L5T 9Z9
eCopy ShareScan 4.5
Setup CD-ROM**
eCopy Desktop
Setup CD-ROM**
Information sheet on how to obtain the
eCopy ShareScan Product Key
War ran ty C a rd
(U.S.A. and Canada only)
Registration Card
(U.S.A. and Canada only)
* Make sure to use only the supplied AC adapter and power cord.
** The PDF files stored on the CD-ROM require Adobe Acrobat or Adobe Reader to open. (You can download Adobe Reader from the Adobe Web site.)
11
Page 16
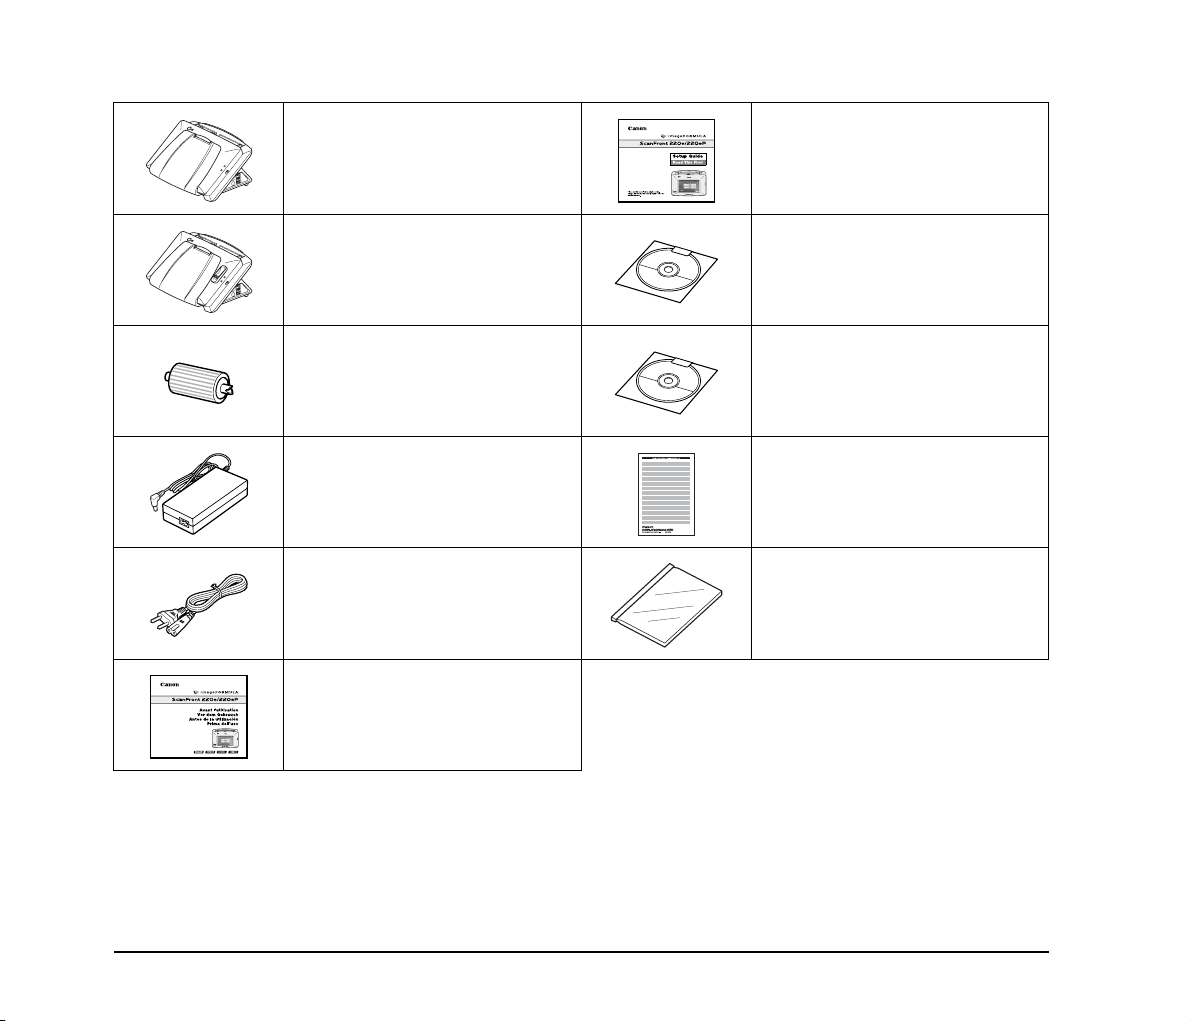
220-240 V model for Europe
ScanFront 220e
(standard model)
ScanFront 220eP
(model with fingerprint sensor)
Feed Roller
The feed roller must be attached to the
device during installation. (See p. 13.)
AC Adapter*
(Cord length: 4.9 ft. (1.5 m))
Power Cord*
(Cord length: 3.3 ft. (1 m))
Before Use
Setup Guide (this manual)
eCopy ShareScan 4.5
Setup CD-ROM**
eCopy Desktop
Setup CD-ROM**
Information sheet on how to obtain the
eCopy ShareScan Product Key
Clear Binder
* Make sure to use only the supplied AC adapter and power cord.
** The PDF files stored on the CD-ROM require Adobe Acrobat or Adobe Reader to open. (You can download Adobe Reader from the Adobe Web site.)
12
Page 17
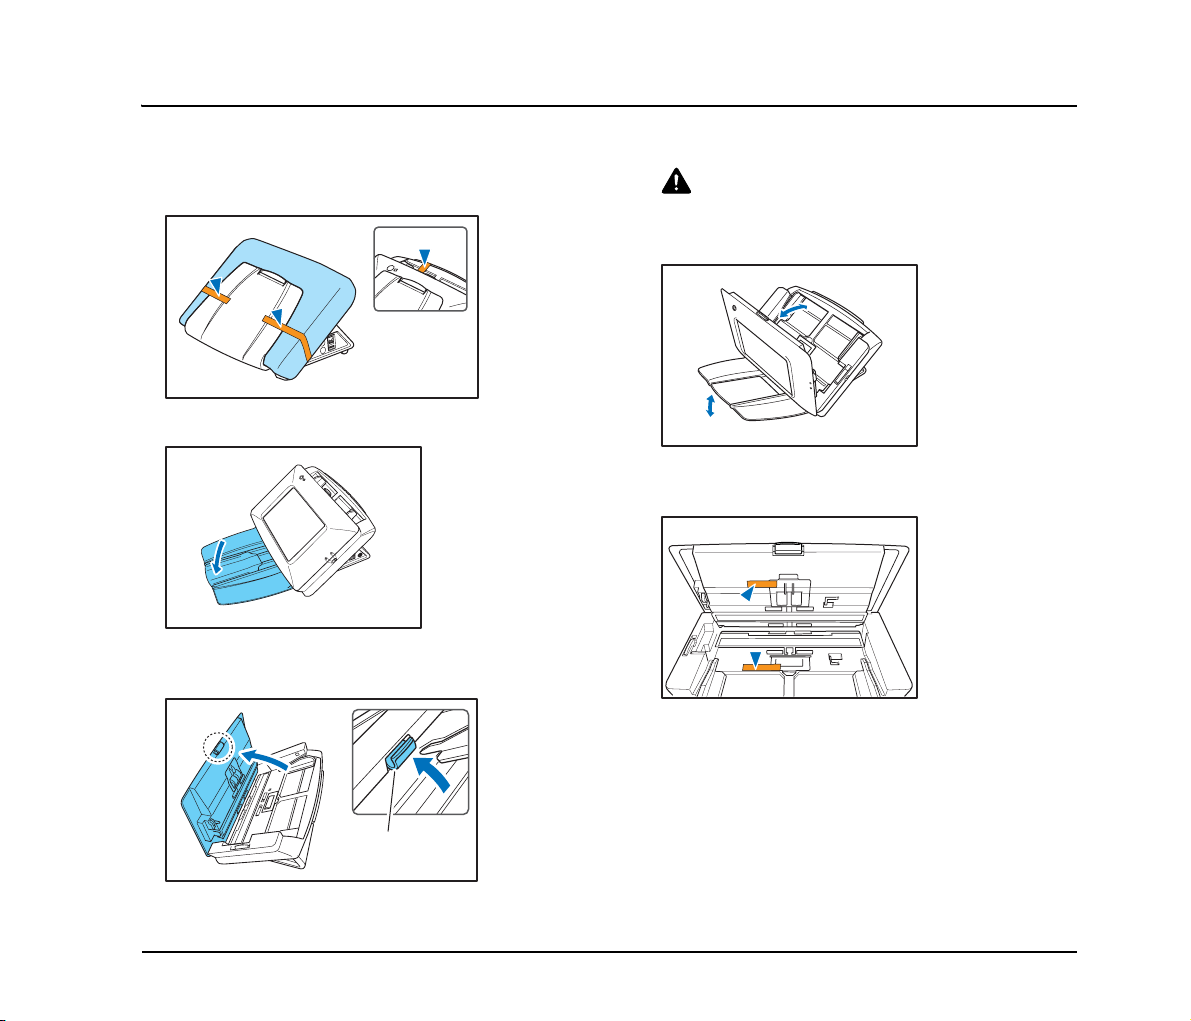
4. Removing the Packing Materials and Attaching the Feed Roller
Remove all of the packing materials protecting the device, and attach the feed roller.
1. Remove the orange tape (3 pieces) securing the
outer case.
2. Gently open the document eject tray.
3. Pull the lock lever toward you and then fully open the
panel unit.
CAUTION
The open/close movement of the panel unit is linked to the up/
down movement of the document eject tray. Do not press on the
document eject tray when you open the panel unit.
4. Remove the orange tape (2 pieces) securing the
roller covers.
Lock lever
13
Page 18
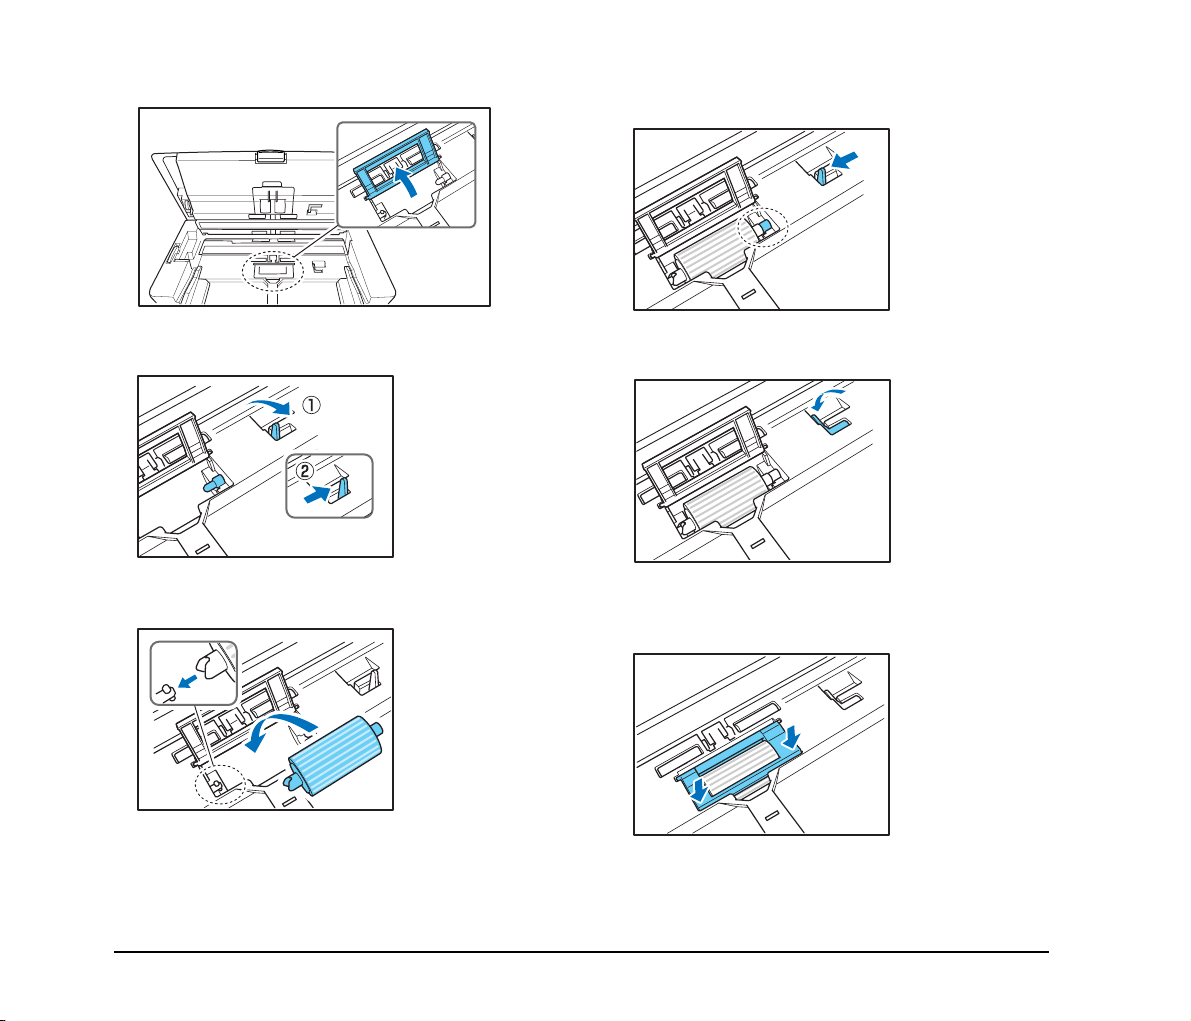
5.
Open the roller cover for the feed roller.
8. Move the lock lever in the direction of the arrow, then
insert it into the hole in the feed roller.
6. Lift up the roller lock lever a, and slide it in the
direction of the arrow b.
7. Align the notch in the shaft of the roller with the shaft
of the device, and place the feed roller into position.
9. Lower the roller lock lever to lock the feed roller into
position.
10.
Close the roller cover. Make sure you hear a click,
which indicates the cover has returned to its original
position.
14
Page 19
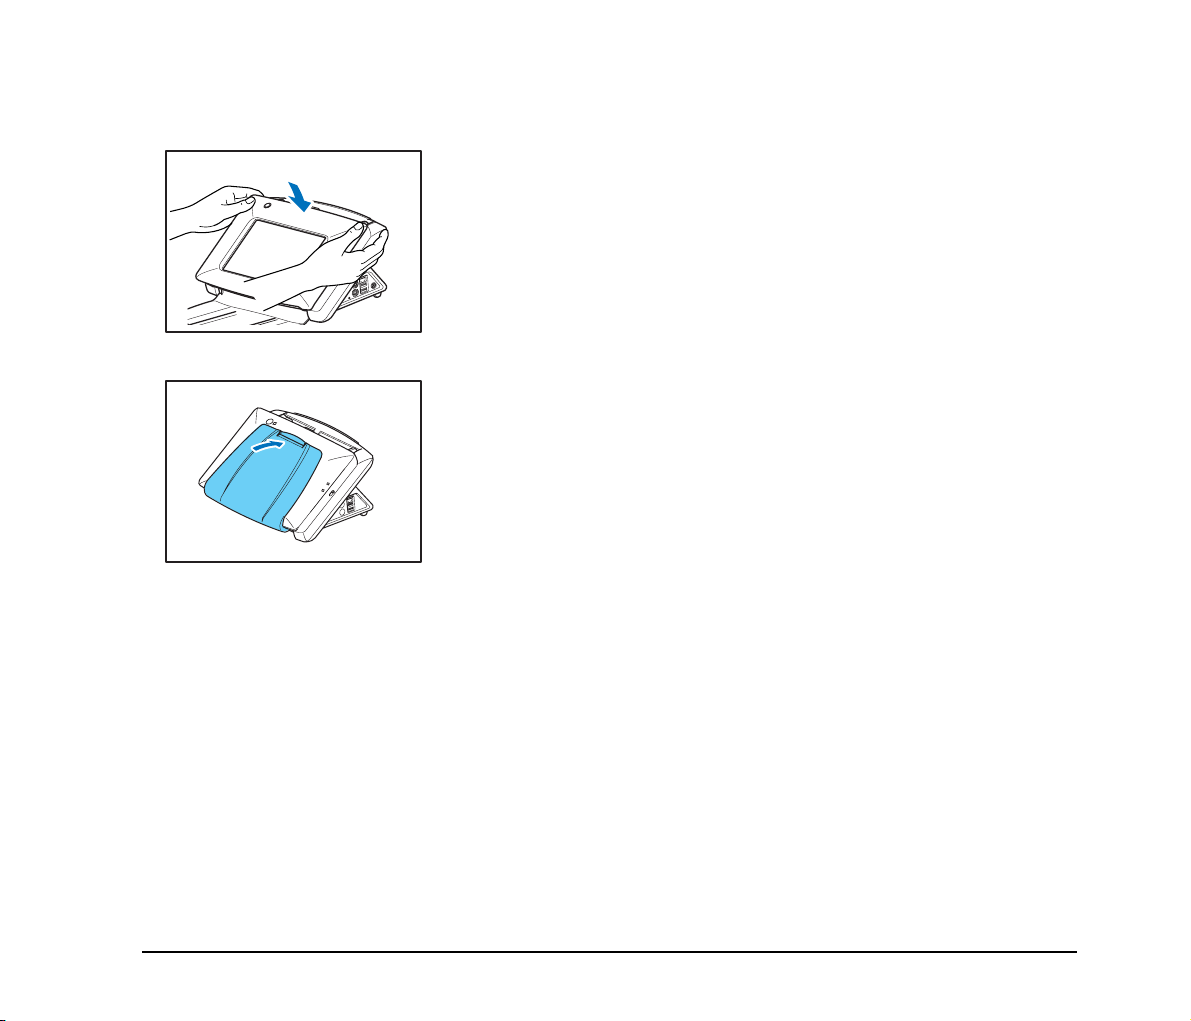
11.
Gently close the panel unit. Press on both sides of
the unit until you hear a click, which indicates the unit
is locked.
12.
Gently close the document eject tray.
15
Page 20
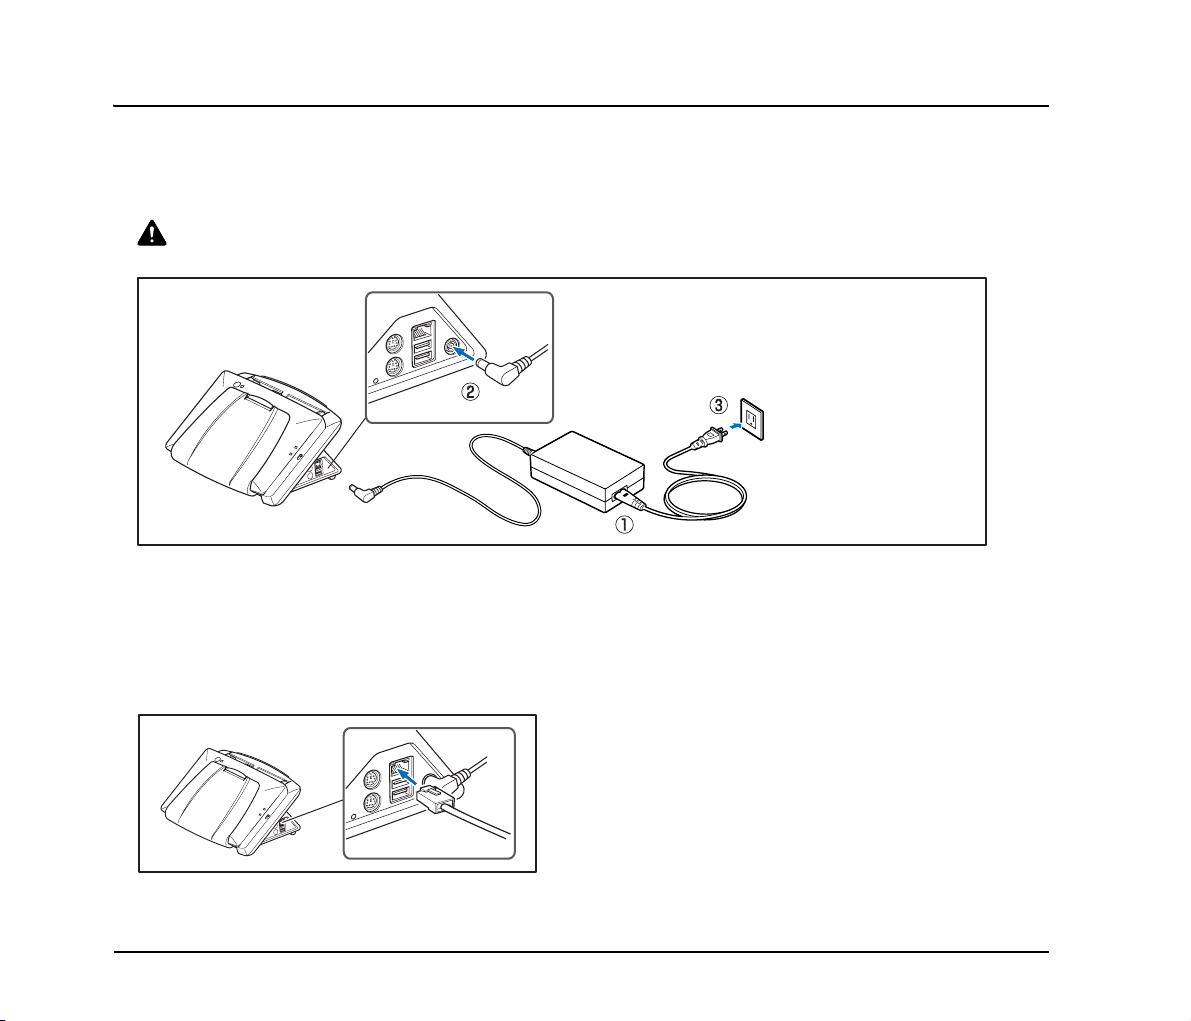
5. Connecting the AC Adaptor and Connecting to a Network
Before setting up the device, you need to connect the AC adaptor and network cable.
❏ Connecting the AC Adapter
Follow the procedure shown below to connect the AC adapter.
CAUTION
Make sure to use only the AC adapter and power cord included with the device.
The shape of the plug and
outlet shown may vary
depending on your country
or region.
a Connect the power cord and AC adapter.
b Insert the plug of the AC adapter into the power connector.
c Connect the power cord to the wall outlet.
❏ Connecting the Network Cable
Insert the network cable connector (RJ-45) into the LAN port.
16
Page 21
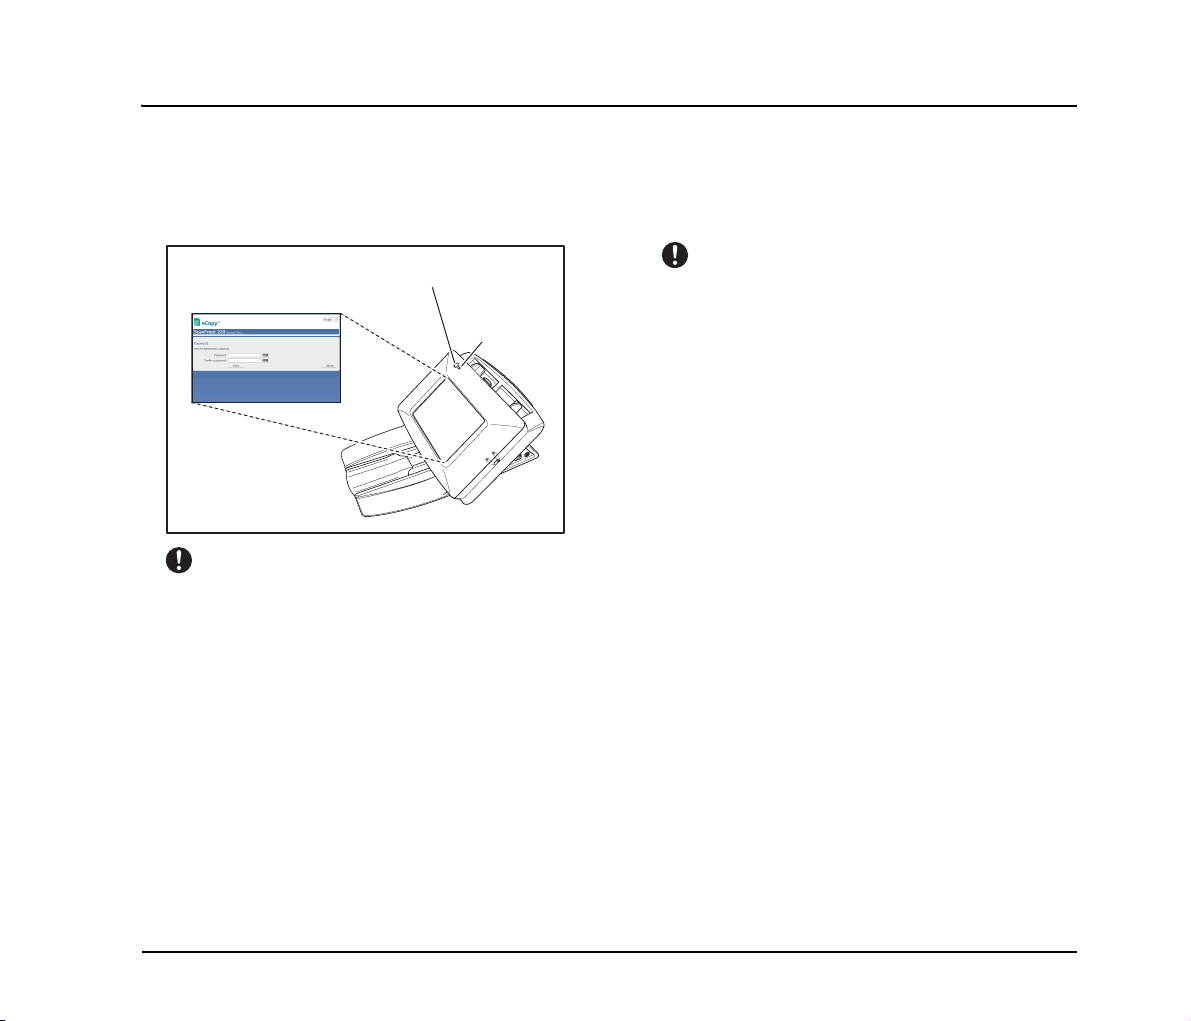
6. Turning the Power ON and OFF
Use the power switch to turn the device ON and OFF.
❏ Turning the Power ON
Press the power switch to turn the device ON. The power
indicator lights, and the Startup Menu screen appears.
Power switch
Startup Menu screen
IMPORTANT
• It takes approximately 40 seconds for the Startup Menu
screen to appear after the power switch is turned on.
• When the power indicator is lit but nothing appears on the
touch panel, Display Off has activated to turn the panel display
off. You can touch the panel to restore the display.
Power
indicator
❏ Turning the Power OFF
Press and hold the power switch until the device shuts
down.
IMPORTANT
When restarting the device, wait at least 5 seconds after turning
the power OFF before turning it ON again.
17
Page 22
7. Establishing the Connection between the Device and ShareScan Services
Manager
In order to use the device, you must first install ShareScan Services Manager on a computer that is connected to the same network
as the device.
This section describes the procedure for installing Services Manager on the computer and establishing a connection with the device.
This section also describes how to install Quick Connect.
❏ System Requirements
The minimum requirements for installing ShareScan
Service Manager on your computer are as follows.
CPU
Intel Pentium 4 2.4GHz or higher
RAM
512MB or higher (1GB or higher is recommended)
Operating System
Micorosoft Windows XP Professional SP3 or later
Microsoft Windows Vista Business or Enterprise
Edition SP1 or later
Microsoft Windows 2003 Server
Microsoft Windows 2008 Server
Hard disk
Type and format
IDE or SCSI drive (NTFS format is required)
Capacity
40GB or higher
Network
100 Base-TX network interface card is required.
Required components
TCP/IP and Client for Microsoft Networks
IMPORTANT
Depending on how the device is used, a system with higher
specifications may be required. For details, refer to the eCopy
ShareScan 4.5 Installation and Setup Guide (electronic
manual).
❏ Installing Services Manager
Install Services Manager (and other necessary software)
on the computer using the eCopy ShareScan 4.5 Setup CDROM supplied with the device.
IMPORTANT
We recommend installing Services Manager on a computer that
has a static IP address assigned.
1. Insert the eCopy ShareScan 4.5 Setup CD-ROM into
the CD-ROM drive on the computer.
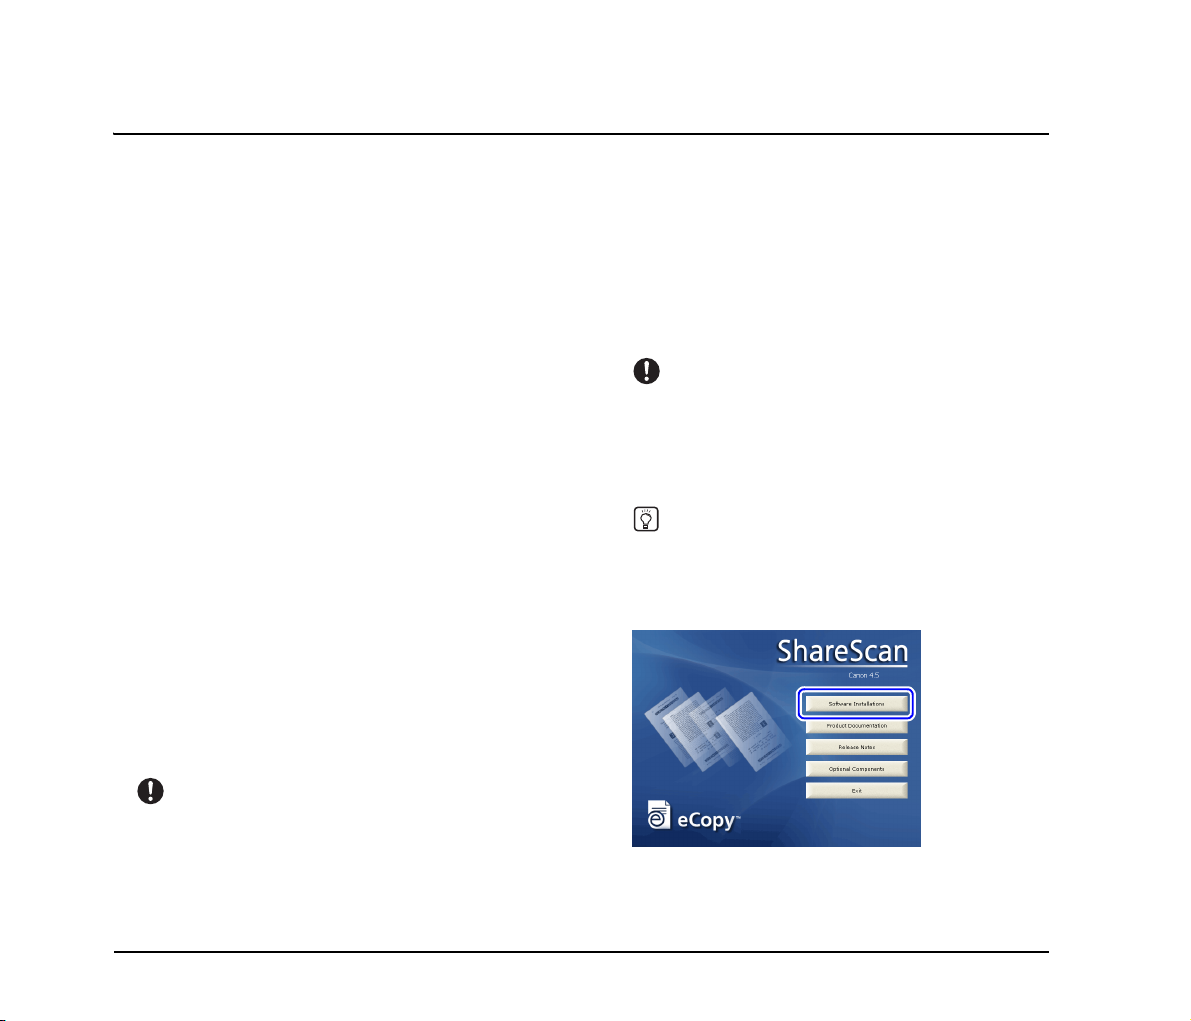
The [Launch] window appears.
Hint
If the [Launch] window does not appear, access the CD-ROM
using Windows Explorer and run ShareScan.exe from the CDROM.
2. Click [Software Installation].
18
Page 23
3.
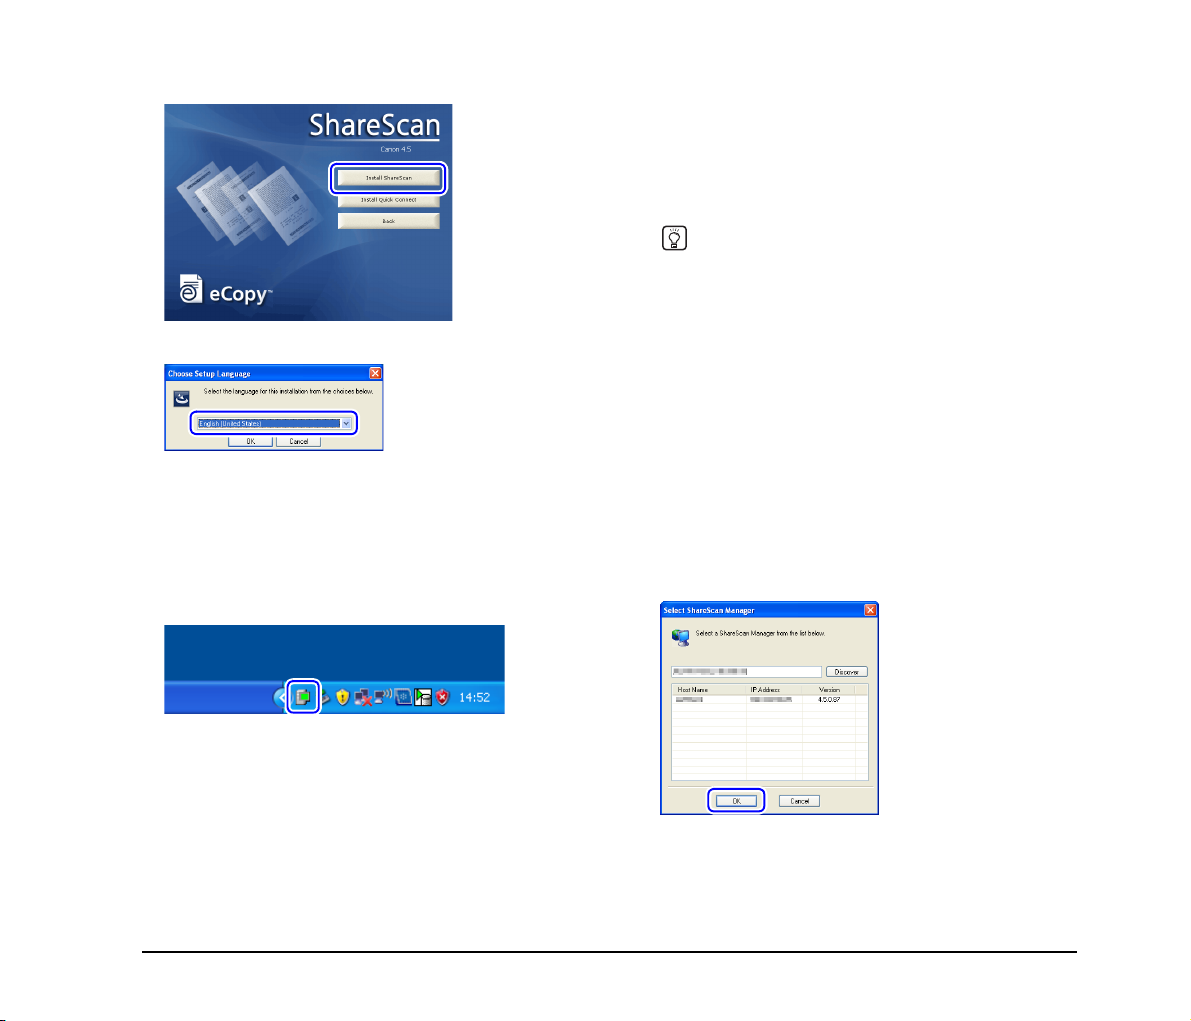
Click [Install ShareScan].
4. Select a language and click [OK].
5. Follow the instructions on the screen to complete
installation.
If a message requesting that you restart the computer
appears after installation is complete, follow the
instructions to restart the computer.
The eCopy Agent icon appears in the notification area of
the taskbar when the application is installed correctly.
❏ Entering the Product Key Licensing the
Device
After installing Services Manager on the computer, start
ShareScan Administration (the administration tool for
Services Manager) and enter the product key to license the
device.
Hint
Refer to the supplied information sheet on how to obtain the
eCopy ShareScan product key, and obtain the product key
beforehand (requires Internet connection). The product key for
the device is also required to obtain the eCopy ShareScan
product key.
1. Click the [Start] button, and then click [All Program],
[eCopy Applications], and [ShareScan
Administration].
eCopy ShareScan Administration starts.
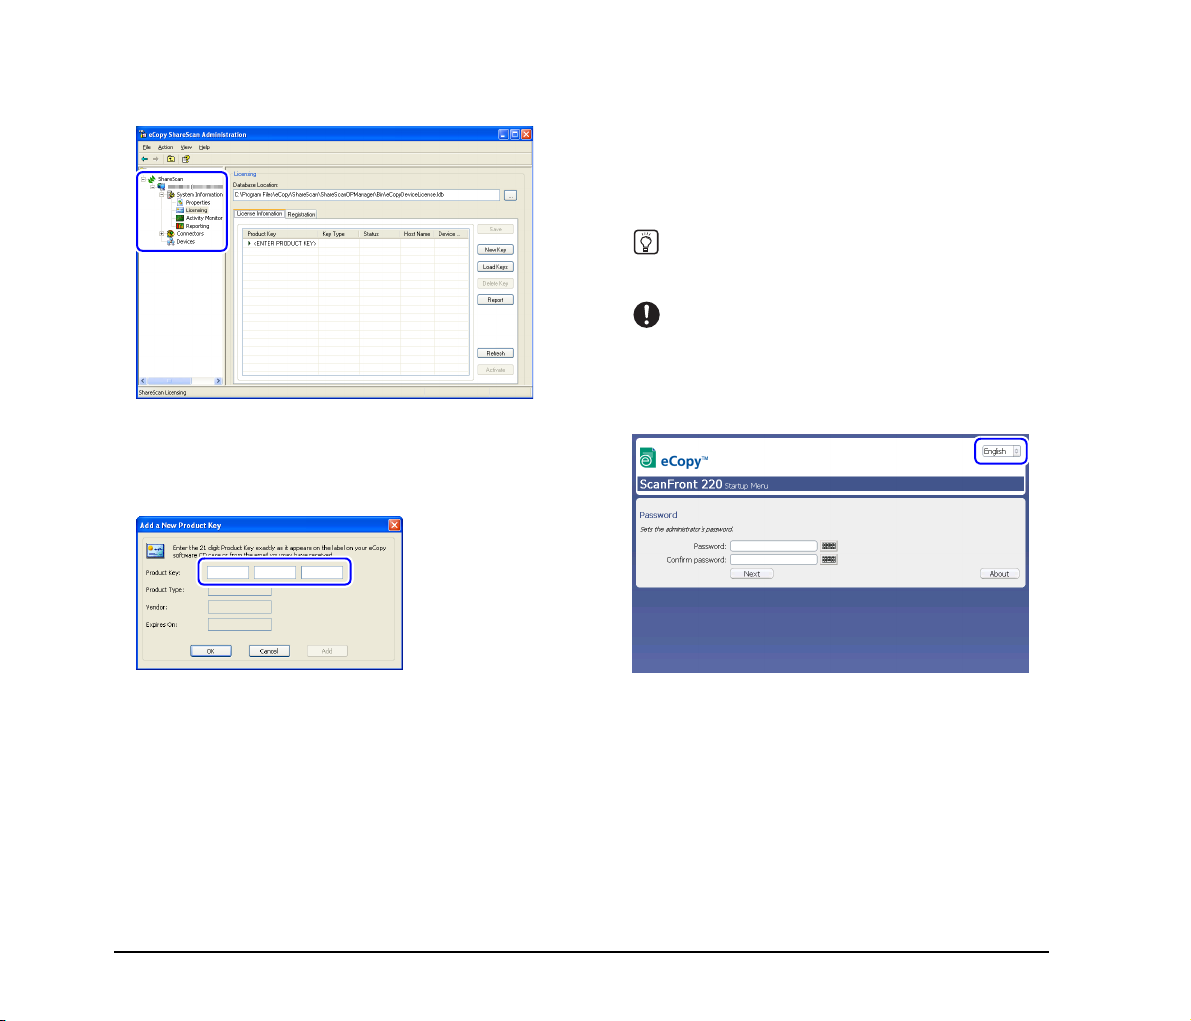
2. Click [ShareScan] under the tree in the left pane, and
then click [Discover Managers] in the [Action] menu.
The [Select ShareScan Manager] dialog box appears.
3. Make sure that the host name of the computer on
which Service Manager is installed is displayed, and
click [OK].
The [Select ShareScan Manager] dialog box closes, and
the computer on which Services Manager is installed
appears under the tree.
19
Page 24
4.
Double-click the computer under the tree to expand
it, and click [Licensing] under [System Information].
The [Licensing] screen appears in the right pane.
5. Click [New Key].
The [Add a New Product Key] dialog box appears.
6. Enter the product key, and click [OK].
❏ Configuring and Registering the Device
After setting up the computer on which Services Manager
is installed, configure the necessary settings on the device
and register the device on the computer.
1. Turn the device ON.
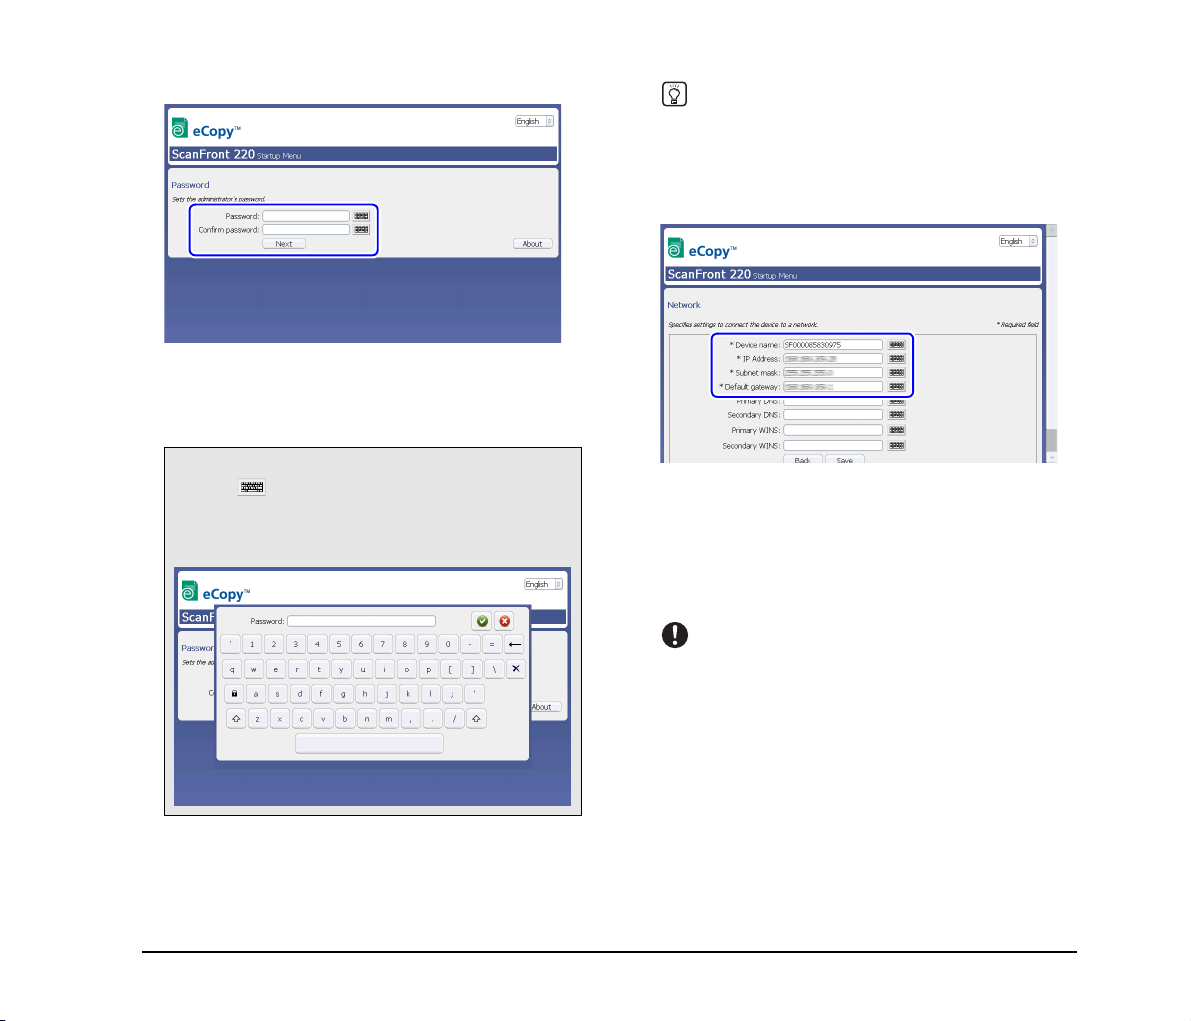
The Startup Menu for the device appears.
Hint
You can change the display language using the pull-down menu
at the top right of the Startup Menu.
IMPORTANT
If you continuously press the touch panel before the connection
to ShareScan Services Manager can be established, an error
may occur and operation may be disabled. In such cases,
restart the device and perform operations again from the
beginning.
For details on the product key, refer to the supplied
information sheet on how to obtain the eCopy ShareScan
product key.
When you click [OK], the [Add a New Product Key]
dialog box closes. Information on the product key you
entered appears under the [License Information] tab of the
[Licensing] screen.
You can now proceed to configuration and registration of
the device. As you will need to operate both the device and
the computer when registering the device, do not exit
ShareScan Administrator yet.
20
Page 25
2.
Set the administrator password.
Enter the password in the [Password] box, and reenter it in
the [Confirm Password] box to confirm.
After entering the password, press [Next]. The network
configuration screen appears.
Hint
If you press [Next] without entering a password, the password
will be left unconfigured and password entry will not be required
for starting the device. To ensure security, we recommend
configuring the password.
3. Configure network settings for the device.
How to input text
Press the icon next to the input box to display the soft
keyboard on the screen and enable text entry. When you
finish entering the text, press [OK] to close the soft
keyboard.
Configure the following settings.
Device Name
Enter a name for the device. This is the name that will
appear for the device on the network.
IP Address
Enter a unique IP address to assign the device.
IMPORTANT
You must assign the device a static IP address. Consult your
network administrator to determine a static IP address for the
device.
Subnet Mask
Enter the subnet mask of the network to which the device
will be connected. For details, contact your network
administrator.
Default Gateway
Enter the default gateway of the network to which the
device will be connected. For details, contact your network
administrator.
21
Page 26
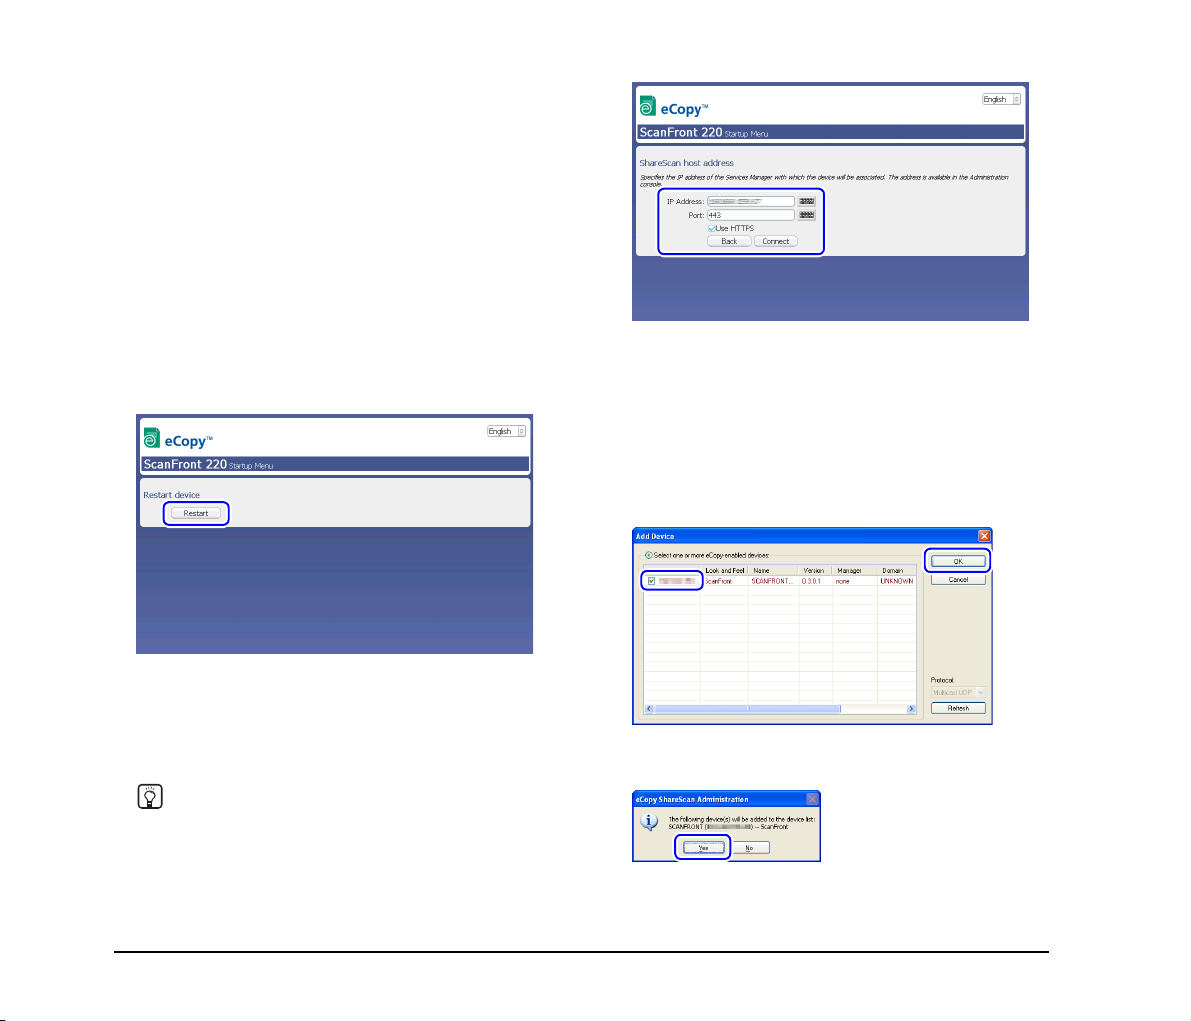
Primary DNS / Secondary DNS
Enter the DNS address of the network to which the device
will be connected. The [Secondary DNS] setting is
optional. For details, contact your network administrator.
Primary WINS / Secondary WINS
If the network to which the device will be connected
includes WINS servers, enter the WINS server addresses
as necessary. The [Primary WINS] and [Secondary WINS]
settings are optional. For details, contact your network
administrator.
When you finish configuring the settings, press [Save].
A message requesting that you restart the device appears.
4. Press [Restart]. Configuration is complete, and the
device restarts.
You should now be able to access the device from the
computer on which Services Manager is installed.
6. Click [Devices] under the tree in eCopy ShareScan
Administration on the computer on which Services
Manager is installed, and then click [Add a new
device] in the [Action] menu.
The [Add Device] dialog box appears.
7. Select the check box for the device, and click [OK].
When the device starts again, a screen for entering the IP
address of the computer on which Services Manager is
installed appears.
5. Enter the IP address of the computer on which
Services Manager is installed, and press [Connect].
Hint
The [Use HTTPS] option is enabled by default. You can disable
this option to enter a port number of your choice in the [Port]
box.
22
A confirmation message for adding the device appears.
8. Click [Yes].
The [Product Key Information] dialog box appears.
Page 27
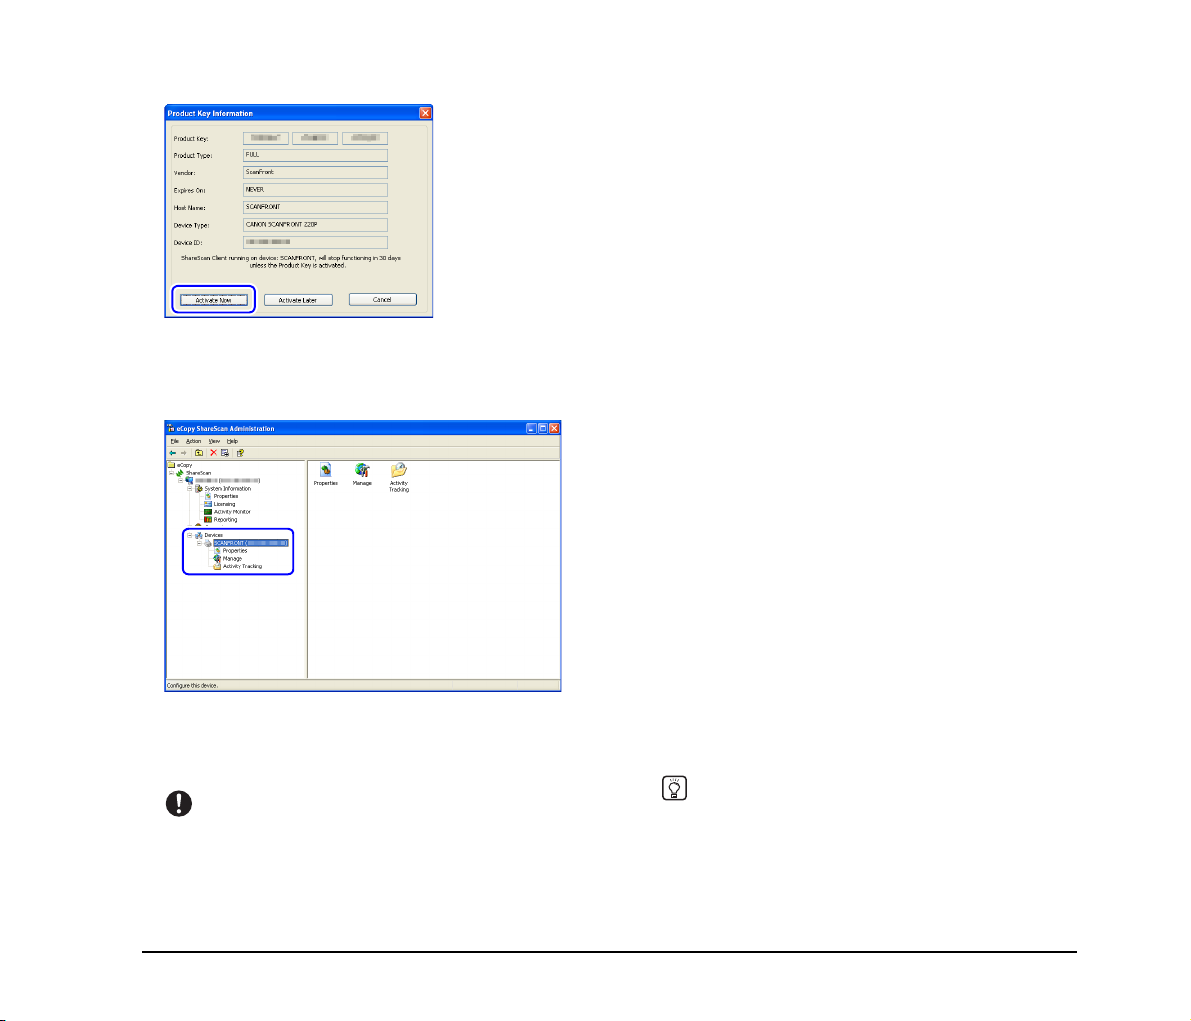
9.
Click [Activate Now].
above procedure. In such cases, you must configure settings
to permit passage of the device through the firewall. For
details, refer to the operating instructions for the computer or
related documents, or contact your network administrator.
• When activating the product key, the computer will connect to
the Internet. If the administrator computer cannot connect to
the Internet, activation can be performed manually. For
details, refer to the eCopy ShareScan 4.5 Installation and
Setup Guide (electronic manual).
• You can also click [Activate Later] in step 9. You will still be
able to use the device in this case, but only for a period of 30
days.
The [Product Key Information] dialog box closes, and the
product key that you entered is activated via the Internet.
When activation is complete, the device is registered under
[Devices] in the device tree.
This completes device registration. The connection
between the device and eCopy ShareScan Services
Manager is established, and you can now use the device.
IMPORTANT
• If firewall software (Windows Firewall included with Windows
XP or other commercially available firewall software) is
running on the computer on which Services Manager is
installed, you may not be able to register the device with the
❏ Installing Quick Connect
The eCopy ShareScan 4.5 Setup CD-ROM also includes a
connector application for eCopy ShareScan called Quick
Connect. Quick Connect is a simplified connector
application that allows you to flexibly specify the save
destination for scanned images. To use the application,
you must install it on the computer on which ShareScan
Manager is installed.
Follow the procedure below to install the application.
1. Insert the eCopy ShareScan 4.5 Setup CD-ROM into
the CD-ROM drive on the computer.
The [Launch] window appears.
2. Click [Software Installation].
3. Click [Install Quick Connect].
4. Select a language and click [OK].
Quick Connect installation starts.
5. Follow the instructions on the screen to complete
installation.
Hint
For details on how to use Quick Connect, refer to the eCopy
Quick Connect Administrator's Guide (electronic manual).
23
Page 28

8. Configuring ShareScan Services Manager
After connection between the ScanFront and eCopy ShareScan Services Manager is established, you can configure the various
settings of eCopy ShareScan and QuickConnect to suit your requirements.
For details, please refer to the eCopy ShareScan 4.5 Installation and Setup Guide (electronic manual).
24
Page 29
9. Documents
The ScanFront can scan documents in a range of sizes from business cards to LTR/A4.
It is possible to feed documents of the following sizes and thicknesses depending on the feeding method used.
❏ Plain Paper
Size
Width: 2" to 8 1/2" (50.8 mm to 216 mm)
Length: 2 1/8" to 14" (53.9 mm to 355.6 mm)
Thickness for Page Separation Feeding
14 lb to 32 lb bond (52 g/m
Thickness for Bypass Feeding
11 lb to 40 lb bond (42 g/m
IMPORTANT
A document must meet the following criteria to be scannable:
• When scanning a multipage document, pages must be
grouped together so that they have the same size, thickness,
and weight. Scanning different types of paper at one time can
cause the device to jam.
• Always make sure that the ink on a document is dry before
scanning it. Scanning documents with the ink still wet may soil
the rollers or scanning glass, cause lines or smudges to
appear on images, or dirty other documents.
• Always clean the rollers or scanning glass after scanning a
document written in pencil. Scanning documents with pencil
written on them may soil the rollers or scanning glass, cause
stripes to appear in images, or dirty other documents.
• When scanning a two-sided document that is printed on thin
paper, the image on the opposite side of each page may show
through. Adjust the brightness in the scanning conditions
before scanning the document.
2
to 128 g/m2)
2
to 157 g/m2)
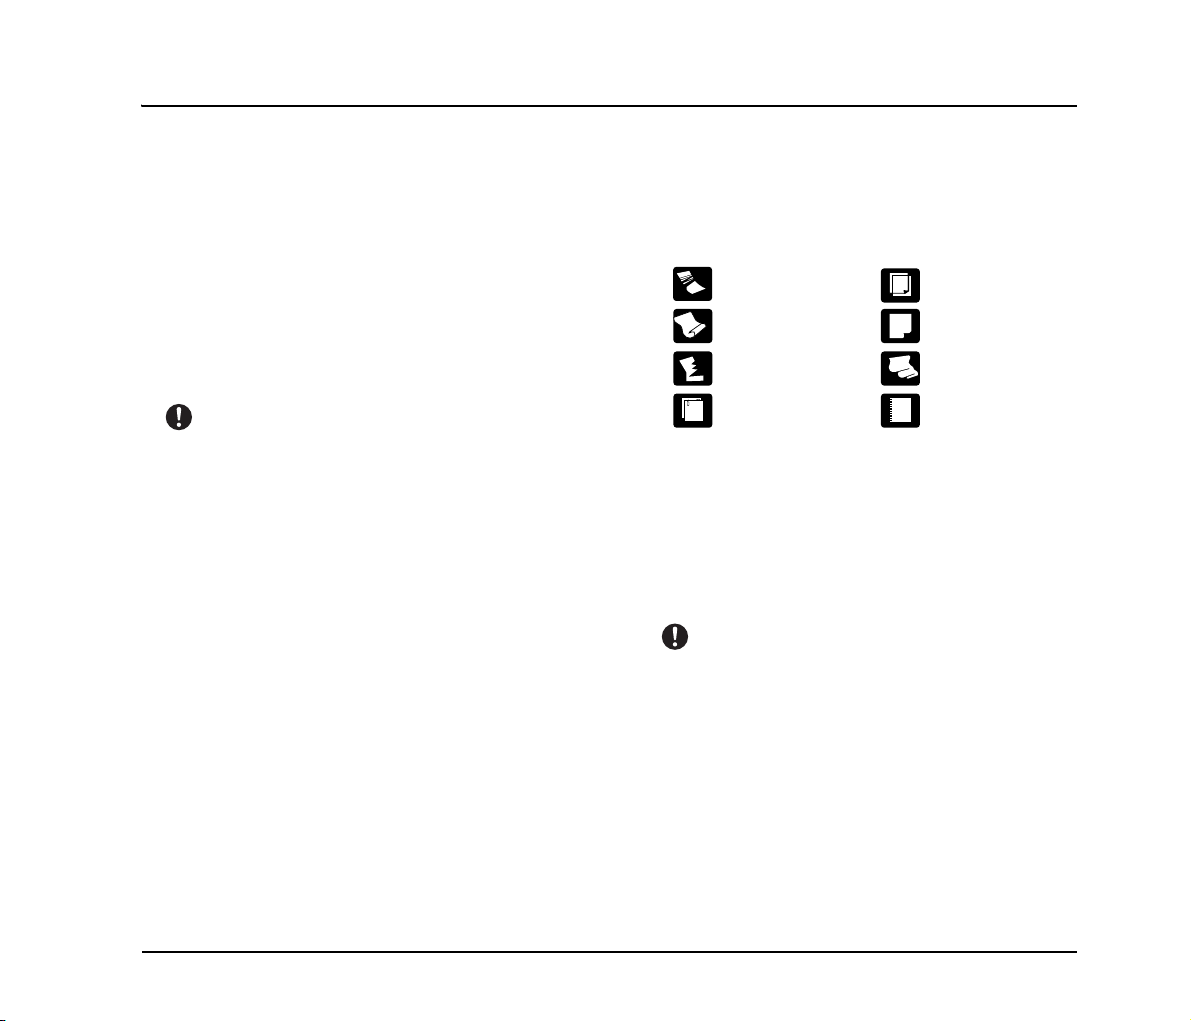
• Note that scanning the following types of documents can
cause a paper jam or malfunction. To scan such a document,
make a photocopy of the document and then scan the
photocopy.
Wrinkled or creased
documents
Curled documents Coated paper
Torn documents
Documents with
paper clips or staples
Carbon paper
Extremely thin,
translucent paper
Document with square
punch holes
❏ Business Card
Size
Width: 2" (50.8 mm) and above
Length: 2 1/8" (53.9 mm) and above
Thickness
110 lb Cover (300 g/m
IMPORTANT
• If the stack of business cards that you placed is not fed
properly, reduce the number business cards.
• Business cards may sometimes be stacked in the wrong order
when they are ejected, depending on the size and thickness
of the business cards, and the orientation that they are loaded.
2
) and below
25
Page 30
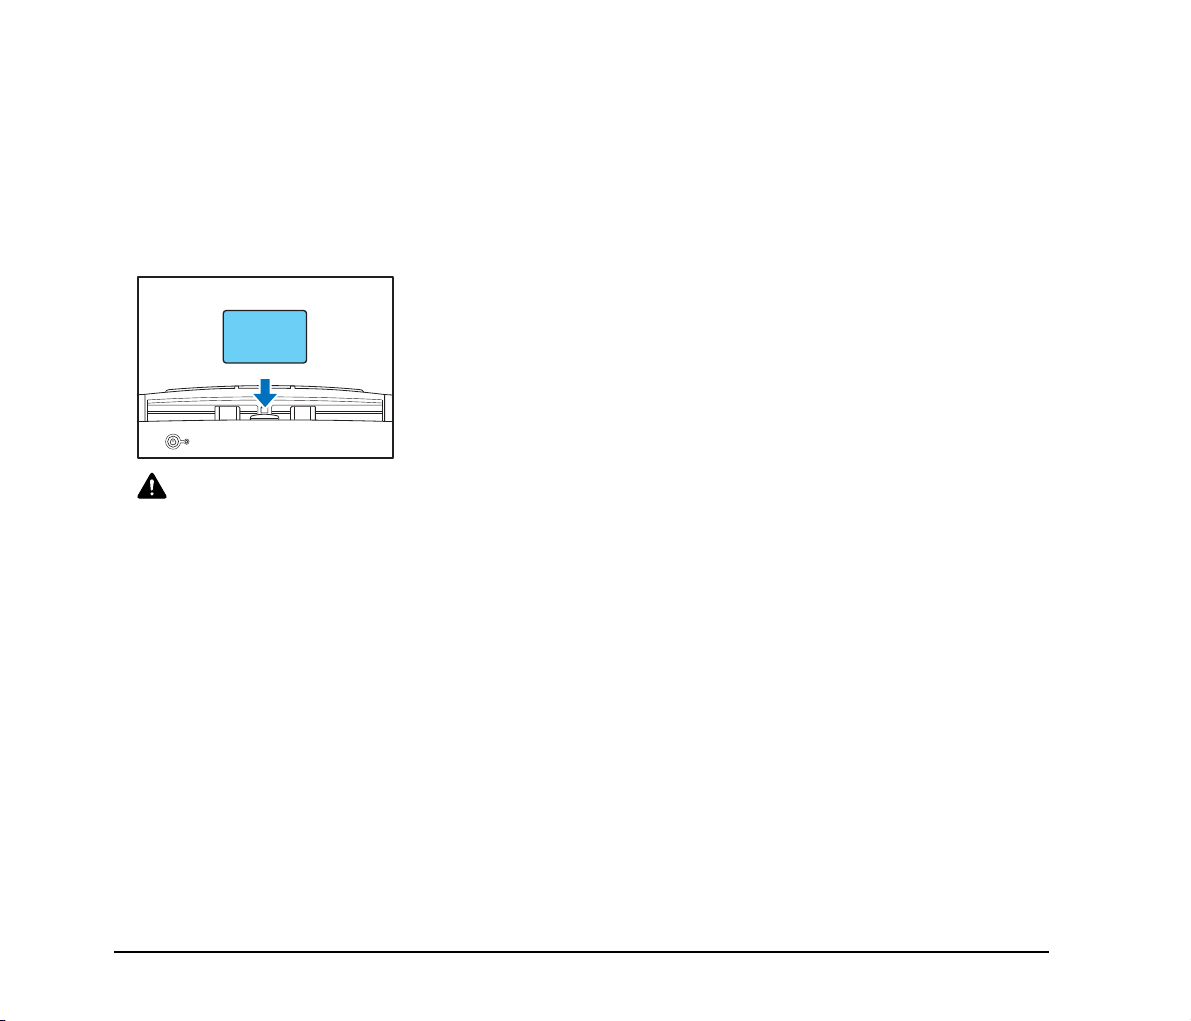
❏ Plastic Card
Size
2.12" × 3.37" (53.9 × 85.5 mm) (Conforming to
ISO7810 Standards)
Thickness
0.0299" (0.76 mm) and below
Insertion orientation
Landscape
CAUTION
A plastic card placed into the document feed tray in the portrait
orientation may not be output properly because a load is placed
on it during feeding. Furthermore, removing a card that has
caused a feeding error may damage the card, so make sure to
correctly insert the card.
26
Page 31
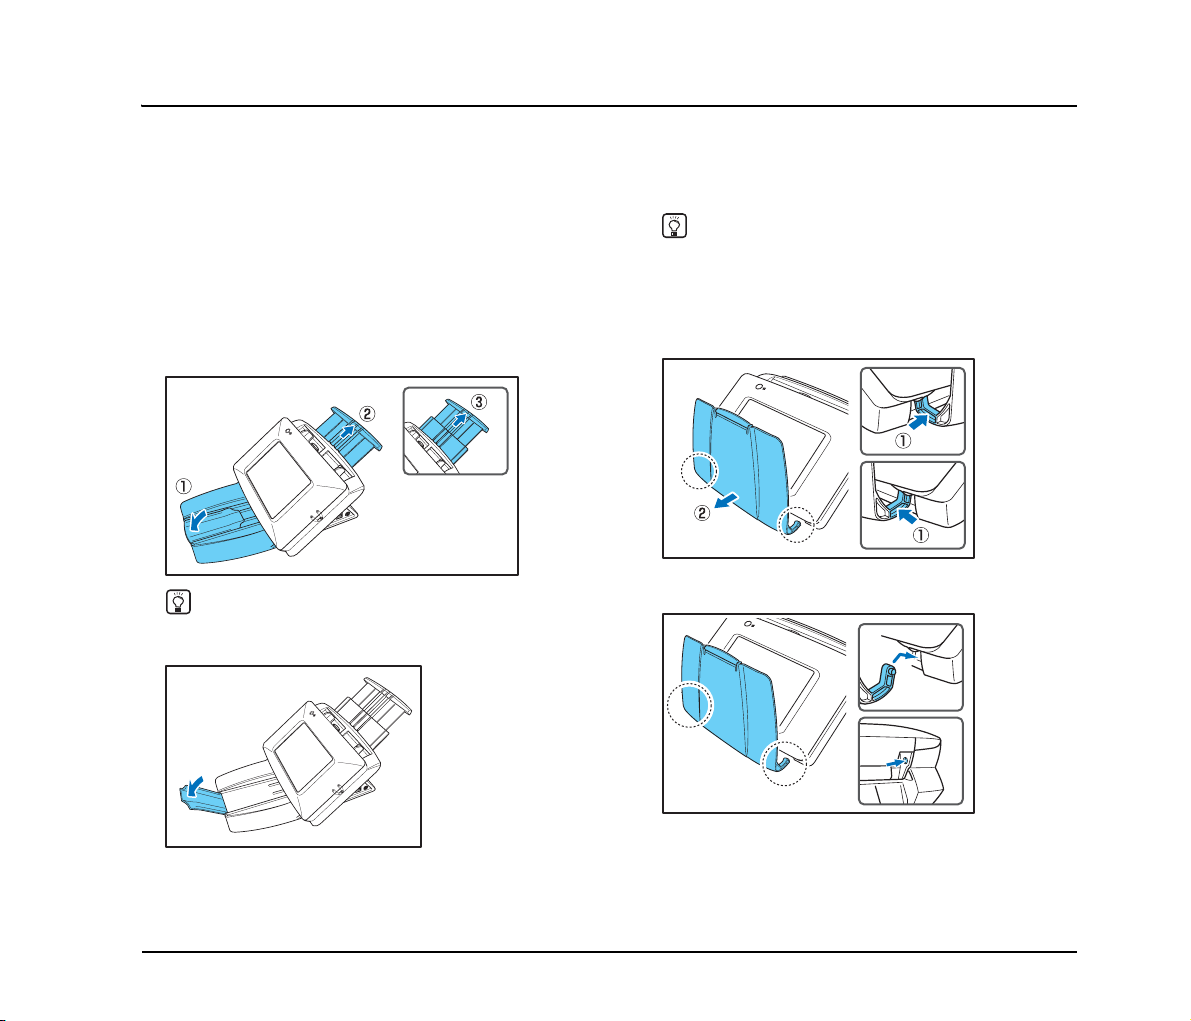
10. Preparing the Device
When placing a document in the device, pull out the document feed tray so that it matches the size of the document, and then move
the feed selection lever to the appropriate position for the desired feed method (page separation feeding or bypass feeding) for the
document.
❏ Preparing the Document Feed Tray and
Eject Tray
Prepare the trays in accordance with the type of document.
1. Open the document eject tray a.
2. Pull out the document feed tray b, c to match the
length of the document to be placed in the tray.
Hint
Open the center tray extension when output documents are
likely to fall out of the tray.
Hint
If the output documents curl in the eject tray when scanning
particularly thin documents, remove the eject tray.
To remove the document eject tray, push in on the illustrated
portions of the tray on both sides in the direction of the arrows
a and pull out b.
To reattach the eject tray, insert the protrusions on both sides of
the tray into the holes on the device.
After connecting the tray, make sure that it is attached securely.
27
Page 32
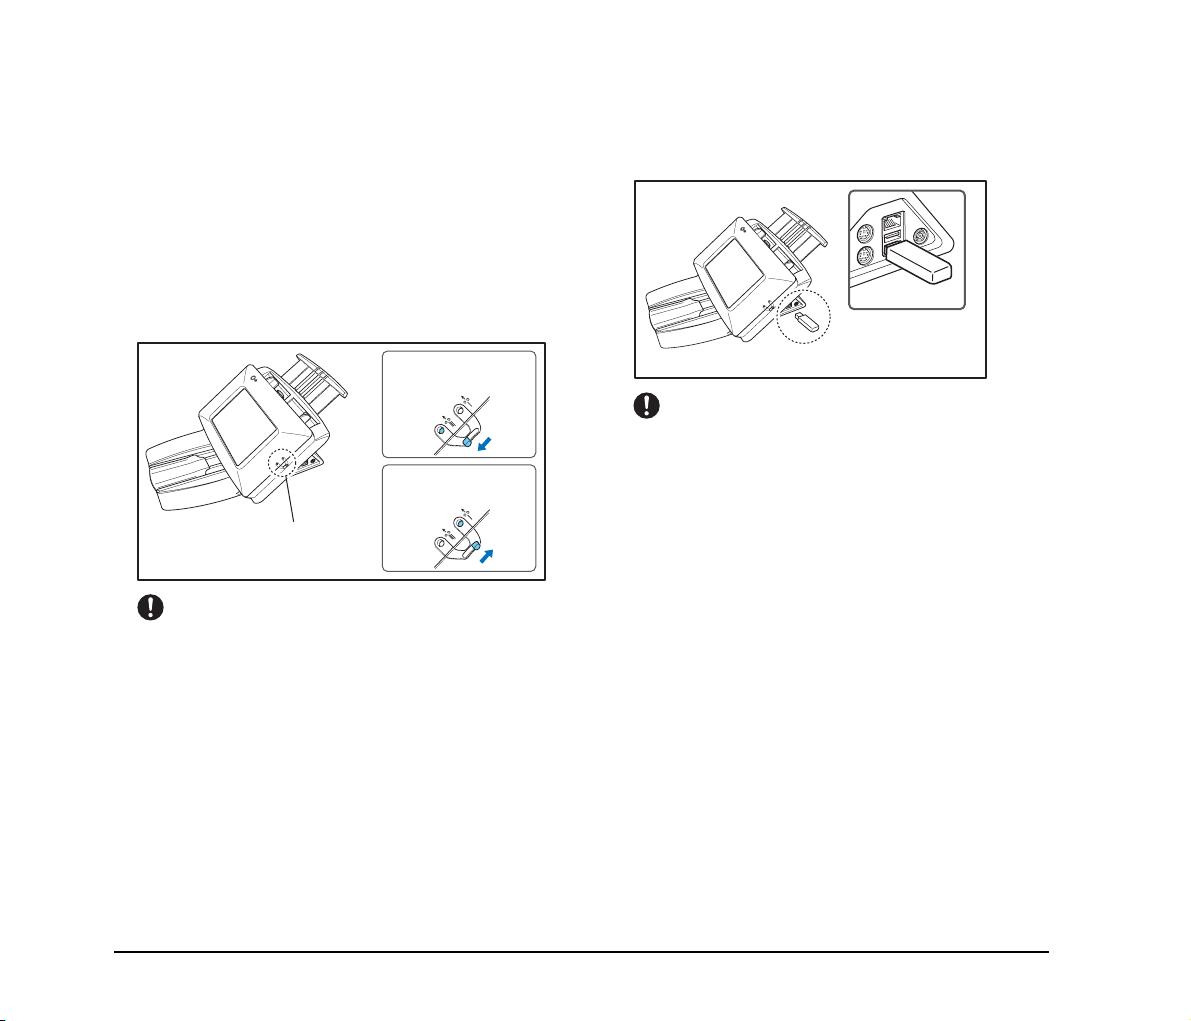
❏ Feed Selection Lever
Change the position of the lever to the desired feed method
for the document.
Page Separation Feeding
Move the lever downward to separate a stack of documents
one page at a time in order to continuously feed the
documents.
Bypass Feeding
Move the lever upward to feed a document with multiple
pages attached together such as an invoice one page at a
time without separating the pages.
Page separation
feeding
Bypass feeding
Feed selection lever
IMPORTANT
Moving the lever upward (bypass feeding) and then scanning a
stack of documents will cause multiple pages to be fed at the
same time.
❏ USB Port
You can insert a USB flash drive to store image files or
connect a USB keyboard or USB mouse to operate the
device.
USB flash drive
IMPORTANT
• Insert the USB flash drive while the device is ON. Some USB
flash drive may not be recognized properly if the power is
turned ON after the USB flash drive is inserted.
• Use USB flash drive that is not write-protected for security. If
the USB flash drive is write-protected, data cannot be written
to the USB flash drive.
• Make sure that the USB flash drive has sufficient space to
store images.
28
Page 33
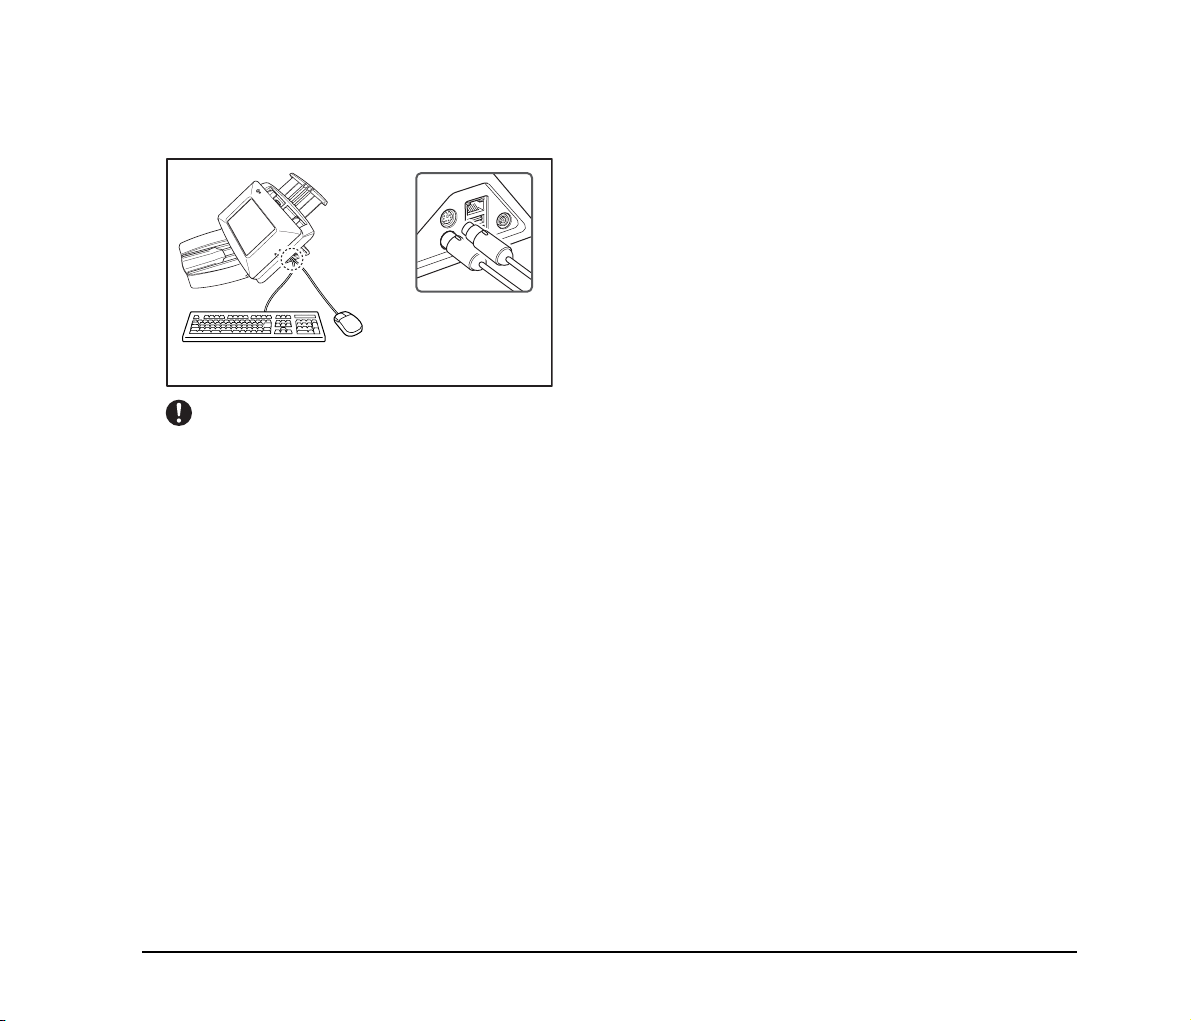
❏ Using a PS/2 Keyboard and PS/2 Mouse
You can connect a PS/2 keyboard and mouse to the PS/2
port and use them to operate the device.
Green (Top):
Mouse
Purple (Bottom):
Keyboard
IMPORTANT
Turn OFF the device before connecting or disconnecting the
PS/2 mouse and keyboard.
29
Page 34
11. Placing Documents
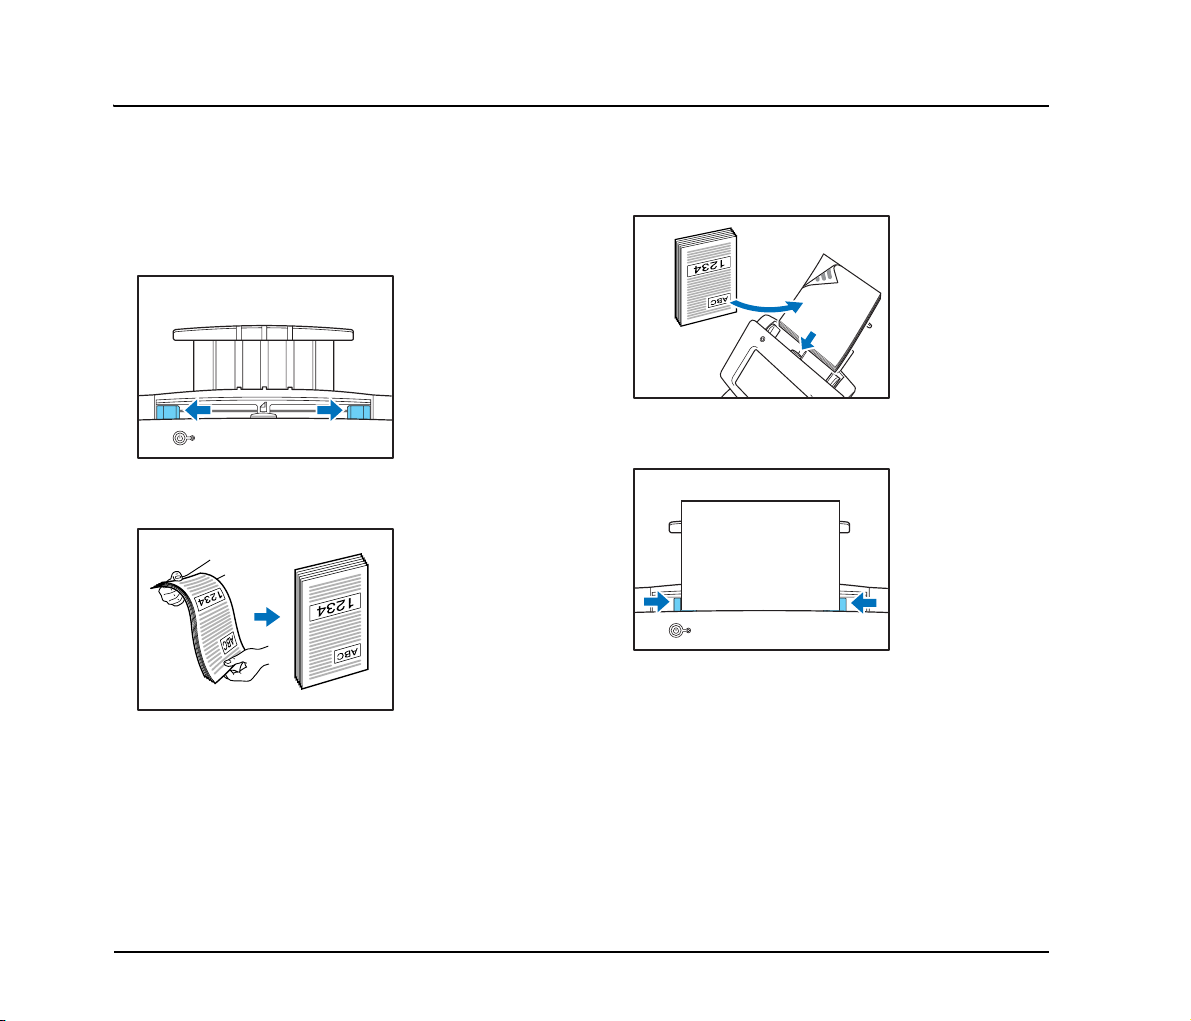
When placing documents into the device, place them face down into the tray with the top edge of the document at the bottom of tray.
❏ Placing a Document
Follow the procedure below to place a document.
1. Adjust the document guides to be wider than the
width of the document.
2. Fan the document to offset the pages so that the top
edge of the first page is the lowest.
3. Place the document face down with its top edge at
the bottom of the tray.
4. Adjust the document guides to fit the width of the
document.
30
Page 35
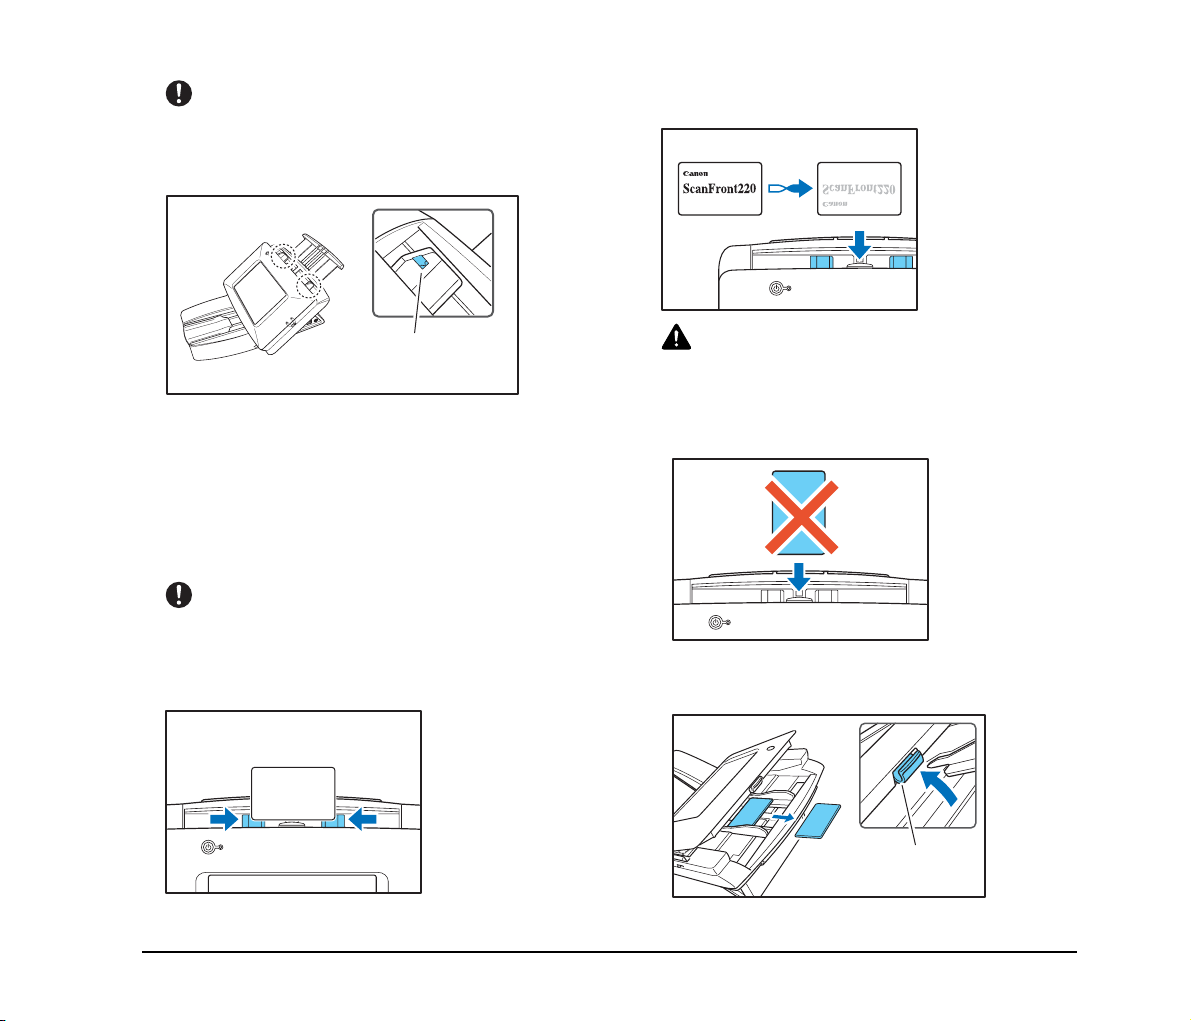
IMPORTANT
Up to 50 sheets of ordinary paper can be loaded into the
document feed tray. When placing the document, make sure the
size of stack does not exceed the loading marks on the
document guides.
3. Place the card face down in the landscape orientation
with the top edge at the bottom of the tray.
Loading mark
❏ Placing a Cards (Business Card, Plastic
Card)
When you want to scan a card, follow the procedure below
to place the card.
1. Move the feed selection lever upward (bypass
feeding).
IMPORTANT
When scanning cards, set the feed selection lever to bypass
feeding and make sure to scan the cards one at a time.
2. Adjust the document guides to match the width of the
card.
CAUTION
• A card placed into the document feed tray in the portrait
orientation may not be output properly because a load is
placed on it during feeding. Furthermore, removing a card that
has caused a feeding error may damage the card, so make
sure to correctly insert the card.
• Pull the lock lever and open the panel unit before removing a
placed card. Inserting a finger into the device while the panel
unit is closed may result in an injury.
Lock lever
31
Page 36
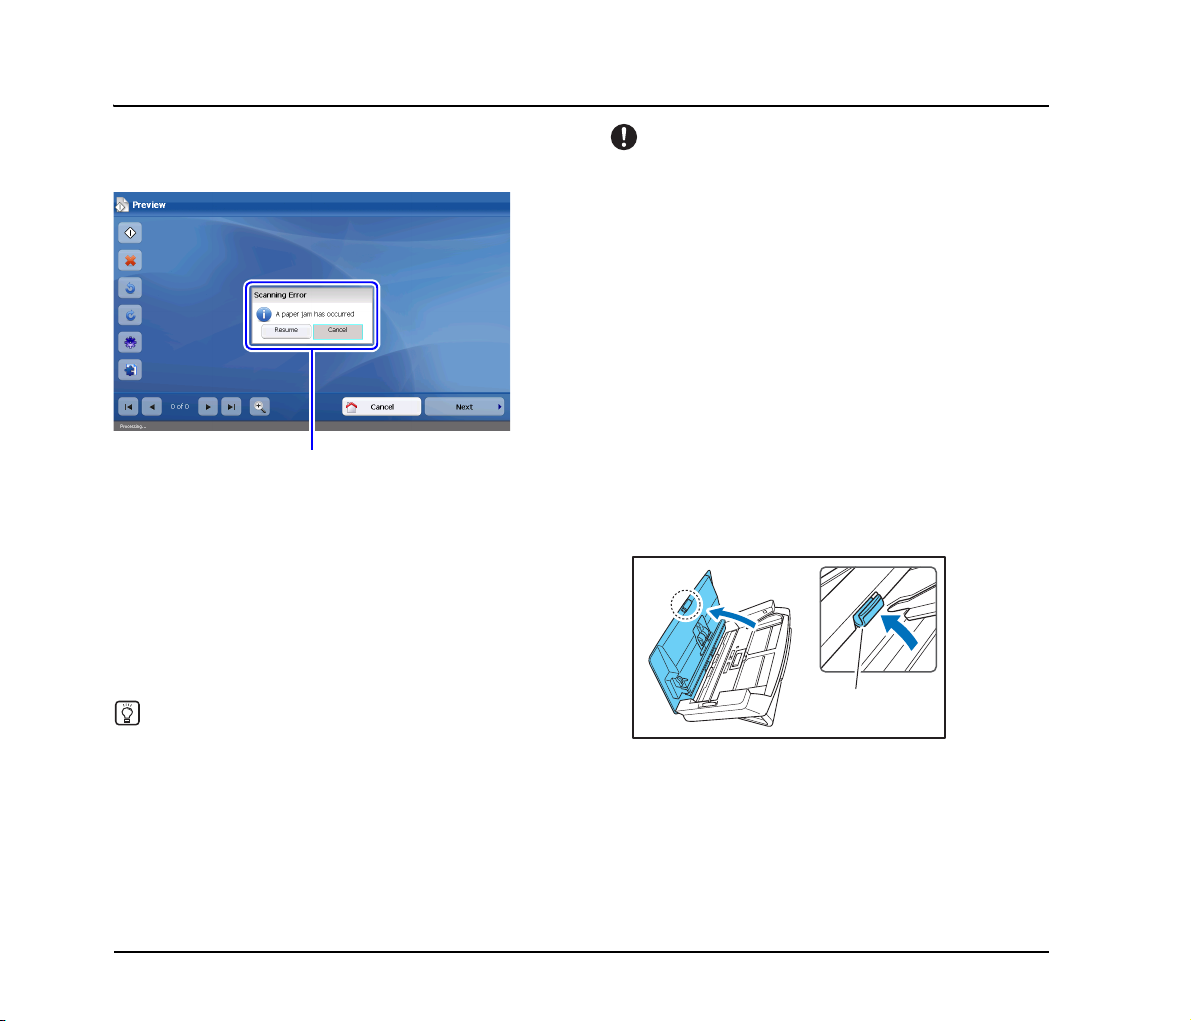
12. Clearing a Paper Jam or Double Feed Error
If a paper jam or double feed error occurs, feeding and
scanning operations are paused, and an error screen similar to
the following appears.
Type of error
When this occurs, clear the paper jam (or document that
stopped mid-feed) and perform one of the following
procedures.
• To continue scanning, reset the document starting with the
page that stopped mid-feed, and then press [Resume]. The
reset document will be scanned, and the Preview screen will
appear when the entire document finishes scanning.
• To cancel scanning, press [Cancel]. The portion of the
document that was scanned before the error occurred will be
displayed on the Preview screen.
Hint
Double feed errors will only be detected if [Double Feed Detection]
is enabled in the Scanning Settings for the device.
IMPORTANT
• If double feed errors occur repeatedly, reduce the number of
sheets you place in the document feed tray to about 10.
• A dirty or worn feed roller, or documents stuck together as a result
of static electricity are common causes of paper jams or double
feed errors.
If the feed roller is dirty, clean it. If paper jams or double feed
errors continue to occur even after cleaning, contact the
ScanFront administrator and replace the rollers (feed roller and
retard roller), and document holding guides.
❏ Removing the Jammed Document
Remove a jammed document (or document that stopped
mid-feed) from the scanner as follows.
1. Remove the scanned documents from the document
eject tray, and any documents remaining in the
document feed tray.
2. Pull the lock lever toward you and then fully open the
panel unit.
Lock lever
32
Page 37
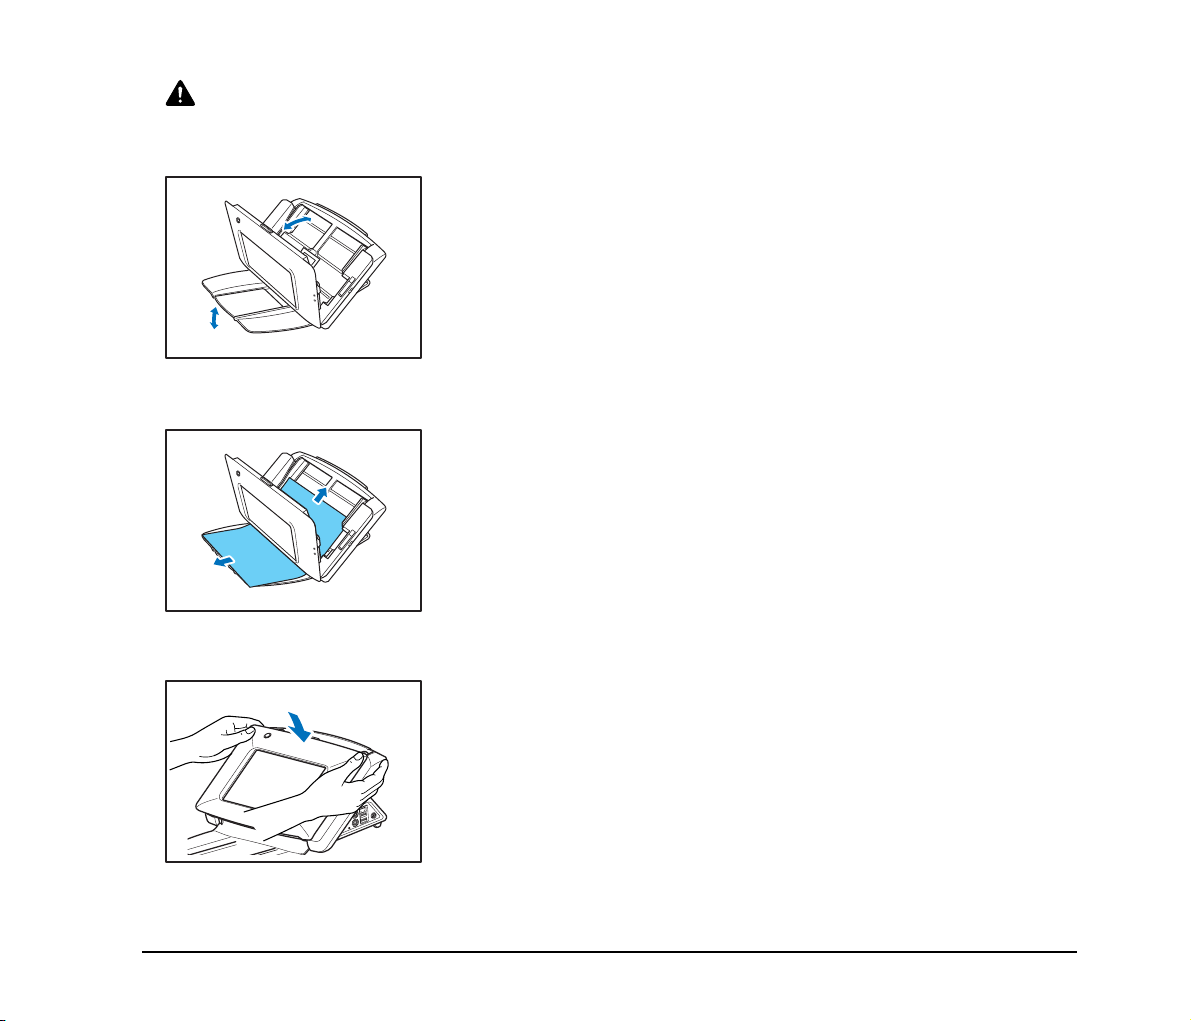
CAUTION
The open/close movement of the panel unit is linked to the up/
down movement of the document eject tray. Do not press on the
document eject tray when you open the panel unit.
3. Pull out the jammed document in the direction that
seems the easiest to remove it.
4. Close the panel unit and then place the document
again.
33
Page 38
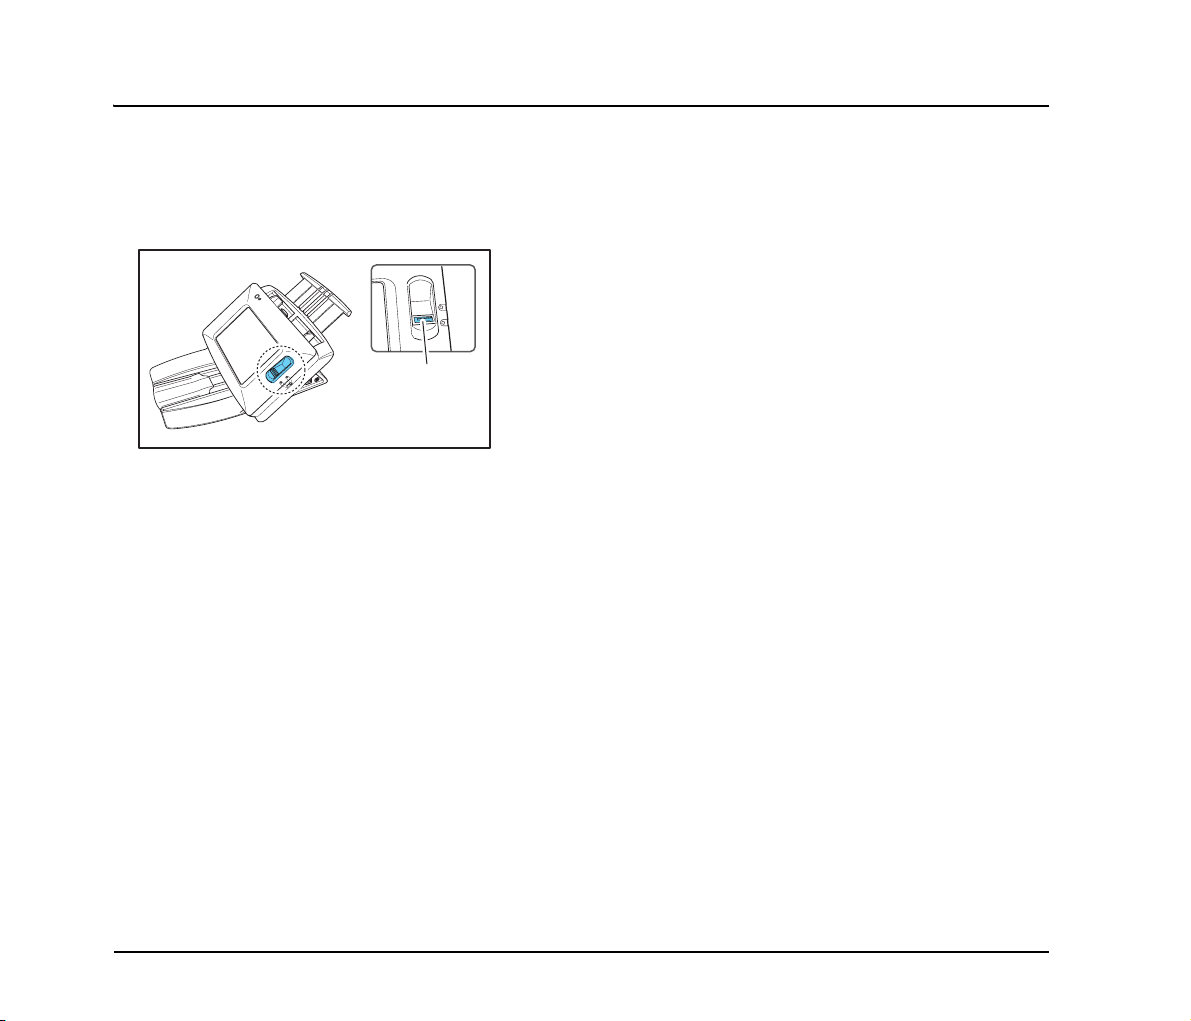
13. Fingerprint Sensor (ScanFront 220eP)
The ScanFront 220eP is equipped with a fingerprint sensor for registering fingerprints and authenticating users.
The fingerprint sensor is a precision component. Be careful when handling this sensor.
❏ Cautions for Handling the Fingerprint
Sensor
Fingerprint Sensor
● The following actions may damage the fingerprint
sensor or cause it to malfunction. Read this
information carefully to avoid damaging the
sensor.
– Dropping an object on the fingerprint sensor, or
otherwise subjecting it to a strong impact
– Scratching the surface of the fingerprint sensor,
or poking it with a pointed object
– Pressing a hard object such as a fingernail or
metal item against the fingerprint sensor,
resulting in scratches being created on the
surface of the fingerprint sensor
– Touching the fingerprint sensor with dirty hands,
which might scratch or dirty the surface of the
fingerprint sensor
– Placing a sticker on the surface of the fingerprint
sensor, or covering the surface with ink or
another substance
● If fingerprint authentication fails frequently, the
fingerprint sensor may be dirty. Clean the surface
of the fingerprint sensor regularly.
● When cleaning the fingerprint sensor, use a soft
dry cloth to wipe dirt off the surface.
● Do not use a pointed object to remove any dirt that
accumulates around the fingerprint sensor. Doing
so may cause the fingerprint sensor to
malfunction.
● Touching the fingerprint sensor while charged with
static electricity may cause the fingerprint sensor
or device unit to malfunction. Before touching the
fingerprint sensor, discharge any static electricity
by touching a piece of metal. Be especially careful
during dry periods, such as the winter season,
when the likelihood of being charged with static
electricity is high.
34
Page 39
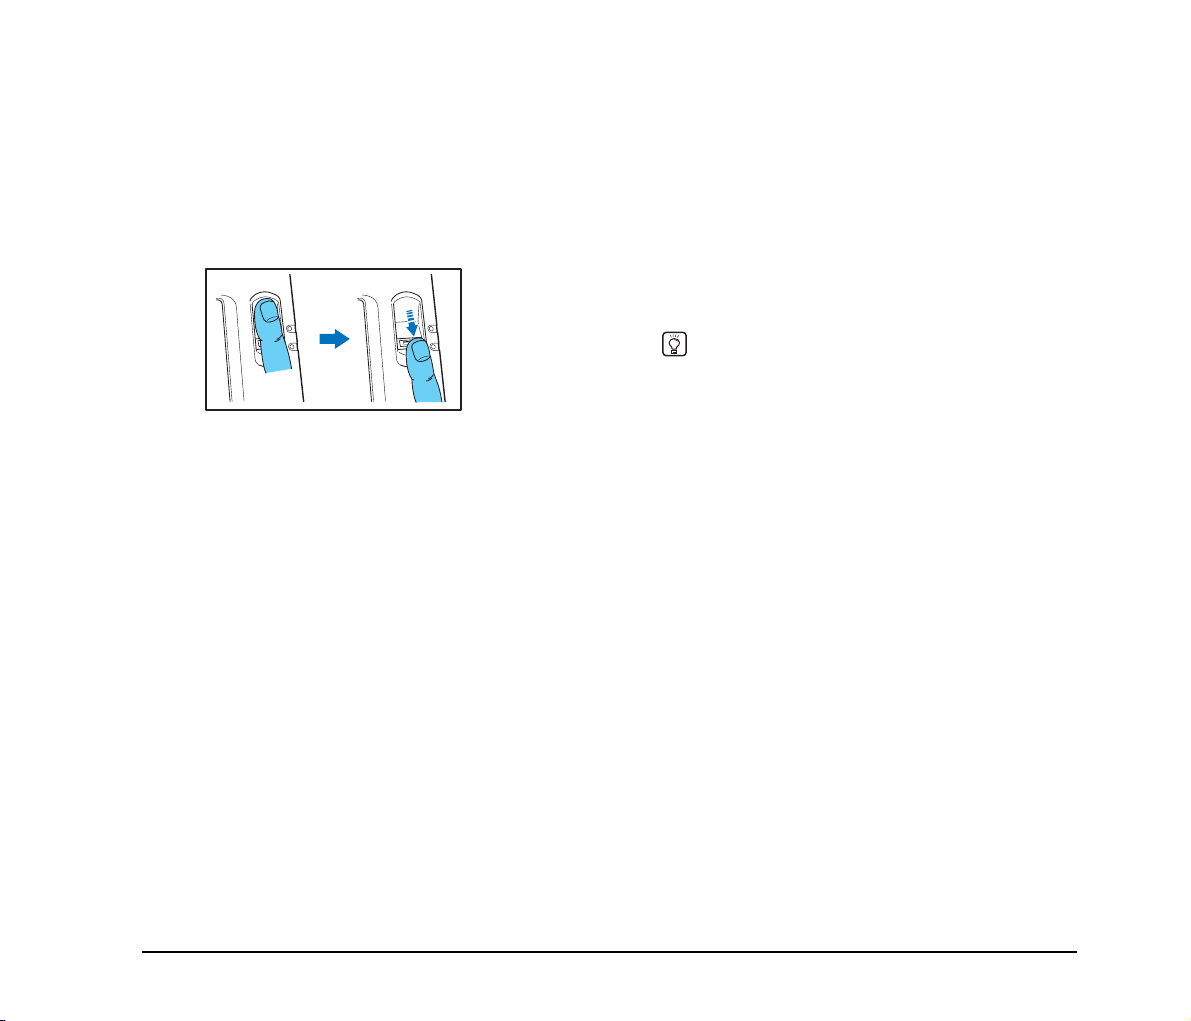
❏ Fingerprint Authentication
● Follow the procedure below to use fingerprint
registration and authentication.
1. Align the first joint of a finger on the sensor and
press the finger on the fingerprint sensor.
2. Keep the finger pressed while slowly sliding it
straight at a constant speed to scan the
fingerprint.
● Fingerprint authentication uses the unique
information of fingerprints. The fingerprint
authentication function may not work properly for a
finger with a fingerprint that is worn down or has
few distinguishable features.
● The same finger needs to be scanned three times
to register the fingerprint.
● The authentication performance differs depending
on the condition of the fingerprint when it is
registered and when it is authenticated. The
following conditions may cause an error in
fingerprint authentication:
– The finger is wet or sweaty
– The finger is dirty
– The grooves of the fingerprint are filled with
sweat or oil
– The finger is dry (dry skin)
– Part of the fingerprint is missing because of, for
example, a wound or burn injury
– The fingerprint has worn thin
● Authentication performance may improve if the
condition of the fingerprint is improved as a result
of washing your hands or applying hand cream.
● Authentication may not be performed properly
depending on the speed with which you slide your
finger over the sensor. In this case, adjust the
speed with which you slide your finger in
accordance with the message that appears.
● Fingerprint authentication does not necessarily
guarantee the authentication and verification of the
identity of a person.
Hint
For details on the procedures for fingerprint registration and
authentication, refer to the eCopy ShareScan 4.5 Installation
and Setup Guide (electronic manual).
35
Page 40
14. Basic Scanning Procedure
This section describes the basic procedure for scanning documents using the device.
Based on the type of connector installed on the Services Manager PC, you can send scanned data to other computers and devices
on a network. This section describes the procedure for sending scanned data to another computer using Quick Connect installed on
p. 23 as an example
❏ Preparing for Scanning
Before scanning, you must configure Quick Connect on
the Services Manager PC, and configure the scanning
conditions and destination for scanned data. For details,
refer to the eCopy ShareScan 4.5 Installation and Setup
Guide/eCopy Quick Connect Administrator's Guide
(electronic manual).
❏ Scanning Procedure
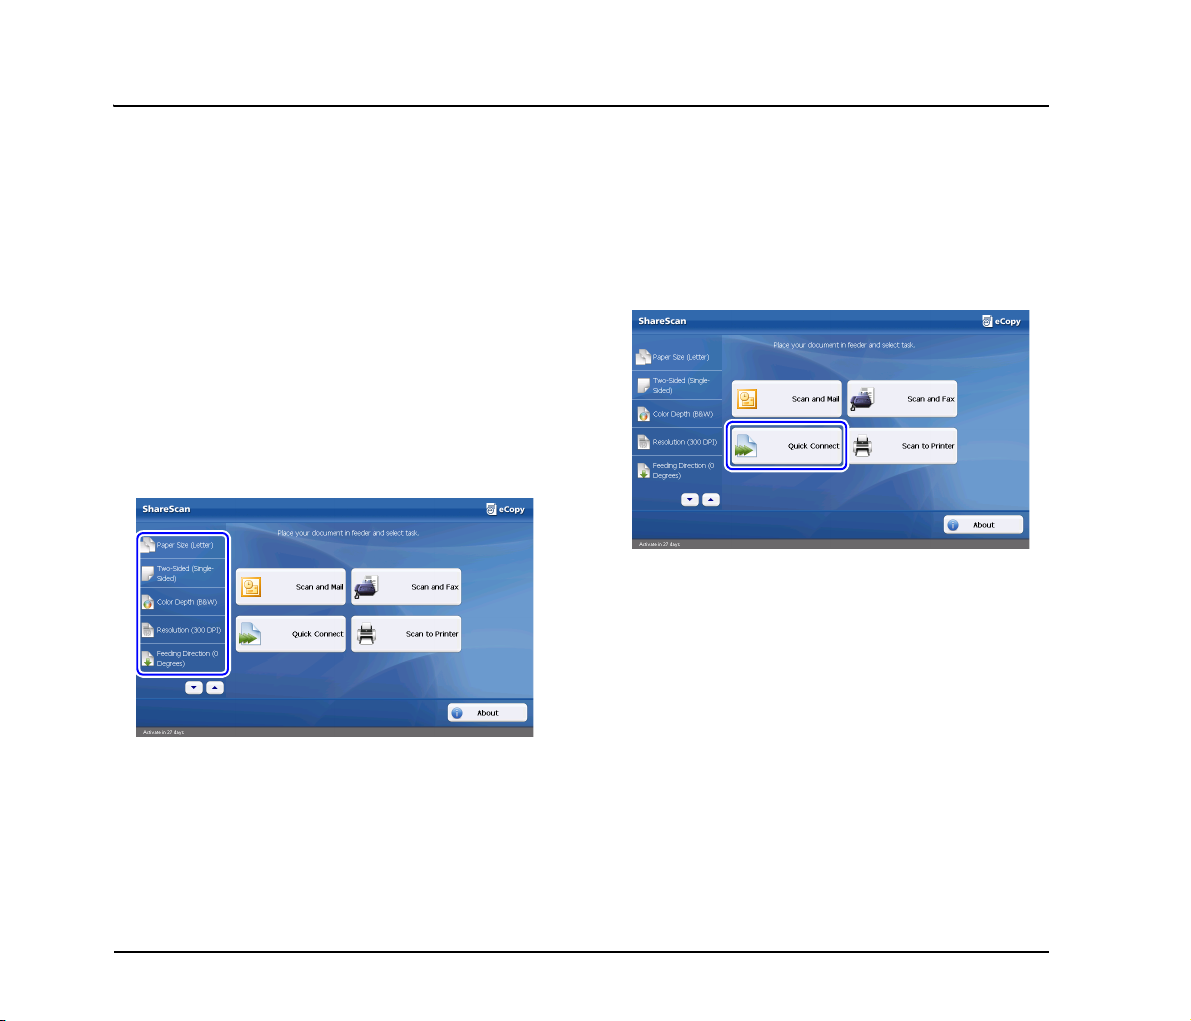
1. Confirm the scan settings in the Home screen and
change them as necessary.
The scan settings appear at the left in the Home screen.
The scan settings displayed here are the same as those
configured on the Services Manager PC. By pressing a
setting item, you can display the configuration for that
item and change it as necessary.
2. Place a document in the device.
3. Press a task button in the Home screen ([Quick
Connect] in this example).
Document scanning starts. The Preview screen appears,
and the scanned pages are displayed in order. Proceed to
the next step when all the pages in the feeder are scanned,
and the last page of the document appears on the Preview
screen.
4. Manipulate the scanned data on the Preview screen
as necessary.
You can manipulate the scanned data by pressing the
buttons on the Preview screen. For details on each button,
see “Preview Screen” on p. 38.
36
Page 41
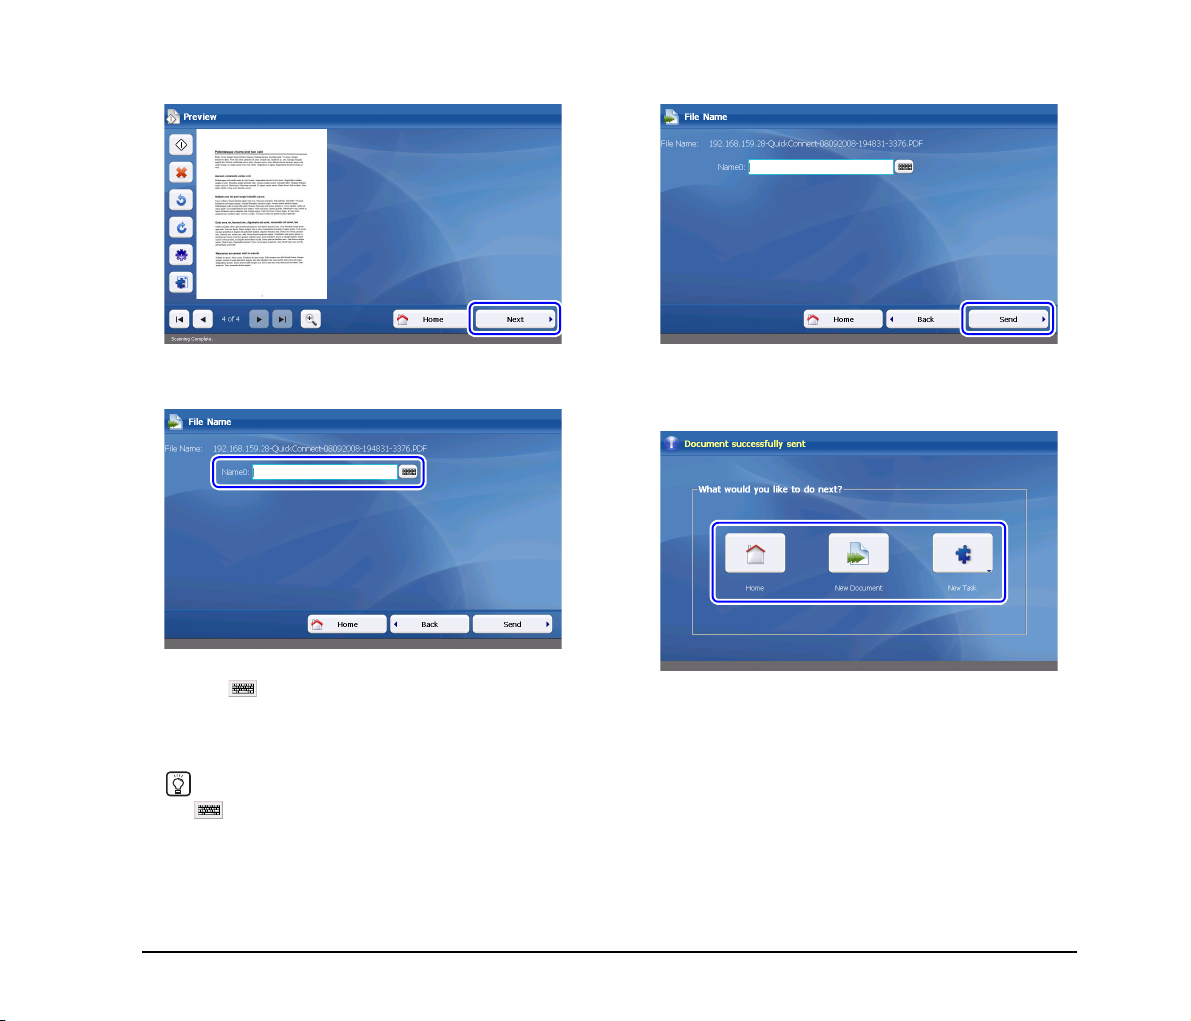
5.
Press [Next].
7. Press [Send].
The filename entry screen appears.
6. Enter a filename.
You can enter the filename for the scanned data by
pressing to display the on-screen keyboard. When an
actual keyboard is connected to the device, you can use
that keyboard for text entry. For details on the on-screen
keyboard, see “On-Screen Keyboard” on p. 38.
Hint
The button will not appear when a USB keyboard is
connected.
The scanned data is sent. After the data is successfully
sent, a screen for selecting the next operation appears.
8. Select the next operation.
Press one of the following buttons.
Home: End scanning operations and return to
the Home screen.
New Document: Begin scanning a new document.
New Task: Send the scanned data to another
connector application.
37
Page 42
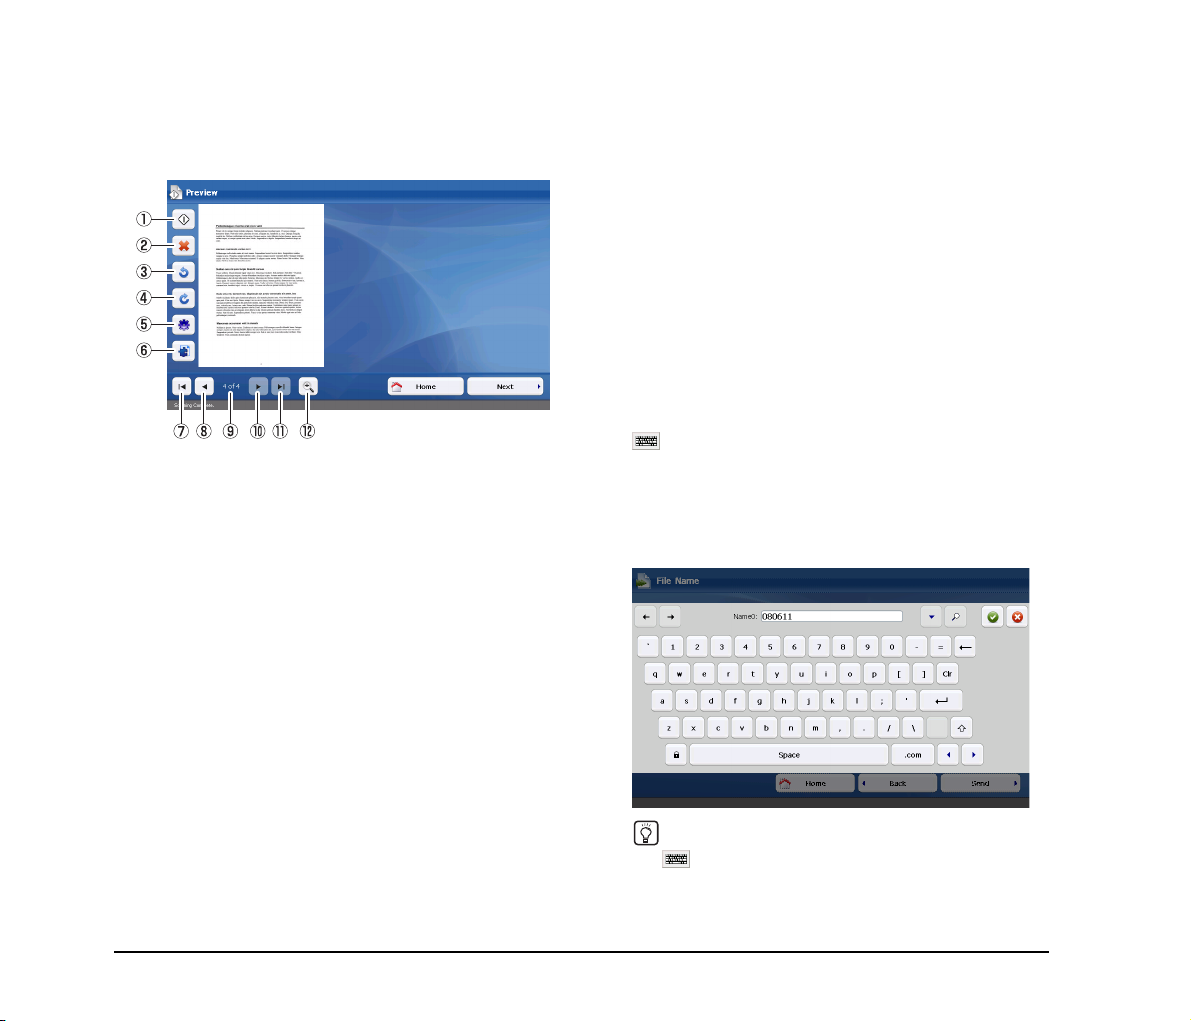
❏ Preview Screen
Images of scanned data appear in the Preview screen.
You can manipulate the images by pressing the buttons on
the screen.
a Scan More
When you press this button after placing additional
documents in the feeder, the new documents are
scanned and added to the previous scan data. The newly
scanned data is inserted after the page that was
previously displayed on the Preview screen.
b Delete
Delete the page currently displayed.
c Rotate left
Rotate the page to the left.
d Rotate right
Rotate the page to the right.
e Scanner Settings
Change scan settings.
f Document Settings
Change the file format for the scanned images.
g First page
Display the first page of the scanned images.
h Previous page
Display the previous page of the scanned images.
i Current page / total pages
Displays the total number of pages for the scanned
images currently displayed, and the current page
number.
j Next page
Display the next page of the scanned images.
k Last page
Display the last page of the scanned images.
l Zoom
Zoom in or out on the scanned images.
❏ On-Screen Keyboard
When text entry is required during device operations, the
button appears next to text boxes. When you press this
button, the on-screen keyboard appears allowing you to
enter text.
If you want to transfer scanned data to another computer
on the network, for example, you can display the on-screen
keyboard to enter a filename.
Hint
The button will not appear when a USB keyboard is
connected.
38
Page 43

The layout of the on-screen keyboard is similar to that of
standard QWERTY keyboards.
The following describes the unique buttons on the
keyboard.
Shift focus to a different text box when multiple
boxes are displayed.
Display candidates for text when typing with the
“Search while typing” option enabled.
Enable or disable the “Search while typing” option.
Apply the entered text and close the on-screen
keyboard.
Cancel the entered text and close the on-screen
keyboard.
39
Page 44

CANON ELECTRONICS INC.
1248, SHIMOKAGEMORI, CHICHIBU-SHI, SAITAMA 369-1892, JAPAN
CANON U.S.A. INC.
ONE CANON PLAZA, LAKE SUCCESS, N.Y. 11042, U.S.A.
CANON CANADA INC.
6390 DIXIE ROAD, MISSISSAUGA, ONTARIO L5T 1P7, CANADA
CANON EUROPA N.V.
BOVENKERKERWEG 59-61, P.O.BOX 2262, 1180 EG AMSTELVEEN, THE NETHERLANDS
CANON AUSTRALIA PTY. LTD.
1 THOMAS HOLT DRIVE, NORTH RYDE, SYDNEY. N.S.W, 2113. AUSTRALIA
CANON SINGAPORE PTE. LTD.
1 HARBOUR FRONT AVENUE #04-01, KEPPEL BAY TOWER, SINGAPORE 098632
PUB. CE-IE-681 © CANON ELECTRONICS INC. 2008
 Loading...