

Cannondale PROPHET, PROPHET MX, Prophet MX 1, Prophet MX 2, Prophet 1 Owner's Manual Supplement
...
1
Please note that the specifications and information in this manual are subject to change for product
improvement. For the latest product information, go to http://www.cannondale.com/tech/.
READ THIS MANUAL CAREFULLY!
It contains important safety information.
Keep it for future reference.
prophet
Owner’s Manual Supplement
120017.PDF
CONTENTS
SAFETY INFORMATION ...........................
About This Supplement .......................2
Safety Messages ....................................2
Intended Use ..........................................3
Building Up A Frameset .......................3
ABOUT FREERIDING & DOWNHILL ....... 4
FRONT TRIANGLE ................................... 6
SWINGARM ............................................ 7
MAXIMUM FORK LENGTH ..................... 8
HEAD TUBE ............................................ 7
LINE & CABLE FRAME PROTECTION .....10
HOUSING GUIDES & CABLE STOPS ...... 11
BB FD CABLE GUIDE .............................. 11
CHAINSTAY PROTECTOR ....................... 11
MAINTENANCE .................................... 22
About Cleaning ....................................23
Tightening Torques .............................23
SWINGARM ...........................................14
Field Check ............................................ 14
Chainslapper ........................................18
Rear Derailluer Hanger ...................... 17
12mm Thru Axle ................................... 18
REAR SHOCK ........................................ 20
Selecting Rear Shocks ........................ 17
Sag .................................................... 17
Changing Rear Shock Mounting .....22
SELECTING TIRES .................................. 23
GEOMETRY ........................................... 24
SPECIFICATIONS ....................................25
REPLACEMENT PARTS .......................... 26
OWNER NOTES .....................................27

2
about this supplement
Cannondale Owner’s Manual Supplements
provide important model specific safety,
maintenance, and technical information.
They are not replacements for your
Cannondale Bicycle Owner’s Manual.
This supplement may be one of several for
your bike. Be sure to obtain and read all of
them.
If you need a manual or supplement, or have
a question about your bike, please contact
your Cannondale Dealer immediately, or call
us at one of the telephone numbers listed
on the back cover of this manual.
You can download Adobe Acrobat PDF
versions of any Cannondale Owner’s
Manuals or Supplements from our website:
http://www.cannondale.com/bikes/tech.
• This manual is not a comprehensive
safety or service manual for your bike.
• This manual does not include assembly
instructions for your bike.
• All Cannondale bikes must be
completely assembled and inspected
for proper operation by a Cannondale
Dealer before delivery to the owner.
WARNING
This document may include procedures beyond the
scope of general mechanical aptitude.
Special tools, skills, and knowledge may be
required. Improper mechanical work increases the
risk of an accident. Any bicycle accident has risk
of serious injury, paralysis or death. To minimize
risk we strongly recommend that owners always
have mechanical work done by an authorized
Cannondale retailer.
safety messages
In this manual, information which affects
your safety is emphasized in the following
ways:
WARNING
A WARNING indicates a potentially
hazardous situation which, if not
avoided, can result in serious injury or
death.
CAUTION
A CAUTION Indicates a potentially
hazardous situation which, if not
avoided, can result in serious damage
to the product. The matters described
under CAUTION may, if not avoided, lead
to personal injury, or results depending
on the situation and degree of damage.
Important matters are described in
CAUTION (as well as WARNING), so be
sure to observe them.
A NOTE provides helpful information or tips
intended to make the information presented
clearer.

120017.PDF
3
intended use
All-Mountain
INTENDED for trail riding and riding
uphill. All-Mountain bicycles are more
heavy duty than cross country bikes,
but less heavy duty than Freeride
bikes. All-Mountain bikes are lighter
and more nimble than Freeride bikes.
All-Mountain bikes are heavier and
have more suspension travel than a
cross country bike, allowing them to
be ridden in more difficult terrain, over
larger obstacles and moderate jumps.
All-Mountain bikes are intermediate in
suspension travel and use components
that fit the intermediate intended use.
All Mountain bikes cover a fairly wide
range of intended use, and within this
range are models that are more or less
heavy duty. Talk to your retailer about
your needs and these models.
NOT INTENDED
for Hardcore Freeriding,
Extreme Downhill, Dirt Jumping, Slopestyle,
or very aggressive or extreme riding .
TRADE OFF All-Mountain bikes are
more rugged than cross country bikes,
for riding more difficult terrain. AllMountain bikes are heavier and harder
to ride uphill than cross country bikes.
All-Mountain bikes are lighter, more
nimble and easier to ride uphill than
Freeride bikes. All-Mountain bikes are
not as rugged as Freeride bikes and must
not be used for more extreme riding and
terrain.
WARNING
USING YOUR BICYCLE IMPROPERLY IS
HAZARDOUS.
building up a frameset
Before building up a frameset, consult with
your Cannondale Dealer and the component
manufacturers, and discuss your riding style,
ability, weight, and interest in and patience
for maintenance.
Make sure the components chosen are
compatible with your bike and intended for
your weight and riding style.
Generally speaking, lighter weight
components have shorter lives. In selecting
lightweight components, you are making a
trade-off, favoring the higher performance
that comes with less weight over
longevity. If you choose more lightweight
components, you must inspect them more
frequently. If you are a heavier rider or have
a rough, abusive or “go for it” riding style,
buy heavy duty components.
Read and follow the component
manufacturers warnings and instructions.

4
about freeriding & downhill
WARNING
FREERIDING AND OTHER FORMS OF “EXTREME RIDING” ARE EXTREMELY DANGEROUS.
YOU CAN BE SEVERELY INJURED OR KILLED IN A SERIOUS ACCIDENT.
Freeriding, jumping, hucking, dirt jumping, mountaincross, downhill, slalom, slopestyle,
urban or street riding or other evolving forms of extreme or hard core mountain biking
are inherently dangerous and can lead to serious accidents. Wear all safety gear and be
sure your bike is in excellent condition. Follow all the instructions and warnings below.
These steps will reduce, but not eliminate, the inherent risks. Even with state of the art
protective safety gear you could be seriously injured, paralyzed or killed. If you do not
want to take these risks, do not engage in this type of riding.
Fundamental Risk
Freeriding, jumping, hucking, dirt jumping, mountaincross, downhill, slalom, slopestyle, urban or street riding. It seems that everywhere you look, from Mountain Dew®
commercials to the X-Games® to the Red Bull®Rampage, riders are grabbing big air and
sticking sick drops. And it sure looks fun.
But what the videos and bike magazines and ads don’t always tell you is that extreme
riding takes an amazing amount of skill. Some of the riders you see are well-paid pros
who have gradually built up their skills through endless hours of practice, and who have
also had their share of stitches, concussions and busted bones (and bikes). Others are
daredevils who have chosen to accept or ignore the risks. Would you allow anyone to
say that you are so weak in the head, and have such poor judgment that you copy those
you see in the media without thought of the serious risks?
The stakes are high if you screw up. Realize too late that you aren’t up to the challenge,
and you run the risk of major injury or even – say it aloud – death, paralysis. In short,
extreme riding carries a high degree of fundamental risk, and you bear the ultimate
responsibility for how you ride and what you attempt to pull off. Do you want to avoid
these significant risks? Then do not ride this way.
continued on next page . . . . .

120017.PDF
5
Product Limitations
Problems of pilot error aside, hard-core riding also beats the heck out of your equipment. Although we build and test our bikes to make them tough, there’s no way that
we can guarantee they’ll survive your umpteenth six-foot drop. For starters, there is no
industry “jumping” standard. The many circumstances of takeoff, landing, speed, rider
technique, etc. are unique. The judgment, lack of judgment or insanity of a rider who
may ride a Cannondale bicycle cannot be completely predicted, so it’s flat-out impossible to predict how anyone’s equipment is going to hold up.
Let’s get another thing straight. Buying a Freeride bike does not make you any better.
Do not confuse the built-in capabilities of equipment with your own capabilities, which
must be learned.
Keeping your bike and all its components in good working order is critical, and it’s up
to you to maintain and inspect it. Even so, your sweet rig isn’t going to last forever.
Nothing does, particularly bikes and parts that are built to minimize weight and then
are subjected to abuse. Cannondale frames carry a warranty, but that’s to cover issues
with workmanship and/or materials. (See the Cannondale Warranties section of the
Owner’s Manual.) The warranty doesn’t mean that they’re going to last forever. They’re
not. The warranty certainly doesn’t mean that the bicycle can in any way protect you
from injury.
In Conclusion
If you’re going hard-core, be smart about it. Always wear a full face helmet, body armor,
full-finger gloves and protective clothing. Choose a bike that’s right for you, your riding
and terrain, and check it often for signs of fatigue or other trouble. (Your dealer can help
you on both fronts.) Read the Mountain Bike Riding section of the Cannondale Bicycle
Owner’s Manual. And most importantly, know your limitations. Practice. Stay in control,
and carefully, gradually expand your limits – but ride within them.
6
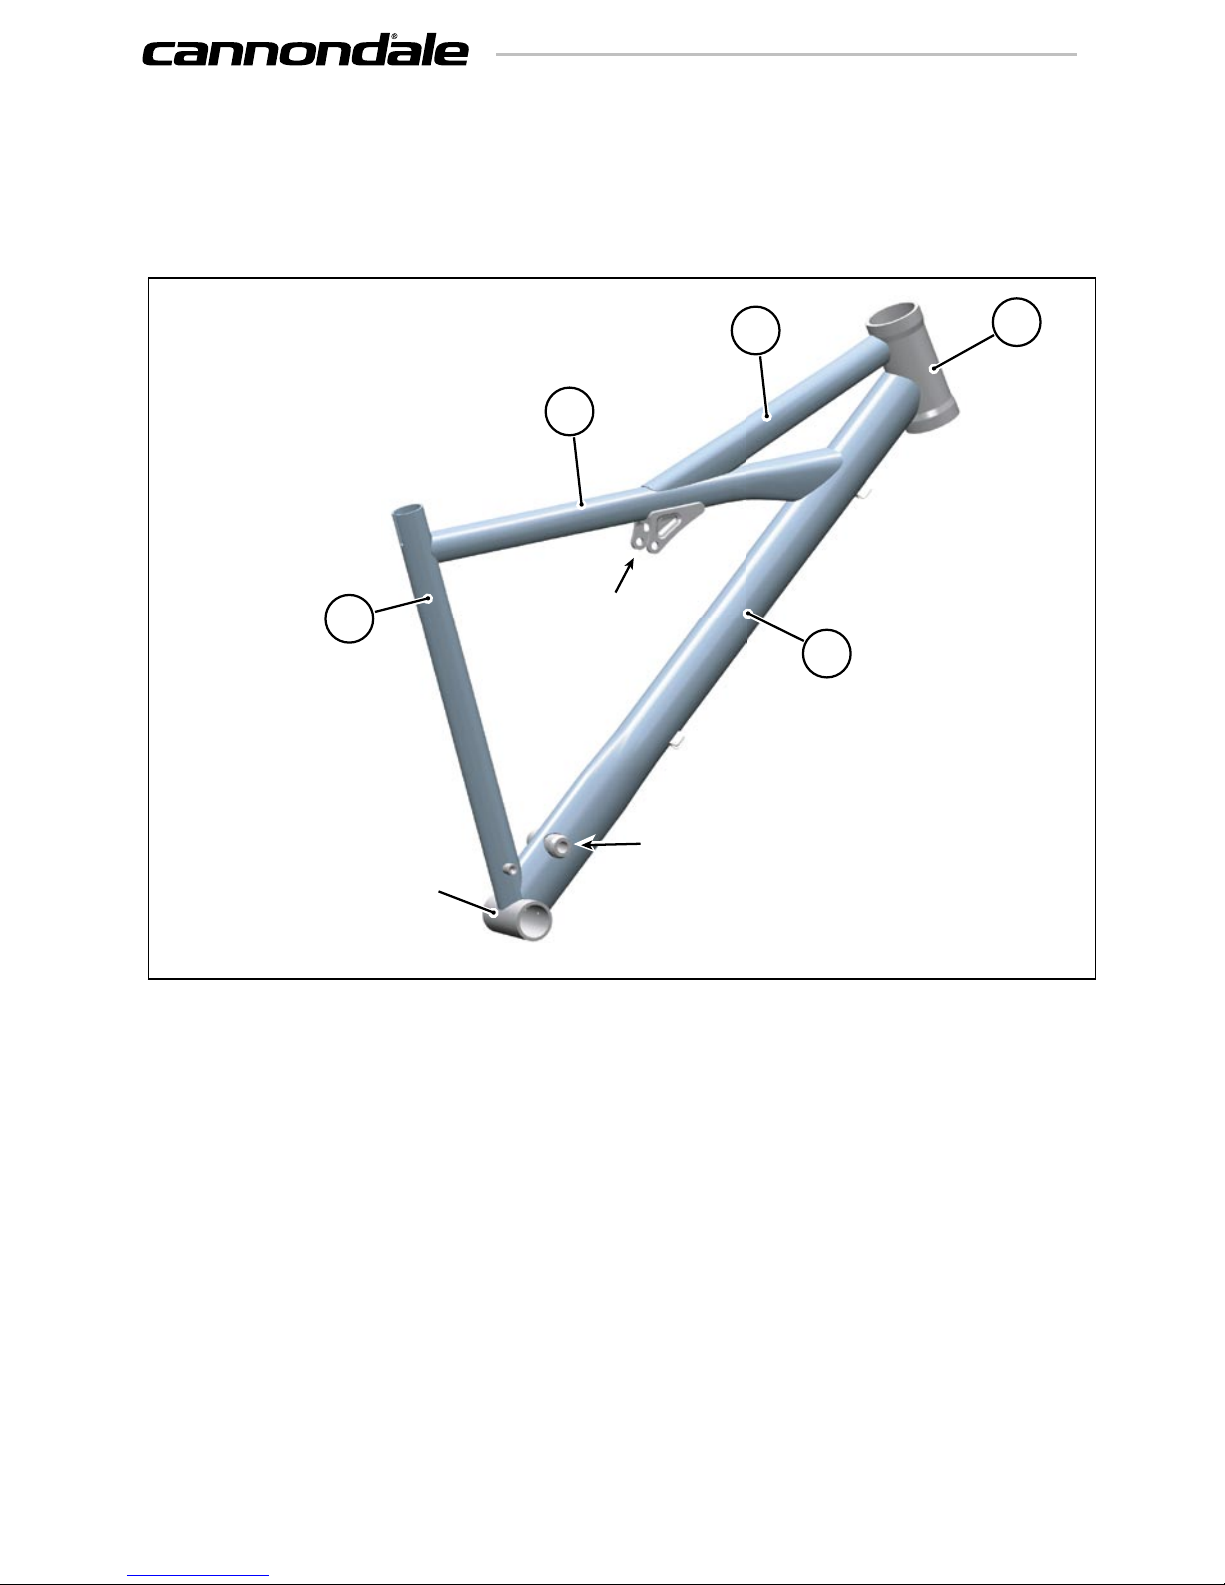
frame
Front Triangle
2
1
4
5
3
1. Top Tube - Formed and tapered to increase impact strength.
2. Delta Tube - Tapered wall to increase shock mount support. Interrupted top
tube for increased stand-over clearance, steering precision and strength.
3. Head Tube - Externally butted for headset bearing reinforcement.
4. Down Tube - Variable wall to strengthen pivot and bottom bracket.
5. Seat Tube - Butted tube with integrated E-type derailleur mount.
SHOCK
MOUNT
SWINGARM
PIVOT
BOTTOM
BRACKET
120017.PDF
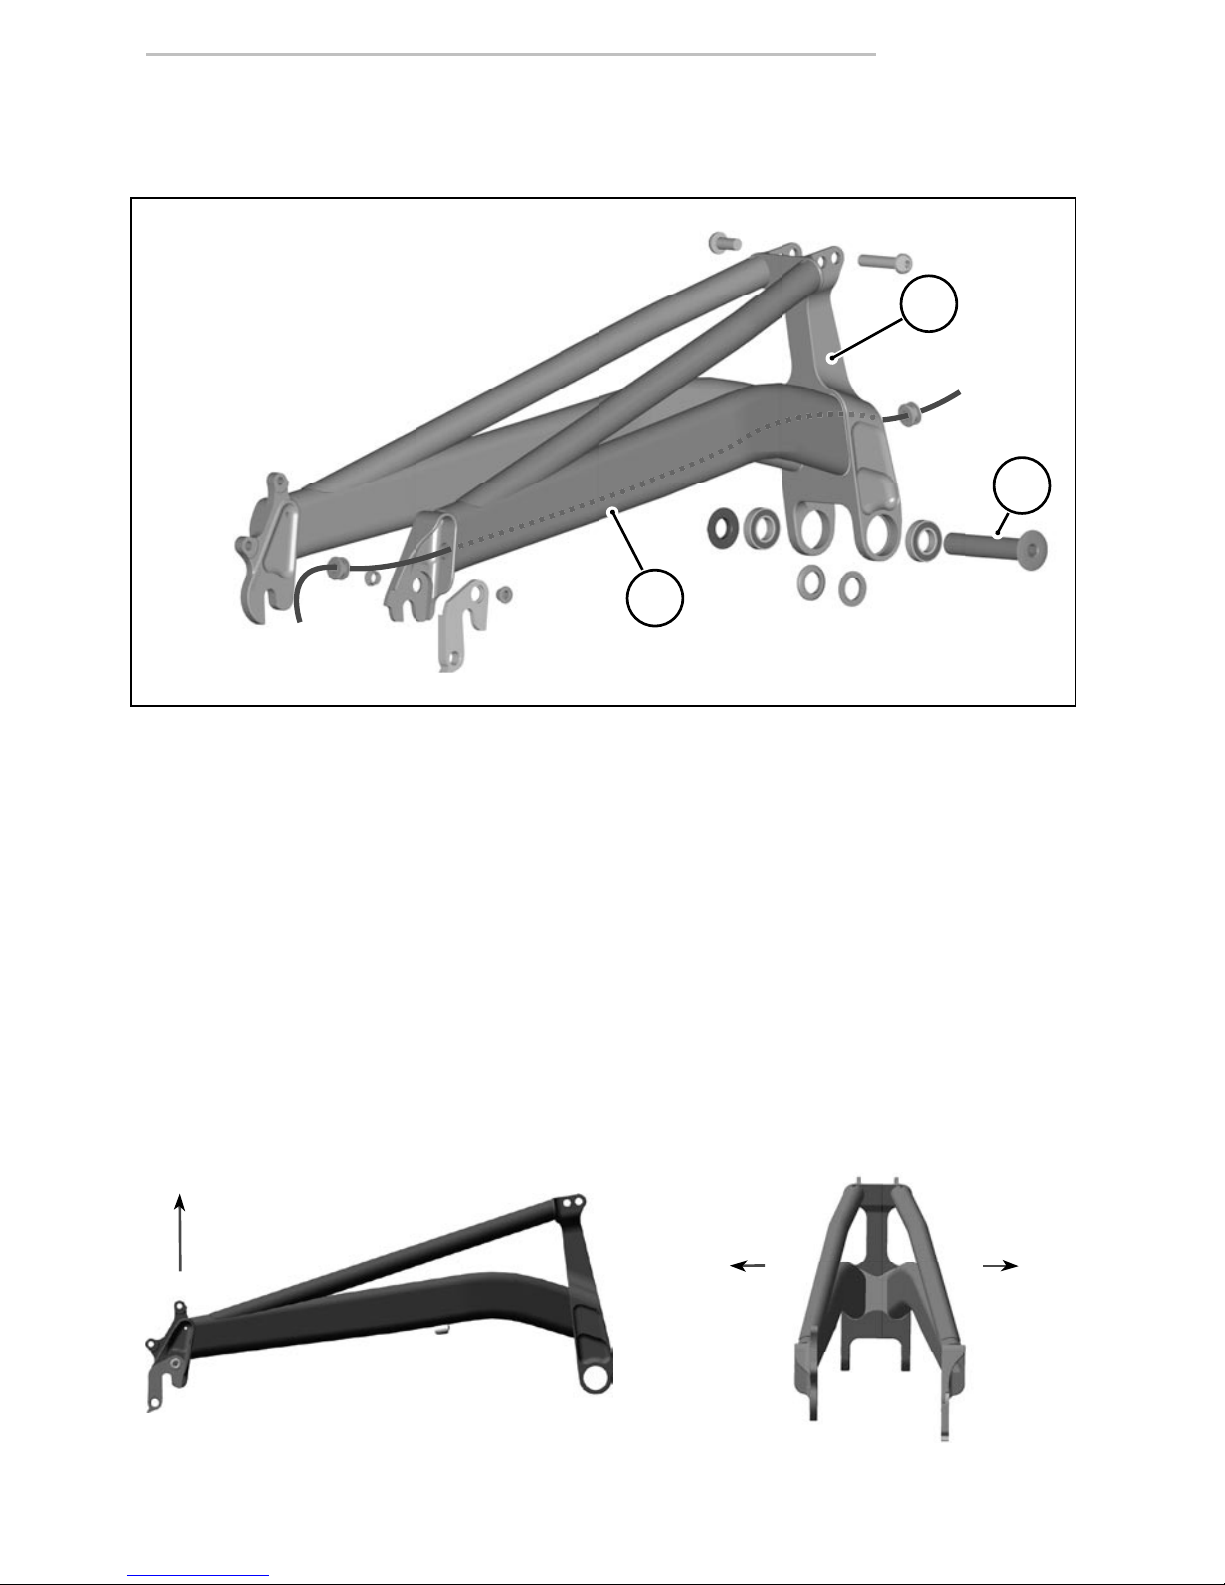
7
Swingarm
3
1
2
1. Chainstays - The custom-formed and tapered chainstays are
optomized for lateral stiffness. Tuned for vertical compliance, they
distribute stress evenly under extreme landing loads.
2. Hot Box Pivot - Constructed as a welded, Hollow-Core swingarm pivot. It
is designed for maximum stiffness and minimum lateral flex. It’s CNC forged hollow core provides a tremedous stiffness-to-weight ratio, boosting
stifness by up to 30% which prevents wagging and increases pedal efficiency.
The rear derailleur cable is routed internally through the Hot box and
within the chainstays, delivering a clean look and no ghost shifting.
3. Pivot Assembly - This assembly features a precision pivot
shaft and renewable sealed cartridge bearings.
VE
RT
ICAL
LATERAL
LATERAL
8
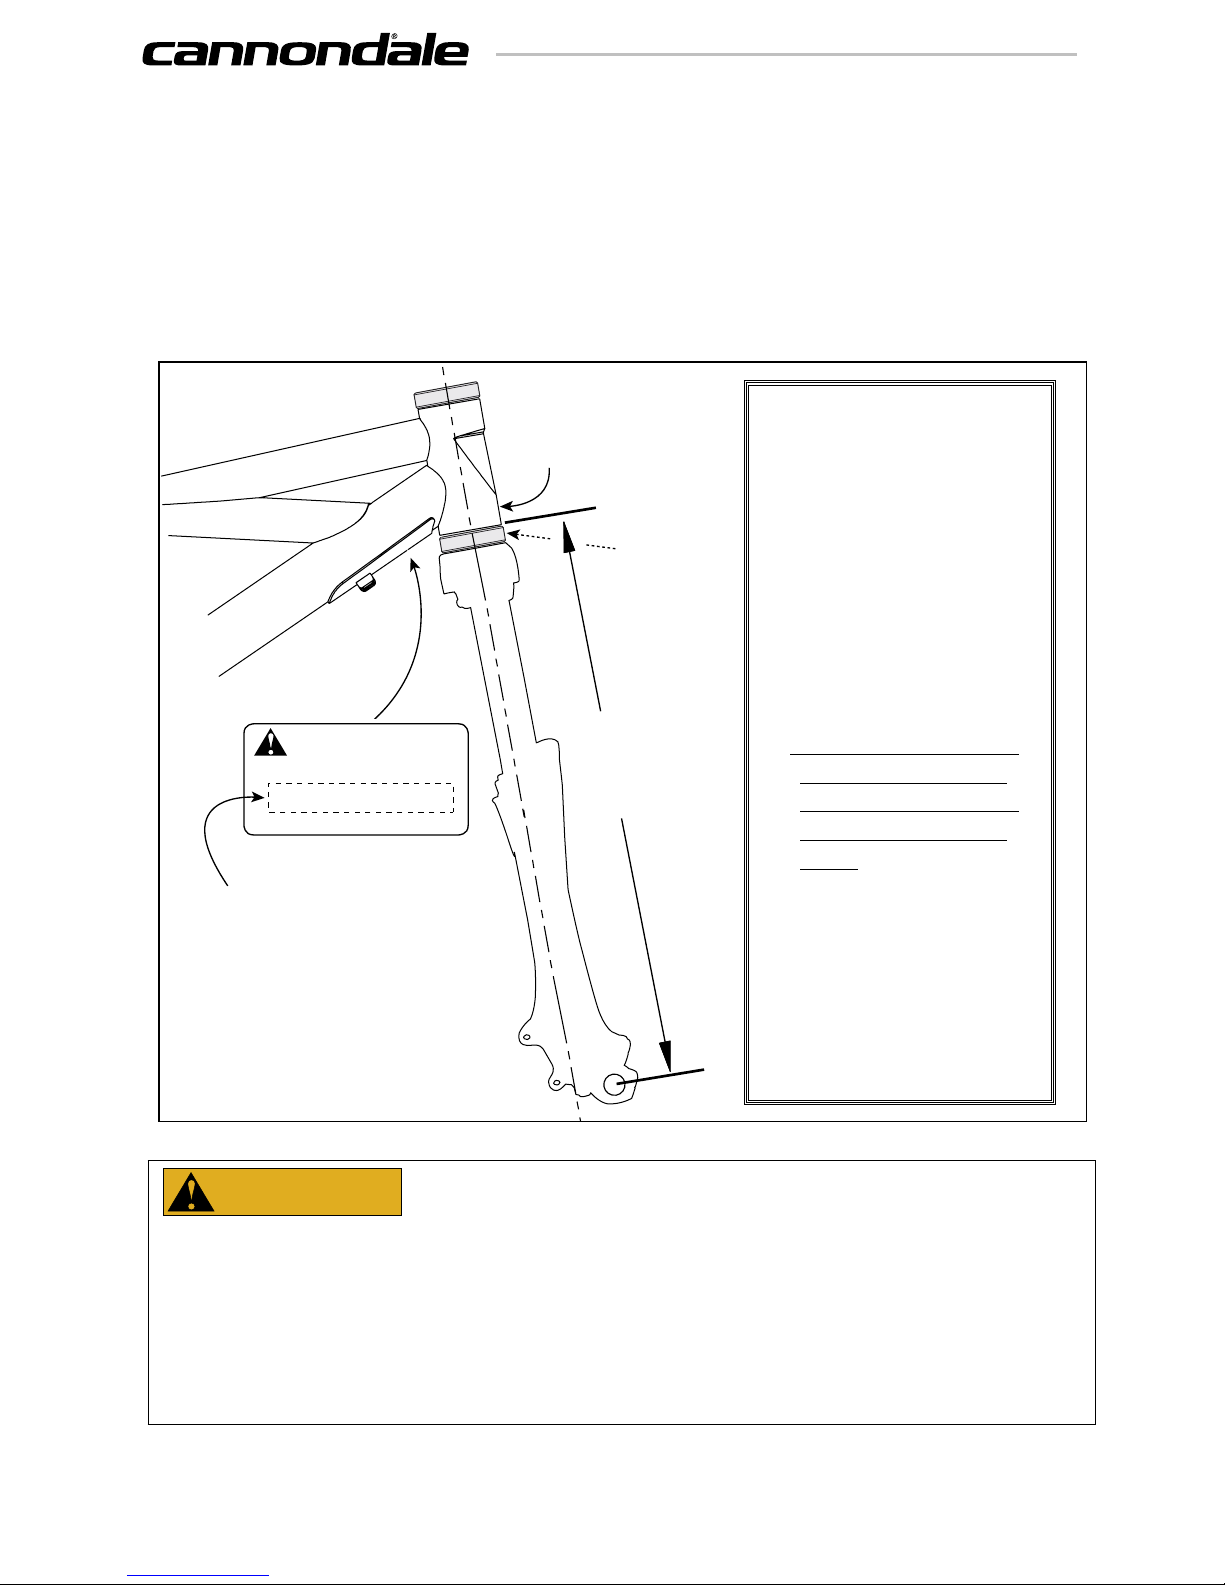
maximum fork length
Maximum Fork Length is an important frame safety testing specification. You must
observe the measurement when installing headset parts, headset adapters, installing
and adjusting a fork, and replacement forks. The specification is printed on a warning
label indicated in the figure below. In this manual, the number is also listed in the
specifications section.
MAXIMUM
FORK
LENGTH
WARNING
MAXIMUM FORK LENGTH
See Owner’s Manual Supplement.
The Maximum Fork Length
in millimeters will be printed
on the label.
HEADTUBE
HEADSET
PART
S or
ADAPTERS
WARNING
DO NOT INSTALL HEADSET PARTS OR FORKS RESULTING IN A MAXIMUM FORK LENGTH
LONGER THAN THE SPECIFICATION FOR YOUR FRAME. DO NOT ADJUST A TRIPLE CLAMP FORK
SO THAT MAXIMUM FORK LENGTH EXCEEDS THE FRAME LIMIT. Exceeding the MAXIMUM
FORK LENGTH limit can overload the frame causing it to fail (break) while riding.
YOU CAN BE SEVERELY INJURED, PARALYZED OR KILLED IN AN ACCIDENT
IF YOU IGNORE THIS WARNING.
HOW TO MEASURE:
1. Temporarily install the
fork into the headtube
with the headset/
adapter in use.
2. Fully extend the fork.
If the fork is a triple
clamp type, extend
the legs to maximum
designed length.
3. Measure the distance
from the bottom of
the head tube to the
center of the wheel
axle.
Do not measure from
the bottom of headset
bearing cups or head
tube adapters. The
measurement MUST be
taken from the bottom of
the head tube!!
120017.PDF
9
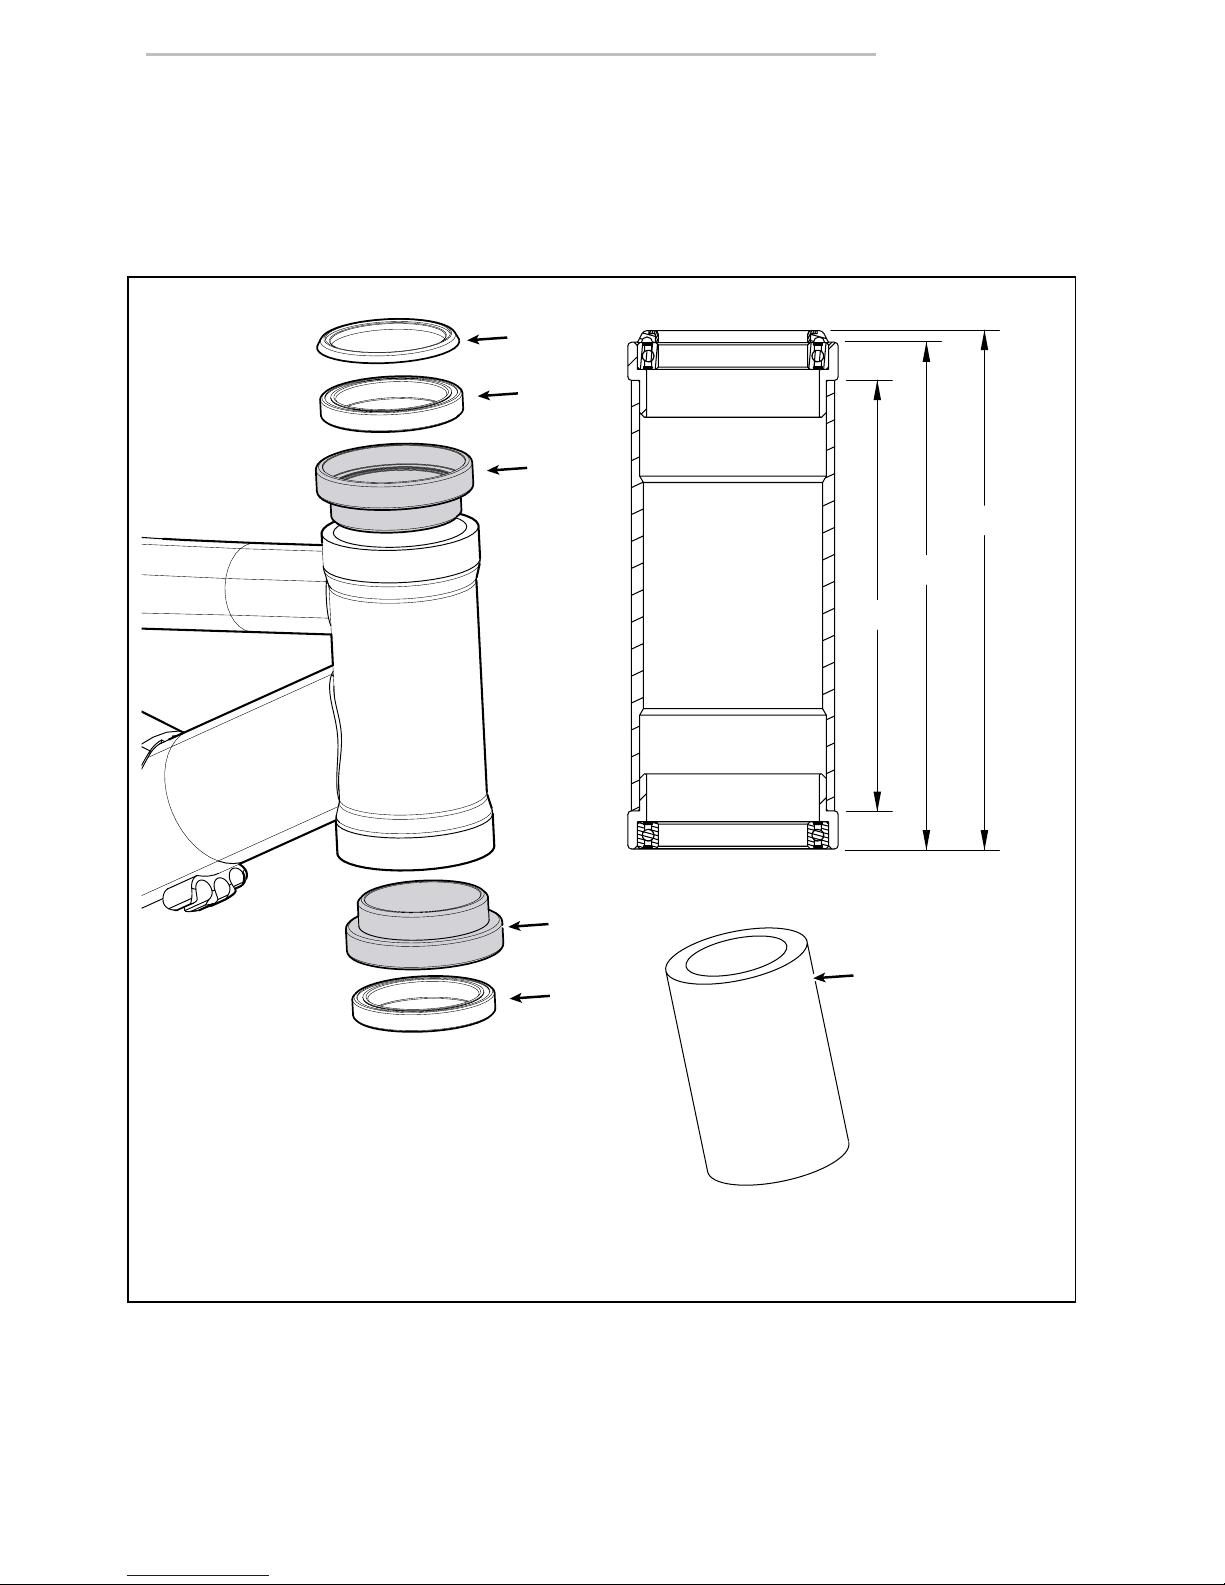
head tube & headshok headset
The head tube accepts Cannondale HeadShok System Integration™ headsets (shown), and
OnePointFive 1.5 (38.1mm) headsets.
137.7mm
134.6mm
4.5”
1
2
3
2
3
Headshok Fork
Installation Tool
Cannondale
Kit # HDTL149/
Cannondale Kit # QHDST/EBO/
Includes two cups (3) and one
bearing (2).
Cannondale Kit # HD169/
Includes two bearings (2).
Cannondale Kit # QSMSEAL/
one seal (1).
 Loading...